Craftsman 17225290 User Manual RECIPROCATING SAW Manuals And Guides L0911487
CRAFTSMAN Saw Reciprocating Manual L0911487 CRAFTSMAN Saw Reciprocating Owner's Manual, CRAFTSMAN Saw Reciprocating installation guides
User Manual: Craftsman 17225290 17225290 CRAFTSMAN RECIPROCATING SAW - Manuals and Guides View the owners manual for your CRAFTSMAN RECIPROCATING SAW #17225290. Home:Tool Parts:Craftsman Parts:Craftsman RECIPROCATING SAW Manual
Open the PDF directly: View PDF ![]() .
.
Page Count: 30

Operator's Manual
ICRRFTSMRNI
Variable Speed
Reciprocating Saw
with Orbital Action
Model No.
172.25290
Double Insulated
CAUTION: Read, understand and follow
all Safety Rules and Operating Instructions
in this manual beforeusing thisproduct.
Sears, Roebuckand Co.,HotfmanEstates,IL 60179U.S.A.
Visit ourCraftsman•website:www.sears.com/crsftsman
• WARRANTY
• SAFETY
•UNPACKING
• DESCRIPTION
• OPERATION
•MAINTENANCE
Warra_ty ................................................................. Page 2
Safety Symbols ............................................................... PacLe :_.
Safety Insbuctions ............................................................ Pages 4.-10
Unpao<ing ............................................................... Page !0
Description ............................................................................................ Pages 11-12
Operation ......................................................................................... Pages !2-22
Ma'ntenance .................................................................................... Pages 23- 24
Accessor es........................................................................................... Page 25
Parts List .......................................................................................... Pages 26-29
Sears Repair ma_s Phone Numbers ..................................................... Back Cover
OHE YEAR FULL WARRANTY ON CRAFTSMAN PROFESSIONAL TOOL
If this Craftsman Professional Tool fails due to a defect in material or workmanship
within one year from the date of purchase, RETURN IT TO ANY SEARS STORE OR
PARTS AND REPAIR CENTER OR OTHER CRAFTSMAN OUTLET IN THE UNITED
STATES FOR FREE REPAIR (OR REPLACEMENT IF REPAIR PROVES
IMPOSSIBLE).
This warranty does nct _nclude expendable parts such as lamps, batteries, bits or
blades.
This warranty gives you specific legal rights, and you may have other rights, which
vary from state to state.
Sears, Roebuck and Co.. Hoffman Estates. IL 60179
SAVE THESE INSTRUCTIONS!
READ ALL INSTRUCTIONS!
_. WARNING : Some dust created by using power tools contai_ts chemicals
known to the State of California to cause cancer and birth defects or uther
reproductive harm.
_."Y_'T'J:!li'dL"1"dJ_I :_o]
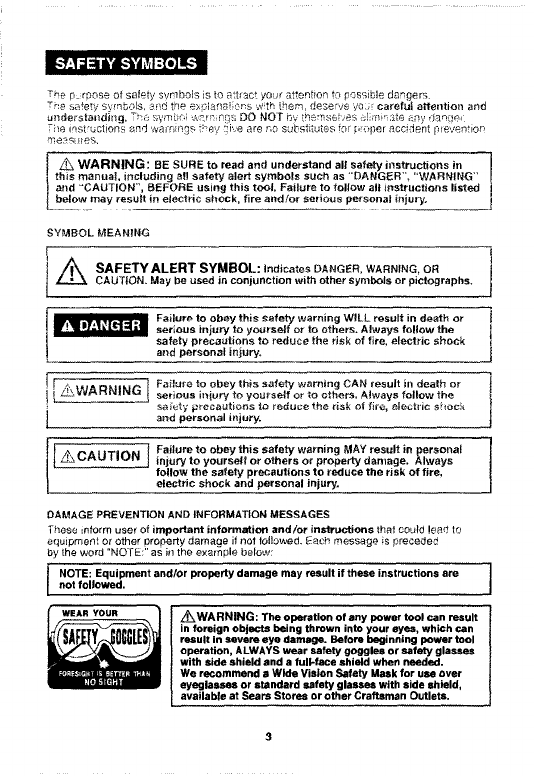
The r,_rp0se of safety svnlbols is to attract your &_entton to _essible dangers.
The se e y sy nbo s, e d toe e;,!_ ann ;e_-s wth hem, deserve yOL;r carefet attelltiol_ and
u}_dersta_ldiug. The svmb_ ! _k_r nrls DO NO[ by thsms€_i,es _;! f_iq3_e _ev darele,
T_e iqs ruct[ons end walnings tbav _i',_'e are no substitutes for h_<_per accide'n pre_,,ention
me:_su_es,
Z_ WARNING: BE SURE to read and understand all safety iestructions in
this manual, including all safety alert symbols such as "DANGER", "WARNING"
and "=CAUTION", BEFORE using this tool. Failure to follow all instructions listed
below may resuff in electric shock, fire audior serious personal injury.
SYMBOL MEANING
/_ SAFETYALERT SYMBOL: Indicates DANGER, WARNING, OR
CAUTION. May be used in conjunction with other symbols or pictographs.
[_ Failure to obey this safety warning WiLL result in death or i
serious injury to yourself or to others. Always follow the I
safety precautions to reduce the risk of fire, electric shock
a_d personal injury, j
[ _4_'-WARNING I
I
Failure to obey this safety warning CAN result in death or I
serious iniury to yourself or to others, AJways follow the
safety _ecautions to reduce the risk _i fire, elan;trio shock
and personal b_jury. J
Failure to obey this safety warning MAY result in personal
injury to yourself or others or property darnage. Always
follow the safety precautions to reduce the risk of fire,
electric shock and personal injury.
DAMAGE PREVENTION AND INFORMATION MESSAGES
These inform user of important information and/or instructions that c0old !e_d to
equlpmen', or other property damage if not tollowed. Eaei_ message is precede_
by the word "NO rE:" as in the example below:
NOTE: Equipmentand/or property damage may result if these instructions aro
not followed.
_WARNING: The operation of any power tool can result
in foreign objects being thrown into your eyes, which can
result In severe eye damage. Before beginning power tool
operation, ALWAYS wear safety goggles or safety glasses
with side shield and a fuIFtoce shield when needed.
We recommend a Wide Vision Safety Mask for use aver
eyeglasses or standard safety glasses with side shield,
available at Sears Stores or other Craftsman Outlets.
WARNING: BE 9[IRE _o read and understand a(I instructions in thi._ manv=l !
beror_ :i_;n_ th s power fool Fai!ure to follow a;l irstr_._ct c !_s _y t_su[t in _,!ectrJc
shock, fire and !or serious personal injury. J
WORK AREA SAFETY
1. Keep your work area clean and well lit, Cluttered workbenches an# dark areas
invite.'- accidents
2. DO NOt ¸opecate power I_oola in explosive atmospheres, suc:h as in the p_eeerlce
of flammable liqt_ids_ gases, or duet, Power tao!a ar_ai_ ,<r_"k3 Which may i_r_i_s the
oust or lames.
3, Keep bystanders, children and visitors away while operating a power toot.
[,istractions can cause you _o lose co!_drok
4. Make your workshop ehildproof with padI0cks and master switches. _ock
tools away ¢,,nen not tn bee.
!i _'_# KE £!!_= the work area has ample lighting so yr,_ _on !_,_ t_,__-,_ _nd ib,_t
_lers are no obst!uc[ions ti_-4t wll inierlere v_Lh safe at;era[ on BEFORE USing your s_w.
PERSONALSAFETY
1. KF,}OW yOL_r power tool _ead toe opera,s's m_Tcual caretu iy :_e_; I i_a t,._,JiS
_pp[_cat_o_s a_i_J hmita_Je_ a_ weii as _h_ bDecific oote_:_&i t_sza_os _;is, ia_ _o t_s too_
2 STAY _LER_ watch wha_ you are eolng and i.iso commo_ '_sa_ss w_e!i eparatin_ a
power tool
3. DO NOT use toni while tired at under the influence of drgs, a co,of or medicatio_.
A mome!i of inattent on whte operal n9 cowe_ tools may resul_ =n serous £,ersonai
iaju[y.
4. DRESS properly. DO NOT wear _oose c_othing or eweky. Pui[ back _ong hal;. Keep your
hair c!othir_g, _md gto,,es away from moving parts. Loose clothing or long heir can be
caught in m_ving pelts. Ai_ vents often covel moving par_s a;;a should atso be avoided.
5. AVOID accidental start_n 9. Be sute switch is is "OFF" position before plugging in.
DO NOT carry tools with your finger on toe switch. Carrying tools witf_ your finger an the
switctq or plugging in tools that have t_e switch in the "ON" pss_t_on r_vites accidenLs.
6. REMOVE adiusting keys or blade wrenches befsre turning the tooi 'ON". A w!ench thai
is left attached _o a rotatlng part of the tool may result in personal iniury.
7. DO not overreach, Keep proper footing and balance at all times. Proper footing an_
balance enables better control of the tool in unexpected situations.
8. ALWAYS SECURE YOUR WORK, Use clamps or a vise to hold walk when practical.
I1 is safer than using your hand and frees both haods to operate tool.
9. USE SAFETY EQUIPMENT. Always weal eye protection. Dust mask. ,_on-skid safety
shoes, ha[d hat. or hearing protection must be used for applopriate conditions.
TOOL USE AND CARE SAFETY
F
i[:_ WARNING: _E SURE to read and understand eli instructions befor_
ioperating this tool, Failure to follow all instructions listed below may reauff inelectric shock, fire and/or serious personal injury.
t. ALWAYS use clamps or other practical ways to secure and support the
workpiece to a stable platform. Hoidi_g the work iy heed ot ag_,_$t yo_r x_oy
unstarte ad rnav lead to loss of cot:t_ol.
2. DO NOT force the toot. Use the correct tool and blade for yo_r application, ! ne
coiieci io)l a_d blade _ili do th-,o job betier a_d sa_er at the rat( iar _,.hi(,l_ Ji is Jes gned,
3, DO NOT use the tool if switch does not turn it "On" or "Off", A_W tool t_'at
cannot be corarotled with ,*.he sw_tCn is dangerous a!_d CflLS! *?£'rape .ed.
4. DISCONNECT the plug from the power source before making any
adjustments, changing accessories or storing the toot, £ush preyer!tire
safety measures _educe the risk of st_ding the 1:o01 accidentally.
5. STORE idle tools out of the reach of children and other untrained persons.
TO_',ISale dangerous in ii_e han_s of untr,qned users.
6. MAIN'lAtiN _oots _,,4th care. Keep cutting tools sharp and ctea_,. ;: _'a_ed',, ma ntai_sd
tools with shar¢_ cutting cages are iess likely _o bind and ale eas_e_ to co _bol
7, ,CHECK for misalignment or binding of moving parts, breakage of parts, and
a_y older need lion hat may af_eot the t!,ots operati(n ifdarrlaged, have ti_,
od serv ce:i be,!ore using _71at_yace den_s _Jre c_used by ['ooriy nh_!irh _4i ed tool:,.
8. USE ONLY accessories that are recommended for this tool. ,_.ccesso_ es tr, at
_,,_, he _ble t(r ,r_ t_nl may eecor^? hazarnot_s ,.,,_e-, L so'.* o_ anoth_-,_ tor_
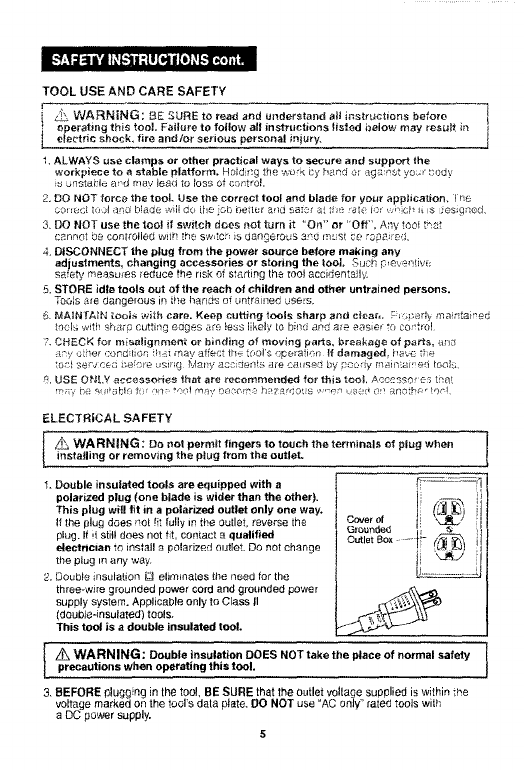
ELECTRICAL SAFETY
_, WARNING: Do not permit fingers to touch the terminals of plug wheninstalling or removir=g the plug from the outlet.
1. Double insulated tools are equipped with a
polarized plug (one blade is wider than the other).
This plug wil! fit in a polarized outlet only one way.
If the plug does not !it fully in the outlet, reve;se the
plug. !t it still does not fit, contact a qualified
electrlciall to install S polarized outlet. DO not change
the plug In any way.
2. Double insulation _ eliminates the need for the
three-wire grounded power cord and grounded power
supply system. Applicable only to Class II
(double-insulated) tools.
This tool is a double insulated tool.
o.... t li
G_ounded /
Outlet B.... !_ (_
1
Z_ WARNING: Double insulation DOES NOT take the place of normal safetyprecautions when operating this tool.
3, BEFORE plugging in the tool, BE SURE that the OLdletvoltage supplied is within the
voltage marked on the tool's data plate. DO NOT use _AC only" rated tools with
a DC power supply.
5
r,r_"TF-"
ELECTRICAL SAFETY cent,
r?._ige_ators _ere i_ a_ :ncrees_d r!sk of _ieci_ic sh_:ck if V0_! ¸ he,iv i_ _i_ded
b. DO NOT expose power tools to _'ain or wet conditions or use power tools in wet
or damp locations, W,_ter entering e po,,ve_ to01 wilt increase the _sk of electric shock.
6. INSPECT tool cords for damage. Have damaged tool cords !ep_'. red at a Sears
Service Center, BE SURE to stay constantly aware of the cord Io :at=on and keep it well
_wey hom tr'o n ovieg oiede.
7. DO NOT aho_e the cord, NEVER use t_'_e cord to carry the tool by or to pull the
plug from the outlet. Keep cor,*J away flora heat. oi! sh,_# _. edges o_ mov!ng parts.
Replace damage3 co_ds immed;ateh_, Damaged cords i_crease the rst of e!ecidc Shock,
EXTENSION COI3DS
Use a proper extet_sion cord. ONLY use cords _s!ed bv Underwriters acoratolies {UI }
Other' extensior d:orde car! cacao ,a drop ,r !!no voltage, rosulti_Y_ i_ a iCeS e_ powe_ and
overh ati,_j c _o4i F a" this tool an AWG Amar ca_ V\,ire Gau_ sz9 of _.__east 14-gauge
_s reooflme tzed a i_ .Jxta_;i,,_ ca_d of 25- ft Or _ess n _engt .LJ_b :'-g_, _- for aa
Re_,;e_ i_i a sm_II_r wi_e gauge size has g_ester capacity than a larger number
i14-gauge _',i_e h_,s more capacity then 16-gauge w;re; 12-gauge wire has more cspac ty
than 1 _'--gauge). When in doubt use the emalle_ number. When operating a _ovJe! too]
outdoors, use a_! outdoor e×tens on cord market "W-A" mr "W", These colds a_o rated fo
outdoor use and reduce the risk of electric shock,
[ ._Z_ CAUTION: Keep the extension cord clear of the working area. Position i
!
the cord so that it will not get caught on lumber, tools or other obstructions while ]you are working with apower tool.
/h WARNING: Check extension cords before each use. tf damaged replace
immediately. Never use tool with a damaged cord since touching the damaged
area could cause electrical shock, resultieg in serious injury,

l-'f:l II 1 ii I_f.11 _tIIll iIt] _t.'1I,.1,1ili
SAFETY SYMBOLS FOR YOUR TOOL
The I__hel on yotir tool nlsy include the following symbols.
V.......................................................................Volts
A......................................................................Amps
Hz....................................................................Hertz
W.....................................................................Watts
rain..................................................................Minutes
..................................................................... Alterna_ng current
_..--. ................................................................Direct current
no....................................................................No-load speed
....................................................................Class il construction, DOuble Insulated
...!min........................................................ Revolutions or Strokes per minute
,_. ....................................................................Indicates danger, warning or caution.
It means attention! Your safety is involved.
SERVICE SAFETY
• If any pari of th,_ tool is il_issing or should break, bend< or fail i:) a,hy wa_.,;
el' sl_ould atly electrical component fall to. pelforrn properly: SHUT OFF _he rower
sv<,itoh,_nd rem_.wethe saw's pfti!_ flora the power source _nd ^a_,e the missing,
damaged or failed pats replaced BEFORE resu'mng operat on
2. Tool service must be performed only at aSea._e Service CenteK Se vice or
m_intena_.ce _,e_to Ted hy cnqua!fied p_rsonrlel cold mt;ult n .: _sk o_ r!lury
in the uiairYtenanee section ef this manual, Use of una_!tho[ized p_:_tsor ir_.!_Ae t:}
follow r'i_t otelsence ir}strtictioRs may create a risk of electric sho(K or njurv.
SAFETY RULES FOB RECIPROCATING SAWS
[_ Keep hands away from cutting area and blade. Keep both
hands on the saw (rear handle and front boot grip). If both hands are holding
the saw, the blade cannot cut them,
iZ?x_CAUTION: Blades coast after saw is switched off+
1, Hold tool by insulated gripping surfaces, (rear handle and front boot grip), when
performing an operation where the cutting tool may contact hidden wiring or its
own cord. Contact with a 'live" wire wilt make the exposed metal parts of the tool "live"
and shock the operator,
[ _ CAUTION: DO NOT saw into existing walls or other blind s where J....
electrical wiring may exist. If the situation is unavoidable, DISCONNECT ALL
ELECTRICAL POWER to the area/worksite BEFORE sawing.
SAFETY RULES FOR RECIPROCATING SAWS cont.
with the saw blade. Csll_"_t_r_farce !:_ iumr_,qg o_ Ki_'k'_c_ :_cli_i; i co!fiq ¢_,._. t_; ,
biaP_e to ber!d o_ break _f_d ii_e s_w to iLir_p 0_CKw_idS C._USiA_ iO._S O_ Con_r'4!,
resulting in seli0us inj,Jry.
3. ALWAYS keep your hands _way from cutting area, DO NOT _eaeh i_rY.:'e_the
q_atefi_l beii_g c!;t beCauSe th_ Nearness of t_e b!_de to your hP_', ", i_ hiode!_ f_o_
V_u_ ¸ sight.
4. {DO NOt use dull or ¢Jamaged blades. _eR! O!,_d_: C_ -s_eak _:_!F;iV, oi Ca_i_
kic_.Dack _'_;s.Jtii!g i_ !o55 of ::_!nt_ol _r_d S_r_aJS ir!iu_ _
5 Whe!_ ._!_r_ir_ R cut i_e speed yg_.i use w!!i be dete_n_iqe_ b!! tr'e hI_e P._d ms[_ri_t
VOU are cut_irlg. Fast s2_eeds for SOft m_teriats a_d siow s_eeds _r h_d PlateriaIs.
If the blade speed is _'oe slow, _e s_w co,.iFf cha_te_ el viorata _ t_e, be,Disliking _ a
Cut_ _nd poss!bly C_.use Coun[er-_rce (_, jumping or kickback _ctio_ and vit3rat_ot_
which c_r/resui_ i_ k_ss oi control and serious perso!_! i_ju_y. Use _-1sli_tty _qs_er
_peed _i th_ very ba_iiw_in_ of youi ¸ Cul. it is always a _oad ide_ to p!actice y_i_r cuts
in s_rap !n_teri_i u_[il y_iu i_v_ _ feel to! _he _tJtti_ _£d h_ndlin_ _ofcq_ce o"
_he Saw.
6, NEVER hold the piece being _ut in '_our hands or ac_oss your legs. ii _s
b_a_e b;nding or !nss of f:_n!_i.
_ O,"_L_ !_E the d_si_l_e_ b!ados for cutting the _ype of material lot which lhe!.'
are recommended¸ _u!iln_ {na,*.e_i_is ih_t at÷ NOT _ecor_lende_l COuld C_LiSe bl_Q_
breakage _I_d ioss o_ _o_t!oi, fesuitlAg il_ serious 4AitJ_"_
9. ALWAYS inspect and remove all nails from lumber before sawing. Following
this rule wilt reduce the risk of counter'-force (a jumping or kickback action)
that could cause loss of control that can cause serious personal injury.
If this is unavoidable, such as when pedorrning demoJit on o_ renovation jobs,
MAKE 9URE to use bi-melal blades that are [flicker with 4 to 6 teeth p'-:r i_ch
and .£peciflcaliy des;g_!ao ia c[;t w.'_od with imbedded n_._its. EXERCISE EXTREME
CAUTION when performing this type of cutting operation.
_ WARNING: To reduce the risk of explosion, electric shock, property
damage and serious bodily injury, ALWAYS check the work area for hidden gas
pipes, electrical wires, water pipes, and nail and cleat imbedded 2 x 4's when
making blind or plunge cuts into walls during demolition or renovation work.
1G. Do not operate this tool for long periods of time. Vibration caused by the
operating action of this tool may cause permanent injury to fingers, hands and
arms. Use gloves to provide extra cushion, take frequent rest periods, end limit
daily time of use.
11. AVOID awkward operations and hand positions where a sudden slip could
cause your hand to move into the blade.
12. NEVER reach into the cutting path of the blade.
mmlll ii |11 IIII
I[,.'f. :1_lq Ik'dJUf__'i | ;{!_ i [I] _[."Jl_,JiII
"t_,WARNING: Some dust created by using power tools c_ntai_s chemicals
kt_owll to the _t.ate of CaJdorni_ to cause cancer at_d birth cfetec_s or o_he_
reproductive harm. Some examples of these chemica)s are:
•Lead from lead-based paints.
•Crystalline silica from bricks and cement and other masonry products.
' Arsenic and chromium, from chemically treated lumber'.
Your risk from these exposures varies, depending upon bow often you do
this type of work, "{o reduce your exposure 1o these chemicals:
• Work in awell*ventilated area.
*Work wrth app._v_d safety equipment, such es _hose dust masks that
are specially designed to filte, out microscopic particles.
Avoid prolonged contact with dust from power sanding, sawing, grinding,
drilling and other construction activities. Wear protective clothing and wash
exposed areas with soap and water. Allowing dust to get into your mouth, eyes,
or lay on the skin may promote absorption of harmful chemicals.
"t
Z_" WARNING : Use of thi*: toot can generate andYor disburse dust, which rvlay
cause serious and permanent respiratory or other injury. Always use /
N]OSH/OSHA approved _esp(rat_ry protection appropriate for the dust e_posure. !
Direct particles away from fa_e and body. I
ADDITIONAL RULES FOR SAFE OPERATION
[_ WARNING: BE SURE to read and understand all instructions. ]
Failure to follow all instructions listed below may result in electric shock, fire [
and /or serious personal injury. ]
i. Know your power tool. Read operator's manual carefully. Learn the apP)ieatiens and
limitations, as well as [he soecific potential hazards related ',o this [eel ":.'.)liow ng the )uie
will reduce the risk Of electric shock, fire or serio-'Js inlurv.
2, ALWAYS wear safety glasses or eye shields when using this tool. Everyday"
eyeglasses have only impac_-)esistant lenses: they are NOT safety glasses.
3, PROTECT your lungs. Weal a face mask or dust mask if the operation is d_sh_
4PROTECT your hearing. Wear approp[ ate pe)sonal hearing protection dudng _._se
Under some conditions no_se from this product may contribute '.o hearing toss
5. ALL VISTORS AND BYSTANDERS MUST wear the same safety equipment that the
operator of the tool wears.
6. INSPECT the tool cords periodically arid if damaged have them repaired at your
nearest Sears Service Center. ALWAYS BE AWARE of the cord location,
7. ALWAYS check the tool for damaged parts. Before further use of the t00! O guard Or
otr_er pair that s damaged should oe carefully checked to determine f i will opec-ate
pre#erly and pedorm its intended function. Check for misalignment or binding of moving
parts, breakage of parts, and any other condition Ihat may affect [he tool's oueration,
A guard or other part that is damaged should be properly repaired or replaced at a
Sea_s Service center.
ADDITIONAL RULES FOR £AFE OPERATION cont.
:. SAVE THESE ;NSTRL,.. ,-i_,,'_S. ;_.eter to the_;_ frequently and use them to _us_u_.L
others wi_t_ may _.,,: _hi:._ to_. }f someone borrows this tool, _r_ake _u_ _. Lhe¥ have
t_ese instructions als,._.
i You_ tool should NEVER be connected to the power source
z_WARNING:
when yu_ are assembling parts, making adiustment$, installing or rel_evh_g
blade,.', cleaning or when it is not in use. Discooeecti_g the saw wilt prevent
accidental starting, which could cause serious personal iniury.
i_em.svo tr_e saw from toe carrying /storage case and iqspect ;t ca_ef!Jiiy to make elite
that _qo b,_k_ge o ,:,a" ,=go i_-_.s occur ad dur!ng emppir_.
2. Du n_ discar':, ;!nv of the saeki/_ 9 materials _=ntil aii parts a_e acceu_'ted for.
_, Thr_e blades _'.r_ r!cP_ded ,';sod Cutt qg ferrOuS ;Tleta_ cut_i _g and gerlerai OLIrpose
CuttingS: pia_ .: ; bar,Fit :< sot ma_3i . Blades a_e ioc£te@ ffsis tr'e 03_ yr_ ; S 9,7,3_
gase,
• If _!iy 3t t! 2_:t$ ;C, &:L_. O: ^ C3; \; _fe tO _AST£ [ IS ; be;w :£1t;; _ ?_2:; : :'_,
¢............................
/_ WA RNING: It any parts are missing, DO NOT operate this saw until the
missing parts are replaced. Failure to do so could result in possible serious
personal injury,
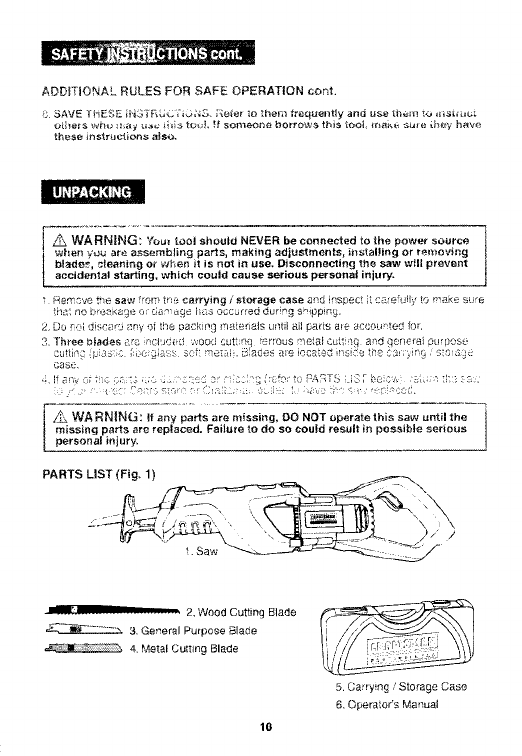
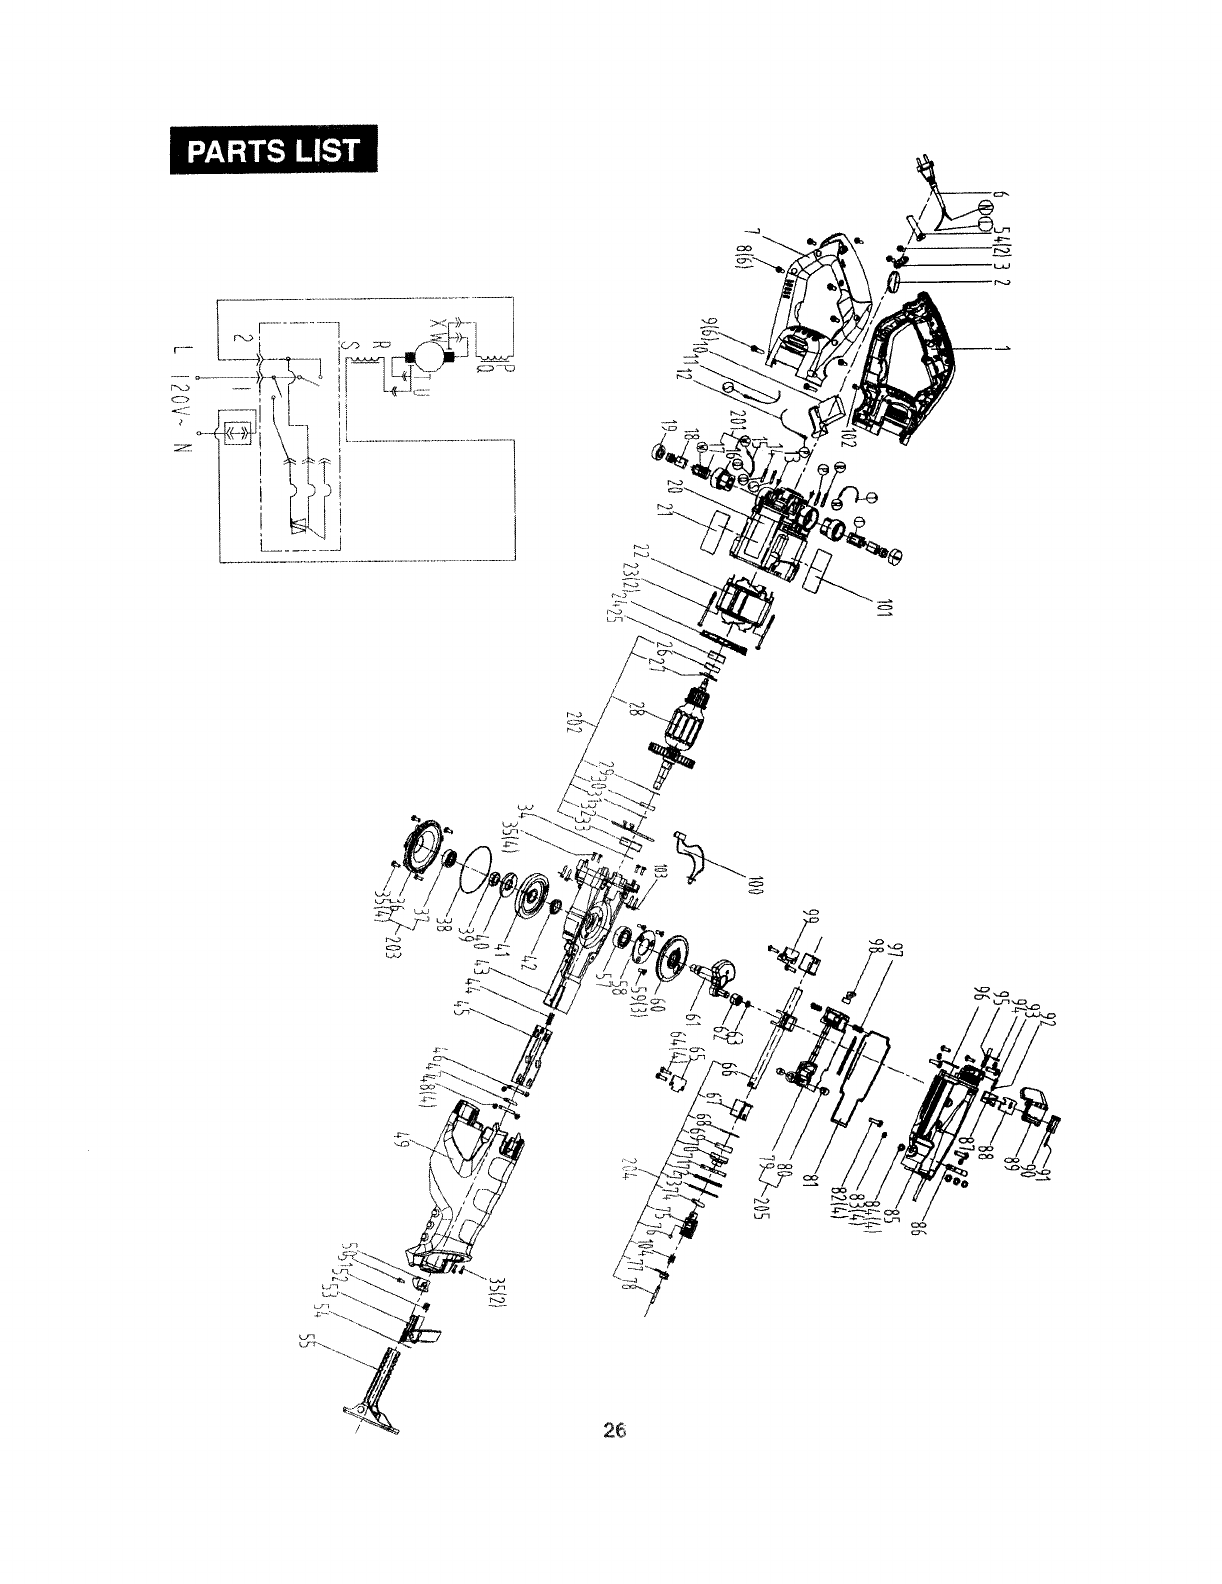
PARTS LIST (Fig. 1 )
t_av,, __--- ____.
_' 2. Wood Cutting Blade
_--_ .......... 3. Ge_eral Purpose Blade
4. Metal Cutting Blade
lO
5, Cazwieg /Storage Case
6, Operator's Manual

KNOW YOUR CRAFTSMAN PROFESSIONAL RECIPROCATING SAW
NOTE: Before att,emptir_g to use your saw, familiarize yourself with al_ of the i
operating feateres arid safety requirements, j
"ltOUl r.,_etessio[l_ reci#roeat ng saw has e p'ecision-bLJi)t elecb c moto_ and ;t should #e
contracted to a I[!() voit, 6O-Piz AC ONlY power supply (normal housetlold curfe_i(}.
DO NOT oper_te orl drect curreni !DC, The lar,'}e voltage drop will cause a !oss oi p,"wer
and ti!e motor wH o!e'hea_: f tee sa" does not operate when (;lugged rite co,rest
12(}-volt 6(}-!z AC ©Ni Y o Jtiet cheek the power su'pr.ly. This .Paw t/a_ a 10-f! xwlr(_ Power
cord o axdaoter _eeded}
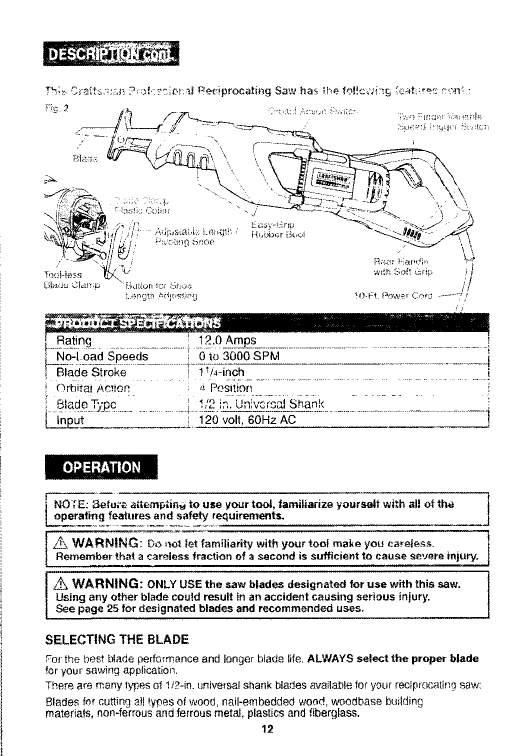
This Professional Reciprocating Saw has the fotlowir_g features:
!, Powerful _otor 12 Amp and 0-3000 SPM (strokes per minute) no-ioad speed
provide sure cuts i_ \;,Pc, d. woodbase building !,qatebals_ plastics, fibergDss, ferrous
an_ norl-fer:ous metal pipe, tubing arid nails, with 3 d f{ele_t blades {nctudee.
2. Four Positier_ Orbitat Action
The control switcb legula[es te 4 cuitb!g modes of tee saw.
O SMOOTN r_i!i-'1 ', spi _ter re; !e.ma] up and dO,.'m elade r-}ot on NO _zrbita_ actiol ,
!, LOW _o_ ctt_g most mete!Is, low orbital action.
2. MBDIUI'_I _or sutti_ig eiast cs :erc/:eod medium orbital eerieR,
3. FAST for r_a_i!-,_qm o_bita! action, iqe for fast opt rig n p;_a>,osd _-oitwe_ds
;5 Va_i_ble spee_ .;tile, ,: rac q,_ sut_}r_[i : (._:: '.o _ia,ue a] _lter ?.i
4. T_..'o finger v_riable _pced triggel switch co!i:rols elada speed by the _moii_t :r
pressure you apply to the trigge_ s'_v Lets.
5. Full 1 V4-#'_ch blade stroke for fast c_ttirlg and e×tended blade ire
6, Toot-tess blade clamp features iever action colta_ lot easy. fast blade change
cilanges, Uses universal i/Z-in s_ank blades.
7 Adjustable length /pivoting shoe to_ ma×imurn control on workpiece in a vat ely of
cuts. Adlusts by press{r_g i_ on yellow bdtton below pivoting shoe,
& LED WOrkllght comes O _, wher_ trigger switch is turned on, illuminates clotting area fo_
better visibility.
9, Easy-to-grip fre_t beet _qd rear handle design with soft-grip qr,'_,id_ m'.'_! _ [r_
control balance and cornlert.
10. Permanently lubricated 100% ball bearings for smooih ol3eration and long life.
11. Oounter-weighted gearing reduces vibration,
!2, Includes 3 blades: i blade for fast wood cutting, ! for smooth cuts in ferrous metal,
pipe, and tubieg, and 1 for cutting soft metal, plastics end fiberglass.
t3, includes rugged storage !carry case,
]boi-i÷Isl _ 'I, Wlth !0[ L_iip i
Lil_,J_ Ck-:_t I " iZii{on Io! {:ii=o_. //
t.,)t_91h itiju_imci !ll.!:fl:_w!r II_,_E .....]',_
[ Rating ! 12.0 Amps i
..................... _--i-_ ..................................... 1
[ Blade Stroke ! ! /=-'09! ............................
i Orbital i_,ctioP, 4 Positiorl i
Blade T'zpc i !/2 ,,s. bniiiria.l Siqai,{ - ........ i
[][hEu { ..... ; 120 volt, 60Hz AC
L NO[E: _etu_>€, a[teraptie,._ to use your tool, |am, iliarize your_elt with all of the |
f
operating features an_ safety requirements. J
[_& WARNING : Oo _ot let familiarity with your tool make you careless.
1
Remember that a careless fraction of a second is sufficient to cause severe injury. [
•z_ WARNING: ONLY USE the saw blades designated for use with this saw, [
Using any other blade could result in an accident causing serious injury. J
LSee page 25 for des gnated b ades and recommended uses.
SELECTING THE BLADE
_-o_the best blade pedcrmance and longer blade life, ALWAYS select the proper blade
for your sawing apptcation,
There are many ty£es of 1i2-in. universal shank blades available for your reciprocating saw:
Blades far cutting at tybes of wood, nail-embedded wood, woodbase building
materials, non-ferrous and ferrous metal, plastics and fiberglass.
12
SELECTING THE BLADE cont.
are also =_lai_bie,
ALWAYS choose a blade ien§th long enough to extend beyond the shoe and your
workplace, througho_ the cutting stroke (see page 18).
SAW BLADES
All saw blades need to be kept clean, sharp and properly set in order to cut efficiently.
Using a d_l( blade hlaces a heavy load on the saw and increases the d_r_ger of
counter force (a jumping or kickback action). Keep extra blades on hand. so sharp blades
are always available. Gum and wood pitch hardened on the blade slows the saw down.
_Jsegum and pitcl] remover, hot water or kerosene to remove them.
DO NOT use gasoline.
BLADE INSTALLATION AND REMOVAL
This saw is designed to use all f/2-in, universal shank blades.
_WARNING: Br. SUnE to wear protective work gloves while handling a ]
saw blade. The blade can injure unprotected hands, j
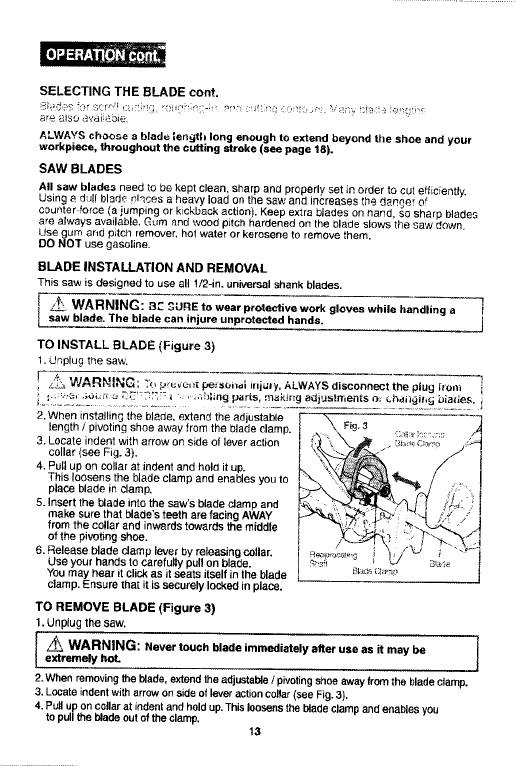
TO INSTALL BLADE (Figure 3)
1. Unplug the saw.
_,_ WARNING: ,o ,_,_,,e,,[ _...son., injury, ALWAYS disconnect the plug [tom i
2. When insta!lin_ the blade, extend the adiustable ,'1
length /pivoting shoe away from the blade clamp. Fig, 3..... °:_
3. Locate indent with arrow on side of lever action i: _ ',:,'_i__'__:,[_
collar (see Fig. 3).
4. Pull up on collar at indent and hold it up.
This loosens the blade clamp and enables you to
p,aee b,ade in o,arnp. __J_:i I
5. Insert the blade into the saw's blade clamp and
make sure that blade's teeth are faeing AWAY _$':__:!_Hi__,_, _,-_,_
from the collar and inw'_.rds towards the middle
of the pivoting shoe.
6. Release blade clamp lever by releasing collar. 1
Use your hands to carefully pull on blade. !" _h. _Ic,;,,'_ J
YOUmay hear it click as it seats itself in the blade
clamp. Ensure that it is securely locked in place.
TO REMOVE BLADE (Figure 3)
1. Unplug the saw.
[extremelyi_WARNING:NhoL .... touch blade immediately after use as it may be J
2. When removing the blade, extend the adjustable/pivoting shoe away from the blade clamp.
3. Locate indent with arrow an side elleveraction ca_ar (see Fig. 3).
4. Pull up on collar at indentand hold up. This loosens the blade clampand enables you
to pull the blade out of the clamp. 13
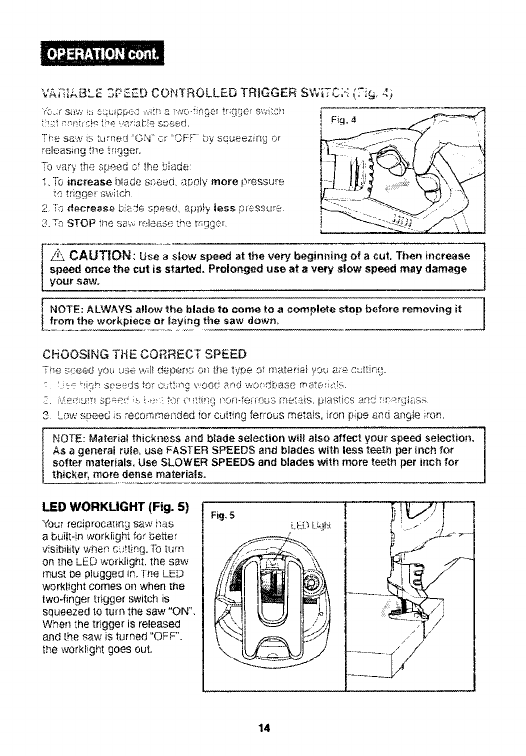
VA;IbC.BLES?_.ZDCONTROLLEDTRIGGERSW_TC;-:('."i£.4_
_L.:r Saw i: Sq_,lppi.'d w_ a w_._.nSsF tr;,.q*;er sw :ci_
The sow is turned '0.'4 ¸`Cr 'OF;_ by s_L_eezirl_ el
releasing ti_e tr_sger.
-0 vary the speed of the blade
I. To increase blade s_ee_l, 85c..Iy more !>_essure
to tr;gge_ s_>.,itch
2 [O decrease bsde s_eed, apl)_y less _;vcssu_e
3. ;r_ STOP the sa_._ releas_ the tr 9ge_
• ' L'
!Z_, CAUTION: Use a slow speed at the very beginning of a cut. Then increase 1
I
speed once the cut is started. Prolonged use at a very slow speed may damage !
your saw,
NOTE: ALWAYS allow the blade to come to acomplete SIOD before removing it /
.f._o2_!.th2 wo,,pieae2_12_Ii2gthesawd.... J
CHOOSING TttE CORRECT SPEED
The _:ceed yOti use wll doper! on the t,/ee .of material you _t_e CLIt r'>_.
: , !inr S_._e_,js re, C!_t', n_ ,,oo{ end we( !Jbase m:_i(,_ _
-. ,.fe_! um sr;_,_< ;_ to_ c:_ 0r_ofl-te mus mett_ts, p'astics an? _ hrglo :_
3 low sicced s recommended for cuizing ferrous motets, ;rorl ppe ,_nd angle ton.
NOTE: Mate[ia! thickness and blade selection will also affect your speed selection,
AS a general rule, use FASTER SPEEDS and blades with lees teeth per inch for
softer materials, Use SLOWER SPEEDS and blades with more teeth per inch for
thicker, more dense materials. J
LED WORKUGHT (Fig. 5)
YOu; re_ieroca_in_ sew i!_s
a bLiiit-in workiight fo_ better
visibility '.',men c itting. "rb turn
on the LED wO_kiight, the saw
must be plugged in. rhe LED
worklight comes on when the
two-finger t.figget switch is
squeezed to tern the saw "ON _,
When the trigger is released
and [he saw is turned "OFF".
the worklight goes out.
14
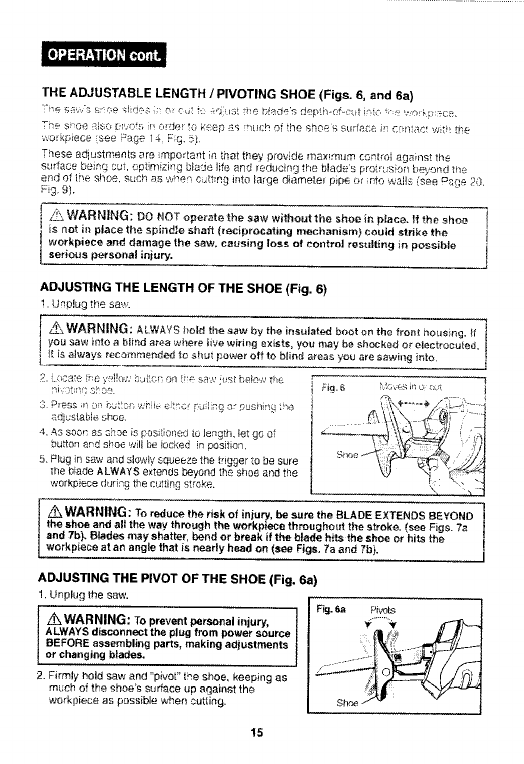
THE ADJUSTABLE LENGTH /PIVOTING SHOE (Figs. 6, and 6a)
The s, oe a).eo[ _,,o_, ne_de_ to kr_ep as quch o_ the shoes ,_urfa_e i_ C_ _tac_ wth _he
'._e_kpiece see :::age i4= Fg, 511,
These adiustments are repentant in that they prey de cna×_mum controi against the
SLIdace being cut, optimizi_!g blage life and reducing the blade's protres.iorl beyond the
end of ihe shoe, such as Whe!_ e_thng i!ito large diame[el pipe or rite walls (see _sge 20,
Fi2_,9}.
[,_3, WARNING: DO HOT operate the saw withol_t the shoe in place. If the shoe I
i is not il_ place the spind,_e shaft (reciprocating mechanism} could strike the t
workpiece and damage the saw. causing loss of control res_dtthg in possible
[ serious pe_'sot_slioiury. !
ADJUSTING THE LENGTH OF THE SHOE (Fig. 6)
u_o u _ th_ So\,.
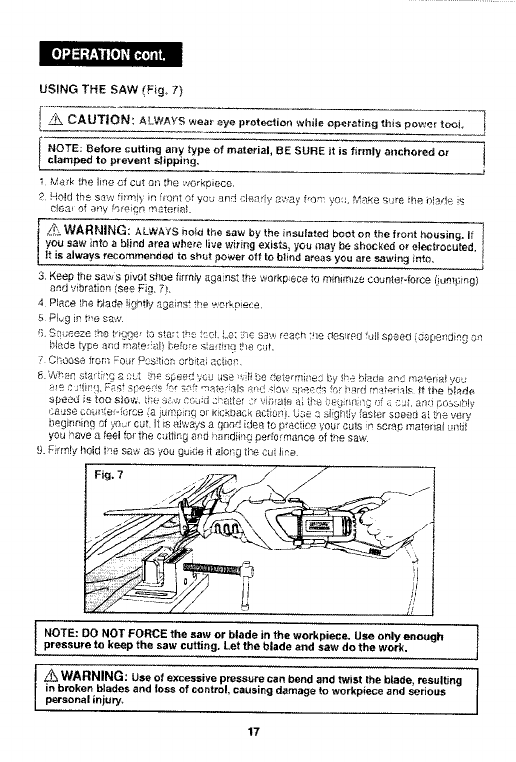
,WARNING: ALWAYS hold the saw by the insulated boot on the front housing, tt i
you saw into a blind area where live w#mg exists, you may be shocked or electrocuted. I
i It is always recommended to shut power off to blind areas Vou are sawing into i
P.. "icale [_e T'q!_4,', S_[tc!] or1 ti_ _ Sa.v rue! below _h¢
S P_ess il_ o_ b_ttse w_iie ¢it_¢_ _uiiic_ n_ _uehi_ _h_
adjustable shoe.
4. AS seo!_ as shoe is Fositioned to length, let go of
button er'd shoe will be locked in position,
,5,Rlug in Sew and slowly squeeze the trigger to be sure
the biade ALWAYS extends beyond the shoe aed the
workpieee duri"g the cutting stroke,
i Fig, s _l:;,es in o o i
\: ....,'-t
!
Z_ WARNING: Te redu_ the risk of injury, be sure the BLADE EXTENDS BEYOND I
the shoe and all the way throagh the workpiece throughoot the stroke. {see Figs. 7a l
and 7b}. Blades may shatter, bend or break if the blade hits the shoe or hits the I
workpiece at an angle that is needy head on (see Figs. 7a and 7b}. i
ADJUSTING THE PIVOT OF THE SHOE (Fig. 6a)
1, Unplug the saw.
Fig. 6a PiVols
z_WARNING: TO prevent personal injury, _'"_
ALWAYS disconnect the plug from power source : _ ,
BEFORE assembling parts, making ad)ustments ' .... /=
or changing blades ....... - _"-i';
2. Firmly hold saw and ='pivot" the shoe, keeping as _
workpiece as possible when sutting.
15
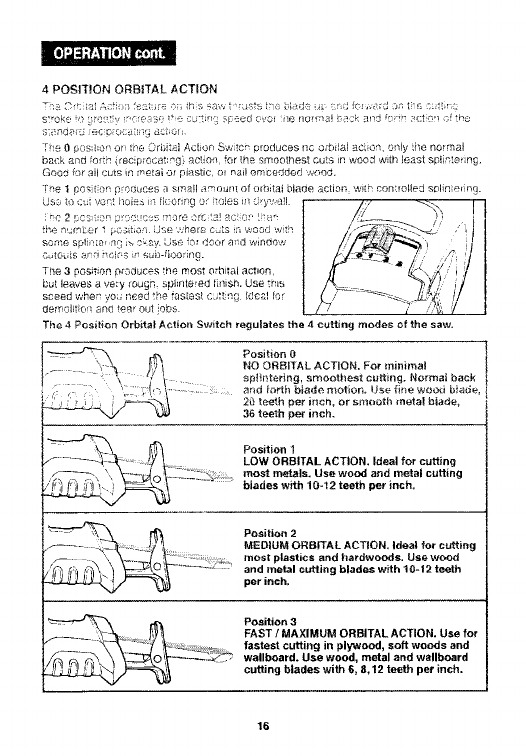
Position 0
NO ORBITAL ACTION. For minimal
splintering, smoothest cutting. Normal back
arid fa_h blade n-lotion. IJ_e fine wood bi4de,
2_} teeth pe_ inc_, or snlootb metal blade, I
36 teeth per inch.
Position 1
LOW ORBITAL ACTION. Ideal for cutting
most metals. Use wood and metal catting
blades with 104 2 teeth per inch.
Positioe 2
F.... _- -_...._ MEDIUM ORBITAL ACTION, Ideal for cutting
_.- \ ...... -most plastics and hardwoods. Use wood
/ ,::, , A _"- _ ....... itf_-' and metal cutting blades with 10-t2 teeth
per inch.
/_!_ Position 3
_____ ........ FAST /MAXIMUM ORBITAL ACTION. Use for
fastest cutting in plywood, soft woods and
wallboard. Use wood, metal and wallboard
cutting blades with 6, 8,12 teeth per inch.
16
I
l OTE: DO NOT FORCE the saw or blade in the workpiece. Use only enoughpressure to keep the saw cutting. Let the blade and saw do the work.
_WARNING: Use of excessive pressure can bend and twist the blade, resulting
in broken blades and loss of control, causing damage to workpiece and serious
personal injury,
17
J

SAWING TIPS (Figs. 7a and 7b)
the oeerator
i. _:lad,._s c(_i c.n _he arav_, er bac_ stroke OP= f;ne _or< .--,Lmh,:a _:ane b_; or fibergiass,
plnce the good side of the wofkpiece facing dewr.
2. C{it only z;dh sharp blades they cdt cleaner, faster ard pZ less sttam on the motor.
3 AIwavs use '*.he correct biade fo_ the n:aterie! beirl9 ciit and always keep extra blades r)n
hand to use wr_ee blades become du& Repiace duil cracked or bent blades
i_rmealier÷b,
4. &lways select the _sraper curt!rig spee_t
5. Atw_ys seiecl _he p_oper ©_b_tai Pas ton.
6. 'i.ihen e_it!r!g arrays rake sure !hat the shoe b_a(e 3 !esti_!g !rarel! a_ainsi t!le
worksiece. :this wii! improve operator contro! and minimize wbration.
ii\ WARNING: Blade breakage slid damage to the workpieee may oCCUr if ]
the blade does not extend past the shoe and the workpiece throughout the cut,
LOSS of control end damage to the shoe can result increasing risk of serious ]personal injury (see Fig, 7a and 7b).
rq
Fg. 7a ._/|
Cuttisg Wood /-_" _]
RIGHT
i
!4
,I
/I
Stroke _1
RIGHT /
WRONG
18
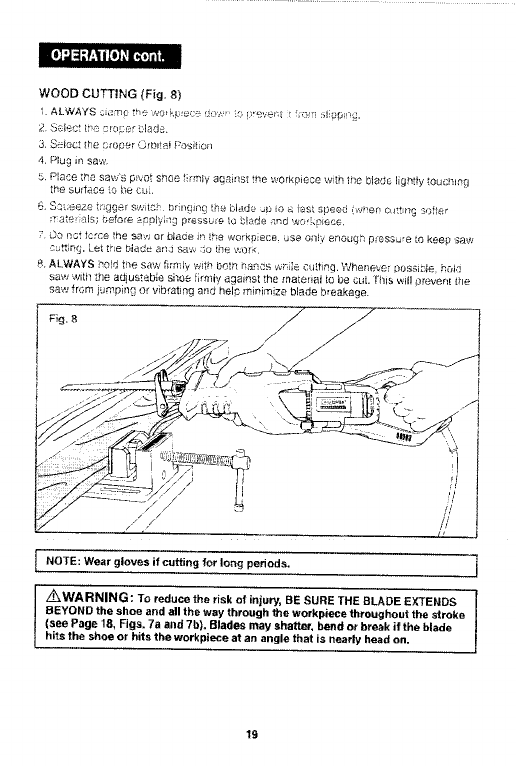
WOOD CUTTING (Fig, 8)
1. ALWAYS 0 _rTi_: thO !_e_i<,p e_,o _o<<._, 1_ i !evel t t of] :q ppil!_.
3< Select the urooer CrL_ltai f_,:)sitio;i
4. PJU9 in saw.
5. Place the. saw'_l p_vot shoe frmly ageinsI the wOrkbiece with the bladb lightly _OUCi11_g
the sudace to be cut,
6.._'5'.;ee.z_e tn_.ger swito_ or i/<Ti{_c_the bli_Je ._ to t-_Fast speed (v._i<,er_ c_ltt i_ solter
_r ate_ _lsj before aOplyl _g p;essuie to 9!ado ._nd wetS.piece,
:L)O ndt fcrce the saw or blade in _he workpiece, use only enough p_essu,e to keep saw
cu_ing. Let the blade and sa'.t, :_o ins wor<
8. ALWAY171 _od the saw firni7 wit_ bet_ na_ds wi_ife cutting. Whenever Possible, hold
saw wiib the adjustable shoe firmly e..gainst the material lo be cut. Thi_ will prevefi! tlle
saw from jumping Or vibrating and hel_ mir'imize blade b_eakage.
Fig, 8 /i
_s7 .;:7"-/" _/
Ii'J ........ 4" ," _a 'i
NOTE: Wear gloves if cutting for long periods.
Z_WARNING: To reduce the risk of injury, BE SURE THE BLADE EXTENDS
BEYOND the shoe aild a|l the way through the workpiece throi_ighotl_i the stroke
(see Page 18, Figs. 7a and 7b). Blades may shatter, bend or b_eak if the blade
hits the shoe or hits the workpiece at an angle that is nearly head on.
19
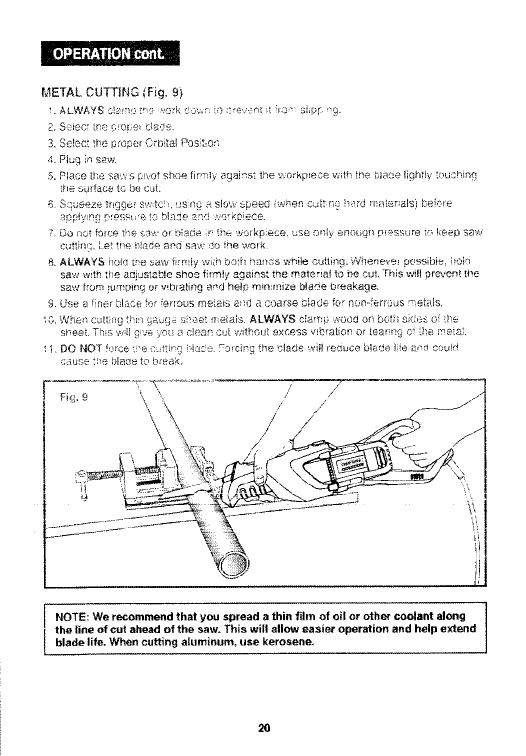
METAL CUTTING _Fig. 9i
;/', S:!iegt iPe C o_,e_ c_8d9
3, Se!ect !he _s_o,sar Orb tal %S t 0_
4. Plug ;n sew
5. Place ti;e sa.'_ s _:,\ at ,shoe firqy at'_ai%t the ,zo,"kpiece wittl tn,_ _aae l],..qhtiv touching
the sulfate to be cut.
6 Squeeze trigoe! swtc! t.'s n9 _, slow spee8 when c_£ nLsh._8 mate_als) before
_p_!y_r_ r ressi e to blade sx .=ork_,!ece.
7 [-}o ilot fo[ce the s:_,z' or blaae rthe _srkp ace, use a!ty enouotl .o!essL!re to keep saw
cuttfnq, let ti_e blade apes saw ,]o 1he woi_:
6_ALWAYS ileld i_a saw firr_!iy wi_h both balms while cutting. Wheneve_ possibie, hal1
saw wittl the aqustabie she9 firm}y against the material to oe cuL This will preyer,( the
saw from iu,l"!ptng or wb/afirTg arid heirs minrr_lize blade breakage.
9. Use a frier L;lcxc<_for fet',ous metais a_d a coarse c.iade for non-_erro Js _'et_ds,
I0, Whe_i CLairl/g ti_/ _._ge s!eet _re[als. ALWAYS ciarr i} woos or! boil sid,_s of !he
siieet, This ,_,i] g_e you _:_c]ea_! cu[ with.out excess vibration or [em% o ihe metal
11 DO NOT force _'e ::it% >la9_ Forcing the 9lade wiil le_uce blade Ire a!_d could
&;use ti!e bla_e to b_eaL
12 ;_,, / /"
Fia 9 " _', /'/
" \ k / /
I i;l
INOTE: We recommend that you spread a thin fUm of oil or other coolant along I
I
the line of cut ahead of the saw. This will allow easier operation and help extend lblade life. When eu_ing aluminum, use kerosene,
20
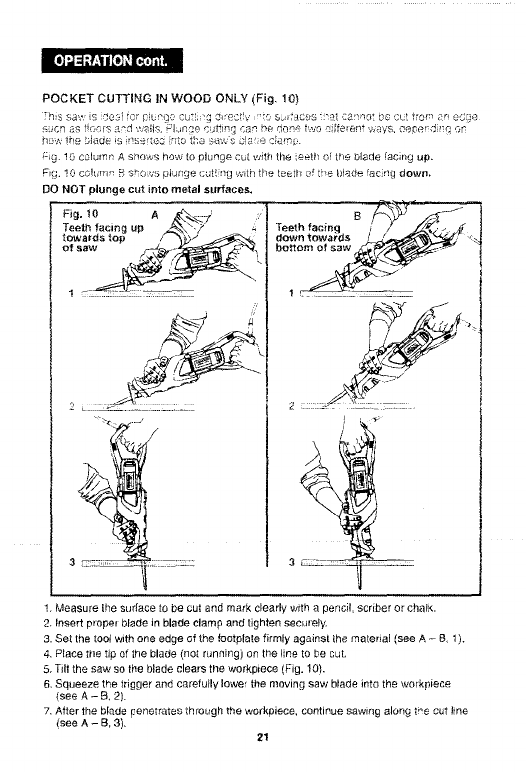
POCKET CUTTING IN WOOD ONLY iFig, 10)
7tls .saw is desl for p L!_ge Cu*. g _recfiv 'e sb_t_ces _t can_o be, out from ,_r ed;_e
how !he bJa_ iL, r!s_rb3_ Rio t_a :_iws daie c_a!'_L ,.
=ig. 10 column A snows how to plunge cu[ with the ieeth oi the olade [ae;ng up,
Fif_'. 10 cohim_ _::sno,vs {.A.'nge curt ng with the teeth of the biade !ac _I!I dowry,
DO NOT plunge cot into metal surfaces.
Fig. 10 A _7 _
Teeti_ facing up .,,_, _,_'
towards top /_'_>-_ _--_-_...-_,_.
Of SaW --
\>..< .j
3_ZZ"_ ,,'.I:I:_:ZC
/_ 11 i
I. Measure ihe surface to be cut and mark clearly with a pencil, scriber or chat_,.
2. Insert propel blade in blade clamp and tighten securely,
3. Set the tool with one edge of the feetplate firmly against ihe material (see A - B, 1).
4, P_aeet_e tip of the blade (not running) on the line to be cut,
5, Tilt the saw so the blade clea!s tile workpiece (Fig. 10).
6, Squeeze the trigger and carefully Iowe_ the moving saw blade into the workpieee
(see A - B. 2).
7. After the blade penetrates through the workpiece, continue sawing along t_e cut line
_see A -B, 3),
21
POCKET CUTTING IN WOOD ONLY {Fig. 10) cont.
I NOTE: Te make cutting easier, use a heavy blade, ]
plunge gauge
In lfl[ck o/very h;_Ki r'_atei &Is, #lurl{_e cutti_kq shouid not be attempted, Pocket cutting in
such materia s shoui_ only be done by start ng the cut from a ho!e dliiied all the way
tk rough the material that is large enogh to fit the saw _;la(ie,
,/_ WA RNING: Use extreme caution if ',]ou use this saw for light tree pruning,
f-otiow all safety instrbmtions regarding use of shoe, blade type and blade stroke.
Make sure branch is firmly anchored or attached before you scat1 and while cutting,
__& WARNING: DO NOT CUT overhead. Anticipate path of falling branches
and debris ahead of time. Pay particglar attention to overhead wires.
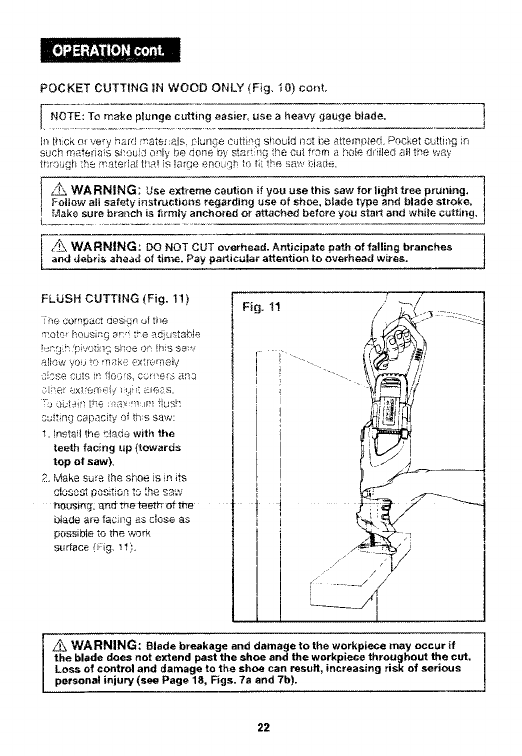
FLUSH CUTTING {Fig. 11)
tie ,Jomp_ct Ges!_r! of ti_e
r'_oto hous n_:} r_r:, t"e ad ustab]e
allow voJ te m£ke extrome?7
dose cuts [_ flo)s co_ er,_ aR3
sL, tt rio capacity o_ ths saw:
1. insta I the cled_,; with the
teeth facing up {towards
top el saw),
?. Make sure {he shoe is in its
closest poSitiOn1 _O ',he ssw
blade ale facing as close as
pOS._ib_e tO the work
sl_rtace {_.qg. _1).
I " --- t",_ ///
i -t,_r--q !,#
! t /z
WARNING: Blade breakage and damage to the workplace may occur if
the blade does not extend past the shoe and the workpiece throughout the cut.
Loss of control and damage to the shoe can result, increasing risk of serious
personal injury (see Page 18, Figs. 7a and 7b).
22

I,Z__,` WARNING; To ensure safety and reliability, repairs, maintenance and
7
adiustme_t_ M[JST be pe_ormed by a q_alified service _echnician at a
Sears Service Center.
[Z_ WARNING: For y rely, ALWAYS t ff switch and unplug saw from i...... ....
the power source before performing any maintenance or cleaning,
It has been found that e_ectric to_'.is are suejeci to aceeie=ated wea, _ and possible
are*'_tare ta !_Jrs ';,7'-e_ t_ey are tlsad la '_ork e_ fber p',ass boats ar_i s_,ort_ c_f._
wa!!bnard spackiing comcou!;ds or pleats , lhe cku_s and _r ngings i_om these ma':erials
ara 1_19!_v abrasive to eJ_dtrieal tooi aart$, su,:;n as [!ear n_s Cruai aS, cormRutatola, _c.
Consequeniiv ]i s not _ecommended that this tOOi be i_sed for extended WOrk on _r]y
bergiass m_teria!. _,,a!lca_,rd, soac,d n_; con-,,pound or p!astar Durii_ any USa On these
mater ale it is extremely important that in2 !eel a cleaned freouently by b:owing wi_t_
an air jet.
.... j
/__-'xWARNING: Always wear safety goggles or safely glasses with side shields
durin(j power tool operations, or when blowing duet. If operation is dusty, atso
wear a dust mask.
TO CHANGE BRUSHES (Figs. 12 and 12a) F_EPLACEMENT OF
CARBON BRUSHES
-_o!ecen_e_T nruet: se_s a'a _V_, iagie t "trOika}" _;ea,'s a!s a! _ _:_c'ai_ _e tars.
,L_npk.'g _he recl_ _o<:ai ng s_w betels i_s_;ectir'!_ o re_u !_t_ br_a_e:_.
._e!:_Iaca _)e_ carl',O!_ bfos,_es when e ti_er/_a _eee i_;_ 1 i4-if_ lea_{h _;_,car>_o!'_
rer_ain ng or ;f the spring or wire i3 dal-l_ed ot buq_ed.
3. being a stetted sorewdnver, remove _he bt_,ck plastic cap ot_ each side of ;i_e
reciprocating saw (Fig. 12) and carefully withdraw the springqoaded brush assemblies.
Keep br _shes clean and sliding freely in thei_ eude channels.
[ ::::__... Fig. 12 !7 .... f_.___._. Fig. 12a
NOTE: To reinstall the same brushes, make sure the brushes go back in thesame way they came out. This will avoid a break-in period.

TO CHANGE BRUSHES jFigs, 12 and ! 2a} REPLACEMENT OF
CARBOi'_ BRUSHES cont.
,:. nse_i new nrush 3cs_,_,hie = rlto im:_ noes ',_t ie c,_rbo_' r'", 0 '_n:} n fh_
oe_ng ce¢.a n to fit ins b,_e met_.! *ears nto tilel ,.qol_ r _ne ci _=r'ne{ (Fk:. 12;.: .
5. H,emembe! to replace t_oti; end cac, s af!:r nspec ng or sarwcin 9 crushes. T;gh_en the
car_s snugly but do _!ot _.,er-ti,'}hten, The ,ecFp coating saw SheLiid ee allowed to
"RUN IN" irun at no _oad withe!Jr _ b!ads for 5 minutes before use, to seat the new
b_ shes proped%
ROUTINE MAINTENANCE
[Z_ WA RNING: DO NOT ai any 'Lime let brake fluids, gasoline, petroleum_
iased products, penetrating oils, etc, corse in contact with plastic parts,
Chemicals can damage, weaken or destroy plastic, which may result in
serious personal injury,
Pei odie meJn',enence s_ ows tar Ioriq iife an8 i_ouble-f_ee epeFet oR, A deanin_
iubric_iiun apd n_aintenance schodLile s}!:_J_d ile mainLained. As a common
_reven_a_ive rnai!_teearlce _c!ioe ,_oilo_ these recoq'_n_ende, d sieps:
I!t'__WARNING: For yea, safety, ALWAYS turn oil switch at_d unplug sew from
the power so_rce before performing any nr!aillte[_a_c_ or cleaning.
i W,.etq ',_'ork qas bee_ conlpi:_{ed, clean tl,.i :oo_ _c, a!]o.', smear" fiJr/ction n_ oi the [oo1
cyst iime.
2. tJse ciean dame cloths _o wice De tooi
f_ Chock the s[a_e sf ail power cords,
4. Keeo the motor air vent openJnqs flee horn oi} qrease and sawdust or wood-'._,hips
and sto_e tool in a dry !:lace.
5. Be certain that _f! m-,,.,i<g .2arts ere t,',.,e!i_Ltbdcdted, p_,'.icu!ady s'_ter lengthy _Z_n _-_,
LUBRICATION
'_ur Cra_sman _ Profess o!lai Reciprocating Saw _'as been p_ope [y I;bricate_ and s
_eady to use, NO furthe_ iubncatio_ is needed under Rorn!al operatb_g conditions.
All bearings in the saw are lubricated for the liie of the tool
24
I Z_ WAFINING : Tile use of attachments or accessories tllat are not
recorn, m_nded for this _oot might be. dangerous and could result i_ serious Injury.
L
Sears arld other Cr-_flsrnar! outlets have a large seleciion of tec:procatiog saw olant>.s
in a variety of blade lencctrls and tee_ per inci! hat afo ideal fur a w_d_} vadety ,st
sE._iting application,s
ALWAYS t_se the _7_ortest blade suiteb!e for _'our job bu t!ong e_ su_" to k_ep the
b! 7,de c_<tt ng througr" the matersal.
_CAUTION: Longer blades are mole likely to bend and become damaged
during use. Du;ing operation, longer blades may vibrate of shake_ sassing Io_s
Lof control, _tamage to workpiece and possible serious personal iniury.
]he _r atedal you ale outtirlg deLeimi_ es ti!e type _i blase to _.se,
"Serla!ally, te_._ ieeI!_ on ihe biaQe ramuvea _"iora material Qufcker cut tDrod_c_s
a cough -i!_i,%_,e_ _ctt,
More teeih c_it s!owe _"b_!t Set, esther.
Use a blaae that is sii'.Th ly !st _el (ion_:er) that the depth of te matedal yo; s_: CL_tV'q,
/,'dr., it_':_C_,c_:;bia,_s a_e i,sre da a',.'re ,,_:':: {le,"i fo_ tocghe ioOS I-:e Oe "ol';o_ .
When cuitiflg wood tiet has embedded nails, cise b-metal blades that are s! e.J caily
ma_ked on the bia_e Dr paekat_ ng !hat ;iley are suited for [his purpose,
Seals and other Craftsman outlets also have a large assortment of oiaf,qps, sawhorses
safety equipment, gloves< extension co_ds ar, d other eeluipment to help you with
all your sawing needs.
V;sd vou, _ local Sears stole el other Craftsman outlets or shop sears,semi€raftsman,
rWARNING:_te _e _ dam_je t_h_workmec_may occur# i
the b|ade does not extend past the shoe a_d the workpie_e throughout the cut. |
Loss of control and d_mage to tile shoe can result, increasing risk of serious /
/persona n ury (see Page 18, Figs. 7a and 7b). |
!. 1
2S
F.....
Z
[........................................
o
o
u_
n_
v
_c_, _..
o
/ 26

RECIPROCATING SAW -MODEL NUMBER 172.25290
.Itenl..No..._.F__art? NO._ .................. Part De sc[i..ptio_n......................... .Qty..
1 2RSR17PO001000A-OO LEFT HANDLE I
22PSR17POOO6000A-O0 ORNAMENT COVER 1
........_,------5"c/5_4_ __2_5__o-6- --_c r_ -S-T_x%..................... -_---
5 200TOO65003000A-O0 Cable protector i 1
7 2PSRt 7POOO2000A-O0 RIGH] HANDLE 1
8 200W4000035000A-O0 Screw ST4.2X16 __o
9- 200W4000044000A-O0 S_rew ST4.2x35
10 200WOO20237000A-OO ! SWlTCHI t 25V,,'14A) 1
-1-1" 200TCI2SO224000A-O0 INNER WIRE 270 i- !
....... 1_2._, 2PSRO6CO04OOOOA-O0 INNERWlRE L 1___
13 i 200W400OOO2000A-O0 Screw ST3,3x6 _ 2
14 200TO1SOOO4000A-O0 TERMINAL [4
F
........._s...... 2o.p_m_2__o.4p=7o£pA-02_0..... iNNERW_R_E................ .L_.2_....
201 200T0040175000A-00 BRUSH HOLDER ASSEMBLY 2
16 200TOO40173000A-O0 BRUSH HOLDER i 2
18 200T0030133000A-00 CARBON BRUSH 2
_.. 19 ... 200T=0_)4-0156000A-00 BRUSH £GVLH ................ __ .2 ....
20 2PSR17PlOO1000A-O0 HOUSING 1
22 20TB9500119000A-00 STATO F_ I
23 200W4000052000A-O0 SCREW 4.2X55 _ 2
_- 2PSR17PlOO2000A-O0 BAFFLE ! 1
25 200TOO70012000A-O0 BEARING SLEEVE 22X24X11 i 1
202 [ 2PSR17Q3000000A-O0 ROTOR _ 1
........_ i_55_55_?_556-X:55 .........._-__ Rii__6_:__ ............_K ........
27 i 2PSR!SAO303000A-O0 DUST PROOF 1"
i20TBQ520102000A-O0 ARMATURE [ 1
_9 , _oowTo_o_s0OOA-Oo i F=_aNINGR_L___!_A...................]. i_....
_ 200WTOOOO15OOOA-O0 RETAINING RING 12-A 1
32 i 2PSR17P3003000A-O0 BEARING COVER ! 1
!200W80BOO33OOOA-O0 BALL BEARING 620!-RS i 1-
1
34 [ 200T024OOB6000A-00 WASHER 12.5x31.6x0.5 i
305_]200W320001000OA-00 SCREW ASSEMBLY M4X10
,L 2PSR17P2400000A-O0 BASE PLATE [1
36 2PSR17P240100OA-O0 BOTTOM COVER i 1
37 200W800O020000A-O0 BALL BEARING 629-2RS L1
38 2PSR17P2004000A-OO AIRPBOOF RING [ 1
"_ 200W2400067001A-O0 NUT M12-LH _- 1
........._-............_ .............._sH._ ......................................__.......
41 20TB9010016000A-OO GEAR J 1
42 2PSR17P2002000A-O0 CUSHION _ 1
_ 2PSR17P2101000A-O0 GEAR CASE F 1
27

RECIPROCATING SAW - MODEL NUMBER !72.25290
tt,_,+,,No. p_sr_;..........................p_,E.£+_++tLp_t!.o,...................... 2._!_-_
44 200TOO50096000A-O0 COMPRESSICN SPRING 1
47 [ 200W5300004000A-O0 CYLINDRICALPIN4X35 , 1
48 _ 200W7000044000A-O0 E RING 3 4
50 ++2PSR17POOO5OOOA O0 PUSt ! ROT FQN 1
51 200W4160004000A O0 SCREWS_33X8 T1
...._..-...... 2-oTTT_s-oT_-_----T_T6_kT_p-___T_-£xT-----_-
.......T+--T-ST+_3Tis885_bT_,_65 .........._Tq-+_ ................................... _-+....
84 200W7000060001A_O0 RETAINING RING 4-A 1
55 2PSR17PSOOOOOOA_O0 SUPPORT BRACKET ASSEMBLY 1
57 200W8OOOO43000A-O0 BALL BEARING 6002-2RS T
........ S+B ..... 2 P.S+__yZ.!_.?j.£_2000_A-_00 ___.p E__A__!_N._G_CO.VE.FL .................................. +__
59 2DOW300005500OA 00 SC_EW 4X10 3
--%_ ........ 2__T _55_T63-a-_8----T+i_-N-£_T5_ _TiS-__TP_T2.............. _+-
__ 6_1 __ 2PSR17P2200000A O0 RING GEAR 1
62 2PSR15AO440000A-O0 NEEDLE BEARING COMPONENT 1
64 200W3200015000A-O0 SCREW WASI4 ER ASSEMBLY 4K +6 + 4
204 2PSR17P43000OOA-OO RECIPROCATOR SE_ 1
66 i 2PSR17P4400000A-QO RECIPROCATING SHAFT 1
67- _ 200TO270045000A-O0 OIL SEAL BEARING !2.7x!gx24
69 I 2PSR17P4302000A-O0 FELT SEAL 1
I, 2PSR17P4303000A-O0 SEALRING 1
............72_71................_2ffgRc+#_T&TSa_+__OBTO_A____ _ +i_ _OTAf 8_H_2ffs,Rl7#;_aSk 888A-85 FEL_TgEA[ ......................................................-- _IT'"" 1....++
13 PP_RiTP4_87r_B_-_8 2 _J_+_2_ m __ l
75 20,_130013000_P. O0 C_.R,,_PER_ ==J,BE +!
-_+ 200W840OOO3OOOA-O0 STEEL BALL 5 1
..... _ ........ _6T_om_oo6A--o8 " _A_i_R &*_ ...................... -
78 20TB9130010000A-O0 PIN4 + 1
205 2P.SR1.7P42.0_O{){)OA-O.O..... AN.(3LE BRACK.E_T ........... i 1....
79 2PSR17P4201000A-O0 ROLLER GUIDE ASSEMBLY i 1
_= 2PSR17P4202000A-OO COPPER CAP + 2
81 2PSR17P40080OOA-O0 AIRPROOF RING i 1
8"2 200W3000040000A-O0 SCREW ASSEMBLY 5X14 i4
83 200W6000037001A-O0 WASHER 5 i 4
200W7O00047000A-00 ERING 5 4
85 2PSR17P4500000A-,90 TOP COVER 1
86 2PSR17P4002000A-OO REVOLVE PIN 1
B7 2PSR17P4003000A-00 PENDULUM PLATE 1
88 2PSR17P4004000A-O0 OUTER FLANGE 1
28

RECIPROCATING SAW - MODEL NUMBER 172.25290
Item No. Parts No, Part Description Qty.
.....-8"_............._'_-_'6_'6_fo_--b_ ........T.6_ .................................................'_'-'_-"
90 2PSR17P4006000A-O0 CLAMP LEVER I 1
91 200W8300002000A-O0 PIN 2X7.8 I 1
93 200TOO50055000A-O0 COMPRESSION SPRING 06x2,Sxg,5 I I
94 200W5200103001A O0 CYLINDRICAL PIN 2.5X8 1
.... 5 S'"" -- _P_76_,6-0i'5"5_.-- 0_--- -_ bi _-D-L_E"_ _ .......................... _""_ .....
96 2PSR17P4001000A_O0 AIRPROO_- RING F 11_
97 200TOO50190000A-O0 COMPRESSION SPRING ............... !_...2
98 2P,£R17P4103000A-O0 PRESS BROCK i !
-99 2PSR17P4800000A-O0 PRESS PLATE L__
100 2PSR17Q600OOOOA-O0 j POWER SUPPLY BOARD ! I
101 2PSR17OOOO7000A-O0 BRAND lABEL t_l
102 200W4! O0004000A-O0 SCREW ST3,3X8 I-J.....
__ 10_3 ..._. 2.0_()TO2400_OTOOOA-OO WASHEP2,.4 ..................... _ 4
___104 __. 2q£TOOSO.242000A-O.O ...... TORS...C)t_AI:SPRINGx6:5x77_5 .... 21
29

Get it fixed, at your home or ours!
Your Home
For reDa_r -in your home - of all major Drana appliances.
awn and garden equipment, or heating and cooling sys[ems.
no matter who made it, no matt_F ,*,,'_'_'-,old it!
For the replacemenl par_s, accessories an_
owners manuals thai you need to do-it-yourself.
For Sears professional installation of home appliances
and items like garage door openers and water heaters.
1-800-4-MY-HOME _' {1.800-469-4663)
Gag 8flytlm_, aay or n_gnt U,S.A and Canada,
Www,sears,com www.sears.ca
For exoeft home _o}utlons advsce:www.nlanagemj,home.corn
Our Home
For repair of camj-m items like vacuums lawn eauiemenl
ana electronics, call or go on-line for the location of your nearest
Sears Parts & Repair Service Center
1-800488-1222 _U.S.A._ 1-800-469-4663 _Canada"
Call anyume,aayor ntgn_
www, sears.com www,sears.ca
To purchasea protectionagreement on a product serviced by Sears:
1-800-827-8655 _u.s.A._ 1-800-361-6665 (Canada)
Para Oedlrserviciode reDaraclon Au Canada 0our serviceen frangaJs
adOmlCIho, y para ordenar plezas 1-SO0-LE-FOYER 'IL
1-888-SU-HOGAR _' _1-800-533-6937)(1-888-784-6427) v,_w.sears.ca _"
J_
r'S
