Craftsman 21450145 User Manual FLOOR JACK Manuals And Guides L0807582
CRAFTSMAN Jack Hydraulic Manual L0807582 CRAFTSMAN Jack Hydraulic Owner's Manual, CRAFTSMAN Jack Hydraulic installation guides
User Manual: Craftsman 21450145 21450145 CRAFTSMAN FLOOR JACK - Manuals and Guides View the owners manual for your CRAFTSMAN FLOOR JACK #21450145. Home:Tool Parts:Craftsman Parts:Craftsman FLOOR JACK Manual
Open the PDF directly: View PDF ![]() .
.
Page Count: 7

Operators Manqal
Manual del usuario
ICRRFTSHRH°I
IPROFESSIONAL
3-1/2 TON CAPACITY FLOOR JACK
GATO ELEVADOR DE ELEVACION
RAPIDA CAPACIDAD: 3.5 TONELADAS
MODEL NO. 214.50145
MODELO 214.50145
CAUTION:
Before using this
product, read this
manual and follow
all its Safety Rules
and Operating
instructions.
PRECAUCION:
Antes de utUizar este
producto, lea este
manual y siga las
Reglas de Seguridad
y las Instrucciones de
Funcionamiento.
• Safety
• Assembly
• Operation
.Maintenance
• Parts
• Seguridad
° Ensamblaje
° Funcionamieno
• Mantenimiento
• Partes
Complies with ANSI standards for automotive rifting devices
En conformidad con los est_ndares A.N.S.L para aparatos
para elevar autom6viles,
Sears, Roebuck and Co.,.Hoffman Estates, IL 60179
Visit our Craftsman webake: www.sears.com •
U.S. Patent No. 5755099, 5937647
U.S. Patente No. 5755099. 5937647
Xc_[_L_._;_,_7 P/N 0M-50145
Parte 5957
Printed in China
Impreso en China
Warranty .....R2
Safety instructions .....P.2
Assembly .....P.4
Operation .....P.4 & P.6
Maintenance .....R6 & R8
Trouble shooting .....R10
Parts .....R10 & R12
Back cover .....P.12
Garantia .....R3
Instrucciones de Seguridad .....P.3
Ensamblaje .....P.5
Funcionamiento .....P.5 & P.7
Mantenimiento .....P.7 & R9
Soluci6n de problemas .....Rll
Partes .....Rll & P.13
Contraportada .....P.13
Full one year warranty on Craftsman
floor Jack
if within one year from date of purchase,
this Craftsman floor jack fails due to a
defect in material or workmanship, return
it tothe nearest Sears store in the United
States and Sears will replace it, free of
charge.
ff this floor jack is used for commercial or
rental purposes, this warranty will apply for
only 30 days from date of purchase.
This warranty gives you specific legal rights,
and you may also have other rights which
vary from state to state. ,
Sears, Roebuck and Co., Dept. 817WA,
Hoffmam Estates, IL 60179
El gato hidrAulico Craftsman tiene garantfa
completa por un afio.
Si antes de un aSo de la fecha de compr&
este gato hidr_ulico Craftsman no funciona
debido a materiales o fabricaci6n defect-
uosa, pres_ntelo en los grandes almacenes
Sears mAs prSximos dentro de los Estados
Unidos, y Sears to reemplazarA
gratuitamente.
El servicio de garant[a est_ disponible
devolviendo la unidad al completo al
Centro Comercial de Sears m_s cercano
en Estados Unidos.
Esta garantfa le dota de derechos legales
especfficos. No obstante podrfa estar
dotado de otros derechos dependiendo
del lugar dSnde se encuentre.
Sears, Roebuck and Co., Dept. 817WA,
Hoffman Estates, IL60179
WARNING
•Study, understand, and follow all
instructionsbefore operating this device.
• Donotexceedratedcapacity.
• Use onlyonha,rd,level surfaces.
•Liftonlyonareasofthevehicleasspecified
by thevehiclemanufacturer.
°Liftingdeviceonly.Immediatelyafterlifting,
supportthevehiclewithappropriatemeans.
• Donotmoveordollythevehiclewhileonthe
jack.
• Noalterationsshallbemadetothisproduct.
• Failure to'heed product markings or
warnings in user's manual may result
in personal injury /or property damage.
CAUTION BEFORE USING
Occasionally during shipment and /or
handling the hydraulic oil can become
unstable or air can get trapped in the
system, both of which can interfere
with the jacks lifting performance ...
• To stabilize the oil it is recom-
mended to cycle the jack a few
times prior to putting a load on it.
- To release air from the hydraulic
system:
- Open the release valve by turning the
jack handle (see Fig. 3) counter.-
clockwise.
- Remove the oil filler plug from the
cylinder.
Rapidly pump jack handle through
several full strokes.
Replace the oil filler plug into the
cylinder again and jack is ready to
use.
BEFORE EACH USE
Visual inspection shall be made before
each use of the floor jack by
checking for abnormal conditions,
such as cracked welds, leaks and
damaged, loose, or missing parts.
AFTER EACH USE
Each floor jack shall be
inspected immediately if the lift is
believed to have been subjected
to an abnormal load or shock.
It is recommended that this
inspection be made by a manu-
facturer's or supplier's authorized
repair facility.
IMPORTANTE
• Leer, comprender y seguir las
instrucciones antes de utilizar el
aparato.
• No exceder la capacidad de carga.
= Utilizar solamente sobre superficies
duras.
Utilizar solamente en aquellas zonas
del vehfculo especificadas pot el
fabricante del vehfculo.
° Aparato elevador t]nicamente. Una
vez elevado, sujetar el vehfculo con
los medios apropiados.
°No mover o maniobrar el vehiculo
una vez se encuentresobre el aparato.
° No puede hacerse ninguna
alteraci6n a este producto.
-No seguir estas instrucciones o las
precauciones del manual del usuario
puede conllevar daffos importantes.
!MPORTANTE ANTES DE SU USO
En ocasiones durante el envfo o su
manipulaci6n, el I[quido hidr&ulico
se puede desestabilizar o puede
quedar aire en el sistema, Io que
reduce el rendimiento del aparato.
• - Para estabilizar el Ifquido hidr#,ulico se
recomienda levantar varias veces el
gab hidr&ulico sin carga. 3
° Para dejar escapar el aire del sistema
hidr_.ulico:
-Abra la v_Jvula de escape girando
la manivela del gato elevador(Fig. 3)
en sentido contratio alas agujas del
reloj.
- Saque el filtro del aceite.
-R_pidamente bombee la manilla
del gato elevador con varios
movimientos completos.
- Vuelva a colocar et filtro del aceite en
el cilindro. El gato elevador estarA
preparado para funcionar de manera
6ptima.
Antes De Cada Uso
Una inspecci6n visual debe hacerse
cada vez que se vaya a utilizar la
plataforma elevadora observando si
hay algt_n tipo de anomalia, como
soldaduras rotas, p6rdidas de Ifquido
o partes danadas, sueltas o que
falten.
Despues De Cada Uso
Cada gato de servicio debe inspecc-
ionarse immediatamente en el caso
en que el aparato elevador haya sido
utilizado con una carga anormal o
golpeado. Se recomienda que esta
inspecciSn se haga por personal
autorizado po r el fabricante o pot el
suministrador.
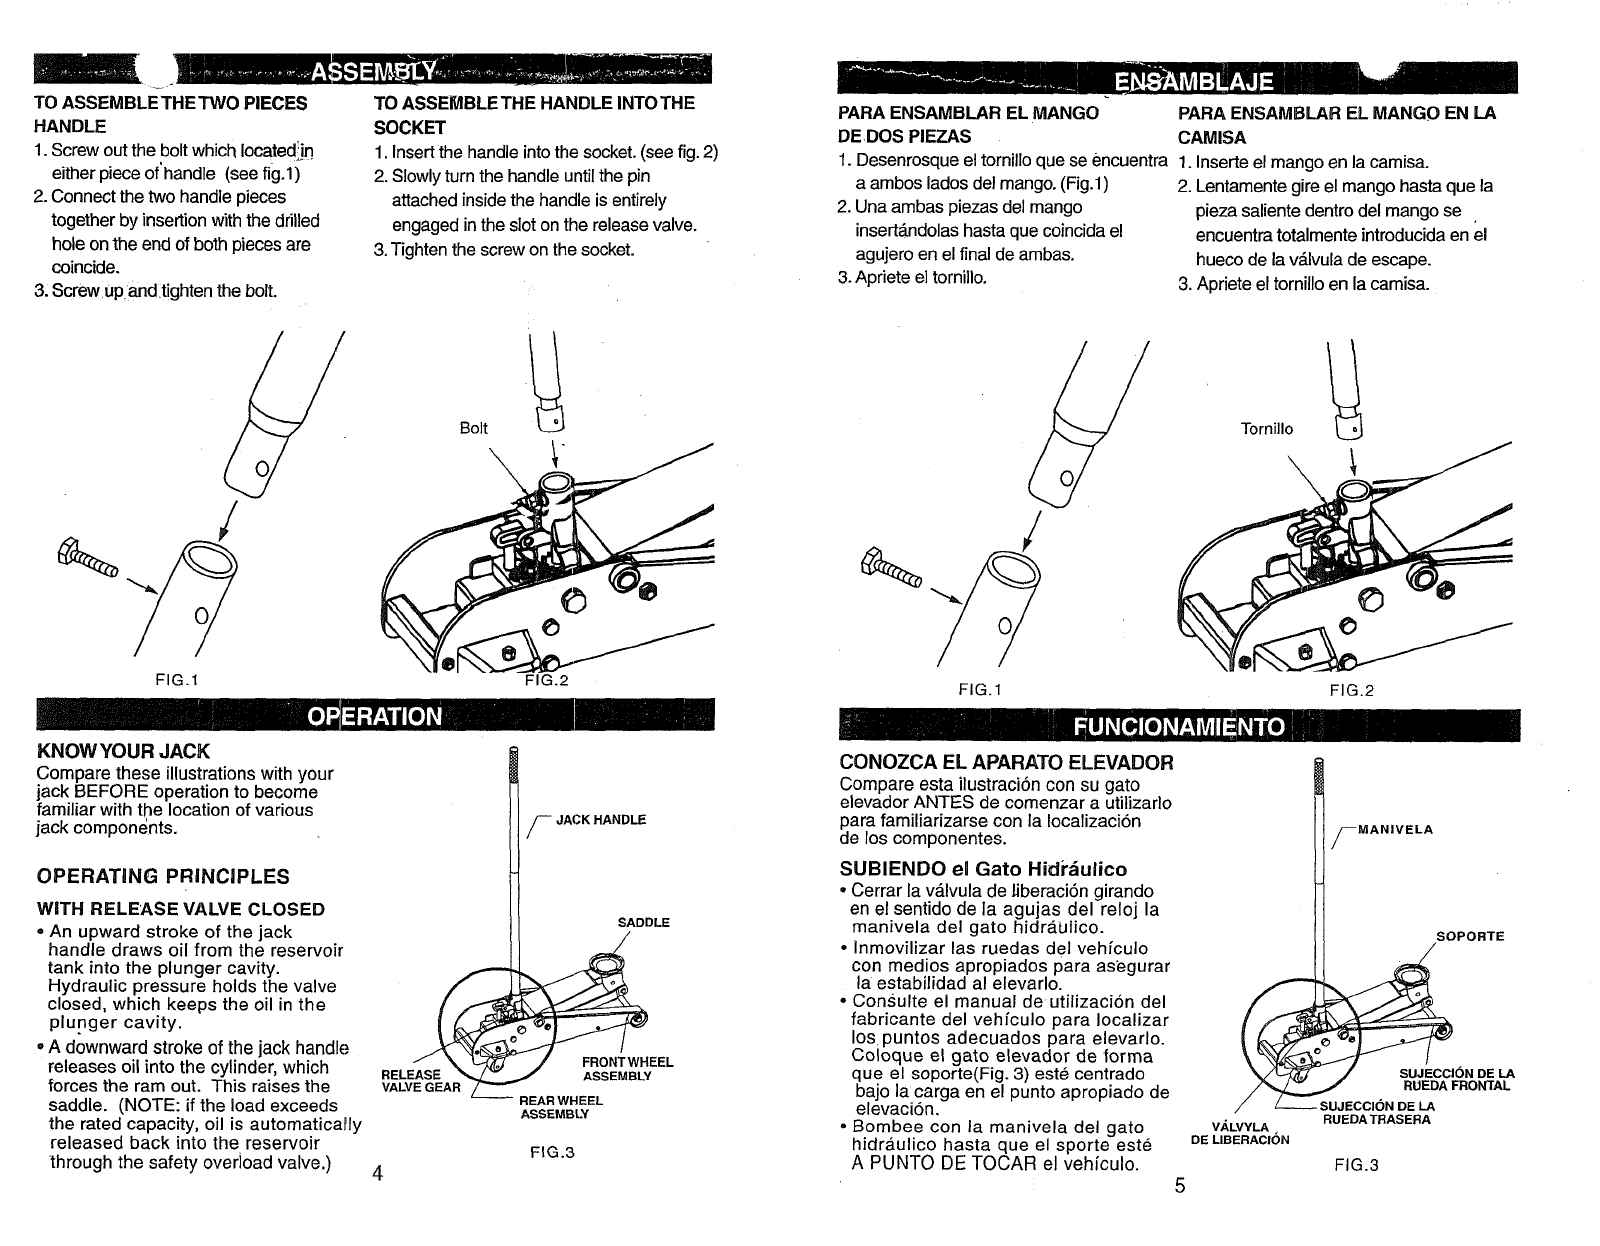
TO ASSEMBLETHETWO PIECES
HANDLE
1. Screw out the bolt which located_n
eitherpiece of'handle (see fig.l)
2. Connect the two handle pieces
together by insertionwith the drilled
hole on the end of both pieces are
coincide.
3, ScrewUp andtighten the bolt.
TO ASSEMBLETHE HANDLE INTOTHE
SOCKET
1. Insert the handle into the socket. (see fig. 2)
2. Slowlyturn the handle until the pin
attached inside the handle is entirely
engaged in the slot onthe release valve.
3. Tightenthe screw on the socket.
Bolt "_
1
/
FIG.1 FIG.2
KNOWYOUR JACK
Compare these illustrations with your
jack BEFORE operation to become
familiar with the location of various
jack components.
OPERATING PRiNCiPLES
WiTH RELEASE VALVE CLOSED
•An upward stroke of the jack
handle draws oil from the reservoir
tank into the plunger cavity.
Hydraulic pressure holds the valve
closed, which keeps the oil in the
plunger cavity.
•Adownward stroke of the jack handle
releases oil into the cylinder, which
forces the ram out. This raises the
saddle. (NOTE: if the load exceeds
the rated capacity, oil is automaticarly
released back into the reservoir
through the safety overload valve.)
RELEASE
VALVE GEAR
4
FJACK HANDLE
SADDLE
FRONTWHEEL
ASSEMBLY
REARWHEEL
ASSEMBL_
FIG.3
PARA ENSAMBLAR EL MANGO PARA ENSAMBLAR EL MANGO EN LA
DE.DOS PIEZAS CAMISA
1. Desenrosque el tornilloque se encuentra 1. Inserte el mango en la camisa.
a ambos lados del mango. (Fig.l) 2. Lentamente gire el mango hasta que la
2. Una ambas piezas del mango pieza saliente dentro del mango se
insert_ndolashasta que coincidael encuentra totalmente introducida en el
agujero en el final de ambas, hueco de la v_Jvulade escape.
3. Apriete el tomillo. 3. Apriete el tornilloen la camisa.
Tornillo
/
FIG.1 FIG.2
CONOZCA EL APARATO ELEVADOR
Compare esta ilustraci6n con su gato
elevador ANTES de comenzar a utitizado
para familiarizarse con la Iocalizaci6n
de los componentes.
SUBIENDO emGato Hidi-dulico
• Cerrar la v_lvula de tiberaci6n girando
en el sentido de la agujas del reloj la
manivela del gato hidra.Ulico.
° Inmovilizar las ruedas del vehfculo
con medios apropiados para asegurar
la estabilidad al elevarlo.
• Consulte el manual de utilizaci6n del
fabricante del vehfculo para Iocalizar
los puntos adecuados para elevarlo.
Coloque el gato elevador de forma
que el soporte(Fig. 3) est_ centrado
bajo la carga en el punto apropiado de
elevaci6n.
° Bombee con la manivela del gato
hidr&ulico hasta que el sporte este
A PUNTO DE TOCAR el vehiculo.
MANIVELA
SOPORTE
fRUEDA FRONTAL
SUJECCION DE LA
V_,LVYLA RUEDA TRASERA
DE LIBERACION
FIG.3
• When the ra ;aches maximum
extension, olios by-passed back into
the reservoir to prevent an over-
extended ram stroke and possible
damage to the jack.
• Opening the release valve allows oil
to flow back into the reservoir. This
releases hydraulic pressure on the
ram, which result in lowering the
saddle.
HOW TO USE YOUR JACK
RAISING THE JACK
° Close release valve by turning the
handle clockwise.
° Block the vehicle's wheel for lifting
stability.
° Refer to the vehicle manufacturei
owners manual to locate approved
lifting points on the vehicle. Position
jack so that the saddle (see Fig. 3)
is centered under the load at an
appropriate lift point.
• Pump jack handle until saddle NEARS
contact with the vehicle. Check to see
that the saddle is centered and will
contact the load lifting point firmly.
©
!
.. One Stroke Speedy Lift
MAINTAINING OIL LEVEL
Important Note: when adding or
replaceing oil, ALWAYS use a good
grade Hydraulic Jack oil. DO
NOT use Hydraulic Brake Fluid,
Alcohol, Glycerine, Detergent Motor
Oil or dirty oil. Use of an improper
fluid can cause serious internal
damage to your jack.
°Continue to pump the jack handle to
lift the vehicle to the desired height.
After lifting, support the load with
appropriately rated vehicle support
stands BEFORE working on the
vehicle.
LOWERING THE JACK
° Open the release valve VERY
SLOWLY by turning the handle
counterclockwise.
Caution: Keep hands and feet clear of
the jack hinge mechanism and ground
contact area when lowering the load!
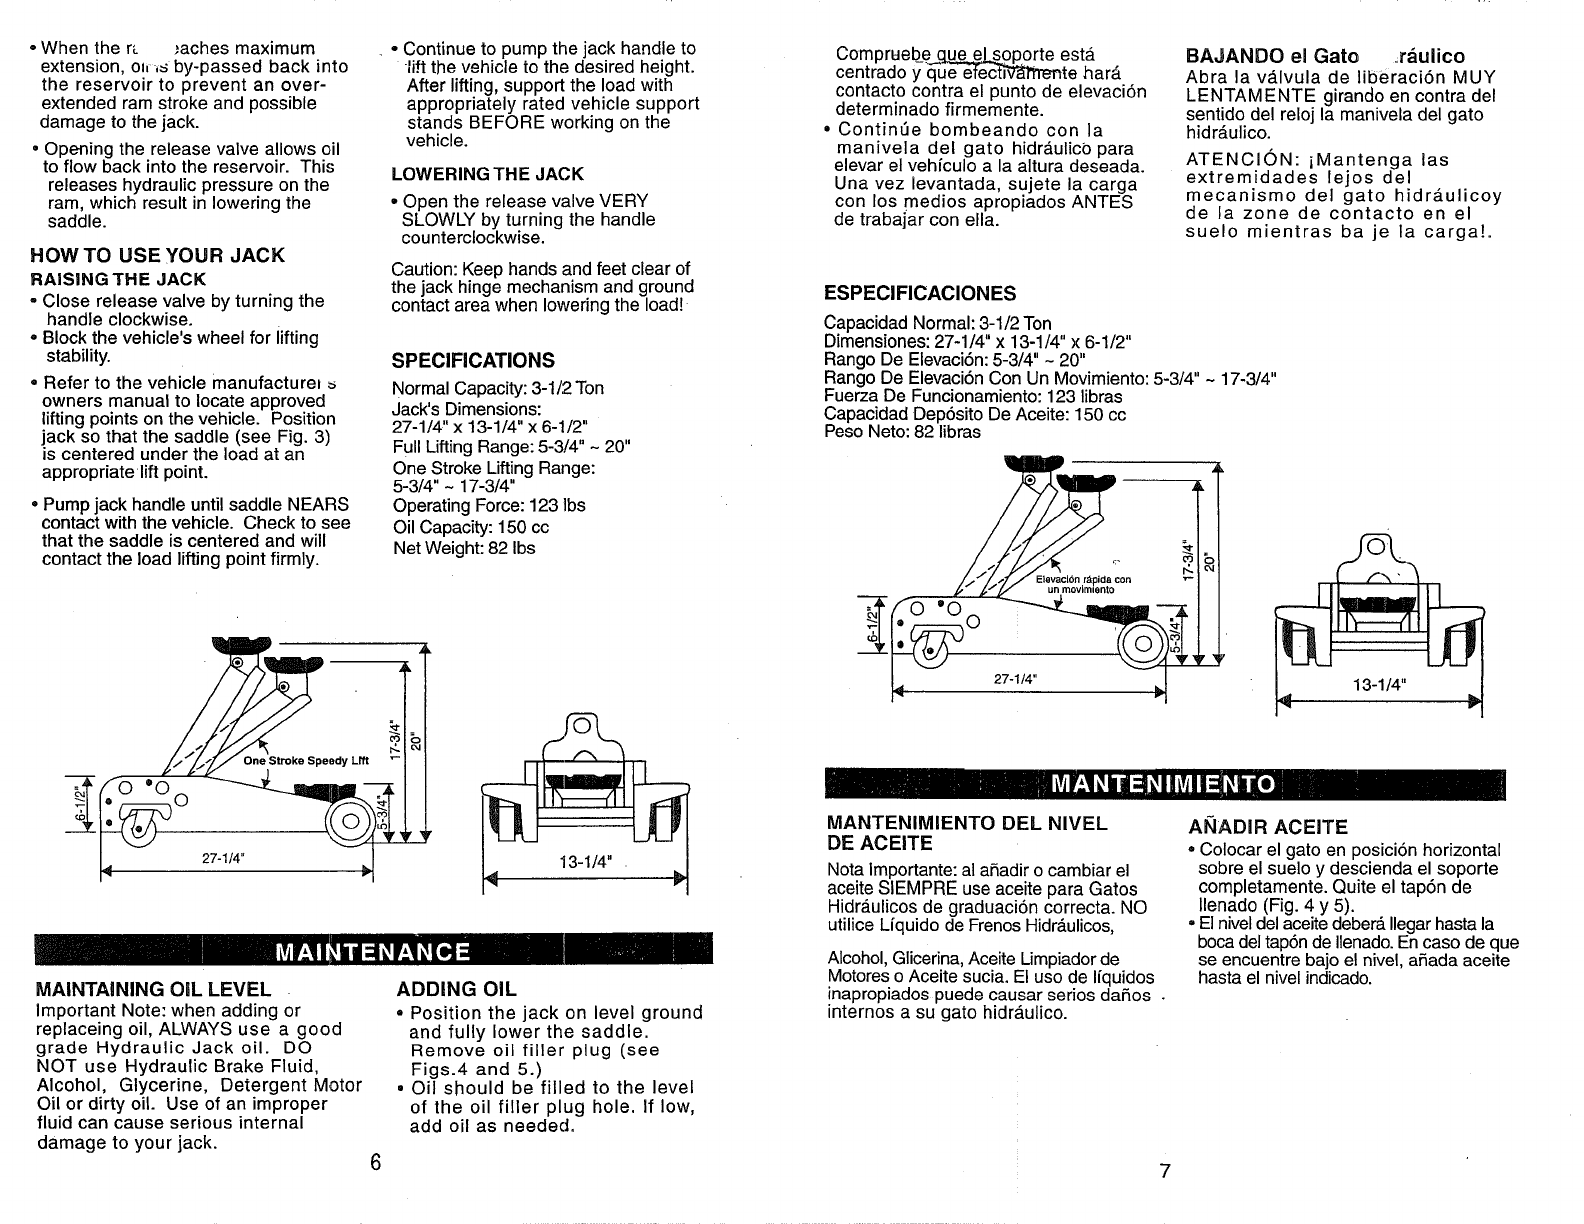
SPECIFICATIONS
Normal Capacity: 3-1/2 Ton
Jack's Dimensions:
27-1/4" x 13-1/4" x 6-1/2"
Full Lifting Range: 5-3/4" - 20"
One Stroke Lifting Range:
5-3/4" ~ 17-3/4"
Operating Force: 123 lbs
Oil Capacity: 150 cc
Net Weight: 82 Ibs
ADDING OIL
° Position the jack on level ground
and fully lower the saddle.
Remove oil filler plug (see
Figs.4 and 5.)
• Oil should be filled to the level
of the oil filler plug hole. If low,
add oil as needed.
Compruebe ue_0Porte esta
centrado y q'_te har,_
contacto contra el punto de elevaci6n
determinado firmemente.
° ContinQe bombeando con la
manivela del gato hidr__ulicb para
elevar el vehfculo a la altura deseada.
Una vez levantada, sujete la carga
con los medios apropiados ANTES
de trabajar con ella.
BAJANDO el Gato _r_ulico
Abra la vMvula de liberaci6n MUY
LENTAMENTE girando en contra del
sentido del reloj la manivela del gato
hidr&ulico.
ATENCION- iMantenga las
extremidades lejos del
mecanismo del gato hidrAulicoy
de la zone de contacto en el
suelo mientras ba je la carga!.
ESPECIFICACIONES
Capacidad Normal: 3-1/2 Ton
Dimensiones: 27-1/4" x 13-1/4" x 6-1/2"
Rango De Elevaci6n: 5-3/4" ~20"
Rango De Elevaci6n Con Un Movimiento: 5-3/4" ~ 17-3/4"
Fuerza De Funcionamiento: 123 libras
Capacidad Dep6sito De Aceite: 150 cc
Peso Neto: 82 libras
O
Etevacl6n r_pida con
un rnovlmlento
27-1/4"
MANTENIMIENTO DEL NIVEL
DE ACEITE
Nota Importante: al afiadir o cambiar el
aceite SIEMPRE use aceite para Gatos
Hidr_.ulicos de graduaci6n correcta. NO
utilice Lfquido de Frenos HidrAulicos,
Alcohol, Glicerina, Aceite Limpiador de
Motores oAceite sucia. El uso de Ifquidos
inapropiados puede causar serios dafios .
internos a su gato hidrAulico.
AI_IADIR ACEITE
°Colocar el gato en posici6n horizontal
sobre el suelo y descienda el soporte
completamente. Quite el tap6n de
Ilenado (Fig. 4 y 5).
.El niveldel aceite deber& Ilegar hasta la
boca del tap6n de Ilenado.En caso de que
se encuentre bajo el nivel, afiada aceite
hasta el nivel indic,ado.
7
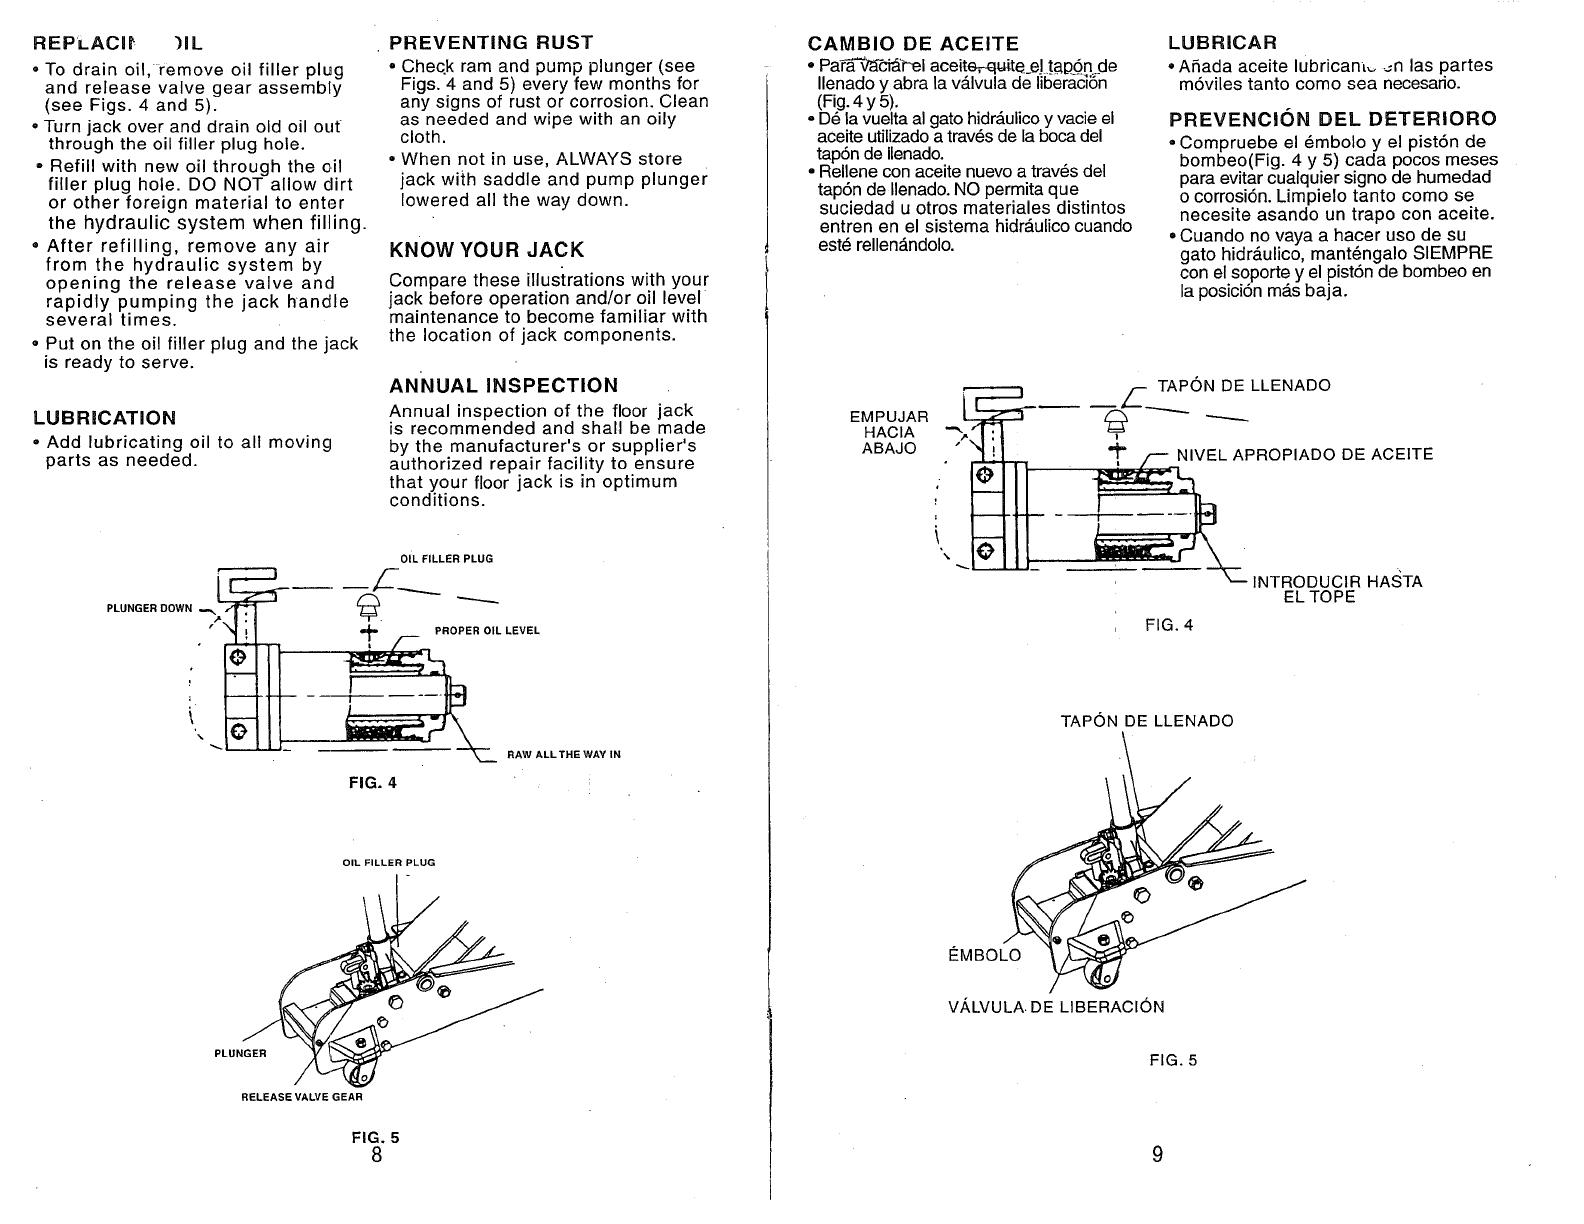
REPLACI[ )IL
•To drain oil, remove oil filler plug
and release valve gear assembly
(see Figs. 4 and 5).
°Turn jack over and drain old oil out
through the oil filler plug hole.
•Refill with new oil through the oil
filler plug hole. DO NOT allow dirt
or other foreign material to enter
the hydraulic system when filling.
•After refilling, remove any air
from the hydraulic system by
opening the release valve and
rapidly pumping the jack handle
several times.
° Put on the oil filler plug and the jack
is ready to serve.
LUBRICATION
• Add lubricating oil to all moving
parts as needed.
PREVENTING RUST
o Cheqk ram and pump plunger (see
Figs. 4 and 5) every few months for
any signs of rust or corrosion. Clean
as needed and wipe with an oily
cloth.
•When not in use, ALWAYS store
jack with saddle and pump plunger
lowered all the way down.
KNOW YOUR JACK
Compare these illustrations with your
jack before operation and/or oil level
maintenance to become familiar with
the location of jack components.
ANNUAL INSPECTION
Annual inspection of the floor jack
is recommended and shall be made
by the manufacturer's or supplier's
authorized repair facility to ensure
that your floor jack is in optimum
conditions.
OIL FILLER PLUG
t _1 I| _ PROPER OIL LEVEL
RAW ALLTHE WAY IN
FIG. 4
OIL FILLER PLUG
PLUNGER
RELEASE VALVE GEAR
FIG. 5
8
CAMBIO DE ACEITE
•Pat_v_ci_el aceiteH;luit__e] t_p6n.._de
Ilenado y abra la vAIvula de liberadbn
(Fig.4 y 5).
° D6 la vuelta al gato hidrAulieoy vacie el
aceite utilizadoatrav6s de la boca del
tap6n de Ilenado.
• Rellene con aceite nuevo a trav6s del
tap6n de Ilenado. NO permita que
suciedad u otros materiales distintos
entren en el sistema hidr&ulicocuando
est6 rellen_ndolo.
LUBRICAR
° Afiada aceite lubricam_ -=n las partes
m6viles tanto como sea necesario.
PREVENCION DEL DETERIORO
°Compruebe el 6mbolo y el pist6n de
bombeo(Fig. 4 y 5) cada pocos meses
para evitar cualquier signo de humedad
o corrosi6n. Limpielo tanto como se
necesite asando un trapo con aceite.
°Cuando no vaya a hacer uso de su
gato hidr_.ulico, mant6ngalo SIEMPRE
con el soporte y el pist6n de bombeo en
la posici6n m_s baja.
EMPUJAR
HACIA
ABAJO
._,._ ,-- TAPON DE LLENADO
." _VEL APROPIADO DE ACEITE
i ..... , w
INTRODUCIR HASTA
EL TOPE
FIG. 4
TAPON DE LLENADO
I_MBOLO
V,_LVULA. DE LIBERACION
FIG. 5
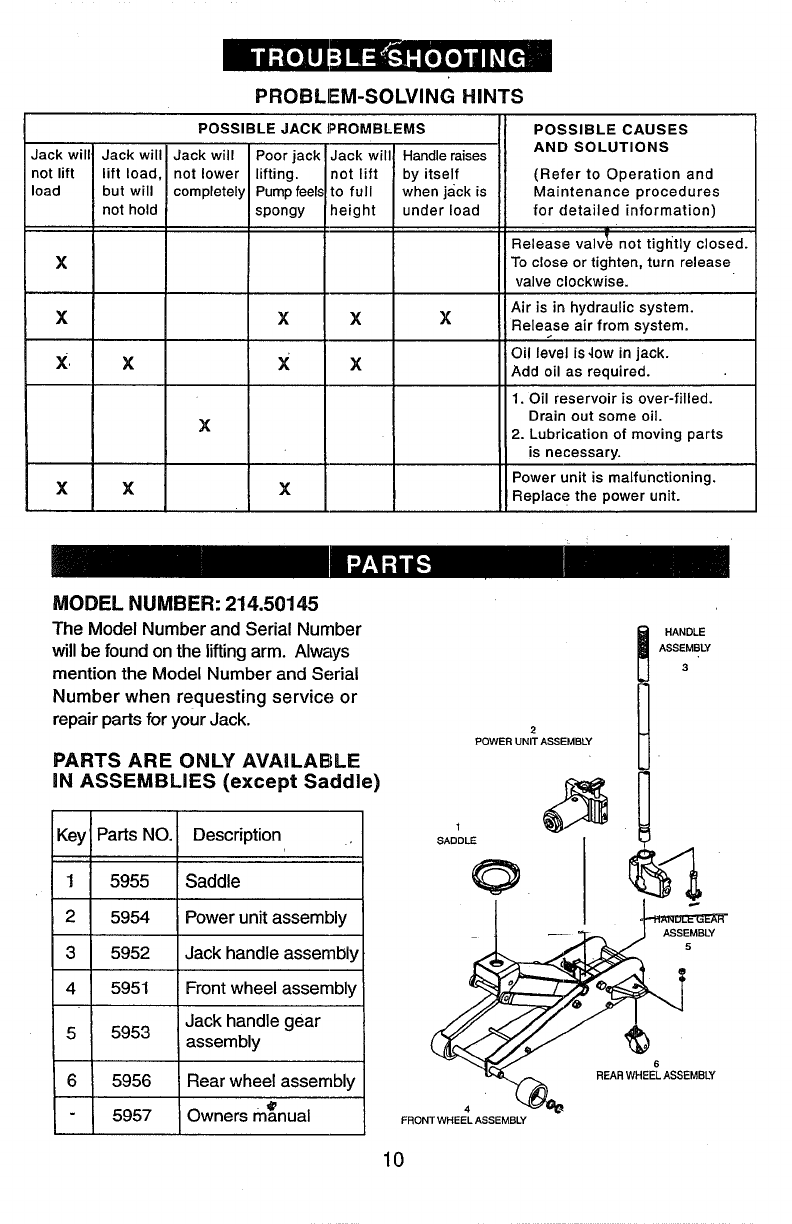
PROBLEM-SOLVING HINTS
POSSIBLE JACK PROMBLEMS
Jack will Jack will Jack will Poor jack Jack will
not lift lift load, not lower lifting, not lift
load but will completely Pumpfeels to full
not hold spongy height
Handle raises
by itself
when jack is
under load
X
XXX X
x x X x
X
XX X
POSSIBLE CAUSES
AND SOLUTIONS
(Refer to Operation and
Maintenance procedures
for detailed information)
Release valve not tiglltly closed.
To close or tighten, turn release
valve clockwise.
Air is in hydraulic system.
Release air from system.
Oi! level is ,low in jack.
Add oil as required.
1. Oil reservoir is over-filled.
Drain out some oil.
2. Lubrication of moving parts
is necessary.
Power unit is malfunctioning.
Replac e the power unit.
MODEL NUMBER: 214.50145
The ModelNumberandSerial Number
willbe found ontheliftingarm. Always
mentionthe ModelNumberandSerial
Number when requesting service or
repairpartsforyourJack.
PARTS ARE ONLY AVAILABLE
IN ASSEMBLIES (except Saddle)
Key Parts NO. Description
1 5955 Saddle
2 5954 Power unit assembly
3 5952 Jack handle assembly
4 5951 Front wheel assembly
Jack handle gear
5 5953 assembly
6 5956 Rear wheel assembly
5957 Owners manua
2
POWER UNIT ASSEMBLY
1
SADDLEO
HANDLE
ASSEMBLY
3
BLY
REARWHEELASSEMBLY
4
FRONT WHEEL ASSEMBLY
10
In U.S.A. or Canada
for in-home major brand repair service:
Call 24 hours a day, 7 days a week
1-800-4-MY-HOME s" (1-800-469-4663)
Para pedir servicio de reparacibn a domicilio-1-800-676-5811
Au Canada pour tout le service-l-877-LE-FOYER s" (1-877-533-6937)
For the repair or replacement parts you need:
Call 6 a.m. - 11 p.m. CST, 7 days a week
PartsDirect s"
1-800-366-PART (1-800-366-7278)
www.sears.com/partsdirect
Para ordenar piezas con entrega a domicilio-1-800-659-7084
For the location of a Sears Service Center in your area:
Call 24 hours a day, 7 days a week
1-800-488-1222
To purchase or inquire about a Sears Maintenance Agreement:
Call 7 a.m. - 5 p.m. CST, Monday-Saturday
1-800-827-6655
