Craftsman 247370310 User Manual LAWN MOWER 1980'S Manuals And Guides 1301419L
User Manual: Craftsman 247370310 247370310 CRAFTSMAN LAWN MOWER 1980'S - Manuals and Guides View the owners manual for your CRAFTSMAN LAWN MOWER 1980'S #247370310. Home:Lawn & Garden Parts:Craftsman Parts:Craftsman LAWN MOWER 1980'S Manual
Open the PDF directly: View PDF ![]() .
.
Page Count: 56

Operator's Manual
CRRFr MRN
21" LAWN MOWER
Model No. 247.370310
CAUTION" Before using this
product, read this manual and
follow all safety rules and operating
instructions.
,, SAFETY
o ASSEMBLY
OPERATION
MAINTENANCE
PARTS LIST
o ESPANOL
Sears Brands Management Corporation, Hoffman Estates, IL 60179, U.S.A.
Visit our website: www.craftsman.com FormI/o 769-07574A
(October1,2012)

WarrantyStatement.............................. Page2
SafetyInstructions............................ Pages3-6
SlopeGuide..................................... Page7
Assembly.................................... Pages8-10
Operation.................................. Pages11-13
ServiceandMaintenance.................... Pages14-17
Off-SeasonStorage.............................. Page18
Troubleshooting................................ Page19
PartsList.................................... Page20-28
Espa_ol........................................ Page33
ServiceNumbers............................ BackCover
CRAFTSMANTWOYEARFULLWARRANTY
Fortwoyearsfromthedateofpurchase,thisproductiswarrantedagainstanydefectsinmaterialorworkmanship.Defectiveproductwill receivefreerepair
orfreereplacementifrepairisunavailable.
Forwarrantycoveragedetailsto obtainrepairorreplacement,visitthewebsite:www.craftsman.com.
ThiswarrantycoversONLYdefectsinmaterialandworkmanship.WarrantycoveragedoesNOTinclude:
,Expendableitemswhichcanwearoutfromnormalusewithinthewarrantyperiod,suchasmowerblades,bladeadapters,belts,filters,orsparkplugs.
,Productdamageresultingfromuserattemptsat productmodificationorrepairorcausedbyproductaccessories.
,Repairsnecessarybecauseofaccidentorfailureto operateormaintainthe productaccordingto allsuppliedinstructions.
,Preventativemaintenanceorrepairsnecessarydueto improperfuelmixture,contaminatedorstalefuel.
Thiswarrantyisvoidifthisproductiseverusedwhileprovidingcommercialservicesorifrentedto anotherperson.
Thiswarrantygivesyouspecificlegalrights,andyoumayalsohaveotherrightswhichvaryfromstateto state.
SearsBrandsManagementCorporation,HoffmanEstates,IL60179
Engine Oil: SAE 30
Fuel: Unleaded Gasoline
Engine: Briggs & Stratton
Model Number
Serial Number
Date of Purchase
Record the model number, serial number,
and date of purchase above.
© Sears Brands, LLC 2

Thissymbolpointsout importantsafety instructionswhich, if not
followed, couldendangerthe personalsafetyand/or property of
yourselfand others.Readandfollow all instructions inthis manual
beforeattempting to operatethis machine.Failureto complywith these
instructionsmayresultinpersonalinjury.Whenyouseethis symbol, HEED
ITSWARNING!
CALIFORNIA PROPOSITION 65
EngineExhaust,someof its constituents,and certainvehiclecomponents
containor emit chemicalsknownto Stateof Californiato causecancerand
birth defectsorother reproductiveharm.
Thismachinewasbuilt to beoperatedaccordingto thesafeoperation
practicesinthis manual.Aswith anytype of powerequipment,
carelessnessorerroronthe part of the operatorcanresultinseriousinjury.
Thismachineiscapableof amputating fingers, hands,toesandfeet and
throwingdebris.Failureto observethefollowing safety instructionscould
resultinseriousinjury or death.
Your Responsibility--Restrict theuseof this powermachineto
personswhoread,understandandfollow thewarningsand instructionsin
this manualandonthe machine.
SAVETHESEINSTRUCTIONS!
GENERAL OPERATION
Readthisoperator'smanualcarefullyinitsentiretybeforeattemptingto
assemblethis machine.Read,understand,andfollowallinstructionsonthe
machineandinthemanualsbeforeoperation.Keepthismanualina safe
placefor futureandregularreferenceandfororderingreplacementparts
Becompletelyfamiliarwith thecontrolsandtheproperuseofthismachine
beforeoperatingit.
Thismachineisa precisionpieceof powerequipment,nota plaything.
Therefore,exerciseextremecautionat alltimes.Thismachinehasbeen
designedto performonejob: to mowgrass.Donotuseitforanyother
purpose.
Neverallowchildrenunder14yearsof ageto operatethis machine.Children
14andovershouldreadandunderstandtheinstructionsandsafeoperation
practicesinthis manualandonthemachineandshouldbetrainedand
supervisedbyanadult.
Onlyresponsibleindividualswhoarefamiliarwith theserulesof safe
operationshouldbeallowedto usethis machine.
Thoroughlyinspecttheareawheretheequipmentisto beused.Removeall
stones,sticks,wire,bones,toysandotherforeignobjects,whichcouldbe
trippedoverorpickedupandthrownbytheblade.Thrownobjectscancause
seriouspersonalinjury.
Planyourmowingpatterntoavoiddischargeof materialtowardroads,
sidewalks,bystandersandthelike.Also,avoiddischargingmaterialagainst
awall orobstruction,whichmaycausedischargedmaterialto ricochetback
towardtheoperator.
Tohelpavoidbladecontactora thrownobjectinjury,stayinoperatorzone
behindhandlesandkeepchildren,bystanders,helpersandpetsat least75
feetfrommowerwhileitisinoperation.Stopmachineifanyoneentersarea.
Alwayswearsafetyglassesorsafetygogglesduringoperationandwhile
performinganadjustmentor repairto protectyoureyes.Thrownobjects
whichricochetcancauseseriousinjuryto theeyes.
Wearsturdy,rough-soledworkshoesandclose-fittingslacksandshirts.
Shirtsandpantsthatcoverthearmsandlegsandsteel-toedshoesare
recommended.Neveroperatethismachineinbarefeet,sandals,slipperyor
light-weight(e.g.canvas)shoes.
Donotputhandsorfeetnearrotatingpartsorunderthecuttingdeck.
Contactwith bladecanamputatefingers,hands,toesandfeet.
Amissingordamageddischargecovercancausebladecontactorthrown
objectinjuries.
Manyinjuriesoccurasa resultofthemowerbeingpulledoverthefoot
duringafall causedbyslippingortripping.Donot holdonto themowerif
youarefalling:releasethehandleimmediately.
Neverpull themowerbacktowardyouwhileyouarewalking.If youmust
backthemowerawayfroma wallorobstructionfirst lookdownandbehind
to avoidtrippingandthenfollowthesesteps:
a. Stepbackfrom mowerto fullyextendyourarmsforward.
b. Besureyouarewell balancedwith surefooting.
c. Pullthemowerbackslowly,no morethanhalfwaytowardyou.
d. Repeatthesestepsasneeded.
Donotoperatethemowerwhileundertheinfluenceof alcoholordrugs.
Donotengagetheself-propelledmechanismonmachinessoequipped
whilestartingengine.
Thebladecontrolhandleisasafetydevice.Neverattemptto bypassits
operation.Doingsomakesthesafetydeviceinoperativeandmayresultin
personalinjurythroughcontactwith therotatingblade.Thebladecontrol
handlemustoperateeasilyinbothdirectionsandautomaticallyreturnto the
disengagedpositionwhenreleased.
Neveroperatethemowerinwetgrass.Alwaysbesureof yourfooting. A
slipandfall cancauseseriouspersonalinjury.Ifyoufeelyouarelosingyour
footing,releasethebladecontrolhandleimmediatelyandthebladewill
stoprotatingwithin threeseconds.
Mowonlyindaylightorgoodartificiallight. Walk,neverrun.
Stopthebladewhencrossinggraveldrives,walksorroads.

Iftheequipmentshouldstarttovibrateabnormally,stoptheengineand
checkimmediatelyforthecause.Vibrationisgenerallyawarningoftrouble.
Shuttheengineoffandwaituntilthebladecomestoacompletestopbefore
removingthegrasscatcheroruncloggingthechute.Thecuttingblade
continuestorotateforafewsecondsafterthebladecontrolisreleased.
Neverplaceanypartofthebodyinthebladeareauntilyouaresurethe
bladehasstoppedrotating.
Neveroperatemowerwithoutpropertrailshield,dischargecover,grass
catcher,bladecontrolhandleorothersafetyprotectivedevicesinplaceand
working.Neveroperatemowerwithdamagedsafetydevices.Failuretodo
socanresultinpersonalinjury.
Mufflerandenginebecomehotandcancauseaburn.Donottouch.
Neverattempttomakeawheelorcuttingheightadjustmentwhilethe
engineisrunning.
Onlyusepartsandaccessoriesmadeforthismachinebythemanufactureras
listedinthePartspagesofthisOperator'sManual.Failuretodosocanresult
inpersonalinjury.
Whenstartingengine,pullcordslowlyuntilresistanceisfelt,thenpull
rapidly.Rapidretractionofstartercord(kickback)willpullhandandarm
towardenginefasterthanyoucanletgo.Brokenbones,fractures,bruisesor
sprainscouldresult.
Ifsituationsoccurwhicharenotcoveredinthismanual,usecareandgood
judgement.
SLOPE OPERATION
Slopesareamajorfactorrelatedto slipandfall accidents,whichcanresultinsevere
injury.Operationonslopesrequiresextracaution.Ifyoufeeluneasyonaslope,do
notmowit.Foryoursafety,usetheSlopeGuideincludedaspartof thismanualto
measureslopesbeforeoperatingthis machineonaslopedor hillyarea.Iftheslope
isgreaterthan 15degrees,donotmowit.
Do:
Mowacrossthefaceofslopes;neverupanddown.Exerciseextremecaution
whenchangingdirectionon slopes.
Watchfor holes,ruts,rocks,hiddenobjects,orbumpswhichcancauseyou
to sliportrip.Tallgrasscanhideobstacles.
Alwaysbesureof yourfooting.Aslip andfallcancauseseriouspersonal
injury.If youfeelyouarelosingyourbalance,releasethebladecontrol
handleimmediatelyandthebladewill stoprotatingwithin three(3)
seconds.
Do Not:
Donotmowneardrop-offs,ditchesorembankments,becauseyoucould
loseyourfootingor balance.
Donotmowslopesgreaterthan15degreesasshownontheslopeguide.
Donotmowonwetgrass.Unstablefootingcouldcauseslipping.
CHILDREN
Tragicaccidentscanoccurif theoperatorisnotalertto thepresenceof children.
Childrenareoftenattractedto themowerandthemowingactivity.Theydonot
understandthedangers.Neverassumethatchildrenwill remainwhereyoulastsaw
them.
Keepchildrenoutof themowingareaandunderwatchfulcareof a
responsibleadultotherthantheoperator.
Bealertandturnmoweroff ifa childentersthearea.
Beforeandwhilemovingbackwards,lookbehindanddownforsmall
children.
Useextremecarewhenapproachingblindcorners,doorways,shrubs,trees,
orotherobjectsthat mayobscureyourvisionof achildwhomayrunintothe
mower.
Keepchildrenawayfromhotorrunningengines.Theycansufferburnsfrom
ahotmuffler.
Neverallowchildrenunder14yearsofageto operatethismachine.Children
14andovershouldreadandunderstandtheinstructionsandsafeoperation
practicesinthismanualandon themachineandbetrainedandsupervised
byanadult.
SERVICE
Safe Handling of Gasoline:
Toavoidpersonalinjuryorpropertydamageuseextremecareinhandling
gasoline.Gasolineisextremely flammable andthe vaporsare explosive.
Seriouspersonalinjury canoccurwhengasolineisspilledonyourselfor your
clotheswhichcan ignite. Washyourskinandchangeclothesimmediately.
Useonlyanapprovedgasolinecontainer.
Neverfill containersinsideavehicleoronatruckortrailerbedwith a plastic
liner.Alwaysplacecontainersonthegroundawayfromyourvehiclebefore
filling.
Removegas-poweredequipmentfromthetruckortrailerandrefuelit on
theground.Ifthisisnotpossible,thenrefuelsuchequipmentonatrailer
with a portablecontainer,ratherthanfromagasolinedispensernozzle.
Keepthenozzleincontactwiththe rimofthefuel tankorcontaineropening
at alltimesuntil fuelingiscomplete.Donot usea nozzlelock-opendevice.
Extinguishallcigarettes,cigars,pipesandothersources
of ignition.
Neverfuelmachineindoorsbecauseflammablevaporswill accumulatein
thearea.
Neverremovegascaporaddfuelwhileengineishotorrunning. Allow
engineto coolat leasttwo minutesbeforerefueling.
Neverover-fillfuel tank.Toallowforexpansionof thefuel,donotfill above
thebottomof thefueltankneck.
Replacegasolinecapandtightensecurely.
Ifgasolineisspilled,wipeit offtheengineandequipment.Movemachineto
anotherarea.Wait5 minutesbeforestartingengine.
Neverstorethemachineorfuelcontainernearanopenflame,sparkorpilot
lightason awaterheater,spaceheater,furnace,clothesdryerorothergas
appliances.
Toreducefire hazard,keepmachinefreeofgrass,leaves,orotherdebris
build-up.Cleanup oilorfuelspillageandremoveanyfuel-soakeddebris.
Allowmachinetocoolat least5 minutesbeforestoring.
4

General Service:
Neverrunanengineindoorsorinapoorlyventilatedarea.Engineexhaust
containscarbonmonoxide,anodorlessanddeadlygas.
Beforecleaning,repairing,orinspecting,makecertainthebladeandall
movingpartshavestopped.Disconnectthesparkplugwireandground
againstthe engineto preventunintendedstarting.
Checkthebladeandenginemountingboltsatfrequentintervalsforproper
tightness.Also,visuallyinspectbladefordamage(e.g.,bent,cracked,worn).
Replacebladewith theoriginalequipmentmanufacture's(O.EM.)blade
only,listedinthe Partspagesof thismanual.Useof partswhichdo notmeet
theoriginalequipmentspecificationsmayleadto improperperformance
andcompromisesafety!
Mowerbladesaresharpandcancut.Wrapthebladeorweargloves,anduse
extracautionwhenservicingthem.
Keepallnuts,bolts,andscrewstightto besuretheequipmentisin safe
workingcondition.
Nevertamperwith safetydevices.Checktheir properoperationregularly.
Afterstrikingaforeignobject,stoptheengine,disconnectthesparkplug
wireandgroundagainsttheengine.Thoroughlyinspectthemowerforany
damage.Repairthedamagebeforestartingandoperatingthe mower.
Neverattemptto makeawheelor cuttingheightadjustmentwhilethe
engineisrunning.
Grasscatchercomponents,dischargecover,andtrailshieldaresubjectto
wearanddamagewhichcouldexposemovingpartsorallowobjectsto be
thrown.Forsafetyprotection,frequentlycheckcomponentsandreplace
immediatelywithoriginalequipmentmanufacturer's(O.EM.)partsonly,
listedinthe Partspagesof thismanual.Useofpartswhichdo notmeetthe
originalequipmentspecificationsmayleadto improperperformanceand
compromisesafety!
Donotchangetheengine'sgovernorsettingorover-speedtheengine.The
governorcontrolsthemaximumsafeoperatingspeedof theengine.
Checkfuelline,tank,cap,andfittingsfrequentlyfor cracksor leaks.Replace
if necessary.
Donotcrankenginewith sparkplugremoved.
Maintainorreplacesafetyandinstructionlabels,asnecessary.
Observeproperdisposallawsandregulations.Improperdisposalof fluids
andmaterialscanharmtheenvironment.
Accordingto theConsumerProductsSafetyCommission(CPSC)andtheU.S.
EnvironmentalProtectionAgency(EPA),thisproducthasanAverageUseful
Lifeofseven(7)years,or140hoursof operation.At theendof theAverage
UsefulLifehavethemachineinspectedannuallybya Searsorotherqualified
servicedealerto ensurethat allmechanicalandsafetysystemsareworking
properlyandnotwornexcessively.Failureto do socanresultinaccidents,
injuriesordeath.
DO NOT MODIFY ENGINE
Toavoidseriousinjuryordeath,do notmodifyengineinanyway.Tampering
with thegovernorsetting canleadto arunawayengineandcauseitto
operateat unsafespeeds.Nevertamperwith factory setting of engine
governor.
NOTICE REGARDING EMISSIONS
Engineswhkh arecertified to complywith Californiaandfederal EPA
emissionregulationsfor SORE(SmallOff RoadEquipment)arecertified
to operateon regularunleadedgasoline,and mayincludethefollowing
emissioncontrolsystems:EngineModification (EM),OxidizingCatalyst(OC),
SecondaryAir Injection (SAI)andThreeWayCatalyst(TWC)ifsoequipped.
SPARK ARRESTOR
Thismachineisequippedwith aninternalcombustionengineandshould
not beusedonor nearanyunimprovedforest-covered,brusbcoveredor
grass-coveredlandunlesstheengine'sexhaustsystemisequippedwith a
sparkarrestormeeting applicablelocalor state laws(if any).
If asparkarrestor isused,itshouldbemaintained ineffective working order
bythe operator.Inthe Stateof Californiathe aboveisrequiredby law (Section
4442 of the CaliforniaPublicResourcesCode).Other statesmayhavesimilar
laws.Federallawsapply onfederallands.
Asparkarrestorfor the muffler isavailablethrough your nearestSearsParts
and RepairServiceCenter.

SAFETY SYMBOLS
Thispage depicts and describes safety symbols that may appear on this product. Read, understand, and follow all instructions on the machine before
attempting to assembleand operate.
• ®
imI
READ THE OPERATOR'S MANUAL(S)
Read, understand, and follow all instructions in the manual(s) before attempting to assemble and
operate
DANGER -- ROTATING BLADES
To reduce the risk of injury, keep hands and feet away. Do not operate unless discharge cover or grass
catcher is in its proper place. If damaged, replace immediately.
DANGER -- BYSTANDERS
Do not mow when children or others are around.
DANGER -- HAND/FOOT CUT
Keep hands and feet away from rotating parts.
DANGER-- THROWNDEBRIS
Remove objects that can be thrown by the blade in any direction. Wear safety glasses.
DANGER -- SLOPES
Use extra caution on slopes. Do not mow slopes greater than 15°.
WARNING--GASOLINE IS FLAMMABLE
Allow the engine to cool at least two minutes before refueling.
WARNING-- CARBON MONOXIDE
Never run an engine indoors or in a poorly ventilated area. Engine exhaust contains carbon
monoxide, an odorless and deadly gas.
WARNING-- HOT SURFACE
Engine parts, especially the muffler, become extremely hot during operation. Allow engine and
muffler to cool before touching.
WARNING: Your Responsibility--Restrict the use of this power machine to persons who read, understand and follow
the warnings and instructions in this manual and on the machine.
SAVETHESEINSTRUCTIONS!
6

(OK)
15° Slope X
(TOO STEEP)
15° Slope
_- _. Figure1
USETHiS SLOPEGAUGETO DETERMINE
iFA SLOPEiS TOOSTEEPFORSAFEOPERATION!
Tocheckthe slope,proceedas follows:
1. Removethis pageandfold alongthe dashedline.
2. Locateavertical objecton or behindthe slope(e.g.a pole, building,fence, tree, etc.)
3. Aligneither side of the slope gaugewith the object(SeeFigure1 andFigure2 ).
4. Adjust gaugeup or down until the left cornertouchesthe slope (SeeFigure1 andFigure2).
5.
_O._daShed._fine
If there is agap belowthe gauge,the slope is too steepfor safeoperation(SeeFigure2 above).
Figure2
Slopesare a major factor relatedto tip-over and roll-overaccidents which can result in severe injury or death. Do not operate machine on slopes
in excess of 15 degrees.All slopes require extra caution. Always mow across the face of slopes, nevermow up and down slopes.

IMPORTANT:Thisunit isshippedwithout gasolineoroil intheengine.Becertainto
serviceenginewithgasolineandoil asinstructedintheOperationsectionbefore
startingorrunningyourmachine.
NOTE:Referenceto right andleft handsideof the LawnMowerisobservedfromthe
operatingposition.
OPENINGCARTON
1. Cuteachcornerof thecartonverticallyfromtopto bottom.
2. Removealllooseparts.
3. Removeloosepackingmaterial.
REMOVINGUNITFROMCARTON
1. Lift unit fromtherearto detachit fromunderlyingcartonmaterialandroll
unit outof carton.
2. Checkcartonthoroughlyforanyotherlooseparts.
LoosePartsIn Carton
GrassCatcher
SideDischargeCover
EngineOil
Assembly
Attaching TheHandle
I. Removeanypackingmaterialwhichmaybebetweenupperandlower
handles.
a. Removewingnutsandcarriageboltshandleasshownin FigureI.
Donotloosenor removeadjacenthexheadscrews.
b. Whilestabilizingmowersoit doesn'tmove,pivotupperhandleupas
shownin Figure2. Donotcrimpcablewhilelifting thehandleup.
2. RemoveT-boltsfromthehandlebracketsasshownin Figure3.
Figure2
Figure3
,,J
Figure1
8

3. Followthestepsbelowto completehandleassembly:
a. Pullupwardon thehandleuntil holesinlowerhandle(shownin
Figure3deckcutaway)lineupwith holesinhandlebracket.See
Figure4.
NOTE:Whenpullingupwardon handle,makesureto not pullhandleall the
wayout.
b. InserttheT-boltsremovedinstepearlierthroughthehandle
bracketsandlowerhandleandtightensecurelyto securethehandle
inplace.SeeFigure4.
c. Reattachwingnutsandcarriageboltsremovedearlierintolower
holesof handleasshownin Figure5.
4. Theropeguideisattachedto the rightsideof theupperhandle.Loosenthe
wingknobwhichsecurestheropeguide.Referto Figure6.
a. Holdbladecontrolagainstupperhandle.
b. Slowlypullstarterropehandlefromengineandslipstarterropeinto
theropeguide.SeeFigure6.
c. Tightenropeguidewingknob.
d. Usecabletiesto securebladecontrolcableto lowerhandle.
Attaching the Grass Catcher
1. Followstepsbelowto assemblethegrasscatcher.Makecertainbagisturned
right sideout beforeassembling(warninglabelwill beontheoutside).
a. Placebagoverframesothat itsblackplasticsideisat thebottom.
b. Slipplasticchannelofgrassbagoverhooksontheframe.SeeFigure7.
2. Followstepsbelowto attachgrasscatcher:
a. Lift reardischargedoor.
Figure5
Figure4
9
Figure6
Figure7

b. Placegrasscatcherintotheslotsinthehandlebracketsasshownin
Figure8. Letgo ofdischargedoorsothat it restsonthegrasscatcher.
Toremovegrasscatcher,lift reardischargedooron themower.Lift grasscatcherup
andoffthe slotsin thehandlebrackets.Releasereardischargedoortoallowit to
closerearopeningof mower.
Attaching SideDischargeCover
Yourmowerisshippedasa mulcher.Toconvertto sidedischarge,makesuregrass
catcherisoffof theunit andreardischargedoorisclosed.
1. Onthesideof the mower,lift themulchingcover.SeeFigure9.
2. Slidetwo hooksof sidedischargecoverunderhingepinonmulchingcover
assembly.Lowermulchingcover.Donotremovesidemulchingcoverat any
time,evenwhenyouarenotmulching.
Adjustments
CuttingHeight
Thereisacutting heightadjustmentleverlocatedabovethefrontandrearright
wheel.
1. Pulltheheightadjustmentleveroutwardtowardswheel(unitwill tendto
fallwhenleverismovedoutward).SeeFigure10.
2. Moveleverto desiredpositionforachangeincuttingheight.SeeFigure10.
3. Releaselevertowardsdeck.
IMPORTAN_Allwheelsmustbeplacedinthesameposition.Forroughoruneven
lawns,moveeachheightadjustmentleverto ahigherposition.Thiswillpreventyou
fromcutting thegrasstoocloseto theground.
HandlePitch
Forconvenienceof operation,youmayadjustthepitchofthe handleasfollows:
I. Removewing nutsandcarriageboltsfromhandle.SeeFigure11.
2. Positionthehandleinoneofthethreepositionsthat ismostcomfortable.
SeeFigure11inset.
3. Secureintopositionwith wingnutsandcarriageboltsremovedearlier.
E
f SideMulching _'
Cover
.......................
f
SideDischarge
Cover
Lower
Figure9
Figure10
J
J
Figure8
Figure11
J
10

fControl
Recoil Starter
Grass Catcher
Deck Wash
Cutting Height
Adjustment
Lever
Cutting Height
Adjustment
Lever
Trail Shield /
Gas Cap
Nulch Cover
Spark Plug
Figure12
J
Blade Control
Thebladecontrolisattachedto theupperhandleof themower.Depressand
squeezeitagainsttheupperhandleto operatetheunit.Releaseitto stopengine
andblade.
SideDischargeCover
Yourmowerisshippedasamulcher.Todischargethegrassclippingsto theside
instead,follow theinstructionsintheAssemblysectionto attachthesidedischarge
cover.
Thisbladecontrol isasafetydevice.Neverattempt to bypassitsoperation.
Cutting HeightAdjustmentLever
Oneadjustmentleverislocatedon theright rearwheelandoneislocatedonthe
rightfrontwheel.Bothlevershaveto beatthesamepositionto ensurea uniform
cut.Toadjustthe cutting height,referto the AssemblySection.
DeckWash
Yourmower'sdeckisequippedwithawaterport onitssurfaceaspartof itsdeck
washsystem.Usethedeckwashto rinsegrassclippingsfrom thedeck'sunderside.
MulchCover
Themulchcoverisusedfor mulchingpurposes.Insteadof collectingthegrass
clippingsin agrasscatcherorusingthesidedischargechute,somemowermodels
havetheoptionof redrculatingtheclippingsbackto thelawn.Thisiscalled
Keephandsandfeet awayfrom the chuteareaoncutting deck.Referto
warning labelonthe unit.
Trail Shield
Thetrail shieldisattachedto therearof the mowerandisthereto protectthe
operatorfromflying debris.Donotusethemowerunlesstheshieldisfully
functionalandin place.
RecoilStarter
Therecoilstarterisattachedto therightupperhandle.Standbehindtheunitand
pulltherecoilstarterropeto starttheunit.
Oil FillCap/Dipstick
Referto theMaintenancesectionforinstructionsoncheckingtheoil.
mulching. MeetsANSISafety Standards
CraftsmanLawnMowersconformto thesafetystandardof theAmericanNationalStandardsInstitute(ANSI).
11
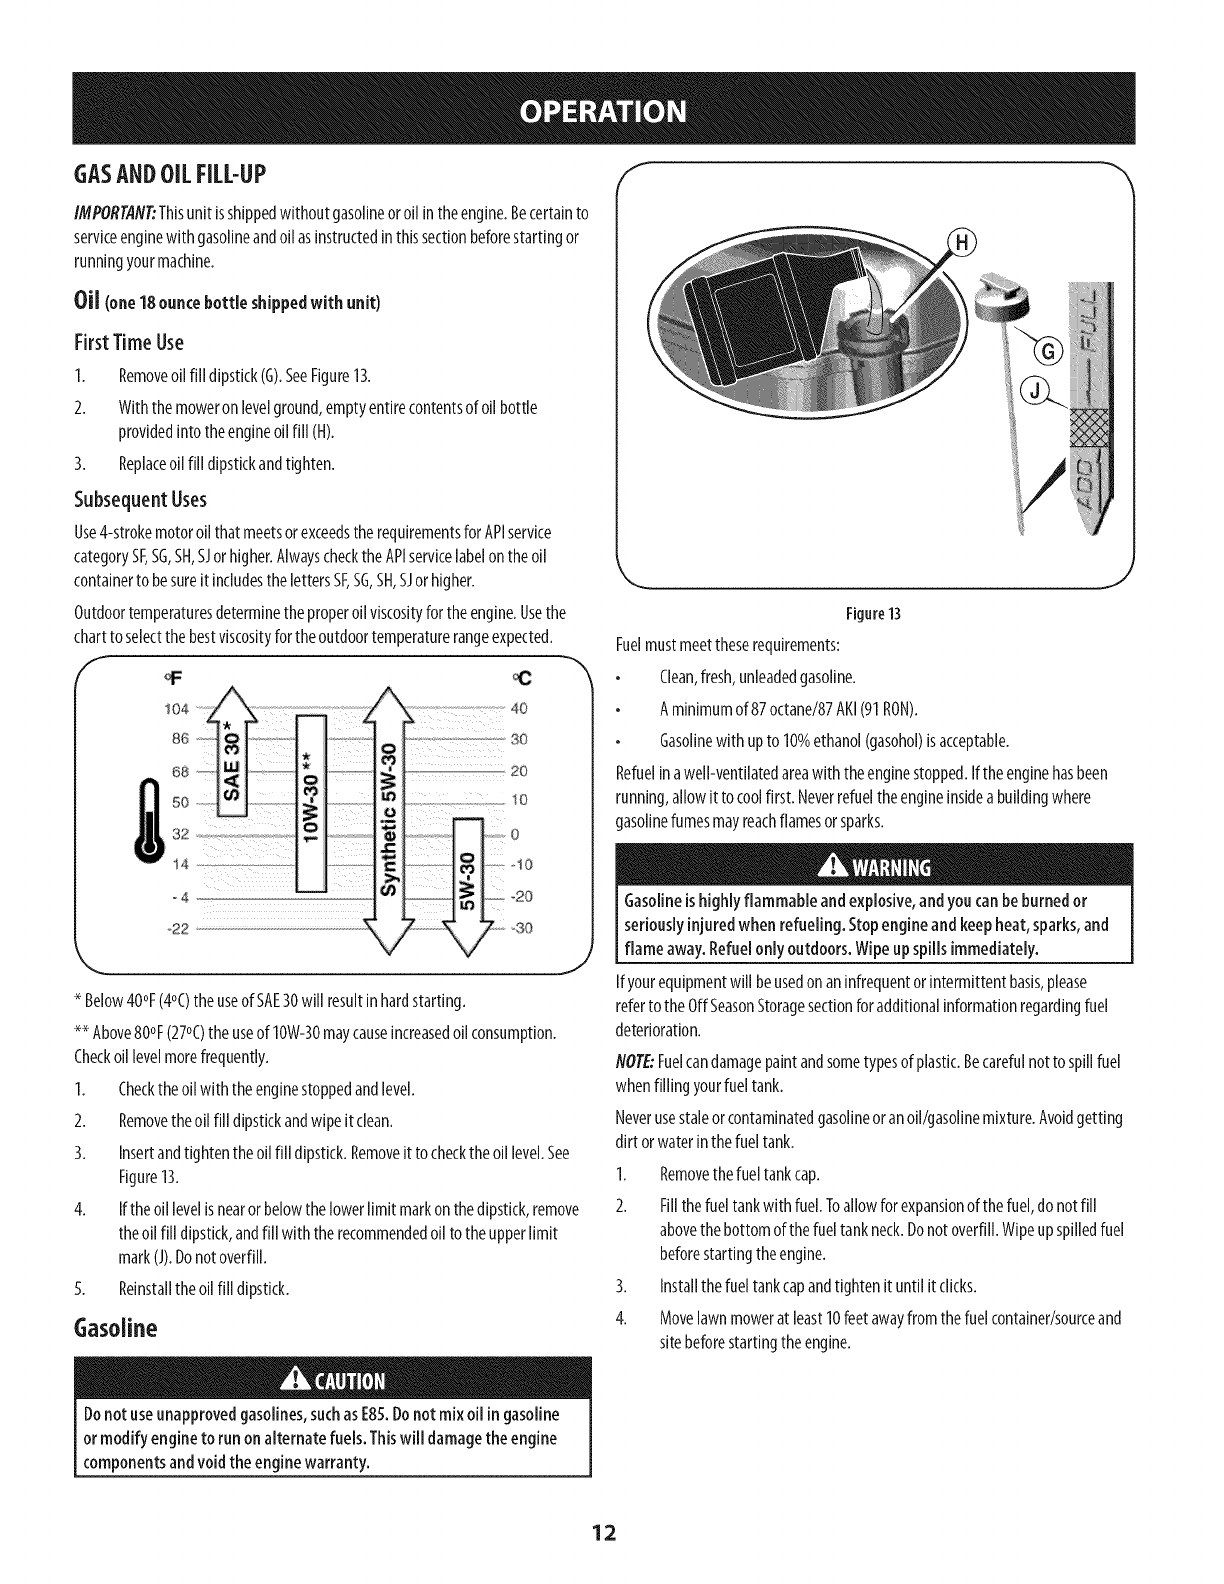
GASANDOILFILL-UP f
IMPORTANT:Thisunit isshippedwithout gasolineoroil intheengine.Becertainto
serviceenginewithgasolineandoil asinstructedin thissectionbeforestartingor
runningyourmachine.
OU(one18ouncebottleshippedwithunit)
First Time Use
1. Removeoilfill dipstick(G).SeeFigure13.
2. Withthe moweronlevelground,emptyentirecontentsof oil bottle
providedintotheengineoilfill (H).
3. Replaceoil fill dipstickandtighten.
SubsequentUses
Use4-strokemotoroilthatmeetsorexceedstherequirementsfor APIservice
categorySF,SG,SH,SJorhigher.AlwayschecktheAPIservicelabelontheoil
containerto besureit includesthelettersSF,SG,SH,SJorhigher.
Outdoortemperaturesdeterminetheproperoil vBcosityfor theengine.Usethe
chartto selectthebestviscosityfortheoutdoortemperaturerangeexpected.
_ 40
2o
Z>°30
* Below40°F(4°C)theuseof SAE30will resultinhardstarting.
** Above80°F(27°C)theuseof 10W-30maycauseincreasedoilconsumption.
Checkoillevelmorefrequently.
1. Checktheoil withtheenginestoppedandlevel.
2. Removetheoilfill dipstickandwipeit clean.
3. Insertandtightentheoil fill dipstick.Removeit to checktheoillevel.See
Figure13.
4. If theoillevelisnearorbelowthelowerlimit markonthedipstick,remove
theoilfill dipstick,andfill with therecommendedoilto theupperlimit
mark(J).Donotoverfill.
5. Reinstalltheoilfill dipstick.
Gasoline
Figure13
Fuelmustmeettheserequirements:
Clean,fresh,unleadedgasoline.
A minimumof 87octane/87AKI(91RON).
Gasolinewith up to 10%ethanol(gasohol)isacceptable.
Refuelinawell-ventilatedareawith theenginestopped.If theenginehasbeen
running,allowit to coolfirst. Neverrefueltheengineinsidea buildingwhere
gasolinefumesmayreachflamesorsparks.
J
Gasolineis highlyflammable andexplosive,andyou canbe burnedor
seriouslyinjuredwhen refueling. Stopengineand keepheat, sparks,and
flame away.Refuelonly outdoors.Wipeup spills immediately.
Ifyourequipmentwill beusedonan infrequentorintermittentbasis,please
refertothe OffSeasonStoragesectionfor additionalinformationregardingfuel
deterioration.
NOTE:Fuelcandamagepaintandsometypesof plastic.Becarefulnot to spillfuel
whenfilling yourfueltank.
Neverusestaleorcontaminatedgasolineoranoil/gasolinemixture.Avoidgetting
dirt orwaterinthefuel tank.
1. Removethefueltankcap.
2. Fillthefuel tankwith fuel.Toallowfor expansionof the fuel,do notfill
abovethe bottomof thefueltankneck.Donotoverfill.Wipeup spilledfuel
beforestartingtheengine.
3. Installthefueltankcapandtightenituntil itclicks.
4. Movelawnmowerat least10feetawayfromthefuel container/sourceand
sitebeforestartingtheengine.
Donot useunapprovedgasolines,suchasE85.Donot mix oil in gasoline
or modify engine to run onalternatefuels.Thiswill damagethe engine
componentsandvoid the engine warranty.
12

Besurenooneother than the operatorisstanding nearthe lawnmower
while starting engine oroperating mower.Neverrun engineindoorsor
inenclosed,poorlyventilated areas.Engineexhaustcontainscarbon
monoxide,anodorlessanddeadlygas.Keephands,feet, hairand loose
clothing awayfrom any movingparts onengineandlawn mower.
ToStart Engine
2.
Standingbehindthemower,squeezethebladecontrolhandleagainstupper
handle.
Holdingthesetwo handlestogetherfirmly,grasprecoilstarterhandleand
pullropeslowlyuntil resistanceisfelt,thenpull witha rapid,continuous,full
armstroke.SeeFigure14.Keepingafirm griponthestartercordhandle,let
theroperewindslowly.Repeatuntil enginecranks.Lettheroperewindeach
timeslowly.
Rapidretraction of starter cord(kickback)will pull handand armtoward
enginefasterthan you canlet go.Brokenbones,fractures,bruisesor
sprainscouldresult.
ToStep Engine
1. Releasebladecontrolto stoptheengineandblade.
Waitfor theblade to stopcompletelybefore performing anywork on the
moweror to removethe grasscatcher.
UsingYourLawnMower
Besurelawnisclearof stones,sticks,wire, orotherobjectswhichcoulddamage
lawnmowerorengine.Suchobjectscouldbeaccidentlythrownbythemowerin
anydirectionandcauseseriouspersonalinjurytotheoperatorandothers.
Theoperationof anylawnmowercanresult inforeign objects being
thrown intothe eyes,which candamageyour eyesseverely.Always
wearsafety glasseswhile operating the mower,orwhile performingany
adjustmentsor repairson it.
Figure14
UsingasMulcher
Formulchinggrass,removethegrasscatcherandsidedischargechutefromthe
mower.Foreffectivemulching,do notcutwet grass.If thegrasshasbeenallowed
to growinexcessoffour inches,mulchingisnotrecommended.Usethegrass
catcherto bagclippingsinstead.
UsingGrassCatcher
Youcanusethegrasscatchertocollectclippingswhileyouareoperatingthe
mower.
1. Attachgrasscatcherfollowinginstructionsinthe"Assembly"section.Grass
clippingswill automaticallycollectinbagasyourun mower.Operatemower
until grassbagisfull.
2. Stopenginecompletelybyreleasingthe bladecontrol.Makesurethat the
unit hascometo acompletestop.
3. Liftdischargedoorandpullgrassbagupandawayfromthemowerto
removethebag.Disposeofthegrassclippingsandreinstallthebagwhen
complete.
If youstrikea foreign object, stoptheengine. Disconnectthe sparkplug
wire,thoroughly inspectmowerfor anydamage,andrepair damage
before restarting andoperating. Extensivevibration of mowerduring
operationisanindicationof damage.Theunit should be promptly
inspectedandrepaired.
13

MAINTENANCESCHEDULE
EachUse
Beforeperforming any typeof maintenance/service,disengageall controls
andstopthe engine.Wait until all moving parts havecometo a complete
stop. Disconnectsparkplug wireand groundit againstthe engineto
preventunintendedstarting.
Ist Monthor5hours
Annuallyor25hours
Annuallyor50hours
Annually
BeforeStorage
1. Engineoil level
2. Looseormissinghardware
3. Aircleaner
4. Unitandengine
1. Engineoil
1. Aircleanerf
2. Controllinkages/pivotsandwheels
3. Undersideof mowerdeck
1. Engineoil ff
1. Sparkplug
2. AirCleaner
1. Fuelsystem
Followthemaintenanceschedulegivenbelow.Thischartdescribesservice
guidelinesonly.Usethe ServiceLogcolumnto keeptrackofcompleted
maintenancetasks.TolocatethenearestSearsServiceCenterorto scheduleservice,
simplycontactSearsat 1-800-4-MY-HOME®.
1. Check
2. Tightenorreplace
3. Check
4. Clean
1. Change
1. Clean
2. Lubewith light oil
3. Clean
1. Change
I. Replace
2. Replace
1. Runengineuntil it stopsfromlackoffuel,or
addstabilizerto afull tankof freshfuel prior
to storage.
Cleanmoreoften underdustyconditionsorwhenairbornedebrisis present.Replaceaircleanerifverydirty.
ff Changeoilevery25hourswhenoperatingtheengineunderheavyloadorinhightemperatures.
14

Alwaysstopengine,disconnectsparkplugwire, andgroundagainstengine
before performing anytype of maintenanceon your machine.
GENERALRECOMMENDATIONS
Alwaysobservesafetyruleswhenperforminganymaintenance.
Thewarrantyonthislawnmowerdoesnotcoveritemsthat havebeen
subjectedto operatorabuseornegligence.Toreceivefull valuefrom
warranty,operatormustmaintaintheequipmentas
instructedhere.
Changingof engine-governedspeedwill voidenginewarranty.
All adjustmentsshouldbe checkedat leastonceeachseason.
Periodicallycheckall fastenersandmakesurethesearetight.
ENGINEMAINTENANCE
SparkPlug
Forgoodperformance,thesparkplugmustbeproperlygappedandfreeof
deposits.Replacethesparkplugannually.
1. Disconnectthecapfromthesparkplug,andremoveanydirt fromthespark
plugarea.
2. Usethe propersizesparkplugwrenchto removethesparkplug.
NOTE:Replacewith aChampionRJ2YXLEsparkplug.
3. Checkthegapwitha wiregauge.SeeFigure15.Sparkpluggapshouldbe
0.020in(0.51mm).If necessary,resetthegap.
4. Installandtightenthesparkplugto therecommendedtorque(180Ib-in [20
Nm]).
5. Attachthesparkplug capto the sparkplug.
Air Cleaner
Adirtyair cleanerwill restrictairflow to thecarburetorandcausepoorengine
performance.Inspectthefilter eachtimetheengineisoperated.Youwill needto
cleanthefiltermorefrequentlyif youoperatetheengineinverydustyareas.
Cleantheaircleanerevery25hoursofoperationoroncea season.Replacetheair
cleanerannually.
f
Electrode
Figure15
.J
f
Figure16
Neverstart orrun the enginewith the aircleanerassemblyor theair filter
removed.
NOTE:Donotusepressurizedairorsolventsto cleanthe filter. Pressurizedair can
damagethefilter andsolventswill dissolvethefilter.
1. Loosenthefastenerthat holdsthecoverandtilt plastichousingcoveronside
ofenginedown.SeeFigure16.
2. Removeair filterfromplastichousingcover.
3. Toloosendebris,gentlytapthefilteron a hardsurface.If thefilteris
excessivelydirty, replacewith a newfilter.
4. Insertcover'stabsintoslotsinbottomof base.
5. Tiltcoverupintoplaceandsecurewith fastener.
15

CheckEngineOil
Checkoil levelbeforeeachoperation.Besureoil levelismaintained.
1. Checkthe oilwiththeenginestoppedandlevel.
2. Removetheoilfill dipstickandwipeit clean.
3. Insertandtightendipstick.Removeit to checktheoil level.
4. If theoillevelis nearorbelowthelowerlimit markonthedipstick,remove
theoilfiller cap/dipstick,andfill with therecommendedoil to the upper
limit mark.Donotoverfill.
5. Reinstalltheoilfill dipstick.
ChangeEngineOil
Gasolineand its vaporsare extremely flammableandexplosive.Fireor
explosioncancausesevereburnsor death.
Changeengineoilafterthefirstfivehoursofoperation,andeveryfiftyhoursor
onceaseasonthereafter.
Whenyoudrainthe oil from the top oilfill tube, the fuel tank must be
empty orfuel canleak out andresult in afire orexplosion.Toempty the
fuel tank, runthe engineuntil it stopsfrom lackof fuel.
1. Withengineoff butstill warm,disconnectthe sparkplugwire andkeepit
awayfromthesparkplug.
2. Placeasuitablecontainernextto theengineto catchtheusedoil.
3. Removetheoilfill dipstickanddraintheoilintothecontainerbytippingthe
enginetowardtheoil filler neck.SeeFigure17.
f
Oil Fill/Dipstick
f
Figure17
Usedoil isa hazardouswasteproduct. Disposeof usedoil properly. Donot
discardwith householdwaste.Checkwithyourlocalauthoritiesor Sears
ServiceCenterfor safedisposal/recyclingfacilities.
4. Withtheenginein alevelposition,fill to the upperlimit markonthedipstick
with therecommendedoil.
Runningthe enginewith a lowoil level cancauseenginedamage.
5. Reinstalltheoiifill dipsticksecurely.
CleanEngine
Dailyorbeforeeveryuse,cleangrass,chaffor accumulateddebrisfrom
engine.Keeplinkage,spring,andcontrolsclean.Keepareaaroundand
behindmufflerfreeof anycombustibledebris.
Keepingenginecleanallowsairmovementaroundengine.
Enginepartsshouldbekeptcleanto reducethe riskof overheatingand
ignitionofaccumulateddebris.
J
Figure18
LUBRICATION
BladeControl
Lubricatepivotpointsonthebladecontrolat leastonceaseasonwith light oil.This
controlmustoperatefreelyin bothdirections.SeeFigure18.
Donot usewater to clean engineparts.Watercouldcontaminatefuel
system.Usea brushor drycloth.
16

DeckWash
Yourmower'sdeckisequippedwithawaterport onitssurfaceaspartof itsdeck
washsystem.
Usethedeckwashto rinsegrassclippingsfrom thedeck'sundersideandprevent
thebuildupof corrosivechemicals.CompletethefollowingstepsAFTEREACH
MOWING:
Pushthe mowertoa level,clearspotonyourlawn,nearenoughfor your
gardenhoseto reach.Removethegrassbagif attached.
Makecertainthe mower'sdischargechute isdirectedAWAYfrom your
house,garage,parkedcars,etc.
2. Threadthehosecoupler(packagedwith yourmower'sOperator'sManual)
ontotheendofyourgardenhose.
3. Attachthehosecouplerto the waterport onyourdeck'ssurface.SeeFigure
19.
4.
5.
6.
7.
8.
Turnthewateron.
Starttheengineasdescribedin theOperationsection.
Runtheenginefor aminimumof two minutes,allowingtheundersideof the
cuttingdeckto thoroughlyrinse.
Releasebladecontrolto stoptheengineandblade.
Turnthewateroff anddetachthehosecouplerfromthewaterport onyour
deck'ssurface.
Aftercleaningyourdeck,restartthemower.Keeptheengineandbladerunning
fora minimumof two minutes,allowingtheundersideofthecuttingdeckto
thoroughlydry.
Blade Care
Whenremovingthe cutting bladefor sharpeningorreplacement,protect
your handswith apair of heavyglovesorusea heavyragto holdthe blade.
Periodicallyinspectthebladeadapterfor cracks,especiallyifyoustrikeaforeign
object.Replacewhennecessary.Followthestepsbelowfor bladeservice.
1. Disconnectsparkplugbootfromsparkplug.Turnmoweronits sidemaking
surethat theairfilter andthecarburetorarefacingup.
2. Removethebolt andthebladebellsupportwhichholdthebladeandthe
bladeadapterto theenginecrankshaft.SeeFigure20.
3. Removebladeandadapterfromthecrankshaft.
4. Removebladefromtheadapterfortestingbalance.Balancethebladeona
roundshaftscrewdriverto check.Removemetalfromtheheavysideuntil
it balancesevenly.Whensharpeningtheblade,followtheoriginalangleof
grind.Grindeachcuttingedgeequallyto keepthebladebalanced.
Anunbalancedbladewill causeexcessivevibrationwhenrotating at high
speeds.It maycausedamageto mowerandcouldbreakcausingpersonal
injury.
f
/
Figure19
J
.......................Blade_ellSup_
J
Figure20
.5. Lubricatethe enginecrankshaftandtheinnersurfaceof thebladeadapter
with light oil.Slidethebladeadapterontotheenginecrankshaft.Placethe
bladeontheadaptersuchthatthesideof theblademarked"Bottom"(or
with partnumber)facesthegroundwhenthe mowerisin theoperating
position.Makesurethatthebladeisalignedandseatedon thebladeadapter
flanges.SeeFigure20inset.
6. Placebladebellsupportontheblade.Alignnotcheson thebladebell
supportwith smallholesin blade.
7. Replacehexbolt andtightenhexbolt to torque:450in. Ibs.min.,600in.Ibs.
max.
Toensuresafeoperationofyourmower,periodicallycheckthebladeboltforcorrect
torque.
17

Neverstore lawn mowerwith fuel in tank indoorsor in poorlyventilated
areaswherefuel fumesmayreachanopenflame, spark,orpilot light ason
afurnace,water heater,clothesdryer, orgasappliance.
PreparingTheEngine
Forenginesstoredover30days:
Topreventgumfromforminginfuel systemoroncarburetorparts,run
engineuntil it stopsfrom lackof fueloraddagasolineadditiveto thegas
inthetank.If youuseagasadditive,runtheenginefor severalminutesto
circulatetheadditivethroughthecarburetor--afterwhichtheengineand
fuelcanbestoredupto 24months.
Whileengineisstill warm,changetheoil.
Cleanengineof surfacedebris.
PreparingTheLawnMower
Cleanandlubricatemowerthoroughlyasdescribedinthelubrication
instructions.
Donotusea pressurewasherorgardenhoseto cleanyourunit.
Coatmower'scutting bladewith chassisgreaseto preventrusting.
Referto PreparingtheEngineforcorrectenginestorageinstructions.
Storemowerinadry,deanarea.Donotstorenextto corrosivematerials,
suchasfertilizer.
Whenstoringanytypeof powerequipmentinapoorlyventilatedormetalstorage
shed,careshouldbetakento rust-prooftheequipment.Usinga lightoil orsilicone,
coattheequipment,especiallycablesandall movingpartsof yourlawnmower
beforestorage.
18

Disconnectthe sparkplug wireand grounditagainstthe engineto prevent
unintendedstarting. Beforeperforminganytypeof maintenance/service,
disengageall controlsandstopthe engine.Waituntil a[Imovingparts
havecometo acompletestop.Alwayswearsafetyglassesduringoperation
orwhile performinganyadjustmentsorrepairs.
Thissectionaddressesminorserviceissues.Tolocatethe nearestSearsServiceCenterorto scheduleservice,simplycontactSearsat 1-800-4-MY-HOME_.
EngineFailstostart
Enginerunserratic
1. Bladecontroldisengaged.
2. Sparkplugbootdisconnected.
3. Fueltankemptyorstalefuel.
4. Enginenotprimed(Ifequippedwith primer).
5. Faultysparkplug.
6. Engineflooded.
7. Blockedfuel line.
1. Sparkplugbootloose.
2. Stalefuel.
3. Ventingascapplugged.
4. Waterordirt infuelsystem.
5. Dirtyaircleaner.
6. Blockedfuel line.
Engineoverheats 1. Engineoillevellow.
2. Airflow restricted.
Occasionalskips(hesitates) 1. Sparkpluggaptooclose.
Idlespoorly 1. Sparkplugfouled,faulty,orgaptoowide.
2. Dirtyaircleaner.
Excessivevibration 1. Cuttingbladelooseorunbalanced.
2. Bentcuttingblade.
Mowerwill notmulchgrass 1. Wetgrass.
Unevencut
2. Excessivelyhighgrass.
3. Dullblade.
1. Wheelsnotpositionedcorrectly.
2. Dullblade.
1. Engagebladecontrol.
2. Connectwireto sparkboot.
3. Filltankwithdean,freshgasoline.
4. PrimeengineasinstructedintheOperationsection.
5. Clean,adjustgap,orreplace.
6. Waitafewminutesto restart.
7. ContactyourSearsParts&RepairCenterto havefuelline
cleaned.
1. Connectandtightensparkplugboot.
2. Filltankwithdean,freshgasoline.
3. Clearvent.
4. Runengineuntilitstopsfromlackoffuel.Refillwithfreshfuel.
5. RefertoAirCleanerinEngineMaintenancesection.
6. ContactyourSearsParts&RepairCenterto havefuelline
cleaned.
1. Fillcrankcasewithproperoil.
2. Cleanareaaroundandontop of engine.
1. Adjustgap.Referto SparkPluginEngineMaintenancesection.
1. Resetgaporreplacesparkplug.
2. RefertoAirCleanerinEngineMaintenancesection.
1. Tightenbladeandadapter.Balanceblade.
2. Replaceblade.
1. Donotmowwhengrassiswet; waituntil
laterto cut.
2. Mowonceat ahighcuttingheight,thenmowagainatdesired
heightormakeanarrowercuttingpath.
3. Sharpenorreplaceblade.
1. Adjustcuttingheightleveronrightfrontandrightrearwheelto
sameposition.
2. Sharpenorreplaceblade.
NEED MORE HELP?
o Find this and all your other product manuals online.
o Get answers from our team of home experts.
o Get a personalized maintenance plan for your home,
Find information and tools to hetp with home projects,
19

Craftsman Mower-- Model No.247.370310
2O
I42
42
20

(:raftsmanMower-- ModelNo.247.370310
1
2
3
4
5
6
7
8
9
10
11
12
13
14
15
16
17
18
19
20
21
22
23
24
747-05184A
749-04681-0637
747-05450
749-04608A-0637
720-0279
710-1205
710-04998
964-04154
720-04072A
731-07486
725-0157
712-04222
631-04369A
747-0710A
787-01779
732-04673
634-04642
921-04041
710-05073
787-01874B-4044
987-02516
732-04674
748-04096
942-0741A
Blade Control
Upper Handle
Grass Catcher Frame
Lower Handle
Wing Nut
Rope Guide
Carriage Screw ,5/16-18
Grass Bag
Hand Knob
Side Chute
Ca ble Tie
Nut, Sq., 1/4-20
Rear Discharge Door Assembly
Hinge Pin
Chute Deflector Bracket
Torsion Spring - RH
Wheel, 7 x 2
Water Nozzle Adapter
Screw, 1/4-20 x .500
Deck- 21"
Hinged Mulch Plug Assembly
Torsion Spring - LH
Blade Adapter
Mulching Blade
m
m
u
25
26
27
28
29
30
31
32
33
34
35
36
37
38
39
40
41
42
43
44
45
N/A
710-1044
731-07531
731-07173
738-04419A
712-04217
720-04130
720-04123A
736-0524B
712-04064
634-04659
946-04661
710-04683A
731-07203
731-07174A
732-1014C
787-01818A-0637
911-04142
911-04143B
710-04995A
710-0895
738-04278
731-07487
Screw, 3/8-24 x 1.50
Hub Cap - Front
Hub Cap - Rear
Sldr. Screw, .375 x .126 x 1/4-20
Flange Lock Nut, 3/8-16
Adjustment Lever Knob
Wing Nut
Blade Bell Support
Nut, Flange Lock, 1/4-20
Wheel, 8 x 2
Control Cable
TT Screw, 3/8-16 x 1.0
Trail shield
Front Cover
Torsion Spring
Front Height Adjuster Plate
Rear Axle Assembly
Front Axle Assembly
Screw, 5/16-14 x .750
Screw, 1/4-15 x .750
Screw, 1/4-20 x .500
Deck Wash Nozzle
Engine (see breakdown)
B & S Model No. 126M02-6863-F1
21

Craftsman Engine Model No. 126MO2-6863-F1For Craftsman Mower Model No.247.370310
[ 48 SHORTB LOCK I I 10580 PERATOR'SM ANUAL I I 1329 REPLACEMENTE NGINE I [ 1330 REPAIR MANUAL I
306
307 ,_
8_8
89
|505 e
615 _
404 @
616 __
12
684
287
524
22

Craftsman Engine Model No. 126MO2-6863-F1For Craftsman Mower Model No.247.370310
3_5
163
137_
276 @
190
957
443 _,
_202
11A
1388_
1386_
1387_ 3' 883_
23

Craftsman Engine Model No. 126MO2-6863-F1For Craftsman Mower Model No. 247.370310
306
307 ,_
_j
7
130_
5
32_
868
89
[505
615 @
404 @
616 _
12
684
54
51 -_-__..%
36 40_--_ 5_
34_ _
24
287
525
524
24

Craftsman Engine Model No. 126MO2-6863-F1For Craftsman Mower Model No.247.370310
365
163
127 (_
76 @
190 I}
957
222
968
445
202
11A
1388(_
1386_
1387_ 883
25

Craftsman Engine Model No. 126MO2-6863-F1For Craftsman Mower Model No.247.370310
590401 Cylinder Assembly
3 299819s Seal-Oil (Magneto Side)
4 493279 Sump-Engine
5 590411 Head-Cylinder
7 799875 Gasket-Cylinder Head
8 590395 Breather Assembly
9 699472 Gasket-Breather
10 691125 Screw (Breather Assembly)
11 691781 Tube-Breather
11A 691923 Tube-Breather
12 692232 Gasket-Crankcase
13 590422 Screw (Cylinder Head)
15 691680 Plug-Oil Drain
16 797017 Crankshaft
20 399781s Seal-Oil (PTO Side)
22 691092 Screw (Crankcase Cover/Sump)
23 691987 Flywheel
24 222698s Key-Flywheel
25 590404 Piston Assembly (Standard)
590405 Piston Assembly (.020" Oversize)
26 590402 Ring Set (Standard)
590403 Ring Set (.020" Oversize)
L
27 691588 Lock-Piston Pin
28 298909 Pin-Piston
29 797306 Rod-Connecting
32 691664 Screw (Connecting Rod) (Short)
32A 695759 Screw (Connecting Rod) (Long)
33 590394 Valve-Exhaust
34 590393 Valve-Intake
35 691270 Spring-Valve (Intake)
36 691270 Spring-Valve (Exhaust)
37 793756 Guard-Flywheel
40 692194 Keeper-Valve
43 691997 Slinger-Governor/Oil
45 690548 Tappet-Valve
46 691449 Camshaft
48 N/A Short Block (Not available at this printing)
794305 Manifold-Intake
51 794306 Gasket-Intake
54 691650 Screw (Intake Manifold)
55 691421 Housing-Rewind Starter
58 697316 Rope-Starter
60 795426 Grip-Starter Rope
65 690837 Screw (Rewind Starter)
78 691108 Screw (Flywheel Guard)
81 691740 Lock-Muffler Screw
89 692348 Plug-Oil (Cylinder)
97 696565 Shaft-Throttle
104 797622 Pin-Float Hinge
108 795935 Valve-Choke
109 795936 Shaft-Choke
117 590440 Jet-Main (Standard)
121 498260 Kit-Carburetor Overhaul
125 799866 Carburetor
127 694468 Plug-Welch
130 696564 Valve-Throttle
133 398187 Float-Carburetor
134 398188 Kit-Needle/Seat
137 796610 Gasket-Float Bowl
141 796193 Kit - Choke Shaft
163 795629 Gasket-Air Cleaner
180 590490 Tank-Fuel
187 791766 Line-Fuel (Cut To Required Length)
188 693399 Screw (Control Bracket)
190 690940 Screw (Fuel Tank)
202 691829 Link-Mechanical Governor
209 699056 Spring-Governor (No Color)
222 793754 Bracket-Control
227 690783 Lever-Governor Control
276 271716 Washer-Sealing
287 690940 Screw (Dipstick Tube)
291 790830 Thermostat
300 790828 Muffler
304 790826 Housing-Blower
26

(:raftsman Engine Model No. 126MO2-6863-F1For (:raftsman Mower Model No.247.370310
691108 Screw (Blower Housing)
306 790836 Shield-Cylinder
307 690345 Screw (Cylinder Shield)
332 690662 Nut (Flywheel)
333 590454 Armature-Magneto
334 691061 Screw (Magneto Armature)
337 591040 Plug-Spark
356 692390 Wire-Stop
358 590508 Gasket Set-Engine
365 691688 Screw (Carburetor)
404 690272 Washer (Governor Crank)
425 690670 Screw (Air Cleaner Cover)
443 692523 Screw (Air Cleaner Primer Base)
445 491588s Filter-Air Cleaner Cartridge
455 791960 Cup-Flywheel
456 692299 Plate-Pawl Friction
459 281505s PawI-Ratchet
505 691251 Nut (Governor Control Lever)
523 499621 Dipstick
524 692296 Seal-Dipstick Tube
525 495265 Tube-Dipstick
562 691119 Bolt (Governor Control Lever)
564 698589 Screw (Control Cover)
584 697734 Cover-Breather Passage
585 691879 Gasket-Breather Passage
592 690800 Nut (Rewind Starter)
597 691696 Screw (Pawl Friction Plate)
601 791850 Hose-Clamp (Green)
604 790703 Cover-Control
608 497680 Starter-Rewind
613 790833 Screw (Muffler)
615 690340 Retainer-Governor Shaft
616 698801 Crank-Governor
617 270344s Seal-O Ring
621 692310 Switch-Stop
633 691321 Seal-Choke/Throttle Shaft (Throttle Shaft)
633A 693867 Seal-Choke/Throttle Shaft (Choke Shaft)
66538s Boot-Spark Plug
684 690345 Screw (Breather Passage Cover)
689 691855 Spring-Friction
718 690959 Pin-Locating
725 590460 Shield - Heat
741 797521 Gear-Timing
745 691648 Screw (Brake)
842 691031 Seal-O Ring (Dipstick Tube)
847 692047 Dipstick/Tube Assembly
851 493880s Terminal-Spark Plug
868 697338 Seal-Valve
869 691155 Seat-Valve (Intake)
870 690380 Seat-Valve (Exhaust)
871 590409 Bushing-Valve Guide
883 691881 Gasket-Exhaust
921 796706 Cover-Blower Housing
922 692135 Spring - Brake
923 796136 Brake
957 591003 Cap-Fuel Tank
966 795259 Base-Air Cleaner Base
968 692298 Cover-Air Cleaner
969 690700 Screw (Blower Housing Cover)
975 796611 Bowl-Float
976 694395 Primer - Carburetor
1036 Label-Emissions (Available from a Briggs &
Stratton Authorized Dealer)
1058 380567TRI Operator's Manual
1059 692311 Kit-Screw/Washer (Fuel Tank)
1095 590507 Gasket Set-Valve
1210 498144 Pulley/Spring Assembly (Pulley)
1211 498144 Pulley/Spring Assembly (Spring)
1329 N/A Replacement Engine (N/A at this printing)
1330 270962 Repair Manual
1386 790848 Vane-Air
1387 790849 Spring-Air Vane
1388 790850 Screw (Air Vane)
1448 690390 Washer (Armature)
Carburetor Overhaul Kit Key No. 121
Engine Gasket Set Key No. 358
Valve Gasket Set Key No. 1095
27

Craftsman Mower Labels -- Model No. 247.370310
777S33353
777S33350
777D14313
777123312
28

(ThispageapplicableintheU.S.A.andCanadaonly.)
Sears Brands Management Corporation (Sears),the California Air Resources Board (CARB)
and the United States Environmental Protection Agency (U,S, EPA)
EmissionControl System Warranty Statement (Owner's Defect Warranty Rights and Obligations)
EMISSIONCONTROLWARRANTYCOVERAGEISAPPLICABLETOCERTIFIEDENGINES ANDTOCERTIFIEDMODELYEAR1997ANDLATERENGINESWHICHAREPURCHASEDAND
PURCHASEDINCALIFORNIAIN1995ANDTHEREAFTER,WHICHAREUSEDINCALIFORNIA,USEDELSEWHEREINTHEUNITEDSTATES(ANDAFTERJANUARY1,2001INCANADA).
California and United States Emission Control Defects Warranty Statement
TheCaliforniaAir ResourcesBoard(CARB),U.S.EPAandSearsarepleasedto explainthe
EmissionControlSystemWarrantyonyourmodelyear2000andlatersmalloff-road
engine(SORE).InCalifornia,newsmalloff-roadenginesmustbedesigned,built and
equippedto meettheState'sstringentanti-smogstandards.Elsewhereinthe United
States,newnon-road,spark-ignitionenginescertifiedformodelyear1997andlater
mustmeetsimilarstandardssetforthbytheU.S.EPA.Searsmustwarranttheemission
controlsystemon yourenginefortheperiodsof timelistedbelow,providedtherehas
beennoabuse,neglectorimpropermaintenanceofyoursmalloff-roadengine.Your
emissioncontrolsystemincludespartssuchasthecarburetor,air cleaner,ignition
system,mufflerandcatalyticconverter.Alsoincludedmaybeconnectorsandother
emissionrelatedassemblies.Whereawarrantableconditionexists,Searswill repair
yoursmalloff-roadengineat nocostto youincludingdiagnosis,partsandlabor.
Sears Emission Control Defects Warranty Coverage
Smalloff-roadenginesarewarrantedrelativetoemissioncontrolpartsdefectsfora
periodof oneyear,subjectto provisionssetforthbelow.Ifanycoveredparton your
Owner's Wa rra nty
Asthesmalloff-roadengineowner,youareresponsiblefortheperformanceof the
requiredmaintenancelistedinyourOperatingandMaintenanceInstructions.Sears
recommendsthat youretainallyourreceiptscoveringmaintenanceonyoursmall
off-roadengine,butSearscannotdenywarrantysolelyforthelackofreceiptsorfor
yourfailureto ensurethe performanceof allscheduledmaintenance.Asthe small
off-roadengineowner,youshouldhoweverbeawarethatSearsmaydenyyouwarranty
coverageifyoursmalloff-roadengineorapart hasfaileddueto abuse,neglect,
engineisdefective,thepartwill berepairedorreplacedbySears.
Responsibilities
impropermaintenanceorunapprovedmodifications.Youareresponsibleforpresenting
yoursmalloff-roadengineto anAuthorizedSearsServiceDealerassoonasaproblem
exists.Theundisputedwarrantyrepairsshouldbecompletedinareasonableamount
of time,notto exceed30days.Ifyou haveanyquestionsregardingyourwarrantyrights
andresponsibilities,youshouldcontacta SearsServiceRepresentativeat 1-800-469-
4663.Theemissionwarrantyis adefectswarranty.Defectsarejudgedonnormalengine
performance.Thewarrantyisnot relatedto an in-useemissiontest.
Soars Emission Control Defects Warranty Provisions
Thefollowingarespecificprovisionsrelativeto yourEmissionControlDefectsWarranty
Coverage.It isinadditionto theSearsenginewarrantyfornon-regulatedenginesfound
in theOperatingandMaintenanceInstructions.
1. WarrantedParts
Coverageunderthiswarrantyextendsonlyto thepartslistedbelow(the
emissioncontrolsystemsparts)to theextentthesepartswerepresenton the
enginepurchased.
a. FueIMeteringSystem
• Coldstartenrichmentsystem
• Carburetorandinternalparts
• FuelPump
b. AirlnductionSystem
• Aircleaner
• Intakemanifold
c. IgnitionSystem
• Sparkplug(s)
• Magnetoignitionsystem
d. CatalystSystem
• Catalyticconverter
• Exhaustmanifold
•Airinjectionsystemor pulsevalve
e. MiscellaneousItemsUsedinAboveSystems
• Vacuum,temperature,position,timesensitivevalvesandswitches
•Connectorsandassemblies
2. Lengthof Coverage
Searswarrantsto the initialownerandeachsubsequentpurchaserthat the
WarrantedPartsshallbefreefromdefectsinmaterialsandworkmanshipwhich
causedthe failureof theWarrantedPartsforaperiodof oneyearfromthedate
theengineisdeliveredto aretailpurchaser.
3. NoCharge
Repairorreplacementof anyWarrantedPartwill beperformedat nochargeto
theowner,includingdiagnosticlaborwhichleadsto thedeterminationthata
WarrantedPartisdefective,if thediagnosticwork isperformedat anAuthorized
SearsServiceDealer.Foremissionswarrantyservicecontactyournearest
AuthorizedSearsServiceDealeraslistedin the"YellowPages"under"Engines,
Gasoline,""GasolineEngines,""LawnMowers,"orsimilarcategory.
4. ClaimsandCoverageExclusions
Warrantyclaimsshallbefiled inaccordancewith the provisionsof theSears
EngineWarrantyPolicy.Warrantycoverageshallbeexcludedforfailuresof
WarrantedPartswhicharenotoriginalSearspartsor becauseof abuse,neglect
orimpropermaintenanceassetforth intheSearsEngineWarrantyPolicy.Sears
isnotliableto coverfailuresofWarrantedPartscausedbytheuseofadd-on,
non-original,ormodifiedparts.
5. Maintenance
AnyWarrantedPartwhichis notscheduledforreplacementasrequired
maintenanceor whichisscheduledonlyforregularinspectionto theeffectof
"repairorreplaceasnecessary"shallbewarrantedastodefectsforthewarranty
period.AnyWarrantedPartwhichisscheduledfor replacementasrequired
maintenanceshallbewarrantedasto defectsonlyfortheperiodoftimeup
to thefirstscheduledreplacementforthat part.Anyreplacementpart thatis
equivalentin performanceanddurabilitymaybeusedin theperformanceof
anymaintenanceorrepairs.Theownerisresponsiblefor theperformanceof
all requiredmaintenance,asdefinedintheSearsOperatingandMaintenance
Instructions.
ConsequentialCoverage
Coveragehereundershallextendto thefailureofanyenginecomponentscaused
bythefailureof anyWarrantedPartstill underwarranty.
Inthe USAandCanada,a24hourhotline,1-800-469-4663,hasamenuofpre-recordedmessagesofferingyouenginemaintenanceinformation.
29
GDOC-100188Rev.B

30

31

Congratulationsonmakingasmartpurchase.YournewCraftsman®productisdesignedandmanufacturedforyearsof
dependableoperation.Butlikeall products,it mayrequirerepairfromtimeto time.That'swhenhavinga RepairProtection
Agreementcansaveyoumoneyandaggravation.
Here'swhat the RepairProtectionAgreement_includes:
[] Expertservice byour10,000professionalrepairspecialists
[] Unlimitedserviceand nocharge forpartsandlaboronallcoveredrepairs
[] Productreplacementupto $1500ifyourcoveredproductcan'tbefixed
[] Discountof 25%from regularpriceof serviceandrelatedinstalledpartsnot coveredbythe agreement;also,25%off
regularpriceof preventivemaintenancecheck
[] Fasthelpby phone- wecallitRapidResolution- phonesupportfromaSearsrepresentative.Thinkof usasa"talking
owner'smanual."
Onceyoupurchasethe RepairProtectionAgreement,a simplephonecallisallthat it takesforyouto scheduleservice.You
cancallanytimedayornight,orscheduleaserviceappointmentonline.
TheRepairProtectionAgreementisa risk-freepurchase.If youcancelfor anyreasonduringthe productwarrantyperiod,
wewill provideafull refund.Or,a proratedrefundanytimeafterthe productwarrantyperiodexpires.PurchaseyourRepair
ProtectionAgreementtoday!
Somelimitations and exclusionsapply. Forpricesand additional informationinthe U.S.A.call 1-800-827-6655.
_Coveragein Canadavariesonsomeitems.Forfull detailscall SearsCanadaat 1-800-361-6665.
SearsInstallationService
ForSearsprofessionalinstallationof homeappliances,garagedooropeners,waterheaters,andothermajorhomeitems,in
the U.S.A.orCanadacall1-800-4-MY-HOME®.
32

Declaraci6n de garantia .............................. 33
Instrucciones de seguridad ........................ 34-37
Guia de cuesta ....................................... 38
Montaje .......................................... 39-41
Operaci6n ........................................ 42-44
Servicio y Mantenimiento ......................... 45-49
Almacenamiento fuera de temporada ................ 50
Soluci6n de problemas ............................ 52-53
Numero de servicio .................. Cubierta posterior
GARANTIACOMPLETACRAFTSMANPORDOSANOS
PORDOSANOSapartirdelafechadelacompra,esteproductoest_garantizadopotdefectosenlosmaterialesy lamanodeobra.Losproductosdefectuosos
ser_nreparadossincostooreemplazadossincostosilareparaci6nnoest_disponible.
Paraobtenerinformaci6nsobreelalcancedelagarantiay solicitarlareparaci6noelreemplazo,visiteelsitioWeb:www.craftsman.com.
EstagarantiacubreI)NICAMENTElosdefectosenlosmaterialesyen lamanodeobra.EstagarantiaNOcubre:
•Articulosdeduraci6nlimitadaquepuedendesgastarsebajocondicionesnormalesdeusoduranteelperiododegarantia,talescomocuchillasde
cortadora,adaptadoresparacuchillas,correas,filtros deaire,y bujiasdeencendido.
•Productodafiosresultantesdelosintentosdelusuariodemodificaci6ndelproducto,reparaci6nocausadosporaccesoriosdeproductos.
•ReparacionesnecesariasdebidoalaccidenteopotnooperaromantenerelproductosegOnlasinstruccionesprovistas.
•Mantenimientopreventivooreparacionesnecesariasdebidoamezcladecombustibleimpropia,combustiblecontaminadooafiejo.
LapresentegarantiaseanulasiseutilizaesteproductoalgunavezparaprestarservicioscomercialesosiseIoalquilaaotrapersona.
Estagarantialeotorgaderechoslegalesespecificos,peroustedpodriagozardeotrosderechosenraz6ndesulugarderesidencia.
SearsBrandsManagementCorporation,HoffmanEstates,IL60179
Aceite del motor: SAE 30
Combustible: Gasolina sin plomo
Motor: Briggs & Stratton
Numero de modelo
Numero de serie
Fecha de compra
Registre el numero de modelo, numero de serie y fecha
de compra m_s arriba.
© Sears Brands, LLC 33

Lapresendadeestesimboloindicaquesetrata deinstrucdones
importantesdeseguridadquesedebenrespetarparaevitar poneren
peligrosuseguddadpersonaly/o materialy ladeotras personas.Leaysiga
todaslasinstruccionesdeestemanualantesde poner enfundonamiento
estam_quina.Sinorespetaestasinstrucdonespodriaprovocarlesiones
personales.Cuandoyeaestesimbolo,ipresteatend6n a laadvertenda!
PROPOSICION 65 DE CALiFORNiA
Elescapedel motor deesteproducto,algunosdesuscomponentesy
algunoscomponentesdel vehkulo contieneno liberansustanciasCluimkas
clueelestadodeCalifornia consideracluepuedenprodudr c_ncer,defectos
denadmiento u otros problemasreproductivos.
Estam_quinafue construidaparasetoperadadeacuerdoconlasreglas
deseguddadcontenidasenestemanual.AI igualqueconcualquiertipo
de equipomotodzado,un descuidoo error pot parte del operadorpuede
produdr lesionesgraves.Estam_quinaescapazdeamputar manosy pies
ydearrojarobjetoscongranfuerza.Denorespetarlasinstrucdonesde
seguddadsiguientessepuedenprodudr lesionesgraveso la muerte.
Su responsabilidad--Restdnja el usodeestam_quina motodzada
alas personascluelean,comprendany respetenlasadvertendase
instrucdonesqueaparecenen estemanualyen la m_quina.
iGUARDEESTASINSTRUCCIONES!
FUNCIONAMIENTO
Leaysigatodaslasinstruccionescontenidasenestemanualantesde
intentarensamblarestam_quina.Lea,comprendaysigatodaslas
instruccionesquefiguranenla m_quinayen elolosmanualesantesde
intentaroperarla.Familiarkesecompletamenteconloscontrolesyconel
usoapropiadode estam_quinaantesdeoperarla.Guardeestemanualenun
lugarseguroparareferenciasfuturasy regularesyparasolicitarrepuestos.
Estarcompletamentefamiliarizadoconloscontrolesyel usoapropiadode
estam_quinaantesdeoperarla.
Estam_quinaesunapiezadeequipodeprecisi6n,no unjuguete.Pottanto,
tengalam_ximaprecauci6nentodomomento.Suunidadhasidodisefiada
pararealizarunatarea:cortarelc_sped.Nolautiliceconningtinotro
prop6sito.
Nopermitanuncaquelosnifiosmenoresde14afiosoperenestam_quina.
Losnifiosde 14afiosy m_sdebenleerycomprenderlasinstrucciones
contenidasenestemanualydebensercapacitadosysupervisadospot
unodelospadres.0nicamentelosindividuosresponsablesquesehayan
familiarizadoconestasreglasdeseguridadparalaoperaci6ndeber_nusar
estam_quina.
Inspecdoneminudosamenteel_reaendondeutilizar_elequipo.Saque
todaslaspiedras,palos,cables,huesos,juguetesy otrosobjetosextrafios
conlosquepodriatropezaro quepodrianserarrojadosporlacuchilla.Los
objetosarrojadosporlam_quinapuedenprodudrlesionesgraves.Planifique
elpatr6nenelquevaair descargandoel recorteparaevitarqueladescarga
dematerialserealicehadaloscaminos,lasveredas,losobservadores,etc.
Eviteadem_sdescargarmaterialcontralasparedesyobstrucdonesque
podrianprovocarqueelmaterialdescargadorebotecontrael operador.
Paraayudara evitarelcontactoconlacuchillao unalesi6nporunobjeto
arrojado,mant_ngaseenlazonadeloperadordetr_sde lasmanijasy
mantengaa losnifios,observadores,ayudantesymascotasapartadosal
menos75metrosdelapodadoramientrasest_enoperad6n.Detengala
m_quinasialguienentraenlazona.
Paraprotegerselosojosutilicesiempreanteojosoantiparrasdeseguddad
mientrasoperalam_quinaomientraslaajustaorepara.Losobjetos
arrojadosquerebotanpuedenlesionargravementelavista.
Utillcezapatosdetrabajoreslstentes,desuelafuerteypantalonesycamlsas
ajustados.Serecomiendautillzarcamlsasypantalonesquecubranlosbrazos
ylaspiernas,as[comocalzadoconpuntasreforzadasenacero.Nuncaopere
estam_quinaconlospiesdesnudos,sandalias,oconzapatosIlgeroso con
losquesepuedaresbalar(pot ejemplo,calzadodeIona).
Nopongalasmanosolospiescercadelasplezasrotatodasoenlatolvade
lacortadora.Elcontactoconlascuchlllaspuedeprodudrlaamputad6nde
manosy pies.
Unacublertadedescargafaltanteodafiadapuedeprovocarelcontactocon
lacuchillao lesionespotobjetosarrojados.
Muchasleslonesocurrencomoresultadodepasarlacortadorasobrelospies
duranteunacaJdaprovocadapotderrapesotroplezos.Nosesostengadela
podadorasiseest_cayendo,sueltelamanljalnmediatamente.
Nuncatire haciaustedlapodadoramlentrascamlna.Sideberetrocederla
podadoraparaevitarunapareduobst_culo,mirepdmeroabajoyarraspara
evltartropezarseyluegoslgaestospasos:
a. Retrocedadelapodadorahastaestirarcompletamentesusbrazos.
b. Aseguresequeest_blenequillbradoyblenparado.
c. Tirede lapodadoralentamentehadausted,no m_sall_de lamltad
deladlstanciaentreustedylapodadora.
d. Repitaestospasoscomoserequiera.
Noopereestam_quinaestandobajolosefectosdelalcoholodedrogas.
Noembragueel mecanlsmodeautopropulsi6nenunldadesconesteequipo
mlentrasarrancaelmotor.
Elmecanlsmodecontroldelacuchillaesundispositivodeseguridad.Nunca
lntentedesviarsedesufundonamlento.Dehacerlonofundonar[anlos
dlsposltlvosdeseguddady podrianprodudrseleslonespersonalesporel
contactoconlascuchlllasglratodas.Lasmanljasdecontrolde lacuchllla
debenfundonarblenenambasdlrecdonesyregresarautom_ticamenteala
posid6ndedesengranecuandoselassuelta.
34

Nuncaoperelapodadoraenc_spedhumedo.Siempreest_segurode su
equilibdo.Sitropiezaycaepuedelesionarsegravemente.Sisienteque
pierdeelequilibrio,suelteinmediatamentelamanijadecontrolde la
cuchillaylacuchilladejar_degiraren tressegundos.
Corteelc_spedsolamenteconluzded[ao conunabuenaluzartificial.
Camine,nuncacorra.
Detengalacuchillacuandocrucecaminosdegravilla,pasosoandadores.
Silam_quinacomenzaraa vibrardemaneraanormal,detengaelmotor,
ybusqueinmediatamentelacausa.Lavibrad6nporIogeneralesuna
advertendadealgunproblema.
Apagueelmotoryesperehastaquelacuchillasedetengacompletamente
antesderetirarlaguardaparael recortedec_spedo desatorarlatolva.La
cuchillacontinuagirandoporunoscuantossegundosdespu_squeel motor
sehaapagado.Nuncacoloqueningunapartedelcuerpoenel _readela
cuchillahastaqueest_seguroquelacuchillahadetenidosumovimiento
rotatorio.
Nuncaoperelacortadorasinlasguardasapropiadas,cubiertadedescarga,
guardapararecorte,manijadecontroldelacuchillayotrosdispositivosde
seguddadyprotecd6nen sulugaryfundonando.Nuncaoperelacortadora
silosdispositivosdeseguddadest_ndaffados.SinoIohace,estopuede
tenetcomoresultadolesiones.
Elsilenciadoryelmotorsecalientanypuedenprodudrquemaduras.Nolos
toque.
Utilicesolamentepartesyaccesonosfabricadosespedalmenteparaesta
m_quina,onginalesdelfabncante(OEM).S[noIohace,estopuedetener
comoresultadolesionespersonales.
Paraencenderel motor,jalede lacuerdalentamentehastaquesienta
resistencia,luegojaler_pidamente.Elreplieguer_pidodelacuerdade
arranque(tensi6nde retroceso)lejalar_lamanoyelbrazohadael motor
m_sr_pidodeIoqueustedpuedesoltar.Elresultadopuedenserhuesos
rotos,fracturas,hematomasoesguinces.
Sisepresentansituacionesquenoest_nprevistasenestemanualsea
cuidadosoyuseelsentidocomtin.
DIENTES
Laspendientessonunfactor[mportantequeserelacionaconlosaccidentes
produddospotderrapesyca[dasyquepuedenproducirlesionesgraves.La
operad6nen pendientesrequieremayorprecaud6n.Sinosesienteseguroenuna
pendiente,nolapode.Parasegundad,useel medidordependientesqueseincluye
comopartedeestemanualparamedirlapendienteantesdeoperarlaunidaden
unazona[nclinada.S[lapendientesuperalos15grados,nolapode.
Haga Io siguiente:
Muevalapodadoraatrav_sdelascarasdelapendiente,nuncahaciaardbay
abajo.Tengacuidadocuandocambiededirecd6ncuandooperelam_quinaen
pendientes.
Est_atentoalosagujeros,rakes,rocas,objetosocultosoabultamientosque
puedanprovocarquesederrapeo setropiece.Elc_spedaltopuedeocultar
obst_culos.
Siempreest_segurodesuequilibdo.Sitropiezaycaepuedelesionarse
gravemente.Sisientequepierdeelequilibno,suelte[nmediatamentelamanija
decontroldelacuchillaylacucMladejar_degirarentres(3)segundos.
No haga Io siguiente:
Nocorteelc_spedcercade pozos,hundimientos,bancos,podr[aperderel
equlllbrlo.
Nopodependientesmayoresde 15gradoscomoIoindicael medidorde
pendientes.
Nopodeelc_spedht_medo.SInoest_firmementeparado,puederesbalarse.
NINOS
Puedenocurnracddentestr_gicoss[eloperadornoest_atentoalapresendade
nifos.PotIogeneralalosnifos lesatraenlaspodadorasylaactividaddepodarel
c_sped.Noentiendenlosdesgosnllospeligros.Nuncad_porsentadoquelosnifos
permanecer_nenelmismolugardondelosviopott_ltimavez.
Mantengaalosnifosfueradel_reade trabajoy bajoestdctavigilandade un
adultoresponsableadem_sdeloperador.
Est_alertay apaguela podadorasiunnifo ingresaal _rea.
Antesy mientasseest_moviendohadaarras,mirehadaarrasycuideque
nohayanlffos.
Tengaextremaprecaud6ncuandoseaproximeaesquinasdegas,entradas
depuertas,_rbolesuotrosobjetosquepuedanobstaculizarlelavistadeun
nifo quepudiesecorrerhadalapodadora.
Mantengaalejadosalosnifosdelosmotoresenmarchaocalientes.Pueden
sufrlrquemadurasconun sllendadorcallente.
Nuncapermitaquenifos menoresde14afrosoperenestam_quina.Los
nifos mayoresde14afrosdebenleeryentenderlasinstrucdonesde
operad6nyreglasdeseguddadcontenidasenestemanualydebenset
entrenadosysupervlsadosporsuspadres.
SERVIClO
Manejo seguro de la gasolina:
Paraevitar lesionespersonalesodafos materialesseasumamentecuidadoso
al manipularla gasolina.Lagasolinaesaltamente inflamabley losvapores
sonexplosivos.Sepuedelesionargravementesi derramagasolinasobreusted
o sobrela ropaya quesepuedeencender.
Utilices61orecipientesparagasolinaautorizados.
NuncaIleneloscontenedoresenel interiordeunvehkuloocami6nocajade
camionetaconrecubrimientospl_sticos.Coloquesiemprelosrecipientesen
el pisoy lejosdel vehkuloantesdeIlenarlos.
Retireel equlpoagasollnadelcaml6noremolqueyII_neloenel plso.Slesto
noesposible,entoncesIlenedichoequipoenunremolqueconun redpiente
port_til,envezdedesdeundispensadordegasolina.
MantengalaboquilladeIlenadoencontactoconel bordedelaentradadel
tanquedegasolinaocontenedorentodomomentohastaqueest_Ileno.No
utillceundlsposltlvoparaabrlr/cerrarlaboqullla.
Apaguetodoslosdgardllos,dgarros,pipasyotrasfuentesdecombusti6n.
Nuncacarguecombustibleenlam_quinaenintedoresporqueLosvapores
inflamablespodr[anacumularseen el_rea.
Nuncasaquelatapadelgasniagreguecombustiblemientraselmotorest_
calienteo enmarcha.Dejequeel motorseenfr[eporIomenosdosminutos
antesdevolveracargarcombustible.
35

Nuncarecargueeltanquedecombustible.Lleneeltanquenom_sdeI
pulgadapordebajode labasedel cuellodellenadoparadejarespadoparala
expansi6ndelcombustible.
Vuelvaacolocarlatapadelagasollnayajfistelablen.
Limplelagasollnaderramadasobreel motoryelequipo.Trasladela
m_quinaaotrazona.Espere5 mlnutosantesdeencenderelmotor.
Nuncaalmacenela m_quinao elredpientedecombustibleen unespado
cerradodondehayafuego,chlspasoaparatosconpilotocomoporejemplo,
calentadoresdeagua,calentadores,hornos,secadoresderopau otros
aparatosagas.
Pararedudrel rlesgodeincendlomantengalam_qulnalimpiadepasto,
hojasydeacumulaci6ndeotrosescombros.Limpielosderramesdeacelteo
combustibleysaquetodoslosdesechosembebldosconcombustible.
Dejequela m_quinaseenfrie5 minutosporIomenosantesdealmacenarla.
Funcionamiento general:
Nuncaenciendaunmotorenespacioscerradosoenunazonaconpoca
ventilad6n.Elescapedel motorcontienemon6xidodecarbono,ungas
inodoroyletal.
AntesdeIlmpiar,repararo lnspecdonarlam_quina,compruebequela
cuchHlaytodaslaspartesquesemuevensehandetenldo.Desconecteel
cabledelabujiayp6ngalodemaneraquehagamasacontrael motorpara
evitarqueseendendademaneraaccidental.
Reviselospernosdemontajedelacuchlllaydel motora lntervalos
frecuentesparaverlficarqueest_nbienapretados.Inspecdoneadem_s
vlsualmentelacuchHlaenbuscadeda_os(abolladuras,desgaste,roturas,
etc.).Reemplacelacuchillaconequipooriginaldelfabrkante(OEM)
Ilstadoenestemanual.Lautilizaci6ndepartesquenocumplanconlas
espedficacionesdeequlposoriginalespodriatenercomoresultadoun
rendimlentolncorrectoyadem_slasegurldadpodriaestarcomprometida.
LascuchHlasde laspodadorassonmuyafiladasy podriancortarlo.Envuelva
lacuchillao utiliceguantesyextremeprecaudonescuandoledeservkio.
Mantengatodoslospernos,tuercasytornillosbienajustadospara
asegurarsequelam_qulnaseencuentraencondlclonessegurasde
operad6n.
Nuncamanipulelosdispositivosdesegurldaddemaneralmprudente.
Controleperi6dicamentequefundonendeformaadecuada.
Despu_sdegolpearconalgtinobjetoextra,o,detengaelmotor,desconecte
elcabledelabujiayconecteelmotoramasa.Inspecdoneminudosamente
lam_quinaparadetermlnarsiest_da_ada.Repareelda_oantesde
encenderlayoperarla.
Nuncatratedeajustarunaruedao laalturadecortemientraselmotorest_
enmarcha.
Loscomponentesdelatolvapararecorte,cublertadedescargayescudode
riel,est_nsujetosadesgasteydaffosquepodriadejarexpuestaspartesque
semueveno permltirquesearrojenobjetos.Paraprotegersusegurldad,
verlfiquefrecuentementetodosloscomponentesyreempl_celoss61ocon
partesdelosfabrkantesdeequlposoriginales(O.E.M.)listadaseneste
manual.Lautilizad6ndepartesquenocumplanconlasespeciflcadonesde
equiposoriginalespodriatenercomoresultadounrendimlento[ncorrectoy
adem_slasegurldadpodriaestarcomprometida.
Nocambielaconflgurad6ndelreguladordelmotorniaceleredemadadoel
mismo.Elreguladorcontrolalaveloddadm_ximaseguradeoperad6ndel
motor.
Verifiquefrecuentementelalineade combustible,eltanque,eltapbn,ylos
accesoriosbuscandorajaduraso pdrdidas.Reemplacedesernecesario.
Noddarranqueal motorsi noest_labujiadeencendido.
Mantengao reemplacelasetiquetasdeseguridad,segtinseanecesario.
Observelasleyesy normasaplicablesparadisponeradecuadamentedelos
desechos.Ladescargainapropiadadeliquidoso materialespuededa_arel
medioambiente.
SegtinlaComisibnde SeguridaddeProductosparaelConsumidordelos
EstadosUnidos(CPSC)ylaAgenciadeProtecci6nAmbientaldelosEstados
Unidos(EPA),esteproductotieneunavidatitil mediadesiete(7)a_os,
6 140horasde fundonamiento.AI finalizarlavidatitil media,adquiera
unam_quinanuevao hagainspeccionaranualmente_staSearsporuno
uotrodistribuidordeserviciosparacerciorarsedequetodoslossistemas
mec_nicosyde seguridadfundonancorrectamenteynotienenexcesivo
desgaste.SinoIohace,puedenprodudrseacddentes,lesionesomuerte.
NO MODIFIQUE EL MOTOR
Paraevitar lesionesgraveso la muerte,nomodifique elmotor bajoninguna
circunstancia.Sicambialaconfiguraci6ndel reguladordel motorel motor
puededescontrolarseyoperaravelocidadesinseguras.Nuncacambiela
configuraci6ndef_brica del reguladordel motor.
AVISO REFERIDO A EMISIONES
Losmotoresqueest_ncertificadosycumplencon lasregulacionesde
emisionesfederalesEPAyde CaliforniaparaSORE(Equipospequeffostodo
terreno)est_ncertificadosparaoperarcongasolina(omfin sinplomoy
puedenincluirlossiguientessistemasdecontroldeemisiones:Modifkaci6n
demotor (EM)y catalizadordeires vias(TWC)siest_nequipadosdeesa
manera.
GUARDACHISPAS
Estam_quinaest_equipadaconunmotor de combusti6ninternayno
debeserutilizadaeno cercade unterreno agrestecubierto pot bosque,
malezaso hierbaexceptosi el sistemadeescapedel motorest_equipado
conunamortiguador dechispasquecumpla conlasleyeslocaleso
estatalescorrespondientes,encasodehaberlas.
Siseutiliza un amortiguador dechispasel operadorIo debemantener
encondicionesde usoadecuadas.Enel EstadodeCalifornia lasmedidas
anteriormente mencionadassonexigidaspotley (Artkulo 4442del C6digo
de RecursosPfiblicosde California).Esposiblequeexistanleyessimilaresen
otrosestados,l.asleyesfederalesseaplkan en territorios federales.
Puedeconseguirel amortiguadordecbispasparael silenciadoratray, sdesu
distribuidor autorizadodemotoreso poni_ndoseencontactoconel centrode
servicioSears.
36

S|MBOLOSDESEGURIDAD
Esta p_gina representa ydescribe la seguridad lossimbolosque pueden parecer en este producto. Lea, comprenda, y sigatodas instruccionesen la m_quina
antes procurar para reunir y operar.
• ®
1At
LEA EL MANUAL(S) DEL OPERADOR
Lea, comprenda, y siga todas instrucciones en el manual (manuales) antes procurar para reuniry
operar.
PELIGRO-- GIRANDO HOJAS
Para reducir el riesgo de herida, guarde manos y pies lejos. No funcione a menos que la tapa
de descarga o el receptor de hierba est6n en su lugar apropiado. De ser daflado, sustituya
inmediatamente.
PELIGRO-- ESPECTADORES
No siegue cuando los niflos o los otros est_n alrededor.
PELIGRO-- Die EL CORTE DE PIE/
Guarde manos y pies lejos de hacer girar partes.
PELIGRO-- Escombros Lanzados
Quite objetos que pueden ser lanzados pot la I_mina en cualquier direcci6n. Lleve galas de seguridad.
PELIGRO-- Cuestas
Use extra la precauci6n en cuestas. No siegue cuestas mayores que 15°.
ADVERTENClA DESPIDA
Para reducir el riesgo de incendio mantenga la m_quina limpia de pasto, hojas y de acumulaci6n de
otros escombros.
ADVERTENCIA VAPORES TOXICOS
Nunca encienda un motor en espacios cerrados o en una zona con poca ventilaci6n. El escape del
motor contiene mon6xido de carbono, un gas inodoro y letal.
ADVERTENClA-- SUPERFIClE CALIENTE
Las partes del motor, especialmente el silenciador, Ilega a set muy caliente durante la operaci6n.
Permita motor y silenciador para ponerse fifo antes de tocar.
ADVERTENCIA: Suresp0nsabilidad-Restringirel us0deestam_quinam0t0rizadaa laspersonasqueLean,c0mprendany
respetenlasadvertenciase instrucci0nesdeestemanualy enlam_quina. J
GUARDEESTASINSTRUCCIONES!
37

t_
,/
(ACEPTAR)
15° Pendiente
(DEMASIADO ESCARPADO)
_- _. Figura1
" " "- 15°/fneadisco t.
USO BE ESTE PENBiENTE BE CALIBREPARA BETERrvIINAR
SiUNA PENDIENTE ES DEMASIADO ESCARPADO PARA UNA OPERACION SEGURA!
Paracomprobar la pendiente, haga Io siguiente:
1. Borrar esta p_gina y doble a Io largo de la linea discontinua.
2.
3.
4.
5,
Localizar un objeto vertical sobre o detr_.sde la pendiente (un poste, un edificio, una valla, un _.rbol,etc.)
Alinee cada lado de pendientede calibre con el objeto vertical (consultar Figura 1 and Figura 2 ).
Ajuste el pendiente de calibre arriba o haciaabajo hasta los toques esquina izquierda el pendiente
(consultar Figura 1 and Figura 2).
Si hay un espacio por debajo de la pendiente decalibre, el pendiente es demasiado escarpa por operaci6n
segura (consultar Figura 2 above).
Figura 2
15° Pendiente
Las pendientesson un factor importante relacionadocon un vuelco y renovaci6nde los accidentesque pueden provocar lesionesgraves o la muerte.
No utilice la ma.quinaen pendientes de ma.sde 15grados. Todos pendientesrequiere mayorprecauci6n.Si no puede retroceder en la pendiente o si se
siente inseguro en ella, no la recorte. Siempre corte el cesped en toda la superficie de la cuesta. Nuncaarriba y abajo las pendientes.

IMPORT,4NTE:Estaunidadseenviasingasolinani aceiteenelmotor.Antesde
comenzarocorrerlam_quinacargueelmotorcongasolinayaceitecomoseindica
enlasecddnde operaddndeestemanual.
NOT,4:Lasreferendasa losladosderechoe izquierdodelacortadoradec_spedse
hacenobservandolam_quinadesdelaposiddndeoperaddn.
APERTURADELACAJADECARTON
1. Cortecadaunadelasesqulnasdelacajaverticalmente,delapartesuperior
alabase.
2. Saquetodaslasplezassueltas.
3. Quiteelmaterialdeempaquesuelto.
COMOSACARLAUNIDADDELACAJA
1. Elevelaunldaddesdelaparteposteriorparasepararladel materialdelacaja
quequededebajoyhagarodarlaunldadfueradelacaja.
2. Verlfiqueculdadosamentesienlacajaquedaalgunapartesuelta.
Piezassueltasdentro de lacaja
Colectordec_sped
Tolvadedescargalateral
Aceitedel motor
Montaje
Montaje de la manUa
I. Retireelmaterialdeempaquequepudieraestarentrelasmanijassuperior
einferior.
2.
f
a. Quitelostornlllosytuercasdemarlposatransportedesdeelmango
comosemuestraenlaFlgura1.Noaflojeo qultaradyacentes
tornlllosdecabezahexagonal.
b. S[bienlaestablllzad6ndecortac_spedporIoquenosemueve,
pivoteasasuperiorcomosemuestraen laFlgura2. Noengarzado
cablemlentraslevantala palancahadaarrlba.
RetirelaT-pernosdelamanljaentrecorchetescomosemuestraenlaFlgura3.
Figura 2
Figura 3
Figura 1
39

4.
Sigalossiguientespasosparacompletarconjuntodel mango:
a. Tirehadaarribaenelasahastaagujerosenlamanija(quese
muestraenlaFigura3cortedelacubierta)sealineanconlos
agujerosenelmangosoporte.YealaFigura4.
NOTA:AItirarhadaarribala palanca,asegtiresedequeno tiredemanejar
todoelcamino.
b. InserteelT-pernosquit6anteriormenteatrav_sdelmango
corchetesyasainferioryaprietebienparaasegurarelmangoensu
lugar.VealaFigura4.
c. Vuelvaacolocartuercasypernosdetransporteretirarseantesen
unareducdbndelosagujerosdelamanijacomosemuestraen la
Figura5.
Lagu[adelacuerda,queest_conectadaalavarilladesost_n,seencuentra
sobreel ladoderechodela manijainferior.VealaFigura6.
a. Sostengalamanijadecontrolde lacuchillacontrala manijasuperior.
b. Jalelacuerdadearranqueparasacarladel motor.Suelteelcontrol
delacuchilla.
c. Deslicelacuerdadearranqueen laguia.
d. Laataduradecableusoparagarantizarcableparabajarde manejar.
Conexi6nde la (olectora de (_sped
I. Paraensamblarelcolectordec_sped(desernecesario),Hagaelderto
bolsoesdio vueltaa laderechaelladoantesdereunir(la advertendadela
etiquetaser_potfuera):
a. Coloquela bolsasobreelmarcoconel ladonegrodepl_sticoenel
rondo.
b. Deslkeelcanaldepl_sticosobrelosganchosdelmarco.VealaFigura7.
Paraacoplarelcolectordec_sped:
a. Levantelapuertadedescargaposterior.
b. Lugardecolecd6ndec_spedenlasranurasen elmangoentre
corchetescomosemuestraenla Figura8. Sueltelapuertade
descargademodoquedescansesobreelcolectordec_sped.
Figura5
Figura 6
J
Figura4
40
Figura7
,J

Paraquitaral receptordehlerba,levantelapuertadedescargatraseraenel
cortac_sped.Ascensorc_spedyfueradelasranurasenel mangoentrepar_ntesis.
Elreversodeliberad6ndescargalapuertaparapermitirqueellocerraralaapertura
traseradelcortac_sped.
Conexi6nde Canalde DescargaLateral
Supodadorahasidoenviadacomoabonadora.Sihatelaconversi6nadescarga
lateral,asegtiresedequeelcolectordec_spedest_fueradelaunidadyquela
puertadedescargatraseraest_cerrada.
1. Enelcostadodelapodadora,levanteeladaptadorparaabono.YeaFigura9.
2. Deslicelosdosganchosdelcanaldedescargalateraldebajodelpasadorde
bisagrasobreelmontajedel adaptadorparaabono.Bajeeladaptadorpara
abono.Noextraigaladavijaparaabonolateralencualquiermomento,atin
cuandonoest_abonando.
Ajustes
Altura de corte
Hayunapalancadeajustede alturadetorte,situadoencimadelaruedadelantera
derechaytrasera.
1. Presionelapalancahacialarueda(unidadtender_acaercuandosesueltala
palanca).
2. Mu_valaacualquierdelasposicionesparalaalturadetortedeseado.Veala
Figura10.
3. Liberelapalancahadalacubiertadelapodadora.
IMPORTANTE:Tantolasruedasdelanterasytraserasdebencolocarseenlamisma
posid6nrelativa.Cuandoelterrenoesagresteo irregularcambielapalancade
ajustedelaalturaa unaposici6nm_salta.Deestamanerasecuidam_selc_sped.
Indinaci6n de la manija
Porconvenienciadelaoperaci6n,puedeajustarlainclinaci6ndelamanijadela
siguientemanera:
1. Quitelostornillosytuercasdemariposatransportedemanejar.VealaFigura11.
2. Coloqueel mangoenunade lastresposicionesquesesientam_sc6modo.
YealaFigura11inserd6n.
3. Fijela posici6ncontuercasypernosdetransporteeliminadoantes.
Figura8
J
41
f Clavijaparaabono "_
lateral
Canalde Descarga
Figura9
Inferior
Figura10
J
Figura11

Arrancador
de retroceso
Colector de
Tap6n de aceite/varilla
de medid6n del nivel
de aceite
Lavado de la Plataforma
Palanca de
ajuste de altura
de corte
Palanca de
ajuste de altura
de corte
Canalde
DescargaLate_Escud ode ruta
Tapdn De Gasolina Buj_a de
encendido
Clavija para
abono
Figura12
Clavija ParaAbono
Controlde CuchUla
Elcontrolde lacuchillaest_unidoalamanijasuperior.Presionelamanijadecontrol
delacuchillacontralamanijasuperiorparaoperarlaunidad.Sueltelamanijade
controldelacuchillaparadetenerelmotorylacuchilla.
Elcontroldelacuchilla esundispositivodeseguridad.Nuncaintente
anular sufuncionamiento.
Eladaptadorparaabonoseutilizat_nicamenteparapropbsitosdeabono.Envez
derecolectarlosrecortesdelc_spedenun colectordec_spedo canaldedescarga
lateral,algunosmodelosdepodadoratienenlaopd6nderedrcularlosrecortesen
elc_sped.Estosellamaabonar.
Canalde DescargaLateral
Sucortac_spedestransportadocomounmulcher.Paradescargarlosrecortes
deperi6dicodehierbaalladoencambio,siga[asinstrucdonesenlasecd6nde
Montajeparaatarelcanaldedescargalateral.
PalancadeAjustede ia Alturade torte
Unapalancadeajusteseencuentraen laruedatraseraderechayel otrose
encuentraenlaruedadelanteraderecha.Losdospalancastienenqueestarenla
mismaposid6nrelativaparaaseguraruncorteuniforme.Paraajustarlaalturade
corte,serefierena lasecci6ndeMontaje.
Lavadode ia Plataforma
Mantengasusmanosy piesalejadosdel _rea del canalde la plataforma de
corte.Consultela etiqueta deadvertenciasenla unidad.
Escudode Ruta
Elescudoderutaseadjuntaala partetraseradelam_quinayest_ah[para
protegeraloperadordeescombrosquevuelan.Noutiliceelcortac_spedamenos
queel escudoestotalmentefuncionalyensulugar.
Arrancadorde Retroceso
Laplataformadesupodadoraest_equipadaconunpuertodeaguasobresu
superfidecomopartedelsistemadelavadodelaplataforma.Utilkeellavadode
laplataformaparalavarla parteinferiordelaplataformayquitarlosrecortesde
c_sped.
Elarrancadorderetrocesoest_unidoa lamanijasuperiorderecha.Paraencenderla
unidadcol6quesedetr_sdelamismaytiredelacuerdadelarrancadorde retroceso.
Cumpleconias normas deseguridad deANSi
Lascortadorasdec_spedCraftsmancumplenconlasnormasdeseguridaddelInstitutoEstadounidensedeNormasNadonales(ANSI).
42

LLENADODEGASOUNAYACEITE f
AceJte (seenviauna botellajuntoconla unidad)
Primer uso
1. Saquelavarilladel niveldeaceite(G).VealaFigura13.
2. Conlacortadoradec_spedubkadaensuelonivelado,viertaelaceite
lentamentepordentrodeltubo deIlenadodeaceitedel motor(H).
3. VuelvaacolocarlavarilladeIlenadodeaceiteyajtistela.
Usos postedores
Useaceiteparamotorde4 tiemposquecumplaosobrepaselosrequisitospara
laclasificaci6ndeservkioAPISF,%, SH,SJoequivalente.Compruebesiemprela
etiquetadeservidoAPIen elredpientedel aceiteparaasegurarsequeincluyelas
letrasSF,SG,SH,SJoequivalente.
Temperaturasalairelibrededeterminarlavlscosidaddelaceitecorrectopara
el motor.Uselatablaparaselecdonarlamejorviscosidadparaelrangode
temperaturaalairelibreseespera.
lO4 _
86 i Z
s°
s2
14
_4
_22
4O
o so
2o
18
8
10
_20
J
Pordebajode40° F(4° C)elusodeSAE30dar_ilugaradurosdepartida.
_ Porencimade 80oF(27oC)elusode10W-30puedeprovocarunaumentodel
consumodepetr61eo.Niveldeaceiteconm_isfrecuencia.
1. Reviseelaceiteconel motorparadoy nivelado.
2. Quitelatapadeldep6sitodeaceite/varillamedidoradel niveldeaceitey
limpiela.
3. Coloqueyajustelavadllaindkadora.Luegoquitelapararevisarelnivelde
aceite.VealaFigura13.
4. Siel niveldeaceiteest,1cercao pordebajodelamarcadelimitebajodela
vadllamedidoradel niveldeaceite,quitelatapadel dep6sitodeaceite/
varillamedidoradel niveldeaceitey II_neloconelaceiterecomendado
hastalamarcadelimite superior.NoIlenede m_is.
5. Vuelvaainstalarlatapa/varillamedidoradelniveldeaceite.
Gasolina
Noutilice gasolinasnoaprobados,tales comoE85.Nomezcleel aceite
enla gasolinao modifkar el motor parafundonar concombustibles
alternativos.Estodahar_ loscomponentesdel motor y anularla garant(a
del motor.
Figura 13
Decombustibledebecumplirestosrequlsitos:
Limpia,fresca,lagasolinasinplomo.
Unminimode87octane/87AKI(91RON).
J
Lagasolinaconhastaun 10%deetanol(gasohol)esaceptable.
Echegasolinaenun_ireabienventiladayconel motorparado.Sielmotorha
estadofundonando,dejequeseenfdepdmero.Noechegasolinaa lam_iquinaen
elinteriordeunedifldo dondelosvaporesdelagasolinapuedanestarexpuestosa
algunallamao chispa.
Lagasolinaesaltamente inflamableyexplosivay ustedpuedequemarse
o lesionarsegravementeal reabastecer.Pareel motory mantengalejos
el calor,laschispasy lasllamas.Reabastezcas61oalaire fibre.Limpie
inmediatamentelosderrames.
Sivaa usarel equipodeformaintermltenteos6loocasionalmente,consultela
secd6ndeAlmacenamientoFueradeTemporadaparaobtenerm_isinformad6n
sobreel detedorodelcombustible.
NOTA:Elcombustiblepuededaffarlapinturayalgunostiposdepl_istico.Tenga
cuidadodenoderramarcombustiblecuandoIlenaeltanque.
Nousenuncagasolinaranciaocontaminadani mezdasdeaceiteygasolina.No
permitaqueentresuciedado aguaeneltanquedecombustible.
1. Quitelatapadeltanquedecombustible.
2. Agreguecombustiblehastalaparteinferiordellimitedenivelde
combustibleeneltubodeltanque.NoIlenedem_is.Limpieelcombustible
derramadoantesdearrancarelmotor.
3. Apneteeltap6nfirmemente.
4. Antesdearrancarelmotor,al_jesealmenos3 metrosdelemplazamientoy
lafuentedelagasolina.
43

Aseguresedequeningunapersonaaparte del operadorpermanezca
cercade la cortadoramientrasarrancael motor u operala misma.Nunca
enciendael motor en espacioscerradosoenuna zonacon pocaventilaci6n.
Elescapedel motor contienemon6xidodecarbono,ungasinodoroy letal.
Mantengalasmanos,lospies,el cabelloy la ropasueltaalejadosdelas
partesm6vilesdel motor yde la cortadora.
ParaEncenderel Motor
Col6quesedetr_sde lapodadora,aprietelamanijadecontroldelacuchillay
sost_ngalacontralamanijasuperior.
Sostengafirmementelasdosmanijasjuntas,tome lamanijadelarrancador
deretrocesoytire delacuerdaparasacarlaconun movimientor_pidoy
continuo.VealaFlgura14.Mantengafirmelamanljadelarrancador,deje
quelacuerdaregreselentamentealarrancador.Repitahastaqueelmotor
est_en marcha.Dejequelacuerdaseenrosquelentamentede regreso.
Deretracci6nr_pidadel cord6nde arranque(soborno)tirar_ demanoy el
brazohaciael motor m_sr_pidodeIo quepuededejar it. Lasfracturasde
huesos,fracturas,contusionesoesguincespodriaresultar.
Para Detener ei Motor
1. Sueltelamanijadecontrolde lacuchillaparadetenerelmotorylacuchilla.
Esperea que[acucNiia sehayadetenido potcompietoantesdehacer
cua[quiertrabajo en [a cortadoraode retirar e[ co[ectorde c_sped.
Usode ia Cortadora de C_sped
AsegLiresedequeelc_spedest_libredepiedras,palos,cablesuotrosobjetos
quepudiesendaffarlacortadorao elmotor.Dkhosobjetospuedenserarrojados
acddentalmenteporlacortadoraencualquierdirecd6nyprovocarlesiones
personalesgravesal operadory a otraspersonas.
AIoperarunacortadoradec_spedesposiblequeobjetosextraffossean
arrojadosa losojos,Iocual puededaffarlosgravemente.Utilicesiempre
galasdeseguridaddurantela operaci6nde lacortadoradec_spedo
mientraslaajusta o repara.
f
J
Figura14
UsocomoAbonadora
Paraabonarelc_sped,quiteelcolectordec_spedyel canaldedescargalateralde
la m_quina.Lapuertadedescargaposteriordeber_estarcerrada.Paraunabono
efidente,nocortec_spedhumedo.SIelc_spedhacreddom_sde10,2cm.(4
pulg.)noserecomiendaelusodelapodadoracomoabonadora.Enesecaso,useel
colectordec_spedparaembolsarlosrecortes.
Usodei Colectorde C sped
Puedeutilizarelcolectordec_spedpararecogerdichosrecortesmientrasoperala
podadora.
1. Acopleelcolectordec_spedsiguiendolas[nstrucdonesen lasecd6nde
Montaje.Losrecortesdec_spedserecolectar_nautom_tkamenteenla
bolsaa medidaquepaselapodadora.Operelapodadorahastaquelabolsa
derecolecd6nest_Ilena.
2. Detengaelmotorporcompletosoltandolamanijadecontroldelacuchilla.
Compruebequelaunidadsehayadetenidoporcompleto.
3. Paradeshacersedelosrecortesdec_spedlevantelapuertadedescargay
tire delabolsaderecolecd6nhadaarriba,apart_ndoladelapodadora.
Sigolpeaunobjeto extraffo,detengael motor. Retireel cabledelabujia,
inspeccionedetenidamentelacortadoraparavet quenotengadaffos,y
repareel daffoantesdevolvera encendery operar.Elexcesode vibraci6n
delacortadoradurante laoperaci6nesunaindicad6n dedaffo.Sedebe
inspecdonary repararla unidadIoantesposible.
44

PROGRAMADEMANTENIMIENTO
Antesderealizarcuaiquiertipo demantenimiento o servicio,desenganche
todos loscontrolesydetengael motor. Esperea quesedetengan
completamentetodaslaspiezasm6viles.Desconecteelcablede labujia
y p6ngalohaciendomasacontrael motor paraevitar queseencienda
accidentalmente.
Sigaelcronogramade mantenimientoquesepresentaa continuaci6n.Estatabla
s61odescribepautasdeservicio.UtilicelacolumnaRegistrode Servidoparahacerel
seguimientodelastareasde mantenimientocompletadas.PanubicarelCentrode
ServidoSearsm_scercanoo paraprogramarunservicio,simplementecomuniquese
conSearsalteBfono1-800-4-MY-HOME®.
Cadauso
lras meso5 horas
Anualmenteo25horas
1. Niveldeaceitedelmotor
2. Piezassueltasofaltantes
3. Depuradordeaire
4. Unidady motor
1. Aceitedel motor
1. Depuradordeairef
2. Varillajes/pivotesdecontrolyruedas
3. Laparteinferiorde laplataformade la
cortadorade c_sped
Aceitedel motorff
Bujiadeencendido
Depuradordeaire
Sistemadecombustible
1. Verificar
2. Ajustaroreemplazar
3. Verificar
4. Limpie
1. Cambiar
1. Limpiaroreemplazar
2. Lubricarconaceiteligero
3. Limpie
Anualmenteo50horas 1. 1. Cambiar
Anualmente 1. 1. Reemplazar
2. 2. Reemplazar
Antesdealmacenar 1. 1. Hacerfuncionarelmotorhastaquesedetenga
potfaltadecombustibleo affadirestabilizador
deuntanqueIlenodecombustiblenuevo
antesdesualmacenamiento.
$ Limpiom_sa menudoencondicionespolvorientaso cuandolosescombrosaerotransportadosest_npresentes.Sustituyaelfiltro deairedesermuysucio.
ff Cambieelpetr6ieocada25horaswhemfuncionamientode[motorbajolacargapesadaoentemperaturasaltas.
Detengasiempree[motor, desconecteel cablede [a buj[ay hagamasa
contrael motor antesdereaiizarcualquiertareademantenimiento asu
m_quina.
RECOMENDACIONESGENERALES
Respetesiemprelasreglasdeseguridadcuandorealicetareasde
mantenimiento.
Lagarantiadeestacortadorano cubreelementosquehanestadosujetos
al malusoo lanegligenciadeloperador.Panredbirel reembolsototalde
lagarantia,eloperadordeber_darmantenimientoal equipotalycomose
indicaenestemanual.
Elcambiodelaveloddadcontroladadelmotorinvalidar_lagarantiadel
motor.
TodoslosajustesdebenserverificadosporIo menosunavezencada
estaci6n.
Reviseperi6dicamentetodoslossujetadoresycompruebequeest_nbien
ajustados.
45

MANTENIMIENTODELMOTOR f
Bujia de encendido
Paraunbuenfuncionamiento,labujiadebeestaradecuadamenteabiertay libre
dedep6sitos.Cambielabujiacada50horaso unavezportemporada.Reempiacela
bujiaanualmente.
1. Desconecteeicapuch6ndelabujiayretirecualquiersuciedaddei_reade
_sta.
2. UselaIlavedebujiasdeltamaffoadecuadoparaextraerla.
NO@:ReemplazarconunaChampionRJ2YXLEbujia.
3. Compruebeelentrehierroconun calibradordealambre.Laseparaci6n
correctaes0,020in.(0,51mm).VealaFigura15.Siesnecesario,reajusteel
entrehierro.
4. Instaleyaprietelabujiaalpardeaprieterecomendado.Paraelajustedel
entrehierrooelpardeapriete,consultelasecd6ndeEspecificaciones.
5. Coloqueelcapuch6ndela bujia.
Fiitrodeaire
Unfiltro deairesuciorestringir_elflujo deairealcarburadory causar_el
funcionamientodefectuosodelmotor.Inspeccioneelfiltro cadavezqueopereel
motor.Necesitar_limpiarconm_sfrecuenciaelfiltro si ustedoperaelmotoren
_reasmuypolvorientas.
Limpioelfiltro deairecada25horasde laoperaci6no unavezportemporada.
Reemplaceelfiltro deaireanualmente.
Nuncaarranqueu opereei motor siremovi6ei conjuntodei fiitro deaireo
el fiitro de aire.
NO@:Nouseairea presi6nni soiventesparaiimpiareifiitro. Elaireapresi6npuede
daffareifiitro ylossoiventespuedendisoiverio.
1. Aflojeeltorniiloquesujetaiatapadepi&sticoytapade iacarcasade
inciinaci6neniapartede abajode[motor.VerFigura16.
2. Quiteelfiitro deairedeiaviviendacubiertadepi&stko.
3. Paraaflojarlosdesechos,goipeesuavementeelfiltro sobreunasuperfide
dura.Sieifiitro est&excesivamentesucio,reempi&ceioconun nuevofiitro.
4. Inserteaquicubiertaeniasranuraseniaparteinferiordeiabase.
5. Inciinaci6ndeiacubiertaparaarribaeniugarseguroyconcierre.
f
Electrodo
--9 _ O.020in. (.51ram)
Figura15
\\
Figura16
J
46

Comprobarel aceitedel motor
Comprobarelnivelde aceiteantesdecadaoperaci6n.Aseguresedequeelnivelde
aceitesemantiene.
1. Reviseelaceiteconelmotorparadoynivelado.
2. Quitelatapadeldep6sitodeaceite/varillamedidoradelniveldeaceitey
limpiela.
3. Coloqueyajustelavarilla[ndkadora.Luegoquitelapararevisarel nivelde
aceite.
4. Sielnlvelde aceiteest_cercaopordebajodelamarcadelimite bajodela
varlllamedidoradelnlveldeaceite,quitelatapadeldep6sltodeaceite/
varlllamedidoradelnlveldeaceiteyII_neloconelacelterecomendadohasta
lamarcadelimitesuperior.NoIlenedem_s.
5. Vuelvaa [nstalarlatapa/varlllamedldoradel nlveldeacelte.
Cambiarel aceitedel motor Filtro de aire /
_ap6n de
aceite/varilla de
medici6n del nivel
de aceite
Lagasolinaysusvaporessonextremadamenteinflamablesyexplosivos.
Unincendioo unaexplosi6npuedencausargravesquemaduraso la
muerte.
Cambleelaceitedelmotordespu_sde lasprimerascincohorasdeoperaci6n,ycada
cincuentahoraso unavezalatemporadadespu_s.
Sidrenaelaceitedesdeel tubo superiorde llenadodeaceite,eltanque de
combustibledebeestar vado ode Io contrariopodria presentarseunafuga
decombustiblequepodriaocasionarun incendioouna explosi6n.Para
desocuparel tanque decombustible,opereel motor basraquesedetenga
por la falta decombustible.
1. Conelmotorapagadoperoatincaliente,desconecteelcabledelabujiay
mant_ngaloadistandadelabujia.
2. Coloqueunredplenteadecuadocercadelmotorpararecogerelacelteusado.
3. Quitelatapa/varillamedidoradel niveldeaceitey dreneel aceiteal
redpienteinclinandoel motorhadaeltubode Ilenadodelaceite.Yeala
Flgura17.
Elaceiteusadoesunresiduopeligroso.Elimineel aceiteusado
adecuadamente.Noloarrojejunto con losresiduosdomkiliarios. Consulte
a lasautoridadeslocalesoal centrode servkio Searsparaaveriguard6nde
hay instaladonesparala eliminad6nl recklaje segura(o)del aceiteusado.
Figura17
Conel motoren unaposici6nnivelada,Ilenehastalamarcadelimite altoen
lavarlllamedldoradel nlveldeacelteconelacelterecomendado.
Poneren marchael motor conunnivel deaceitebajo puedecausardaffos
enel motor.
5. Vuelvaainstalarbienlatapa/varillamedidoradelniveldeaceite.
Limpie el motor
Diariamenteoantesdecadauso,limpieelc_sped,lagrasao losresiduos
acumuladosdel motor.Mantengalimpioselvarillaje,losresortesy los
controles.Mantengael _reaquerodeaalsilenciadorydetr_sdel mismofibre
decualquierresiduocombustible.
Elmantenimientodel motorencondicioneslimpiaspermiteel movimiento
de airealrededordel mismo.
Laspartesdel motorsedebenmantenerIlmplaspararedudrelrlesgode
sobrecalentamientoycombusti6ndelosresiduosacumulados.
Nouseagua paralimpiar laspiezasdel motor. Elaguapuedecontaminar el
sistemade combustible.Useuncepilloo untrapo seco.
47

Controlde la cuchilla
Lubnqueconaceiteligerolospuntosdepivotedelcontroldelacuchillaal
menosunavezcadaestad6n.Estecontroledebefundonarllbrementeenambas
dlrecdones.VealaFlgura18.
Lavadode la Plataforma
Laplataformadesupodadoraest_equipadaconunpuertodeaguasobresu
superfidecomopartedelslstemadelavadodelaplataforma.
Utiliceel lavadodelaplataformaparalavarla parteinferiordelaplataformay
quitarlosrecortesdec_spede [mpedlrlaacumulad6ndesustandasquimkas
corrosivas.
RealkelossiguientespasosDESPUESDECADACORTEDECESPED:
1. Empujelapodadoraaunazonaniveladaydespejadadelc_sped,quese
encuentresufidentementecercade unacanillade aguaal alcancedela
mangueradeljard[n.Siadjunta,quitelabolsadec_sped.
Aseguresedequeel canaldedescargadelapodadoraNOESTIeORIENTADO
enla direcci6nen queseencuentranlacasa,el garaje,losvehkulos
estadonados,etc.
2. Enrosqueelacopledemanguera(embaladoconelManualdelOperadorde
sutractor)en elextremodelamangueradejard[n.
3. Unaelacopledelamangueraalpuertodeaguaqueseencuentraenla
superfidedelaplataforma.Yeala Figura19.
4. Abraelsuministrodeagua.
5. Arranqueel motorcomosedescribeenlasecd6ndeOperad6n.
6. Hacerfundonarelmotordurantedosminutoscomom[nimo,permitiendo
quelaparteinferiordelaplataformadecorteselaveafondo.
7. Hojadecontroldelacuchillaalpararelmotory lacuchilla.
8. Desconecteelaguayretireelacopladordelamangueradesdeelpuertode
aguaqueseencuentraenlasuperfidedelaplataforma.
Despu_sdelimpiarlaplataforma,reinide[a podadora.Mantengaelmotory la
cuchillaenfundonamientodurantedosminutosporIomenosparapermitirquese
sequetotalmenteelladoinferiorde lamisma.
Figura18
f
//"
/
f
/
Figura19
48

Cuidadode ia cuchUla
Cuandosaquela cuchilladecorte paraafilarla o reemplazarla,prot_jaselas
manosusandoun parde guantesparatrabajorudoountrapogruesopara
sostenerlacuchilla.
Inspeccioneperi6dicamenteeladaptadordelacuchillaenbuscaderajaduras,
especialmentecuandogolpeeunobjetoextraffo.Realicelosreemplazos
queresultennecesarios.Sigalospasosqueaparecendebajopararealizarel
mantenimientodelacuchilla.
2.
3.
Desconecteelcapuch6ndelcabledelabujia.Girelacortadorade c_sped
sobreel costadoycompruebequeelfiltro deaireyelcarburadorqueden
mirandohaciaarriba.
Saqueel pernoyelsoportedecampanadelacuchillaquesostienenla
cuchillayel adaptadordelamismaal cigiJeffaldel motor.YealaFigura20.
Saquelacuchillay eladaptadordel dgiJeffal.
NOTA:Quitandoestosartkulos,laarandelatambi_npuedenliberarsedeel
cigiJeffal.Est_seguroparahacerlanoradelaorientaci6ndeesteartkulo
paranuevasesi6n.
\
................................Cuc_illa _- ........ Perno
Figura20
Silacuchillaest_desequilibradagenerar_vibracionesexcesivascuando
rote aaltas veloddades.Puedeprodudr daffosa la cortadoradec_spedy se
puederomper,causandoasilesionespersonales.
4. Saquelacuchilladeladaptadorparacomprobarelequilibrio.Balanceela
cuchillasobreundestornilladordeeje redondoparainspeccionarla.Saque
metaldel ladopesadohastaquequedebienequilibrada.Cuandoafile la
cuchilla,sigael_ngulooriginalde lamuelacomoguia.Afilecadabordede
corteporigualparamantenerelbalancedelacuchilla.
5. Lubriqueeldgiieffaldelmotory[asuperficieinternadeladaptadordela
cuchillaconaceiteligero.DesliceeladaptadordelacuchillasobreelcigiJeffal
delmotor.Instalelacuchillaeneladaptadorconel ladomarcado"Bottom"
(inferior)(oconelnumerode parte)hadaelpisocuandolacortadorade
c_spedest_enposid6ndefuncionamiento.Aseguresequelacuchillaquede
alineadayasentadaenlasbridasdeladaptador.VealaFigura20inserto.
6. Coloqueel soportedecampanadelacuchillaen lamisma.Alineelas
muescasdelsoportedecampanadelacuchillaconlosorificiospequeffosde
lacuchilla.
Z Vuelvaacolocarelpernohexagonalyajustelosegunlossiguientesvalores
detorsi6n:450Ib-puigcomom[nimo,600Ib-pulgcomom_ximo.
Paragarantizarlaoperaci6nsegurade lacortadorade c_sped,revise
peri6dicamenteelpernodelacuchillaparadeterminarsiest_bienajustado.
49

Nuncaalmacenelacortadoradec_spedconcombustibleen eltanque en
unespaciocerradooen_reasconpocaventilaci6n,dondelosgasesdel
combustiblepuedanalcanzarelfuego,chispaso unaluzpiloto comolaque
tienenalgunoshomos,calentadoresdeagua,secadoresderopao algun
otro dispositivoa gas.
Preparaci6ndeiMotor
Yaquelosmotoresalmacenaronm_sde30dias:
Paraimpediralagomaformarseenel sistemadecombustibleoen partes
decarburador,dirijaselmotorhastaqueestoseparea faltadel combustible
oaffadirunaditivodegasolinaalgaseneltanque.Siustedusaunaditivo
degas,dirigeelmotordurantevariosminutosparaponerendrculaci6nel
aditivoporelcarburador-- despu#squeelmotory elcombustiblepueden
seralmacenadoshasta24meses.
Mientraselmotorestodaviacaliente,cambioel petr61eo.
Limpieel motordeescombrossuperficiales.
Preparaci6n de ia Cortadora de C_sped
Limpieylubriquelacortadoracomosedescribeenlasinstruccionesde
lubricad6n.
Noutiliceunalavadoraa presi6nni unamangueradejard[nparalimpiarsu
unidad.
Cubralacuchi[[adelacortadoracongrasaparachasisparaimpedirla
oxidaci6n.
Refi_rasealaPreparaci6ndelMotorparainstruccionesdealmacenajede
motorcorrectas.
Almacenelaunidadenunazonalimpiayseca.Nolaalmacenecercade
materialescorrosivoscomoporejemplofertilizantes.
Cuandoalmacenecualquiertipo deequipomotorizadoen ungalp6ndedep6sito
met_licooconpocaventilaci6n,tengaespecialcuidadode realizarleuntratamiento
antioxidantealequipo.Useaceiteligeroo siliconapararecubrirelequipo,
especialmenteloscablesypartesm6vilesdesucortadoraantesde almacenarla.
5O

51

Antesderealizarcualquiertipo del mantenimiento/servicio,suelte
todos losmandosy pareel motor. Esperehastaquetodaslaspartesde
movimientohayanvenido a unaparadacompleta.Desconecteel alambre
debujia y b_selocontrael motor paraprevenirelcomienzoinvoluntario.
Siemprellevepuestoscristalesinastillablesdurante laoperad6no
realizandocualquierajusteo reparadones.
Estasecddnseocupa de cuestionesdemenor importanda del servkio.Paralocalizar el m_scercanoCentrode Servkio Sears,o para programar un
servido,simplemente p6ngase en contactoconSearsal 1-800-4-MY-HOMEo
Elmotornoarranca I. Controldelacuchilladesenganchado.
2. Sehadesconectadoelcapuchdndelabujia.
3. Eldepdsitodecombustibleest_vadooelcombustible
sehaechadoa perder.
4. Elmotornoest_cebado.(SiIotiene)
5. Labujianofuncionacorrectamente.
6. Elmotorsedesbordd.
7. Lineadecombustiblebloqueada.
Elmotorfundonademanera I. Elcapuchdndelabujiaest_flojo.
err_tica 2. Elcombustiblesehaechadoaperder.
3. Laventilad6ndelatapadelcombustibleest_
obstrqda.
4. Aguao sudedadenelsistemadelcombustible.
5. Elfiltrodeaireest&sudo.
6. Lineadecombustiblebloqueada.
Elmotorrecallenta 1. Elniveldeaceitedelmotorest_ibajo.
2. Flujodealrerestrlngido.
I. Engraneelcontroldelacuchilla.
2. Conecteelcablealcapuch6ndelabujia.
3. Lleneeltanquecongasollnallmplay nueva.
4. Cebeelmotortalcomoseexplkaenlasecd6nde
Fundonamiento.
5. Limpie,ajuste[aseparaddn,ocamNelabujia.
6. Esperarunosmlnutosparareactivarse,peronocebe.
7. ContacteconsucentrodepartesyreparadonesSears.
I. Conecteyajusteelcapuchdnde[abujia.
2. Lleneeltanquecongasollnallmplay nueva.
3. Destapelavendlad6n.
4. Vadeeltanquedecombustible.Carguecombustiblenuevoen
eldep6sito.
5. ConsultelasecddnMantenlmlentodelmanual.
6. ContacteconsucentrodepartesyreparadonesSears.
1. Lleneel motorconlacantidadytlpodeacelteadecuado.
2. Limpielosresiduosdealrededordelasaletasderefrlgerad6n
delmotorydelalojamlentodelsoplador.
LNECESITA MAS AYUDA?
Encontrar5 b I_e pue tay m_ en managemylife.com - isin cargo!
En linea podr_ encontrar este manual y los manuales de todos los otros productos que posea,
Sus preguntas ser_n respondidas pot nuestro equipo de especialistas,
Obtenga un plan de mantenimiento personalizado para su hogar.
Encuentre informacidn y herramientas que Io ayudar4n con los proyectos de su hogar.
managemylife
52

Elmotorvadlaaaltasrevoludones 1. Pocaseparad6ndeloselectrodosdelabuj[a. 1. Ajustelaseparad6n.Consultelasecd6nMantenimientodel
manual.
Elmotorfundonamalenmarcha 1. Buj[aatorada,averladaoexcesodeseparad6n. 1.
lenta 2. ElfiltrodeaJreest_sudo. 2.
Demasiadavibrad6n 1. Cuchilladetorteflojaodescentrada. 1.
2. Cuchlllaabollada. 2.
1. C_spedhtimedo. 1.Lacortadoradec_spednoregresa
elrecortedec_spedcomoabono
2. C_speddemasiadoalto.
3. Lacuchilladelacortadoranoest_afilada. 3.
Cortedesigual 1. Laposici6ndelasruedasno escorrecta. 1.
2. LacuchJlladelacortadoranoest_afilada. 2.
LJmpie,reemplaceo reajustelaseparad6n.
Consultelasecd6nMantenimientodelmanual.
AprletelacuchlllayeladaptadorBalanceelacuchllla.
Camblelacuchllla.
Notorteelc_spedcuandoest_mojado,esperehastaquesea
m_stardeparahacerlo.
Corteunavezaalturadetorteelevada,luegovuelvaacortarala
alturadeseadao hagaunsenderodetortem_sangosto.
Afileocamblelacuchllla.
Coloque[ascuatroruedasenlamismaposid6ndealtura.
Afileocamblelacuchllla.
i_NECESITA MAS AYUDA?
[{r_':_':_r_v:r_r_I_ r_! Flue v:_y m_ _!_ managemylife.com _ isin cargo!
En Iff/ea podr4 encontrar este manual y los manuales de todos los otros productos que posea.
Sus preguntas ser_n respondidas por nuestro equipo de especialistas. !!
Obtenga un plan de mantenimier/to personalizado para su hogar,
Encuentre informaciOn y herramientas que Io ayudar4n con los proyectos de su hogar,
mar agemylife iil
53

(Estap_iginaseaplicas6loenEE.UU.y Cana&i).
Sears Brands Management Corporation, el Consejo de Recursos Ambientales de California (CARB) yla Agencia de Protecci6n
Ambiental de los Estados Unidos (EPA) Declaraci6n de garantia del sistema de control de emisiones (derechos yobligaciones
de la garantia de defectos del propietario)
LACOBERTNRADELAGARANTIADECONTROLDEEMISIONESESAPLICABLEALOSMOTORES YNTILICENENCNALQUIERPARTEDELOSESTADOSNNIDOS(YAPARTIRDEL1DEENERODE2001EN
CERTIFICADOSCOMPRADOSENCALIFORNIAEN1995YPOSTERIORMENTEQUESENTILIZANEN CANADA).
CALIFORNIA,YPARALOSMODELOSCERTIFICADOSDELANO1997YPOSTERIORES,QUESECOMPREN
Dedaraci6n de garantia sobre defectos en el control
ElConsejodeRecursosAmbientalesde California(CARB),laEPA(AgendadeProtecci6n
Ambientalde losEENU.)ySearstienen elgustode explkar lagarantiadelsistemadecontrol
de emisionespara motoresdelafro2000yparael futuro conrelaciona motorespequeffostodo
terreno(SORE).EnCalifornia,losnuevosmotorespequeffostodo terrenodebenestardiseiiados,
construidosy equipadosparacumplirconlasrigurosasnormasanti-smogdel estado.Enel resto
de losEstadosNnidos,losmotoresnuevostodoterrenodeencendidoporcNspacertificadospara
el afro1997debencumplkest_ndaressimilaresestableddosporlaEPA.Searsdebegarantizar
de emisiones para California y los Estados Unidos
el sistemadecontrolde emisionesde sumotorparalos periodosde tiempoenumeradosa
continuacion,siemprequeno hayaabuso,negligenciao mantenimientoindebidodesumotor
todo terrenopeque_o.Susistemade controldeemisionespuedeincluirpiezastalescomoel
carburador,el filtro deaire,elsistemade encendido,el silenciadoryelconversorcatalitico.
Tambi_npuedeincluirconectoresyotrasunidadesrelacionadasconlasemisiones.Dondeexista
unacondicioncubiertaporlagarantia,Searsreparar;_supequeiiomotortodo terrenosincosto
algunoincluyendodiagnostico,piezasy manodeobra
Cobertura de la garantia Sears para defectos en el control de emisiones
Losmotorestodoterrenopeque_osest_ngarantizadosen Io relativoal controlde disposicionesquese indiquena continuaci6n.Si unapartedesu motorcubierta
emisionesparadefectosen piezasduranteunper[ododedosafios,sujetoalas por la garanfiaes defectuosa,Searsreparar_o sustituir_dichaparte.
Responsabilidades del propietario en relaci6n con la garantia
Comopropietariodelmotor todoterrenopequeiio,Nd.esresponsabledela realizaciondel
mantenimientorequeridoqueseincluyeen lasinstruccionesde operaciony mantenimiento.
Searsrecomiendaqueseconserventodoslos recibosrelativosal mantenimientodesumotor
todo terrenopequeiio,perono pudedenegarlagarantiasimplementepor lafalta delos mismos,
o por suincumplimientodelmantenimientoprogramado.Comopropietariodelmotor pequeiio
todoterrenodebesaberque,sin embargo,Searslepuedenegarlacoberturade lagarantiasi
sumotortodoterrenopequeffoo unapiezadelmismohanfalladodebidoa abuso,negligencia,
mantenimientoindebidoo a modificacionesnoaprobadas.Nd.esresponsabledepresentarsu
motor todoterrenopequeiioaun distribuidorde serviciosSearsautorizadotan prontocomo
aparezcaun problema.Lasreparadonesdela garantiasinconflictodebencompletarseen
un plazode tiempo razonable,nosuperiora 30dias.Sitiene algunapreguntarespectoa sus
derechosy responsabilidadesreferentesa lagarantia,debecontactarcon un representantede
serviciosSearsal 1--800--469--4663.Lagarantiade emisionesesunagarantiapordefectos.Los
defectossejuzgande acuerdoconel funcionamientonormaldeun motor.Lagarantianoest_
relacionadaconunapruebade emisionesen uso.
Disposiciones de la garantia Sears para defectos en el control de emisiones
Lassiguientessondisposicionesespedficasrelacionadasconlacoberturade lagarantiapara
defectosenel controldeemisiones.Esun a_adidoa lagarantiade motorSearsparamotoresno
reguladosqueseencuentraenlas instruccionesdefuncionamientoy mantenimiento.
I. Piezascongarantia
Lacoberturade estagarantiaseextiendefinicamentealas piezasqueaparecena
continuacion(laspartesdelossistemasdecontrol deemisiones),siemprequedichas
piezasestuvieranyaen el motorenel momentodesucompra.
a. Sistemademediciondecombustible
•Sistemade enriquecimientoparaarranqueenffio
•Carburadorypartesinternas
•Bombadecombustible
b. Sistemade inducci6ndeaire
•Filtrodeaire
•Colectorde admision
c. Sistemadeencendido
•Bujia(s)deencendido
•Sistemadeencendidomagneto
d. Sistemadelcatalizador
•Convertidorcatalitko
•Colectorde escape
•Sistemade inyecciondeaireo v_lvulade impulsos
e. Elementosvariadosusadosen lossistemasanteriores
•V;ilvulasdevacJo,sensiblesa temperatura,posicionytiempo e interruptores
•Conectoresymontajes
2. Alcancede lacobertura
Searsgarantizaal poseedorinicialya loscompradoressubsiguientesquelaspiezascon
garantianotendr;indefectosen matefialesni manodeobraqueprovoquenlafallade las
mismasduranteun periododedosa_osa partir dela fechaen queelmotor seentregaa
un compradorparticular.
Sincargo
Lareparationo reemplazodecualquierpartecongarantiaserealizar;_sincargoalguno
parael poseedor,incluyendotareasdediagn6sticoque permitandeterminarsi unaparte
congarantiaesdefectuosa,siemprequedichodiagn6sticoserealiceenun distribuidor
de serviciosSearsautorizado.Paraelservidode lagarantiadeemisiones,contacteal
distribuidordeservidosSearsautorizadom;_scercanoincluidoen las"P_ginasamarillas"
en lascategofias"Motores,gasolina","Motoresde gasolina","Podadorasdec_sped",o
similares.
4. Reclamadonesy exclusionesala cobertura
Lasreclamacionesdelagarantiadebenenviarsedeacuerdoconlasdisposicionesde [a
politka degarantiaparamotoresSears.Lacoberturadela garantiaexcluk;_defectos
en piezascongarantiaqueno seanpartesofiginalesSears,oabuso,negligendao
mantenimientoincorrecto,tal y comoseestableceenla politka degarantiaparamotores
Sears.Searsnoesresponsablede lasfallasen piezascongarantiaprovocadasporel uso
de partesaffadidas,que noseanodginalesoquesehayanmodificado.
5. Mantenimiento
Cualquierpartecongarantiaqueno est_programadaparaserreemplazadacomo
mantenimientorequefido,o ques61odebainspecdonarseregularmenteal efectode
"inspecdoneo reemplacesegunseanecesado",estar;_garantizadacontradefectos
duranteel pefiododelagarantia.Todaslaspiezasgarantizadasqueest_nprogramadas
parasureemplazoparacumplkconlosrequisitosdemantenimientoestar;_n
garantizadass6loporelperiodoanterioral primerreemplazoprogramadoparadicha
pieza.Cualquierpiezade recambioqueseaequivalenteenfundonamientoy durabilidad
puedeusarsepararealizarmantenimientoo reparadones.Elpropietadoesresponsable
de realizartodoel mantenimientorequefido,tal ycomosedefine enlas instruccionesde
fundonamientoymantenimientoSears
6. Coberturaindkecta
Porla presente,la coberturaseextiendea lafalladecualquiercomponentedemotor
provocadaporlafalla de unapiezacongarantiaqueest_todaviaenperiodode garantia.
EnlosEstadosUnidosyCana&ihayunalineadeatenci6nde 24horas,1-800-469--4663,quecuentaconunmenticonmensajespre-grabadosquecontieneninformaci6nparael
mantenimientodemotores.
54
GDOC-100188Rev.B

Felicitacionespor haberrealizadouna adquisicidninteligente.EIproductoCraftsman®que haadquiridoestddise#adoy fabricado
parabrindarmuchosa#osde funcionamientoconfiable.Perocomotodoslosproductosa vecespuederequerirde reparaciones.Es
en esemomento cuandoeldisponerde un Acuerdodeproteccidnpara reparacioneslepuede ahorrardineroy problemas.
Acontinuad6nsedetailanlospuntosinduidosenel Acuerdo:
[] Servido expertoprestadopornuestros10,000espedalistasenreparadonesprofesionales
[] Servido Uimitado sincargo paralaspiezasy lamanodeobraentodaslasreparadonescubiertas
[] Reemplazodel producto hasta1500d6laressinoesposiblerepararelproductocubierto
[] Descuentode 25%delpredonormaldelservkioy delaspiezasreladonadasconelmismoquenoest_ncubiertaspor
elacuerdo;adem_s,25%delpredonormaldelavefificaci6ndemantenimientopreventivo
[] Ayudar_pidapot tei_fono- IoIlamamosResolud6nR_pida- elapoyotelef6nicodeun Chamuscaal representante.
Pienseennosotroscomoelmanual"deundueffohablador."
UnavezadquiridoelAcuerdo,puedeprogramarelservidocontan s61orealizarunaIlamadatelef6nica.PuedeIlamaren
cualquiermomentodeldfao dela nocheoprogramarunservk[oen Ifnea.
ElAcuerdodeProtecd6ndeReparad6nesunacomprasinfiesgo.Siustedanulaporalgunaraz6nduranteelpeffodode
garantfadeproducto,propordonaremosunreembolsoIleno.O,unreembolsoprorrateadoencualquiermomentodespu_s
delpeffododegarantfadeproductoexpira,iAdquierahoysuacuerdodeprotecd6nparareparadones[
Seaplican determinadas iimitacionesy exclusiones.Paraobtener informaci6nadicionai y preciosen los
EstadosUnidosiiameai 1-800-827-6655.
El*Coverageen Canad_variaen algunosartkulos. Paradetalles llenos la llamada ChamuscaCanad_en 1-800-
361-6665.
Servidode instalad6ndeSears
Sideseasolidtarlainstalad6nprofesionaldeSearsdeaparatosdom_sticos,dispositivosparaabfirportones,calentadoresde
aguay otrosartkulosdom_sticosimportantes,enlosEstadosUnidoso Canad_Ilameal1-800-4-MY-HOME®.
55

Your Home
For troubleshooting, product manuals and expert advice:
managernylife
www.managemylife.com
For repair - in your home - of all major brand appliances,
lawn and garden equipment, or heating and cooling systems,
no matter who made it, no matter who sold it!
For the replacement parts, accessories and
owner's manuals that you need to do-it-yourself.
For Sears professional installation of home appliances
and items like garage door openers and water heaters.
1-800-4-MY-HOME ®(1-800-469-4663)
Call anytime, day or night (U.S.A. and Canada)
www.sears.com www.sears.ca
Our Home
For repair of carry-in items like vacuums, lawn equipment,
and electronics, call anytime for the location of your nearest
Sears Parts & Repair Service Center
1-800-488-1222 (U.S.A.) 1-800-469-4663 (Canada)
www.sears.com www.sears.ca
To purchase a protection agreement on a product serviced by Sears:
1-800-827-6655 (U.S.A.) 1-800-361-6665 (Canada)
Para pedir servicio de reparaci6n
a domicilio, y para ordenar piezas:
1-888-SU-HOGAR ®
(1-888-784-6427)
www.sears.com
Au Canada pour service en frangais:
1-800-LE-FOYER Mc
(1-800-533-6937)
www.sears.ca
® Registered Trademark /TMTrademark of KCD IP, LLC in the United States, or Sears Brands, LLC in other countries
® Marca Registrada !TMMarca de Fabrica de KCD IP, LLC en Estados Unidos, o Sears Brands, LLC in otros paises
MCMarque de commerce !MDMarque deposee de Sears Brands, LLC
