Craftsman 247770130 User Manual YARD VACUUM Manuals And Guides LR708115
CRAFTSMAN Lawn Vacuum Manual LR708115 CRAFTSMAN Lawn Vacuum Owner's Manual, CRAFTSMAN Lawn Vacuum installation guides
User Manual: Craftsman 247770130 247770130 CRAFTSMAN YARD VACUUM - Manuals and Guides View the owners manual for your CRAFTSMAN YARD VACUUM #247770130. Home:Lawn & Garden Parts:Craftsman Parts:Craftsman YARD VACUUM Manual
Open the PDF directly: View PDF ![]() .
.
Page Count: 60
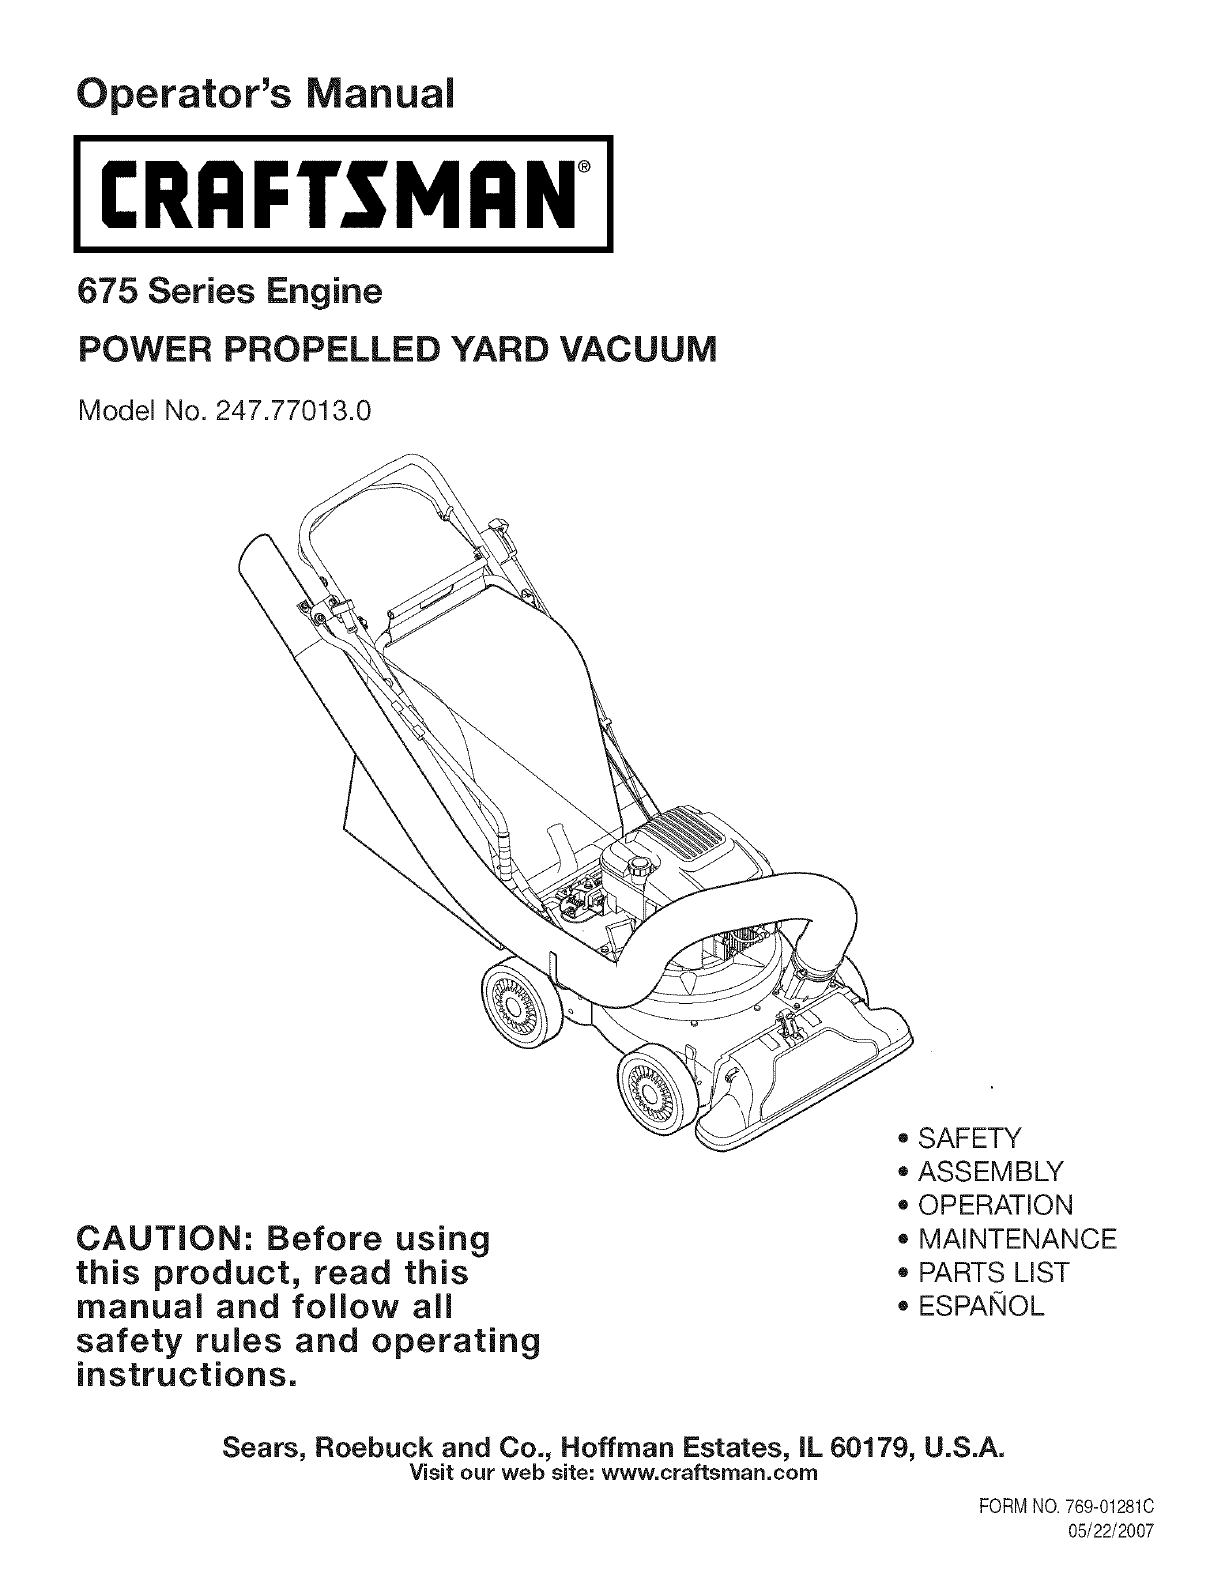
Operator's Manual
I:RRFTSMRN+
675 Series Engine
POWER PROPELLED YARD VACUUM
Model No. 247.77013.0
CAUTION: Before using
this product, read this
manual and follow all
safety rules and operating
instructions.
+ SAFETY
• ASSEMBLY
+ OPERATION
+ MAINTENANCE
+ PARTS LIST
ESPAI_OL
Sears, Roebuck and Co., Hoffman Estates, IL 60179, U.S.A.
Visit our web site: www.craftsman.com
FORMNO.769-01281C
05/22/2007

WarrantyStatement..................................Page2
RepairProtectionAgreement...................Page3
SafeOperationPractices.........................Pages4-5
SafetyLabels............................................Page7
Assembly..................................................Pages8-11
Operation..................................................Pages12-15
ServiceandMaintenance.........................Pages16-21
Off-SeasonStorage..................................Page22
TroubleShooting......................................Page23
PartsList...................................................Page24-33
Espa_ol.....................................................Page36
ServiceNumbers......................................BackCover
OneYearFull Warranty on Craftsman Yard Vacuum
Thisequipmentis coveredbya one-yearwarranty,providedthat it is maintained,lubricated,andtunedupaccordingto the instructionsinthe
operator'smanual.Duringthe warrantyyear,if thisequipmentexperiencesany failuredueto defectsinmaterialor workmanship,RETURNITTO
YOURNEARESTSEARSPARTS& REPAIRCENTER,andSearswill repairit, freeof charge.In-homewarrantyserviceis available,butyou will
haveto paya trip charge.
Thiswarranty does not cover:
•Expendableitemswhichbecomewornduringnormaluse,suchas sparkplugs,aircleaners,belts,andoil filters.
•Tire replacementor repaircausedby puncturesfromoutsideobjects,suchas nails,thorns,stumps,or glass.
•Repairsnecessarybecauseof operatorabuse,includingbut notlimitedto, damagecausedby objects,suchas stones,metaldebrisor
oversizedpiecesof wood,or impactingobjectsthatbendtheframeorcrankshaft,or over-speedingthe engine.
•Repairsnecessarybecauseof operatornegligence,includingbut not limitedto,electricalandmechanicaldamagecausedby improper
storage,failureto usethe propergradeandamountof engineoil, orfailureto maintainthe equipmentaccordingto the instructionscontained
in theoperator'smanual.
•Engine(fuelsystem)cleaningorrepairscausedbyfuel determinedto becontaminatedor oxidized(stale). Ingeneral,fuel shouldbeused
within30 daysof itspurchasedate.
•Equipmentif usedfor commercialorrentalpurposes.
Thiswarrantyappliesforonly 90 daysif thisproductis everusedfor commercialor rentalpurposes.
This warrantyappliesonly whilethisproductis usedinthe UnitedStates.
This warrantygivesyouspecificlegalrights,andyou mayalsohaveotherrightswhichvaryfromstateto state.
Sears, Roebuck and Co., Hoffman Estates, IL 60179
EngineSeries: 675
EngineOil Type: SAE30
EngineOil Capacity: 18ounces
FuelCapacity: 1 1/2Quarts
SparkPlug: Champion@RJ19LM
SparkPlugGap: .020"
Model Number.................................................................
Serial Number.................................................................
Dateof Purchase.............................................................
Recordthe modelnumber,serialnumber
anddateof purchaseabove
©SearsBrands,LLC 2

Congratulationson makingasmartpurchase.YournewCraftsman®
productis designedandmanufacturedfor yearsof dependableopera-
tion.But likeall products,it mayrequirerepairfromtimeto time.That's
whenhavinga RepairProtectionAgreementcansaveyou moneyand
aggravation.
Here'swhat'sincludedinthe Agreement:
,, Expertserviceby our 12,000professionalrepairspecialists
,, Unlimitedserviceand nochargefor partsandlaboronall covered
repairs
,, Productreplacementif yourcoveredproductcan'tbe fixed
,, Discountof 10%fromregularpriceof serviceandservice-related
partsnotcoveredby the agreement;also,10%off regularpriceof
preventivemaintenancecheck
,, Fasthelpby phone- phonesupportfroma Searstechnicianon
productsrequiringin-homerepair,plus convenientrepair
scheduling
Purchasea RepairProtectionAgreementnowandprotectyourself
fromunexpectedhassleandexpense.
Onceyou purchasethe Agreement,a simplephonecall is all thatit
takesfor you toscheduleservice.Youcan call anytimeday ornight,or
schedulea serviceappointmentonline.
Searshas over12,000professionalrepairspecialists,who have
accesstoover 4.5millionqualitypartsandaccessories.That'sthe
kindof professionalismyoucan counton to helpprolongthe lifeof
your newpurchasefor yearsto come.Purchaseyour RepairProtection
Agreementtoday!
Some limitationsand exclusionsapply. For pricesand additional
informationcall 1-800-827-6655.
Sears Installation Service
ForSearsprofessionalinstallationof homeappliances,garagedoor
openers,waterheaters,andothermajorhomeitems,in the U.S.A.call
1-800-4-MY-HOME®

__1, Thissymbolpointsoutimportantsafetyinstructions
which,ifnotfollowed,couldendangerthepersonal
safetyand/orpropertyofyourselfandothers.Read
andfollowallinstructionsinthismanualbefore
attemptingtooperatethismachine.Failuretocomplywiththese
instructionsmayresultinpersonalinjury.Whenyouseethissymbol,
HEEDITSWARNING!
YourResponsibility:Restricttheuseofthispowermachineto
personswhoread,understand,andfollowthewarningsandinstruc-
tionsinthismanualandonthemachine.
Thismachinewasbuilttobeoperatedaccordingtotherulesfor
safeoperationinthismanual.Aswithanytypeofpowerequipment,
carelessnessorerroronthepartoftheoperatorcanresultinserious
injury.Thismachineiscapableofamputatinghandsandfeetand
throwingobjects.Failuretoobservethefollowingsafetyinstructions
couldresultinseriousinjuryordeath.
Engine Exhaust, some of its constituents, and certain vehicle
components contain or emit chemicals known to State of California toJcause cancer and birth defects or other reproductive harm.
TRAINING
•Read,understand,andfollowall instructionson the machineand in
the manual(s)beforeattemptingto assembleand operate.Keepthis
manualina safeplacefor future andregularreferenceandfor ordering
replacementparts.
•Be familiarwith allcontrolsandtheir properoperation.Knowhowto stop
the machineanddisengagethemquickly.
•Neverallowchildrenunder 16years oldto operatethis machine.Chil-
dren16years oldand overshould readand understandthe operation
instructionsand safetyrulesin this manualand shouldbetrained and
supervisedbya parent.
•Neverallowadultsto operatethis machinewithout properinstruction.
•Keepbystanders,helpers,pets,andchildrenat least75feet fromthe
machinewhileit isinoperation.Stop machineif anyoneentersthearea.
•Neverrunan engineindoorsor in a poorlyventilatedarea.Engine
exhaustcontainscarbonmonoxide,anodorlessanddeadlygas.
•Donot put handsandfeet nearrotatingparts orin thefeedingchambers
anddischargeopening.Contactwiththe rotatingimpellercan amputate
fingers,hands,andfeet.
,, Neverattemptto unclogeitherthefeed intakeor dischargeopening,
removeorempty vacuumbag,or inspectand repairthe machinewhile
theengineis running.Shutthe engineoff andwait untilall movingparts
havecometo acompletestop. Disconnectthe spark plugwire and
groundit againstthe engine.
PREPARATION
•Thoroughlyinspectthe areawherethe equipmentisto be used. Remove
all rocks,bottles,cans, orotherforeignobjectswhichcould bepickedup
or thrownandcausepersonalinjuryor damageto the machine.
,, Alwayswearsafetyglassesorsafetygogglesduringoperationor while
performinganadjustmentor repair,to protecteyes.Thrownobjects
which ricochetcan causeserious injuryto the eyes.
•Wearsturdy,rough-soledworkshoesandclose-fittingslacksand shirts.
Loosefitting clothesorjewelry canbe caughtin movableparts. Never
operatethis machinein barefeet or sandals.Wearleatherworkgloves
whenfeedingmaterialinthe chipperchute.
•Beforestarting,checkall boltsandscrewsfor propertightnessto be
sure the machineis in safeworkingcondition.Also, visuallyinspect
machinefor any damageatfrequentintervals.
•Maintainor replacesafetyand instructionslabels,as necessary.
•To avoidpersonalinjuryor propertydamageuseextremecare in
handlinggasoline.Gasolineisextremelyflammableandthevaporsare
explosive.Seriouspersonalinjurycan occur whengasolineis spilled on
yourselforyour clotheswhichcanignite.Washyour skinandchange
clothesimmediately.
•Useonly an approvedgasolinecontainer.
•Extinguishall cigarettes,cigars,pipes,and othersourcesof ignition.
•Neverfuel machineindoors.
•Neverremovegascapor addfuelwhilethe engineis hot or running.
•Allowengineto cool at leasttwo minutesbefore refueling.
•Neveroverfill fuel tank. Filltankto no morethan 1/2inch belowbottom
of filler neckto providespacefor fuel expansion.
,, Replacegasolinecapandtightensecurely.
•If gasolineis spilled,wipeit offthe engineandequipment.Move
machineto anotherarea.Wait 5 minutesbeforestartingthe engine.
•Neverstore the machineorfuelcontainerinsidewherethere isan open
flame, spark,or pilot light (e.g.furnace, waterheater,spaceheater,
clothesdryer,etc.).
,, To reduceafire hazard,keep machinefree of grass, leaves,or other
debrisbuild-up.Cleanup oil orfuelspillageand removeanyfuel soaked
debris.
•Allowmachineto cool at least 5 minutes beforestoring.
4

OPERATION
. Do notputhandsandfeet nearrotatingpartsor inthe feedingchambers
anddischargeopening.Contactwiththe rotatingimpellercanamputate
fingers,hands,and feet.
,, Beforestartingthe machine,makesurethe chipperchute,feed intake,
andcutting chamberare empty andfree of all debris.
,, Thoroughlyinspectall materialto beshreddedandremoveany metal,
rocks,bottles,cans,or otherforeignobjectswhichcouldcause personal
injuryor damageto the machine.
,, If the impellerstrikesaforeign objector ifyour machineshould start
makingan unusualnoiseorvibration,immediatelyshutthe engineoff.
Allowthe impellerto cometo a completestop. Disconnectthespark plug
wire,groundit againsttheengineand performthefollowingsteps:
1.Inspectfor damage.
2. Repairor replaceanydamagedparts.
3. Checkfor any loosepartsandtighten to assurecontinuedsafe
operation.
. Do notallowan accumulationof processedmaterialto buildup inthe
dischargearea.This canpreventproperdischargeand resultin kickback
of materialthroughthefeed opening.
,, Do notattemptto shredor chip materiallargerthan specifiedonthe
machineor in this manual.Personalinjuryor machinedamagecould
result.
,, Neverattemptto unclogeitherthefeed intakeor dischargeopening
whilethe engineis running.Shutthe engineoff, waituntil all moving
parts havestopped,disconnectthe sparkplugwire andgrounditagainst
theenginebeforeclearingdebris.
. Neveroperatewithoutvacuumbag anddischargechuteproperly
attachedto the machine.Neveremptyor changevacuumbagwhilethe
engineis running.Zipperedendof vacuumbagmust be keptclosedat
alltimes duringoperation.
. Neveroperatewithouteitherthe inlet nozzleor optionalhoseattachment
properlyattachedto the machine.Neverattemptto attach orchange
eitherattachmentwhilethe engineis running.
,, Keepall guards,deflectorsandsafetydevicesin placeandoperating
properly.
,, Keepyourface andbody back andto the side of thechipperchute while
feedingmaterialintothe machineto avoidaccidentalkickback injuries.
,, Neveroperatethis machinewithoutgoodvisibilityor light.Alwaysbe
sureof your footingandkeepa firm holdonthe handles.
,, Do notoperatethis machineon a gravelsurface.
. Do notoperatethis machinewhile undertheinfluenceof alcoholor
drugs.
. Mufflerand enginebecomehotand cancausea burn. Donottouch.
. Neverpickupor carrymachinewhilethe engineis running.
MAINTENANCE & STORAGE
• Nevertamperwith safetydevices.Checktheir properoperation
regularly.
. Check boltsandscrewsfor propertightnessat frequentintervalsto keep
the machinein safeworkingcondition.Also,visuallyinspectmachinefor
anydamageand repair,if needed.
,, Beforecleaning,repairing,or inspecting,stoptheengineand make
certainthe impellerand allmoving partshavestopped.Disconnectthe
spark plugwire andground itagainstthe engineto preventunintended
starting.
. Donotchangethe enginegovernorsettingsor overspeedthe engine.
Thegovernorcontrolsthe maximumsafeoperatingspeedof the engine.
. Maintainor replacesafetyand instructionlabels,as necessary.
,, Followthis manualfor safeloading,unloading,transporting,and storage
of this machine.
,, Neverstorethe machineorfuelcontainerinsidewherethere is anopen
flame, sparkor pilot lightsuch asa water heater,furnace,clothes dryer,
etc.
. Alwaysreferto the operator'smanualfor properinstructionson
off-seasonstorage.
. Ifthe fueltank hasto bedrained,do this outdoors.
,, Observeproperdisposallawsand regulationsfor gas, oil,etc. to protect
the environment.
Do not modify engine
Toavoidseriousinjuryor death,do notmodifyenginein anyway.Tampering
withthe governorsettingcanleadto a runawayengineandcauseitto operate
at unsafespeeds.Nevertamperwithfactorysettingof engine governor.

This page left intentionallyblank.
6

m
TO AVOID SERIOUSiNJURY
READ OPERATOR'S MANUAL _
KEEP HANDS OUT OF iNLET AND DISCHARGE OPENINGS WHILE MACHINE
iS RUNNING, ROTATING BLADES ARE iNSIDE
TURN ENGINE OFF AND ALLOW iMPELLER TOCOME TO COMPLETE STOP _"
BEFORE REMOVING BAG, _: ,f_
DO NOTATTEMPTTO CLEAR A CLOGOR JAMWITH THE ENGINE RUNNING` _=========
DO NOT OPERATE UNiT WITHOUT BAG OR OPTIONAL BLOWER CHUTE iN _ _PLACE.
DO NGI-S_D Off._/ALKIN FRONT OF BtZWERCHUIE OR AIM I;KTBYSTANDERS, --
OBJECTSTHROWN OUT OF DISCHARGE CAN C,_JSE PERSONAL INJL_Y_
DO NOT OPERATEWHEN CHILDREN OROTHERS ARE AROUND ,,.=mCj:_j_
WEAR APPROVED SAFETY GLASSES,
•KEEP HANDS OUT OF DISCHARGE OPENING,
• DO HOT STAND OR WALK iN FRONT OF
DISCHARGE OPENING OR AiM iT AT
BYSTANDERS, OBJECTS THROWN OUT OF
CHUTE CAN CAUSE PERSONAL iNJURY
= KEEP CHIUDREH AND OTHERS AWAY s3o2
FRONT WHEEL /VACUUM NOZZLE HEIGHT
ADJUSTER
HiGH LOW
For use in To pick up wet
grass to pick material, pine
up leaves cones, acorns
and debris or material on
pavement.
L................................
7

IMPORTANT:Thisunit is shippedwithoutgasolineoroil in theengine.
Becertainto serviceenginewithgasolineandoil as instructedinthe
separateenginemanualbeforeoperatingyourmachine.
NOTE:Referenceto rightand lefthandsideof the YardVacuumis
observedfromthe operatingposition.
OPENING CARTON
1. Cuteachcornerof the cartonverticallyfromtopto bottom.
2. Removeall looseparts.
3. Removeloosepackingmaterial.
REMOVING UNIT FROM CARTON
1. Liftunit fromthe rearto detachit fromunderlyingcartonmaterial
androll unitout of carton.
2. Checkcartonthoroughlyfor anyother looseparts.
NOTE:Makesure notto crimpcableswhileremovingloosepartsor
the entireunitfromthe carton.
LOOSE PARTS IN CARTON
(See Figure 1)
,, UpperandLowerHandle
,, HoseAssembly
,, SafetyGlasses
,, EngineOil (Maybe locatedin bag)
,, Bag
,, BlowerChute
,, Operator'sManual
f" _jUpper Handle
Drive Control..._ SpeedControl
Wing Nut
Upper Hose
Handle Bracket _4.{
Guide_j_ CableGuide
Rope /
Lower Hose
Handle Bracket Carriage
Lower Handle
J
WingNut
Bag
Safety Glasses
Operator's Manual Bottle of Engine Oil
Hose
Assembly
Blower Chute
Figure1
J
8

ATTACHING THE HANDLE
1. Removethehairpinclipsfromthe handlebracketsandremovethe
carriagescrewsandwingnutsfromthe lowerhandle.
a. Placethe bottomholesin lowerhandleoverthe pinson the
handlebracketsandsecurewith hairpinclips.SeeFigure2.
b. Insertcarriagescrewsthroughupperholein lowerhandlefrom
the insideand securewithwingnuts.SeeFigure2.
2. a. Unfoldthe upperhandleuntilit alignswithlowerhandle.Make
surethe ropeguideis onthe rightside of upperhandle.See
Figure3.
IMPORTANT:Makesure thecablesareroutedoutsidethe lower
handle.Also,donot crimpthe cableswhileliftingupthe handles.
b. Securethe twohandlesby tighteningthe handleknobs(carriage
boltsmustbeseatedproperlyintothe handle).SeeFigure3.
3. Pullthetwo cabletiesattachedto the cablestightapproximately
8 inchesfromeachcableendand placethe cablesintothe cable
guide.
4. Loosenthe wing nutthatsecuresthe ropeguideto the rightsideof
upperhandle.
a. Pullthestarter ropeout of the engineslowly.SeeFigure4.
b. Slipthe starterropeintothe ropeguide.Tightenthe wing nut.
SeeFigure4.
f 'm
Rope Guide
f
Figure3
9
Figure4
J

/
/
/
i ,
J
_,_-W,Ahgnpin
/
/with this
/.............,
/
Figure5
J
ATTACHING THE HOSE ASSEMBLY
1. a. Slidehoseadapterof hoseassemblyintothe baseadapter
locatedon the leftfrontof the YardVacuum.SeeFigure5.
b. Pullspringloadedpinout on the baseandalignpinwiththe first
hole(closestto the endof the tube)in the hoseadapter.
c. Releasethe pinto lockthe hosein place.
2. a. Snapthe hosehandlefirst intothe upperhosehandlebracket
andthen intothe lowerhosehandlebracket.
b. Layhosetubingon hangerbracketnextto chipperchute.See
Figure6.
ATTACHING THE BAG
1. Graspbaghandlewithone handandslide lockingrodon mounting
bracketwithotherhandtowardengine.Usethe endof mounting
bracketas leveragewhenslidingthe lockingrod.
a. Slipbagover therim of the dischargeopeningandrelease
lockingrodto securebagin place.SeeFigure7.
b. Snapbagclip to the topof the lowerhandle.
c. Placethe lowerstrapsonthe bagoverthe topof lowerhandle,
hookingthemon the studs.SeeFigure7.
NOTE:The bag/chuteswitchbuttonattachedto the mountingbracket
mustbefullydepressedby thetip of fronttabon baghandlewhen
securingthe bagorenginewill not start.
Figure6 \ .)
Figure7
10

ATTACHING THE BLOWER CHUTE f
NOTE:The bagmustbe removedbeforeinstallingthe blowerchute.
1. a. Graspblowerchutewithonehandandslide lockingrodon
mountingbracketwithother handtowardengine.Usethe endof
mountingbracketas leveragewhenslidingthe lockingrod. See
Figure8.
b. Slipblowerchuteoverrim of dischargeopeningandrelease
lockingrodto securechutein place,as in Figure8.
c. Raisethe nozzleheightto the highestsettingwhenusingthe
blowerchute.Referto nozzleheightadjustmentbelow.
NOTE:The bag/chuteswitchbuttonattachedto the mountingbracket
mustbefullydepressedbythe tip of fronttab onthe blowerchuteor
enginewill notstart.
Alwaysstopengineanddisconnectsparkplugwire beforeperforminc
anymaintenanceoradjustments.Alwayswearsafetyglassesduring
operationor whileperforminganyadjustmentsor repairs.
NOZZLE HEIGHT ADJUSTMENT
The nozzlecan beadjustedto any fivepositions,rangingfrom5/8"
to 4 1/8" groundclearance.The nozzleheighthasto be adjusted
accordingto yardconditions.
1. Depressnozzleheightadjustmentlevertowardswheel.See
Figure9.
2. Movethe heightadjustmentleverforwardor backwardto adjust
the nozzleupwardsor downwards.Makesureboth leversarein
the sameposition.
3. Releaselevertowardsdeck.
NOTE:In general,raisethe nozzleheightto vacuuma thick layerof
leavesorto operatewiththe blowerchute.Lowerthe nozzleheightfor
smoothersurfaces.
f
Figure8
J
Figure9
J
11

f Drive Control
Starter _eedControl Thr, Control ChokeControl
Bag
Lower
Hose
Bracket
BagHandle
Fill
Hose
Handle
Fill
_arkPlug Wire
HoseAssembly
1-Blower Chi
Chute Chute
er Bracket
NozzleHeight
Adjustment Lever
Nozzle/Hose
Lever
_Nozzle
1-If Equipped
Figure10
Nowthatyouhavesetup youryardvacuumfor operation,get
acquaintedwith itscontrolsand features.Thesearedescribedbelow
andillustratedon thispage.Thisknowledgewill allowyouto use your
newequipmentto its fullestpotential.
The operationof any yardvacuumcan resultinforeignobjectsbeing
thrownintothe eyes,whichcan damageyoureyesseverely.Always
I wearthe safetyglassesprovidedwiththis unitor eyeshieldswhile
[operatingor performingany adjustmentsor repairsonit.
CHIPPER CHUTE
Allowstwigsandsmallbranchesupto 1-1/2"indiameterto befed into
the impellerfor chipping.SeeFigure10.
DRIVE CONTROL
Locatedon the undersideof the upperhandle,the drivecontrolis used
to engage/disengagewheels.Fullysqueezethe drivecontrolagainst
the upperhandleto engagethe wheels;releaseto disengage.(DO
NOTslip clutch).
SPEED CONTROL
Locatedon the leftside of the upperhandle,the speedcontrolis used
to selectthe forwardspeedof theyard vacuum.
IMPORTANT:Movethe speedcontrolonly whenthe engineis
running.Changingthe speedcontrolsettingwiththe engineoff can
damagethe yardvacuum.
NOZZLE HEIGHT ADJUSTMENT LEVER
Usedto adjustthe nozzlegroundclearancerangingapproximately
from5/8" to 4 1/8".SeeFigure10.
NOZZLE
Yardwastesuchas leavesor pineneedlescan be vacuumedup
throughthe nozzlefor shredding.
HOSE ASSEMBLY
Usedas analternativeto the nozzleto vacuumyardwastesuchas
leavesor pineneedlesin hardto reachplaces.SeeFigure10.
NOZZLE/HOSE VAC LEVER
The nozzle/hosevachandleis locatedon top ofthe nozzle.Useit to
switchvacuumsuctionbetweenthe nozzleandthe hoseassembly.
HOSE HANDLE
Usedto guidehoseassemblywhenvacuuming.
Meets ANSi Safety Standards
CraftsmanYardVacuumsconformto the safetystandardof the AmericanNationalStandardsInstitute(ANSI).
12

BAG HANDLE
Usedto graspbag inorderto assistin attaching,removing,and
emptyingbag.SeeFigure10.
BAG
Collectsshreddedmaterialfed throughthe chipperchuteorvacuumed
throughthe nozzleor hose.
BLOWER CHUTE
When attachedto unit,the blowerchuteis usedto dischargeyard
wastesuchas leaves,pineneedle,orsmalltwigsacrossyard.
THROTTLE CONTROL
This levercontrolsthe enginespeedandstopfunction.Throughthree
separatepositionson the leverfromleft to right,theoperationisas
follows:
Start/Run Slow/Idle Engine Off
CHOKE CONTROL
The chokecontrolis usedto chokethecarburetorandassistinstarting
the engine.
STARTER HANDLE
Usedto startthe engine.
GAS AND OiL FILL-UP
Oil (one bottle shipped with unit)
First Time Use
1. Removeoil fill dipstick.
2. WiththeYardVacuumonlevelground,usea funnelto empty
entirecontentsof oil bottleprovidedintothe engine.
3. Replaceoil fill dipstickandtighten.
Subsequent Uses
Onlyuse highqualitydetergentoil ratedwithAPIserviceclassification
SF,SG,or SH.Selectthe oil's SAEviscositygradeaccordingto the
expectedoperatingtemperature.Followthe chartbelow:
f'_older _'_ 32°F _Warrner_
Oil Viscosity Chart
Althoughmulti-viscosityoils (5W30,10W30,etc.)improvestarting
incold weather,theywill resultin increasedoilconsumptionwhen
usedabove32°RCheckyourengineoil levelmorefrequentlyto avoid
possibleenginedamagefromrunninglow onoil.
1. Checkthe oil levelmakingcertainnot to rubthe dipstickalongthe
insidewalls of the oilfill tube.Thiswouldresultina falsedipstick
reading.Refillto FULLmarkon dipstick,if necessary.Capacity
is approximately18oz.Overfillingwill causethe engineto smoke
profuselyandwill resultinpoorengineperformance.
2. Replaceoilfill dipstickandtighten.
3. Keepoillevelat FULL.Runningthe enginewithtoo littleoil can
resultin permanentenginedamage.
Useextremecarewhen handlinggasoline.Gasolineis extremely
flammableandthe vaporsareexplosive.Neverfuel machineindoors
or whilethe engineis hot or running.Extinguishcigarettes,cigars,
pipes,andothersourcesof ignition.
Gasoline
1. Removefuel capfromthe fueltank.
2. Makesurethe containerfromwhichyou will pourthe gasolineis
cleanandfree fromrustorforeignparticles.Neverusegasoline
that maybestalefromlongperiodsof storageinits container.
Gasolinethat hasbeensitting forany periodlongerthanfour
weeksshouldbeconsideredstale.
3. Fill fuel tankwithclean,fresh,unleadedregulargasolineonly.Do
not use gasolinecontainingMETHANOL.Replacefuel cap.
UseAlcoholblendedfuels(calledgasoholor usingethanolor metha-
nol)canattractmoisturewhichleadsto separationandformationof
acidsduringstorage.Acidicgas candamagethe fuel systemof an
enginewhile instorage.
Toavoidengineproblems,thefuel systemshouldbeemptiedbefore
storagefor 30daysorlonger.Drainthe gas tank,start theengine
andlet it rununtilthe fuel linesandcarburetorareempty.Use
freshfuel nextseason.SeeSTORAGEInstructionsfor additional
information.
Neveruseengineorcarburetorcleanerproductsinthe fueltank or
permanentdamagemayoccur.
NOTE:Checkthe fuel levelperiodicallyto avoidrunningout of gaso-
linewhileoperatingthe YardVacuum.Ifthe unitrunsout of gas as it
is chipping,it maybenecessaryto unclogthe dischargeareabeforeit
can be restarted.Referto SERVICEANDMAINTENANCEsection.
13

f
ThrottleControl
ChokeControl
Figure11
Whenmovingthrottlecontrollever,becarefulof heatedsurfacesand
sharpedgeson mufferguard. J
TO START ENGINE
1. Attachsparkplugwire andrubberboot to sparkplug.
2. The bag/chuteswitchbuttonmustbefullydepressedbythe tip of
fronttab on baghandleor blowerchutefor engineto start.
3. Makesurebag/chuteswitchwire is connectedto engineand
groundedto mountingbracket.
4. Gas tankshouldbefilled3/4 to full beforestarting.
5. Movethrottlecontrolto START/RUN(Rabbit) _ position.See
Figure11.
6. Movethe chokecontrol I'_1 towardthe throttlecontrolto choke
the engine'scarburetor.(Awarmenginemaynot requirechoking.)
SeeFigure11.
7. Standingbehindthe unit,graspstarterhandleand pullropeout
untilyoufeel a drag.
8. Pullthe ropewitha rapid,continuous,full arm stroke.Keepa firm
gripon the starterhandle.Let the roperewindslowly.
9. Repeat,if necessary,until enginestarts.When enginestarts,
movechokecontrolgraduallyawayfromthe throttlecontrol.
10. Ifenginefalters,movechokecontrolbacktowardthethrottle
controlandrepeatsteps7 through9. j...,_
11. ALWAYSkeepthe throttlecontrolin the START/RUN
positionwhenoperatingthe YardVacuum.
TO STOP ENGINE
1. Movethrottlecontrolleverto slow (turtle)_ position.
Wheneverpossible,graduallyreduceenginespeedbefore
stoppingengine.
Movethrottlecontrolleverto STOP or OFFposition.
2,
3.
f
Disconnectsparkplugwire andgroundit to the retainingpostto
preventaccidentalstartingwhilethe equipmentis unattended.
Figure12
TO EMPTY BAG
1. Unhookbagstrapsfromthe lowerhandle.
2. Unsnapbagclip fromthetop of lowerhandle.SeeFigure12.
3. Graspbaghandlewithone handandpulllock rodonmounting
bracketwithotherhandtowardengineto release.
4. Liftbagoff backof unit.
5. Twistthe twobuttonsonthe backof the bagto unlockandempty
contents.SeeFigure13.Hold baghandleandbagclipwhile
emptyingthe contents.
6. Compressbagopeningandfold innerflap overopening.
7. Foldouterflapoverinnerflapand insertbuttonsonthe bag
throughmetaloutlets.SeeFigure13.
8. Twistthe buttonsto lockbag.Placebagbackontounit as
instructedinthe ASSEMBLYsection.
J
Figure13
14

TO REMOVE BLOWER CHUTE
1. Graspblowerchutewithonehandand pulllockrodon mounting
bracketwithotherhandtowardengineto release.Referto Figure
8 inthe ASSEMBLYsection.
2. Removeblowerchutefromoverthe rim of the dischargeopening.
USING THE NOZZLE VACUUM
1. Placenozzle/hosevacleverinthetoppositiononthenozzleto
vacuumthroughnozzle.SeeFigure14.
2. Thespringloadedpinmustbe inthe first hole(closestto theend
of the tube)of the hoseadapterto operatethe nozzlevac.
3. Placebothhandsontop of the upperhandleandfullyliftthe drive
controlagainstthe upperhandleto propelthe unitoveryard.
4. Usethespeedcontrolto chooseeitherthe highor lowspeed.The
speedcontrolmaybemovedeitherwhilethe unit is propellingor
beforeengagingthe wheels.
f --,,
IMPORTANT:Movethe speedcontrolonlywhen theengineis
running.Changingthe speedcontrolsettingwiththe engineoff can
damagethe yardvacuum.
Yardwastesuchas leavesandpineneedlescan be vacuumedup
throughthe nozzlefor shredding.Aftermaterialhasbeenshredded
by theflail bladesonthe impellerassembly,it will bedischarged
intocatcherbagorthroughblowerchute.Do notattemptto shredor
chipany materialother thanvegetationfoundin a normalyard (i.e.
branches,leaves,twigs,etc.) Avoidfibrousplantssuchas tomato
vinesuntiltheyarethoroughlydriedout. Materialssuchas stalksor
heavybranchesupto 1-1/2"indiametermaybefed intothe chipper
chute.
Do notattemptto shred,chip,or vacuumanymateriallargerthan
specifiedonthe machineorin thismanual.Personalinjuryordamag_
to the machinecouldresult.
IMPORTANT:Theflail screenis locatedinsidethe housinginthe
dischargearea.If the flailscreenbecomesclogged,removeandclean
as instructedin the SERVICE& MAINTENANCEsection.Forbest
performance,it is alsoimportantto keepthe chipperbladesharp.
Do notat any time makeanyadjustmentswithoutfirststopping
engneanddsconnectngsparkpug w re. j
\
I
Figure14
Figure15
USING THE HOSE ASSEMBLY
1. Placenozzle/hosevachandlein thebottompositiononthe
nozzleto redirectvacuumto the hoseassembly.SeeFigure15.
2. Thespringloadedpinmustbe inthe secondholeof the hose
adapterto operatethe hoseassembly.
3. Unhookthe hosefromupperhandlebracketandgraspthe hose
handleto guidewhilevacuumingyardwastesuchas leavesor
pineneedlesin hardto reachplaces.
15

Alwaysstopengineanddisconnectsparkplugwire beforeperforminc
I anymaintenanceoradjustments.Alwayswearsafetyglassesduring
[operationor whileperformingany adjustmentsor repairs.
GENERAL RECOMMENDATIONS
,, Alwaysobservesafetyruleswhen performing
anymaintenance.
,, Thewarrantyon thisyardvacuumdoes notcoveritemsthat have
beensubjectedto operatorabuseor negligence.To receivefull
valuefromwarranty,operatormust maintainthe equipmentas
instructedhere.
,, Someadjustmentswill haveto bemadeperiodicallyto maintain
yourunit properly.
,, Periodicallycheckall fastenersand makesurethesearetight.
f Electrode Porcelain
-_ .020inch(.51mm)gap
\_ Figure16
,J
ENGINE MAINTENANCE
Checking the Spark Plug
Cleansparkplugandresettheelectrodegapto 0.020"at leastoncea
season;replaceevery100hoursof operation.
,, Cleanareaaroundthe sparkplugbase.Do notsandblastspark
plug.Sparkplugshouldbecleanedbyscrapingorwire brushing
andwashingwitha commercialsolvent.
,, Removeand inspectthe sparkplug.Checkgap to makesureit is
setat .020".SeeFigure16.
,, Replacethe sparkplugif electrodesarepitted,burned,or the
porcelainis cracked.
Servicing the Air Cleaner
lDo not air solventsto cleanthe air cleanercartridge.USepressurized or 1
Theair cleanerpreventsdamagingdirt, dust,etc.,fromenteringthe
carburetorandbeingforcedintothe engineandis importantto engine
lifeand performance.Theair cleanerconsistsof apleatedfilter.Never
runthe enginewithoutanaircleanercompletelyassembled.
Cleanorreplacetheair cleanerevery25hoursof operation.
1. Loosenscrewandtilt plastichousingcoveronside of engine
down.SeeFigure17.
2. Removeair filterfromplastichousingcoverandreplacewith
cleanor newfilter.
3. Insertcover'stabsintoslots in bottomof base.
4. Tiltcoverupinto placeandtightenscrew.
NOTE:If thefilter istorn or damagedin anyway,replaceit.
f
Figure17
,J
16

Check Engine Oil
1. Stopengineandwaitseveralminutesbeforecheckingoillevel.
Withengineonlevelground,theoil mustbe to FULLmarkon
dipstick.
2. Removeoil fill dipstickand wipecleanwithcloth.
3. Replaceand tightendipstick.Removeandcheckoil level.Level
shouldbeat FULLmark.
4. if needed,addoil slowly- recheck.Do not overfill.
5. Wipedipstickclean,replaceandtighten.Removeandcheckoil
level.Oil levelshouldbeat FULLlineon dipstick.
Do not overfil.Overfillingwithoil maycausethe engineto not start,
or hardstarting.Ifoverthe FULLmarkon thedipstick,drainoilto
reduceoil levelto FULLmarkon dipstick.
Change Engine Oil
,, Onlyuse highqualitydetergentoil ratedwithAPIservice
classificationSE SG,or SH.Selectthe oil'sSAEviscositygrade
accordingto the expectedoperatingtemperature.Referto opera-
tionsectionfor viscositychart.
,, Changeengineoil afterthefirst fiveto eight hoursof operation,
andeveryfifty hoursoreveryseasonthereafter.Changeoil every
twentyfivehourswhenoperatingengineunderheavyloador in
hightemperatures.
Clean Engine
,, Dailyorbeforeeveryuse,cleangrass,chaffor accumulated
debrisfromengine.Keeplinkage,spring,andcontrolsclean.
Keepareaaroundand behindmufflerfree of anycombustible
debris.
,, Keepingenginecleanallowsair movementaroundengine.
,, Enginepartsshouldbekeptcleanto reducethe riskof over-
heatingandignitionof accumulateddebris.This is especially
importantif cuttingtall grass.
Donot usewaterto cleanengineparts.Watercouldcontaminatefuel
system.Useabrushor dry cloth.
Carburetor Adjustment
The carburetoronthisengineis notadjustable.
Engine Speed
Do not attemptto alterthe enginespeedbytamperingwiththe
engine'sgovernorlinkage.Doingso couldresultinseriouspersonal
injuryanddamageto theengine.The engineRPMhas beensetat
the factory.
To Drain Oil
1. Drainthe fuelfromthe tankby runningthe engineuntilthe fuel
tankis empty.
2. Disconnectsparkplugwireandkeep it awayfromsparkplug.
3. WithengineOFFbutstill warmremoveoil fill dipstick.
4. Tip uniton itsside (sparkplugside up)to drainthroughthe oil fill
tube intoappropriatereceptacle.
Usedoilis a hazardouswasteproduct.Disposeof usedoilproperly.
Do not discardwithhouseholdwaste.Checkwithyourlocalauthori-
tiesor SearsServiceCenterfor safedisposal/recyclingfacilities.
5. Whenengineis drainedof alloil, placeenginelevel.Refillwith
approximately18oz.of freshoil. Fill to FULLlineon dipstick.Do
notoverfill.Referto Gas And Oil Fill-Up inOPERATIONsection.
6. Replaceoil fill dipstickandtighten.
7. Replacesparkplugwire beforestarting.
Temperatureof mufflerand nearbyareasmayexceed150° F (65°0).
Avod theseareas.
LUBRICATION
• Wheels- Placea fewdropsof SAE30 oiloneach shoulderscrew
once a season.
•Nozzle height adjustment levers- Lubricatenozzleheight
adjustmentleverswith lightoil.
Locking Rod- Lubricatethe lockrodandcompressionsprings
whichattachto the mountingbracket.
Nozzle/Hose Vac Lever: Lubricatethe nozzle/hosevac leveron
top of the nozzleoncea seasonwithlight oil.
CLEAN EQUIPMENT
,, Cleanthe YardVacuumthoroughlyaftereachuse.
,, Washbagperiodicallywithwater.Allowto drythoroughlyin
shade.
,, If the flail screenbecomesclogged,removeandcleanas
instructedbelow.
NOTE:Cleaningwitha forcefulsprayof wateris notrecommendedas
it couldcontaminatethe fuelsystem.
Service Muffler
,, Inspectmufflerperiodically,and replaceif necessary.Replace-
mentpartsfor the mufflermustbethe sameandinstalledinthe
samepositionas the originalparts,otherwisefire canoccur.
17

Beforeperformingany typeof maintenanceonthe machine,waitfor
allpartsto stopmovinganddisconnectthe sparkplugwire.Failure
I to followthis instructioncouldresultinpersonalinjuryor property
|damage.
DRIVE CONTROL CABLE ADJUSTMENT
Adjustthe drivecontrolcable if the yardvacuumdoesnot selfpropel
withthe drivecontrolengaged,orif the unithesitateswhile theengine
maintainsthesamespeedafterapproximately20 hoursof use.
Tomovethe z-fittingof the drivecontrolcablefromits factoryset
positionin thefrontholeof the drivecontrolto the rearhole,proceed
as follows:
1. Pushthe rightsideof the controloutof the right holeinthe upper
handle.SeeFigure18A.
2. Pivotcontroldowntowardsthe lowerhandle.
3. Pivotstraightupto removeit fromthe left holein the upper
handle.SeeFigure18A.
4. Thereis nowsufficientslack inthe drivecontrolcableto graspthe
z-fittingwithyourhandandmoveit fromthe frontholeto the rear
holeof the drivecontrol.SeeFigure18B.
iMPORTANT:Makesure to insertthe z-fittingintothe rearholeas
it wasinsertedin the fronthole,that is fromthe outside of the drive
control.
5. Youmaynowcarefullyreinstallthe drivecontrolby performingthe
previoussteps inthe oppositeorderandmannerof removal.
iMPORTANT:Onceassembledandpriorto restarting,makesurethat
the cableis properlyadjusted.Withthe drivecontroldisengaged,the
unitshouldfreelypullin reverse.
REMOVING THE FLAIL SCREEN
If the dischargeareabecomesclogged,removetheflail screenand
cleanareaas follows:
1. Stopthe engine.Makecertainthe chipper/shreddervacuumhas
cometo a completestop.
2. Beforeuncloggingthe dischargechute,disconnect and ground
the sparkplugwireto retaining post.
3. Removethe vacuumbagor blowerchutefromthe unitas
instructedin the OPERATIONsectionto obtainaccesstoflail
screen.
4. Removethe threeself tappingscrewssecuringthe beltcover,and
removebeltcover.SeeFigure19.
f@ -',
\
\
Figure18
f
/ / /
/ / /
/
/
i--¸-• •
!)
/
/
,/
Figure19
18

5. Removeself tappingscrewon rightsideof unitthatattachesto
the flailscreen.It maybe necessaryto removethe hosebracket
hangerto get accessto the screw.SeeFigure20.
6. Removehexscrewontop of rearhousingnearmountingbracket
andthe flangelocknutthat securesflailscreen.SeeFigure20.
7. Removeand cleanthe screenby scrapingor washingwithwater.
SeeFigure21.
8. Reinstallthe screen.
SHARPENING OR REPLACING CHIPPER
BLADE
NOTE:When tippingthe unit,emptythe oil andfuel tankandkeep
enginesparkplugside up.
1. Disconnect and ground the spark plugwireto retaining post.
2. Removebagassemblyorblowerchute.
3. Removethe three hexcap screwsholdingthe hose hanger
bracketandchipperchuteto the upperhousing.SeeFigure22.
4. Removethe fronthubcaps,flangelocknuts,frontwheels,and
wavewashersthatattachto the pivotarmassemblies.SeeFigure
23.
5. Removethe shoulderscrews,thrustwashers,andbellwashers
thatgothroughthe pivotarmsto the frontsupportbrace.The
frontsupportbraceandlocknut can beremovedat thistimeas
well.
J
Figure20
f Z
_\ s\
f
........"/Front Support Brace and Lock NUi
Bell Washer
Thrust Washer
Shoulder Screw
Hub Lock Nut
Wave
Washer
Wheel
Figure23
Figure21
Figure22
J
19

6. Removethe four screwsonthe upperhousingthat securethe
nozzlecover.SeeFigure24.
7. Carefullytilt andsupportthe unitupto provideaccessunderneath
to the nozzlemountinghardwareand impeller.Removethethree
shoulderboltssecuringthe blackplasticlowerflail housingtothe
lowerhousing.Referto Figure25.
8. Tilttop of blackplasticlowerflail housingtowardthe engineto
remove.
9. Usinga 3/16"allenwrench,removethe flatheadcap screwsthat
holdthe chipperbladeto the impeller.Thesescrewsareacces-
siblethroughthe openingcreatedwhenthe chipperchutewas
removedearlier.SeeFigure26.
10. The nutson the flatheadcap screwscan bereachedfrom
underneathusinga 1/2-inchsocket,universal,andextension.
SeeFigure27.
11. Replaceor sharpenchipperblade.The bladecanbe sharpened
witha file oron agrindingwheel.
The chipperbladeis sharp.Whensharpeningblade,wear leather
workglovesto protectyourhandsandfollowthe originalangleof
grind.
12. Reassembleby performingthe previousstepsin the opposite
orderand mannerof removal.
NOTE:Tightenbladescrewsto 210- 250 in-lbs.Makecertainchipper
bladeis reassembledwiththe sharpedgefacingupward.
fImpeller
,. j
Figure27
\
\
Black ........
Nozzle
\
Shoulder Screws
Figure25
C
Flat Head Screws
Chipper Blade
\
Figure26
2O

MAINTENANCE SCHEDULE
Beforeperforminganytypeof maintenance/service,disengageall
controlsandstoptheengine.Waituntilallmovingpartshavecometo
a completestop.Disconnectsparkplugwireandgroundit againstthe
enginetopreventunintendedstarting.Alwayswearsafetyglassesduring
operationorwhileperforminganyadjustmentsorrepairs•
Followthe maintenanceschedulegivenbelow•This chartdescribes
serviceguidelinesonly•Usethe ServiceLogcolumnto keeptrackof
completedmaintenancetasks•To locate the nearestSears Service
Centeror to schedule service,simplycontactSears at
1-800-4-MY-HOME®.
EachUse
1st5- 8 hours
25 hours
50 hours
Annuallyor 100hours
BeforeStorage
•Underheavyloador inhightemperatures
1. Engineoil level
2. Looseor missinghardware
3. Unitandengine•
1. Engineoil
1. Engineoil-i
2. Aircleaner
3. Controllinkagesand pivots
1. Engineoil
1. Sparkplug
1. Fuelsystem
1. Check
2. Tightenor replace
3. Clean
1. Change
1. Change
2. Cleanor replace
3. Lubewithlight oil
1. Change
1. Clean,replace,re-gap
1. Runengineuntil it stopsfromlackof
fuelor addagasolineadditiveto the
gasin the tank.
21

Neverstoreyardvacuumwithfuel in tankindoorsor in poorly
ventilatedareaswherefuel fumesmayreachan openflame,spark,
or pilot lightas ona furnace,waterheater,clothesdryer,or gas
appliance.
PREPARING THE ENGINE
Forenginesstoredover30 days:
1. To preventgumfromformingin fuelsystemor oncarburetor
parts,runengineuntil it stopsfromlackoffuel or adda gasoline
additiveto the gas inthe tank. Ifyou usea gas additive,runthe
enginefor severalminutesto circulatethe additivethroughthe
carburetor--afterwhichtheengineandfuel can bestoredupto
six months.
2. Whileengineis stillwarm,changethe oil.
3. Removesparkplugand pourapproximately1 oz.(30 ml)of clean
engineoil intothe cylinder.Pull the recoilstarterseveraltimesto
distributethe oil, andreinstallthesparkplug.
4. Cleanengineof surfacedebris.
PREPARING THE YARD VACUUM
,, Whenstoringthe yardvacuuminan unventilatedor metalstorage
shed,careshouldbetakento rustproofthe non-paintedsurfaces.
Usinga lightoil orsilicone,coatthe equipment,especiallyany
springs,bearings,andcables.
,, Removealldirt fromexteriorof engineand equipment.
,, Followlubricationrecommendations.
,, Storeequipmentin a clean,dry area.Do not storein anarea
whereequipmentis presentthatmayusea pilot lightor hasa
componentthatcancreatea spark.
22

Beforeperforminganytypeof maintenance/service,disengageall
controlsandstopthe engine.Waituntilallmovingpartshavecometo
acompletestop.Disconnectsparkplugwireandgroundit againstthe
enginetopreventunintendedstarting.Alwayswearsafetyglassesduring
operationorwhileperforminganyadjustmentsor repairs.
This sectionaddresses minor serviceissues,To locatethe nearestSears Service Center or to scheduleservice,simplycontactSears
at 1-800-4-MY-HOME®.
Enginefailsto start
Enginerunserratically
1. Movethrottleleverto START/RUNposition.
2. MoveCHOKEto ONposition.
3. Connectwireto sparkplug.
4. Clean,adjustgap,or replace.
5. Filltankwithclean,freshgasoline.
6. Obstructionlodgedin impeller.Disconnectspark
plugwireandremovelodgedobject.
7. Safetyswitchmustbedepressedby the fronttabon
the baghandlewhensecuringthe bag.
8. Connectsafetyswitchwire to engineconnectorand
groundto mountingbracket.
1. Movechokeleverto OFFposition.
2. Connectandtightensparkplugwire.
3. Filltankwithfreshgasoline.
4. Drainfuel.Refillwithfreshfuel.
5. Cleanor replaceaircleanerfilter.
6. Alwaysrunengineat full throttle.
7. ContactyourSearsParts&RepairCenter.
1. Fillenginewithproperamountand typeof oil.
2. Cleangrassclippingsanddebrisfromaroundthe
engine'scoolingfinsandblowerhousing.
1. Removesparkplugandadjustgap.
1. Replacesparkplugandadjustgap.
2. Replaceair cleanercartridge.
1. Stopengineimmediatelyanddisconnectsparkplug
wire.ContactyourSearsParts& RepairCenter.
1. Stopengineimmediatelyanddisconnectsparkplug
wire.Cleanflail screenandinsideof dischargeopen-
ing.
2. Stopengineanddisconnectsparkplugwire.Remove
lodgedobject.
3. Alwaysrunengineat full throttle.
4. Emptybag.
1. Alwaysrunengineat full throttle.
2. Replacechipperbladeor contactyourSearsParts&
RepairCenter.
1. Followadjustmentprocedurein Service& Mainte-
nancesection.
2. ContactyourSearsParts&RepairCenter.
1. Throttle levernot in correctstartingposition
2. Chokenotin ON position
3. Sparkplugwire disconnected
4. Faultysparkplug
5. Fueltankemptyorstalefuel
6. Cannotpullrecoilcord
7. Safetyswitchnotdepressed
Engineoverheats
Enginehesitatesat highRPMs 1. Sparkpluggap settooclose
Engineidles poorly 1. Fouledsparkplug
2. Dirtyair cleaner
Excessivevibration 1. Loosepartsor damagedimpeller
Unitdoesnot discharge 1. Dischargeareaclogged
8. Safetyswitchwireis not connectedto
engineor notproperlygrounded
1. UnitrunningonCHOKE
2. Sparkplugwire loose
3. Stalefuel
4. Waterordirt infuelsystem
5. Dirtyair cleaner
6. LowengineRPM
7. Carburetorout of adjustment
1. Engineoillevel low
2. Airflowrestricted
2. Foreignobjectlodgedin impeller
3. Lowengine RPM
4. Vacuumbagis full
Rateof dischargeslows 1. LowengineRPM
considerablyorcompositionof 2. Chipperbladedull
dischargedmaterialchanges
Unitfailsto propelitselfor 1. Drivecontrolcable outof adjustment
slipswhendrivecontrolis
engaged 2. Drivebelt wornor damaged
23

Craftsman 675 Series Yard Vacuum Model 247.77013.0
B
@
24

Craftsman 675 Series Yard Vacuum Model 247.77013.0
Ref. No. PartNo. Description
1. 731-0981A HubCap
2. 749-04163 UpperHandle
3. 720-0279 Knob
4. 710-1205 EyeBolt
5. 781-1056 UpperHandleBracket
6. 710-0726 HexCap Screw5/16-12x.750
7. 720-04072 HandleKnob5/16-18
8. 710-1174 CarriageBolt
9. 731-04911 NozzleHandleClip
10. 749-04165 LowerHandle
11. 711-1293 Studs
12. 710-0703 CarriageScrew1/4-20x.75
13. 712-0397 Wing Nut1/4-20
14. 710-1611B TT Screw,5/16-18x .750
15. 710-0599 Screw,1/4-20x .500
16. 712-0442 Cap LockNut,1/4-20
17. 710-0751 HexCap Screw1/4-20x.620
18. 681-0195 HoseBaseAdapterAssembly
(Incl.Ref.#19-21)
19. 716-0104 ERing.500Dia
20. 732-3035 CompressionSpring
21. 711-1571 ClevisPin
22. 736-3020 FlatWasher.271IDx.630OD
23. 781-04069 UpperFlail Housing
24. 746-04156 DriveControlCable
25. 731-1820 CableGuide
26. 681-0122 ChipperChuteAssembly
27. 746-04155 SpeedControlCable
28. 710-1122 HexScrew,1/4-20x 2.50
29. 781-1058 HoseHangerBracket
30. 712-04064 FlangeLockNut, 1/4-20
31. 748-0457 Spacer
32. 731-2478 HoseNozzle
33. 710-3288 HexCap Screw1/4-20x 2.625
34. 723-0295 AdjustmentClamp
35. 749-1270 NozzleHandle
36. 764-0648 VacuumHose
37. 07071 HandleGrip
38. 731-2292 HoseAdapter
39. 747-04305 DriveControl
40. 725-0157 CableTie
41. 618-04460 TransmissionAssembly
42. 681-04027 IdlerAssembly(Incl.Ref.#74-80)
Ref. No. Part No. Description
43. 710-1650 ShoulderScrew,#12-24x .30 x .46
44. 710-1220 Screw,#12-16x .750
45. 711-04245 ImpellerHub
46. 715-0221 DowelPin
47. 781-04082 FrontWheelSupportBrace
48. 781-04081 RearWheel SupportBrace
49. 714-0104 CotterPin
50. 716-0104 E-Ring
51. 736-0258 FlatWasher,.385 x 1.00x .135
52. 736-0232 WaveWasher.531IDx.781OD
53. 738-1015 ShoulderScrew3/8-16
54. 734-2042 Wheel,8x 2.125
55. 716-0865 SnapRing
56. 741-0751 HeightAdjustmentBearing
57. 687-02094 PivotArm Assembly
58. 720-0426 HeightAdjustmentKnob
59. 732-1026 SpringLever
60. 736-0741 BellWasher.760IDx.25OD
61. 738-1172 ShoulderScrew,.750x.500
62. 687-02051 HeightLeverAssembly
(Incl. Ref.#58-59)
63. 734-2004A Wheel 8x 2
64. 710-1652 Screw,1/4-20x .625
65. 712-04065 FlangeLockNut,3/8-16
66. 731-04879 BeltCover
67. 736-0314 ThrustWasher.375IDx.70OD
68. 731-2522 Wheel Cover
69. 732-04217 ExtensionSpring,.375x 2.95
70. 736-0369 FlatWasher,.5081Dxl.0OODx.020
71. 738-0930 ShoulderScrew,.560x.165
72. 741-04108 DriveAxle Bushing
73. 781-04078 TransmissionMountingBracket
74. 710-0597 Screw,1/4-20x 1.00
75. 712-04064 FlangeLockNut, 1/4-20
76. 741-0124 BallBearing
77. 750-1050 FlangeSpacer,.260x.659x.517
78. 754-0369 Belt,3/8 x 32.5
79. 781-04077 IdlerBracket
80. 782-7598 Belt Keeper
81. 717-1762 SpurGear- RH
-- 717-1761 SpurGear- LH (NotShown)
82. 681-0156A HandleBracketAss'y RH
-- 681-0155A HandleBrktAss'y LH (NotShown)
25

Craftsman 675 Series Yard Vacuum Model 247.77013.0
I
Q
Q
26

Craftsman 675 Series Yard Vacuum Model 247.77013.0
Ref. No. Part No. Description
1. 664-0094 BagAssembly
2. 681-0154 ScreenAssembly
3. 710-1054 HexScrew5/16-24x 1.0
4. 781-0490 ChipperBlade
5. 781-0735 PinClip
6. 719-0329 Flail
7. 715-0166 SpiralPin
8. 711-1401 ClevisPin
9. 712-0411 LockNut,5/16-24
10. 736-0119 LockWasher,5/16
11. 681-0152 ImpellerAssembly
(Incl.Ref.#3- 10)
12. 781-0721B LowerFlailHousing
13. 712-04063 FlangeLockNut5/16-18
14. 710-0607 Screw,5/16-18x.500
15. 747-04297 HingePin
16. 731-2293A Nozzle
17. 781-1064 BaseAdapterDoor
18. 732-1156 TorsionSpring
19. 726-0106 Cap SpeedNut 1/4
20. 711-1551 PivotRod
21. 731-04967 NozzleDoorLever
22. 710-1256 HexScrew,#8-18x 1.25
23. 750-1294 ShoulderSpacer
24. 732-3118 ExtensionSpring
25. 732-1151A NozzleDoorTorsionSpring
26. 731-2294A NozzleDoor
Ref. No. Part No. Description
27. 664-04039 Bag
28. 631-0083 ChuteAssembly
29. 736-0247 FlatWasher.375IDx 1.25OD
30. 736-0217 LockWasher3/8
31. 710-1273 HexCapScrew,3/8-24x 2.75
32. 631-04118 EngineSpacerAssembly
33. 710-1008 Screw,3/8-16x 1.875
34. 725-1700 SwitchCover
35. 725-3166 SafetySwitch
36. 731-1613 SafetySwitchCover
37. 710-0224 HexWasherScrew#10-16x.50
38. 629-0920A Wire Harness
39. 714-0104 CotterPin
40. 732-0962 CompressionSpring
41. 781-0778A MountingBracket
42. 747-1153 LockRod
43. 710-3195 HexCapScrew5/16-18x 4.5
44. 710-3025 HexCapScrew5/16-18x.625
45. 710-1220 Screw,#12-16x.750
46. 710-0351 Screw#10- 16x.500
47. 736-0607 ExternalL-Washer5/16
48. 726-0139 SpeedNut
49. 710-0726 HexIndexScrew,5/16-12x.750
50. 710-1650 ShoulderScrew,#12-24x .30 x .46
51. 631-0090 BlowerChute
-- 723-0400 SafetyGlasses(NotShown)
27

Craftsman 675 Series Engine Model No. 126T02
For Yard Vacuum Model 247.77013.0
I 1019 LABEL Kl_ 684
J
5O
383_
m
524
635
868 4_
505 °Is8
m
741
[1330 REPAIR MANUAL j
11058 OWNER'S MANUA_
306
28

Craftsman 675 Series Engine Model No. 126T02
ForYard Vacuum Model 247.77013.0
425
968
443_
843
81
613
445
977 CARBURETOR
GASKET SET
m
621 _;_
188_
970
615 @
404
616
%
365
%633A @
633
61 276_
121 CARBURETOR OVERHAUL KiT
1
633_ 633A @
692 t
[ 633A@J
276 Q
@
130
95 617
29

Craftsman 675 Series Engine Model No. 126T02
For Yard Vacuum Model 247.77013.0
668
969_
921
1329 REPLACEMENT ENGINE i
i 1036 EMiSSiONS LABEL ]
m
48 i
930
332
324
23
1005
65
58
592_
i459
60
689
I456_
597_
3O

Craftsman 675 Series Engine Model No. 126T02
ForYard Vacuum Model 247.77013.0
m
1.
2.
3.
4.
5.
7.
8.
9.
10.
11.
12.
13.
15.
16.
20.
22.
23.
24.
25.
26.
27.
28.
29.
32.
32A.
33.
34.
697322
399269
299819f
493279
691160
692249f
695250
699472
691125
691260
692232t
690912
691680
694478
399781f
691092
692315
222698
697339
697341
499425
499427
691866
499423
499424
691664
695759
262651
262652
D _ Q Q
CylinderAssembly
Kit-Bushing/Seal
Seal-Oil(MagnetoSide)
Sump-Engine
Head-Cylinder
Gasket-CylinderHead
BreatherAssembly
Gasket-Breather
Screw(BreatherAssembly)
Tube-Breather
Gasket-Crankcase
Screw(CylinderHead)
Plug-OilDrain
Crankshaft
Seal-Oil(PTOSide)
Screw(EngineSump)
Flywheel
Key-Flywheel
PistonAssembly(Standard)
PistonAssembly(.020"Oversize)
RingSet-Piston(Standard)
RingSet-Piston(.020"Oversize)
Lock-PistonPin
Pin-Piston
Rod-Connecting
Screw(ConnectingRod)
Screw(ConnectingRod)
Valve-Exhaust
Valve-Intake
35.
36.
37.
40.
43.
45.
46.
48.
50.
51.
54.
55.
58.
60.
65.
78.
81.
95.
97.
104.
108.
109.
117.
121.
125.
127.
130.
133.
134.
691270
691270
694086
692194
691997
690548
691449
498828
497465
272199f
691650
691421
697316
281434
690837
691108
691740
691636
493267
691242tt
691182
498593
498978
498260
499059
694468tt
691203
398187
398188ff
D _ eQ
Spring-Valve(Intake)
Spring-Valve(Exhaust)
Guard-Flywheel
Retainer-Valve
Slinger-Governor/Oil
Tappet-Valve
Camshaft
Short Block
Manifold-Intake
Gasket-Intake
Screw(IntakeManifold)
Housing-RewindStarter
Rope-Starter(Cutto RequiredLength)
Grip-StarterRope
Screw(RewindStarter)
Screw(FlywheelGuard)
Lock-MufflerScrew
Screw(ThrottleValve)
Shaft-Throttle
Pin-FloatHinge
Valve-Choke
Shaft-Choke
Jet-Main(Standard)
Kit-CarburetorOverhaul
Carburetor
Plug-Welch
Valve-Throttle
Float-Carburetor
Valve-Needle/Seat
31

Craftsman 675 Series Engine Model No. 126T02
For Yard Vacuum Model 247.77013.0
D _ O Q
693981tt* Gasket-FloatBowl
146. 690979 Key-Timing
159. 691753 Bracket-AirCleanerPrimer
163. 272653t*tt Gasket-AirCleaner
187. 691050 Line-Fuel(Cutto RequiredLength)
188. 693399 Screw(ControlBracket)
190. 690940 Screw(FuelTank)
202. 691829 Link-MechanicalGovernor
209. 691291 Spring-Governor
222. 692150 Bracket-Control
227. 690783 ControlLever-Governor
276. 271716tt* SealingWasher
287. 690940 Screw(DipstickTube)
300. 692038 Muffler
304. 493294 Housing-Blower
305. 691108 Screw(BlowerHousing)
306. 690450 Shield-Cylinder
307. 690345 Screw(CylinderShield)
324. 695161 Cup/ScreenAssembly
332. 690662 Nut(Flywheel)
333. 802574 Armature-Magneto
334. 691061 Screw(ArmatureMagneto)
337. 802592 Plug-Spark
347. 691396 Switch-Rocker
Ref.No. PartNo. Description
356. 496381 Wire-Stop
358. 497316 EngineGasketSet
363.
365.
383.
404.
425.
443.
445.
456.
459.
497.
505.
523.
524.
525.
529.
562.
564.
584.
585.
592.
597.
601.
604.
608.
613.
615.
616.
19069
692524
89838
690272
690670
692523
491588
692299
281505
690664
691251
495264
692296t
495265
691923
92613
698589
697734
691879t
690800
691696
95162
698588
497680
691340
690340
698801
FlywheelPuller
Screw(Carburetor)
Wrench-SparkPlug
Washer(GovernorCrank)
Screw(AirCleanerCover)
Screw(AirCleanerPrimerBase)
Filter-AirCleanerCartridge
Plate-PawlFriction
PawI-Ratchet
Screw(Stopswitch)
Nut(GovernorControlLever)
Dipstick
Seal-DipstickTube
Tube-Dipstick
Grommet
Bolt (GovernorControlLever)
Screw(ControlCover)
Cover-BreatherPassage
Gasket-BreatherPassage
Nut(RewindStarter)
Screw(PawlFrictionPlate)
Clamp-Hose
Cover-Control
Starter-Rewind
Screw(Muffler)
Retainer-GovernorShaft
Crank-Governor
32

Craftsman 675 Series Engine Model No. 126T02
ForYard Vacuum Model 247.77013.0
m
617.
621.
627.
633.
633A.
635.
668.
670.
Ref.No.
684.
689.
692.
718.
741.
832.
836.
842.
843.
847.
851.
868.
869.
870.
270344f*ff
692310
692872
691321ff*
693867ff*
66538
493823
692294
PartNo.
690345
691855
690579
690959
790345
499034
690664
691031f
691884
692017
493880
697338
691155
690380
D _ ! e
Seal-ORing(IntakeManifold)
Switch-Stop
Bracket-Stopswitch
Seal-Choke/ThrottleShaft
Seal-Choke/ThrottleShaft
Boot-SparkPlug
Spacer
Spacer-FuelTank
Description
Screw(BreatherPassageCover)
Spring-Friction
Spring-Detent
Pin-Locating
Gear-Timing
Guard-Muffler
Screw(MufflerGuard)
Seal-ORing(DipstickTube)
Sleeve-Lever
Assembly-Dipstick/Tube
Terminal-SparkPlug
Seal-Valve
Seat-Valve(intake)
Seat-Valve(Exhaust)
921.
930.
95_
966.
968.
969.
970.
972.
975.
976.
97_
1005.
1019.
1036.
1058.
1059.
1210.
1211.
1329.
1330. Repair Manual
262001
63709
698587
691919
397974
496116
692298
690700
691669
699374
493640
694395
498261
691346
494256
697457
MS5244
692311
498144
498144
123KO2-
0240-E1
272147
D _ e e
Bushing-Guide(Exhaust)
Bushing-Guide(Intake)
Cover-BlowerHousing
Guard-Rewind
Cap-FuelTank
Base-AirCleanerPrimer
Cover-AirCleaner
Screw(BlowerHousingCover)
Screw(AirCleanerPrimerBracket)
Tank-Fuel
Bowl-Float
Primer-Carburetor
Set-CarburetorGasket
Fan-Flywheel
Kit-Label
Label-Emission
Owner'sManual
Kit-Screw/Washer
Assembly-Pulley/Spring(Pulley)
Assembly-Pulley/Spring(Spring)
ReplacementEngine
1Includedin EngineGasketSet,Key.No.358
11Includedin CarburetorOverhaulKit,Key.No.121
*includedin CarburetorGasketSet,Key.No.977
33

(Thispageapplicableinthe U.S.A.and Canadaonly.)
Sears, Roebuck and Co., U.S.A. (Sears), the California Air Resources Board (CARB)
and the United States Environmental Protection Agency (U.S. EPA)
Emission ControJ System Warranty Statement (Owner's Defect Warranty Rights and ObJigations)
EMISSIONCONTROLWARRANTYCOVERAGEISAPPLICABLETOCERTI- YEAR1997AND LATERENGINESWHICHARE PURCHASEDANDUSED
FlEDENGINESPURCHASEDINCALIFORNIAIN 1995ANDTHEREAF- ELSEWHEREINTHE UNITEDSTATES(ANDAFTERJANUARY1,2001 IN
TER,WHICHARE USEDINCALIFORNIA,ANDTOCERTIFIEDMODEL CANADA).
California and United States Emission Control Defects Warranty Statement
The CaliforniaAir ResourcesBoard(CARB),U.S.EPAandSearsare pleased
to explainthe EmissionControlSystemWarrantyon your modelyear2000 and
latersmalloff-roadengine(SORE).In California,newsmall off-roadengines
mustbe designed,builtand equippedto meettheState'sstringentanti-smog
standards.Elsewhereinthe UnitedStates, newnon-road,spark-ignition
enginescertifiedfor modelyear 1997and latermustmeetsimilarstandardsset
forthbythe U.S.EPA.Searsmustwarranttheemissioncontrolsystemon your
enginefor the periodsof timelistedbelow,providedtherehasbeenno abuse,
neglector impropermaintenanceof your smalloff-roadengine.Youremis-
sion controlsystemincludespartssuch as thecarburetor,air cleaner,ignition
system,mufflerand catalyticconverter.Also includedmaybeconnectorsand
otheremissionrelatedassemblies.Wherea warrantableconditionexists,Sears
will repairyour smalloff-roadengine at nocost to youincludingdiagnosis,parts
and labor.
Sears Emission Control Defects Warranty Coverage
Smalloff-roadenginesarewarrantedrelativeto emissioncontrolpartsdefects
fora periodof oneyear,subjectto provisionsset forth below,Ifany covered
Owner's Warranty
Asthe smalloff-roadengineowner,youare responsiblefor theperformanceof
therequiredmaintenancelistedinyour Operatingand MaintenanceInstruc-
tions.Searsrecommendsthatyou retainallyour receiptscoveringmaintenance
on yoursmall off-roadengine,butSearscannotdenywarrantysolelyforthe
lackof receiptsorfor yourfailureto ensuretheperformanceof all scheduled
maintenance.Asthe smalloff-roadengineowner,you shouldhoweverbe
awarethat Sears maydenyyou warrantycoverageifyour smalloff-roadengine
ora part hasfaileddueto abuse,neglect,impropermaintenanceor unap-
part onyour engineisdefective,the part willbe repairedor replacedbySears.
Responsibilities
provedmodifications.Youare responsiblefor presentingyour smalloff-road
engineto anAuthorizedSearsService Dealeras soonas a problemexists.The
undisputedwarrantyrepairsshouldbe completedina reasonableamountof
time,notto exceed30 days.Ifyou haveany questionsregardingyourwarranty
rightsand responsibilities,youshouldcontacta SearsServiceRepresentative
at 1--800--469--4663.Theemissionwarrantyis a defectswarranty.Defectsare
judgedon normalengineperformance.Thewarrantyis notrelatedto an in-use
emissiontest.
Sears Emission Control Defects Warranty Provisions
ThefollowingarespecificprovisionsrelativetoyourEmissionControlDefectsWarrantyCoverage.Itisinadditionto theSearsenginewarrantyfornon-regulated
enginesfoundin theOperatingandMaintenanceInstructions.
1. WarrantedParts
Coverageunderthis warrantyextendsonly to the parts listed below(the
emissioncontrol systemsparts)to the extentthese parts werepresenton
theenginepurchased.
a. FuelMeteringSystem
,,Coldstart enrichmentsystem
,,Carburetorand internalparts
•FuelPump
b. Airlnduction System
,,Air cleaner
•Intakemanifold
c. IgnitionSystem
,,Sparkplug(s)
•Magnetoignitionsystem
d. CatalystSystem
,,Catalyticconverter
•Exhaustmanifold
,,Air injectionsystemor pulsevalve
e. MiscellaneousItemsUsed inAboveSystems
•Vacuum,temperature,position,timesensitivevalves
andswitches
•Connectorsand assemblies
2. Lengthof Coverage
Searswarrantsto the initialownerand eachsubsequentpurchaserthat
theWarrantedParts shall befree from defectsin materialsandworkman-
ship whichcausedthe failureof the WarrantedPartsfor a periodof one
yearfromthe datethe engineis deliveredto a retailpurchaser.
3. NoCharge
Repairor replacementof any WarrantedPartwill beperformedat no
chargeto the owner,includingdiagnosticlabor whichleadsto the
determinationthata WarrantedPartis defective,ifthe diagnosticwork is
performedat an AuthorizedSears ServiceDealer.For emissionswarranty
servicecontact your nearestAuthorizedSears ServiceDealeras listed in
the "YellowPages"under"Engines,Gasoline,""GasolineEngines,""Lawn
Mowers,"or similarcategory.
4. Claimsand CoverageExclusions
Warrantyclaimsshall be filed in accordancewiththe provisionsofthe
SearsEngineWarrantyPolicy.Warrantycoverageshall beexcludedfor
failures of WarrantedPartswhichare not originalSears parts or because
of abuse,neglector impropermaintenanceas setforth in theSears
EngineWarrantyPolicy.Searsis notliable to coverfailuresof Warranted
Partscausedby the useof add-on,non-original,or modifiedparts.
5. Maintenance
AnyWarrantedPartwhich is notscheduledfor replacementas required
maintenanceor which is scheduledonly for regularinspectionto the effect
of "repairor replaceas necessary"shall bewarrantedas to defectsfor the
warrantyperiod.Any WarrantedPartwhich is scheduledfor replacement
as requiredmaintenanceshallbe warrantedasto defectsonly for the
periodof time up to the first scheduledreplacementforthat part. Any
replacementpartthat is equivalentin performanceand durabilitymay
be usedin the performanceof anymaintenanceor repairs.The owneris
responsibleforthe performanceof all requiredmaintenance,as definedin
the SearsOperatingandMaintenanceInstructions.
6. ConsequentialCoverage
Coveragehereundershallextend to thefailure of any enginecomponents
caused bythefailureof anyWarrantedPartstill underwarranty.
Inthe USAand Canada,a 24 hourhotline, 1-800-469-4663,has a menuof pre-recordedmessagesofferingyou enginemaintenanceinformation.

Look For Relevant Emissions Durability Period and
Air index information On Your Engine Emissions Label
Engines that are certified to meet the California Air Resources Board (CARB) Tier 2 Emission Standards must
display information regarding the Emissions Durability Period and the Air Index. Sears, Roebuck and Co., U.S.A.
makes this information available to the consumer on our emission labels.
The Emissions Durability Period describes the number of hours of actual running time for which the engine is
certified to be emissions compliant, assuming proper maintenance in accordance with the Operating & Mainte-
nance instructions. The following categories are used:
Moderate: Engine is certified to be emission compliant for 125 hours of actual engine running time.
intermediate: Engine is certified to be emission compliant for 250 hours of actual engine running time.
Extended: Engine is certified to be emission compliant for 500 hours of actual engine running time.
For example, a typical walk-behind lawn mower is used 20 to 25 hours per year. Therefore, the Emissions
Durability Period of an engine with an intermediate rating would equate to 10 to 12 years.
The Air index is a calculated number describing the relative level of emissions for a specific engine family. The
lower the Air index, the cleaner the engine. This information is displayed in graphical form on the emissions label.
After July 1,2000, Look For Emissions Compliance Period
On Engine Emissions Compliance Label
After July 1, 2000 certain Sears, Roebuck and Co., U.S.A. engines will be certified to meet the United States
Environmental Protection Agency (USEPA) Phase 2 emission standards. For Phase 2 certified engines, the Emis-
sions Compliance Period referred to on the Emissions Compliance label indicates the number of operating hours
for which the engine has been shown to meet Federal emission requirements.
For engines less than 225 cc displacement, Category C = 125 hours, B = 250 hours and A = 500 hours.
For engines of 225 cc or more, Category C = 250 hours, B = 500 hours and A = 1000 hours.
This is a generic representationof the emission labeltypically found on a certified engine.
35

Declaraci6n de garantia ...................... PAgina 36
Acuerdo de Protecci6n Para
Reparaciones ....................................... PAgina 37
PrActicas operaci6n seguras ............... PAginas 38-39
Montaje ................................................ PAginas 40-43
Operaci6n ............................................ PAginas 44-47
Servicio y Mantenimiento .................... PAginas 48-53
Almacenamiento fuera de temporada.... PAgina 54
Soluci6n de problemas ...................... PAgina 55-56
Etiquetas de seguridad ....................... PAgina 7
Lista de piezas .......................................... PAgina 24
NOmero de servicio ..................... Cubierta posterior
Garantia completa de un a_o para la aspiradora para patios Craftsman
Esteequipoestacubiertoporunagaranfiade unaho,siemprequese mantenga,lubriquey ajustedeacuerdoconlas instruccionesdelpresente
manualdeloperador.Duranteel ahode garanfia,si esteequiposufrecualquierfallaproducidapordefectosen materialeso manodeobra,
DEVUELVALOA SUCENTRODE PARTES& REPARACIONSEARSM_,SCERCANO,y SearsIorepararAsin ningOncargo.Elserviciode
garanfiaa domicilioestAdisponibleperose aplicarAuncargode traslado.
Esta garantia no cubre:
• Articulosde duraci6nlimitadaquesufrendesgastebajocondicionesnormalesde uso,talescomobujiasde encendido,purificadoresde
aire,correasy filtrosde aceite.
Reemplazoo reparacionesde Ilantascausadasporpinchadurasconobjetosexteriorescomo,porejemplo,clavos,espinas,palosovidrios,etc.
Reparacionesnecesariasdebidoa abusodel operador,incluyendo,perosin limitarsea ellos,losdahoscausadosporobjetos,talescomo
piedras,desechosde metalo trozosde maderade untamahodemasiadogrande,objetosque hacenimpactoque puedendoblarla
estructurao el carter,o sobreacelerarel motor.
Reparacionesnecesariasdebidoa negligenciadeloperador,incluyendoentre otros,dahosmecanicoy electricoocasionadoporun
almacenamientonoapropiado,falla porel usode aceitede gradoy/o cantidadnoapropiadao fallapor nodar mantenimientoal equipode
acuerdocon las instruccionescontenidasenel manualdel operador.
Limpiezao reparacionesal motor(sistemadecombustible)provocadasporuncombustiblecontaminadouoxidado(viejo).Engeneral,el
combustibledebeutilizarseen unperiodono mayorde30 diasa partir desu adquisici6n.
Equiposutilizadosparafinescomercialeso dealquiler.
Estagaranfias61otendravalidezdurante90 dias si esteproductose utilizaencualquiermomentoparafinescomercialeso dealquiler.
Estagaranfias61otendravalidezmientrasel productose utiliceen los EstadosUnidos.
Estagaranfialeotorgaderechoslegalesespecificos,peroustedpodriagozardeotrosderechosen raz6nde su lugarde residencia.
Sears, Roebuck and Co., Hoffman Estates, IL 60179
Serie: 675
Tipo deaceitedelmotor: SAE30
Capacidadde aceitedel motor: 18onzas
Capacidadde combustible: 1 1/22 cuartos
Bujias: Champion®RJ19LM
Separaci6nde lasbujias: .020"
N_merode modelo ..........................................................
Numerode serie ..............................................................
Fechade compra.............................................................
Registrearribael nOmerodel modelo,el nOmerode seriey la fecha
de compra
©SearsBrands,LLC 36

Felicitacionespor haberrealizadounaadquisici6ninteligente.El
productoCraftsman@que haadquiridoest,.disehadoy fabricado
parabrindarmuchosahosdefuncionamientoconfiable.Perocomo
todoslosproductosa vecespuederequerirde reparaciones.Esen
ese momentocuandoeldisponerde unAcuerdode protecci6npara
reparacionesle puedeahorrardineroy problemas.
Acontinuaci6nse detallanlos puntosincluidosen elAcuerdo:
,Servicio experto prestadopor nuestros12,000especialistasen
reparacionesprofesionales
Servicio ilimitadosin cargo paralas piezasy la manodeobraen
todaslas reparacionescubiertas
•Reemplazodel productosi noes posiblerepararelproducto
cubierto
Descuentode 10%del precionormaldelservicioy delas piezas
relacionadascon el mismoquenoestencubiertasporel acuerdo;
adem_ts,10%delprecionormalde laverificaci6nde manten-
imientopreventivo
, Ayudar_pida portel_fono- asistenciatelef6nicaa cargode un
tecnicode Searsparalos productosquerequierenreparaci6n
a domicilio,adem_tsdeunaprogramaci6nconvenienteparala
reparaci6n
Unavezadquiridoel Acuerdo,puedeprogramarelserviciocon
tan s61orealizarunaIlamadatelef6nica.PuedeIlamaren cualquier
momentodeldia o dela nocheo programarunservicioen linea.
Searsdisponedem_.sde 12.000especialistasenreparaciones
profesionalesquetienenaccesoa m_tsde4.5 millonesdepiezasy
accesoriosde buenacalidad.Estees el tipo deprofesionalismoen
el quepuedeconfiarparaque leayudeaprolongarlavida 0til del
productorecientementeadquiridoen losahos porvenir,iAdquierahoy
su acuerdodeprotecci6nparareparaciones!
Se aplican determinadaslimitacionesyexclusiones.Paraobtener
informaci6nadicional y preciosIlameal 1-800-827-6655.
Serviciode instalaci6nde Sears
Sideseasolicitarla instalaci6nprofesionalde Searsdeaparatos
dom_sticos,dispositivosparaabrirportones,calentadoresde aguay
otrosarticulosdom_sticosimportantes,en losEstadosUnidosIlame
al 1-800-4-MY-HOME@.
30

Lapresenciade estesimbolo indicaque se tratade
instruccionesimportantesde seguridadquese deben
respetarparaevitar poneren peligrosu seguridad
personaly/o materialy lade otraspersonas.Leay siga
todaslas instruccionesde estemanualantesde poner
enfuncionamientoesta maquina.Si no respetaestasinstruccionespod@
provocarlesionespersonales.Cuandovea estesfmbolo,ipresteatenciona
la advertencia!
Su responsabilidad: Restrinjael usode estam_tquinamotorizada
alas personasquelean,comprendany respetenlasadvertenciase
instruccionesqueaparecenen estemanualyen la m_tquina.
Estamaquinafueconstruidaparaser operadade acuerdocon las reglas
deseguridadcontenidaseneste manual.AI igual quecon cualquiertipo
de equipomotorizado,un descuidoo error por partedel operadorpuede
producirlesionesgraves.Estamaquinaes capazde amputarmanosy pies
y dearrojarobjetoscon granfuerza. Deno respetarlas instruccionesde
seguridadsiguientesse puedenproducirlesionesgraveso lamuerte.
El escapedel motorde esteproducto,algunosde suscomponentesy
algunoscomponentesdelvehfculocontieneno liberansustanciasqufmicas
que el estadodeCaliforniaconsideraque puedenproducircancer,defectos
de nacimientou otros problemasreproductivos.
r
CAPACITACION
,, Lea,entienday cumplatodas las instruccionesincluidasen la maquina
yen los manualesantesde montarlay utilizarla.Guardeestemanual
en un lugarseguropara consultasfuturasy regulares,asf como para
solicitarrepuestos.
,, Familiarfcesecon todos loscontrolesy su operacionadecuada.Sepa
c6modetenerla maquinay comodesengranarloscontrolesrapidam-
ente.
,, No permitanuncaque losni_osmenoresde 16a_osutilicen esta
maquina.Losni_osde 16a_osy mas mayoresdebenleery comprender
las instruccionesdeoperaciony las reglasdeseguridadcontenidasen
estemanual,y tambiendebensercapacitadosy estarsupervisadospor
unode los padres.
,, Nuncapermitaquelos adultosoperenestamaquinasinrecibirantesla
instruccionapropiada.
,, Mantengaa los transet]ntes,ayudantes,mascotasy ni_osal menosa
75 pies de lamaquinamientrasestaoperando.Detengala maquinasi
alguienentraen lazona.
,, Nuncaenciendaun motoren espacioscerradoso en unazonacon poca
ventilaci6n.Elescapedel motorcontienemon6xidode carbono,un gas
inodoroy letal.
,, No pongalas maneso lospies cercade las piezasrotatoriaso enlas
camarasdealimentacionni en laaberturade descarga.Elcontactocon
el motorrotatoriopuedeproducirla amputacionde dedos,manoso pies.
,, Nuncatrate dedestaparla toma dealimentaciono la aberturade
descarga,nitrate desacar ovaciar la bolsadela aspiradora,nide
revisary repararla maquinamientrasel motorestaenmarcha.Apague
el motory espere hastaquetodas las piezasmovilesse hayandetenido
por complete.Desconecteel cablede labujiay pongalode maneraque
hagamasacontrael motor.
PREPARATIVOS
• InspeccioneminuciosamenteelAreadondeutilizaraelequipo.Retire
todaslaspiedras,botellas,latasu otrosobjetosextra_osquepuedanser
levantadosoarrojadoscausandolesionespersonaleso dahosa lamaquina.
,, Paraprotegerselos ojosutilice siempreanteojoso antiparrasde
seguridadmientrasopera la maquinao mientrasla ajustao repara.Los
objetosarrojadosque rebotanpuedenlesionargravementelavista.
,, Utilicezapatosde trabajo resistentes,de suelafuerte, asi como
pantalonesy camisasajustados.Las prendassueltaso lasalhajas
puedenquedaratrapadasen laspiezasmoviles.Nuncautilice la
maquinadescalzoo consandalias.Utilice guantesde trabajode cuero
cuandoalimentematerialpor el canaldela cortadora.
,, Antesdeencenderla maquinacontrolequetodoslospemosy tornillos
estenbienajustadosparacomprobarquelamaquinaseencuentraen
condicionessegurasdeoperacion.Ademas,realiceunainspeccionvisual
dela maquinaa intervalosfrecuentesparacontrolarsi lamismaesta
da_ada.
,, Mantengao reemplacelas etiquetasde seguridade instruccionessegt]n
sea necesario.
,, Paraevitar lesionespersonaleso dahos materialessea sumamente
cuidadosoal manipularlagasolina.Lagasolinaes altamenteinflamable
y sus vaporespuedencausarexplosiones.Se puedelesionargrave-
mentesiderramagasolina sobreustedo sobrela ropaya que se puede
encender.Lavesela piely cambiesede ropadeinmediato.
,, Utilicesolo recipientesparagasolinaautorizados.
,, Apaguetodosloscigarrillos,cigarros,pipasy otrasfuentesde combustion.
,, Nuncacarguecombustibleen la maquinaen un espaciocerrado.
,, Nuncasaque latapa del gas niagreguecombustiblemientrasel motor
estacaliente o enmar@a.
,, Dejequeel motorse enfrfeper Io menosdos minutosantesde volvera
cargar combustible.
,, Nuncarecargueeltanque decombustible.Lleneel tanquenomasde
1/2pulgadaper debajode la basedel cuellodel filtroparadejarespacio
paraladilataciondel combustible.
,, Vuelvaa colocar latapa de lagasolinay aj@telabien.
,, Limpielagasolinaderramadasobreel motory el equipo.Trasladela
maquinaa otra zona.Espere5 minutosantesdeencenderel motor.
,, Nuncaalmacenela maquinao el recipientede combustibleenun
espaciocerradodondehayafuego,chispaso luz piloto(porejemplo,
homes,calentadoresdeagua,calefactores,secadoresde ropa,etc.)
,, Parareducirel riesgo deincendiomantengalamaquinalimpiade
paste,hojasy de acumulaciondeotros desechos.Limpielosderrames
de aceiteo combustibley saquetodos los desechosembebidoscon
combustible.
,, Dejequela maquinase enfriepor Io menos5 minutesantes de
guardarla.
38

OPERACION
• No pongalas maneso los piescerca de las piezasrotatoriaso enlas
camarasdealimentacionni en laaberturade descarga.El contactocon
el motorrotatoriopuedeproducirla amputaci6nde dedos,manoso pies.
,, Antesdeencenderla maquinacompruebeque elcanal delacortadora,
latomade alimentaciony la camaradecorte estanvadas y sin
desechos.
,, Inspeccioneminuciosamentetodo el materialque deseatriturary saque
losobjetosmeta.licos,piedras,botellas,latasu otrosobjetosextra_os
que puedenocasionarlesioneso da_arla maquina.
,, Siel motorgolpeaunobjetoextrahoo si la maquinaempiezaa producir
unsonidopococomuno unavibraci6n,apagueel motordeinmediato.
Dejequeel motorse detengapor complete.Desconecteel cablede la
bujfa,p6ngalode maneraquehagamasacontrael motory sigaestos
pasos:
1. Inspeccionela maquinapara versiestada_ada.
2. Repareo reemplacelas piezasda_adas.
3. Controlesihay piezasflojasy ajustelaspara asegurarquela maquina
funcionedemaneraseguray continua.
,, No permitaque se acumulematerialprocesadoen lazona de descarga.
El mismopuedeobstaculizarla descargaadecuaday provocarel
retornodel materiala traves dela aberturade alimentacion.
,, No intentetriturarni picarmaterialde mayortamaho al especificadoen
la maquinao en estemanual.Se podrfanproducir lesioneso dahos.
,, Nuncatrate dedestaparlatomadealimentaci6no la aberturade
descargamientrasel motorestaenmarcha.Apagueel motory espere
hastaquetodas las piezasquese muevense hayandetenidopor
complete,desconecteel cabledela bujfay pongalodemaneraque
haga masacontrael motorantesdesacar losescombros.
,, Nuncaoperela maquinasin que la bolsadela aspiradoray el canalde
descargaestenconectadosa la ma.quinacomo corresponde.Nunca
vacie nicambiela bolsadela aspiradoramientrasel motoresta en
marcha.El extremoconcierrede la bolsadela aspiradoradebe quedar
cerradotodo el tiempo mientraslaopera.
,, Nuncaoperela maquinasi el pico deingresoo la unionopcionalparala
mangueranoestanconectadosa la maquinaadecuadamente.Nunca
intenteconectaro cambiarningunadeestas unionesmientrasel motor
estaen marcha.
,, Mantengatodos losprotectores,desviadoresy dispositivosdeseguridad
ensu lugaryen buenascondiciones.
,, Mientrasalimentamaterialdentrode lamaquinamantengasu rostro
y sucuerpodetrasy haciaun costadodel canalde lacortadora para
evitarlesionespor retrocesosaccidentales.
,, Nuncaopereestamaquinasin buenavisibilidado iluminaci6n.Siempre
debeestarsegurode queesta bienafirmadoy sostengabienlas
manijas.
,, Noopere estamaquinaen superficiescongrava.
,, Noopere estamaquinaestandobajo losefectos del alcoholo de
drogas.
,, El silenciadory el motorse calientany puedenproducirquemaduras.No
lostoque.
,, Nuncalevanteotransportela maquinacuandoel motorestaencendido.
MANTENIMIENTO YALMACENAMIENTO
,, Nuncamanipulelosdispositivosde seguridaddemaneraimprudente.
Controleperi6dicamenteque funcionende formaadecuada.
,, Controlefrecuentementequetodos lospernosy tornillosesten bien
ajustadosparacomprobarque la ma.quinase encuentraen condiciones
segurasdefuncionamiento.AdemAs,realiceuna inspecci6nvisual de
la maquinaparacontrolarsi la mismaestAdahaday reparelade ser
necesario.
,, Antesde limpiar,repararo inspeccionarla maquina,detengael motor
y compruebequeel mismoy quetodas las piezasmovilesse hallan
detenido.Desconecteel cabledela bujfay pongalodemaneraque
haga masacontrael motorparaevitar quese enciendade manera
accidental.
,, Nocambiela configuraci6ndel reguladordel motorni acelerede-
masiadoel mismo.El reguladorcontrolala velocidadmaximasegurade
operaciondel motor.
,, Mantengao reemplacelas etiquetasdeseguridade instruccionessegt]n
sea necesario.
,, Siga lasinstruccionesde estemanualparacargar,descargar,transpor-
tary almacenarde maneraseguraestama.quina.
,, Nuncaalmacenela maquinao el recipientedecombustibleen un
espaciocerradodondehayafuego,chispaso luzpilotocomo por
ejemplo,calentadoresdeagua,hornos,secadoresde ropa,etc.
,, Consultesiempreel manualdel operadorparaconocerlas instrucciones
adecuadasparael almacenamientofueradetemporada.
,, Si debe vaciareltanque decombustible,hagaloal airelibre.
,, Respetelas normasreferentesa la disposicioncorrectay las reglamen-
tacionessobregas,combustible,etc. paraprotegerel medioambiente.
No modifique el motor
Paraevitarlesionesgraveso la muerte,no modifiqueelmotorbajoninguna
circunstancia.Si cambialaconfiguraci6ndel reguladorel motorpuededescon-
trolarsey operara velocidadesinseguras.Nuncacambielaconfiguracionde
fabricadel reguladordel motor.
39

IMPORTANTE:Estaunidadse envfasin gasolinaniaceiteen el mo-
tor.Antesdeoperarlamaquinacargueel motorcongasolinay aceite
comose indicaen el manualseparadodelmismo.
NOTA:Las referenciasa los ladosderechoe izquierdode laaspira-
doraparapatiosse hacenobservandolam_tquinadesdela posici6n
deoperaci6n.
APERTURA DE LA CAJA DE CARTON
1. Cortecada unadelas esquinasdela cajaverticalmente,de la
partesuperiora la base.
2. Saquetodaslaspiezassueltas.
3. Quiteel materialde empaquesuelto.
C61VlO SACAR LA UNIDAD DE LA CAJA
1. Elevelaunidaddesdela parteposteriorparasepararladel
materialde lacaja quequededebajo,y hagarodarlaunidad
fuerade lacaja.
2. Verifiquecuidadosamentesi enla cajaquedaalgunaparte suelta.
NOTA:AsegOresede nodoblarloscablesmientrasextraede lacaja
las partessueltaso todala unidad.
PIEZAS SUELTAS DENTRO DE LA CAJA
(Yea la figura 1)
,, Manijasuperiore inferior
,, Montajedela manguera
,, Bolsa
,, Canaldesoplado
,, Anteojosde seguridad
,, Aceiteparamotor(puedeestaren elinteriordela bolsa)
,, Manualdel operador
de la transmisi6n
Wing Nut
Soporte para la manija dej_..
la manguerasuperior .._
Guiade la
cuerda
Perillamanual
S Manija superio_r
Control de
velocidad
Guia del
cable
Soporte parala manija de la
manguerainferiort Tornillo
carro
Manija
Tuercade
mariposa
Bolsa
_je
manguera
Botella deaceite para motor Canal desoplado
Manual del operador
_ Anteojos de segurida
Figura1
40

MONTAJE DE LA MANIJA
1. Saquelos brochesdehorquillade lossoportesde lamanija,y
saquelostornillosdelcarroy las tuercasde mariposadela manija
inferior.
a. SitOelos agujerosinferioresde lamanijainferiorsobre
los pernosde los soportesde lamanija,y asegOreloscon
brochesdehorquilla.Vealafigura2.
b. Insertelostornillosdel carrodesdeel ladode afueraa traves
delagujerosuperiorde la manijainferiory asegOreloscon
tuercasde mariposa.Veala figura2.
2. a. Desplieguelamanijasuperiorhastaquequedealineadacon
la manijainferior.AsegOresequela guiade lacuerdaeste
situadaa laderechadela manijasuperior.Yeala figura3.
IMPORTANTE:AsegOresedeenrutarlos cablesfuerade la manija
inferior.Asimismo,noprenseloscablesmientraslevantalasmanijas.
3,
4,
b. Parasujetarlasdos manijasajustelas perillasde la manija
(los pernosdelcarro debenestarcolocadosde forma
adecuadaen la manija).Vealafigura 3.
Tire delas dos unionesdelcable unidasa los cables,ajuste
aproximadamente8 pulgadasdecadaextremodecable,y ubique
los cablesensu guia.
Aflojela tuercade mariposaquesostienelaguiade lacuerd
contrael ladoderechodela manijasuperior.
a. Tire lentamentede lacuerdade arranqueparasacarladel
motor.Vealafigura4.
b. Deslicelacuerdadearranqueenlaguia. Ajustelatuercaa
mariposa.Vealafigura4.
41
f
Figura 2
Guia de lacuerda
Figura 3
Figura 4
J
J

Figura5
f_'_ INSTALACION DEL MONTAJE DE LA
IVIANGUERA
1. a. Desliceel adaptadorparamangueradel montajede la misma
haciael interiordel adaptadorbase ubicadoa la izquierday al
frentedela aspiradoraparapatios.Yeala figura5.
b. Tire delpernocon resortedel ladoexteriordela base,y ponga
el pernoenIfneaconel primeragujero(elm_tscercanoal
extremodeltubo)deladaptadorparamanguera.
c. Suelteelpernoparaajustarla mangueraensu lugar.
2. a. Primero,unaapresi6nla manijade la mangueraconel soporte
parala manijade la manguerasuperior,y despuescon el
soportedela manguerainferior.
b. SitOeel cahode la mangueraenel ganchodesoportejuntoal
canalde la cortadora.Veala figura6.
MONTAJE DE LA BOLSA
.._ 1. Sostengala manijade labolsacon unamanoy deslicelavarillade
seguridaddelsoportede montajehaciael motorconla otra mano.
Useel extremodelsoportedemontajecomopalancacuando
deslicelavarilladeseguridad.
a. Deslicelabolsa porencimadelbordedela aberturade
descargay sueltelavarilladeseguridadparaajustarla bolsa
en su lugar.Vealafigura7.
b. Unaelbrochede labolsaa presi6nconla partesuperiorde la
manijainferior.
c. Coloquelastiras inferioresde la bolsaporencimade laparte
superiorde la manijainferior,enganch_mdolasen los pernos.
Vealafigura 7.
f
Figura6
NOTA:El bot6ninterruptorde bolsa/canal,unidoa la m6nsulade
montaje,debequedarpresionadototalmenteporla puntadela aleta
delanterasituadaen lamanijadela bolsacuandoajustedichabolsa,
o el motornoarrancar_..
f
Figura7
42

INSTALAR EL CANAL DE SOPLADO f
NOTA:hayqueretirarlabolsaantesde instalarel canalde soplado.
1. a. Tomeel canalde sopladocon unamanoy deslicelavarillade
seguridaddel soportede montajehaciael motorcon la otra
mano.Useel extremodelsoportede montajecomopalanca
cuandodeslicelavarillade seguridad.Veala figura8.
b. Desliceel canalde sopladoporencimadelbordede laabertura
dedescarga,y sueltelavarillade seguridadparaajustarel
canalensu lugar.
c. Aumentela alturadelpico alm_.ximocuandoutiliceelcanalde
soplado.Consultelas instruccionesparaajustarla alturadel
picoen la siguientesecci6n.
NOTA:Elbot6ninterruptordebolsa/canalunidoa lam_nsulade
montajedebequedarpresionadototalmentepor lapuntade laaleta
delanterasituadaen el canaldesoplado,o elmotornoarrancar&
Siempredetengael motory desconecteel cablede labujfaantes
dehacercualquiertipo demantenimientoo ajustes.Utilicesiempre
anteojosde seguridaddurantelaoperaci6no mientrasajustao
reparaesteequipo.
./
Figura8
/
/
s
,i
,\
Y
AJUSTE DE LA ALTURA DEL PICO
Puedeajustarel picoen seisposicionesquevariandesde5/8"a 4
1/8" de distanciadelsuelo.Debeajustarlaalturadelpico segOnlas
condicionesdelpatio.
1. Oprimalapalancade ajustede laalturadelpico haciala rueda.
Yealafigura9.
2. Muevalapalancadeajustede alturahaciadelanteo haciaatr_ts,
paramoverel pico arribao abajo.AsegOresede queambas
palancasest_.nen lamismaposici6n.
3. Liberela palancahaciala cubierta.
NOTA:en general,levantelaalturadel picoparaaspirarunacapa
gruesade hojaso parausarelcanal desoplado.Bajelaalturadel
pico parasuperficiesm_tslisas.
f
Figure9
J
43

f Controldelatransmisi6n "X
Controldel
]ntrol develocidadestrangulador
Manijadei Controlde
obturaci6n
Bolsa
SoporteparaI_
manijadela
manguerainferior
IVIontajedela-
manguera
Manijadela
Llenadodeaceite
decombL
Manijade
manguera
Cable de la
bujia
Palanca del pico /
uera de la
aspiradora
Canal de la
cortadora
1 Canalde
soplado Soporte
' 'k,, gancno
_____.. Palanca de
__ delaalturadel
uu _ plco 1-DeSerequipado
Figura10
Ahoraqueya ha ajustadosu aspiradoraparapatiosparalaoperaci6n,
familiaricesecon suscontrolesy caracteristicas.Estosse describen
y se ilustranen estap_.gina.Esteconocimientole permitir_tutilizarsu
nuevoequipoa su maximacapacidad.
CONTROL DE LA TRANSMISION
Ubicadosobrela partedeabajode lamanijasuperior,elcontroldela
transmisi6nse utilizaparaengranar/desengranarlas ruedas.Apriete
porcompletoel controlde latransmisi6ncontralamanijasuperior
paraengranarlasruedas,y suelteloparadesengranarlas.(NO suelte
el embrague).
IMPORTANTE:Muevael controlde velocidads61ocuandoel motor
est6en marcha.Si cambiael ajustedel controldevelocidadconel
motorapagado,su aspiradoraparapatiospuederesultardahada.
PALANCA
Losdesechosquese acumulanenlospatioscomoporejemplolashojas
o lasagujasdelospinosse puedenaspirarconel picoparapicarlos.
AIoperarunacortadoratrituradorapuedeser queobjetosextrahos
seanarrojadosa losojos Iocual puededaharlosgravemente.Utilice
siemprelosanteojosde seguridadprovistoscon estaunidado
protectoresparaojosmientrasoperay mientrasrealizaajusteso
[reparacones.
CANAL DE LA CORTADORA
Permiteque lasramaspequehasde hasta1-1/2"dediametroingresen
al motorparapicarlas.Vealafigura9.
CONTROL DE VELOClDAD
Situadoen laparte izquierdade la manijaizquierda,el controlde
velocidadse utilizaparaseleccionarlavelocidaddeavancedela
aspiradoraparapatios.
BOLSA
Juntael materialtrituradoqueingres6a travesdelcanalde picadoo
querueaspiradoa travesdel pico ode la manguera.
MANIJA DE LA BOLSA
Seutilizaparatomarlabolsaparacolocarla,sacarlayvaciarla.Vealafigura
10.
Cumple con los est_ndares de seguridad de ANSI
LasaspiradorasparapatiosdeCraftsmancumplencon losest_.ndaresdeseguridaddelinstitutoestadounidensedeest_.ndaresnacionales(ANSI).
44

CANAL DE SOPLADO
CuandoseIounealaunidadelcanaldesopladose utilizaparasoplaro
esparcirporlospatioslosdesechosqueseacumulanenlosmismoscomo
porejemplolashojas,lasagujasdelospinoso lasramaspequehas.
MONTAJE DE LA MANGUERA
Seusa comoalternativadeluso delpico paraaspirarlos desechos
quese acumulanen lospatioscomoporejemplolas hojasolas
agujasdelos pinosquese encuentranen lugaresde dificilacceso.
Vealafigura 10.
PALANCA DEL PICO /MANGUERA DE LA
ASPIRADORA
La manijadelpico/manguerade laaspiradoraest,.situadaen
laparte superiordelpico.Utilfcelaparaalternarlasucci6nde la
aspiradoraentreel picoy el montajede la manguera.
PALANCA DE AJUSTE DE LA ALTURA DEL
PICO
Seutilizaparaajustarladistanciaentreel sueloy el pico quevaria
aproximadamentede5/8" a 4 1/8".Veala figura10.
CONTROL DEL ESTRANGULADOR
Estapalancacontrolalavelocidaddelmotory lafunci6ndedetenci6n.
Mediantetresposicionesindependientesde lapalanca,de izquierdaa
derecha,laoperaci6nse realizade lasiguienteforma:
Arranque/lento/Motorapagado
funcionamiento marchalenta
CONTROL DE OBTURACION
Elcontroldeobturaci6nse utilizaparacebarel carburadory ayudara
queel motorarranque.
MANIJA DEL ARRANCADOR
Seutilizaparaencenderel motor.
LLENADO DE GASOLINA Y ACEITE
Aceite (se envia una botella junto con la unidad)
Primer uso
1. Saquela varilladel niveldeaceite.
2. Conla aspiradoraparapatiosal niveldel suelo,utiliceunembudo
paravaciardentrodel motortodoel contenidode la botellade
aceitesuministradacon la unidad.
3. Vuelvaa colocarla varillade Ilenadodeaceitey ajOstela.
Usos posteriores
Usesolamenteun aceitedetergentedealta calidadcuyaclasificaci6n
deservicioAPIsea SF,SGo SH.Seleccioneel gradode viscosidad
SAEdel aceitesegOnla temperaturade operaci6nesperada.Cumpla
latabla queaparecea continuaci6n:
rTabladeviscosidad del aceite ,,/
Aunquelos aceitesde viscosidadmOltiple(5W30,10W30,etc.)
mejoranel encendidocuandoel climaesterfifo, los mismosincremen-
tan el consumodeaceitecuandose usana m_.sde32°R Compruebe
el nivelde aceitecon mayorfrecuenciaparaevitardahosdebidoa que
el motortrabajecon unnivelde aceitebajo.
1. Compruebeel niveldeaceiteasegur_.ndoseque lavarilladel
nivelde aceiteno rocecon las paredesinterioresdeltubo de
Ilenadode aceite.Dehacerlose puedeproducirunalectura
falsade lavarilladel niveldeaceite.Rellenehastalamarcade
FULL(lleno)de lavarilladel niveldeaceite,si es necesario.La
capacidades de aproximadamente18oz.El Ilenadoenexceso
hace queel motoremanemuchohumoy queel rendimientodel
mismonosea bueno.
2. Vuelvaacolocarlavarillade Ilenadode aceitey ajOstela.
3. Mantengael nivelde aceiteen lamarcaFULL.Siponeel motor
en marchaconmuypocoaceitele puedecausardahosperman-
entes.
Tengaextremocuidadocuandomanipulegasolina.Lagasolinaes
altamenteinflamabley susvaporespuedencausarexplosiones.
Nuncacarguecombustibleenla maquinaenun espaciocerrado
o cuandoel motorest,.calienteo en marcha.Apaguecigarrillos,
cigarros,pipasy otrasfuentesde combusti6n.
GASOMNA
1. Saquelatapadel combustibledeldep6sitodelmismo.
2. Verifiquequeel recipientedelquevaa verterlagasolinaeate
limpioy librede6xidoodeobjetosextrahos.No usenunca
gasolinaquepuedaestarviejaporhaberestadoalmacenadaensu
recipienteporlargosperiodos.Lagasolinaquehaestadoestacio-
nadaporun periodosuperiora cuatrosemanasdebeconsiderarse
vieja.
3. Lleneel tanquede combustibles61ocongasolinanormalsin
plomo,limpiay fresca.No usegasolinaquecontengaMETANOL.
Vuelvaacolocarlatapa decombustibleensu lugar.
Los combustiblesconmezclade alcohol(quese Ilamangasohol,
o queutilizanetanolo metanol)puedenatraerhumedad,Io que
conducea laseparaci6ny formaci6nde _.cidosduranteel almace-
namiento.Elgas acidicopuededaharel sistemade combustibledel
motormientraslam_tq_uinaesteralmacenada.
No use nuncaproductosdelimpiezaparamotoreso carburadores
enel dep6sitodecombustible,se puedenocasionardahosperma-
nentes.
45

Controldeobturaci6n
Figura11
Figura12
Aleta exterior-_,
Aleta
Figura13
Paraevitarproblemascon el motor,se debevaciarel sistemade
combustibleantesdealmacenarlam_.quinadurante30 diaso m_.s.
Vacieel tanquede nafta,enciendael motory dejelofuncionarhasta
quelas lineasde combustibley elcarburadorest6nvacios.La
siguientetemporadause combustiblefresco.Consultelas Instruc-
cionesde ALMACENAMIENTOsi deseainformaci6nadicional.
NOTA:Verifiqueperi6dicamenteel nivelde combustibleparaevitar
quedarsesin gasolinamientrasesteroperandolaaspiradorapara
patios.Si la unidadse quedasin combustiblemientrasest,.triturando,
puederesultarnecesariodestaparel _.readedescargaantesdepoder
volvera encenderla.Consultelasecci6nSERVICIOY MANTEN-
IMIENTO.
,J
Cuandomuevalapalancadelcontroldel reguladortengacuidado
con lassuperficiescalientesy los bordesafiladosde laprotecci6ndel
silenciador.
PARA ENCENDER EL MOTOR
1. Conecteel cablede la bujiay la mangade gomaa la misma.
2. Elbot6ndelinterruptordebolsa/canaldebequedarpresionado
totalmenteporlapuntadelaaletadelanterasituadaenlamanijadela
bolsaoenelcanaldesoplado,yaqueencasocontrarioelmotorno
arrancar_..
3. Compruebequeelcable delinterruptorde labolsa/canalest_
conectadoal motory queesteconectadoa tierramediantela
m_nsulademontaje.
4. EltanquedecombustibledebeIlenarsea3/4deltotalantesde
arrancar.
5. Muevala palancade controldelestranguladora la posici6n
START/RUN(encendido/funcionamiento,representadoporuna
liebre).Veala figura11.
el controldelobturadorI"_1
6. Mueva haciael controldel regulador
paraobturarel carburadordel motor.(Siel motorestertibiola
obturaci6npuedenoser necesaria).
7. Situadodetr_tsde launidad,tomela manijadelarrancadory tire
de lacuerdahastaquesientaun tir6n.Yealafigura 11.
8. Tirede lacuerdademanerar_.piday continua.Aprietebienla
manijadelarrancador.Dejequelacuerdase enrosquelentamente.
9. Repitaestepaso,deser necesario,hastaquese enciendael mo-
tor.Cuandose enciendeel motormuevael controldeobturaci6n
gradualmentelejosdel controldelestrangulador.
10. Siel motorfalla,muevael controldel obturadorhaciaatr_ts,en
direcci6nal controldelestrangulador,y repitalos pasos1a 9.
11. MantengaSIEMPREel controldel estranguladorenposici6n
START/RUN(encendido/funcionamiento)_ mientrasopere
laaspiradoraparapatios.
PARA DETENER EL MOTOR
1. Elreguladorde movimientocontrolalapalancaparareducir'_
lamarcha(tortuga)de laposici6n.Siempreque posible,gradual-
mentereduzcala velocidadde motorantesde pararel motor.
2. Muevalas palancasde controldel reguladora laposici6n
STOP(detenci6n)u OFF(apagado).
46

3. Desconecteel cablede labujiade labujiay col6queloa masa f --_
contrael postede retenci6nparaevitarquese enciendaac-
cidentalmentemientrasnose esterprestandoatenci6nalequipo.
DESCARGA DE LA BOLSA
1. Desenganchelas tirasde labolsade la manijainferior.
2. Suelteel brochede labolsaa presi6nde la partesuperiorde la
manijainferior.Yeala figura12.
3. Tomela manijade labolsacon unamanoy tire dela varillade
seguridaddel soportede montajehaciael motorcon laotra mano
parasoltarla.
4. Elevelabolsafuerade laparte posteriorde la unidad.
5. Girelosdos botonesdela parteposteriordela bolsaparaabrirla
y vaciarel contenido.Vealafigura 13.Sostengala manijay el
brochedela bolsamientrasvaciael contenido.
6. Comprimalaaberturadelabolsay doblelaaletainteriorsobrela
abertura.
7. Doblelaaleta exteriorsobrelaaleta interiore insertelos botones
de labolsaa travesdelas salidasmet_tlicas.Veala figura13.
8. Girelosbotonesparacerrarlabolsa.Ubiquelabolsade nuevo
enla unidadcomose indicaen laSecci6ndeAsamblea.
EXTRACCION DEL CANAL DE SOPLADO
1. Tomeel canalde sopladocon unamanoy tire dela varillade
seguridaddel soportede montajehaciael motorcon laotra mano
parasoltarlo.Consultelafigura 8en la Secci6nde Asamblea.
2. Saqueelcanaldesopladoporencimadelbordedelaaberturade
descarga.
USO DEL PICO DE LA ASPIRADORA
1. Coloquelapalancadelpico/mangueradelaaspiradoraenlaposici6n
superiordelpicoparaaspiraratravesdelmismo.Vealafigura14.
2. Elpernocon resortedebeestarenel primerorificio(elm_.s
cercanoalfinal deltubo)del adaptadorde la manguerapara
operarel picode la misma.
3. Conambasmanossituadasen la partesuperiorde la manija
superior,elevecompletamenteel controlde transmisi6ncontrala
manijasuperiorparaimpulsarla unidadporel patio.
4. Utiliceel controldevelocidadparaelegirvelocidadaltao baja.
Elcontrolde velocidadpuedemoversemientrasla unidadse
impulsao antesdeengranarlas ruedas.
IMPORTANTE:Muevaelcontrolde velocidads61ocuandoel motor
esteenmarcha.Sicambiael ajustedelcontrolde velocidadcon el
motorapagado,su aspiradoraparapatiospuederesultardahada.
Eldesechoquese acumulaen los patioscomoporejemplolas hojas
y las agujasdelos pinospuedenaspirarsea travesdelpico para
triturarlos.Despuesquehatrituradoel materialcon las hojasde
desgranardel montajedel motor,el mismoser_.descargadoa la bolsa
colectorao a travesdelcanalde soplado.%1outilicela m_.quinapara
trituraro picarel materialintegrantede lavegetaci6nquese encuentra
en unpationormal(esdecir,ramas,hojas,ramaspequehas,etc.)
Evitelas plantasfibrosascomoporejemplolasde tomateshastaque
est_ntotalmentesecas.Sepuedenintroducirmaterialescomopor
ejemplotroncoso ramaspesadasde hasta1-1/2"de di_tmetroen el
canalde lacortadora.
\
,. j
Figura14
r-
\
Figura15
J
No intentetriturar,picarni aspirarmaterialde mayortamahoal
especificadoenla m_.quinao enestemanual.Sepodrianproducir
lesioneso dahosa lam_tquina.
IMPORTANTE:Lapantalladedesgranadoesta ubicadadentrode la
cajaen lazonade descarga.Sise tapa lapantallade desgranado,
s_.quelay Ifmpielacomose indicaen la secci6nde mantenimiento.
Paraobtenerel mejorresultadoes importantetambienmantener
Siempredetengael motory desconecteel cablede labujiaantesde
realizarcualquierajuste.
USO DEL MONTAJE DE LA IV1ANGUERA
1. Coloquela manijadel pico/manguerade laaspiradoraenla
posici6nde labase delpico paravolveradirigirla aspiraci6nal
montajede la manguera.Vealafigura 15.
2. Paraoperarel ensambladode la manguera,el pernoconresorte
debeestarenel segundoagujerodeladaptadorde lamisma.
3. Desenganchela mangueradelsoportedela manijasuperiory
tomela manijadela mangueraparadirigirlamientrasaspiralos
desechosquese acumulanenlos patioscomoporejemplohojas
o agujasde pinosquese encuentranen lugaresde dificilacceso.
47

rl-
Siempredetengael motory desconecteel cablede labujiaantes
dehacercualquiertipode mantenimientoo ajustes.Utilicesiempre
pnteojos de seguridaddurantelaoperaci6no mientrasajustao
[reparaesteequipo.
RECOMENDACIONES GENERALES
,, Respetesiemprelas reglasde seguridadcuandorealicetareas
demantenimiento.
,, Lagaranfiadeestaaspiradoraparapatiosnocubreelementos
quehanestadosujetosal mal usoo negligenciadel operador.
Pararecibirel reembolsototaldela garantia,eloperadordeber_t
darmantenimientoal equipotal y comose indicaen estemanual.
,, Algunosajustesdebenser realizadosperi6dicamenteparael
mantenimientoadecuadodela unidad.
,, Reviseperi6dicamentetodoslossujetadoresy compruebeque
estenbienajustados.
3
II
II
1. Espaciode0.020pulg(0,51mm)
2. Electrodo
3. Porcelana
Figura 16
MANTENIMIENTO DE MOTOR
Servicio A La Bujia
Limpielabujiay ajusteel espacioa 0.020"al menosunavezpor
estaci6n;sustituyacada 100horasde la operaci6n.
,, .4realimpiaalrededordela basede bujia. No lije labujia. Se
debenlimpiarlas bujiasmedianteraspadoo talladoconcepillo
dealambrey lavadocon unsolventecomercial.
,, Quitee inspeccionela bujia.Compruebeel huecoparaasegu-
rarsequees puestoen .020".Verla Figura16.
,, Sustituyala bujiasi los electrodossonpicados,quemados,o la
porcelanaes rajada.
Servicio Del Filtro De Aire
Nouse aire presurizadoo solventesparalimpiarel cartuchode filtro
de are. j
Elfiltrode aireevitael ingresoal carburadorde suciedad,polvo,etc.
perjudicialesy evitaque los mismosseanintroducidosdentrodel mo-
tor.Adem_ts,dicho filtroes importanteparala vidaOtily el rendimiento
delmotor.Elfiltrodeaireconstade unfiltroplisado.Noponganunca
enfuncionamientoel motorsin habermontadototalmenteel filtrode
aire.
fX X
X Y,
Figura17
//
J
Limpioosustituyenel filtrode airecada25 horasdela operaci6n.
1. Aflojeeltornilloe inclinehaciaabajolacubiertadelalojamiento
depl_.sticoenel lateraldel motor.Vealafigura 17.
2. Retireel filtroplisadode lacubiertadelalojamientode pEtsticoy
sustituyaporunfiltro limpioo nuevo.
3. Insertelasetiquetasde latapa en ranurasenel rondodela base.
4. Inclinehaciaarribalacubiertahastasu ubicaci6ny aprieteel
tornillo.
NOTA:Siel filtroesterrotoo dahado,dtmbielo.
48

Compruebe El Aceite Del Motor
1. Detengael motory esperevariosminutosantesdeverificarel
niveldeaceite.Conel motorubicadoensueloparejo,elaceite
debeestaren lamarcaFULL(lleno)dela varilladel nivelde
aceite.
2. Saquela varilladel niveldeaceitey limpielimpiocon latela.
3. Sustituyay aprietelavarillade aceite.Quitey compruebeel nivel
delaceite.Elniveldeberfaestaren lasehal LLENA.
4. De ser necesario,ahadael petr61eodespacio- nuevocontrol.No
sobrellenar.
5. Limpielavarilladeaceitelimpia,sustituyay apretar.Quitey
compruebeel niveldelaceite.Elniveldelaceitedeberiaestaren
la lineaLLENAenla varilladeaceite.
No hagaoverfil.Elsobrellenocon el petr61eopuedehacerqueel
motornocomience,o con fuerzacomienzo.Sisobrela sehalLLENA
en la varilladeaceite,dreneel petr61eoparareducirel niveldel I
aceitea lasehal LLENAenla varillade aceite, j
Cambio Del Aceite Del Motor
• Usesolamenteunaceitedetergentede alta calidadcuya
clasificaci6nde servicioAPI seaSF,SGo SH. Seleccioneel
gradode viscosidadSAEdel aceitesegOnlatemperaturade
operaci6nesperada.Consultelasecci6ndeoperaci6nparaver la
tablade viscosidad.
Cambieel petr61eode motordespuesde lascincoa ocho
primerashorasde laoperaci6n,y cadacincuentahoraso
cadatemporadaa partirde entonces.Cambieel petr61eocada
veinticincohorascuandomotordeoperacionesbajolacarga
pesadao entemperaturasaltas.
Como Vaciar El Aceite
1. Vacieelcombustibledeltanquehaciendofuncionarel motor
hastaqueel tanquedecombustibleestevado.
2. Desconectela bujiaIoalambrany guardanlejosde la bujia.
3. Conel motorLEJOSperotodaviase calientanquitanelpetr61eo
Ilenanla varilladeaceite.
4. La unidadde puntaensu lado (ladode bujfa)paradrenarporel
petr61eoIlenaeltubo enel recept_tculoapropiado.
El petr61eousadoes undesechoarriesgado.Elimineelpetr61eo
usadocorrectamente.Nodesechecon labasurade lacasa.
Compruebecon susautoridadeslocaleso Chamuscael Centrode
Servicioparainstalacionesde disposici6n/reciclajeseguras.
5. Cuandoel motores drenadode todoel petr61eo,niveldemotor
de lugar.Recambiocon aproximadamente18onz.depetr61eo
fresco.Llenesea la IfneaLLENAenla varilladeaceite.No
sobrellenar.RefieraseaGas y Petr61eoLlenaren lasecci6nde
OPERACION.
6. Vuelvaa colocarla varillade Ilenadodeaceitey ajOstela.
7. Sustituyael alambrede bujiaantesdelcomienzo.
La temperaturadel silenciadory las _treascercanaspuedesuperar
I os 150oF (65oF). Evte esaszonas.
Servicio AI Silenciador
Inspeccioneperi6dicamenteel silenciadory reempl_tcelodeser
necesario.Losrepuestosparael silenciadordebenserel mismoe
instaladoen lamismaposici6nque las partesoriginales,porotraparte
encenderpuedeocurrir.
Limpieza Del Motor
Diariamenteo antesde cadauso,limpiehierba,barciao
escombrosacumuladosdel motor.Guardeencadenamiento,
primavera,y mandoslimpios.Guardeel_.reaalrededory detr_ts
del silenciadorsincualesquieraescombroscombustibles.
El cuidadodel motorlimpiopermiteel movimientoaereoalred-
edordel motor.
Las partesde motordeberianser guardadaslimpiasparareducir
el riesgode recalentarsey la ignici6ndeescombrosacumulados.
Estees sobretodo importantecortandola altahierba.
I No use aguaparalimpiarpartes aguapodria
el de motor.El
I contamnare s sternadecombustb e. Useuncep o o ate aseca.
Ajuste de Carburador
Elcarburadoren estemotornoes ajustable.
Velocidad de Motor
No intentecambiarlavelocidadde motormanipulandoelencade-
namientodegobernadordel motor.Haciendotan podriacausarla
heridapersonalseriay daharal motor.Las REVOLUCIONESPOR
IM NUTOde motorhans do puestasen a f_tbrca.
LUBRICACION
*Ruedas- SitQeunaspocasgotasde aceiteSAE30 encada
tornillocon rebordeunavez portemporada.
, Palancasde ajuste de altura del pico-Lubriquelas palancas
de ajustedealturadel picocon aceiteligero.
. Varilla de seguridad- Lubriquelavarillade seguridady los
resortesdecompresi6nque launena lam_nsulademontaje.
, Palancadel pico /manguera de la aspiradora- Lubriquela
palancadelpico/mangueradela aspiradoraquela unena la
m6nsulade montaje.
LIMPIEZA DEL EQUIPO
•Limpiecuidadosamentela aspiradoraparapatiosdespuesde
cada uso.
Lave labolsacon aguaperi6dicamente.Permitaquese seque
bienen unsitioa la sombra.
49

,' Sise tapa lapantalladedesgranado,s_tquelay limpielacomose ?"_(_ '_"_
indicaabajo.
NOTA:Lalimpiezacon unchorrode aguaa presi6nnose recomien-
da, ya queel sistemadecombustiblepodriaresultarcontaminado.
Antesde realizarcualquiertipo del mantenimientoenla m_.quina,
esperetodaslaspartesadejarde moversey desconectarel alambre
de bujia.El fracasodeseguirestainstrucci6npodriacausarla herida
personalo el dahoa lapropiedad.
AJUSTE DEL CABLE DEL CONTROL DE
TRANSMISION
Ajusteel cabledecontroldetransmisi6nsi la aspiradoraparapatios
nose autopropulsacon el controldetransmisi6nengranado,o si la
correade transmisi6nse desliza(la unidadvacilamientrasel motor
mantienela mismavelocidad)trasaproximadamente20horasde uso.
Paramoverel accesorio"Z"delcablede controlde transmisi6nde
laposici6nconfiguradaenfabricaenel orificiofrontaldel controlde
transmisi6nal orificioposterior,realiceIosiguiente:
1. a. Empujeel ladoderechodelcontrolhaciaafueradelorificiodel
ladoderechoen lamanijasuperior.Yeala figura18A.
b. Gireelcontrolhaciaabajo,hacia lamanijainferior.
c. Girehaciaarribapararetirarlodelorificioizquierdode la manija
superior.Vealafigura 18A.
2. Ahorahaysuficienteholguraenel cabledecontroldetrans-
misi6nparatomarel accesorio"Z"consu manoy moverlodel
orificiofrontalalposteriordelcontrolde transmisi6n.Veala
figura18B.
IMPORTANTE:asegOresedeinsertarel accesorio"Z"enel orificio
posteriortal y comose insert6en el orificiodelantero:es decir,desde
elexterior del controldetransmisi6n.
3. Ahorapuedevolvera instalarel controlde transmisi6nconcuidado,
realizandolos pasosanterioresen el ordeny formainversosa losde
su retirada.
IMPORTANTE:unavezmontadoy antesdevolveraarrancar,
asegOresedequeel cableesterbienajustado.Conel controlde la
transmisi6ndesengranado,la unidaddebemoverselibrementehacia
atr_ts.
EXTRACCION DE LA PANTALLA DE DES=
GRANADO
Si lazonade descargase tapa,saquelapantalladedesgranadoy
limpielazonacomose indicaa continuaci6n.
1. Detengael motor.Compruebequeelvado de lacortadora/tritu-
radorase hayadetenidoporcompleto.
2. Antesdedestaparel canaldedescarga,desconecte el cable de
la buj{ay p6ngalode manera que haga masacontrael poste
de retenci6n.
3. Saquelabolsa dela aspiradorao el canalde sopladodela
unidad,comose indicaenla secci6nOPERACION,paraacceder
a lapantalladedesgranado.
%.,.
Figure18
J
/
/ / /
Figure19
5O

4. Retirelos trestornillosautosellantesqueaseguranlatapade la
correay extraigala misma.Veala figura19.
5. Saqueel tornilloautosellantedel ladoderechodela unidadque
se unea lapantalladedesgranado.Puedeser necesarioquitar la
suspensi6ndesoportedemangueraparaconseguirel accesoal
tornillo.Veala figura20.
6. Saqueeltornillode cabezahexagonalde lapartesuperiorde
la cajaposteriorcercadelsoportedemontaje,y la tuercade
seguridadde la bridaque unelapantallade desgranado.Veala
figura20.
7. Saquela pantallay limpielacon uncepilloo I_tvelacon agua.Vea
la figura21.
8. Vuelvaa colocarla pantalla.
AFILADO O REEMPLAZO DE LAS HOJAS DE
LA CORTADORA
NOTA:cuandoinclinela unidad,vacieeldep6sitodecombustibley
aceite,y mantengael ladode labujia haciaarriba.
1. Deeconecteel cablede la bujia y p6ngalode manera que
hagamasacontrael postede retenci6n.
2. Retireel montajede la bolsao elcanalde soplado.
3. Ajustelos trestornillosdecabezahexagonalque sostienenla
suspensi6ndesoportedemanguera y el canalde lacortadoraa
la cajasuperior.Vealafigura22.
4. Saquelas tapasde bujedelanteras,las tuercasde seguridadde
brida,las ruedasdelanterasy lasarandelasondulatoriasquevan
unidasa los montajesdelbrazogiratorio.Veala figura23.
5. Saquelos tornilloscon reborde,lasarandelasdearrastrey las
arandelasde campanaque pasanpor losbrazosgiratorioshasta
latraba desostendelantera.Latraba desostendelanteray la
tuercadeseguridadpuedenquitarseeneste momentotambien.
fTrabade so,stUndelantera y,....
tuerca de seguridad
Monta
Arandela de campana
Arandela de arrastre
Tornillo con reborde
Arandela
ondulatoria
Tuerca de Rueda
seguridad
Figura23
j '..
x\
Figura21
Figura22
J
51

6. Saquelos cuatrotornillosdela cajasuperiorqueajustanla
cubiertadelpico.Vealafigura24.
7. Inclinela unidadcon cuidadoy ap6yelahaciaarribaparaobtener
accesoporlaparte inferioral materialde montajedel picoy al
motor.Retirelos trestornilloscon rebordeque aseguranel pico
depl_.sticonegroa la cajainferior.Consultelafigura25.
8. Inclinela partesuperiordel picode pl_tsticonegrohaciael motor
pararetirarlo.
9. MedianteunaIlaveAllende3/16",retirelostornillosdecabeza
planaquesujetanlahojade lacortadoraal motor.Dichostornil-
los sonaccesiblesa travesde laaberturaquese cre6 cuando
retir6el canalde la cortadoraanteriormente.Yeala figura26.
10. Es posiblealcanzarlas tuercasde lostornillosde cabezaplana
desdelaparte inferior,medianteunaIlaveuniversalde 1/2 pulg.
conextensi6n.Veala figura27.
11. Cambieo afile las hojasde lacortadora.Sepuedeafilar la
cuchillacon unafiladoro con unaruedade esmalte.
Cuandoafilelas hojas,protejaselas manosmedianteel usode
guantesy siga el _mgulooriginalde molido.
12. Pararealizarel reensambladosiga los pasosanterioresenorden
y manerainversosa la extracci6n.
NOTA:Ajustelostornillosde la hojaconun pardetorsi6nde 210-250
in-lbs.Compruebequese reensamblenlashojasde lacortadoracon
elfilo haciaarriba.
de ma
Motor
Figura27
J
f
f
J
Figura24
Pico de
pl_stico
negro
\
i\,
\\
f
Tornillos con reborde
Figura25
Tornillos de
cabeza plana
de la
_ cortadora
Figura26
52

LISTA DE IVIANTENllVIIENTO
Antesde realizarcualquiertipodel mantenimiento/servicio,suelte
todoslos mandosy pareel motor.Esperehastaque todaslaspartes
demovimientohayanvenidoa unaparadacompleta.Desconecteel
alambredebujiay b_.selocontrael motorparaprevenirel comienzo
involuntario.SiempreIlevepuestoscristalesinastillablesdurantela
operaci6no realizandocualquierajusteo reparaciones.
Cada Uso
los 5- 8 horas
25 horas
1. Niveldelaceitede motor
2. Hardwaresueltooausente
3. Unidady motor
1. Elaceite de motor
1. Elaceite de motor1.
2. Filtrode aire
3. Encadenamientosdecontrol
y pivotes
1. Elaceite de motor
1. Bujia
1. Sistemade combustible
Sigala listade mantenimientodadaabajo.Estacartadescribepautas
deservicios61o.Usela columnadeTroncode Servicioparaguardar
lapistade tareasdemantenimientocompletadas.Localizarel m_.s
cercanoChamuscael Centrode Serviciooprogramarel servicio,sim-
plementeponerseencontactoChamuscaen 1-800-4-MY-HOME®.
"•
1. Comprobar
2. Aprieteosustituir
3. Limpio
1. Cambio
1. Cambio
2. Limpioosustituyen
3. Lubricaci6ncon petr61eoligero
50 horas 1. Cambio
Anualmenteo 100horas 1. Limpio,sustituya,nuevohueco
AntesdeAlmacenaje 1. Elmotordirigidohastaqueestose
parea faltadelcombustibleo ahada
unaditivode gasolinaalgas enel
tanque.
1 Bajocargapesadao entemperaturasaltas
53

Nuncaalmaceneel vacfodeyardaconel combustibleenel tanque
dentrooen _.reasmalventiladasdondelos vaporesde combustible
puedenalcanzarunallamaabierta,lachispa,o el pilotocomoen un
homo,calentadorde agua,secadorderopa,o aplicaci6nde gas.
PREPARACI6N DEL MOTOR
Yaquelos motoresalmacenaronm_tsde 30dfas:
1. Paraimpedira lagomaformarseen elsistemade combustible
o enpartesde carburador,dirijasel motorhastaqueestose
parea faltadel combustibleo ahadirunaditivode gasolinaal
gasen el tanque.Siustedusaunaditivodegas,dirigeel motor
durantevariosminutosparaponerencirculaci6neladitivoporel
carburador-- despuesqueel motory el combustiblepuedenser
almacenadoshastaseismeses.
2. Mientrasel motores todaviacaliente,cambioelpetr61eo.
3. Quitelabujfa y viertaaproximadamente1onz.(30ml) del
petr61eode motorlimpioenel cilindro.Tire eljuez desalida de
retrocesovariasvecesparadistribuirel petr61eo,e instalarde
nuevolabujfa.
4. Limpieel motorde escombrossuperficiales.
LA PREPARACI6N DEL VAClO DE YARDA
,, Almacenandoelvaciodeyardaen uncobertizode almacenajeno
ventiladoo met_tlico,el cuidadodeberiaser tornadoa inoxidable
las superficiesnopintadas.Usandoun petr61eoligeroo silicona,
cubrael equipo,sobretodocualquierprimavera,portes,y cables.
,, Quitetoda la suciedaddel exteriorde motory equipo.
,, Sigarecomendacionesdelubricaci6n.
,, Equipodetiendaen un_.realimpia,seca. Noalmaceneen un
Areadondeel equipoest,.presentequepuedeusarun pilotoo
tieneun componenteque puedecreeunachispa.
54

realizarcualquiertipo delmantenimiento/servicio,sueltetodoslos mandosy pareel motor.Esperehastaquetodaslas partesde
novimientohayanvenidoa unaparadacompleta.Desconecteel alambrede bujiay b_tselocontrael motorparaprevenirelcomienzoinvolun-
ario.SiempreIlevepuestoscristalesinastillablesdurantela operaci6no realizandocualquierajusteo reparaciones.
Esta secci6n se dirigeacuestionesde servicio menores. Localizarel maccercanoChamuecael Centro de Servicio o programarel
servicio, simplemente ponerseencontactoChamusca en 1-800-4-MY-HOME®.
1. Lapalancadel reguladorno esteren la
posici6ndearranquecorrecta
2. Lapalancade obturaci6nnoesteren la
posici6nON(encendido)
3. Sehadesconectadoelcablede la bujia
4. Labujiano funcionacorrectamente
5. Eltanquedecombustibleestervaciooel
combustiblees viejo
6. Nose puedetirarde lacuerdade retroceso
El motornoarranca
7. Elinterruptorde seguridadno ester
presionado
El motorfuncionade manera
err_ttica
8. Elcabledel interruptorde seguridadnoestdt
conectadoal motoro noesterconectadoa
tierracomocorresponde
1. La unidadesterfuncionandoen laposici6n
CHOKE(obturaci6n)
2. Elcablede la bujiaest,.flojo
3. EIcombustibleesviejo
4. Aguao suciedaden el sistemadel combus-
tible
5. Elfiltrode aireest_.sucio
6. RPMdel motorbajas
7. Es necesarioajustarelcarburador
1. Muevalapalancadel reguladora la posici6nSTART
(inicio)/RUN(dirigido).
2. Pongael interruptoren laposici6nCHOKE(obtura-
ci6n).
3. Conecteelcablea labujia.
4. Limpie,ajusteladistanciadisruptivao cambie.
5. Lleneel tanquecon gasolinalimpiay fresca.
6. Hayunaobstrucci6nen el motor.Desconecteel
cablede labujiay retireel objetoatascado.
7. Elinterruptordeseguridaddebeserpresionadopor
laaletadelanterade la manijade labolsacuandose
aseguralabolsa.
8. Conecteelcabledel interruptordeseguridadal
conectordelmotor,de maneraquehagamasa
contrala mensulade montaje.
1. Cambielapalancade obturaci6na laposici6nOFF
(apagado).
2. Conectey ajusteel cablede labujia.
3. Lleneel tanquecon gasolinalimpiay fresca.
4. Vacieel tanquedelcombustible.Vuelvaa Ilenarlo
concombustiblelimpio.
5. Limpieo cambieel filtrodeaire.
6. Siempreaccioneel motorcon el estranguladoral
m_.ximo.
7. Contactecon sucentrode partesy reparaciones
Sears.
55

luier tipodel mantenimiento/servicio,sueltetodoslos mandosy pareelmotor.Esperehastaquetodaslas partesde
Ilevepuestoscristalesinastillablesdurantela operaci6no realizandocualquierajusteo reparaciones.
Estasecci6nsedirigeacuestione$de serviciomenoree,Localizarel maccereanoChamuecael Centrode Servicio o programarel
servicio,simplementeponerseen contactoChamuscaen 1-800-4-MY-HOME@.
El motorrecalienta 1. El nivelde aceitedel motores bajo
2. Flujode aire restringido
Saltosocasionales(pausas)a 1. Ladistanciadisruptivade labujiaes muy
alta velocidad poca
El motorfuncionaenvado mal 1. Bujiaensuciada 1.
2. Elfiltrode aireestersucio 2.
Demasiadavibraci6n 1. Haypartesqueest_mflojaso el motorester 1.
dahado
La unidadnodescarga 1. El_treadedescargaestertapada 1.
La tasade descargase reduce
de maneraconsiderableo
cambiala composici6ndel
materialdescargado
La unidad no se autopro-
pulsa, o se desliza cuando
el control de transmisi6n
esta engranado
2. Hayunobjetoextrahoenel motor
3. RPMdel motorbajas
4. Labolsade la aspiradoraesterIlena.
1. RPMdel motorbajas
2. La hojade lacortadoraesterdesafilada
1. Elcabledelcontroldetransmisi6nestermal
ajustado.
2. Lacorreadetransmisi6nesterdesgastadao
dahada.
D . = @ @
1. Lleneel c_.rtercon la adecuadaselecci6nde aceite.
2. Recortesde peri6dicode hierbalimpiosy escom-
brosdealrededordelas aletasde refrigeraci6ndel
motory alojamientodesoplador.
1. Quite labujiay ajusteel hueco.
Sustituyalabujia y ajusteel hueco.
Limpieo cambieel filtrodeaire.
Detengael motorde inmediatoy desconecteel
cable dela bujia.Contacteconsu centrodepartesy
reparacionesSears.
Detengael motorde inmediatoy desconecteel
cable dela bujia. Limpiela pantalladedesgranadoy
el interiorde laaberturade descarga.
2. Detengael motory desconecteel cablede labujia.
Saqueelobjetoextrahodel motor.
3. Siempreaccioneel motorconel estranguladoral
m_tximo.
4. Vadelabolsa.
1. Siempreaccioneel motorconel estranguladoral
m_.ximo.
2. Reemplacela hojade lacortadorao contacteasu
centrode reparacionesy partesSears.
1. Sigael procedimientodeajusteen lasecci6nsobre
ajustesy serviciodel manual.
2. Contactecon su centrode partesy reparaciones
Sears.
56

(Esta p_tginase aplica s61oen EE.UU. y CanadA).
Sears, Roebuck and Co., LI.S.Ao (Sears), el Coneejo de Recureoe Ambientalee de California (CARB)
y la Agencia de Protecci6n Ambiental de los Eetados Unidoe (EPA)
Declaracion de garant[a del sieterna de control de emisionee (derechoe y obmigacionee de la garant[a de defectoe del propi-
etario)
LACOBERTURADELA GARANTfADE CONTROLDEEMISIONESES
APLICABLEA LOSMOTORESCERTIFICADOSCOMPRADOSENCALIFOR-
NIAEN 1995Y POSTERIORMENTE,QUE SE UTILIZANENCALIFORNIA,
Declaracion de garantia sobre defectoe en el control
ElConsejodeRecursosAmbientalesde California(CARB),la EPA(Agencia
deProteccionAmbientaldelos EE.UU.)y Searstienenel gustode explicarla
garantfadel sistemade controldeemisionesparamotoresdel ado2000y para
elfuture conrelaciona motorespequehostedo terreno(SORE).EnCalifornia,
los nuevosmotorespequeSostodo terrenodebenestar diseSados,construidos
yequipadosparacumplirconlas rigurosasnormasanti-smogdelestado.En
el restede losEstadosUnidos,losmotoresnuevostodoterrenode encendido
perchispacertificadosparael aSo1997debencumplirestAndaressimilares
establecidosper la EPA.Searsdebegarantizarel sistemade controldeemis-
Y PARALOSMODELOSCERTIFICADOSDELAiqO 1997YPOSTERIORES,
QUESE COMPRENY UTILICENENCUALQUIERPARTEDE LOS ESTADOS
UNIDOS(Y A PARTIRDEL 1 DEENERODE2001 ENCANAD,_).
de emisionee para California y los Eetadoe Unidoe
ionesdesu motorparalosperiodosdetiempoenumeradosa continuaci6n,
siemprequeno hayaabuse,negligenciao mantenimientoindebidode su
motortodoterrenopeque_o.Su sistemadecontrolde emisionespuedeincluir
piezastales comeel carburador,el filtrodeaire, elsistemadeencendido,el
silenciadory elconversercatalitico.Tambienpuedeincluirconectoresy otras
unidadesrelacionadascon las emisiones.Dondeexistaunacondicioncubierta
perla garantfa,Searsrepararasu peque_omotortodo terrenosincostoalguno
incluyendodiagnostico,piezasy manede obra
Cobertura de la garantia Sears para defectoe en el control de ernieionee
Losmotorestodo terrenopeque_osestangarantizadosen Io relativealcontrol a lasdisposicionesque se indiquena continuacion.Siuna partede su motor
deemisionesparadefectosenpiezasduranteun periodode dosahos,sujeto cubiertaper la garantiaesdefectuosa,Sears repararao sustituiradichaparte.
Responeabilidadee del propietario en relacibn con la garantia
Comepropietariodel motortodo terrenopequeffo,Ud.es responsablede la
realizaciondel mantenimientorequeridoquese incluyeen las instrucciones
deoperaciony mantenimiento.Searsrecomiendaquese conserventodoslos
recibosrelativesal mantenimientode su motortodoterrenopequeSo,pero
nopude denegarlagarantfasimplementeperla faltadelosmismos,o per su
incumplimientodel mantenimientoprogramado.Comepropietariodel motor
peque_otodoterrenodebesaberque, sinembargo,Searslepuedenegar
lacoberturade lagarantfasi su motortodoterrenopequeSoo una piezadel
mismehanfalladodebidoa abuse,negligencia,mantenimienteindebideo
a modificacienesnoaprobadas.Ud.es responsablede presentarsu motor
todoterrenopequehoa undistribuidorde serviciosSearsautorizadotan pronto
comeaparezcaunproblema.Lasreparacionesdela garantiasinconflicto
debencompletarseen un plazodetiemporazonable,no superiora 30dfas.Si
tienealgunapreguntarespectoa sus derechosy responsabilidadesreferen-
tes a la garantia,debe contactarcon un representantedeserviciosSearsal
1--800--469--4663.La garantiadeemisioneses unagarantiaper defectos.Los
defectossejuzgan deacuerdoconelfuncionamientenormalde un motor.La
garantfano estarelacionadacon unapruebade emisionesenuse.
Diepoeicionee de la garantia Sears para defectoe en el control de emieiones
Lassiguientessondisposicionesespecificasrelacionadasconla coberturade la garantiaparadefectosenel controldeemisiones.Esuna_adidoa lagarantiade
motorSearsparamotoresno reguladesque seencuentraen lasinstruccionesde funcionamientoy mantenimiento.
1. Piezascongarantfa
Lacoberturade estagarantfase extiendeunicamentea las piezas
que aparecena continuacion(las partesde los sistemasde controlde
emisiones),siemprequedichaspiezasestuvieranya en el motoren el
mementode su compra.
a. Sistemademedicionde combustible
•Sistemadeenriquecimientoparaarranqueenfrio
•Carburadory partesinternas
•Bombade combustible
b. Sistemadeinduccionde aire
•Filtrode aire
•Colectorde admision
c. Sistemadeencendido
•Bujia(s)deencendido
•Sistemadeencendidomagneto
d. Sistemadelcatalizader
•Convertidorcatalftico
•Colectorde escape
•Sistemadeinyecci6nde aireo valvula de impulses
e. Elementosvariadosusadosen los sistemasanteriores
•Valvulasdevacio,sensiblesa temperatura,posici6ny tiempo
e interruptores
•Conectoresy montajes
2. Alcancedela cobertura
Searsgarantizaalposeederinicialy a loscempradoressubsiguientes
que laspiezascon garantianotendrandefectosenmaterialesnimane
deobraque provoquenla falla delas mismasduranteunperiodo de
dosahosa partirde la fecha enqueel motorse entregaa uncomprador
particular.
3. Sincargo
Lareparaciono reemplazode cualquierpartecongarantfase realizara
sin cargoalgunoparael poseedor,incluyendotareasde diagnosticoque
permitandeterminarsi una partecon garantiaes defectuosa,siempreque
dicho diagnosticose realiceen un distribuidorde serviciosSearsautoriza-
do. Parael serviciode lagarantiadeemisiones,contacteal distribuidorde
serviciosSearsautorizadomascercanoincluidoen las"Paginasamarillas"
en lascategoNas"Motores,gasolina","Motoresde gasolina","Podadoras
decesped",o similares.
4. Reclamacionesy exclusionesa la cobertura
Lasreclamacionesde lagarantfadebenenviarsede acuerdocon las
disposicionesdela polfticade garantfaparamotoresSears.Lacobertura
de la garantiaexcluiradefectosen piezascongarantfaque noseanpartes
originalesSears,o abuse,negligenciao mantenimientoincorrecto,tal y
come se estableceen lapoliticade garantiapara motoresSears.Searsno
es responsablede lasfallas en piezascongarantiaprovocadasperel use
de partesa_adidas,que no sean originaleso que se hayanmodificado.
5. Mantenimiento
Cualquierpartecongarantiaque no este programadaparaser reem-
plazadacomemantenimientorequerido,o que solo deba inspeccionarse
regularmenteal efectode "inspeccioneo reemplacesegun seanecesario",
estaragarantizadacontra defectosduranteel periodode la garantfa.Todas
las piezasgarantizadasqueesten programadasparasu reemplazopara
cumplircon los requisitesdemantenimientoestarangarantizadassolo
per el periodoanterioral primerreemplazoprogramadoparadichapieza.
Cualquierpiezade recambioquesea equivalenteen funcionamientoy
durabilidadpuedeusarsepararealizarmantenimientoo reparaciones.El
propietarioes responsablede realizartodo el mantenimientorequerido,tal
y come sedefine en lasinstruccionesdefuncionamientey mantenimiento
Sears
6. Ceberturaindirecta
Perla presente,la coberturase extiendea lafallade cualquiercomponente
de motorprovocadaper lafallade unapiezacongarantfaqueestetodavfa
en periododegarantfa.
Enlos EstadosUnidosy Canadahayunalinea deatenci6nde24 horas,1-800=469--4663,quecuentacon unmenL_conmensajespre-grabadosquecontienen
informacionparael mantenimientode motores.

Busque el periodo de duracion de emisiones importantes yla informacion de clasificacion de aire en
la etiqueta de emisiones de su motor
Los motores cuyo cumplimiento con los est&ndares de emisi6n Tier 2 de la Comisi6n de Recursos Ambientales de California (CARB)
est6 certificado deben exhibir la informaci6n relacionada con el periodo de duraci6n de las emisiones y la clasificaci6n de aire. Sears,
Roebuck and Co., de los Estados Unidos ponen esta informaci6n a disposici6n del consumidor en nuestras etiquetas de emisiones.
El Pedodo de Duraci6n de las Emisiones describe el nQmero de horas de tiempo real de funcionamiento para el cual se certifica que
el motor cumple con las reglas de emisi6n, descontando el mantenimiento adecuado del mismo segQn las instrucciones de oper-
aci6n y mantenimiento. Se utilizan las siguientes categodas:
Moderado:Se certifica que el motor cumple con las reglas de emisi6n durante 125 horas de tiempo real de funcionamiento del motor.
Inmediato:Se certifica que el motor cumple con las reglas de emisi6n durante 250 horas de tiempo real de funcionamiento del motor.
Extendido:Se certifica que el motor cumple con las reglas de emisi6n durante 500 horas de tiempo real de funcionamiento del motor.
Por ejemplo, una cortadora de c6sped tipica que se empuja desde atr&s se usa entre 20 y 25 horas por afio. Per Io tanto, el Perfodo
de Duraci6n de Emisiones de un motor con una clasificaci6n intermedia seria equivalente aentre 10y 12 afios.
Laclasificaci6n de aire es un nQmero calculado para describir el nivel relativo de emisiones para un grupo de motores en particular.
Cuanto menor sea la clasificaci6n de aire, mayor es la limpieza del motor. La informaci6n se presenta de forma gr&fica en la etiqueta
de emisiones.
Despu_s del 1 de julio de 2000, busque el periodo de cumplimiento de las reglas de
emisiones en la etiqueta de cumplimiento de las reglas de emisiones del motor
Despu6s delf de julio de 2000 se certificar& que determinados motores Sears, Roebuck and Co., de los Estados Unidos
cumplen con los est&ndares de emisiones de la fase 2 de la Agencia de Protecci6n Ambiental de los Estados Unidos (USE-
PA). Para los motores certificados para la etapa 2, el periodo de cumplimiento con las reglas de emisiones al cual se hace
referencia en la etiqueta de cumplimiento con las reglas de emisiones indica el n_mero de horas de funcionamiento para el
cual se ha demostrado que el motor cumple con los requerimientos federales de emisi6n.
Para los motores con desplazamiento inferior a 225 cc, Categoria C = 125 horas, B = 250 horas y A = 500 horas.
Para los motores con desplazamiento de 225 cc o re&s, Categoria C = 250 horas, B = 500 horas y A = 1000 horas.
El desplazamiento de los motores de la serie modelo 150112 es 249 cc.
Lapresente es una representaci6n gen_rica de la etiqueta de emisi6n que se encuentra generalmenteen un
motor certificado.
58

59

Your Home
For repair - in your home - of all major brand appliances,
lawn and garden equipment, or heating and cooling systems,
no matter who made it, no matter who sold it!
For the replacement parts, accessories and
owner's manuals that you need to do-it-yourself.
For Sears professional installation of home appliances
and items like garage door openers and water heaters.
1-800-4-MY-HOME ® (1-800-469-4663)
Call anytime, day or night (U.S.A. and Canada)
www.sears.com www.sears.ca
For expert home solutions advice: www.managemyhome.com
Our Home
For repair of carry-in items like vacuums, lawn equipment,
and electronics, call or go on-line for the location of your nearest
Sears Parts & Repair Service Center
1-800-488-1222 (U.S.A.) 1-800-469-4663 (Canada)
Call anytime, day or night
www.sears.com www.sears.ca
To purchase a protection agreement on a product serviced by Sears:
1-800-827-6655 (U.S.A.) 1-800-361-6665 (Canada)
Para pedir servicio de reparaci6n Au Canada pour service en fran(_ais:
a domicilio, y para ordenar piezas: 1-800-LE-FOYER M°
1-888-SU-HOGAR ® (1-800-533-6937)
(1-888-784-6427) www.sears.ca
TM
® Registered Trademark /Trademark /sM Service Mark of Sears Brands, LLC
Tm
® Mama Registrada /' Mama de F_brica /sM Marca de Servicio de Sears Brands, LLC
MC MD
Marque de commerce /_ Marque d_pos_e de Sears Brands, LLC © Sears Brands, LLC
