Craftsman 257796040 User Manual WEED AND GRASS TRIMMER Manuals Guides L0707274
CRAFTSMAN Line Trimmers/Weedwackers, Electric Manual L0707274 CRAFTSMAN Line Trimmers/Weedwackers, Electric Owner's Manual, CRAFTSMAN Line Trimmers/Weedwackers, Electric installation guides
User Manual: Craftsman 257796040 257796040 CRAFTSMAN CRAFTSMAN WEED AND GRASS TRIMMER - Manuals and Guides View the owners manual for your CRAFTSMAN CRAFTSMAN WEED AND GRASS TRIMMER #257796040. Home:Lawn & Garden Parts:Craftsman Parts:257796040 Craftsman Grass trimmer (weed wacker) Manual
Open the PDF directly: View PDF ![]() .
.
Page Count: 8
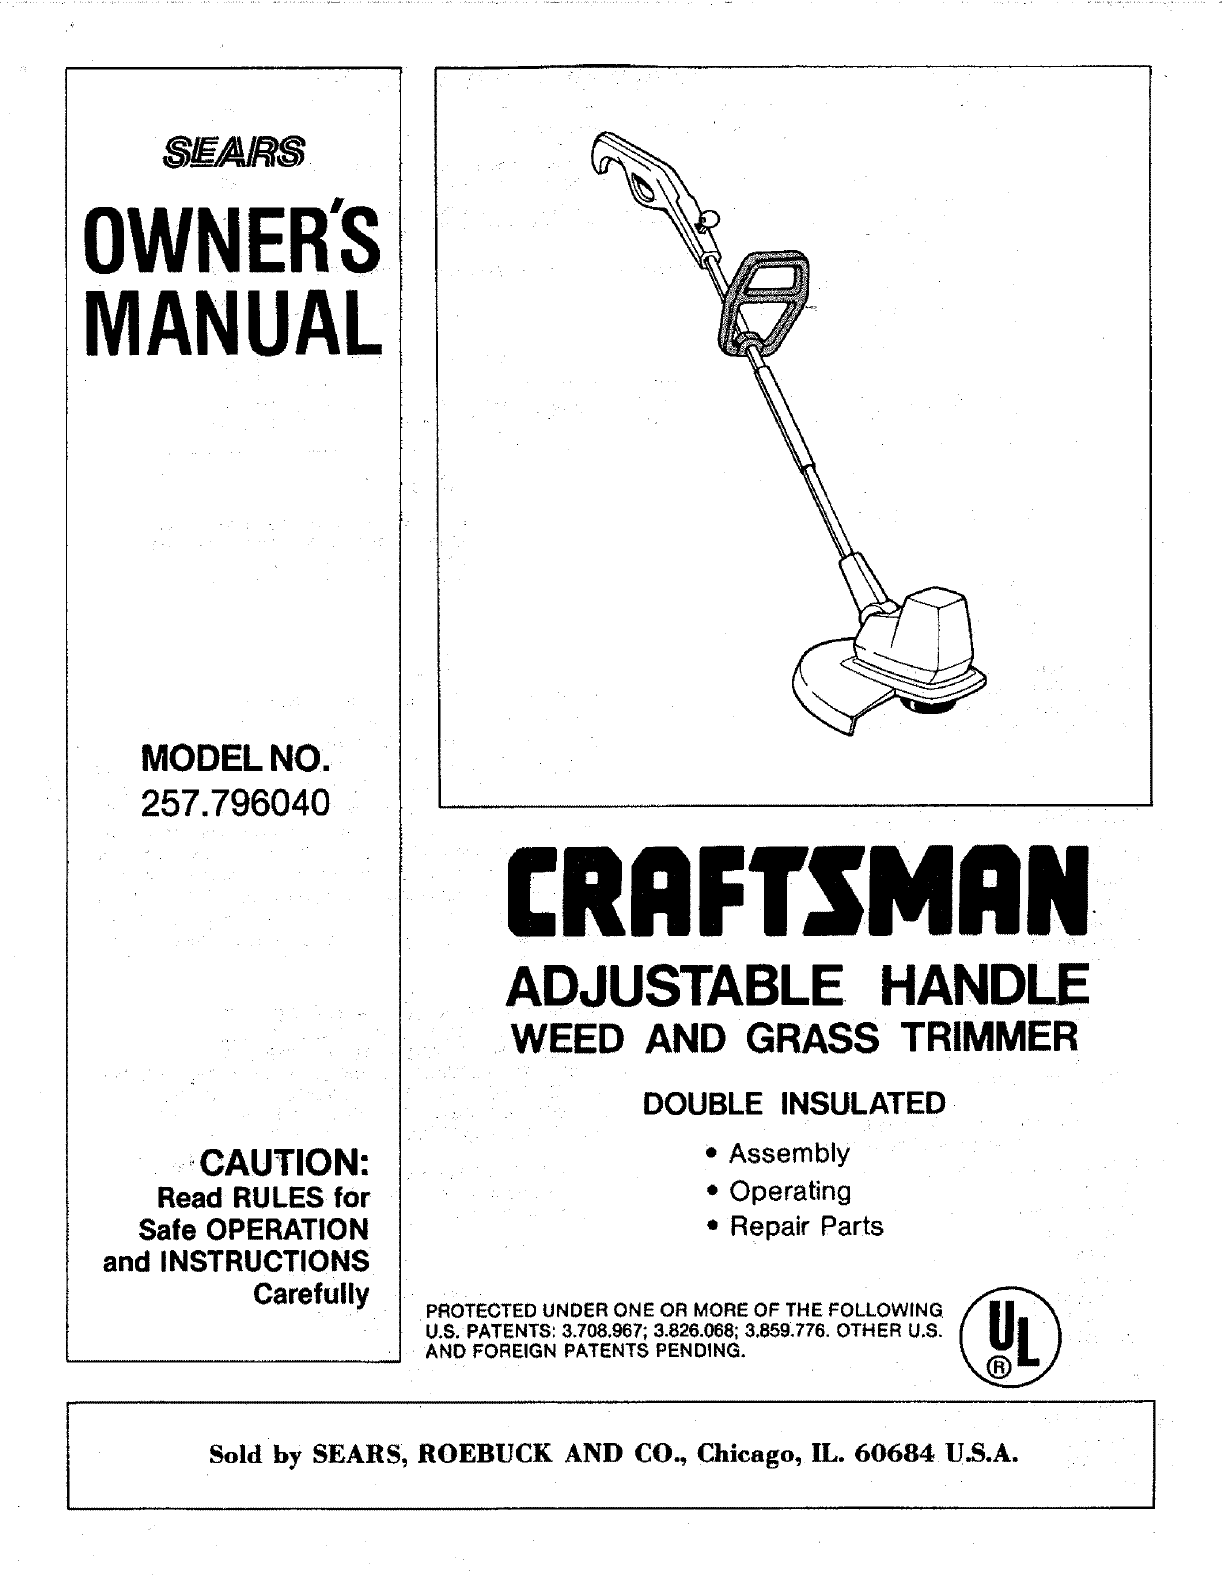
SF_/ARS
OWNER'S
MANUAL
MODEL NO.
257.796040
CAUTION:
Read RULES for
Safe OPERATION
and INSTRUCTIONS
Carefully
I:RRFTSMN
ADJUSTABLE HANDLE
WEED AND GRASS TRIMMER
DOUBLE INSULATED
•Assembly
•Operating
•Repair Parts
PROTECTED UNDER ONE OR MORE OF THE FOLLOWING
U.S. PATENTS: 3.708.967; 3.826.068; 3.859.776. OTHER U.S.
AND FOREIGN PATENTS PENDING.
Sold by SEARS, ROEBUCK AND CO., Chicago, IL. 60684 U.S.A.
FULL ONE-YEAR WARRANTY ON CRAFTSMAN GRASS TRIMMER
If this Electric Weedwacker fails to perform properly due to a defect in material or workmanship
within one year from the date of purchase, Sears will repair it. free of charge_;
ff this Electric Weedwacker is used for commercial or rental purposes, thiswarranty applies for only
90 days from the date of purchase. This warranty applies only while this product is _n use in the
United States_
Warranty service is available by simply contacting the nearest Sears store or Service Center
throughout the United States,
This warranty gives you specific legal rights, end you may also have other dghts which vary from
state to state.
SEARS, ROEBUCK AND CO,, Dept. 698/73tA, Sears Tower, Chicago, IL 60684
IMPORTANT: RULES FOR SAFE OPERATION
SAFETY RULES FOR POWER TOOLS
CAUTION
1. Keep hands, feet and face clear of rotating line. Do not
operate without guard in place.
2. Always use Safety Goggles. Wear at all times when
trimming.
3. Dress properly_ Always wear shoes. Do not operate
Tool while barefoot or when wearing sandals, canvas
or open toed shoes. Use of rubber gloves and safety
footwear _s recommended when working outdoors.
Wear long pants to protect your legs.
4. Keep Children away. Keep spectators at e safe
distance.
,
.
7_
8.
g,
10.
11,
12.
WARNING: To reduce electric shock hazard use only
with an extension cord suitable for outdoor use, A two-
wire cord without aground connection may be used
since the toollis double insufated..Cord should be 16
gauge or heavier to prevent overheating and loss of,
power. Extension cord should not exceed 100 feet. U.L
listed extension cords are available from your nearest
Sears store.
13.
14.
15.
16.
children.......................
To prevent disconnection of power supply cord from
the extension cord during operation, see instructions
with Figure 4.
Avoid Dangerous Environment -- Do not use unit in
damp or wet areas.
Don't force this tool. It will work better and safer at the
rate for which it was designed. If motor slows down
too much, pul! away and allow unit to obtain full speed.
Do not use tool for any job except that for which it is
intended.
Do not immerse tool in water or operate in rain.
Don't overreach _Keep proper footing and balance at
all times.
Don't abuse cord -- never carry appliance by cord or
yank cord from receptacle. Keep cord away from heat,
oil and sharp edges. Replace damaged cord
immediately.
Never carry plugged in appliance with finger on switch.
Disconnect tool from the power supply when not in use and
when making any repairs or inspections.
Maintain Trimmer with care and follow instructions for
replacing or rewinding spool.
Store idle Trimmer indoors. When not in use, Trimmer
should be stored indoors in dry place out of reach of
17. Theautomaticlinecutterisextremefysharpandcareshould
be exercised when handling or operating the Trimmer to
avoid contact with the cutter.
"_8. Keep air vents clear of debris.
DOUBLE INSULATION
Double Insulation is a concept in safety, replacing the standard
grounded supply system, in electric power toots. The construction
of adouble insulated tool affords comparable protection to apro-
per[y grounded tool without the necessity for using agrounded
conductor. The double insulation system eliminates the need for
the us_Jalthree wire grounded power cord and grounded supply
system. Wherever there is electriccurrent in the tool there are two
complete sets of insulation to protect the user. All exposed metal
parts are isolated from the internal metal motor components
with protecting insulation. The lead wires, switch, etc. with
their functional insulation have the added protection of non-
conductive sleeving or housings to complete the double insula-
tion system.
SERVICING OF A TOOL WITH DOUBLE INSULATION
REQUIRES EXTREME CARE AND KNOWLEDGE OF THE
SYSTEM AND SHOULD BE PERFORMED ONLY BY A
QUALIFIED SERVICE TECHNICIAN, FOR SERVICE WE
SUGGEST YOU RETURN THE TOOL TO YOUR NEAREST
AUTHORIZED DEALER FOR REPAIR WHICH WILL BE
DONE WITH ORIGINAL FACTORY REPLACEMENT PARTS,
SUB-FREEZING TEMPERATURE de-magnetizes the perma-
nent magnets when in operation. DO NOTloperate in freez-
ing temperature.
BOX CONTENTS
This box should contain:
1257.796040Weedand GrassTrimmer
1LoosePartsKit containing:
!ea. 6831=05AssistHandleAssy.
2ea. 1745-2Screws
2 ea. 2359-1StopNuts
2ea.1847-4 Screws
Ica. 6772-05 Front Guard
1ca. 6852-15 Rear Guard & Blade Assy.
Iea. 88-544-00 Owner's Manual
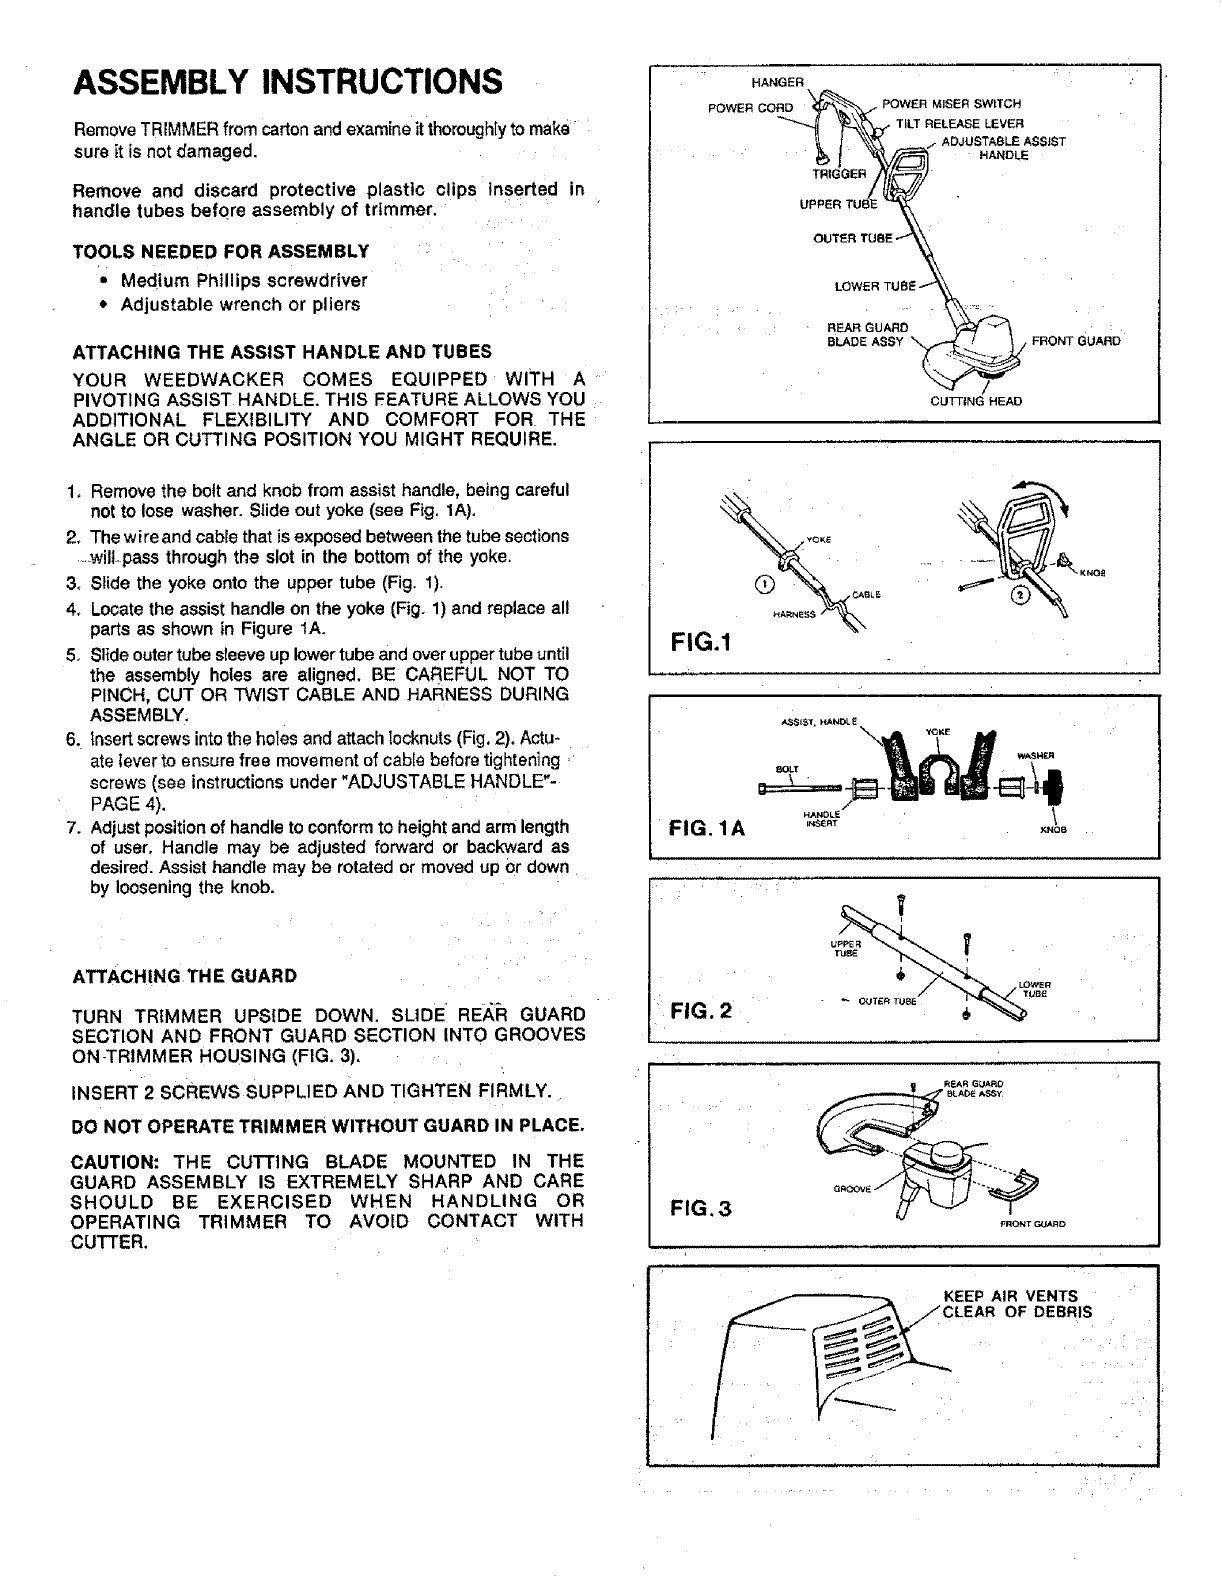
ASSEMBLY INSTRUCTIONS
RemoveTRIMMERfrom cartonandexamineit thoroughIyto make
sure it is not damaged.
Remove and discard protective plastic clips inserted in
handle tubes before assembly of trimmer.
TOOLS NEEDED FOR ASSEMBLY
• Medium Phillips screwdriver
• Adjustable wrench or pliers
ATTACHING THE ASSIST HANDLE AND TUBES
YOUR WEEDWACKER COMES EQUIPPED WITH A
PIVOTING ASSIST HANDLE. THIS FEATURE ALLOWS YOU
ADDITIONAL FLEXIBILITY AND COMFORT FOR THE
ANGLE OR CUTTING POSITION YOU MIGHT REQUIRE,
HANGER
POWER CORD "_ POWER MISER SWITCH
--'_l y_._ TILTRELEASELEVER
UPPER TU6E _
OUTER TUSE-'_-_\
Z2:
BLADE ASSY ,__ FRONT GUARD
CUTFING HEAD
1. Remove the bolt and knob from assist handle, being careful
not to lose washer. Siide out yoke (see Fig. 1A).
2, The wire and cable that is exposed between the tube sections
.....wifl-pass through the slot in the bottom of the yoke,
3_ Slide the yoke onto the upper tube (Fig. 1).
4, Locate the assist handle on the yoke (Fig. 1) and replace all
parts as shown in Figure 1A,
5, Slide outer tube sleeve up lowertube and overupper tube until
the assembly holes are aligned. BE CAREFUL NOT TO
PINCH, CUT OR TWIST CABLE AND HARNESS DURING
ASSEMBLY.
6. Insertscrews into the holes and attach [ocknuts(Fig. 2). Actu-
ate lever to ensure free movement of cable before tightening
screws (see instructions under "ADJUSTABLE HANDLE"-
PAGE 4).
7. Adjust position of handle to conform to height and arm length
of user, Handle may be adjusted forward or backward as
desired. Assist handle may be rotated or moved up or down
by loosening the knob.
ATTACHING THE GUARD
TURN TRIMMER UPSIDE DOWN. SLIDE RE_,R GUARD
SECTION AND FRONT GUARD SECTION INTO GROOVES
ON-TRIMMER HOUSING (FIG. 3).
INSERT 2 SCREWS SUPPLIED AND TIGHTEN FIRMLY.
DO NOT OPERATE TRIMMER WITHOUT GUARD IN PLACE.
CAUTION: THE CUTTING BLADE MOUNTED IN THE
GUARD ASSEMBLY IS EXTREMELY SHARP AND CARE
SHOULD BE EXERCISED WHEN HANDLING OR
OPERATING TRIMMER TO AVOID CONTACT WITH
CUTTER.
E
FIG.1
FIG. 1A
A,*__IST, PIANOL F_
yOKE
WASHI_
HANOLE 1
INSERT I_NOB
FIG. 2
FIG.3
REAR GUARD
__BLADE A_Y
FRONT GIM_D
OPERATING INSTRUCTIONS
BEFORE OPERATING
Before using your WEEDWACKER, read and understand the Safety
Rules for Power Tools.
• Always wear SAFETY GOGGLES.
•Cut to your LEFT side.
•Keep people away from you.
•Inspect the areas you are going to trim for wires, cord and any
string-like matter to prevent them from getting tangled in the
cutting head,
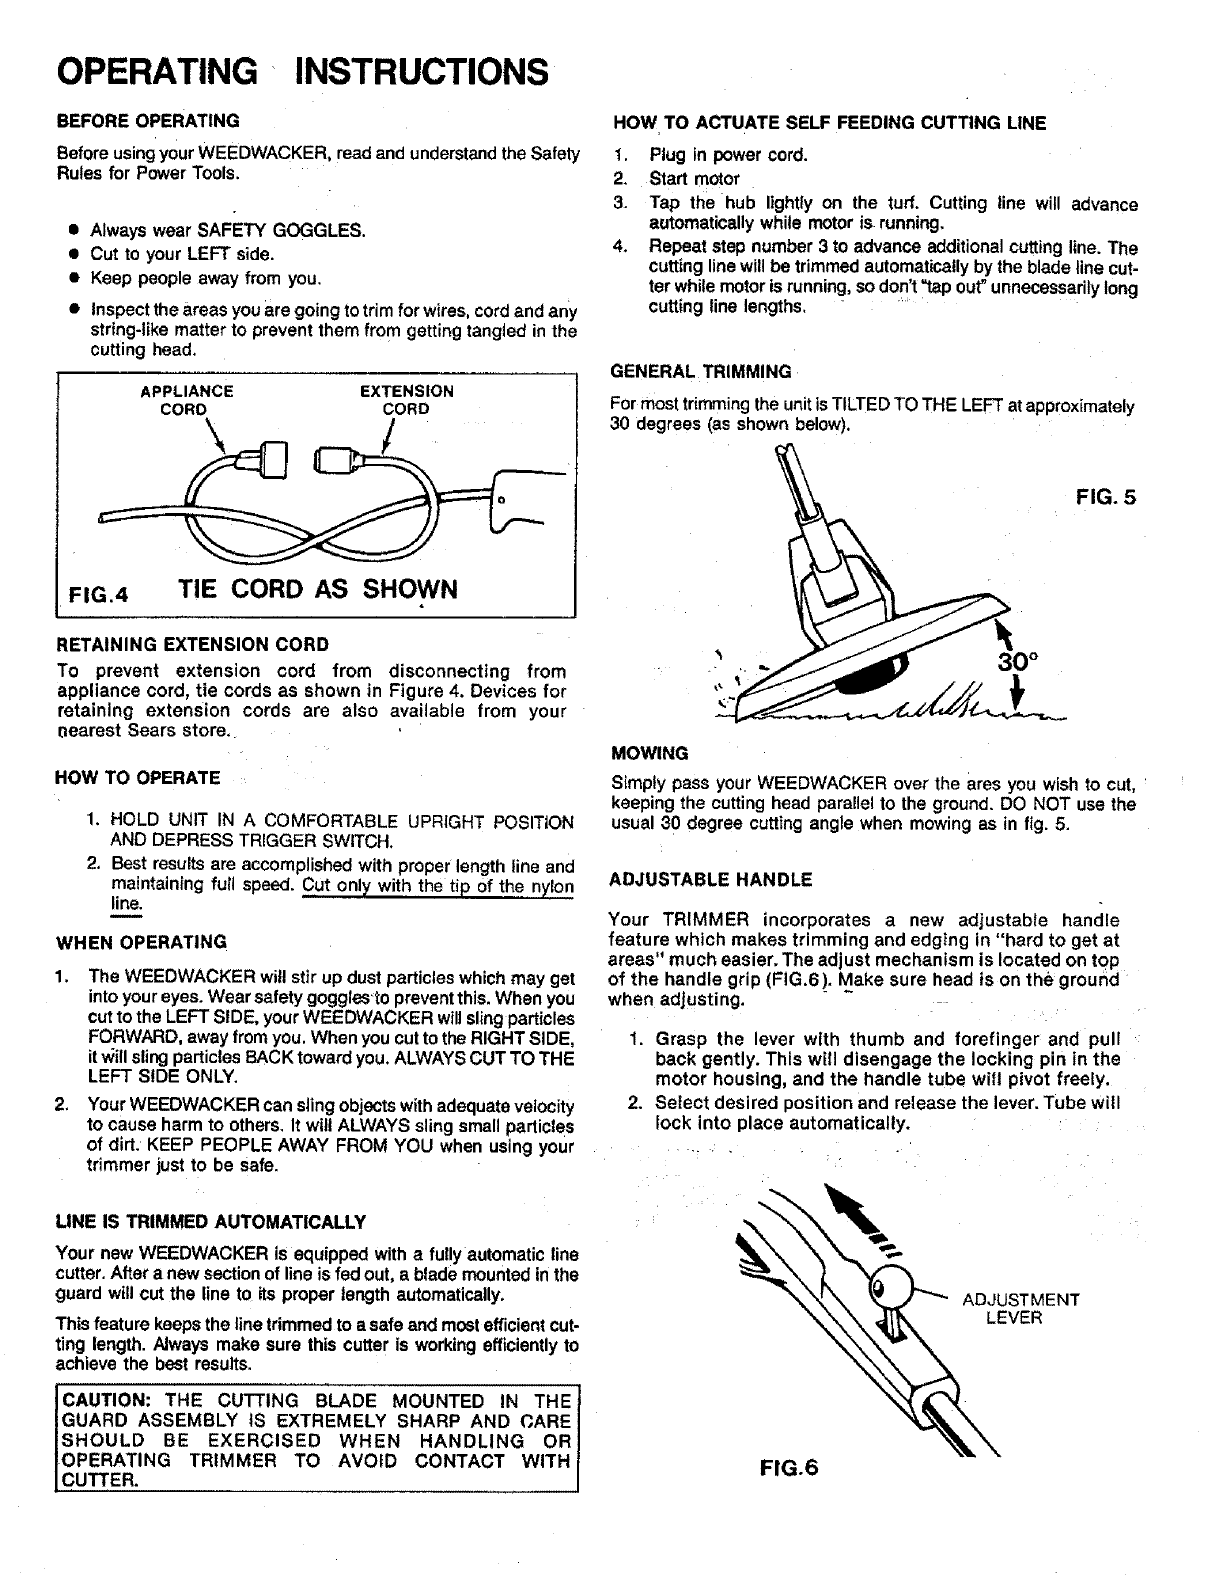
APPLIANCE EXTENSION
CORD CORD
FIG.4 TIE CORD AS SHOWN
RETAINING EXTENSION CORD
To prevent extension cord from disconnecting from
appliance cord, tie cords as shown in Figure 4. Devices for
retaining extension cords are also available from your
nearest Sears store.
HOW TO OPERATE
1. HOLD UNIT IN A COMFORTABLE UPRIGHT POSITION
AND DEPRESS TRIGGER SWITCH,
2. Best results are accomplished with proper length line and
maintaining full speed. Cut only with the tip of the nylon
line.
WHEN OPERATING
1. The WEEDWACKER will stir up dust particles which may get
into your eyes. Wear safety goggles'to prevent this. When you
cut to the LEFT SIDE, your WEEDWACKER will sling particles
FORWARD, away from you, When you cut to the RIGHT SIDE,
itv_illsling particles BACK toward you, ALWAYS CUT TO THE
LEFT SIDE ONLY.
2. Your WEEDWACKER can sling objects with adequate velocity
to cause harm to others. It will ALWAYS sling small particles
of dirt, KEEP PEOPLE AWAY FROM YOU when using your
trimmer just to be safe.
LINE IS TRIMMED AUTOMATICALLY
Your new WEEDWACKER is equipped with a fuUy automatic line
cutter, After a new section of line is fed out, ablade mounted in the
guard will cut the line to its proper length automatically.
This feature keeps the line trimmed to asafe and most efficient cut-
ting length. Always make sure this cutter is working efficiently to
achieve the best results.
CAUTION: THE CUTTING BLADE MOUNTED IN THE
GUARD ASSEMBLY tS EXTREMELY SHARP AND CARE
SHOULD BE EXERCISED WHEN HANDLING OR
OPERATING TRIMMER TO AVOID CONTACT WITH
CUTTER.
HOW TO ACTUATE SELF FEEDING CUTTING LINE
1. Plug in power cord.
2. Start motor
3. Tap the hub lightly on the tuff, Cutting line will advance
automatically while motor is running.
4. Repeat step number 3to advance additional cutting line. The
cutting line will be trimmed automatically by the blade line cut-
ter while motor is running, so don't "tap out" unnecessarily long
cutting line lengths,
GENERAL TRIMMING
For most trimming the unit is TILTED TO THE LEFT at approximate y
30 degrees (as shown below),
FIG. 5
_30 °
MOWING
Simply pass your WEEDWACKER over the ares you wish to cut,
keeping the cutting head parallel to the ground. DO NOT use the
usual 30 degree cutting angle when mowing as in fig. 5.
ADJUSTABLE HANDLE
Your TRIMMER incorporates a new adjustable handle
feature which makes trimming and edging in "hard to get at
areas" much easier. The adjust mechanism is located on top
of the handle grip (FIG.6 !. Make sure head is on the ground
when adjusting.
1. Grasp the lever with thumb and forefinger and pull
back gently. This will disengage the locking pin in the
motor housing, and the handle tube will pivot freely.
2. Select desired position and release the lever. Tube will
lock into place automatically.
ADJUSTMENT
LEVER
FIG.6
OPERATING INSTRUCTIONS (cont'd)
POWER MISER
Your WEEDWACKER comes equipped with apower miser
switch located on the front of the handle. This feature
increases the power of your WEEDWACKER and is intended
for use when additional power is needed.
LOW
HIGH
TO REPAIR BROKEN CUTTING LINE
1. Stop the motor an unplug power cord.
2. Visible cutting line can be retrieved with needle nosed pliers.
3. Hub should be depressed and released while keeping tension
on the cutting line. One inch of cutting line should feed each
time the hub is depressed.
4. If cutting line cannot be retrieved, follow instructions under
SPOOL REPLACEMENT.
SPOOL REPLACEMENT
1. Stop motor and unplug power cord.
2, Remove cotter pin
3. Restrain rear plate and rotate hub assembly counter-clockwise
until locking tabs disengage. Remove hub assembly.
4. Remove spool from assembly and remove spring from spool.
5. Rewind spool in accordance with the instructions included herein
(fig. 8) or replace spool as appropriate.
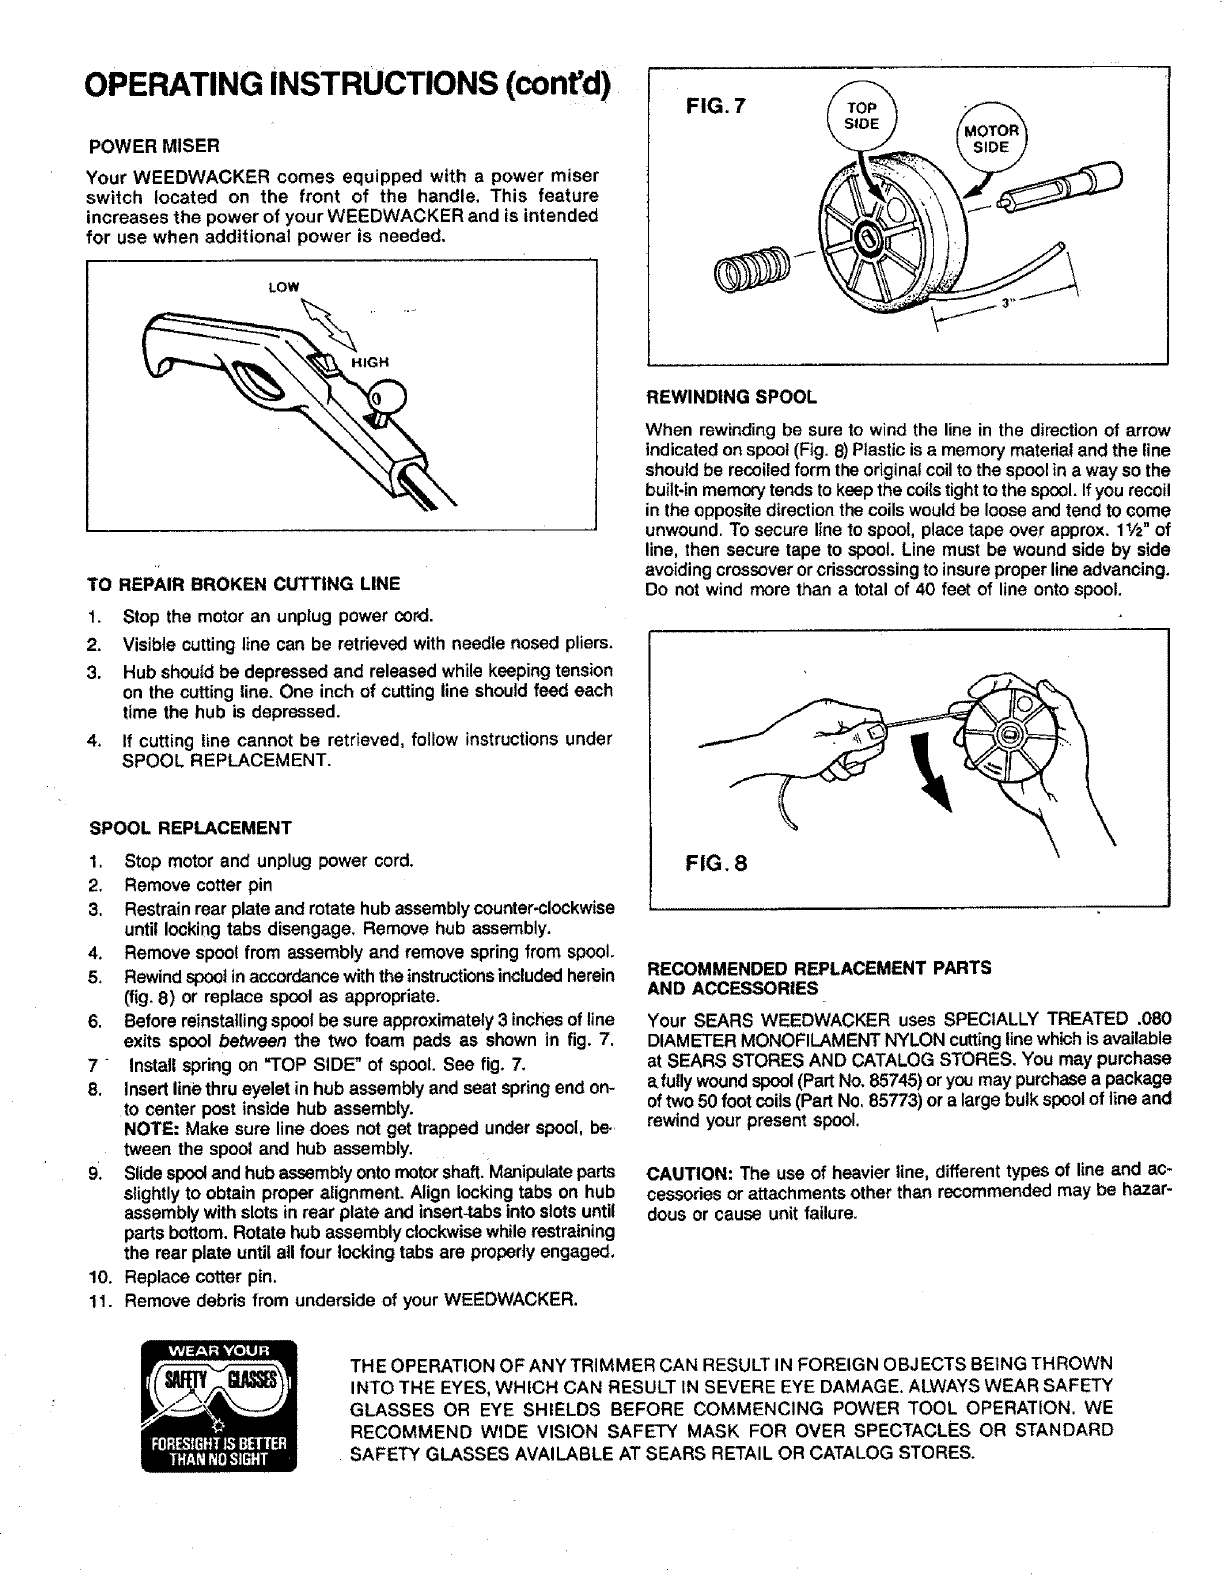
6. Before reinstalling spool be sure approximately 3 inches of line
exits spool between the two foam pads as shown in fig. 7.
7"Install spring on "TOP SIDE" of spool. See fig. 7.
8. Insert line thru eyelet in hub assembly and seat spring end on-
to center post inside hub assembly.
NOTE: Make sure line does not get trapped under spool, be.
tween the spool and hub assembly.
9. Slide spootand hub assembly onto motor shaft. Manipulate parts
slightly to obtain proper alignment. Align locking tabs on hub
assembly with slots in rear plate and insert-tabs into slots until
parts bottom. Rotate hub assembly clockwise while restraining
the rear plate until all four locking tabs are properly engaged.
10. Replace cotter pin.
11. Remove debris from underside of your WEEDWACKER.
FIG. 7
REWINDING SPOOL
When rewinding be sure to wind the line in the direction of arrow
indicated on spool (Fig. 8) Plastic is a memory material and the line
should be recoiled form the original coil to the spool in a way so the
built-in memory tends to keep the coils tight to the spool. If you recoil
in the opposite direction the coils would be loose and tend to come
unwound. To secure line to spool, place tape over approx. 1V2" of
line, then secure tape to spool. Line must be wound side by side
avoiding crossover or crisscrossingto insure proper line advancing.
Do not wind more than a total of 40 feet of line onto spool.
FIG. 8
RECOMMENDED REPLACEMENT PARTS
AND ACCESSORIES
Your SEARS WEEDWACKER uses SPECIALLY TREATED .080
DIAMETER MONOFILAMENT NYLON cutting line which is available
at SEARS STORES AND CATALOG STORES. You may purchase
a.fully wound spool(Part No. 85745) or you may purchase a package
of two 50 foot coils (Part No, 85773) or a large bulk spool of line and
rewind your present spool.
CAUTION: The use of heavier line, different types of line and ac-
cessories or attachments other than recommended may be hazar-
dous or cause unit failure.
THE OPERATION OF ANY TRIMMER CAN RESULT IN FOREIGN OBJ ECTS BEING THROWN
INTO THE EYES, WHICH CAN RESULT IN SEVERE EYE DAMAGE, ALWAYS WEAR SAFETY
GLASSES OR EYE SHIELDS BEFORE COMMENCING POWER TOOL OPERATION. WE
RECOMMEND WIDE VISION SAFETY MASK FOR OVER SPECTACLES OR STANDARD
SAFETY GLASSES AVAILABLE AT SEARS RETAIL OR CATALOG STORES.

............... 1
Illll I I
NOTES
I

IIIIII I I
NOTES
OWNER'S
MANUAL
MODEL NO.
257.796040
Sears
SERWCE
is at
YOUR SERVICE.
How to Order Repair Parts
The Model Number will be found on a plate attached to your Weedwacker
handle tube. Always mention the Model Number when requesting service
or repair parts for_you-i;Craftsman Weedwacker_
Atl parts listed herein may be ordered from any SEARS, ROEBUCK AND
CO. retail or catalog store.
WHEN ORDERING REPAIR PARTS, ALWAYS GIVE THE FOLLOWING
INFORMATION.
1. PART NUMBER
2. PART DESCRIPTION
3. MODEL NUMBER -- 257,796040
4. NAME OF ITEM -- WEED.AND GRASS TRIMMER
USE ONLY SEARS REPLACEMENT PARTS,
If the parts you need are not stocked Iocalty, your order will be elec.
tronicalfy transmitted to a Sears Repair Parts Distribution Center for
expedited handfing.
"Your Sears merchandise has added value when you consider that Sears has
service units staffed with Sears trained technicans...professional techni.
clans specifically trained on Sears products, having the parts, tools and equip-
ment to insure that we meet our pledge to you...we service what we sell."
Sold by SEARS, ROEBUCK AND CO., Chicago, IL. 60684 U.S.A.
