Craftsman 315111810 User Manual SINGLE SPEED REVERSIBLE CORDLESS SCREWDRIVER Manuals And Guides 98100166
CRAFTSMAN Screwdriver Cordless Manual 98100166 CRAFTSMAN Screwdriver Cordless Owner's Manual, CRAFTSMAN Screwdriver Cordless installation guides
User Manual: Craftsman 315111810 315111810 CRAFTSMAN SINGLE SPEED REVERSIBLE CORDLESS SCREWDRIVER - Manuals and Guides View the owners manual for your CRAFTSMAN SINGLE SPEED REVERSIBLE CORDLESS SCREWDRIVER #315111810. Home:Tool Parts:Craftsman Parts:Craftsman SINGLE SPEED REVERSIBLE CORDLESS SCREWDRIVER Manual
Open the PDF directly: View PDF ![]() .
.
Page Count: 12
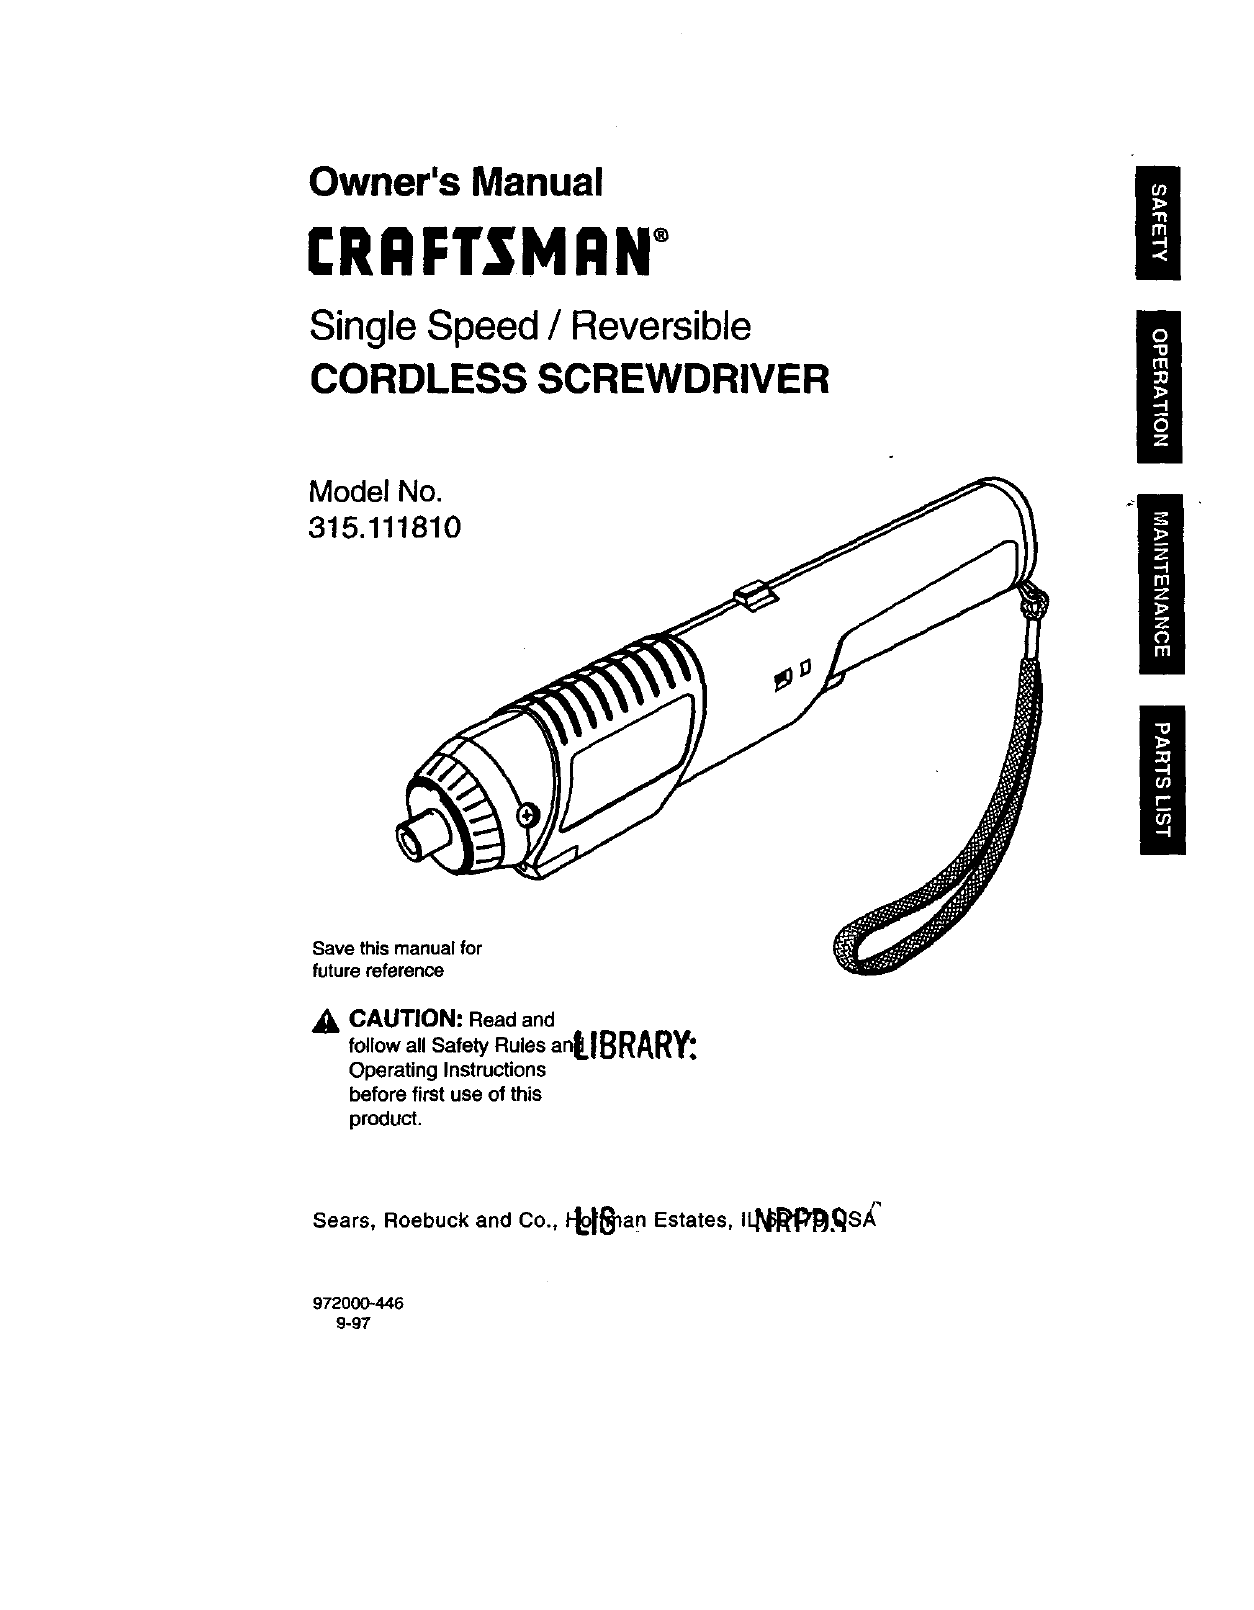
Owner's Manual !
CRRFTSMRN°
Single Speed /Reversible
CORDLESS SCREWDRIVER
Model No.
315.111810
Save this manual for
future reference
CAUTION: Read and
follow all Safety Rules anlLIBRARY:.
Operating Instructions
before first use of this
product.
Sears, Roebuck and Co., I-LO_llan Estates, I_._S,_'
972000-446
9-97

• Table Of Contents ................................................................................................................................ _._.._....2
• Warranty ......................................................................................................................................................... 2
•Introductionand ProductSpecifications......................................................................................................... 2
•RulesFor Safe Operation ........................................................................................................................... 3-5
A. ImportantSafety Rules For Battery Tools .............................................................................................. 4
B. ImportantSafety InstructionsFor Charger .......................................................................................... 4-5
•Accessodes .................................................................................................................................................... 5
•Features ......................................................................................................................................................... 6
•Operation..................................................................................................................................................... 7-9
•Maintenance ................................................................................................................................................. 10
•Battery Removal ........................................................................................................................................... 11
A. Battery Removal, Preparation For Recycling....................................................................................... 11
•Replacement Parts ................................................................................. .:.................................................... 11
•Parts Ordering/Service ............................................................................................................................... 12
FULL ONE YEAR WARRANTY ON CRAFTSMAN CORDLESS SCREWDRIVER
If this CRAFTSNAN Cordless Screwdriverfails to give complete satisfactionwithinone year from the date of
purchase, RETURN IT TO THE NEAREST SEARS STORE IN THE UNITED STATES, and Sears willreplace it,
free of charge.
If this rRAFlrSNRN Cordless Screwdriver iSused for commemialor rental purposes,this warrantyapplies for
only 90 days from the date of purchase,
This warranty gives you specific legal rights,and you may also have otherrightswhich vary from state to state.
Sears, Roebuck and Co., Dept. 817WA, Hoffman Estates, IL 60179
Yourscrewdriver has many features for making
driving operationsmore pleasant and enjoyable.
Safety, performance and dependabilityhave been
given top priorityinthe design of this screwdriver
makingit easy to maintain and operate.
CAUTION: Carefully read throughthis entire
owner's manual before usingyour new
screwdriver.Pay close attention to the Rules For
Safe Operation, Warnings and Cautions. If you
useyour screwdriver properlyand only for what it
is intended, you will enjoy years of safe, reliable
SPECIFICATIONS:
Collet 1/4 in.
Motor 2.4 Volts DC
Charger Rating 120 Volts,60 Hz, AC Only
No Load Speed 165 RPM
Switch Single Speed - Reversible
Charge Rate 3-5 Hours
tl_._;_J 20 in. Lbs.
,_-Look for this symbol to point out important safely Precautions. It means attention!!! Your
_Pf_e]yJsjnvolved ....
The purpose of safety symbols is to attract your attention to possible dangers. The safety symbols, and
the explanations wlth them, deserve your careful attention and understanding, The safety wamlngs do _
not by themselves ellmlnate any danger. The Instructions or warnings they give are not substltutes for
proper accident prevention measures.
SYMBOL MEANING
ASAFETY ALERT SYMBOL:
Indicatescautionorwarning.Maybe usedinconjunctionwithothersymbolsorpictographs.
g
AWARNING: Failureto obey a safety warning can resultin seriousinjuryto yourselforto others.
Always followthe safety precautionsto reduce the dskof fire, electricshock and personal injury.
ACAUTION: Failureto obey asafetywarning may result inpropertydamage or personalinjuryto
yourselfor to others. Always follow thesafety precautionsto reduce_thedsk of fire, electdc shock
and personalinjury.
NOTE: Advises you of informationor instructionsvital to the operationor maintenanceof the equipment._-" *-
_k WARNING: Do not attemptto operate this tool •
untilyou have read thoroughlyand understand
completelyall instructions,safety rules, etc.
contained in this manual. Failure to comply can
resultin accidents involvingfire, electricshock,
or sedous personal injury.Save owner'smanual •
and reviewfrequently for continuingsafe
operation, and instructingothers who may use
this tool.
READ ALL INSTRUCTIONS
KNOW YOUR POWER TOOL. Read owner's
manual carefully. Learn its applications and
limitations as well as the specific potential
hazards related to this tool.
GUARD AGAINST ELECTRICAL SHOCK by
preventingbody contact withgroundedsurfaces.
Forexample: Pipes, radiators,ranges, refrigera-
tor enclosures.
•KEEP WORK AREA CLEAN. Cluttered areas
and benches invite accidents.
AVOID DANGEROUS ENVIRONMENT. Don't
use power tool in damp orwet locationsor
expose to rain. Keep work area well lit.
KEEP CHILDREN AND VISITORS AWAY. All
visitorsshouldwear safety glasses and be kept a
safe distance from work area. Do not let visitors
contact tool or extension cord.
STORE IDLE TOOLS. When not in use tools
should be stored in a dry and high or locked-up
place - out of the reach of children.
DON'T FORCE TOOL. It will do the job better
and safer at the rate for which it was designed.
USE RIGHT TOOL Don'tforce small tool or
attachment to do the job of a heavy dutytool.
Don't usa tool for purposenot intended - for
example - A circularsaw should never be used
for cuttingtree limbsor logs.
WEAR PROPER APPAREL. Do not wear loose
clothingor jewelrythat can get caught intool's
movingparts and cause personal injury.Rubber
glovesand nonskidfootwear are recommended
when workingoutdoors.Wear protectivehair
coveringto contain long hair and keep it from
being drawn into nearby air vents.
ALWAYS WEAR SAFETY GLASSES. Everyday
eyeglasses have only impact-resistant lenses;
they are NOT safety glasses,
PROTECT YOUR LUNGS. Wear a face mask or
dust mask if operation is dusty.
PROTECT YOUR HEARING. Wear headng
protectionduringextended periods of operation.
SECURE WORK. Use clamps or avise to hold
work. It'ssafer than using your hand and it frees
both hands to operate tool.
DON'T OVERREACH. Keep proper footing and
balance at all times. Do not use on aladder or
unstable supped.
MAINTAIN TOOLS WITH CARE. Keep tools
sharp at all times, and clean for best and safest
performance. Follow instructions for lubricating
and changing accessories.
REMOVE ADJUSTING KEYS AND
WRENCHES. Form habit of checking to see that
keys and adjusting wrenches are removed from
tool before turning it on
3
RULESFORSAFEOPERATION(Continued)
NEVER USE IN AN EXPLOSIVE ATMO-
SPHERE. Normal sparking of the motor could
ignite flammable liquids, gases, or fumes.
KEEP HANDLES DRY, CLEAN, AND FREE
FROM OIL AND GREASE. Always use a clean
cloth when cleaning. Never use brake fluids,
gasoline, petroleum-based productsor any
strongsolventsto clean your tool
STAY ALERT. Watch what you are doing and
use common sense. Do not operate tool when
you are tired. Do not rush.
CHECK DAMAGED PARTS. Before further use
of the tool, a guard or other part that is damaged
should be carefully checked to determine that it
will operate properly and perform its intended
function. Chock for alignment of moving pads,
binding of moving pads, breakage of parts,
mounting, and any other conditions that may
affect its operation. A guard or other part that is
damaged should be properly repaired or
replaced by an authorized service center unless
indicated elsewhere in this instruction manual.
DO NOT USE TOOL IF SWITCH DOI_S NOT
TURN IT ON AND OFF. Have defective switches
replaced by an authorized service center.
DRUGS, ALCOHOL, MEDICATION. Do not
operate tool while under the influence of drugs,
alcohol, or any medication.
DRIVING SCREWS INTO ELECTRICAL
WIRING IN WALLS, CEILINGS, OR OTHER
AREAS CAN CAUSE THE SCREWDRIVER BIT
OR COLLET TO BECOME ELECTRICALLY
LIVE. Do not touch metal parts when driving
screws into a wall; grasp only the insulated
handle(s) or plastic housing when using this tool.
Make sure hidden electrical wiring, water pipes,
and mechanical hazards are not in the path of
the bit when driving screws into a wall.
•INSPECT FOR and remove all nails from lumber
before driving screws.
IMPORTANT SAFETY RULES FOR BATTERY
TOOLS
Battery toolsdo not have to be plugged intoan
electrical outlet; therefore, they are always in
operating condition.Be aware of possible
hazards when not using your battery tool or
when changing accessories.
USE ONLY THE CHARGER PROVIDED WITH
YOUR BATTERY TOOL. Do notsubstituteany
other charger. Use of another charger could
cause batteries to explode causing possible
serious injury.
DO NOT PLACE BATTERY TOOLS OR THEIR
BATTERIES NEAR FIRE OR HEAT. Theymay
explode.
DO NOT CHARGE BA'FrERY TOOL IN A
DAMP OR WET LOCATION.
Your battery tool should be charged in a location
where the temperature is more than 50°F but
less than 100°F.
Under extreme usage or temperature conditions,
battery leakage may occur. If liquidcomes in
contactwith your skin, wash immediatelywith
soap and water, then neutralize withlemon juice
or vinegar. If liquidgets in your eyes, flush them
with clean water for at least 10 minutes, then
seek immediate medical attention.
if carryingyour battery tool at your side, make
sure itis not running and your finger is not__on the
switch.Avoid accidentalstarting.
SECURE WORK before applyingpower, NEVER
hold workpiecein your hand or acrossyour legs.
WHEN SERVICING USE ONLY IDENTICAL
CRAFTSMAN REPLACEMENT PARTS,
IMPORTANT SAFETY INSTRUCTIONS FOR
CHARGER
•SAVE THESE INSTRUCTIONS. This manual
contains importantsafety and operating
instructionsfor battery charger part number
999555-001.
Before usingbattery charger, read allinstructions
and cautionary markings in this manual, on
battery charger, and product using battery
charger,
_k WARNING: To reduce riskof injury,charge only
nickel-cadmiumtype rechargeable batteries.
Other types of batteries may burstcausing
personal injuryand damage.
mDo not expose charger to rain or snow.
Use of an attachment not recommended orsold
by the battery charger manufacturermay result
in ariskof fire, electricshock, or injuryto
persons.
To reduce risk of damage to charger body and
cord, pullby charger bodyrather than cordwhen
disconnectingcharger.
Make sure cord is located so that it will net be
stepped on, tripped over, or otherwisesubjected
to damage or stress.
RULESFORSAFEOPERATION(Continued)
Anextensioncordshouldnotbeusedunless
absolutelynecessary,Useofimproper
extensioncordcouldresultinariskoffireand
electricshock.Ifextensioncord must be used,
make sure:
a. That pinson plug of extensioncord are the
same number, size and shape as those of
plugon charger.
b. That extensioncord is properly wired and in
good eiactdcalcondition; and
c. That wire size is largeenough for AC
ampere ratingof charger as specified
below:
Cord Length(Feet) 25ft. 5Oft. 100ft. 150ft.
Cord Size (AWG) 16 16 16 14
Note: AWG = American Wire Gage
•DO NOT OPERATE CHARGER WITH A
DAMAGED CORD OR PLUG. Ifdamaged, have
replacedimmediatelyby a qualifiedserviceman.
Do not operate charger if it has received a
sharp blow, been dropped, or othen,#ise
damaged in any way; take it to a qualified
serviceman.
Do not disassemblecharger;take itto a
qualifiedserviceman when service or repairis
required, Incorrectreassemblymay resultin a
dskof electricshockor fire.
To reduce risk of electdc shock, unplugcharger
from outlet before attempting any maintenance
or cleaning. Turning off controls will not reduce
this risk.
• Do not use charger outdoors.
•Disconnectcharger from power supplywhen
not in use.
SAVE THESE INSTRUCTIONS. Refer to them
frequentlyand use-them to instructotherswho
may use thistool, If you loan someonethis tool,
loan them these instructionsalso,
_1= WARNING:
The operation of any power tool can result in foreign objects being thrown into your eyes,
which can result in severe eye damage, Before beginning power tool operation, always wear
safety goggles or safety glasses with side shields and afull face shield when needed, We
recommend Wide Vision Safety Mask for use over eyeglasses or standard safety glasses
with side shields, avaiEable at Sears Retail Stores.
,_ WARNING: Do not allow familiarity with your
screwdriver to make you careless, Remember
that a careless fraction of a second is sufficient to
inflict severe injury.
,_ CAUTION: Your screwdrivercontains special
hightemperature batteriesto help prevent
battery damage when left on charge for extended
periodsof time. However, once the batteries
become fully charged, we recommendthat you
unplug yourcharger from power supply and
disconnectitfrom scrswddver.
The fo ow ng recommended accessories are_urrently available at Sears Retail Stores.
No, 2 Phillips/8-10 Slotted,2 Ea.
No. 3 Phillips/6-8 Slotted, 2 Ea.
5-Pc. Hex Shank Drill BitSet
6-Pc. Extra Length Screwdriver Bit Set
"/-Pc. Screwdriver Bit Set and Case
13-Pc. Power Screwdriver /Nutdriver Set and
Case
30-Pc. Power Scrawddver/Nutdriver Set and
Case
17-Pc, Power Screwdriver/Nutdriver Set and
Case
_. WARNING: The useof attachmentsor accessories not listed mightbe hazardous,
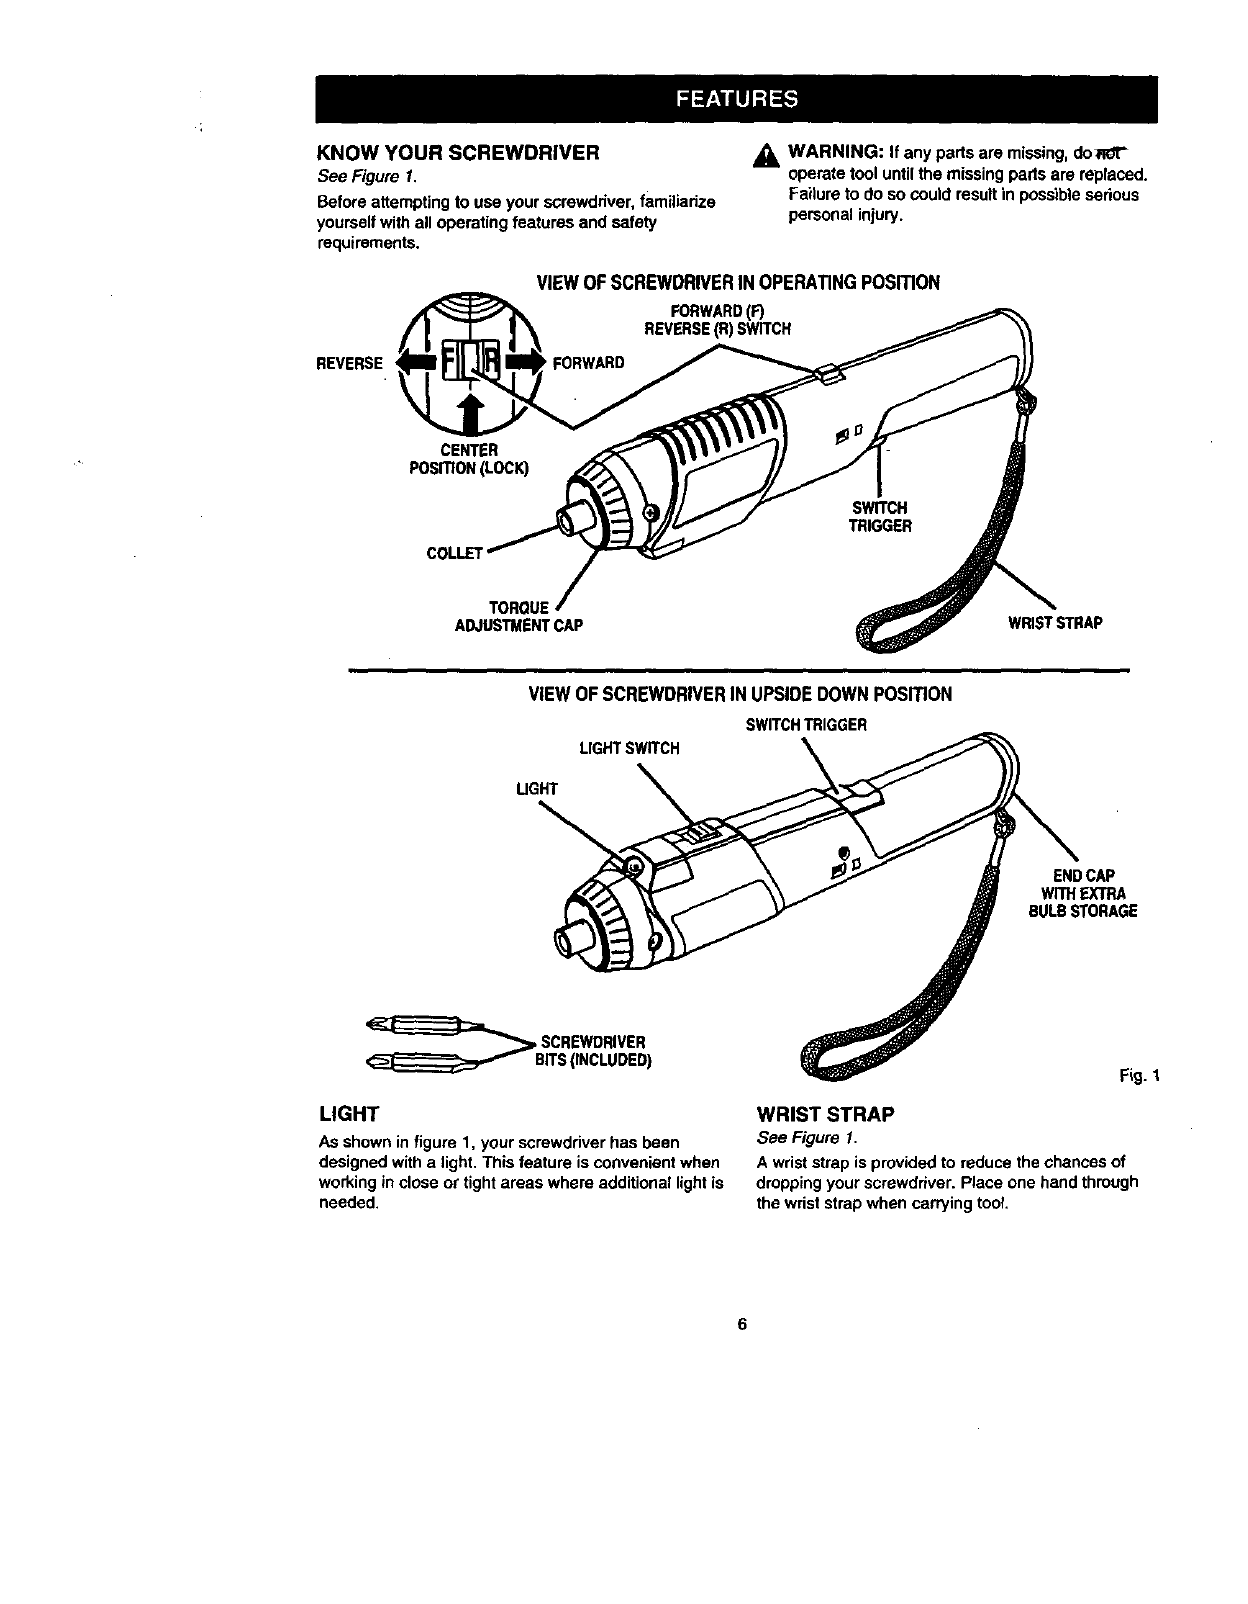
KNOW YOUR SCREWDRIVER
See Figure 1.
Before attemptingto use your screwdriver,familiadze
yourselfwithall operating features and safety
requirements.
WARNING: If any parts are missing,do_01"
operate tool until the missingparts are replaced.
Failure to do so could result in possibleserious
personal injury.
REVERSE
_EWOFSCREWDRIVERIN OPERA_NG PosmoN
FORWARD(_
REVERSE_)SWITCH
FORWARD
CENTER
POSITION_OCK)
ADJUSTMENT CAP WRISTSTRAP
VIEW OF SCREWDRIVER IN UPSIDE DOWN POSITION
SWITCHTRIGGER
LIGHTSWITCH
UGHT
ENDCAP
WlTHEXTRA
BULBSTORAGE
LIGHT
As shown in figure 1, your screwdriver has been
designedwith a light. This feature is convenientwhen
workingin close or tight areas where additional lightis
needed.
Fig. 1
WRIST STRAP
See Figure 1.
A wrist strap is provided to reduce the chances of
droppingyour screwdriver.Place one hand through
the wrist strap when carryingtool,
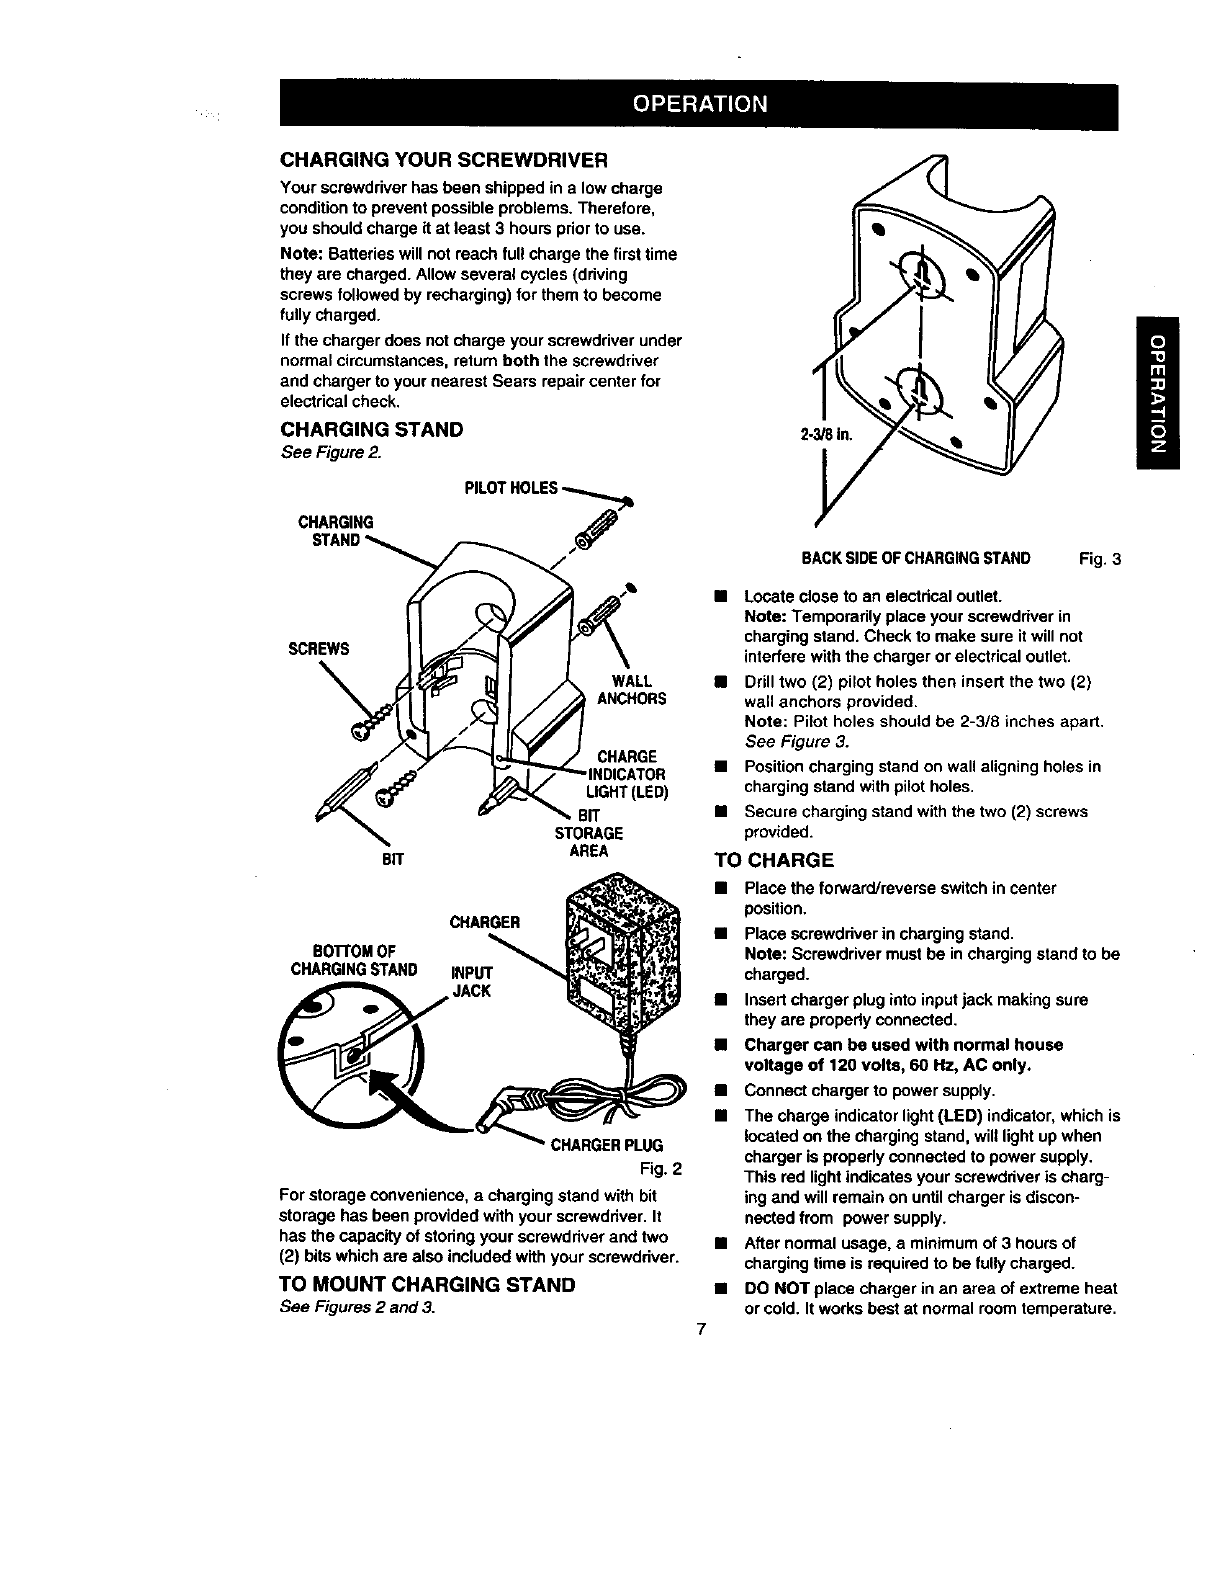
CHARGING YOUR SCREWDRIVER
Your screwdriver has been shipped in a low charge
condition to prevent possible problems. Therefore,
you should charge it at least 3 hours prior to use.
Note: Batteries will not reach ful! charge the first time
they are charged. Allow several cycles (driving
screws followed by recharging) for them to become
fully charged.
If the charger does not charge your screwdriver under
normal circumstances, return both the screwdriver
and charger to your nearest Sears repair center for
electrical check.
CHARGING STAND
See Figure2.
CHARGING
PILOTHOLES .s
SCREWS
WALL
ANCHORS
BIT
CHARGE
UGHT(LED)
BR
STORAGE
AREA
CHARGER
BO'I'rOMOF
CHARGING STAND INPUT
CHARGERPLUG
Fig. 2
For storage convenience,a chargingstand withbit
storage has been providedwith your screwdriver.It
has the capacityof storingyour screwdriverand two
(2) bitswhich are also includedwith your screwdriver.
TO MOUNT CHARGING STAND
See Figures2 and 3.
2-3/8 in.
BACK SIDE OF CHARGINGSTAND Fig. 3
•Locate close to an electrical outlet.
Note: Temporarily place your screwdriver in
charging stand. Check to make sure it will not
interfere with the charger or electrical outlet.
•Drill two (2) pilot holes then insert the two (2)
wall anchors provided.
Note: Pilot holes should be 2-3/8 inches apart.
See Figure 3.
•Position charging stand on wall aligning holes in
charging stand with pilot holes.
•Secure charging stand with the two (2) screws
provided.
TO CHARGE
•Place the forward/reverse switchin center
position.
•Place screwdriver in chargingstand.
Note: Screwdrivermust be inchargingstand to be
charged.
•Insert charger plug into inputjack making sure
they are propertyconnected.
•Charger can be used with normal house
voltage of 120 volts, 60 Hz, AC only.
•Connectcharger to power supply.
•The charge indicatorlight(LED) indicator, which is
locatedon the charging stand, willlightup when
charger is propedy connected to power supply.
This red lightindicatesyour screwdriverischarg-
ingand willremain on untilcharger is discon-
nectedfrom power supply.
•After normal usage, a minimumof 3 hours of
chargingtime is required to be fully charged.
•DO NOT place charger in an area of extreme heat
orcold. It worksbest at normal room temperature.
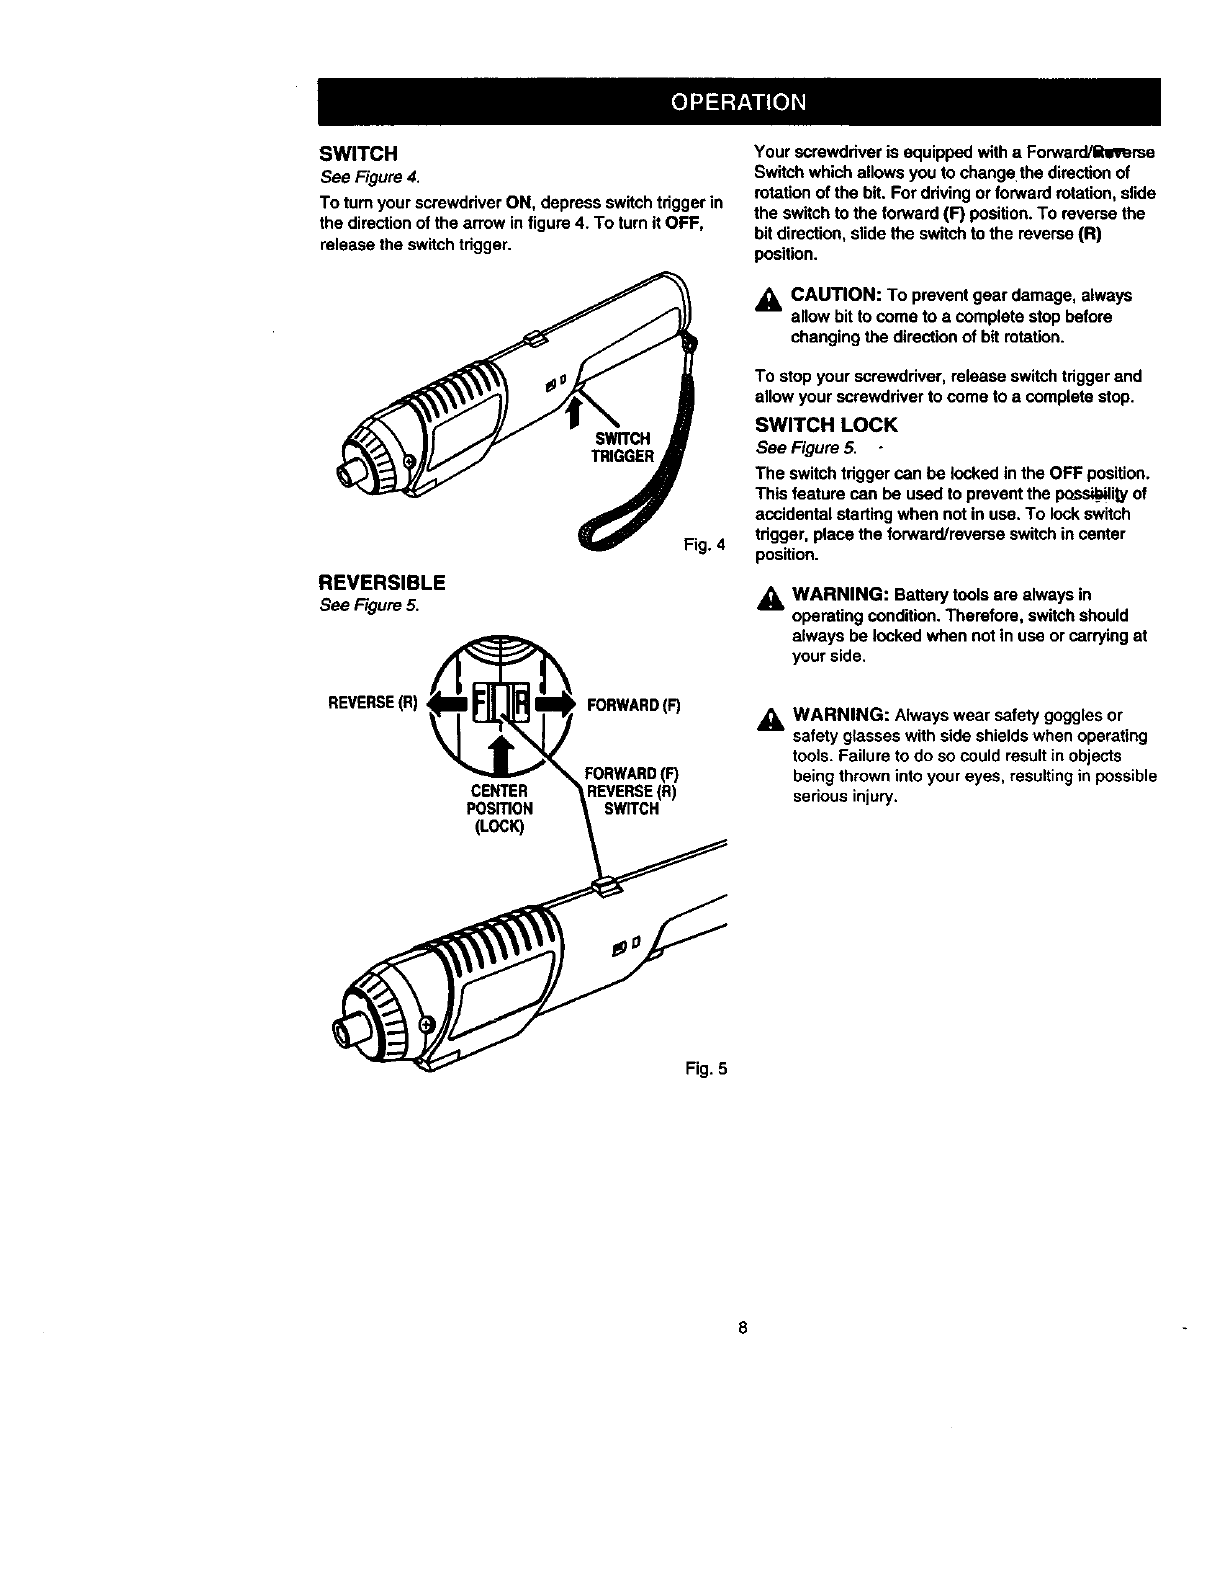
SWITCH
See Figure 4,
To turn your screwdriverON, depress switchtriggerin
the direction of the arrow infigure 4. To turn it OFF,
release the switchtdgger.
REVERSIBLE
See Figure5.
Fig. 4
REVERSE(R) FORWARD(_
FORWARD(_
CENTER REVERSE(R)
PosmoN SWITCH
(LOC_
Your screwdriver is equipped with aForward/litllmrse
Switch which allows you to change the direction of
rotationof the bit. For ddvingor forward rotation,slide
the switchto the forward(F) position.To reversethe
bitdirection,slide the switch to the reverse(R)
position.
CAUTION: To preventgear damage, always
allow bit to come to a complete stopbefore
changing the directionof bit mtation.
To stop your screwdriver,release switchtdggerand
allow your screwdriver to come to a complete stop.
SWITCH LOCK
See Figure 5.
The switch trigger can be lockedin the OFF position.
This feature can be used to prevent the pessi_"ity of
accidental startingwhen not in use. To lockswitch
tdgger, place the forward/reverse switchin center
position.
_WARNING: Battery toolsare always in
operatingcondition. Therefore, switchshould
always be locked when not in usaor carrying at
your side.
_WARNING: Always wear safety goggles or
safety glasses with side shields when operating
tools. Failure to do so could result in objects
being thrown into your eyes, resulting in possible
serious injury.
Fig. 5
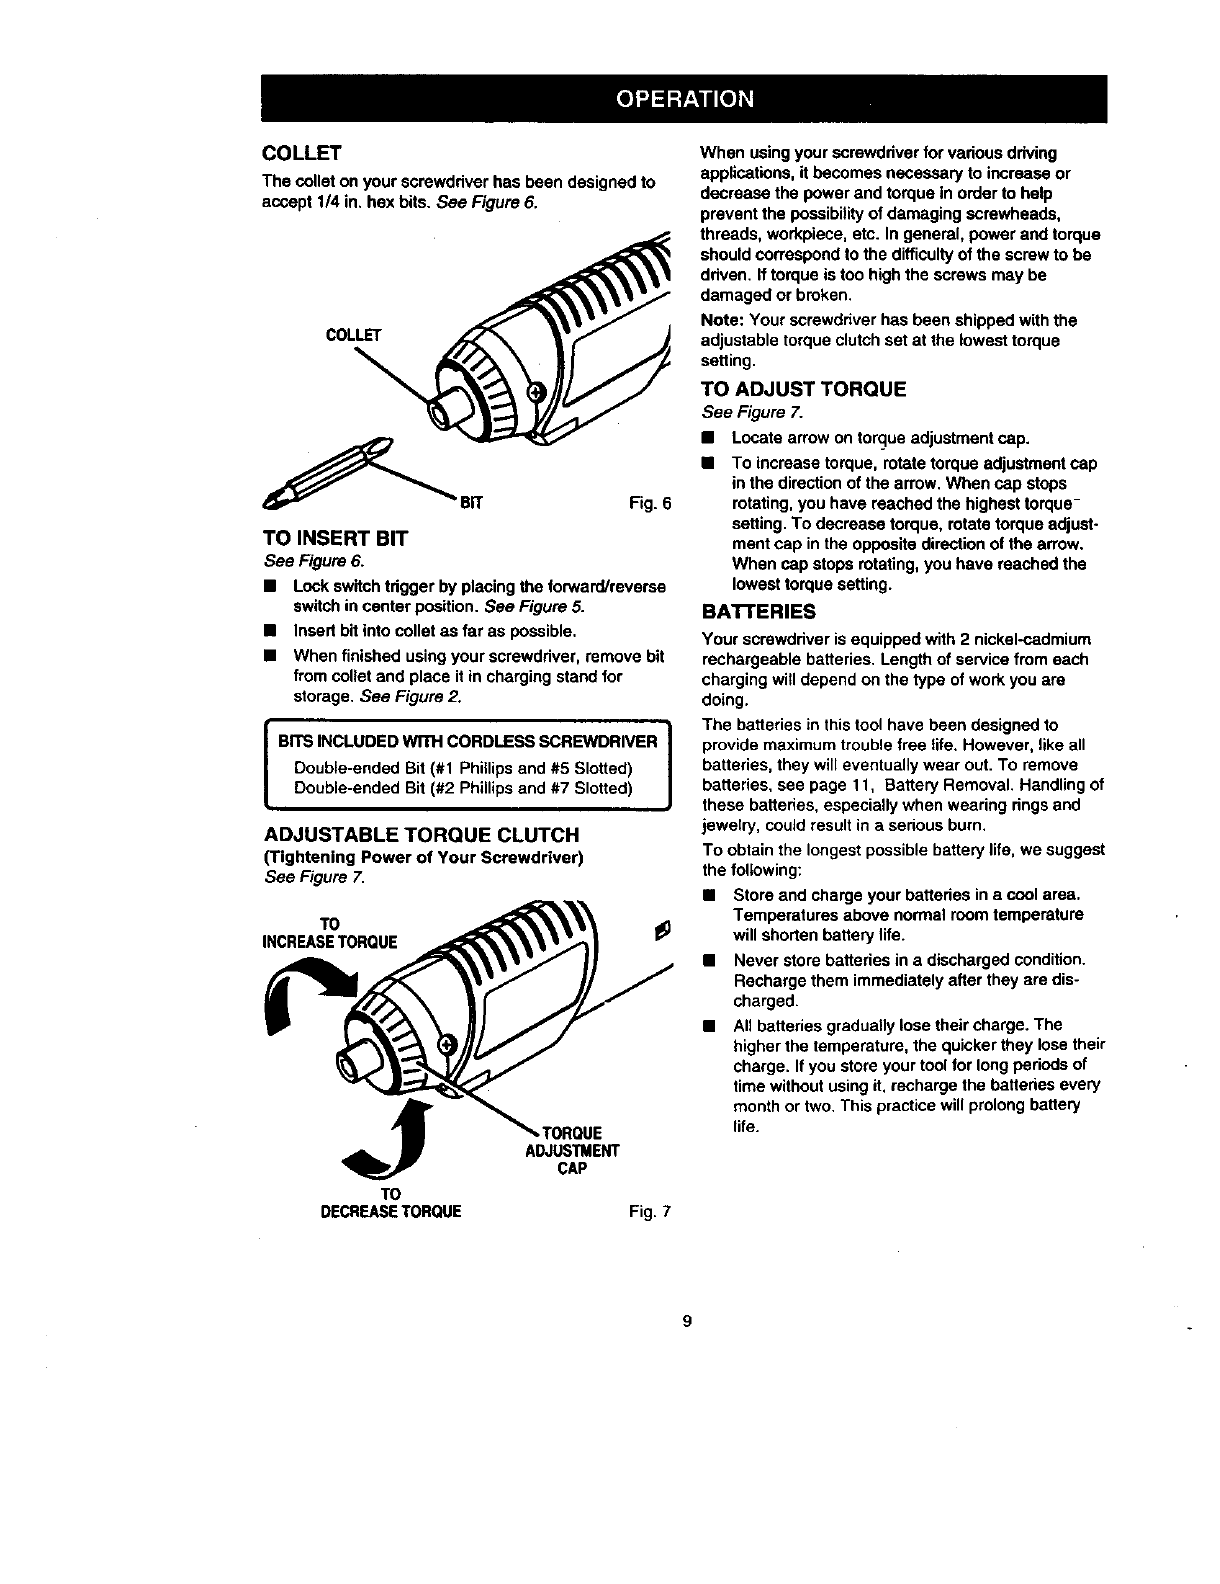
COLLET
Thecolletonyourscrewdriverhasbeendesignedto
accept1/4in,hoxbits.See Figure 6,
COLLET
\
Fig. 6
TO INSERT BIT
See Figure 6.
• Lock switch tdgger by placing the forward/reverse
switchin center position. See Figure 5.
•Insert bit into collet as far as possible,
•When finished usingyour screwdriver,remove bit
fromcolletand place it in charging standfor
storage. See Figure 2.
II
BITSINCLUDED WITH CORDLESS SCREWDRIVER I
I
Double-ended Bit (#1 Phillipsand #5 Slotted)
Double-ended Bit (#2 Phillipsand #7 Slotted)
ADJUSTABLE TORQUE CLUTCH
(Tightening Power of Your Screwdriver)
See Figure
TO
INCREASETOROUE
J TORQUE
ADJUSTMENT
CAP
TO
DECREASETORQUE Fig. 7
When usingyour screwdriverfor various driving
applications,it becomes necessaryto increase or
decrease the power and torquein order to help
preventthe possibilityof damaging screwheads,
threads, workpiece, etc. In general, power and torque
shouldcorrespondto the difficultyof the screw to be
ddven. If torqueis too highthe screws may be
damaged or broken.
Note: Your screwdriver has been shipped with the
adjustable torqueclutch set at the lowest torque
setting.
TO ADJUST TORQUE
See Figure 7.
•Locatearrow on torque adjustmentcap.
•To increase torque, rotate torqueadjustmentcap
inthe directionof the arrow, When cap stops
rotating,you have reached the highest torque-
setting.To decrease torque, rotatetorque adjust-
ment cap in the oppositedirection of the arrow.
When cap stops rotating,you have reached the
lowesttorquesetting.
BATrERIES
Your scrowddver is equipped with 2 nickel-cadmium
rechargeable batteries. Length of servicefrom each
chargingwill depend on the type of work you are
doing.
The batteries in thistool have been designed to
providemaximum troublefree life, However, like all
batteries, they willeventuallywear out. To remove
batteries, see page 11, Battery Removal. Handling of
these batteries, especially when wearing dngsand
jewelry, could result in a serious burn,
To obtain the longest possiblebattery life, we suggest
the following:
•Store and charge your batteries in a cool area.
Temperatures above normal room temperature
will shorten battery life.
•Never store batteries in a discharged condition.
Recharge them immediately after they are dis-
charged.
•All batteries gradually losetheir charge. The
higher the temperature, the quicker they losetheir
charge. If you store your toolfor longperiodsof
time without usingit, recharge the batteriesevery
month or two. This practice willprolong battery
life.
_, WARNING: When servicing,use only identical
Craftsman replacement parts. Use of any other
part may create a hazard or cause product
damage.
,_ WARNING: Donot at any time let brake fluids,
gasoline, petroleum-based products,penetrating
oils, etc. come in contact withplastic parts. They
contain chemicals that can damage, weaken or
destroy plastic.
Only the partsshown on parts list, page 11, are
intended to be repaired or replaced by the customer•
All other parts shouldbe replaced by a qualified
service technician at an authorized servicefacility.
Avoid usingsolvents when cleaning plasticparts.
Most plastics are susceptibleto damage from various
types of commercial solvents and may be damaged
by their use. Use clean clothsto remove dirt,dust, oil,
grease, etc.
DO NOT ABUSE POWER TOOLS. Abusivepractices
can damage tool as well as workpiece.
_k WARNING: Do not attempt to modifythis tool or
create accessories not recommended for use
with thistool•Any such alterationor modification
is misuse and could result in a hazardous
conditionleadingto possibleserious personal
injury.
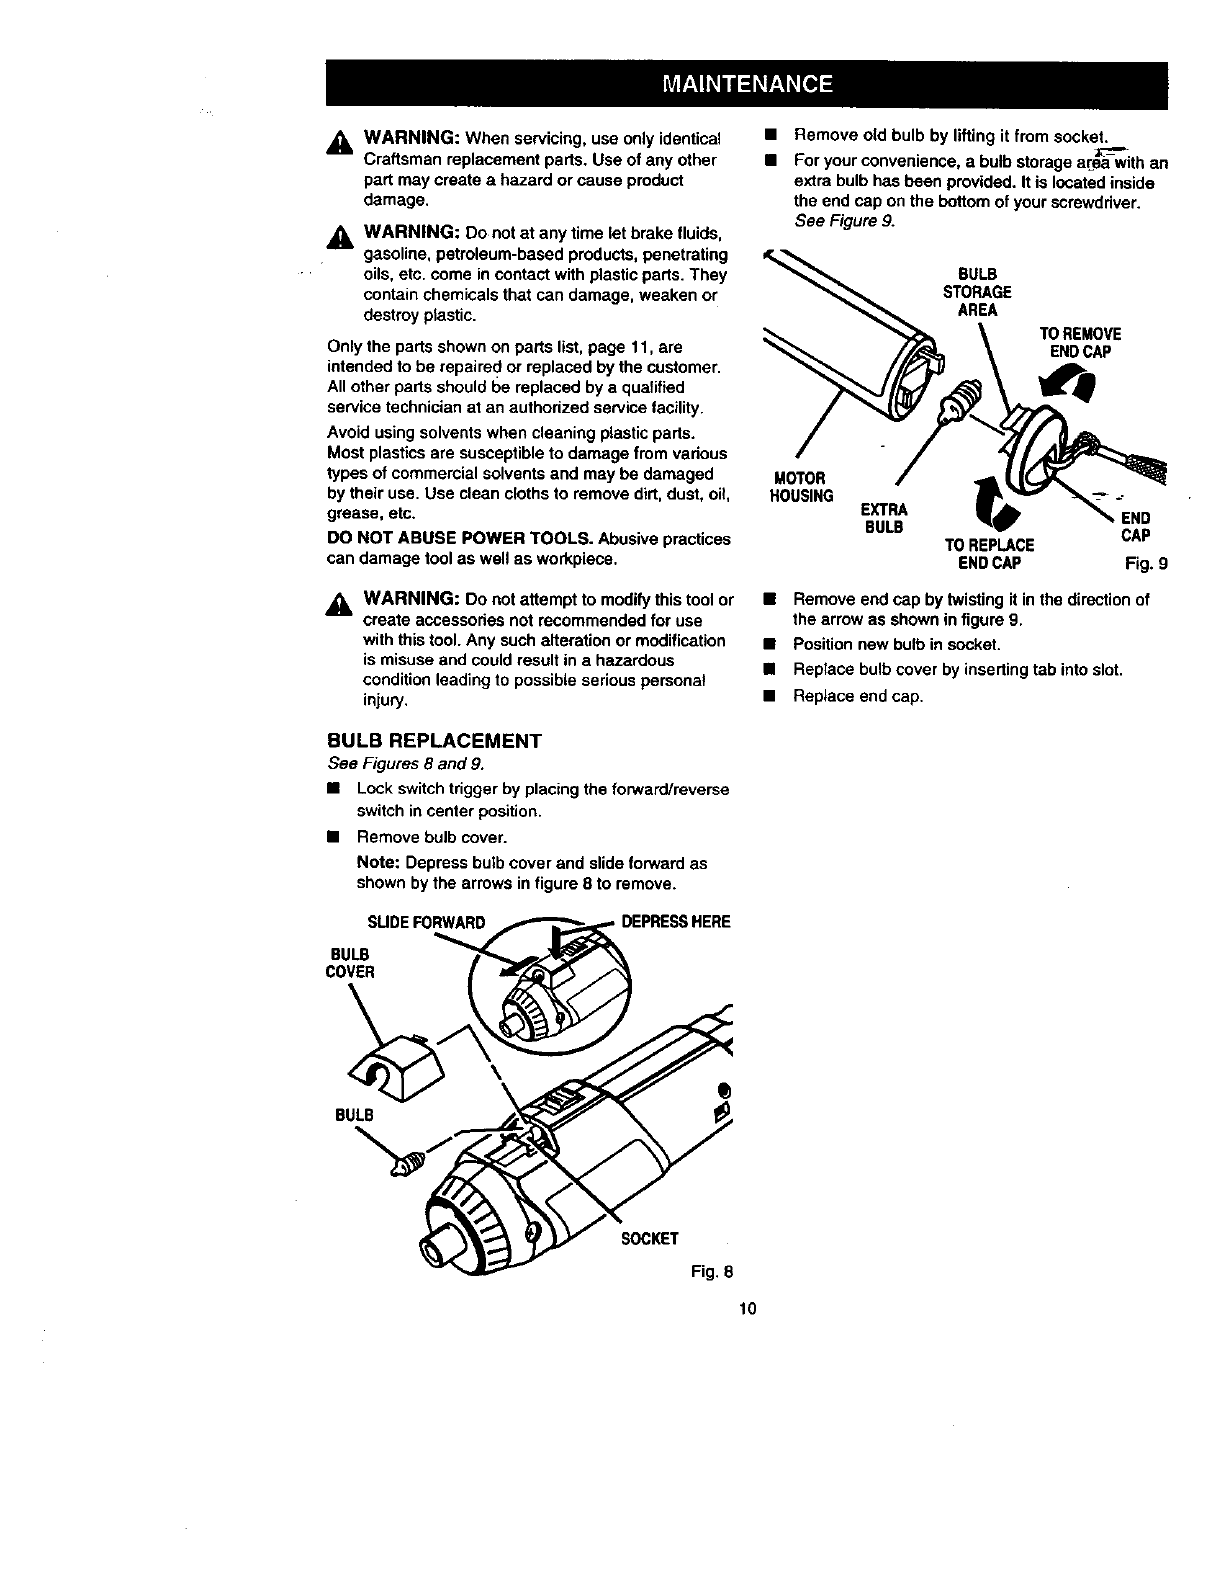
BULB REPLACEMENT
See Figures 8and 9.
•Loci< switch trigger by placing the forward/reverse
switch in center position.
•Remove bulb cover.
Note: Depress bulb cover and slide forward as
shown by the arrows in figure 8 to remove.
SUDEFORWARD DEPRESSHERE
BULB
COVER
Remove old bulb by liftingit from socket.
Foryour convemence, a bulb storage area with an
extra bulb has been provided.It is locatedinside
the end cap on the bottomof your screwdriver.
See Figure 9.
BULB
STORAGE
AREA
TOREMOVE
ENDCAP
MOTOR
HOUSING EXTRA END
BULB CAP
TOREPLACE
ENDCAP Fig. 9
•Remove end cap by twistingit inthe directionof
the arrow as shownin figure 9.
•Position new bulb insocket.
•Replace bulb cover by insertingtab into slot.
•Replace end cap.
BULB
\
SOCKET
Fig. 8
10
To preservenaturalresources,please
recycleor disposeof expiredbatteries
This productcontains nickel-cadmium
battery. Must be disposed of properly.
Local,state, or federal laws may prohibitdisposalof
nickel-cadmiumbatteries in ordinarytrash.
Consultyour localwaste authorityfor information
regardingavailable recyclingand/or disposaloptions.
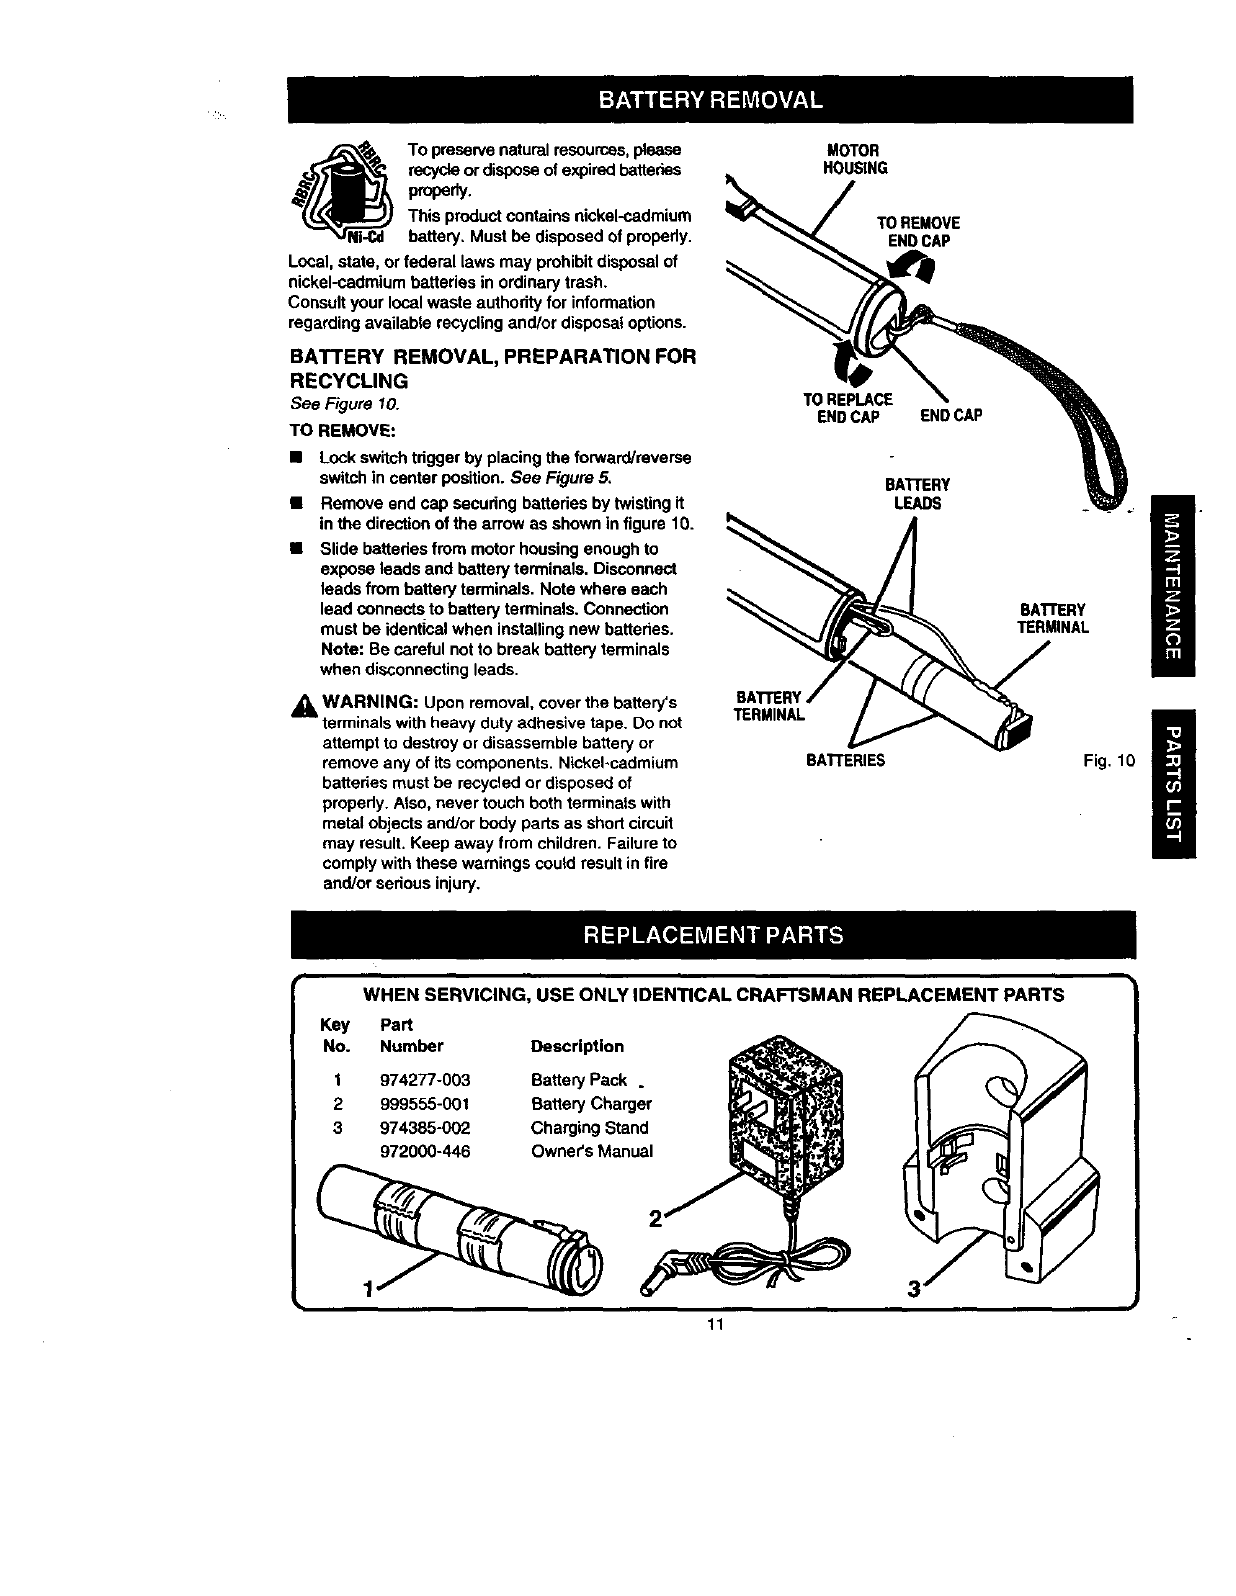
BATTERY REMOVAL, PREPARATION FOR
RECYCLING
SeeRgurel_
TO REMOVE:
•Lock switchtdgger by placingthe forward/reverse
switchin center position.See Figure 5.
•Remove end cap securing batteriesby twistingit
in the direction of the arrow as shown in figure 10.
•Slide batteriesfrom motor housingenoughto
expose leads and battery terminals. Disconnect
leads frombattery terminals. Note where each
lead connectsto battery terminals. Connection
must be identicalwhen installingnew batteries.
Note: Be careful notto break battery terminals
when disconnectingleads.
_k WARNING: Upon removal, cover the battery's
terminals with heavy duty adhesive tape. Do not
attempt to destroy or disassemble battery or
remove any of its components. Nickel-cadmium
batteries must be recycled or disposed of
properly. Also, never touch both terminals with
metal objects and/or body parts as short circuit
may result, Keep away from children. Failure to
comply with these warnings coutd result in fire
and/or serious injury,
TERMINAL
MOTOR
HOU_NG
TOREMOVE
ENDCAP
TO REPLACE
END CAP END CAP
BAKERY
LEADS
BATTERIES
BA'I'rERY
TERMINAL
Fig. 10 H
WHEN SERVICING, USE ONLY IDENTICAL CRAFTSMAN REPLACEMENT PARTS
Key Part
No. Number Description
1 974277-003 Battery Pack .
2 999555-001 Battery Charger
3 974385-002 Charging Stand
972000-446 Owner's Manual
11

Forthe repairor replacementpartsyouneed
delivereddirectlyto yourhome
Call7 am - 7 pm, 7 daysa week
1-800-366-PART
(1-800-366-7278)
Forrepairservice
Call24 hoursa day,7 daysa week
1-800-4-REPAIR
(1-800-473-7247)
Forthe locationof a
SearsPartsandRepairCenterinyourarea
Call24 hours a day,7 days aweek
1-800-488-1 222 imiii|
Themodelnumberof thistool will befoundon a serialplate
attachedtothemotorhousing.Whenrequestingserviceor
order!ngparts,alwaysprovidethefollowinginformation:
•ProductName
Cordless
Screwdriver
•Model Number
315.111810 SEARS
• PartName • Part Number America'sRepairSpecia/ists
