Craftsman 315220730 User Manual DRILL Manuals And Guides L0405193
CRAFTSMAN Drill Reversing Manual L0405193 CRAFTSMAN Drill Reversing Owner's Manual, CRAFTSMAN Drill Reversing installation guides
User Manual: Craftsman 315220730 315220730 CRAFTSMAN DRILL - Manuals and Guides View the owners manual for your CRAFTSMAN DRILL #315220730. Home:Tool Parts:Craftsman Parts:Craftsman DRILL Manual
Open the PDF directly: View PDF ![]() .
.
Page Count: 16
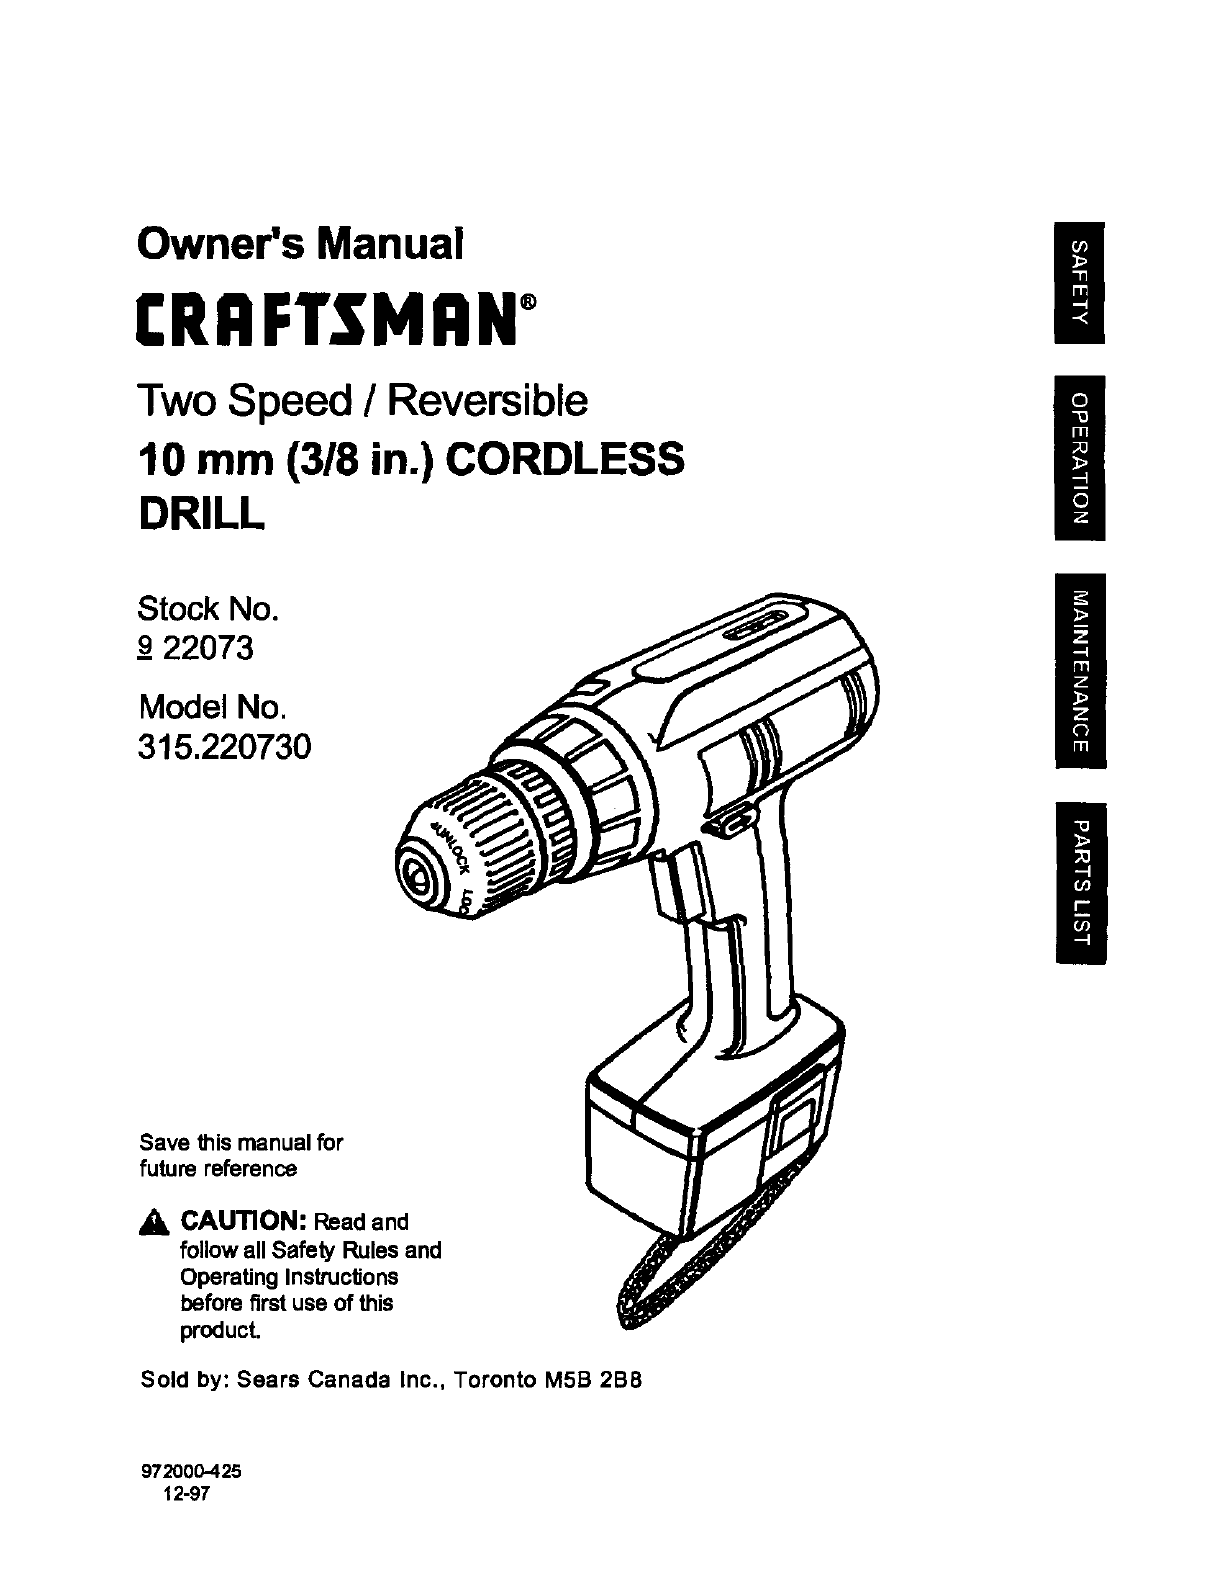
Owner's Manual
CRRFTSMRW
Two Speed /Reversible
10 mm (318 in.) CORDLESS
DRILL
Stock No.
_922073
Model No.
315.220730
Save this manual for
future reference
a, CAUTION: Read and
follow all Safety Rules and
Operating InstruclJons
before first use of this
product.
Sold by: Sears Canada Inc., Toronto M5B 2B8
972000-425
12-97
•Warranty ......................................................................................................................................................... 2
•Introductionand ProductSpecifications......................................................................................................... 2
•Rules ForSafe Operation ........................................................................................................................... 3-5
A. ImportantSafety Rules For BatteryTools.............................................................................................. 4
B. ImportantSafety InstructionsFor Charger ............................................................................................. 4
C, ImportantInformationFor RechargingHot Batteries............................................................................. 5
•Features ......................................................................................................................................................... 6
•Operation................................................................................................................................................... 7-12
•Maintenance ................................................................................................................................................. 13
•Exploded Viowand Repair Parts List........................................................................................................... 15
•Parts Ordering/Service............................................................................................................................... 16
FULL "RNO YEAR WARRANTY ON CRAFTSMAN TOOL
If thisCIIRFTSMRN Toolfails to operate withintwoyears from the data of purchase, ratum it to the nearest
Sears Canada Inc. ("Sears') store and =Sears"will repairit,free of charge.
If thistool is usedfor commercialor rental purposesthiswarranty appliesfor only90 days from the date of
purchase.
This waKa_y is in additionto any statutorywarranty,
Sears Canada Inc., Toronto M5B 2B8
Your ddll has manyfeatures for making ddllJng
operationsmore pleasant and enjoyable.Safety,
performanceand dependabilityhave been given top
pdodtyinthe design of thisdrill making it easy to
maintainand operate.
_, CAUTION: Carefully read throughthisentire
owners manual before usingyour new ddll. Pay
close attentionto the Rules For Safe Operation,
Warningsand Cautions. If you use your ddll
pmpedy and onlyfor what it is intended,you will
enjoyyears of safe, reliable service.
SPECIFICATIONS:
Chuck Capacity
Motor
Charger Rating
No Load Speed
Switch
Charge Rate
10 mm (3/8 in.)
7.2 VoltsDC
120 Volts, 60 Hz, AC Only
300 /600 RPM
TwoSpeed - Reversible
3 Hours
2
The purpose of safety symbols is to attract your attention to possible dangora. The ssfoly symbols, and
the explanations with them, deserve your careful attention and understanding. The safety warnings do
not by themselves eliminate any danger. The instructions or warnings they give are not substitutes for
proper accident prevention measures.
SYMBOL MEANING
&SAFETY ALERT SYMBOL:
Indicatescautionor warning.May be used inconjunctionwithother symbolsor pictographs,
AWARNING: Failure to obey a safetywarningcan result in serious Injuryto youmelforto others.
Alwaysfollowthe safety precautionsto reduce the dskof tire, electricshockand personalinjury,
&CAUTION: Failure to obey a safetywarning may resultin propertydamage or personal injuryto
yourselfor to others.Alwaysfollow the safety precautionsto reducethe riskof fire, electdcshock
and personal injury.
NOTE: Advisesyou of informationor instructionsvitalto the operationor maintenanceof the equipment.
,_ WARNING: Do not attempt to operate this tool
untilyou have read thoroughlyand understand
completely all instructions,safety rules,etc,
contained in thismanual, Failure to comply can
resultin accidents involvingfire, electdc shock,
or sadous personal injury.Save owner'smanual
and review frequently for continuingsafe
operation,and instructingotherswho may use
thistool.
READ ALL INSTRUCTIONS
KNOW YOUR POWER TOOL. Rood owner's
manual carefully.Learn its applicationsand
limitationsas well as the specificpotential
hazards related to thistool.
GUARD AGAINST ELECTRICAL SHOCK by
preventingbodycontactwith gmundeq surfaces,
For example: Pipes, radiators,ranges, refrigera-
tor enclosures,
•KEEP WORK AREA CLEAN. Cluttered areas
and benches Invite accidents.
•AVOID DANGEROUS ENVIRONMENT. Don't
use power tool in damp or wet locations or
exposeto rain. Keep work area well lit, •
•KEEP CHILDREN AND VISITORS AWAY. All
visitorsshouldwear safetyglasses and be kept a
safe distance fromwork area, Do not let visitors •
contact tool or extensioncord.
STORE IDLE TOOLS. When notin usa tools
shouldbe stored in a dry and highor locked-up
place - out of the reach of children,
DON'T FORCE TOOL. It will do the job better
and safer at the rate for which it was designed.
USE RIGHT TOOL. Don'tforce smalltool or
attachmentto do the job of a heavy dutytool.
Don't use toolfor purpose net intended-for
example- A circularsaw shouldneverbe used
for ct._ingtree limbsor logs.
WEAR PROPER APPAREL. Do not wear loose
clothingor jewelrythat can get caught intool's
movingpartsand cause personal injury,Rubber
glovesand nonskidfootwear are recommended
when workingoutdoors.Wear protectivehair
covetingto contain longhair and keep it from
being drawn into nearby airvents,
ALWAYS WEAR SAFETY GLASSES. Everyday
eyeglasses have only impact-resistantlenses;
they are NOT safety glasses,
PROTECT YOUR LUNGS. Wear a face mask or
dustmask if operationis dusty.
PROTECT YOUR HEARING. Wear hoofing
protectiondudngextended periodsof operation.
SECURE WORK. Use clamps or a visa to hold
work. It's safer than usingyour hand and it frees
both hands to operate tool.
DON'T OVERREACH. Keep properfooting and
balance at all times. Do net use ona ladder or
unstable support.
MAINTAIN TOOLS WITH CARE. Keep tools
sharp at all times, and cleanfor best and safest
performance. Follow instructionsfor lubricating
and changingaccessories.
REMOVE ADJUSTING KEYS AND
WRENCHES. Form habit of checkingto see that
keys and adjustingwrenchesare removed from
tool before turningit on.
3
RULES FOR SAFE OPERATION (Continued)
M
M
m
M
NEVER USE IN AN EXPLOSNE ATMO-
SPHERE. Normal sparkingof the motor could
igniteflammable liquids,gases, or fumes.
M
KEEP HANDLES DRY, CLEAN, AND FREE M
FROM OIL AND GREASE. Always use a clean
clothwhen cleaning.Never use brakefluids. M
gasoline, petroleum-basedproductsor any
strongsolventsto clean your tool.
STAY ALERT. Watch what you are doingand
use commonsense, Do not operate tool when
you ara tired, Do not rush,
M
M
CHECK DAMAGED PARTS. Befora further use
of the tool,a guard or other part that is damaged
shouldbe carefullychecked to determinethat it
willoperate properlyand performits intended
function.Chock for alignmentof movingparts, •
bindingof moving parts, breakage of parts,
mounting,and any other conditionsthat may
affect its operation.A guard or other partthat is
damaged shouldbe pmparlyrepaired or M
raplaced by an authorized service center unless
indicatedelsewhere in this instructionmanual, M
DO NOT USE TOOL IF SWITCH DOES NOT
TURN IT ON AND OFF. Have defective switches
replaced by an authorizedservice center,
DRUGS, ALCOHOL, MEDICATION. Do not
operate toolwhile under the influenceof drugs,
alcohol,or any medication,
DRILLING OR DRNING SCREWS INTO
ELECTRICAL WIRING IN WALLS, CEILINGS,
OR OTHER AREAS CAN CAUSE THE BIT OR
CHUCK TO BECOME ELECTRICALLY LIVE.
Do nottouch metal parts when drillingintoa wall;
grasp only the insulated handle(s)or plastic
housingwhen usingthistool, Make surehidden
electdcal wiring,water pipes, and mechanical
hazardsare not inthe path oftha bitwhen
drillingintoa wall.
BINSPECT FOR and removeall nailsfrom lumber
beforedrilling,
IMPORTANT SAFETY RULES FOR BATrlERY
TOOLS
Batterytoolsdo not hoveto be pluggedinto an
electrical outlet;therefore, they are always in
operatingcondition. Be aware of possible
hazards when not usingyour batterytool or
when changingaccessodes.
MUSE ONLY THE CHARGER PROVIDED WITH
YOUR BATTERY TOOL, Do not substituteany
other charger. Use of another chargercould
cause bettedes to explode causingpossible
serious injury.
DO NOT PLACE BAI-FERY TOOLS OR THEIR
BAI"FERIEB NEAR FIRE OR HEAT. They may
explode.
DO NOT CHARGE BATTERY TOOL IN A
DAMP OR WET LOCATION.
Your batterytool shouldbe charged inalocation
where the temparatum is morethan 50°F but
less than 100°F,
Under extreme usageor temperatureconditions,
battery leakage may occur.If liquidcomes in
contactwithyour skin,wash immediatelywith
soap and water, then neutralizewith lemonjuice
or vinegar. If liquidgets inyour eyes, flushthem
with cleanwater for at least 10 minutes, then
seek immediate medical attention.
If carrying your batterytool at your side, make
sureit is notrunning and your fingeris noton the
switch.Avoid accidentalstarting.
SECURE WORK before applyingpower, NEVER
holdworkpieceinyour hand oracrossyour legs,
WHEN SERVICING USE ONLY IDENTICAL
CRAFTSMAN REPLACEMENT PARTS.
IMPORTANT SAFETY INSTRUCTIONS FOR
CHARGER
• SAVE THESE INSTRUCTIONS. This manual
containsimportantsafetyand operating
instructionsfor batterychargerpart number
999555-008.
MBefore usingbatterycharger, read all instructions
and cautionary maddngsin this manual, on
battery charger, and productusingbattery
charger,
_i, WARNING: To reduce riskof injury,charge only
nickel.cadmiumtype rachargeablebatteries.
Other types of pattedes may burstcausing
personal injuryand damage.
m
M
M
Do note_pose chargerto rain or snow.
Use of an attachmentnot recommendedor sold
by the batter/chargermanufacturermay result
in a dsk of fire, electricshock, or injuryto
parsons.
To reduce dskof damage to chargerbody and
cord, pullby chargerbody ratherthan cord when
disconnectingcharger,
Make sure cord is located so that it will not be
stepped on, tdppadover, or othe_vise subjected
to damage or stress.
4
RULESFORSAFEOPERATION(ConUnued)
An extensioncord shouldnot be used unless
absolutelynecessary. Usa of improper
extensioncord couldresult in a riskof fire and
electdc shock. If extensioncord must be used,
make sure:
a, That pinson plugof extensioncord are the
same number, size and shape as thoseof
plug on charger.
b. That extensioncord is propedywired and in
goodelectricalcondition; and
c. That wire size is large enough for AC
ampere ratingof charger as specified
below:
Cord Length(Feet) 25ft, 50ft, 100ft. 150ft,
Cord Size (AWG) 16 16 16 14
Note: AWG = Amedoan Wire Gage
•DO NOT OPERAI_ CI'IARGER WITH A
DAMAGED CORD OR PLUG. If damaged,have
replacedimmediatelyby a qualifiedserviceman.
Do notoperate charger if it has receiveda
sharp blow, been dropped,or otherwise
damaged in any way; take it to a qualified
serviceman,
Do not disassembJecharger, take itto a
qualifiedservicemanwhen sawice or repairis
required. Incorrectreassemblymay resultina
riskof electric shockor fire,
To reduce dsk of electdc shock,unplugcharger
from outlet before attemptingany maintenance
or cleaning.Turningoff controls will notreduce
thisrisk.
• Do notuse chargeroutdoors.
•Disconnectchargerfrom power supplywhen
not in use.
SAVE THESE INSTRUCTIONS. Refer to them
frequently and use them to instructotherswho
may use thistool. If you loan someone thistool,
loan them these instructionsalso.
A Look for this symbol to point out important safety precautions. It means attentionlll Your
safety is involved.
IMPORTANT INFORMATION FOR RECHARGING HOT BA'n'ERIES
When usingyour drillcontinuously,the hattedes in
your batterypack will become hot. You shouldlet a
hot batterypeck cool down for appreximately30
minutes before attemptingto recharge,
Note; This situationonlyoccurs when continuoususa
of your drill causes the batteriesto become hot. It
does notoccur under normalciroumstances.Refer to
"CHARGING BA'rrERY PACK" for normalrecharg-
ing of batteries,If the chargerdoes notcharge your
battery peck undernormalcircumstances,ratum both
the batterypack and chargerto your nearest Soars
repair centerfor electricalchock.
AWARNING:
The operationof any power tool can resultinforeign objects beingthrownintoyour eyes,
which can resultin severe eye damage. Before beginningpower tcol operation, alwayswear
safetygoggles or safety glasseswith side shieldsand a full face shieldwhen needed, We
recommendWide VisionSafety Mask for use overeyeglasses or standard safetyglasses
with sideshields, availableat Sears Retail Stores.
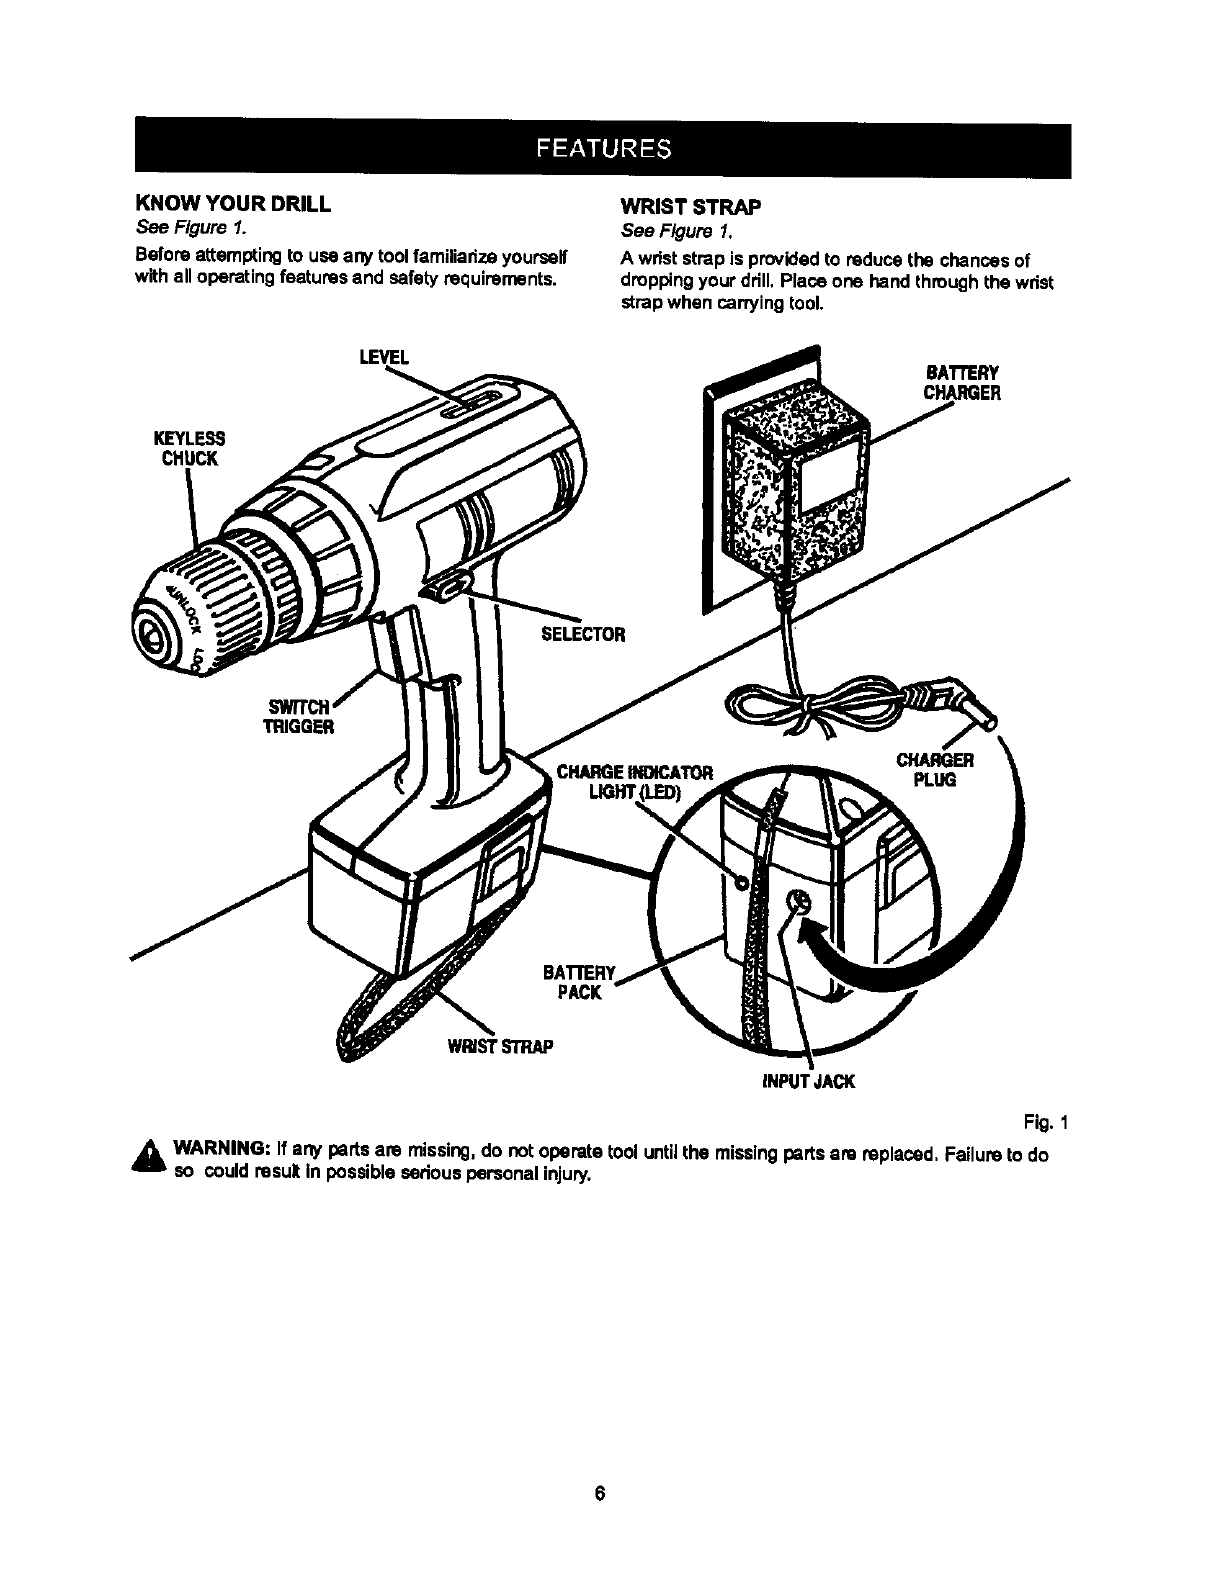
KNOW YOUR DRILL
See Figure 1.
Before attemptingto usa any toolfamiliarizeyourself
withall operatingfeatures and safetyrequirements,
WRIST STRAP
See Figure 1.
A wrist strapis providedto reducethe chancesof
droppingyour drill.Place one hand throughthe wrist
strapwhen carryingtool.
KIEYLESS
CHUCK
LEVEL BAI"rERY
CHARGER
TRIGGER
BATrERY
PACK
WRISTSTRAP
INPUTJACK
Fig. 1
WARNING: If any partsare missing,do notoperate tool untilthe missingparts are replaced, Failure to do
so couldresult in possibleseriouspersonal injury.
AWARNING: Always wear safetygogglesor
safetyglasseswith side shieldswhen operating
tools. Failure to do so couldresult in objects
beingthrownIntoyour eyes, resultingin possible
sodous injury,
_k WARNING: Do not allow familiaritywithyour
drillto make you careless. Remember that a
saraless fraction of a second is sufficientto inflict
severe injury.
CHARGING BATTERY PACK
The batterypack for thistool has been shippedin a
lowcharge conditionto prevent possible problems.
Therefore, you shouldcharge it at least 5 hoursprior
to use,
Note: Batteries will not reach full charge the firsttime
they are charged, Allow several cycles (drilling
followed by recharging)for them to become fully
charged,
TO CHARGE
• Charge batterypeck onlywiththe charger
provided,
•Make sure power supply is normal house
voltage, 120 volts, 60 Hz, AC only.
• Connect chargerto batterypack by inserting
charger pluginto inputJack.As showninfigure 1,
inputjack is located on the beck side of battery
pack.
Note: Batterypack can remain on your ddll or be
removedwhile charging.When battery peck Jsout
of the ddll, be careful notto touch beth terminals
witha metal object.Touchingbothterminalswitha
metal objectwill shortout the batterypack.
•Make surecharger plugand inputjack are properly
connected.
• Connectchargerto power supply,
• When properlyconnected, the red lighton battery
peck will turn on,
•Note: If charger does notcharge batterypack,
returnbatterypack and chargerto your nearest
Sears Repair Center for electricalcheck.
•Afternormal usage, 3 hours of chargingtime is
requiredto be fully charged.A minimumcharge
time of 5 hoursis requiredto recharge a completely
dischargedtool.
•The batterypack will become slightlywarm to the
touchwhile charging.This is normaland does not
indicatea problem.
•Do not operate the toolwhile it is connected to the
charger.The drivingabilitywill not increase.
•Do not place charger inan area of extreme heat or
cold.It willwork best at normalroomtemperature.
_. CAUTION: Your drilrs battery pack contains
special hightemperaturebettedes to help prevent
batterydamage when lefton charge for extended
pedodsof time. However, oncethe bettedes
becomefully charged, we recommendthat you
unplugyour chargerfrom power supplyand
disconnectit from the batterypack.
SWITCH
See Figure2.
To turnyour drill ON, depress the switchtdgger. To
turn it OFF, releasethe switch trigger.
SELECTOR
CENTERPosmoN
(LOCK) TRIGGER
Fig. 2
TWO SPEED
Your drill has a two speedfeature inthe switch.
Depress the switchtriggerhalfwayfor drivingscrews
at low speed. Depress the switch triggerall the way
for normaldrilling, Release the switch triggerto turn
drill off.
Noto: When changingfrom lowto highspeed, you
may noticea dead spot inthe tdgger switch.This is
partof the design of the switchend there is nothing
wrongwith your ddll. Continueto pullthe switch
trigger untilhigh speeddrillingbegins.
SWITCH LOCK
See Figure 3.
The switch tdgger can be locked inthe OFF position.
This feature can be usedto prevent the possibiliLy of
accidentalstartingwhen not in use, To lockswitch
trigger, placethe directionof rotationselector in
center position.
SELECTOR REVERSE
CENTERPOSITION ,_
(LOCK) FORWARD
Fig, 3
_k WARNING: Battery toolsare always inoperating
condition.Therefore, switch shouldalways be
lockedwhen not in use or carryingat your side.
REVERSIBLE
See Figure 3.
This tool has the feature of being reversible,The
directionof rotationis controlledby a selector located
above the switchtrigger,With the ddllheld in normal
operatingposition, the directionof rotationselector
shouldbe positionedto the left of the switchfor
drilling,The drillingdirectionis reversedwhen the
selector is to the rightof the switch, When the selector
is in center position,the switch triggeris locked.
,_ CAUTION: To preventgear damage, always
allow chuckto come to a complete stopbefore
changingthe directionof rotation.
To stop, release switchtriggerand allow the chuckto
come to a complete stop,
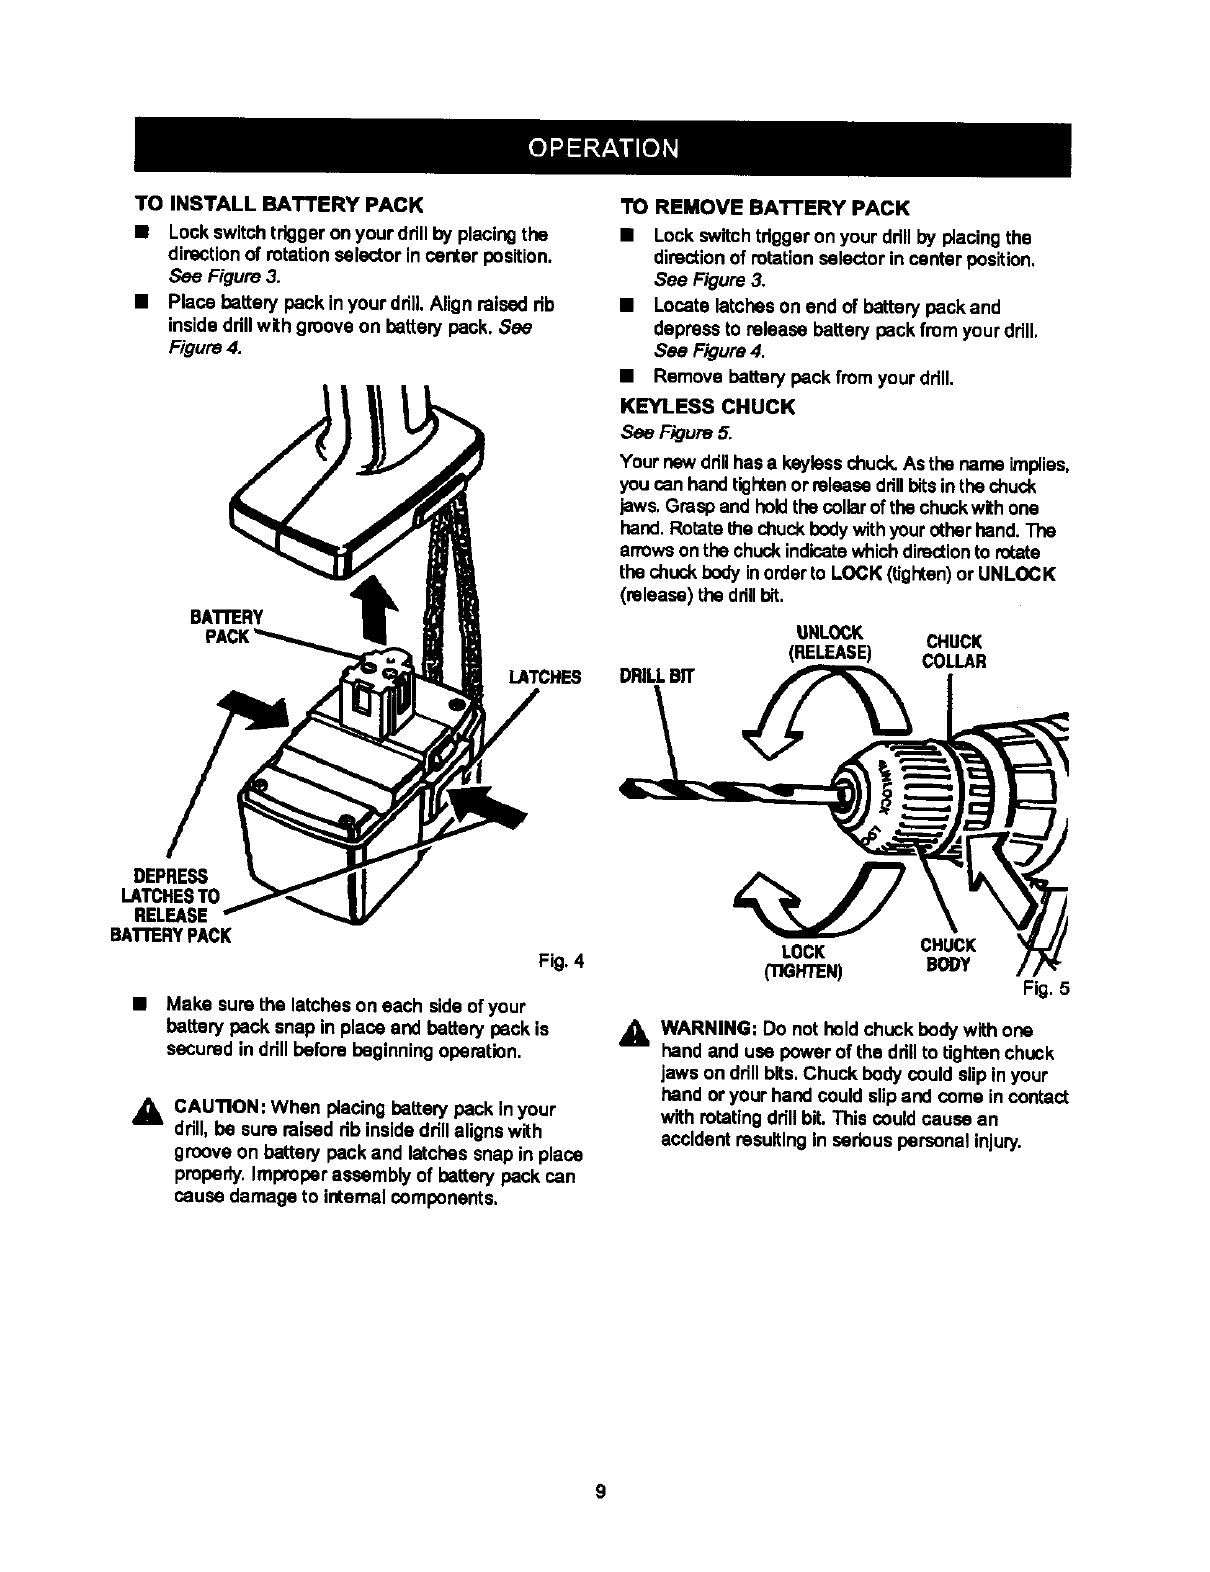
TOINSTALLBATTERYPACK
•Lockswitchtriggeron your ddll by placingthe
directionof rotation selector incanter position.
See Figure 3.
•Place battery back in your drill.Align raised rib
insidedrillwithgroove on battery back. See
Figure 4.
BATrERY
LATCHES
TO REMOVE BATTERY PACK
•Lockswitchtriggeron your drillby placingthe
directionof rotation selector in canter position,
See Figure 3.
•Locate latcheson end of batterybackand
depress to release batterypack from your ddll,
See Figure4.
•Remove battery back from your ddll.
KEYLESS CHUCK
See Figure 5.
Your new drillhas a keylasschuck.As the name implies,
youcan hand tightenor releasedrillbitsinthe chuck
jaws,Graspand held the collarof the chuckwithone
hand.Rotatethe chuck bodywithyourotherhand.The
arrowsonthe chuckindicatewhichdirectionto rotate
the chuck bodyinorderto LOCK (tighten)orUNLOCK
(release) the drillbit,
DRILLBIT
UNLOCK CHUCK
(RELEASE) COLLAR
DEPRESS
LATCHESTO
RELEASE
BAI"rERYPACK
Fig.4
•Make surethe latcheson each sideof your
battery back snap in place and battery back is
secured in ddllbefore beginningoperation.
,_ CAUTION: When placing battew back inyour
drill,be sure raised rib insidedrillalignswith
grooveon battery back and latchessnap in place
properly,Improperassembly of battery back can
cause damage to internalcomponents,
LOCK CHUCK
('I1GFffEN) BODY Fig, 5
_k WARNING: Do notholdchuck bodywithone
hand and use power of the drillto tightenchuck
jaws on ddllbits, Chuck body could slipin your
hand or your hand could slipand coma incontact
withrotatingdrillbit. This could cause an
accidentresulting in serious personal injury.
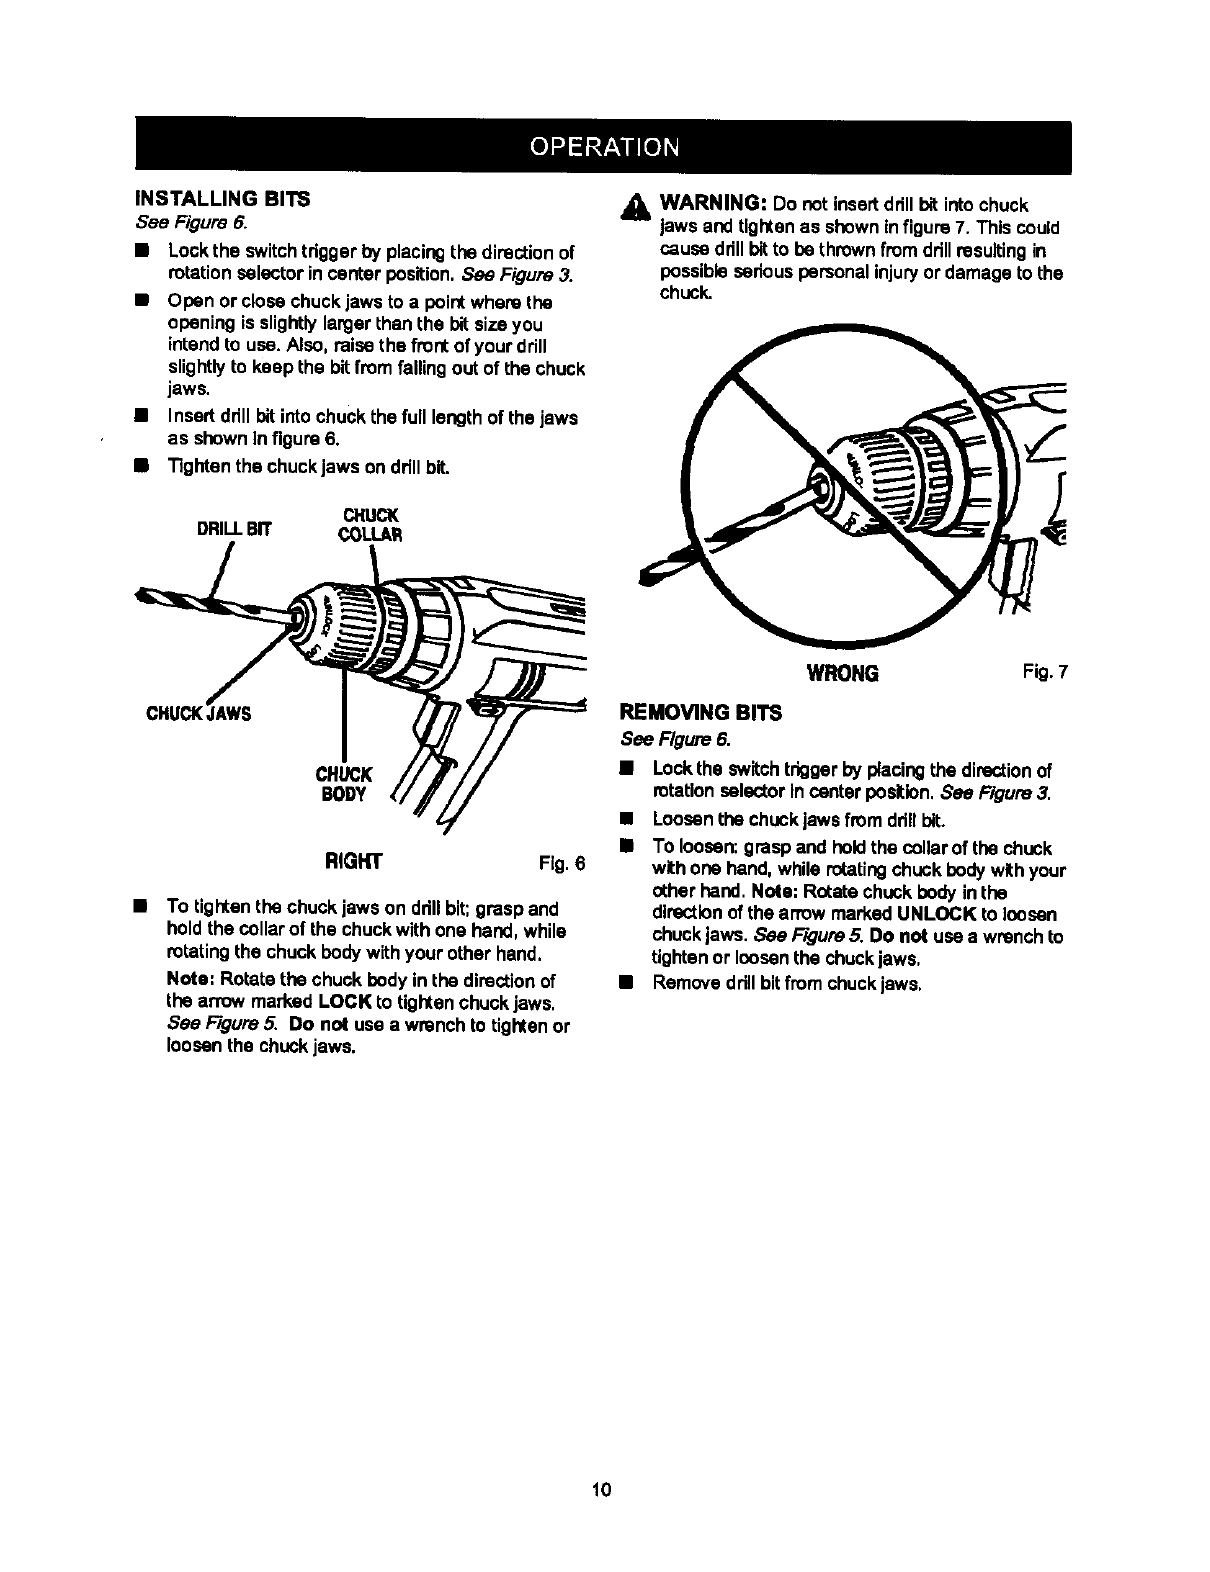
INSTALLINGBITS
See Figure 6.
•Lockthe switchtdgger by placingthe directionof
rotationselector in canter position.See Figure 3.
•Open or closechuck jaws to a pointwhere the
opening is slightlylargerthan the bit sizeyou
intendto use. Also, raise the front of your drill
sUghtlyto keep the bit from fallingout of the ohuck
jaws.
•Insert ddll bitinto chuckthe full lengthof the Jaws
as shown Infigure 6.
•Tighten the chuckjaws ondrill bit.
CI'tUCK
DRILLBIT COLI.AR
CHUCK
BODY
RIGHT Fig. 6
•To tighten the chuck jaws on ddll bit;grasp and
holdthe collarof the chuckwith one hand, while
rotating the chuck bodywithyour other hand,
Note: Rotate the chuck body in the directionof
the anow marked LOCK to tightenchuck jaws.
See F/gum 5. Do not use a wrench to tightenor
loosen the chuckjaws.
A WARNING: Do notinsertdrill bit intochuck
laws and tlgtCen as shown in figure7. This could
cause drillbitto be thrownfrom drillresultingin
possible sedous personal injuryor damage to the
chuck.
WRONG Fig. 7
REMOVING BITS
See Figure 6.
•Locktha switchtrigger by placingthe directionof
rotation selector In centerposition. See Figure 3.
•Loosenthe chuckjawsfrom dflllbit.
•To loosen:grasp and hell the collarof the chuck
withone hand,while rotatingchuck body withyour
other hand. Note; Rot_e chuckbody in the
directionof the arrow marked UNLOCK to loosen
chuckjaws. See F/gum5. Do not use a wrench to
tightenor loosenthe chucklaws.
•Removedrill bitfromchuck jaws.
10
,_ WARNING: Alwayswear safety gogglesor
safetyglasses withside shieldswhen operating
tools, Failure to do so couldresult in objects
beingthrownintoyour eyes, resultingin possible
seriousinjury.
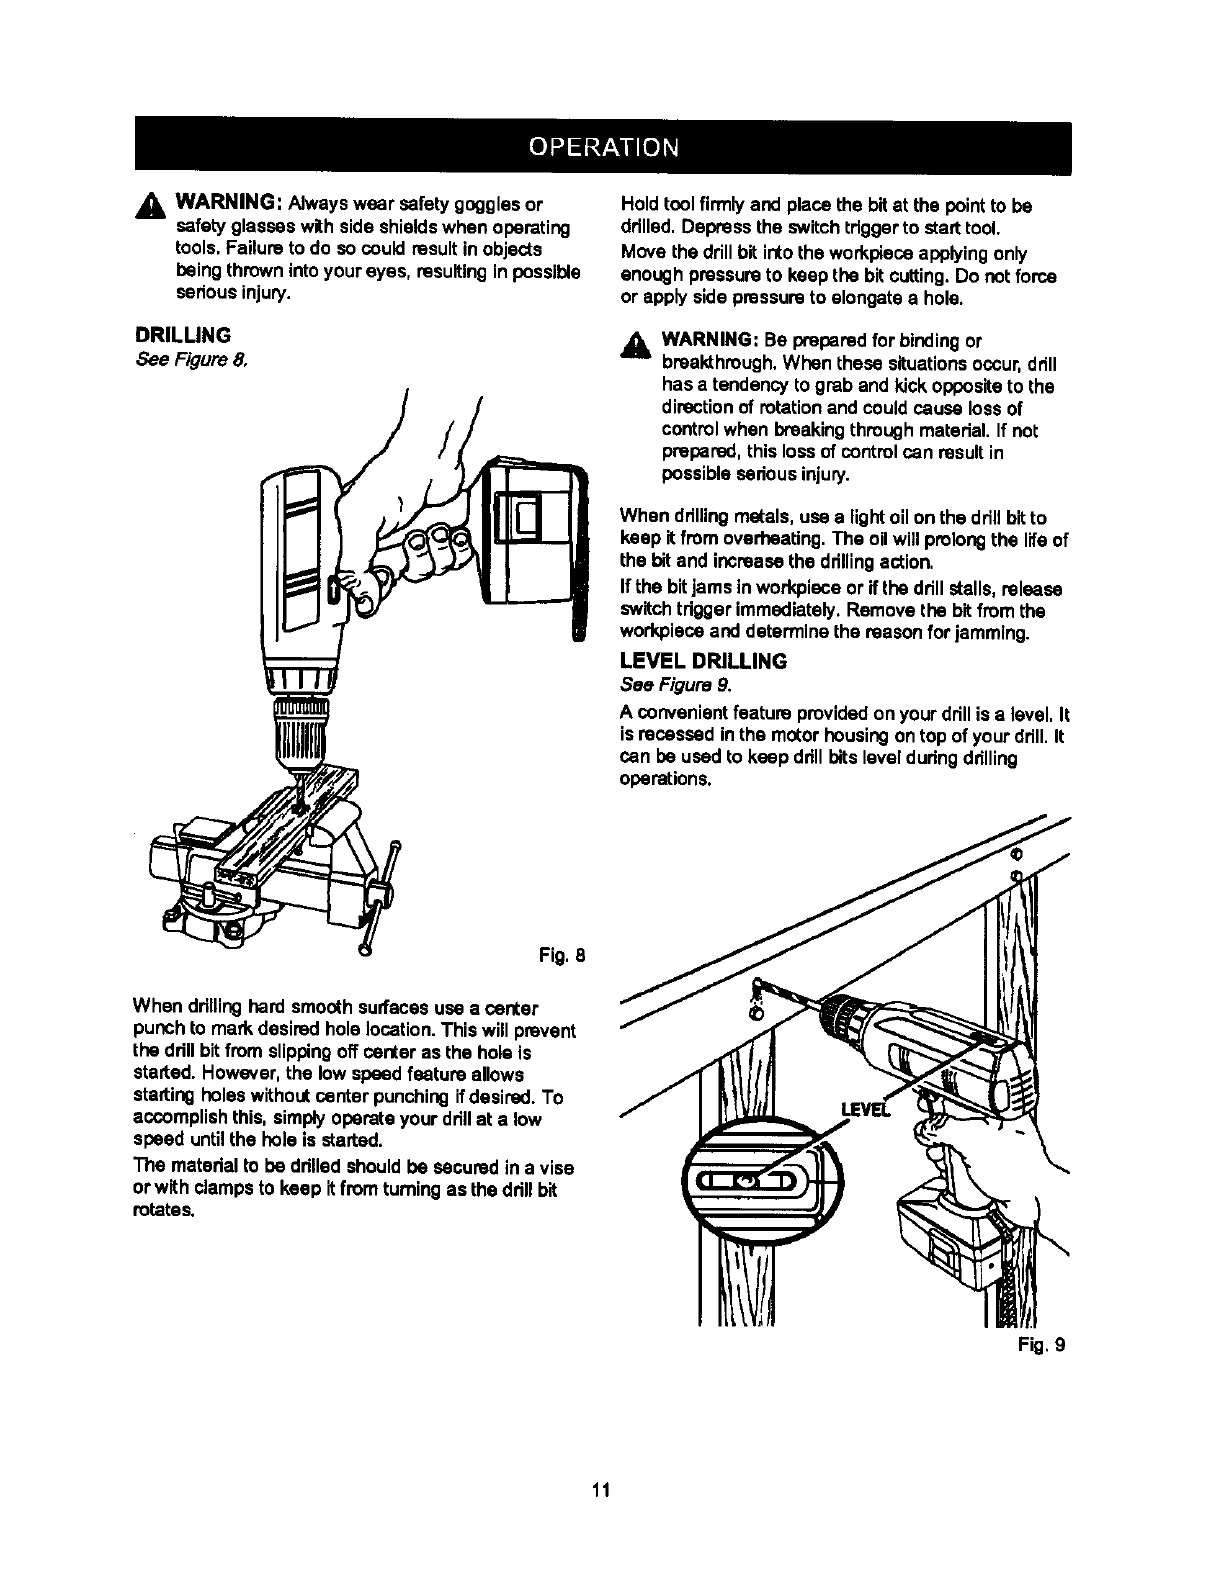
DRILLING
See Figure 8.
Holdtool firmlyand placethe bit at the pointto be
ddlled.Depress the switchtdggerto starttool.
Move the drillbit into(he workpiecaapplyingonly
enough pressureto keep the bitcutting.Do notforce
or apply side pressureto elongatea hole.
_. WARNING: Be preparedfor bindingor
bmaldhrough.When these situationsoccur,drill
has a tendency to grab and kickoppositeto the
directionof rotationand couldcause lossof
controlwhen breakingthroughmaterial. If not
preparad,thisloss of control can resultin
possible seriousinjury.
When ddlling metals,use a lightoil on the drillbitto
keep itfrom overheating,The oil will prolongthe lifeof
the bit and increase the ddllingaction,
If the bitjams inworkpiece or if the drill stalls,release
switch tdggerimmediately. Remove the bit from the
workplecaand determinethe reason for jamming.
LEVEL DRILLING
See Figure 9.
Aconvenient feature providedon your drillis a level, It
is recessed inthe motor housingontop of yourdrill. It
can be used to keep ddll bitslevelduringdrilling
operations.
Fig. 8
When drillinghard smooth surfacesuse a canter
punch to mark desired hole location.This will prevent
the ddll bitfrom slippingoff canter as the hole is
started. However,the low speedfeature allows
startingholes withoutcenter punchingif desired. To
accomplishthis, simplyoperate your drillat a low
speed untilthe hole is started.
The matedal to be ddlled shouldbe sacured in a vise
or with clampsto keep it from turningas the ddn bit
rotates.
Fig, 9
11
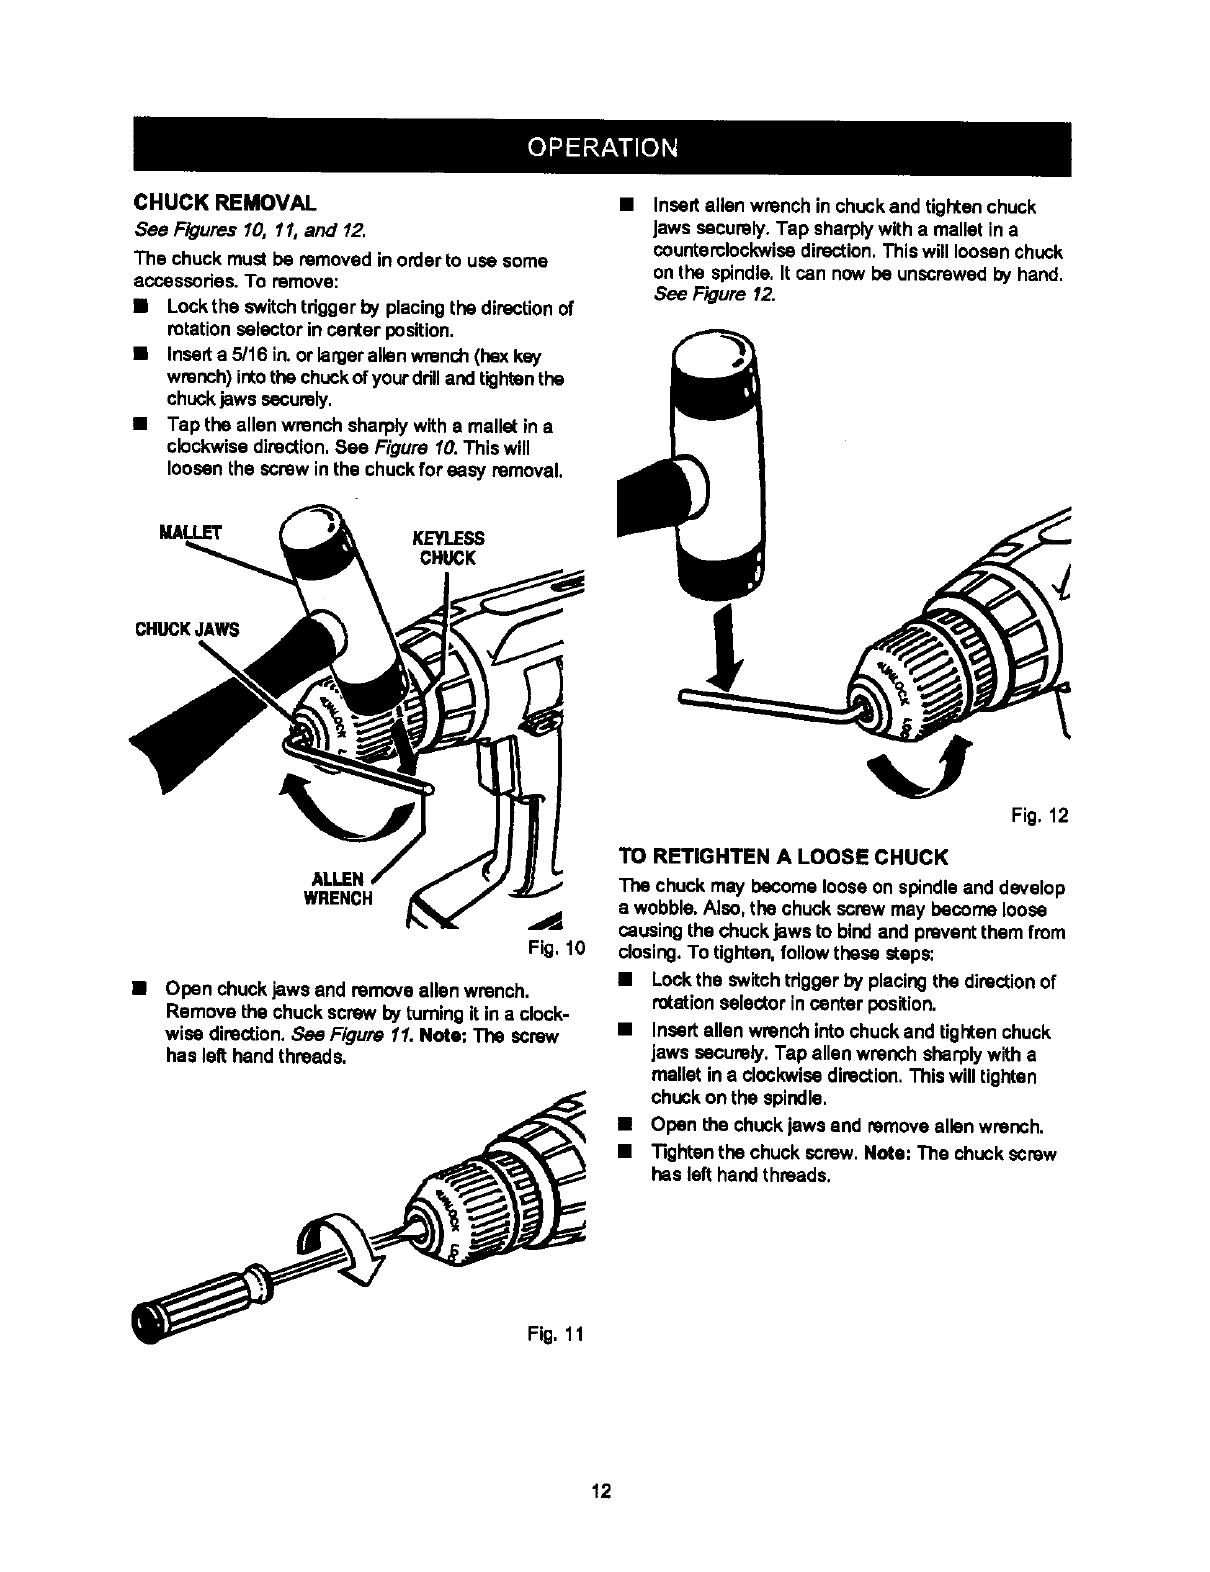
CHUCK REMOVAL
See Figures 10, 11, and 12.
The chuck must be removed in orderto use some
accasscdes. To remove:
•Leck the switchtrigger by placingthe direcUonof
rotation selector in center position.
•Inserta 5/16 in.or lerger allen wrench(hex key
wrench)intothe chuckofyourdrilland tightenthe
chuckjaws securely.
•Tap the allen wrench sharplywith a mallet in a
clockwisedirection.See Figure 10. This will
loosen the screw inthe chuckfor easy removal.
Insert allen wrench in chuckand tightenchuck
Jawssecurely.Tap sharplywith a mallet in a
countemlockwisedirection,Thiswill loosenchuck
on the spindle,It can now be unscrewedby hand.
See Figure 12.
MALLET KEYLESS
CHUCK
CHUCKJAWS
\
ALLEN
WRENCH ..d
Fig, 10
•Open chuckjaws and remove allen wrench.
Remove the chuckscrew by turningit in a clock-
wise direction,See Figure 11. Note: The screw
has leR hand threads.
Fig, 11
Fig. 12
TO RETIGHTEN A LOOSE CHUCK
The chuck may become looseon spindle and develop
a wobble. Also,the chuck screw may become loose
causingthe chuckjaws to bindand preventthem from
closing.To tighten,follow these steps:
•Lockthe switchtdggerby placingthe directionof
rotationselector incanter position.
•Insertallen wrench intochuckand tightenchuck
jaws securely. Tap allen wrench sharplywith a
mallet in a clockwisedirection.This willtighten
chuckon the spindle,
•Open the chuckjaws end removeallen wrench.
•Tightenthe chuck screw. Note; The chuckscrew
has left hand threads.
12
_k WARNING: When servicing,use only Identical
Craftsman reptacementparts. Use of any other
part may create a hazard or cause product
damage,
Avoid usingsolventswhen cleaning plasticparts,
Most plasticsare susceptibleto damage from vadous
types of commemlal solventsand may be damaged
by their use, Use clean clothsto remove dirt,dust, oil,
grease, etc,
AWARNING: Do notat any time tatbrake fluids,
gasoline, petroleum-basedproducts,penetrating
oils,etc. come in contactwith plasticparts, They
contain chemicalsthat can damage, weaken or
destroy plastic.
Do not abuse power tools.Abusivepracticescan
damage tool as well as workpieca.
Only the parts shown on partslist, page fifteen, are
intendedto be repaired or rapiacad by the customer,
All other parts shouldbe rapleced by aqualified
service technicianat an authodzeqservicefacility.
_L WARNING: Do not attempt to modifythis toolor
create accessoriesnot recommendedfor use
withthistool. Any suchalterationor modification
is misuse and couldresult in e hazardous
conditionleadingto possibleserious personal
injury.
BATTERIES
Your ddn'sbatterypack is equippedwith6 nickel-
cadmium rechargeable batteries,Lengthof service
from each chargingwill depend on the type of work
you are doing.
The batteriesin thistool have been designed to
provide maximum troublefree llfe. However, likeall
batteries,they will eventuallywear out, Do tlot
disassemblebattery pack and attempt to replacethe
batteries, Handling of these bettedes, especiallywhen
weadng dngsand jewelry, couldresult ina serious
bum.
To obtainthe longestpossildebatterylife,we snggest
the following:
BStore and charge yourbatteries In a coolarea,
Temperatures above normal roomtemperature
will shortenbattery life.
BNever store batteriesin a dischargedcondition.
Rechargethem immediatelyalterthey are
discharged.
MAll batteriesgraduallylosetheir charge.The
higherthe temperaturethe quickerthey losetheir
charge. If you storeyour tool for longpariods of
time withoutusingit, rechargethe batteries every
monthor two. This practicewill prolongbattery.
IFOR A COMPLETE SELECTION OF 1
ACCESSORIES FOR THIS AND OTHER
CRAFTSMAN POWER AND BENCH TOOLS,
VISIT YOU R NEAREST SEARS RETAIL STORE.
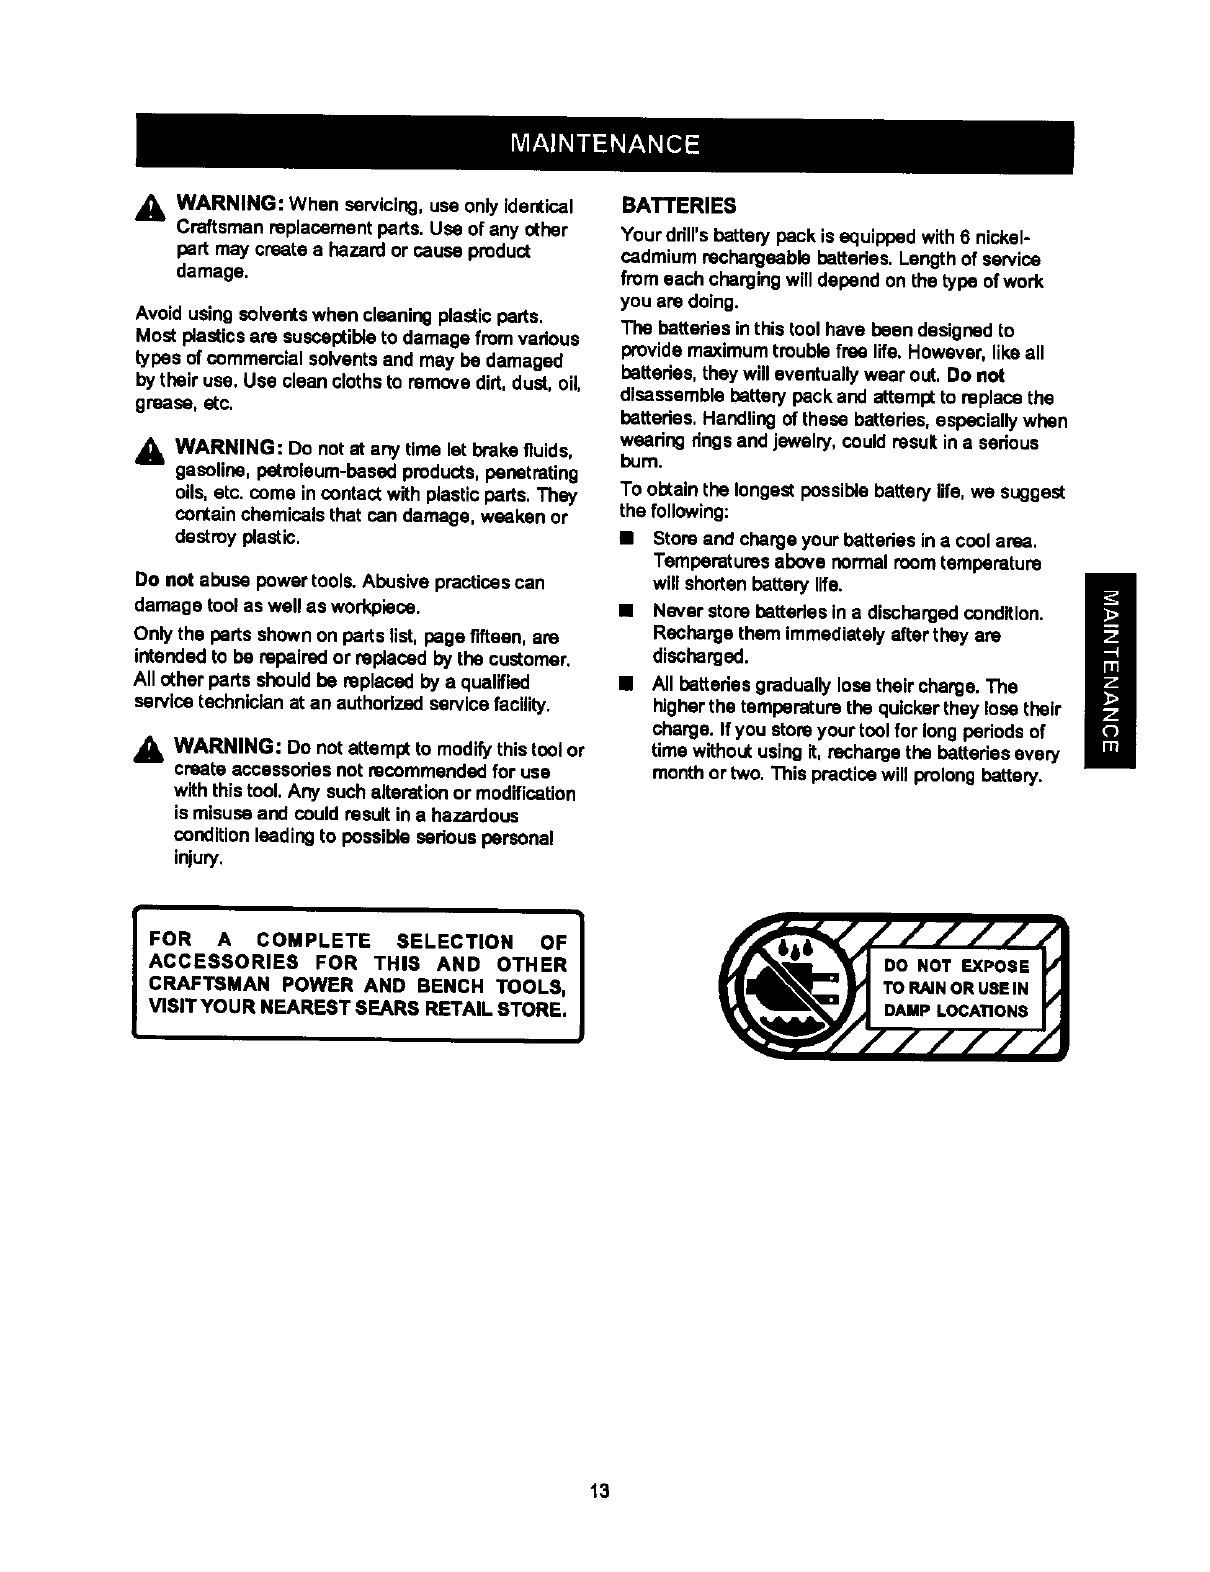
DO NOT EXPOSEH
TORAINORUSEIN
DAMP LOCATIONS [J
/////|
13

14
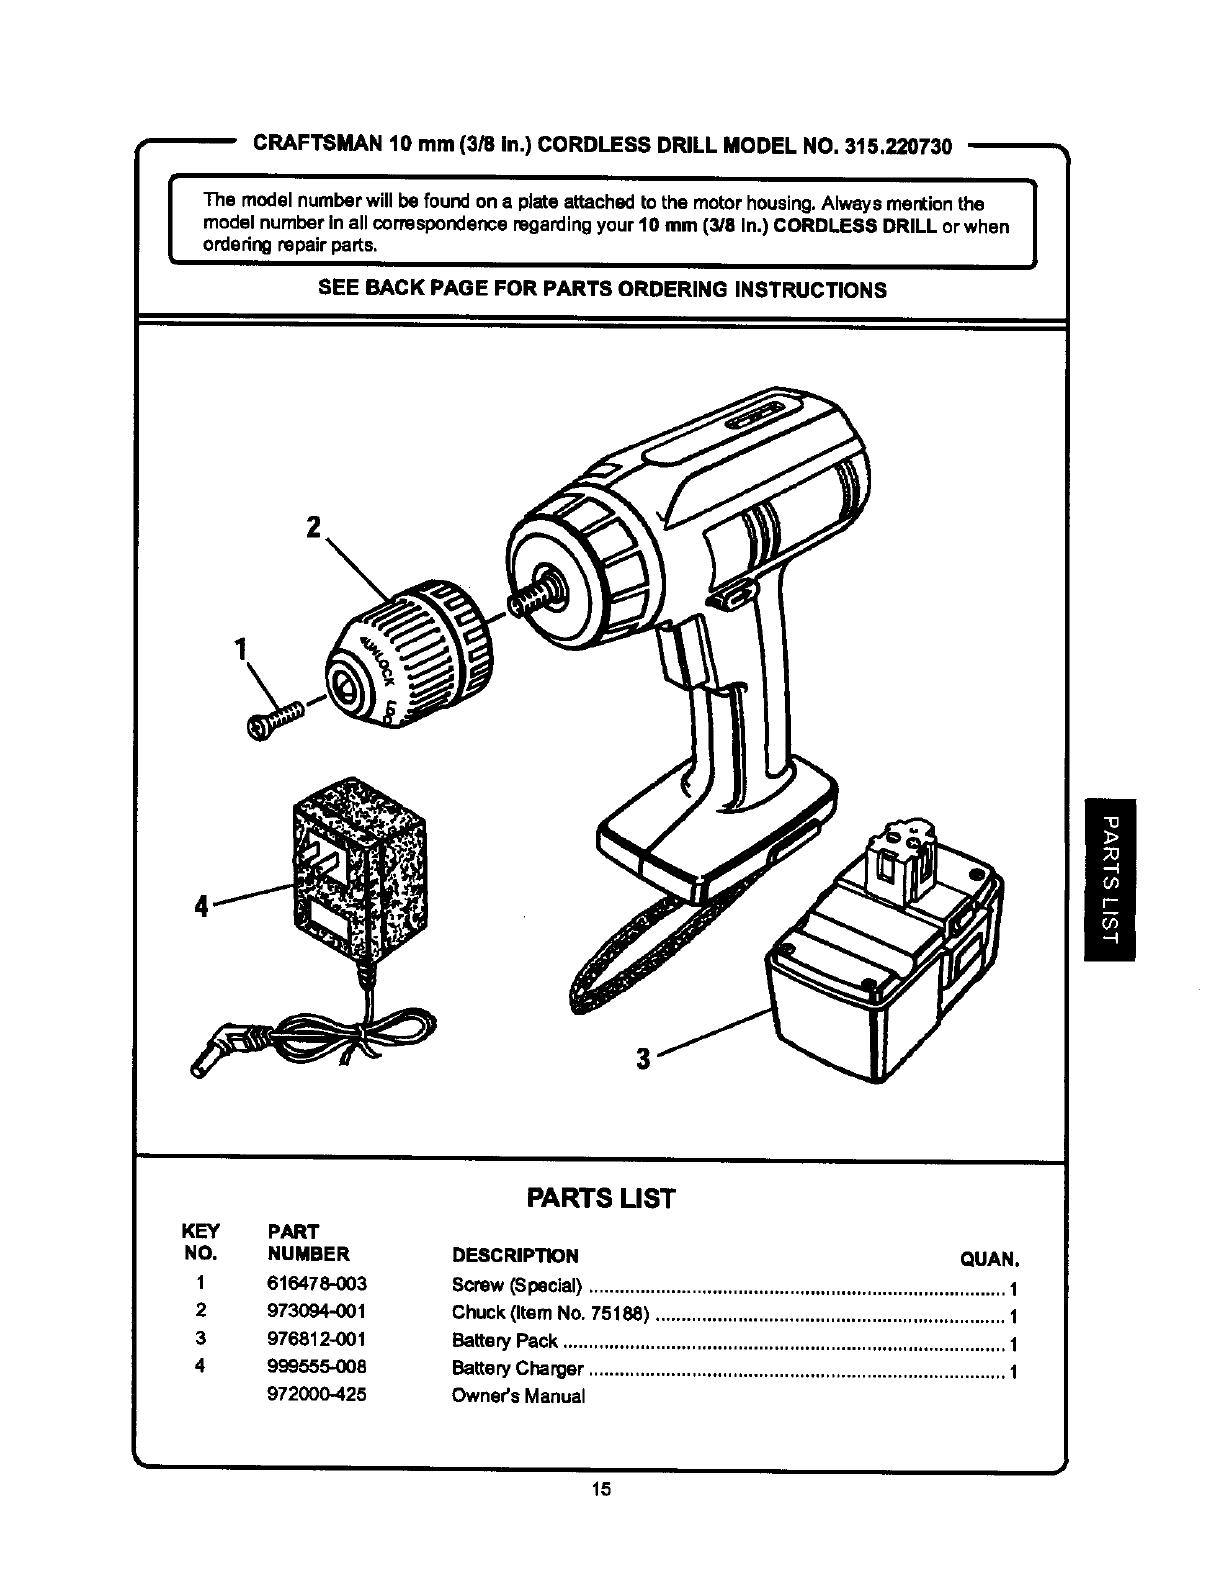
CRAFTSMAN 10 mm (3/8 In.) CORDLESS DRILL MODEL NO. 315.220730
[The model numberwill be foundon a plate attached to the motor housing.Always mentionthe I
model number in all correspondenceregardingyour 10 mm (3/8 In.) CORDLESS DRILL or when I
orderingrepair parts,
SEE BACK PAGE FOR PARTS ORDERING INSTRUCTIONS
2
1
KEY PART
NO. NUMBER
1 616478-003
2 973094-001
3 976812-001
4 999555-008
972000-425
PARTS LIST
DESCRIPTION QUAN.
Screw (Special) ................................................................................. 1
Chuck (Item No. 75188) .................................................................... 1
BatteryPack ...................................................................................... 1
BatteryCharger ................................................................................. 1
Owner's Manual
15
Owner's Manual
STOCK NO. a22073
MODEL NO. 315.220730
Sears service is available at or through
your Sears Retail Store
or Catalogue Sales Office.
How to order repair parts
SERVICE AND REPAIR PARTS
CALL 1-800-665-4455"
Keep this number handy shouldyou require a
servicecall or need to order repairpars.
If ordering parts, make sure you have the name, make and
model no. of the merchandiseand the name and number
of the partyou wish to order.
*If calling locally, please use one of the following numbers:
Regina - 566-5124 Montreal - 333-5470
Toronto -744 4900 Halifax - 454-2444
Kitchener - 894-7590 Ottawa - 738-4440
Vancouver- 420-8211
When orderingrepairparts
always give:
1. The Part Number
2. The Part DescdptJon
3. The Model Number.
315.220730
4. The name of the item:
10 mm (3/8 in,)
CordlessDrill
WE SERVICE WHAT WE SELL.
WE MAKE THIS PLEDGE BECAUSE OUR CONCERN FOR OUR CUSTOMERS DOES NOT END
WITH THE SALE. TO HONOR OUR PLEDGE, WE HAVE DEVELOPED A TOP-NOTCH SERVICE
PROGRAM STAFFED BY HIGHLY TRAINED SPECIALISTS. THEIR KNOWt.EDGE OF OUR NEW
PRODUCTS IS CONSTANTLY UPGRADED. THEY USE ONLY PARTS SPECIFICALLY DESIGNED
FOR YOUR FINE SEARS PRODUCTS.
Sold by: SEARS CANADA INC., TORONTO M5B 2B8
