Craftsman 315228310 User Manual TABLE SAW Manuals And Guides L0310398
CRAFTSMAN Saw Table Manual L0310398 CRAFTSMAN Saw Table Owner's Manual, CRAFTSMAN Saw Table installation guides
User Manual: Craftsman 315228310 315228310 CRAFTSMAN TABLE SAW - Manuals and Guides View the owners manual for your CRAFTSMAN TABLE SAW #315228310. Home:Tool Parts:Craftsman Parts:Craftsman TABLE SAW Manual
Open the PDF directly: View PDF ![]() .
.
Page Count: 4
Operator's Manual
ICP.RFTSMRN'I
DUST COLLECTION SYSTEM
FOR MODEL NOS. 315.228310, 315.228390, 315.228410,
315.228490, 315.228510, AN D 315.228590
10 in. STATIONARY TABLE SAWS
Item No.
315.22100
Save this manual for
future reference.
A_, CAUTION: Read and follow
all Safety Rules and Operating
Instructions before first use of
this product.
Customer Help Line: 1-800-932-3188
• SAFETY
•LOOSE PARTS
• INSTALLATION
• SERVICES
Sears, Roebuck and Co., 3333 Beverly Rd. Hoffman Estates, IL 60179 USA
Visit the Craftsman web page: www.sears.com/craflsman
972000-628
3.02
READ ALL INSTRUCTIONS
•READ THESE INSTRUCTIONS AND INSTRUC-
TIONS FOR THE 315.228310, 315.228390,
315.228410, 315.228490, 315.228510, or
315.228590 STATIONARY TABLE SAW THOR-
OUGHLY before usingaccessory. Recommended
for use with315.228310, 315.228390, 315.228410,
315.228490, 315.228510, or 315.228590 only.
•KNOW YOUR POWER TOOL. Read the owner's
manual for the StationeryTable Saw carefully.
Learn the saw'sapplications and limitationsas well
as the specific potential hazards related to thistool.
•KEEP THE WORK AREA CLEAN. Clutteredwork
areas and work benches Inviteaccidents.DO NOT
leave tools or pieces of wood on the sew while it is
In operation.
•ALWAYS WEAR SAFETY GLASSES. Everyday
eyeglasseshave only Imbect-reslstantlenses;they
are NOT safety glasses.
•ALWAYS DISCONNECT SAW FROM POWER
SUPPLY BEFORE MAKING ADJUSTMENTS OR
ADDING ACCESSORIES. Make sum the switchIs
off when reconnectingto power supply,
• SAVE THESE INSTRUCTIONS. Refer to them
frequentlyand use to Instructother users. If you
loan someone thistool, loan them these instruc-
tions also.
_k Look for this symbol to point out important safety precautions. It
means attention!!! Your safety is involved.
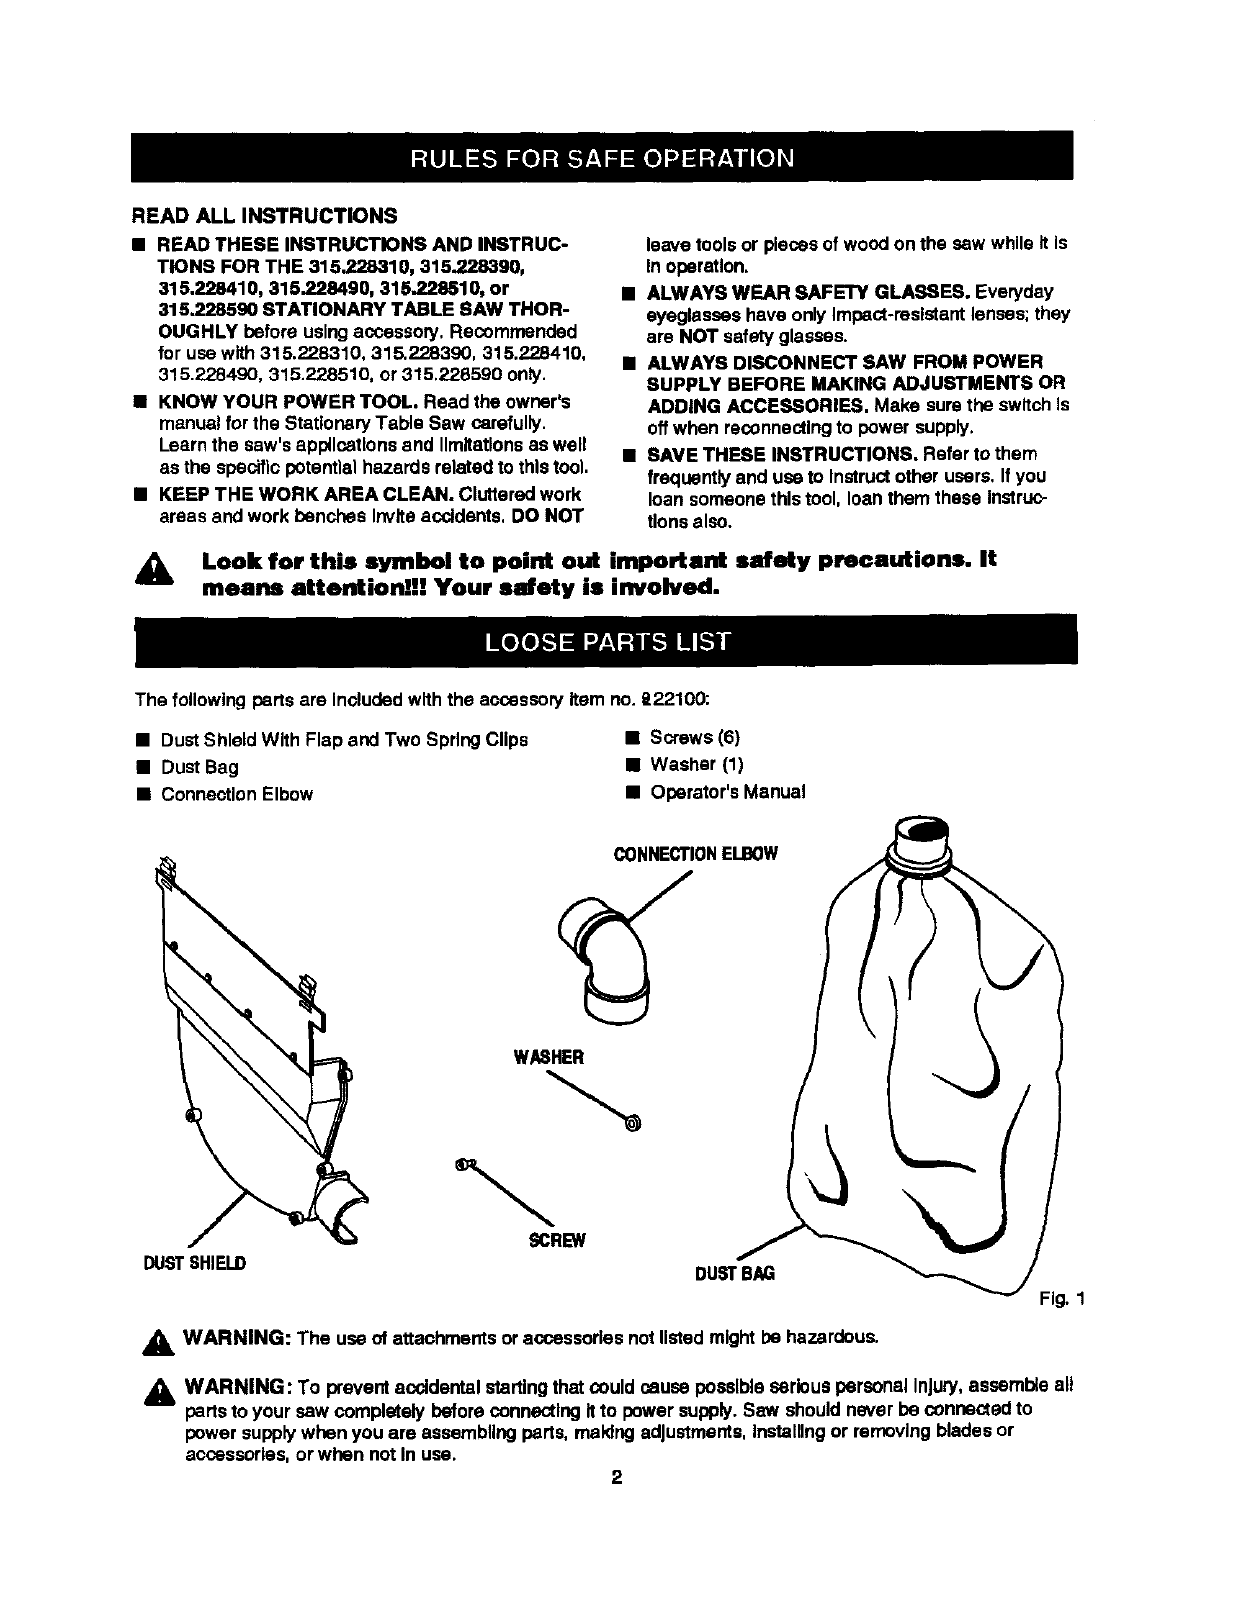
The followingpartsare Included with the accessoryitem no. t122100:
•DustShield With Flap end Two SpringClips
•DustBag
•Connection Elbow
•Screws (6)
•Washer (1)
•Operator'sManual
CONNECTIONEI.BOW
WASHER
DUSTSHIELD SCREW
DUSTBAG
,_k WARNING: The use of attachmentsor accessories notlisted might be hazardous.
Fig, 1
_k WARNING: To prevent a_ldental startingthat could cause possibleserious personal Injury, assemble all
parts to your sew completelybefore connectingitto power supply.Saw should never be connectedto
power supplywhen you are assembling parts, making adjustments,Installingor removing blades or
accessories,or when not In use. 2

Dustcollectionsystemhelpskeepyourworkareaclean,
DUST SHIELD AND CONNECTION
ELBOW
See Figures2 and 3.
Note: If Installingthis dust collection systemto a new
saw, It is recommended that thisInstallationbe done
priorto assemblingthe leg standto the saw. At this
pointthe saw Is upsidedown on the floor. If Installing
this systemto a saw that has already been as-
sembled, removal of the motorwill allow easier
access to the area for Installingdust shield.
The dust shieldencloses the blade beneath the table.
The rubberflap helps dlreotthe flow of sawdustIn the
blade area. Installthe dust shieldto the blade cover
usingfive screws.The use of a stubby Phillipsscrew-
driverIs requireddue to the limitedspace available
Insidethe cabinet.
After fasteningdust shieldto the blade cover, snap
the two springclipsthat are on the rubberflap to the
cast rib onthe undersideof the sew table. Be sure
they are completely seated on this rib, and that rubber
flap Is smooth and not buckled againstthe table.
After Installingthe dust shield, place the connection
elbow on the exhaust port that Is formed by the dust
shieldand blade cover. Align the hole In the connec-
tion elbow withthe hole In the blade cover by usinga
pointedobject suchas a small nail. Then use a
washer and screwto attach the connectionelbowto
the blade cover. The conneotlon elbow will still rotate
when the screw Is tightened.
BLADECOVER
SAWBLADE
CUPRRMLV
SNAPPED
OVERRIB
CUPRRMLVsNAPPEDOVERRIB Fig. 3
DUST BAG
Sae Figure 4.
The dust bagfits Insidethe connection elbow. To
Install, slidethe opanlngof the dust bag Intothe
conneotlon elbow. For more efficientoperation, empty
dust bag when no more than half full.This will permit
batter air flowthroughthe bag.
DUSTBAG
DU6TSHIELD SCREWS WASHER
CONNECllONELBOW Fig. 2 3
For repair of major brand appliances in your own home..,
no matter who made it, no matter who sold it!
1-800-4-MY-HO MEsM_ytime,day or night
(1-800-469-4663)
www.sears.com
i!-+!.+ To bring in products such as vacuums, lawn equipment and elec_'onics
+_i;_ for repair, call for the location of your nearest Sears Parts & Repair Center. _i
i=-=:.l_I ;====
iJ!ii
im+!+_
if|||
_+Nj
ill!il
tii!i
ii!Iii
:=©==l
ll==ttl!
_N
,!h_!
i=illllll
i!iii
iE=L=_
_=.====
L_H=
ii55_-.
i+i_i
illil
i-+!U
1-800-488-1222 An_.ma,_orn_,ht
www.sears.com
For the replacement parts, accessories and owner's manuals
that you need to do-it-yourself, call Sears PartsDirect _ !
1-800-366-PART 6a.m.- 11 p.m. CST,
(1-800-366-7278) 7 days a week
www.sears.com/pa rtsdirect
To purchase or inquire about a Sears Service Agreement:
1-800-827-6655
7a.m. - 5 p.m. CST, Mon. - Sat.
Para pedir servicio de reparacibn a demidlio,
y para ordenar plazas con antmga a domicilio:
1-888-SU-HOGAR =
(__z_m'z) I HomeCen_=,_l..]
Au Canada pour service an franP,,,ais:
1-877-LE-FOYER =
(1-877-533-6937)
_====
ii!!!
lilly
15n_
i!!il
]55_
iilH
in!i
iiili+
iiiii;
=====
"55='?-
J!!!
N_
ilIN
i!!._
INI+
®Re_iltered Trademark / "_ Tr ademI'k _d_ Roebuck and Co.
© _, RoebuO_ and Co, _M_'_ Re_il.rl_ /TM M_'ca _e F_dc_ de Se_r=, ROebu_ a_d Co.
