Craftsman 32010861 User Manual CIRCULAR SAW Manuals And Guides L0804428
CRAFTSMAN Saw Circular Manual L0804428 CRAFTSMAN Saw Circular Owner's Manual, CRAFTSMAN Saw Circular installation guides
User Manual: Craftsman 32010861 32010861 CRAFTSMAN CIRCULAR SAW - Manuals and Guides View the owners manual for your CRAFTSMAN CIRCULAR SAW #32010861. Home:Tool Parts:Craftsman Parts:Craftsman CIRCULAR SAW Manual
Open the PDF directly: View PDF  .
.
Page Count: 28
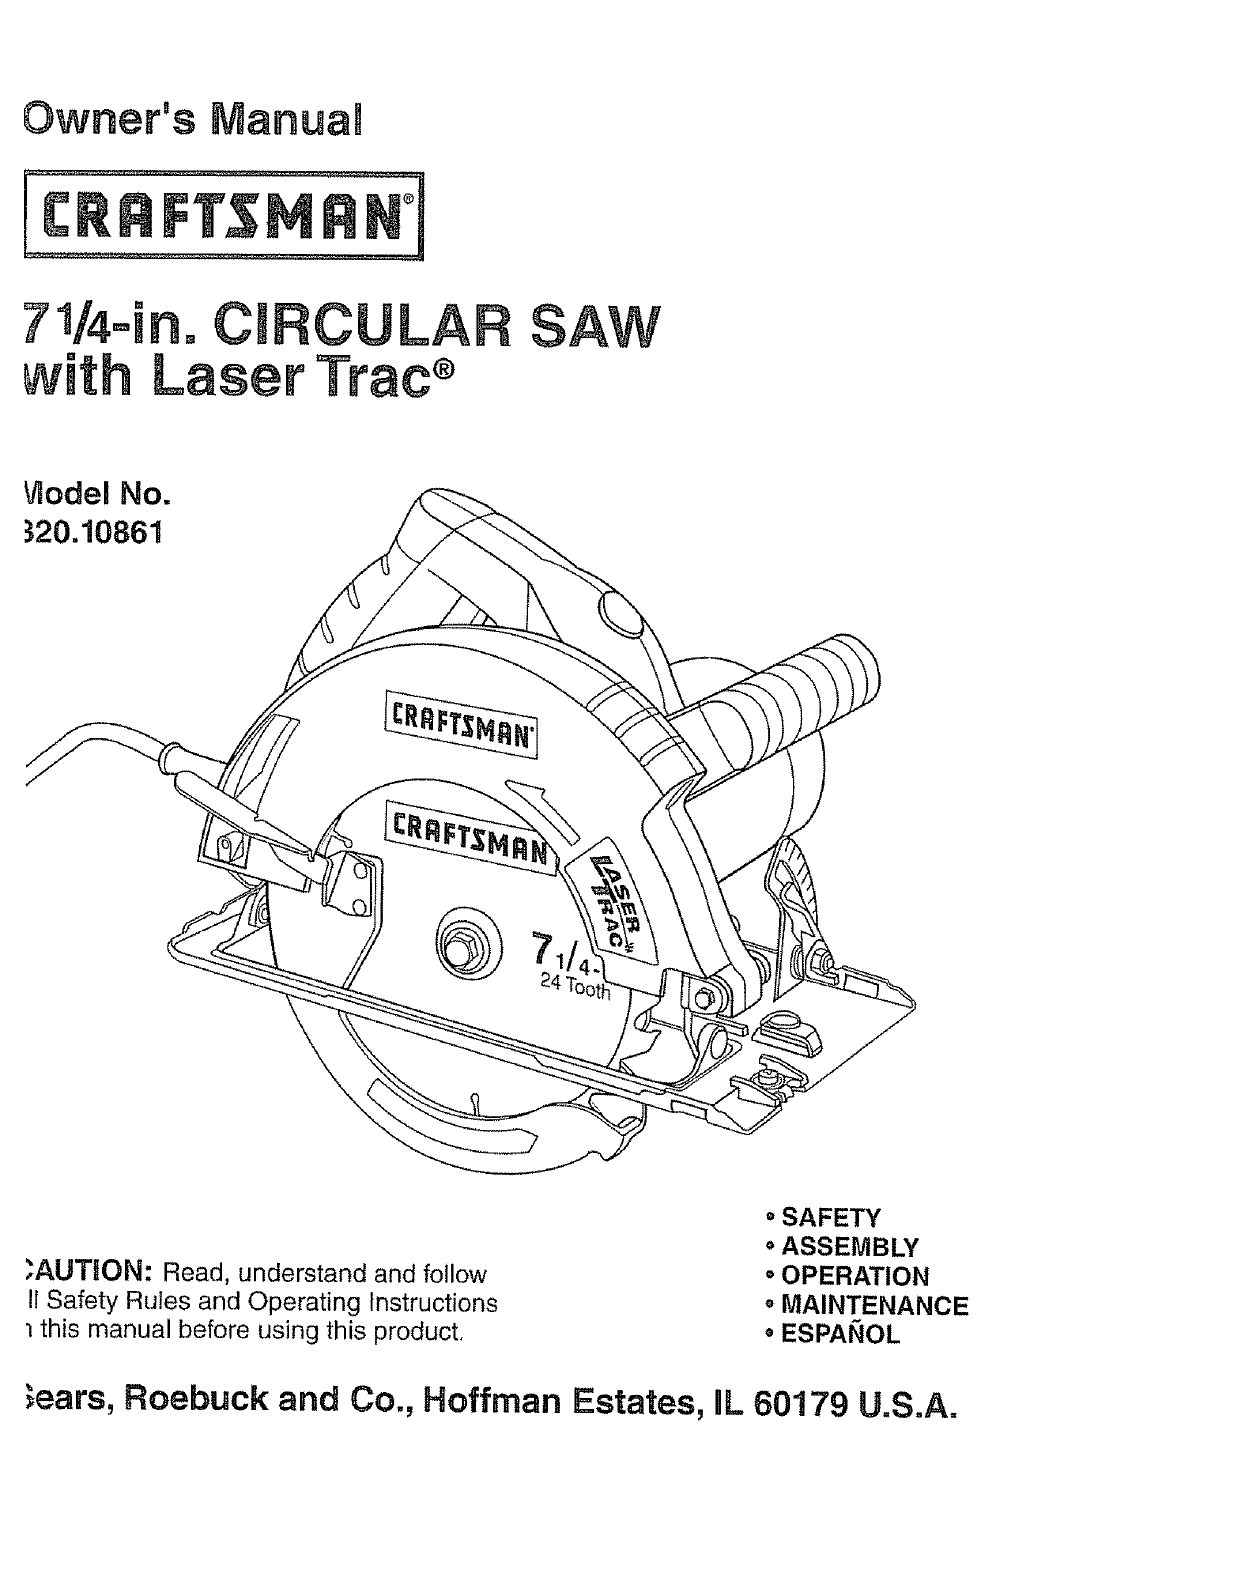
Owner's ManuaW
Vlodel No.
320.10861
,AUTtON. Read, understand and follow
!1Safety Rules and Operating Instructions
1 this manual before using this product.
o SAFETY
oASSEMBLY
oOPERATION
,' MAINTENANCE
•ESPAI_iOL
;ears, Roebuck and Co., Hoffman Estates, nL60179 U.S.A.
Warranty ................................................... Page
Safety Instructions ......................................... Pages
Safety Symbols ............................................ Page
Assembly .........
Description ........
Operation .........
Maintenance ......
Accessories .......
Service Numbers.
....................... Pages
....................... Pages
....................... Pages
........................ Page
....................... Page
2
3-11
11
12-13
13-14
15-23
24
25
.................................... Back cover
FULL ONE YEAR WARRANTY ON CRAFTSMAN CIRCULAR SAW
If this product fails due to a defect in material or' workmanship within two years from
the date of purchase, RETURN IT TO THE NEAREST SEARS STORE IN CANADA,
and Sears will replace it, free of charge.
This warranty gives you specific legal rights, and you may also have other rights which
vary from province to province.
Sears, Roebuck and Co., Dept. 817 WA, Hoffman Estates, IL 60179
,_ .... wlnrwm ...................................... I" ,i !
SAVETHESE iNSTRUCTIONS!
READ ALL iNSTRUCTIONS!
2
F H........................... _ H..=,., H. W
WARNING: BE SURE to read and understand all instructions, Failure to follow all
| instructions listed below may result in electric shock, fire and/or serious personal injury,.
_. .=.1..1 .1.1.1 1.1 .... = 111.. =..Hi=.
SAFETY PRECAUTIONS FOR LASER
This saw has a built-in laser light° The laser is a Class Ilia and emits output power of a maximum
2,,5mW and 400nm * 700nm wavelengths,, These lasers do not normally present an optical hazard.
However, DO NOT stare at the beam because it can cause flash blindness,
IMPORTANT: The following label is on your saw. it indicates
where the laser light is emitted by the saw. ALWAYS BE AWARE
of its location when using the saw and ALWAYS MAKE SURE
that any bystanders in the vicinity of use are made aware
of the dangers of looking directly into the laser.
AVOID EXPOSURE
LASER RADIATION EMITTED
FROM THIS APERTURE
m == ....=, , i ,,=,,',,
WARNING: LASER LIGHT. LASER RADIATION Avoid Direct Eye Exposure° Do Not
Stare into beam, Only turn laser beam on when tool is on the workpiece. Class Ilia.
WARNING: DO NOT stare directly at the laser beam,, A hazard may exist if you
deliberately stare into the beam ALWAYS follow the following safety precautions when
using this saw°
................... = . .m.r.=.... 1...,
1. The tinted glasses that were included will enhance the laser light in bright light conditions,
DO NOT wear these glasses if they interfere with the safe operation of this saw.
Z. NEVER aim the beam at any person or object other than the workpieceo
]. The laser beam can be harmful to the eyes, ALWAYS avoid direct eye
exposure. DO NOT look directly into the faser beam output aperture
during operation,.
_. The laser on the saw is not a toy., ALWAYS keep out of the reach of children.
The laser light emitted from this device SHOULD NEVER be directed towards
any person, for any reason,.
_. ALWAYS be sure the laser beam is aimed at a sturdy workpiece (such as wood or rough
coated surfaces) that does not have a reflective surface
SAFETY PRECAUTIONS FOR LASER cont.
6, DO NOT use on surfaces such as sheet steel that have a shiny, reflective surface. The shiny
surface could reflect the beam back at the operator.
7. ALWAYS be aware that laser light reflected off of a mirror or any other
reflective surfaces can also be dangerous°
J,_,,,_,J , ..... = ............................. ,,.,
I CAUTION: ALWAYS follow only the instructions contained in this manuat when using
this laser, Use of this feature in any manner other than what appears in this manual may
result in a hazardous radiation exposure _,un ............
8. DO NOT attempt to modify the performance of this laser device in any way°
This may result in a dangerous exposure to laser radiation.
9. For further information regarding lasers, refer to ANSI -Zt36.1
The STANDARD FOR THE SAFE USE OF LASERS, available from the
Laser Institute of America (407) 380-1553.
WORK AREA SAFETY
1. ALWAYS keep your work area clean and well lit. Cluttered benches and dark areas
invite accidents..
2. DO NOT operate power tools in explosive atmospheres, such as in the presence of
flammable liquids, gases, or dust. Power tools create sparks which may ignite the dust
or fumes.
3. ALWAYS keep bystanders, children, and visitors away while operating a power tool.
Distractions carl cause you to lose control.
ELECTRICAL SAFETY
1. Double insulated tools are equipped with apolarized plug (one blade is wider than
the other_)This plug will fit in apolarized outlet only one way. If the plug does not
fit fully in the outlet, reverse the plug. If it still does not fit, contact a qualified
electrician to install apolarized outlet. Do not change the plug in any way.
2. Double insulation _ eliminates the need for the three-wire grounded power cord and
grounded power supply system. Applicable only to Class tl (double insulated) tools.
3. Before plugging in the tool, BE SURE that the outlet voltage supplied is within the voltage
marked on the tool's data plate. DO NOT use "AC only" rated tools with a DC power supply°
4. ALWAYS avoid body contact with grounded surfaces, such as pipes, radiators,
ranges and refrigerators. There is an increased risk of electric shock if your body
is grounded.
ELECTRICAL SAFETY cont.
5. If operating the power tool in damp locations is unavoidable, ALWAYS use a Ground
Fault Circuit interrupter to supply power to your tool. ALWAYS wear electrician's
rubber gloves and footwear in damp conditions.
6. DO NOT expose power tools to rain or wet conditions. Water entering a power tool
will increase the risk of electric shock°
7. DO NOT abuse the cord. NEVER use the cord to carry the tools or pull the plug from
the outlet. Keep cord away from heat, oil, sharp edges or moving parts_ Replace
damaged cords immediately. Damaged cords increase the risk of electric shock_
8. When operating a power tool outside, ALWAYS use an outdoor extension cord marked
"W-A" or"W". These cords are rated for outdoor use and reduce the risk of electric shock°
NOTE: The extension cord must have adequate wire size AWG (American Wire Gauge) for safe,
efficient use Smaller gauge wires, have greater capacity (I6 gauge wire has more capacity
than 18 gauge wire).
PERSONAL SAFETY
1. ALWAYS stay alert, watch what you are doing and use common sense when operating
a power tool. DO NOT use tool while tired or under the influence of drugs, alcohol,
or medication. A moment of inattention while operating power tools may result in serious
personal injury
2. ALWAYS dress properly. DO NOT wear loose clothing or jewelry. Pull back tong hair.
Keep your hair, clothing, and gloves away from moving parts.
Loose clothes, jewelry, or long hair can be caught in moving parts°
PERSONAL SAFETY cont.
3. ALWAYS avoid accidental starting. BE SURE switch is in the "Off" position before
plugging in. DO NOT carry tools with your finger on the switch, Carrying tools with
your finger on the switch or plugging in tools that have the switch in the "On" position
invites accidents.
4, ALWAYS remove adjusting keys or wrenches before turning the tool "On". A wrench
or a key that is left attached to a rotating part of the tool may result in personal injury,
5. DO NOT overreach, ALWAYS keep proper footing and balance at all times.
Proper footing and balance enables better control of the tool in unexpected situations.
6. ALWAYS use safety equipment, Always wear eye protection,
TOOL USE AND CARE SAFETY
1. ALWAYS use clamps or other practical ways to secure and support the workpiece
to a stable platform, Holding the work by hand or against your body is unstable and may
lead to loss of control.
2. DO NOT force tool. Use the correct tool and blade for your application. The correct
tool and blade will do the job better and safer at the rate for which it is designed,
3. DO NOT use tool if switch does not turn it "On" or "Off". Any tool that cannot be
controlled with the switch is dangerous and must be repaired°
4, ALWAYS disconnect the plug from the power source before making any
adjustments, changing accessories,or storing the tool, Such preventive safety
measures reduce the risk of starting the tool accidentally°
5. ALWAYS store idle tools out of reach of children and other untrained persons,
Tools are dangerous in the hands of untrained users.
6. ALWAYS maintain tools with care. Keep cutting tools sharp and clean, Properly
maintained tools with sharp cutting edges are tess likely to bind and are easier to control.
7. ALWAYS check for misalignment or binding of moving parts, breakage of parts,
and any other condition that may affect the tool's operation. If damaged, have the
tool serviced before using. Many accidents are caused by poorly maintained toots=
6
TOOL USE AND CARE SAFETY cont.
,i,,11 i ........
IWARNING: USEOFACCESSORIESTHATARENOTRECOMMENDEDFORUSE I
W1T,H THIS TOOL MAY,,CREATE A HAZARDOUS CONDITION_
8. ALWAYS use only accessories that are recommended for this tool. Accessories that may
be suitable for one tool may become hazardous when used on another tooL
SERVICE SAFETY
1. If any part of this saw is missing or should break,bend, or fail in any way; or should
any electrical component fail to perform properly: ALWAYS shut off the power switch and
remove the saw plug from the power source and have the missing, damaged or failed part
replaced BEFORE resuming operation_
2. Tool service must be performed only at a Sears Service Center. Service or maintenance
performed by unqualified personnel could result in a risk of injury
SAFETY RULES FOR CIRCULAR SAWS
DANGER! Keep hands away from cutting area and blade. Keep your second hand
on the auxiliary handle or motor housing, if both hands are hotding the saw, they cannot
be cut bv the. blade
1. ALWAYS keep your body positioned to either side of the saw blade, but not in line
with the saw blade. Kickback could cause the saw to jump backwards (See Kickbacko..
What Causes It and Ways to Prevent It on pages 8-9)
2. DO NOT reach underneath the work. The guard cannot protect you from the bfade
beneath the work
3. ALWAYS check lower guard for proper closing BEFORE each use. DO NOT operate
the saw if the lower guard does not move freely and close instantly. Never clamp or
tie the lower guard in the open position. If the saw is accidentally dropped, the lower
guard may be benL Raise the lower guard with the retracting handler Make sure that it moves
freely and does not touch the blade or any other part in all angles and depths of cut.
4. ALWAYS check the operation and condition of the lower guard spring. If the guard
and the spring are not operating properly, they MUST be serviced before use.
The lower guard may operate sluggishly, due to damaged parts, gummy deposits, or a
buildup of debris_
5. The lower guard should be retracted manually ONLY for making special cuts, such as
pocket or compound cuts. ALWAYS raise the lower guard by retracting the handle.
As soon as the blade enters the material, the lower guard MUST be released. For alt
other sawing, the tower guard should operate automatically.
6. ALWAYS make sure that the lower guard is covering the blade BEFORE placing the
saw down on a work bench or floor. An unprotected moving blade will cause the saw to
walk backwards, cutting whatever is in its path Make note of the time it takes for the blade
to stop spinning after the switch is released
SAFETY RULES FOR CIRCULAR SAWS cont.
7. NEVER hold the piece being cut in your hands or across your legs. It is important
to support the work properly in order to minimize body exposure, blade binding, or loss
of control.
8. ALWAYS hold tool by insulated gripping surfaces when performing an operation
where the cuttingtool may contact hidden wiring or its own cord. Contact with a
"live" wire will make the exposed metal parts of the tool "live" and shock the operator
9.When ripping, ALWAYS use a rip fence or straight edge guide. This improves the
accuracy of the cut and reduces the chance of the blade binding.
10. ALWAYS use blades that have the correct size and shape (diamond vs. round)
arbor holes. Blades that do not match the mounting hardware of the saw will run
erratically and will cause loss of control°
11. ALWAYS BE SURE that all adjusting screws and the blade holder are fastened tightly
BEFORE making a cut. Loose adjusting screws and holders can cause the tool or
blade to slip and loss of control may result.
12. When removing the blade from the tool, ALWAYS avoid contact with skin and ALWAYS
wear protective gloves when grasping the blade or accessory. Accessories may be hot
after prolonged user
KICKBACKo..WHAT CAUSES IT AND WAYS TO PREVENT IT
The Causes of Kickback
1. Kickback is a sudden reaction to a pinched, bound or misaligned saw blade, which causes
the uncontrolled saw to lift up and out of the workpiece and towards the operator
2. When the blade is pinched or bound tightly by the kerf closing down, the blade stalls and
the motor reaction drives the unit rapidly back towards the operator.
3. If the blade becomes twisted or misaligned in the cut, the teeth at the back edge of the
blade can dig into the to_ surface of the wood_ This causes the blade to climb out of
the kerr and jump back towards the operator.
4. Kickback is a result of tool misuse and/or incorrect operating procedures or conditions.
It can be avoided by taking the proper precautions, as listed on next page°
Waysto Prevent Kickback
1. ALWAYS maintain a firm grip with both hands on the saw and position your body and
arms to allow you to resist KICKBACK forces. KICKBACK forces can be controlled by the
operator, if the proper precautions are taken.
2. If the blade is binding, or when you are interrupting a cut for any reason, ALWAYS
release the trigger and hold the saw motionless in the material until the blade comes
to acomplete stop. NEVER attempt to remove the saw from the work or pull the saw
backward while the blade is in motion or KICKBACK may occur. ALWAYS
check and be ready to take corrective action to eliminate the cause of blade binding°
3.When restarting the saw in the workpiece, ALWAYS center the blade in the kerf and
check to be sure that the saw teeth are not engaged into the material. If the saw blade
is binding, it may walk up or KICKBACK from the workpiece when the saw is restarted.
4. ALWAYS support large panels to minimize the risk of blade pinching and KICKBACK.
Large panels tend to sag under their own weight. Supports MUST be placed under the
panel on both sides, near the line of cut and near the edge of the panel,,
5. DO NOT use a dull or damaged blade. Unsharpened or improperly set
blades produce narrow kerr which causes excessive friction, blade bindingand KICKBACK.
6. ALWAYS be sure that the blade depth and adjusting locking levers are tight
and secure BEFORE making a cut. If blade adjustment shifts while cutting, it may
cause binding and KICKBACK.
7. ALWAYS use extra caution when making a "Pocket Cut" into existing walls
or other blind areas. The protruding blade may cut objects that can cause KICKBACK.
8. ALWAYS have saw blade at full speed before contacting workpiece,
9. ALWAYS hold tool by insulated gripping surfaces when performing an operation
where the cutting tool may contact hidden wiring or its own cord. Contact with a
"live" wire wilt
make the exposed metal parts of the tool "live" and shock the operator.
IMPORTANT: See Operation Section of this Manual for additional instructions for
avoiding Kickback,
ADDITIONAL RULES FOR SAFE OPERATION
s
WARNING: BE SURE to read and understand all instructions. Failure to follow all !
.............instructions.., listed below may result in electric shock, fire andlor serious personal injury.
1. Know your power tool. Read operator's manual carefully. Learn the applications and
limitations, as well as the specific potential hazards related to this tool.
2. ALWAYS wear safety glasses or eye shields when using this saw. Everyday eyeglasses
have only impact-resistant lenses; they are NOT safety glasses.
3. ALWAYS protect your lungs. Wear a face mask or dust mask if the operation is dusty.
4. ALWAYS protect your hearing. Wear hearing protection during extended periods of
operation.
5. ALWAYS inspect the tool cords periodically and if damaged have them repaired at
your nearest Sears Service Center or other Authorized Service Facility. ALWAYS be
aware of the cord location.
6. ALWAYS check for damaged parts. Before further use of the tool, a guard or other
part that is damaged should be carefully checked to determine if it will operate
properly and perform its intended function. Check for misalignment or binding of
moving parts, breakage of parts, and any other condition that may affect the tool's
operation. A guard or other part that is damaged, should be properly repaired or
replaced at a Sears Service Center.
7. DO NO]" abuse the cord. NEVER use the cord to carry the tool or pull the plug from
the outlet. Keep cord away from heat, oil, sharp edges or moving parts. Replace
damaged cords immediately. Damaged cords increase the risk of electric shock.
8. ALWAYS make sure that your extension cord is in good condition.When using an
extension cord be sure to use one that is heavy enough to carry the current that
your tool will draw. A wire gauge (AWG) of at least 14 is recommended for an extension
cord 25 feet or less in length, When working outdoors ALWAYS use an extension cord
that is suitable for outdoor use The cord's jacket will be marked WA. Smaller gauge
wires, have greater capacity (16 gauge wire has more capacity than 18 gauge wire).
An undersized cord will cause a drop in line voltage, resulting in loss of power and overheating.
10
ADDITIONAL RULES FOR SAFE OPERATION cont.
9. ALWAYS inspect and remove all nails from lumber before sawing.
10. DO NOT use the too! while tired or under the influence of drugs, alcohol or any
medication.
11. SAVE THESE INSTRUCTIONS. Refer to them frequently and use them to instruct others
who may use this tool. If someone borrows this tool, make sure they have these
instructions also.
WEAR YOUR
i....... i i, ,11 ......................
WARNING: The operation of any circular saw can result in foreign
objects being thrown into your eyes, which can result in severe eye damage.
Before beginning power tool operation, ALWAYS wear safety goggles or
safety glasses with side shield and a full face shield when needed_ We
recommend A Wide Vision Safety Mask for use over eyeglasses or
standard safety glasses with side shield, available at Sears Retai! Stores.
' L,I,I .................... i i,,,,,i,
WARNING: Some dust particles created by power sanding, sawing, grinding,
drilling and other construction jobs contains chemicals known to cause cancer, birth
defects or other reproductiveharm. Some examples of these chemicals are:
•Lead from lead-based paints.
•Crystalline silica from bricks and cement and other masonry products°
• Arsenic and chromium from chemically-treated lumber.,
Your risk from these exposures varies, depending upon how often you do
this type of work° To reduce your exposure to these chemicals:
•Work in a well-ventilated area.
-Work with approved safety equipment, such as those dust
masks that are specially designed to filter out microscopic particles..
............. IIH, ,,,i,i1,11,1 ,, , ,i ,11111I'"M
The label on your tool may include the following symbols.
V.....................................................................Volts
A.................................................................Amperes
Hz......................................................................Hertz
W .....................................................................Watts
rain ...................................................................Minutes
.....,....................................................................Alternating current
.............................................................Direct current
no ....................................................................No-load speed
. [] ............................................................................Class ii construction
..fmin .......................................................Revolutions or Strokes per minute
................................................................... indicates danger, warning or caution,
It means attention! Your safety is involved..
IMPORTANT! READ ALL INSTRUCTIONS
11
UNPACKING
Your circular saw has been shipped completely assembled. Inspect the saw carefully to make
sure that no breakage or damage has occurred during shipping.
If any parts are damaged or missing return the saw to your nearest Sears Store
to have it replaced.
Z_,f_'ARNgNG. " If any parts are missing, DO NOT operate this saw until the missing parts
are replaced. Failure to do so could result in possible serious personal injury,,
,,,ml,=,,,=,, ,!=,=== ,,, ,1,,1,,11
MOUNTING THE BLADE TO SAW
Carefully remove the blade from its packing and thoroughly inspect it to be
sure that it is not cracked or damaged.
z_W,&RNING: Your saw should NEVER be connected to the power source when you
are assembling parts, making adjustments, installing or removing blades, cleaning or when it
is not in use.Disconnecting the saw will prevent accidental starting, that could cause serious
personal injury,
_WA, RNING: A 7 1/4-inch blade is the maximum blade capacity of your saw,, A larger
than 7 1/4-inch blade will come in contact with the blade guards. Also, NEVER use a blade
that is so thick that it prevents the outer blade washer from engaging with the flat side of the
spindle. Blades that are too large or too thick can result in an accident causing serious
personal injury.
Your saw has a spindle lock button for locking the spindle on your saw in a stationary position.
Push and hold the spindle lock button when mounting, changing or removing the blade.
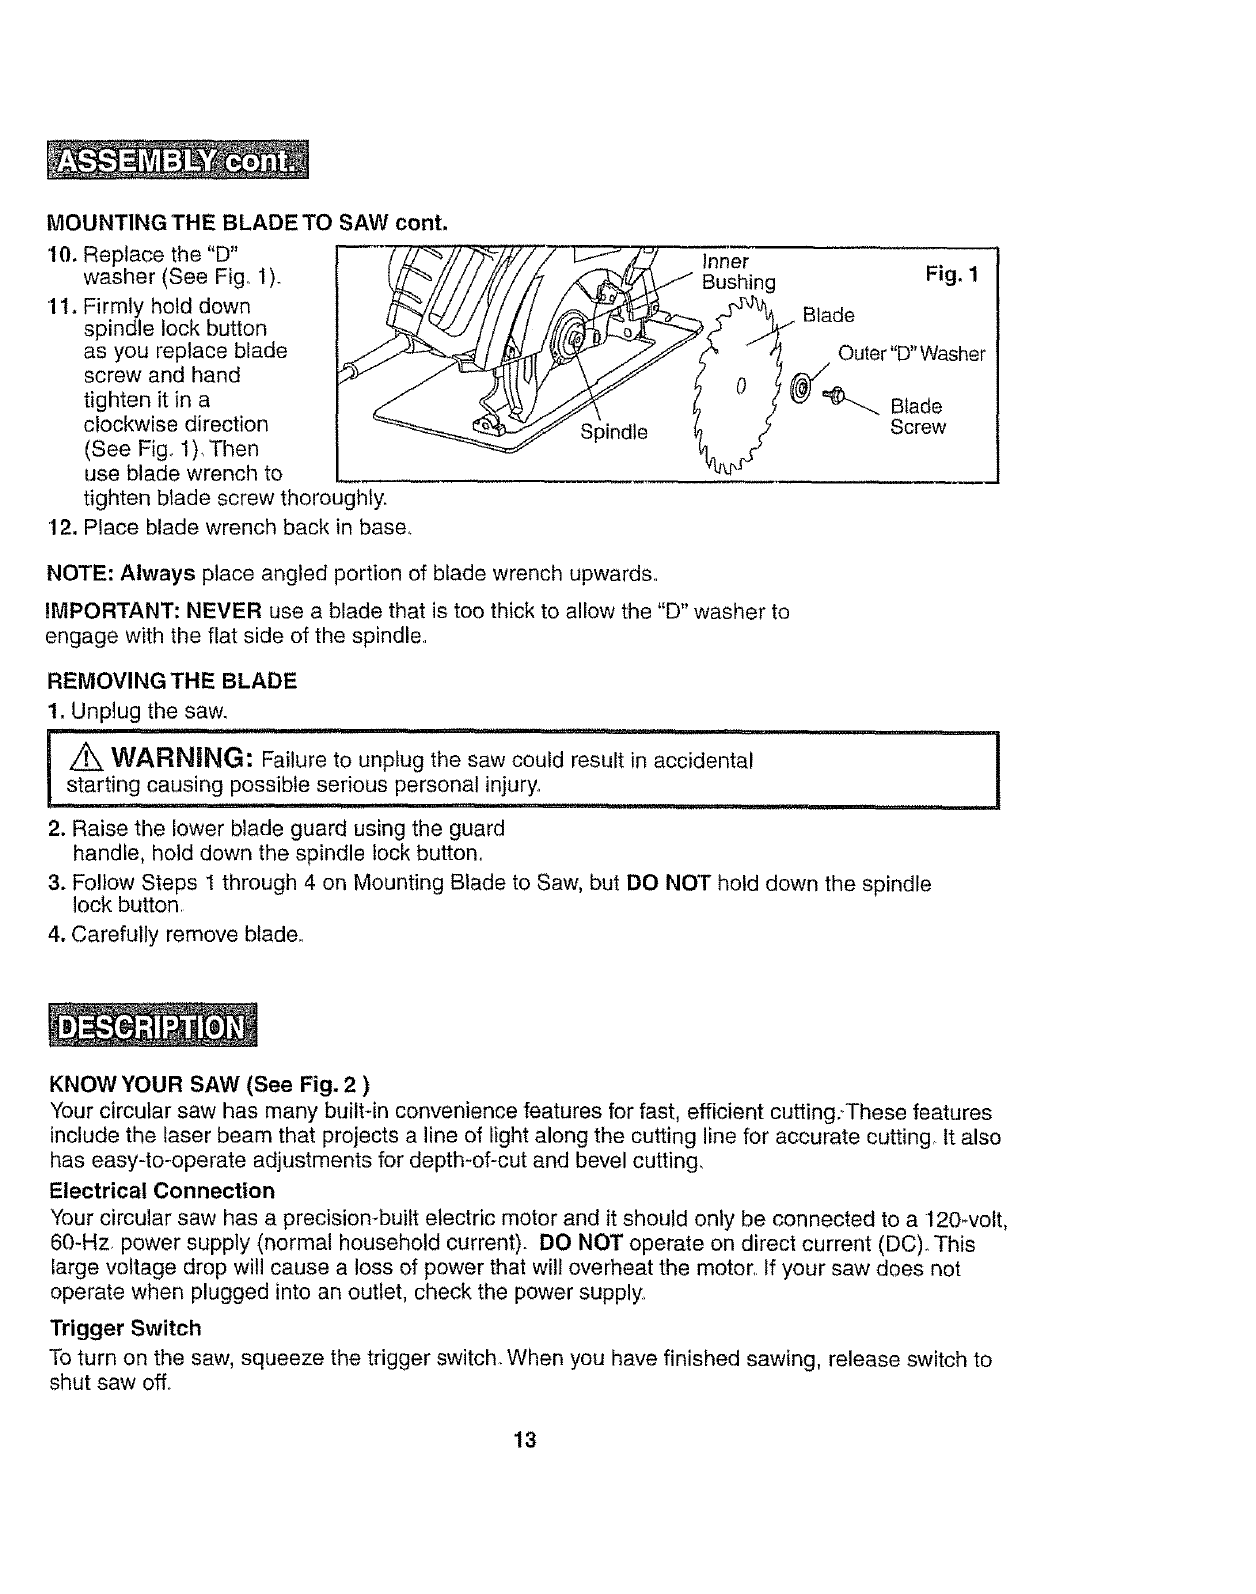
1. Remove blade wrench from base.
2. Place saw on its side on a flat surface,,
3. Firmly hold down spindle lock button, and use blade wrench to loosen blade screw by
turning it in a counterclockwise direction. Completely remove blade screw (See Fig. 1).
4. Remove outer "D" washer (See Fig. 1).
5. The part remaining is the inner bushing (See Fig,, 1), It does not need to be removed.
6. Wipe a drop of oil onto the inner bushing and outer "D" washer where they will touch blade.
7. Place the saw blade inside the lower blade guard, onto the spindle and
against the inner bushing (See Fig. 1),
NOTE; The teeth of the blade should point upward at the front of the saw as shown in Fig° 1,
8. Place saw on the edge of a flat surface so the blade is not in contact with anything.
9. Raise lower blade guard using the blade guard handle and hold it in the raised
position for the next steps,
!
12
MOUNTING THE BLADE TO SAW cont.
'10. Replace the "D"
washer (See Fig° 1).
11. Firmly hold down
spindle lock button
as you replace blade
screw and hand
tighten it in a
clockwise direction
(See Fig, 1), Then
use blade wrench to
tighten blade screw thoroughly.
12. Place blade wrench back in base.
Spindle
inner
Bushing Fig. 1
Blade
Outer"D" Washer
Screw
NOTE: Always place angled portion of blade wrench upwards,,
IMPORTANT: NEVER use a blade that is too thick to allow the "D" washer to
engage with the flat side of the spindle,
REMOVING THE BLADE
1. Unplug the saw.
, ,,, 1,, 1, '=M,IH 11"'"',', ,'1 =
I WARNING: Failure to unplug the saw could result in accidental
starting causing possible serious personal injury ...............
........ = 111 , ,11mlrl,, = M"H=" I I ",,
2. Raise the lower blade guard using the guard
handle, hold down the spindle lock button.
3. Follow Steps 1 through 4 on Mounting Blade to Saw, but DO NOT hold down the spindle
lock button,
4. Carefully remove blade.
KNOW YOUR SAW (See Fig, 2 )
Your circular saw has many built-in convenience features for fast, efficient cutting:These features
include the laser beam that projects a line of light along the cutting line for accurate cutting It also
has easy-to-operate adjustments for depth-of-cut and bevel cutting.
Electrical Connection
Your circular saw has a precision-built electric motor and it should only be connected to a 120wolt,
60-Hz_ power supply (normal household current). DO NOT operate on direct current (DC)o This
large voltage drop will cause a loss of power that will overheat the motor, If your saw does not
operate when plugged into an outlet, check the power supply,
Trigger Switch
To turn on the saw, squeeze the trigger switch. When you have finished sawing, release switch to
shut saw off.
13
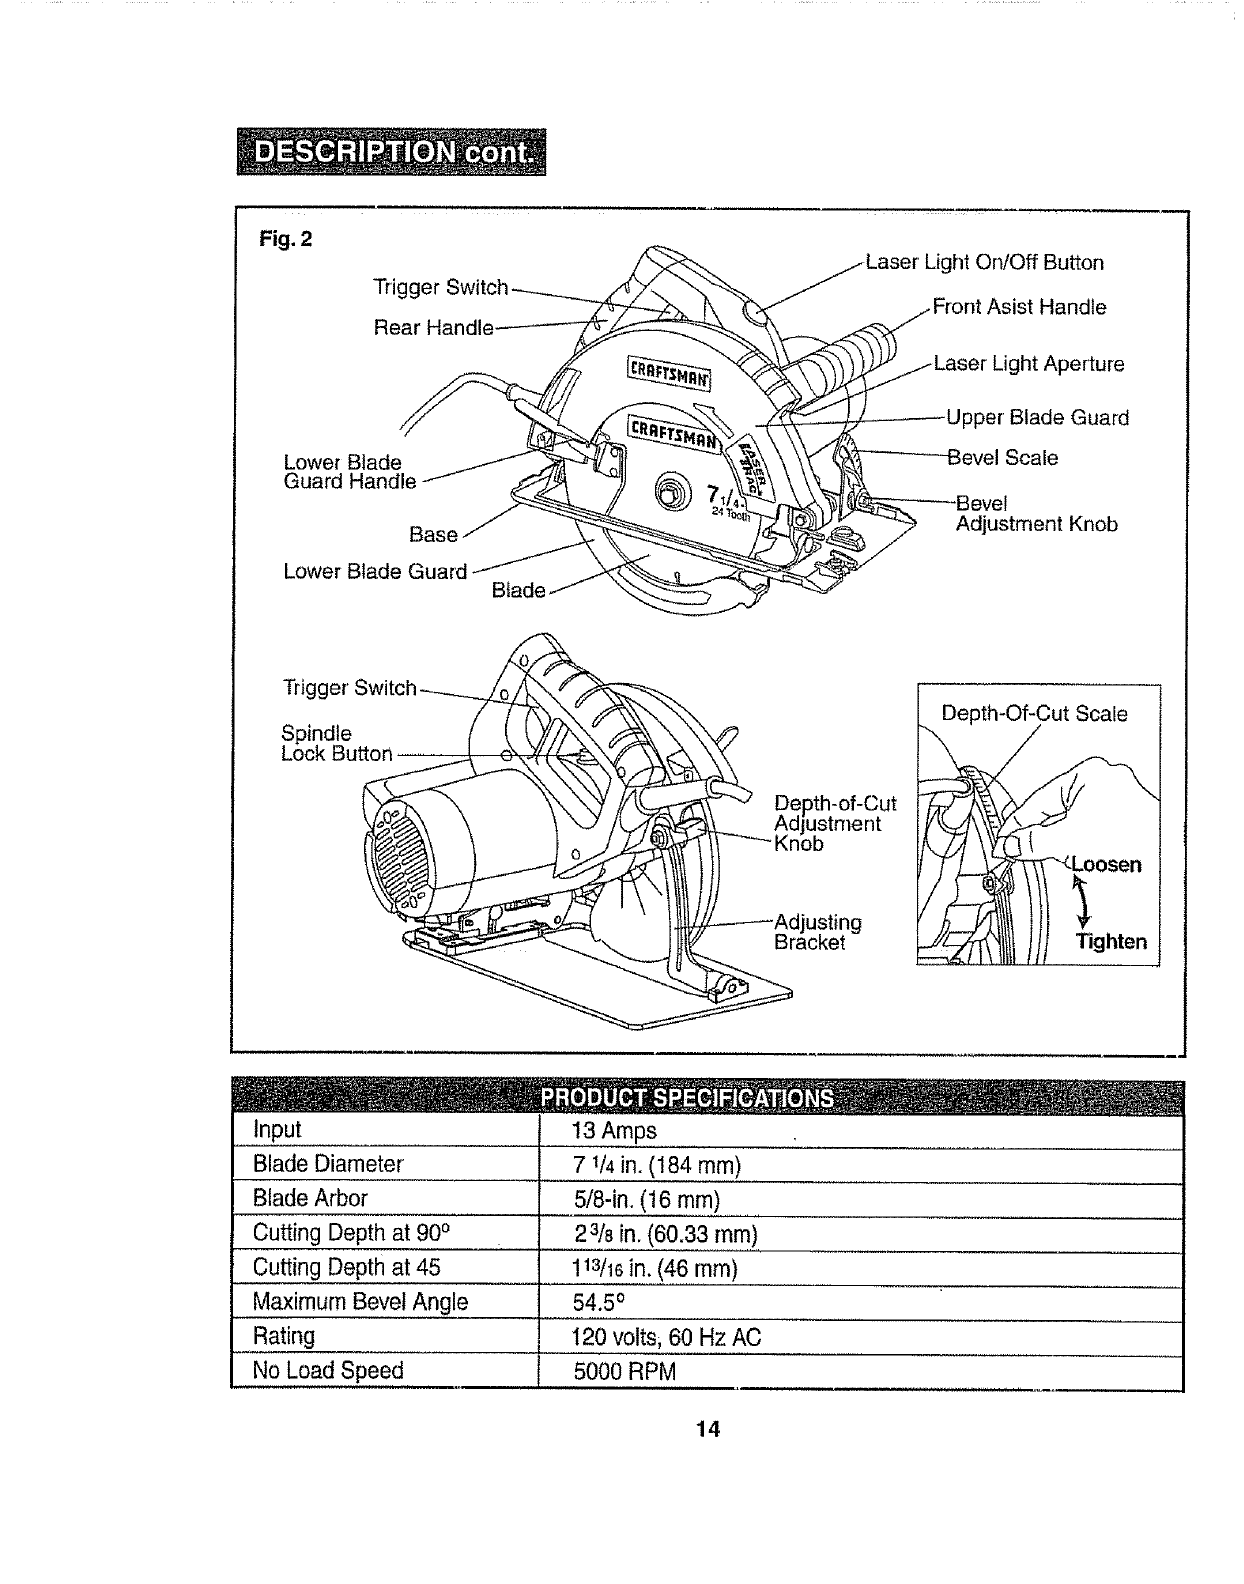
Fig. 2
Trigg
Rear Handle
Lower Blade
Guard Handle
Base
Lower Blade Gua Blade
ght On/Off Button
Asist Handle
Light Aperture
Upper Blade Guard
evel Scale
Adjustment Knob
Trig
Spindle
Lock Button
De ustment
_b
Depth-Of-Cut Scale
t
Tighten
Input
Blade Diameter
Blade Arbor
Cutting Depth at 900
Cutting Depth at 45
Maximum Bevel Angle
Rating
No Load Speed
13 Amps
7 1/4in. (184 ram)
5/8-in. (16 ram) ......
23/8,,,in. 60.33 ram),
113116in. (46m m)
54.50
120 volt& 60 Hz AC
500O RPM
14
.............. _l, rl, i, i,l-i ...... i,, , i ,,,,,i,l,i ....... i,i.... ii
CAUTION: DO NOT let familiarity with your saw make you careless. Remember that !
a careless fraction of a second is sufficient to cause severe injury°
.....i ........ ii .........i ii .....................
Before attempting to use any tool, be sure to familiarize yourself with all the operating features
and safety instructions.
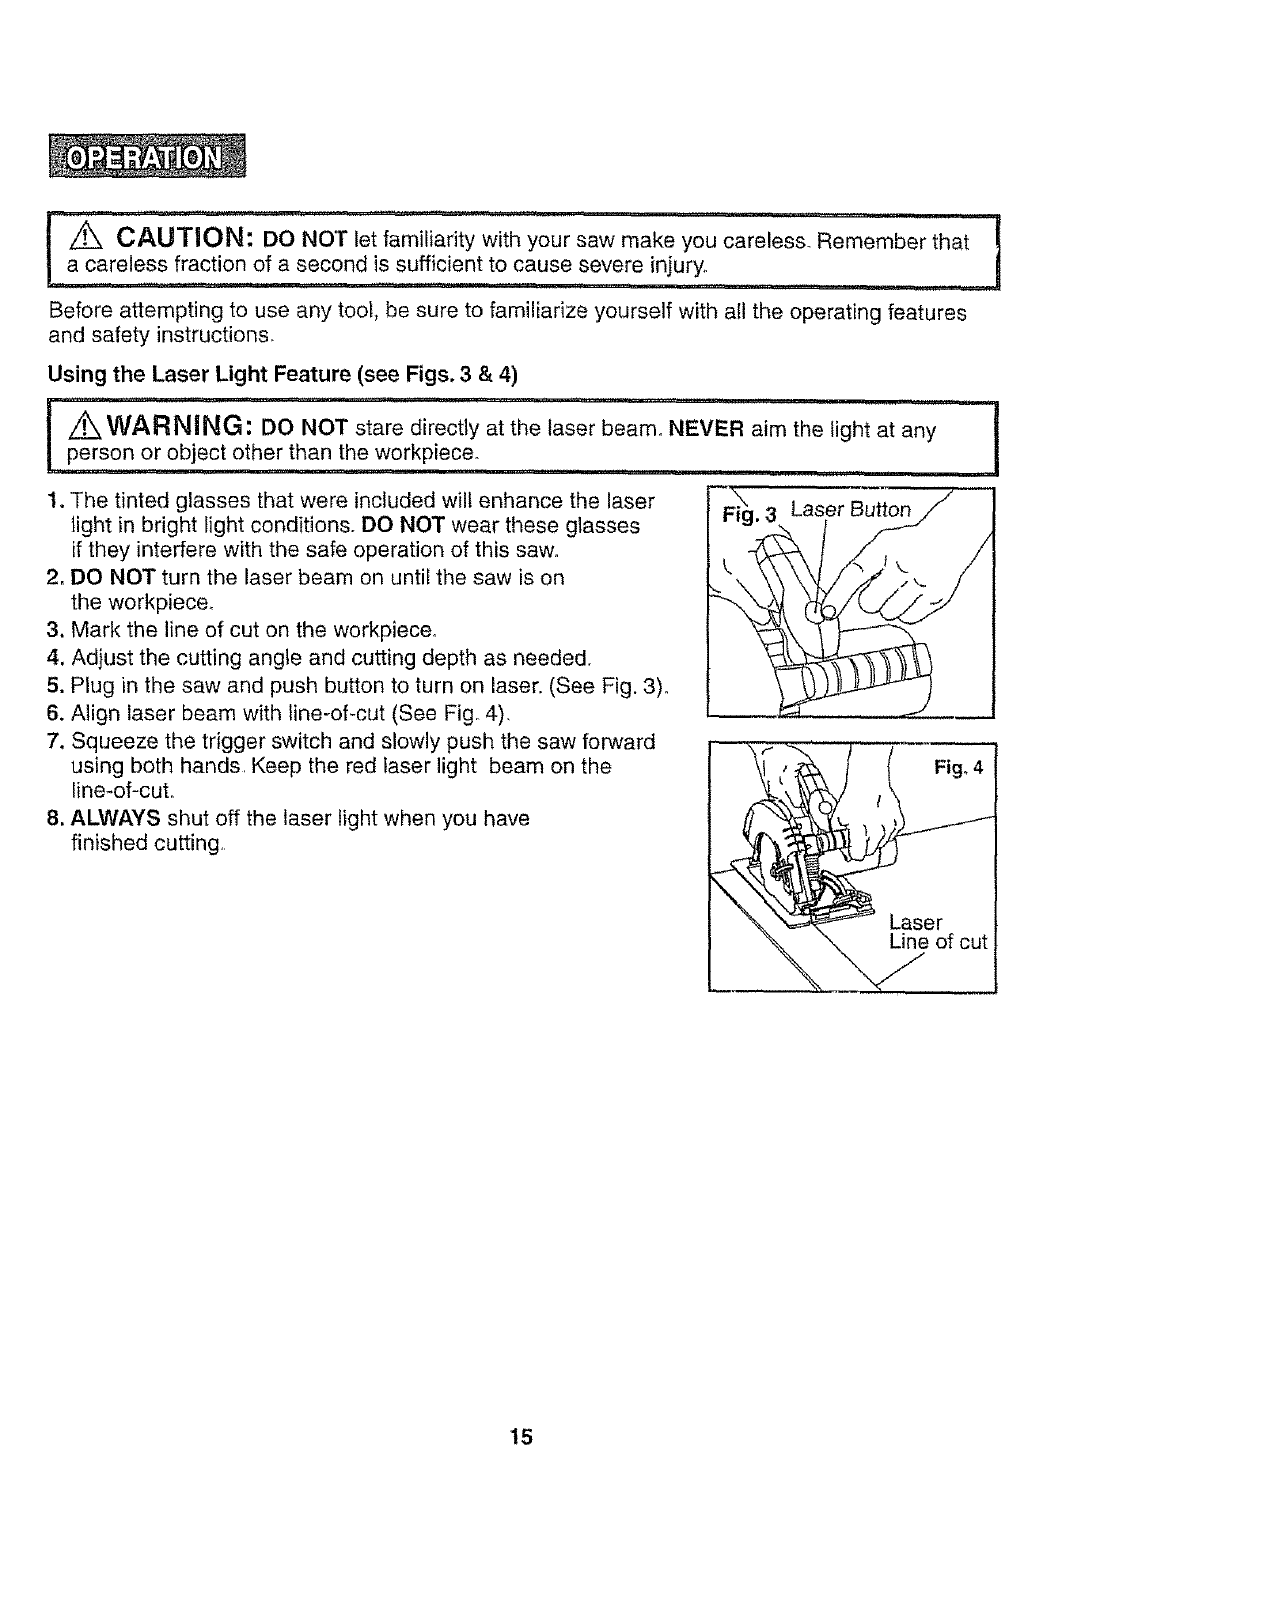
Using the Laser Light Feature (see Figs, 3& 4)
'..................................... i
ARNING: Do NOT stare directly at the laser beam. NEVER aim the light at any
Lpe!son or object other than the workpiece.
I, The tinted glasses that were included will enhance the laser
light in bright light conditions° DO NOT wear these glasses
if they interfere with the safe operation of this saw.
2, DO NOT turn the laser beam on until the saw is on
the workpiece.
3, Mark the line of cut on the workpieceo
4, Adjust the cutting angle and cutting depth as needed.
5. Plug in the saw and push button to turn on laser. (See Fig. 3)°
6, Align laser beam with tine-of-cut (See Fig. 4).
7, Squeeze the trigger switch and slowly push the saw forward
using both hands. Keep the red laser light beam on the
line-of-cuto
8, ALWAYS shut off the laser light when you have
finished cutting.
Laser Button
15
SAW BLADES
All saw blades need to be kept clean, sharp and properly set in order to cut efficiently° Using a
dull blade places a heavy toad on the saw and increases the danger of kickback., Keep extra
blades on hand, so sharp blades are always available. Gum and wood pitch hardened on the
blade slows the saw down, Use gum and pitch remover, hot water or kerosene to remove them.
DO NOT use gasoline°
BLADE GUARD SYSTEM
The lower blade guard, attached to your circular saw, is there for your protection and
safety. It should NEVER be altered for any reason. If it becomes damaged or begins to
return slowly or sluggishly, DO NOT operate your saw until the damage has been repaired
or replaced. ALWAYS leave the guard in its correct operating position when using the saw.
i i ....... i
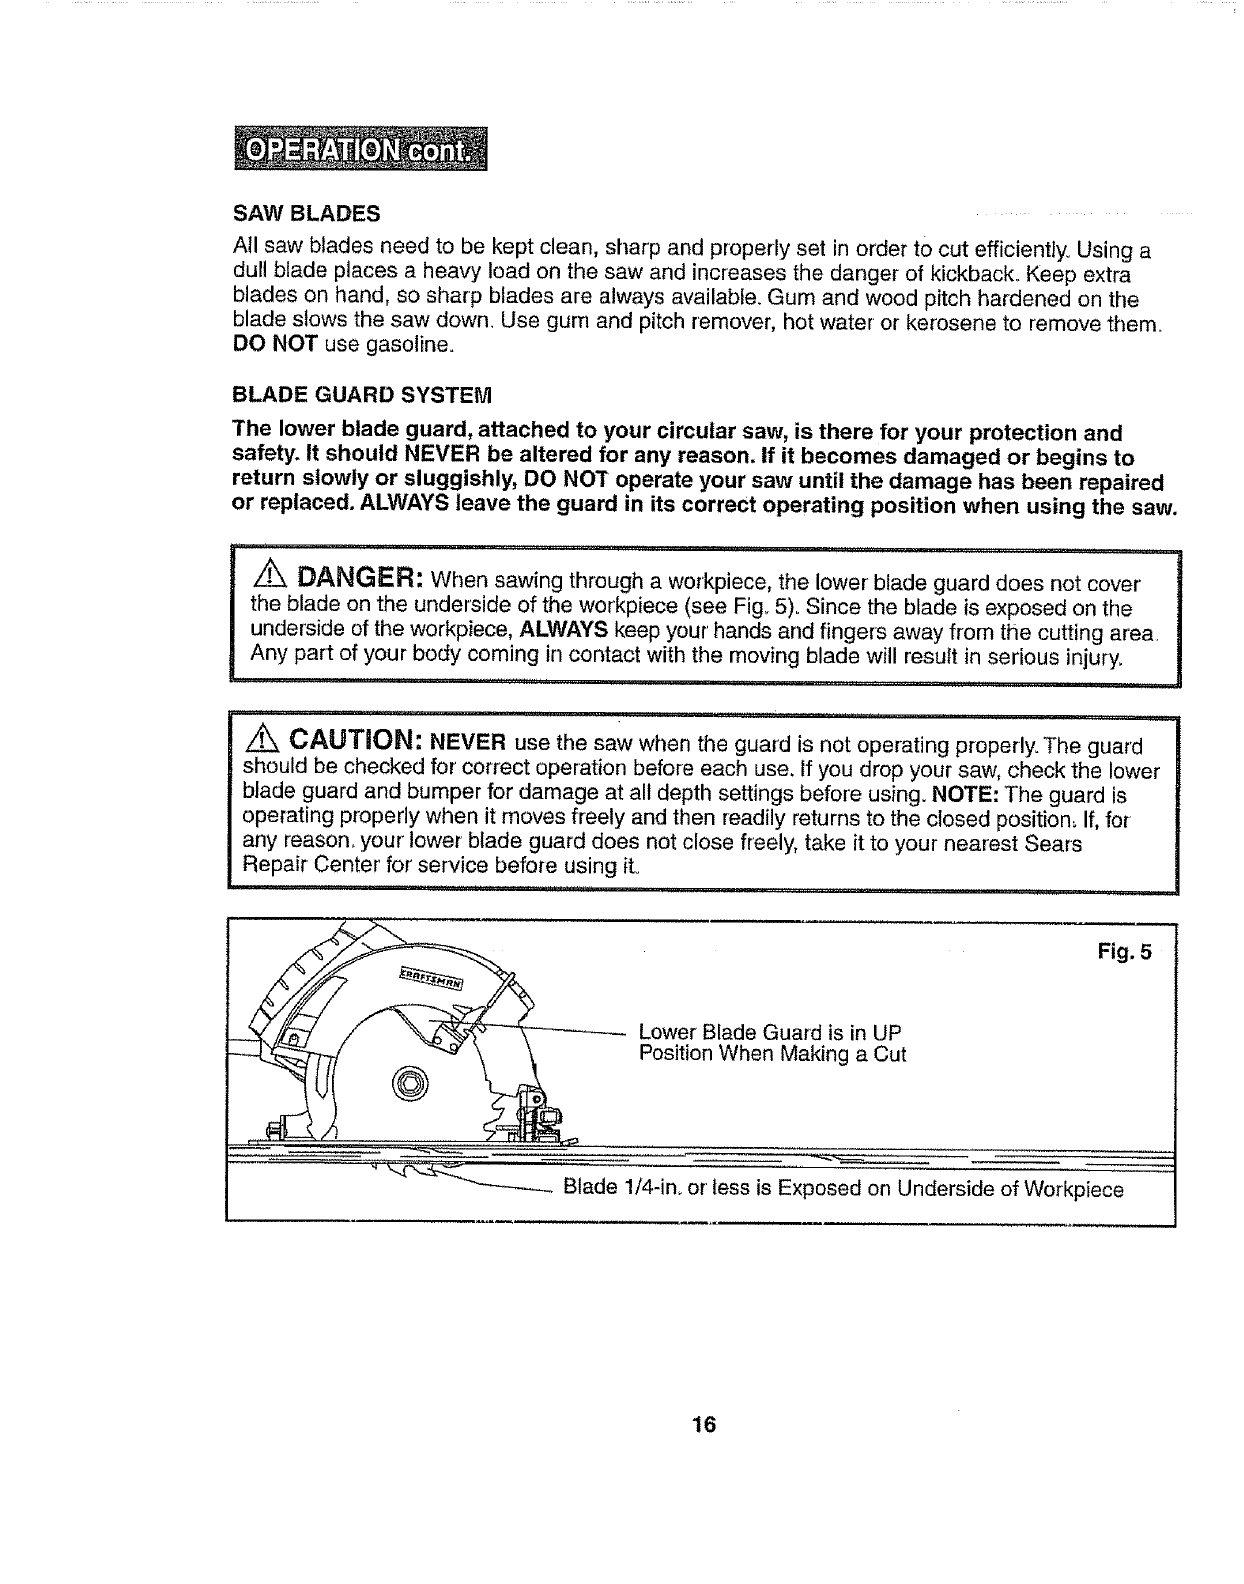
DANGER: When sawing through a workpiece, the lower blade guard does not cover
the blade on the underside of the workpiece (see Fig_ 5)° Since the blade is exposed on the
underside of the workpiece, ALWAYS keep your' hands and fingers away from the cutting area,
Any part of your body coming in contact with the moving blade will result in serious injury.
l!l, ,,i,,,,,i,ii, i, ,11 , ,,11,,,,i, ii1,11 i
....... i,, i , ii1,, ,, n .............................. ,Hil,,i,lU,
CAUTION: NEVER use the saw when the guard is not operating properly. The guard
should be checked for correct operation before each use. if you drop your saw, check the lower
blade guard and bumper for damage at all depth settings before using. NOTE: The guard is
operating properly when it moves freely and then readily returns to the closed position, If, for
any reason, your lower blade guard does not close freely, take it to your nearest Sears
Repair Center' for service before using ito
i,,, i, i IHI'I'"'L"J ...................
Lower Blade Guard is in UP
Position When Making a Cut
Fig. 5
_ "-'-'_""'---_----- Blade 1/4-in_ or less is Exposed on Underside of Workpiece
16
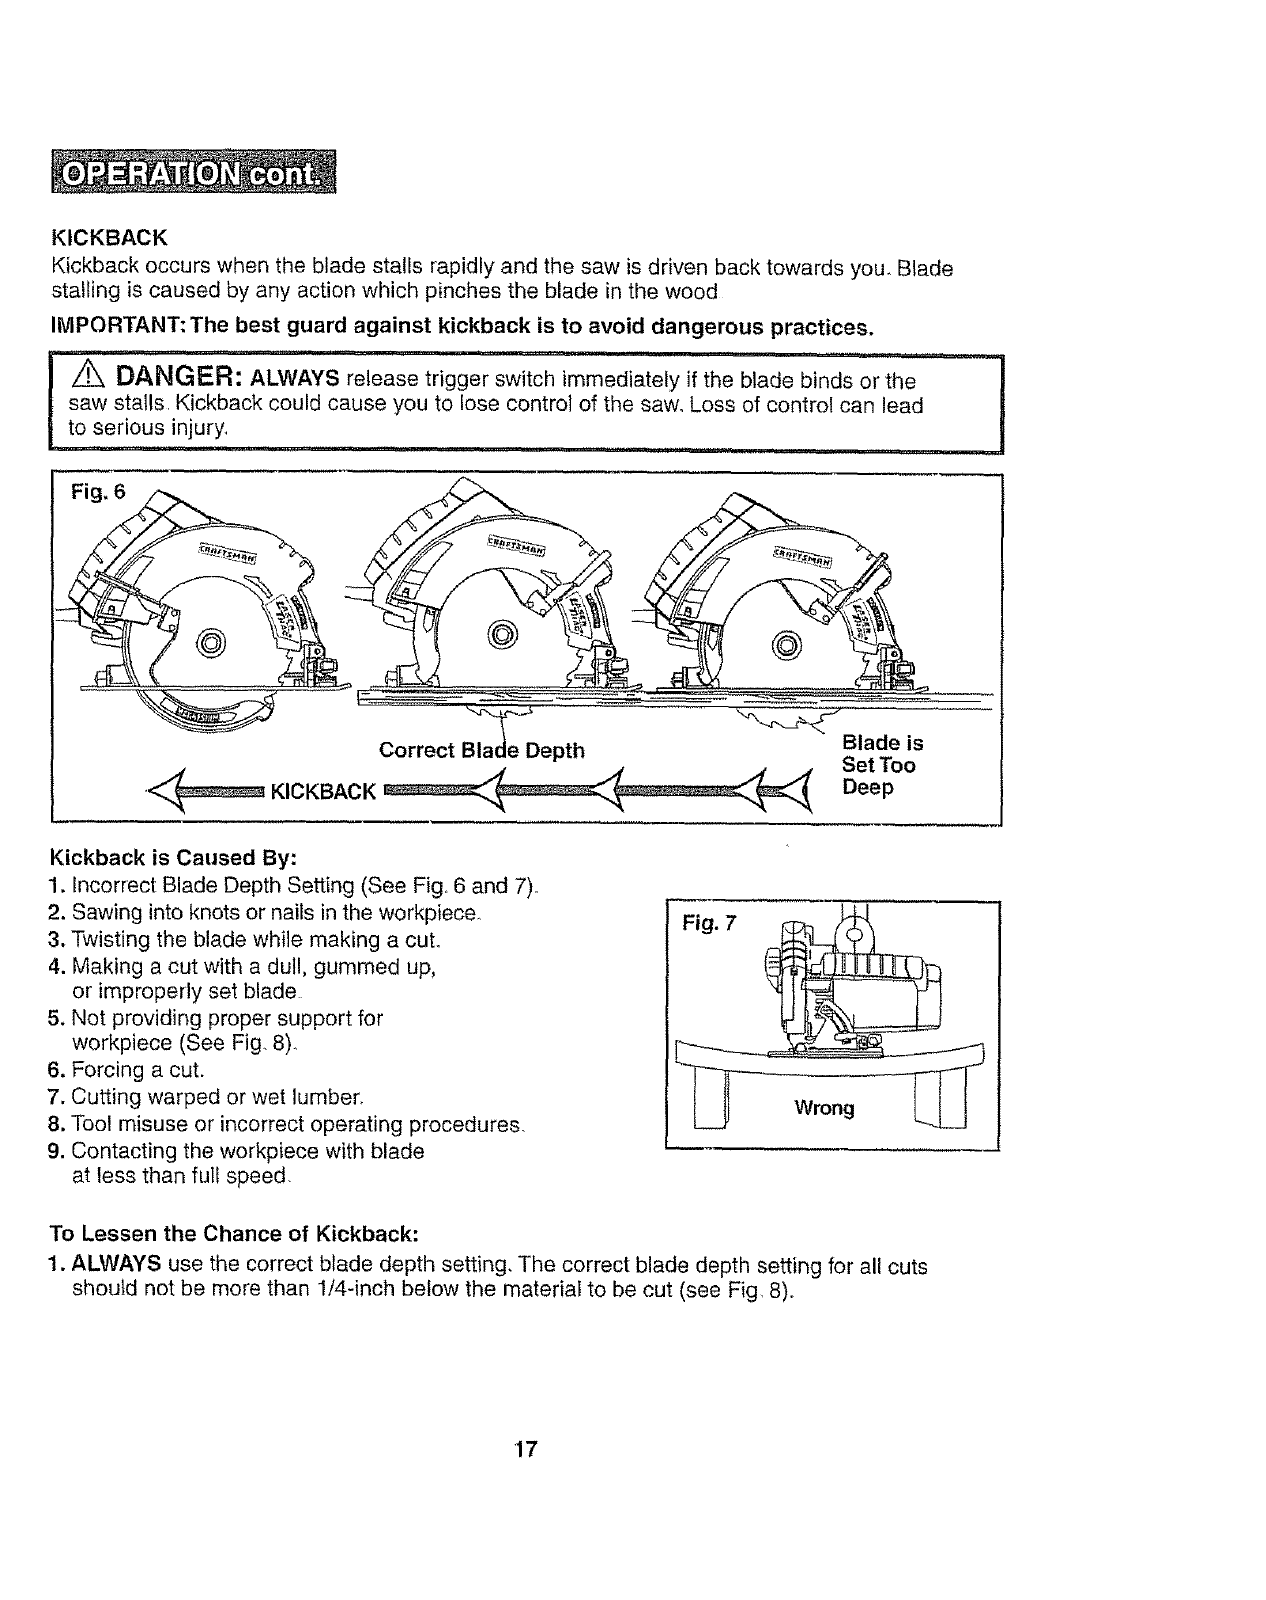
KICKBACK
Kickback occurs when the blade stalls rapidly and the saw is driven back towards you, Blade
stalling is caused by any action which pinches the blade in the wood
IMPORTANT: The best guard against kickback is to avoid dangerous practices.
.. ,,, ,Hml ................. ,"'Nm'""l '' I'"'nnr
I DANGER: ALWAYS release trigger switch immediately if the blade binds or the I
! saw staIIs Kickback could cause you to lose control of the saw, Loss of control can lead
!,, to serio,,us irljury_ , .....................................
i HI, iiii im ......
Correct Depth Blade is
Set Too
Deep
Kickback is Caused By:
1. Incorrect Blade Depth Setting (See Fig 6 and 7)°
2. Sawing into knots or nails in the workpiece,
3. Twisting the blade while making a cut.
4. Making a cut with a dull, gummed up,
or improperly set blade
5. Not providing proper support for
workpiece (See Fig, 8)
6. Forcing a cut.
7. Cutting warped or wet lumber,
8. Tool misuse or incorrect operating procedures,
9. Contacting the workpiece with blade
at less than full speed,
Fig. 7
Wrong
To Lessen the Chance of Kickback:
1. ALWAYS use the correct blade depth setting, The correct blade depth setting for all cuts
should not be more than 1/4-inch below the material to be cut (see Fig, 8),
17
To Lessen the Chance of Kickback: cont.
2. ALWAYS inspect the workpiece for knots or nails
BEFORE beginning to cuL NEVER saw into a knot or nail.
3. Make straight cuts. ALWAYS use astraight edge guide
when rip cutting This wil! help prevent twisting the
blade in the cut°
This will help prevent twisting the blade in the cut
4. ALWAYS use clean, sharp and properly set blades.
NEVER make cuts with dull blades°
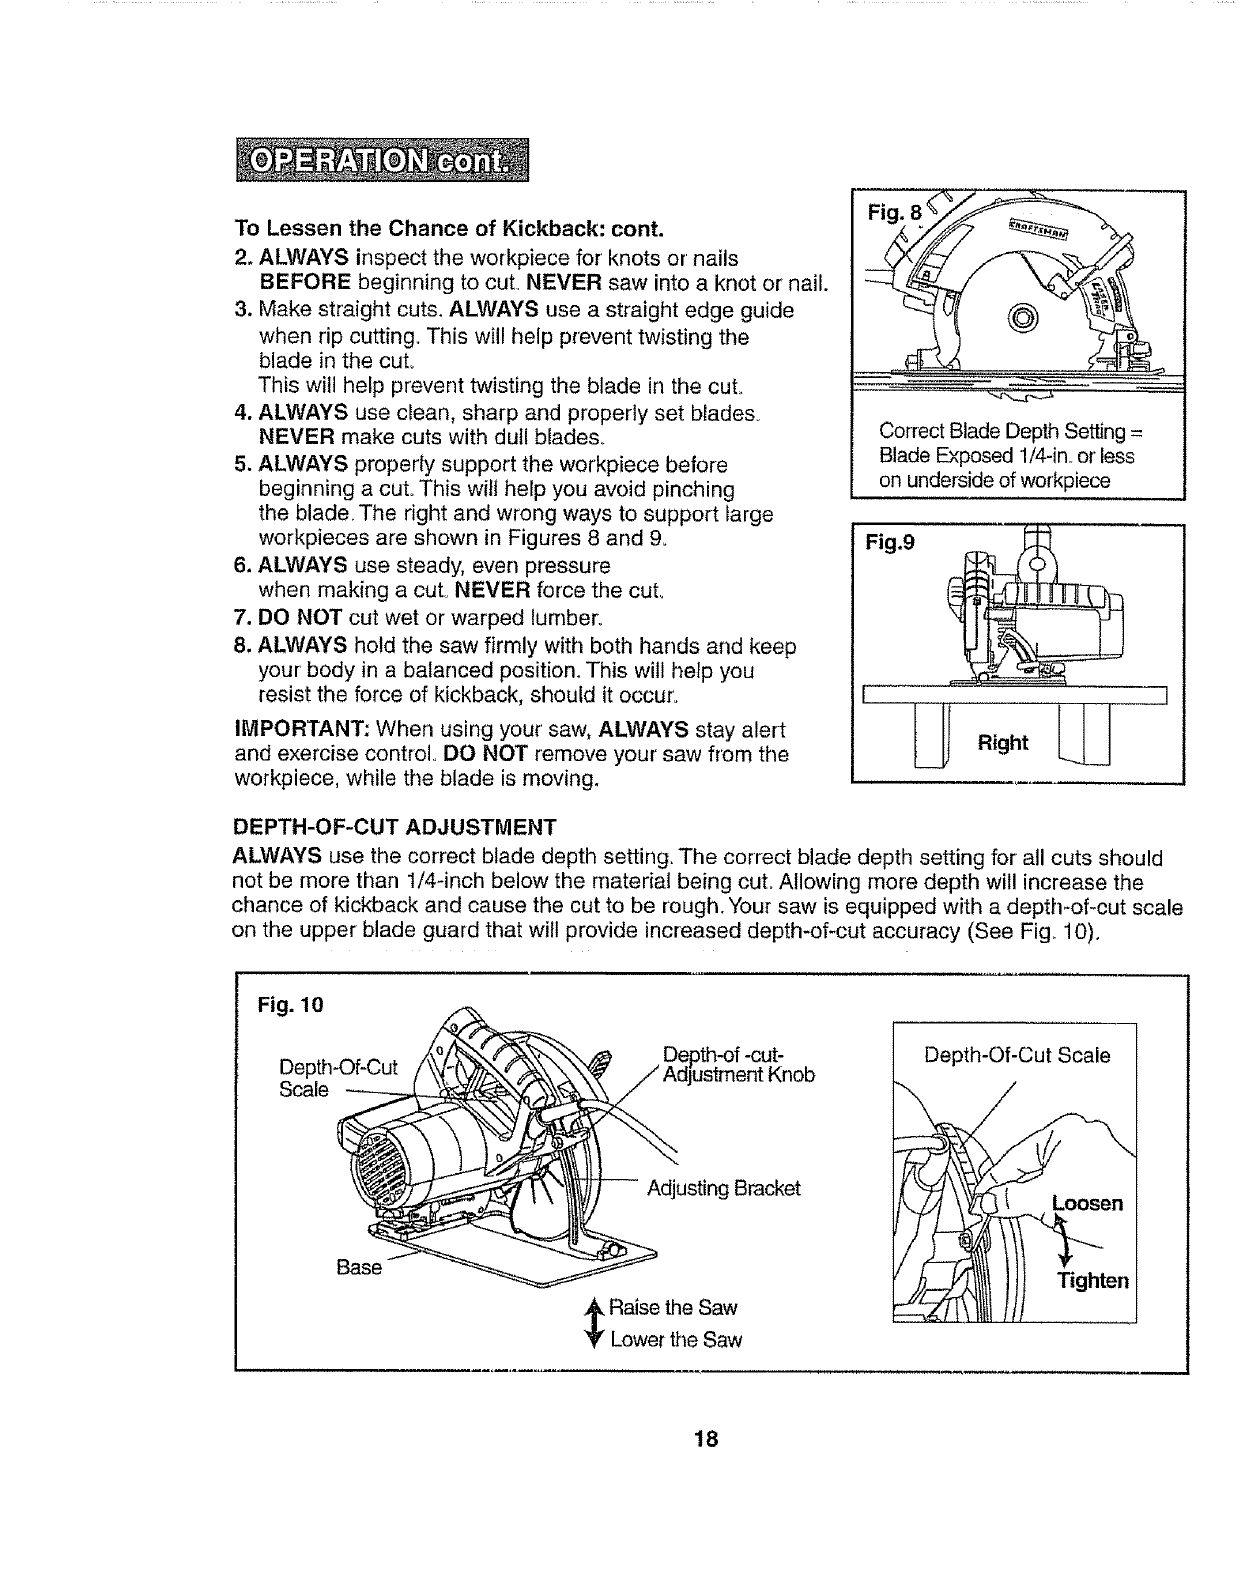
5. ALWAYS properly support the workpiece before
beginning a cut° This witt help you avoid pinching
the blade The right and wrong ways to support large
workpieces are shown in Figures 8 and 9.
6. ALWAYS use steady, even pressure
when making a cut° NEVER force the cuL
7. DO NOT cut wet or warped lumber.
8. ALWAYS hold the saw firmly with both hands and keep
your body in a balanced position. This will hetp you
resist the force of kickback, should it occur.
IMPORTANT: When using your saw, ALWAYS stay alert
and exercise control° DO NOT remove your saw from the
workpiece, while the blade is moving.
Correct Blade Depth Se_ng =
Blade Exposed 1/4-in,. or less
on underside of workpiece
Fig,9
DEPTH-OF-CUT ADJUSTMENT
ALWAYS use the correct blade depth setting, The correct blade depth setting for all cuts should
not be more than 1/4-inch below the material being cut. Allowing more depth will increase the
chance of kickback and cause the cut to be rough. Your saw is equipped with a depth-of-cut scale
on the upper blade guard that will provide increased depth-of-cut accuracy (See Fig. 10).
Fig. 10
Depth-Of-Cut
Scale
Depth-Of-Cut Scale
Adjusting Bracket
Base
_ Raise the Saw
Lower the Saw
18
TO ADJUST BLADE DEPTH
1. Unplug the saw.
I ..............................................................-I
WARNING: Failure to unplug the saw could result in accidental starting causing
possible serious personal injury.
, u ,i.................... n,u ......................
2, Raise depth adjust lever to loosen,, (See Fig, 10),
3. Determine the desired depth of cut°
4o Locate the depth_of-cut scale on the back of the upper blade guard
5. Hold the base of the saw flat against the edge of workpiece and then raise or lower the saw
until the indicator mark on the bracket aligns with the notch on the blade guard°
6, Tighten depth adjust lever,
STARTING ACUT
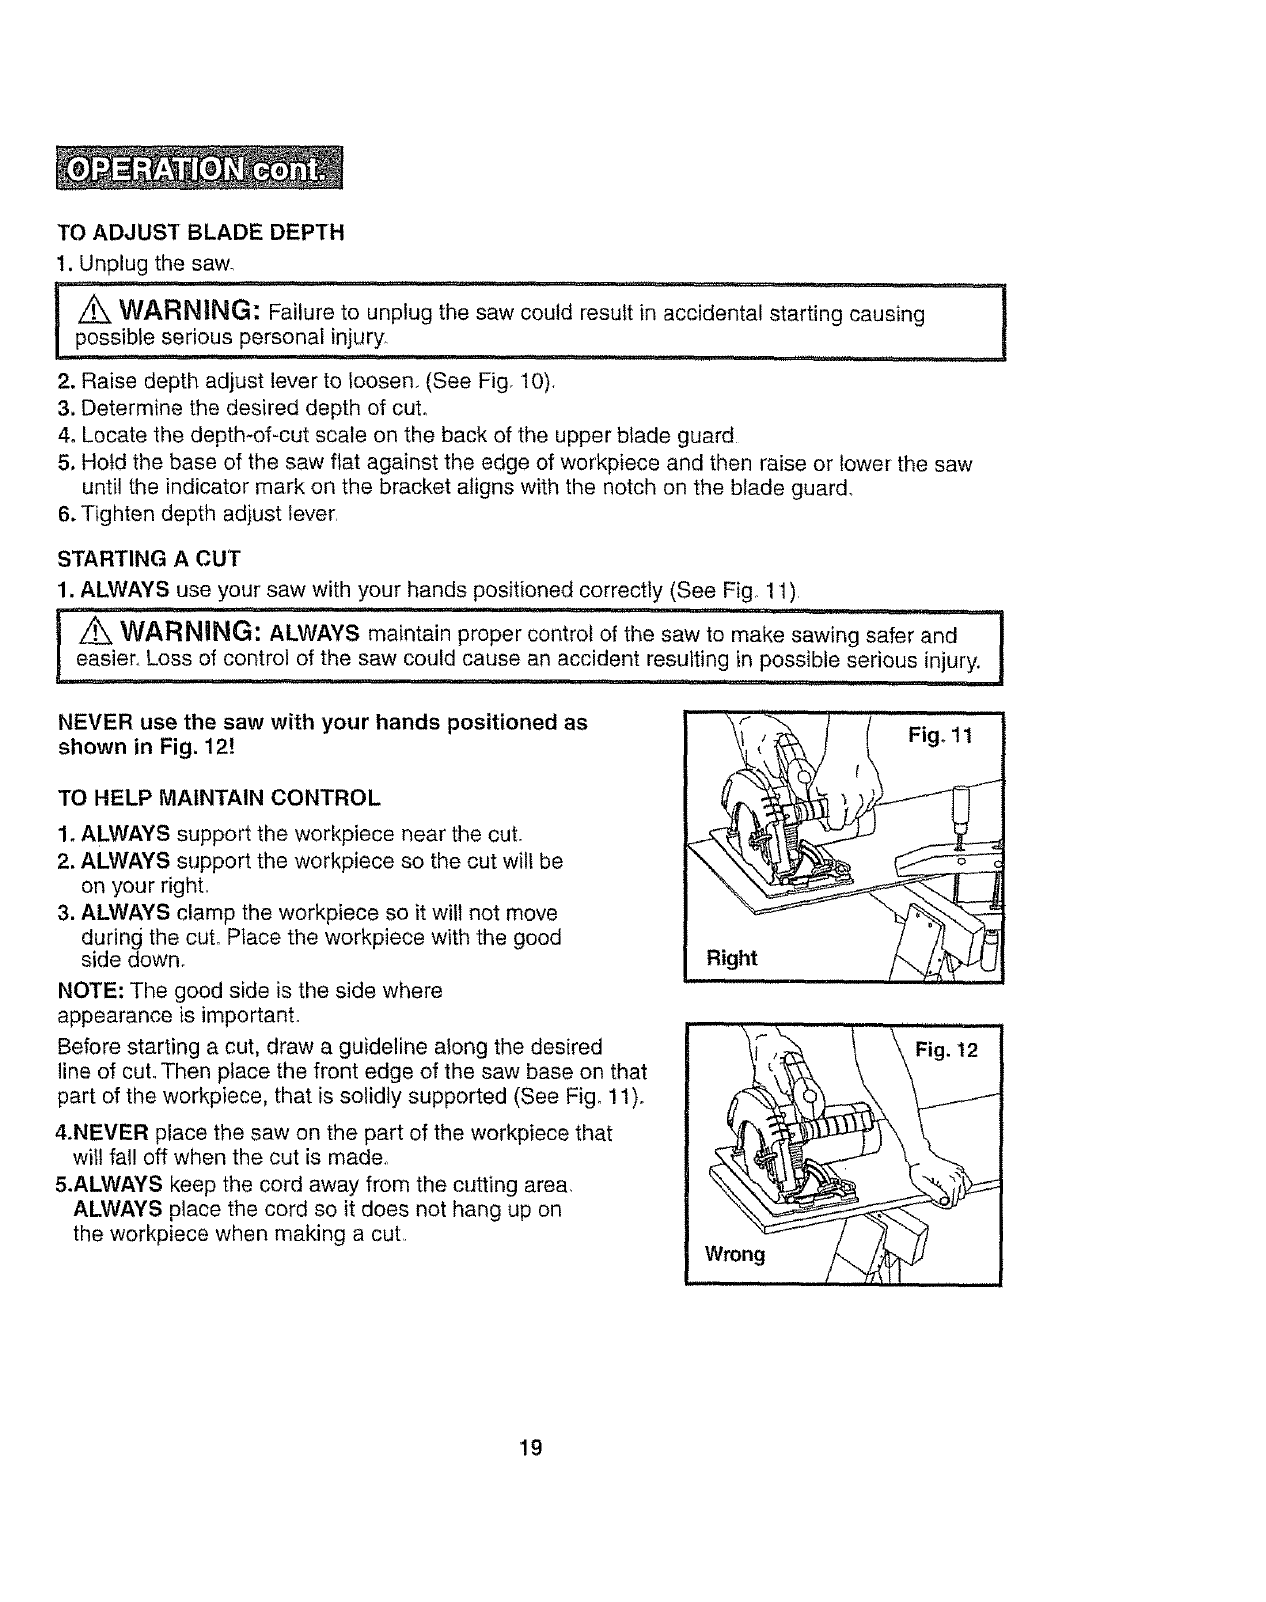
1. ALWAYS use your saw with your hands positioned correctly (See Fig° ! 1),
.....M, I...... I.........................................
I,t_ WAR NING :ALWAYS maintair] proper control of the saw to make sawing safer and !easier,, Loss of control of the saw could cause an accident resulting in possible serious injury.
ii ,,,,,n,,ll, i,u i
NEVER use the saw with your hands positioned as
shown in Fig. 12!
TO HELP MAINTAIN CONTROL
1, ALWAYS support the workpiece near the cut.
2. ALWAYS support the workpiece so the cut will be
on your right,,
3. ALWAYS clamp the workpiece so it will not move
during the cut° Place the workpiece with the good
side down,
NOTE: The good side is the side where
appearance is important°
Before starting a cut, draw a guideline along the desired
line of cut. Then place the front edge of the saw base on that
part of the workpiece, that is solidly supported (See Fig. 11)_
4.NEVER place the saw on the part of the workpiece that
will fall off when the cut is made°
5.ALWAYS keep the cord away from the cutting area,
ALWAYS place the cord so it does not hang up on
the workpiece when making a cut
119
TO HELP MAINTAIN CONTROL cont.
= .................. ==!===,==,,,=,,,,,,=,=......
I Z_ WARNUNG: If the cord hangs up on the workpiece during a cut_ re,ease the trigger switch Iimmediately° To avoid injury unplug the saw and move the cord to prevent it from hanging up again°
it,,, i....... iii, ,i ,11, i, ,i,.i, , I, [
=,,,,i,l,,=...... =,,,=,,,H .... ,u, m
IDANGER: Using the saw with a damaged cord could result in serious injury or death° !
If the cord has been damaged, have it replaced before using the saw again_
" u,uunu,,,,n ,,i, , u
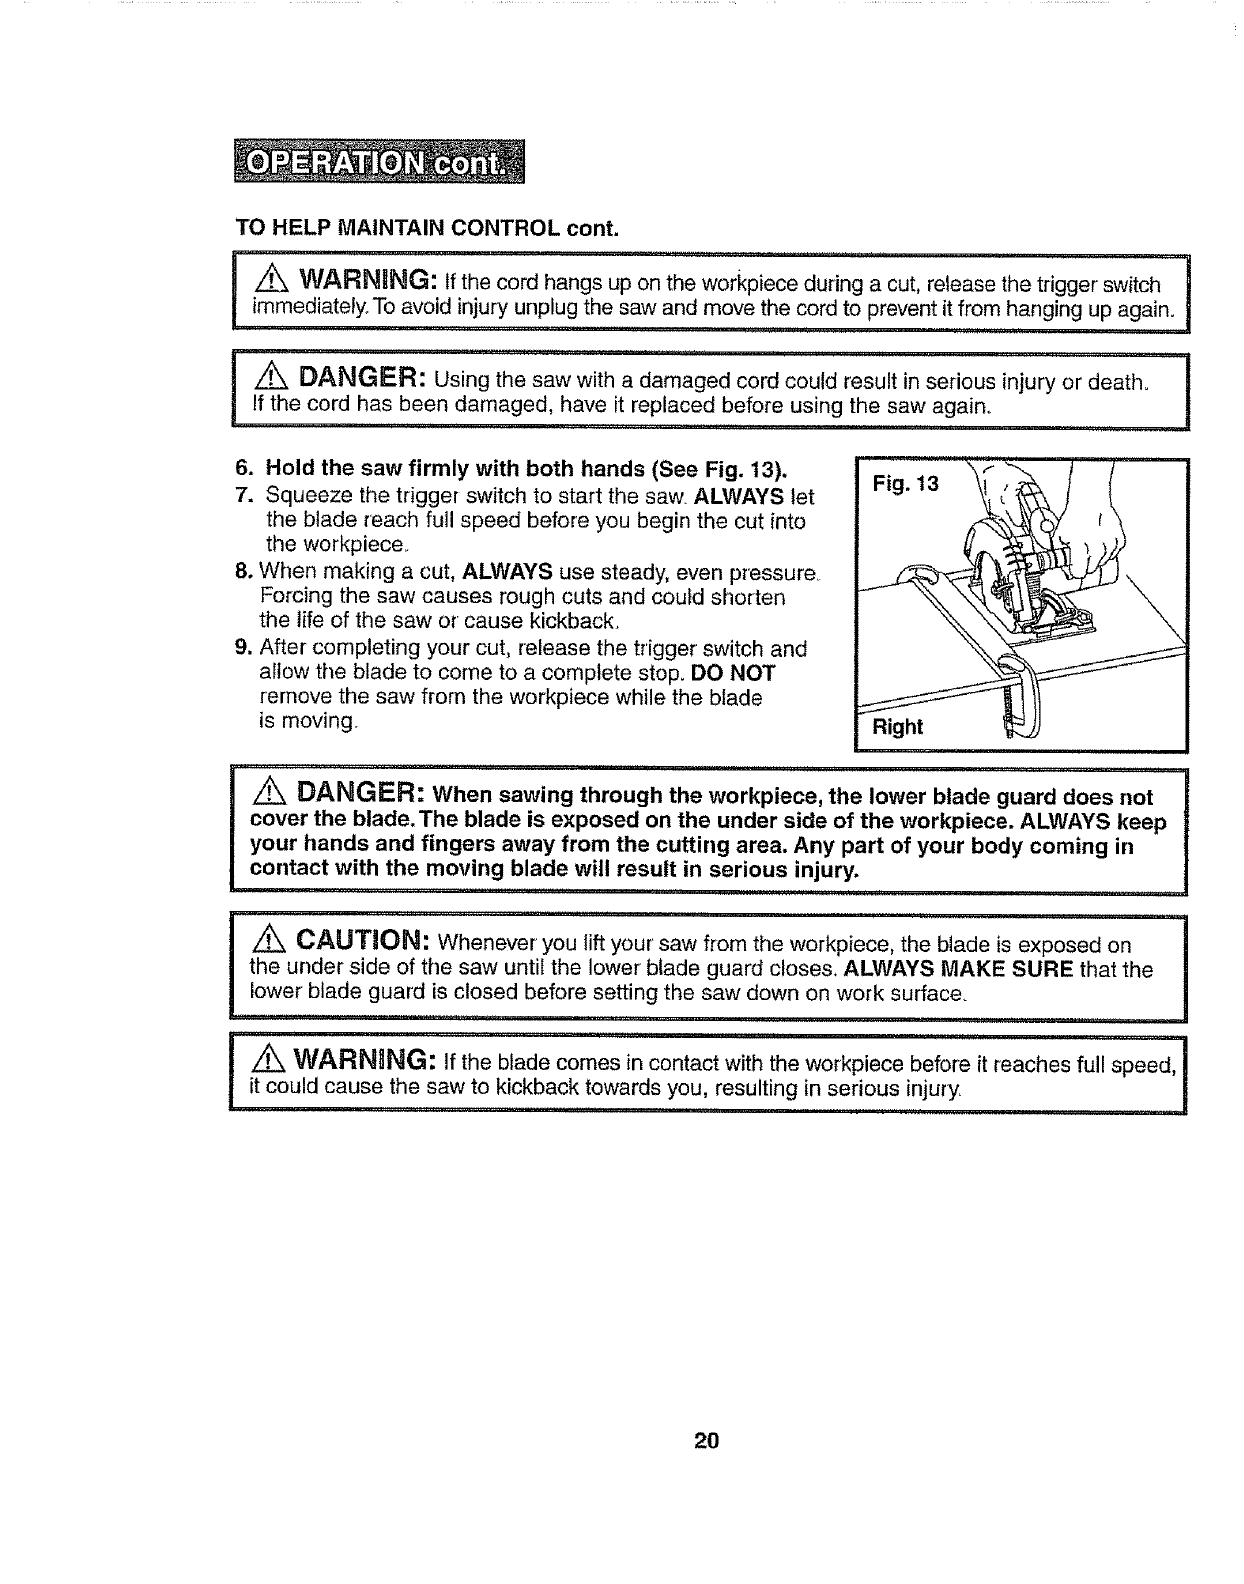
6. Hold the saw firmly with both hands (See Fig. 13),
7. Squeeze the trigger switch to start the saw. ALWAYS let
the blade reach full speed before you begin the cut into
the workpiece.
8. When making a cut, ALWAYS use steady, even pressure
Forcing the saw causes rough cuts and could shorten
the life of the saw or cause kickback.
9, After completing your cut, release the trigger switch and
allow the blade to come to a complete stop° DO NOT
remove the saw from the workpiece while the blade
is moving..
Fig. 13
DANGER: When sawing through the workpiece, the lower blade guard does not I
cover the blade.The blade is exposed on the under side of the workpiece. ALWAYS keep I
your hands and fingers away from the cutting area. Any part of your body coming in
contact with the moving blade will result in serious injury.
m .......
,,n ==,=,1 n,,,,n,
CAUTION: Whenever you lift your saw from the workpiece, the blade is exposed on
the under side of the saw until the lower blade guard closes. ALWAYS MAKE SURE that the
lower blade guard is closed before setting the saw down on work surface.
t, ,=m ,....................... i,i1,1,111111,,i,, I
WARNING: If the blade comes in contact with the workpiece before it reaches ful! speed,
it could cause the saw to kickback towards you, resulting in serious injury
nm,n uu, = ,1,,'1
2O
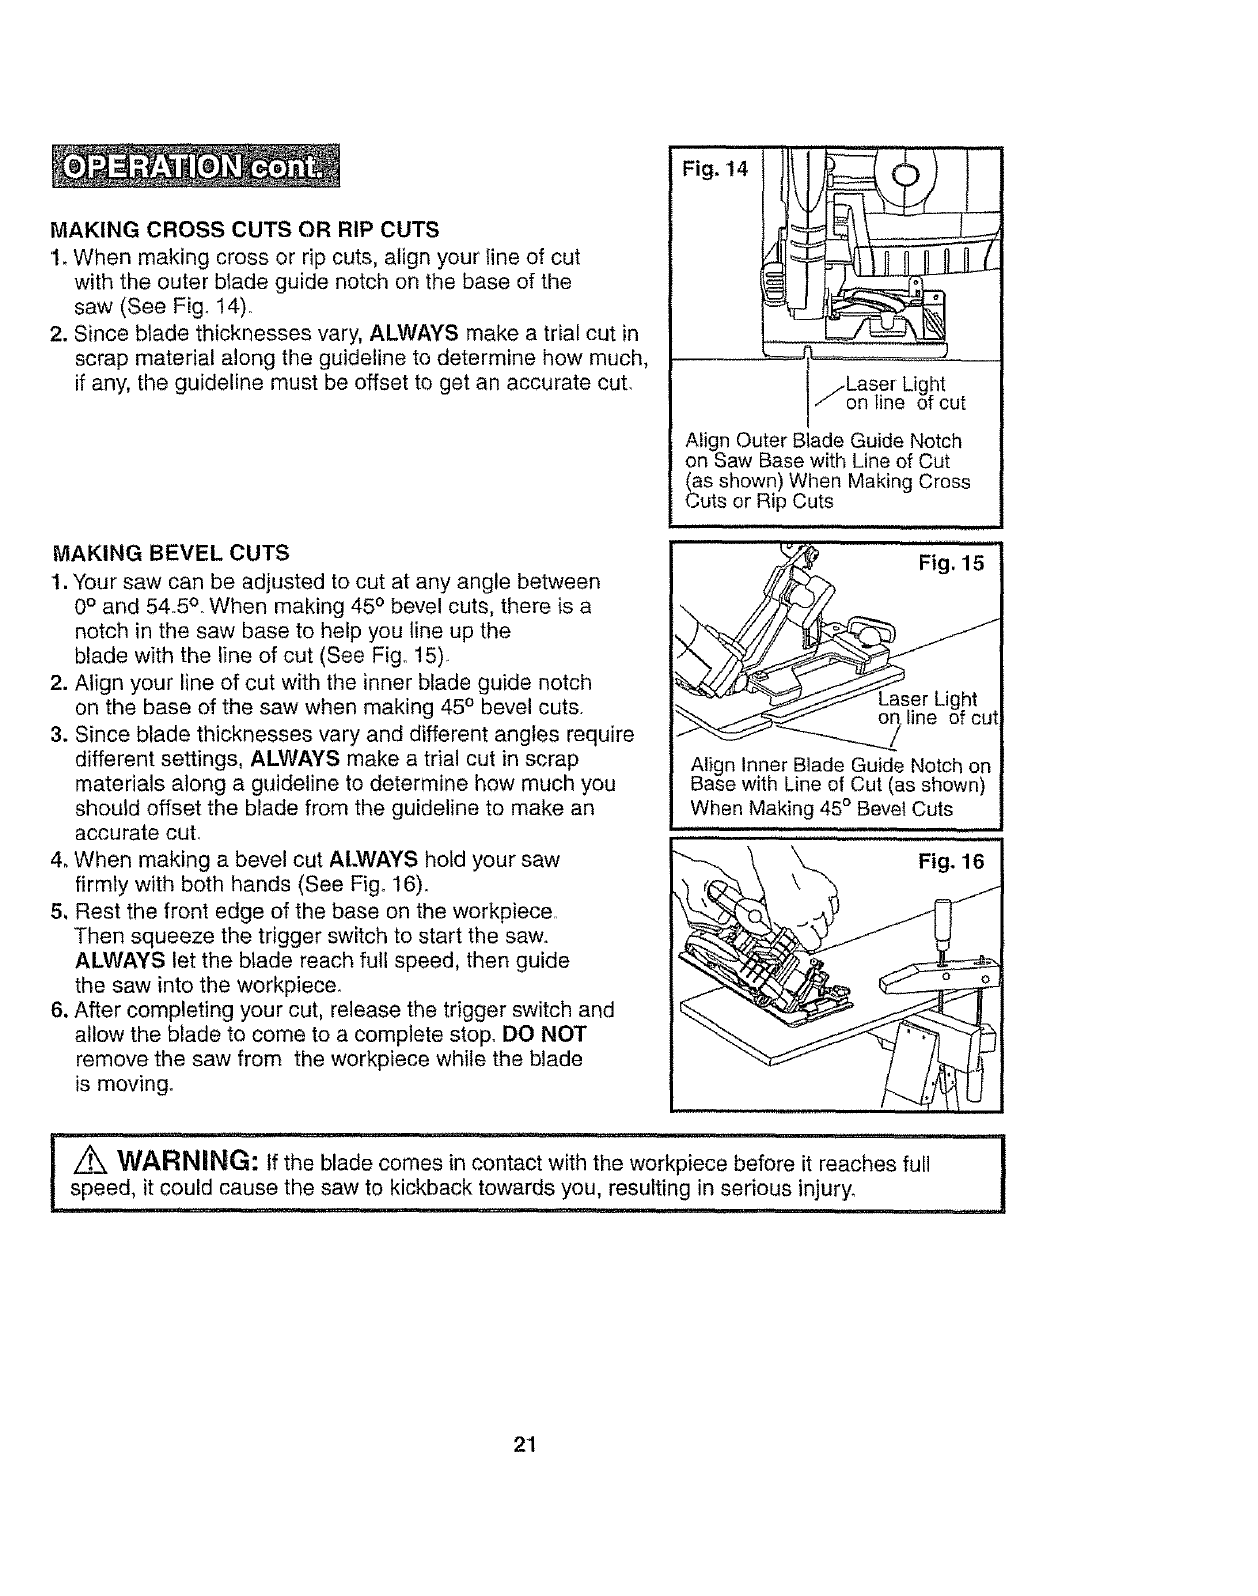
MAKING CROSS CUTS OR RIP CUTS
1. When making cross or rip cuts, align your iine of cut
with the outer blade guide notch on the base of the
saw (See Fig° 14).
2. Since blade thicknesses vary, ALWAYS make a trial cut in
scrap material along the guideline to determine how much,
if any, the guideline must be offset to get an accurate cut.
MAKING BEVEL CUTS
1. Your saw can be adjusted to cut at any angle between
0° and 54,5°° When making 45 ° bevel cuts, there is a
notch in the saw base to help you line up the
blade with the line of cut (See Fig° t5).
2. Align your line of cut with the inner blade guide notch
on the base of the saw when making 45 ° bevel cuts.
3. Since blade thicknesses vary and different angles require
different settings, ALWAYS make a trial cut in scrap
materials along a guideline to determine how much you
should offset the blade from the guideline to make an
accurate cuL
4, When making a bevel cut ALWAYS hotd your saw
firmly with both hands (See Fig,, 16).
5, Rest the front edge of the base on the workpiece,
Then squeeze the trigger switch to start the saw.
ALWAYS let the blade reach full speed, then guide
the saw into the workpiece.
6. After completing your cut, release the trigger switch and
allow the blade to come to a complete stop° DO NOT
remove the saw from the workpiece while the blade
is moving°
.......... 1 ilulr.
Fig, 14
U0h:
I/ on line of cut
Align Outer Blade Guide Notch
on Saw Base with Line of Cut
(as shown) When Making Cross
Cuts or Rip Cuts
Align Inner Blade Guide Notch on
Base with Line of Cut (as shown)
When Making 45° Bevel Cuts
,,,,,i.i. I,I,H,,.,.
.......................... I' I,ul , I .................... II1",1'111 I ....................
! _.k W.at, RN_NQ: if the blade comes in contact with the workpiece before it reaches full I
D
speed, it could cause the saw to kickback towards you, resulting in serious injury. I
,_ i u,,i i,i......
21
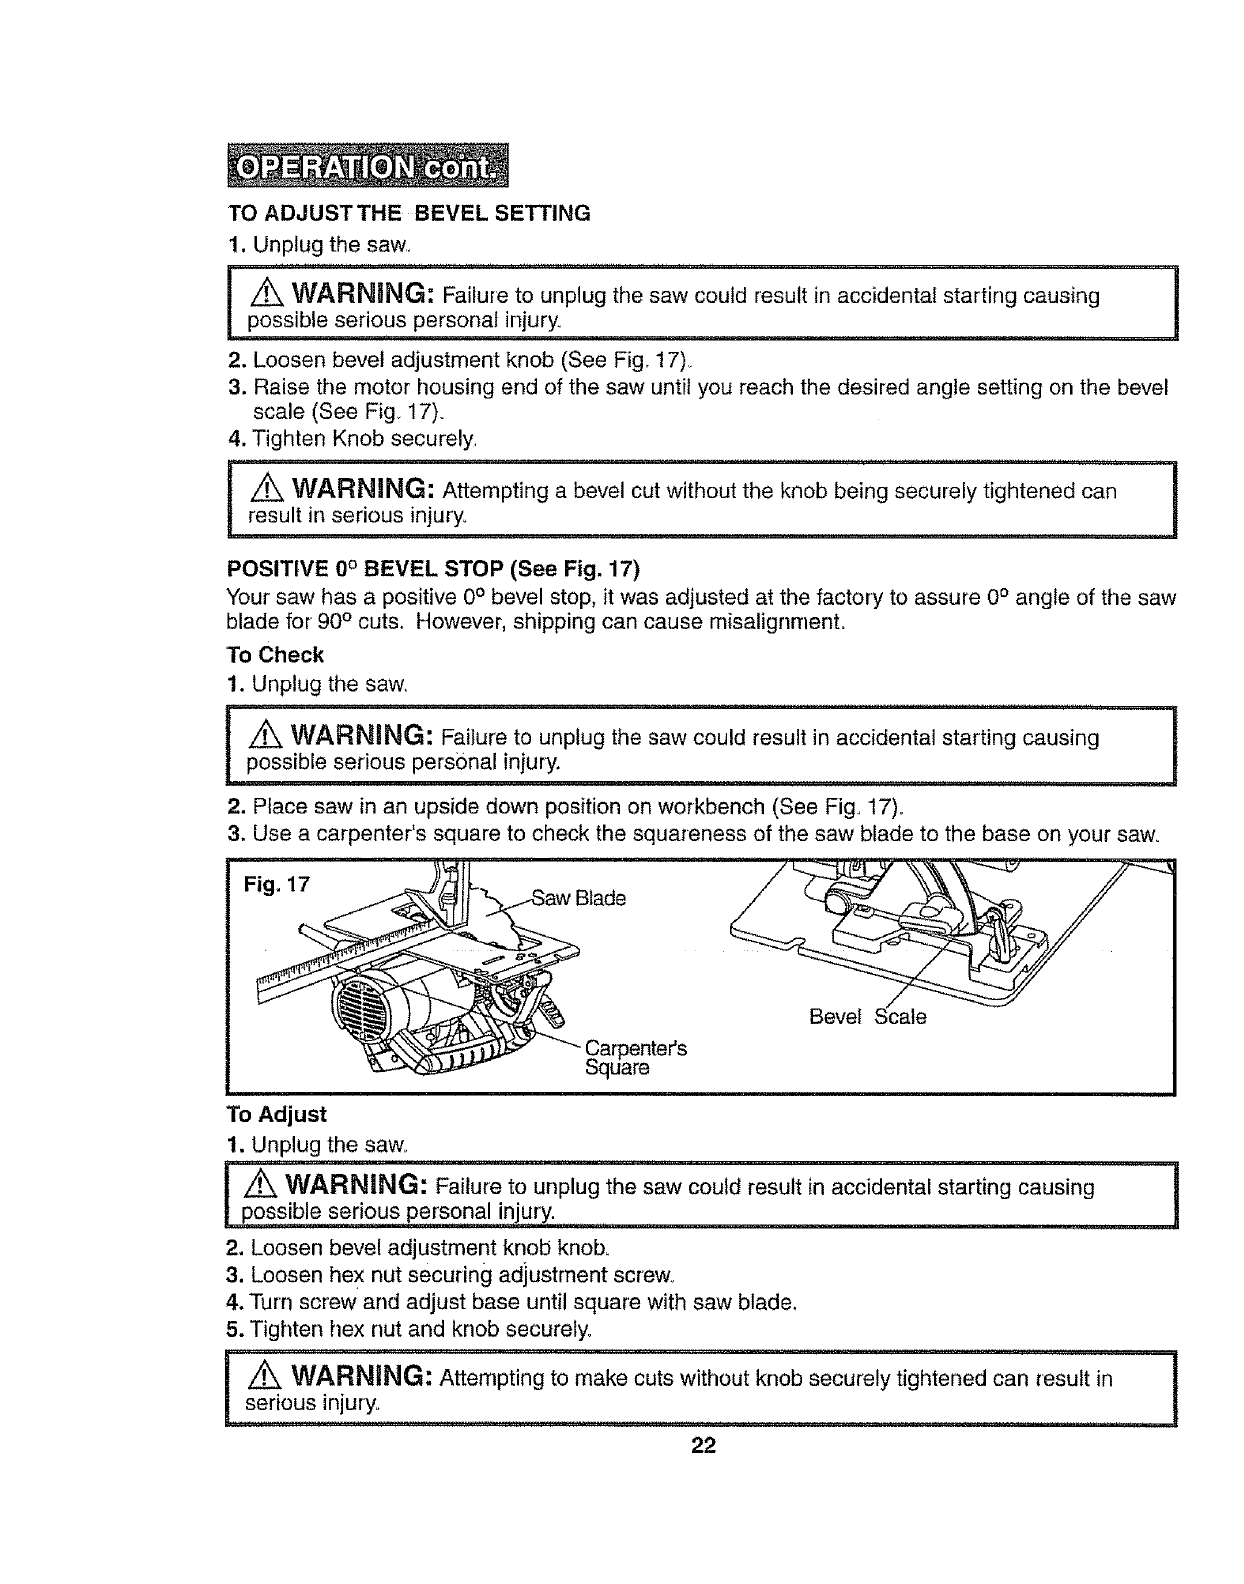
TO ADJUST THE BEVEL SETTING
1. Unplug the saw
_ WARNSNG: Failure to unplug the saw could result in accidental starting causing I
i possible serious personal injury, I
2. Loosen bevel adjustment knob (See Fig, 17)
3. Raise the motor housing end of the saw until you reach the desired angle setting on the bevel
scale (See Fig 17),
4. Tighten Knob securely
I _ WARN'NG"- Attempting a bevel cut with°ut the kn°b being securely tightened canlresult in serious injury,
POSITIVE 0° BEVEL STOP (See Fig. 17)
Your saw has a positive 0° bevel stop, it was adjusted at the factory to assure 0° angle of the saw
blade for 90 ° cuts. However, shipping can cause misalignment.
To Check
1. Unplug the saw,
! Z_ WARNING: Failure to unplug the saw could result in accidental starting causing !
LPossible serious personal injury. ,J
2. Place saw in an upside down position on workbench (See Fig, 17)o
3. Use a carpenter's square to check the squareness of the saw blade to the base on your saw,
Fig. 17
Cqarpenter's
uare
Bevel S_ate
To Adjust
1. Unplug the saw,,
/_ WARNING: Failure to unplug the saw could result in accidental starting causing i
possible serious personal injury. ,, , i
2. Loosen bevel adjustment knob knob,
3. Loosen hex nut securing adjustment screw.,
4. Turn screw and adjust base until square with saw blade,
5. Tighten hex nut and knob securely.
_WARNING: Attempting to make cuts without knob securely tightened can result in I
I seri°us!nJur; !
nllllm,un i,n ,,, n i i
22
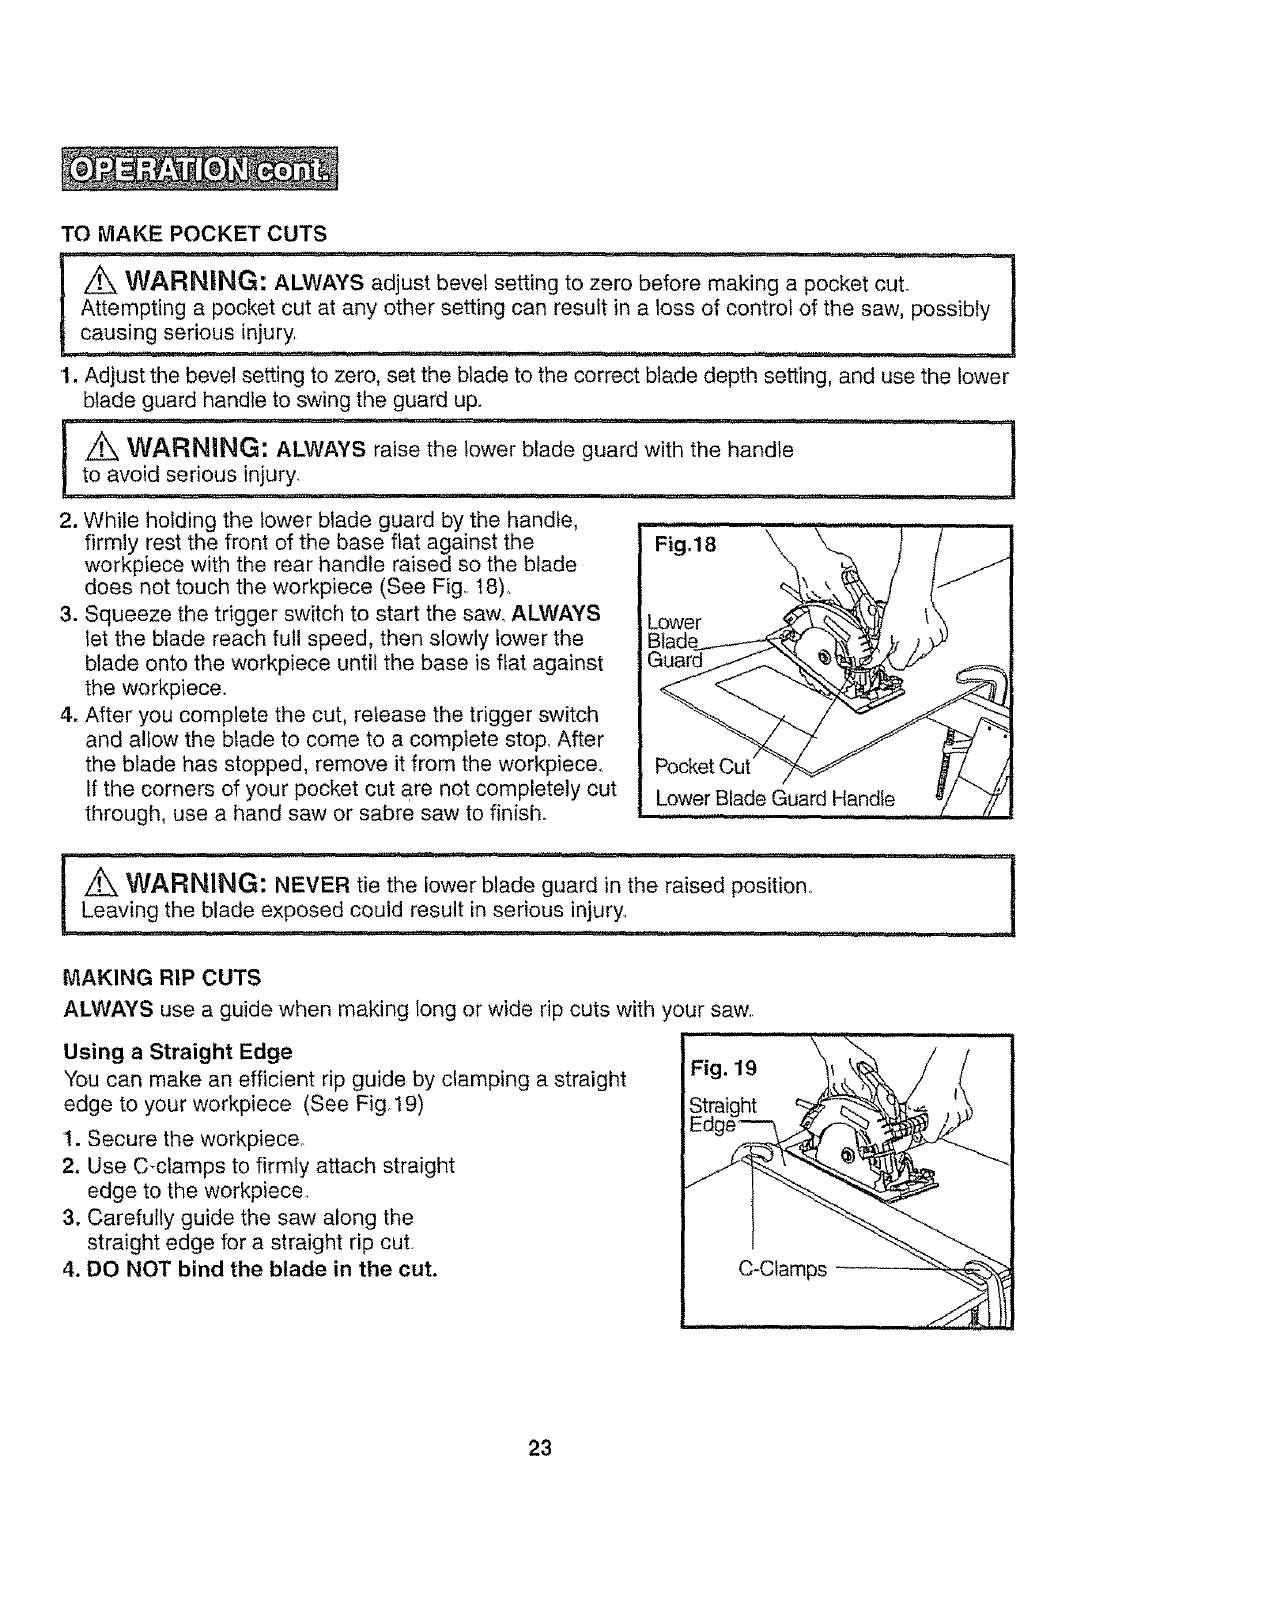
TO MAKE POCKET CUTS zero
! Artier setting can result in a loss of contro_ dthe saw, possibly i
!caus,ng serious in:.ury. . _ !
1. Adjust the bevel setting to zero, set the blade to the correct blade depth setting, and use the lower
blade guard handle to swing the guard up.
,, ............. ,, rr,ii " ,i,l,,,imn .
iZ_ WARNING: ALWAYS raise the tower blade guard with the handle
I
to avoldl serious injury,, ..... ....................iii.............. ,......................................... 1
2. White holding the tower blade guard by the handle,
firmly rest the front of the base flat against the
workpiece with the rear handle raised so the blade
does not touch the workpiece (See Fig,, 18),,
3. Squeeze the trigger switch to start the saw_ ALWAYS
let the blade reach full speed, then slowly lower the
blade onto the workpiece until the base is flat against
the workpiece.
4. After you complete the cut, release the trigger switch
and allow the blade to come to a complete sto F After
the blade has stopped, remove it from the workpiece.
If the corners of your pocket cut are not completely cut
through, use a hand saw or sabre saw to finish.
- _ ................................................ i,,i ,, i,,i , !,it
I Z_ WARNING: NEVER tie the lower blade guard in the raised position., I
i Leaving the blade exposed could result in serious injury..
........... nl i,,,i, ..................
MAKING RIP CUTS
ALWAYS use a guide when making tong or wide rip cuts with your saw,.
Using a Straight Edge
You can make an efficient rip guide by clamping a straight
edge to your workpiece (See Fig19)
1. Secure the workpiece_
2. Use C_ctamps to firmly attach straight
edge to the workpiece_
3. Carefully guide the saw along the
straight edge for a straight rip cut
4. DO NOT bind the blade in the cut.
23
SERVICE
i= ........ 1,,,1.... n .... = u = u ,,,,_, .....
WARNING: Preventive maintenance performed by unauthorized personnel may
result in misplacing of internal wires and components, which could cause a serious
hazard.
WARNING: To avoid accidents, ALWAYS disconnect the tool from the power source
BEFORE cleaning or performing any maintenance,
t,j i, ill ii,,i , .... .................................. i,,, ,i, i,i ,i
o All service that requires opening the saw MUST only be performed by a Sears Service Center.
All motor part represent an important part of the double insulation system and MUST only be
serviced by a Sears Service Center. Service performed by unqualified personnel could result
in a dsk of injury.
o When servicing this tool, ALWAYS use only identical replacement part& Follow instructions in
the Maintenance Section of this manual. Use of unauthorized parts or failure to foltow
Maintenance Instructions may create a risk of electrical shock or injury..
oAvoid solvents when cleaning plastic parts° Most plastics are susceptible to damage from
various types of commercial solvents and may be damaged by their use. Use clean cloths to
remove dirt, carbon dust, etc.
• It is a known fact that electric tools are subject to accelerated wear and possible premature
failure when they are used to work on fiber glass boats and sports cars, wallboard, spackling
compounds or plaster° The chips and grindings from these materials are highly abrasive to
electrical tool parts, such as bearings, brushes, commutators, etc. Consequently, it is not
recommended that this tool be used for extended work on any fiber glass material, wallboard,
spackling compound, or plaster. During any use on these materials, it is extremely important
that the tool is cleaned frequently by blowing with an air jet.
LUBRICATION
A!l of the bearings in this tool are lubricated with a sufficient amount of high-grade lubricant for the
life of the tool under normal operating condition&Therefore, no further lubrication is required.
24
The following recommended accessories are currently available at your local Sears Store,
WARNING: The use of attachments or accessories that are not recommended might I
be dangerous and could result in serious injury. !
EXTENSION CORDS
Sears offers a large selection of extension cords that help extend your working range.
The use of any extension cord will cause some loss of power_ To keep the loss at a minimum and
to prevent overheating, use an extension cord that is heavy enough to carry the current that
the tool will draw
A wire gauge (AWG) of at least 14 is recommended for an extension cord 25 feet or less in length,
When working outdoors ALWAYS use an extension cord that is suitable for outdoor use.
The cord's jacket will be marked WA.
,,,,it,,=1,,,1...... = ,11,,1,11 ,,
I CAUTION: Keep extension cords away from the cutting area, and position the cord I
so it will not get caught on lumber, tools, etc during the cutting operation
I ................................. " ,H..... i I
= = == ,,====,,,,,= ,, === m ==, = == , HHHI,IH'"""N'IH"'= .... H H
WARNING: Check extension cords before each use. If damaged, replace it
immediately. NEVER use a tool with a damaged cord because touching the damaged area
could cause electrical shock, resulting in serious injury,
.... = =
BLADES
Sears has a large selection of circular saw blades for fast, efficient cuttiing in a variety of materials
and applications,
,,, ,,,i,,,,,,,,
7 1/4-in. (18 era) 40-Tooth General-Purpose Cut-Off Blade
7 1/4-in° (18 cm) 35-Tooth Master Combination Blade
7 1/4-in, (18 cm) 200-Tooth Plywood Blade
7 1/4-in. (I8 cm) 18-Tooth Carbide Blade
7 1/4-in, (18 cm) 18-Tboth Mach II Silver Series Carbide Blade
7 114-in. (18 cm) 24-Tooth Mach II Silver Series Carbide Blade
7 1/4-in. (I8 cm) 24-Tooth Combination Carbide Blade
Sears also offers Combination Squares, Framing Squares and various length Edge Guides
to help you with all your cutting needs
25

NOTES
26

NOTES
27

NOTES
28
