Craftsman 35834111 User Manual CHAINSAW Manuals And Guides L0807300
CRAFTSMAN Chainsaw, Electric Manual L0807300 CRAFTSMAN Chainsaw, Electric Owner's Manual, CRAFTSMAN Chainsaw, Electric installation guides
User Manual: Craftsman 35834111 35834111 CRAFTSMAN CHAINSAW - Manuals and Guides View the owners manual for your CRAFTSMAN CHAINSAW #35834111. Home:Lawn & Garden Parts:Craftsman Parts:Craftsman CHAINSAW Manual
Open the PDF directly: View PDF ![]() .
.
Page Count: 24
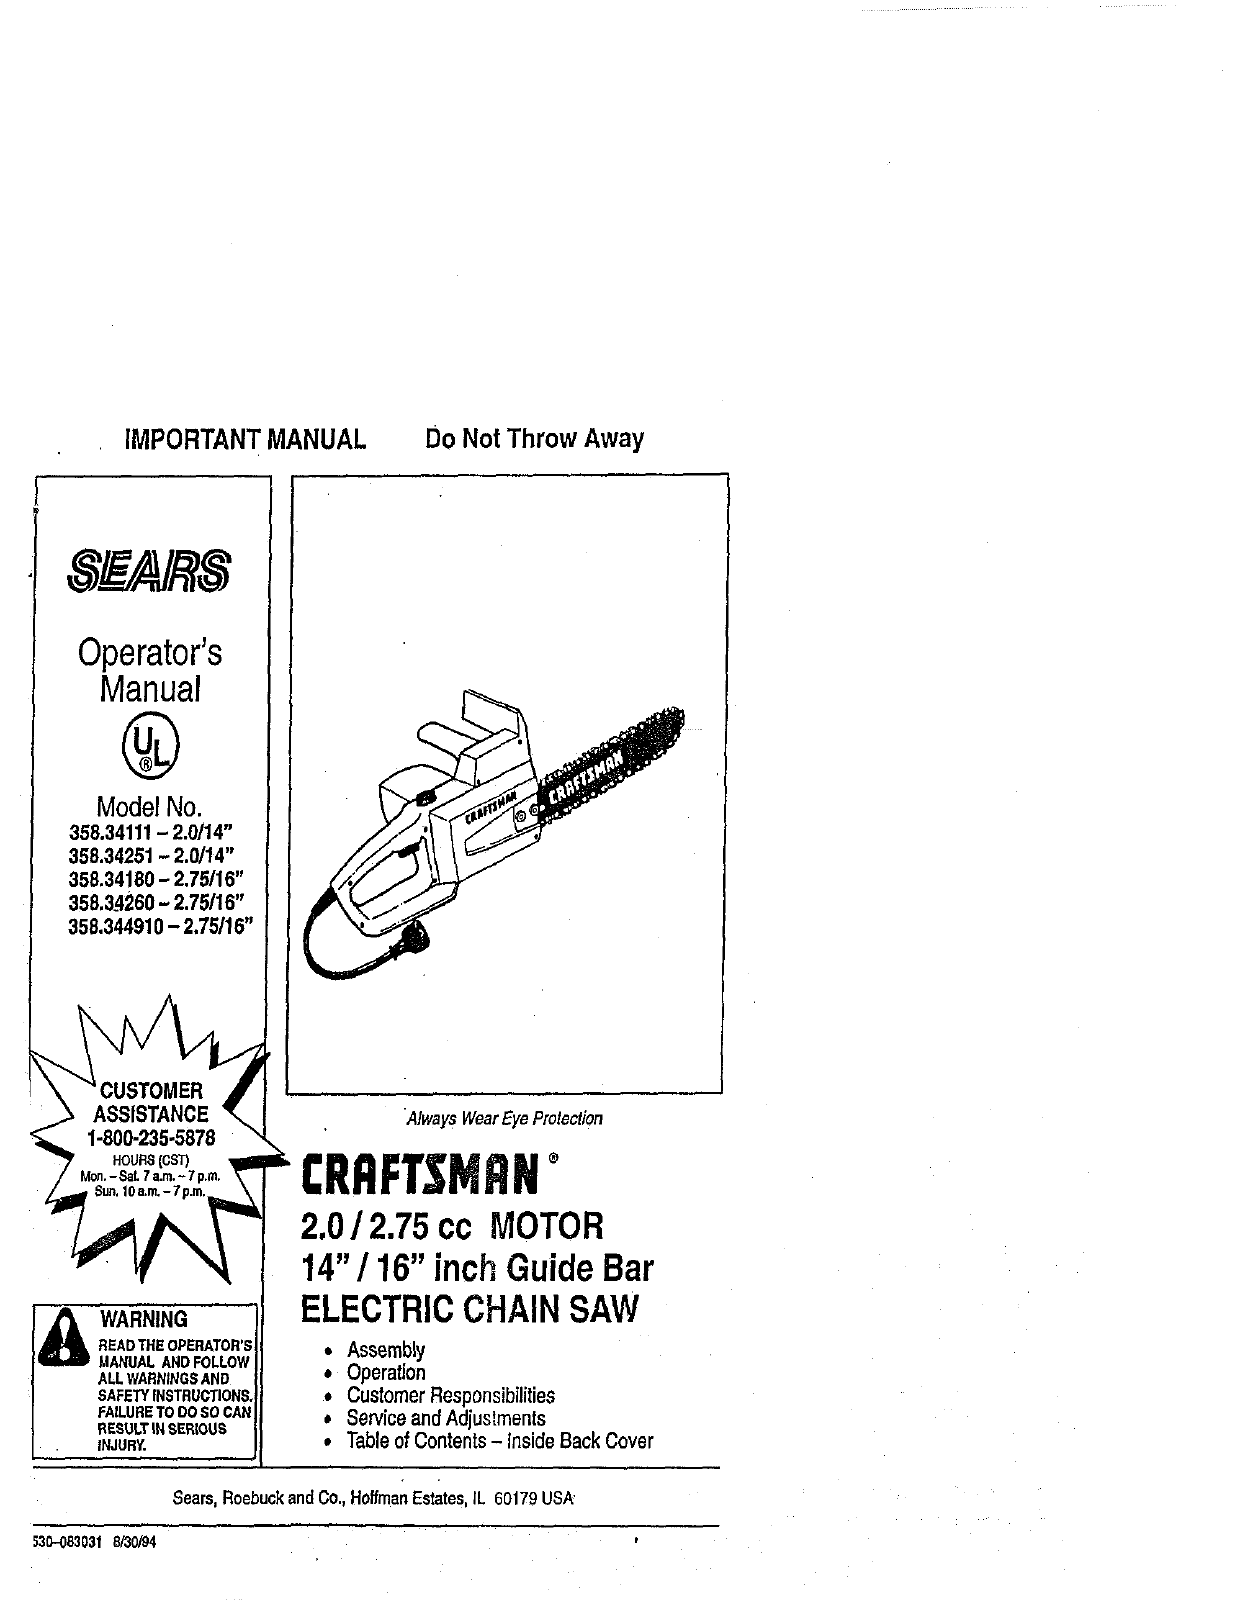
IMPORTANTMANUAL Do Not Throw Away
Operator's
Manual
@
ModelNo.
358.34111 - 2.0/14"
358.34251 - 2.0/14"
358.34180- 2.75116"
' if
358.3.4260- 2.75/16
358.344910 -2,75/16"
AlwaysWearEyeProtection
& WARNING
READTHEOPERATOR'S
MANUALANDFOLLOW
ALL WARNINGSAND
SAFETYINSTRUCTIONS,
FAILURETODO SOCAN
RESULTIN SERIOUS
• INJURY.
CRRFTSMRN°
2.0/2.75cc MOTOR
14"/16" inchGuideBar
ELECTRICCHAINSAW
•Assembly
•Operation
• Customer Responsibilities
*Serviceand Adjustments
• Table of Contents - Inside Back Cover
Sears,RoebuckandCo.,HoffmanEstates,IL 60179 USA
_30-083031 8_0/94
SAFETYRULES
q
_ARNING:
WHEN USINGAN ELECTRICCHAINSAW, BASIC SAFETY PRECAUTIONSSHOULDALWAYSBE
FOLLOWEDTO REDUCETHE RISKOFRRE, ELECTRICSHOCK;AND INJURYTO PERSONS.READ
ALL INSTRUCTIONS.SEEADDITIONALSAFETYINSTRUCTIONSTHROUGHOUTTHISMANUAL
• BECAUSE A CHAIN SAW IS A HIGH-SPEED WOOD-CUTTINGTOOL, SPECIAL SAFETY
PRECAUTIONSMUST BE OBSERVEDTO REDUCETHE RISK OF ACCIDENTS,CARELESSOF
IMPROPERUSEOF THISTOOLCANCAUSESERIOUSINJURY.
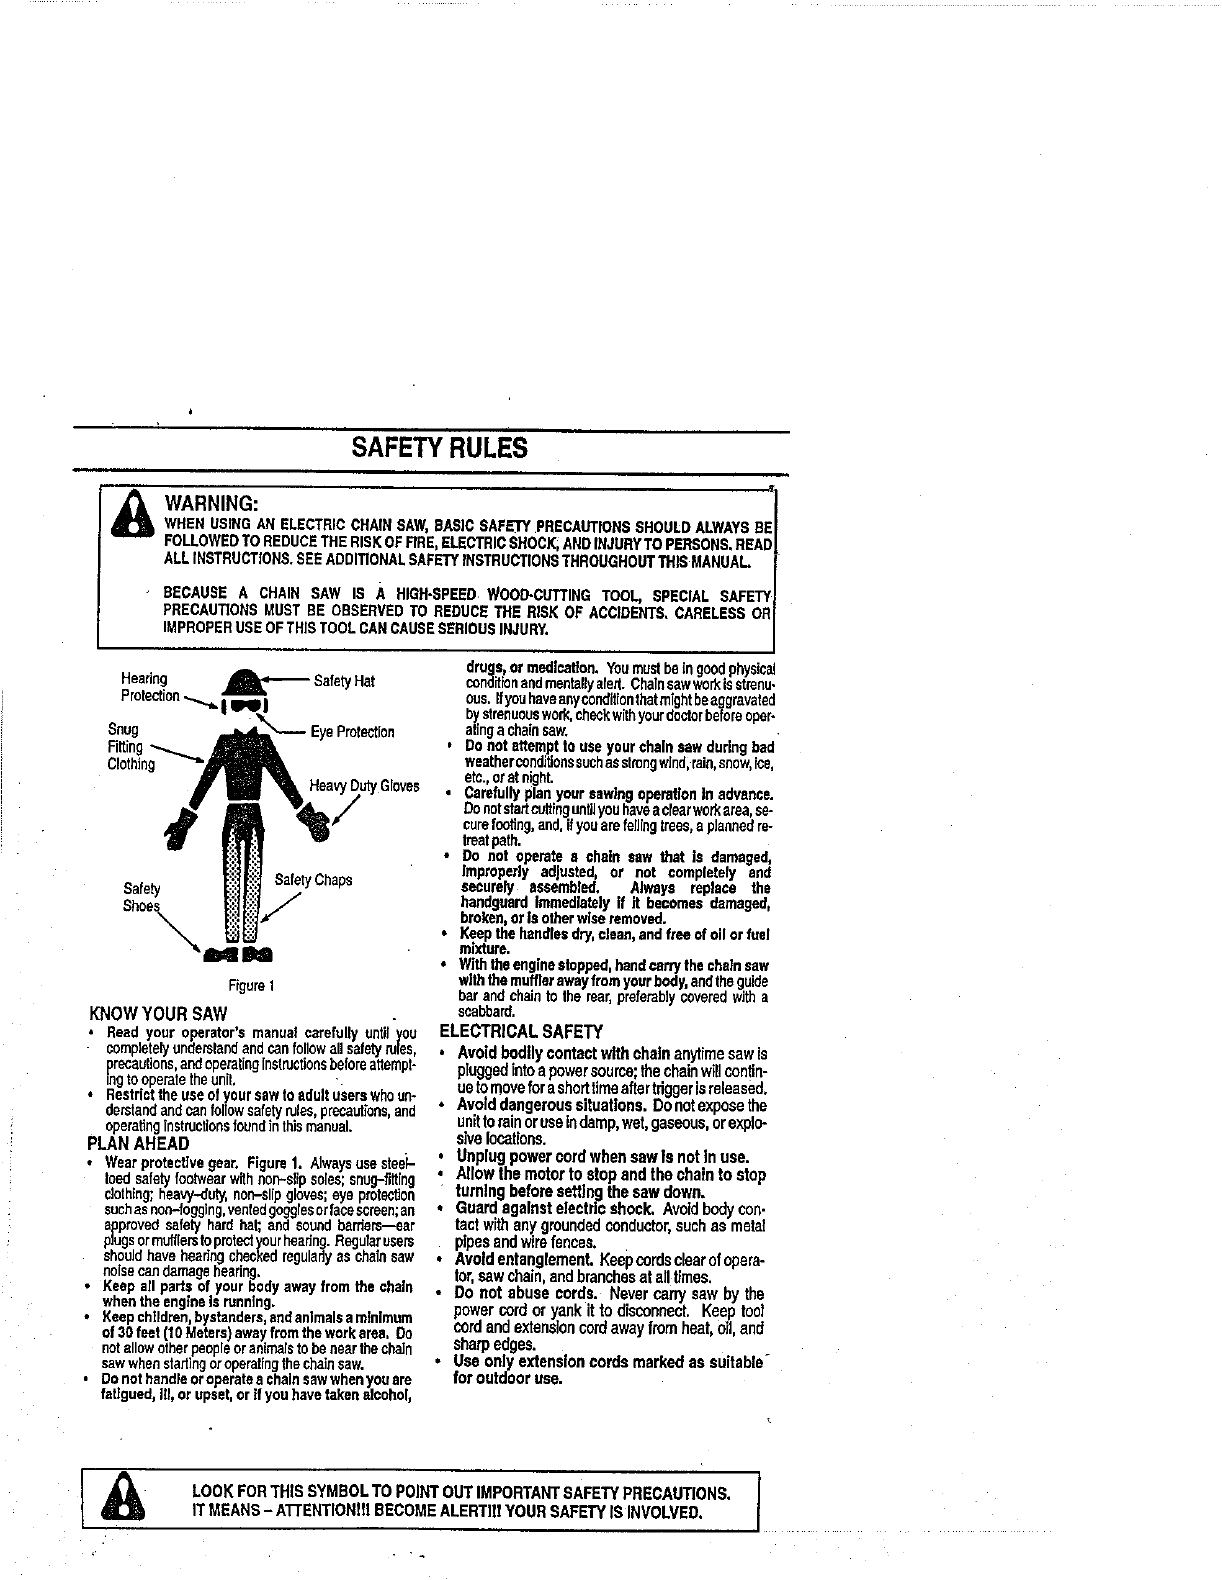
Headng _SafetyHat
Snug EyeProtection
Rtting
Clothin_
Safety SafetyCbeps
Shoes
--Nlm
Figure1
KNOWYOURSAW
• Read your operator's manual carefully untiJyou
completelyunderstandandcan followall safetytutes,
precautions,andoperatingInstructionsbeforeattempt-
_ngtooperatetheunit.
• Restrictthe useof yoursew to adultuserswhoun.
dendaedandcanfollowsafetyrules,precautions,and
operatingInstructionsfoundin thismanual.
PLANAHEAD
•Wearprotectivegear. Figure1. Alwaysuse stee_-
toedsafetyfootwearwithnon-slip soles snug-fitting
clothing;heavy-duty,non-slipgloves;eye protection
suchas non-fogging,ventedgogglesorfacescreenan
approvedsafetyhard bat; and soundbarfiers--sar
plugsormufflerstoprotectyourheadng.Regutarusers
shouldhave headngcheckedregularlyas chainsaw
noisecan damagehearing.
•Keep agparts of your bodyaway from the chain
whenthe engineIs running.
•Keepchildren,bystanders,cod colmstaamthlmum
of3S feet (10Meters)awayfromthe workarea. Do
notallowotherpeopleor animalstobenearthechain
sawwhenstarlingoroperattngthechainsaw.
, DOnothandtaoroperetea bbalnsawwhcayouare
fatigued, Ig, or upset,orif youhavetakenalcohol,
drugs,ormedication.YoumustbeIngoodphysical
conditionandmentallysteal.Chalnsawv/or:<isstrenu.
cos. Ifyouhaveanycoedltlonthatmightbeaggravated
bystrenuouswork,checkwithyourdoctorbeforeoper-
atingachainsaw.
•Oonotattempttouseyourchainsawduringbad
waathercondgionssuchasstrongwJndlrain,snow,Ice,
etc.,oratnight.
•Carefullyplanyoursawingopemtlcainadvance.
Donotstartcuttinguntilyouhaveaclearworkarea,se-
curefooting,and,ifyouarefellingtrees,a pJannedre-
treatpath.
• Do not operates chainsawthat Is damaged
Improperlyadjusted,or not completely and
securely assembled, Always replace the
haodgcardimmediatelyif it becomesdamaged,
broken,orIsotherwiseremoved.
•Keepthehantilasdry ctaan,andfrcoofoilorfuel
mxture.
•Withtheenginestoppedhandcarrythechainsaw
withthemufflerawayfromyourbody,andtheguide
barandchainto therear,preferablycoveredwitha
scabbard.
ELECTRICAL SAFETY
•Avoidbodilycontactwithchainanytimesawis
pluggedintoa powersource;thechainwillcontin-
uetomoveforashorttimeaftertdggerisreleased.
•Avoiddangeroussituations.Donotexposethe
unittorainoruseindamp,wet,gaseous,orexplo-
sivelocations.
• UnplugpowereordwhensawIs notth use.
,_ Allowthemotor to stopandthechainto stop
turnthgbeforesettingthesawdown.
•Guardagainsteleotd¢shock. Avoidbodycon-
tactwithanygroundedconductor,suchasmetal
pipesandwirefences.
•Avoidentanglement.Keepcordsclearofopera-
tor,sawchain,endbranchesataJItimes.
• Do not abusecords. Nevercarrysewby the
powercord oryankitto disconnect,Keeptool
cord andextensioncordawayfromheat,0il,and
sharpedges.
•Useonly extensioncordsmarked assuitable-
foroutdooruse.
|
LOOK FOR THIS SYMBOL TO POINT OUT IMPORTANT SAFETY PRECAUTIONS. /
IT MEANS -ATTENTIONIII BECOME ALERTII! YOUR SAFETY !S iNVOLVED. J

SAFETY RULES
OPERATEYOURSAWSAFELY • Keepoilcap, ecrews, andfastenerssecurelyBgbt.
• Donut oporateachainsaw withonehand,Sedous ened.
InjuP/totheoperator,helpers,bystandersor anycom-
binationof thesepersonsmayresugfromone-handed •
operation.Achaincawisintendedfortwo-handeduse.
• Operatethe chain saw only In well-veutilatedout- MAINTAIN YOUR SAW IN GOOD WORKING
doorareas. ORDER
•Donotoperatesawfromaladderor inatree, udess
• specificallyttainedto do so.
Positionall partsof yourbodyto the leftof cutand
awayfrom thechainwhen theenglne is running.
•Cut woodonly. Donotuseyoursawto pPjorshove
awaylimbs,roots,or otherobieofs.
•Makesure thechain will notmakecontactwithany
objectwhile startingtheengine. NeverWtoofadthe
sawwhentheguldebarisin acutor kerr.
•UseextremecauBonwhencuttingsmagsizebrush
and saplings. Slendermatedalcan catchthe chain
• andbe whippedtowardyouor pullyouogbalance.
Be aledfor sprthgbeckwhencuttingalimbthatisun-
dertensionsoyouwillnotbestruckbythe limborsaw
whenthetensioninthewoodfibersisreleased.
• DOnutput pressureon thesaw at theendof acuL
Applyingpressurecancauseyouto losecontrolwhen
thecutiscompleted.
•Stoptheunitbeloreseffingthesawdown.
•Haveagchaincaw serriedperformedbyyour Sears
ServiceCenterwilhtheexceplionoftheitemslistedin
thema_enanca sectionof_is manuof.
• Make certain the chain stops movingwhen the
throttletriggeris released.
Stopthe sawif the chain strikes aforeign object,
i nspectunitandrapairor replacepattsas necesca_y.
Disconnectthe unit from the powersourcebefore
pedormlngany maintenance.
• Nevermodifyyoursawin any way. Useonlyaitaeb-
mentssuppliedor specificallyrecommendedbythe
raanofaoturec
TRANSPORTING AND STORAGE
•Stoptheunitbeforstraosporting.
• Allowtocool,covertheguidebarandchain,andsecure
the unitbeforestoringortransportingina vehicle.
• Storaunitsothechaincannotaccidenlallycaucainjury.
• Storatheunitoutofthereachofchildran.
GUARDAGAINSTKICKBACK-Kickbackisadangerousreactionthatcanleadtoseriousinjury.
I& KICKBACK WARNING
KICKBACKCAN OCCUR WHEN THE KICKBACK
MOVING CHAIN CONTACTS AN
OBJECTAT THE UPPER PORTIONOF
THETiP OF THEGUIDEBARORWHEN
THEWOODCLOSES INAND PINCHES
THECHAININ THECUT. CONTACTAT
THE UPPERPORTIONOF THE TiP OF
THE GUIDE BAR CAN CAUSE THE
CHAIN TO DIG INTO THE OBJECT,
WHICH STOPS THE CHAIN FOR AN
INSTANT.THERESULTISA UGNtNING
FAST, REVERSE REACTION WHICH
KICKSTHE GUIDEBARUP ANDBACK
TOWARD THE OPERATOR. IF THE
CHAIN IS PINCHEDALONG THE TOP
OF THE GUIDEBAR THE GUIDEBAR
CAN DE DRVEN RAP DLY SACK
TOWARDTHEOPERATOR.EITHEROF
THESEREACTIONSCAN CAUSELOSS
OF SAW CONTROL WHICH CAN,
RESULTIN SERIOUSINJURY.DO NOT
RELYONLYON THE SAFEW DEVICES
PROVIDEDWITH YOUR SAW. AS A
CHAINSAW USER, YOU MUST TAKE
SPECIAL SAFETY PRECAUTIONSTO
HELP KEEP YOUR CUTTING JOBS
FREEFROMACCIDENTOR IRJURY. '
Figure2
AVOi0
Figure3
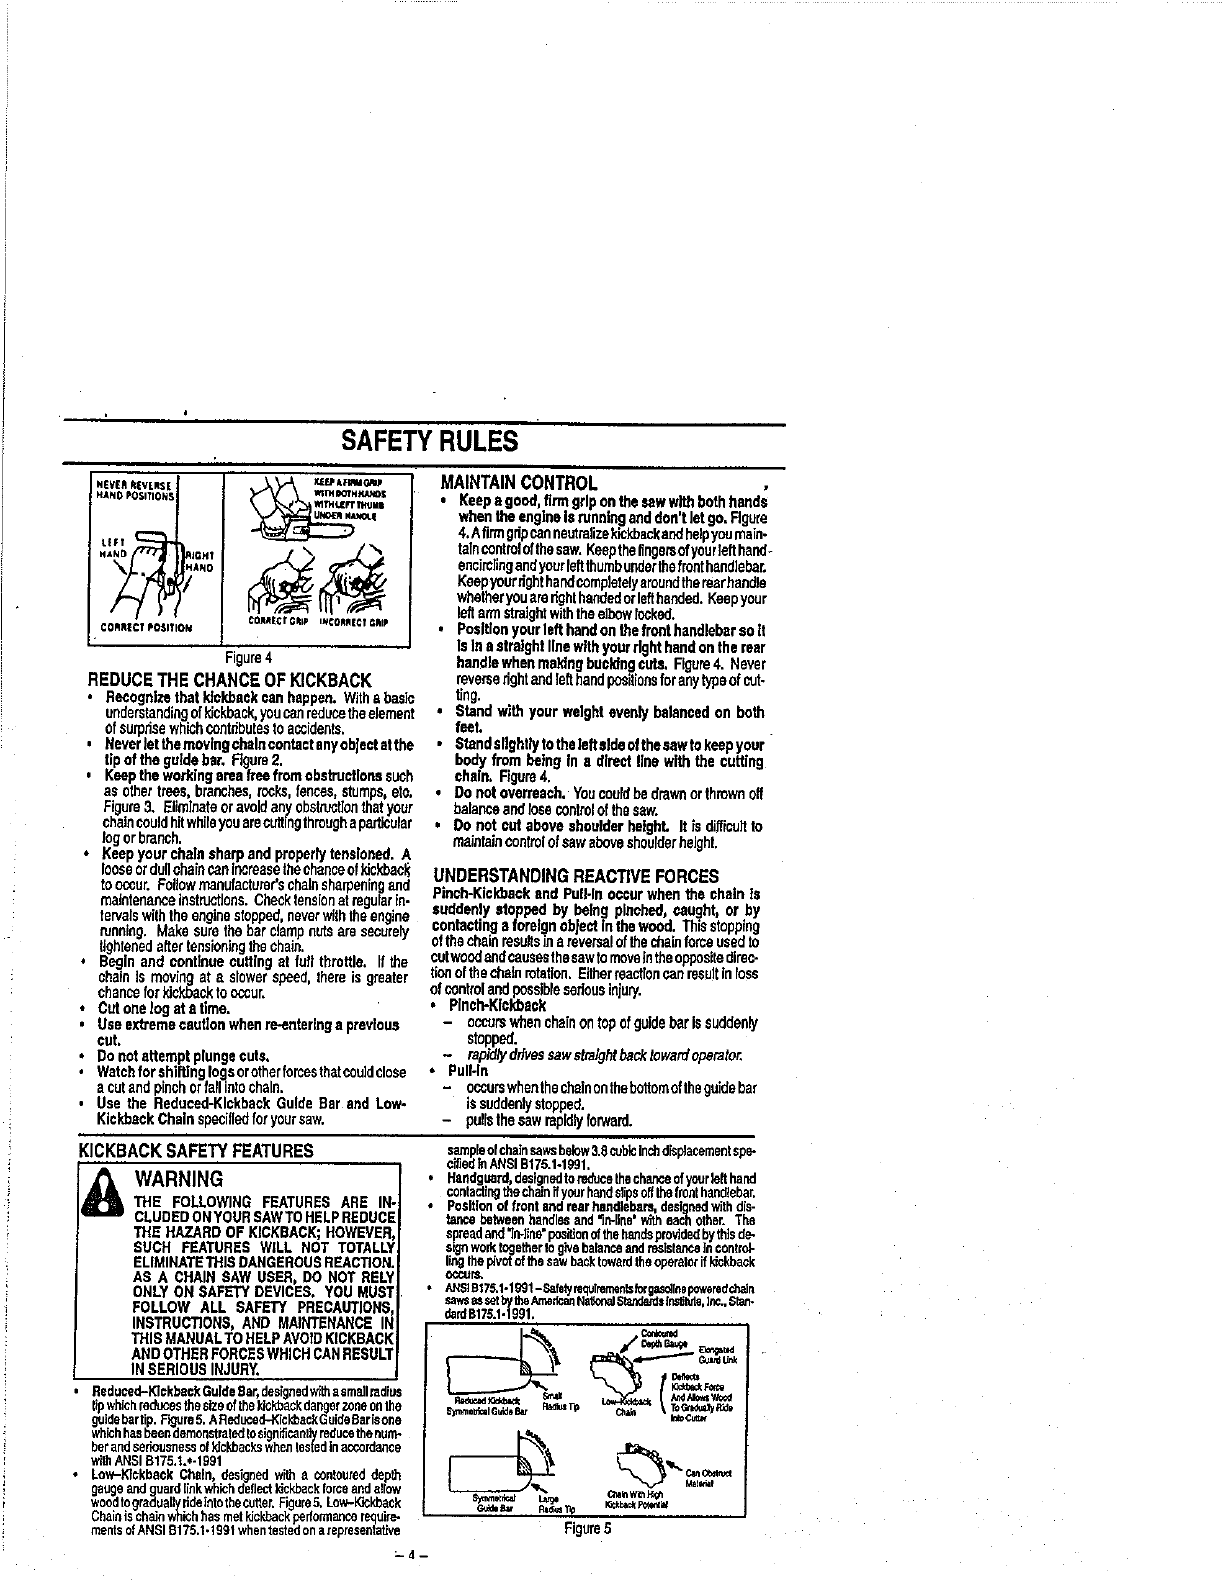
SAFETYRULES
N[_'[,_ R|VERSE
HANDPOSITIONS
t.{fT
HAND JGHI
ANO
C0RREC!PO$1T_ON
JEJE_AF_ eA_
W11_DG?HJC_G$
_ITN U[FT 1HUI
CORrECt GI_I_ INCORR[¢f GRIp
Figure4
REDUCETHECHANCEOFKICKBACK
. Recognizethat kfcldoankcan happen. Withabasle
understandingof_ckbeck,youconreducetheelement
ofsurpasswhichcontributestoaccidents.
,NeverIst themovthgchelacantact anyobjectatthe
tipof the guidobar, Figure2.
* Keepthe workingareafreefrom obstructionssuch
as othertrees,branches,rocks,fences, stumps,etc.
Figure3. Elimlnataor avoidan7obstmat]onthatyour
chaincouldhitwhileyouarecuttingthroughe particular
logorbreach.
• Keepyour chela sharpand properlytanelaaed. A
looseordu[Icha{ncanincreasethechanceofkickbec)_
tooccur. Followmanufacturerschainsharpeningand
maintenanceinstnJcltoco.Checktensionat regularIn-
tervalswiththeenginestopped,neverwiththeengine
running.Makesurethe bar clampnutsare securely
lightenedaftertensioningthechain.
• Begin and continuecuttingat tugthrottle. Ifthe
chainis movingat aslowerspeed,thereis greater
chancefor kicld_cktooccur.
•Cut onelog at e time.
. Use ex_'emecautlon whenre-enterthg a prevthua
cut,
•Do notattemptplungecuts,
, Watchfor ehiRlnglogsorotherforcoethatcouldclose
acutandpinchorfallintochain.
, Use the Reduced-KickbackGuide Bar and Low-
KickbackChainspeciltedforyoursaw.
MAINTAINCONTROL
• Keepa go_, firm gripon thecow withbcth heads
whenthe engineIs runninganddon'tletgo, Rgure
4,Afirmgdpconneutndizekickbeckandhelpyoumain-
tamcontrolofthesew.Keeptheltngereofyourlefthand
encimiingandyourreftthurebunderthefmuthaed]ebar.
Keepyourdghtheedcompletelyereundthe rearhandle
whetheryouaredghtheededorleftheeded.Kanpyour
leftarmstraightwiththee]bawlooked.
•Position yourlefthandDothefronthandlebersoIt
Is in a straightline withyourrighthandonthe rear
handlewhenmakingbuckingcuts, Figure4. Never
mvemerightandlefthandpesiltonsforanytypeofcut.
tins.
•Stand with your weightevenlybalancedon both
feet.
• Standaffghtlytothe Isft sideoftheeawtokeepyour
body from being In a directllnewith the cutting
chain. Figure4.
•Donot overreach, Youcouldbedrawnorthrownoff
balanceandrosecontrolofthesaw.
• Do not cut above shoulderheighL It is difficultto
maintaincontrolofsawaboveshoulderheight.
UNDERSTANDINGREACTIVEFORCES
Pinch-KickbackendPug-InoccurwhenthechainIS
suddenlystoppedbybathspinched,caught,or by
contactingaforeignob_eofInthewood.Thisstoppfng
ofthechainresultsinareversalofthechainforceusedto
cutwoodandcausesthesawtomoveintheoppositedirec_
tianofthechainrotagon.Eitherreactionconresuffintoss
ofcontrolandpassiblecodousinjury,
•Pinch-Kiskback
-occurswhenchainontopofguide_r issuddeely
stopped.
-rapMiyddvessaws_/ghtbacktowardoperetor.
•Pug-In
- ocoumwhanthecheinontheboftomofthegu]debar
issuddenlystopped.
- pullsthesawrapidlyforward.
KICKBACKSAFETYFEATURES
A WARNING 1
THE FOLLOWING FEATURES ARE IN-J
CLUDEOONYOURSAWTOHELPREDUCEI
THE HAZARDOF KICKBACK;HOWEVER,I
SUCH FEATURES WILL NOT TOTALLYI
ELIMINATETHIS DANGEROUSREACTION
AS A CHAINSAW USER, DO
ONLYON SAFETYDEVICES. YOU
FOLLOW ALL EAFET'f
THIS
IN SERIOUS INJURY.
Reduced-Klokbecl(Gulde9er, designedw_ a smkilradths
lipwhichreducesthe size ofthekickbackdangerzoneonthe
guidebartip. F)gure5. AReduced-KickbackGuideBarkione
whichhasbeendemonctratedtosigni;icanll]yreducethenum-
der andseriousnessofkickbacks whentestedinaccord_ce
withANSIB175.t.*-1991
• Low--k%kback Chain, designedw_ a contoureddepth
gaugeand ard[inkwhkih deflectkickback forceandaithw
woedtogra_Uuali_/rideintothecuner.Figure5. Low-I_ckback
Chainis chainwninhhas metkickbackperformancerequire-
mantact ANSI B175.1.1991whentestedonarepresentaiJve
sampleofchainsawsbelow3.8cubicInchdisplacementspe-
cifiedinANSI B175.1.1991.
•Handguard deslgnedtoredecethechanceofyourlofthand
contactingthechainffyourhandslips offthe ltoct henolebar.
•Position of front and rearhandlebars, desilgEnedw_hdis-
tahoe between handlesand "in-line"with eachother. The
sprereadand"In-line"positionofthehandsprovidedbythis de-
signworktogethertogivebabnce andre_kitanceincontrol-
llngthe I_votof the sawbacktowardtheoperatorifkickback
occurs.
•AN_ Br7a.t. 1991- Safetyrequlrerr_n_forgasdthepowerecld'_n
saws=Beet theAn'_dcanNaflceaJa_instliute inc.,Start*
dardB17a.1_99 ,
5"F_netrEalGuide BatRadle=_
Joe_8=w,e_
/_/JIo,vs_
k_oCut_,
Malwlal
FigureS
CONGRATULATIONSon yourpurchaseof aSeam
CraftsmanElectdsChainSaw.Ithasbeendesigned,engi-
neeredandmanufacturedtogiveyouthebestpessibrede*
pendabifityandperiormaece.
Shouldyouexpedenceanyproblemsyoucannoteasily
remedy,pleasecontactyournearestSearsServiceCen-
ter/Oepadment.Searshascompetent,welltrainedtechni-
ciansandthepropertoolstoserviceorrepairthisunit.
Pleasereadandmtsin this manual The instructionswill
enableyouto assemMeandmaintainyour unitpropedy.
Alwaysobservethe"SAFETYRULES."
MODELNUMBER:
358.34111 35824260
358.34251 358,344910
35824180
SERIALNUMBER:
DATEOF PURCHASE:
THEMODELANDSERIALNUMBERWILLBEFOUND
ONTHEPRODUCT,
YOU SHOULD RECORD BOTH SER_L NUMBER
ANDDATEOF PURCHASEAND KEEP IN A SAFE
PLACEFORFUTUREREFERENCE.
PRODUCT SPECIFICATIONS
VOLTAGE:................. 120VoIIAC50_0 Hz,
AMPS:
358.34111.. 10,5
358.34251.. t0.5
358.34180.. 12
358.34260.,12
358.34491.. 12
GUIDE BAR:
358.34111 ,. 14"
358.34251.. 14"
358.34180 .. 16"
358.34260.. 16"
358.34491 .. 16"
CHAIN: ....... Low Profile3/8" Pitch
OILER: .................... Manual
DRIVESYSTEM ............ Gear Drive
M_NUFACTIJREPUH_ER1HE FO_/_G PAT_N_
CUSTOMER RESPONSIBILITIES
• Readandobservethesafetyrules.
•Followaregularschedulein maintaining,caringIor,
andusingyour unit.
• Fofl0wtheinstructionsunder"CustomerRespensibili-
ties"and=Storage"sectionsofthLsOperalor'sManual.
FULLONEYEARWARRANTYONCRAFTSMANELECTRICCHAINSAW
If IMsCrsgsmanElectdeChainSawfailsto performpropedyduetoa detectinmatedalor workmanshipwithin t
oneyearfromthedateofpurchase,Searswillrepairorrepleceit,freeofcharge.
Thiswarrantyexcludesthebarandchainwhichareexpendableparts,andbecomewornduringnormaluse.
WARRANTYSERVICEIS AVAILABLEBY'RETURNINGTHE CRAFTSMANELECTRICCHArNSAWTO THE
NEARESTSEARSSTOREINTHEUNITEDSTATES.
Thiswarrantygivesyouspecificlegaldghts,andyoumayalsohaveotherrightswhichveryfromstatetostate.
SEARS,ROEBUCKANDCO,,DEPT.817WA,HOFFMANESTATES,IL 60179
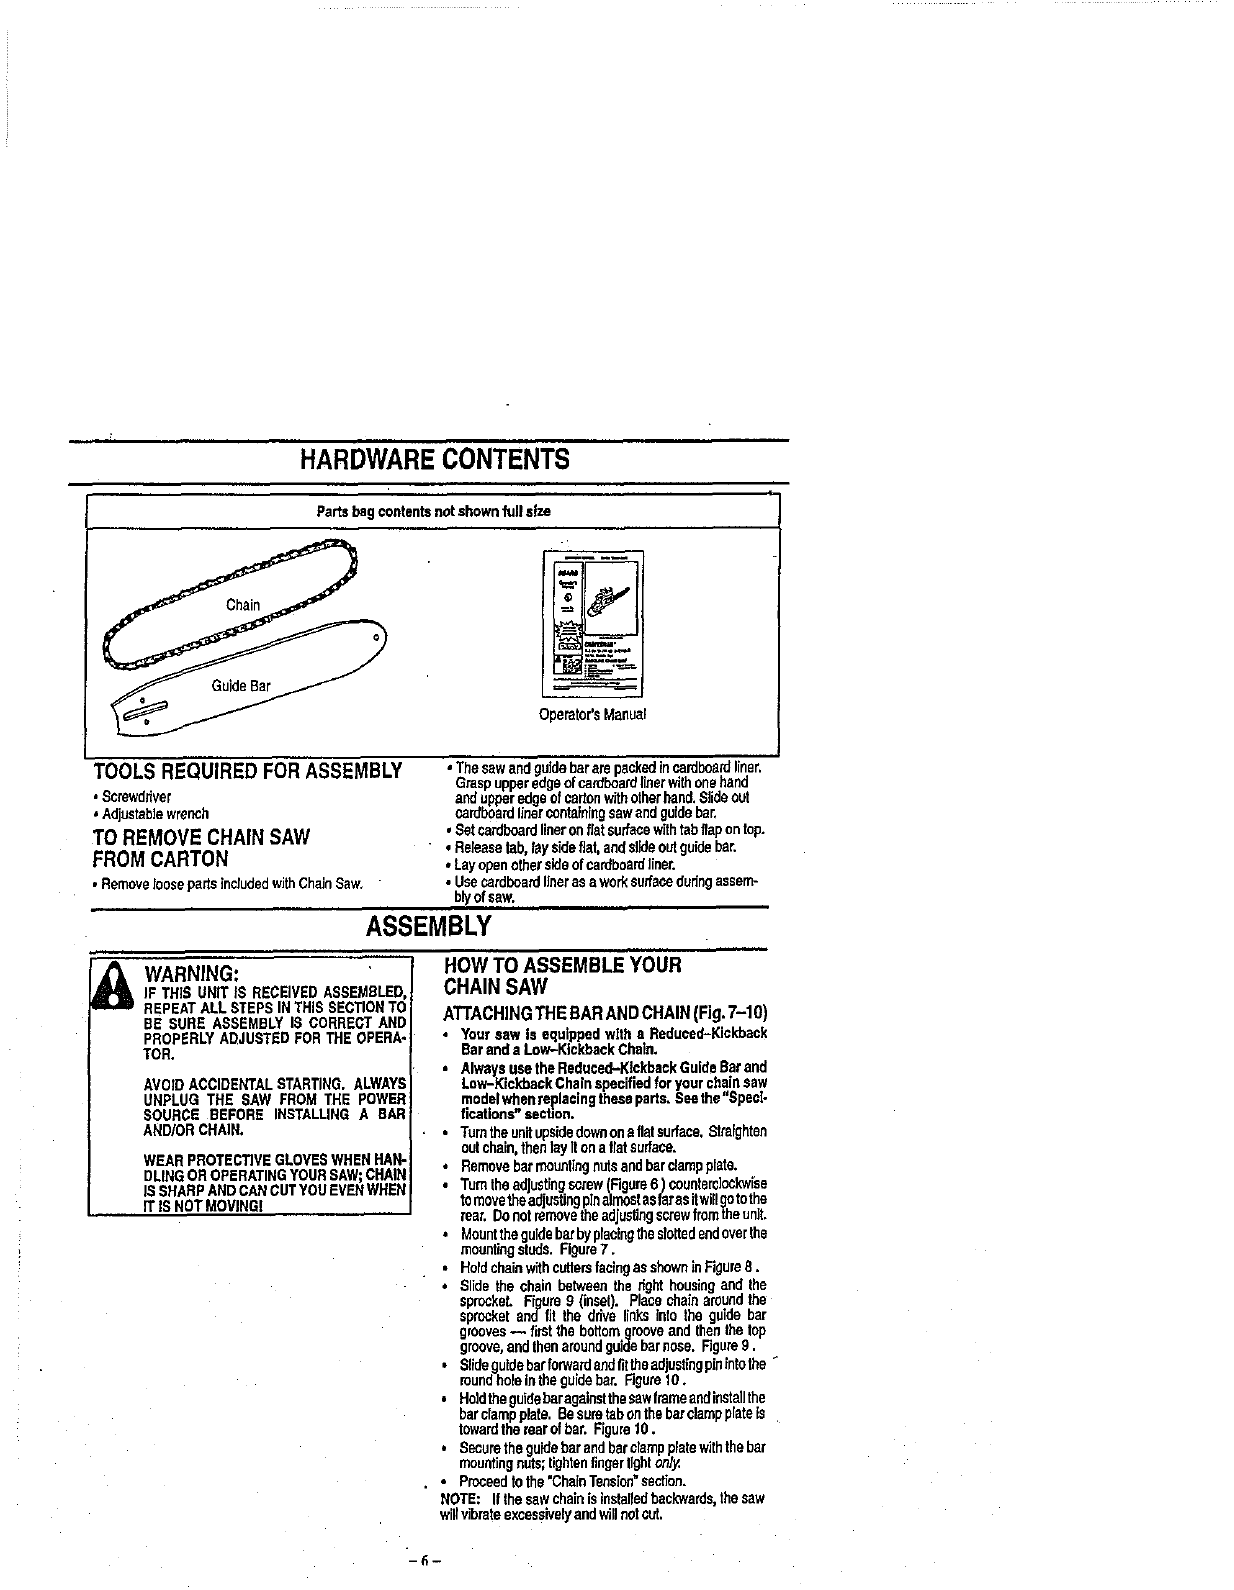
HARDWARECONTENTS
Partsbogcontentsnotshownfull size
Operator'sManuel
TOOLS REQUIRED FOR ASSEMBLY •Thesswendgu]debararepackndfacardbosrdlinen
Graspupperedgeof cardboardlinerwithonehand
,Screwdfiver andupperedgeofcartonwithetherhand.Slideout
• Adjustablewrench cardboardlinercontaidfafisawand guidebar,
TO REMOVE CHAIN SAW , Setcardboardlineronflatsurfacewithtabflapontop.
, Releasetab,faysidefiat,andslideoutguidebar.
FROM CARTON , Layopenethersideof cardboardliner.
, RemovelooseparfsincludedwithChafeSaw. " • Usecardboardlineras e worksurfacedudngassem-
blyof sew.
ASSEMBLY
" ARNING:IF THJS UNIT iS RECEIVEDASSEMBLED,
REPEATALL STEPSIN THIS SECTIONTO
BE SURE ASSEMBLYIS CORRECTAND
PROPERLYADJUSTEDFOR THEOPERA-
TOR.
AVOIDACCIDENTALSTARTING.ALWAYS
UNPLUG THE SAW FROM THE POWER
SOURCE BEFORE INSTALLINGA BAR
AND/ORCHAIN,
WEARPROTECTIVEGLOVESWHENHAN-
DLINGOR OPERATINGYOURSAW;CHAIN
IS SHARPANDCANCUTYOUEVENWHEN
IT tS NOTMOVING[
HOW TO ASSEMBLE YOUR
CHAIN SAW
ATTACHINGTHEBARANDCHAIN(Fig.7-10)
• Yoursew Is equippedwlth a Reduced-Kickback
Bar anda Low-KickbackChain.
•Alwaysusethe Reduood-KlekbeckGuidoBarand
Low-Kickback Chainspecifiedfor yourchainsaw
modelwhenreplacing theseparts.Seethe"Speci-
fications"section.
•Turnthe unitupsidedownonsflatsurface.Straighten
outchain,thenlayItona flat surface.
• Removebarrnoundngnutsandbarclampplate.
•TurntheedJusfingscrew(Rfiure6) counterc]nckwise
tomovetheedjuutingpinalmostastarasitwillgotothe
rear.De notremovetheadjusfingscrewfromtheunit.
•Mounttheguidebarbypfacfagthesfottedendoverthe
mountingstuds. Figure7,
•Holdchainwfihcutterstaethgoo shawnfa Figure8.
•Slidethe chain betweenthe fight housingand the
epreckeL RgureS (inset). Place chainaroundthe
sprocketand fit the drive linksinto the guidebar
grooves-- firstthe bottomgrooveandthenthetop
groove,andthenaroundguidebarnose. Figure9.
• Slideguidebarforwardendfittheadusfingpfaintothe _
roundhotainthegudebar,Figure10,
•Holdthegutdeheragainstthesawframeandinstallthe
bardampplate. Sesuretabonthebarclampplateis
towardtherearofbar. Rgure10.
• Securethegu_e harand bareismppFetewiththebar
mountingnuts;lightenfingertighton_
• Proooodtothe "ChafaTooeioo"section.
NOTE: Ifthesaw chainis fastaflndbookwards,thesaw
willvibrateexeeeeivelyandwillnotcut.
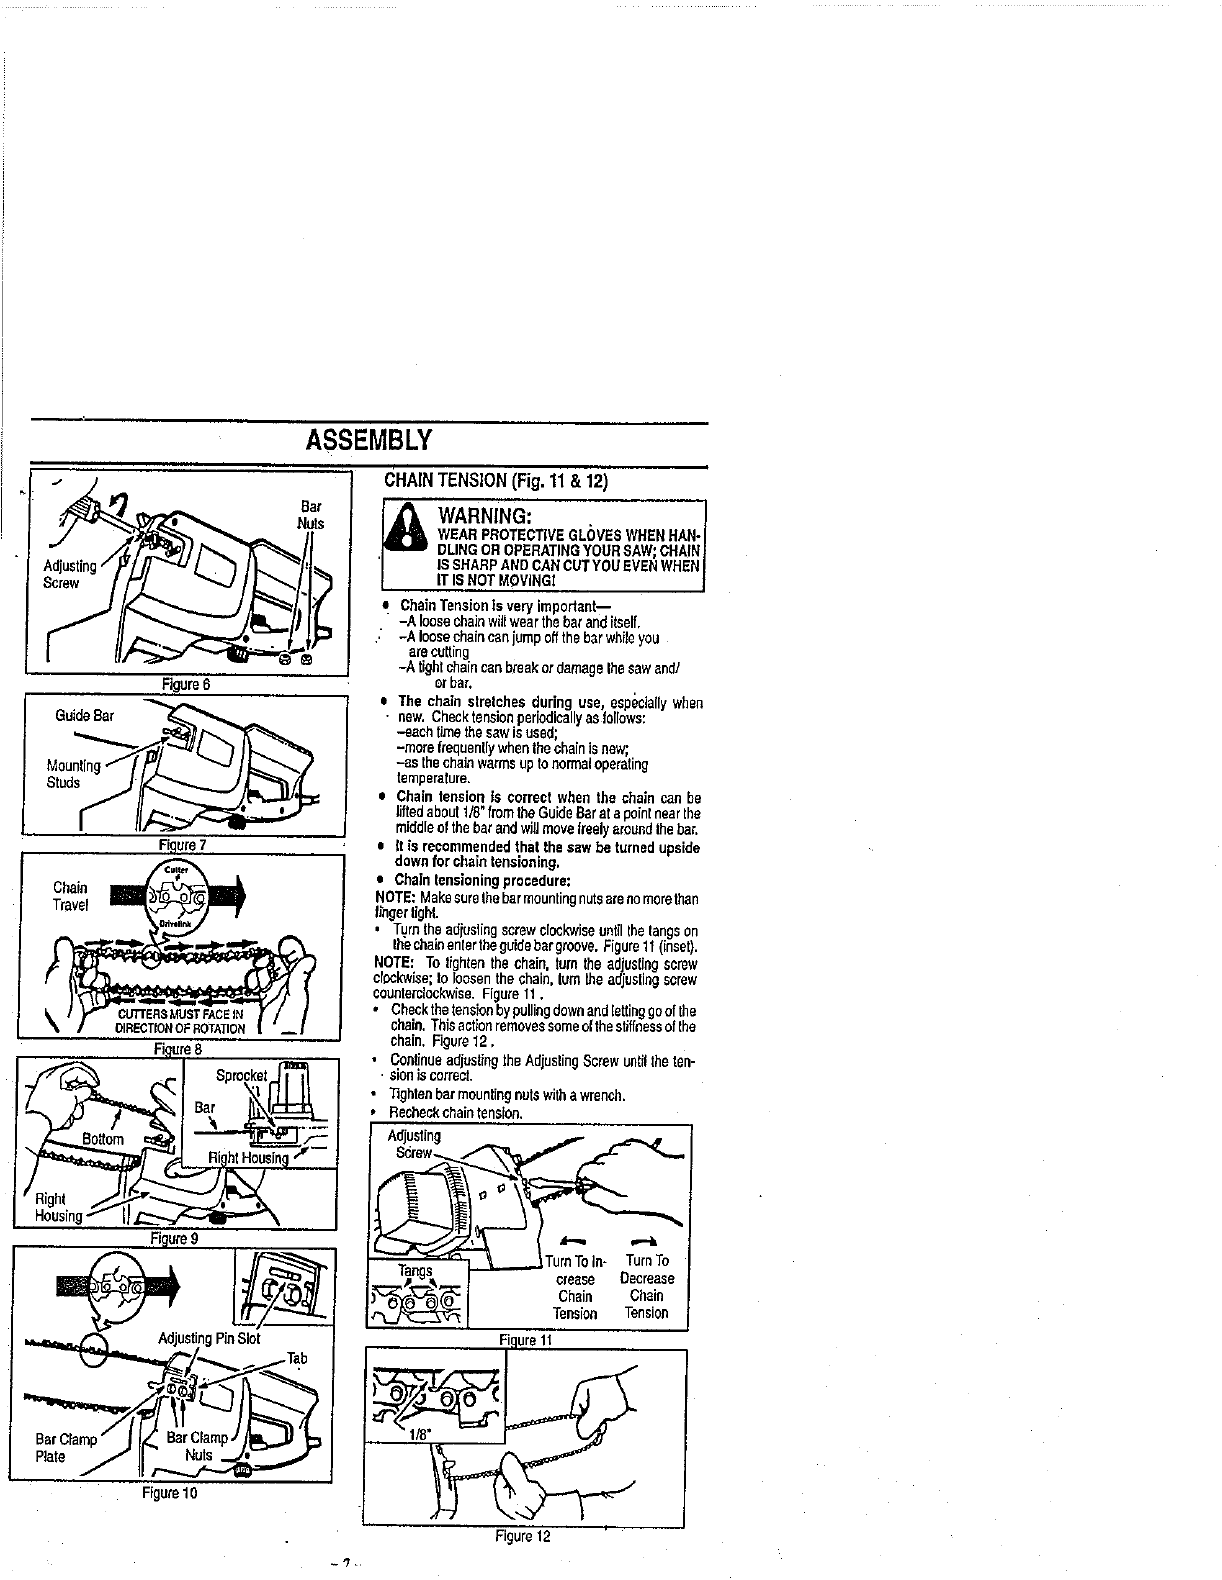
ASSEMBLY
FigureS
GuideBar
Studs
Figure7
Chain
Travel
CUTTERSMUSTFACEIN
OIRECTIONOFROTATION
r-
Figure9
a_
Sprooket.,.._
Bar
PinSlot
Rate
Figure10
CHAINTENSION(Fig.11& 12)
[_'_ WARNING: .
rAlulL WEARPROTECTIVEGLOVESWHENHAN-I
DUNG OR OPERATHGYOURSAW;CHAN I
'/ IS SHARPAND CANCUTYOUEVENWHEN|
IT ISNOT MOVINGZ J
ChainTensionis veryimportant--
-A loosechainwillwearthebaranditself,
,. -A loosechaincanjumpoffthebarwhileyou
areoolting
-A tightchaincanbreakordamageIhesaw and/
or bar.
• The chain stretchesduring use, especiallywhen
•new.Checktensionperiodicallyas follows:
-each timethesawisused;
-morefrequenLiffwhenthechainisnew;,
-as the chainwarmsup tonormaloperating
temperature.
oChain tensionis correct when the chain can be
liftedabout1/8"fromthe GuideBarat a pointnearthe
middleofthebarandwillmovefreelyaroundthebar.
• it is recommendedthat the sawbe turnedupside
downfor chaintensioning,
oChaintensioningprocedure:
NOTE: Makesurethebarmountingnutsarenomorethan
t_ngertight.
,T.umthe adiuslingscrewclockwiseuntil thelangs on
thechainentertheguidebargroove. Figure11(inset).
NOTE= To tightenthe chain turnthe adiustiagscrew
clockwise;to loosenthe chain,turnIheadjustingscrew
counterclockwise.Figure11,
• Checktbetensionbypullingdownandlettinggoofthe
chain,Thisactionremovessomeofthestiffnessofthe
chain. Figure12,
•ContinueadjustingtheAdjustingScrewuntilthe ten-
' sionis correct•
"lightenbarmountingnutswitha wrench.
Recheckchaintension.
Adjusting
Tangs
)_ _ crease Decrease
Chain Chain
Tension Tension
Figure11
Figure12
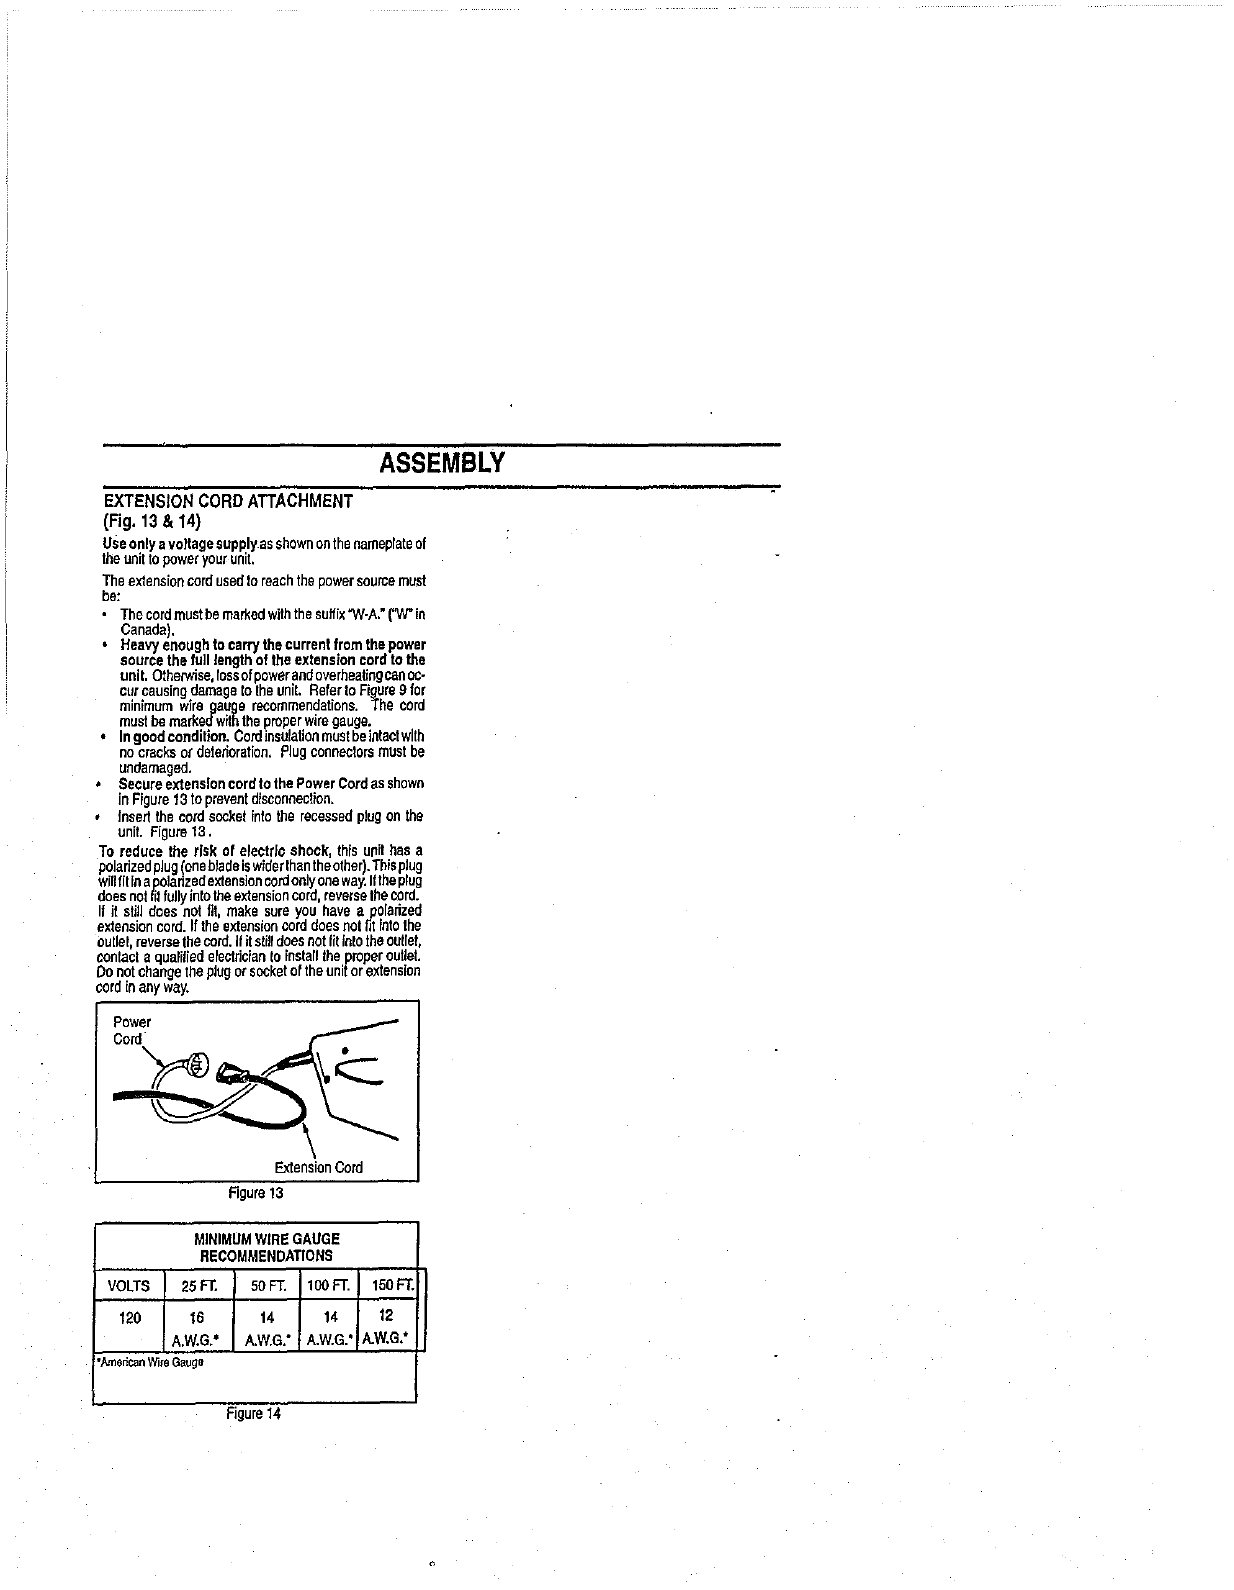
ASSEMBLY
EXTENSION CORD ATTACHMENT
(Fig. 13 & 14)
Useonlyavoltagesupplyasshownonthenameplateof
theunittopowecyourunit,
Theextensioncordusedtoreachthepowersourcemust
be:
• Thecordmustbe markedwiththesuifix"W-A."("W"in
Canada).
•Heavyenoughto carry thecurrentfrom the power
sourcethe fu]llengthof the extensioncordto the
unit.Othera'ise,lossofpowerandoverheatingcanec-
curcausingdamageto the unit. RefertoFigure9for
minimum wiregauge recommendations.The cord
mustbemarkedwiththeproperwiregauge.
• Ingoodcondition.Cordinsulationmustbei_eclwith
no cracksordetedoragon,Plugconnectorsmustbe
undamaged,
• Secureextensioncordtothe PowerCordasshown
inFigure13 topreventdisconnection.
• Insertthe cordsocketInto the recessedplugon the
unit. Figure13.
To reduce the risk of electrfoshock,thisunithasa
polarizedplug(onebladeiswiderthantheother).Thisplug
wiflfitlnapoladzedextensioncordonJyonsway.lftheplug
doesnotglfullyintotheextensioncord,reversethecord.
If it stilldoesnot fit make sureyou havea ,ecladzed
extensioncord.Iftheextensioncorddoesnotfit ntothe
outlel,reversethecord.ifitstilldoesnotfit intotheoutlet,
contactaqualifiedelectriciantoinstall theproperoutlet.
Donotchangetheplugorsocketoftheunitorextension
cordin anyway,
I Power /J
Cord
eI
Figure13
MINIMUMWIREGAUGE
RECOMMENDATIONS
IA.W.O.,IA.W :t
'.t_mor_WileGauge
i
Figure14
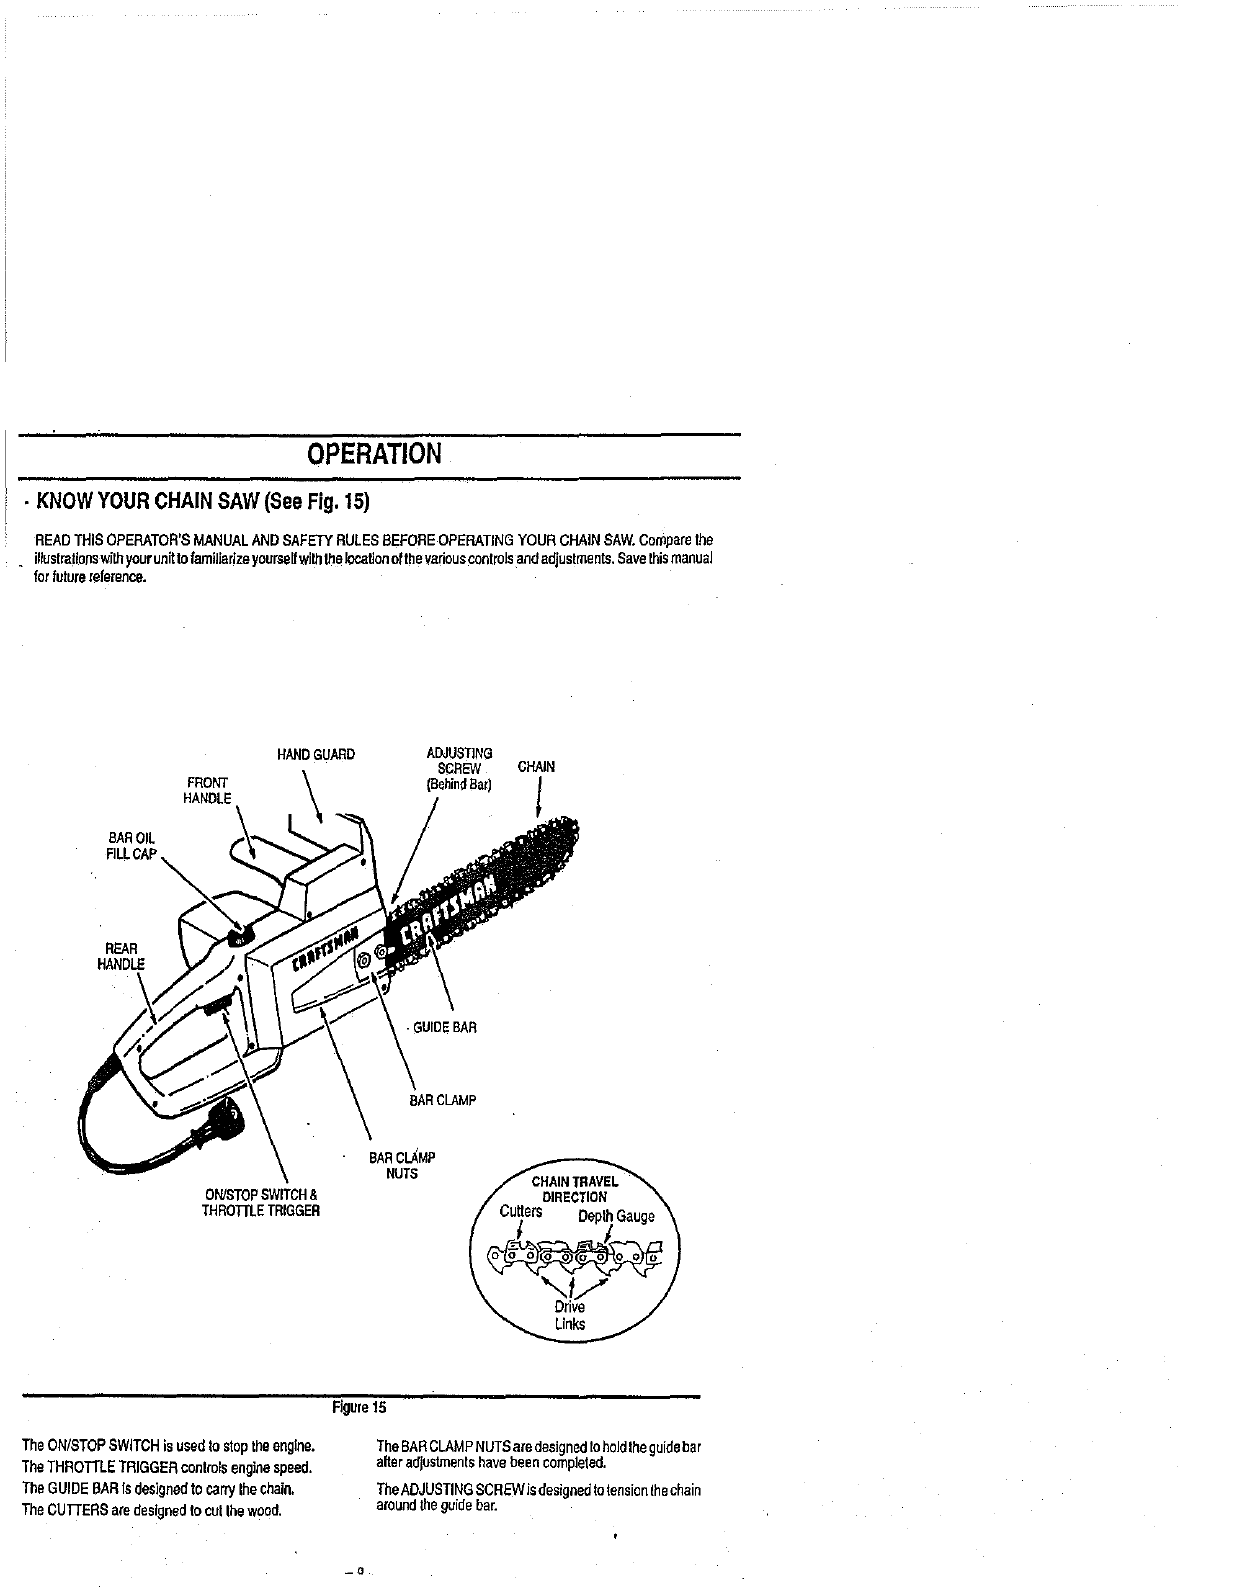
OPERATION
•KNOW YOUR CHAIN SAW (See Fig. 15)
READTHISOPERATOR'SMANUALAND SAFET_RULESBEFOREOPERATINGYOURCHAINSAW.Comparethe
.iflustrationswfthyourunRtefamiJiarizeyeerselfwghthelocatienofthe variouscontrolsendedjustmente.Savethismaeual
for futurereference.
BAROIL
FILLCAP
HANDGUARD ADJUSTING
SCREW CHAdN
FRONT (BehindBaD l
HANDLE
REAR
HANDLE
\
-GUIDEBAR
eAR CLAMp
ON/STOPSWITCH&
THROT[LETRIGGER
BARC_MP
NUTS
TheON/STOPSWITCHis usedtostoptheengine.
TheTHROTTLETRIGGERcontrolsenginespeed.
The GUIDEBARIs designedtocany thechain.
TheCUTTERSaredesignedtocutthewood.
Figure15
TheBARCLAMPNUTSaredesignedleholdtheguidebar
alteradjustmentshavebeen completed.
TheADJUSTINGSCREWisdesignedtotension[hechain
aroundtheguidebar.
-o
ii
OPERATION-SAFETY
& WARNING
IFSAWBECOMESPINCHEDORHUNGIHA
LOG,DONOTTRYTO FORCEITOUT.YOU
CAN LOSE CONTROL OF THE SAW
RESULTINGIN INJURYAND/ORDAMAGE
TO THE SAW, STOPTHE SAW,DRIVE A
WEDGEOF PLASTICORWOODINTOTHE
CUT UNTILTHESAW CAN BE REMOVED
EASILY. RESTART THE SAW AND
CAREFULLY REENTER THE CUT, T(
AVOIDKICKBACKAND CHAINDAMAGE
OO NOT USE A METALWEDGE.DO NO'
ATTEMPTTORESTARTYOURSAWWHEN
ITIS PINCHEDOR HUNGIN ALOG,
KICKBACK CAN OCCUR WHEN THE
MOVINGCHAIN CONTACTSAN OBJECT
ATTHE UPPERPORTIONOF THETIP OF
THE GUIDE BAR OR WHEN THE WOOD
CLOSESINANDPINCHESTHESAWCHAIN
iN THE CUT.CONTACTAT THE UPPER
PORTIONOF THETiP OF THEGUIDEBAR
CANCAUSETHE CHAINTO DIGINTOTHE
OBJECTAND STOP THE CHAINFOR AN
INSTANT.THE RESULTIS A LIGHTNING
FAST,REVERSEREACTIONWHICHKICKS
THEGUIDEBAR UP ANDBACKTOWARD
THE OPERATOR.IF THE SAW CHAIN IS
PINCHEDALONGTHETOPOFTHE GUIDE
BAR, THE GUIDEBAR CAN DE DRIVEN
RAPIDLYBACKTOWARDTHEOPERATOR.
EITHER OF THESE REACTIONS CAN
CAUSE LOSSOF SAWCONTROLWHICH
CANRESULTINSERIOUSINJURY.
GENERAL SAFETY
•Keepmbioratfu_lthruttledudngcutt;ngprecedura.
• Aliowthecheintocutthryouexertonlylightdowaward
pressure, you ore thecut,damagetothebar,chain,
ormotorcanresult.
• Releasethethrotttetdggeras econas theoutis cony
pleted,aUowingthemotortoidle.Ifyouruntheunitatfull
throttlewithoutcutting,unnecessarywearcanoccurto
thechain,bar,andmotor,
• Toavoidlosingcontrolwhencompletingthecut,doect
putpressureonthesawdudngtheendofthecut,
• Stopmotorbeforesettingunltdownafteroperetion.
FELLING SAFETY
WARNING
DONOT Cb3_.
-NEAR ELECTRICALWIRESOR BUILDINGS.
-IF YOUDONOTKNOWTHE DIRECTIONOF
TREEPALL
-AT NIGHT.
-DURINGBADWEATHER- RAIN,SNOW,
STRONG,WIND, ETC.
* Look for decayend rot. If the trunkis rotted,_tcan
snapandfalltowardtheoperator.
•Checkforbrokenordsadbrancheswhichcanfall on
youwhilecutting.
• Be extremelycautiouswithparltallyfallentreesthatmay
bepoedysupported.Whenatreedoesn'tfallcomplete-
ly,setthesawasideandpulldownthetreew_tha cable
winch,blockandtackle,ortractor.Toavoidinjury,donot
cutdownapartiallyfallentreewithyoursaw.
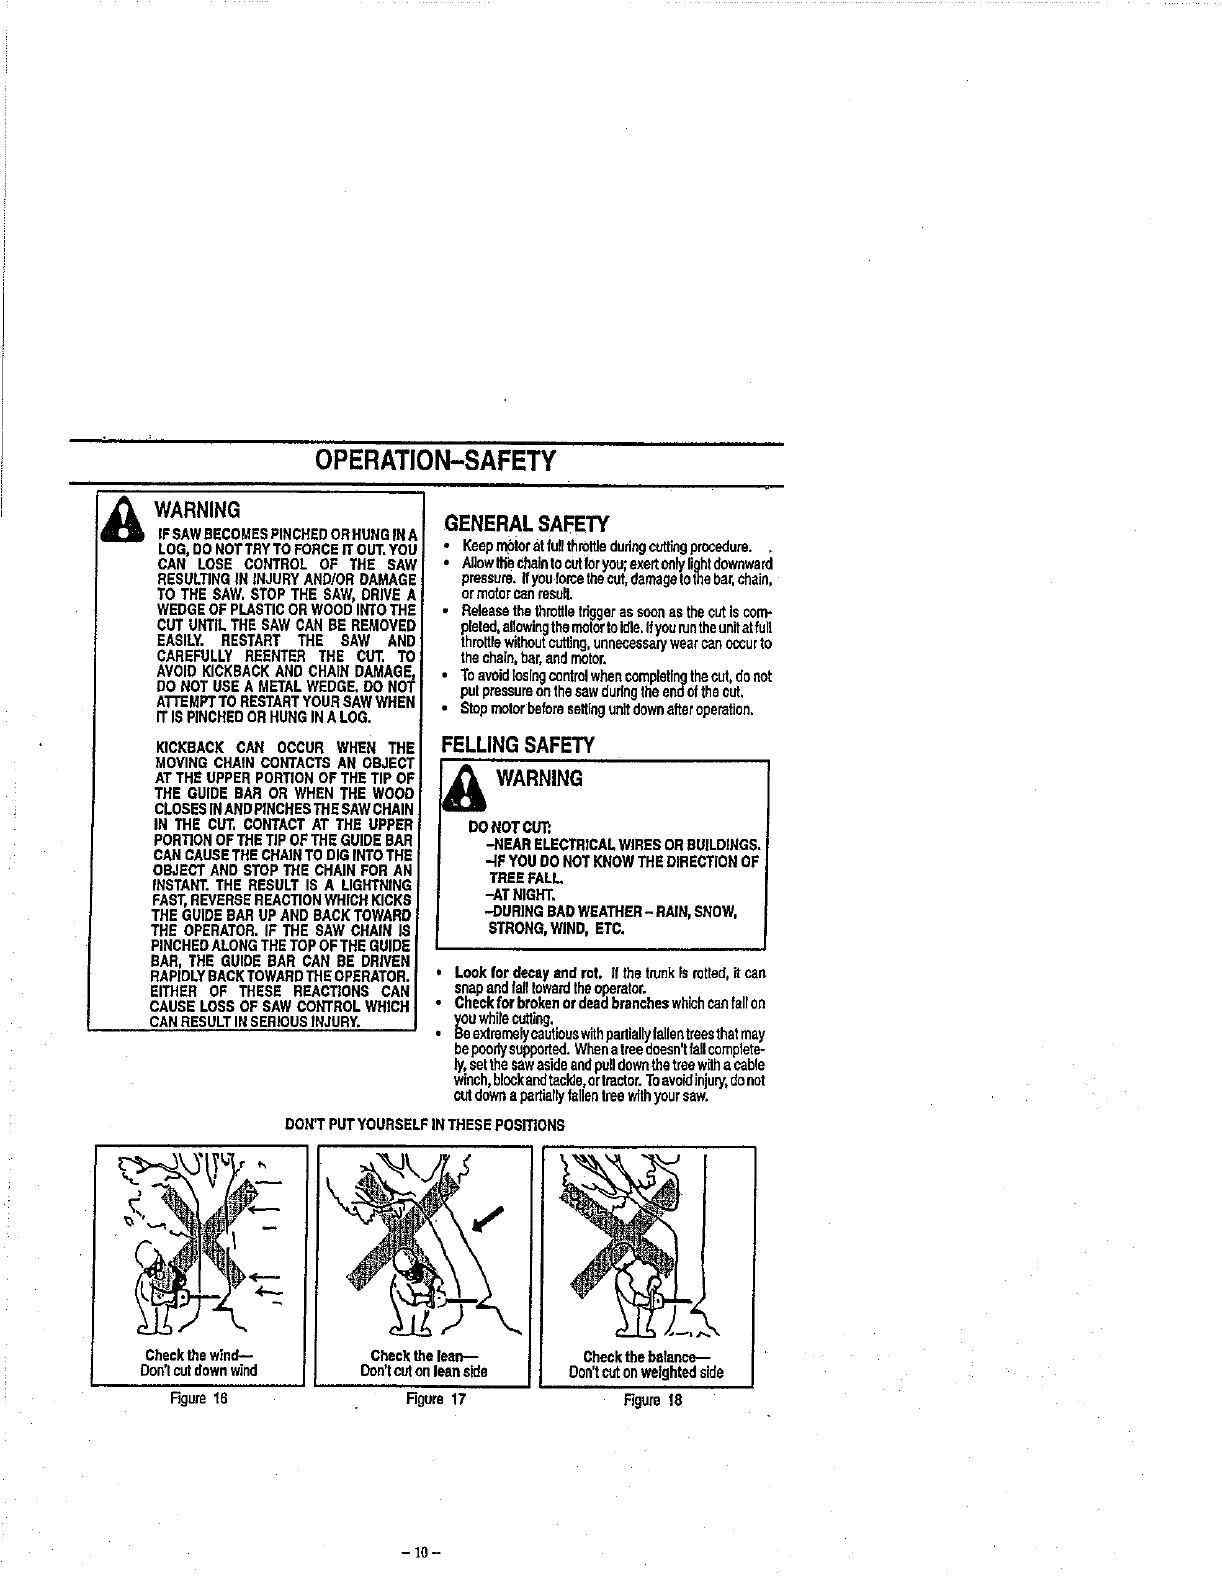
DON'TPUTYOURSELFIN THESEPOSITIONS
Checkthewind--
Don'tcutdownwind
Rgure16
Checkthe leon--
Don'tcutonleanside
Rgure 17
Checkthe befence--
Don'tcutonweightedside
Rgure 18
- 10-
OPERATION
"STOPPING YOUR UNIT
•Releasethe throttlotdgger.
iSTARTINGYOURUNIT
I
,"*Squeezethethrottlofrigger,
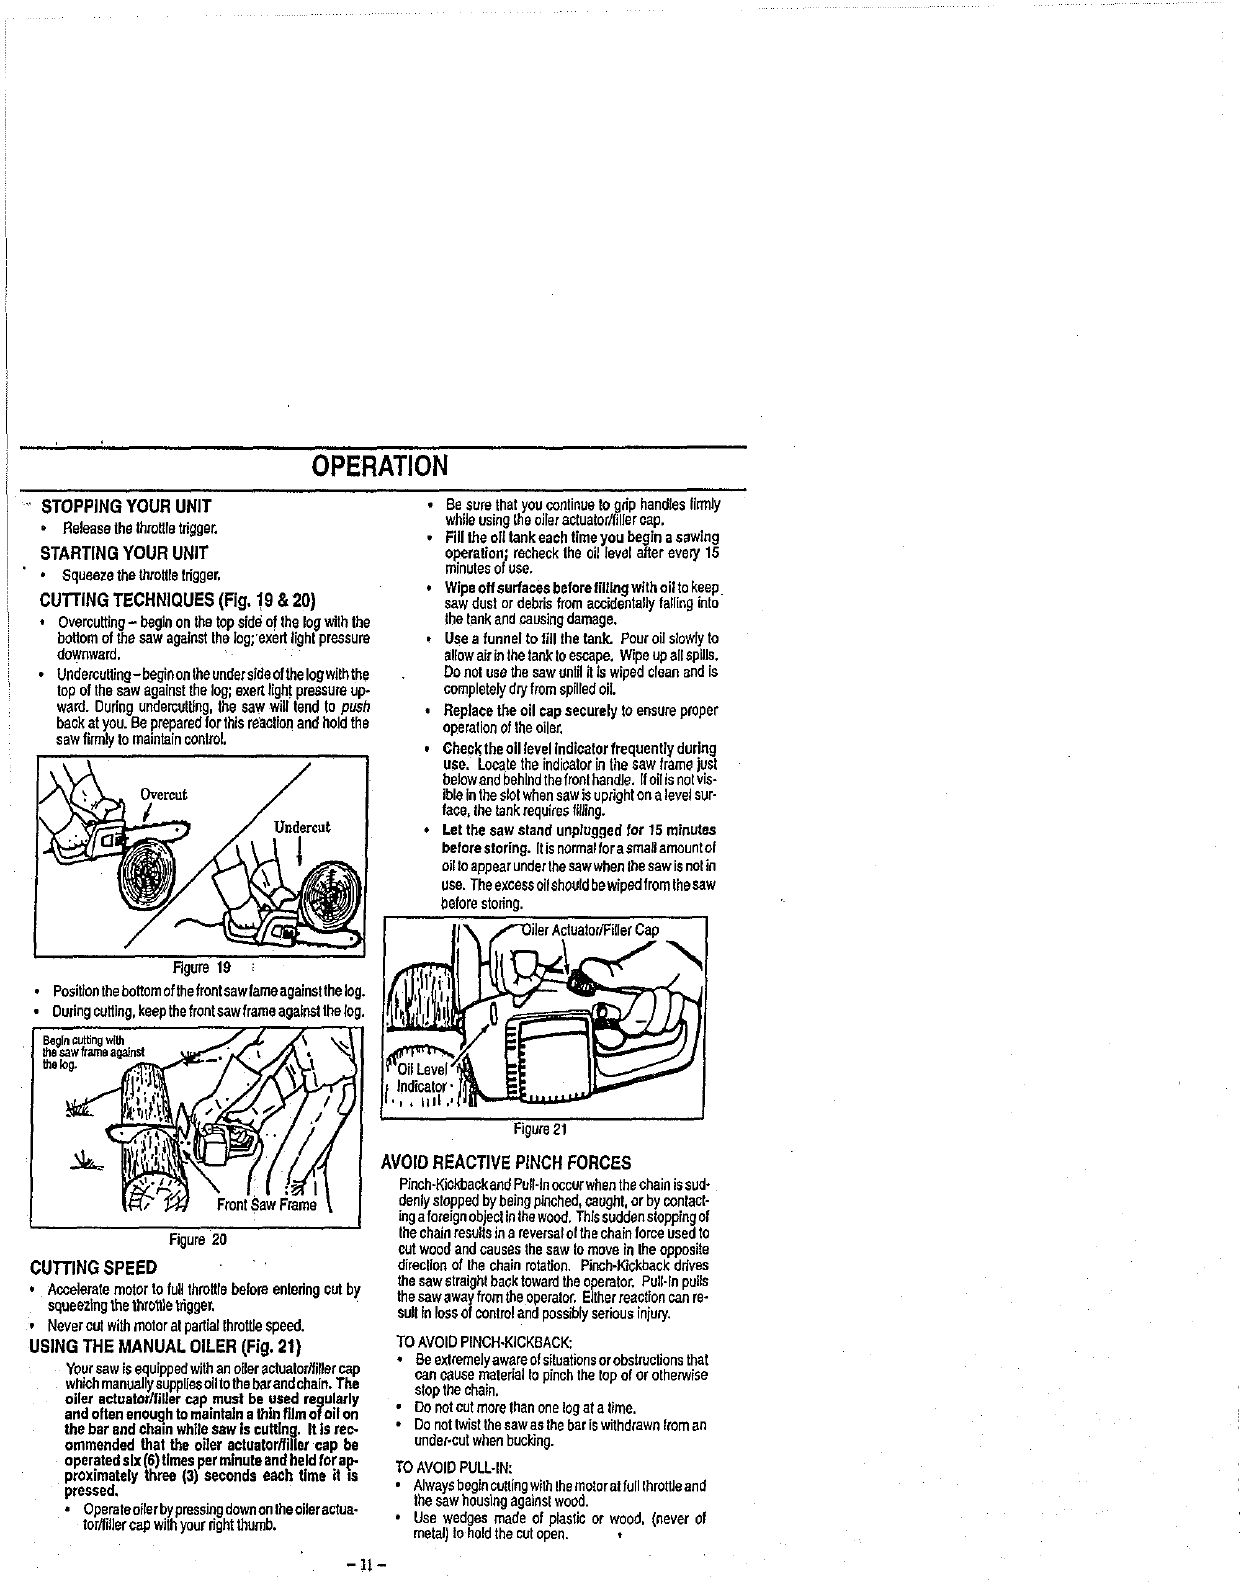
CUTTINGTECHNIQUES(Fig,19&20)
• Overcatting-beginca thethpsid_ of the log withthe
bottomof thesawagainstthe log; axed tightpressure
downward.
• Undercuttlog- beginontheundersideofthelogwghthe
topof thesawagainstthelog;exertgghtpressureup
ward.Dudngundercatgng,thesaw wilttend to push
hackat you.Be preparedforthisreactionandholdthe
sawfirmlyto maintaincontrol,
Overcut
•Besurethatyoucontinuetogdp handlesfirmly
whileusingthe oileractuator/fillercap.
•Fillthe ogtankeachtimeyou beginasawing
operation;recheckthe oillevelafterevery15
minutesof use.
•Wipeoffsurfacesbefore ttlftngwtthogta keep
sawdustordehdsfromeccidentagyfailinginto
the tankandcausingdamage.
tUsea funnelto fill thetank. Pouroilslowlyto
allowairinthetanktoescape.W_peupell spills.
Donet usethe sawuntilitIswipedcleanand is
completelydryfromspilledoil
•Rap!acetheoil cap securelyto ensureproper
operationof theoiler.
, Che0ktbaoilravelindicator frequently during
use. Locatetheindicatorin thesawframe est
belowendbehindthefronthandle.Ifoilisnotvs-
ibleintheslot whensawis uprightona levelsur-
face,thetankrequiresfilling.
• Letthe sawstand unptaggedfor 15 minutes
beforestortag, gisnormalforasmallamountof
oilto appearunderthe sawwhenthesawis notin
use.Theexcassoilshoefdbewipedfromthesaw
beforestodng.
Rgure 19 ;
•Positionthebottomofthefrordsawtameagalostthelog.
Oudngcutting,keepthefrontsawframeagainstthelog.
|'(:::(/" _ FmrdSawFrame
Figure20
CUTrlNG SPEED
•Acceleratemotorto fullthrottlebeforeentedngcutb)'
squeezingthethrottletrigger,
•Nevercutwithmotor atpadialthrottlespeed.
USING THE MANUAL OILER (Fig. 21)
Yoursawisequippedwithanoileractaatadfillorcap
whichmanuallysuppliesoiltothebarandchain.The
oiler sctuatedfiltarcap must be usedregularly
andoRenenou_Jhto maintaina thinfilmof off on
thebar endchainwhilesewis cutting. Itis rec-
ommendedthat the oger actuator/filler cap be
operatedsix(6)timesperminuteendheldforap
proximatelythree (3) seconds each time it m
pressed.
•Operateoitarbypressingdownontheoilorectae.
todfiJlorcapwithyourdghtthumb.
-!1-
=IM.I tw.,
OilLevd
Indicator
;, i.t,
Figure21
AVOID REACTIVE PINCH FORCES
Ploch-KickbackandPuIHnoccurwhenthechainissud-
denlystoppedbybeingpinched,caught,or byoontact-
loga foreignobjectintftewood.Thissuddenstoppingof
thechainresultsina revematel the chainforceusedto
cutwoodandcausesthesawtomovein theopposite
dimcllonof the chainmtatton. Pinch-Kickbackdrives
thesawstraightbaefttowardtheoperator.PuIHnpulls
thesawawayfromtheoperator.Eitherreactioncanre-
sultinlossofcontroland possiblyseriousinjury.
TOAVOIDPINCH-KICKBACK:
•Beextremelyawareofsguatlonsorobstructionsthat
cancause materiallo pinchthetopoforotherwise
stopthe chain.
• Donotcutmorethanonelogat e time.
•Donuttwistthe sawas thebariswithdrawnfroman
under-cutwhenbucking.
TO AVOIDPULL-IN:
•AlwaysbegtacuttJngwithlhemotoralfullthrotttasnd
thesawhousingagainstwood.
• Use wedgesmade of plastic or wood,(never of
metal}toholdthe cutopen.
OPERATION
FELLINGTREE
&WARNING
IF THETRUNKORLIMBSARERO'R'ING,
THEYCANFALLUNEXPECTEDLYAND
CAUSESERIOUSINJURY.
ASYOUMAKEYOURFELLINGCUT,IF
THESAWAPPEARSTO BE BINDING,
THETREE ISSTARTINGTO FALLIN THE
WRONGDiRECTiON,IMMEDIATELYSTOP
THESAWAND USEA FELLINGWEDGE
ANDMAUL(HAMMER)TO FORCETHE
FELLINGCUTOPEN,THEWEDGEWILL
HOLDTHE FELLINGCUTOPEN
ALLOWINGYOUTOREMOVETHESAW,
KEEPEVERYONEAWAYFROMTHE
TREEINALLDIRECTIONS.
DETERMINE THE NATURAL FALL DIRECTION
•Wind- Atreeevenlybalancedwillfaginthesamedirec-
tionthewindis biowiog.
• Lean- Use a carpenter'slevelor plumbbobtodeter-
mineif treehasa na_umrlean.A leaningtreewilltendto
fallindirectionof lean.
,Shape- Atreewilltendtofalltowa_s sidethatismore
heavilybranched.
, OtherFactors- Cootacliogornearbytrees,buildings,or
wirescaninfluencethedirectionthetreewillfell.
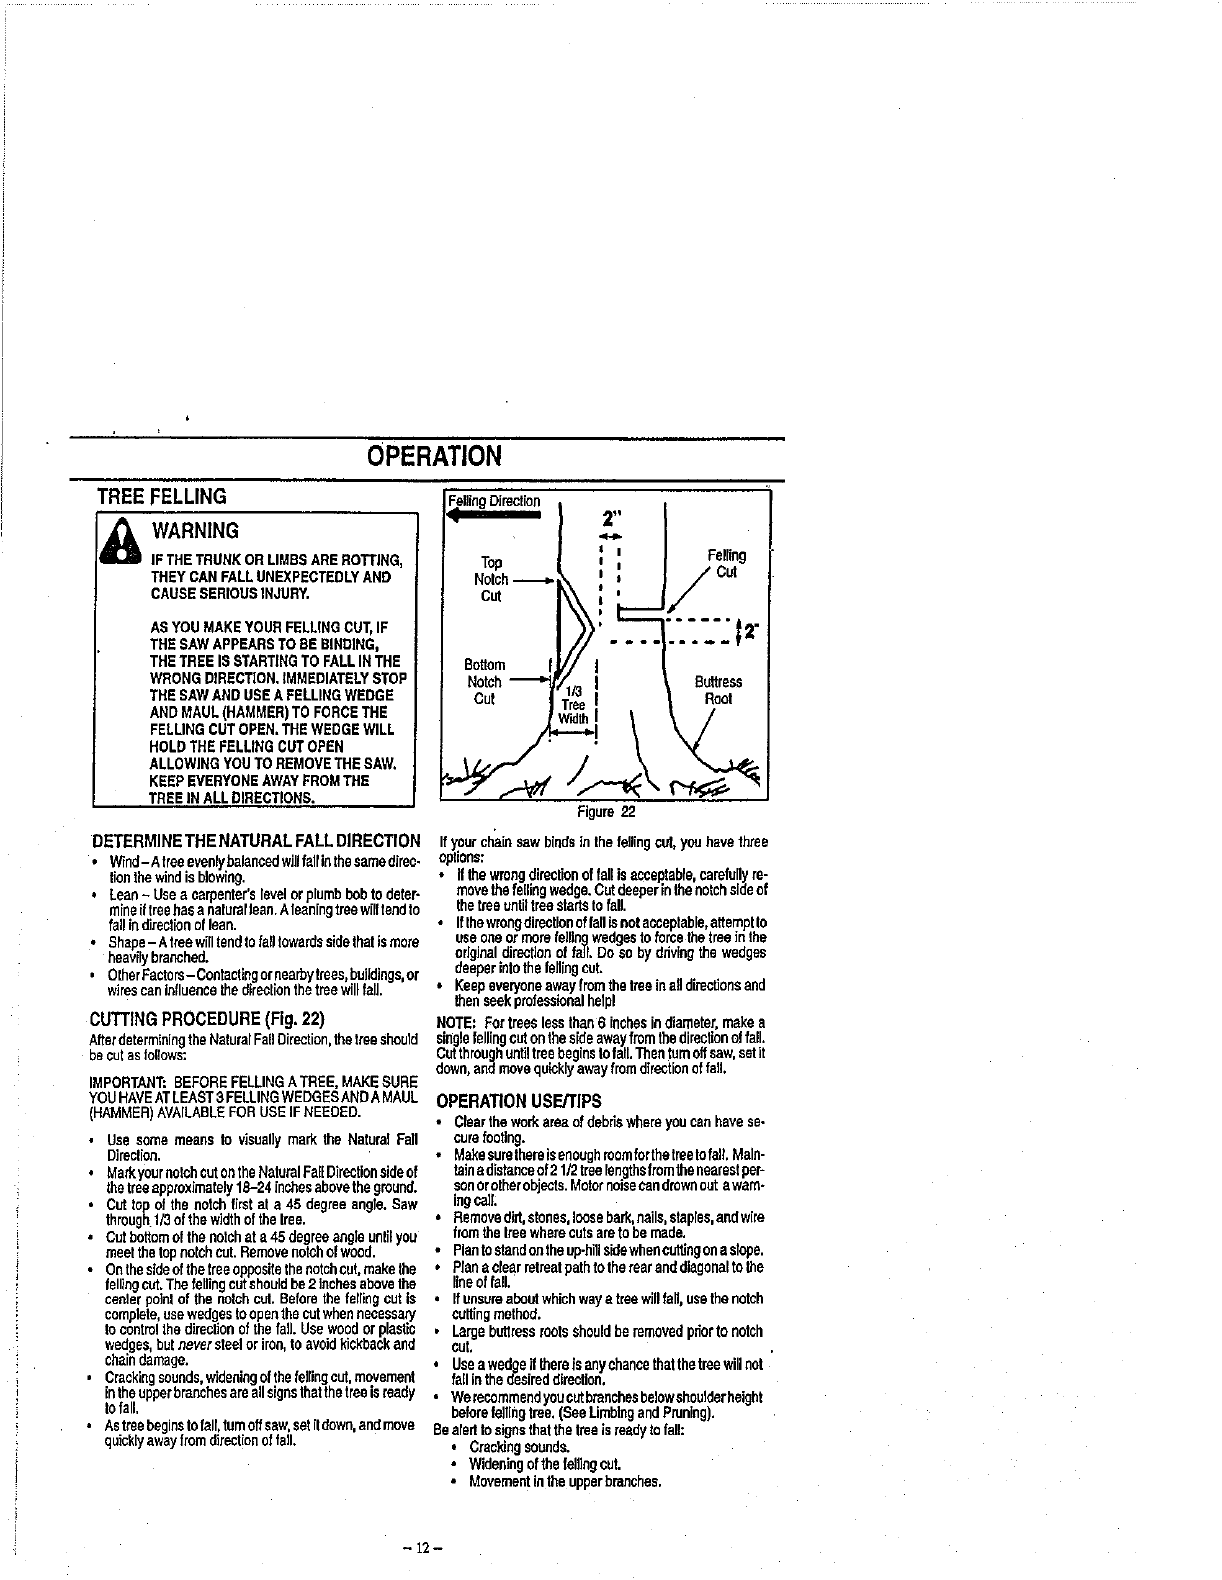
CUTTINGPROCEDURE(Fig. 22)
AfterdeterminingtheNaturelFallDirection,thetreeshould
Decutasfollows:
IMPORTANT:BEFOREFELLINGATREE, MAKESURE
YOUHAVEATLEAST3FELLINGWEDGESANDA MAUL
(HAMMER)AVAILABLEFORUSEIFNEEDED.
• Use somemeansto visuallymark the NaturalFall
Direclion.
• MarkyournotchcutontheNaturelFa[[Directionsideof
thetreeapproximately18-24 inchecabovetheground.
•Cuttopof thenotchfirstat a 45 degreeanglo.Saw
throughf/3 ofthewidthofthe tree.
•Cutbottomofthenotchata45degmeoogioungEyou
meetthe topnotchcut.Removenotchofwood.
•Onthesideofthetreeoppesitothenotchout,makethe
fellingcut.Thefellingcutshouldhe2 lachesabovethe
cenlerpetalof the notchcut. Beforethefellingcut is
complete,usewedgestoopenthe cutwhennecessary
tocontrolthe directionofthefall.Usewoodorplasgo
wedges,hutnever steeloriron,toavoidkickbackand
chaindamage.
•Crackingsoundswideningofthefellingcut,movement
intheupperbranchesareallsignsthorthetree s ready
tofall,
•Astreebeginstofall,tumoffsaw.setitdown.andmove
quicklyawayfromdirectionoffall.
211
Top Felting
Notch_ f Cut
Cut /
BoHom
Notch
Cut
Figure22
If yourchainsawbindsin thefellingcul youhave three
optons:
• Ifthewrongdimotionof faUis acceptabre,cumfullyre-
movethefellingwedge.Cutdeeperinthenotchsideof
thetreeuntilfreestartsto fall.
• IfthewrengdirectionoffallLsnot accaptable,attempNo
useoneormorefeiliogwedgesto tomethetreein the
odgJnaldimotionof fail. Do sobyddvingthe wedges
deeperintothefellingcut.
•Keepeveryooeawayfromthetreeinoffd[mcgonsand
thenseekprofessionalhelpl
NOTE: Forfreeslessthan6 inchesindiameter,makea
singlefellingcutonthesideawayfromthedirectionof fall.
CutthroughuntiltreebeginsIofelt.Thenturnoffsaw.setit
down,andmovequicklyawayfromdirectionoffall.
OPERATION USE/TIPS
• Cleartheworkareaofdebdswhereyoucanhovesa*
cure footing.
•MakesurethereIsenoughroomforthetreetofalhMain-
lainadistanceof21/2treelengthsfromthe nearestpep
sonorotherobjects.Motornoisecandrownout awarn-
ingcall
•Removedid,stones,loosebark,nails,staples,andwire
fromthe treewherecutsareto bemade.
•Plantostandontheup-halsidewhencuttingona slope.
•Planacioarretreatpathto therearanddiagonaltothe
lineof fall.
•Ifunsureaboutwhichwayetreewglfall, usathenotch
cubingmethod.
• Largeb_ress rootsshould_removedpdorto notch
cut,
•Useawedgeif thereis anychancethatthetreewill Dot '
failinthe desireddirection,
•Werecummeodyoucutbreachesbeiowshculderheight
beforefe]gi_gtree.[SeeUmb]ngandPruning).
Bealerttosignsthatthe treeis readytofall:
•Creddngsounds.
•Wideningofthefeltingcut.
•Movementinthe upperbreaches.
- 12-
i
OPERATION
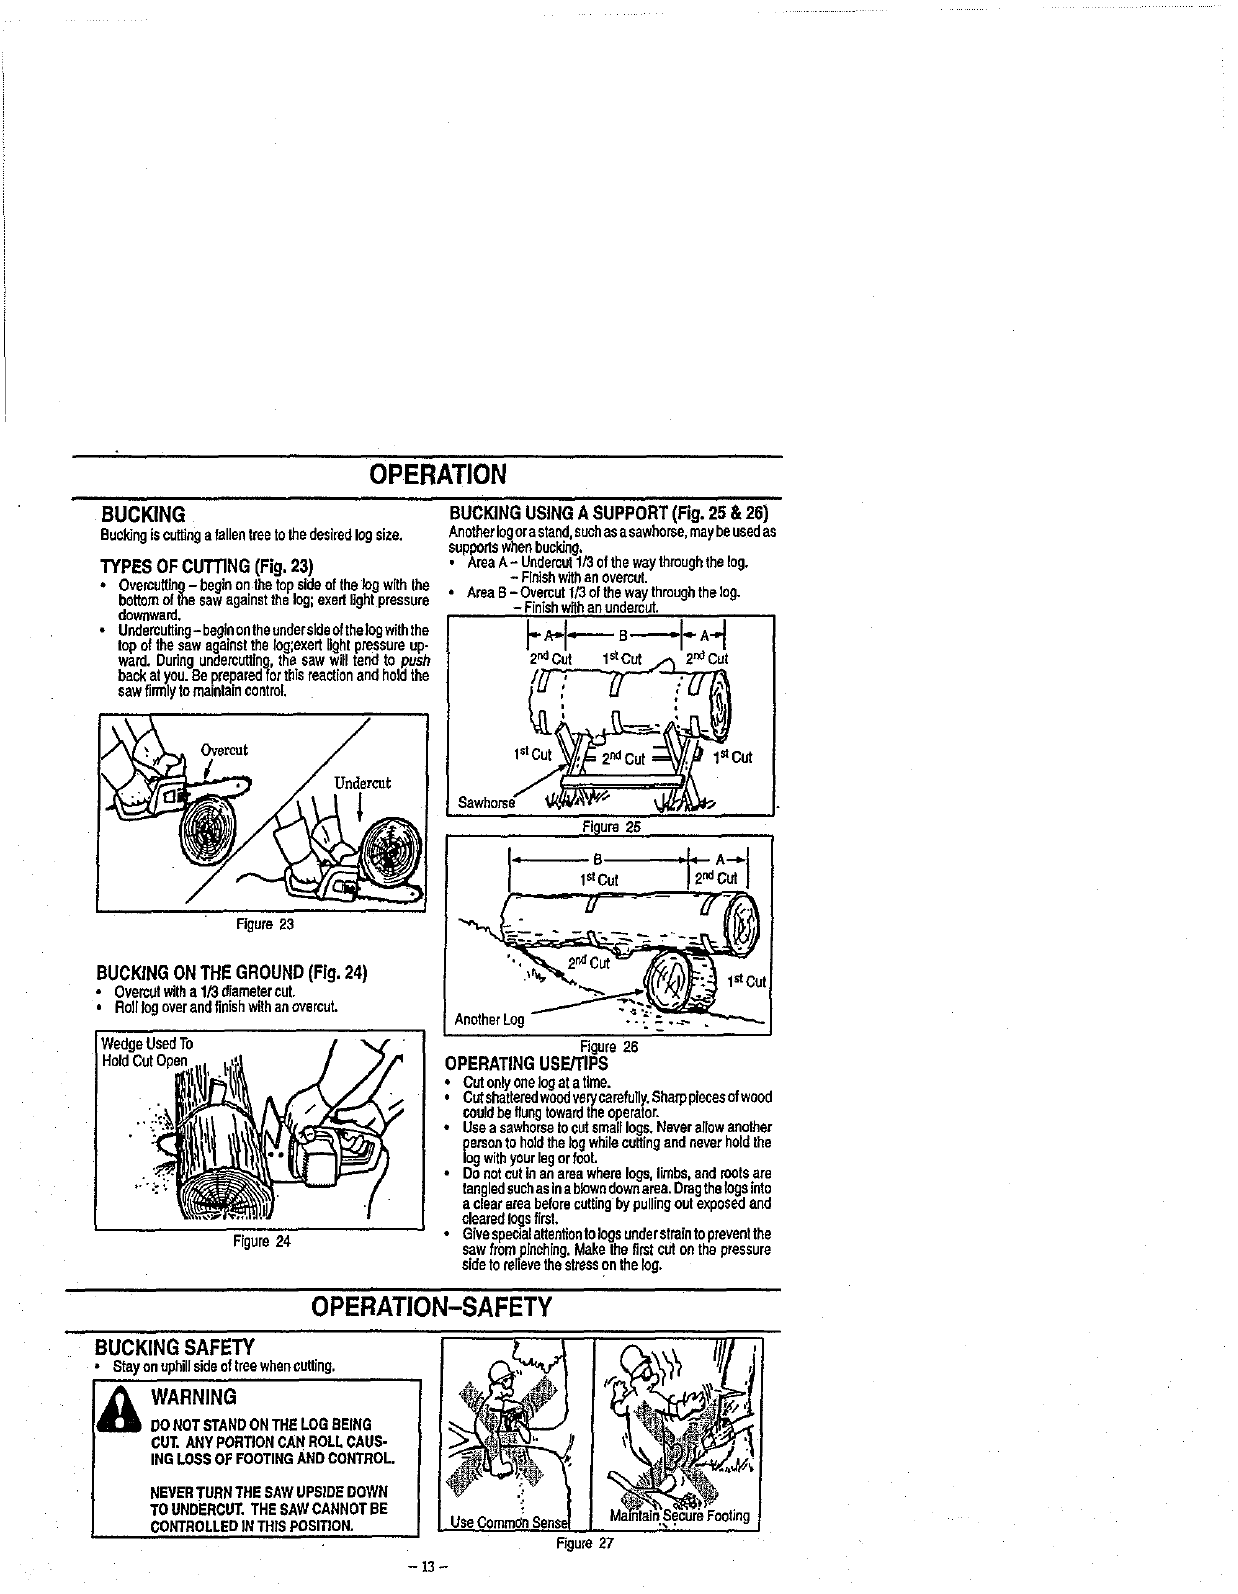
BUCKING
Buckingiscuttinga fallentreetothedesiredlogsize.
TYPES OF CUTTING (Fig.23)
•Ovemu_ng- beginonthetop skieofthe_ogwiththe
bottomofthe sawagainstthelog;exertlightpressure
downward.
•Uedemutting-beginontheuedersideofthefogwghthe
topofthesawagainstthelog;exertlightpressureup-
ward.Duringundercutting,the sawwilltendto push
backatyou.Bepreparedforthisreactionandholdthe
sawfirmlytomaintaincontrol.
Ovsrcut
Figure23
BUCKINGON THE GROUND(Fig.24)
•Ovemutwitha 1/3diametercut.
• Rollfogoveraedfinishwithanovercut.
WedgeUsedTo
Figure24
BUCKING USING A SUPPORT (Fig. 25 & 26)
Anotherlogorastand,suchasasawhome,maybeusedas
souppottswhenbucking,
AreaA- Undercut1/3ofthewaythroughthelog.
-Finishwithan ovemut.
• AreaB-Ovemutl/3ofthewaythroughthelog.
- Finishwithanundercut.
lstCu CUt
Figure25
1_cut 12ndcutI
--\' __ lstCu
AnotherLog - .: :-'-_
Figure26
OPERATINGUSE/TIPS
CUtonlyonelogata time.
CutshatteredwoodYeWcamfuny.Sharppfcoesofwood
couldbeflungtowardtheoperator.
Usea sawhorsetocutsmalllogs.Neverallowanother
pemontoholdthelogwhitecuttingandneverheldthe
logwithyourlegorfooL
Donotcutinanareawherelogs limbs,and rootsare
tangledsuchasina bbwndownarea.Dragthe ogsrdo
aclearareabeforecuttingbypullingout exposedand
clearedtogsfirst.
•Givespatialatten_ntologsuederstrafnth preventthe
sawfromplnching.Makethe firstcutonthe pressure
aidetofehevethestressOnthe log.
OPERATION-SAFETY
BUCKING SAFETY
• Btayonophillsideoftreewhenoutting.
WARNING
DONOTSTANDONTHELOGBEING
CUT.ANY PORTIONCAN ROLLCAUS-
INGLOSSOF FOOTINGANDCONTROL.
NEVERTURNTHESAWUPSIDEDOWN
TO UNDERCUT.THESAWCANNOTBE
CONTROLLEDINTHISPOSITION. Figure27
-13 -
OPERATION
PRUNING AND LINIBING
Pruningisremovingbranchesfroma standingtree.
Urebingisremovingbranchesfroma felledtree.
LIMBING(Fig. 28)
•Stadatbaseofthefelladtreeandwarktowardthetop.
•Leavethelargerlimbsundemeelhthefelledtreetoeup.
podthetreeasyouwork,
RemoveSmallLimbsWithOneGut
Figure28
PRUNING (Fig. 29)
Smallbranches-smallar thanwidthof gutdebar.
Largebranches- largerthanwidthofgeidebar.
•Removesmalllimbswtthonecub
•Removelarger;supportlagbraanheswiththeli3-2/3
eutttngtechniques_eecdbedinthebuckingsecgon.
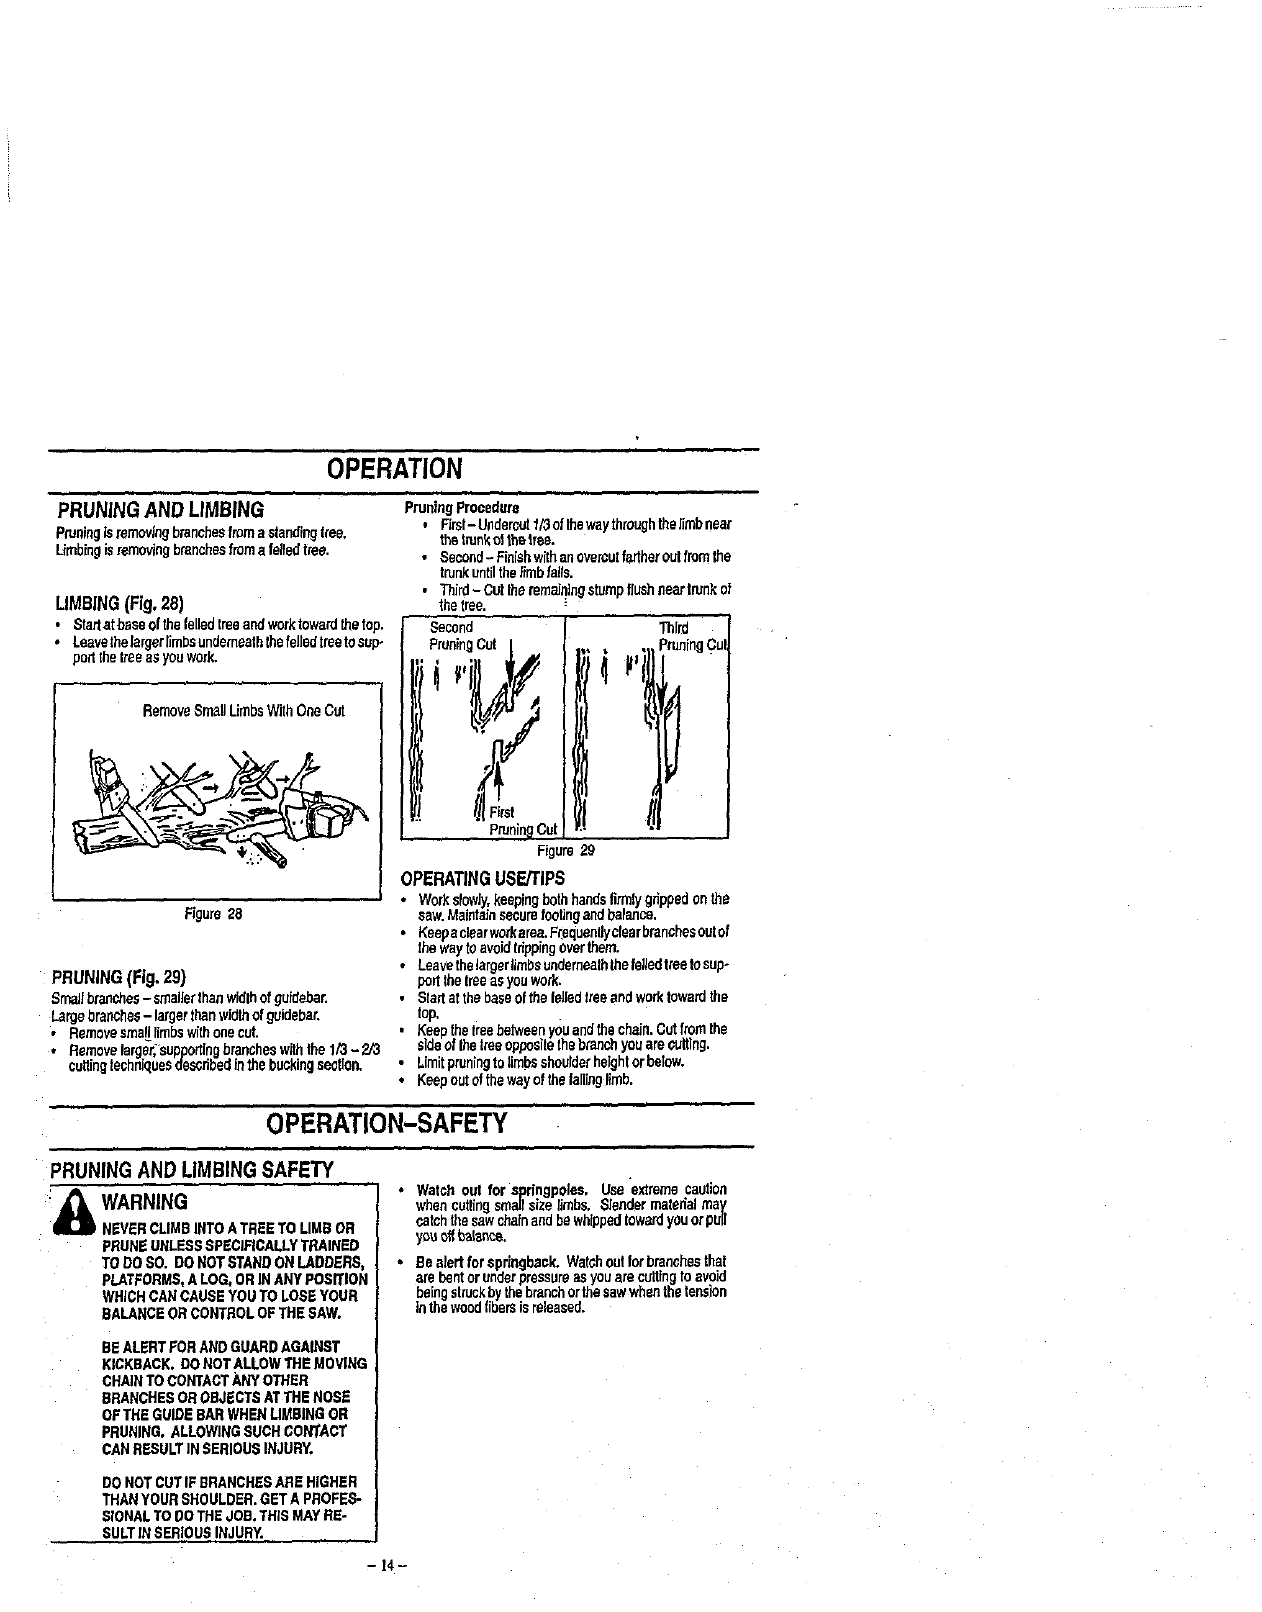
PruningProcedure
, Firat- Uedemut1/3ofthewaythreughthalirebnear
thetrunkofthetree.
•Secrmd- Finishwithanovetcutfartheroutfromthe
trunkuntilthelimbfails.
•Third- CuttheremaJnlagstumplluchneartronkof
thetree.
Second 11_gd
_=i PruningCul
Figure29
OPERATING USFJi'IPS
WorkslawJy,keepingbothhandsfirmly gdppedonthe
saw.Maintainsecurefootingandbalance.
Keepe clearworkarea.Frequantlyniearbraechesoutof
thewaytoavoidthppingoverthere.
Leavethelargerlimbsundemesththefelledh'eetosup-
portthetreeasyouwork.
S_artatthebaseofthe idledtreeendworktowardthe
top.
Keepthetreebetweenyouandthe chain.Cutfromthe
sideofthetreeoppositethe b{anchyouera cuttthg.
Limitpruningtolimbsshoulderheightorbelow.
Keepoutofthewayofthefallinglimb.
OPERATION-SAFETY
PRUNING AND LIMRING SAFETY
_'IL WARNING
=, NEVERCLIMBINTOA TREETO LIMBOR
PRUNEUNLESSSPECIRGALLYTRAINED
TO OOSO. DONOTSTANDON LADDERS,
PLATFORMS,ALOG,ORINANY POSITION
WHICHCANCAUSEYOUTO LOSEYOUR
BALANCEOR CONTROLOF THE SAW.
BEALERTFORANDGUARDAGAINST
KICKBACK.DONOTALLOWTHEMOVING
CHAINTOCONTACTANY OTHER
BRANCHESOR OBJECTSATTHENOSE
OFTHE GUIDEBARWHENLIMBINGOR
PRUNING.ALLOWINGSUCHCONTACT
CANRESULTINSERIOUSINJURY.
DONOTCUTIFBRANCHESARE HIGHER
THANYOURSHOULDER.GET APROFES-
SIONALTO DOTHE JOB.THIS MAYRE-
SULT1NSERIOUSINJURY.
•Watch out for springpoles. Usa extreme caution
whencuttingsmaJIsizelimbs. Slander malehalmay
catchthesawchainendbewhippedtowardyouorpull
you_balance.
•Bealertfor eprthgbaek.Watchoutforbraecheethai
erebentor underpressureas youarecuttingtoavoid
beingslrochbythebranchorthesawwhenthetension
inthe woodfibersis released.
-14-
i,,i , ul i i ,
CUSTOMERRESPONSIBILITIES
i
MAINTENANCE SCHEDULE
Fillindateseeyoucompleiereguraroervice Before After Every Every Every
Use Use 5 hrs. 25 hrs. Season
cruanUnitandLabels ': P"
CheckforDamagedorWornParts
CheckforLooseFastenersendParts v' Ii
CheckChstnSharpness _' ,,,' _"
GuideBarMaintenance , Y" P"
ServiceOat,
GENERAL RECOMMENDATIONS
Thewarrantyonthisunitdoesnot coveritemsthathave
beensubactedtooperatorabuseor negligence.To re-
ceivefu valuefromhewarranty,heoperaormus main-
tainunitasinstructedin this manual.
Somaadjusftoentswigneedto bemodeperlodIcstlyto
propedymaintainyourunit.
All adjustmentsin the'Se_ice endAdjustments"section
ofthismanualshouldbecheckedatleastonceeachsea-
son.
• Followthemaintenancescheduleinthismanuel.
CLEANUNITANDLABELS
•C]een theunitusinga dampclothwitha milddetergent.
•Wipeofftheunitwithadean drycloth.
BEFORE EACH USE
CHECKFORDAMAGED/WORNPARTS
The followingdamaged/wornpartsshou_lbereferredto
yourSearsServiceCenter.
NOTE: ftfscormelfor asmarlamountofoilta apeearun-
derthesawaftermotorstops.Donotconfusethiswitha
leeldngoiltank.
•On/StopSwitch- ensureon/stopswitchfunctionspmpo
edyb_,movingtheswitchtothe"Stop"positionandas-
sureu_atmotorstops,thenrestartyourmotorandcontin.
ee,
•FuelTank-discontinueusaofchainsaw iffueltank
showssignsof damageor leeS.
•OlJTank-discontinueuseofchainsawit o]1tankshows
signsof damageorleaks.
•ChainCatcher- replacechaincatcherif bent,cut,or
damagedinanyway,
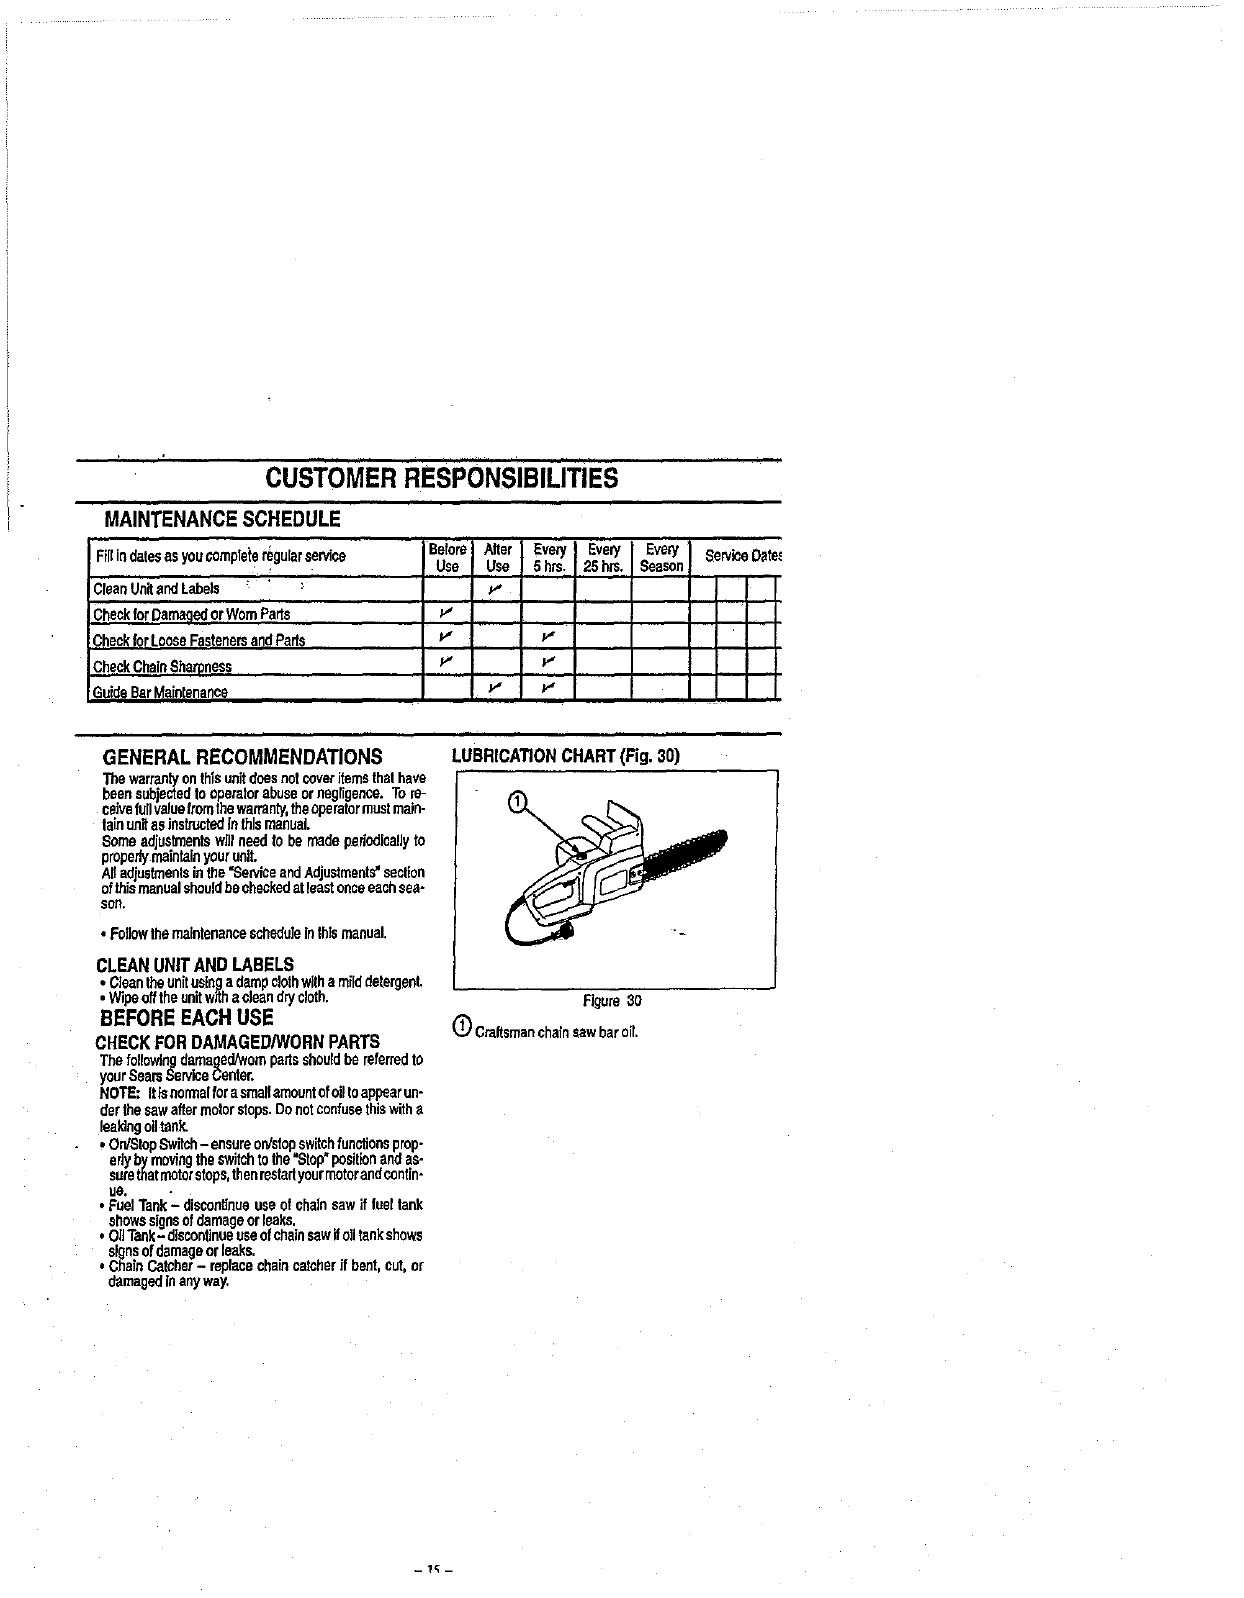
LUBRICATIONCHART(Fig. 30)
Figure30
1(_Craftsmanchainsawbaroil
CUSTOMERRESPONSIBILITIES
CHECKFORLOOSEFASTENERS/PARTS
•Fasteners
•BarClampNuts
•Chain
GUIDE BAR LUBRICATION (Fig. 31)
Formaaimumguidebarandchainlife,werecommendyou
useCraftsmanchainsawbaroil.IfCraftsmanchainsaw
ber oilisnotavailable,youmayuseagoodgradeSAE30
0iluntilyourareablete obtainCraftsmenbrand,The oil
outputis automaticallymeteredduringoperation,Your
sawwilluseonetankofbaroilforeverytankoffuelmix.
dwayefill thebar oiltankwhenyoufill the fueltank.
Figure31
SHARPENCHAIN (Fig.32- 38)
WARNING
MPROPERCHAINSHARPENING
TECHNIQUESAND/ORDEPTHGAUGE
MAINTENANCEWILLINCREASETHE
CHANCEOF KICKBACKWHICHCAN
RESULTIN SERIOUSINJURY.
ALWAYSWEARGLOVESWHEN
HANDLINGTHE CHAIN.THECHAINCAN
BESHARPENOUGHTO CUTYOUEVEN
THOUGHIT ISTOODULL TOCUTWOOD.
Cutter
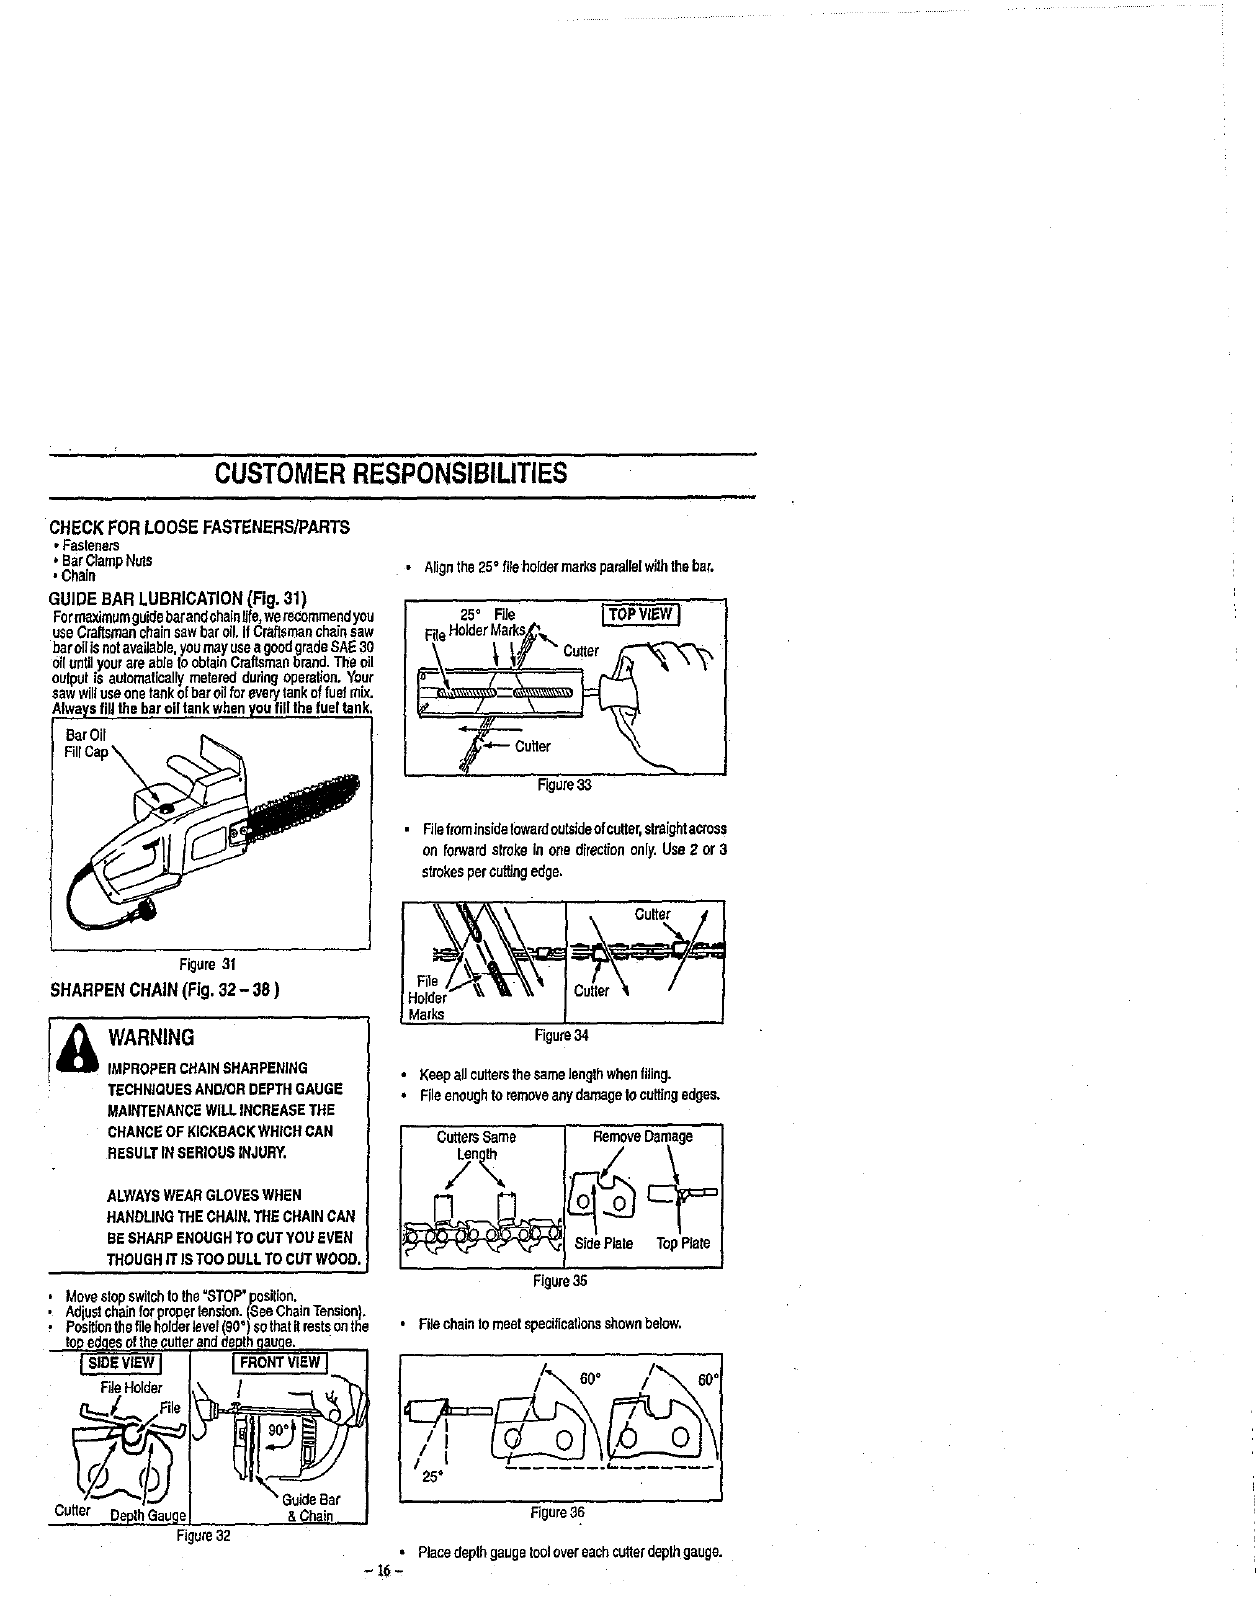
Movestopswitchtothe"STOP'position.
Adjustchainforpropertension.(SeeChainTension).
Poaigonthefileholderlevel(90")sothatil restsonthe
topedgesofthecutteranddepthgauge.
FileHolder. \/_.
DepthGauge &Chain,
Figure32
•Alignthe25"fileholdermarksparallelwiththebar.
25" File
Figure33
,Fgefrominsidetowardoutsideofcutter,straightao'oss
onforwardstrokeinoeedirectiononly.Use2 or3
strokespercuttingedge.
ICutter
|Holder " I u er
| Marks |
Figure34
• Keepall cutterethesamelengthwhenftJing.
•Fileenoughto removeanydamagetocuttingedges,
CuttersSame
yn_
SideRata TopPlate
I
Figure35
•Filechainto meetspecificationsshownbelow.
60°
25"
Figure36
•Placedepthgaugetoolovereachcutterdepthgauge.
CUSTOMER RESPONSIBILITIES
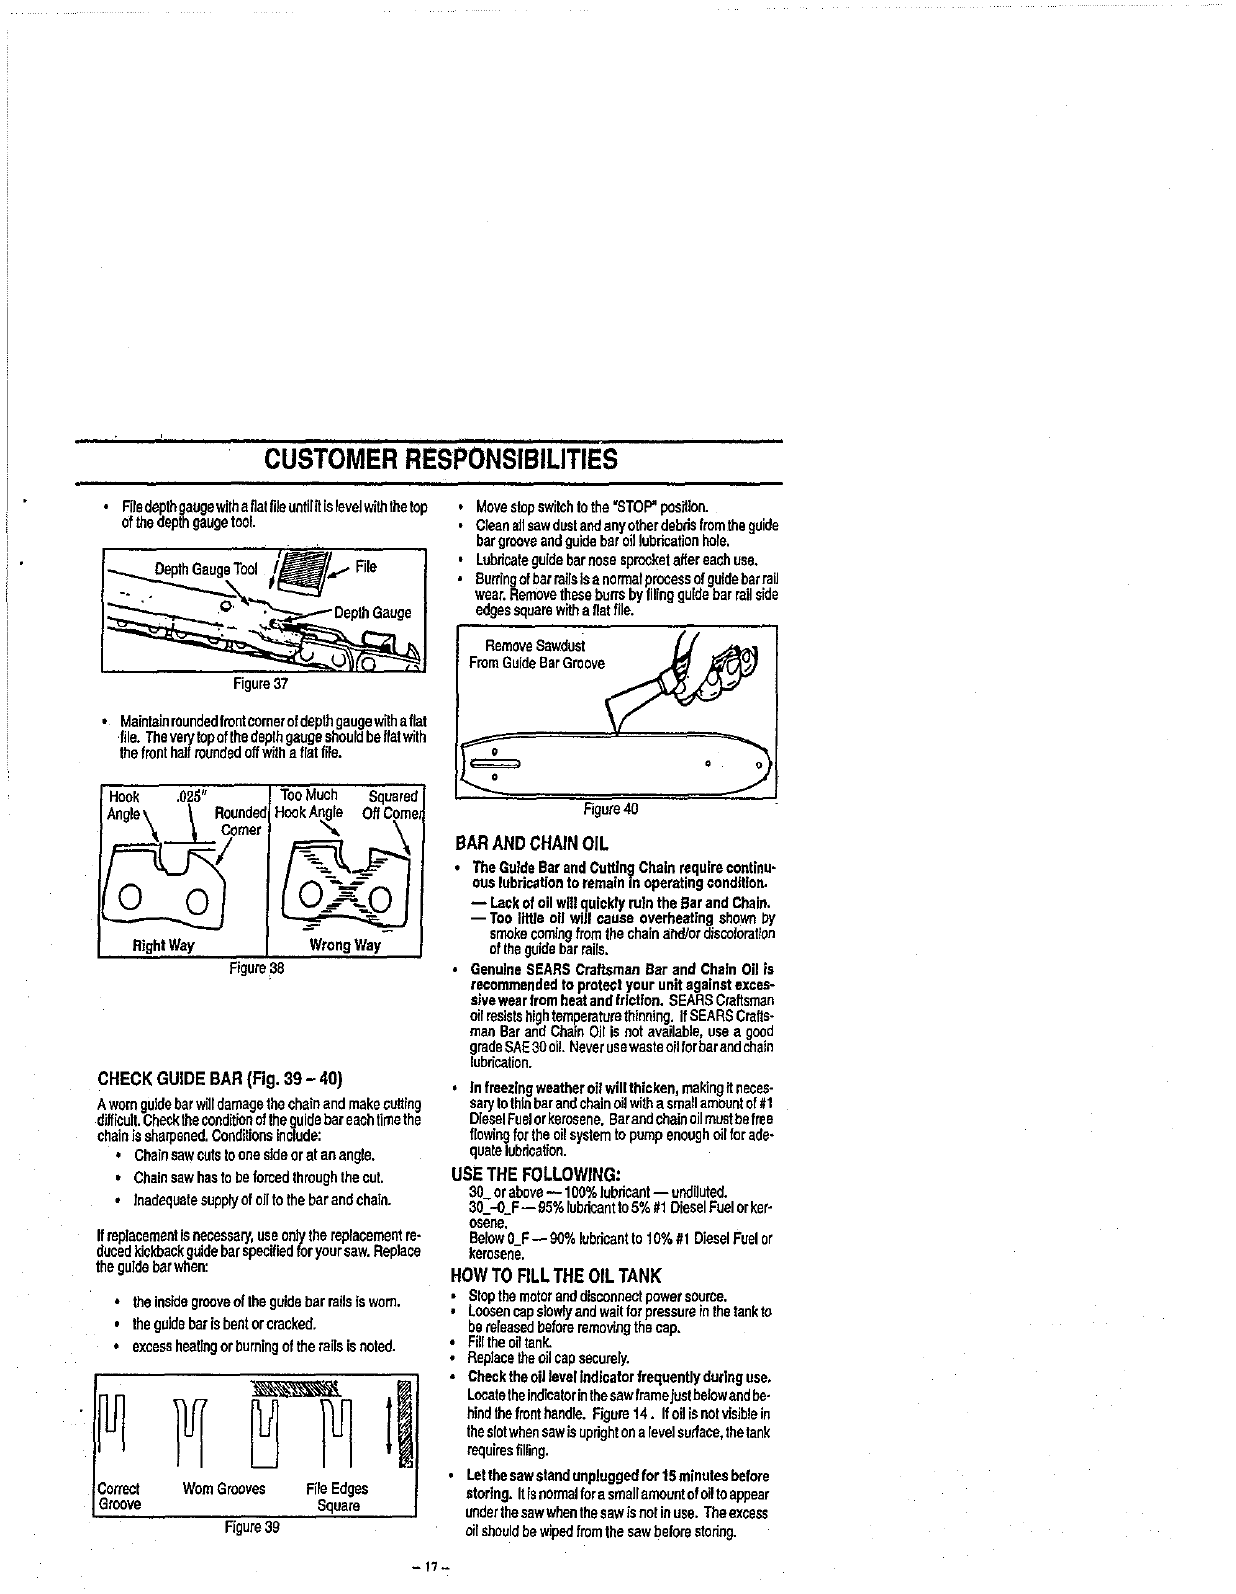
•Fitsdepthgaugewghaitat fileuntilgislevelwghthatop
Ofthedepthgaugetool.
Deplh GaugeTool /_/_.,,. Fifo
Figure37
•Maintainmundedtrentcomerofdepthgangewitha fiat
•file.Theverytopofthedepthgaugeshoukibeflatwith
thefronthagraundedoffwithaflatfile.
Hook .025"
_ngle\ _ Rounded
\'t_ Orner
RightWay
TooMuch Squared
HookAngle OffCornel
WrongWay I
Figure38
CHECK GUIDE BAR (Fig. 39 - 40)
Awornguidebarwilldamagethechainandmakecutting
difficult.Checktheconditionofthoguidebareachtimethe
chainis sharpened.Conditionsinclude:
• Chainsawcufsthoneskleoretaeangio.
•Chainsawhasth ha reinedthroughthecut.
•Inadequatesupplyofall to theher andchain.
Ifreplacementisnecessary,useooJythereplacementre-
ducedkickbackguidebarspecifiedforyoursaw.Replace
theguideherwhen:
•the inskiegrooveoftha guidebarraikiis worn.
• theguidebarisheatorcracked,
•excessheegngorburningoftheraikiis noted.
Correct WornGrooves RleEdges
Groove Square
Figure39
•Movestepswitchtothe"STOP"posidon.
•Cteanagsawdustandanyothardebdsfrnmthe guide
bargrooveandguidebar offlubricationhoio.
•Lubricateguidebarnosesprooketaftereachuse.
• BurringofbarragsIsanormalprocessofguideharrail
wear.Removetheseburrsbyfilingguidebarrailside
edgessquarewithaflatfile.
RemoveSawdust
FromGuideBarGroove
Figure40
BAR AND CHAIN OIL
•TheGuldeBesandCuttth_Chathrequirecontinu-
ouslubricationto remainIn operatingcondition.
-- Lackofoil wglquicklyrule the Sar and Chain.
--Tee little oll will cause overheatingshownby
smokecomingfromthechainand/or disooiormioo
of theguidebarrails.
•GenuineSEARSCraftsmenBar and Chath Oilis
recommendedto protectyour unit againstexces-
sive wearfromheatand friction. SEARSCraftsman
oilresistshightemperaturethinning.IfSEARSCrafts-
manBarandChainOit is not available,usea good
gradeSAE3OoiLNeverusewasteoilthrhar andshale
lubrication.
. Infreezingweatheroilwiltthicken makingftneces-
saP/tothinbarandchainoilwithesmallamountof#1
DieselFuelorkerosene.Barandchainoilmustbefree
fkiwthgfor theoilsystemto pumpenoughoilforade-
quatelubrication.
USE THE FOLLOWING:
30_or above-- 100%lubricant-- undiluted.
30_--0F-- 95%lubricantto5%#1 DieselFuelorker-
osene,
BelowO_F-- 90%lubricantto 10%#1 DieselFuelor
kerosene.
HOW TO RLL THE OIL TANK
Stopthemotoranddisconnectpowersource.
Loooencapeiowiyandwagforpressureth thetankto
beraioesedbeforeremovingthecap,
•Filltheoiftank,
•Replooethe oilcapsecurely.
•ChecktheoillevelindicatorfrequenUyduringuse.
Locatetheindicatorinthesawframejustbethwandbe-
hindthefronthandio.Figure14. Ifoflisnotvisibioin
theskitwhensawisuprightona levelsurface,thetank
requiresfilling.
• Let thesawstandunpluggedfor lg rnthutesbefore
storing. ItIsnormalfora srnaitamountofoiltoappear
underthesawwhenthesawisnotieuse. Theexcess
oilshouldbewipedfromthesawbeforestedng,
-f'/_
SERVICEAND ADJUSTMENTS
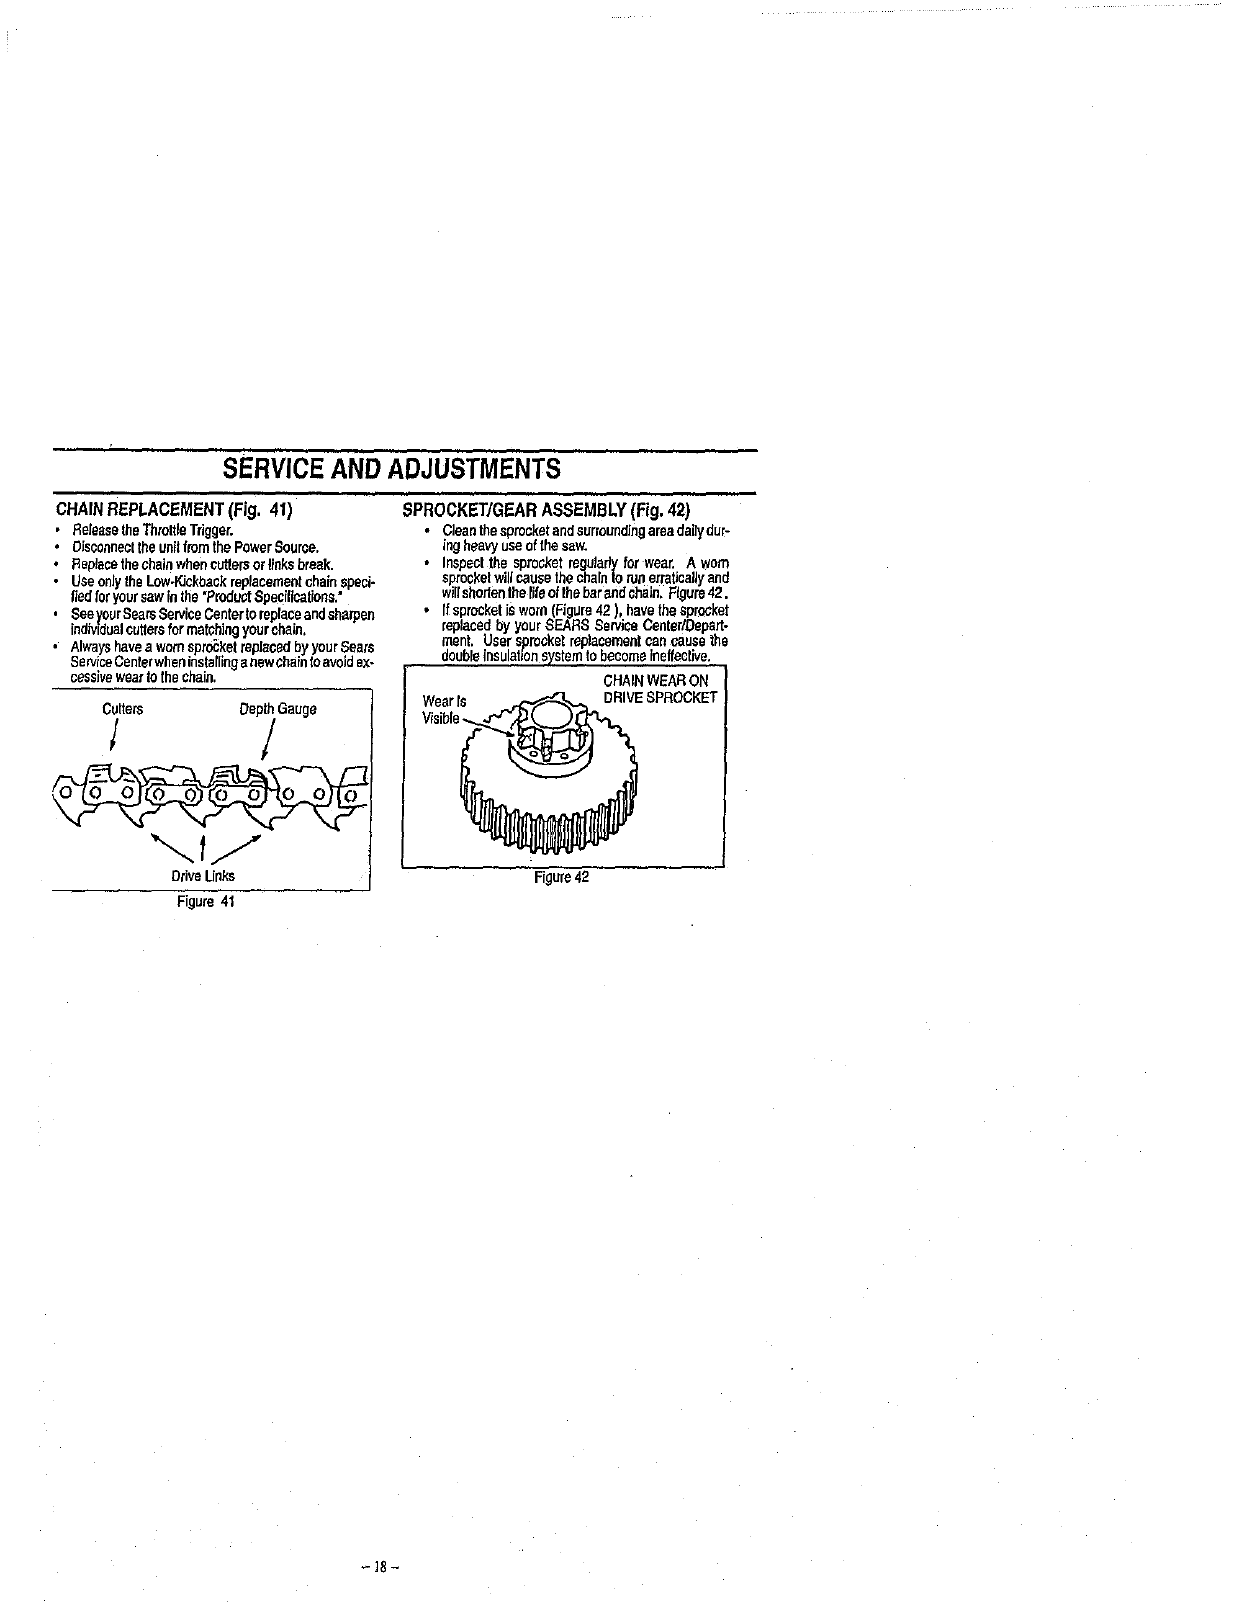
CHAIN REPLACEMENT(Fig. 41)
•ReleasetheThruttleTrigger.
*DisconnecttheunitfromthePewerSource.
°ReplecetbeehalnwhencuttersorlJnksbreak.
• UseonlytheLow-KJckbeckreplacementohainspeci-
fledforyoursawinthe"Prudu_'tSpecifications."
. SeeyecrSearsSen,'iceCentertoreplaceandsharpen
individualcuttersfor matchingyourchain,
• AlwayshaveaworneprocketrsplecedbyyourSears
Sen,iceCenlsrwheninstallinganewchaintoavoidex-
cessiveweartothechain.
Cutters DepthGauge
/
DriveUeks
SPROCKET/GEAR ASSEMBLY (Fig.42)
•Cleanthesprucketandsurruundingarsadailydur-
ingheavyuseof the,saw.
•Inspectthe sprocketregularlyfor wear. A worn
sprocketwillcausethechainto rune,'raticalJyand
wiltshodenthelifeofthebarandChain,Figure42.
•[fsprocketis worn(Figure42 , havethesprocket
replacedbyyourSEARS Sen'ice CenterlDepert.
ment. Usersprocketreplacementcancausethe
doubleinsulationsystemtobecomeineffective.
CHAINWEARON
Wearre DRIVESPROCKET
Visib[_
-Figure42
Figure41
_]tt-
STORAGE
Immediatelyprepareyourunitforstorageattheendofthe
seasonorifitwitlnotbe usedfor30 daysormore.
WARNING
STORE UNIT WITH ALL GUARDS IN
PLACE.POSITIONSOTHATANYSHARP
OBJECTSUCHASTHE CHAINCANNOT
ACCIDENTLY CAUSE INJURY TO
PASSERSBY.
STORETHE UNITOUT OF THE REACH
OF CHILDREN.
CHAINSAWSTORAGEINSTRUCTIONS
Ifyourchainsawistobestoredforaperiodoftime,c]eenit
thoroughlypdortostorage, Removeany dirt,sawdust,
leaves,oil,grease,etc. Storeina cleandryarea:
• Cleanthee_re unit.
• Inspecttheparclamparesandcleananydid,sawdust,
grass,or debdsthathascoitected.Inspectthe guide
barandchain;replacea guidebarthatisbent,warped,
cracked,broken,ordamagedinanyotherway.
•Replacea damagedorwornchain.
•tJghtlyoi_externalmetalsuitacestopreventresttrem
forming.
'_ AUTION: Wearprotectivegloveswhen
handlingchain,The chainis sharp and
can cutyouevenwhenit Is not rnovin.q.
•Appfyacastiogofoiltotheentiresutfaeeofthegu[de
barandchain;wrapitinheavypaper,cloth,orplastic.
• Besuraairhandlesandguardsareinplaceandarese-
curelyfastened. Replecaanydamagedpads.
•CheckengraunitforIoocascrews,nuts,andbolts.Re-
placeanydamaged,broken,orwornpads.
•Donotcoverwithplastic.Plasticcannotbreatheand
wi}linducecondensationandeventualrustorcorm.
sion.
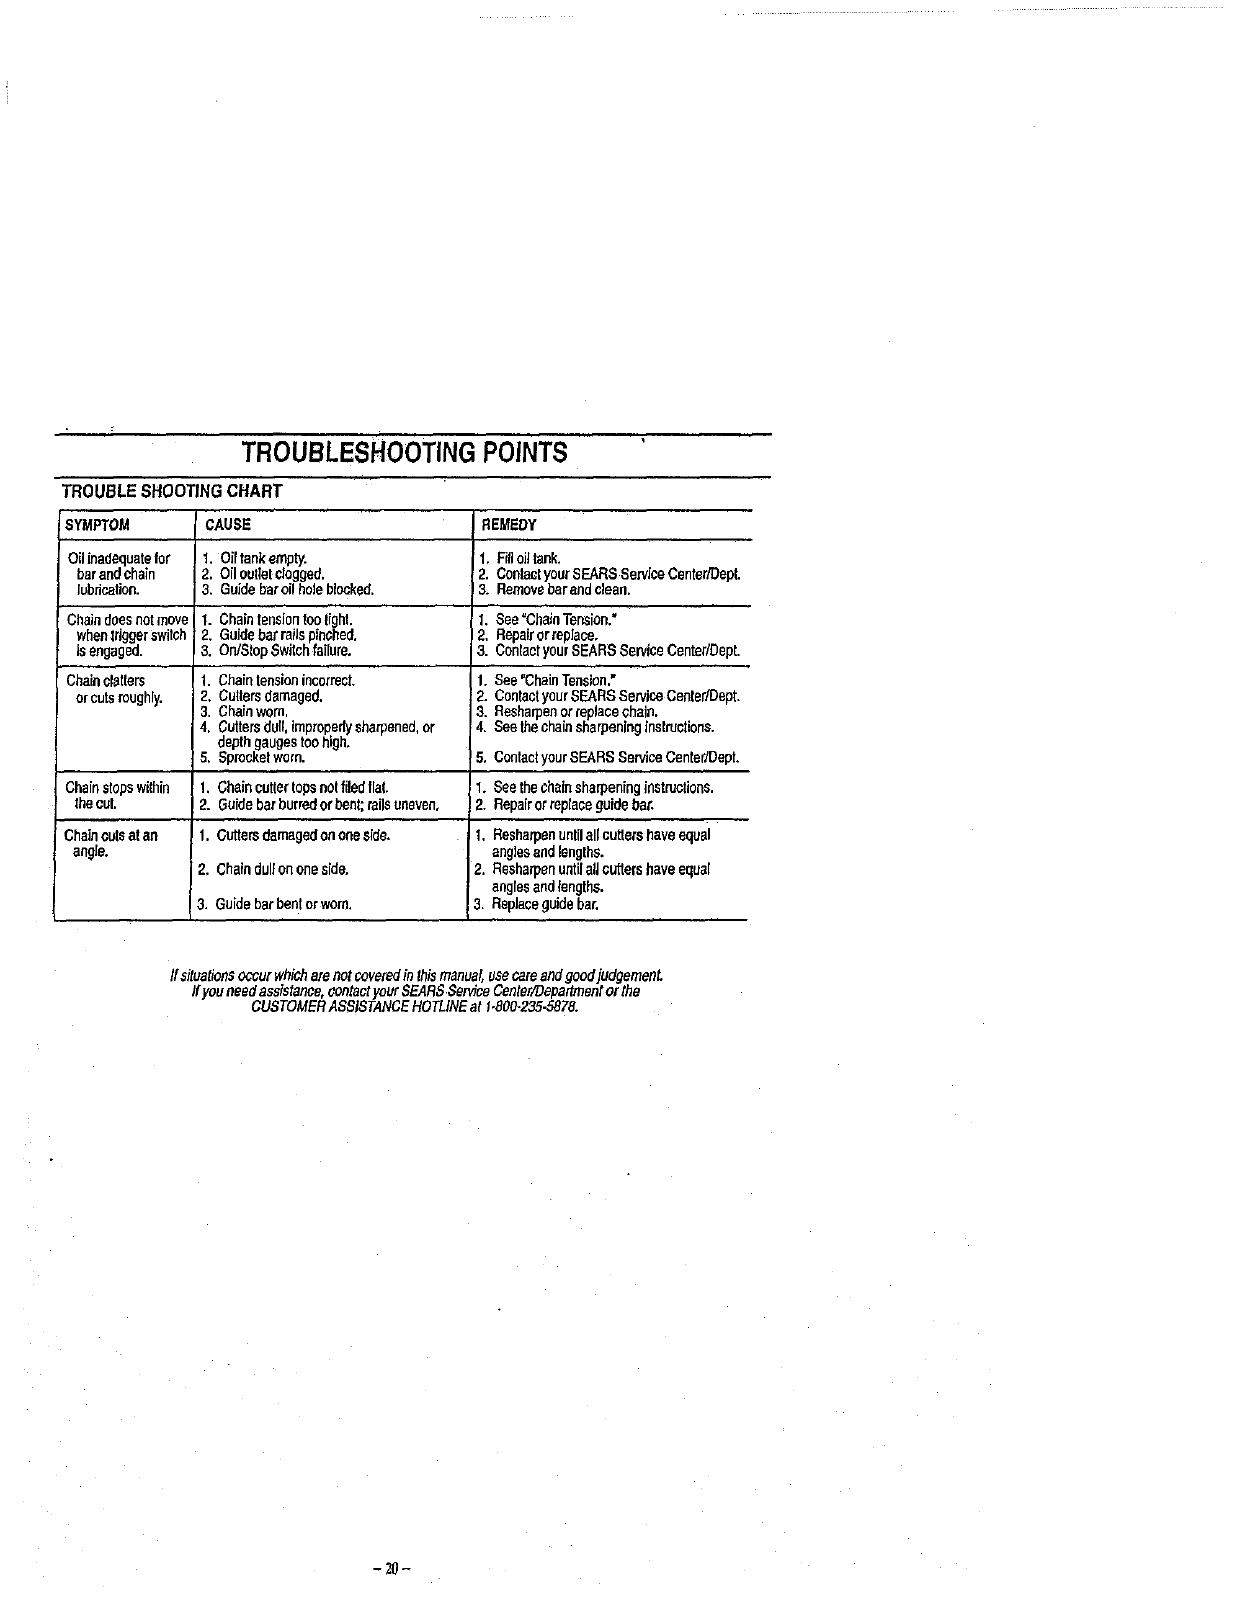
TROUBLESHOOTINGPOINTS
TROUBLE SHOOTINGCHART
SYMPTOM iCAUEE
Oil inadequatefor
barandchain
lubrication.
Chaindoesnot move
whentriggerswitch
isengaged.
Chainclatters
orcutsroughly.
Chainstopswithin
thecuL
Chaincutsatan
angle.
1. oglankempty,
2. Oiloutletdogged.
3. Guidebaroilholeblocked.
1. Chaintensiontoolighl,
2. Guidebarrailspinched.
3. OrdStopSwgchfagure.
t. Chaintensionincorrect.
2. Cuttersdamaged.
3. Chainworn,
4. Cuttersdull. Impropertysharpened,or
depthgaugestoohigh.
5. Spxockelworn.
1. Chaincuttertopsnotfiledflat.
2. Guidebarburredor bent;railsuneven,
1. Cuttersdamagedor=oneside.
i
2, Chaindullononeside.
3. Guidebarben orworn.
REMEDY
I.FilloiItank.
2, ContactyourSEARSServiceCenferlDept.
!3. Removebarandclean.
i.See=ChainTensioo."
2. Repairorreplace,
3. ConlaetyourSEARSServiceCenter/Dept.
1. See"ChainTension."
2. ContactyourSEARSServiceCenter/Dept.
3. Reeharpenorreplacechain.
4. Seethechainsharpeninginstructions.
5. ContactyourSEARSServiceCenter/Dept.
1. Seethechainsharpeninginstructions.
2. Repairorreplaceguidebar.
I. Resharpenuntilalfcuttershave equal
anglesand lengths.
2. Resharpenuntilallcuttershave equal
anglesandlengths.
3. Replaceguidebar.
If situationsoccur whicham notcoveredin thismanual,rjsecamandgoodjudgemenL
If you needassistance,contactyourSEARSSan4ceCenter/Depadmentor the
CUSTOMERASSISTANCEHOTLINEat 1.800-235-5878.
- 20-
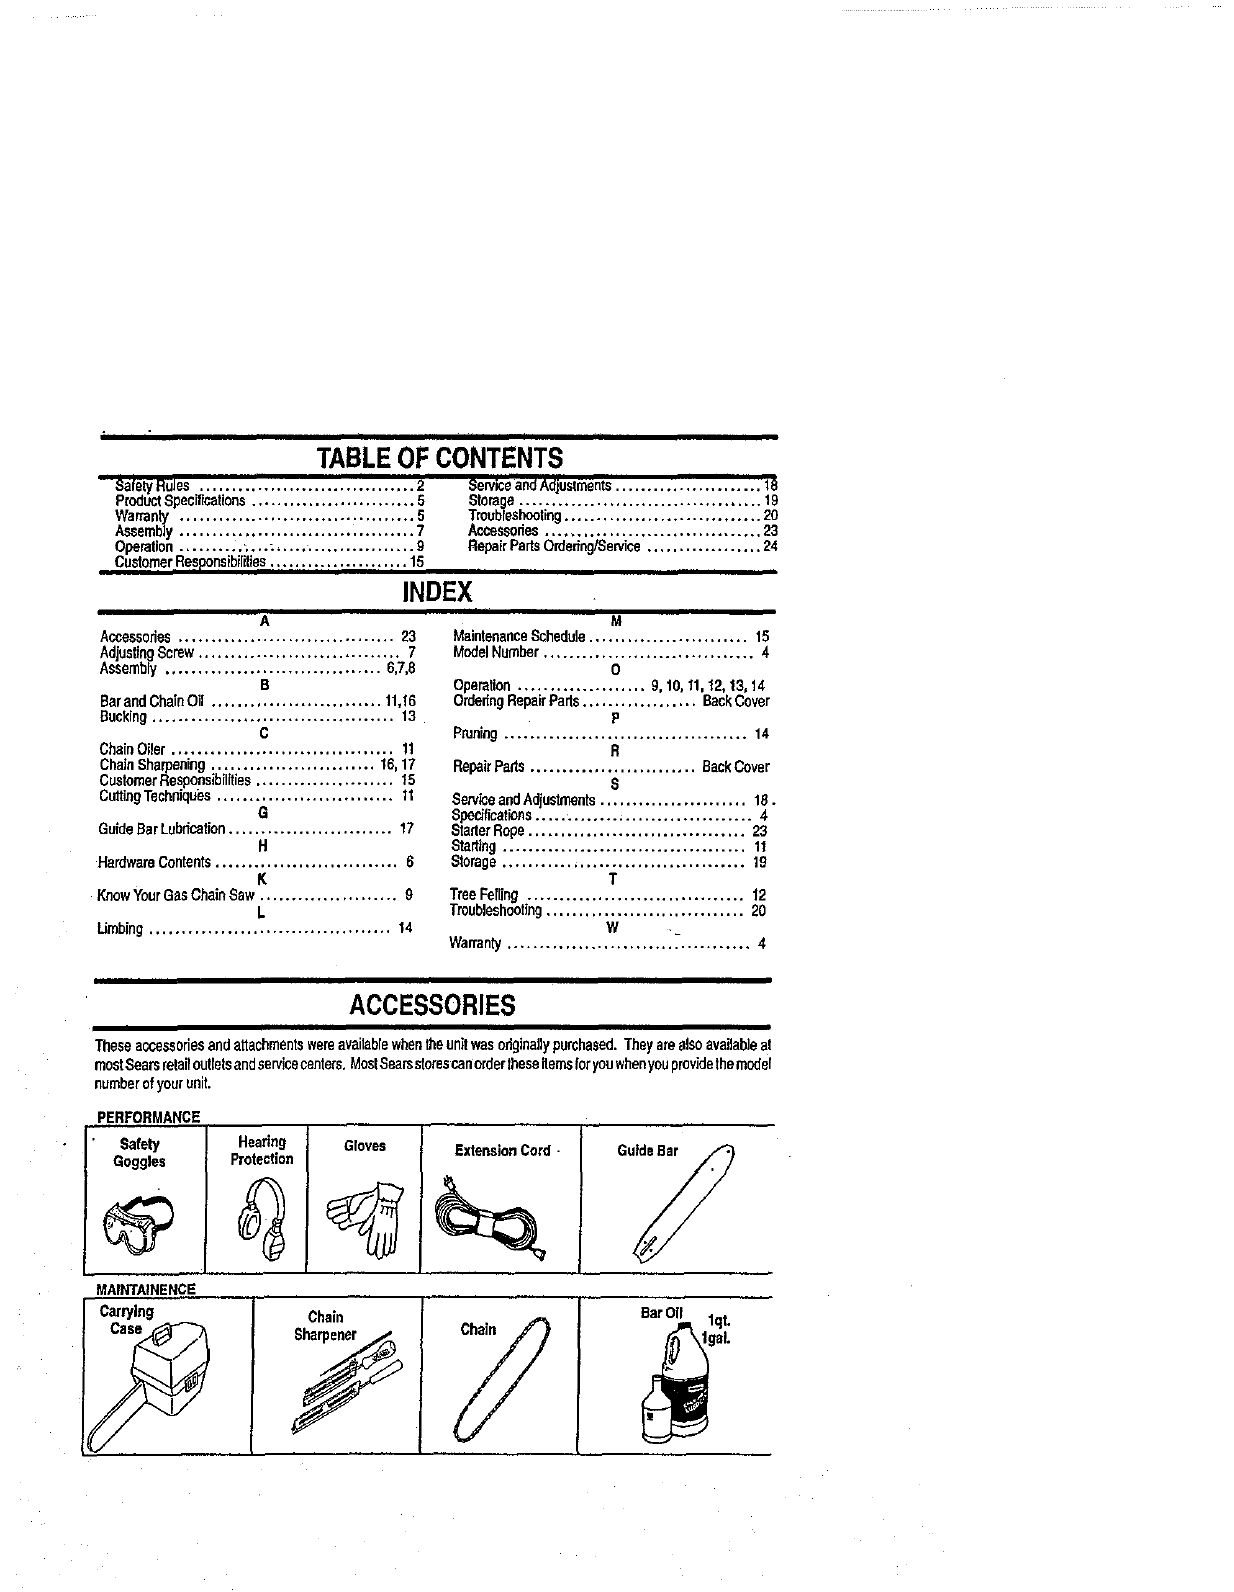
TABLE ....
OFCONTENTS
iiii
SafetyRules .................................. 2ServiceandAdjustments....................... 18
ProductSpecirmations.......................... 5 Storage...................................... 19
Warranty ..................................... 5 Troubleshooting............................... 20
Assembly..................................... 7 Accessodes.................................. 23
Operation.......... +...; ...................... 9 RepairPartsOrdedng/Se_ca .................. 24
CustomerResponsibilities...................... 15
INDEX
III
A
Accessories.................................. 23
AdjustingScrew................................ 7
Assembly.................................. 6,7,8
B
Barand ChainOil ........................... 11,16
Bucking...................................... 13
C
Chair)Oiler................................... 11
ChainSharpening.......................... 16,17
CustomerResponsibilities...................... 15
Cut6ngTeehniqubs............................ 11
G
GuideBar Lubrication.......................... 17
H
HardwareContents............................. 8
K
KnowYourGasCbeinSew ...................... 9
L
Umbing...................................... 14
M
MaintenancaSchedule......................... 18
ModelNumber................................. 4
O
Operation.................... 9, 10, 11,12, 13,14
OrdedngRepairParts.................. BackCover
P
Pruning...................................... 14
R
RepeirPads .......................... _]ackCover
S
ServiceandAdjustments....................... 18.
Specifications.................................. 4
StarterRope.................................. 23
Starting...................................... 11
Biomge...................................... 19
T
TreeFelting.................................. 12
Tmubioshoottng............................... 20
W .
Warranty......................................4
ACCESSORIES
T_eseaccessoriesandattachmentswereavailablewhentheunitwasoriginallypurchased.Theyarealso availableat
mostSearsretailouSetsandservicecenters.MostBearsstorescanordertheseitemsforyouwhenyouprovidethemodel
numberofyourunit.
Hearing
Protection
PERFORMANCE
Safety
Goggles
MAINTAINENCE
Carrying
9
Gloves
i
ExtensionCord -
Chain
Y
II
III
Operator's
Manual
Model No.
358.34111- 2.0/14"
358.34251 - 2.0/14"
358.34180 - 2.75/16"
358.34260 - 2.75/16"
358.344910 - 2.75/16"
IF YOU NEED REPAIR
SERVICE OR PARTS:
REPAIR SERVICE
1-800-4,REPAIR
(1-800-473-7247)
ORDERINGPARTS
1-800-FON-PART
(
ASSISTANCE
_ 1-800-235-5878
HOURS(cs_
Mort.-Sat. 7a.m.- 7p.m.
CRRFTSHRN°
!2.0/2.75 cc MOTOR
14"/16" inchGuideBar
ELECTRICCHAINSAW
EachE_lricChainSawhasitsownmodelnumber.Themodelnum-
berforyourunitwillhefoundona decalattachedtotheunit.
Allpar_lisiedhereinmayheorderedthroughSears,Roebuckand
Co.Se_iceCentersandmostRetailStores.
WHE.NORDERINGREPAIRPARTS,ALWAYSGIVETHEFOLLOW-
iNGINFORMATION
• PRODUCT-'GASOLINE CHAINSAW"
• MODELNUMBER-358.34111/358.34251/358.34180
358.34260/358.344910
•PARTNUMBER
• PARTDESCRIPTION
Your,Se_tsmerchandisehasaddedvaluewhenyouconsiderthat
SearshasserviceunitsnationwidestaffedwithSearstrainedlechni-
cians..,professionaltechniciansspecificallytrainedonSearsprod-
ucls,havingtheparts,toolsandtheequipmentto insurethatwemeet
ourpledgetoyou,weservicewhatwesell
Sears,RoebuckandCo,,HoffmanEstates,IL 60179USA
