Craftsman 358341240 User Manual ELECTRIC CHAIN SAW Manuals And Guides 98110061
CRAFTSMAN Chainsaw, Electric Manual 98110061 CRAFTSMAN Chainsaw, Electric Owner's Manual, CRAFTSMAN Chainsaw, Electric installation guides
User Manual: Craftsman 358341240 358341240 CRAFTSMAN ELECTRIC CHAIN SAW - Manuals and Guides View the owners manual for your CRAFTSMAN ELECTRIC CHAIN SAW #358341240. Home:Lawn & Garden Parts:Craftsman Parts:Craftsman ELECTRIC CHAIN SAW Manual
Open the PDF directly: View PDF ![]() .
.
Page Count: 18
J4
Operator's Manual
CRRFTSMRN
2.5 HP Motor
ELECTRIC CHAIN SAW
Model No.
358.341240 - 14 in. Bar
®
WARNING:
Read and follow all Safety Rules and Operating
Instructions before first use of this product.
Jl!_ 'For answers to your quest!ons about this product:
Call 7 am-7 pro, Mon-Sat, Sun, 10 am-7 pm
I1"
• 1-800-235-5878
Sears,Roebuckand Co., HoffmanEstates,IL 60179 USA
530.-O87622 08/24/98
2
2Service and Adjustments 13
Storage 15
Trouble Shooting 15
Spanish 18
Parts Ordedng Back
If this
chase,
and
If this
In _aw.fails to perform pmpedy due to a
wdhin (1) year fromthe date of pup
it, free of charge.
chain, which are expendable parts
is used for commercial purposes,
from the date of purchase. If this
for rental purposes, this warranty
'date of purchase. This warranty ap-
in use in the Un=ted States.
WARRANTY SERVICE IS AVAILABLE BY RETURNING THE CRAFTSMAN
ELECTRIC CHAIN SAW TO THE NEAREST SEARS SERVICE CENTER IN THE
UNITED STATES.
This warranty gives you specific legal rights, and you may also have oth-
er rightswhich vary from state to state.
Seam, Roebuck and Co., Inc., Hoffman Estates, IL 60179 U.S.A.
WARNING: When usingan electdc
chain saw, basic safety precautions, in-
cludingthe following,should always be
followedto reduce the dsk offire, elec-
tdc shook, and injuryto persons. Read
all instructions.
WARNING: Alwaysdisconnectpower
sourcewhen makingrepairs.Becausea
chainsaw is a high.speedwoocbutting
tool,carelessor ,'nproperuse of thistool
can cause seriousInjury.
PLAN AHEAD
.. Rastrict_e use of yours_v to adult
userswho undemtandend cen fdllow
thes_fstyroles,precautions,andopor-
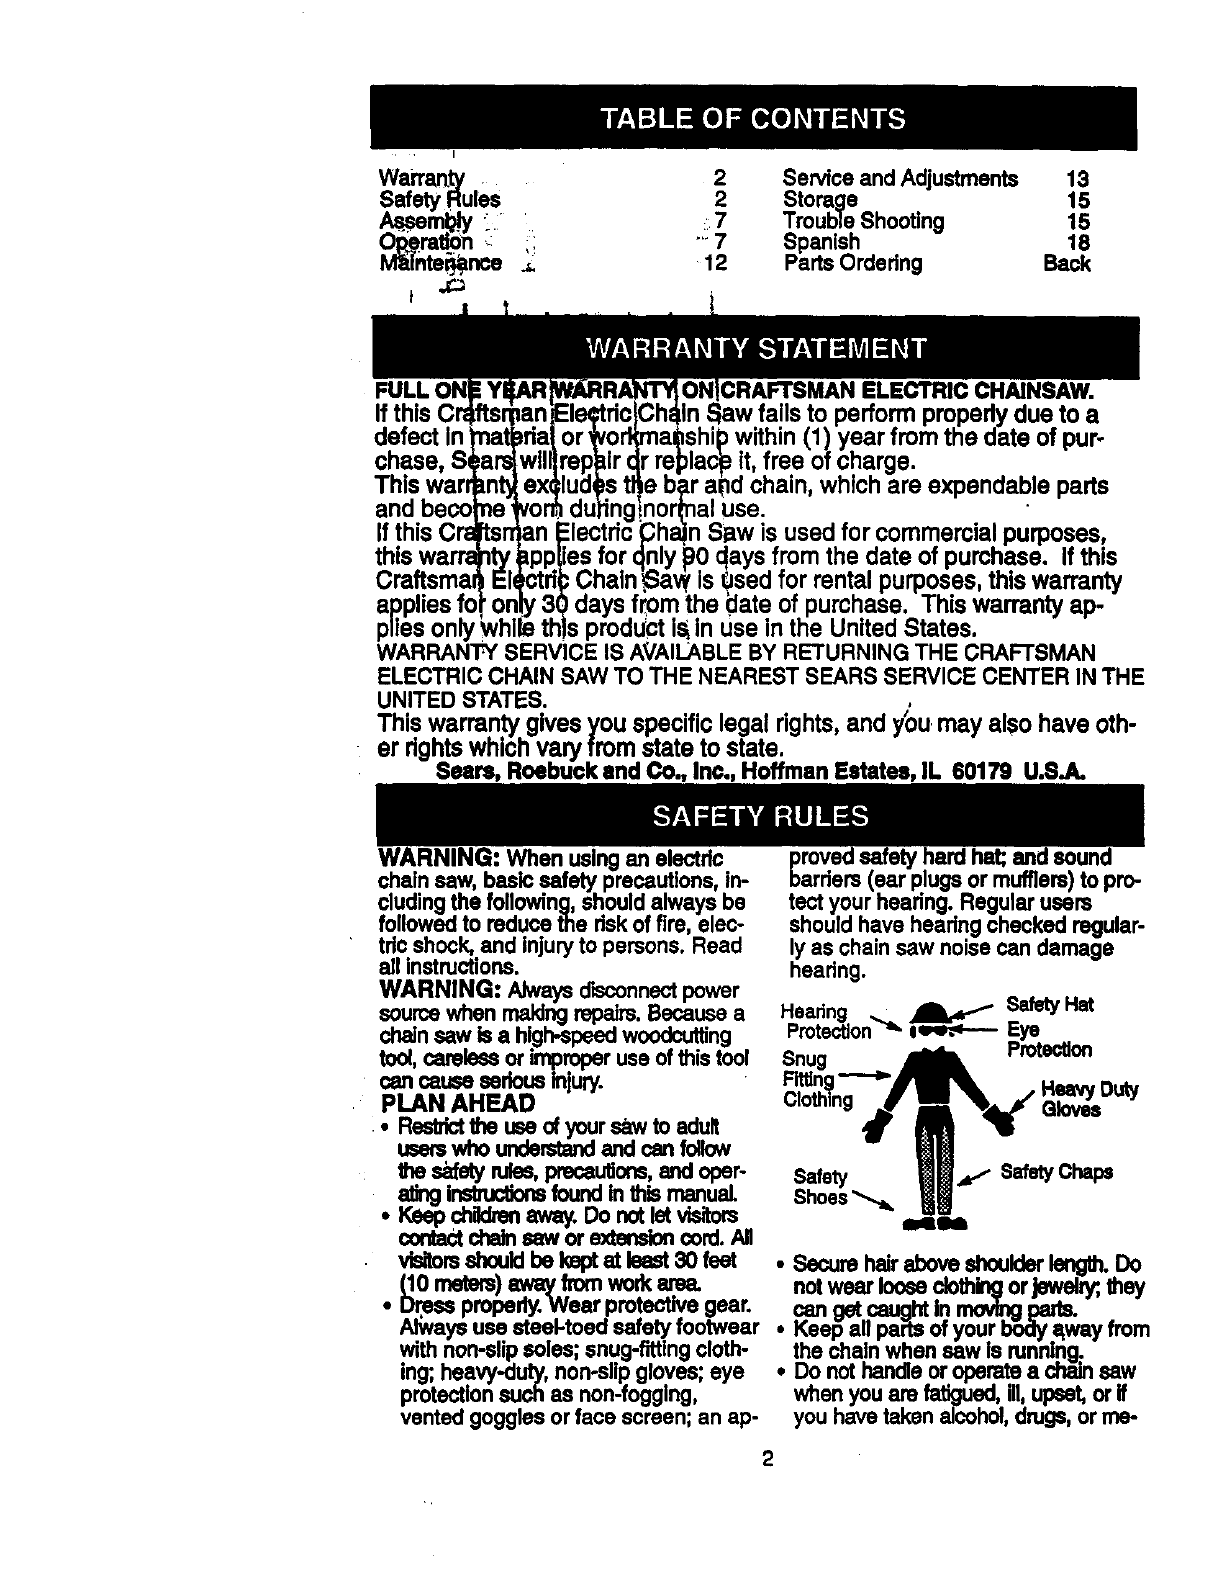
Iear or mufflers)to pro-
tect
have headng checked regular-
ly as chain saw noise can damage
hearing.
Hearing ._. _ Safety Hat
Protection _" iu_-----
Snug
Duty
instructionsfoundIn this manuaL
• Ksepchgc_enawey. Do nct ist vldtom _
correctchainmor extenskmcord.All
vlsitomshould10eic_ st is_t aOfsat • Bacure hair aboveshoulderisngth. Do
(10 rnetm) away fromwork area. not wear looseclothingorjewelry;,they
• Dress properly.Wear protective gear. can get htin
Always use steel-toed safety footwear • Keep allpaC_ of your _way from
with non-shpsoles; snug-fitting cloth- the chain when saw ls running.
ing; heavy-duty, non-slipgloves, eye • Do not handle or.ope.ra__a chainsaw
protectionsuch as non-fogging, when you are fatigued,dl,upset,or if
vented goggles or face screen; an ep- you have taken alcohol, drugs,or me-
2

_on... Youmustbe ingcodphysical
ndlticnandmsntailyaierLIfyouhave
_ny cond_cothatmightbe aggravated
y strenuouswork,checkwithdoctor
before operating.
Watch what you are doing. Use com-
mon sense.
• Do not startcutting untilyou have a
clear work area, secure footing_and
especially if you am felling a tree, a
rstreat path. Keep work area dean.
Cluttered areas inviteinjudes.
OPERATE YOUR SAW SAFELY
•Do not operate with one hand. Sed-
ous injurytothe oparator, helpem, or
bystandem may result from one-
handed operation. A chain saw is in-
tended for two-handed use.
•Do not operate saw from a ladder or
in a tree.
•Make sure the chain will not make
contact with any object while starting
the saw. Never start the saw when the
guide bar is in a cut.
•Don't tome chain saw. It willdo the job
better and safer at the rate for which it
was intended.
•Do not putpressure on the saw, es-
pecially at the end of the cuL Doing
so can cause you to lose control
when the cut is completed.
•Stop the saw before setting it down.
•Hand carry sew only when motor is
stopped. Cany the cha_ saw by the
fronthandiswith_e saw stopped,_-
gsr offthe switch,the guidebar and
saw chaintothe rear.
•Use the dghttool, cut wood only.
Don't use chain saw for purpose not
intended; for example, don't use
chain saw for cutting plastic, masonry,
non-wood buildingmaterials.
•Use extreme cautionwhen cutting
small size brush and saplingsbe-
cause the tender matedaJmay catch
the saw chain and I_ewhipped toward
you or pullyou off balance.
•When cutting a limb that is under ten-
don be alert for spdng back so you
will notbe struck when the tension in
the wood fibers is released.
MAINTAIN YOUR SAW IN GOOD
WORKING ORDER
•Have all chain saw service performed
by a Sears Service Center except the
items listedin the maintenance sec-
tion ofthis manual.
•Make certain sew chain stopsmoving
when tdgger switch is released.
•Keep the handles dryand dean and
•free from-oiland grease.
Keep oilcap andfastenem securely
tightened.
•Nonconform g compo-
nentsorthe removalofsafsty devices
may cause damageto the unitand
possiblestarpos_/em.iniurytotheoperatoror by-
UseonlyCraftsmsnaccesso-
rissandreplacam_ pertsas recom-
mended. Neverrood@.,yoursew..
• Maintainchainsew with_are.
•Keep unitsharp and dsan for better
and safer performance. .
•Followinstructionsfor lubricatingand
changinga.cc.essofies.
•Unplugthe chainsew from the power
sourcewhen not in use, beforeservin-
_g,andwhencha_ng_
andsttschments, suchas sew chain
• ed pads. Beforefur-
theruse of the chain sew, a guardor
otherpartthat is damagsdshouldbe
carefullycheckedto determinethat it
will operateproperlyand performits in-
tendedfunction.Checkfor alignmentof
moving per__biting ofmovingparts,
breakage_pads, mountingand any
otfterconditionsthat may affectitsop-
eration.A guardor otherpartthat is
damagsdsho dbepropedyrep=red
or replacedby aSears Service Center
unlesso_erwiseindicatedelsewherein
the operator'smanual.
•Do notoperate a chain saw that is
damaged, improperlyadjusted, or is
notcompletely and securely as-
sembled. Inspectchain sew cords pe-
d_ically, and if damaged have re-
paired by a Sears Service Center.
• When notin use, chain sews should
be storedin a dry, high or locked-up
place outof the reachof children.
•When stodng sew, unplugand use a
barsheath orcarrying case. Store idle
chainsaw.
ELECTRICAL SAFETY
•Usaa voitsgssupplyesshownonunit.
Avoidd,_..,gerou..s,environments. Don't
," use al_hanses m damp_orwet loca-
tions. Donl u_e Inrain.
•Avoiddangeroussituations. Do not
use in the presence of flammable liq-
uidsor gases to avoid creating a fire
or explos'mnand/or causing damage
to unit.
•To reducethe dsk of electricalshock, saw cords pedodk:aUyand if
thisappl'Bncehas a polarizedplug aged, have repaired by aSe'g_S-Sdt-
vice Center.
(one blade iswider thanthe other)and
willrequirethe use of a polarizedex- GUARD AGAINST KICKBACK
tens n Thaappr nca w= Fo owal to =,o d ck-
intoa polarizedextensioncordonly backand otherforceswhichcan resultin
Oneway.ifthe.p_gdosenot_tfuUy serous_=y.
intothe extans_ cord, roversethe
plug.If the plug alill does not fit,obtain
acorrect polarizedextensioncord. A
poladzedexmndoncordwillrequirethe
useofa peladzedwalloutJet."l'hisplug
willfit Intothepeladzedwalloutletonly
onsway.Ifplugdoesnot_funyInto
thewallcotlet,roversetheplug.ifthe
plugstilldoes notfit, contacta qualified
electddanto Installthe properwall out-
let Donotchangethaequ_omantplug,
extensioncord receptacle,or extension
•use
extensioncordsspecificallymarkedas
suitablefor outdoorapprBnceshaving
electricalratingnot less thanthe rating
of unit.Cord mustbe markedwithsurf's<
"W'. Make sure yourextensioncordis
in goodconcrdion.Inspectextension
cord beforeuse and replaceif dam-
aged. An undem'rpedextensioncord
willcause a dropin Finevoltageresult-
ing in lossof power and overheating.If
in doubt,use the next heaviergauge.
The I_v.e.rthe gauge number,the
heavierthe cord(see "Selectan exten-
sioncord3.
•Do not abuse cord. Never carry the
unit bythe extension cordor yank ex-
tensioncord to disconnectunit.
•Secure extensioncord to powercord
to preventdisconne_i.'onfrom unit.
•Do not use the unit if the swdch does
not tum the unit on and offproperly,or
if the lockoutdoes not work. Repairs
tothe switch must be made by a
Sears Service Center.
•Keep extensionco_ clear of operator
and obstaclesat all times. Position
cord so that it will not be caught on
branches. Do not expose cords to
heat, oil,water, or sharp edges.
•To avoidthe possibilityofelectric
shcok_avoid body contact with any
groundedconductor, such as metal
fences or pipes.
•Ground Fault Circuit Interrupter
(GFCI) protectionshouldbe provided
on circuitor outletto be used. Recep-
tacles are available having built-in
GFCI protectionand may be used for
this measure of safety. Inspectchain
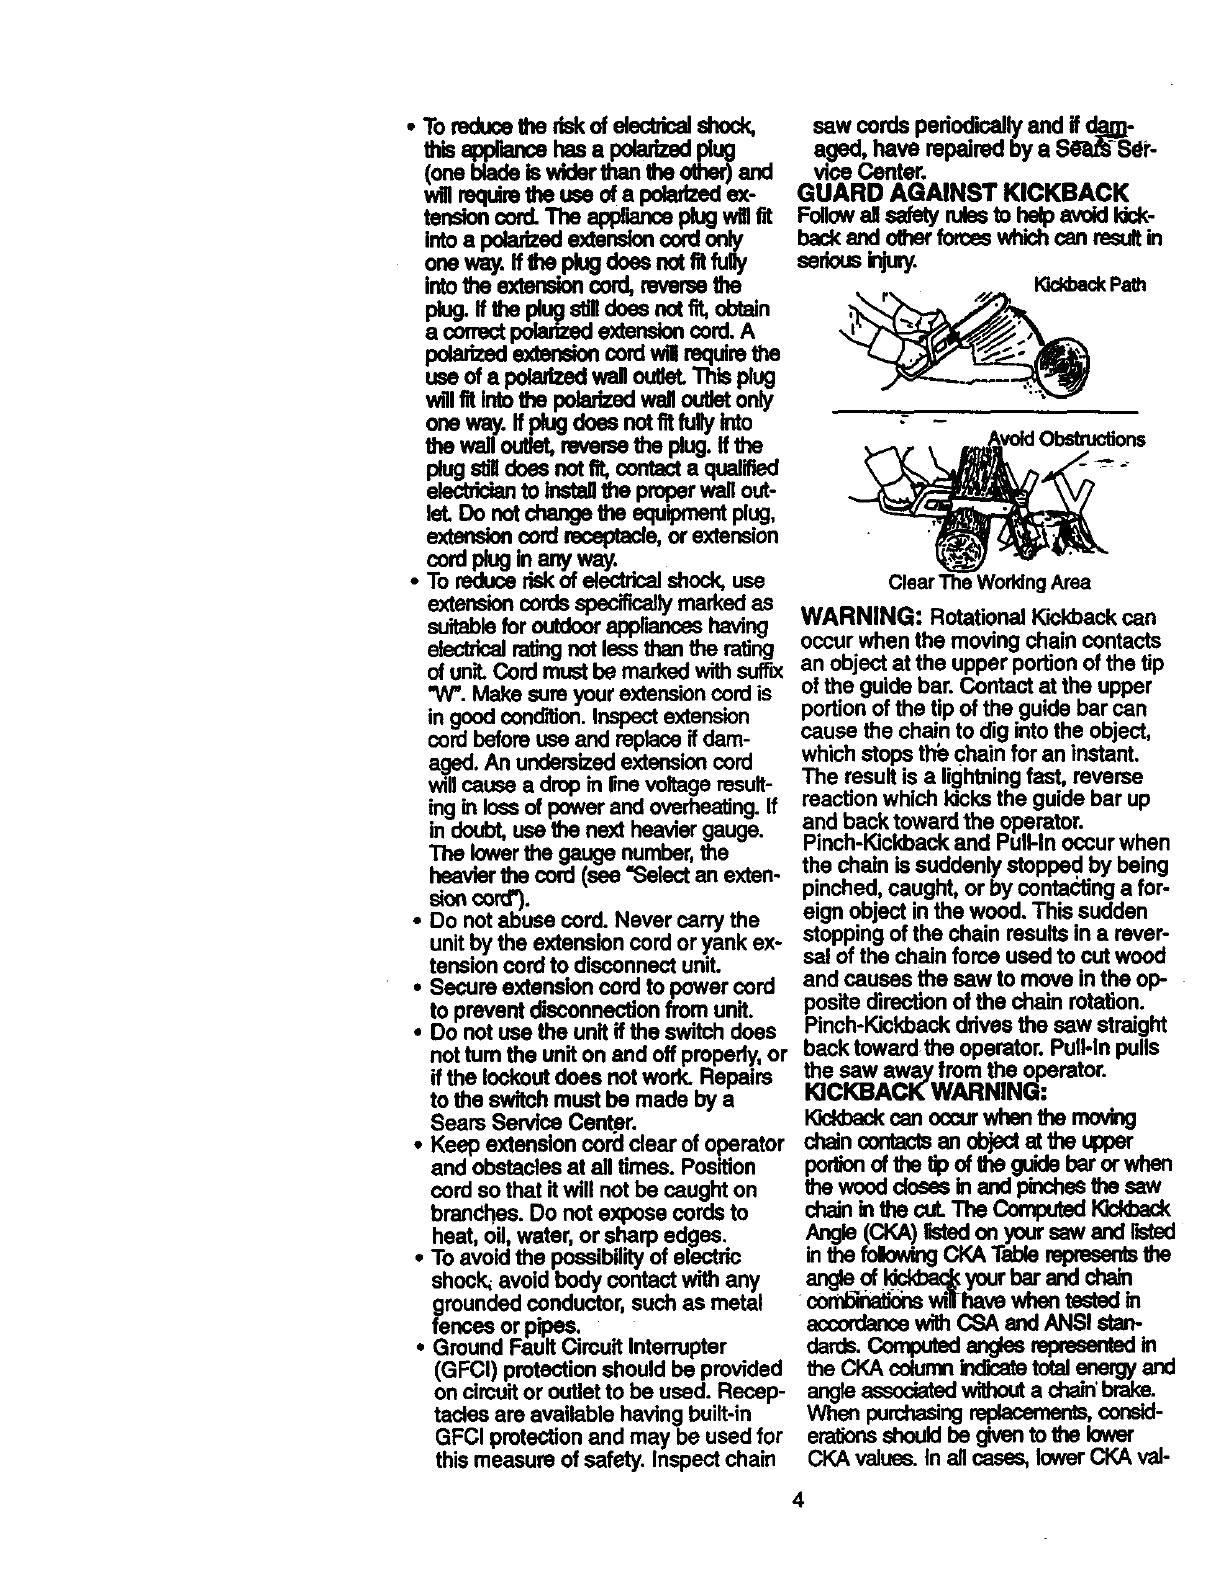
Clear The WorkingArea
WARNING: Rotational Kickbackcan
occur when the moving chain contacts
an objectat the upper portionof the tip
ofthe guide bar. Contactat the upper
portionof the tip of the guide bar can
cause the chain to dig into the object,
whichstops thb chain for an instant.
The result is a lightningfast, reverse
reactionwhich Idcksthe guide bar up
and back toward the operator.
Pinch-Kickbackand PuIHn occurwhen
the chain is suddenly stoppeclby being
pinched, caught, or by contactinga for-
eign object in the wood. This sudden
stopping of the chain resultsin a rever-
sal of the chain force used to cut wood
and causes the saw to move inthe op-
positedirectionof the chain rotation.
Pinch-Kickbackdrives the saw straight
backtoward the operator. PuN-Inpulls
the saw away from the operator.
IOCKBACK WARNING:
IC._kbackcan occurwhenthe moving
chaincontactsan objectat the upper
porUonofthetipoftheguidebarorwhan
the wcoddosas inand pinches the saw
chaJninthe cut.The CompuledW.K:kback
Angle (CKA) listedOn yoursaw and r_ed
inthe folowingCKA Tabla represen__e
an_._0f Idckba_ yourbar andcha_
_will=havewhentested in
accordancewithCSA and ANSI stan-
dards.Computedariesrsprasantedin
the CKA cclumnindicate totalanergy and
angleassodaledwithoutachain'brake.
Whenpurch_ngrep_camants,condd-
erationsshouldbe givantothe lower
CKAvalues.In all cases, lowerCKAval-
4
uesrepresenta _operatingenviron- CKArequirementsper standard.
meritfortheuser. REDUCE-THE CHANCE OF
Do not rely exclusively upon the safety KICKBACK
devices built intoyour.saw. The _precautionsshouldbe fol-
• Either ofthase feastions may cause lowedto minimizel_kbadc
you to lose controlof the saw which • G.dpsaw firmly.Hold chain.saw
. couidresult in serious,injury.. . withbothhandswhenmotorIs nmrmg.
•Pinching.thesaw cnmn along me tip Use a finn.gripwiththumbsand falgem
of the guide bar may push the guide endrcEngchainsaw handk_
bar rapidlyback toward the operator. Do not over rea_.".
• TIp cohtad in some casesmay cause ."_properfootingand balance at
a lightningfastRFJ,.CnON,kiddng the ail timas.
g_debarupandbacktowardoperetor.•Don't let the nose of the guide bar
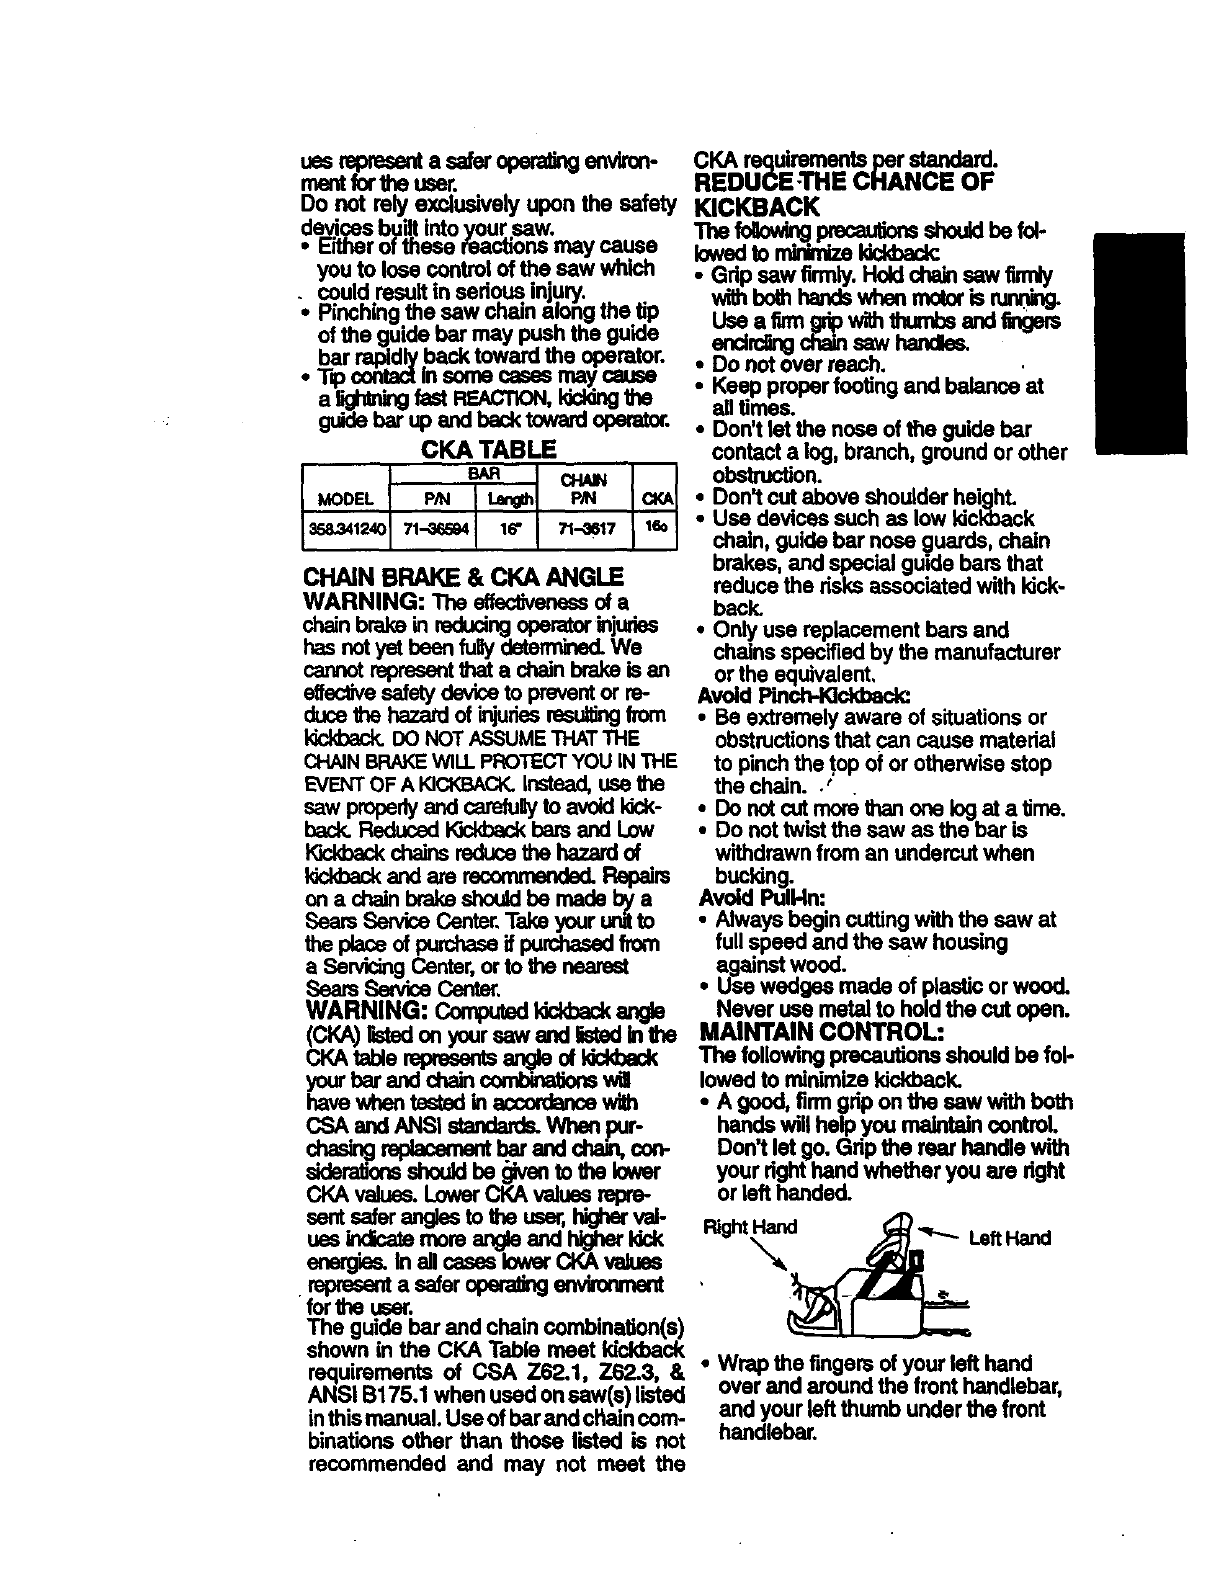
CKA TABLE contact a log, branch, ground or other
BAR CHAIN
.OOEL _,_ L.,_! e_. c_
358341240 71-3_g4 16" 71-3617 16o
CHAIN BRAKE & CKA ANGLE
WARNING: Theeffectivenessofa
chainbrake in redudngoperat,_injuries
has not yet been fubj dsterminsd.We
cannotrepresentUlat a chainbrakeis an
effoclivesafetydevicetopreventor re-
duce thehazardof_judasresu_ngfrom
Idcld)ack.DONOTASSUMETHATTHE
CHAINBRAKEWILLPROTECTYOUIN THE
EVENTOF A KICKBACK.instead,use
saw properlyand carefullyto avoidkick-
back.ReducedKickbackbars and Low
Kickbackchainsreducetha hazard of
_and are rocommended.Repa_
on a chainbrakeshouidbe made by a
Sears Sewice Center.Takeyour unitto
the pisceof purchaseifpurchasedfrom
a ServicingCenter,or to the nearest
Seam ServiceCe_t..er,
WARNING: Computedkickbackangle
(CKA) Estedon your saw and listedinthe
c|<._taUerepresents.a_e of_ckback
yourbarand chaincombinsltons_1
l-_vewben te_edinaccorde_ewilh
CSA andANSI standan:b. When.pur-
..cccccccc ..rep cem barandcha con-
sideraUonsshouldbegivenIo'd_elower
CKA valuas.LowerCKA valuesrepre-
sentsaferanglastothe user,higherval-
uesincicaternoreangleandhigherkick
energiss.InallcaseslowerCKAvaltm
.representa safer op_ enviromnent
forthe user.
The guide bar and chain combinatlen(s)
shown in the CKA Table meet kictd_ck
requirements of CSA Z62.1, Z62.3, &
ANSI B175.1 when used onsaw(s) listed
inthismanual. Use of barand cl_aincom-
binationsother than those listed is not
recommended and may not meet the
obstruction.
•Don't cut above shoulder height.
• Use devicessuch as low kickioack
chain, guide bar nose guards, chain
brakes, and..,specialgu!de bars..,that
reduce the nsks associatedwith kick-
back.
• Only use replacement bars and
chains spec.ifiedby the manufacturer
or the equwalent,
Avoid Pinch-IQcid)adc
•Be extremely aware of situationsor
obstructionsthat can cause matadal
to pinchthe top of or otherwise stop
the chain..'
Do nct cutmore thanons logat a time.
:Do nottwistthe saw as the bar is
withdrawnfrom an undercutwhen
bucking.
Avoid PulHn:
•Alwaysbegin cuttingwith the saw at
full speed and the saw housing
against wood.
•Use wedges made of plasticor wood.
Never use metal to holdthe cut open.
MAINTAIN CONTROL:
The followingprecautionsshouldbe fol-
lowed to minimize kickback.
• A good, firm gdp on the saw with bath
handswill helpyou maintain control.
Don't let go. Grip the rear handle wi_
your right hand whether you are right
or left handed.
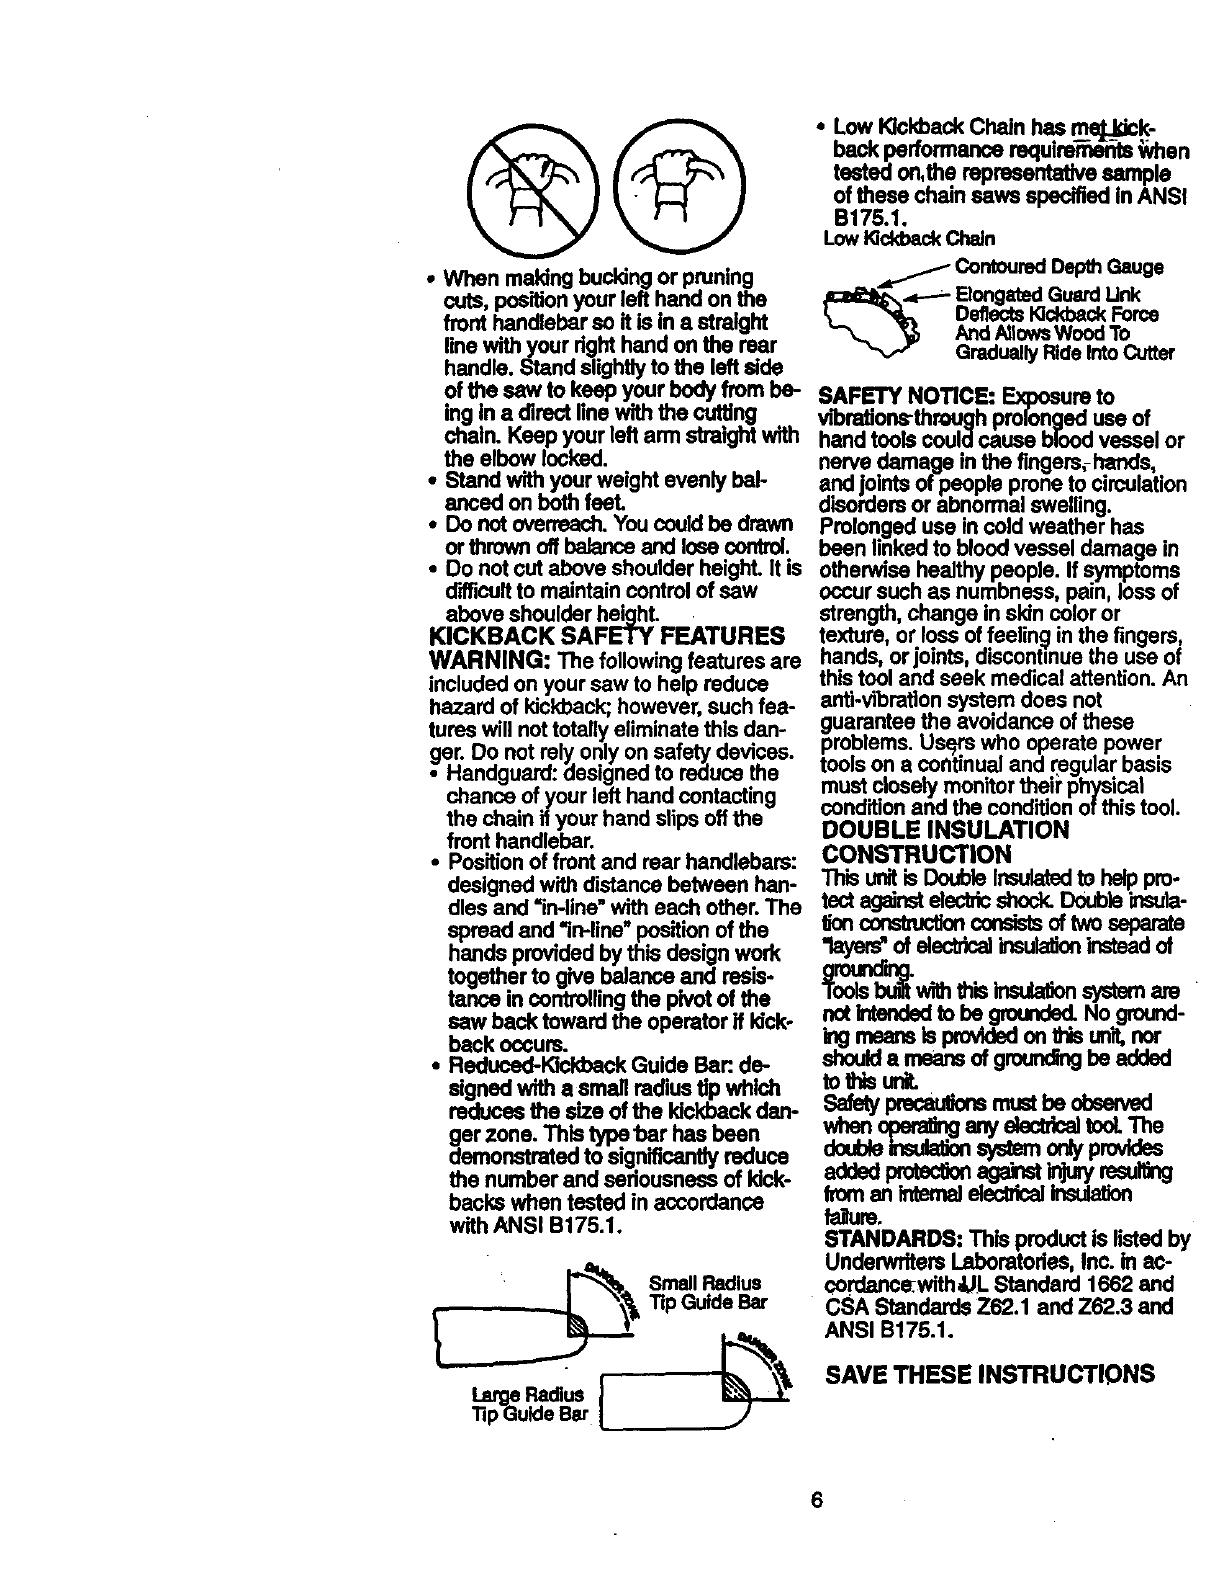
,Right,__Left Hand
• Wrap the ringers of your left hand
over and aroundthe fronthandlebar,
and your left thumb underthe front
handlebar.
_(_ •Low 1<3ckbackChain has m__k-
back performancerequl_ _vhen
tested on,the representative sample
of these chain saws specified inANSI
B175.1.
LowK)ckbackChain
•When making bucking or pruning _Contoured Depth Gauge
cuts, position your left hand on the /calif.,P--- Elongated Guard Unk
_, _ DeflectsKickback Force
'_ And/_ows Wood To
Gradually Ride Into Cutter
front handlebarso it is in astraight
line with your dght hand on the rear
handle. Stand slightlyto the left side
ofthe saw to keep yourbody from be-
ing in a direct line with the cut_ng
chain. Keep your left arm straightwith
the elbow locked.
•Stand withyour weight evenly bal-
anced on both feeL
• Do notoverreach.Youcouldbe drawn
or thrown off balanceand lose contrd.
• Do notcut above shoulderheight. It is
d'_cuit to maintain controlofsaw
above shoulder height.
KICKBACK SAFETY FEATURES
WARNING: The following features are
included on your saw to help reduce
hazard of kickback;however, such fea-
tureswill nottotally eliminate thisdan-
ger. Do not rely onlyon safety devices.
Handguard: designed to reduce the
chance of your left hand contacting
the chain if your hand slips offthe
front handlebar.
• Positionof front and rear handlebars:
designed with distance between han-
dles and "in-line"with each other.The
spread and "in-line"positionof the
hands provided by this design work
together to give balance and re=s-
tance in controllingthe pivotof the
saw back toward the operator if kick°
back occurs.
• Reduced-Kickback Guide Bar:.de-
signed with a small radiustip which
roducsathe size of the kickback dan-
dgerzone. This typebar has been
ernonstratedto significantlyreduce
the number and sedousnese of kick-
backs when tested in accordance
with ANSI B175.1.
_"_ SmallRadius
SAFETY NOTICE: Exposure to
vibrstions_through prolongeduse of
hand tools couldcause blood vessel or
nerve damage in the fingersrhands,.
and jointsof people prone to circulatmn
disoidersor abnormal swelling.
Prolongeduse incold weather has
been linked to bloodvessel damage in
otherwisehealthy people. If symptoms
occur such as numbness, pain, lossof
strength,change inskin color or
texture, or loss of feeling/in the fingers,
hands, or joints, discontinuethe use of
this tool and seek medical attention. An
anti-vibrationsystem does not
guarantee the avoidance of these
problems. Usf_m- who operate power
toolson a continualand regular basis
must closelymonitortheii" physical
condition and the condition of this tool.
DOUBLE INSULATION
CONSTRUCTION
This unitis Dot._le Insulatedto hsip pro.
tectagainstelectricshock.Doubleinsula-
_on _ condstsof two ssparate
"1_ of eisctfica]insul_on insteadof
ingmsemisprovidedana-isur_t.nor
shouldamsansof groumingbe added
toUlis ur_
whanSafstYopen nganyPrsCau °mmustba°bseved
elec_cai tcoLThe
addedpfo c ega t re dng
froman intemalaiecMcal Insulation
fanuro.
STANDARDS: This product is listed by
UnderwritersLaboratodes, Inc. in ac-
cordance.withaL Standard 1662 and
CSA Standards Z62.1 and Z62.3 and
ANSI B175.1.
SAVE THESE INSTRUCTIONS
6
CARTON CONTENTS
Model358.341240
ChainSaw(fullyassembled)
"BarSheath
ExtraChain
Examinepartsfor dam_e. Do notuse
damaged parts.
NOTE: ffyou needass.stanceorfind
partsmissingor damaged,pleasecall
1-800-235-5878
ASSEMBLY
Yoursawisfullyassembled;no
assemblyis necessary.
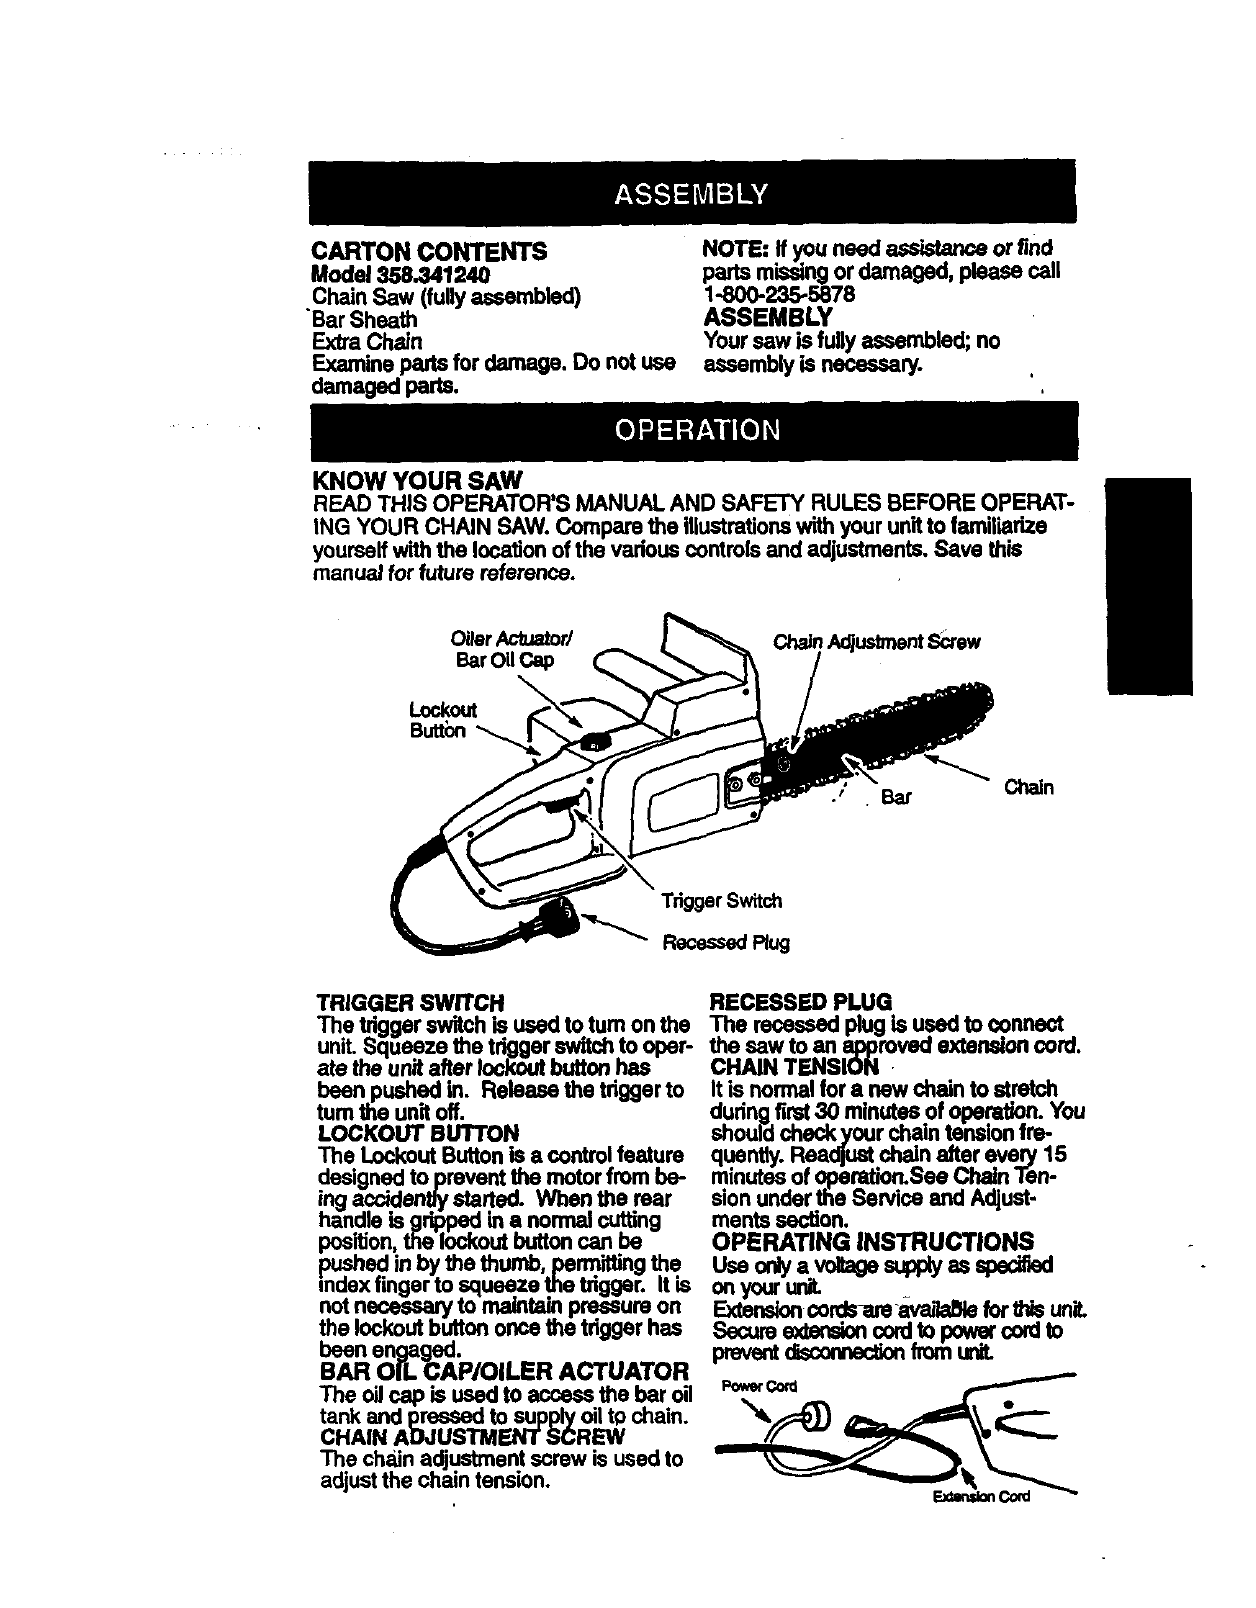
KNOW YOUR SAW
READ THIS OPERATOR'S MANUAL AND SAFETY RULES BEFORE OPERAT-
ING YOUR CHAIN SAW. Compare the illustrationswith your unit to familiarize
yourseffwith the location of the variouscontmis and adjustments.Save this
manual for future reference.
OilerActuator/
BarOilCap
Lockout
Butt'on
ChainAdjustmentScrew
Tdgger Switch
Recessed Rug
°t .Bar ChsJn
TRIGGER SWITCH
The _gger switchis used to tom on the
unit. Squeeze the triggerswitchto oper-
ate the unit after Iockc;utbuttonhas
been pushed in. Release the tdgger to
turnthe unit off.
LOCKOUT BUTTON
The Lockout Buttonis acontrolfeature
designedto prevent the motorfrom be-
ing accidentlystarl.ed. When the mar
handle is gripped m a normal cutting
position,the-10ckout buttoncan be
pu,?hedin by the thumb, permittingthe
index finger to squeeze the rigger. It is
not necessary to maintain pressure on
the lockoutbutton once the tdgger has
been engaged.
BAR OIL CAP/OILER ACTUATOR
The oil cap is used to access the bar oil
tank and pressed to supply oil to chain.
CHAIN ADJUSTMENT SCREW
The chain adjustment screw is used to
adjustthe chain tension.
RECESSED PLUG
The recessed plug is used to connect
the saw to an approved extensioncord.
CHAIN TENSION
It is normal for a new chain to stretch
dudng first30 minutes of operation. You
shouldcheck your chain tensionfre-
quently. Readjustchain after every 15
minutes of 0peration.sae Chain Ten-
sion underthe Service and Adjust-
mentssection.
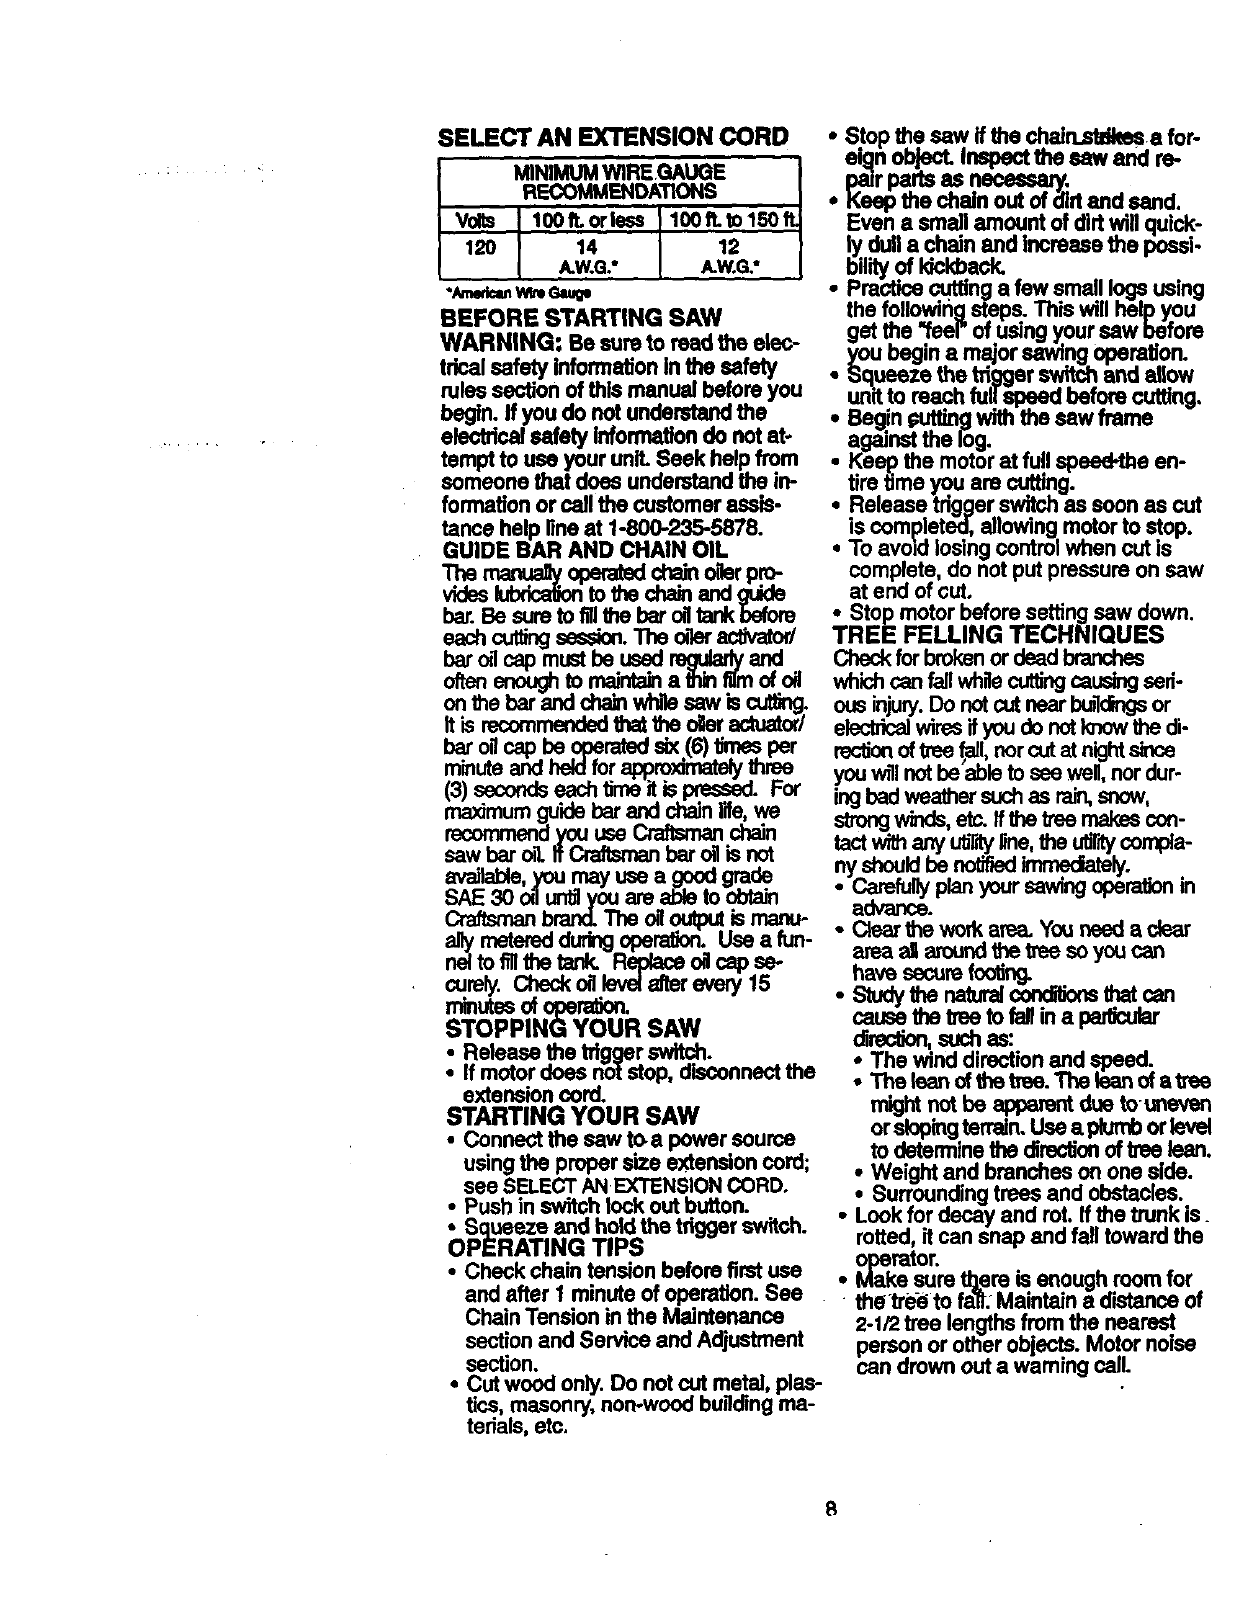
OPERATING INSTRUCTIONS
orCyavo gesumy
on youruniL
Extensionscrdsare avanaBlefor _is unit.
Sacureextendoncordto pov_.r. cordto
preventdsconnsc_n_omun_L
SELECT AN EXTENSION CORD •Stop the saw If the ch_n_Idksa a for-
eign object. Inepectthe s_v and re-
MINIMUMWlREe_UGE I pairpartsas necass___:
RECOMMENDATIONS |•Keep the chain out ofdirt and sand.
vo=I100, orl,=100 to150 I
12o I14. 12 |
IAW.G. AW.G."l
•/k'aed,:_W_ Ga,_le
BEFORE STARTING SAW
WARNING: Be sure to read the elec-
trical safety informationin the safety
rulessection of thismanual beforeyou
begtn. If you do not understandthe
electrical safety Informationdo notat-
tempt to usa your unit.Seek help from
someone that does understandthe in-
formationor callthe customerassis-
tence help line at 1-800-235-5878.
GUIDE BAR AND CHAIN OIL
The _ope_. chainoilerpro-
vides_tothe chin and gtJde
bar.Be sure to fillt'_e baroiltankbefore
Even asmallamount of dirt ..willquick-
ly dull a _aln and increase me possi-
bility of kickback.
•Practice cuffinga few small logsusing
the following steps. Thin will help you
get the "feel" ofualng your saw before
you begin a major sawing operation.
• Sq.u_ze the trigger switchand allow
unitto roach full _ before cutting,
• Begin _-'ut_g with the saw frame
againstthelog.
• Keep the motor at fu!l spsad-tbe en-
tire time _u are cutting.
•Release tngger switchas soon as cut
is complet_l, allowing motorto stop.
•To avoid losingcontrolwhen cut is
complete, do not putpressure on saw
at end ofcut.
eachcuttingsesdon. The olierscllvator/
bar c_1cap mustbe used regularlyand
ollen enoughto maintainathinfilmof _
on the bar andchab whilesaw is cut_ng.
Itis recommendedthstthe oileractuator/
bar o=1csp be operatedsix.(6)_'ms per
minuteand heklfor approximatelythree
(3) secondseach time it is prsased. For
maximumguidebarand chainIde,we
recommendyou use Craftsmanchain
saw bar='L If Craftsmanbar oilis not
_, youmay use a gcodgrade
SAE 30 _untl youare able to chtain
Craftsmanbrand.The olioutputis manu-
allymetereddurbg operaJon. Usa a fun-
nelto fll the tank. Replaceoacep sa-
_mly. Check olilev_ aiter eve_ 15
rrmutesdi opera,on.
STOPPING YOUR SAW
Release the triggerswitch.
:If motor does not step, olsconnectthe
extensioncord.
STARTING YOUR SAW
•Connect the saw toa power source
usingthe proper size extensioncord;
see SELECTAN.EXTENSIONCORD.
•Pushin switchlock out button.
•Squeezeandhdd thetdggerswitch.
OPERATING TIPS
•Stopmotorbeforesetting saw down.
TREE FELLING TECHNIQUES
Checkfor brokenor dsad _
whichcan fali whilecurlingcausingsed-
ousinjury.Do notcutnearb_lcingsor
electricalwiresifyou do notkncwthe di-
recticoof tree ,b!l,nor cutat n_ht since.
youwill notbe ableto see well,nor dur
ingbadwsathersuchas rain,snow,
strongwinds,etc. II thetree makes con-
tactwithany ufirltyline,the utT_ compla-
nyshouUbenot ed
•Carefullyplanyoursavangoperationin
advance.
•Cle_ the workar_ Youneed adsar
area all aroundthe trse so youcan
have securefoot_9.
•Stay the_ coedHk_s_ can
causa U_etree to faliin a padJcular
direclJon,such as:
•The winddirection and speed.
• The lean ofthe tree.The Isanof a treo
mightnetbe epperentduetouneven
orslopingterrain.Use eplumborlevel
to determinethe directionof tree lean.
•Weight and brancheson one side.
•Surroundingtrees and obstacles.
•Look for decay and rot. If the trunk is
rotted,If can snap and fall toward the
operator.
•Check chain tension before firstuse •Make sure tlzere is..enough.r_m for
and after 1 minute of operation. See the tre_ to fall. Maintain a distance of
Chain Tension in the Maintenance 2-1/2tree lengthsfrom the nearest
sectionand Service end Adjustment personor other objects. Motor noise
section, can drown out a warning call.
•Cut wood only. Do not cut metal, plas-
tics, masonry,non-woodbulidingma-
terials, etc.
8
• Remove dirt, stones, loose bark, higherthan the horizontalnotchingcut
nails,staples, and wire from the tree as illustrated.Keep the fellingback cut
where cutsare to be made. parallel to the horizontal notchingcut.
Plana clearretreatpath Make the felling back cut so enough
wood is left to act as a hinge...Thehinge
wood helps the tree from twisUngand
fallingin the wrong direction.Do not cut
.... _ ._"_" Directionof Fall throughthe hinge.
As the fesl_g cut gets dsse ot the hinge
_p_'/ the tree shouldbe_n to falLIf them is
any chance thst the ires may notfagin
A retreat path shouldbe planned and
cleared as necessary before cuts are
staded. The retreat path should extend
back and diagonally to the rear of the
expectedlineof fall as illustratedabove.
FELLING LARGE TREES
(6 inches in diameter or larger)
The notch method Is used to fell large
trees. A notch is cut on the side of the
tree in the desired directionof fall. After
a felling cut is made on the opposite
side of tree, the tree will tend to fall in
the direction of the notch.
NOTE: If tree has large buttress roots,
remove them before making the notch.
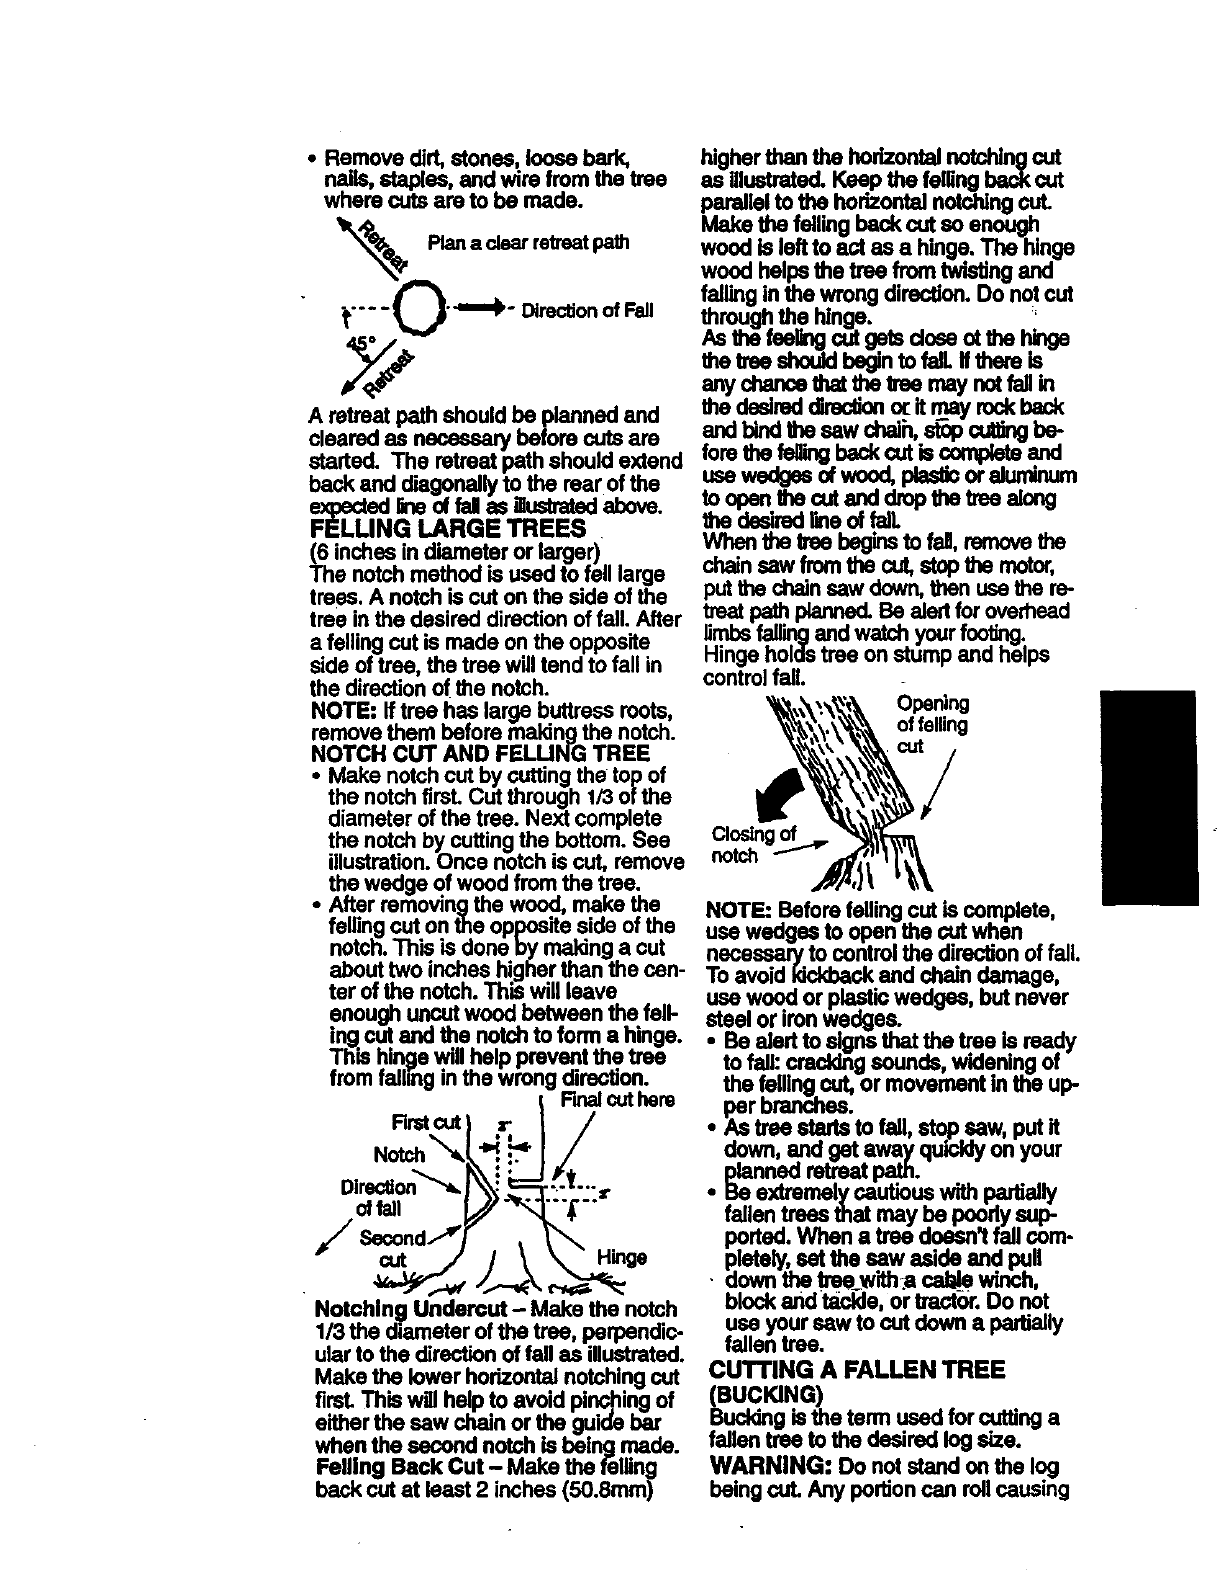
NOTCH CUT AND FELLING TREE
•Make notch cut by cutting the top of
the notchfirsL Cut through 1/3 ofthe
diameter of the tree. Next complete
the notch by cuttingthe bottom. See
illustration.Once notch is cut, remove
the dsslred d'_Dcliono[ it may rcokI_ck
andbindthesawchalh,stT0pcuit_ be-
forethe feting back cut is cumpiste and
usewedgssofwcod,ples_or¢uminum
toopenthecutanddropthetreesiong
the dssiredrmeot falL
When the tree beginstc feE,removethe
chein sawfrom the cut,stopthe motor,
putthe chainsaw down, then use the re-
beat pathplanned.Be alert for overhead
limbsfallingand watch your fooling.
Hinge holds tree on stump and helps
controlfall.
Opening
offelling
Closingof
notch
•the wedge of wood from the tree.
After removingthe wood, make the NOTE: Before fellingcut is complete,
fellingcut on the oppositeside of the use wedges to open the cut when
notch. This is done.by making a cut necessary to controlthe d'.m_.'.'onof fall.
about two inches higherthan the can- To avoid Idckbaokand chain damage,
ter ofthe notch.This will leave use wood or plasticwedges, but never
enough uncut wood between the fell- steel or ironwedges.
ing cut and the notch to form a hinge. • Be alert to signs that the tm.e is reedy
This hinge will help prevent the tree to fall: crasldngsounds,widening of
frem fsilmgin the wrong direction, the fellingcut, or movement in the up-
Rrstcut r Finalcut hem per branches.
/• As tree starts to fall, stop saw, put it
Notch ""_', _down, and get away quicklyon your
Oirection"_ _! "-- ,.P'.t...=,. pisnnedretreetpath.
otfall )/_._, .._._. • Be extremolycautlous with partially
fallen trees that may be poody sup-
// _mnd_ ,_.. ported. When a tree doesn't fall com-
,cut,....j /\ X,_ge pletely,set the _...waside and pull
,v,,.,y._ <f__ .._---_ • down the tree with.a _winch
Notching Undercut- Make the notch block and tackle, or ba_0r. Do not
1/3 the diameter of the tree, perpendic- use youreew to cut down aparUally
uler to the direction offall as illustrated, fallen tree.
Make the lower horizontal notchingcut CUTTING A FALLEN TREE
fi.mLThis will helpto avoid pinchingof (BUCKING)
either the sew chain or the guide bar Bucking is the term used for cutting a
when the second not_Hh= is being made. fallen tree to the desired logsize.
Felling Bsck Cut Make the felling WARNING: Do not stand on the log
back cut at least2 inches (50.8ram) beingcut. Any portioncan rollcausing
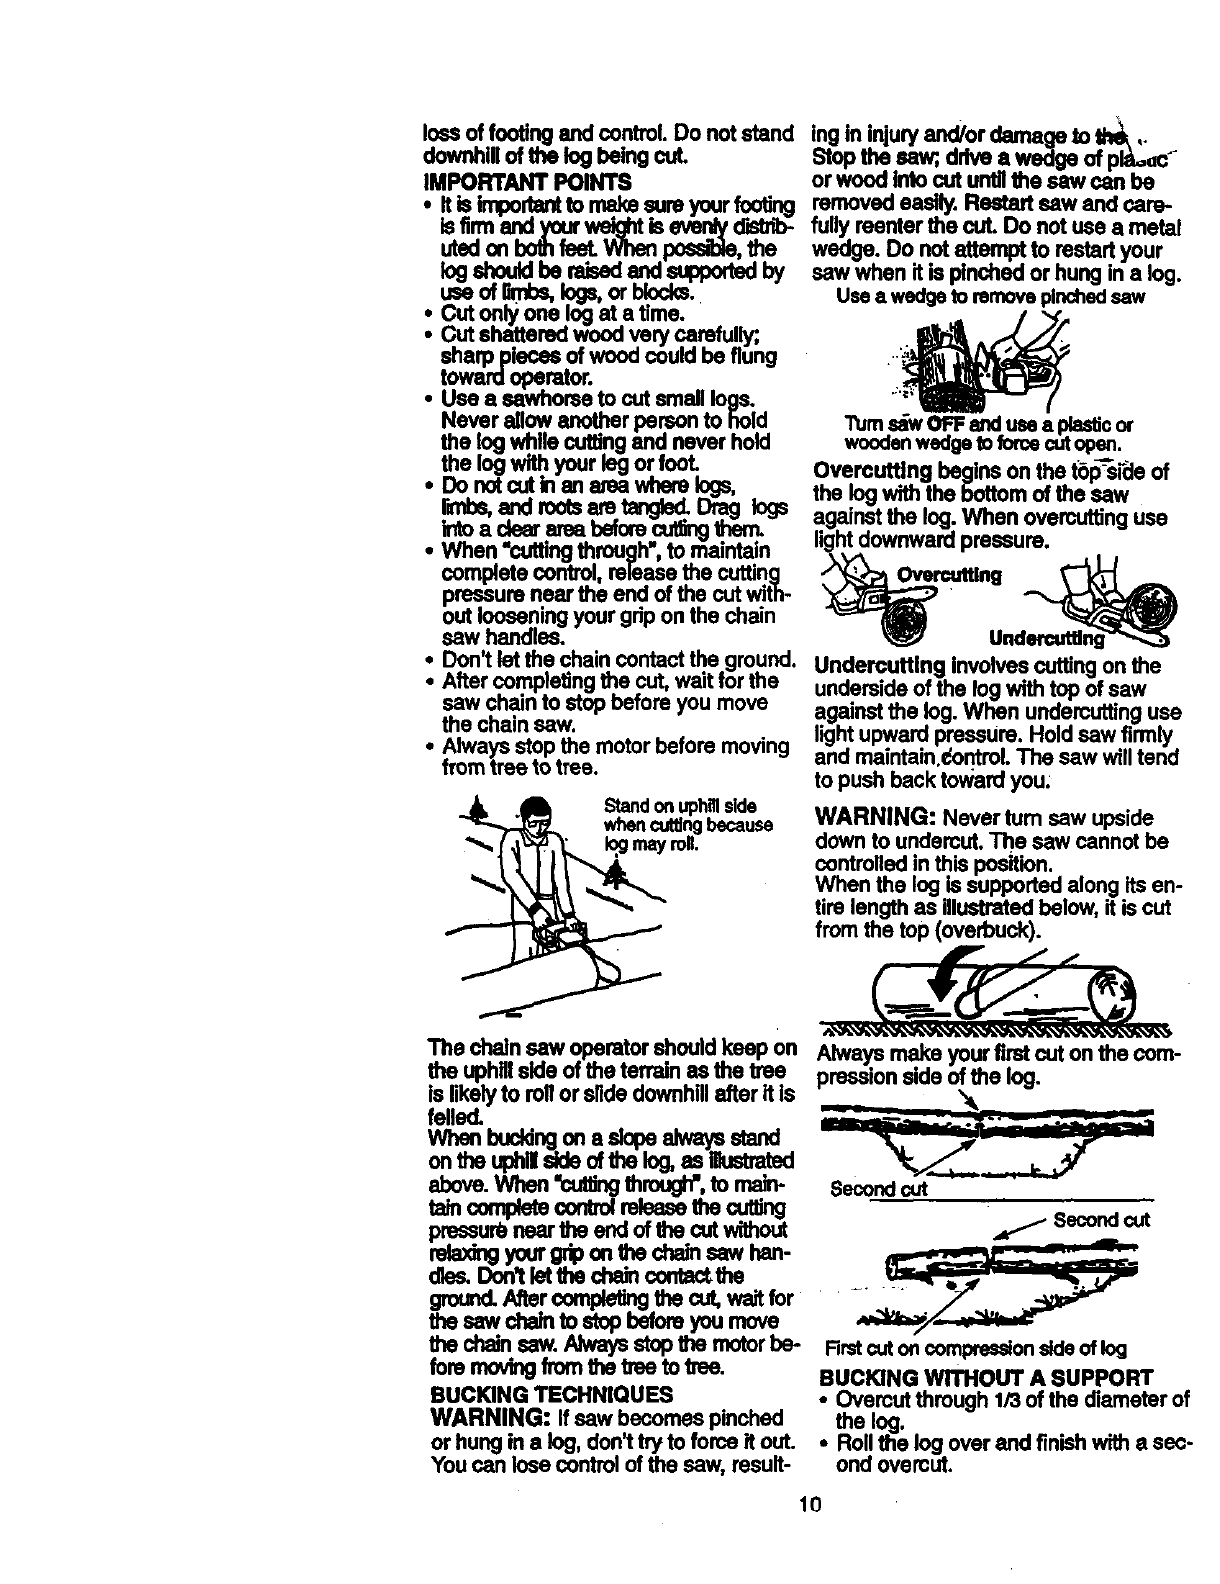
lossof footingandcontrol.Donotstand ingin injuryand/ordamageto _ ,.
downhillof the log being cut+ utop the saw;,ddve a wedge of pl_,uc
IMPORTANT POINTS or wood Into cut untilthe saw can be
•it is importmltto m_. sureyourfooting removed easily. Rastart saw and care-
is firmand yourweightis evenlydistffS, fully reenter the cut. Do not use a metal
uted on _feeL..Whenposalde,the wedge. Do notattempt to restartyour
logshouldbe raisedand suppodedby sew when it is pinched or hung in a log.
use of _logs, or blocks.. Use a wedge to remove plndled saw
• o+onelog=.m..
•Cut shattered Woodvery carefully;,
sharp pieces of wood could be flung
•towardoperator.
Use a sawhorseto cutsmall logs.
Never allow _..._r parasnto hold -_m _OFF __Al)las_cor
the logwhile cuttingand never hold
the log with yourleg or foot. eof
• Do notcut b an area wherek_s,
•When "cuffing through', to mainta.!n I
completecontrol,release the cutting
pressure near the end of the cut with-
out Icosen,ngyour gripon the chain
saw handles.
•Don't let the .chaincontactthe ground.
•After completing the cut, walt for the
sew chain tostop before you move
the chain sew.
•Alwaysstop the motorbefore moving
from tree totree.
Standonuphlflside
whencuffingbecause
_may_.
Undercutting Involves cuttingon the
undersideof the log with top of saw
against the log.When undercuttinguse
lightupward pressUre. Hold saw firmly
and maintaln.dontmLThe saw willtend
to push back toward you:
WARNING: Never tum saw upside
down to undercut. The sew cannot be
controlled in this position.
When the log is supported along its en-
tire length as illustrated below, it is cut
from the top (overbuck).
The chain saw operatorshould keep On ^-,'_'_'_w_-wa_-_'_a
Always make your firstcut on the corn-
the uphillside of the terrain as the tree pressionside of the log.
ls likelyto roll or slide downhillafter it is _.= ,,_j._. _
felled. . :-_' .: .....
Whon buddng on aslope always stand _. -_- :r,,:i" --
ontheUl_lll_leofllmlog, asi_,mtreted "_,s_+, +: ,- _;V"
ahove.Whon"coflJngthrough',to main- Secondcut
tainCOmldeteonntn_ reloasethe cut6ng Secondcut
Rrstcutoncompressionsldeoflog
BUCKING WITHOUT A SUPPORT
• Ovemut through 1/3 of the diameter of
the log.
•Rollthe log over and finishwith a sec-
ond overcut.
pressureneartheendof thecutwithout
raiaxingyour griponthechainsew han-
die_ Don't_ the cha_ contactthe
ground.Aftercomplel_ the oJt,wait for
the saw che_ to stophofore you move
c n.m. stop rnotor
fore mov_ fromthe trse totrco.
BUCKING TECHNIQUES
WARNING: If sew becomes pinched
or hung ina log, don'ttry to force it out.
You can lose control of the saw, result-
10
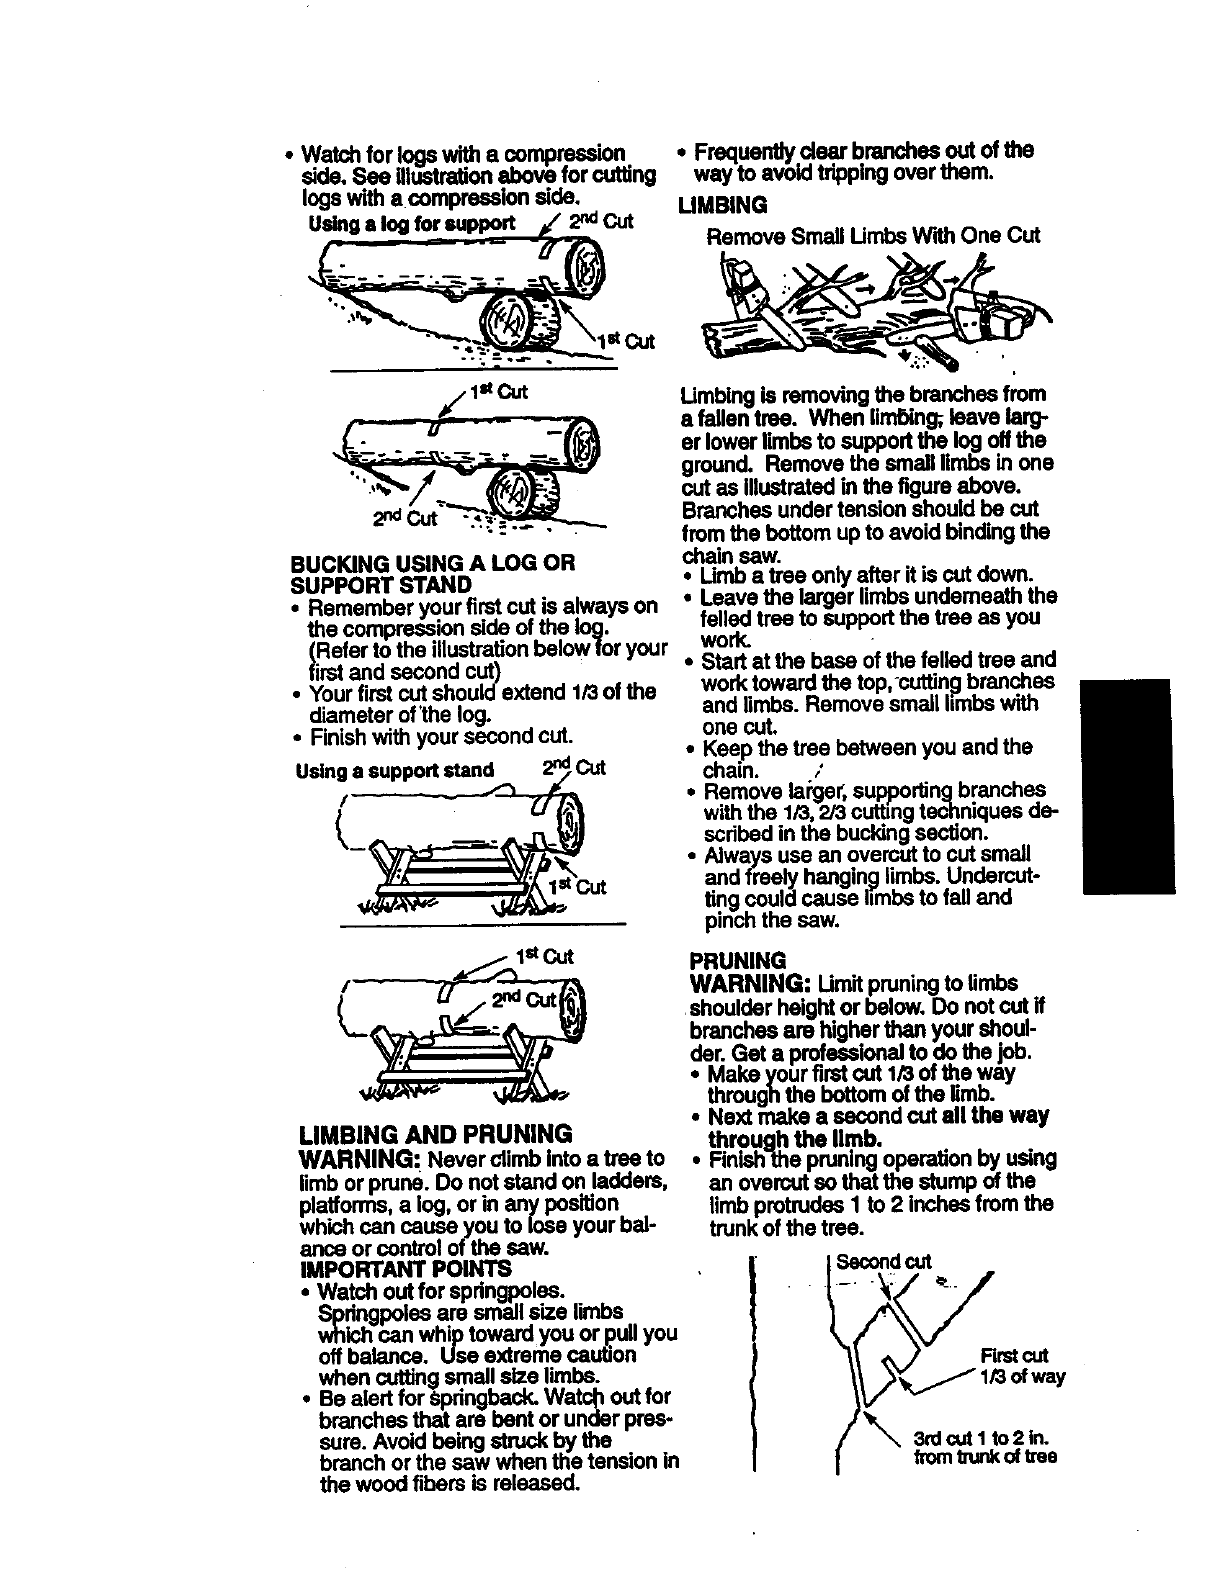
• Watch for logs with acompression. • Frequentlyclear branches outof the
side. See illdstrationabove for oumng way to avoid trippingover them.
logswith a compression side. UMBING
u Qalogtorsuppo f2 Cut
_ . r ---- --dr-- Remove Small Umbs WHhOne Cut
__ 1_
BUCKING USING A LOG OR
SUPPORT STAND
• Remember yourfirst cut is always on
the compression side of the log.
(Refer to the illustrationbelow for your
firstand second cut)
• Yourfirst cut shouidextend 1/3of the
diameter of'the log.
•Finishwith yoursecond cut.
Umbing isremovingthe branches from
afallen tree. When lirnDing; leave larg-
er lower limbs to supportthe log offthe
ground. Remove the small limbs in one
cut as Illustratedinthe figure above.
Branchesunder tensionshouldbe cut
from the bottom up to avoid bindingthe
chain saw.
:Limba tree only after it is cut down.
Leave the larger limbs undemeath the
felled tree to support the tree as you
work.
•Start at the base of the felled tree and
work toward the top,-cuttin_ branches
and limbs. Remove small limbswith
one out.
•Keep the tree between you and the
chain. /
•Remove la_jer, supporUngbranches
with the 1/3,2/3 cuttingtechniquesde-
scdbed in the bucking section.
•Alwaysuse an overcutto cut small
and freely hanging limbs. Undercut-
ting couldcause limbsto fall and
pinchthe saw.
__ ptCut
LIMBING AND PRUNING
WARNING: Neverclimbintoatreeto
limb or prune. Do notstand on .ladders,
platforms, a log, or in any position
which can cause you to lose yourbal-
ance or control of the saw.
IMPORTANT POINTS
•Watch outfor spdngi_les.
Spdngpolas are small size limbs
which can whip toward you or pullyou
offbalance. Use extreme caution
when cutting small size limbs.
•Be alert for Spdngback.Watc_ out for
branchesthat are bent or under pres-
sure. Avoid being struck by the
branch or the saw when the tension in
the wood fibers is released.
PRUNING
WARNING: Umit pruningto limbs
shoulder heightor below. Do notcut if
branches are higher than your shoul-
der. Get a professionalto do the job.
•Make yourF_'t out 1/3 of _e way
through the bottomof the limb.
•Next make a second cut all the way
through the limb.
•Finish-thepruningoperationby using
an overcutso that the stump of the
limbprotrudes I to 2 inches from the
trunk ofthe tree.
i Secondcut
_',, _1_1 _21n.
l_'n _ tree
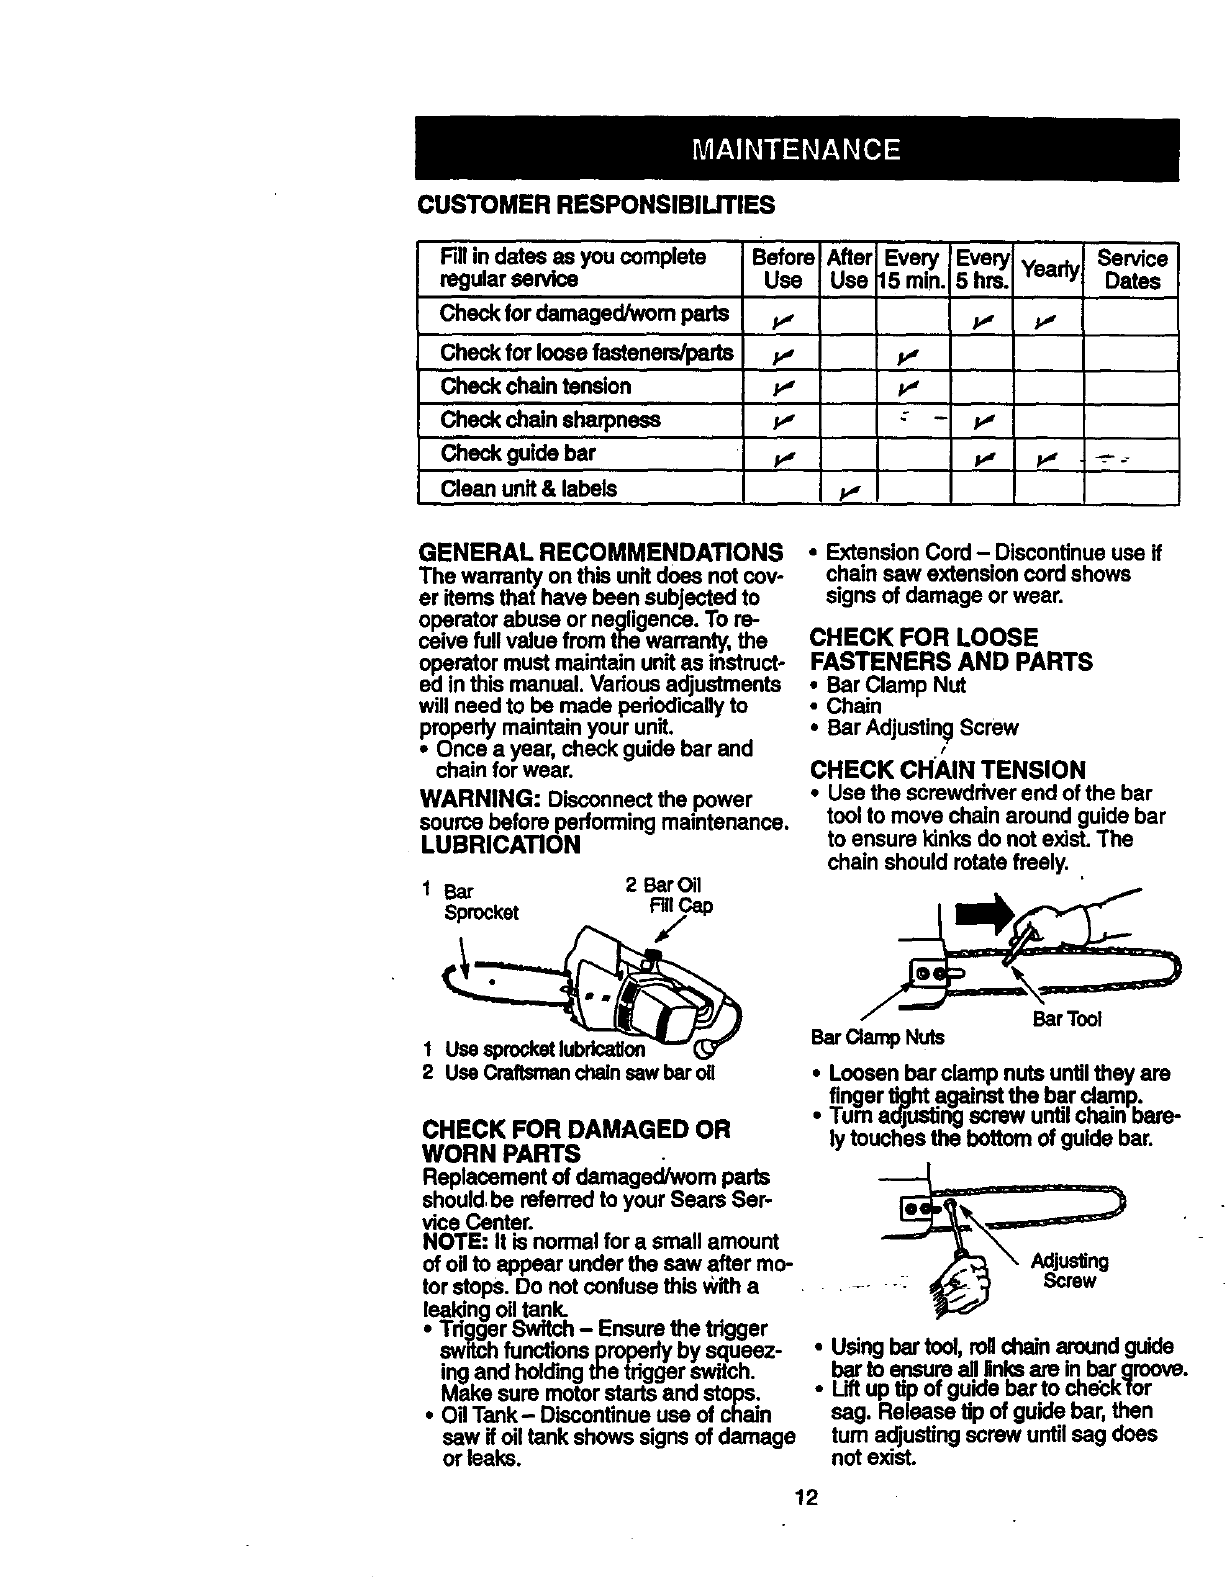
CUSTOMER RESPONSIBILITIES
RII in dates as youcomplete
regular service
Check for damaged/worn parts
Check for loose festenem/parts
Check chain tension
Check chain sharpness
Check guide bar
Clean unit & labels
Before Afteri Every Every Yearly Service
Use Use 15min. 5hm. Dates
k., p.,
p., p*
k" v"
:p.,
p.,
GENERAL RECOMMENDATIONS
The warranty on this unit does notcov-
er itemsthat have been subjectedto
operatorabuse or negligence. To re-
calve full value from the warranty, the.
operator mustmaintain unit as instruct
ed in this manual. Various adjustments
will need to be made periodicallyto
propedy maintainyour unit.
• Once a year, check guide bar and
chain for wear.
WARNING: Disconnectthe power
sourcebeforeperformingmaintenance.
LUBRICATION
1 Bar 2 BarOil
Sprocket RII Cap
/
1 Use sprocketlubrication
2 Use Craftsman chaln saw bar oli
CHECK FOR DAMAGED OR
WORN PARTS
Replacement of damage_wom parts
should,be referredto your Sears Ser-
vice Center.
NOTE: It is normal for a smallamount
ofoil to appear under the saw after mo-
tor stops. Do not confuse this _,ith a
leakingoiltank.
•Td_.gerSwttc.h - Ensure the trigger
switch funotionspropedyby squeez-
ing and holdingthe tdgger switch.
Make sure motor starts and stops.
•Oil Tank Discontinueusa of chain
saw ifoiltank shows signsof damage
or leaks.
• ExtensionCord - Discontinueusa if
chain saw extensioncord shows
signs ofdamage or wear.
CHECK FOR LOOSE
FASTENERS AND PARTS
•Bar Clamp Nut
•Chain
•Bar AdjustingScrew
t
CHECK CHAIN TENSION
•Use the screwdriverend of the bar
tool to move chain around guide bar
toensure kinksdo not exist."[he
chain should rotatefreely. ,
\r,=
BarC_np Nuts
•Loosenbar clamp nuts untilthey are
finger tightagainst the bar d.amp..
• Ium adjustingscrew untilchain Dare-
ly touches the bottom ofguide bar.
•Usingbar tool,rollchain aroundguide
bartoensore all linksam in bar_aroove.
•Liftup tip of guide berto check'for
sag. Release tip ofguide bar, then
turn adjusting screw until sag does
notexist.
12
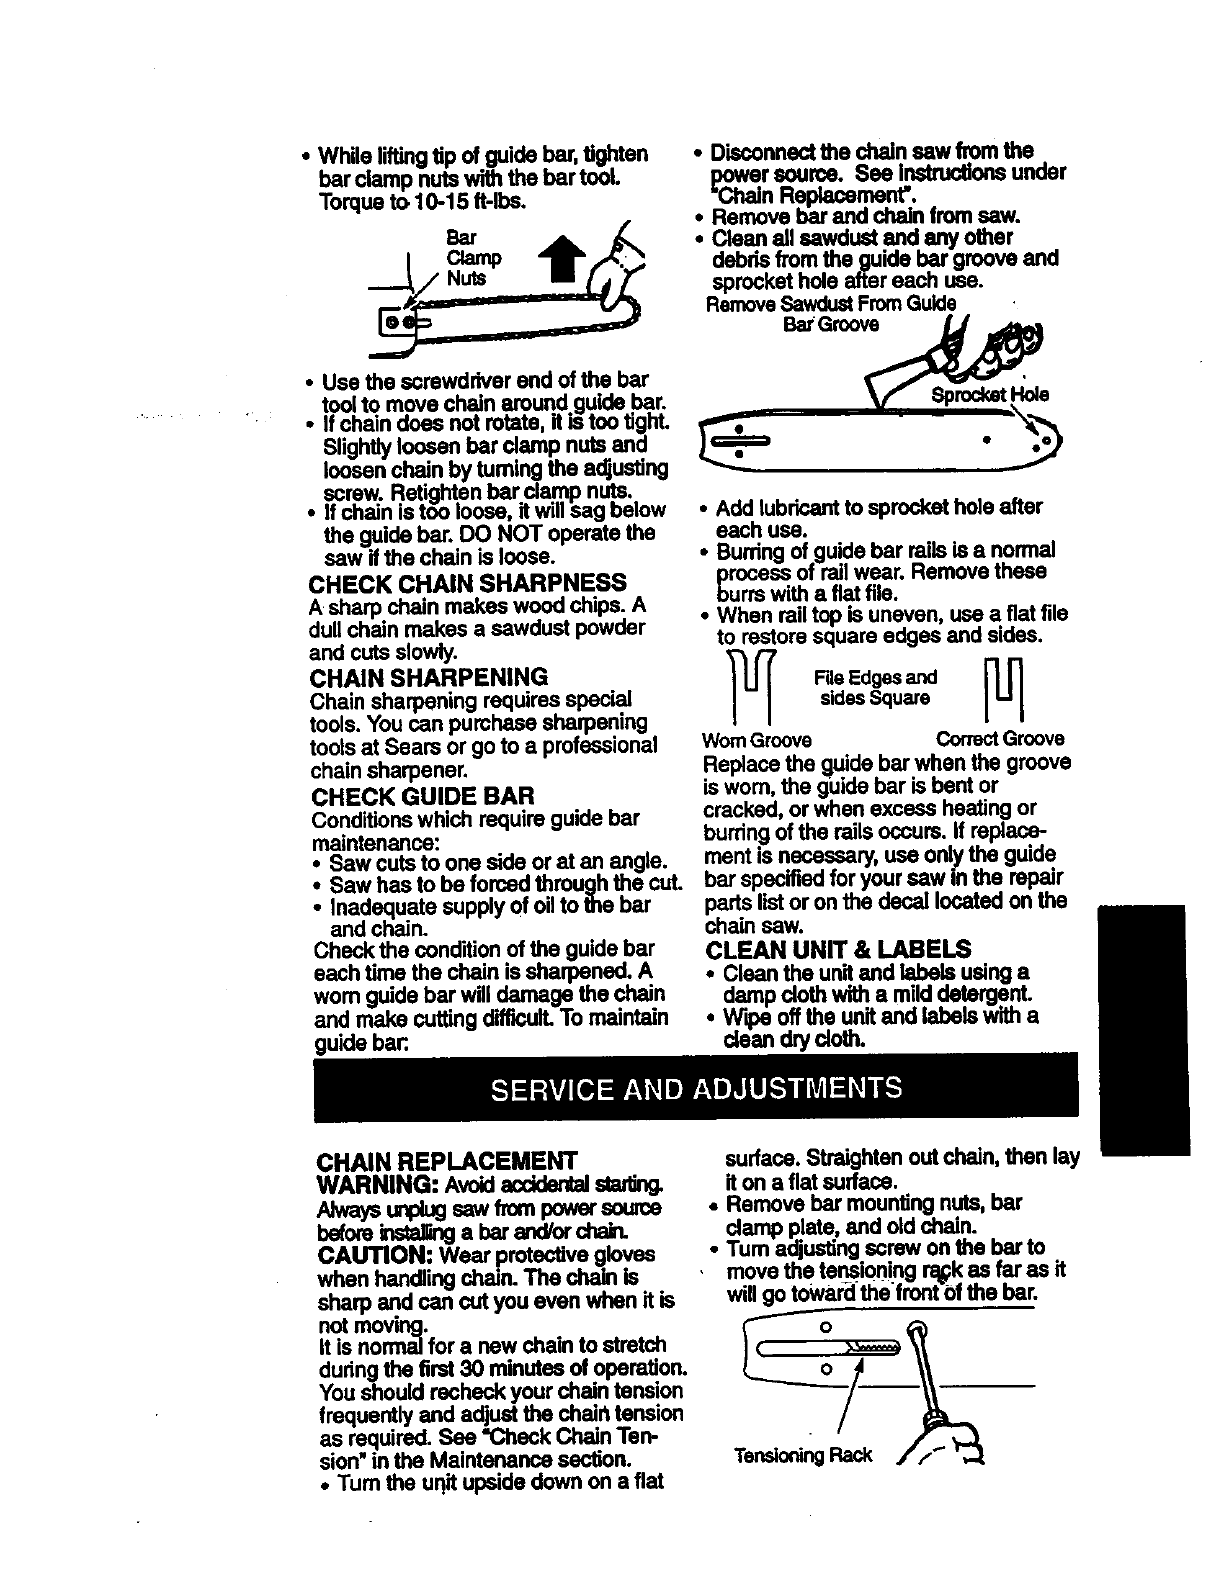
•While liftingtip ofguide bar, tighten
bar clamp nutswith the bar tool.
Torqueto 10-15 ft-lbs.
I
• Use the screwdriver end of the bar
.toolto move chain around.guide .bar.
•If chain aces not rotate, it s too tigm.
Slightlyloosen bar clamp nuts and
loosen chain by fuming the adjusting
screw. Retightan bar ola_m,p nuts.
• Ifcnain is too lOOSe,it w,, sag below
the guide bar. DO NOT operate the
saw ifthe chain is loose.
CHECK CHAIN SHARPNESS
A sharp chain makes wood chips. A
dullchain makes a sawdust powder
and cutsslowly.
CHAIN SHARPENING
Chain sharpening requires special
tools. You can pumhase sharpening
toolsat Sears or go to a professional
chain sharpener.
CHECK GUIDE BAR
Conditionswhich require guide bar
maintenance:
Saw cutsto one aide or at an angle.
Saw has to be forced through the cut.
Inadequate supply of oilto the bar
and chain.
Check the conditionof the guide bar
each time the chain is sharpened. A
wom guide bar will damage the chain
and make cuttingdifficulLTo maintain
guide bar:.
• Disconnectthe chain saw from the
i_r source. See Instructionsunder
nReplacement'.
• Remove bar and chain from saw.
•CI.asnall sawdust and any other
debns ,'ore the guide bar groove and
sprockethole after each use.
RemoveSawdustFromGuide
BarGroove_
-
•Add lubricantto sprockethole after
each use.
•Burringof guidebar mils is a normal
process of railwear. Remove these
burrswith a fiat file.
•When rail top is uneven, use a fiat file
to restoresquare edges and sides.
File Edgesand
sidesSquare
WornGroove CorrectGroove
Replace the guidebar when the groove
is wom, the guide bar is bent or
cracked, or when excess heating or
burringof the railsoccurs.If replace-
ment is necessary,use onlythe guide
bar specifiedfor yoursawin the repair
pads listor on the decal locatedon the
chain sew.
CLEAN UNIT & LABELS
•Clean the unitand labals uaing a
damp clothwith a milddetergent.
• W';)e off the unitand labels with a
dean drycloth.
CHAIN REPLACEMENT
WARNING: Avoidaccidentalstinting.
Alwayste¢_gsawfrompowerscurce
beforebstar_ a bar andi'orchab.
CAUTION: Wear protectivegloves
when handlingchain. The chain is
sharp and can cut you even when it is
notmoving.
It is normalfor a new chain to stretch
duringthe first30 minutes of operation.
You shouldrecheck your chain tension
frequently and adjust the chair_tension
as required. See "Check Chain Ten-
sion"in the Maintenance section.
• Turn the uqit upside down on a flat
surface. Straighten out chain, then lay
it on a flat surface.
• Remove bar mountingnuts, bar
clamp plate, and old chain.
•Tum adjustingscrew on the bar to
move the tension!ngr_k as far as it
will go toward thefront {)fthe bar.
Tendor_ng Rack
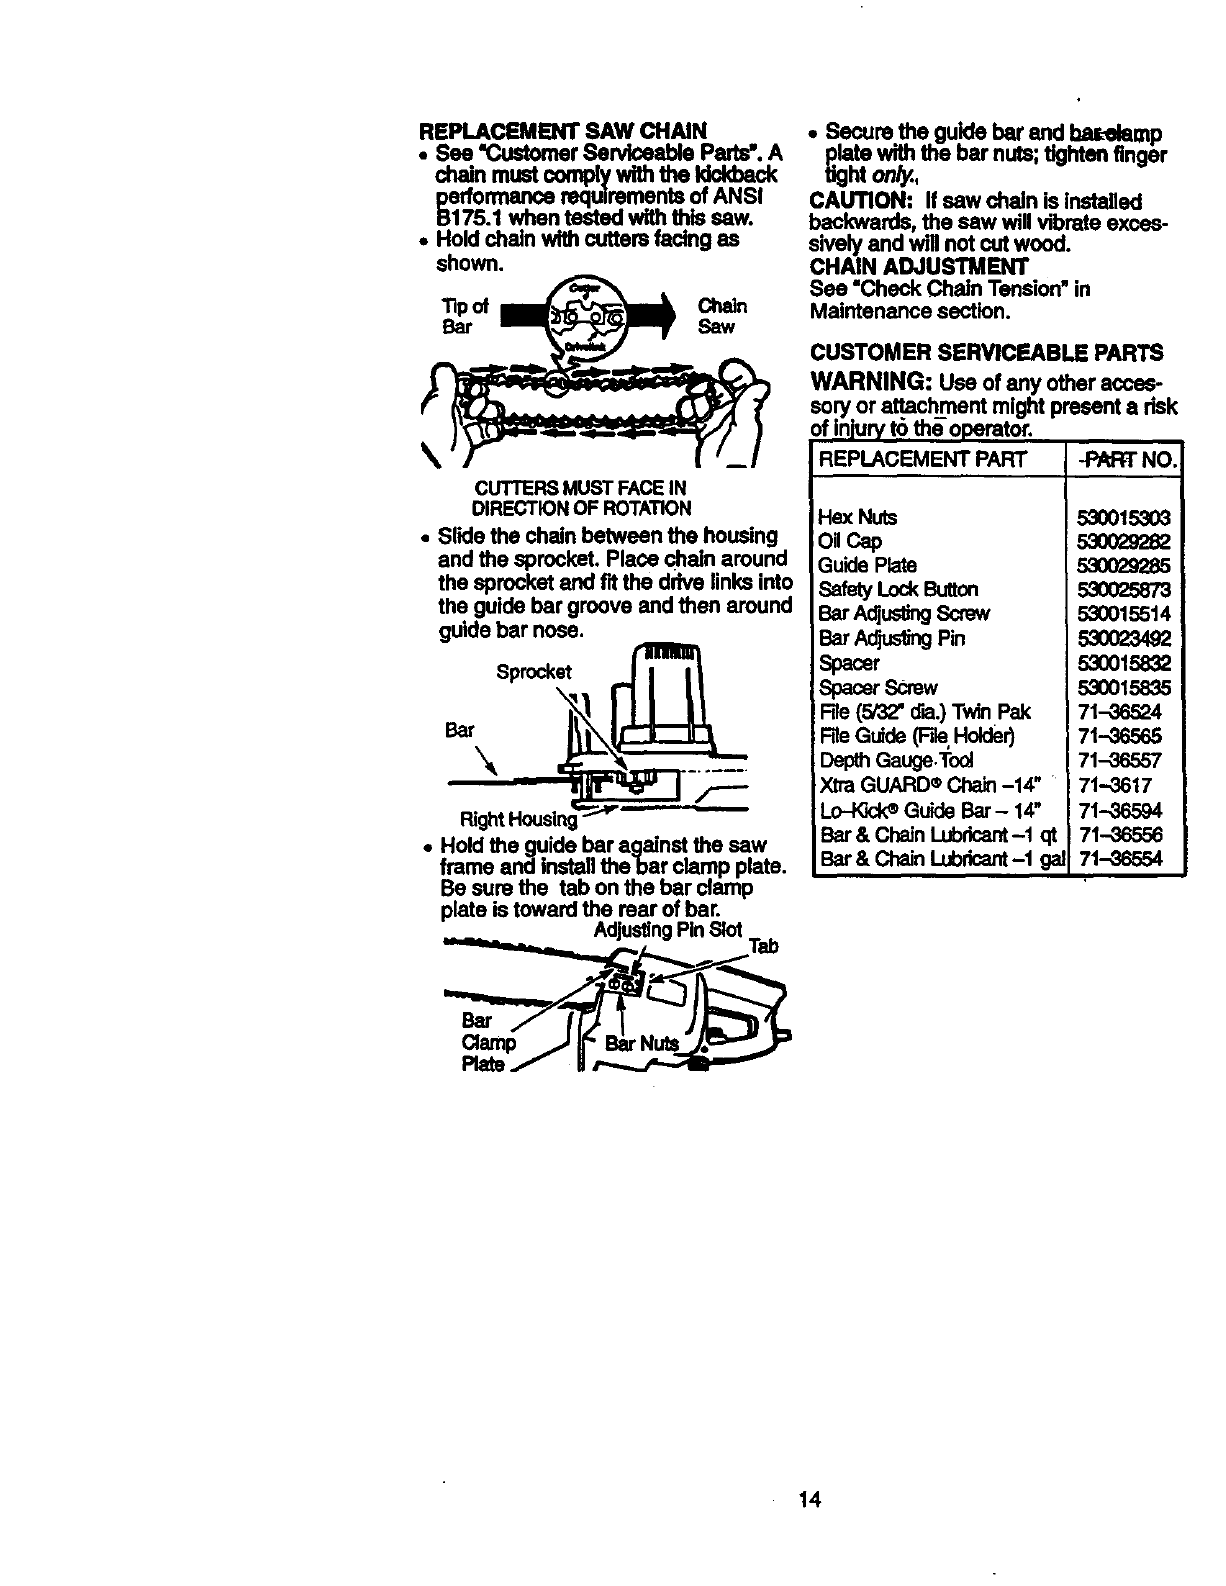
REPLACEMENT SAW CHAIN
•See "CustomerServiceable Parts'. A
chain must complywith the Iddd_ck
performancerequirementsof ANSI
S175.1 when tasted wlththls saw.
• Hold chain with cuttersfacing as
shown.
Tip of Chain
Bar Saw
\
CUTTERS MUST FACEIN
DIRECTIONOF ROTATION
•Slide the chain between the housing
and the sprocket. Place chain around
the sprocket and f'dthe drive links into
the guide bar groove and then around
guide bar nose.
Sprocket
Bar
•Hold the guide bar against the saw
frame and installthe bar clamp plate.
Be sure the tab on the bar clamp
plate is toward the mar of bar.
AdjustingPin Slot
• Secure.the guide bar end ba_lamp
plate _ the bar nuts;_ghten finger
tight on_.,
CAUTION: If saw chain is installed
backwards, the saw willvibrate exces-
sively and will not cut wood.
CHAIN ADJUSTMENT
See "Check Chain Tension"in
Maintenance section.
CUSTOMER SERVICEABLE PARTS
WARNING: Use of any other acces-
sory or attachment might present arisk
of injuryt6 theopemtor.
REPLACEMENT PART -PART NO.
He:<Nuts
O, Cap
GuidePlate
SafetyLockButton
BarA_usUngScrew
Bar_ Pin
Spacer
Spacer,Screw
File(5/32"dia.)TwinPal(
FileGuide(FileHolder)
DepthGauge.Tool
XtraGUARD®Chain-14"
Lo-Wuc_GuideBar- 14"
Bar& ChainLubricant-1qt
Bar& ChainI.ubricant-1 gal
53OO153O3
53O029282
530025873
530015514
53O023492
530015832
5,3OO15835
71-36524
71-36565
71-36557
71-3617
71-36594
71-36556
71-36554
14
Prepareyourunitforstorageat the end
ofthe season or if it will not be used for
30 days or more.
WARNING:
• Allowthe motor to cool, then secure
the unit before atodng or transporting.
• Storechain sew and extensioncord
in a well ventilated area
•Store chain sew with _1 guards in
place and positionchain sew so that
any sh.arpobject cannot accidentally
cause injury.
•Store chain saw unplugged, well out
of the reach of children.
EXTERNAL SURFACES
if yonrchainsaw ls to be storedfor a
ps d oi , oug y
.beUlahstorage.Storeina desnd#Yare_
Ughtly oilexternal metal sudases and
guide bar.
•Oil the chain and wrap it in heavy
ToPaperor cloth. .
prevent chain oilseepage dunng
storage, storethe se_das Tollows:
•upside down if stored on a shelf, or
•hung on a hook or nail through the
holein the bar
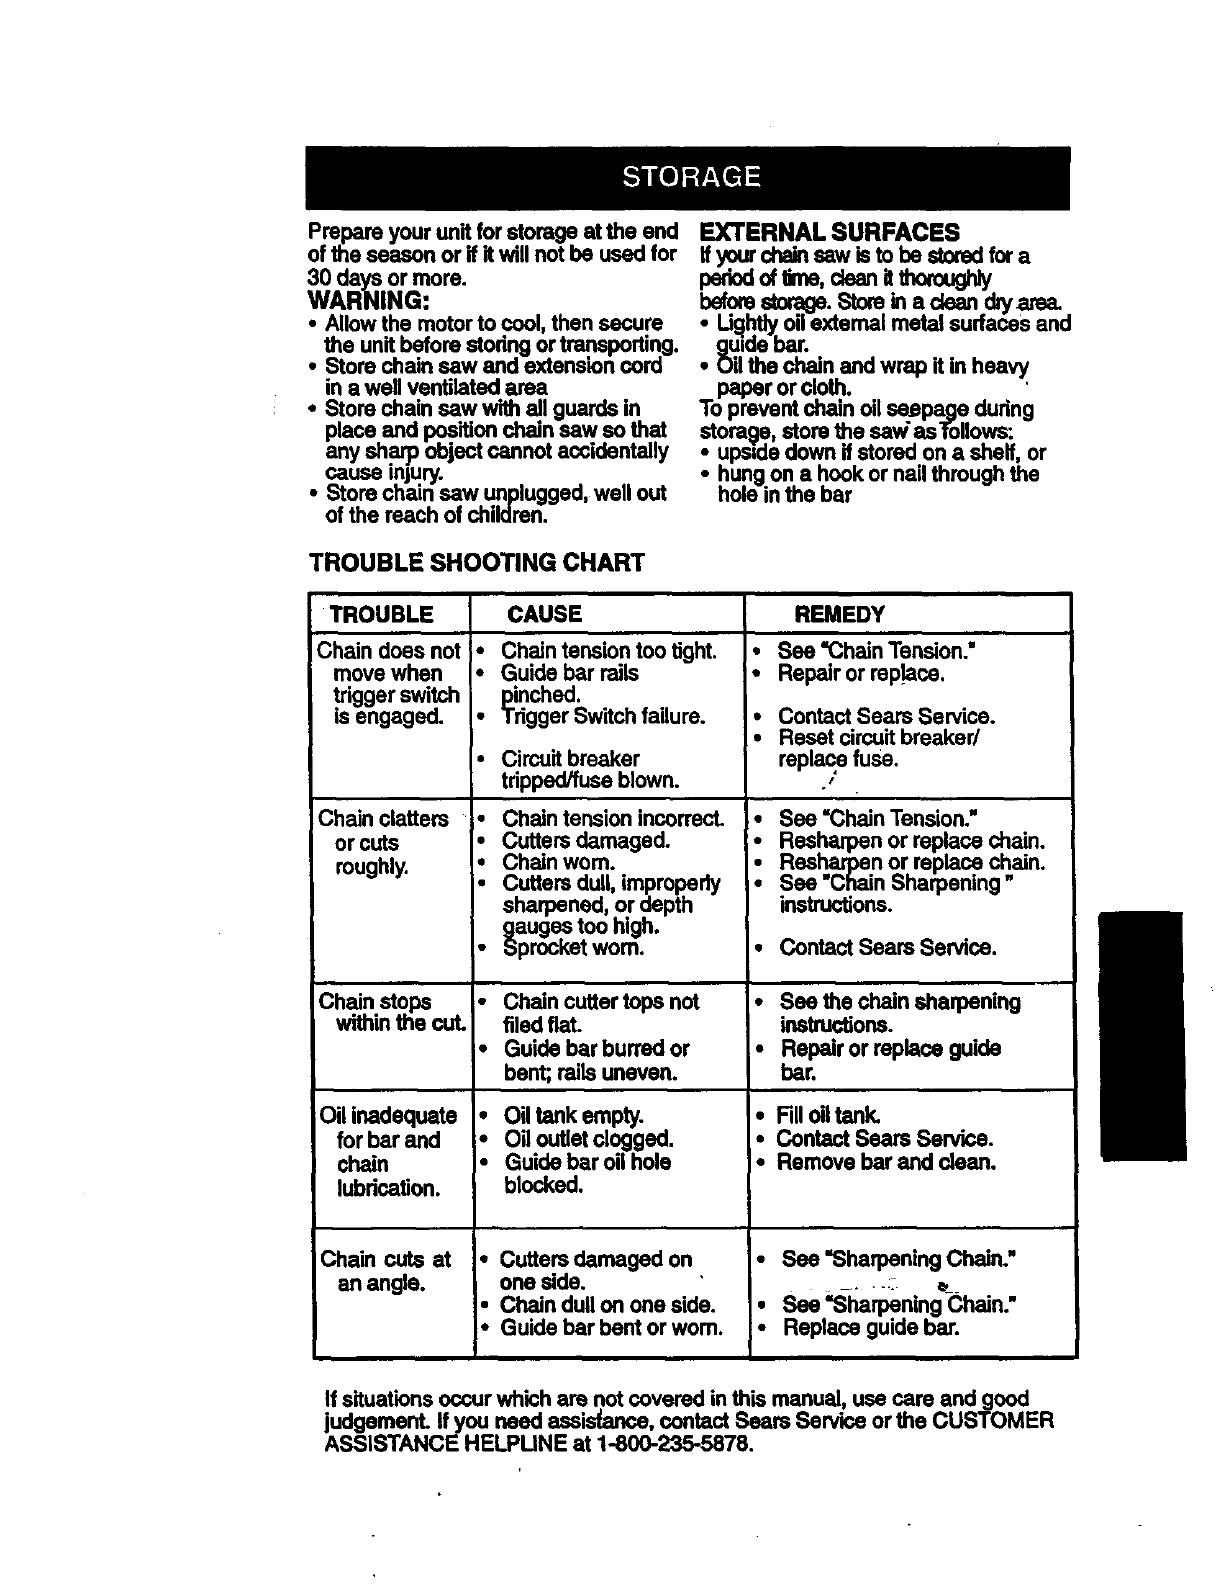
TROUBLE SHOOTING CHART
TROUBLE CAUSE REMEDY
Chain does not
move when
trigger switch
is engaged.
Chain clatters
or cuts
roughly.
Chain stops
within the cut.
Oil inadequate
for bar and
chain
lubrication.
Chain cuts at
an angle.
•Chain tensiontoo tight.
• Guide bar rails
pinched.
•Tdgger Switchfailure.
•Circuit breaker
tripped/fuse blown.
•Chain tension incorrect.
• Cutters damaged.
•Chain wom.
iuttersdull, improperly
sharpened, or depth
gauges too high.
Sprocket wom.
•Chain cuttertops not
filedfiat.
•Guide bar burred or
bent; railsuneven.
•Oil tank empty.
•Oil outletdogged.
•Guide bar oilhole
blocked.
• Cuttersdamaged on
one side.
• Chain dull on one side.
•Guide bar bent or wom.
•See =Chain Tension."
•Repair or replace,
•Contact Sears Service.
•Reset circuitbreaker/
replace fuse.
.t
•See =ChainTension."
Rasharpan or replace chain.
iResharpen or replace chain.
See "Chain Sharpening"
instructions.
•Contact Sears Service.
• See the chain sharpening
instructions.
•Repair or replace guide
bar.
•RII oiltank.
•Contact Sears Service.
•Remove bar and dean.
•See'Sharpening Chain."
•See'Sharpening-chain."
•Replace guide bar.
If situationsoccur which are not covered in this manual, use care and good
judgement. If you need ass_ance, contactSears Service or the CUSTOMER
ASSISTANCE HELPUNE at 1-800-235-5878.
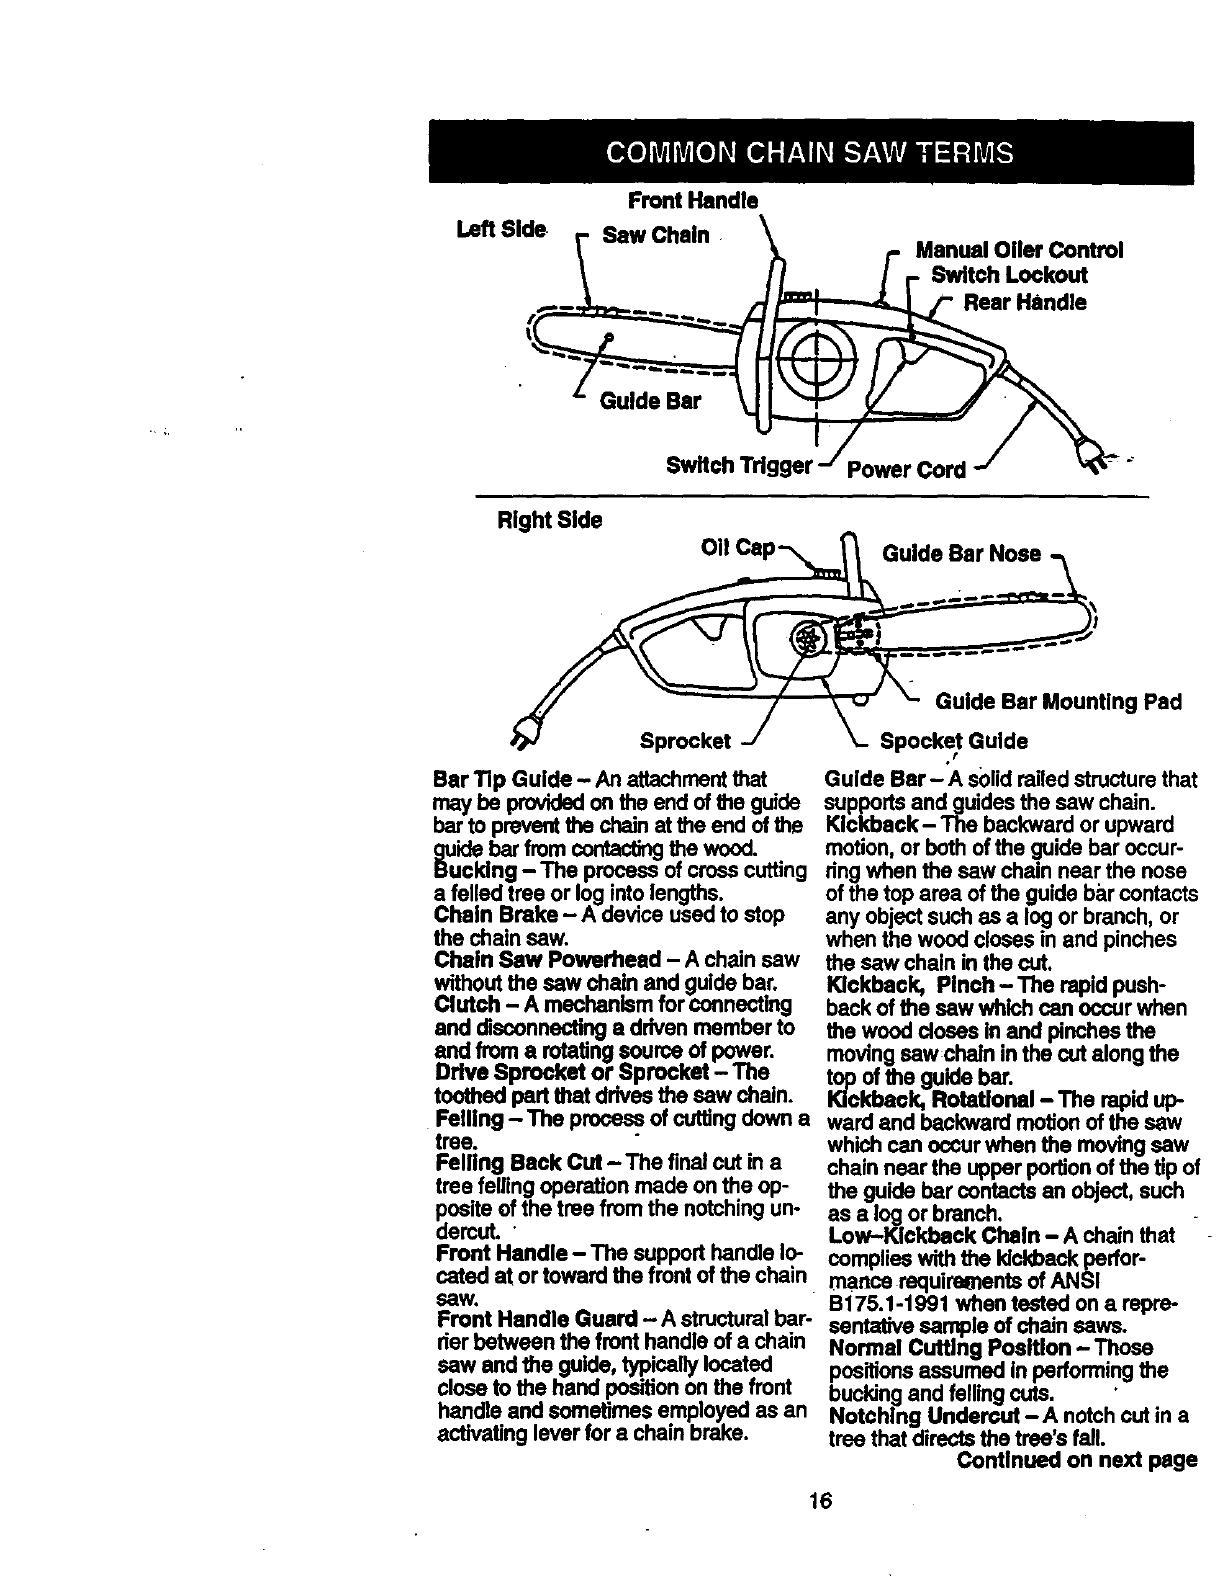
Left Side Front Handle
Saw Chain.
Guide Bar
Power Cord
Manual Oiler Control
Switch Lockout
Rear Handle
Right Side o.cap- _
t_ -- /'_" "- GuldeBarMountlngPad
Sprocket J_- Spocket Guide
.,
Bar Tip Guide - An attachmentthst Guide Bar- A s()lidrailedstructurethat
may be providedonthe end ofthe guide
barto preventthe chain atthe end of the
wood.
cldng The process of crosscutting
a felled tree or log into lengths.
Chain Brake - A device used to stop
the chain saw.
Chain Saw Powerhead - A chain saw
withoutthe saw chain and guide bar.
Clutch - A mechanism for connecting
and disconnectinga driven member to
end from a rotatingsource of power.
Drive Sprocket or.Sprocket-The
toothedpert that dnvas the saw chain.
Felling -The prnce_, of cuttingdown a
tree.
Felling Back Cut -The final cut in a
tree fellingopemUonmade on the op-
posite of the tree from the notchingun-
dercut. '
Front Handle - The support handle lo-
cated at or toward the frontof the chain
saW.
Front Handle Guard - A structural bar-
der between the front handle of a chain
saw and the guide, t_.._callylocated
close to the hand positionon the front
handle and sometimes employed as an
activatinglever for a chain brake.
supportsand guides the saw chain.
Kickback- The backward or upward
motion, or both of the guide bar occur-
dng when the saw chain near the nose
of the top area of the guidebar contacts
any object such as alog or branch, or
when the wood closes in and pinches
the saw chain in the cut.
Kickback, Pinch - The rapidpush-
back of the saw which can occur when
the wood doses in and pinches the
movingsawchaln in the cut alongthe
_°c°f the guide bar" _
kbaok, Rotutional The rapid up-
ward and backward motionof the saw
which can occurwhen the movingsaw
chain near the upper portion of the tip of
the guide bar contacts an object,such
as a logor branch.
Low--Kickback Cheln - A chain that
complies with the kickbackporfor-
manos requirementsof ANSI
B175.1-1991 when tested on a repre-
sentative sample of chain saws.
Normal Cutting Poaltlon - Those
positionsassumed in performingthe
buckingand felling cuts. '
Notching Undercut -A notchcut in a
tree that directsthe tree's fail.
Continued on next page
16
OilerControl- A systemfor oilingthe thatis ddvenby_motor and is sup-
the guide bar.
guide bar and saw chain. SpllmBporteddbYumper
Rear Handle-The support handle Io- (Spike) The pointed
m
ceted at or toward the rear of the saw. toothor teeth for use when felling or
Reduced Kickback Guide Bar - A bucldngto pivotthe saw and maintain
guidebar which has been demon-
stratsd to reduce Idckbecksignifican,tly.
Replacement Saw Chain -A chain
that complies withthe Idckbackperfor-
mance requirementsof ANSI
B175.1-1991 when tested with specW_c
chain saws. It may not meet the ANSI
performance requirements when used
with other saws.
Saw Chain - A loop of chain having
cuttingteeth, that cut the wood, and
_i_'eon while sa..wing.
h - A de,neethat when operated
willcomplete or interruptan electrical
power circuitto the motor of the chain
,SAW.
Switch Unkage' The mechanism g'mt
transmits motion from the_trigger to the
sw't,_h.
Switch Lockout - A movable stop that
preventsthe unintentionaloperationof -
the switchuntilmanually actuated.
For the repair or replacement parts you need
delivered directly to your home
Cali7 am - 7 pm, 7 days a week
1-800-366-PART
(1-800-366-7278)
Para ordenar piezas con entrega a
domicilio - 1-800-659-7084
For in-house major brand repair service
Call 24 hours a day, 7 days a week
1-800-4-REPAIR
(1-800-473-7247)
Para pedir servicio de reparaci6n a
domicilio - 1-800-676-5811
For the location of a Sears Parts and
Repair Center in your area
Call 24 hours a day, 7 days a week
1-800-488-1222
For information on purchasing a Sears
Maintenance Agreement or to inquire
about an existing Agreement
Call 9 am - 5 pm, Monday-Saturday
1-800-827-6655
When requesting service or ordering
parts, always provide the following
nnformat,on:
• Product Type • Part Number
• Model Number • Part Description
SEARS
America's Repair Spec_ists
