Craftsman 358341250 User Manual CHAINSAW Manuals And Guides L0910177
CRAFTSMAN Chainsaw, Electric Manual L0910177 CRAFTSMAN Chainsaw, Electric Owner's Manual, CRAFTSMAN Chainsaw, Electric installation guides
User Manual: Craftsman 358341250 358341250 CRAFTSMAN CHAINSAW - Manuals and Guides View the owners manual for your CRAFTSMAN CHAINSAW #358341250. Home:Lawn & Garden Parts:Craftsman Parts:Craftsman CHAINSAW Manual
Open the PDF directly: View PDF ![]() .
.
Page Count: 33
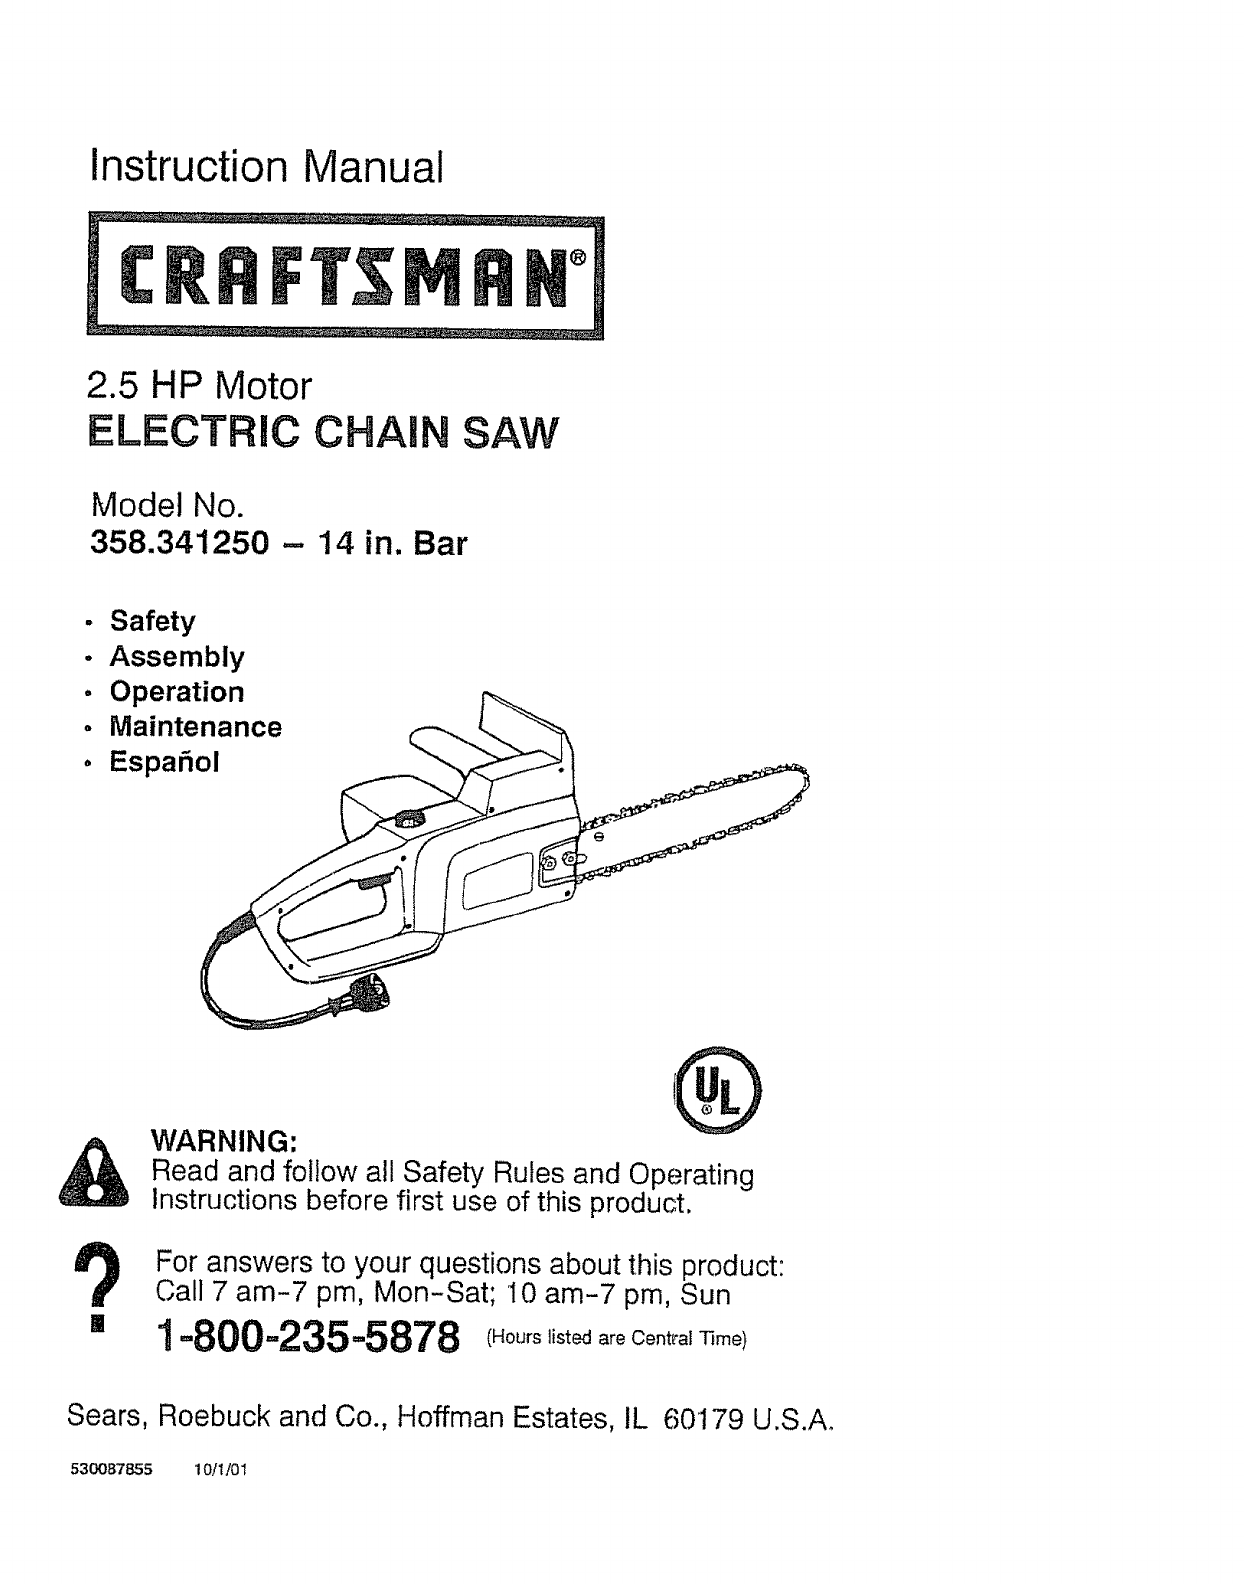
Instruction Manual
2.5 HP Motor
ELECTRIC CHAIN SAW
Model No.
358.341250 - 14 in. Bar
. Safety
-Assembly
.Operation
oMaintenance
oEspaSol
I
WARNING: I_
Read and follow all Safety Rules and Operating
Instructions before first use of this product.
For answers to your questions about this product:
Call 7 am-7 pm, Mon-Sat; 10 am-7 pro, Sun
1=800-235=5878 I_oo,_,,_e__,oceo_,,_,T_me)
Sears, Roebuck and Co., Hoffman Estates, IL 60179 U.S.Ao
530087855 10/t/0t
Warranty 2 Service and Adjustments 13
Safety Rules 2 Storage 14
Assembly 6 Troubleshooting 15
Operation 7 Spanish 16
Maintenance 11 Parts Ordering Back Cover
FULL ONE YEAR WARRANTY ON CRAFTSMAN ELECTRIC CHAIN SAW.
If this Craftsman Electric Chain Saw fails to perform properly due to a defect in
material or workmanship within (1) year from the date of purchase, Sears will
replace it free of charge
This warranty excludes the bar and chain, which are expendable parts and be-
come worn during normal use..
If this Craftsman Electric Chain Saw is used for commercial purposes, this war-
ranty applies for only 90 days from the date of purchase. If this Craftsman Elec-
tric Chain Saw is used for rental purposes, this warranty applies for only 30 days
from the date of purchase. This warranty applies only while this product is in use
in the United States.
WARRANTY SERVICE iS AVAILABLE BY RETURNING THE CRAFTSMAN ELECTRIC
CHAIN SAW TO THE NEAREST SEARS SERVICE CENTER iN THE UNITED STATES,
This warranty gives you specific legal rights, and you may also have other rights
which vary from state to state.,
Sears, Roebuck and Co. inc., Hoffman Estates IL U.S.A.
WARNING: When using an elec-
tric chain saw, basic safety precau-
tions, including the :following, should
always be followed 'to reduce the risk
of fire, electric shock, and serious inju-
ry. Read and follow all instructions.,
,_ WARNING: Always disconnect
power source when making repairs.. Be-
cause a chain saw is a high-speed
woodcutting tool, cai!eless or improper
use of this tool can cause serious injury.
Because a chain sew is a high-speed
woodcutting tool, special precautions
must be observed to reduce risk of ac-
cidents. Careless or improper use of
this tool can cause serious injury.
PLAN AHEAD
•Restrict the use of your saw to adult
users who understand and can follow
the safety rules, pltecautions, and op-
erating instructions found in this
manual,
•Dress properly. Wear protective gear,.
Always use steel-toed safety footwear
with non-slip soles;; snug-fitting cloth-
ing; heavy-duty, non-slip gloves; eye
protection such as nonfogg_ng,
vented goggles or face screen; an ap-
proved safety hard hat; and sound
barriers (ear plugs or mufflers) to pro-
tect your hearing_ Regular users
should have hearing checked regular-
ly as chain saw noise can damage
hearing,,
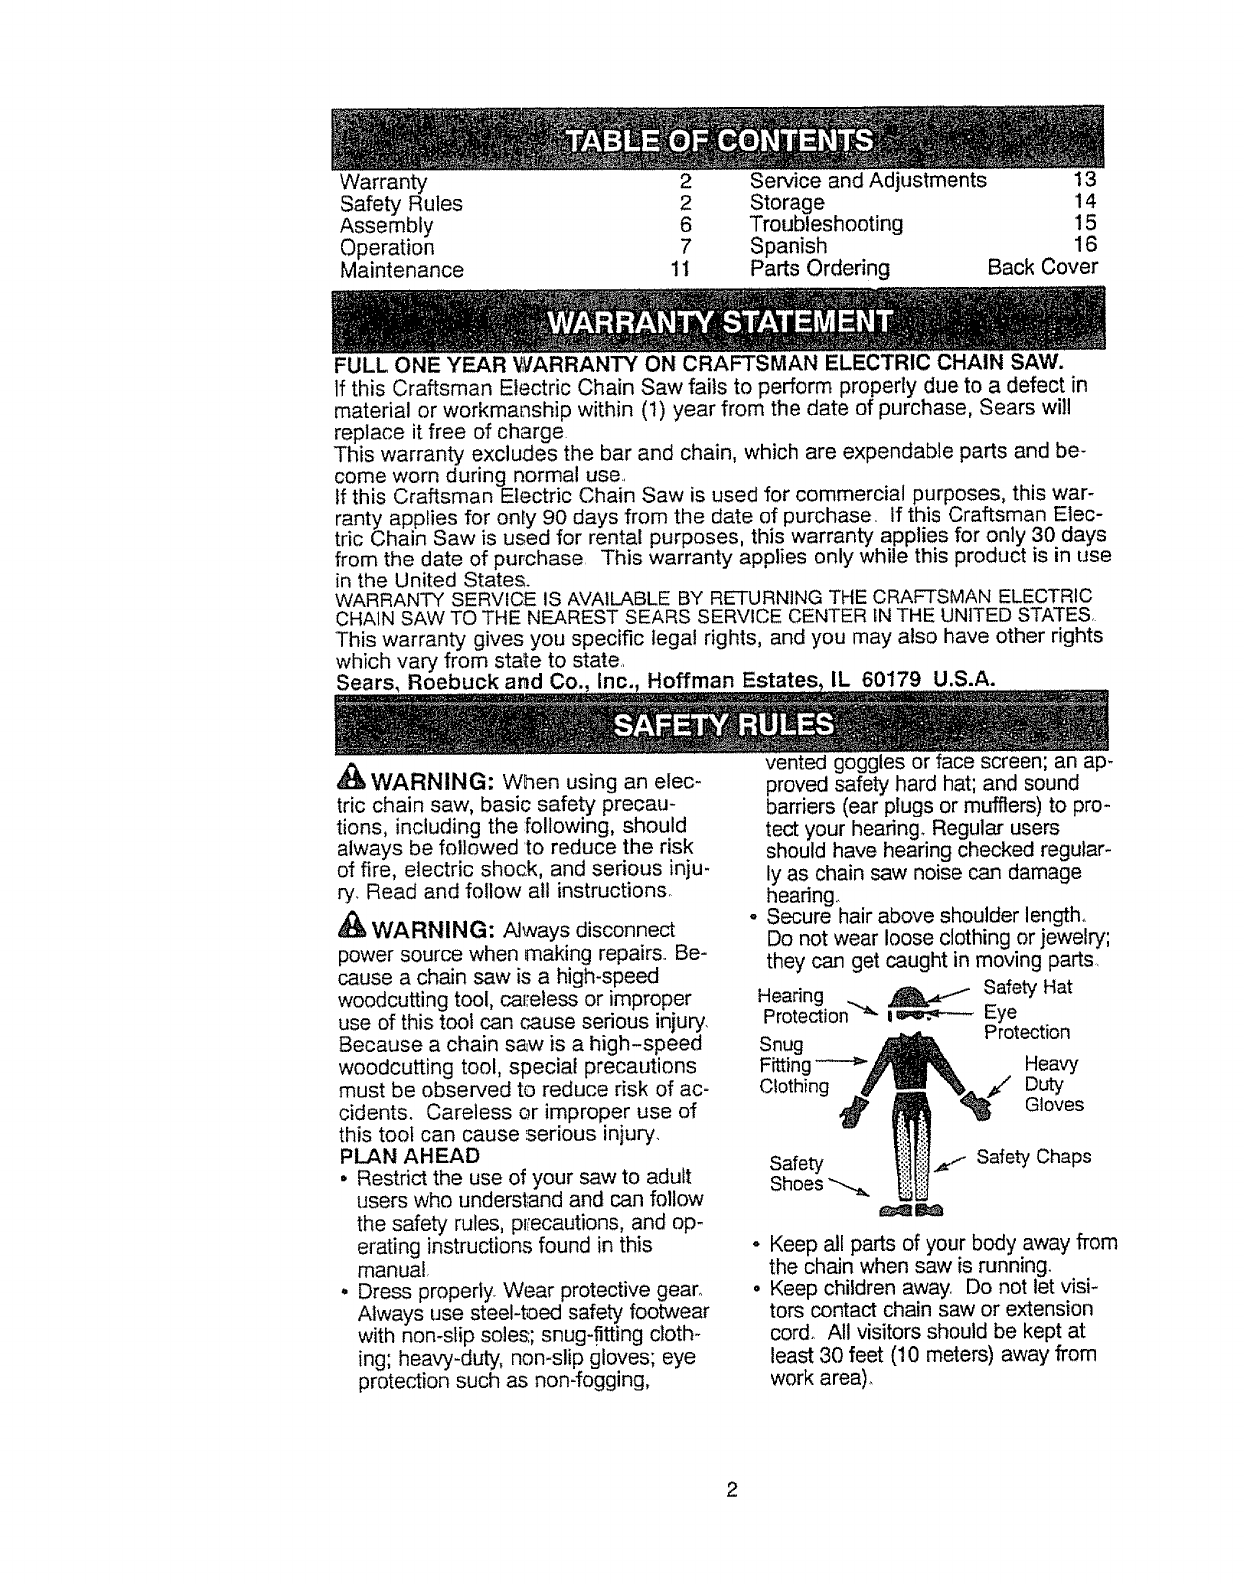
o Secure hair above shoulder length°
Do not wear loose clothing or jewelry;
they can get caught in moving parts
Hearing _ _ Safety Hat
Protection _'_ D_ Eye
S _ Protection
nug
Fitting --'-'-_ _l_lW_, Heavy
Clothing L_" _ "_.___/' Duty
aloves
6
O
Safety
Shoes
Safety Chaps
Keep all parts of your body away from
the chain when saw is running.
Keep children away, Do not let visi-
tors contact chain saw or extension
cord_ All visitors should be kept at
least 30 feet (10 meters) away from
work area)_
oDonothandleoroperatea chainsaw
whenyouarefatigued,ill,upset,orif
youhavetakenalcohol,drugs,orme-
dication.Youmustbeingoodphysi-
calconditionandmentallyalert.If you
haveanyconditionthatmightbeag-
gravatedby strenuouswork,check
withdoctorbeforeoperating.Watch
whatyouaredoing,Usecommon
sense.
• Donotstartcuttinguntilyouhavea
clearworkarea,securefooting,and
especiallyif youarefellinga !ree,a
retreatpath.Keepworkareaclean,
OPERATE '(OUR SAW SAFELY
° Do not operate with one hand.. Seri-
ous injury' to the operator, helpers, or
bystanders may result from one-
handed operation., A chain saw is in-
tended for two-handed use..
• Do not operate saw from a ladder or
in a tree,,
•Make sure the chain will not make
contact with any object while starting
the saw. Never start the saw when
the guide bar is in a cut.
o Don't force chain saw. It will do the job
better and safer at the rate for which it
was intended.
° Do not put pressure on the saw, es-
pecially at the end of the cut. Doing
so can cause you to lose control
when the cut is completed..
•Stop the saw before setting it down.
° Hand carry saw only when motor is
stopped,. Carry the chain saw by the
front handle with the saw stopped, fin-
ger off the switch, the guide bar and
saw chain to the rear.
° Use the right tool, cut wood only
Don't use chain saw for purpose not
intended; for example, don't use chain
saw for cutting plastic, masonry, non-
wood building materials.,
° Do not operate a chain saw that is
damaged, improperly adjusted, or not
completely and securely assembled,
Always replace bar, chain, hand
guard, or other parts immediately if
they become damaged, broken, or
otherwise removed,.
° Inspect chain saw cords periodically
and if damaged, have repaired by a
Sears Service Center.
MAINTAIN YOUR SAW IN GOOD
WORKING ORDER
° Have all chain saw service performed
by a Sears Service Center except the
items tisted in the M@.,INTENANCEsec-
tion of this manual.
3
-Make certain saw chain stops moving
when tdgger switch is released.
*Keep the handles dry and clean and
free from oil and grease
,Keep oil cap and fasteners securely
tightened..
° Nonconforming replacement compo-
nents or the removal of safety devices
may cause damage to the unit and
possible injury to the operator or by-
standers, Use onliy Craftsman acces-
sories and replacement parts as rec-
ommended. Never modify your saw
.Maintain chain sa_wwith care,
- Keep unit sharp and clean for better
and safer performance,
.Follow instructions for lubricating and
changing accessories,
oUnplug the chain saw from the power
source when not in use, before servic-
ing, and when changing accessories
and attachments, such as saw chain
and guard.
.Check for damaged parts, Before fur-
ther use of the chain saw, a guard or
other part that is damaged should be
carefully checked to determine that it
will operate properly and perform its
intended function.. Check for align-
ment of moving parts, binding of mov-
ing parts, breakage of parts, mounting
and any other conditions that may af-
fect its operation. A guard or other
part that is damaged should be prop-
erly repaired or replaced by a Sears
Service Center unless otherwise indi-
cated elsewhere in the instruction
manual,.
oWhen not in use, chain saws should
be stored in a dry; high or locked-up
place out of the reach of children,
° When storing sa_, unplug and use a
bar sheath or carrying case.,
ELECTRICAL SAFETY
_,WARNING: Avoid a dangerous
environment.. To reduce the risk of
electrical shock, do not use in rain, in
damp or wet locations, or around
swimming pools, hot tubs, etc. Do not
expose to snow, ravin, or water to avoid
the possibility of electrical shock. Do
not handle extension cord or plug with
wet hands.
° Use a voltage supply as shown on
unit.
o Avoid dangerous situations. Do not
use in the presence of flammable liq-
uids or gases to avoid creating a fire
or explosion and!or causing damage
to unit,.
. Toreducetherisk,of electrical shock,
this appliance has a polarized plug
(one blade is wider than the other)
and will require the use of a polarized
extension cord. The appliance plug
Will fit into a polarized extension cord
only one way. If the plug does not fit
fully into the extension cord, reverse
the plug If the plug still does not fit,
obtain a correct polarized extension
cord A polarized extension cord will
require the use of a polarized wail out-
let. This plug will fit into the polarized
wall outlet only one way° If plug does
not fit fully into the wall outlet, reverse
the plug. If the plug still does not fit,
contact a qualified electrician to install
the proper wall outUet. Do not change
the equipment plug, extension cord
receptacle, or extension cord plug in
any way.
• To reduce risk of electrical shock, use
extension cords specifically marked
as suitable for outdoor appliances
having electrical rating not less than
the rating of unit. The cord must be
marked with suffix '°W-A" (in Canada,
'%_/").Make sure your extension cord
is in good condition. Inspect extension
cord before use and replace if dam-
aged. An undersized extension cord
wilt cause a drop in line voltage result-
ing in loss of power and overheating_
If in doubt, use the next heavier
gauge. The lower l_he gauge number,
the heavier the cord (see SELECT AN
EXTENSION CORD iin the OPERATION
section) Do not use multiple cords.
oDo not abuse cord. Never carry the
unit by the extension cord or yank ex-
tension cord to disconnect unit.
° Secure extension cord to power cord
to prevent disconnection from unit.
• Do not use the uni_ if the switch does
not turn the unit on and off properly, or
if the lock-out does not work Repairs
to the switch must ,be made by a
Sears Service Cer_ter_
• Keep extension cord clear of operator
and obstacles at _t time& Position
cord so that it will not be caught on
branches, Do not expose cords to
heat, oil, water, or sharp edges.
• To avoid the possibility of electric
shock, avoid body _contact with any
grounded conductor, such as metal
fences or pipes.
o Ground Fault Circuit interrupter (GFCI)
protection should be provided on cir-
cuit or outlet to be used. Receptacles
are available having built-in GFCt
protection and may be used for this
measure of safety, Inspect chain saw
cords periodically and if damaged,
have repaired by a Sears Service
Center..
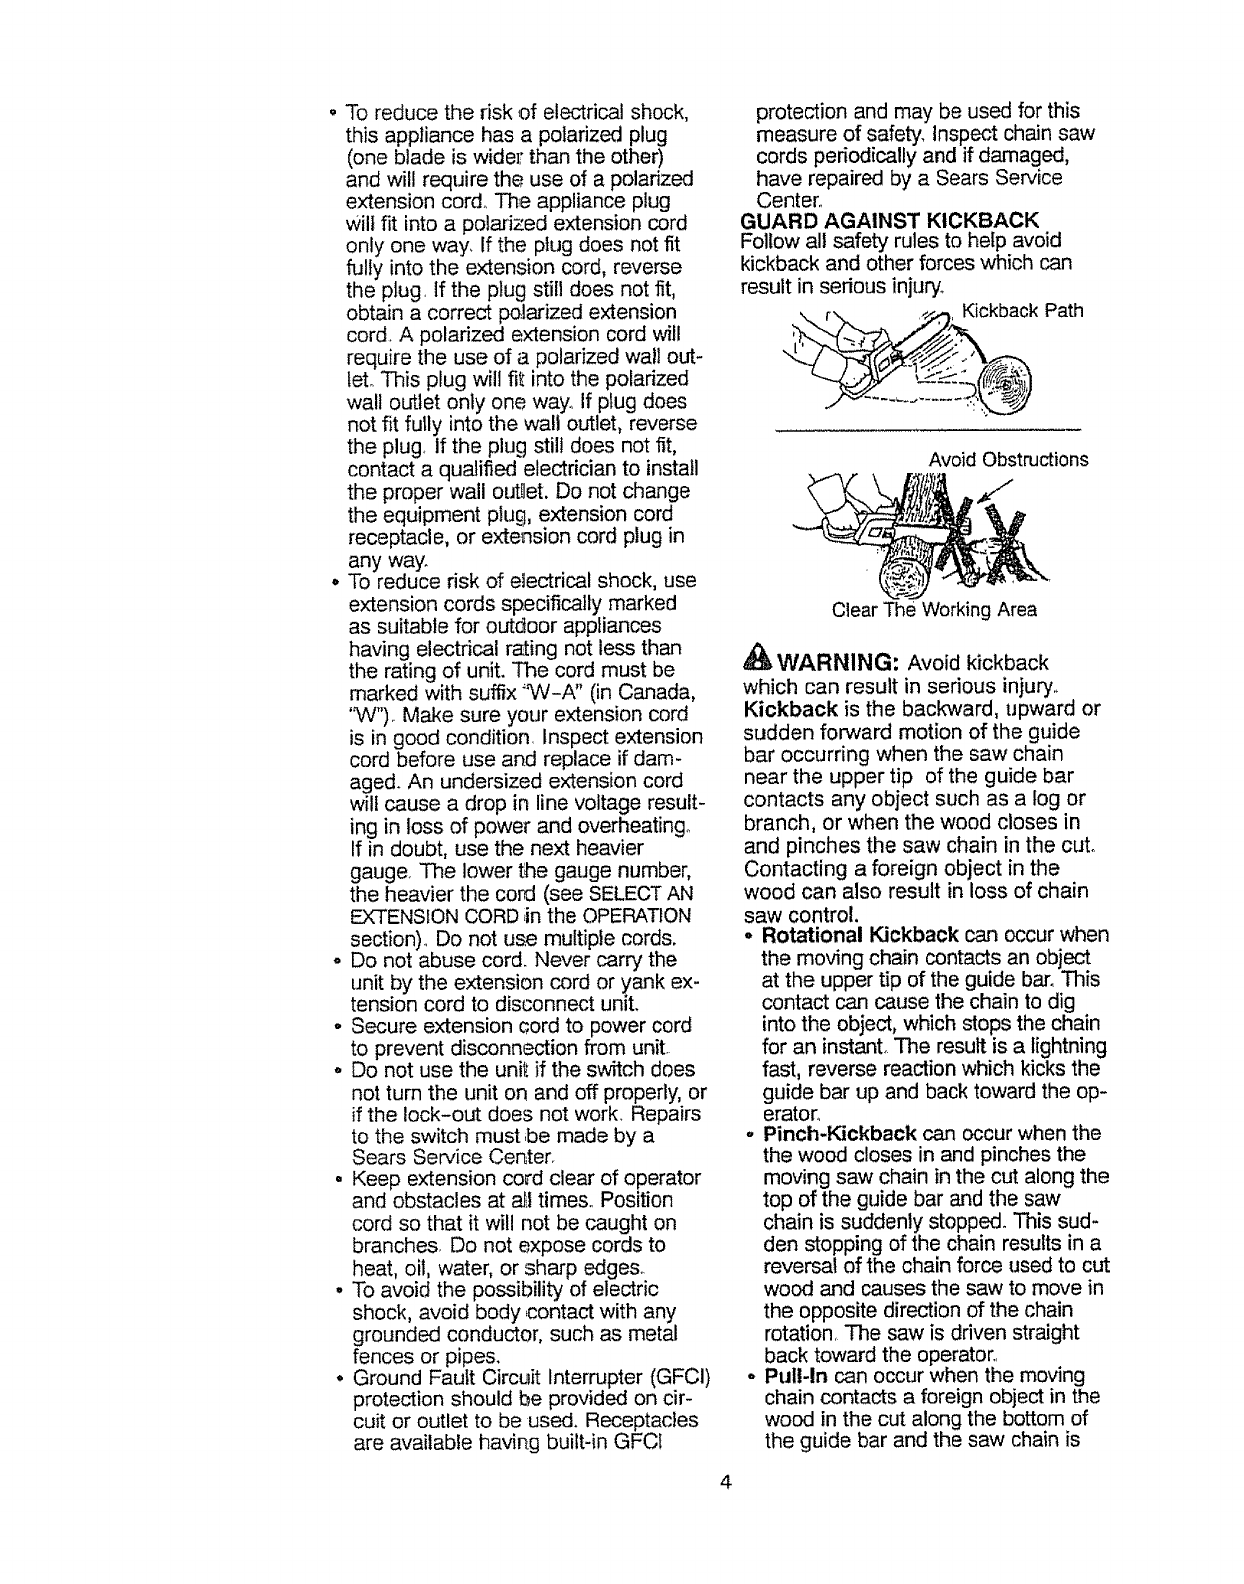
GUARD AGAINST KICKBACK
Follow all safety rules to help avoid
kickback and other forces which can
result in serious injury° Path
Avoid Obstructions
4
Clear The Working Area
WARNING: Avoid kickback
which can result in serious injury..
Kickback is the backward, upward or
sudden forward motion of the guide
bar occurring when the saw chain
near the upper tip of the guide bar
contacts any object such as a tog or
branch, or when the wood closes in
and pinches the saw chain in the cut°
Contacting a foreign object in the
wood can also result in loss of chain
saw control.
° Rotational Kickback can occur when
the moving chain contacts an object
at the upper tip of the guide bar_ This
contact can cause the chain to dig
into the object, which stops the chain
for an instant The result is a lightning
fast, reverse reaction which kicks the
guide bar up and back toward the op-
eratoro
-Pinch-Kickback can occur when the
the wood closes in and pinches the
moving saw chain in the cut along the
top of the guide bar and the saw
chain is suddenly stopped, This sud-
den stopping of the chain results in a
reversal of the chain force used to cut
wood and causes the saw to move in
the opposite direction of the chain
rotation, The saw is driven straight
back toward the operator.,
o Pull-In can occur when the moving
chain contacts a foreign object in the
wood in the cut along the bottom of
the guide bar and the saw chain is
suddenlystoppedThissuddenstop-
pingpullsthesawforwardandaway
fromtheoperatorandcouldeasily
causetheoperatorto losecontrolof
thesaw,,
REDUCE THE CHANCE OF
KICKBACK
•Recognize that kickback can happen
With a basic understanding of kick-
back, you can reduce the element of
surprise which contributes to acci-
dents.
. Never let the moving chain contact
any object at the tip of the guide bar.
• Keep working area free from obstruc-
tions such as other trees, branches,
rocks, fences, stumps, etc, Eliminate
or avoid any obstruction that your saw
chain could hit while cutting.
. When cutting a branch, do not let the
guide bar contact another branch or
other objects around it
• Keep saw chain sharp and properly
tensioned. A loose or dull chain can
increase the chance of kickback. Fol-
low manufacturer's chain sharpening
and maintenance instructions, Check
tension at regular intervals, but never
with engine running,, Make sure bar
clamp nuts are securely tightened,.
° Begin and continue cutting at full
speed. If the chain is moving at a
slower speed, there is greater chance
of kickback occurring,,
• Use extreme caution when re-entering
a cut,,
° Do not attempt cuts starting with the
tip of the bar (plunge cuts),
° Watch for shifting togs or other objects
that could close a cut and pinch or fall
onto chain,
• Use the specified Reduced-Kickback
Guide Bar and Low Kickback Chain,
Avoid Pinch-Kickback:
°Be extremely aware of situations or
obstructions that can cause material
to pinch the top of or otherwise stop
the chain,
o Do not cut more than one log at a
time,,
° Do not twist the saw as the bar is
withdrawn from an undercut when
bucking.
Avoid Pull-In:
°Always begin cutting with the saw at
full speed and the saw housing
against wood,,
° Use wedges made of plastic or wood.
Never use metal to hold the cut open.
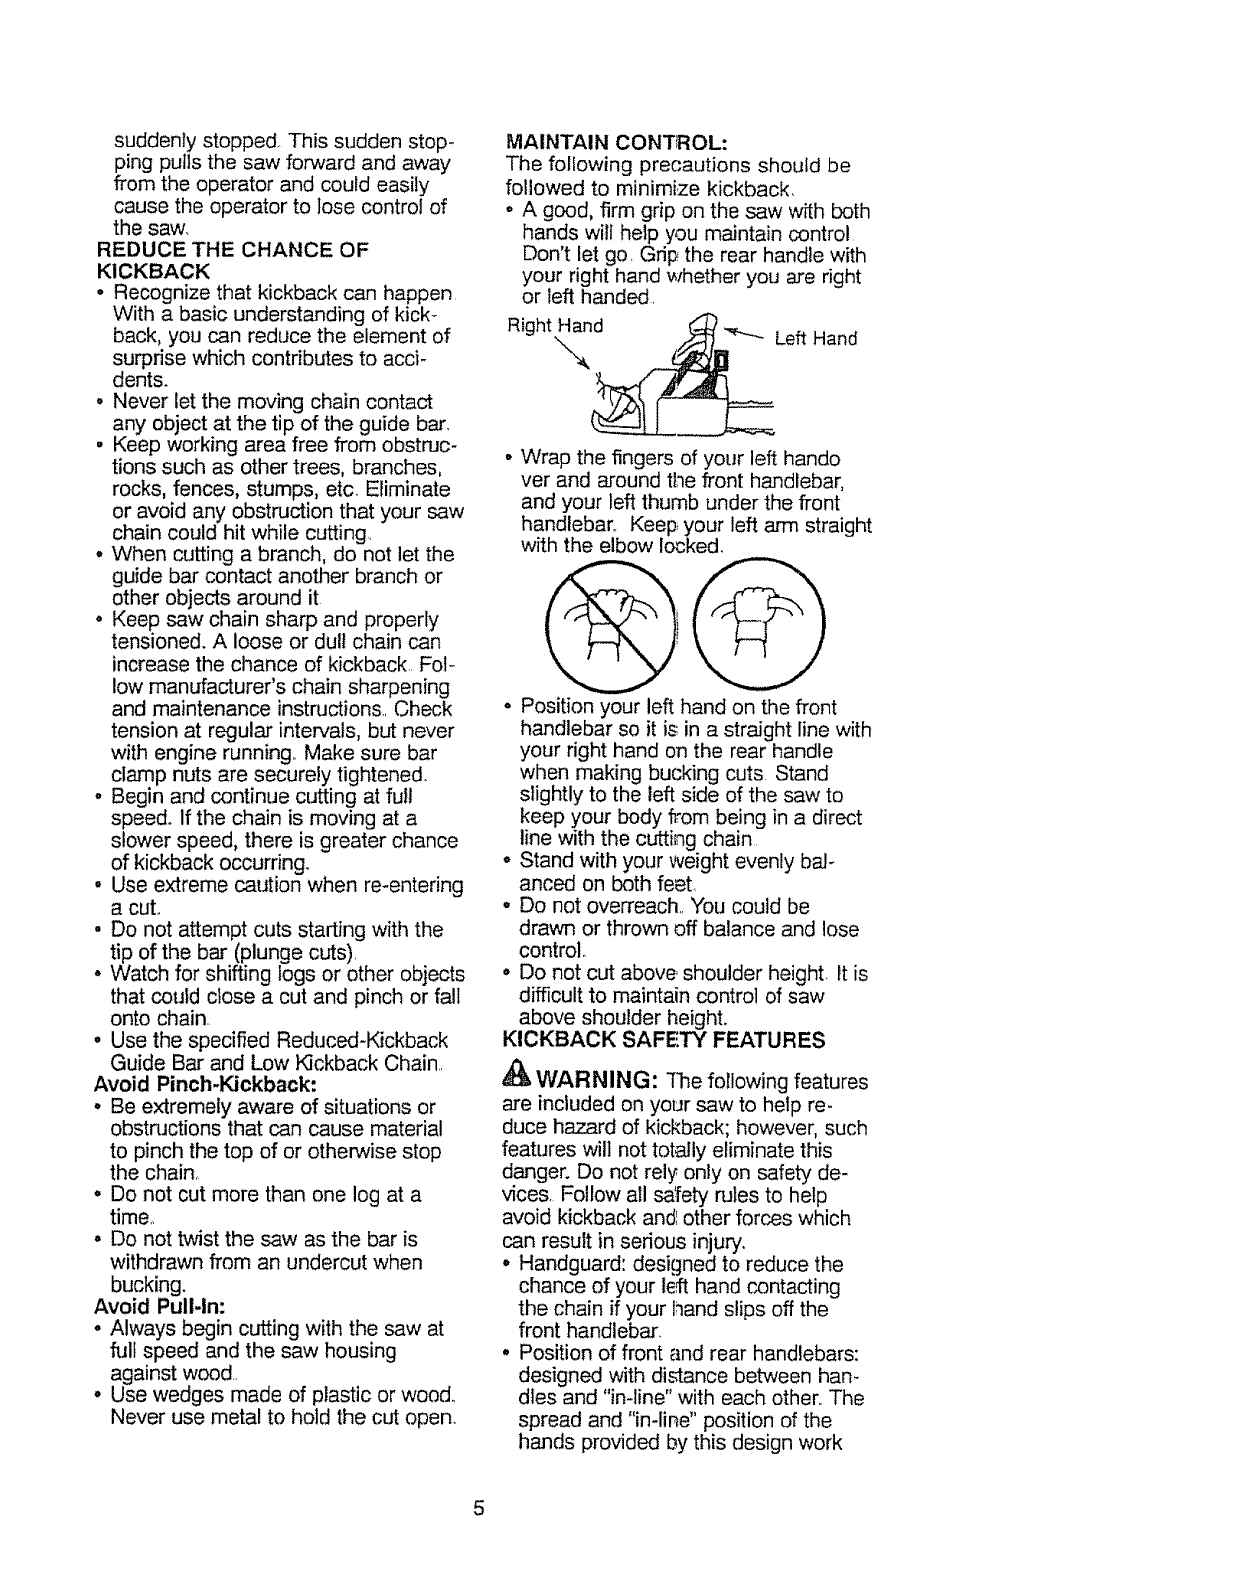
MAINTAIN CONTROL:
The following precautions should be
followed to minimize kickback,
o A good, firm grip on the saw with both
hands wilt help you maintain control
Don't let go, Grip the rear handle with
your right hand whether you are right
or left handed,
Right \_.4n_Left Hand
• Wrap the fingers of your left hando
ver and around the front handlebar.
and your left thumb under the front
handlebar., Keep your left arm straight
with the elbow locked.
@@
o Position your left hand on the front
handlebar so it is in a straight line with
your right hand on the rear handle
when making bucking cuts Stand
slightly to the left side of the saw to
keep your body from being in a direct
line with the cutting chain
° Stand with your weight evenly bal-
anced on both feet..
° Do not overreach. You could be
drawn or thrown off balance and lose
control.
° Do not cut above, shoulder height It is
difficult to maintain control of saw
above shoulder height.
KICKBACK SAFETY FEATURES
WARNING: The following features
are included on your saw to help re-
duce hazard of kickback; however, such
features will not totally eliminate this
danger. Do not rely only on safety de-
vices Follow all safety rules to help
avoid kickback and',other forces which
can result in serious injury.
° Handguard: designed to reduce the
chance of your le_ hand contacting
the chain if your hand slips off the
front handlebar.
° Position of front and rear handlebars:
designed with di_ance between han-
dles and "in-line" with each other,, The
spread and "in-line" position of the
hands provided by this design work
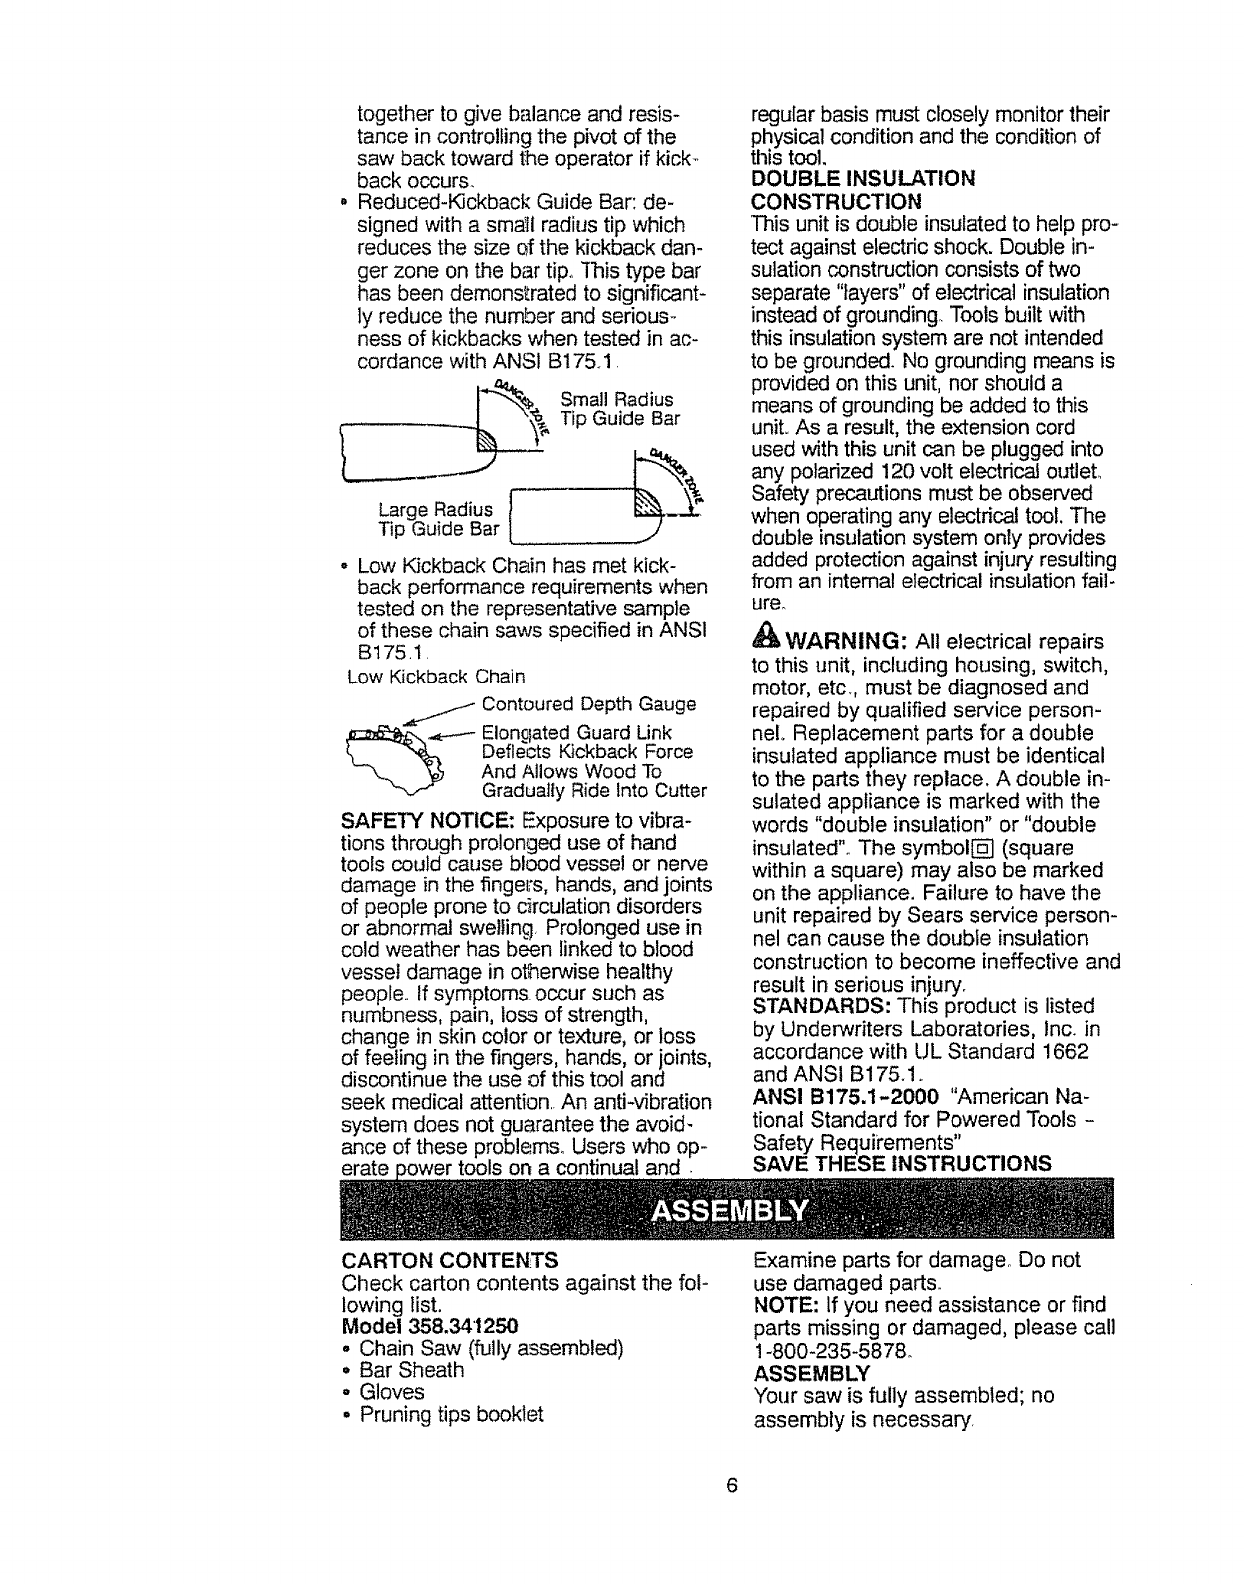
LargeRadius
TipGuideBar
togetherto givebalanceandresis-
tanceincontrollingthepivotof the
sawbacktowardt_heoperatorif kick-
backoccurs.
• Reduced-KickbackGuideBar:de-
signedwitha sma_ilradiustip which
reducesthesizeDfthekickbackdan-
gerzone on the bar tip, This type bar
has been demonstrated to significant-
ly reduce the number and serious-
ness of kickbacks when tested in ac-
cordance with ANSI B175.1
__ SmaU Radius
Tip Guide Bar
__J
- Low Kickback Chain has met kick-
back performance requirements when
tested on the representative sample
of these chain saws specified in ANSI
B175.1
Low Kickback Chain
Contoured Depth Gauge
Elongated Guard Link
Deflects Kickback Force
And Allows Wood To
Gradually Ride Into Cutter
SAFETY" NOTICE: Exposure to vibra-
tions through prolonged use of hand
tools could cause blood vessel or nerve
damage in the fingef's, hands, and joints
of people prone to circulation disorders
or abnormal swelling. Prolonged use in
cold weather has been linked to blood
vessel damage in otherwise healthy
people.. If symptoms, occur such as
numbness, pain, loss of strength,
change in skin color or texture, or loss
of feeling in the fingers, hands, or joints,
discontinue the use of this tool and
seek medical attention. An anti-vibration
system does not guarantee the avoid-
ance of these problems° Users who op-
erate tools on a continual and.
regular basis must closely monitor their
physical condition and the condition of
this tool.
DOUBLE INSULATION
CONSTRUCTION
This unit is double insulated to help pro-
tect against electric shock. Double in-
sulation construction consists of two
separate "layers" of electrical insulation
instead of grounding. Tools built with
this insulation system are not intended
to be grounded. No grounding means is
provided on this unit, nor should a
means of grounding be added to this
unit,. As a result, the extension cord
used with this unit can be plugged into
any polarized 120 volt electrical outlet.
Safety precautions must be observed
when operating any electrical tool. The
double insulation system only provides
added protection against injury resulting
from an internal electrical insulation fail-
ure.
_1_ WARNING; All electrical repairs
to this unit, including housing, switch,
motor, etc., must be diagnosed and
repaired by qualified service person-
nelo Replacement parts for a double
insulated appliance must be identical
to the parts they replace. A double in-
sulated appliance is marked with the
words "double insulation" or "double
insulated". The symbol['5] (square
within a square) may also be marked
on the appliance. Failure to have the
unit repaired by Sears service person-
nel can cause the double insulation
construction to become ineffective and
result in serious injury.
STANDARDS: This product is listed
by Underwriters Laboratories, Inc. in
accordance with UL Standard 1662
and ANSI B175.1,
ANS! B175.1,-2000 "American Na-
tional Standard for Powered Tools -
Safety Requirements"
SAVE THESE INSTRUCTIONS
CARTON CONTENTS
Check carton contents against the fol-
lowing list.
Model 358,3412,_
° Chain Saw (fully assembled)
o Bar Sheath
o Gloves
° Pruning tips booklet
Examine parts for damage, Do not
use damaged parts.
NOTE: if you need assistance or find
parts missing or damaged, please call
1-800-235-5878.
ASSEMBLY
Your saw is fully assembled; no
assembly is necessary,
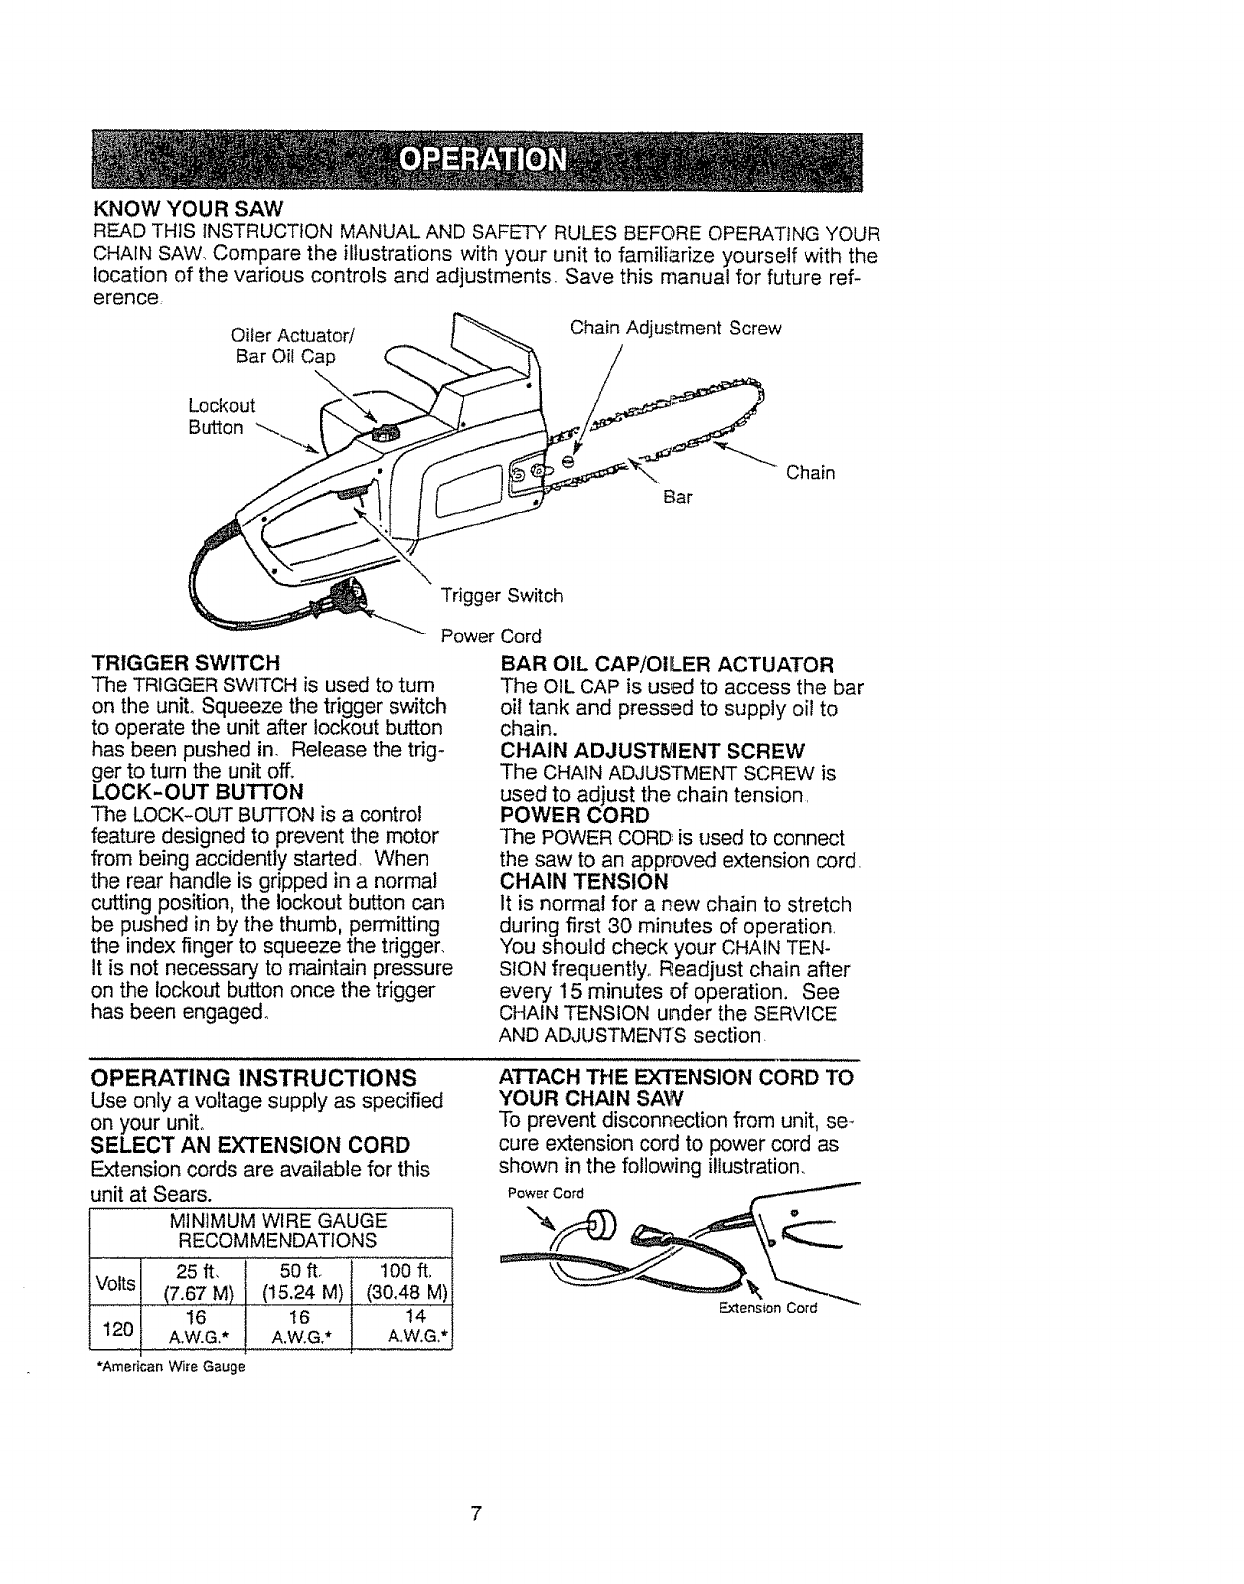
KNOW YOUR SAW
READ THIS INSTRUCTION MANUAL AND SAFETY RULES BEFORE OPERATING YOUR
CHAIN SAW. Compare the illustrations with your unit to familiarize yourself with the
location of the various controls and adjustments Save this manual for future ref-
erence
Oiler Actuator/
Bar Oil Cap
\.
Lockout
Button '-....
Chain Adjustment Screw
Chain
Bar
Trigger Switch
Power Cord
TRIGGER SWITCH
The TRIGGER SWITCH is used to turn
on the unit. Squeeze the trigger switch
to operate the unit after lockout btAon
has been pushed in, Release the trig-
ger to turn the unit off.
LOCK-OUT BUTTON
The LOCK-OUT BUTTON is a control
feature designed to prevent the motor
from being accidently started, When
the rear handle is gripped in a normal
cutting position, the lockout button can
be pushed in by the thumb, permitting
the index finger to squeeze the trigger,
It is not necessary to maintain pressure
on the lockout button once the trigger
has been engaged.
BAR OIL CAP/OILER ACTUATOR
The OIL CAP is used to access the bar
oil tank and pressed to supply oil to
chain.
CHAIN ADJUSTMENT SCREW
The CHAIN ADJUSTMENT SCREW is
used to adjust the chain tension
POWER CORD
The POWER CORD_is used to connect
the saw to an approved extension cord
CHAIN TENSION
It is normal for a new chain to stretch
during first 30 minutes of operation
You should check your CHAIN TEN-
SION frequently° Readjust chain after
every 15 minutes of operation. See
CHAIN TENSION under the SERVICE
AND ADJUSTMENTS section
OPERATING INSTRUCTIONS
Use only a voltage supply as specified
on your unit°
SELECT AN EXTENSION CORD
Extension cords are available for this
unit at Sears.
MINIMUM WIRE GAUGE
RECOMMENDATIONS
25 ft, 50 fL 100 ft,
Volts (7.67N) (15.24 M) (30.48 M)
16 I6 !4
120 AoW.G.* A,W.G,* A,W.G.*
ATTACH THE EXTENSION CORD TO
YOUR CHAIN SAW
To prevent disconnection from unit, se-
cure extension cord to power cord as
shown in the following illustration._
*American Wile Gauge
7
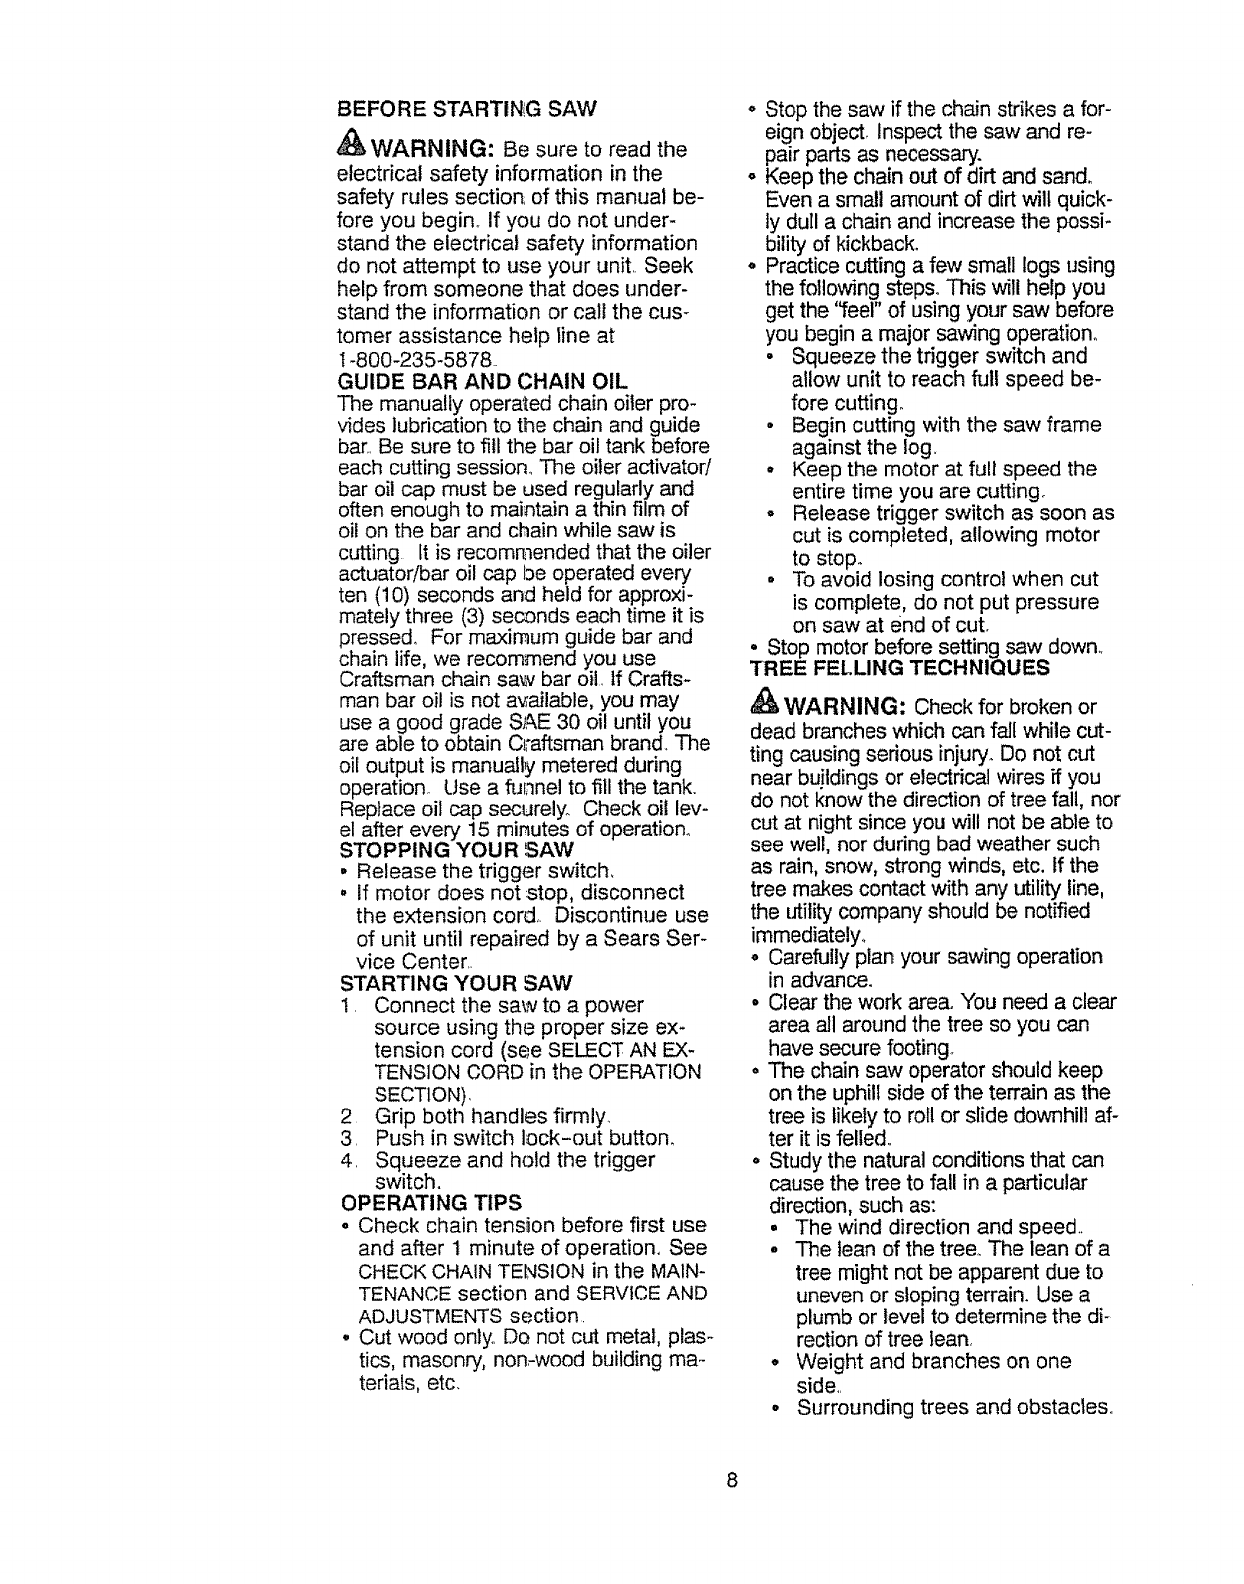
BEFORE STARTIN!G SAW
_WARNING: Be sure to read the
electrical safety information in the
safety, rules section; of this manual be-
fore you begin., if you do not under-
stand the electrical safety information
do not attempt to use your unit.. Seek
help from someone that does under-
stand the information or call the cus-
tomer assistance help line at
1-800-235-5878..
GUIDE BAR AND CHAIN OIL
The manually operated chain oiler pro-
vides lubrication to the chain and guide
bar,, Be sure to fill the bar oil tank before
each cutting session., The oiler activator/
bar oil cap must be used regularly and
often enough to maintain a thin film of
oil on the bar and chain while saw is
cutting It is recommended that the oiler
actuator/bar oil cap be operated every
ten (10) seconds and held for approxi-
mately three (3) seconds each time it is
pressed. For maximum guide bar and
chain life, we recommend you use
Craftsman chain sav;vbar oil, tf Crafts-
man bar oil is not available, you may
use a good grade SAE 30 oil until you
are able to obtain C_'aftsman brand. The
oil output is manually metered during
operation_ Use a funnel to fill the tank,,
Replace oil cap securely. Check oil lev-
el after every 15 minutes of operation.
STOPPING YOUR ',SAW
• Release the trigger switch,
• If motor does not stop, disconnect
the extension cord.. Discontinue use
of unit until repaired by a Sears Ser-
vice Center..
STARTING YOUR SAW
1. Connect the saw to a power
source using the proper size ex-
tension cord (see SELECT AN EX-
TENSION CORD in the OPERATION
SECTION),
2 Grip both handles firmly.
3. Push in switch lock-out button_
4. Squeeze and hold the trigger
switch.
OPERATING TIPS
oCheck chain tension before first use
and after 1 minute of operation° See
CHECK CHAIN TENSION in the MAIN-
TENANCE section and SERVICE AND
ADJUSTMENTS section.
.Cut wood only. Do not cut metal, plas-
tics, masonry, nomwood building ma-
terials, etc.
o Stop the saw if the chain strikes a for-
eign object, Inspect the saw and re-
pair parts as necessary.
, Keep the chain out of dirt and sand,
Even a small amount of dirt wilt quick-
ly dull a chain and increase the possi-
bility of kickback.
o Practice cutting a few small logs using
the following steps° This will help you
get the "feel" of using your saw before
you begin a major sawing operation,.
• Squeeze the trigger switch and
allow unit to reach full speed be-
fore cutting.
•Begin cutting with the saw frame
against the log.,
° Keep the motor at full speed the
entire time you are cutting.
°Release trigger switch as soon as
cut is completed, allowing motor
to stop.
°To avoid losing control when cut
is complete, do not put pressure
on saw at end of cut.
° Stop motor before setting saw down_
TREE FELLING TECHNIQUES
WARNING: Check for broken or
dead branches which can fail while cut-
ting causing serious injury. Do not cut
near buildings or electrical wires if you
do not know the direction of tree fall, nor
cut at night since you wilt not be able to
see well, nor during bad weather such
as rain, snow, strong winds, etc, If the
tree makes contact with any utility line,
the utility company should be notified
immediately°
o Carefully plan your sawing operation
in advance.
• Clear the work area. You need a clear
area all around the tree so you can
have secure footing
• The chain saw operator should keep
on the uphill side of the terrain as the
tree is likely to roll or slide downhill af-
ter it is felled,.
• Study the natural conditions that can
cause the tree to fall in aparticular
direction, such as:
° The wind direction and spee&
•The lean of the tree_ The lean of a
tree might not be apparent due to
uneven or sloping terrain. Use a
plumb or level to determine the di-
rection of tree lean,
• Weight and branches on one
side,.
o Surrounding trees and obstacles.
,Look for decay and roL If the trunk is
rotted, it can snap and fall toward the
operator.
, Make sure there is enough room for
the tree to fall. Maintain a distance of
2-1/2 tree lengths from the nearest
person or other objects,. Motor noise
can drown out a warning call..
• Remove dirt, stones, loose bark, nails,
staples, and wire from the tree where
cuts are to be made.
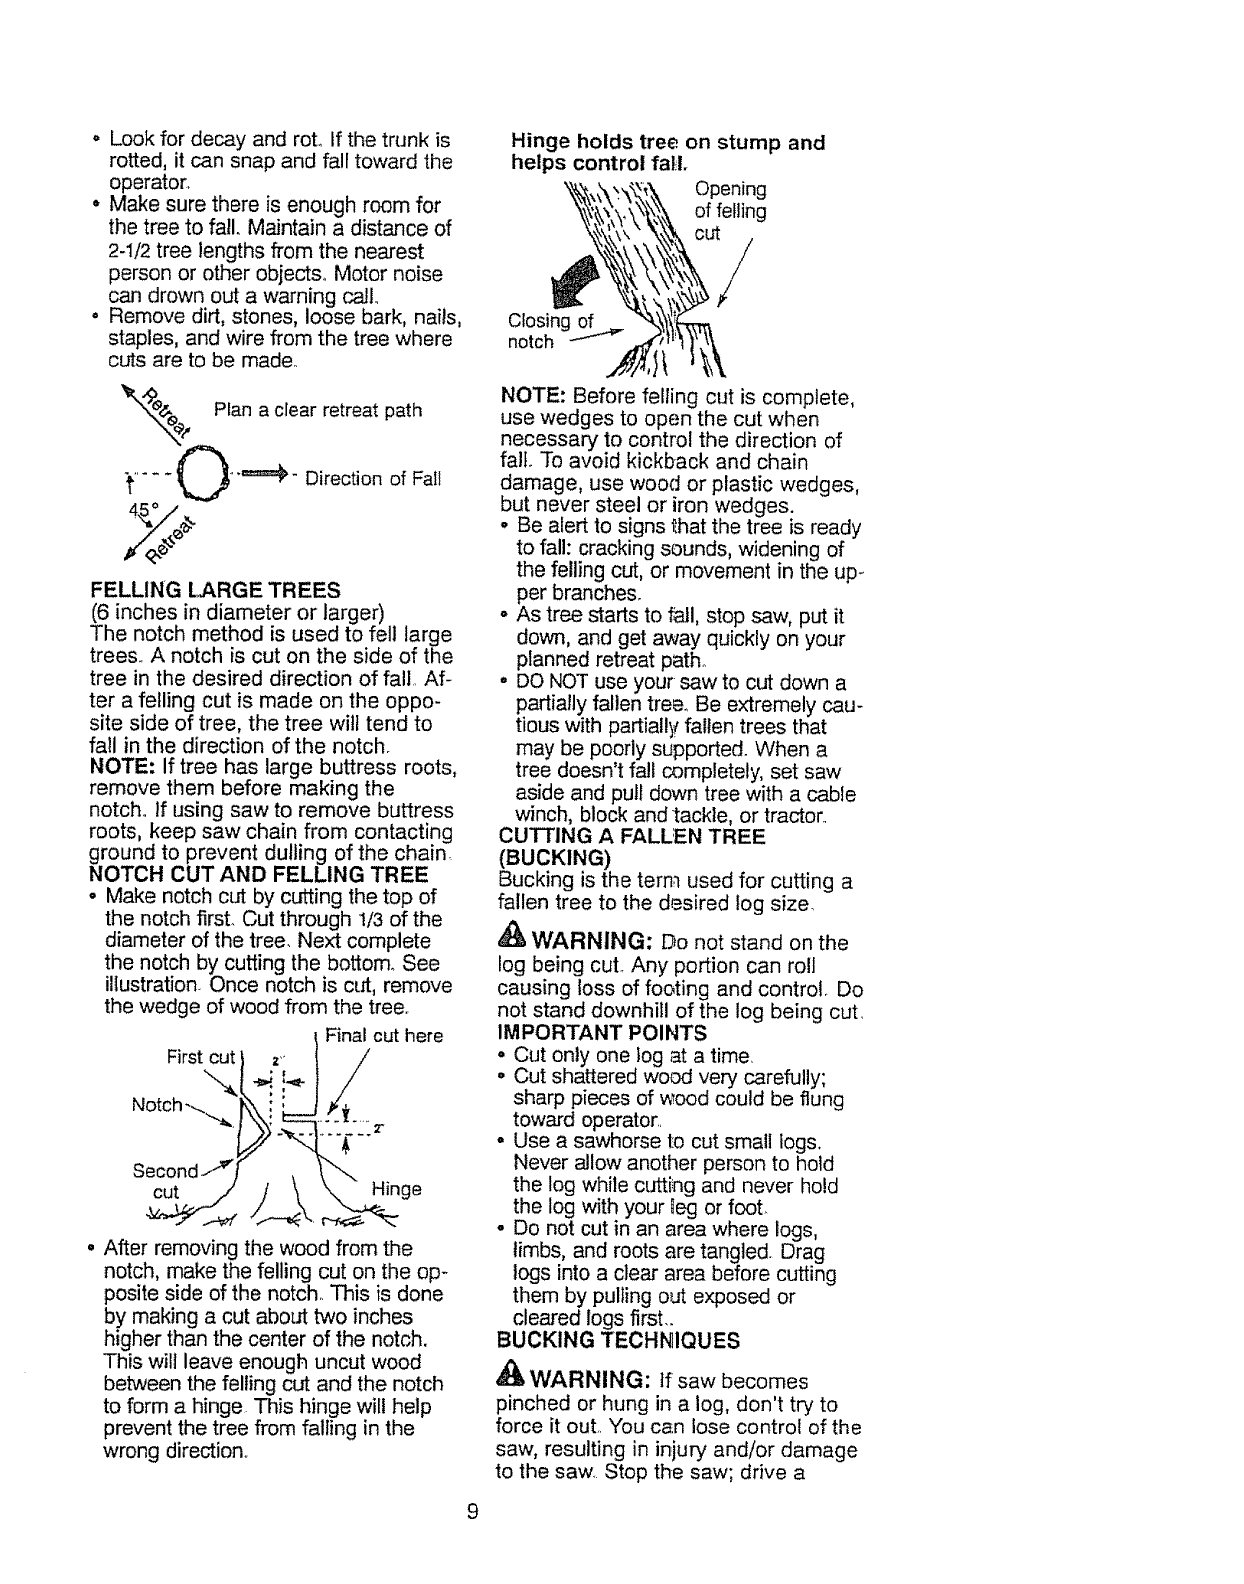
_'_e_.e_ Plan a clear retreat path
:t..... L )_'"=_=_" Direction of Fall
FELLING LARGE TREES
(6 inches in diameter or larger)
The notch method is used to fell large
trees.. A notch is cut on the side of the
tree in the desired direction of fall. Af-
ter a felling cut is made on the oppo-
site side of tree, the tree will tend to
fall in the direction of the notch.
NOTE: if tree has large buttress roots,
remove them before making the
notch. If using saw to remove buttress
roots, keep saw chain from contacting
ground to prevent dulling of the chain.
NOTCH CUT AND FELLING TREE
• Make notch cut by cutting the top of
the notch first. Cut through 1/3 of the
diameter of the tree. Next complete
the notch by cutting the bottom° See
ilIustration Once notch is cut, remove
the wedge of wood from the tree.
Final cut here
Z "i
Firstcut t /
Second -J_" .
• After removing the wood from the
notch, make the felling cut on the op-
posite side of the notch.. This is done
by making a cut about two inches
higher than the center of the notch.
This will leave enough uncut wood
between the felling cut and the notch
to form a hinge This hinge will help
prevent the tree from falling in the
wrong direction..
Hinge holds tree on stump and
helps control fal_l.
Opening
of felling
Closing of
notch
9
NOTE: Before felling cut is complete,
use wedges to open the cut when
necessary to control the direction of
fall. To avoid kickback and chain
damage, use wood or plastic wedges,
but never steel or iron wedges.
o Be alert to signs that the tree is ready
to fail: cracking sounds, widening of
the felling cut, or movement in the up-
per branches.
oAs tree starts to fall, stop saw, put it
down, and get away quickly on your
planned retreat path°
°DO NOT use your saw to cut down a
partially fallen tree° Be extremely cau-
tious with partially fallen trees that
may be poorly supported. When a
tree doesn't fall completely, set saw
aside and pull down tree with a cable
winch, block and tackle, or tractor..
CUTTING A FALLEN TREE
(BUCKING)
Bucking is the term used for cutting a
fallen tree to the desired fog size
WARNING: Do not stand on the
log being cut. Any portion can roll
causing loss of footing and control° Do
not stand downhill of the log being cut
IMPORTANT POINTS
o Cut only one tog at a time.
, Cut shattered wood very carefully;
sharp pieces of wood could be flung
toward operator..
• Use a sawhorse I_ cut small logs.
Never allow another person to hold
the log while ct_i_ng and never hold
the log with your leg or foot.
• Do not cut in an area where logs,
limbs, and roots are tangled. Drag
logs into a clear area before cutting
them by pulling out exposed or
cleared logs first..
BUCKING TECHNIQUES
WARNING: if saw becomes
pinched or hung in a log, don't try to
force it out.. You ca:n lose control of the
saw, resulting in iniury and/or damage
to the saw+ Stop the saw; drive a
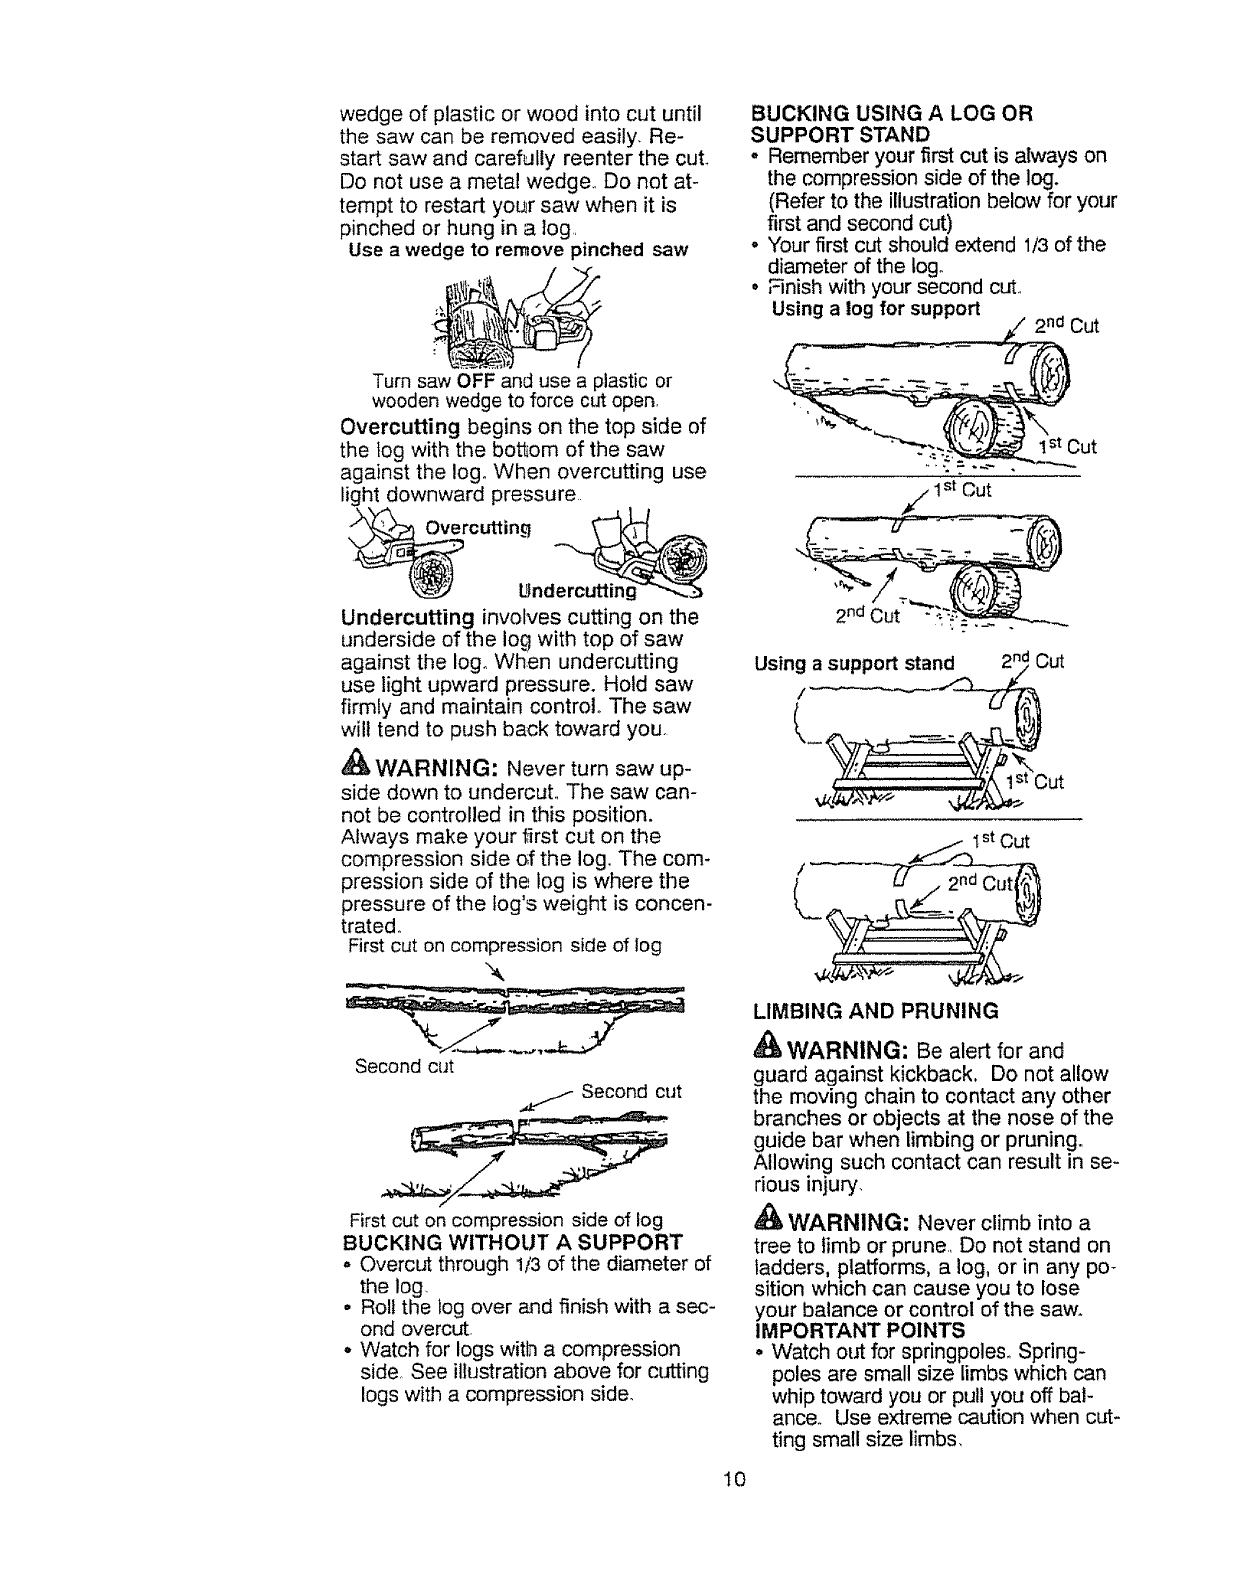
wedgeof plasticor woodintocut until
thesawcanberemovedeasily,Re-
startsawandcarefullyreenterthe cut
Donotusea metalwedge,,Donotat-
temptto restartyou_rsawwhenit is
pinchedor hungina log,
Use a wedge to remove pinched saw
BUCKING USING A LOG OR
SUPPORT STAND
* Remember your first cut is always on
the compression side of the log.
(Refer to the illustration below for your
first and second cut)
o Your first cut should extend 1/3 of the
diameter of the tog_
o Finish with your second cut,,
Using a log for support
Turn saw OFF and use a plastic or
wooden wedge to force cut open,
Overcutting begins on the top side of
the tog with the bottom of the saw
against the logo When overcutting use
light downward pressure.. 1st Cut
Undercutting involves cutting on the
underside of the log with top of saw
against the log. When undercutting
use light upward pressure. Hold saw
firmly and maintain control° The saw
will tend to push back toward you.
WARNING: Never turn saw up-
side down to undercut,, The saw can-
not be controlled in this position.
Always make your _irst cut on the
compression side {;f the log,, The com-
pression side of the log is where the
pressure of the fog's weight is concen-
trated_
First cut on compression side of log
Second cut
Second cut
First cut on compression side of log
BUCKING WITHOUT A SUPPORT
o Overcut through 1/3 of the diameter of
the log.
• Roll the log over and finish with a sec-
ond overcut
.Watch for logs with a compression
side,, See illustration above for cutting
logs with a compression side.
2 nd Cut
Using a support stand_ 2_._Cut
10
LIMBING AND PRUNING
WARNING: Be alert for and
guard against kickback. Do not al!ow
the moving chain to contact any other
branches or objects at the nose of the
guide bar when lirnbing or pruning.
Allowing such contact can result in se-
rious injury.
WARNING: Never climb into a
tree to limb or prune, Do not stand on
ladders, platforms, a log, or in any po-
sition which can cause you to lose
your balance or control of the saw.
IMPORTANT POINTS
o Watch out for springpole& Spring-
poles are small size limbs which can
whip toward you or pull you off bal-
ance. Use extreme caution when cut-
ting small size limbs,
° Bealertfor springbackfromany
branchesthat arebentor under
pressure.Avoidbeingstruckby the
branchorthesawwhenthetension
inthe woodfibersis released.
o Frequentlyclearbranchesoutofthe
wayto avoidtrippingoverthem.
LIMBING
= Umba treeonlyafterit iscutdown.,
o Leavethelargerlimbsundemeaththe
felledtreeto supportthetreeasyou
work.
• Startatthe baseofthefelledtreeand
worktowardthe top, cutting branches
and limbs.. Remove small limbs with
one cut..
° Keep the tree between you and the
chain,
• Remove larger, supporting branches
with the cutting techniques described
in BUCKING WITHOUT A SUPPORT,
.Always use an overcut to cut small
and freely hanging limbs. Undercut-
ting could cause limbs to fall and
pinch the saw.
CUSTOMER RESPONSIBILITIES
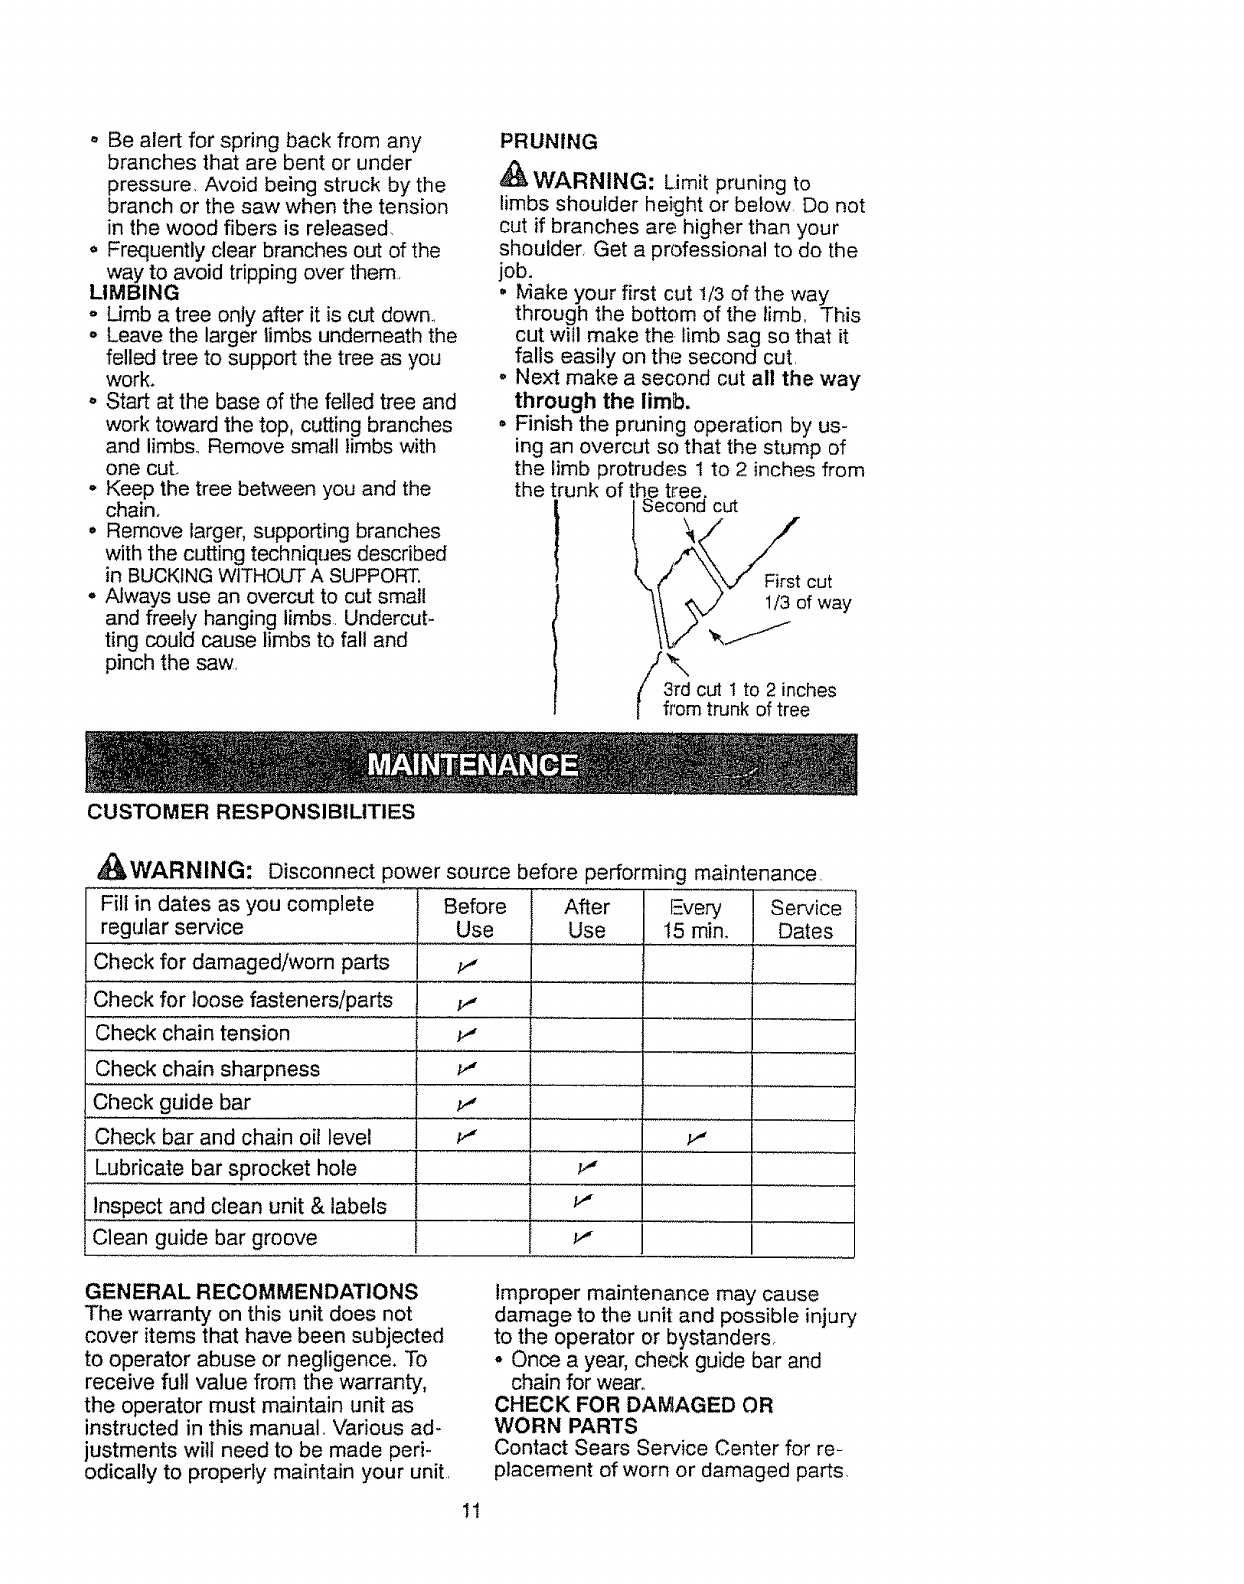
PRUNING
'_qkWARNING: Limit pruning to
limbs shoulder height or below, Do not
cut if branches are higher than your
shoulder, Get a professional to do the
job.
° Make your first cut 1/3 of the way
through the bottom of the limb. This
cut will make the-limb sag so that it
falls easily on the second cut.
.Next make a second cut all the way
through the limb.
° Finish the pruning operation by us-
ing an overcut so that the stump of
the limb protrudes 1 to 2 inches from
the trunk of _he_n_ cut
First cut
1/3 of way
\
i3rd cut 1 to 2 inches
[from trunk of tree
,_WARNING: Disconnect power source before performing maintenance
tl
Before After
Use
Fill in dates as you complete
regular service Use
Check for damaged/worn parts
Check for loose fasteners/parts
Check chain tension _,'
Check chain sharpness
Check guide bar
Check bar and chain oil level
Lubricate bar sprocket hole
Inspect and clean unit & labels
Clean guide bar groove
Every Service
15 rain, Dates
i
v'
k"
ii
GENERAL RECOMMENDATIONS
The warranty on this unit does not
cover items that have been subjected
to operator abuse or negligence. To
receive full value from the warranty,
the operator must maintain unit as
instructed in this manual, Various ad-
justments will need to be made peri-
odically to properly maintain your unit,
11
Improper maintenance may cause
damage to the unit and possible injury
to the operator or bystanders°
° Once a year, cheek guide bar and
chain for wear,,
CHECK FOR DAMAGED OR
WORN PARTS
Contact Sears Service Center for re-
placement of worn or damaged parts,
NOTE:It is normalfor a smallamount
of oil to appearunderthesawafter
motorstops,Donotconfusethiswith
a leakingoiltank..
oTriggerSwitch- Ensurethetrigger
switchfunctionsproperlybysqueez-
ingandholdingtheetriggerswitch°
Makesuremotorstartsandstops.
oOilTank- Discontinueuseof chain
sawif oiltankshowssignsof damage
orleaks.
• PowerCord- Discontinueuseif
chainsawpowercordshowssignsof
damageorwear.
CHECKFORLOOSE
FASTENERSANDPARTS
• BarMountingNuts
, Chain
° BarAdjustingScrew
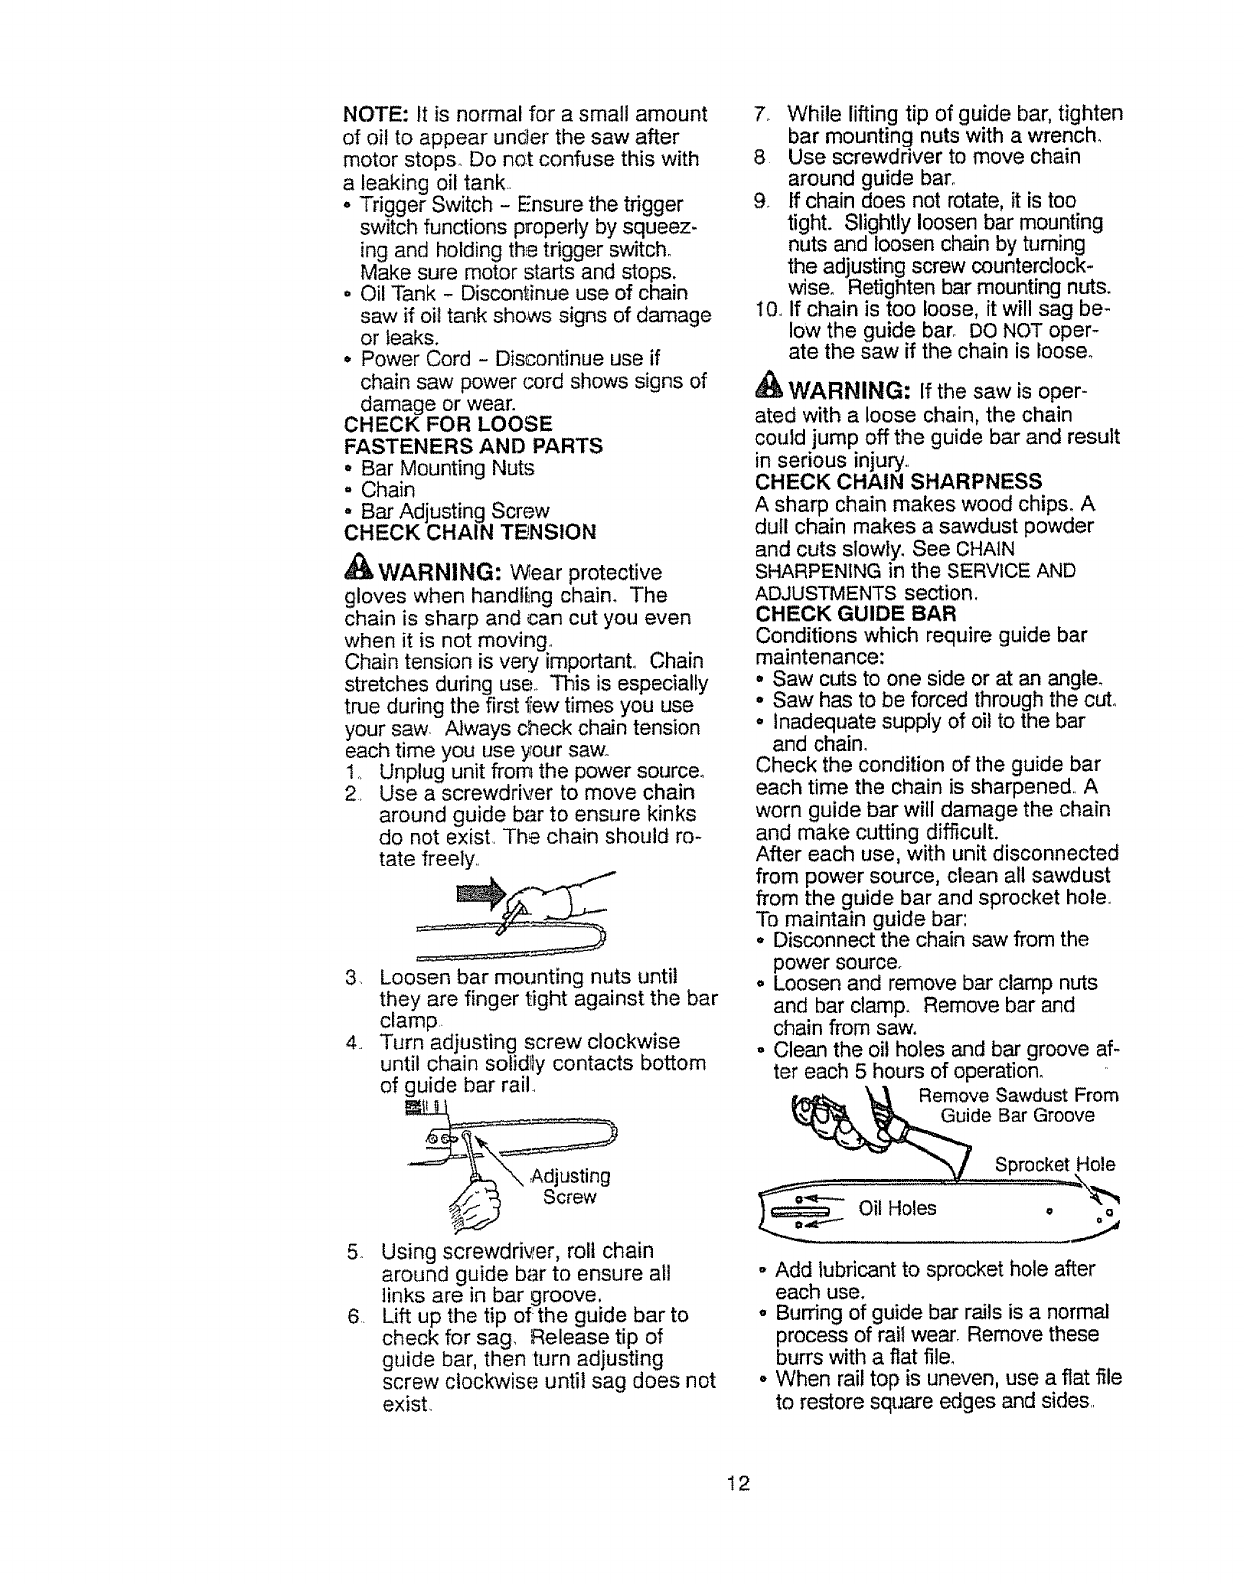
CHECKCHAINTENSION
,_ WARNING: Wear protective
gloves when handti:ng chain, The
chain is sharp and can cut you even
when it is not moving.
Chain tension is very importanL Chain
stretches during use., This is especially
true during the first few times you use
your saw, Always check chain tension
each time you use your saw.,
!,, Unplug unit from the power source°
2, Use a screwdriver to move chain
around guide bar to ensure kinks
do not exist, The chain should ro-
tate freely,,
3, Loosen bar mounting nuts until
they are finger tight against the bar
clamp,
4, Turn adjusting screw clockwise
until chain solidt}y contacts bottom
of guide bar rail_
5_
.
Using screwdriver, roll chain
around guide bar to ensure all
links are in bar groove.
Lift up the tip of the guide bar to
check for sag, Release tip of
guide bar, then turn adjusting
screw clockwise until sag does not
exist,
7, While lifting tip of guide bar, tighten
bar mounting nuts with a wrench,
8 Use screwdriver to move chain
around guide ban
9o If chain does not rotate, it is too
tight. Slightly loosen bar mounting
nuts and loosen chain by turning
the adjusting screw counterclock-
wise, Retighten bar mounting nuts.
10, If chain is too loose, it will sag be-
low the guide bar, DO NOT oper-
ate the saw if the chain is loose°
WARNING; If the saw is oper-
ated with a loose chain, the chain
could jump off the guide bar and result
in serious injury.,
CHECK CHAIN SHARPNESS
A sharp chain makes wood chips, A
dull chain makes a sawdust powder
and cuts slowly. See CHAIN
SHARPENING in the SERVICE AND
ADJUSTMENTS section.
CHECK GUIDE BAR
Conditions which require guide bar
maintenance:
° Saw cuts to one side or at an angle.
• Saw has to be forced through the cut.,
° inadequate supply of oil to the bar
and chain_
Check the condition of the guide bar
each time the chain is sharpened., A
worn guide bar will damage the chain
and make cutting difficult.
After each use, with unit disconnected
from power source, clean all sawdust
from the guide bar and sprocket hole,
To maintain guide bar:
° Disconnect the chain saw from the
power source,
o Loosen and remove bar clamp nuts
and bar clamp, Remove bar and
chain from saw.
o Clean the oil holes and ba r groove af-
ter each 5 hours of operation_
\_._ Remove Sawdust From
de Bar Groove
Sprocket Hole
o_--- Oil Holes • 91
• Add lubricant to sprocket hole after
each use,
° Burring of guide bar rails is a normal
process of rail wear, Remove these
burrs with a flat file,
° When rail top is uneven, use a flat file
to restore square edges and sides,,
12

ihr_ .__. File Rail Edges--_ N ['t
and Sides I U I
square I I
Worn Groove Correct Groove
Replace the guide bar when the
groove is worn, the guide bar is bent
or cracked, or when excess heating or
burring of the rails occurs,. If replace-
ment is necessary', contact your Sears
Service Center°
LUBRICATION
Bar Bar Oil Fil! Cap
Sprocket j
- Check bar and chain oil before use
and every 15 minutes while operat-
ing the saw. See GUIDE BAR AND
CHAIN OIL under the OPERATION
section,,
o Lubricate bar sprocket hole after
each use.
INSPECT AND CLEAN UNIT AND
LABELS
• After each use, inspect complete unit
for loose or damaged parts. Clean
the unit and labels using a damp cloth
with a mild detergent.
o Wipe off the unit and labels with a
clean dry cloth
CHAIN SHARPENING
Chain sharpening requires special
tools. You can purchase sharpening
tools at Sears or go to a professional
chain sharpener.,
WARNING: Avoid accidental
starting. Always unplug saw from power
source before installing a bar and/or
chain.,
CHAIN REPLACEMENT
WARNING: Wear protective
gloves when handling chain,, The
chain is sharp and can cut you even
when it is not moving.
It is normal for a new chain to stretch
during the first 30 minutes of operation.
You should recheck your chain tension
frequently and adjust the chain tension
as required. See CHECK CHAIN TEN-
SION in the MAINrTENANCE section.
Replace the old chain when it becomes
worn or damaged,, Use only the Low
Kickback replacement chain specified in
the list of available replacement parts.
The chain must comply with kickback
performance requirements of ANSI
B17&1 when tested with this saw,
See your Sears Service Center to re-
place and sharpen individual cutters
on your chain.
TO REPLACE CHAIN:
1o Disconnect unit from power
source.
2, Remove bar mounting nuts and
bar clamp plate.
Bar
Plate Bar Mounting Nuts
3 Turn the adjusting screw on the
bar counterclockwise to move the
tensioning rack as far as it will go
toward the front of the bar.
o
o
Tensioning Rack
4_ Slide guide bar toward the drive
sprocket until guide bar stops
against the sprocket_
5, Remove the old chain.
6, Carefully remove the new chain
from the package° Hold chain with
the drive links as shown,
Tip of
Bar
DIRECTION OF: ROTATION
13
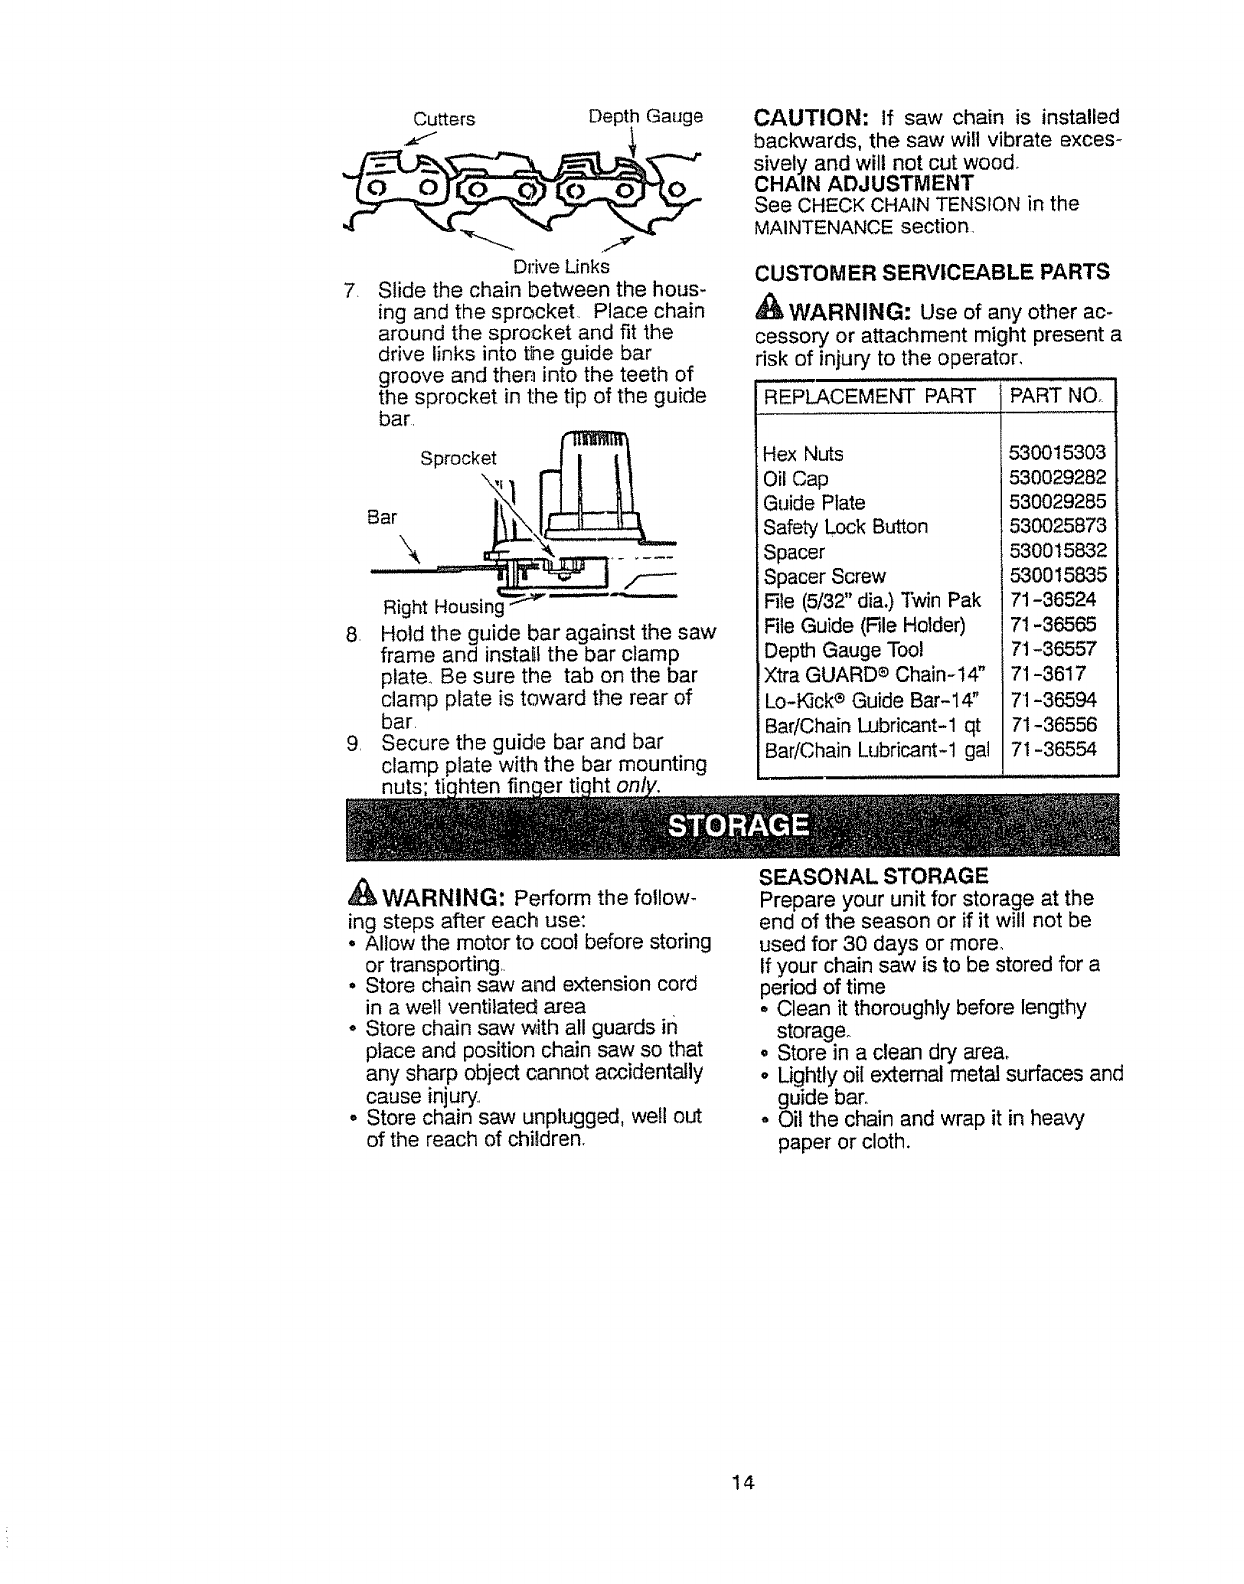
Ddve Links
7. Slide the chain between the hous-
ing and the sprocket, Place chain
around the sprocket and fit the
drive links into the guide bar
groove and then into the teeth of
the sprocket in the tip of the guide
bar.
Sprocket _
Right Housing I
8. Hotd the guide bar against the saw
frame and install the bar clamp
plate. Be sure the tab on the bar
clamp plate is toward the rear of
bar.
9, Secure the guide bar and bar
clamp plate with the bar mounting
Ls;ti
CAUTION: if saw chain is installed
backwards, the saw wi!l vibrate exces-
sively and will not cut wood°
CHAIN ADJUSTMENT
See CHECK CHAIN TENSION in the
MAINTENANCE section
CUSTOMER SERVICEABLE PARTS
WARNING: Use of any other ac-
cessory or attachment might present a
risk of injury' to the operator,
REPLACEMENT PART PART NO.
:Hex Nuts
Oil Cap
Guide Plate
Safety Lock Button
Spacer
Spacer Screw
File (5/32" dia.) Twin Pak
FileGuide (FileHolder)
Depth Gauge Tool
Xtra GUARD® Chain-14"
Lo-K]ck e Guide Bar-14"
Bar/Chain Lubricant-1 qt
Bar/Chain Lubricant-1 gal
530015303
530029282
530029285
530025873
530015832
530015835
71-36524
71-36565
71-36557
71-3617
71-36594
71-36556
71-36554
WARNING: Perform the follow-
ing steps after each use:
, Allow the motor to cool before storing
or transporting..
• Store chain saw and extension cord
in a well ventilated area
o Store chain saw w,ith all guards in
place and position chain saw so that
any sharp object cannot accidentally
cause injury..
o Store chain saw unplugged, well out
of the reach of children.
SEASONAL STORAGE
Prepare your unit for storage at the
end of the season or if it will not be
used for 30 days or more.
If your chain saw is to be stored for a
period of time
° Clean it thoroughly before lengthy
storage.
o Store in a clean dry area,
o Lightly oil external metal surfaces and
guide bar,,
o Oil the chain and wrap it in heavy
paper or cloth.
14
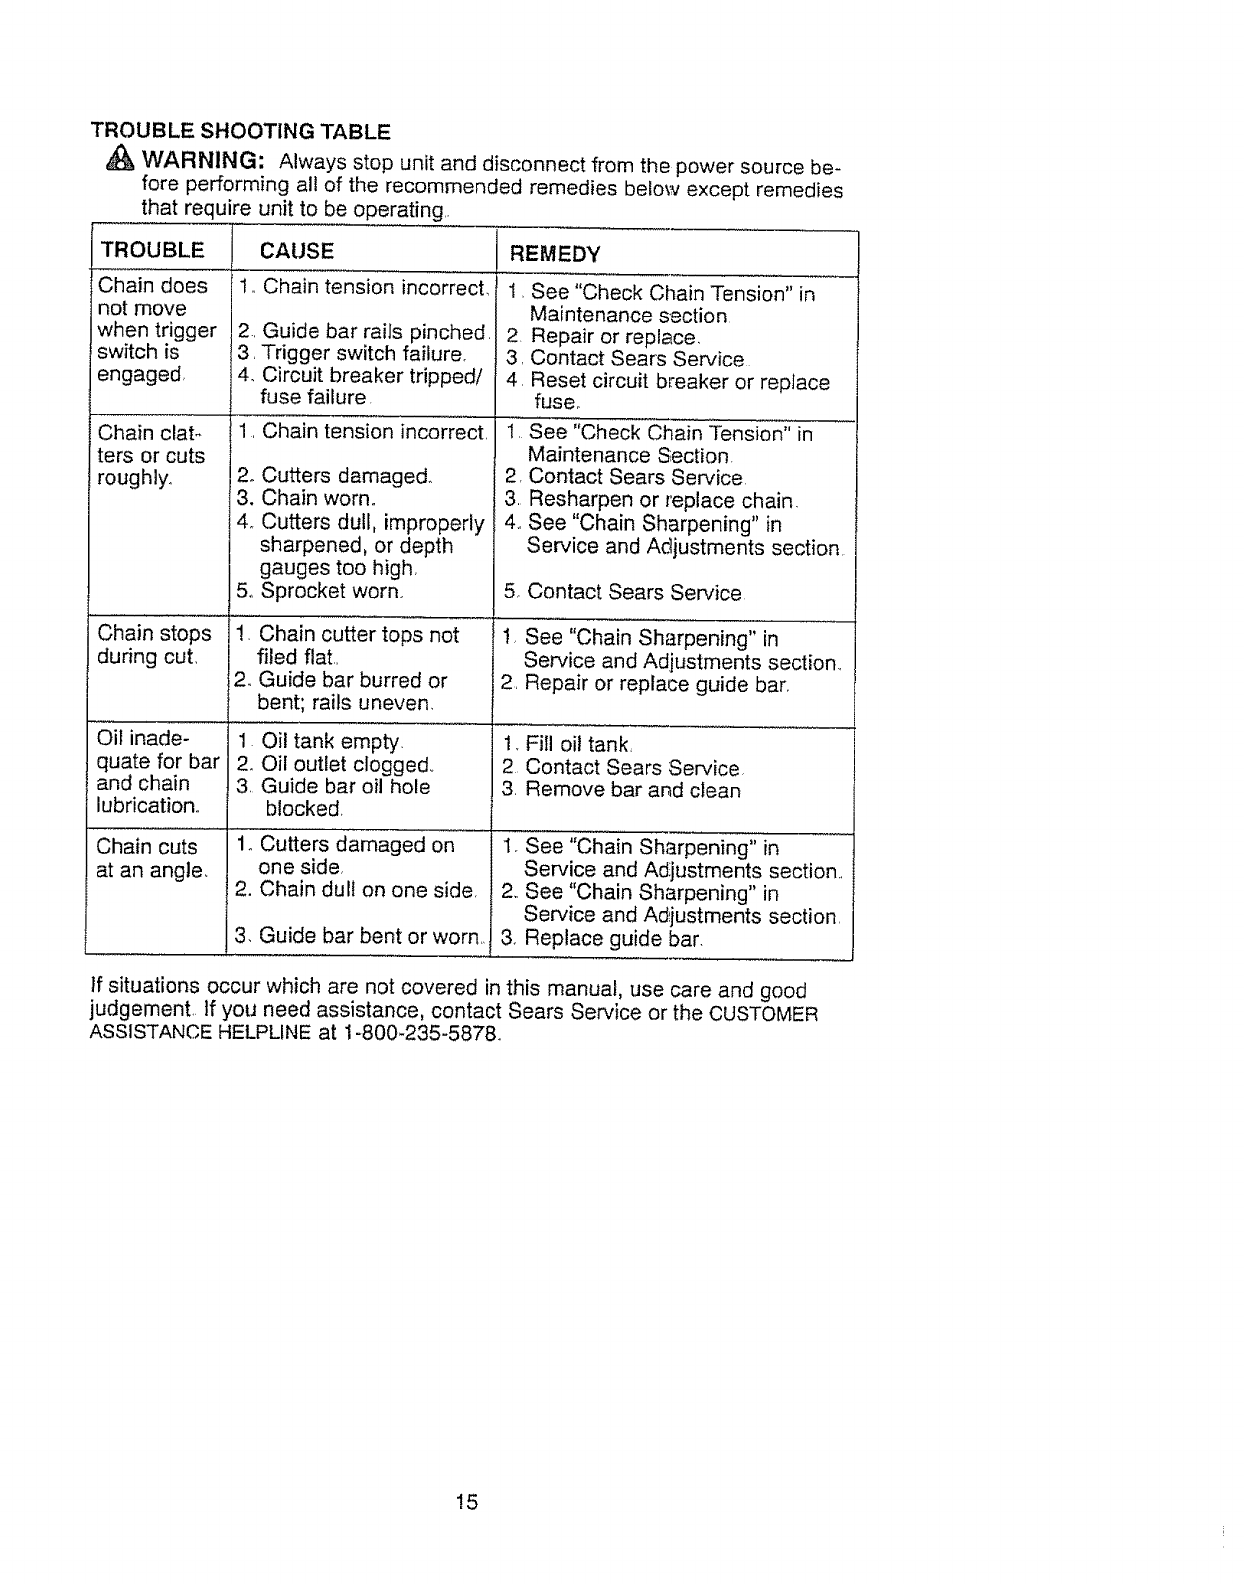
TROUBLE SHOOTING TABLE
,_ WARNING: Always stop unit and disconnect from the power source be-
fore performing all of the recommended remedies below except remedies
that require unit to be operating..
TROUBLE
iChain does
not move
when trigger
switch is
engaged,
Chain clat-
ters or cuts
roughly,
Chain stops
during cut.
Oil inade-
quate for bar
and chain
lubrication,
Chain cuts
at an angle,
CAUSE REMEDY
1. Chain tension incorrect.
2. Guide bar rails pinched.
3. Trigger switch failure.
4. Circuit breaker tripped/
fuse failure.
1, Chain tension incorrect,
2. Cutters damaged.
3. Chain worn.
4o Cutters dull, improperly
sharpened, or depth
gauges too high,
5o Sprocket worn.
!. Chain cutter tops not
filed flat,,
2, Guide bar burred or
bent; rails uneven
1 Oi! tank empty.
2o Oil outlet clogged,,
3, Guide bar oil hole
blocked,
1, Cutters damaged on
one side,
2. Chain dull on one side,
3, Guide bar bent or worn,,
1, See "Check Chain Tension" in
Maintenance section
2. Repair or replace
3, Contact Sears Service
4, Reset circuit breaker or replace
fuse°
I, See "Check Chain Tension" in
Maintenance Section,
2, Contact Sears Service
3, Resharpen or replace chain,
4,, See "Chain Sharpening" in
Service and Actjustments section,
5, Contact Sears Service
!, See "Chain Sharpening" in
Service and Adjustments section,
2, Repair or replace guide bar,
1, Fill oil tank
2 Contact Sears Service,
3, Remove bar and clean
1. See "Chain Sharpening" in
Service and Ad:justments section,,
2, See "Chain Sharpening" in
Service and Adjustments section,
3Replace guide bar.
If situations occur which are not covered in this manual, use care and good
judgement.. If you need assistance, contact Sears Service or the CUSTOMER
ASSISTANCE HELPLINE at 1-800-235-5878.
15
Garantia 16
ReglasdeSegurida_d 16
Montaje 22
Uso 22
Mantenimiento 27
Servicioy Ajustes 29
Almacenaje 31
TablaDiagn6stica 32
Repuestosy Encargos Contratapa
GARANTIA COMPLETA DE UN ANO PARA LA SIERRA DE CADENA ELECTRI-
CA DE LA MARCA CRAFTSMAN.
Siesta Sierra de Cadena El_ctrica de la marca Craftsman dejara de funcionar
apropiadamente debido a defectos en el material o mano de obra, dentro de un
(t) aSo a partir de la fecha de compra, Sears la repondr,=4,gratuitamenteo
Elsta garantia excluye la barra y la cadena, los cuales son artlculos fungibles y
se deterioran con el uso normal del aparato_
Siesta Sierra de Cadena EI6ctrica de la marca Craftsman es usada para prop6si-
tos comerciales, esta garant_a aplicar& solamente por 90 dias contados desde la
fecha original de compra. Siesta Sierra de Cadena EI6ctrica de la marca Crafts-
man es usada para prop6sitos de alquiler, esta garantla aplicar_, solamente por
30 dias contados desde Ia fecha original de compra. Esta garantia apticarA uni-
camente mientras este producto sea usado dentro de los Estados Unido&
SERVICIO PAJO GARANTIA ESTARA DISPONIBLE DEVOLVIENDO LA SIERRA DE CA-
DENA ELECTRICA DE LA MARCA CRAFTSMAN A LA TIENDA SEARS MAS CERCANA
EN LOS ESTADOS UNIDOS,
Esta garantia le confiere derechos juridicos especificos; adem&s ud. podr& tener
otros derechos que varian entre estados.
Sears, Roebuck and Co., D/817 WA, Hoffman Estates, IL 60179 U.S.A.
_J, ADVERTENCIA: Siempre que se
use cuatquier cortador el_ctrico, deben
observarse precauciones b_.sicas de se-
guridad para reducir el riesgo de incen-
dio, choque el6ctrico, y accidentes per-
sonates. Lea todas la.,sinstrucciones.
ADVERTENClA: Siempre desco-
necte la sierra de cadena del recurso de
energia cuando no se encuentre en
uso, antes de efectuar servicio, y at
cambiar accesorios, como Io es la cade-
na de la sierra y el protector.
Debido a que las sierra de cadena son
instrumentos para co_ar madera a atta
velocidad, deben observarse precau-
ciones de seguridad especiales para re-
ducir el riesgo de accidente& El uso
descuidado o indebid:o de esta herra-
mienta puede causar graves heridas.
PIENSE ANTES DE PROCEDER
.Limite el uso de la sierra a aquellos
usuarios adultos que comprendan y
puedan implementar todas las pre-
cauciones, reglas de seguridad e
instrucciones de uso que se encuen-
tran en este manual
stase de forma apropiada. Use equi-
po protector. Siempre use catzado de
seguddad con puntas de acero y sue-
las anti-deslizantes; ropa ajustada al
cuerpo; guarantes gruesos de uso in-
dustrial anti-desluzantes; protecci6n de
ojos talescomo gafas de seguddad
que no se la cara; casco duro aproba-
do; y barrera de sonido (tapones de
oJdo u orejeras a_nti-sonido) para pro-
teger la audici6no Los que usan sier-
ras de fuerza habituatmente deber&n
hacerse revisar la audici6n freuente-
mente ya que el ruido de las sierras
de cadena puede daSar los oidos.
Proteci6n de Casco Duro
Oidos ...._ m,_,tr_--- Protecci6n
Ropa de Ojos
Ajustada"-_, A
al Cuerpo _' _1_. ./deGuanteSuso
#_" industrial
Zapatos Pantorrilleras
de Sec /de Seguridad
t6
oMantengaelcabellopot encimadel
niveldeloshombrosoNodesgaste
laropasueltaojoyeria; puedenen-
redarseen las piezas mSviles.
• Mantenga todas las partes del cuer-
pc alejadas de la cadena siempre
que el motor de la sierra se en-
cuentre en funcionamiento
• Mantenga a los ni5os alejados. No
permita que ninguna persona haga
contacto con la sierra de cadena ni
con el cable de extensiSno Todos los
espectadores deber&n mantenerse
alejados por 1o menos 10 metros (30
pies) de la zona trabajoo
o No maneje o use la sierra de cadena
mientras se encuentre fatigado, en-
fermo, ansioso o bajo los efectos del
alcohol, drogas u otros medicamen-
tos Es imprescindible que usted se
encuentre en buena condid6n fisica
alert mentalmente Si usted sufre
e cualquier condici6n que pueda
empeo.rar con el trabajo arduo,
ases6rese con su m6dico antes de
comenzar a usar este producto.
act_e con cautela, haga uso del
buen senttdo comSn
• No ponga en marcha la sierra sin
tenet un &rea de trabajo despejada,
una superficie estable para pararse
y, si est& derrubando _rboles, un ca-
mino predeterminado de retroceso.
USE LA SIERRA OBSERVANDO TO-
DOS LOS PROCEDIMIENTOS DE
SEGURIDAD
.Mantenga las dos manos en las
manijas siempre que et aparato est6
en marchao El uso del aparato con
una sola mano puede causar graves
heridas al usuario, a los asistentes o
a los espectadoreso Las sierras de
cadena est,_n diseSadas para que
se ias use con las dos manos en
todo momento.
o No haga uso de la sierra desde las
escaleras los
,port&tiles ni _rboleso
o Asegurese de que ta cadena no
vaya a hacer contacto con ningL_n
objeto antes de poner en marcha el
motor., Nunca intente hacer arrancar
la sierra con la barra guia dentro de
un corte.
°No fuerce la sierra de cadena, Esta
har& el trabajo de manera m&s eft-
ciente y con mayor seguridad si se
usa en la proporci6n para la cual fue
dise_ada
° No aplique presi6n a la sierra, espe-
cialmente al final del core. Et aplicar
presi6n puede hacer que se pierda
el controt al completarse el corteo
Permita que la sierra corte por usted
Ejerza una presi6n liviana hacia aba-
jo 5nicamente.
o Detenga el motor antes de apoyar la
sierra en ning_n :lado..
° Cuando traslade la sierra en la
mano, h_igalo Qnicamente con et mo-
tor apagado. Mueva la sierra de ca-
dena por el mango delantero con el
motor apagado, con tos dedos aleja-
dos del interruptor, con la barra guia
y la sierra de cadena mirando hacia
atr_.s.
° Use la herramienta correcta, corte
madera _nicamente. No use la sierra
de madera para prop6sitos que no
sean otros que lo,s prop6sitos para la
cual fue dise_,ada - por ejemplo - no
use la sierra de cadena para cortar
pl_.stico, masoneria, o materiales de
construcciSn que no sean de mad-
era.
o No ponga en funcionamiento la sier-
ra de cadena si est_ daflada, incor-
rectamente ajustada, o si no est_ ar-
mada completa y seguramente.
Siempre cambie el barre, cadena,
protector de mano, freno de cadena,
oel otras piezas immediatamente si
daSado, roto, o se sale por cualquier
motivo.
° Inspeccione peri6dicamente los
cables de la sierra de cadena y si
_stos se encuentran dariados, per-
mita que sean reparados por un
Centro de Servicio Sears.
MANTENGA LA SIERRA EN BUE-
NAS CONDICIONES DE FUNCIONA-
MIENTO
° Ueve la sierra de cadena a un Centro
de Servicio Sears para que haga
todo servicio menos aquetlos procedi-
mientos listados en la secci6n de
MANTENIMtENTO de este manual
• Aseg_rese de que la cadena se de-
tenga por compteto cuando se suelta
e! gatillo,.
• Mantenga las manijas secas, limpias
y libres de aceite o de mezcla de
combustible.
• Mantenga las tapas y los fijadores
bien fijoso
° Use exclusivamente los accesorios y
repuestos Craftsman recomenda-
dos. Nunca modi_que la sierra.
• Mantenga su sierra de cadena con
cuidado
17
- Mantengalaherramientaafiladay
limpiaparamejorfuncionamientoy
mayorseguridad.
• Sigatodastasinstruccionespara lu-
bricaci6ny cambiodeaccesorios
oDesconectela sierrade cadenadef
recursode energiacuandonose en-
cuentreenuso,antesdeefectuar
servicioy alcambiaraccesorios
comota cadenay at protector
• lnspeccione todas las piezas por si
hubiera daSos. Antes de continuar
con et uso del apa,rato; el protector u
otra pieza que se encuentre daSada
deber_ ser inspeccionada cuidado-
samente para deterrninar si pueden
usarse de forma apropiada y para
vierificar si puede efectuar el funcio-
namiento para el cueal fue diseSada
fnspeccione el alineamiento de las
piezas movibfes, piezas movibles
que se encuentren atascadas, la
ruptura de piezas, montura y cualqu-
ier otra condici6n que pueda afectar
el uso det aparato, E1 protector o cu-
alquier otra pieza que se encuentre
daSada debera set reparada apro-
piadamente o deber_, set reemplaza-
da por un centro de servicio autori-
zado, a no set que se indique de
otra forma en este manual de in-
strucciones
• AI no encontrarse en uso, las sierras
de cadena deber_n almacenarse en
un lugar seco, en un lugar alto o bajo
llave, fuera del alcance de los nibos
• AI almacenar ta sierra, use una fun-
da o un estuche de carga
SEGUR1DAD ELECTRICA
ADVERTENClA: Evite ambientes
petigrosos Para reducir el riesgo de
choque el6ctdco, no use su aparato en
lugares h6medos o mojados ni cerca de
piscinas, de los hidremasajes, etc_ No
exponga el aparato a la nieve, a la lluvia
ni al agua para evita[ la posibilidad de
choque el6ctdco. No toque el enchufe
del cable de extensi6n ni el del aparato
con las manos mojadas
. Use el tipo de voltaje que se muestra
en su aparatoo
°Evite situaciones peligrosas. No use
en presencia de liquidos o gases in-
flamables para evitar crear incendio o
explosi6ny/o causar da_o al aparato.
o Para reducir el riesgo de choque
el6ctrico, este eqt_ipo cuenta con un
enchufe polarizado (una aleta es
rn_s ancha que la otra).. Este enc-
hufe entrarA solamente en una sola
posiciSn en un enchufe poladzado del
cable de extensi6no Aseg_3rese de ten-
er un cable de extensi6n polarizado. A
su vez, el enchufe polarizado del
cable de extensi6n potarizado., A su
vez, el enchufe polarizado det cable
de extensiSn entrar& en el tomacor-
riente de una sola forma.. Si el enchufe
no entra completamente en el toma-
corriente, in,,4erta el enchufeo Si to-
davia no entra, contacte un electficista
autorizado para que instale el toma-
corriente apropiado No cambie et en-
chufe de ninguna form&
o Pa,ra reducir el riesgo de choque
electrico, use cables de extensiSn es-
pecificamente marcados como com-
patibles para el uso de aparatos de
exterior, y que tengan una clasificaci6n
el_,ctdca no menor que la clasificaci6n
del aparato. El cable deber& venir
marcado con el sufijo '_/V-A" ("W" en
Canada.),. AsegSrese de que su cable
de extensi6n este en buenas condi-
clones de uso. tnspeccione el cable
de extensi6n de m_.s baja clasifica-
ciSn, se podr_a crear una baja en el
voltaje resultando en la perdida de
electricidad y calentamiento_ Si se en-
cuentra en duda, use un cable con la
clasificaciSn siguiente de m&s atta es-
cala. Mientras m&s bajo sea el calibre
del cable, m&s grueso ser& el cable.
(Vea SE_CCION DEL CABIF DE EX-
TENSION en la secci6n USO)o No uti-
lice las cables de extensiSn mt31tipleso
° No abuse del cord6n. Nunca maneje
el aparato por el cable de extensiSn
o tire det mismo para desconectar el
aparato..
• Amarre el cable de extensi6n a cable
del aparato para as[ evitar que se
desconecten el uno del otroo
° No use el aparato si el interruptor no
enc,iende o apaga el aparato de for-
ma apropiada, o si el cierre de salida
no funciona. Reparaciones al inter-
ruptor deber&n ser hechas por un
Centro de Servicio Sears.
- Mantenga el cable de extensi6n libre
de todo obst,4culo y alejado del usua_
rio en todo momento. Mantenga e!
cable de manera que no pueda enre-
darsecon las ramas, No exponga el
cable al caJor, aceite, agua o bordes
con filo_
o Para evitar la posibilidad de choque
el6ctrico, evite el contacto del cuerpo
con el conductor a tierra, como lo
son el metal, las cercas o tuberias_
18
o Laproteccci6ndel InterruptordeFatla
de Circuitoa Tierra(GFC!)deber_,ser
provistaenel enchufeo circuitoa ser
usados.Vienendisponiblesrecept&cu-
losconelGFClincluldoy estosdeb-
er&-_serusadoscomomedidadese-
guridadolnspeccioneloscablesdela
sierradecadenaperi6dicamentey si
_stosseencuentrandafiados,permit
queseanreparadosporunafacilidad
deservicioautorizada.
PROTEJASE CONTRA LAS
RECULADAS
Udo debe seguir todas las precau-
ciones e instrucciones de seguridad
para ayudar a evitar las recutadas y
las demas fuerzas que pueden causar
graves heridas.
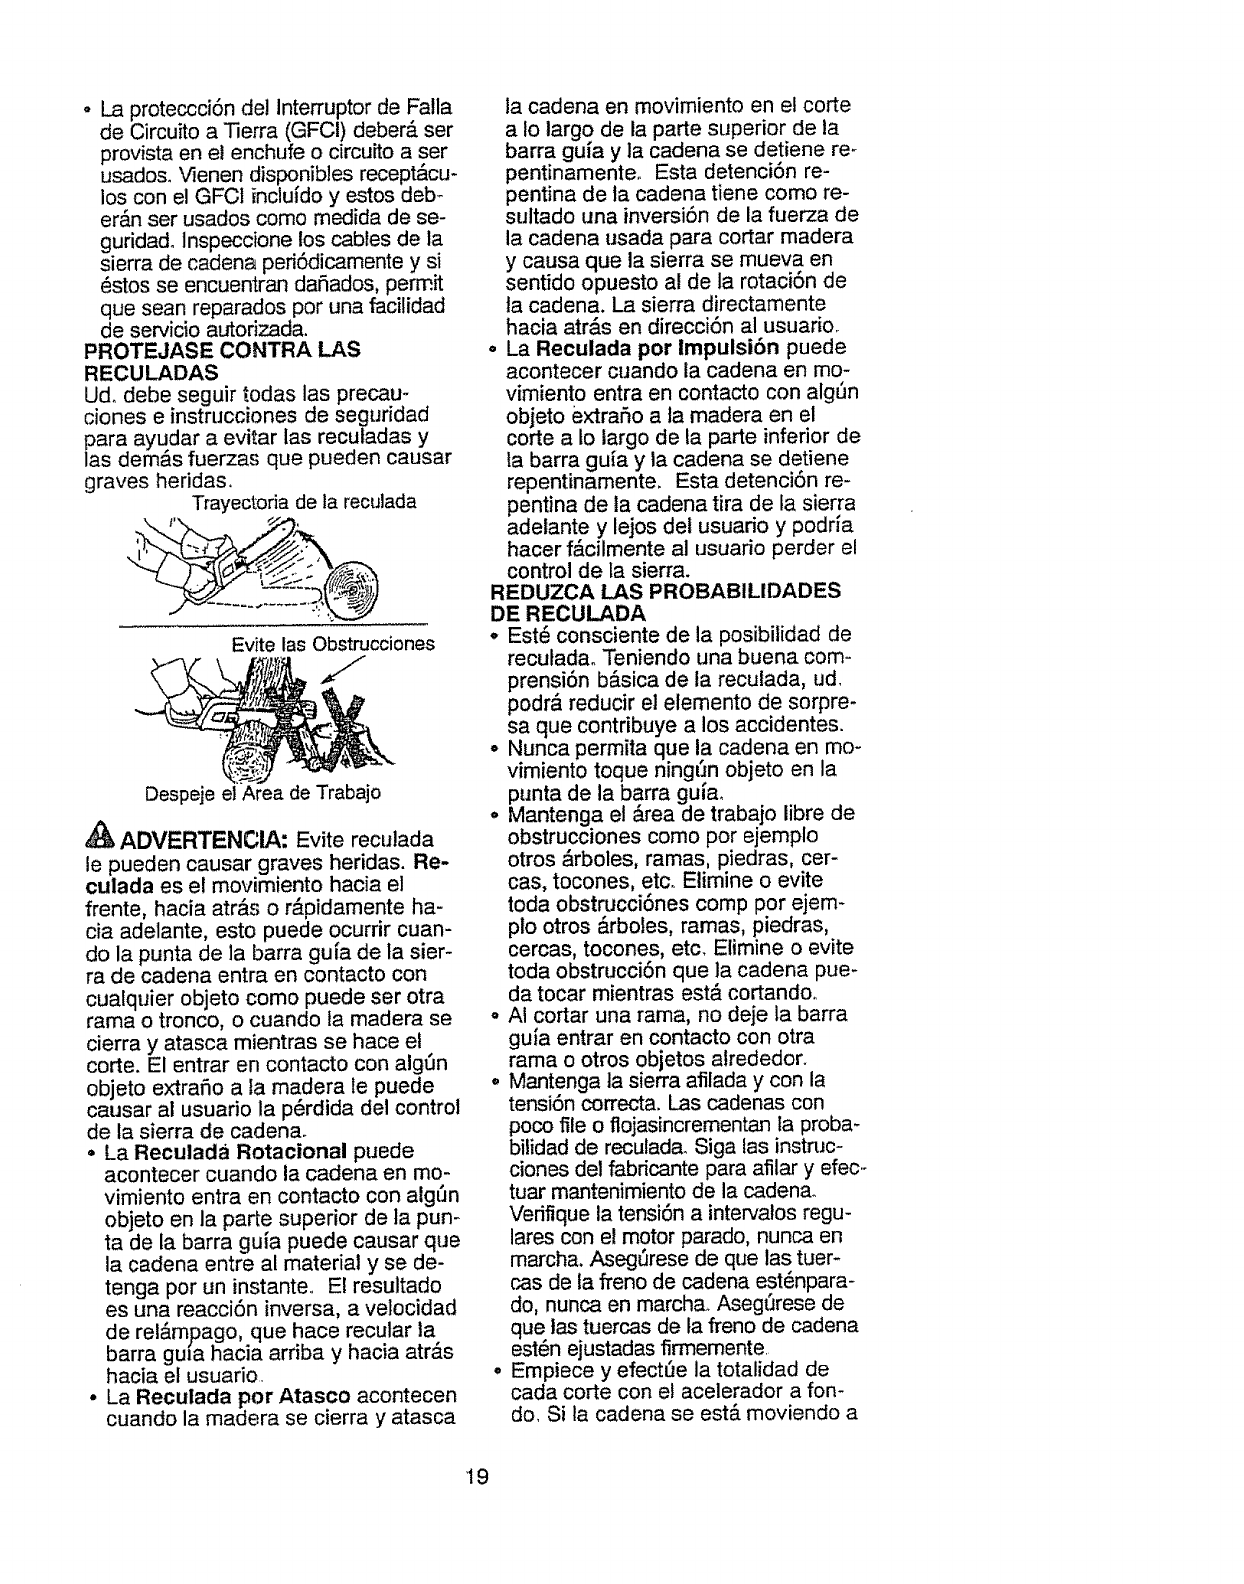
Trayectoria de la reculada
Evite las Obstrucciones
Despeje el Area de Trabajo
_1_ ADVERTENCIA: Evite reculada
le pueden causar graves heridas. Re-
¢ulada es el movimiento hacia el
frente, hacia atr&s o r&pidamente ha-
cia adelante, esto puede ocurrir cuan-
do la punta de la barra gufa de la sier-
ra de cadena entra en contacto con
cualquier objeto como puede ser otra
rama o tronco, o cuando la madera se
cierra y atasca mientras se hace el
corte. El entrar en contacto con algSn
objeto extrafio a la madera le puede
causar al usuario la p6rdida del control
de la sierra de cadena.
° La Reculada Rotational puede
acontecer cuando la cadena en mo-
vimiento entra en contacto con algSn
objeto en la parte superior de ta pun-
ta de la barra guia puede causar que
la cadena entre al material y se de-
tenga por un instante.. El resultado
es una reacci6n inversa, a velocidad
de rel_.m.pago, que hace recular la
barra gu_a hacia arriba y hacia atr&s
hacia el usuario
° La Reculada por Atas¢o acontecen
cuando la madera se cierra y atasca
la cadena en movimiento en el corte
a Io largo de la parte superior de la
barra guJa y la cadena se detiene re-
pentinamenteo Esta detenci6n re-
pentina de la cadena tiene como re-
sultado una inversiSn de la fuerza de
la cadena usada para cortar madera
y causa que la sierra se mueva en
sentido opuesto a! de la rotaci6n de
ta cadena. La sierra directamente
hacia atrAs en direcci6n al usuario,
o La Reculada por Impulsi6n puede
acontecer cuando la cadena en mo-
vimiento entra en contacto con algt3n
objeto extrafio a la madera en el
corte a Io largo de la parte inferior de
la barra gula y la cadena se detiene
repentinamente. Esta detenci6n re-
pentina de ia cadena tira de la sierra
adelante y lejos det usuario y podria
hacer f_.cilmente al usuado perder el
control de la sierra.
REDUZCA LAS PROBABILIDADES
DE RECULADA
•Est_ consciente de la posibilidad de
reculadao Teniendo una buena com-
prensi6n b_.sica de ta reculada, ud
podra reducir el elemento de sorpre-
sa que contribuye a los accidentes.
,, Nunca perrnita que la cadena en mo-
vimiento toque ningun objeto en la
punta de la barra guJa.
° Mantenga et &rea de trabajo libre de
obstrucciones como por ejemplo
otros &rboles, ramas, piedras, cer-
cas, tocones, etc. Elimine o evite
toda obstrucci6nes comp por ejem-
plo otros &rboles, ramas, piedras,
cercas, tocones, etc. Elimine o evite
toda obstrucciSn que la cadena pue-
da tocar mientras est#. cortando_
o AI cortar una rama, no deje la barra
guia entrar en contacto con otra
rama o otros objetos alrededor.
• Mantenga ta sierra afilada y con la
tensi6n correcta. Las cadenas con
poco file o flojasincrementan la proba-
bilidad de reculada. Siga las instruc-
ciones del fabricante para afilar y efec.-
tuar mantenimiento de la cadena.
Vedfique la tensi6n a intervalos regu-
lares con el motor parado, nunca en
marcha. AsegSrese de que las tuer-
(',as de ta freno de cadena est_npara-
do, nunca en marcha. AsegSrese de
que tas tuercas de la freno de cadena
est_n ejustadas firmemente
° Empiece y efect_e la totalidad de
cada corte con el acelerador a fon-
do. Si la cadena se estA moviendo a
'19
unavefocidadmenorquelam_xima,
hayrn#,sprobabilidaddequelasierra
recule.
o Usecuidadoextremoalentrarde
nuevoenuncorteya empezado.
° Nointentehacercortesempezando
conlapuntadelabarra(cortesde
taladro)o
- Tengacuidadocontroncosquese
desplazany conlasdern_sfuerzas
fquepodrfancerraruncortey apretar
a cadenao biencaersobreella.
° Usela BarraGufaReducidorade
Reculadasy iaCadenaMinirnizado-
rade Reculadasrecornendadas
parasusierra.
Evite la Reculada por Presibn:
- Mant_ngase siempre al tanto de
toda situaci6n u obstnJcci6n que
pueda apretar ta cadena en la parte
superior de la barra o detener la ca-
dena de cualquier form&
- No corte rn&s de un tronco a la vez,
o At seccionar troncos con corte as-
cendiente, no tuerza la sierra al sa-
car la varra del corte.
Evite la Impulsibn:
- Siemi_re empiece a cortar con el mo-
tor acelerado a fondo y la caja de la
sierra apoyada en el rnadera.,
oUse cutlas de pl_.stico o de rnadera,
no de metal para mantener abierto el
corte.
MANTENGA EL CONTROL
Las siguientes precauciones deber&q
set seguidas para rninirnizar las recula-
das.
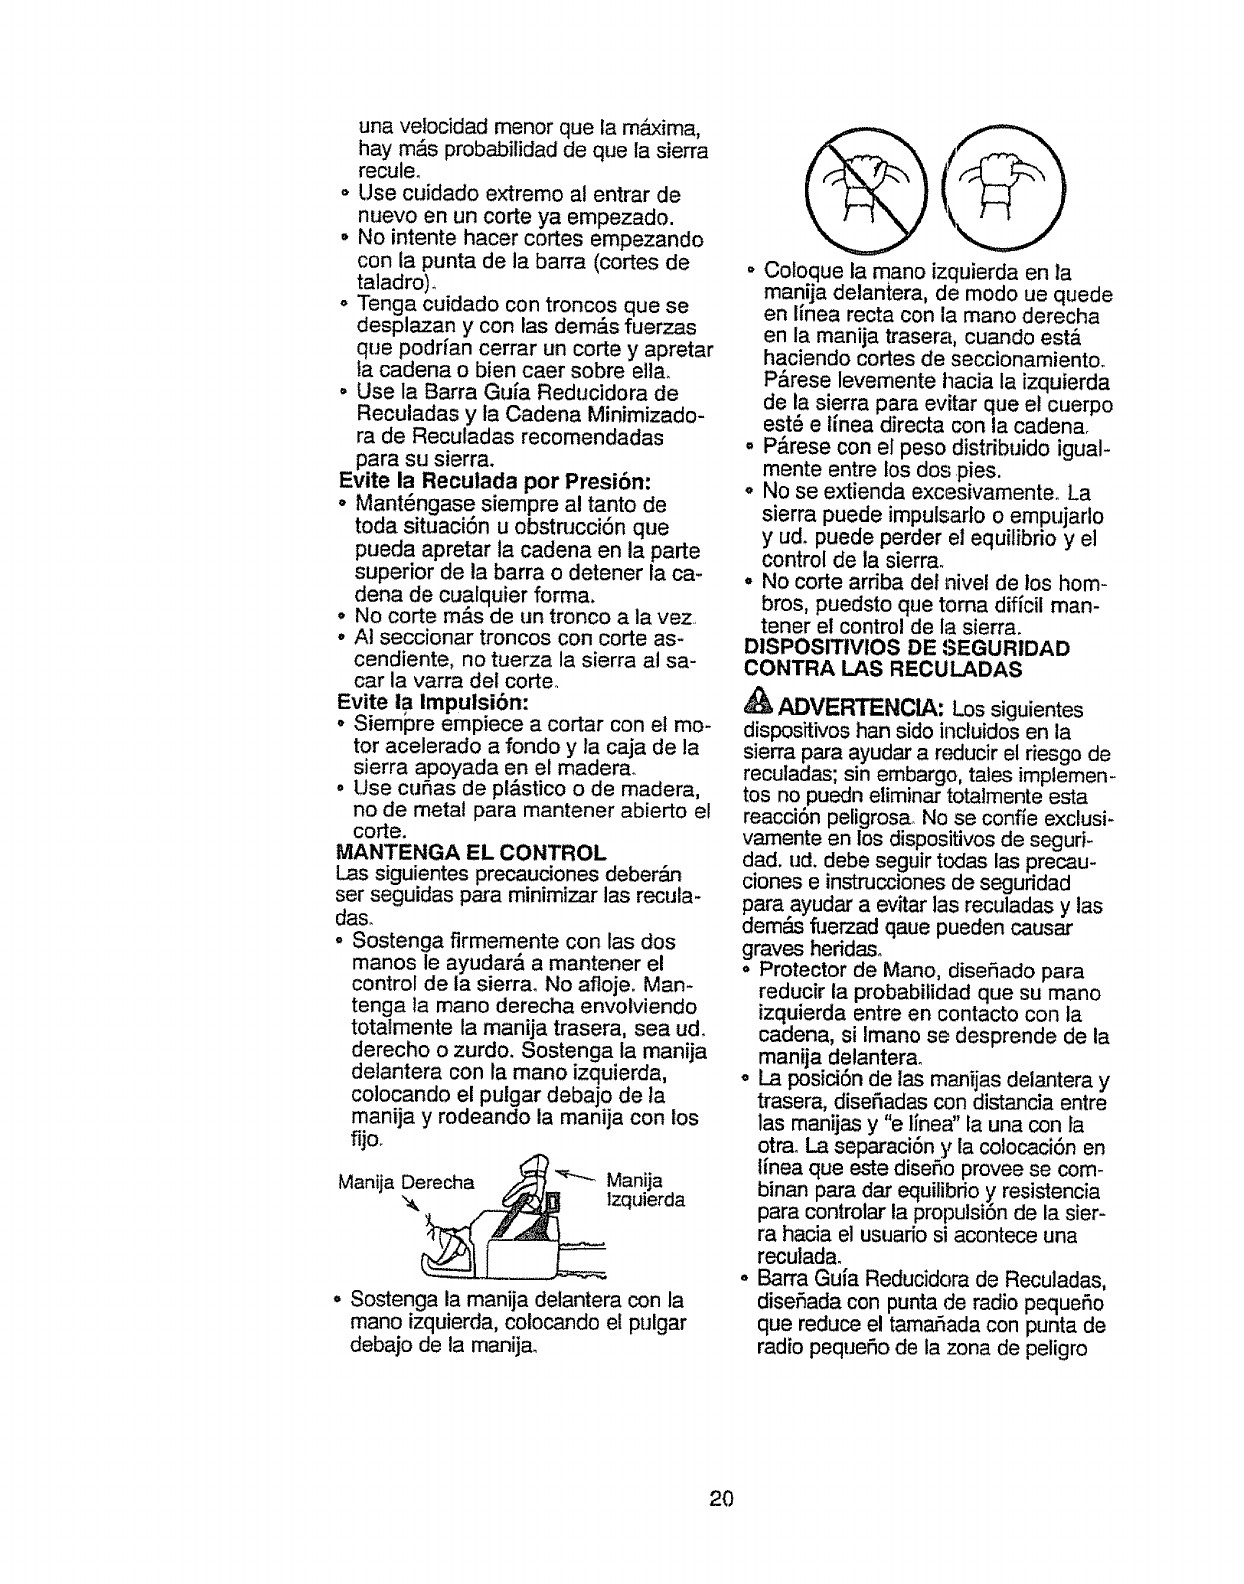
. Sostenga firrnernente con las dos
rnanos le ayudar& a rnantener el
control de ta sierra. No afloje. Man-
tenga la rnano derecha envotviendo
totalrnente la rnanija trasera, sea ud.
derecho o zurdo. Sostenga la manija
delantera con la rnano izquierda,
colocando el pulgar debajo de la
manija y rodeando la rnanija con los
fijo.
Manija Derecha /._ _ Manija
",__Izquierda
°Sostenga la manija delantera con la
mano izquierda, colocando el pulgar
debajo de ta manijao
• Coloque la mano izquierda en la
manija delantera, de modo ue quede
en hnea recta con la mano derecha
en la manija trasera, cuando est&
haciendo cortes de seccionamientoo
P&rese levemente hacia la izquierda
de la sierra para evitar que et cuerpo
est6 e hnea directa con ta cadena.
• P_.rese con el peso distribuido igual-
mente entre los dos pies.
o No se extienda excesivamenteo La
sierra puede impulsado o empujarlo
y ud. puede perder el equilibrio y el
control de la sierra.
°No corte ardba det nivel de los hom-
bros, puedsto que torna dificil man-
tener el control de la sierra.
DISPOSITIVIOS DE SEGURIDAD
CONTRA LAS RECULADAS
ADVERTENCIA: Los siguientes
dispositivos han sido incluidos en la
sierra para ayudar a reducir el riesgo de
reculadas; sin embargo, tales implemen-
tos no puedn etirninar totalrnente esta
reacci6n peligros& No se confie exclusi-
varnente en los dispositivos de seguri-
dad. ud. debe seguir todas las precau-
clones e instrucciones de seguridad
para ayudar a evitar las reculadas y las
dem&s fuerzad qaue pueden causar
graves heddaso
= Protector de Mano, disefiado para
reducir la probabilidad que su mano
izquierda entre en contacto con la
cadena, si Irnano se desprende de la
manija delanterao
o La posici6n de las rnanijas delantera y
trasera, disefiadas con distancia entre
las manijas y "e linea" fauna con fa
otr& La separaciSn y la colocaciSn en
ifnea que este disefio provee se com-
binan para da_requilibdo y, resistencia
para controtar la propulsion de la sier-
ra hacia el usuado si acontece una
reculada.
, Barra Guia Reducidora de Reculadas,
disefiada con punta de radio pequefio
que reduce el tamaSada con punta de
radio pequefio de la zona de peligro
20
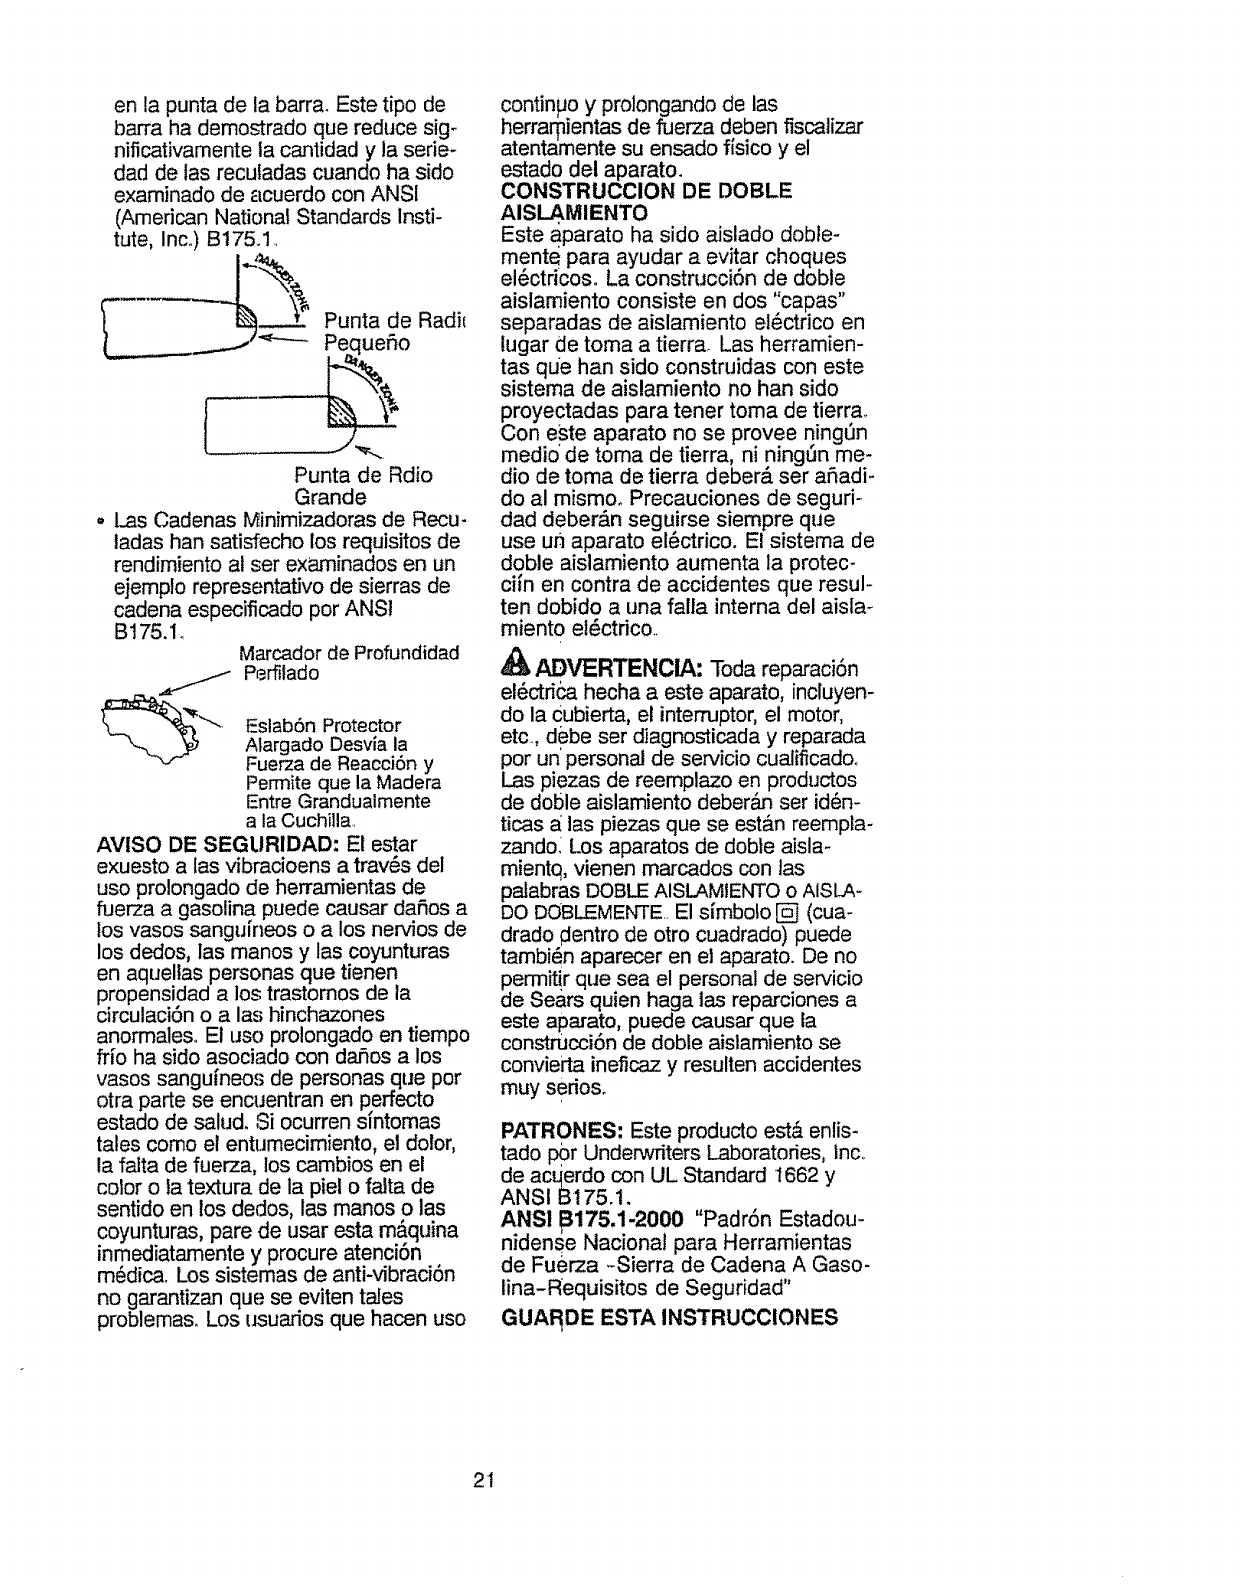
en la punta de la barr& Este tipo de
barra ha demostrado que reduce sig-
nificativamente ta cantidad y la serie-
dad de tas recufadas cuando ha sido
examinado de acuerdo con ANSI
(American National Standards Insti-
tute, Inco) B17&1..
r%
Punta de Rdio
Grande
.Las Cadenas Minimizadoras de Recu-
tadas han satisfecho los requisitos de
rendimiento al set examinados en un
ejemplo representativo de sierras de
cadena especificado por ANSI
B175.1. Marcador de Profundidad
_ Pe_lado
EslabSn Protector
Atargado Desvia la
Fuerza de Reacci6n y
Permite que la Madera
Entre Grandualmente
a la Cuchilla.
AVISO DE SEGLIRIDAD." E! estar
exuesto alas vibracioens a trav#s del
uso prolongado de herramientas de
fuerza a gasolina puede causar dafios a
los vasos sangumeos o a los nervios de
los dedos, las manos y las coyunturas
en aquellas personas que tienen
propensidad a los trastomos de la
circulaciSn o alas hinchazones
anormaleso El uso prolongado en tiempo
fr[o ha sido asociado con dar3os a los
vasos sangufneos de personas que por
otra parte se encuentran en perfecto
estado de salud. Si ocurren smtomas
tales como el entumecimiento, el dolor,
la falta de fuerza, los cambios en el
color o ia textura de la piel o falta de
sentido en los dedos, las manos o las
coyunturas, pare de usar esta m_.quina
inmediatamente y procure atenciSn
m_dica. Los sistemas de anti-'_braci6n
no garantizan que se eviten tales
problema& Los usuados que hacen uso
contin#o y prolongando de las
herrarpientas de fuerza deben fiscalizar
atentamente su ensado fisico y el
estado del aparato.
CONSTRUCClON DE DOBLE
AISL.AMIENTO
Este aParato ha sido aislado doble-
mente para ayudar a evitar choques
el6ctdCOSo La construcci6n de doble
aislamiento consiste en dos "capas"
separadas de aislamiento el6ctrico en
lugar de toma a tierrar Las herramien-
tas que han sido construidas con este
sistema de aislamiento no han sido
proyectadas para tener toma de tierrao
Con este aparato no se provee ningSn
medio _de toma de tierra, ni ningun me-
dio de toma de tierra deber& ser aSadi-
do al mismo. Precauciones de seguri-
dad deber&n seguirse siempre que
use un aparato el6ctrico. El sistema de
doble aislamiento aumenta la protec-
ci_n en contra de accidentes que resul-
ten dobido a una falla interna del aisla-
miento ei_ctdco._
ADVERTENCIA: Toda reparaciSn
el6ctri_ hecha a este aparato, incluyen-
do la Cubierta, el interruptor, el motor,
etc, debe ser diagnosticada y reparada
por un' personal de servicio cualificad&
Las piezas de reemplazo en productos
de doSle aislamiento deber&n ser id6n-
ticas a_las piezas que se est_.n reempla-
zando_ Los aparatos de dobte aisla-
mientq, vienen marcados con tas
palabras DOB_ AISLAMIENTO o AISLA-
DO DOB_MENTE.. El s[mbolo [] (cua-
drado #entro de otro cuadrado) puede
tambi6n aparecer en et aparato. De no
permitir que sea el personal de ser¢icio
de Se&rs quien haga las reparciones a
este aparato, puede causar que la
construcci6n de dobte aislamiento se
conviei'ta ineficaz y resulten acddentes
muy sedoso
PATRONES, Este producto est,_ enlis-
tado p0r Underwriters Laboratories, inc,.
de acqerdo con UL Standard 1662 y
ANSIB ! 75.1.
ANSI 1_1715.1-201)0 "PadrSn Estadou-
nidense Nacional para Herramientas
de Fuerza -Sierra de Cadena A Gaso-
lina-Requisitos de Seguridad"
GUA_DE ESTA INSTRUCCIONES
2t

CONTENIDO DE LA CAJA
Usa la siguiente lista para verificar el
contenido.
Modelos 358.341250
•Sierra de cadena (completamente)
• Barra Protector
o Guantes
° Manual podadora
CONOZCA SU APARATO
Vedfique que no haya piezas daSa-
das. No use piezas da5adaso
AVISO: Si necesita ayuda o encuen-
tra piezas daSadas o piezas no in-
cluidas en ta caja. favor comunicarse
a] 1-800-235-5878_
MONTAJE
El aparato viene completamente arma-
do y no hay necesidad de montaje.
LEA ESTE MANUAL DE INSTRUCC1ONES Y LAS REGLAS DE SEGURIDAD ANTES DE
USAR LA SIERRA DE CADENA. Compare las ilustraciones con su aparato para
faniliadzarse con la ubicaci6n de los varios controles y ajustes, Guarde este
manual para uso futuro.
Lubricador/Tapa
del Tanque de
Aceite de Barra
Tornilio de Ajuste de la Cadena
Bot6n de
Cadena
Barra
interruptor en Forrna de Gatillo
..Cable del aparato
INTERRUPTOR EN FORMA
DE GATILLO
Et INTERRUPTOR EN FORMA DE GATIL-
LO es usado para porter en marcha el
aparato. Oprima el interruptor en for-
ma de gatillo para poner en marcha el
aparato despu_s que el bot6n de la
traba del interruptor haya sido oprimi-
do, Suelte el gatillo para detener el
motor.
BOTON DE LA TRABA
El BOTON DE LA TRABA es un dispositi_
vo de control diseSado para prevenir
que el motor sea puesto en marcha de
forma accidental, Cuando el usuado
tiene agarrado el mango trasero en la
posici6n normal de corte, el bot6n de
la traba puede ser oprimido con el
dedo pulgar, permitiendo que el dedo
fndice apriete el gatillo. No ser_ nece-
sario mantener el bot6n de la traba op-
rimido una vez que e! gatillo haya sido
apretado.
TAPA DEL TANQUE DE ACEtTE DE
BARRA/LUBRICADOR
La TAPA DEL ACEITE se usa para dar
acceso al tanque del aceite de barra y
se presiona para suplir con aceite la
cadena_
TORNILLO DE AJUSTE DE LA
CADENA
E! TORNILLO DE AJUSTE DE LA CADE-
NA se usa para ajustar la tensi6n de la
cadena.
CABLE DEL APARATO
El CABLE DEL APARATO se usa para
conectar la sierra de cadena a un
cable de extensi6n aprobado.
TENSION DE LA CADENA
Es normal que las cadenas nuevas se
estiren durante los primeros 30 minu-
tos de usoo Deber& verificarse ta TEN-
SION DE LA CADENA con frecuencia_
Reajuste la cadena despu_s de cada
15 minutos de uso. VeaTENSION DE
LA CADENA en la secci6n de SERVI-
ClOS Y AJUSTES.
22
fNSTRUCCfONES DE USO
Use _nicamente el suministro de vol-
taje que se especifica en el aparato.
SELECCION DEL CABLE DE
EXTENSION
Hay cables de extensi6n disponibles
en Sears para este aparato.
RECOMENDACIONES MINIMAS
DE CALIBRE DEL CABLE
25 p)es 50 pies 100 pies
v'oltios (7.67 M) (15.24 M) (30.48 M)
16 16 14
120 AWG* A W.,G* A..W,,G.*
*Calibr_ de Cable Americano
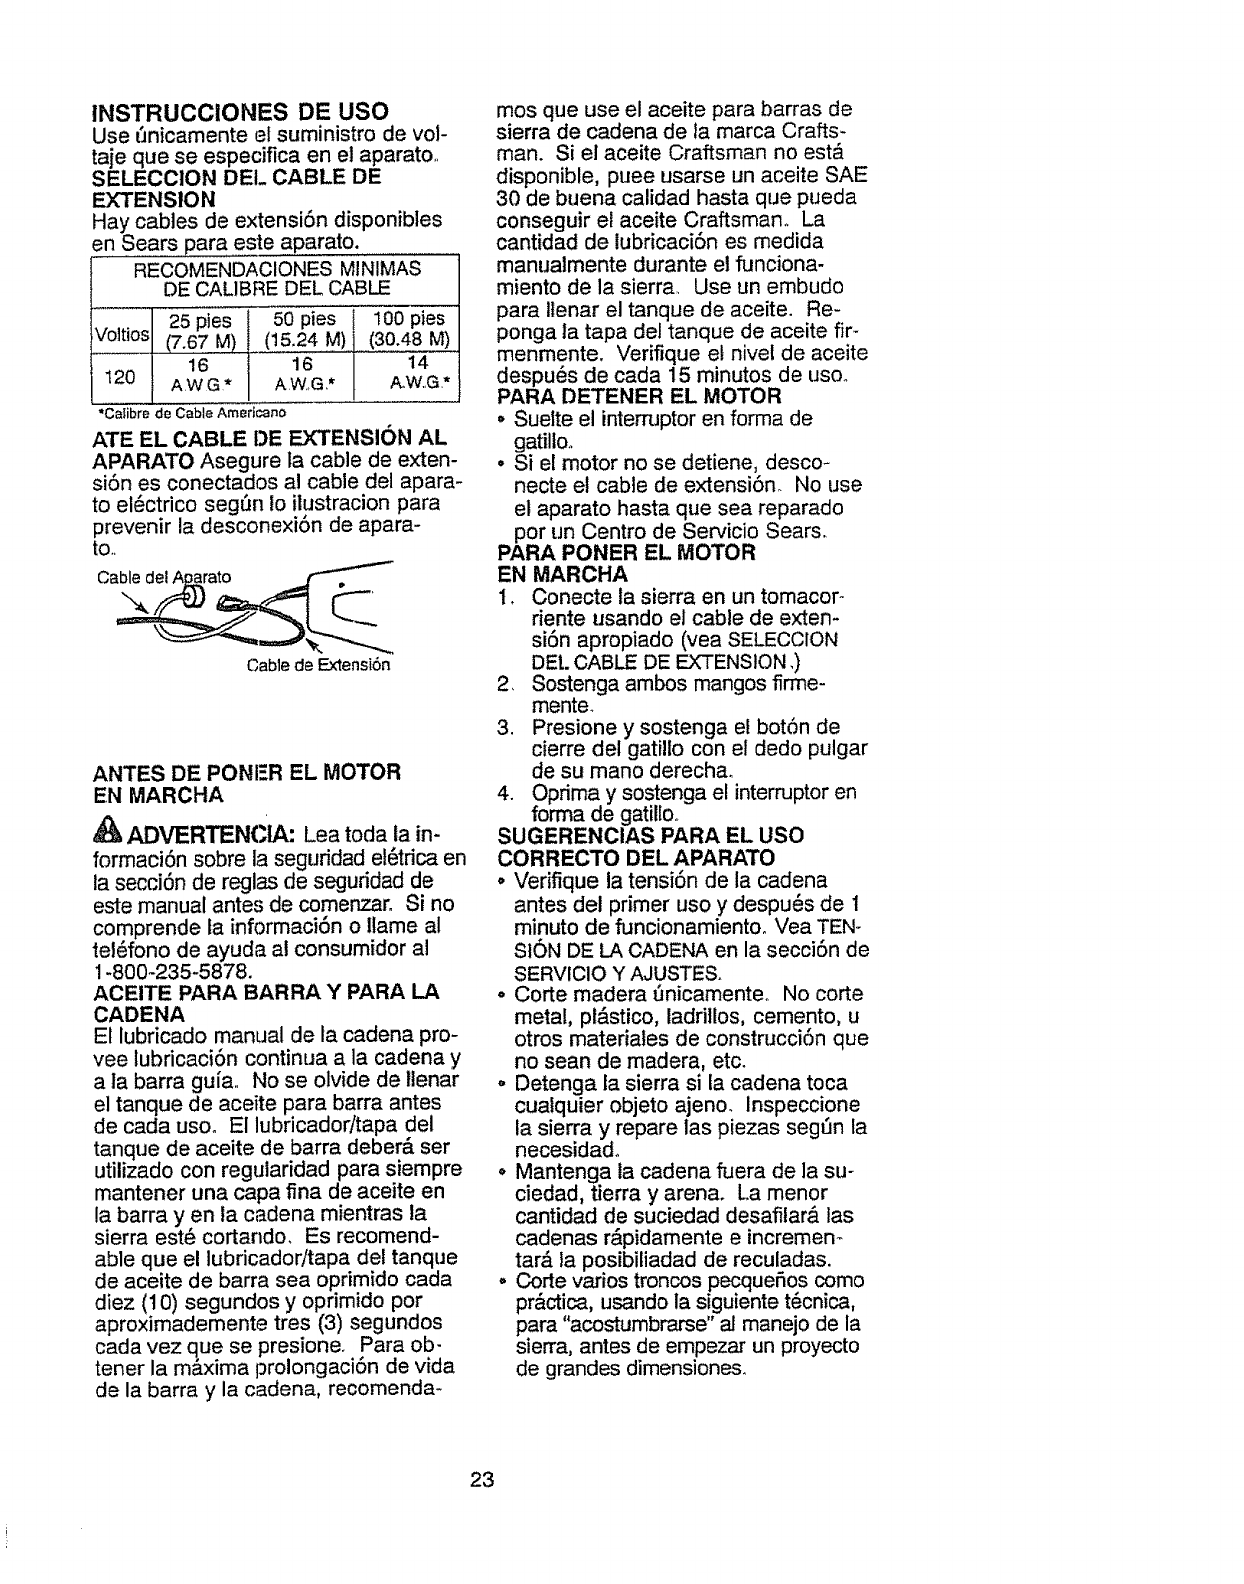
ATE EL CABLE DE EXTENSION AL
APARATO Asegure la cable de exten-
si6n es conectados al cable del apara-
to el_ctrico seg_n Io ilustracion para
prevenir la desconexiSn de apara-
to..
Cable de Extensi6n
ANTES DE PONI=.R EL MOTOR
EN MARCHA
ADVERTENCIA: Lea toda la in-
formaci6n sobre la seguridad et_tdca en
la secci6n de reglas de seguridad de
este manual antes de comenzaro Si no
comprende la informaci6n o llame al
teI_fono de ayuda al consumidor al
1-800-235-5878.
ACEITE PARA BARRA YPARA LA
CADENA
El lubricado manual de la cadena pro-
vee lubricaci6n continua a la cadena y
a ta barra gufa. No se olvide de llenar
el tanque de aceite para barra antes
de carla usoo El lubricador/tapa del
tanque de aceite de barra deber_, ser
utilizado con regularidad para siempre
mantener una capa fina de aceite en
la barra yen la cadena mientras la
sierra este cortartdo. Es recomend-
able que el lubricador!tapa del tanque
de aceite de barra sea oprimido cada
diez (10) segundos y oprimido por
aproximademente tres (3) segundos
cada vez que se presione. Para ob-
tener la m_.xima prolongaci6n de vida
de la barra y la cadena, recomenda-
mosque use ef aceite para barras de
sierra de cadena de la marca Crafts-
man. Si el aceite Craftsman no est&
disponible, puee usarse un aceite SAE
30 de buena calidad hasta que pueda
conseguir el aceite Craftsman. La
cantidad de lubricaci6n es medida
manualmente durante el funciona-
miento de la sierra. Use un embudo
para Itenar el tanque de aceite. Re-
ponga la tapa del tanque de aceite fir-
menmente. Verifique el nivel de aceite
despu_s de cada 15 minutos de uso.
PARA DETENER EL MOTOR
• Suelte el interruptor en forma de
gatiltoo
°Si el motor no se detiene, desco-
necte el cable de extensi6n. No use
el aparato hasta que sea reparado
por un Centro de Servicio Sears.
PARA PONER EL MOTOR
EN MARCHA
1. Conecte ta sierra en un tomacor-
riente usando el cable de exten-
si6n apropiado (vea SELECCION
DEf..CABLE DE EXTENSION _)
2. Sostenga ambos mangos firme-
mente.
3. Presione y sostenga el bot6n de
cierre del gatilto con el dedo pulgar
de su mano derechao
4. Oprima y sostenga el interruptor en
forma de gatilto..
SUGERENCIAS PARA EL USO
CORRECTO DEL APARATO
o Verifique la tensi6n de la cadena
antes del primer uso y despu_s de 1
minuto de funcionamientoo Vea TEN-
SI6N DE LA CADENA en la secci6n de
SERVICIO Y AJUSTES.
o Corte madera 5nicamente.. No corte
metal, pl&stico, ladriUos, cemento, u
otros materiales de construcci6n que
no sean de madera, etc.
-Detenga la sierra si la cadena toca
cualquier objeto ajeno. Inspeccione
la sierra y repare las piezas seg_3n la
necesidado
oMantenga ia cadena fuera de la su-
ciedad, tierra y arena. La menor
cantidad de suciedad desafitar,_ las
cadenas r&pidamente e incremen-
tar& la posibiliadad de reculadas.
° Corte varios troncos pecqueSos como
pr,_ctica, usando la siguiente t_cnica,
para "acostumbrarse" al manejo de la
sierra, antes de empezar un proyecto
de grandes dimensiones_
23

• Acelereel motoralm&ximoantes
deempezara cortarapretandoel
gatilloaceteradorafondo.
o Empieceel corteconelbastidor
delasierraapoyadacontrael
tronco.
oMantenga el motor con el acelera-
dot a fondo constantemente mien-
tras corta.
• Suelte el interruptor en forma de
gatillo inmediatamente al terminar
de cortar, permitiendo que el motor
se deteng&
,Para no perder el control cuando
se haya completado el corte, no le
ponga preslon a la sierra al final
del corte.
°Detenga el motor antes de apoyar la
sierra al finalizar un corte_
TECNICAS PARA CORTAR ARBOLES
ADVI_RTENCIA: Vea que no
haya ramas rotas o muertas que
podrfan caerte encima mientras corta,
causando heridas graves° No corte
cerca de edificios y cables el_ctricos si
no sabe la direcci6n de cafda del
_.rbol, no corte durante ta noche ya
que no podr& ver bien, ni durante mal
tiempo como ltuvia, nieve, o vientos
fuertes, etc. Si el &rbol hace contacto
con algSn cable de li'nea de servico
p0blico, la compafia de servicio p_bli-
co deber& ser notificada de inmediato.
• Planifique la operaci6n de corte cui-
dadosamente por adelantado.
o Despeje el ,_rea de trabajo. Usted
precisa un &tea despejada en todo
el contorno del ,_rbol donde pueda
pisar con firmeza en todo momento_
oEl usuario de la sierra de cadena
deber_, permanecer del lado cuesta
arriba del terreno ya que es probable
que el _rbol rodillo o se deslice cues-
ta abajo despu_s de caer.
°Estudie las condiciones naturales
que puedan causar que el &rbol cai-
ga en una direcci6n determinad&
Entre tales condiciones figuran:
oLa direcci6n y velocidad del viento.
° El &ngulo de inclinaci6n del &rboL
El _.ngulo de los &rboles a veces
no se nota debido at declive del
terreno o a terreno desparejo.
Use plana o cordel de sonda para
determinar la direcci6n de la incli-
naci6n del &rbol°
, El &rbol es m_.s pesado o tiene
m_.s ramas de un lado.
• Arboles y obstaculos en derredoro
oVerifique si hay porciones descom-
puestas o podridas. Si el tronco est,.
podrido, puede partirse y caer sobre el
usuario.
•Aseg_rese de que haya suficiente
espacio para la caida del &rbot.
Mantenga una distancia equivalente
a dos veces y medio el largo del
&rbol que esta cortando entre el
_rbol y la persona m_ls cercana u
otros objetos. El ruido det motor
puede impedir que se escuchen las
advertencias gritadaso
o Retire la tierra, piedras, corteza suelta,
clavos, grapas y alambre que pueda
haber en el _.oI en el lug.ar del code.
_,,_%_. Planifique una ru[a pre-ae-
"_oo_ terminada y despejada de
x_eo retroceso.
.... (_ _'"===_- Direcci6n de la
4_o Caida
PARA CORTAR ARBOLES
GRANDES
(con di&metro de 15 cm o mrs)
Se usa el m_todo de torte de muesca
para los &rboles grandeso La muesca
es un corte en el lado del &rbot hacia
el cuat se desea que ca ig& Despu_s
de hacer el corte de caJda del lado op-
uesto, el &rbol tendr& la tendencia de
caer hacia el lado en que se ha hecho
el corte de muesca.
AVISO: Si el _.rbol tiene raices grand-
es de apoyo, retfrelas antes de hacer
la muesca. Si us6 la sierra para quitar
rafces grandes de apoyo, prevenir la
cadena de entrar en contacto con la
tierra esto ]e previene de perder el filo.
CORTE DE MUESCA Y CAIDA DI=L
ARBOL
° Haga el corte de muesca cortando
primero la parte superior de la mues-
ca. Haga que el corte atraviese un
tercio del di&metro del tronco. Luego
complete el corte de muesca cortan-
do la parte de abajo de la muesc&
Vea la ilustraci6n_ Una vez comple-
tado el corte de muesca, retire la
cu5a de madera del ,_rbol,
Primer Corte
\
Muesca
Segundo/_
Corte final aqui
agra
24
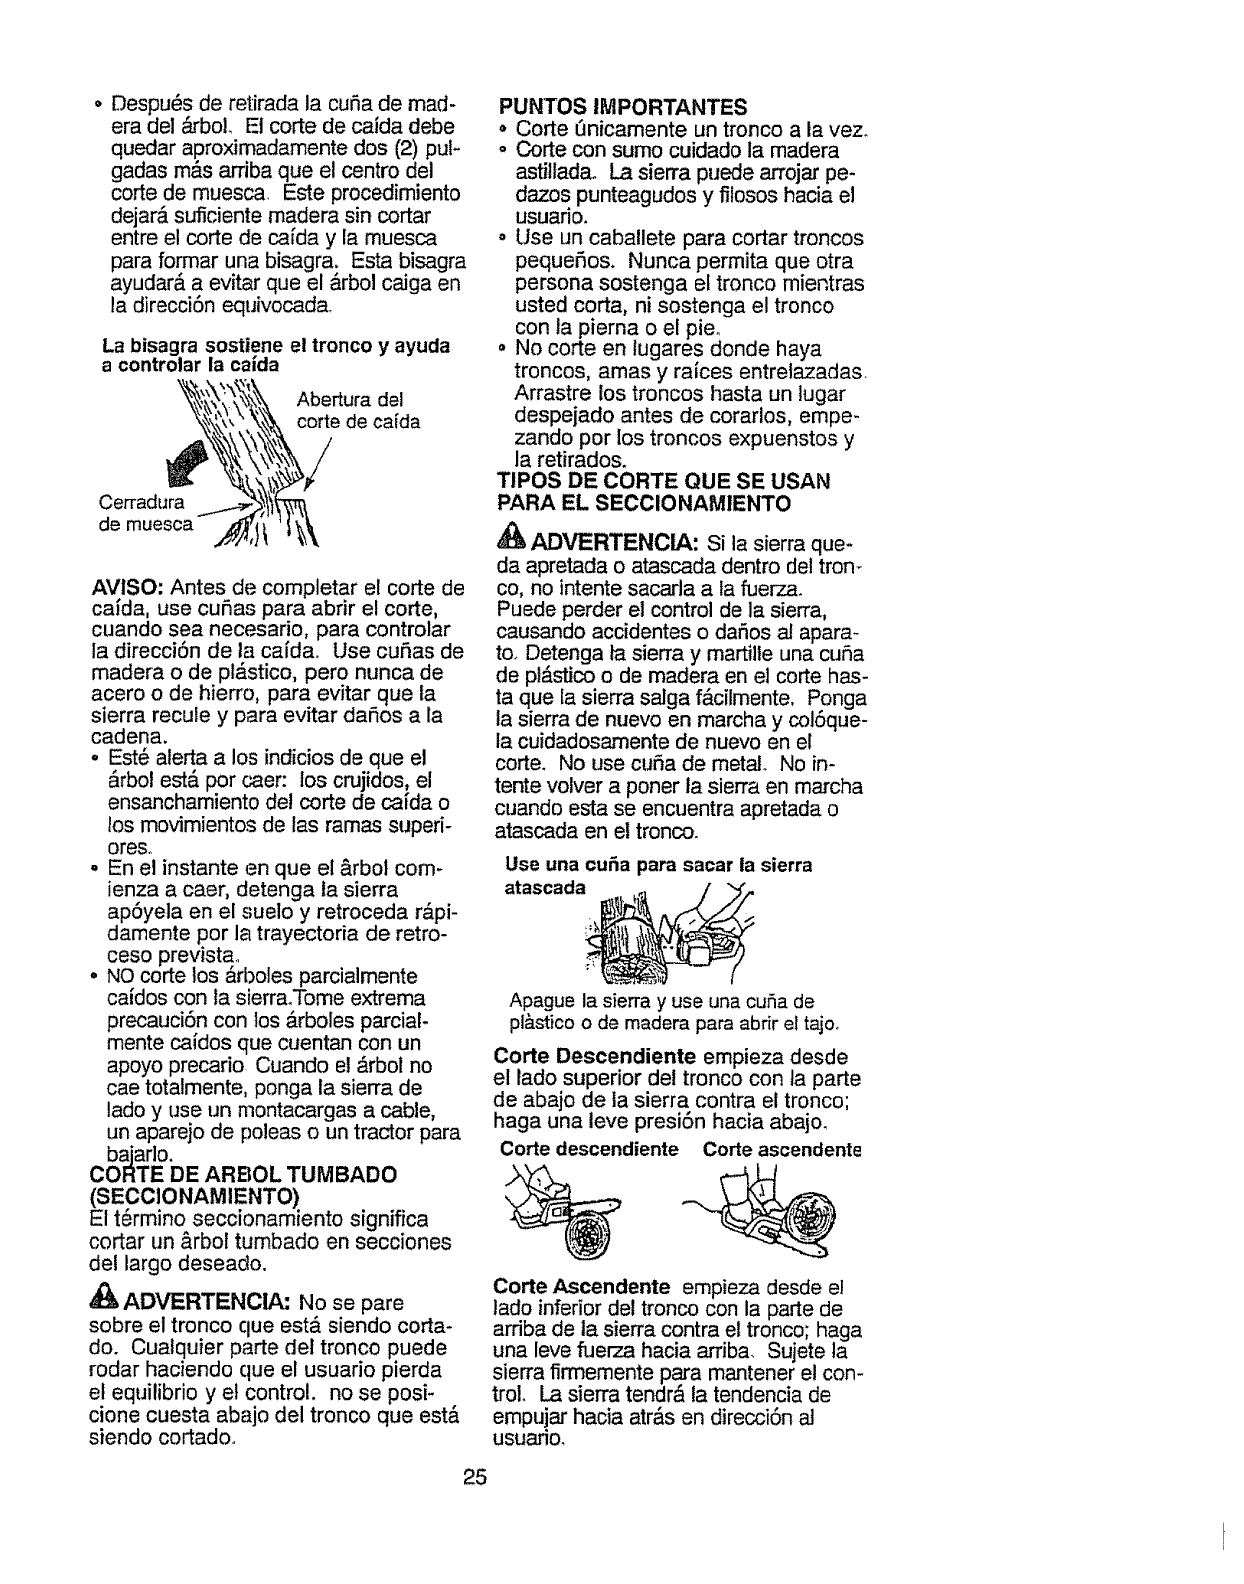
o Despu_s de retirada la cuSa de mad-
era del _rboL El corte de caida debe
quedar aproximadamente dos (2) pul-
gadas m&s arriba que el centro del
corte de muesca Este procedimiento
dejar& suficiente rnadera sin cortar
entre el corte de cafda y la muesca
para formar una bisagra. Esta bisagra
ayudar_, a evitar que el &rbol caJga en
la direcci6n equivocada,
La bisagra sostiene el tronco y ayuda
a controlar la caida
Abertura del
corte de caida
Cerradura
de muesoa
AVlSO: Antes de completar el corte de
calda, use cuSas para abrir el corte,
cuando sea necesario, p ra controlar
la direccion de la caida_ause cuSas de
madera o de pl&stico, pero nunca de
acero o de hierro, para evitar que ta
sierra recule y para evitar daSos a la
cadena.
. Est_ alerta a los indicios de que el
&rbol est,. por caer: los crujidos, el
ensanchamiento del corte de cafda o
los movimientos de las ramas suped-
ores°
• En el instante en que el &rbol com-
ienza a caer, detenga la sierra
apSyela en el suelo y retroceda r,4pi-
damente por la trayectoria de retro-
ceso previst&
•NO corte los &rboles parcialmente
caldos con la sierr&Tome extrema
precauci6n con los &rboles pa,-cial-
mente caidos que cuentan con un
apoyo precario Cuando el _.rbol no
cae totatmente, ponga la sierra de
lado y use un montacargas a cable,
un aparejo de poleas o un tractor para
bajado.
CORTE DE ARBOL TUMBADO
(SECCIONAMIENTO)
El t_rmino seccionamiento significa
cortar un &rbol tumbado en secciones
del largo deseado.
_h, ADVERTENOIA: No se pare
sobre el tronco clue est,. siendo corta-
do. Cualquier parte del tronco puede
rodar haciendo que el usuario pierda
et equilibrio y et control, no se posi-
clone cuesta abajo del tronco que est,.
siendo cortado.
PUNTOS IMPORTANTES
o Corte t_nicamente un tronco ala vez.
o Corte con sumo cuidado la madera
astilfada.. La sierra puede arrojar pe-
dazos punteagudos y filosos hacia el
usuano,
-Use un caballete para cortar troncos
pequeSos. Nunca permita que otra
persona sostenga el tronco mientras
usted corta, ni sostenga el tronco
con la piema o el pie°
°No corte en lugares donde haya
troncos, areas y raices entrelazadas.
Arrastre los troncos hasta un lugar
despejado antes de corarlos, empe-
zando per los troncos expuenstos y
la retirados.
TIPOS DE CORTE QUE SE USAN
PARA EL SECCIONAMIENTO
_!b ADMERTENCIA: Si la sierra que-
da apretada o atascada dentro del tron-
co, no intente sacarla a ta fuerza.
Puede perder el control de la sierra,
causando accidentes o dar_os al apara-
to. Detenga ta sierra y martille una cuSa
de pl_.stico o de madera en el corte has-
ta que la sierra salga f&cilmente. Ponga
ta sierra de nuevo en marcha y colSque-
la cuidadosamente de nuevo en el
corte. No use cuSa de metal° No in-
tente volver a poner la sierra en marcha
cuando esta se encuentra apretada o
atascada en el tronco.
Use una cuSa para sacar la sierra
atascada
Apague la sierra y use una cuSa de
pl&stico o de madera para abrir el tajoo
Corte Descendiente empieza desde
el lado superior del tronco con ta parte
de abajo de la sierra contra el tronco;
haga una leve presi6n hacia abajo_
Corte descendiente Corte ascendente
Corte Ascendente empieza desde el
lado inferior del tronco con la parte de
arriba de la sierra contra el tronco; haga
una leve fuerza hacia arriba. Sujete ta
sierra firmemente para mantener el con-
troL La sierra tendra la tendencia de
empuiar hacia atr_.s en direcci6n al
usuarlO.
25
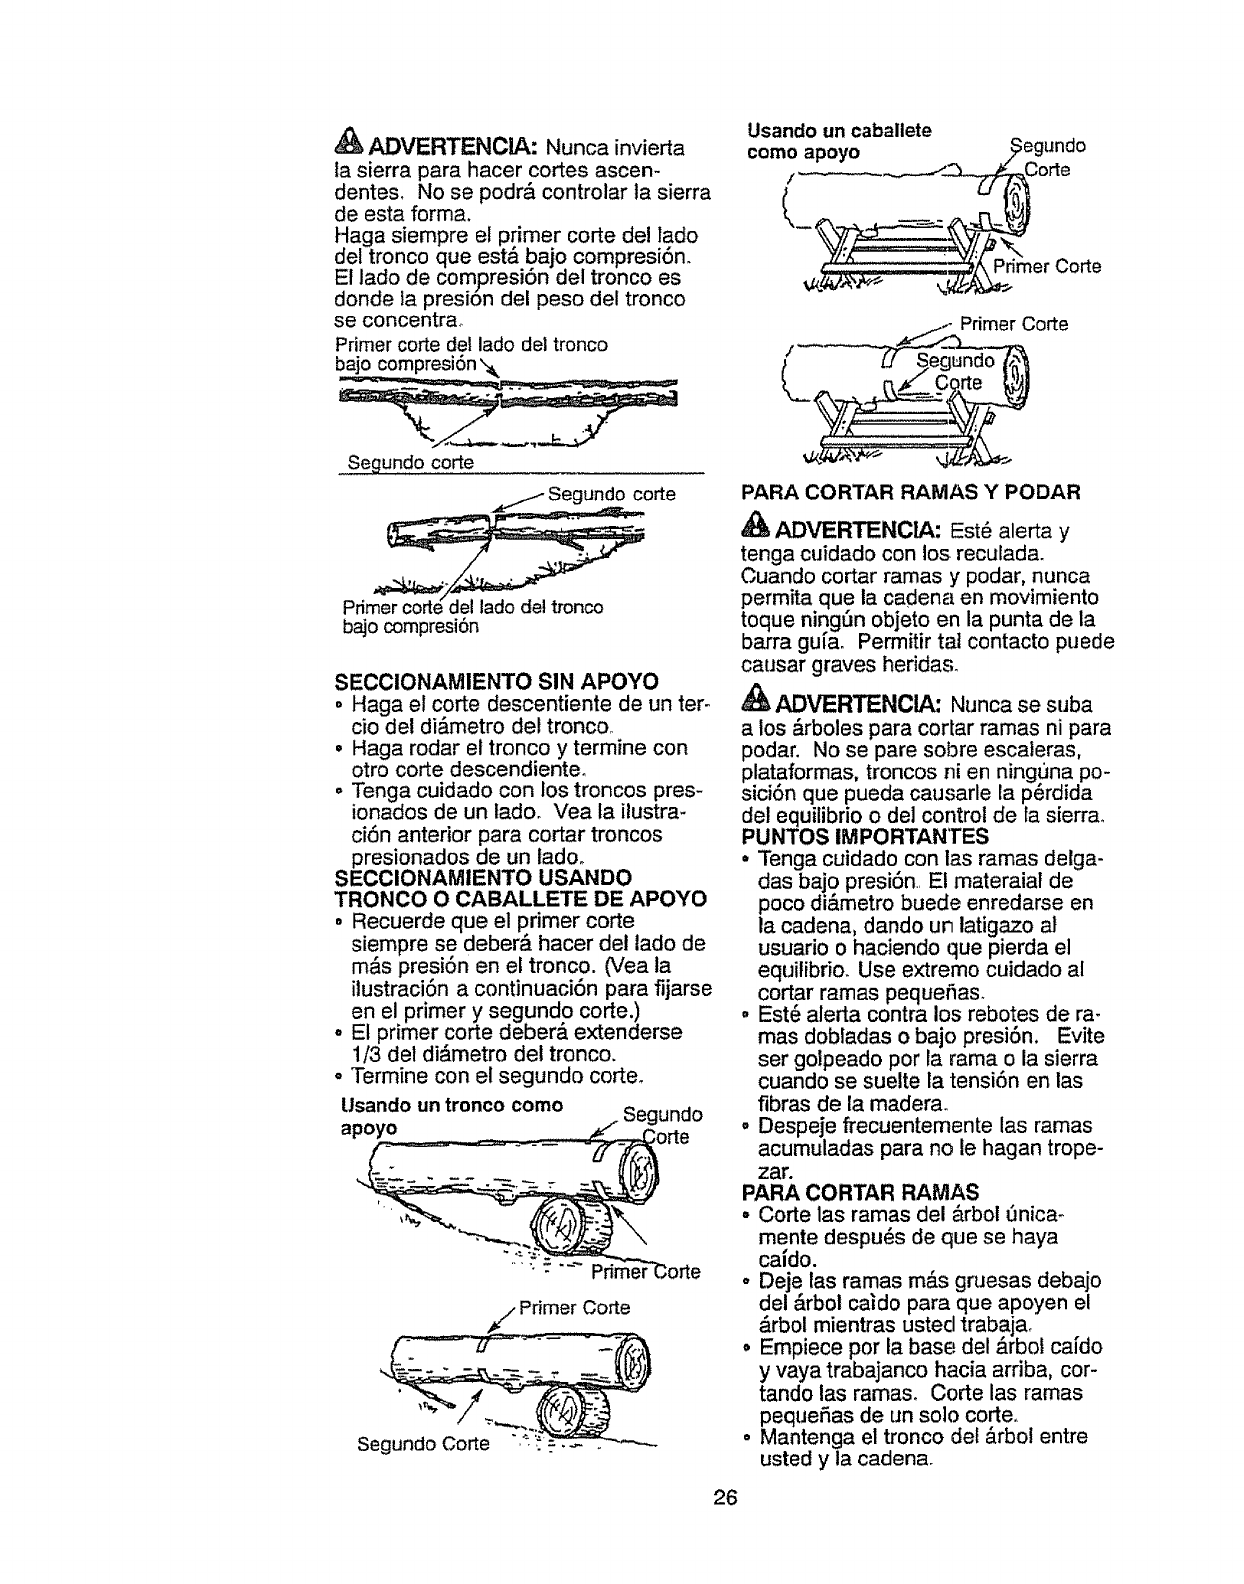
ADVERTENCIA: Nunca invierta
la sierra para hacer cortes ascen-
dentes, No se podr& controlar ta sierra
de esta forma.
Haga siempre el primer corte dei lado
del tronco que est& bajo compresi6n.
E! lado de compresi6n del tronco es
donde la presi6n del peso del tronco
se concentra_
Primer corte del lado del tronco
bajo compresi6n _
Usando un caballete
Segundo co_e
bajo compresi6n
SECCIONAMIENTO SIN APOYO
o Haga el corte descentiente de un ter-
cio del di&metro del troncoo
° Haga rodar el tronco y termine con
otro corte descendiente.
°Tenga cuidado con los troncos pres-
ionados de un tado. Vea la ilustra-
ci6n anterior para cortar troncos
presionados de un ladoo
SECCIONAMtENTO USANDO
TRONCO O OABALLETE DE APOYO
• Recuerde que el primer corte
siernpre s.e deber_, hacer det lado de
m&s preston en el tronco. (Vea ta
ilustraci6n a continuaci6n para fijarse
en el primer y segundo code.)
oEt primer corte deber& extenderse
1/3 del di_,metro del tronco.
•Termine con el segundo corte.
Usando un trence come Segundo
apeyo
Corte
26
PARA CORTAR RAMAS YPODAR
ADVERTENClA: Est6 alerta y
tenga cuidado con los reculada.
Cuando cortar ramas y podar, nunca
permita que la cadena en movimiento
toque ningSn objeto en la punta de la
barra gula. Permitir tal contacto puede
causar graves herida&
ADVERTENCIA: Nunca se suba
a los _.rboles para cortar ramas ni para
podar. No se pare sobre escaleras,
plataforrnas, troncos ni en ningt]na po-
sicion que pueda causarle la p_rdida
del equilibrio o del control de ta sierr&
PUNTOS IMPORTANTES
•Tenga cuidado con las ramas delga-
das bajo presi6n El materaial de
poco di&metro buede enredarse en
la cadena, dando un latigazo al
usuario o haciendo que pierda el
equitibrio. Use extremo cuidado al
cortar ramas pequefias.
° Est6 alerta contra los rebotes de ra-
mas dobladas o bajo presi6n. Evite
ser golpeado por la rama o la sierra
cuando se suelte la tensi6n en las
fibras de la madera.
° Despeje frecuentemente las ramas
acumuladas para no le hagan trope-
zar.
PARA CORTAR RAMAS
°Corte las ramas del &rbol 5nica_
mente despu_s de que se haya
caJdo.
° Deje las ramas m&s gruesas debajo
del _trbol caJdo para que apoyen el
&rboi mientras usted trabaja,
o Empiece por la base: del &rbot cafdo
y vaya trabajanco hacia arriba, cor-
tando las ramas. Corte las ramas
peque_as de un solo corte.
o Mantenga el tronco del &rbol entre
usted y la cadena.
o RetirelasramasmAsgrandesconla
t6cnicadeuntercioy dostercios
descritaen la secci6n de SECCIONA-
MIENTO SIN APOYO.
• Use siempre un corte descentiente
para cortar ramas pequefias y ramas
que cuelgan libremente. Los cortes
ascendientes podrian hacer que las
ramas caigan y apreten ta sierra.
PARA PODAR
_ ADVERTENOIA: Pode t_nica-
mente las ramas que se encuentren a
la altura del hombro o m_.s abajon No
corte las ramas que se encuentren
m_.s arriba de sus hombros_ Busque
una persona profesional para que
efectue este tipo de trabajo.
.Haga el primer corte en forma as-
cendiente atravesando 1/3 del
di&metro de la rama. Este corte har_.
RESPONSABILIDADES DEL USUARIO
que el rama cede y caiga f&cilmente
en el segundo corte.
Siguiente haga que el segundo corte
un corte descendiente atravesando
completamente ia rama,
Finalice la maniobra de podar dando
un cote de manera que el tocSn de
la rama sobresalga de 3 a 5 cm (1 a
2 pulgadas) desde el tronco del
_xbol.
Ili_...Segund°
Primer Corte
_" 1/3 del di&metro
Tercer corte de1 a 2
pulgadas del tronco del
_,rbol
_, ADVERTENClA: Desconecte del recurso de energ{a antes de dar man-
tenimiento a este aparato.
Anote las fechas al cornpletar el Antes de Despu6s
servicio de rutina Usar de Usar
•,. ................... = ............. ,,. ,. = .
Verifique que no haya piezas
da_adasigastadas
Verifique que no haya fija-
doreslpiezas sueltas
Verifique la tensi6n de la cadena
Verifique el filo de la cade'na
Inspeccione la barra gu[a
Verifique el nivel del aceite
para barra y caden a .......... __
ASada lubricante al orificio del
engranaje
Inspeccione y limpie el aparato ''•.... _,, i
y las p!acas ...........
Umpie el ranura de la barra
RECOMENDAOIONES GENERALS
La garantia de este aparato no cubre
los artfculos que han sido sometidos al
abuso o a la negtigencia por parte det
usuarioo Para poder recibir el valor to-
tal de la garantfa, el usuario deber&
hacer e! mantenimiento tal y como se
indica en este manual. Har&falta hac-
er varios ajustes periSdicos para mare
tener el aparato adecuadamenteo
° Una vez al afio, inspeccione la barra
guia y !a cadena para verificar que
no esten gastadas,,
Cada 15 Fechas de
minutos Servicio
, ,,i , ' L_t
v"
,,,,,,,,,,..................
VERIFIQUE QUE NO HAYA PIEZAS
DANADAS OGASTADAS
Entre en contacto con et Centro de
Servicio Sears para el reemplazo de
piezas dafiadas o desgastada&
AVlSO: Es normal que aparezca una
peque_a cantidad de aceite debajo de
ta sierra despu_s de que el motor se
detiene. No confunda esto con p6rdi-
das de aceite en el tanque.
• Interruptor en forma de Gatillo -
Asegt'Jrese de que et interrputor en
forma de gatillo est6 funcionando
27
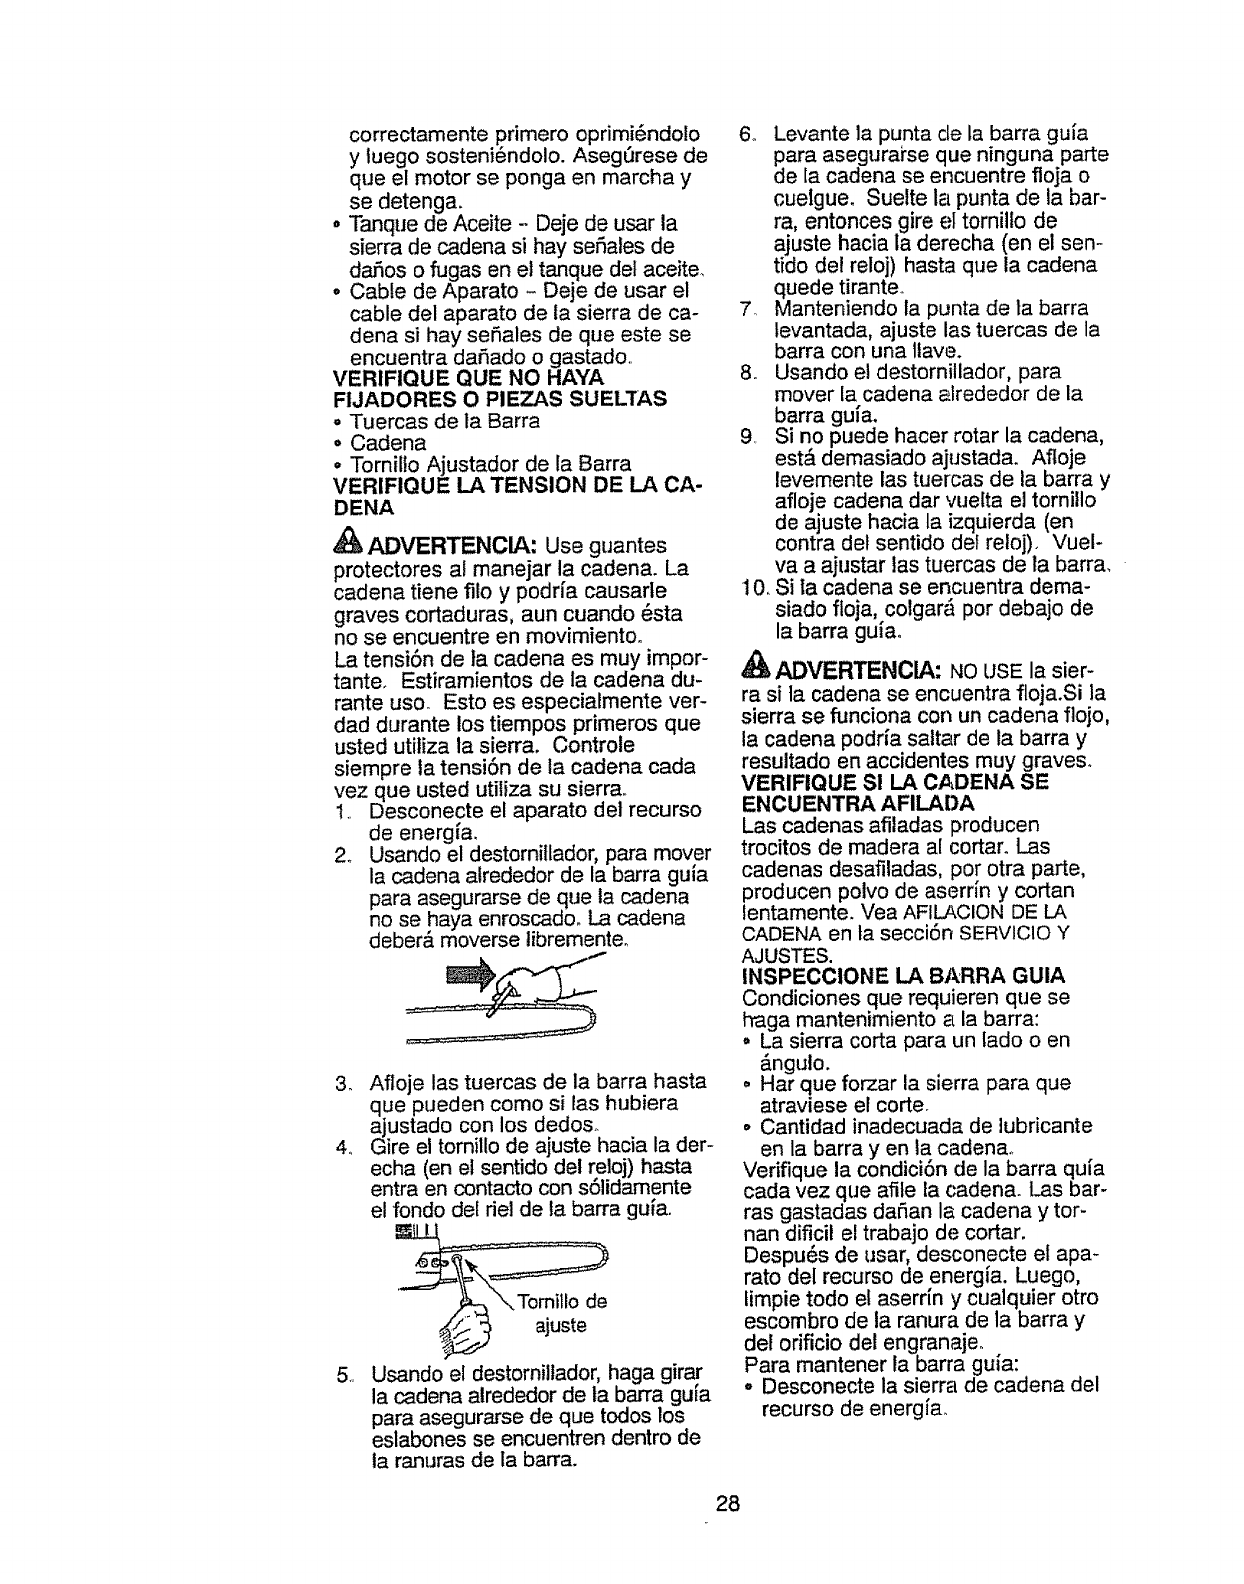
correctamente primero oprimi6ndolo
y luego sosteni_ndolo. Asegt_rese de
que el motor se ponga en marcha y
se detenga.
°Tanque de Aceite - Deje de usar la
sierra de cadena si hay seSales de
daSos o fugas en el tanque del aceite_
° Cable de Aparato - Deje de usar el
cable del aparato de la sierra de ca-
dena si hay seSales de que este se
encuentra daSado o gastado.
VERIFIQUE QUE NO HAYA
FIJADORES O PIEZAS SUELTAS
. Tuercas de la Barra
•Cadena
° Tornillo Ajustador de la Barra
VERIFIQUE LA TENSION DE LA CA-
DENA
,_ ADVERTENCIA: Use guantes
protectores al manejar la cadena. La
cadena tiene filo y podfia causarle
graves cortaduras, aun cuando _sta
no se encuentre en movimientoo
La tensiSn de ta cadena es muy impor-
tante. Estiramientos de la cadena du-
rante usoo Esto es especialmente ver-
dad durante los tiempos primeros que
usted utitiza ta sierra. Controte
siempre la tensiSn de la cadena cada
vez que usted utiliza su sierra,
I Desconecte el aparato del recurso
de energfao
2_ Usando el destorniilador, para mover
la cadena atrededor de la barra gufa
para asegurarse de que la cadena
no se haya enroscadoo La cadena
deber,_ moverse tibrementeo
3. Afloje las tuercas de la barra hasta
que pueden como si las hubiera
ajustado con los dedos.
4o Gire el tornillo de ajuste hacia la der-
echa (en et sentido del reloj) hasta
entra en contacto con s61idamente
el fondo del del de ta barra gufa.
,, Usando el destornillador, haga gira,r
la cadena alrededor de ta barra gu_a
para asegurarse de que todos los
eslabones se encuentren dentro de
la ranuras de la barra.
6,, Levante la punta de la barra gu[a
para asegurai'se que ninguna parte
de la cadena se encuentre floja o
cuelgue. Suelte la punta de la bar-
ra, entonces gire el tornillo de
ajuste hacia la derecha (en el sen-
tido deF reloj) hasta que la cadena
quede tirante°
7 Manteniendo la punta de la barra
tevantada, ajuste las tuercas de la
barra con una llave.
8. Usando el destornillador, para
mover la cadena _lrededor de la
barra gufa.
9 Si no puede hacer rotar la cadena,
esta demasiado ajustada. Afloje
levemente las tuercas de la barra y
afloje cadena dar vuelta el tornillo
de ajuste hacia la izquierda (en
contra del sentido def reloj). Vuel-
va a ajustar ias tuercas de la barra,
10, Si la cadena se encuentra dema-
siado floja,.colgar& por debajo de
la barra gu_ao
ADVERTENCIA: NO USE la sier-
ra si ta cadena se encuentra floja.Si la
sierra se funciona con un cadena flojo,
la cadena podda sattar de la barra y
resuitado en accidentes muy graves.
VERIFIQUE S! LA CADENA SE
ENCUENTRA AFILADA
Las cadenas afiladas producen
trocitos de madera al cortar. Las
cadenas desafiladas, por otra parte,
producen polvo de aserr(n y cortan
lentamente. Vea AFILACION DE LA
CADENA en ta secci6n SERVICIO Y
AJUSTES.
INSPECCIONE LA BI_RRA GUIA
Condiciones que requieren que se
haga mantenimiento a la barra:
o La sierra corta para un lado o en
_ngulo.
• Har que forzar la sierra para que
atraviese el corte_
oCantidad inadecuada de lubricante
en la barra yen la cadenao
Verifique la condicion de la barra qufa
cada vez que afile la ('adena. Las bar-
ras gastadas daSan la cadena y tor-
nan dificit el trabajo de cortar.
Despu6s de usar, desconecte el apa-
rato del recurso de energia. Luego,
limpie todo el aserr[n y cualquier otro
escombro de la ranura de la barra y
det orificio det engranaje,
Para mantener la barra guia:
• Desconecte la sierra de cadena del
recurso de energia,
28
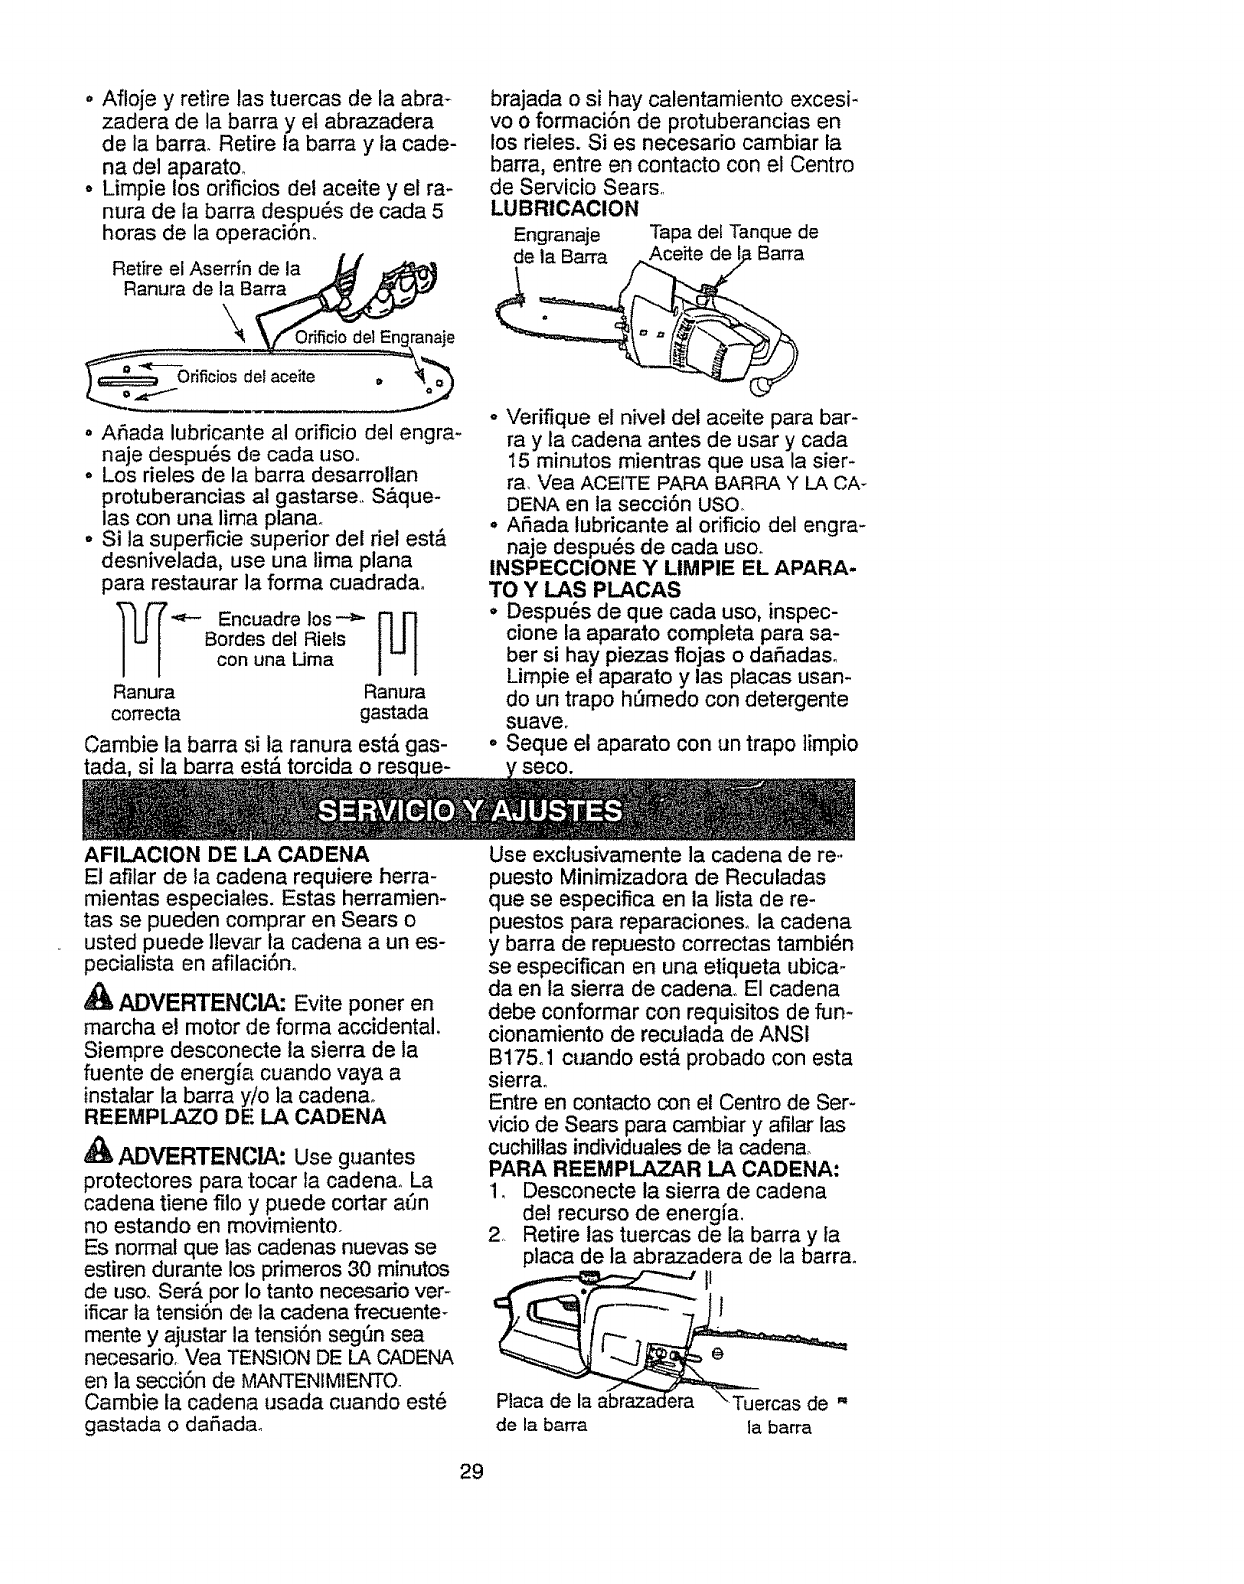
• Af!oje y retire las tuercas de la abra-
zadera de la barra y et abrazadera
de la barra. Retire la barra y la cade-
na del aparato.
. Limpie los orificios del aceite y el ra-
nura de la barra de:spu6s de carla 5
horas de la operacJon.
brajada o si hay calentamiento excesi-
vo o formaci6n de protuberancias en
los rieles. Si es necesario cambiar la
barra, entre en contacto con el Centro
de Servicio Sears.
LUBRICAClON
Engranaje Tapa del Tanque de
o AiSada lubricante al orificio del engra-
naje despu6s de carla uso..
• Los deles de la barra desarrollan
protuberancias al gastarse. S&que-
las con una lima plana,.
° Si la superficie superior del riel est&
desnivelada, use una lima plana
para restaurar la forma cuadradao
"_- Encuadre los-'_ [_
Bordes del Riefs
con una Uma
Ranura Ranura
correcta gastada
Cambie la barra si la ranura est#, gas-
tada, si la barra est,. torcida o
o Verifique el nivel del aceite para bar-
ray la cadena antes de usar y cada
15 minutos mientras que usa la sier-
ra, Vea ACEITE PARA BARRA Y LA CA-
DENA en la secci6n USO,.
o Afiada tubricante al orificio del engra-
naje despu_s de cada uso.
INSPECCIONE Y LIMPIE EL APARA-
TO Y LAS PLACAS
o Despu_s de que cada uso, inspec-
clone la aparato completa para sa-
ber si hay piezas flojas o dafiadas.
Limpie el aparato y las placas usan-
do un trapo h6medo con detergente
suave.
• Seque el aparato con un trapo lirnpio
'seco.
AFILACION DE I.A CADENA
El afilar de ta cadena requiere herra-
mientas especiales. Estas herramien-
tas se pueden comprar en Sears o
usted puede ]levar la cadena a un es-
pecialista en afilaci6no
ADVERTENCIA: Evite poner en
marcha e! motor de forma accidental.
Siempre desconecte la sierra de la
fuente de energfa cuando vaya a
instalar la barra yio la cadenao
REEMPLAZO DE LA CADENA
ADVERTENCIA: Use guantes
protectores para tocar la cadenao La
cadena tiene filo y puede cortar at'_n
no estando en movimiento.
Es normal que las cadenas nuevas se
estiren durante los primeros 30 minutos
de uso. SerA por Io tanto necesado ver-
ificar la tensi6n de la cadena frecuente-
mente y ajustar la tensi6n segt'm sea
necesado. Vea TENSION DE LA CADENA
en ta secci6n de MANI"ENIMtENTO.
Cambie ta cadena usada cuando est6
gastada o dafada.
Use exclusivamente la cadena de re..
puesto Minimizadora de Reculadas
que se especifica en la lista de re-
puestos para reparaciones, la cadena
y barra de repuesto correctas tambi6n
se especifican en una etiqueta ubica-
da en la sierra de cadena,, El cadena
debe conformar con requisitos de fun-
cionamiento de reculada de ANS!
B175ol cuando est,. probado con esta
sierra°
Entre en contacto con el Centro de Ser-
vicio de Sears para cambiar y afilar las
cuchillas individuales de ta cadenao
PARA REEMPLAZAR LA CADENA:
1, Desconecte la sierra de cadena
det recurso de energfa,
2 Retire tas tuercas de la barra y la
placa de la abrazadera de la barra.
de la barra la barra
29
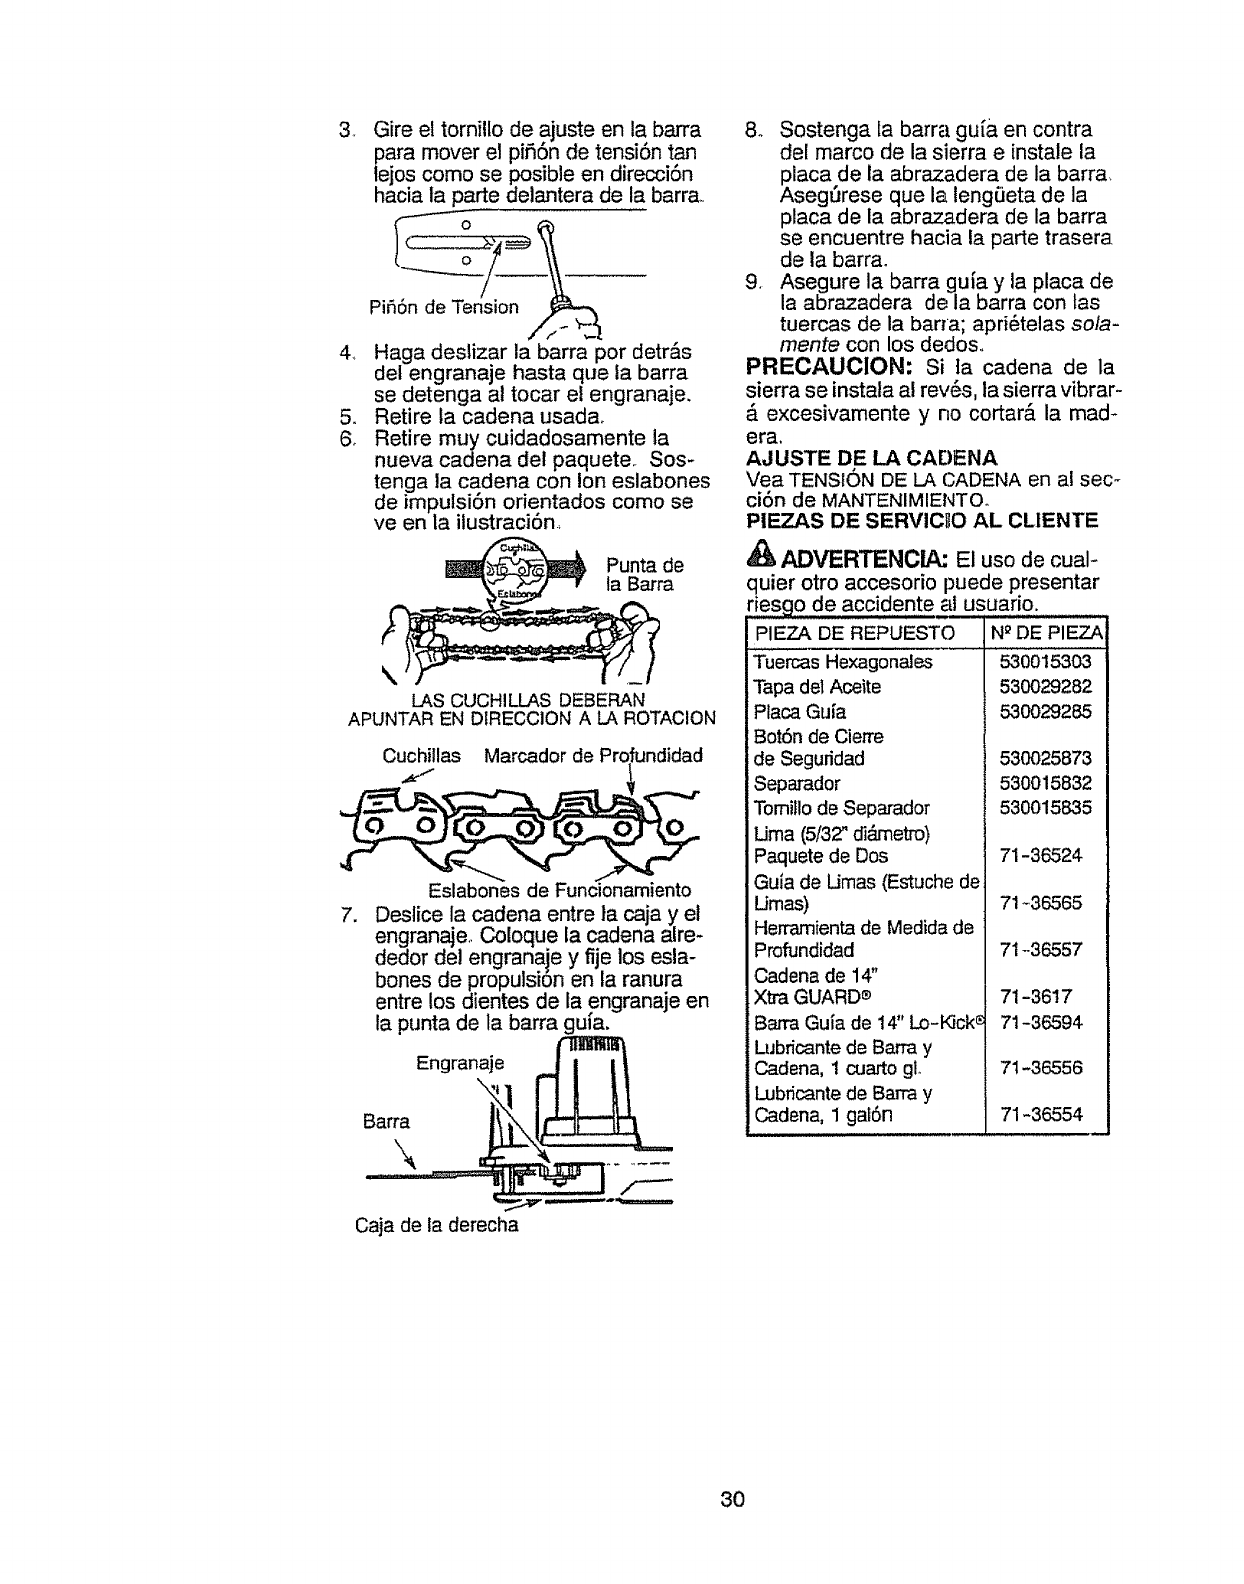
3_ Gire el tornillo de ajuste en la barra
para mover el piSon de tensi6n tan
tejos como se posible en direcci6n
hacia la parte delantera de la barra,
4_ Haga destizar la barra por detr&s
det engranaje hasta que la barra
se detenga al tocar el engranaje.
5. Retire la cadena usada.
6. Retire muy cuidadosamente la
nueva cadena del paquete, Sos-
tenga la cadena con ion eslabones
de imputsi6n orientados como se
ve en la ilustraci6n.,
LAS CUCHILLAS DEBERAN
APUNTAR EN DIRECClON A LA ROTACION
Cuchillas Marcador de Profundidad
O
.
Eslabones de Funcionamiento
De.slice la cadena entre la caja y el
engranaje, Coloque la cadena alre-
dedor del engranaje y fije los esla-
bones de propulsion en la ranura
entre los dientes de la engranaje en
la punta de la barra gufa.
Engranaje
\
Barra
8. Sostenga la barra gu[a en contra
del marco de la sierra e instale la
placa de la abrazadera de la barra,
Aseg_rese que la leng_Jeta de la
placa de la abrazadera de la barra
se encuentre hacia la parte trasera
de la barra.
9, Asegure la barra guia y la placa de
la abrazadera de la barra con las
tuercas de la barra; apd6telas sola-
mente con los dedos,,
PRECAUCION: Si ta cadena de la
sierra se instala al rev6s, la sierra vibrar-
excesivamente y no cortar,_ la mad-
era,
AJUSTE DE LA CADENA
Vea TENSION DE LA CADENA en al sec _
ci6n de MANTENIMIENTOo
PIEZAS DE SERVICUO AL CUENTE
ADVERTENOILA: El uso de cual-
quier otro accesorio puede presentar
riesgo de accidente al usuano.
PIEZA DE REPUESTO
Tuercas HexagonaJes
Tapa del Aceite
Placa Guia
Bot6n de Cierre
de Seguddad
Separador
TomiIlo de Separador
Uma (5/32" di_neb-o)
Paquete de Dos
Gula de Ureas (Estuche de
Umas)
Herramienta de Medida de
Profundidad
Cadena de 14"
Xtra GUARD8
Barra Guia de 14" Lo-K]ck_
Lubricante de Barra y
Cadena, 1 cuarto gL
Lubficante de Barra y
Cadena, 1 gat6n
N_DE PIEZA
530015303
530029282
530029285
53OO25873
530015832
530015835
71-36524
71-36565
71-36557
71-3617
71-36594
71-36556
71-36554
Caja de la derecha
3O
AD_RTENClA: Prepareelapa-
ratoatfinal dela temporada o si no Io
va a usar por 30 dfas o m&s.
o Deje que el motor se enfrle antes de
guardarlo o transportarlo.
° Guarde la sierra y el cable de exten-
siSn en un lugar bien ventilado.
. Guarde el aparato con todos los pro-
tectores en su lugar y coloque el apa-
rato de rnodo que las piezas con filo
no puedan causat heridas por acci-
denteo
o Guarde el aparato en un lugar segu-
ro y cornpletamente fuera del al-
cance de los nifios,
ESTACIONAL ALMACENAJE
Prepare el aparato at final de ta tempo-
rada o si no Io va a usar por 30 dJas o
m_.s.
Siva a guardar el aparato durante un
periodo largo:
o Limpie la sierra a conciencia antes
del almacenaje.
o Alrnac6ne en un lugar limpio y secoo
oAptique una pequefia cantidad de
aceite alas superficies externas
met_,licas y a la barra gufa.,
. Lubrique la cadena y envu61vala en
papel grueso o en teta.
31
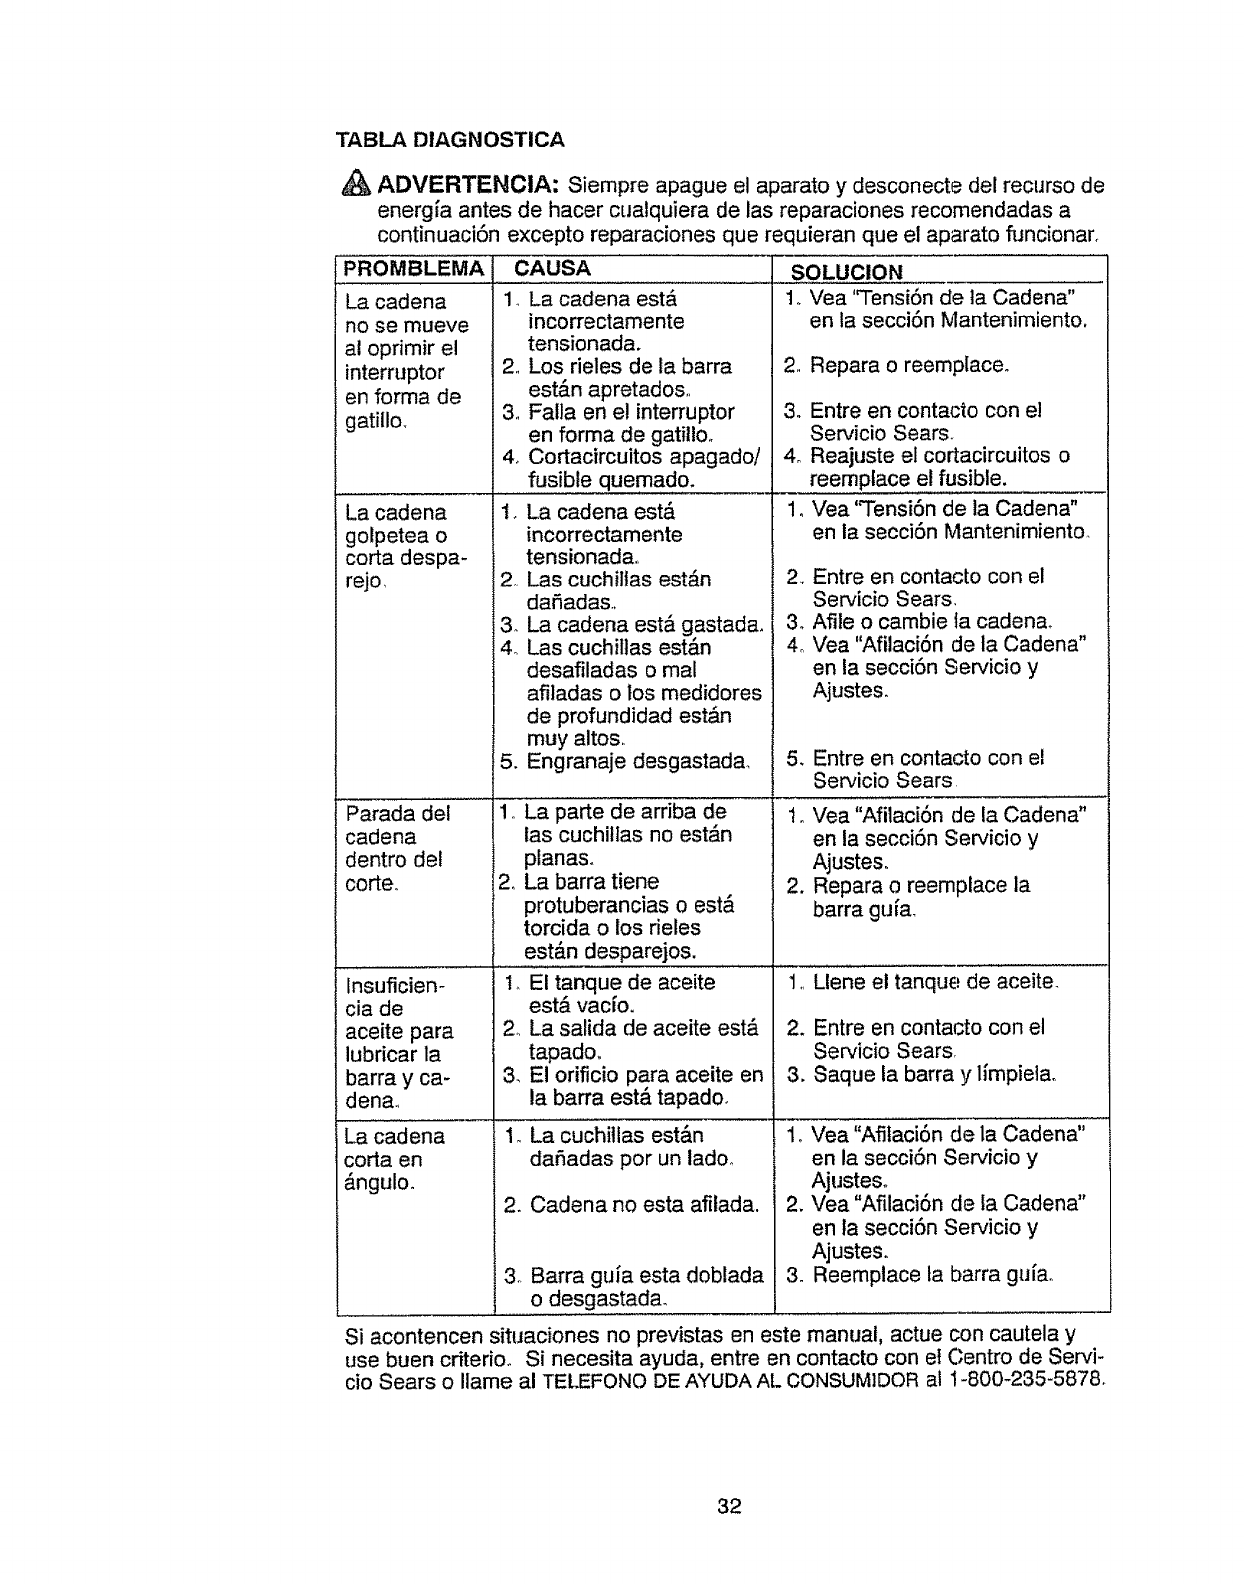
TABLA DIAGNOSTICA
,_ ADVERTENCIA: Siempre apague el aparato y desconecte del recurso de
energfa antes de hacer cualquiera de las reparaciones recomendadas a
continuaci6n excepto reparaciones que requieran que el aparato funcionar_
PROMBLEMA
La cadena
no se mueve
al oprimir el
interruptor
en forma de
gatillo.
4,
La cadena 1,
golpetea o
corta despa-
rejo, 2,
3.
4,
5.
cadena
dentro det
corteo
CAUSA
1, La cadena est&
incorrectamente
tensionada.
2. Los rieles de la barra
est_.n apretados,,
3. Fatla en el interruptor
en forma de gatillo.
Cortacircuitos apagado/
fusible quemado.
La cadena est&
incorrectamente
tensionada.
Las cuchillas est&n
daSadas.,
La cadena est& gastada.
Las cuchiltas est&n
desafiladas o real
afitadas o los medidores
de profundidad est&n
muy altos,
Engranaje desgastada,
parte de arriba de
las cuchitlas no est&n
planas.
2. La barra tiene
protuberancias o est&
torcida o los rieles
est&n desparejos.
Vea 'q'ensi6n de ta Cadena"
en la secci6n Mantenimiento,
,,
3.
4o
Repara o reempiace_
Entre en contacto con el
Servicio Sears°
Reajuste el cortacircuitos o
reemplace et fusible.
Vea "Tensi6n de la Cadena"
en la secci6n Mantenimiento,.
2_ Entre en contacto con el
Servicio Sears
3_ Afite o cambie ia cadenao
4o Vea "AfitaciSn de la Cadena"
en la secci6n Servicio y
Ajustes.
5. Entre en contacto con el
Servicio Sears
to Vea "Afilaci6n de la Cadena"
en la secci6n Servicio y
Ajustes,
2, Repara o reemplace la
barra gufa,
2. Entre en contacto con el
Servicio Sears
3. Saque la barra y limpiela°
Insuficien- : ii El ianque de aceite
cia de est,. vac[o.
aceite para 2o La salida de aceite est&
lubricar la tapado.
barra y ca- & El orificio para aceite en
den& la barra est& tapado,
La cadena 1. La cuchitlas est&n 1.
corta en daSadas por un ladoo
_.ngulo. 2. Cadena no esta afilada. 2.
3o Barra gu{a esta doblada 3.
o desgastad&
Si acontencen situaciones no previstas en este manual, actue
use buen criterio_ Si necesita ayuda, entre en contacto con et
cio Sears o Ilame al TELEFONO DE AYUDA AL CONSUM3DOR al
Yea "Afilaci6n de la Cadena"
en la secciSn Servicio y
Ajusteso
Vea "Afilaci6n de la Cadena"
en la secci6n Servicio y
Ajustes.
Reemptace ta barra gufao
con cautela y
Centro de Servi-
1-800-235-5878.
32

i' i_%ii!_!S 7_
{! q;:!£!:
! :'i:ik':A'{_
:_:L-:N={,:ilS
!/'/:!: {{£
:._ii£_i{,::_?:
:;i: _ r::'
i_!%!i£!iI
i L'¸_/i::: Sf
}i£ii{::!:!Si
kq':ig:!_i
'i'ki'!_ 3:¸:£
!ii:!_ili,_?{i
,q{_!:;i_¸
, Ki=i "!i]¸
i¸ /_$?i_:
_{S{{b!{iI
no matter who made it,no matterwho sold it! _:::
1-800-4-MY-HOME "_ Anytime,dayornight
(1-800-469-4663) (U.S.A.and Canada)
_/vw._r_corfl _rw,sears.ca
r 0o,ro, e0o,0 on ,ao0ii!i{ !ili
electronics, call for the nearest Sears Parts and Repair Center.
1-800-488-1222 Any_me,day or night (USA, only)
www.sear_com
For the replacement parts, accessories and owner's manuals
that you need to do-it-yourself, call Sears PartsDin_ts_!
1-800-366-PART 6 a,m,-11 p.m,, 7days _v,,_:_k
(i-800-366-7278) (USA, on}y)
www.sears.comJpartsdirect
,]PL::i::'
To purchase or inq@re about a Sears Service Agreement
or Sears Maintenance Agreement:
1-800-827-6655 (U.SA) 1-800-361-6665 (Canada)
7amo - 5 p,m., CST, Mon,-Sat 9 a,m,- 8 p,m, EST, M - F,4 pro, Sat,
Para pedirserviciode reparaciSna
domicilio,y para ordenarpiezas:
1,,888_I..I.HOGARs_
(1-888-784-6427)
Au Canada pour service enfr_s:
1-800-LE-FO_F.RMc
© Sears,RoebuckandCo,
(9 Registered Trademark I_MTrademark /sMService Mark of Sears, Roebuck and Coo
(9 Marca Reglstrada /TMMarca de Fdbrica /sMMarca de Servicio de Sears, Roebuck and COo
_c Marque de commerce /_o Marque d_pos_e de Sears, Roebuck and Co,
