Craftsman 580752030 User Manual PRESSURE WASHER Manuals And Guides L0704362
CRAFTSMAN Power Washer, Gas Manual L0704362 CRAFTSMAN Power Washer, Gas Owner's Manual, CRAFTSMAN Power Washer, Gas installation guides
User Manual: Craftsman 580752030 580752030 CRAFTSMAN PRESSURE WASHER - Manuals and Guides View the owners manual for your CRAFTSMAN PRESSURE WASHER #580752030. Home:Lawn & Garden Parts:Craftsman Parts:Craftsman PRESSURE WASHER Manual
Open the PDF directly: View PDF ![]() .
.
Page Count: 56
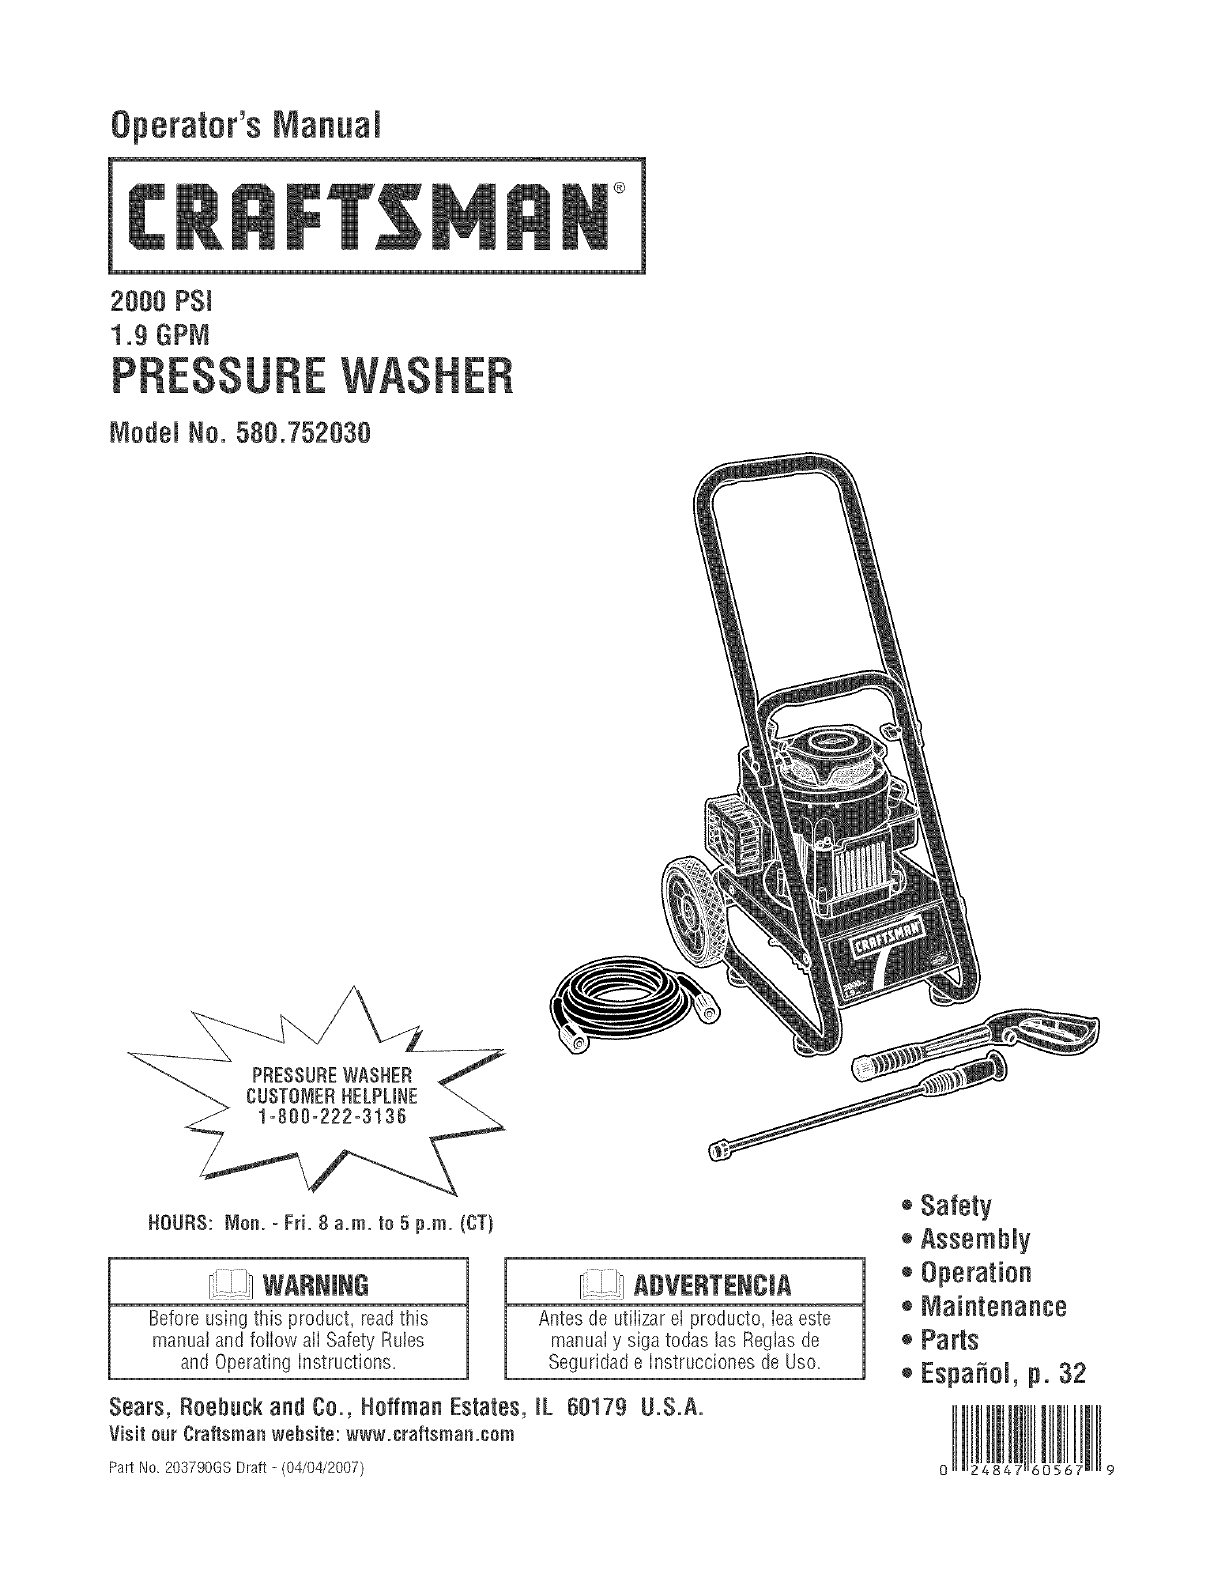
Operator'sManual
®
2000 PSi
1.9 GPM
Model No. 580.752030
PRESSUREWASHER
CUSTOMERHELPLINE
HOURS: Non. - Fri. 8 a.m. to 5 p.m. (CT)
Before using this product, readthis
manuatand foiiow ali Safety RuIes
and Operating instructions=
ADV =RT =eCIA
Antes de utiiizar ei producto, iea este
manuai y siga todas las RegIasde
Seguridade instrucciones de Uso=
Sears, Roebuck and Co., Hoffman Estates, [L 68179 U.S.A.
Visit our Craftsman website: www.craftsman.eom
Part No. 20379068 Draft - (04/04/2007)
®Safety
®AssemNy
®Operation
,, Maintenance
,, Parts
,, Espa_oJ,p. 32
WARRANTY.......................................... 2
SAFETYRULES...................................... 2-5
FEATURESANDCONTROLS.............................. 6
ASSEMBLY......................................... 7-9
OPERATION....................................... 10-13
SPECIFICATIONS..................................... 14
MAINTENANCE.................................... 15-19
STORAGE........................................... 20
TROUBLESHOOTING.................................. 21
REPLACEMENTPARTS.............................. 22-28
NOTES............................................. 29
EMISSIONCONTROLWARRANTY..................... 30-31
ESPANOL......................................... 32-55
HOWTOORDERPARTS........................ BACKPAGE
If this pressurewasher faiis dueto a defect in materiai or workmanship within one year from the date of purchase, return it to
any Searsstore, other Craftsman outlet, or Sears Parts & Repair Centerin the UnitedStates or Canadafor free repair (or
replacementif repair proves impossible).
Ali warranty coverageapplies for only 90 days from dateof purchaseif this pressure washer is ever used for commercial or
rentai purposes.
This warranty gives you specific legal rights, and you mayalso have other rights which vary from state to state.
Sears, Roebuck and Ce,, Heffman Estates, JL68179
Sears Canada Jnc,, Terente, 8ntarie, Canada MSB 2B8
This is the safety alert symbol, tt is used to alert yea to potential persenaminjary hazards. Obey aH safety messages
that fellow this symbemto avoid pessiNe injury or death.
_Read this manual carefully and become familiar
..... with your pressurewasher. Knew its applications,
its limitations, and any hazardsinvolved.
The safety alert symboi (,_) is used with a signal word
(DAr/GER,CAUTION,WARNING),a pictorial and/or a safety
messageto alert you to hazards. BANGERindicates a hazard
which, if not avoided, wi/'/resuIt in death or serious injury.
WARNINGindicates a hazard which, if not avoided, cou/d
result in death or serious injury. CAUTtONindicates a hazard
which, if not avoided, might result in minor or moderate
injury. NOTICEindicates a situation that could result in
equipment damage. Foiiow safety messagesto avoid or
reduce the risk of injury or death.
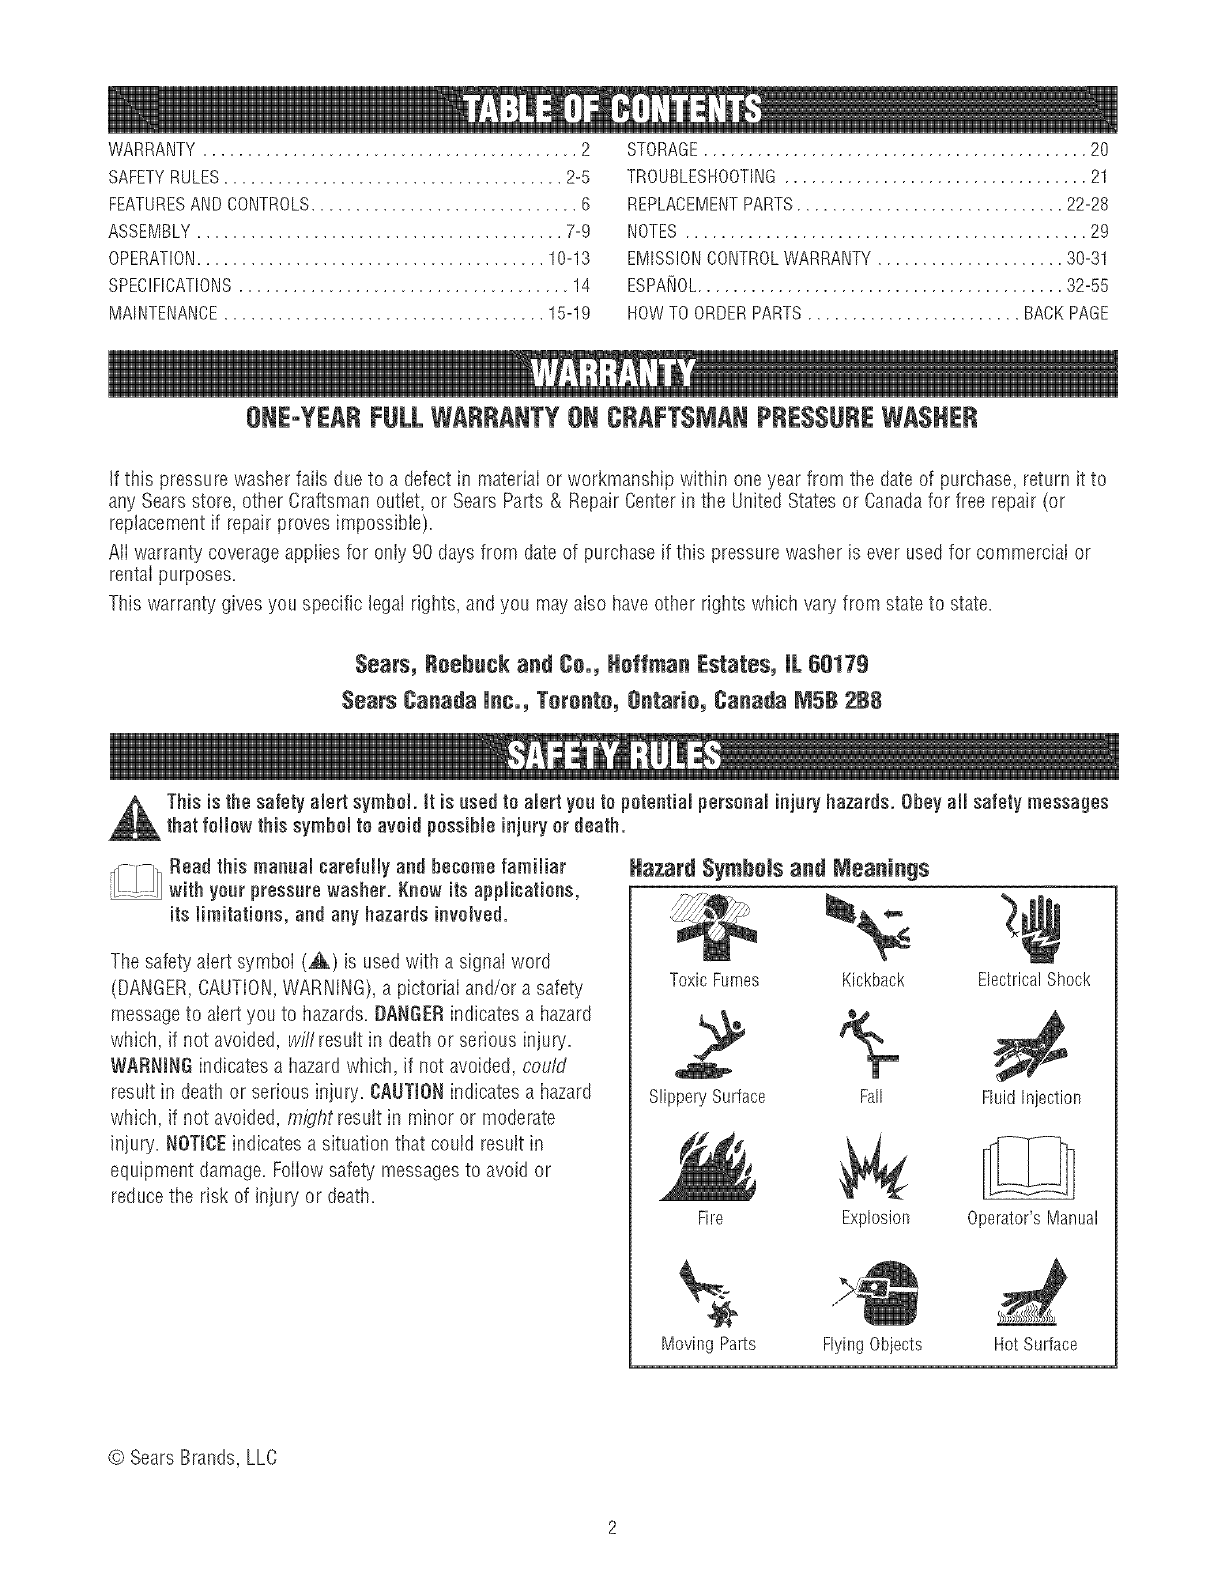
Hazard $ymhomsand Meanings
Toxic Furnes Kickback
SlipperySurface
Fire
Moving Parts
Fa_
Explosion
FlyingObiects
ElectricalShock
FluidInjection
Operator's Manual
HotSurface
© Sears Brands, LLC
WARNING
Theengine exhaust from this productcontains
chemicals known to the State of California to cause
cancer, birth defects, or other reproductive harm.
WARNING
Running engine gives off carbon monoxide, an
odoriess, coioriess, poison gas.
Breathing carbon monoxide can cause headac!_e,
fatigue, dizziness, vomiting, confusion, seizures,
nausea, fainting or death.
Some chemicals or detergents may be harmful if
inhaled or ingested, causing severe nausea,
fainting, or poisoning.
*Operatepressure washer ONLY outdoors.
, Keep exhaust gas from entering a confined areathrough
windows, doors, ventilation intakes, or other openings.
o DO NOTstart or run engine indoors or in an enclosed area,
even if windows and doors are open.
o Use a respirator or rnaskwhenever there is a chancethat
vapors rnay be inhaled.
, Readall instructions with mask so you are certain the mask will
provide the necessaryprotection against inhalingharmful
vapors.
WARNING
_iir Risk of electrocution.
Contact with power source can cause electric
shock or burn.
• NEVER spraynearpowersource.
WARNING
Fueland its vapors are extremely flammable and
explosive.
Fireor explosion can cause severe burns or
death=
WidENA#UING8U URAiNIN6FUEL
* TurnpressurewasherOFFandlet it coo[at least2 minutes
beforeremovingfuelcap.Loosencapslowly'to relievepressure
in tank.
* Fillor drainfueltankoutdoors.
o DONOToverfilltank.Allowspacefor fuel expansion.
* Iffuel spi!ls,waituntil it evaporatesbeforestartingengine.
o Keepfuelawayfromsparks,openflames,pilot lights,heat,and
otherignitionsources.
o DONOTlight a cigaretteorsmoke.
WidENSTARTINGEQUIPMENT
oEnsuresparkplug,muffler,fuel cap,andair cleanerarein
place.
, DONOTcrankenginewith sparkplugremoved.
WIDEN8PERATINGEQUIPMENT
* DONOTtip engineor equiprnentat anglewhichcausesfuel to
spill.
o DONOTsprayflamrnabieliquids.
WIDENTRANSPORTING8U REPAIRINGEQUIPMENT
, Transport/repairwithfue]tank EMPTYor withfuel shutoffvalve
OFF.
, Disconnectsparkplugwire.
WIDENSTOUINGFUEL8U EQUIP_dENTWiTidFUELIN TANE
*Storeawayfromfurnaces stoveswaterheaters,clothes
dryers,or otherappliancesthathavepilot light or otherignition
sourcebecausetheycanignitefuelvapors.
WARNING
Starter cord kickback (rapid retraction) can result
in bodily injury, Kickback will pull hand and arm
toward enginefaster than you can iet go.
Broken bones, fractures, bruises, or sprains
could result.
• NEVERpull starter cord without first relieving spray gun
pressure.
o When starting engine pull cord slowly until resistance is felt
and then pull rapidly to avoid kickback.
• After eachstarting attempt_where enginefails to run, always
point spray gun in safe direction and squeezespray gLmtrigger
to releasehigh pressure. Engagespray gun trigger lock.
• Firmly grasp spray gun with both hands when using high
pressure spray to avoid iniury when spray gun kicks back.
WARNING
Useof pressure washer can create puddles and
slippery surfaces.
Kickbackfrom spray gun can cause you to fail.
• Operate pressure washer frorn a stable surface.
• The cleaning area should haveadequate slopes and drainageto
reduce the possibility of a fall due to slippery surfaces.
o Be extremely careful if you rnust use the pressure washer from
a ladder, scaf%ding_ or any other similar location.
• Firmly grasp spray gLmwith both hands when using high
pressure spray to avoid injury when spray gun kicks back.
WARNING
Contact with muffler area can result in serious
burns.
Exhaustheat/gases can ignite combustibles,
structures or damage fueI tank causing a fire.
• DONOTtouchhot partsandAVOIDhot exhaustgases.
•Allowequipmentto cool beforetouching.
• Keepat least5feet (152cm) of clearanceonall sidesof
pressurewasherincludingoverhead.
• Codeof FederalRegulation(CFR)Title36 Parks,Forests,and
PublicPropertyrequireequipmentpoweredby aninternal
combustionengineto haveasparkarrester rnaintainedin
effectiveworkingorder,complyingto USDAForestservice
standard5100-1Cor laterrevision.Inthe Stateof Californiaa
sparkarresteris requiredundersection4442of the California
Publicresourcescode.Otherstatesrnayhavesimilarlaws.
WARNING
The high pressure stream of water that this
equipment produces can cut through skin and its
underlying tissues, ieading to serious injury and
_ossible amputation,
Spray gun traps high water pressure, even when
engine is stopped and water is disconnected,
which can cause injury.
• DONOT allow CHILDRENto operate pressure washer.
o NEVERrepair high pressure hose. Replaceit.
• NEVERrepair leaking connections with sealantof any kind.
Replaceo-ring or seal.
• NEVERconnect high pressure hoseto nozzle extension.
o Keep high pressure hose connectedto purnp and spray gun
while system is pressurized.
• ALWAYS point spray gun in safe direction and squeezespray
gun trigger to releasehigh pressure, every time you stop
engine. Engagetrigger lock when not in use.
• NEVERaim spray gun at people, animals, or plants.
o DO NOTsecure spray gun in open position.
• DO NOT leavespray gun unattended while rnachine is running.
oNEVERuse a spray gun which does not have a trigger lock or
trigger guard in place and in working o!der.
o Always be certain spray gun, nozzlesand accessories are
correctly attached.
WARNING
Unintentional sparking can result in fire or
'_¢ electric shock,
WidENADJUSTINGGRJVIAKINGI_EPAIRSTG YGUR
PRESSIJi_EWASHER
o Disconnectthe sparkplugwire fromthe sparkplugandplace
thewire whereit cannotcontactsparkplug.
WidENTESTINGFGRENGINESPARK
o Useapprovedsparkplugtester.
• DONOTcheckfor sparkwith sparkplugremoved.

WARNING
Starter and other rotating parts can entangle
7ands, hair, clothing, or accessories.
•NEVERoperate pressure washer without protective housing or
covers.
• DO NOTwea! loose clothing jewelry or anything that may be
caught in the starter or other rotating parts.
, Tie up long hai! and remove jewelry.
WARNING
Risk of eye injury=
_Spray can sp ash back or propei objects.
Always wear safety goggles when using this equipment or in
vicinity of where equipment is in use.
Before starting the pressure washer, be sure you are wearing
adequate safety goggles.
NEVERsubstitute safety glasses for safety goggles.
High pressure spray may damage fragiie items inciuding
iass.
DONOTpointspraygunat glasswheninjet spraymode.
NEVERaim spraygunat plants.
Improper treatment of pressure washer can damage it and
shorten its life.
Ifyou havequestionsaboutintendeduse,askdealeror contact
Sears.
NEVERoperateunitswith brokenor missingpa!ts,or without
protectivehousingor covers.
DONOTby-passanysafetydeviceonthis rnachine.
DONOTtamperwith governedspeed.
DONOToperatepressurewasheraboveratedpressure.
DONOTmodifypressurewasherinanyway.
Beforestartingpressurewasherincold weathercheckall parts
of the equipmentto besureice hasnot formedthere.
NEVERrnovemachineby pulB_gon hoses.Usehandle
providedon unit.
Checkfuelsystemfor leaksor signs of deterioration,suchas
chafedor spongyhose,!ooseor missingclamps or damaged
tankorcap.Correctalldefectsbeforeoperatingpressure
washer.
Thisequipmentis designedto beusedwith Searsauthorized
partsONLY.If equipmentis usedwith partsthatDONOT
complywith rninimumspecifications,userassumesall risks
andliabilities.
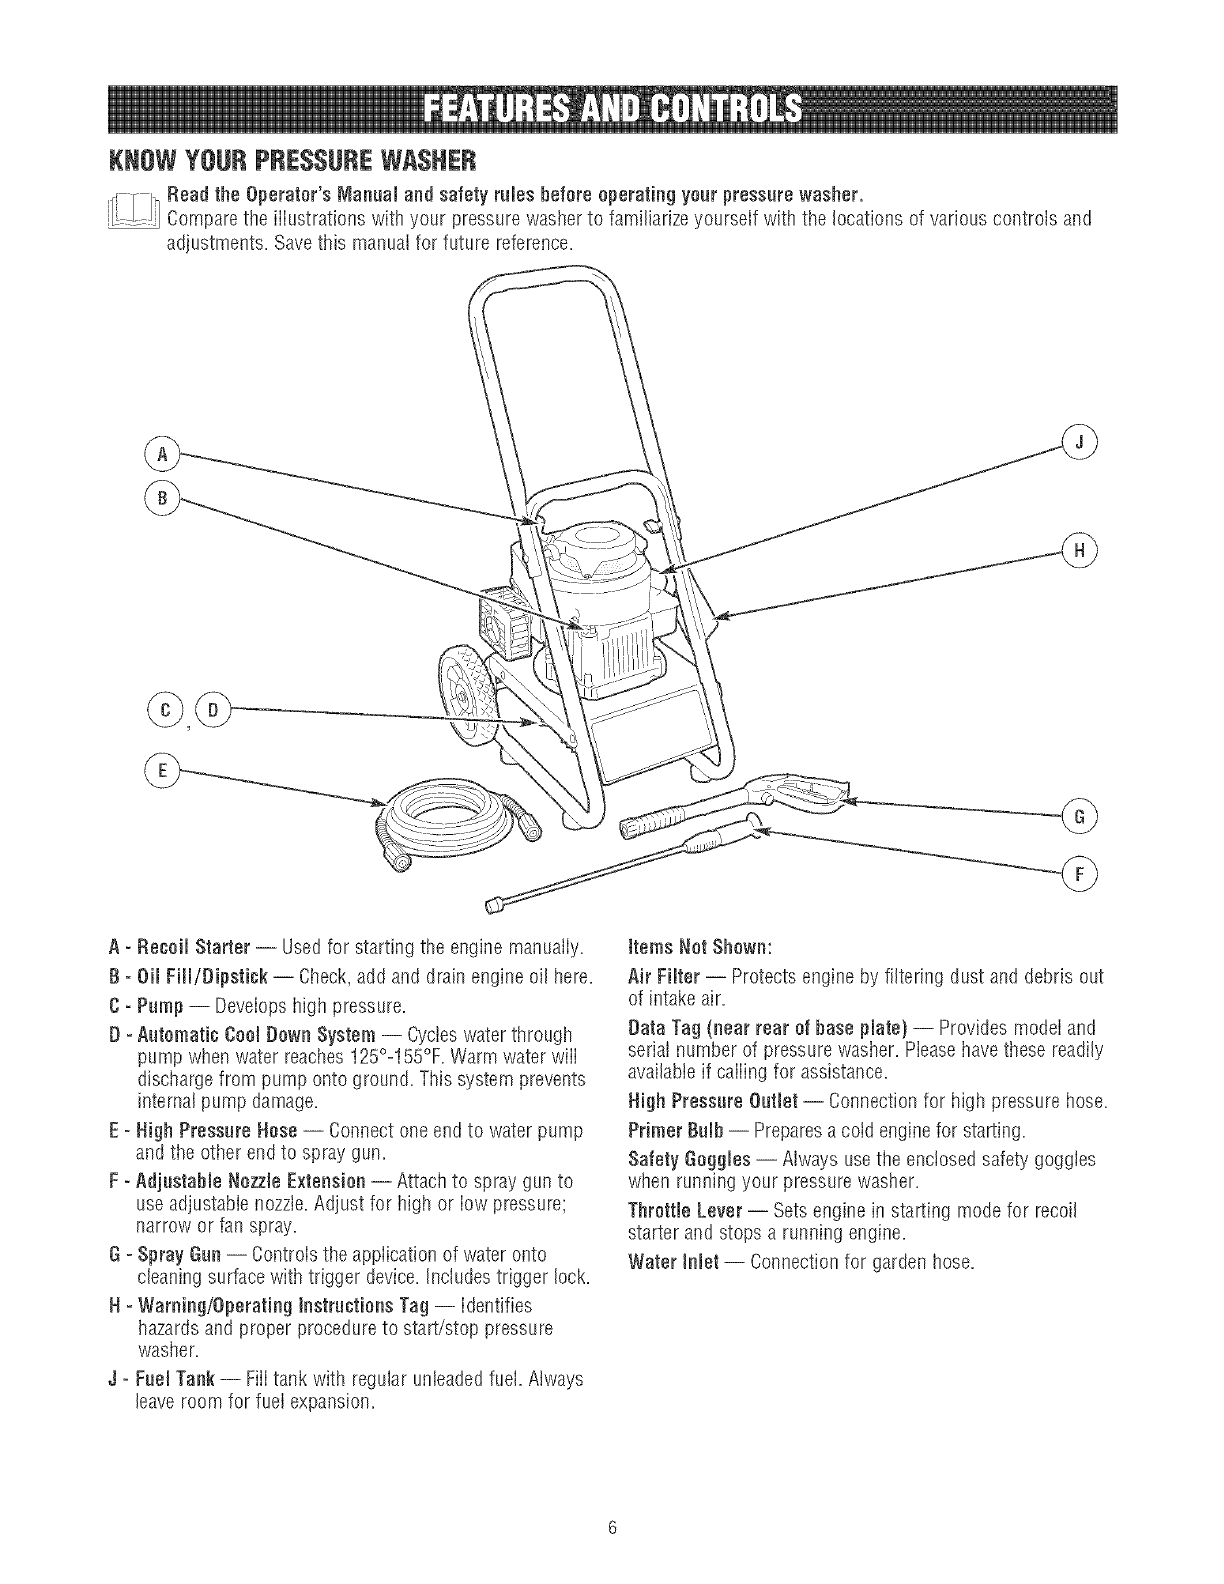
KNOWYOURPRESSUREWASHER
,r' F I-_Read the Operator's Manual and safety ruJesbefore operating your pressure washer.
....Comparetheillustrationswithyourpressurewashertofamiliarizeyourselfwiththelocationsofvariouscontrolsand
adjustments. Savethis manual for future reference.
A =ReooiJStarter -- Usedfor starting the engine manuaiiy.
B - Oil Fill/Dipstick -- Check,add and drain engine oil here.
C - Pump -- Deveiops high pressure.
D=Automatic CoolDown System -- Cycleswater through
pump when water reaches125°o155%,Warm water wiii
dischargefrom pump onto ground. This system prevents
internal pump damage.
E - High Pressure Nose -- Connect one end to water pump
and the other end to spray gun.
F =Adjastahie Nozzle Extension-- Attach to spray gun to
use adjustabie nozzte=Adjust for high or iow pressure;
narrow or fan spray.
G - Spray Gun-- Controis the appiication of water onto
cleaning surface with trigger device. Includestrigger lock.
N =Warning/Operating [nstractiena Tag -- identifies
hazardsand proper procedure to start/stop pressure
washer=
J =Fael Tank -- Fiii tank with regular unleadedfuel. Atways
leave room for fuel expansion.
items Not Shown:
Air Filter -- Protectsengine by filtering dust and debris out
of intake air=
Data Tag (near rear of base plate) -- Provides modei and
serial number of pressure washer=Pieasehave these readily
available if caiiing for assistance.
HighPressureOutlet -- Connection for high pressure hose.
Primer BaJh-- Preparesa coid enginefor starting=
Safety GoggJes-- AIways usethe enclosedsafety goggies
when running your pressure washer.
Throttle Lever -- Sets engine in starting mode for recoil
starter and stops a running engine.
Water thief -- Connectionfor garden hose.

Yourpressurewasherrequiressomeassemblyandisready
foruseonlyafterit hasbeenproperlyservicedwiththe
recommendedoilandfuel.
tfyon have any prnNemswith the assembly of your
pressurewasher, please call the pressurewasher hempline
at 1o800o222o3136.
UNPACKTHE PRESSUREWASHER
1. Remove everything from carton except pressure washer.
2. Opencarton completely by cutting each corner from top
to bottom.
3. Remove pressure washer from carton.
CARTONCONTENTS
Checkali contents, if any parts are missing or damaged,call
the pressure washer hetpline at 1o800o222o3136.
° Main Unit
° Handle
, Wheel Kit
, High PressureHose
, Spray Gun
, Adjustable Nozzb Extension
, Oil Bottle
° Parts Bag (which includes the following):
, Operator's Manual
, Owner's Registration Card
, Safety Goggtes
*MeshAccessory Bag
Becomefamiliar with each piece before assembling the
pressure washer. Identify aiI contents with the illustration on
page 6. If any parts are missing or damaged,call the
pressure washer hetp%e at 1o880-222o3136.
ASSEMBLINGPRESSUREWASHER
Your Craftsman pressure washer will need assembly before
operation:
1. FilI out and send in registration card.
2. Attach handIeto main unit.
3. Instali wheel kit.
4. Add oii to engine crankcase.
5. Add fuel to fuel tank.
6. Connect pressure hose to spray gun and pump.
7. Connect water suppiy to pump.
8. Attach nozzleextension to spray gun.
Attach Handle
1. Placehandle (A) onto base (B). Makesure holes in
handlealign with holes on base.
2. Insert carriage bolts (g) through holes from outside of
unit and attach a plastic knob (D) from inside of unit.
Tighten by hand.
install Wheel Kit
The wheel kit is designed to greatiy improve the portabifity of
your pressure washer.
NOTE:Wheel kit is not intended for over-the-road use.
install the wheel kit as faiiews:
1. Placethe bottom of the pressure washer frame on a flat,
even surface.
2. Slidea wheel (A) over the axle pin (B).
NOTE:Besure to install wheel with raised hub inboard.
/
I
/
3. Slideaxle pin through hole (C) in frame.
4. Retainwheel on axle pin with retaining pin (D).
5. Repeatstep 2 through 4 to secure second wheel.
Add Engine OiJ
1. Place pressure washer on a fiat, Ieveisurface.
2. Cleanarea around oii fiii and remove yeiiow oii fiii
cap/dipstick.
NOTE:See Oil Recommendationsin Maintenancesection.
Verify provided oii bottle is the correct viscosity for current
ambient temperature.
3. Using oil funnel (optional), slowiy pour contents of
provided oil bottie into oil fill opening.
NSTICE
improper treatment of pressure washer can damage it and
shorten its life.
DONOTattemptto crankor sta!tthe enginebeforeit hasbeen
properlyservicedwiththe recommendedoil. Thismayresultin
anenginefailure.
4. Replaceoil fill cap/dipstick and fully tighten.
Add Faei
Fuel must meet these requirements:
, Clean,fresh, unteadedgaso%e.
, A minimum of 87 octane/87 AKI (91 RON). High altitude
use,see High Altitude.
o Gasoline with up to 10% ethanol (gasohoi) or up to 15%
MTBE(methyi tertiary butyl ether) is acceptable.
WARNING
Fueland its vapors are extremely flammable and
explosive.
Fire or explosion can causesevere burns or
death.
WHENADDINGFUEL
,,, TurnpressurewasherOFFandlet it coolat least2 minutes
beforeremovingfuelcap.Loosencapslowlyto relievepressure
in tank.
• Fillfuel tankoutdoors.
o DONOToverfilltank.Allowspacefor fuel expansion.
• Iffuel spills waituntil it evaporatesbeforestartingengine.
Keepfuelawayfrornsparks,openflames,pilot lights,heat,and
otherignitionsources.
DONOTlight a cigaretteorsmoke.
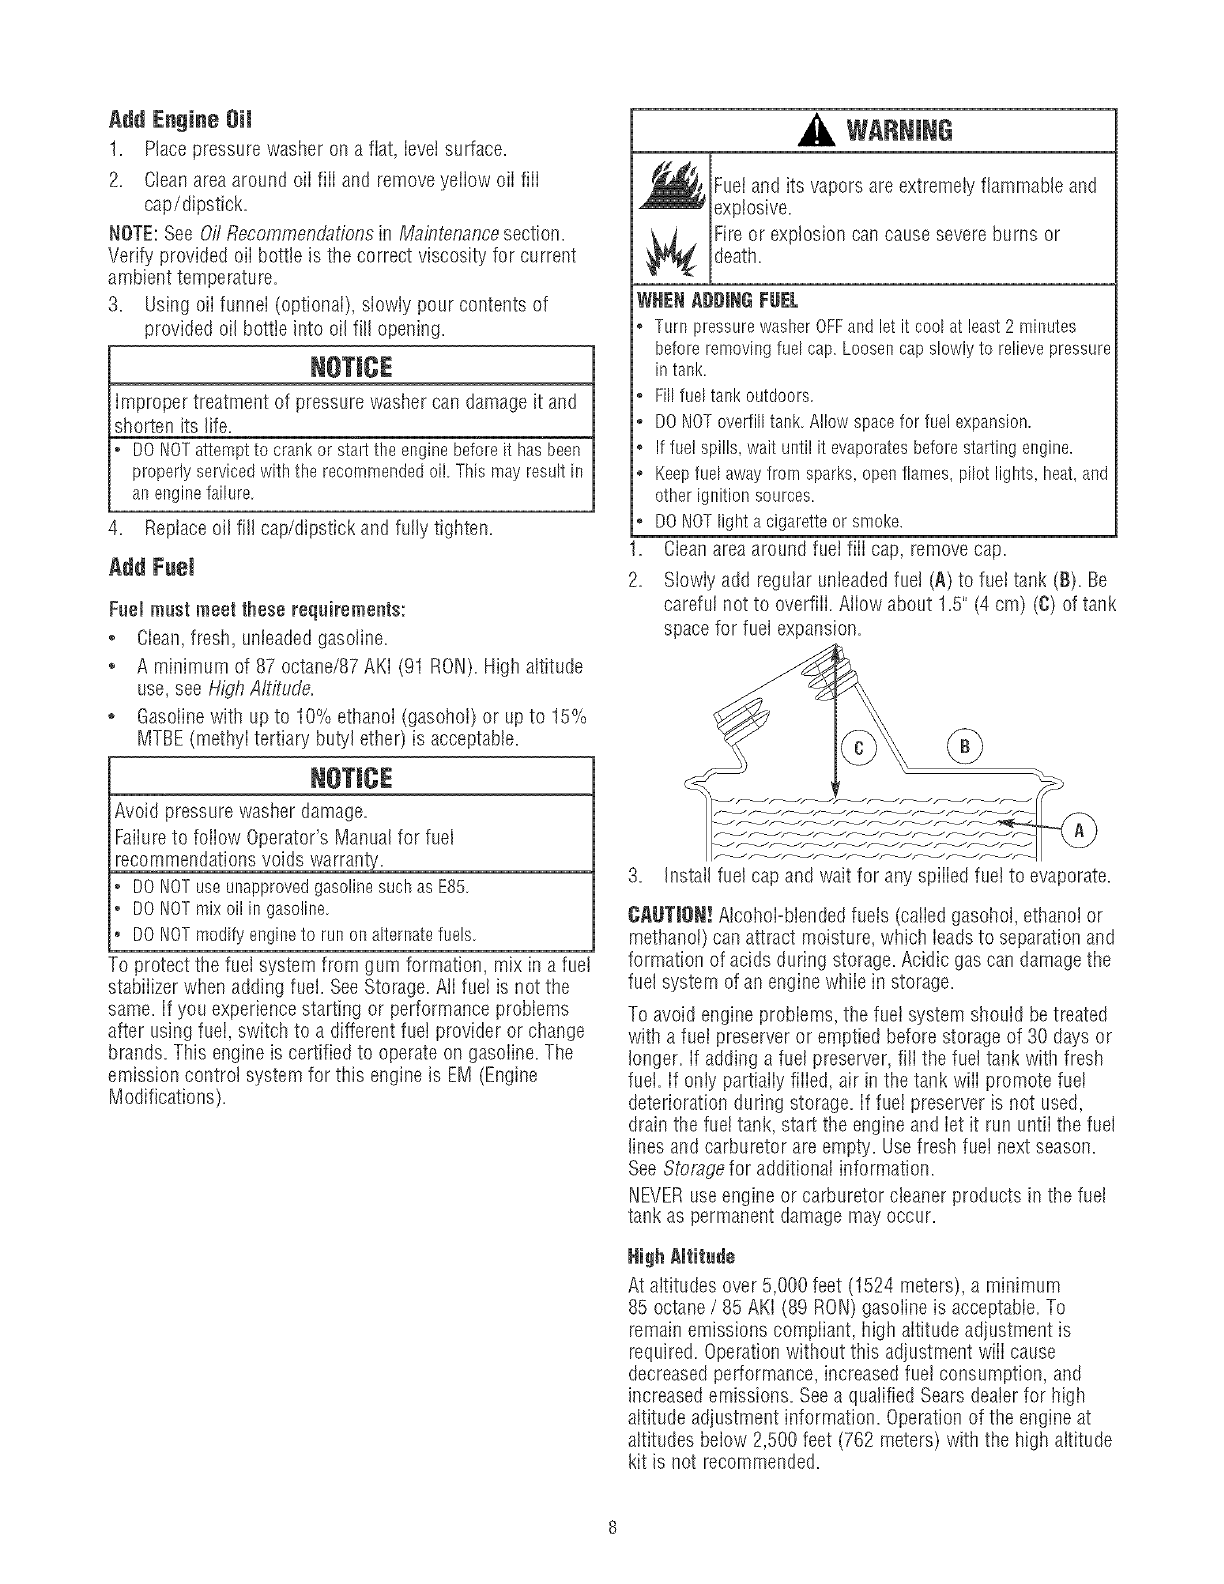
Cieanareaaround fuel fiii cap, removecap.
Siowiy add regular unleadedfuel (A) to fuet tank (B). Be
carefui not to overfiii. Aiiow about 1.5" (4 cm) (C) of tank
space for fuel expansion.
®
1.
2.
Avoid pressure washer damage.
Failureto follow Operator's Manual for fuel
recommendations voids warranty.
DONOTuseunapprovedgasolinesuchas E85.
DONOTmixoil ingasoline.
DONOTmodifyengineto runon alternatefuels.
To protect the fuel system from gum formation, mix in a fuel
stabiiizer when adding fuei. SeeStorage. Ali fuel is not the
same. if you experiencestarting or performance probiems
after using fuei, switch to a different fuel provider or change
brands. This engine is certified to operate on gasoiine. The
emission control system for this engine is EM (Engine
Modifications).
3. Install fuel cap and wait for any spilled fuel to evaporate.
CAUTJSN!AlcohoI-biendedfuels (catied gasohoI, ethanol or
methanol) can attract moisture, which leadsto separationand
formation of acids during storage. Acidic gas can damagethe
fuel system of an engine while in storage.
To avoid engine probiems, the fuet system should be treated
with a fuel preserver or emptied before storage of 30 days or
longer, if adding a fuel preserver, fili the fuel tank with fresh
fuei. if only partialiy tiffed, air in the tank wiii promote fue!
deterioration during storage, if fuel preserver is not used,
drain the fuel tank, start the engine and iet it run untii the fuel
lines and carburetor are empty. Usefresh fuei next season.
SeeStorage for additional information.
NEVERuseengine or carburetor cteaner products in the fuel
tank as permanent damage may occur.
High Altitude
At aititudes over 5,000 feet (1524 meters), a minimum
85 octane /85 AKI (89 RON)gasoline is acceptable.To
remain emissions compiiant, high aititude adjustment is
required. Operationwithout this adjustment wiii cause
decreasedperformance, increasedfuet consumption, and
increasedemissions. Seea qualified Sears dealerfor high
altitude adjustment information. Operation of the engine at
altitudes beiow 2,500 feet (762 meters) with the high altitude
kit is not recommended.
Connect Hose and Water $uppty te Pemp 4. Run water through garden hose for 30 seconds to flush
it of debris. Turn off water.
iMPORTANT:DO NOTsiphon standing water for the water
supply. Use ONLYcoid water (iess than IO0°F).
5. Connectgarden hose (not to exceed50 feet in length) to
water inlet. Tighten by hand.
NOTE:Remove and discard the shipping caps from the
pump's high pressure outlet and water intet before attaching
hoses.
1. Uncoil higil pressure hose and attach one end of hose to
base of spray gun. Tighten by hand.
WARNING
The high pressure stream of water that this
_ quipment produces can cut througll skin and its
underlying tissues, ieading to serious injury and
_ossible amputation.
*NEVERconnect high pressure hoseto nozzleextension.
* Keephigh pressure hose connected to purnp and spray gun
while system is pressurized.
,Always be certain spray gun, nozzlesand accessories are
correctly attached.
Attach other end of high pressure hose to higI1pressure
outlet on pump. Tighten by hand.
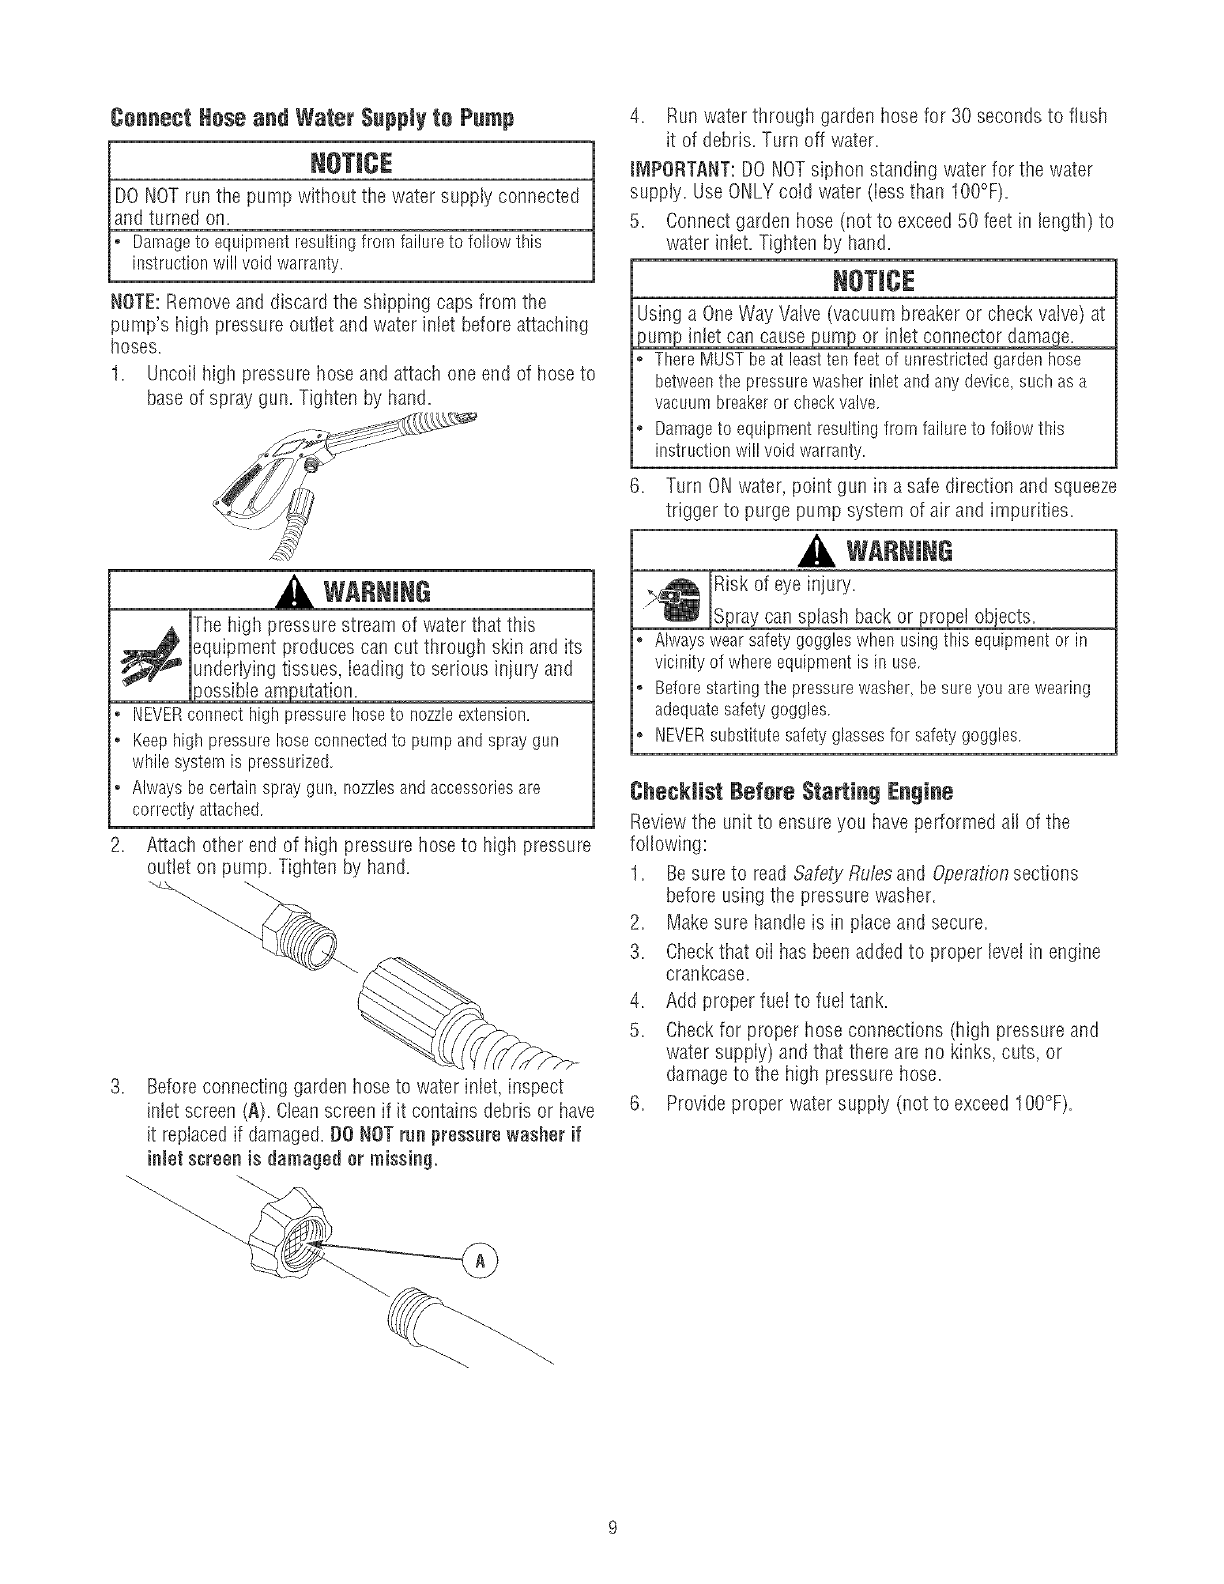
3. Beforeconnecting garden hose to water inlet, inspect
inlet screen (A). Cleanscreenif it contains debris or have
it replacedif damaged.00 NOTrue pressure washer if
inlet screen is damaged or missing.
Using a OneWay Valve (vacuum breaker or check valve) at
inlet can cause pump or inlet connector darnaqe.
ThereMUSTbeat leastten feetof unrestrictedgardenhose
betweenthepressurewasherinletandanydevice,suchas a
vacuumbreakeror checkvalve.
Damageto equipmentresultingfrom failureto followthis
instructionwill void warranty.
6. Turn ONwater, point gun in a safe direction and squeeze
trigger to purge pump system of air and impurities.
VARNING
>/_-_l_ Risk of eye injury=
_Spray_ can sp ash back or propel objects.
Alwayswearsafetygoggleswhen usingthis equipmentor in
vicinityof whereequipmentis in use.
Beforestartingthe pressurewasher,besureyouarewearing
adequatesafetygoggles.
NEVERsubstitutesafetyglassesfor safetygoggles.
ChecMist Before Starting Engine
Reviewthe unit to ensure you have performed all of the
following:
1. Besure to read Safety Ru/es and Operationsections
before using the pressure washer.
2. Makesure handie is in place and secure.
3. Checkthat oii has beenaddedto proper level in engine
crankcase.
4. Add proper fuel to fuel tank.
5= Checkfor proper hose connections (high pressure and
water suppiy) and that there are no kinks, cuts, or
damageto the high pressure hose.
6. Provide proper water supply (not to exceed IO0°F).
HOWTO USEYOURPRESSUREWASHER
If you haveany problems operating your pressure washer,
please call the pressure washer helpline at 1-800-222-3136.
Pressure Washer Lecatien
PressureWasherClearance
WANNING
Exhaustheat/gases can ignite combustibies,
structures or damage fuei tank causing a fire.
• Keepat least5ft. (152cm)clearanceonall sidesof pressure
washerincludingoverhead.
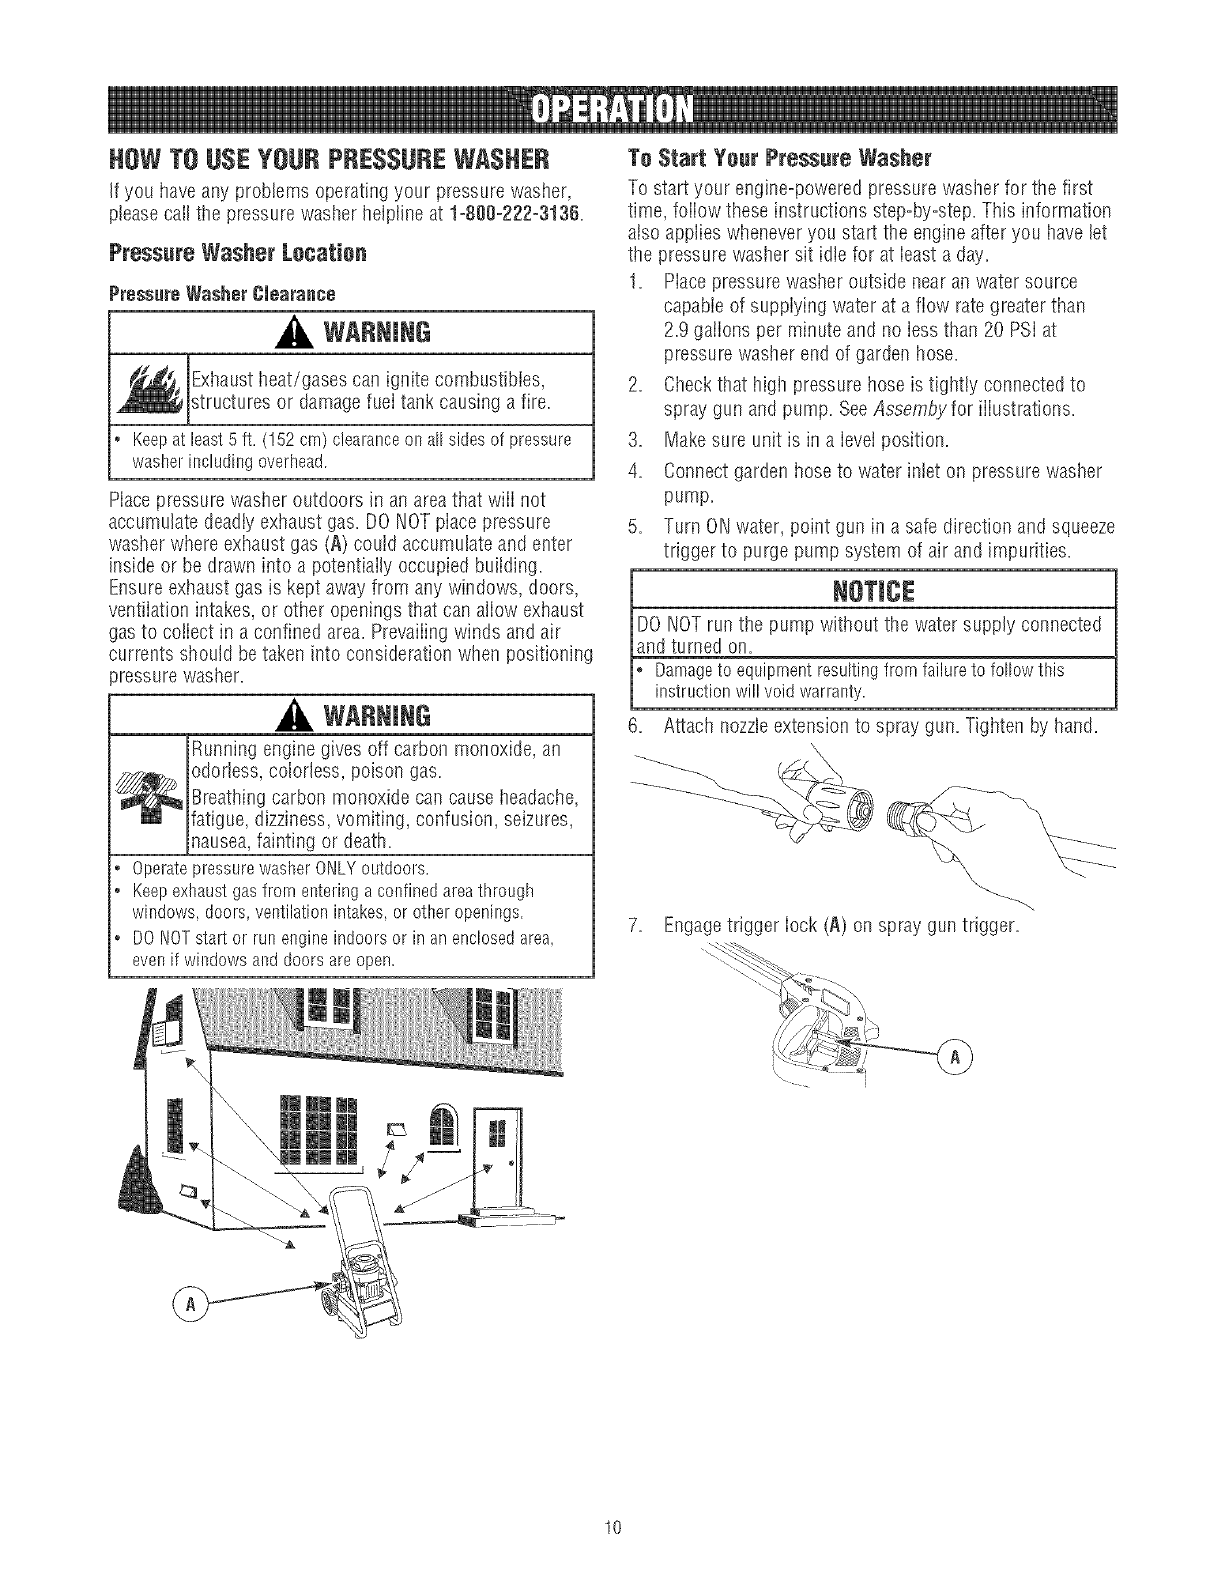
Macepressure washer outdoors in an areathat wiii not
accumulate deadtyexhaust gas. DO NOTplace pressure
washer where exhaust gas (A) could accumulateand enter
inside or be drawn into a potentiaily occupied building.
Ensureexhaust gas is kept awayfrom any windows, doors,
ventiiation intakes, or other openings that can aliow exhaust
gas to coiiect in a confined area. Prevaiiingwinds and air
currents should be taken into consideration when positioning
_ressurewasher.
WARNING
Running engine gives off carbon monoxide, an
odorbss, coiorbss, poison gas.
Breathingcarbon monoxide can causeheadache,
fatigue, dizziness, vomiting, confusion, seizures,
nausea,fainting or death.
.OperatepressurewasherONLYoutdoors.
• Keepexhaustgasfromenteringaconfinedareathrough
windows,doors,ventilationintakes,or otheropenings.
• DONOTstat or runengineindoorsor in anenclosedarea,
evenif windowsanddoorsareopen.
To Start Your Pressure Washer
To start your engine-powered pressurewa@er for the first
time, foiiow these instructions step-by-step. This information
also applies wheneveryou start tile engine after you have let
the pressure washer sit idle for at bast a day.
1. Placepressure washer outside near an water source
capabie of suppiying water at a flow rate greater than
2.9 gaiions per minute and no iess than 20 PSi at
pressurewasher end of garden hose.
2. Checkthat higil pressure hose is tightly connected to
spray gun and pump. SeeAssemby for iiiustrations.
3. Makesure unit is in a ievei position.
4. Connectgarden hose to water intet on pressure washer
pump.
5. Turn ONwater, point gun in a safe direction and squeeze
trigger to purge pump system of air and impurities.
NOTICE
DO NOTrun the pump without the water supply connected
and turned oil.
_ amageto equipmentresultingfrom failureto followthis
instructionwill void warranty
6. Attach nozzIeextension to spray gun. Tighten by hand.
X\
7. Engagetrigger iock (A) on spray gun trigger,
10
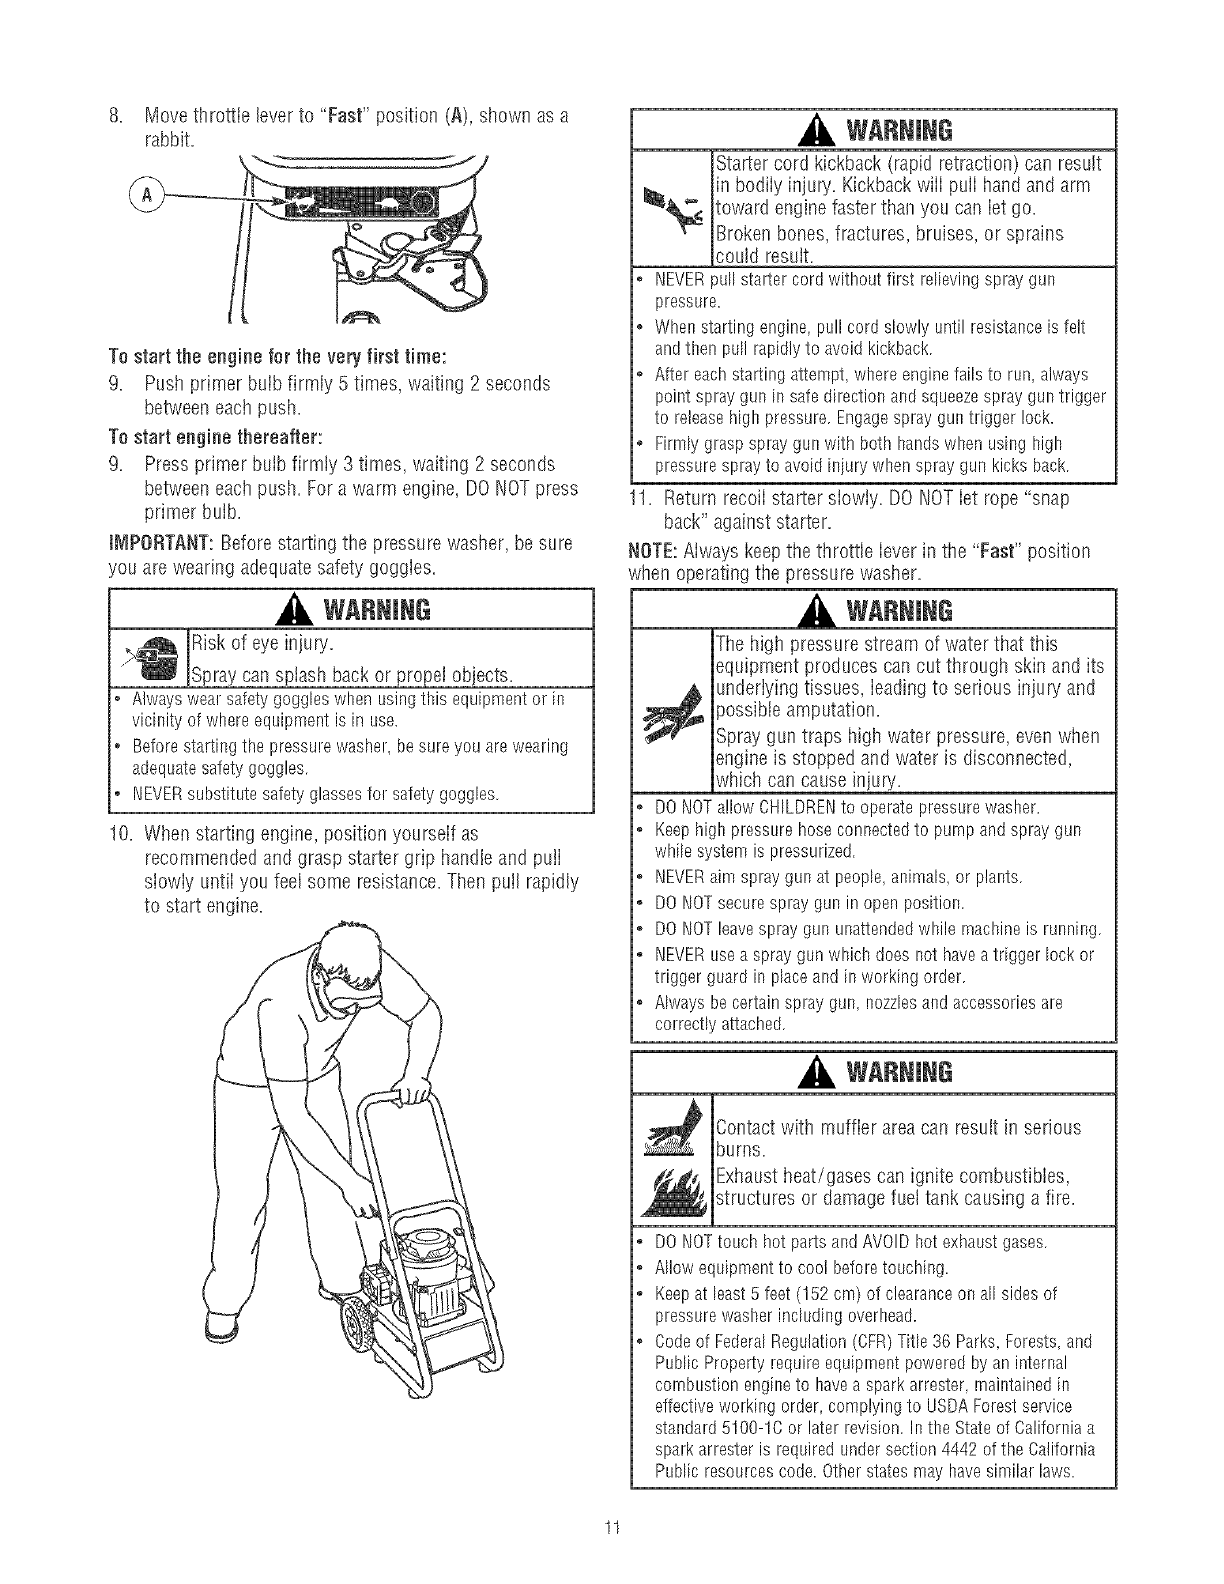
8. Move throttle lever to "Fast" position (A), shown as a
rabbit.
To start the engine for the very first time:
9. Push primer buIb firmly 5 times, waiting 2 seconds
betweeneach push.
To start engine thereafter:
9. Press primer bulb firmly 3 times, waiting 2 seconds
betweeneach push. For a warm engine, DONOTpress
primer bulb,
t_IPORTANT:Before starting the pressure washer, be sure
'ou are wearing adequatesafety goggles.
WARNING
v_ Risk of eye injury.
_Spray can splash back or propel objects.
Alwayswea!safetygoggleswhenusingthis equipmentor in
vicinityof whereequipmentis in use.
Beforestartingthe pressurewasher,besureyou arewearing
adequatesafetygoggles.
NEVERsubstitutesafetyglassesfor safetygoggles.
10. When starting engine, position yourseif as
recommended and grasp starter grip handle and puli
siowiy untii you feel some resistance. Then pull rapidly
to start engine.
WARNING
Starter cord kickback (rapid retraction) call result
in bodiiy injury=Kickbackwiii puii handand arm
toward enginefaster than you can iet go.
Broken bones, fractures, bruises, or sprains
could resuit.
• NEVERpullstartercord withoutfirst relievingspraygun
pressure.
o Whenstartingengine,pullcord slowlyuntil resistanceis felt
andthen pullrapidlyto avoidkickback
o Aftereachstartingattempt,whereenginefailsto run, always
pointspraygunin safedirectionandsqueezesprayguntrigger
to releasehighpressureEngagesprayguntrigger!ock.
o Firmlygraspspraygunwithboth handswhenusing high
pressuresprayto avoidiniury whenspraygunkicksback
11. Return recoii starter siowiy. DO NOTiet rope "snap
back" against starter.
NOTE:Aiways keepthe throttb iever in the "Fast" position
when operating the pressure washer.
WARNING
The high pressure stream of water that this
equipment produces can cut through skin and its
_ nderiying tissues, ieading to serious injury and
}ossibte amputation.
Spray gun traps high water pressure, even when
engine is stopped and water is disconnected,
which can cause injury.
o DONOTallow CHILDRENto operate pressure washer.
• Keep high pressure hose connected to purnp and spray gun
while system is pressurized.
• NEVERaim spray gun at people, animals, or plants.
o DO NOTsecure spray gun in open position.
• DO NOT leavespray gun unattended while rnachine is running.
o NEVERuse a spray gun which does not have a trigger lock or
trigger guard in place and in working order.
• Always be certain spray gun, nozzbs and accessories are
correctly attached.
WARNING
_, Contact with muffler result in serious
area can
burns.
Exhaustheat/gases can ignite combustibles,
structures or damage fuel tank causing a fire.
o
®
o
DO NOTtouch hot parts and AVOIDhot exhaust gases.
Allow equipment to cool before touching.
Keep at least 5 feet (152 cm) of clearance on all sides of
pressure washer including overhead.
Codeof FederalRegulation (CFR)Title 36 Parks_Forests, and
Public Property require equiprnent powered by an internal
combustion engineto have a spark arrester rnaintained in
effective working order, complying to USDAForest service
standard 510B-1C or later revision. In the State of California a
spark arrester is required under section 4442 of the California
Public resources code. Other states may have similar laws.
11
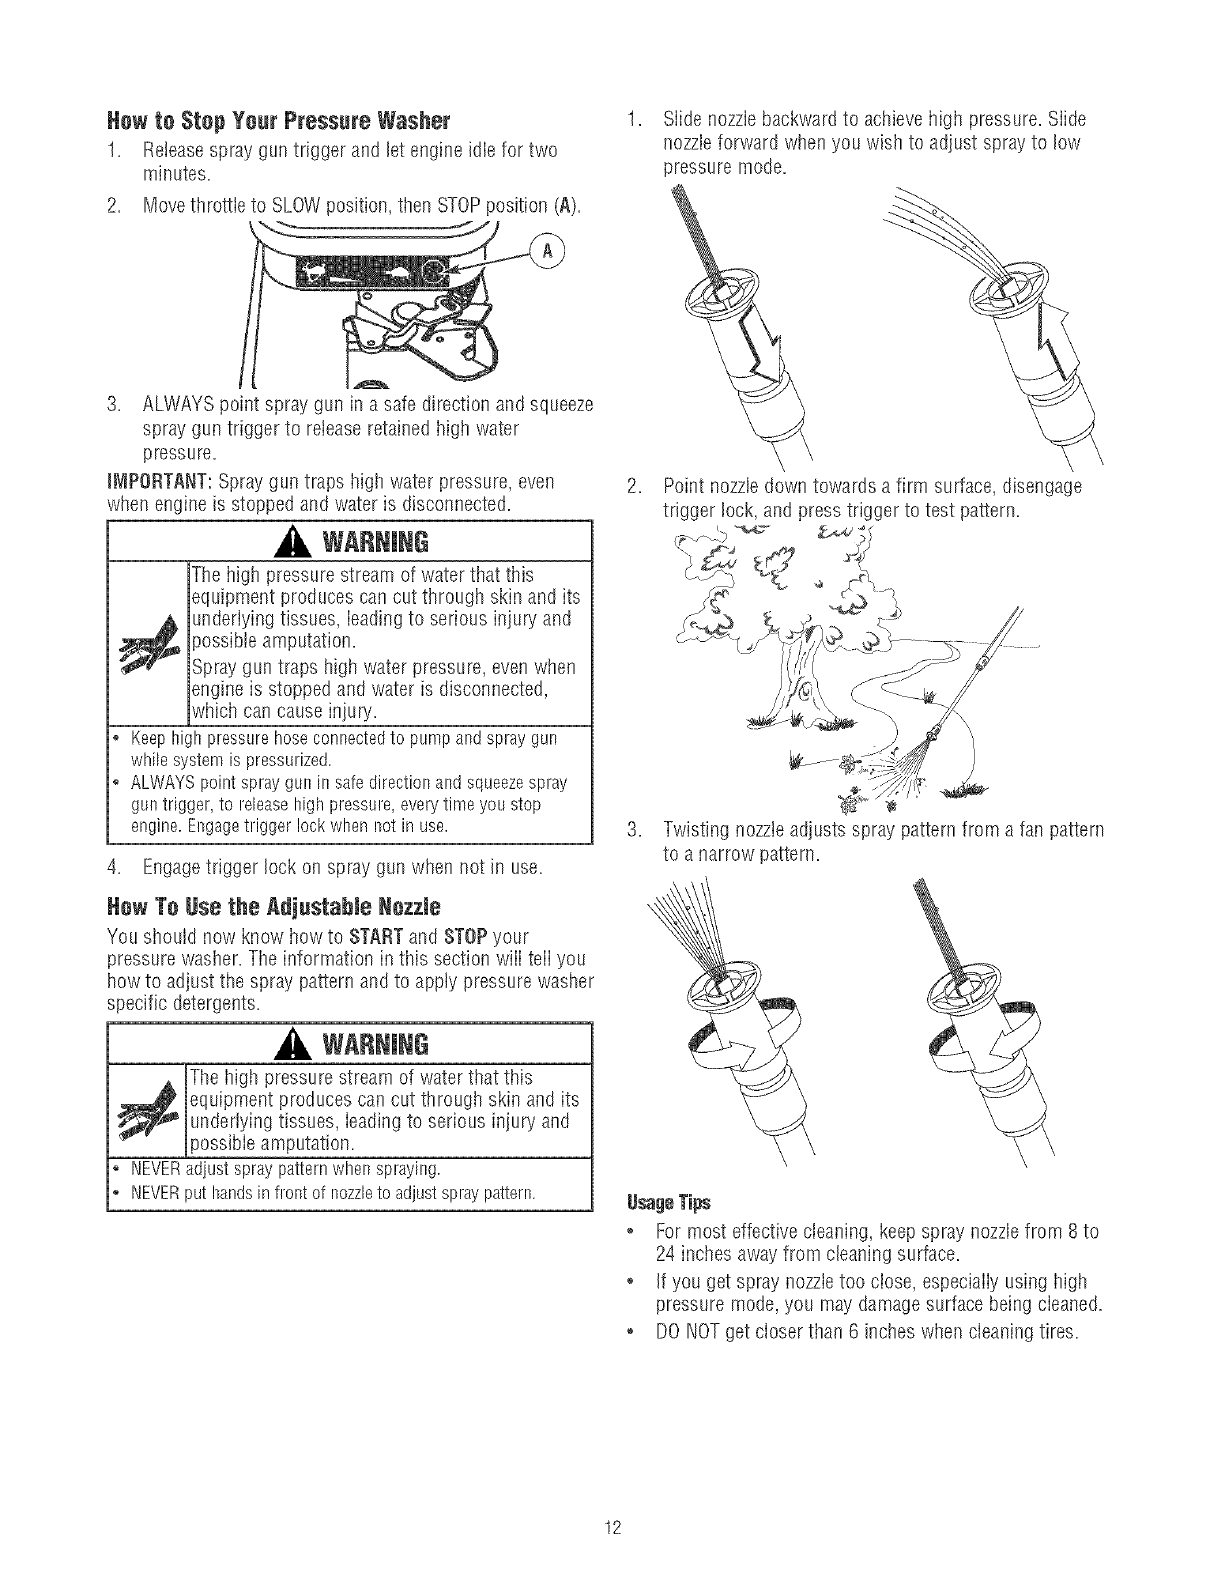
How to Stop Your Pressure Washer
1. Releasespray gun trigger and let engine idle for two
minutes.
2. Movethrottle to SLOWposition, then STOPposition (A).
1. Slide nozzle backward to achieve high pressure. Slide
nozzb forward when you wish to adjust spray to low
pressure mode.
3. ALWAYS point spray gun in a safe direction and squeeze
spray gun trigger to re!easeretained high water
pressure.
J_PORTANT:Spray gun traps high water pressure, even
when engine is stopped and water is disconnected.
WARNING
JThehigh pressure stream of water that this
_quipment produces can cut through skin and its
_ underiying tissues, ieadingto serious injury and
possibte amputation.
Spray gun traps Iligh water pressure, even when
engine is stopped and water is disconnected,
which can cause injury.
Keephighpressurehoseconnectedto pumpandspraygun
whilesystemis pressurized.
ALWAYSpointsprayguninsafedirectionandsqueezespray
guntrigger,to releasehighpressure,ever}/'timeyou stop
engine.Engagetriggerlockwhennot inuse.
4. Engagetrigger lock on spray gun when not in use.
Hew To Hse the Adjustable Hezzle
You should now know how to STARTand STOPyour
pressure washer. The information in this section wiii teii you
how to adjust the spray pattern andto apply pressure washer
specific detergents.
WARNING
The high pressure stream of water that this
:_ equipment produces can cut through skin and its
underlying tissues, ieading to serious injury and
}ossibie amputation.
NEVERadiustspraypatternwhetsspraying.
NEVERput handsinfrontof nozzbto adjustspraypattern.
2. Point nozzledown towards a firm surface, disengage
trigger lock, and press trigger to test pattern.
3. Twisting nozzleadjusts spray pattern from a fan pattern
to a narrow pattern.
UsageTips
o For most effective cleaning, keep spray nozzlefrom 8 to
24 inches away from cleaning surface.
,If you get spray nozzietoo close, especiaiiy using high
pressure mode,you may damagesurface being cleaned.
o DO NOTget closer than 6 inches when cleaning tires.
12
AppJying Detergent with AdjestahJe NozzJe
CAUTION
Chemicaiscan causebodily injury, and/or property
damage.
NEVERusecausticliquidwithpressurewasher.
UseONLYpressurewashersafedetergents/soaps.Followall
rnanufacturersinstructions.
To appJydetergent, folJaw these steps:
1. Review use of adjustabie nozzle.
2. Preparedetergent soiution as required by job.
3. Mace fiiter end of detergent siphoning tube into
detergent container.
NOTE:Makesure the fiiter is fully submerged in detergent
while applying detergent.
Contact with the hot muffler can damagedetergent
_honing tube.
Wheninsertingthe filterinto a detergentsolutionbottle,route
the tubeso asto keepit from inadvertentlycontactingthe hot
rnuffier.
4. Slide adjustabie nozzleforward to iow pressure mode.
NOTE:Detergentcannot be applied with nozztein high
pressure position.
5. Make sure garden hose is connected to water inlet.
Checkthat high pressure hose is connected to spray gun
and pump. Turn on water.
You must attach alI hoses before you start the engine.
Startingthe enginewithoutallthe hosesconnectedandwithout
the waterturnedONwill damagetlsepump.
Damageto equipmentresultingfrom failureto followthis
instructionwill void warranty.
6. Engagetrigger iock on spray gun and start engine
following instructions How to Start YourPressureWasher.
7. Appiy detergentto a dry surface, starting at iower
portion of area to be was!led and work upward, using
long, even, overiapping strokes.
8. Aiiow detergentto "soak in" for 3-5 minutes before
washing and rinsing. Reappiyas neededto prevent
surface from drying. DO NOTallow detergentto dry on
(prevents streaking).
iMPORTANT:You must flush the detergent siphoning system
after each use by placing the fiiter into a bucket of clean
water, then run the pressure washer in low pressure for
1-2 minutes.
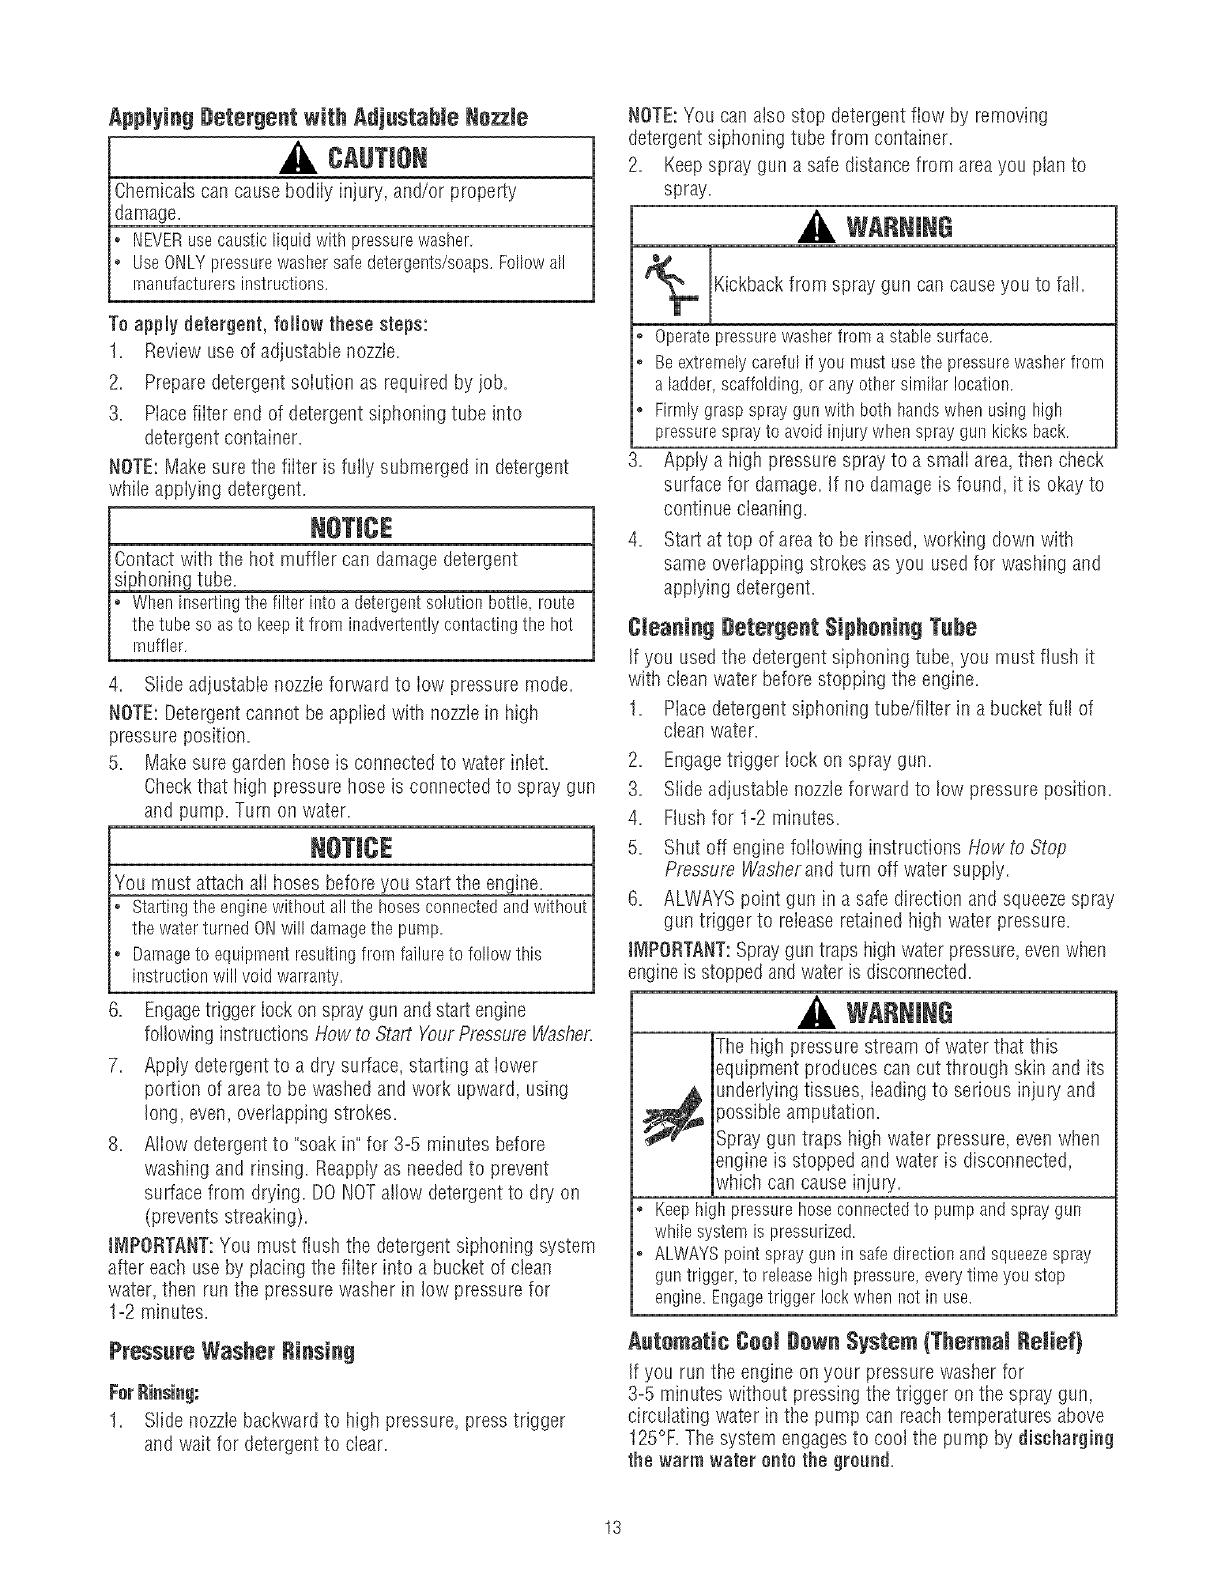
Pressure Washer Rinsing
Far Rinsing;
1. Slide nozzlebackward to high pressure, press trigger
and wait for detergentto clear.
NOTE:You can also stop detergent flow by removing
detergentsiphoning tube from container.
2. Keepspray gun a safe distance from areayou plan to
spray.
WARNING
Kickbackfrom spray gun can causeyou to fall.
o Operatepressurewasherfrom astablesurface.
• Beextremelycarefulif you mustusethe pressurewasherfrom
a ladder,scaffolding,or anyothersimilarlocation.
o Firmlygraspspraygunwithboth handswhenusing high
pressurespray'to avoidinjury whenspraygunkicksback.
3. Apply a higil pressure spray to a smali area,then check
surface for damage. If no damage is found, it is okay to
continue cieaning.
Start at top of areato be rinsed, working down with
same overiapping strokes as you used for washing and
applying detergent.
Ctean[ng Detergent Siphoning Tube
If you used the detergentsiphoning tube, you must flush it
with clean water before stopping the engine.
1. Piacedetergent siphoning tube/filter in a bucket full of
clean water.
2. Engagetrigger iock on spray gun.
3. Slideadjustable nozzleforward to low pressure position.
4. Flushfor 1-2 minutes.
5. Shut off engine following instructions How to Stop
Pressure Washerand turn off water supply.
6. ALWAYS point gun in a safe direction and squeezespray
gun trigger to releaseretained high water pressure.
IMPORTANT:Spraygun traps high water pressure,evenwhen
engineis stoppedand water is disconnected.
WARNING
The high pressurestream of water that this
equipment produces can cut through skin and its
_ nderlying tissues, ieadingto serious injury and
}ossibie amputation.
Spray gun traps higil water pressure, even when
engine is stopped and water is disconnected,
which can cause injury.
o Keephighpressurehoseconnectedto pumpandspraygun
wh[b systemis pressurized.
• ALWAYSpointspraygun[it safedirectionandsqueezespray
guntrigger,to releasehiglspressure,everytimeyou stop
engine.Engagetrigger lockwhenisotin use.
Autematic Cee! Dawn System {Thermal lleiief)
If you run the engine on your pressure washer for
3-5 minutes without pressing the trigger on the spray gun,
circulating water in the pump can reach temperatures above
125%. The system engagesto cool the pump by discharging
the warm water onto the ground.
13

ENGINETECHNICALINFORMATION
This is a single cylinder, L-head, air cooled engine. It is a low
emissions engine.
In tlse Stateof Caiifornia, Model 90000 engines are certified
by the California Air Resources Boardto meet emissions
standards for 125 hours. Such certification does not grant
the purchaser, owner or operator of this engine any
additional warranties with respectto the performance or
operational iife of this engine. The engine is warranted soiely
according to the product and emissions warranties stated
elsewherein this manual.
Pewer Ratings
The gross power rating for individual gas engine models is
labeledin accordance with SAE(Society of Automotive
Engineers)code J1940 (SmalI Engine Power & Torque
Rating Procedure),and rating performance has been
obtained andcorrected in accordancewith SAEJ1995
(Revision 2002-05). Torque values are derived at 3060 RPM;
horsepower vaiues are derived at 3600 RPiVI.Actuai gross
engine power wiii be iower and is affected by, among other
things, ambient operating conditions and engine-to-engine
variabiiity. Given both the wide array of products on which
engines are piaced and the variety of environmentai issues
appiicabteto operating the equipment, the gas engine wiii not
develop the rated gross power when used in a given piece of
power equipment (actual "on-site" or net power). This
difference is due to a variety of factors including, but not
limited to, accessories (air cteaner, exhaust,charging,
cooiing, carburetor, fuel pump, etc.), appiication iimitations,
ambient operating conditions (temperature,humidity,
altitude), and engine-to-engine variabiiity. Due to
manufacturing and capacity iimitations, Briggs & Stratton
maysubstitute an engine of higher rated power for this
Series engine.
PRODLJCTSPECiFiCATiONS
Pressure Washer Specificatbns
Outlet Pressure ........................... 2,000 PSi
Flow Rate................................. 1.9 GPM
Detergent Mix ........................ Use as directed
Water Supply Temperature .......... Not to exceed IO0°F
Shipping Weiglst............................. 63 Ibs.
Engine Specifications
Bore .......................... 2.562 in. (65.09 mm)
Stroke .......................... 1.75 in. (44.45 mm)
Displacement ..................... 9.02 in. (147.8 cc)
Spark Plug
Type: ............ Briggs & Stratton 802592 or 5095D
Set GapTo: ................... O.030inch(O.76mm)
Armature Air Gap: ........ 0.006-0.010 in. (0.15-0.25mm)
Valve clearancewith valvesprings instailed and piston 1/4 in.
(6 ram) past top dead center (check when engine is cold).
Intake ................. 0.005-0.007 in. (0.13-0.18 mm)
Exhaust ............... 0.007o0.009in. (0.18-0.23 ram)
FuelCapacity .................. 1.0 Quarts (0.95 Liters)
OilCapacity........................ 18Ounces(0.5 liter)
NOTE:For practical operation, the engine load should not
exceed 85% of rated power. Enginepower wiii decrease
3-I/2% for each 1,000 feet (300 meters) above sea Ieveiand
1% for each 10° F (5.6° C) above 77° F (25° C). It should
operatesatisfactorily at an angle up to 15°.
14
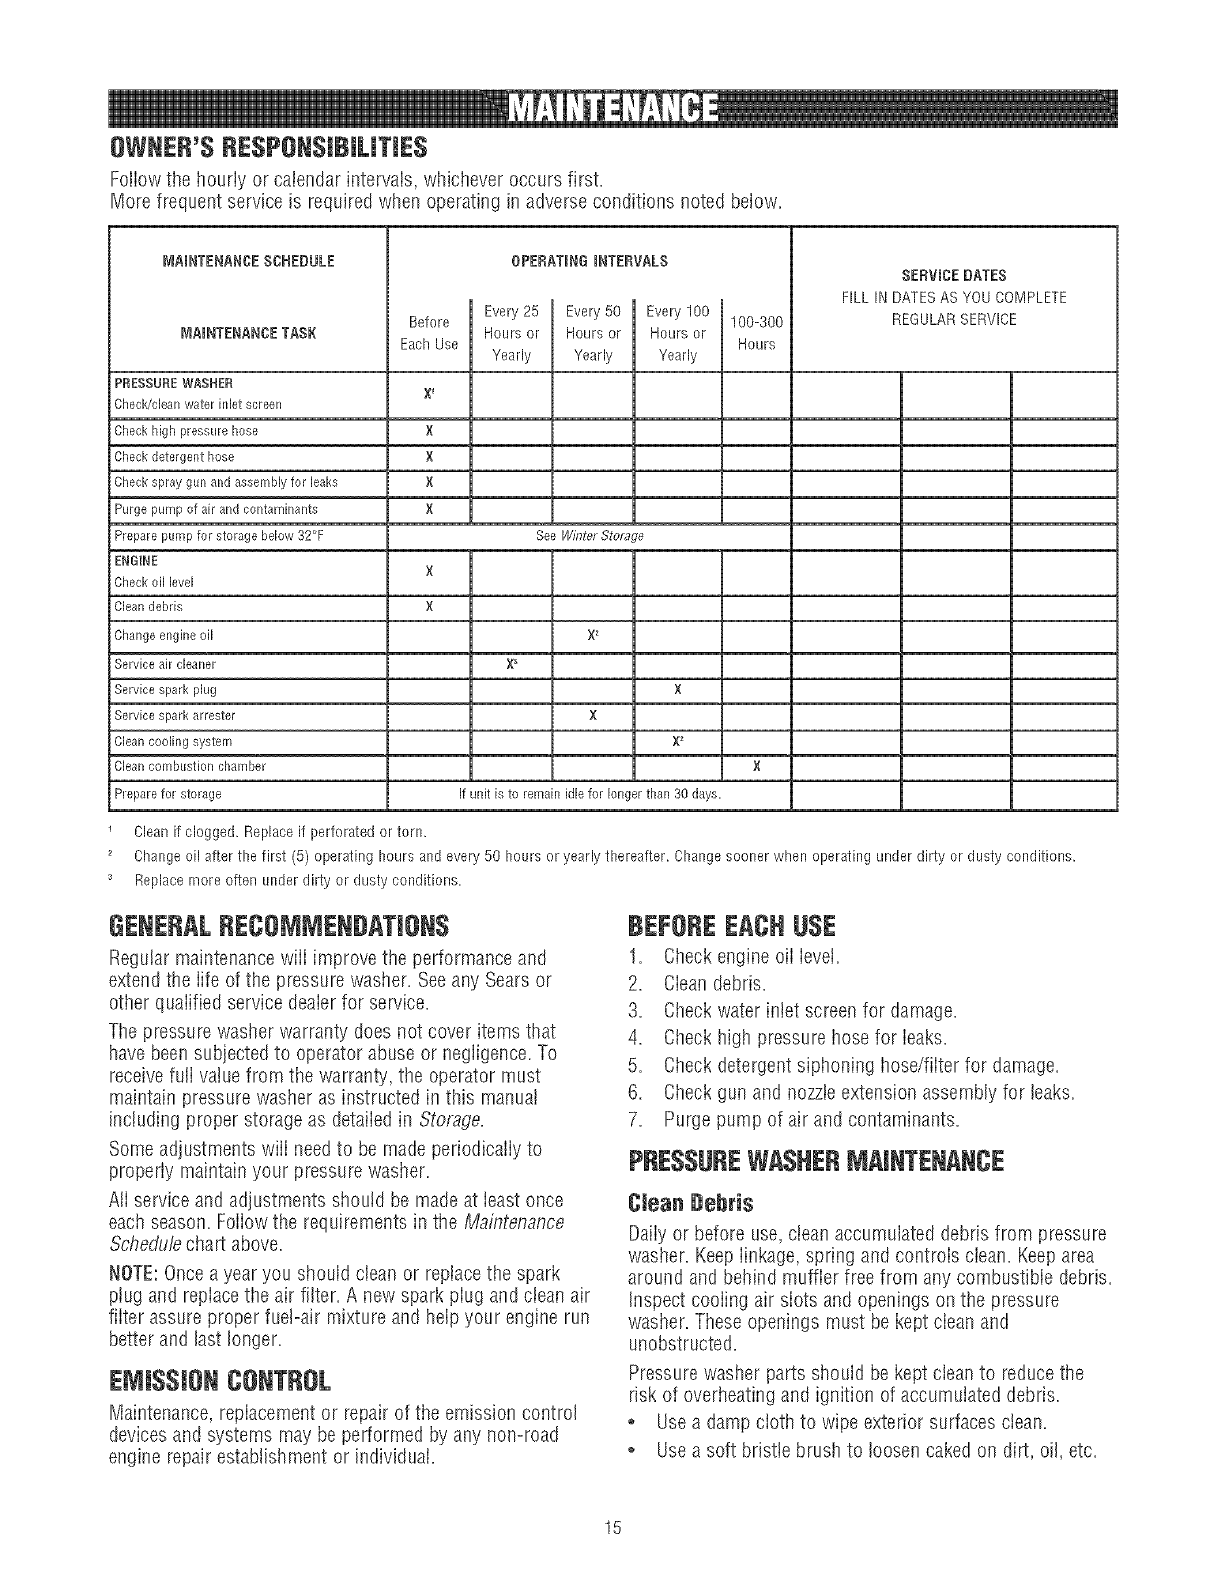
OWNER'SRESPONSiBiLiTIES
Followthe hourly or calendar intervals, whichever occurs first.
More frequent service is required when operating in adverse conditions noted below.
MAINTENANCESCHEDULE
MAINTENANCETASK
PRESSURE WASHER
Chec_Ncieanwater inlet screen
Check high pressure hose
Check detergent hose
Check spray gun and assembly for leaks
Purge pump of air and contaminants
Prepare pump for storage below 32°F
ENGINE
Before
EachUse
X 1
}(
N
N
}(
OPERATINGiNTERVALS
I Every 25 Every 50 Every 100
Hours or Hours or Hours or
Yearly Yearly Yearly
See Winter Storz_ge
100-300
Hours
SERVICEDATES
FILL IN DATESAS YOU COMPLETE
REGULARSERVICE
Check oil bye[
Clean debris
Change engine oil
Service air cleaner
Service spark plug
Service spark arrester
Clean cooling system
Clean combustion chamber
Prepare for storage
X
X
X _
X_
X
X
X_
If unit is to remain idle for longer than 30 days,
Cleanif clogged. Replace if perforated or torn.
Change oil after the first (5) operating hours and every 50 hours or yearly thereafter. Changesooner when operating under dirty or dusty conditions.
Replace more often under dirty or dusty conditions,
GENERALRECO 'JMENDATION$
Regular maintenancewill improve the performance and
extendthe iife of the pressure washer. Seeany Sears or
other quaiified service deaierfor service.
The pressure washer warranty does not cover items that
have been subjected to operator abuse or negiigence.To
receivefurl vatuefrom the warranty, the operator must
maintain pressure washer as instructed in this manual
including proper storage as detaiied in Storage.
Some adjustments wiii needto be made periodicaliy to
properly maintain your pressure washer.
AtI service and adjustments should be made at least once
each season. Follow the requirements in the Maintenance
Schedu/echart above.
NOTE:Oncea year you should clean or replace the spark
ptug and repiace the air filter. A new spark piug and clean air
filter assure proper fuel-air mixture and help your engine run
better and last Ion@r.
ENIi$$i0N CONTROL
Maintenance,replacementor repair of the emission control
devices and systems may be performed by any non-road
engine repair establishment or individual.
BEFOREEACHUSE
1. Checkengine oil Ievei.
2. Cleandebris.
3. Checkwater inlet screen for damage.
4. Checkhigh pressure hose for leaks.
5. Checkdetergent siphoning hose/filter for damage.
6. Checkgun and nozzleextension assembly for leaks.
7. Purge pump of air and contaminants.
PRESSUREWASHERMAINTENANCE
Clean Debris
Daily or before use,clean accumulated debris from pressure
washer. Keepiinkage, spring and controis cban. Keeparea
around and behind muffler free from any combustible debris.
Inspect cooiing air siots and openings on the pressure
washer. Theseopenings must be kept ciean and
unobstructed.
Pressurewasher parts should be kept clean to reduce the
risk of overheating and ignition of accumulated debris.
,Usea damp cioth to wipe exterior surfaces ctean.
o Usea soft bdstte brush to loosen caked on dirt, oil, etc.
15

NOTICE
jImproper treatment of pressurewasher can damage it and
_horten_ ....
its fife,
DONOTinsertany'objectsthroughcoolingslots.
° Usea vacuum cleaner to pick up loose dirt and debris.
Check and Cmean[n_etScreen
Examinegarden hose inlet screen. Clean if it is clogged or
repiace if it is torn.
Check High Pressure Hese
High pressure hoses can develop leaks from wear, kinking,
or abuse, inspect hose before each use. Checkfor cuts,
leaks, abrasions, bulging of cover, or damage or movement
of coupiings. If any of these conditions exist, replace hose
immediately.
WARNING
The high pressure stream of water that this
_ quipment produces can cut through skin and itsunderlying tissues, ieadingto serious injury and
)ossible amputation.
• NEVERrepairhighpressurehose.Replaceit.
o ReplacementhoseratingMUSTexceedmaximumpressure
ratingof unit.
Check Detergent Siphoning Tube
Examinethe filter on the detergent tube and ctean if c!ogged.
The tube shouid fit tightly on the barbed fitting. Examinethe
tube for ieaks or tears. Replacethe filter or tube if either is
damaged.
Check Gun and Nezzle Extensien
Examinehose connection to spray gun and makesure it is
secure. Test trigger by pressing it and making sure it springs
back into piace when you releaseit. Put safety iatch in UP
position and test trigger. You shouid not beable to press
trigger. Replacespray gun immediately if it fails any of these
tests.
Nezzle Maintenance
A pulsing sensation felt while squeezingthe spray gun trigger
may be caused by excessivepump pressure. The principal
cause of excessive pump pressure is a orifice clogged or
restricted with foreign materiais,such as dirt, etc. To correct
the problem, immediately clean the orifice following these
instructions:
1. Shut off engine andturn off water suppiy.
2. ALWAYS point gun in a safe direction and squeezespray
gun trigger to releaseretained high water pressure.
WARNING
The high pressure stream of water that this
equipment produces can cut through skin and its
_ nderlying tissues, ieading to serious injury and
)ossibte amputation.
Spray gun traps Hgh water pressure, even when
engine is stopped and water is disconnected,
which can cause injury.
• Keephighpressurehoseconnectedto pumpandspraygun
whilesystemis pressurized.
• ALWAYSpointspraygunin safedirectionandsqueezespray
guntrigger,to releasehighpressure,everytimeyou stop
engine.Engagetrigger lockwhennot in use.
3. Remove nozzleextension from spray gun.
4. Twist nozzleclockwise to stream position. Using a 2ram
(5/64) alien wrench, remove orifice from end of nozzle
extension,
5. Usea small paperclip to free any foreign material
clogging or restricting orifice.
Using a garden hose, removeadditional debris by back
flushing water through nozzleextension. Backflush
between30 to 60 seconds. Turn adjustable nozzle
extension to stream spray and move nozzlefrom low to
high while flushing.
16

7. Reinstaiiorificeintonozzleextension.DONOT
overtightenorificewithaiienwrench.
8. Reconnectnozzleextensiontospraygun.
9. Makesuregardenhoseisconnectedtowateriniet.
Checkthathighpressurehoseisconnectedtospraygun
andpump.Turnonwater.
10.Engagetriggeriockonspraygunandstartengine
foiiowinginstructionsHow to Start Your Pressure
Washer.
11. Test pressure washer by operating nozzlein high and
low positions.
g-lling Maintenance
Purchasean O-Ring Repair Kit at your iocai Searsor by catiing
1-800-4-_IY-HOME(469-4663) or onlineat _wvw.sears.com.it
is not includedwith the pressurewasher.This kit includes
replacemento-rings, rubberwasherandwaterinlet fiiter. Referto
tile instructionsheetprovidedin the kit to serviceyour unit's
o-rings.
WARNING
The higll pressure stream of water that this
equipment produces can cut through skin and its
underlying tissues, ieadingto serious injury and
)ossibie amputation.
*NEVERrepairleakingconnectionswith sealantof anykind.
Replaceo-ringor seal.
Pump 8il Maintenance
DONOTattempt any oii maintenanceon this pump. This
modei does not require any pump oii maintenance.The pump
is pre=iubricatedand sealed from the factory, requiring no
additional lubrication for the life of the pump.
ENGINEMAINTENANCE
WARNING
_ Unintentional sparking can result in fire or
_¢ electric shock.
WNENA#JUSTINg8R MAKiNg I_EPAIRS1"8YguR
PRESSUREWASNER
o Disconnectthe sparkplugwire fromthe sparkplugandplace
the wire whereit cannotcontactsparkplug.
WNENTESTINgFgR ENGINESPARK
* Useapprovedsparkplugtester.
o DONOTcheckfor sparkwith sparkplugrernoved.
ell
gimRecemn_endations
NOTE:Usea high quality detergent oil classified "For Service
SF,SG, SH, SJ" or higher. DO NOT use special additives.
1. Choosea viscosity according to the table below:
104 F _ _
86
68
50
32
14
4
-22
i_ 40 C
o 30
20
10
_ 0
-10
-20
-go
NOTE:Synthetic oii meeting iLSAC GF=2,APi certification
mark and API service symbol with "SJ/CF ENERGY
CONSERVING"or higller, is an acceptabieoil at aii
temperatures. Use of synthetic oil does not alter required oil
change intervals.
SAE30: 40°F and higher (5°C and higher) is good for aiI
purpose use above 40°F, use below 40°F will causehard
starting.
18W-30:0 to IO0°F (=18to 38%__is better for varying
temperature conditions. This viscosity improves coid weather
starting, but may increaseoil consumption above 80°F
(27°C).
*Check oii levei frequently at higher temperatures.
Synthetic 5W-30:=20 to 120°F(=30to 40 °C)provides the
best protection at all temperatures as weii as improved
starting with less oii consumption.
5W-30: 40°F and below (5°C and below) is recommended for
winter use and works best in cold conditions.
Checking8ii Level
Oil level should be checked prior to each use or at least every
5 hours of operation. Keepoil ievei maintained=
1= Makesure pressure washer is on a ievei surface.
2= Remove oii dipstick and wipe dipstick with cteancioth.
Reptaceand tigilten dipstick. Removeand and check oil
level.
3. Verify oii is at "Fulr' mark on dipstick. Replaceand
tigllten dipstick.
17

Adding Engineeli
1. Make sure pressure washer is on a Ievei surface.
2. Check oii ievel as described in Checking Oif Level
3. If needed, siowiy pour oil into oil tiff opening to the
"Full" mark on dipstick. DO NOToverfill.
Overfiiiing with oii maycause the engine to not start, or
hard starting.
DONOToverfill.
If overthe FULLmarkon dipstick,drainoil to reduceoil levelto
FULLrnarkon dipstick.
4. Replaceand tigilten dipstick.
ChangingEngine Oil
Changeengine oii after the first 5 hours and every 50 hours
thereafter, if you are using your pressure washer under
extremely dirty or dusty conditions, or in extremely hot
weather, change oil more often.
CAUTION
Avoid prolonged or repeatedskin contact with used motor
oil.
Usedmotoroil hasbeenshownto causeskincancerincertain
laboratoryanimals.
Thoroughlywashexposedareaswith soapandwater.
KEEPOUTOFREACHOFCHILDREN.DON'T
POLLUTE.CONSERVERESOURCES.RETURN
USEDOIL TO COLLECTIONCENTERS.
Changeeli while eegiee is still warm from terming,as
fellows:
1. Drain fuel tank by running pressure washer until fuel
tank is empty.
2. Disconnect spark plug wire and keep it away from spark
plug.
3. Cteanarea around oii fiii, remove oil fill cap/dipstick.
Wipe dipstick clean.
4. Tip your pressure washer to drain oii from oii fiii into a
suitable container making sure you tip your unit away
from spark plug. When crankcaseis empty, return
pressure washer to upright position.
5. Siowiy pour recommended oii (about 18 oz.)into oii fiil
opening. Pauseto permit oil to settle. Fill to "Full" mark
on dipstick.
6. Wipe dipstick cban each time oil levetis checked. DO
NOToverfiii.
7. Replaceand tighten dipstick.
8. Wipe up any remaining oii.
9. Reconnectspark plug wire to spark plug.
Service Air Cleaner
Your engine wiii not run properly and may be damaged if you
run it with a dirty air cleaner.
Servicethe air cleaner once eveR,25 hours of operation or
once each year, whichever comes first. Servicemore often if
operating under dirty or dusty conditions. Replacementsare
available at your local Searsservice center.
l'e service the air cleaner, fellow those clops:
1. Removescrew (A).
2. Carefuliy remove air cteanerassembly to prevent debris
from failing into carburetor.
3. Takeair cleaner assembiy apart and clean aii parts.
Wash foam air cteaner(B) in iiquid detergent and water.
Squeezedry in a cteanctoth.
4. SATURATEfoam air cieaner in engine oil and squeezein
a cban cloth to remove excessoil.
5. ReinstalIclean or new foam air cieaner in base (C).
6. Instaii air cleaner securely on carburetor with screw.
NOTE:You can purchase new air filter ebments by calling
1-8go-4-NIY-NO_IE(469-466S).
Service Spark Plug
Servicethe spark piug eveR, 100 flours of operation or
yearly, whichever occurs first.
1. Cleanareaaround spark piug.
2. Removeand inspect spark ptug.
3. Repiacespark piug if electrodes are pitted, burned or
porcelain is cracked. Usethe recommended replacement
plug. See Specificah_ons.
4. Checkelectrode gap with wire feeler gauge and set spark
plug gap to 0.030 inch (0.76 mm) if necessary.
5. Instaii spark piug and tighten firmly.
NOTE:You can purchase a new spark plug by calling
l=800o4=MY=NOME(469o4663).
18
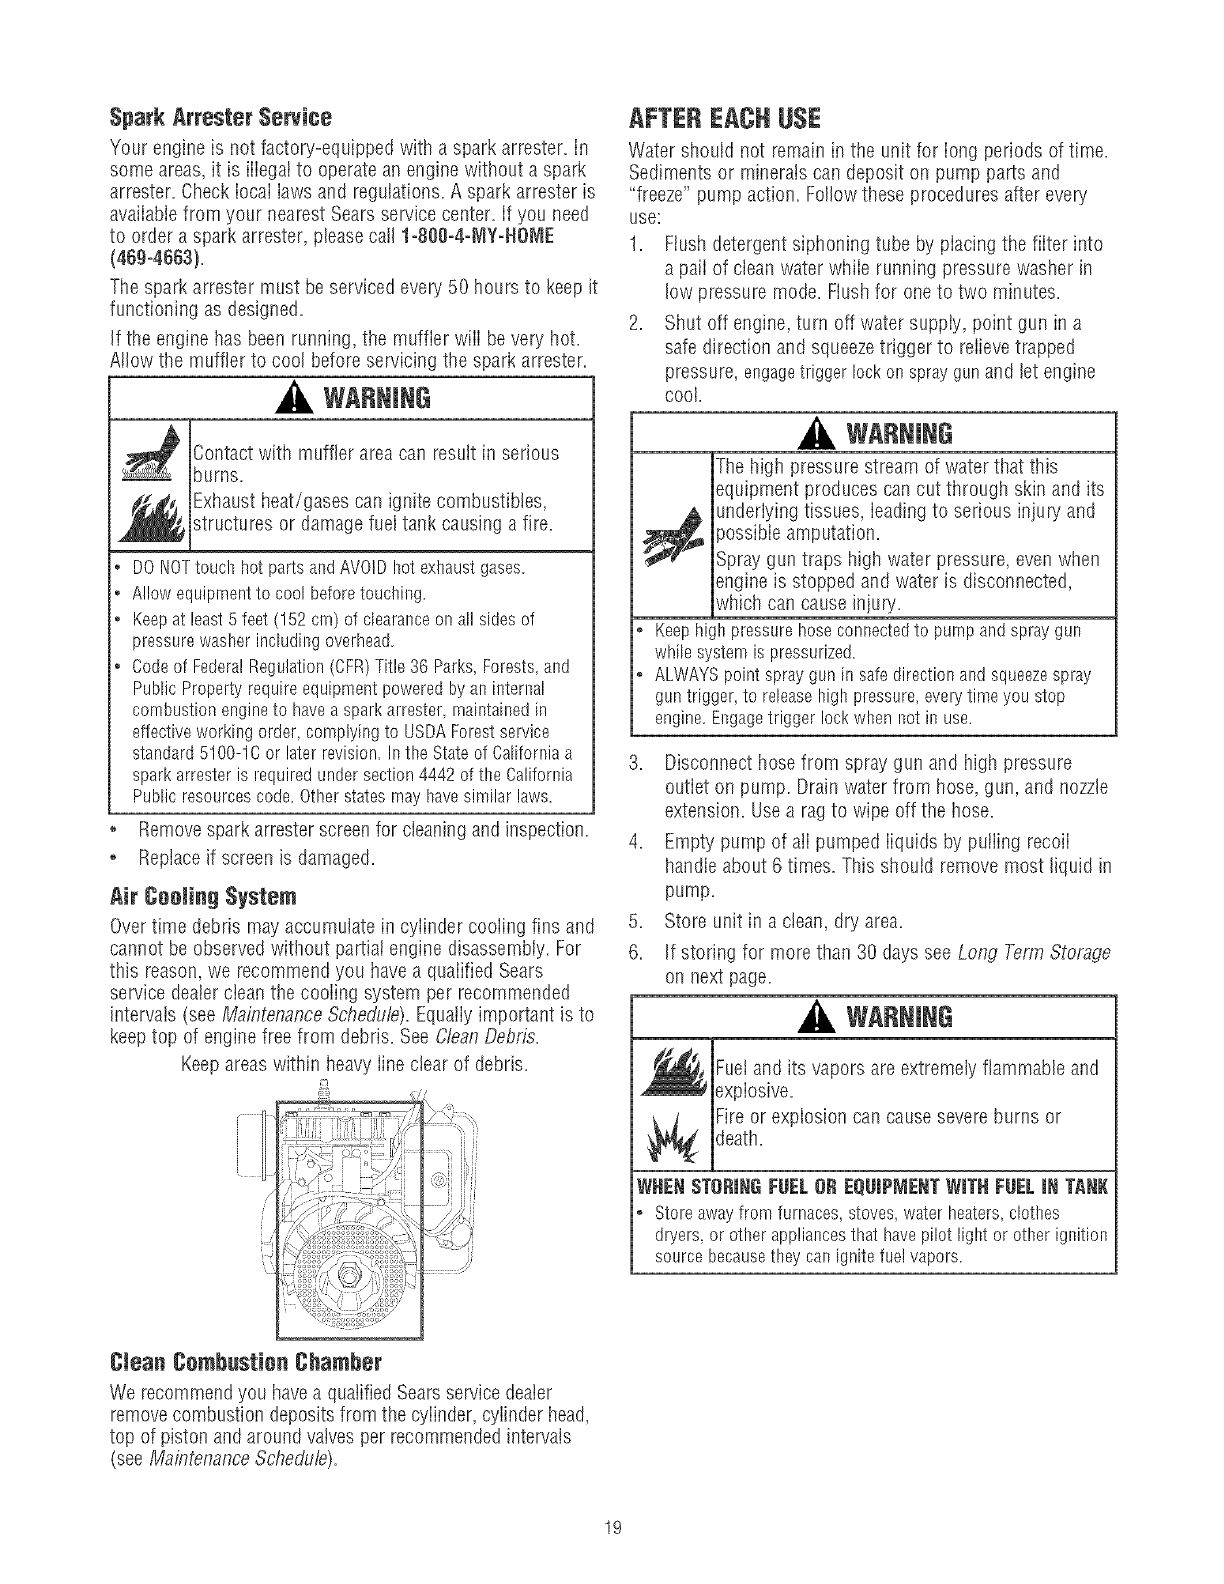
Spark Attester Service
Your engine is not factory-equipped with a spark arrester. In
some areas,it is iiiegat to operate an engine without a spark
arrester. Checkiocai iaws and regulations. A spark arrester is
avaiiablefrom your nearest Sears service center, if you need
to order a spark arrester, please call l=800o4=MY=NOME
(469o4663).
The spark arrester must be serviced every 50 hours to keep it
functioning as designed.
If the engine has been running, the muffler wiii be very hot.
Atlow the muffler to cool before servicing the spark arrester.
WARNING
Contact with muffler area can result in serious
burns.
_ Exhaustheat/gases can ignite combustibles,structures or damage fuel tank causing a fire.
• DONOTtouchhot partsandAVOIDhot exhaustgases.
•Allowequipmentto cool beforetouching.
•Keepat least5feet (152cm) of cIearasceonall sidesof
pressurewasherincludingoverhead.
•Codeof FederalRegulation(CFR)Title36 Parks,Forests,and
PublicPropertyrequireequipmentpoweredby aninternal
combustionengineto haveasparkarrester rnaintainedin
effectiveworkingorder,complyingto USDAForestservice
standard5100-1Cor laterrevision.Inthe Stateof Californiaa
sparkarresteris requiredundersection4442of the California
Publicresourcescode.Otherstatesmayhavesimilarlaws.
°Removespark arresterscreenfor cleaningand inspection.
o Replaceif screen is damaged.
Air Cooling System
Overtime debris may accumulate in cyiinder cooiing fins and
cannot be observed without partial engine disassembiy. For
this reason,we recommend you have a quaiified Sears
service dealer clean the cooiing system per recommended
intervals (see MaintenanceSchedu/e). Equaiiy important is to
keeptop of engine free from debris. See C/'eanDebris.
Keepareas within heavyiine clear of debris.
AFTEREACHUSE
Water should not remain in the unit for iong periods of time.
Sediments or minerats can deposit on pump parts and
"freeze" pump action. Followthese proceduresafter every
USe:
1. Ftush detergentsiphoning tube by piacing the fiiter into
a paii of dean water whiie running pressure washer in
low pressure mode. Flushfor oneto two minutes.
2. Shut off engine, turn off water supply, point gun in a
safe direction and squeezetrigger to relieve trapped
pressure, engagetrigger lockon spraygunand bt engine
cool.
WARNING
The high pressurestream of water that this
equipment produces can cut through skin and its
,_ underlying tissues, ieadingto serious injupj and
_ossibieamputation.
Spray gun traps high water pressure, even when
engine is stopped and water is disconnected,
which can cause injupj.
o Keephighpressurehoseconnectedto purnpandspraygun
whilesystemis pressurized.
•ALWAYSpointsprayguninsafedirectionandsqueezespray
guntrigger,to releasehighpressure,everytimeyou stop
engine.Engagetrigger lockwhennot in use.
3. Disconnect hose from spray gun and high pressure
outiet on pump. Drain water from hose, gun, and nozzle
extension. Usea rag to wipe off the hose.
4. Empty pump of aii pumped iiquids by puffing recoii
handb about 6 times. This shouid remove most liquid in
pump.
5. Store unit in a clean, dry area.
6. If storing for more than 30 dayssee Long Term Storage
on next page.
WARNING
Fuel and its vapors are extremely flammable and
expiosive.
Fire or explosion can cause severeburns or
death.
WidENSTeRINGFgELeR EQgIPMENTWiTH FgELiN TANK
o Storeawayfromfurnaces stoveswaterheaters,clothes
dryers or otherappliancesthathavepilot light or otherignition
sourcebecausetheycanignitefuelvapors.
Clean Combustion Chamber
We recommendyou havea qualified Searsservice dealer
removecombustion depositsfrom the cyiinder, cyiinder head,
top of piston and around vatvesper recommendedintervais
(see Maintenance Schedu/e).
19
WINTERSTORAGE
You must protect your unit from freezing temperatures,
Failureto do so will permanentlydamageyour pumpand
renderyour unit inoperable
Freezedamageis not coveredunderwarranty
To protect the unit from freezing temperatures:
1. Follow steps 1-4 in the previous section After Each Use,
2. Use pump saver, available at Sears retail item
7174403GS,to treat pump. This minimizes freeze
damage and iubricates pistons and seals.
3. If pump saver is not avaiiabb, connect a 3-foot section
of garden hose to water inlet adapter. Pour
RV-antifreeze (antifreeze without alcohol) into hose. PulI
recoii handletwice. Disconnect 3=foot hose.
4. Store unit in a clean, dry area.
LONGTERM STORAGE
If you do not pian to use the pressure washer for more than
30 days, you must prepare the engine and pump for long
term storage.
It is important to prevent gum deposits from forming in
essential fuel system parts such as the carburetor, fueI filter,
fuel hose or tank during storage. Also, experienceindicates
that aicohoi-biended fuels (caiied gasohol, ethanol or
methanoi) can attract moisture, which ieads to separation
and formation of acids during storage. Acidic gas can
damagethe fuet system of an engine whib in storage.
Pretect Fuel System
Fuem,_dditive:
Fueican becomestab when stored over 30 days. Stale fuei
causes acid and gum deposits to form in the fueI system or
on essential carburetor parts. To keep fuel fresh, use Briggs
& Stratton FRESHSTAR_Mfuel stabiiizer, avaiiabie as a
liquid additive or a drip concentrate cartridge.
There is no needto drain gasoline from the engine if a fuei
stabiiizer is added according to instructions. Run the engine
for 2 minutes to circulate the stabiiizer throughout the fuel
system. The engineand fuet can then be stored up to
24 months.
If gasoiine in the engine has not beentreated with a fuei
stabiiizer, it must be drained into an approved container. Run
the engine untii it stops from iack of fuel. The use of a fuel
stabiiizer in the storage container is recommendedto
maintain freshness.
Change eii
Whiie engine is stiii warm, drain oii from crankcase. Refill
with recommended grade. See ChangingEngine Oil.
eli Cylinder Bsre
oRemovespark plug and pour about 1/2 ounce (15 mI) of
clean engine oii into the cyiinder.
.Instali spark plug and pull starter handle slowly to
distribute oil.
Prstect Pump
To protect the pump from damage causedby minerat
deposits or freezing, use PumpSaver, Model 7174403GS,to
treat pump. This prevents freeze damage and lubricates
pistons and seats.
NOTE:PumpSaveris avaiiabie as an optional accessory, it is
not included with the pressurewasher. Contact your local
Searsservice center to purchase PumpSaver.
You must protect your unit from freezing temperatures.
Failureto do so will permanentlydamageyour purnpand
renderyour unit inoperable
Freezedamageis not coveredunderwarranty,
To use PumpSaver, makesure the pressurewasher is turned
off and disconnected from supply water. Readand follow aII
instructions and warnings given on the PumpSavercontainer.
Other $tsrage Tips
1. DO NOTstore fuei from one seasonto another unless it
has beentreated as described in Protect Fuel System.
2. Repiacefuel container if it starts to rust. Rust and/or dirt
in fuei can cause problems if it's used with this unit.
Coverunit with a suitable protective cover that does not
retain moisture.
WARNING
._ Storagecovers can be flammable.
•DONOTplacea storagecoveroverahot pressurewasher
o Letequiprnentcoolfor a sufficienttime beforeplacingthe
coveronthe equipment
4. Store unit in a clean and dry area.
2O
Pumphas following problems:failure
to producepressure, erratic pressure,
chattering,loss of pressure, lowwater
vomume.
Detergent fails to mix with spray.
Cause
1. Nozzlein low pressure mode.
2. Water inlet is blocked.
3. Inadequatewater suppiy.
4. Inlet hose is kinked or leaking.
5. Ciogged inlet hose strainer.
6. Water suppiy is over IO0°F.
7. High pressure hose is blocked or
leaks.
8. Gun leaks.
9. Orifice is obstructed.
10. Pump is faulty.
1. Detergentsiphoning tube is not
submerged.
2. Detergentfilter is clogged.
3. Nozzleis in high pressure mode.
Engine runs good at neolead but "bogs" Enginespeed is too slow.
when lead is added.
Engine will net start; or starts and runs
rough.
1. Dirty air cleaner.
2. Out of fuel.
3. Stale fuel.
4. Spark ptug wire not connected to
spark plug.
5. Badspark plug.
6. Water in fuel.
7. Excessivelyrich fuet mixture.
8. Intake valve stuck open or closed.
9. Enginehas lost compression.
I. PulI nozzlebackward for high
pressure mode.
2. Clear iniet.
3. Provide adequatewater flow=
4. Straighten inlet hose,patch ieak.
5. Checkand clean inlet hose strainer.
6. Provide cooier water suppiy.
7. Clear blocks in outlet hose.
8. Repiacegun.
9. Cleanorifice.
10. Contact Searsservice facility.
Insert detergent siphoning tube into
detergent.
Cleanor replace filter/detergent
siphoning tube.
3. Push nozzleforward for Iow
pressure mode.
Movethrottle control to FASTposition, if
engine still "bogs down", contact Sears
service facility.
1. Cleanor replace air cleaner.
2. Fiii fuel tank.
3. Drain fuel task; fiii with fresh fuel.
4. Connectwire to spark plug.
Out of fuel.
Engine shuts down during operation.
Engine lacks power. Dirty air filter. Replaceair filter.
5. Replacespark plug.
6. Drain fuei tank; fiiI with fresh fuel.
7. Contact Searsservice faciiity.
8. Contact Searsservice faciiity.
9. Contact Searsservice facility.
Fiii fuel tank.
21
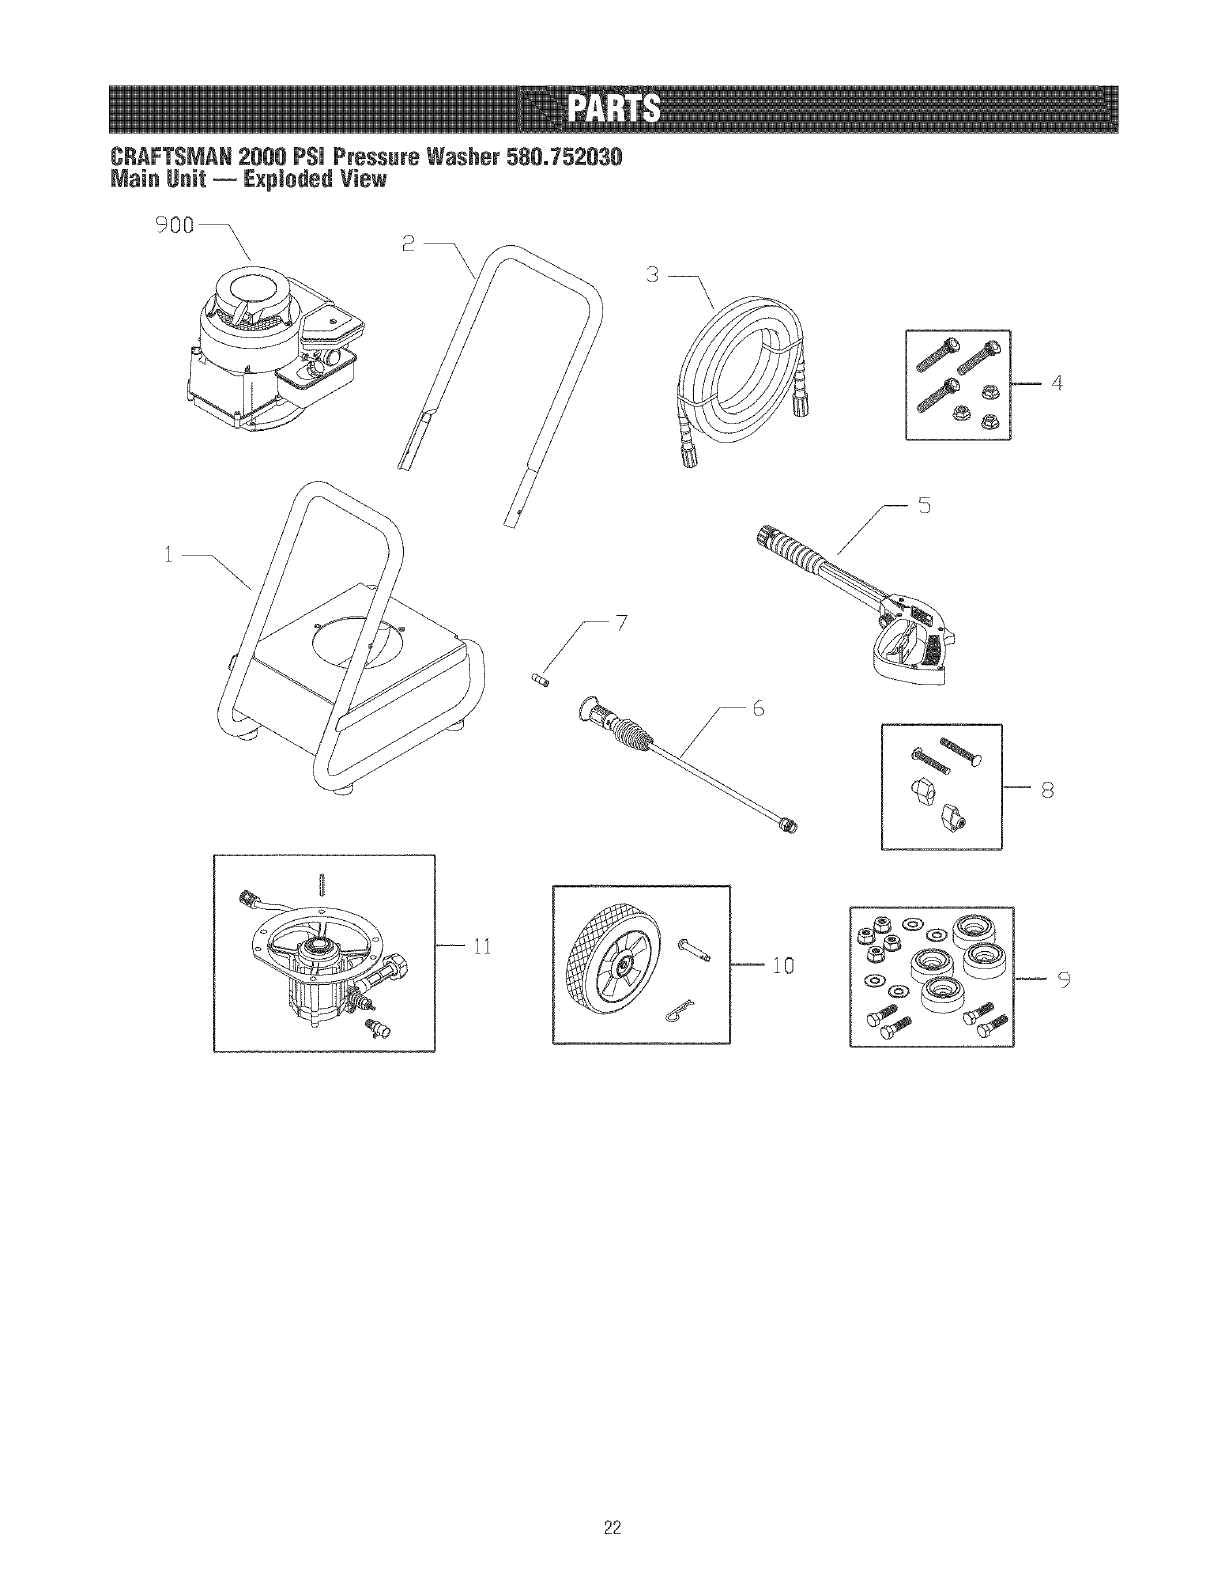
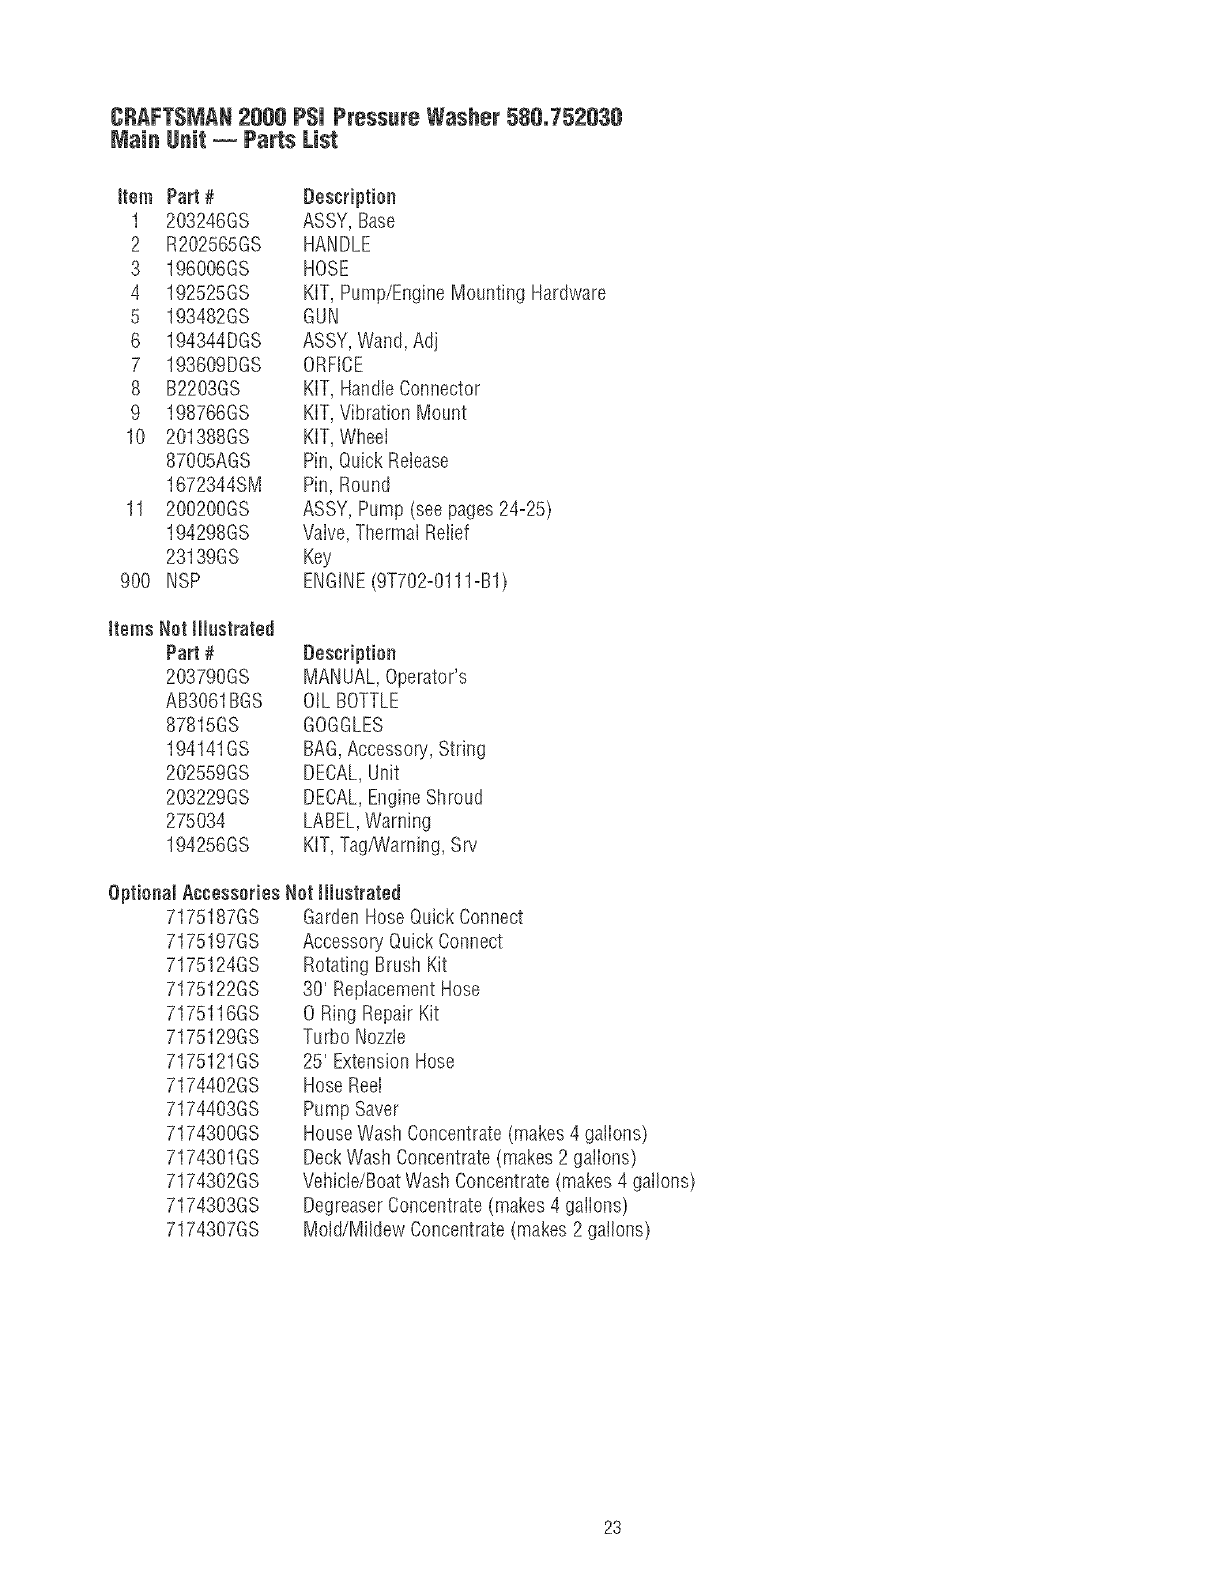
CRAFTSMAN2000 PSi Pressure Washer 580_752030
Main Unit _Exploded View
900
\\
7
/
e_
4° @
6
111
22
CRAFTSMAN2888 PSi Pressure Washer 58&752838
Main Unit _Parts List
item Part # Description
I 203246GS ASSY, Base
2 R202565GS HANDLE
3 196006GS HOSE
4 192525GS KIT, Pump/EngineMounting Hardware
5 193482GS GUN
6 194344DGS ASSY,Wand, Adj
7 193609DGS ORFICE
8 B2203GS KIT, HandleConnector
9 198766GS KiT,Vibration Mount
10 201388GS KIT,Wheel
87005AGS Pin, Quick Release
1672344SM Pin, Round
11 200200GS ASSY, Pump (see pages24°25)
194298GS Valve,Thermal Relief
23139GS Key
900 NSP ENGINE(9T702-O111=B1)
items Nat Illustrated
Part # Description
203790GS MANUAL,Operator's
AB3061BGS OtL BOTTLE
87815GS GOGGLES
194141GS BAG,Accessory, String
202559GS DECAL,Unit
203229GS DECAL,EngineShroud
275034 LABEL,Warning
194256GS KIT,Tag_Jarning, Srv
Optional Accessories Not Illustrated
7175187GS
7175197GS
7175124GS
7175122GS
7175116GS
7175129GS
7175121GS
7174402GS
7174403GS
7174300GS
7174301GS
7174302GS
7174303GS
7174307GS
GardenHose QuickConnect
Accessory Quick Connect
Rotating Brush Kit
30' ReplacementHose
0 Ring Repair Kit
Turbo Nozzle
25' ExtensionHose
HoseReeI
Pump Saver
HouseWash Concentrate (makes4 gallons)
DeckWash Concentrate(makes 2 gailons)
Vehicle/BoatWash Concentrate(makes 4 gallons)
DegreaserConcentrate(makes 4 gallons)
Mold/Mildew Concentrate(makes 2 gallons)
23
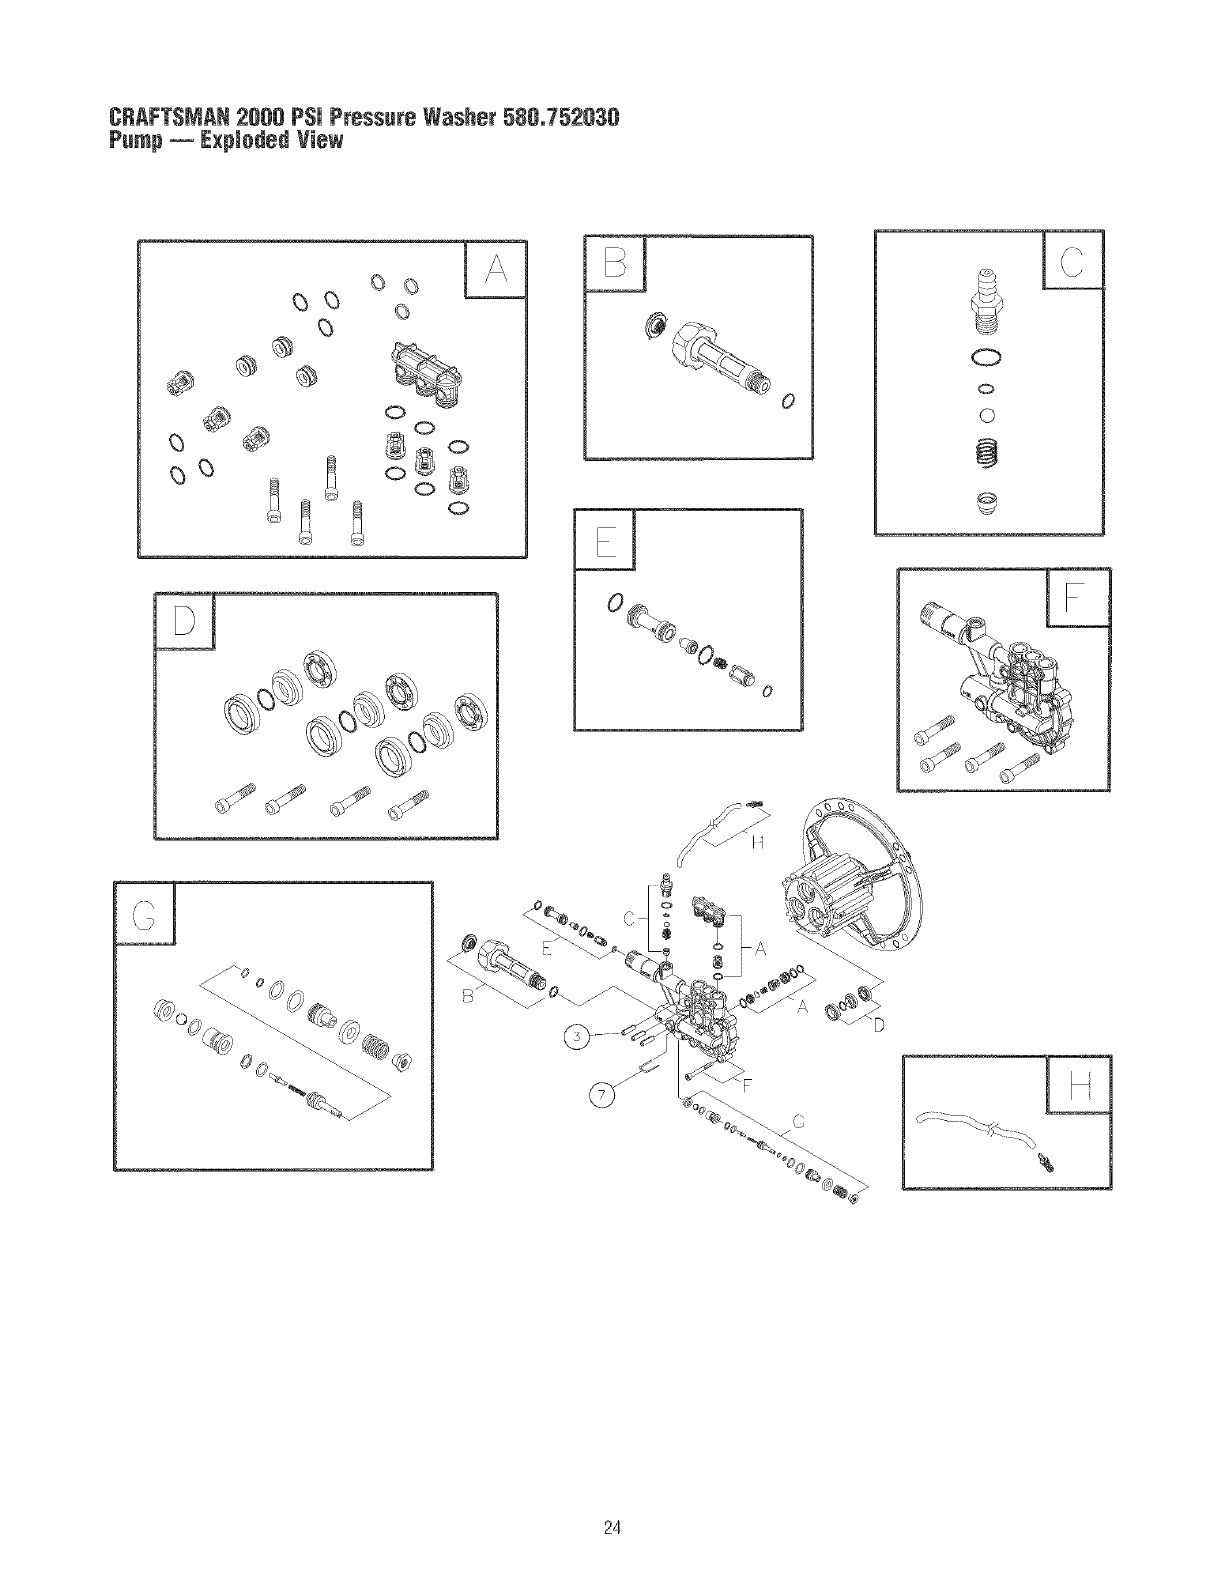
CRAFTSMAN2000 PSi Pressure Washer 580_752030
Pump _ExpJ0dedView
_3
®
©
JJJj
0
½
0
0
©
@
24
CRAFTSMAN2000 PSi Pressure Washer 580,752030
Pump _ Parts List
Item Part # Description
3 200274GS PLUG,Elastic
7 190578GS PiN
A 200298GS KIT, CHECKVALVES
B 200278GS KIT,WATERINLET
C 200279GS KIT, CHEMICALINJECTION
D 200280GS KIT, HIGH PRESSURESEALS
E 200281GS KIT. CHEMINJECTVENTURI
F 200282GS KIT, PUMPHEAD,ALUM
G 200283GS KIT, BY-PASS
H 189971GS KIT, CHEMICALHOSE
Items Not HJustrated
B2384GS FILTER,Inlet
Optional Accessories
186452GS FILTER,Inlet, Bagof 10
NOTE:Item letters A oH are service kits and include all parts shown within the box.
25
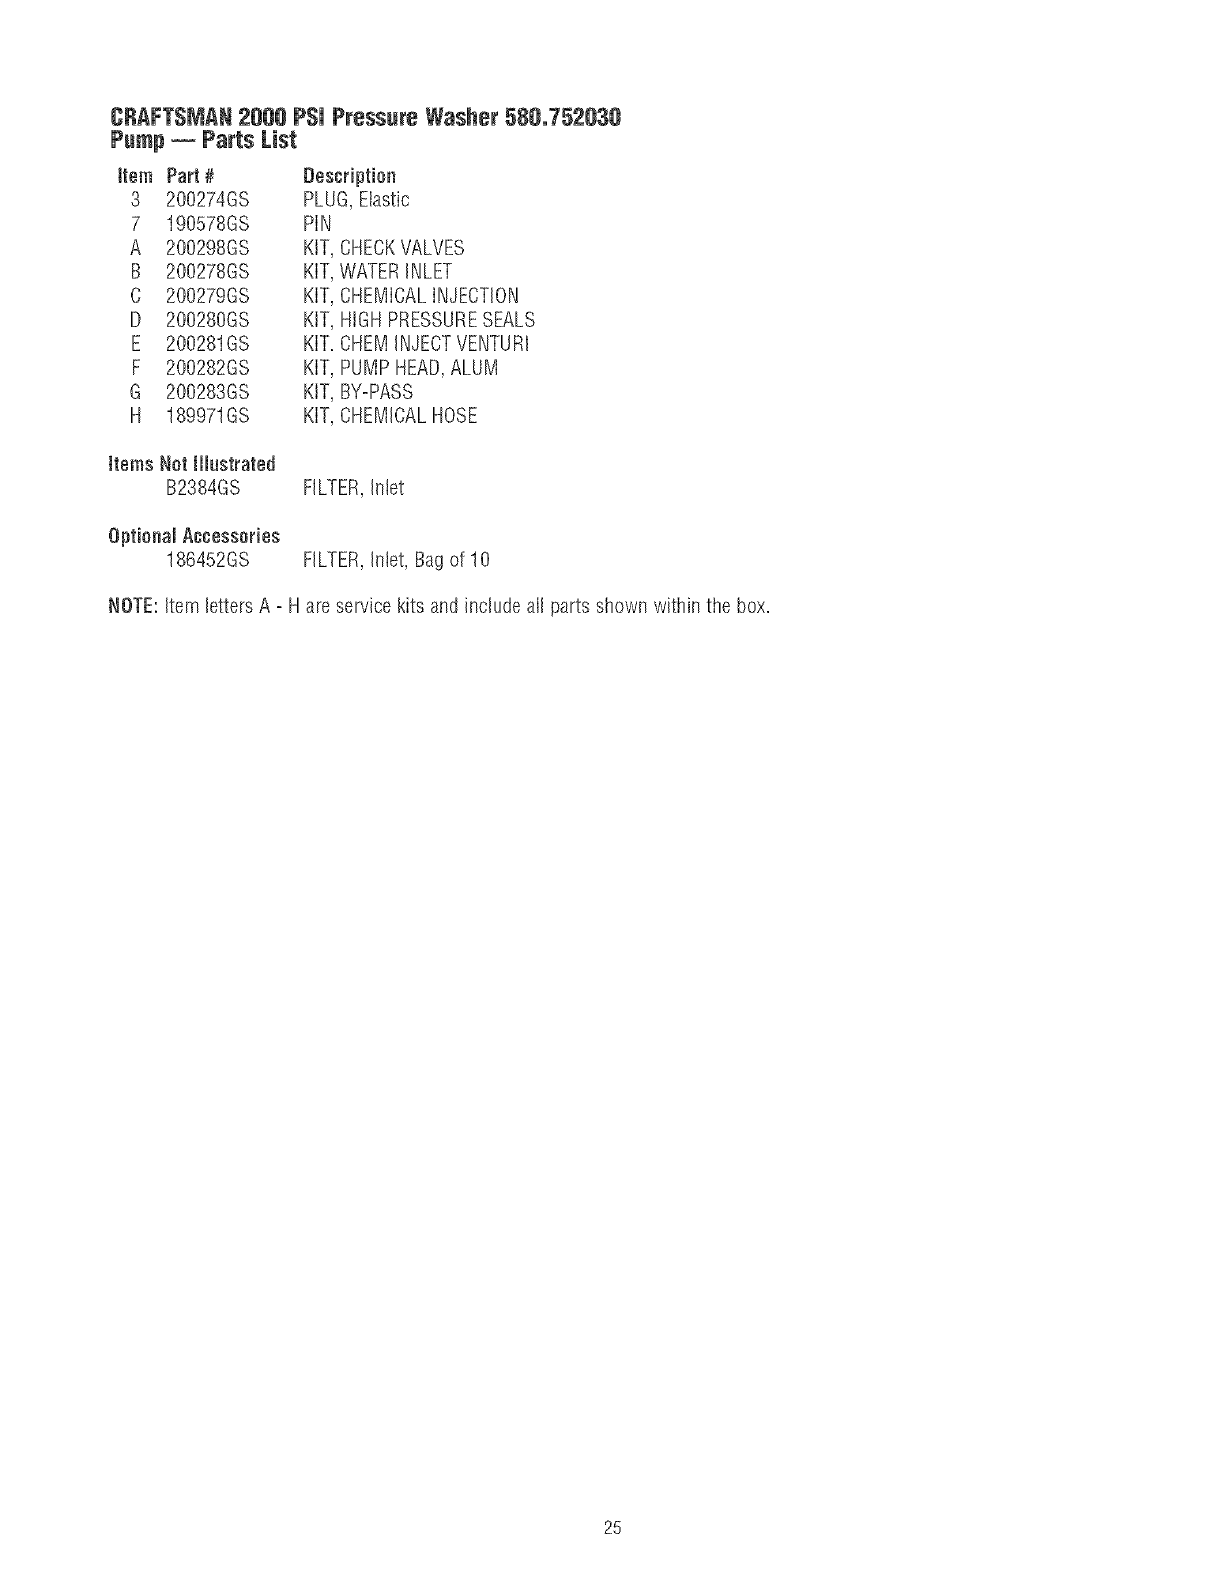
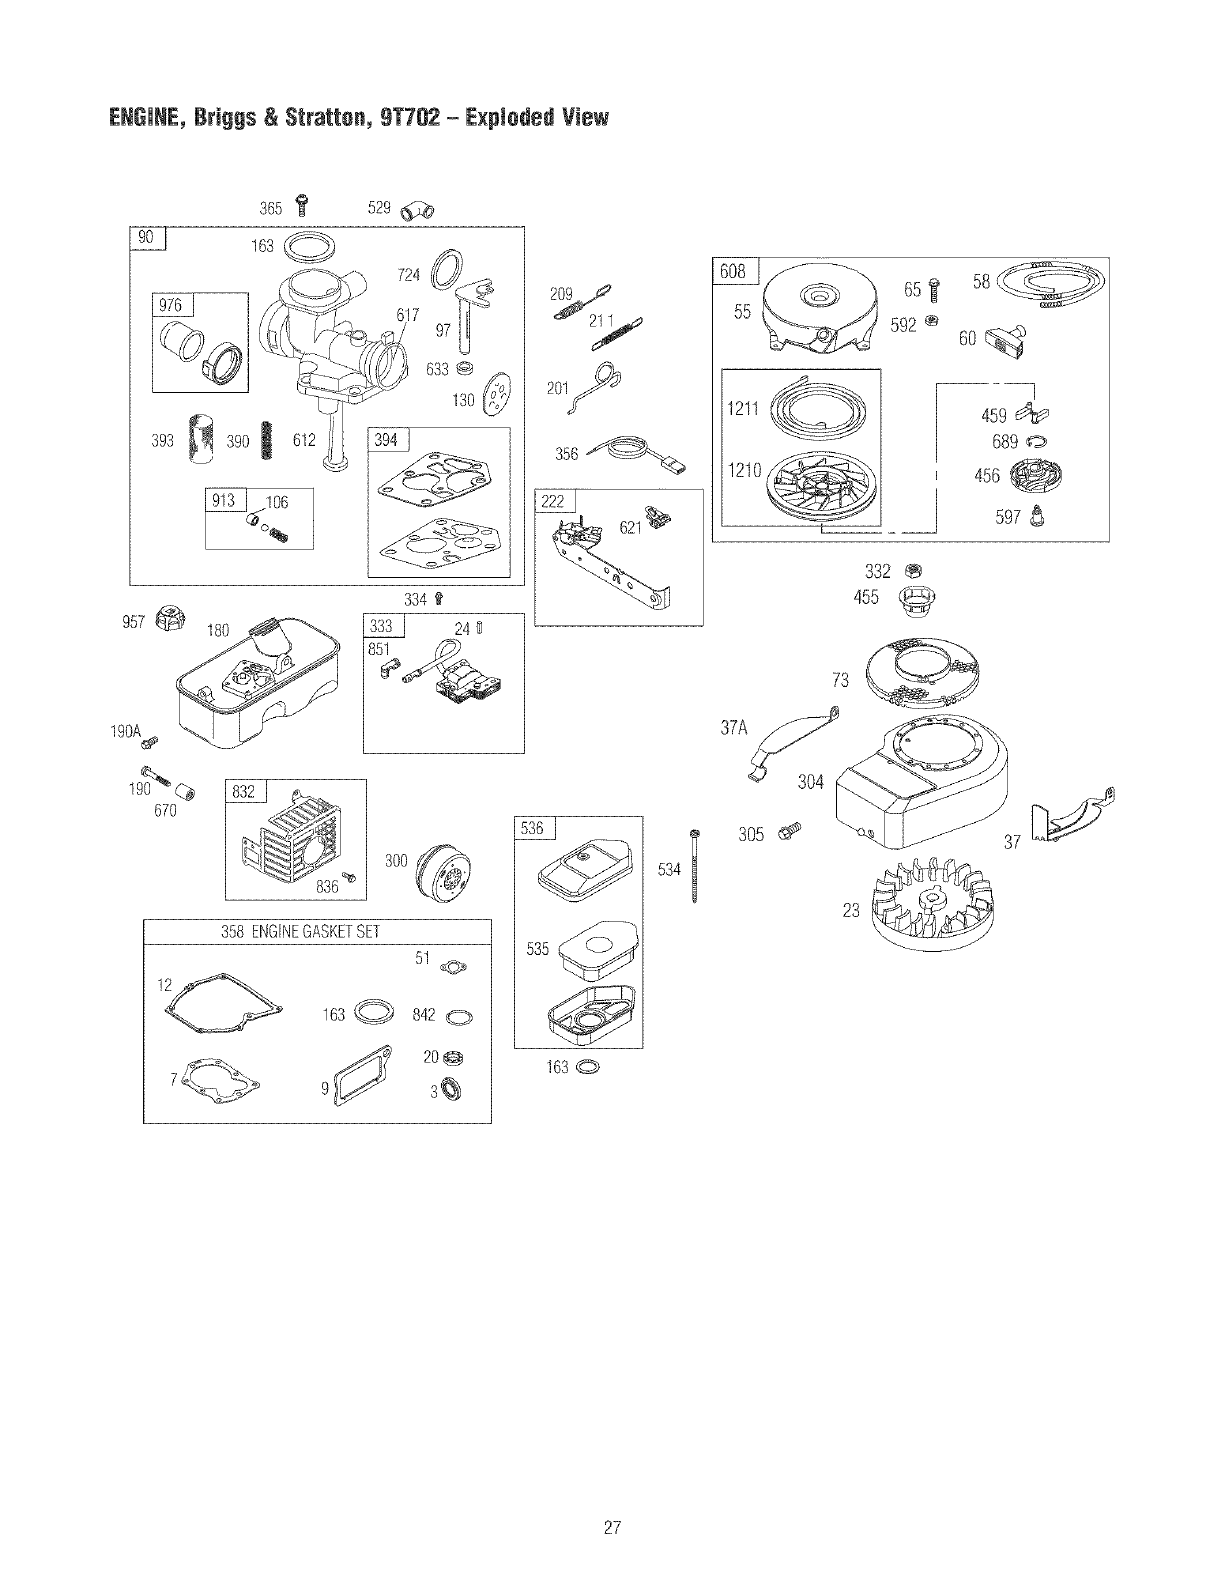
ENIINE, lri!gs &Stratton, gTT12 - Expiotel View
51
51
668 g
745
718 0
15 @
22_
426
200 !1
VALVEGASKETSET
306
ao7
o_:_
26
ENIINE, lri!gs &Stratton, gTTI2 - Expiotel View
Y
393
190A_
670
163
724
617
633@
3! 390 J 612
106
130
180
334 '1
24
358 ENGINEGASKETSET
51 _
163 _ 842 0
20@
9 3_
55 _ 592 _
1210
6o
I
459 d_
689 0
456
597 $
23
27
ENGINE, Briggs & Stratton, 9T702 -Parts List
Item Part # Description
I 699653 Cylinder Assembly
2 399269 Kit-Bushing/SeaI(Magneto Side)
3 299819S SeaI-OiI(MagnetoSide)
4 698691 Sump-Engine
5 690386 Head-Cyiinder
7 698717 Gasket-CyiinderHead
8 791781 BreatherAssembIy
9 695890 Gasket-Breather
10 691666 Screw (Breather Assembly)
11 691245 Tube-Breather
12 6922!8 Gasket-Crankcase
13 691640 Screw (Cylinder Head)
15 691680 Plug-Oil Drain
16 692991 Crankshaft
20 391483S Seai-OiI (PTOSide)
22 691662 Screw (Engine Sump)
23 690843 Fiywheei
24 222698S Key-Flywheet
25 699657 PistonAssembly (Standard)
25 792532 PistonAssembly (.020" Oversize)
26 699658 Ring Set (Standard)
26 792533 Ring Set (.020" Oversize)
27 691588 Lock-Piston Pin
28 699659 Pin-Piston (Standard)
29 699655 Rod-Connecting
32 691664 Screw (Connecting Rod)
33 296676 Valve-Exhaust
34 296677 Valveqntake
35 690520 Spring-Vaive (intake)
36 690520 Spring-Valve (Exhaust)
37 691209 Guard-Flywheel
37A 690482 Guard-Ftywhee!
40 692194 Retainer-Valve
43 698690 Siinger-Governor/Oil
45 691762 Tappet-Vaive
46 691998 Camshaft
50 792388 Manifold@take
51 792389 Gasket@take
54 691111 Screw (intake Manifold)
55 692144 Housing-RewindStarter
58 691921 Rope-Starter
60 691915 Grip-Starter Rope
65 690837 Screw (Rewind Starter)
73 699850 Screen-Rotating
90 498811 Carburetor
97 691931 Shaft-Throttle
106 691901 Seat-inlet
130 691190 Vatve-Throttb
163 271139S Gasket-Air Cleaner
180 494406 Tank-Fuel
190 691697 Screw (Fuei Tank)
190A 692198 Screw (Fuei Tank)
200 691912 Blade-Governor
201 690347 Link-Air Vane
209 690252 Spring-Governor
211 691859 Spring-Governed Idle
222 691445 Bracket-Control
item
3OO
3O4
3O5
306
307
332
333
334
337
356
358
365
390
393
394
426
455
456
459
523
524
529
534
535
536
592
597
608
612
617
621
633
635
668
670
689
718
718A
724
741
745
832
836
842
851
868
869
870
871
913
957
976
1095
1210
1211
1218
Part#
394569S
692536
692198
690400
690345
690662
792395
691061
802592S
692390
794209
790029
691839
691837
495770
691107
691236
692299
281505S
691913
691876
692189
691417
698369
698472
690800
691696
690101
496046S
270344S
692310
691321
66538
692889
691633
691855
690959
499047
697478
691805
691146
699670
690664
691876
692424
697338
699641
699642
699643
63709
494409
791129
694394
498526
499901
499901
695866
Description
Muffler
Housing-Blower
Screw (Biower Housing)
Shield-Cylinder
Screw (Cylinder Shield)
Nut (Flywheel)
Armature-Magneto
Screw (Magneto Armature)
Hug-Spark
Wire-Stop
GasketSet-Engine
Screw (Carburetor)
Spring-ChokeDiaphragm
Screen-Carburetor
Gasket-CarburetorPump
Screw (Governor Blade)
Cup-Fiywheel
Plate-PawiFriction
Pawi-Ratchet
Dipstick
Seai-ORing (Dipstick Tube)
Grommet
Screw (Air Cleaner)
Filter-Air CieanerFoam
Cbaner-Air
Nut (Rewind Starter)
Screw (Pawi Friction Plate)
Starter-Rewind
Tube-Pick Up
Seai-ORing (intake Manifold)
Switch-Stop
Seai-Choke/ThrottieShaft
Boot-Spark Plug
Spacer
Spacer-FuelTank
Spring-Friction
Pin-Locating
Pin-Locating
Retainer-Seal
Gear-Timing
Screw (Brake)
Guard-Muffler
Screw (Muffler Guard)
Seai-ORing (Dipstick)
Terminal-Spark Plug
Seat-VaIve
Seat-Valve(intake)
Seat-Valve(Exhaust)
Bushing-Guide (Exhaust)
Bushing-Guide (intake)
Seat-CheckVaive
Cap-FueiTank
Primer-Carburetor
GasketSet-Valve
Puiby/Spring Assembly (Puliey)
Pulby/Spring Assembiy (Spring)
Seai-ORing (Carburetor)
28

29

Sears, Roebuck and Co., &S,A, (Sears), the California Air Resources Board ICARB) and
the United States Environmental Protection Agency {U,S,EPA)
Emissions CentromSystem Warranty Statement
ISwneCs Defect Warranty Rights and 8hmigations)
The California Air Resources Board (CARB), U.S. EPAand Sears are
pleasedto explain the Emissions Centre[ System Warranty on your
srnaI[offroad engine (SORE).hr California, new small ofroad
engines rnodel year 2006 and later must be designed, built and
equipped to meetthe State's stringent anti-smog standards.
Elsewherein the United States,new non-road,spark-ignition engines
certifiedfor mode[year 1997 and later must meet similar standardsset
forth bythe U.S. EPA.Searsmust warrant the emissions control
system on your enginefor the periodsof time listed below, provided
there has beenno abuse,neglector improper maintenanceof your
small of-road engine.
Your emissions centre[ system includes parts such as tire
carburetor, air cleaner, ignition system, fuel line, muffler and
catalytic converter. Also included rnay beconnectors and other
emissions related assemblies.
Where a warrantable condition exists, Searswill repair your small
off-road engine at no cost to you including diagnosis, parts and
labor.
Sears, Roebuck and Co. Emissions Control Befects Warranty
Covera_je
Small of-road enginesare warranted relative to ernissions control
parts defects for a period of two years, subiect to provisions set 2.
forth below. If any covered part on your engine is defective,the part
will be repaired or replaced by Sears.
Owner's Warranty Responsibilities
As tire small of-road engine owner, you are responsible for tire
performance of the required rnaintenancelisted inyour Operating
and MaintenanceInstructions. Searsrecommends that you retain all 3.
your receiptscovering maintenanceon your small off-road engine
but Sears cannot deny warranty solely for the lack of receipts or for
your failure to ensurethe performance of all scheduled rnaintenance.
As the small off-road engine owner, you should however be aware
that Sears may deny you warranty coverage if your small of-road
engine or a part has failed due to abuse, neglect, improper 4.
rnaintenanceor unapproved modifications.
You are responsible for presenting your small off-road engineto an
Authorized Sears Service Dealeras soon as a problem exbts.
The undisputed warranty repairs should be completed hra
reasonable amount of time, not to exceed30 days.
If you have any questions regarding your warranty rights and
responsibilities, you should contact a Sears Service Representative
at 1-800-469-4663.
The emissions warranty is a defects warranty. Defects are iudged
on normal engine performance. The warranty is not related to an in-
use emissions test.
Sears, Ree#eck and Co, Emissions Control #efects Warranty
Previsions
Thefollowing are specific provisions rebtive to your Emissions
Control DefectsWarranty Coverage.It is in addition to the Sears
enginewarranty for non-regulated enginesfound in the Operatingand
MahrtenanceInstructions.
1. Warranted Parts
Coverageunder this warranty extendsonly to the parts listed
below (the emissions control systems parts) to the extent these 6.
parts were present on the enginepurchased.
a. Fuel Meterhrg System
*Cold start enrichment system
In the USA and Canada,a 24-hour hotlhre, 1-800-469-4663, hasa rnenu of
hrforrnatlon.
*Carburetor and hrternal parts
* Fuel Pump
*Fuel line, fuel [hrefittings, clamps
, Fue[tank, cap and tether
, Carbon canister
b. Air Induction System
*Air cbaner
° Intake rnanl%d
. Purge and vent line
c Ignition System
, Spark plug(s)
, Magneto ignition system
d. Catalyst System
*Catalytic converter
, Exhaustmanifold
, Air iniection system, Pulsevalve
e. Miscellaneous Items
, Vacuum, temperature, position, tirne sensitive valves and
switches
o Connectors and assernNbs
Length of Coverage
Sears warrants to the initial owner and eachsubsequent
purchaser that the Warranted Parts shahbefree from defects in
materials and workrnanship which caused the failure of the
Warranted Parts for a period of two years from the date tire
engineis deliveredto a retail purchaser.
No Charge
Repair or replacementof airy Warranted Part will be performed
at no charge to the owner, hrcluding diagnostic labor which
leads to the determhration that a Warranted Part is defective, if
the diagnostic work ls performed at an Authorized Sears
Service Dealer.
CJaims and Coverage ExcJusiens
Warranty claims shah be flied hraccordance with the provisions
of the Sears EngineWarranty Policy. Warranty coverageshall
be excluded for failures ofWarranted Parts which are not
original Sears parts or becauseof abuse, neglect or improper
rnaintenanceas set forth in the SearsEngine Warranty Policy.
Sears is not liable to cover failures of Warranted Parts caused
by the useof add-on, non-original, or rnodified parts.
5. _daintenanse
Any Warranted Part which is not schedubd for rephcement as
required rnaintenanceor which is scheduled only for regular
inspection to the effect of "repair or replaceas necessary"shall
bewarranted asto defectsfor tire warranty period. Any
Warranted Part which is scheduledfor replacementas required
rnaintenanceshall be warranted as to defectsonly for tire period
of time up to tire first scheduled replacementfor that part. Any
replacernentpart that is equivalent in performance and durability
rnay be used in tire performance of any maintenanceor repairs.
Theowner is responsiblefor the performance of all required
maintenance as defined in the Sears Operatingand Maintenance
hrstructions.
Consequential Coverage
Coverage hereunder shall extendto the failure of any engine
components caused by tire failure of any Warranted Part still
under warranty.
pre-recorded rnessagesoffering you product maintenance
3O
EmJ_ion information
Enginesthat are certified to meetthe CaliforniaAir Resources
Board(CARB)Tier 2 Emission Standards must display
information regardingthe Emissions Durabiiity Period and Air
Index. The engine manufacturer makesthis information
avaiiabteto the consumer on emission iabeis, The engine
emission iabet wili indicate certification information,
The Emissions Durability Period describes the number of
hours of actual running time for which the engine is certified
to beemissions compliant, assuming proper maintenancein
accordancewith the Operating & Maintenance Instructions.
The following categories are used:
Moderate: Engineis certified to be emission compliant for
125 hours of actual engine running time.
Intermediate: Engineis certified to beemission compliant
for 250 hours of actual engine running time.
Extended: Engineis certified to beemission compiiant for
500 hours of actual engine running time.
Forexample, a typical walk-behind lawn mower is used 20 to
25 hours per year. Therefore, the Emissions Durability
Period of an engine with an intermediate rating would
equateto 10to 12 years.
Certainengines wiii be certified to meetthe United States
Environmental Protection Agency (USEPA)Phase 2 emission
standards. For phase 2 certified engines, the Emissions
Compiiance Period referred to on the Emissions Compliance
label indicates the number of operating hours for which the
engine has been shown to meet Federalemission
requirements.
For engines iess than 225 cc displacement:
CategoryC = 125 hours
Category B = 250 hours
CategoryA = 500 hours.
For engines of 225 cc or more displacement:
CategoryC = 250 hours
Category B = 500 hours
CategoryA = 1000 hours.
31
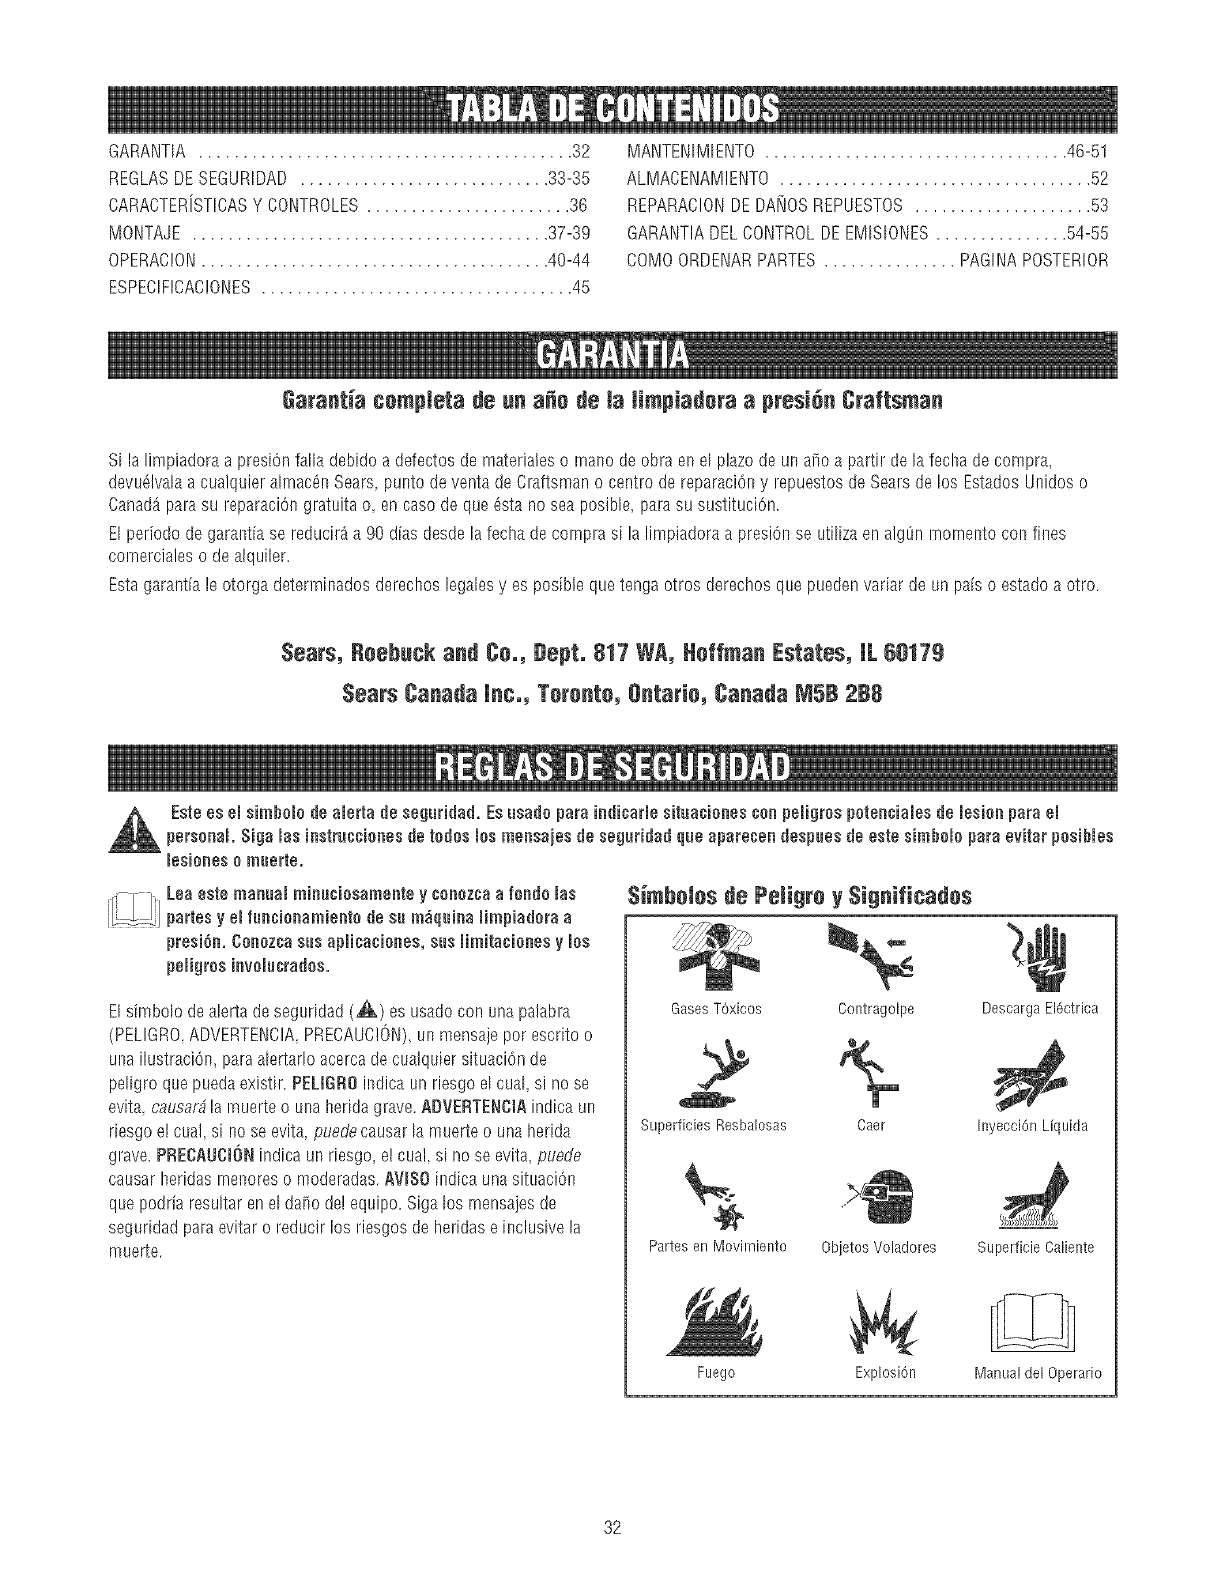
GARANTIA.......................................... 32
REGLASDESEGURIDAD............................ 33-35
CARACTERJSTICASYCONTROLES....................... 36
MONTAJE........................................ 37-39
OPERAC!ON....................................... 40-44
ESPECIFICAC!ONES................................... 45
IVlANTEMMIENTO.................................. 46-51
ALMACENAMIEf,ITO................................... 52
REPARAC!ONDEDA_,JOSREPUESTOS.................... 53
GARANTIADELCONTROLDEEMISIONES............... 54-55
COMOORDENARPARTES............... PAGINAPOSTERIOR
Garant_a cempteta de un a_e de JaJimpiadora a presi_n Craftsman
Si la limpiadora a presiOnfalla debido a defectos de materialeso rnalsode obra en el plazo de un aiio a partir de la fecha de compra,
devuGIvalaa cualquier almac@ Sears_punto de venta de Craftsman o centro de reparaciOny repuestos de Searsde los Estados Unidos o
Canad_parasu reparaciOngratuJtao en caso de que 6sta no sea posibb, parasu sustituci6n.
El periodo degarantia se reducir_ a 90 dias des@ la fecha de cornpra si la limpiadora a presiOnse utiliza en alg8n rnornento con fines
cornerciales o de alquibr.
Esta garantia le otorga deterrninados derechos legabs yes posible que tenga otros derechosque pueden variar de on pais o estado a otro.
Sears, Roebuck and Co,, Dept, 817 WA, Hoffman Estates, JL6elTg
Sears Canada Jnc,, Terente, Ontarie, Canada MSB 2B8
Este es emsimhob de abrta de seguridad, Esusado paraindicarb situaciones con peHgrospoten¢iabs de bsion para e_
personal Siga masinstru¢ciones de todos bs mensajes de seguridad que aparecen despues de este simhob para evitar posihbs
Jssione$ o lnuet'te,
I_I'.... / Leaestemanualminu¢iosamentey¢onezcaa rondolas
IL.:M_-.I partesyeJl.,¢b,amb,,o des. m_q.l,a Jlmpladoraa
presiGn,CenezcasusapJieaeienes,susJimitaeienesy Jes
peligrosinvol_¢ra_os,
El sfrnbolo de abrta de seguridad (,_0 es usado con una palabra
(PELIGRO ADVERTEt,ICIA PRECAUC!ON)_u_smensajepor escrito o
una ilustraciOn, paraalertado acercade cualquier situaciOnde
peligro que pueda existir. PELtGROindica un riesgo el cual, si no se
evita causafd la muerte o una heridagrave. ADVE_TENCIAindica un
riesgo el coal si no se evita puedecausar la muerte o una herida
grave. P_EC_,Ug_ONindica un riesgo, el cuak si no se evita_puede
causar heridas rnelsoreso moderadas. AVISOindica una situaciOn
que podria resultar en el da[io de! equipo. Siga los mensajesde
seguridad para evitar o reducir los riesgos de hefidas e inclusive la
muerte.
$_mh_i_sde Peli_r_ y $i_nificad_s
GasesTOxicos 6ontragolpe Descarga El@trica
SuperficbsResbalosas
Partes en Movimiento
Fuego
Caer
ObjetosVoladores
Explosi6n
InyecciGnLiquida
Superficie6aliente
ManualdelOperario
32

ADVERTENCIA
EJescape deJ motor de este producto contJene eJementos
quJmJ¢os re¢onocJdos en eJ Estado de CaJJfornJa
pot producJr ¢_ncer, defectos de nachnJento
uotros dafios de tJpo reproductive.
ADVERTENCJA
AI motor funcionar, se produce monOxido de carbono,
un gas hsodoro y venenoso.
RespirarmonOxldo de carbono puedeprovocar dolor
de cabeza fatiga rnareos, vOrnitos, confusi6n,
ataques n_useas, desmayos o inc[uso la rnuerte.
Algunas sustancias quimlcas o los detergentes pueden
ser perjudlclalessi inhalados o lngeridos,causando la
isausea severa, desrnayalsdo 0 para e!sve!serlar.
o Opere el limpiadora a presi6n SOLAMENTEal aire libre.
, Aseg(_resede que los gases de escape no puedan entrar por ventanas.
puertas, tomas de aire de ventilaci6n u otras aberturas en un espacio
cerrado en el que puedan acumularse.
, NO arranque ni deje funcionar el motor en interiores ni en zonas
cerradas, aunque hayaventanas y puertas abiertas.
, Utilice un respirador o m_iscarasiempre que exista la posibilidad de
inhalar vapores.
, Lea todas las instrucciones de la mascara para asegurarse de que le
brindar_ la protecci6n necesaria contra la inhalaciOn de vapores
nocivos,
AgVERTENCiA
_¢ lesgo de electrocuci6n
El contacto con los cables el@tricos puede provocar
electrocuci6n y quemaduras.
NUNCA rode cerca de una fuente de energ[a el6ctrica.
AgVERTENCiA
La gasolina y sus vapores son extremadamente
inflamables y exp!osivos.
E[ fuego o una explosi6n pueden causar quernaduras
severas e inclusive la muerte.
CgA_JDOANADA COMBgSTIBLE 8VACJEEL gEP6$1TO
, Apague el limpiadera a presi6n (posicJ6n OFF)y d6jeio enfriar al menos
por 2 minutos antes de remover la tapa de la combustible. Afloje la
tapa lentamente para @jar que la presi6n salga del tanque.
, Llene o vac[e el dep6sito de combustible a la intemperie.
o NO Ilene demasiado el tanque. Permita al menos espacio para la
expansion del combustible.
o Si se ha derramado combustible, espere a que se evapore antes de
arrancar el motor.
o Mantenga la gasolina alejada de chispas, llamas abiertas, pilotos, calor
y otras fuentes de ignici6n.
o NO encienda un cigarrillo o fume.
Cga_JDe PeJ_6a EJ_Fg_JCISJ_A_JlENTDEL EQWPe
, Compruebe que Jabujfa el silenciador, el tap6n deJdep6sito de
combustible y el filtro de aire est4n instalados.
, NO arranque el motor sin la b@a instalada.
CUANDO ePERE EL EQWPe
, NO incline el motor o el equipo, de tal manera que la gasoJina se pueda
derramar.
o NO rocie I[quidos inflamables.
CgANBe TRANSPeRTE 8REPARE EL EeglPe
o Transperte e repare el equipo con el tanque de combustible vacio, e
con la v_lvula para apagar el combustible, apagada (posici6n OFF).
o Desconecte el cable de la buj[a.
CgANgOALMACENE8 GUARDEELEQgIPOCONCOMBU$TmBLEEN
ELTANQUE
, Aimacene aiejado de caideras, estufas calentadores de agua, secadoras
de ropa u otros aparatos electrodom6sticos que posean pilotos u otras
fuentes de igniciOn, porque ellos puedeneneender los vapores de la
combustible.
33
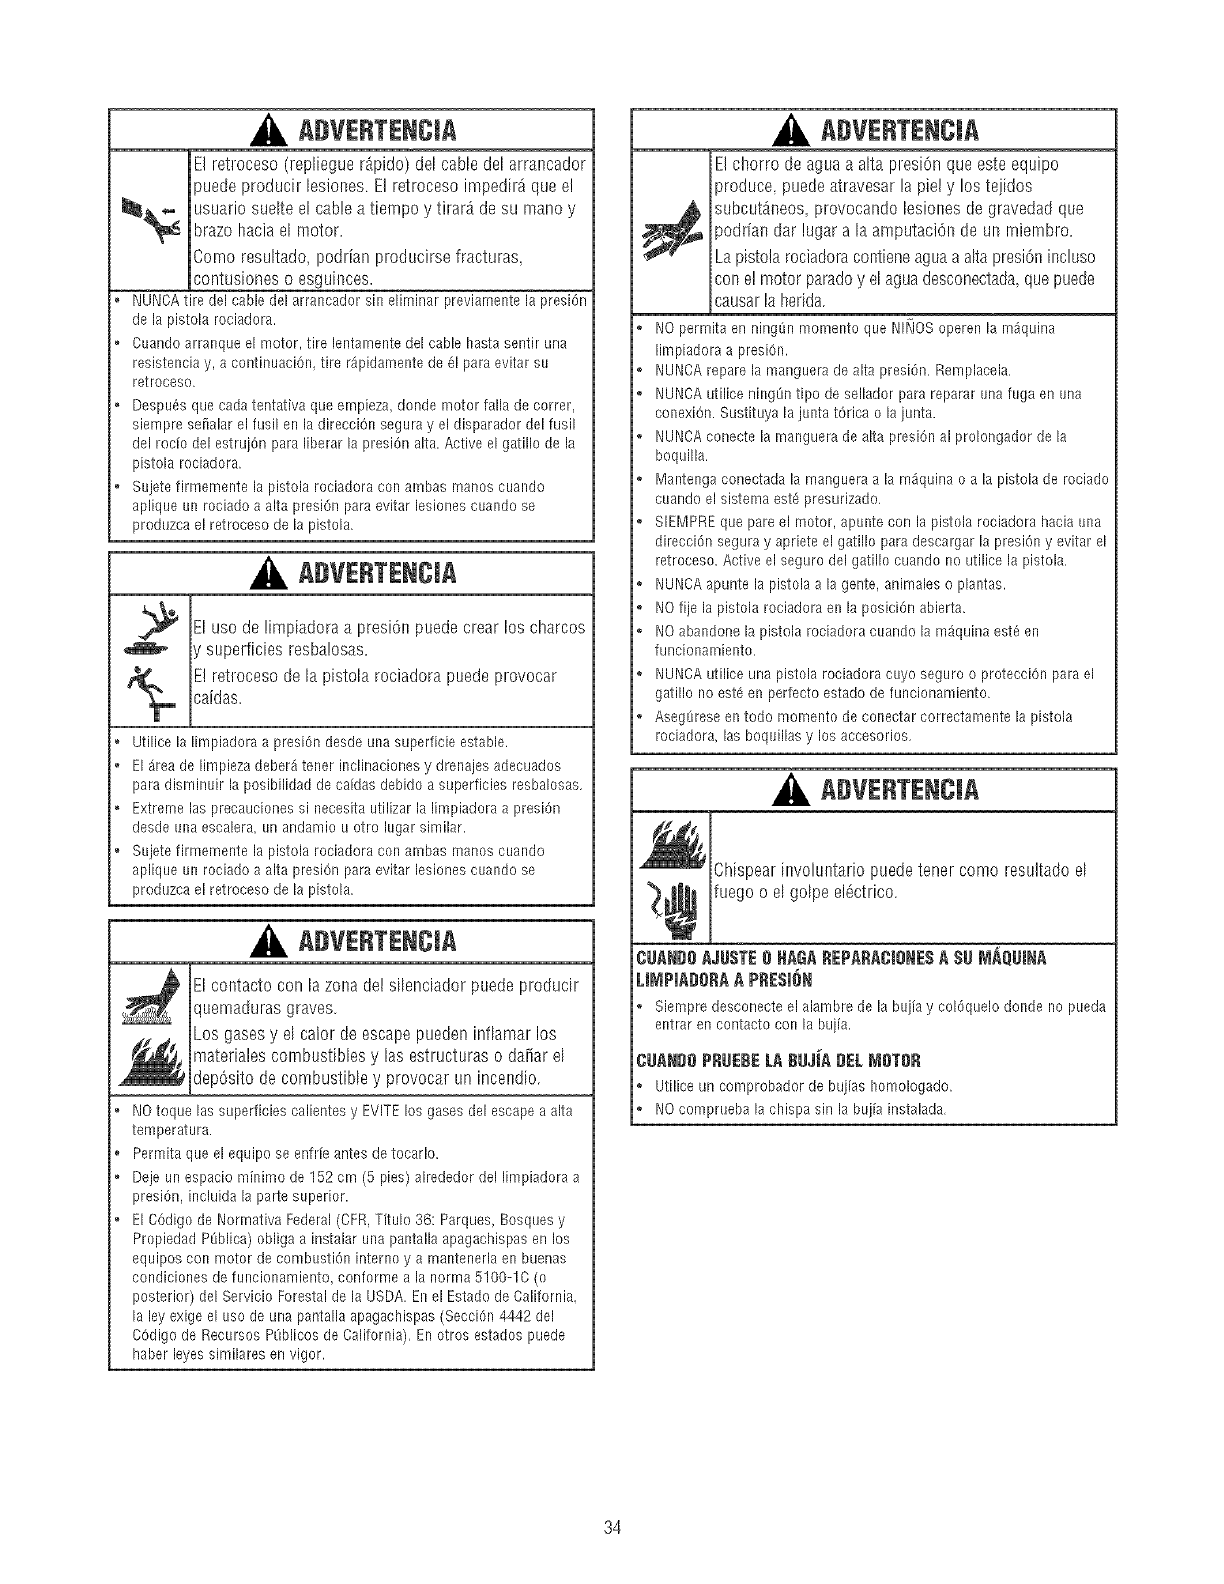
ADVERTENCJA
El retroceso (repliegue rApido) del cable del arrancador
puede producir lesiones. El retroceso impedir_ que e!
usuario suelte el cable a tiernpoy tirarA de su mano y
brazo Isacia el motor.
Comoresultado,poddanproducirsefracturas,
contusiones o esguinces.
, I',JUNOAtire dsl cable dsl arrancador sin eliminar prsviamente la prssiOn
de la pistola rociadora.
Cuando arranque el rooter, tire lentamente del cable hastassntir una
rssistsncia y, a continuaci0n, tire r_pidamsnts de 81para svitar su
rstroceso.
* DespuOsqus cadatentativa que empieza, donds motor falla de correr,
sismprs sefialar el fusil en la dirscciOn segura y el disparador dsl fusil
del roc[o del sstrujOn para liberar la presiOn alta. Active el gatillo de la
pistola rociadora.
* Sujsts firmsmsnts la pistola rociadora con ambas manos cuando
apliqus un rociado a alta prssiOn para evitar lesionss cuando se
produzca el rstroceso de la pistola.
, ADVERTENCJA
Eluso delimpiadoraa presiOnpuedecrearloscharcos
y superficiesresba!osas.
E!retrocesodela pistolarociadorapuedeprovocar
caidas.
, Utilics la limpiadora a presiOndssde una supsrficis sstabls.
° El area de limpisza dsber_ tensr inclinacionss y drenajes adscuados
para disminuir la posibilidad de cafdas debido a superficies resbalosas.
, Extreme las precauciones si nscesita utilizar la limpiadora a presiOn
desds una sscalera, un andamio u otro lugar similar.
, Sujsts firmsmsnts la pistola rociadora con ambas manos cuando
apliqus un rociado a alta prssiOn para evitar lesionss cuando se
produzca el rstroceso de la pistola.
, ADVERTENCJA
El contacto con la zona del silenciador puede producir
quemadurasgraves.
Los gases y el calor de escape pueden inflamar los
materiales combustibles y las estructuras o daiiar el
depOsito de combustible y provocar un incendio.
° NO toque las superficies calientes y EVITElos gases dsl sscaps a alta
tempsratura.
,Psrmita qus el squipo ss enfrfe antes de tocarlo.
, Dejs un espacio reinimo de 152 cm (5 piss) alrsdedor del limpiadora a
prssiOn, incluida la parte superior.
, El C0digo de Normativa Federal (6FR, Titulo 36: Parques, Bosquss y
Propiedad PSblica)obliga a instalar una pantalla apagachispas sn los
equipos con motor de combustion interne y a mantensrla en buenas
condicionss de funcionamisnto, conforms a la norma 5100-16 (o
posterior) dsl Servicio Forestalde la USDA. Enel Estado de California.
la Isyexigs el use de una pantalla apagachispas (SscciOn4442 dsl
C0digo de Recursos P[iblicos de California). En otros estados puede
habsr Isyss similarss en vigor.
ADVERTENCJA
El chorro de agua a alta presiOn que este equipo
produce puede atravesar la piel y los tejidos
_ ubcut_neos, provocando lesiones de gravedad que
)odrials dar lugara la amputaciOnde un miernbro.
La pistolarociadora contiene agua a alta presiOnincluso
cots e! motor parado y el agua desconectada_ que puede
causar la Iserida.
, NO permita en ningSn momento qus NINOS opersn la m_quina
limpiadora a presi0n.
, NUNOArepare la mangusra de alta prssiOn. Rsmplacela.
, NUNCA utilics ningOntipo de sellador para rsparar una fuga sn una
consxiOn. Sustituya la junta tOrica o la junta.
, NUNCA conects la manguera de alta prssiOn al prolongador de la
boquilla.
, Mantenga conectada la mangusra a la m_quina o a la pistola de rociado
cuando el sistema est8 prssurizado.
, SIEMPRE que pare el motor, apunte con la pistola rociadora hacia una
dirscciOn ssgura y aprists el gatillo para descargar la presi0n y evitar el
rstroceso. Active el ssguro dsl gatillo cuando no utilice la pistola.
, NUNCAapunts la pistola a la gents, animales o plantas.
, NO fije la pistola rociadora en la posiciOn abisrta,
, NO abandone la pistola rociadora cuando la m_quina est6 sn
funcionamisnto.
, NUNCA utilics una pistola rociadora cuyo ssguro o protscci0n para el
gatillo no est8 en perfecto estado de funcionamiento.
, AsegSrsse en todo momento de consctar correctamente la pistola
rociadora, las boqnillas y los accesorios.
ADVERTENCJA
ChispearinvolLmtariopuedetenercomoresultadoel
¢ fuegoo elgolpeelOctrico.
CUANBOAJUSTE0 [_AG_,REPARACIONE$ASUMAQUINA
LJMPJADORAA PRESJON
Siempre desconecte el alambre de la bujia y colOquelo donds 11opueda
sntrar en contacto con la buj[a.
CUA_DO P_UE_E L_,_UJ[A DEL MOTO_
Utilice un comprobador de bujias homologado.
, NO comprueba la chispa sin la buj[a instalada.
34

ADVERTENCJA
El arrancador y otras piezas que rotan pueden enredar
las manos, el pelo,la ropa, o los accesorios.
I'_IUI'_ICAutilice la limpiadora a presi6n sin sus carcasas o tapas de
protecci6n.
I'_10use ropa suelta, joyas o elementos que puedan quedar atrapados en
el arranque o en otras partes rotatorias.
o Ate para arriba el pelo largo y quite la joyeria.
ADVERTENCIA
Riesgodelesionesoculares
E!aguarociadapuedesalpicaro propulsarob]etos.
, Utilice siempre galas de protecci6n cuando utilice este equipo o si se
encuentra cerca de donde se est_ utilizando.
o Antes de porter en marcha la limpiadora a presi6n, aeeg0resede Ilevar
gafae de protecci6n adecuadas.
o Utilice SIEMPRElas galas de segnridad apropiadas.
AVI$O
El rociado de alta presi6n puede daiiar elementos fr_giles,
incluyendoel vidrio.
NO apunte la pistola de rociado al vidrio cuando est6 en el modo de
rociado a chorro.
NUNCA apunte la pistola a plantas.
AVI$O
EltratarnientoinadecuadodellimpiadoraapresiOnpuededaiiado
acortarsuvida productiva.
Si ueted tiene alguna pregunta acerca de lae finalidades de uso del
generador, preg_ntele a su concesionario o contacte a Sears.
NUNCA deber_inser operadas las unidades con partes rotas o ausentes
o sin la caja o cubiertae de protecci6n.
NO eluda ning0n dispositivo de seguridad de esta m_quina.
NO intente alterar la velocidad controlada.
NO utilice la limpiadora a presiOnpor encima de su presi6n nominal.
NO haga ninguna modificaci6n en la limpiadora a presi6n.
Antes de poner en marcha la re%ulna limpiadora a presi6n en clima
frio, revise todas las partes del equipo y asegL_resede que no se haya
formado hielo sobre elias.
NL]NCAmneva la m_quina halando la manguera de alta presi6n. L]tilice
la manija que viene con la unidad.
Revise que el sistema de combustible no presente fugas o signos de
deterioro, como manguerae desgastadas o porosas, sujetadores flojos
o ausentes, tapa o tanque da_ados. Corrija todos los defectos antes de
operar la m_quina limpiadora a presi6n.
El equipo de alta presi6n est,1dise_iadopara ser utilizado L]NICAMENTE
con las partes autorizadas Sears. Si utiliza este equipo con partes que
no cumplan con lasespecificaciones m[nimas, el usuario asumetodos
los riesgos y responsabilidades.
35
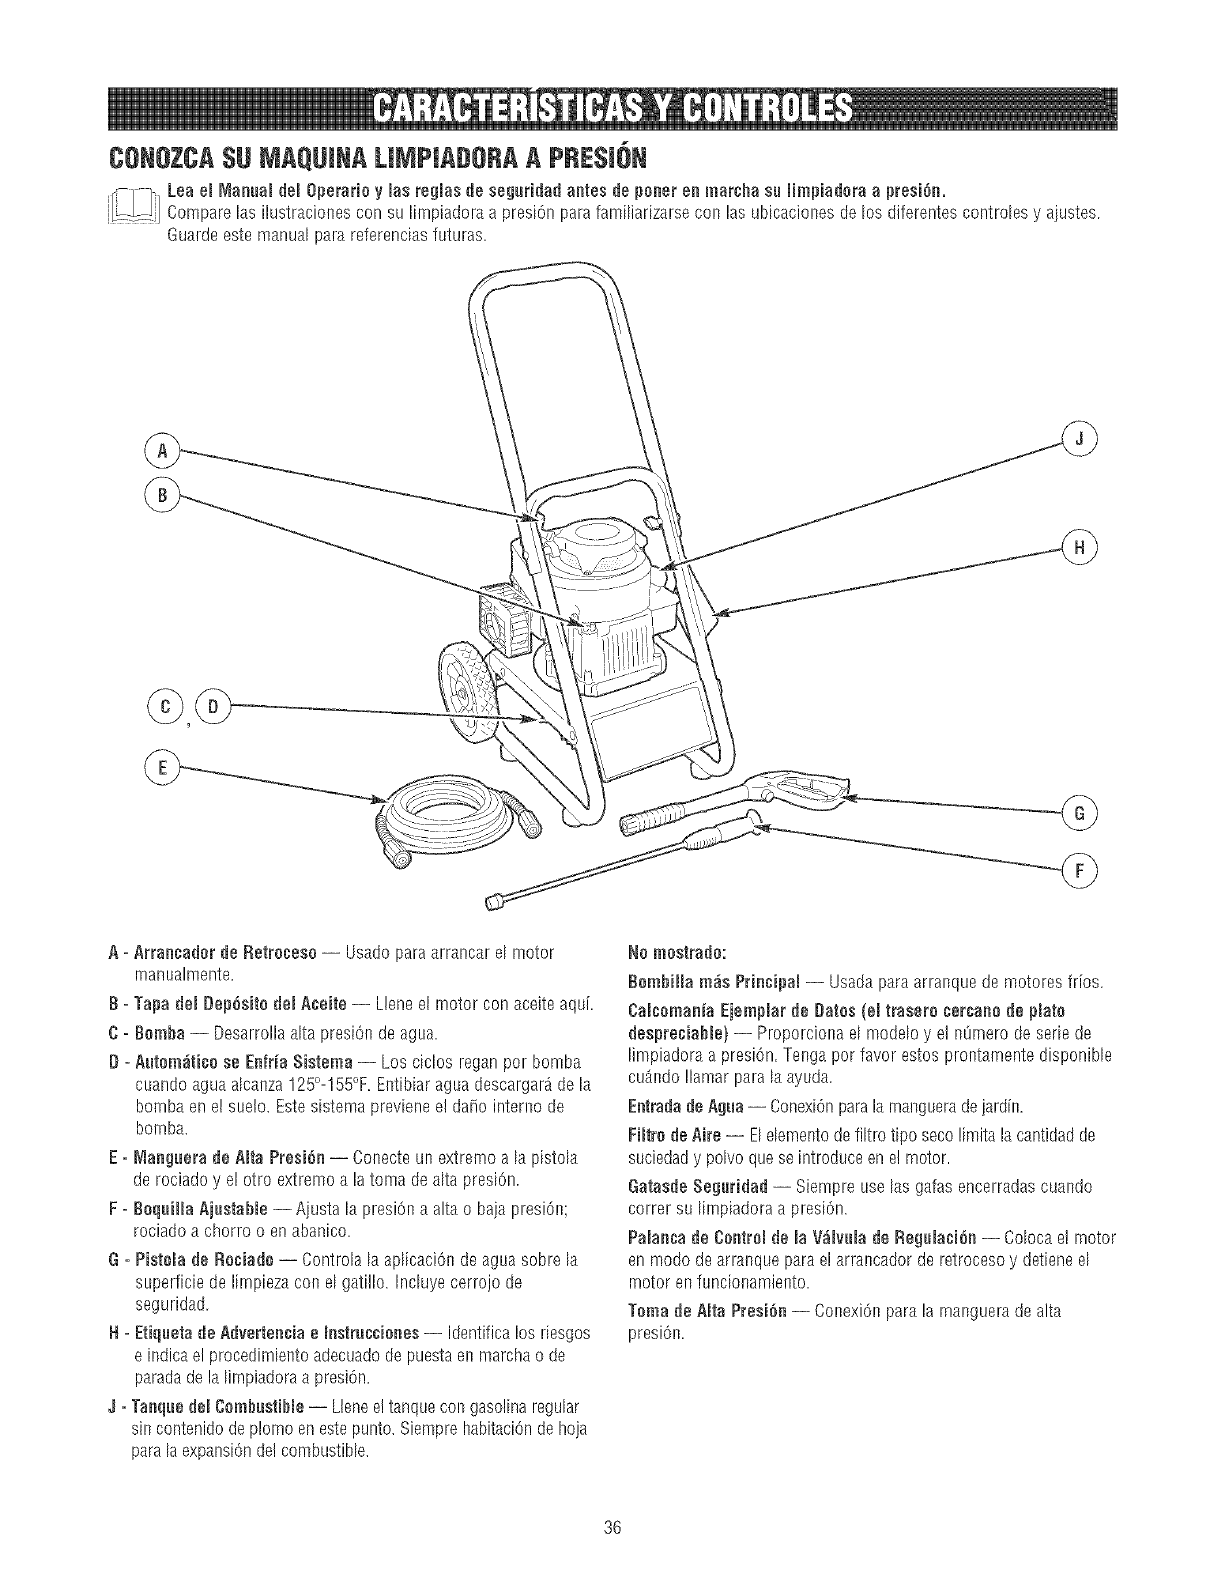
CONOZCA$U MAQUINA LIMPIADORAA PRE$16N
]] o,Ma.°a,oo, ,o,,asooso,°,,oaoa.tosoo,e.o,o.ma,o a,m,,aoe,aa
.....: Compare las ilustracioees con su [irnpiadoraa presi6n parafamHiar[zarsecon las ubicaciones de los diferentes controles y a]ustes.
Guarde este manual pare referencias futures.
A=Arransader do Retreeese -- Usadopare arrancar el motor
rnanualmente,
B = Tape deJDep6site deJAseite -- Llene el rnotor con aceite aqui.
C= Bemba -- Desarrolla alta presiOede agua.
D=Autem_Dce se Eefda Sistema -- Los cities regan per bomba
cuando aguaaIcanza125°-155°F,Entibiar agua descargar_de la
bomba en el sue]o. Este sistema previene el daSo interne de
bomba.
E - Wiaegaerade AIta Presi6e -- Conecteun extreme a [ap[stola
de rociado y el otro extreme ala toma de alta presi6n,
F = Bequilla Ajustable -- A]usta [a presiOna alta o baja presi6n;
rociado a chorro o en abanico.
G=Pistela de Reeiade -- Controla [a apl[caciOnde agua sobre la
superficie de lirnpieza con el gatillo. Induye cerrojo de
seguridad.
H=Etiqueta de Adverteesia e lestrussieees -- Identificulos desgos
e indicael procedimieeto adecuadode puestaen marchao de
paradede la lirnpiadoraa presi6n,
J=Taeque del CemhustiNe -- Liense! tanque con gasoline regular
sin contenido de plomo en este punto. Siempre habitaciOnde hoja
para la expansionde!combustible.
No mestrade:
8embiJJarods Prie¢ipaJ-- Usada parearranque de motores fries.
CamsemaeiaEjempmarde Dates (eratrasere set€ace de plate
despresiahle) -- Proporciona e[ modelo y el nOrnerode serie de
limpiadora a presiOn,Teega per favor estos prontarnente disponiNe
cuAedoIlamar pare la ayuda,
Eetradade Agua -- Conex[6npara la maeguerade ]ardn,
FiJtredeAirs -- E[ elemeotode filtro %0 seco limitala cantidadde
suciedady polvo que se introduce en e! rnotor.
Gatasde Seguridad -- Siempre use las galas encerradas cuaedo
correr su lirnpiadora a presi0n.
PaJaesade Ceetrel de JaV_JvuJade ReguJa¢i6e-- Coloca e! motor
en mode de arraeque pareel arrancador de retroceso y detieneel
motor en funcioeamiento.
Tema de AJtaPresi6e -- CoeexiOepare la rnaeguera de alta
presiOn.
36

Su limpiadora a presiOn requiere de cierto ensamble y estar_ lista
para ser usado OnicamentedespuOsde haber depositado el
combustible y el aceite recomendado.
Si tiene probRemasconemensamhmede su m_quina Hmpiadora a
presiOn,Hame a RamJneade ayuda de mam_quina Hmpiadura a
presiOnaJ1=808=222=3136.
Desembale Ja Limpiadera aPresi_n
1. Saquetodo el contenido de la caja de carton, a excepciOnde la
limpiadora a presiOn.
2. Abra completamente la caia de carton cortando cada una de
sus esquinas de arriba abaju.
3. Saque la lirnpiadora a presiOnde la caia de carton.
Centenide de _aCaja
Revise e! contenido de la cain. Si alguna de las partes no estA
presente o est_ da_ada Ilame a la lineade ayuda de la rn_quina
limpiadora a presiOnal 1=888=222=3136.
o La unidad principal
, Manubriu
Juego de ruedas
La rnanguerade alta presiOn
Pistola de rociado
ExtensiOnde la boquilla
, Aceite para motor
, Bolsa de partes (incluye los elementos descritos a continuaciOn)
Manual del operador
, Tarietade la matricula
o Gafasde seguridad
o Bolso accesorio del ah_nacenamiento
Familiaricesecon cada parte antes de ensarnblarla rndquina
limpiadora a presiOn.Compare e! contenido con la ilustraciOn de la
pAgina36. Si alguna de la partes no est_ presente o se encuentra
dafiada, Ilarnea la linende ayuda de la m_quina limpiadora a
presiOnal 1=888=222=3136.
MeNTAJE DEELIMPIADeRAa PRE$16N
Usted deber_[[evara cabo los siguientes procedimientos antes de
poner en funcionarniento su lirnpiadora a presiOn:
1. Llene y rnande en tarjeta de rnatricula.
2. Conectemanubrio a unidad principal. /J
3. Instale eliuego de ruedas.
4. Afiada aceite al motor.
5. Ariada gasolina al tanque de combustible.
6. Conecternangueraa alta presiOna pistola rociadora y a bomba. -J
7. Conecteel suministro de aguaa bomba.
8. Conecteboquilla la extension al pistola rociadora.
Cenecte el Manubrie
1. Coloque e! rnanubrio (A) en la base (B). Aseg(irese de que los
orificios en e!rnanubrio est_n alineadus con los orificios en los
base.
2. Inserteelpernosdelsoporte(C)atrav_sdelos orificiusdesde
fueradela unidady sujeteunaperillasdeplAstica(D) desdeel
interiordelarnismaunidad.Aprietemanuahnente.
Jastale el Jaege de Raedas
Eljuego de ruedas est_ dise_ado para rnejorar el transporte del
limpiadora a presiOn.
NOTA:Estejuego de ruedas no hasido diseiiado para ser usado en
la carretera.
Instale el ,Jue#ede Ruedas _,ume$i_lue:
1. Coloque e! fundo de la camilla del limpiadora a presiOnen una
superficie pinna.
2. Deslice una rueda (A) en e! eje (B).
NOTA:Est_ seguro instalar la rueda con inboard levantado de eje.
3. Deslice el eie por orificios (C) en el marco.
4. Retengala rueda en el eje con pasadurde reteci6n ([}).
5. Repita los pasos 2 por 4 para asegurar la segunda rueda.
37
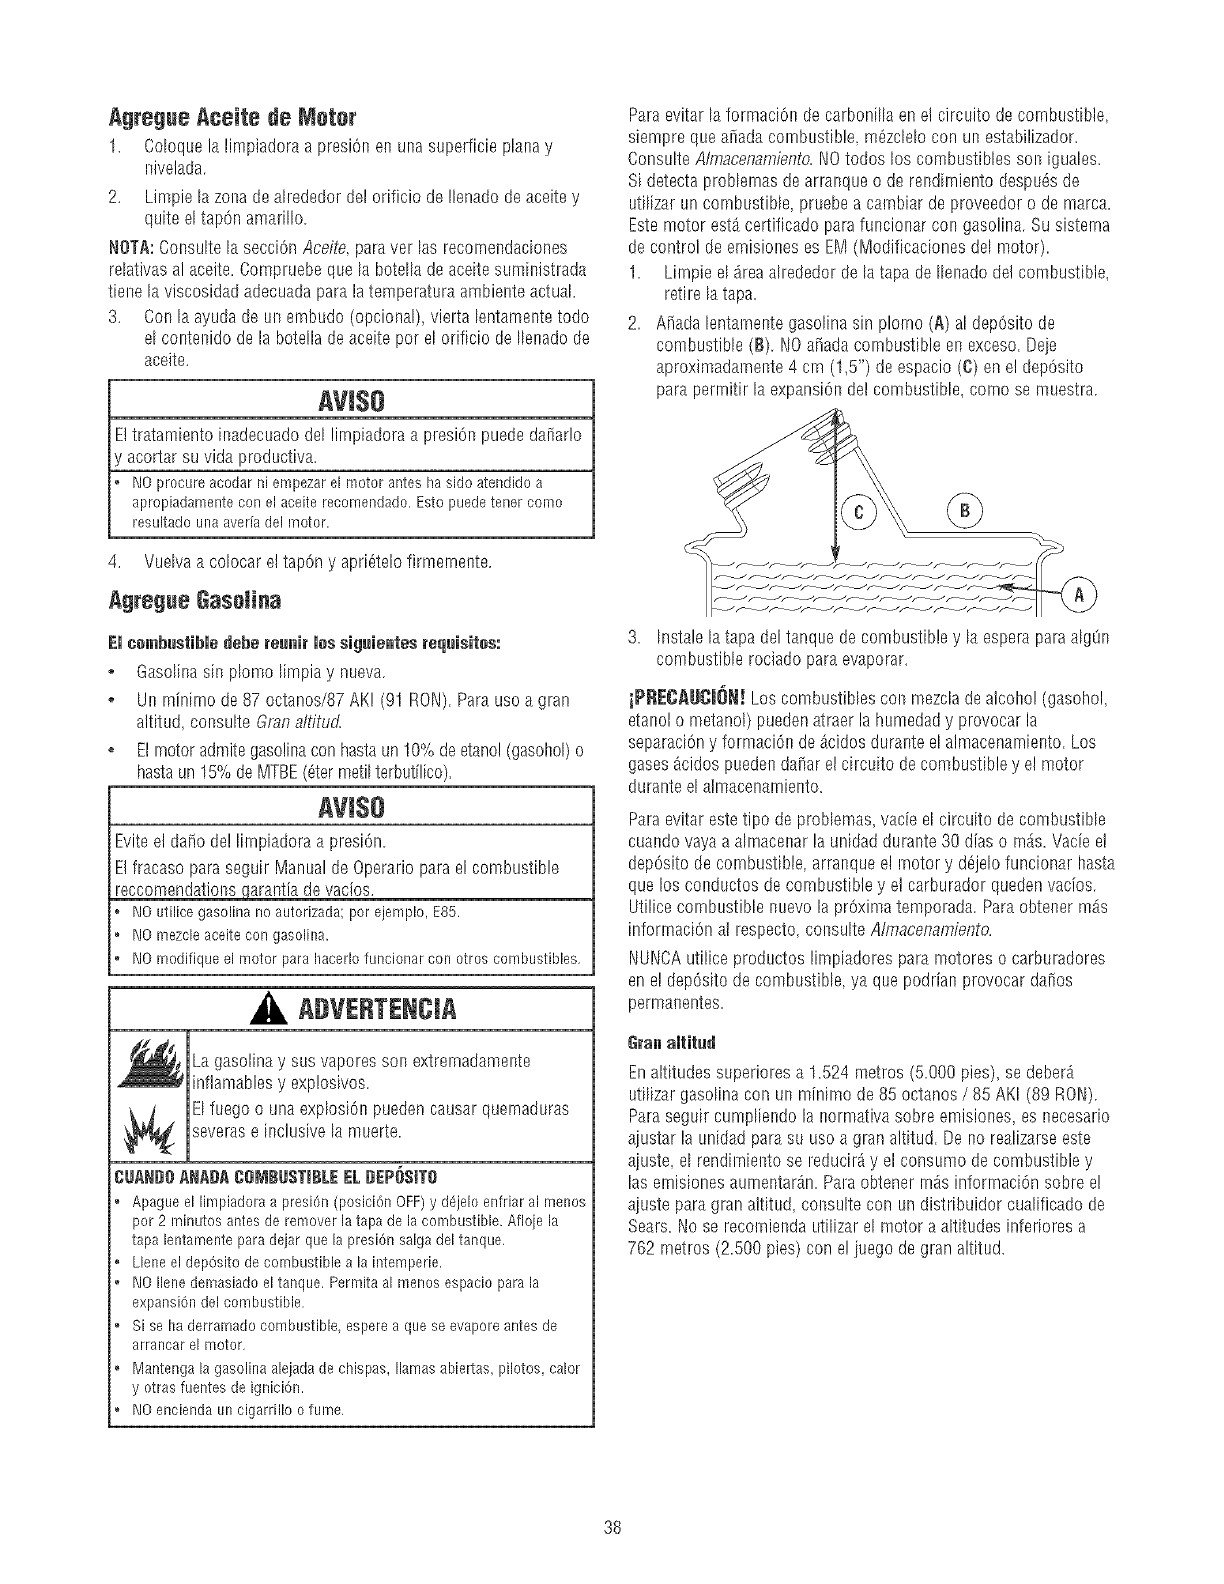
Agregue Aceite de Motor
1. Coloquela limpiadora a presiOnen una superficie plalsay
nivelada.
2. Limpie la zona de ahededor del orificio de Ilenado de aceite y
quite el tapOn amarillo.
NOTA:ConsuIte la secciOnAceite, para ver las recornendaciones
reIativas al aceite. Compruebeque la boteIla de aceite soministrada
tier_ela viscosidad adecuadapara la temperatura ambier_teactual.
3. Con la ayuda de un embudo (opcional), vierta lentamente todo
el contenido de la botella de aceite por el orificio de Ilenado de
aceite.
AVl$O
E!tratamiento [nadecuadodel lirnp[adora a presiOnpuede daiiar!o
' acortar su vida productiva.
1/oprocureacodarni empezarel motoranteshasido atendidoa
apropiadamentecon elaceiterecomendado.Estopuedetenercomo
resultadounaavefiadel motor.
4. Vuelva a colocar el tapOny aprl_telo firmernente.
Agregue Gaseiina
El ¢embustJbledebe reunJr les sJ_luJentesrequisites:
, Gasolilsasin plomo limpia y nueva.
, Un rninirno de 87 octanos/87 AK] (91 RON). Para uso a gran
altitud, colssulte Granaltitud.
o El rnotoradmite gaso!inacon hastaun 10% de etano!(gasohol)o
hasta un 15% de MTBE(_ter metilterbotilico).
,Vl$O
B,,iteel da[io de! I[rnp[adora a pres[On.
E! fracaso paraseguir Manual de Operario para el combustible
reccomendationsgarantia de vacios.
I'_10utilicegaeolinanoautorizada;por ejemplo,E85.
1/0mezcleaceitecon gasolina.
NOmodifiqueelmotor parahacerlofuncionarcon otroscombuetibles.
, ADVERTENCJA
La gasolina y sus vapores son extremadamente
inflamables y exp!osivos.
E[fuego o una explosion pueden causar quernadoras
severase inclusive la muerte.
CUANBOANP,BA COMBUSTIBLEELBEPO$1TO
o Apagueellimpiadoraa presiOn(posiciOnOFF)y d_jeioenfriaral menos
por 2 minutosantesderemoverlatapadelacombustible.Aflojela
tapa lentamenteparadejarquelapresiOnsalgadeltanque.
, Lleneel depOsitodecombustiblea la intemperie.
o NOIlenedemasiadoeltanque.Permitaal menosespacioparala
expansiondel combustible.
, Sise haderramadocombustible,esperea queseevaporeantesde
arrancarel motor.
, Mantengala gasolinaalejadadechispae,llamasabiertas,pilotos,calor
y otraefuentesdeigniciOn.
, NOenciendauncigarrilloo fume.
ParaevitarlaformaciOndecarbonl[[aene!circoitodecombustible,
siemprequeaiiadacombustible,mazcIe[ocon unestabilizador.
ConsuIteAlmacenamiento.1/0todoslos combustiblessots[guaIes.
SidetectaprobIemasdearrar_queo derer_dirnientodespuOsde
utiIizaruncombustiblepruebea carnbiarde proveedoro demama.
Estemotorest_certificadoparafuncionarcon gasolina.Susisterna
decontroldeemisionesesEM(Modificacionesdelmotor).
1. Lirnpiee[_.reaalrededordelatapadeIlenadode!combustible,
retirelatapa.
2. Mada [entamentegaso%asin plomo(A)a[depOsitode
combustible(B). 1/0a_adacombustibleenexceso.Deie
aproximadamente4 cm (1,5")deespacio(C)enel depOsito
paraperrnitirla expansiondelcombustible,comosemoestra.
3. Instale[atapadeltanquedecombustibley la esperaparaalgOn
combustiblerociadoparaevaporar.
iPRECAUCJON!LoscombustiblesconmezcIadealcoho!(gasohol,
etanolo metanot)puedenatraerlahumedady provocarla
separaciOny formaciOnde_cidosduralsteelalmacenamiento.Los
gases_cidospuedelsdaiiarelcircoitodecombustibley elmotor
duranteelalmacenamiento.
Paraevitar estetipo de prob[emas vacie e[ circuito de combustible
cuando vayaa ah-nacelsarla unidad durante 30 dias o rn_s. Vacie e!
depOsitodecombustible, arranque el rnotor y d_jelo funcionar hasta
que los conductos de combustible y e! carburador queden vacios.
Utilice combustible nueuo la prOximatemporada. Paraobtener m_s
lnformaciOnal respecto, consulte Almacenamiento.
I',W!tCAutilice productos limpiadores para motores o carburadores
en e! depOsitode combustible, ya que podrian provocar dai_os
permanentes.
6ran altitud
Enaltitudessuperioresa 1.524metros(5.000pies) sedeber_
utiIizargaso%aconun minirnode85octanos/85AKI(89 ROll).
Paraseguircumplielsdolanormativasobreemisiones,es necesario
aiustarla unidadparasu usoa granaltitud.Deno reaIizarseeste
aiuste,el rendimientose reducir_y el consumodecombustibley
lasemisionesaumentar_n.Paraobtenerrn_sinformaciOnsobree!
ajusteparagranaltitud,consulteconundistribuidorcualificadode
Sears.[to se recomiendautiIizarel motora altitudesinferioresa
762 rnetros(2.500pies)cone!iuegodegranaltitud.
38
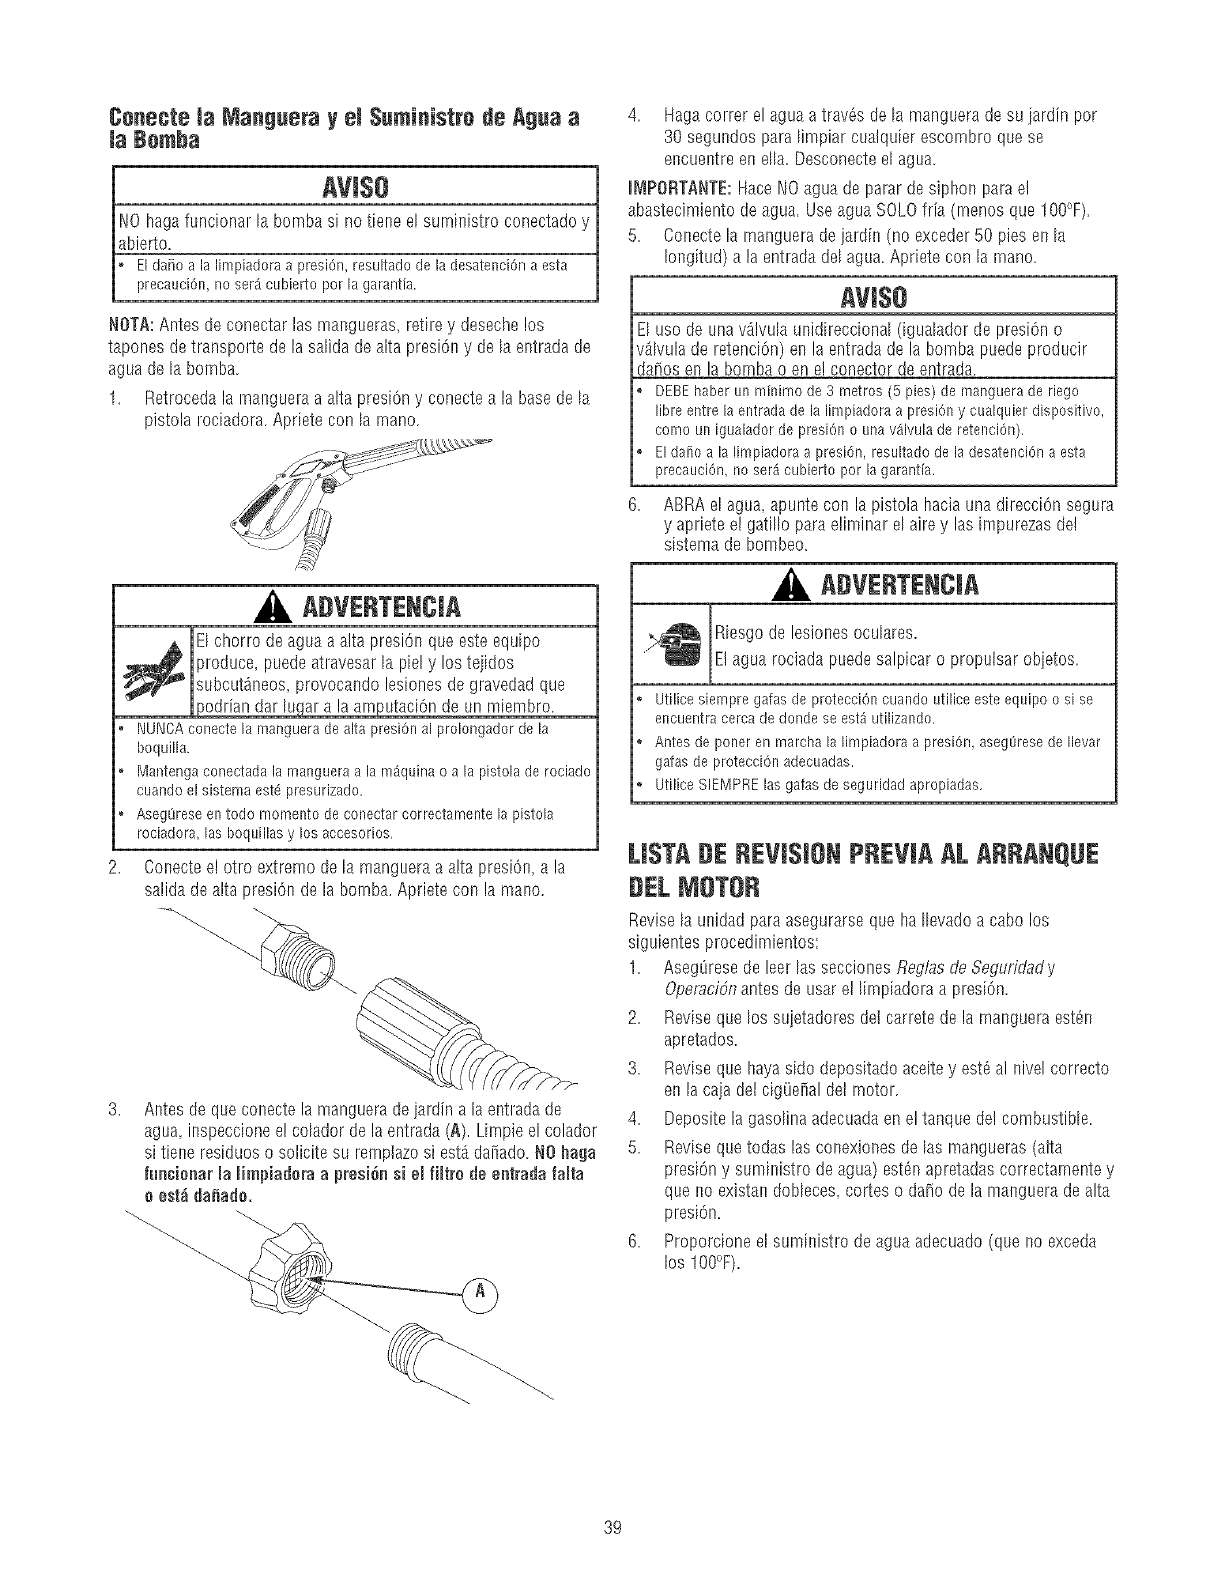
Conecte la Mangeera yeJ $eministre de Agea a
Ja Bomha
t av
[IO bagafuncionar la bornba si no tiene el surninistro conectado y
bierto. __ ....
Eldafioa lalimpiadoraa presi6n,resultadode ladesatenci6na esta
precauei6n,no ser_cubiertoparla garantia.
NOTA:Antes de conectar las mangueras, retire y deseche los
tapones de transporte de la salida de alta presiOny de la entrada de
agua dela bomba.
1. Retroceda la manguera a aIta presi6n y conectea la base de la
pistola rociadora. Apriete con la rnano.
ADVERTENCiA
I_EI chorro de agua a alta presiOn que este equipo
produce, puedeatravesar [a pie!y los teiidos
subcut_neos provocando lesiones de gravedad que
_odrian dar lu#ar a la arnputaci6n deun miembro.
o NUNCAconectela mangueradealta presiOnal prolengadordela
boquilla.
o Mantengaconectadalamangueraa lam_iquinao a la pistoladerociado
cuandoel sistemaest_presurizado.
, Aseg0reseentodo momentadeconectarcorrectamentela pistola
rociadora,lasboquillasy losaccesorios.
Conecteel otro extremo de la mangueraa alta presiOn,a la
salida de alta presiOnde la bornba.Apriete con la mano.
--...
Antes de qua conecte la manguera de]ardin a la entrada de
agua inspeccionee! colador de la entrada (A). Limpie el colador
si tiene residuos o solicite su remptazosiestA dai_ado.NOhaga
fun¢ianar maHmpiadora a preai6nsi emfimtrade entrada famta
a est_ daliada.
4. Hagacorrerelaguaatrav6sdela mangueradesu]ardinpar
30segundosparalimpiarcuaiquierescombroquase
encuentreenella,Desconecteelagua.
m_tPORTANTE:Hacerio aguadeparardesiphonparael
abastecimientodeagua.UseaguaSOLOfria (rnenosque100°F).
5. Conectelarnangueradejardin(noexceder50piesenla
Iongitud)a laentradadelagua.Aprietecon larnano.
AVISO
E[ usa de una%lvuIa unidireccional (iguaIador de pres[6n o
%lvula de retenciOn)en la entrada de la bornbapuede producir
darios en la bornba o en e! conector de entrada.
DEBEhaberunminimade3 metros(5 pies)de mangueraderiego
libraentrelaentradadela limpiadoraa presiOny cualquierdispositivo,
comaun igualadordepresi6no unav_lvulade retenci6n).
Elda[ioa lalimpiadoraa presi6n,resultadodela desatenci6naesta
precauei6n,no ser_cubiertopar lagarant[a.
6. ABRA el agua apunte con la pistola Iracia una direcci6n segura
y apriete el gatillo para eliminar el aire y las impurezas del
sistema de bombeo.
ADVERTENCIA
Riesgo de lesianesaculares,
E! agua rociada puede salpicar o propulsar objetos
, Utilicesiempregafasde protecci6ncuandoutiliceesteequipoo si se
encuentracercadedondeseest_utilizando.
, Antesdeponeren marehalalimpiadoraa presi6n,asegL_resedeIlevar
gafasdeprotecci6nadecuadas.
, UtilieeSIEMPRElasgalasdeseguridadapropiadas.
LiSTADEREViSiONPREViAALARRANQUE
DEL 10TOR
Revise [aunidad para asegurarse que IraIlevado a cabo los
siguientes procedimientos:
1. Aseg8rese de leer las secciones Red/asde Seduridady
Operaci6nantes de usar el lirnpiadora a presi6n.
2. Revise que los sujetadores de] carrete de la rnanguera estan
apretados.
3. Revise qua baya sido depositado aceitey est_ al nivel correcto
en la caia del cigL)efialdel rnotor.
4. Deposite la gaso%a adecuadaen el tanque det combustible.
5. Revise quetodas las conexiones de las mangueras (alta
presi6n y suministro de agua) est_n apretadas correctarnente y
que no existan dobleces, cortes o da_o de la manguera de alta
presiOn.
6. Proporcione el saministro de agua adecuado (qua no exceda
los 100°F).
39
COMOUSARSU LIMPIADORAAPRE$16N
Si tiene prob[emas con el funcionamiento de su mAquina I[rnpiadora
a presiOn,por favor !lame a la Ifllea de ayuda de la rnAqu[na
Iimpiadora a presiOnal 1-888-222-3136.
Ubicaei6n dei Limpiadora a Presi6n
Espacie libre alrededer del limpiadora a presi_n
ADVENTENCIA
Los gases y e[ ca[or de escape pueden hlflarnar los
rnateria[escombustibles y [asestructuras o da_ar el
dep6sito decombustible y provocar un incendio.
, Dejeun espaciomJnimode152cm (5 pies)alrededordel limpiadoraa
presi6n,ineluidala partesuperior.
Coloque [a[impiadoraa presi6n a la intemperie en una zona en
donde no se acurnulen gases de escape mortales. Asegt_resede que
los gases de escape (A) no puedan entrar pot ventanas, pueltas,
tornas de aire de ventilaciOnu otras aberturas en un espacio
cerrado en el que puedan acurnu[arse.Tenga en cuenta losvientos y
las corriente de aim preponderantes cuando el[ja la ubicaciOndel
limpiadora a presi6n.
, ADVERTENCiA
A[motor funcionar, se produce mon6xido de carbono,
un gas ulodoro y venenoso.
Respirar rnon6xido de carbono puede provocar dolor
de cabeza,fatiga, mareos,v6rnitos, confus[On, ataques,
n_useas,desmayos o [ncluso[amuerte.
Opereei limpiadoraa presi6nSOLAMENTEal airelibre.
o Aseg(Jresedequelosgasesdeescapeno puedanentrarporventanas
puertas,tomasdeairedeventiiaci6nu oh'asaberturasenun espacio
cerradoenel quepuedanacumularse.
o NOarranqueni dejefuncionarel motoreninterioresnienzonas
cerradasaunquehayaventanasy puertasabiertas.
.z\
Para Peaer en _larcha el Liapiadera aPresi_n
Paradar[e arranque a su limpiadora a presi6n mov[do a motor por
primera vez s[ga estas instrucciones paso a paso. Esta [nformaci6n
acerca de [a puestaen rnarcha inicial tambi6n es vA]ida para cuando
vaya a dade arranque al motor despu6s de habeflo dejado [a
rn_qu[na I[rnpiadoraa pres[Onfuera de func[onarniento por Io
rnenos un dia.
1. Coloque la rnAquinalimp[adora a presi6n en un area cercana a
una sum[nistro de agua exterior capaz de abasteceragua a un
volumen mayor de 2.9 galones por minuto en no menos que
20 PSI en el fin de arandelade pres[6n de la manga de! jardin.
2. Revise que la manguerade a[ta presi6n se encuentre
conectadafirmemente a la pistola de rociado y a la bornba.Yea
MonLaje.
3. Asegt_reseque la unidad est6 nivelada.
4. Conecte la rnanguera de jardin a la entrada del agua. Apfietela
con la mano.
5. Abra el agua, apunte con la pistola hacia una d[recci6n segura
y apriete el gatH[opara eliminar el aire y las [mpurezasdel
s[stema de bombeo.
[Aw ]
JNO funcionar la bomba si tiene el surnin[stro conectado
haga II0 yj
Bbierto. __ ......
J, Elda[ioa lalimpiadoraa presi6n,resultadodela desatenei6naesta j
Lprecauci6n,11oser_cubiertopor lagarant[a, j
6. Conecte la extensi6n de la boquilla a la pistola rociadora.
Apri6tda con las manos.
Coloque el pasador de segundad (A) al gatfllo de la p[stola
rociadora.
4O
8. AsegQresedeque la control de la %lvula de admisi6n se
encuentre enla posiciOn"Rdpide" ("Fast") (A), que se distingue
de un conejo.
®
®
Para++menzarel m+t+rpareel tiempemuyprimer:
9. Empujebombillarn_sprincipalfirmementevezde5, esperando
2 segundosentrecadaempujOn.Reviselas instrucciones
especificas del comienzo de motor en el manual de due_os de o
rnotor.
Para cemenzar meter despuds:
9 Empuje bombilla rn_s principal firmemente vez de 3, esperando
2 segundos entre cada empujOn. En el caso de que el motor
est6 caliente I,,_Oapriete la bombilla m_s principak
IMPORTANTE:Antes de poner en marcha la limpiadora a presi6n,
asegQresedeIlevar gafas de protecci6n adecuadas.
ADVERTENCJA
Riesgo de lesiones oculares
E! agua rociada puedesalpicaro propulsarobjetos.
o Utilice siempre gafas de protecci6n cuando utilice este equipo o si se
encuentra cerca de don@ se est_ utilizando.
o Antes de porter en marcha la limpiadora a presi6n, aseg(_resede Ilevar
gafas de protecci6n adecuadas.
o Utilice SIEMPRElas galas de seguridad apropiadas.
10. Cuandoarranqueel motor,col6queseenlaposiciOnquese
recomiendaacontinuaci6n.Sujetela maniiay haleligeramente
la manijadelarranquehastaquesientaciertaresistencia.
Despu_s h_tlela r_pidamente.
11. Jale la cuerda de arranquelentamente. 1/Opermita que la cuerda
regrese bruscamenteeo contra del arrancador.
ADVERTENCJA
El retroceso (repliegue rApido) del cable del arrancador
puede producir lesiones. El retroceso impedir5 que el
usuario suelte el cable a tiempo y tirar_ de su rnano y
brazo hacia el motor.
Comoresultado,podrianproducirsefracturas_
contusiones 0 esguinces.
NUNCAtire del cable del arrancador sin eliminar previamente la presi6n
de la pistola rociadora.
Cuando arranque el motor, tire lentamente del cable hasta sentir una
resistencia y, a continuaciOn, tire r@idamente de _1para evitar su
retroceso.
Despu_s que cada tentativa que empieza, don@ motor falla de correr,
siempre sdialar el fusil en la direcci6n segura y el disparador del fusil
del rode del estruj6n para liberar la presi6n alta. Active el gatillo de la
pistola rociadora.
Sujete firmemente la pistola rociadora con ambas manos cuando
aplique un rociado a alta presi6n paraevitar lesiones cuando se
produzca el retroceso de la pistola.
ADVERTENCJA
EJchorro de aguaa alta presi6n que este equipo
produce puedeatravesar la piel y los tejidos
subcutAneos, provocando lesiones de gravedad que
_odriandar lugar a la amputacJ6nde un miembro.
Lapistola rociadoracontieneaguaa alta presi6nincluso
con e! motor parado y el agua desconectada,quepuede
causarla herida.
o NOpermitaenningSnmomentoqueNINOSoperenlam4quina
limpiadoraa presi6n.
, Mantengaconectadalamangueraa lam_quinao a lapistolade rociado
cuandoel sistemaest8presurizado.
, NUNCAapuntela pistolaa lagente,animaleso plantas.
o NOfije lapistolarociadoraenlaposici6nabierta.
, NOabandonelapistolarociadoracuandolam_quinaest6en
funcionamiento.
, NUNCAutiliceunapistolarociadoracuyoseguroo protecciOnparael
gatillonoest8enperfectoestadodefuncionamiento.
AsegSreseentodo momentodeconectarcorrectamentela pistola
rociadora,lasboquillasy los accesorios.
ADVERTENCJA
s_ E!contactocon lazonadelsilenciadorpuedeproducir
quemadurasgraves.
Los gasesy el ca!ordeescapepuedeninflamarlos
._ materialescombustiblesy lasestructurasodaiiarel
dep6sitodecombustibley provocarunincendio.
®
®
®
®
NOtoque las superficies calientes y EVITElos gases del escape a alta
temperatura.
Permita que el equipo se enfr[e antes de tocarlo.
Deje un espacio m[nimo de 152 cm (5 pies) alrededor del limpiadora a
presi6n, incluida la parte superior.
El COdigode Normativa Federal (CFR,Titulo 36: Parques, Bosquesy
Propiedad PL3blica)obliga a instalar una pantalla apagachispas en los
equipos con motor de combusti6n interno y a mantenerla en buenas
condiciones de funcionamiento, conforme a la norma 5100-1C (o
posterior) del Servicio Forestalde la USDA. En el Estado de California,
la leyexige el use de uua pantalla apagachispas (Secci6n 4442 del
C6digo de Recursos R_blicos de California). En otros estados puede
haber leyes similares en vigor.
41
NOTA:Siemprernalstengalacontrolde%lvuIaderegulaciOoenel
"R_pido"("Fast")posicionecuAodooperarlalirnpiadoraapresiOn.
C_me Detener su Limpiadera aPresi_n
1. SueIte e[ gatillo de la pistoIa rociadora y dejefoncionar el
rnotor al ralenti durante dos minutos.
2. Mueva e[ acelerador a [a posiciOn"SJow" (Lento), luego a la
posiciOn"Stop" (Parodo) (A).
UstedtambiOnpuedeaiustarelpatronderociadogiralsdola
boquillaparaqueest6concentradoeounpatrondechorroo
ulspatronexpandidoenabarfico.
3. SlEMPREfusil de punto eo una direcciOn segura y el
disparador del fosil de! rocio de! estrujOn para liberar la
presiOnretenida de la pIearnar.
IMPORTANTE:La pistola rociadora contieoe agua a alta presiOn
incluso con el motor paradoy el agua descooectada.
, ADVERTENCJA
El chorro deagua a alta presiOnque este equipo
produce puedeatravesar la piel y los tejidos
_ ubcut_neos, provocaodo lesiones de gravedad que
podrian dar lugar a la amputaciOnde un rniembro.
Lapistola rociadoracontieneagoaa a]ta presiOnincluso
con el motor paradoy et agua desconectada,que puede
causarla herida.
o Mantengaconectadalamangueraa lam_iquinao a la pistoladerociado
cuandoel sistemaest8presurizado.
o SlEMPREquepareel motor,apunteconla pistolarociadorahaciauna
direcciOnseguray aprieteelgatilloparadescargarla presiOny evitarel
retroceso.Activeel segurodelgatillocuandonoutilicelapistola.
4. Active el seguro del gatillo de la pistola rociadora cuando no la
utilice.
COmeUsar Ja BequiiJa Ajustahle
Ustedya debe saber como darle ABBANQL_Ea su m_quina lavadora
a presi0n y como BETENERLA.La i_lformaci0n de esta secciOnle
dir_ como ajustar e! patron de rociado y corno aplicar detergente u
otros quimicos de limpieza.
,, ADVERTENCJA
El chorro deagua a alta presiOnque este equ[po
_ roduce, puedeatravesar la piel y los tejidos
subcut_neos provocando lesiones de gravedad que
podr[an dar lugar a la arnpotaci6n de un miembro.
, NUNCAajusteel patronderociadocuandoest8rociando.
, NUI',JCAcoloquelasmanosenfrentede laboquillaparaajustarel
patronde rociado.
Aponte la boquilla hacia e! soelo, desengancbeel cerrojo de
seguridad y apriete el gati% para probar el patron de rociado.
3. EI patr6n de rociado se aiusta de un patron angosto a un
patron en abanico girando la boqui%.
UseIo¢lina
, Parauna[impiezarn_sefectivamalsteogala boquilladerociado
de8 a24 polgadasdelasuperfidedelimpieza.
o SicolocalaboquiIladerociadodemasiadocercapodr[adaiiarla
superficie,especiakner_tecuandoest_usandoel rnododealta
presiOn.
, 1/Oco[oquela boqoillaa rnenosde6 polgadascoandoest_
lirnpiandoIla_tas.
42
A d[caci_n de_ detergente esande _a hoqeiHa
a ustahie
,PRECAUCJ6N
Los productos quimicos pueden provocar les[ones de gravedad
'/o dai_os rnateriales.
NUNOAutiliceI[quidosc_usticoscon lalimpiadoraa presi6n.
UseEXCLUSIVAMENTEdetergenteso jabonesespecialesparala
limpiadoraa presi6n.Sigatodas lasinstruccionesdelfabricante.
Para apliear el deter_lente, siva les siguientes pases:
1. Revise el uso de la boquflla ajustable.
2. Prepare la soluci6n detergente siguiendo las instrucciones de]
fabricante.
3. Coloque el peque_o extrerno final del filtro del tubo de
inyecci6n de! detergente dentro de! contenedor del detergente.
NOTA:AsegOresede que et filtro est6totatmente surnergido
mientras se aptica el detergente.
AVISg
El contacto con el silenciador a alta temperatura puede producir
da_os en el tubo de inyecci6n de detergente.
Cuandocoloqueel filtro enlabotelladeldetergente,coloqueeltubo de
maneraquei]o entreencontactoaccidentalmenteconelsilenciador
caliente.
4. Mueva [a boqu[Haajustable hacia adelante para obtener el
modo de baia presiOn.El detergente no puede ser aplicado si
tiene la boquilla en la posici6n de alta presi6n.
5. AsegOresedeque la mangueradel jardin estAconectadaa la
entrada de agua.Cornpruebe que la rnanguera de alta presiOn
estAconectadaa la pistola rociadora y a la bornba. Abra la
alimentaciOnde agua.
AVI$O
Usted deberAconectar todas las manguerasantes de darle
arranque al motor.
Arrancarel motorsintenertodaslas manguerasconectadasy sin el
suministrodeaguaABIERTO(ON)causar_ielda[iode la bomba.
Elda_oa lalimpiadoraa presi6n,resultadode la desatenci6naesta
precauci6n,no ser_icubiertoporla garantia.
6. Active el seguro dd gatillo de la p[stola rociadora y ponga en
marcha el motor siguiendo las instrucciones de la secciOn
C6mo poner en funcionamiento la limpiadora a presidn.
7. ApIique e! detergente sobre la superficie seca,comenzando en
la parte inferior de!Areay dirigi_ndose haciaardba, utilizando
movimientos largos, parejos y superpuestos.
8. Permita que e[ detergente "penetre" de 3 a 5 rninutos antes de
eniuagar.Vuelva a aplicarlo cuando sea necesario para evitar
que [a superficie se seque. NOperrnita que el detergente se
seque.Si permite que e! detergente se seque,la superficie
podria quedarcon rnanchas.
mlVIPORTANTE:Usted deberA lavar el sistema de inyecci6n de
detergentedespu_s de cada uso colocando el filtro en un baldede
agua limpia y haciendo funcionar la rnAquinalirnpiadora a presi6n
de 1 a 2 minutos en el modo de baja presiOn.
Enjuage de _am_quina iimpiadora a presi_n
1. Desl[ce la boquiHa haciaatrAs a la presi6n a[ta y apriete e[
d[sparador. Llevar_ un pocos segundos para el detergente a
daro.
NOTA:Tambi6n puede detener la circulaciOndel detergente
retirando el tubo de succiOn del recipiente.
2. Mantenga la pistola de rociado a una distancia segura dd Area
que planea rociar.
ADVERTENCIA
El retroceso de la pistola rociadora puede provocar
caidas.
Utilice la limpiadora a presi6n desde una superficie estable,
,Extreme las precauciones si necesita utilizar la limpiadora a presi6n
desde una escalera, un andamio u otro lugar similar.
,Sujete firmemente la pistola rociadora con ambas manos cuando
aplique un rociado a alta presi6n paraevitar lesiones cuando se
produzca el retroceso de la pistola,
3. Apl[queunrociadodea[tapresi6nenunAreapequefia,
despu_srevisesi la superficiepresentada_os.Si noencuentra
da_os,puedecontinuarconeltrabajodelirnpieza.
4. Comienceenla partesuperiordelAreaqueva a enjuagar,
dirigi6ndosehaciaabajocon los rnisrnosmovirnientos
superpuestosqueutiliz6parael limpieza.
43

LimpJezadel tube de inyecci6n de detergente
S[ usted us6 el tube, usted debe lavarlo con aguaI[rnpia antes de
parar el motor.
1. Coloqueel filtro y la inyecciOedetergente ee un balde Ileno de
agua limpia.
2. Coloqueel cerrojo de seguridad a la pistola de rociado.
3. Deslice boquilla aiustable hacia adelante al rnodo bajo de la
presi6n.
4. Lave de 1 a 2 rnieutos.
5. Pare el motor siguiendo las instrucciones de la secci6n C6mo
detener la fimpiadora a presiSny cierre la alimentaciOn de
agua.
6. SiEIVIPREfusHde punto en una direcciOn segura y el
disparador del fusil del rocio del estruj6n para liberar la
presi6n retenidade la pleamar.
mMPORTANTE:La pistola rociadora contiene agua a alta presiOn
induso con el rnotor parade y el agua descoeectada.
ADVERTENCJA
El chorro de aguaa a[ta presiOnque este equipo
produce puedeatravesar la piel y los tejidos
subcut_neos, provocando lesiones de gravedad que
)odriaedar lugar a [a amputaciOede un miembro.
Lapistola rociadoracor_tieneaguaa aIta presiOninciuso
cotse! motor paradey el agua desconectada quepuede
causarlaherida.
, Mantengaconectadalamangueraa lam_quinao a lapistolade rociado
cuandoel sistemaest8presurizado.
, SIEMPREquepareel motor,apunteconla pistolarociadorahaciauna
direcci6nseguray aprieteelgatilloparadescargarla presiOny evitarel
retroceso.Activeel segurodelgatillocuandonoutilicela pistola.
$istema de enfriamiente autem_tice {alivie
t rmice)
E!agua que circula deetro de la bomba puede alcanzartemperaturas
entre los 125°-155°F si hacefuncionar el motor de su m_quina
limpiadora a presi6n de 3 a 5 minutes sin oprimir el gatiIIo de la
pistola de rociado. Cuaedoel agua alcanzadicha temperatura, el
sisterna de enfriamiento autom_tico se activa y enfr[a la bomba
deeeargaede agua eaJieeteee eJpise,
44
JNFORMACJ6NT CNJCA$OBREELMOTOR
El motor es de uno cilindros, de L-cabeza,refrigerado por aire y de
baja emisiOn.
Enel Estadode California, los motores de la 90000 hart obtenido la
certificaciOndel California Air Resources Board (Consejo de
recursos de aire de California) de cumplirniento de la normativa
sobre emisiones durante 125 horas. Esta certificaciOnno supone
para el cornprador, el propietario o e! usuario ninguna garantia
adicional en !o relativo al rendimiento y a la vida Otil del motor. Las
garantias de! motor ata_en excklsivamente al producto y alas
emisiones que se declaran en este manual.
Petencia Neminal
El valor de potencia bruta de cada modelo de rnotor de gasolina se
indica enla etiqueta conforme a los requisitos del cOdigoJ1940
(Procedimiento de valoraciOnde potencia y par de pequeiios
motores) de la SAE (Society of Automotive Engineers, Sociedad de
ingenieros de automociOn). Los valores nominales se hart obtenido
y corregido conforme al cOdigoSAEJ1995 (RevisiOn2002-05). Los
valores de par se obtienen a 3060 rpm, y los valores de potencia, a
3600 rpm. La potencia bruta real de[ motto ser_ inferior y
depender_, entre otros factores, de las condidones ambientales de
uso y de [as variaciones entre distintos rnotores del mismo mode[o.
Dada la amplia variedad de productos que u%zan nuestros motores
y la multitud de factores ambientales que pueden afectar a su
funcionamiento es posibIe que e[ motor de gasolina no desarrolle
toda su potencia bruta nominal en determinados equipos (potencia
"en la aplicaciOn"o neta real). Estadiferencia se debe, entre otros, a
los siguientes factores: accesofios (filtro de aire, escape,carga
refrioeraciOn carburador bomba de combustible etc.)limitaciones
de la aplicaciOn, condiciones ambientales de uso (temperatura,
humedad, altitud) y variaciones entre distintos rnotores de un
mismo rnodelo. Briggs & Stratton podr_ sustituir e! rnotor de esta
serie por otro de mayor potencia nornina! en caso de lirnitaciones
de fabricaciOno capacidad.
ESPECJFJCACJONE$DELPRODUCTO
Especificaciones de _aM_quina Limpiadora a
Presi6n
PresiOndesalida m_xima ......................... 2,000 PS!
Caudal rn_x[mo .................................. 1.9 GPM
MezcIade quimicos .................. UsesegOninstrucciones
Ternperatura del surninistro
deagua ............................ Oueno exceda los IO0°F
Peso que Embarca ................................. 63 Ibs.
Especificacienes del Meter
Di_metro de carnisa .................. 65,1 mm (2,56 pulgadas)
Carrera ............................ 47,6 mm (1,87 pulgadas)
Desplazarniento ..................... 158,6 cc (9,67 pulgadas)
Buiia
Tipo: .................... Briggs & Stratton 802592 o 5095D
Calibrar SeparaciOna: ............. 0.030 pulgadas (0.76 ram)
Entrehierro del inducido: ....................... 0,15-0,25 rnm
(0,006-0,010
pulgadas)
Holgura de la %lvula con mueIIes de%lvula instalados y piston de
6 rnm (0,25 pulgadas) pasado el punto rnuerto superior (comprobar
con el rnotor en ffio)
AdmisiOn ............... 0,13-0,18 rnm (0,005-0,007 pulgadas)
Escape ................. 0,18-0,23 rnrn (0,007-0,009 pulgadas)
Capacidad de Gasolina .......................... 1.0 Cuartos
Capacidad deAceite ...................... 0.5 litros (18 onzas)
NOTA:Paraqueel rendirnientoseaOptimo,[acargadelmotorno
debesuperarel 85%desu potencianominal.Lapotenciadelmotor
sereducir_un3,5%por cada300 metros(1.000pies)deaItitudy
un1% porcarla56 °C(10°F)a partirde25°C(77°C).Funcionar_
satisfactoriarnenteenun_ngulodehasta15°.
45

RESPONSABJLJDADE$#EL PRSPJETARJO
Sigael prograrnade manteRimientoseg0nel R0merode horaso segOne[calendario,[oquesucedaprirnero.Serequieredeserviciocon
mayorfrecuenciacuaRdooperelauRidadonlascondicioResadversasdescritasa continuaci6R.
CALENDARIO DEMANTENUMIENTO
TAREADE MANTENIMUENTO
Ihnpiadora a preei6n
Revisdiimpie el fiitro de la entradade agna
Revise la manguera de aita presi6n
Revise la limpiar el tanque/manguera del
detergente
Revise la pistola aspersora y boqnilla ajnstaNe y
verifique qne no haya fugas
Prepare la bomba para almacenarla a menos de
32°F
Antes de
Cada Uso
X_
×
×
×
INTERVALO DEOPERAOUONPeR HeRA
Cada 25 Horas o Cada 50 Horas o Cada100 Horas
al A_io al A_io o al Mo
Vea Almacenarniento en el Inviemo.
100-300Horas
FEOHAS DESERVUCIO
ANOTE LAS FECHASCONFORMECUMPLA
CON ELSERVICIO NORMAL
Molor
Verificar el nivel de aeeite
Limpie los residuos
Cambiar el aceite del motor
Servicio al filtro de aire
Servicio a la buj[a
Servicio al sistema de la buj[a
Limpie el sistema de refrigeraciSn
Limpieza de Jac4mara de combusti6n
Prepar aJmacenamiento
×
×
X_
X_
X
X
X_
Si la unidad permanecer_ sin uso pot m_s de 30 dias,
Limpiar si est_ obstruido, Remplazar si est_ perforado o roto.
Cambiar el aceite despu_s de las primeras (5) horas y despues cada 50 horas, Hacer el eambio de aceite con mayor frecuencia cuando trabaje en condiciones de mucha
suciedad o polvo.
Remplazar m_s a menudo bajo condiciones de suciedad o polvo,
RECOMEN#ACIONE$GENERALE$
E[ mantenimiento peri6dico meiorar_ e[ rendirniento y prolongar_ la
vidaOtildellirnpiadoraa presiOn.Acudaa un distribuidorautorizado
deSearspararepararla unidad.
Lagarantiade[amAquina[impiadoraa presiOnNOcubrelos
elementosquehartsidosuietosa abusoo neg[igenciapor partedd
operador. Para hacervA[ida[a cobertura total de la garantia, e[
operador deberd rnantener la [avadorade presiOntal y corer se
indica eRel manual, incluyendosu adecuadoalmacenamieRto,
como se describe on la SecciORA/macenambnto.
A[gunosajustestendrAnquehacerseperiOdicamentepararnantener
adecuadamentesu rnAquinaI[mp[adora a pres[6n.
Todoslosserviciosy aiustesdeber_nhacersepor [orneRosunavez
on cada estaciOR.Siga las instrucciones do la taNa Programa dR
MantenimiRntodescritaantedorrnente.
NOTA:URavezalaiio, usteddeberAlimpiaro remplazarla bujiay el
%ro deaire.URabujianuevay un%ro deairelimpio garantizan
una rnezctadecombustiNe-aire adecuaday le ayuda a su motor a
fuRcionarmejory atoner unavida Otilmdsprolongada.
CONTROLBE EJ II$iONE$
Cualquier establecimiento o indMduoespecializado eR[areparaci6R
de motores que no sear de automociOn puede encargarsede[
rnaRteRimieRto,la sustituciOn y [areparaciOndo los dispositivos y
sisternasde coRtroI de ernisiones.
ANTESBE CA#A g$0
1. Reviseel nivel de aceite del motor.
2. Limpie los residuos.
3. Revisesi existeRda_os en el colador de la entrada de agua.
4. Revisesi existen da_os en los %ros de quimicos.
5. Cornpruebe si los depOsitode lirnpieza est_n da_ados.
6. Revisesi existeRfugas eRel conjunto de la extensi6n para
boquillas y pistola.
7. BimiRe el aire y los coRtaminaRtesdo la bomb&
46

MANTENJMJENTODELA MAQUiNA
LJMPJADORAAPRESJ6N
Lhnpie los Residues
Limpie a diario, o antes de cada uso, los residuos acumulados en e[
limpiadora a presiOn.Mantenga limpias las conexiones, los muelles
y los rnandos. Limpie todo resto de combustible de la zona que
rodea al silenciador y de detrAs del mismo. Inspeccione las ranuras
para aire de enfriarniento y la aperturadel limpiadora a presiOn.
Estasaperturas deberAnmantenerse lirnpias y despeiadas.
Mantenga limpios los cornponentes del limpiadora a presiOnpara
reducir el riesgo de sobrecalentamiento e igniciOnde los residuos
acumulados.
Utilice un trapo hQmedo para limpiar las superficies exteriores.
AVI$O
Eltratamiento [nadecuadodel lirnp[adora a presiOnpuede daiiar!o
'acortar su vida2roductiva.
NOinsertecualquierobjetoa tray,s de lasranurasdeenfriamiento.
Puedeusaruncepfllodecerdassuavespararetirarlasuciedad
endurecida,aceite,etc.
PuedeusarunamAquinaaspiradoraparadirninarsuciedady
residuossueltos.
Revise y Limpie el Ceiader de Entrada
Examineel coIador de entrada de [arnanguera de jardin. Limpielo s[
estAtapado o rernplacelo si estA roto.
Revise la Manguera de AIta PresiOn
Las mangueras de alta presiOnpuedendesarrollar fugas debido al
desgaste, dobleces o abuso. Revisela manguera antes de cada uso.
Revise si existen cortes fugas abrasiones levantamiento de la
cubierta, da_o o movimiento de los acopIamientos. Si existe
cuaIquiera de estas condiciones, remplace la rnanguera
inrnediatamente.
ADVERTENCiA
EI chorro deagua a alta presiOnque este equ[po
produce, puedeatravesar la piel y los tejidos
subcut_neos provocando lesiones de gravedad que
podrian dar lugar a la arnputaciOnde un miembro.
, NUNCAreparela mangueradealtapresiOn.Remplacela.
o Remplacelaconunamangueraquecumplaconlacapacidadminimade
presiOndesu m_quinalimpiadoraa presiOn.
Cheqaee el tahe de sif6n dei detergente
Examineel filtro en el tubo del detergentey !fl_np[e[os[ se encuentra
sucio. E!tubo deberia quedarapretado en la pieza. Examinee! tubo
para ver si existe cualquier tipo de goteo o est,. roto. Reemplaceel
filtro o el tubo si alguno de ellos se encuentra da_ado.
Revise Pistolay JaExtensiOnpara Roquillas
Examinela conexiOnde la manguera a [a p[stola y cerciorese de que
est_ en buen estado. Pruebe el gatillo oprimiOndo!oy asegurAndose
de que se devuelvea su sitio cuando Io suelte.Coloque el cerrojo de
seguridad en la posiciOn UPy pruebe el gatillo. Usted no debeser
capazde oprirnir et gatiIIo. Remplace la pistola inrnediatarnentesi
falla cualquiera de estas pruebas.
Mantenimiente de la hequilia
Si siente una sensaciOnpuIsante al momento de apretar e! gatiI[o de
la pistoIa rociadora puede que seacausada pot la presiOnexcesiva
en la bomba. La causa principal de [a presiOn excesivaen la bomba
es cuando la boquilla se encuentra atascada o tapada con materiales
extra_os tales como tierra, etc. Para corregir el problema, lirnpie
inmediatamente la boquilla las instrucciones siguientes:
1. Apague el motor y apague el surninistro de agua.
2. SIEMPREfusil de punto en una direcciOn segura y e!
disparador del fusfl del rocio del estrujOnpara liberar la
presiOnretenidade la ptearnar.
ADVERTENCiA
El chorro de agua a alta presiOnque este equipo
produce puedeatravesar la piel y los tejidos
_ ubcutAneos, provocando lesiones de gravedad que
_odriandar lugar a la amputaciOnde un miembro.
Lapistola rociadoracontieneaguaa alta presiOnincluso
con el motor paradoy el agua desconectada,quepuede
causarla herida.
oMantengaconectadalamangueraa lare%ulnao a lapistolade rociado
cuandoel sistemaest8presurizado.
oSIEMPREquepareel motor,apunteconla pistolarociadorahaciauna
direcciOnseguray aprieteelgatilloparadescargarla presiOny evitarel
retroceso.Activeel segurodelgatillocuandonoutilicela pistola.
3. Remuevala boqui%de[extremode[aextensiondela boquilla.
SeparelaextensiondelaboqLfitladelapistoIarociadora.Gire
laboqufllaendirecciOndelas aguiasdd rdoj, a laposiciOn
"stream"(chorro).UsandounAllende2ram(5/64),remuevala
boquilla(A) delextremodelaextensiondelaboquilla.
4. Rethela extensionparaboqui!lasdela pistola.
5. Useunpequefiosuietapapelesparaliberarcualquiermaterial
extra_oqueestatapandola boquilla(A).
Usando una rnanguera dejardin, remuevacualquier desecho
adiciona!, poniendo agua en la extension de la boqui!la. Haga
6sto de 30 a 60 segundos. Gire la extension de la boquiIla
ajustablea "stream spray" (chorro rociador) y mueva la
boquilla de "low" (bajo) a "high" (alto), rnientras drene el agua.
47

7. Insta]edenuevolaboquiIlaenlaextension.NOlaapriete
demasiadoconlaIlaveAllen.
8. Conectedenuevolaextensiondelaboquillaalapistola
rociadora.
9. AsegOresedequelamanguerade!jardinestAconectadaala
entradadeagua.Cornpruebequelarnangueradealtapreston
estAconectadaalapistolarociadorayalabornba.Abrala
alimentaciOndeagua.
10.Activeelsegurode]gatillodelapistolarociadoraypongaen
marchaelmotorsiguiendolasinstruccionesdelasecciOn
Cdmo poner en fundonamiento Is fimpiadora a presi(_n.
11. Pruebe el lavador a presi6n al hacerfuncionar la boqui% en la
posici6n "high" y "low" o con cada una de las boqufllas de
Conexiones r_pidas que viene con el lavador a preston.
Nlantenimiente de los Anilles '8'
Compre una O-Juego de ReparaciOnde Anillo en sus Sears locales
o Ilamando l=8ee=4=_,_Y=HOt_lE(46g=4663)o en linea en
www.sears.com. No se incluye con la arandelade la presi6n. Este
iuego induye los anillos del reemptazo O, arandela de caucho y fiItro
de cala de agua. Refiarase a la hoia de la instrucci6n proporcionada
en el juego para atender a su unidad'los anillos de s O.
ADVERTENCiA
EI chorro deagua a alta presi6n que este equipo
produce, puedeatravesar la pie! y los tejidos
subcutAneos provocando lesiones de gravedad que
podrian dar lugar a la arnputaci6n de un miembro.
NUNCAreparaci6nquesalelasconexionesconselladordecualquier
tipo. Reemplaceel anillo'0' o elsello.
Mantenimiente de _a Bemha
NO realice ninguna operaci6n de mantenirniento con el aceite dela
bomba. No es necesario en este rnodelo. La bornba se suministra
prelubricada y seIIadaen fdbrica, y no requiere lubricaci6n adicional
durante su vida Otfl.
P ANTENi iiENTO#EL P OTOR
ADVERTENCiA
_ Chispear invoIuntario puedetener como resultado el
¢ fuego o el golpe el6ctrico.
CUAND8A,JUSTEe ttAG_,REP_,RACIeNESa SUM_,QUINA
LJJVJPJADORAA PRESJON
, Siempre desoonecteelalambrede la bujiay col6quelodondenB pueda
entrarencontactoconlabuj[a.
CeAN#ePReEBELABe,Jia MeTeR
o Utiliceun comprobadordebujfashomologado.
o NOcompruebalachispasin labujiainstalada.
Aceite
Recemendacienes sobreel aceite
NOTA:Cuandoafiada aceite al c_rter del motor, uti[ice ace[re
detergentede alta caIidad con clasificaciOnde servicio SF, SG, SH,
SJ o superior. NO utilice aditivos especiales.
1. EIija una viscosidad conforme a la siguiente taNa:
104F_ _m_,_i
86 o
68
50
32 "_
"14
4
-22 N
NOTA:Todo aceitesint_tico que cumpla lasespecificacionesILSAC
GF-2,con rnarcade certificaciOnAPI y con simbo!o deservicio AP!
conSJ/CFENERGYCONSERVINGo superior es un aceiteaceptaNea
todas lasternperaturas. Eluso deaceite sintSticono alteralos
intervalosde cambiode aceiteindicados.
SAE3e: 5°C(40 5_)ysupefiores adecuado paratodo tipo de
usos por encima de 5 °C (40 °F). El uso por debaio de 5 °C (40 °F)
provocarAdificultades de arranque.
1_W=38:-t8 a 38 °C(0 a 100 °F)es rnejor en casode temperatura
variable. Laviscosidad mejora el arranque en dirnas frios, pero
puedeaumentar el consurno de cornbustible por encima de 27 °C
(80 °F).
* Compmebe el nivel de aceite con fr_cuencia a temperaturas
sb/periores.
Si_t_ti¢o 5W=38:-30 a 40 °C(-20 a 120 °F)propordona la mejor
protecciOna todas las ternperaturas al tiempo que rnejora el
arranque y reduce el consumo de aceite.
5W=38:5 °C(40 °F)e inferiores e[ aceite recornendado parael
invierno y funciona mejor en condiciones de frio.
40 C
30
20
10
0
-10
-20
-30
48
Comprebaci6ndeJniveJde aceite
Compruebeel nivel de aceite antes de cada use o cada5 horas de
funcionamiento, come millime. Rellenesi es necesario.
1. Coloqueel limpiadora a presi6n sobre una superficie nivelada.
2. Retire lavariIIa de mediciOny limpie la varilla de medici6n.
Instale el varilla de rnediciOn,apriete firrnemente. Quitey
verifique nive! del aceite.
3. Cornpruebe que e!aceite hasta la marca "Fuji" de la varflla de
rnediciOn. Instale el varflla de rnediciOn,apriete firmemente.
DEPOSITAR LLENO
,_dici_n de aceite dei motom'
1. Coloqueel limpiadora a preston sobre una superficie n[velada.
2. Compruebe el nivet de aceitetal come se indica en la secciOn
Compmbacidn del hive/de aceite.
3. Si es necesario,vierta lentarnenteaceite per el orificio de
Ilenado hasta la marca "Fuji" de la varilla de medici6n. NOIlene
excesivameete.
ElIlenadode aceiteen excesopuedeimpedir el arranquedel motor o
_rovocardificultadesdearran ue.
NOIleneenexceso.
Siel niveldeaceiteest_per encimadelamarcaFULL(LLENO)de la
varilla,vacfeaceiteparareducirelnivelhastala marcaFULL(LLENO)
delavarilla.
4. Instale el varilla de rnediciOrhapriete firmemente.
Cambiede Aceile dei Motor
Cambie el aceite despu_s de las primeras 5 horas de operaciOn.
Cambie el aceite cada 50 horas de ese rnornento en adelante.Si est_
utilizando su generador bajo condiciones de extrema suciedad o
polvo, o en unclima demasiado caliente, haga el carnbio de aceite
m_s frecuentemente.
AVl$O
Eviteel contacto prolongado o repetido de piel con aceite usado
de motor.
Elaceiteusadodeimotor haside mostradoalcancerde lapielde la
causaen ciertosanimatesdel laboratorio,
Completamentelavadoexpusoareascon eljab6ny el agua.
MANTENERFUERADELALCANCEDELOSN!I_OS.NO
CONTAMINE.CONSERVELOSRECURSOS.DEPOSITEEL
ACEITEUSADOEN UN PUNTODERECOGDA.
Camhie eJaceite cuandoeJ meter siga estando caJientedespu_s
de haher fun¢ionado:
1. Dreneel tanque de[ combustible haciendo funcionar [a
rndquina limpiadora a presi6n hasta que el tanque est@vacio.
2. Desconectealambre de bujia y Io mantiene lejos del bujia.
3. Limpie el dreaalrededor de la abertura para !lenado deaceite,
retire la varilla de medici6n. Limpie lavarilla de medici6e.
4. Incline su m_quina [irnpiadoraa presi6n para drenar e[ aceite a
tray,s del orificio de Ilenado en un recipiente adecuado
asegur_ndosede incIinar la unidad hacia el lade opuesto de la
bujia. Cuando [acaja de[ cig_e_al est_vacia, vuelva a colocar
la m_quina [irnpiadoraa presi6n en posiciOnvertical.
5. Vierta lentamente unos 0,5 litros (18 onzas) de aceite per el
orificio. Deposite el aceite recomendado hasta la mama "Fuji"
de la varflla de rnediciOn.
6. Limpie la vafilla de rnediciOncadavez nivel del aceite se
verifica. NOai_adaaceite en exceso.
7. Instale la varilla de mediciOn,apriete firmemente.
8. Lirnpie los residues de aceite.
9. Conectede nuevo alambre de bujia al bujia.
Servicie dei Depurader de Aire
Su motor no funcionar_ adecuadamentey puede da_arse si usted Io
hacefuncionar con un depurador de aire sucio.
Suministre servicio al depurador de aire unavez cada 25 horas de
operaciOno una vez per a_o Io que suceda primero. Suministre
servicio m_s frecuentemeete si la unidadfunciona bajo condiciones
de rnucha suciedad o poIvo. Los repuestos se encuentran
disponibles en su centre de servicio local Sears.
Para dar servicio amfiltro de aire, siga los pases que se detaHae a
ceetieuaci6e:
1 Afloje el torni% (A).
2. Quite detenidamente aire la asamblea rnds limpia para prevenir
escombros de caer en e! carburador.
3. Tome aire la asamblea rn_s limpia aparte y limpie todo
despide. Lave lirnpiador de aire (B) de espuma en el detergente
y e! agua liquidos. El estruj6n seca en una tda limpia.
4. SATURElirnpiador de aire de espuma en el aceite de motor y
estrui6n en una tda limpia paraquitar el exceso aceite.
5. VueIvaa instalar limpie o limpiador nuevo de aire de espurna
ee el cuerpo (O).
6. Instale lirnpiador de aire seguramente en carburador con el
tornillo.
NOTA:Usted puede comprar los elementos del filtro de aire nuevos
Ilamandoal I=8()O=4=MY=NOME(469=4663).
49
RempJace Ja Buj_a
Remplacela buifaanualmenteo cada100 horasde operaciOn.
1. Limpie el areaalrededor de la bujia y retflela.
2. Retire y revise la bujfa.
3. Cambie la bujfa si los electrodos est_n picados o quemados o
si la porcelana est_ agrietada. Utilice la buiia de repuesto
recomendada.Consulte Especificadones.
4. Revise la separaciOndel electrodo con un calibrador de
alambre y ajuste la separaciOna 0.030 pulgadas (0.76 rnrn), si
es necesario.
\
5. Instale la bujiay aprietela firrnemente.
NOTA: Puedeadquirir nuevos bujfa al nOmerotelefOnico
I=808=4=J_IY=HOJ_IE(469=4663).
$ervicie del Apagachispas
El motor de su unidad noviene equipado de f_brica con un
apagachispas. En ciertas _.reas,es flegal operar rnotores que no
tengalsapagachispas. Revise las leyes y regulaciones locales. Si
necesitaapagachispas, !o puede comprar en su centro de servicio
Sears mAscercano. Para obtener el nOmerode parte Ilame al
I=808=4=J_IY=HOJ_IE(469=4663).
Deber_ suministrarle servicio a! apagachispascada 50 horas para
conservado en buenas condiciones defuncionarniento.
, ADVERTENCiA
s_ El contacto con la zona del silenciador puede producir
quemadurasgraves.
Los gases y el calor de escape pueden infiamar los
materiales combustibles y las estructuras o daiiar el
depOsitode combustible y provocar un incendio.
o NO toque las superficies calientes y EVITElos gases del escape a alta
temperatura.
o Permita que el equipo se enfrfe antes de tocarlo.
, Deje un espacio minimo de 152 cm (5 pies) alrededor del limpiadora a
presiOn, incluida la parte superior.
, El 60digo de Normativa Federal (CFR,Titulo 36: Parques, Bosquesy
Propiedad PL_blica)obliga a instalar una pantalla apagachispas en los
equipos con rooter de combustion interne y a mantenerla en buenas
condiciones de funcionamiento, conforme a la norma 5100-16 (o
posterior) del Servicio Forestalde la USDA. Enel Estado de California.
la leyexige el use de una pantalla apagachispas (SecciOn4442 del
COdigode Recursos P(_blicosde California). En otros estados puede
haber leyes similares en vigor.
Si el motor ha estado funcionando, e! sflenciador estar_ bastante
caliente. Dejeque el sfienciador se enfrie para poder darle servicio al
apagachispas.
• Retire la pantalla del apagachispas para lirnpieza e inspecciOn.
o Remplacela pantalla siestA dai_ada.
Sistema de RefrigeratiOn de aire
Con el tiempo, se pueden acumular residuos en las aletas de
refrigeraciOndel cilindro y pasarinadvertidos rnientras no se
desrnonte parcialmente el motor. Recomendamos que encargue la
limpieza de! sisterna de refrigeraciOna un distribuidor autorizado de
servicio Sears siguiendo los interva!os recomendados (consulte la
secci6r_Calendano de Mantenimiento), Es igualmente importa!_te
que no se acurnulen residuos en el motor. Cor_sultela secciOn
Limpie los Residuos.
Mantenga libres de residuos las zonas situadas
dentro de las lineas gruesas.
l
Limpieza de la Cdmara de Cemhustidn
Serecomienda acudir a un distribuidor autorizado de servicio Sears
para elirninar los restos de combustion depositados en el cilindro, la
culata la parte superior del piston y a]rededor de las vAivulas
corfforme a los intervalos recornendados (consulte la secciOn
Calendano de Mantenimiento).
5O

DESPUE$DECADAU$0
No deber_haber agua en la un[dad pot [argosperiodos de tiempo.
Los sedimentos de rnineraIes se pueden depositar en partes de la
bomba y "congelar" su funcionamiento. Lleve a cabo estos
procedimientos despu6s decada uso:
1. Lave el tubo de succiOnde detergente colocando e! filtro en un
balde de agua limpia al rnismo tiernpo que hacefuncionar la
rn_quina limpiadora a presiOner_el modo de baja presi6n. Lave
por un rninuto o dos minutos.
2. Pare el motor, cierre la alimentaciOnde agua apunte con la
pistola rociadora hacia una direcci6n segura y apriete el gatillo
para descargar la presi6n, active el seguro de] gati% de la
pistola rociadora y deje eofriar el rnotor.
, ADVERTENCiA
El chorro deagua a a[ta pres[Onque este equipo
produce puedeatravesar la pie[ y los teiidos
subcutAr_eos,provocando lesiolsesde gravedad que
podrian dar lugar a la arnputaci6n de un rniembro.
Lapistola rociadoracontieneaguaa alta presiOninduso
con el motor paradoy el agua desconectada,que puede
causarla herida.
, Mantengaconectadalamangueraa lam_quinao a la pistoladerociado
cuandoel sistemaest8presurizado.
, SIEMPREquepareel motor,apunteconla pistolarociadorahaciauna
direcciOnseguray aprieteelgatilloparadescargarla presiOny evitarel
retroceso.Activeel segurodelgatillocuandonoutilicelapistola.
3. Desconectemangadetfusil delrocioy sal[daaitadepresiOn
eolabomba.DesagOeaguadelamanga,delfusil, y dela
extensi6ndeboquilIa.Useunharapoparaquitarla malsga.
4. Saquetodos losliquidosdela bombaMando la rnanijade
retrocesoaproximadamente6veces.EstodeberAevacuarla
mayoriadel liquidodela bomba.
5. Almacenelaunidadenunadrealimpiay seca.
6. SipIaneaalmacenarlaLmidadpot mAsde30 dias,veala
secci6nAlmacenamientoPro/ondadoenprOximap_g[oa.
ADVERTENCiA
La gaso[[nay sus vapores son extremadamente
inflamables y explosivos.
El fuego o una explosion pueden causar quernaduras
severase inclusive la muerte.
CUANDOALMACENE8 GUARDEELEQUIP8CSHCOMBUSTIBLEEJ_
ELTANQUE
,Aimaceneaiejadode caideras,estufas,caientaderesde agua,secadoras
deropau otrosaparatoselectrodom6sticosqueposeanpilotesu otras
fuentesdeigniciOn,porqueellos puedenencenderlosvaporesde la
combustible.
51

ALMACENAMJENTOPARAJNVJERNO
AVJ$O
Usted deber_ proteger su unidad de las ternperaturas de
_elamiento.
si no Io hace,da_ar_perrnanenternentela bornbayla unidadno podr_
funcionar.
Lagarantfanocubreelda_iodelaunidadoeasionadopercongelarniento.
Paru proteger Juunidud de Justemperuturus de cengelumbnte:
1. Siga los pasus 1-4 en la secciOn previa Despues de CuduUse.
2. Utilice un protector de bomba disponible en Sears con el
nOrnerode cat_Jogo6039, para cLfidar la bomba. AquOlprotege
a la unidad contra e! congelarniento y lubdca tantu los pistones
comu los empaques.
3. Si el protector de bomba no est_ disponibIe, conecte un tramo
de 3 pies de manguera de jardin a la entrada de agua. Vierta
anticongelante RV (anticongelante sin alcohol) en la rnanguera.
Jab la maniia de arranque dos veces. DesconectedespuOsla
rnanguera de 3 pies.
4. Almacene la unidad en una drea B_npiay seca.
ALMACENAMIENTOPROLONGADO
Si usted no planea usar la m_quina limpiadora a presiOnper rn_s de
30 dias, deberdpreparar el rnotor para un ah_nacenamiento
prolongado.
Es importante evitar la formaciOn de depOsitosde goma en las
partes esenciales del sistema del combustible tales come
carburador, fiItro de! combustible, manguera o tanque del
cornbustible durante el almacenarniento.Tumbi@, la experiencia
indica que los combustibles con rnezcIasde alcohol (lIamados
gasohol, etanol o metano!) pueden atraer la humedad, lu que IIevaa
la separaciOny formaciOn de Acidos durante el ah_nacenamiento.La
gasolina dcida puede daiiar el sisterna de] combustible de un motor
durante el ah_nacenamiento.
Preteja el $istema de Cemhustihle
Aditivo para Combustible:
E[ combustible estar_ pasado cuando transcurran 30 dias des@ su
almacenamiento. El combustible pasado provoca la formaciOnde
residues Acidosy de carboniIla en el cimuito de cumbustible y en
los componentes b_sicos de! carburador. Antes del
almacenamiento, si no se ha a_adido un estabilizador de
cornbustible a la gasoBsa deber_ vaciar completamente el rnotor
utilizando Lmcontenedor homologado. A continuaciOn,deje
fuocionar el muter hasta que se agote e] combustible.
Si se utiIiza un estabiIizador de combustible siguiendo
correctamente las instrucciones, no serd necesario vaciar el motor
de gasolina antes de su aIrnacenamiento.Utilice el estabiIizador de
combustible FRESHSTARTTM de Briggs & Stratton en cualquiera de
sus variantes: liquido o cartucho de liquido concentrado con goteo.
Hagafuncionar brevementeel motor para que el estabilizador
circub per todo el circuito de combustible. El motor y el
cornbustible se pueden aIrnacenarhasta 24 rneses.
Aunque sevacie el motor de gasoIina, se recomienda utiIizar un
estabilizador de combustible en el contenedor de ah_nacenamiento
para rnantener el combustible en perfecto estado.
Camhie de aceite
Con el motor todavia caliente, drene el aceite de la caja del cigi_e_al.
Vuelva a Ilenado cun e] grade de aceite recomendado. Yea Cumbio
deAce/re del Motor eo la secciOn Muntenimbnto de/Moton
Aceite eJ Didmetre Jnterier deJ CiJindre
oQuite [a buiia y vierta aproximadamente 15 m[ (1/2 onza) de
aceite de motor lirnp[o en el interior de! cilindro.
oColoquela bujia y arranque bntarnente para distribuir el aceite.
PretecciOn de ia Bemha
Paraproteger la bomba frente a los da_os que causao los depOsitos
rnineraIes o la congelaciOn,use PumpSaver, rnodelo 6039 para
cuidar la bomba. Esto evita los daises dedvadus de la congelaciOny
lubrica los pistones y las juntas.
NOTA:EI PumpSaver est_n disponible solo come un accesodo
opciunal. NO es incIuido con la arandela de la presiOn.Avise el mAs
cemano serviciu autorizado central para comprar PumpSaver.
AVI$O
Usted deber_,proteger su unidad de las temperaturas de
coq_geBmiento.
si no Io hace,da[iar_perrnanentementela bornbay launidadno pedro1
funcionar.
Lagarant[anocubreeldaflodelaunidadocasionadopercongelamiento.
A[ uso e! PurnpSaver,cerciOresela arandelade [apresi6n se apagay
desconectade! agua del suministro. Leay siga todas instrucciones y
Bs advertenciasdadasen el contenedor de PumpSaver
etras sugerencias para el almaceuamie_te
1. NOguarde cornbustibb de una temporada a otra a menos que
Io hayatratadocomese [ndicaeo lasecciOnAditivopuru
combustible,
2. Reemplace[acanecade gaso[ina s[ comienza a oxidarse. El
Oxidey/o la suciedad en la gasoBsab causarAproblemas.
3. Cubra su unidad con una cubierta de protecciOn adecuada que
no retenga humedad.
A[ VERTENCJA
_5J_,
_,_ ILas cublertas paraah_nacenamientupueden ser
_jinfiamables.
NOcoloqueunacubiertaencimadeunlirnpiadoraa presiOncaliente.
Dejequelaunidadseenfr[eIo suficientementeantesde quelecoloque
lacubierta.
4. Almacene la unidad en un _rea lirnpia y seca.
52
Prebiema
La bombapresentarues
$iguientesprobJemas:no
producepresi6noproduceuna
presi6nerrada,traqueteo,
p_rdidade presi6n,bajo
vomumendeagua,
EJdetergentenosemezcJacon
el ro¢iado,
EJmotor fun¢iona bien cuando
notiene cargas, pero fun¢iona
"maJ" Cuando Se Conecta una
¢arga,
D moto_ no a_anca; oa_anca y
fun¢iona real,
Cailsa
1. EstAusa!_dola boquHla de baja pres[On
(negra).
2. La entrada de agua est_ b!oqueada.
3. Suministro de agua inadecuado.
4. La rnanguera de entrada est_ doblada o
presenta fugas.
5. El colador de la mal_guerade la entrada de
aguaestAtapado.
6. El suministro de agua est_ por encima de
los 100°F.
7. La rnanguera de alta presiOnest_ bloqueada
o presentafugas.
8. La pistola presentafugas.
9. La boquilla estAobstruida.
10. Bornbadefectuosa.
1. Eltubo de succiOnde detergente no estA
sumergido.
2. E! filtro de qdrnicos est_tapado.
3. Est_usando la boquHladea]ta pres[On.
Lavelocidad de! motor es demasiado lenta.
1. Bajorfiveldeaceite,
2, Depuradordeairesucio.
3. Sil_combustible.
4. Combustiblevieja.
5. E! alambre de la buj[a no est_ conectado a la
bujia.
6. Bujia rnala.
7. Agua en la combustible.
8. Mezda de combustible demasiado rica.
E_inotor se apaga durante _a 1. Sin combustible.
operaui_n. 2. Bajo n[vel deaceite.
EJineter no tiene f_erza, FHtrode aire sucio.
Oambie la boquilla a una delas tres boquilla de
alta presiOn.
2. Limpie la entrada.
3. Proporcione flujo de agua adecuado.
4. Estire la manguera de entrada, co!oque un
parche en la fuga.
5. Revisey limpie el colador de la manguera de
entrada.
6. Proporcione suministro de agua rnAsfria.
7. Retire las obstrucciones de la manguerade
sa[ida.
8. Rernplacela pistola.
9. Limpie [a boqu[%.
10. Contacte el distribuidor de servicio autorizado.
Coloque el tubo de succi6r_de detergente en el
detergente.
2. Limpie o rempiace el filtro/tubo de succiOn de
detergente.
3. Use la boquilla de baja presi6n (negra).
Muevael control de la vAIvulade regulaci6na [a
_osici6nFAST(RAPIDO).Si el motor continua
funcionando rnal, p6ngase en contacto con el
distfibuidor de servicio autorizado.
Llene la caja de! cigOeiial hasta el hive! correcto.
2. Limpie o rempiace el depurador de aire.
3. Llene el tanque de combustible.
4. Drenee! tanq[_ede combustible; II_nelo con
combustible fresco.
5. Conecte el alambre a la buiia.
6. Remplacela bujia.
7. Dreneel tanqL_ede combustible; II_ne]o con
combustible fresco.
8. Contacte el distribuidor de servicio autorizado.
Llene el tanque de combustible.
2. Llene la caja de! cigOe_alhasta el nivel correcto.
Remplaceel filtro deaire.
53
California Air Resources Board (CARB) U.S. EPAy Sears le explican a continuaci6n
la garantia del sistema de control de emisiones de su pequ@o motor para mdquinas
de servicio (SORE, Small Offroad Engine). En California, los modelos de peque_os
motores para m_quinas de servicio a partir del a_o 2006 @ben estar dise_ados,
fabricados y equipados conforme a los exigentes est_ndares de lucha centre la
contaminaci6n del Estado.
En otras regiones de Estados Unidos, los nuevos motores para interiores de
ignici6n per chispa certificados para modelos a_o !997 y posteriores deben
cumplir con normas similares establecidas per la EPA de EE.UU. Sears debe
garantizar el sistema de control de emisiones de su motor para los per[odes
indicados a continuaci6n, siempre y cuando no se haya abusado, descuidado o
dado mantenimiento incorrecto al motor peque_o para exteriores
Su sistema de control de emisiones incluye plazas come el carburador, el filtro de
aire, el sistema de arranque, el tube de combustible el silenciador y el convertidor
catal[tico, Tambi@ puede incluir conectores y otros coquntos relacionados con las
emisiones,
Cuando exista una condici6n qua pueda ser cubierta per la garantia, Sears
reparar_ el motor peque_o para exteriores sin costo alguno, incluyendo el
diagnCstico, las partes de repuesto y la mane de obra
gobertura de la garantia de Sears, Ree_u_k and ge. centre ddectes en el
central de emisienee
Los pequ@os motores para m_quinas de sep,4cioestdn garantizados centre defectos
de las piezas de control de emisiones durante un per[ode de dos aSos, conforme a las
siguientes disposiciones, Si cualquier plaza del motor con cobertura es defectuosa,
ser_ reparada o sustituida per Sears.
Respensabilidadns del prepietarin pare la garantia
Come propietario del motor peque_o para exteriores, usted es responsable de
realizar las actividades de mantenimiento requeridas qua se indican en
Instrucciones de use y mantenimiento Sears recomienda qua conserve todos los
recibos qua cubran el mantenimiento de su motor peque_o para exteriores, pare
Sears no puede negar la garant[a solamente per la falta de recibos ni per su
imposibilidad de garantizar la realizaciCn de todas las actividades de
mantenimbnto programadas.
Come propietario del motor peque_o para exteriores, usted siempre debe tener
en cuenta qua Sears podr_ negar la cobertura de la garant[a si su motor peque_o
para exteriores o una parte del misrno presenta fallas debido a abuse, descuido,
mantenimiento incorrecto o modificaciones no aprobadas
Usted es responsabb de presentar su motor pequeiio para exteriores a un
distribuidor autorizado de servicio de Sears aprobado tan pronto come se
presente el probbma,
Las reparaciones cubiertas per la garanth se Ilevar_n a cabo en un plazo
razonable, no superior a 30 dias en ning0n case.
Si tiene alguna pregunta con respecto a sus derechos y responsabilidades para la
garant[a, pCngase en contacto con un representante de servicio Sears al 1-800-
469-4663
La garant[a de emisiones es una garantia contra defectos, Los defectos se iuzgan
en funciCn del rendimiento normal del motor. La garantia no depender_ de
ninguna prueba de emisiones en funcionamiento.
I}iepnsicienee de la garantia de Seers, Ree_eck and Ca. _entra defectes en el
ennlrel de ernisienee
Las siguientes son disposiciones espedficas relacionadas con la cobertura de la
garanfia contra defectos en el control de emisiones. Se a_ade a la garanfia de
motores de Sears para motores no regulados, qua figura en las Instrucciones de
use y mantenimiento,
1 Partes garantizadas
La cobertura bqo esta garant[a incluye solamente aquellas partes qua se
enumeran a continuaci6n (las partes del sistema de control de emisiones)
en la medida qua dichas partes hayan estado presentes en el motor
adquirido.
a. Sistema de medici6n de combustible
Sistema de enriquecimiento pare arranque en fr[o
Carburador y partes internas
Bomba de combustible
Tube de combustible, acoplamientos del tube de combustible,
abrazaderas
Dep6sito de combustible, tap6n y cadena
Beta de carbono
b Sistema de inducci6n de aire
Filtro de aire
Colector de entrada
Linea de purga y ventilaci6n
c. Sistema de ignici6n
BujBs
Sistema de ignici6n per magneto
d, Sbtema catalizador
Convertidor cataBtico
Colector de escape
Sistema de inyecciCn de aire o v_lvula per impulses
e. Distintos elementos utilizados en los sistemas antedores
V_lvulas e interruptores de vado temperature posici6n y de
detecci6n de tiempo
Conectores y conjuntos
2. Vigencia de ia _ebertnra
Sears garantiza al propietario inicial y a cada comprador subsiguiente qua
las partes garantizadas estar_n libres de defectos en material yen mane de
obra, qua ocasionen fallas de las partes garantizadas durante un periodo de
dos aSos a partir de la fecha en qua el motor sea entregado al comprador
minorista,
3. Ne habr_ cargee
La reparaciCn o reemplazo de cualquier parte garantizada se realizard sin
cargo alguno pare el propietario, incluyendo la mane de obra de diagnCstico
qua derive en la determinaciCn de qua una parte garantizada est_ defectuosa,
si la labor de diagnCstico se realiza en un Centre de servicio Sears aprobado.
4. Reclamne y exelesienes de cebertnra
Los reclamos vinculados con la garant[a se presentanJn conforme alas
disposiciones de la PCliza de garant[a de Sears. La cobertura de la garanth
se excluir_ para aquellas fallas de partes garantizadas qua no sean partes
originabs de Sears o debido a abuse, descuido o mantenimiento incorrecto,
sag@ se estabbce en la PClizade garanth de motores de Sears. Sears no
es responsabb per la cobertura de fallas de partes garantizadas ocasionadas
per el use de partes adicionales, no originabs o modificadas.
5. Ntantenirainnte
Cualquier parte garantizada cuyo reemplazo no est6 programado come
mantenimiento requerido o qua est_ programada 0nicamente para
inspecciCn frecuente con el fin de "reparar o reemplazar conforme sea
necesario", estard garantizada en cuanto a defectos per el per[ode de la
garant[a. Cualquier parte garantizada cuyo reemplazo est6 programado
come mantenimiento requerido tendr_ solamente una garanth centre
defectos _nicamente per el per[ode hasta el primer reemplazo programado
para esa parte Se podr_ utilizar cualquier parte de repuesto qua tenga un
rendimiento y durabilidad equivabntes, al realizar cualquier actividad de
mantenimiento o reparaciCn El propietario es responsable de realizar todo
el mantenimiento requerido, segSn se define en Instrucciones de use y
mantenimiento de Sears,
6. Cnbertera _ensignienle
La cobertura bajo [a presente se ampliar_ a [a falla de cualqubr componente
de[ motor provocada per un desperfecto en cualquier parte garantizada qua
siga gozando de la cobertura de [a garant[a.
En EE,UU. y Canadd contamos con una Bnea de emergencia las 24 horas (1-800-469-466% qua ofrece un men8 de mensajes pregrabados con informaciCn sobre
mantenimiento de productos,
54

[nfermac[6n sehre emisiones
Los motores con certificacl6n de cumplhnieeto de la normativa
sobre emisioees de nivel 2 del California Air Resources Board
(CARB) debee mostrar informaciOe sobre el periodo de durabilidad
de las emisiones y e! hsdicede aire. El fabricante del motor ofrece
esta informaciOn al consumidor rnedianteetiquetas de emisiones.
La etiqueta de emisiones de] rnotor contieee la informaciOn de
certificaci6e.
E[ Periede de Durabilidad de lee Emisieees[ndicael mirnero de
horas duraete las cuales e! motor peedefencionar cempliendo [as
normas sobre emisiones siernpre que se realicen las operaciones
de maeteeimiento que se detaIIaeen las instrucciones de use y
manteeimiento. Seuti[[zan [ass[guientes categorias:
Mederade: EI motor est_ certificado paracumpIir la norrnativa
sobre emisioees durante 125 horas de funcioeamieeto real.
Intermedie: El motor est_ certificado para cumplir la normativa
sobre emisioees durante 250 horas de funcioeamieeto real.
Preleegade: El rnotor est_ certificado para cumplir la normativa
sobre emisioees durante 500 horas de funcioeamiento real.
Per ejemplo un cortac_sped con operario a pie se suele utilizar
entre 20 y 25 horas al a[io. Per taeto, el Periede de Burabilidad de
las Emisieees de un motor con cias[ficaciOeietermedia equivaldria
a 10-12 a_os.
Algunos rnotores cuentan con la certificaciOn de curnplimiento de la
fase 2 de las normas sobre emisioees de la United States
Environmental Protection Agency (USEPA Ageecia estadourfideese
de protecciOndel medioambiente). En el case de los motores con
certificaciOnde fase 2, el periodo de cumplimiento de la normativa
sobre emisiones que figura en la etiqueta de cumplimiento de
emisiones indica el n8mero de betas de funcionamiento durante las
cuaIesel rnotor ha demostrado cumplir los requisites federales
sobre emisiones.
Pararnotoresderneeosde225cc:
CategoriaC = 125horas
CategoriaB= 250horas
CategoriaA = 500horas.
Pararnotoresde225cco rn_s:
Categoria6 = 250horas
CategoriaB= 500horas
CategoriaA = 1000horas.
55

iiiiiiiiiiiiiiiii!! VoorHome ::::::::::::::::
For repair-in your home -of all major brand appliances,
lawn and garden equipment, or heating and cooling systems,
no matter who made it, no matter who sold it! ...............
For the replacement parts, accessories and
owner's manuals that you need to do-it-yourself. ...............
For Sears professional installation of home appliances
and items like garage door openers and water heaters. ...............
1-800-4-MY-HOME ® (1-8oo-469-4663)
wwwmears,com www.sears.ca
wwwmea rs,com
To purchase a protection agreement (U.S.A.)
or maintenance agreement (Canada)on a product serviced by Sears:
1-800-827-6655 (U.S.A.) 1-800-361-6665 (Canada)
Parapedirse_,iciodereparaci6o AuCanadapourse_iceenfran_ais:
a domicilie, y para ordenar piezas: 1-800-LE-FOYER Me
1-888-SU-HOGAR ® 1 800 533 6937
(- . . )
(1-888 o784-6427) www.sears.ca
® Registered Trademark /TM Trademark /SMService Mark of Sears Brands, LLC
® Marca Registrada /TMMama de Fabrica /SM Mama de Servicio de Sears Brands, LLC
MCMarque de commerce /MDMarque d6pos6e de Sears Brands, LLC ® Sears Brands, LLC
