Craftsman 646106791 User Manual BUFFER/POLISHER SYSTEM Manuals And Guides L0020228
CRAFTSMAN Buffer/polisher Manual L0020228 CRAFTSMAN Buffer/polisher Owner's Manual, CRAFTSMAN Buffer/polisher installation guides
User Manual: Craftsman 646106791 646106791 CRAFTSMAN BUFFER/POLISHER SYSTEM - Manuals and Guides View the owners manual for your CRAFTSMAN BUFFER/POLISHER SYSTEM #646106791. Home:Tool Parts:Craftsman Parts:Craftsman BUFFER/POLISHER SYSTEM Manual
Open the PDF directly: View PDF ![]() .
.
Page Count: 7

Owner's Manual
Dual-Function Double Insulated
BUFFER/POLISHER SYSTEM
Model No. 646.106791
®
CAUTION:
Read and follow all safety
rules and operating
instructions before first
use of this product.
•Safety Rules
• Operation
• Maintenance
• Accessories
• EspaSol
Save this manual for future reference.
Sears, Roebuck and Co., Hoffman Estates, IL 60179 USA
Visit our Craftsman website: www.sears.conv'craftsman
_/_ WARNING: Read and
understand all instructions.
Failure to follow all instructions listed
below may result in electric shock, fire
and/or serious personal injury.
SAVE THESE INSTRUCTIONS.
WORK AREA
• Keep your work area clean and well lit.
Cluttered benches and dark areas invite
accidents.
• Do not operate power tools in explosive
atmospheres, such as in the presence of
flammable liquids, gases, or dust. Power
tools create sparks which may ignite the
dust or fumes.
• Keep bystanders, children, and visitors
away while operating a power tool.
Distractions can cause you to lose
control.
ELECTRICAL SAFETY
• Double insulated tools are equipped with
a polarized plug (one blade is wider than
the other.) This plug will fit in a polarized
extension cord only one way. If the plug
does not fit fully in the outlet, reverse the
plug. If it still does not fit, contact a
qualified electrician to install a polarized
outlet. Do not change the plug in any way
to make it fit your extension cord. Double
insulation [] eliminates the need for the
three-wire grounded power cord and
grounded power supply system.
• Avoid body contact with grounded
surfaces such as pipes, radiators,
ranges and refrigerators. There is an
increased risk of electric shock if your
body is grounded.
• Don't expose power tools to rain or wet
conditions. Water entering a power tool
will increase the risk of electric shock.
• Do not abuse the extension cord. Never
use the cord to carry the tools or pull the
plug from an outlet. Keep cord away
from heat, oil, sharp edges or moving
parts. Replace damaged cords
immediately. Damaged cords increase
the risk of electric shock.
•When operating a power tool outside, use
an outdoor extension cord marked "W-A"
or '_/V."These cords are rated for outdoor
use and reduce the risk of electric shock.
PERSONAL SAFETY
•Stay alert, watch what you are doing and
use common sense when operating a
power tool. Do not use tool while tired or
under the influence of drugs, alcohol, or
medication. Amoment of inattention
while operating power tools may result in
serious personal injury.
• Dress properly. Do not wear loose
clothing or jewelry. Contain long hair.
Keep your hair, clothing, and gloves
away from moving parts. Loose clothes,
jewelry, or long hair can be caught in
moving parts.
• Avoid accidental starting. Be sure switch
is off before plugging in. Carrying tools
with your finger on the switch or
plugging in tools with the switch on
invites accidents.
•Do not overreach. Keep proper footing
and balance at all times. Proper footing
and balance enables better control of
the tool in unexpected situations.
•Use safety equipment. Always wear eye
protection. Dust mask, non-skid safety
shoes, hard hat, or hearing protection
must be used for appropriate conditions.
TOOL USE AND CARE
• Use clamps or other practical ways to
secure and support the workpiece to a
stable platform. Holding the work by
hand or against your body is unstable
and may lead to loss of control.
•Do not force tool. Use the correct tool for
your application. The correct tool will do
the job better and safer at the rate for
which it is designed.
• Do not use tool if switch does not turn it
on or off. Atool that cannot be controlled
with the switch is dangerous and must
be repaired.
• Disconnect the plug from the power
source before making any adjustments,
changing accessories, or storing the
tool. Such preventive safety measures
reduce the risk of starting the tool
accidentally.
•Store idle tools out of reach of children
and other untrained persons. Tools are
dangerous in the hands of untrained
users.
•Maintain tools with care. Propedy
maintained tools are less likely to bind
2 and are easier to control.
TOOL USE AND CARE
• Checkfor misalignmentor binding of
moving parts, breakage of parts, and
any other condition that may affect the
tool's operation. If damaged, have the
tool serviced before using. Many
accidents are caused by poorly
maintained tools.
•Use only accessories that are
recommended by the manufacturer for
your model. Accessories that may be
suitable for one tool may create a risk of
injury when used on another tool,
SERVICE
•Tool service must be performed only by
qualified repair personnel, Service or
maintenance performed by unqualified
personnel may result in a risk of injury.
•When servicing a tool, use only identical
replacement parts. Follow instructions in
the maintenance section of this manual,
Use of unauthorized parts or failure to
follow maintenance instructions may
create arisk of electric shock or injury,
Before you begin, make sure your car is
clean and dry. The work area should be dry
also. If necessary, remove road tar with a
general cleaner before polishing. Also,
remove excess grease spots, bug stains, etc.
The function settings have been factory
preset to achieve maximum performance.
Use APPLY setting when applying paste
or liquid wax to the surface to be polished.
Use POLISH/BUFF setting when polishing
the applied wax and for the final buffing.
NOTE: The Wax & Polishing Solution
containers shown in the illustrations are
representative. Yours may look different.
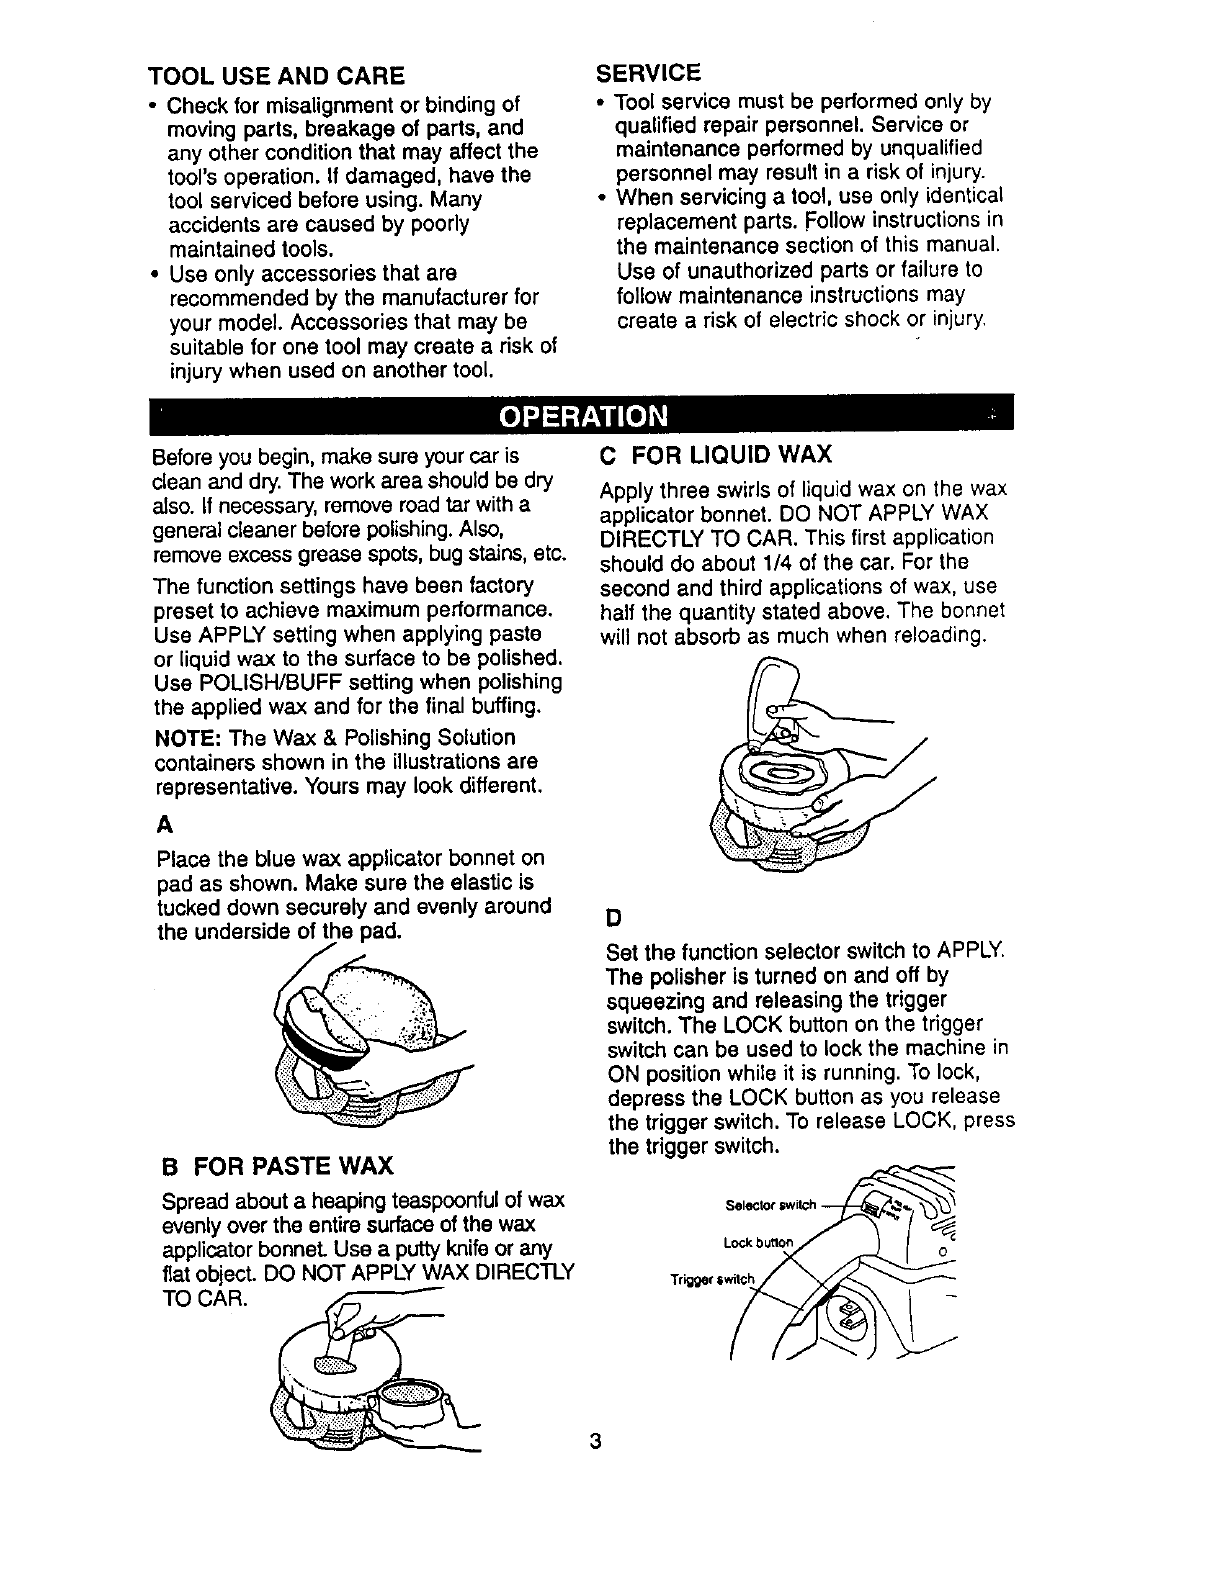
A
Place the blue wax applicator bonnet on
pad as shown. Make sure the elastic is
tucked down securely and evenly around
the underside of the pad.
B FOR PASTE WAX
Spread about a heaping teaspoonful of wax
evenly over the entire surface of the wax
applicator bonnet. Use aputty knife or any
fiat object. DO NOT APPLY WAX DIRECTLY
TO CAR.
C FOR LIQUID WAX
Apply three swirls of liquid wax on the wax
applicator bonnet. DO NOT APPLY WAX
DIRECTLY TO CAR. This first application
should do about 1/4 of the car. For the
second and third applications of wax, use
half the quantity stated above. The bonnet
will not absorb as much when reloading.
D
Set the function selector switch to APPLY.
The polisher is turned on and off by
squeezing and releasing the trigger
switch. The LOCK button on the trigger
switch can be used to lock the machine in
ON position while it is running. To lock,
depress the LOCK button as you release
the trigger switch. To release LOCK, press
the trigger switch.
Lock butlon 0
3
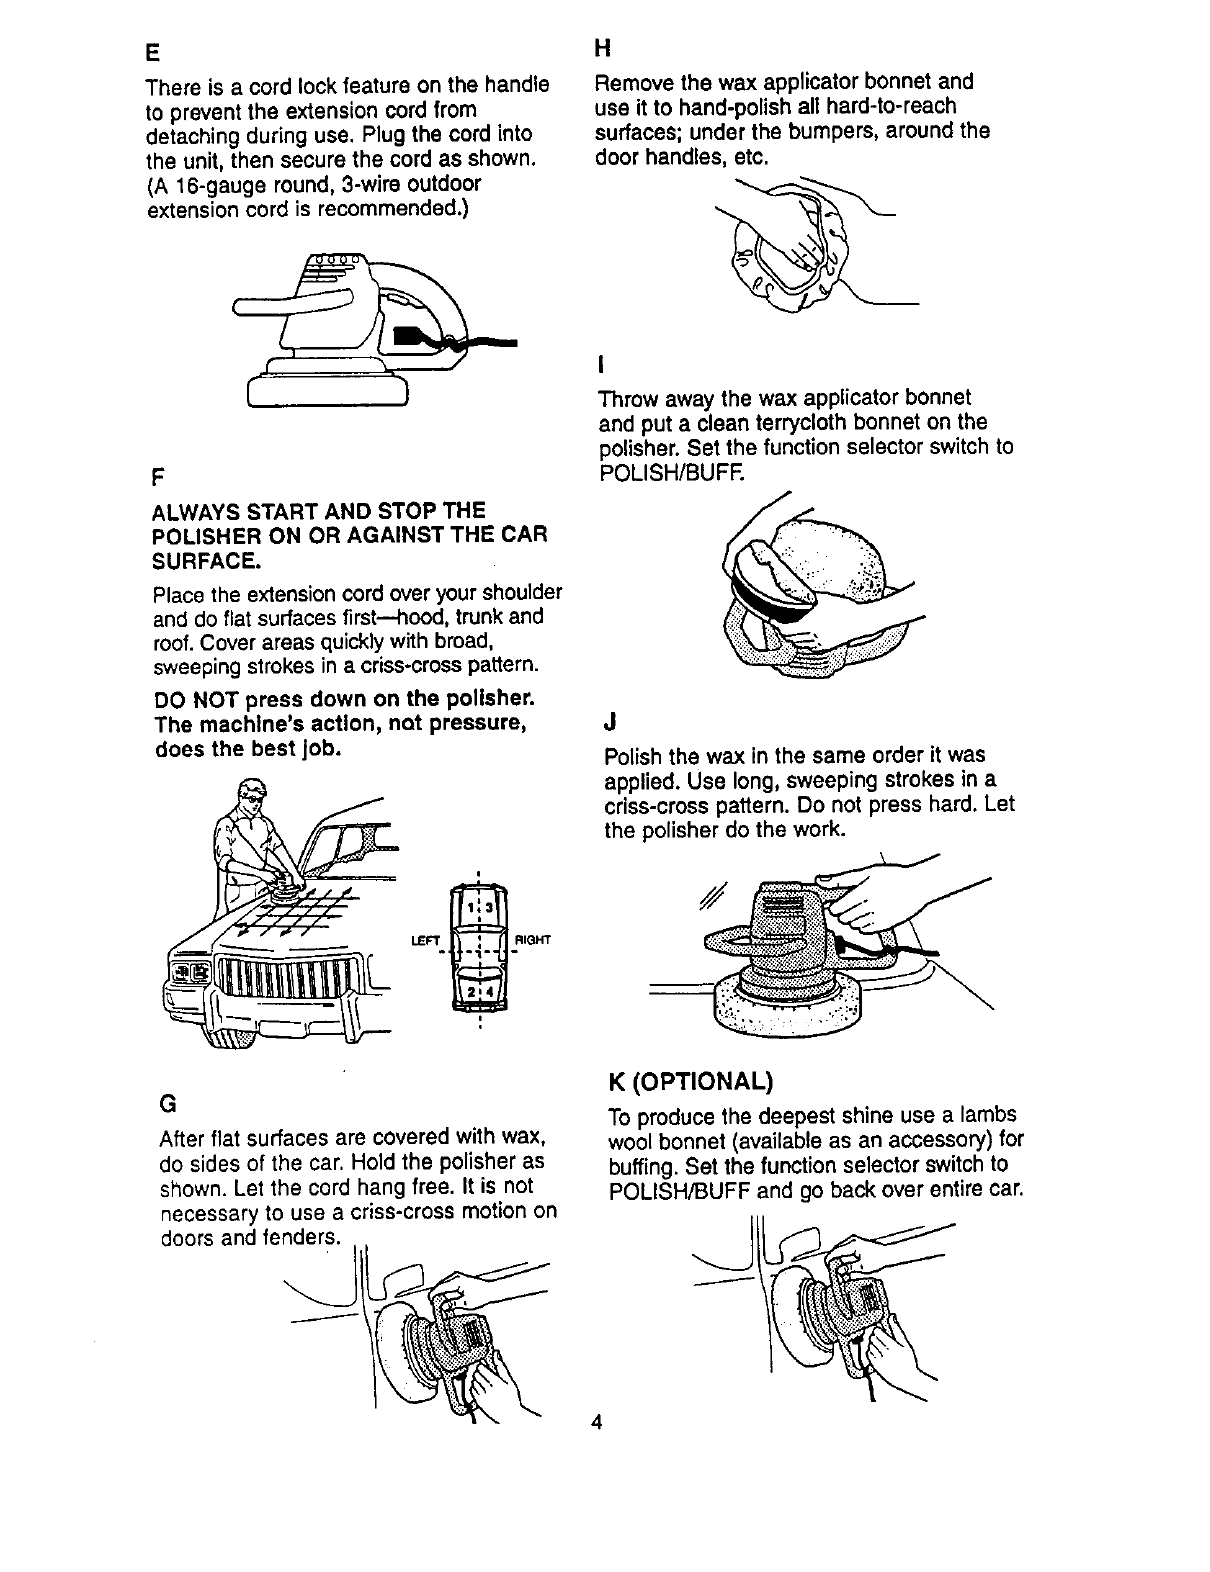
E
There is a cord lock feature on the handle
to prevent the extension cord from
detaching during use. Plug the cord into
the unit, then secure the cord as shown.
(A 16-gauge round, 3-wire outdoor
extension cord is recommended.)
F
ALWAYS START AND STOP THE
POLISHER ON OR AGAINST THE CAR
SURFACE.
Place the extension cord over your shoulder
and do flat surfaces first---hood, trunk and
roof. Cover areas quickly with broad,
sweeping strokes in acriss-cross pattern.
DO NOT press down on the polisher.
The machine's action, not pressure,
does the best job.
H
Remove the wax applicator bonnet and
use it to hand-polish all hard-to-reach
surfaces; under the bumpers, around the
door handles, etc.
Throw away the wax applicator bonnet
and put a clean terrycloth bonnet on the
polisher. Set the function selector switch to
POLISH/BUFF.
J
Polish the wax in the same order it was
applied. Use long, sweeping strokes in a
criss-cross pattern, Do not press hard. Let
the polisher do the work.
G
After flat surfaces are covered with wax,
do sides of the car. Hold the polisher as
shown. Let the cord hang free. It is not
necessary to use a criss-cross motion on
doors and fenders.
K(OPTIONAL)
To produce the deepest shine use a lambs
wool bonnet (available as an accessory) for
buffing. Set the function selector switch to
POLISH/BUFF and go back over entire car.
4
•Terrycloth bonnets are 100% cotton and 2.
can be machine-washed in cold water
with a small amount of detergent, then
machine-dried at low heat. However,
hand-washing and air drying is recom-
mended for longer terrycloth bonnet life.
• Wax applicator bonnets are to be used
only once, then thrown away.
•To prolong pad life and shape, always
store polisher with pad face up, 3.
•Remove bonnet from pad when polisher
is not in use so that pad can dry out and
retain its original shape.
•Badly oxidized paint may require several
applications. DO NOT USE ABRASIVE
COMPOUNDS.
• The most common error is applying too
much wax. If pad becomes saturated, it
will not last as long, and polishing will
be more difficult and take longer.
• If applicator bonnet continually comes off
pad, you may be using too much wax.
• If buffing seems difficult, you may have
used too much wax.
•Use only mild soap and a damp sponge
to clean polisher. Do not immerse any
part in liquid. If polisher needs repair,
use only identical replacement parts
illustrated and listed on Page 6.
• The lamb's wool bonnet is only to be
used for the final buff. Do not use it to
apply or remove wax.
• Lamb's wool bonnets can be cleaned by
hand washing in lukewarm water and
mild detergent; then machine dry at the
lowest setting.
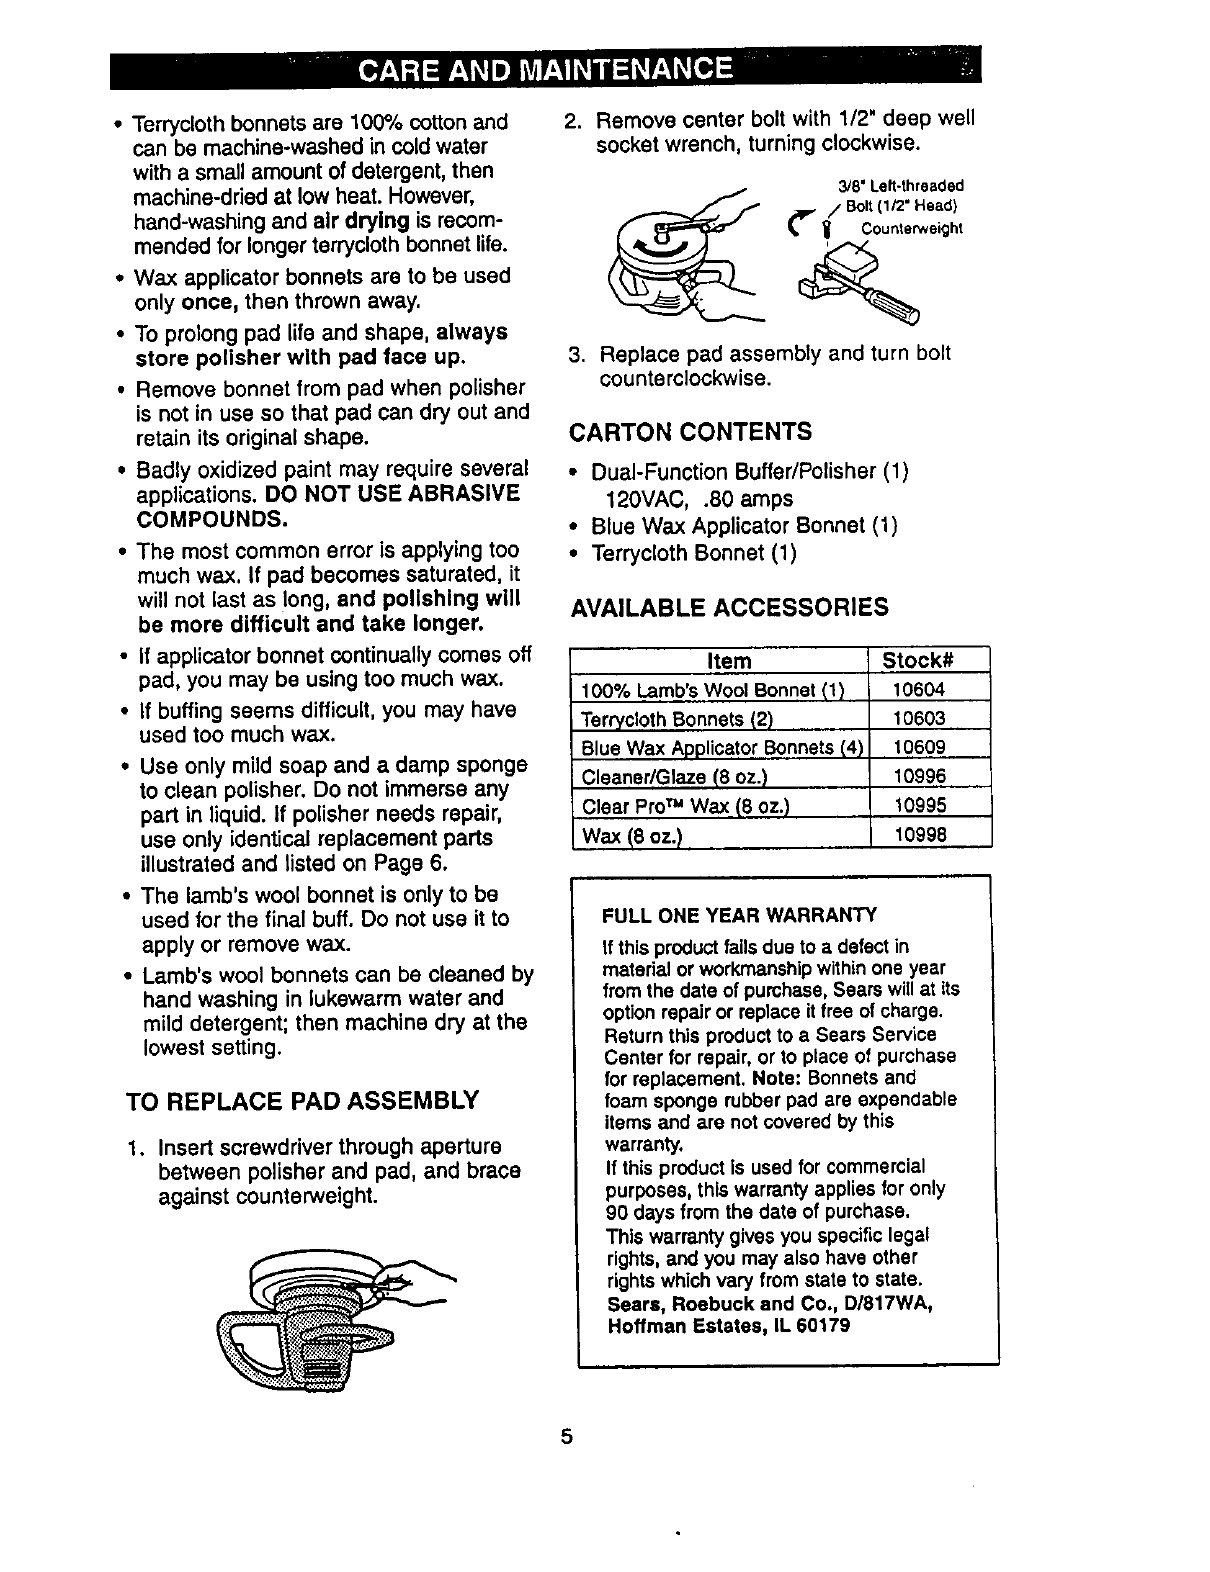
TO REPLACE PAD ASSEMBLY
1. Insert screwdriver through aperture
between polisher and pad, and brace
against counterweight.
Remove center bolt with 1/2" deep well
socket wrench, turning clockwise.
3/8' Left-threaded
_, _ /Bolt (1/2" Head)
_Counterweight
%
Replace pad assembly and turn bolt
counterclockwise.
CARTON CONTENTS
•Dual-Function Buffer/Polisher (1)
120VAC, .80 amps
• Blue Wax Applicator Bonnet (1)
• Terrycloth Bonnet (1)
AVAILABLE ACCESSORIES
Item
100% Lamb's Wool Bonnet (1)
Terrycloth Bonnets (2)
Blue Wax Applicator Bonnets (4)
Cleaner/Glaze (8 oz,)
Clear ProTM Wax (8 oz.)
Wax(8oz.)
Stock#
10604
10603
10609
10996
10995
10998
FULL ONE YEAR WARRANTY
If this product failsdue to adefect in
matedai or workmanshipwithinone year
from the date of purchase, Sears will at its
option repair or replace it free of charge,
Return this product to a Sears Service
Center for repair, or to place of purchase
for replacement. Note: Bonnets and
foam sponge rubber pad are expendable
items and are not covered by this
warranty.
If this product is used for commercial
purposes, this warranty applies for only
90 days from the date of purchase,
This warranty gives you specific legal
rights, and you may also have other
rights which vary from state to state.
Sears, Roebuck and Co., D/817WA,
Hoffman Estates, IL 60179
5
8
4B
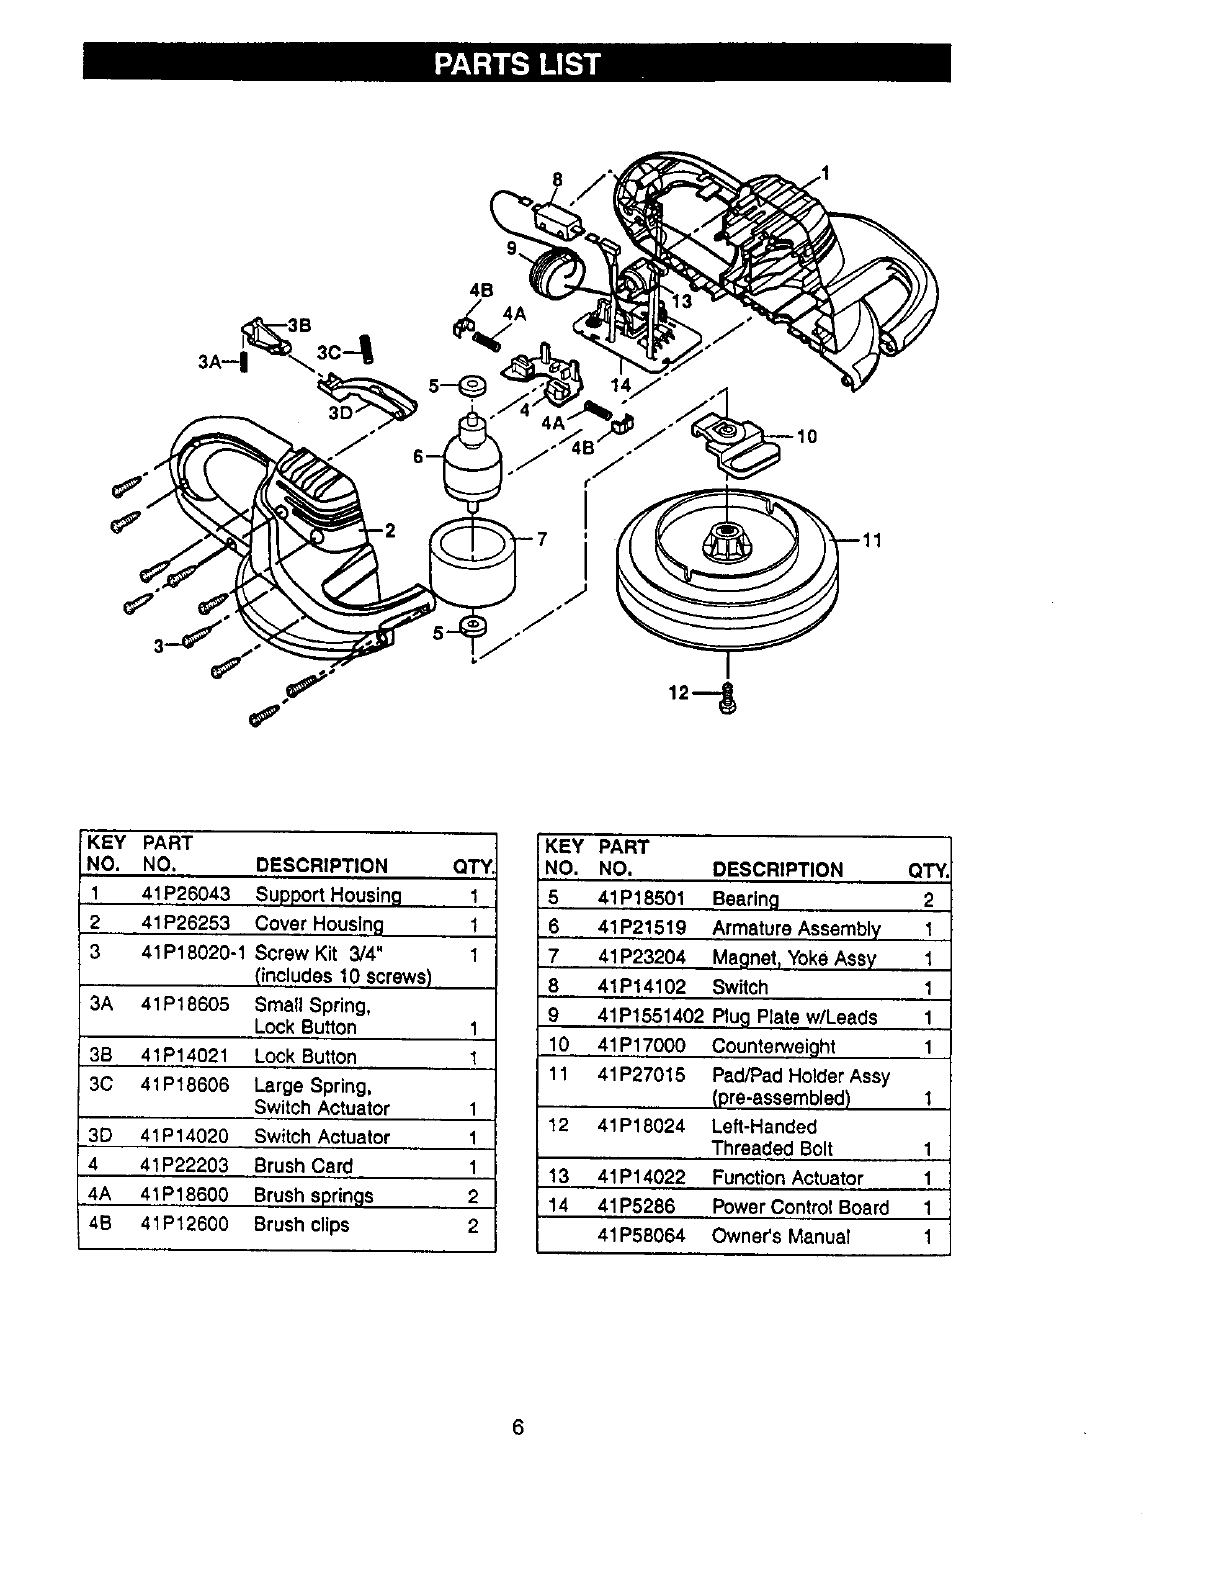
KEY PART
NO. NO. DESCRIPTION QTY.
1 41P26043 Support Housing 1 i
I
241P26253 Cover Housing 1
3 41P18020-1 Screw Kit 3/4" 1
(includes 10 screws)
3A 41P18605 Small Spring,
Lock Button 1
3B 41P14021 Lock Button 1
3C 41P18806 Large Spring,
Switch Actuator 1
3D 41P14020 Switch Actuator 1
441P22203 Brush Card 1
4A 4tP18600 Brush springs
4B 41P12600 Brush clips
2
2
KEY
NO.
5
6
7
8
9 41P1551402 Plug Plate w/Leads 1
10 41P17000 Counterweight 1
11 41P27015 Pad/Pad Holder Assy
(pre-assembled) 1
12 41P18024 Left-Handed
Threaded Bolt 1
13 41P14022 FunctionActuator 1
14 41P5286 Power Control Board 1
41P58064 Owner's Manual 1
PART
NO. DESCRIPTION QTY
41P18501 Bearing 2
41P21519 Armature Assembly 1
41P23204 Magnet, Yoke Assy 1
41P14102 Switch 1
For in-home major brand repair service:
Call 24 hours a day, 7 days aweek
1-800-4-MY-HOME _(1-800-469-4663)
Para pedir serviclo de reparaci6n a domicilio - 1-800-676-5811
For the repair or replacement parts you need:
Call 6 a.m. - 11 p.m. CST, 7 days a week
PartsOirect"
1-800-366-PART (1-800-366-7278)
www.sea rs.com/partsdlrect
Para ordenar piezas con entrega a domicilio - 1-800-659-7084
For the location of a Sears Service Center in your area:
Call 24 hours aday, 7 days aweek
1-800-488-1222
To purchase or inquire about a Sears Maintenance Agreement:
Call 7 a.m. - 5 p.m. CST, Monday - Saturday
1-800-827-6655
HorneCentral s"
58-064C © 1999, All Rights Reserved Printed in Mexico
