Craftsman 706149530 User Manual DOOR KIT Manuals And Guides L1003092
CRAFTSMAN Tool Box Accessories Manual L1003092 CRAFTSMAN Tool Box Accessories Owner's Manual, CRAFTSMAN Tool Box Accessories installation guides
User Manual: Craftsman 706149530 706149530 CRAFTSMAN DOOR KIT - Manuals and Guides View the owners manual for your CRAFTSMAN DOOR KIT #706149530. Home:Tool Parts:Craftsman Parts:Craftsman DOOR KIT Manual
Open the PDF directly: View PDF ![]() .
.
Page Count: 8

OPERATOR'S MANUAL
II_RAFTSM AH°l
Door Kit
jo.o.o-o-
I --- 1
I
III
J i
I I I I
jjj_.JJJ_i
_jos_J __ ILl
Please indicate the following information from the service part drawing provided.
Model Number:
Model Description:
*Product you purchased may vary from picture shown.
Caution: Read and follow all Safety Rules and Operating Instructions before first
use of this product. Retain this document for future reference.
Distributed by Sears Brands Management Corporation., Hoffman Estates, IL 60179 F1728

SAFETY WARNINGS AND CAUTIONS:
• Use appropriate safety equipment when using _ower and hand tools. Failure to do so may cause personal injury or product
damage.
• Use adequate manpower when assembling and moving this unit. Failure to do so may cause personal injury or product
damage.
DO NOT stand on this product. You may fall which may cause personal injury.
DO NOT mount this product on a truck bed or any other moving object. This may cause personal injury or product damage.
Appropriately secure this product before moving it with a forklift.
DO NOT alter this product in any manner. For example, do not weld external Iockbars or attach electrical equipment. This
may cause product damage or personal injury.
Keep the product on level surfaces. The product may become unstable and tip if stored or moved on an un-level surface,
which may cause personal injury or product damage.
k,.
Tools Required:
Socket wrench
7/16" socket
11/32" wrench
Screwdriver, crosstip
Screwdriver, flathead
Square
Hardware Included
AA(6) EE (2)
BB(6)
\./
'\ /
FF
_A
cc(6)
GG
DD(2)
HH
Call 1-800-4MY-HOME (1-800-469-4663) for Service Parts.
efer to Service Parts Drawing for full listing of Service Parts.

STEP (1):
AA(4)
BB(4)
CC(4)
Note: Door kit may be installed on left or right side. Installation
shown on right side.
•Move workbench away from any walls to gain access to the
back of the unit.
• Remove the necessary hardware securing the upper rail. The
top rail does NOT need to be removed completely, just the
lower hardware removed.
• The bottom rail needs to be removed completely so the back
panel B can be installed behind the lower rail.
AA BB
• Secure Back panel B with (4) AA, (4) BB and (4) CC.
• Secure bottom rail with original fasteners.
STEP (2):
DD (2)
'i
\_/
FF
_111111
f
• Attach F, as shown, using (2) DD.
Workbench Top
removed for clarity
i
11-7/8"
(30.16 cm)
!
F
STEP (3):
AA(2)
BB(2)
cc(2)
• Remove top front rail and bottom rail from workbench.
• Attach door A through hinge (which is welded to door) using
(2) AA, (2) BB and (2) CC.
• Be sure to use the lower mounting hole on top rail and upper
hole in bottom rail as shown below.
• Re-attach front rails using existing hardware.
Door removed for
clarity
//
A
,J

STEP (4):
GG
HH
• Attach the lock to the door
• Remove the lock nut from GG
• Indert body of GG through hole in door, than attach HH onto
GG
• Secure with lock nut and test to sure of smooth operation
STEP (5):
EE (2)
• Attach bumpers to workbench frame
• Peat off the adhesive protector on the back of EE
• Using the door as a guide, place the bumper EE on the
workbench frame to protect the door from contacting the frame
rails
• One bumper should be placed at the top of the door, and the
other at the bottom
EE
and water.
as to a car The wax wilt also help protect the unit against
scratches
fluids For safety, use a nonflammable cleaning fluid
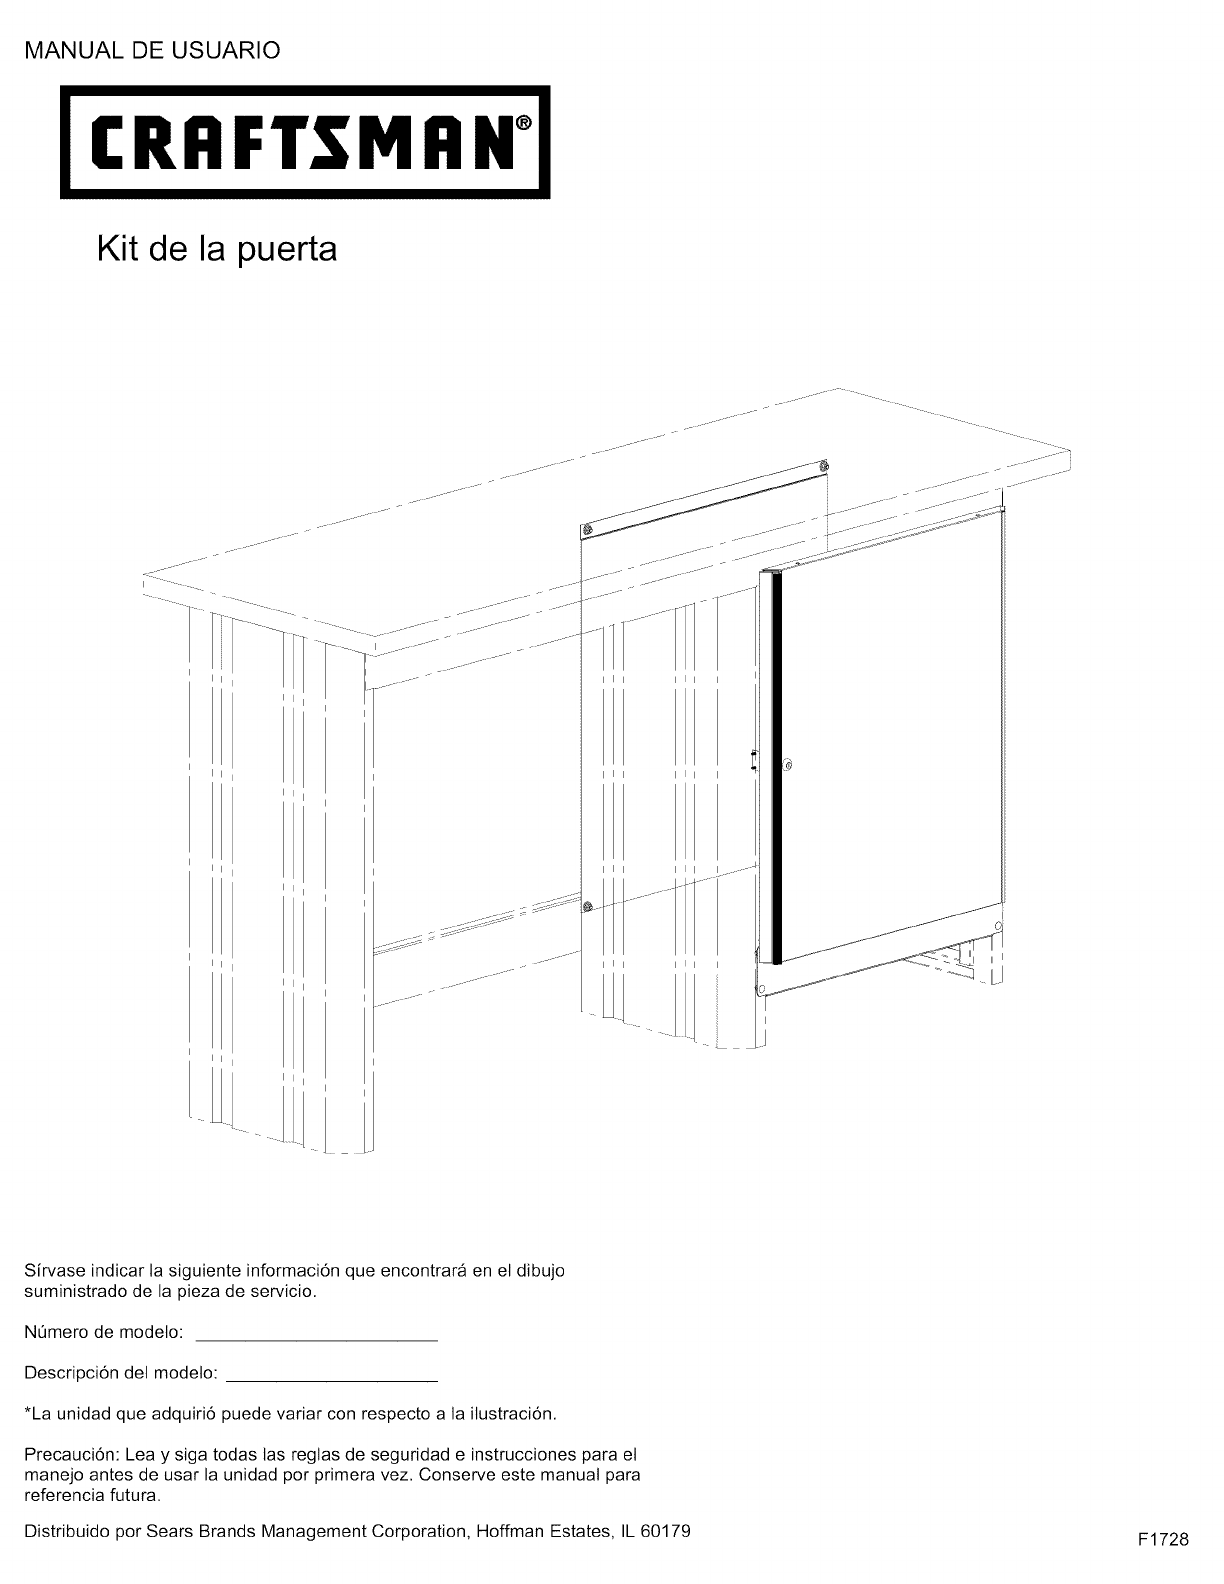
MANUAL DE USUARIO
I €RRFTSM II #°l
Kit de la puerta
._ _.---_
.j.J-
I I
HI
I I I
I
Sirvase indicar la siguiente informaci6n que encontrar£ en el dibujo
suministrado de la pieza de servicio.
NQmero de modelo:
Descripci6n del modelo:
*La unidad que adquiri6 puede variar con respecto a la itustraci6n.
Precauci6n: Lea y siga todas tas reglas de seguridad e instrucciones para et
manejo antes de usar la unidad por primera vez. Conserve este manual para
referencia futura.
Distribuido por Sears Brands Management Corporation, Hoffman Estates, IL 60179 F1728

.1
ADVERTENCIAS Y PRECAUCIONES DE SEGURIDAD:
•Utilice et equipo de seguridad adecuado cuando emplee herramientas et6ctricas. De Io contrario, podria causarte lesiones personales u|
ocasionar da_os al producto. |
• Utilice et personal adecuado para et montaje y el traslado de esta unidad. De Io contrario podria ocasionarse lesiones personales o |
da_ar el producto. |
•NO se ponga de pie sobre la unidad. Podria caerse y lesionarse. |
• NO monte esta unidad en la ptataforma de carga de la camioneta ni en ning6n otro objeto m6vil. Podria causar lesiones personales o |
da_o a la unidad. |
•Asegure adecuadamente la unidad antes de moverla con un montacargas. |
• NO attere la unidad en modo alguno. Por ejemplo, no suelde las barras de sujeci6n extemas nile incorpore equipos el6ctricos. Podria |
causar da_o a ta unidad o lesiones personales. |
• Mantenga el producto sobre superficies ptanas. El producto puede desestabitizarse y votcar si se almacena o se mueve en superficies |
no Itanas, Io cual podria causar lesiones personales o daSar el producto. /
J
Herramientas necasarias:
Llave de tubo
Casquillo adaptador de 7/16 pulgadas
Llave Inglesa de 11/32"
Destornitlador, punta de cruz
Destornitlador de cabeza plana
Escuadra de carpintero
Ferreteria incluida
AA(6) t\
\.
BB(6)
s\
\ S
f\,
EE (2)
FF
.... -°"A
cc(6)
GG
DD(2)
HH
Llame al 1-800-659-7084 para
bujo de piezas de servicio si desea un
las piezas de repuesto. Consulte el
listado completo de piezas de servicio.

PASO (1):
AA(4)
BB(4)
CC(4)
Nora: El kit de la puerta se puede instalar en derecho izquierdo o,
Instalaci6n demostrada en derecho,
• Mueva el banco de trabajo lejos de cualquier pared para acceder a la
parte posterior de la unidad,
• Quite el hardware necesario que asegura el carril superior, El carril
superior no necesita ser quitado totalmente, apenas el hardware mas
bajo quitado,
• El carril inferior necesita ser quitado totalmente asi que el panel
trasero (B) se puede instalar detras del carril mas bajo,
AA BB
• Asegure el panel trasero B con (4) AA, (4) BB y (4) CC,
• Asegure el carril inferior con los sujetadores originales,
PASO (2):
DD (2)
\_)
FF
_Iiiii
f-
•Ate F, como se muestra, usando (2) DD,
Banco de trabajo sin
la parte superior para
mayor claridad
PASO (3):
AA(2)
BB(2)
cc(2)
• Quite el carril delantero superior y el carril inferior del banco de trabajo,
• Ate la puerta A a traves de la bisagra (que se suelda con aut6gena a
la puerta) usando (2) AA, (2) BB y (2) CC,
• Este seguro de utilizar el agujero de montaje mas bajo en el carril
superior y el agujero superior en el carril inferior como se muestra
abajo,
• Reate los carriles delanteros usando el hardware existente,
Puerta quitada para
mayor clareza
//
/
AA A
,J
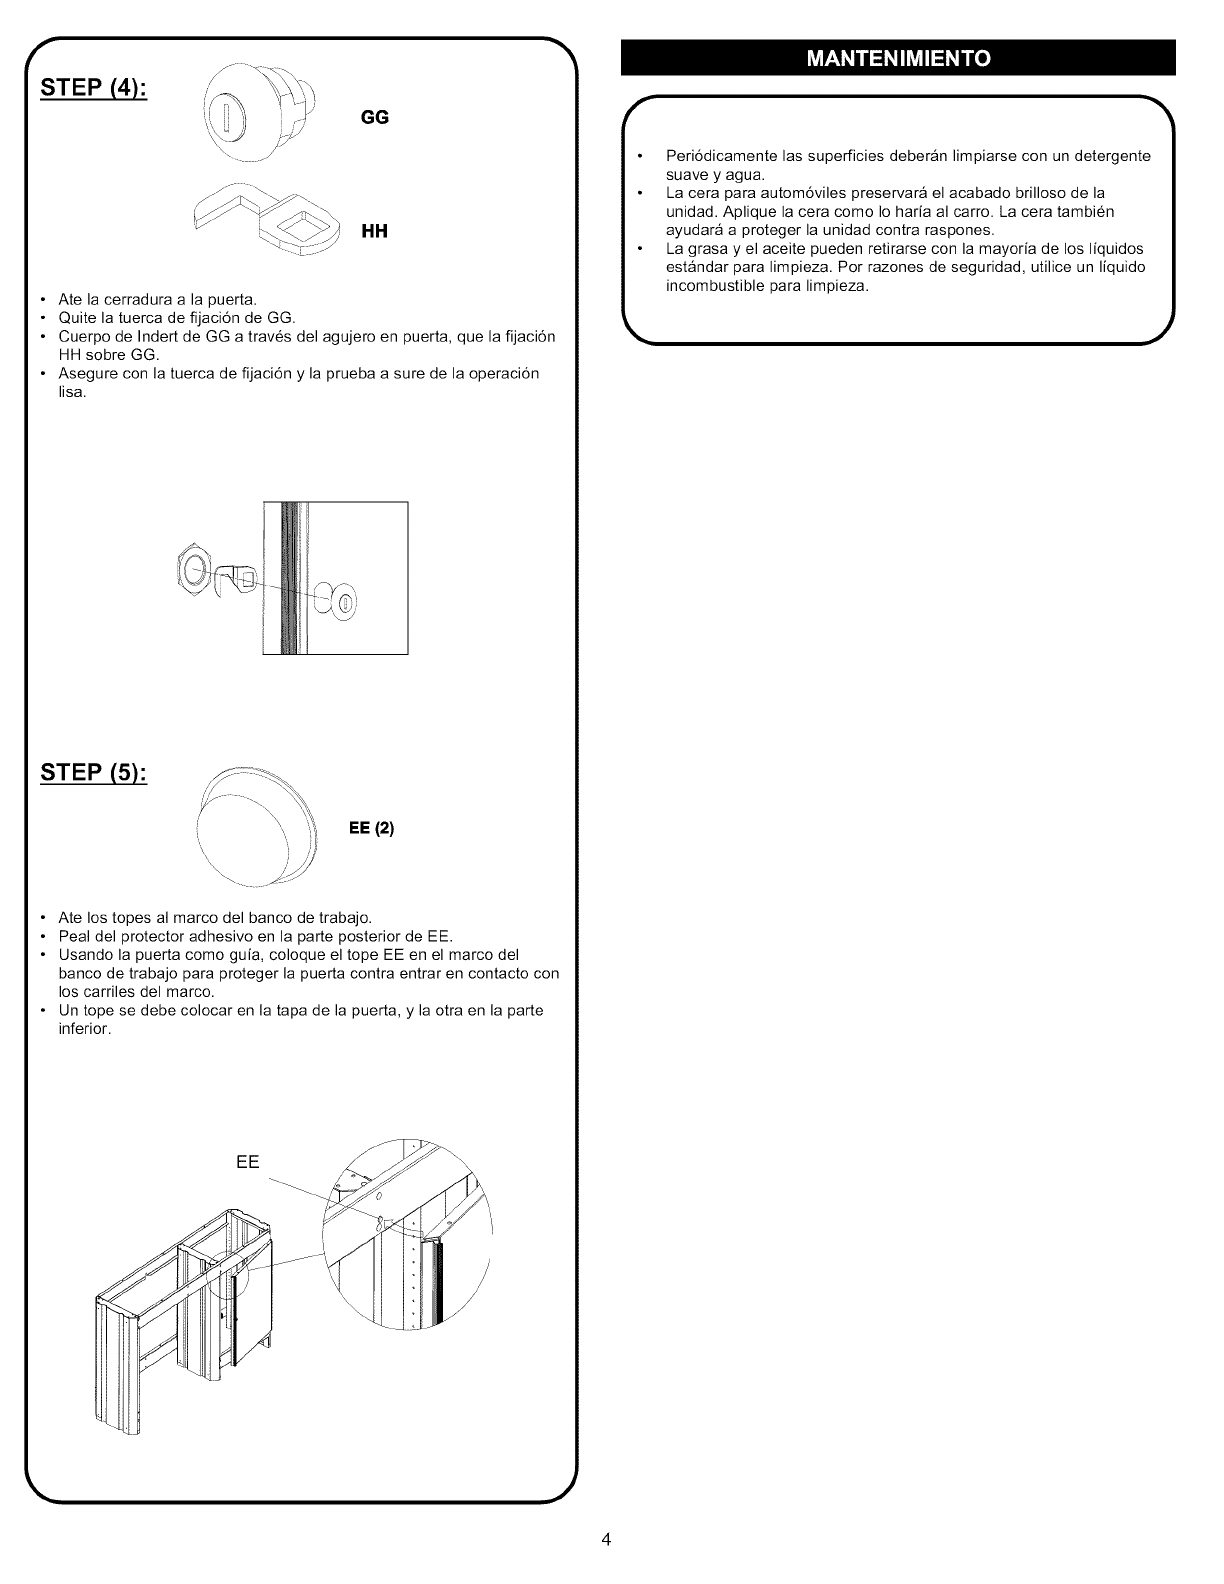
STEP (4):
GG
HH
• Ate la cerradura a la puerta.
• Quite la tuerca de fijaci6n de GG.
• Cuerpo de Indert de GG a traves del agujero en puerta, que la fijaci6n
HH sobre GG.
• Asegure con la tuerca de fijaci6n y la prueba a sure de la operaci6n
lisa.
STEP (5):
EE (2)
• Ate los topes al marco del banco de trabajo.
• Peal del protector adhesivo en la parte posterior de EE.
• Usando la puerta como guia, coloque el tope EE en el marco del
banco de trabajo para proteger la puerta contra entrar en contacto con
los carriles del marco.
• Un tope se debe colocar en la tapa de la puerta, y la otra en la parte
inferior.
EE
suave y agua.
La cera para autom6viles preservara el acabado brilloso de la
unidad. Aplique la cera como Io haria al carro. La cera tambien
ayudara a proteger la unidad contra raspones.
incombustible para limpieza.
