Craftsman 706466340 User Manual MOBILE TOOL CHEST Manuals And Guides 1409291L
User Manual: Craftsman 706466340 706466340 CRAFTSMAN MOBILE TOOL CHEST - Manuals and Guides View the owners manual for your CRAFTSMAN MOBILE TOOL CHEST #706466340. Home:Tool Parts:Craftsman Parts:Craftsman MOBILE TOOL CHEST Manual
Open the PDF directly: View PDF ![]() .
.
Page Count: 4
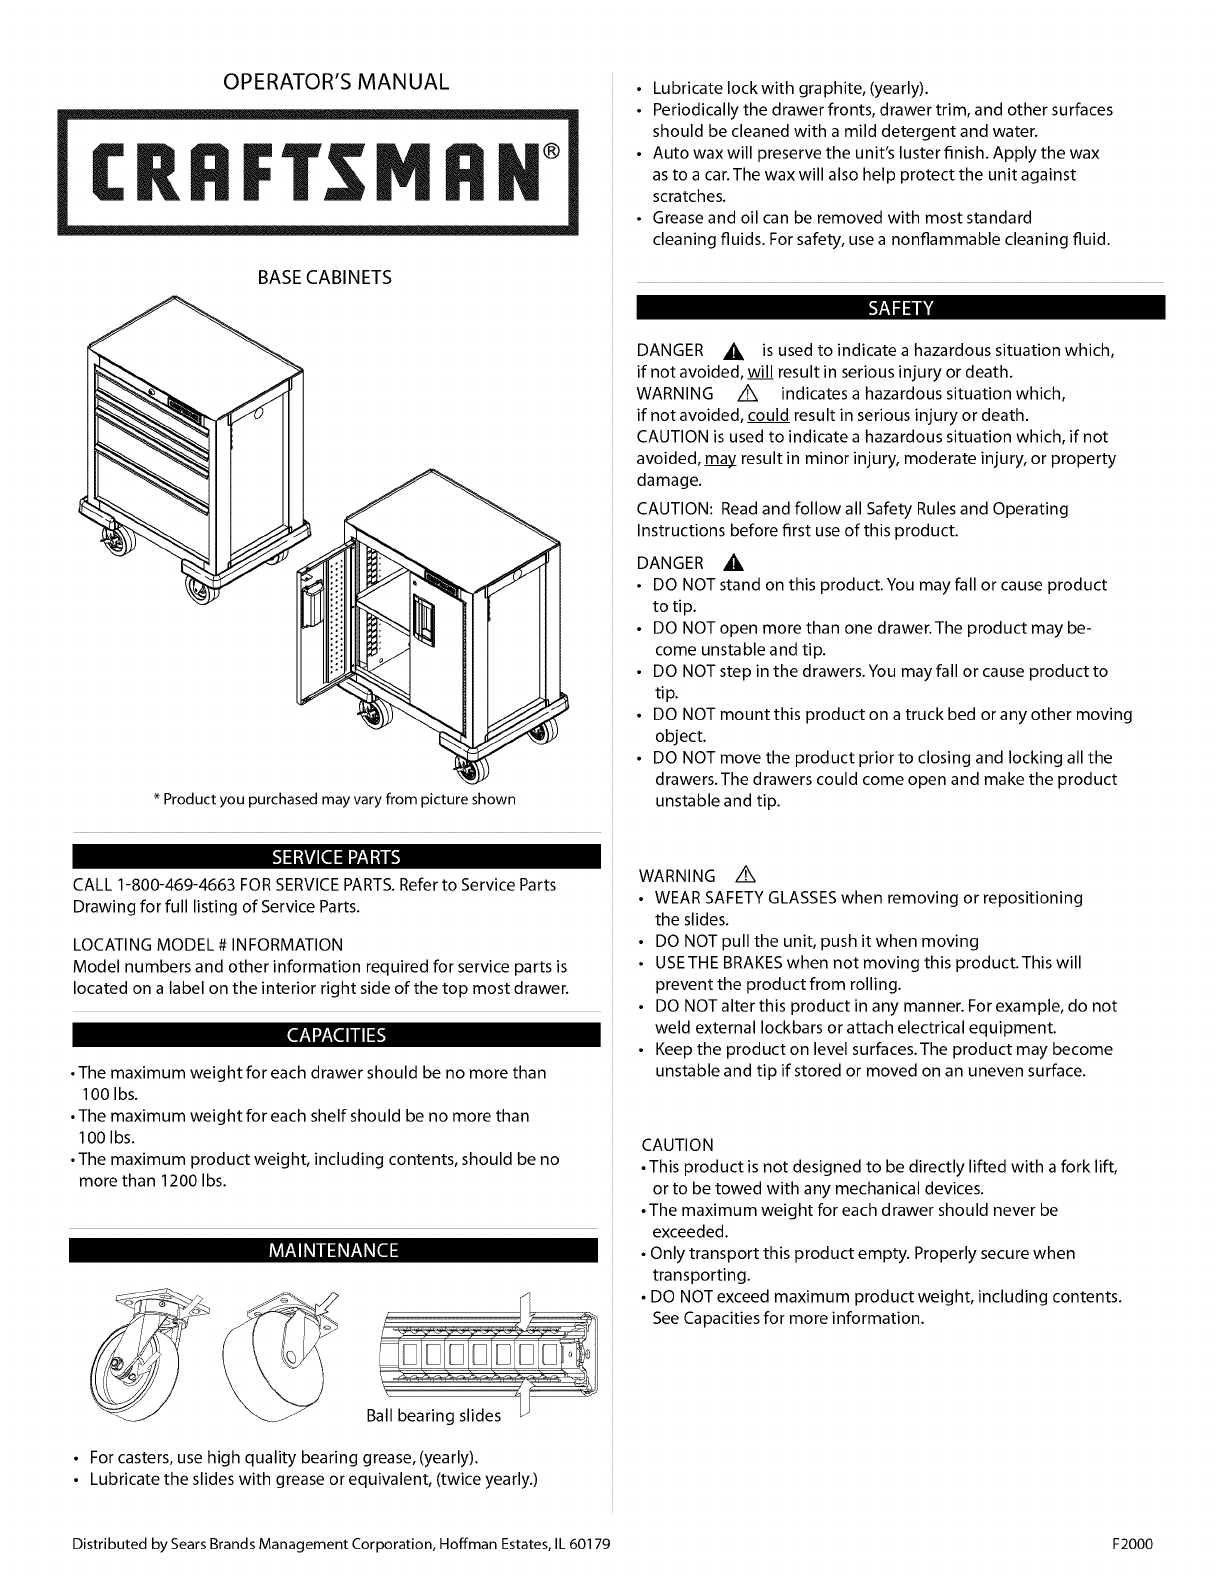
OPERATOR'S MANUAL
BASE CABINETS
• Lubricate lock with graphite, (yearly).
• Periodically the drawer fronts, drawer trim, and other surfaces
should be cleaned with a mild detergent and water.
• Auto wax will preserve the unit's luster finish. Apply the wax
as to a car.The wax will also help protect the unit against
scratches.
• Grease and oil can be removed with most standard
cleaning fluids. For safety, use a nonflammable cleaning fluid.
[,,,'Jr-'1li B'4
* Product you purchased may vary from picture shown
_ I :kvj[el:I'J-'l:tl_
CALL 1-800-469-4663 FORSERVICEPARTS.Refer to Service Parts
Drawing for full listing of Service Parts.
LOCATING MODEL # INFORMATION
Model numbers and other information required for service parts is
located on a label on the interior right side of the top most drawer.
In!'-,1",,7-,I[aI/i I:i[,,'l
• The maximum weight for each drawer should be no more than
100 Ibs.
• The maximum weight for each shelf should be no more than
1O0 Ibs.
• The maximum product weight, including contents, should be no
more than 1200 Ibs.
r_f-'1I_I 11_f-'1_Jill:I
F
Ball bearing slides
• For casters, use high quality bearing grease, (yearly).
• Lubricate the slides with grease or equivalent, (twice yearly.)
DANGER AIL is used to indicate a hazardous situation which,
if not avoided, will result in serious injury or death.
WARNING Z_ indicates a hazardous situation which,
if not avoided, could result in serious injury or death.
CAUTION is used to indicate a hazardous situation which, if not
avoided, _ result in minor injury, moderate injury, or property
damage.
CAUTION: Read and follow all Safety Rules and Operating
Instructions before first use of this product.
DANGER _I_
• DO NOT stand on this product.You may fall or cause product
to tip.
• DO NOT open more than one drawer.The product may be-
come unstable and tip.
• DO NOT step in the drawers. You may fall or cause product to
tip.
• DO NOT mount this product on a truck bed or any other moving
object.
• DO NOT move the product prior to closing and locking all the
drawers.The drawers could come open and make the product
unstable and tip.
WARNING z_
• WEAR SAFETY GLASSES when removing or repositioning
the slides.
• DO NOT pull the unit, push it when moving
• USETHE BRAKES when not moving this product.This will
prevent the product from rolling.
• DO NOT alter this product in any manner. For example, do not
weld external lockbars or attach electrical equipment.
• Keep the product on level surfaces.The product may become
unstable and tip if stored or moved on an uneven surface.
CAUTION
• This product is not designed to be directly lifted with a fork lift,
or to be towed with any mechanical devices.
• The maximum weight for each drawer should never be
exceeded.
• Only transport this product empty. Properly secure when
transporting.
• DO NOT exceed maximum product weight, including contents.
See Capacities for more information.
Distributed by Sears Brands Management Corporation, Hoffman Estates, IL 60179 F2000

I-"r__y;tD],VtVl__y;ta
TOOLS REQUIRED:
Socket Wrench
3/8" Socket
HARDWARE INCLUDED:
_]_ # 14 - 10 x 1 1/2-in Hex Screws
(Qty: 16)
Side Handle Grip (Qty: 2)
r__!,,_,,j:l_l:]L,d
CASTER INSTALLATION
Items Needed:
#14- 10 x 1 1/2-in Hex Screws (Qty: 16)
3/8" Socket
Process:
NOTE: Use adequate personnel for this operation.
[o]",I:I:_-_Ii[o]ll
• Lay the cabinet on its back. Use packaging material to
protect the finish.
• Attach casters, caster angles and bumpers using (4)
screws in each caster.
• Wrench tighten.
• Return the cabinet to its upright position.
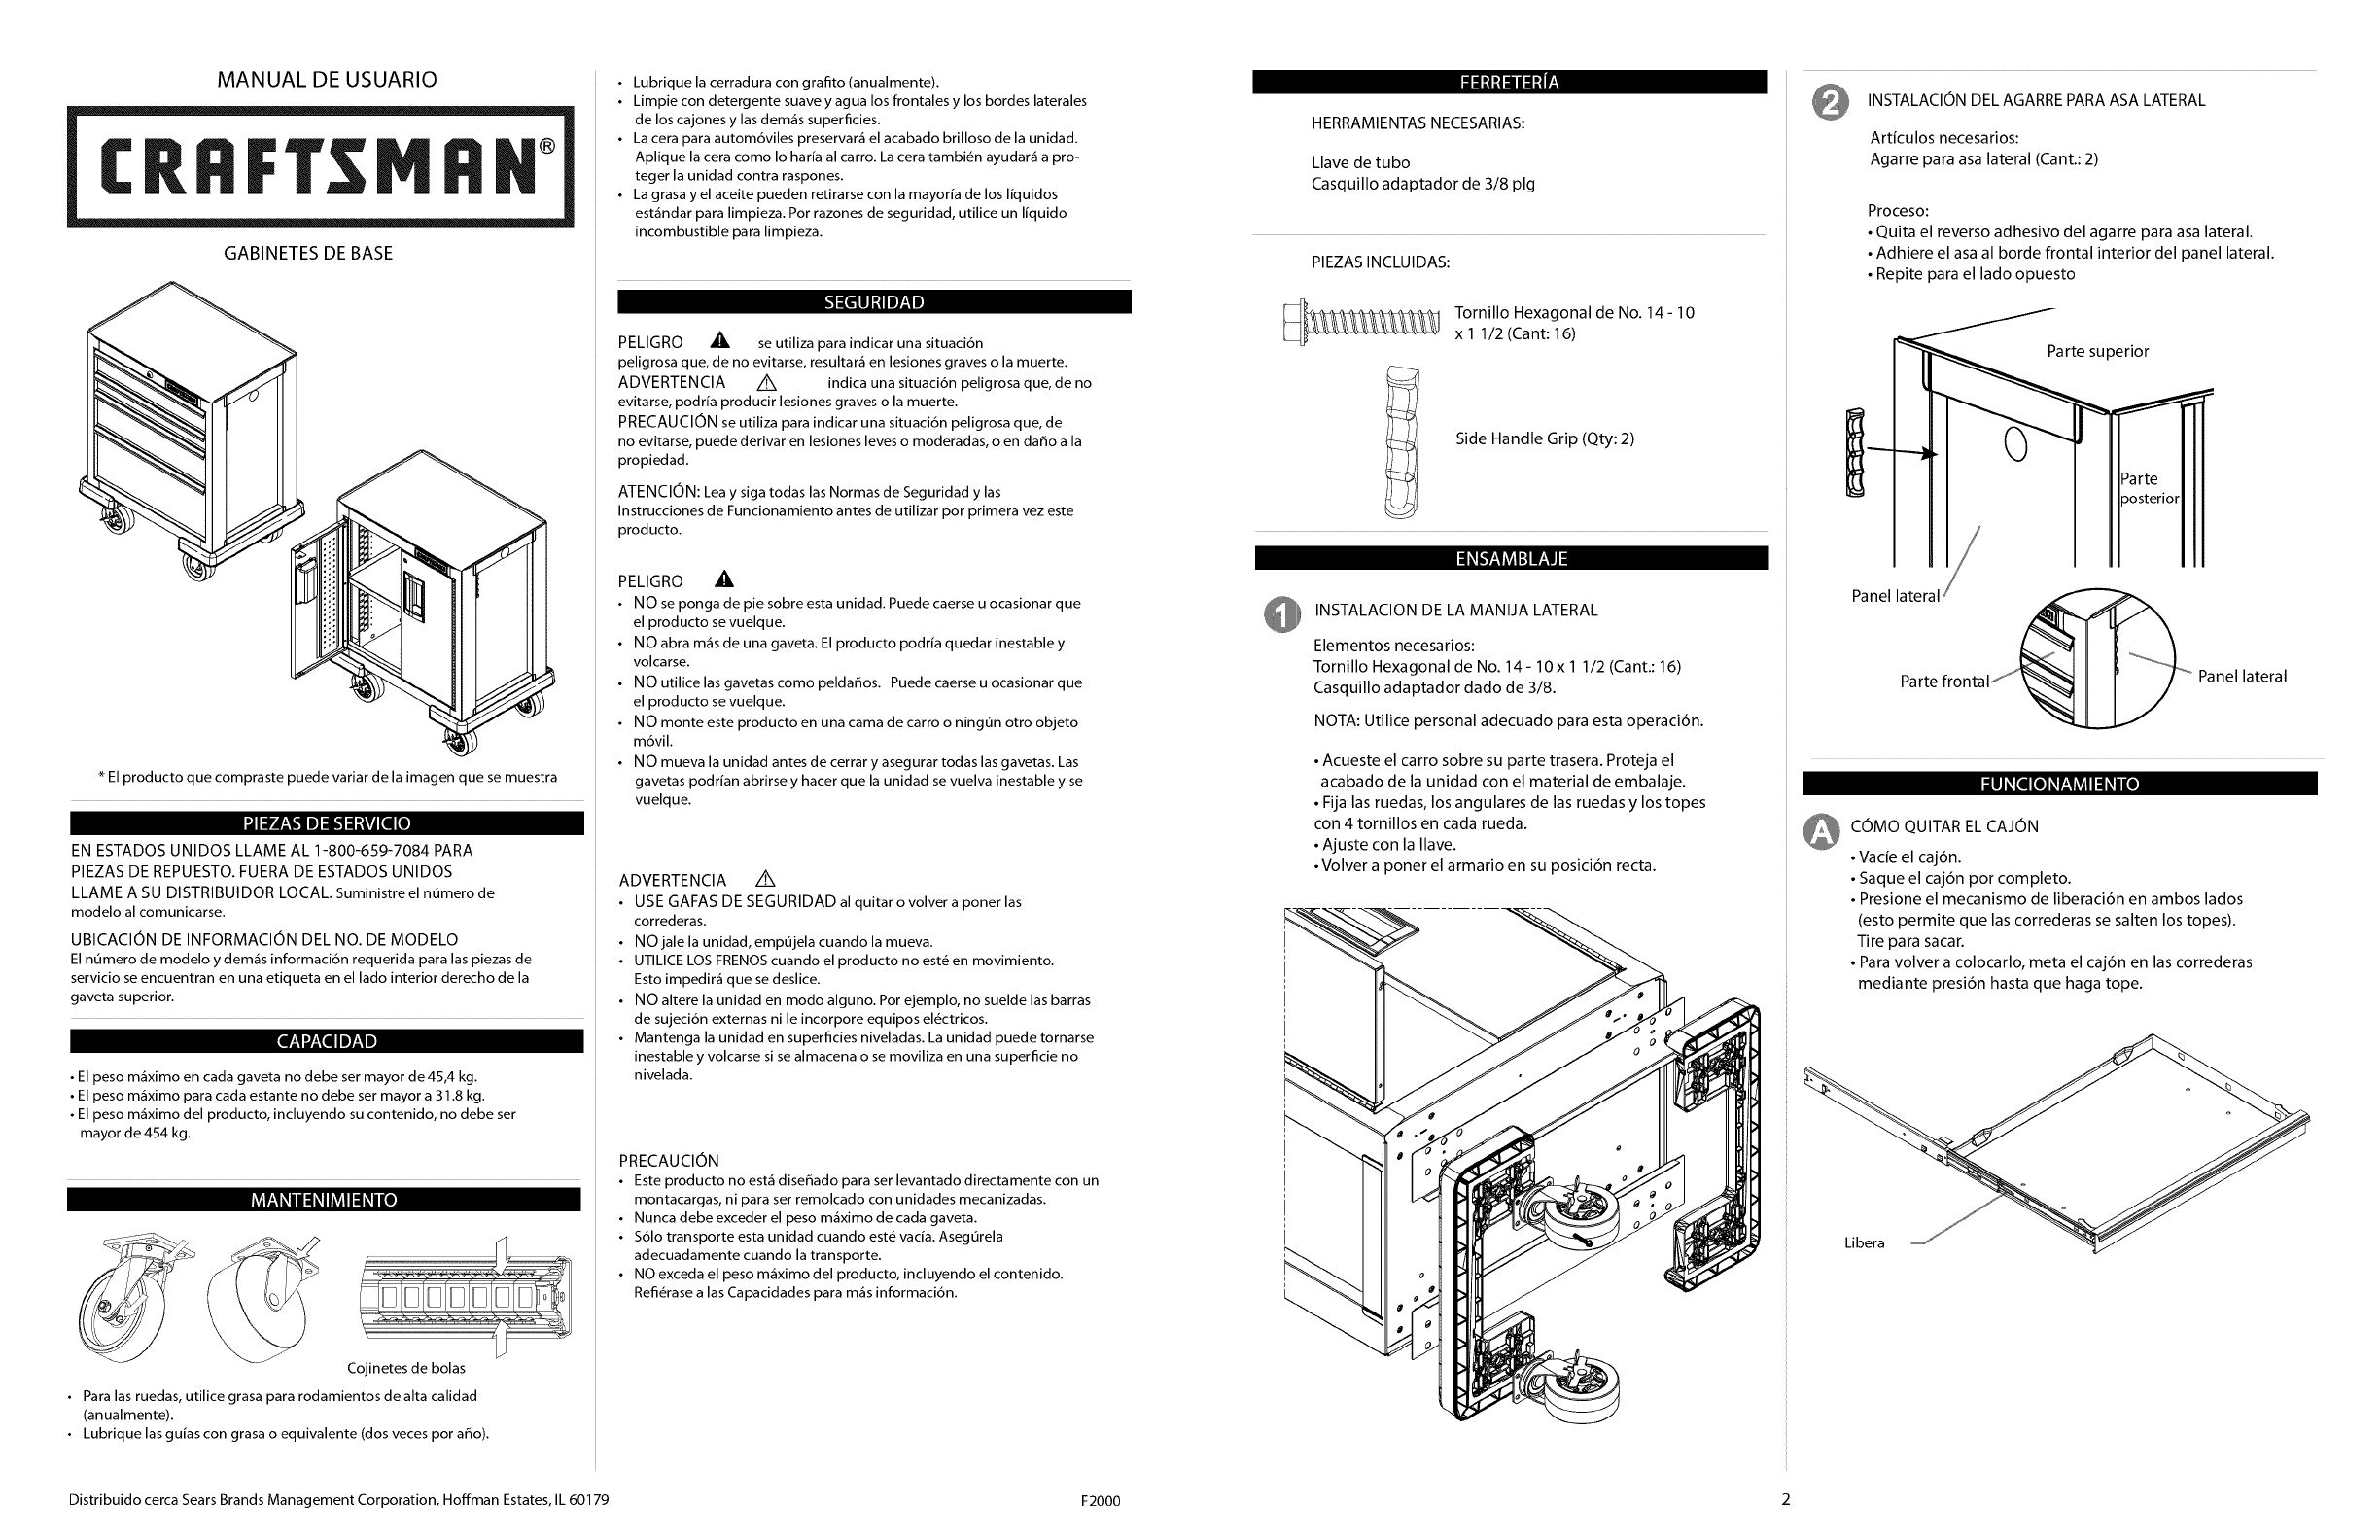
SIDE HANDLE GRIP INSTALLATION
Items Needed:
Side Handle Grip (Qty: 2)
Process:
• Remove adhesive back from side handle grip.
• Adhere handle to the front inside edge of side panel.
• Repeat for opposite side.
Top
Side Panel
Front
REMOVING DRAWERS
•Empty the drawer.
•Fully extend the drawer.
•Depress the release tab on both sides, (this allows the
slides to ride over the stops). Pull out to remove.
• To reinstall, carefully push the drawer into the slides until
the drawer stops.
R ....
.... N I
Product questions or problems?
1-888-331-4569
Customer Care Hot Line
iiiiiiiiiiiiiiiiiiiiiiiiiiiiiiiiii....
iiiiiiiiiiiiiiiiiiiiiiiiiiiiiiiiii.... iiiiiiiiiiiiiiiiiiiiiiiiiiiiiiiiii....
Join the Craftsman Club today!
www.craftsman.com/signup
Receive exclusive member benefits including special pricing and offers, project sharing, expert
advice, and SHOP YOUR WAYREWARDS!
Como miembro exclusivo, recibe diversos beneflcios como ofertas, precios especiales,
proyectos nuevos, consejos de expertos y nuestro programa de puntos SHOP YOUR
o WAY REWARDS!
RegisteredTrademark/TM TrademarkofKCD IP,LLCintheUnitedStates,orSearsBrands,LLCinothercountries
®MarcaRegistrada/TMMarcade F_bricade KCD IPLLCen EstadosUnidoso SearsBrands LLCinotrospaises
MANUAL DE USUARIO
CRRI:TSMRN
GABINETES DE BASE
Illltltii/lltill
_'ll[lilJ i| 1171111
Illl,'li!_l:tlE!l i
El producto que compraste puede variar de la imagen que se muestra IIlll ! [11[I] ! !ililll II ! I [I]
Il IlJi!,_ Ill: _ i :IVlIll [e]
EN ESTADOS UNIDOS LLAME AL 1-800-659-7084 PARA
PIEZAS DE REPUESTO. FUERA DE ESTADOS UNIDOS
LLAME A SU DISTRIBUIDOR LOCAL. Suministre el nt_mero de
modelo al comunicarse.
UBICACION DE INFORMACION DEL NO. DE MODELO
El nt_mero de modelo y demos informaci6n requerida para laspiezas de
servicio se encuentran en una etiqueta en el lado interior derecho de la
gaveta superior.
[llil ",/jill IIlil I]
• El peso m_ximo en cada gaveta no debe ser mayor de 45,4 kg.
• El peso m_ximo para cada estante no debe ser mayor a 31.8 kg.
• El peso m_ximo del producto, incluyendo su contenido, no debe ser
mayor de 454 kg.
I_lilll / I!11_11111[I]
Cojinetes de bolas
• Para las ruedas, utilice grasa para rodamientos de alta calidad
(anualmente).
• Lubrique las gufas con grasa o equivalente (dos veces por a6o).
• Lubrique la cerradura con grafito (anualmente).
• Limpie con detergente suave y agua los frontales y los bordes laterales
de los cajones y las demos superficies.
• La cera para autom6viles preservar_ el acabado brilloso de la unidad.
Aplique la cera como Io haria al carro. La cera tambi_n ayudar_ a pro-
teger la unidad contra raspones.
• La grasa y el aceite pueden retirarse con la mayorfa de los liquidos
est_ndar para limpieza. Por razones de seguridad, utilice un Ifquido
incombustible para limpieza.
PELIGRO _ se utiliza para indicar una situaci6n
peligrosa que, de no evitarse, resultar_ en lesiones graves o la muerte.
ADVERTENCIA Z_ indica una situaci6n peligrosa que, de no
evitarse, podrfa producir lesiones graves o la muerte.
PRECAUCION se utiliza para indicar una situaci6n peligrosa que, de
no evitarse, puede derivar en lesiones leves o moderadas, o en daEo a la
propiedad.
ATENCION: Lea y siga todas las Normas de Seguridad y las
Instrucciones de Funcionamiento antes de utilizar por primera vez este
producto.
PELIGRO
• NO se ponga de pie sobre esta unidad. Puede caerse u ocasionar que
el producto se vuelque.
• NO abra m_s de una gaveta. El producto podrfa quedar inestable y
volcarse.
• NO utilice las gavetas como pelda_os. Puede caerse u ocasionar que
el producto se vuelque.
• NO monte este producto en una cama de carro o ningOn otro objeto
m6vil.
• NO mueva la unidad antes de cerrar y asegurar todas las gavetas. Las
gavetas podrfan abrirse y hacer que la unidad se vuelva inestable y se
vuelque.
ADVERTENCIA /_
• USE GAFAS DE SEGURIDAD al quitar o volver a poner las
correderas.
• NO jale la unidad, empOjela cuando la mueva.
• UTILICE LOS FRENOS cuando el producto no est_ en movimiento.
Esto impedir_ que se deslice.
• NO altere la unidad en modo alguno. Por ejemplo, no suelde las barras
de sujeci6n externas nile incorpore equipos el_ctricos.
• Mantenga la unidad en superficies niveladas. La unidad puede tornarse
inestable y volcarse si se almacena o se moviliza en una superficie no
nivelada.
PRECAUCION
• Este producto no est_ dise_ado para ser levantado directamente con un
montacargas, ni para ser remolcado con unidades mecanizadas.
• Nunca debe exceder el peso m_ximo de cada gaveta.
• S61o transporte esta unidad cuando est_ vacia. AsegOrela
adecuadamente cuando la transporte.
• NO exceda el peso m_ximo del producto, incluyendo el contenido.
Refi_rase a las Capacidades para m_s informaci6n.
HERRAMIENTAS NECESARIAS:
Llave de tubo
Casquillo adaptador de 3/8 pig
PIEZASINCLUIDAS:
Tornillo Hexagonal de No. 14- 10
x I I/2 (Cant: 16)
Side Handle Grip (Qty: 2)
INSTALACION DE LA MANIJA LATERAL
Elementos necesarios:
Tornillo Hexagonal de No. 14- 10x I I/2 (Cant.: 16)
Casquillo adaptador dado de 3/8.
NOTA: Utilice personal adecuado para esta operaci6n.
• Acueste el carro sobre su parte trasera. Proteja el
acabado de la unidad con el material de embalaje.
• Fija las ruedas, los angulares de las ruedas y los topes
con 4 tornillos en cada rueda.
• Ajuste con la llave.
• Volver a poner el armario en su posici6n recta.
INSTALACION DEL AGARRE PARA ASA LATERAL
Artfculos necesarios:
Agarre para asa lateral (Cant.: 2)
Proceso"
• Quita el reverso adhesivo del agarre para asa lateral.
• Adhiere el asa al borde frontal interior del panel lateral.
• Repite para el lado opuesto
Parte superior
Panel lateral IS
Parte
posterior
Panel lateral
_ COMO QUITAR EL CAJON
• Vacie el caj6n.
• Saque el caj6n por completo.
• Presione el mecanismo de liberaci6n en ambos lados
(esto permite que las correderas se salten los topes).
Tire para sacar.
• Para volver a colocarlo, meta el caj6n en las correderas
mediante presi6n hasta que haga tope.
Distribuido cerca Sears Brands Management Corporation, Hoffman Estates, IL 60179 F2000 2

Customer Care Hot Line _i
CRAFTSMFIN
