Craftsman 706591870 User Manual TOOLBOX Manuals And Guides L0803285
CRAFTSMAN Tool Chest Manual L0803285 CRAFTSMAN Tool Chest Owner's Manual, CRAFTSMAN Tool Chest installation guides
User Manual: Craftsman 706591870 706591870 CRAFTSMAN TOOLBOX - Manuals and Guides View the owners manual for your CRAFTSMAN TOOLBOX #706591870. Home:Tool Parts:Craftsman Parts:Craftsman TOOLBOX Manual
Open the PDF directly: View PDF ![]() .
.
Page Count: 16
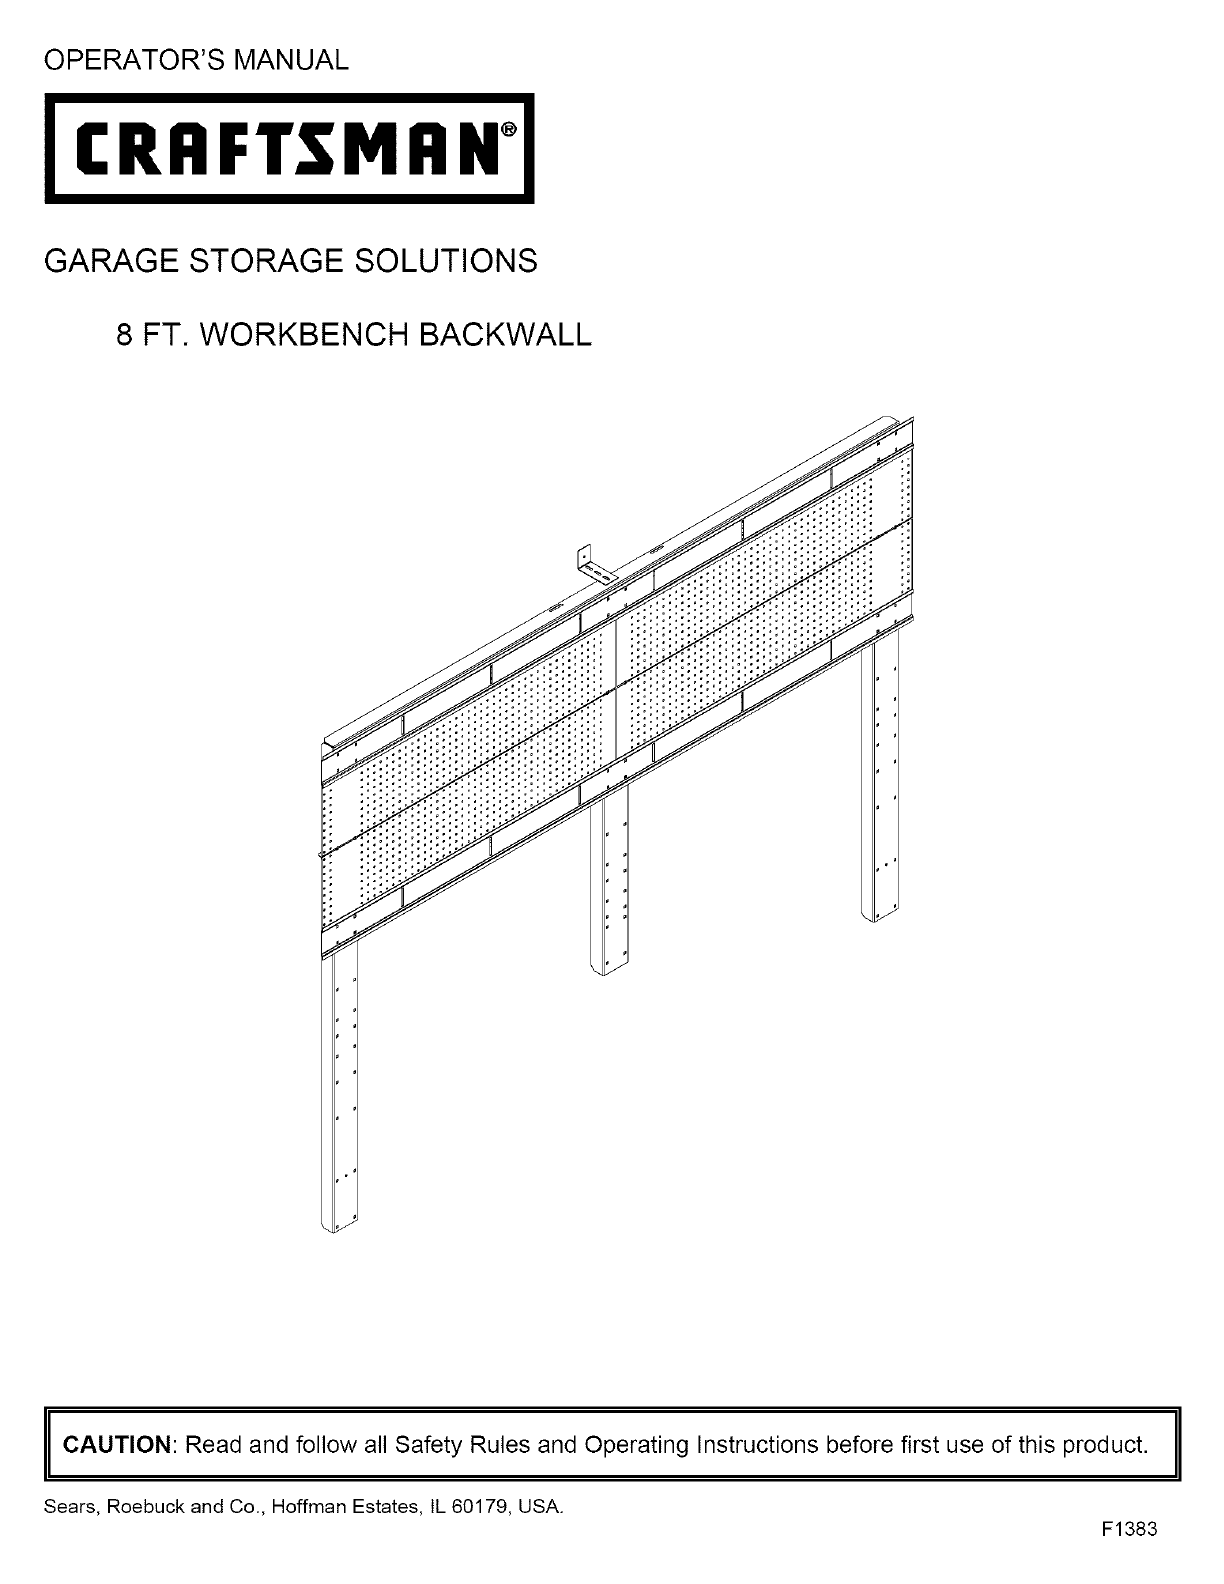
OPERATOR'S MANUAL
CRRFTSMRH °
GARAGE STORAGE SOLUTIONS
8 FT. WORKBENCH BACKWALL
II CAUTION: Read and follow all Rules and Instructions before first of this
Safety Operating product.
use
Sears, Roebuck and Co., Hoffman Estates, IL 60179, USA. F1383
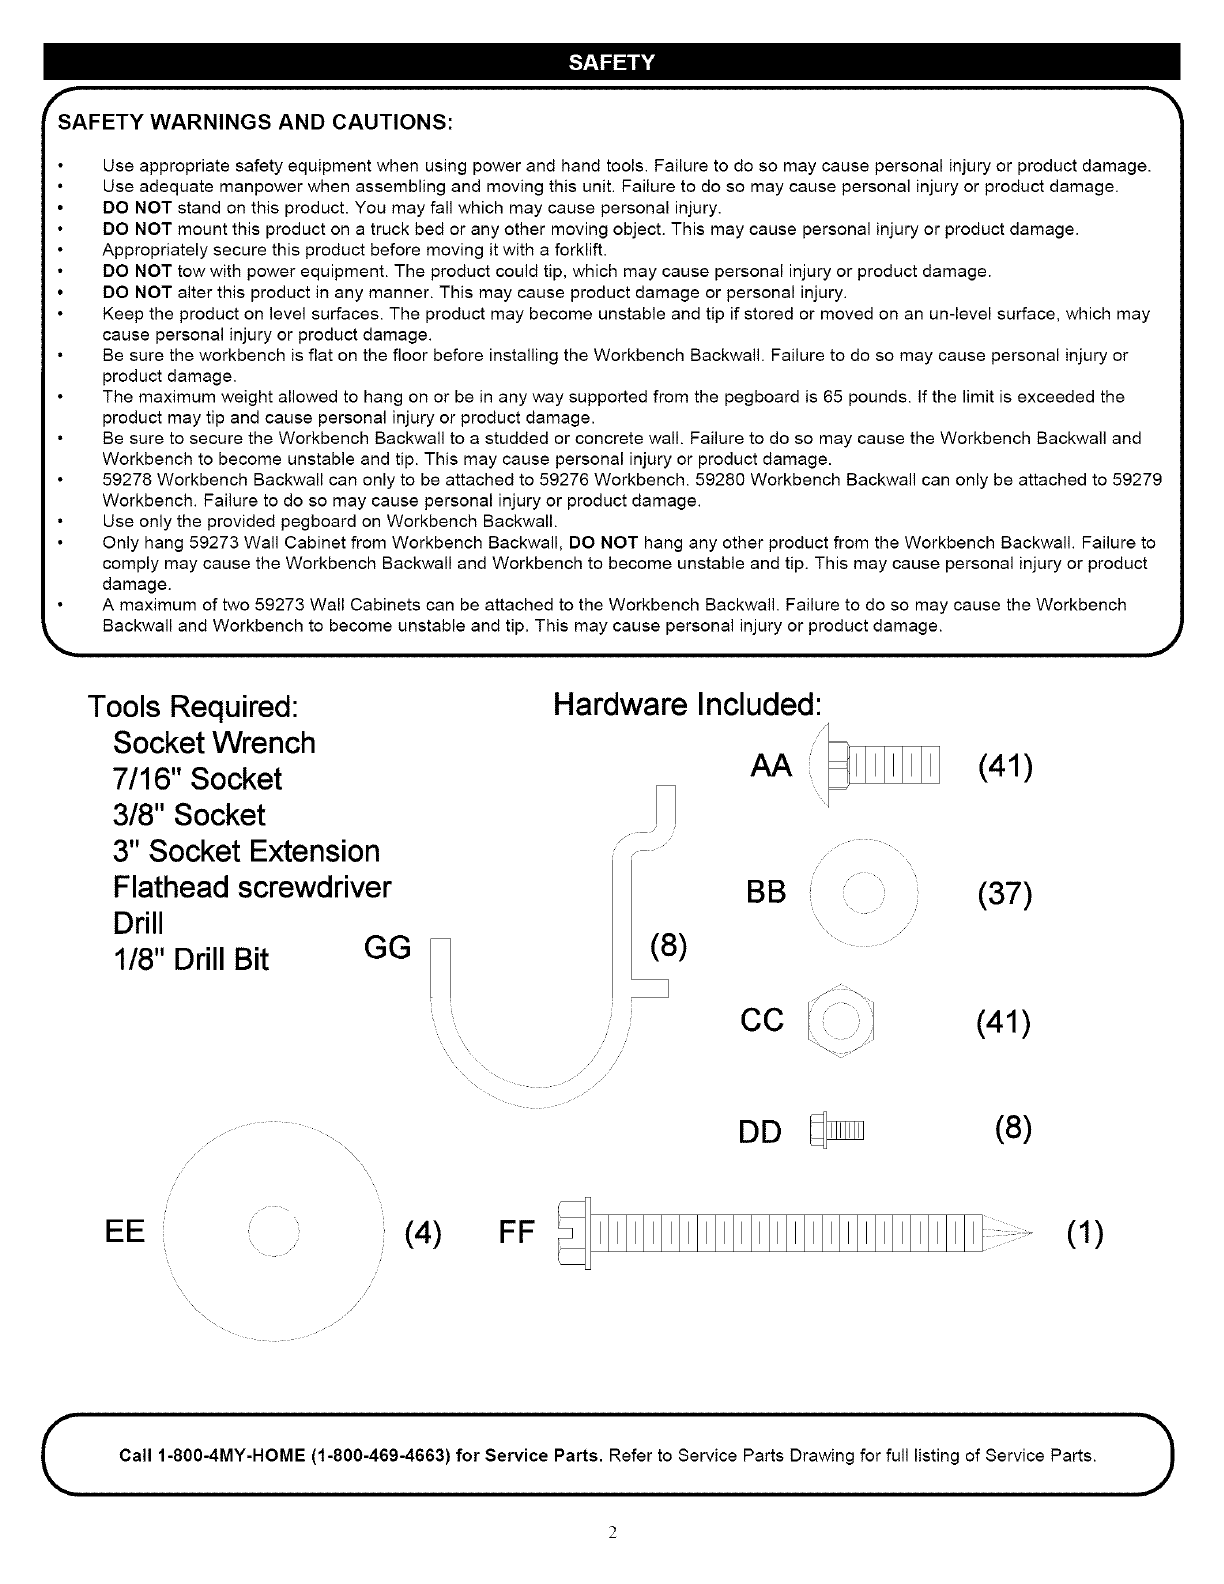
fSAFETYWARNINGSAND CAUTIONS:
Use appropriate safety equipment when using power and hand tools. Failure to do so may cause personal injury or product damage.
Use adequate manpower when assembling and moving this unit. Failure to do so may cause personal injury or product damage.
DO NOT stand on this product. You may fall which may cause personal injury.
DO NOT mount this product on a truck bed or any other moving object. This may cause personal injury or product damage.
Appropriately secure this product before moving it with a forklift.
DO NOT tow with power equipment. The product could tip, which may cause personal injury or product damage.
DO NOT alter this product in any manner. This may cause product damage or personal injury.
Keep the product on level surfaces. The product may become unstable and tip if stored or moved on an un-level surface, which may
cause personal injury or product damage.
Be sure the workbench is flat on the floor before installing the Workbench Backwall. Failure to do so may cause personal injury or
product damage.
The maximum weight allowed to hang on or be in any way supported from the pegboard is 65 pounds. If the limit is exceeded the
product may tip and cause personal injury or product damage.
Be sure to secure the Workbench Backwall to a studded or concrete wall. Failure to do so may cause the Workbench Backwall and
Workbench to become unstable and tip. This may cause personal injury or product damage.
59278 Workbench Backwall can only to be attached to 59276 Workbench. 59280 Workbench Backwall can only be attached to 59279
Workbench. Failure to do so may cause personal injury or product damage.
Use only the provided pegboard on Workbench Backwall.
Only hang 59273 Wall Cabinet from Workbench Backwall, DO NOT hang any other product from the Workbench Backwall. Failure to
comply may cause the Workbench Backwall and Workbench to become unstable and tip. This may cause personal injury or product
damage.
A maximum of two 59273 Wall Cabinets can be attached to the Workbench Backwall. Failure to do so may cause the Workbench
Backwall and Workbench to become unstable and tip. This may cause personal injury or product damage. J
Tools Required:
Socket Wrench
7/16" Socket
3/8" Socket
3" Socket Extension
Flathead screwdriver
Drill
1/8" Drill Bit GG
Hardware Included:
AA
(8)
(41)
BB" (37)
\
CC (41)
..... DD (8)
EE (4) FF (1)
Call 1-800-4MY-HOME (1-800-469-4663) for Service Parts. Refer to Service Parts Drawing for full listing of Service Parts. )
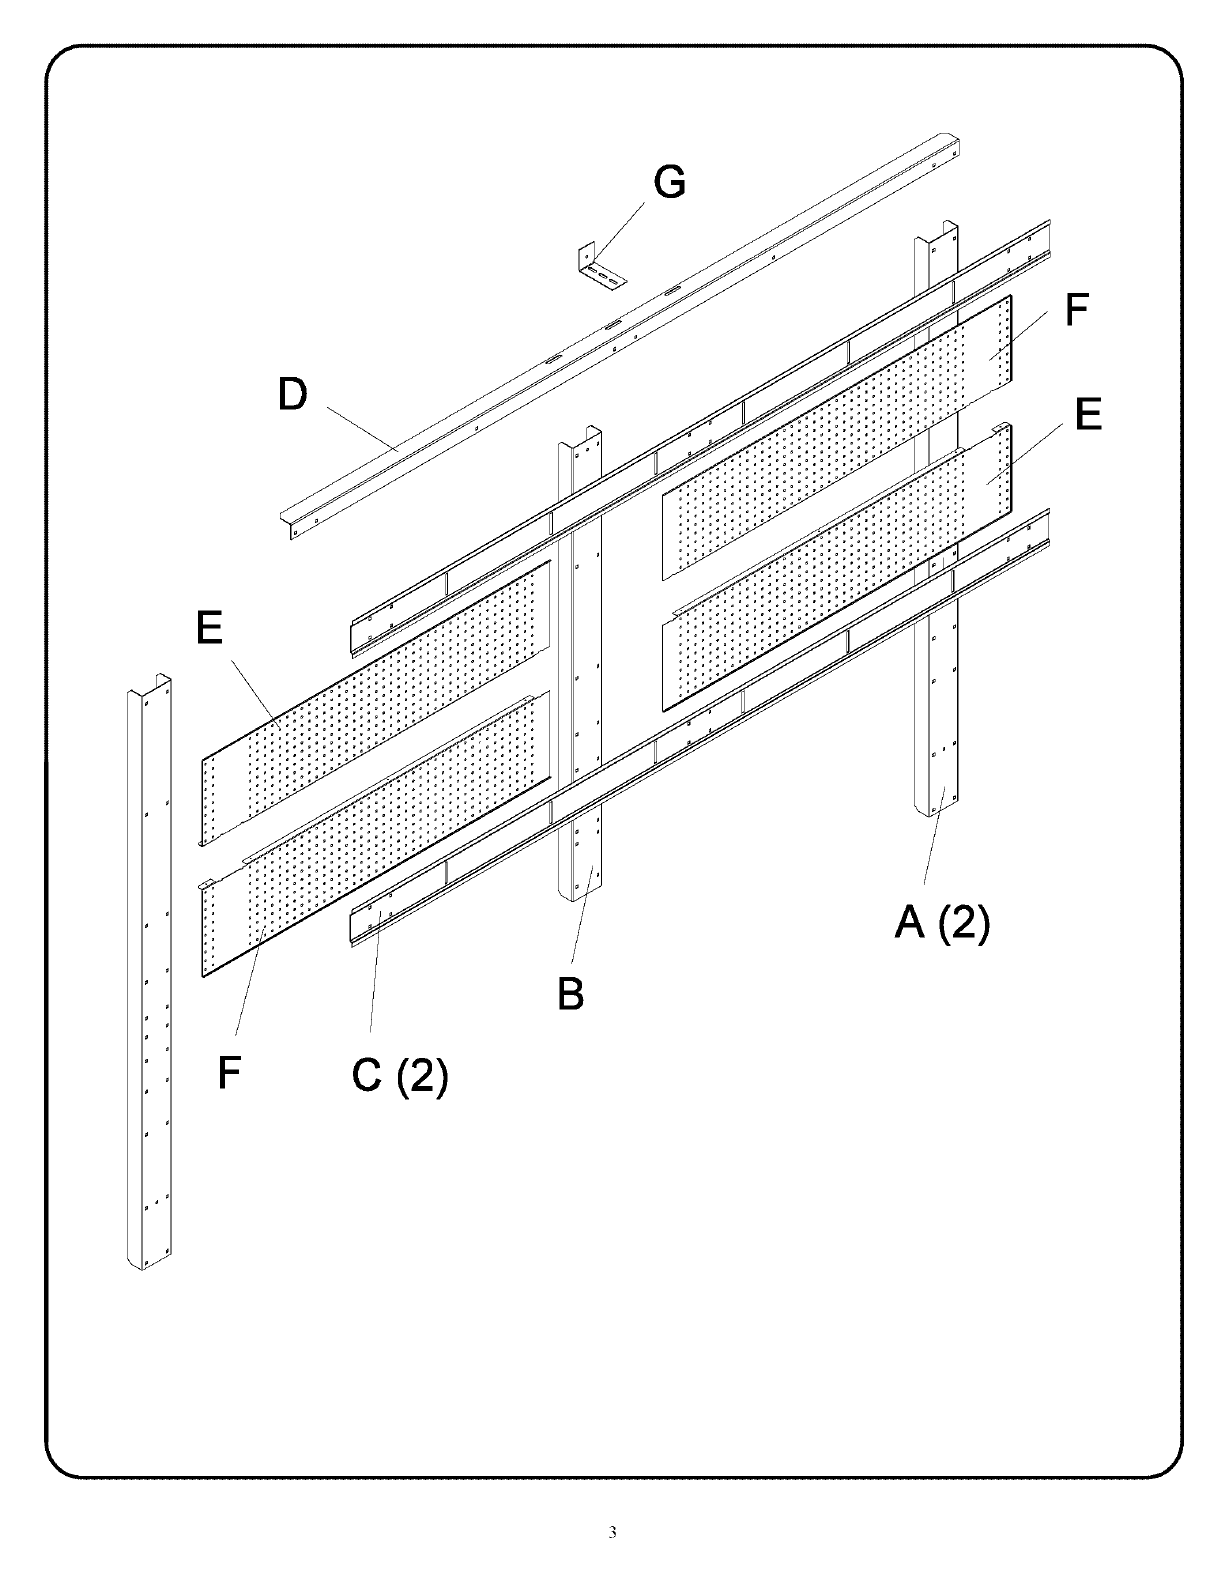
E
G
o
A (2)
B
F
E
FC (2)
J
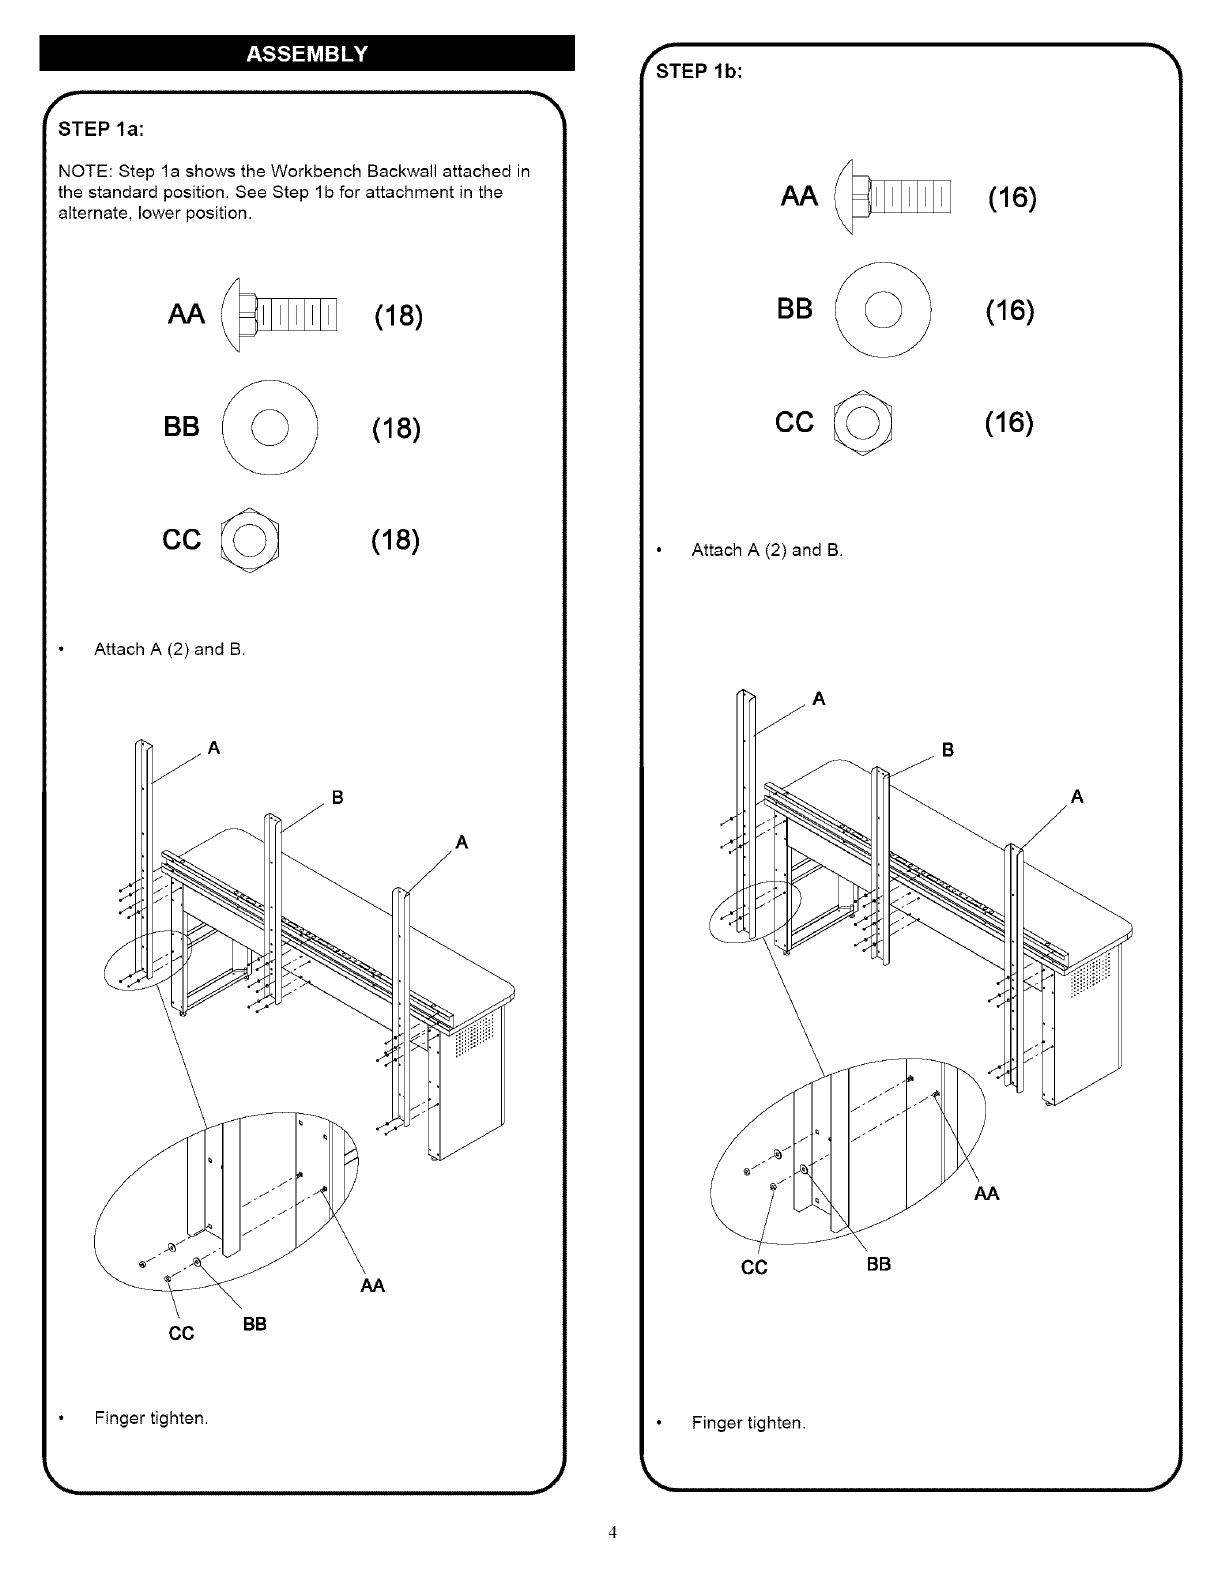
_STEP lb: -_
I_STEP la:
NOTE: Step la shows the Workbench Backwall attached in
the standard position. See Step 1 b for attachment in the
alternate, lower position.
(18)
(18)
CC (18)
Attach A (2) and B.
A
AA
CC BB
Finger tighten.
4
(16)
(16)
CC (16)
Attach A (2) and B.
A
B
AA
CC BB
Finger tighten.
J
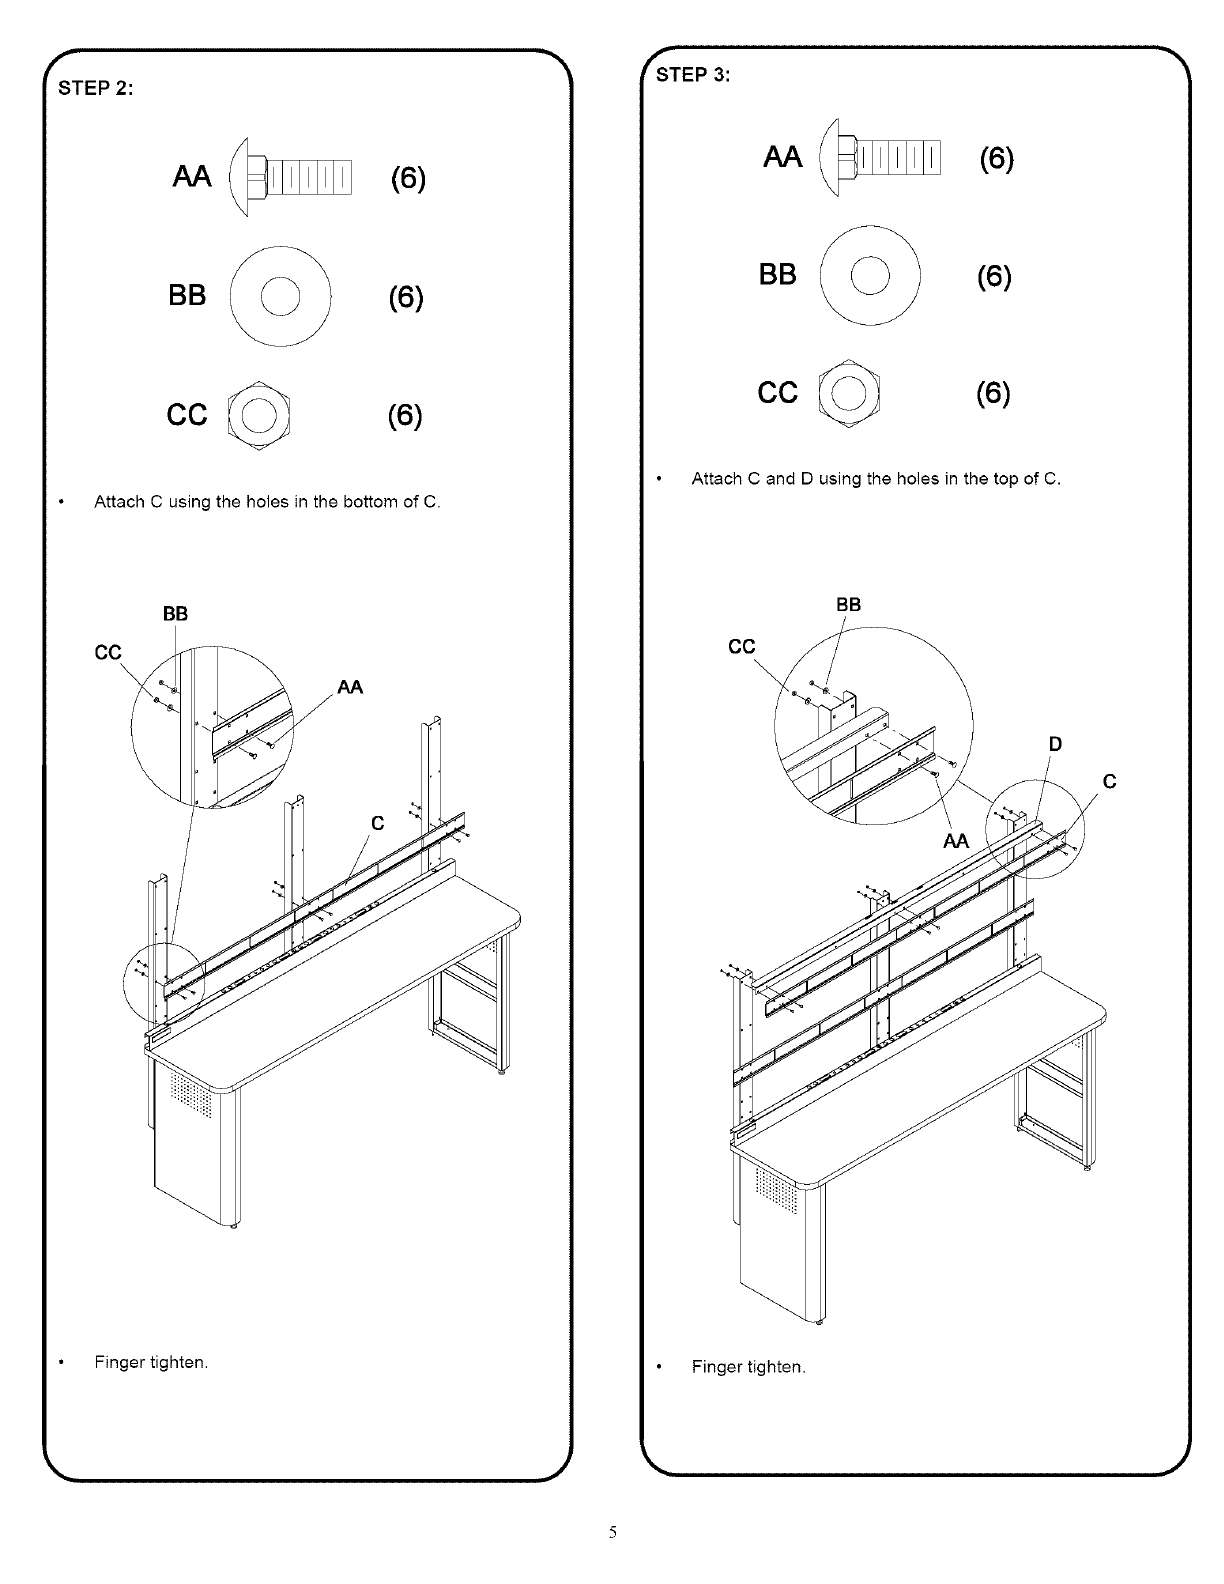
_STEP 2:
CC
(6)
(6)
(6)
Attach C using the holes in the bottom of C.
CC
BB
AA
C
Finger tighten.
fSTEP 3:
(6)
(6)
CC (6)
Attach C and D using the holes in the top of C.
BB
CC
D
AA
Finger tighten.
k. ,J ,J
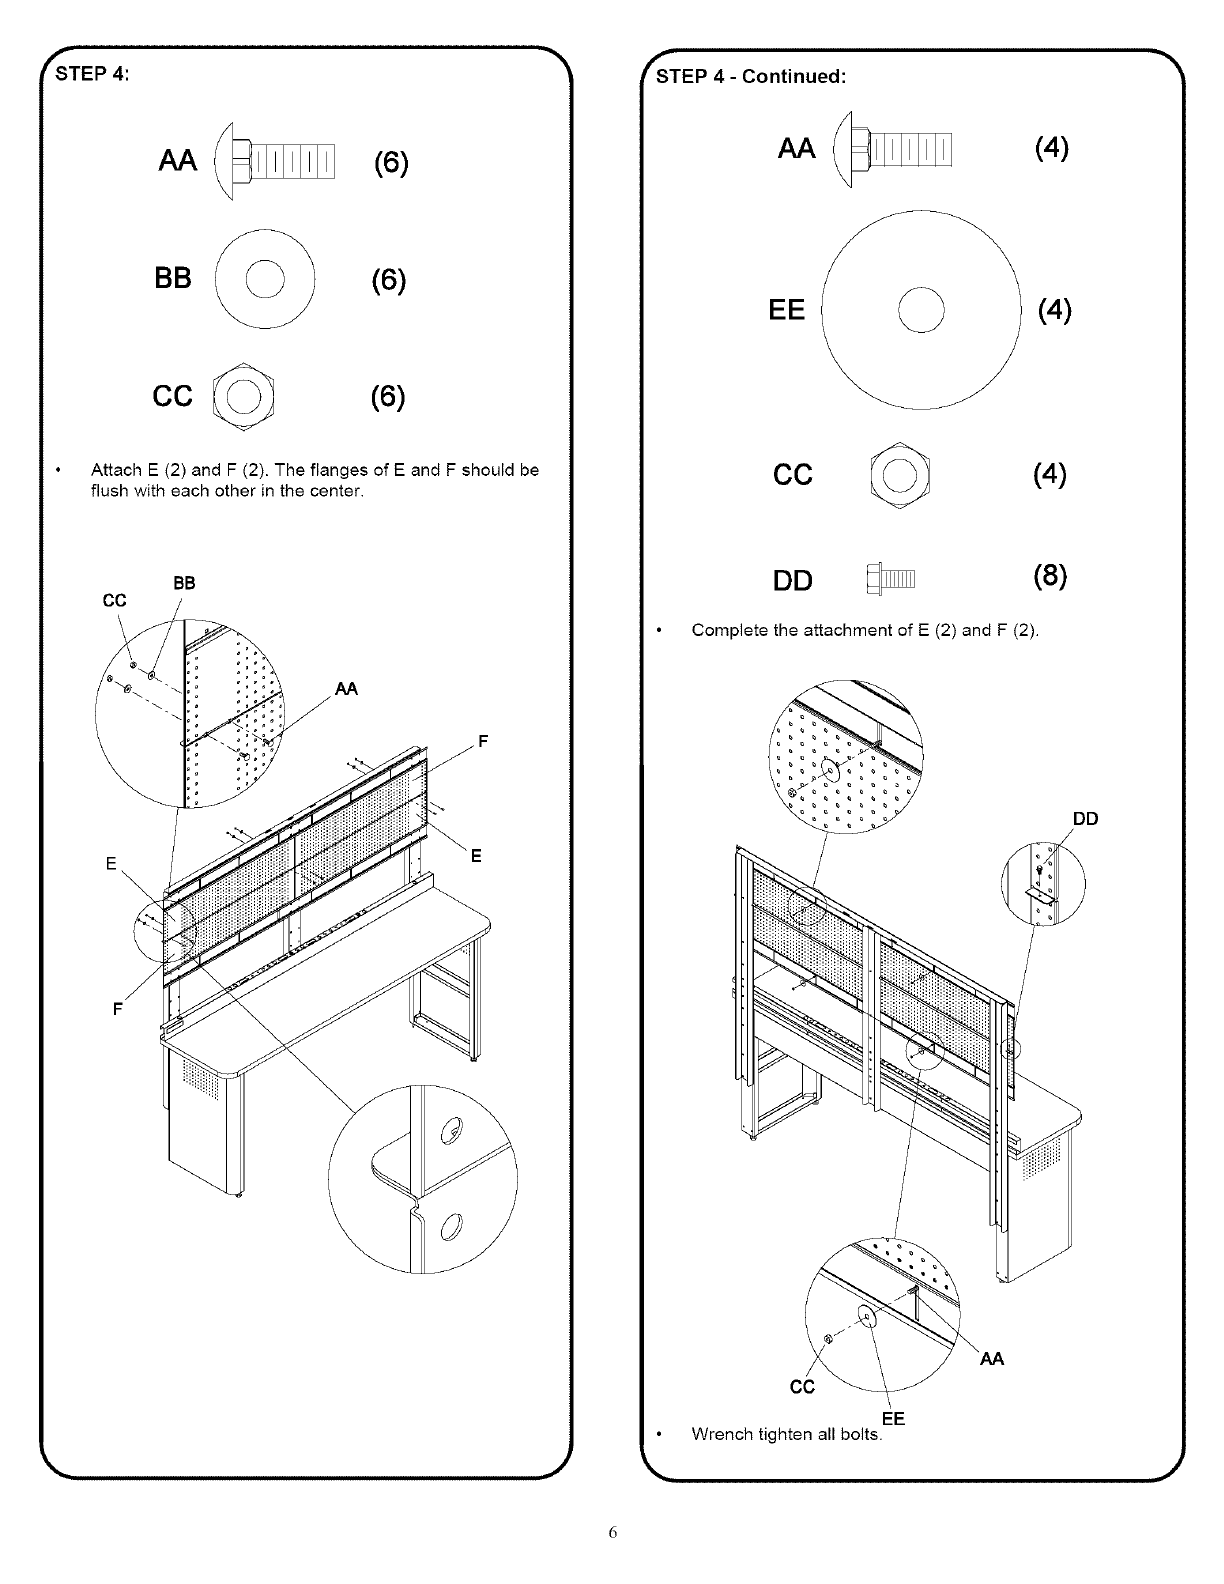
fSTEP 4:
AA (6)
(6)
CC (6)
Attach E (2) and F (2). The flanges of E and F should be
flush with each other in the center.
BB
CC
AA
,J
fSTEP 4 -Continued:
AA /_ (4)
EE _ (4)
CC (4)
DD (8)
Complete the attachment of E (2) and F (2).
DD
CC
EE
Wrench tighten all bolts.
J
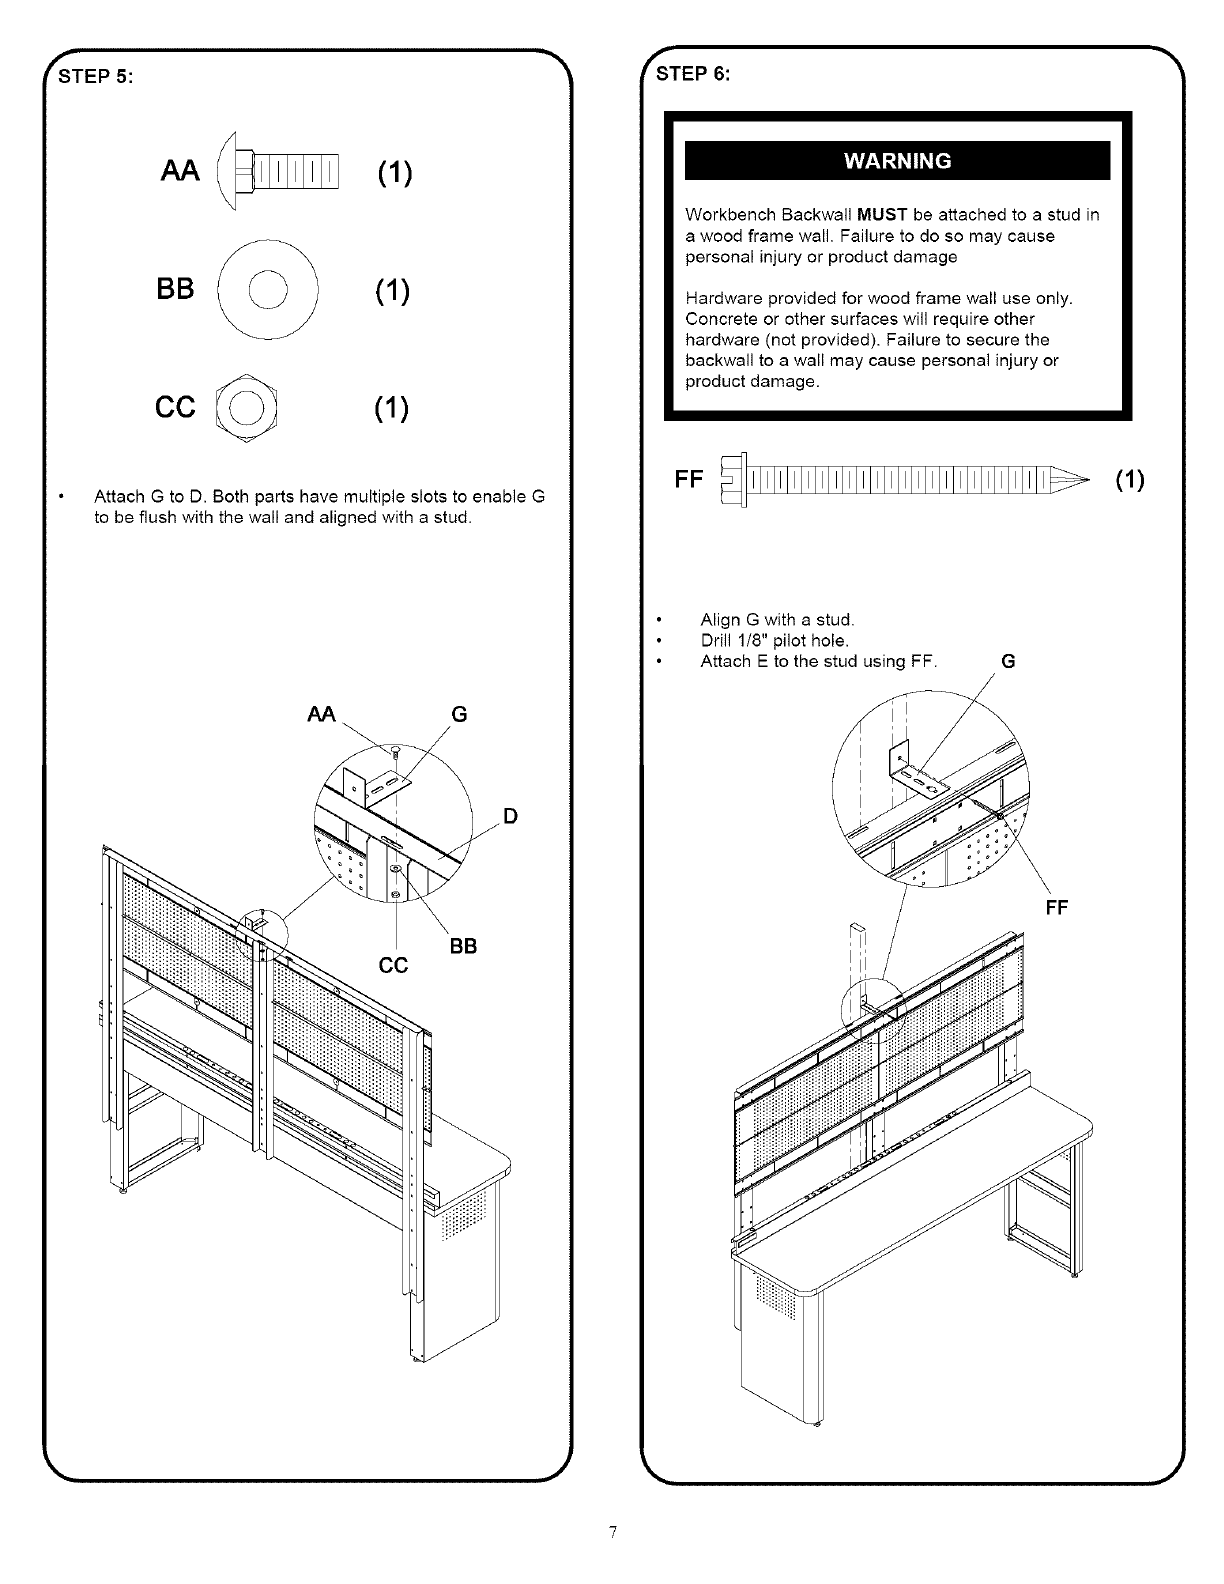
_ _STEP 6: -_
f_STEP 5:
AA (1)
(1)
CO (1)
Attach G to D. Both parts have multiple slots to enable G
to be flush with the wall and aligned with a stud.
AA G
BB
CC
Workbench Backwall MUST be attached to a stud in
a wood frame wall. Failure to do so may cause
personal injury or product damage
Hardware provided for wood frame wall use only.
Concrete or other surfaces will require other
hardware (not provided). Failure to secure the
backwall to a wall may cause personal injury or
product damage.
FF (1)
Align G with a stud.
Drill 1/8" pilot hole.
Attach E to the stud using FF.
FF
,J J

f• Periodically the surfaces should be cleaned with a mild
detergent and water.
• Auto wax will preserve the unit's luster finish. Apply the
wax as to a car. The wax will also help protect the unit
against scratches.
• Grease and oil can be removed with most standard
cleaning fluids. For safety, use a nonflammable cleaning
fluid.
J
MANUAL DEL OPERADOR
CRRFTSMRH °
SOLUClONES PARA ALMACENAMIENTO EN EL GARAJE
PANEL POSTERIOR DE PARED PARA BANCO
DE TRABAJO DE 8 PIES (2,44 METROS)
ATENClON: Lea y siga todas las Normas de Seguridad y las Instrucciones de Funcionamiento antes
de utilizar por primera vez este producto.
Sears, Roebuck and Co., Hoffman Estates, IL 60179, Estados Unidos F 1383A2
fADVERTENCIAS Y PRECAUCIONES DE SEGURIDAD:
Utilice un equipo de seguridad apropiado cuando use herramientas electricas y manuales. De Io contrario podria ocasionarse lesiones
personales o daSar el producto.
Utilice el personal adecuado para el montaje y el traslado de esta unidad. De Io contrario podria ocasionarse lesiones personales o
daSar el producto.
NO se ponga de pie encima de este producto. Podria caerse y causarse lesiones personales.
NO monte este producto en la plataforma de un cami6n ni en ning_n objeto en movimiento. Esto podria causarle lesiones personales o
dar_ar el producto.
Asegure de forma adecuada este producto antes de moverlo con una carretilla elevadora.
NO Io remolque con equipo electrico. El producto podria volcar Io que podria causarle lesiones personales o daSar el producto.
•NO altere este producto de modo alguno. Esto podria daSar el producto o causarle lesiones personales.
Mantenga el producto sobre superficies planas. El producto puede desestabilizarse y volcar si se almacena o se mueve en superficies
no lianas, Io cual podria causar lesiones personales o daSar el producto.
AsegQrese de que el banco de trabajo esta colocado piano en el suelo antes de instalar el Panel Posterior de Pared. De Io contrario
podria ocasionarse lesiones personales o dafiar el producto.
El peso m&ximo que se puede colgar de o que puede de modo alguno soportar el tablero es de 65 libras (29,5 kilos). Si se excede
este limite, el producto podria volcar y causar lesiones personales o daSar el producto.
AsegQrese de afianzar el Panel Posterior de Pared auna pared de cemento o tachonada. De Io contrario, el Panel Posterior de Pared
y el Banco de Trabajo podrian desestabilizarse y caer. Esto podria causade lesiones personales o daSar el producto.
El Panel Posterior de Pared 59278 s61o puede acoplarse al Banco de Trabajo 59276. El Panel Posterior de Pared 59280 s61o puede
acoplarse al Banco de Trabajo 5927. De Io contrafio podria ocasionarse lesiones personales o dadar el producto.
Utilice exclusivamente el tablero que se suministra con el Panel Posterior de Pared.
Cuelgue del Panel Posterior de Pared _nicamente el Armario de Pared 59273, NO cuelgue ningun otto producto del Panel Posterior
de Pared. De Io contrario, el Panel Posterior de Pared y el Banco de Trabajo podrian desestabilizarse y volcar. Esto podria causarle
lesiones personales o daSar el producto.
$61o se puede acoplar un m&ximo de dos Armarios de Pared 59273 al Panel Posterior de Pared. De Io contrario, el Panel Posterior de
Pared y el Banco de Trabajo podrian desestabilizarse y caer. Esto podria causarle lesiones personales o daSar el producto.
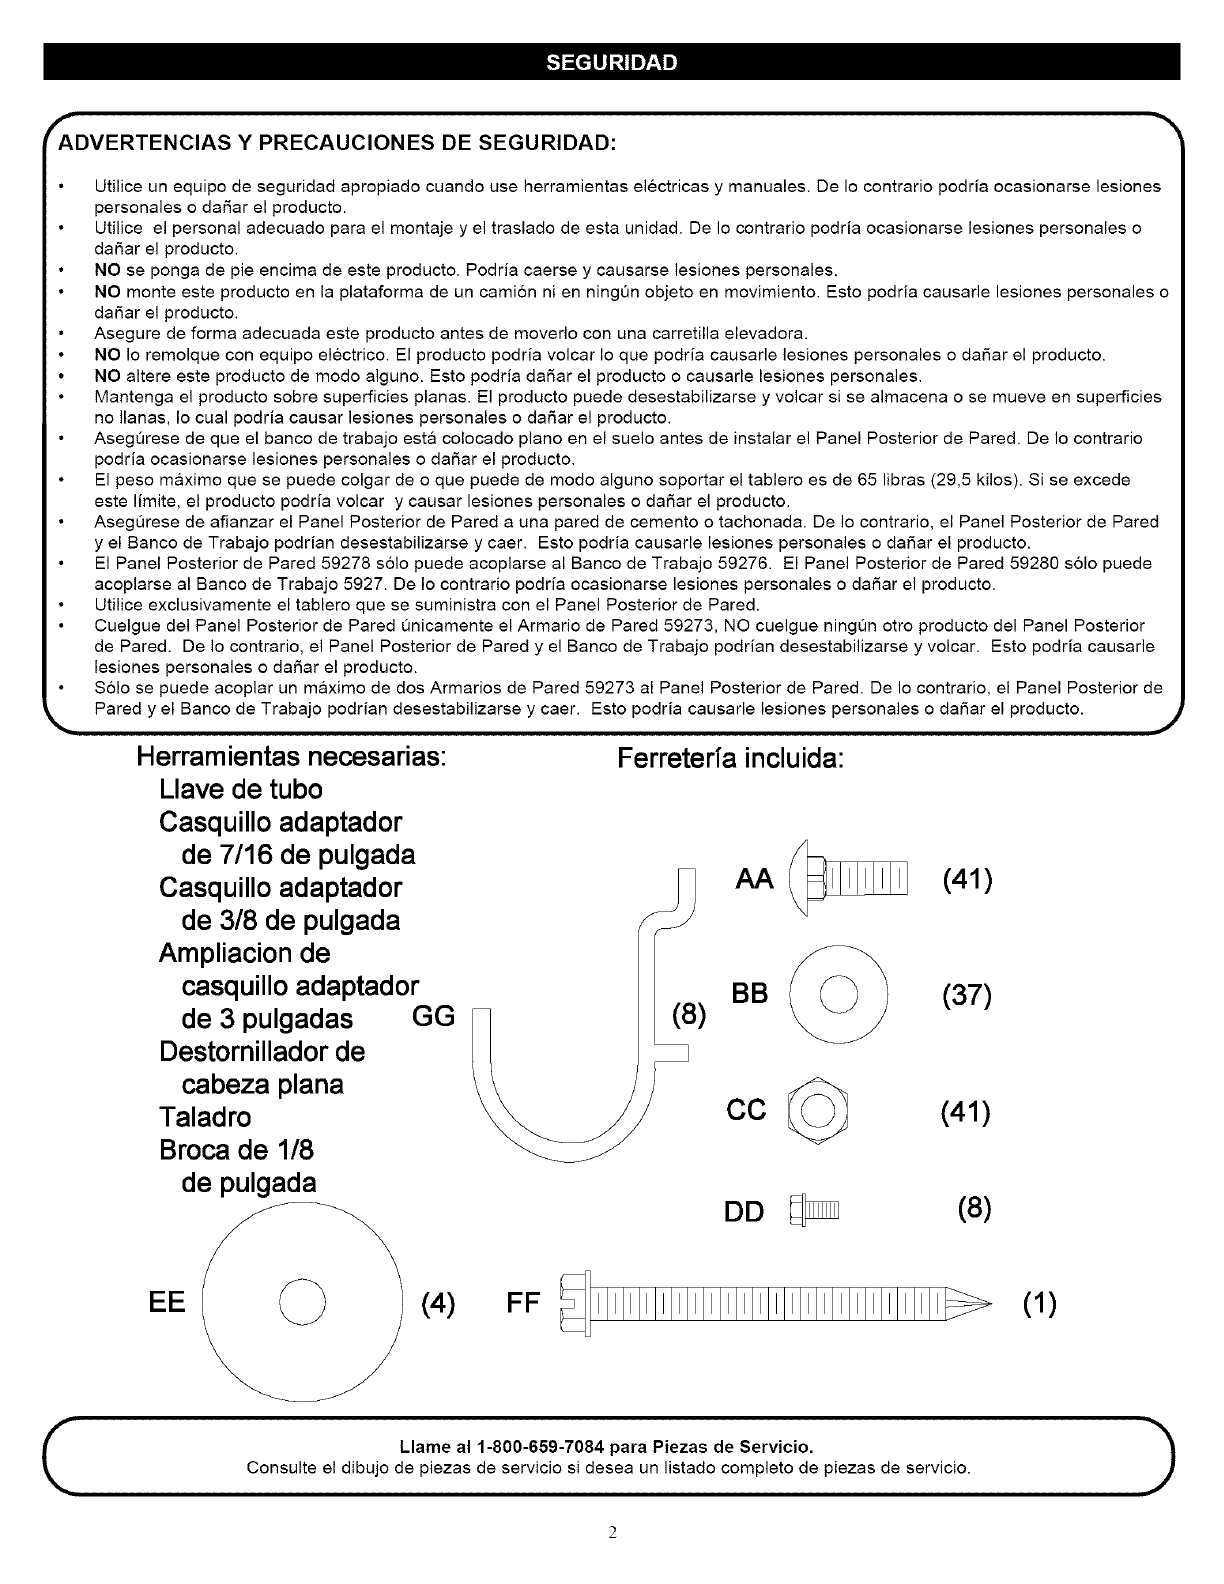
Herramientas necesarias: Ferreterfa incluida:
Llave de tubo
Casquillo adaptador
de 7/16 de pulgada
Casquillo adaptador AA
BB
GG )
CC
de 3/8 de pulgada
Ampliacion de
casquillo adaptador
de 3 pulgadas
Destornillador de
cabeza plana
Taladro
Broca de 1/8
de pulgada
(41)
EE _ (4) FF
(37)
(41)
DD (8)
(1)
Llame al 1-800-659-7084 para Piezas de Servicio.
Consulte el dibujo de piezas de servicio si desea un listado completo de piezas de servicio. J
i i

E
G
D
A (2)
B
F
E
FC (2)
,J
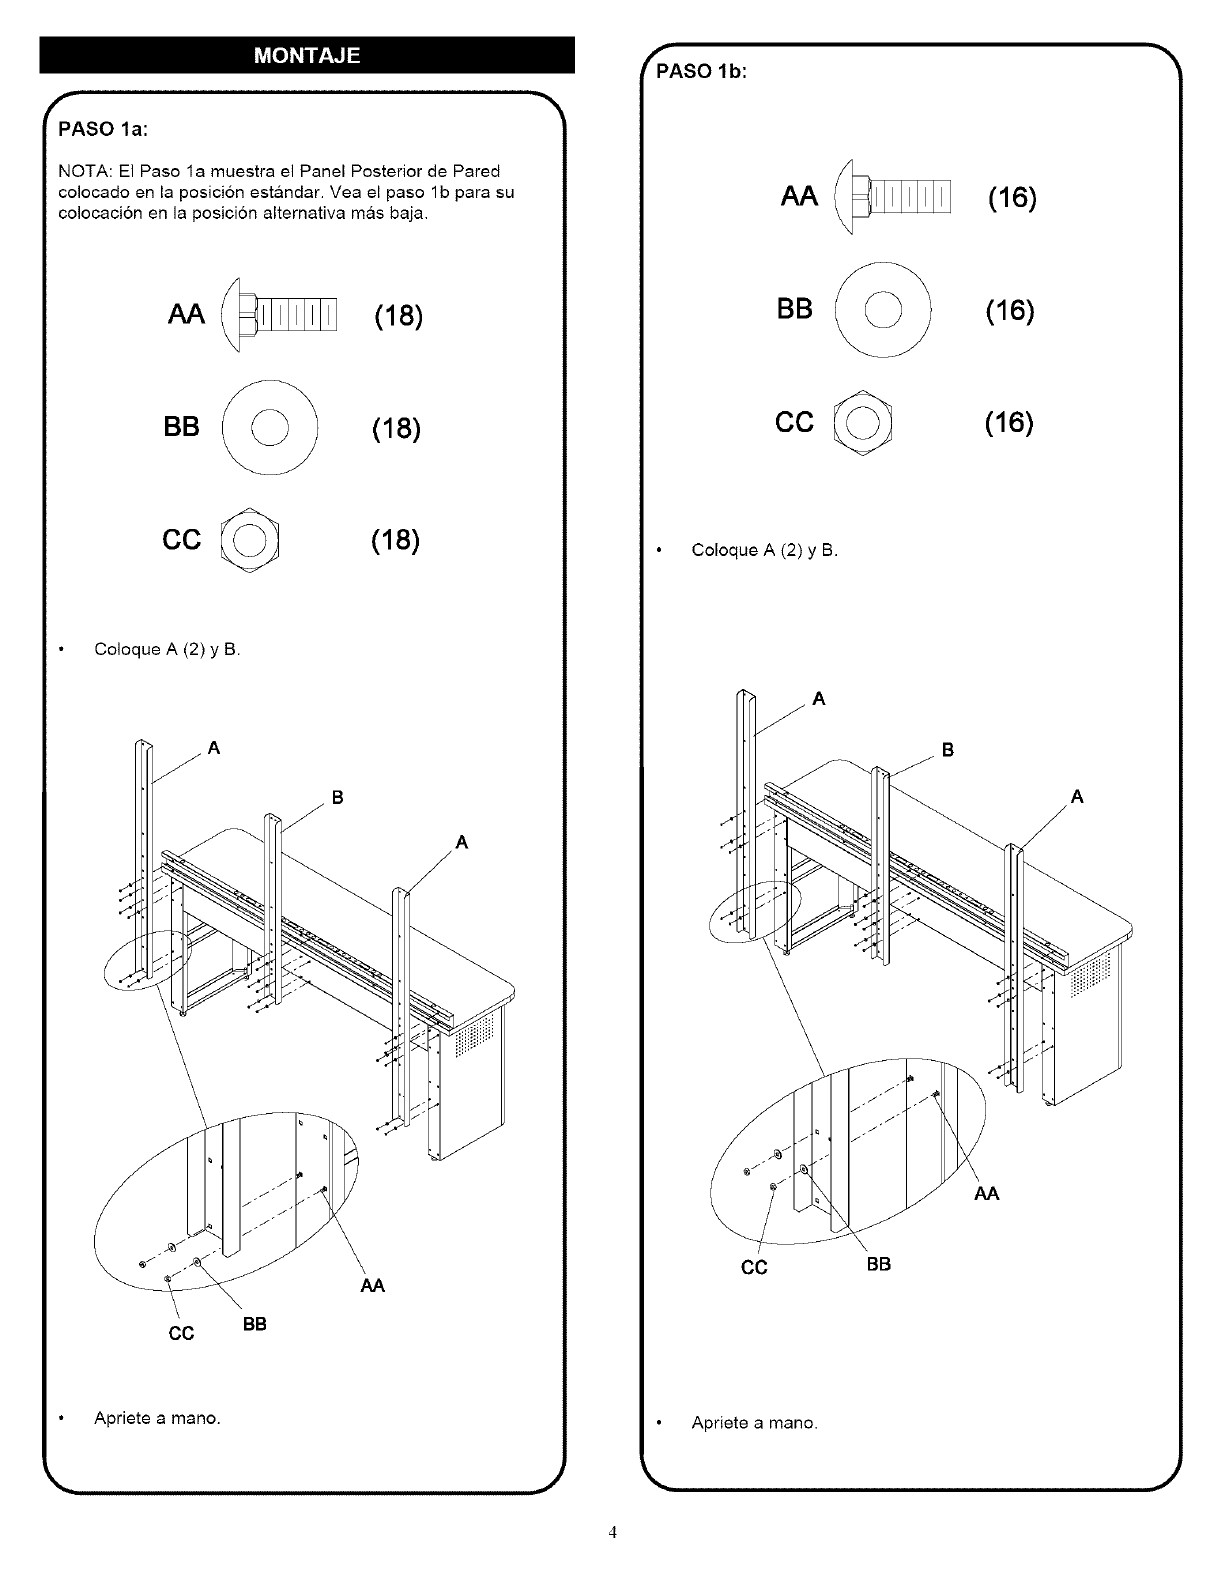
_PASO 1b: -_
f_PASO la:
NOTA: El Paso la muestra el Panel Posterior de Pared
colocado en la posici6n est&ndar. Yea el paso 1 b para su
colocaci6n en la posici6n alternativa m_ls baja.
(18)
(18)
CC (18)
Coloque A (2) y B.
A
AA
CC BB
Apriete a mano.
(16)
(16)
CC (16)
Coloque A (2) y B.
A
B
AA
CC BB
Apriete a mano.
J
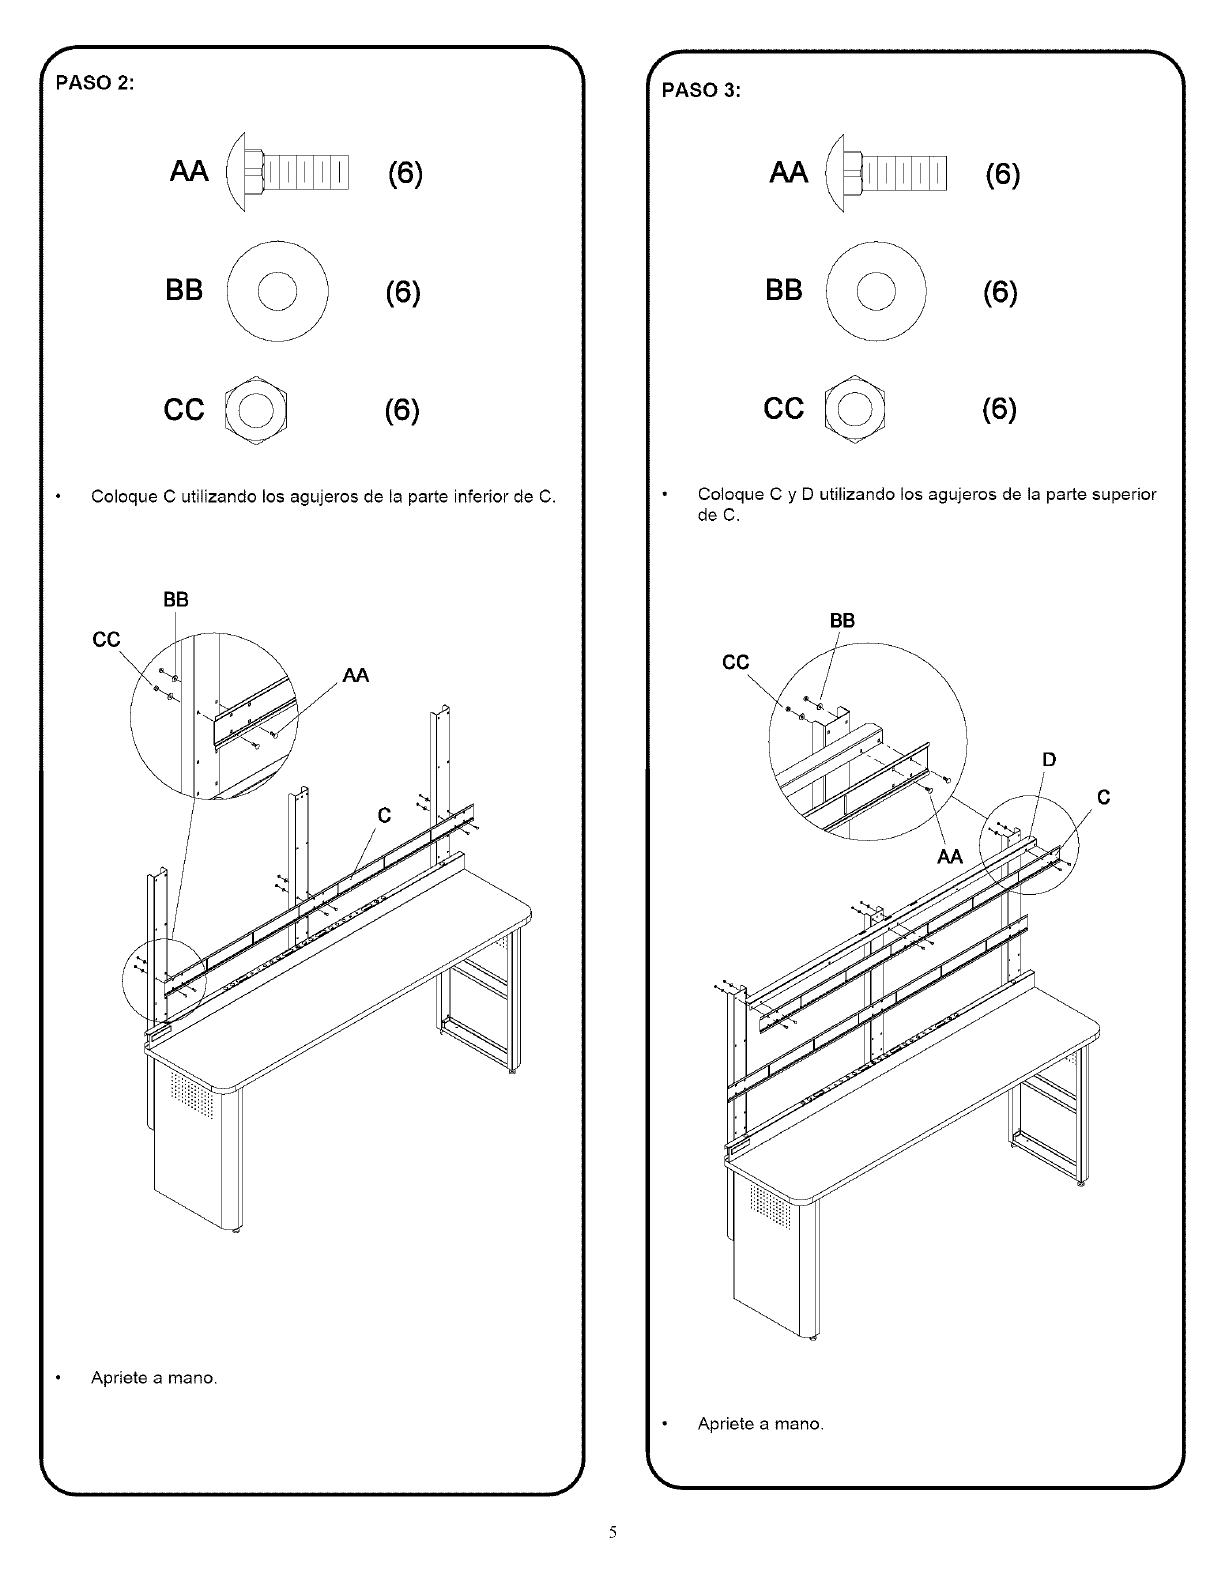
fPASO 2:
AA (6)
(6)
CO (6)
Coloque C utilizando los agujeros de la parte inferior de C.
CC
BB
AA
Apriete a mano.
f
PASO 3:
(6)
(6)
CC (6)
Coloque C y D utilizando los agujeros de la parte superior
de C.
BB
CC
D
C
AA
Apriete a mano.
J
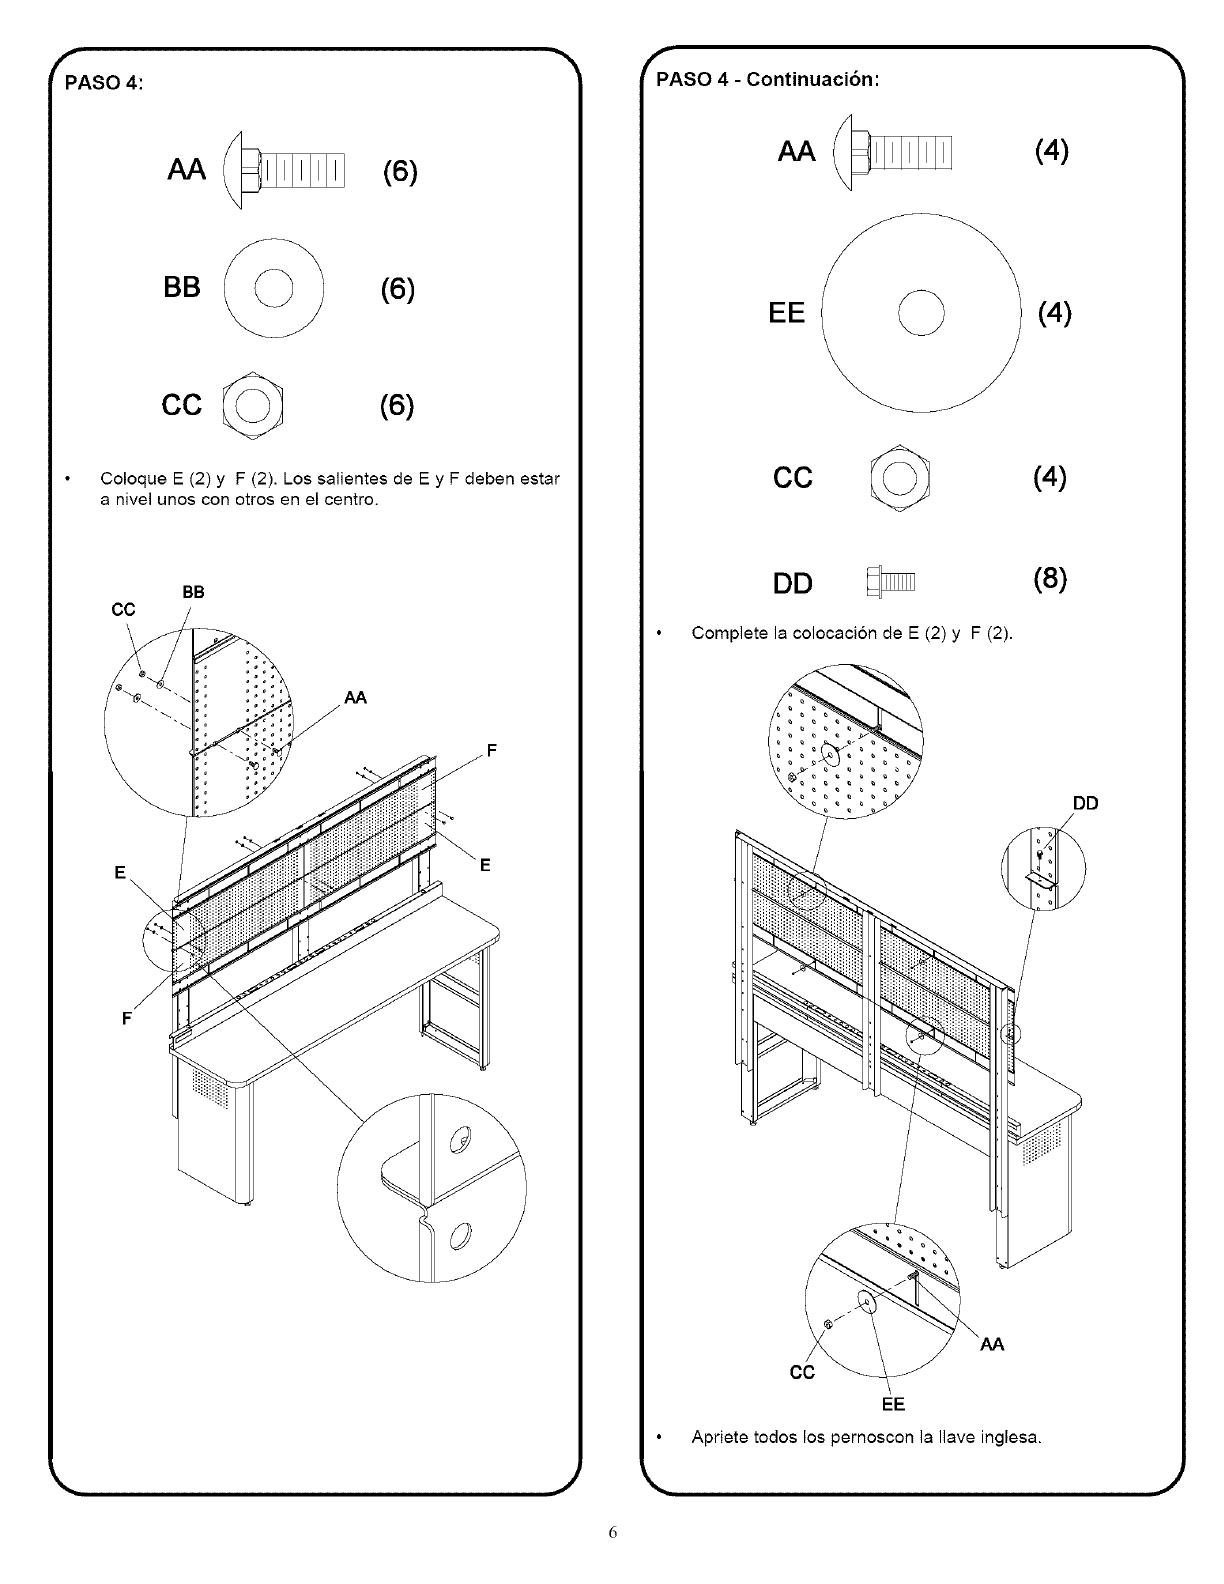
fPASO 4:
AA (6)
(6)
CC (6)
Coloque E (2) y F (2). Los salientes de E y F deben estar
a nivel unos con otros en el centro.
BB
CC
AA
fPASO 4 - Continuacion:
AA /_ (4)
EE _ (4)
CC (4)
DD (8)
Complete la colocaci6n de E (2) y F (2).
DD
CC
EE
Apriete todos los pernoscon la Ilave inglesa.
,J
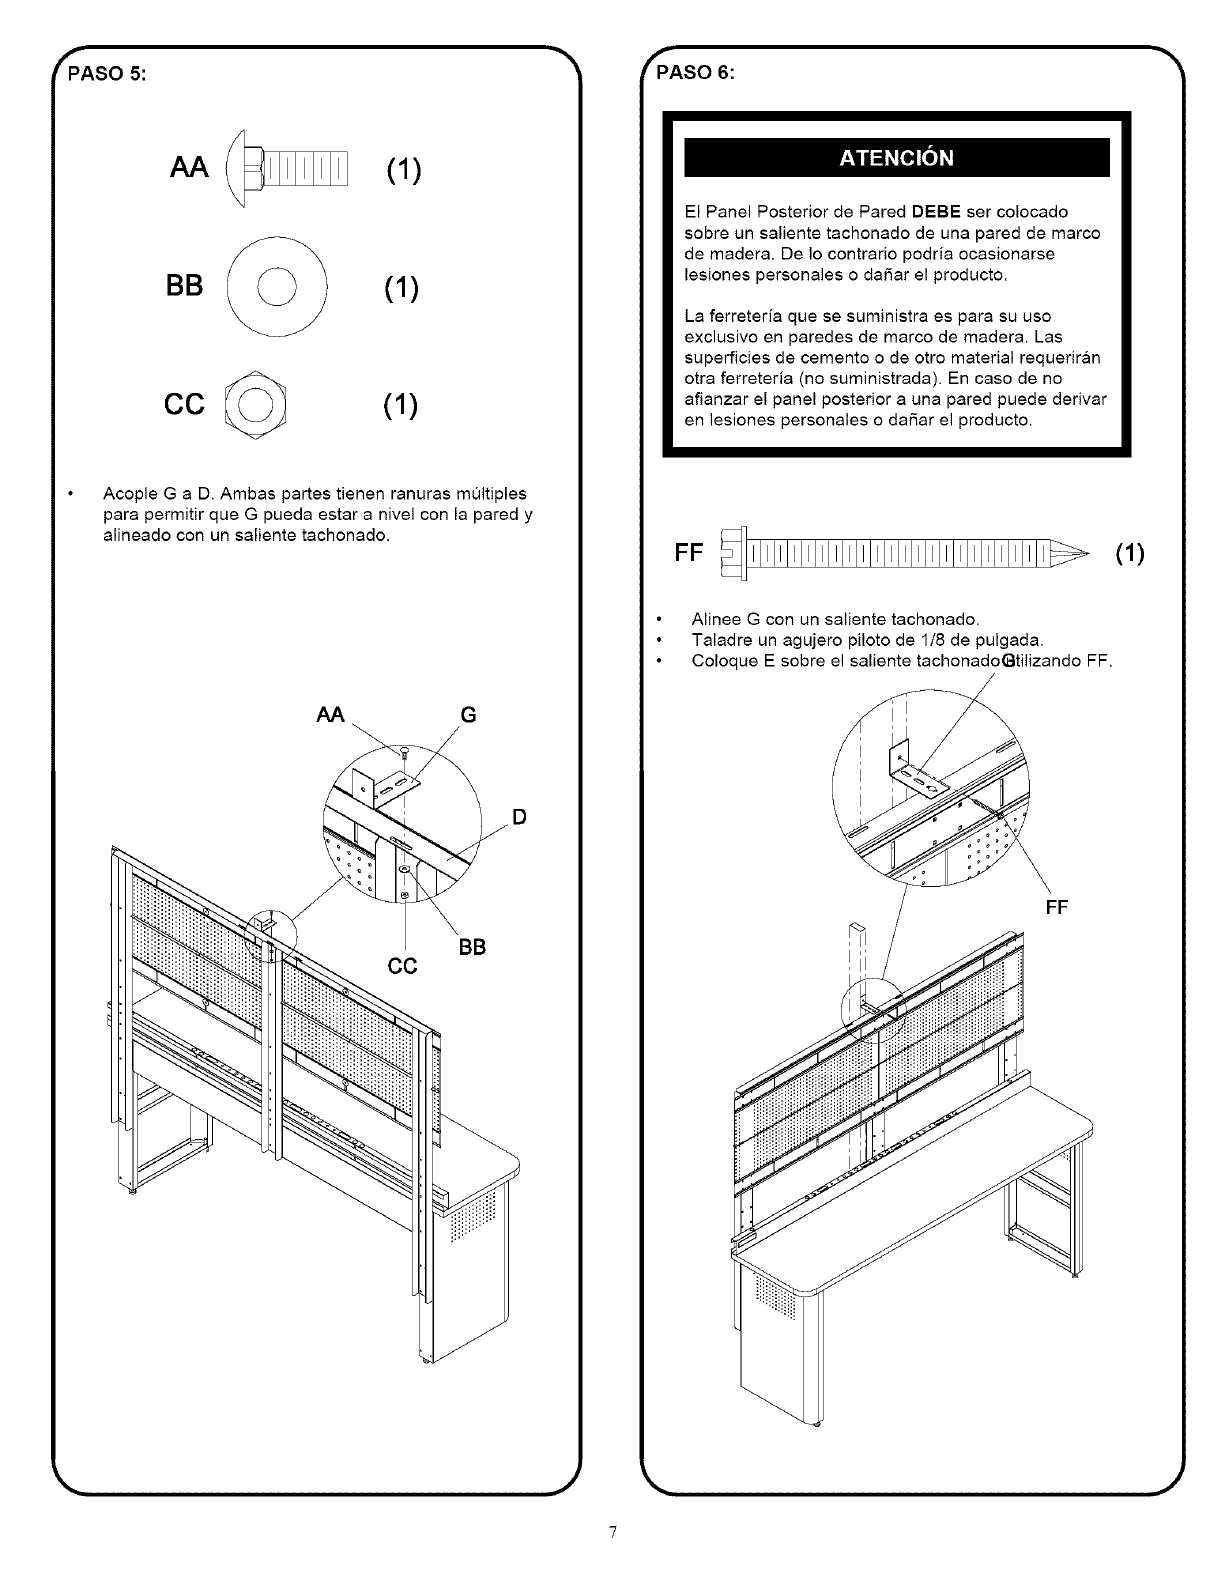
fPASO 5:
(1)
(1)
CC (1)
Acople G a D. Ambas partes tienen ranuras mOltiples
para permitir que G pueda estar a nivel con la pared y
alineado con un saliente tachonado.
AA G
BB
CC
_PASO 6:
El Panel Posterior de Pared DEBE ser colocado
sobre un saliente tachonado de una pared de marco
de madera. De Io contrario podria ocasionarse
lesiones personales o daSar el producto.
La ferreteria que se suministra es para su uso
exclusivo en paredes de marco de madera. Las
superficies de cemento o de otro material requeriran
otra ferreteria (no suministrada). En caso de no
afianzar el panel posterior a una pared puede derivar
en lesiones personales o daSar el producto.
FF llllllllllllllllllllllllllllllllllllllllllll
Alinee G con un saliente tachonado.
Taladre un agujero piloto de 1/8 de pulgada.
Coloque E sobre el saliente tachonadoGtilizando FF.
FF
(1)
,J

• Debe limpiar las superficies periodicamente con
detergente suave y agua.
• La cera de automovil ayudara a preservar el acabado
brillante de la unidad. Aplique la cera como a un coche.
La cera tambien ayudara a proteger la unidad de
rayados.
• La grasa y el aceite se pueden limpiar con la mayoria de
los liquidos de limpieza est&ndar. Por seguridad, utilice
liquidos de limpieza no inflamables.
