Craftsman 917256451 User Manual Lawn, Tractor Manuals And Guides L0807746
CRAFTSMAN Lawn, Tractor Manual L0807746 CRAFTSMAN Lawn, Tractor Owner's Manual, CRAFTSMAN Lawn, Tractor installation guides
User Manual: Craftsman 917256451 917256451 CRAFTSMAN Lawn, Tractor - Manuals and Guides View the owners manual for your CRAFTSMAN Lawn, Tractor #917256451. Home:Lawn & Garden Parts:Craftsman Parts:Craftsman Lawn, Tractor Manual
Open the PDF directly: View PDF ![]() .
.
Page Count: 224 [warning: Documents this large are best viewed by clicking the View PDF Link!]

®
ODEL 917.256451 OWNER'S MANUAL
_°Assembly
__Qperation
_CUstomer Responsibilities
_Service and Adjustments
_ Repair Parts
_AUToOP_; Read and follow all safety rules and instructions before operating this equipment.
FOR CONSUMER ASSISTANCE HOT LINE, CALL THiS TOLL FREE NUMBER: t-800-659-5917
II i _ilrr'

SAFETY RULES
Safe Operation Practices for Ride-On Mowers
IMPORTANT: THIS CUTTING MACHINE [S CAPABLE OF AMPUTATING HANDS AND FEETAND THROWING OBJECTS.
FAILURE TO OBSERVE THE FOLLOWING SAFETY INSTRUCTIONS COULD RESULT IN SERIOUS INJURY OR DEATH.
t. GENERAL OPERATION
o Read_ understand, and foI!ow all instructions in the manual
and onthe machine before starting.
, Only a!tow responsible adults, who are familiar with the
instructions, to operate the machine,
* Clear the area of objects such as rocks, toys, wire, etc.,
which could be picked up and thrown by the blade.
*Be sure the area is clear of other people before mowing. Stop
machine if anyone enters the area.
*Never carry passengers,
,Do not mow in reverse unless absolutely necessary. Always
!ook down and behind before and while backing.
, Be aware of the mower discharge direction and do not point
it at anyone. Do not operate the mower without either the
entire grass catcher or the guard in ptace.
o SIow down before turning.
,Never leave a running machine unattended. Always turn off
blades, set parking brake, stop engine, and remove keys
before dismounting.
o Turn off blades when not mowing.
Stop engine before removing grass catcher or uncIogging
chute.
o Mow only in daylight or good artificial light.
o Do not operate the machine while under the influence of
alcohol or drugs.
Watch for traffic when operating near or crossing roadways.
= Use extra care when loading or unloading the machine into
.._ a trailer or truck.
lL SLOPE OPERATION
Slopes are a major factor related to loss-of-control and
tipover accidents, which can result in severe _njuryor death.
All slopes require extra caution. If you cannot back up the
slope or if you feel uneasy on it, do not mow it.
DO:
o Mow up and down slopes, not across.
Remove obstacles such as rocks, tree limbs, etc.
Watch for holes, ruts, or bumps. Uneven terrain could
overturn the machine. Tal! grass can hide obstacles.
Use slow speed. Choose a low gear so that you wiJl not have
to stop or shift while on the slope.
o Fottow the manufacturer's recommendations for wheel
weights or counterweights to improve stability.
Use extra care with grass catchers or other attachments.
These can change the stability of the machine.
Keep att movement on the slopes stow and gradual Do not
make sudden changes in speed or direction.
- Avoid starting or stopping on a slope. If tires lose traction,
disengage the blades and proceed slowly straight down the
sfope,
DO NOT:
Do not turn on slopes unless necessary, and then, turn slowly
and gradua]ty downhill, if possible.
Do not mow near drop-effs, ditches, or embankments. The
mower could suddenly turn over if a wheel is over the edge
of aCtiff or ditch, or if an edge caves in.
,Do not mow on wet grass. Reduced traction could cause
sliding.
"DOnot try to stabilize the machine by putting your foot on the
ground,
*Do not use grass catcher on steep slopes.
2
Itl. CHILDREN
Tragic accidents can occur if the operator is not alert to the
presence of children. Children are often attracted to the
machine and the mowing actMty. Never assume that
chitdren will remain where you last saw them.
° Keep children out of the mowing area and under the watchful
care of another responsible adult.
= Be alert and turn machir_e off if children enter the area.
Before and when backing, look behind and down for small
children.
Never carry children. They may fall off and be seriously
injured or interfere with safe machine operation,
Never allow children to operate the machine.
Use extra care when approaching blind corners, shrubs,
trees, or other objects that may obscure vision.
iV. SERVICE
* Use extra care in handling gasoline and other fuets. They are
flammable and vapors are explosive.
Use only an approved container.
Never remove gas cap or add fue! with the engine
running. Altow engine to cool before refueling, Do not
smoke,
Never refuel the machine indoors.
Never store the machine or fuel container inside where
there is an open flame, such as a water heater.
Never run a machine inside a closed area.
o Keep nuts and bolts, especially blade attachment botts, tight
and keep equipment in good condition.
, Never tamper with safety devices. Check their proper
operation regularly.
*Keep machine free of grass, leaves, or other debris build_up.
Clean oil or fuel spiIlage. Atiow machine to cool before
storing.
" StOP and inspect the equipment if you strike an object.
Repair, if necessary, before restarting.
,Never make adjustmerits or repairs with the engine running.
Grasscatchercomponentsaresubjecttowear, damage, and
deterioration, which could expose moving parts or aliow
obiects to be thrown. Frequently check components and
replace with manufacturer's recommended parts, when nec*
essary.
, Mower blades are shaqo and can cut. Wrap the blade(s) or
wear gloves, and use extra caution when servicing them.
Check brake operation frequently. Adiust and service as
required.
&Look for this symbol to point out im-
portant safety precautions, _t means
CAUTION!!! BECOME ALERT!!! YOUR
SAFETY JS INVOLVED,
CAUTION: Always disconnect spark ptug
wire and place wire where it cannot contact
spark plug in order to prevent accidental
starting when setting up, transporting,
adjusting or making repairs.
WARNING
The engine exhaust from this product cpn-
rains c_iemicais known tothe State of Cati_or.
nia to cause cancer, birth defects, or Other
reproductive harm.

CONGRATULATIONS on your purchase of a Sears
Tractor, It has been designed, engineered and manufac-
tured to give you the best possibte dependability and
performance.
Should you experience any probiem you cannot easily
remedy, please contact your nearest Sears Authorized
Sewice Center/Department, We have competenL we_i-
trained technicians and the proper tools to se_iice or repair
this tractor,
Please read and retain this manual. The instructions will
enable you to assemble and maintain your tractor properly.
Always obsewe the "SAFETY RULES".
MODEL
NUMBER 917,256451
SERIAL
t NUMBER
THE MODEL AND SERtAL NUMBERS WILL BE FOUND
.. r _.,_,__. UNDER THi_ SEAT.
rot ; qHthUi D RE,J .DRD BOTH S;_4 ..<c t.fu, JIBE,, A. _D
' DATE OF PURCHASE AND KEEP _N A SAFE PLACE
FOR FUTURE REFERE]NCE.
s :NANkA ! ACSR {E aENT
A b_a,s Maintenance Agreement Jsavailable on this prod_
uct° Contact you_ nearest oearo store for details,
o Read and obsewe the safety roles.
Foliow a regt_ar schedule in maintaining, caring for and
doiny yOU, ,R:_,,_._...
-_' Follow the instructioss under"Custom@:' Responsibili.-.
tkes': and "Sto(age '_sections of this owner's manua!.
PRODUCT SPEO F OAT1ONS
HORSEPOWER: 12.5
', e" t P _ ¢'T"
GA_OL,NE _,A, A_I, Y ! .25 _'_A_ t ,'_......
_A UNLEADED REGULAR
ND TYPE: ._
]Otl TY_>E (API-SFiSG): SAE 30 (above 32'W)
1 SAE 5W-30 (below 32'_F)
OIL CAPACITY: 3.0 PINTS
SPARK PLUG: CHAMPION RJIgLM
(GAP: .030") STD 3614.58
VALVE CLEARANCE: INTAKE: .005" - .007"
EXHAUST: .009" o .0I I"
kGROUND_SPEED (MPH): FORWARD:
Ist 1,0
2rid 2.1
3_d 3. I
4tt_ 4.0
5th 5.'i
REVERSE: I ,,6
TIRE PRESSURE; FRONT: 14 PFL
RF _ n, 12 PS:i
j CHA_GING..,._.:,Y'S __M.
L.........
t
i BATTEF1Y:
]_aL_-,b__BOLT TORQUE:
3 AMPS BATTERY
5 AMPS Iflc.ADLiL-_fmtS
AMP!FIR: 25
MtN° CCA: t90
CASE SIZE:: U!R
30°35 FI', _ _ _:"
WARNING: This tractor is equipped with an internai
combustion engine and sho_..lld not be used on or near any
unimproved forest-covered,, br-sh-covered or grass-.cov -.
e{-ed land uniess the engine's exhaust system is equipped
with a spark arrestor meeting applicable iocai o__st_,_talaws
(if any), if a spark attester is useG it should be maintained
in effective working oMer by the operator.
in the state of Caiifomia the above is _equired by !aw
(Section 4442 of the Caiifomia Pubiic Resb'urces Code).
O_.h_r _t;:_l_:P,rnav _ave s rnila_ laws. Fede "_.ilaws _,b[) V on
f_de_i lands A s ad< a_"es_e_ for t_ m_,ff _r i's av;diabte
through your nearest Sears Authorized ::;ervk>_ Cented
DepaRment (See REPAIR PARTS section of this manual).
i
, _U,JiqOct_,,a aDO td, ,8 Li[:) aCCO_dii']Ci"°' "E.d_lr.,y_x_ I.IS _ }1For one k_) year f._omthe date of ourch,ase_ if this Craftsman Riding "_,, ',...... i.'. maintained, _"_"" ...._.... _ , n _d
to the instructions in the owner's maneaJ, Sears wiii repair or repiace, :free of charge, any [saris found to be defective in rnateriai :!
o_workmanship, i
This Warranty does not cover: _
_ Expendabb items which become worn dudng normal use, such as blades, spark piugs, air cteane(s, beits, etc.
o Tire replacement or repair caused by punctures from outside objects, such as na_, thorns, stumps, or glass.
Repairs necessary because of operator abuse, negligence, improper storage or accident or the failure to maintain the
equipmeni according to the instructions contained in the owner's manual,
Riding equipment used for commercia_ or rental purposes.
LIMITED 90 DAY WARRANTY ,ON BATTERY
For ninety (90) days from date of ourchase if an}, batteR7 included with this riding equipment proves defective in material or
workmanship and our testing determines the battery, will not held a charge, Sears will replace the battery' at no charge,
IN-HOME WARRANTY SERVICE ON YOUR CRAFTSMAN RIDING EQJIPMENT IS AVAILABLE AT NO-CHARGE FOR 30
DAYS FROM THE DATE OF PURCHASE, PLEASE CONTACT YOUR NEAREST SER _IC_ CENTER. AF-!X::R 30 DAYS
FROM THE DATE OF PURCHASE. WARRANTY SERVICE iS AVAILABLE BY TAKING YOUR _.,RAFTSMAN RIDING EQUIP-
.... AVM _._Lc
MENT TO YOUR NEAREST SEARS .:_RVICE CENTER. (IN@JOME WARRANTY c_Emv,,._,_WILL STILL BE
AFTER 30 DAYS FROM THE DATE OF PURCHASE BUT A STANDARD TR_P CHARGE WILL APPLY.) THIS WARRANTY
.°, ,..,_::_ONLY VVH!t_ETHIS :PRODUCT _StN THE UNITED STATES.
This War_nty gives you specific iegat fights, and you rnay also have other rights which may vaPy from state to state.
SEAR& ROEBUCK AND COo, D/817 WA, HOFFMAN LoTAT=S, IL ,'-n_,.,.,,_o,,_
3

TABLE OF CONTENTS
MAINTENANCE SCHEDULE ...... :............................... t4
SERVICE AND ADJUST_ENTS ........................... t9o24
STORAGE .................................................................... 25
TROUBLESHOOTING ,.o;....................................... 26_27
REPAIR PARTS-TRACTOR ................................ 30-47
REPAIR PARTS - ENGINE .................. .................. 48-52
PARTS ORDERING/SERViCE ............... BACK COVER
A
Accessories ........................................... 5
Adjustments:
Broke ................................................ 2"I
Cart)L!_etor .................................... 24
Mower
Front.-TooBack ......................... 20
SideoTo..Side ........................... 20
Thrott!e Contact Cable .................. 23
Air Fii!:eh Engine .................................. 17
Air Screen Engine ..................... :........ 17
Assemb}y ............................................. 7-.9
B
Battery:
Charging ......................................... 8
• 3ta@_g witiq Weak Battery .....:..... 22
Sto_age ........................................ 25
Terminals ...................................... i 6
Beit:
Motion Drive
Removal/Replacement ............ 2!
iV_owerBlade(s)
RemovaItRep!acement ............ 21
Blade:
:!.harpening .................................... l 5
:::_epi_cement .................................. ! 5
B;'ake Ad]usiment ................................ 21
If%
%.#,
......ss<o.'...,,__!"_.o!"Adjustment ........................... 24
%,0 n,t_oi:,s _o.,,.I,_1 i 0
Customer Responeibi!ities ............... 15o,i8
Air Filter .................................... i 7
Air Smeen, Engine ..................... 17
Cooling Fins, Engine ................ !7
Engine Oi! ................................ 16
Fuei Filter ................................. 18
Spark Plug(s) ............................ I8
Tractor:
Battery ...................................... I6
Bk_de ........................ ,................ i5
Lubrication '-'- "
,_hart ...................... 14
Maintenance Schedule ............ i4
Tire <}}are.......................... 8,t 5,22
Transaxie ................................. I 8
Cutting Height, _4ower ......................... t I
£
Electrical:
Interlocks and Relays .................. 23
Schematic ..................................... 29
Wiring Diagram ............................ 30
Engine:
Air Filter ........................................ !7
Air Screen .................................... 17
Cooiing Fins, Engine .................... 17
Oil Change ................................... 16
Oil Level .................................. ! 2,16
Oil Type ......................................... I6
Preparation ................................... 12
Repair Parts ............................ 48_52
Sta_ing ......................................... I3
Storage ........................................ 25
Filter:
Air Filter ........................................ 17
Fuel .............................................. 18
Fuel:
Type ............................................. I2
Storage ........................................ 25
Fuse .................................................... 23
H
Hood Removattlnsta[lal:ion ................... 23
L
Leveling Mower L.e,.k .......................... 20
Lubrication:
Chart ............................................. i4
Maintenance Schedule ....................... 14
Mower:
Adjustment, Front4o-Back ........... 20
Adjustment, Side4o-Side ............. 20
Blade Sharpening ........................ 15
Blade Replacement ...................... 15
Cutting Height ...................... :....... 11
Installation .................................... 19
Operation ..................................... 12
Removal ....................................... 19
Mowing Tips ........................................ 13
Muffler ................................................. 18
Spark Arrester ........................... 3,40
Oil:
O
Cold Weather Conditions ........ t2,16
Engine .......................................... ! 6
Storage ................. ...... :................ 25
Operation ....................................... i0-13
Operating Mower ................................ I2
Options:
Accessories .................................... 5
Spark An'ester ........................... 3,40
P
Parking Brake .................................. 104 1
Pa_s Bag .............................................. 6
Parts, RepiacementiRepair ............ 30-47
Product Specifications ........................... 3
R
Repair Parts ................................... 30--47
S
Safety Rules .......................................... 2
Seat ....................................................... 8
Service and Adjustments ............... 19-24
Carburetor ........ :........................... 24
Fuse ............................................. 23
Hood Removallinstatlation ........... 23
Motion Drive Belt
Removal/Replacement ............ 21
Mower Belt(s)
Removal!Replacement ............ 21
Mower Adjustment
Front-to-Back .......................... 20
Side4o-Side ............................ 20
Mower Removal ........................... 19
Tire Care ................................. 8/i 5,22
Stope Guide Sheer .............................. 5 !
Spark Plug(s) ....................................... 18
Specifications ......................................... 3
Starting the Engine ........................ 12- I3
Steering Wheel ................................. 7,22
SIopping the Tractor ............................ ! i
Storage ................................................ 25
T
Throttle Control Cable Adjustment ...... 24
Tires ............................................ 8,t 5,22
Trouble Shooting Chart .................. 2&27
Transaxle ............................................ 16
W
Warranty ................................................ 3
Wiring Diagram ................................... 30
Wiring Schematic ................................ 29
4

ES D ATTACH
These accessories arid attachments were avaiiab_e through most Sears retaii out!ets a_sdcease.......s, ,_=,s wn..,] the tractor was purchased.
Most Sears stores can order these }_ems for you when you provide the mode! number of yo_Jrtractor,
•_._ _ :_s ....
SPARK, !
GAS _A_,_
C ;'
i
i
_NGINE O_L ] FUEL STABILIZER
4
;,IA
PSzRFOB ANC£
Sears offers a wide variety of attachments that fit your tractor_ Many of these are tinted be_ow with brief explanations o_how they car_hetp
you. This list was current at the time of pc_b_icatk_n;however, it may change in fuiure years .. more attachrner_ts may be .added, chan9es
may be made in these attachments, or some may no Ionger be available o_ iit your model, Co_ta.ct your 5nearest Sears store for _he
accessode_ and attach_'ae_ts that are avaiiable for you_" t_'actot.
Most of these attachments do not require additional hitches or conversion kits (those that do are indicated) and are designed for easy
attaching and detaching.
A_:RA"_OR promotes deep root growth for a healthy lawn. Ta-.
pe_ed 2Sqnch steel spikes moun_.ed on 10-irich diamete" discs
puncture holes in 8oi_ at ciose k_tervais to let moisture soak in°
Steel weight tray for increased ps,qetration.
BAGGER iets you. co{bct g_ass c_ippings and leaves for a
healthier, nea.ter !ookJng _awr. Two Permane,x containers isold
30-gallon piastic bags.
BUMPeR protects front end of tracto_ from damage.
CARTS make hautbig easy. Va_iety of sizes avaiiabie, pRts
accessories such as side pans.i kits, tool caddy, car1 cover_
proteciive mat and doiiy..
CO_t_G A_RATOR takes small plugs out of soil to a!tow mo_s_.
ture and nutrients _e reach grass roots. 36-inch swath. 24
hardeeed steei coring tips. 150 }b. capacity WEight tray.
_ASY ©_,. ©_Usji,,_VALVB makes 6i! changes easier, faster.
FROKT NOSE Re LL_K:_can(era in f_'antof mower deck to reduce
ch_w_,cesof ":£:xdpi_g" on unev:::_rte;_ain.
GAN(I_ _4([_C_qk,_tsyou :ow 2 of 3 pull-behind attachments at once,
such as sw_e.p_ws, dethatchers_ aerators 0"_otfo_ _se with rol!ers,
carts or other heavy attac_'_ments).
,@A_JG_ '@'{N£:HX8 on both sid_-s of the mowe_ deck reduce
char_ces o_;%s_aiping" on uneven terrain° For mower decks r_otso
equippe£
_qi!jLC_-__:_{AKI_J{}_THA'TCN_£B_oosens soil and flips thatch and
matted ieaw;_sto !awn suHace _o_'easy pic-kL_p.Twenty spring line
taeth_ UseXl to p_epare bare areas to,seeding. AvailaNe forfi'oni
o_ rear rnet.intin_. H_GH PXRFO{a_JIAHC;{ R£9:b,.ACT_©H
SPFIIHG 7_N_ t:iiqi_.-:TH_itrCH_Rcovers 36-inch wide path and
tosses thatch into _a_!e hopper_ Mounts behir_d tractor.
MUL,CH_HG ©LOSS_OUT PkAT#£ HK once insta!led, lets you
roach, discharge or bag clippings (bagger optional) withodt
changing biades For models no_ equipped as 3qml Convertible
mowers. See "MOWER" in the Repair Pa_Is section of this
manual
RA_P 70£S AND _£_'I _let you k)ad and untoad tractor from a
pickug truck, Use with 2 x 8 or 2 x !0 Iumber.
ROLLER for smoother lawn surface. 36-inch wide, 184neh
d;ame[e_,'wate_4ight drum holds upto 390 Ibsoof weight. Rounded
edges prevent i3amq to tu,ff. A@ustable scraper automaticaJly
cleans dt'um,
SN©W 1_loAD£ for snow removal only. 14-inch higiq, 48qr_ch wide
btade eF;ars 4.24nan path when angled !eft or right. Raises, !owers
with side [eve_'. AdiIsstable skids; _ep!aceabte, reversible sc_aper
bar. (Us,_ with tire chains and wheel weights and/or rear drawba!-
weight.)
SNOW°_%_ROW_:_Rhas 4i}...inchswatK Drum-.type auger hat, dies
powdery and we,/heavy snow. Mounts easily with simple pin
a_rarigement. Discharge!._eh_.£eadjusts from tractor seat. 64nch
diameter spo_£ discharges snow 10 to S0 feet. Lift eont_o_Iedat
tractor seat. (Usa with chains and whee! weights and/or rear
drawbar wef£iht,)
a_'_._£_a use 12.ovolt :DO _ r_.__',-_s,._.,_,..motor that connects to _ss
tractor ba_t,ery or other 12-volt source, !rscludes booms foe
automa£ic si.wayk_gand h_,.ndhe!d wand for spot a_}r.win% Wa_sd
has adjt_st_:_blespray pattem_ For appiyir_g herbick_es_ inse.cti _
cides, [ungicides end }iquid fe_!i_izers_
SPF}£AB£B/S_©i_'_RS make seeding, fertilizing, and weed kiiF
i!_g e_,sy, @_oadcast spi'eade_s are aIso user@ for gran@ai de._
ieers arc:t sand,
SWSEP!_._:.::9iet yo_._co!_eet grass clippir_gs and leaves,
T_LL_!iI!:}!__as5 hp er_Nne and 36.-inch swath to p_epai'e seed beds,
cu_tiw4e and com::}est garden residue. 7ifler has its own buik4a
}iftand depth control system and does NOT require a s_eeve hitch
Fits any kawn,yard or gai'd.en tractor. Simpiy hook _@i:othe t!actor
drawbar and go! O_st]©_'_ai accs-sse_ies convert _nit for
dethatching, aerating, hiJli,qg...without toeis_
"f'_RBC_,_A,_NSate heavy duty; closely spaced e-;traqarge cross
iinks give smooth ride, outstanding traction,
S-°RACT©R CAB has heavy duty vinyl fabric over tt._butar staei
frame, ABS p_astic top; Near plastic windshield offers 360 degree
visibility. Hinged me_al doers with catch. Keeps opet'ato_' warm
and d% Remove viny! sides and windshields for use as sun
protecto_" in s.snmer. O}st]oaa_ accessories _ck_de; tinted/
tempered soiid safety glass windshield with hand operated wiper;
!2-voit amber caution light for mour_tir_g on cab top.
VACS for poweff@ collection of heavy g_ass dippi_sgs and ieaves.
Optior_a_ wand attac_'wsser_tto pick up debris in hud4o-reach
piaces. VAC/CH1RP_R includes a chipper_shredde.n
WEIGHT BRACKK1 _for drawbar for snow removai appiicatior's.
Uses (t) 55 ib. weight.
WHSFCLWB_GHTS for roar wheeis provide needed traction for
snow removai or dozing heavy matedais.
5

OF HA
t;'.
17
I
t
i
i
(1} ,::>I<iOUld_'el"..... _-'_5olY5i! 8-i 8
+. ............. ............ ..,
/,. -,.,
<,.? ,.,\
\
% ..J:" i
... .......... .-
/,
/
{i } _-oct-",__asnei" 112
i : "" _,-.::,.>n,_17i32 xi-3ii6 x12 ¢:sauge
i
$
_ t27 ...... _=v,:÷,,.-."i,a4<;20 8!4
' {2) Hex Nuts 114-20
i
ii
. , ,_._,c_W_she,,.'s t!4
i
t2) V'_8.sb,e,,'s _,,ai_°,,_.x 518 )<!9 Gauae
Ra_r'ts sao}(ed se_arat_D_ i_1 Cantton.
t
!
I
:I
I
l
t
!
i
Steering
'¢I=_o..d
_sianual
Steenng
Soot
V_dmo
Cass':_tt,._
,--? ........................... _-
I
I
I
I
Parts Bag ._
...._,_.-,@_-_¢._._]:',oc,:Fi-O_i£i'l@':;V£i #,_.,l'_ *
I.......... 7 ,,,'++ ............ _" ",,
<7,"¸
/
/")
...... E_L_---i;-/TT............... i.Nhee!
.... , ,................................ .,i
Steednq v",4neei " -7
_', ...................... 7
Ad::::_.ioter
(2) _" "
t I
Slope Sheet

YournewtractorhasbeenassembledalthefactoPiwithexceptionofthosepartsleftunassembiedforshippingpurposes°
,,_' _'_ ,dg, _u:;n_d .-_d_*:4yo UseTo ensure safe and proper ooeratbn of your _,ac,._.,all _oarts;and hardware you assemble mus_ be + _,+,_,_ ,-,_r- -=',
the correct toots as necessap! to insure proper tightness.
TOOLS REQUIRED FOR ASSE_IBL¥
A socket w_ench set wil! make assembiy easier. Standard
wrench sizes are iisted.
(!) 5/16" wrench (!) 9/16" wrench
(2) 7/16" wrenches Ti_e pressure gauge
(1) t/2" wrench Utlity knife
(1} 3/4:' wrench
When Aght and left hand are mentioned in this manual, ;t
means when you ane, in the operating position (seated
behind the steering whee0.
TO R_2_:JIOV[_TRAOTOB _RO_q OARTON
UNPACK CAn'T'ON
_._ Remove eli accessible :loose pa._Ssand parts ca_tons
fi°om cai!:on (See page 6)_
° Cut s.Jonglines on ca_tono,from top to _._.,._,h_-.¢-_.,-w_,_,_a.t four
comers of ca_ton and Iay panels flat.
n,<_c_for any additionai I _ ..
. .OO.,_-,_padre Or Ca_ons ahd
remove,
BEFOR_ _ROLLtHG °TRAO°TOF_ OFF
SK@
ATT,AOH STffff_]NM WHffE£ (See _]go t}
'_ Side the steering bushing ove_'the steering shdto
Raise steering shaft fc,n_varduntil screw holes in dash
lne up with steering bushing° instatI two {2) she,et
mete; screws and tighter_ securMy.
* Position steering• boot ova( ,:_..,,.,,_-___.-,_;_shall
,_ Piece tabs of steedng boot evertab st(>ts in dash and
push down to secure.
,_ Slide steedng wheei adapter onto upper steedng shaft,.
,, n,...._,'._o._., _.........e, _,,,t,_;=,ya_e poiKt;ng
o._it_.__,front wheeis of the-'+r..,,--',--r .......'_---,......
st..'aight fo_wa_'d.
_* Position steedng wheel so cross bars are hoAzontai
{ieft to dght) and siide onto adaptor..
o_ Assets:hie l_cu._ fiat wasf_er ........ "":=,_e3/8-z_,_iocknut and
t_ghten secure 8,
_> Snap steering whee_ insert into center of steering
wheel,
'_ Remove protective ptastic from tractor hood and gdk
1M_OR ANTk, HECK FOR AND REMOVE ANY STAPLES
IN SK![) THAT MAY PUNCTU RE TIRES WHERE TRACTOR
is To ROLL O_:F SKtO,
TO BOLL TRACTOR OFF SKID (See Opera°
tics s®ctios f@_ !oeat]o_ and _unetion of con-
t_ols)
o Press _itt}ever plunger and _ais¢ attachment lift lever to
}is highest position.
Re!ease parking brake by depressing clutch/brake
peda!.
'_ P!ace gearshift lever in neutral (N) position.
_, Rol tt'actor backwards off skid.
Remove banding holding discharge guard up agains;:
tractor. #

ASSE BUsf
The tires on you_"tracto__were ovednflsted at the factor_ for
shipping purposes: Co_rect tire pressure is important for
test cutting periofmancso
Reduce tire pressure _e PSI shown in "PRODUCT
SPEC!FtCATJONS' on page 3 of this manual.
OH_OK ©_OK LEV_LHESS
Forbestc_4ttingresuits_mower housingshouldbe pFoperiy
leveled, See N°O L._2VELMOWER HOUSING" in the
Serdce @nd Adius'tmet_tssectiono_thismanual.
See the figut"es that a_e showr., for re@acing motion and
mowe_°b!ade diive be!ts in the Secvioe and Adjustments
section of this manual. Verify thst the belts are routed
corrt_ctly,
I:;£&AT
S¢+,'I''?I£FQV
£i,L)I<O00:?I /! '
;: !!!
I
I::;'!f.';;,,:-3
/$ ##
;-u_er you Ieat'n how to ope_a_e your tractor, checL Io see
that =-_ is ......
t_e brake p_'opedy adjusted. Se_-'."TO A©JUST
..... 8,._,n of
i'[}aflIlal,
BEFC_RE YOU OPE];©_,7'2: AND &-N#OY YOUR NEW
0 Aoo urn.. TH,q7-"ytOU RES'E'I VE7WACTOR, WF Vi:,qSH_" ,,':,..........= ,c-
7WEBLY:S'TPI£'/::_FOF_%IANCEANDS/4 FiSF:AC770N #-i:_OH
N-lie QI_z_£iTY PRODUCK
PLi.EASE REWzZW K_E FOLiOW!NG OHEC_:fZ._ST;"
/All assemNy }nstl°uctiens have been compJeted.
# No rems_ining ioose pa',_tsin earl:on.
/ Battery is pr,,.)peAyp_epa_ed and chai'ged. (MinimL,'m
! !_,our_'.t'¢ amps).
¢" Seat is adjus%_=,dcomfor!:e_biyand tightened secL_reiy.
/AI tit'es are pi'operiy inflated. (For shippi¢.,g putpcses,
the tiles were ovednfisted at the factory)°
/" Be sure mower deck is pi'opedy ieveied side-to-:side/
front.;to-rea_ l%r be.st cutting _'esuits. (Th'es y_ft..istbe
ptepe_ly inflated fe_ ieve!ing).
# Oheck mower _.q"sdddve be!ts. Se sure they are routed
p_operiy aro_nd puleys and inside at bait keepet-s.
t.,f,_osswiring, oee m.a_.al connections are s,.&,secure
and wires are propedy cIamped.
WH&K fiEARN@G HOW7"O USE YOUR KRA OrOR. PAY
E)(_r-?AA 7hCEN770N TO THESFOLLOWING IMPORTANT
!7_MS:
V" Engine oit is at proper ]ev@,
/ Fuei tank is filied wkh fresi% clean, reguiar unIeaded
gasoline.
../ Become familiar with al controls - their location and
function, Operate them befo._eyou sta_ the engL__e,
7" Be sure b_ake system is in safe operating con,::i_tion.

Thesesymbo!smayappearonyourtracto_orinliteraturesuppliedwiththep_'oductoLearnandunde,,standthei_meaning.
BATTERY CAUTIONOR REVERSE FORWARD FAST SLOW
WARNING
ENGINEON ENGINEqFF OILFREo,_,I.;_:. LIGHTSON LIGHTS" .......
L_Y .....
_H J,\_;. MOWER HEIGHT DiFFEREN]]AL
rUE_ PARKING BRAKE jNo_,_.Klxb'
REVERSE NEUTF_AL -_v"_ i C)*%_
MOWER UFT AttACHMENT
CLUTCH ENGAGED ..,LUTort DISENGAGED
IGNiTiON
_ANG_:_, KEEP HANDS AND FEET AWAY
HYDROSTATIC FREE WHEEL
(Hydro Models oniy)
9

OPE ON
A_i-_u_ _%gUH FRAC I OH
._,-0E,_uW:£TM THIS OWNEWS _ANUAL AND SAFETY RULES BEFORE OPE_ATING YOUR TRACTOR
cvmu_:_,_e the i!iu.sti'ations with your tractor to famiiarize yourse! with the locations of various controls and adjustments. Save
this rqar uai fi:)r?.mxe refers)nee.
Our t<actoi's co<from] to lh.q ,:,<_..f_'_'v,,%,standa_'ds of the American Nationa.i Standards !nstitute.
_r'.<_._,*,l._mI_;:w.'t"CLUTCH LI.':VIIR: Used to engage the
_' ,,,e,_b}ades, or _' .... "_'_ to _, _,
,,,o ..... othe¢ .=Lavhr,__n.,_ muunt..d to your
< {11,,,,kO _.
THIOTTL!iCHOKE OONTtOL: Used for sta_ing and
oonti'oiIing engine speed.
o,ra_k-
,+,.olj _CH,=_#RA¢_Ic ;=¢,:_,_=_.. Used 'lOt dec,IuIchfflg and ....
ingthe tractor and starti,-@ the engine.
PA,'_MH_:_ BRAKE: Locks c!utchibrake pedal into the
b<s.keposition.
_AR_'m,r I _% _,R, Selects the speed and direction of
t_actor.
ATTACHMENT LIFT L[!V[R: Used to raise; lower and
adjust the mower deck or other attachments mounted to
your tractor.
Lt_\T L_V_R PLUNGER: Used to _elease attachment fft
lever when changing its position.
IGNFIqON SWITCH: Used for sta#:ing and stopping the
engine,
I0

OPE
HOW TO USE YOUR TRAOT_R
TO SET PATx_K@4QBRAKE (See FiG 6)
You r:tracto r is equipped with an operator presence sensing
switch,, When engine is running, any 8fttempt by the
operator to ]eave the seat without fi!*st setting the parking
brake wit shut off the engine,
Depress clutch/brake pedal into full "BRAKE" position
and hoido
_. P!ece parking brake iever in "ENGAGED" position and
rebase pressure from ciutchibrake pedal Pedaishouid
;,amain }n ;:BRAKE _'position. Make sure parking b_ai,,:_::::
wil! hoid t_stctor secu_eo
STOPP@4Q (See _:'iG 6}
MOWER BLADES -
,:_ Move attachment c}utch lever to "DISENGAGED '_pc.,
sition.
GROUND DRIVE -
= Demess clutch/brake pedal into full "BRAKE" position.
Move gearshift lever to neutraD(N) position,
ENGINE -
o Move throttle control to slow (_) position,
HOTE: Faiiuf8 to move throttle control to stow (,_)
position aad aitowing engine to idle before stopping may
cause engineto "backfire",
Turn ignitior_ key to "OFf position and remove key.
Aiways remove key when leaving t_actor to p_"event
unauthorized use,
o Neve_ use choke to stop engine.
NOTE: Unde_ certain conditions when tractor is standing
idle with the engine running, hot engine exhaust gases may
cause "browning:" of grass, To e!iminate th}s pessibiity,
always stop engine when stopping tri_ctor on grass area_,
,_,*,L!f!O .... Always stop t_aotor ogre- ,
p4ete@,as desc,sqbed above_ _efo_e lear° 1
j_'_:_the ope_a_.o_ _sposition, te empty I
{:;_ass catc_qer_,etco :_
AM_I',/s operate engine at fl.Althrotth_iL
Operating engine at }ass than Mi throttle reduces the
batte._ycharging rate.
_ F:uilthrottie offers the best bagging and mower peffo_--
f_aP, ceo
TO _iOVE FO_:aWARD AND BACKWARD
(See 15"i9,(5)
The diFection and speed of movement is cont_oled by the
gea_shif!: bver,
+ Staff b4actor with ciutchibrake pedai dep_°essed and
gearshift iever in neuti'ai (N) posH:]ono
-_ Move gearshift ieve_ to desired position.
€ S!o,_,Ayr,aiease c;utch!brake peda; to start moven;enL
ii?IPOR!R/&HY: BRING TRACTOF] TO ACO?dPL,_iT'E S'FOP
_._ L :I%,Y'i [9 ,
_;,::;,-_,iH: :brIn-F_NG OH CHANGING ....'-" "=' Fi:'ALUREI
TO DO ,10 WILL.SHORT!N'-i '!-H-{USEi:-UL LiFE O_: YOUR
TIIAHSA)(LE.
TO £©dUST H2iiGHT
{See FiG 5)
The post:ion of the ath_chm,er_t iift iever determines ihe
cutting height,
-- Grasp lift 1ever,
Pr:_:}sspiunger with thumb and move iever to desired
poftion,
The cutting height range is approxime, te!y !-I/2 to 4", The
heights are measured from the ground £oIhe biade tip with
the en@ne not running. These heights are appro×imate
and may vary depending upon sot conditions, height of
grass and types of grass being mowed.
The average lawn should be cut to approximateiy 2-I/2
inches duqn9 the cooI season and to over 3 inches
during hot months, f:o_"healthier' and better looking
lawns, mow often and after moderate growth.
,_ For best cutting pe,donmance, grass ove_"6 inches in
height should _e mowed twice, Make the first cut
re!ativeiy high; the second to desired height.

U o E
TO OPERATE! _OWdA (See _!ig, 7)
You rtracto__is equipped with an operator presence sensing
switch. Any attemot by _he operator to ieave the seat wih
the engine running and I've attachment aiutch engaged will
si_ut off the el]gine.
_ Se!ect desired height of cut.
StaF: mow@" blades by engaging attachment clutci]
cont_oi.
, ',"....... m i & ,_'%vit 0
"X) <rw'x_:_,uOW:=H d se_,_s_getsttachment
!£
C:hx_se the .>,.,,,_q-',,e_,.'o_s_.eed before starting up o_down
>. Avoid stopping .::_changirsg speed on isils.
if s}owir_g _!{ ecessary, move throttie control {ever to
sbwe_" pos_i:ton,
,,, H"s:oppi_g Js..}psoluteJy' necessa% push ck£chiD_ake
pedai q.Hc}dy te brake position and engage pa_king
brai<e.
Mov:s- ._earsisfft iever :'o.!st .'sear.,.. :Be.sure you }save
"_Sowed morn _or traei:or to roll oJ,gt,_,y as you rested:
o To res.tad movemer %.dowfy, .dease e.ark,t g b_ake and
cit..'tchibrake :pedaJo
q
o Make a 1.um_ slowly
R_e attachment fft to.highest position with attach-
ment lft control.
o When pushing or towing your tractor, be sure gearshift
Ieve_ is in neutral (N) position°
DO ROt , ' _""_
_;},o.,_,or tow tractor at more than five (5) MPH,
iNOTB: To p_otect hoed from d@mage when Wansporting
yod_'tractor on s.ta;ck or a traiier, be s.u_-ehood is clesed and
secured to t_actor. Use an appropriate means of tying hood
to .t,,acto_"{rope, cord, etc.).
!r"._g.I
........ _o,. !._,.uof hen been shipped, fromthe
"".he<.._with summer vve,g A;oil,.facto% aiready ":_ ""'"_ _"
lo /,,., qround,
............ r g_neot with tractor on _ --,_
siq'i_,Ss pk "_'m
oFJemove oi!-iiti.cap/dipstick, ,._nd_.t,,_,_..,e_ ,, '-*" _"," ";':-"
,..,,i_'_'°fi"<'-,..--and screw -.'-,.-,,..<.tight, wait for _s_.f¢.._gs_..--,,s,_o_d_,,
remove and _'eadoi! !<.veL If necessary, add ol g.ntii
....FULL" mark on dipstiok is _.._c__,-_
.e_,_,_,_.._.Do not overfi!l.
..,.,,a,. _, .,.,.rs..,,J,, you shouid cr_ange oil fo_
C.............".......I .....; ' . ,;_..,.1,O. ix]anuall.
..d_.J[o,,4s,-.-.les,ue_'_,,b!lities_," "sof this . . ' '}
., To :hancje ..... ........... the 0 d---_,,, -c_.... ,:'_'._li-
ties seotJon ii'] this menuS.
t2
.Fiii K_ei lank. Use fi"esh, ciean, regt.Aar urfie.:.ttded
gasol_se with 8 mir@rium of 87 octane. (Us _::,of ieaded
gasoiine wiJ!incrs'ase cs.rbon and _ad oxile deposits
and reduce va-.ive!ire},.Do _otmi:,<el wJ-i:t_ga:..o!ne.
}]:'tJrGi%ase !L}(,} ]o q_JaN_ities _hai ca, _',be iJse(J within _}0
,daystoassu;'crue! f_eshness.
IB_IPOF_TAH%',".WHEN OPERATING IN TZMP[iRA-!'UR_.S
S-i']LOW32°F(0<:0), USF FP;ESH, CLEAN W_N-YEIRGRADE
GASOLIH£ TO H£LP INSURE GOOD COLD WEATHYR
S'T'ART!NG,
WARH/HG: Exoedence _ccares _ "
, , }at alcohol blended
fuels (ca!led gasohei or .....,_'_-,gethan@ or methanoi) can
attract meisture which leads to separation and formation of
acids during storage. Acidic gas can damage the fuel
system of an engine while in storage. -To avoid engine
prob eros., the _,u.=,,;-_,system should be emptied before stof
age of 30 days or longer. Drain the gas tank, sta£ the
engine and IeI it run until the iuei lines and carburetor are
O_
empty. Use fresh fuei next season, o_;e Storage Instruc-
ions for additionai information. Never use erN_ne or
ca@uretor cleaner p['oducts in the fuel tank or permanent
damage may occur,
I _.._,,TlOk,!o Fill to bottom of :gas t..ar_k
:1

09E
TO STA aT EH@HE (See Fig, 6)
When staddng the engine for the first time or if ti!e engine
has run out of fuel it wJJt<take _"÷ "
_.,_da 8rar_king time to move
fuel from ÷t-._ .
,.i_ tank to the engine.
Depress o!utchibrake pedal and set parking beake.
,, Place gear shift lever in neutrai (N) position°
o Move attachment clutch to °'m_M'_'A_¢zcm"
........ _s_,,a.... position.
Move thrott!e controt to choke (iX[) position.
Here: Before "'-" the
.:s_.art_t_g,read _. _ warm and coid starting
procedures below.
hsert key into ignition and turn key clockwise to "START"
position and retease s_eyas so(m as engine starts_ D.e
not _un sta_er continuously for mere than fifteen sec_
onds per minute° ....i_t_'e engine does not <_._._,.afte_
severa_ a_.t_mpt_ move tt_rottie controi to Tast (@)
position% wait a few m autos anci try again° If_a_,ne ,_MI
doe_ rK)t rt "''d
" ..._.¢_..... move the thro@e control beck f:o the
choke {1\I) oosition and rot%
WARM °'amx_°"_'_:_c_'_"_' _' _....
_v,,,:,:.,,_,.;_o _Ai_ t _N',.;_(50°Fand above,}
-_ When engine .>.aabo_- _'_-'.move the in rottF',,....... cont tel to t_e fast
(@) position.
o 1%e<_.4t_d__=.nts and g,o._na ch,_,e car,,now be used. !f
the erx]ine does not scOOp!,the !oad, restart the ,_"-%in_:,_ "_
and aibw itto warm up for one minute using the choke
as described above.
COLD WEATHI:!!R STARTING ( 50':' F and beiow)
-_ VVhene.ngine sta _:s,allow engine to run with the throttle
control in the choke (]\]) position until the engine runs
roughly, then move throi:fie control to _ast(.'@)position.
This may require an e_!;ff,e warm--t_p period from
severai seconds to several minutes_ depending on the
temperature.
_'-' The attachmer_ts can also be used c!uring the engP_e
warm-.upperiod
NiOT_: If at a high altitude (above 3000 feet) or in cold
temperatures {bebw 32 F) the carburetor fuei mi4tu!'e may
ADJUST CARaURE] O q"'in the Service and Adjusm_ents
section of this manual.
FIG, 8
.,13

R R:SP BI ES
I _ _}Tia _g(: _mx<:_o[te_; wilen opera:ring under a hear 7 ioad or in hif_h amb[erll temperatures,
2, S<}!_/i?;_ moe_ ofte;_ !,/net,, ope_(,£fng its @ty o!' dasty colditions,
:':f. i ::du :}_ed wRh oii fif;'er, chm:ga ot evsy 50 hours,
4- ;:_epk_ ;a bktdes more o[_ea when mow_i G ]rl sandy ,';-._ol.
5 - If aquipae<,i wlti_ _:ctjusiabie sy.sterr_.
",B-Not reqq_ed if ,_quipped with mainlenm_ced,_e6 batep/.
7 - Tl!7_:#.eniront ax}_:_pivot boll to 35 fblbs, maximum,
Do fiat ovsqighten.
Son% adjtJstme_sts wiif %-ed to be rP.,adepe_°iodically to
7:',_opetiymsJr_taitsyour tr%i:or.
AII adjt,_stmer;ts ir_t!-e Semicf; and Adlus';:ments section of
t!;is .................... _ be checked ai: ,.._._ o, ,c_...<d. ,>,_a..o,,,
Once a year you shouid }'epJacethe spa_°kplug, clean
or replace ai_ tilted a_sd check blades and belts for
we% A new spark plug and clean air filter assure
proper air@el mixture and he!p your engir_e run better
and last longer°
_:_ _'Dt_ _-?"- e"<,__ -__,;',_'=
bh_{.: erigiRe 011 ,:,_e
Oheck b:ak:e operatk}n.
+ C_-#._-_-.,,_._....,..tit-e p_'essure.
Check '" :o'_s,., "
._of . .. _astefiers.
14
!ITtPORTANT; DO NOT OIL OR GREASE THE PIVOT POINTS
WHICH HAVE SPECIAL. NYLON BEARINGS. VISOOUS LUBRI-
CANTS WILl., ATTRACT DUST AND DIRT THAT WILL SHORTEN
Tlq_ LolF_ OF THE SELF+LLIBRICATING BEARINGS. IF YOU
r"£EL THEY MUST BE LUBRICATED, USE ONLY A DRY, POW-
DERED GRAPHITE TYPE LUBRICANT SPARINGLY,

CU MER LKIES
TRACTOR
Always obsewe safety rules when performing any ma]nte-
Ranc@_
BRAKE OPBRATIOH
if tractor requires more than six (6) feet stopping distance
at high speed in highest gea,r,then brake must be adjusted.
(See "TO ADJUST BRAKE" in the SewJce and Adjust°
merits section of this manual)_
Maint@n proper air pressure in al! tires (See "PROD-
UCT SPECIF]CATIONS" on page 3 of this manuat)°
Keep tires free of gasoline, oil, or insect control chemi-
cals which can harm rubber.
o Avoid stumps, stones, deep _"ru,,_, sharp objects and
other hazards that may cause tire damage.
BLAD£ @A8_8
Fo_"best resu!ts mower blades must be kept sharp_ Re-
place bent or damaged btades,
BLAD£ R_,MOVAL (See _dg°_'°°_'_,G
Raise mower to highest position to allow acce@sto
biades.
* Remove hex belt, iock washer and flat washer securing
biade.
._ i.qstal new or resharpened blade with traiIng edge up
towards deck as shown.
Reassemble hex boll _ockwasher and fiat washer in
exact order as shown.
_, Tigi_tep, bolt securely @0-35. FI_._....,_:_._h_, torque}o..
',:_ ,¢I_;1HI: ;.:_:,u,._ =.,..,,.....iSGRADEoilEAT _hEAIID.
NOTE: We do not £_cor'nmer@sharpenir_g bl_._de-bul: if you
do, be sure the blade is balanced
[
J
!
l
!
I
]!
:]
I
BLADB i.. J
:................%..f
FIGo 9
t
i
[
i
Care should be taken to keep the blade balanced, An
unbalanced blade wil cause excessive vibration and even-
tuat damage to mower and engine,
+ The blade can be sharpened with a fiie or on a grinding
wheel. Do not attempt to sharpen while on the mower.
To check blade balance, yo u wit! need a 5/8" diameter
steel boit, pin_ or a cone baiancer. {When usk'6Ja cone
baianc@r, blow the instructions supplied with bah
ancer)_
Side blade on to an unthreaded poddon of the steel bolt
or pin and held the boit or pin paraiiei with the :£!round..
if blade ;s balanced: it should remain in a hodzont_i
position, !f either end of the !:,'.lademoves downwar:::i_
shad°penthe heavy end until the blade is balanced.
HOT_!: Do not use a nail fo_ balancing his.de. The lobes of
the center hole may appear Io be centered, but a_e net
,/- /"
//'
,/
,/ /!i
£qG, !0
15

S B LK ES
8A_'%EF_Y
Your tracto_ _aasa battet_/charging system which is suffi-
cient for normat use. -However, periodic charging of the
batte%' with an automotive charger wiIt extend its lifeo
_,,._phatter, and termina!s ctean.
Keep battery bo_ts tight.
Keep smatl vent holes open.
,_ Recharge at 6d 0 amperes for I hour..
Co__c,sion and d._ on :_hebatte%_and tem_inais can cause
the battery to %ak _'power,
_ Open battery box di}or.
,o Disconnect SLACK batte_y cable first then RED bat.-
tery cane {_md_'emove battery f,_omtractor°
,_ i_;nse the battery v_,'ithpia;n wate_ and dry.
._ Ciean tem__inais and battei% °cabi,e ends with wire b_usis
,tintii bfighL
'_, Coat terminats with @'ease of petroleum ]eI_y.
_, Reinst:{d[ battery (See _'CONNECT' BANTERY" in the
Assembiy section of th{s manuai)_
_,h..s.....\.,_.... _or.... _ro,;_._ .... and wear after !00 hours of
._..........u._, ,_.;.,_rs_eptace if necessary_ Yhe baits am not
adjustable_ Heplace _a_,.,,,,if :_hev becim _o sup from wear.
_',_;_ut ....... " ...... {tom build-up o_ dS: and (,,la,_ which
C:CFi _"eSti'iC _,,.;,.u_h;";"_ _.....v-
Ortiy sue high quaiity detergent oil rated with AP_ service
SP{_{",i!St:)OSNY GRADES
i
c"" ..2@' 0 _
[ ,_ .30 _ .10 _. .!0,_ 20 _ .')O_ 40 '_ [
i TT'MP_FiATUR_ RANG@ ANTICIPATED BEFOg:V:: NEXT OIL CHANG_ [
F_G, II
HOT_: Although multi°viscosity oils (5W30, IOW80 etc.)
improve starting in cold weather, these multi-viscosity oils
will result in increased oil consumption when used above
32°F. Check your engine oii level more frequently to avoid
possible engine damage from running low on oil.
Change the oH after the first two hours of operation and
every 25 hours thereafter or at least once a year if the
tractor is not used for 25 hours in one year.
Check the crankcase oil levei before staring the engine
and after eacheigh_ (8) hours of operation: Tighten oi! fitt
cap/dipstick securely each time you check the oii level.
TO u.r_._P._r'_.:_u: ENGINE O!L (See Figs. 11 and 12)
Determine temperature range expected before oil change.
All oil must meet AP! sewlce classification SF or SG.
lBe sure tractor is on Ievel surface.
_, Oil wil! drain more freely when warm.
_'_oh oi! in a suitable container.
Remove eli fi!I cap/dipstick. Be careful not to allow dirt
to e_ter the engine when changing oil.
o Remove drain plug.
o After oii has drained completely, replace oil drain plug
and tighten securely.
o Refili e,%ine with oil through oil fill dips£ick tube. Pour
slowiv. _!2 not ove_iitli For approximate capacity see
PRODU,,, oP,.._t_t,_LA,]ONS 0n page 3 of this
manual,
Ose gauge on oil filI cap/dipstick fo_'checking ievel. Be
sure dipstick cap is tightened securely fo_ accurate
,e_...dmg. Keee oii at "FULL" line on diostic£
/
/
F_G,, 12
OIL HLL
CAPiDIPS'?_8}(

tBl _S
AtE FILTE_ (See Fi9o 13)
Your engine wi! not run pmperiy usir_g a dirty air filter.
Clean the foam pre-cleaner after even./25 hours of opera-
tion or eveR/season. Service paper ca_ridge ever 7 100
hours of operation or every season, whichever occurs first.
Service air cleaner more often under dusty conditions.
Remove knob(s) and cover.
TO SERVICE PAE-CLEANER
o Slide foam pYe-cieaner off cartridge.
Wash it in fquid detergent and water,
Squeeze JtdB_in a clean cloth.
_ Saturate it in engine oil. Wrap it Jn clean, absorbent
cioth and squeeze to remove excess oil
,o If very diRy or damaged, replace pro-cleaner.
Reinstat p_e-clearler over cartridge.
Reinsta!i cover and secure with k_ob(s}..
TO SERVICI C/\RTRIDGE
OL£AN AIR SCREEN (See Figo t4)
Air screen must be kept fr_e of dlR and chaff to prevent
engine damage from overheatir_go Ctean with a wire brush
or compassed air to remove dirl arqd stubborn dried gc._m
fibers.
INGtNI COOLING FINS (See £g. !4
Remove any dust, dirt or oii from _ngi_e cooling fins to
prevent engine damage from ov_rheating.
*, Remove screws from biower housing and !ift housing
and dipstioR tube assembly off engine°
_ Cover ot ftl openi_g to prevent entry of dirL
<_ Use compressed air or stiff bristle brush to thoroughly
clean englr_,ecooling fins.
To reassemble, reverse above procedure°
Ii!Gill @OOLIIQ 7IN::I
Fl(]h i 4
FIG. t3
17
ILiT ESCUSI°O
_V_UFFL£R ,.
, muffi_, and spark attester (if
!nsoect and reotace corroded _-,
equipped) as it co,aid create a fire hazard and/or damage.
SPARX PLUGS
Replace spark plugs at the beginning of each mowing
season or after every 100 hours of operation, whichever
occurs first. Spark plug type and gap setting are shown in
"PRODUCT SPECIFICATIONS" on page 3 of this manuat.
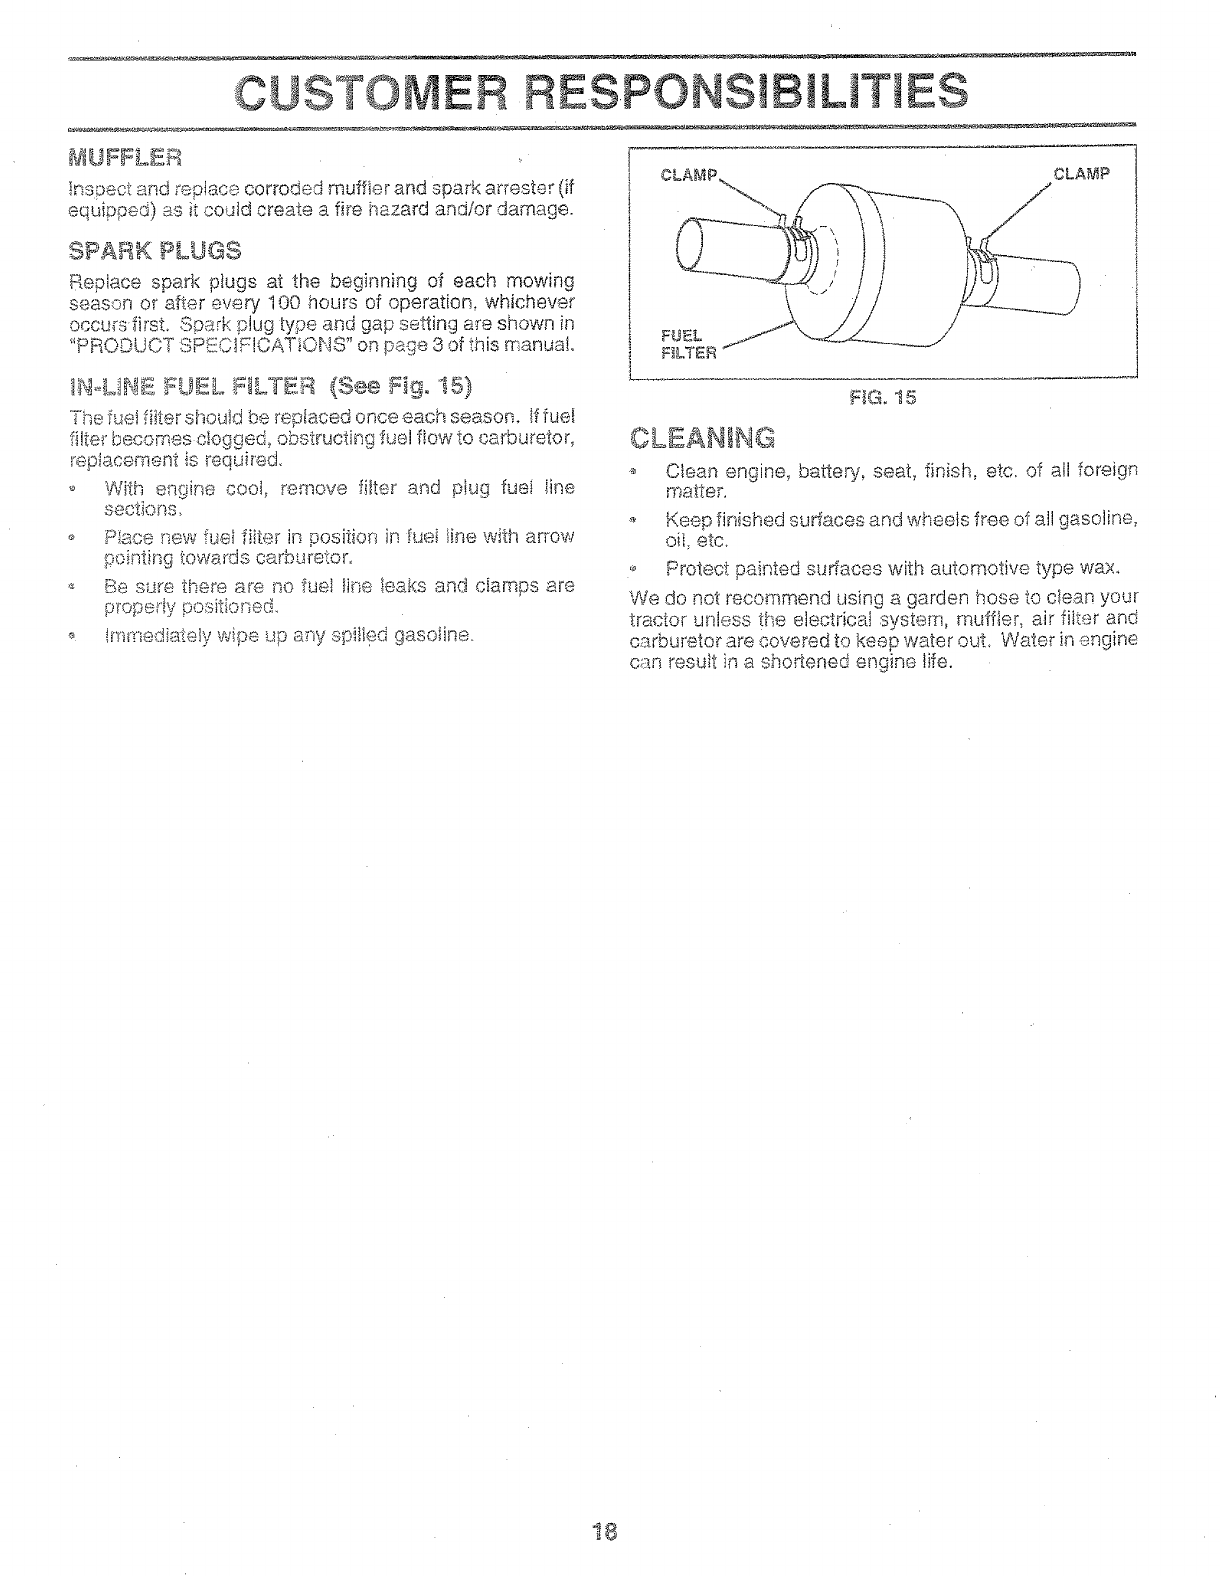
1N,dN[{ RiF, L _aLTER (See Fig° I5)
The rue! fiiter should be reptaced once each season. If fuel
filter becomes clogged_ obstructing fuel flow to carburetor,
replacement is required.
With e%ine cool, remove filter and plug fuei line
sections.
P_e _,p,*,f-_ fiiter in sos t or in fuei line with arrow
pointing towards carburetor,
', Be sure there are no fuel line teaks and ciamps are
p_opedy positioned.
!mmed;ately wipe up any spiiigd gasoline.
'_IG,15
CLEANING
.>_ Clean engine,batte% seat, finish, etc. of all foreign
ma_ter.
Keep finished surfaces and wheels free of all gasoline,
oil, etc_
_, Protect paff_ted sudaees with automotive type wax,
We do not recommend using a garden hose to ctean your
tractor unbss the electrical system, muffier_ air filter and
carburetor are Covered to keep water ouL Water in engine
can resuit in .a shortened engine life.
18

A E
CAUTION: BEFORE PERFOR_IN_:_ ANY SERVICE OR AOJU_T_ENT_:
Depress c_utch#brake pedai fuliy and set parkin 9 brakeo
P_ace 9eat'shift _eve__n _seut_a_{N) positior_0
o P_ace attschme_t ciutch i__"O_S_NGAGED" positioned
o _m ignition key "OF_" and ram®re key,
Make sure the blades arid a_ moving parts have comp_eteiy stopped.
#O_sconneot spark P_4g wire from spa_k plug and p_ace wire where it cannot come in co#tact with [
TO RE,_!#_©V_{ B_qOW_R (See Pig_, 18).
Mower wiil be easierto remove _rom th#_dght side of tractor,
P!ace attachment clutch in "©;SENGAGDD '_position.
Move attachment JiltIever forward Io iower mower to its
iowest position°
_ RoJlbe!t off engir_e pa!Iey,,
,_ Disco_ssect cit£ch rod from clutch iever by removing
retainer spring.
'_ Disco;_nect anti.-sway bar from chassis bracket by
removing retainer spring.
Disconnect suspension arms from rear deck brackets
by ,_emoving retainer springs.
Disconp,,ec_front links from deck by removing retainer
sprhsgs.
o F_aise!ift lever to raise s_Jspensio_sa_"ms.Slide mower
out from ur_der _racto£
_[_.aPO£TA_tT';tF AN ATTACHMENT O]'HER THAN THX
MOW_!iR DECK _{!:;TO BE MOUNTED ON THE TRACTOR,
REMOVi_i]i--.i_:£F:qON! L!NKS_
_ Raise attschmer-_t lift ieve_ to ib highest position°
_ S_ide_ssowerunder tractor with discharge guapJ to dght
side of tra:::-tor.
o Lowe_ lift ieve_ to its iowest positio_
_* hstatt mower _I peve_,se o(der _ .... _ _
CL, LITCbl RO_ L,_V_R
/9:USP_NS_ON FRON'T
ARbIS UNKS
!9

TO L£VBL kaOW_£R HOU.,,_sNG
Adjust the mower while tractor is parked on tevel ground or
driveway. Make sure tires are properly inflated (See
"PRODUCT SPEC1F}CAT!ONS" on page 3 oftMs manuat).
!fti_es are over or undefinfiated, you win not properly adjust
your mower.
S!DE_TO-S!DE ADdUSTMENT (See Figs. 17 and t8)
o Raise mower to-its highest position.
o A! the midpeint of both sides of mower, measure height
from bottom edge of mower to ground. Distance"A" on
boris sides of mower shou!d be the same or within !/4"
of each other.
If aqustment is necessa% make adjustment on one
s}de of mower only.,
_0 To raise one side of mower, tiqhten lift link adjustment
nut on tha.t s:d_°
To bwer on_::_side of ,,,._,t_..,_'o,_,_' .oosen }ift l_r¢",,. adjustment
nut on that .. :e
,d,i tU_"r!S
mow._srhJe,ghtabout I/8'L
i
i
)
,_s*adjustment nut wii! change
Recheck _ a,_,,-.o ,-._t<, adjusting.._e _.:,,._..m...,,.._after
,_3OTTOM EDGE BOTTO_il 8©GE
OS_':£iOWER TO OF MOWER TO
"_4_ I_.- _7{I,_"---..;j!_.-_I -47
ki.{.........V1-':!-_'<"'_'_ ......... _-_ i;I..... ._
,_',,'" i t l f _....A
ENTS
LiFT _ _.4"
ADJUSTmeNT NUT
Ff@° !8
FRONT-TO-BACK ADJUSTMENT (See Figs. 19 and 20)
IR,1PORTANT: DECK MUST BE LEVEL StDEZFOoSIDE. IF
THE FOLLOWING FRONT-TO-BACK ADJUSTMENT tS
NECESSARY, BE SURETO ADJUST BOTH FRONT LINKS
EQUALLY SO MOWER WILL STAY LEVEL SIDE-TO-
4
i
To obtain the best cutting results, the mower housing
should be adjusted so that the front is approximately I/4" to
3/4" lower than the rea_ when the mower is in its highest
position.
Check adjustment on right side of tractor. Measure dis-
tance "D'_directly in front and behind the mandrel at bottom
edge of mower housing as shown.
• Before makint_ any nacessary adjustments, check that
beth front links a_e equal in length. Both links should be
approximately 10-3/8,.
!f links at:e nol: equal in _ength, adjust one link to same
length as other link.
o To lower front of mower loosen nut "E" on both front
links an equai number of turns.
When distance "D" is !/4" to 3/4" iower at front than
rear, tighten nuts "F" against trunnion on both front
links.
i
!
1
I
To raise _ront of mower, loosen nut "F"from trunnion on
both front !inks. Tighten nut "E" on both front !inks an
equal number of tums_
When distance "D" is I/4" to 3/4" !ower at front than
rear, tighten nut °%"against trunnion on both front links.
Recheck side4o-side adjustment°
_=_"_.,_ _,_S_,i_>s -.... _...... _. _ '_ "_ _ _1 _,€_T_
f-f _'i I[
/
/
[-
J
2O
NUT
_RONT L1NI(S TRUNNION
FIG. 20
NUT "5"
s
/
/
SE CE A A©J
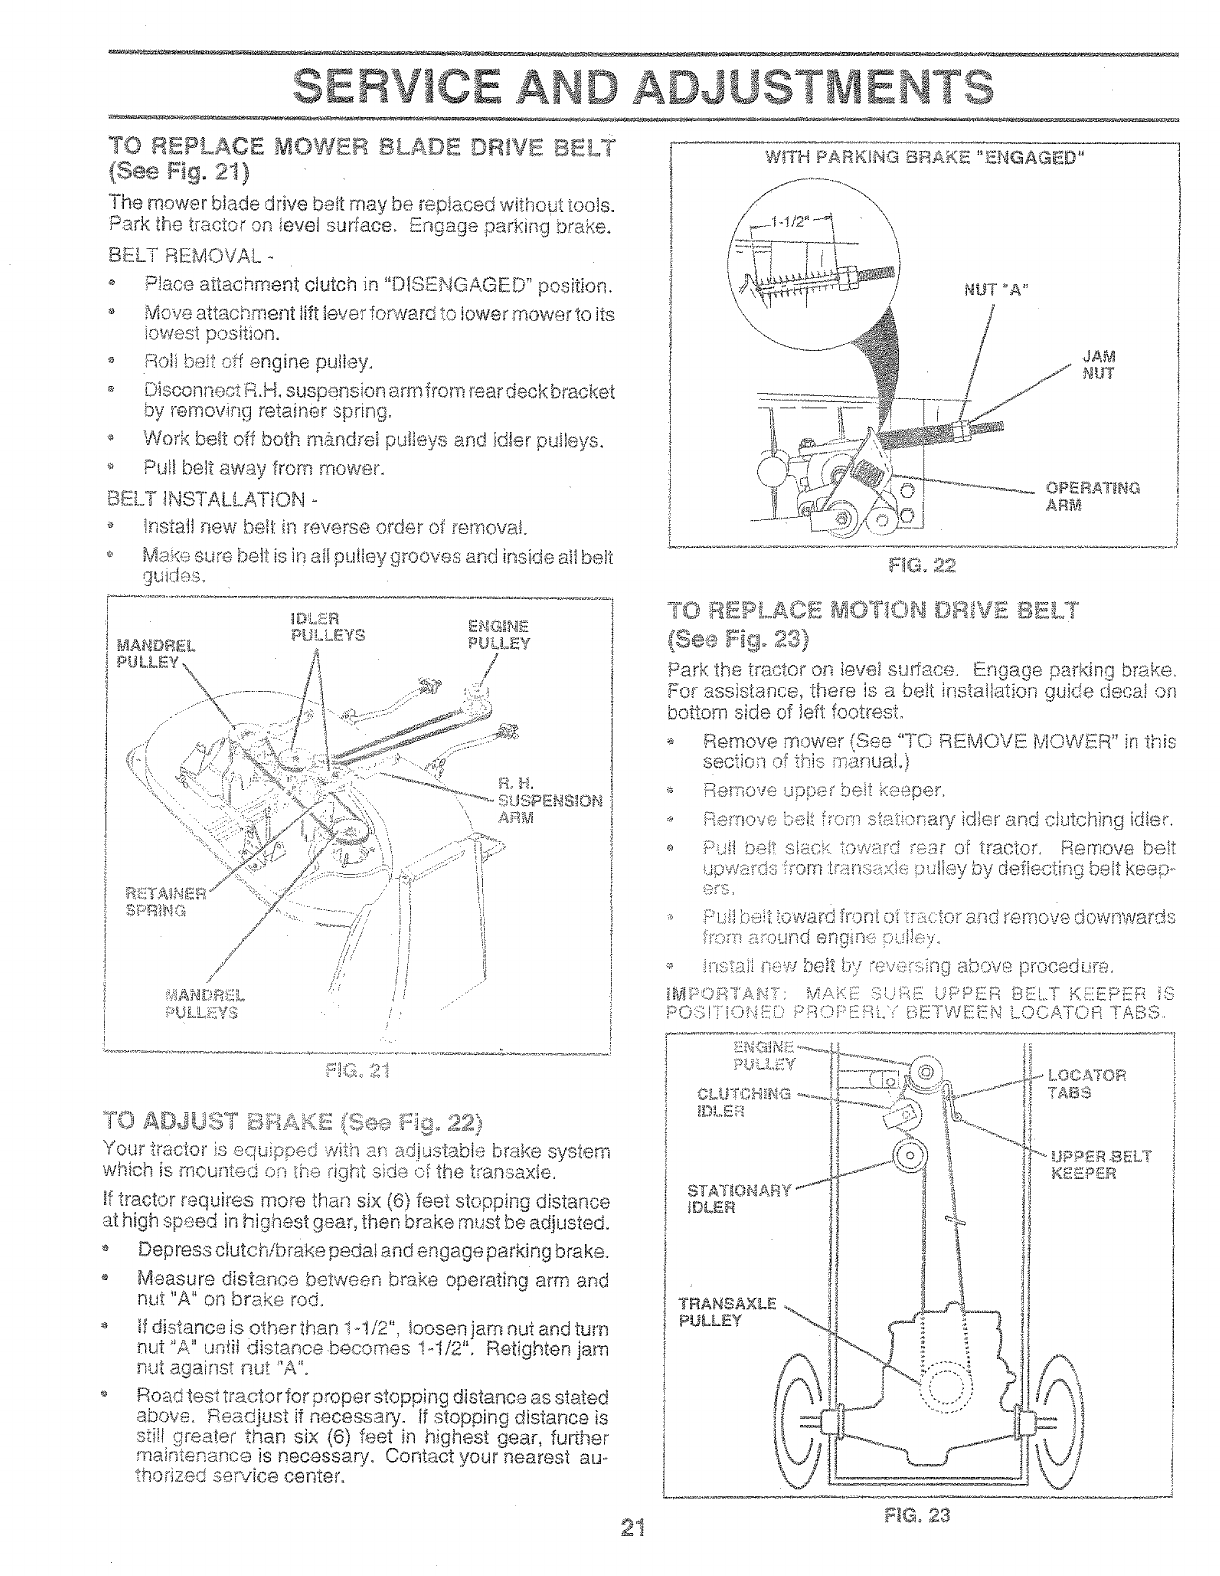
TO REPLACE _IOWER BLADE ©RWE BELT
(See Fig. 21}
The mower btade drive be!t may be rep!aced without tooIs.
Park the tractor on ievei sudace. Engage parking brake.
BELT REMOVAL
o _ Dlo,.__IGAu_Eu position.
s _ace attachment clutch in" _"=_ " '_" _'"
Move attachment lift lever fon*7ardto iower mower to its
iowest position°
Roli bait off engine pulley,
o Disconnect R.H, suspension arm from rear deck bracket
by removi;qg retainer spdng.
Wori_tbe_t off both m{_:nd_eip@ieys and idter puileys.
_ Pull bett away from mower,
BELT INSTALLATION
lnstalt new belt in reverse order- of removai.
i
7
WITH P,_;_H,..a :BRAKE _IGAG_:D
/ ...H/2,,_, \\
X
""_-..._,_._-_
NUT"A"
JAM
NUT
I
°O4 _ "'_ _,_ -
o Ma£e sure bett is in ail puNey grooves,,and'tn_:4ut,oo -_--ail betl
guides+ F]Go 22
You_ ti'actor ;s equpped with an adjustable brake system
which is mounteci ors the dght s}de of the transax!e.
if tractor requi_es more than six (6) feet stopping distance
at high speed in highest gear, then brake must be adjusted,
o Depress clutch/brake pedal and engage parking brake.
o Measure distance between b_ake operating arm and
nut "A" on brake rod,
tfdistance is o'ther than ! 4/2% ioosenjam nut and turn
nut "A" un!i! distance becomes !4/2". Retighten jam
nut against nut "A".
Road test t:actor for proper stopping distance as stated
above. Readjust if necessa% If stopping distance is
still grealer than six (6) feet in highest geaq further
maintenar_ce is necessary, Contact your nearest au,°
thorized service centen
TRANSAXL_
PULLEY
21 FtGo 23

if steedngwheelc_ossbarsa_enothorizontal(}efttorigh0
whenwheelsarepositionedstraightforward,removesteer-
ingwheeiarid(eassemDieperinstructions;nt!_eAssembly
sectiofofthismanual
Fqtj!tq _ .....,_,.=°'+"*:;_,,,=.. TO_-_dOAZ#!B!I_:R
,,, Bleck up axle secu_e-iy,
_ F:%;)move._xxLecovei, te_:2ifh_g h_ and washers I;oatow
wheel i-emo'-+'s.f,{ree_-"wheel conLf&"_s::0,sq,uare key - Do
.qot ose),
".' Rep-_ir tke and _es.ssembk-,
*: Ors tea_'wheels only; align _!c<:)ves h'_,_"earwheel hub
and axis. inse_i sGu@fe key,
_; }se:i.AaOe W:_8}q@1% aN@ st_,an ' " ' d_,_-........... _<
i;}(it_ _:J .... ; = %
_ i;:_epte, oe _!t.)(,9 oovei%
if your battery is too weak to start t_seerGk'_e_it should be
rechad@d, if ".}.'drapercabies" are used for emergency
star_in_!, blow this procedure:
,_']_-_., _, ....... Y O t JH Y"RA C i _<>;{ _ l S :::a I __*_,:'p <::_n WKH A 12
VOLT _ '-"_ _;"_"'"'-'+ _ .... SY "_Tl::l",f_
:_qc:!.a_-',__:: GROLCa);ED ........... [}-ii!_OYHER
VEHICLE MUST AL.SO 817:: i',. "ii.! VOL.Y N_'iIEGATiVE
GFiOL,_NDF.{DSYSTEM. DO NOT USE YOL;R TRACTOR
BA'rTERY T'O STARY OTHER V!EHICI...ES.
Cermec'i each end of the _"°=", ..........t,-, PF)SIJtVI;
\_/?'*"%'t'="F'v*i_"Y_ld_.i=lc"_ Ot eSOf _o._.i"_'%<:_"'5,,[eKllSq''" oate qoI',. 11ooN_l_'=r-+
aga_instchassis
_, Connect one end of the _-__,o_ " 'to.......-........ cable the NEGA-
,,,-,,,,-(.).............
,_ " +,_.- _ _,ov cable ix- good
Cor•inect the otisei" end of _._,..:..,.........-,.,...,,
C"';-4 __t;<:;t_:::.'#:wx; ': i_,q% :' " ' " "_d b_"ttam_
.,, A,. ............, ,OU,,_...., away !'t:_mfuel cariu(<._,,.... _,...,:_,._
"_"r'_.. I-s.l: _,M'_ ,, '1:1- r_ ,_ F"I _-c, iiliiVf;fi:_ 17:11 kiWI"h'_"-;[,?t11.2.]',l-i
'_ m_b+_,.4",cable 'ill'Sttrenq ciqaSsls _,""-d+.=then h'om the fully
_-_"_:::_.=...%<_."M",_*:,,.,,....,,_:.fail ftori! bath batt!f'iel.
_7
!
/
/
POS!'i"IIIE "[LRRIIl:NikL
71iG, 25
CABLES
BATTIRY
\\

TO REPLACE HEADLIGHT _ =_
o Raise hood_
o Pult bWb holder out of the hole in the backside of the
grill.
o Replace bulb in holder and push buib hoider securety
back into the hole in the backside of ._hegriii.
o Close hood,
INTERLOCKS AND AELAYS
Loose or damaged widr_ may cause your tractor to run
pooriy, stop Rmnin{:_ or prevent it from sta_ing.
,9
D ADJ
... :+:,.,# _at wiring diag;am in Repair
Check wirinft See _::"_"_:._ : ' °
Replace with 30 amp automotive-4ype D,,.,._qJrjfuse. The
fuse holder is located btmmd the dash..
TO Bai_!tOVE _4OOD A_',il© GRILL, ASS_i_aBLY
(S,.(_®#i$ 2M
o Raise hood.
Unsnap headiight wire connector.
o Stand in front oftracton Grasp hood at sides, ti_ttovvard
entwineand lift off of tractor,
To replace, reverse above procedure.
-4N
TO ADJUST THROTTLE CONTROL OABL£
(See Fig. 27}
The thro_tte contro_ has been preset at the factors; and
adjustment should not be necessaPy. Check adjustment as
described beiow before loosening cabte. If adjustment is
necessary, proceed as fot_ows:
With engine r_ot ru,qnin_, move throttte control iever
from siow (_@**)to choke ('_,) oosit:,on. Slowly inove
fewer from ono_,t (I _,,),.ofao. (_ #...;.::;4wn.
Check that holes "A" in governor centre! lever ar,_dho!e
in governor plate line-up. If holes "A" are r_otaiigned_
loosen clamp screw and move throttle eabie untiJ .qoies
are aiigned. Tighten clamp screw securely°
GOVERNOR GOV:_£_;_iOR
OONTBOL £_VE}S_ ©O_'_TROL PZ.AT£
/
¢i
o
O
F_G. 26
23

SERVICE AND ADd
TO A©JUST CARBU_3ETOR (See Fig. 28)
The carburetor isas been p_eset at the facto_j and adjust-
merit should not be secessary. However, minor adjust °
merit may be _'equiredto compensate fordifferences in fuel,
tempe_ature_ a!titude or load. If the carburetor does need
adiustment, p_oceed as follows:
!n ge,qecai, tumi_g idle mixture valve in (clockwise) de-
c re _s:sesthe suppiy of fuei to the engine giving a leaner fuel/
ai_"m,i×t_.._re.Turning the idle mix:ture valve out (counter-
c!ockwis ::).incre ¢_sesthe supp:iy of fuel to the;engine giving
a richer fuei/a;_ mi;<ture_
!WiSOF:_iTA_4T_DAMA(_£ TO THff NEEDLE VALVE AND
1'HE !}_EAT!N CAHBUf::_.L{TORMAY RESULT !F SCREW 1S
TU :I:NiLDtN TOO TIGHT,
PRELIM!:NARY SETTING -
_, Aii° clean.,.ir_ss embty paustbe assembled to the ca_bu_,
_"eto_w! ;_n __..:_:kin_.]ca_'bui-eto__adjustments,
_, Be sure the th_"ottleconti-oi cabie is adjusted properly
(see above).
With en{_iir::eoff turn idle mixtiye valve i_,_(clockwise)
ck)s;__git finger tigY£ and titan turn otat (countercleck-
F!NAL S_I}TFTi:NG-
_ Start engine and allow to warm fo__five minutes. Make
iinai adit._strt_e,:_tswith engine i-urming and shift!motion
controi ievet" in _eub'at (N) position.
,_ _4ove throt<Jecontrol ieve_ to siow(<_s_) positieno With
_inger_;]ii!ta1:ea__dho!d th_ottle !ever against idle speed
screw, sum idie speed screw !:o8.1:rain!'750 RPM_
.,, VVb_:ie:stii: hold:r:f: th_ott!e !eve:" sga:nst :die speed
sc_'ew turn idle mixture .iaive :_-_(ciockwise) until am
ji£':,eb _:_g[nsto <fiea_"_.dif:an turn ,s:,_ut(cou nterciockvd se)
:._n:::iies,:_ff_e _.ms _'oufS";. -rum :,,'alva _o a Oeird: midway
beb_vees those two positions. R@ease th_'ottb ieve[o
ENTS
A,..,._LERA __O,(_T_o T
o Move throttie control !ever from slow (_) to fast (@)
position. If engine hesitates or dies, turn idle mixture
valve out (counterclockwise) 1/8 tu m. Repeat tes_and
continue to adjust, if necessa% untii engine acceler-
ates smoothlyo
High speed stop is factom/ adjusted. Do not adjust -
damage may resulto
_MPORTANT: NEVER TAMPER WITH THE ENGINE
GOVERNOR, WHICH IS FACTORY SET FOR PROPER
ENG_NESPE_D, OVERSPEEDING THE ENGINE ABOVE
i-HE FACTORY HIGH SPEED SETTING CAN BE
DANGEROUS° IF YOU THINK THE ENGtNE_GOVERNED
i-IIGH SPEED NEEDS ADJUSTING, CONTACT YOUR
NEAREST AUTHORIZED SERVICE OENTERi
DEPARTMENT, WHICH HAS PROPER EQUIPMENT AND
EXPERIENOE TO MAKE ANY NECESSARY
ADJUSTMENTS.
\\
_DLiI_?_I_XTU_8 VALVE
_:iG_28
24

STO E
immediately prepare your tractor for storage at the end of
the season or if the tractor wil not be used fo: 30 days or
more,
_ CAUTION: Hess _"sto_e the tractor with 1
gasoiime in the tank inside a b_ldiP, 9 !
_a_h÷refumes may r_eachan ope_ fiarae
o_ spark. A!ow the engine to ¢ooI 1
before stodag ]m a,_y e_otosu_e° _
TRAC°'[OR
Remove mower from tractor for winter storage_ When *
mower is to be stored for a period of time_ clean it ti_o_,- o
oughiy, _emove atl dir% g_eas_s, leaves, etc, Store in a
clean, dry area.
_ Clean entire tractor (See "CL!AN H'qG"inthe Customer
Respo_'_s]btities section of this man_4al)o @
,_ Inspect a_!d replace belts, if necessarl (See beit re-
placement instn.sctions in the Serdce and Adjustments
section of this manual).
_, Lubricate as shown in the Customer ResponsiNlties
section of this manual
_, F3esu_e that aii nuts, bets and screws are securely
fastened, k'_spect moving palls for damage, breakage
and wear, Replace if necessuy.
0_ Touch up all rusted or chipped paint surfacesl sand
iightiy before painting.
BA T1"[£RY
<, Fuly charge the batteR1 for sto_age.
,_ Afte_ a Defied of time in s:o_a!De.,_battery ms.y_:m_<":qU'_'_"!:_
• '_ r *....
rechargiDg ....... ......
}ong pedods of storage_ batte%_ tames sqouid be
discoanected a_'sdbattery cbaned thoroughly {see '_TO
_Ji,,4Y',AIqt r:><"'_°'_'_-c" -,,! Atqi+=->_...............
romeo Resporusibiiities sec:tion of this manuai}.
,_ After cieaning, leave Rabies disconnected _7.:ndplace
cables where they oat'mot come in contact with butte%,
terrrAnals.
Be sure bat__e_ydrai_ tube is secu_eiy attached.
,_ If Dattery is _emoved from tractor for storage, do not
store batter}/directly on concrete o_"damp surfaces.
ENGINE
FUBL SYSTEM
IMPORTANT: IT tS IMPORTANT TO PREVENT GUI_a
DEPOSITS FROM FORMING IN ESSENTIAL FUEL
SYSTEM PARTS SUCH AS CARBURETOR, FU£iL FILTER,
FUEL HOSE, OR TANK DURING STORAGTZ+ ALSO,
EXPERIENCE IND!CATES THAT ALCOHOL. BLENDED
FUELS (CALLED GASOHOL OR USING ETHANOL OR
METHANOL) CAN A'TYRACT MOISTURE WHICH LEADS
TO SEPARAT!ON AND FORMATiON OF ACIDS DURING
STORAGE. ACIDIC GAS CAN DAMAGE THE YUFL
SYS"iEM OF _k' .- _ ,_r:/.tl_ ENGfNEi WHiLf._ tN ST_R,-,uE.
OrahYthe fuel t_xnk,
Start the engine and let it run until the rue! ines and
_,-_,-' °",,_''" _, empty.
,,_.,,POUI__+,,,.A,.+d%:, .
Never use engine or carburetor" cleaner products in t.h_¢
fuel tank or pe_'manent damage may occur.
Use f_esh fuel next season+
H©7'_Z: Fuel stabilizer is an acceptable altemaEve in
rrinimizing the formation of fuel gum deposits du,,:ir_gsto_'-
age. Add stabi!izer to gasoNne in fuel tank or storage
container. Always fo!low the ms' ratio found on stabilizer
container. Run engine at least 10 minutes after addk:<g
stabiiizer to aliow th,.-stabiizer to reach the carburetor. Do
not @-sinthe gas tar'k and carburetor if using fuel stabilizer..
BHGiHE OIL
D_ain oii {with engine warm} and replace with clean e.__gir',,e
oi!.. (See <'ENGtNE_' in the Customer Responsibiiities
section of this manuai),
OYLiHDIIRS
• _d_._.7_7;. _ i_,_: <...-% : ,,
'* I-=OLIF (HIe OUF]O@ Qt ei! {ilret_gF} ,<,;_IJtIi4L [3{b!i [l{)i(-j(;::;pili',,LJ
Turn i@'_itionkey to =S'TART '_positio_ lots few secou,,ds
to distribut9 oii
_* Replace with riewspark [:Aug(s).
,_ Do not s!:oi"egasoline f_om one season to anothe_ •.
o Re@ace your gasoline cap, if your can sta£s to rust,
Rust and/or <,t.i_-£in your gaso'h_e will cause proble:ns.
._ if possibIe, store your" tractor indoors and cover it to
give proteclen from dust and di_.
Cover your t_actor with a suitable protective cover that
does not retain moisture. Do not use plastic. Plastic
cannot breathe which slows condensation te form and
will cause your tractor to rus_.
!@ROW:DANT: NEVER COVER TRACTOR WHILE ENGINE
AND _XHAUST AREAS ARE STILL WARM.
25

TB
1
Wil_ not start t
_Z
I
,i
I*
9_
! I O.
i. Out of fuel.
2. E"_gine not'_CHOKED" properly.
3. Engine flooded.
,.i B_d spark p_ug,
5. Ditly .',-:_irfilter.
Dirty _uei fiiter.
Water in iuei.
Loose or damaged wiping,
Carburetor o_.xtof adjustment,
E_sginew:4'ves out of adjustment,
I. Dirtyair ti!i:er,
2. _3ad spark ptug,
3, Weak or dead beaten/,
4. Di£y fuei fitter_
5. Stale or dirty fuel
6. Loose or damaged wiring.
7, Carburetor out of adiustment.
8, Engine vaIves out o[ad]ustment.
i. Clutch/brake pedal not depressed,
2. Attaehmen_ b4utch is engaged,
3, Week o_dead battery.
4, Blown fuse.
5. Corroded battery termi_ais.
iS, Loose or damaged wiring.
7. Faulty ignition switch.
8. Fau!ty solenoid or staI1en
RR_2CT_ON
1"
&
7,
&
i! 9.
!i0.
i i.
il 2.
4,
5,
8,
:l 7.
9. Fra.uityape_ator presence switch(as), i]
sta_i: 2, Cop'reded bat!e'v;-ermnais :i
3. Loose o,_damaged wiling, i
4. F_.uit7 eoian@d O_'star{at. :!I
:1
;::ill fuel tank.
See 'TO START ENGINE" in Operation se.c_ion.
Wait severaI minutes before attempting to start.,
Rap!ace spark ptug,
Clean/replace air filter,
Repiaee fuel litter,
Drain _ueftank and carburetor, refill tank witis fresh
gasotine and replace fuel filter,
Check all wiring,
Contact an authorized sewice centeddepa£ment.
Contact an authorized sen/ice centeffdepaftment,
Cleanirepface aiT filter,
Replace spark ptug.
Recharge o__replace battery.
Replace fuel filter,
Drain fuel tank and refilt with fresh gasoline.
Check nil wiring,
Contact an authorized service eenteridepaAn-_ent.
Contact an authorized service center/depa_ment,
[[ t, Depress ctutchtbrake pedal,
2. Disengage attachment clutch,
i 3. Recharge or replace battery.
! 4. RepIace fuss,
I 5, Clean batte_iterminals.
I 6. Cheek atl w}ring,
7, ChecWreplace ignRion switch,
_] 8, Cheeklreptace solenoid or sfarter.
9. Contact an authorized service centeddepa£ment.
I, Recharge or _'ep!ace battery.
2, Clean batte! 7 terminals,
3. C.h,ck n!l wiring.
4_ CheeWreplace sotenoid or sled:at.
;[ t. Cu_}n,s _oo much grass/too _ast.
2. 'Th_'ottle it" "CHOK:E" position.
:)
I 4 Dirty aftPiker,
4
;i 5. L,ow oil ,.. _,_.,/-,,,_,,,voil,
iJ £ F"_ ", ....... " : 7
! 7 Didy fuei _itfer.
i 8. Stale o_ di£y fuel.
iJ 9. Water in iuet,
I0, Spark plug wi_e loose.
tl, Di£y engine air screenfiins,
i2, DirWiclo_,ged muffler,
!3. Loose o_ damaged wiring.
14. Carbureto_ out oFadjustment.
! 5. 8.ngine v'_.ives out of -:&d!ustment,
I. Worn, bent orloose blade.
2. Bent b$ada mandrel,
8. Loose/damaged part(s),
i, Setin "Higher Cuff positierdreduce speeci.
2, Adjust thro_ie control,
3, Clears underside of _ssowerhousing.
4, Clear#replace air filter.
5. Check oil level/change oiL
6, Clean and regap ot change spark p_ug,
7, Replace fuei f[tte_',
8. Drain fuel tank and refill with fresh 9asotid'e.
9. Drain fuei tank .and carburetor, refilt tank with fresh
gasoline and replace fuel fitter,
10, Connect and tighten spark plug wire,
1!. Clean engine air screenf[ins,
12, Clean/replace muffler,
I3. Cheek all wiring,
I4. Contact an authorized sen/ice center/department.
!5, Contact an authorized sen/ice center/department.
i. Replace blade, Tighten b!ade boit,
2, Replace blade mandrel,
8. Tighten loose pa_(s). Replace damaged parts,
28
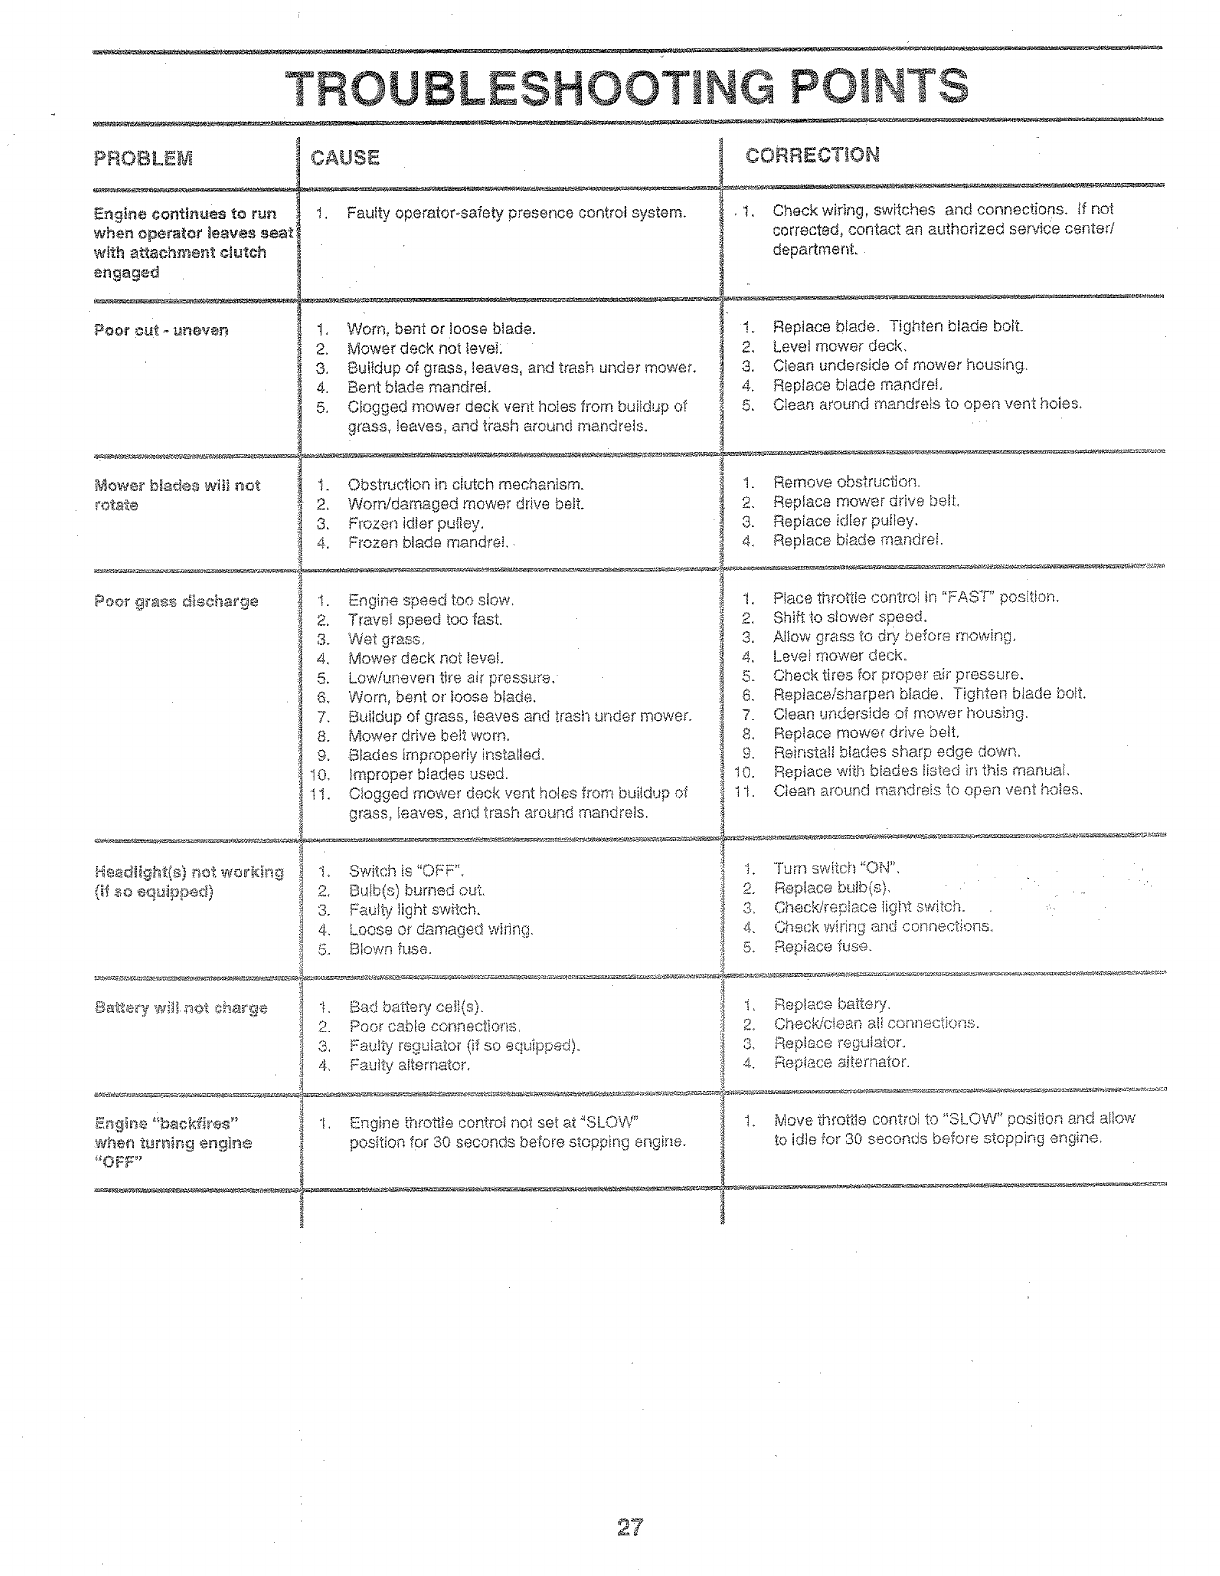
TROUBLESHOOTING PO
PROBLE_
Engine contin_ee to run
when operator leave_ seat
with attachment clutch
engaged
PO0{ OUt _ L_f'_'.ven
CAUSE
t_ Faulty operatorosafe[y presence control system.
1. Worn, bent or loose btade.
2. Mower deck not IeveI:
3. Bui{dup of grass, leaves, and trash under mower.
4, Bent biade mandrel,
5. Clogged mower deck vent he;as from buildup of
grass, leaves, and t_ash around mandrels,
CORRECTION
,1, Check wiring, switches and connections. If not
corrected, contact an authorized service center/
departmenL
i, Replace blade. Tighten blade bolt,
2, Level mower deck,
3. Clean underside of mower housing.
4. Replace blade mandret,
5, Clean around mandrels to open vent holes,
_lowe_ btades will not
;'orate
Poe_ 9_ass discharge
I, Obstruction in clutch mechanism.
2, Worn/damaged mower drive belt.
3. Frozen ldter puiley.
4.. Frozen blade mandrel
t. Engine speed too slow.
2. TraveI speed too fast.
3. Wet grass,
4, Mower deck not tevel,
5. Low/uneven tire air pressure,
8, Worn, bent or loose bIade.
1. Remove obstruction.
2, Replace mower drive bell
3. Replace idler puIley.
4. Replace Made mandrel
1. Place throttle centre! in "FAST" pos[tion.
2. Shif[to slower speed.
3, Ai!ow grass to dry' before mowing,
4, Levetmower deck.
5, Check tires for proper air pressure,
6, Replace/sharpen blade. Tighten blade bolt.
7. Buiidup of grass, ;eaves and trash under mower,
8. Mower drive belt worn,
9, BIadesimpropedy installed.
I0, Improper b!ades used.
11. Clogged mower deck vent holes from buildup of
Headlight{a) net werki_'_9
(if so equipped)
£ngi_e 'ibackfires"
when turning engine
"OFF"
grass, !eaves, and trash around mandrels.
7. Clean underside of mower housing.
8. Rap!ace mower drive belt.
9. Reinsta!I blades sharp edge down.
10. Repiace with biades Iisted in this manual,
11. Ctean around mandrels to open vent hoies,
I° Switch is {'OFF'L
2, Bulb(s) burned out,
3, Faulty Iight switct_,
4. Loose or damaged wiring,
5, Blown fuse.
I. Turn switch "ON",
2, Replace bulb(s),
3, ChecWreplace fight swkch.
4, Check wiring anti connections,
5, Replace fuse,
I. Bad battery ceil(s), i, Replace battery.
2. Poor cabfe connectior_s, 2, ChecW'eiea_ all cor_nect}oqs.
3, Fautty reguiator {if so equipped), 8, Repiace regt'tator_
4, Faulty alternator. 4, Replace aiternator.
t. E_gine th{o_te control not set at _'SLOW"
position for 30 seconds before stopping engine.
1. Move thtottIe control to "SLOW" position and allow
to [die [or 30 seconds before stopping engine,
27

SERVICE NOTES

TRACTOR oo MODEL NUMBER 9! 7°256451
SCHEMATIC
RED °I I °
oll!o
BATTERY
BLACK
RED
WHITE
f
TFiS --. -
Bs
}GN1TIONSWITCH
BLACK
M B
FUSE 30 AMP.
r _ _ -- _[_
f-o o '_
k t
CLUTCH /BRAKE
(PEDAL UP)
BLACK
BLACK
P
i
[
---_,-J IiiLs-T........ ,._,@ .............@
: d@. S:rAm-ER i
i J
j SOLENOID
I
! WHITE
I
E I
i,} I
>7,kj .j_-_:.,._----
"-_--" A_'MENT CLUTCH ]
.... (CLUTCH OFF) l
SEAT SWITCH
(NOT OCCUPIED)
iK-'_ F'h _ F
q _,sNmoN:1_-
GROUNDING
,_.ONNb......ut.,
CHARGING BYSTEM OUTPUT
3 AMP OC @ 3800 RPM
\
IGNITION SWITCH
POS_T1ON
OFF
ON
START
REB
---4_.-- NON-REMOVABLE ---¢_--- REMOVABLE
CONNECTIONS
NOT_
YOUR TRACTOR IS
EQUIPPED WFrH A SPECIAL.
ALTERNATOR SYSTEM.
THE LIGHTS ARE NOT
CONNECTED TO THE
BATTERY, BUT HAVE THEIR
OWN ELECTRICAL SOURCE.
BECAUSE OF THIS, THE
BRIGHTNESS OF THE LIGHTS
WILL CHANGE WITH ENGINE
SPEED, AT IDLE THE LIGHTS
WILL DIM. AS THE ENGINE IS
SPEEDED UP, TIdE LIGHTS
WILL BECOME THEIR BRIGHTEST.
PLLJG:: @ .... _;_
i
28 VOLTS AC M_N. @ 3600 RPM l
(CHARGING SYSTEM D_SCONNECTC:B)
t
i
LIGHTING SYSTEM i
OUTPUT D_ODc:
%\.
i_ 14 VOLTS AC IRWIN. @ _00 _PM (L,_*]HT_ OFF}
,,1° HEADLIGHTS
i ........
HEADLIGHT
SWITCH
(OFF)
W_RING INSULATED CUPS
NOTE: iF WIRING INSULATED
CLIPS WERE REMOVED FOR
SERVICING OF UNIT, THEY
SHOULD BE REPLACED TO
CONN_.CTIONS PROPERLY SECURE YOUR WIRING.
29

REPAIR PARTS
ELECTRICAL
TRACTOR ,_oMODEL NU#aBER 917,25645!
7O
i
43
36 38
I
I
39
I
is_
I

REPAIR PARTS
ELECTRICAL
TRACTOR o °, J ODEL NUMBER 9t7o25645t
KEY PART
NO. NO, DESCR_PT._ON
.1 146139
2 74760412
3 STD551025
4 STD551125
6 STD54i025
7 t09238X
8 t44940
9 109596X
15 147688
I6 153664
19 STD55tI25
20 78350400
21 136850
22 4t52J
24 4799J
25 146147
26 108824X
28 420_j
29 121305X
30 144921
31 140400
32 141226
33 140403
34 1t07!2X
35 140336
36 S°TD6O1005
39 I09553X
40 146057
4! 71110408
43 145673
44 73640400
48 140844
49 153249
70 140413
Battery t2 Volt 25 AMP
Bolt Hex Hd I/4-20unc X 3/4
Washer 9/32 X 5/8 X 16 Ga
Washe_" Lock Hvv Heiicaf t/4
Nut Fin Hex I/4-20 Unc
Tube P!astic 12'I
Case Battery wi2 HoJes
.Clamp Hose Olive
t
roas.ener Snap- in
Switch Interlock Push-4I-I
Washer Lock t/4
Nut Jam Hex 1/4_20 Unc
Harness Asm Light Wi4152j
Bulb Light #! 156
Cable Batten/8 Ga ! I" red
Cable Battery i3 Ga red w/16 W}_e
Fuse 30 AMP Auto Green
Cable Ground 6Ga t2" black
Switch Plunger Nc Gray
Switch _gn 3 pos
Nut Ignition
Cover Sw Key Btk 1 25 Text SLZ'
Key tgn Molded Craftsman
Switch Light Btk 5!k Red
Bracket Switch !ntedock
Screw Tap Hex #10o24_xncX i/2
Switch lntlk Ci_JtchRed 4 Term
'_ < " <_"Lt IPC
t-_mes,, Ign Da,_, Mch 95
Bdt BIk, Fin Hex !/4o20 Uric x _/2
Cove_ Terminat Red
Soie_;oid
Nut Keps Slk H:× 1/4o20 U_qc
Adapter Ammete__Recta{_g_da¢
Washer Pinned DeJta
Harness Engine B&S5
N©'(E: A_tcomponent dimensions give in UoSo inches
I inch = 25_4 mm
31

R...PA_RPARTS
TRACTO_ MO#SL NU_IBER _J.7.25645t
CH ' @
. ASS_ AND £NCLOSUR£S
14
3S 10
2"1
\ 22
\_ \
\
28
\
3
\
/
34.
14

REPAIR PARTS
TRACTOR o o MODEL NU IBER 917o256451
CHASSIS AND ENCLOSURES
KEY PART
NO. NOo DESCRIPTION
1 151169
2 140356
3 17490612
4 STD55t025
5 146077
6 145208X015
7 124027X
8 12647IX
9 t46757X0t3
!t 146956
13 I46961X0t2
I4 17490608
I5 74180512
16 STD541431
!7 t31445X4t7
18 t26938X
!9 1752131O
21 122933X
22 124479X
24 STD523710
25 19131312
26 STD541437
27 17030814
28 t40"135
29 124029X
30 !09872X417
31 136619
33 I05476X4t7
34 105475X4!7
35 STD533707
38 139888
39 i3D887
60 72140606
74 73680600
i00 105037X
140 150556
-- 5479J
Chassis Weldment 1Iga 1996
Drawbar Stretch
Screw Thdrot 3/8-16x3/4 Tyott
Washer t3/32 x 3/4 x 16 Ga.
Bumper, Snap In
Saddle Sitkscrees F_tSdf 5Sp D4360
Heat Shield Sloped Hood
Clip Line Fuel !3/32 Mtg Hote
Dash bflkscreen®q Sears EngiSy
Panet Pnt Dash Lh
Panel Slkscr Dash Rh Weldment
Screw Thdrot 3/8-t6xl/2 Ty-tt
Screw Mach Trhd 5/16-i8uncx3/4
Nut Keps 5/16-18 Unc
Hood Asm Pnt
Bumper Hoed
Screw Sltd Hex Hd w,@i Washer
Rivet Ratchet Nylon
Washer Nylon B!k 28× 75x 19
Bolt Fin Hex 3/8-16unc X t
Washer 13/!6 X 13/I6 X !2 Ga
Nut Lock 3/8o,16 Uric
Screw, Hex Head, Spidefiock #8 x "7/8
Gdlte Gray
Lens Headlight Bar CIear
Fender Pnt
Bracket Pat Fetsder
Footrest Pnt Lh Peff
Foo!rest Pnt Rh Peff
Boit Rdhd Sht Sqnk 3/8-16 X8/4,
Bracket, Asm_ [:_ivot, L.H. Mowe: ;£ear
Bracket, Aan_._oPivot, R.H. _i_ower Rea:_
Boit Rdhd Sqnk 3/8-16 x 3/4
Nut Crownlock 3/8_!6
Stfip_ Foam 18"
Bracket Chassis Front 7 Ga.
:Plug B_sttonSlk 359 Dia
NOT_: All component dimensions
t inch = 25,4 mm given in U,8, inches
33
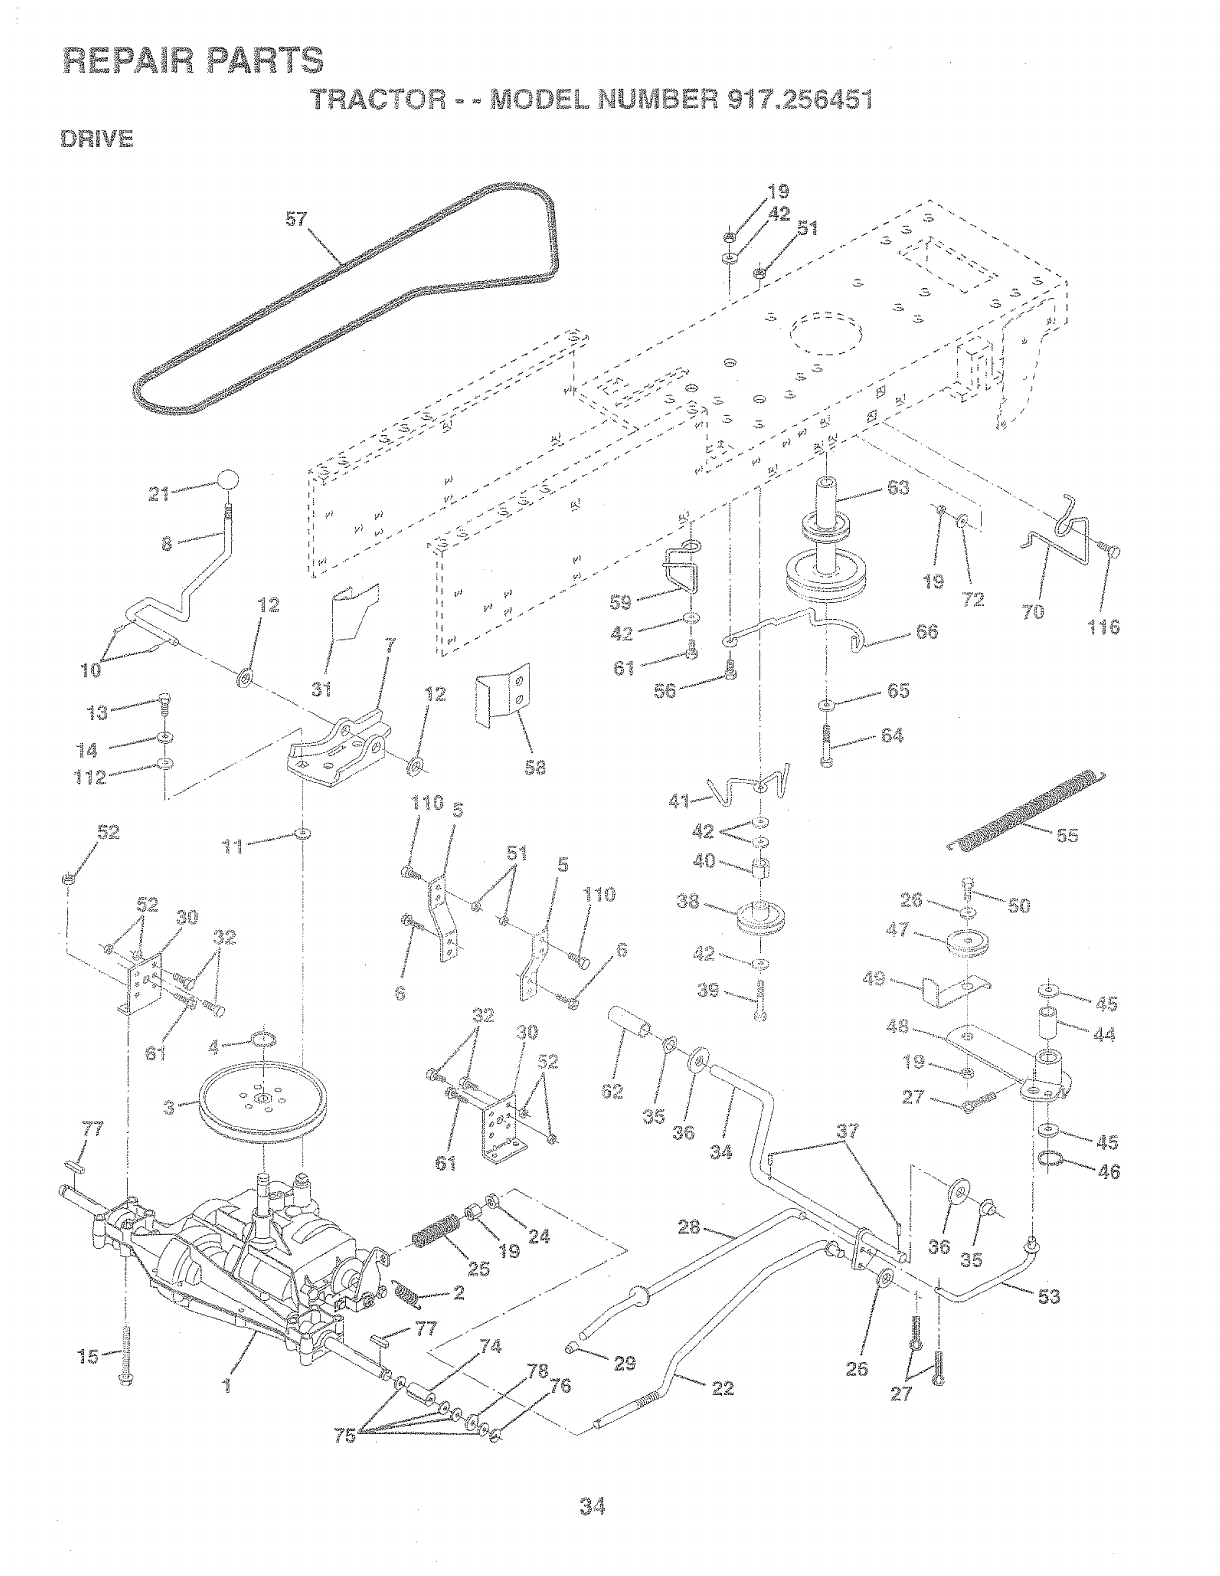
/
/
53
22
3_

REPAIR PARTS
RAO OR fiO:©EL NUMBER 917o2 645
DRIVE
KEY PARY KEY PART
NO, NO, DESCRIPTION NO, NOo #ESC_-31PTtON
Washer t3/32 X 13/t6 X I2 Ga
Beadr_gNyi 503X 628XI 25
Washe_ Hardened
Ring Klip #t5304,-50
Pulley !dler V Groove Plastic
Be!lcrank Asm
Retainer Belt Style Sprir_g
Bolt Hex Hd 3/8o16unc X !_-1/2
N' d.Cf'owRtook o/,__1u tJnc
Nut Lock 5/16-!8 Ur!c
Link Clutch 7 66
Spring Return Clutch 675
Bolt Fin Hex 3/Sd6unc X I-!/4
V-bett Ground Drive 95,25
Keeper Belt Rh Lt Pntizinc 16g
Retainer Beit......Chassis Lh _"_..inc
Screw Thclro! 318-i 6x3/4 Ty-tt
Cover Pedal Blk ,_ta""
Pulley FAngine
Bolt Flnhex 7t16-20 x 4 g5
Washer Lock b!vy i-qJc!Spr 7/t6
Keeper Be_t Engine Lh L.t
Guide Belt D_'Mower Rh
Washe_' 13/32 X 1_i/4 X t2 Ga
Spacer Spilt _80xio94
V,lao..... ,,,,v._I" _;6.,:.JlO,( 1 ,<q. X Ga
Rir_g _71#5i 33.,,75
Key Square 2 0 X 184.5/t865
Washer '25/3:.__,.'_I 5i8 X .....',bga
Bolt F:in Hex 3/8.d6 x 3/4.
Vw::_r,e_,,'a_, )(_;/,__z 314 i_,vI0 <"a
Bolt Rdhd Sqnk 3/8.d 6 x i,25
35

REPAIR PARTSTRAC_TOR _ -, MODEL NUMBER 917o25645I
ST_£ER_NG ASSEMBLY
$2
\
<JJ
'_."*",7"..... 39
LL'
' _ 42
[
\\
,-..>_ , 4.[)!_Z__, I
ff_ to
47
3O
! 4\
36
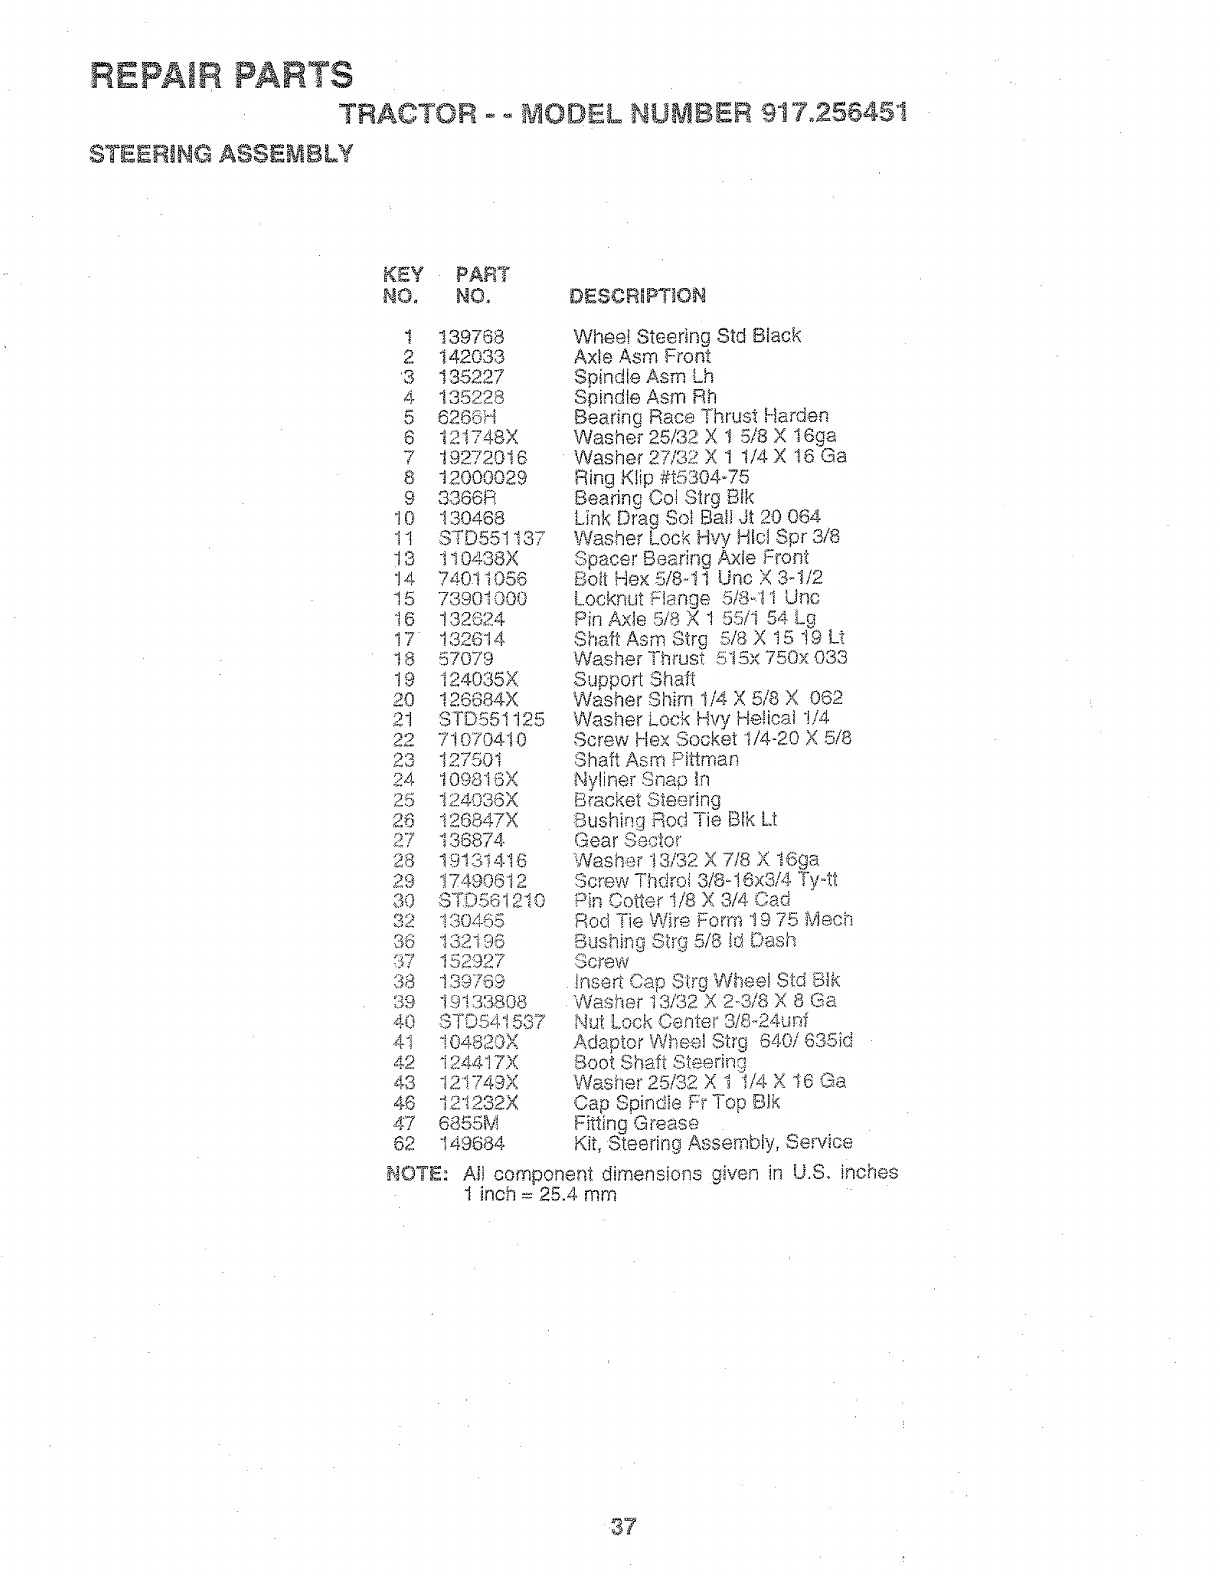
REPAIR PARTS
"TRACTOR o o MODEL NUMBER 917o256451
STEERING ASSEWBLY
KEY PART
NO. NO, DESCRIPTION
I 139768
2 142033
3 135227
4 135228
5 6266H
6 121748X
7 19272016
8 120O0O29
9 3366R
10 130468
11 STD551!37
13 110438X
14 74011058
15 73901000
16 132624
17 132614
t8 57O79
t9 124035X
20 !26684X
21 STD551125
22 71O7O410
23 1275O1
24 !09816X
25 124036X
26 !26847X
27 138874.
28 !91314.16
29 17490612
30 STD56'I210
32 !30465
88 132196
37 152927
38 139769
39 I9!33808
41 !04820X
42 i24417X
43 121749X
48 121232X
47 6855M
62 "149684
NOTE:
Wheel Steering Std Black
Axle Asm Front
Spindle Asm Lh
Spindle Asm Rh
Beadng Race Thrust Harden
Washer 25/32 X 1 5/8 X 16ga
Washer 27/32 X 1 I/4 X t6 Ga
Ring Ktip #t5304°75
Bearing Col Strg Bik
Link Drag Sot Ball Jt 20 064
Washer Lock Hvy Htcl Spr 3/8
Spacer Bearing Axle Front
Bott Hex 5/8-! 1 Unc X 3-!/2
Locknut Flange 5/8-t I Uric
PinAxle 5/8 }4 1 55/'i 54. Lg
Shaft Asm Strg 5/8 X 15 19 Lt
Washer ThnJst 5t5x 750x 033
Support Shaft
Washer Shim t/4 X 5/8 X 062
Washer Lock Hvy Helical t/4
Screw He>,'Socket 1/4-20 X 5/8
Shaft Asm Pittman
Nyliner Snap In
Bracket Steedng
:Bushing Rod Tie Blk Lt
Gear Sector
Washer t3/32 X 7/8 X t6ga
Screw Thdroi 3/8-t6x3/4 Tyott
Pin Cotter I/8 X 3/4 Cad
Rod Tie W}re Form t9 75 Mech
Sushisg ocg 5/8 td Dash
Screw
!nseri Cap S(rg Wheel Std B]k
Washer t3/'32 X 2_8/8 v_ 8 Ga
Nut Lock Center 3/8_24un:_
Adapter Wheel Strg _'_'
,_'_u/835id
Soot Shaft Steering
Washer 25/32 X 1 !/4 X I6 Ga
Cap Spindie Fr Top BJk
Fitting Grease
Kit, Steering Assembly, Service
Alt component dimensions given in U.So inches
! inch = 25.4 mm
37

REPAIR PARTS
TRAC ?' U BER 9i7.2564,5t
SEAT ASSE_IBLY
_J
J
i
I
i
2¢%.
\
-!- _<.
q
@,,
"%
",,<\ 23
17 i2
2t
K_Y
NO,
1
2
3
4
5
6
7
8
9
!0
12
t3
151205
140551
STD523710
19131610
145006
STD541437
124181X
i74.90616
19131614
140552
!2t246X
121248X
DBSCRIPTIO_I
Seat V350
Bracket Pnt Pivot Seat (btk)
Bolt Fin Hex 3/8-t6unc X I
Washer t3/32 X 3/4 X 10 Ga
Clip Push In Hinged
Nut Crownlock 3/8-16 Unc
Spring Seat Cprsr_ 2 250 B_kZi
Screw Thdrot 3/8-16 X I Ty°tt
Washer t3/32 X I X 14 Ga
Pan P_t Seat (b k }
Bracket Pnt Mour_ti_sgSwitch
Bushing Snap B_k Nyi 50 td
_ZY PART
NOo NOo D_SGR]PT!ON
14 72050411
I5 134300
t6 121250X
17 t23976X
t8 I24238X
2t t53236
22 STD54!431
23 74780814
24 '19i7'I9i2
25 1270'18X
26 STD55It50
BIOT£:
Bolt Rdhd Sht Nk 1/4-20x1-3/8
Spacer Split 28 X 96 Zinc
Spring Cprsn 1 27 Bik Pnt
Nut Lock i/4 Lge F_g Gr 5 Zinc
Cap Spring Seat
Bolt Shoulder 5/16-18 Unc BIkz
:Nut Crown Lock 5/16-18
Bolt Fin Hex 1/2-13 X 7/8 Gr 5
Washer 17/32 X t-3/16 X t2 Ga
Bolt Shoulder 5/16-18 X 62
Washer Lock Hvy Hlcl Spr 1/2
AI componer:_t dimensions give_ in U.S. inches.
I i_ch = 25.4 mm

REPAIR
DECALS.
9
PARTS
TRACTOR oo MODEL NUMBER 917,256451
14 17 8 6 3 7 21 7 4 8 14
\
5
\I1
I 5 I8
\t3
t0
KEY PART
NO, NO,
1 138955
2 272936
3 151815
4 151816
5 i32674
6 i3364.4
7 142249
8 t42252
9 125880X
10 1495!6
1i 137537
KEY PART
DESCR!PTION NOo NO,
Decal Instruclion Operat Eng 12
Decal Engine 12.5 Hp B&S _C Cra:_ts 13
Decal Hood Slope Rh Craftsman 14
Decal Hood Slope Lh Craftsman t5
Decal Grille 16
Decal Maint Customer Sears Dora !7
Deca! Panel Side _ic i8
Decal lnsed. Hood Bik 21
Decai Fender Craftsman Red .-
Deca_ Btry DngdPsn Eng, Acme -
Decal r. ,.,
_,,au_on EnglishlSpanis
4900J
146o46
105809X
136832
! 4.0837
133179
131265
13831 t
t539t7
t r<or_ 8
DESCRiPTiON
Decal Clutchib_ake Engiish
Decal \A,be!t Dr Sch Tractor
Decai Chassis 5 Sp 38"
Decai Mower Drive Schematic 38
Decai, Brake Parking Saddle
:,eca.,_ ,.,ap CNSMR help u_
Decai Mower Qc System
Decal Lightbox
Deca! Lift HandIe
Manuai_ Owner's (,:£ng!ish)
Manua!_ Owners (Spanish)
\
4,10
1t
KZY PART
NO, NO, DESCRIP'T_ON
1 59192
2 65139
3 106222X
4 59904
5 I06732X417
6 278H
7 9040H
8 106108X4t7
9 124635X
10 7t52J
1I I04757X
-_ 144334
Cap Value Tire
Stem Vatue
-Fire F Ts 15 X 6 0 _6 Service
Tube Inner Front #35060
Rim Asm 6"front White Sewice
Fitting G_ease
Bearing F!ange
Rim Asm 8"rear White Service
TiTe R Ts 18x8 5-8 Service
Tube Rear 9 5 X 8 Service
Cap Axle Blk t 50 X 1 00
Sealant, Tire (10 oz. Tube)
NOTE: A!l component dimensions given in U.S. inches,
l inch = 25.4 mm
39

REPAIR PARTSTRACTO_ o _ MOD_L NUMBER 9t 7°2564_
ENGINE
3
(
! i
i12
i
/
13 /
4
4O /
29
t OPTIONAL EQUIP_1_NT
! Spa_:k A_'este_
t
_5
4O

REPAIR PARTS
TRACTOR °°MODEL NUMBER 917.25645t
ENGINE
KEY PART
NO, NO. DESCRIPTION
t
2
3
132759
17720410
150453
4 137348
t3 272293
!4 13280324
15 13200300
16 STD551237
23 t50554
29 137180
31 109202X
32 128549X
33 i23487X
35 17490512
37 137040
38 ......
40 124028)(
44 17490412
46 19091416
62 STD55113I
72 71O70512
78 17490620
81 128861
NOTE:
Control Throt Rh BIk Pd115 10
Screw Hex Thd Cut 1/4-20x5/8 T
Engine B&S 10.5-t2.5 _C, DC
Model No. 289707, -0179-01
Muffler Exhaust B&S Lt
Gasket 1 313 td Tin Plated
Nipple Pipe 3!8 Npt X 3"
E_bow Std 90 Degree 3/8-t8 Npt
Washer Lock Ext Tooth 3/8
Shield Browning
Arrestor Spark
Tank Fuel t 25 Fr
Cap Asm Fuel W/sym Vented
C_amp Hose Btk
Screw Thdrol 5/t6-18 x 3/4
Line Fuel 20"
Ptug Oil Drain (Order From Er_gine
Manufacturer)
Bushing Snap Nyt Btk Fuel Line
ScrewHexwsh Thdml t/4o20x3/4
Washer 9/32 X 7/8 X t6ga
Washer Lock Hvy Hlcl Spr 5/16
Screw Hexhd Cap 5/'I6oi8x3/4
Screw Thdrot 3/8-16xt qi4 Tytt
Nut Ftange I/4-20 Starter Nut
Altcomponer_tdime;_sionsaiven _n.... ._, ,,,........
I inch = 25.4 mm
41

REPAIR PARTS
T_RAC°t"OR °- £JIODBL NUMBER 9!7o25645t
L]Fi"
7
5
@
4
32 !9
18,
3
,\2
8
42

REPAIR PARTS
TRACTOR oo MODEL NUMBER 917o256451
L_
KEY PART
NO. NO. DESCRJPT)ON
I 138973 Rod Asmo Lever
2 122507X Shaft Asm. Lift
3 ,105767X Pin Groove
4 12000002 E Ring #5133-62
5 19211621 Washer 21/32 x 1 x 21 Ga,
6 120183X Bearing Nylong
7 I2563IX Grip Ha_dfe Fiuted
8 122365X Button P_unger Read
10 122512X Spring Cprsa
11 t39865 Lift Asm, Link LH
12 t39866 UR Asm. Link RH
t3 4939M Reta;ner Spring
15 127218 Link Fron_
t6 73350800 Nut Jam Hex 1/2-13 Unc
17 130171 Trunnion BlkZinc
18 73800800 Nut LockWiWsh 1/2q3 Unc
t9 139868 Arm Suspension Mower
20 3146R Ftetainer Spring
31 t40302 Bearing, Pvto Lift, Spherical
32 73540600 Nut Crownlock 3/8-24
NOT£: Aft component dimei_sions given in U,S. inches
1 inch = 25,4 mm
43

_:PAtR PARTS
TRAOTOB - o _oaO©£L NU-_ZaB:R 9t7o255451
_aOWER
4O
I
2 .... 8_
i
II
b/
15
29
t
44

REPAIR
£8OWER
PARTS
TRACTOR-- MODEL NUMBER 917.256451
KEY PART
NO. NO.
1 142829
2 STD533t07
3 t380I7
4. 138440
5 4939M
8 130832
8 850857
10 140296
1I 134148
i2 129895
"_q,,_137645
14. 128774
'i5 1!0485X
16 t40329
19 13282'7
2'1 8TD54143I
_.o t37807
24 105304X
25 i237i3X
26 110A52X
27 t06738X
28 19111016
29 !06735X
30 t38'7'76
31 129988
32 153532
33 i37265
:!)8 i :31494
4.1 13355I
4.8 ! 33504.
-4.5 ",-:-.m_.,'> ' ".qe
53 13.084,0
54. i $3943
55 i83840
KEY PART
DESCRIPTION NO. NO.
Mower blousing Assembly 56 122052X
Bolt Carriage 5/16-I8 x 3/4 67 149848
Bracket Asm. Fram Sway Bar 38/.42 68 144200
Bracket, Asrno Deck Sway Bar 38" 69 _ _D._60907
Retainer_ Spring 7t 142427
Asrn. Suspension Rear 72 !3t870
Boit, Hex 3/8-24 x !-I/4 Grade 8 73 127847
Washeh Lock, HW Htcl Spring 3/8 74 12t748X
Washer_ Hard B!ade Mower Vented 75 12000029
Blade, Mower, M@ching 38" 75 128909
Bail Bearing 77 127845
Shaft and Bearing Assembly 78 140384
(b3ctudes Key Number I5) 79 !27498
Mar@tel Housing, Vented 80 153701
Bail @eaSng, Mand_ei 81 73350600
Stdppe_= Meweh Vented 82 142028
:SOILShouider 88 783ij
Nut, C;owniock 5/18o!8 87 128772
Bracket, Mower Deflector 88 19t 1I2i 6
Cap, Sleeve 89 19133612
Spring. Defie(;tor 92 73800600
NuL Push 107 133502
Shie!d_ Deflector !08 133503
Washer !I/32 x 8/4 x16 Gauge 109 74760640
Rod, ._--_"_',.,_,se 1! 0 i 42587
Sc_ew_Yhdf"ol He× Hd 1t3 174905't2
Washer, Spacer
Putey, Mandrel 122 131289
Nut, Fb.qgeiock 9116 123 t3i 288
Pulley, tcileh Fiat 'I1...{4.STDS33717
Nut, Crownlock 3/8-16 128 i53390
Rod, Pivot .... t 30794.
Rod, Ctutcl% Secondary
Retaineh Sprin9 - .. 142820
B_aXe Assembly
_Nasher Hs.rdeaed
!dler Arm Assernbiy
DESCRIPTION
Spaceh Retainer i-3/4
Knob
Beit
Pin_ Cotter 3/32 x 3/4.
iqed, Clutch, Primary
Spring, Re_um
Arm, Ck;_ch, Secondapy
Washer 25/32 x I,,,5/8 x I6 Gauge
Ring, Klip
B.O[t, o{10 UICk-:,
_(eeper, Spring
A_]"a,Clutch, Prima%_
Bushing
Spdng
_\' _ Jam 3/8-48 UNC
Trunnion Adj 94
Runner, Li-._
Runner, RH
Washer 'ti/32 x 3/4 x 15 Gauge
Washer I3/32 x 1 x 12 Gauge
Nut Lock Hex W!h_s 3/8-16 UNC
Spacer, Retainer
Stifferler, tdier Arm
So!t, Hex Head 3/8-t6 x 2-i/2
Upsto9 Deck Front 38"
Screw, He:( Head, Tied. Roll.
5/I8-1.8 x 3/4
!qod, @rak% LH
Rod, @_aKe,RH
Soft., C_arlia.ge 8t8-i6 x 1-814
Washer f-"ht
_='-,_d"<"'....... '" _" (inc!.,Jdesivt_.n.x_,I.,'._,.>,>efa_.,._y _<ey
Nur_ibe!'s I2-!5, '17-I 9, 81 and 33)
iY!ow®rf_e_<'k ,_",_,,.,,.....@'_:q-':'_.,..,
HOT[(: AI oompone!st dhnensions giver,, in U.8. k_ches
45
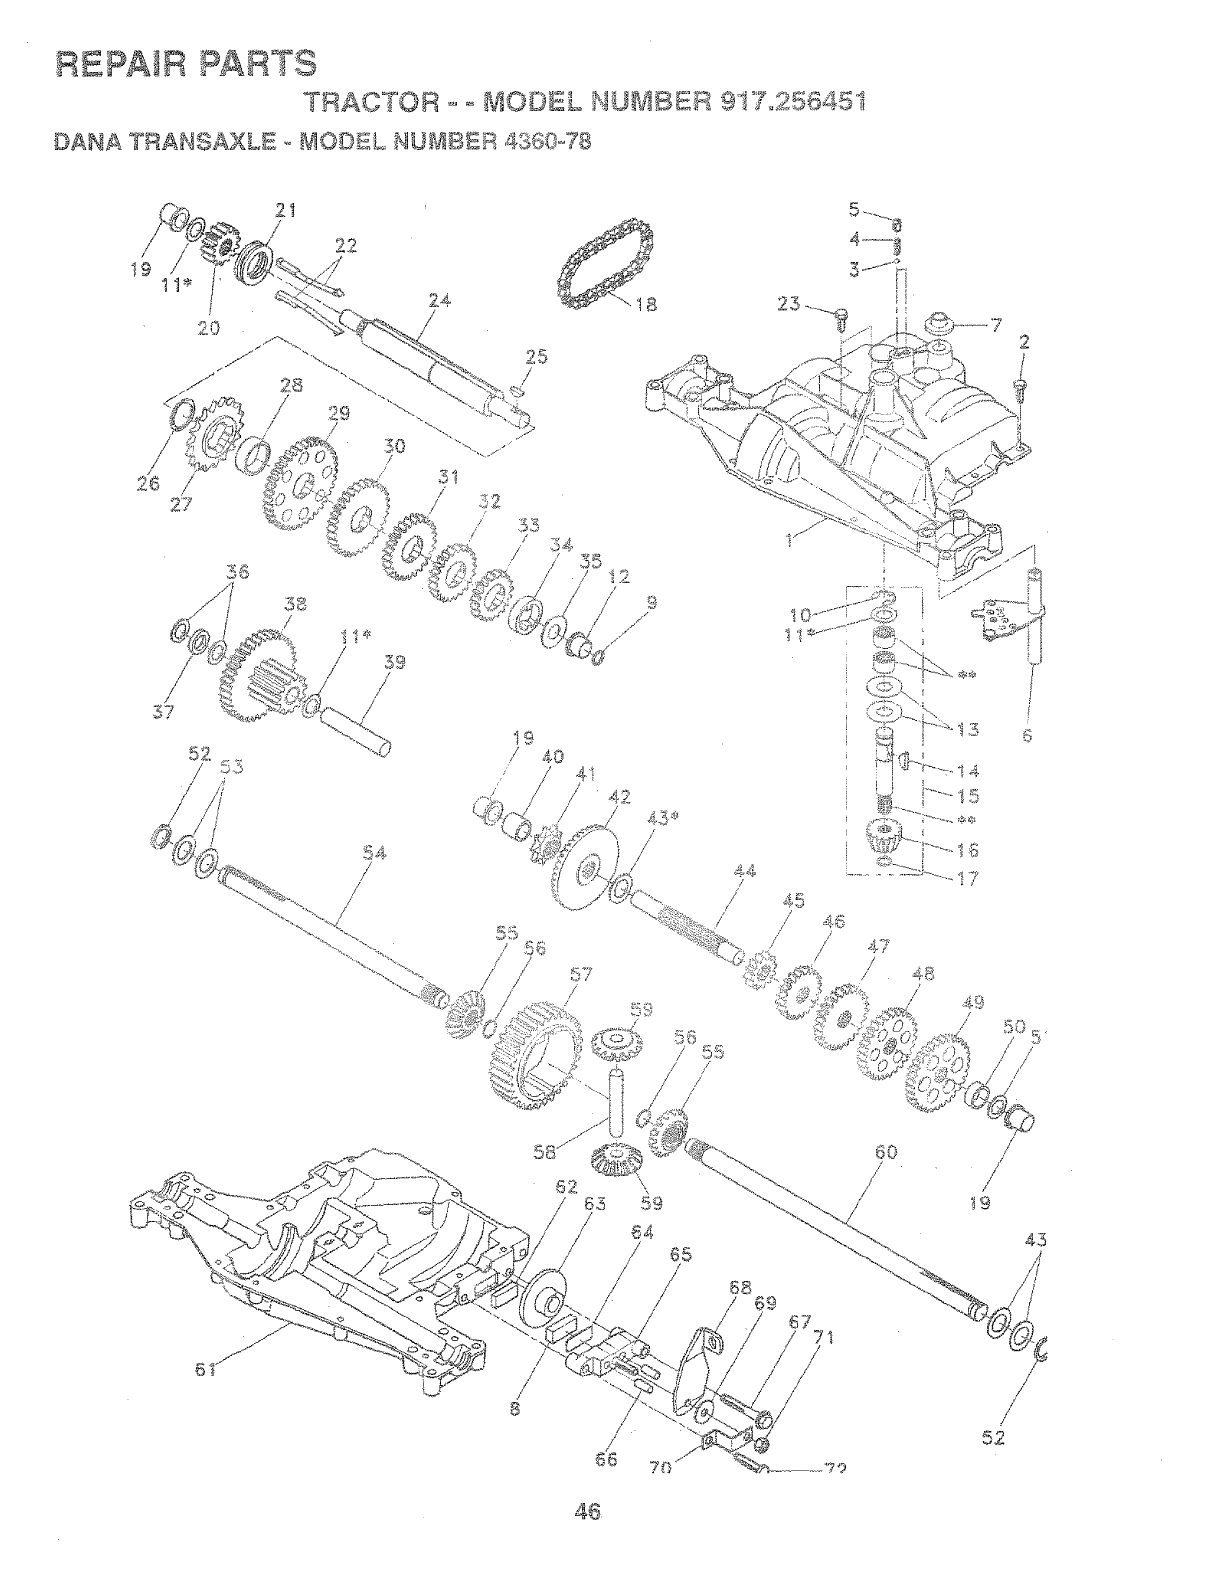
REPAIR PARTS
TRACTOR o-_ MODEL _UMBER 9, Z°2.o4_3 _I
DANA ° e # ,_ -o_.7RAN<-_AXLo_ _.L!ODEL NU_BER ,_;_G0,q8
52
<'<_:'.% /
/
/
I9 40 41
42
t4
i t5
4,5
/
/4_
/47
/
/48
46

REPAIR PARTS
TRACTOR -- MODEL NUMBER 9!7o256451
DANA TRAHSAXLE- _ODEL NU_IBER 4360-78
KEY PART KiT PART
NO. NO, IISOIIP'I"IOH NO, HO,
! 142671 Housing, Upper
2 2274J Screw, Self-Tapping, Large
1/4o20 × .734
3 134400 BaH, Detent
4 !05904X Spring, Detent
5 t05905X Screw, Set
6" 138235 Kit, Shifte.r Assembly
::>[ hte_
7 '_'_o",o_'_"_°C_ Boot, " '- °'_ "
8 I2095iX Puck, Fdction
9 143045 Seal O!
10 142672 Ring, Retaining
tt 134793 * Assemb% Kit Shim °625 Shaft
t2 143051 Seadr% F}ange
13 !20415X Washer, Plain °632 x t.38 x °046
14 1426,74 Key, Woodruff, #9
15 t38234 Assemb!y, Kit Input Shaft
16 tI0078X Pinion, Bevel, 14 Teeth
t7 !05909X Ring, Retainhs9
18 -s,,_:¢q-_v,,,,.,_o_,_., Chain, 24 Pitches
19 106,9I!X Beating; Flange
20 !426,,75 Gear_ Spur, 14 Teeth
21 138246 Cofiar, Clutch
22 138238 Assembly, Kit, Clutch Keys
23 !3479i Screw, Tapping w/Sealer
24. !,._._.._.6,7o Shafi, Intermediate
25 2244.J Key, Woodruff, #6I
26 ._a<_-,_._:.,v
27 t20470X Sprocket, 18Teeth (Reve_-se)
28 !t0070X Spacer
29 .,_.,.,._,x::7-,f Ges.r_ Spur, 37 Teeth (!.=,)
30 129405X Gea[, Spur 30 Teeth (2=,)
3! !08980X Gear, Spur,. 25 Teeth {3,o)
312 ':...... .6'{ " -
: 4 _-"_-, Geer, 6put, 22 Teeth (@,)
33 1,::4.sop Ge_', 8pub i9 x-_ _, z,.o,,_
....., ,, JO :_<;QD._ =o
34 184797 Sps.ce_" i.i33 x !.50 x .375
35 I05925X Wa.sheh Plain .640 x 1.37 x ..061
37 101978)( Spacer .130 x ! .00 x .169
38 si0079X Asser_bty, Gea!'_ Col _bination of
_._o Teeth aP,d 't<...... ',.,._Teeth.
39 i24639X Shaft, Idler
4.0 120472X Spacer .635 x .875 x .755
DESOFIPTION
41 I05928X
42 tt0084X
43 134394
44 I20473X
45 t42678
46` i20407X
4,7 I06589X
48 120408X
49 I05937X
5O i 05936X
51 2226J
52 13440!
53 2264J
54 120474X
55 !t008!X
56 I05941X
57 !10071X
58 120952X
_ 00cv._,,59 _i c-'r,_"
60 I20475X
61 1426`80
62 i20961X
6`3 7294J
64 ...... v108t_bgA
55 120953X
,66 i 20954K
67 i84799
88 138244-
70 ! 1T:0950)(
71 73810500
72 i 0@596:£
""_ 1204.'18X
/©
SprocKet, 9 Teeth (Revel'so)
Gear, Bevel, 42 Teeth
Assembly, Kit, Shim .750 Shaft
Shaft, Driw_
Gear, 5pub 12 Teeth (1=)
G,_a.r,c,pu_, 20 "f-o_h (2,,0)
Gear, Spur, 25 Teeth (3=)
Gear; Spur, 28 Teeth (4,°)
Gear, _r_t]r 31 Teeth {5Q
Spacer .781 x i.00 x .375
Washer, Plain .632 x !:00 x .060
Washeh Neop._ene
Wasi_eh Plain .758 x !.25 x .03i
Axle, LH.
Gear, Miter_ 15 Teeth
Ring, Retaktmg
Gear, Spur, 32 Teeth
Shaft, Cross
Gear, Miter, I5 Teeth
Axh:_,R.H.
Housing, Lower
Puck. Friction
Disc, Brake
Spacer
Jaw, Brake
Pin, Dowel
Sc_'ew; SNf..Tapping, L.a__'ge
5/I6oi8 x 2.25
:Leve_', Acttt_£in9
,00.,:_'WasheiL _::_-_"" ";_'" .00 _-_:<:..... :>& I X' 1 X
@tacke%AY'ti-Re_:ation
hocknu1: S/I 6-24
Screw, % ii:-Yapping_ i._arge
5i16-18 x 1.44
Greags
*Use in combinations to maintain p_'ope_ c!earances
** O@er Key No. 15
HOTI; Aii component dimensions given ip, U.S. ir.ches
I inch :: 25.4. mm
47
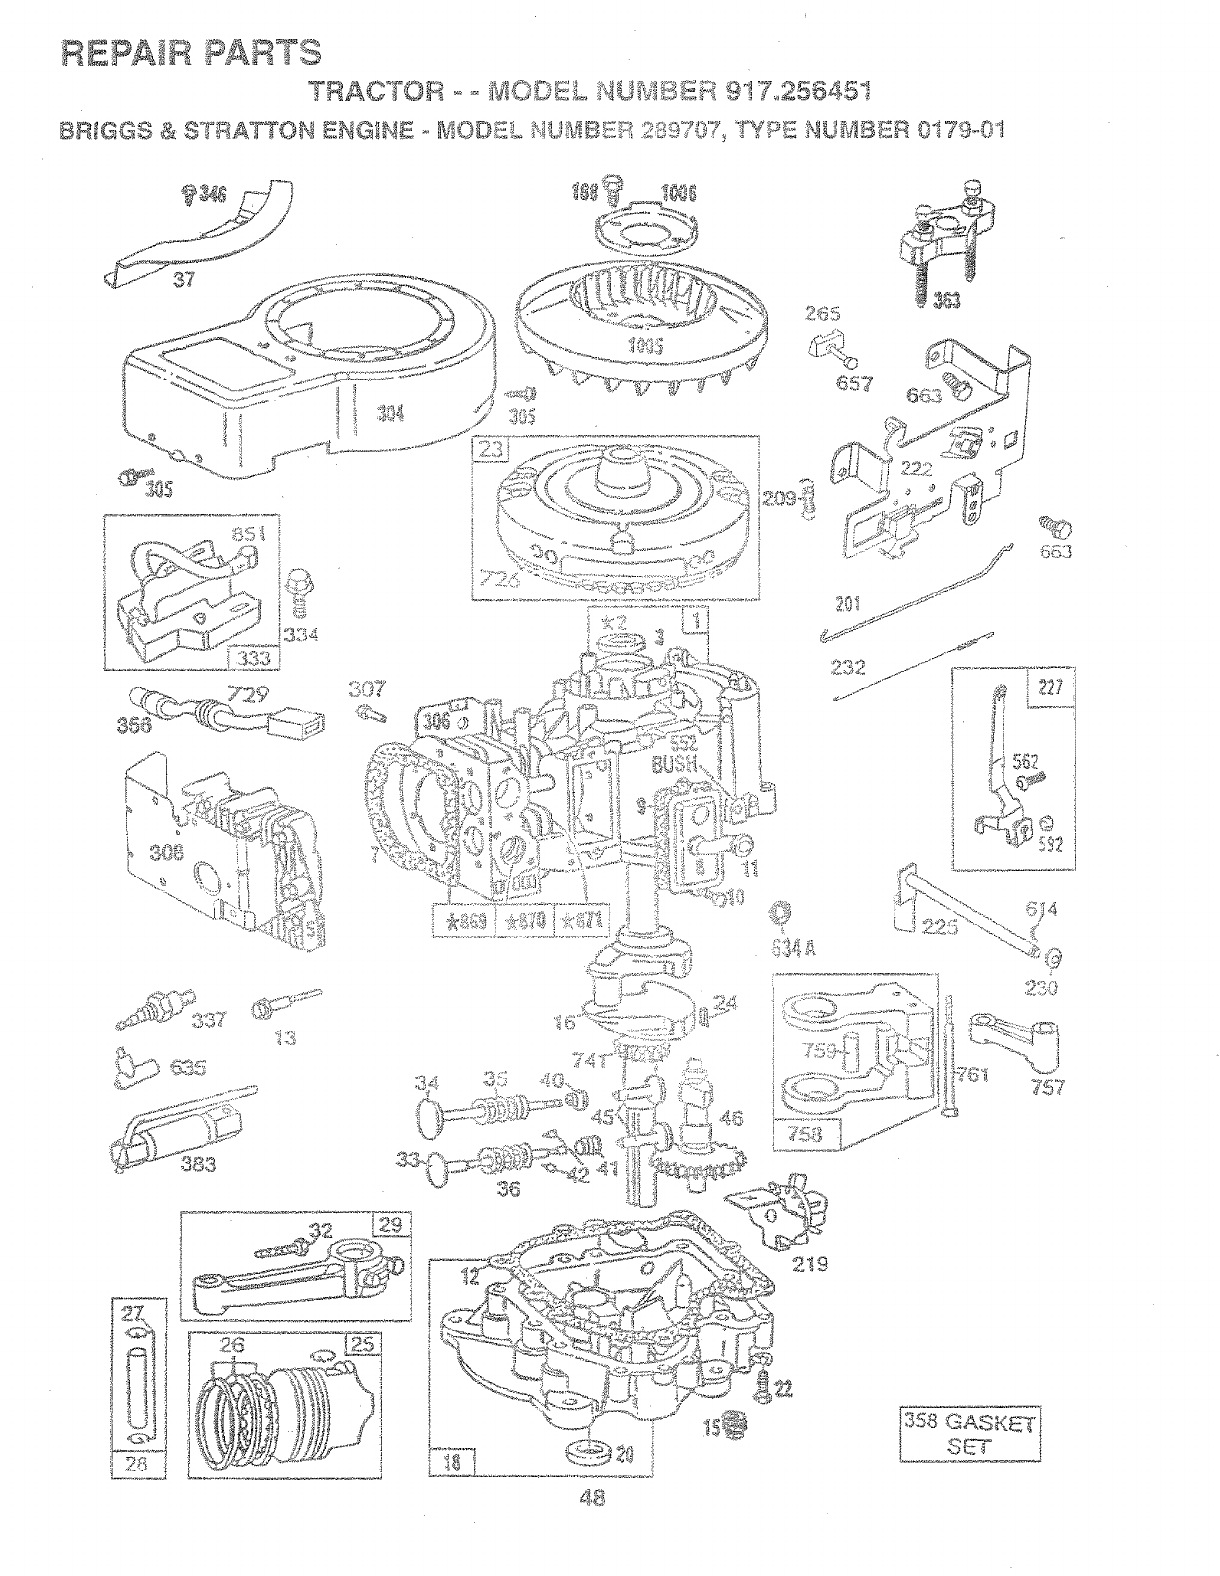
" .... ::_:_7 (li....
l! _ l.I
&IS.......
................. .;,L%"]_')
7_ X ,7
41

REPAIR PARTS
TRACTOR - ° MODEL NUMBER g17,£56451
BR_GGS & STRA_ON ENGINE MO©EL NU_B_:R 289707,_ _Y. c NUMBER 0179o0!
_2_ii__
%
_t044
_.S.-TS
Vps3-
12.1 CA_BU:_'Ofl OV_.RH,&UL K_T
, :<::.::...... [_-%, .
k.. 1
:;?N V
224
[ @2_::s::, :L:2S!!d
,_7:'¢i i
t ;S_# ,{;
--. L 2_F
492
8,011 "_J
49
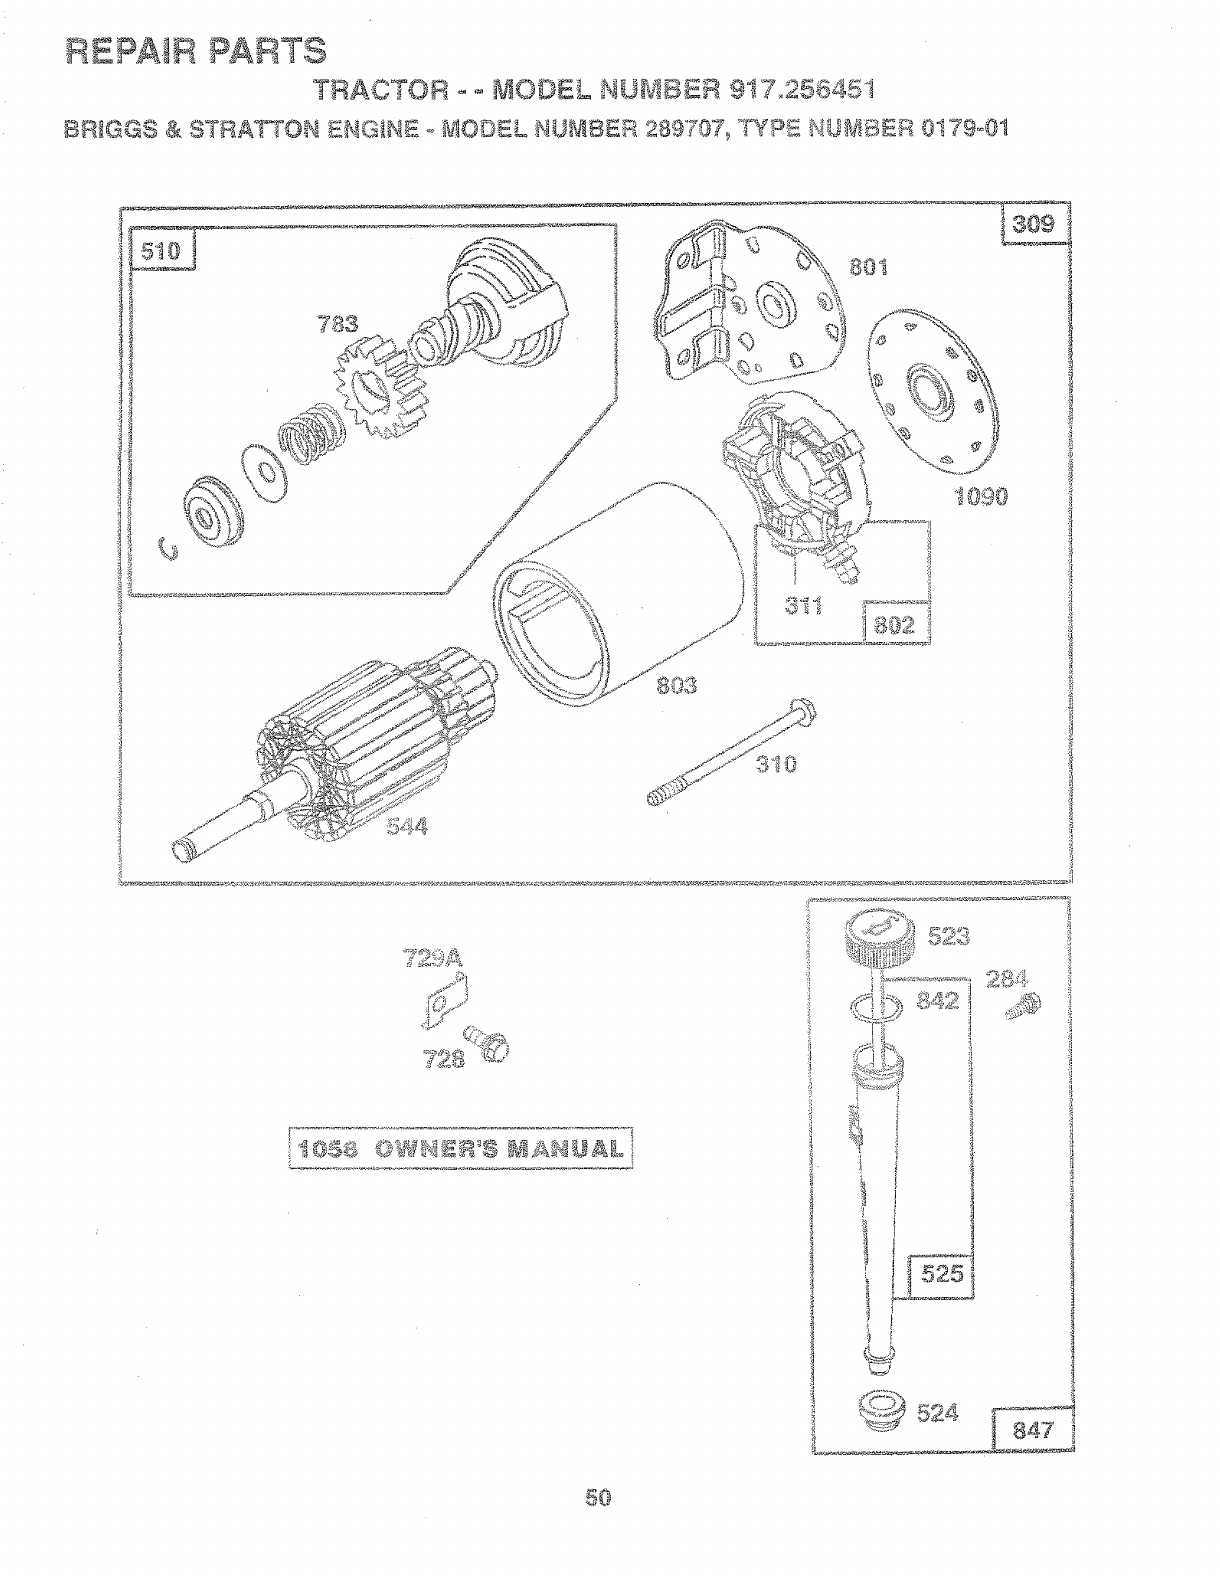
REPAIR PARTS
801
_802 i
:!i
:i
5
:%_,L.!_i/
.i _!h
284
1
%_ 524 1 d
5O

REPAIR PARTS
TRACTOR MODEL NUMBER 917o25645.
BR_GGS & STRATTON ENGINE ° MODEL NUMBER.289707, TYPE NUMBER 0!79@t
KEY PART KEY PART
NO_ NO, DESCRIPTION NO. NO, DESCRIPTION
t 496413
2 399265
3 391086
5 4.94240
7 271866
8 39'14.06
9 27803
10 94821
ti 28O10O
t2 271916
271997
271996
13 _:.M62'_
15 94239
16 495162
94196
18 494.238
20 291675
22 94524
2:} .4928:26
24 222898
25 394681
394852
394663
894654
26 39'!?'80
392331
391781
391782
391788
27 260924
28 299691
391285
29 490:348
49048{)
32 9487i
33 262246
34. 262247
35 65906
36 26828
37 224502
40 221596
41 292260
42 93630
45 262248
46 212897
51 272465
Cylinder Assembly 52
Bearing, Cylinder (Requires Special 53
Toois For Installation) 75
*Seai, Oii 78
Head. Cylinder 95
* Gas_et, Cyt:inder Head 98
Breathe_ Assembly 104
* Gas£et, Valve Cover 105
Screw, .....c_-=m_',,.._ 106
Tt_be..B<eather 108
*::_;_<,b_t_-' an _,'. m_Cover t/64" 118
.............,,..4_s.:,K,.a,:._e
,,n_:::ke_, Cover "{ "" 12!V.YaR_L,c_S@ A):}b
* Gasket. _"-_ ,_........ __.3
•'..,,tc'.[,_.'_._a÷ Cover °009" _ ''_
c;crev,ACylinder Iqead t25
PIug, Oil Drair; 127
C_ankshaft I 30
.._:y,Timing Geal' 13!
,.3_, Engirte I33
* Seai, Oii 137
Screw. Seres, Base Mounting 138
Flywheet and Ring .Gear Ass,-. "_""', ,_m_,b 14t
Magneto 14.2
i{ev, Fiywheei 147
Piston Assernbly, Standard 164
Piston Assembiy .010" Oversize 171
Piston Assemb!y .020" Oversize 187
Piston Assembly .030" Oversize 188
i-qin9 c..... e.... _ ,.,_e;.,._ o.....>_:£,Pssto!%
R;n':_Set, P<'q * OhtoR_e. "::._"_ c _"_ o@9
Rin_._Set, o;_.,..,-. .
.. _....._, .0t 0" Ow:-ws_ze 2I6
.0_0 Over'size _t
.:::'qqqSe_ Pistcxi ......" ,', o
Rin!_:;Set, Ristes .0S0" Overs;ze
Lee.% :Piston .Pin 222
Pin Assembly, Piston, Standard 224.
Pin >_ssy., Piston ,005" Oversize 225
Rod AsseF.abty, Connectb 9 227
ROd '_............... ,_'s's's,4_
,_,ba_:>uNb:y, OO(1[lee'u!x%
.02(}" ;vt'n'_"v"'i,_.s,_;b._.b::._' Cra%_kDin, So_e ......o_".12
Screw, Connecting Rod 240
Valve, ExhE,.ust 265
Vaive, _ntake
SOT nq, "_ '_
Spdng, Exhaust Valve
Guard, Flywheel
Retainer, Intake Valve
Rotocoii, Exhaust Valve
Retainer, Exhaust Valve Rotocoii
Tappet, VaIve
Gear, Cam
.... Gasket, Carburetor(to Elbow)
272554
94637
224061
9:3805
94098
495800
231789
231855
231854
224540
494383
49 ,'.'.._o_
94-616
495796
224539
494379
4.94381
281 i65
281164.
494.380
494537
PAwg
2i 38t 9
28 t 051
8938t5
93535
"762767
260871
2827@3
490815
494887
94513
495157
493935
94742
262785
394358
_,:_t 535
* GaskeL Carburetor
Stud, Carbu_etor Mounting
Washen Spring
Sc_ew, Se¢,qs
Screw, Idie Speed
**Pin, Fioat Hinge
** Vaive Assemb!y, Inlet ,,,_,,.._._-"_4i_
tnleL Valve Sea_
Vaive, Choke
**Vaive, Needie
Oarbu_et,x' Overhaui f<il
Screw, Eibow Mountir,.g
** i:qug VVe;ic;n(Sold in Kit Only)
Va!ve, Throttle
Shaft and Lever_ Thrott!e
*** Ge.skeL Float Bowl
.... Washer, Fiou£ _owl Screw
** Shaft _" ...... Choke
,_..;_,,. L_(::.x:V({?_"
** Nozz!e /JeL Carburetor
** jT';i'_ot,,.Jet
Carbu_ete_', L.Ibow
Nut, Air C:Ie_ner Mounting
L.ine, Fuel
SC_'ew_ .."!},_{:-_rq s
L;_]_,,,_"(}(:'Ve_T, or
Sorirg.Gove:'no_:
Oii ".....i'r .... _:_ea_ '
;3r;_.u;i.-:et.._.ssembiy
.-:';:'Jar'_..,(b_c:,,/::'_'r_o;"Contrei
(}i"art!:.::. {}:_':>it:):r) o F
Leve;" &ssem_:)iy, Geverno_
Wasi-e_, Gore;mot Crank
[::'i;ter Ft..ie}
C;a:,,"np,:::ssina
* ff_chJded in Gasket Set (494241)
** ;ncluded in Carburetor Overhaul Kit (497535)
*** Included in both Carburetor Overhaul Kit (497535)
and Carburetor Gasket Set (494385)
NOTE: AIi component dimensions given in U.S. inches
1 inch = 25.4 mm
5!

REPAtR PARTS
TRACTOR - - MODEL NU£oaBER 917 256451
BRIGGS & STRATTON ENGINE =_£ODEL NU_BEiB 289707_ TYPE NU;_;IBER 0! 79°0t
KEY PART K£Y PART
Nee ?,lO, DBSc2,RtPT!ON NO, NO, 9ESOR_tPTtON
284 94073 Screw, Shoulder, 726 392134
Hex Washe: Head
284A 94704 Screw.. iqex Head 727 490324
304 4.98319 Housir% Bbwe_
305 94819 Screw, Seres, 81owe; Housing 728 94627
Mou_tii-,g 729 281i59
306 224545 Shieid_ (3yfinder 729A 225!'70
307 94623 Screw_ Seres, Cyiir;,der Shield 74I 262i35
Mounting '757 2!2359
308 491490 Cove< CyihderHead 758 899891
309 497595 Motor. Sta_%_.:n 759 298909
310 497@02 Boit, Yhru 76t 93875
3t 1 497608 B<ush Set 783 280104
333 492341 AmTatu<e, M:%j@eto 80I 894556
334 93381 S<:,'_ew_Seres, A,wnature Mounting 802 497605
_.>..... 802592 _ q 4% S04
346 93705 Sc<ew_He;< Head 842 270920
356 494328 Wire> G!o-'dnd 847 495415
858 4c,4P4t.............. _.aa:_te{"'...............o_s_ 85'1 22' .,-xw,i;_o
383 'i9203 Pule< Hywi;eet 869 26i463
383 89838 Wrench_ Spark Pk_g 870 2133t6
423 94073 Screw, Seres 871 261961
¢'B ............ ' J'-i "_a _' o< ._ "'*_' <
443 4.93909 -_,.._i_,G<:;.,:_Air ,...,e_, _e_
455 22255I Cup, Screen tv'iounting 872 28i104
z'...S"7493903 K,no_ /x_-Ciea.!._et. 875 .""_-_:"_-_
......... ; ..... -1'<1} -z 4_ d,_ /
4G:::i_222562 Sc,"-een_Fiush Rotating 8'77 393456
4.74 393474 Starer A!temr4o_
48:';:_93!!1121 Screw. Sef¢_s 955 94.642
5!0 4,97506 OSw.%Stari::'r 965 94108
.......... bA_<k:.,' _jn_; o/'d [.'.}iOS"isk: Oii hJleF {.!}7:!_ 4.<;_..k:,/-._
524:68838 Seai, i::ilk:::"T_be 977 4.94385
525 _.96i i 3 Tube° Oil ..'.::i!ie< !i87 281 ! 5@
585 272403 _:_£Jem,6._K_:qrCiea[]er i 005 260i:;::_7
537 281 ! 06 * O.-!::_i:._i],"d_Ck)s.i-te_ 1006 224.4.i3
544. 497@03 Am_a_:<..:r,:;::2)t.::_'te:' i01_:} :1-91255
_)!:£;i! ,!t'N !i_Y7 BUShiY';g, fl]i(;,v@ 'XOf Cys_'ti( J044 9.4.]i,;'3
50:2 92513 Seit, Govern<x :,....ever 1053 272397
592 2:}i082 Nut, P:iex i090 ,:$97607
501 ......_..............
::'b0c, d L.}ia:riq_)_ )-L£._i _"':'
w£,)e
6ii 49.$¢5I Fuel tniei-ube
614 9_:_39_ uotte% Hai<H;n
618 282803 Spring, Choke Return
834 281t68 ** Seal, Choke Shaft
634A 49i328 * Seat Governor
6348 28i 167 ** Washe< Throttie Shaft
635 66538 Elbow_ Spark Plug
546 224546 Brace, Air Cleaner
8r:°_ 93498 Screw, Seres
AD
663 94620 Screw, Hex Head
663 280848 Spacer
Sea< Ring
{includes Mounting Paris)
L,ove_. b,.alt,_,
(includes ,k_bunting Screws)
Screw, Hex Head
Cti_, Lead Wire
Retainer Wi_e
t'],':. ,/a 'TA" "+t....
i...]i'_k,Counterweight
Cou r'..,!e_'we;ghtAssembly
Pin, Coun_:erwHght
Sc_ev%<}oLmto_weight
Gear, St,.:-::._4er
C,sp_Drive
Cap End
Seal. Oii Fiik_r Cap
Fill (]roup, Oil
7emfi,:_al, Ignition Cable
Seat, intake VaD.(e,Standard
Sea% Exhaust Valve, Standard
(kide, 'E!xhausi Valve
(iuicie, i,_--_t:-_!<eValve
sever, _-q,Cleaner
Bedy, Air Cieane_
Diode _:mdOormector Assembly,
<::)Lu!dC i:.cui!
:£,<.;_'ew:Fi.J,',_i{:bwl
i...,a,:.:k<m:t,i;_irCleaner Mounting
{Sowi i<sseynbiy, Carburetor
£)a<!i)_Ife_o[G.::_sketHit
Ss,:_i.']'_,":_i:i:ieShaft
i:::'.!V'}. ,):::i /w iff e i
P,etsi_ e< !::a_7
.._.be!:;<:i:
S.,.)rew,;_._xHead
IV}9,fiLiSl, 11>wn_,:_i"%
_,.::ie!_--,ine< Srus.h
RPM .... ; " o_ soG.11i}50; High: 3200-3400<:_._)@_Ngs, / _d: '[ F .....
* included in (Saskei 0..::_<..... \4_.o_',r'-'_o3o)_"
** !ncluded in Carbur@.or Ovemaui Kit (495799)
*** included in both Ca<bureto_ Overhaul Kit (497535)
and Carburetor Gasket Sei (494385)
NOT£: All component dirnensions given in U.S. inches
I inch :25.4 mm
52

SERVICE NOTES
53¸

SERVICE NOTES
54

SUGGESTED GUIDE FOR SJGH'TING SLOPES FOR SAFE OPERATION
ONLY RIDE UP AND DOWN HILL,
NOT ACROSS HiLL
o1
O1
SIGHT AND HOLD THIS LEVEL WIiTH
SKY LINE OFt TREE.

OWNER'
UAL
MODEL NO.
917.256451
IF YOU NEED
REPAIR SERVICE
OR PARTS:
FOR REPAIR SERVICE, CALL
TH{S TOLL FREE NUMBER:
1-800-4=REPAIR
(1-800-473=7247)
FOR REPLACEMENT PARTS
INFORMATION AND
ORDERING, CALL THIS
TOLL FREE NUMBER:
1-800oFON-PAR'T
(t -800o366o7278)
FOR CONSUMER ASSISTANCE
HOT LINE, CALL THIS
TOLL FREE NUMBER:
1=800o659_5917
®
12.5 HP IC
ELECTRIC START
38" MOWER
5 SPEED TRANSAXLE
LAWN TRACTOR
Each tractor has its own model number. Each engine has
its own model number.
The model number for your tractor witl be found on the
modet plate located under the seat.
The model number for your engine will be found on the
blower housing of the engine.
Afl parts listed herein may be ordered from any Sears,
Roebuck and Co. Service Center/Department and most Re-
tail Stores.
WHEN ORDERING REPAIR PARTS, ALWAYS GIVE THE
FOLLOWING iNFORMATION:
° PRODUCT- TRACTOR
MODEL NUMBER - 917.256451
ENGINE MODEL NO. * 289707, TYPE NO, 0179-0t
o PART NUMBER
PART DESCRiPTiON
Your Sears merchandise has added vafue when you
consider Sears has service units nationwide staffed with
Sears trained technicians.., professional technicians
specifically trained to insure that we meet our pfedge to
you, we service what we sel!.
153917 3.20.96 JH Printed in U.S.A.
_;::td_,t_,

®
ODEL 917.256451 OWNER'S MANUAL
_°Assembly
__Qperation
_CUstomer Responsibilities
_Service and Adjustments
_ Repair Parts
_AUToOP_; Read and follow all safety rules and instructions before operating this equipment.
FOR CONSUMER ASSISTANCE HOT LINE, CALL THiS TOLL FREE NUMBER: t-800-659-5917
II i _ilrr'

SAFETY RULES
Safe Operation Practices for Ride-On Mowers
IMPORTANT: THIS CUTTING MACHINE [S CAPABLE OF AMPUTATING HANDS AND FEETAND THROWING OBJECTS.
FAILURE TO OBSERVE THE FOLLOWING SAFETY INSTRUCTIONS COULD RESULT IN SERIOUS INJURY OR DEATH.
t. GENERAL OPERATION
o Read_ understand, and foI!ow all instructions in the manual
and onthe machine before starting.
, Only a!tow responsible adults, who are familiar with the
instructions, to operate the machine,
* Clear the area of objects such as rocks, toys, wire, etc.,
which could be picked up and thrown by the blade.
*Be sure the area is clear of other people before mowing. Stop
machine if anyone enters the area.
*Never carry passengers,
,Do not mow in reverse unless absolutely necessary. Always
!ook down and behind before and while backing.
, Be aware of the mower discharge direction and do not point
it at anyone. Do not operate the mower without either the
entire grass catcher or the guard in ptace.
o SIow down before turning.
,Never leave a running machine unattended. Always turn off
blades, set parking brake, stop engine, and remove keys
before dismounting.
o Turn off blades when not mowing.
Stop engine before removing grass catcher or uncIogging
chute.
o Mow only in daylight or good artificial light.
o Do not operate the machine while under the influence of
alcohol or drugs.
Watch for traffic when operating near or crossing roadways.
= Use extra care when loading or unloading the machine into
.._ a trailer or truck.
lL SLOPE OPERATION
Slopes are a major factor related to loss-of-control and
tipover accidents, which can result in severe _njuryor death.
All slopes require extra caution. If you cannot back up the
slope or if you feel uneasy on it, do not mow it.
DO:
o Mow up and down slopes, not across.
Remove obstacles such as rocks, tree limbs, etc.
Watch for holes, ruts, or bumps. Uneven terrain could
overturn the machine. Tal! grass can hide obstacles.
Use slow speed. Choose a low gear so that you wiJl not have
to stop or shift while on the slope.
o Fottow the manufacturer's recommendations for wheel
weights or counterweights to improve stability.
Use extra care with grass catchers or other attachments.
These can change the stability of the machine.
Keep att movement on the slopes stow and gradual Do not
make sudden changes in speed or direction.
- Avoid starting or stopping on a slope. If tires lose traction,
disengage the blades and proceed slowly straight down the
sfope,
DO NOT:
Do not turn on slopes unless necessary, and then, turn slowly
and gradua]ty downhill, if possible.
Do not mow near drop-effs, ditches, or embankments. The
mower could suddenly turn over if a wheel is over the edge
of aCtiff or ditch, or if an edge caves in.
,Do not mow on wet grass. Reduced traction could cause
sliding.
"DOnot try to stabilize the machine by putting your foot on the
ground,
*Do not use grass catcher on steep slopes.
2
Itl. CHILDREN
Tragic accidents can occur if the operator is not alert to the
presence of children. Children are often attracted to the
machine and the mowing actMty. Never assume that
chitdren will remain where you last saw them.
° Keep children out of the mowing area and under the watchful
care of another responsible adult.
= Be alert and turn machir_e off if children enter the area.
Before and when backing, look behind and down for small
children.
Never carry children. They may fall off and be seriously
injured or interfere with safe machine operation,
Never allow children to operate the machine.
Use extra care when approaching blind corners, shrubs,
trees, or other objects that may obscure vision.
iV. SERVICE
* Use extra care in handling gasoline and other fuets. They are
flammable and vapors are explosive.
Use only an approved container.
Never remove gas cap or add fue! with the engine
running. Altow engine to cool before refueling, Do not
smoke,
Never refuel the machine indoors.
Never store the machine or fuel container inside where
there is an open flame, such as a water heater.
Never run a machine inside a closed area.
o Keep nuts and bolts, especially blade attachment botts, tight
and keep equipment in good condition.
, Never tamper with safety devices. Check their proper
operation regularly.
*Keep machine free of grass, leaves, or other debris build_up.
Clean oil or fuel spiIlage. Atiow machine to cool before
storing.
" StOP and inspect the equipment if you strike an object.
Repair, if necessary, before restarting.
,Never make adjustmerits or repairs with the engine running.
Grasscatchercomponentsaresubjecttowear, damage, and
deterioration, which could expose moving parts or aliow
obiects to be thrown. Frequently check components and
replace with manufacturer's recommended parts, when nec*
essary.
, Mower blades are shaqo and can cut. Wrap the blade(s) or
wear gloves, and use extra caution when servicing them.
Check brake operation frequently. Adiust and service as
required.
&Look for this symbol to point out im-
portant safety precautions, _t means
CAUTION!!! BECOME ALERT!!! YOUR
SAFETY JS INVOLVED,
CAUTION: Always disconnect spark ptug
wire and place wire where it cannot contact
spark plug in order to prevent accidental
starting when setting up, transporting,
adjusting or making repairs.
WARNING
The engine exhaust from this product cpn-
rains c_iemicais known tothe State of Cati_or.
nia to cause cancer, birth defects, or Other
reproductive harm.

CONGRATULATIONS on your purchase of a Sears
Tractor, It has been designed, engineered and manufac-
tured to give you the best possibte dependability and
performance.
Should you experience any probiem you cannot easily
remedy, please contact your nearest Sears Authorized
Sewice Center/Department, We have competenL we_i-
trained technicians and the proper tools to se_iice or repair
this tractor,
Please read and retain this manual. The instructions will
enable you to assemble and maintain your tractor properly.
Always obsewe the "SAFETY RULES".
MODEL
NUMBER 917,256451
SERIAL
t NUMBER
THE MODEL AND SERtAL NUMBERS WILL BE FOUND
.. r _.,_,__. UNDER THi_ SEAT.
rot ; qHthUi D RE,J .DRD BOTH S;_4 ..<c t.fu, JIBE,, A. _D
' DATE OF PURCHASE AND KEEP _N A SAFE PLACE
FOR FUTURE REFERE]NCE.
s :NANkA ! ACSR {E aENT
A b_a,s Maintenance Agreement Jsavailable on this prod_
uct° Contact you_ nearest oearo store for details,
o Read and obsewe the safety roles.
Foliow a regt_ar schedule in maintaining, caring for and
doiny yOU, ,R:_,,_._...
-_' Follow the instructioss under"Custom@:' Responsibili.-.
tkes': and "Sto(age '_sections of this owner's manua!.
PRODUCT SPEO F OAT1ONS
HORSEPOWER: 12.5
', e" t P _ ¢'T"
GA_OL,NE _,A, A_I, Y ! .25 _'_A_ t ,'_......
_A UNLEADED REGULAR
ND TYPE: ._
]Otl TY_>E (API-SFiSG): SAE 30 (above 32'W)
1 SAE 5W-30 (below 32'_F)
OIL CAPACITY: 3.0 PINTS
SPARK PLUG: CHAMPION RJIgLM
(GAP: .030") STD 3614.58
VALVE CLEARANCE: INTAKE: .005" - .007"
EXHAUST: .009" o .0I I"
kGROUND_SPEED (MPH): FORWARD:
Ist 1,0
2rid 2.1
3_d 3. I
4tt_ 4.0
5th 5.'i
REVERSE: I ,,6
TIRE PRESSURE; FRONT: 14 PFL
RF _ n, 12 PS:i
j CHA_GING..,._.:,Y'S __M.
L.........
t
i BATTEF1Y:
]_aL_-,b__BOLT TORQUE:
3 AMPS BATTERY
5 AMPS Iflc.ADLiL-_fmtS
AMP!FIR: 25
MtN° CCA: t90
CASE SIZE:: U!R
30°35 FI', _ _ _:"
WARNING: This tractor is equipped with an internai
combustion engine and sho_..lld not be used on or near any
unimproved forest-covered,, br-sh-covered or grass-.cov -.
e{-ed land uniess the engine's exhaust system is equipped
with a spark arrestor meeting applicable iocai o__st_,_talaws
(if any), if a spark attester is useG it should be maintained
in effective working oMer by the operator.
in the state of Caiifomia the above is _equired by !aw
(Section 4442 of the Caiifomia Pubiic Resb'urces Code).
O_.h_r _t;:_l_:P,rnav _ave s rnila_ laws. Fede "_.ilaws _,b[) V on
f_de_i lands A s ad< a_"es_e_ for t_ m_,ff _r i's av;diabte
through your nearest Sears Authorized ::;ervk>_ Cented
DepaRment (See REPAIR PARTS section of this manual).
i
, _U,JiqOct_,,a aDO td, ,8 Li[:) aCCO_dii']Ci"°' "E.d_lr.,y_x_ I.IS _ }1For one k_) year f._omthe date of ourch,ase_ if this Craftsman Riding "_,, ',...... i.'. maintained, _"_"" ...._.... _ , n _d
to the instructions in the owner's maneaJ, Sears wiii repair or repiace, :free of charge, any [saris found to be defective in rnateriai :!
o_workmanship, i
This Warranty does not cover: _
_ Expendabb items which become worn dudng normal use, such as blades, spark piugs, air cteane(s, beits, etc.
o Tire replacement or repair caused by punctures from outside objects, such as na_, thorns, stumps, or glass.
Repairs necessary because of operator abuse, negligence, improper storage or accident or the failure to maintain the
equipmeni according to the instructions contained in the owner's manual,
Riding equipment used for commercia_ or rental purposes.
LIMITED 90 DAY WARRANTY ,ON BATTERY
For ninety (90) days from date of ourchase if an}, batteR7 included with this riding equipment proves defective in material or
workmanship and our testing determines the battery, will not held a charge, Sears will replace the battery' at no charge,
IN-HOME WARRANTY SERVICE ON YOUR CRAFTSMAN RIDING EQJIPMENT IS AVAILABLE AT NO-CHARGE FOR 30
DAYS FROM THE DATE OF PURCHASE, PLEASE CONTACT YOUR NEAREST SER _IC_ CENTER. AF-!X::R 30 DAYS
FROM THE DATE OF PURCHASE. WARRANTY SERVICE iS AVAILABLE BY TAKING YOUR _.,RAFTSMAN RIDING EQUIP-
.... AVM _._Lc
MENT TO YOUR NEAREST SEARS .:_RVICE CENTER. (IN@JOME WARRANTY c_Emv,,._,_WILL STILL BE
AFTER 30 DAYS FROM THE DATE OF PURCHASE BUT A STANDARD TR_P CHARGE WILL APPLY.) THIS WARRANTY
.°, ,..,_::_ONLY VVH!t_ETHIS :PRODUCT _StN THE UNITED STATES.
This War_nty gives you specific iegat fights, and you rnay also have other rights which may vaPy from state to state.
SEAR& ROEBUCK AND COo, D/817 WA, HOFFMAN LoTAT=S, IL ,'-n_,.,.,,_o,,_
3

TABLE OF CONTENTS
MAINTENANCE SCHEDULE ...... :............................... t4
SERVICE AND ADJUST_ENTS ........................... t9o24
STORAGE .................................................................... 25
TROUBLESHOOTING ,.o;....................................... 26_27
REPAIR PARTS-TRACTOR ................................ 30-47
REPAIR PARTS - ENGINE .................. .................. 48-52
PARTS ORDERING/SERViCE ............... BACK COVER
A
Accessories ........................................... 5
Adjustments:
Broke ................................................ 2"I
Cart)L!_etor .................................... 24
Mower
Front.-TooBack ......................... 20
SideoTo..Side ........................... 20
Thrott!e Contact Cable .................. 23
Air Fii!:eh Engine .................................. 17
Air Screen Engine ..................... :........ 17
Assemb}y ............................................. 7-.9
B
Battery:
Charging ......................................... 8
• 3ta@_g witiq Weak Battery .....:..... 22
Sto_age ........................................ 25
Terminals ...................................... i 6
Beit:
Motion Drive
Removal/Replacement ............ 2!
iV_owerBlade(s)
RemovaItRep!acement ............ 21
Blade:
:!.harpening .................................... l 5
:::_epi_cement .................................. ! 5
B;'ake Ad]usiment ................................ 21
If%
%.#,
......ss<o.'...,,__!"_.o!"Adjustment ........................... 24
%,0 n,t_oi:,s _o.,,.I,_1 i 0
Customer Responeibi!ities ............... 15o,i8
Air Filter .................................... i 7
Air Smeen, Engine ..................... 17
Cooling Fins, Engine ................ !7
Engine Oi! ................................ 16
Fuei Filter ................................. 18
Spark Plug(s) ............................ I8
Tractor:
Battery ...................................... I6
Bk_de ........................ ,................ i5
Lubrication '-'- "
,_hart ...................... 14
Maintenance Schedule ............ i4
Tire <}}are.......................... 8,t 5,22
Transaxie ................................. I 8
Cutting Height, _4ower ......................... t I
£
Electrical:
Interlocks and Relays .................. 23
Schematic ..................................... 29
Wiring Diagram ............................ 30
Engine:
Air Filter ........................................ !7
Air Screen .................................... 17
Cooiing Fins, Engine .................... 17
Oil Change ................................... 16
Oil Level .................................. ! 2,16
Oil Type ......................................... I6
Preparation ................................... 12
Repair Parts ............................ 48_52
Sta_ing ......................................... I3
Storage ........................................ 25
Filter:
Air Filter ........................................ 17
Fuel .............................................. 18
Fuel:
Type ............................................. I2
Storage ........................................ 25
Fuse .................................................... 23
H
Hood Removattlnsta[lal:ion ................... 23
L
Leveling Mower L.e,.k .......................... 20
Lubrication:
Chart ............................................. i4
Maintenance Schedule ....................... 14
Mower:
Adjustment, Front4o-Back ........... 20
Adjustment, Side4o-Side ............. 20
Blade Sharpening ........................ 15
Blade Replacement ...................... 15
Cutting Height ...................... :....... 11
Installation .................................... 19
Operation ..................................... 12
Removal ....................................... 19
Mowing Tips ........................................ 13
Muffler ................................................. 18
Spark Arrester ........................... 3,40
Oil:
O
Cold Weather Conditions ........ t2,16
Engine .......................................... ! 6
Storage ................. ...... :................ 25
Operation ....................................... i0-13
Operating Mower ................................ I2
Options:
Accessories .................................... 5
Spark An'ester ........................... 3,40
P
Parking Brake .................................. 104 1
Pa_s Bag .............................................. 6
Parts, RepiacementiRepair ............ 30-47
Product Specifications ........................... 3
R
Repair Parts ................................... 30--47
S
Safety Rules .......................................... 2
Seat ....................................................... 8
Service and Adjustments ............... 19-24
Carburetor ........ :........................... 24
Fuse ............................................. 23
Hood Removallinstatlation ........... 23
Motion Drive Belt
Removal/Replacement ............ 21
Mower Belt(s)
Removal!Replacement ............ 21
Mower Adjustment
Front-to-Back .......................... 20
Side4o-Side ............................ 20
Mower Removal ........................... 19
Tire Care ................................. 8/i 5,22
Stope Guide Sheer .............................. 5 !
Spark Plug(s) ....................................... 18
Specifications ......................................... 3
Starting the Engine ........................ 12- I3
Steering Wheel ................................. 7,22
SIopping the Tractor ............................ ! i
Storage ................................................ 25
T
Throttle Control Cable Adjustment ...... 24
Tires ............................................ 8,t 5,22
Trouble Shooting Chart .................. 2&27
Transaxle ............................................ 16
W
Warranty ................................................ 3
Wiring Diagram ................................... 30
Wiring Schematic ................................ 29
4

ES D ATTACH
These accessories arid attachments were avaiiab_e through most Sears retaii out!ets a_sdcease.......s, ,_=,s wn..,] the tractor was purchased.
Most Sears stores can order these }_ems for you when you provide the mode! number of yo_Jrtractor,
•_._ _ :_s ....
SPARK, !
GAS _A_,_
C ;'
i
i
_NGINE O_L ] FUEL STABILIZER
4
;,IA
PSzRFOB ANC£
Sears offers a wide variety of attachments that fit your tractor_ Many of these are tinted be_ow with brief explanations o_how they car_hetp
you. This list was current at the time of pc_b_icatk_n;however, it may change in fuiure years .. more attachrner_ts may be .added, chan9es
may be made in these attachments, or some may no Ionger be available o_ iit your model, Co_ta.ct your 5nearest Sears store for _he
accessode_ and attach_'ae_ts that are avaiiable for you_" t_'actot.
Most of these attachments do not require additional hitches or conversion kits (those that do are indicated) and are designed for easy
attaching and detaching.
A_:RA"_OR promotes deep root growth for a healthy lawn. Ta-.
pe_ed 2Sqnch steel spikes moun_.ed on 10-irich diamete" discs
puncture holes in 8oi_ at ciose k_tervais to let moisture soak in°
Steel weight tray for increased ps,qetration.
BAGGER iets you. co{bct g_ass c_ippings and leaves for a
healthier, nea.ter !ookJng _awr. Two Permane,x containers isold
30-gallon piastic bags.
BUMPeR protects front end of tracto_ from damage.
CARTS make hautbig easy. Va_iety of sizes avaiiabie, pRts
accessories such as side pans.i kits, tool caddy, car1 cover_
proteciive mat and doiiy..
CO_t_G A_RATOR takes small plugs out of soil to a!tow mo_s_.
ture and nutrients _e reach grass roots. 36-inch swath. 24
hardeeed steei coring tips. 150 }b. capacity WEight tray.
_ASY ©_,. ©_Usji,,_VALVB makes 6i! changes easier, faster.
FROKT NOSE Re LL_K:_can(era in f_'antof mower deck to reduce
ch_w_,cesof ":£:xdpi_g" on unev:::_rte;_ain.
GAN(I_ _4([_C_qk,_tsyou :ow 2 of 3 pull-behind attachments at once,
such as sw_e.p_ws, dethatchers_ aerators 0"_otfo_ _se with rol!ers,
carts or other heavy attac_'_ments).
,@A_JG_ '@'{N£:HX8 on both sid_-s of the mowe_ deck reduce
char_ces o_;%s_aiping" on uneven terrain° For mower decks r_otso
equippe£
_qi!jLC_-__:_{AKI_J{}_THA'TCN_£B_oosens soil and flips thatch and
matted ieaw;_sto !awn suHace _o_'easy pic-kL_p.Twenty spring line
taeth_ UseXl to p_epare bare areas to,seeding. AvailaNe forfi'oni
o_ rear rnet.intin_. H_GH PXRFO{a_JIAHC;{ R£9:b,.ACT_©H
SPFIIHG 7_N_ t:iiqi_.-:TH_itrCH_Rcovers 36-inch wide path and
tosses thatch into _a_!e hopper_ Mounts behir_d tractor.
MUL,CH_HG ©LOSS_OUT PkAT#£ HK once insta!led, lets you
roach, discharge or bag clippings (bagger optional) withodt
changing biades For models no_ equipped as 3qml Convertible
mowers. See "MOWER" in the Repair Pa_Is section of this
manual
RA_P 70£S AND _£_'I _let you k)ad and untoad tractor from a
pickug truck, Use with 2 x 8 or 2 x !0 Iumber.
ROLLER for smoother lawn surface. 36-inch wide, 184neh
d;ame[e_,'wate_4ight drum holds upto 390 Ibsoof weight. Rounded
edges prevent i3amq to tu,ff. A@ustable scraper automaticaJly
cleans dt'um,
SN©W 1_loAD£ for snow removal only. 14-inch higiq, 48qr_ch wide
btade eF;ars 4.24nan path when angled !eft or right. Raises, !owers
with side [eve_'. AdiIsstable skids; _ep!aceabte, reversible sc_aper
bar. (Us,_ with tire chains and wheel weights and/or rear drawba!-
weight.)
SNOW°_%_ROW_:_Rhas 4i}...inchswatK Drum-.type auger hat, dies
powdery and we,/heavy snow. Mounts easily with simple pin
a_rarigement. Discharge!._eh_.£eadjusts from tractor seat. 64nch
diameter spo_£ discharges snow 10 to S0 feet. Lift eont_o_Iedat
tractor seat. (Usa with chains and whee! weights and/or rear
drawbar wef£iht,)
a_'_._£_a use 12.ovolt :DO _ r_.__',-_s,._.,_,..motor that connects to _ss
tractor ba_t,ery or other 12-volt source, !rscludes booms foe
automa£ic si.wayk_gand h_,.ndhe!d wand for spot a_}r.win% Wa_sd
has adjt_st_:_blespray pattem_ For appiyir_g herbick_es_ inse.cti _
cides, [ungicides end }iquid fe_!i_izers_
SPF}£AB£B/S_©i_'_RS make seeding, fertilizing, and weed kiiF
i!_g e_,sy, @_oadcast spi'eade_s are aIso user@ for gran@ai de._
ieers arc:t sand,
SWSEP!_._:.::9iet yo_._co!_eet grass clippir_gs and leaves,
T_LL_!iI!:}!__as5 hp er_Nne and 36.-inch swath to p_epai'e seed beds,
cu_tiw4e and com::}est garden residue. 7ifler has its own buik4a
}iftand depth control system and does NOT require a s_eeve hitch
Fits any kawn,yard or gai'd.en tractor. Simpiy hook _@i:othe t!actor
drawbar and go! O_st]©_'_ai accs-sse_ies convert _nit for
dethatching, aerating, hiJli,qg...without toeis_
"f'_RBC_,_A,_NSate heavy duty; closely spaced e-;traqarge cross
iinks give smooth ride, outstanding traction,
S-°RACT©R CAB has heavy duty vinyl fabric over tt._butar staei
frame, ABS p_astic top; Near plastic windshield offers 360 degree
visibility. Hinged me_al doers with catch. Keeps opet'ato_' warm
and d% Remove viny! sides and windshields for use as sun
protecto_" in s.snmer. O}st]oaa_ accessories _ck_de; tinted/
tempered soiid safety glass windshield with hand operated wiper;
!2-voit amber caution light for mour_tir_g on cab top.
VACS for poweff@ collection of heavy g_ass dippi_sgs and ieaves.
Optior_a_ wand attac_'wsser_tto pick up debris in hud4o-reach
piaces. VAC/CH1RP_R includes a chipper_shredde.n
WEIGHT BRACKK1 _for drawbar for snow removai appiicatior's.
Uses (t) 55 ib. weight.
WHSFCLWB_GHTS for roar wheeis provide needed traction for
snow removai or dozing heavy matedais.
5

OF HA
t;'.
17
I
t
i
i
(1} ,::>I<iOUld_'el"..... _-'_5olY5i! 8-i 8
+. ............. ............ ..,
/,. -,.,
<,.? ,.,\
\
% ..J:" i
... .......... .-
/,
/
{i } _-oct-",__asnei" 112
i : "" _,-.::,.>n,_17i32 xi-3ii6 x12 ¢:sauge
i
$
_ t27 ...... _=v,:÷,,.-."i,a4<;20 8!4
' {2) Hex Nuts 114-20
i
ii
. , ,_._,c_W_she,,.'s t!4
i
t2) V'_8.sb,e,,'s _,,ai_°,,_.x 518 )<!9 Gauae
Ra_r'ts sao}(ed se_arat_D_ i_1 Cantton.
t
!
I
:I
I
l
t
!
i
Steering
'¢I=_o..d
_sianual
Steenng
Soot
V_dmo
Cass':_tt,._
,--? ........................... _-
I
I
I
I
Parts Bag ._
...._,_.-,@_-_¢._._]:',oc,:Fi-O_i£i'l@':;V£i #,_.,l'_ *
I.......... 7 ,,,'++ ............ _" ",,
<7,"¸
/
/")
...... E_L_---i;-/TT............... i.Nhee!
.... , ,................................ .,i
Steednq v",4neei " -7
_', ...................... 7
Ad::::_.ioter
(2) _" "
t I
Slope Sheet

YournewtractorhasbeenassembledalthefactoPiwithexceptionofthosepartsleftunassembiedforshippingpurposes°
,,_' _'_ ,dg, _u:;n_d .-_d_*:4yo UseTo ensure safe and proper ooeratbn of your _,ac,._.,all _oarts;and hardware you assemble mus_ be + _,+,_,_ ,-,_r- -=',
the correct toots as necessap! to insure proper tightness.
TOOLS REQUIRED FOR ASSE_IBL¥
A socket w_ench set wil! make assembiy easier. Standard
wrench sizes are iisted.
(!) 5/16" wrench (!) 9/16" wrench
(2) 7/16" wrenches Ti_e pressure gauge
(1) t/2" wrench Utlity knife
(1} 3/4:' wrench
When Aght and left hand are mentioned in this manual, ;t
means when you ane, in the operating position (seated
behind the steering whee0.
TO R_2_:JIOV[_TRAOTOB _RO_q OARTON
UNPACK CAn'T'ON
_._ Remove eli accessible :loose pa._Ssand parts ca_tons
fi°om cai!:on (See page 6)_
° Cut s.Jonglines on ca_tono,from top to _._.,._,h_-.¢-_.,-w_,_,_a.t four
comers of ca_ton and Iay panels flat.
n,<_c_for any additionai I _ ..
. .OO.,_-,_padre Or Ca_ons ahd
remove,
BEFOR_ _ROLLtHG °TRAO°TOF_ OFF
SK@
ATT,AOH STffff_]NM WHffE£ (See _]go t}
'_ Side the steering bushing ove_'the steering shdto
Raise steering shaft fc,n_varduntil screw holes in dash
lne up with steering bushing° instatI two {2) she,et
mete; screws and tighter_ securMy.
* Position steering• boot ova( ,:_..,,.,,_-___.-,_;_shall
,_ Piece tabs of steedng boot evertab st(>ts in dash and
push down to secure.
,_ Slide steedng wheei adapter onto upper steedng shaft,.
,, n,...._,'._o._., _.........e, _,,,t,_;=,ya_e poiKt;ng
o._it_.__,front wheeis of the-'+r..,,--',--r .......'_---,......
st..'aight fo_wa_'d.
_* Position steedng wheel so cross bars are hoAzontai
{ieft to dght) and siide onto adaptor..
o_ Assets:hie l_cu._ fiat wasf_er ........ "":=,_e3/8-z_,_iocknut and
t_ghten secure 8,
_> Snap steering whee_ insert into center of steering
wheel,
'_ Remove protective ptastic from tractor hood and gdk
1M_OR ANTk, HECK FOR AND REMOVE ANY STAPLES
IN SK![) THAT MAY PUNCTU RE TIRES WHERE TRACTOR
is To ROLL O_:F SKtO,
TO BOLL TRACTOR OFF SKID (See Opera°
tics s®ctios f@_ !oeat]o_ and _unetion of con-
t_ols)
o Press _itt}ever plunger and _ais¢ attachment lift lever to
}is highest position.
Re!ease parking brake by depressing clutch/brake
peda!.
'_ P!ace gearshift lever in neutral (N) position.
_, Rol tt'actor backwards off skid.
Remove banding holding discharge guard up agains;:
tractor. #
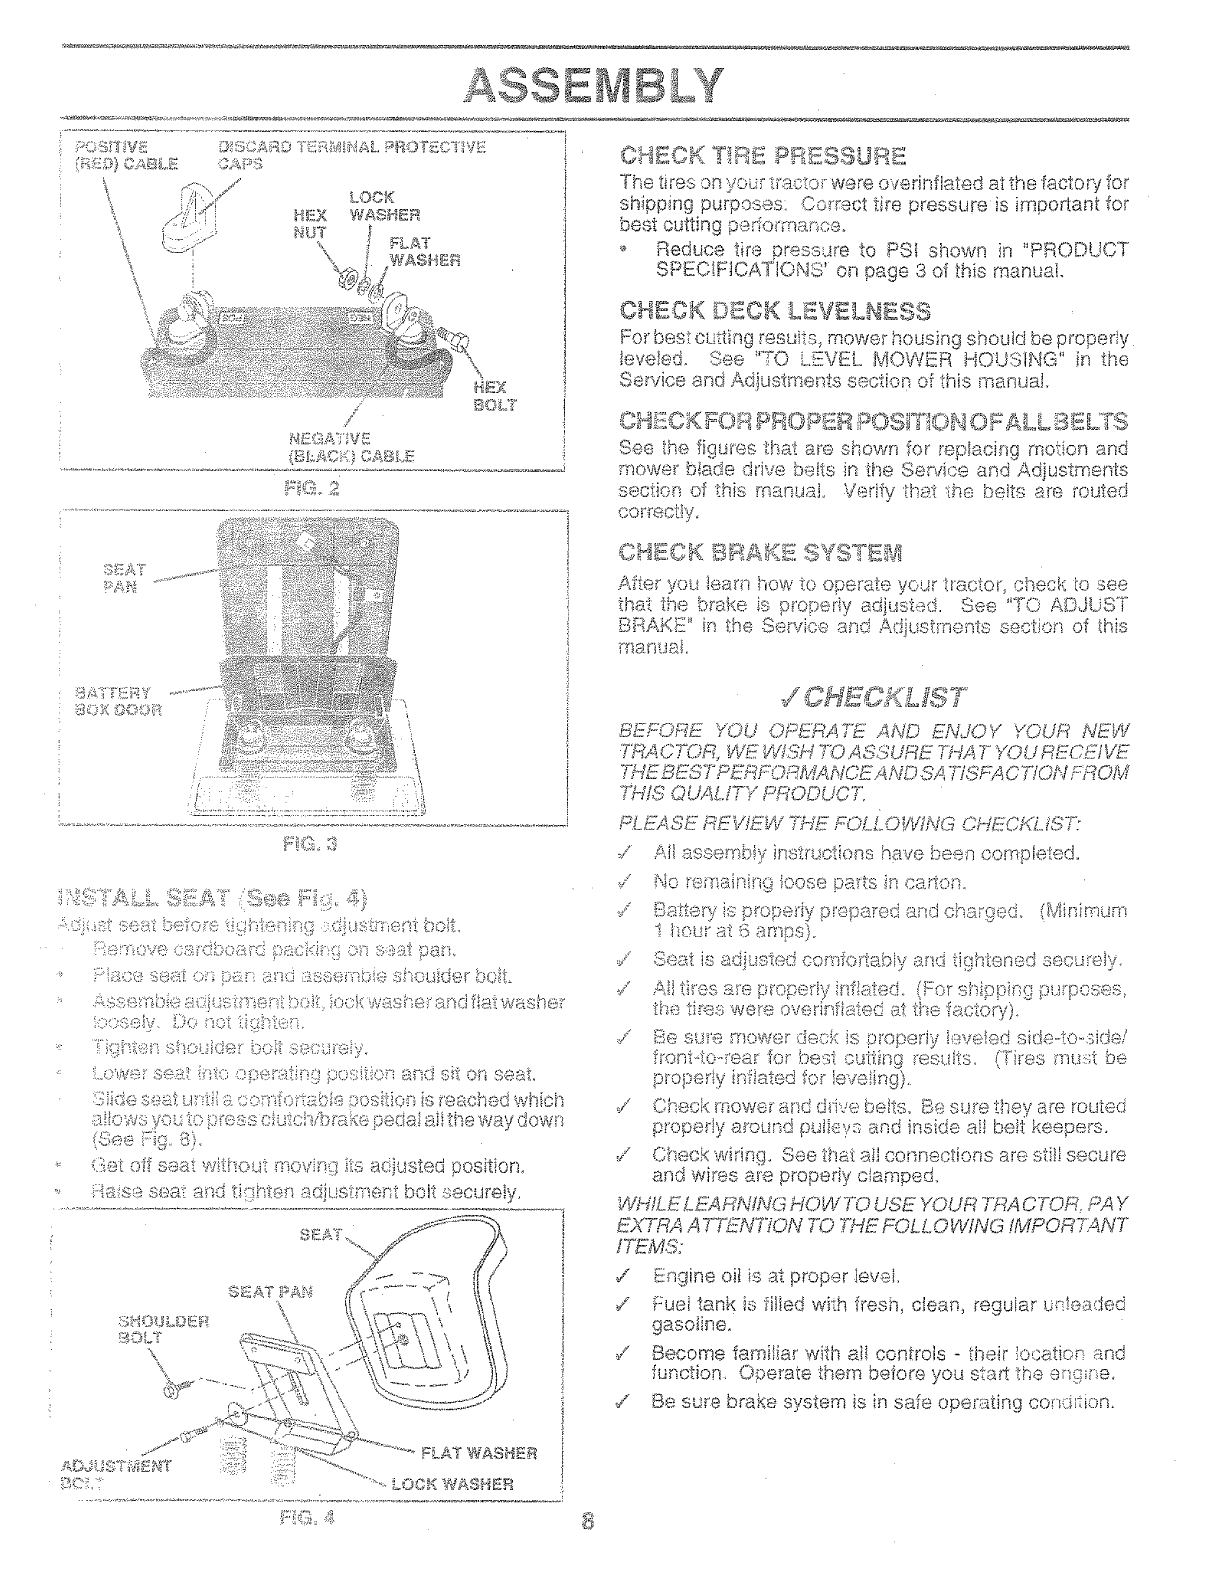
ASSE BUsf
The tires on you_"tracto__were ovednflsted at the factor_ for
shipping purposes: Co_rect tire pressure is important for
test cutting periofmancso
Reduce tire pressure _e PSI shown in "PRODUCT
SPEC!FtCATJONS' on page 3 of this manual.
OH_OK ©_OK LEV_LHESS
Forbestc_4ttingresuits_mower housingshouldbe pFoperiy
leveled, See N°O L._2VELMOWER HOUSING" in the
Serdce @nd Adius'tmet_tssectiono_thismanual.
See the figut"es that a_e showr., for re@acing motion and
mowe_°b!ade diive be!ts in the Secvioe and Adjustments
section of this manual. Verify thst the belts are routed
corrt_ctly,
I:;£&AT
S¢+,'I''?I£FQV
£i,L)I<O00:?I /! '
;: !!!
I
I::;'!f.';;,,:-3
/$ ##
;-u_er you Ieat'n how to ope_a_e your tractor, checL Io see
that =-_ is ......
t_e brake p_'opedy adjusted. Se_-'."TO A©JUST
..... 8,._,n of
i'[}aflIlal,
BEFC_RE YOU OPE];©_,7'2: AND &-N#OY YOUR NEW
0 Aoo urn.. TH,q7-"ytOU RES'E'I VE7WACTOR, WF Vi:,qSH_" ,,':,..........= ,c-
7WEBLY:S'TPI£'/::_FOF_%IANCEANDS/4 FiSF:AC770N #-i:_OH
N-lie QI_z_£iTY PRODUCK
PLi.EASE REWzZW K_E FOLiOW!NG OHEC_:fZ._ST;"
/All assemNy }nstl°uctiens have been compJeted.
# No rems_ining ioose pa',_tsin earl:on.
/ Battery is pr,,.)peAyp_epa_ed and chai'ged. (MinimL,'m
! !_,our_'.t'¢ amps).
¢" Seat is adjus%_=,dcomfor!:e_biyand tightened secL_reiy.
/AI tit'es are pi'operiy inflated. (For shippi¢.,g putpcses,
the tiles were ovednfisted at the factory)°
/" Be sure mower deck is pi'opedy ieveied side-to-:side/
front.;to-rea_ l%r be.st cutting _'esuits. (Th'es y_ft..istbe
ptepe_ly inflated fe_ ieve!ing).
# Oheck mower _.q"sdddve be!ts. Se sure they are routed
p_operiy aro_nd puleys and inside at bait keepet-s.
t.,f,_osswiring, oee m.a_.al connections are s,.&,secure
and wires are propedy cIamped.
WH&K fiEARN@G HOW7"O USE YOUR KRA OrOR. PAY
E)(_r-?AA 7hCEN770N TO THESFOLLOWING IMPORTANT
!7_MS:
V" Engine oit is at proper ]ev@,
/ Fuei tank is filied wkh fresi% clean, reguiar unIeaded
gasoline.
../ Become familiar with al controls - their location and
function, Operate them befo._eyou sta_ the engL__e,
7" Be sure b_ake system is in safe operating con,::i_tion.
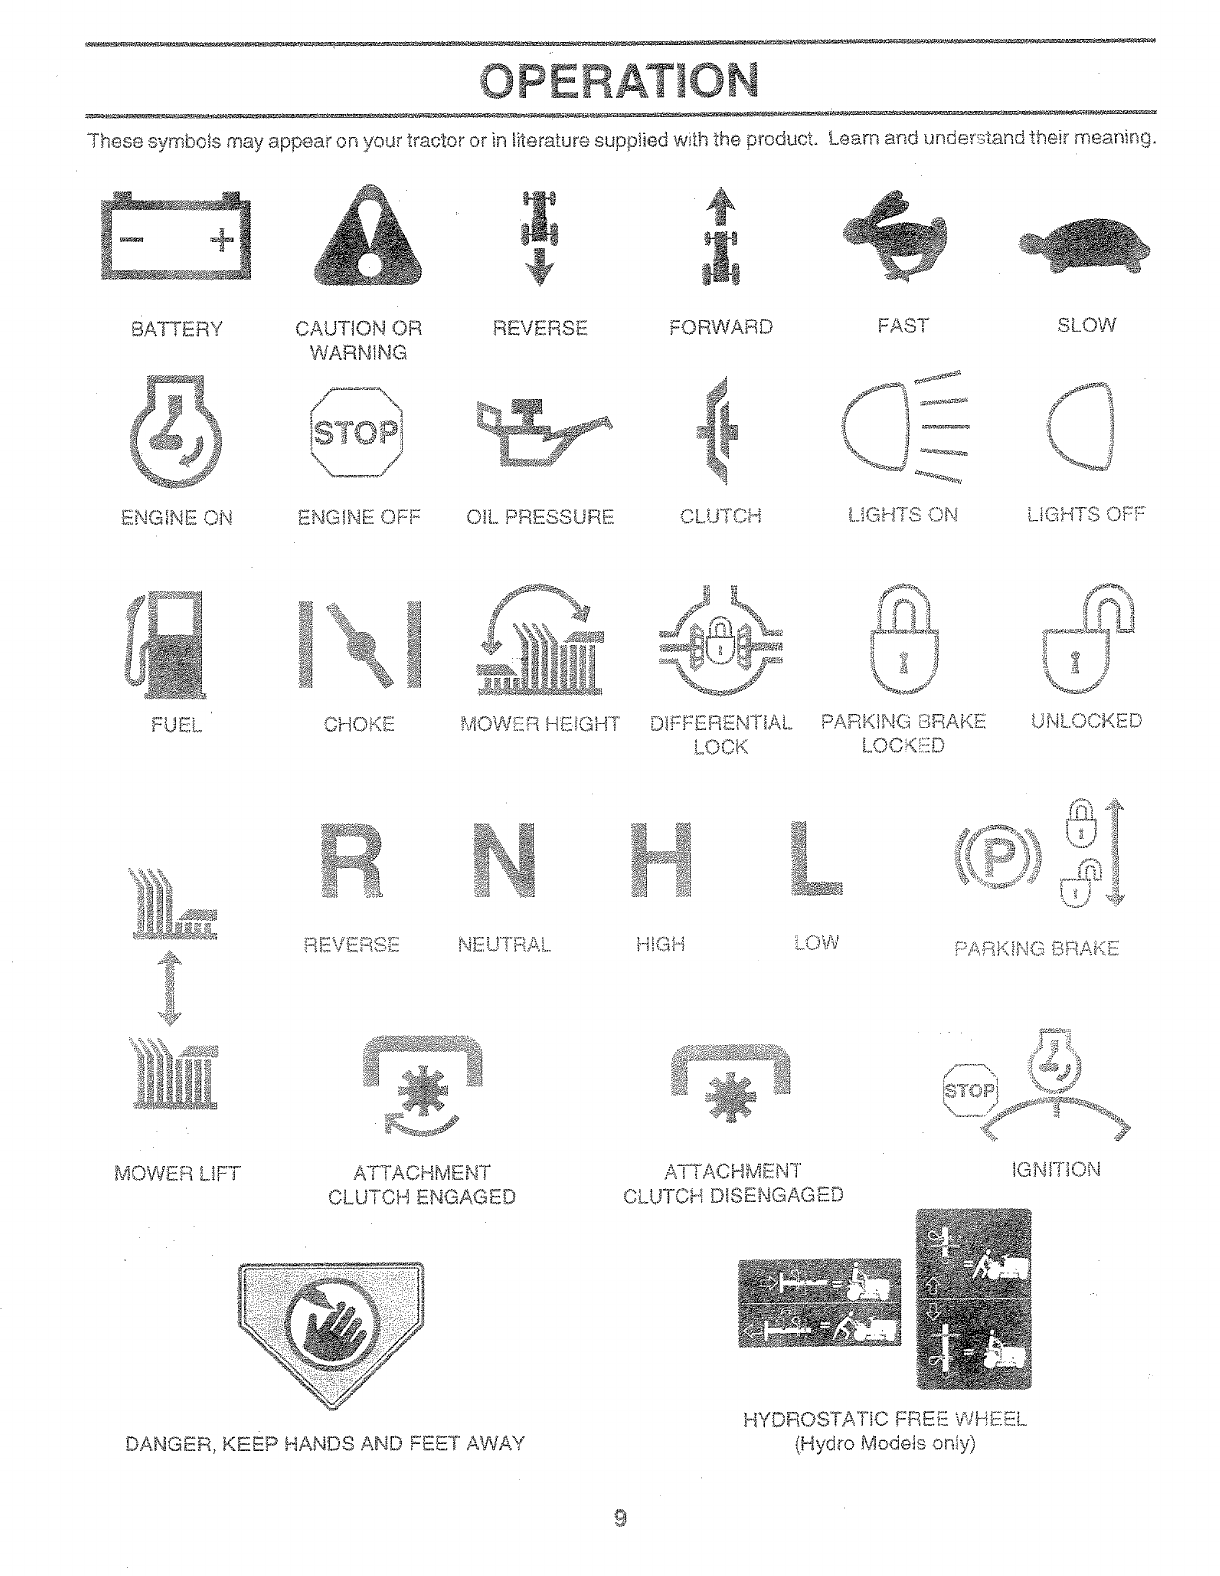
Thesesymbo!smayappearonyourtracto_orinliteraturesuppliedwiththep_'oductoLearnandunde,,standthei_meaning.
BATTERY CAUTIONOR REVERSE FORWARD FAST SLOW
WARNING
ENGINEON ENGINEqFF OILFREo,_,I.;_:. LIGHTSON LIGHTS" .......
L_Y .....
_H J,\_;. MOWER HEIGHT DiFFEREN]]AL
rUE_ PARKING BRAKE jNo_,_.Klxb'
REVERSE NEUTF_AL -_v"_ i C)*%_
MOWER UFT AttACHMENT
CLUTCH ENGAGED ..,LUTort DISENGAGED
IGNiTiON
_ANG_:_, KEEP HANDS AND FEET AWAY
HYDROSTATIC FREE WHEEL
(Hydro Models oniy)
9
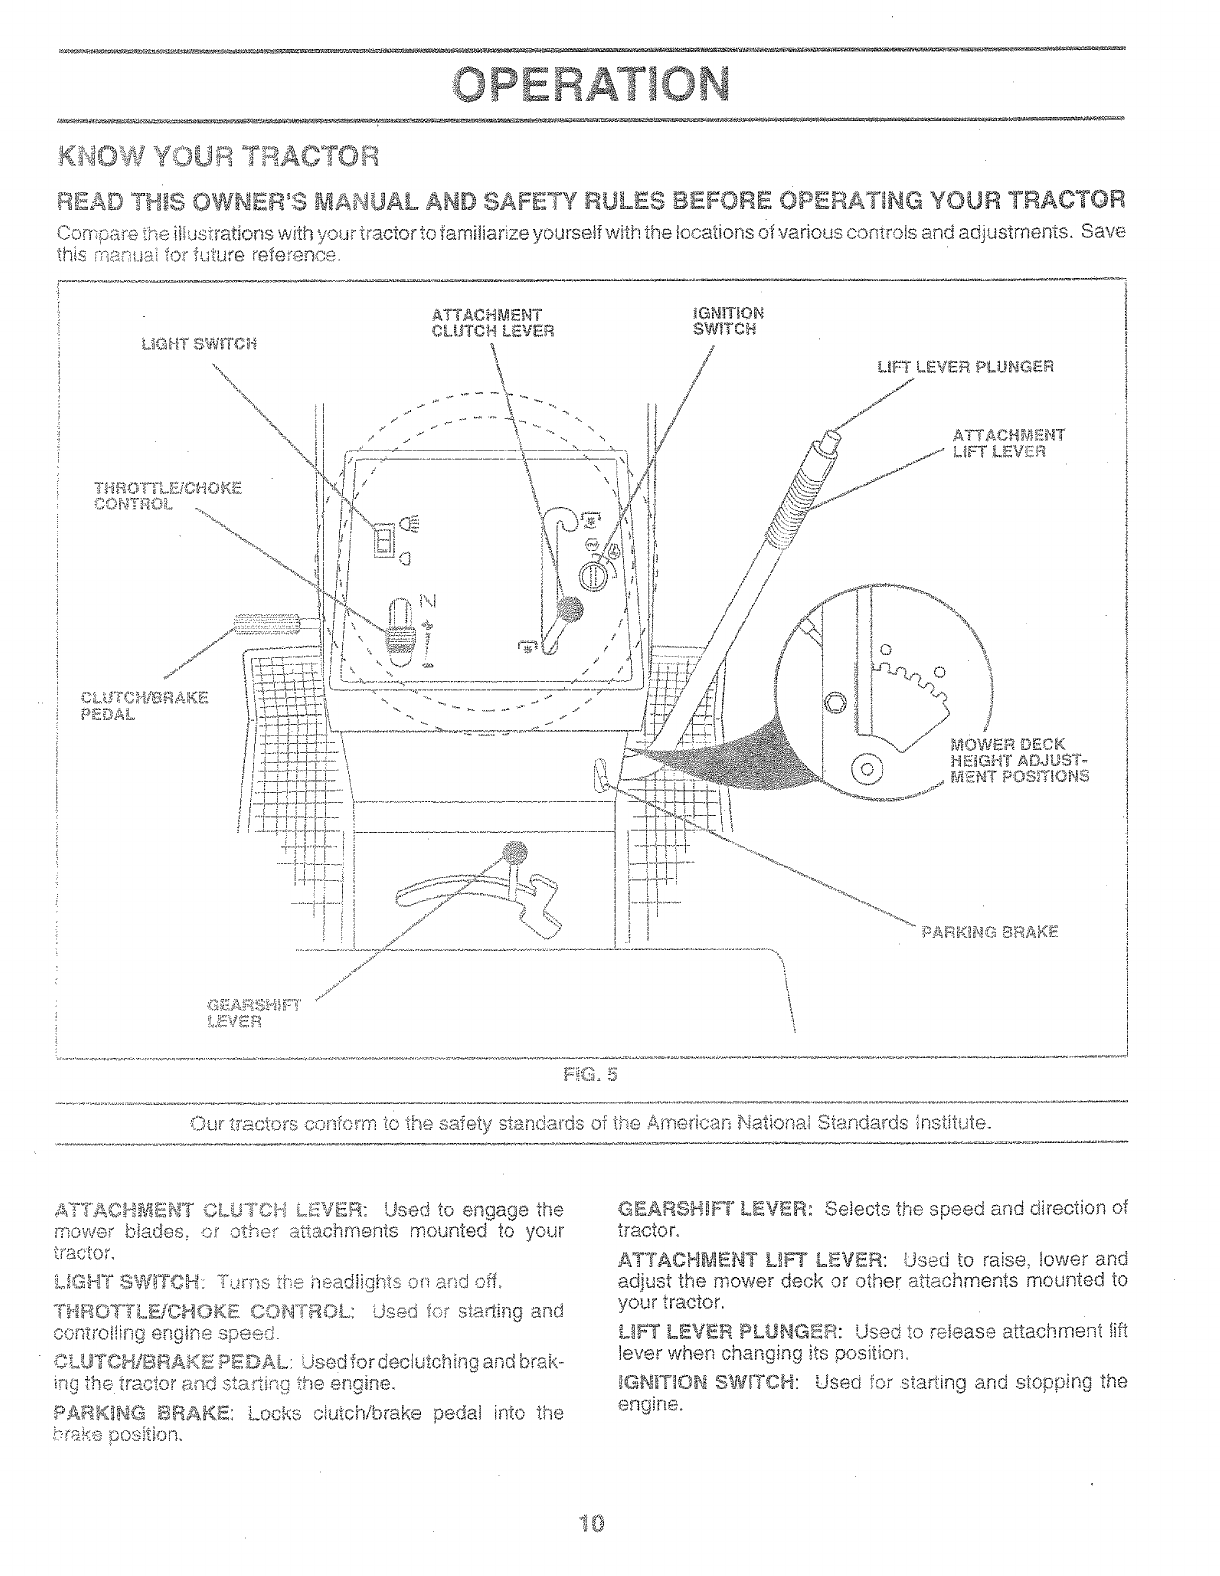
OPE ON
A_i-_u_ _%gUH FRAC I OH
._,-0E,_uW:£TM THIS OWNEWS _ANUAL AND SAFETY RULES BEFORE OPE_ATING YOUR TRACTOR
cvmu_:_,_e the i!iu.sti'ations with your tractor to famiiarize yourse! with the locations of various controls and adjustments. Save
this rqar uai fi:)r?.mxe refers)nee.
Our t<actoi's co<from] to lh.q ,:,<_..f_'_'v,,%,standa_'ds of the American Nationa.i Standards !nstitute.
_r'.<_._,*,l._mI_;:w.'t"CLUTCH LI.':VIIR: Used to engage the
_' ,,,e,_b}ades, or _' .... "_'_ to _, _,
,,,o ..... othe¢ .=Lavhr,__n.,_ muunt..d to your
< {11,,,,kO _.
THIOTTL!iCHOKE OONTtOL: Used for sta_ing and
oonti'oiIing engine speed.
o,ra_k-
,+,.olj _CH,=_#RA¢_Ic ;=¢,:_,_=_.. Used 'lOt dec,IuIchfflg and ....
ingthe tractor and starti,-@ the engine.
PA,'_MH_:_ BRAKE: Locks c!utchibrake pedal into the
b<s.keposition.
_AR_'m,r I _% _,R, Selects the speed and direction of
t_actor.
ATTACHMENT LIFT L[!V[R: Used to raise; lower and
adjust the mower deck or other attachments mounted to
your tractor.
Lt_\T L_V_R PLUNGER: Used to _elease attachment fft
lever when changing its position.
IGNFIqON SWITCH: Used for sta#:ing and stopping the
engine,
I0

OPE
HOW TO USE YOUR TRAOT_R
TO SET PATx_K@4QBRAKE (See FiG 6)
You r:tracto r is equipped with an operator presence sensing
switch,, When engine is running, any 8fttempt by the
operator to ]eave the seat without fi!*st setting the parking
brake wit shut off the engine,
Depress clutch/brake pedal into full "BRAKE" position
and hoido
_. P!ece parking brake iever in "ENGAGED" position and
rebase pressure from ciutchibrake pedal Pedaishouid
;,amain }n ;:BRAKE _'position. Make sure parking b_ai,,:_::::
wil! hoid t_stctor secu_eo
STOPP@4Q (See _:'iG 6}
MOWER BLADES -
,:_ Move attachment c}utch lever to "DISENGAGED '_pc.,
sition.
GROUND DRIVE -
= Demess clutch/brake pedal into full "BRAKE" position.
Move gearshift lever to neutraD(N) position,
ENGINE -
o Move throttle control to slow (_) position,
HOTE: Faiiuf8 to move throttle control to stow (,_)
position aad aitowing engine to idle before stopping may
cause engineto "backfire",
Turn ignitior_ key to "OFf position and remove key.
Aiways remove key when leaving t_actor to p_"event
unauthorized use,
o Neve_ use choke to stop engine.
NOTE: Unde_ certain conditions when tractor is standing
idle with the engine running, hot engine exhaust gases may
cause "browning:" of grass, To e!iminate th}s pessibiity,
always stop engine when stopping tri_ctor on grass area_,
,_,*,L!f!O .... Always stop t_aotor ogre- ,
p4ete@,as desc,sqbed above_ _efo_e lear° 1
j_'_:_the ope_a_.o_ _sposition, te empty I
{:;_ass catc_qer_,etco :_
AM_I',/s operate engine at fl.Althrotth_iL
Operating engine at }ass than Mi throttle reduces the
batte._ycharging rate.
_ F:uilthrottie offers the best bagging and mower peffo_--
f_aP, ceo
TO _iOVE FO_:aWARD AND BACKWARD
(See 15"i9,(5)
The diFection and speed of movement is cont_oled by the
gea_shif!: bver,
+ Staff b4actor with ciutchibrake pedai dep_°essed and
gearshift iever in neuti'ai (N) posH:]ono
-_ Move gearshift ieve_ to desired position.
€ S!o,_,Ayr,aiease c;utch!brake peda; to start moven;enL
ii?IPOR!R/&HY: BRING TRACTOF] TO ACO?dPL,_iT'E S'FOP
_._ L :I%,Y'i [9 ,
_;,::;,-_,iH: :brIn-F_NG OH CHANGING ....'-" "=' Fi:'ALUREI
TO DO ,10 WILL.SHORT!N'-i '!-H-{USEi:-UL LiFE O_: YOUR
TIIAHSA)(LE.
TO £©dUST H2iiGHT
{See FiG 5)
The post:ion of the ath_chm,er_t iift iever determines ihe
cutting height,
-- Grasp lift 1ever,
Pr:_:}sspiunger with thumb and move iever to desired
poftion,
The cutting height range is approxime, te!y !-I/2 to 4", The
heights are measured from the ground £oIhe biade tip with
the en@ne not running. These heights are appro×imate
and may vary depending upon sot conditions, height of
grass and types of grass being mowed.
The average lawn should be cut to approximateiy 2-I/2
inches duqn9 the cooI season and to over 3 inches
during hot months, f:o_"healthier' and better looking
lawns, mow often and after moderate growth.
,_ For best cutting pe,donmance, grass ove_"6 inches in
height should _e mowed twice, Make the first cut
re!ativeiy high; the second to desired height.
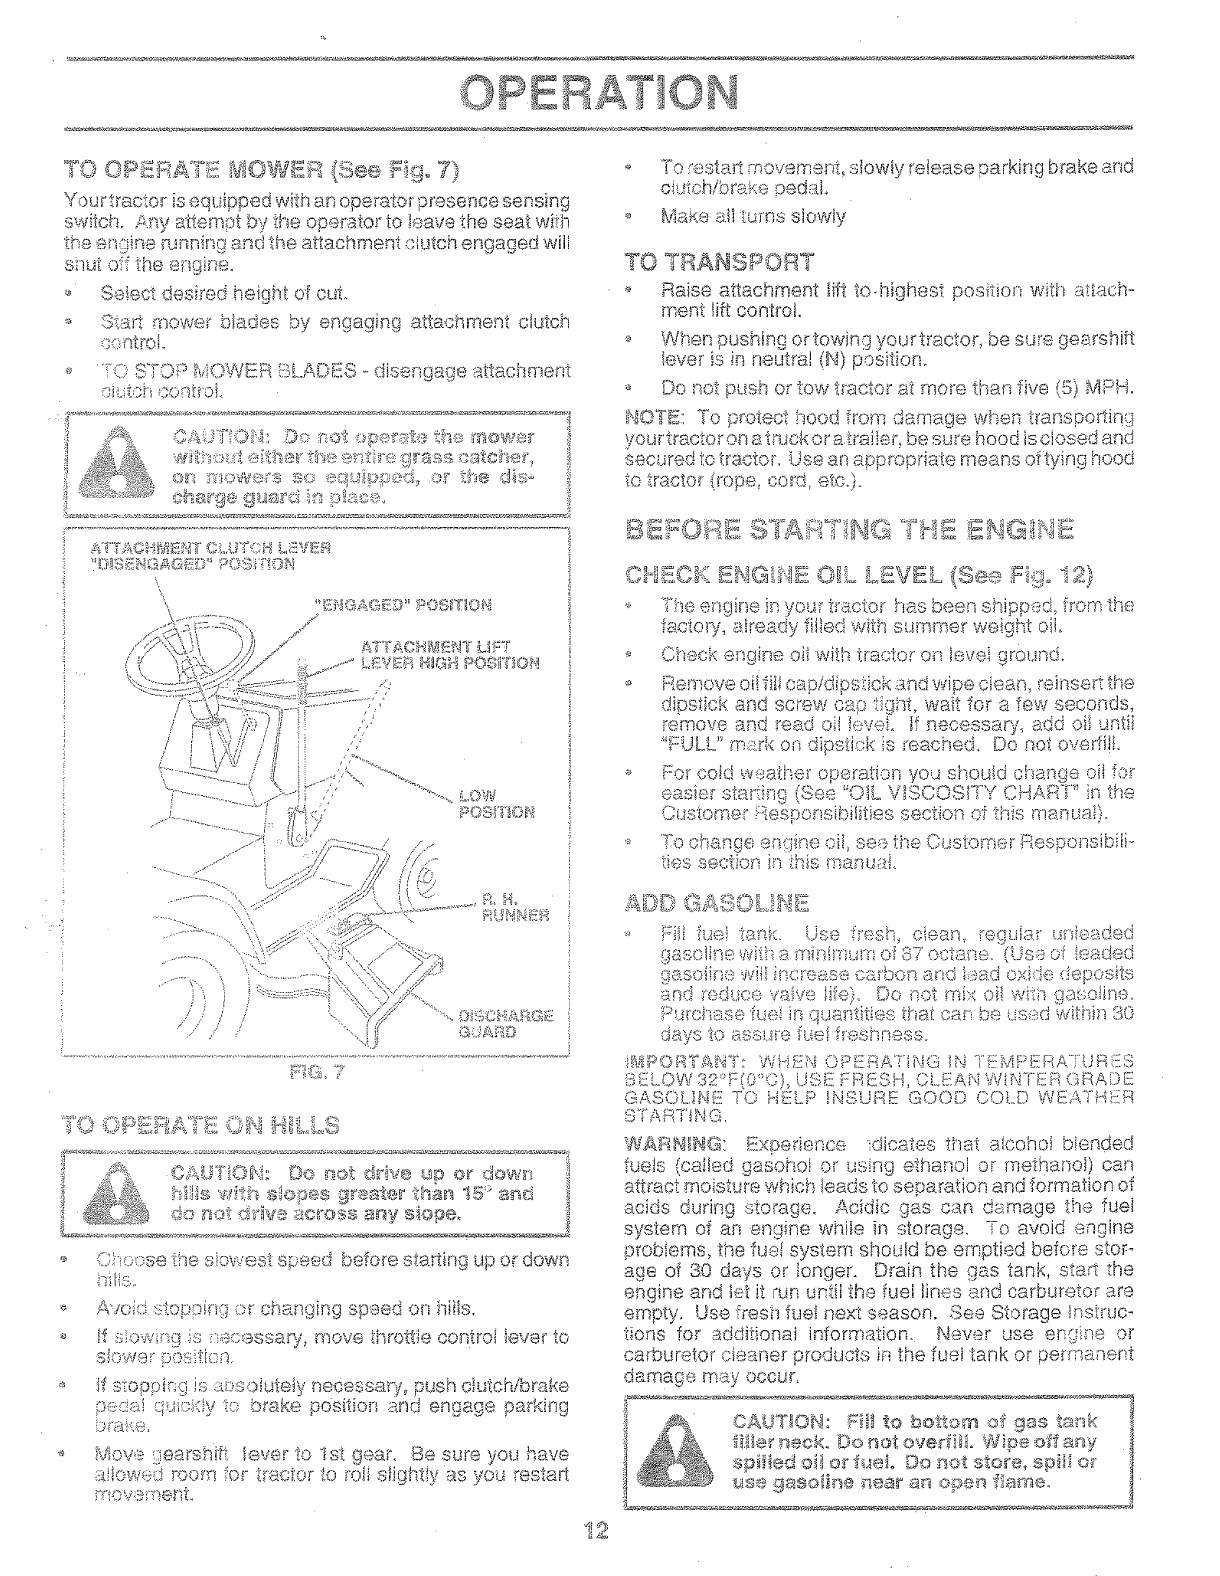
U o E
TO OPERATE! _OWdA (See _!ig, 7)
You rtracto__is equipped with an operator presence sensing
switch. Any attemot by _he operator to ieave the seat wih
the engine running and I've attachment aiutch engaged will
si_ut off the el]gine.
_ Se!ect desired height of cut.
StaF: mow@" blades by engaging attachment clutci]
cont_oi.
, ',"....... m i & ,_'%vit 0
"X) <rw'x_:_,uOW:=H d se_,_s_getsttachment
!£
C:hx_se the .>,.,,,_q-',,e_,.'o_s_.eed before starting up o_down
>. Avoid stopping .::_changirsg speed on isils.
if s}owir_g _!{ ecessary, move throttie control {ever to
sbwe_" pos_i:ton,
,,, H"s:oppi_g Js..}psoluteJy'necessa% push ck£chiD_ake
pedai q.Hc}dy te brake position and engage pa_king
brai<e.
Mov:s- ._earsisfft iever :'o.!st .'sear.,.. :Be.sure you }save
"_Sowed morn _or traei:or to roll oJ,gt,_,y as you rested:
o To res.tad movemer %.dowfy, .dease e.ark,t g b_ake and
cit..'tchibrake :pedaJo
q
o Make a 1.um_ slowly
R_e attachment fft to.highest position with attach-
ment lft control.
o When pushing or towing your tractor, be sure gearshift
Ieve_ is in neutral (N) position°
DO ROt , ' _""_
_;},o.,_,or tow tractor at more than five (5) MPH,
iNOTB: To p_otect hoed from d@mage when Wansporting
yod_'tractor on s.ta;ck or a traiier, be s.u_-ehood is clesed and
secured to t_actor. Use an appropriate means of tying hood
to .t,,acto_"{rope, cord, etc.).
!r"._g.I
........ _o,. !._,.uof hen been shipped, fromthe
"".he<.._with summer vve,g A;oil,.facto% aiready ":_ ""'"_ _"
lo /,,., qround,
............ r g_neot with tractor on _ --,_
siq'i_,Ss pk "_'m
oFJemove oi!-iiti.cap/dipstick, ,._nd_.t,,_,_..,e_ ,, '-*" _"," ";':-"
,..,,i_'_'°fi"<'-,..--and screw -.'-,.-,,..<.tight, wait for _s_.f¢.._gs_..--,,s,_o_d_,,
remove and _'eadoi! !<.veL If necessary, add ol g.ntii
....FULL" mark on dipstiok is _.._c__,-_
.e_,_,_,_.._.Do not overfi!l.
..,.,,a,. _, .,.,.rs..,,J,, you shouid cr_ange oil fo_
C.............".......I .....; ' . ,;_..,.1,O. ix]anuall.
..d_.J[o,,4s,-.-.les,ue_'_,,b!lities_," "sof this . . ' '}
., To :hancje ..... ........... the 0 d---_,,, -c_.... ,:'_'._li-
ties seotJon ii'] this menuS.
t2
.Fiii K_ei lank. Use fi"esh, ciean, regt.Aar urfie.:.ttded
gasol_se with 8 mir@rium of 87 octane. (Us _::,of ieaded
gasoiine wiJ!incrs'ase cs.rbon and _ad oxile deposits
and reduce va-.ive!ire},.Do _otmi:,<el wJ-i:t_ga:..o!ne.
}]:'tJrGi%ase !L}(,} ]o q_JaN_ities _hai ca, _',be iJse(J within _}0
,daystoassu;'crue! f_eshness.
IB_IPOF_TAH%',".WHEN OPERATING IN TZMP[iRA-!'UR_.S
S-i']LOW32°F(0<:0), USF FP;ESH, CLEAN W_N-YEIRGRADE
GASOL.IH£ TO H£LP INSURE GOOD COLD WEATHYR
S'T'ART!NG,
WARH/HG: Exoedence _ccares _ "
, , }at alcohol blended
fuels (ca!led gasohei or .....,_'_-,gethan@ or methanoi) can
attract meisture which leads to separation and formation of
acids during storage. Acidic gas can damage the fuel
system of an engine while in storage. -To avoid engine
prob eros., the _,u.=,,;-_,system should be emptied before stof
age of 30 days or longer. Drain the gas tank, sta£ the
engine and IeI it run until the iuei lines and carburetor are
O_
empty. Use fresh fuei next season, o_;e Storage Instruc-
ions for additionai information. Never use erN_ne or
ca@uretor cleaner p['oducts in the fuel tank or permanent
damage may occur,
I _.._,,TlOk,!o Fill to bottom of :gas t..ar_k
:1

09E
TO STA aT EH@HE (See Fig, 6)
When staddng the engine for the first time or if ti!e engine
has run out of fuel it wJJt<take _"÷ "
_.,_da 8rar_king time to move
fuel from ÷t-._ .
,.i_ tank to the engine.
Depress o!utchibrake pedal and set parking beake.
,, Place gear shift lever in neutrai (N) position°
o Move attachment clutch to °'m_M'_'A_¢zcm"
........ _s_,,a.... position.
Move thrott!e controt to choke (iX[) position.
Here: Before "'-" the
.:s_.art_t_g,read _. _ warm and coid starting
procedures below.
hsert key into ignition and turn key clockwise to "START"
position and retease s_eyas so(m as engine starts_ D.e
not _un sta_er continuously for mere than fifteen sec_
onds per minute° ....i_t_'e engine does not <_._._,.afte_
severa_ a_.t_mpt_ move tt_rottie controi to Tast (@)
position% wait a few m autos anci try again° If_a_,ne ,_MI
doe_ rK)t rt "''d
" ..._.¢_..... move the thro@e control beck f:o the
choke {1\I) oosition and rot%
WARM °'amx_°"_'_:_c_'_"_' _' _....
_v,,,:,:.,,_,.;_o _Ai_ t _N',.;_(50°Fand above,}
-_ When engine .>.aabo_- _'_-'.move the in rottF',,....... cont tel to t_e fast
(@) position.
o 1%e<_.4t_d__=.nts and g,o._na ch,_,e car,,now be used. !f
the erx]ine does not scOOp!,the !oad, restart the ,_"-%in_:,_ "_
and aibw itto warm up for one minute using the choke
as described above.
COLD WEATHI:!!R STARTING ( 50':' F and beiow)
-_ VVhene.ngine sta _:s,allow engine to run with the throttle
control in the choke (]\]) position until the engine runs
roughly, then move throi:fie control to _ast(.'@)position.
This may require an e_!;ff,e warm--t_p period from
severai seconds to several minutes_ depending on the
temperature.
_'-' The attachmer_ts can also be used c!uring the engP_e
warm-.upperiod
NiOT_: If at a high altitude (above 3000 feet) or in cold
temperatures {bebw 32 F) the carburetor fuei mi4tu!'e may
ADJUST CARaURE] O q"'in the Service and Adjusm_ents
section of this manual.
FIG, 8
.,13

R R:SP BI ES
I _ _}Tia _g(: _mx<:_o[te_; wilen opera:ring under a hear 7 ioad or in hif_h amb[erll temperatures,
2, S<}!_/i?;_ moe_ ofte;_ !,/net,, ope_(,£fng its @ty o!' dasty colditions,
:':f. i ::du :}_ed wRh oii fif;'er, chm:ga ot evsy 50 hours,
4- ;:_epk_ ;a bktdes more o[_ea when mow_i G ]rl sandy ,';-._ol.
5 - If aquipae<,i wlti_ _:ctjusiabie sy.sterr_.
",B-Not reqq_ed if ,_quipped with mainlenm_ced,_e6 batep/.
7 - Tl!7_:#.eniront ax}_:_pivot boll to 35 fblbs, maximum,
Do fiat ovsqighten.
Son% adjtJstme_sts wiif %-ed to be rP.,adepe_°iodically to
7:',_opetiymsJr_taitsyour tr%i:or.
AII adjt,_stmer;ts ir_t!-e Semicf; and Adlus';:ments section of
t!;is .................... _ be checked ai: ,.._._ o, ,c_...<d. ,>,_a..o,,,
Once a year you shouid }'epJacethe spa_°kplug, clean
or replace ai_ tilted a_sd check blades and belts for
we% A new spark plug and clean air filter assure
proper air@el mixture and he!p your engir_e run better
and last longer°
_:_ _'Dt_ _-?"- e"<,__ -__,;',_'=
bh_{.: erigiRe 011 ,:,_e
Oheck b:ak:e operatk}n.
+ C_-#._-_-.,,_._....,..tit-e p_'essure.
Check '" :o'_s,., "
._of . .. _astefiers.
14
!ITtPORTANT; DO NOT OIL OR GREASE THE PIVOT POINTS
WHICH HAVE SPECIAL. NYLON BEARINGS. VISOOUS LUBRI-
CANTS WILl., ATTRACT DUST AND DIRT THAT WILL SHORTEN
Tlq_ LolF_ OF THE SELF+LLIBRICATING BEARINGS. IF YOU
r"£EL THEY MUST BE LUBRICATED, USE ONLY A DRY, POW-
DERED GRAPHITE TYPE LUBRICANT SPARINGLY,

CU MER LKIES
TRACTOR
Always obsewe safety rules when performing any ma]nte-
Ranc@_
BRAKE OPBRATIOH
if tractor requires more than six (6) feet stopping distance
at high speed in highest gea,r,then brake must be adjusted.
(See "TO ADJUST BRAKE" in the SewJce and Adjust°
merits section of this manual)_
Maint@n proper air pressure in al! tires (See "PROD-
UCT SPECIF]CATIONS" on page 3 of this manuat)°
Keep tires free of gasoline, oil, or insect control chemi-
cals which can harm rubber.
o Avoid stumps, stones, deep _"ru,,_, sharp objects and
other hazards that may cause tire damage.
BLAD£ @A8_8
Fo_"best resu!ts mower blades must be kept sharp_ Re-
place bent or damaged btades,
BLAD£ R_,MOVAL (See _dg°_'°°_'_,G
Raise mower to highest position to allow acce@sto
biades.
* Remove hex belt, iock washer and flat washer securing
biade.
._ i.qstal new or resharpened blade with traiIng edge up
towards deck as shown.
Reassemble hex boll _ockwasher and fiat washer in
exact order as shown.
_, Tigi_tep, bolt securely @0-35. FI_._....,_:_._h_, torque}o..
',:_ ,¢I_;1HI: ;.:_:,u,._ =.,..,,.....iSGRADEoilEAT _hEAIID.
NOTE: We do not £_cor'nmer@sharpenir_g bl_._de-bul: if you
do, be sure the blade is balanced
[
J
!
l
!
I
]!
:]
I
BLADB i.. J
:................%..f
FIGo 9
t
i
[
i
Care should be taken to keep the blade balanced, An
unbalanced blade wil cause excessive vibration and even-
tuat damage to mower and engine,
+ The blade can be sharpened with a fiie or on a grinding
wheel. Do not attempt to sharpen while on the mower.
To check blade balance, yo u wit! need a 5/8" diameter
steel boit, pin_ or a cone baiancer. {When usk'6Ja cone
baianc@r, blow the instructions supplied with bah
ancer)_
Side blade on to an unthreaded poddon of the steel bolt
or pin and held the boit or pin paraiiei with the :£!round..
if blade ;s balanced: it should remain in a hodzont_i
position, !f either end of the !:,'.lademoves downwar:::i_
shad°penthe heavy end until the blade is balanced.
HOT_!: Do not use a nail fo_ balancing his.de. The lobes of
the center hole may appear Io be centered, but a_e net
,/- /"
//'
,/
,/ /!i
£qG, !0
15
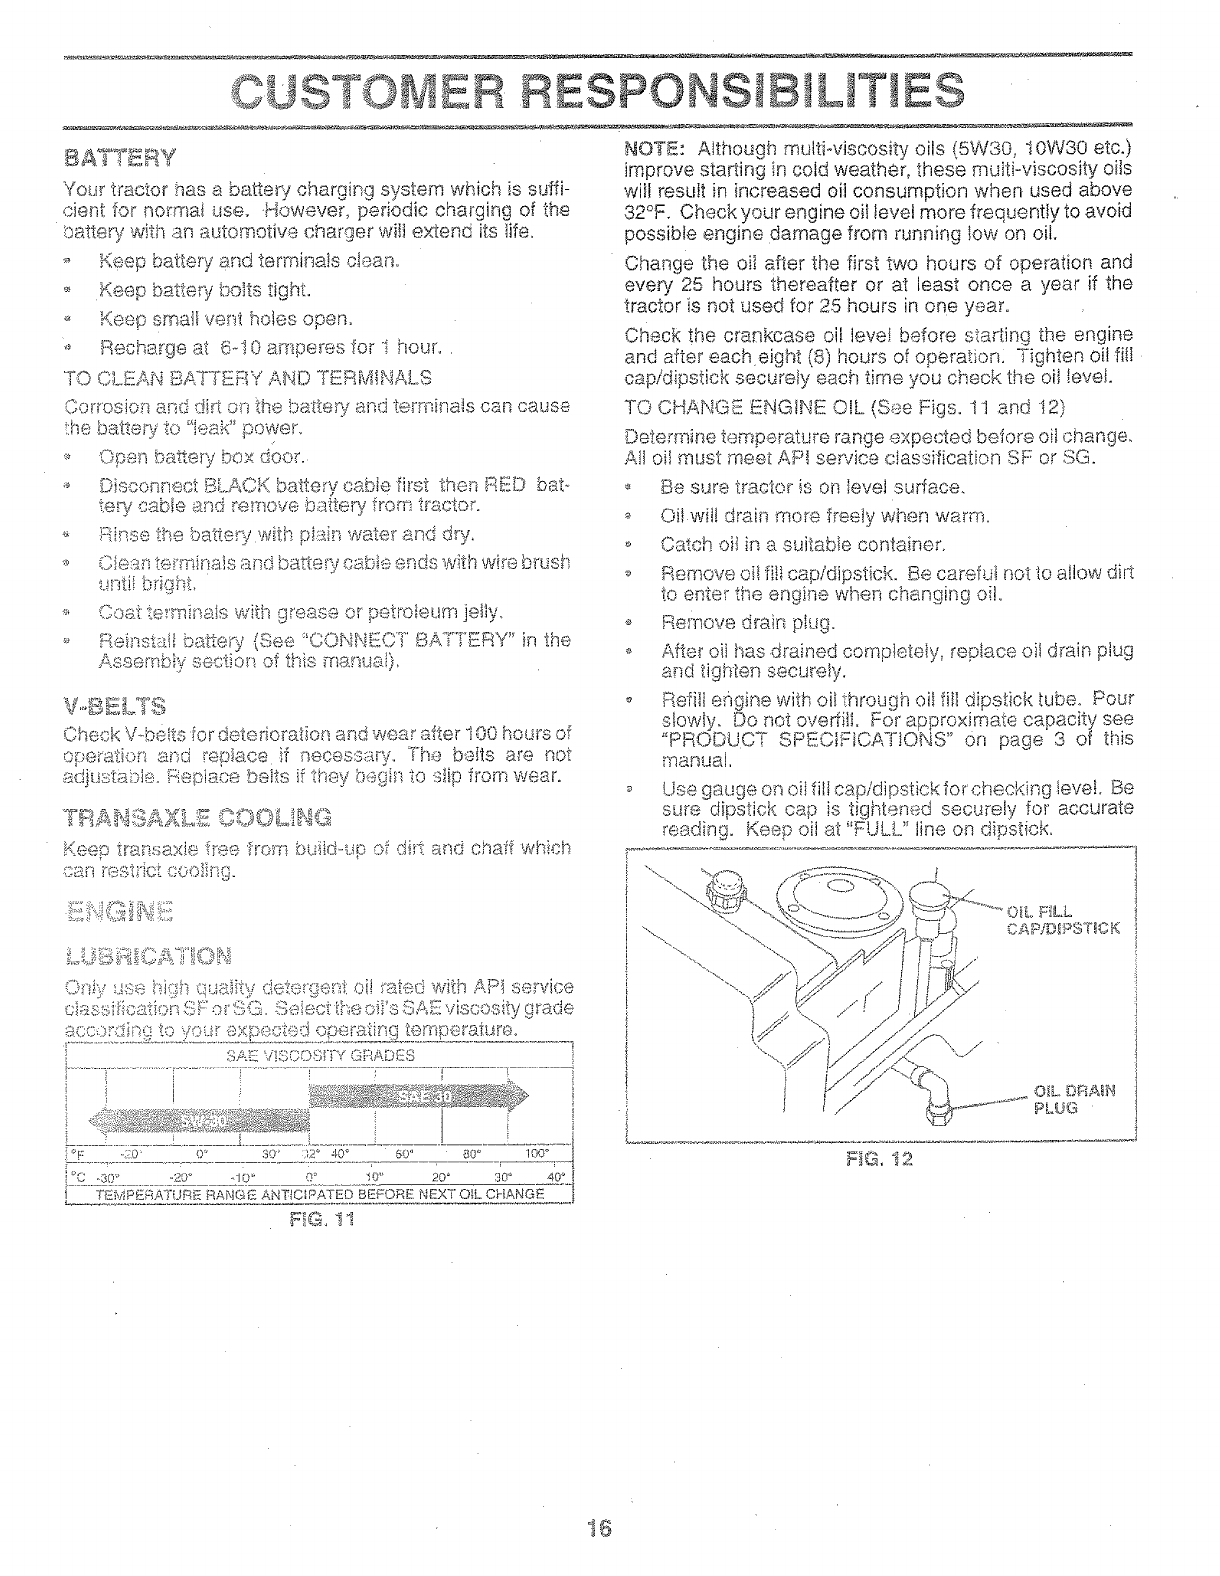
S B LK ES
8A_'%EF_Y
Your tracto_ _aasa battet_/charging system which is suffi-
cient for normat use. -However, periodic charging of the
batte%' with an automotive charger wiIt extend its lifeo
_,,._phatter, and termina!s ctean.
Keep battery bo_ts tight.
Keep smatl vent holes open.
,_ Recharge at 6d 0 amperes for I hour..
Co__c,sion and d._ on :_hebatte%_and tem_inais can cause
the battery to %ak _'power,
_ Open battery box di}or.
,o Disconnect SLACK batte_y cable first then RED bat.-
tery cane {_md_'emove battery f,_omtractor°
,_ i_;nse the battery v_,'ithpia;n wate_ and dry.
._ Ciean tem__inais and battei% °cabi,e ends with wire b_usis
,tintii bfighL
'_, Coat terminats with @'ease of petroleum ]eI_y.
_, Reinst:{d[ battery (See _'CONNECT' BANTERY" in the
Assembiy section of th{s manuai)_
_,h..s.....\.,_.... _or.... _ro,;_._ .... and wear after !00 hours of
._..........u._, ,_.;.,_rs_eptace if necessary_ Yhe baits am not
adjustable_ Heplace _a_,.,,,,if :_hev becim _o sup from wear.
_',_;_ut ....... " ...... {tom build-up o_ dS: and (,,la,_ which
C:CFi _"eSti'iC _,,.;,.u_h;";"_ _.....v-
Ortiy sue high quaiity detergent oil rated with AP_ service
SP{_{",i!St:)OSNY GRADES
i
c"" ..2@' 0 _
[ ,_ .30 _ .10 _. .!0,_ 20 _ .')O_ 40 '_ [
i TT'MP_FiATUR_ RANG@ ANTICIPATED BEFOg:V:: NEXT OIL CHANG_ [
F_G, II
HOT_: Although multi°viscosity oils (5W30, IOW80 etc.)
improve starting in cold weather, these multi-viscosity oils
will result in increased oil consumption when used above
32°F. Check your engine oii level more frequently to avoid
possible engine damage from running low on oil.
Change the oH after the first two hours of operation and
every 25 hours thereafter or at least once a year if the
tractor is not used for 25 hours in one year.
Check the crankcase oil levei before staring the engine
and after eacheigh_ (8) hours of operation: Tighten oi! fitt
cap/dipstick securely each time you check the oii level.
TO u.r_._P._r'_.:_u: ENGINE O!L (See Figs. 11 and 12)
Determine temperature range expected before oil change.
All oil must meet AP! sewlce classification SF or SG.
lBe sure tractor is on Ievel surface.
_, Oil wil! drain more freely when warm.
_'_oh oi! in a suitable container.
Remove eli fi!I cap/dipstick. Be careful not to allow dirt
to e_ter the engine when changing oil.
o Remove drain plug.
o After oii has drained completely, replace oil drain plug
and tighten securely.
o Refili e,%ine with oil through oil fill dips£ick tube. Pour
slowiv. _!2 not ove_iitli For approximate capacity see
PRODU,,, oP,.._t_t,_LA,]ONS 0n page 3 of this
manual,
Ose gauge on oil filI cap/dipstick fo_'checking ievel. Be
sure dipstick cap is tightened securely fo_ accurate
,e_...dmg. Keee oii at "FULL" line on diostic£
/
/
F_G,, 12
OIL HLL
CAPiDIPS'?_8}(

tBl _S
AtE FILTE_ (See Fi9o 13)
Your engine wi! not run pmperiy usir_g a dirty air filter.
Clean the foam pre-cleaner after even./25 hours of opera-
tion or eveR/season. Service paper ca_ridge ever 7 100
hours of operation or every season, whichever occurs first.
Service air cleaner more often under dusty conditions.
Remove knob(s) and cover.
TO SERVICE PAE-CLEANER
o Slide foam pYe-cieaner off cartridge.
Wash it in fquid detergent and water,
Squeeze JtdB_in a clean cloth.
_ Saturate it in engine oil. Wrap it Jn clean, absorbent
cioth and squeeze to remove excess oil
,o If very diRy or damaged, replace pro-cleaner.
Reinstat p_e-clearler over cartridge.
Reinsta!i cover and secure with k_ob(s}..
TO SERVICI C/\RTRIDGE
OL£AN AIR SCREEN (See Figo t4)
Air screen must be kept fr_e of dlR and chaff to prevent
engine damage from overheatir_go Ctean with a wire brush
or compassed air to remove dirl arqd stubborn dried gc._m
fibers.
INGtNI COOLING FINS (See £g. !4
Remove any dust, dirt or oii from _ngi_e cooling fins to
prevent engine damage from ov_rheating.
*, Remove screws from biower housing and !ift housing
and dipstioR tube assembly off engine°
_ Cover ot ftl openi_g to prevent entry of dirL
<_ Use compressed air or stiff bristle brush to thoroughly
clean englr_,ecooling fins.
To reassemble, reverse above procedure°
Ii!Gill @OOLIIQ 7IN::I
Fl(]h i 4
FIG. t3
17

ILiT ESCUSI°O
_V_UFFL£R ,.
, muffi_, and spark attester (if
!nsoect and reotace corroded _-,
equipped) as it co,aid create a fire hazard and/or damage.
SPARX PLUGS
Replace spark plugs at the beginning of each mowing
season or after every 100 hours of operation, whichever
occurs first. Spark plug type and gap setting are shown in
"PRODUCT SPECIFICATIONS" on page 3 of this manuat.
1N,dN[{ RiF, L _aLTER (See Fig° I5)
The rue! fiiter should be reptaced once each season. If fuel
filter becomes clogged_ obstructing fuel flow to carburetor,
replacement is required.
With e%ine cool, remove filter and plug fuei line
sections.
P_e _,p,*,f-_ fiiter in sos t or in fuei line with arrow
pointing towards carburetor,
', Be sure there are no fuel line teaks and ciamps are
p_opedy positioned.
!mmed;ately wipe up any spiiigd gasoline.
'_IG,15
CLEANING
.>_ Clean engine,batte% seat, finish, etc. of all foreign
ma_ter.
Keep finished surfaces and wheels free of all gasoline,
oil, etc_
_, Protect paff_ted sudaees with automotive type wax,
We do not recommend using a garden hose to ctean your
tractor unbss the electrical system, muffier_ air filter and
carburetor are Covered to keep water ouL Water in engine
can resuit in .a shortened engine life.
18

A E
CAUTION: BEFORE PERFOR_IN_:_ ANY SERVICE OR AOJU_T_ENT_:
Depress c_utch#brake pedai fuliy and set parkin 9 brakeo
P_ace 9eat'shift _eve__n _seut_a_{N) positior_0
o P_ace attschme_t ciutch i__"O_S_NGAGED" positioned
o _m ignition key "OF_" and ram®re key,
Make sure the blades arid a_ moving parts have comp_eteiy stopped.
#O_sconneot spark P_4g wire from spa_k plug and p_ace wire where it cannot come in co#tact with [
TO RE,_!#_©V_{ B_qOW_R (See Pig_, 18).
Mower wiil be easierto remove _rom th#_dght side of tractor,
P!ace attachment clutch in "©;SENGAGDD '_position.
Move attachment JiltIever forward Io iower mower to its
iowest position°
_ RoJlbe!t off engir_e pa!Iey,,
,_ Disco_ssect cit£ch rod from clutch iever by removing
retainer spring.
'_ Disco;_nect anti.-sway bar from chassis bracket by
removing retainer spring.
Disconnect suspension arms from rear deck brackets
by ,_emoving retainer springs.
Disconp,,ec_front links from deck by removing retainer
sprhsgs.
o F_aise!ift lever to raise s_Jspensio_sa_"ms.Slide mower
out from ur_der _racto£
_[_.aPO£TA_tT';tF AN ATTACHMENT O]'HER THAN THX
MOW_!iR DECK _{!:;TO BE MOUNTED ON THE TRACTOR,
REMOVi_i]i--.i_:£F:qON! L!NKS_
_ Raise attschmer-_t lift ieve_ to ib highest position°
_ S_ide_ssowerunder tractor with discharge guapJ to dght
side of tra:::-tor.
o Lowe_ lift ieve_ to its iowest positio_
_* hstatt mower _I peve_,se o(der _ .... _ _
CL, LITCbl RO_ L,_V_R
/9:USP_NS_ON FRON'T
ARbIS UNKS
!9

TO L£VBL kaOW_£R HOU.,,_sNG
Adjust the mower while tractor is parked on tevel ground or
driveway. Make sure tires are properly inflated (See
"PRODUCT SPEC1F}CAT!ONS" on page 3 oftMs manuat).
!fti_es are over or undefinfiated, you win not properly adjust
your mower.
S!DE_TO-S!DE ADdUSTMENT (See Figs. 17 and t8)
o Raise mower to-its highest position.
o A! the midpeint of both sides of mower, measure height
from bottom edge of mower to ground. Distance"A" on
boris sides of mower shou!d be the same or within !/4"
of each other.
If aqustment is necessa% make adjustment on one
s}de of mower only.,
_0 To raise one side of mower, tiqhten lift link adjustment
nut on tha.t s:d_°
To bwer on_::_side of ,,,._,t_..,_'o,_,_' .oosen }ift l_r¢",,. adjustment
nut on that .. :e
,d,i tU_"r!S
mow._srhJe,ghtabout I/8'L
i
i
)
,_s*adjustment nut wii! change
Recheck _ a,_,,-.o ,-._t<, adjusting.._e _.:,,._..m...,,.._after
,_3OTTOM EDGE BOTTO_il 8©GE
OS_':£iOWER TO OF MOWER TO
"_4_ I_.- _7{I,_"---..;j!_.-_I -47
ki.{.........V1-':!-_'<"'_'_ ......... _-_ i;I..... ._
,_',,'" i t l f _....A
ENTS
LiFT _ _.4"
ADJUSTmeNT NUT
Ff@° !8
FRONT-TO-BACK ADJUSTMENT (See Figs. 19 and 20)
IR,1PORTANT: DECK MUST BE LEVEL StDEZFOoSIDE. IF
THE FOLLOWING FRONT-TO-BACK ADJUSTMENT tS
NECESSARY, BE SURETO ADJUST BOTH FRONT LINKS
EQUALLY SO MOWER WILL STAY LEVEL SIDE-TO-
4
i
To obtain the best cutting results, the mower housing
should be adjusted so that the front is approximately I/4" to
3/4" lower than the rea_ when the mower is in its highest
position.
Check adjustment on right side of tractor. Measure dis-
tance "D'_directly in front and behind the mandrel at bottom
edge of mower housing as shown.
• Before makint_ any nacessary adjustments, check that
beth front links a_e equal in length. Both links should be
approximately 10-3/8,.
!f links at:e nol: equal in _ength, adjust one link to same
length as other link.
o To lower front of mower loosen nut "E" on both front
links an equai number of turns.
When distance "D" is !/4" to 3/4" iower at front than
rear, tighten nuts "F" against trunnion on both front
links.
i
!
1
I
To raise _ront of mower, loosen nut "F"from trunnion on
both front !inks. Tighten nut "E" on both front !inks an
equal number of tums_
When distance "D" is I/4" to 3/4" !ower at front than
rear, tighten nut °%"against trunnion on both front links.
Recheck side4o-side adjustment°
_=_"_.,_ _,_S_,i_>s -.... _...... _. _ '_ "_ _ _1 _,€_T_
f-f _'i I[
/
/
[-
J
2O
NUT
_RONT L1NI(S TRUNNION
FIG. 20
NUT "5"
s
/
/

SE CE A A©J
TO REPLACE _IOWER BLADE ©RWE BELT
(See Fig. 21}
The mower btade drive be!t may be rep!aced without tooIs.
Park the tractor on ievei sudace. Engage parking brake.
BELT REMOVAL
o _ Dlo,.__IGAu_Eu position.
s _ace attachment clutch in" _"=_ " '_" _'"
Move attachment lift lever fon*7ardto iower mower to its
iowest position°
Roli bait off engine pulley,
o Disconnect R.H, suspension arm from rear deck bracket
by removi;qg retainer spdng.
Wori_tbe_t off both m{_:nd_eip@ieys and idter puileys.
_ Pull bett away from mower,
BELT INSTALLATION
lnstalt new belt in reverse order- of removai.
i
7
WITH P,_;_H,..a :BRAKE _IGAG_:D
/ ...H/2,,_, \\
X
""_-..._,_._-_
NUT"A"
JAM
NUT
I
°O4 _ "'_ _,_ -
o Ma£e sure bett is in ail puNey grooves,,and'tn_:4ut,oo -_--ail betl
guides+ F]Go 22
You_ ti'actor ;s equpped with an adjustable brake system
which is mounteci ors the dght s}de of the transax!e.
if tractor requi_es more than six (6) feet stopping distance
at high speed in highest gear, then brake must be adjusted,
o Depress clutch/brake pedal and engage parking brake.
o Measure distance between b_ake operating arm and
nut "A" on brake rod,
tfdistance is o'ther than ! 4/2% ioosenjam nut and turn
nut "A" un!i! distance becomes !4/2". Retighten jam
nut against nut "A".
Road test t:actor for proper stopping distance as stated
above. Readjust if necessa% If stopping distance is
still grealer than six (6) feet in highest geaq further
maintenar_ce is necessary, Contact your nearest au,°
thorized service centen
TRANSAXL_
PULLEY
21 FtGo 23
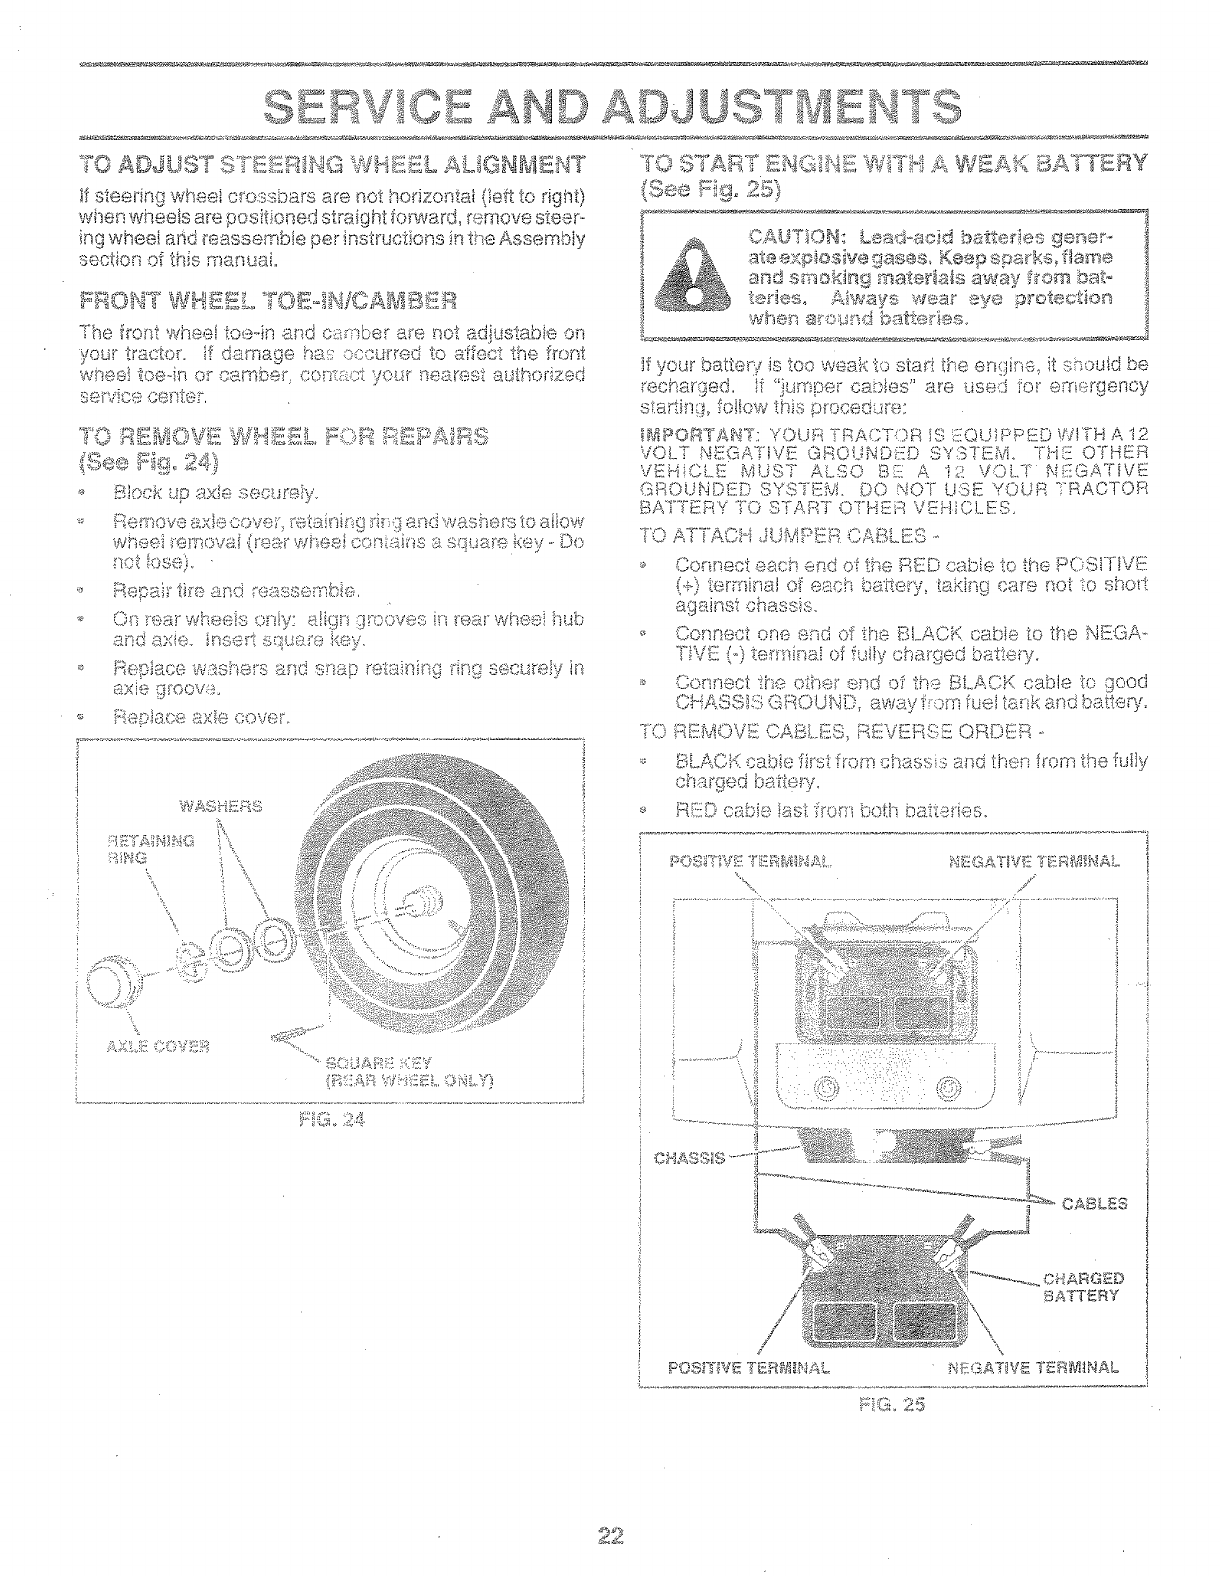
if steedngwheelc_ossbarsa_enothorizontal(}efttorigh0
whenwheelsarepositionedstraightforward,removesteer-
ingwheeiarid(eassemDieperinstructions;nt!_eAssembly
sectiofofthismanual
Fqtj!tq _ .....,_,.=°'+"*:;_,,,=.. TO_-_dOAZ#!B!I_:R
,,, Bleck up axle secu_e-iy,
_ F:%;)move._xxLecovei, te_:2ifh_g h_ and washers I;oatow
wheel i-emo'-+'s.f,{ree_-"wheel conLf&"_s::0,sq,uare key - Do
.qot ose),
".' Rep-_ir tke and _es.ssembk-,
*: Ors tea_'wheels only; align _!c<:)ves h'_,_"earwheel hub
and axis. inse_i sGu@fe key,
_; }se:i.AaOe W:_8}q@1% aN@ st_,an ' " ' d_,_-........... _<
i;}(it_ _:J .... ; = %
_ i;:_epte, oe _!t.)(,9 oovei%
if your battery is too weak to start t_seerGk'_e_it should be
rechad@d, if ".}.'drapercabies" are used for emergency
star_in_!, blow this procedure:
,_']_-_., _, ....... Y O t JH Y"RA C i _<>;{ _ l S :::a I __*_,:'p <::_n WKH A 12
VOLT _ '-"_ _;"_"'"'-'+ _ .... SY "_Tl::l",f_
:_qc:!.a_-',__:: GROLCa);ED ........... [}-ii!_OYHER
VEHICLE MUST AL.SO 817:: i',. "ii.! VOL.Y N_'iIEGATiVE
GFiOL,_NDF.{DSYSTEM. DO NOT USE YOL;R TRACTOR
BA'rTERY T'O STARY OTHER V!EHICI...ES.
Cermec'i each end of the _"°=", ..........t,-, PF)SIJtVI;
\_/?'*"%'t'="F'v*i_"Y_ld_.i=lc"_ Ot eSOf _o._.i"_'%<:_"'5,,[eKllSq''" oate qoI',. 11ooN_l_'=r-+
aga_instchassis
_, Connect one end of the _-__,o_ " 'to.......-........ cable the NEGA-
,,,-,,,,-(.).............
,_ " +,_.- _ _,ov cable ix- good
Cor•inect the otisei" end of _._,..:..,.........-,.,...,,
C"';-4 __t;<:;t_:::.'#:wx; ': i_,q% :' " ' " "_d b_"ttam_
.,, A,. ............, ,OU,,_...., away !'t:_mfuel cariu(<._,,.... _,...,:_,._
"_"r'_.. I-s.l: _,M'_ ,, '1:1- r_ ,_ F"I _-c, iiliiVf;fi:_ 17:11 kiWI"h'_"-;[,?t11.2.]',l-i
'_ m_b+_,.4",cable 'ill'Sttrenq ciqaSsls _,""-d+.=then h'om the fully
_-_"_:::_.=...%<_."M",_*:,,.,,....,,_:.fail ftori! bath batt!f'iel.
_7
!
/
/
POS!'i"IIIE "[LRRIIl:NikL
71iG, 25
CABLES
BATTIRY
\\
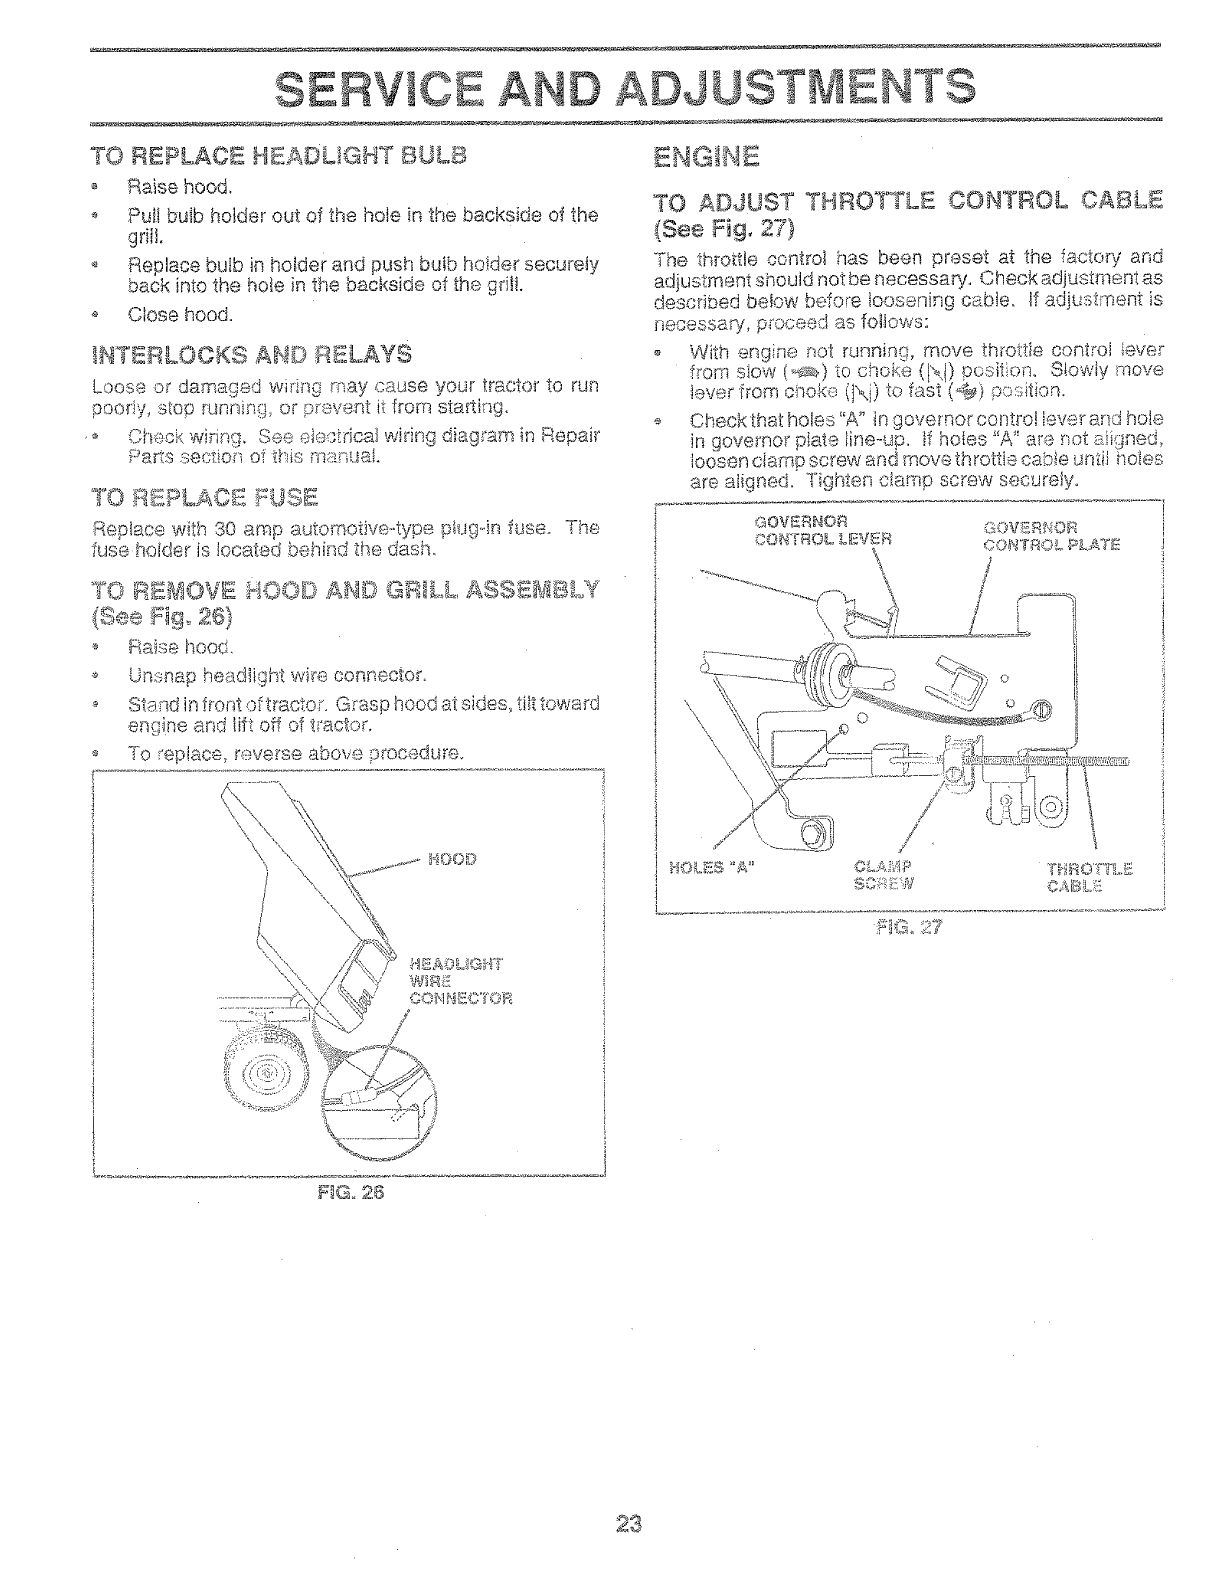
TO REPLACE HEADLIGHT _ =_
o Raise hood_
o Pult bWb holder out of the hole in the backside of the
grill.
o Replace bulb in holder and push buib hoider securety
back into the hole in the backside of ._hegriii.
o Close hood,
INTERLOCKS AND AELAYS
Loose or damaged widr_ may cause your tractor to run
pooriy, stop Rmnin{:_ or prevent it from sta_ing.
,9
D ADJ
... :+:,.,# _at wiring diag;am in Repair
Check wirinft See _::"_"_:._ : ' °
Replace with 30 amp automotive-4ype D,,.,._qJrjfuse. The
fuse holder is located btmmd the dash..
TO Bai_!tOVE _4OOD A_',il© GRILL, ASS_i_aBLY
(S,.(_®#i$ 2M
o Raise hood.
Unsnap headiight wire connector.
o Stand in front oftracton Grasp hood at sides, ti_ttovvard
entwineand lift off of tractor,
To replace, reverse above procedure.
-4N
TO ADJUST THROTTLE CONTROL OABL£
(See Fig. 27}
The thro_tte contro_ has been preset at the factors; and
adjustment should not be necessaPy. Check adjustment as
described beiow before loosening cabte. If adjustment is
necessary, proceed as fot_ows:
With engine r_ot ru,qnin_, move throttte control iever
from siow (_@**)to choke ('_,) oosit:,on. Slowly inove
fewer from ono_,t (I _,,),.ofao. (_ #...;.::;4wn.
Check that holes "A" in governor centre! lever ar,_dho!e
in governor plate line-up. If holes "A" are r_otaiigned_
loosen clamp screw and move throttle eabie untiJ .qoies
are aiigned. Tighten clamp screw securely°
GOVERNOR GOV:_£_;_iOR
OONTBOL £_VE}S_ ©O_'_TROL PZ.AT£
/
¢i
o
O
F_G. 26
23

SERVICE AND ADd
TO A©JUST CARBU_3ETOR (See Fig. 28)
The carburetor isas been p_eset at the facto_j and adjust-
merit should not be secessary. However, minor adjust °
merit may be _'equiredto compensate fordifferences in fuel,
tempe_ature_ a!titude or load. If the carburetor does need
adiustment, p_oceed as follows:
!n ge,qecai, tumi_g idle mixture valve in (clockwise) de-
c re _s:sesthe suppiy of fuei to the engine giving a leaner fuel/
ai_"m,i×t_.._re.Turning the idle mix:ture valve out (counter-
c!ockwis ::).incre ¢_sesthe supp:iy of fuel to the;engine giving
a richer fuei/a;_ mi;<ture_
!WiSOF:_iTA_4T_DAMA(_£ TO THff NEEDLE VALVE AND
1'HE !}_EAT!N CAHBUf::_.L{TORMAY RESULT !F SCREW 1S
TU :I:NiLDtN TOO TIGHT,
PRELIM!:NARY SETTING -
_, Aii° clean.,.ir_ss embty paustbe assembled to the ca_bu_,
_"eto_w! ;_n __..:_:kin_.]ca_'bui-eto__adjustments,
_, Be sure the th_"ottleconti-oi cabie is adjusted properly
(see above).
With en{_iir::eoff turn idle mixtiye valve i_,_(clockwise)
ck)s;__git finger tigY£ and titan turn otat (countercleck-
F!NAL S_I}TFTi:NG-
_ Start engine and allow to warm fo__five minutes. Make
iinai adit._strt_e,:_tswith engine i-urming and shift!motion
controi ievet" in _eub'at (N) position.
,_ _4ove throt<Jecontrol ieve_ to siow(<_s_) positieno With
_inger_;]ii!ta1:ea__dho!d th_ottle !ever against idle speed
screw, sum idie speed screw !:o8.1:rain!'750 RPM_
.,, VVb_:ie:stii: hold:r:f: th_ott!e !eve:" sga:nst :die speed
sc_'ew turn idle mixture .iaive :_-_(ciockwise) until am
ji£':,eb _:_g[nsto <fiea_"_.dif:an turn ,s:,_ut(cou nterciockvd se)
:._n:::iies,:_ff_e _.ms _'oufS";. -rum :,,'alva _o a Oeird: midway
beb_vees those two positions. R@ease th_'ottb ieve[o
ENTS
A,..,._LERA __O,(_T_o T
o Move throttie control !ever from slow (_) to fast (@)
position. If engine hesitates or dies, turn idle mixture
valve out (counterclockwise) 1/8 tu m. Repeat tes_and
continue to adjust, if necessa% untii engine acceler-
ates smoothlyo
High speed stop is factom/ adjusted. Do not adjust -
damage may resulto
_MPORTANT: NEVER TAMPER WITH THE ENGINE
GOVERNOR, WHICH IS FACTORY SET FOR PROPER
ENG_NESPE_D, OVERSPEEDING THE ENGINE ABOVE
i-HE FACTORY HIGH SPEED SETTING CAN BE
DANGEROUS° IF YOU THINK THE ENGtNE_GOVERNED
i-IIGH SPEED NEEDS ADJUSTING, CONTACT YOUR
NEAREST AUTHORIZED SERVICE OENTERi
DEPARTMENT, WHICH HAS PROPER EQUIPMENT AND
EXPERIENOE TO MAKE ANY NECESSARY
ADJUSTMENTS.
\\
_DLiI_?_I_XTU_8 VALVE
_:iG_28
24

STO E
immediately prepare your tractor for storage at the end of
the season or if the tractor wil not be used fo: 30 days or
more,
CAUTION: Hess _"sto_e the tractor with 1
gasoiime in the tank inside a b_ldiP, 9 !
_a_h÷refumes may r_eachan ope_ fiarae
o_ spark. A!ow the engine to ¢ooI 1
before stodag ]m a,_y e_otosu_e° _
TRAC°'[OR
Remove mower from tractor for winter storage_ When *
mower is to be stored for a period of time_ clean it ti_o_,- o
oughiy, _emove atl dir% g_eas_s, leaves, etc, Store in a
clean, dry area.
_ Clean entire tractor (See "CL!AN H'qG"inthe Customer
Respo_'_s]btities section of this man_4al)o @
,_ Inspect a_!d replace belts, if necessarl (See beit re-
placement instn.sctions in the Serdce and Adjustments
section of this manual).
_, Lubricate as shown in the Customer ResponsiNlties
section of this manual
_, F3esu_e that aii nuts, bets and screws are securely
fastened, k'_spect moving palls for damage, breakage
and wear, Replace if necessuy.
0_ Touch up all rusted or chipped paint surfacesl sand
iightiy before painting.
BA T1"[£RY
<, Fuly charge the batteR1 for sto_age.
,_ Afte_ a Defied of time in s:o_a!De.,_battery ms.y_:m_<":qU'_'_"!:_
• '_ r *....
rechargiDg ....... ......
}ong pedods of storage_ batte%_ tames sqouid be
discoanected a_'sdbattery cbaned thoroughly {see '_TO
_Ji,,4Y',AIqt r:><"'_°'_'_-c" -,,! Atqi+=->_...............
romeo Resporusibiiities sec:tion of this manuai}.
,_ After cieaning, leave Rabies disconnected _7.:ndplace
cables where they oat'mot come in contact with butte%,
terrrAnals.
Be sure bat__e_ydrai_ tube is secu_eiy attached.
,_ If Dattery is _emoved from tractor for storage, do not
store batter}/directly on concrete o_"damp surfaces.
ENGINE
FUBL SYSTEM
IMPORTANT: IT tS IMPORTANT TO PREVENT GUI_a
DEPOSITS FROM FORMING IN ESSENTIAL FUEL
SYSTEM PARTS SUCH AS CARBURETOR, FU£iL FILTER,
FUEL HOSE, OR TANK DURING STORAGTZ+ ALSO,
EXPERIENCE IND!CATES THAT ALCOHOL. BLENDED
FUELS (CALLED GASOHOL OR USING ETHANOL OR
METHANOL) CAN A'TYRACT MOISTURE WHICH LEADS
TO SEPARAT!ON AND FORMATiON OF ACIDS DURING
STORAGE. ACIDIC GAS CAN DAMAGE THE YUFL
SYS"iEM OF _k' .- _ ,_r:/.tl_ ENGfNEi WHiLf._ tN ST_R,-,uE.
OrahYthe fuel t_xnk,
Start the engine and let it run until the rue! ines and
_,-_,-' °",,_''" _, empty.
,,_.,,POUI__+,,,.A,.+d%:, .
Never use engine or carburetor" cleaner products in t.h_¢
fuel tank or pe_'manent damage may occur.
Use f_esh fuel next season+
H©7'_Z: Fuel stabilizer is an acceptable altemaEve in
rrinimizing the formation of fuel gum deposits du,,:ir_gsto_'-
age. Add stabi!izer to gasoNne in fuel tank or storage
container. Always fo!low the ms' ratio found on stabilizer
container. Run engine at least 10 minutes after addk:<g
stabiiizer to aliow th,.-stabiizer to reach the carburetor. Do
not @-sinthe gas tar'k and carburetor if using fuel stabilizer..
BHGiHE OIL
D_ain oii {with engine warm} and replace with clean e.__gir',,e
oi!.. (See <'ENGtNE_' in the Customer Responsibiiities
section of this manuai),
OYLiHDIIRS
• _d_._.7_7;. _ i_,_: <...-% : ,,
'* I-=OLIF (HIe OUF]O@ Qt ei! {ilret_gF} ,<,;_IJtIi4L [3{b!i [l{)i(-j(;::;pili',,LJ
Turn i@'_itionkey to =S'TART '_positio_ lots few secou,,ds
to distribut9 oii
_* Replace with riewspark [:Aug(s).
,_ Do not s!:oi"egasoline f_om one season to anothe_ •.
o Re@ace your gasoline cap, if your can sta£s to rust,
Rust and/or <,t.i_-£in your gaso'h_e will cause proble:ns.
._ if possibIe, store your" tractor indoors and cover it to
give proteclen from dust and di_.
Cover your t_actor with a suitable protective cover that
does not retain moisture. Do not use plastic. Plastic
cannot breathe which slows condensation te form and
will cause your tractor to rus_.
!@ROW:DANT: NEVER COVER TRACTOR WHILE ENGINE
AND _XHAUST AREAS ARE STILL WARM.
25

TB
1
Wil_ not start t
_Z
I
,i
I*
9_
! I O.
i. Out of fuel.
2. E"_gine not'_CHOKED" properly.
3. Engine flooded.
,.i B_d spark p_ug,
5. Ditly .',-:_irfilter.
Dirty _uei fiiter.
Water in iuei.
Loose or damaged wiping,
Carburetor o_.xtof adjustment,
E_sginew:4'ves out of adjustment,
I. Dirtyair ti!i:er,
2. _3ad spark ptug,
3, Weak or dead beaten/,
4. Di£y fuei fitter_
5. Stale or dirty fuel
6. Loose or damaged wiring.
7, Carburetor out of adiustment.
8, Engine vaIves out o[ad]ustment.
i. Clutch/brake pedal not depressed,
2. Attaehmen_ b4utch is engaged,
3, Week o_dead battery.
4, Blown fuse.
5. Corroded battery termi_ais.
iS, Loose or damaged wiring.
7. Faulty ignition switch.
8. Fau!ty solenoid or staI1en
RR_2CT_ON
1"
&
7,
&
i! 9.
!i0.
i i.
il 2.
4,
5,
8,
:l 7.
9. Fra.uityape_ator presence switch(as), i]
sta_i: 2, Cop'reded bat!e'v;-ermnais :i
3. Loose o,_damaged wiling, i
4. F_.uit7 eoian@d O_'star{at. :!I
:1
;::ill fuel tank.
See 'TO START ENGINE" in Operation se.c_ion.
Wait severaI minutes before attempting to start.,
Rap!ace spark ptug,
Clean/replace air filter,
Repiaee fuel litter,
Drain _ueftank and carburetor, refill tank witis fresh
gasotine and replace fuel filter,
Check all wiring,
Contact an authorized sewice centeddepa£ment.
Contact an authorized sen/ice centeffdepaftment,
Cleanirepface aiT filter,
Replace spark ptug.
Recharge o__replace battery.
Replace fuel filter,
Drain fuel tank and refilt with fresh gasoline.
Check nil wiring,
Contact an authorized service eenteridepaAn-_ent.
Contact an authorized service center/depa_ment,
[[ t, Depress ctutchtbrake pedal,
2. Disengage attachment clutch,
i 3. Recharge or replace battery.
! 4. RepIace fuss,
I 5, Clean batte_iterminals.
I 6. Cheek atl w}ring,
7, ChecWreplace ignRion switch,
_] 8, Cheeklreptace solenoid or sfarter.
9. Contact an authorized service centeddepa£ment.
I, Recharge or _'ep!ace battery.
2, Clean batte! 7 terminals,
3. C.h,ck n!l wiring.
4_ CheeWreplace sotenoid or sled:at.
;[ t. Cu_}n,s _oo much grass/too _ast.
2. 'Th_'ottle it" "CHOK:E" position.
:)
I 4 Dirty aftPiker,
4
;i 5. L,ow oil ,.. _,_.,/-,,,_,,,voil,
iJ £ F"_ ", ....... " : 7
! 7 Didy fuei _itfer.
i 8. Stale o_ di£y fuel.
iJ 9. Water in iuet,
I0, Spark plug wi_e loose.
tl, Di£y engine air screenfiins,
i2, DirWiclo_,ged muffler,
!3. Loose o_ damaged wiring.
14. Carbureto_ out oFadjustment.
! 5. 8.ngine v'_.ives out of -:&d!ustment,
I. Worn, bent orloose blade.
2. Bent b$ada mandrel,
8. Loose/damaged part(s),
i, Setin "Higher Cuff positierdreduce speeci.
2, Adjust thro_ie control,
3, Clears underside of _ssowerhousing.
4, Clear#replace air filter.
5. Check oil level/change oiL
6, Clean and regap ot change spark p_ug,
7, Replace fuei f[tte_',
8. Drain fuel tank and refill with fresh 9asotid'e.
9. Drain fuei tank .and carburetor, refilt tank with fresh
gasoline and replace fuel fitter,
10, Connect and tighten spark plug wire,
1!. Clean engine air screenf[ins,
12, Clean/replace muffler,
I3. Cheek all wiring,
I4. Contact an authorized sen/ice center/department.
!5, Contact an authorized sen/ice center/department.
i. Replace blade, Tighten b!ade boit,
2, Replace blade mandrel,
8. Tighten loose pa_(s). Replace damaged parts,
28

TROUBLESHOOTING PO
PROBLE_
Engine contin_ee to run
when operator leave_ seat
with attachment clutch
engaged
PO0{ OUt _ L_f'_'.ven
CAUSE
t_ Faulty operatorosafe[y presence control system.
1. Worn, bent or loose btade.
2. Mower deck not IeveI:
3. Bui{dup of grass, leaves, and trash under mower.
4, Bent biade mandrel,
5. Clogged mower deck vent he;as from buildup of
grass, leaves, and t_ash around mandrels,
CORRECTION
,1, Check wiring, switches and connections. If not
corrected, contact an authorized service center/
departmenL
i, Replace blade. Tighten blade bolt,
2, Level mower deck,
3. Clean underside of mower housing.
4. Replace blade mandret,
5, Clean around mandrels to open vent holes,
_lowe_ btades will not
;'orate
Poe_ 9_ass discharge
I, Obstruction in clutch mechanism.
2, Worn/damaged mower drive belt.
3. Frozen ldter puiley.
4.. Frozen blade mandrel
t. Engine speed too slow.
2. TraveI speed too fast.
3. Wet grass,
4, Mower deck not tevel,
5. Low/uneven tire air pressure,
8, Worn, bent or loose bIade.
1. Remove obstruction.
2, Replace mower drive bell
3. Replace idler puIley.
4. Replace Made mandrel
1. Place throttle centre! in "FAST" pos[tion.
2. Shif[to slower speed.
3, Ai!ow grass to dry' before mowing,
4, Levetmower deck.
5, Check tires for proper air pressure,
6, Replace/sharpen blade. Tighten blade bolt.
7. Buiidup of grass, ;eaves and trash under mower,
8. Mower drive belt worn,
9, BIadesimpropedy installed.
I0, Improper b!ades used.
11. Clogged mower deck vent holes from buildup of
Headlight{a) net werki_'_9
(if so equipped)
£ngi_e 'ibackfires"
when turning engine
"OFF"
grass, !eaves, and trash around mandrels.
7. Clean underside of mower housing.
8. Rap!ace mower drive belt.
9. Reinsta!I blades sharp edge down.
10. Repiace with biades Iisted in this manual,
11. Ctean around mandrels to open vent hoies,
I° Switch is {'OFF'L
2, Bulb(s) burned out,
3, Faulty Iight switct_,
4. Loose or damaged wiring,
5, Blown fuse.
I. Turn switch "ON",
2, Replace bulb(s),
3, ChecWreplace fight swkch.
4, Check wiring anti connections,
5, Replace fuse,
I. Bad battery ceil(s), i, Replace battery.
2. Poor cabfe connectior_s, 2, ChecW'eiea_ all cor_nect}oqs.
3, Fautty reguiator {if so equipped), 8, Repiace regt'tator_
4, Faulty alternator. 4, Replace aiternator.
t. E_gine th{o_te control not set at _'SLOW"
position for 30 seconds before stopping engine.
1. Move thtottIe control to "SLOW" position and allow
to [die [or 30 seconds before stopping engine,
27

SERVICE NOTES

TRACTOR oo MODEL NUMBER 9! 7°256451
SCHEMATIC
RED °I I °
oll!o
BATTERY
BLACK
RED
WHITE
f
TFiS --. -
Bs
}GN1TIONSWITCH
BLACK
M B
FUSE 30 AMP.
r _ _ -- _[_
f-o o '_
k t
CLUTCH /BRAKE
(PEDAL UP)
BLACK
BLACK
P
i
[
---_,-J IiiLs-T........ ,._,@ .............@
: d@. S:rAm-ER i
i J
j SOLENOID
I
! WHITE
I
E I
i,} I
>7,kj .j_-_:.,._----
"-_--" A_'MENT CLUTCH ]
.... (CLUTCH OFF) l
SEAT SWITCH
(NOT OCCUPIED)
iK-'_ F'h _ F
q _,sNmoN:1_-
GROUNDING
,_.ONNb......ut.,
CHARGING BYSTEM OUTPUT
3 AMP OC @ 3800 RPM
\
IGNITION SWITCH
POS_T1ON
OFF
ON
START
REB
---4_.-- NON-REMOVABLE ---¢_--- REMOVABLE
CONNECTIONS
NOT_
YOUR TRACTOR IS
EQUIPPED WFrH A SPECIAL.
ALTERNATOR SYSTEM.
THE LIGHTS ARE NOT
CONNECTED TO THE
BATTERY, BUT HAVE THEIR
OWN ELECTRICAL SOURCE.
BECAUSE OF THIS, THE
BRIGHTNESS OF THE LIGHTS
WILL CHANGE WITH ENGINE
SPEED, AT IDLE THE LIGHTS
WILL DIM. AS THE ENGINE IS
SPEEDED UP, TIdE LIGHTS
WILL BECOME THEIR BRIGHTEST.
PLLJG:: @ .... _;_
i
28 VOLTS AC M_N. @ 3600 RPM l
(CHARGING SYSTEM D_SCONNECTC:B)
t
i
LIGHTING SYSTEM i
OUTPUT D_ODc:
%\.
i_ 14 VOLTS AC IRWIN. @ _00 _PM (L,_*]HT_ OFF}
,,1° HEADLIGHTS
i ........
HEADLIGHT
SWITCH
(OFF)
W_RING INSULATED CUPS
NOTE: iF WIRING INSULATED
CLIPS WERE REMOVED FOR
SERVICING OF UNIT, THEY
SHOULD BE REPLACED TO
CONN_.CTIONS PROPERLY SECURE YOUR WIRING.
29

REPAIR PARTS
ELECTRICAL
TRACTOR ,_oMODEL NU#aBER 917,25645!
7O
i
43
36 38
I
I
39
I
is_
I

REPAIR PARTS
ELECTRICAL
TRACTOR o °, J ODEL NUMBER 9t7o25645t
KEY PART
NO. NO, DESCR_PT._ON
.1 146139
2 74760412
3 STD551025
4 STD551125
6 STD54i025
7 t09238X
8 t44940
9 109596X
15 147688
I6 153664
19 STD55tI25
20 78350400
21 136850
22 4t52J
24 4799J
25 146147
26 108824X
28 420_j
29 121305X
30 144921
31 140400
32 141226
33 140403
34 1t07!2X
35 140336
36 S°TD6O1005
39 I09553X
40 146057
4! 71110408
43 145673
44 73640400
48 140844
49 153249
70 140413
Battery t2 Volt 25 AMP
Bolt Hex Hd I/4-20unc X 3/4
Washer 9/32 X 5/8 X 16 Ga
Washe_" Lock Hvv Heiicaf t/4
Nut Fin Hex I/4-20 Unc
Tube P!astic 12'I
Case Battery wi2 HoJes
.Clamp Hose Olive
t
roas.ener Snap- in
Switch Interlock Push-4I-I
Washer Lock t/4
Nut Jam Hex 1/4_20 Unc
Harness Asm Light Wi4152j
Bulb Light #! 156
Cable Batten/8 Ga ! I" red
Cable Battery i3 Ga red w/16 W}_e
Fuse 30 AMP Auto Green
Cable Ground 6Ga t2" black
Switch Plunger Nc Gray
Switch _gn 3 pos
Nut Ignition
Cover Sw Key Btk 1 25 Text SLZ'
Key tgn Molded Craftsman
Switch Light Btk 5!k Red
Bracket Switch !ntedock
Screw Tap Hex #10o24_xncX i/2
Switch lntlk Ci_JtchRed 4 Term
'_ < " <_"Lt IPC
t-_mes,, Ign Da,_, Mch 95
Bdt BIk, Fin Hex !/4o20 Uric x _/2
Cove_ Terminat Red
Soie_;oid
Nut Keps Slk H:× 1/4o20 U_qc
Adapter Ammete__Recta{_g_da¢
Washer Pinned DeJta
Harness Engine B&S5
N©'(E: A_tcomponent dimensions give in UoSo inches
I inch = 25_4 mm
31

R...PA_RPARTS
TRACTO_ MO#SL NU_IBER _J.7.25645t
CH ' @
. ASS_ AND £NCLOSUR£S
14
3S 10
2"1
\ 22
\_ \
\
28
\
3
\
/
34.
14

REPAIR PARTS
TRACTOR o o MODEL NU IBER 917o256451
CHASSIS AND ENCLOSURES
KEY PART
NO. NOo DESCRIPTION
1 151169
2 140356
3 17490612
4 STD55t025
5 146077
6 145208X015
7 124027X
8 12647IX
9 t46757X0t3
!t 146956
13 I46961X0t2
I4 17490608
I5 74180512
16 STD541431
!7 t31445X4t7
18 t26938X
!9 1752131O
21 122933X
22 124479X
24 STD523710
25 19131312
26 STD541437
27 17030814
28 t40"135
29 124029X
30 !09872X417
31 136619
33 I05476X4t7
34 105475X4!7
35 STD533707
38 139888
39 i3D887
60 72140606
74 73680600
i00 105037X
140 150556
-- 5479J
Chassis Weldment 1Iga 1996
Drawbar Stretch
Screw Thdrot 3/8-16x3/4 Tyott
Washer t3/32 x 3/4 x 16 Ga.
Bumper, Snap In
Saddle Sitkscrees F_tSdf 5Sp D4360
Heat Shield Sloped Hood
Clip Line Fuel !3/32 Mtg Hote
Dash bflkscreen®q Sears EngiSy
Panet Pnt Dash Lh
Panel Slkscr Dash Rh Weldment
Screw Thdrot 3/8-t6xl/2 Ty-tt
Screw Mach Trhd 5/16-i8uncx3/4
Nut Keps 5/16-18 Unc
Hood Asm Pnt
Bumper Hoed
Screw Sltd Hex Hd w,@i Washer
Rivet Ratchet Nylon
Washer Nylon B!k 28× 75x 19
Bolt Fin Hex 3/8-16unc X t
Washer 13/!6 X 13/I6 X !2 Ga
Nut Lock 3/8o,16 Uric
Screw, Hex Head, Spidefiock #8 x "7/8
Gdlte Gray
Lens Headlight Bar CIear
Fender Pnt
Bracket Pat Fetsder
Footrest Pnt Lh Peff
Foo!rest Pnt Rh Peff
Boit Rdhd Sht Sqnk 3/8-16 X8/4,
Bracket, Asm_ [:_ivot, L.H. Mowe: ;£ear
Bracket, Aan_._oPivot, R.H. _i_ower Rea:_
Boit Rdhd Sqnk 3/8-16 x 3/4
Nut Crownlock 3/8_!6
Stfip_ Foam 18"
Bracket Chassis Front 7 Ga.
:Plug B_sttonSlk 359 Dia
NOT_: All component dimensions
t inch = 25,4 mm given in U,8, inches
33

/
/
53
22
3_

REPAIR PARTS
RAO OR fiO:©EL NUMBER 917o2 645
DRIVE
KEY PARY KEY PART
NO, NO, DESCRIPTION NO, NOo #ESC_-31PTtON
Washer t3/32 X 13/t6 X I2 Ga
Beadr_gNyi 503X 628XI 25
Washe_ Hardened
Ring Klip #t5304,-50
Pulley !dler V Groove Plastic
Be!lcrank Asm
Retainer Belt Style Sprir_g
Bolt Hex Hd 3/8o16unc X !_-1/2
N' d.Cf'owRtook o/,__1u tJnc
Nut Lock 5/16-!8 Ur!c
Link Clutch 7 66
Spring Return Clutch 675
Bolt Fin Hex 3/Sd6unc X I-!/4
V-bett Ground Drive 95,25
Keeper Belt Rh Lt Pntizinc 16g
Retainer Beit......Chassis Lh _"_..inc
Screw Thclro! 318-i 6x3/4 Ty-tt
Cover Pedal Blk ,_ta""
Pulley FAngine
Bolt Flnhex 7t16-20 x 4 g5
Washer Lock b!vy i-qJc!Spr 7/t6
Keeper Be_t Engine Lh L.t
Guide Belt D_'Mower Rh
Washe_' 13/32 X 1_i/4 X t2 Ga
Spacer Spilt _80xio94
V,lao..... ,,,,v._I" _;6.,:.JlO,( 1 ,<q. X Ga
Rir_g _71#5i 33.,,75
Key Square 2 0 X 184.5/t865
Washer '25/3:.__,.'_I 5i8 X .....',bga
Bolt F:in Hex 3/8.d6 x 3/4.
Vw::_r,e_,,'a_, )(_;/,__z 314 i_,vI0 <"a
Bolt Rdhd Sqnk 3/8.d 6 x i,25
35
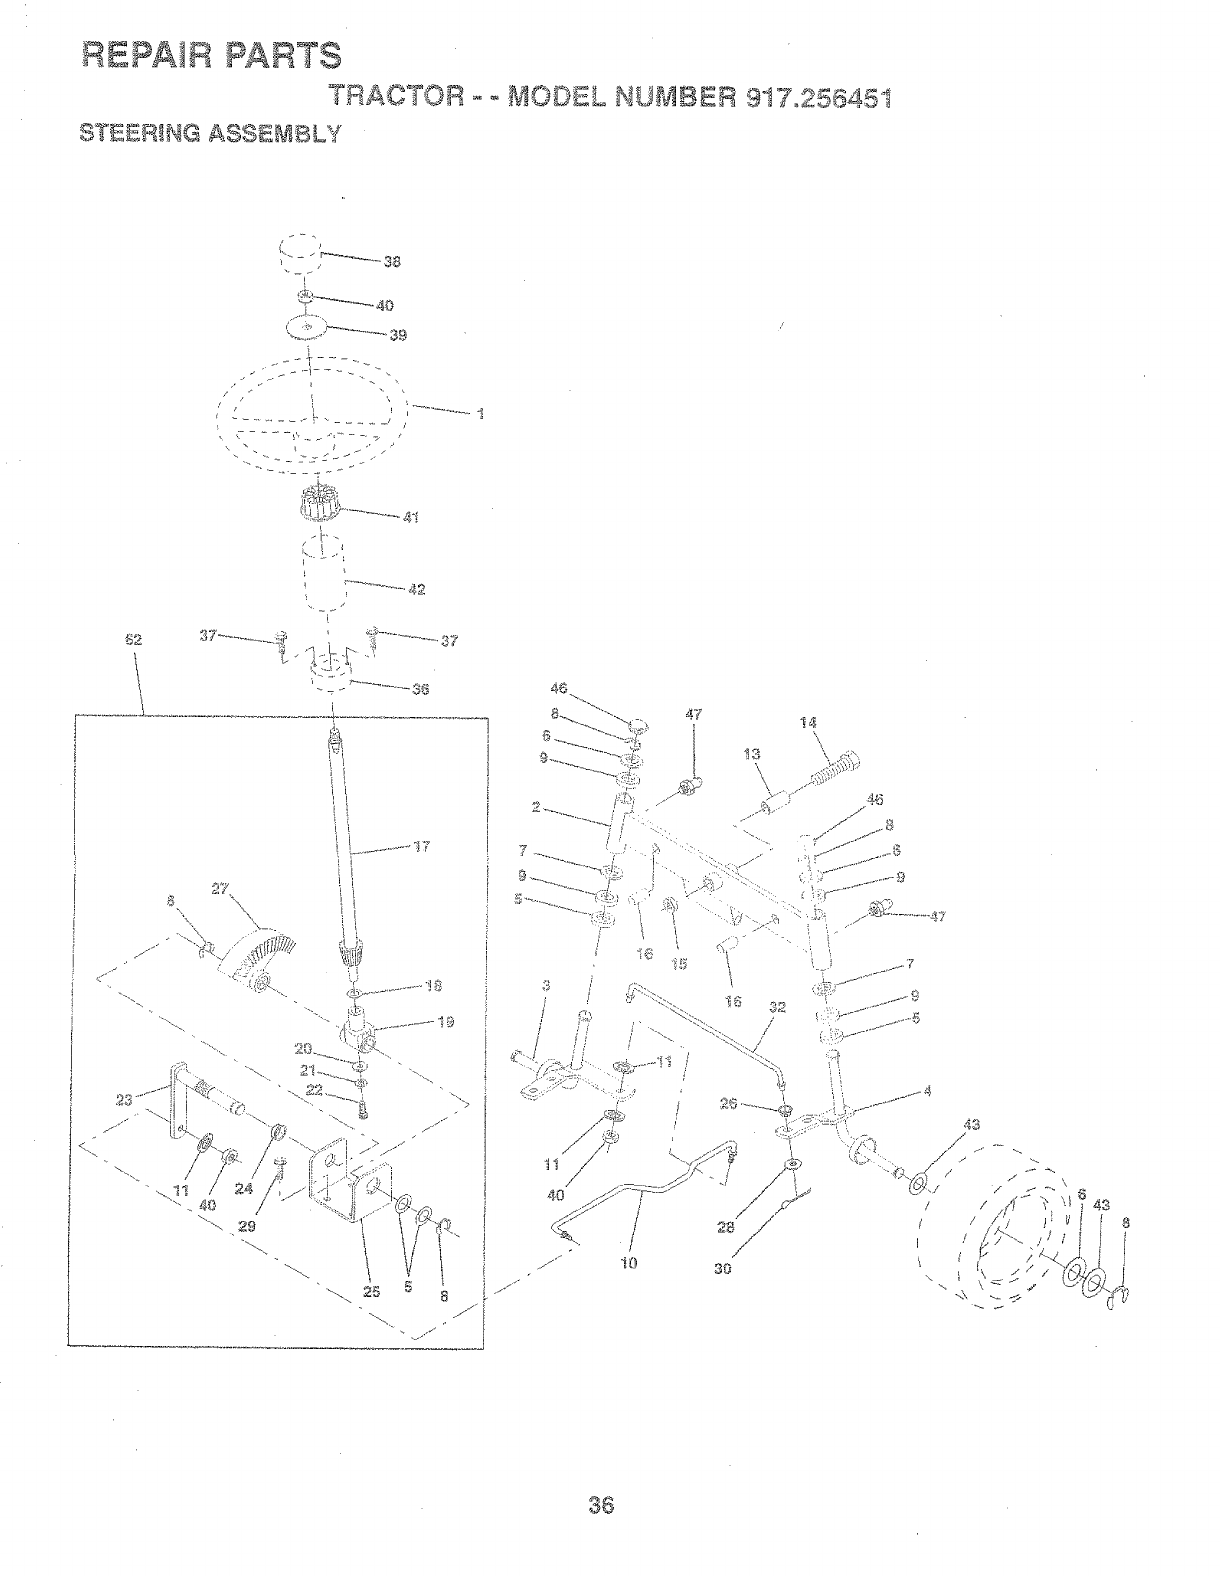
REPAIR PARTSTRAC_TOR _ -, MODEL NUMBER 917o25645I
ST_£ER_NG ASSEMBLY
$2
\
<JJ
'_."*",7"..... 39
LL'
' _ 42
[
\\
,-..>_ , 4.[)!_Z__, I
ff_ to
47
3O
! 4\
36

REPAIR PARTS
"TRACTOR o o MODEL NUMBER 917o256451
STEERING ASSEWBLY
KEY PART
NO. NO, DESCRIPTION
I 139768
2 142033
3 135227
4 135228
5 6266H
6 121748X
7 19272016
8 120O0O29
9 3366R
10 130468
11 STD551!37
13 110438X
14 74011058
15 73901000
16 132624
17 132614
t8 57O79
t9 124035X
20 !26684X
21 STD551125
22 71O7O410
23 1275O1
24 !09816X
25 124036X
26 !26847X
27 138874.
28 !91314.16
29 17490612
30 STD56'I210
32 !30465
88 132196
37 152927
38 139769
39 I9!33808
41 !04820X
42 i24417X
43 121749X
48 121232X
47 6855M
62 "149684
NOTE:
Wheel Steering Std Black
Axle Asm Front
Spindle Asm Lh
Spindle Asm Rh
Beadng Race Thrust Harden
Washer 25/32 X 1 5/8 X 16ga
Washer 27/32 X 1 I/4 X t6 Ga
Ring Ktip #t5304°75
Bearing Col Strg Bik
Link Drag Sot Ball Jt 20 064
Washer Lock Hvy Htcl Spr 3/8
Spacer Bearing Axle Front
Bott Hex 5/8-! 1 Unc X 3-!/2
Locknut Flange 5/8-t I Uric
PinAxle 5/8 }4 1 55/'i 54. Lg
Shaft Asm Strg 5/8 X 15 19 Lt
Washer ThnJst 5t5x 750x 033
Support Shaft
Washer Shim t/4 X 5/8 X 062
Washer Lock Hvy Helical t/4
Screw He>,'Socket 1/4-20 X 5/8
Shaft Asm Pittman
Nyliner Snap In
Bracket Steedng
:Bushing Rod Tie Blk Lt
Gear Sector
Washer t3/32 X 7/8 X t6ga
Screw Thdroi 3/8-t6x3/4 Tyott
Pin Cotter I/8 X 3/4 Cad
Rod Tie W}re Form t9 75 Mech
Sushisg ocg 5/8 td Dash
Screw
!nseri Cap S(rg Wheel Std B]k
Washer t3/'32 X 2_8/8 v_ 8 Ga
Nut Lock Center 3/8_24un:_
Adapter Wheel Strg _'_'
,_'_u/835id
Soot Shaft Steering
Washer 25/32 X 1 !/4 X I6 Ga
Cap Spindie Fr Top BJk
Fitting Grease
Kit, Steering Assembly, Service
Alt component dimensions given in U.So inches
! inch = 25.4 mm
37

REPAIR PARTS
TRAC ?' U BER 9i7.2564,5t
SEAT ASSE_IBLY
_J
J
i
I
i
2¢%.
\
-!- _<.
q
@,,
"%
",,<\ 23
17 i2
2t
K_Y
NO,
1
2
3
4
5
6
7
8
9
!0
12
t3
151205
140551
STD523710
19131610
145006
STD541437
124181X
i74.90616
19131614
140552
!2t246X
121248X
DBSCRIPTIO_I
Seat V350
Bracket Pnt Pivot Seat (btk)
Bolt Fin Hex 3/8-t6unc X I
Washer t3/32 X 3/4 X 10 Ga
Clip Push In Hinged
Nut Crownlock 3/8-16 Unc
Spring Seat Cprsr_ 2 250 B_kZi
Screw Thdrot 3/8-16 X I Ty°tt
Washer t3/32 X I X 14 Ga
Pan P_t Seat (b k }
Bracket Pnt Mour_ti_sgSwitch
Bushing Snap B_k Nyi 50 td
_ZY PART
NOo NOo D_SGR]PT!ON
14 72050411
I5 134300
t6 121250X
17 t23976X
t8 I24238X
2t t53236
22 STD54!431
23 74780814
24 '19i7'I9i2
25 1270'18X
26 STD55It50
BIOT£:
Bolt Rdhd Sht Nk 1/4-20x1-3/8
Spacer Split 28 X 96 Zinc
Spring Cprsn 1 27 Bik Pnt
Nut Lock i/4 Lge F_g Gr 5 Zinc
Cap Spring Seat
Bolt Shoulder 5/16-18 Unc BIkz
:Nut Crown Lock 5/16-18
Bolt Fin Hex 1/2-13 X 7/8 Gr 5
Washer 17/32 X t-3/16 X t2 Ga
Bolt Shoulder 5/16-18 X 62
Washer Lock Hvy Hlcl Spr 1/2
AI componer:_t dimensions give_ in U.S. inches.
I i_ch = 25.4 mm

REPAIR
DECALS.
9
PARTS
TRACTOR oo MODEL NUMBER 917,256451
14 17 8 6 3 7 21 7 4 8 14
\
5
\I1
I 5 I8
\t3
t0
KEY PART
NO, NO,
1 138955
2 272936
3 151815
4 151816
5 i32674
6 i3364.4
7 142249
8 t42252
9 125880X
10 1495!6
1i 137537
KEY PART
DESCR!PTION NOo NO,
Decal Instruclion Operat Eng 12
Decal Engine 12.5 Hp B&S _C Cra:_ts 13
Decal Hood Slope Rh Craftsman 14
Decal Hood Slope Lh Craftsman t5
Decal Grille 16
Decal Maint Customer Sears Dora !7
Deca! Panel Side _ic i8
Decal lnsed. Hood Bik 21
Decai Fender Craftsman Red .-
Deca_ Btry DngdPsn Eng, Acme -
Decal r. ,.,
_,,au_on EnglishlSpanis
4900J
146o46
105809X
136832
! 4.0837
133179
131265
13831 t
t539t7
t r<or_ 8
DESCRiPTiON
Decal Clutchib_ake Engiish
Decal \A,be!t Dr Sch Tractor
Decai Chassis 5 Sp 38"
Decai Mower Drive Schematic 38
Decai, Brake Parking Saddle
:,eca.,_ ,.,ap CNSMR help u_
Decai Mower Qc System
Decal Lightbox
Deca! Lift HandIe
Manuai_ Owner's (,:£ng!ish)
Manua!_ Owners (Spanish)
\
4,10
1t
KZY PART
NO, NO, DESCRIP'T_ON
1 59192
2 65139
3 106222X
4 59904
5 I06732X417
6 278H
7 9040H
8 106108X4t7
9 124635X
10 7t52J
1I I04757X
-_ 144334
Cap Value Tire
Stem Vatue
-Fire F Ts 15 X 6 0 _6 Service
Tube Inner Front #35060
Rim Asm 6"front White Sewice
Fitting G_ease
Bearing F!ange
Rim Asm 8"rear White Service
TiTe R Ts 18x8 5-8 Service
Tube Rear 9 5 X 8 Service
Cap Axle Blk t 50 X 1 00
Sealant, Tire (10 oz. Tube)
NOTE: A!l component dimensions given in U.S. inches,
l inch = 25.4 mm
39
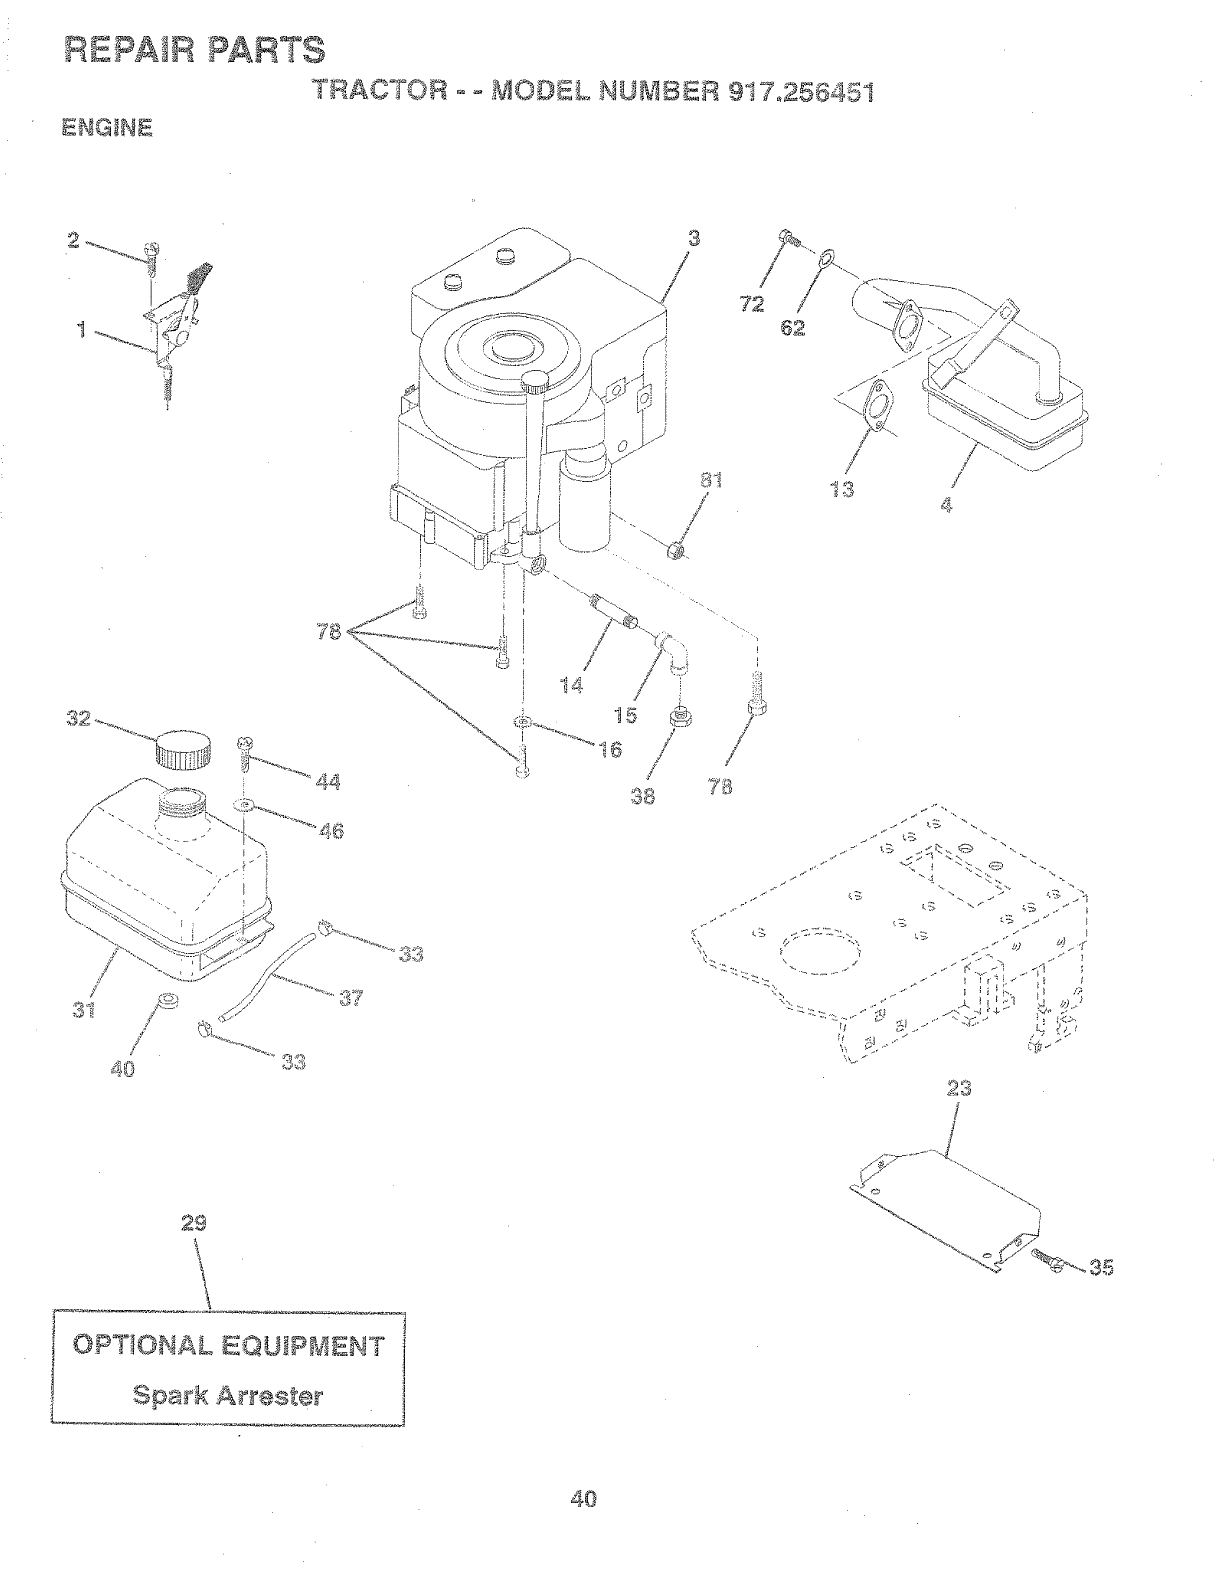
REPAIR PARTSTRACTO_ o _ MOD_L NUMBER 9t 7°2564_
ENGINE
3
(
! i
i12
i
/
13 /
4
4O /
29
t OPTIONAL EQUIP_1_NT
! Spa_:k A_'este_
t
_5
4O

REPAIR PARTS
TRACTOR °°MODEL NUMBER 917.25645t
ENGINE
KEY PART
NO, NO. DESCRIPTION
t
2
3
132759
17720410
150453
4 137348
t3 272293
!4 13280324
15 13200300
16 STD551237
23 t50554
29 137180
31 109202X
32 128549X
33 i23487X
35 17490512
37 137040
38 ......
40 124028)(
44 17490412
46 19091416
62 STD55113I
72 71O70512
78 17490620
81 128861
NOTE:
Control Throt Rh BIk Pd115 10
Screw Hex Thd Cut 1/4-20x5/8 T
Engine B&S 10.5-t2.5 _C, DC
Model No. 289707, -0179-01
Muffler Exhaust B&S Lt
Gasket 1 313 td Tin Plated
Nipple Pipe 3!8 Npt X 3"
E_bow Std 90 Degree 3/8-t8 Npt
Washer Lock Ext Tooth 3/8
Shield Browning
Arrestor Spark
Tank Fuel t 25 Fr
Cap Asm Fuel W/sym Vented
C_amp Hose Btk
Screw Thdrol 5/t6-18 x 3/4
Line Fuel 20"
Ptug Oil Drain (Order From Er_gine
Manufacturer)
Bushing Snap Nyt Btk Fuel Line
ScrewHexwsh Thdml t/4o20x3/4
Washer 9/32 X 7/8 X t6ga
Washer Lock Hvy Hlcl Spr 5/16
Screw Hexhd Cap 5/'I6oi8x3/4
Screw Thdrot 3/8-16xt qi4 Tytt
Nut Ftange I/4-20 Starter Nut
Altcomponer_tdime;_sionsaiven _n.... ._, ,,,........
I inch = 25.4 mm
41

REPAIR PARTS
T_RAC°t"OR °- £JIODBL NUMBER 9!7o25645t
L]Fi"
7
5
@
4
32 !9
18,
3
,\2
8
42

REPAIR PARTS
TRACTOR oo MODEL NUMBER 917o256451
L_
KEY PART
NO. NO. DESCRJPT)ON
I 138973 Rod Asmo Lever
2 122507X Shaft Asm. Lift
3 ,105767X Pin Groove
4 12000002 E Ring #5133-62
5 19211621 Washer 21/32 x 1 x 21 Ga,
6 120183X Bearing Nylong
7 I2563IX Grip Ha_dfe Fiuted
8 122365X Button P_unger Read
10 122512X Spring Cprsa
11 t39865 Lift Asm, Link LH
12 t39866 UR Asm. Link RH
t3 4939M Reta;ner Spring
15 127218 Link Fron_
t6 73350800 Nut Jam Hex 1/2-13 Unc
17 130171 Trunnion BlkZinc
18 73800800 Nut LockWiWsh 1/2q3 Unc
t9 139868 Arm Suspension Mower
20 3146R Ftetainer Spring
31 t40302 Bearing, Pvto Lift, Spherical
32 73540600 Nut Crownlock 3/8-24
NOT£: Aft component dimei_sions given in U,S. inches
1 inch = 25,4 mm
43
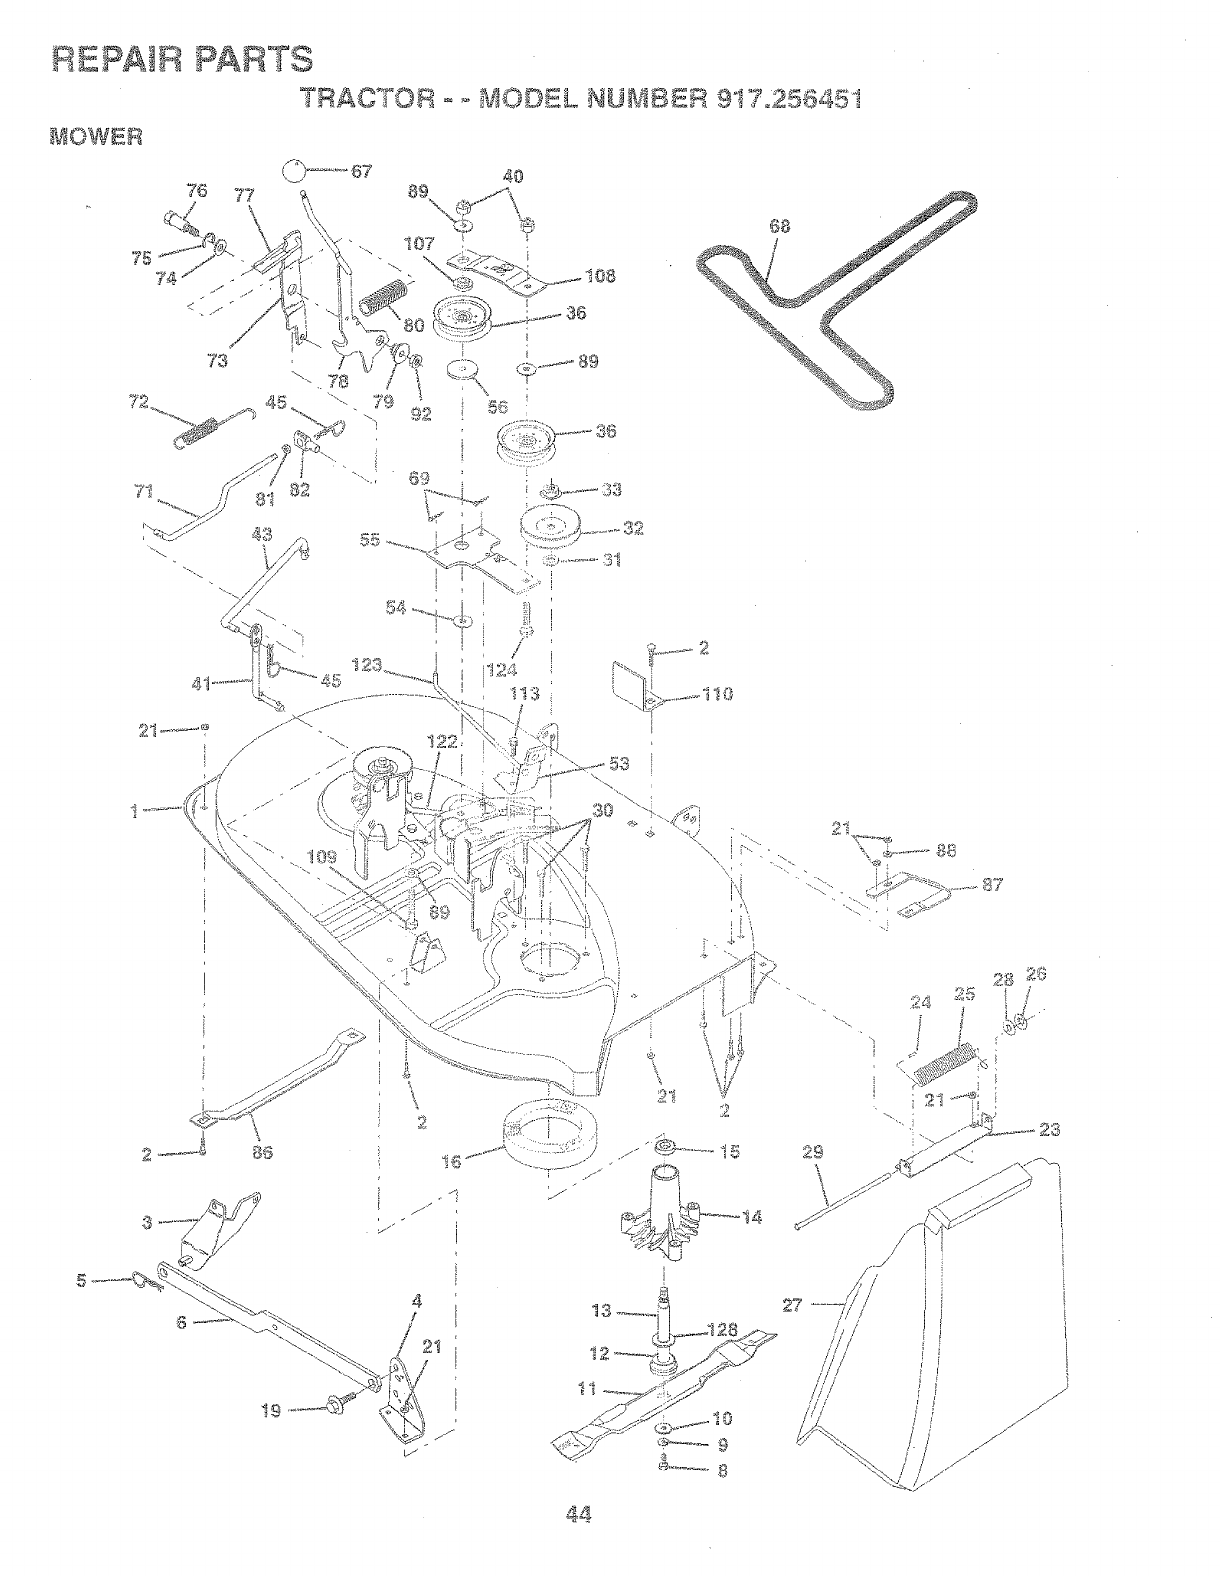
_:PAtR PARTS
TRAOTOB - o _oaO©£L NU-_ZaB:R 9t7o255451
_aOWER
4O
I
2 .... 8_
i
II
b/
15
29
t
44
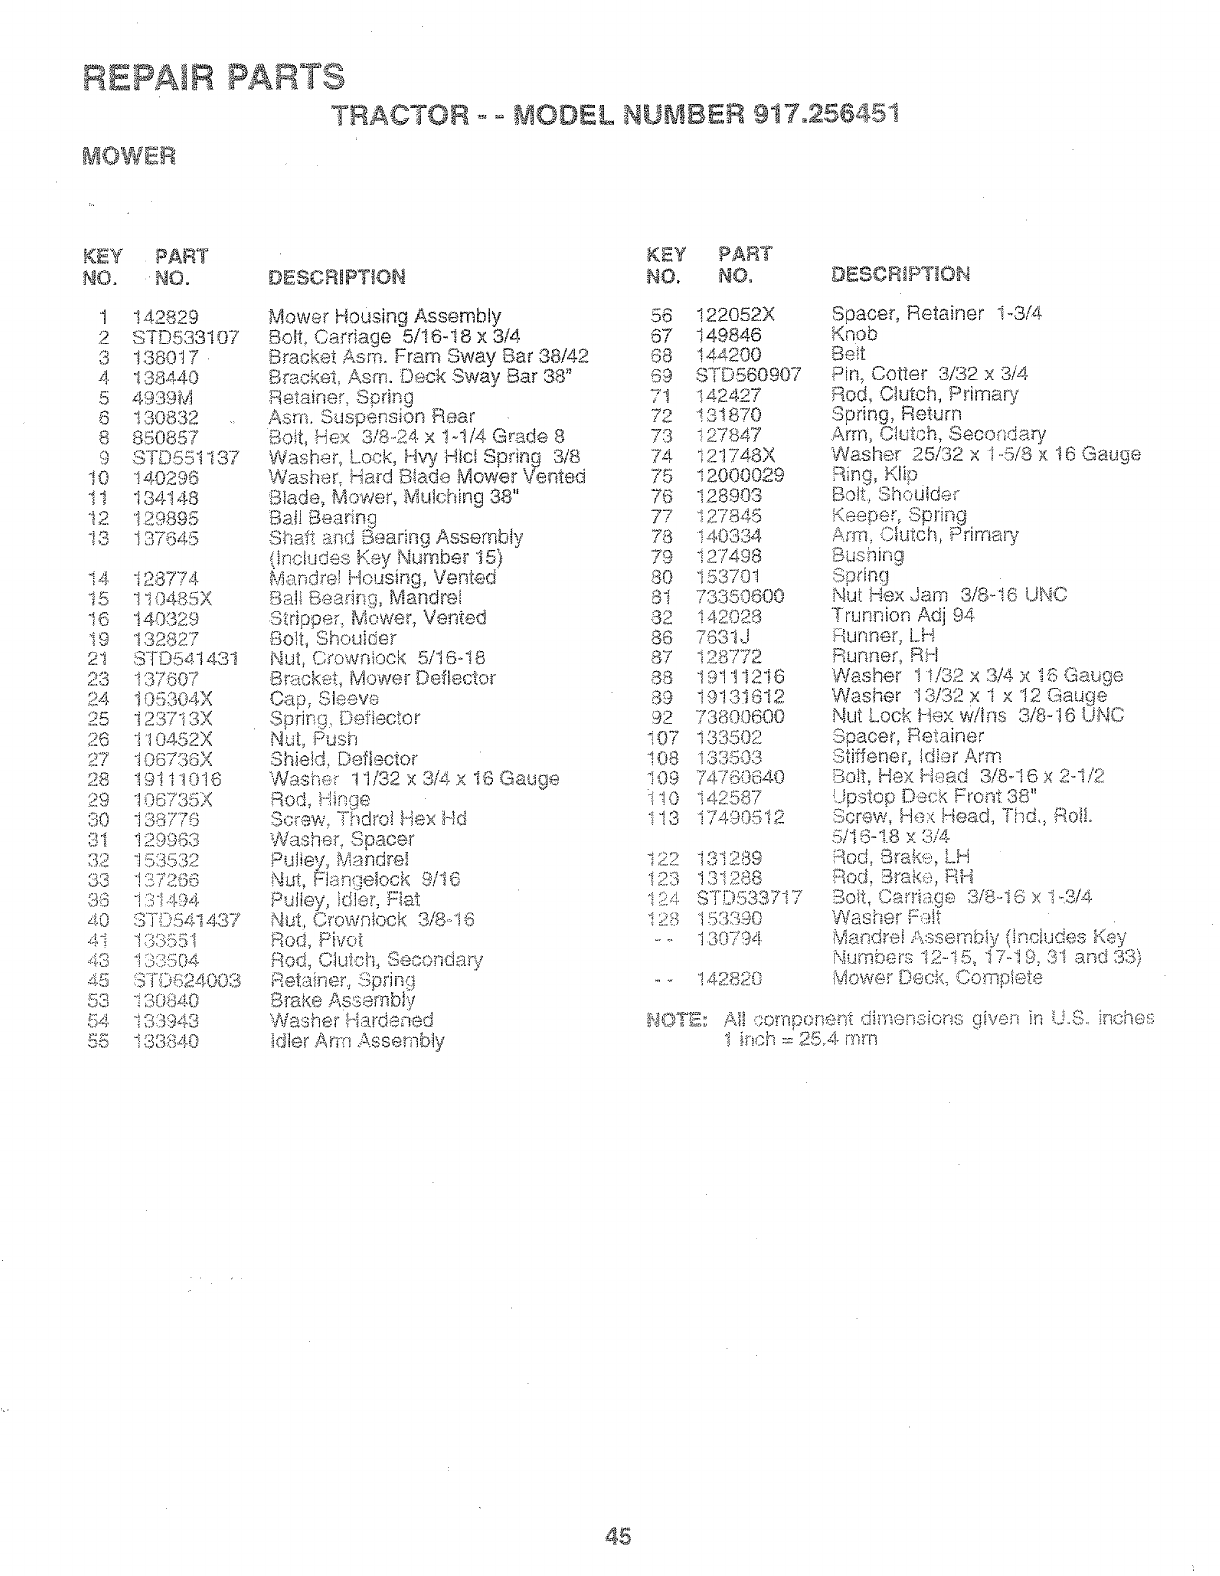
REPAIR
£8OWER
PARTS
TRACTOR-- MODEL NUMBER 917.256451
KEY PART
NO. NO.
1 142829
2 STD533t07
3 t380I7
4. 138440
5 4939M
8 130832
8 850857
10 140296
1I 134148
i2 129895
"_q,,_137645
14. 128774
'i5 1!0485X
16 t40329
19 13282'7
2'1 8TD54143I
_.o t37807
24 105304X
25 i237i3X
26 110A52X
27 t06738X
28 19111016
29 !06735X
30 t38'7'76
31 129988
32 153532
33 i37265
:!)8 i :31494
4.1 13355I
4.8 ! 33504.
-4.5 ",-:-.m_.,'> ' ".qe
53 13.084,0
54. i $3943
55 i83840
KEY PART
DESCRIPTION NO. NO.
Mower blousing Assembly 56 122052X
Bolt Carriage 5/16-I8 x 3/4 67 149848
Bracket Asm. Fram Sway Bar 38/.42 68 144200
Bracket, Asrno Deck Sway Bar 38" 69 _ _D._60907
Retainer_ Spring 7t 142427
Asrn. Suspension Rear 72 !3t870
Boit, Hex 3/8-24 x !-I/4 Grade 8 73 127847
Washeh Lock, HW Htcl Spring 3/8 74 12t748X
Washer_ Hard B!ade Mower Vented 75 12000029
Blade, Mower, M@ching 38" 75 128909
Bail Bearing 77 127845
Shaft and Bearing Assembly 78 140384
(b3ctudes Key Number I5) 79 !27498
Mar@tel Housing, Vented 80 153701
Bail @eaSng, Mand_ei 81 73350600
Stdppe_= Meweh Vented 82 142028
:SOILShouider 88 783ij
Nut, C;owniock 5/18o!8 87 128772
Bracket, Mower Deflector 88 19t 1I2i 6
Cap, Sleeve 89 19133612
Spring. Defie(;tor 92 73800600
NuL Push 107 133502
Shie!d_ Deflector !08 133503
Washer !I/32 x 8/4 x16 Gauge 109 74760640
Rod, ._--_"_',.,_,se 1! 0 i 42587
Sc_ew_Yhdf"ol He× Hd 1t3 174905't2
Washer, Spacer
Putey, Mandrel 122 131289
Nut, Fb.qgeiock 9116 123 t3i 288
Pulley, tcileh Fiat 'I1...{4.STDS33717
Nut, Crownlock 3/8-16 128 i53390
Rod, Pivot .... t 30794.
Rod, Ctutcl% Secondary
Retaineh Sprin9 - .. 142820
B_aXe Assembly
_Nasher Hs.rdeaed
!dler Arm Assernbiy
DESCRIPTION
Spaceh Retainer i-3/4
Knob
Beit
Pin_ Cotter 3/32 x 3/4.
iqed, Clutch, Primary
Spring, Re_um
Arm, Ck;_ch, Secondapy
Washer 25/32 x I,,,5/8 x I6 Gauge
Ring, Klip
B.O[t, o{10 UICk-:,
_(eeper, Spring
A_]"a,Clutch, Prima%_
Bushing
Spdng
_\' _ Jam 3/8-48 UNC
Trunnion Adj 94
Runner, Li-._
Runner, RH
Washer 'ti/32 x 3/4 x 15 Gauge
Washer I3/32 x 1 x 12 Gauge
Nut Lock Hex W!h_s 3/8-16 UNC
Spacer, Retainer
Stifferler, tdier Arm
So!t, Hex Head 3/8-t6 x 2-i/2
Upsto9 Deck Front 38"
Screw, He:( Head, Tied. Roll.
5/I8-1.8 x 3/4
!qod, @rak% LH
Rod, @_aKe,RH
Soft., C_arlia.ge 8t8-i6 x 1-814
Washer f-"ht
_='-,_d"<"'....... '" _" (inc!.,Jdesivt_.n.x_,I.,'._,.>,>efa_.,._y _<ey
Nur_ibe!'s I2-!5, '17-I 9, 81 and 33)
iY!ow®rf_e_<'k ,_",_,,.,,.....@'_:q-':'_.,..,
HOT[(: AI oompone!st dhnensions giver,, in U.8. k_ches
45

REPAIR PARTS
TRACTOR o-_ MODEL _UMBER 9, Z°2.o4_3 _I
DANA ° e # ,_ -o_.7RAN<-_AXLo_ _.L!ODEL NU_BER ,_;_G0,q8
52
<'<_:'.% /
/
/
I9 40 41
42
t4
i t5
4,5
/
/4_
/47
/
/48
46

REPAIR PARTS
TRACTOR -- MODEL NUMBER 9!7o256451
DANA TRAHSAXLE- _ODEL NU_IBER 4360-78
KEY PART KiT PART
NO. NO, IISOIIPI'IOH NO, HO,
! 142671 Housing, Upper
2 2274J Screw, Self-Tapping, Large
1/4o20 × .734
3 134400 BaH, Detent
4 !05904X Spring, Detent
5 t05905X Screw, Set
6" 138235 Kit, Shifte.r Assembly
::>[ hte_
7 '_'_o",o_'_"_°C_ Boot, " '- °'_ "
8 I2095iX Puck, Fdction
9 143045 Seal O!
10 142672 Ring, Retaining
tt 134793 * Assemb% Kit Shim °625 Shaft
t2 143051 Seadr% F}ange
13 !20415X Washer, Plain °632 x t.38 x °046
14 1426,74 Key, Woodruff, #9
15 t38234 Assemb!y, Kit Input Shaft
16 tI0078X Pinion, Bevel, 14 Teeth
t7 !05909X Ring, Retainhs9
18 -s,,_:¢q-_v,,,,.,_o_,_., Chain, 24 Pitches
19 106,9I!X Beating; Flange
20 !426,,75 Gear_ Spur, 14 Teeth
21 138246 Cofiar, Clutch
22 138238 Assembly, Kit, Clutch Keys
23 !3479i Screw, Tapping w/Sealer
24. !,._._.._.6,7o Shafi, Intermediate
25 2244.J Key, Woodruff, #6I
26 ._a<_-,_._:.,v
27 t20470X Sprocket, 18Teeth (Reve_-se)
28 !t0070X Spacer
29 .,_.,.,._,x::7-,f Ges.r_ Spur, 37 Teeth (!.=,)
30 129405X Gea[, Spur 30 Teeth (2=,)
3! !08980X Gear, Spur,. 25 Teeth {3,o)
312 ':...... .6'{ " -
: 4 _-"_-, Geer, 6put, 22 Teeth (@,)
33 1,::4.sop Ge_', 8pub i9 x-_ _, z,.o,,_
....., ,, JO :_<;QD._ =o
34 184797 Sps.ce_" i.i33 x !.50 x .375
35 I05925X Wa.sheh Plain .640 x 1.37 x ..061
37 101978)( Spacer .130 x ! .00 x .169
38 si0079X Asser_bty, Gea!'_ Col _bination of
_._o Teeth aP,d 't<...... ',.,._Teeth.
39 i24639X Shaft, Idler
4.0 120472X Spacer .635 x .875 x .755
DESOFIPTION
41 I05928X
42 tt0084X
43 134394
44 I20473X
45 t42678
46` i20407X
4,7 I06589X
48 120408X
49 I05937X
5O i 05936X
51 2226J
52 13440!
53 2264J
54 120474X
55 !t008!X
56 I05941X
57 !10071X
58 120952X
_ 00cv._,,59 _i c-'r,_"
60 I20475X
61 1426`80
62 i20961X
6`3 7294J
64 ...... v108t_bgA
55 120953X
,66 i 20954K
67 i84799
88 138244-
70 ! 1T:0950)(
71 73810500
72 i 0@596:£
""_ 1204.'18X
/©
SprocKet, 9 Teeth (Revel'so)
Gear, Bevel, 42 Teeth
Assembly, Kit, Shim .750 Shaft
Shaft, Driw_
Gear, 5pub 12 Teeth (1=)
G,_a.r,c,pu_, 20 "f-o_h (2,,0)
Gear, Spur, 25 Teeth (3=)
Gear; Spur, 28 Teeth (4,°)
Gear, _r_t]r 31 Teeth {5Q
Spacer .781 x i.00 x .375
Washer, Plain .632 x !:00 x .060
Washeh Neop._ene
Wasi_eh Plain .758 x !.25 x .03i
Axle, LH.
Gear, Miter_ 15 Teeth
Ring, Retaktmg
Gear, Spur, 32 Teeth
Shaft, Cross
Gear, Miter, I5 Teeth
Axh:_,R.H.
Housing, Lower
Puck. Friction
Disc, Brake
Spacer
Jaw, Brake
Pin, Dowel
Sc_'ew; SNf..Tapping, L.a__'ge
5/I6oi8 x 2.25
:Leve_', Acttt_£in9
,00.,:_'WasheiL _::_-_"" ";_'" .00 _-_:<:..... :>& I X' 1 X
@tacke%AY'ti-Re_:ation
hocknu1: S/I 6-24
Screw, % ii:-Yapping_ i._arge
5i16-18 x 1.44
Greags
*Use in combinations to maintain p_'ope_ c!earances
** O@er Key No. 15
HOTI; Aii component dimensions given ip, U.S. ir.ches
I inch :: 25.4. mm
47

" .... ::_:_7 (li....
l! _ l.I
&IS.......
................. .;,L%"]_')
7_ X ,7
41
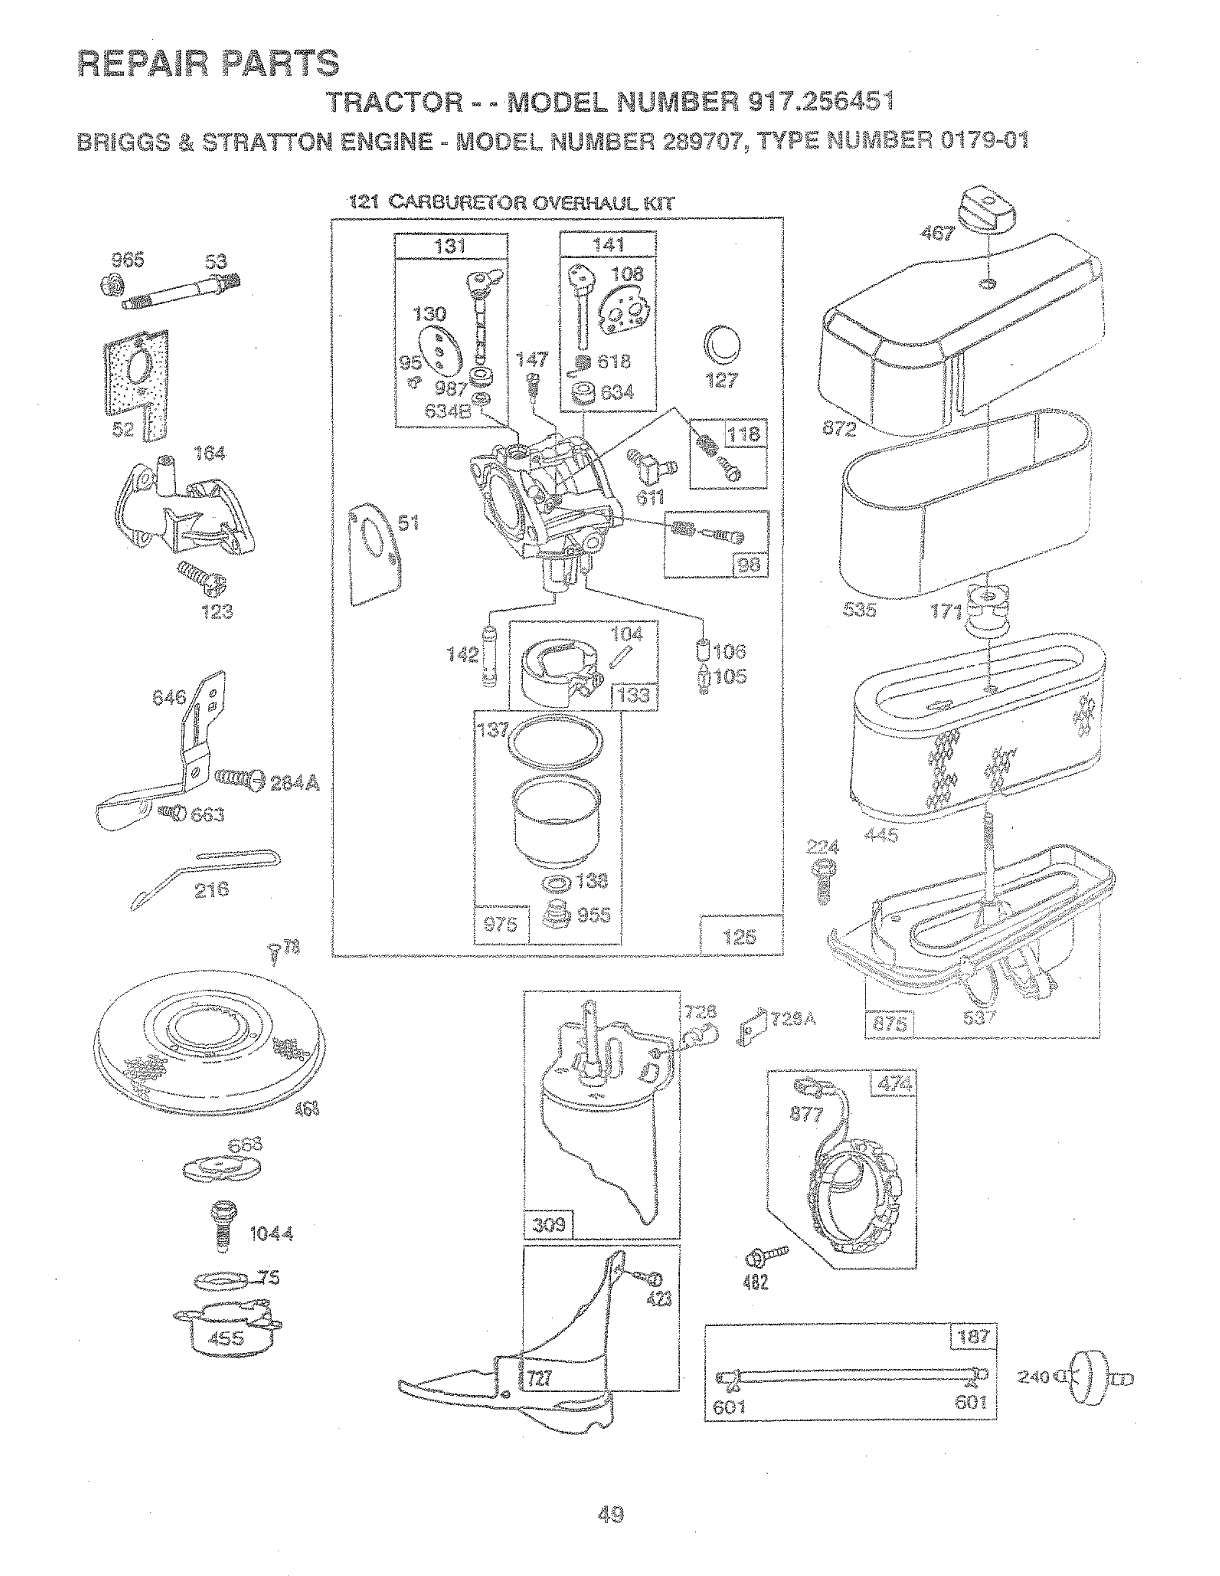
REPAIR PARTS
TRACTOR - ° MODEL NUMBER g17,£56451
BR_GGS & STRA_ON ENGINE MO©EL NU_B_:R 289707,_ _Y. c NUMBER 0179o0!
_2_ii__
%
_t044
_.S.-TS
Vps3-
12.1 CA_BU:_'Ofl OV_.RH,&UL K_T
, :<::.::...... [_-%, .
k.. 1
:;?N V
224
[ @2_::s::, :L:2S!!d
,_7:'¢i i
t ;S_# ,{;
--. L 2_F
492
8,011 "_J
49

REPAIR PARTS
801
_802 i
:!i
:i
5
:%_,L.!_i/
.i _!h
284
1
%_ 524 1 d
5O

REPAIR PARTS
TRACTOR MODEL NUMBER 917o25645.
BR_GGS & STRATTON ENGINE ° MODEL NUMBER.289707, TYPE NUMBER 0!79@t
KEY PART KEY PART
NO_ NO, DESCRIPTION NO. NO, DESCRIPTION
t 496413
2 399265
3 391086
5 4.94240
7 271866
8 39'14.06
9 27803
10 94821
ti 28O10O
t2 271916
271997
271996
13 _:.M62'_
15 94239
16 495162
94196
18 494.238
20 291675
22 94524
2:} .4928:26
24 222898
25 394681
394852
394663
894654
26 39'!?'80
392331
391781
391782
391788
27 260924
28 299691
391285
29 490:348
49048{)
32 9487i
33 262246
34. 262247
35 65906
36 26828
37 224502
40 221596
41 292260
42 93630
45 262248
46 212897
51 272465
Cylinder Assembly 52
Bearing, Cylinder (Requires Special 53
Toois For Installation) 75
*Seai, Oii 78
Head. Cylinder 95
* Gas_et, Cyt:inder Head 98
Breathe_ Assembly 104
* Gas£et, Valve Cover 105
Screw, .....c_-=m_',,.._ 106
Tt_be..B<eather 108
*::_;_<,b_t_-' an _,'. m_Cover t/64" 118
.............,,..4_s.:,K,.a,:._e
,,n_:::ke_, Cover "{ "" 12!V.YaR_L,c_S@ A):}b
* Gasket. _"-_ ,_........ __.3
•'..,,tc'.[,_.'_._a÷ Cover °009" _ ''_
c;crev,ACylinder Iqead t25
PIug, Oil Drair; 127
C_ankshaft I 30
.._:y,Timing Geal' 13!
,.3_, Engirte I33
* Seai, Oii 137
Screw. Seres, Base Mounting 138
Flywheet and Ring .Gear Ass,-. "_""', ,_m_,b 14t
Magneto 14.2
i{ev, Fiywheei 147
Piston Assernbly, Standard 164
Piston Assembiy .010" Oversize 171
Piston Assemb!y .020" Oversize 187
Piston Assembly .030" Oversize 188
i-qin9 c..... e.... _ ,.,_e;.,._ o.....>_:£,Pssto!%
R;n':_Set, P<'q * OhtoR_e. "::._"_ c _"_ o@9
Rin_._Set, o;_.,..,-. .
.. _....._, .0t 0" Ow:-ws_ze 2I6
.0_0 Over'size _t
.:::'qqqSe_ Pistcxi ......" ,', o
Rin!_:;Set, Ristes .0S0" Overs;ze
Lee.% :Piston .Pin 222
Pin Assembly, Piston, Standard 224.
Pin >_ssy., Piston ,005" Oversize 225
Rod AsseF.abty, Connectb 9 227
ROd '_............... ,_'s's's,4_
,_,ba_:>uNb:y, OO(1[lee'u!x%
.02(}" ;vt'n'_"v"'i,_.s,_;b._.b::._' Cra%_kDin, So_e ......o_".12
Screw, Connecting Rod 240
Valve, ExhE,.ust 265
Vaive, _ntake
SOT nq, "_ '_
Spdng, Exhaust Valve
Guard, Flywheel
Retainer, Intake Valve
Rotocoii, Exhaust Valve
Retainer, Exhaust Valve Rotocoii
Tappet, VaIve
Gear, Cam
.... Gasket, Carburetor(to Elbow)
272554
94637
224061
9:3805
94098
495800
231789
231855
231854
224540
494383
49 ,'.'.._o_
94-616
495796
224539
494379
4.94381
281 i65
281164.
494.380
494537
PAwg
2i 38t 9
28 t 051
8938t5
93535
"762767
260871
2827@3
490815
494887
94513
495157
493935
94742
262785
394358
_,:_t 535
* GaskeL Carburetor
Stud, Carbu_etor Mounting
Washen Spring
Sc_ew, Se¢,qs
Screw, Idie Speed
**Pin, Fioat Hinge
** Vaive Assemb!y, Inlet ,,,_,,.._._-"_4i_
tnleL Valve Sea_
Vaive, Choke
**Vaive, Needie
Oarbu_et,x' Overhaui f<il
Screw, Eibow Mountir,.g
** i:qug VVe;ic;n(Sold in Kit Only)
Va!ve, Throttle
Shaft and Lever_ Thrott!e
*** Ge.skeL Float Bowl
.... Washer, Fiou£ _owl Screw
** Shaft _" ...... Choke
,_..;_,,. L_(::.x:V({?_"
** Nozz!e /JeL Carburetor
** jT';i'_ot,,.Jet
Carbu_ete_', L.Ibow
Nut, Air C:Ie_ner Mounting
L.ine, Fuel
SC_'ew_ .."!},_{:-_rq s
L;_]_,,,_"(}(:'Ve_T, or
Sorirg.Gove:'no_:
Oii ".....i'r .... _:_ea_ '
;3r;_.u;i.-:et.._.ssembiy
.-:';:'Jar'_..,(b_c:,,/::'_'r_o;"Contrei
(}i"art!:.::. {}:_':>it:):r) o F
Leve;" &ssem_:)iy, Geverno_
Wasi-e_, Gore;mot Crank
[::'i;ter Ft..ie}
C;a:,,"np,:::ssina
* ff_chJded in Gasket Set (494241)
** ;ncluded in Carburetor Overhaul Kit (497535)
*** Included in both Carburetor Overhaul Kit (497535)
and Carburetor Gasket Set (494385)
NOTE: AIi component dimensions given in U.S. inches
1 inch = 25.4 mm
5!

REPAtR PARTS
TRACTOR - - MODEL NU£oaBER 917 256451
BRIGGS & STRATTON ENGINE =_£ODEL NU_BEiB 289707_ TYPE NU;_;IBER 0! 79°0t
KEY PART K£Y PART
Nee ?,lO, DBSc2,RtPT!ON NO, NO, 9ESOR_tPTtON
284 94073 Screw, Shoulder, 726 392134
Hex Washe: Head
284A 94704 Screw.. iqex Head 727 490324
304 4.98319 Housir% Bbwe_
305 94819 Screw, Seres, 81owe; Housing 728 94627
Mou_tii-,g 729 281i59
306 224545 Shieid_ (3yfinder 729A 225!'70
307 94623 Screw_ Seres, Cyiir;,der Shield 74I 262i35
Mounting '757 2!2359
308 491490 Cove< CyihderHead 758 899891
309 497595 Motor. Sta_%_.:n 759 298909
310 497@02 Boit, Yhru 76t 93875
3t 1 497608 B<ush Set 783 280104
333 492341 AmTatu<e, M:%j@eto 80I 894556
334 93381 S<:,'_ew_Seres, A,wnature Mounting 802 497605
_.>..... 802592 _ q 4% S04
346 93705 Sc<ew_He;< Head 842 270920
356 494328 Wire> G!o-'dnd 847 495415
858 4c,4P4t.............. _.aa:_te{"'...............o_s_ 85'1 22' .,-xw,i;_o
383 'i9203 Pule< Hywi;eet 869 26i463
383 89838 Wrench_ Spark Pk_g 870 2133t6
423 94073 Screw, Seres 871 261961
¢'B ............ ' J'-i "_a _' o< ._ "'*_' <
443 4.93909 -_,.._i_,G<:;.,:_Air ,...,e_, _e_
455 22255I Cup, Screen tv'iounting 872 28i104
z'...S"7493903 K,no_ /x_-Ciea.!._et. 875 .""_-_:"_-_
......... ; ..... -1'<1} -z 4_ d,_ /
4G:::i_222562 Sc,"-een_Fiush Rotating 8'77 393456
4.74 393474 Starer A!temr4o_
48:';:_93!!1121 Screw. Sef¢_s 955 94.642
5!0 4,97506 OSw.%Stari::'r 965 94108
.......... bA_<k:.,' _jn_; o/'d [.'.}iOS"isk: Oii hJleF {.!}7:!_ 4.<;_..k:,/-._
524:68838 Seai, i::ilk:::"T_be 977 4.94385
525 _.96i i 3 Tube° Oil ..'.::i!ie< !i87 281 ! 5@
585 272403 _:_£Jem,6._K_:qrCiea[]er i 005 260i:;::_7
537 281 ! 06 * O.-!::_i:._i],"d_Ck)s.i-te_ 1006 224.4.i3
544. 497@03 Am_a_:<..:r,:;::2)t.::_'te:' i01_:} :1-91255
_)!:£;i! ,!t'N !i_Y7 BUShiY';g, fl]i(;,v@ 'XOf Cys_'ti( J044 9.4.]i,;'3
50:2 92513 Seit, Govern<x :,....ever 1053 272397
592 2:}i082 Nut, P:iex i090 ,:$97607
501 ......_..............
::'b0c, d L.}ia:riq_)_ )-L£._i _"':'
w£,)e
6ii 49.$¢5I Fuel tniei-ube
614 9_:_39_ uotte% Hai<H;n
618 282803 Spring, Choke Return
834 281t68 ** Seal, Choke Shaft
634A 49i328 * Seat Governor
6348 28i 167 ** Washe< Throttie Shaft
635 66538 Elbow_ Spark Plug
546 224546 Brace, Air Cleaner
8r:°_ 93498 Screw, Seres
AD
663 94620 Screw, Hex Head
663 280848 Spacer
Sea< Ring
{includes Mounting Paris)
L,ove_. b,.alt,_,
(includes ,k_bunting Screws)
Screw, Hex Head
Cti_, Lead Wire
Retainer Wi_e
t'],':. ,/a 'TA" "+t....
i...]i'_k,Counterweight
Cou r'..,!e_'we;ghtAssembly
Pin, Coun_:erwHght
Sc_ev%<}oLmto_weight
Gear, St,.:-::._4er
C,sp_Drive
Cap End
Seal. Oii Fiik_r Cap
Fill (]roup, Oil
7emfi,:_al, Ignition Cable
Seat, intake VaD.(e,Standard
Sea% Exhaust Valve, Standard
(kide, 'E!xhausi Valve
(iuicie, i,_--_t:-_!<eValve
sever, _-q,Cleaner
Bedy, Air Cieane_
Diode _:mdOormector Assembly,
<::)Lu!dC i:.cui!
:£,<.;_'ew:Fi.J,',_i{:bwl
i...,a,:.:k<m:t,i;_irCleaner Mounting
{Sowi i<sseynbiy, Carburetor
£)a<!i)_Ife_o[G.::_sketHit
Ss,:_i.']'_,":_i:i:ieShaft
i:::'.!V'}. ,):::i /w iff e i
P,etsi_ e< !::a_7
.._.be!:;<:i:
S.,.)rew,;_._xHead
IV}9,fiLiSl, 11>wn_,:_i"%
_,.::ie!_--,ine< Srus.h
RPM .... ; " o_ soG.11i}50; High: 3200-3400<:_._)@_Ngs, / _d: '[ F .....
* included in (Saskei 0..::_<..... \4_.o_',r'-'_o3o)_"
** !ncluded in Carbur@.or Ovemaui Kit (495799)
*** included in both Ca<bureto_ Overhaul Kit (497535)
and Carburetor Gasket Sei (494385)
NOT£: All component dirnensions given in U.S. inches
I inch :25.4 mm
52

SERVICE NOTES
53¸

SERVICE NOTES
54

SUGGESTED GUIDE FOR SJGH'TING SLOPES FOR SAFE OPERATION
ONLY RIDE UP AND DOWN HILL,
NOT ACROSS HiLL
o1
O1
SIGHT AND HOLD THIS LEVEL WIiTH
SKY LINE OFt TREE.
OWNER'
UAL
MODEL NO.
917.256451
IF YOU NEED
REPAIR SERVICE
OR PARTS:
FOR REPAIR SERVICE, CALL
TH{S TOLL FREE NUMBER:
1-800-4=REPAIR
(1-800-473=7247)
FOR REPLACEMENT PARTS
INFORMATION AND
ORDERING, CALL THIS
TOLL FREE NUMBER:
1-800oFON-PAR'T
(t -800o366o7278)
FOR CONSUMER ASSISTANCE
HOT LINE, CALL THIS
TOLL FREE NUMBER:
1=800o659_5917
®
12.5 HP IC
ELECTRIC START
38" MOWER
5 SPEED TRANSAXLE
LAWN TRACTOR
Each tractor has its own model number. Each engine has
its own model number.
The model number for your tractor witl be found on the
modet plate located under the seat.
The model number for your engine will be found on the
blower housing of the engine.
Afl parts listed herein may be ordered from any Sears,
Roebuck and Co. Service Center/Department and most Re-
tail Stores.
WHEN ORDERING REPAIR PARTS, ALWAYS GIVE THE
FOLLOWING iNFORMATION:
° PRODUCT- TRACTOR
MODEL NUMBER - 917.256451
ENGINE MODEL NO. * 289707, TYPE NO, 0179-0t
o PART NUMBER
PART DESCRiPTiON
Your Sears merchandise has added vafue when you
consider Sears has service units nationwide staffed with
Sears trained technicians.., professional technicians
specifically trained to insure that we meet our pfedge to
you, we service what we sel!.
153917 3.20.96 JH Printed in U.S.A.
_;::td_,t_,

®
ODEL 917.256451 OWNER'S MANUAL
_°Assembly
__Qperation
_CUstomer Responsibilities
_Service and Adjustments
_ Repair Parts
_AUToOP_; Read and follow all safety rules and instructions before operating this equipment.
FOR CONSUMER ASSISTANCE HOT LINE, CALL THiS TOLL FREE NUMBER: t-800-659-5917
II i _ilrr'
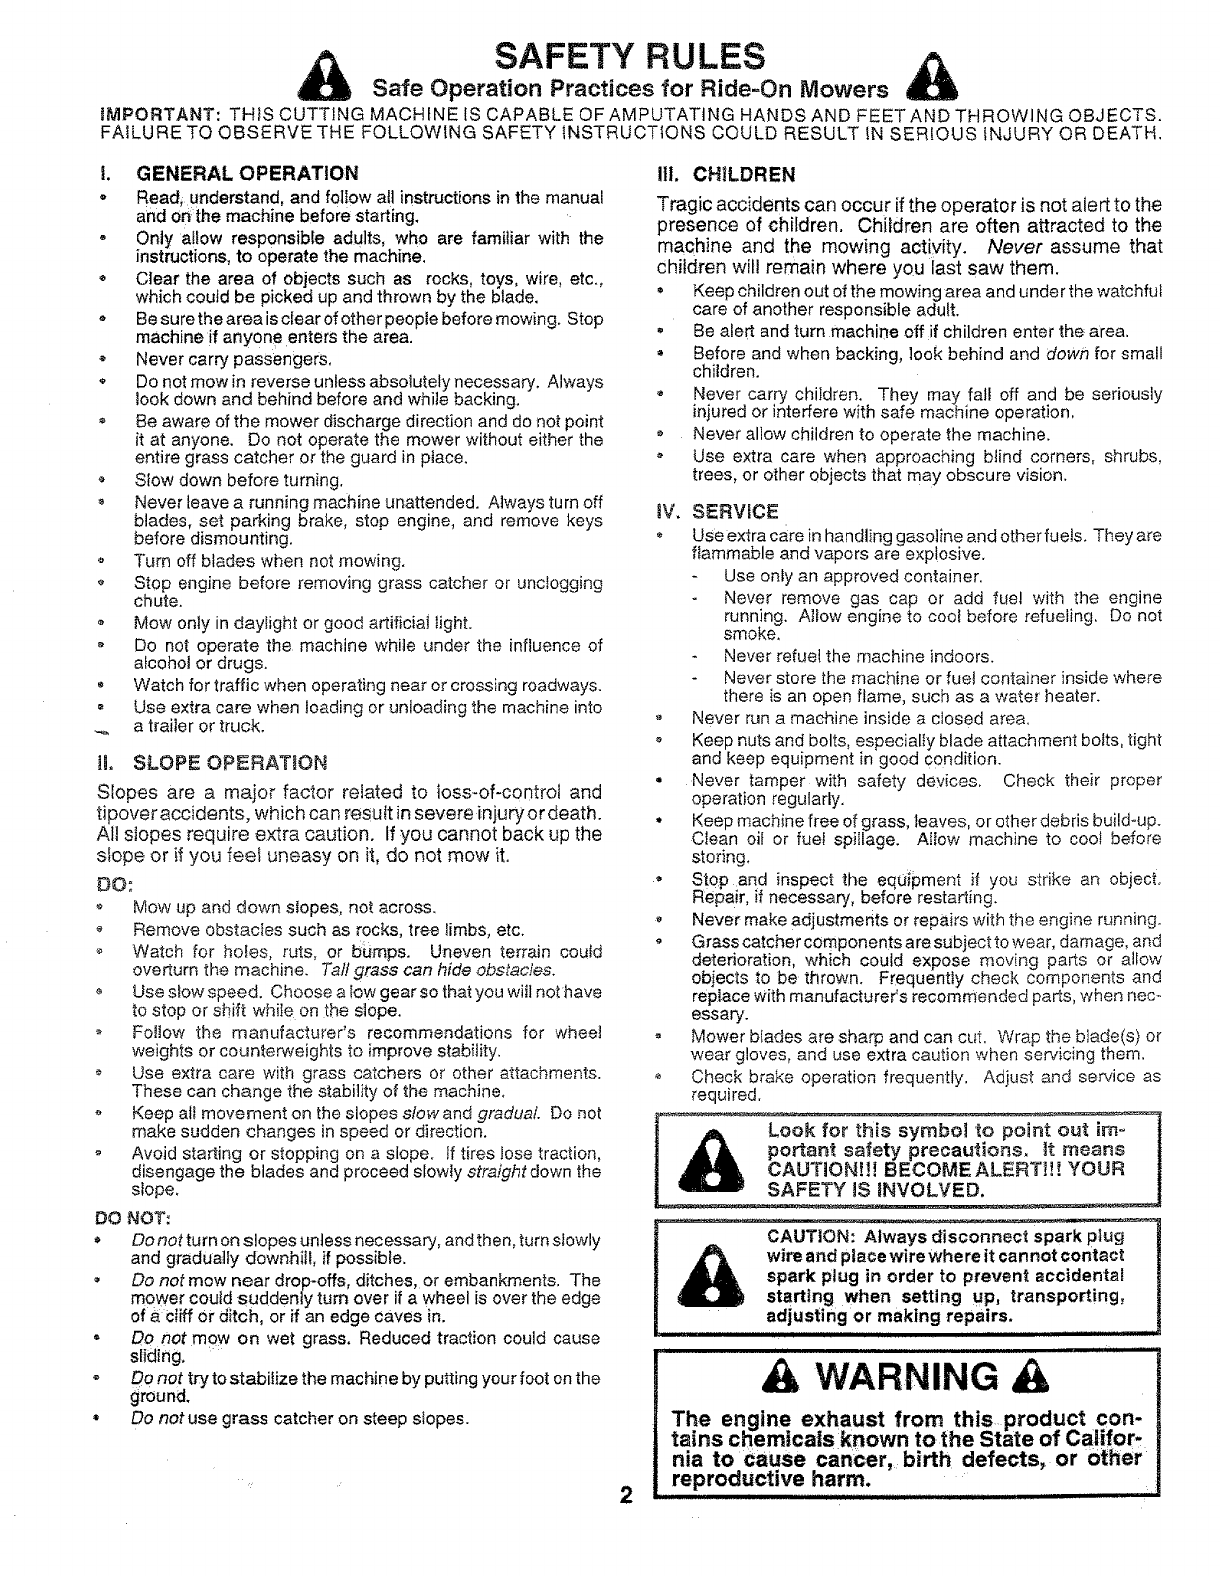
SAFETY RULES
Safe Operation Practices for Ride-On Mowers
IMPORTANT: THIS CUTTING MACHINE [S CAPABLE OF AMPUTATING HANDS AND FEETAND THROWING OBJECTS.
FAILURE TO OBSERVE THE FOLLOWING SAFETY INSTRUCTIONS COULD RESULT IN SERIOUS INJURY OR DEATH.
t. GENERAL OPERATION
o Read_ understand, and foI!ow all instructions in the manual
and onthe machine before starting.
, Only a!tow responsible adults, who are familiar with the
instructions, to operate the machine,
* Clear the area of objects such as rocks, toys, wire, etc.,
which could be picked up and thrown by the blade.
*Be sure the area is clear of other people before mowing. Stop
machine if anyone enters the area.
*Never carry passengers,
,Do not mow in reverse unless absolutely necessary. Always
!ook down and behind before and while backing.
, Be aware of the mower discharge direction and do not point
it at anyone. Do not operate the mower without either the
entire grass catcher or the guard in ptace.
o SIow down before turning.
,Never leave a running machine unattended. Always turn off
blades, set parking brake, stop engine, and remove keys
before dismounting.
o Turn off blades when not mowing.
Stop engine before removing grass catcher or uncIogging
chute.
o Mow only in daylight or good artificial light.
o Do not operate the machine while under the influence of
alcohol or drugs.
Watch for traffic when operating near or crossing roadways.
= Use extra care when loading or unloading the machine into
.._ a trailer or truck.
lL SLOPE OPERATION
Slopes are a major factor related to loss-of-control and
tipover accidents, which can result in severe _njuryor death.
All slopes require extra caution. If you cannot back up the
slope or if you feel uneasy on it, do not mow it.
DO:
o Mow up and down slopes, not across.
Remove obstacles such as rocks, tree limbs, etc.
Watch for holes, ruts, or bumps. Uneven terrain could
overturn the machine. Tal! grass can hide obstacles.
Use slow speed. Choose a low gear so that you wiJl not have
to stop or shift while on the slope.
o Fottow the manufacturer's recommendations for wheel
weights or counterweights to improve stability.
Use extra care with grass catchers or other attachments.
These can change the stability of the machine.
Keep att movement on the slopes stow and gradual Do not
make sudden changes in speed or direction.
- Avoid starting or stopping on a slope. If tires lose traction,
disengage the blades and proceed slowly straight down the
sfope,
DO NOT:
Do not turn on slopes unless necessary, and then, turn slowly
and gradua]ty downhill, if possible.
Do not mow near drop-effs, ditches, or embankments. The
mower could suddenly turn over if a wheel is over the edge
of aCtiff or ditch, or if an edge caves in.
,Do not mow on wet grass. Reduced traction could cause
sliding.
"DOnot try to stabilize the machine by putting your foot on the
ground,
*Do not use grass catcher on steep slopes.
2
Itl. CHILDREN
Tragic accidents can occur if the operator is not alert to the
presence of children. Children are often attracted to the
machine and the mowing actMty. Never assume that
chitdren will remain where you last saw them.
° Keep children out of the mowing area and under the watchful
care of another responsible adult.
= Be alert and turn machir_e off if children enter the area.
Before and when backing, look behind and down for small
children.
Never carry children. They may fall off and be seriously
injured or interfere with safe machine operation,
Never allow children to operate the machine.
Use extra care when approaching blind corners, shrubs,
trees, or other objects that may obscure vision.
iV. SERVICE
* Use extra care in handling gasoline and other fuets. They are
flammable and vapors are explosive.
Use only an approved container.
Never remove gas cap or add fue! with the engine
running. Altow engine to cool before refueling, Do not
smoke,
Never refuel the machine indoors.
Never store the machine or fuel container inside where
there is an open flame, such as a water heater.
Never run a machine inside a closed area.
o Keep nuts and bolts, especially blade attachment botts, tight
and keep equipment in good condition.
, Never tamper with safety devices. Check their proper
operation regularly.
*Keep machine free of grass, leaves, or other debris build_up.
Clean oil or fuel spiIlage. Atiow machine to cool before
storing.
" StOP and inspect the equipment if you strike an object.
Repair, if necessary, before restarting.
,Never make adjustmerits or repairs with the engine running.
Grasscatchercomponentsaresubjecttowear, damage, and
deterioration, which could expose moving parts or aliow
obiects to be thrown. Frequently check components and
replace with manufacturer's recommended parts, when nec*
essary.
, Mower blades are shaqo and can cut. Wrap the blade(s) or
wear gloves, and use extra caution when servicing them.
Check brake operation frequently. Adiust and service as
required.
&Look for this symbol to point out im-
portant safety precautions, _t means
CAUTION!!! BECOME ALERT!!! YOUR
SAFETY JS INVOLVED,
CAUTION: Always disconnect spark ptug
wire and place wire where it cannot contact
spark plug in order to prevent accidental
starting when setting up, transporting,
adjusting or making repairs.
WARNING
The engine exhaust from this product cpn-
rains c_iemicais known tothe State of Cati_or.
nia to cause cancer, birth defects, or Other
reproductive harm.

CONGRATULATIONS on your purchase of a Sears
Tractor, It has been designed, engineered and manufac-
tured to give you the best possibte dependability and
performance.
Should you experience any probiem you cannot easily
remedy, please contact your nearest Sears Authorized
Sewice Center/Department, We have competenL we_i-
trained technicians and the proper tools to se_iice or repair
this tractor,
Please read and retain this manual. The instructions will
enable you to assemble and maintain your tractor properly.
Always obsewe the "SAFETY RULES".
MODEL
NUMBER 917,256451
SERIAL
t NUMBER
THE MODEL AND SERtAL NUMBERS WILL BE FOUND
.. r _.,_,__. UNDER THi_ SEAT.
rot ; qHthUi D RE,J .DRD BOTH S;_4 ..<c t.fu, JIBE,, A. _D
' DATE OF PURCHASE AND KEEP _N A SAFE PLACE
FOR FUTURE REFERE]NCE.
s :NANkA ! ACSR {E aENT
A b_a,s Maintenance Agreement Jsavailable on this prod_
uct° Contact you_ nearest oearo store for details,
o Read and obsewe the safety roles.
Foliow a regt_ar schedule in maintaining, caring for and
doiny yOU, ,R:_,,_._...
-_' Follow the instructioss under"Custom@:' Responsibili.-.
tkes': and "Sto(age '_sections of this owner's manua!.
PRODUCT SPEO F OAT1ONS
HORSEPOWER: 12.5
', e" t P _ ¢'T"
GA_OL,NE _,A, A_I, Y ! .25 _'_A_ t ,'_......
_A UNLEADED REGULAR
ND TYPE: ._
]Otl TY_>E (API-SFiSG): SAE 30 (above 32'W)
1 SAE 5W-30 (below 32'_F)
OIL CAPACITY: 3.0 PINTS
SPARK PLUG: CHAMPION RJIgLM
(GAP: .030") STD 3614.58
VALVE CLEARANCE: INTAKE: .005" - .007"
EXHAUST: .009" o .0I I"
kGROUND_SPEED (MPH): FORWARD:
Ist 1,0
2rid 2.1
3_d 3. I
4tt_ 4.0
5th 5.'i
REVERSE: I ,,6
TIRE PRESSURE; FRONT: 14 PFL
RF _ n, 12 PS:i
j CHA_GING..,._.:,Y'S __M.
L.........
t
i BATTEF1Y:
]_aL_-,b__BOLT TORQUE:
3 AMPS BATTERY
5 AMPS Iflc.ADLiL-_fmtS
AMP!FIR: 25
MtN° CCA: t90
CASE SIZE:: U!R
30°35 FI', _ _ _:"
WARNING: This tractor is equipped with an internai
combustion engine and sho_..lld not be used on or near any
unimproved forest-covered,, br-sh-covered or grass-.cov -.
e{-ed land uniess the engine's exhaust system is equipped
with a spark arrestor meeting applicable iocai o__st_,_talaws
(if any), if a spark attester is useG it should be maintained
in effective working oMer by the operator.
in the state of Caiifomia the above is _equired by !aw
(Section 4442 of the Caiifomia Pubiic Resb'urces Code).
O_.h_r _t;:_l_:P,rnav _ave s rnila_ laws. Fede "_.ilaws _,b[) V on
f_de_i lands A s ad< a_"es_e_ for t_ m_,ff _r i's av;diabte
through your nearest Sears Authorized ::;ervk>_ Cented
DepaRment (See REPAIR PARTS section of this manual).
i
, _U,JiqOct_,,a aDO td, ,8 Li[:) aCCO_dii']Ci"°' "E.d_lr.,y_x_ I.IS _ }1For one k_) year f._omthe date of ourch,ase_ if this Craftsman Riding "_,, ',...... i.'. maintained, _"_"" ...._.... _ , n _d
to the instructions in the owner's maneaJ, Sears wiii repair or repiace, :free of charge, any [saris found to be defective in rnateriai :!
o_workmanship, i
This Warranty does not cover: _
_ Expendabb items which become worn dudng normal use, such as blades, spark piugs, air cteane(s, beits, etc.
o Tire replacement or repair caused by punctures from outside objects, such as na_, thorns, stumps, or glass.
Repairs necessary because of operator abuse, negligence, improper storage or accident or the failure to maintain the
equipmeni according to the instructions contained in the owner's manual,
Riding equipment used for commercia_ or rental purposes.
LIMITED 90 DAY WARRANTY ,ON BATTERY
For ninety (90) days from date of ourchase if an}, batteR7 included with this riding equipment proves defective in material or
workmanship and our testing determines the battery, will not held a charge, Sears will replace the battery' at no charge,
IN-HOME WARRANTY SERVICE ON YOUR CRAFTSMAN RIDING EQJIPMENT IS AVAILABLE AT NO-CHARGE FOR 30
DAYS FROM THE DATE OF PURCHASE, PLEASE CONTACT YOUR NEAREST SER _IC_ CENTER. AF-!X::R 30 DAYS
FROM THE DATE OF PURCHASE. WARRANTY SERVICE iS AVAILABLE BY TAKING YOUR _.,RAFTSMAN RIDING EQUIP-
.... AVM _._Lc
MENT TO YOUR NEAREST SEARS .:_RVICE CENTER. (IN@JOME WARRANTY c_Emv,,._,_WILL STILL BE
AFTER 30 DAYS FROM THE DATE OF PURCHASE BUT A STANDARD TR_P CHARGE WILL APPLY.) THIS WARRANTY
.°, ,..,_::_ONLY VVH!t_ETHIS :PRODUCT _StN THE UNITED STATES.
This War_nty gives you specific iegat fights, and you rnay also have other rights which may vaPy from state to state.
SEAR& ROEBUCK AND COo, D/817 WA, HOFFMAN LoTAT=S, IL ,'-n_,.,.,,_o,,_
3
TABLE OF CONTENTS
MAINTENANCE SCHEDULE ...... :............................... t4
SERVICE AND ADJUST_ENTS ........................... t9o24
STORAGE .................................................................... 25
TROUBLESHOOTING ,.o;....................................... 26_27
REPAIR PARTS-TRACTOR ................................ 30-47
REPAIR PARTS - ENGINE .................. .................. 48-52
PARTS ORDERING/SERViCE ............... BACK COVER
A
Accessories ........................................... 5
Adjustments:
Broke ................................................ 2"I
Cart)L!_etor .................................... 24
Mower
Front.-TooBack ......................... 20
SideoTo..Side ........................... 20
Thrott!e Contact Cable .................. 23
Air Fii!:eh Engine .................................. 17
Air Screen Engine ..................... :........ 17
Assemb}y ............................................. 7-.9
B
Battery:
Charging ......................................... 8
• 3ta@_g witiq Weak Battery .....:..... 22
Sto_age ........................................ 25
Terminals ...................................... i 6
Beit:
Motion Drive
Removal/Replacement ............ 2!
iV_owerBlade(s)
RemovaItRep!acement ............ 21
Blade:
:!.harpening .................................... l 5
:::_epi_cement .................................. ! 5
B;'ake Ad]usiment ................................ 21
If%
%.#,
......ss<o.'...,,__!"_.o!"Adjustment ........................... 24
%,0 n,t_oi:,s _o.,,.I,_1 i 0
Customer Responeibi!ities ............... 15o,i8
Air Filter .................................... i 7
Air Smeen, Engine ..................... 17
Cooling Fins, Engine ................ !7
Engine Oi! ................................ 16
Fuei Filter ................................. 18
Spark Plug(s) ............................ I8
Tractor:
Battery ...................................... I6
Bk_de ........................ ,................ i5
Lubrication '-'- "
,_hart ...................... 14
Maintenance Schedule ............ i4
Tire <}}are.......................... 8,t 5,22
Transaxie ................................. I 8
Cutting Height, _4ower ......................... t I
£
Electrical:
Interlocks and Relays .................. 23
Schematic ..................................... 29
Wiring Diagram ............................ 30
Engine:
Air Filter ........................................ !7
Air Screen .................................... 17
Cooiing Fins, Engine .................... 17
Oil Change ................................... 16
Oil Level .................................. ! 2,16
Oil Type ......................................... I6
Preparation ................................... 12
Repair Parts ............................ 48_52
Sta_ing ......................................... I3
Storage ........................................ 25
Filter:
Air Filter ........................................ 17
Fuel .............................................. 18
Fuel:
Type ............................................. I2
Storage ........................................ 25
Fuse .................................................... 23
H
Hood Removattlnsta[lal:ion ................... 23
L
Leveling Mower L.e,.k .......................... 20
Lubrication:
Chart ............................................. i4
Maintenance Schedule ....................... 14
Mower:
Adjustment, Front4o-Back ........... 20
Adjustment, Side4o-Side ............. 20
Blade Sharpening ........................ 15
Blade Replacement ...................... 15
Cutting Height ...................... :....... 11
Installation .................................... 19
Operation ..................................... 12
Removal ....................................... 19
Mowing Tips ........................................ 13
Muffler ................................................. 18
Spark Arrester ........................... 3,40
Oil:
O
Cold Weather Conditions ........ t2,16
Engine .......................................... ! 6
Storage ................. ...... :................ 25
Operation ....................................... i0-13
Operating Mower ................................ I2
Options:
Accessories .................................... 5
Spark An'ester ........................... 3,40
P
Parking Brake .................................. 104 1
Pa_s Bag .............................................. 6
Parts, RepiacementiRepair ............ 30-47
Product Specifications ........................... 3
R
Repair Parts ................................... 30--47
S
Safety Rules .......................................... 2
Seat ....................................................... 8
Service and Adjustments ............... 19-24
Carburetor ........ :........................... 24
Fuse ............................................. 23
Hood Removallinstatlation ........... 23
Motion Drive Belt
Removal/Replacement ............ 21
Mower Belt(s)
Removal!Replacement ............ 21
Mower Adjustment
Front-to-Back .......................... 20
Side4o-Side ............................ 20
Mower Removal ........................... 19
Tire Care ................................. 8/i 5,22
Stope Guide Sheer .............................. 5 !
Spark Plug(s) ....................................... 18
Specifications ......................................... 3
Starting the Engine ........................ 12- I3
Steering Wheel ................................. 7,22
SIopping the Tractor ............................ ! i
Storage ................................................ 25
T
Throttle Control Cable Adjustment ...... 24
Tires ............................................ 8,t 5,22
Trouble Shooting Chart .................. 2&27
Transaxle ............................................ 16
W
Warranty ................................................ 3
Wiring Diagram ................................... 30
Wiring Schematic ................................ 29
4

ES D ATTACH
These accessories arid attachments were avaiiab_e through most Sears retaii out!ets a_sdcease.......s, ,_=,s wn..,] the tractor was purchased.
Most Sears stores can order these }_ems for you when you provide the mode! number of yo_Jrtractor,
•_._ _ :_s ....
SPARK, !
GAS _A_,_
C ;'
i
i
_NGINE O_L ] FUEL STABILIZER
4
;,IA
PSzRFOB ANC£
Sears offers a wide variety of attachments that fit your tractor_ Many of these are tinted be_ow with brief explanations o_how they car_hetp
you. This list was current at the time of pc_b_icatk_n;however, it may change in fuiure years .. more attachrner_ts may be .added, chan9es
may be made in these attachments, or some may no Ionger be available o_ iit your model, Co_ta.ct your 5nearest Sears store for _he
accessode_ and attach_'ae_ts that are avaiiable for you_" t_'actot.
Most of these attachments do not require additional hitches or conversion kits (those that do are indicated) and are designed for easy
attaching and detaching.
A_:RA"_OR promotes deep root growth for a healthy lawn. Ta-.
pe_ed 2Sqnch steel spikes moun_.ed on 10-irich diamete" discs
puncture holes in 8oi_ at ciose k_tervais to let moisture soak in°
Steel weight tray for increased ps,qetration.
BAGGER iets you. co{bct g_ass c_ippings and leaves for a
healthier, nea.ter !ookJng _awr. Two Permane,x containers isold
30-gallon piastic bags.
BUMPeR protects front end of tracto_ from damage.
CARTS make hautbig easy. Va_iety of sizes avaiiabie, pRts
accessories such as side pans.i kits, tool caddy, car1 cover_
proteciive mat and doiiy..
CO_t_G A_RATOR takes small plugs out of soil to a!tow mo_s_.
ture and nutrients _e reach grass roots. 36-inch swath. 24
hardeeed steei coring tips. 150 }b. capacity WEight tray.
_ASY ©_,. ©_Usji,,_VALVB makes 6i! changes easier, faster.
FROKT NOSE Re LL_K:_can(era in f_'antof mower deck to reduce
ch_w_,cesof ":£:xdpi_g" on unev:::_rte;_ain.
GAN(I_ _4([_C_qk,_tsyou :ow 2 of 3 pull-behind attachments at once,
such as sw_e.p_ws, dethatchers_ aerators 0"_otfo_ _se with rol!ers,
carts or other heavy attac_'_ments).
,@A_JG_ '@'{N£:HX8 on both sid_-s of the mowe_ deck reduce
char_ces o_;%s_aiping" on uneven terrain° For mower decks r_otso
equippe£
_qi!jLC_-__:_{AKI_J{}_THA'TCN_£B_oosens soil and flips thatch and
matted ieaw;_sto !awn suHace _o_'easy pic-kL_p.Twenty spring line
taeth_ UseXl to p_epare bare areas to,seeding. AvailaNe forfi'oni
o_ rear rnet.intin_. H_GH PXRFO{a_JIAHC;{ R£9:b,.ACT_©H
SPFIIHG 7_N_ t:iiqi_.-:TH_itrCH_Rcovers 36-inch wide path and
tosses thatch into _a_!e hopper_ Mounts behir_d tractor.
MUL,CH_HG ©LOSS_OUT PkAT#£ HK once insta!led, lets you
roach, discharge or bag clippings (bagger optional) withodt
changing biades For models no_ equipped as 3qml Convertible
mowers. See "MOWER" in the Repair Pa_Is section of this
manual
RA_P 70£S AND _£_'I _let you k)ad and untoad tractor from a
pickug truck, Use with 2 x 8 or 2 x !0 Iumber.
ROLLER for smoother lawn surface. 36-inch wide, 184neh
d;ame[e_,'wate_4ight drum holds upto 390 Ibsoof weight. Rounded
edges prevent i3amq to tu,ff. A@ustable scraper automaticaJly
cleans dt'um,
SN©W 1_loAD£ for snow removal only. 14-inch higiq, 48qr_ch wide
btade eF;ars 4.24nan path when angled !eft or right. Raises, !owers
with side [eve_'. AdiIsstable skids; _ep!aceabte, reversible sc_aper
bar. (Us,_ with tire chains and wheel weights and/or rear drawba!-
weight.)
SNOW°_%_ROW_:_Rhas 4i}...inchswatK Drum-.type auger hat, dies
powdery and we,/heavy snow. Mounts easily with simple pin
a_rarigement. Discharge!._eh_.£eadjusts from tractor seat. 64nch
diameter spo_£ discharges snow 10 to S0 feet. Lift eont_o_Iedat
tractor seat. (Usa with chains and whee! weights and/or rear
drawbar wef£iht,)
a_'_._£_a use 12.ovolt :DO _ r_.__',-_s,._.,_,..motor that connects to _ss
tractor ba_t,ery or other 12-volt source, !rscludes booms foe
automa£ic si.wayk_gand h_,.ndhe!d wand for spot a_}r.win% Wa_sd
has adjt_st_:_blespray pattem_ For appiyir_g herbick_es_ inse.cti _
cides, [ungicides end }iquid fe_!i_izers_
SPF}£AB£B/S_©i_'_RS make seeding, fertilizing, and weed kiiF
i!_g e_,sy, @_oadcast spi'eade_s are aIso user@ for gran@ai de._
ieers arc:t sand,
SWSEP!_._:.::9iet yo_._co!_eet grass clippir_gs and leaves,
T_LL_!iI!:}!__as5 hp er_Nne and 36.-inch swath to p_epai'e seed beds,
cu_tiw4e and com::}est garden residue. 7ifler has its own buik4a
}iftand depth control system and does NOT require a s_eeve hitch
Fits any kawn,yard or gai'd.en tractor. Simpiy hook _@i:othe t!actor
drawbar and go! O_st]©_'_ai accs-sse_ies convert _nit for
dethatching, aerating, hiJli,qg...without toeis_
"f'_RBC_,_A,_NSate heavy duty; closely spaced e-;traqarge cross
iinks give smooth ride, outstanding traction,
S-°RACT©R CAB has heavy duty vinyl fabric over tt._butar staei
frame, ABS p_astic top; Near plastic windshield offers 360 degree
visibility. Hinged me_al doers with catch. Keeps opet'ato_' warm
and d% Remove viny! sides and windshields for use as sun
protecto_" in s.snmer. O}st]oaa_ accessories _ck_de; tinted/
tempered soiid safety glass windshield with hand operated wiper;
!2-voit amber caution light for mour_tir_g on cab top.
VACS for poweff@ collection of heavy g_ass dippi_sgs and ieaves.
Optior_a_ wand attac_'wsser_tto pick up debris in hud4o-reach
piaces. VAC/CH1RP_R includes a chipper_shredde.n
WEIGHT BRACKK1 _for drawbar for snow removai appiicatior's.
Uses (t) 55 ib. weight.
WHSFCLWB_GHTS for roar wheeis provide needed traction for
snow removai or dozing heavy matedais.
5

OF HA
t;'.
17
I
t
i
i
(1} ,::>I<iOUld_'el"..... _-'_5olY5i! 8-i 8
+. ............. ............ ..,
/,. -,.,
<,.? ,.,\
\
% ..J:" i
... .......... .-
/,
/
{i } _-oct-",__asnei" 112
i : "" _,-.::,.>n,_17i32 xi-3ii6 x12 ¢:sauge
i
$
_ t27 ...... _=v,:÷,,.-."i,a4<;20 8!4
' {2) Hex Nuts 114-20
i
ii
. , ,_._,c_W_she,,.'s t!4
i
t2) V'_8.sb,e,,'s _,,ai_°,,_.x 518 )<!9 Gauae
Ra_r'ts sao}(ed se_arat_D_ i_1 Cantton.
t
!
I
:I
I
l
t
!
i
Steering
'¢I=_o..d
_sianual
Steenng
Soot
V_dmo
Cass':_tt,._
,--? ........................... _-
I
I
I
I
Parts Bag ._
...._,_.-,@_-_¢._._]:',oc,:Fi-O_i£i'l@':;V£i #,_.,l'_ *
I.......... 7 ,,,'++ ............ _" ",,
<7,"¸
/
/")
...... E_L_---i;-/TT............... i.Nhee!
.... , ,................................ .,i
Steednq v",4neei " -7
_', ...................... 7
Ad::::_.ioter
(2) _" "
t I
Slope Sheet

YournewtractorhasbeenassembledalthefactoPiwithexceptionofthosepartsleftunassembiedforshippingpurposes°
,,_' _'_ ,dg, _u:;n_d .-_d_*:4yo UseTo ensure safe and proper ooeratbn of your _,ac,._.,all _oarts;and hardware you assemble mus_ be + _,+,_,_ ,-,_r- -=',
the correct toots as necessap! to insure proper tightness.
TOOLS REQUIRED FOR ASSE_IBL¥
A socket w_ench set wil! make assembiy easier. Standard
wrench sizes are iisted.
(!) 5/16" wrench (!) 9/16" wrench
(2) 7/16" wrenches Ti_e pressure gauge
(1) t/2" wrench Utlity knife
(1} 3/4:' wrench
When Aght and left hand are mentioned in this manual, ;t
means when you ane, in the operating position (seated
behind the steering whee0.
TO R_2_:JIOV[_TRAOTOB _RO_q OARTON
UNPACK CAn'T'ON
_._ Remove eli accessible :loose pa._Ssand parts ca_tons
fi°om cai!:on (See page 6)_
° Cut s.Jonglines on ca_tono,from top to _._.,._,h_-.¢-_.,-w_,_,_a.t four
comers of ca_ton and Iay panels flat.
n,<_c_for any additionai I _ ..
. .OO.,_-,_padre Or Ca_ons ahd
remove,
BEFOR_ _ROLLtHG °TRAO°TOF_ OFF
SK@
ATT,AOH STffff_]NM WHffE£ (See _]go t}
'_ Side the steering bushing ove_'the steering shdto
Raise steering shaft fc,n_varduntil screw holes in dash
lne up with steering bushing° instatI two {2) she,et
mete; screws and tighter_ securMy.
* Position steering• boot ova( ,:_..,,.,,_-___.-,_;_shall
,_ Piece tabs of steedng boot evertab st(>ts in dash and
push down to secure.
,_ Slide steedng wheei adapter onto upper steedng shaft,.
,, n,...._,'._o._., _.........e, _,,,t,_;=,ya_e poiKt;ng
o._it_.__,front wheeis of the-'+r..,,--',--r .......'_---,......
st..'aight fo_wa_'d.
_* Position steedng wheel so cross bars are hoAzontai
{ieft to dght) and siide onto adaptor..
o_ Assets:hie l_cu._ fiat wasf_er ........ "":=,_e3/8-z_,_iocknut and
t_ghten secure 8,
_> Snap steering whee_ insert into center of steering
wheel,
'_ Remove protective ptastic from tractor hood and gdk
1M_OR ANTk, HECK FOR AND REMOVE ANY STAPLES
IN SK![) THAT MAY PUNCTU RE TIRES WHERE TRACTOR
is To ROLL O_:F SKtO,
TO BOLL TRACTOR OFF SKID (See Opera°
tics s®ctios f@_ !oeat]o_ and _unetion of con-
t_ols)
o Press _itt}ever plunger and _ais¢ attachment lift lever to
}is highest position.
Re!ease parking brake by depressing clutch/brake
peda!.
'_ P!ace gearshift lever in neutral (N) position.
_, Rol tt'actor backwards off skid.
Remove banding holding discharge guard up agains;:
tractor. #

ASSE BUsf
The tires on you_"tracto__were ovednflsted at the factor_ for
shipping purposes: Co_rect tire pressure is important for
test cutting periofmancso
Reduce tire pressure _e PSI shown in "PRODUCT
SPEC!FtCATJONS' on page 3 of this manual.
OH_OK ©_OK LEV_LHESS
Forbestc_4ttingresuits_mower housingshouldbe pFoperiy
leveled, See N°O L._2VELMOWER HOUSING" in the
Serdce @nd Adius'tmet_tssectiono_thismanual.
See the figut"es that a_e showr., for re@acing motion and
mowe_°b!ade diive be!ts in the Secvioe and Adjustments
section of this manual. Verify thst the belts are routed
corrt_ctly,
I:;£&AT
S¢+,'I''?I£FQV
£i,L)I<O00:?I /! '
;: !!!
I
I::;'!f.';;,,:-3
/$ ##
;-u_er you Ieat'n how to ope_a_e your tractor, checL Io see
that =-_ is ......
t_e brake p_'opedy adjusted. Se_-'."TO A©JUST
..... 8,._,n of
i'[}aflIlal,
BEFC_RE YOU OPE];©_,7'2: AND &-N#OY YOUR NEW
0 Aoo urn.. TH,q7-"ytOU RES'E'I VE7WACTOR, WF Vi:,qSH_" ,,':,..........= ,c-
7WEBLY:S'TPI£'/::_FOF_%IANCEANDS/4 FiSF:AC770N #-i:_OH
N-lie QI_z_£iTY PRODUCK
PLi.EASE REWzZW K_E FOLiOW!NG OHEC_:fZ._ST;"
/All assemNy }nstl°uctiens have been compJeted.
# No rems_ining ioose pa',_tsin earl:on.
/ Battery is pr,,.)peAyp_epa_ed and chai'ged. (MinimL,'m
! !_,our_'.t'¢ amps).
¢" Seat is adjus%_=,dcomfor!:e_biyand tightened secL_reiy.
/AI tit'es are pi'operiy inflated. (For shippi¢.,g putpcses,
the tiles were ovednfisted at the factory)°
/" Be sure mower deck is pi'opedy ieveied side-to-:side/
front.;to-rea_ l%r be.st cutting _'esuits. (Th'es y_ft..istbe
ptepe_ly inflated fe_ ieve!ing).
# Oheck mower _.q"sdddve be!ts. Se sure they are routed
p_operiy aro_nd puleys and inside at bait keepet-s.
t.,f,_osswiring, oee m.a_.al connections are s,.&,secure
and wires are propedy cIamped.
WH&K fiEARN@G HOW7"O USE YOUR KRA OrOR. PAY
E)(_r-?AA 7hCEN770N TO THESFOLLOWING IMPORTANT
!7_MS:
V" Engine oit is at proper ]ev@,
/ Fuei tank is filied wkh fresi% clean, reguiar unIeaded
gasoline.
../ Become familiar with al controls - their location and
function, Operate them befo._eyou sta_ the engL__e,
7" Be sure b_ake system is in safe operating con,::i_tion.

Thesesymbo!smayappearonyourtracto_orinliteraturesuppliedwiththep_'oductoLearnandunde,,standthei_meaning.
BATTERY CAUTIONOR REVERSE FORWARD FAST SLOW
WARNING
ENGINEON ENGINEqFF OILFREo,_,I.;_:. LIGHTSON LIGHTS" .......
L_Y .....
_H J,\_;. MOWER HEIGHT DiFFEREN]]AL
rUE_ PARKING BRAKE jNo_,_.Klxb'
REVERSE NEUTF_AL -_v"_ i C)*%_
MOWER UFT AttACHMENT
CLUTCH ENGAGED ..,LUTort DISENGAGED
IGNiTiON
_ANG_:_, KEEP HANDS AND FEET AWAY
HYDROSTATIC FREE WHEEL
(Hydro Models oniy)
9

OPE ON
A_i-_u_ _%gUH FRAC I OH
._,-0E,_uW:£TM THIS OWNEWS _ANUAL AND SAFETY RULES BEFORE OPE_ATING YOUR TRACTOR
cvmu_:_,_e the i!iu.sti'ations with your tractor to famiiarize yourse! with the locations of various controls and adjustments. Save
this rqar uai fi:)r?.mxe refers)nee.
Our t<actoi's co<from] to lh.q ,:,<_..f_'_'v,,%,standa_'ds of the American Nationa.i Standards !nstitute.
_r'.<_._,*,l._mI_;:w.'t"CLUTCH LI.':VIIR: Used to engage the
_' ,,,e,_b}ades, or _' .... "_'_ to _, _,
,,,o ..... othe¢ .=Lavhr,__n.,_ muunt..d to your
< {11,,,,kO _.
THIOTTL!iCHOKE OONTtOL: Used for sta_ing and
oonti'oiIing engine speed.
o,ra_k-
,+,.olj _CH,=_#RA¢_Ic ;=¢,:_,_=_.. Used 'lOt dec,IuIchfflg and ....
ingthe tractor and starti,-@ the engine.
PA,'_MH_:_ BRAKE: Locks c!utchibrake pedal into the
b<s.keposition.
_AR_'m,r I _% _,R, Selects the speed and direction of
t_actor.
ATTACHMENT LIFT L[!V[R: Used to raise; lower and
adjust the mower deck or other attachments mounted to
your tractor.
Lt_\T L_V_R PLUNGER: Used to _elease attachment fft
lever when changing its position.
IGNFIqON SWITCH: Used for sta#:ing and stopping the
engine,
I0

OPE
HOW TO USE YOUR TRAOT_R
TO SET PATx_K@4QBRAKE (See FiG 6)
You r:tracto r is equipped with an operator presence sensing
switch,, When engine is running, any 8fttempt by the
operator to ]eave the seat without fi!*st setting the parking
brake wit shut off the engine,
Depress clutch/brake pedal into full "BRAKE" position
and hoido
_. P!ece parking brake iever in "ENGAGED" position and
rebase pressure from ciutchibrake pedal Pedaishouid
;,amain }n ;:BRAKE _'position. Make sure parking b_ai,,:_::::
wil! hoid t_stctor secu_eo
STOPP@4Q (See _:'iG 6}
MOWER BLADES -
,:_ Move attachment c}utch lever to "DISENGAGED '_pc.,
sition.
GROUND DRIVE -
= Demess clutch/brake pedal into full "BRAKE" position.
Move gearshift lever to neutraD(N) position,
ENGINE -
o Move throttle control to slow (_) position,
HOTE: Faiiuf8 to move throttle control to stow (,_)
position aad aitowing engine to idle before stopping may
cause engineto "backfire",
Turn ignitior_ key to "OFf position and remove key.
Aiways remove key when leaving t_actor to p_"event
unauthorized use,
o Neve_ use choke to stop engine.
NOTE: Unde_ certain conditions when tractor is standing
idle with the engine running, hot engine exhaust gases may
cause "browning:" of grass, To e!iminate th}s pessibiity,
always stop engine when stopping tri_ctor on grass area_,
,_,*,L!f!O .... Always stop t_aotor ogre- ,
p4ete@,as desc,sqbed above_ _efo_e lear° 1
j_'_:_the ope_a_.o_ _sposition, te empty I
{:;_ass catc_qer_,etco :_
AM_I',/s operate engine at fl.Althrotth_iL
Operating engine at }ass than Mi throttle reduces the
batte._ycharging rate.
_ F:uilthrottie offers the best bagging and mower peffo_--
f_aP, ceo
TO _iOVE FO_:aWARD AND BACKWARD
(See 15"i9,(5)
The diFection and speed of movement is cont_oled by the
gea_shif!: bver,
+ Staff b4actor with ciutchibrake pedai dep_°essed and
gearshift iever in neuti'ai (N) posH:]ono
-_ Move gearshift ieve_ to desired position.
€ S!o,_,Ayr,aiease c;utch!brake peda; to start moven;enL
ii?IPOR!R/&HY: BRING TRACTOF] TO ACO?dPL,_iT'E S'FOP
_._ L :I%,Y'i [9 ,
_;,::;,-_,iH: :brIn-F_NG OH CHANGING ....'-" "=' Fi:'ALUREI
TO DO ,10 WILL.SHORT!N'-i '!-H-{USEi:-UL LiFE O_: YOUR
TIIAHSA)(LE.
TO £©dUST H2iiGHT
{See FiG 5)
The post:ion of the ath_chm,er_t iift iever determines ihe
cutting height,
-- Grasp lift 1ever,
Pr:_:}sspiunger with thumb and move iever to desired
poftion,
The cutting height range is approxime, te!y !-I/2 to 4", The
heights are measured from the ground £oIhe biade tip with
the en@ne not running. These heights are appro×imate
and may vary depending upon sot conditions, height of
grass and types of grass being mowed.
The average lawn should be cut to approximateiy 2-I/2
inches duqn9 the cooI season and to over 3 inches
during hot months, f:o_"healthier' and better looking
lawns, mow often and after moderate growth.
,_ For best cutting pe,donmance, grass ove_"6 inches in
height should _e mowed twice, Make the first cut
re!ativeiy high; the second to desired height.

U o E
TO OPERATE! _OWdA (See _!ig, 7)
You rtracto__is equipped with an operator presence sensing
switch. Any attemot by _he operator to ieave the seat wih
the engine running and I've attachment aiutch engaged will
si_ut off the el]gine.
_ Se!ect desired height of cut.
StaF: mow@" blades by engaging attachment clutci]
cont_oi.
, ',"....... m i & ,_'%vit 0
"X) <rw'x_:_,uOW:=H d se_,_s_getsttachment
!£
C:hx_se the .>,.,,,_q-',,e_,.'o_s_.eed before starting up o_down
>. Avoid stopping .::_changirsg speed on isils.
if s}owir_g _!{ ecessary, move throttie control {ever to
sbwe_" pos_i:ton,
,,, H"s:oppi_g Js..}psoluteJy'necessa% push ck£chiD_ake
pedai q.Hc}dy te brake position and engage pa_king
brai<e.
Mov:s- ._earsisfft iever :'o.!st .'sear.,.. :Be.sure you }save
"_Sowed morn _or traei:or to roll oJ,gt,_,y as you rested:
o To res.tad movemer %.dowfy, .dease e.ark,t g b_ake and
cit..'tchibrake :pedaJo
q
o Make a 1.um_ slowly
R_e attachment fft to.highest position with attach-
ment lft control.
o When pushing or towing your tractor, be sure gearshift
Ieve_ is in neutral (N) position°
DO ROt , ' _""_
_;},o.,_,or tow tractor at more than five (5) MPH,
iNOTB: To p_otect hoed from d@mage when Wansporting
yod_'tractor on s.ta;ck or a traiier, be s.u_-ehood is clesed and
secured to t_actor. Use an appropriate means of tying hood
to .t,,acto_"{rope, cord, etc.).
!r"._g.I
........ _o,. !._,.uof hen been shipped, fromthe
"".he<.._with summer vve,g A;oil,.facto% aiready ":_ ""'"_ _"
lo /,,., qround,
............ r g_neot with tractor on _ --,_
siq'i_,Ss pk "_'m
oFJemove oi!-iiti.cap/dipstick, ,._nd_.t,,_,_..,e_ ,, '-*" _"," ";':-"
,..,,i_'_'°fi"<'-,..--and screw -.'-,.-,,..<.tight, wait for _s_.f¢.._gs_..--,,s,_o_d_,,
remove and _'eadoi! !<.veL If necessary, add ol g.ntii
....FULL" mark on dipstiok is _.._c__,-_
.e_,_,_,_.._.Do not overfi!l.
..,.,,a,. _, .,.,.rs..,,J,, you shouid cr_ange oil fo_
C.............".......I .....; ' . ,;_..,.1,O. ix]anuall.
..d_.J[o,,4s,-.-.les,ue_'_,,b!lities_," "sof this . . ' '}
., To :hancje ..... ........... the 0 d---_,,, -c_.... ,:'_'._li-
ties seotJon ii'] this menuS.
t2
.Fiii K_ei lank. Use fi"esh, ciean, regt.Aar urfie.:.ttded
gasol_se with 8 mir@rium of 87 octane. (Us _::,of ieaded
gasoiine wiJ!incrs'ase cs.rbon and _ad oxile deposits
and reduce va-.ive!ire},.Do _otmi:,<el wJ-i:t_ga:..o!ne.
}]:'tJrGi%ase !L}(,} ]o q_JaN_ities _hai ca, _',be iJse(J within _}0
,daystoassu;'crue! f_eshness.
IB_IPOF_TAH%',".WHEN OPERATING IN TZMP[iRA-!'UR_.S
S-i']LOW32°F(0<:0), USF FP;ESH, CLEAN W_N-YEIRGRADE
GASOL.IH£ TO H£LP INSURE GOOD COLD WEATHYR
S'T'ART!NG,
WARH/HG: Exoedence _ccares _ "
, , }at alcohol blended
fuels (ca!led gasohei or .....,_'_-,gethan@ or methanoi) can
attract meisture which leads to separation and formation of
acids during storage. Acidic gas can damage the fuel
system of an engine while in storage. -To avoid engine
prob eros., the _,u.=,,;-_,system should be emptied before stof
age of 30 days or longer. Drain the gas tank, sta£ the
engine and IeI it run until the iuei lines and carburetor are
O_
empty. Use fresh fuei next season, o_;e Storage Instruc-
ions for additionai information. Never use erN_ne or
ca@uretor cleaner p['oducts in the fuel tank or permanent
damage may occur,
I _.._,,TlOk,!o Fill to bottom of :gas t..ar_k
:1

09E
TO STA aT EH@HE (See Fig, 6)
When staddng the engine for the first time or if ti!e engine
has run out of fuel it wJJt<take _"÷ "
_.,_da 8rar_king time to move
fuel from ÷t-._ .
,.i_ tank to the engine.
Depress o!utchibrake pedal and set parking beake.
,, Place gear shift lever in neutrai (N) position°
o Move attachment clutch to °'m_M'_'A_¢zcm"
........ _s_,,a.... position.
Move thrott!e controt to choke (iX[) position.
Here: Before "'-" the
.:s_.art_t_g,read _. _ warm and coid starting
procedures below.
hsert key into ignition and turn key clockwise to "START"
position and retease s_eyas so(m as engine starts_ D.e
not _un sta_er continuously for mere than fifteen sec_
onds per minute° ....i_t_'e engine does not <_._._,.afte_
severa_ a_.t_mpt_ move tt_rottie controi to Tast (@)
position% wait a few m autos anci try again° If_a_,ne ,_MI
doe_ rK)t rt "''d
" ..._.¢_..... move the thro@e control beck f:o the
choke {1\I) oosition and rot%
WARM °'amx_°"_'_:_c_'_"_' _' _....
_v,,,:,:.,,_,.;_o _Ai_ t _N',.;_(50°Fand above,}
-_ When engine .>.aabo_- _'_-'.move the in rottF',,....... cont tel to t_e fast
(@) position.
o 1%e<_.4t_d__=.nts and g,o._na ch,_,e car,,now be used. !f
the erx]ine does not scOOp!,the !oad, restart the ,_"-%in_:,_ "_
and aibw itto warm up for one minute using the choke
as described above.
COLD WEATHI:!!R STARTING ( 50':' F and beiow)
-_ VVhene.ngine sta _:s,allow engine to run with the throttle
control in the choke (]\]) position until the engine runs
roughly, then move throi:fie control to _ast(.'@)position.
This may require an e_!;ff,e warm--t_p period from
severai seconds to several minutes_ depending on the
temperature.
_'-' The attachmer_ts can also be used c!uring the engP_e
warm-.upperiod
NiOT_: If at a high altitude (above 3000 feet) or in cold
temperatures {bebw 32 F) the carburetor fuei mi4tu!'e may
ADJUST CARaURE] O q"'in the Service and Adjusm_ents
section of this manual.
FIG, 8
.,13

R R:SP BI ES
I _ _}Tia _g(: _mx<:_o[te_; wilen opera:ring under a hear 7 ioad or in hif_h amb[erll temperatures,
2, S<}!_/i?;_ moe_ ofte;_ !,/net,, ope_(,£fng its @ty o!' dasty colditions,
:':f. i ::du :}_ed wRh oii fif;'er, chm:ga ot evsy 50 hours,
4- ;:_epk_ ;a bktdes more o[_ea when mow_i G ]rl sandy ,';-._ol.
5 - If aquipae<,i wlti_ _:ctjusiabie sy.sterr_.
",B-Not reqq_ed if ,_quipped with mainlenm_ced,_e6 batep/.
7 - Tl!7_:#.eniront ax}_:_pivot boll to 35 fblbs, maximum,
Do fiat ovsqighten.
Son% adjtJstme_sts wiif %-ed to be rP.,adepe_°iodically to
7:',_opetiymsJr_taitsyour tr%i:or.
AII adjt,_stmer;ts ir_t!-e Semicf; and Adlus';:ments section of
t!;is .................... _ be checked ai: ,.._._ o, ,c_...<d. ,>,_a..o,,,
Once a year you shouid }'epJacethe spa_°kplug, clean
or replace ai_ tilted a_sd check blades and belts for
we% A new spark plug and clean air filter assure
proper air@el mixture and he!p your engir_e run better
and last longer°
_:_ _'Dt_ _-?"- e"<,__ -__,;',_'=
bh_{.: erigiRe 011 ,:,_e
Oheck b:ak:e operatk}n.
+ C_-#._-_-.,,_._....,..tit-e p_'essure.
Check '" :o'_s,., "
._of . .. _astefiers.
14
!ITtPORTANT; DO NOT OIL OR GREASE THE PIVOT POINTS
WHICH HAVE SPECIAL. NYLON BEARINGS. VISOOUS LUBRI-
CANTS WILl., ATTRACT DUST AND DIRT THAT WILL SHORTEN
Tlq_ LolF_ OF THE SELF+LLIBRICATING BEARINGS. IF YOU
r"£EL THEY MUST BE LUBRICATED, USE ONLY A DRY, POW-
DERED GRAPHITE TYPE LUBRICANT SPARINGLY,

CU MER LKIES
TRACTOR
Always obsewe safety rules when performing any ma]nte-
Ranc@_
BRAKE OPBRATIOH
if tractor requires more than six (6) feet stopping distance
at high speed in highest gea,r,then brake must be adjusted.
(See "TO ADJUST BRAKE" in the SewJce and Adjust°
merits section of this manual)_
Maint@n proper air pressure in al! tires (See "PROD-
UCT SPECIF]CATIONS" on page 3 of this manuat)°
Keep tires free of gasoline, oil, or insect control chemi-
cals which can harm rubber.
o Avoid stumps, stones, deep _"ru,,_, sharp objects and
other hazards that may cause tire damage.
BLAD£ @A8_8
Fo_"best resu!ts mower blades must be kept sharp_ Re-
place bent or damaged btades,
BLAD£ R_,MOVAL (See _dg°_'°°_'_,G
Raise mower to highest position to allow acce@sto
biades.
* Remove hex belt, iock washer and flat washer securing
biade.
._ i.qstal new or resharpened blade with traiIng edge up
towards deck as shown.
Reassemble hex boll _ockwasher and fiat washer in
exact order as shown.
_, Tigi_tep, bolt securely @0-35. FI_._....,_:_._h_, torque}o..
',:_ ,¢I_;1HI: ;.:_:,u,._ =.,..,,.....iSGRADEoilEAT _hEAIID.
NOTE: We do not £_cor'nmer@sharpenir_g bl_._de-bul: if you
do, be sure the blade is balanced
[
J
!
l
!
I
]!
:]
I
BLADB i.. J
:................%..f
FIGo 9
t
i
[
i
Care should be taken to keep the blade balanced, An
unbalanced blade wil cause excessive vibration and even-
tuat damage to mower and engine,
+ The blade can be sharpened with a fiie or on a grinding
wheel. Do not attempt to sharpen while on the mower.
To check blade balance, yo u wit! need a 5/8" diameter
steel boit, pin_ or a cone baiancer. {When usk'6Ja cone
baianc@r, blow the instructions supplied with bah
ancer)_
Side blade on to an unthreaded poddon of the steel bolt
or pin and held the boit or pin paraiiei with the :£!round..
if blade ;s balanced: it should remain in a hodzont_i
position, !f either end of the !:,'.lademoves downwar:::i_
shad°penthe heavy end until the blade is balanced.
HOT_!: Do not use a nail fo_ balancing his.de. The lobes of
the center hole may appear Io be centered, but a_e net
,/- /"
//'
,/
,/ /!i
£qG, !0
15

S B LK ES
8A_'%EF_Y
Your tracto_ _aasa battet_/charging system which is suffi-
cient for normat use. -However, periodic charging of the
batte%' with an automotive charger wiIt extend its lifeo
_,,._phatter, and termina!s ctean.
Keep battery bo_ts tight.
Keep smatl vent holes open.
,_ Recharge at 6d 0 amperes for I hour..
Co__c,sion and d._ on :_hebatte%_and tem_inais can cause
the battery to %ak _'power,
_ Open battery box di}or.
,o Disconnect SLACK batte_y cable first then RED bat.-
tery cane {_md_'emove battery f,_omtractor°
,_ i_;nse the battery v_,'ithpia;n wate_ and dry.
._ Ciean tem__inais and battei% °cabi,e ends with wire b_usis
,tintii bfighL
'_, Coat terminats with @'ease of petroleum ]eI_y.
_, Reinst:{d[ battery (See _'CONNECT' BANTERY" in the
Assembiy section of th{s manuai)_
_,h..s.....\.,_.... _or.... _ro,;_._ .... and wear after !00 hours of
._..........u._, ,_.;.,_rs_eptace if necessary_ Yhe baits am not
adjustable_ Heplace _a_,.,,,,if :_hev becim _o sup from wear.
_',_;_ut ....... " ...... {tom build-up o_ dS: and (,,la,_ which
C:CFi _"eSti'iC _,,.;,.u_h;";"_ _.....v-
Ortiy sue high quaiity detergent oil rated with AP_ service
SP{_{",i!St:)OSNY GRADES
i
c"" ..2@' 0 _
[ ,_ .30 _ .10 _. .!0,_ 20 _ .')O_ 40 '_ [
i TT'MP_FiATUR_ RANG@ ANTICIPATED BEFOg:V:: NEXT OIL CHANG_ [
F_G, II
HOT_: Although multi°viscosity oils (5W30, IOW80 etc.)
improve starting in cold weather, these multi-viscosity oils
will result in increased oil consumption when used above
32°F. Check your engine oii level more frequently to avoid
possible engine damage from running low on oil.
Change the oH after the first two hours of operation and
every 25 hours thereafter or at least once a year if the
tractor is not used for 25 hours in one year.
Check the crankcase oil levei before staring the engine
and after eacheigh_ (8) hours of operation: Tighten oi! fitt
cap/dipstick securely each time you check the oii level.
TO u.r_._P._r'_.:_u: ENGINE O!L (See Figs. 11 and 12)
Determine temperature range expected before oil change.
All oil must meet AP! sewlce classification SF or SG.
lBe sure tractor is on Ievel surface.
_, Oil wil! drain more freely when warm.
_'_oh oi! in a suitable container.
Remove eli fi!I cap/dipstick. Be careful not to allow dirt
to e_ter the engine when changing oil.
o Remove drain plug.
o After oii has drained completely, replace oil drain plug
and tighten securely.
o Refili e,%ine with oil through oil fill dips£ick tube. Pour
slowiv. _!2 not ove_iitli For approximate capacity see
PRODU,,, oP,.._t_t,_LA,]ONS 0n page 3 of this
manual,
Ose gauge on oil filI cap/dipstick fo_'checking ievel. Be
sure dipstick cap is tightened securely fo_ accurate
,e_...dmg. Keee oii at "FULL" line on diostic£
/
/
F_G,, 12
OIL HLL
CAPiDIPS'?_8}(

tBl _S
AtE FILTE_ (See Fi9o 13)
Your engine wi! not run pmperiy usir_g a dirty air filter.
Clean the foam pre-cleaner after even./25 hours of opera-
tion or eveR/season. Service paper ca_ridge ever 7 100
hours of operation or every season, whichever occurs first.
Service air cleaner more often under dusty conditions.
Remove knob(s) and cover.
TO SERVICE PAE-CLEANER
o Slide foam pYe-cieaner off cartridge.
Wash it in fquid detergent and water,
Squeeze JtdB_in a clean cloth.
_ Saturate it in engine oil. Wrap it Jn clean, absorbent
cioth and squeeze to remove excess oil
,o If very diRy or damaged, replace pro-cleaner.
Reinstat p_e-clearler over cartridge.
Reinsta!i cover and secure with k_ob(s}..
TO SERVICI C/\RTRIDGE
OL£AN AIR SCREEN (See Figo t4)
Air screen must be kept fr_e of dlR and chaff to prevent
engine damage from overheatir_go Ctean with a wire brush
or compassed air to remove dirl arqd stubborn dried gc._m
fibers.
INGtNI COOLING FINS (See £g. !4
Remove any dust, dirt or oii from _ngi_e cooling fins to
prevent engine damage from ov_rheating.
*, Remove screws from biower housing and !ift housing
and dipstioR tube assembly off engine°
_ Cover ot ftl openi_g to prevent entry of dirL
<_ Use compressed air or stiff bristle brush to thoroughly
clean englr_,ecooling fins.
To reassemble, reverse above procedure°
Ii!Gill @OOLIIQ 7IN::I
Fl(]h i 4
FIG. t3
17

ILiT ESCUSI°O
_V_UFFL£R ,.
, muffi_, and spark attester (if
!nsoect and reotace corroded _-,
equipped) as it co,aid create a fire hazard and/or damage.
SPARX PLUGS
Replace spark plugs at the beginning of each mowing
season or after every 100 hours of operation, whichever
occurs first. Spark plug type and gap setting are shown in
"PRODUCT SPECIFICATIONS" on page 3 of this manuat.
1N,dN[{ RiF, L _aLTER (See Fig° I5)
The rue! fiiter should be reptaced once each season. If fuel
filter becomes clogged_ obstructing fuel flow to carburetor,
replacement is required.
With e%ine cool, remove filter and plug fuei line
sections.
P_e _,p,*,f-_ fiiter in sos t or in fuei line with arrow
pointing towards carburetor,
', Be sure there are no fuel line teaks and ciamps are
p_opedy positioned.
!mmed;ately wipe up any spiiigd gasoline.
'_IG,15
CLEANING
.>_ Clean engine,batte% seat, finish, etc. of all foreign
ma_ter.
Keep finished surfaces and wheels free of all gasoline,
oil, etc_
_, Protect paff_ted sudaees with automotive type wax,
We do not recommend using a garden hose to ctean your
tractor unbss the electrical system, muffier_ air filter and
carburetor are Covered to keep water ouL Water in engine
can resuit in .a shortened engine life.
18
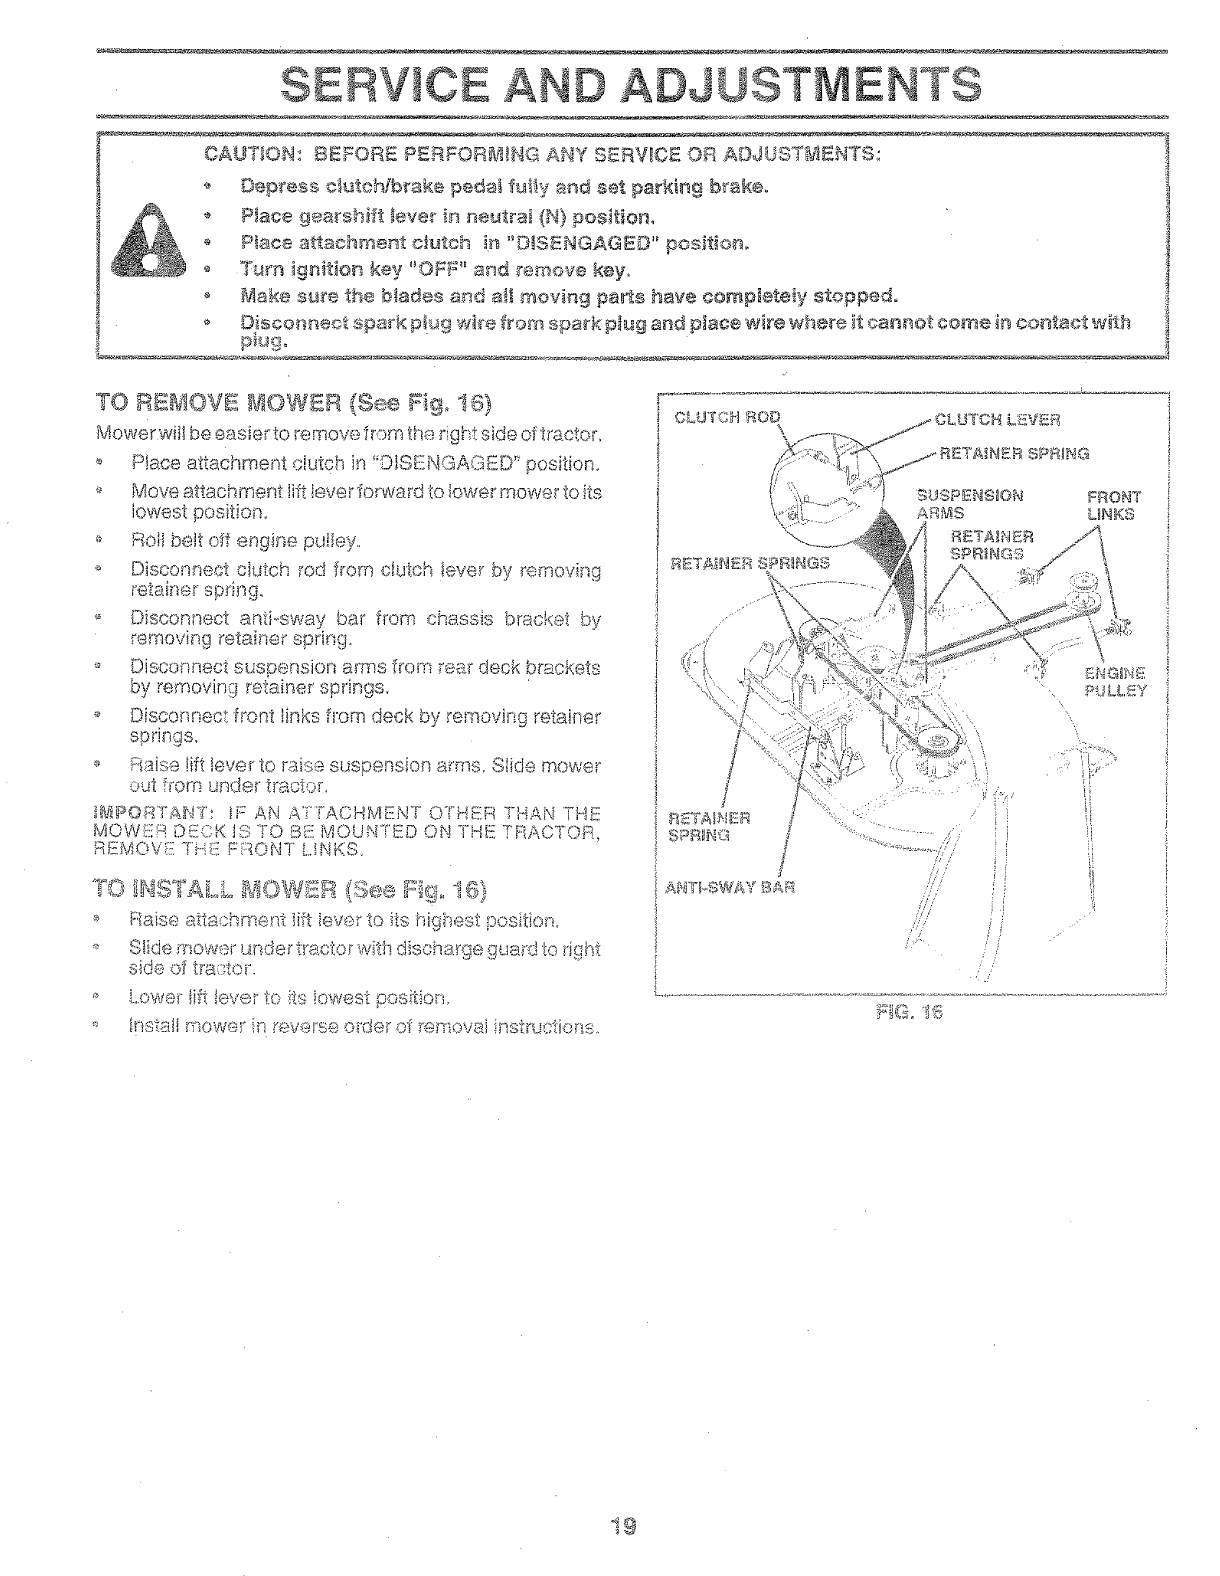
A E
CAUTION: BEFORE PERFOR_IN_:_ ANY SERVICE OR AOJU_T_ENT_:
Depress c_utch#brake pedai fuliy and set parkin 9 brakeo
P_ace 9eat'shift _eve__n _seut_a_{N) positior_0
o P_ace attschme_t ciutch i__"O_S_NGAGED" positioned
o _m ignition key "OF_" and ram®re key,
Make sure the blades arid a_ moving parts have comp_eteiy stopped.
#O_sconneot spark P_4g wire from spa_k plug and p_ace wire where it cannot come in co#tact with [
TO RE,_!#_©V_{ B_qOW_R (See Pig_, 18).
Mower wiil be easierto remove _rom th#_dght side of tractor,
P!ace attachment clutch in "©;SENGAGDD '_position.
Move attachment JiltIever forward Io iower mower to its
iowest position°
_ RoJlbe!t off engir_e pa!Iey,,
,_ Disco_ssect cit£ch rod from clutch iever by removing
retainer spring.
'_ Disco;_nect anti.-sway bar from chassis bracket by
removing retainer spring.
Disconnect suspension arms from rear deck brackets
by ,_emoving retainer springs.
Disconp,,ec_front links from deck by removing retainer
sprhsgs.
o F_aise!ift lever to raise s_Jspensio_sa_"ms.Slide mower
out from ur_der _racto£
_[_.aPO£TA_tT';tF AN ATTACHMENT O]'HER THAN THX
MOW_!iR DECK _{!:;TO BE MOUNTED ON THE TRACTOR,
REMOVi_i]i--.i_:£F:qON! L!NKS_
_ Raise attschmer-_t lift ieve_ to ib highest position°
_ S_ide_ssowerunder tractor with discharge guapJ to dght
side of tra:::-tor.
o Lowe_ lift ieve_ to its iowest positio_
_* hstatt mower _I peve_,se o(der _ .... _ _
CL, LITCbl RO_ L,_V_R
/9:USP_NS_ON FRON'T
ARbIS UNKS
!9

TO L£VBL kaOW_£R HOU.,,_sNG
Adjust the mower while tractor is parked on tevel ground or
driveway. Make sure tires are properly inflated (See
"PRODUCT SPEC1F}CAT!ONS" on page 3 oftMs manuat).
!fti_es are over or undefinfiated, you win not properly adjust
your mower.
S!DE_TO-S!DE ADdUSTMENT (See Figs. 17 and t8)
o Raise mower to-its highest position.
o A! the midpeint of both sides of mower, measure height
from bottom edge of mower to ground. Distance"A" on
boris sides of mower shou!d be the same or within !/4"
of each other.
If aqustment is necessa% make adjustment on one
s}de of mower only.,
_0 To raise one side of mower, tiqhten lift link adjustment
nut on tha.t s:d_°
To bwer on_::_side of ,,,._,t_..,_'o,_,_' .oosen }ift l_r¢",,. adjustment
nut on that .. :e
,d,i tU_"r!S
mow._srhJe,ghtabout I/8'L
i
i
)
,_s*adjustment nut wii! change
Recheck _ a,_,,-.o ,-._t<, adjusting.._e _.:,,._..m...,,.._after
,_3OTTOM EDGE BOTTO_il 8©GE
OS_':£iOWER TO OF MOWER TO
"_4_ I_.- _7{I,_"---..;j!_.-_I -47
ki.{.........V1-':!-_'<"'_'_ ......... _-_ i;I..... ._
,_',,'" i t l f _....A
ENTS
LiFT _ _.4"
ADJUSTmeNT NUT
Ff@° !8
FRONT-TO-BACK ADJUSTMENT (See Figs. 19 and 20)
IR,1PORTANT: DECK MUST BE LEVEL StDEZFOoSIDE. IF
THE FOLLOWING FRONT-TO-BACK ADJUSTMENT tS
NECESSARY, BE SURETO ADJUST BOTH FRONT LINKS
EQUALLY SO MOWER WILL STAY LEVEL SIDE-TO-
4
i
To obtain the best cutting results, the mower housing
should be adjusted so that the front is approximately I/4" to
3/4" lower than the rea_ when the mower is in its highest
position.
Check adjustment on right side of tractor. Measure dis-
tance "D'_directly in front and behind the mandrel at bottom
edge of mower housing as shown.
• Before makint_ any nacessary adjustments, check that
beth front links a_e equal in length. Both links should be
approximately 10-3/8,.
!f links at:e nol: equal in _ength, adjust one link to same
length as other link.
o To lower front of mower loosen nut "E" on both front
links an equai number of turns.
When distance "D" is !/4" to 3/4" iower at front than
rear, tighten nuts "F" against trunnion on both front
links.
i
!
1
I
To raise _ront of mower, loosen nut "F"from trunnion on
both front !inks. Tighten nut "E" on both front !inks an
equal number of tums_
When distance "D" is I/4" to 3/4" !ower at front than
rear, tighten nut °%"against trunnion on both front links.
Recheck side4o-side adjustment°
_=_"_.,_ _,_S_,i_>s -.... _...... _. _ '_ "_ _ _1 _,€_T_
f-f _'i I[
/
/
[-
J
2O
NUT
_RONT L1NI(S TRUNNION
FIG. 20
NUT "5"
s
/
/

SE CE A A©J
TO REPLACE _IOWER BLADE ©RWE BELT
(See Fig. 21}
The mower btade drive be!t may be rep!aced without tooIs.
Park the tractor on ievei sudace. Engage parking brake.
BELT REMOVAL
o _ Dlo,.__IGAu_Eu position.
s _ace attachment clutch in" _"=_ " '_" _'"
Move attachment lift lever fon*7ardto iower mower to its
iowest position°
Roli bait off engine pulley,
o Disconnect R.H, suspension arm from rear deck bracket
by removi;qg retainer spdng.
Wori_tbe_t off both m{_:nd_eip@ieys and idter puileys.
_ Pull bett away from mower,
BELT INSTALLATION
lnstalt new belt in reverse order- of removai.
i
7
WITH P,_;_H,..a :BRAKE _IGAG_:D
/ ...H/2,,_, \\
X
""_-..._,_._-_
NUT"A"
JAM
NUT
I
°O4 _ "'_ _,_ -
o Ma£e sure bett is in ail puNey grooves,,and'tn_:4ut,oo -_--ail betl
guides+ F]Go 22
You_ ti'actor ;s equpped with an adjustable brake system
which is mounteci ors the dght s}de of the transax!e.
if tractor requi_es more than six (6) feet stopping distance
at high speed in highest gear, then brake must be adjusted,
o Depress clutch/brake pedal and engage parking brake.
o Measure distance between b_ake operating arm and
nut "A" on brake rod,
tfdistance is o'ther than ! 4/2% ioosenjam nut and turn
nut "A" un!i! distance becomes !4/2". Retighten jam
nut against nut "A".
Road test t:actor for proper stopping distance as stated
above. Readjust if necessa% If stopping distance is
still grealer than six (6) feet in highest geaq further
maintenar_ce is necessary, Contact your nearest au,°
thorized service centen
TRANSAXL_
PULLEY
21 FtGo 23

if steedngwheelc_ossbarsa_enothorizontal(}efttorigh0
whenwheelsarepositionedstraightforward,removesteer-
ingwheeiarid(eassemDieperinstructions;nt!_eAssembly
sectiofofthismanual
Fqtj!tq _ .....,_,.=°'+"*:;_,,,=.. TO_-_dOAZ#!B!I_:R
,,, Bleck up axle secu_e-iy,
_ F:%;)move._xxLecovei, te_:2ifh_g h_ and washers I;oatow
wheel i-emo'-+'s.f,{ree_-"wheel conLf&"_s::0,sq,uare key - Do
.qot ose),
".' Rep-_ir tke and _es.ssembk-,
*: Ors tea_'wheels only; align _!c<:)ves h'_,_"earwheel hub
and axis. inse_i sGu@fe key,
_; }se:i.AaOe W:_8}q@1% aN@ st_,an ' " ' d_,_-........... _<
i;}(it_ _:J .... ; = %
_ i;:_epte, oe _!t.)(,9 oovei%
if your battery is too weak to start t_seerGk'_e_it should be
rechad@d, if ".}.'drapercabies" are used for emergency
star_in_!, blow this procedure:
,_']_-_., _, ....... Y O t JH Y"RA C i _<>;{ _ l S :::a I __*_,:'p <::_n WKH A 12
VOLT _ '-"_ _;"_"'"'-'+ _ .... SY "_Tl::l",f_
:_qc:!.a_-',__:: GROLCa);ED ........... [}-ii!_OYHER
VEHICLE MUST AL.SO 817:: i',. "ii.! VOL.Y N_'iIEGATiVE
GFiOL,_NDF.{DSYSTEM. DO NOT USE YOL;R TRACTOR
BA'rTERY T'O STARY OTHER V!EHICI...ES.
Cermec'i each end of the _"°=", ..........t,-, PF)SIJtVI;
\_/?'*"%'t'="F'v*i_"Y_ld_.i=lc"_ Ot eSOf _o._.i"_'%<:_"'5,,[eKllSq''" oate qoI',. 11ooN_l_'=r-+
aga_instchassis
_, Connect one end of the _-__,o_ " 'to.......-........ cable the NEGA-
,,,-,,,,-(.).............
,_ " +,_.- _ _,ov cable ix- good
Cor•inect the otisei" end of _._,..:..,.........-,.,...,,
C"';-4 __t;<:;t_:::.'#:wx; ': i_,q% :' " ' " "_d b_"ttam_
.,, A,. ............, ,OU,,_...., away !'t:_mfuel cariu(<._,,.... _,...,:_,._
"_"r'_.. I-s.l: _,M'_ ,, '1:1- r_ ,_ F"I _-c, iiliiVf;fi:_ 17:11 kiWI"h'_"-;[,?t11.2.]',l-i
'_ m_b+_,.4",cable 'ill'Sttrenq ciqaSsls _,""-d+.=then h'om the fully
_-_"_:::_.=...%<_."M",_*:,,.,,....,,_:.fail ftori! bath batt!f'iel.
_7
!
/
/
POS!'i"IIIE "[LRRIIl:NikL
71iG, 25
CABLES
BATTIRY
\\

TO REPLACE HEADLIGHT _ =_
o Raise hood_
o Pult bWb holder out of the hole in the backside of the
grill.
o Replace bulb in holder and push buib hoider securety
back into the hole in the backside of ._hegriii.
o Close hood,
INTERLOCKS AND AELAYS
Loose or damaged widr_ may cause your tractor to run
pooriy, stop Rmnin{:_ or prevent it from sta_ing.
,9
D ADJ
... :+:,.,# _at wiring diag;am in Repair
Check wirinft See _::"_"_:._ : ' °
Replace with 30 amp automotive-4ype D,,.,._qJrjfuse. The
fuse holder is located btmmd the dash..
TO Bai_!tOVE _4OOD A_',il© GRILL, ASS_i_aBLY
(S,.(_®#i$ 2M
o Raise hood.
Unsnap headiight wire connector.
o Stand in front oftracton Grasp hood at sides, ti_ttovvard
entwineand lift off of tractor,
To replace, reverse above procedure.
-4N
TO ADJUST THROTTLE CONTROL OABL£
(See Fig. 27}
The thro_tte contro_ has been preset at the factors; and
adjustment should not be necessaPy. Check adjustment as
described beiow before loosening cabte. If adjustment is
necessary, proceed as fot_ows:
With engine r_ot ru,qnin_, move throttte control iever
from siow (_@**)to choke ('_,) oosit:,on. Slowly inove
fewer from ono_,t (I _,,),.ofao. (_ #...;.::;4wn.
Check that holes "A" in governor centre! lever ar,_dho!e
in governor plate line-up. If holes "A" are r_otaiigned_
loosen clamp screw and move throttle eabie untiJ .qoies
are aiigned. Tighten clamp screw securely°
GOVERNOR GOV:_£_;_iOR
OONTBOL £_VE}S_ ©O_'_TROL PZ.AT£
/
¢i
o
O
F_G. 26
23

SERVICE AND ADd
TO A©JUST CARBU_3ETOR (See Fig. 28)
The carburetor isas been p_eset at the facto_j and adjust-
merit should not be secessary. However, minor adjust °
merit may be _'equiredto compensate fordifferences in fuel,
tempe_ature_ a!titude or load. If the carburetor does need
adiustment, p_oceed as follows:
!n ge,qecai, tumi_g idle mixture valve in (clockwise) de-
c re _s:sesthe suppiy of fuei to the engine giving a leaner fuel/
ai_"m,i×t_.._re.Turning the idle mix:ture valve out (counter-
c!ockwis ::).incre ¢_sesthe supp:iy of fuel to the;engine giving
a richer fuei/a;_ mi;<ture_
!WiSOF:_iTA_4T_DAMA(_£ TO THff NEEDLE VALVE AND
1'HE !}_EAT!N CAHBUf::_.L{TORMAY RESULT !F SCREW 1S
TU :I:NiLDtN TOO TIGHT,
PRELIM!:NARY SETTING -
_, Aii° clean.,.ir_ss embty paustbe assembled to the ca_bu_,
_"eto_w! ;_n __..:_:kin_.]ca_'bui-eto__adjustments,
_, Be sure the th_"ottleconti-oi cabie is adjusted properly
(see above).
With en{_iir::eoff turn idle mixtiye valve i_,_(clockwise)
ck)s;__git finger tigY£ and titan turn otat (countercleck-
F!NAL S_I}TFTi:NG-
_ Start engine and allow to warm fo__five minutes. Make
iinai adit._strt_e,:_tswith engine i-urming and shift!motion
controi ievet" in _eub'at (N) position.
,_ _4ove throt<Jecontrol ieve_ to siow(<_s_) positieno With
_inger_;]ii!ta1:ea__dho!d th_ottle !ever against idle speed
screw, sum idie speed screw !:o8.1:rain!'750 RPM_
.,, VVb_:ie:stii: hold:r:f: th_ott!e !eve:" sga:nst :die speed
sc_'ew turn idle mixture .iaive :_-_(ciockwise) until am
ji£':,eb _:_g[nsto <fiea_"_.dif:an turn ,s:,_ut(cou nterciockvd se)
:._n:::iies,:_ff_e _.ms _'oufS";. -rum :,,'alva _o a Oeird: midway
beb_vees those two positions. R@ease th_'ottb ieve[o
ENTS
A,..,._LERA __O,(_T_o T
o Move throttie control !ever from slow (_) to fast (@)
position. If engine hesitates or dies, turn idle mixture
valve out (counterclockwise) 1/8 tu m. Repeat tes_and
continue to adjust, if necessa% untii engine acceler-
ates smoothlyo
High speed stop is factom/ adjusted. Do not adjust -
damage may resulto
_MPORTANT: NEVER TAMPER WITH THE ENGINE
GOVERNOR, WHICH IS FACTORY SET FOR PROPER
ENG_NESPE_D, OVERSPEEDING THE ENGINE ABOVE
i-HE FACTORY HIGH SPEED SETTING CAN BE
DANGEROUS° IF YOU THINK THE ENGtNE_GOVERNED
i-IIGH SPEED NEEDS ADJUSTING, CONTACT YOUR
NEAREST AUTHORIZED SERVICE OENTERi
DEPARTMENT, WHICH HAS PROPER EQUIPMENT AND
EXPERIENOE TO MAKE ANY NECESSARY
ADJUSTMENTS.
\\
_DLiI_?_I_XTU_8 VALVE
_:iG_28
24
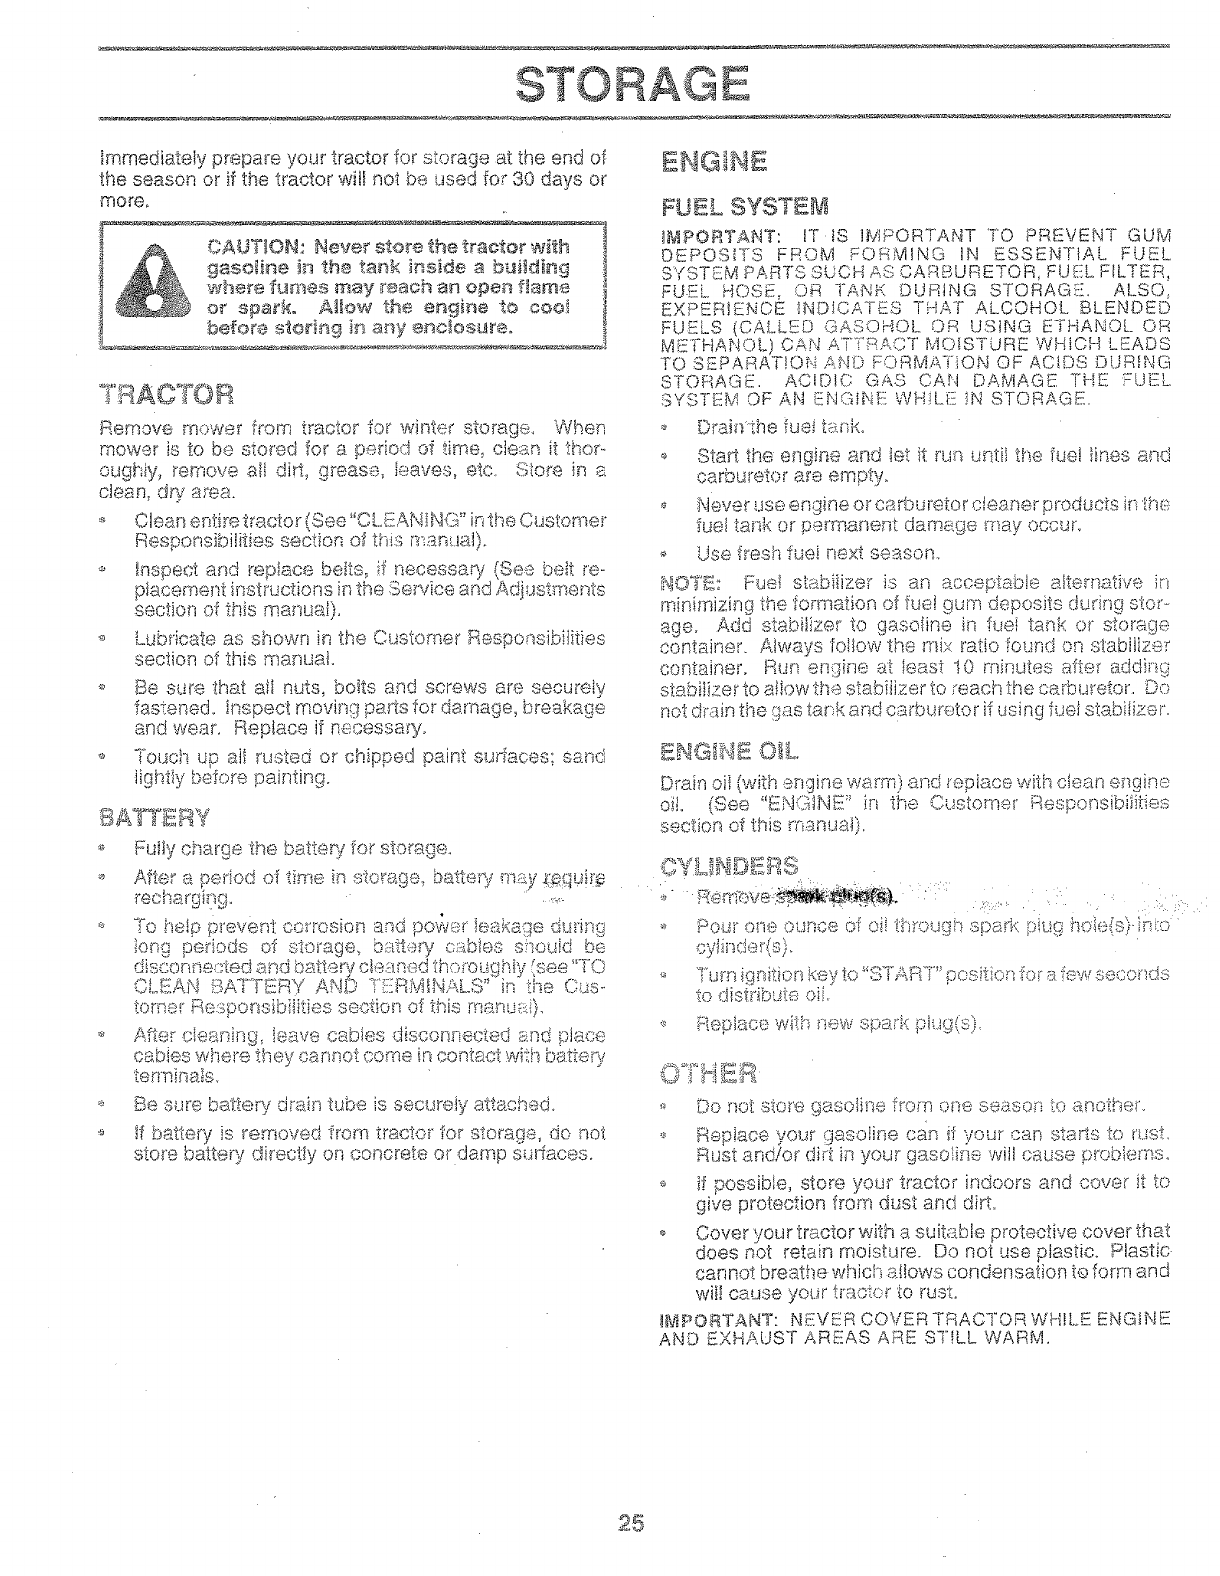
STO E
immediately prepare your tractor for storage at the end of
the season or if the tractor wil not be used fo: 30 days or
more,
CAUTION: Hess _"sto_e the tractor with 1
gasoiime in the tank inside a b_ldiP, 9 !
_a_h÷refumes may r_eachan ope_ fiarae
o_ spark. A!ow the engine to ¢ooI 1
before stodag ]m a,_y e_otosu_e° _
TRAC°'[OR
Remove mower from tractor for winter storage_ When *
mower is to be stored for a period of time_ clean it ti_o_,- o
oughiy, _emove atl dir% g_eas_s, leaves, etc, Store in a
clean, dry area.
_ Clean entire tractor (See "CL!AN H'qG"inthe Customer
Respo_'_s]btities section of this man_4al)o @
,_ Inspect a_!d replace belts, if necessarl (See beit re-
placement instn.sctions in the Serdce and Adjustments
section of this manual).
_, Lubricate as shown in the Customer ResponsiNlties
section of this manual
_, F3esu_e that aii nuts, bets and screws are securely
fastened, k'_spect moving palls for damage, breakage
and wear, Replace if necessuy.
0_ Touch up all rusted or chipped paint surfacesl sand
iightiy before painting.
BA T1"[£RY
<, Fuly charge the batteR1 for sto_age.
,_ Afte_ a Defied of time in s:o_a!De.,_battery ms.y_:m_<":qU'_'_"!:_
• '_ r *....
rechargiDg ....... ......
}ong pedods of storage_ batte%_ tames sqouid be
discoanected a_'sdbattery cbaned thoroughly {see '_TO
_Ji,,4Y',AIqt r:><"'_°'_'_-c" -,,! Atqi+=->_...............
romeo Resporusibiiities sec:tion of this manuai}.
,_ After cieaning, leave Rabies disconnected _7.:ndplace
cables where they oat'mot come in contact with butte%,
terrrAnals.
Be sure bat__e_ydrai_ tube is secu_eiy attached.
,_ If Dattery is _emoved from tractor for storage, do not
store batter}/directly on concrete o_"damp surfaces.
ENGINE
FUBL SYSTEM
IMPORTANT: IT tS IMPORTANT TO PREVENT GUI_a
DEPOSITS FROM FORMING IN ESSENTIAL FUEL
SYSTEM PARTS SUCH AS CARBURETOR, FU£iL FILTER,
FUEL HOSE, OR TANK DURING STORAGTZ+ ALSO,
EXPERIENCE IND!CATES THAT ALCOHOL. BLENDED
FUELS (CALLED GASOHOL OR USING ETHANOL OR
METHANOL) CAN A'TYRACT MOISTURE WHICH LEADS
TO SEPARAT!ON AND FORMATiON OF ACIDS DURING
STORAGE. ACIDIC GAS CAN DAMAGE THE YUFL
SYS"iEM OF _k' .- _ ,_r:/.tl_ ENGfNEi WHiLf._ tN ST_R,-,uE.
OrahYthe fuel t_xnk,
Start the engine and let it run until the rue! ines and
_,-_,-' °",,_''" _, empty.
,,_.,,POUI__+,,,.A,.+d%:, .
Never use engine or carburetor" cleaner products in t.h_¢
fuel tank or pe_'manent damage may occur.
Use f_esh fuel next season+
H©7'_Z: Fuel stabilizer is an acceptable altemaEve in
rrinimizing the formation of fuel gum deposits du,,:ir_gsto_'-
age. Add stabi!izer to gasoNne in fuel tank or storage
container. Always fo!low the ms' ratio found on stabilizer
container. Run engine at least 10 minutes after addk:<g
stabiiizer to aliow th,.-stabiizer to reach the carburetor. Do
not @-sinthe gas tar'k and carburetor if using fuel stabilizer..
BHGiHE OIL
D_ain oii {with engine warm} and replace with clean e.__gir',,e
oi!.. (See <'ENGtNE_' in the Customer Responsibiiities
section of this manuai),
OYLiHDIIRS
• _d_._.7_7;. _ i_,_: <...-% : ,,
'* I-=OLIF (HIe OUF]O@ Qt ei! {ilret_gF} ,<,;_IJtIi4L [3{b!i [l{)i(-j(;::;pili',,LJ
Turn i@'_itionkey to =S'TART '_positio_ lots few secou,,ds
to distribut9 oii
_* Replace with riewspark [:Aug(s).
,_ Do not s!:oi"egasoline f_om one season to anothe_ •.
o Re@ace your gasoline cap, if your can sta£s to rust,
Rust and/or <,t.i_-£in your gaso'h_e will cause proble:ns.
._ if possibIe, store your" tractor indoors and cover it to
give proteclen from dust and di_.
Cover your t_actor with a suitable protective cover that
does not retain moisture. Do not use plastic. Plastic
cannot breathe which slows condensation te form and
will cause your tractor to rus_.
!@ROW:DANT: NEVER COVER TRACTOR WHILE ENGINE
AND _XHAUST AREAS ARE STILL WARM.
25

TB
1
Wil_ not start t
_Z
I
,i
I*
9_
! I O.
i. Out of fuel.
2. E"_gine not'_CHOKED" properly.
3. Engine flooded.
,.i B_d spark p_ug,
5. Ditly .',-:_irfilter.
Dirty _uei fiiter.
Water in iuei.
Loose or damaged wiping,
Carburetor o_.xtof adjustment,
E_sginew:4'ves out of adjustment,
I. Dirtyair ti!i:er,
2. _3ad spark ptug,
3, Weak or dead beaten/,
4. Di£y fuei fitter_
5. Stale or dirty fuel
6. Loose or damaged wiring.
7, Carburetor out of adiustment.
8, Engine vaIves out o[ad]ustment.
i. Clutch/brake pedal not depressed,
2. Attaehmen_ b4utch is engaged,
3, Week o_dead battery.
4, Blown fuse.
5. Corroded battery termi_ais.
iS, Loose or damaged wiring.
7. Faulty ignition switch.
8. Fau!ty solenoid or staI1en
RR_2CT_ON
1"
&
7,
&
i! 9.
!i0.
i i.
il 2.
4,
5,
8,
:l 7.
9. Fra.uityape_ator presence switch(as), i]
sta_i: 2, Cop'reded bat!e'v;-ermnais :i
3. Loose o,_damaged wiling, i
4. F_.uit7 eoian@d O_'star{at. :!I
:1
;::ill fuel tank.
See 'TO START ENGINE" in Operation se.c_ion.
Wait severaI minutes before attempting to start.,
Rap!ace spark ptug,
Clean/replace air filter,
Repiaee fuel litter,
Drain _ueftank and carburetor, refill tank witis fresh
gasotine and replace fuel filter,
Check all wiring,
Contact an authorized sewice centeddepa£ment.
Contact an authorized sen/ice centeffdepaftment,
Cleanirepface aiT filter,
Replace spark ptug.
Recharge o__replace battery.
Replace fuel filter,
Drain fuel tank and refilt with fresh gasoline.
Check nil wiring,
Contact an authorized service eenteridepaAn-_ent.
Contact an authorized service center/depa_ment,
[[ t, Depress ctutchtbrake pedal,
2. Disengage attachment clutch,
i 3. Recharge or replace battery.
! 4. RepIace fuss,
I 5, Clean batte_iterminals.
I 6. Cheek atl w}ring,
7, ChecWreplace ignRion switch,
_] 8, Cheeklreptace solenoid or sfarter.
9. Contact an authorized service centeddepa£ment.
I, Recharge or _'ep!ace battery.
2, Clean batte! 7 terminals,
3. C.h,ck n!l wiring.
4_ CheeWreplace sotenoid or sled:at.
;[ t. Cu_}n,s _oo much grass/too _ast.
2. 'Th_'ottle it" "CHOK:E" position.
:)
I 4 Dirty aftPiker,
4
;i 5. L,ow oil ,.. _,_.,/-,,,_,,,voil,
iJ £ F"_ ", ....... " : 7
! 7 Didy fuei _itfer.
i 8. Stale o_ di£y fuel.
iJ 9. Water in iuet,
I0, Spark plug wi_e loose.
tl, Di£y engine air screenfiins,
i2, DirWiclo_,ged muffler,
!3. Loose o_ damaged wiring.
14. Carbureto_ out oFadjustment.
! 5. 8.ngine v'_.ives out of -:&d!ustment,
I. Worn, bent orloose blade.
2. Bent b$ada mandrel,
8. Loose/damaged part(s),
i, Setin "Higher Cuff positierdreduce speeci.
2, Adjust thro_ie control,
3, Clears underside of _ssowerhousing.
4, Clear#replace air filter.
5. Check oil level/change oiL
6, Clean and regap ot change spark p_ug,
7, Replace fuei f[tte_',
8. Drain fuel tank and refill with fresh 9asotid'e.
9. Drain fuei tank .and carburetor, refilt tank with fresh
gasoline and replace fuel fitter,
10, Connect and tighten spark plug wire,
1!. Clean engine air screenf[ins,
12, Clean/replace muffler,
I3. Cheek all wiring,
I4. Contact an authorized sen/ice center/department.
!5, Contact an authorized sen/ice center/department.
i. Replace blade, Tighten b!ade boit,
2, Replace blade mandrel,
8. Tighten loose pa_(s). Replace damaged parts,
28

TROUBLESHOOTING PO
PROBLE_
Engine contin_ee to run
when operator leave_ seat
with attachment clutch
engaged
PO0{ OUt _ L_f'_'.ven
CAUSE
t_ Faulty operatorosafe[y presence control system.
1. Worn, bent or loose btade.
2. Mower deck not IeveI:
3. Bui{dup of grass, leaves, and trash under mower.
4, Bent biade mandrel,
5. Clogged mower deck vent he;as from buildup of
grass, leaves, and t_ash around mandrels,
CORRECTION
,1, Check wiring, switches and connections. If not
corrected, contact an authorized service center/
departmenL
i, Replace blade. Tighten blade bolt,
2, Level mower deck,
3. Clean underside of mower housing.
4. Replace blade mandret,
5, Clean around mandrels to open vent holes,
_lowe_ btades will not
;'orate
Poe_ 9_ass discharge
I, Obstruction in clutch mechanism.
2, Worn/damaged mower drive belt.
3. Frozen ldter puiley.
4.. Frozen blade mandrel
t. Engine speed too slow.
2. TraveI speed too fast.
3. Wet grass,
4, Mower deck not tevel,
5. Low/uneven tire air pressure,
8, Worn, bent or loose bIade.
1. Remove obstruction.
2, Replace mower drive bell
3. Replace idler puIley.
4. Replace Made mandrel
1. Place throttle centre! in "FAST" pos[tion.
2. Shif[to slower speed.
3, Ai!ow grass to dry' before mowing,
4, Levetmower deck.
5, Check tires for proper air pressure,
6, Replace/sharpen blade. Tighten blade bolt.
7. Buiidup of grass, ;eaves and trash under mower,
8. Mower drive belt worn,
9, BIadesimpropedy installed.
I0, Improper b!ades used.
11. Clogged mower deck vent holes from buildup of
Headlight{a) net werki_'_9
(if so equipped)
£ngi_e 'ibackfires"
when turning engine
"OFF"
grass, !eaves, and trash around mandrels.
7. Clean underside of mower housing.
8. Rap!ace mower drive belt.
9. Reinsta!I blades sharp edge down.
10. Repiace with biades Iisted in this manual,
11. Ctean around mandrels to open vent hoies,
I° Switch is {'OFF'L
2, Bulb(s) burned out,
3, Faulty Iight switct_,
4. Loose or damaged wiring,
5, Blown fuse.
I. Turn switch "ON",
2, Replace bulb(s),
3, ChecWreplace fight swkch.
4, Check wiring anti connections,
5, Replace fuse,
I. Bad battery ceil(s), i, Replace battery.
2. Poor cabfe connectior_s, 2, ChecW'eiea_ all cor_nect}oqs.
3, Fautty reguiator {if so equipped), 8, Repiace regt'tator_
4, Faulty alternator. 4, Replace aiternator.
t. E_gine th{o_te control not set at _'SLOW"
position for 30 seconds before stopping engine.
1. Move thtottIe control to "SLOW" position and allow
to [die [or 30 seconds before stopping engine,
27

SERVICE NOTES

TRACTOR oo MODEL NUMBER 9! 7°256451
SCHEMATIC
RED °I I °
oll!o
BATTERY
BLACK
RED
WHITE
f
TFiS --. -
Bs
}GN1TIONSWITCH
BLACK
M B
FUSE 30 AMP.
r _ _ -- _[_
f-o o '_
k t
CLUTCH /BRAKE
(PEDAL UP)
BLACK
BLACK
P
i
[
---_,-J IiiLs-T........ ,._,@ .............@
: d@. S:rAm-ER i
i J
j SOLENOID
I
! WHITE
I
E I
i,} I
>7,kj .j_-_:.,._----
"-_--" A_'MENT CLUTCH ]
.... (CLUTCH OFF) l
SEAT SWITCH
(NOT OCCUPIED)
iK-'_ F'h _ F
q _,sNmoN:1_-
GROUNDING
,_.ONNb......ut.,
CHARGING BYSTEM OUTPUT
3 AMP OC @ 3800 RPM
\
IGNITION SWITCH
POS_T1ON
OFF
ON
START
REB
---4_.-- NON-REMOVABLE ---¢_--- REMOVABLE
CONNECTIONS
NOT_
YOUR TRACTOR IS
EQUIPPED WFrH A SPECIAL.
ALTERNATOR SYSTEM.
THE LIGHTS ARE NOT
CONNECTED TO THE
BATTERY, BUT HAVE THEIR
OWN ELECTRICAL SOURCE.
BECAUSE OF THIS, THE
BRIGHTNESS OF THE LIGHTS
WILL CHANGE WITH ENGINE
SPEED, AT IDLE THE LIGHTS
WILL DIM. AS THE ENGINE IS
SPEEDED UP, TIdE LIGHTS
WILL BECOME THEIR BRIGHTEST.
PLLJG:: @ .... _;_
i
28 VOLTS AC M_N. @ 3600 RPM l
(CHARGING SYSTEM D_SCONNECTC:B)
t
i
LIGHTING SYSTEM i
OUTPUT D_ODc:
%\.
i_ 14 VOLTS AC IRWIN. @ _00 _PM (L,_*]HT_ OFF}
,,1° HEADLIGHTS
i ........
HEADLIGHT
SWITCH
(OFF)
W_RING INSULATED CUPS
NOTE: iF WIRING INSULATED
CLIPS WERE REMOVED FOR
SERVICING OF UNIT, THEY
SHOULD BE REPLACED TO
CONN_.CTIONS PROPERLY SECURE YOUR WIRING.
29

REPAIR PARTS
ELECTRICAL
TRACTOR ,_oMODEL NU#aBER 917,25645!
7O
i
43
36 38
I
I
39
I
is_
I
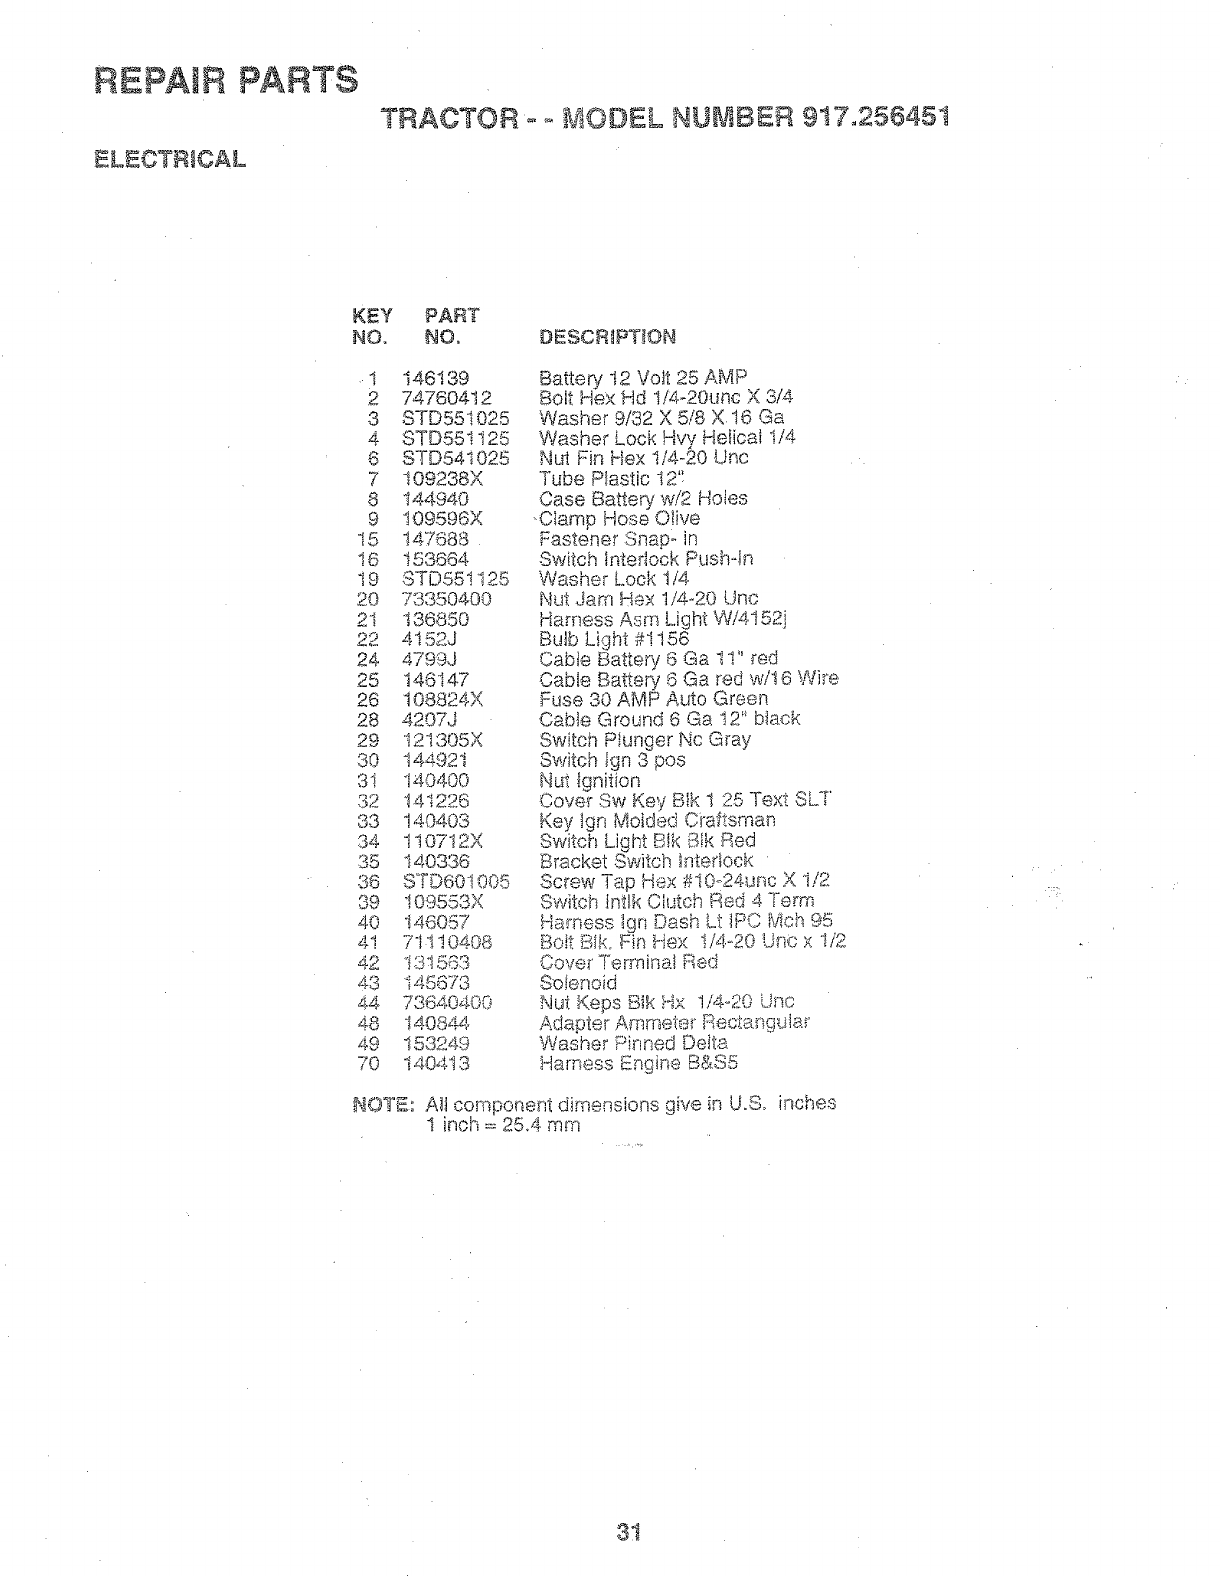
REPAIR PARTS
ELECTRICAL
TRACTOR o °, J ODEL NUMBER 9t7o25645t
KEY PART
NO. NO, DESCR_PT._ON
.1 146139
2 74760412
3 STD551025
4 STD551125
6 STD54i025
7 t09238X
8 t44940
9 109596X
15 147688
I6 153664
19 STD55tI25
20 78350400
21 136850
22 4t52J
24 4799J
25 146147
26 108824X
28 420_j
29 121305X
30 144921
31 140400
32 141226
33 140403
34 1t07!2X
35 140336
36 S°TD6O1005
39 I09553X
40 146057
4! 71110408
43 145673
44 73640400
48 140844
49 153249
70 140413
Battery t2 Volt 25 AMP
Bolt Hex Hd I/4-20unc X 3/4
Washer 9/32 X 5/8 X 16 Ga
Washe_" Lock Hvv Heiicaf t/4
Nut Fin Hex I/4-20 Unc
Tube P!astic 12'I
Case Battery wi2 HoJes
.Clamp Hose Olive
t
roas.ener Snap- in
Switch Interlock Push-4I-I
Washer Lock t/4
Nut Jam Hex 1/4_20 Unc
Harness Asm Light Wi4152j
Bulb Light #! 156
Cable Batten/8 Ga ! I" red
Cable Battery i3 Ga red w/16 W}_e
Fuse 30 AMP Auto Green
Cable Ground 6Ga t2" black
Switch Plunger Nc Gray
Switch _gn 3 pos
Nut Ignition
Cover Sw Key Btk 1 25 Text SLZ'
Key tgn Molded Craftsman
Switch Light Btk 5!k Red
Bracket Switch !ntedock
Screw Tap Hex #10o24_xncX i/2
Switch lntlk Ci_JtchRed 4 Term
'_ < " <_"Lt IPC
t-_mes,, Ign Da,_, Mch 95
Bdt BIk, Fin Hex !/4o20 Uric x _/2
Cove_ Terminat Red
Soie_;oid
Nut Keps Slk H:× 1/4o20 U_qc
Adapter Ammete__Recta{_g_da¢
Washer Pinned DeJta
Harness Engine B&S5
N©'(E: A_tcomponent dimensions give in UoSo inches
I inch = 25_4 mm
31

R...PA_RPARTS
TRACTO_ MO#SL NU_IBER _J.7.25645t
CH ' @
. ASS_ AND £NCLOSUR£S
14
3S 10
2"1
\ 22
\_ \
\
28
\
3
\
/
34.
14

REPAIR PARTS
TRACTOR o o MODEL NU IBER 917o256451
CHASSIS AND ENCLOSURES
KEY PART
NO. NOo DESCRIPTION
1 151169
2 140356
3 17490612
4 STD55t025
5 146077
6 145208X015
7 124027X
8 12647IX
9 t46757X0t3
!t 146956
13 I46961X0t2
I4 17490608
I5 74180512
16 STD541431
!7 t31445X4t7
18 t26938X
!9 1752131O
21 122933X
22 124479X
24 STD523710
25 19131312
26 STD541437
27 17030814
28 t40"135
29 124029X
30 !09872X417
31 136619
33 I05476X4t7
34 105475X4!7
35 STD533707
38 139888
39 i3D887
60 72140606
74 73680600
i00 105037X
140 150556
-- 5479J
Chassis Weldment 1Iga 1996
Drawbar Stretch
Screw Thdrot 3/8-16x3/4 Tyott
Washer t3/32 x 3/4 x 16 Ga.
Bumper, Snap In
Saddle Sitkscrees F_tSdf 5Sp D4360
Heat Shield Sloped Hood
Clip Line Fuel !3/32 Mtg Hote
Dash bflkscreen®q Sears EngiSy
Panet Pnt Dash Lh
Panel Slkscr Dash Rh Weldment
Screw Thdrot 3/8-t6xl/2 Ty-tt
Screw Mach Trhd 5/16-i8uncx3/4
Nut Keps 5/16-18 Unc
Hood Asm Pnt
Bumper Hoed
Screw Sltd Hex Hd w,@i Washer
Rivet Ratchet Nylon
Washer Nylon B!k 28× 75x 19
Bolt Fin Hex 3/8-16unc X t
Washer 13/!6 X 13/I6 X !2 Ga
Nut Lock 3/8o,16 Uric
Screw, Hex Head, Spidefiock #8 x "7/8
Gdlte Gray
Lens Headlight Bar CIear
Fender Pnt
Bracket Pat Fetsder
Footrest Pnt Lh Peff
Foo!rest Pnt Rh Peff
Boit Rdhd Sht Sqnk 3/8-16 X8/4,
Bracket, Asm_ [:_ivot, L.H. Mowe: ;£ear
Bracket, Aan_._oPivot, R.H. _i_ower Rea:_
Boit Rdhd Sqnk 3/8-16 x 3/4
Nut Crownlock 3/8_!6
Stfip_ Foam 18"
Bracket Chassis Front 7 Ga.
:Plug B_sttonSlk 359 Dia
NOT_: All component dimensions
t inch = 25,4 mm given in U,8, inches
33

/
/
53
22
3_

REPAIR PARTS
RAO OR fiO:©EL NUMBER 917o2 645
DRIVE
KEY PARY KEY PART
NO, NO, DESCRIPTION NO, NOo #ESC_-31PTtON
Washer t3/32 X 13/t6 X I2 Ga
Beadr_gNyi 503X 628XI 25
Washe_ Hardened
Ring Klip #t5304,-50
Pulley !dler V Groove Plastic
Be!lcrank Asm
Retainer Belt Style Sprir_g
Bolt Hex Hd 3/8o16unc X !_-1/2
N' d.Cf'owRtook o/,__1u tJnc
Nut Lock 5/16-!8 Ur!c
Link Clutch 7 66
Spring Return Clutch 675
Bolt Fin Hex 3/Sd6unc X I-!/4
V-bett Ground Drive 95,25
Keeper Belt Rh Lt Pntizinc 16g
Retainer Beit......Chassis Lh _"_..inc
Screw Thclro! 318-i 6x3/4 Ty-tt
Cover Pedal Blk ,_ta""
Pulley FAngine
Bolt Flnhex 7t16-20 x 4 g5
Washer Lock b!vy i-qJc!Spr 7/t6
Keeper Be_t Engine Lh L.t
Guide Belt D_'Mower Rh
Washe_' 13/32 X 1_i/4 X t2 Ga
Spacer Spilt _80xio94
V,lao..... ,,,,v._I" _;6.,:.JlO,( 1 ,<q. X Ga
Rir_g _71#5i 33.,,75
Key Square 2 0 X 184.5/t865
Washer '25/3:.__,.'_I 5i8 X .....',bga
Bolt F:in Hex 3/8.d6 x 3/4.
Vw::_r,e_,,'a_, )(_;/,__z 314 i_,vI0 <"a
Bolt Rdhd Sqnk 3/8.d 6 x i,25
35

REPAIR PARTSTRAC_TOR _ -, MODEL NUMBER 917o25645I
ST_£ER_NG ASSEMBLY
$2
\
<JJ
'_."*",7"..... 39
LL'
' _ 42
[
\\
,-..>_ , 4.[)!_Z__, I
ff_ to
47
3O
! 4\
36

REPAIR PARTS
"TRACTOR o o MODEL NUMBER 917o256451
STEERING ASSEWBLY
KEY PART
NO. NO, DESCRIPTION
I 139768
2 142033
3 135227
4 135228
5 6266H
6 121748X
7 19272016
8 120O0O29
9 3366R
10 130468
11 STD551!37
13 110438X
14 74011058
15 73901000
16 132624
17 132614
t8 57O79
t9 124035X
20 !26684X
21 STD551125
22 71O7O410
23 1275O1
24 !09816X
25 124036X
26 !26847X
27 138874.
28 !91314.16
29 17490612
30 STD56'I210
32 !30465
88 132196
37 152927
38 139769
39 I9!33808
41 !04820X
42 i24417X
43 121749X
48 121232X
47 6855M
62 "149684
NOTE:
Wheel Steering Std Black
Axle Asm Front
Spindle Asm Lh
Spindle Asm Rh
Beadng Race Thrust Harden
Washer 25/32 X 1 5/8 X 16ga
Washer 27/32 X 1 I/4 X t6 Ga
Ring Ktip #t5304°75
Bearing Col Strg Bik
Link Drag Sot Ball Jt 20 064
Washer Lock Hvy Htcl Spr 3/8
Spacer Bearing Axle Front
Bott Hex 5/8-! 1 Unc X 3-!/2
Locknut Flange 5/8-t I Uric
PinAxle 5/8 }4 1 55/'i 54. Lg
Shaft Asm Strg 5/8 X 15 19 Lt
Washer ThnJst 5t5x 750x 033
Support Shaft
Washer Shim t/4 X 5/8 X 062
Washer Lock Hvy Helical t/4
Screw He>,'Socket 1/4-20 X 5/8
Shaft Asm Pittman
Nyliner Snap In
Bracket Steedng
:Bushing Rod Tie Blk Lt
Gear Sector
Washer t3/32 X 7/8 X t6ga
Screw Thdroi 3/8-t6x3/4 Tyott
Pin Cotter I/8 X 3/4 Cad
Rod Tie W}re Form t9 75 Mech
Sushisg ocg 5/8 td Dash
Screw
!nseri Cap S(rg Wheel Std B]k
Washer t3/'32 X 2_8/8 v_ 8 Ga
Nut Lock Center 3/8_24un:_
Adapter Wheel Strg _'_'
,_'_u/835id
Soot Shaft Steering
Washer 25/32 X 1 !/4 X I6 Ga
Cap Spindie Fr Top BJk
Fitting Grease
Kit, Steering Assembly, Service
Alt component dimensions given in U.So inches
! inch = 25.4 mm
37
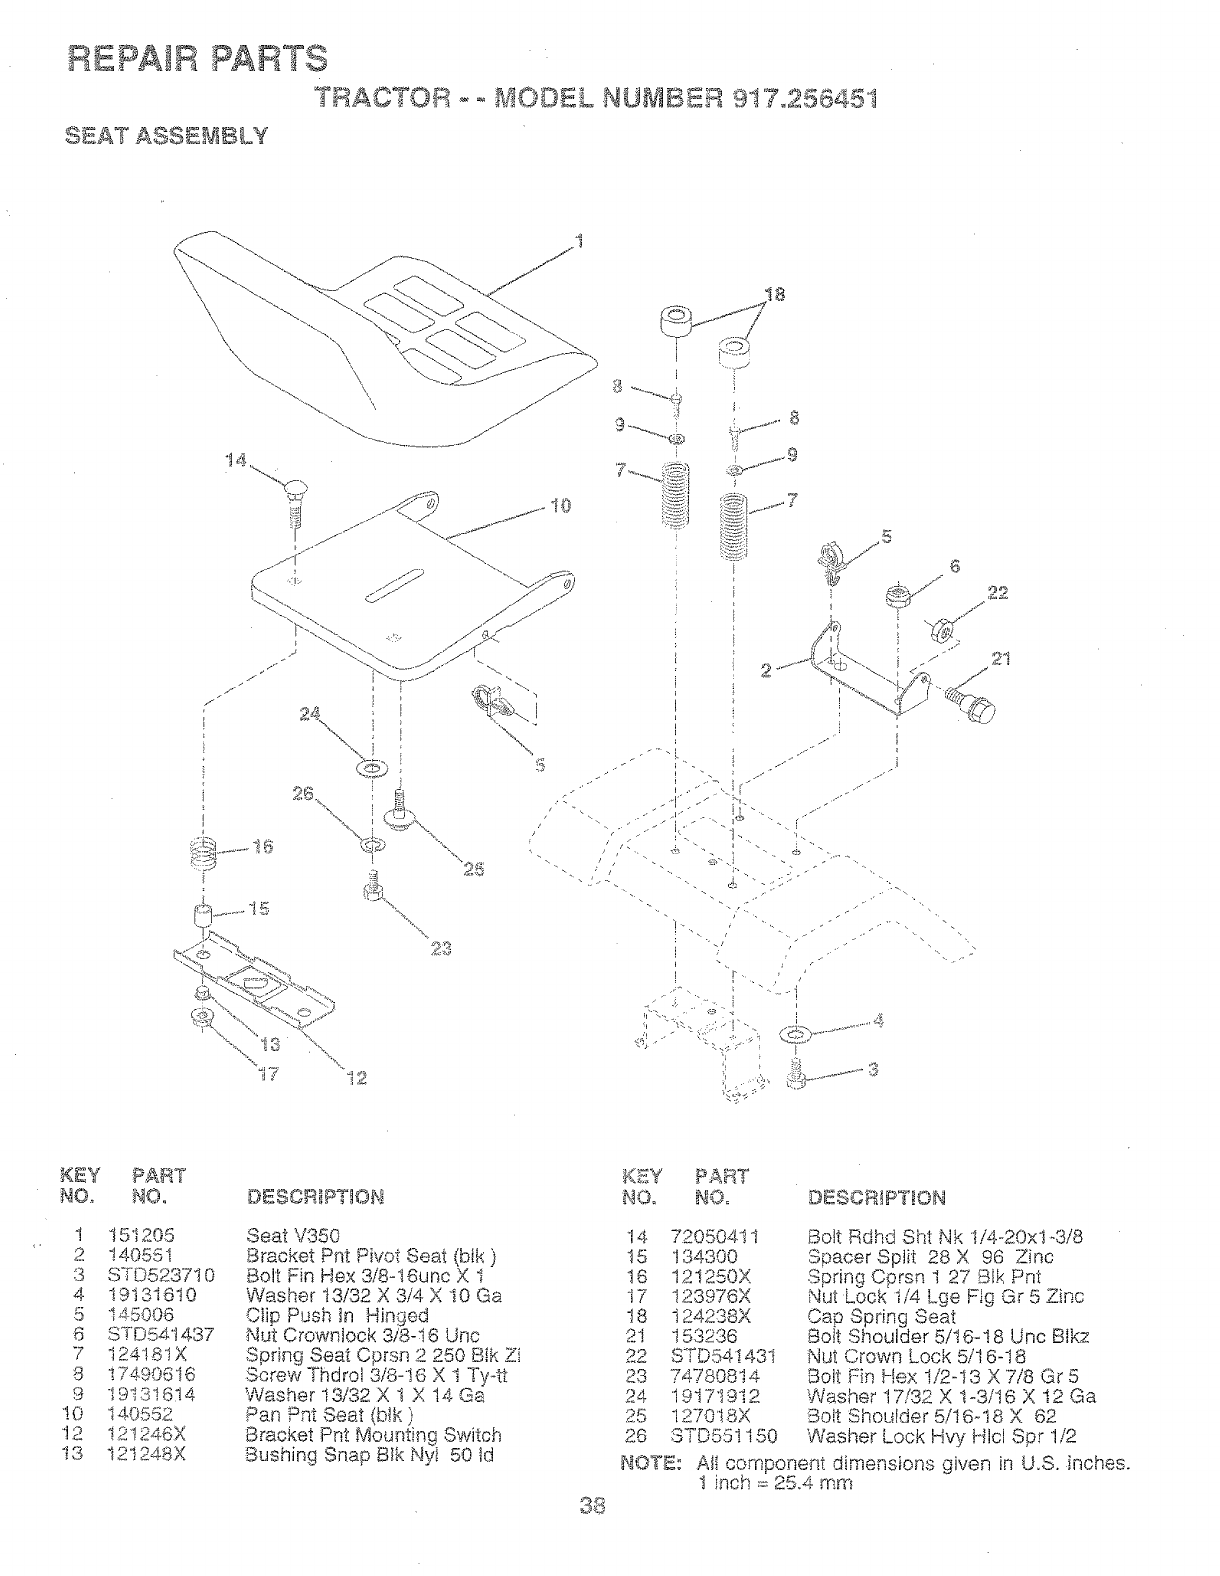
REPAIR PARTS
TRAC ?' U BER 9i7.2564,5t
SEAT ASSE_IBLY
_J
J
i
I
i
2¢%.
\
-!- _<.
q
@,,
"%
",,<\ 23
17 i2
2t
K_Y
NO,
1
2
3
4
5
6
7
8
9
!0
12
t3
151205
140551
STD523710
19131610
145006
STD541437
124181X
i74.90616
19131614
140552
!2t246X
121248X
DBSCRIPTIO_I
Seat V350
Bracket Pnt Pivot Seat (btk)
Bolt Fin Hex 3/8-t6unc X I
Washer t3/32 X 3/4 X 10 Ga
Clip Push In Hinged
Nut Crownlock 3/8-16 Unc
Spring Seat Cprsr_ 2 250 B_kZi
Screw Thdrot 3/8-16 X I Ty°tt
Washer t3/32 X I X 14 Ga
Pan P_t Seat (b k }
Bracket Pnt Mour_ti_sgSwitch
Bushing Snap B_k Nyi 50 td
_ZY PART
NOo NOo D_SGR]PT!ON
14 72050411
I5 134300
t6 121250X
17 t23976X
t8 I24238X
2t t53236
22 STD54!431
23 74780814
24 '19i7'I9i2
25 1270'18X
26 STD55It50
BIOT£:
Bolt Rdhd Sht Nk 1/4-20x1-3/8
Spacer Split 28 X 96 Zinc
Spring Cprsn 1 27 Bik Pnt
Nut Lock i/4 Lge F_g Gr 5 Zinc
Cap Spring Seat
Bolt Shoulder 5/16-18 Unc BIkz
:Nut Crown Lock 5/16-18
Bolt Fin Hex 1/2-13 X 7/8 Gr 5
Washer 17/32 X t-3/16 X t2 Ga
Bolt Shoulder 5/16-18 X 62
Washer Lock Hvy Hlcl Spr 1/2
AI componer:_t dimensions give_ in U.S. inches.
I i_ch = 25.4 mm

REPAIR
DECALS.
9
PARTS
TRACTOR oo MODEL NUMBER 917,256451
14 17 8 6 3 7 21 7 4 8 14
\
5
\I1
I 5 I8
\t3
t0
KEY PART
NO, NO,
1 138955
2 272936
3 151815
4 151816
5 i32674
6 i3364.4
7 142249
8 t42252
9 125880X
10 1495!6
1i 137537
KEY PART
DESCR!PTION NOo NO,
Decal Instruclion Operat Eng 12
Decal Engine 12.5 Hp B&S _C Cra:_ts 13
Decal Hood Slope Rh Craftsman 14
Decal Hood Slope Lh Craftsman t5
Decal Grille 16
Decal Maint Customer Sears Dora !7
Deca! Panel Side _ic i8
Decal lnsed. Hood Bik 21
Decai Fender Craftsman Red .-
Deca_ Btry DngdPsn Eng, Acme -
Decal r. ,.,
_,,au_on EnglishlSpanis
4900J
146o46
105809X
136832
! 4.0837
133179
131265
13831 t
t539t7
t r<or_ 8
DESCRiPTiON
Decal Clutchib_ake Engiish
Decal \A,be!t Dr Sch Tractor
Decai Chassis 5 Sp 38"
Decai Mower Drive Schematic 38
Decai, Brake Parking Saddle
:,eca.,_ ,.,ap CNSMR help u_
Decai Mower Qc System
Decal Lightbox
Deca! Lift HandIe
Manuai_ Owner's (,:£ng!ish)
Manua!_ Owners (Spanish)
\
4,10
1t
KZY PART
NO, NO, DESCRIP'T_ON
1 59192
2 65139
3 106222X
4 59904
5 I06732X417
6 278H
7 9040H
8 106108X4t7
9 124635X
10 7t52J
1I I04757X
-_ 144334
Cap Value Tire
Stem Vatue
-Fire F Ts 15 X 6 0 _6 Service
Tube Inner Front #35060
Rim Asm 6"front White Sewice
Fitting G_ease
Bearing F!ange
Rim Asm 8"rear White Service
TiTe R Ts 18x8 5-8 Service
Tube Rear 9 5 X 8 Service
Cap Axle Blk t 50 X 1 00
Sealant, Tire (10 oz. Tube)
NOTE: A!l component dimensions given in U.S. inches,
l inch = 25.4 mm
39

REPAIR PARTSTRACTO_ o _ MOD_L NUMBER 9t 7°2564_
ENGINE
3
(
! i
i12
i
/
13 /
4
4O /
29
t OPTIONAL EQUIP_1_NT
! Spa_:k A_'este_
t
_5
4O

REPAIR PARTS
TRACTOR °°MODEL NUMBER 917.25645t
ENGINE
KEY PART
NO, NO. DESCRIPTION
t
2
3
132759
17720410
150453
4 137348
t3 272293
!4 13280324
15 13200300
16 STD551237
23 t50554
29 137180
31 109202X
32 128549X
33 i23487X
35 17490512
37 137040
38 ......
40 124028)(
44 17490412
46 19091416
62 STD55113I
72 71O70512
78 17490620
81 128861
NOTE:
Control Throt Rh BIk Pd115 10
Screw Hex Thd Cut 1/4-20x5/8 T
Engine B&S 10.5-t2.5 _C, DC
Model No. 289707, -0179-01
Muffler Exhaust B&S Lt
Gasket 1 313 td Tin Plated
Nipple Pipe 3!8 Npt X 3"
E_bow Std 90 Degree 3/8-t8 Npt
Washer Lock Ext Tooth 3/8
Shield Browning
Arrestor Spark
Tank Fuel t 25 Fr
Cap Asm Fuel W/sym Vented
C_amp Hose Btk
Screw Thdrol 5/t6-18 x 3/4
Line Fuel 20"
Ptug Oil Drain (Order From Er_gine
Manufacturer)
Bushing Snap Nyt Btk Fuel Line
ScrewHexwsh Thdml t/4o20x3/4
Washer 9/32 X 7/8 X t6ga
Washer Lock Hvy Hlcl Spr 5/16
Screw Hexhd Cap 5/'I6oi8x3/4
Screw Thdrot 3/8-16xt qi4 Tytt
Nut Ftange I/4-20 Starter Nut
Altcomponer_tdime;_sionsaiven _n.... ._, ,,,........
I inch = 25.4 mm
41

REPAIR PARTS
T_RAC°t"OR °- £JIODBL NUMBER 9!7o25645t
L]Fi"
7
5
@
4
32 !9
18,
3
,\2
8
42

REPAIR PARTS
TRACTOR oo MODEL NUMBER 917o256451
L_
KEY PART
NO. NO. DESCRJPT)ON
I 138973 Rod Asmo Lever
2 122507X Shaft Asm. Lift
3 ,105767X Pin Groove
4 12000002 E Ring #5133-62
5 19211621 Washer 21/32 x 1 x 21 Ga,
6 120183X Bearing Nylong
7 I2563IX Grip Ha_dfe Fiuted
8 122365X Button P_unger Read
10 122512X Spring Cprsa
11 t39865 Lift Asm, Link LH
12 t39866 UR Asm. Link RH
t3 4939M Reta;ner Spring
15 127218 Link Fron_
t6 73350800 Nut Jam Hex 1/2-13 Unc
17 130171 Trunnion BlkZinc
18 73800800 Nut LockWiWsh 1/2q3 Unc
t9 139868 Arm Suspension Mower
20 3146R Ftetainer Spring
31 t40302 Bearing, Pvto Lift, Spherical
32 73540600 Nut Crownlock 3/8-24
NOT£: Aft component dimei_sions given in U,S. inches
1 inch = 25,4 mm
43

_:PAtR PARTS
TRAOTOB - o _oaO©£L NU-_ZaB:R 9t7o255451
_aOWER
4O
I
2 .... 8_
i
II
b/
15
29
t
44

REPAIR
£8OWER
PARTS
TRACTOR-- MODEL NUMBER 917.256451
KEY PART
NO. NO.
1 142829
2 STD533t07
3 t380I7
4. 138440
5 4939M
8 130832
8 850857
10 140296
1I 134148
i2 129895
"_q,,_137645
14. 128774
'i5 1!0485X
16 t40329
19 13282'7
2'1 8TD54143I
_.o t37807
24 105304X
25 i237i3X
26 110A52X
27 t06738X
28 19111016
29 !06735X
30 t38'7'76
31 129988
32 153532
33 i37265
:!)8 i :31494
4.1 13355I
4.8 ! 33504.
-4.5 ",-:-.m_.,'> ' ".qe
53 13.084,0
54. i $3943
55 i83840
KEY PART
DESCRIPTION NO. NO.
Mower blousing Assembly 56 122052X
Bolt Carriage 5/16-I8 x 3/4 67 149848
Bracket Asm. Fram Sway Bar 38/.42 68 144200
Bracket, Asrno Deck Sway Bar 38" 69 _ _D._60907
Retainer_ Spring 7t 142427
Asrn. Suspension Rear 72 !3t870
Boit, Hex 3/8-24 x !-I/4 Grade 8 73 127847
Washeh Lock, HW Htcl Spring 3/8 74 12t748X
Washer_ Hard B!ade Mower Vented 75 12000029
Blade, Mower, M@ching 38" 75 128909
Bail Bearing 77 127845
Shaft and Bearing Assembly 78 140384
(b3ctudes Key Number I5) 79 !27498
Mar@tel Housing, Vented 80 153701
Bail @eaSng, Mand_ei 81 73350600
Stdppe_= Meweh Vented 82 142028
:SOILShouider 88 783ij
Nut, C;owniock 5/18o!8 87 128772
Bracket, Mower Deflector 88 19t 1I2i 6
Cap, Sleeve 89 19133612
Spring. Defie(;tor 92 73800600
NuL Push 107 133502
Shie!d_ Deflector !08 133503
Washer !I/32 x 8/4 x16 Gauge 109 74760640
Rod, ._--_"_',.,_,se 1! 0 i 42587
Sc_ew_Yhdf"ol He× Hd 1t3 174905't2
Washer, Spacer
Putey, Mandrel 122 131289
Nut, Fb.qgeiock 9116 123 t3i 288
Pulley, tcileh Fiat 'I1...{4.STDS33717
Nut, Crownlock 3/8-16 128 i53390
Rod, Pivot .... t 30794.
Rod, Ctutcl% Secondary
Retaineh Sprin9 - .. 142820
B_aXe Assembly
_Nasher Hs.rdeaed
!dler Arm Assernbiy
DESCRIPTION
Spaceh Retainer i-3/4
Knob
Beit
Pin_ Cotter 3/32 x 3/4.
iqed, Clutch, Primary
Spring, Re_um
Arm, Ck;_ch, Secondapy
Washer 25/32 x I,,,5/8 x I6 Gauge
Ring, Klip
B.O[t, o{10 UICk-:,
_(eeper, Spring
A_]"a,Clutch, Prima%_
Bushing
Spdng
_\' _ Jam 3/8-48 UNC
Trunnion Adj 94
Runner, Li-._
Runner, RH
Washer 'ti/32 x 3/4 x 15 Gauge
Washer I3/32 x 1 x 12 Gauge
Nut Lock Hex W!h_s 3/8-16 UNC
Spacer, Retainer
Stifferler, tdier Arm
So!t, Hex Head 3/8-t6 x 2-i/2
Upsto9 Deck Front 38"
Screw, He:( Head, Tied. Roll.
5/I8-1.8 x 3/4
!qod, @rak% LH
Rod, @_aKe,RH
Soft., C_arlia.ge 8t8-i6 x 1-814
Washer f-"ht
_='-,_d"<"'....... '" _" (inc!.,Jdesivt_.n.x_,I.,'._,.>,>efa_.,._y _<ey
Nur_ibe!'s I2-!5, '17-I 9, 81 and 33)
iY!ow®rf_e_<'k ,_",_,,.,,.....@'_:q-':'_.,..,
HOT[(: AI oompone!st dhnensions giver,, in U.8. k_ches
45

REPAIR PARTS
TRACTOR o-_ MODEL _UMBER 9, Z°2.o4_3 _I
DANA ° e # ,_ -o_.7RAN<-_AXLo_ _.L!ODEL NU_BER ,_;_G0,q8
52
<'<_:'.% /
/
/
I9 40 41
42
t4
i t5
4,5
/
/4_
/47
/
/48
46
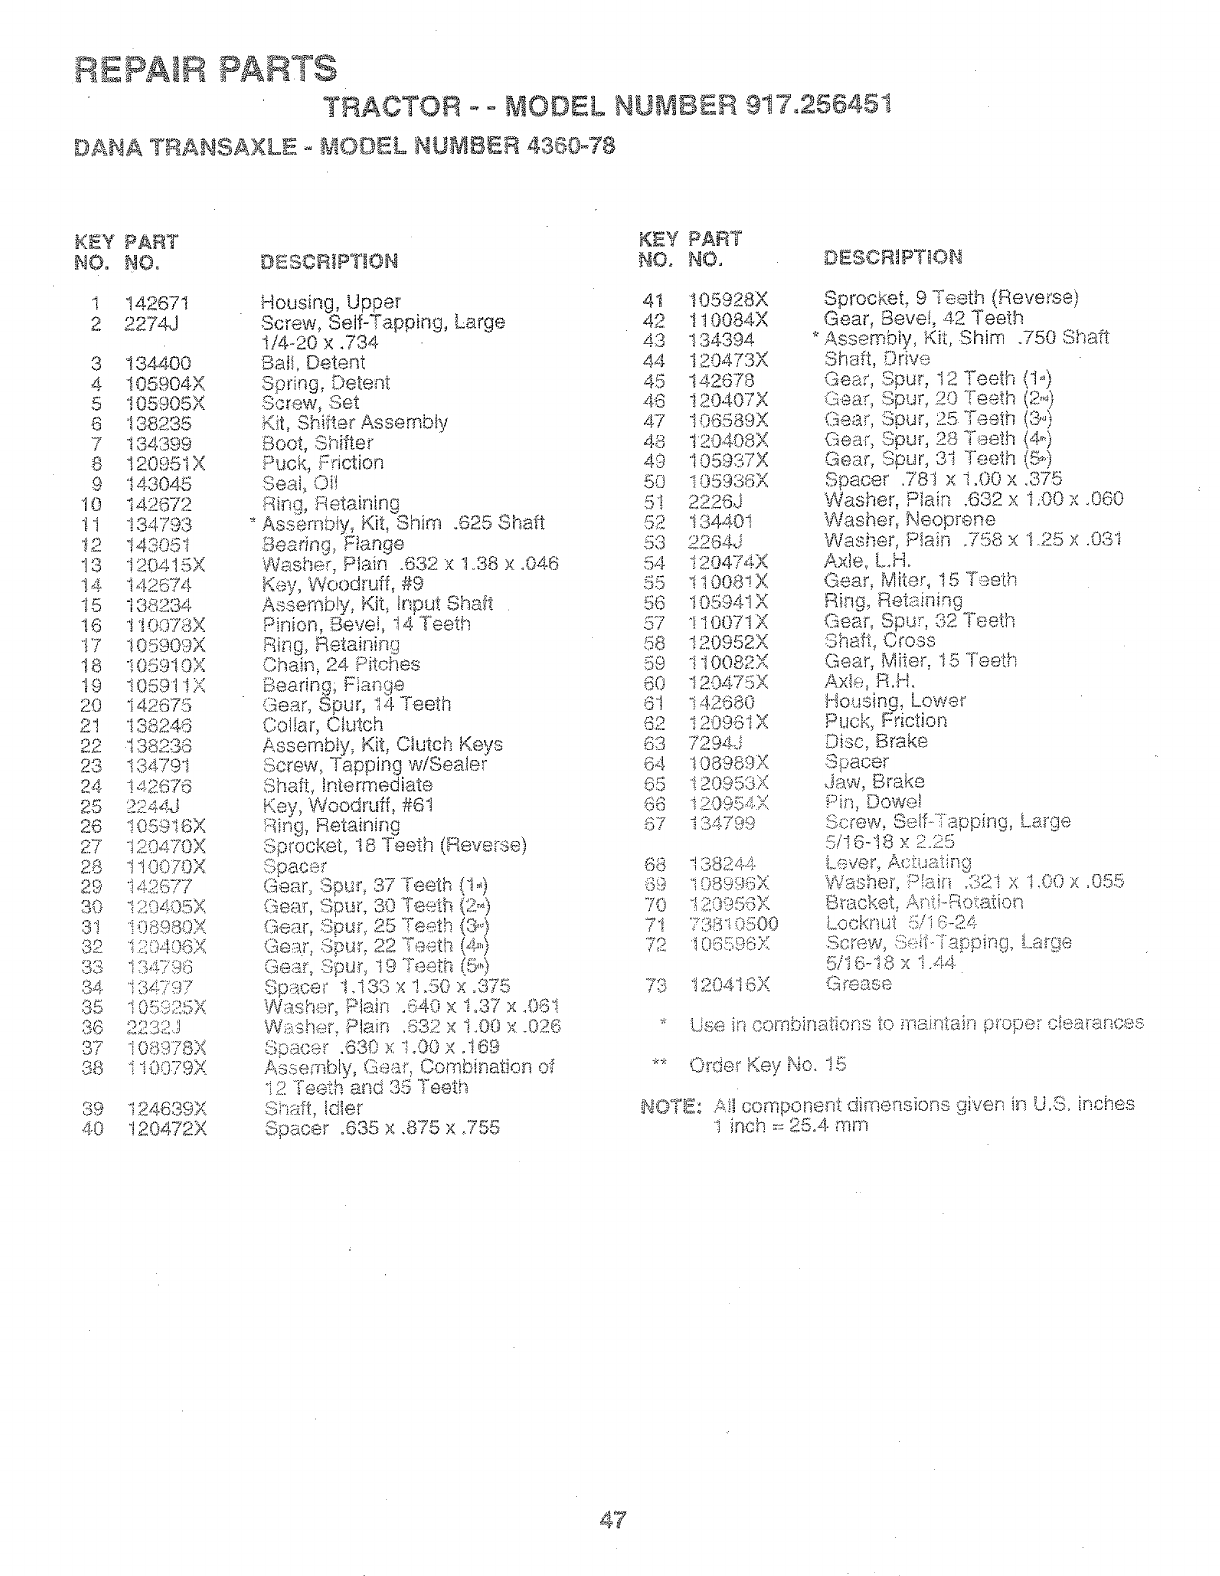
REPAIR PARTS
TRACTOR -- MODEL NUMBER 9!7o256451
DANA TRAHSAXLE- _ODEL NU_IBER 4360-78
KEY PART KiT PART
NO. NO, IISOIIPI'IOH NO, HO,
! 142671 Housing, Upper
2 2274J Screw, Self-Tapping, Large
1/4o20 × .734
3 134400 BaH, Detent
4 !05904X Spring, Detent
5 t05905X Screw, Set
6" 138235 Kit, Shifte.r Assembly
::>[ hte_
7 '_'_o",o_'_"_°C_ Boot, " '- °'_ "
8 I2095iX Puck, Fdction
9 143045 Seal O!
10 142672 Ring, Retaining
tt 134793 * Assemb% Kit Shim °625 Shaft
t2 143051 Seadr% F}ange
13 !20415X Washer, Plain °632 x t.38 x °046
14 1426,74 Key, Woodruff, #9
15 t38234 Assemb!y, Kit Input Shaft
16 tI0078X Pinion, Bevel, 14 Teeth
t7 !05909X Ring, Retainhs9
18 -s,,_:¢q-_v,,,,.,_o_,_., Chain, 24 Pitches
19 106,9I!X Beating; Flange
20 !426,,75 Gear_ Spur, 14 Teeth
21 138246 Cofiar, Clutch
22 138238 Assembly, Kit, Clutch Keys
23 !3479i Screw, Tapping w/Sealer
24. !,._._.._.6,7o Shafi, Intermediate
25 2244.J Key, Woodruff, #6I
26 ._a<_-,_._:.,v
27 t20470X Sprocket, 18Teeth (Reve_-se)
28 !t0070X Spacer
29 .,_.,.,._,x::7-,f Ges.r_ Spur, 37 Teeth (!.=,)
30 129405X Gea[, Spur 30 Teeth (2=,)
3! !08980X Gear, Spur,. 25 Teeth {3,o)
312 ':...... .6'{ " -
: 4 _-"_-, Geer, 6put, 22 Teeth (@,)
33 1,::4.sop Ge_', 8pub i9 x-_ _, z,.o,,_
....., ,, JO :_<;QD._ =o
34 184797 Sps.ce_" i.i33 x !.50 x .375
35 I05925X Wa.sheh Plain .640 x 1.37 x ..061
37 101978)( Spacer .130 x ! .00 x .169
38 si0079X Asser_bty, Gea!'_ Col _bination of
_._o Teeth aP,d 't<...... ',.,._Teeth.
39 i24639X Shaft, Idler
4.0 120472X Spacer .635 x .875 x .755
DESOFIPTION
41 I05928X
42 tt0084X
43 134394
44 I20473X
45 t42678
46` i20407X
4,7 I06589X
48 120408X
49 I05937X
5O i 05936X
51 2226J
52 13440!
53 2264J
54 120474X
55 !t008!X
56 I05941X
57 !10071X
58 120952X
_ 00cv._,,59 _i c-'r,_"
60 I20475X
61 1426`80
62 i20961X
6`3 7294J
64 ...... v108t_bgA
55 120953X
,66 i 20954K
67 i84799
88 138244-
70 ! 1T:0950)(
71 73810500
72 i 0@596:£
""_ 1204.'18X
/©
SprocKet, 9 Teeth (Revel'so)
Gear, Bevel, 42 Teeth
Assembly, Kit, Shim .750 Shaft
Shaft, Driw_
Gear, 5pub 12 Teeth (1=)
G,_a.r,c,pu_, 20 "f-o_h (2,,0)
Gear, Spur, 25 Teeth (3=)
Gear; Spur, 28 Teeth (4,°)
Gear, _r_t]r 31 Teeth {5Q
Spacer .781 x i.00 x .375
Washer, Plain .632 x !:00 x .060
Washeh Neop._ene
Wasi_eh Plain .758 x !.25 x .03i
Axle, LH.
Gear, Miter_ 15 Teeth
Ring, Retaktmg
Gear, Spur, 32 Teeth
Shaft, Cross
Gear, Miter, I5 Teeth
Axh:_,R.H.
Housing, Lower
Puck. Friction
Disc, Brake
Spacer
Jaw, Brake
Pin, Dowel
Sc_'ew; SNf..Tapping, L.a__'ge
5/I6oi8 x 2.25
:Leve_', Acttt_£in9
,00.,:_'WasheiL _::_-_"" ";_'" .00 _-_:<:..... :>& I X' 1 X
@tacke%AY'ti-Re_:ation
hocknu1: S/I 6-24
Screw, % ii:-Yapping_ i._arge
5i16-18 x 1.44
Greags
*Use in combinations to maintain p_'ope_ c!earances
** O@er Key No. 15
HOTI; Aii component dimensions given ip, U.S. ir.ches
I inch :: 25.4. mm
47

" .... ::_:_7 (li....
l! _ l.I
&IS.......
................. .;,L%"]_')
7_ X ,7
41

REPAIR PARTS
TRACTOR - ° MODEL NUMBER g17,£56451
BR_GGS & STRA_ON ENGINE MO©EL NU_B_:R 289707,_ _Y. c NUMBER 0179o0!
_2_ii__
%
_t044
_.S.-TS
Vps3-
12.1 CA_BU:_'Ofl OV_.RH,&UL K_T
, :<::.::...... [_-%, .
k.. 1
:;?N V
224
[ @2_::s::, :L:2S!!d
,_7:'¢i i
t ;S_# ,{;
--. L 2_F
492
8,011 "_J
49

REPAIR PARTS
801
_802 i
:!i
:i
5
:%_,L.!_i/
.i _!h
284
1
%_ 524 1 d
5O

REPAIR PARTS
TRACTOR MODEL NUMBER 917o25645.
BR_GGS & STRATTON ENGINE ° MODEL NUMBER.289707, TYPE NUMBER 0!79@t
KEY PART KEY PART
NO_ NO, DESCRIPTION NO. NO, DESCRIPTION
t 496413
2 399265
3 391086
5 4.94240
7 271866
8 39'14.06
9 27803
10 94821
ti 28O10O
t2 271916
271997
271996
13 _:.M62'_
15 94239
16 495162
94196
18 494.238
20 291675
22 94524
2:} .4928:26
24 222898
25 394681
394852
394663
894654
26 39'!?'80
392331
391781
391782
391788
27 260924
28 299691
391285
29 490:348
49048{)
32 9487i
33 262246
34. 262247
35 65906
36 26828
37 224502
40 221596
41 292260
42 93630
45 262248
46 212897
51 272465
Cylinder Assembly 52
Bearing, Cylinder (Requires Special 53
Toois For Installation) 75
*Seai, Oii 78
Head. Cylinder 95
* Gas_et, Cyt:inder Head 98
Breathe_ Assembly 104
* Gas£et, Valve Cover 105
Screw, .....c_-=m_',,.._ 106
Tt_be..B<eather 108
*::_;_<,b_t_-' an _,'. m_Cover t/64" 118
.............,,..4_s.:,K,.a,:._e
,,n_:::ke_, Cover "{ "" 12!V.YaR_L,c_S@ A):}b
* Gasket. _"-_ ,_........ __.3
•'..,,tc'.[,_.'_._a÷ Cover °009" _ ''_
c;crev,ACylinder Iqead t25
PIug, Oil Drair; 127
C_ankshaft I 30
.._:y,Timing Geal' 13!
,.3_, Engirte I33
* Seai, Oii 137
Screw. Seres, Base Mounting 138
Flywheet and Ring .Gear Ass,-. "_""', ,_m_,b 14t
Magneto 14.2
i{ev, Fiywheei 147
Piston Assernbly, Standard 164
Piston Assembiy .010" Oversize 171
Piston Assemb!y .020" Oversize 187
Piston Assembly .030" Oversize 188
i-qin9 c..... e.... _ ,.,_e;.,._ o.....>_:£,Pssto!%
R;n':_Set, P<'q * OhtoR_e. "::._"_ c _"_ o@9
Rin_._Set, o;_.,..,-. .
.. _....._, .0t 0" Ow:-ws_ze 2I6
.0_0 Over'size _t
.:::'qqqSe_ Pistcxi ......" ,', o
Rin!_:;Set, Ristes .0S0" Overs;ze
Lee.% :Piston .Pin 222
Pin Assembly, Piston, Standard 224.
Pin >_ssy., Piston ,005" Oversize 225
Rod AsseF.abty, Connectb 9 227
ROd '_............... ,_'s's's,4_
,_,ba_:>uNb:y, OO(1[lee'u!x%
.02(}" ;vt'n'_"v"'i,_.s,_;b._.b::._' Cra%_kDin, So_e ......o_".12
Screw, Connecting Rod 240
Valve, ExhE,.ust 265
Vaive, _ntake
SOT nq, "_ '_
Spdng, Exhaust Valve
Guard, Flywheel
Retainer, Intake Valve
Rotocoii, Exhaust Valve
Retainer, Exhaust Valve Rotocoii
Tappet, VaIve
Gear, Cam
.... Gasket, Carburetor(to Elbow)
272554
94637
224061
9:3805
94098
495800
231789
231855
231854
224540
494383
49 ,'.'.._o_
94-616
495796
224539
494379
4.94381
281 i65
281164.
494.380
494537
PAwg
2i 38t 9
28 t 051
8938t5
93535
"762767
260871
2827@3
490815
494887
94513
495157
493935
94742
262785
394358
_,:_t 535
* GaskeL Carburetor
Stud, Carbu_etor Mounting
Washen Spring
Sc_ew, Se¢,qs
Screw, Idie Speed
**Pin, Fioat Hinge
** Vaive Assemb!y, Inlet ,,,_,,.._._-"_4i_
tnleL Valve Sea_
Vaive, Choke
**Vaive, Needie
Oarbu_et,x' Overhaui f<il
Screw, Eibow Mountir,.g
** i:qug VVe;ic;n(Sold in Kit Only)
Va!ve, Throttle
Shaft and Lever_ Thrott!e
*** Ge.skeL Float Bowl
.... Washer, Fiou£ _owl Screw
** Shaft _" ...... Choke
,_..;_,,. L_(::.x:V({?_"
** Nozz!e /JeL Carburetor
** jT';i'_ot,,.Jet
Carbu_ete_', L.Ibow
Nut, Air C:Ie_ner Mounting
L.ine, Fuel
SC_'ew_ .."!},_{:-_rq s
L;_]_,,,_"(}(:'Ve_T, or
Sorirg.Gove:'no_:
Oii ".....i'r .... _:_ea_ '
;3r;_.u;i.-:et.._.ssembiy
.-:';:'Jar'_..,(b_c:,,/::'_'r_o;"Contrei
(}i"art!:.::. {}:_':>it:):r) o F
Leve;" &ssem_:)iy, Geverno_
Wasi-e_, Gore;mot Crank
[::'i;ter Ft..ie}
C;a:,,"np,:::ssina
* ff_chJded in Gasket Set (494241)
** ;ncluded in Carburetor Overhaul Kit (497535)
*** Included in both Carburetor Overhaul Kit (497535)
and Carburetor Gasket Set (494385)
NOTE: AIi component dimensions given in U.S. inches
1 inch = 25.4 mm
5!

REPAtR PARTS
TRACTOR - - MODEL NU£oaBER 917 256451
BRIGGS & STRATTON ENGINE =_£ODEL NU_BEiB 289707_ TYPE NU;_;IBER 0! 79°0t
KEY PART K£Y PART
Nee ?,lO, DBSc2,RtPT!ON NO, NO, 9ESOR_tPTtON
284 94073 Screw, Shoulder, 726 392134
Hex Washe: Head
284A 94704 Screw.. iqex Head 727 490324
304 4.98319 Housir% Bbwe_
305 94819 Screw, Seres, 81owe; Housing 728 94627
Mou_tii-,g 729 281i59
306 224545 Shieid_ (3yfinder 729A 225!'70
307 94623 Screw_ Seres, Cyiir;,der Shield 74I 262i35
Mounting '757 2!2359
308 491490 Cove< CyihderHead 758 899891
309 497595 Motor. Sta_%_.:n 759 298909
310 497@02 Boit, Yhru 76t 93875
3t 1 497608 B<ush Set 783 280104
333 492341 AmTatu<e, M:%j@eto 80I 894556
334 93381 S<:,'_ew_Seres, A,wnature Mounting 802 497605
_.>..... 802592 _ q 4% S04
346 93705 Sc<ew_He;< Head 842 270920
356 494328 Wire> G!o-'dnd 847 495415
858 4c,4P4t.............. _.aa:_te{"'...............o_s_ 85'1 22' .,-xw,i;_o
383 'i9203 Pule< Hywi;eet 869 26i463
383 89838 Wrench_ Spark Pk_g 870 2133t6
423 94073 Screw, Seres 871 261961
¢'B ............ ' J'-i "_a _' o< ._ "'*_' <
443 4.93909 -_,.._i_,G<:;.,:_Air ,...,e_, _e_
455 22255I Cup, Screen tv'iounting 872 28i104
z'...S"7493903 K,no_ /x_-Ciea.!._et. 875 .""_-_:"_-_
......... ; ..... -1'<1} -z 4_ d,_ /
4G:::i_222562 Sc,"-een_Fiush Rotating 8'77 393456
4.74 393474 Starer A!temr4o_
48:';:_93!!1121 Screw. Sef¢_s 955 94.642
5!0 4,97506 OSw.%Stari::'r 965 94108
.......... bA_<k:.,' _jn_; o/'d [.'.}iOS"isk: Oii hJleF {.!}7:!_ 4.<;_..k:,/-._
524:68838 Seai, i::ilk:::"T_be 977 4.94385
525 _.96i i 3 Tube° Oil ..'.::i!ie< !i87 281 ! 5@
585 272403 _:_£Jem,6._K_:qrCiea[]er i 005 260i:;::_7
537 281 ! 06 * O.-!::_i:._i],"d_Ck)s.i-te_ 1006 224.4.i3
544. 497@03 Am_a_:<..:r,:;::2)t.::_'te:' i01_:} :1-91255
_)!:£;i! ,!t'N !i_Y7 BUShiY';g, fl]i(;,v@ 'XOf Cys_'ti( J044 9.4.]i,;'3
50:2 92513 Seit, Govern<x :,....ever 1053 272397
592 2:}i082 Nut, P:iex i090 ,:$97607
501 ......_..............
::'b0c, d L.}ia:riq_)_ )-L£._i _"':'
w£,)e
6ii 49.$¢5I Fuel tniei-ube
614 9_:_39_ uotte% Hai<H;n
618 282803 Spring, Choke Return
834 281t68 ** Seal, Choke Shaft
634A 49i328 * Seat Governor
6348 28i 167 ** Washe< Throttie Shaft
635 66538 Elbow_ Spark Plug
546 224546 Brace, Air Cleaner
8r:°_ 93498 Screw, Seres
AD
663 94620 Screw, Hex Head
663 280848 Spacer
Sea< Ring
{includes Mounting Paris)
L,ove_. b,.alt,_,
(includes ,k_bunting Screws)
Screw, Hex Head
Cti_, Lead Wire
Retainer Wi_e
t'],':. ,/a 'TA" "+t....
i...]i'_k,Counterweight
Cou r'..,!e_'we;ghtAssembly
Pin, Coun_:erwHght
Sc_ev%<}oLmto_weight
Gear, St,.:-::._4er
C,sp_Drive
Cap End
Seal. Oii Fiik_r Cap
Fill (]roup, Oil
7emfi,:_al, Ignition Cable
Seat, intake VaD.(e,Standard
Sea% Exhaust Valve, Standard
(kide, 'E!xhausi Valve
(iuicie, i,_--_t:-_!<eValve
sever, _-q,Cleaner
Bedy, Air Cieane_
Diode _:mdOormector Assembly,
<::)Lu!dC i:.cui!
:£,<.;_'ew:Fi.J,',_i{:bwl
i...,a,:.:k<m:t,i;_irCleaner Mounting
{Sowi i<sseynbiy, Carburetor
£)a<!i)_Ife_o[G.::_sketHit
Ss,:_i.']'_,":_i:i:ieShaft
i:::'.!V'}. ,):::i /w iff e i
P,etsi_ e< !::a_7
.._.be!:;<:i:
S.,.)rew,;_._xHead
IV}9,fiLiSl, 11>wn_,:_i"%
_,.::ie!_--,ine< Srus.h
RPM .... ; " o_ soG.11i}50; High: 3200-3400<:_._)@_Ngs, / _d: '[ F .....
* included in (Saskei 0..::_<..... \4_.o_',r'-'_o3o)_"
** !ncluded in Carbur@.or Ovemaui Kit (495799)
*** included in both Ca<bureto_ Overhaul Kit (497535)
and Carburetor Gasket Sei (494385)
NOT£: All component dirnensions given in U.S. inches
I inch :25.4 mm
52

SERVICE NOTES
53¸

SERVICE NOTES
54

SUGGESTED GUIDE FOR SJGH'TING SLOPES FOR SAFE OPERATION
ONLY RIDE UP AND DOWN HILL,
NOT ACROSS HiLL
o1
O1
SIGHT AND HOLD THIS LEVEL WIiTH
SKY LINE OFt TREE.

OWNER'
UAL
MODEL NO.
917.256451
IF YOU NEED
REPAIR SERVICE
OR PARTS:
FOR REPAIR SERVICE, CALL
TH{S TOLL FREE NUMBER:
1-800-4=REPAIR
(1-800-473=7247)
FOR REPLACEMENT PARTS
INFORMATION AND
ORDERING, CALL THIS
TOLL FREE NUMBER:
1-800oFON-PAR'T
(t -800o366o7278)
FOR CONSUMER ASSISTANCE
HOT LINE, CALL THIS
TOLL FREE NUMBER:
1=800o659_5917
®
12.5 HP IC
ELECTRIC START
38" MOWER
5 SPEED TRANSAXLE
LAWN TRACTOR
Each tractor has its own model number. Each engine has
its own model number.
The model number for your tractor witl be found on the
modet plate located under the seat.
The model number for your engine will be found on the
blower housing of the engine.
Afl parts listed herein may be ordered from any Sears,
Roebuck and Co. Service Center/Department and most Re-
tail Stores.
WHEN ORDERING REPAIR PARTS, ALWAYS GIVE THE
FOLLOWING iNFORMATION:
° PRODUCT- TRACTOR
MODEL NUMBER - 917.256451
ENGINE MODEL NO. * 289707, TYPE NO, 0179-0t
o PART NUMBER
PART DESCRiPTiON
Your Sears merchandise has added vafue when you
consider Sears has service units nationwide staffed with
Sears trained technicians.., professional technicians
specifically trained to insure that we meet our pfedge to
you, we service what we sel!.
153917 3.20.96 JH Printed in U.S.A.
_;::td_,t_,

®
ODEL 917.256451 OWNER'S MANUAL
_°Assembly
__Qperation
_CUstomer Responsibilities
_Service and Adjustments
_ Repair Parts
_AUToOP_; Read and follow all safety rules and instructions before operating this equipment.
FOR CONSUMER ASSISTANCE HOT LINE, CALL THiS TOLL FREE NUMBER: t-800-659-5917
II i _ilrr'

SAFETY RULES
Safe Operation Practices for Ride-On Mowers
IMPORTANT: THIS CUTTING MACHINE [S CAPABLE OF AMPUTATING HANDS AND FEETAND THROWING OBJECTS.
FAILURE TO OBSERVE THE FOLLOWING SAFETY INSTRUCTIONS COULD RESULT IN SERIOUS INJURY OR DEATH.
t. GENERAL OPERATION
o Read_ understand, and foI!ow all instructions in the manual
and onthe machine before starting.
, Only a!tow responsible adults, who are familiar with the
instructions, to operate the machine,
* Clear the area of objects such as rocks, toys, wire, etc.,
which could be picked up and thrown by the blade.
*Be sure the area is clear of other people before mowing. Stop
machine if anyone enters the area.
*Never carry passengers,
,Do not mow in reverse unless absolutely necessary. Always
!ook down and behind before and while backing.
, Be aware of the mower discharge direction and do not point
it at anyone. Do not operate the mower without either the
entire grass catcher or the guard in ptace.
o SIow down before turning.
,Never leave a running machine unattended. Always turn off
blades, set parking brake, stop engine, and remove keys
before dismounting.
o Turn off blades when not mowing.
Stop engine before removing grass catcher or uncIogging
chute.
o Mow only in daylight or good artificial light.
o Do not operate the machine while under the influence of
alcohol or drugs.
Watch for traffic when operating near or crossing roadways.
= Use extra care when loading or unloading the machine into
.._ a trailer or truck.
lL SLOPE OPERATION
Slopes are a major factor related to loss-of-control and
tipover accidents, which can result in severe _njuryor death.
All slopes require extra caution. If you cannot back up the
slope or if you feel uneasy on it, do not mow it.
DO:
o Mow up and down slopes, not across.
Remove obstacles such as rocks, tree limbs, etc.
Watch for holes, ruts, or bumps. Uneven terrain could
overturn the machine. Tal! grass can hide obstacles.
Use slow speed. Choose a low gear so that you wiJl not have
to stop or shift while on the slope.
o Fottow the manufacturer's recommendations for wheel
weights or counterweights to improve stability.
Use extra care with grass catchers or other attachments.
These can change the stability of the machine.
Keep att movement on the slopes stow and gradual Do not
make sudden changes in speed or direction.
- Avoid starting or stopping on a slope. If tires lose traction,
disengage the blades and proceed slowly straight down the
sfope,
DO NOT:
Do not turn on slopes unless necessary, and then, turn slowly
and gradua]ty downhill, if possible.
Do not mow near drop-effs, ditches, or embankments. The
mower could suddenly turn over if a wheel is over the edge
of aCtiff or ditch, or if an edge caves in.
,Do not mow on wet grass. Reduced traction could cause
sliding.
"DOnot try to stabilize the machine by putting your foot on the
ground,
*Do not use grass catcher on steep slopes.
2
Itl. CHILDREN
Tragic accidents can occur if the operator is not alert to the
presence of children. Children are often attracted to the
machine and the mowing actMty. Never assume that
chitdren will remain where you last saw them.
° Keep children out of the mowing area and under the watchful
care of another responsible adult.
= Be alert and turn machir_e off if children enter the area.
Before and when backing, look behind and down for small
children.
Never carry children. They may fall off and be seriously
injured or interfere with safe machine operation,
Never allow children to operate the machine.
Use extra care when approaching blind corners, shrubs,
trees, or other objects that may obscure vision.
iV. SERVICE
* Use extra care in handling gasoline and other fuets. They are
flammable and vapors are explosive.
Use only an approved container.
Never remove gas cap or add fue! with the engine
running. Altow engine to cool before refueling, Do not
smoke,
Never refuel the machine indoors.
Never store the machine or fuel container inside where
there is an open flame, such as a water heater.
Never run a machine inside a closed area.
o Keep nuts and bolts, especially blade attachment botts, tight
and keep equipment in good condition.
, Never tamper with safety devices. Check their proper
operation regularly.
*Keep machine free of grass, leaves, or other debris build_up.
Clean oil or fuel spiIlage. Atiow machine to cool before
storing.
" StOP and inspect the equipment if you strike an object.
Repair, if necessary, before restarting.
,Never make adjustmerits or repairs with the engine running.
Grasscatchercomponentsaresubjecttowear, damage, and
deterioration, which could expose moving parts or aliow
obiects to be thrown. Frequently check components and
replace with manufacturer's recommended parts, when nec*
essary.
, Mower blades are shaqo and can cut. Wrap the blade(s) or
wear gloves, and use extra caution when servicing them.
Check brake operation frequently. Adiust and service as
required.
&Look for this symbol to point out im-
portant safety precautions, _t means
CAUTION!!! BECOME ALERT!!! YOUR
SAFETY JS INVOLVED,
CAUTION: Always disconnect spark ptug
wire and place wire where it cannot contact
spark plug in order to prevent accidental
starting when setting up, transporting,
adjusting or making repairs.
WARNING
The engine exhaust from this product cpn-
rains c_iemicais known tothe State of Cati_or.
nia to cause cancer, birth defects, or Other
reproductive harm.

CONGRATULATIONS on your purchase of a Sears
Tractor, It has been designed, engineered and manufac-
tured to give you the best possibte dependability and
performance.
Should you experience any probiem you cannot easily
remedy, please contact your nearest Sears Authorized
Sewice Center/Department, We have competenL we_i-
trained technicians and the proper tools to se_iice or repair
this tractor,
Please read and retain this manual. The instructions will
enable you to assemble and maintain your tractor properly.
Always obsewe the "SAFETY RULES".
MODEL
NUMBER 917,256451
SERIAL
t NUMBER
THE MODEL AND SERtAL NUMBERS WILL BE FOUND
.. r _.,_,__. UNDER THi_ SEAT.
rot ; qHthUi D RE,J .DRD BOTH S;_4 ..<c t.fu, JIBE,, A. _D
' DATE OF PURCHASE AND KEEP _N A SAFE PLACE
FOR FUTURE REFERE]NCE.
s :NANkA ! ACSR {E aENT
A b_a,s Maintenance Agreement Jsavailable on this prod_
uct° Contact you_ nearest oearo store for details,
o Read and obsewe the safety roles.
Foliow a regt_ar schedule in maintaining, caring for and
doiny yOU, ,R:_,,_._...
-_' Follow the instructioss under"Custom@:' Responsibili.-.
tkes': and "Sto(age '_sections of this owner's manua!.
PRODUCT SPEO F OAT1ONS
HORSEPOWER: 12.5
', e" t P _ ¢'T"
GA_OL,NE _,A, A_I, Y ! .25 _'_A_ t ,'_......
_A UNLEADED REGULAR
ND TYPE: ._
]Otl TY_>E (API-SFiSG): SAE 30 (above 32'W)
1 SAE 5W-30 (below 32'_F)
OIL CAPACITY: 3.0 PINTS
SPARK PLUG: CHAMPION RJIgLM
(GAP: .030") STD 3614.58
VALVE CLEARANCE: INTAKE: .005" - .007"
EXHAUST: .009" o .0I I"
kGROUND_SPEED (MPH): FORWARD:
Ist 1,0
2rid 2.1
3_d 3. I
4tt_ 4.0
5th 5.'i
REVERSE: I ,,6
TIRE PRESSURE; FRONT: 14 PFL
RF _ n, 12 PS:i
j CHA_GING..,._.:,Y'S __M.
L.........
t
i BATTEF1Y:
]_aL_-,b__BOLT TORQUE:
3 AMPS BATTERY
5 AMPS Iflc.ADLiL-_fmtS
AMP!FIR: 25
MtN° CCA: t90
CASE SIZE:: U!R
30°35 FI', _ _ _:"
WARNING: This tractor is equipped with an internai
combustion engine and sho_..lld not be used on or near any
unimproved forest-covered,, br-sh-covered or grass-.cov -.
e{-ed land uniess the engine's exhaust system is equipped
with a spark arrestor meeting applicable iocai o__st_,_talaws
(if any), if a spark attester is useG it should be maintained
in effective working oMer by the operator.
in the state of Caiifomia the above is _equired by !aw
(Section 4442 of the Caiifomia Pubiic Resb'urces Code).
O_.h_r _t;:_l_:P,rnav _ave s rnila_ laws. Fede "_.ilaws _,b[) V on
f_de_i lands A s ad< a_"es_e_ for t_ m_,ff _r i's av;diabte
through your nearest Sears Authorized ::;ervk>_ Cented
DepaRment (See REPAIR PARTS section of this manual).
i
, _U,JiqOct_,,a aDO td, ,8 Li[:) aCCO_dii']Ci"°' "E.d_lr.,y_x_ I.IS _ }1For one k_) year f._omthe date of ourch,ase_ if this Craftsman Riding "_,, ',...... i.'. maintained, _"_"" ...._.... _ , n _d
to the instructions in the owner's maneaJ, Sears wiii repair or repiace, :free of charge, any [saris found to be defective in rnateriai :!
o_workmanship, i
This Warranty does not cover: _
_ Expendabb items which become worn dudng normal use, such as blades, spark piugs, air cteane(s, beits, etc.
o Tire replacement or repair caused by punctures from outside objects, such as na_, thorns, stumps, or glass.
Repairs necessary because of operator abuse, negligence, improper storage or accident or the failure to maintain the
equipmeni according to the instructions contained in the owner's manual,
Riding equipment used for commercia_ or rental purposes.
LIMITED 90 DAY WARRANTY ,ON BATTERY
For ninety (90) days from date of ourchase if an}, batteR7 included with this riding equipment proves defective in material or
workmanship and our testing determines the battery, will not held a charge, Sears will replace the battery' at no charge,
IN-HOME WARRANTY SERVICE ON YOUR CRAFTSMAN RIDING EQJIPMENT IS AVAILABLE AT NO-CHARGE FOR 30
DAYS FROM THE DATE OF PURCHASE, PLEASE CONTACT YOUR NEAREST SER _IC_ CENTER. AF-!X::R 30 DAYS
FROM THE DATE OF PURCHASE. WARRANTY SERVICE iS AVAILABLE BY TAKING YOUR _.,RAFTSMAN RIDING EQUIP-
.... AVM _._Lc
MENT TO YOUR NEAREST SEARS .:_RVICE CENTER. (IN@JOME WARRANTY c_Emv,,._,_WILL STILL BE
AFTER 30 DAYS FROM THE DATE OF PURCHASE BUT A STANDARD TR_P CHARGE WILL APPLY.) THIS WARRANTY
.°, ,..,_::_ONLY VVH!t_ETHIS :PRODUCT _StN THE UNITED STATES.
This War_nty gives you specific iegat fights, and you rnay also have other rights which may vaPy from state to state.
SEAR& ROEBUCK AND COo, D/817 WA, HOFFMAN LoTAT=S, IL ,'-n_,.,.,,_o,,_
3

TABLE OF CONTENTS
MAINTENANCE SCHEDULE ...... :............................... t4
SERVICE AND ADJUST_ENTS ........................... t9o24
STORAGE .................................................................... 25
TROUBLESHOOTING ,.o;....................................... 26_27
REPAIR PARTS-TRACTOR ................................ 30-47
REPAIR PARTS - ENGINE .................. .................. 48-52
PARTS ORDERING/SERViCE ............... BACK COVER
A
Accessories ........................................... 5
Adjustments:
Broke ................................................ 2"I
Cart)L!_etor .................................... 24
Mower
Front.-TooBack ......................... 20
SideoTo..Side ........................... 20
Thrott!e Contact Cable .................. 23
Air Fii!:eh Engine .................................. 17
Air Screen Engine ..................... :........ 17
Assemb}y ............................................. 7-.9
B
Battery:
Charging ......................................... 8
• 3ta@_g witiq Weak Battery .....:..... 22
Sto_age ........................................ 25
Terminals ...................................... i 6
Beit:
Motion Drive
Removal/Replacement ............ 2!
iV_owerBlade(s)
RemovaItRep!acement ............ 21
Blade:
:!.harpening .................................... l 5
:::_epi_cement .................................. ! 5
B;'ake Ad]usiment ................................ 21
If%
%.#,
......ss<o.'...,,__!"_.o!"Adjustment ........................... 24
%,0 n,t_oi:,s _o.,,.I,_1 i 0
Customer Responeibi!ities ............... 15o,i8
Air Filter .................................... i 7
Air Smeen, Engine ..................... 17
Cooling Fins, Engine ................ !7
Engine Oi! ................................ 16
Fuei Filter ................................. 18
Spark Plug(s) ............................ I8
Tractor:
Battery ...................................... I6
Bk_de ........................ ,................ i5
Lubrication '-'- "
,_hart ...................... 14
Maintenance Schedule ............ i4
Tire <}}are.......................... 8,t 5,22
Transaxie ................................. I 8
Cutting Height, _4ower ......................... t I
£
Electrical:
Interlocks and Relays .................. 23
Schematic ..................................... 29
Wiring Diagram ............................ 30
Engine:
Air Filter ........................................ !7
Air Screen .................................... 17
Cooiing Fins, Engine .................... 17
Oil Change ................................... 16
Oil Level .................................. ! 2,16
Oil Type ......................................... I6
Preparation ................................... 12
Repair Parts ............................ 48_52
Sta_ing ......................................... I3
Storage ........................................ 25
Filter:
Air Filter ........................................ 17
Fuel .............................................. 18
Fuel:
Type ............................................. I2
Storage ........................................ 25
Fuse .................................................... 23
H
Hood Removattlnsta[lal:ion ................... 23
L
Leveling Mower L.e,.k .......................... 20
Lubrication:
Chart ............................................. i4
Maintenance Schedule ....................... 14
Mower:
Adjustment, Front4o-Back ........... 20
Adjustment, Side4o-Side ............. 20
Blade Sharpening ........................ 15
Blade Replacement ...................... 15
Cutting Height ...................... :....... 11
Installation .................................... 19
Operation ..................................... 12
Removal ....................................... 19
Mowing Tips ........................................ 13
Muffler ................................................. 18
Spark Arrester ........................... 3,40
Oil:
O
Cold Weather Conditions ........ t2,16
Engine .......................................... ! 6
Storage ................. ...... :................ 25
Operation ....................................... i0-13
Operating Mower ................................ I2
Options:
Accessories .................................... 5
Spark An'ester ........................... 3,40
P
Parking Brake .................................. 104 1
Pa_s Bag .............................................. 6
Parts, RepiacementiRepair ............ 30-47
Product Specifications ........................... 3
R
Repair Parts ................................... 30--47
S
Safety Rules .......................................... 2
Seat ....................................................... 8
Service and Adjustments ............... 19-24
Carburetor ........ :........................... 24
Fuse ............................................. 23
Hood Removallinstatlation ........... 23
Motion Drive Belt
Removal/Replacement ............ 21
Mower Belt(s)
Removal!Replacement ............ 21
Mower Adjustment
Front-to-Back .......................... 20
Side4o-Side ............................ 20
Mower Removal ........................... 19
Tire Care ................................. 8/i 5,22
Stope Guide Sheer .............................. 5 !
Spark Plug(s) ....................................... 18
Specifications ......................................... 3
Starting the Engine ........................ 12- I3
Steering Wheel ................................. 7,22
SIopping the Tractor ............................ ! i
Storage ................................................ 25
T
Throttle Control Cable Adjustment ...... 24
Tires ............................................ 8,t 5,22
Trouble Shooting Chart .................. 2&27
Transaxle ............................................ 16
W
Warranty ................................................ 3
Wiring Diagram ................................... 30
Wiring Schematic ................................ 29
4
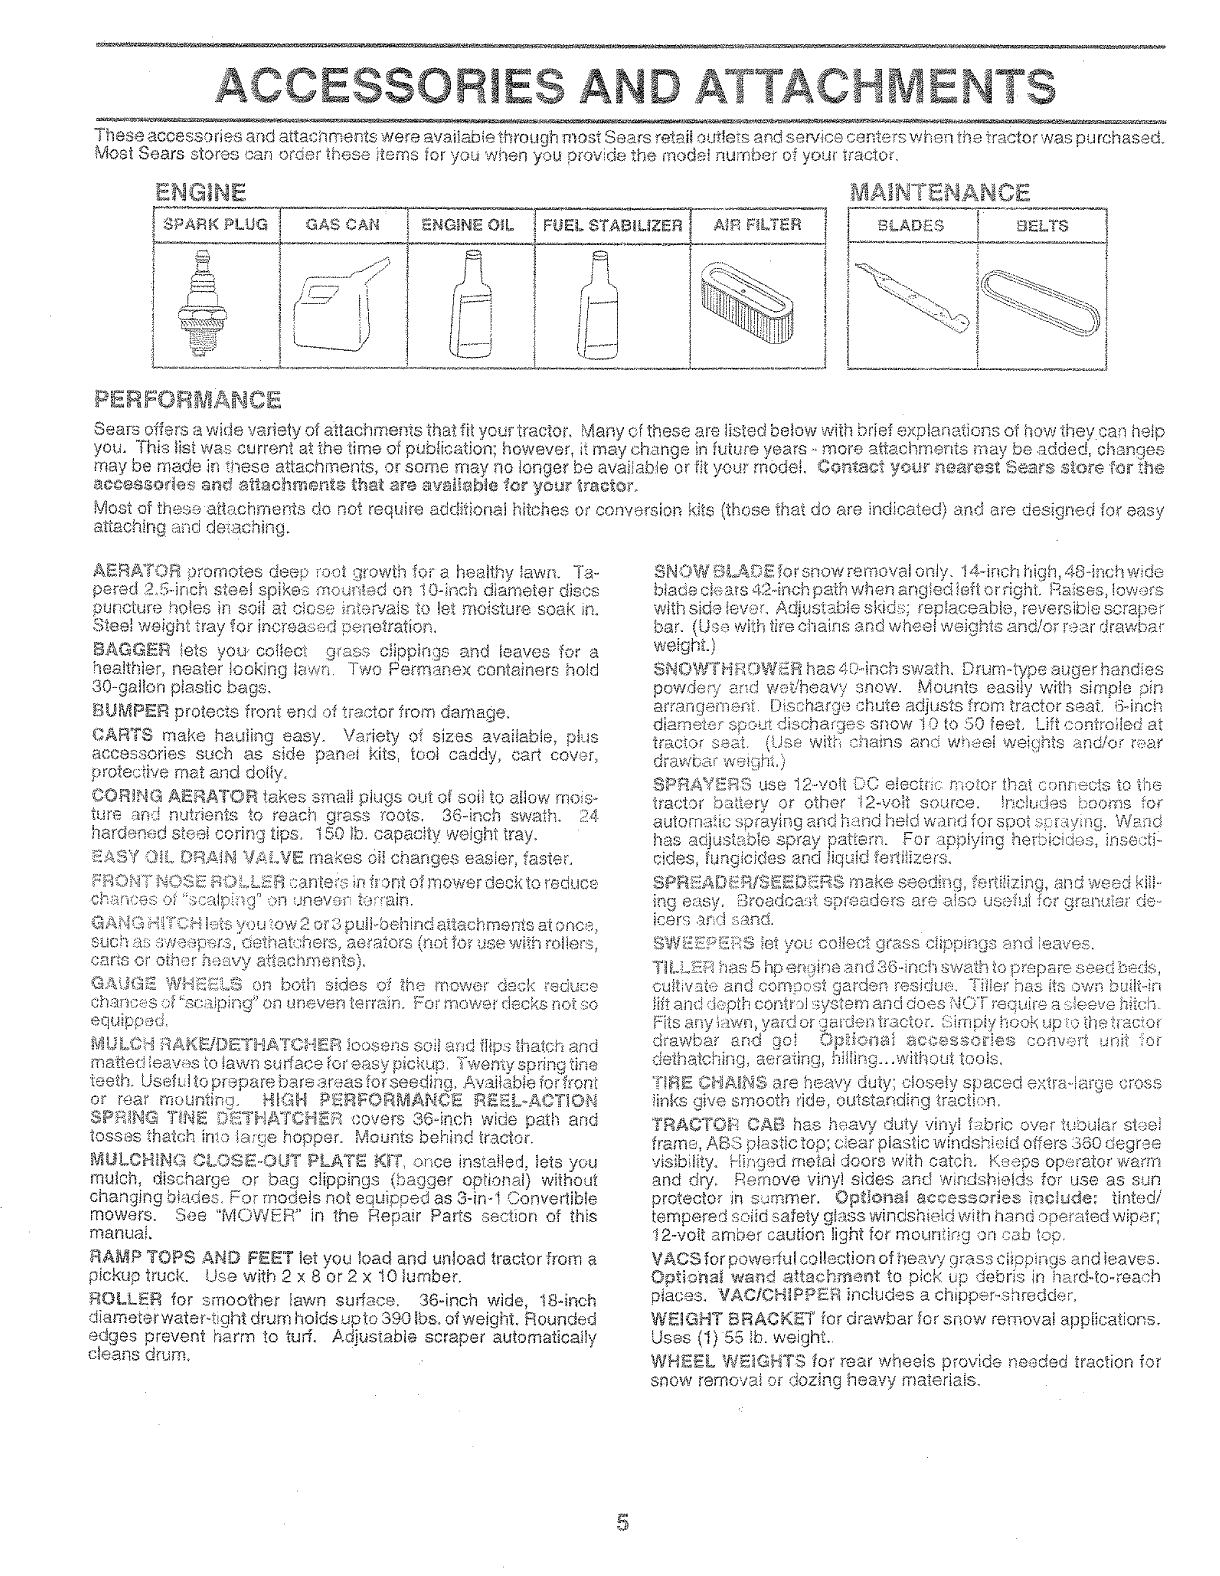
ES D ATTACH
These accessories arid attachments were avaiiab_e through most Sears retaii out!ets a_sdcease.......s, ,_=,s wn..,] the tractor was purchased.
Most Sears stores can order these }_ems for you when you provide the mode! number of yo_Jrtractor,
•_._ _ :_s ....
SPARK, !
GAS _A_,_
C ;'
i
i
_NGINE O_L ] FUEL STABILIZER
4
;,IA
PSzRFOB ANC£
Sears offers a wide variety of attachments that fit your tractor_ Many of these are tinted be_ow with brief explanations o_how they car_hetp
you. This list was current at the time of pc_b_icatk_n;however, it may change in fuiure years .. more attachrner_ts may be .added, chan9es
may be made in these attachments, or some may no Ionger be available o_ iit your model, Co_ta.ct your 5nearest Sears store for _he
accessode_ and attach_'ae_ts that are avaiiable for you_" t_'actot.
Most of these attachments do not require additional hitches or conversion kits (those that do are indicated) and are designed for easy
attaching and detaching.
A_:RA"_OR promotes deep root growth for a healthy lawn. Ta-.
pe_ed 2Sqnch steel spikes moun_.ed on 10-irich diamete" discs
puncture holes in 8oi_ at ciose k_tervais to let moisture soak in°
Steel weight tray for increased ps,qetration.
BAGGER iets you. co{bct g_ass c_ippings and leaves for a
healthier, nea.ter !ookJng _awr. Two Permane,x containers isold
30-gallon piastic bags.
BUMPeR protects front end of tracto_ from damage.
CARTS make hautbig easy. Va_iety of sizes avaiiabie, pRts
accessories such as side pans.i kits, tool caddy, car1 cover_
proteciive mat and doiiy..
CO_t_G A_RATOR takes small plugs out of soil to a!tow mo_s_.
ture and nutrients _e reach grass roots. 36-inch swath. 24
hardeeed steei coring tips. 150 }b. capacity WEight tray.
_ASY ©_,. ©_Usji,,_VALVB makes 6i! changes easier, faster.
FROKT NOSE Re LL_K:_can(era in f_'antof mower deck to reduce
ch_w_,cesof ":£:xdpi_g" on unev:::_rte;_ain.
GAN(I_ _4([_C_qk,_tsyou :ow 2 of 3 pull-behind attachments at once,
such as sw_e.p_ws, dethatchers_ aerators 0"_otfo_ _se with rol!ers,
carts or other heavy attac_'_ments).
,@A_JG_ '@'{N£:HX8 on both sid_-s of the mowe_ deck reduce
char_ces o_;%s_aiping" on uneven terrain° For mower decks r_otso
equippe£
_qi!jLC_-__:_{AKI_J{}_THA'TCN_£B_oosens soil and flips thatch and
matted ieaw;_sto !awn suHace _o_'easy pic-kL_p.Twenty spring line
taeth_ UseXl to p_epare bare areas to,seeding. AvailaNe forfi'oni
o_ rear rnet.intin_. H_GH PXRFO{a_JIAHC;{ R£9:b,.ACT_©H
SPFIIHG 7_N_ t:iiqi_.-:TH_itrCH_Rcovers 36-inch wide path and
tosses thatch into _a_!e hopper_ Mounts behir_d tractor.
MUL,CH_HG ©LOSS_OUT PkAT#£ HK once insta!led, lets you
roach, discharge or bag clippings (bagger optional) withodt
changing biades For models no_ equipped as 3qml Convertible
mowers. See "MOWER" in the Repair Pa_Is section of this
manual
RA_P 70£S AND _£_'I _let you k)ad and untoad tractor from a
pickug truck, Use with 2 x 8 or 2 x !0 Iumber.
ROLLER for smoother lawn surface. 36-inch wide, 184neh
d;ame[e_,'wate_4ight drum holds upto 390 Ibsoof weight. Rounded
edges prevent i3amq to tu,ff. A@ustable scraper automaticaJly
cleans dt'um,
SN©W 1_loAD£ for snow removal only. 14-inch higiq, 48qr_ch wide
btade eF;ars 4.24nan path when angled !eft or right. Raises, !owers
with side [eve_'. AdiIsstable skids; _ep!aceabte, reversible sc_aper
bar. (Us,_ with tire chains and wheel weights and/or rear drawba!-
weight.)
SNOW°_%_ROW_:_Rhas 4i}...inchswatK Drum-.type auger hat, dies
powdery and we,/heavy snow. Mounts easily with simple pin
a_rarigement. Discharge!._eh_.£eadjusts from tractor seat. 64nch
diameter spo_£ discharges snow 10 to S0 feet. Lift eont_o_Iedat
tractor seat. (Usa with chains and whee! weights and/or rear
drawbar wef£iht,)
a_'_._£_a use 12.ovolt :DO _ r_.__',-_s,._.,_,..motor that connects to _ss
tractor ba_t,ery or other 12-volt source, !rscludes booms foe
automa£ic si.wayk_gand h_,.ndhe!d wand for spot a_}r.win% Wa_sd
has adjt_st_:_blespray pattem_ For appiyir_g herbick_es_ inse.cti _
cides, [ungicides end }iquid fe_!i_izers_
SPF}£AB£B/S_©i_'_RS make seeding, fertilizing, and weed kiiF
i!_g e_,sy, @_oadcast spi'eade_s are aIso user@ for gran@ai de._
ieers arc:t sand,
SWSEP!_._:.::9iet yo_._co!_eet grass clippir_gs and leaves,
T_LL_!iI!:}!__as5 hp er_Nne and 36.-inch swath to p_epai'e seed beds,
cu_tiw4e and com::}est garden residue. 7ifler has its own buik4a
}iftand depth control system and does NOT require a s_eeve hitch
Fits any kawn,yard or gai'd.en tractor. Simpiy hook _@i:othe t!actor
drawbar and go! O_st]©_'_ai accs-sse_ies convert _nit for
dethatching, aerating, hiJli,qg...without toeis_
"f'_RBC_,_A,_NSate heavy duty; closely spaced e-;traqarge cross
iinks give smooth ride, outstanding traction,
S-°RACT©R CAB has heavy duty vinyl fabric over tt._butar staei
frame, ABS p_astic top; Near plastic windshield offers 360 degree
visibility. Hinged me_al doers with catch. Keeps opet'ato_' warm
and d% Remove viny! sides and windshields for use as sun
protecto_" in s.snmer. O}st]oaa_ accessories _ck_de; tinted/
tempered soiid safety glass windshield with hand operated wiper;
!2-voit amber caution light for mour_tir_g on cab top.
VACS for poweff@ collection of heavy g_ass dippi_sgs and ieaves.
Optior_a_ wand attac_'wsser_tto pick up debris in hud4o-reach
piaces. VAC/CH1RP_R includes a chipper_shredde.n
WEIGHT BRACKK1 _for drawbar for snow removai appiicatior's.
Uses (t) 55 ib. weight.
WHSFCLWB_GHTS for roar wheeis provide needed traction for
snow removai or dozing heavy matedais.
5

OF HA
t;'.
17
I
t
i
i
(1} ,::>I<iOUld_'el"..... _-'_5olY5i! 8-i 8
+. ............. ............ ..,
/,. -,.,
<,.? ,.,\
\
% ..J:" i
... .......... .-
/,
/
{i } _-oct-",__asnei" 112
i : "" _,-.::,.>n,_17i32 xi-3ii6 x12 ¢:sauge
i
$
_ t27 ...... _=v,:÷,,.-."i,a4<;20 8!4
' {2) Hex Nuts 114-20
i
ii
. , ,_._,c_W_she,,.'s t!4
i
t2) V'_8.sb,e,,'s _,,ai_°,,_.x 518 )<!9 Gauae
Ra_r'ts sao}(ed se_arat_D_ i_1 Cantton.
t
!
I
:I
I
l
t
!
i
Steering
'¢I=_o..d
_sianual
Steenng
Soot
V_dmo
Cass':_tt,._
,--? ........................... _-
I
I
I
I
Parts Bag ._
...._,_.-,@_-_¢._._]:',oc,:Fi-O_i£i'l@':;V£i #,_.,l'_ *
I.......... 7 ,,,'++ ............ _" ",,
<7,"¸
/
/")
...... E_L_---i;-/TT............... i.Nhee!
.... , ,................................ .,i
Steednq v",4neei " -7
_', ...................... 7
Ad::::_.ioter
(2) _" "
t I
Slope Sheet

YournewtractorhasbeenassembledalthefactoPiwithexceptionofthosepartsleftunassembiedforshippingpurposes°
,,_' _'_ ,dg, _u:;n_d .-_d_*:4yo UseTo ensure safe and proper ooeratbn of your _,ac,._.,all _oarts;and hardware you assemble mus_ be + _,+,_,_ ,-,_r- -=',
the correct toots as necessap! to insure proper tightness.
TOOLS REQUIRED FOR ASSE_IBL¥
A socket w_ench set wil! make assembiy easier. Standard
wrench sizes are iisted.
(!) 5/16" wrench (!) 9/16" wrench
(2) 7/16" wrenches Ti_e pressure gauge
(1) t/2" wrench Utlity knife
(1} 3/4:' wrench
When Aght and left hand are mentioned in this manual, ;t
means when you ane, in the operating position (seated
behind the steering whee0.
TO R_2_:JIOV[_TRAOTOB _RO_q OARTON
UNPACK CAn'T'ON
_._ Remove eli accessible :loose pa._Ssand parts ca_tons
fi°om cai!:on (See page 6)_
° Cut s.Jonglines on ca_tono,from top to _._.,._,h_-.¢-_.,-w_,_,_a.t four
comers of ca_ton and Iay panels flat.
n,<_c_for any additionai I _ ..
. .OO.,_-,_padre Or Ca_ons ahd
remove,
BEFOR_ _ROLLtHG °TRAO°TOF_ OFF
SK@
ATT,AOH STffff_]NM WHffE£ (See _]go t}
'_ Side the steering bushing ove_'the steering shdto
Raise steering shaft fc,n_varduntil screw holes in dash
lne up with steering bushing° instatI two {2) she,et
mete; screws and tighter_ securMy.
* Position steering• boot ova( ,:_..,,.,,_-___.-,_;_shall
,_ Piece tabs of steedng boot evertab st(>ts in dash and
push down to secure.
,_ Slide steedng wheei adapter onto upper steedng shaft,.
,, n,...._,'._o._., _.........e, _,,,t,_;=,ya_e poiKt;ng
o._it_.__,front wheeis of the-'+r..,,--',--r .......'_---,......
st..'aight fo_wa_'d.
_* Position steedng wheel so cross bars are hoAzontai
{ieft to dght) and siide onto adaptor..
o_ Assets:hie l_cu._ fiat wasf_er ........ "":=,_e3/8-z_,_iocknut and
t_ghten secure 8,
_> Snap steering whee_ insert into center of steering
wheel,
'_ Remove protective ptastic from tractor hood and gdk
1M_OR ANTk, HECK FOR AND REMOVE ANY STAPLES
IN SK![) THAT MAY PUNCTU RE TIRES WHERE TRACTOR
is To ROLL O_:F SKtO,
TO BOLL TRACTOR OFF SKID (See Opera°
tics s®ctios f@_ !oeat]o_ and _unetion of con-
t_ols)
o Press _itt}ever plunger and _ais¢ attachment lift lever to
}is highest position.
Re!ease parking brake by depressing clutch/brake
peda!.
'_ P!ace gearshift lever in neutral (N) position.
_, Rol tt'actor backwards off skid.
Remove banding holding discharge guard up agains;:
tractor. #

ASSE BUsf
The tires on you_"tracto__were ovednflsted at the factor_ for
shipping purposes: Co_rect tire pressure is important for
test cutting periofmancso
Reduce tire pressure _e PSI shown in "PRODUCT
SPEC!FtCATJONS' on page 3 of this manual.
OH_OK ©_OK LEV_LHESS
Forbestc_4ttingresuits_mower housingshouldbe pFoperiy
leveled, See N°O L._2VELMOWER HOUSING" in the
Serdce @nd Adius'tmet_tssectiono_thismanual.
See the figut"es that a_e showr., for re@acing motion and
mowe_°b!ade diive be!ts in the Secvioe and Adjustments
section of this manual. Verify thst the belts are routed
corrt_ctly,
I:;£&AT
S¢+,'I''?I£FQV
£i,L)I<O00:?I /! '
;: !!!
I
I::;'!f.';;,,:-3
/$ ##
;-u_er you Ieat'n how to ope_a_e your tractor, checL Io see
that =-_ is ......
t_e brake p_'opedy adjusted. Se_-'."TO A©JUST
..... 8,._,n of
i'[}aflIlal,
BEFC_RE YOU OPE];©_,7'2: AND &-N#OY YOUR NEW
0 Aoo urn.. TH,q7-"ytOU RES'E'I VE7WACTOR, WF Vi:,qSH_" ,,':,..........= ,c-
7WEBLY:S'TPI£'/::_FOF_%IANCEANDS/4 FiSF:AC770N #-i:_OH
N-lie QI_z_£iTY PRODUCK
PLi.EASE REWzZW K_E FOLiOW!NG OHEC_:fZ._ST;"
/All assemNy }nstl°uctiens have been compJeted.
# No rems_ining ioose pa',_tsin earl:on.
/ Battery is pr,,.)peAyp_epa_ed and chai'ged. (MinimL,'m
! !_,our_'.t'¢ amps).
¢" Seat is adjus%_=,dcomfor!:e_biyand tightened secL_reiy.
/AI tit'es are pi'operiy inflated. (For shippi¢.,g putpcses,
the tiles were ovednfisted at the factory)°
/" Be sure mower deck is pi'opedy ieveied side-to-:side/
front.;to-rea_ l%r be.st cutting _'esuits. (Th'es y_ft..istbe
ptepe_ly inflated fe_ ieve!ing).
# Oheck mower _.q"sdddve be!ts. Se sure they are routed
p_operiy aro_nd puleys and inside at bait keepet-s.
t.,f,_osswiring, oee m.a_.al connections are s,.&,secure
and wires are propedy cIamped.
WH&K fiEARN@G HOW7"O USE YOUR KRA OrOR. PAY
E)(_r-?AA 7hCEN770N TO THESFOLLOWING IMPORTANT
!7_MS:
V" Engine oit is at proper ]ev@,
/ Fuei tank is filied wkh fresi% clean, reguiar unIeaded
gasoline.
../ Become familiar with al controls - their location and
function, Operate them befo._eyou sta_ the engL__e,
7" Be sure b_ake system is in safe operating con,::i_tion.

Thesesymbo!smayappearonyourtracto_orinliteraturesuppliedwiththep_'oductoLearnandunde,,standthei_meaning.
BATTERY CAUTIONOR REVERSE FORWARD FAST SLOW
WARNING
ENGINEON ENGINEqFF OILFREo,_,I.;_:. LIGHTSON LIGHTS" .......
L_Y .....
_H J,\_;. MOWER HEIGHT DiFFEREN]]AL
rUE_ PARKING BRAKE jNo_,_.Klxb'
REVERSE NEUTF_AL -_v"_ i C)*%_
MOWER UFT AttACHMENT
CLUTCH ENGAGED ..,LUTort DISENGAGED
IGNiTiON
_ANG_:_, KEEP HANDS AND FEET AWAY
HYDROSTATIC FREE WHEEL
(Hydro Models oniy)
9

OPE ON
A_i-_u_ _%gUH FRAC I OH
._,-0E,_uW:£TM THIS OWNEWS _ANUAL AND SAFETY RULES BEFORE OPE_ATING YOUR TRACTOR
cvmu_:_,_e the i!iu.sti'ations with your tractor to famiiarize yourse! with the locations of various controls and adjustments. Save
this rqar uai fi:)r?.mxe refers)nee.
Our t<actoi's co<from] to lh.q ,:,<_..f_'_'v,,%,standa_'ds of the American Nationa.i Standards !nstitute.
_r'.<_._,*,l._mI_;:w.'t"CLUTCH LI.':VIIR: Used to engage the
_' ,,,e,_b}ades, or _' .... "_'_ to _, _,
,,,o ..... othe¢ .=Lavhr,__n.,_ muunt..d to your
< {11,,,,kO _.
THIOTTL!iCHOKE OONTtOL: Used for sta_ing and
oonti'oiIing engine speed.
o,ra_k-
,+,.olj _CH,=_#RA¢_Ic ;=¢,:_,_=_.. Used 'lOt dec,IuIchfflg and ....
ingthe tractor and starti,-@ the engine.
PA,'_MH_:_ BRAKE: Locks c!utchibrake pedal into the
b<s.keposition.
_AR_'m,r I _% _,R, Selects the speed and direction of
t_actor.
ATTACHMENT LIFT L[!V[R: Used to raise; lower and
adjust the mower deck or other attachments mounted to
your tractor.
Lt_\T L_V_R PLUNGER: Used to _elease attachment fft
lever when changing its position.
IGNFIqON SWITCH: Used for sta#:ing and stopping the
engine,
I0
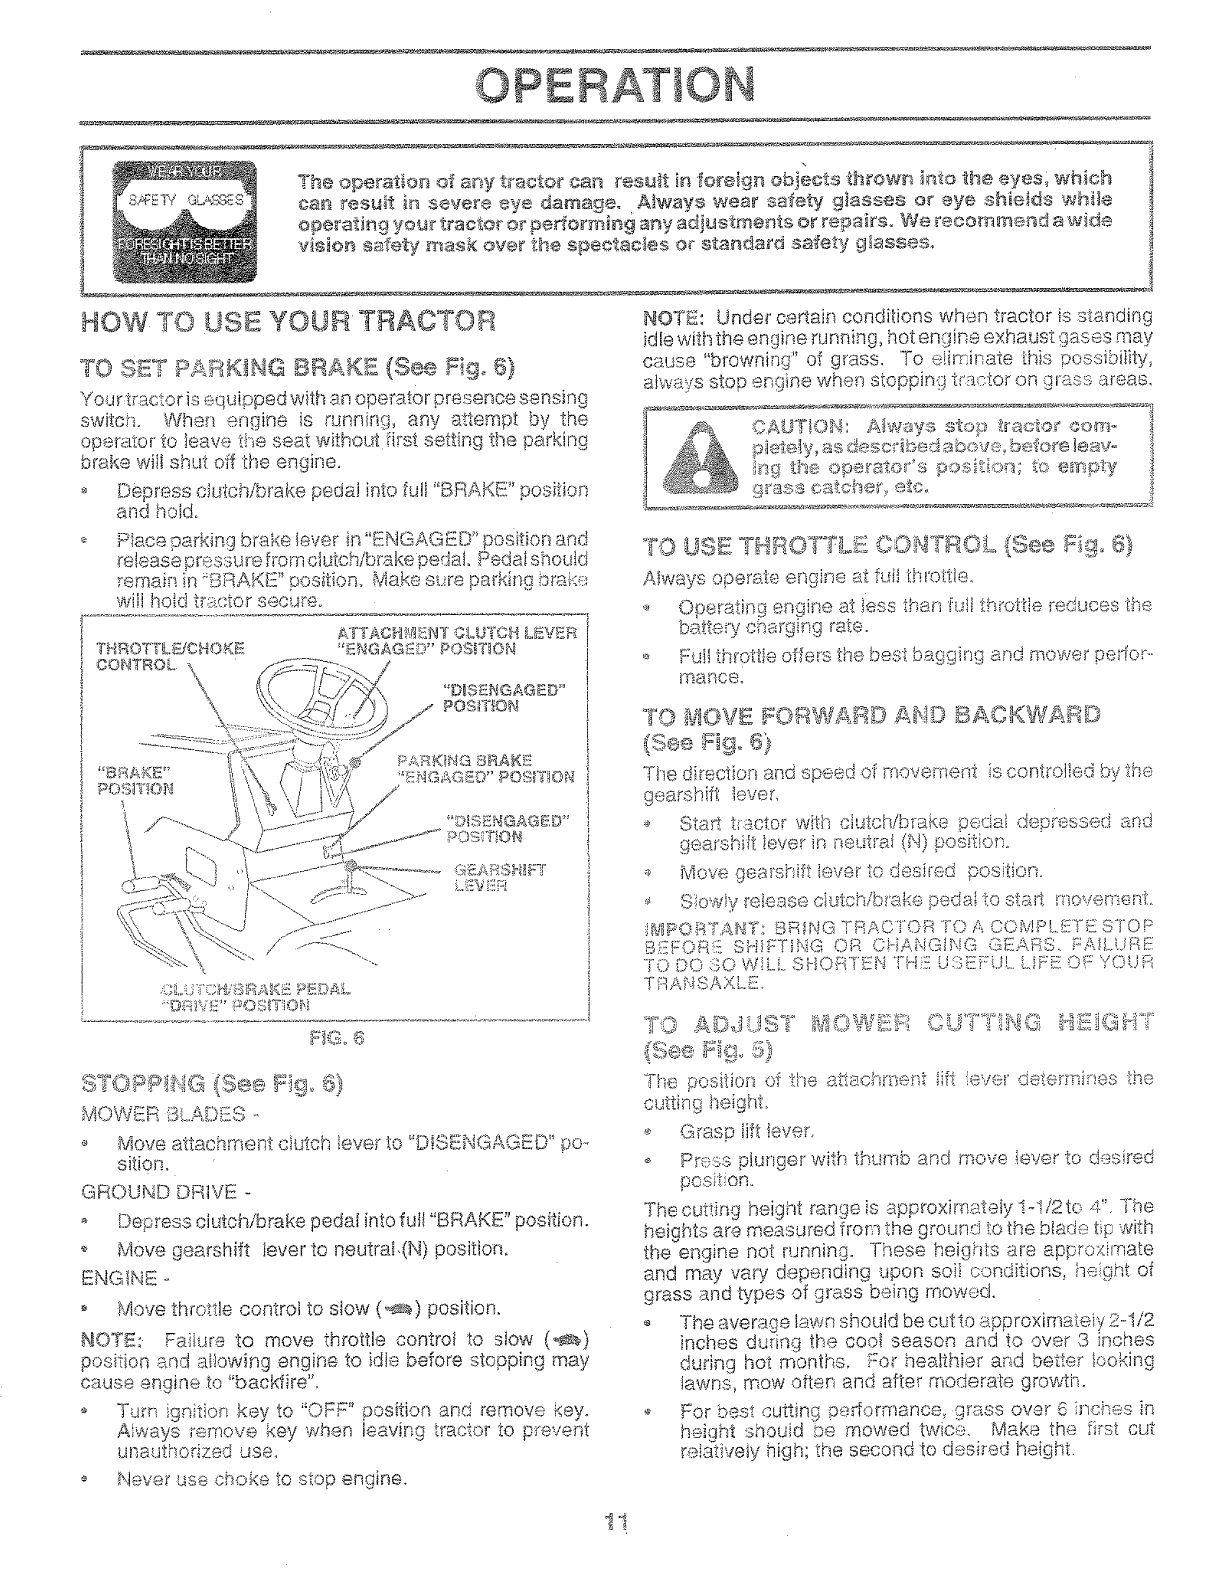
OPE
HOW TO USE YOUR TRAOT_R
TO SET PATx_K@4QBRAKE (See FiG 6)
You r:tracto r is equipped with an operator presence sensing
switch,, When engine is running, any 8fttempt by the
operator to ]eave the seat without fi!*st setting the parking
brake wit shut off the engine,
Depress clutch/brake pedal into full "BRAKE" position
and hoido
_. P!ece parking brake iever in "ENGAGED" position and
rebase pressure from ciutchibrake pedal Pedaishouid
;,amain }n ;:BRAKE _'position. Make sure parking b_ai,,:_::::
wil! hoid t_stctor secu_eo
STOPP@4Q (See _:'iG 6}
MOWER BLADES -
,:_ Move attachment c}utch lever to "DISENGAGED '_pc.,
sition.
GROUND DRIVE -
= Demess clutch/brake pedal into full "BRAKE" position.
Move gearshift lever to neutraD(N) position,
ENGINE -
o Move throttle control to slow (_) position,
HOTE: Faiiuf8 to move throttle control to stow (,_)
position aad aitowing engine to idle before stopping may
cause engineto "backfire",
Turn ignitior_ key to "OFf position and remove key.
Aiways remove key when leaving t_actor to p_"event
unauthorized use,
o Neve_ use choke to stop engine.
NOTE: Unde_ certain conditions when tractor is standing
idle with the engine running, hot engine exhaust gases may
cause "browning:" of grass, To e!iminate th}s pessibiity,
always stop engine when stopping tri_ctor on grass area_,
,_,*,L!f!O .... Always stop t_aotor ogre- ,
p4ete@,as desc,sqbed above_ _efo_e lear° 1
j_'_:_the ope_a_.o_ _sposition, te empty I
{:;_ass catc_qer_,etco :_
AM_I',/s operate engine at fl.Althrotth_iL
Operating engine at }ass than Mi throttle reduces the
batte._ycharging rate.
_ F:uilthrottie offers the best bagging and mower peffo_--
f_aP, ceo
TO _iOVE FO_:aWARD AND BACKWARD
(See 15"i9,(5)
The diFection and speed of movement is cont_oled by the
gea_shif!: bver,
+ Staff b4actor with ciutchibrake pedai dep_°essed and
gearshift iever in neuti'ai (N) posH:]ono
-_ Move gearshift ieve_ to desired position.
€ S!o,_,Ayr,aiease c;utch!brake peda; to start moven;enL
ii?IPOR!R/&HY: BRING TRACTOF] TO ACO?dPL,_iT'E S'FOP
_._ L :I%,Y'i [9 ,
_;,::;,-_,iH: :brIn-F_NG OH CHANGING ....'-" "=' Fi:'ALUREI
TO DO ,10 WILL.SHORT!N'-i '!-H-{USEi:-UL LiFE O_: YOUR
TIIAHSA)(LE.
TO £©dUST H2iiGHT
{See FiG 5)
The post:ion of the ath_chm,er_t iift iever determines ihe
cutting height,
-- Grasp lift 1ever,
Pr:_:}sspiunger with thumb and move iever to desired
poftion,
The cutting height range is approxime, te!y !-I/2 to 4", The
heights are measured from the ground £oIhe biade tip with
the en@ne not running. These heights are appro×imate
and may vary depending upon sot conditions, height of
grass and types of grass being mowed.
The average lawn should be cut to approximateiy 2-I/2
inches duqn9 the cooI season and to over 3 inches
during hot months, f:o_"healthier' and better looking
lawns, mow often and after moderate growth.
,_ For best cutting pe,donmance, grass ove_"6 inches in
height should _e mowed twice, Make the first cut
re!ativeiy high; the second to desired height.

U o E
TO OPERATE! _OWdA (See _!ig, 7)
You rtracto__is equipped with an operator presence sensing
switch. Any attemot by _he operator to ieave the seat wih
the engine running and I've attachment aiutch engaged will
si_ut off the el]gine.
_ Se!ect desired height of cut.
StaF: mow@" blades by engaging attachment clutci]
cont_oi.
, ',"....... m i & ,_'%vit 0
"X) <rw'x_:_,uOW:=H d se_,_s_getsttachment
!£
C:hx_se the .>,.,,,_q-',,e_,.'o_s_.eed before starting up o_down
>. Avoid stopping .::_changirsg speed on isils.
if s}owir_g _!{ ecessary, move throttie control {ever to
sbwe_" pos_i:ton,
,,, H"s:oppi_g Js..}psoluteJy'necessa% push ck£chiD_ake
pedai q.Hc}dy te brake position and engage pa_king
brai<e.
Mov:s- ._earsisfft iever :'o.!st .'sear.,.. :Be.sure you }save
"_Sowed morn _or traei:or to roll oJ,gt,_,y as you rested:
o To res.tad movemer %.dowfy, .dease e.ark,t g b_ake and
cit..'tchibrake :pedaJo
q
o Make a 1.um_ slowly
R_e attachment fft to.highest position with attach-
ment lft control.
o When pushing or towing your tractor, be sure gearshift
Ieve_ is in neutral (N) position°
DO ROt , ' _""_
_;},o.,_,or tow tractor at more than five (5) MPH,
iNOTB: To p_otect hoed from d@mage when Wansporting
yod_'tractor on s.ta;ck or a traiier, be s.u_-ehood is clesed and
secured to t_actor. Use an appropriate means of tying hood
to .t,,acto_"{rope, cord, etc.).
!r"._g.I
........ _o,. !._,.uof hen been shipped, fromthe
"".he<.._with summer vve,g A;oil,.facto% aiready ":_ ""'"_ _"
lo /,,., qround,
............ r g_neot with tractor on _ --,_
siq'i_,Ss pk "_'m
oFJemove oi!-iiti.cap/dipstick, ,._nd_.t,,_,_..,e_ ,, '-*" _"," ";':-"
,..,,i_'_'°fi"<'-,..--and screw -.'-,.-,,..<.tight, wait for _s_.f¢.._gs_..--,,s,_o_d_,,
remove and _'eadoi! !<.veL If necessary, add ol g.ntii
....FULL" mark on dipstiok is _.._c__,-_
.e_,_,_,_.._.Do not overfi!l.
..,.,,a,. _, .,.,.rs..,,J,, you shouid cr_ange oil fo_
C.............".......I .....; ' . ,;_..,.1,O. ix]anuall.
..d_.J[o,,4s,-.-.les,ue_'_,,b!lities_," "sof this . . ' '}
., To :hancje ..... ........... the 0 d---_,,, -c_.... ,:'_'._li-
ties seotJon ii'] this menuS.
t2
.Fiii K_ei lank. Use fi"esh, ciean, regt.Aar urfie.:.ttded
gasol_se with 8 mir@rium of 87 octane. (Us _::,of ieaded
gasoiine wiJ!incrs'ase cs.rbon and _ad oxile deposits
and reduce va-.ive!ire},.Do _otmi:,<el wJ-i:t_ga:..o!ne.
}]:'tJrGi%ase !L}(,} ]o q_JaN_ities _hai ca, _',be iJse(J within _}0
,daystoassu;'crue! f_eshness.
IB_IPOF_TAH%',".WHEN OPERATING IN TZMP[iRA-!'UR_.S
S-i']LOW32°F(0<:0), USF FP;ESH, CLEAN W_N-YEIRGRADE
GASOL.IH£ TO H£LP INSURE GOOD COLD WEATHYR
S'T'ART!NG,
WARH/HG: Exoedence _ccares _ "
, , }at alcohol blended
fuels (ca!led gasohei or .....,_'_-,gethan@ or methanoi) can
attract meisture which leads to separation and formation of
acids during storage. Acidic gas can damage the fuel
system of an engine while in storage. -To avoid engine
prob eros., the _,u.=,,;-_,system should be emptied before stof
age of 30 days or longer. Drain the gas tank, sta£ the
engine and IeI it run until the iuei lines and carburetor are
O_
empty. Use fresh fuei next season, o_;e Storage Instruc-
ions for additionai information. Never use erN_ne or
ca@uretor cleaner p['oducts in the fuel tank or permanent
damage may occur,
I _.._,,TlOk,!o Fill to bottom of :gas t..ar_k
:1
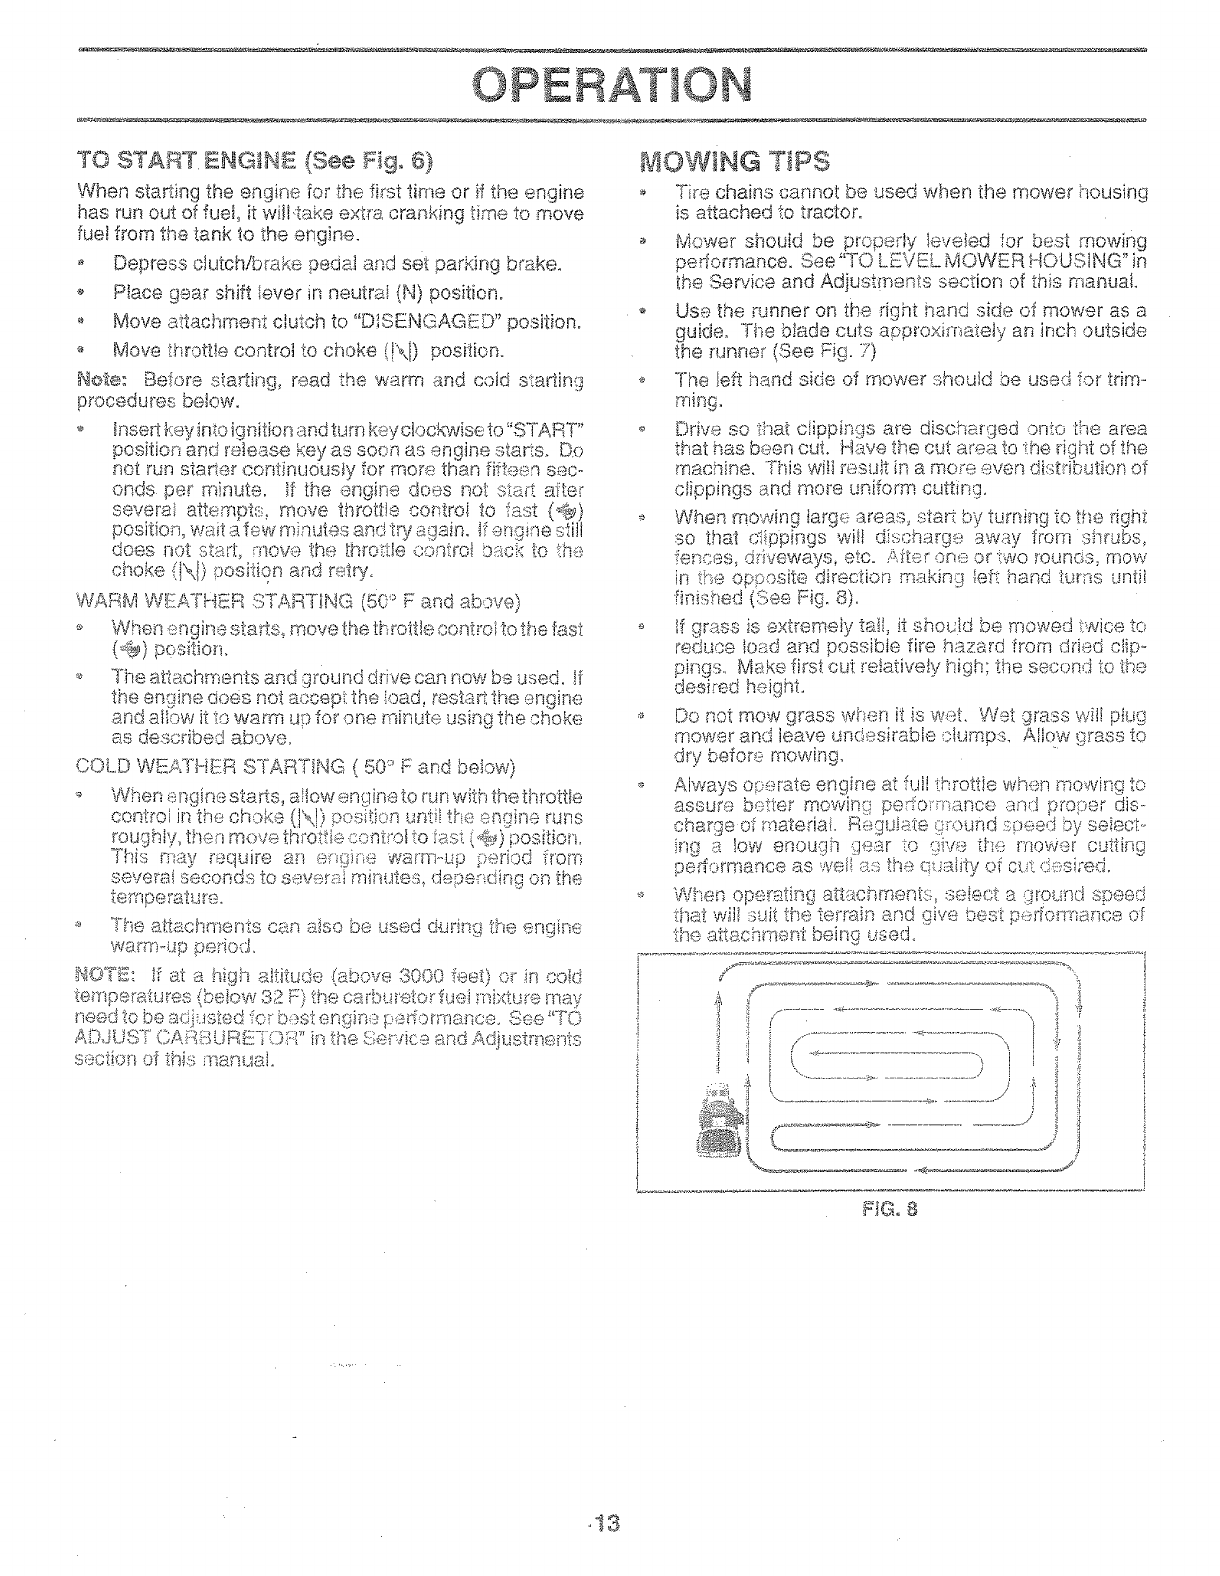
09E
TO STA aT EH@HE (See Fig, 6)
When staddng the engine for the first time or if ti!e engine
has run out of fuel it wJJt<take _"÷ "
_.,_da 8rar_king time to move
fuel from ÷t-._ .
,.i_ tank to the engine.
Depress o!utchibrake pedal and set parking beake.
,, Place gear shift lever in neutrai (N) position°
o Move attachment clutch to °'m_M'_'A_¢zcm"
........ _s_,,a.... position.
Move thrott!e controt to choke (iX[) position.
Here: Before "'-" the
.:s_.art_t_g,read _. _ warm and coid starting
procedures below.
hsert key into ignition and turn key clockwise to "START"
position and retease s_eyas so(m as engine starts_ D.e
not _un sta_er continuously for mere than fifteen sec_
onds per minute° ....i_t_'e engine does not <_._._,.afte_
severa_ a_.t_mpt_ move tt_rottie controi to Tast (@)
position% wait a few m autos anci try again° If_a_,ne ,_MI
doe_ rK)t rt "''d
" ..._.¢_..... move the thro@e control beck f:o the
choke {1\I) oosition and rot%
WARM °'amx_°"_'_:_c_'_"_' _' _....
_v,,,:,:.,,_,.;_o _Ai_ t _N',.;_(50°Fand above,}
-_ When engine .>.aabo_- _'_-'.move the in rottF',,....... cont tel to t_e fast
(@) position.
o 1%e<_.4t_d__=.nts and g,o._na ch,_,e car,,now be used. !f
the erx]ine does not scOOp!,the !oad, restart the ,_"-%in_:,_ "_
and aibw itto warm up for one minute using the choke
as described above.
COLD WEATHI:!!R STARTING ( 50':' F and beiow)
-_ VVhene.ngine sta _:s,allow engine to run with the throttle
control in the choke (]\]) position until the engine runs
roughly, then move throi:fie control to _ast(.'@)position.
This may require an e_!;ff,e warm--t_p period from
severai seconds to several minutes_ depending on the
temperature.
_'-' The attachmer_ts can also be used c!uring the engP_e
warm-.upperiod
NiOT_: If at a high altitude (above 3000 feet) or in cold
temperatures {bebw 32 F) the carburetor fuei mi4tu!'e may
ADJUST CARaURE] O q"'in the Service and Adjusm_ents
section of this manual.
FIG, 8
.,13

R R:SP BI ES
I _ _}Tia _g(: _mx<:_o[te_; wilen opera:ring under a hear 7 ioad or in hif_h amb[erll temperatures,
2, S<}!_/i?;_ moe_ ofte;_ !,/net,, ope_(,£fng its @ty o!' dasty colditions,
:':f. i ::du :}_ed wRh oii fif;'er, chm:ga ot evsy 50 hours,
4- ;:_epk_ ;a bktdes more o[_ea when mow_i G ]rl sandy ,';-._ol.
5 - If aquipae<,i wlti_ _:ctjusiabie sy.sterr_.
",B-Not reqq_ed if ,_quipped with mainlenm_ced,_e6 batep/.
7 - Tl!7_:#.eniront ax}_:_pivot boll to 35 fblbs, maximum,
Do fiat ovsqighten.
Son% adjtJstme_sts wiif %-ed to be rP.,adepe_°iodically to
7:',_opetiymsJr_taitsyour tr%i:or.
AII adjt,_stmer;ts ir_t!-e Semicf; and Adlus';:ments section of
t!;is .................... _ be checked ai: ,.._._ o, ,c_...<d. ,>,_a..o,,,
Once a year you shouid }'epJacethe spa_°kplug, clean
or replace ai_ tilted a_sd check blades and belts for
we% A new spark plug and clean air filter assure
proper air@el mixture and he!p your engir_e run better
and last longer°
_:_ _'Dt_ _-?"- e"<,__ -__,;',_'=
bh_{.: erigiRe 011 ,:,_e
Oheck b:ak:e operatk}n.
+ C_-#._-_-.,,_._....,..tit-e p_'essure.
Check '" :o'_s,., "
._of . .. _astefiers.
14
!ITtPORTANT; DO NOT OIL OR GREASE THE PIVOT POINTS
WHICH HAVE SPECIAL. NYLON BEARINGS. VISOOUS LUBRI-
CANTS WILl., ATTRACT DUST AND DIRT THAT WILL SHORTEN
Tlq_ LolF_ OF THE SELF+LLIBRICATING BEARINGS. IF YOU
r"£EL THEY MUST BE LUBRICATED, USE ONLY A DRY, POW-
DERED GRAPHITE TYPE LUBRICANT SPARINGLY,

CU MER LKIES
TRACTOR
Always obsewe safety rules when performing any ma]nte-
Ranc@_
BRAKE OPBRATIOH
if tractor requires more than six (6) feet stopping distance
at high speed in highest gea,r,then brake must be adjusted.
(See "TO ADJUST BRAKE" in the SewJce and Adjust°
merits section of this manual)_
Maint@n proper air pressure in al! tires (See "PROD-
UCT SPECIF]CATIONS" on page 3 of this manuat)°
Keep tires free of gasoline, oil, or insect control chemi-
cals which can harm rubber.
o Avoid stumps, stones, deep _"ru,,_, sharp objects and
other hazards that may cause tire damage.
BLAD£ @A8_8
Fo_"best resu!ts mower blades must be kept sharp_ Re-
place bent or damaged btades,
BLAD£ R_,MOVAL (See _dg°_'°°_'_,G
Raise mower to highest position to allow acce@sto
biades.
* Remove hex belt, iock washer and flat washer securing
biade.
._ i.qstal new or resharpened blade with traiIng edge up
towards deck as shown.
Reassemble hex boll _ockwasher and fiat washer in
exact order as shown.
_, Tigi_tep, bolt securely @0-35. FI_._....,_:_._h_, torque}o..
',:_ ,¢I_;1HI: ;.:_:,u,._ =.,..,,.....iSGRADEoilEAT _hEAIID.
NOTE: We do not £_cor'nmer@sharpenir_g bl_._de-bul: if you
do, be sure the blade is balanced
[
J
!
l
!
I
]!
:]
I
BLADB i.. J
:................%..f
FIGo 9
t
i
[
i
Care should be taken to keep the blade balanced, An
unbalanced blade wil cause excessive vibration and even-
tuat damage to mower and engine,
+ The blade can be sharpened with a fiie or on a grinding
wheel. Do not attempt to sharpen while on the mower.
To check blade balance, yo u wit! need a 5/8" diameter
steel boit, pin_ or a cone baiancer. {When usk'6Ja cone
baianc@r, blow the instructions supplied with bah
ancer)_
Side blade on to an unthreaded poddon of the steel bolt
or pin and held the boit or pin paraiiei with the :£!round..
if blade ;s balanced: it should remain in a hodzont_i
position, !f either end of the !:,'.lademoves downwar:::i_
shad°penthe heavy end until the blade is balanced.
HOT_!: Do not use a nail fo_ balancing his.de. The lobes of
the center hole may appear Io be centered, but a_e net
,/- /"
//'
,/
,/ /!i
£qG, !0
15

S B LK ES
8A_'%EF_Y
Your tracto_ _aasa battet_/charging system which is suffi-
cient for normat use. -However, periodic charging of the
batte%' with an automotive charger wiIt extend its lifeo
_,,._phatter, and termina!s ctean.
Keep battery bo_ts tight.
Keep smatl vent holes open.
,_ Recharge at 6d 0 amperes for I hour..
Co__c,sion and d._ on :_hebatte%_and tem_inais can cause
the battery to %ak _'power,
_ Open battery box di}or.
,o Disconnect SLACK batte_y cable first then RED bat.-
tery cane {_md_'emove battery f,_omtractor°
,_ i_;nse the battery v_,'ithpia;n wate_ and dry.
._ Ciean tem__inais and battei% °cabi,e ends with wire b_usis
,tintii bfighL
'_, Coat terminats with @'ease of petroleum ]eI_y.
_, Reinst:{d[ battery (See _'CONNECT' BANTERY" in the
Assembiy section of th{s manuai)_
_,h..s.....\.,_.... _or.... _ro,;_._ .... and wear after !00 hours of
._..........u._, ,_.;.,_rs_eptace if necessary_ Yhe baits am not
adjustable_ Heplace _a_,.,,,,if :_hev becim _o sup from wear.
_',_;_ut ....... " ...... {tom build-up o_ dS: and (,,la,_ which
C:CFi _"eSti'iC _,,.;,.u_h;";"_ _.....v-
Ortiy sue high quaiity detergent oil rated with AP_ service
SP{_{",i!St:)OSNY GRADES
i
c"" ..2@' 0 _
[ ,_ .30 _ .10 _. .!0,_ 20 _ .')O_ 40 '_ [
i TT'MP_FiATUR_ RANG@ ANTICIPATED BEFOg:V:: NEXT OIL CHANG_ [
F_G, II
HOT_: Although multi°viscosity oils (5W30, IOW80 etc.)
improve starting in cold weather, these multi-viscosity oils
will result in increased oil consumption when used above
32°F. Check your engine oii level more frequently to avoid
possible engine damage from running low on oil.
Change the oH after the first two hours of operation and
every 25 hours thereafter or at least once a year if the
tractor is not used for 25 hours in one year.
Check the crankcase oil levei before staring the engine
and after eacheigh_ (8) hours of operation: Tighten oi! fitt
cap/dipstick securely each time you check the oii level.
TO u.r_._P._r'_.:_u: ENGINE O!L (See Figs. 11 and 12)
Determine temperature range expected before oil change.
All oil must meet AP! sewlce classification SF or SG.
lBe sure tractor is on Ievel surface.
_, Oil wil! drain more freely when warm.
_'_oh oi! in a suitable container.
Remove eli fi!I cap/dipstick. Be careful not to allow dirt
to e_ter the engine when changing oil.
o Remove drain plug.
o After oii has drained completely, replace oil drain plug
and tighten securely.
o Refili e,%ine with oil through oil fill dips£ick tube. Pour
slowiv. _!2 not ove_iitli For approximate capacity see
PRODU,,, oP,.._t_t,_LA,]ONS 0n page 3 of this
manual,
Ose gauge on oil filI cap/dipstick fo_'checking ievel. Be
sure dipstick cap is tightened securely fo_ accurate
,e_...dmg. Keee oii at "FULL" line on diostic£
/
/
F_G,, 12
OIL HLL
CAPiDIPS'?_8}(

tBl _S
AtE FILTE_ (See Fi9o 13)
Your engine wi! not run pmperiy usir_g a dirty air filter.
Clean the foam pre-cleaner after even./25 hours of opera-
tion or eveR/season. Service paper ca_ridge ever 7 100
hours of operation or every season, whichever occurs first.
Service air cleaner more often under dusty conditions.
Remove knob(s) and cover.
TO SERVICE PAE-CLEANER
o Slide foam pYe-cieaner off cartridge.
Wash it in fquid detergent and water,
Squeeze JtdB_in a clean cloth.
_ Saturate it in engine oil. Wrap it Jn clean, absorbent
cioth and squeeze to remove excess oil
,o If very diRy or damaged, replace pro-cleaner.
Reinstat p_e-clearler over cartridge.
Reinsta!i cover and secure with k_ob(s}..
TO SERVICI C/\RTRIDGE
OL£AN AIR SCREEN (See Figo t4)
Air screen must be kept fr_e of dlR and chaff to prevent
engine damage from overheatir_go Ctean with a wire brush
or compassed air to remove dirl arqd stubborn dried gc._m
fibers.
INGtNI COOLING FINS (See £g. !4
Remove any dust, dirt or oii from _ngi_e cooling fins to
prevent engine damage from ov_rheating.
*, Remove screws from biower housing and !ift housing
and dipstioR tube assembly off engine°
_ Cover ot ftl openi_g to prevent entry of dirL
<_ Use compressed air or stiff bristle brush to thoroughly
clean englr_,ecooling fins.
To reassemble, reverse above procedure°
Ii!Gill @OOLIIQ 7IN::I
Fl(]h i 4
FIG. t3
17

ILiT ESCUSI°O
_V_UFFL£R ,.
, muffi_, and spark attester (if
!nsoect and reotace corroded _-,
equipped) as it co,aid create a fire hazard and/or damage.
SPARX PLUGS
Replace spark plugs at the beginning of each mowing
season or after every 100 hours of operation, whichever
occurs first. Spark plug type and gap setting are shown in
"PRODUCT SPECIFICATIONS" on page 3 of this manuat.
1N,dN[{ RiF, L _aLTER (See Fig° I5)
The rue! fiiter should be reptaced once each season. If fuel
filter becomes clogged_ obstructing fuel flow to carburetor,
replacement is required.
With e%ine cool, remove filter and plug fuei line
sections.
P_e _,p,*,f-_ fiiter in sos t or in fuei line with arrow
pointing towards carburetor,
', Be sure there are no fuel line teaks and ciamps are
p_opedy positioned.
!mmed;ately wipe up any spiiigd gasoline.
'_IG,15
CLEANING
.>_ Clean engine,batte% seat, finish, etc. of all foreign
ma_ter.
Keep finished surfaces and wheels free of all gasoline,
oil, etc_
_, Protect paff_ted sudaees with automotive type wax,
We do not recommend using a garden hose to ctean your
tractor unbss the electrical system, muffier_ air filter and
carburetor are Covered to keep water ouL Water in engine
can resuit in .a shortened engine life.
18

A E
CAUTION: BEFORE PERFOR_IN_:_ ANY SERVICE OR AOJU_T_ENT_:
Depress c_utch#brake pedai fuliy and set parkin 9 brakeo
P_ace 9eat'shift _eve__n _seut_a_{N) positior_0
o P_ace attschme_t ciutch i__"O_S_NGAGED" positioned
o _m ignition key "OF_" and ram®re key,
Make sure the blades arid a_ moving parts have comp_eteiy stopped.
#O_sconneot spark P_4g wire from spa_k plug and p_ace wire where it cannot come in co#tact with [
TO RE,_!#_©V_{ B_qOW_R (See Pig_, 18).
Mower wiil be easierto remove _rom th#_dght side of tractor,
P!ace attachment clutch in "©;SENGAGDD '_position.
Move attachment JiltIever forward Io iower mower to its
iowest position°
_ RoJlbe!t off engir_e pa!Iey,,
,_ Disco_ssect cit£ch rod from clutch iever by removing
retainer spring.
'_ Disco;_nect anti.-sway bar from chassis bracket by
removing retainer spring.
Disconnect suspension arms from rear deck brackets
by ,_emoving retainer springs.
Disconp,,ec_front links from deck by removing retainer
sprhsgs.
o F_aise!ift lever to raise s_Jspensio_sa_"ms.Slide mower
out from ur_der _racto£
_[_.aPO£TA_tT';tF AN ATTACHMENT O]'HER THAN THX
MOW_!iR DECK _{!:;TO BE MOUNTED ON THE TRACTOR,
REMOVi_i]i--.i_:£F:qON! L!NKS_
_ Raise attschmer-_t lift ieve_ to ib highest position°
_ S_ide_ssowerunder tractor with discharge guapJ to dght
side of tra:::-tor.
o Lowe_ lift ieve_ to its iowest positio_
_* hstatt mower _I peve_,se o(der _ .... _ _
CL, LITCbl RO_ L,_V_R
/9:USP_NS_ON FRON'T
ARbIS UNKS
!9
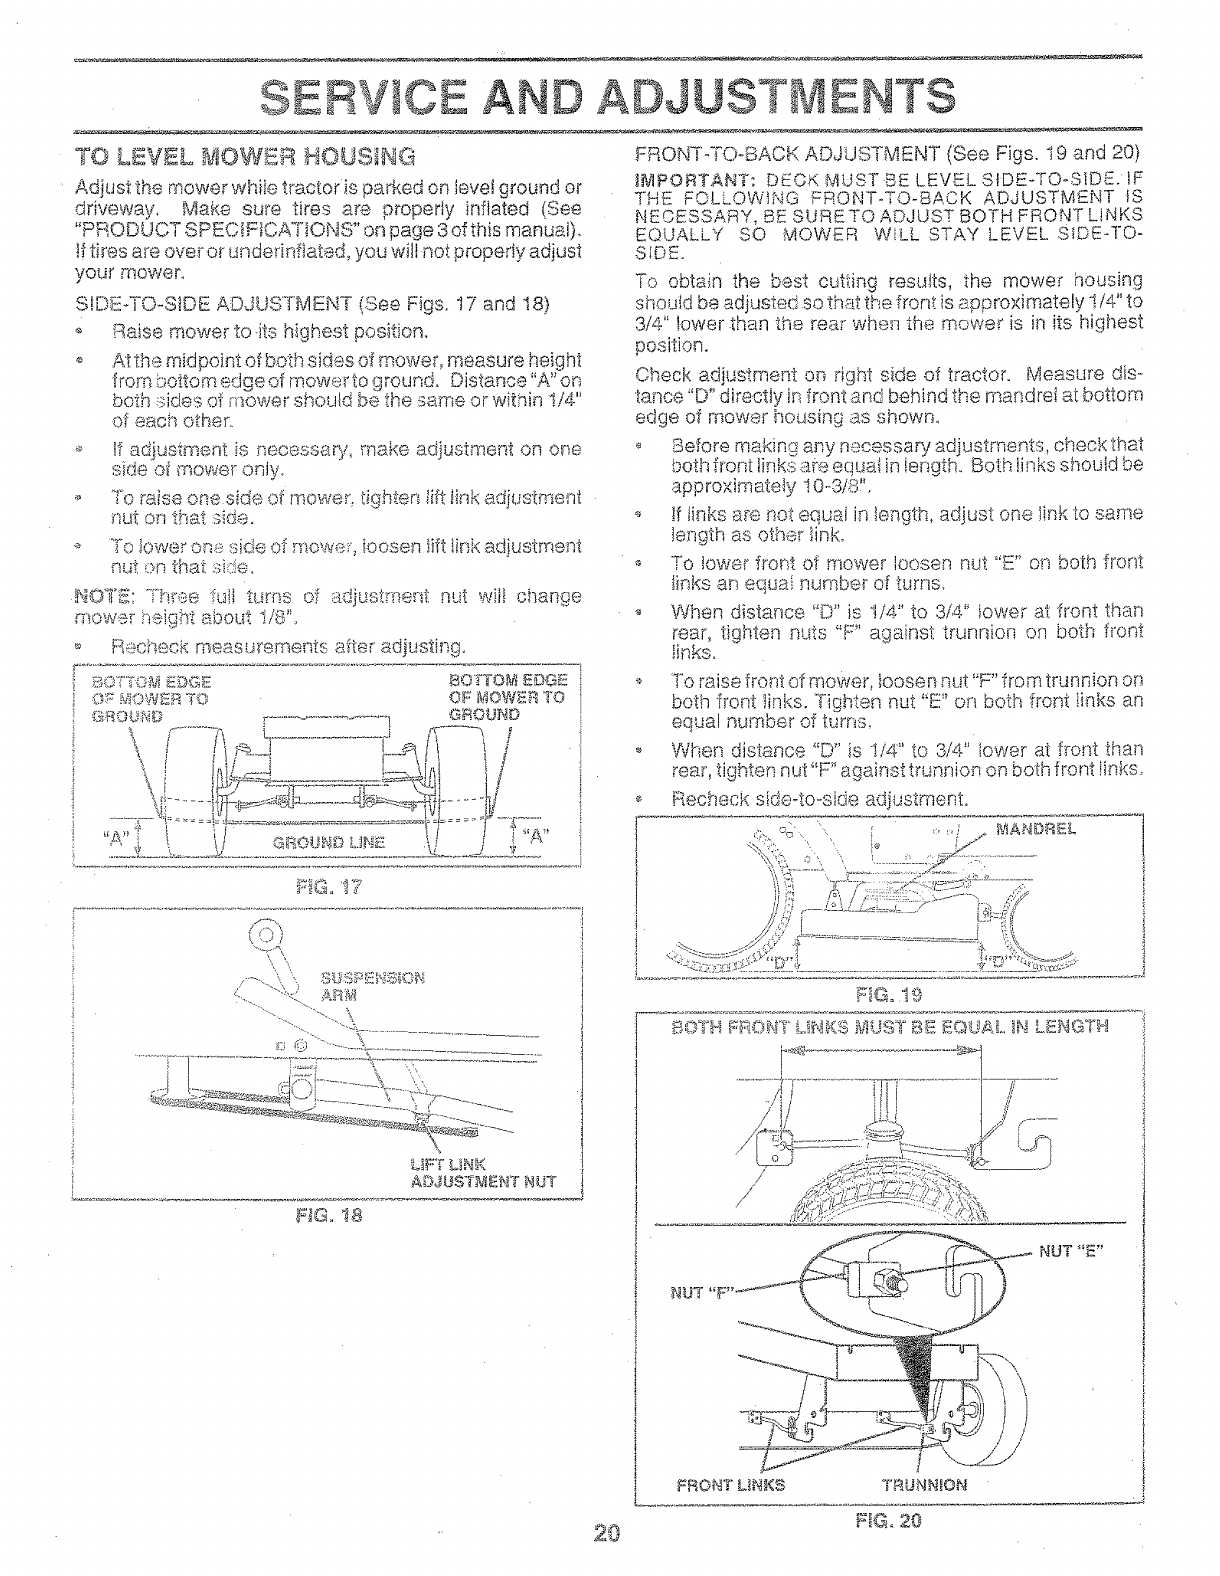
TO L£VBL kaOW_£R HOU.,,_sNG
Adjust the mower while tractor is parked on tevel ground or
driveway. Make sure tires are properly inflated (See
"PRODUCT SPEC1F}CAT!ONS" on page 3 oftMs manuat).
!fti_es are over or undefinfiated, you win not properly adjust
your mower.
S!DE_TO-S!DE ADdUSTMENT (See Figs. 17 and t8)
o Raise mower to-its highest position.
o A! the midpeint of both sides of mower, measure height
from bottom edge of mower to ground. Distance"A" on
boris sides of mower shou!d be the same or within !/4"
of each other.
If aqustment is necessa% make adjustment on one
s}de of mower only.,
_0 To raise one side of mower, tiqhten lift link adjustment
nut on tha.t s:d_°
To bwer on_::_side of ,,,._,t_..,_'o,_,_' .oosen }ift l_r¢",,. adjustment
nut on that .. :e
,d,i tU_"r!S
mow._srhJe,ghtabout I/8'L
i
i
)
,_s*adjustment nut wii! change
Recheck _ a,_,,-.o ,-._t<, adjusting.._e _.:,,._..m...,,.._after
,_3OTTOM EDGE BOTTO_il 8©GE
OS_':£iOWER TO OF MOWER TO
"_4_ I_.- _7{I,_"---..;j!_.-_I -47
ki.{.........V1-':!-_'<"'_'_ ......... _-_ i;I..... ._
,_',,'" i t l f _....A
ENTS
LiFT _ _.4"
ADJUSTmeNT NUT
Ff@° !8
FRONT-TO-BACK ADJUSTMENT (See Figs. 19 and 20)
IR,1PORTANT: DECK MUST BE LEVEL StDEZFOoSIDE. IF
THE FOLLOWING FRONT-TO-BACK ADJUSTMENT tS
NECESSARY, BE SURETO ADJUST BOTH FRONT LINKS
EQUALLY SO MOWER WILL STAY LEVEL SIDE-TO-
4
i
To obtain the best cutting results, the mower housing
should be adjusted so that the front is approximately I/4" to
3/4" lower than the rea_ when the mower is in its highest
position.
Check adjustment on right side of tractor. Measure dis-
tance "D'_directly in front and behind the mandrel at bottom
edge of mower housing as shown.
• Before makint_ any nacessary adjustments, check that
beth front links a_e equal in length. Both links should be
approximately 10-3/8,.
!f links at:e nol: equal in _ength, adjust one link to same
length as other link.
o To lower front of mower loosen nut "E" on both front
links an equai number of turns.
When distance "D" is !/4" to 3/4" iower at front than
rear, tighten nuts "F" against trunnion on both front
links.
i
!
1
I
To raise _ront of mower, loosen nut "F"from trunnion on
both front !inks. Tighten nut "E" on both front !inks an
equal number of tums_
When distance "D" is I/4" to 3/4" !ower at front than
rear, tighten nut °%"against trunnion on both front links.
Recheck side4o-side adjustment°
_=_"_.,_ _,_S_,i_>s -.... _...... _. _ '_ "_ _ _1 _,€_T_
f-f _'i I[
/
/
[-
J
2O
NUT
_RONT L1NI(S TRUNNION
FIG. 20
NUT "5"
s
/
/

SE CE A A©J
TO REPLACE _IOWER BLADE ©RWE BELT
(See Fig. 21}
The mower btade drive be!t may be rep!aced without tooIs.
Park the tractor on ievei sudace. Engage parking brake.
BELT REMOVAL
o _ Dlo,.__IGAu_Eu position.
s _ace attachment clutch in" _"=_ " '_" _'"
Move attachment lift lever fon*7ardto iower mower to its
iowest position°
Roli bait off engine pulley,
o Disconnect R.H, suspension arm from rear deck bracket
by removi;qg retainer spdng.
Wori_tbe_t off both m{_:nd_eip@ieys and idter puileys.
_ Pull bett away from mower,
BELT INSTALLATION
lnstalt new belt in reverse order- of removai.
i
7
WITH P,_;_H,..a :BRAKE _IGAG_:D
/ ...H/2,,_, \\
X
""_-..._,_._-_
NUT"A"
JAM
NUT
I
°O4 _ "'_ _,_ -
o Ma£e sure bett is in ail puNey grooves,,and'tn_:4ut,oo -_--ail betl
guides+ F]Go 22
You_ ti'actor ;s equpped with an adjustable brake system
which is mounteci ors the dght s}de of the transax!e.
if tractor requi_es more than six (6) feet stopping distance
at high speed in highest gear, then brake must be adjusted,
o Depress clutch/brake pedal and engage parking brake.
o Measure distance between b_ake operating arm and
nut "A" on brake rod,
tfdistance is o'ther than ! 4/2% ioosenjam nut and turn
nut "A" un!i! distance becomes !4/2". Retighten jam
nut against nut "A".
Road test t:actor for proper stopping distance as stated
above. Readjust if necessa% If stopping distance is
still grealer than six (6) feet in highest geaq further
maintenar_ce is necessary, Contact your nearest au,°
thorized service centen
TRANSAXL_
PULLEY
21 FtGo 23

if steedngwheelc_ossbarsa_enothorizontal(}efttorigh0
whenwheelsarepositionedstraightforward,removesteer-
ingwheeiarid(eassemDieperinstructions;nt!_eAssembly
sectiofofthismanual
Fqtj!tq _ .....,_,.=°'+"*:;_,,,=.. TO_-_dOAZ#!B!I_:R
,,, Bleck up axle secu_e-iy,
_ F:%;)move._xxLecovei, te_:2ifh_g h_ and washers I;oatow
wheel i-emo'-+'s.f,{ree_-"wheel conLf&"_s::0,sq,uare key - Do
.qot ose),
".' Rep-_ir tke and _es.ssembk-.
*: Ors tea_'wheels only; align _!c<:)ves h'_,_"earwheel hub
and axis. inse_i sGu@fe key,
_; }se:i.AaOe W:_8}q@1% aN@ st_,an ' " ' d_,_-........... _<
i;}(it_ _:J .... ; = %
_ i;:_epte, oe _!t.)(,9 oovei%
if your battery is too weak to start t_seerGk'_e_it should be
rechad@d, if ".}.'drapercabies" are used for emergency
star_in_!, blow this procedure:
,_']_-_., _, ....... Y O t JH Y"RA C i _<>;{ _ l S :::a I __*_,:'p <::_n WKH A 12
VOLT _ '-"_ _;"_"'"'-'+ _ .... SY "_Tl::l",f_
:_qc:!.a_-',__:: GROLCa);ED ........... [}-ii!_OYHER
VEHICLE MUST AL.SO 817:: i',. "ii.! VOL.Y N_'iIEGATiVE
GFiOL,_NDF.{DSYSTEM. DO NOT USE YOL;R TRACTOR
BA'rTERY T'O STARY OTHER V!EHICLES.
Cermec'i each end of the _"°=", ..........t,-, PF)SIJtVI;
\_/?'*"%'t'="F'v*i_"Y_ld_.i=lc"_ Ot eSOf _o._.i"_'%<:_"'5,,[eKllSq''" oate qoI',. 11ooN_l_'=r-+
aga_instchassis
_, Connect one end of the _-__,o_ " 'to.......-........ cable the NEGA-
,,,-,,,,-(.).............
,_ " +,_.- _ _,ov cable ix- good
Cor•inect the otisei" end of _._,..:..,.........-,.,...,,
C"';-4 __t;<:;t_:::.'#:wx; ': i_,q% :' " ' " "_d b_"ttam_
.,, A,. ............, ,OU,,_...., away !'t:_mfuel cariu(<._,,.... _,...,:_,._
"_"r'_.. I-s.l: _,M'_ ,, '1:1- r_ ,_ F"I _-c, iiliiVf;fi:_ 17:11 kiWI"h'_"-;[,?t11.2.]',l-i
'_ m_b+_,.4",cable 'ill'Sttrenq ciqaSsls _,""-d+.=then h'om the fully
_-_"_:::_.=...%<_."M",_*:,,.,,....,,_:.fail ftori! bath batt!f'iel.
_7
!
/
/
POS!'i"IIIE "[LRRIIl:NikL
71iG, 25
CABLES
BATTIRY
\\

TO REPLACE HEADLIGHT _ =_
o Raise hood_
o Pult bWb holder out of the hole in the backside of the
grill.
o Replace bulb in holder and push buib hoider securety
back into the hole in the backside of ._hegriii.
o Close hood,
INTERLOCKS AND AELAYS
Loose or damaged widr_ may cause your tractor to run
pooriy, stop Rmnin{:_ or prevent it from sta_ing.
,9
D ADJ
... :+:,.,# _at wiring diag;am in Repair
Check wirinft See _::"_"_:._ : ' °
Replace with 30 amp automotive-4ype D,,.,._qJrjfuse. The
fuse holder is located btmmd the dash..
TO Bai_!tOVE _4OOD A_',il© GRILL, ASS_i_aBLY
(S,.(_®#i$ 2M
o Raise hood.
Unsnap headiight wire connector.
o Stand in front oftracton Grasp hood at sides, ti_ttovvard
entwineand lift off of tractor,
To replace, reverse above procedure.
-4N
TO ADJUST THROTTLE CONTROL OABL£
(See Fig. 27}
The thro_tte contro_ has been preset at the factors; and
adjustment should not be necessaPy. Check adjustment as
described beiow before loosening cabte. If adjustment is
necessary, proceed as fot_ows:
With engine r_ot ru,qnin_, move throttte control iever
from siow (_@**)to choke ('_,) oosit:,on. Slowly inove
fewer from ono_,t (I _,,),.ofao. (_ #...;.::;4wn.
Check that holes "A" in governor centre! lever ar,_dho!e
in governor plate line-up. If holes "A" are r_otaiigned_
loosen clamp screw and move throttle eabie untiJ .qoies
are aiigned. Tighten clamp screw securely°
GOVERNOR GOV:_£_;_iOR
OONTBOL £_VE}S_ ©O_'_TROL PZ.AT£
/
¢i
o
O
F_G. 26
23
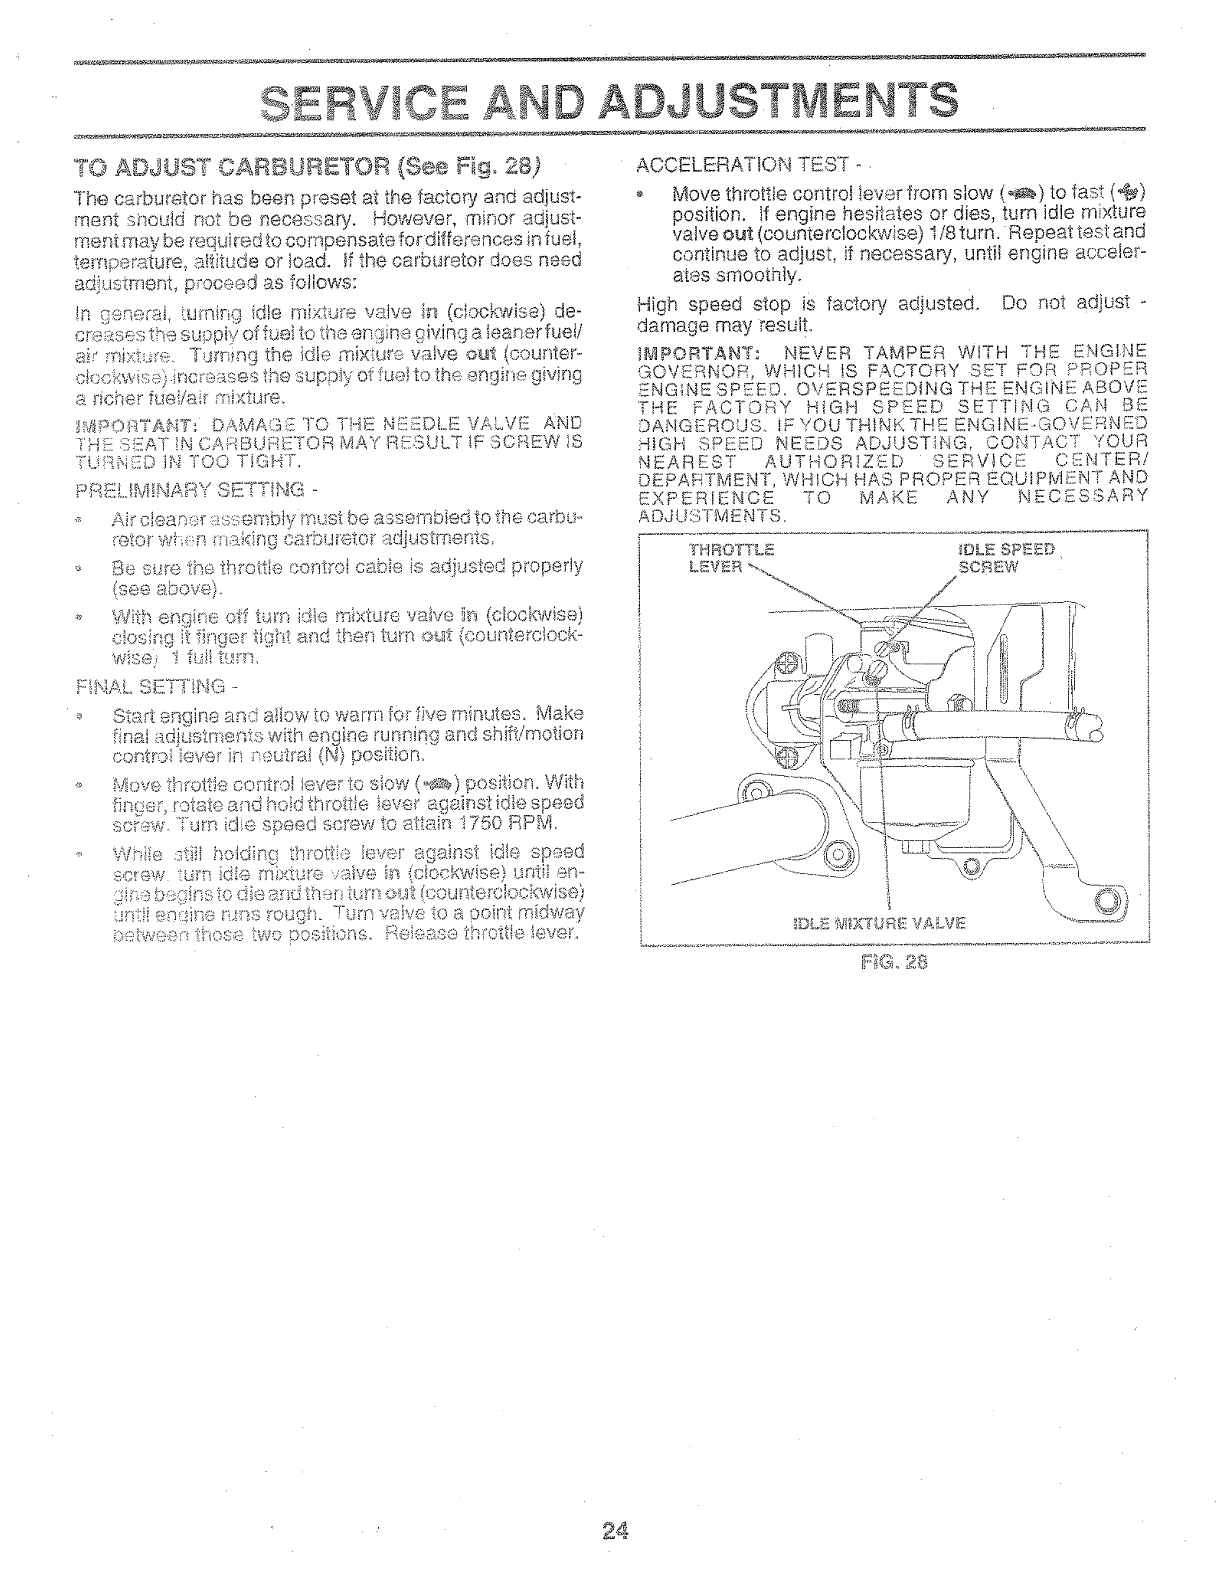
SERVICE AND ADd
TO A©JUST CARBU_3ETOR (See Fig. 28)
The carburetor isas been p_eset at the facto_j and adjust-
merit should not be secessary. However, minor adjust °
merit may be _'equiredto compensate fordifferences in fuel,
tempe_ature_ a!titude or load. If the carburetor does need
adiustment, p_oceed as follows:
!n ge,qecai, tumi_g idle mixture valve in (clockwise) de-
c re _s:sesthe suppiy of fuei to the engine giving a leaner fuel/
ai_"m,i×t_.._re.Turning the idle mix:ture valve out (counter-
c!ockwis ::).incre ¢_sesthe supp:iy of fuel to the;engine giving
a richer fuei/a;_ mi;<ture_
!WiSOF:_iTA_4T_DAMA(_£ TO THff NEEDLE VALVE AND
1'HE !}_EAT!N CAHBUf::_.L{TORMAY RESULT !F SCREW 1S
TU :I:NiLDtN TOO TIGHT,
PRELIM!:NARY SETTING -
_, Aii° clean.,.ir_ss embty paustbe assembled to the ca_bu_,
_"eto_w! ;_n __..:_:kin_.]ca_'bui-eto__adjustments,
_, Be sure the th_"ottleconti-oi cabie is adjusted properly
(see above).
With en{_iir::eoff turn idle mixtiye valve i_,_(clockwise)
ck)s;__git finger tigY£ and titan turn otat (countercleck-
F!NAL S_I}TFTi:NG-
_ Start engine and allow to warm fo__five minutes. Make
iinai adit._strt_e,:_tswith engine i-urming and shift!motion
controi ievet" in _eub'at (N) position.
,_ _4ove throt<Jecontrol ieve_ to siow(<_s_) positieno With
_inger_;]ii!ta1:ea__dho!d th_ottle !ever against idle speed
screw, sum idie speed screw !:o8.1:rain!'750 RPM_
.,, VVb_:ie:stii: hold:r:f: th_ott!e !eve:" sga:nst :die speed
sc_'ew turn idle mixture .iaive :_-_(ciockwise) until am
ji£':,eb _:_g[nsto <fiea_"_.dif:an turn ,s:,_ut(cou nterciockvd se)
:._n:::iies,:_ff_e _.ms _'oufS";. -rum :,,'alva _o a Oeird: midway
beb_vees those two positions. R@ease th_'ottb ieve[o
ENTS
A,..,._LERA __O,(_T_o T
o Move throttie control !ever from slow (_) to fast (@)
position. If engine hesitates or dies, turn idle mixture
valve out (counterclockwise) 1/8 tu m. Repeat tes_and
continue to adjust, if necessa% untii engine acceler-
ates smoothlyo
High speed stop is factom/ adjusted. Do not adjust -
damage may resulto
_MPORTANT: NEVER TAMPER WITH THE ENGINE
GOVERNOR, WHICH IS FACTORY SET FOR PROPER
ENG_NESPE_D, OVERSPEEDING THE ENGINE ABOVE
i-HE FACTORY HIGH SPEED SETTING CAN BE
DANGEROUS° IF YOU THINK THE ENGtNE_GOVERNED
i-IIGH SPEED NEEDS ADJUSTING, CONTACT YOUR
NEAREST AUTHORIZED SERVICE OENTERi
DEPARTMENT, WHICH HAS PROPER EQUIPMENT AND
EXPERIENOE TO MAKE ANY NECESSARY
ADJUSTMENTS.
\\
_DLiI_?_I_XTU_8 VALVE
_:iG_28
24

STO E
immediately prepare your tractor for storage at the end of
the season or if the tractor wil not be used fo: 30 days or
more,
CAUTION: Hess _"sto_e the tractor with 1
gasoiime in the tank inside a b_ldiP, 9 !
_a_h÷refumes may r_eachan ope_ fiarae
o_ spark. A!ow the engine to ¢ooI 1
before stodag ]m a,_y e_otosu_e° _
TRAC°'[OR
Remove mower from tractor for winter storage_ When *
mower is to be stored for a period of time_ clean it ti_o_,- o
oughiy, _emove atl dir% g_eas_s, leaves, etc, Store in a
clean, dry area.
_ Clean entire tractor (See "CL!AN H'qG"inthe Customer
Respo_'_s]btities section of this man_4al)o @
,_ Inspect a_!d replace belts, if necessarl (See beit re-
placement instn.sctions in the Serdce and Adjustments
section of this manual).
_, Lubricate as shown in the Customer ResponsiNlties
section of this manual
_, F3esu_e that aii nuts, bets and screws are securely
fastened, k'_spect moving palls for damage, breakage
and wear, Replace if necessuy.
0_ Touch up all rusted or chipped paint surfacesl sand
iightiy before painting.
BA T1"[£RY
<, Fuly charge the batteR1 for sto_age.
,_ Afte_ a Defied of time in s:o_a!De.,_battery ms.y_:m_<":qU'_'_"!:_
• '_ r *....
rechargiDg ....... ......
}ong pedods of storage_ batte%_ tames sqouid be
discoanected a_'sdbattery cbaned thoroughly {see '_TO
_Ji,,4Y',AIqt r:><"'_°'_'_-c" -,,! Atqi+=->_...............
romeo Resporusibiiities sec:tion of this manuai}.
,_ After cieaning, leave Rabies disconnected _7.:ndplace
cables where they oat'mot come in contact with butte%,
terrrAnals.
Be sure bat__e_ydrai_ tube is secu_eiy attached.
,_ If Dattery is _emoved from tractor for storage, do not
store batter}/directly on concrete o_"damp surfaces.
ENGINE
FUBL SYSTEM
IMPORTANT: IT tS IMPORTANT TO PREVENT GUI_a
DEPOSITS FROM FORMING IN ESSENTIAL FUEL
SYSTEM PARTS SUCH AS CARBURETOR, FU£iL FILTER,
FUEL HOSE, OR TANK DURING STORAGTZ+ ALSO,
EXPERIENCE IND!CATES THAT ALCOHOL. BLENDED
FUELS (CALLED GASOHOL OR USING ETHANOL OR
METHANOL) CAN A'TYRACT MOISTURE WHICH LEADS
TO SEPARAT!ON AND FORMATiON OF ACIDS DURING
STORAGE. ACIDIC GAS CAN DAMAGE THE YUFL
SYS"iEM OF _k' .- _ ,_r:/.tl_ ENGfNEi WHiLf._ tN ST_R,-,uE.
OrahYthe fuel t_xnk,
Start the engine and let it run until the rue! ines and
_,-_,-' °",,_''" _, empty.
,,_.,,POUI__+,,,.A,.+d%:, .
Never use engine or carburetor" cleaner products in t.h_¢
fuel tank or pe_'manent damage may occur.
Use f_esh fuel next season+
H©7'_Z: Fuel stabilizer is an acceptable altemaEve in
rrinimizing the formation of fuel gum deposits du,,:ir_gsto_'-
age. Add stabi!izer to gasoNne in fuel tank or storage
container. Always fo!low the ms' ratio found on stabilizer
container. Run engine at least 10 minutes after addk:<g
stabiiizer to aliow th,.-stabiizer to reach the carburetor. Do
not @-sinthe gas tar'k and carburetor if using fuel stabilizer..
BHGiHE OIL
D_ain oii {with engine warm} and replace with clean e.__gir',,e
oi!.. (See <'ENGtNE_' in the Customer Responsibiiities
section of this manuai),
OYLiHDIIRS
• _d_._.7_7;. _ i_,_: <...-% : ,,
'* I-=OLIF (HIe OUF]O@ Qt ei! {ilret_gF} ,<,;_IJtIi4L [3{b!i [l{)i(-j(;::;pili',,LJ
Turn i@'_itionkey to =S'TART '_positio_ lots few secou,,ds
to distribut9 oii
_* Replace with riewspark [:Aug(s).
,_ Do not s!:oi"egasoline f_om one season to anothe_ •.
o Re@ace your gasoline cap, if your can sta£s to rust,
Rust and/or <,t.i_-£in your gaso'h_e will cause proble:ns.
._ if possibIe, store your" tractor indoors and cover it to
give proteclen from dust and di_.
Cover your t_actor with a suitable protective cover that
does not retain moisture. Do not use plastic. Plastic
cannot breathe which slows condensation te form and
will cause your tractor to rus_.
!@ROW:DANT: NEVER COVER TRACTOR WHILE ENGINE
AND _XHAUST AREAS ARE STILL WARM.
25

TB
1
Wil_ not start t
_Z
I
,i
I*
9_
! I O.
i. Out of fuel.
2. E"_gine not'_CHOKED" properly.
3. Engine flooded.
,.i B_d spark p_ug,
5. Ditly .',-:_irfilter.
Dirty _uei fiiter.
Water in iuei.
Loose or damaged wiping,
Carburetor o_.xtof adjustment,
E_sginew:4'ves out of adjustment,
I. Dirtyair ti!i:er,
2. _3ad spark ptug,
3, Weak or dead beaten/,
4. Di£y fuei fitter_
5. Stale or dirty fuel
6. Loose or damaged wiring.
7, Carburetor out of adiustment.
8, Engine vaIves out o[ad]ustment.
i. Clutch/brake pedal not depressed,
2. Attaehmen_ b4utch is engaged,
3, Week o_dead battery.
4, Blown fuse.
5. Corroded battery termi_ais.
iS, Loose or damaged wiring.
7. Faulty ignition switch.
8. Fau!ty solenoid or staI1en
RR_2CT_ON
1"
&
7,
&
i! 9.
!i0.
i i.
il 2.
4,
5,
8,
:l 7.
9. Fra.uityape_ator presence switch(as), i]
sta_i: 2, Cop'reded bat!e'v;-ermnais :i
3. Loose o,_damaged wiling, i
4. F_.uit7 eoian@d O_'star{at. :!I
:1
;::ill fuel tank.
See 'TO START ENGINE" in Operation se.c_ion.
Wait severaI minutes before attempting to start.,
Rap!ace spark ptug,
Clean/replace air filter,
Repiaee fuel litter,
Drain _ueftank and carburetor, refill tank witis fresh
gasotine and replace fuel filter,
Check all wiring,
Contact an authorized sewice centeddepa£ment.
Contact an authorized sen/ice centeffdepaftment,
Cleanirepface aiT filter,
Replace spark ptug.
Recharge o__replace battery.
Replace fuel filter,
Drain fuel tank and refilt with fresh gasoline.
Check nil wiring,
Contact an authorized service eenteridepaAn-_ent.
Contact an authorized service center/depa_ment,
[[ t, Depress ctutchtbrake pedal,
2. Disengage attachment clutch,
i 3. Recharge or replace battery.
! 4. RepIace fuss,
I 5, Clean batte_iterminals.
I 6. Cheek atl w}ring,
7, ChecWreplace ignRion switch,
_] 8, Cheeklreptace solenoid or sfarter.
9. Contact an authorized service centeddepa£ment.
I, Recharge or _'ep!ace battery.
2, Clean batte! 7 terminals,
3. C.h,ck n!l wiring.
4_ CheeWreplace sotenoid or sled:at.
;[ t. Cu_}n,s _oo much grass/too _ast.
2. 'Th_'ottle it" "CHOK:E" position.
:)
I 4 Dirty aftPiker,
4
;i 5. L,ow oil ,.. _,_.,/-,,,_,,,voil,
iJ £ F"_ ", ....... " : 7
! 7 Didy fuei _itfer.
i 8. Stale o_ di£y fuel.
iJ 9. Water in iuet,
I0, Spark plug wi_e loose.
tl, Di£y engine air screenfiins,
i2, DirWiclo_,ged muffler,
!3. Loose o_ damaged wiring.
14. Carbureto_ out oFadjustment.
! 5. 8.ngine v'_.ives out of -:&d!ustment,
I. Worn, bent orloose blade.
2. Bent b$ada mandrel,
8. Loose/damaged part(s),
i, Setin "Higher Cuff positierdreduce speeci.
2, Adjust thro_ie control,
3, Clears underside of _ssowerhousing.
4, Clear#replace air filter.
5. Check oil level/change oiL
6, Clean and regap ot change spark p_ug,
7, Replace fuei f[tte_',
8. Drain fuel tank and refill with fresh 9asotid'e.
9. Drain fuei tank .and carburetor, refilt tank with fresh
gasoline and replace fuel fitter,
10, Connect and tighten spark plug wire,
1!. Clean engine air screenf[ins,
12, Clean/replace muffler,
I3. Cheek all wiring,
I4. Contact an authorized sen/ice center/department.
!5, Contact an authorized sen/ice center/department.
i. Replace blade, Tighten b!ade boit,
2, Replace blade mandrel,
8. Tighten loose pa_(s). Replace damaged parts,
28

TROUBLESHOOTING PO
PROBLE_
Engine contin_ee to run
when operator leave_ seat
with attachment clutch
engaged
PO0{ OUt _ L_f'_'.ven
CAUSE
t_ Faulty operatorosafe[y presence control system.
1. Worn, bent or loose btade.
2. Mower deck not IeveI:
3. Bui{dup of grass, leaves, and trash under mower.
4, Bent biade mandrel,
5. Clogged mower deck vent he;as from buildup of
grass, leaves, and t_ash around mandrels,
CORRECTION
,1, Check wiring, switches and connections. If not
corrected, contact an authorized service center/
departmenL
i, Replace blade. Tighten blade bolt,
2, Level mower deck,
3. Clean underside of mower housing.
4. Replace blade mandret,
5, Clean around mandrels to open vent holes,
_lowe_ btades will not
;'orate
Poe_ 9_ass discharge
I, Obstruction in clutch mechanism.
2, Worn/damaged mower drive belt.
3. Frozen ldter puiley.
4.. Frozen blade mandrel
t. Engine speed too slow.
2. TraveI speed too fast.
3. Wet grass,
4, Mower deck not tevel,
5. Low/uneven tire air pressure,
8, Worn, bent or loose bIade.
1. Remove obstruction.
2, Replace mower drive bell
3. Replace idler puIley.
4. Replace Made mandrel
1. Place throttle centre! in "FAST" pos[tion.
2. Shif[to slower speed.
3, Ai!ow grass to dry' before mowing,
4, Levetmower deck.
5, Check tires for proper air pressure,
6, Replace/sharpen blade. Tighten blade bolt.
7. Buiidup of grass, ;eaves and trash under mower,
8. Mower drive belt worn,
9, BIadesimpropedy installed.
I0, Improper b!ades used.
11. Clogged mower deck vent holes from buildup of
Headlight{a) net werki_'_9
(if so equipped)
£ngi_e 'ibackfires"
when turning engine
"OFF"
grass, !eaves, and trash around mandrels.
7. Clean underside of mower housing.
8. Rap!ace mower drive belt.
9. Reinsta!I blades sharp edge down.
10. Repiace with biades Iisted in this manual,
11. Ctean around mandrels to open vent hoies,
I° Switch is {'OFF'L
2, Bulb(s) burned out,
3, Faulty Iight switct_,
4. Loose or damaged wiring,
5, Blown fuse.
I. Turn switch "ON",
2, Replace bulb(s),
3, ChecWreplace fight swkch.
4, Check wiring anti connections,
5, Replace fuse,
I. Bad battery ceil(s), i, Replace battery.
2. Poor cabfe connectior_s, 2, ChecW'eiea_ all cor_nect}oqs.
3, Fautty reguiator {if so equipped), 8, Repiace regt'tator_
4, Faulty alternator. 4, Replace aiternator.
t. E_gine th{o_te control not set at _'SLOW"
position for 30 seconds before stopping engine.
1. Move thtottIe control to "SLOW" position and allow
to [die [or 30 seconds before stopping engine,
27

SERVICE NOTES
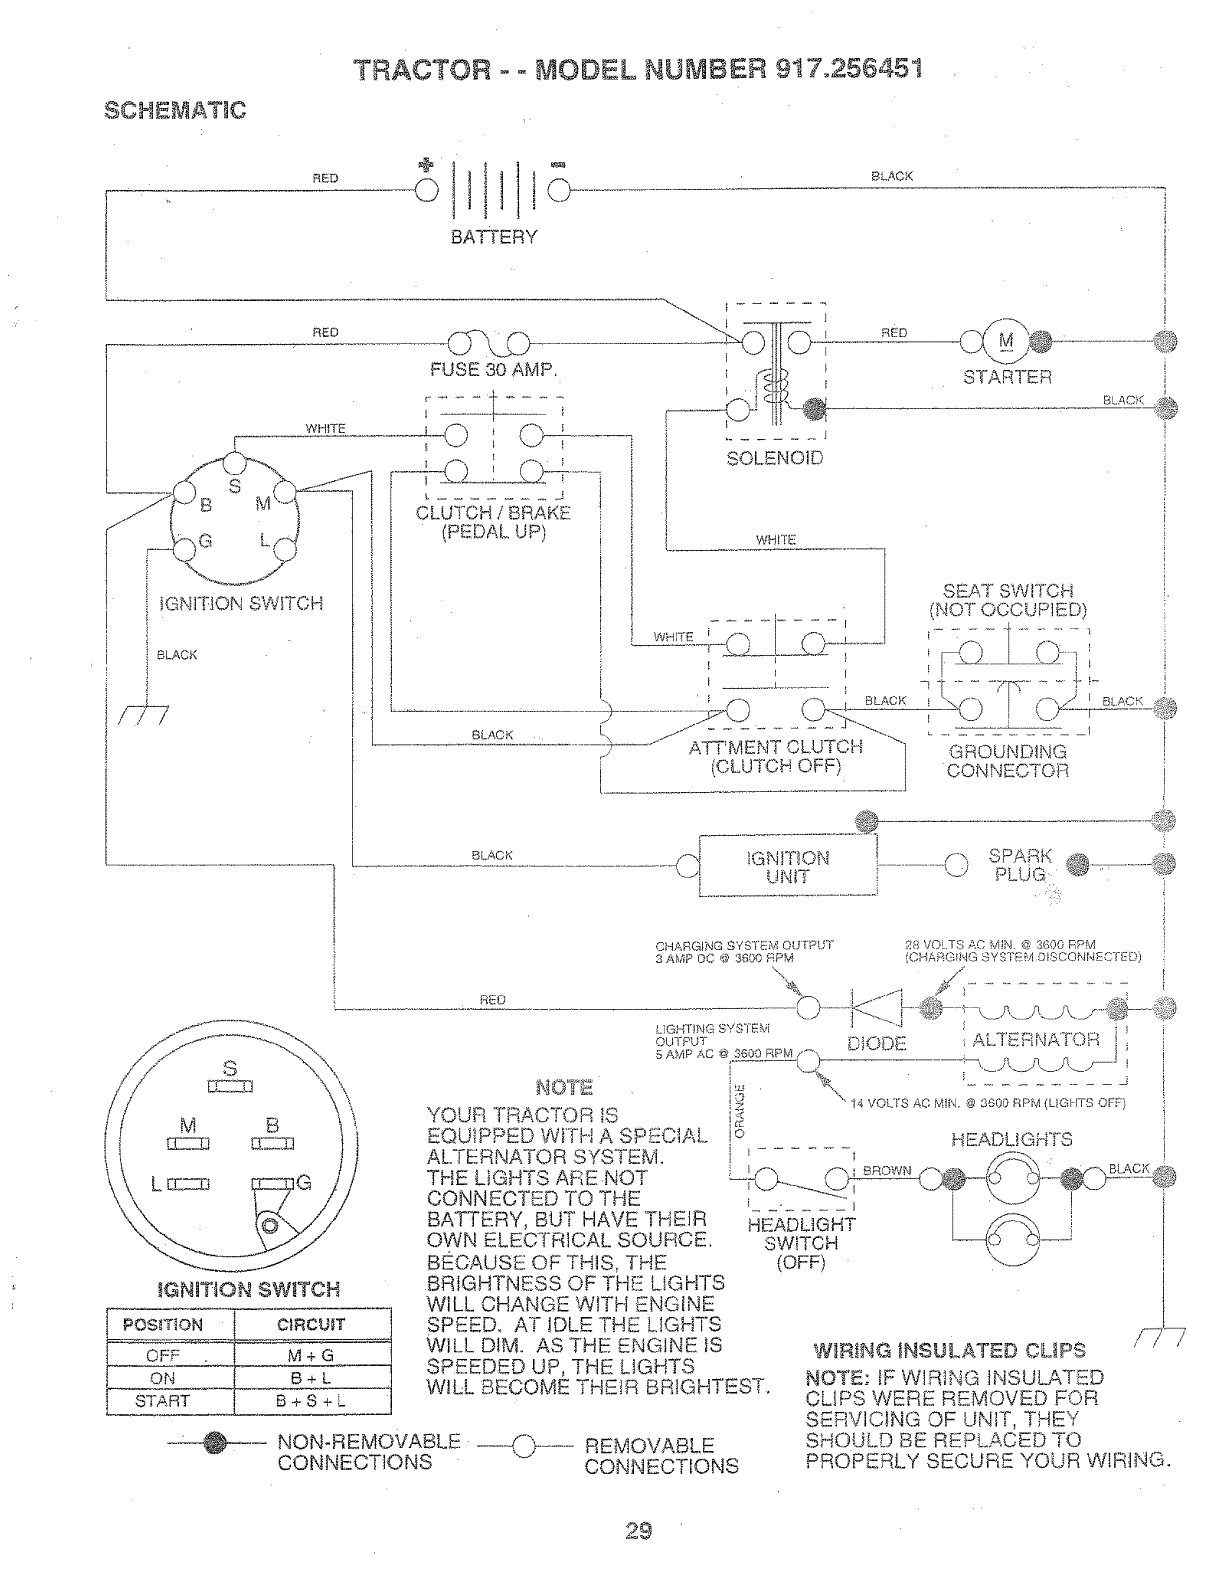
TRACTOR oo MODEL NUMBER 9! 7°256451
SCHEMATIC
RED °I I °
oll!o
BATTERY
BLACK
RED
WHITE
f
TFiS --. -
Bs
}GN1TIONSWITCH
BLACK
M B
FUSE 30 AMP.
r _ _ -- _[_
f-o o '_
k t
CLUTCH /BRAKE
(PEDAL UP)
BLACK
BLACK
P
i
[
---_,-J IiiLs-T........ ,._,@ .............@
: d@. S:rAm-ER i
i J
j SOLENOID
I
! WHITE
I
E I
i,} I
>7,kj .j_-_:.,._----
"-_--" A_'MENT CLUTCH ]
.... (CLUTCH OFF) l
SEAT SWITCH
(NOT OCCUPIED)
iK-'_ F'h _ F
q _,sNmoN:1_-
GROUNDING
,_.ONNb......ut.,
CHARGING BYSTEM OUTPUT
3 AMP OC @ 3800 RPM
\
IGNITION SWITCH
POS_T1ON
OFF
ON
START
REB
---4_.-- NON-REMOVABLE ---¢_--- REMOVABLE
CONNECTIONS
NOT_
YOUR TRACTOR IS
EQUIPPED WFrH A SPECIAL.
ALTERNATOR SYSTEM.
THE LIGHTS ARE NOT
CONNECTED TO THE
BATTERY, BUT HAVE THEIR
OWN ELECTRICAL SOURCE.
BECAUSE OF THIS, THE
BRIGHTNESS OF THE LIGHTS
WILL CHANGE WITH ENGINE
SPEED, AT IDLE THE LIGHTS
WILL DIM. AS THE ENGINE IS
SPEEDED UP, TIdE LIGHTS
WILL BECOME THEIR BRIGHTEST.
PLLJG:: @ .... _;_
i
28 VOLTS AC M_N. @ 3600 RPM l
(CHARGING SYSTEM D_SCONNECTC:B)
t
i
LIGHTING SYSTEM i
OUTPUT D_ODc:
%\.
i_ 14 VOLTS AC IRWIN. @ _00 _PM (L,_*]HT_ OFF}
,,1° HEADLIGHTS
i ........
HEADLIGHT
SWITCH
(OFF)
W_RING INSULATED CUPS
NOTE: iF WIRING INSULATED
CLIPS WERE REMOVED FOR
SERVICING OF UNIT, THEY
SHOULD BE REPLACED TO
CONN_.CTIONS PROPERLY SECURE YOUR WIRING.
29

REPAIR PARTS
ELECTRICAL
TRACTOR ,_oMODEL NU#aBER 917,25645!
7O
i
43
36 38
I
I
39
I
is_
I

REPAIR PARTS
ELECTRICAL
TRACTOR o °, J ODEL NUMBER 9t7o25645t
KEY PART
NO. NO, DESCR_PT._ON
.1 146139
2 74760412
3 STD551025
4 STD551125
6 STD54i025
7 t09238X
8 t44940
9 109596X
15 147688
I6 153664
19 STD55tI25
20 78350400
21 136850
22 4t52J
24 4799J
25 146147
26 108824X
28 420_j
29 121305X
30 144921
31 140400
32 141226
33 140403
34 1t07!2X
35 140336
36 S°TD6O1005
39 I09553X
40 146057
4! 71110408
43 145673
44 73640400
48 140844
49 153249
70 140413
Battery t2 Volt 25 AMP
Bolt Hex Hd I/4-20unc X 3/4
Washer 9/32 X 5/8 X 16 Ga
Washe_" Lock Hvv Heiicaf t/4
Nut Fin Hex I/4-20 Unc
Tube P!astic 12'I
Case Battery wi2 HoJes
.Clamp Hose Olive
t
roas.ener Snap- in
Switch Interlock Push-4I-I
Washer Lock t/4
Nut Jam Hex 1/4_20 Unc
Harness Asm Light Wi4152j
Bulb Light #! 156
Cable Batten/8 Ga ! I" red
Cable Battery i3 Ga red w/16 W}_e
Fuse 30 AMP Auto Green
Cable Ground 6Ga t2" black
Switch Plunger Nc Gray
Switch _gn 3 pos
Nut Ignition
Cover Sw Key Btk 1 25 Text SLZ'
Key tgn Molded Craftsman
Switch Light Btk 5!k Red
Bracket Switch !ntedock
Screw Tap Hex #10o24_xncX i/2
Switch lntlk Ci_JtchRed 4 Term
'_ < " <_"Lt IPC
t-_mes,, Ign Da,_, Mch 95
Bdt BIk, Fin Hex !/4o20 Uric x _/2
Cove_ Terminat Red
Soie_;oid
Nut Keps Slk H:× 1/4o20 U_qc
Adapter Ammete__Recta{_g_da¢
Washer Pinned DeJta
Harness Engine B&S5
N©'(E: A_tcomponent dimensions give in UoSo inches
I inch = 25_4 mm
31
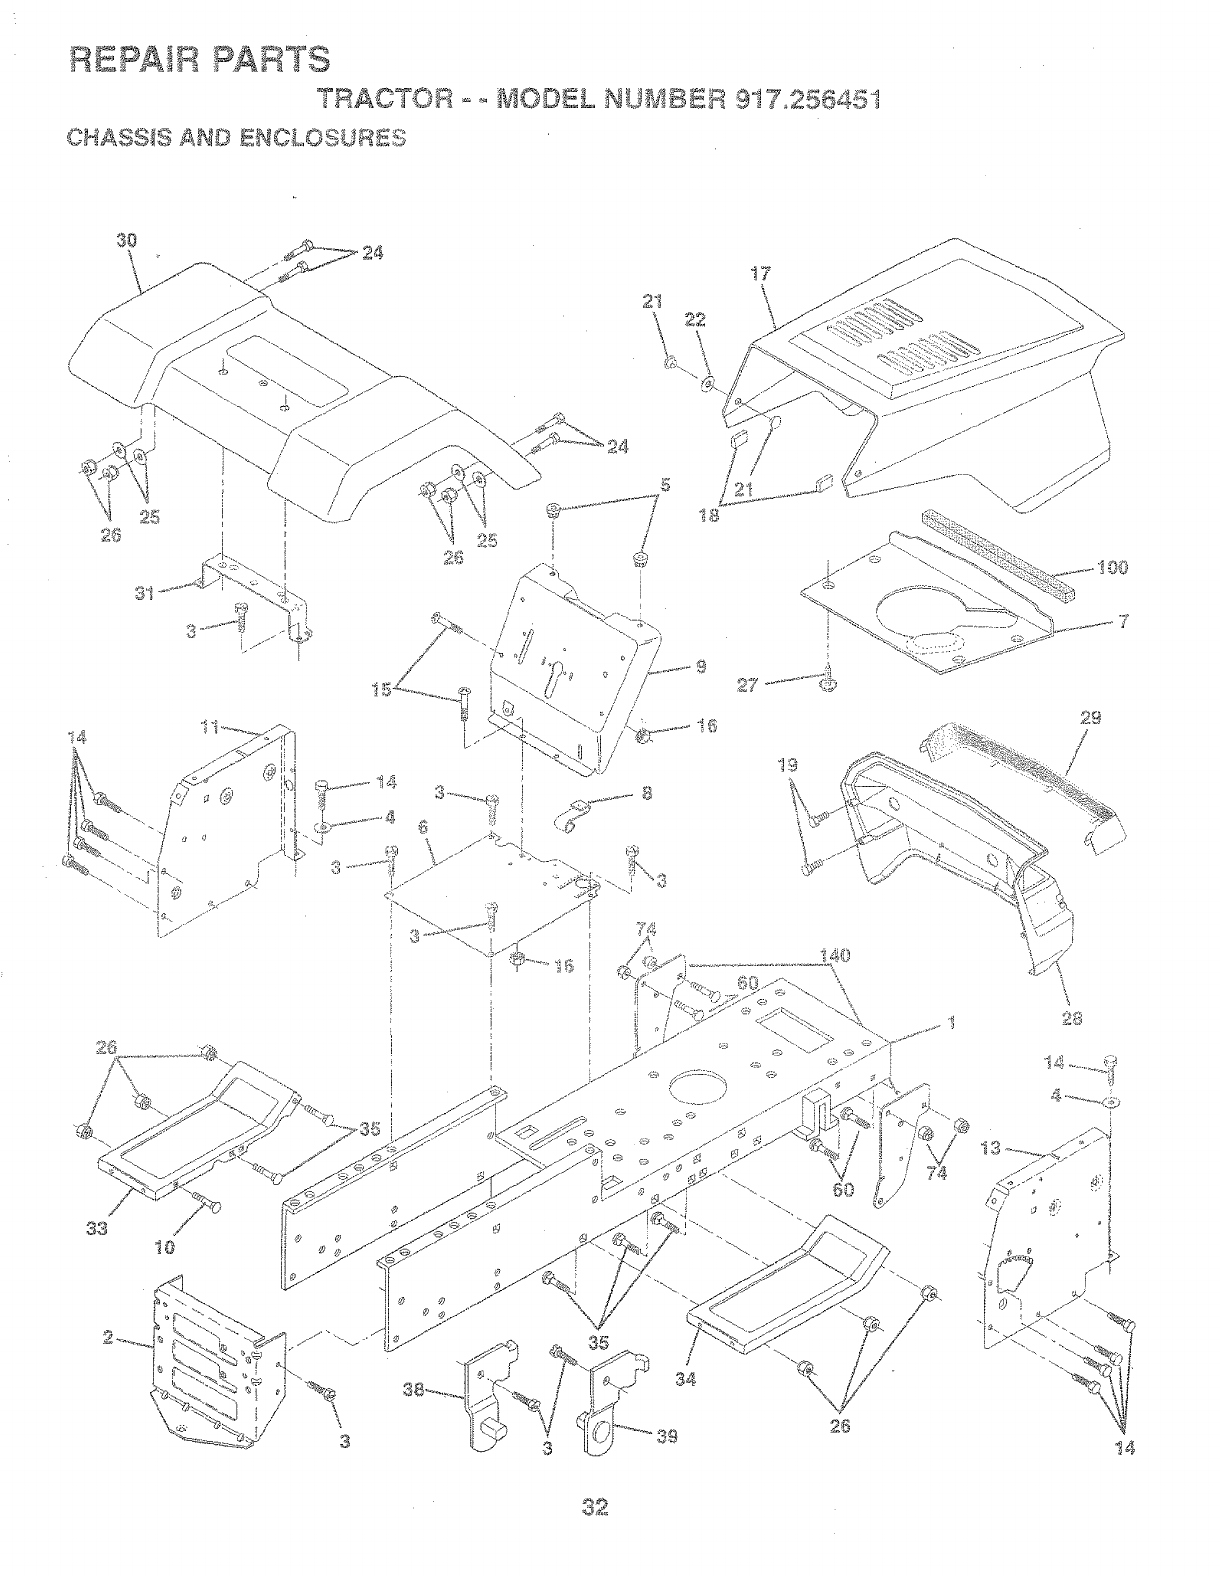
R...PA_RPARTS
TRACTO_ MO#SL NU_IBER _J.7.25645t
CH ' @
. ASS_ AND £NCLOSUR£S
14
3S 10
2"1
\ 22
\_ \
\
28
\
3
\
/
34.
14
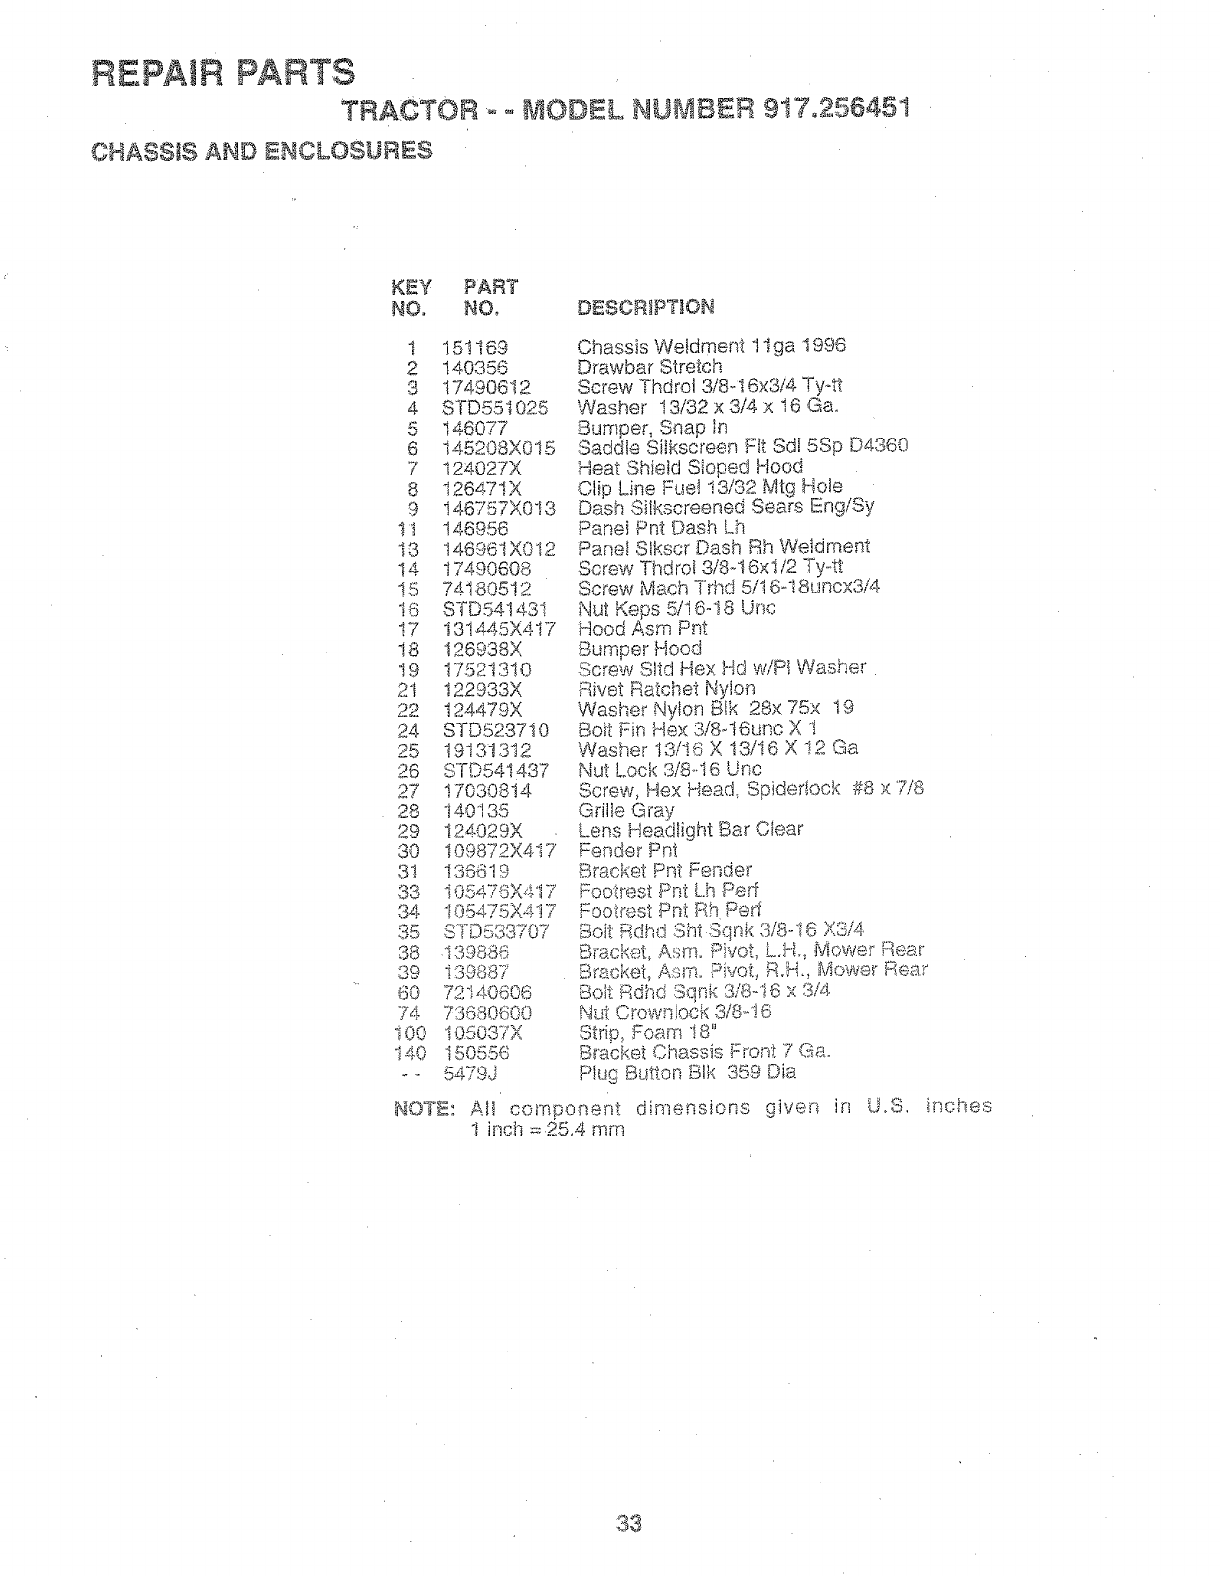
REPAIR PARTS
TRACTOR o o MODEL NU IBER 917o256451
CHASSIS AND ENCLOSURES
KEY PART
NO. NOo DESCRIPTION
1 151169
2 140356
3 17490612
4 STD55t025
5 146077
6 145208X015
7 124027X
8 12647IX
9 t46757X0t3
!t 146956
13 I46961X0t2
I4 17490608
I5 74180512
16 STD541431
!7 t31445X4t7
18 t26938X
!9 1752131O
21 122933X
22 124479X
24 STD523710
25 19131312
26 STD541437
27 17030814
28 t40"135
29 124029X
30 !09872X417
31 136619
33 I05476X4t7
34 105475X4!7
35 STD533707
38 139888
39 i3D887
60 72140606
74 73680600
i00 105037X
140 150556
-- 5479J
Chassis Weldment 1Iga 1996
Drawbar Stretch
Screw Thdrot 3/8-16x3/4 Tyott
Washer t3/32 x 3/4 x 16 Ga.
Bumper, Snap In
Saddle Sitkscrees F_tSdf 5Sp D4360
Heat Shield Sloped Hood
Clip Line Fuel !3/32 Mtg Hote
Dash bflkscreen®q Sears EngiSy
Panet Pnt Dash Lh
Panel Slkscr Dash Rh Weldment
Screw Thdrot 3/8-t6xl/2 Ty-tt
Screw Mach Trhd 5/16-i8uncx3/4
Nut Keps 5/16-18 Unc
Hood Asm Pnt
Bumper Hoed
Screw Sltd Hex Hd w,@i Washer
Rivet Ratchet Nylon
Washer Nylon B!k 28× 75x 19
Bolt Fin Hex 3/8-16unc X t
Washer 13/!6 X 13/I6 X !2 Ga
Nut Lock 3/8o,16 Uric
Screw, Hex Head, Spidefiock #8 x "7/8
Gdlte Gray
Lens Headlight Bar CIear
Fender Pnt
Bracket Pat Fetsder
Footrest Pnt Lh Peff
Foo!rest Pnt Rh Peff
Boit Rdhd Sht Sqnk 3/8-16 X8/4,
Bracket, Asm_ [:_ivot, L.H. Mowe: ;£ear
Bracket, Aan_._oPivot, R.H. _i_ower Rea:_
Boit Rdhd Sqnk 3/8-16 x 3/4
Nut Crownlock 3/8_!6
Stfip_ Foam 18"
Bracket Chassis Front 7 Ga.
:Plug B_sttonSlk 359 Dia
NOT_: All component dimensions
t inch = 25,4 mm given in U,8, inches
33

/
/
53
22
3_

REPAIR PARTS
RAO OR fiO:©EL NUMBER 917o2 645
DRIVE
KEY PARY KEY PART
NO, NO, DESCRIPTION NO, NOo #ESC_-31PTtON
Washer t3/32 X 13/t6 X I2 Ga
Beadr_gNyi 503X 628XI 25
Washe_ Hardened
Ring Klip #t5304,-50
Pulley !dler V Groove Plastic
Be!lcrank Asm
Retainer Belt Style Sprir_g
Bolt Hex Hd 3/8o16unc X !_-1/2
N' d.Cf'owRtook o/,__1u tJnc
Nut Lock 5/16-!8 Ur!c
Link Clutch 7 66
Spring Return Clutch 675
Bolt Fin Hex 3/Sd6unc X I-!/4
V-bett Ground Drive 95,25
Keeper Belt Rh Lt Pntizinc 16g
Retainer Beit......Chassis Lh _"_..inc
Screw Thclro! 318-i 6x3/4 Ty-tt
Cover Pedal Blk ,_ta""
Pulley FAngine
Bolt Flnhex 7t16-20 x 4 g5
Washer Lock b!vy i-qJc!Spr 7/t6
Keeper Be_t Engine Lh L.t
Guide Belt D_'Mower Rh
Washe_' 13/32 X 1_i/4 X t2 Ga
Spacer Spilt _80xio94
V,lao..... ,,,,v._I" _;6.,:.JlO,( 1 ,<q. X Ga
Rir_g _71#5i 33.,,75
Key Square 2 0 X 184.5/t865
Washer '25/3:.__,.'_I 5i8 X .....',bga
Bolt F:in Hex 3/8.d6 x 3/4.
Vw::_r,e_,,'a_, )(_;/,__z 314 i_,vI0 <"a
Bolt Rdhd Sqnk 3/8.d 6 x i,25
35

REPAIR PARTSTRAC_TOR _ -, MODEL NUMBER 917o25645I
ST_£ER_NG ASSEMBLY
$2
\
<JJ
'_."*",7"..... 39
LL'
' _ 42
[
\\
,-..>_ , 4.[)!_Z__, I
ff_ to
47
3O
! 4\
36

REPAIR PARTS
"TRACTOR o o MODEL NUMBER 917o256451
STEERING ASSEWBLY
KEY PART
NO. NO, DESCRIPTION
I 139768
2 142033
3 135227
4 135228
5 6266H
6 121748X
7 19272016
8 120O0O29
9 3366R
10 130468
11 STD551!37
13 110438X
14 74011058
15 73901000
16 132624
17 132614
t8 57O79
t9 124035X
20 !26684X
21 STD551125
22 71O7O410
23 1275O1
24 !09816X
25 124036X
26 !26847X
27 138874.
28 !91314.16
29 17490612
30 STD56'I210
32 !30465
88 132196
37 152927
38 139769
39 I9!33808
41 !04820X
42 i24417X
43 121749X
48 121232X
47 6855M
62 "149684
NOTE:
Wheel Steering Std Black
Axle Asm Front
Spindle Asm Lh
Spindle Asm Rh
Beadng Race Thrust Harden
Washer 25/32 X 1 5/8 X 16ga
Washer 27/32 X 1 I/4 X t6 Ga
Ring Ktip #t5304°75
Bearing Col Strg Bik
Link Drag Sot Ball Jt 20 064
Washer Lock Hvy Htcl Spr 3/8
Spacer Bearing Axle Front
Bott Hex 5/8-! 1 Unc X 3-!/2
Locknut Flange 5/8-t I Uric
PinAxle 5/8 }4 1 55/'i 54. Lg
Shaft Asm Strg 5/8 X 15 19 Lt
Washer ThnJst 5t5x 750x 033
Support Shaft
Washer Shim t/4 X 5/8 X 062
Washer Lock Hvy Helical t/4
Screw He>,'Socket 1/4-20 X 5/8
Shaft Asm Pittman
Nyliner Snap In
Bracket Steedng
:Bushing Rod Tie Blk Lt
Gear Sector
Washer t3/32 X 7/8 X t6ga
Screw Thdroi 3/8-t6x3/4 Tyott
Pin Cotter I/8 X 3/4 Cad
Rod Tie W}re Form t9 75 Mech
Sushisg ocg 5/8 td Dash
Screw
!nseri Cap S(rg Wheel Std B]k
Washer t3/'32 X 2_8/8 v_ 8 Ga
Nut Lock Center 3/8_24un:_
Adapter Wheel Strg _'_'
,_'_u/835id
Soot Shaft Steering
Washer 25/32 X 1 !/4 X I6 Ga
Cap Spindie Fr Top BJk
Fitting Grease
Kit, Steering Assembly, Service
Alt component dimensions given in U.So inches
! inch = 25.4 mm
37

REPAIR PARTS
TRAC ?' U BER 9i7.2564,5t
SEAT ASSE_IBLY
_J
J
i
I
i
2¢%.
\
-!- _<.
q
@,,
"%
",,<\ 23
17 i2
2t
K_Y
NO,
1
2
3
4
5
6
7
8
9
!0
12
t3
151205
140551
STD523710
19131610
145006
STD541437
124181X
i74.90616
19131614
140552
!2t246X
121248X
DBSCRIPTIO_I
Seat V350
Bracket Pnt Pivot Seat (btk)
Bolt Fin Hex 3/8-t6unc X I
Washer t3/32 X 3/4 X 10 Ga
Clip Push In Hinged
Nut Crownlock 3/8-16 Unc
Spring Seat Cprsr_ 2 250 B_kZi
Screw Thdrot 3/8-16 X I Ty°tt
Washer t3/32 X I X 14 Ga
Pan P_t Seat (b k }
Bracket Pnt Mour_ti_sgSwitch
Bushing Snap B_k Nyi 50 td
_ZY PART
NOo NOo D_SGR]PT!ON
14 72050411
I5 134300
t6 121250X
17 t23976X
t8 I24238X
2t t53236
22 STD54!431
23 74780814
24 '19i7'I9i2
25 1270'18X
26 STD55It50
BIOT£:
Bolt Rdhd Sht Nk 1/4-20x1-3/8
Spacer Split 28 X 96 Zinc
Spring Cprsn 1 27 Bik Pnt
Nut Lock i/4 Lge F_g Gr 5 Zinc
Cap Spring Seat
Bolt Shoulder 5/16-18 Unc BIkz
:Nut Crown Lock 5/16-18
Bolt Fin Hex 1/2-13 X 7/8 Gr 5
Washer 17/32 X t-3/16 X t2 Ga
Bolt Shoulder 5/16-18 X 62
Washer Lock Hvy Hlcl Spr 1/2
AI componer:_t dimensions give_ in U.S. inches.
I i_ch = 25.4 mm
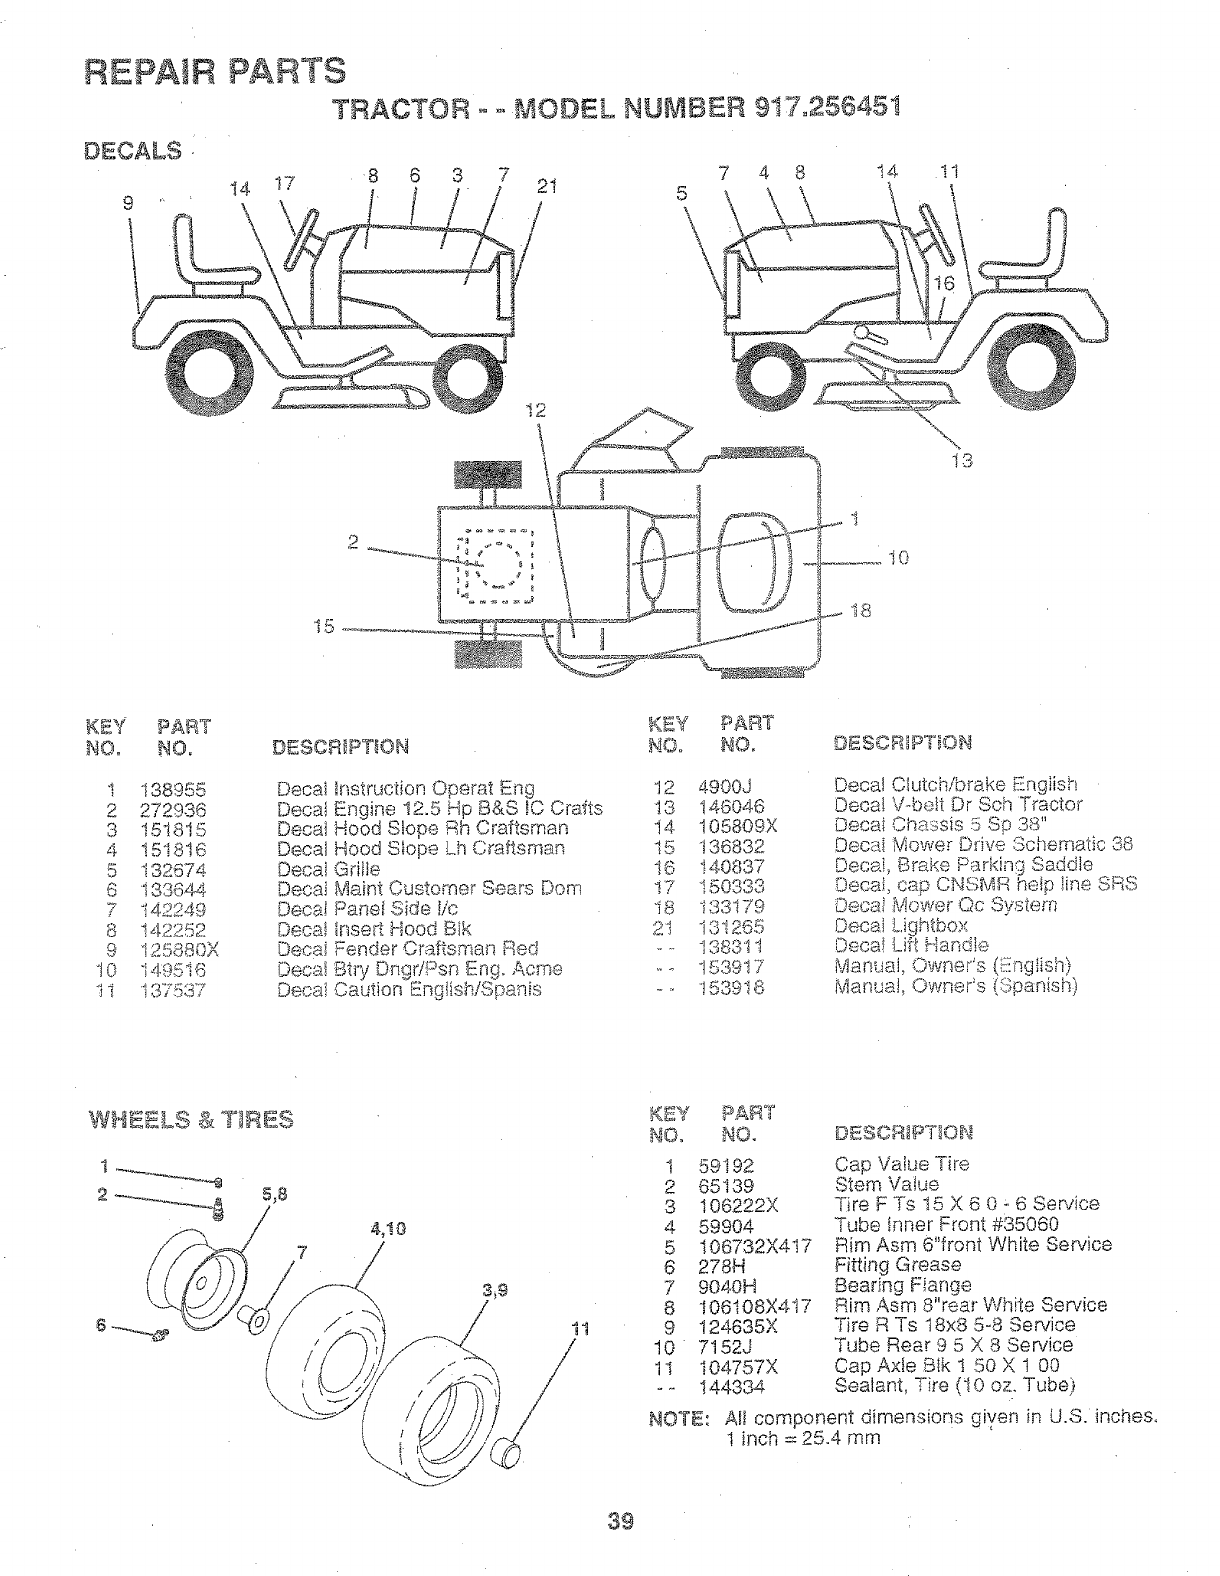
REPAIR
DECALS.
9
PARTS
TRACTOR oo MODEL NUMBER 917,256451
14 17 8 6 3 7 21 7 4 8 14
\
5
\I1
I 5 I8
\t3
t0
KEY PART
NO, NO,
1 138955
2 272936
3 151815
4 151816
5 i32674
6 i3364.4
7 142249
8 t42252
9 125880X
10 1495!6
1i 137537
KEY PART
DESCR!PTION NOo NO,
Decal Instruclion Operat Eng 12
Decal Engine 12.5 Hp B&S _C Cra:_ts 13
Decal Hood Slope Rh Craftsman 14
Decal Hood Slope Lh Craftsman t5
Decal Grille 16
Decal Maint Customer Sears Dora !7
Deca! Panel Side _ic i8
Decal lnsed. Hood Bik 21
Decai Fender Craftsman Red .-
Deca_ Btry DngdPsn Eng, Acme -
Decal r. ,.,
_,,au_on EnglishlSpanis
4900J
146o46
105809X
136832
! 4.0837
133179
131265
13831 t
t539t7
t r<or_ 8
DESCRiPTiON
Decal Clutchib_ake Engiish
Decal \A,be!t Dr Sch Tractor
Decai Chassis 5 Sp 38"
Decai Mower Drive Schematic 38
Decai, Brake Parking Saddle
:,eca.,_ ,.,ap CNSMR help u_
Decai Mower Qc System
Decal Lightbox
Deca! Lift HandIe
Manuai_ Owner's (,:£ng!ish)
Manua!_ Owners (Spanish)
\
4,10
1t
KZY PART
NO, NO, DESCRIP'T_ON
1 59192
2 65139
3 106222X
4 59904
5 I06732X417
6 278H
7 9040H
8 106108X4t7
9 124635X
10 7t52J
1I I04757X
-_ 144334
Cap Value Tire
Stem Vatue
-Fire F Ts 15 X 6 0 _6 Service
Tube Inner Front #35060
Rim Asm 6"front White Sewice
Fitting G_ease
Bearing F!ange
Rim Asm 8"rear White Service
TiTe R Ts 18x8 5-8 Service
Tube Rear 9 5 X 8 Service
Cap Axle Blk t 50 X 1 00
Sealant, Tire (10 oz. Tube)
NOTE: A!l component dimensions given in U.S. inches,
l inch = 25.4 mm
39

REPAIR PARTSTRACTO_ o _ MOD_L NUMBER 9t 7°2564_
ENGINE
3
(
! i
i12
i
/
13 /
4
4O /
29
t OPTIONAL EQUIP_1_NT
! Spa_:k A_'este_
t
_5
4O

REPAIR PARTS
TRACTOR °°MODEL NUMBER 917.25645t
ENGINE
KEY PART
NO, NO. DESCRIPTION
t
2
3
132759
17720410
150453
4 137348
t3 272293
!4 13280324
15 13200300
16 STD551237
23 t50554
29 137180
31 109202X
32 128549X
33 i23487X
35 17490512
37 137040
38 ......
40 124028)(
44 17490412
46 19091416
62 STD55113I
72 71O70512
78 17490620
81 128861
NOTE:
Control Throt Rh BIk Pd115 10
Screw Hex Thd Cut 1/4-20x5/8 T
Engine B&S 10.5-t2.5 _C, DC
Model No. 289707, -0179-01
Muffler Exhaust B&S Lt
Gasket 1 313 td Tin Plated
Nipple Pipe 3!8 Npt X 3"
E_bow Std 90 Degree 3/8-t8 Npt
Washer Lock Ext Tooth 3/8
Shield Browning
Arrestor Spark
Tank Fuel t 25 Fr
Cap Asm Fuel W/sym Vented
C_amp Hose Btk
Screw Thdrol 5/t6-18 x 3/4
Line Fuel 20"
Ptug Oil Drain (Order From Er_gine
Manufacturer)
Bushing Snap Nyt Btk Fuel Line
ScrewHexwsh Thdml t/4o20x3/4
Washer 9/32 X 7/8 X t6ga
Washer Lock Hvy Hlcl Spr 5/16
Screw Hexhd Cap 5/'I6oi8x3/4
Screw Thdrot 3/8-16xt qi4 Tytt
Nut Ftange I/4-20 Starter Nut
Altcomponer_tdime;_sionsaiven _n.... ._, ,,,........
I inch = 25.4 mm
41
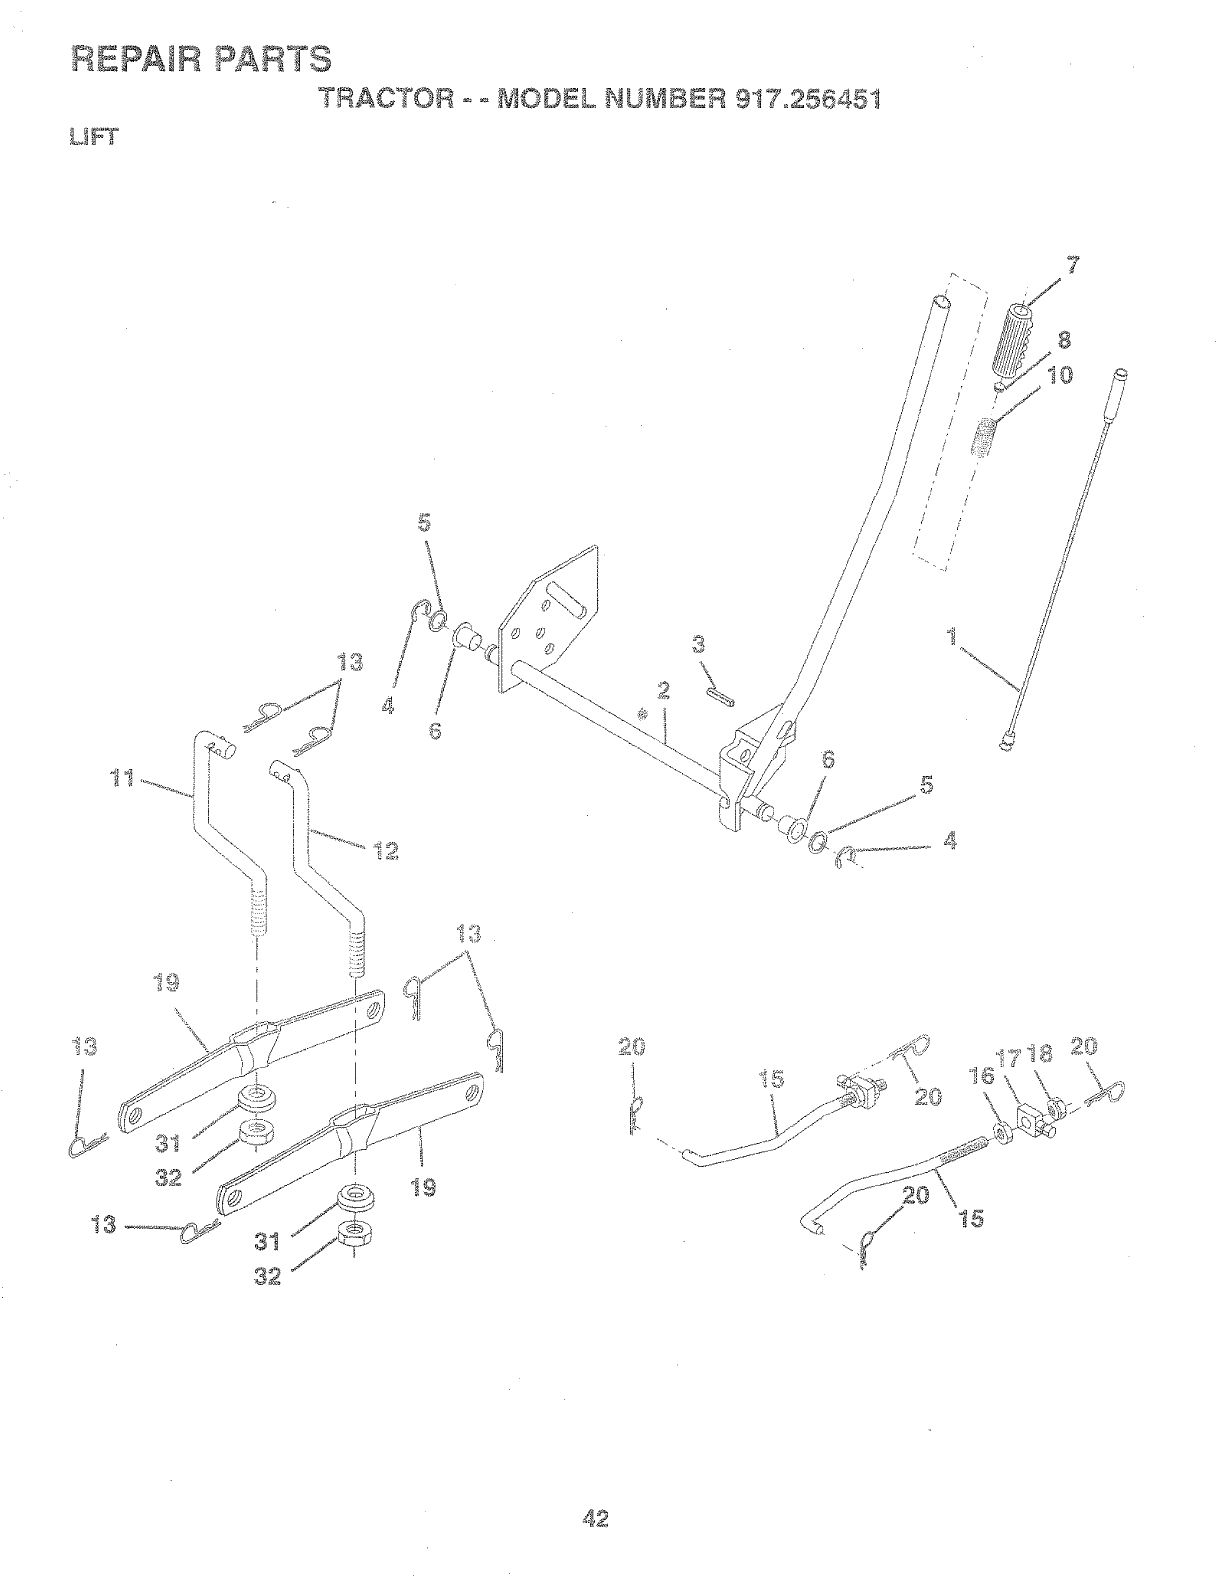
REPAIR PARTS
T_RAC°t"OR °- £JIODBL NUMBER 9!7o25645t
L]Fi"
7
5
@
4
32 !9
18,
3
,\2
8
42
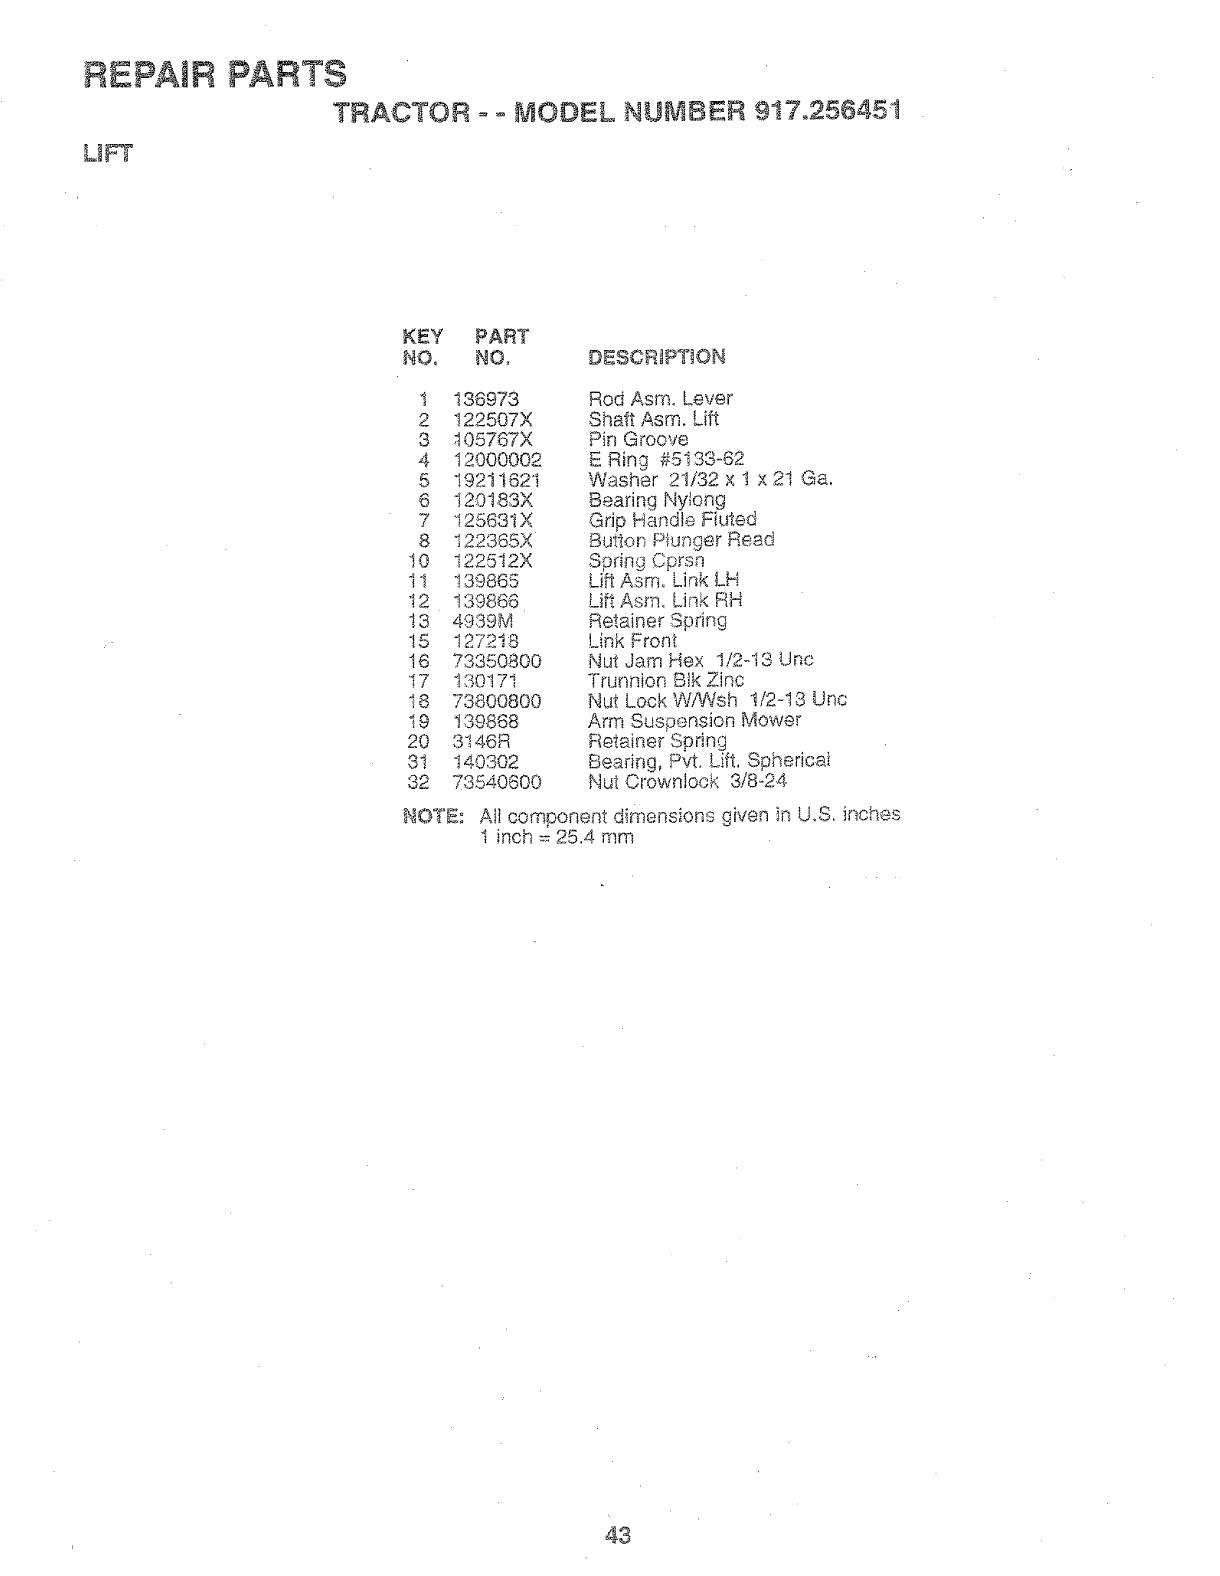
REPAIR PARTS
TRACTOR oo MODEL NUMBER 917o256451
L_
KEY PART
NO. NO. DESCRJPT)ON
I 138973 Rod Asmo Lever
2 122507X Shaft Asm. Lift
3 ,105767X Pin Groove
4 12000002 E Ring #5133-62
5 19211621 Washer 21/32 x 1 x 21 Ga,
6 120183X Bearing Nylong
7 I2563IX Grip Ha_dfe Fiuted
8 122365X Button P_unger Read
10 122512X Spring Cprsa
11 t39865 Lift Asm, Link LH
12 t39866 UR Asm. Link RH
t3 4939M Reta;ner Spring
15 127218 Link Fron_
t6 73350800 Nut Jam Hex 1/2-13 Unc
17 130171 Trunnion BlkZinc
18 73800800 Nut LockWiWsh 1/2q3 Unc
t9 139868 Arm Suspension Mower
20 3146R Ftetainer Spring
31 t40302 Bearing, Pvto Lift, Spherical
32 73540600 Nut Crownlock 3/8-24
NOT£: Aft component dimei_sions given in U,S. inches
1 inch = 25,4 mm
43

_:PAtR PARTS
TRAOTOB - o _oaO©£L NU-_ZaB:R 9t7o255451
_aOWER
4O
I
2 .... 8_
i
II
b/
15
29
t
44

REPAIR
£8OWER
PARTS
TRACTOR-- MODEL NUMBER 917.256451
KEY PART
NO. NO.
1 142829
2 STD533t07
3 t380I7
4. 138440
5 4939M
8 130832
8 850857
10 140296
1I 134148
i2 129895
"_q,,_137645
14. 128774
'i5 1!0485X
16 t40329
19 13282'7
2'1 8TD54143I
_.o t37807
24 105304X
25 i237i3X
26 110A52X
27 t06738X
28 19111016
29 !06735X
30 t38'7'76
31 129988
32 153532
33 i37265
:!)8 i :31494
4.1 13355I
4.8 ! 33504.
-4.5 ",-:-.m_.,'> ' ".qe
53 13.084,0
54. i $3943
55 i83840
KEY PART
DESCRIPTION NO. NO.
Mower blousing Assembly 56 122052X
Bolt Carriage 5/16-I8 x 3/4 67 149848
Bracket Asm. Fram Sway Bar 38/.42 68 144200
Bracket, Asrno Deck Sway Bar 38" 69 _ _D._60907
Retainer_ Spring 7t 142427
Asrn. Suspension Rear 72 !3t870
Boit, Hex 3/8-24 x !-I/4 Grade 8 73 127847
Washeh Lock, HW Htcl Spring 3/8 74 12t748X
Washer_ Hard B!ade Mower Vented 75 12000029
Blade, Mower, M@ching 38" 75 128909
Bail Bearing 77 127845
Shaft and Bearing Assembly 78 140384
(b3ctudes Key Number I5) 79 !27498
Mar@tel Housing, Vented 80 153701
Bail @eaSng, Mand_ei 81 73350600
Stdppe_= Meweh Vented 82 142028
:SOILShouider 88 783ij
Nut, C;owniock 5/18o!8 87 128772
Bracket, Mower Deflector 88 19t 1I2i 6
Cap, Sleeve 89 19133612
Spring. Defie(;tor 92 73800600
NuL Push 107 133502
Shie!d_ Deflector !08 133503
Washer !I/32 x 8/4 x16 Gauge 109 74760640
Rod, ._--_"_',.,_,se 1! 0 i 42587
Sc_ew_Yhdf"ol He× Hd 1t3 174905't2
Washer, Spacer
Putey, Mandrel 122 131289
Nut, Fb.qgeiock 9116 123 t3i 288
Pulley, tcileh Fiat 'I1...{4.STDS33717
Nut, Crownlock 3/8-16 128 i53390
Rod, Pivot .... t 30794.
Rod, Ctutcl% Secondary
Retaineh Sprin9 - .. 142820
B_aXe Assembly
_Nasher Hs.rdeaed
!dler Arm Assernbiy
DESCRIPTION
Spaceh Retainer i-3/4
Knob
Beit
Pin_ Cotter 3/32 x 3/4.
iqed, Clutch, Primary
Spring, Re_um
Arm, Ck;_ch, Secondapy
Washer 25/32 x I,,,5/8 x I6 Gauge
Ring, Klip
B.O[t, o{10 UICk-:,
_(eeper, Spring
A_]"a,Clutch, Prima%_
Bushing
Spdng
_\' _ Jam 3/8-48 UNC
Trunnion Adj 94
Runner, Li-._
Runner, RH
Washer 'ti/32 x 3/4 x 15 Gauge
Washer I3/32 x 1 x 12 Gauge
Nut Lock Hex W!h_s 3/8-16 UNC
Spacer, Retainer
Stifferler, tdier Arm
So!t, Hex Head 3/8-t6 x 2-i/2
Upsto9 Deck Front 38"
Screw, He:( Head, Tied. Roll.
5/I8-1.8 x 3/4
!qod, @rak% LH
Rod, @_aKe,RH
Soft., C_arlia.ge 8t8-i6 x 1-814
Washer f-"ht
_='-,_d"<"'....... '" _" (inc!.,Jdesivt_.n.x_,I.,'._,.>,>efa_.,._y _<ey
Nur_ibe!'s I2-!5, '17-I 9, 81 and 33)
iY!ow®rf_e_<'k ,_",_,,.,,.....@'_:q-':'_.,..,
HOT[(: AI oompone!st dhnensions giver,, in U.8. k_ches
45

REPAIR PARTS
TRACTOR o-_ MODEL _UMBER 9, Z°2.o4_3 _I
DANA ° e # ,_ -o_.7RAN<-_AXLo_ _.L!ODEL NU_BER ,_;_G0,q8
52
<'<_:'.% /
/
/
I9 40 41
42
t4
i t5
4,5
/
/4_
/47
/
/48
46

REPAIR PARTS
TRACTOR -- MODEL NUMBER 9!7o256451
DANA TRAHSAXLE- _ODEL NU_IBER 4360-78
KEY PART KiT PART
NO. NO, IISOIIP'I"IOH NO, HO,
! 142671 Housing, Upper
2 2274J Screw, Self-Tapping, Large
1/4o20 × .734
3 134400 BaH, Detent
4 !05904X Spring, Detent
5 t05905X Screw, Set
6" 138235 Kit, Shifte.r Assembly
::>[ hte_
7 '_'_o",o_'_"_°C_ Boot, " '- °'_ "
8 I2095iX Puck, Fdction
9 143045 Seal O!
10 142672 Ring, Retaining
tt 134793 * Assemb% Kit Shim °625 Shaft
t2 143051 Seadr% F}ange
13 !20415X Washer, Plain °632 x t.38 x °046
14 1426,74 Key, Woodruff, #9
15 t38234 Assemb!y, Kit Input Shaft
16 tI0078X Pinion, Bevel, 14 Teeth
t7 !05909X Ring, Retainhs9
18 -s,,_:¢q-_v,,,,.,_o_,_., Chain, 24 Pitches
19 106,9I!X Beating; Flange
20 !426,,75 Gear_ Spur, 14 Teeth
21 138246 Cofiar, Clutch
22 138238 Assembly, Kit, Clutch Keys
23 !3479i Screw, Tapping w/Sealer
24. !,._._.._.6,7o Shafi, Intermediate
25 2244.J Key, Woodruff, #6I
26 ._a<_-,_._:.,v
27 t20470X Sprocket, 18Teeth (Reve_-se)
28 !t0070X Spacer
29 .,_.,.,._,x::7-,f Ges.r_ Spur, 37 Teeth (!.=,)
30 129405X Gea[, Spur 30 Teeth (2=,)
3! !08980X Gear, Spur,. 25 Teeth {3,o)
312 ':...... .6'{ " -
: 4 _-"_-, Geer, 6put, 22 Teeth (@,)
33 1,::4.sop Ge_', 8pub i9 x-_ _, z,.o,,_
....., ,, JO :_<;QD._ =o
34 184797 Sps.ce_" i.i33 x !.50 x .375
35 I05925X Wa.sheh Plain .640 x 1.37 x ..061
37 101978)( Spacer .130 x ! .00 x .169
38 si0079X Asser_bty, Gea!'_ Col _bination of
_._o Teeth aP,d 't<...... ',.,._Teeth.
39 i24639X Shaft, Idler
4.0 120472X Spacer .635 x .875 x .755
DESOFIPTION
41 I05928X
42 tt0084X
43 134394
44 I20473X
45 t42678
46` i20407X
4,7 I06589X
48 120408X
49 I05937X
5O i 05936X
51 2226J
52 13440!
53 2264J
54 120474X
55 !t008!X
56 I05941X
57 !10071X
58 120952X
_ 00cv._,,59 _i c-'r,_"
60 I20475X
61 1426`80
62 i20961X
6`3 7294J
64 ...... v108t_bgA
55 120953X
,66 i 20954K
67 i84799
88 138244-
70 ! 1T:0950)(
71 73810500
72 i 0@596:£
""_ 1204.'18X
/©
SprocKet, 9 Teeth (Revel'so)
Gear, Bevel, 42 Teeth
Assembly, Kit, Shim .750 Shaft
Shaft, Driw_
Gear, 5pub 12 Teeth (1=)
G,_a.r,c,pu_, 20 "f-o_h (2,,0)
Gear, Spur, 25 Teeth (3=)
Gear; Spur, 28 Teeth (4,°)
Gear, _r_t]r 31 Teeth {5Q
Spacer .781 x i.00 x .375
Washer, Plain .632 x !:00 x .060
Washeh Neop._ene
Wasi_eh Plain .758 x !.25 x .03i
Axle, LH.
Gear, Miter_ 15 Teeth
Ring, Retaktmg
Gear, Spur, 32 Teeth
Shaft, Cross
Gear, Miter, I5 Teeth
Axh:_,R.H.
Housing, Lower
Puck. Friction
Disc, Brake
Spacer
Jaw, Brake
Pin, Dowel
Sc_'ew; SNf..Tapping, L.a__'ge
5/I6oi8 x 2.25
:Leve_', Acttt_£in9
,00.,:_'WasheiL _::_-_"" ";_'" .00 _-_:<:..... :>& I X' 1 X
@tacke%AY'ti-Re_:ation
hocknu1: S/I 6-24
Screw, % ii:-Yapping_ i._arge
5i16-18 x 1.44
Greags
*Use in combinations to maintain p_'ope_ c!earances
** O@er Key No. 15
HOTI; Aii component dimensions given ip, U.S. ir.ches
I inch :: 25.4. mm
47

" .... ::_:_7 (li....
l! _ l.I
&IS.......
................. .;,L%"]_')
7_ X ,7
41

REPAIR PARTS
TRACTOR - ° MODEL NUMBER g17,£56451
BR_GGS & STRA_ON ENGINE MO©EL NU_B_:R 289707,_ _Y. c NUMBER 0179o0!
_2_ii__
%
_t044
_.S.-TS
Vps3-
12.1 CA_BU:_'Ofl OV_.RH,&UL K_T
, :<::.::...... [_-%, .
k.. 1
:;?N V
224
[ @2_::s::, :L:2S!!d
,_7:'¢i i
t ;S_# ,{;
--. L 2_F
492
8,011 "_J
49

REPAIR PARTS
801
_802 i
:!i
:i
5
:%_,L.!_i/
.i _!h
284
1
%_ 524 1 d
5O
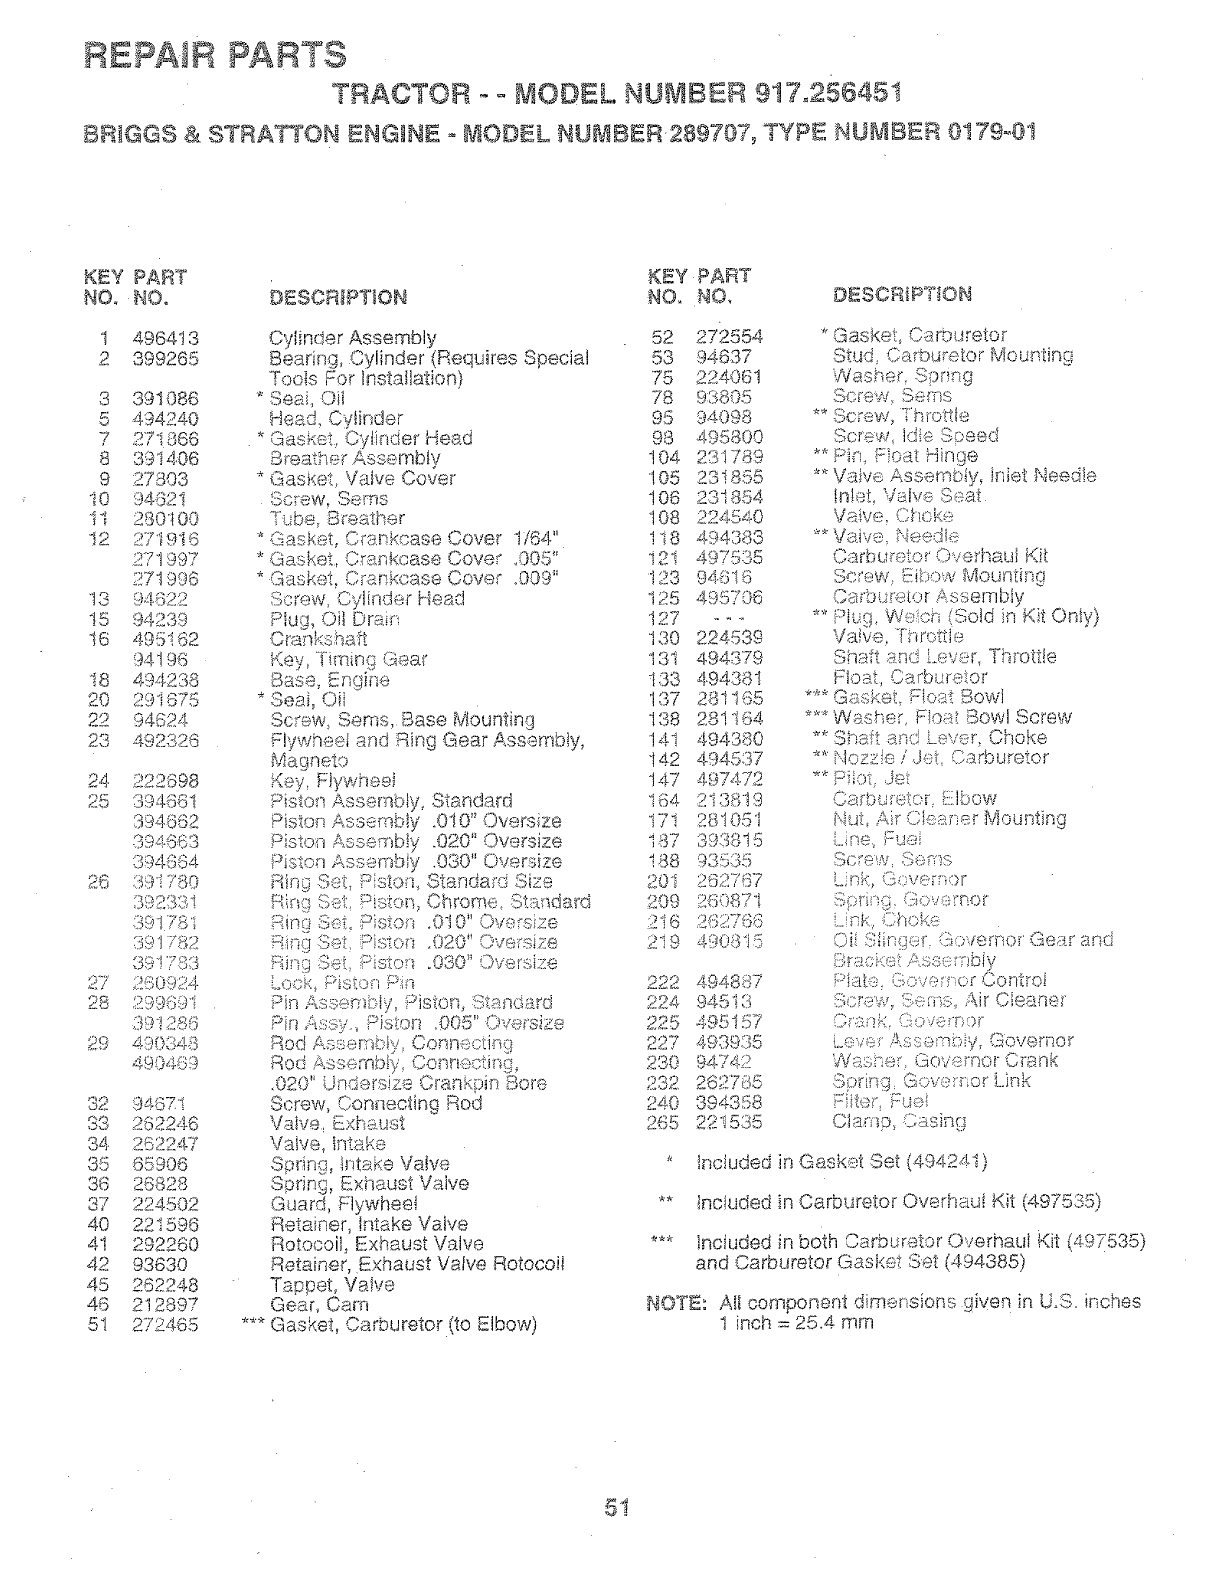
REPAIR PARTS
TRACTOR MODEL NUMBER 917o25645.
BR_GGS & STRATTON ENGINE ° MODEL NUMBER.289707, TYPE NUMBER 0!79@t
KEY PART KEY PART
NO_ NO, DESCRIPTION NO. NO, DESCRIPTION
t 496413
2 399265
3 391086
5 4.94240
7 271866
8 39'14.06
9 27803
10 94821
ti 28O10O
t2 271916
271997
271996
13 _:.M62'_
15 94239
16 495162
94196
18 494.238
20 291675
22 94524
2:} .4928:26
24 222898
25 394681
394852
394663
894654
26 39'!?'80
392331
391781
391782
391788
27 260924
28 299691
391285
29 490:348
49048{)
32 9487i
33 262246
34. 262247
35 65906
36 26828
37 224502
40 221596
41 292260
42 93630
45 262248
46 212897
51 272465
Cylinder Assembly 52
Bearing, Cylinder (Requires Special 53
Toois For Installation) 75
*Seai, Oii 78
Head. Cylinder 95
* Gas_et, Cyt:inder Head 98
Breathe_ Assembly 104
* Gas£et, Valve Cover 105
Screw, .....c_-=m_',,.._ 106
Tt_be..B<eather 108
*::_;_<,b_t_-' an _,'. m_Cover t/64" 118
.............,,..4_s.:,K,.a,:._e
,,n_:::ke_, Cover "{ "" 12!V.YaR_L,c_S@ A):}b
* Gasket. _"-_ ,_........ __.3
•'..,,tc'.[,_.'_._a÷ Cover °009" _ ''_
c;crev,ACylinder Iqead t25
PIug, Oil Drair; 127
C_ankshaft I 30
.._:y,Timing Geal' 13!
,.3_, Engirte I33
* Seai, Oii 137
Screw. Seres, Base Mounting 138
Flywheet and Ring .Gear Ass,-. "_""', ,_m_,b 14t
Magneto 14.2
i{ev, Fiywheei 147
Piston Assernbly, Standard 164
Piston Assembiy .010" Oversize 171
Piston Assemb!y .020" Oversize 187
Piston Assembly .030" Oversize 188
i-qin9 c..... e.... _ ,.,_e;.,._ o.....>_:£,Pssto!%
R;n':_Set, P<'q * OhtoR_e. "::._"_ c _"_ o@9
Rin_._Set, o;_.,..,-. .
.. _....._, .0t 0" Ow:-ws_ze 2I6
.0_0 Over'size _t
.:::'qqqSe_ Pistcxi ......" ,', o
Rin!_:;Set, Ristes .0S0" Overs;ze
Lee.% :Piston .Pin 222
Pin Assembly, Piston, Standard 224.
Pin >_ssy., Piston ,005" Oversize 225
Rod AsseF.abty, Connectb 9 227
ROd '_............... ,_'s's's,4_
,_,ba_:>uNb:y, OO(1[lee'u!x%
.02(}" ;vt'n'_"v"'i,_.s,_;b._.b::._' Cra%_kDin, So_e ......o_".12
Screw, Connecting Rod 240
Valve, ExhE,.ust 265
Vaive, _ntake
SOT nq, "_ '_
Spdng, Exhaust Valve
Guard, Flywheel
Retainer, Intake Valve
Rotocoii, Exhaust Valve
Retainer, Exhaust Valve Rotocoii
Tappet, VaIve
Gear, Cam
.... Gasket, Carburetor(to Elbow)
272554
94637
224061
9:3805
94098
495800
231789
231855
231854
224540
494383
49 ,'.'.._o_
94-616
495796
224539
494379
4.94381
281 i65
281164.
494.380
494537
PAwg
2i 38t 9
28 t 051
8938t5
93535
"762767
260871
2827@3
490815
494887
94513
495157
493935
94742
262785
394358
_,:_t 535
* GaskeL Carburetor
Stud, Carbu_etor Mounting
Washen Spring
Sc_ew, Se¢,qs
Screw, Idie Speed
**Pin, Fioat Hinge
** Vaive Assemb!y, Inlet ,,,_,,.._._-"_4i_
tnleL Valve Sea_
Vaive, Choke
**Vaive, Needie
Oarbu_et,x' Overhaui f<il
Screw, Eibow Mountir,.g
** i:qug VVe;ic;n(Sold in Kit Only)
Va!ve, Throttle
Shaft and Lever_ Thrott!e
*** Ge.skeL Float Bowl
.... Washer, Fiou£ _owl Screw
** Shaft _" ...... Choke
,_..;_,,. L_(::.x:V({?_"
** Nozz!e /JeL Carburetor
** jT';i'_ot,,.Jet
Carbu_ete_', L.Ibow
Nut, Air C:Ie_ner Mounting
L.ine, Fuel
SC_'ew_ .."!},_{:-_rq s
L;_]_,,,_"(}(:'Ve_T, or
Sorirg.Gove:'no_:
Oii ".....i'r .... _:_ea_ '
;3r;_.u;i.-:et.._.ssembiy
.-:';:'Jar'_..,(b_c:,,/::'_'r_o;"Contrei
(}i"art!:.::. {}:_':>it:):r) o F
Leve;" &ssem_:)iy, Geverno_
Wasi-e_, Gore;mot Crank
[::'i;ter Ft..ie}
C;a:,,"np,:::ssina
* ff_chJded in Gasket Set (494241)
** ;ncluded in Carburetor Overhaul Kit (497535)
*** Included in both Carburetor Overhaul Kit (497535)
and Carburetor Gasket Set (494385)
NOTE: AIi component dimensions given in U.S. inches
1 inch = 25.4 mm
5!

REPAtR PARTS
TRACTOR - - MODEL NU£oaBER 917 256451
BRIGGS & STRATTON ENGINE =_£ODEL NU_BEiB 289707_ TYPE NU;_;IBER 0! 79°0t
KEY PART K£Y PART
Nee ?,lO, DBSc2,RtPT!ON NO, NO, 9ESOR_tPTtON
284 94073 Screw, Shoulder, 726 392134
Hex Washe: Head
284A 94704 Screw.. iqex Head 727 490324
304 4.98319 Housir% Bbwe_
305 94819 Screw, Seres, 81owe; Housing 728 94627
Mou_tii-,g 729 281i59
306 224545 Shieid_ (3yfinder 729A 225!'70
307 94623 Screw_ Seres, Cyiir;,der Shield 74I 262i35
Mounting '757 2!2359
308 491490 Cove< CyihderHead 758 899891
309 497595 Motor. Sta_%_.:n 759 298909
310 497@02 Boit, Yhru 76t 93875
3t 1 497608 B<ush Set 783 280104
333 492341 AmTatu<e, M:%j@eto 80I 894556
334 93381 S<:,'_ew_Seres, A,wnature Mounting 802 497605
_.>..... 802592 _ q 4% S04
346 93705 Sc<ew_He;< Head 842 270920
356 494328 Wire> G!o-'dnd 847 495415
858 4c,4P4t.............. _.aa:_te{"'...............o_s_ 85'1 22' .,-xw,i;_o
383 'i9203 Pule< Hywi;eet 869 26i463
383 89838 Wrench_ Spark Pk_g 870 2133t6
423 94073 Screw, Seres 871 261961
¢'B ............ ' J'-i "_a _' o< ._ "'*_' <
443 4.93909 -_,.._i_,G<:;.,:_Air ,...,e_, _e_
455 22255I Cup, Screen tv'iounting 872 28i104
z'...S"7493903 K,no_ /x_-Ciea.!._et. 875 .""_-_:"_-_
......... ; ..... -1'<1} -z 4_ d,_ /
4G:::i_222562 Sc,"-een_Fiush Rotating 8'77 393456
4.74 393474 Starer A!temr4o_
48:';:_93!!1121 Screw. Sef¢_s 955 94.642
5!0 4,97506 OSw.%Stari::'r 965 94108
.......... bA_<k:.,' _jn_; o/'d [.'.}iOS"isk: Oii hJleF {.!}7:!_ 4.<;_..k:,/-._
524:68838 Seai, i::ilk:::"T_be 977 4.94385
525 _.96i i 3 Tube° Oil ..'.::i!ie< !i87 281 ! 5@
585 272403 _:_£Jem,6._K_:qrCiea[]er i 005 260i:;::_7
537 281 ! 06 * O.-!::_i:._i],"d_Ck)s.i-te_ 1006 224.4.i3
544. 497@03 Am_a_:<..:r,:;::2)t.::_'te:' i01_:} :1-91255
_)!:£;i! ,!t'N !i_Y7 BUShiY';g, fl]i(;,v@ 'XOf Cys_'ti( J044 9.4.]i,;'3
50:2 92513 Seit, Govern<x :,....ever 1053 272397
592 2:}i082 Nut, P:iex i090 ,:$97607
501 ......_..............
::'b0c, d L.}ia:riq_)_ )-L£._i _"':'
w£,)e
6ii 49.$¢5I Fuel tniei-ube
614 9_:_39_ uotte% Hai<H;n
618 282803 Spring, Choke Return
834 281t68 ** Seal, Choke Shaft
634A 49i328 * Seat Governor
6348 28i 167 ** Washe< Throttie Shaft
635 66538 Elbow_ Spark Plug
546 224546 Brace, Air Cleaner
8r:°_ 93498 Screw, Seres
AD
663 94620 Screw, Hex Head
663 280848 Spacer
Sea< Ring
{includes Mounting Paris)
L,ove_. b,.alt,_,
(includes ,k_bunting Screws)
Screw, Hex Head
Cti_, Lead Wire
Retainer Wi_e
t'],':. ,/a 'TA" "+t....
i...]i'_k,Counterweight
Cou r'..,!e_'we;ghtAssembly
Pin, Coun_:erwHght
Sc_ev%<}oLmto_weight
Gear, St,.:-::._4er
C,sp_Drive
Cap End
Seal. Oii Fiik_r Cap
Fill (]roup, Oil
7emfi,:_al, Ignition Cable
Seat, intake VaD.(e,Standard
Sea% Exhaust Valve, Standard
(kide, 'E!xhausi Valve
(iuicie, i,_--_t:-_!<eValve
sever, _-q,Cleaner
Bedy, Air Cieane_
Diode _:mdOormector Assembly,
<::)Lu!dC i:.cui!
:£,<.;_'ew:Fi.J,',_i{:bwl
i...,a,:.:k<m:t,i;_irCleaner Mounting
{Sowi i<sseynbiy, Carburetor
£)a<!i)_Ife_o[G.::_sketHit
Ss,:_i.']'_,":_i:i:ieShaft
i:::'.!V'}. ,):::i /w iff e i
P,etsi_ e< !::a_7
.._.be!:;<:i:
S.,.)rew,;_._xHead
IV}9,fiLiSl, 11>wn_,:_i"%
_,.::ie!_--,ine< Srus.h
RPM .... ; " o_ soG.11i}50; High: 3200-3400<:_._)@_Ngs, / _d: '[ F .....
* included in (Saskei 0..::_<..... \4_.o_',r'-'_o3o)_"
** !ncluded in Carbur@.or Ovemaui Kit (495799)
*** included in both Ca<bureto_ Overhaul Kit (497535)
and Carburetor Gasket Sei (494385)
NOT£: All component dirnensions given in U.S. inches
I inch :25.4 mm
52

SERVICE NOTES
53¸

SERVICE NOTES
54

SUGGESTED GUIDE FOR SJGH'TING SLOPES FOR SAFE OPERATION
ONLY RIDE UP AND DOWN HILL,
NOT ACROSS HiLL
o1
O1
SIGHT AND HOLD THIS LEVEL WIiTH
SKY LINE OFt TREE.

OWNER'
UAL
MODEL NO.
917.256451
IF YOU NEED
REPAIR SERVICE
OR PARTS:
FOR REPAIR SERVICE, CALL
TH{S TOLL FREE NUMBER:
1-800-4=REPAIR
(1-800-473=7247)
FOR REPLACEMENT PARTS
INFORMATION AND
ORDERING, CALL THIS
TOLL FREE NUMBER:
1-800oFON-PAR'T
(t -800o366o7278)
FOR CONSUMER ASSISTANCE
HOT LINE, CALL THIS
TOLL FREE NUMBER:
1=800o659_5917
®
12.5 HP IC
ELECTRIC START
38" MOWER
5 SPEED TRANSAXLE
LAWN TRACTOR
Each tractor has its own model number. Each engine has
its own model number.
The model number for your tractor witl be found on the
modet plate located under the seat.
The model number for your engine will be found on the
blower housing of the engine.
Afl parts listed herein may be ordered from any Sears,
Roebuck and Co. Service Center/Department and most Re-
tail Stores.
WHEN ORDERING REPAIR PARTS, ALWAYS GIVE THE
FOLLOWING iNFORMATION:
° PRODUCT- TRACTOR
MODEL NUMBER - 917.256451
ENGINE MODEL NO. * 289707, TYPE NO, 0179-0t
o PART NUMBER
PART DESCRiPTiON
Your Sears merchandise has added vafue when you
consider Sears has service units nationwide staffed with
Sears trained technicians.., professional technicians
specifically trained to insure that we meet our pfedge to
you, we service what we sel!.
153917 3.20.96 JH Printed in U.S.A.
_;::td_,t_,
