Craftsman 917259170 User Manual TRACTOR Manuals And Guides 1108040L
User Manual: Craftsman 917259170 917259170 CRAFTSMAN TRACTOR - Manuals and Guides View the owners manual for your CRAFTSMAN TRACTOR #917259170. Home:Lawn & Garden Parts:Craftsman Parts:Craftsman TRACTOR Manual
Open the PDF directly: View PDF ![]() .
.
Page Count: 60

J_
MODEL E £1 170 OWNER'S MANUAL
o Assembty
_oOperation
_,_Customer Responsibi!ities
o Service and Adjustments
_ Repsir Parts
CAUTION: Read and follow aH safety rules and instructions before operating this equipment,
FOR CONSUMER ASSISTANCE HOT LINE, CALL THiS TOLL FREE NUMBER: 1-800-659-5917
SAFETY RULES
Safe Operation Practices for Ride-On Mowers
IMPORTANT: THIS CUTTING MACHINE IS CAPABLE OF AMPUTATING HANDS AND FEET AND THROWING OBJECTS.
FAILURE TO OBSERVE THE FOLLOWING SAFETY INSTRUCTIONS COULD RESULT IN SERIOUS INJURY OR DEATH_
1. GENERAL OPERATION
o Read, understand, and fo_low al_ inst_cfions in the manuaI
and on the machine before starting.
o Only allow responsible adults, who are familiar with the
instructions, to operate the machine.
o Clear the area of objects such as rocks, toys, wire, etco,
which could be picked up and thrown by the blade.
o Be sure the area isctear of other people before mowing. Stop
machine if anyone enters the area.
o Never carry passengers.
o Do not mow in reverse unless absolutely necessary. Always
took down and behind before and while backing.
Be aware of the mower discharge direction and do not point
it at anyone_ Do not operate the mower without either the
entire grass catcher or the guard in ptace.
_Slow down before turning.
Never leave a running machine unattended. Always turn off
blades, set parking brake, stop engine, and remove keys
before dismounting.
,_ Turn off blades when not mowing.
Stop engine before removing grass catcher or unclogging
chute.
o Mow only in daylight or good artificial light.
Do not operate the machine while under the influence of
alcohol or drugs.
o Watch for traffic when operating near or crossing roadways.
Use extra care when loading or unioading the machine into
a traiier or truck.
_L SLOPE OPERATION
Slopes are a maior factor related to loss-of-control and
tipover accidents, which can result in severe injury or
death. AII slopes require extra caution. If you cannot back
up the siope or if you feel uneasy on it, do not mow it.
DO:
o Mow up and down slopes, not across.
,_ Remove obstacles such as rocks, tree limbs, etc.
_ Watch for ho_es, ruts, or bumps. Uneven terrain could
overturn the machine. Taft grass can hide obstacles.
o Use slow speed. Choose a tow gear so that you will not have
to stop or shift while on the slope.
o Follow the manufacturer's recommendations for wheel
weights or counterweights to improve stability.
Use extra care with grass catchers or other attachments.
These can change the stability of the machine.
Keep at! movement on the slopes slowand gradual Do not
make sudden changes in speed or direction.
o Avoid starting or stopping on a slope. If tires lose traction,
disengage the blades and proceed slowly straight down the
slope.
DO NOT:
Do not turn on slopes unless necessary, and then, turn slowly
and gradually downhill, if possible.
,_ Do not mow near drop-offs, ditches, or embankments. The
mower could suddenly turn over if a wheel is over the edge
o_a cliff or ditch, or if an edge caves in.
oDo not mow on wet grass. Reduced traction could cause
sliding.
oDo not try to stabilize the machine by putting your foot on the
ground.
oDo not use grass catcher on steep slopes.
2
ill= CHILDREN
Tragic accidents can occur ifthe operator is not alert to the
presence of chHdren. Children are often attracted to the
machine and the mowing activity. Never assume that
children wil! remain where you tast saw them.
o Keep children out of the mowing area and under the watchful
care of another responsible adu!t.
o Be alert and turn machine off if children enter the area.
o Before and when backing, look behind and down for small
children.
o Never carry children. They may fail off and be seriously
injured or interfere with safe machine operation.
Never allow children to operate the machine_
o Use extra care when approaching blind corners, shrubs,
trees, or other ob}ects that may obscure vision.
!Vo SERVICE
Use extra care in handting gasoline and other fuets= They are
flammable and vapors are explosive.
Use onIy an approved container.
Never remove gas cap or add fuei with the engine
running. Allow engine to cooi before refueling. Do not
smoke.
Never refuel the machine indoors.
Never store the machine or fuel container inside where
there is an open flame, such as a water heater.
Never run a machine nside a ciosed area.
Keep nuts and bolts, especiaily blade attachment bolts, tight
and keep equipment in good condition.
Never tamper with safety devices. Check their proper
operation regularly.
Keep machine free of grass; leaves, or other debris build-up.
Clean oil or fuel spillage. Allow machine to cool before
storing.
Stop and inspect the equipment if you strike an object.
Repair, if necessary, before restarting.
Never make adjustments or repairs with the engine running.
Grass catcher components are subject to wear. damage, and
deterioration, which could expose moving parts or allow
objects to be thrown. Frequently check components and
replace with manufacturer's recommended parts, when nec-
essary.
Mower b{ades are sharp and can cut. Wrap the biade(s) or
wear gloves, and use extra caution when servicing them.
Check brake operation frequently. Adjust and service as
required.
Look for this symbol to point out important
safety precautions, It means
CAUTION!!! BECOME ALERT!!! YOUR
SAFETY !S INVOLVED.
CAUTION: Always disconnect spark plug
wire and place wire where it cannot contact
spark plug in order to prevent accidental
starting when setting up, transporting,
adjusting or making repairs.
A WARNING
The engine exhaust from this product contains
chemicals known to the State of California to
cause cancer, birth defects, or other reproduc-
tive harm.

CONGRATULATIONS on your purchase of a Sears
Tractor. It has been designed, engineered and manufac-
tured to give you the best possible dependability ad
Should you experience any probiem you cannot easiv
remedy, please contact your nearest Sears Authorzed
Sewice CentedDepa_ment Depa£mento We have co,m-
potent, wel-trained technicians and _h_ _,_o_r........t_w-__::_,_,
service or repair this tractor.
Piease read and retain this manuai. The insirucdons wiii
enabte you to assembie and maintain ,, ,,_*__*+'- ............
Always observe the ....... "" mt.)L£:©
MODEL
NUMBER 917.259i 70
PROBUOY SPECIFICATIONS
_ ORSEPOWER: -_o _
,-__s. c. UNLEADED REGuLAm
OL "_'v:_=_ ,API.SFfSG/SH'!:. SAE 30 (above A2°_c_.,, ,
,._,= sW-ou (beiow 32"F)
UO_ i
if:.CL:_L&RA?,C}-: _',,TA<:E: 004"--..006"
:::&H;,:_grit .007" -- 009"
::: ", < -': :ca="-,"- ', £';_', ':ORWARLt): {} -5.5
REiERSE: 1}-- 2.4
......7::2 ::: S!_SSURi%:: :=: ,,-,_r_..
_iY]AF>' "i0 ::>-c:,.,=
:] i- .:d:c:ACJ1"G S" "_TE!', : :'i ,_',; _"_::* R_I_T_'_s_V.............
::: ,4 _,4S;C :.-/1:[_} ¢::',k4s'_
::A_" R" ::.t,.i='_Hk'--_ 30
i ,3C,-':,: 240
!:Ii_ADE :"= ...... "- "_ _=" ]/)--I Li.3 .
NUMBER
i THE MODELAND SERIAL ;'iUMBERS WiLL iE FO LIhd;L)
ON A PLATE UNDER THE SEAT.
YOU SHOULD RECORD BOTH SERIAL ?,iUMBER !:;.isiD
DATE OF PURCHASE AND KEEP !N A SAFE PLACE
FOR FUTURE REFERENCE.
AINTENANCE AGREEMENT
A Sears Maintenance Agreement s ova iaPie on this _/:_ocu-
uct. Contact your earest Sears store for detaiso
CUSTOMER RESPONSIBILITIES
Read and observe the safety rules.
o Folowa reguJar schedule in maintaining, caring for and
using your tractor.
0> Follow the instructions unclear C_;stomer Responsibiii-
des" and =Storage" sections of this owners manual.
WARNING: This tractor is equipped with an internai
combustion engine and should not be used on or near any
unimproved forest-covered brush-covered or grass-cov o
:_red and _sniesshe engine's exhaust system is equipped
wic_e:ss__n_arrestor meeting aptsiicabie ioca or state Jaws
{it any.ls,f a spark arrestor is used, t shoutd be maintained
n effective wor}dn{};order by the operatoro
:,:: the sta_e of Catfoma t_e above s _equired by law
:Sec_:o s 4442 of the Caifom a Pubfic Resources Code}.
Other states may save simi ar aws..::ederal _awsappiy on
fedora lands. A spark arresier for the muffbr is available
throu!_h your nearest Sears Authorized Sewice Cented
DepaEment (See REPAIR PARTS section of this manua }.
LIMITED YEAR WARRANTY ON CRAFTSMAN RIDING EQUIPMENT
For two (2) years from the date of purchase, if this Cra_sman Riding Equipment is maintaineG iubricated and tuned up according
to the instructions in the owner°s manuai, Sears wiil repair or repiace, free of charge, any pars found to be defective in material or
workmanship.
TMs Warranty does not cover:
o Expendabk items which become worn during normai use such ss b odes, spark plugs, air cleaners, beRs, etc.
o Tire replacement or repair caused by punctures from outside obiects, such as naiJs, thorns, stumps, or giass.
o Repairs necessary because of o_era_or abuse, neglgence improper storage or accident or the failure to maintain the
equipment according to the instructions contained in the owner*s manua.
Riding equipment used for commercial or rental purposes.
Lt fTED 90 DAY WARRAN ON BAKERY
For ninety (90) days from date of purchase, if any batteq/ included with this riding equipment proves defective in material or
workmanship and our testing determines the battery wil not hold a charge, Sears will replace the battew at no charge.
IN-HOME WARRANTY SERVICE ON YOUR CRAFTSMAN RIDING EQUIPMENT IS AVAILABLE AT NO-CHARGE FOR 30
DAYS FROM THE DATE OF PURCHASE. PLEASE CONTACT YOUR NEAREST SERVICE CENTER. AFTER 30 DAYS FROM
THE DATE OF PURCHASE, WARRANTY SERVICE IS AVAILABLE BY TAKING YOUR CRAFTSMAN RIDING EQUIPMENT TO
YOUR NEAREST SEARS SERVICE CENTER. (iN-HOME WARRANTY SERVICE WILL STILL BE AVAILABLE AFTER 30 DAYS
FROM THE DATE OF PURCHASE BUT A STANDARD TRIP CHARGE WILL APPLY.} THIS WARRANTY APPLIES ONLY
WHILE THIS PRODUCT IS IN THE UNITED STATES.
This Warranty gives you specific legal rights, and you may also have other rights which may vary. from state to state.
SEARS, ROEBUCK AND CO., D/817 WA, HOFFMAN L,_. _A_ _S, IL 60179

TABLE OF CONTENTS
A
"-\C C!_S £ :71 :?* ........................................... 5
,,,dits " " ::
_.:, , ?©
. _qT-T'a-_:_c_.......................2i
-: "_ { ontroi Cabie ...... 9;_
:r_ ,.qb,-_ ...............18
•. :_<<"v:
...._ g with ......................24
S r_'_e ......................................27
T<_rmnais....................................17
Pqts:
:(__ovai/R_,<)acement e2
Moser Biade Drive
_ emovaL/Re@acement ?_>
5iacse:
...._,per _,g..................................
Pep acemen ...............................17
Brake J_.dus ment 22
C
Carb_ retor /diustment .......................25
'''P _' "__'actor ................................12
CLstome,_ SesDonsibitities. ............... o,_.._? "
A" Fiter ...................................8
,q Screen, Engine ..................18
8atiec, /....................................._7
3 :qnf? Fin?, Engine ..............',_
/.t_qeOil ...............................i8
71FHter ................................19
ark Plugs ............................19
T r : 7,r:
_des ..................................... 17
L _brication Chart .................... ! 6
_Jabtenance Schedu!e ........... I 6
Tire Care ........................ 8,17,23
C_@ng Hegnt Mower ....................... I2
E!ectr cak
interiocks and Reiavs ................. 24
Schemat c ..............................,}0
Wirng Diagram .............................31
Ar Fiter ......................................i8
A_ Scrqen ..................................P
Coonq Fins, E_-:gine...................9
C Change ...................................! @
() Leve .................................3.I_!
Preparation ...................................3
Repai_ f%÷_:s ............................4955
S a_ing ........................................I3
Storage .......................................27
?:
Air ................................................18
Fue_...............................................19
Fael:
Type .........................................I3
S orage ......................................27
:c_.,-e...................................................24
Gauge Wheels .....................................8
H
Hood RemovaHnst Ilation ................. 24
L
Leveiing Mower Deck ........................ 21
..ubricaton Cha_ ................................16
b_
Maintenance Schedu e ......................! E
Mower:
Ad ustment Front4o-Back ......... 21
Adiastment S de-to.-Side ............21
Biade Sharpening ....................... 17
Blade Replacement .................... t7
Cutting Height ............................. 12
installation ................................... 20
Operation ................................ 1i-14
Removal .....................................20
h4owingTips.......................................14
Muffler................................................19
Spark Arrester. ......................... 3,41
Mulcher P!ate ....................................... 9
O
Oil:
Cold Weather Conditions ....... 13,18
Engine ......................................... 18
Storage ................................. _..... 27
Operation ......................................i 1-14
O!}erating Mower. ..................... 12_i 3
Options:
i:\ccesso _n£ ...........................({
S[)an_ AriesX:_r .....................................
P_-_rk_(_Bake ................................" 2
9'rc,:_c Seeci ica_ion,s...........................2'
R
Repair Pa_s <.:8
S
Safsv Ruies ..........................................
{Seat.......................................................!
Ser,4ce and Adiustments ..............20-26
Brake ...........................................2;2
Ca_ureter ............................................
Fuse ............................................1:£4
Hood RemovaHnstaD£ion ...........24-
Motion Drive Belt
Removal/Replacement ........... Z2
Mower B_ade Drive Beit
Removat/Repiacement .......... ;2
Mower Adjustment:
Front-to-Back ........................2"
Side.to-Side ............................2!
Mower Installation .......................20
Mower Removal ...........................20
Tire Care .............................8173
Siope Guide Sheet .............................56
Spark Plugs.........................................19
Specifications ........................................8
S_arting the Engine .......................8-14
Steering Wheef _ _,o
Stopping the Tractor ..........................12
Storage ............................................... 27
T
Thrott}e Control Cable Adjustment ..... 25
Tires ............................................8,i7Z13
TroubleShoolingCha_ ...................28-29
TransaxleRepairPaMs .................47-48
W
Warranty ..............................................3
Wiring Diagram .................................. 3i
Wiring Schematic ............................... 30
4
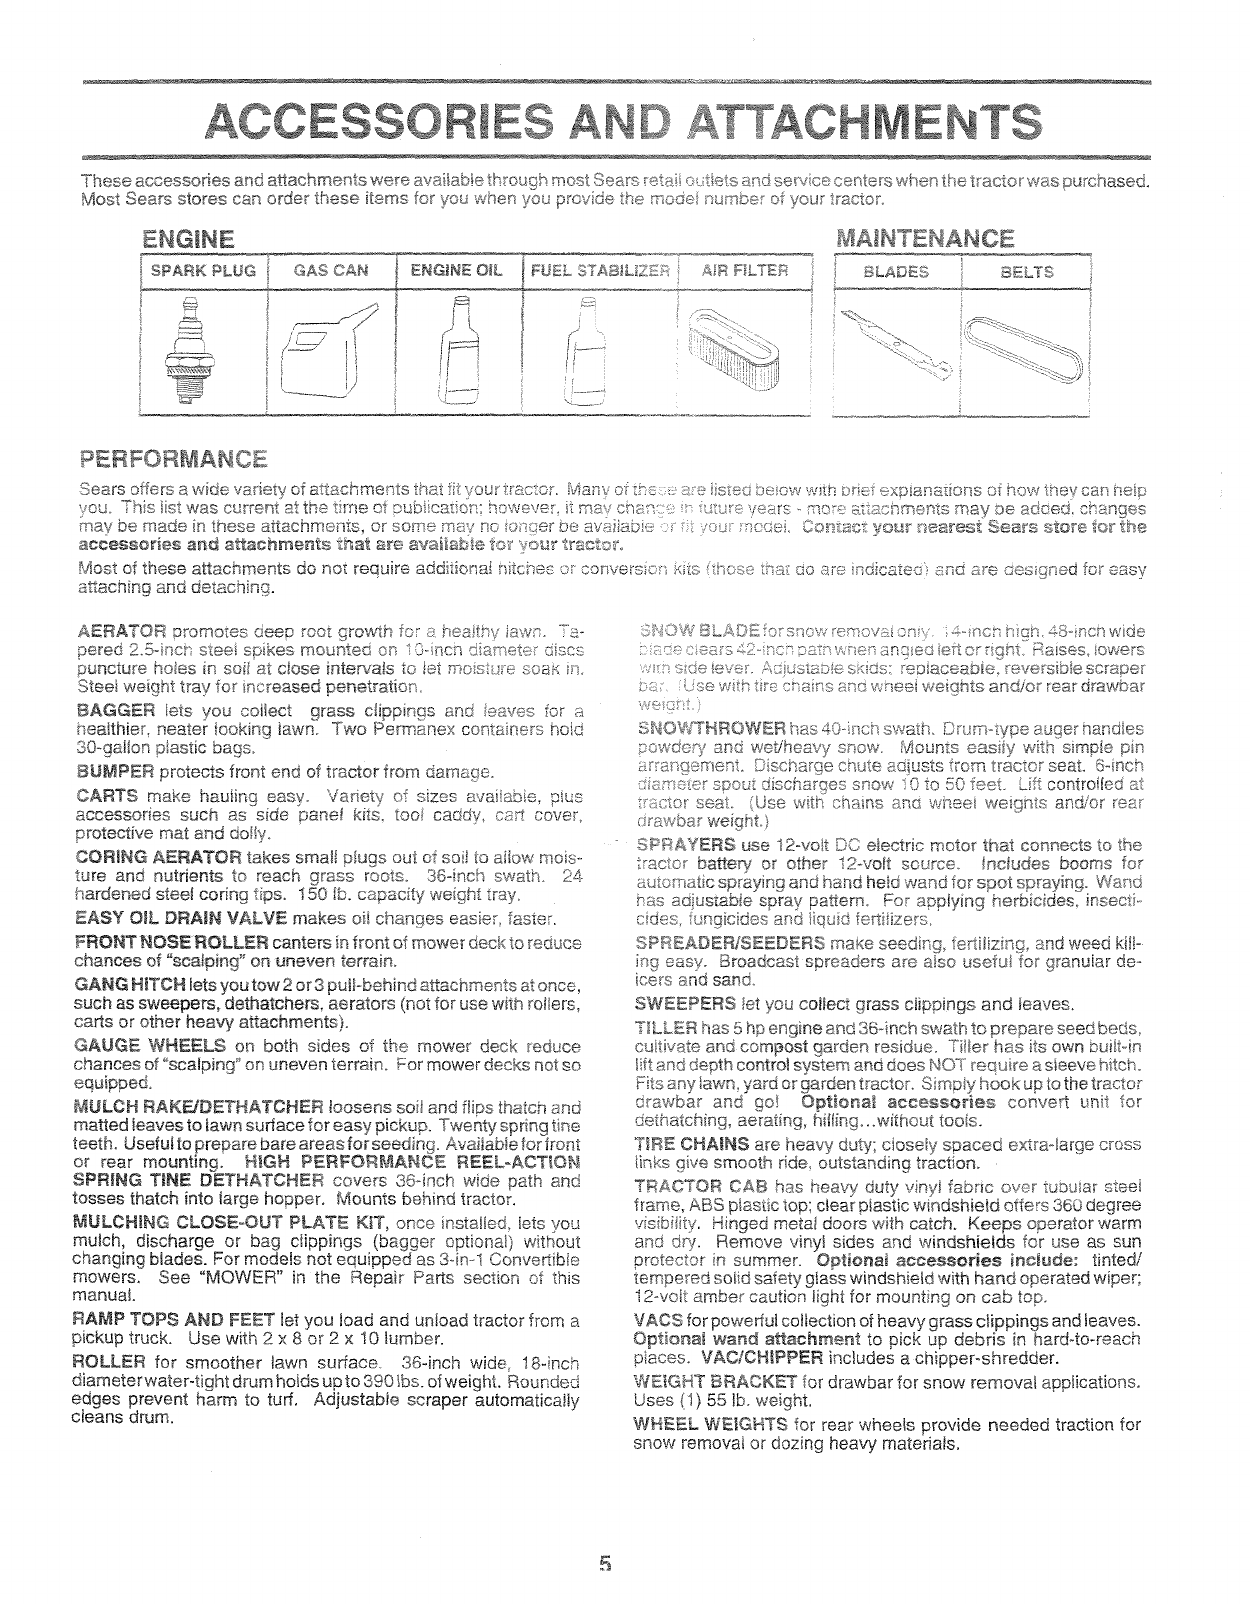
These accessones and attachments were availab!e through most Sears reta o_ tets and service cer ters when the tractor was purchased.
Most Sears stores can order these items for you when you provide the m_-se,_msmber of your tractor°
SPARK PLUG
Sears offers a wide variety of attachments that fit you£ tractor. Many of a:e stee oeow with brief expianadons of how tnev can neip
m'ay be made in these a_achments, or some may no _o_get be aveiiab e, t vot.)rheaei Contact yo_,_rr'_earest'Sears store for the
accessories and a_achments treat are avai_aS_e tos,'}/our wastor,,
Most of these attachments do not require addtionat tfitchss o_"corwersio kits hose _sa_do are i_sdicatee end a_'e ces_ r'_edfor easy
attaching and detaching.
AERATOR promotes deep root growth for a heathy iawn. Ta-
pered 2.5° nct stee spikes mounted on I0o ncn d art eter discs
puncture hoies in soii at close _ntervals to iet me st _re soa£ ir_,
Steel weight tray for ncreased penetration
BAGGER _ets you collect grass clippings and eaves for a
healthier, seater _ooking lawn, Two Permanex conta nets ho!d
30-gaibn piastic bags°
BU_PER protects front end of tractor from damage.
CARTS make hauiing easy. Vade_/ of sizes svai!abie, piLS
accessories sucR as side panel kits, too caddy, ca_ cover,
protective mat and do_Iy.
COR|NG AERATOR takes small plugs out of sol to a_tow mois-
ture and nutrients to reach grass roots. 36-inch swath 24
hardened steel coting tps. 150 [b. capacity weight tray.
£ASY OIL DRAIN VALVE makes oil changes easier, faster.
FRONT NOSE ROLLER canters in front dmower deck to reduce
chances d °scaiping" on uneven terrain.
GANG H_TCH tets you taw 2 or 3 putFbehind attachments at once,
such as sweepers, dethatche_, aerators (not for use with rollers,
carts or other heavy attachments}.
GAUGE WHEELS on both sides of the mower deck _educe
chances of"_aiping" on uneven terrain. For mower decks not so
_ULCH RAK_DETHATCHER bosens son and flips thatch and
matted _eaves to lawn surface for easy pickup. Twenty spring the
teeth. Usefut to prepare bare areas for seeding. AvaitaMe for front
or rear mounting. H_GH PERFORMANCE REEL_ACT_ON
SPRING TtNE DETHATCHER covers 36qnch wide path and
tosses thatch into targe hopper. Mounts behind tractor.
MULCHING CLOSE-OUT PLATE KF, once instatfed Iets you
roach, discharge or bag c!ippings (bagger optional) without
changing blades. For models not equipped as 3qml Convertibie
mowers, See "MOWER" in the Repair Parts section of this
manual.
RAMP TOPS AND FEET let you toad and unload tractor from a
pickup truck. Use with 2 x 8 or 2 x 10 lumber.
ROLLER for smoother lawn surface, 36qnch wide 18-inch
diameter water-tight drum holds up to 390 lbs. of weight. Rounded
edges prevent harm to turf. Adjustable scraper automatically
cleans drum.
:}._,OW BLAB_i rotsnow re _:ovaiany 4ncn fgh_ 48oincn wide
/-::ece's af_ _c;:::_wrer angecefto rght Raises lowers
wx_ sde eve. i_c dStSb e skids: re_iaceabie, reversible scraper
_-:a Use with e cr}a ns a_s@wneei weights andJor rear drawbar
s,,f{_}e: !
S_,aOWS%_BOWERhas 40o sch swath, Dnxr> ype auger handies
aowde% _ and wet/heavy snow. Mounts easiiy with simpie pin
_r ar !_ement D scharge chute adiusts torn tractor seat. 6_nch
d smeter spout discharges snow 10 to 50 feet. Lfi controited at
_-actor seat, Use with chains and wheei weghs and/or tea
_:_rawbar weight.}
SPRAYERS use 12ovoIt DC e_ectric motor that connects to the
t acto_ battep7 or other 12-vo[t source. Includes booms for
automatic spr&ying and hand heid wand for spot spraying° Wand
has ao ustab[e spray pattern. For abptying herbicdes_ insecfi,,,
sides fungicides and iiqud fe_iizers,
SPREABER/SBEDERS make seeding, fertilizing and weed kiiio
ing easy. Broadcast spreaders are aiso usefd _for granuiar dec
icers and sand
SWEEPERS let you coitect grass clippings and [eaves.
TELLER has 5 hp engine and 36qnch swath to prepare seed beds
cat rate and compost _arden residue. Tiller has its own buittoin
lift and depth contro_ system and does NOY require a sieeve hitch.
Fits any !awn, yard or garden tractor. Smpiy hook up to the tractor
drawbar and go! Optional accessories conve_ _nit for
dethatching, aerating, hiIIingo.owithout tools.
TIRE CHAINS are heavy duty; ctoseiy spaced extraolarge cross
links give smooth ride, outstanding traction.
TRACTOR CAB has heavy duty viny_ fabric over tubuiar steei
frame, ABS plastic top; ciear plastic windshie{d offers 360 degree
visibi ity. Hinged metal doors with catch. Keeps operator warm
and dq/. Remove vinyl sides and windshields for use as sun
protector in summer. Optior_a_ accessories include: tinted/
tempered said safety giass windshieid with hand operated wiper;
12-vo_t amber caution light for mounting on cab top.
VACS for powerful collection of heavy grass clippings and leaves.
Optiona_ wand attachment to pick up debris in hard-to-reach
piaces. VACJCH_PPER includes a ch}pper_shredder.
WEIGHT BRACKET for drawbar for snow remova_ applications.
Uses (t} 55 lb. weight.
WHEEL WEIGHTS for rear wheels provide needed traction for
snow removai or dozing heavy materials,
5

E
/
/,
' /
(!) L,ockwasher 3/8
/
/"
(1) Hex Boit
112-!3 x 1
.............
_,:_Screws
(2} Lock"_' ' 'm /i
%_;' Washers #10 x 518
"#I0
\
I_ :: 2} Washers (2) Weld
'L /3/16 x 3/4
%_' /x t6 Gauge Nuts #t0
Botts 114-20 x 3/4
(2) Hex Nuts 114-20
!
(2) s'_,<_'ers 9i32 x 518 x t6 Gauge
............ ._. _ ...... 2 Lock Washers 114
Parts packed separately i_ ca;ton
Seat
..... :L.....
Steeripe
Nhee °
....................... /'}i:)
i ...........................
1
Manual
_i I!;Y
:iiii_
00{
ii
I
:i
:i
i
:qbChe
/ia_e
i! i
i:Sa_s Baq
Parts bag contents not shown full size
p)_Shoulder
Bolts
/_-., (2} Washers 318
x 7/8 x I4 Gauge
,_..............._........ (2) Center-
lock Nuts
Steering Wheet
//
}}) ,, i
i
...... >
(
2 _::_a_,'_e
{2} Keys
/
Wee
jbq
Stope Sheet
/,, ¢ :<,s '
i;C££ YlStOn
Ssaft
O
LJ
Your new tractor has been assembled at the factory with except on of ttose parts eft unassembted for shipping purposes
To ensure safe and proper operation of your tracto_ aI parts and hardware you assemb e must be t ghtened secure y. Use
the correct tools as necessanl to insure proper tightness_
TOOLS REQURED FOR ASSEMBLY
A socket wrench set will make assembly easier. Standard
wrench sizes are tistedo
(1} 9/16' wrench
(2) 7/16" wrenches
(21 I/2" wrenches
UtiIity ,knife
When right or eft hand is mentioned :_s ma_._a, t
means when you are in the operat n{# _:_ositon {seate{s
behind the steering wheei}.
(I} 3/4" Socket w£sr ve racnet
PhiI/ips Screwd iver
_re #ressu e _8_ F_
iNSERT
_o HEX BOLT
::: -<_ 318 LOCK WASHER
FLAT
.........................:} rvASHER
Y:AEZL
UNPACK CARTON
o Remove a[[accessibieoose ;_a_cs_/_::_s c_e_ons
rein ca_ton See page 6}.
_o Cut from ton to bo_om, aior_c;r_es os a.__......co >ers
of carton, and iay paneis flat.
,_ L_he.K for any additionai ioose [_ans c_ canor',s and
remove.
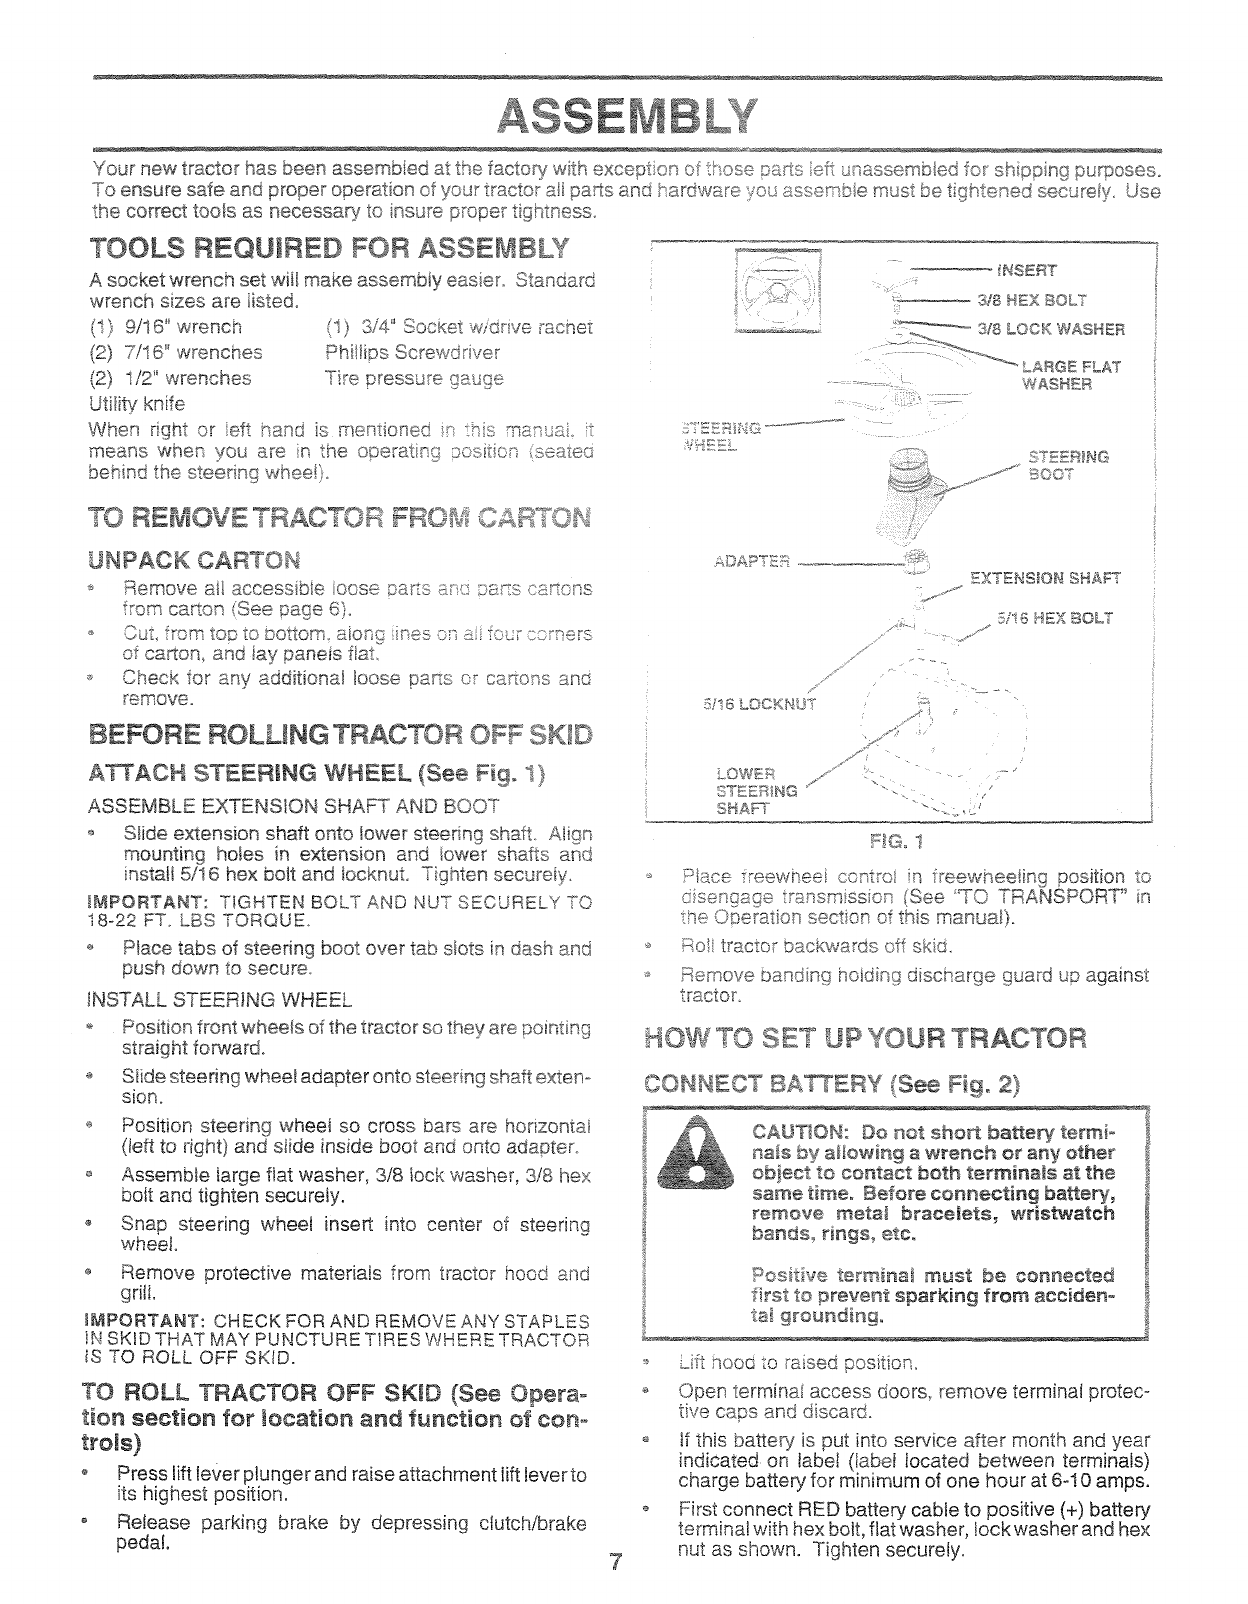
BEFORE ROLLING TRACTOR OFF SKID
A_ACH STEERING WHEEL (See 1i 9. l }
ASSEMBLE EXTENSION SHAFT AND BOOT
o Slide e_ension shaft onto lower steeling shaft_ Align
mounting hobs in extension and iower shafts and
instal 5/16 hex bott and bcknuL Tighten secureiy.
F_PORTANT: TIGHTEN BOLT AND NUT SECURELY TO
18-22 FT. LBS TORQUE.
o Place tabs of steering boot over tab slots in dash and
push down to secure.
INSTALL STEERING WHEEL
Position front wheets of the tractor so they are pointing
straight forward.
SIide steering wheel adapter onto steering shaft exten-
sion.
°Position steering wheel so cross bars are honzonta
(left to dght) and stide inside boot and onto adapter
° Assemble iarge flat washer, 3/8 lock washer, 3/8 hex
bolt and tighten securely.
o Snap steering wheel insert into center of steering
wheel.
o Remove protective materials from tractor hood and
gHt,
IMPORTANT: CHECK FOR AND REMOVE ANY STAPLES
iN SKID THAT MAY PUNCTURE TIRES WHERE TRACTOR
tS TQ ROLL OFF SKID.
TO ROLL TRACTOR OFF SKID (See Opera°
tion section for location and function of con-
trois)
o Press lift lever plunger and raise attachment lift lever to
its highest position.
o Release parking brake by depressing clutch/brake
pedal.
AiIAPT:E_:_
/
SXTENSION SHA_
LOWEIa
STEERING
SHA_"
,/
//
IZ
, :_/'+
if ".: i
""1 L: - /
5116 HEX BOLT
FIG=I
...... w ..e ,._,__{,,._q freewheefing position to
d .:y_,_as_ +...... o_-' iSee '%0
.........L__ _!s,,s_s, _ TRANSPORT' in
. ,_ se,.t_,x _nL.manual!.
tractor backwards off skid
Remove band ng holding discharge guard up against
tractor
HOW TO SET UP YOUR TRACTOR
7
CONNECT BAKERY (See Fig. 2)
CAUTION: Do not sho_ batte_ termi-
nals by alorving a rvrench or any other
obiect to contact both terminals at the
same tmeo Before connecting battery,
remove metal bracelets, rvristrvatch
bands.., rings, etc.
Positive terminal must be connected
first to prevent sparking from acciden-
tal grounding°
,; Lift b_ooO_o raised position.
Open terminal access doors remove term[na_ protec-
tive caps and discard.
o tf this battery is put into service after month and year
indicated on label (label located between terminals)
charge battery' for minimum of one hour at 6-10 amps.
o First connect RED battery cable to positive (+) battery
terminal with hex bolt, flat washer, !ock washer and hex
nut as shown. Tighten securely.

o _L**,_',grounding_ble to negative(o)bat-
re;":,t_,::mnatwithremaininghexbo_t,flatwasher!ock
was/,_nd bexnut°Tightensecu_eiy.
Cost ,_erminaiaccessdoo,_s.
Uset_-:_:"_r;alaccessdoo_fo_:
nsr:ec_onfo_-secupeconnections(to t_,ghtenhard_
_o RS _:Ot On for corrosion.
_ es:? ba_et!/.
_ Ju7_, >SFre{uired).
Re _:::sc char{_ing.
LOC}< FLAT
>£2X _,£#T WASHEF_ WASHER
", /
F_G 2
_NSTALL SEAT (See Fig. 3)
AdiL:s before tightening adjustment bolt.
o Ro,_ :re cardboard pack ng on seat pan°
P_ce seat on seat pan and assemble shoulder boil
_ . :__:_.........._,_'_eadiustmentbo_t._ iockwast_erand fiatwasher
;oos_{y. Do not tighten.
._. !]::::, !an shoulder bo#t sec_Jr@y.
_ Lower seat into ope_ting position and sit on seal
* Sde s_u{_tuntii a comfo£abIe position is reached which
sows you to press dutchibm.ke pedal sit the way
(,IOW
Get off seat wit_ out moving its adjusted position°
- ;:::_as,: seat and tighten adiustment bolt securely.
SEAT
\,
SEAT PAN
F|G. 3
LARGE FLAT WASHER
LOCK WASHER
CHECKT_REPRESSURE
The tires on your tractor were over nfiated at tPe factoP/for
shipping purposes. Correct tire p_essure is impoRant fo:
best cutting pedormance.
o Reduce tire pressure to PSI shown '°PROD ;C°r
SPECIF!CAT[ONS" on page 3 of ths marua
CHECK DECK LEVELNESS
For best cutting resuits, mower bot;si c;sLoxd be
ieveied. See "TO LEVEL MOW R HO_St'G* ;'_ "':
Ser_4ce and Adiustments sec_ e<_cf _s :__>rL,:_
CHECK FOR PROPER _'°"_
See [_e t_gures that are s _o¢in icr eesc 't? "xot e< ;_:c
mower biade drive bets hc : : /sx ..................
secton of ths maRLS ',_:.[:V :- ,_ i _3:'_(:t!2(
CHECK BRAKE SYSTEM
A:{tet vDu ieartt ow to operate jou :solo :: £0: 3E
that the brake _s prope_v ' ....... °"adju _ed. See L, ;D,;: S'_
_,AK[[ n _ht:_ Ser\qcE! 8qd ,_,,d[t S!_T"eN f: sec:tlOY Ot
manual
ASSEB_BLE GAUGE WHEELS TO
DECK (See Fig. 4}
The gauge wheels are designed to Keep the _-_owe_deo:
proper position when operating mower, Be sL_e they are
properly adjusted to ensure optimt m mower _}edorrnance,
o Assemble gauge whe@s wth t_actor os a Iat eve
sudace.
Adjust mower to desireQ cutting heigt;t (See TO Ab-
JUST MOWER CU_H'4G HEIGHT" n tse Operator
section of this manuai}
_, With mower in desirers heght of cut posi os gauge
wheels should be assembled so they are slighdy off the
ground. Instatl gatJge whee n appro0date he!e wth
shoWder bolt, 3/8 washer, and 3/5-I6 ockn_t s_d
tighten securely.
._ Repeat for opposte sde nst_lin£ _su_Te wr_ee Lq
same adjustment hole.
GAUGE WHEEL
MOUNTING _ \ ,.....
BRACKET - :_}T::J-/:-_: ................. _, ",
::... /. , j
3i_o,16 ....._:<:--...... ;" { ; ......: ;' 1
LOCKNUT _ _;5_£. __}uJ}cIz/::: ".
318" _ : "d,' pOL .DEr_
WASHER / /' '
GAUGE WHEEL _j" '_ BOLT
F_G. 4
8
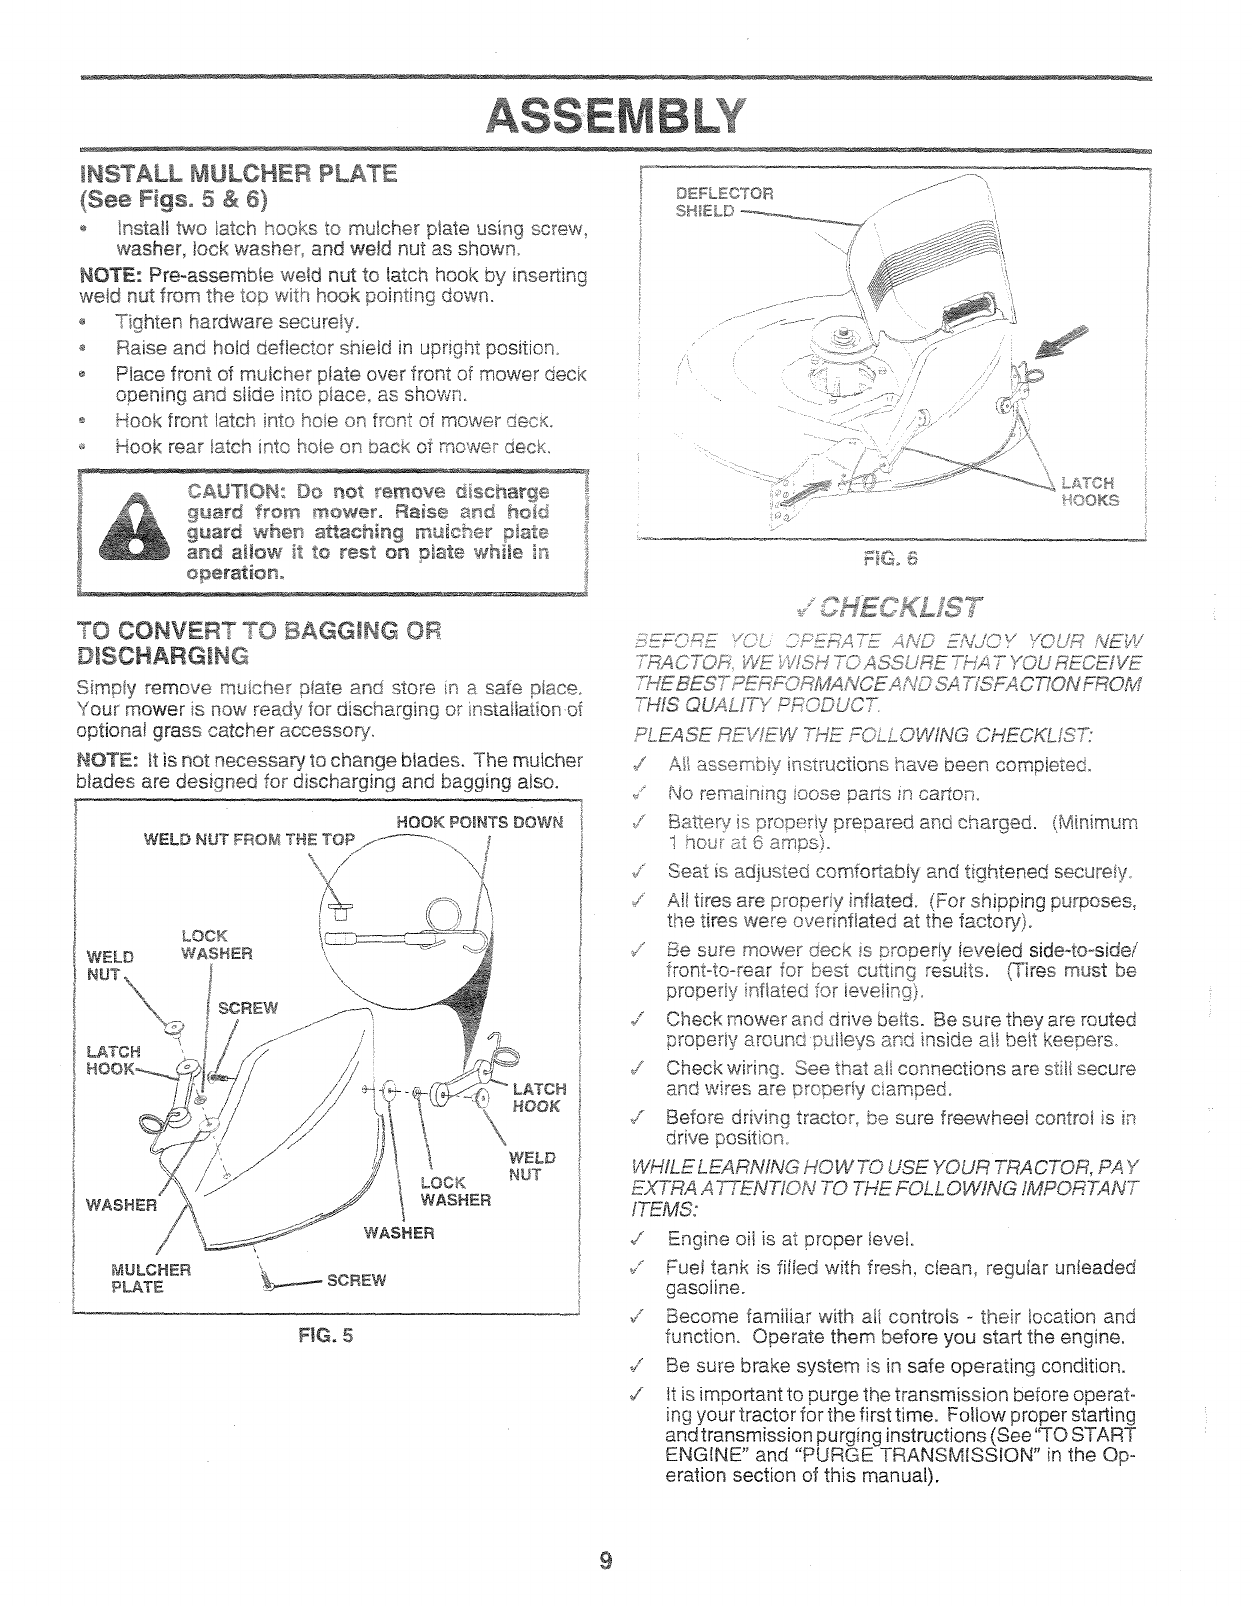
NSTALL MULCHER PLATE
(See Figs. 5 & 6}
o Install two iatch hooks to mulcher plate using screw,
washer, lock washer, and wetd nut as shown
NOTE: Pre-assembie weld nut to latch hook by inseRing
weid nut from the top wth hook pointing down.
o Tighten hardware securely.
o Raise and hold deflector shietd in upright position_
o Place front of mutcher ptate over front of mower deck
opening and slide into ptace0 as shown..
o Hook front latch into hoie on front of mower _Je_.
;; Hook rear latch into hoie on bac_<of mower deci<
guard from mower° Raise a_d hotd
guard when a_aching mulcher ptate
and allow it to rest on p_ate while in
©EFLECTOR .. -
_H_ELD ......
ca_..... - ............. * 7
--. ,%.
- _ _
TO CONV_R _ TO BAGGING OR
Simply remove muicher p_ate and store in a safe place.
Your mower is now ready for discharging or installation of
optiona_ grass catcher accessow.
NOTE: it is not necessary to change biades. The muicher
blades are designed for discharging and bagging also.
HOOK POINTS DOWN
WELD NUT FRO_ THE TOP..-- ............... "\ J
\,k! /,,
LATCH
/
WASHER
MULCHER
PLATE
LOCK
WASHER
SCREW
/
LOCK
WASHER
WASHER
_ SCREW
HOOK
WELD
NUT
F_G. 5
/:/5_':_/?_E _"L:i.' £:P_b_C_ AL:D _'JC'Y Y\CU:O MEW
:"1_,4_5_5";,RWE WSH :_fi::ASSURE _B'/4T I/OU £ECE/VE
G_EST _ANCEAN_3 S',,__4CTfON F_d
?WtS QUALITY P£ODL/C7.
PLEASE REWEW THz? _CLLOWING CHECKLIST:
VAft assembiy instructions have been completed.
v No remaining ioose pars _ncarton.
,," Bat_:eryis properiy prepared and charged.
I houi at 6 emps).
,/ Seat is adjusted comfo_abty and tightened secureiy
/inflated° (For shipping purposes,
the tires were over nflated at the factopy).
¢" Be sure mower deck is properiy Jeveied side-to-side/
front-toorear for best cutiing resuits. (Tires must be
properly inflated for ieveiing).
/Check mower and drive beits. Be su_-ethey are routed
properiy around pul!evs and inside ai_ beit keepers_
/Check wiring. See that eft connections are stiil secure
and wires are properly camped.
/Before driving tractor, be sure freewheel contro_ is in
drive position°
WHILE LEARNING HOW TO USE YOUR TRACTOR, PAY
EXTRA A _-ENTION TO THE FOLLOWING IMPORTANT
ITEMS:
7 Engine oil is at proper tevet.
_.-" Fuel tank is fiiied with fresh, dean, regular un!eaded
gasoline.
¢Become familiar with all controls - their location and
function. Operate them before you start the engine.
/Be sure brake system is in safe operating condition.
/It is important to purge the transmission before operat-
ing your tractor for the first time. Follow proper starting
and transmission purging instructions (See'%Q START
ENGINE" and "PURGE TRANSMISSION" in the Op-
eration section of this manual).
9

[!- ese -, :",Doismay appear on your tractor or in literature sup[ iied with the prod ;ct. Learn and understand the_ _ ear ing
£/:"i"TERY CAUTION OR REVERSE ,-_,_; _,_,r-, _-.......
._ARNING
L,.s _ o r.q'S 12Fi;
r'} _::
: . i:.L L,K__ iqOWER HEtGH-f DIFFERENTIAL PARK!NG BRAKE
._O_K LOCKED
REVERSE NEUTRAL H!GH LOW
÷
PARKING BRAKE
i',AGW_/R_IFT
_,L_,_ CH ENGAGED
ATTACHMENT
.4_U1_H DISENGAGED
9 _N(:x_:rl, KEEP HANDS AND FEET AWAY
HYDROSTATIC FREE WHEEL
(Hydro Models only)
t0
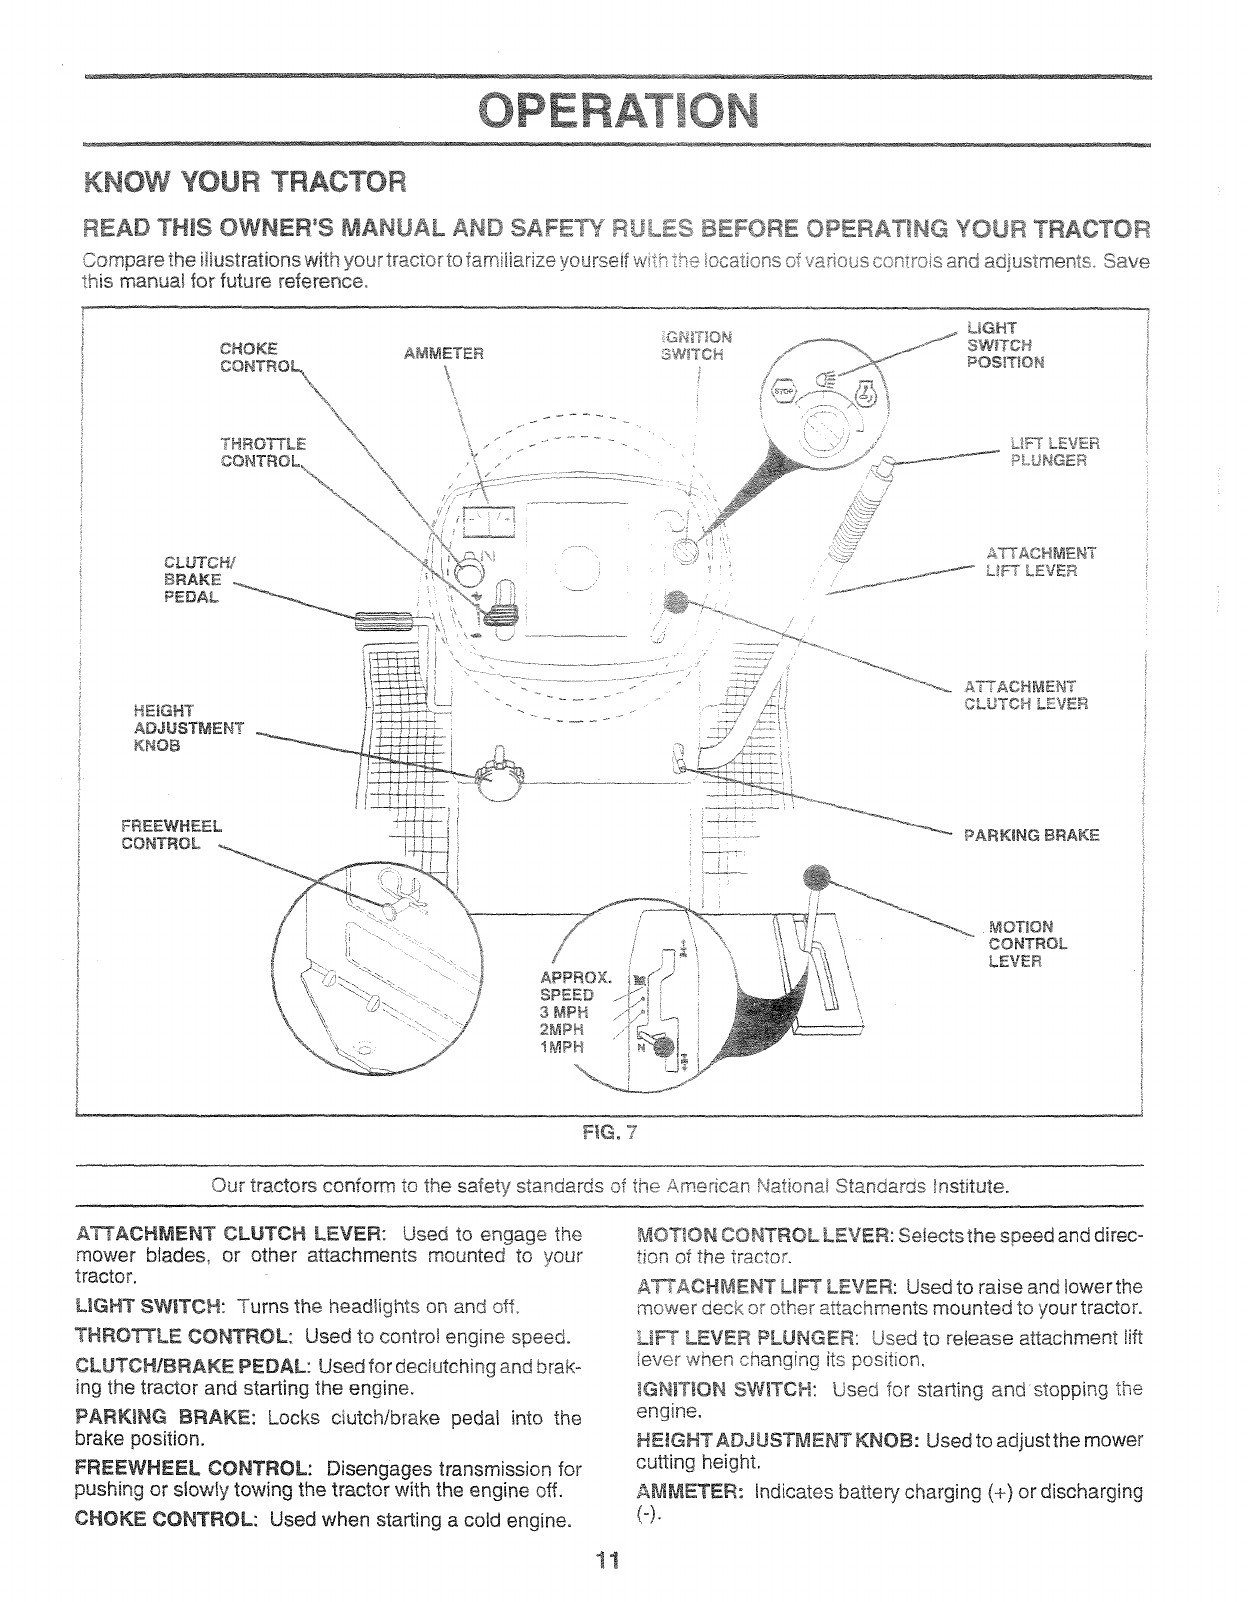
KNOW YOUR TRACTOR
READ THiS OWNER'S MANUAL AND SAFETY RU_ BEFORE OPERATING YOUR TRACTOR
Compare the illustrations with your tractor to faro iiarize yourseif wtP: the:,(>cations of varieus ::ontro;s and adiustments Save
this manual for future reference.
CHOKE A_4METER 5W_TCH
THBO_LE
\
\\
=
\ .......
Li_ _ -- ___ . -
%
CLUTCH/
BRAKE
PEDAL
LIGHT
..... _.,_,_-_ SW_'TCH
C_' t _E _
......... _ PLUNGER
,_TTA_H [_IEN
_:_7_7__! ..............
£j ............
HEIGHT ,l_
FREEWHEEL
CONTROL
J
SPEED ""
s _PH
2MPH
!MPH
_. ._.._,_ ATTACHIk,IENT
..... _'" PARKING BRAKE
_"'-_,_. MOTION
CONTROL
LEVER
F_,Go7
Our tractors conform to the safety standards of the American Nationat Standards Institute.
A_ACH_ENT CLUTCH LEVER: Used to engage the
mower blades, or other attachments mounted to your
tractor.
L_GHT SW_TCH: Turns the headlights on and off,
THROTTLE CONTROL: Used to control engine speed.
CLUTCH!BRAKE PEDAL: Used for declutching and brak-
ing the tractor and starting the engine,
PARKING BRAKE: Locks ciutchibrake pedal into the
brake position.
FREEWHEEL CONTROL: Disengages transmission for
pushing or slowly towing the tractor with the engine off.
CHOKE CONTROL: Used when starting a cold engine.
MOTION CONTROL LEVER: Se!ects the speed and direc-
tion of the tractor.
A_ACH_ENT L_ LEVER: Used to raise and lower the
mower deck or other a_achments mounted to your tractor,
L_ LEVER PLUNGER: Used to retease a_achment lift
iever when changing its position,
_GN_T_ONSW_TOH: Used for starting and stopping the
engine,
HEIGHT ADJUSTMENT KNOB: Used to adjust the mower
cutting height.
AM,_aETER: Indicates batter'/charging (+) or discharging
(-).
11
in severe eye damage. Always wear safe_ glasses or eye shietds while operadng your tractor
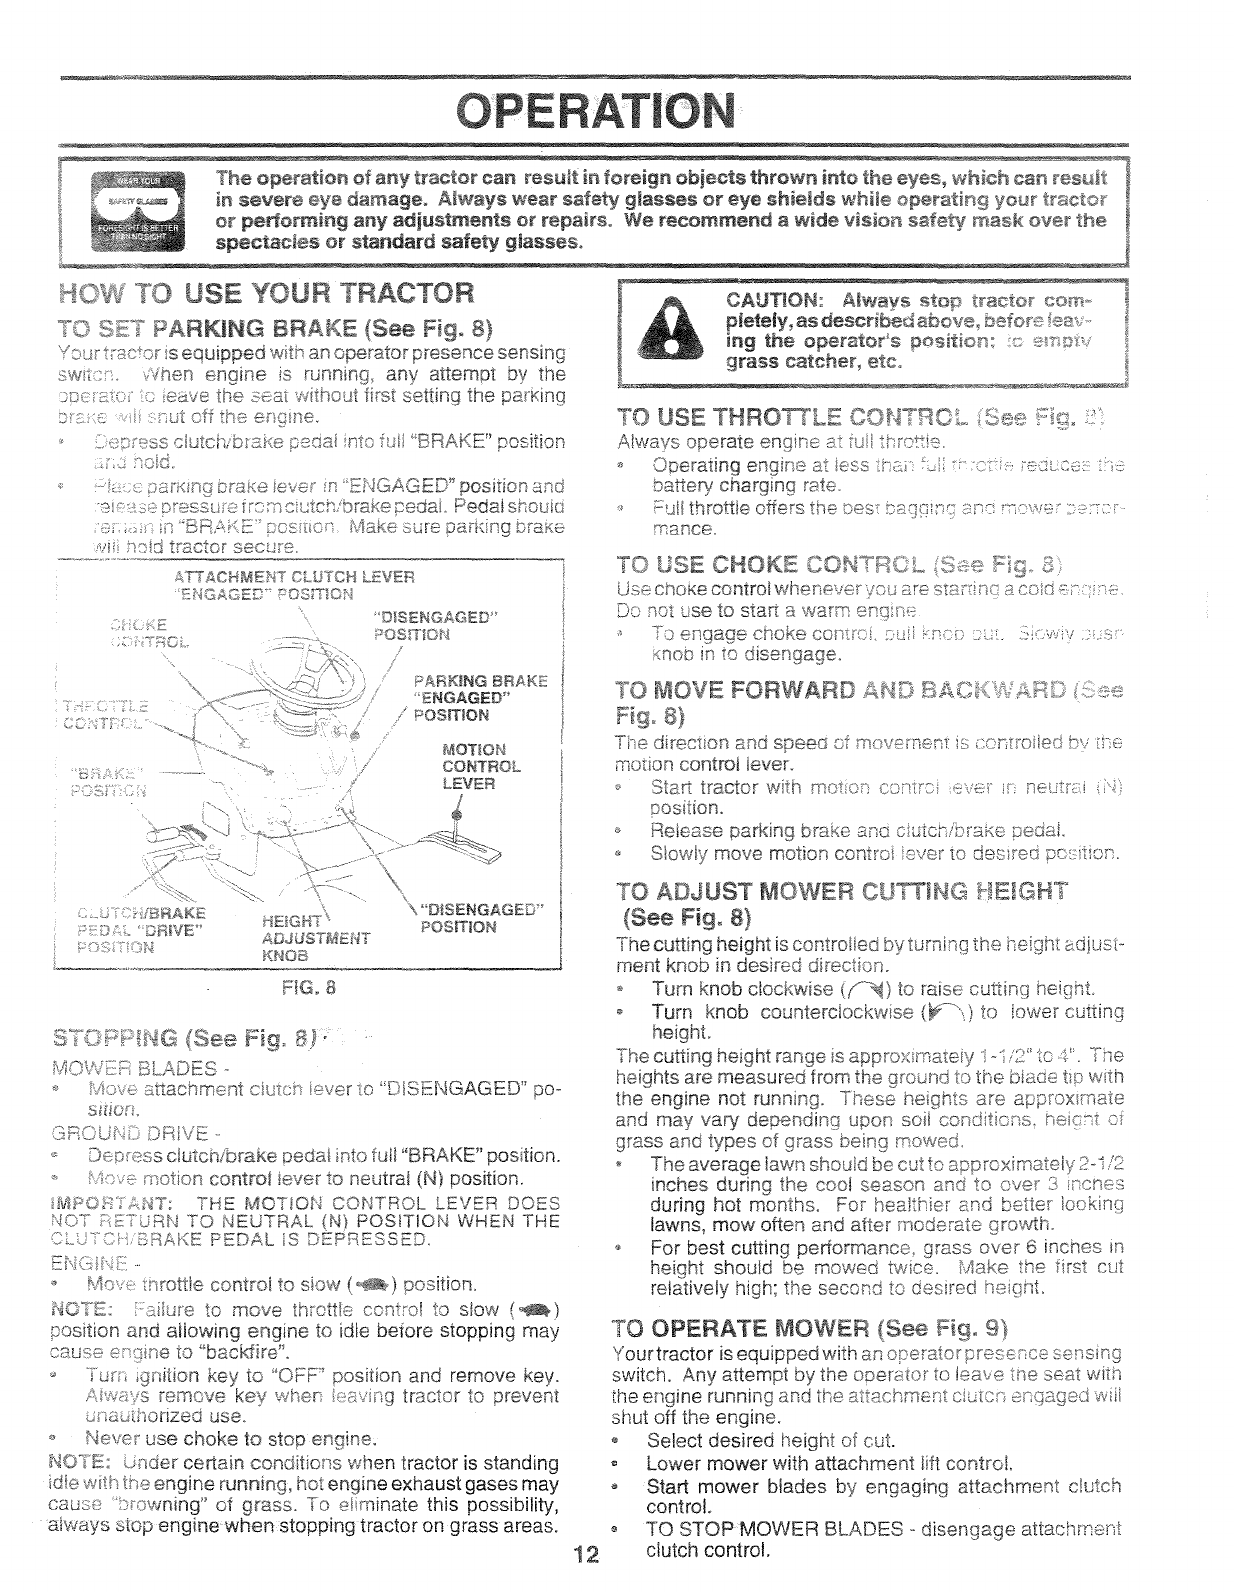
TO USE YOUR TRACTOR
TO S_!T PARKING BRAKE (See Figo 8}
Vo2r trac or is equipped wth an operator presence sensing
sw_tc:. _Jhen engine is running, any attem0t by the
o c :,::c: 1o eave the seat without fist setting the parking
t ::re : ,utoff÷ ......,_ e[ane
,, £e>;'e sdutch, bta£e !::ec_ainto fui 'BRAKE" position
L: :_od
_. par<lng _,; _:eieve; n E_qGAGED" position and
e : _.s:_!.Tess_ efrcm c utchibrake pedal Pedal shouid
;-:_ n BRi:_KZ p s_o__ iv!ake sure parking brake
,_.'i i'so tracYor sect;re,
;;}
--.)i
_£CH_E?_? CLUTCH L_VE_
_D1SENGAGED'
,_-'-,i \ RANKING BRAKE
_ -4p/." /,
_::. "ENGAGED'*
/POSITION
... t'p7
%. _OTION
CONTROL
LEVER
..... /_!5_AK _: \ "DISENGAGED _
_E,;,GH7 POSITION
;.}[_IVE 4DJUST_4_F?T
[( NOE_
FIGo8
STOPP NG (See F[go 8):
MOVVi;;ic;BLADES -
0, yore :£_achmest cutc> ever o ....k-:;_:NGAGED po-
si_io::.
GROUb__, ©RIVE-
Dep ess dutch/brake pedai ;nto full "BRAKE" pos tion.
_, Move motion control iever to neutral (N} position.
B,s£O;;;:_£iT: THE MOTiOnS CONTROL LEVER DOES
NOT F }£TURN TO NEUTRAL (N} POSITION WHEN THE
CLLTC} BRAKE PEDAL,S DEPRESSED.
ENG i1;°: ..
Mow:, :_rottJe control to siow (o_>) position.
i_,_OTZ: Failure to move throttte control to slow (_)
position and altowing engine to idte before stopping may
cause e_g ne to "bac_ire'L
Tu__ ;gMtion key to 'OFF' position and remove key.
Aways remove key when eavi_g tractor to prevent
.;ha hoiized use.
,, Neve_ use choke to stop engine.
_¢OTE: Lnder certain conditions when tractor is standing
[dte with tfe engine running, hot engine exhaust gases may
cause t _OWning" of grass. To e!mlnate this possibility,
always stop engine when stopping tractor on grass areas.
12
CA_ON: Always stop tractor com_-
pletely, as described a#ove_ before ea,_
i_g the operator's posit[o_: n:>e_t_p:,,
grass catcher, etco
TO USE THROWLE COHTRO o_,{See !;:ig_ ::'
Always operate engine at u f-_rotte
Operating engine at ess_:a:'u ::o_ e2.ce _ <::.
baden! charging rate.
_- h-jl throttte offers the Des: bmuiTnq rm_do ,,,er .::._;::::_
mance.
Use choke control whet, ever ye are ..........>-'.......e -,-_..............
tDLC i _. ,_UI£_ "T: !%,
no not use to star a wart?! _Rm;"::_
...... g
._ To engage choke co_u:x} ::>2 :.:ns:.'.::u:. ]i,:_, _
nee in to disengage,
TO MOVE FORWARD AND BAC_(.WAT_D
Ti-e d rect on and speed smovemerx is con_roi[ed by ive
modon control tevet
_, Sta_ tractor with motor contro eve < neuTr i :'.:
Release parking brake and c utchibra_:e pedai
o Sbwlv move motion _- _" .........to desired
TO ADJUST MOWER CU_ING HEIGHT
(See Fig. 8)
The cutting height is controlled by turning the height uJiust _
ment knob in desired direction.
o Turn knob cbckwise (fr_) to raise cutting heighL
o Turn knob counterclockwise (_--"0 to bwer cutting
The cutting height range is approx;mateiy 'i -':/2" i:o $. T_e
heights are measured from the ground to the biade tip with
the engine not running_ These heights are approx mate
and may vary dependin{7 upon soil condtions _eignt of
grass and types of grass being mowed
The average lawn should be cut to approximately 2-i/2
inches during the coot season and to over 3 :scnes
during hot months. For heaithier and better iook[ng
lawns, mow often and atter rnoderate growth.
o For best cutting performance, grass over 6 inches in
height should be mowed twice. _4ake the first cut
relatively high; the second to desired hei{!nt.
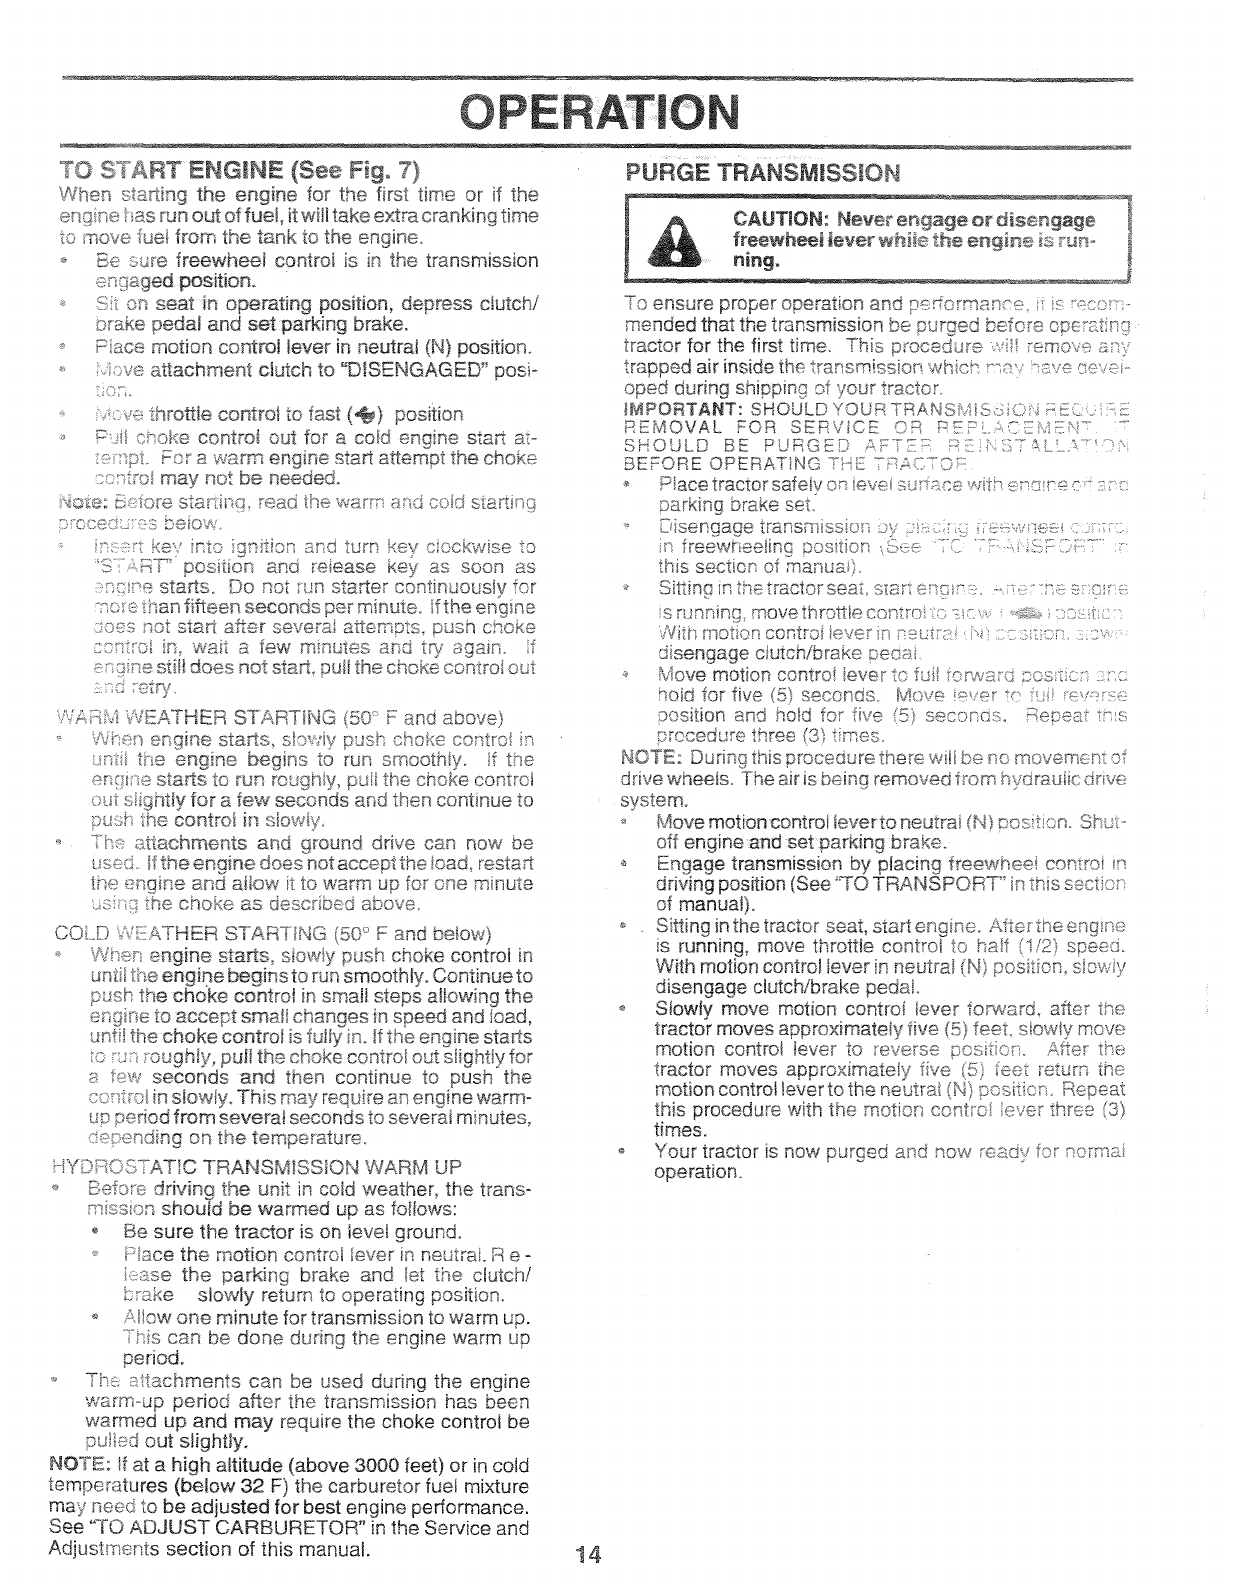
TO OPERATE MOWER (See Fig. 9}
Your tractor is equipped with ar operator press;_ c÷ sensing
switch. Any attempt by the opera4o_ to leave the seat with
the engine running and the attach_re _tc _.xc_e__;_._gedw{ii
shut off the engine.
o Select desired height of cut.
Lower mower with attachment lift controt,
o Start mower blades by engaging attachment ck;tch
control.
_- TO STOP MOWER BLADES - disengage attachme_4
clutch control,

_{SOTE:Top_otecthoodfromdamagewhentransporting
yourt_actoronathickoratrailer,besurehoodisdosedand
securedtotractorUseanappropriatemeansofb/inghood
toifactor(rope_cordetc)o
A_ACHMENT CLUTCH "ENGAGED"
POSIT_ON AT_ACH_EN'T
GUARD
FiG. 9
TO OPERATE ON NmLLS
hills with siopes greater than 15° and
do not drive across any s_ope°
Choose the s!owest speed before starting up or down
hilts
o Avoid stopping or changing speed on hills.
o If slowing is necessary_ move throttle control tever to
slower position..
tf stopping is absohstefy necessac7, push clutch/brake
pedal quickly to brake position and engage parking
brake.
o Move motion control lever to neutral (N) position.
IMPORTANT: THE MOTION CONTROL LEVER DOES
NOT RETURN TO NEUTRAL (N) POSITION WHEN THE
CLUTCH/BRAKE PEDAL IS DEPRESSED.
o To restart movement, sfowly release parking brake and
clutch/brake pedaI.
o Slowly move motion control lever to slowest setting.
o Make all turns slowly°
TO TRANSPORT (See Fig. I0}
When pushing or towing your tractor, be sure to disengage
transmission by piecing freewheel control in freewheeling
position. Free wheel control is located at the rear drawbar
of tractor.
o Raise attachment lift to highest position with attach-
ment lift control.
o Pull freewheel control knob out and hold in position by
inserting retainer spring into forward hole of control rod.
o Do not push or tow tractor at more than two (2) MPH.
To reengage transmission, reverse above procedure.
13
'. Theen ne _:your recto has :,ee_ shipped fmmthe
facto_sv already filed with summer weight oii.
Check e ir}e o with tractor o_ eve/!{_round
:' Remove o fi ca;},,dipst c',4and wipe ciean, reinse£ t_qe
d pstick and screw cap ti{#ht, wet for a few seconds
remove and read oii tore. if necessac!_ add oil until
FULLS mark on dipstick is reached. Do not oveffi!io
_ For cold weather operation you should change oil for
easier stading (See _OIL V_SCOSITY CHART _in the
(_<÷ m .....Respoqsibitities section of this manuaf).
,_ o change engine oit, see the Customer Responsibifi-
tes sec_ on in this manua.
ADD GASOLINE
;_ Ftl fuel tank. Use fresh_ c!ean, r_m,qar unleaded
f_asoiine with a m nimum of 87 octane. (Use of !ceded
gasoiine will increase carbon and lead oxide depos ts
and reduce valve iife). Do not mix oi_ with gasoline.
Purchase fuet in quantities that can be used within 30
days to assure fuet freshness.
!I_PORTANT: WHEN OPERATING tN TEMPERATURES
BELOW32°F(0°C), USE FRESH CLEAN WINTER GRADE
GASOLINE TO HELP NSURE GOOD COLD WEATHER
STARTING
WARNING: indicates that atcohoi b_ended
fuels (called gasoho_ or using ethanol or methanol} can
attract moisture which ieads to separation and formation of
acids during storage Acidic gas can damage the fuel
system of an engine whife in storage. To avoid engine
problems: the fuel system should be emptied before stor-
age of 30 days or Ionger. Drain the gas tank, start the
engine and iet it run until the fuet fines and carburetor are
empty. Use fresh fue_ next season. See Storage lnstmc o
tions for additional information° Never use engine or
carburetor cieaner products in the fuel tank or permanent
damage may occur.
TO S _ART ENGIN= (See Fig, 7}
When sta_ing the engine for the first time or if the
entre ins run out of fuel, it wi/take extra cranking time
to move fuel from the tank to the engine.
o Be sxre freewheel control is in the transmission
PURGETRANSMISSEON
CAUTION: Never" eHgage or disengage
freewheel tever whie the engine is t'_-
hinge
_, St on seat in operating position, depress clutch/
brake pedal and set parking brake.
Pace motion controt lever in neutral (N} position.
_, .S,ve attachment ctutch to =DISENGAGED" posi-
el.
thro_Sle contnsl to fast (@) position
_ P I choke controf out for acoid engine sta£ at°
_';pL For a warm engine sta£ attempt the choke
c_ -sro may not be needed.
_,_ote:Li:fore staRi_ sad the warm _d c:oid star,q_sg
DDeed:. : }s beiow
r.:_: t key nto gt tion _nd turn kev ciockwise to
'SIR_T _ position and reiease ke)_ as soon as
rxxr, e sta_so Do not _n sta,,ter continuously for
":o :_1than fifteen seconds per minute° if the engine
::Des not start after severa_ a_empts, puss che_e
co:_:t_o n, wait a few mnu_es atd tG_ again, if
_r:? ne sdHdoes not sta£, puI the choke controt out
: A retry
_/ARM _'- .... _"_ ,'_" , and above)_.v_cA_HEN ST_ R tlh_ (50 _'-_
Whe"_ engine sta£s, slowly push choke centre! i
_t the engine begins to run smoothly, if tt_e
engi;se sta£s to run rough y, pIi the choke control
o_Jtsghty for a few seconds and then continue to
pusi the control in slowly.
, T_,.:::_.ttachments and ground drive can now be
_s_ i If the engine does not accept the toad, resta£
the engine and aitow it to warm up for one minute
COLD WI:iiATHER STARTING (50° F and below)
,Whet engine sta_s slowly push choke control in
unti the engf_e begins to run smoothly. Continue to
p:ssh the choke control in small steps alowing the
e s_!ineto accent sinai changes in speed and Ioad,
unt the choke contro_ is fully n. If the engine stads
o u_ roughly, pu! the choke contro_ out siightiy for
_:,few s_onds and then continue to push the
corot_:ciin siow_y. This may require a_ engine warm°
up period from severat seconds to several minutes,
d_pending on the temperature.
HYDROSTATIC TRANSMISSION WARM UP
_, Before drk4ng the unit in cold weather, the trans-
mssios should be warmed up as foIows:
o Be sure the tractor is on tevet ground.
', _qace the mot!on controi lever in neutral. R e-
:xr<se the parking brake and bt the clutch/
bake slowly return to operating position.
"_ AIIow one minute for transmission to warm up.
ibs can be done during the engine warm up
period.
-, The:, _L.!tachments can be used during the engine
warm-up period after the transmission has been
warmed up and may require the choke control be
ptAed out slightly.
NOTE: If at a high altitude (above 3000 feet) or in cotd
temperatures (below 32 F) the carburetor fuet mixture
may need to be adjusted for best engine performance.
See "TO ADJUST CARBURETOR" in the Sep,Ace and
Adjustments section of this manual.
To ensure proper operation and 2edormar_--_-: i:: "*c,:--
mended that the transmission be p,.=q:xe,_before op(-s:finy
tractor for the first time Th;s .......... ;_
trapped air inside the .........+_==.m,ssk,i "-_,.........,,,m,,- -<:,Q "e-,:- -
oped during shipping of your. -_aco__
IMPORTANT: SHOULD YOUR TRANSbiIB< ;O -_..
REMOVAL FOR SERVICE ";- r_
SHOULD BE PuR_::., r:"-: .',.:'_'- k t '
BEFORE OPERATING :HG -i,::_'.
* _iacetractorsafeiy oq eve_su: ::c "__ :<_-;c_roec
_:,arkingbrake set
D sengage _,ransrnisse _ , .........
;r! freewheeing iostiol ...... . J-:F:-L:......
this sect!on of manua ).
sTt]nnin[_ move tnro_.fe canto ....z..
/v'it_ motion control iever _r --_-v_ -::;c.: --
disengage clutch/brake :}ecs_
Move motion centre! _eve_ -_._7c_-w_:_:__c:_:::L:
hok_ for five (5) seconos _v0_._ ,,_-_
,(:}OSition..... And fsoId for ,,_= _x seso[tQ:5 -,cOSeC '"
NOTI'. During this procedure trite itlti 1)(-! _111_moven-!d nY o]
drive wheels. The air is heine removed from h ;afoul,c"," a,-_e-:
Move mot!on control _everto neuYral 'r__;:}oh x:en :-s -
off engine and set oarking r_ra_<e,
Engage transmisgion by placing _reewnee_ torture L_'s
driving position (See '_TOTRANSPORT" in ths sscst _
of manual),
S[Hing in the trac_or seat, start engine. After _neenM_e
is running, move throttle control to bah {1/2} speec.
With motion control lever in neutral (N) position, siev. _y
disengage clutch/brake pedal
Slowly move motion control iever forward, a_er t¢:e
tractor moves approximately five (5) feet. stow_y move
motion controt lever to reverse _.,..._,....
tractor moves approximately five (5) fee_ [e_um the
motion control lever to the neutral (N) pesitktr. Repeat
this procedure with the motion cent_ol over thr_;e (3)
times.
Your tractor is now purged and sow ready for nomq_.}_
operation.
t4
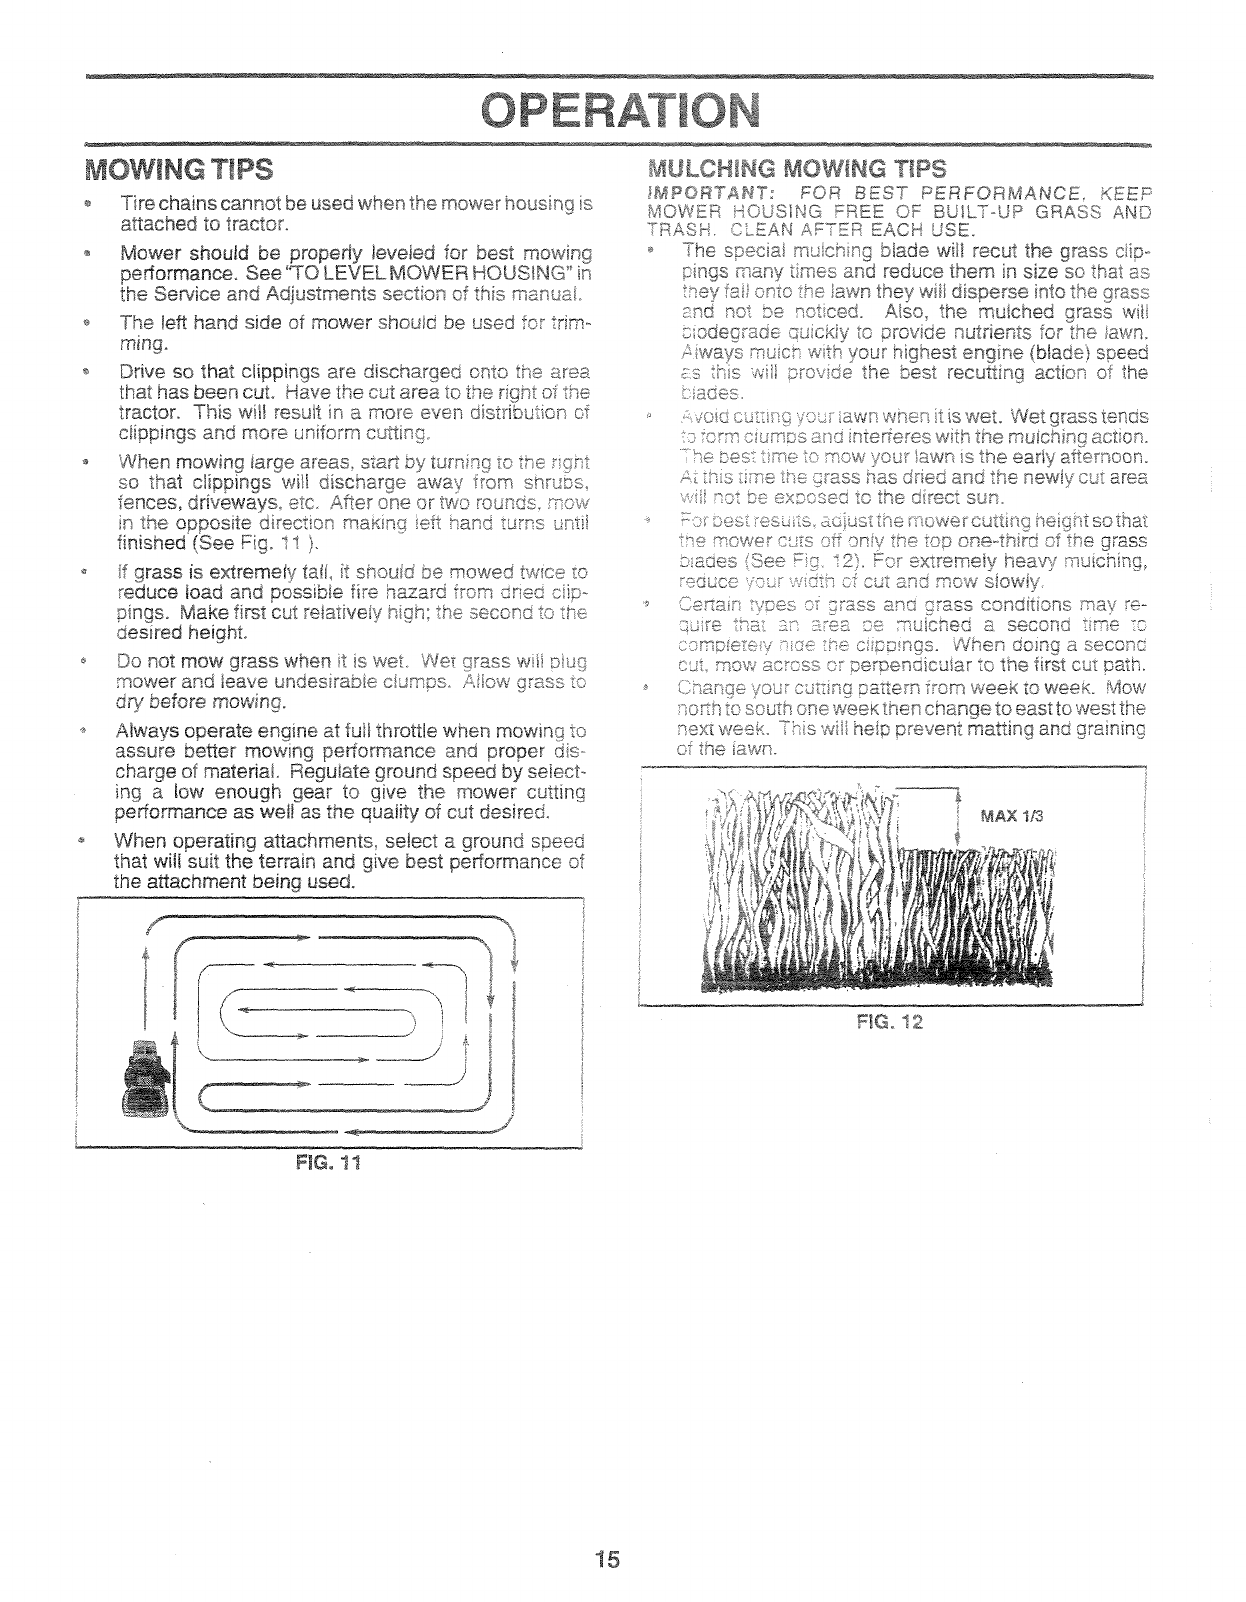
Tire chains cannot be used when the mower housing is
attached to tractor.
o Mower should be properly teveied for best mowing
performance. See '%0 LEVEL MOWER HOUSING" in
the Sewice and Adiustments section of this manua.
o The left hand side of mower should be used for t:im_
o Drive so that clippings are discharged onto the area
that has been cut. Have the cut area to the right of the
tractor. This wNl result in a more even distribut on of
ciippings and more uniform cuttmg..
o When mowing iarge areas_ staR by turning o the rgr:t
so that clippings will discharge away from snrcPs
fences, driveways, etc. After one o_'two rounds mow
in _he opposite direction making eft hand turns urmi
finished (See Fig. 11 }.
f grass is extremely tall it snoud be mowed twice _o
reduce toad and possibie fire hazard from dried cip--
pings. Make first cut reiativeiy hgh the second to the
desired height.
Do not mow grass when t is wet. We_ grass wii :aug
mower and leave undesirabie c umpso Alow grass :re
de' before mowing.
._ Atways operate engine at full throttle when mowing to
assure better mowing pedormance and proper ds-_
charge of material Reguiate ground speed by se!ect.-
ing a low enough gear to give the mower cutting
pedormance as weit as the quality of cut desired.
o When operating attachments select a ground speed
that will suit the terrain and give best performance of
the attachment being used.
_4ULOHING MOWfNG TIPS
IMPORTA_T: FOR BEST PERFORMANCE. KEEF
........#_ =RE_ OF BUILT-UP GRASS ANnMOWER _<_ub _o .......
TRASH. CLEAN A R =_,,_,, USE.
'_ -he speciai m._c_v*g btade will recut the grass ciioo
pings many trees and reduce them in size so that as
bseyfa onto t:,e awn they wiil disperse into the grass
, ,,_,,.t_,_ _s,,_,the mulched grass wii
b odeo_ade q ;_c_v o srovide nutrients _or ,_o lawn.
x_way% mu;cr, wtdyour highest engne (blade} speed
.............:: t_is wH z¢ovde.....the best recu_ing acd,,+r,_"of the
tages,
' .:,_o< s tt .i_vet_ awnwh(s tiswet. Wet grass tends
_- _'__ *_ < a_d nterferes with the muichina act on.
-he ben: r:_se',.esew your awn is tt<_eearly attemOOno
s - t ss_,_. $,
....._ns ..... e :_rass has dried and t_-_enewty cs area
s be exsosed tO the "_ _÷
+_0 zies es s L£ _S i'eiitoweic_Titi-<_ °ieiq1_so_a_
:"_omnw#_ n < #_-#,,r_,++h=op one4h rd of the grass
.,o, m",,"extreme!v heavy _ ,u-h _r_
:eoce vo:.z wdh o; cu£ nd mow siow_y
+' :Sedan 7v©es o 3rass ants orass corsditons #7sas _e-
..... },
qure ira{ :}.: :_ea me -_u_had a second tree o
cui mow across or serDenqmular to the first cut _s_o_.
_,;4J evour cu; asa_emfomweektoweek. Mow
:oHF_to south one week then change to east to west the
nexi wee_ TYs wi he!p prevent matting and graining
of the iawrh
FIG. 12
FIG: 11
15

ES
Change Engine Oi;I
CIean Ai Fi!ter
C_ean A_r Screen
hsoect MuffledSpark A_ester
RepJace Oit Filter (Jrequipped)
C_ean Er*_gne Cooiing Fins
Replace Spark Ptug
i i iJ
I-Change more often wb÷n operating under a heavy ioad or in high ambient temperatures.
2 _ _e_viee mo_*e_ wber_ opera ing in d_rty or dust_" conditions.
3 - f a_uip_d _ _s*_fl_e_; charge off every 50 borers.
$ - ;,esiace btades mete e_÷_ wh-a_}mowing ir_ sandy soil
+
T i
i , !
i i i
5-!f equipped with ad}ustab!e system.
6 - Not required if equipped w4th maintenance--free batte 7
7 _]qghte_s _nt ax_ pivot bo_t to 35 _.4bs. max m_ m
Do not ovedighten,
LUBRICAT_ON CHART
The warranty on this tractor does not cover items that have
beer_ subjected to operator abuse or negligence. To
receive fui[ vaiue from the warranty, operator must maintain
t_qIS manual:
........... ir_stmcted ir_ ' "
So_'_e a_n_sstments w[l! need to be made periodically to
creditOr"iV maintain your tractor.
_u_ ae _s in the Service and Adjustments section of
t_fismanuat should be checked at bast once each season.
Os,'ce a year you shouid repiace the spark plug, clean
or replace air filter, and check blades and belts for
wear. A new spark piug and clean air filter assure
proper air-fuel mixture and heip your engine run better
arid iast onge_.
BE!::_O;ii{}_EACH USE
' Check engine oit b_/et.
C_eck brake operation°
,,, Check tire pressure.
_ Ciseck for loose fasteners.
16
SAE 30 OR 10W30 MOTOR OIL
(_ GENERAL PURPOSE GREASE
(_ REFER TO CUSTOMER RESPONSiBiLiTIES "ENGINE" SECT1ON
IMPORTANT: DO NOT OiL OR GREASE THE PIVOT POINTS
WHICH HAVE SPECIAL NYLON BEARINGS. WSCOUS LUBRI-
CANTS WILL ATTRACT DUST AND DIRT THAT WILL SHORTEN
THE LIFE OF THE SELF-LUBRICATING BEARINGS. IF YOU
FEEL THEY MUST BE LUBRICATED, USE ONLY A DRY, POW-
DERED GRAPHITE TYPE LUBRICANT SPARINGLY
ER
Always observe safety rutes when performing any mainte-
nance°
BRAKE OPERATION
If tractor requires more than six (6) feet stoppin 9 distance
at high speed in highest gear, then brake must be adiusted.
(See '%0 ADJUST BRAKE'; in the Service and Adjust-
merits section of this manual).
TIRES
_ Maintain proper air pressure in at tres (See "PROD-
UCY SPECIFICATIONS" on page 3 of this manua!}.
+ Keep tires free of gasoline, oi, or insect cor_troi chem-
cas which can harm rubbe.
_ Avod stumps, stones_ deep ruts shar_o obiects and
other hazards that may cause tire aamage.
NOTE: To seal tire punctures and prevent fiat tires due to
stow feaKs, tire sealant may be purchased from you_ oca
Da_s deater. Tre seatant also srevents t r_ _:w r_ _,_.,'_
coKosiono
BLADE CARE
For best resutts mower blades must be kept sharp. Re-
@ace bent or damaged blades.
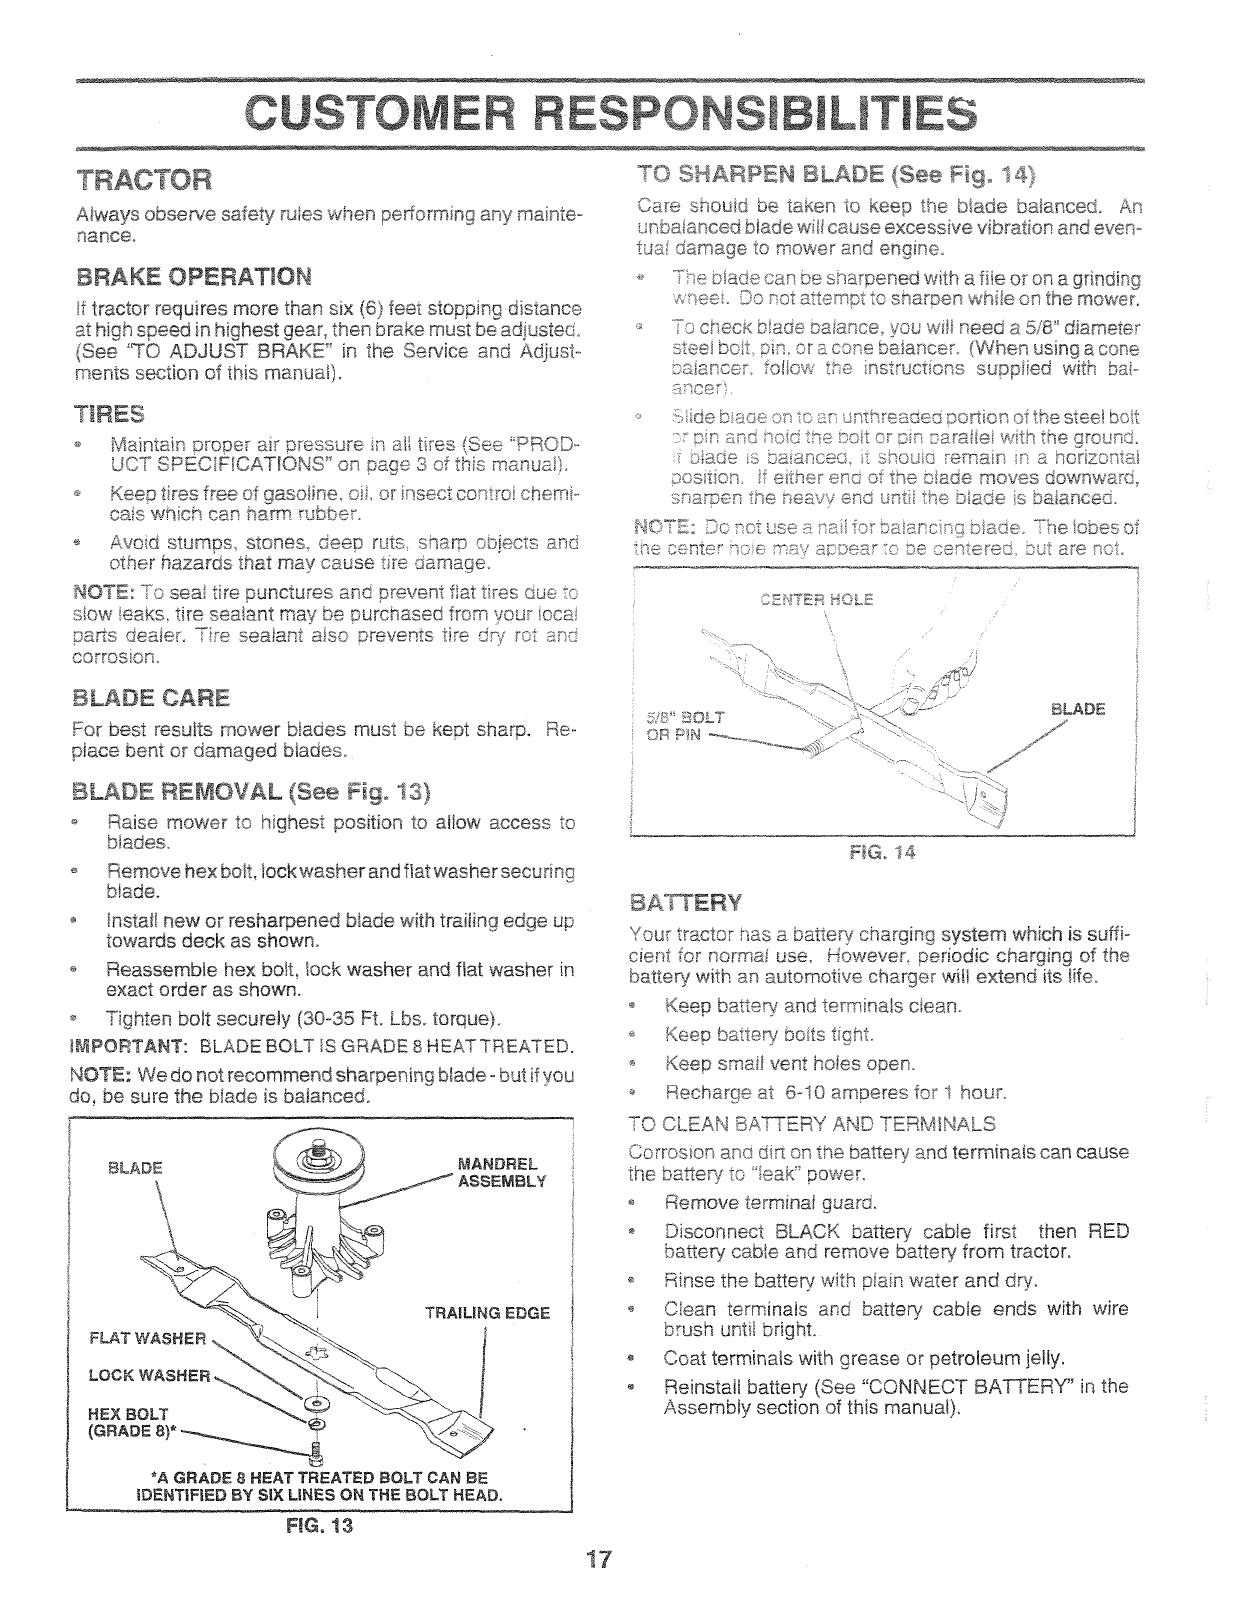
TO SHARPEN BLADE (See riga !4}
Care should be taken _o keep the biade batancecL An
_.Jnbatancedbiade wAtcause excessive vibration and evem
tsa; damage to mower and engine.
+. T?,e D!ade can be snaraened with a fiie or on a grinding
_ee. O( no_anem2x x sharpen wniie or} the mower.
cnecK mao_:_ba_ar_ce you v. neeo a 5/8 '_diameter
_ee_co_ . _n o_acoNes_ancer _Whenusingacose
ss_ancer, renew ERe ns_rucsons suopted ba_-
}:co
:i-i@ C_?iqTO_ qoe ..... _.i }<-_s_ D@ .:£-}N_e[e£ 3uY are r_c%
.£K_4TET_t i0L£
--%'p .
i/=;:" IOLY "<..--_.>-- BLADE
BLADE RE_4OVAL (See Fig. 13}
o Raise mower to highest position to aIow access to
blades.
_ Remove hex bait, tockwasher and flat washer securing
blade.
o Instal new or resharpened blade with trailing edge up
towards deck as shown.
o Reassemble hex bolt, lock washer and fiat washer in
exact order as shown.
o Tighten bolt securely (30-35 Ft. Lbs. torque).
!AaPORTANT: BLADE BOLT IS GRADE 8 HEATTREATEDo
NOTE: We do not recommend sharpening btade- but if you
do, be sure the blade is balanced.
L2.==° '
WASHER /
*A GRADE 8 HEAT TREATED BOLT CAN BE
IDENTIFIED BY SiX LINES ON THE BOLT HEAD,
FIG. 13
FIG. 14
Your tractor has a baReh_,charging system which is suffi-
cient for normai use. However, periodic charging of the
battery with an automotive charger wit extend its life.
o Keep baReG7and terminals ctean.
.Keep batter !bolts tent.
Keep stoat vent hoies open.
Recharge at 6-t0 amperes for 1 hour.
TO CLEAN BAKERY AND TERMINALS
Corrosion and din on the battery and terminais can cause
the baSe%, to "ieak" power.
o Remove terminat guard.
Disconnect BLACK battery cable first then RED
baser}, cable and remove batteR/from tractor.
o Rinse the batter !with plain water and dry'.
Clean terminals and battery cabJe ends with wire
brush untt bright.
o Coat terminals with grease or petroleum jelly.
o Reinstall battery (See "CONNECT BATTERY" in the
Assembly section of this manual).
17
.__,he_.........c,eRs for deterioration and wear after 100 hours of
operaton and replace if necessar?° The belts are not
,:_@..st_, ,-_.Replace b÷_s if they begin to sfip from wear°
TRANSAXLE COOUNG
x>._ofan and coofinq_ fins of transmission should be kept
c_ean to _sssure proper cooling°
Do so f: erupt to clean fan or transmission while engine is
_Jhiie the trar_smiss on is hot.
°_S/r; :)Or COOi nq fsN ÷O b a sure fan blades are intact and
ss::}ect cooing fins for dir%grass cfippings and other
m_a_:erias To ?revent damage to sesJs, do not use
::_:p sued a o high p_essu_-e sprayer to ciean
so: _gi:ns_
_......._ ,_ PUMP rLbD
:c was _.=,_e,sat factory 8pd fiuid mainte-
......n.... _ for _]e @eof thetransaxie. SPoud the
"v;_- }e_-'_( OF :eau_e servcing contact _..... _
VL_L_t i levi -
e::; eL}. ;C L_}d SeTvce ce terideDa_meyt
£:;;,i x $1}tc
(/);/' ;e _'_a,_"_' detement, oli rat_d_with API sepdce
........... oe eo. the ol _ SAE viscosity
:>:so cst_ ding to you_ expected operating temperature.
SAE ViSCOSKY GRADES
HOTN,: ,though mutti-vscosity oils (5W30_ IOW30 etc.)
imrK:ve starting in cod wea[her, these multi-viscosity otis
,>s:_t n ncreased oil consumption when used above
3£*[::o L:_ec_ your engine oit level more frequently to avoid
possib e enine damage from running low on oiL
Ch_;,::f: h_-.oil afte eveR,' 25 hours of operation or at least
once :_;'es _-'f the tracto_ is no_:sed for 25 hours in one year°
Checkt[ _:crankcase oHteve[ before starting the engine and
atre c_,c-_eight (8} hou_ of operation. Tighten oi_fill cap/
: psticK: securely each time you check the oJtrevel.
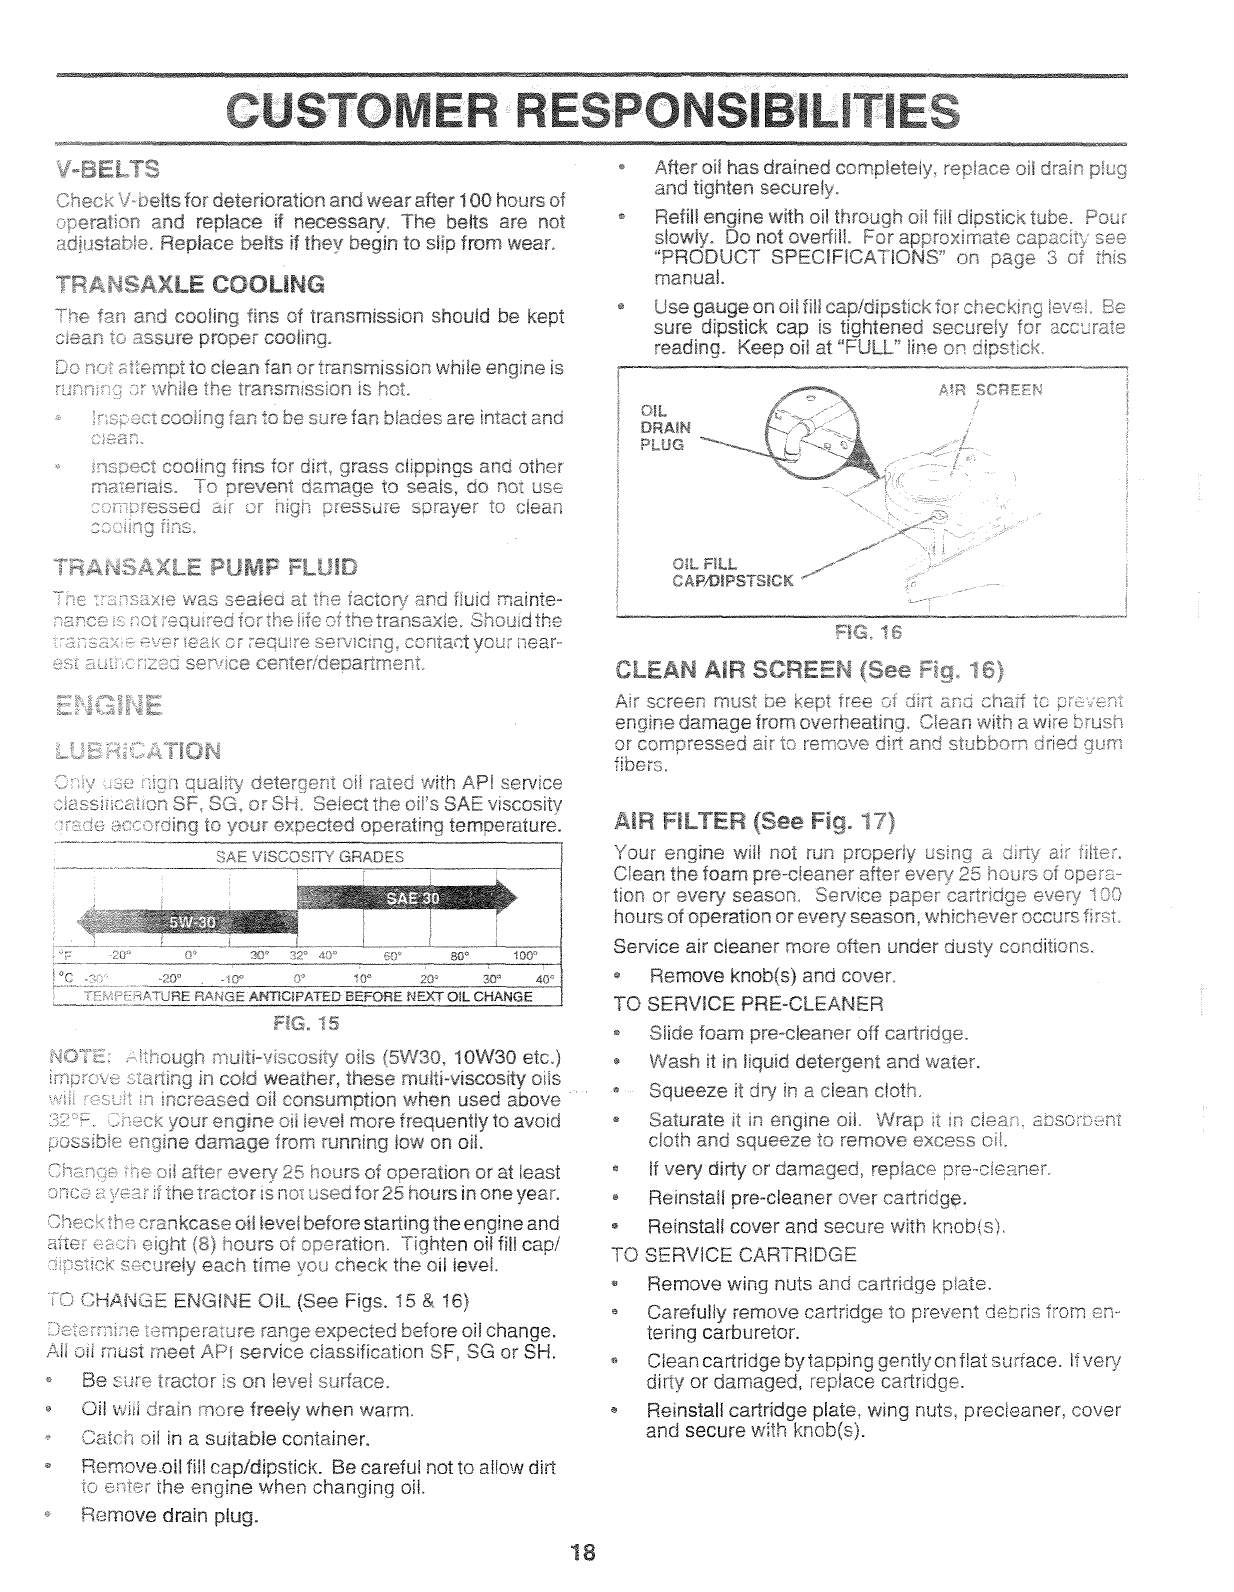
L, ,..,rs._ ENGINE OiL (See Figs. i5 & 16}
/);_::_x4i._e '_smpera _re range expected before oil change.
Aii oil must meet API service classification SF, SG or SH.
_ Be sure tractor is on levet su_ace.
,, Off wiii drain more freely when warm.
,_,_:,,,.,_oil in a suitable container.
o Remove.oil filt cap/dipstick. Be carefu! not to allow dl_
_o erte_" the engine when changing oil.
_} Remove drain plug.
After oil has drained com@etely re@ace oi! drain pug
and tighten securely_
Refill engine with oH through oHfin dipstick tube. Pour
slowJy_ Do not ovedHL For approximate capacity see
'PRODUCT SPECIFICATIONS" on page 3 of ths
manual,
Use gauge on oit fill cap/dipstick for checking love. Be
sure dipstick cap is tightened securety for accurate
readinq_ Keep oit at "FULL" tine on __Ip,_,_,,_.__""
OiL
DRAIN
PLUG
,j ....
OiL FiLL .-""" ........
CAP,giPSTSJCK "/_
u ......
CLEAN AIR SCREEN (See Fig, ! 6}
Air scree must be kept free of d a_sdchaff to bk ,_C'i
engine damage from overheating° ,_t_an with a wire ._ us_
orcompressed air to remove d_ and stubbo n dried (_un_
_ib_ro
AiR FILTER (See Fig. 17}
Your engine wilt not run properly using a ar_y sir iilter.
CIean the foam pre-cieaner after every 25 hours of ope_>
tion or every season. SenJice paper cartr dqe every 100
hours of operation or even/season, whichever occurs fist.
Serdce air cleaner more often under dusty conditions
o Remove knob(s) and cover.
TO SERWCE PRE*CLEANER
o Slide foam pre_deaner off ca_ridge°
o Wash it in liquid detergent and water.
Squeeze it dn/in a clean cloth.
o Saturate it in engine oito Wrap [t in ciea. aSsor;N__nt
ctoth and squeeze to remove excess o!
o If very dirty or damaged, replace pre-deaner.
o Reinstall pre-cteaner over ca£ridge.
o Reinstall cover and secure with knob(s).
TO SERVICE CARTRIDGE
o Remove wing nuts and cartridge p_ate.
o Carefully remove cartridge to prevent debris f_om em
tering carburetor.
,_ Clean cartridge bytapping gently on flat sudace. Ifvep7
dirty or damaged, replace cartridge°
o Reinstall cartridge plate, wing nuts, precieaner, cover
and secure with knob(s).
18
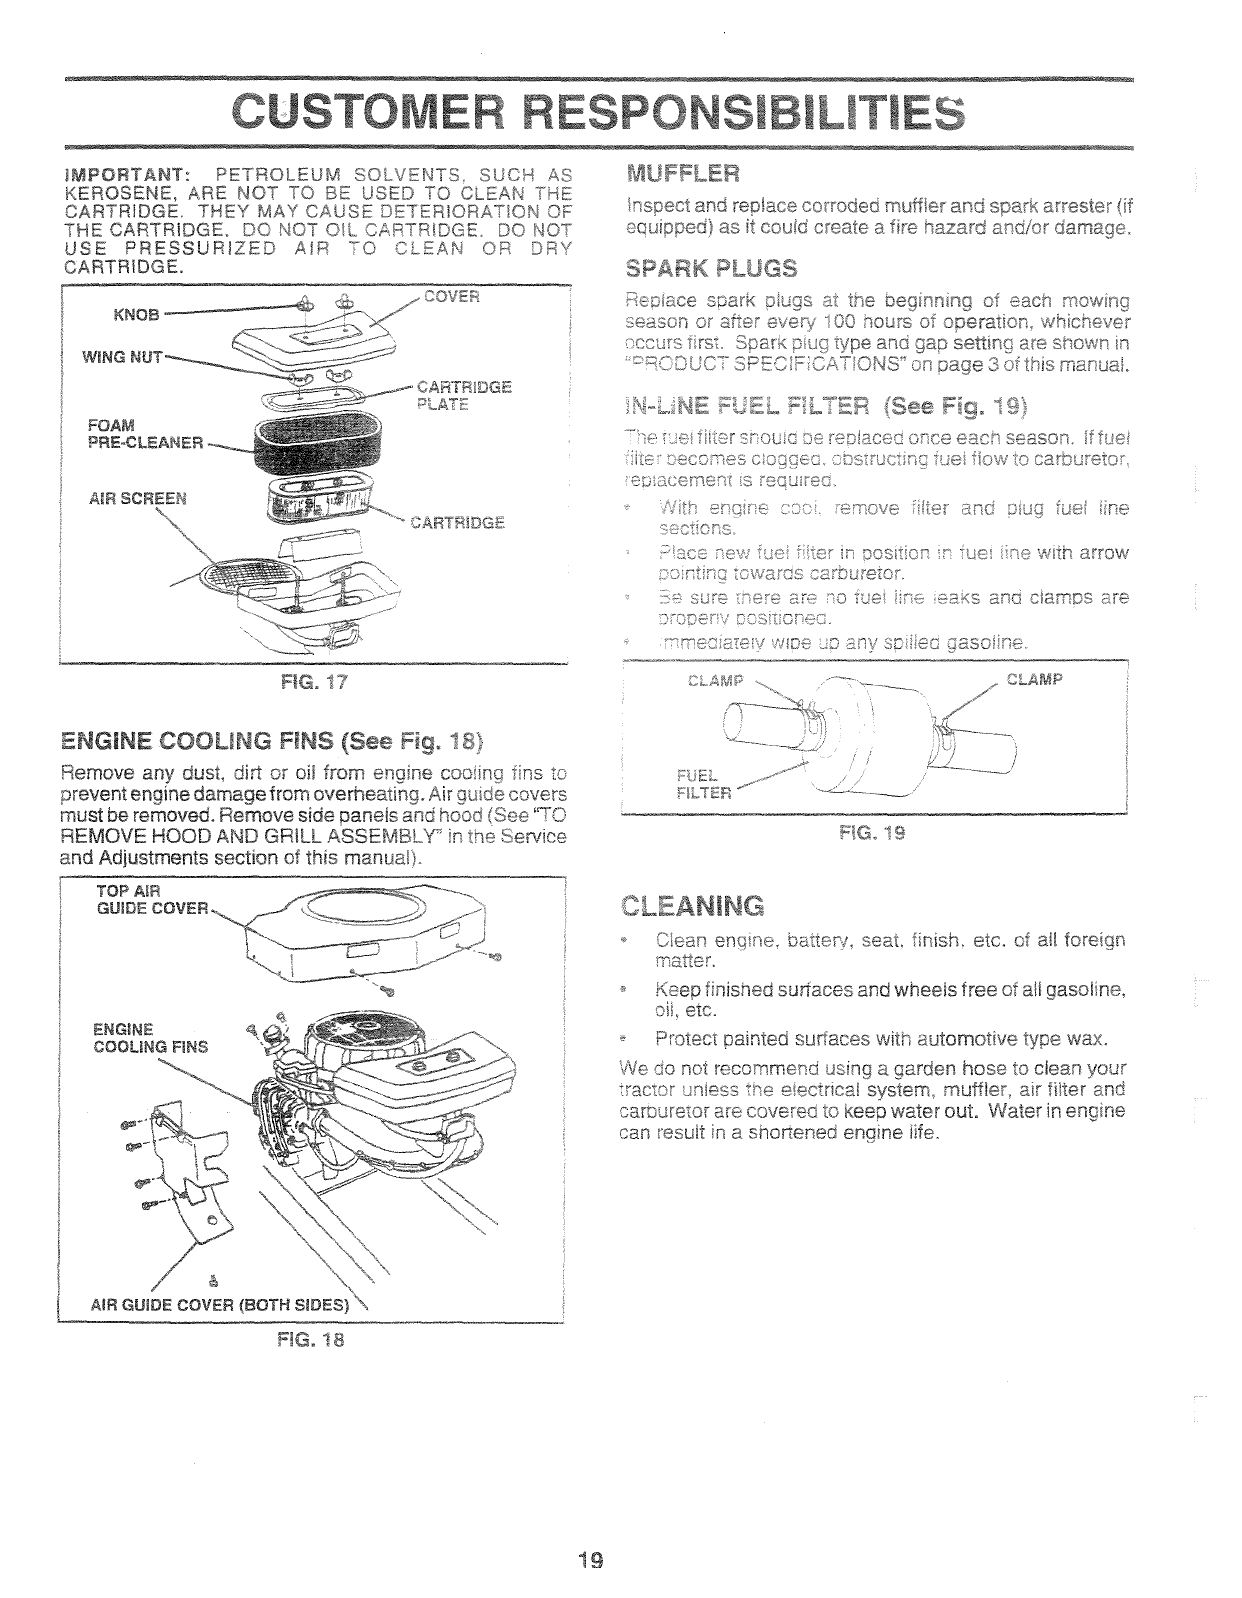
iMPORTANT: PETROLEUM SOLVENTS, SUCH AS
KEROSENE, ARE NOT TO BE USED TO CLEAN THE
CARTRIDGE, THEY MAY CAUSE DETERJORATtONOF
THECARTR_DGE° DO NOT OIL .......,_,_R RIDGe.. DO NOT
USE PRESSURIZED AIR 70 CLEAN OR DRY
CARTRIDGE.
FOA_
PRE-CLEANER
A_R SCREEN
%
Re° 17
inspect and repiace corroded muffler and spark attester (f
equipped} as it could create a fife hazard and/or damage.
SPARK PLUGS
Repiace sDaFk piugs a_ tse beginning of each mowng
season or after ever,i 100 hours of operation whichever
occurs irst. Spar_ pug type and gap se_ing are srsown in
BNGINE COOUNG F_NS (See Fig. 18}
Remove any dust, di,_ or oil from engine cooiing fins to
prevent engine damage from overheating. Air guide covers
must be removed. Remove side panets and hood {See "TO
REMOVE HOOD AND GRILL ASSEMBLY _ in the Service
and Adjustments section of this manuaIt
ENGINE
COOLING FiNS
AIR GUIDE COVER (BOTH S_DES) '\
F_Go18
o_ L,_e_n engine_ batter/ seat, finish_ etc. of a_{fore gn
K_e#._finished surfaces and wheels free of atl gasoline_
oii etc°
Protec_ painted surfaces with automotive typewax,
We do not recommend using a garden hose to clean your
trac_or unless ire e ectdcaI system_ muffler air fi_ter and
carturetor are covered to Keep water out. Water in engine
can resuR n a shortened engine life.
19
E DJ E
CAUTION: BEFORE PERFORMING ANY SERVICE OR ADJUST_IENTS:
o Depress ciutc_brake pedal fulty and set parking brake°
o Place motion coRtrol tever in neutral (N} position°
o Place a_achment c_utch in "DISENGAGED" position,
;,Turn ignition key "OFF" and remove ks?_
blake sure the blades and a# moving pa_s have completely stopped.
o Disconnect spark Drug wire from spark p_ug and piace wire where it cannot come in contact
with plug.
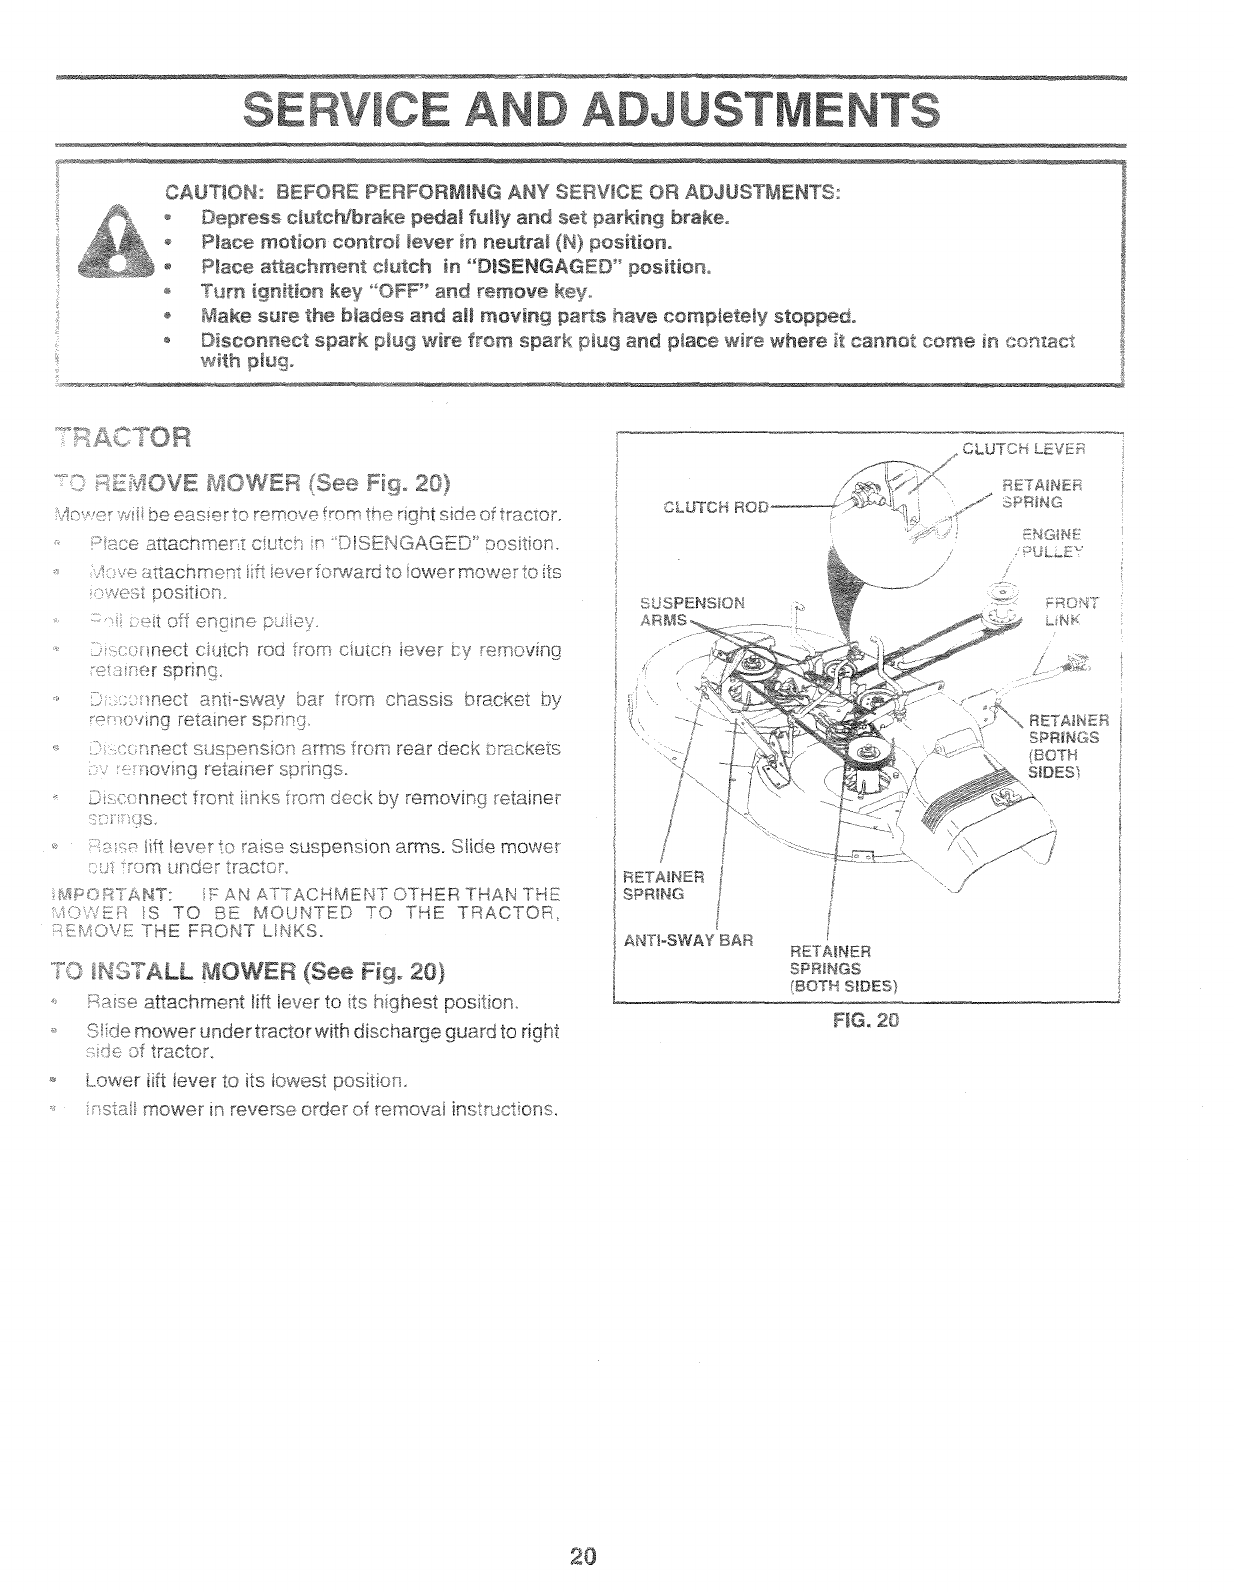
.... i:;ESiiOVE #_OWER (See Fig° 20}
:,47, e v.4 be ess_er o remove from the right side oftrac or_
:>}_,ce£_tiachme_-.cctcff 'DISENGAGED" s_ositon.
,.s(w_ttachment ifi ieve_? rward to owermowe to its
:west positio:_.
_:etoffe_s _nep ey,
_, Z co_nect cutch rod _om cutcn iever by emoving
e _}er spris!{_.
. [} xsct nect sqt°sway bar Trom cr_assis bracket by
"e cingretainer spr I}
" £[_' c ;n@ct sIspelhsor_ _r_3s _oRs year deck Dr&sk@ts
,: _-_ovr_gretainer sp i_sgs,
Dsc ;nnect front nks _om ceck by removiFg _etaJnei
SD:_S.
,_ ss8 lift _eveTto _s{s÷ suspension arms. Siide rnowe_
c 9 tom _rder t_acto,
_4POA3ANT: IF AN ATTACHMENT OTHER THAN THE
MOWk_F S TO BE MOUNTED TO THE TRACTOR,
:,_1i?_OVE THE FRONT LINKS.
£_ _ALL _OWER (See Fig. 20}
_- _se attachment tiff iever to its h ghest position
-_ Sde mower under tractor with discharge guard to right
::_e of tractor_
_ Lower tift iever to its iowest positios,
, stat mower in reverse order of removal instruct ens,
ANT_-SWAY BAR RETAINER
SPRINGS
(BOTf_4_ S_DES}
F_G. 20
2O

TO LEVEL MOWER HOUSING
Adjust the mower while tractor is parked on leve! ground or
Make sure tires are propery inflated (See
"PRODUCT SPECIFICATIONS" on page 3 of this manual)
If tiros are over or underinfiated, you will not properly adiust
your mower.
SIDE-TO-SIDE ADJUSTMENT (See Figso 2! and 22)
Raise mower to its highest positiom
_ Atthe midpoint of both sides of mower, measure height
from bottom edge of mower to ground. Distance "#7'or
both sides of mower shouid be the same or within t/4"
of each other
_t adiustment is necessary make ad ustment on ,,,,e
side o1mower oniy°
aut on that side.
To iower one side of mower, loosen lift tink adjustment
nut os that side.
NOTE: _acnfuttturn _ /_-" _ *_- + "
O_ ae __stm_s_ __ Wh_ cnanqe mowe_
height about I/8.
o Recheck measurements after adjusting.
FRONT_.TO_oBACKADJUSTMENT (See Figs. X3 and X4}
_B_PORTANT: DECK MUST BE LEVEL SIDE-_TOoSIDE IF
THE FOLLOWING FRONToTO_BACK ADJUSTMENT IS
NECESSARY BE SURE TO ADJUST BOTH FRONT L_NKS
EQUALLY SO MOWER WiLL STAY LEVEL SIDE-TO_
SIDE
7o obtai£the oest cu_ir_gresuitsthe mower housing
sbou}d be ad}usted so that the front is approximm@y 1/8'_to
i/2' ower than the rear when the mower is in its highest
Check ad}ustmer.,t on rght side of tracto< Measure dine
:enc_-:__)_ d <ecty r _ost and behnd the mandrei at bo_om
_s,cCee_ J:;ower ous ':gas sr_owr_
• _efore rasing any necessa_..,ad ustments check that
::oth fermi nks are equa! in ength Both !inks shoutd be
approx mate y 10-3/8',
t [ ;<sq<c _'_oeq<.,a n eng,°:, adust one ink to same
en<xh as ot er sk.
,_<sowe_ f_-os_o mower oosen nu_:"" on bo_h from
"{KS ar_ equai ritN :}e! _ of t iT'S,
._ Whendsmsce Ds i/8' e s2' owerat rontthan
i_ea tqh/er <us<s'_ s:__ain<tt_tq_nio< *n both font
. o
in<s.
To raise front of mower oosen nut"F" from trunnion on
both front nks Tighten nu "E on both front Jinks an
equai number of turns.
, When distance 'D'_is 1/8" to I/2' !ower' at front than
tea< ti hten nut'F*' against trunnion on both front Iinks.
_ Recheck side4o-s de adjustment.
\
LIFT LINK
ADJUSTMENT NUT
FJGo22
FiG, 23
BOTH FRONT UNKS _WST BE EQUAL iN LENGTH
NUT "E"
NUT "_"
FRONT LINKS TRUNNION
21 FIG, 24
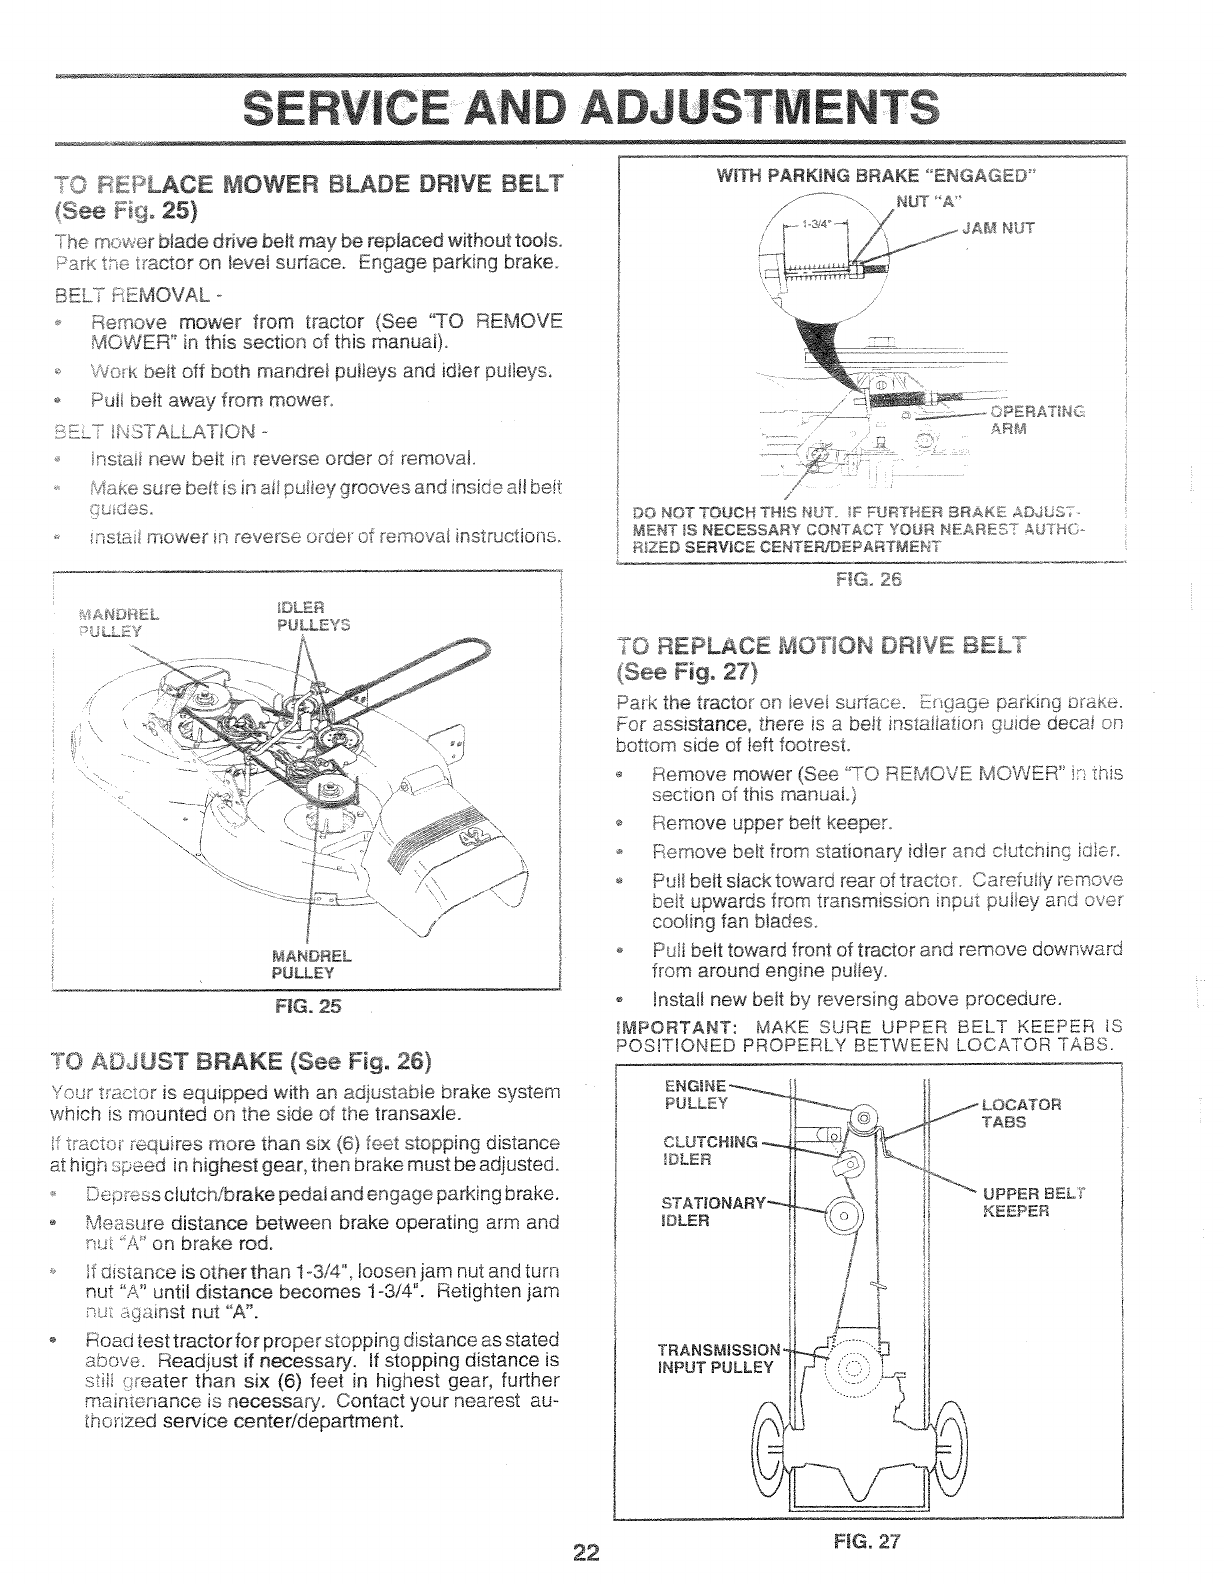
TO REd'LACE MOWER B_BE DRIVE BELT
(See Fig° 25)
°Themower blade drive belt may be replaced without tools,
Park tr4_ tractor on _evel sudace. Engage parking brake
B=_ _.F EMOVAL
,, Remove mower from tractor (See "TO REMOVE
MOWER *_in this section of this manual}.
,-_ Wo_: her off both mandrel puJieys and idler puiJeys,
o Puii belt away from mower.
B£L7 INSTALLA]]ON -
_ ns_aii new belt in reverse order of removal
,_ f,i!a_<esur_ beit is in ait putiey grooves and inside a!l beit
:_u deS.
_ ns_.;:,i mower _nreverse o_-derof removal instructions.
\\/
MANDREL
PULLEY
FIG. 25
TO AOJUST BRAKE (See Fig. 26}
Your reactor is equipped with an adjustable brake system
which is mounted on the side of the transaxle.
f _ractor _÷quires more than six (6) feet stopping distance
at high speed in highest gear, then bra_e must be adjusted.
-_ Dep;x._ssclutch/brake pedal and engage parking brake.
o Measure distance between brake operating arm and
r_ A' on brake rod.
if distance is other than 1-3/4", loosen jam nut and turn
nut "A" until distance becomes 1-3/4". Retighten jam
r_,_ X._:_.}nstnut "A_.
Road test tractor for proper stopping distance as stated
above. Readjust if necessa% If stopping distance is
sti_i _::reater than s_x (6) feet in highest gear, further
maintenance is necessary. Contact your nearest au-
thorized service center/department.
WITH PARKING BRAKE "ENGAGED
NUT 'A'
ARM
/
DO NOTTOUCH TN!S NUT._FFURTHER BRAKE ADJ_STo
MENTtS NECESSARY CONTACT YOUR NEAREST AUTNC,,
I R_ZED SERVICE CENTER_EPARTMENT
TO REPLACE BaOTION DR_VE BELT
(See Fig_ 27}
Pa_k the tractor on ievei su_taCeo gage par_Jng o_a_:e.
For assistance, there is a beit instatiation guide dece_ on
bottom side of left footrest
o Remove mower (See "TO REMOVE MOWER" in this
section of this manual.)
o Remove upper be_t keeper.
F emove belt from stationaP/idler and clutching idler.
o Put/belt slack toward rear of tractor. Camfu_iy remove
bett upwards from transmission input pul!ey and over
cooling fan blades
o Puli belt toward front of tractor and remove downward
from around engine pulley.
o Install new belt by reversing above procedure.
!_IPORTANT: MAKE SURE UPPER BELT KEEPER IS
POS!TIONED PROPERLY BETWEEN LOCATOR TABS.
PULLEY
CLUTCHING
_DLEB
IDLER
TRANSMISSION-
INPUT PULLEY
TABS
UPPER BELT
_{EEPER
]
l
t
I
I
!
J
22 FIG. 27
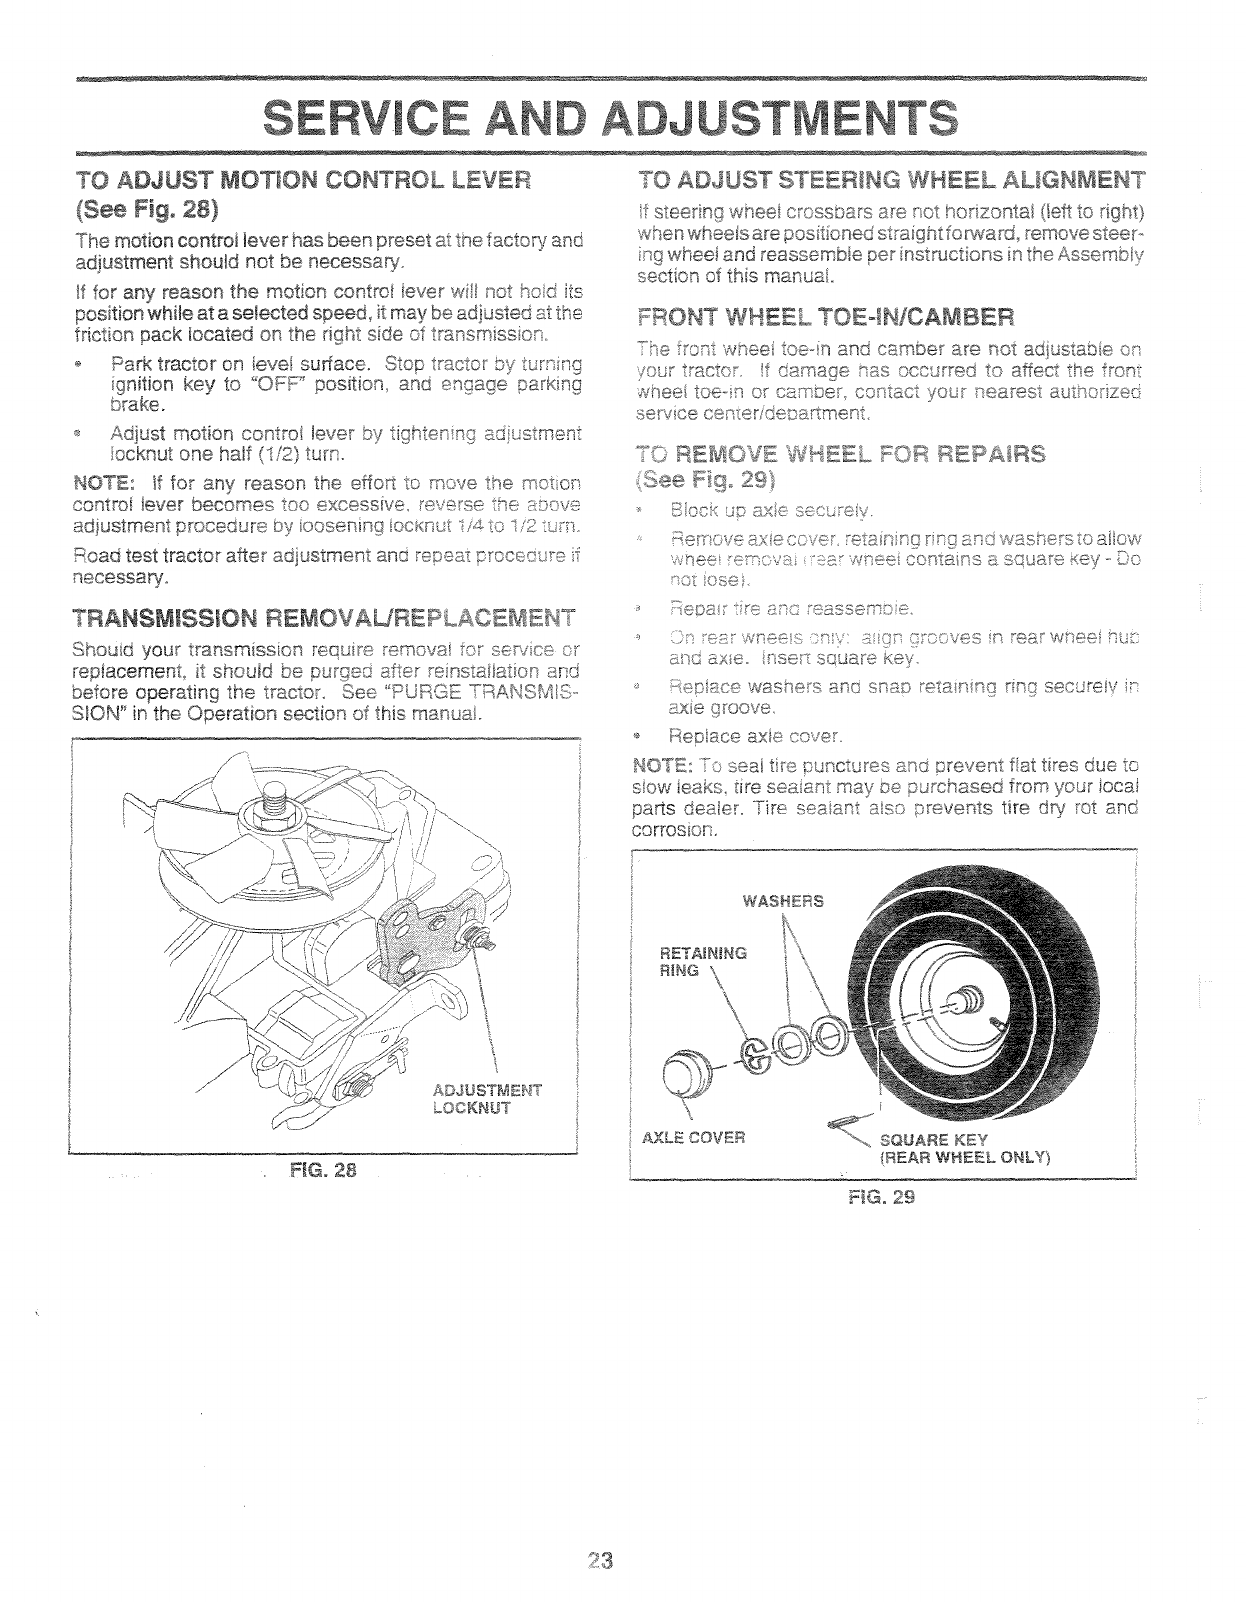
TO ADJUST MOTION OONTROL LEVER
Fig. 28)
"Themotion control lever has been preset at the facto%_and
adiustment shoutd not be necessary,
If for any reason the motion controi lever wi_i _-_othod its
position while at a selected speed, it may be adiusted st the
friction pack located on the right side of transmiss on,,
0_ Pad<tractor on ievel surface° Stop tractor by turning
9nition key to "OFF _ position, and engage parkng
brake.
_" Adjust motion contro! tever by tighten ng ad ustment
ocknut one half !I/21 turn.
NOTE: tf for any reason the effo_ to move the moron
controi lever becomes too excessive _everse tte e_:,ove
adiustment procedure by oosening ocKrs_t 1i_,sto i/2 tu_'_]
Road test tractor after adiustment and repea_:procecure f
necessa(¢o
TRANSMISSION REMOVAU'REPLACE_aEH°?
Shoed your transmission require emova for sewce or
replacement it shouid be pureed afte£ reinsta_at on and
before operating the tracion See "PURGE TRANSM!S -_
SION '_in the Operation section of this manua.
F_G°28
TO ADJUST STEERING WHEEL ALIGNMENT
f steering who@ crossbars are not her zontai (left to right)
when wheeis are positioned straight forward_ remove stee_-
T_gwheei and reassemble per instruct ons in the Assembty
section of this manua.
FRONT WHEEL TOE-INtCAMBER
The fro;st wnee toeoin and camber are not adiustab e o_
your tracto f damage r;as occurred to affect the front
whee toen or camber cor_tact you _nearest authorized
sewice ce_ terideoaRment
(See Pgo 29}
,* ({Y_ocku_, axe secs_e y
#_e_-_oveaxe cove__, eta _-_n rn_#an<_wassers_o aiiow
wBee e_xov@ ( :}a wr_ee coy_a{r*,re a sGuae _<ey _, _}o
so ose >
,_ ReDa{ :reasd reasseKsoe
-, 0 _ _esrwrees <,;nv :,kgs grooves n earwreei _u:;
as@ axe nse_< squa_e Hey
,: Re_}ace washes and snas rata f_ng ring secureiy iP
axie groove
IRe@aceaxie cove
HOT_: To seai t_e _}unc_u(es ano prevent fiat tires due to
sow leaks, tire sea ant may se purchased from your iocai
parts dealer, Tire seaant aso prevents tire dry _ot and
corrosion.
WASHERS
RETAiNiNG
R_NG \
%
AXLE COVER _SQUARE KEY
(REAR WHEEL ONLY}

f your battery" is too weak to siart the engine, it shoutd be
_f 'umber cabies" arc used'for emergency
t_:::_,n9 foitow this procedure:
_'f_:_O_:iTANT: YOUR TRACTOR tS EQUIPPED WITH A
L dOLT NEGATIVE GROUNDED SYSTEM. THE OTHER
MUST ALSO BE A i2 VOLT NEGATIVE
GROU_',iDED SYSTEM. DO NOT USE YOUR TRACTOR
_::;ATTERY TO START OTHER VEHICLES
_-O ATTACH JUMPER CABLES
,_ Connect eac_send of the RED cabie to the POSITIVE
{_- terminai ot eacr_ ba_:leql taking ca_e r_ot to sr_oR
aga_ns[ chassis
Co#_nect one end ot ti!e BLACK cabte t} the NEGA--
TiVE (-} termina_ of fulty charged baSery.
_ Connect the other end of the BLACK cabte to good
C dASS_S GROUND, away from fuei tank and batte.ry,
O REMOVE CABLES, REVERSE O_DER -
'_ _,4oACKcabtc first from cr_assis and then from the futiy
{
R_c.IDcable iast from both batteries
"POSI_VE" (+} "ItEGAT_VE" (-}
,/
/
/
/ /
/ /
/ //
/ /
', /
\/
1
F_G.30
TO REPLACE HEADLIGHT BULB
Raisehood.
PuH bulbholderoutofthehoieinthebacksideofthe
o Replace butb in holder and push buib holder securety
back into the hole in the backside of the gri&
o Ctose hood,
_NTERLOCKS AND RELAYS
Loose or damaged wiring may cause your actor ::o _ur_
poorly, stop running, or prevent t from startin _
o Check wiring. See e_ec_rica wirn_ :x_g;_ _, _e
Repair Pans section o_this msnuai
Replace with 30 amp automotiw_-type ptu_-_ :,_s_ i_e
fuse hofder is iocated behnd the t_as,:
TO REMOVE HOOD AND GRILL ASSEMBLY
(See Fig. Sl}
o Raise hoed.
o Unsnap headlight wire connector.
o Stand in front of tracton Grz'.Sbhood at sides, tilt tows rd
engine and lfi off of t_"actor,
o To repiace reverse above proceaures.
•\
HOOD
\ >.,
HEADLIGHT
W_RE
CONNECTOR
/
i
FIG. 31
24

TO ADJUST THRO LE CONTROL CABLE
(See F[go32)
The throttle control has been preset at the factory and
adiustment should not be necessary'. Check adjustment as
described below bdore loosening cable. If adiustment is
necessary, proceed as fo!tows:
o With engine not running, move throttle control Iever to
fast (_) position.
Ch_k that swive_ is against side of qua_er circie f it
is not, Ioosen cable clamp screw and pu!i cable back
untit swivet is against quaker circie_ Tighten cabie
c_amp screw securely.
The choke controt has been preset at the facterv and
adiustment should not be necessap!_ Check ad#ustment as
described below before loosening cable. !f adiustment s
necessaq7, proceed as follows:
o With engine not running move choke control (Iocated
on dash panei) to full choke (IX) position
o Remove air c_eaner cover fitter and cartridge pis.te to
expose carburetor choke (see "A_R b,LT£, ," the
Customer Responsibilities section of this manuai}.
o Choke shoutd be ctosed. If it is not, ioosen casing
c_amp screw and move choke cable until choke is
completely ciosed. Tighten casing c!amp screw se-
curely.
o Reassemble air cleaner°
SWIVEL
CASING
CLAMP
SCREW
F_Go33
25

SKRV!C£ AND ADJUST[IaKNTS
, -,E_ } , .r _£--_ _
. I
=q_[_:_[._;-+'i_ "t_ #LIil G_,"_'FI@_L.-qII[,{ K _:,-, [.'Q'_; I]
i& "o- i_ ,,_-.;_, 4. '_ ;'0 c- [IC
AOi[i_ 50 -T,:.,, ;÷V_:;, _K S OH [,_ _,pg.,3 [IO % hO d
• -'-K: I_V_: ,'_T_}c-_r'_ i'. ,:s f]:JL:_-J SCI-_V¢ _.HC] bZ] JS[ K £
._c_,:<. _'rI:'_:?OO_:_4OOR!M
, _;n._e [c ROla t,r,-'[_;e !_vel _ga!]st tt,ie speed scTew
-_ -u:_ _, _c,_ speea screw to obtain 990 to 12u9
de'.-lu_;se ti] .otTe te,/_r.
_,-Z_L:_]-% TEST-
.- I[ to-t,:........cc;--rc_ i+-:verTr:>m,::uw_,(_) to fast (_---{_.,,
q, i, E,-rC_r:'9 [':'-l[_K:i ( _ L'<S, tJm ,:lie r,qb:[i:_
c-u{ '.t.&:;nle,-C_OCkV_..S6-__. turF. F,epeat _ea[
_n<-continue [2 aclust, if r:ecez-s[:r< until er g:ne acc.. -
- :i-b L_!Tr)'_ ,,.
/4 _ER_K)I ;._,' r=_c FL:'y L" /[ :C:_ ,:p l:. _{_:
i- _'41RJ_FKED_..=_L_o'::'::_*KED!I:ZITr_ZZ,,GII!L_-, -r':' I....
:"'Z-, -'=---'_---,,__- -,,.-'-".... :'_ZZL SEYTit;] C -'=` ZD
_*-._G ERe d Li ; D., - t__,_-._ Tr-Z =-,.-.....;_ _.;i'= - .="-_.>'. EF;DoE L
m;GH ZFEZD _=:_:-_.... ,_.DJb. c.... ,;•.,;. C©h-' '-CT . _.b
I} Z A'-' E STm _0"'- m O.F,_'_"-m =.bE ;_ "dl C:: u E_IY C:
1.E._pTB_E_T .L,Fi.C:_ u_,._,c_ L'_--._EK EC :I'-:V E'_:-,=, L'-'L
E.':FE_ENCE -C _."Av `Z '__'_" "iF__ EL ?" :
-jL'STN, E_:T
,,-Z.K SPSZ'_
....... _ ........... . CI::L:,
S.
-,,-_ _r,=ed STO_-__s f_aclor%= a.diugted. Do r.o[ _.'J!US_
__.;,_ ._£ }T]ay r,ssjj!.
2_
Immediately prepare your tractor for storage at the end of
the season or if the tractor win not be used for 30 days o
more.
Remove mower from trac_or for winter storage When
mower is to be stored for a period of tree, ciean t thor--
oughiy_ remove aii diq, grease eaves, ec. Store r_ a
ciean d_' ares.
Ctean entire tractor (See"CLEANING" i me Customer
Responsibilities section of this manuaiL
o !nspect and replace bets° f necessae/ (See beit re.-
placement instructions inthe Sewce aria Adiustments
section of this manua }.
Lubricate as shown in the Customer Responsibilities
section of this manual.
,_ Be sure that aft nuts bolts and screws are securely
fastened. Inspect moving pa£s for damage, breakage
and wear. Replace if necessary.
o Touch up aft rusted or chipped pain,t sudaces; sand
tightly before _aintingo
BAKERY
o F@Jycharge the battery for storage.
o After a period of time in storage, battery may require
o To help prevent corrosion and power leakage during
iong periods of storage, battery cables should be
disconnected and battery cteaned thoroughly (see "TO
CLEAN BATTERY AND TERMINALS" in the Cus-
tomer Responsibiiities section of this manual)°
After cleaning, reave cables disconnected and place
cables where they cannot come in contact with batte_i
terminals.
o Be sure battery drain tube is securely attached.
o If batte_.! is removed from tractor for storage, do not
store battery directly on concrete or damp su_aces,
FUEL SYSTEM
_@PORTAWR T IS MPORTANT TO _REVENT GUM
DEPOSITS FROM FORMING _N ESSENTAL FUEL
SYSTEM PARTS SUCH AS CARBURETOR, FUEL F LTER,
FxJ[_. HOSE OR TANK DURING STORAGE ALSO
EXPERIENCE NDCATES THAT ALCOHOL BLENDED
=UELS (CALLED GASOHOL OR USING ETHANOL OR
{_4ETHANOL)CAN ATTRACT MO STURE WHICH LEADS
70SEPARATO _ AND FORMAT ON OFACDSDURtNG
STORAGE ACDC GAS CAN DAMAGE THE irUEL
:q" STEM ()_ AN ENGINE WHILE b4 STORAGE.
_, £kar' t:se fe ta._¢
,_ :::.ta_ the engine an@ et trim until the fuei linesanci
carbu;_elor Ryeemb<y
";,ever use engne or carburetor cleaner sroducis in the
Je e:]_<or sermanem: {samage m8%_occur
_, Jse es< ue next season,
iqOTS2: =ue stabiize_ _ s an acceota_e aternatve n
-c:s_qzngt_sefor ate of rue gum<seoosits::v_ingsto_-
_:,_ge, Add stab{ize _o gasoine n rue tan_: or storage
contame. Aiways toiiow 8no mx ratio found on stabiiize_
containe_ iRun engine at ieast I0 minu_es after adding
stab izer _oailow the stabilizer to reach the carburetor. Do
not .crs_n the gas tank and carburetor if using fuei stabiiiZero
Drain bit {with engine warm} an@repiace with ciean engine
ci. (See ENGD4E _ in the Customer Responsibilities
section of this manuai}.
Remove spark plug(s).
o Pour one ounce of bit _-" ' _ 7" Zrouyh soark _,_uu hoie{s] into
Turn ignition key to "START" position for afew seconds
to distribute oi,
Replace with new spark p_ug(s).
o Do not store gasoline from one season to another.
_ Repiace your gasotine can if your can starts to rust.
Rust and/or di._ in your gasoline will cause probiemSo
,-' if possible, store your tractor indoors and cover it to
give protection from dust and dirt.
Cover your tractor with a suitabie protective cover that
does not retain moisture. Do not use plastic. Plastic
cannot breathe which altows condensation to form and
will cause your tractor to rust.
I_IPORTANT: NEVER COVER TRACTOR WHILE ENGINE
AND EXHAUST AREAS ARE STILL WARM.
27

G
:-_i_r_ _c ¸_! 11
CORRECTION
i£n_ir_e siicks but wHI not
Loss Sf :S:_wer
Excessi,_e vibratiorl
CAUSE
• C'u_ of fuei I Fi_I fuel tank
2. Engine not'CHOKED _pro ery_ 2. See_OSTARTENG_NE' nO_:-eraion s_c on.
3, Engine flopped. 3. Wait severai minutes before at_emb_n_} :o s_e__:
4. Bad spark pk_g. 4. Replace spark piug.
5. Dirty air fter, 5 Ctean/repiace air fi}ter.
6 Di_ ¢fuet filter 6. Replace fuei filter.
7 Water n fuei 7. Drain fl._eItank and carburetor _etii tenet w_ _:s
gasoiiRe and repiace rue! f}te
8. .pose o_ {_amaged w_fin, 8. Ciseck ai wtnnc.
9. CA<rb_ (eior oLt of adiustmen. 9. See '% A{]iust Carr:urHor :ew c_
section.
_O. _'_q e vaives out of adius_r_enL 10. Contact an authorized se_ ce ':'e"'-'s
i}sv sir tte_' _ C_san/re_)acs @ f!te_
Weak edead batter/ Recharge or eDsc _'
:.rtv tse te_ Repiace _ue filter
5 Stafeor@iHvtue. Dranfde_tankmw; ef w: a o_-:
:L L_C::;: <} @arnageovvn:r_ 6. C3ecFaiwirme.
alsure;:ol e o {csustme :{ _ .......:See "TcAdius Cast/ 3e _ s :-_,rvcs ;£d_s ST :"
,ectc
8. £}ontac1 a_1 atzno[tzeg Se_V/,C@,:s e_,,3@_ancs'
8. _F#_ne valves out o adss_ment
C'_utcbib_ake De,at not desresss8.
2_ Attachmert ctzc_ is ersgagee.
S Week or oesd saue v,
4. _}bW_ USe.
5. Corrode(_ ba?ew termiaais,
6. .pose of <samaged winn_.
7, F.auw ignition switch.
8. Faui wsoieaoid or sta_er.
9 F{_u ty opere_or T}resence swilchfes}.
I. Weak or _ead batten/.
2. Corroded batter/termfna!s_
3. Loose or damaged w@nng
4. FauIty soie_od or staFs_.
i Depress c uteri/blaKe perle
2. Osengage attacr_ment cietc"
3 Recharge or re@ace Dattep/
4 Repiace iuse
5. Ciean battery termma_s
{S. Chec_ all widng.
7, Cteck/re_tace _gni_io swi!cr
8. ChecWreplace soienold o:_s_arter
9. Contacl a_ aut_°_orize{_serwcn ce:-te_!eepar_'mer,L
i. Recharge or re@ace ba_ev
2. C_ean bakery termmas.
3. Check att wiring.
4. ChecWreptace so_enoid or s[a_xe_.
i. Cutting too much grassRoo fast.
2. :nFX_e n CHOKE" pesitior.
,3. Buiid--up o qrass, ieaves and trash under mower.
4. D:tva fitor,
5, Low o_ evei:@m/oil.
£!!.Fauty sperk piug.
7 D_yfue fter
8. Saeord tyfue.
9. Wa_er in fuet_
10. Spark piug wre icons.
! ! D_'ty eng_e air screen/fins.
12. Dirb,!cbgged muffler
} 3. Loose or damaged wiPng.
14. Ca buretor out of adjustment,
!5_ Engine vaives e_4t of adiustment
1, Worn, bent or loose blade.
2. Bent blade mandrei.
d ¢
3, Lapse/damaged part(_,),
1. Set in "Higher Cut position/redxce speed
2. Adiust _rot£ie contoi.
3. Clean underside of mower _A.m :_.
4, Clean/replace air fitten
5 Check oii level/chance o
{:L Ciean and regap or change s_ar_ p_uq
7. Re@ace fuel fiiter,
8. Drain fuel tank and refilI with fresh qaso rse.
9, Drain fuel tank and carburetor, retili _ark wth fresi
gasot ne and replace f_et filter
10. Connect and tighten spark ptug w.re
11. Clean engine air screen/fins.
!2. Clean/replace muffler.
13. Check all wiring.
i4, See'%o Adiust Carburetor _in 5srv!ce P,,sius_menr:
section.
15. Contact an authorized service cgnt,gr r{ep/: Truer :
1. Replace blade. Tighten biads boit.
2. Re@ace blade mandrel.
3. Tighten loose part(s). RepJace damaged psr, s
28

aSH
_ngag_d
POOr OUt _ b_never_
d!ower btades wiiI net
rotate
7, V_#OYS Den# Of [OOSe DV_aS
2, [!4OW@[ QecK TtOx{leVeL
3. r}U_JQUD {:}_ eras_, tee%'ee, an@ was'i !Jnaer Tqowe_
4. _er':t e;a4se ma_qar£,i
_, _}IOLT_s_Q {TtGW@F QeC_< ven_ _CieS ;FGH] _L_]_CqD
£1rass. ie_,Jes _r_c: _rasr_ arow]i2 ,rnan_reL'-:',
i. _}DStfUCT!OP _ C_U_CD _eenaR!sm
2, WoN}/c£Rv( eo K;ower Grwe _.xa!;
_, _Z_oz_r ote[ L _tlev
ilk _m_'ozeF} oiaae rnanorei.
_eo}ac_i s_aG£. Tie4q:e_ e:a@e Dolt
_@V6 F,qowcr ,£1ecK.
:_iee£_ !inae stqe oi rqower TIOUS_iSC
,-._eK.qace place rnanere_
-v/)£W; t_rcunG _iaf]_r_[_ T.r: ©oeT_ ',/eni 7(_H.:,£
-<e[Nov_,_ O©STYlJC'_ OF:
-_eO}Rce :Rov,_er £!rpce !._@L,,
_@r)[RC% 'Ci_ r _.f!ke'
i!÷OH;Ci=' ©ldL]e N _/1G[e}
Poor grass discharge
Hea_ight(a) not working
(i'l so equipped}
*. _r}P(3 ne sDeec \co Siow
_i. _s/e_ soeeo cc iRs[
3. vve_ erase
4_oweF aLaCK FK31"eVe[
{,. Li;&_q/utlevevi fiT@ Parr" OFeSSUFQ
6. W_rn DePI or _oose maae,
7. Bu}idu_:}o_ grass _eaves ane aasn unaer mower.
8. i',/_owetdrwe beK wens
9. _ta@es tmu[[ )eylv p,s_a_ea,
10. knorooer b_aaes uses.
11. C[oqgeo mowel seek van[ no!as from DUttGUDO!
_r[ZSS.reeves. ERe WaShs.rouRd manare;s
i. Switch is'OFNL
2. BuD(s) burned out.
8. Fa@%,tight switch.
4. Loose or damaged wiring.
5. 8Iown fuse
£.
u_'C( ."qS? te _]WQ_ n "'_-A_w, _" oosvJer,.
P _- "C _owe!/ _DO;:G
t ;-:-t%S (} r.'.eTore rriow_R¢
£ :V' t }'_%'_ttQ{¢C
_i_.uk_ice/sn?zf 9en 2face, -k_!en D_ade DOX
.Neen bnoe s}qe o_ mower noumnG
-.._u:J_ac_mower @rive De!T.
Fienqsta ! elaaes snare eage aowr,,
0 RaDiate w_tn Napes tiered tn th}s manuai
Oiean afoun@ manatees re peon yen,; noes.
"urn swi_cn ';'ON"
Feeiace buib(sL
ChecWre[} ace ignt switch.
Check wiring and connections.
Replace fuse.
Battery wi!i not charge I. Bad ba_e9 ce!I(s).
_. Poor cable connections.
_au tv regulator (if so equipped).
4. Faulty alternator.
Loss of drive I, Freewhee_ control in "disengaged" position.
2. Motion drive belt worn, damaged, or broken.
3. Air trapped in transmission during shipment
or servicing.
i. Replace battery.
2. ChecWcIean aiI connections.
3, Replace reguiator.
4. Repiace alternator.
i, Place freewheei control in "engaged" eositien.
2. Re@ace motion drive be_t.
_Purge transmission,
..... _ •
Engiaa "backfDes" 1, Engine throttle control not set at "SLOW" !, Move throttle control to "SLOW" position and allow
when t_rning engine cosition for 30 seconds before stopping enaine, to id!e !or 30 seconds before stopping engine.
"o F ' i
29

SE
30
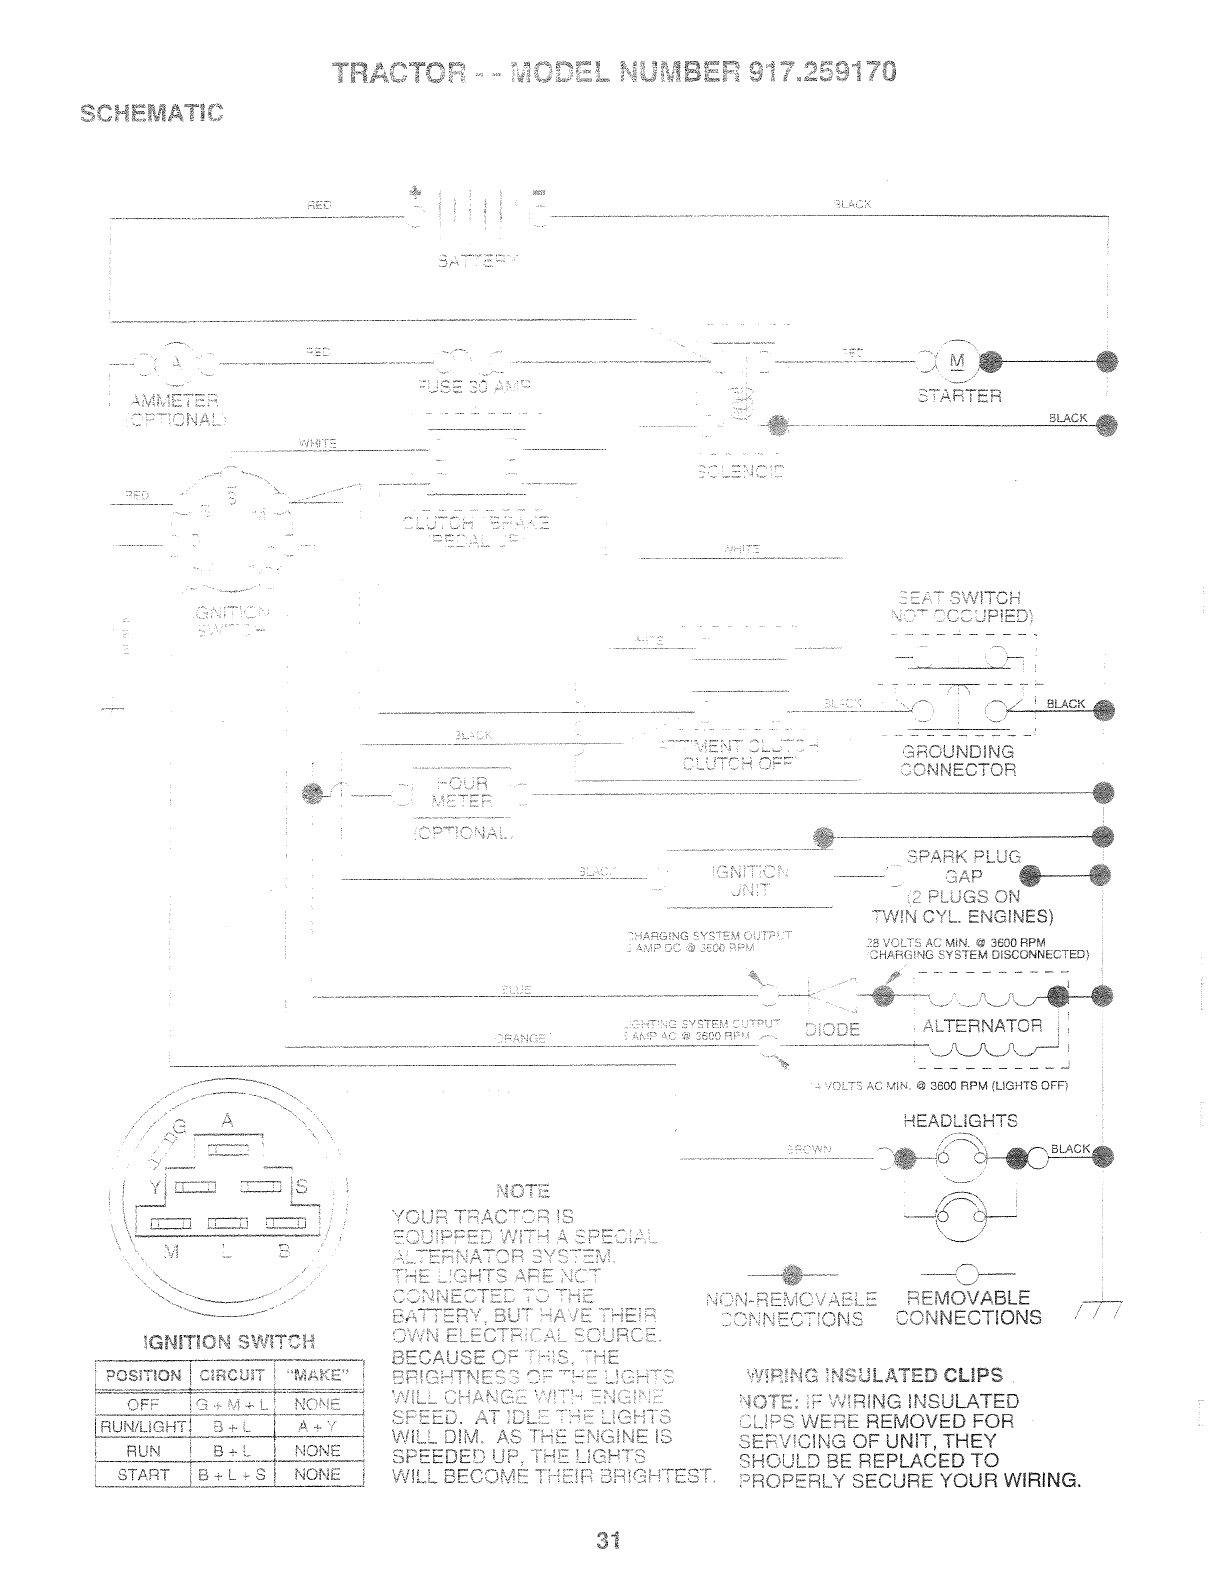
_>_. _ 4_;_#_%_! _ _#_%_tW _ _ _ _ _ "9_ ,=,<_ _>u _,,_,_ _
BLACK
...... ]
.... :SWITCH
A
........................ -- _ BLACK_@
,E!-i.... ... 3ROUNDING
£'_L.:C _-' - =- TONNECTO_
DI 'C
"-= -.:ODE
............................................. L'i]:.................... L....... "."__.........................
£PAI_K >LUQ
GAP
PLUGS ON
°_'V4!N CYL. ENGINES}
]B V©L_-*I A< M_N ; 3600 RPM
]HAH('-,I_qG _YSTEM D SCONNECTED
&i.TERNATOR
=- 3
.... _....
vi.T---< "---2£ b
L-T-Li ::_T_--TJ
]
IGNITION S\.-'¢ITCI1
POSITION CI£;IC UIY I4_IcIU"
±T
OF,=" _ _ NO_,!c
RUN/LIGHT' :_-_ - i _*
RUN B - _, NONE
3T_RT B +S , NONE
r-! T:, £,{, MH,_ @ 3600 RPM LIGHTS OFFT
HEADLIGHTS
Li{,:T :, ii!:; THE _=
:Lti;H G ::::_..................._--, '_ !:C:LRCi{:.
{_IHCALJ_'E O- -if -;-_F
c£[>!GHT_,!{T -, ......... ,-._ ......._ _- :
'/fiLL if) !/_"- &/ ......... -/1;
,,,,=:L;!..... -
V',q.__ L)h\l .¢£ T;-AI !DIGiNIY ill
......... ,---i, ,£F;. LXRHT?c_,t" .rEmD'E ..,,_ -2_-:i_!
HiLL BECOME ,_::,'-" >!,:: ...... .:"-_ i- I" D_'" _'"I__'r'<:_:'_'<
:.._NNE.,., IION,.
+Y!u HG INSULATEE CLIPS
OTE ;= W!RING INSULATED
_i!-s2:.:WEF:IEREMOVED FOR
SER',i;C!NG OF UNIT, THEY
SHOULD BE REPLACED TO
:'ROPERLY SECURE YOUR WIRING,
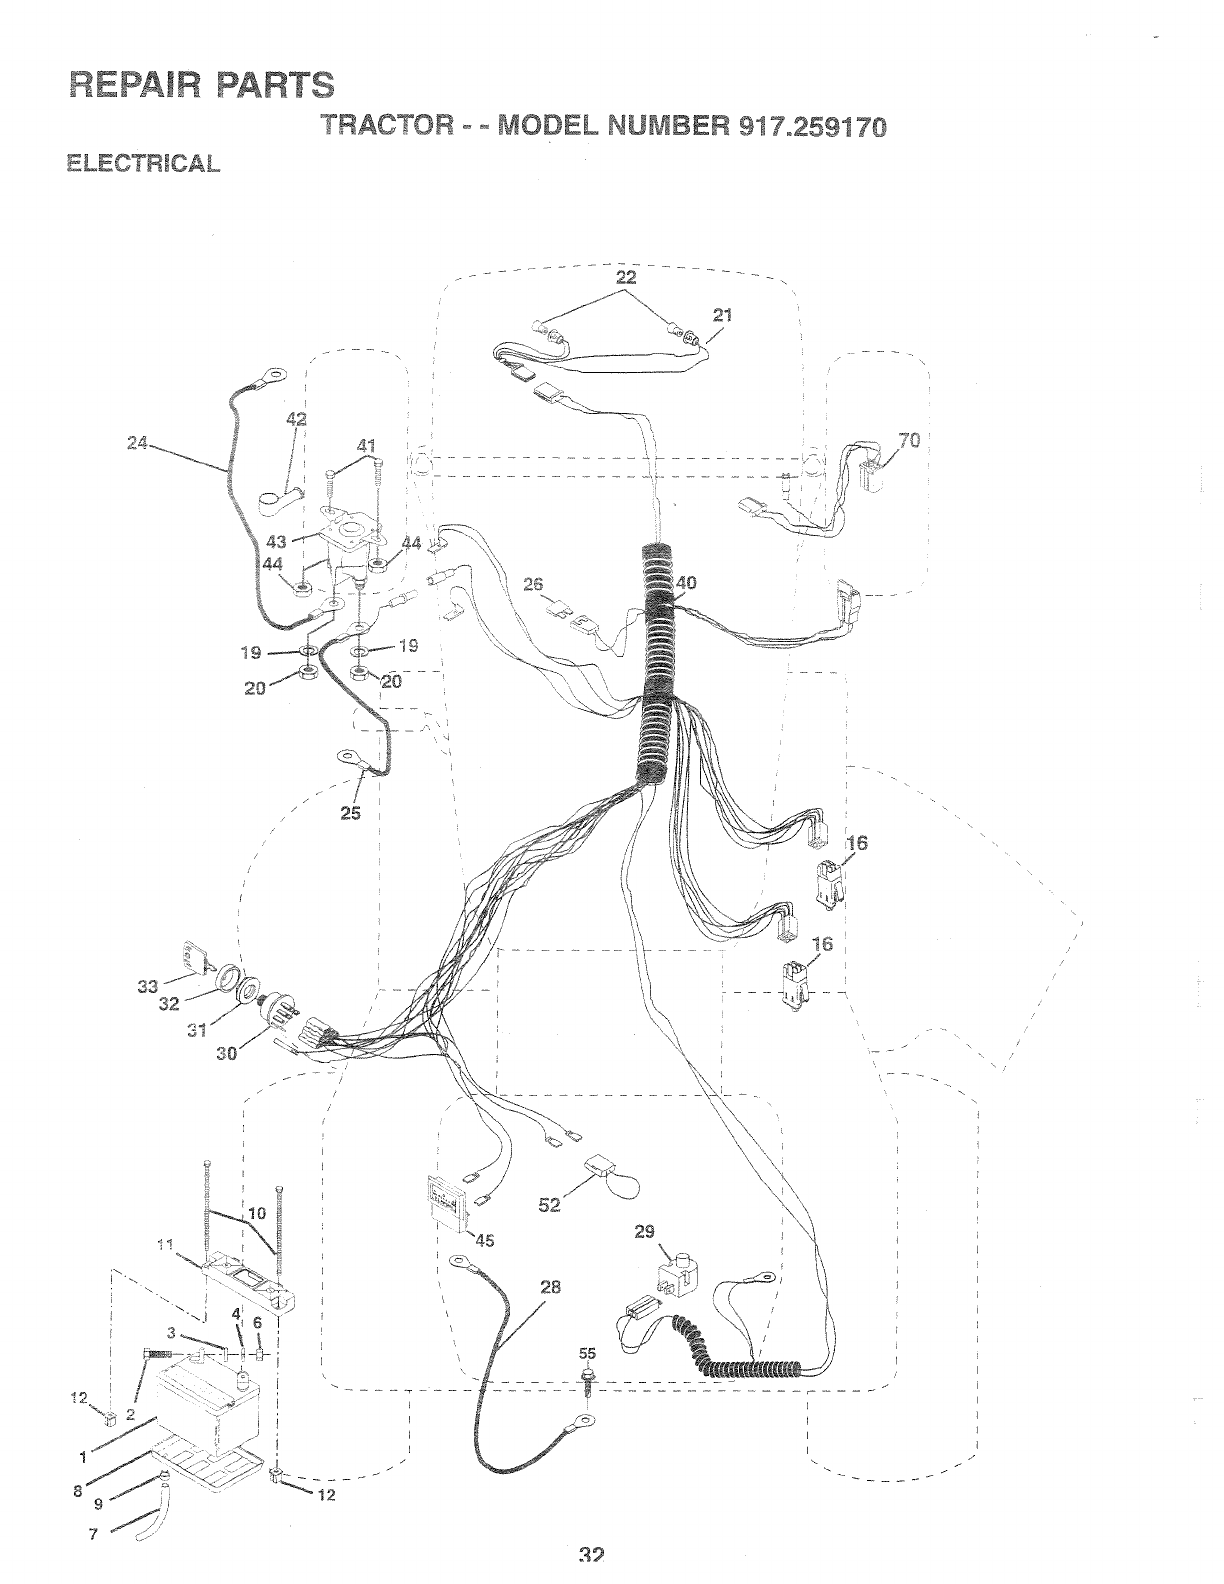
REPAtF_ PARTS
TRACTOR ° ° _,IODEL NUMBER 917o259t70
............. _.2-............. -
7O
12
83 32
i
i
/
9
;40
I
I
1
f
i2
\
52

k
C¸ _ ,,
_Y
C£ 5"\_ 3(3 _"3
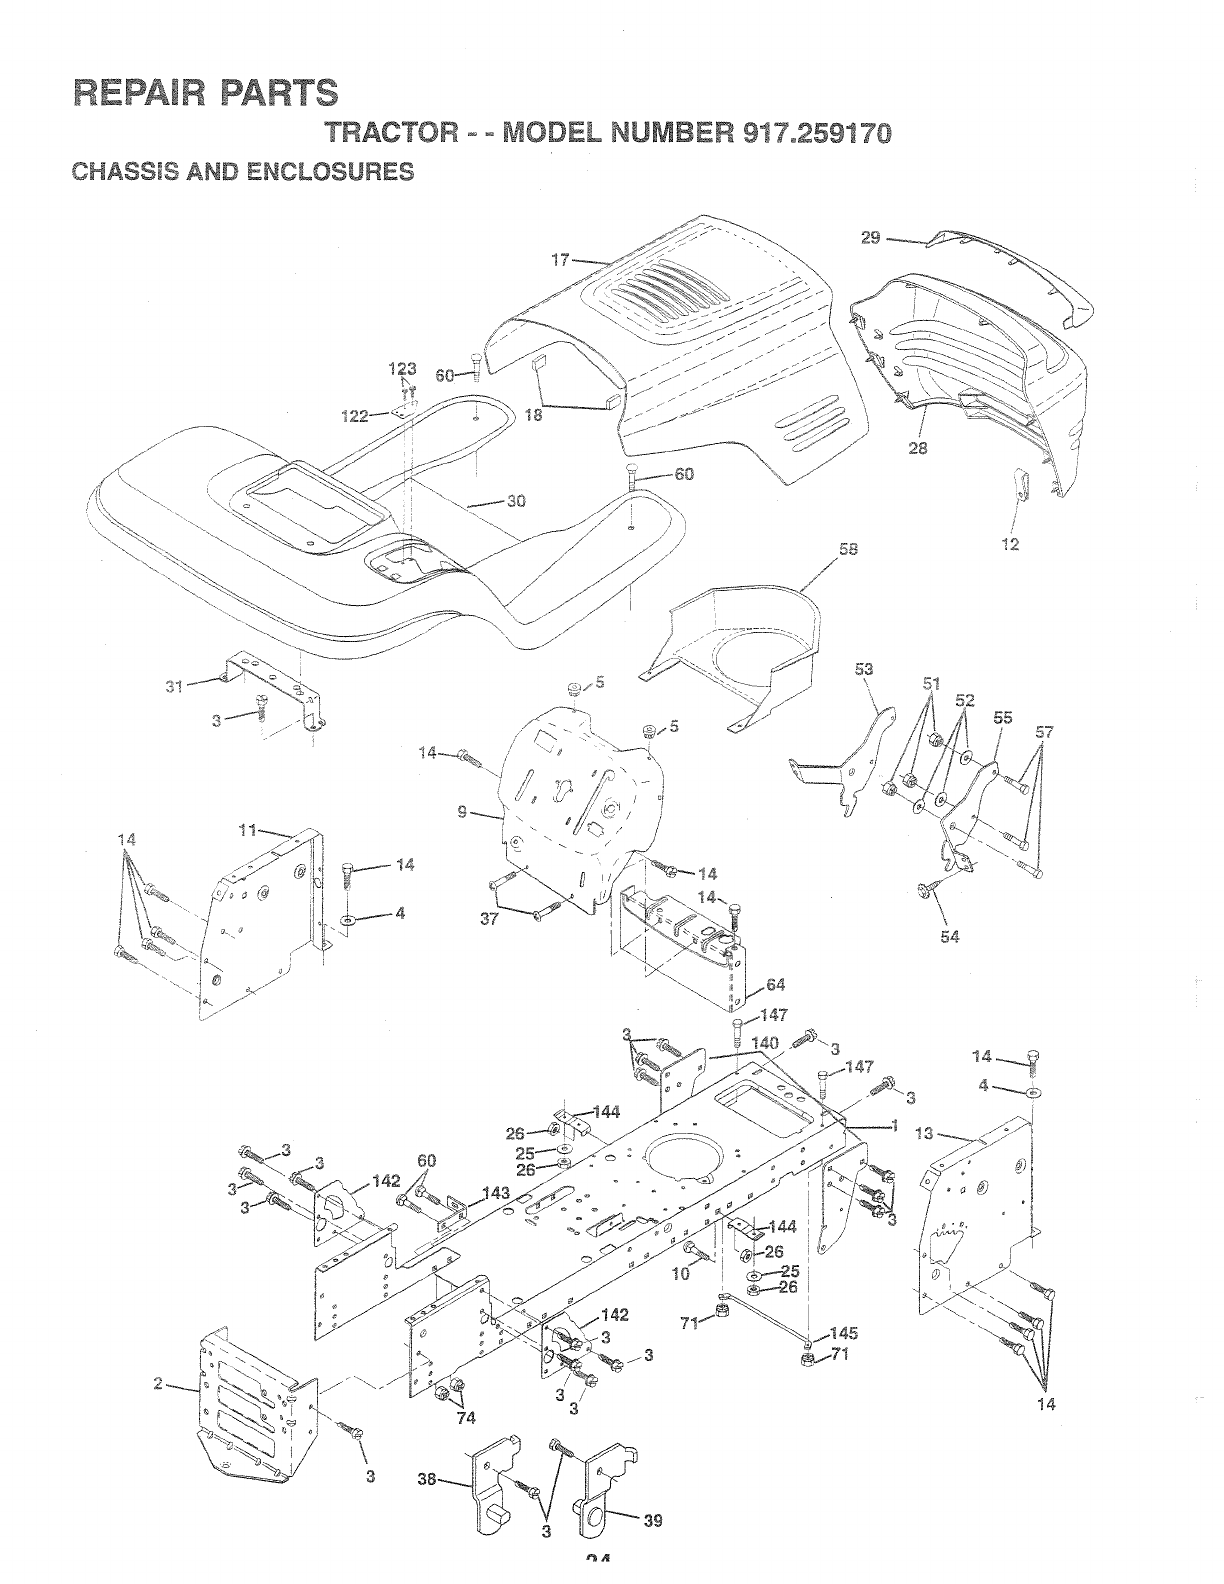
REPAIR PARTS
TRACTOR oo MODEL NUMBER 917.259170
CHASSIS AND ENCLOSURES
12:3
29
58
28
/
/
12
60
3
37
74
3//
3
/
/ /
14
53 5t
55
54
i

REPAIR PARTS
TRACTOB ° ° MODEL NUMBER 91 °"9
AND !NOLOSURE S
_:Y PA£T
_O i\fO. DESCAfPT_ON
:7
:8
/, !
}2
53
54
S5
5_
/
DO
C0
7I
,7.4
©_}
123
40
AO
142
- ,4 _X
i 47
I 59{ :
140S:
_7490{{ i
TTD55:2::
ff}27
',{:_592 -
"_:593(;
269S8}
36-;
• UZ
"TD541437
45198X54 {:7
5521 7
:_ ig?)(£:5_
s3997_:7
17490508
! 39886
t 39887
73800400
t 4520 !
! 45202
STD552507
! 40547
STD533707
154798
73680400
STD541437
-i5730 t
152927
158z.18
! 56095
i":}4966
t 54207
156524°
747604!2
t.s-
L:;UT
-s :
-" -- b- _ "- W'VDO .......
; <SOte}@Y_@L
SF!:FYao: _ "-
Dash -
_ _?S67/ :Z
:_L;_7 :)@_ :!,t.
_ors :_r!iie
.u_'(!( :,"/Loor[es
BracKe_, [;en eUSuse{::
f:t<._ew Thcro. 5/I6-i8 x em T\,"T'
P vot _rac_:et Assembly. tJ-u Viow_er. £e;:_ '
;:"'"- AssembIv RH .............
....cK \:Vlh'lse_ ti4-_ .......x ,.
_'" _ "_ 715 16vva:A_er 913_,.)( X Ga,
Sracke_ Grille _ic_.off LH
Screw_ Hex Hea¢ Spiceriock _'S ::'-)-/8 AS
Bracket Gri!ie Pickoff RH
Bo_t FinHex !i4-20 UNC X°75
Air Duct PiL 18HP B&S Opp. Twin
Bol Rdhd Sqnk 3/8-!6 UNC x 3/4
Dash Lower STLT
Nut Crowniock 1t4-20 URc
Nut Crown ock 3i8-I 6 UNLI
Bi'ac_(et bhl STLT
Screw
Bracke_: _Suspens_ors F_on_
Piate melnforcem_n_ STLT
Back:rest Swaybar Ch_ss_s
Br_}c_et Footrest STLT
Rod E rot '-'"_- [-_ood
L<.O_ )-_ex Hd /,-z_ Uric x 3/4
NOTE: All component dimensions given in U.S. ;r c'r_r_
iscis = 25.4 mm
35
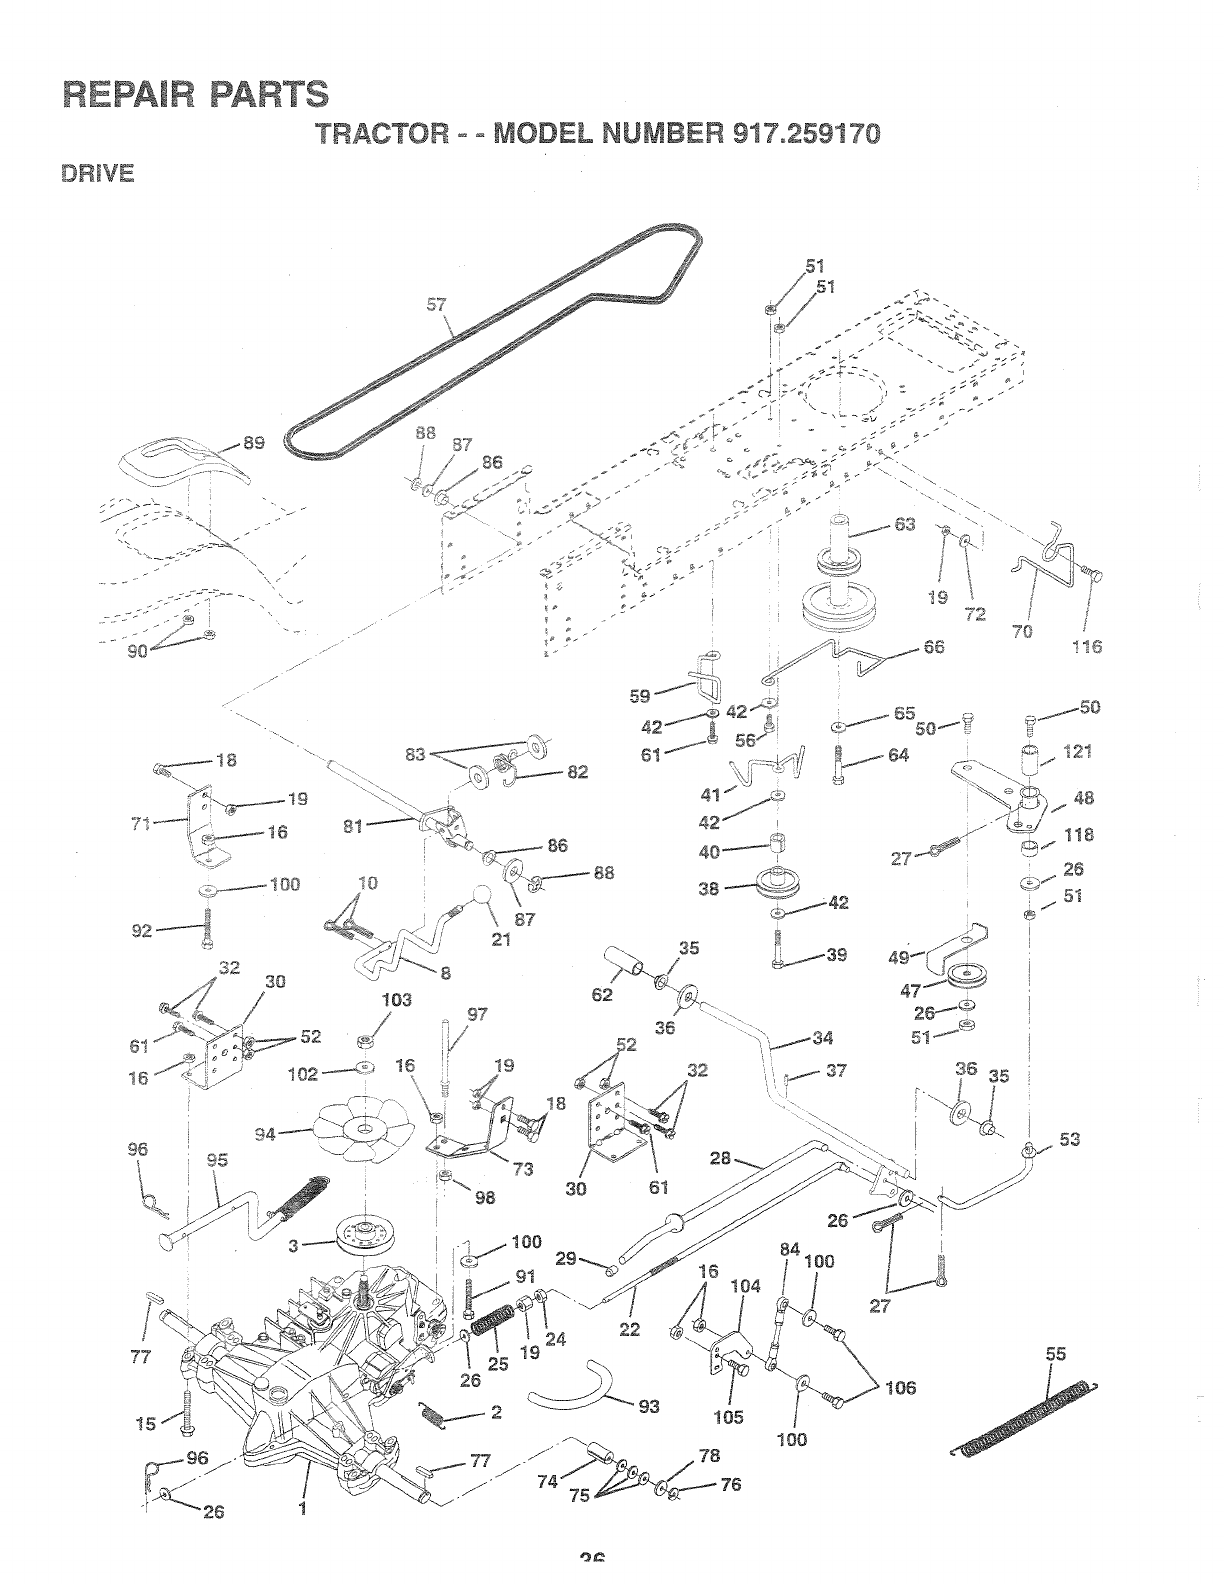
REPAIR PARTS
TRACTOR oo MODEL NUMBER 917o259170
..... " _ "_( Jt ";}
/
j,J"
,_S _ _
i
72 70 /
!16
77
32
21
87
g7
19
35 _/39
36
SO
84
16 104 /t00
100
26
51
r .I
@
5S
55

TRAOTOR -- MODEL iIUt IBER .....sS= o£59t 70
Ha,
:2 i 47_4L7
{_yS £......... 99..
(} 3, _)So ,_C:Y',',
s{_ 74490544
(S STD54.s4}
q 7_D52.:? ¢
19 :-77a=-;1+
Xi{ 0D{; i
...... ;÷C,7,£
2 "/° r _1 ;J A= t-_-
2 .............. :
;_ 06888/
;Y TTD5614"! :if
' @t:>_du_,°'......
91°4° #'.
0130807
4;; 8TD523-; 0Y
.... Oqa ,'>,
E} i _U u©.:_
'" -,Q?_ S....
.5_[3 ._<-. I _5 I <)
QW PS£Ti =
..... Oct-:::-:.:"4W
':C "7"_"V"-_:1© q 7 __T
• -" , 4 =_ i
40 .÷--t 0.
-* i 54777
42 i9tSi812
47' 127785
48 S54604
" '-' q O_ _<4t, ,_205/
53 BT55237i _}
5" STD541437
;:%) C:U_Im _ <-<
53 i05710X
55 i 05709X
56 o-<, £_,,7:o
o D,_£Q=,_:_
_='-' 40294
_:_) 1403 2
6t ! ]:490(:}, 12
62 888:] :::i
63 140i86
%" ........"....... 9£SCRIPTIOI
T FgEY_S&X e iksseISSDiW
Quoin(7 :% sn
iL.2iev, T s:r:-x xie
SaG Sh;?+Fencer S_;. T
Pi_. Co_er I 6 < ] CA(."
{boi N.A.i.it]n:: :!i,i$--!8 .J< ::
_'tJ( LOC:,rfiix_.'_11<".-,1:.'ibi,J:.ig
Boi F-wx { t.;rhc ( .i
:\iLII Lacy t-sG;,, \' ,'b_SY7 :}./_-i :}:1
t..}oi].:£.:_-itJXe] 2" 11.11
.£0C. }.:ti<_t_:" V<:<';:
3inng, S ',_._<eF,
?V:; IX, I
i:'n Cotte_ S. DCA£
,--_o:; f=,u-g i:'::;÷
!_I'SQ)(@{] 11!ans'{>,ie
Bait Sex MI 5/if-l@ JRC. :,,,,
Shatt Foot Peca
Bearing, Nyion
Wasne
Pn :_oi
Puie?, idie< Fiat.
Bolt
Bpacer Sp:
et ;@i "
Washer 13i32 :< i;7ii6 :: 2 G,-_;ge
Pulley die_ V-Groove
Beitcrank Assembly
Retaine< Be_t
Bait
Nut Crowntock 3/8-16 _' "
NUt ,'" _,, _, _. ;:x _ . ::,L, YOW_ _ uCk i.j i'C
Link, Cutch
Spring, AettJr, Clt£cf;
Bol iqex 3;8/16x 1.'!4
V-Beit Ground ve
<..,.,.nterSrD_ _
i<_epeL "_
ScrewTh oi 318-!6 x 3,': ' <-
Co_{:c.F-ecai
. -; '; - 70764
5 ;7T955114-3
:11:: 1!-!_71<
........1] .:tTN:7
1;:-31:;R
....171 911}201 £.
....7 : 4T
"" "2 }::::}(
21 /
....= 2773% 07:7
..... 2£ £ 11:<
':. : :J: '7¢2}
:::: ":;20t:
"1'%: F%<-O
% ;.. z_<)_:_,<17q
j! i -7.17 Mr<G!2
:1 ;Z 8052::
:] 142!:iL3-
"kI, ,:<.i?£'"
-1 <x , .....
14464:1
....... b )tO <:,-+U<ic
4t .4©:y
/:i 'U351050(
£ 0 1£ 1 1216
(7:.2 1¢ io.>,-,o.+:
"707 7:7.g,.0S30
,:,_ 40"I 5(}
"gt;: "'_ :"'-_P_ "'<..., /i \ /U[/ / (;;1
IOA ....... <"q ........
116 721106i0
-8 _5.,,"2
12 ii!xm.i9
Bet Hex 7/i6-20 x 4 GI. 5
&iSRe
<eeper _et Enaine Full-Proof
}<;ce Bet Mower Drive RH
:::_tr o o_que k_ Hydro t2v T
'Vt_sr'e 13132 >( i-i/4 X 12 GI.
1_._=5 orqse mn P{/d[o 0650
issaC;_- [{Dt
')£/qo, -_ si4 "_h GauGe
< i)< 0(it_ ;1)F£
.............. -5i8x'_ o;a; ,:,:,
:t <: 2bi3 /. "; ,£ ._ _..
A ri':. Cross Hydro 20" Tir<-s
.... i .51_i I ....
?SSY! ' ,o_,_ 3/4 X 16 _Qa,
,-t:::<: -,_, -:vdro 20" Tires
£:..sr m Rod Strig. 629/632 ID
....,,r_sr_e, 2i/32 x i-i/4 xi6 Ga.
Kiip S5304-62
Consoie, Shift
N Seif-Thd Wsh-hd I/4Zinc
:£et Fn He)( 5/16-t8 × 2-!/4
41":)
..:_:'-,:_Fn. Hex 516-18 Unc x _- ......
L;:e F.Je Hydro 4"
;;:qr, qvdro 7"
Co_:Troi Bypass Hydro 20" Tires
:-{ets.i:;er Spring i" Zinc/Cad
.e6eet Bait Rh Hydro 0750. 1u.zu
,u Keps Hex 3/8-16 Unc
Wasie 11i32x3!4x16Ga.
w:asner Be Iviile .501D x i.505
< t,e-2_,
Nut Hex Jam Topiock :_ '_ ,..,,_"_.
Arm, Control Hydro
Screw Cap Hex 5/16 x 18 x I
B:t F; Hex 5i16-18 Uncx I-Ii4
iXt £_.shd Sq Nect4 3/8-t6 x i.25
{:_,acer Beilcrank
_.4vit er Clutching STL
UO°S'E N; :::ornmose<_ d mensions given in U.S. inches
37
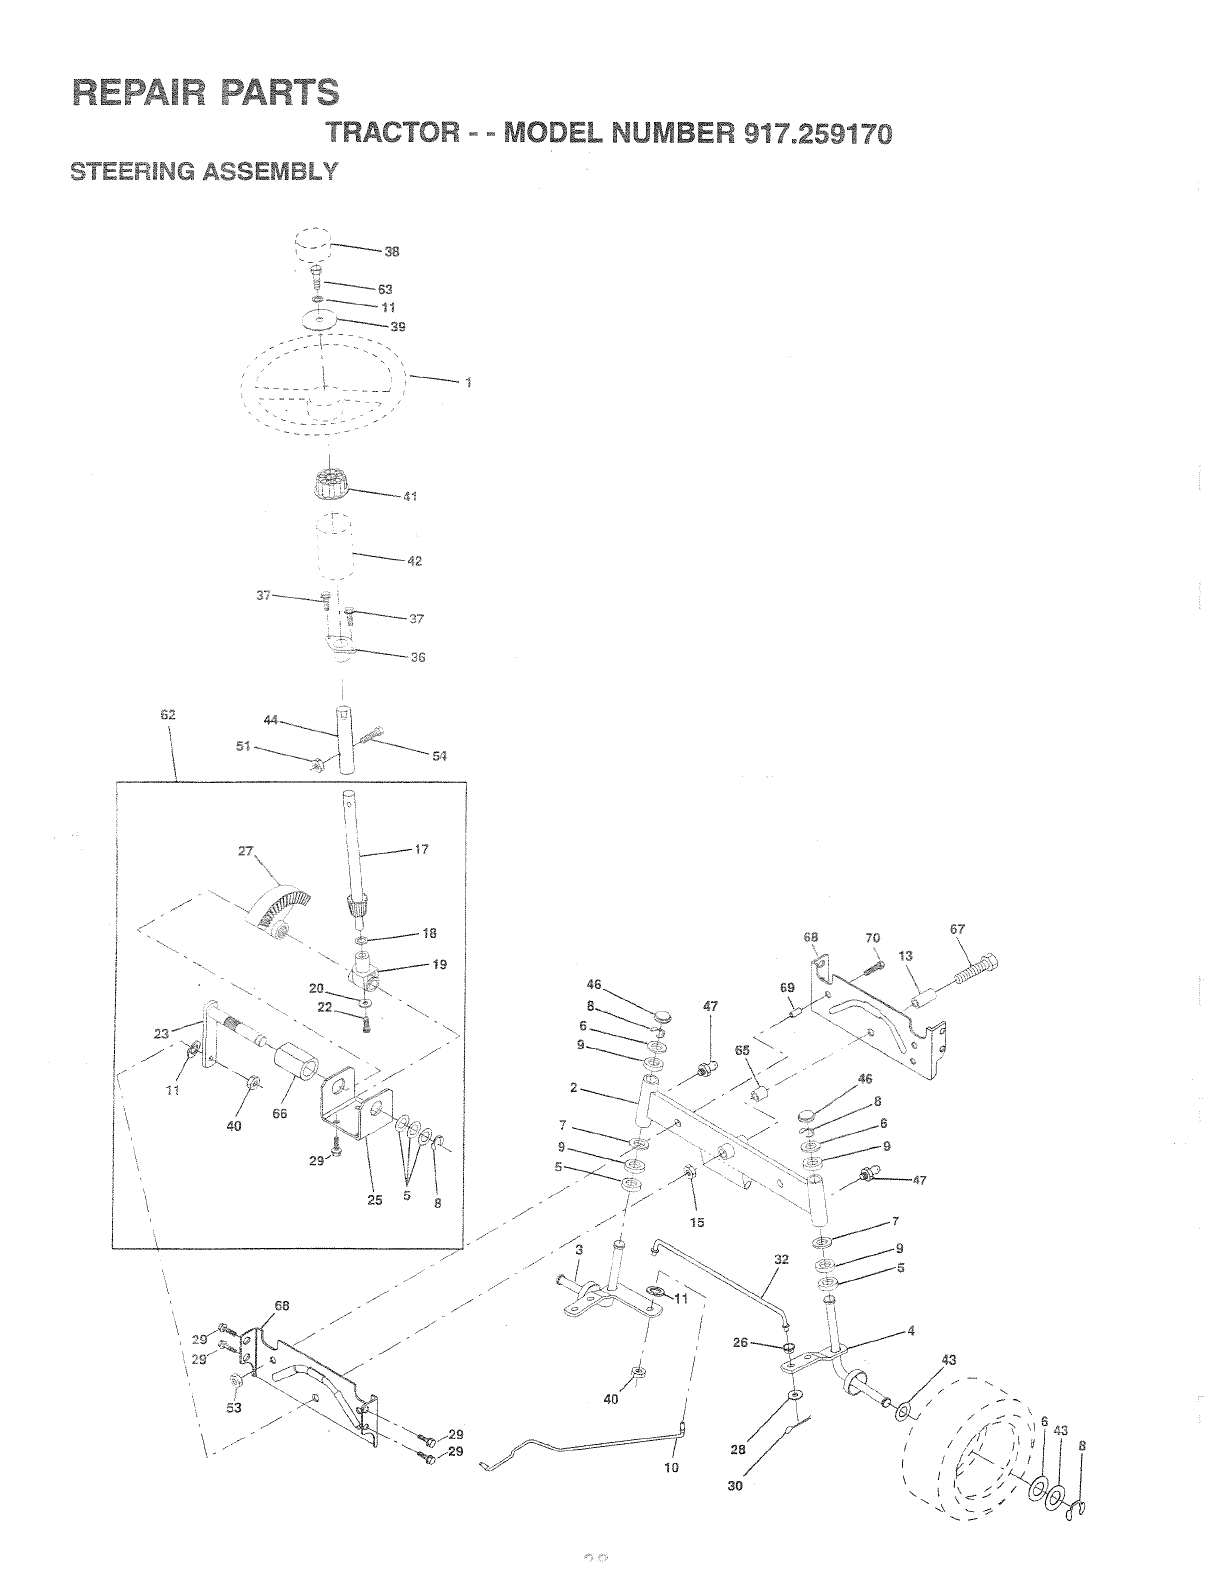
REPAIR PARTS
TRACTOR o- MODEL NUraBER 917.259170
STEERING ASSEMBLY
:...... i' _ ,
G£
//
-----4
'i '=
i 1/17
X . '/ 'i,
....k(:.:¢......... '4_.,--"_"_'_ t8
25 8
J.
/
/
z
•. . / //1
///
'¢9 0
'/\ }'

REPAIR ° ARTS
TBACTOR ° o MODEL HUMBER 9172591"70
;,(£s::. PAH
i 39}£>8
274427
." i 5C483
4 _fY_73
! } 2 }SH
2 748X
6
s %£sys._.
,: < ytJW_.
:- :L,L66R
S 59 !7
s{ 4779
,, ;!7079
24(3&/
,. ; "'_/(L£; _}
23 27501/.
;;4 m::
:} ; £co,_ ..
,:' cs(s.............._
1!:. 191:314 8
£°74906 i _"
30 b,Dsb ,_.,,.
£"30465
_i;}_::, 4£ s:C'sO Q
;35 I 397'69
39 9t33808
4C STD5¢1537
S.1 .o{]_r?,_
2 145054
4 i 21749X
44 ..........
!bo/_;U
;_5 <t21 .........
ZQ4._-
$7 6855M
:;l OT_sZ -_ q4
£3 73680600
:;;4- ....4................Cbb4J
62 i56594
:% c7 %598710
65 i " _.... '
7I ;cs.x_',
57 :=4.78'I 044
68 i54429
69 160367
70 )>4780636
Wheet Steer n@ Std _}ac}<
8pind eAsrn
5_indie Asm }_\i}
3ea_{n9 Race Thrust barq£ ,_
Masi_er 26;;? X %/8 ;1 611"
%Jashei :4 " $ L.}}
mn_'_ , #t5304- 7{i
........... L_ £'{IA
;,1i%(:............."......i[d. hxIe[_ee© 1:_&F7[{(f
....VI3S:.se_ L 0ci< r-i _ ;-ii N PI7
711.b {
..=_ ,.+.,:o_e S7L.T _}'Y
_}ckr_.i Fiag 5,8-1" ;INS
Shaft As? q_-' ......
...... Y'TvS _.sC.,:
0Vasp_er 5! 5x JSO)
SuSmoH Staff
,_VasNer '4 ;', .,.:so u£
Screw 7-+_u:,So/?_(e+ iiz'. ;7{0, L 77
Shaft Asm Pktmar_
Bracket Steerin
........bin Rod -
-s_:_r Sector
-'_,_e ......._..;K 7i-!! ,. 6_1_
Screw Thdro ...................
t"_""ikiiPn oot_e 18 ( ,:,:._
:-_0d Tie We F:orm i915
Bushmo R,-_ 5/8 "_._Das"
Screw TT s_-,n q't'h,,_£ ,'_iS i" 8 r:;e
__se_ Cap Strg WBee S!_':;B<
Washer _a'_° 23/8 "",_,,._z.X ,,. A O <_
_u'_Lock "-'"_÷a "-L't2":bNF
Adaptor Whee qtr,_
3
Boot Shaft Steering
_/,so I/4Washer 2 _,_ X t X i6 Gs_.
Extensio Steering Non-Ad .s_
Cap S)nde Fr Top B,k
Fitting Grease
Nut Lock Hex Wilns 5/I_ --!8 t. !'--C
-...... ,"- 318-i "NU ,_ _;W Ou_, b UI]C
Boit Fi_ Hex 51111- 18 _.,_L.,.......11 -;
}(it, Steernq " -' ,'"'
_,s_ernNy
Beaqng Arm Pittman
Bolt F'] Hex %8- ! ' I\ .........
LJl 4_..J )<,
Axle Brace
Spacer, Brace Axie
7}oit, Fn Uiex 318- 6 L}nc x 2- i 4
..,_,.,=_s.... ,_,,t.,,x_w,,. dimensions giv_-n n LIS. inc)nes
•t nnh 7!54 mm
39
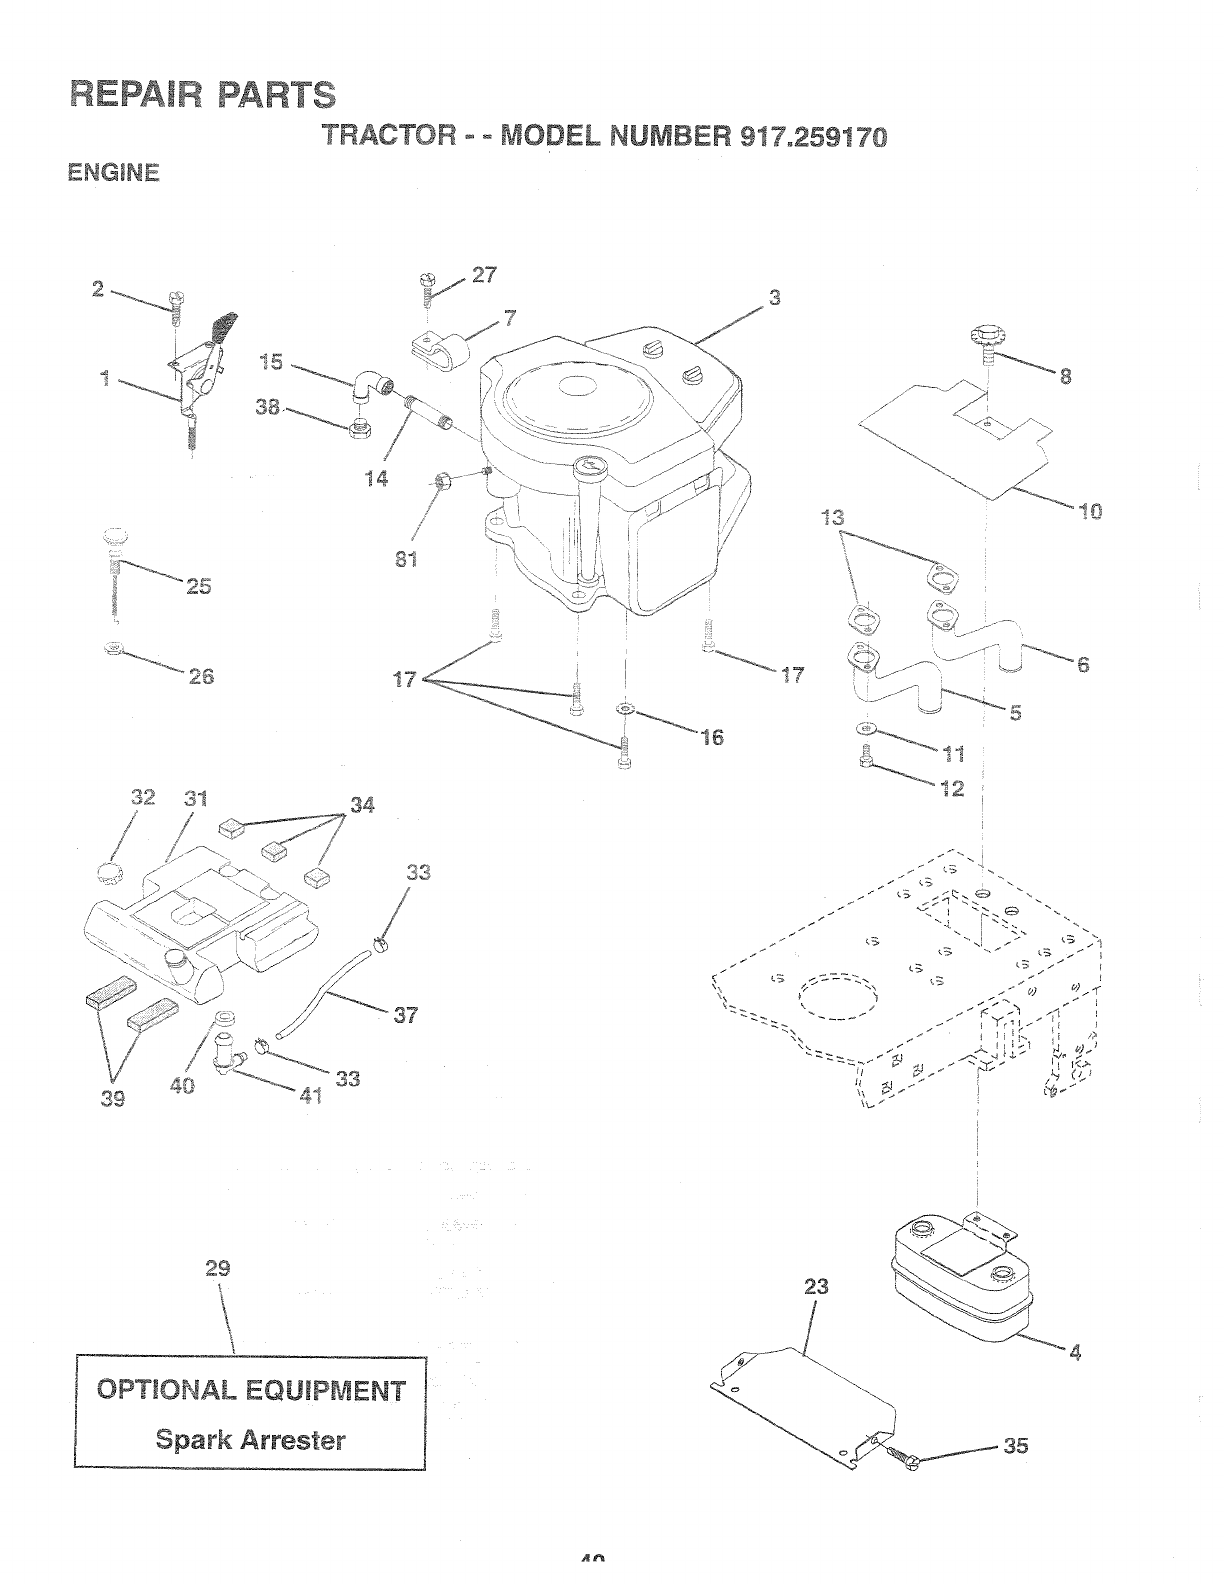
t
sl
/
\\

REPAIR
TRACTOR ° ° t !ODEL NUMBER 917.259t70
KEY PART
i i 'i"1'"-_q
L,i v,_
39 09227X
40 3645J
4" '1_OOw'r'
L1 128861
1os_%..... Thor Pad< e8,%,'_:<:
:},c£-w >ex Y}-c ,/£_i!:-2£x5/{_ "
e }..÷e _::geaKqown) :':,_.........._._at:
vL e} ,,. 42E71}7 . 8{}:o.#:
>
_UTX%:" L: !"a xb
Y:xsasst :,sin ..e-
Exha si._:sm
OaST; " ._)e)"u6 ..........: IR_%
30 :;i{ ::; :[',C:: ;< ......
-_¢at ..:bed L:
:¢_£i_£! ..1;8':: {V _. '_- i:;£-i :!
lot _', r--e; 42
':7 1:_S_ :>. _C; K :cv? °OOi1 }:.
}:;e>, 3i:_-i@x: 1,2 7
;/ ::'<_ro 'o'-;e
N._;.Keps 3/8-2 ,-: J3f
{:{crew Y- ::i '}.-{}2 x 1:}>:{_/": _-:8"_Ge
_wresior _::,P_:}"_;*'
a_!-¢F e 350 b{ea_
(as Fie GuagGSTL-:
_'.am_ :--9;,se :Nk
:i:?ac<,P _ ::!
:::k,-._,::.'r-.-_-_-:5/! <q-:7 :{L,4 T'rr
L. q:'_ i:,..ql
;::1 :..- 7}Fair}{Order ,mr,_,,,,"'-"7:,..,.:_,>:.,::.,_,
i._23
P;_C :diet _ 7;_ ..... ,.,........ ,X.IT_,,.06
Stem Tank FJei
:,, + "-' ,_ .?r_Sta:i3o _ :.,t-_.., b {{:hO{1i,{" .,_."_<.v_
A: comso,qerst ,rm_ ":'::_r_it: L..S.
,+, c__h,:_.ns!oris. -'_ ",,-
-' k_ch = 25.4 :nrr
41
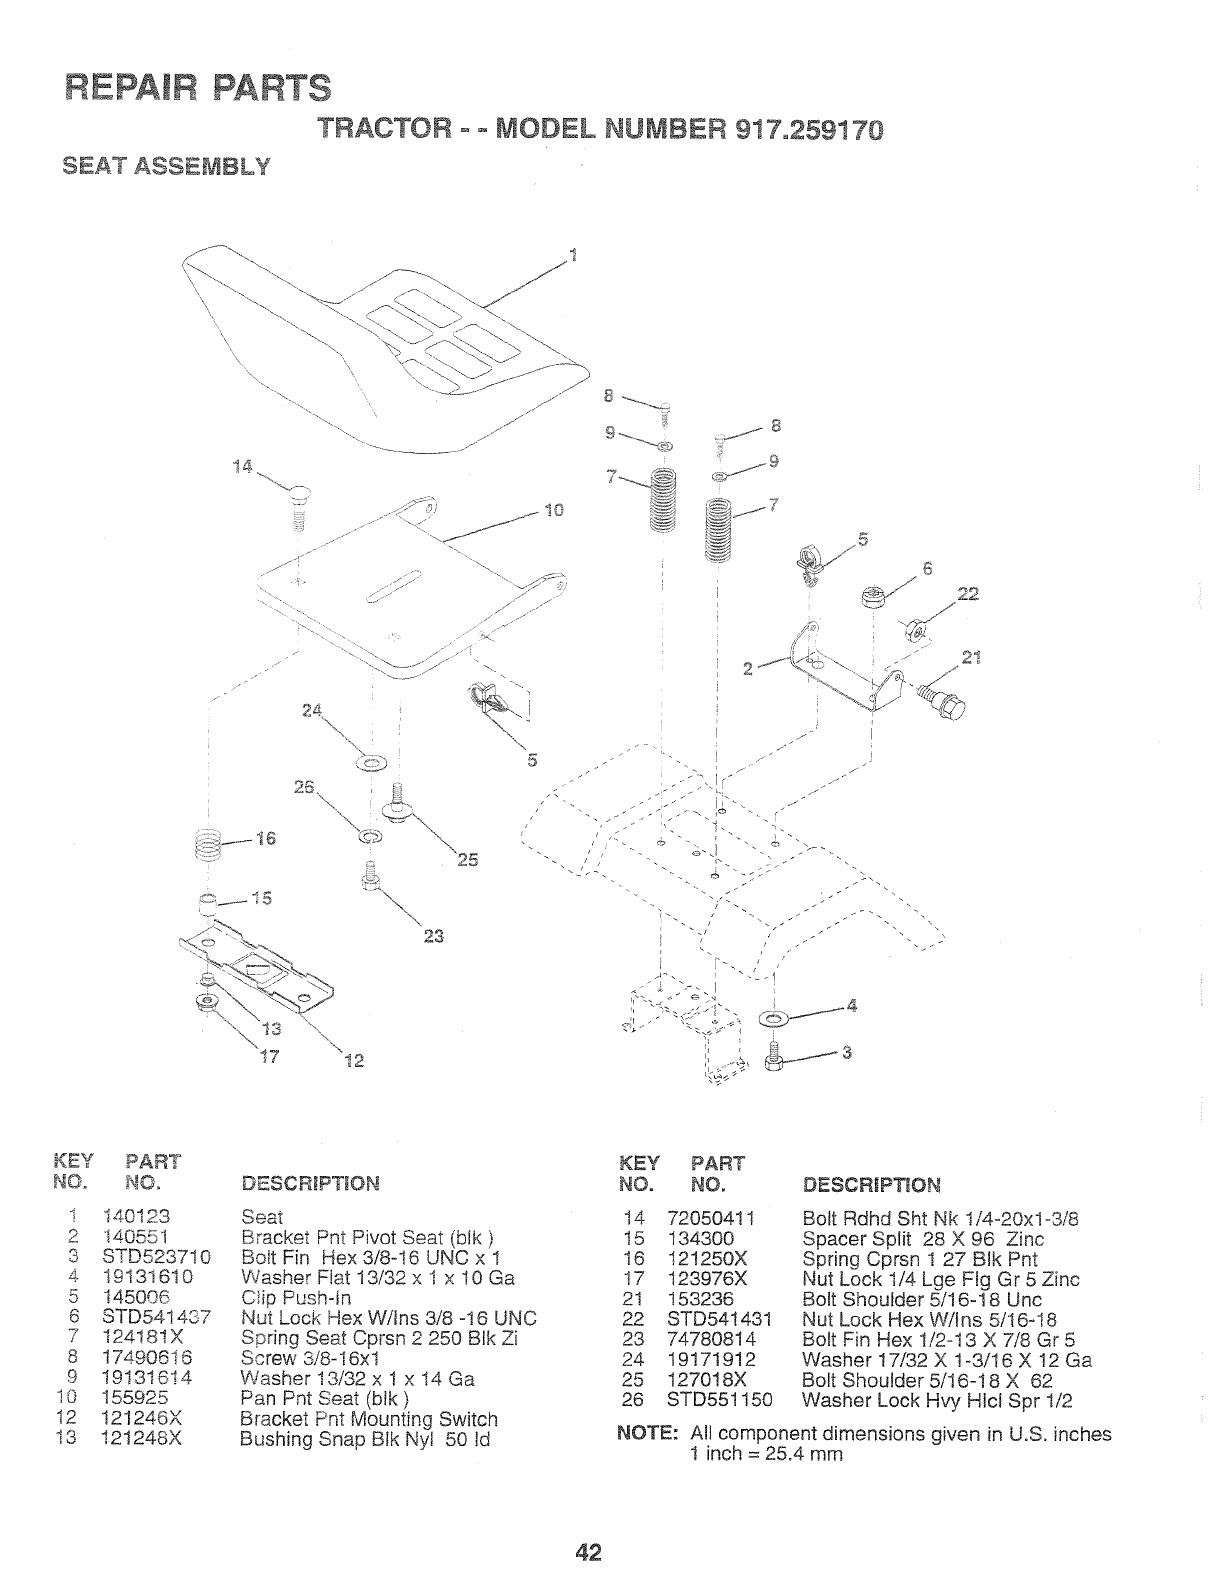
REPAIR PARTS
TRACTOR o ° MODEL NUr BER 917.259170
_-AT ASSE_IBLY
I-!0
.......<_ijjJ ....
......_i I
1111<27......
24\\,
-%
26,
¢c__I--i 5
\17 12
\
\% 23
---1
h "% "<.>_ I ". .--4
d_ j
KEY
NO.
I
2
3
4.
5
6
7
8
9
10
12
i3
PART
NO.
140123
1.05ot
STD5237!0
19131610
145006
STD541437
124t81X
17490616
19131614
155925
!21246X
121248X
DESCRiPTiON
Seat
Bracket Pnt Pivot Seat (blk)
Bolt Fin Hex 3/8-!6 UNC x 1
Washer Fiat 13/32 x 1 x 10 Ga
Clip Push-in
Nut Lock Hex W/Ins 3/8 -16 UNC
Spring Seat Cprsn 2 250 Btk Zi
Screw 3/8-16xl
Washer 13/32 x 1 x t4 Ga
Pan Pnt Seat (blk)
Bracket Pnt Mounting Switch
Bushing Snap BIk Nyl 50 Id
KEY PART
NO. NO, DESCRIPTION
t4 72050411
15 134300
16 121250X
!7 123976X
21 153236
22 STD54t431
23 74780814
24 19171912
25 127018X
26 STD551150
Bolt Rdhd Sht Nk 1/4-20xl-3/8
Spacer Split 28 X 96 Zinc
Spring Cprsn 1 27 BIk Pnt
Nut Lock 1/4 Lge Fig Gr 5 Zinc
Bolt Shoulder 5/16-18 Unc
Nut Lock Hex W/Ins 5/16-! 8
Bolt Fin Hex 1/2-13 X 7/8 Gr 5
Washer 17/32 X 1-3/16 X 12 Ga
Bolt Shoulder 5/16-18 X 62
Washer Lock Hvy HIcl Spr 1/2
NOTE: All component dimensions given in U.S. inches
! inch = 25,4 mm
42
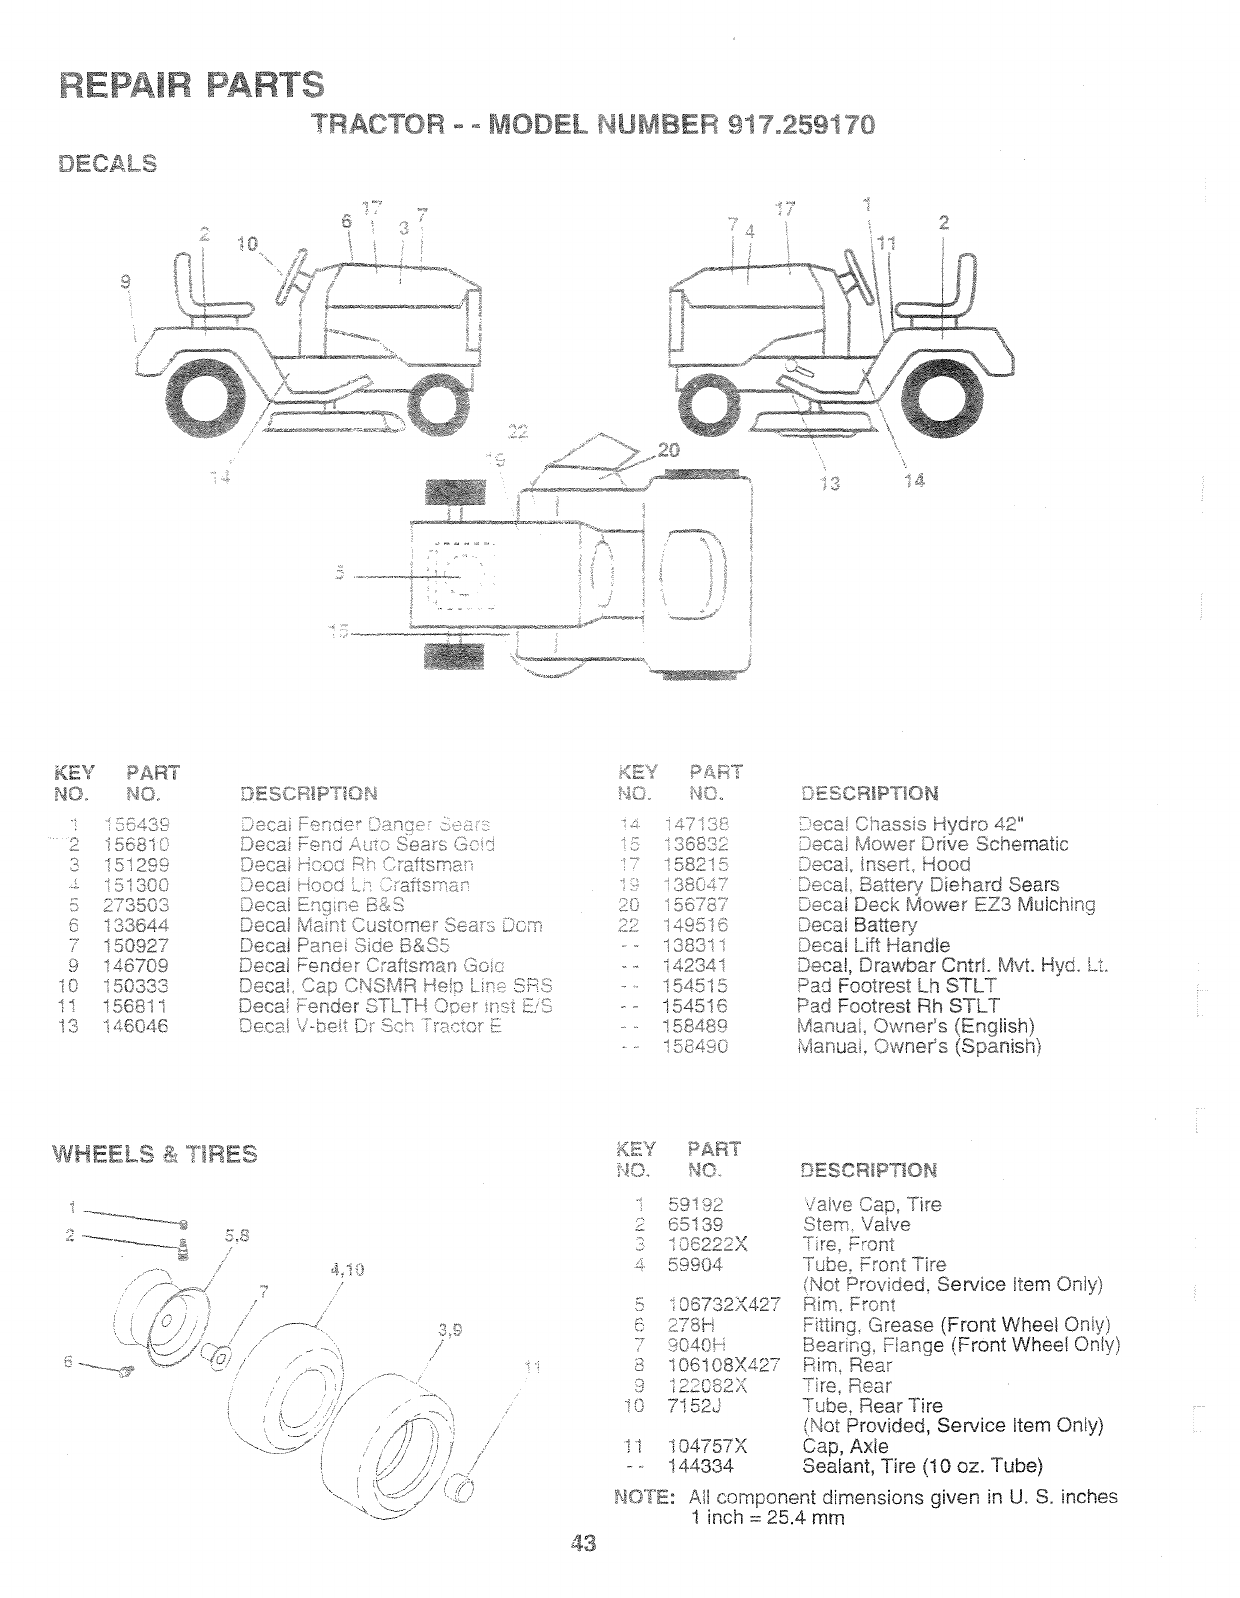
RE tR
TRACTOR '!ODEL NUMBER- - 7.259t 70
9/
!
;3 _4
o
KEY PART
NO. NO.
1 155489
2 156810
3 151299
J- iO_oOu
5 273503
6 133644
7 180927
9 148709
i0 150383
1i 156811
18 146046
Deca Ferder ©_nge: Set's
Deca Fend Ats:o Sea_s God
Deca Hoot;: Fk_ C:afisma
Decai Hood L _ Gaffssan
L}ecat Ersg{<e 6!>&S
Decai Mast Customer Sea_s L}o;s
Decai Pane Side B&S5
Decal Fender C aftsmas Go:;
Decal Cap CNSMR Hep kme _7_i:::i!i:
Deca Fender STLTH Oser _st £:8
==._ ........ _ ,J ; [, .,.,=i
£EY PA_T
HO. NO.
_s i47138
_5 136832
17 _£ os
19 i38047
2O 156787
22 '1495"18
-- 138811
-- 142341
.... 154515
--. 154516
-- 158489
o- 158490
_ s;_.oRIPTION
Decal Chassis Hydro 42"
Decai Mower Drive Schematic
Decal insed Hood
Decai Batteq/Diehard Sears
Decai Deck Mower EZ3 Mulching
Decat Battery
Deca! Lift Handte
_e_.a,, Drawbar CntrL Mvt H,,_ Lt
Pad Footrest Lh STLT
Pad Footrest Rh SYLT
Manual_ OwneCs (English)
Manuai, OwneCs (Spanish)
WHEELS £,'........._.;._;"
9 r_
gC,
/
/
:/
/
/
43
_<:Pif PARS"
x_J. SO, DESCRIPTION
i
2
4,
5
6
8
9
10
4
_ _",_ ,i__
59 ! 92
65! 39
5990,1-
]u© :,.S_/\%£ /
:&VSP
9040H
106t 08X427
7152J
Ide:O/A
Valve Cap, Tire
Stem. Valve
Font
Tube, Front Tire
Not Prov ded, Service Item Only)
Rm. Front
Fitting Grease (Front Wheel Oniy)
Bearng Flange (Front Wheel Only)
Rim_ Rear
Tire, Rear
Tube, Rear Tire
(Not Provided, Service Hem Only)
Cap, Axte
Sealant, Tire (10 oz. Tube)
All component dimensions given inU. S. inches
1 inch =25.4 mm
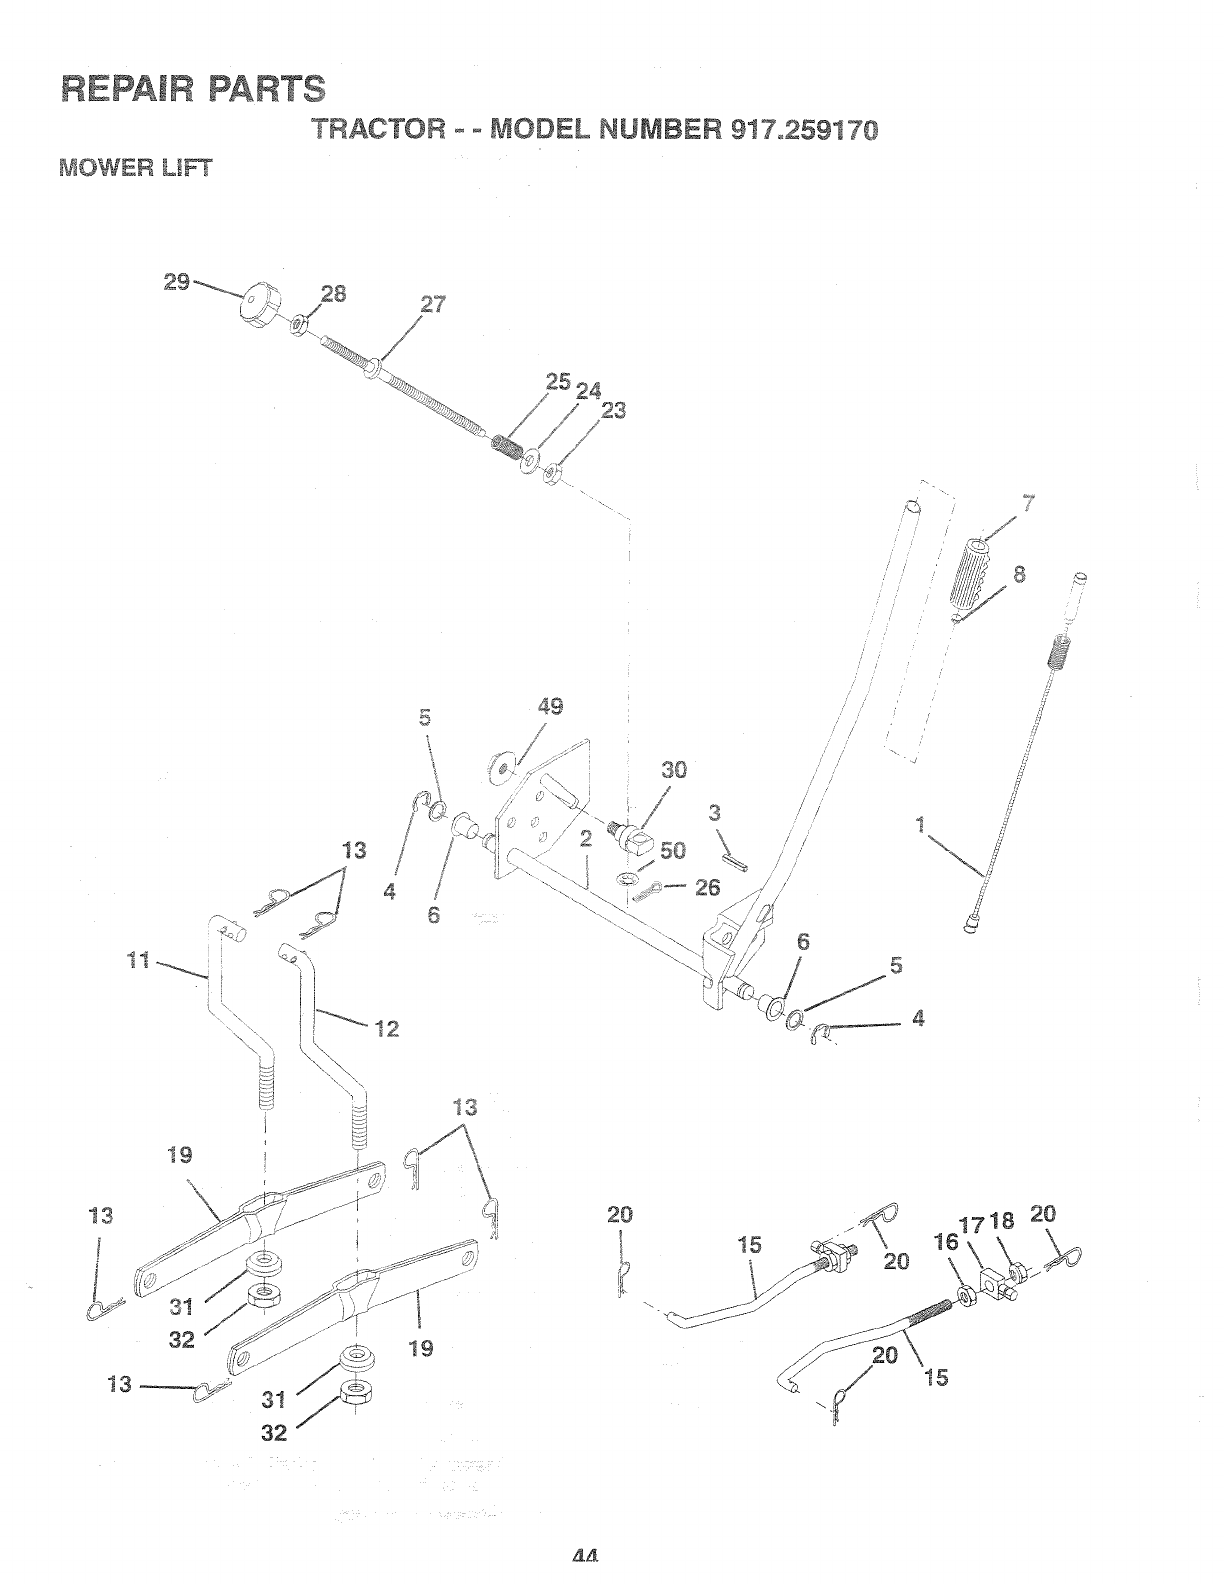
REPAIR PARTS
TRACTOR oo MODEL NUMBER 917.259170
MOWER LI_
28 27
25 24
13
3!
32
32
t9
13
49
/
/
3
/ /
//
// /
/ /
,/ /
/ !J
i / // "-
i' /
//
/ /
I I
/ /
20
15
7
/7
161718 20
/
ztzt
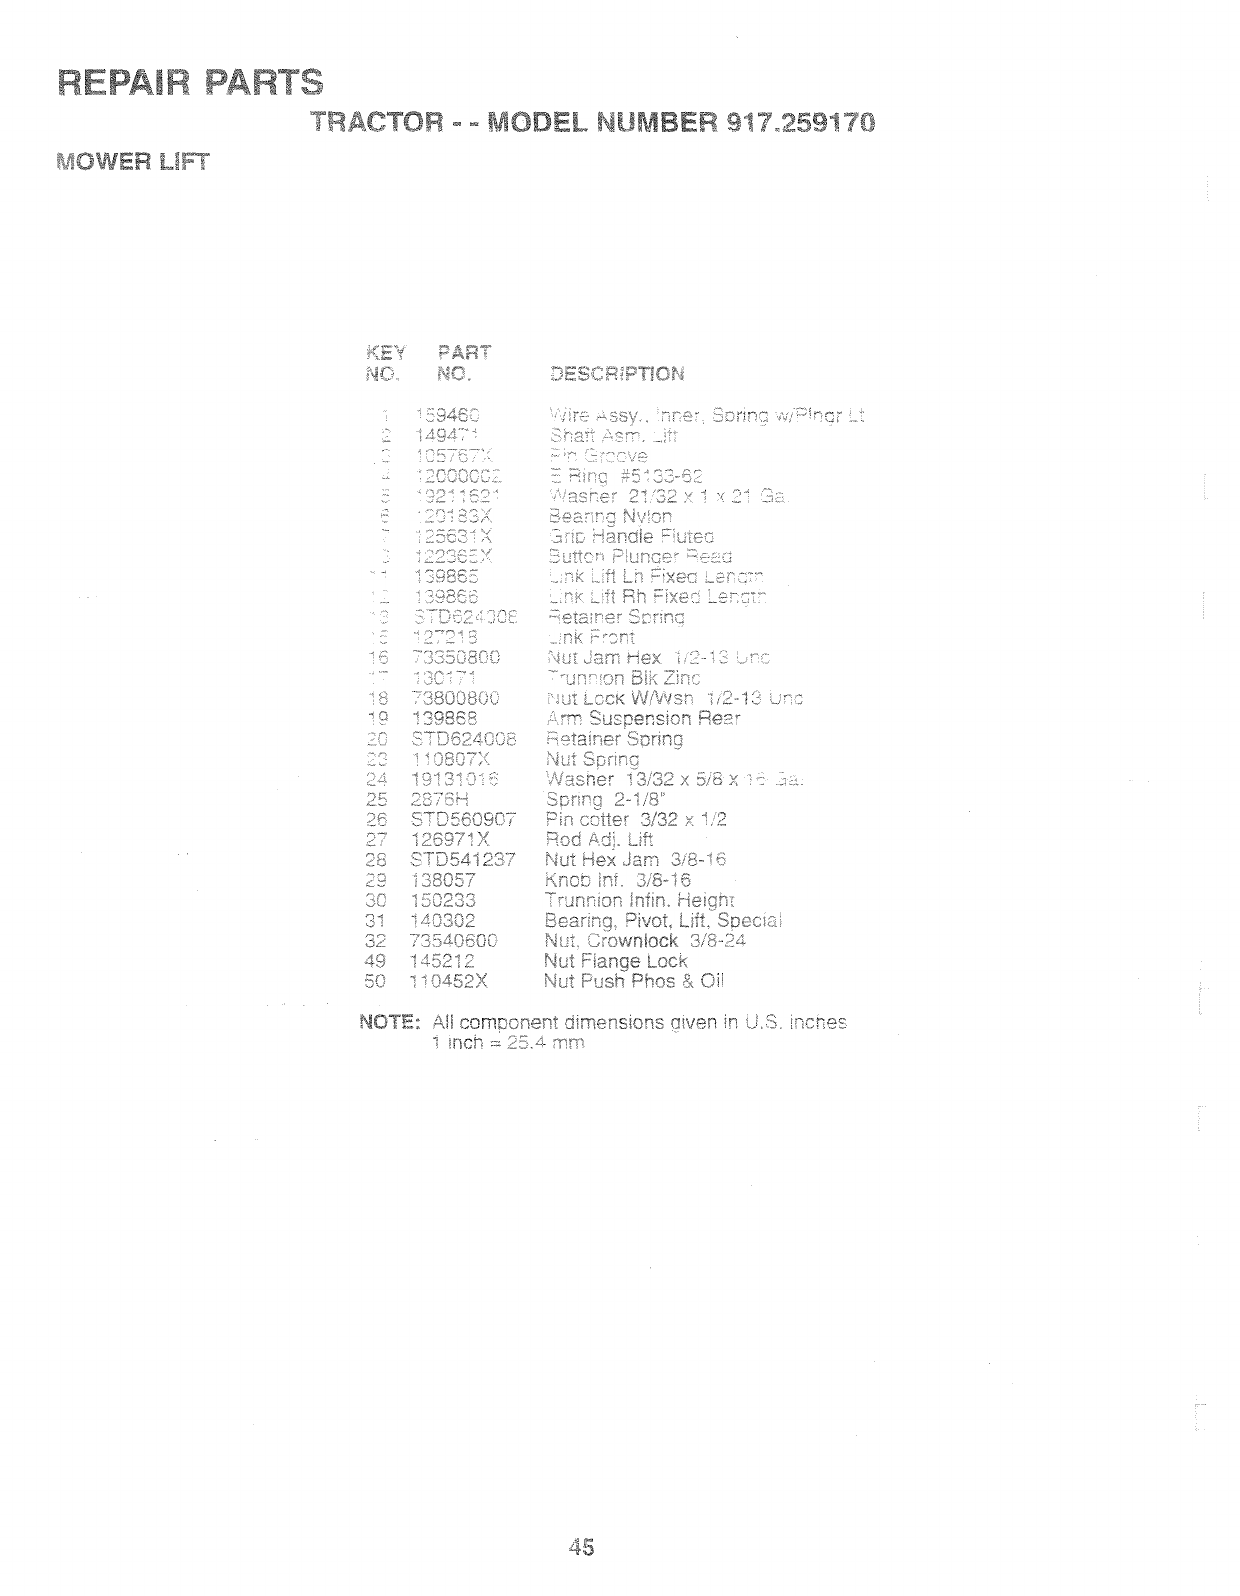
REPAIR PARTS
TRACTOR BIODEL NLII"4BBR 9t" t° o .259.70
MOWER LI_T
C 2_eq:, L
; 4 4 Q 4 _"
:: :XtT£TX
?2" : {::2
2': S3 X
::: 2231:Y:
" "7986_:7
QA: :%
......... 272 ! :}
'::: 7: 3:1708(0
P
I }807)<
£4 1913!0-;
25 2S:: } A
:_6 8TD56090,7
.g: ..,.f, } r_dt
29 138057
,,,. I SU2OO
_JOLj_C
32 tq_x_ AOI';
;-:m : -st145 >}'(
'/T:: ,.x_,£_y_ ;::t¢'!r; _;:;[iP_C ,':::!_qi" :.:
Sh ::ft ,;:,':._: ....i
...... : ":12¢::
:{ 4:,,- _:_5133-'[2
,_:_ste: 27'32 x : x 2' ........
23 ::
iPv[r {7
!{uric " i: .pc,:: ::-_-:_-,:_
. r_-_.ift Lh !:: xec
"_, Xft Rh _"" " "'
......-_g:ixt::R"
' ; J':_ :Hex 3
..... U Y OS £ {Z'._nc
LOCK W_i,%III] 1 O-i. Li _ ]
:'rm Suspensio_ Rer
;: etai_e Scribe
qlt Sp_rc
4/_ r",r:s_ i Oi ;) ........
,,::tc_..: ,:_.,_ X 3/5 X :::}_
Pn cotter o,_-.cA./ )"fi2
_£od i:'di _ft
t. ut Hex J F t;_ -_,:-,
Kisob _ .7i8- i 6
_....... s!r_fin Heicnt
Nx. Crowntock 318-24-
Nit !:iange Lock
Nut PJsh Phos & 0ii
NOTE: Ail _'-' , _._ t a v_n in Li.S i-_c_es....m!ss........p. dimensions ......
i _nch _,.-,25.4 mrs
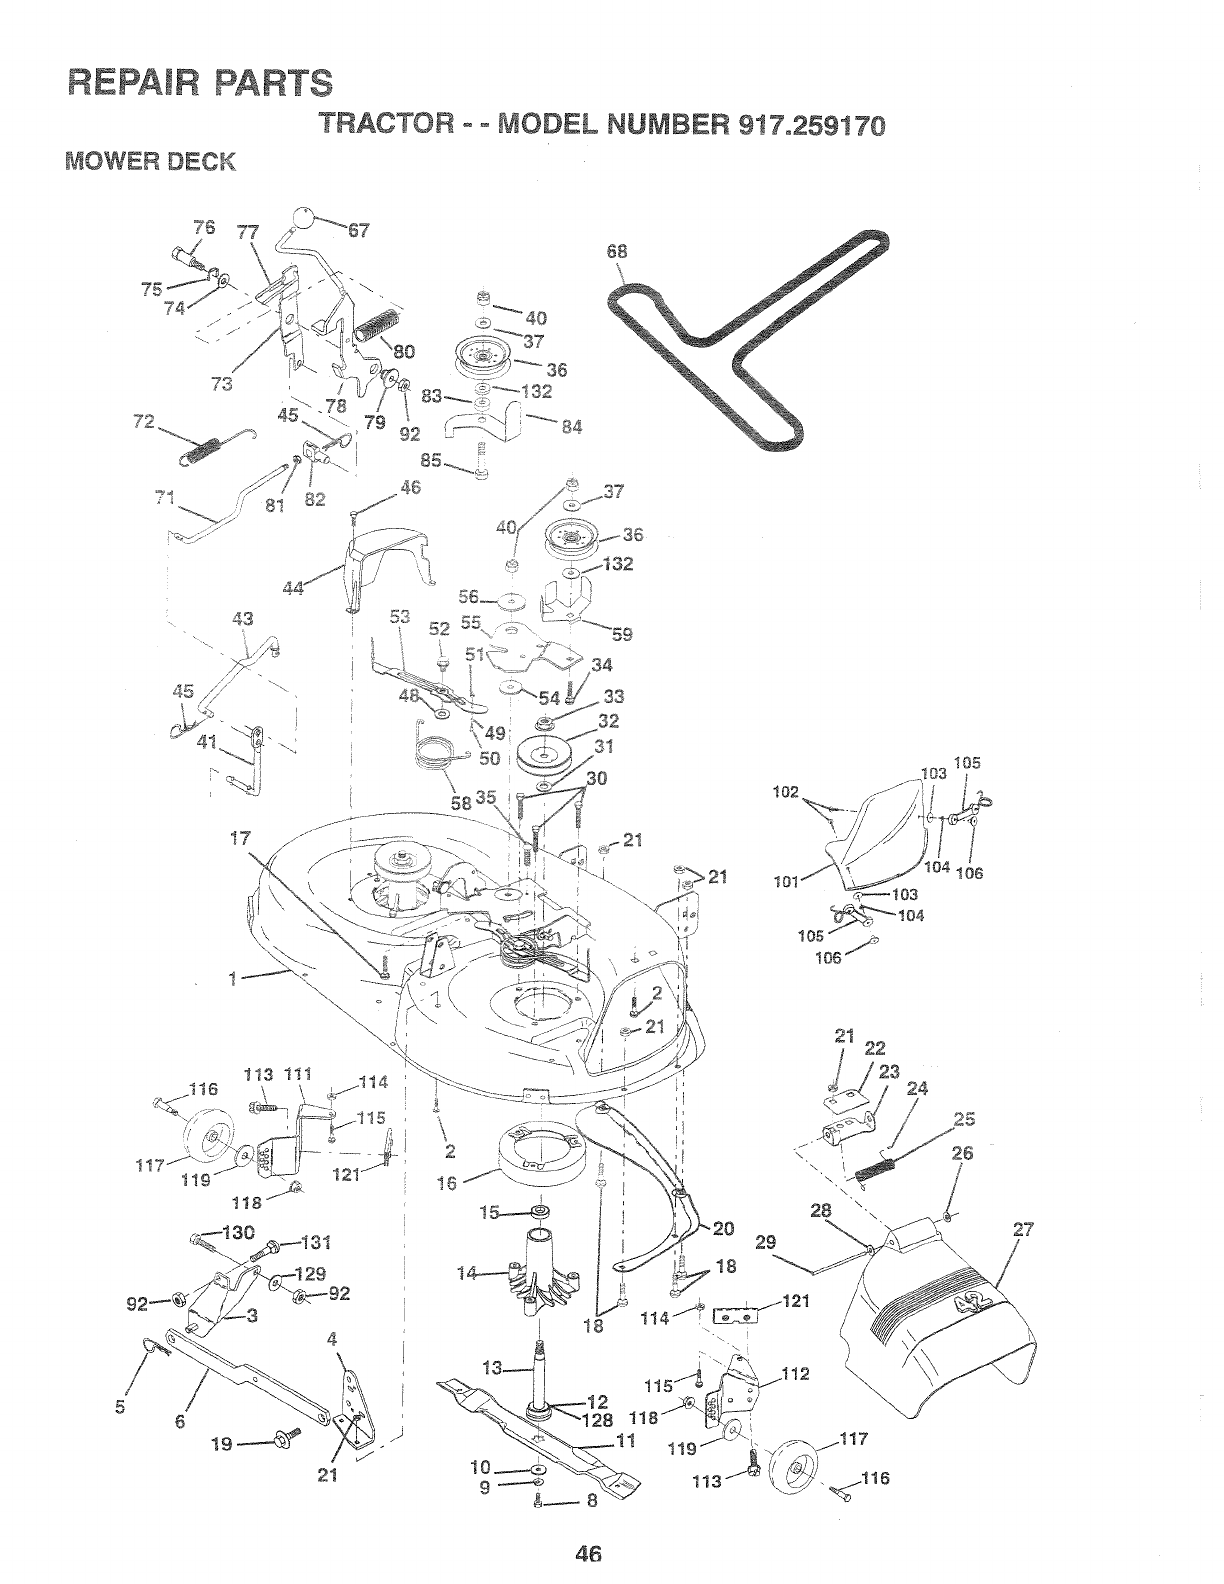
REPAIR PARTS
TRACTOR -o MODEL NUMBER 917.25!i!170
IVtOWER DECK
75 77
72
73
43
\
105 i
I06_
21
17
27
46

RACTOR V!O©EL iU qBER 91%£59t70
_<E Y P _k_'T
A:(:93
ii {-3 {f 3310>
i 3801
•i 38x._-0
. } £.+' ;'J
.} i b()8;_2
{}-....
; z(} 21i::{
.... s{
_' " x9895
< 3134{}
"%; A< "(
: i 41 :}229
• ........2i _'=" -
t ......÷.........."-:: sic,.: ;1[<
3282:7
:1{) "_:36 }8 _}"
C'_Pi- q.
; i _c>**xt31
........ >+ /b©
?s 1:31267
_;b _ zo,
i O_OZ,
o .... -_or'.O_p
2":! 191110111
29 .....1_""
,., o / 72£
31 29_63a
,:; 137266
{}4 OT[h£ q _<7"_ '?
,.::,c_ Io38_1o
8@ 18_ 494
,_/ STDoo t03 /
40 '-'_ .... _ 4 '_-'°
, _; I L.}C,_-_ I ,o1
.! i 1335S 1
43 i _,no-_
_% ,-],-_ c_
46 STD624003
41; I 3-729
46 133944
49 155066
c.<, }d d4_
._'q2 i 39888
5,._- i33943
......... s0_6
-=' I 9QMIO'_
C,ART
})_;Ci AsseTr,i) ' %<'
Bit
_, ;%CRQi ,:;d-:b: [J}eci 4.£ Svva: :ii:-_
@ia,/ie t 3p _ g
.-. T! {{OAFS etsc3 ::"
L!.oI 3i8-24X-i.2L iii c_ ,!
'!S pl r, _" i
SOr "tAYrSe '<{
i;;}t;]5 i"'=i;ic.:!::, i!'<d: i}:,Fc':
!:!_elrly 1. i:_!f:!!
{;i} , : i:@ 7Dr
tC t fii'<h ;/
O ;w-e <{tt<}:
!;!e>>c <-:,:,.it <de',
::£t C::' ;;: _!divic,<'
_;,',.i_" f;; *s_qm q%:,. = , .
:,gw __,ei'[ 1:., c < _;;,
6oit i£bou d_ t
Baffle. it!e)<
*',._+(;cwnock 5/i6-8
)c_._Ke . [})e ie'tt<
CaD 3hse _-,
;" _ PuS
V4astte i 1'32 >::5/8 i6 IIW,__I ,
Rod. Hnge
Screw T],< .... _- _A _,ci-_.:_. _-_ieat
I .UI <._.I i I. _ ._,..,
VVaaheR Spacer
PuJ_w Mandrel
t +4_f-,. m =.Nu,Flanged, _,.=n_u;, 9'i8
Bolt
Fastne< ("_",,_,::,_"+__.......,_x>"t>s_,,'_
Pulley, die< Fat
Washer _ '....... _ '_#,, ""
3,0)4 >. .,_ _o v io Liktugo
Nut, CrowtAock
Rod, " .... *'_..........l-_iVO[, ,-= i%I[}L
_od, CIutch ,..<,.,..<,..... '_'"'_*_i+,,=<x,,,, v'ith i]ib t,
Guard, Mandre:. _ ......
Retaicer
ScH_.v>flex Hd '...... 1 4-].:0 ;<5!
Washe* Hardened
Roler AssemNy Cam
Bolt, Sho@de_ _"_._ "'_: ...._ _,• 0;.;:<;:race i:i
LOCK U{
i-win i%s, embh?, F>sd, Brake
Washe_ _ Hardened
A_ .... _,_ Retaine-
<.... O08 C
::0.?
" ...... " , * {!R A;X:
.... it@s] /
....."1187M
.........;£7847
"i , i = gw
o ,;;<-.} =
-ii 12110!i°1!9
(28902
....... 12-" SsS
......... :5.-.L:0;,
iZ79
t --: ({£'-"
i.0/; :!.
:1<! 2095 S}'1
:z:: <'¢£4
G;: "!
...... <s
-,, 3TD=>t _
'} i jq;;l ;1,_"
..... t )?0
! t0A" r', £
104 37%,55"1'0
.4_. /
11i ! ![_19-7
i12 ! 5i'_6
i_÷ .... I L.;_.4+ =*,.?
It<"q °_
..... .:: I 0bU4
1 , 37644
7 IJo9o1
•;i8.... _v.q, _9300,_,;>
19 c'wm__ Oq-x
i/ I £,J_=< J i! ,.3,{
2 ! i ..... "='"
4"_W " %.';_ © .8 s/i
30 87[}'5233 (
3< -sin', --_":_.[i) _ t.}.. O.L>. 0
3£ i :,"_,L._U,
.... 130794
- i4541t
Siring Yorsion, B_ake
Gua'd, Idler
'_<'lOb <. StOr_" uu_:_
'iB=:.t 2 '='.... _4uwe
TrL_--_;,_ % _eh P[Ir%a[?
is: hi, Ext_-_sion. Reum
-_-i s
: <"L ._ u_CR Seco]<]ayy
,:<o i6 ":i<s<_e 25/32 x -../® x <sau.':le
ig .
- ....... ii:osde 38 i6: _.o................. X 4-
!<@ei:%[ <p i_r
iF<) CI.iTQH, dl-r_r,
}!:i,JCnlNq i ;4 -,::_ Clime<
[1[i+ii= g_ s11 .....
v. v,-,t PhilO<
hit '--ieR, .ILIZ" Ri - iq
[]ci O'
/asimf, t;i,nter@%
}<eeDeN <.:!t !(qe"
:-'-fit ,qmhI '-......... oc 3/8-I _%C nc )<'2-'i i=z
.... =,, ........ NseN
E, /_it <
Mulcher c,.t,..
Screw
,Yahe #I0
VYashe< Lock
'q t Wed
Bracket _.......
_a_u e Wheel H
_.,ra_i,+t, Gauge,
Scew. Thdroi 5,,16 -!8 x 3/4
Nut. Hex Keps 5/!6-18 UNC
-'+ Camaae.. 5/16 UNC x i/2
B@_ Shoutder
Wheel, Gauge
Nut, Oenteflock 3/8-16
Washe_ 318 x 7!8 x !4 Ga
B_ac_<et0 Extruded Gauge Whee
Washer Fe!t
Washer ' " ,_=_.=13,,3= x 13116 x i2 r:_.-,
Bit Fin Hex 3/8-16 UNC x I G:S
Bolt Rdhd Sqnk 3/8-I6 UNC x i
Spacer,e_ "_,a9 i.D. i 3i8
'_ v,_SReY tdI_£ X
"_ _-" "114
<,,._, A ,
Manarei Assembly (Includes F{e',i
o31
N_.;mbers 8-t0, 12-15, 31 and " "'
Mower Deck, Compiete
(Standard Deck; Order Mulcher
Pate and Gauge Wheel
c,omponems Separately- Key
Nos. 101-106, !11-1t9, !2i)
,o : =;: .u_ component @menstons given _n U.,_.. inches
" ' os d
', NCK] :=: =S, _ .:_iff'I
S7
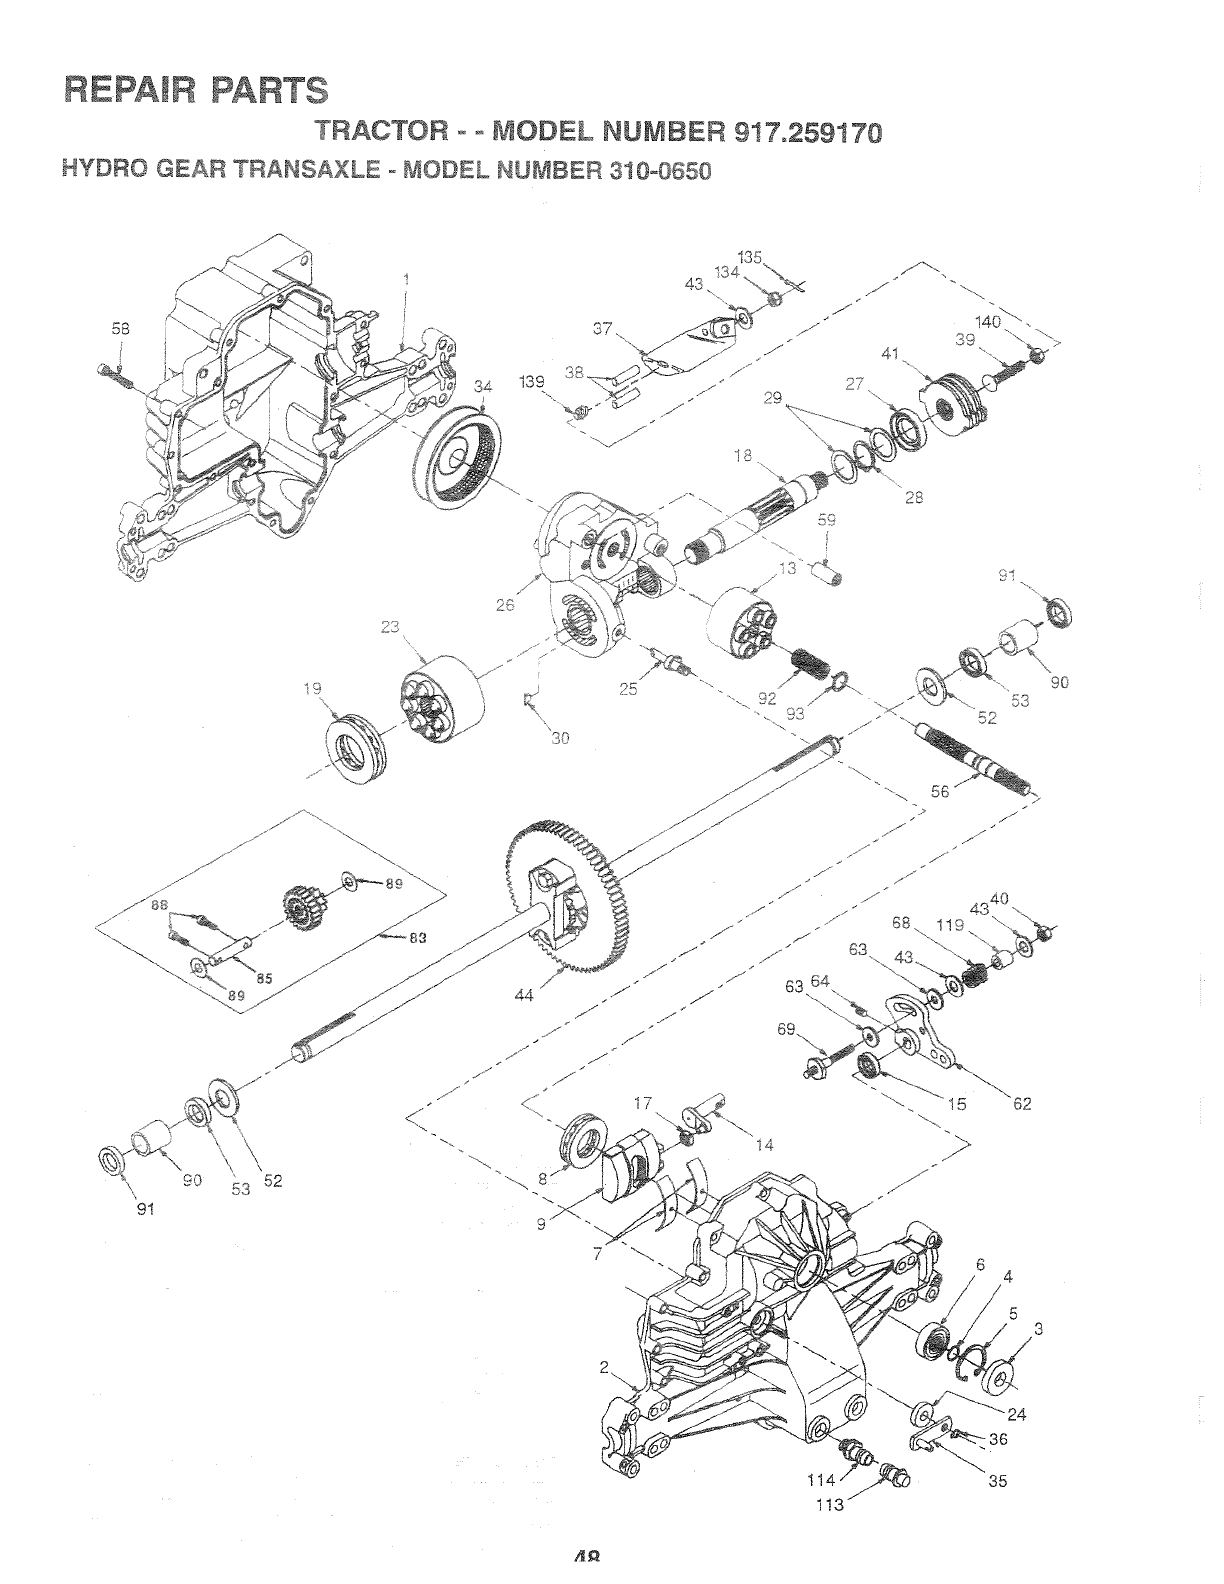
TRACTOR o o MODEL NUMBER 9!7,259170
HYDRO GEAR TRANSAXLE o f4ODEL NU#BER 310o0650
34
37.
135 /t/-...
j -...
140 "".
\\9!
<"
7
17
14
4
5
24
11
I
35

! {}F; :x L':) - x[r
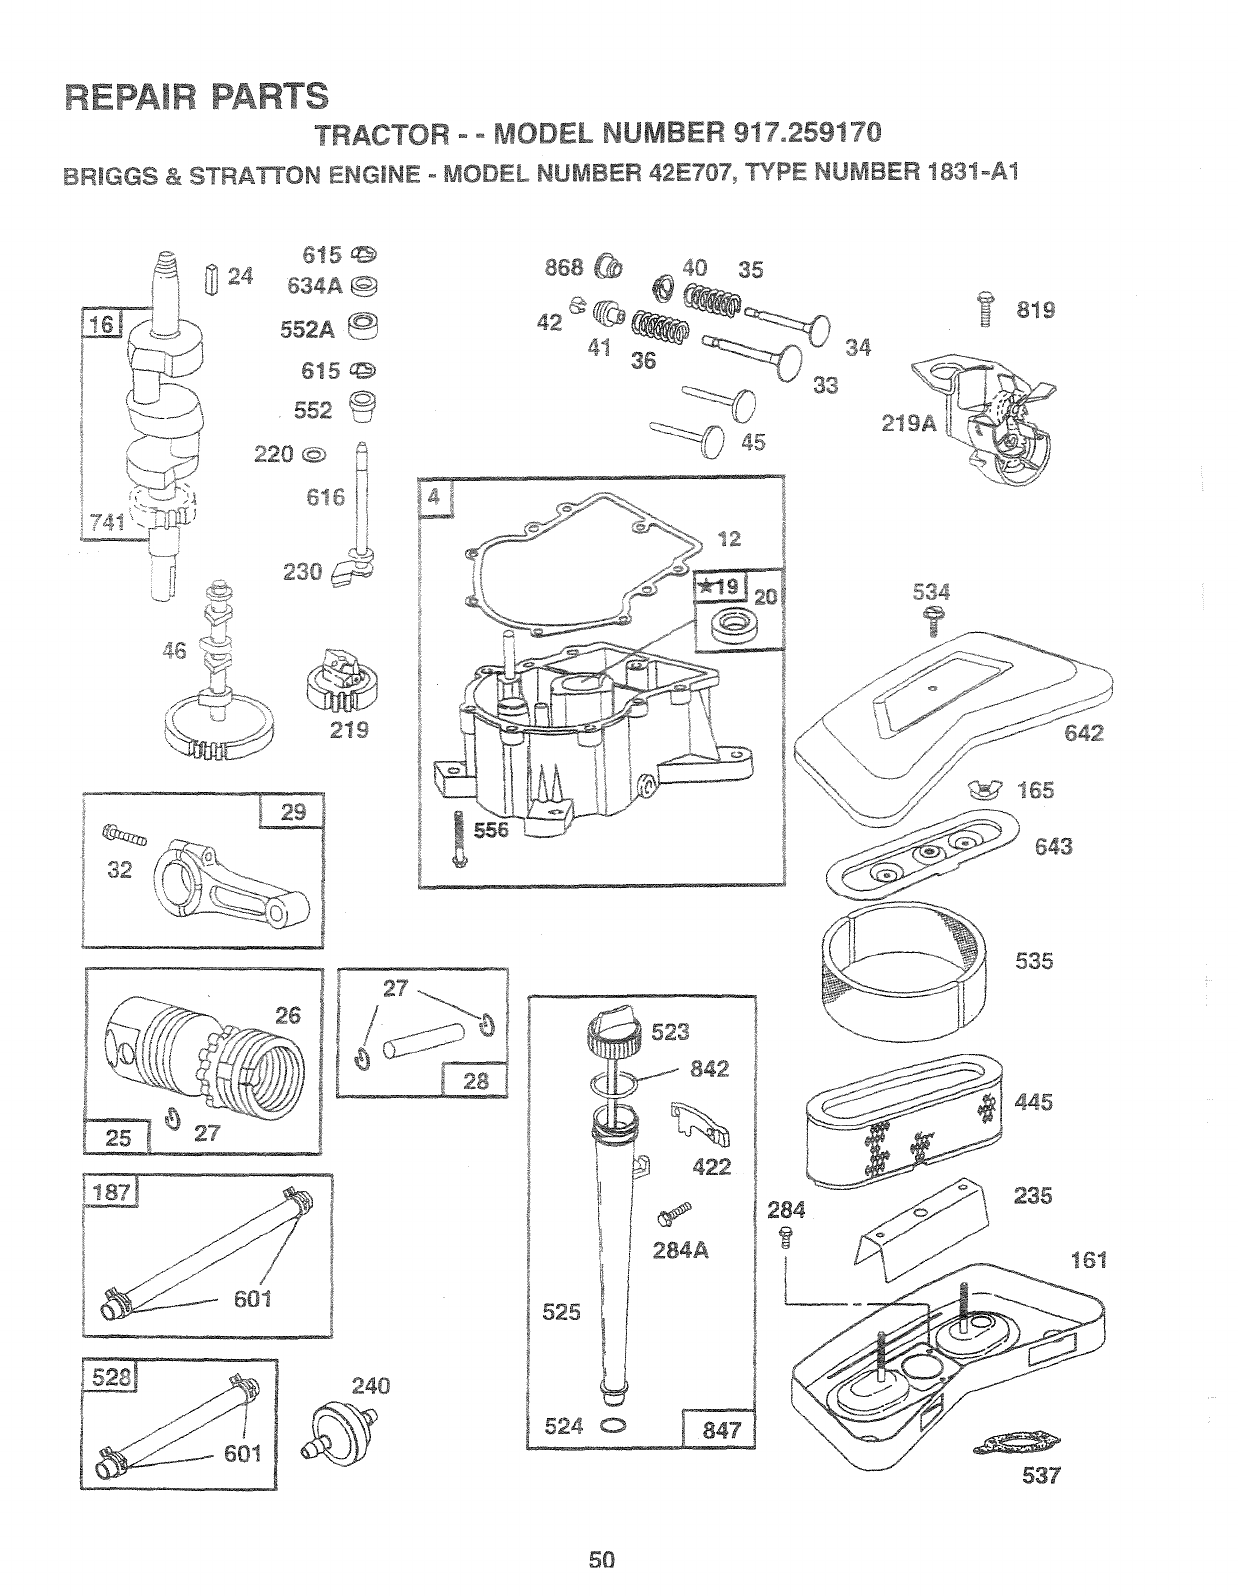
REPAIR PARTS
TRACTOR o o MODEL NUMBER 917,259170
BRIGGS & STRA_ON ENGINE o MODEL NUMBER 42E707, _¢PE NUMBER 1831-A1
24
819
46 o&,:(
32
615 @
634A @
552A
615 @
552 ,,_
220 @
230
219
!
_68_ _ _ss
41
45
12
34
534
_ 1_5
535
240
I
525
524 0
284
445
235
537
5O
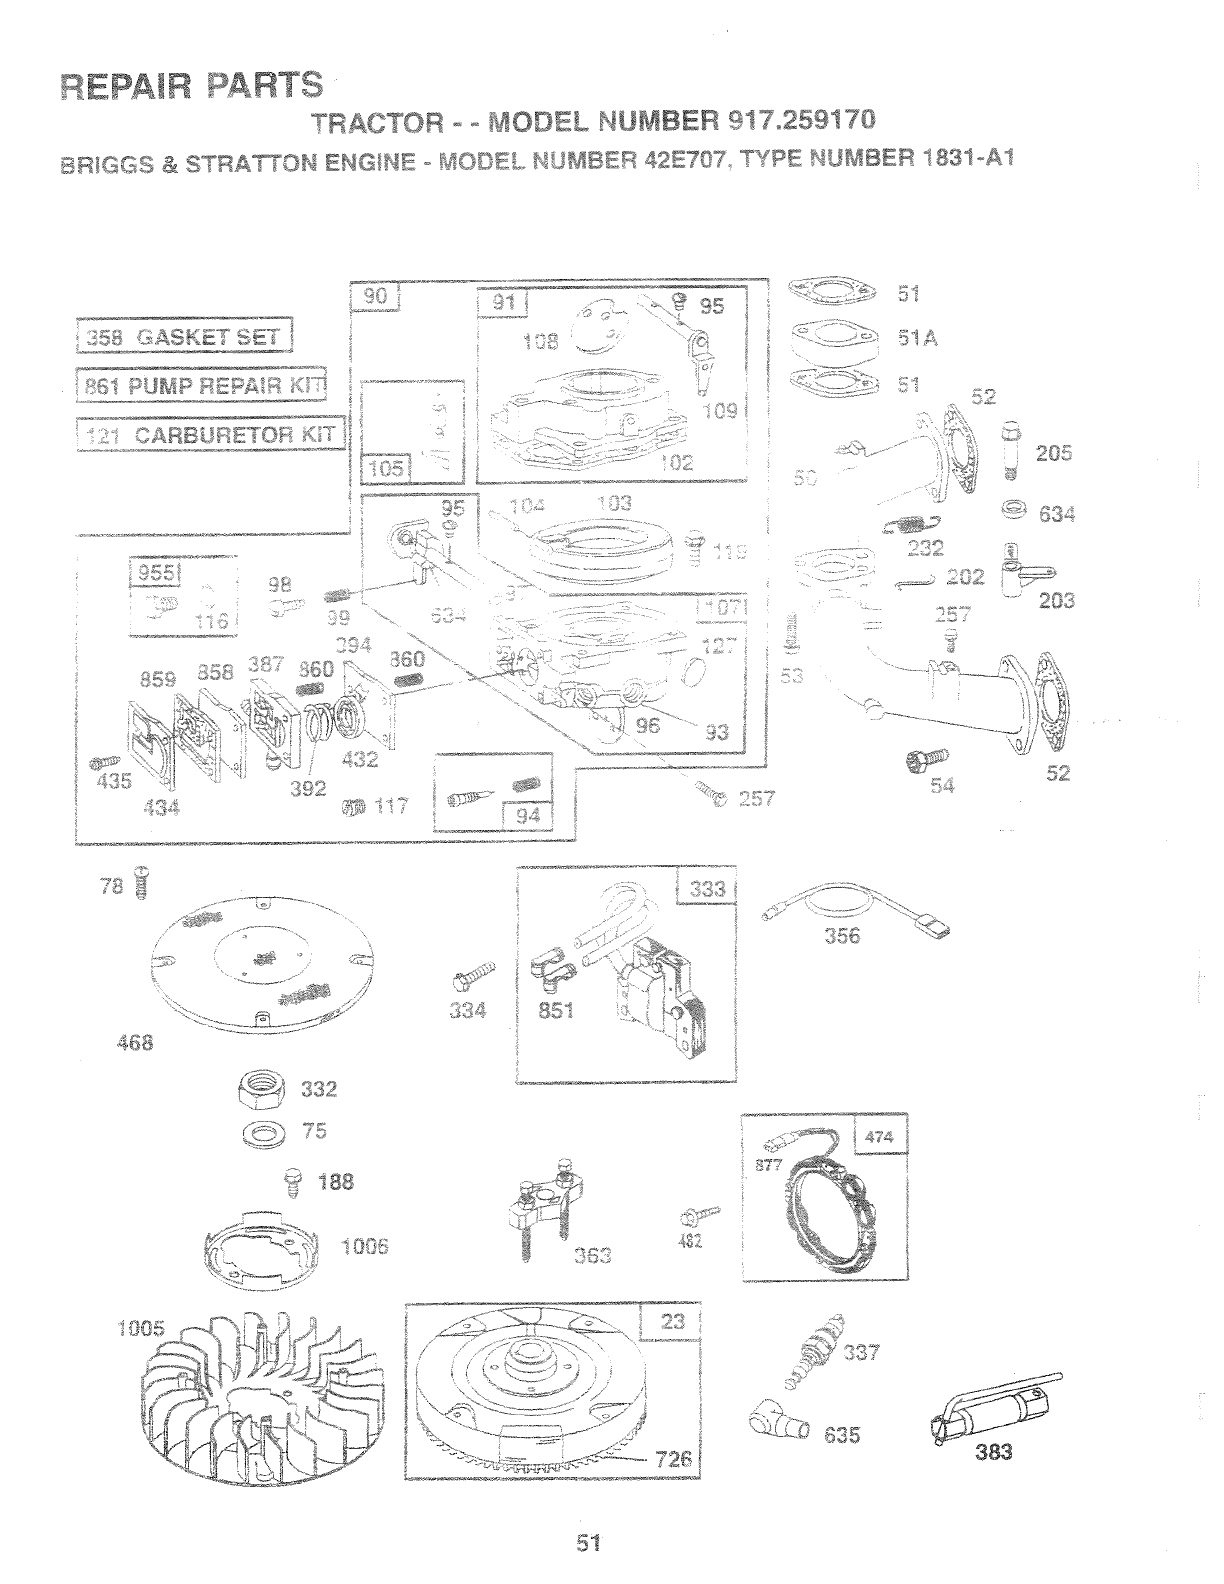
REPAtR R?S
, RACTOR [_4ODEL NUk_BER 917o259170
L:L_ik ::iASKET SE°i
851 PtJMR _;:t
.......... v-* _='] OF_ _'(.i i
?
i
i;i5i! 61. "" i[
_%It;
I
_5
r .........
;:LL [;S ;;; -
L
t_! ,]92
d:_:...... .
}I ':-"....
=...........
...... _ -)-]z]"
]
4_$1
_',?t }:;..'! _
---_ t x_;c[
........<..... i i:%d
,80_<.
®
-, t _9
.......... _ i _ (.![;41 "
",Ui '(_
52:
,*_ 188
i 80q
i " "<" _:;]:i[;i081" "o = .€=._ ,._
8©1
383
51
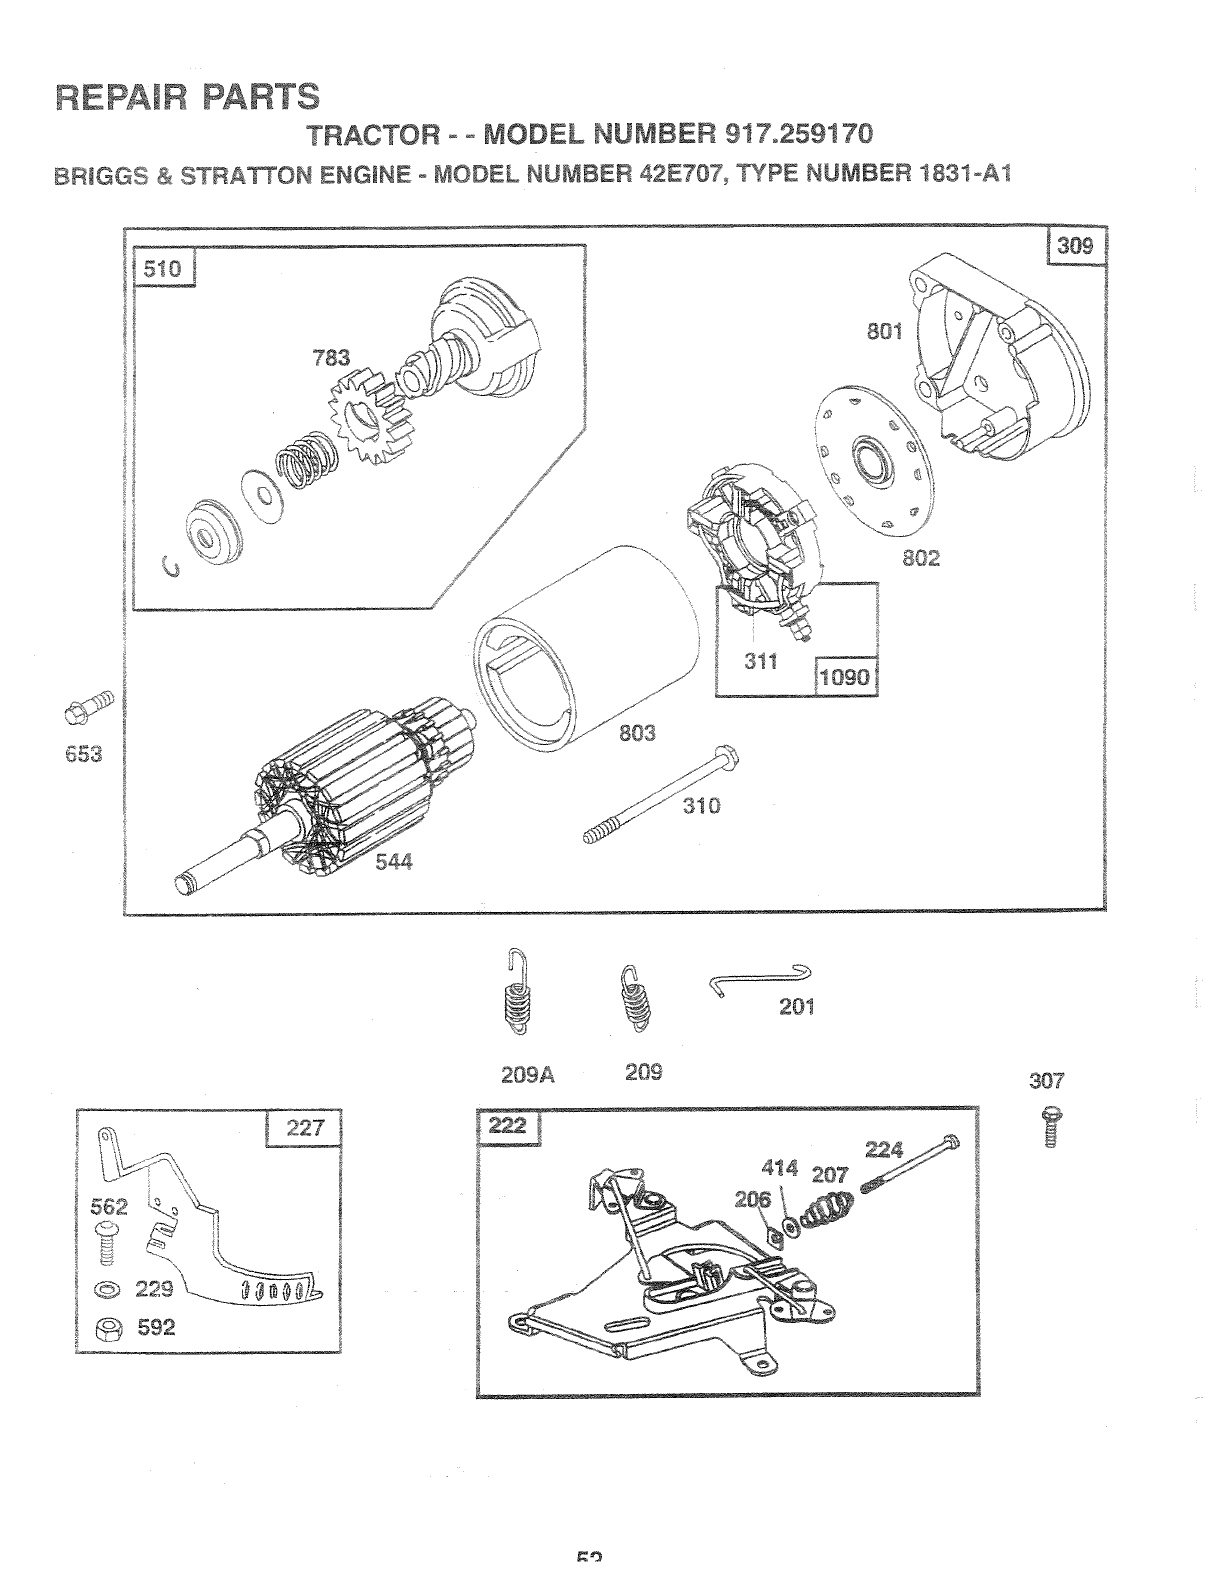
REPAIR PARTS
TRACTOR _o _ODEL NUMBER 917o259170
BRIGGS & STRA_ON ENGINE o MODEL NUMBER 42E707_ _IPE NUB,_BER 183toAI
783
\
311
801
201
209A 209
_4
4t4 207
307
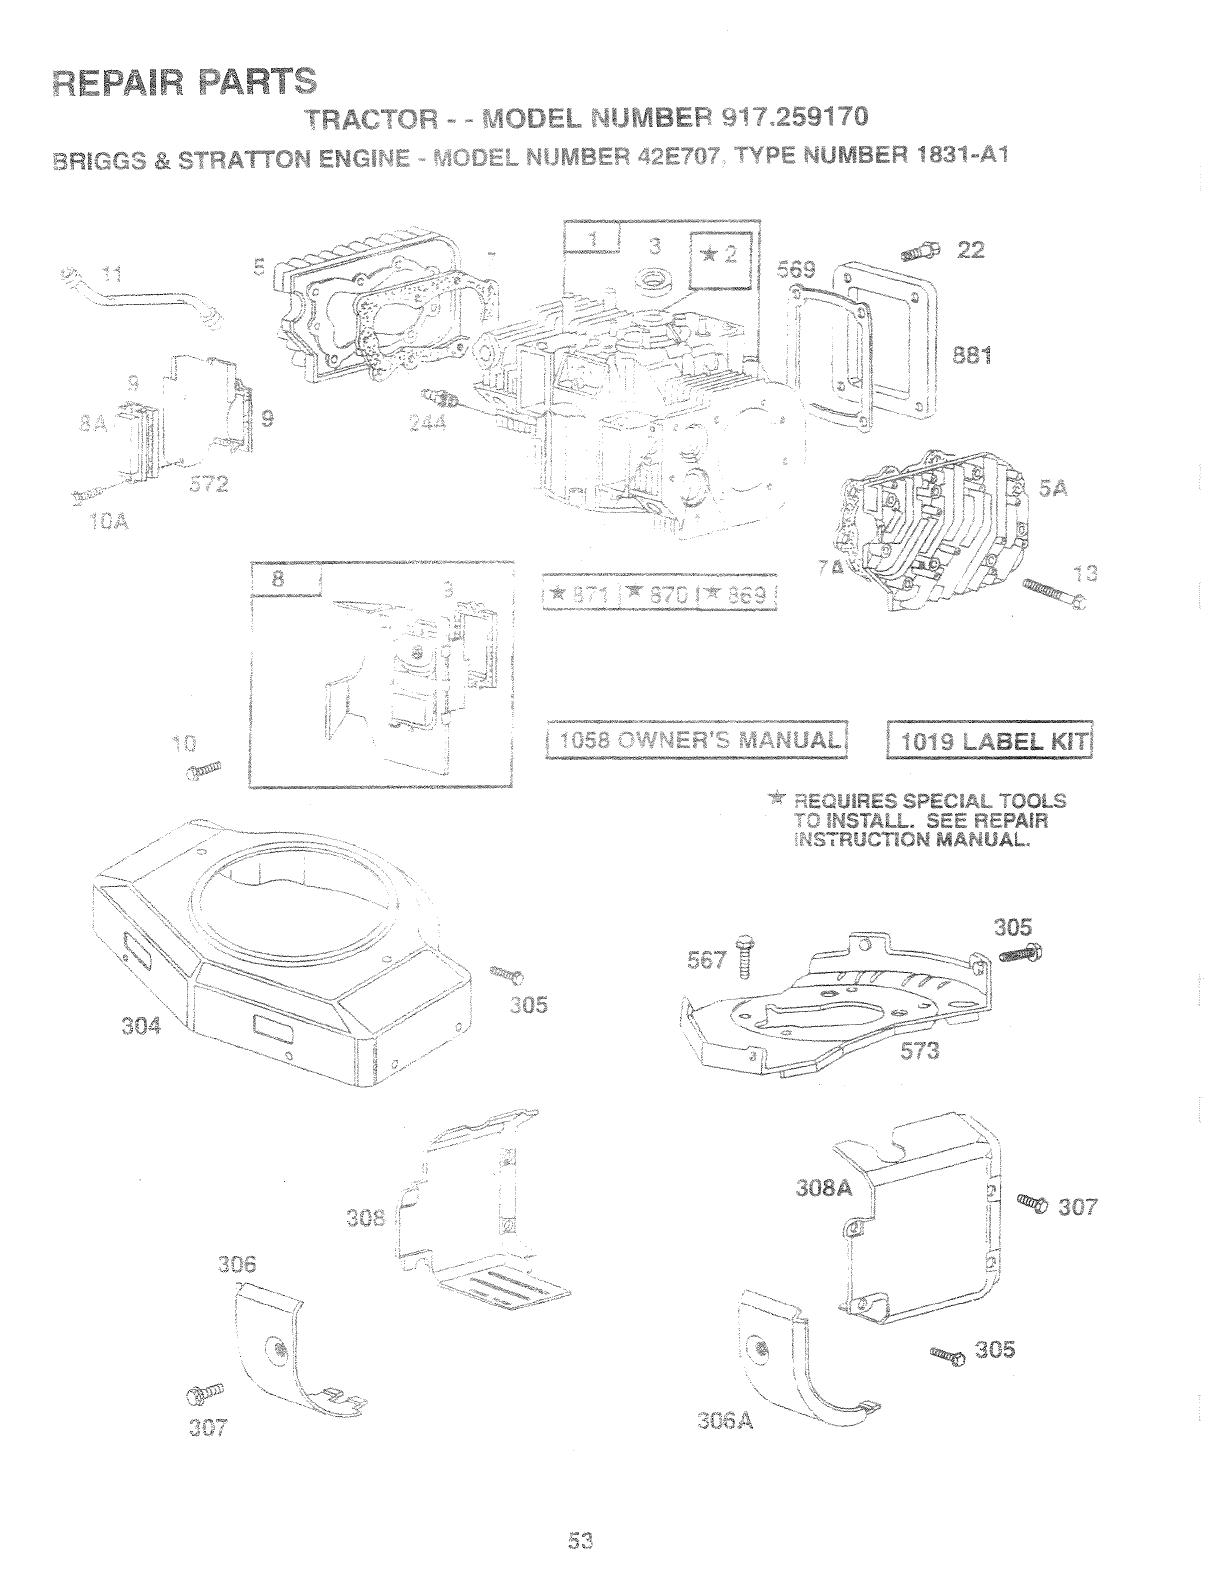
EPA[R PARTS
_AC©D o_ V!ODEL _U_BER 9!7o259170
...... ,,÷z_7O_ s°v[s_ NU_IBER t83!oA1
_881
/
2-
_'_ 2:
10SS9 LABE£ K_T!
>_:" EQUtR_S SP£ B_AL TOOLS
_73
S08_
305
307
_0_

REPAIR
TRACTOR o o MODEL NUMBER 917.259170
BRJGGS & STRA_ON ENGINE o _JIODEL NU#_BER 42E707, TYPE NUMBER 1831-A1
KEY PART KEY PART
NO. NO. DESCRIPTION NOo NOo DESCRIPTION
1 497074
2 399265
3 391086
493304
5 493457
5A 493458
7 271867
7A 271868
S 495754
8A 222892
9 27803
10 94.382
i0A 9483O
!I 280225
12 273208
271188
271189
13 94565
15 94239
16 394028
94196
20 291675
22 94724
23 491180
24 222698
25 498584
498585
498586
498587
26 394959
394960
394961
394962
27 263129
28 498319
391286
29 394306
39"7168
32 94671
33 390420
34 261528
35 65906
36 26828
40 221596
41 292260
42 494553
45 261368
46 214484
50 21329O
51 271412
51A 281411
52 270884
53 93970
Cylinder Assembly 54 93208 Screw, Phi/lips
75 22251t Washer, Spring
Sea_, Oil 78 95039 Screw, Hex
Sump, Engine 90 499169 Carburetor
Head, Cytinder #I 9t 499281 BodyAssembty, Upper
Head, Cylinder #2 93 231209 Bushing, Throttle Shaft
* Gasket, Cylinder Head #! 94 491538 ** Vaive idle Adjust
*Gasket, Cyiinder Head #2 95 93499 Screw Seres
Breather Assembiy #I 96 221939 Valve, Throttle
_r _ - , _ 97 392672 Shaft. ThrottleCover, Bre_th_. Cvhnaer #z
(Used Only on Key #572. 98 91920 Screw, FHister Head
Air Baffle with Holes for Mounting) _:_e 26157 orinqo _" ..... Adjust
* Gasket, Breather 02 271607 ** Gasket, Ca_uretor Body
._,0q _
_o_t, Carburetor
Screw_ Sems "_ 29851
Screw, Sems 104 231435 ** Pin Float Hinge
,,_ _.s Valve, Needle
Tube, Breather 05 q_'z_..........
._._ _07 491543 Body Assembly. Lower
* Gasket C_anKc_e..015" Thick
Gasket_ Crankcase, .005" Thick 108 _0<_-7,_ Valve Choke
* Gasket, Crankcase, .009" Thick 109 392673 Shaft, Choke
Screw, Cylinder Head _:t6 280474 * CoRing
Je_. Needte Valve, Fixed
Plug, Oil Drain 117 232018 +
Crankshaft 232022 Jet, Needle Valve, Fixed,
Timing Gear Key High Altitude
* Seal, Oil t 19 94152 Screw, Hex Head
Screw, Sems I21 491539 Carburetor Kit
Flywhee! 127 223472 ** Plug, Welch
Key, Flywheel !61 496599 Base, Air Cleaner
Piston Assembly, Standard Size 185 94.289 NuL Wing
Piston Assembly, _010" Oversize I87 299146 Line, Fuel, 28" Long (Cut to Suit)
Pston Assembly, .020" Oversize 188 94627 Screw
Piston Assembly, .030" Oversize 201 262683 Link
Ring Set, Standard Size 202 262684 Link
Ring Set, .010" Oversize 203 280997 Crank, Bell
Ring Set, .020" Oversize 206 94298 Nut
Ring Set, .030" Oversize 207 262337 Spring, Control Rod
Lock, Piston Pin 205 93971 Screw, Hex Head
Pin Piston, Standard Size 209 262352 Spring, Governor
Pin, Piston, .005" Oversize 209A 261563 Spring, Governor Idle
Rod, Connecting, Standard Size 219 394348 Gear, Governor
Rod, Connecting, .020 '° Undersize 219A 393415 Oil Slinger
Screw, Connecting Rod 220 222773 Washer, Thrust
Valve, Exhaust 222 491282 Bracket, Control
Valve, Intake 224 94297 Screw, Torx®
Spring, Valve, Intake
Spring, Valve, Exhaust * IncJuded in Gasket Set (495868)
Retainer, Valve, Intake
Retainer, Valve, Exhaust ** Included in Carburetor Kit (491539)
Keeper Valve ***
Tappet, Valve included in Carburetor Kit (491539),
Gear, Cam and Pump Repair Kit (393397)
Manifold, Intake ....
Gasket, Carburetor Mounting Included in Gasket Set (495868),
Spacer, Carburetor and Carburetor Kit (491539)
Gasket, Intake Manifold Mounting
Screw, Hex Head, NOTE: All component dimensions given in U.S. inches
Carburetor to Manifold 1 inch = 25.4 mm
54

............ qsd"
d21 F£_
£S ££33882
..... 92S995
:} _} 39xi3F
,J: 230' S
:;:)389
::58 4fLi:':3
}}93890
2 c .{}23!;3{S
.?,,:C;":
,/i v -; 4_4
(;£ {/'5:-6{
- Sd7 :_(
:,{)( : ,:,
() 5, ;U'/;
)0_, :24,7-u:
/.:0 !'/:. U::4775
30:_ ¢9759{
:}{ 0 4({)8
51 ,#-,'_:';_
--_ J t )
1!34, 94i31
f:!{:i5<_,._o
!){1 4.._i 85£"
3113 19203
'S !;)":! .... . +' '_
..,.... d L::tsh£d
o, 1801 7
.-(O.'s _'_51 "s}O£
394 i_70988
41 i 220680
:i-...... "-_0_" 7_
]:J .-';'__=,,.o,O
4S2 22: $77
4:14 223588
4A5 -,-,,.,,r-
....... _:}d o ,4 _:4
4.68 /_csvoOl:
:174. :98,'-7/-
4.82 9 _}2i
d.i 0 497506
x _ 4 "7
?A .;+Sz_9_ t
525 95S4.8
t!}o _) m #sm o -
£>:; 8tdO© 0
/1134- 9482S
_'535 :':5:190
:.:1& : Z7 -:,L: '
:::4z]. r --£" <:
1])© =::: _ O_-1.O,D_.
v_as- i
V she!. :};.()y:gmd ::T.:)FII(. 1!: :i}
:: :_::.F ()
:}0[ i':uC' ;; : ...:::
Qi:[i
L:'{:W. L:@_ {
:IiL'<: .D;) ''I
::Ire --ii L:::i
.... }-::,/,(
:C i!v,
:::vd :_
:::,,. (:. .............:_ucs
o(r St/:_rte_
t- J_
:::0_ Yff.
i:ir si] ]}e:
P,:st He:,:
ssRet Set
:i'i_e_sch. "° .......
.... bO,,s
i-_O(Jy, PIJrOD
:"_' 'OiaDh[aqY_
_','8_S[ L;"
i_-acKet i)il Fiii
C_:4:, :3t ir:_._
CeveE. 938oht-sc x
b]Few, L./8[;),iqYe(]']] { ii@'
1: P_'_ ,&iI
:£_c_ee :,, _otati:',,,
A ternatc,*
tcscfev,q
Drve, Sta_e_
r,;-,o-_q! Fil
Seat, FI Tube
7ube, OiiFciiliinc; ces _ s s
Hose. ' ..........
_- iC[J LI
.m_ k..,i _: L} [ i
Ftteh
Gaske, A_r .}ieat_
Ot_i >ss_Am_atu e, c...
L_owe["i:bus qnc. :}::..,e.."::: ,
_"JH _ _ :5 LISP,! nC, i}; 11)*,_:!.' '_ :3
sL]O.
- ]5: :. $ el: :.JY L.Lj\i@
;hoe"
_o,,:. }:
h-
_TSC2L
L
7Q_6 _
if:,t 5bc
ss LQx -
_: 11![ 411]
b4959(5
_e_ }97E
iO0[ 2_t05]
;L_ 22490
-" s96726
05E 272"12
:+ ,o
__77}: "
.-r- ](7
£_:IL
}_)/, G b 2:_" {'[
ncluce-s ,;_wbi_'e,'e" !<it !'4.91539'
:;.Ja z_.] ,-(3atr}u_'etor Kit [491539..
:dsc _-..tb-:[ _¢99A_"54; ,39y[.89-7_
.......... .... ,, /(('}_ S__, Q ,_
md ' .............. iq15 qc
•_..__;. Ali co; -_pc,.nent dimensions given in U.S. inches
1 .pch = 25,4 mm
55

E

SEBV_CE

SE CE
_A

SUGGESTED GUm[)E FOR S_GHTING SLOPES FOR SAFE OPERATION
S_GHTING
GUIDE
ONLY R_DE UP AND DOWN H_LL_
NOT ACROSS H_LL
SIGHT AND HOLD TH_S LEVEL WtlH
SKY LtNE OR TREE,

E
P_ODEL NOo
917 _=_ 70
_F YOU NEED
REPAIR SERVICE
OR PARTS:
FOR REPAIR SBRV!CE CALL
TH_S TOLL FREE NUMBER:
1oS00o4°REPA_R
FOR REPLACEMENT PARTS
NFORMATiON AND
ORDERING, CALL THiS
TOLL FREE NUMBER:
t °800o,FON°PART
FOR CONSUMER ASSISTANCE
HOT LiNE CALL THIS
TOLL FREE NUMBER:
Io800o659o5917
19,5 HP
ELECTRIC START
42" MOWER
HYDROSTATIC
LAWN TRACTOR
Each tractor .ha=.,., its w_""modei number. Each er_qme_,has
is own modei numbe.
The mode number for your tractor wifi be _.,u, u .,,, the
modet piate iocated under the seat.
n_:, mode number for u_, endine wiii be __' _'_
bower hOUsing of the engine.
£ Darts isted herein may se ordered from _::ry Sea:m:
Roebuck and Co Service Ce ter/Department _<nd most Re--
_a Stores.
WHEN ORDERING REPAR PARTS, ALWAYS G_VE THE
FOLLOWING INFORMATION:
PRODUCT -TRACTOR
o _qODEL NUMBER -9t7.259170
o ENGINE MODEL NO. - 42E707-1831°AI
o PART NUMBER
o PART DESCRIPTION
Your Sears merchandise has added vaiue when you
consider Sears has service units nationwde staffed with
Sears trained technicians.., professionai technicians
specifically trained to insure that we meet our pledge to
you, we service what we seli_
158489 4.9.97 RH Printed in U.S.A.
