Craftsman 917377302 User Manual MOWER Manuals And Guides L0806650
CRAFTSMAN Walk Behind Lawnmower, Gas Manual L0806650 CRAFTSMAN Walk Behind Lawnmower, Gas Owner's Manual, CRAFTSMAN Walk Behind Lawnmower, Gas installation guides
User Manual: Craftsman 917377302 917377302 CRAFTSMAN MOWER - Manuals and Guides View the owners manual for your CRAFTSMAN MOWER #917377302. Home:Lawn & Garden Parts:Craftsman Parts:Craftsman MOWER Manual
Open the PDF directly: View PDF ![]() .
.
Page Count: 44
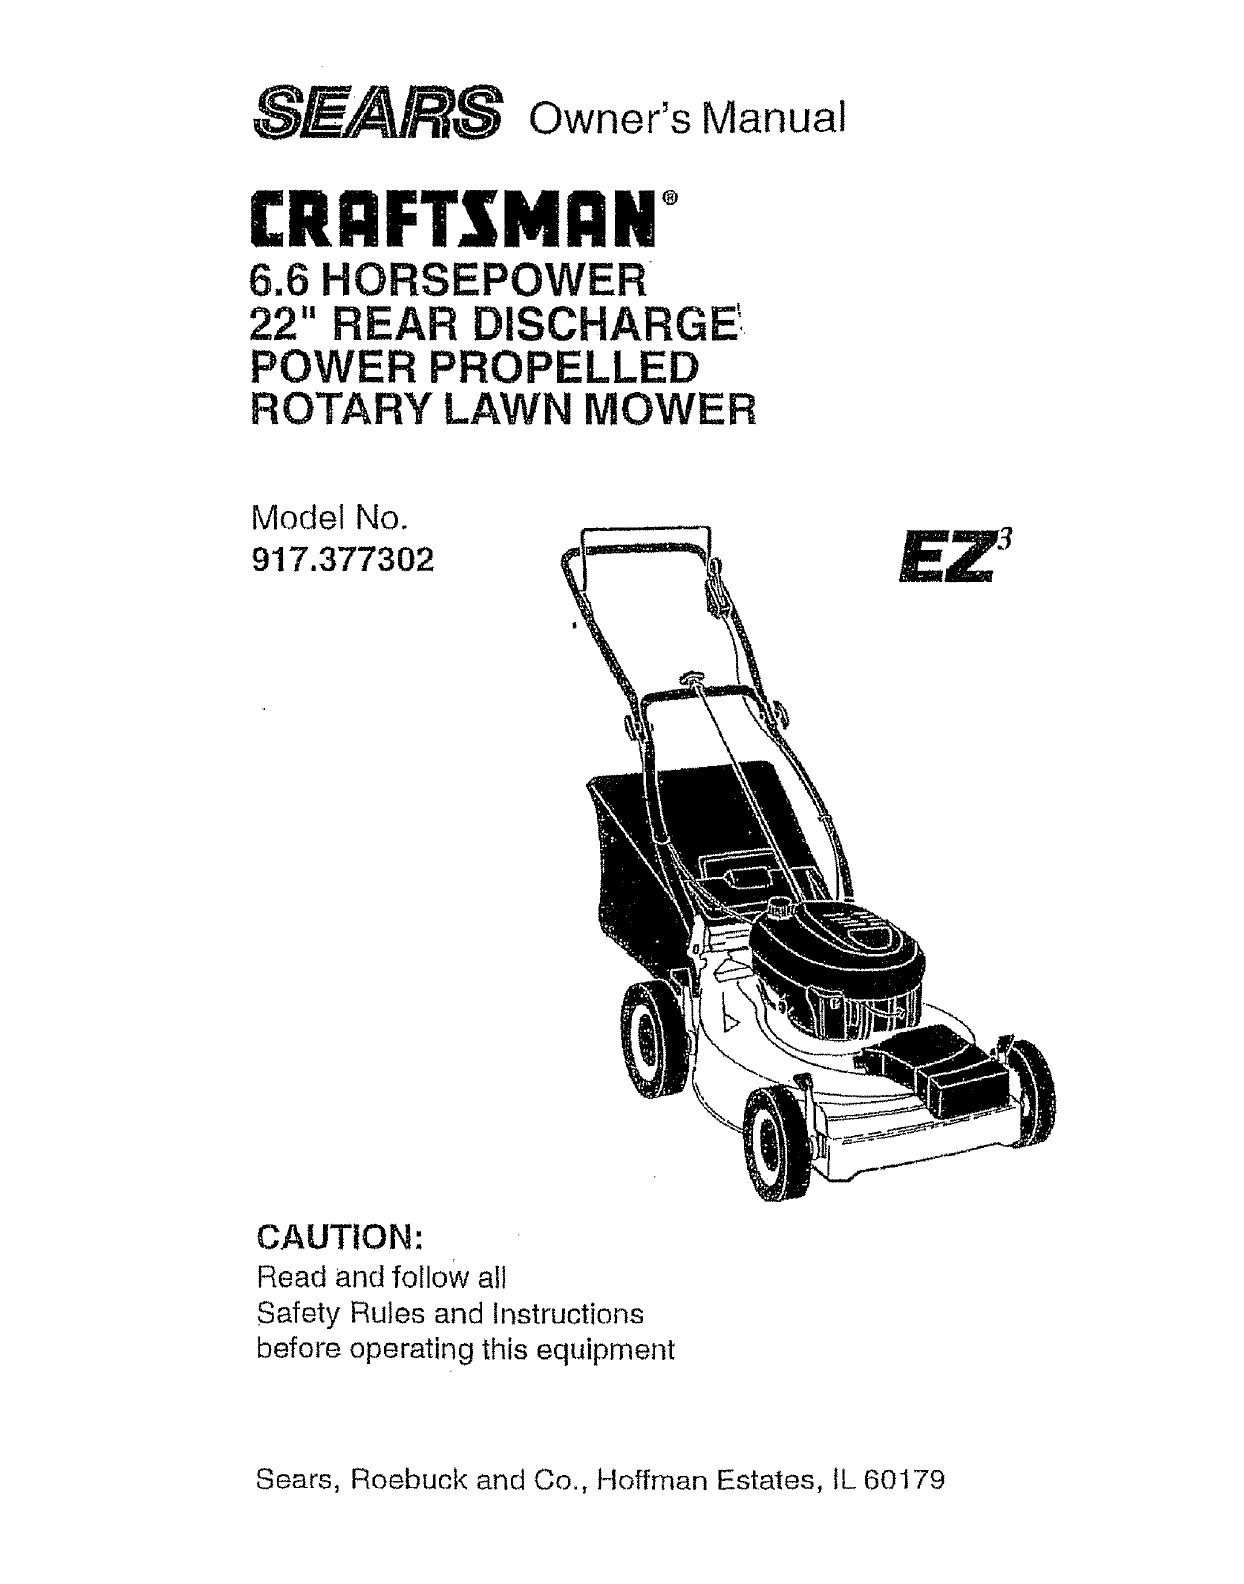
_)__ Owner's Manual
CRAFTSMANo
6.6 HORSEPOWER
22" REAR DISCHARGE'
POWER PROPELLED
ROTARY LAWN MOWER
Model No.
917.377302
CAUT!ON:
Read and follow all
Safety Rules and Instructions
before operating this equipment
Sears, Roebuck and Co., Hoffman Estates, IL 60179
Warranty 2 Product Specifications 11
Safety Rules 2 Service and Adjustments 14
Assembly 4 Storage 15
Operation 6 Troubleshooting 16
Maiiltenance Schedule I0 Repair Parts 33
Maintenance e, 10 Parts Ordering Back Cover
LIMITED TWO YEAR WARRANTY ON CRAFTSMAN POWER MOWER
For two years from date of purchase, when this Craftsman Lawn Mower is maintained,
lubricated, and tuned up according to the operating and maintenance instructions in the
owner's manual, Sears will repair free of charge any defect in material or workmanship.
If this Craftsman Lawn Mower is used for commercial or rental purposes, this warranty
applies for only 90 days from the date of purchase.
This Warranty does not cover:
. Expendable items which become worn during normal use, such as rotary mower
blades, blade adapters, belts, air cleaners and spark plug.
o Repairs necessary because of operator abuse or negligence, including bent crank-
shafts and the failure to maintain the equipment according to the instructions con-
tained in the owner's manual.
Warranty service is available by returning the craftsman power mower to the nearest
sears service center/department in the united states. This warranty applies only while
this product is in use in the united states.
This Warranty gives you specific legal rights, and you may also have other rights which
vary from state to state,
SEARS, ROEBUCKAND CO., D/817 WA, HOFFMAN ESTATES, ILLINOIS 60179
TRAINING:
•Read this operator's manual carefullyo
Become familiar with the conlrots and
know how to operate your mower
properly. Learn how to quickly stop.
mower.
• Do not allow children to use your mower.
Never allow adults to use mower without
proper instructions..
• Keep the area of operation clear of all
persons, especially small children and
pets.
•Use mower only as the manufacturer
intended and as described in this manual.
oDo not operate mower if it has been
dropped or damaged in any manner.
Always have damage repaired before
using your mower.
•Do not use accessory attachments that
are not recommended by the manufac-
turer. Use of such attachments may be
hazardous.
- The blade turns when the engine is
running.
PREPARATION:
• Always thoroughly check the area to be
mowed and clear it of all stones, sticks,
wires, bones, and other foreign objects.
These objects will be thrown by the blade
and can cause severe injury..
,, Always wear safety glasses or eye
shields when starting and while using
your mower.
• Dress properly. Do not operate mower
when barefoot or wearing open sandals_
Wear only solid shoes with good traction
when mowing,
- Check fuel tank before starting engine.
Do not _l gas tank indoors, when the
engine is nJnnlng or when the engine is

hot.Allowtheengineto coolfor several
minutesbeforefillingtile gastank°Clean
offanyspilledgasolinebeforestartingthe
engine.
, Alwaysmakewheelheightadjustments
beforestarlingyourmower.Never
attemptto dothiswhiletheengineis
running,
°Mow only in daylight or good artificial
light,
OPERATION:
° Keep your eyes and mind on your mower
and the area being cut. Do not let other
interests distract you.
•Do not mow wet or slippery grass, Never
run while operating your mower. Always
be sure of your footing -- keep a firm
hold on the handles and walk.
oDo not pul hands or feet near or under
rotating parts. Keep clear of the discharge
opening at all times.
•Always stop the engine wheneveJ'you
leave or are not using your mower, or
before crossing driveways, walks, roads,
and any gravel.--.covered areas_
. Never direct discharge of materfai toward
bystanders nor allow anyone near the
mower while you are operating it.
• Before cleaning, inspecting, or repairing
your mower, stop the engine and make
absolutely sure the blade and all moving
parts have stopped.. Then disconnect the
spark plug wire and keep it away from the
spark plug to prevent accidental starting.
o Do not continue to run your mower if you
hit a foreign object° Follow the procedure
o_Jttined above, then repair any damage
before restarting and operating you
mower.
. Do not change the governor settings or
overspeed the engine° Engine damage or
personal injury may result.
•Do net operate your mower if it vibrates
abnormally, Excessive vibration is an
indication of damage; stop the engine,
safely check for the cause of vibration
and repair as required.
• Do not run the engirie indoors. Exhaust
fumes are dangerous.
• Never cut grass by pulling the mower
towards you. Mow across the face of
slopes, never up and down or you might
lose your footing. Do nol mow exces-
sively steep slopes, Use cmJtion when
operating the mower on uneven terrain or
when changing direclions -- maintain
good fooling.
• Never operate your mower without
proper guards, plates, grass catcher or
other safety devices in place.
MAINTENANCE AND STORAGE:
° Check the blade and the engine mount-
ing bolts often to be sure they are
tightened properly,
•Check all boils, nuts and screws al
frequent intervals for proper tightness to
be sure mower is in safe working
condition.
• Keep all safety devices in place and
working.
o To reduce fire hazard, keep time engine
free of grass, leaves or excessive grease
and oil
° Check grass catcher often for deteriora-
tion and wear and replace worn bags,,
Use only replacement bags that are
recommended by and comply with
specifications of the manufacturer of your
mower.
° Always keep a sharp blade on your
mower.
• Allow engine to cool before storing in any
enclosure°
o Never store mower with fuel in the tank
inside a building where fumes may reach
an open flame or an ignition source such
as ahot water heater, space heater,
clothes dryer, etc.
CAUTION: Always disconnect spmk plug
wire and place wire where it cannot
contacl, spark plug in Order to prevent
accidental starting when setting up,
transporting, adjusting or making repairs.
WARNING
The engine exhaust from this product
contains chemicals known to the State of
California to cause cancer, birth defects, or
other reproductive harm.
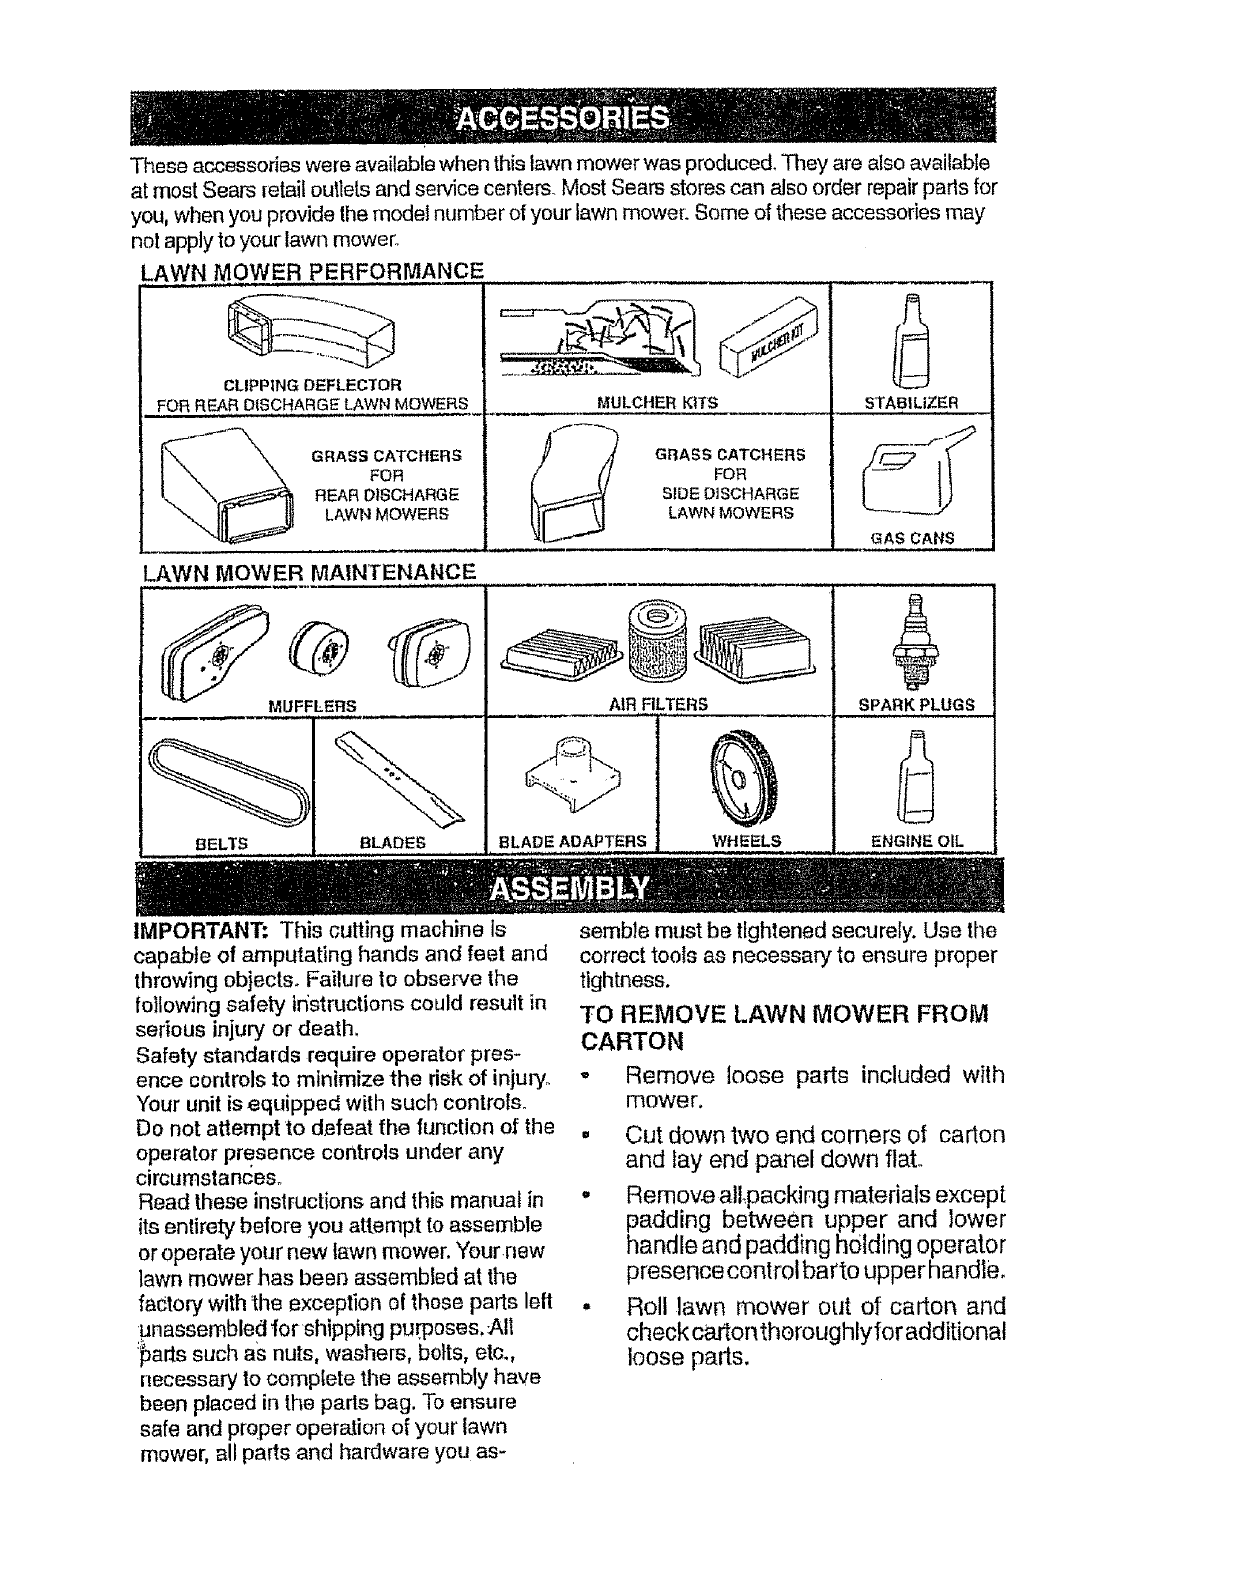
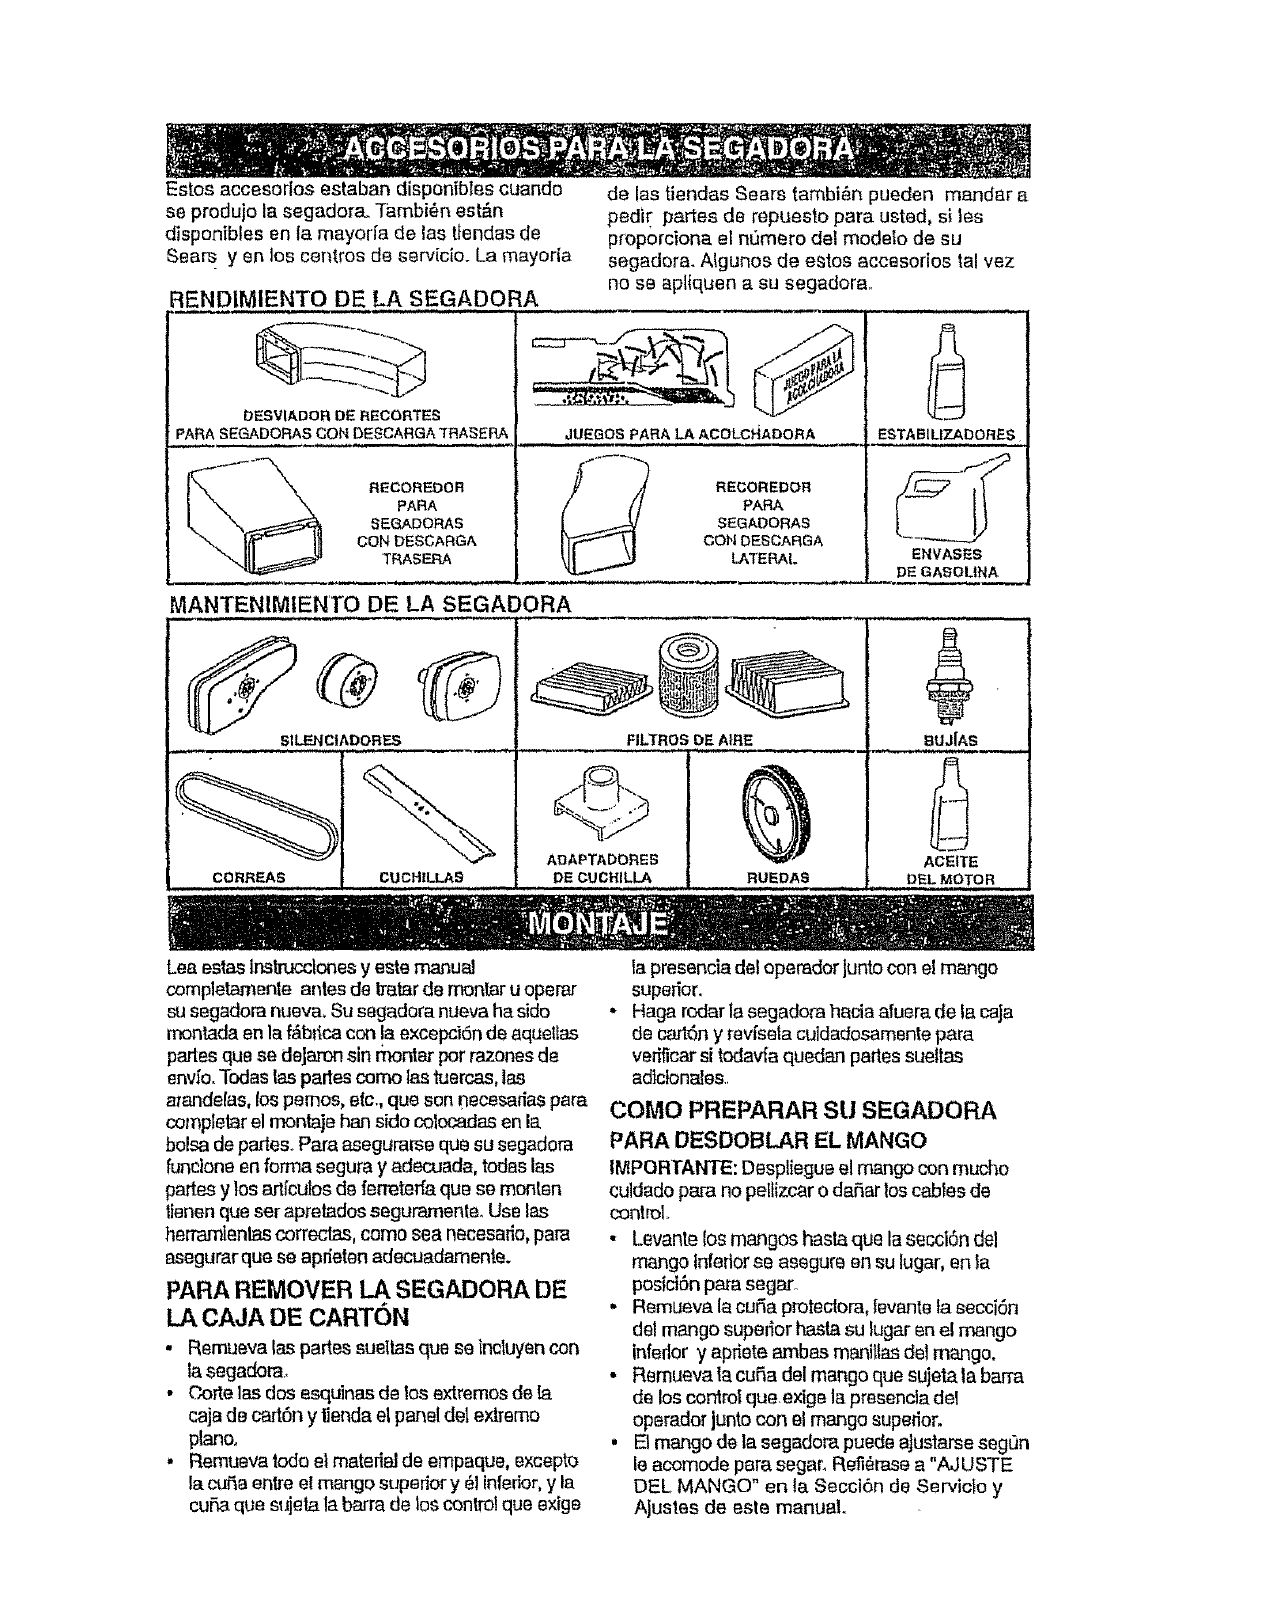
Theseaccessorieswereavailablewhenthislawnmowerwasproduced.Theyarealsoavailable
atmostSearsretailoutletsandservicecenters.MostSearsstorescanalsoorderrepairpartsfor
you,whenyouprovidethernodelnumberofyourlawnmower:Someoftheseaccessoriesmay
nolapplytoyourlawnmower.
LAWN MOWER PERFORMANCE
CLIPPING DEFLECTOR
FOF_ REAR DtSCHARGE LAWN MOWERS
GRASS CATCHERS
FOR
REAR OtSCHARGE
LAWN MOWERS
MULCHER KITS
GRASS CATCHERS
FOR
StDEDISCHARGE
LAWN MOWERS
STABILIZER
GAS CANS
LAWN MOWER MAINTENANCE
MUFFLERS
BELTS
AIR FILTERS SPARK PLUGS
BLADE ADAPTERS _WHEELS . ENGINE OIL
IMPORTANT; This cutting machine Is
capable of amputating hands and feet and
throwing objects. Failure to observe the
following safety ir_structions could result in
serious injury or death,
Safety standards require operator pres-
ence controls to minimize the risk of injury.
Your unit is equipped with such controls.
Do not attempt to defeat the function of the
operator presence controls under any
circumstances.
Read these instructions and this manual in
its entirety before you attempt to assemble
or operate your new lawn mower, Your new
lawn mower has beer} assembled at the
factory with '_he exception of those parts left
unassembled for shipping purposes...All
:_ar_s such as nuts, washers, bolts, etc.,
necessary to complete the assembly have
been placed in the parts bag. To ensure
safe and proper operation of your lawn
mower, all parts and hardware you as-
semble must be tightened securely. Use the
correct tools as necessary to ensure proper
tightness.
TO REMOVE LAWN MOWER FROM
CARTON
• Remove loose parts included with
mower.
• Cut down two end corners of carton
and lay end panel down flat.
•Remove alLpacking materials except
padd=ng between upper and lower
handle and padding holding operator
presence control barto upper handte.
• Roll lawn mower out of carton and
check cartonthoroughlyfor additional
loose parts.
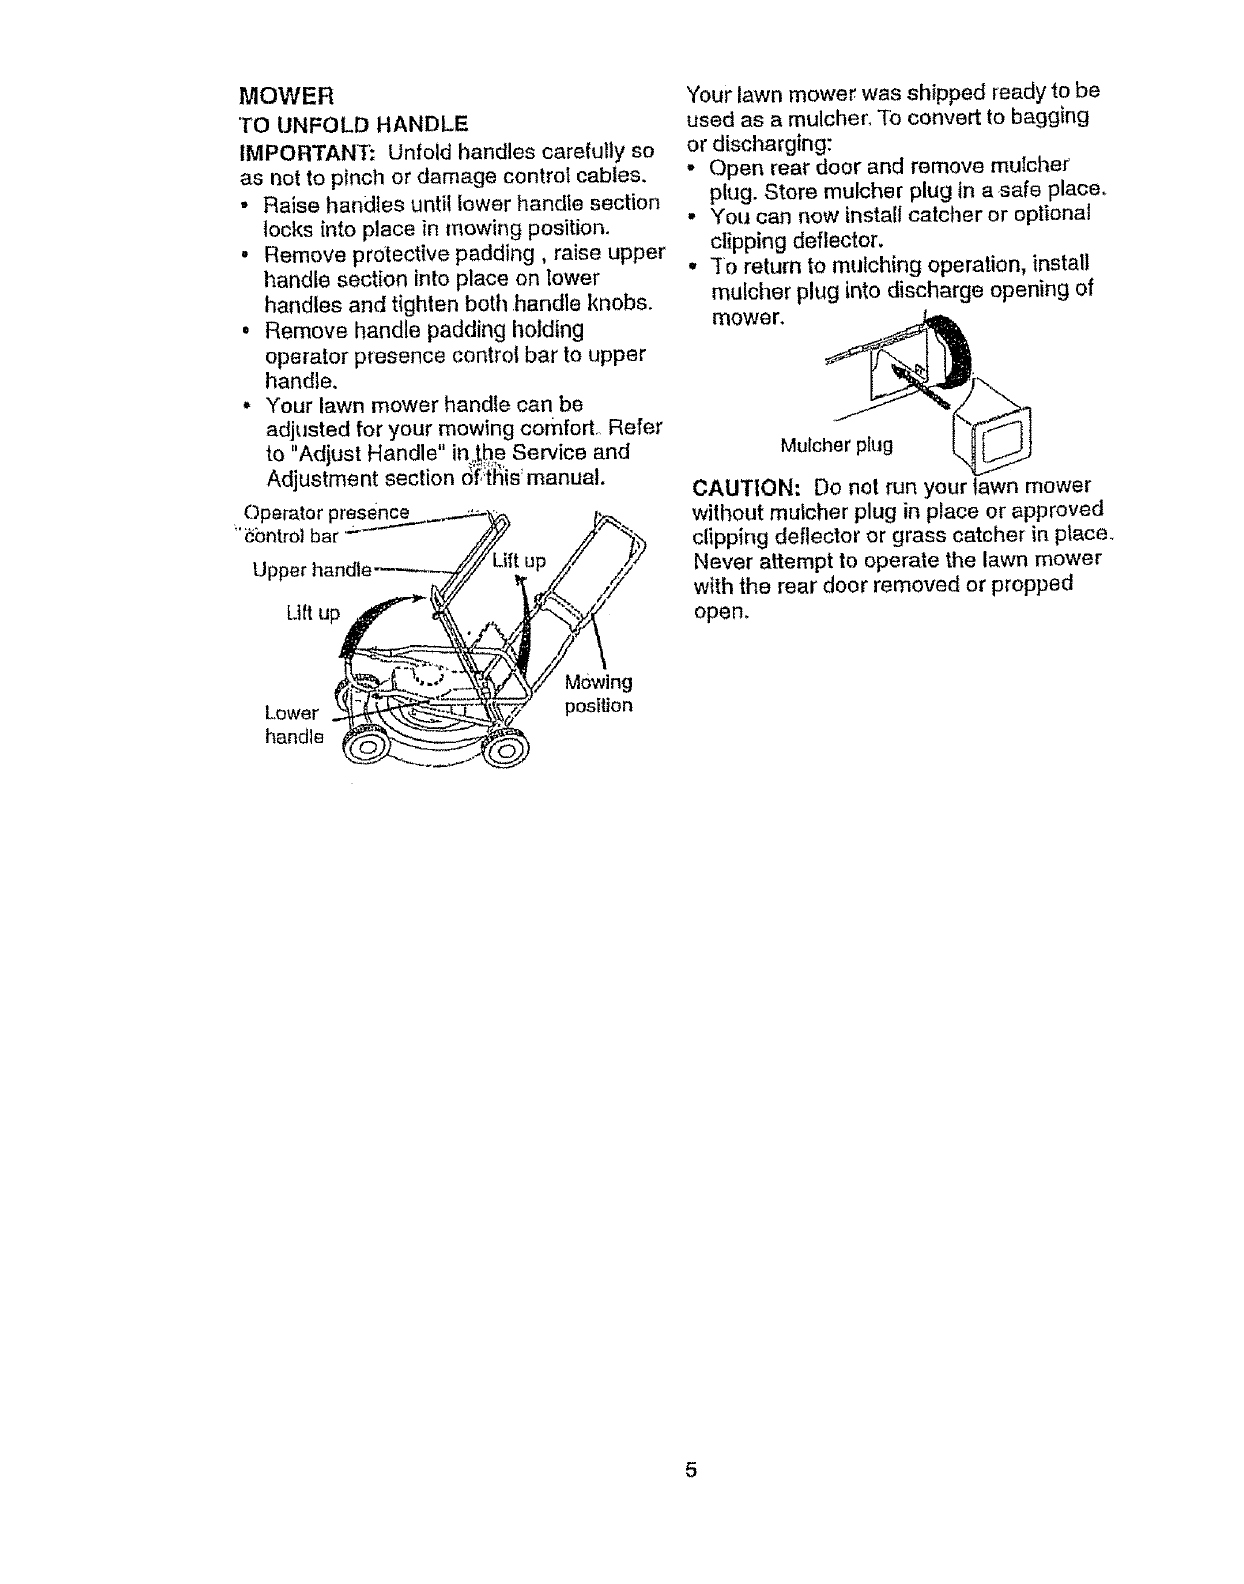
MOWER
"TO UNFOLD HANDLE
IMPORTANT'; Unfold handles carefully so
as not to pinch or damage controT cables.
oRaise handles until lower handle section
locks into place in mowing position.
, Remove protective padding, raise upper
handle section into place on lower
handles and tighten both handle knobs.
o Remove handle padding holding
operator presence control bar to upper
handle,
•Your lawn mower handle can be
adjusted for your mowing comfort., Refer
to "Adjust Handle" in.._he Service and
Adjustment section c_:t'i_is'manual.
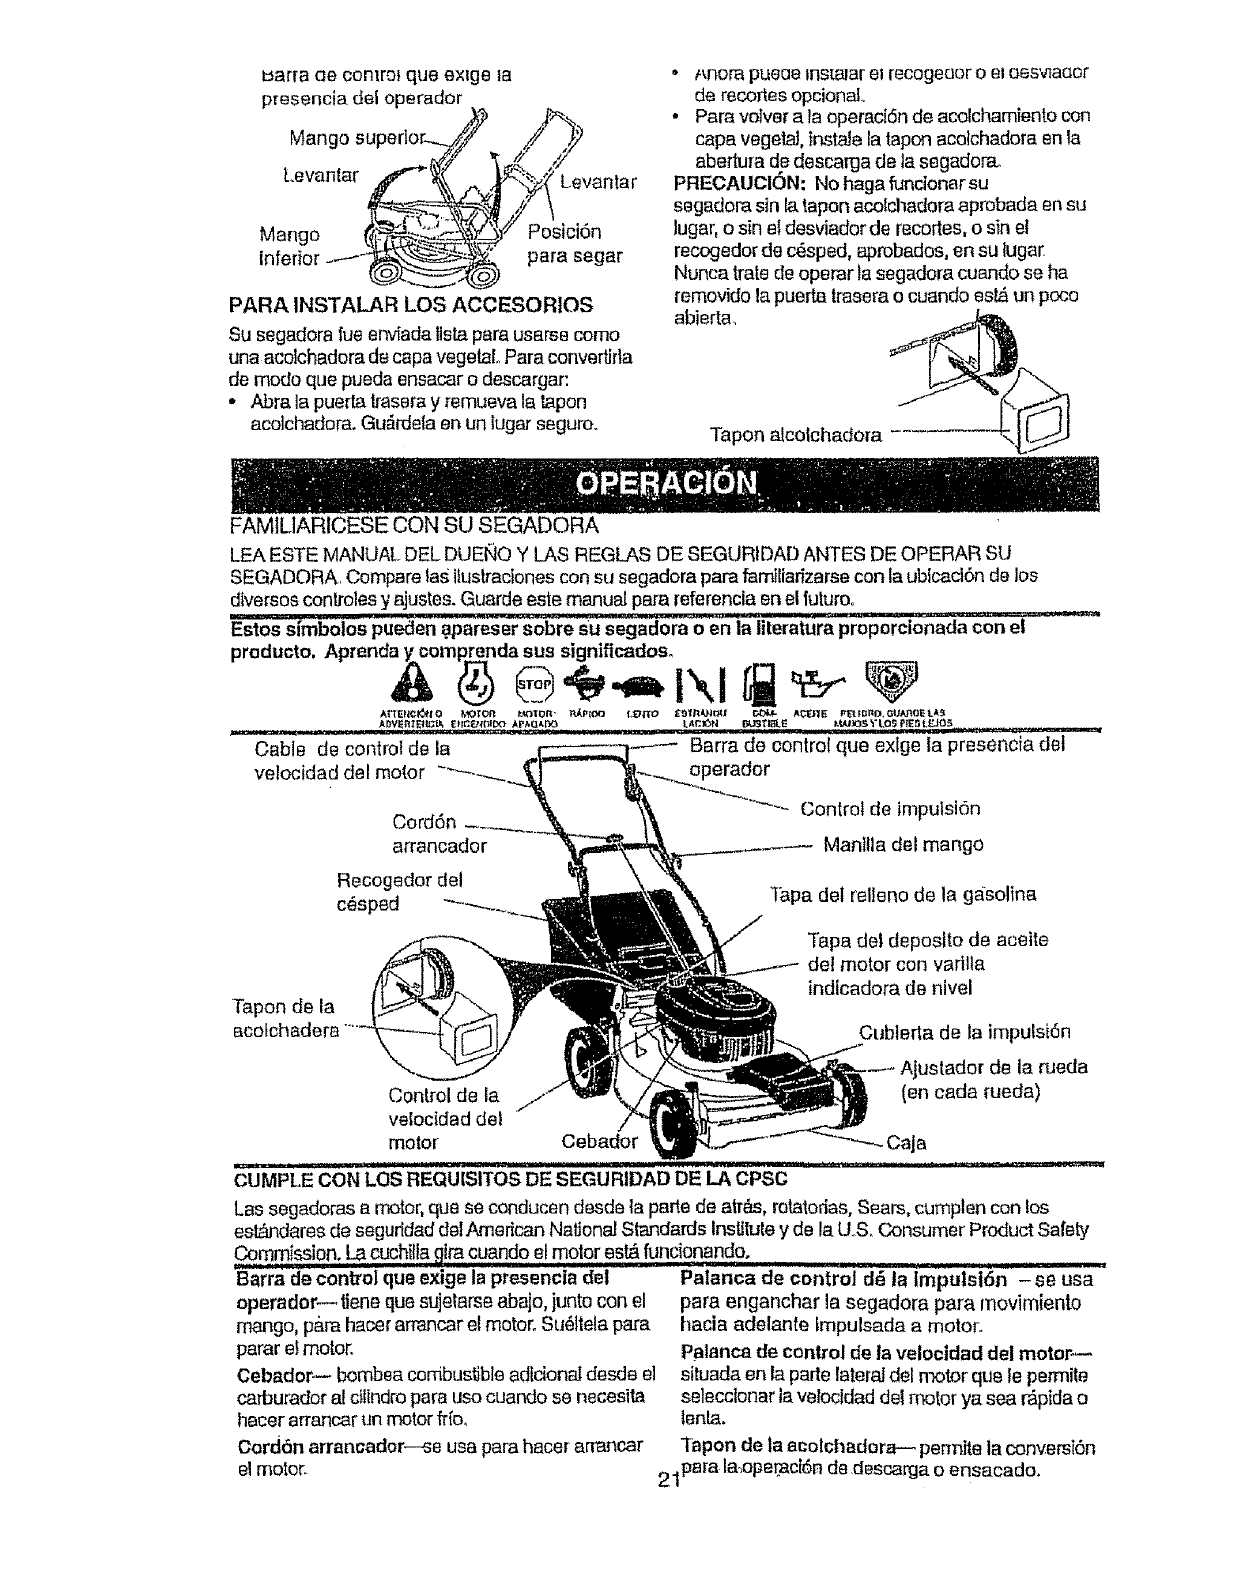
Operator presence _, _,_
Upper handle ------_--_//_ Lift uP/////'
"four lawn mower was shipped ready to be
used as a mulcher, To convert to bagging
or discharging:
- Open rear door and remove muIcher
plug. Store mulcher plug tn a safe place.
- You can now install catcher or optional
clipping deflector,
• [o return to mulching operation, install
mulcher plug into discharge opening of
mower.
Mulcher plug
CAUTION" Do not run your lawn mower
without mulcher plug in place or approved
clipping deflector or grass catcher in place.
Never attempt to operate the lawn mower
with the rear door removed or propped
open.
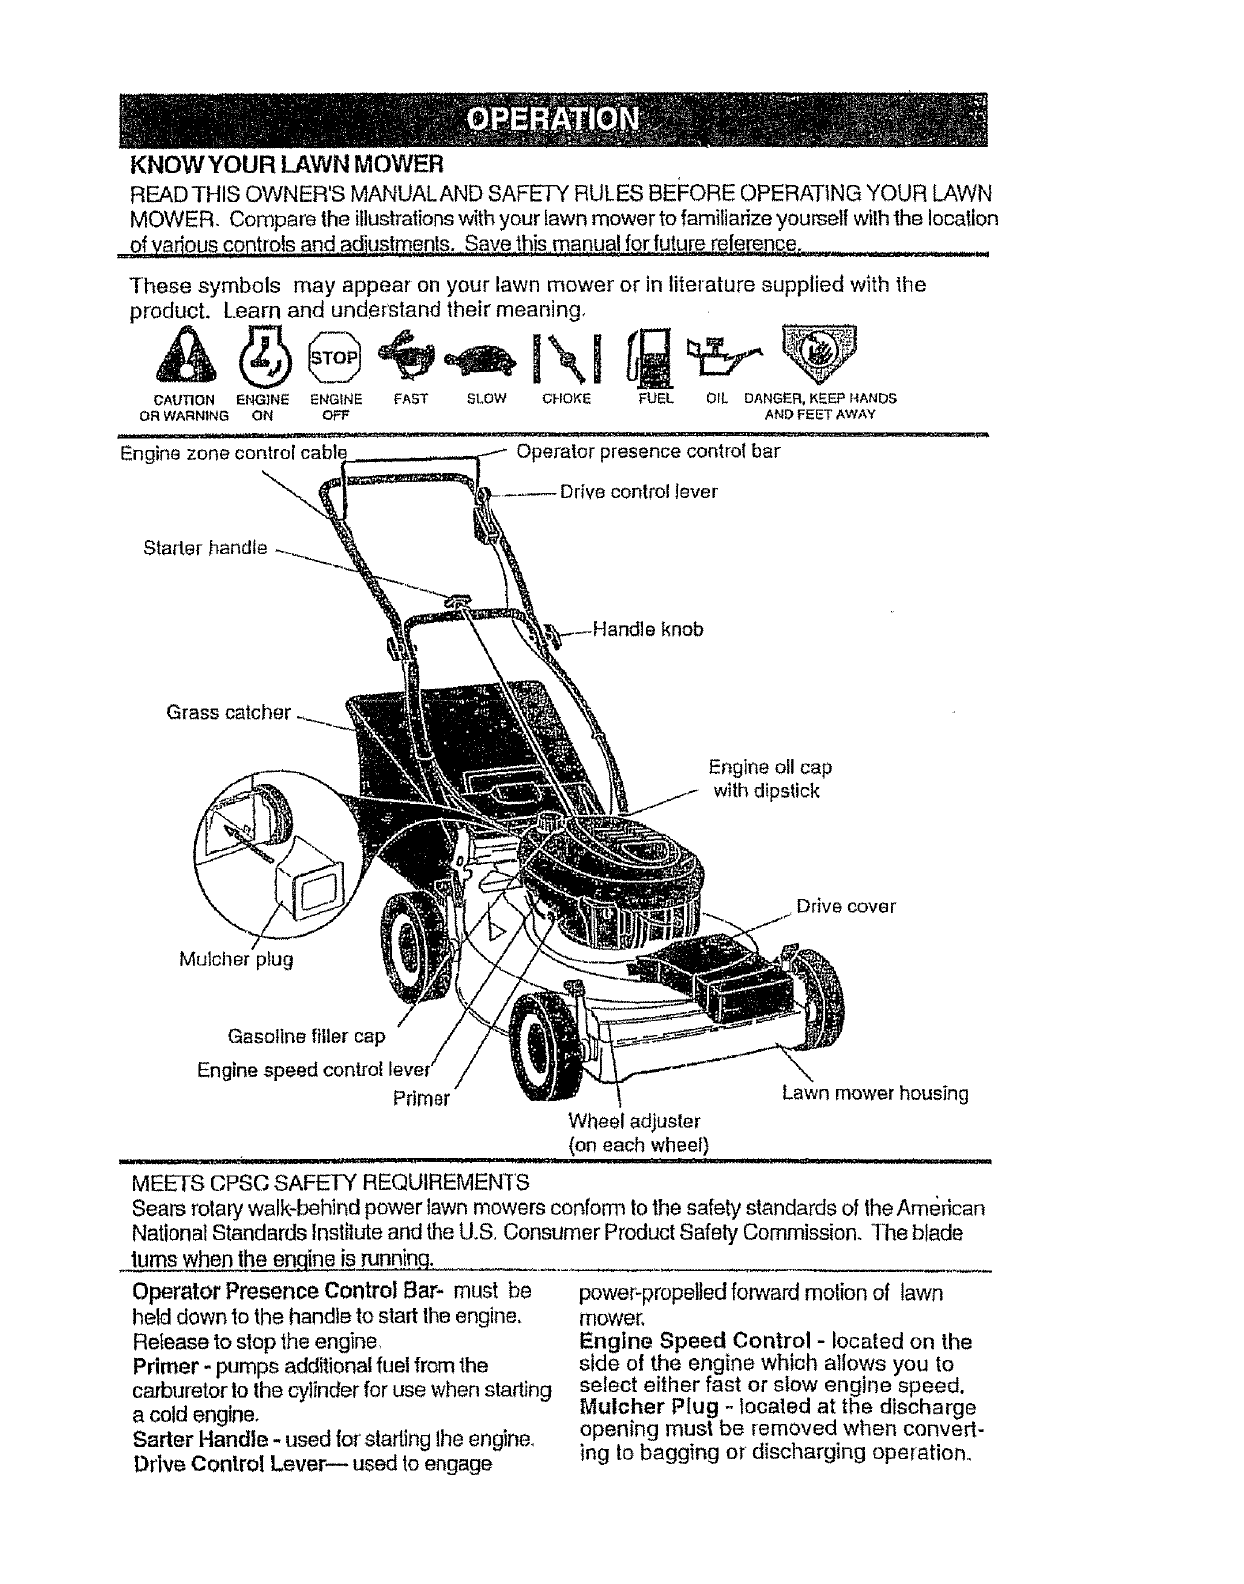
KNOW YOU R LAWN MOWER
READ THIS OWNER'S MANUALAND SAFETY RULES BEFORE OPERATING YOUR LAWN
MOWER. Compare the illustrations with your lawn mower to familiarize yourself wilh the location
of yar_ous cpl_!rois and adiustments. Save this manual for future reJerence.,.__.,.,_..__.._.__m..
These symbols may appear on your lawn mower or in literature supplied with the
product. Learn and understand their meaning.
CAUTION ENG}N_ ENGINE FAST SLOW CHOKE
OR WARNING ON OP3 _
FUEL OIL DANGER, KEEP HANbS
AND FEET AWAY
Engine zone control cabl_ Operator presence contro{ bar
_-,..., rive control lever
Starter handle
knob
Grass catcher
Engine oil cap
with dipstick
Drive cover
Mutcher plug
Gasoline filler cap
Engine speed con|rol
Primer Lawn mower housing
Wheel adjuster
(on each wheel) . . _au_,._.. iii,
MEETS CPSC SAFETY REQUIREMENTS
Sears rotary walk-behind power lawn mowers conform to the safety standards of the Ame.rican
National Standards Institute and the U.S. Consumer Product Safety Commission. The blade
lures when the enqine is runninL ...........
Operator Presence Control Bar- must be
held down to the handle to start the engine,
Release to stop the engine,
Primer - pumps additional fuel from the
carburetor to the cylinder for use when starting
a cold engine,
Sarter Handle - used tor starting lhe engine°
Drive Control Lever-- used to engage
powe[_propelled forward motion of lawn
mower.
Engine Speed Control - located on the
side of the engine which allows you to
select either fast or slow engine speed.
Mulcher Plug -. located at the discharge
opening must be removed when convert-
ing to bagging or discharging operation.
Theoperationofanylawnmowercan result in
foreign objects thrown into the eyes, which can
resuii in severe eye damage. Always wear
safety glasses or eye shields while operating
your lawn mower or performing any adjust-
ments or repairs. We recommend a wide
vision safety mask over the speclacles or
standard safely glasses.
HOW TO USE YOUR LAWN MOWER
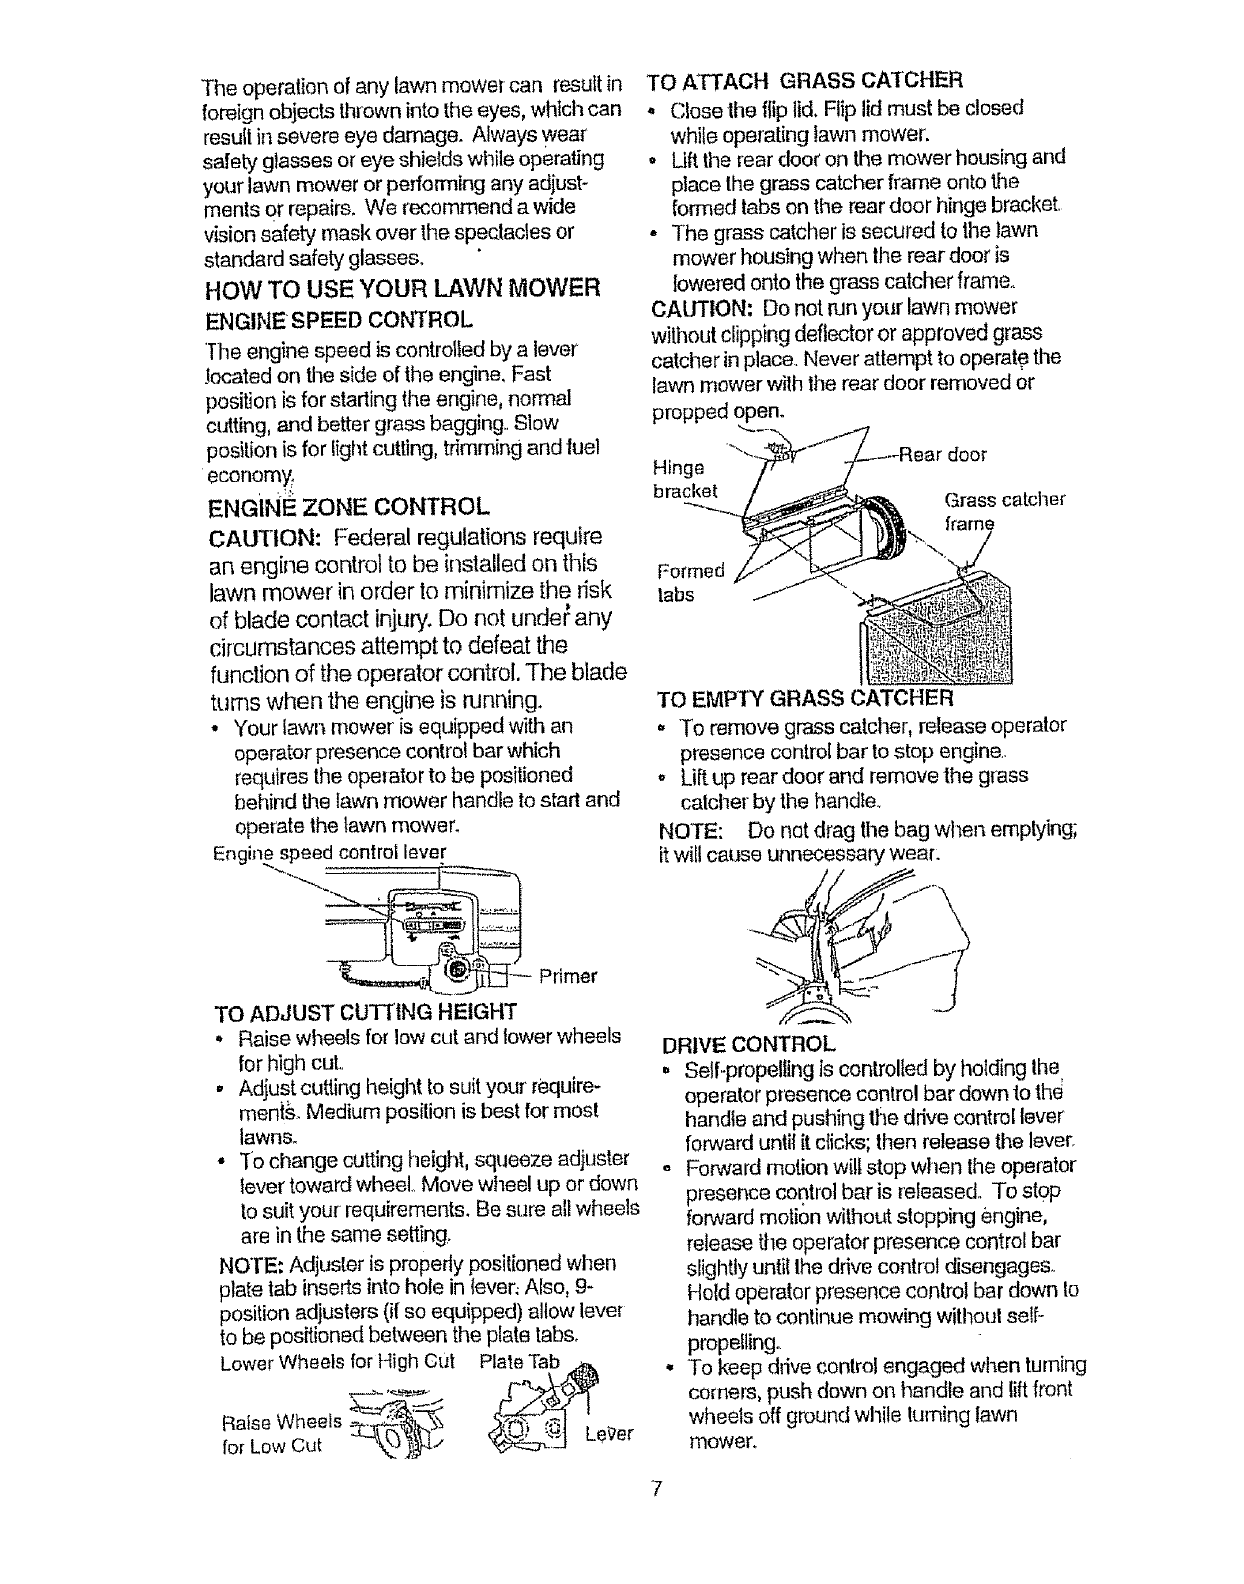
ENGINE SPEED CONTROL
T he engine speed is controlled by a lever
.located on the side of the engine. Fast
position is for starling the engine, normal
cutting, and better grass bagging,, Slow
position is for light cutting, trimming and fue!
economy,
ENGINE ZONE CONTROL
CAUTION: Federal regulations require
an engine control to be installed on this
lawn mower in order to minimize the risk
of blade contact injury. Do not undJ any
circumstances attempt to defeat the
function of the operator control. The blade
turns when the engine is running.
• Your lawn mower is equipped with an
operator presence control bar which
requires the operator to be positioned
behind lhe fawn mower handle to start and
operate the lawn mower.
Engine speed control lever
TO ADJUST CUTTING HEIGHT
•Raise wheels for low cut and lower wheels
for high cut.,
,Adjust cutting height to suit your require-
meni& Medium position is best for most
lawns.
•"10 change cutting height, squeeze adjuster
fever toward wheel,, Move wheel up or down
to suit your requirements. Be sure all wheels
are in the same setting.
NOTE:Adjusteris properly positioned when
plate tab inserts into hole in Iever, Also, 9-
position adjusters (if so equ{pped) allow lever
to be positioned between the plate tabs,
Lower Wheels for High Grit Plate Tab =-_
Raise Wheels _-_
for Low Cut "_._,_1 ','0) '_ Le#er
TO ATTACH GRASS CATCHER
° Close the flip lid. Flip lid must be closed
while operating fawn mower.
. Uft the rear door on the mower housing and
place the grass catcher frame onto the
formed tabs on the rear door hinge bracket.
o The grass catcher is secured to the lawn
mower housing when the rear door is
lowered onto lhe grass catcher frame,,
CAtYrlON: Do not run your lawn mower
without clipping deflector or approved grass
catcher in place., Never attempt to operate the
lawn mower wilh the rear door removed or
propped open.
Hinge
bracket Grass catcher
frame
Formed
tabs
TO EMP'TY GRASS CATCHER
. To remove grass catcher, release operator
presence control bar to stop engine..
° Lift up rear door and remove lhe grass
catcher by the handle.
NOTE: Do net drag tile bag when emplying;
it will cause unnecessary wear.
DRIVE CONTROL
. Self-propelling is controlled by holding the
operator presence control bar down to the
handle and pushing the drive control lever
forward until it clicks; then release the lever.
o Forward motion will stop when the operator
presence control bar is released, To slop
forward molion without stopping engine,
release the operalor presence control bar
slightly until the drive control disengages,.
Hold operator presence control bar down Io
handle to continue mowing withoul self
propelling.
,, To keep drive control engaged when turning
comers, push down on handle and lift front
wheels off ground while turning lawn
mower.
Operalor presence Ddve
contro .bar\L .....,4,' --. on rel
To engage \' "_ .4=....... ._
drive control
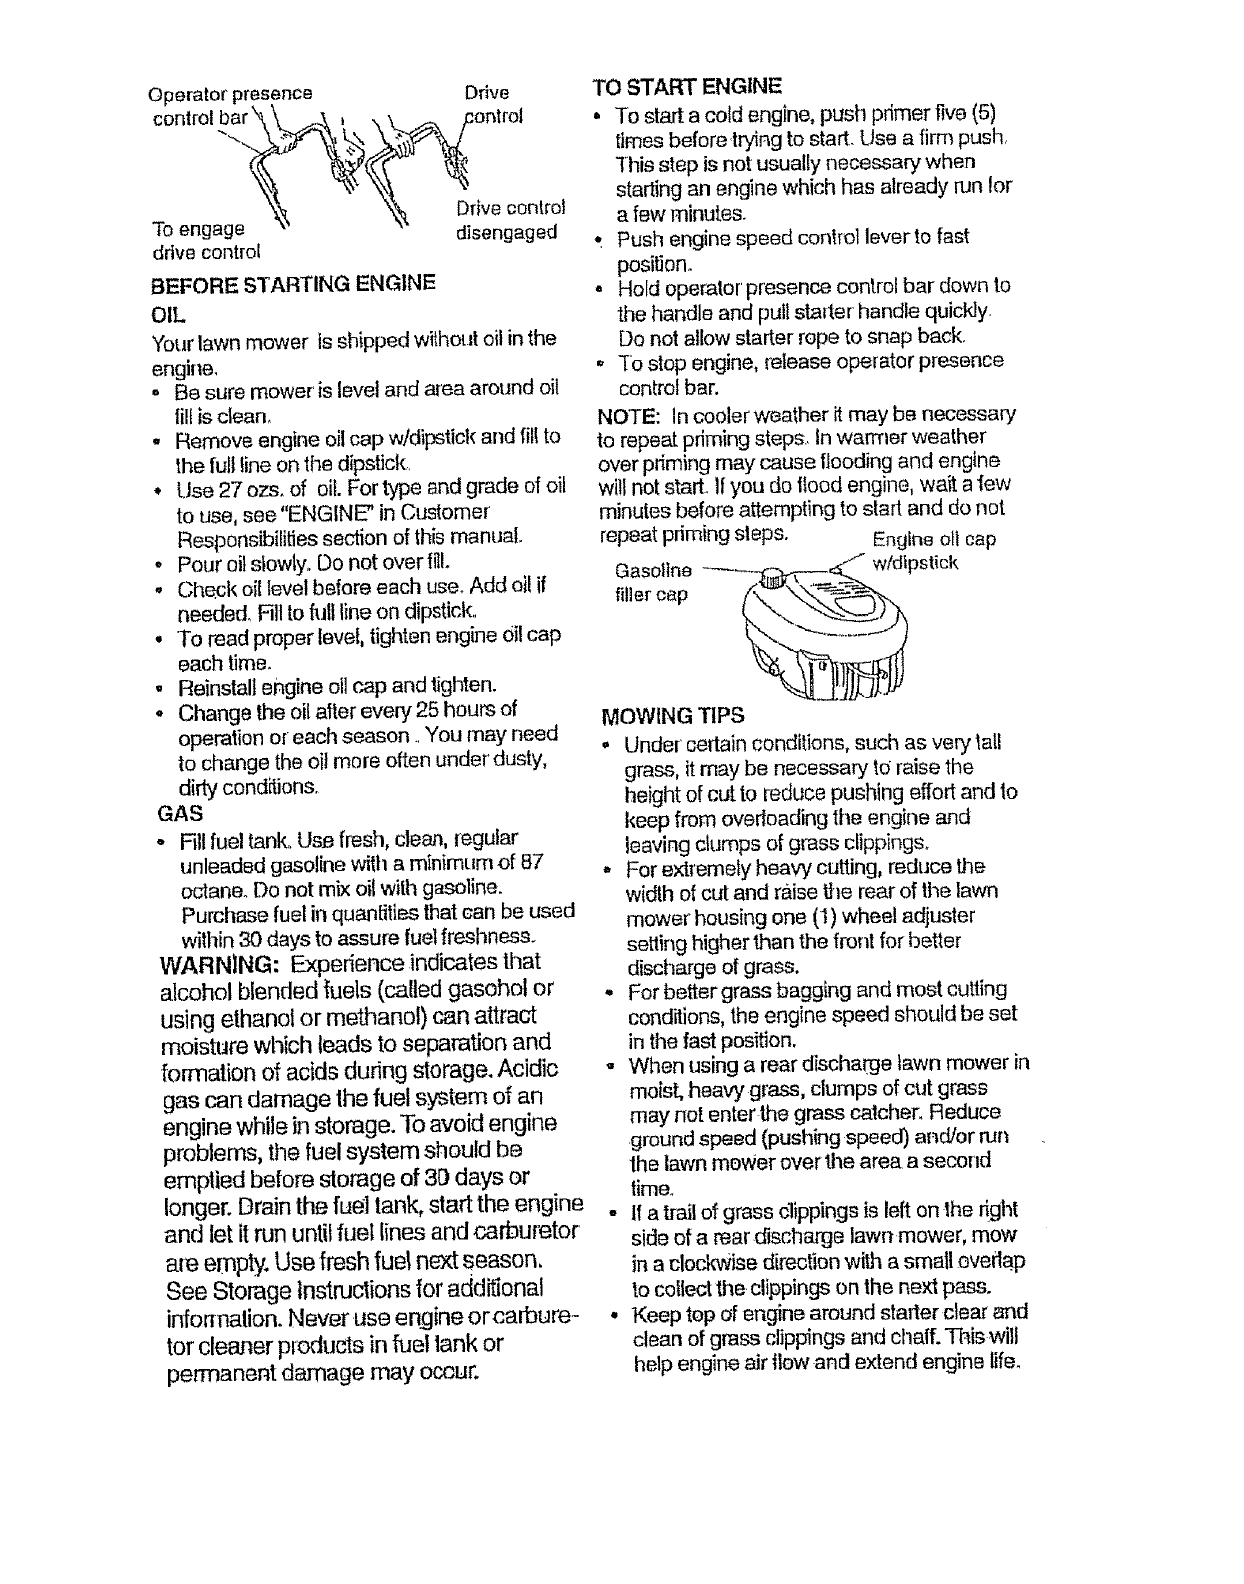
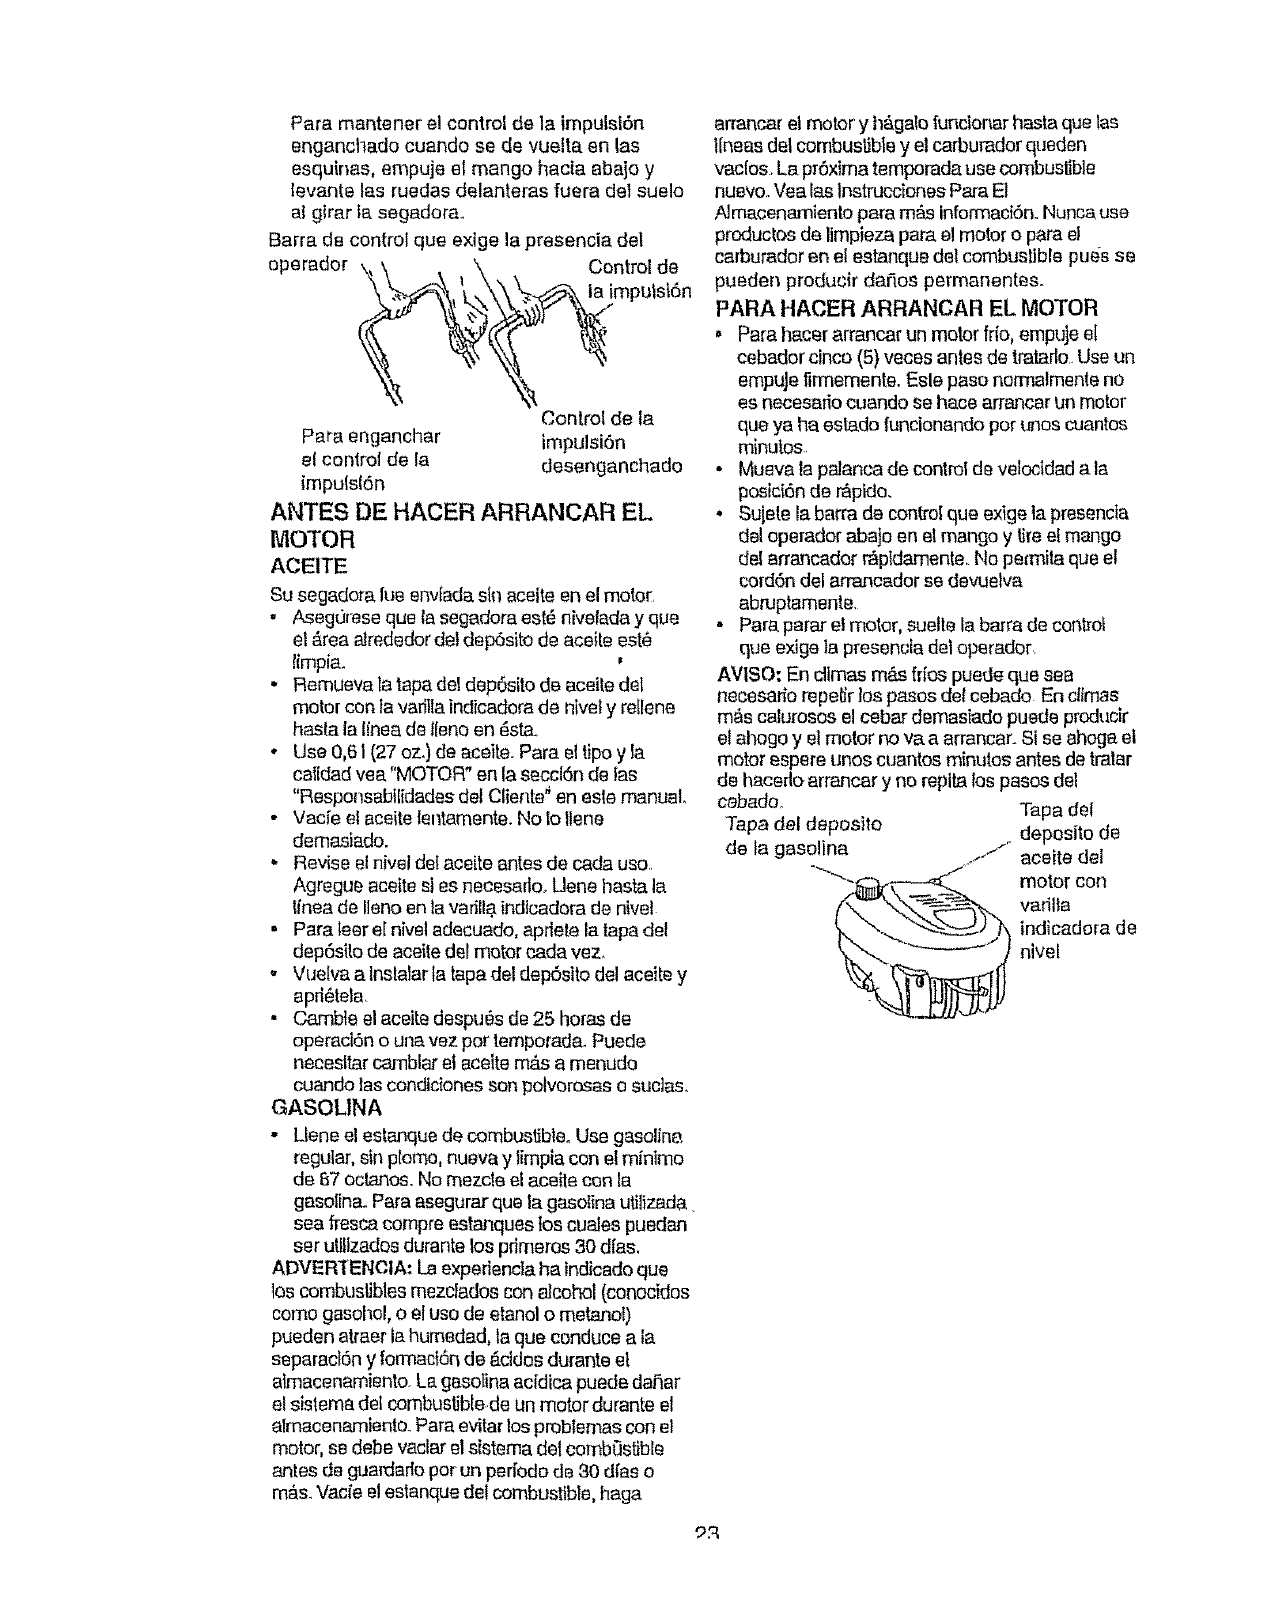
BEFORE STARTING ENGINE
OIL
Your lawn mower is shipped wiihot_t oil in the
engine,
', Be sure mower is leve_ and a_ea around off
Ill{ is clean,
,, Remove engine oil cap w!dipstick and fill to
the full fine on the dipstick.
* Use 27 ozs. of oil. For type and grade of oil
to use, see "ENGINE" in Customer
Responsibilities seelion of this manual
o Pour oil slowly. Do not over f&
,, Check oil level before each use. Add oil if
needed. Fill to fiJll line on dipstick°
, To read proper level, tighten engine 0il cap
each time.
,, Reinstall engine eli cap and tighlen.
. Change the oil after every 25 hours of
operation or each season ..You may need
to change the oi! mere often under dusty,
didy condffion&
GAS
o Fill fuel tank, Us_ fresh, clean, fegular
unleaded gasoline with a minimum of 87
octane. Do not mix oil with gasoline.
Purchase fuel in quantilies that oan be used
within 30 days to assure fuel freshness.
WARNING: Experience indicates that
alcohol blended heels (called gasohol or
using ethanol or methano!) can attract
moisture which leads to separation and
formation of acids during storage. Acidic
gas can damage the fuel system of an
engine while in storage. To avoid engine
problems, the fuel system should be
emptied before storage of 3D days or
longer. Drain the fuel tank, start the engine
and let it run until fuel lines and carburetor
ate empty. Use fresh fuel next season.
See Storage Instructions _oradditional
information° Never use engine orcarbure-
tor cleaner products in fuel tank or
permanent damage may o_ur.
TO START ENGINE
• To start a cold engine, push primer five (5)
/_mes before.trying to start. Use a firm push,
This step is not usually necessary when
starting an engine which has already run _or
a few minutes.
•. Push engine speed conlrol lever to fast
position.
- Hold operator presence control bar down to
the handle and pult starter handle quickly.
Do not allow starter rope to snap back.
,, To stop engine, release operator presence
control bar.
NOTE: In cooler'weather it may be necessary
_o repeat priming steps. In warmer weather
over priming may cause flooding and engine
will not start. If you do flood engine, wait a few
minutes before attempting to start and do not
repeat priming slops. Engine oll cap
Gasoline wldipstick
filler cop
MOWING TIPS
. Under certain conditions, such as very _all
grass, it may be necessary tc_raise the
height of cut to reduce pushing effort and to
keep from overloading the engine and
leaving dumps of grass clippings_
" For extremely hea Wcutting, reduce the
width el cut and raise the rear of the lawn
mower housing one (1) wheel adjuster
setting higher than the front for better
discharge of grass,
°For better grass bagging and most cutting
conditions, the engine speed should be set
in the fast pos_on,
" When using a rear discha_e lawn mower in
moist, heavy grass, clumps of cut grass
may not enter lhe grass catcher. Reduce
ground speed (pushing .speed) and/or run
the lawn mower over the area a second
time.
- 1I a frail of grass clippings is left on the fight
side of a rear discharge lawn mower, mow
in a clod_ise direction with a small oved ap
1o coflect bhe.clippings on the next pass.
• Keep top of engine around starter clear and
clean of grass clippings and chalf. This will
help engine air flew and extend engine life_

filledwithdirtanddustwiihuseand
catcherswillcollectlessgrass.Toprevent
"this,regularlyhosecatchersoffwithwater
andletdrybeforeusing.
MULCHINGMOWINGTIPS
IMPORTANT:Forbestperformance,keep
mowerhousingfreeofbuilt-upgrassandtrash.
CleanUNDERSIDEOFMOWERHOUSING
aftereachuse.See"Cleaning"inCUSTOMER
RESPONSIBILITIESsectionofthismanual.
• Thespecialmulchingbladewillrecurthe
grassclippingsmanylimesandreduce
theminsizesothatastheyfallontothe
lawntheywiltdisperseintothegrassand
notbenoticed.Also,themulchedgrasswill
biodegradequicklytoprovidenutrientsfor
thelawn.Alwaysmulchwithyourhighest
engine(blade)speedasthiswillprovidethe
bestrecurringactionof theblades.
- Avoidcuttingyourlawnwhenitiswet.Wet
grasstendstoformclumpsandinterferes
withthemulchingaclion_Thebes!timeto
mowyourlawnistheeadyaftemoonoAtthis
timethegrasshasddedandthenewlycut
areawillnotbeexposed to 1he direct sun.
Gutting helght so that the lawn mower cuts
off only the top one-third of the grass blades.
If the lawn ts overgrown it will be necessary
to raise the height of cut to reduce pushing
effort and to keep from overloading the
engine and leaving clumps of mulched
grass, For extremely heavy mulching,
reduce your widlh of cut, mow slowly and
raise the rear of the lawn mower one wheel
adjuster setting higher than the front.
Cerlain types of grass and grass condilions
may require thai an area be mulched a
second time to completely hide the
clippings° When doing a second cut, mow
across or perpendicular to the first cut path.
Change your cutting pattern from week to
weelc Mow north to south one week then
change to east to west the next Week. This
will help prevent matting and graining of lJ-_e
lawn_
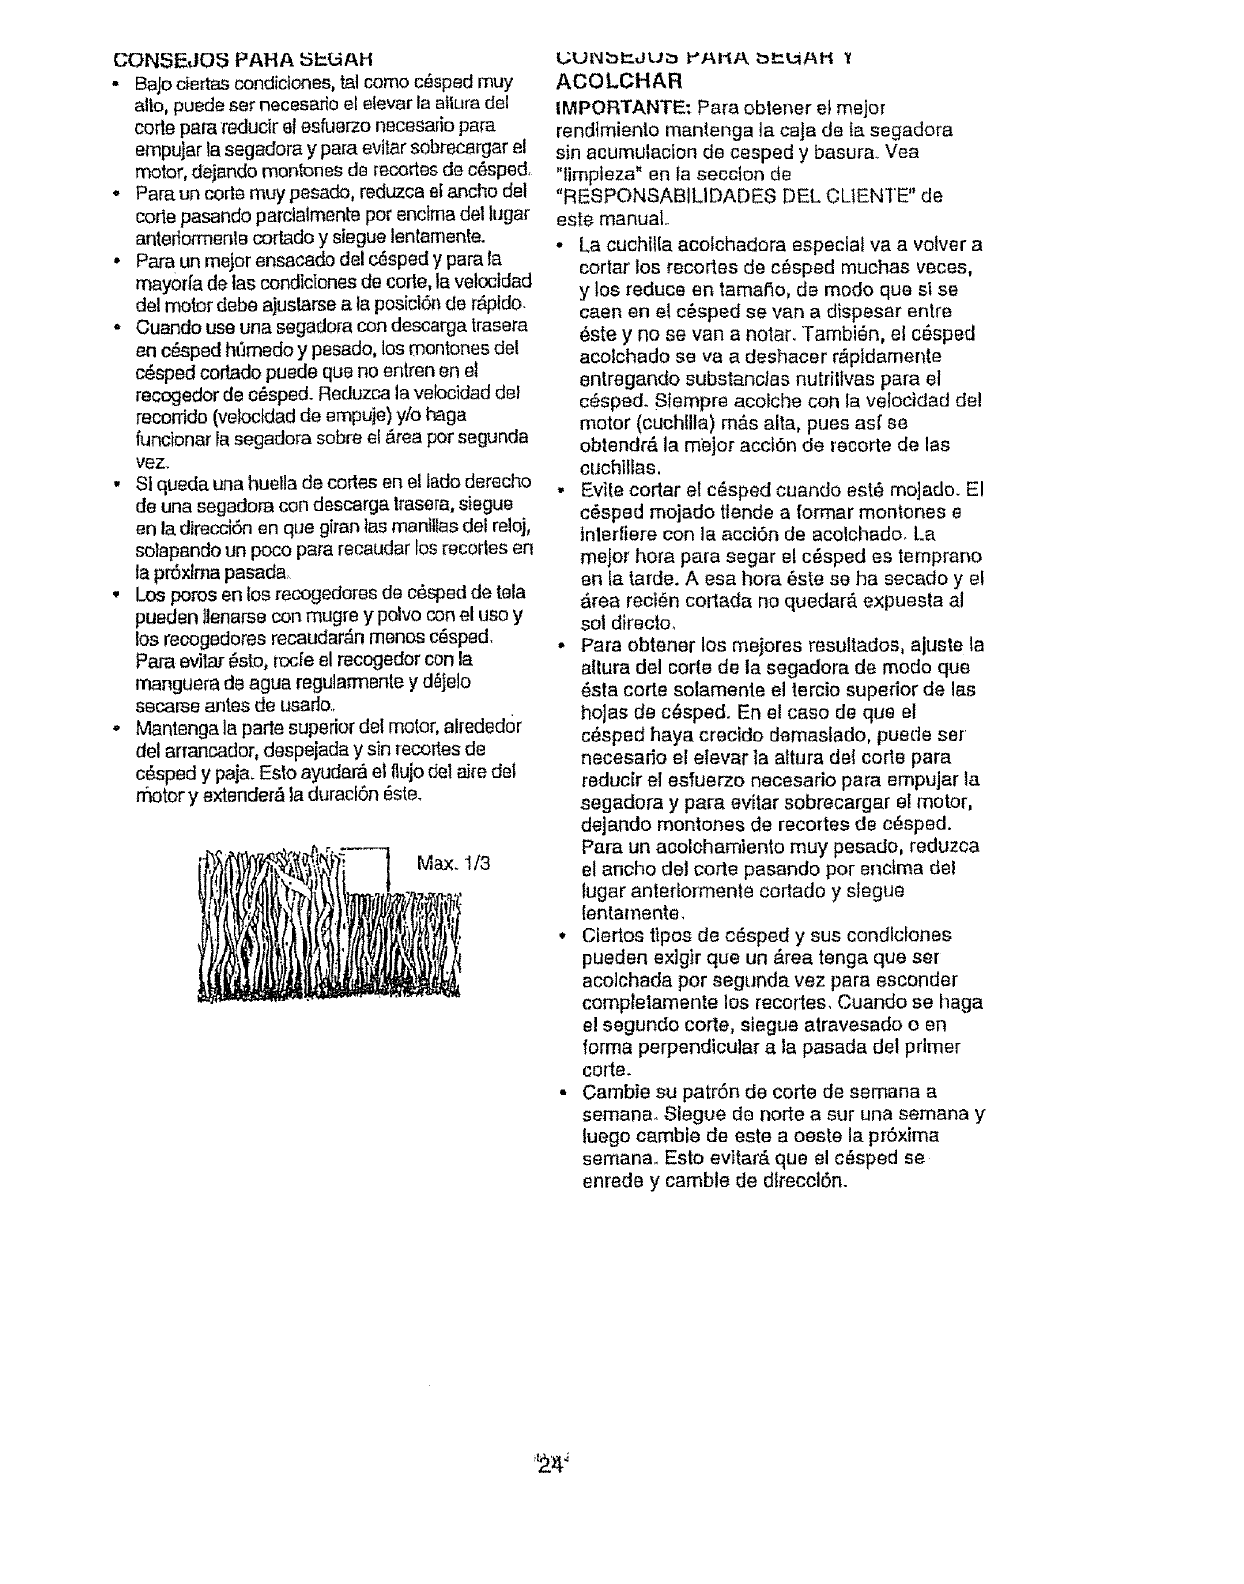
MAX 1/3

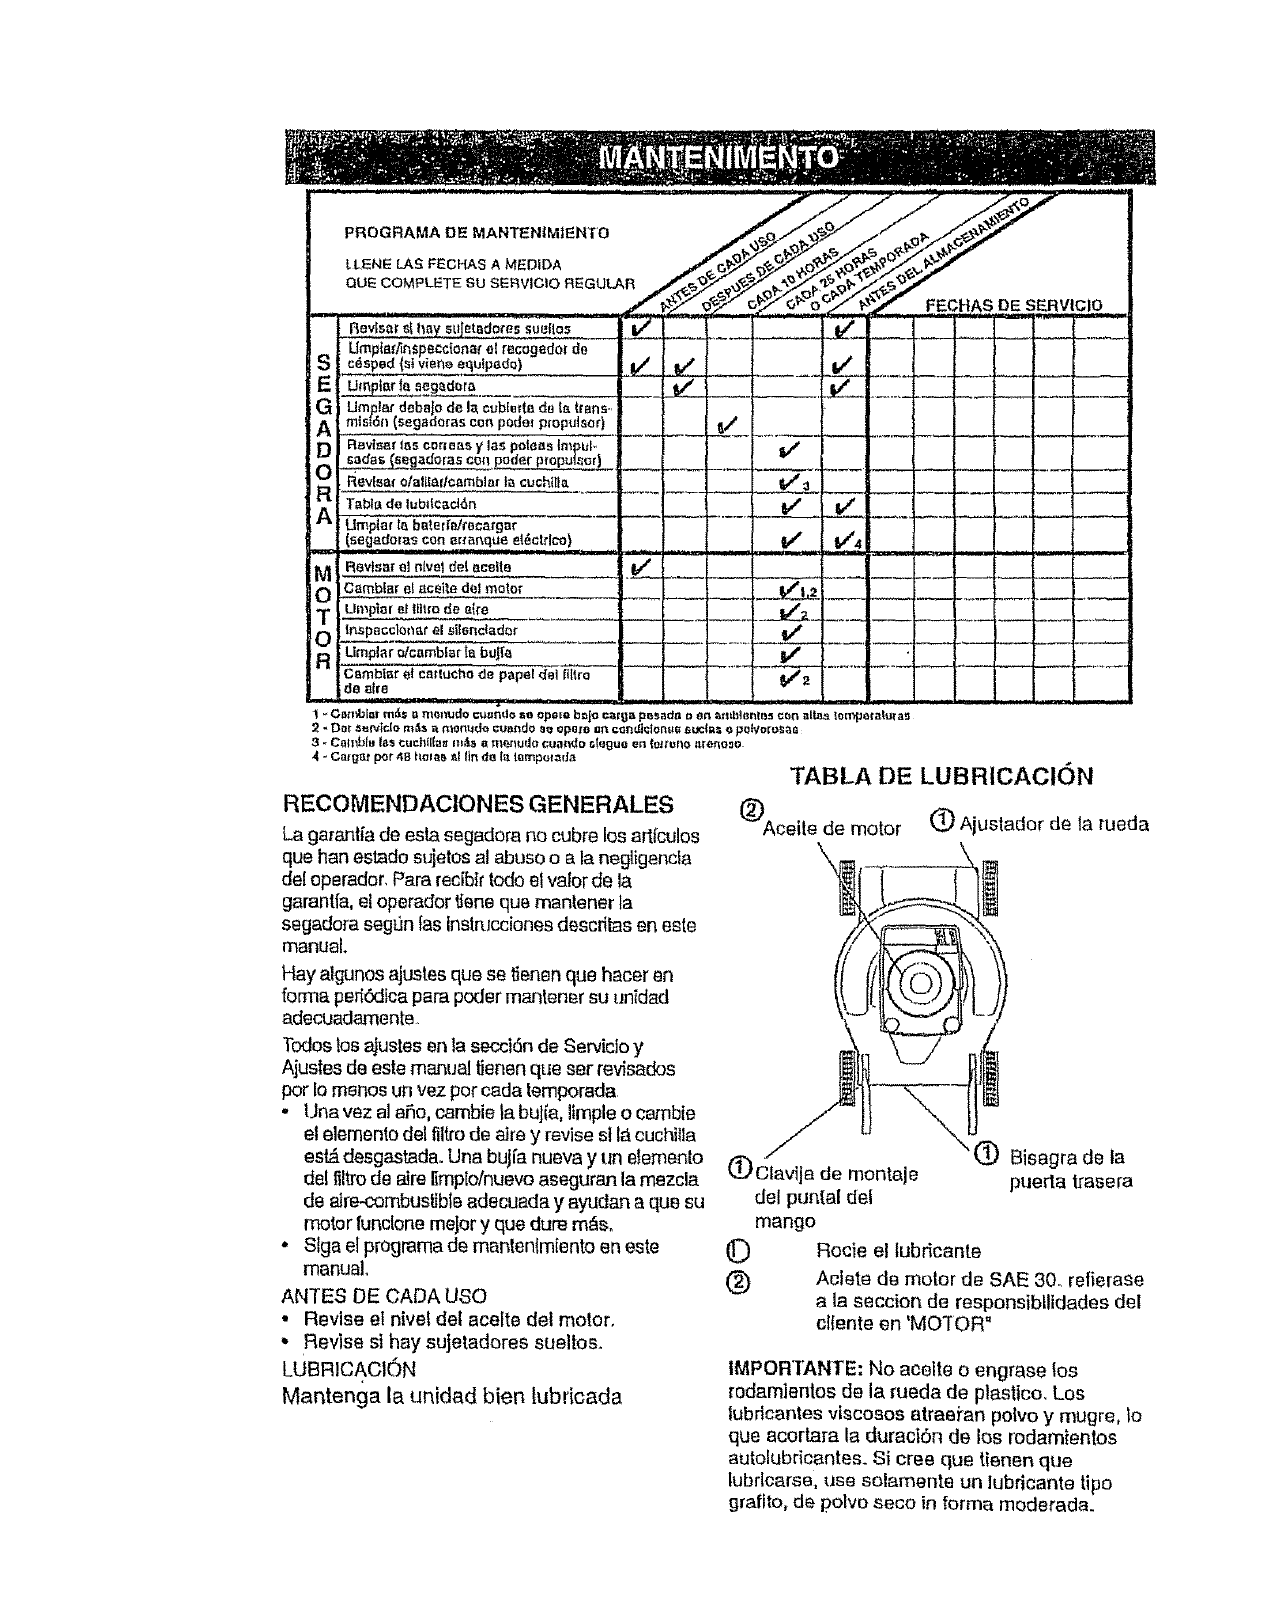
MAINTENANCE SCHEDULE
FILL IN DATES
AS YOU COMPLETE
REGUL^RSERVICE
MClean Lawn Mower _i
_t_ Clean Under bdve Cover
Check drive belt/pulleys i
Ch Bc_dSharp anlR_p},_ce B_ada i
Lubrication Chad I
_rymeche_ _-- _- ....
E_ctdC Sta_ Mowem]
ECheck Engine O, Level ,_':
U Chart e Engine O_ i
P
GClean Air Filter _,
IInspect Mu_fler
N Clean or Replace Spar_ Plug i
EReplace Air Filler Paper Cartridge I I
.'_ERV1GE DATES
y:'-
v"
i/2 I
1-Ck_ng_ mma ohBnwhen operating,_md_ta heavy k_=dor _ high _mblen_ _rJmp_ml_}_os
2-Ssrv_,:,_more ellen whan operatingin d_y or dasty-r,or_lil_m_
3,-Rgp_co bl,'_dm'_mo_, of_.n when _c, wtng in _y soiL
4,1 Chz=_ge 48 hou_ at snd ol"sr_ason
GENERAL RECOMMENDATIONS
The Warranty on this lawn mower does not
cover items that have been subjected to
operator abuse or negligence. To receive full
value from the warranty, operator must maintain
mower as instructed in this manual.
Some adjustments will need to be made
periodically to properly maintain your un]L
All adjustments in the Service and
Adjustmenls section of this manual should be
checked at least once each season.
= Once a year, replace the spark plug, replace
air filter element and check blade for wear. A
new spark plug and clean/new air filter
element assures proper air-fuel mixture and
helps your engine run better and last longer.
• Follow the maintenance schedule in this
manual (_)
BEFORE EACH USE
• Check engine oil level. (_)
•Check for loose fasteners,.
LUBRICATION
Keep unit well lubricated (See "LUBRICATION
CHAR'P).
LUBRICATION CHART
Wheel
Engine oil
Rear (_) Handle bracket
door
hinge mounting pin
SPRAY LUBRICANT
SAE 30 MOTOR OIL REFER TO
ENGINE- CUSTOMER
RESPONSIBILITIES SECTION.
IMPORTANT'. Do not oil or grease plastic
wheel bearings..Viscous lubricants will attract
du_t and dirt that will shorten the life of the self
lubricating bearings, ifyou {eelthey must be
lubricated, use only a dry, powdered graphite
type lubricantsparingly.
10
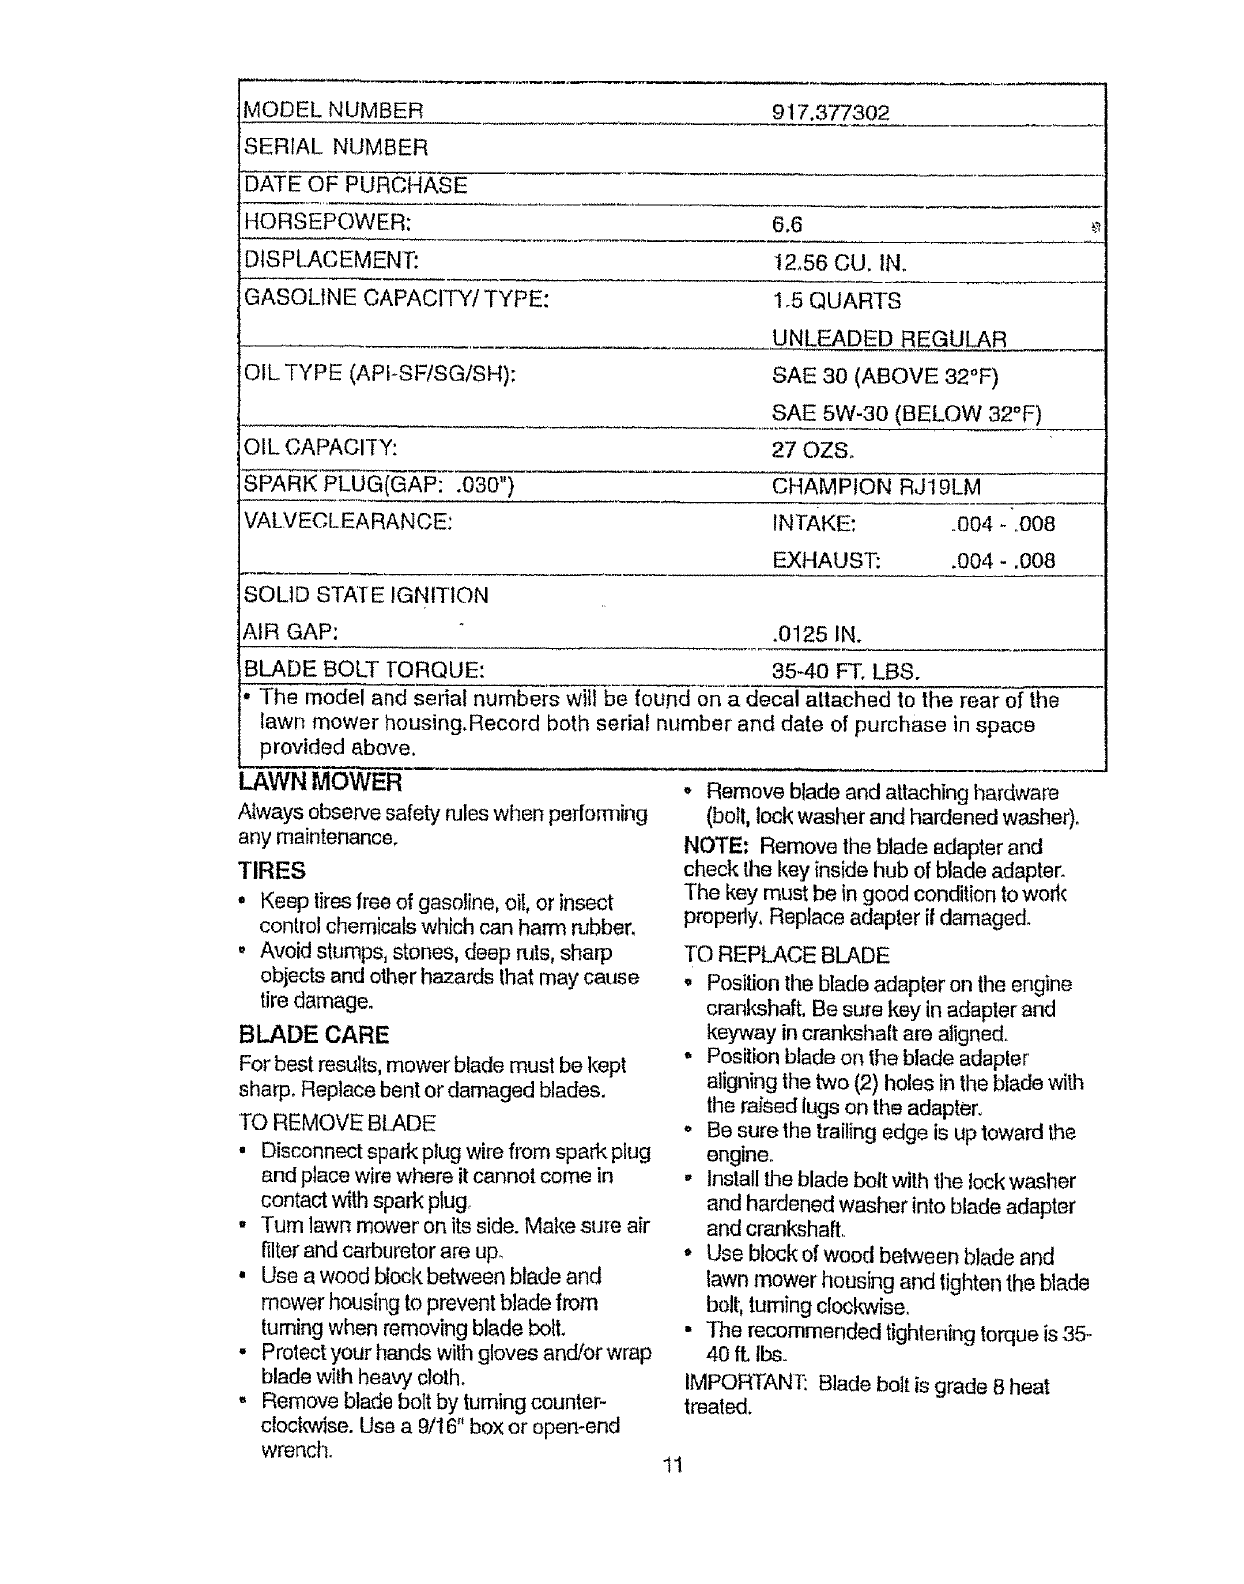
MODEL NUMBER 917.377302
!SERfAL NUMBER
DATE OF PURCHASE
HORSEPOWER; 6,6 _
DISPLACEMENT: 12.56 CU. IN.
GASOLINE CAPACITY/TYPE: 1.5 QUARTS
UNLEADED REGULAR
;OIL TYPE (API-SF/SG/SH): SAE 30 (ABOVE 32°F)
SAE 5W-30 (BELOW 32°F)
OIL CAPACITY: 27 OZSo
SPARK PLUG(GAP: .030") CHAMPION RJlgLM
VALVECLEA RANCE: IN TAKE: ,,004 - .O08
EXHAUST: .004 - .008
SOLID STATE IGNmON
AIR GAP: .0125 IN.
BLADE BOLT TORQUE: 35-40 FT, LBS.
The model and serial numbers will be fou#d on a decal attached to the rear of the
lawn mower housing, Record both serial number and date of purchase in space
provided above.
LAWN MOWER
Always observe safety rules when perforating
any maintenance,
TIRES
• Keep tires free of gasoline, oil, or insect
control chemicals which can harm rubber.
, Avoid stumps, stones, deep ruts, sharp
objects and other hazards that may cause
tire damage.
BLADE CARE
For best results, mower blade must be kept
sharp, Replace bent or damaged blades.
TO REMOVE BLADE
• Disconnect spark plug wire from spark plug
and place wire where it cannot come in
contact with spark plug
. Turn lawn mower on its side. Make sure air
filter and carburetor are upo
, Use a wood block between blade and
mower housing to prevent blade from
turning when removing blade bolt.
•Protect your hands with gloves and/or wrap
blade with heavy cloth.
, Remove blade bolt by turning counter-
clocloMse. Use a 9/16" box or open-end
wrench.
o Remove blade and altaching hardware
(bolt, lock washer and hardened washer).
NOTE: Remove the blade adapter and
check the key inside hub of blade adapter.
The key must be in good condition to work
properly, Replace adapter if damaged.
TO REPLACE BLADE
° Position the blade adapler on the engine
crankshaft, Be sure key in adapter and
keyway in crankshalt ale aligned.
- Position blade on the blade adapler
aligning the two (2) holes in the blade with
the raised lugs on the adapter.
• Be sure the trailing edge is up toward the
engine.
• Install the blade bolt with the lock washer
and hardened washer into blade adapter
and crankshafL
• Use block of wood between blade and
lawn mower housing and tighten the blade
bolt, turning clockwise,
• The recommended tightening torque is 35-
40 ft lbs.
IMPORTANT: Blade bolt is grade 8 heat
treated,
tl
NOTE:Wedonotrecommendsharpening
blade- butifyoudo,besurethebladeis
balanced.
TO SHARPEN BLADE
Care should be taken to keep the blade
balanced. An unbalanced blade will cause
eventual damage to lawn mower or engine°
o The blade can be sharpened with a tile or
on a grinding wheel. Do not attempt to
sharpen while on the mower.
•To check blade balance, drive a nail into a
beam or wall. LeaVe about one inch of the
straight nai! exposed. Place center hole of
blade over the head of the nail. If blade is
balanced, it should remain in a horizontal
position. If either end of the blade moves
downward, sharpen the heavy end until the
blade is balanced.
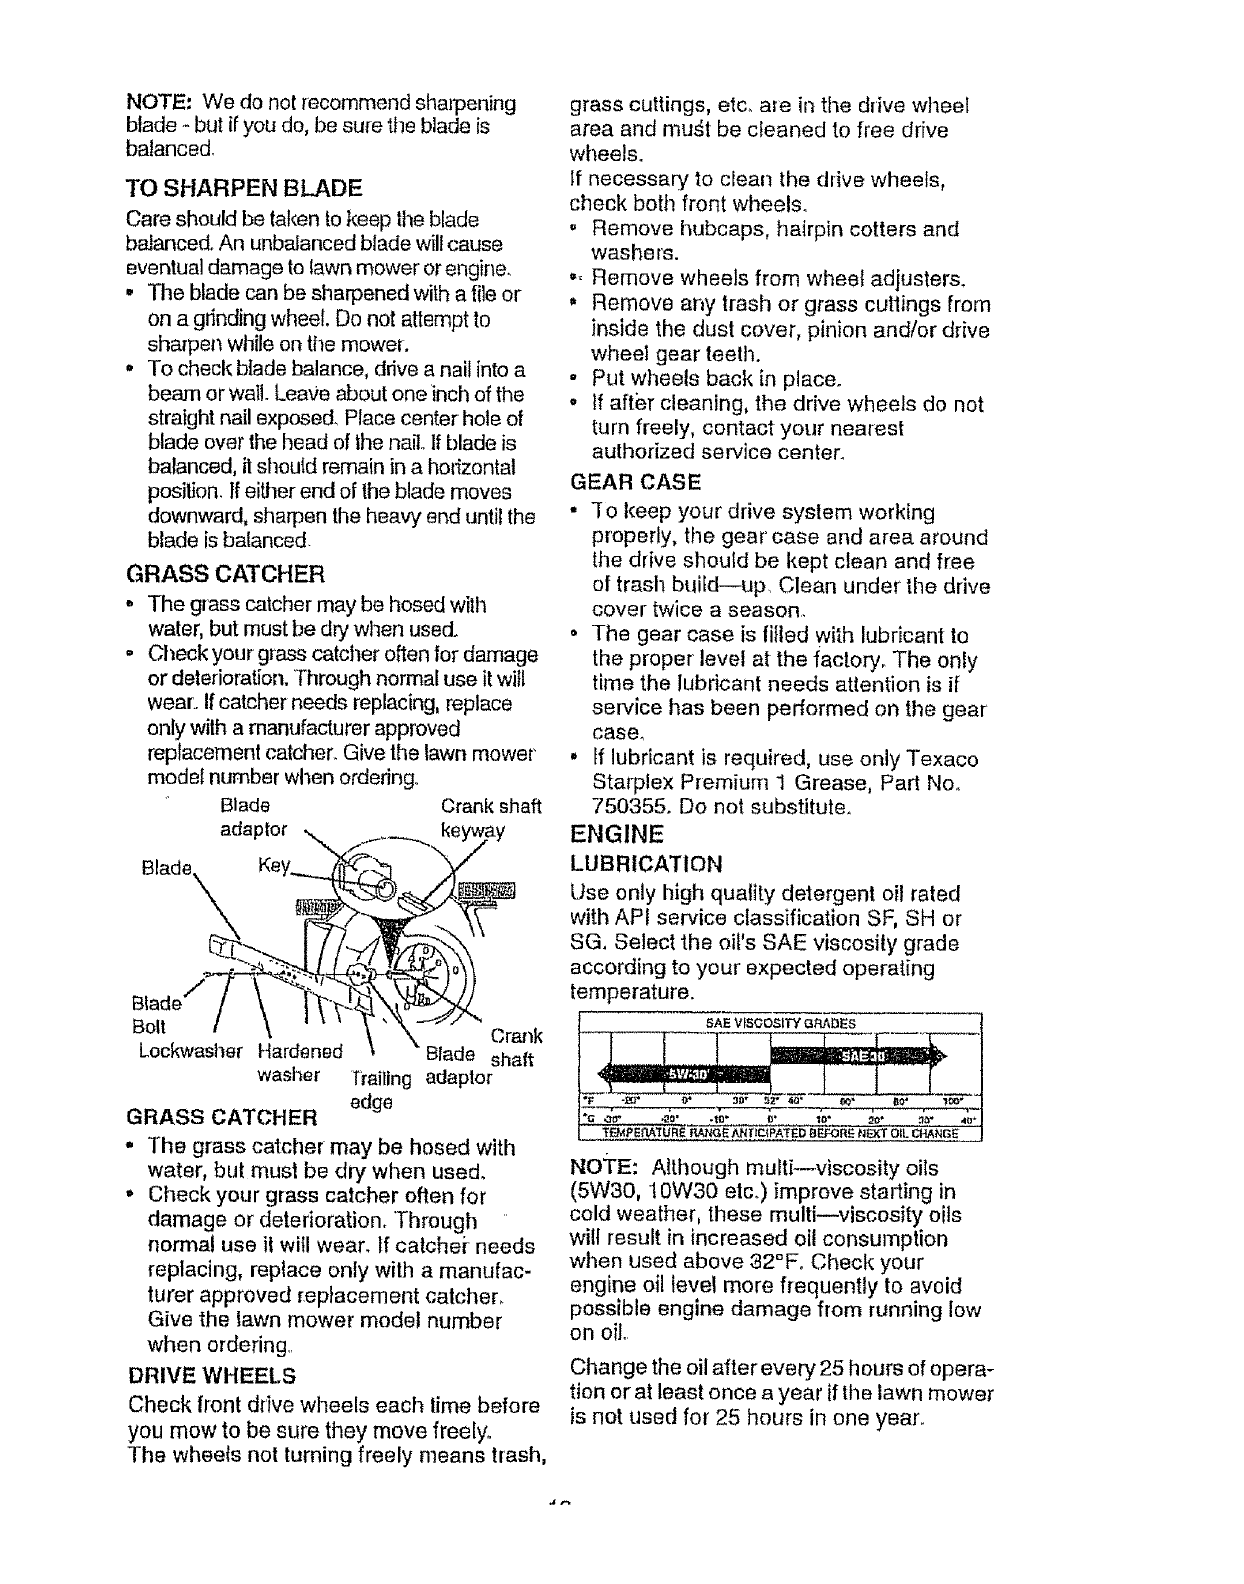
GRASS CATCHER
• The grass catcher may be hosed wilh
water, but must be dry wllen used.
•Check your grass catcher often for damage
or deterioration. Through normal use it will
wear:. If catcher needs replacing, replace
only with a manufacturer approved
replacement catcher1 Give the lawn mower
model number when ordering.
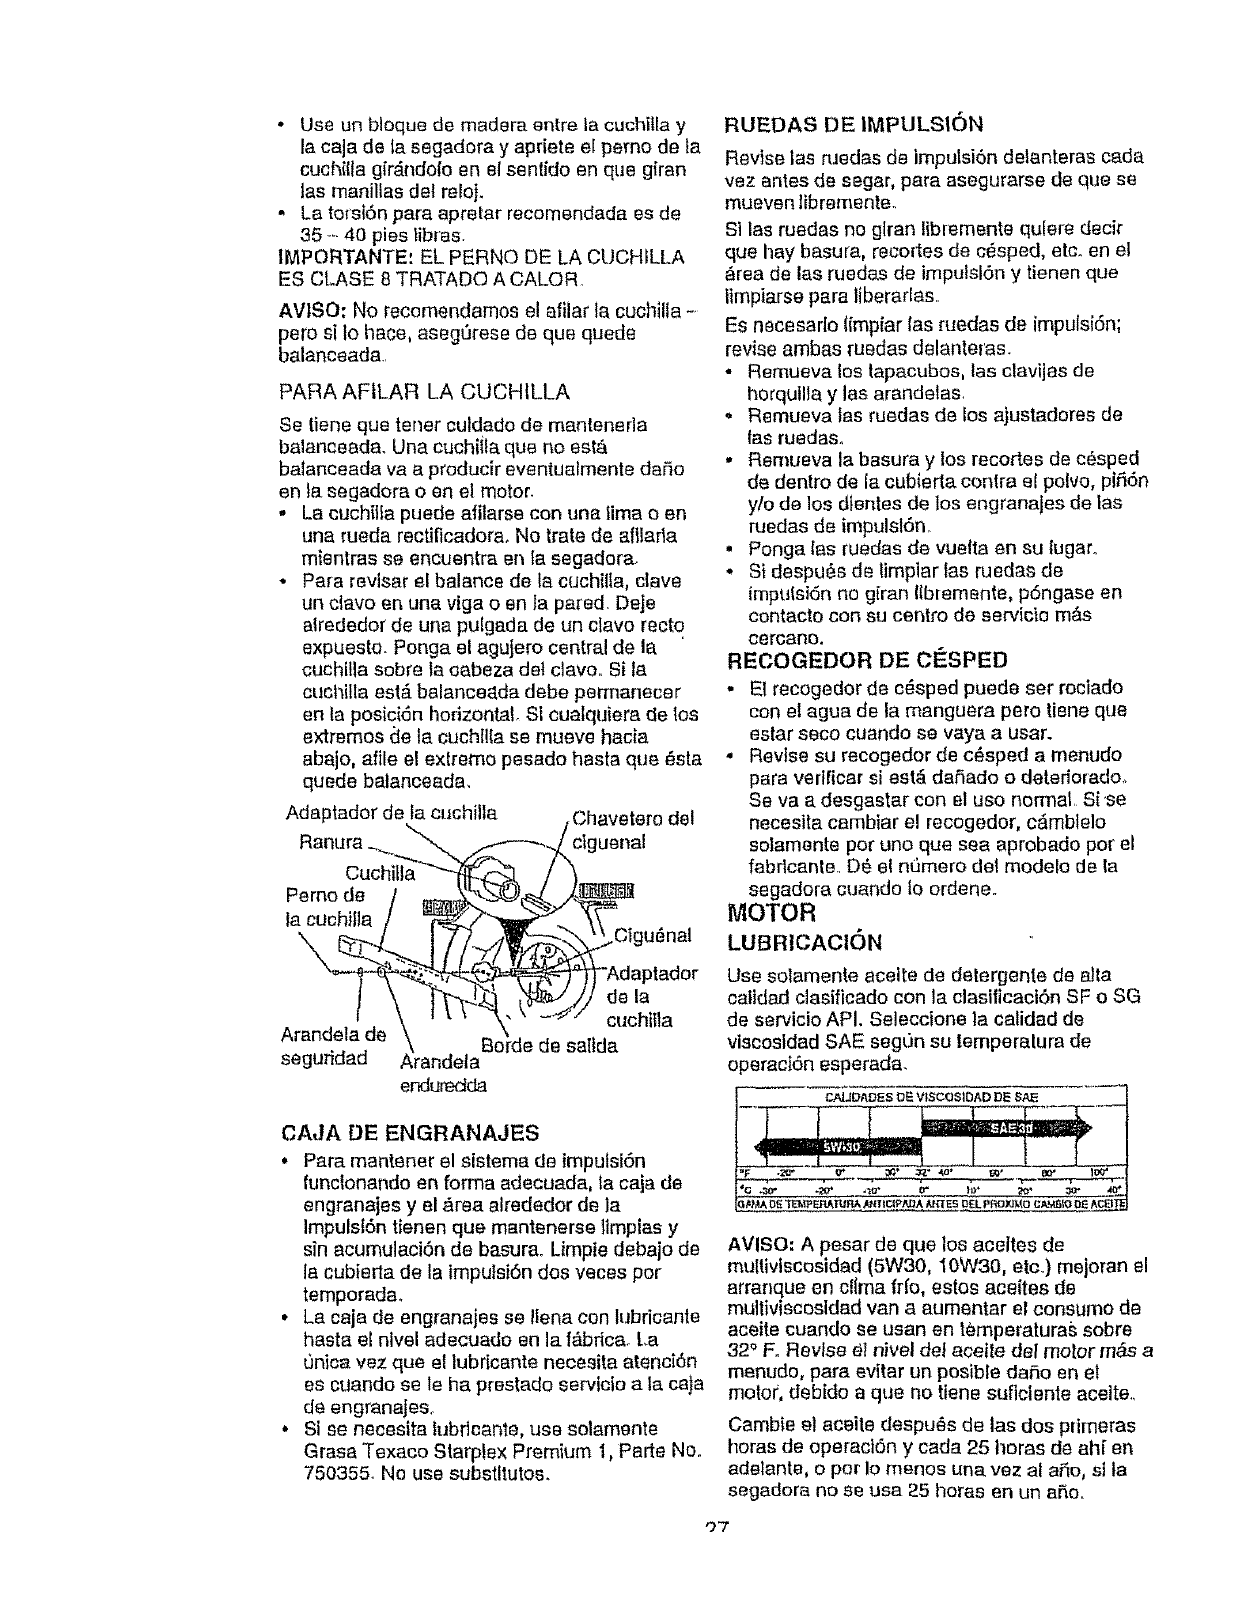
Blade Crank shaft
adaptor
Boll Crank
Lockwasher Hardened Blade shaft
washer flailing adaptor
edge
GRASS CATCHER
° The grass catcher may be hosed with
water, but must be dry when used.
• Check your grass catcher often for
damage or deterioration. Through
normal use il will wear. If catchei" needs
replacing, replace only with a manufac-
turer approved replacement catcher_
Give the lawn mower model number
when ordering..
DRIVE WHEELS
Check front drive wheels each time before
you mow to be sure they move freely..
The wheels not turning freely means trash,
grass cuttings, etc. are in the drive wheel
area and mu_t be cleaned to free drive
wheels.
If necessary to clean the drive wheels,
check both front wheels.
,Remove hubcaps, hairpin cotters and
washers.
•. Remove wheels from wheel adjusters.
• Remove any trash or grass cuttings from
inside the dust cover, pinion andlor drive
wheei gear teeth.
- Put wheels back in place.
,, if aft;_r cleaning, the drive wheels do not
turn freely, contact your nearest
authorized service center_
GEAR CASE
• -Io keep your drive system working
properly, the gear case and area around
the ddve should be kept clean and free
of trash build--up Clean under the drive
cover twice a season.
, The gear case is filled with lubricant to
the proper level at the factoryo The only
time the lubricant needs attention is if
service has been performed on the gear
case_
° If lubricant is required, use only Texaco
Starplex Premium 1 Grease, Part No.
750355. Do not substitute.
ENGINE
LUBRICATION
Use only high quality detergent oil rated
with API service classification SF, SH or
SG, Select the oil's SAE viscosity grade
according to your expected operating
temperature.
NOTE: Although multi--viscosity oils
(5W30, 10W30 etc..) improve stmling in
cold weather, these multi--viscosity oils
will result in increased oil consumption
when used above 32°F. Check your
engine oil level more frequently to avoid
possible engine damage from running low
on oil
Change the oil after every 25 hours of opera-
tion or at least once a year if the lawn mower
is not used for 25 hours in one year.
Checkthecrankcaseoil levelbefore
startingthe engineand after eachfive(5)
hoursof continuoususe°Tightenoil plug
securelyeachlime youchecktheoil level
TO CHANGE ENGINE OIL
NOTE: Beforelippinglawnmowerto drain
oil,drainfueltank by running engine until
fuel tank is empty.
• Disconnect spark plug wire from spark
plug and place wire where it cannot
come in contact with spark plug,
,, Remove engine oil cap; lay aside on a
clean surface.
. Tip lawn mower on its side and drain oil
into a suitable container. Rock lawn
mower back and forth to remove any oil
trapped inside of engine.
• Wipe off any spilled oil on lawn mower
and on side of engine.
• Fill engine with oil. Fill only to the "FULL"
line on file dipstick_ DO NOT OVI_R
FILL.
•Replace engine oil cap.
.Reconnect spark plug wire to spark
plug.
Conlainer
"t
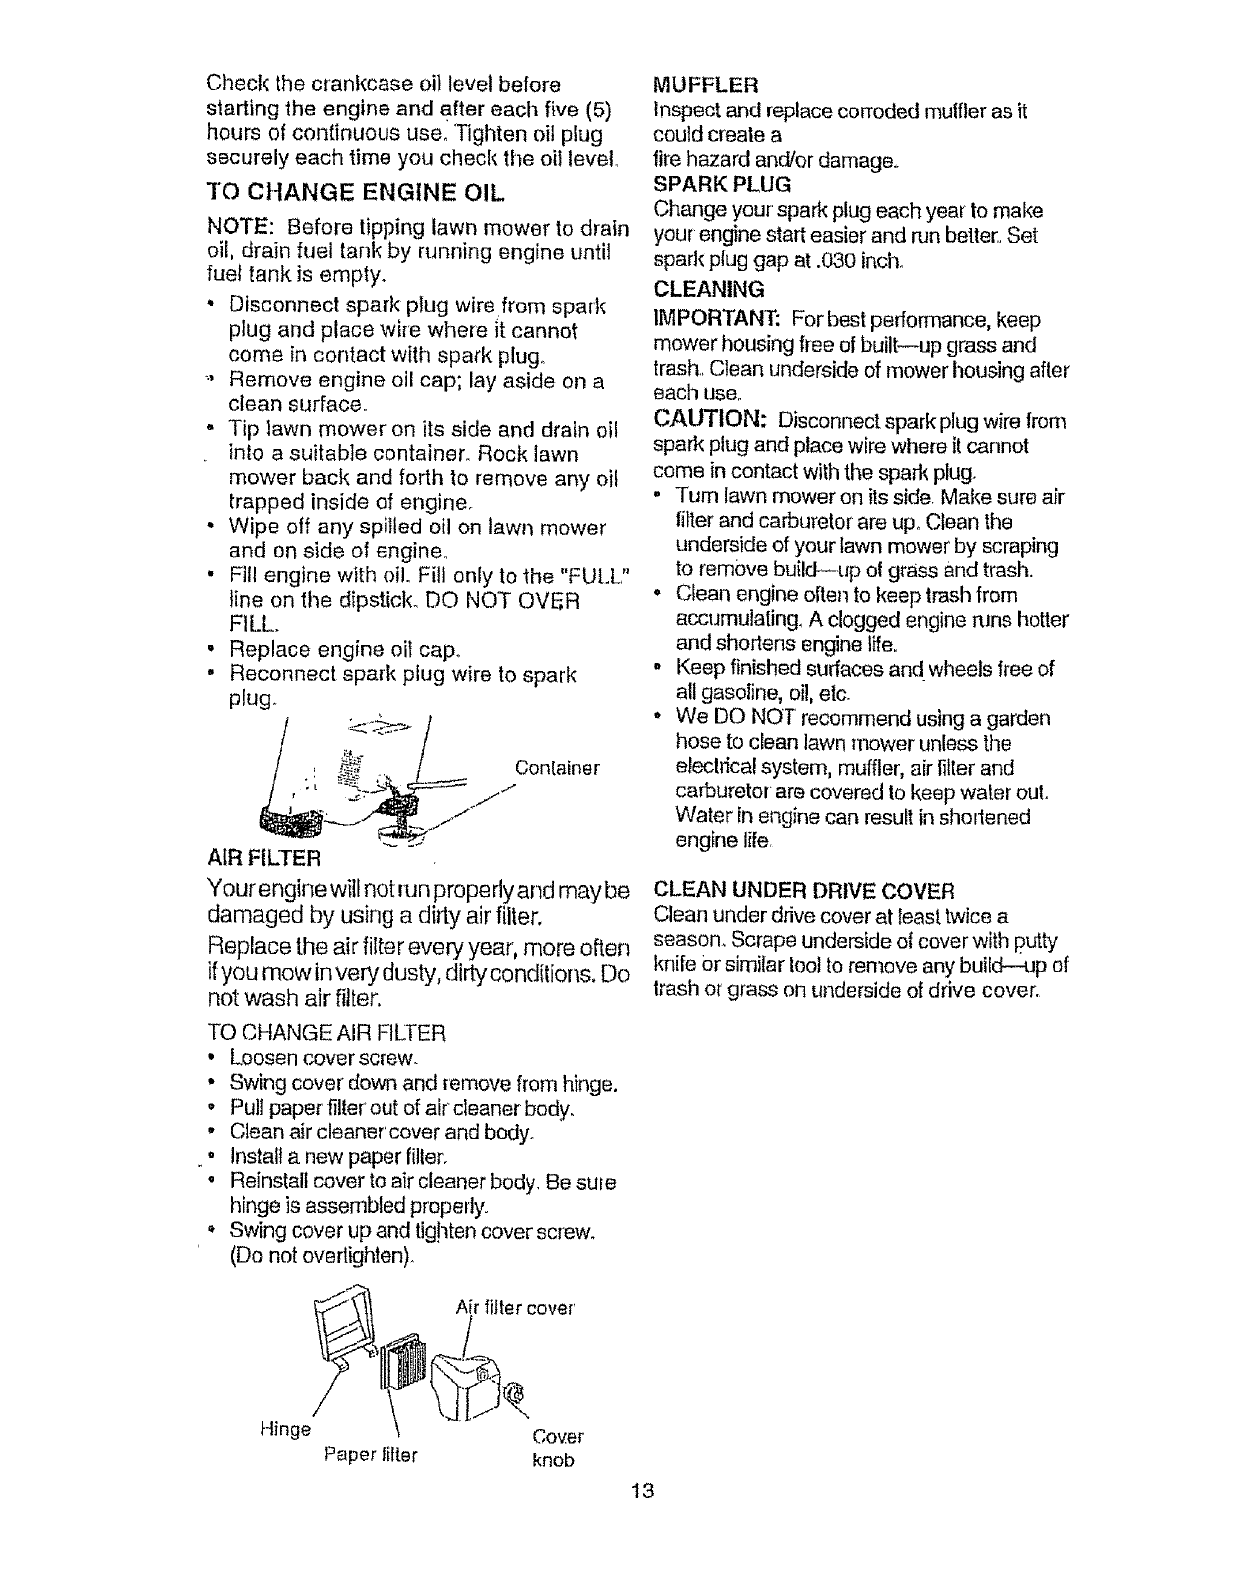
AIR FILTER
Your engine will not run prope fly and may be
damaged by using a dilly air filter.
Replace the air filter every year, rnore often
if you mow in very dusty, dirty conditions. Do
not wash alr filler.
TO CHANGE AIR FI[ZER
, Loosen cover screw.
- Swing cover down and remove from hinge.
• Pull paper filter' out of air cleaner body.
- Clean air cleaner cover and body.
• Install a new paper filter.
• Reinstall cover to air cleaner body. Be sule
hinge is assembled properly.
• Swing cover up and tig!lten cover screw.
(Do not ovedighten)_
Air filler cove['
MUFFLER
Inspect and replace corroded mulfler as it
could creole a
fire hazard and/or damage.
SPARK PLUG
Change your' spark plug each year to make
your engine start easier and run better, Set
spark plug gap at .03o inch°
CLEANING
IMPORTANT: Forbest pedormance, keep
mower housing fiee of built--up grass and
trash,, Clean underside of mower housing after
each use.
CAUTION: Disconnect spark plug wire from
spark plug and place wire where it cannot
come in contact with the spark plug.
.Turn lawn mower on its side, Make sure air
filter and carburetor are up. Clean the
underside of your lawn mower by scraping
to remove build--up ot grass and trash.
•Clean engine often to keep trash from
accumulating, A clogged engine runs hotter
and shortens engine life.
- Keep finished surfaces and wheels free of
all gasoline, oi!, etc.
. We DO NOT recommend using a garden
hose to clean lawn mower unless the
electrical system, muffler, air filler and
carburetor are covered to keep water out.
Water in engine can result in shodened
engine life,
CLEAN UNDER DRIVE COVER
Clean under drive cover at least twice a
season. Scrape underside of cover with putty
knife Or similar loot to remove any build--up of
trash or grass on underside of drive cover.
Hinge Cover
Paper litter knob
13
CAUTION: Beforeperformingany
serviceor adjustments:
• Releasecontrolbar,,
,, Makesurethe bladeandall moving
parts havecompletelystopped,
• Disconnectspark plugwire from
sparkplugandplacewhereit cannot
comeincontactwithplug.
LAWN MOWER
TO ADJUSTCUTTINGHE|GHT
See"TOADJUSTCUTTINGHEIGHT"in
theOperationsectionof this manual,,
REARDEFLECTOR
The reardeflector,attachedbetweenthe
rearwheelsofyourlawnmower,is
providedto minimizethe possibilitythat
objectswill bethrownoutthe rearof the
lawnmowerintotheoperator'smowing
position.
If lhe reardeflectorbecomesdamaged,it
shouldbe replaced.
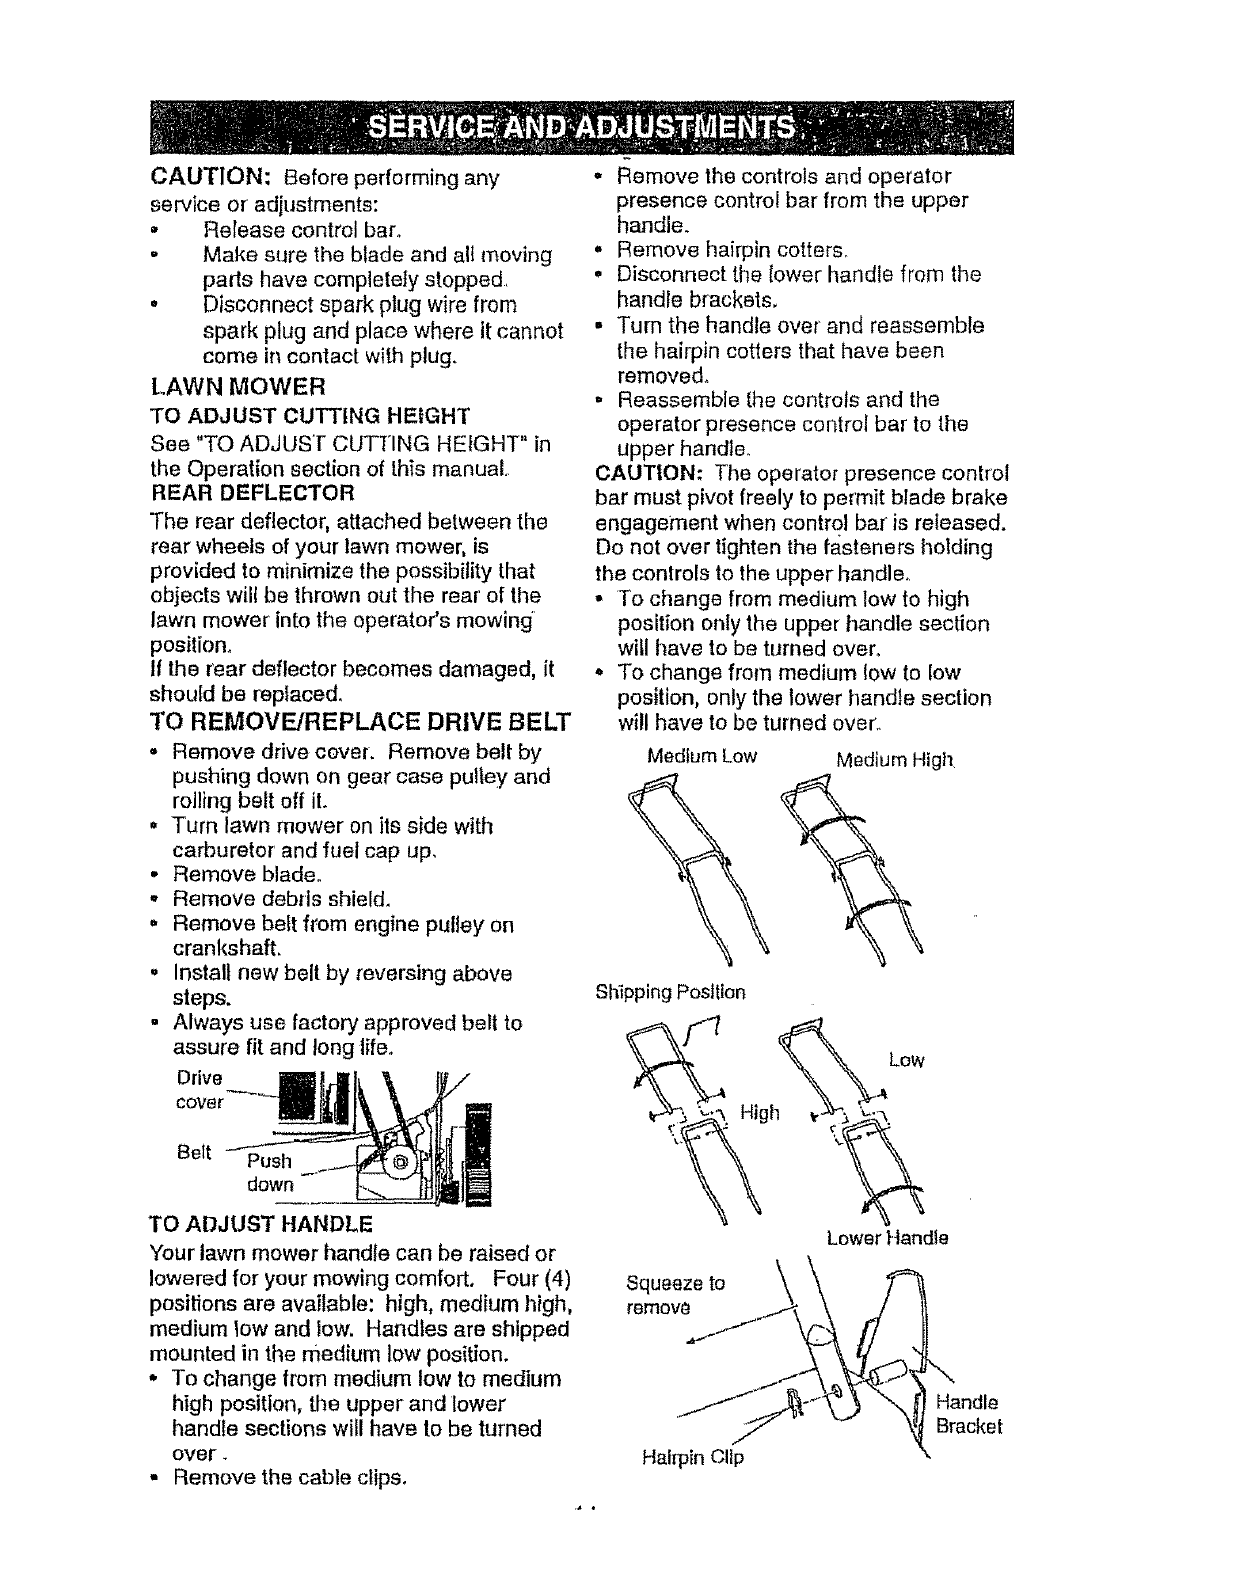
TO REMOVE/REPLACE DRIVE BELT
- Removedrivecover. Removebeltby
pushingdownongearcasepulleyand
rollingbeltoff it.
• Turn lawnmoweron itsside with
carburetorandfuelcapup,
• Removeblade°
-Remove debris shield,
• Remove belt from engine pulley on
crankshaft.
o Install new belt by reversing above
steps.
. Always use factory approved belt to
assure fit and long life.
Drive
CoVer
Belt Push
down
• Remove the controls and operator
presence control bar from the upper
handle.
° Remove hairpin cotters_
• Disconnect the tower handle from the
handle brackets.
• Turn the handle over and reassemble
the hairpin cotters that have been
removed.
- Reassemble the controls and the
operator presence control bar to the
upper handle°
CAUTION." The operator presence control
bar must pivot freely to permit blade brake
engagement when control bar is released.
Do not over tighten the fasteners holding
the controls to the upper handle.
• To change from medium low to high
position only the upper handle section
witl have to be turned over°
o To change from medium low to low
position, only the lower handle section
will have to be turned over..
Medium Low Medium High
Shipping Position
Low
High _:
TO ADJUST HANDLE
Your lawn mower handle can be raised or
lowered for your mowing comfort, Four (4)
positions are available: high, medium high,
medium low and low. Handles are shipped
mounted in the medium low position.
°To change from medium low to medium
high position, the upper and lower
handle sections will have to be turned
over.
•Remove the cable clips.
Squeeze to
remove
Hairpin Clip
Lower Handle
Handle
Bracket
I_l_,It._II_Ir_..
CARBURETOR
Your carburetor has a non-adjustable fixed
main jet !or mixture control., If your engine
does not operate properly due to sus-
pected carburetor problems, take your
lawn mower to an authorized service
center for repair or adjustmenL
L_l'It,._ll111.,. ".._I I...I.,..I.I
Your engine speed has been factory set.
Do not attempt to increase engine speed
or it may result in personal injury If you
believe that the engine is running too fast
or too slow, take your lawn mower to an
authorized service center for repair and
adjustment,
Immediately prepare your lawn mowerfor
storage at the end of the season or if the unit
wilt not be used for 30 days or more°
LAWN MOWER
When lawn mower is to be stored for a period
of time, clean it thoroughly, remove alldirt,
grease, {eaves, etc, Store in a clean, d_y area.
• Clean entire lawn mower (See "CLEANING"
in the Customer Responsibilities section of
this manual)..
-Lubricate as shown in the Custome¢
Responsibilities section of this manual.
•Be sure that all nuts, belts, screws, and pins
are securely fastened. Inspect moving
parts for damage, breakage and wear.
Replace if necessary
- Touch up all nJsted or chipped paint
surfaces; sand lightly before painting.
HANDLE
You can fold your lawn mower handle for
storage.
. Squeeze the bottom ends of the lower
handle toward each other unti! the lower
handle clears tile handle bracket, then
move handle forward.
.Loosen upper handle mounting bolts
enough to allow upper handle to be folded
back.
IMPORTANT. When folding the handle for
storage or transportation, be sure to fold the
handle as shown or you may damage the
control cables.
,When setting up your handle from the
storage position, the lower handle will
automatically lock into the mowing position.
Lower _j_,._\ Handle
Handle _,______..(_ Bracket
Sqoee to ,L)
Cotter
Operator Presence
Oonlrol Bar .....
Upper Handle _._,
Fold Forward
_x_,'/_ Fold Backward
Mowing Position
For Storage Lower Handle
ENGINE
FUEL SYSTEM
IMPORTANT: ff is important to prevent bum
deposits from forming in essential juel system
parts such as carburetor, fuel filter, fuel hose,
or tank during storabe. Also, experience
indicates that alcolol blinded fuels (called
gasohot or using ethanol or methanol) can
attract moisture which leads to sepa'r'alion and
formation of acids during storage. Acidic gas
can damage the fuel system of an engine
while in storage.
-Drain the fuel tank.
• Start the engine and let it run until lhe fuel
lines and carburetor are empty.
-Never use engine or carburetor cleaner
products in the fuel tanker permanent
damage may occur.
• Use fresh fue! next season.
NO'rE: Fuel stabi]izer is an acceptable
alternative in minimizing the formalion of fuel
gum deposits during storage_ Add stabilizer to
gasoline in fuel tank or storage conlainero
Always follow the mix ratio found on stabilizer
container, Run engine at least 10 minutes
after adding stabilizer to alIow tile stabilizer to
reach the carburetor. Do not drain lhe gas
tank and carburetor if using f_Jetstabilizer.
ENGINE OIL
Drain oil (with engine warm) and replace with
clean engine oiL (See "ENGINE" in tile
Customer Responsibilitie_ .section of this
manual).
15
CYLINDER
• Remove spark plug
• Pour one ounce (29 ml) of oil through spark
plug hole into cylinder.
, Pull starier handle slowly a few times to
distribute oil
• Replace with new spark plug.
OTHER
• Do not store gasoline from one season to
another.
,, Replace your gasoline can if your can starls
to rust. Rust and!or dirt in your gasoline will
cause problems.
,, If possible, store your unit indoors and cover
it to give protection from dust and dirt.
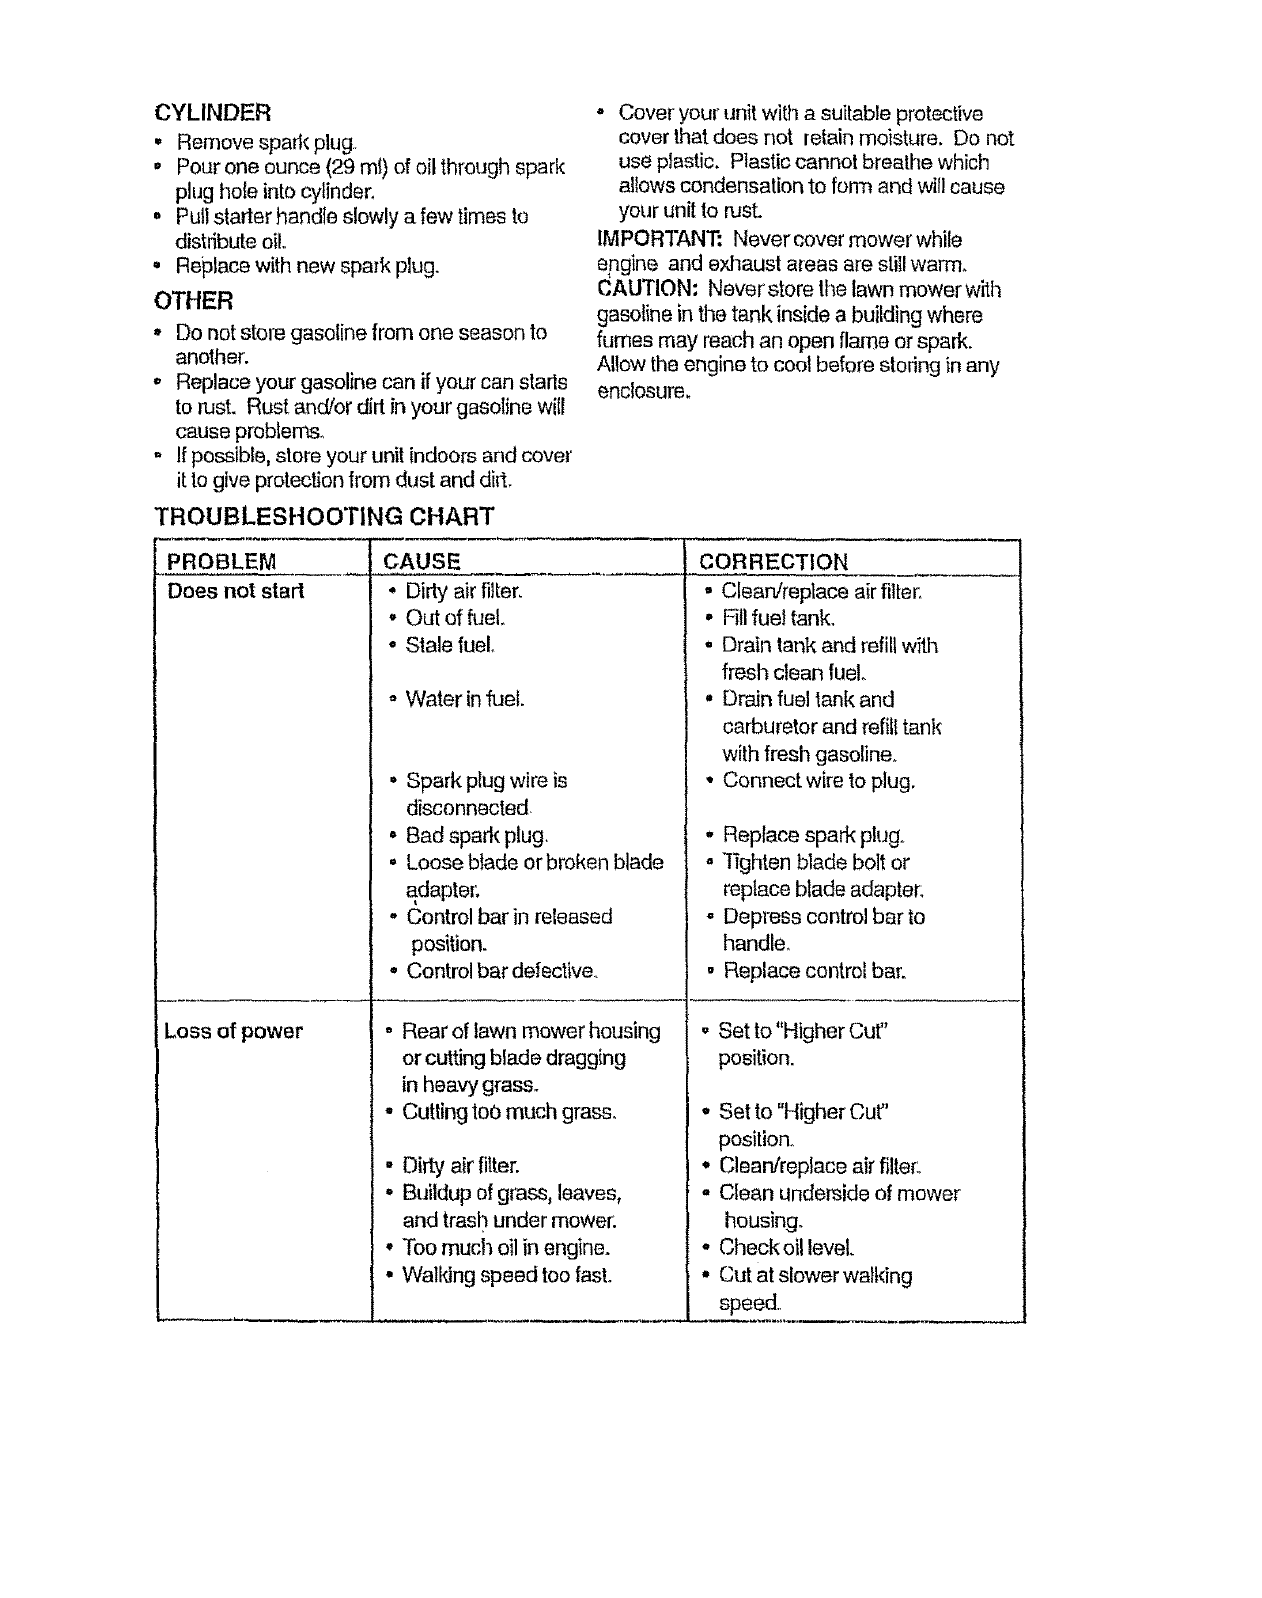
tROUBLESHOOTING CHART
PROBLEM CAUSE
Does not starl • Dirty air filter.
•Out of fuel.
• Stale fuel
Loss of power
o Water infuel.
• Spark plug wire is
disconnected.
• Bad spark plug,
• Loose blade or broken blade
adapler;
- Control bar in released
position.
o Control bar defective,,
Rear of lawn mower housing
or cutting blade dragging
° Cover your unit with a suitable protective
cover that does not retain moisture. Do not
use plastic. Plastic cannot breathe which
allows condensation to form and will cause
your unit to rust.
IMPORTANT= Never cover mower while
engine and exhaust areas are still warm.
CAUTION; Neverstore the lawn mower with
gasoline in the tank inside a building where
fumes may reach an open flame or spark.
Allow the engine to coot before storing in any
enclosure.
CORRECTION
o Clean/replace air filler,
• Fill fuel tank.
• Drain tank and refill with
fresh clean fuel
° Drain fuel tank and
carburetor and refill tank
with fresh gasoline.
• Connect wire to plug.
•Replace spark plugo
°Rghten blade bolt or
replace blade adapter:
• Depress control bar to
handle°
• Replace control bar,
,, Set to"Htgher Cut"
position.
in heavy gras&
- Cutting too much grass.
- Dirty air fitter.
° Buildup of grass, leaves,
and trash under mower:
° Too much oil in engine.
° Walking speed too fast.
°Set to "Higher Cut"
posilion_
°Clean/replace air filter:.
• Clean underside of mower
housing.
• Checkoil level.
° Cut at slower walking
speed..
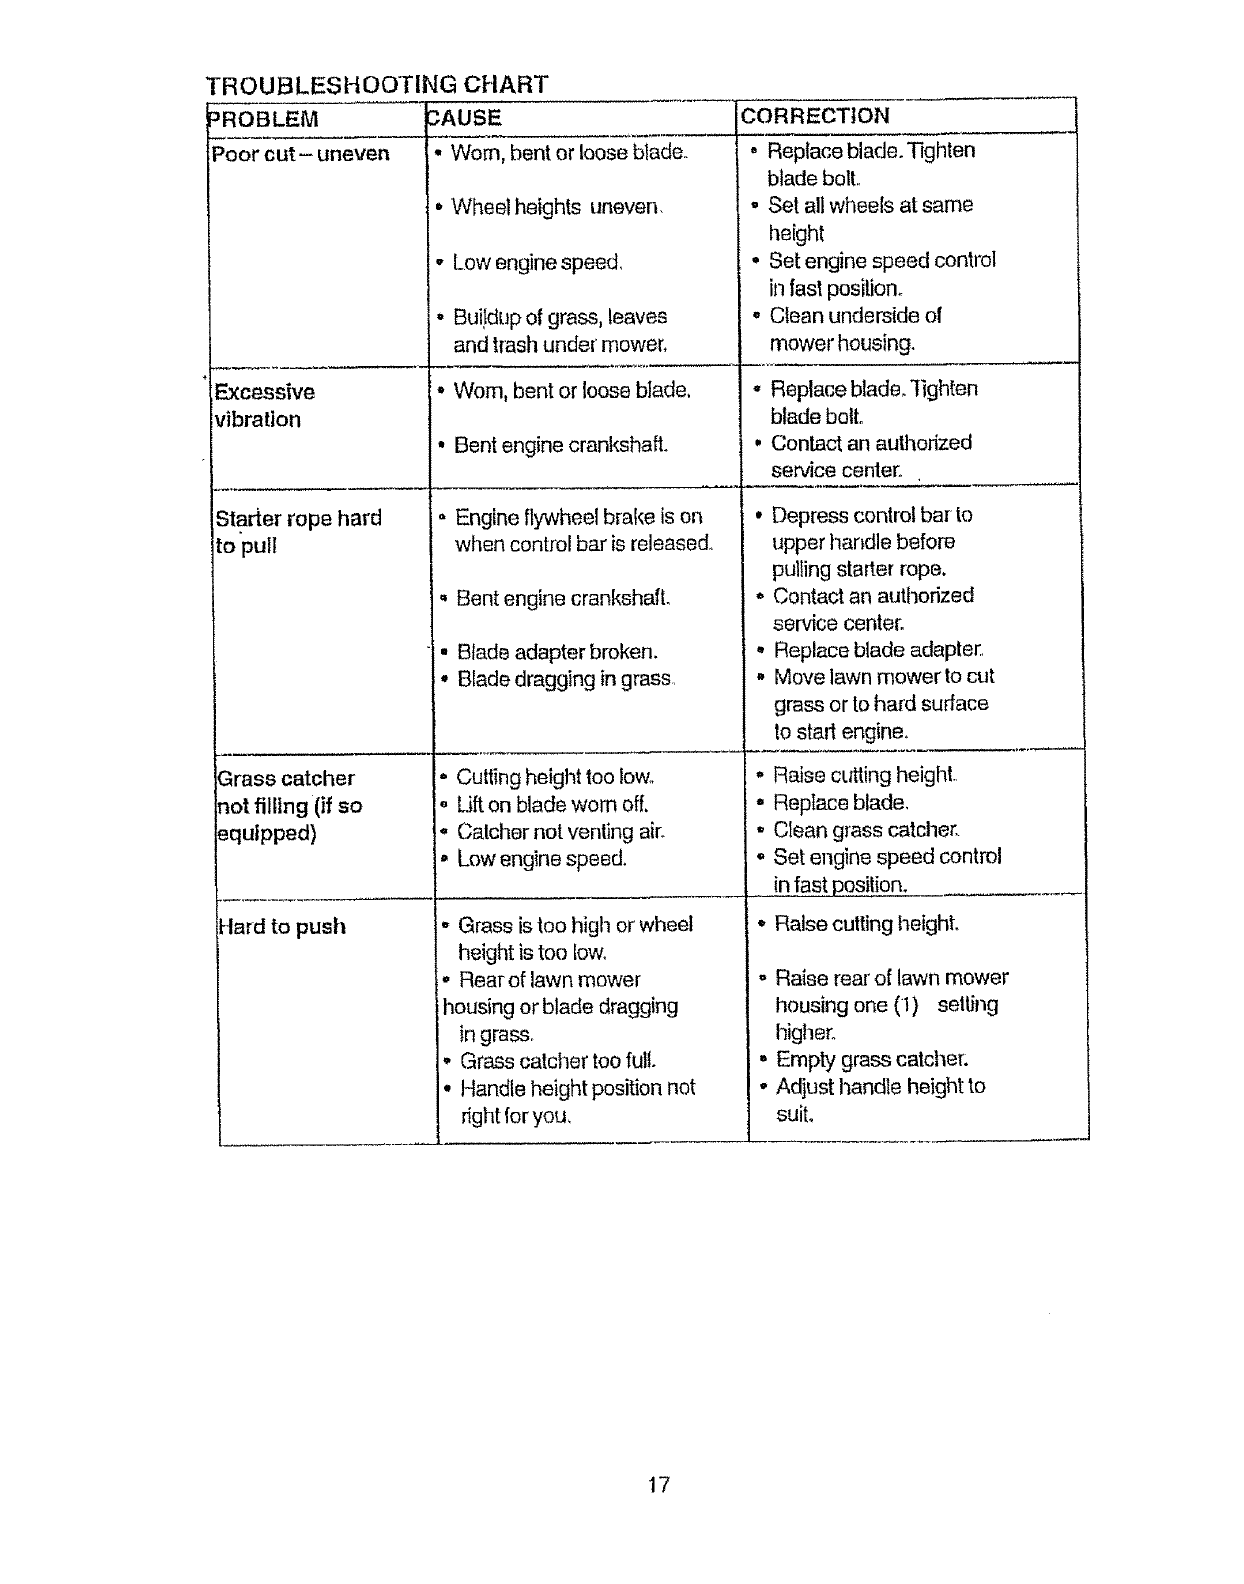
TROUBLESHOOTING CHART
-OBLEM
)oor cut- uneven
Excessive
vibration
_!]AUSE
• Worn, bent or loose blade.
Starter rope hard
to pull
Grass catcher
not filling (if so
_quipped)
Hard to push
•Wheel heights uneven.
- Low engine spee&
• Bui!dfJp of grass, leaves
and trash under mower,
- Wor, bent or loose blade,
• Bent engine crankshafL
• Englne flywheel brake is on
when control bar is released.
. Bent engine crankshalt.
• Blade adapter broken.
,• Blade dragging in grass,
_ Cutting height too low,,
Lift on blade worn off.
-Catcher not venting air.
=Low engine speed.
.Grass is too high or wheel
height }s too low.
•Rear of lawn mower
housing or blade dragging
in grass,
°Grass catcher too full.
, Handle height position not
right for you,
L.
CORRECTION _ , ,,,,,,,_
o Replace blade. Tighten
blade bolt..
. Set all wheels at same
height
• Set engine speed control
ill fast position.
° Clean underside of
mower housing.
° Replace blade, lighten
blade bolt.
, Contact an authorized
service cenler.
• Depress control bar to
upper handle beiora
pulling starter rope,
- Contact an authorized
service center.
• Replace blade adapter.
,, Move lawn mower to cut
grass or to hard surface
to start engine.
° Raise cutting height..
• Replace blade,
• Ctean grass catcher,,
• Set engine speed control
in fast position .......
• Raise cutting height.
o Raise rear o| lawn mower
housing one (1) setting
higher°
• Empty grass catcher.
• Adjust handle height to
suit.
17
CRAFTSMAN Model No. 917.377302
Garantl'a
Reglas de Segufidad
Montaje
Operaci6n
Mantenimiento
Programa de Mantenimiento
18 Espbclficaciones del Producto 26
18 Servicio y Adjustes 29
20 Almacenamlento 30
2t ldentiftcaci6n de problemas 31
25 Par|as de repuesto Veael manual
25 lngl6s det dueSo
Contratapa
Orden de Partes
GARANTIA LIMITADA DE DOS ANOS PARA LA SEGADORAA MOTOR CRAFTSMAN
Per dos (2) a_os, a par|it de ta fecha de compra, cuando esla Segadora Cra|tsman se mantenga, lubrique
y aline segLinlas instrucciones para la oparac{6n y el mantenimiento en el manual de| dueSo, Sears
reparar& gralJstodo defecto en el mata_al y la mane de obr&
Si fa Segadora Craftsman se usa pare fines comerciales o de ardendo, esta gamntia s61ose aplica par
novenla (90) d_asa padJl de lafecha de compra.
Esla Garantfa no cubre:
= Arliculos qua se desgastan durante el use normal tales coma las cuchiilas segadoras rotator|as, los
adaptadores de ta cuchilfa, tascoffees, los fillros dante ytas bujt'as.
• Reparadones necesar;as debldo al abuse o ala negligencta del operador, tncluy_ndosea los
dgrjeSales doblados y ata faiWLde mantenlmiento del equtpo segen tas Instrdccionesqua se tnc[uyen
en el manual del due5o°
EL SERVIC10 DE GARANTJAESTA DISPONIBLE al devotvar ia segadpra a motor Craftsman al cenirol
departmenlo de servicio Sears mas cercano enlos estados unidos Esta.garantla se aplica sotamente
mtentras el producto esta en use en los eslados unidoso
Esta Garanlta le otorga derechos legates espec[_cos,y puede qua tambi_n _engaotros derechos qua
vadan de es'_do a estadoo
Sears, Roebuck and Co,, DI817WA, Hoi[man Estates, IL 60179 USA
Los estandrares de segurtdad exigen la presencia
del operator en los conlro|es pare reducir a un
mtnimo el riesgo de leslonarse. S u unidaclvlene
equipada con dichos conlrolesoPer ningun moikto
tmle del eliminar {a funcl6n de los conlroles qua
exigen la presencia de| operador.
ENTRENAMIENTO:
• Lea este rrranua! de[ operador
cuidadosamente Fam[ltarfeesecon los
controles y a,orendaa operar su segadora en
forma adecuadao Aprenda a parer stJ
segadora r&pidamant&
• No pen'nitaqua los nihos usen su segador&
Nunca permita qua los adultos operan la
segadom sin contar con las tnslrucciones
adecuadas.
o Manlenga el _ea de operad6n despejada
de gente, especla!mente da nt,Sospeque_os
y de animates dom_s_icos.
', Use la segadora sotamenta para los
fines propuestosper el fabficante y
segen |as expllcaciones descritas en
esie manual
• No opera la segadora sl so ha ca[do o dafiado
en cualquiera form& Siempre repare los da._os
antes de usada,
• No use accesorlos qua no hayan sldo
recomendados per el fabricanta. El use de
dichos accesor_ospuede set peligroso.
• La cuchilta glra cuando el motor est_
funcionando.
PREPARACI(SN:
,. Siempre revise cuidadesamente el _rea qua
se va a sager y desp_Jelade |odes las piedras,
palos, alambres, huesos y otros objetos
extraSos. Estos oblates ser_n lanzados con la
cuchttlay pueden producir lesbnes graves.
• Stempre use anleoios de seguddad o
protectores de ojos cuando arranque y du-
rante el |tempo que use ta segador&
- V[stase en forma adecuada. No opere la
segadora sin zapatos o con sandaltas
abler|as. Use sotamante zapatos s61tdoscon
buena traccl6n cuando stegue
o Reviseelestanque de combustible antes de
hacer arrancar at motor,, No 1lenael esianque
de gaso]ina on rectntos cerrados,
ni cuando el motor est& funcionando o cuando
est_ caliente. Permita que el motor se enfrie
per varies minutes antes de lienar el estanque
de gasoline, Limpie toda la gasoline
derramada antes de hacer arrancar el motor
- Siempre haga los aJustes de allure de las
ruedas antes de hacer arrancar su
segadora Nunca Irate de hacer _sto
mientras que et motor est& funcionando,
. Siegue siempre durante el d_ao con buena
luz adifictaL
OPERACI6N:
* Mantonga sus o]os y su mente en la
segadora yen el _rea que se est& cortando.
No permita que cites intereses Io distraigan.
-No code c_sped mojado o resbaloso., Nunca
corra mientras est_ operando su segadora.
Siempre asegLirese de mantener el equilibdo
- mantenga el mango agarrado t'irmemente y
camine.
. No ponga las manes e los pies corca odeba]o
de las patios rotatorias. Mant6ngase
alejado de la abertura de desoarga en todo
rnomentoo
. Siempre pare et motor cuando se vaya
ocuando no est# usando su segadora, o
antes de atravesar las entradas pare autos,
los senderes, caminos y &teas cubiedas de
ripioo
,Nunca dirija la descarga del material hacia
los espactadores ni permita a nadie cerca de
la segadora mientras la est_ operando.,
. Antes de llmpiar, inspecctonar o de reparar I
a segadot'a, pare el motor y est_
completamente seguro de que la cuchilla y
que redes las partes que se mueven se
hayan detenldo, Luego, desconecte et
alambre de la bujia y mant6ngalo alejado de
esta para evitar el arranque per accidente.
*No continOe haciendo funclonar su segadora
si le pega a un ebjeto extrat'_o.Siga el
procedimiento descrito anteriorrnente, luego
repare cualquler dare antes de volver a
arrancar y de operar su segadora,,
• No cambie los aj',Jslesdet regulador o
hagaque el meier ande a una velocidad
excesiva., Se pueden produclr dares an el
motor y I esiones personale&
- No opere su segadora si vibra fuera de lo
normal. La vibraci6n exeesiva es una
indicaci6n de dale; pare el motor, revise en
forma ssgura la causa de la vibraci6n y haga
1asreparaciones seg[}n sea necesario.
. No haga funcior, ar ef motor en
recintoscerrados, Los gases de escape son
peligrosos_
o Nunca corte el c_sped tlrando la segadora
hacta usted. Siegue a trav6s de la cara de
las pendientes, nunca hacia arriba o haole
abajo puss puede perder el equitibrlo.. No
siegue pendtentes demasiado empinadas
Tonga cuidado cuando opereta segadera en
terreno disparejo o cuando eatable de
direcci6n - mantenga un been equilibrio,
• Nunca opero la segadora sin las
protecciones adecuadas, las planchas, el
recogedor de c_sped y otros disposttivos de
seguridad en su lugar.
MANTENIMIENTO YALMACENAMIEN-
TO:
,Revise la cuchilla y los parries de montaje
de{ motor a menudo, pare asegurarse que
est#.n aprelados on ta forma adecuada.
• Revise lodes los pBmos, tuercas y lorniEios a
lntewalos frecuentes, pare verificar si est&n
apretados en forma adecuada, y
asegurarseque la segadora se encuentra en
condiciones de funcionamiento seguro
. Mantenga redes los dispositivos de
seguridad en su lugar y listos pare luncienar.
. Pare reducir el peligro de tncendio,
mantenga e! motor sin c6sped, hojas y grasa
o aceite en exceso,
• Revise el recogedor de c_sped a menudo
pare verificar si hay deterioro y desgaste y
cambie las bolsas desgastadas. Use
solamente las bolsas de repuesto
recomendadas per el fabricante de su
segadora o qua cumplen con las
espocificaciones de _ste
. Siempre mantenga una cuchilla afitada en su
segadora.
. Siempre permita qua el motor se enfrfe
antes de guardarla en cualquler [ecinlo
cerrado.
o Nunca guarde la segadora con combustible
en el estanque dentro de un ediiicio endonde
los gases pueden atcanzar una llama
expuesta o una fuente de ignicl6n, tal come
el calentador de agua, fa estufa de
calefacci6n, ta secado_a de rope, etc,,
PRECAUCI6N: Siempre desconecte el
alambre de la bujla y p6ngalo dende no pueda
entrar en contacto con la buj{a, para evitar el
arranque par accidente, duranle la preparaci6n,
el transporle, el ajusta o cuando se hacen
reparaclone&
PRECAUCI()N: Es conocfdo per el Estado de
California que los gases de escape del'motor
de este productor conlienen quimtcos los
cuales a ctertos niveles, pueden ocastonar,
cancer, defeclos de naclmiente, y otros daSos
at sislema reproductive
19
DESVIADOR DE RECORTES
PARA SEGADORAS CON DESCARGA *fRASERA
Estos accesorlos estaban dispanibles cuando
se produjo la segadora. Tambi6n est_n
disponibles en fa mayorfa de las ttendasde
Sears y en los cantros do servicio. La mayoria
no se apliquen a su segadora,r
REND!M!ENTO DE LA SEGADORA ,.........
JUE_OS PAFtA LA ACOLcHADoRA
RECOREbOR
pARA
SEGADORAS
CON DESCARGA
TRABERA
MANTENIMIENITO DE LA SEGADORA
sILF...NCIADORF-3
_,lJ,,,,, , ,,11, _ , ::
de las tiendas Sears tambt6n pueden mender a
pedir pertes de repuesto para usted, si los
proporciona el numero del modelo de su
segadora. Algunos de estos accesorios tel vez
RECOREDOR
PARA
SEGADORAS
COHDESCARGA
LATERAL
CORREAS CUCHtLLAS
FILTROS !)E AIRE
RUEDAS
ADAPTADORES
DE CUCHILLA
ESTABIL|ZAbORES
ENVASES
DE GASOUNA
_uJlAs
ACEITE
D_L,u,o'roR
Lea estas Instrucclones y este manua!
completamente antes de tretar de rnontar u operar
su segadora nueva. Su segadora nueva ha side
mentada an la f&brlcacon la excepci6nde aquetlas
partes que se deJaronsin reenter perrazonesdo
env_o.Todas las partescomo las tuercas,las
arandefas, los pemos, sic., que son !lecesa6as pare
completer el montaje ban side colocadas en la
balsa de partes.,Pare asegurarse que su segadora
funelone en farina segura y adecuada, lodes las
partes y los artfculos de feneterfe que se monten
lienenque ser apretados seguramenteo Usa las
herramlanlas correclas, cam0 sea necesa_o, pare
asegurar qua se ap6eten adecuadamente.
PARA REMOVER LA SEGADORA DE
LA CAJA DE CARTON
• Remueva las partes sueltas que se inctuyen con
le segadora..
•Carte las dos esqu]nasde los extremes do la
caja de cart6n y tienda el panel de] extreme
piano,
• Remueva lode el material de empaque, excepto
la cuba entre el mango superior y 61inferior,y la
cuSa que sIJjetala barra de loscontrol qua exige
la presencia delopemdor junto con el mango
superior.
Haga rcdar la eegadora hacia afuera de la caja
de car_n y rev(setacuidadosamente pare
re.car si todav_aquedan partes sueltas
ad}ctonales,
COMO PREPARAR St] SEGADORA
PARA DESDOBLAR EL MANGO
IMPORTANTE: Despliegueel mango con touche
culdado pare no peIl{zcaro daSarloscablesde
control
• Levante {asmangos hasla que la seccl6n del
mango Inferior se asegure en su lugar, en la
peslci6nparasegar,
• Remueva la curia ptotectora, levante ta secci6n
del mango superior hasla su lugar en el mango
inferior y apriete ambas man|lies det mango.
• Remueva la cu6a del mango que sujeta la barra
de los control que exige la presencla del
operador junto con el mango supe_ior.
,El mango de la segadora puede aJuslarsesegDn
le acomode pare segar. R_6rase a "AJUSTE
DEL MANGO" en la Secci6n de Serviclo y
AJusles de este manual.
pal:reaecomrotquaexlgeta
presenciadeloperador
Mangosupertorj
Mango __'_,,
,nfenor - __
,,_i Posioi6n
pare segar
PAR/& INSTALAR LOS ACCESORIOS
Su segadora rueerMada tsta pare userse come
una acolchadora de capa vegetal. Para convertida
de mode que pueda ensacar o descargar:
• Abra ]epueda trasera y remueva la tapon
aco]chadora. Gu_rdela en un ]ugarseguro.
• _nora pueae insular el recogeaor o el eeswaaor
do recortes opcionaL
• Pare velvet ala operaci6n de acoEchamientocon
cape vegetal, tnstale la tapon ace]chadora en la
abettura de descarga de la segador'&
PREOAUCI6N: No haga funcionar su
segadora sin la tapon acolchadora aprobada en su
lugar, o sin el desviador de recortes, o sin et
recogedor de c_sped, aprobados, en su lugar
Nunca trate de operar la segadora cuando se ha
removido la puerla traeera o cuando es_ un poco
ablerta, __L%i _
Tapon alcolchadora
FAMILIARICESE CON SU SEGADORA
LEA ESTE MANUAL DEL DUEIr,iO Y I_AS REGLAS DE SEGURIDAD ANTES DE OPERAR SU
SEGADORA, Compare las lfustractones con su segadora para famlliarizarse con la ublcacl6n de los
diversos conlroles y ajustes. Guarde esle manual para referenciaen el luluro,
Esto'==_sfmboles pueden apare.sersobre su segadora o en ia literature proporcionada-con el
producto, Aprenda y=eemprenda sue significados°
AI'IEttC!_!lO _tTOff t,_'llOtf" _flOfl f_tlO £91/_1D_tl _ A_'EiIE P'E_IDII),GU_OILI5
, , -:_mF .L:_;m ._____ _ I !,! ii i mill
Cable de control de la Barra de oonlrol que extge la presencia del
velocidad del motor operador
Cord6n
arrancador
Recogedor del
c_sped
Tapon de la
acotchade
Control de la
velocidad del
motor Cebador
Control de impulsi6n
Manila del mango
"l;apadel rel]eno de la gasoline
Tape del deposlto de acelte
de! motor con varila
indicadora de nivel
Cublerla de ta impulsi6n
Ajustador de la rueda
(en cada [ueda)
Caja
CUMPLE C0N LOS REOUISITOS DE sEGuRIDAD DE LA CPSC ' ........ ........................ .,,
Las segadoras a triter, qua se conducen desde la pade do elf&s, retatorias,Sears, cumplen con los
estAndares de seguddad delAmeican Natonal Standards Insllule y de la US. Consumer Product Safety
_mrrTssioq; Lacuchilla aira cuando el motor est& fi.incionando.
t, ............ ii i |if i1 H r 1,u_,_,,2 _y- .....
Barm de control que exige la presencia det Palanca de controi d_ la lmpulel6n - se usa
operador_ lena qua sujetarse abajo, junto con el
mango, p&ra hater arrancar el motor. Su_ltela pare
parar e! motor..
Cebador--- bombea corribus_ble adtcionat desde el
carbufador at ctlindro pare use cuar_o se necesita
hater arrancar un motor fdo,
oord6n arrancador---se usa pare hacer arrancar
el motor.
pare enganchar la segadora pare movimiento
hacia adelante Irnpulsada e meter:
Palanca de control de la veloeidad dei motor_
situada en la parle lateral del motor qua le permite
selecclonar ta veloctdad del motor ya sea r&pidao
len_..
"fapon de la acolchadora-- permte la conversi6n
2 IPara le_ope_cf6n de descarga o ensacado.
Laoperaci6ndecuatquiersegadorapuede
hacerquaseltenobjetesextraRosdentrodesus
ojos,1oquapuedaprodudrdaresgravesen_stos.
Slempreuseanteo]osdeseguridadeprotecci6n
paralosoJosmientrasope_esusegadoraocuando
hagaajustesoroparac]ones.Recomendamosuna
mascaradeseguddaddevisf6namplia,pareuse
espejuelosoanteojosdesegu_dad estandade,
COMe USAR SU SEGADORA
CONTROL DE LA VELOClDAD DEL
MOTOR
La velocUad del motor se conir<31aper media de
una palanca ublcada en el lade del mob[ La
posiciOnde r_pidoso usa pare arrancar e! motor;
para el code normal y un meier ensacamiento clef
c_sped.,La posici6n lento es pare code liviano,
recede y pare economizer combusUble.
CONTROL DE ZONA DEL MOTOR
Palanca de control de
la velocidad del motor
PRECAUClON: Los regulaciones federales e×igen
qua se insf_e un control pare el motor en esta
segadora pare reducir a un mfnimo el riesgo de
lesionarse debido a] conlacto con la cuchilla. Per
ningQnmolJvo trate de eflminarla funci6n del control
d;_toperador. La cuchilla gira cuando el motor est_
fundonando.
• Su segadora viene equ[pada con una barra de
control que exige Ia presencfa del operador, lo
qua requiere qua el operador est6 detr&s del
mango de la segadora para haceda arrancar y
operarla,
PARA AJUSTAR LA ALTURA DIE CARTE
.Levante los rdedas pare et carte bajo y baje las
nJedas para el carte alto.
•Ajuste la allure de code pare que se acomode a
sue requisites,,La poslcl6n del media es ta meier
pare la rnayorfa de los c_pedes,
• pare camblar laaltula de code, empuje la
pa]anca det ajustador hacia la rued& Mueva la
rueda hacla arnba o hacla abajo de mode qua se
acomode a sus requisites.AsegL_resequa todas
los nJadesqueden igualmenle ajustadas°
ATENCION. El ajustador esta cormctamente
colocado cuando tas erejas de la place asian
insertadas en el agujero del mango_Tambi_n, los
aJustesde 9 posiciones {sfequtpado) permiten qua
et mango pueda ser may{do entre las orejes de la
plac&,
Para un code alto,
baje fas ruedas
Orejas de la place
l_r_ Itn _nrfP. h_in Iavante los ruedas
PARA MON1"AR Y ADJUNTAR EL
RECOGEDOR DE ClaSPED
• Cierre la tape so]labia. La tapa soltable debe
estar cerrada cuando se esta operanclo la
segadera..
oLevanle la puerta tra_era de la caja de la
segaclora y ponga el bastidor del recogedor de
c_sped on los orejas formadas en el puntal de
bfsagra de la puerto lrase[a.
• El recogedor de c_sped esta asegurado en la
caJade la segadora cuando se baja la puafla
trasera pare descansar en et baslidor del
recogedor de c_sped
PRECAUCl6N; No haga funcsor_r su segadora sin
el desviador de recorles o sin el recogedor de
c6sped, aprobados, en su lugar. Nunca trate de
operar la segadora cuando se ha removldo Ia
puerto trasera o cuando est_lun pace ablerla.
....---, .._z...-Puerta trasera
Puntai de
bidag
Bas[idor de
. _recogedordot
ii!l cespod
formadas i_
PARA VACIAR El. RECOGEDOR DE
C_SPED
• Pare remover et recogedor def c_sped suofte la
barra de control del operador para poder parer et
motor.
oLevanle la pueda de arras y remora el recogedor
del casped per el mango°
AVISO: No a.rraslrela balsa cuando la vacfe; se
producird un desgasle lnnecesarioo
CONTROL DE LA IMPULSION
• La autoimpulsi6n se controla al sujetar la
barra de control qua exlge la presencia del
operador hacta abajo on el mango y el
empujar la patanca de control de la {mpulsl6r
hacla adelante haste qua suene "clic," luego
se suelta la palanca.
• El movimienlo hacla adelante parar_ cuando
la barra de control que exlge la presencla del
operador se sublla. Pare parer el movlmlento
hacta adelante sin parar el motor, suette la
barra de control qua exige fa presencia del
eperador un pace hasta que se desenganche
e! control de ta impulsfdn, Sujete la barra de
control que exige la presencia del operador
abajo en centre del mango pare conttnuar
segando sin au!oimpulsf6n,
Paramantenerelcontroldelaimpulsi6n
engancttadocuandosedevueltaenlas
esquinas,empuje el mango hacta abajo y
levante los ruedas delanteras fuera del suelo
al gtrar la segadora+
Barra de control qua exlge la presencia del
eperador \, \ \ Control de
Control de le
Pare enganchar impulsibn
el control de la desenganchado
impulsl6n
ANTES DE HACER ARRANCAR EL
MOTOR
ACE1TE
Su segadera lue envlada sin aceite en el motor.
•Asegt)rese qua la segadora est_ nivelada y que
el #,reaalrededer de! dep6sito de aceite est6
timpia.
,Remueva ta tapa del dep6sito de aceite dot
mote[ con la varilla indicadora de nivel y reIlene
hasta la Jfneade ireneen _st&
• Use 0,61 (27 oz_)de aceite. Pare el ripe y la
calidad yea"MOTOR" en la secci6n de las
"Responsabtiidades det Cliente" en este manuel.
• Vacfe el aceite lentamente. No Io llene
demasiadoo
, Revise el nivel del aceite antes de coda use+
Agregue acette si es necesarto, Uene hasta la
Ifnee de llano en la varilla indicadora de nivet
• Para leer e[ nivel adecuado, apriete la tape del
dep6sito de aceite del motor coda vez.
,Vueiva a lnstalar ta tape del dep6sito del aceite y
apfl_tela.
• (".,ambleel aceite despu6s de 25 heros de
operacl6n o una vez per temporada. Puede
necesi_3rcarnblar el aceite m&s a menudo
cuando las cendiciones son polvorosas o sucias.
GASOL1NA
,, Ltene el estanque de combuslibleo Use gasoline
regular, sin plomo, nueva y limpia con el m[ntmo
de 87 octanes. No mezcte el aceile con la
gasoline+Para asegurar qua la gasotina utSzada.
sea fresco compre eslanques los cuales puedan
ser ullttzedos durante los pdmeros 30 dies,
ADVERTENOIA: La experiencta ha indicado que
los combusUbles mezclados con alcohol (conocidos
come gasehol, o el use de etanel o metanol)
pueden atraer la humedad, la qua conduce ale
separaci6n y Jormacl6nde _cldos durante et
aimacenamiento. La gasotina acidica puede dafiar
et sistema del combusUbtede un motor durante el
almacenarnlento+Pare evitar los probtemas con el
motor, se debe racier el sistema dot combQstibte
antes de guardario per un perfodo de 30 dfas o
m&s. Vacie el estanque del combustible, haga
9.q
arrancar el motor y h&gate fundenar haste qua los
llneas del combustible y et carburador queden
vac[es..La pr6xima temporada use combuslible
nue'_'o.Vea los lnstrucc_enesPara El
Almacenamiento para m&s infon'naciSn°Nunca use
productos de Iimpieza pare el motor o para el
carburador en el eetanque det combusllble pues se
pueden producir defies permanentes+
PARA HACER ARRANCAR EL MOTOR
• Pare hacer arrancar un motor frio, empuje el
cebador clnco (5) veces antes de trataflo Use un
empuJelirmemente. Esle paso normalmente no
es necesario cuando se hace arrancar un motor
qua ya ha eslad{3 funcionando per Lrnoscuantos
minutes..
• Mueva la palanca de control de veloddad a ta
posid6n de r&pido.
• Sujete la barra de control qua exige ta presencia
del operader abajo en el mango y tire et mango
del arrancador _pldamenle. No pem_ila que el
cord6n del arrancador se devuelva
abruptamente.
• Pare parer el motor, suelte la barra de controi
que exige la presencia del operador.
AVISO: En cttmas mAs fries puede qua sea
necesario repe_r los pesos del cebado En climes
m&s calurosos el cebar demasiado puede producir
et ahogo y et motor no va a arrancar. Si se ahoga el
motor espere unos cuantes minutes antes de tralar
de hacedoarrancar y no replLalos pesos del
cabado.. Tape det
Tapa del deposito deposito de
de la gasoline ,--'/ aceite del
""___ vadltam°t°rcon
indicadora de
ntvel
GONSEJOS PAHA _bUAH
• Bajociertascondiclones,telcomo c_spedmuy
alto, puede ser necesario el clever ta al|ura del
code pararedudr el esfuerzo necesario pare
empujar la segadora y pare evltar sobrecargar el
motor, dejando montones de recor_esde c_sped+
° Pare un coda muy pesado, reduzca el ancho del
code pasando parctalmente per enclma del lugar
anterion-nenle codado y siegue lentamenle.
• Pare un meier ensacado del c_sped y pare la
mayorfa de las cor,,dicionesde cede, la veloctdad
del motor debe ajustarse ata posiclc_ de r_pldo.
,, Cuando use una segadora con descarga lrasera
en cE_.spedht3medoy pesado, los montones det
c_sped cortado puede que no entren en el
recogedor de c6sped. Reduzca la velocidad de!
recorrido (veloctdad de empuje) y/o haga
funcionar la segadora sobre el Area per segunda
vez+
- Si queda una huellade cortes en el ladoderecho
de una segadora co+]descarga trasera, Wegue
en la direcci6n en que giran las manttlasdei reloj,
solapando un poco para recaudar los recorles en
la pr6xtma pasada
• Los pores en los recogedores de c_sped de tela
pueden }lenarse con mugre y polvo con el use y
los reoogederes recaudar_'_ menos c_sped.
Pare eviler #ate, roc[e el recogedor con la
rnanguera de agua regulan'nente y d_jelo
secarse antes de usarlo+
- Mantenga la parle superior del motor, alrededor
del arrancador, despejada y sin tecortes de
c#.sped y paja+Esto ayudar_ el flujo del aire det
motor y extenderA la duraclOn6ste.
Max. 1/3
t;ur_=du_ rAI_A _AN Y
ACOLCHAR
IMPORTANTE: Pare obtener el meier
rend{miento mantenga ta caJa de fa segadora
sin acumulacion de cesped y basura+ Vea
"Iimpleza" en la seccton de
"RESPONSABILIDADES DEL CLtENTE" de
este manual,.
. La cuchilla acolchadora especial va a volver a
cortar los recortes de c_sped muchas veces,
y los reduce en tamaSo, de mode que sl se
caen en el c6sped se van a dispesar entre
6ste y no se van a notar+ Tambi0n, el c0sped
acolchado se va a deshacer r_pldamente
entregando substanclas nutrillvas pare el
c6sped. Sfempre acolche con la velocidad del
motor (cuchUla) m&s alia, pues as[ se
obtendrA la meier acclOn de I'ecorte de las
cuchlllas,
• Evile cortar el c_sped cuando estO moJado. El
c6sped mojado tlende a [ormar montones e
inlerliere con la acci6n de acolchado. La
meier hera pare segar el c_sped es temprano
en la tarde. A esa hera 6ste se ha secede y e!
Area rect_n cortada no quedar_, expuesla al
sol directo_
•Para obtener los mejores resultados, ajuste la
allura del code de la segadora de mode que
_sta corte solamente el tercio superior de las
he]as de c_sped. En el case de que el
c_sped haya crecido demasfado, puede set
necesario el elevar la altura del code para
reducir el esfuerzo necesario pare empujar la
segadora y pare evitar sobrecargar el motor,
deJando montones de recortes de c_sped.
Pare un aooloham_ento muy pesado, reduzca
el ancho del corle pasando per enctma del
lugar anterlormenle cortado y stegue
lentamente,
,, Ciedos tipos de cOsped y sus condlclones
pueden exlgir que un Area tenga que set
acolchada per megunda vez para esconder
completamente los recedes, Cuando se haga
el segundo corte, siegue atravesado o en
forma perpendicular ala pasada del primer
code.
• Cambie su patr6n de code de semana a
semana. Slegue de notre a sur una semana y
luego camble de este a oeste la prSxima
semana,, Esto evitar& que el c_sped se
enrede y cambte de dtrecci6n.
PROGRAMA DE MANTEN1M|ENTO
!LENE LAS FECHAS A MEDIDA
QUE COMPLETE
FECHAS DE SERVICIO
v" v'4
4-Ca_gat par 48 ha=e_sa_lift da {a tarnp_=ada
RECOMENDACIONES GENERALES
La garanffa de estasagadom no cubra los artfculos
qua ban estado sujetos al abuse o ala negligencia
del operador. Pare recib{_lode el valor de la
garantfa, el operador t_snequa man|ener la
segadora segun tas instruccionesdescdtas en eats
manual.
Hay algunos ajustes qua se t_enenqua hacer en
fom_a per_Sdicapare poder manten_r su unidad
adecuadamente
Todoslos a_ustesen la seccldn de Servicto y
Ajusles de esle manual fienenque set revisados
par Io manes un vez par cada lemporada
- Una vez al aSo, cambie la buJfa,Iimple o cambie
el elemenlo del filLrode a]re y revise st IAcuchiUa
es_ desgastadaoUna bujfa nueva y un elemenlo
del filtrode aire Iimp[o/nuevo aseguran la mezcla
de alre-combuslible adecuada y ayudan a clue su
motor functone major y que dure m_s,
* Slga el programa de manlenlmlento en este
manual,
ANTES DE CADA usa
• Revise el nivel det acefte de! motor.
*Revise st hay sujetadores sueltos.
LUBRICAOION
Mantenga la unidad bien tubricada
TABLA DE LUBRlCAClON
(_)Aceile de motor (_ Ajustador de la rueda
Bisagra de fa
a de montaje puerta trasera
del puntal del
mango
(_ Rocie el tubricante
(_) Aciete de mol.or de SAE 30° relieraae
ala seccion de responsibHidades del
cl{ente en 'Me'TaR"
|MPORTANTE: No aeeite oengrase los
rodamienlos de la rueda de plastico. Los
lubdcantes vi_,coaos atraei'an poivo y rnugre, Io
qua acortara la duraci6n de los rodarnientos
autolubricantes. Si cree qua tienen qua
lubrlcarse, use solamente un lubricants ripe
grafito, de polvo seco in forma moderada.
ESPECiFICACIONES DEL PRODUCTO
NOMERO DE MODELO 917.377302
NL')MERO DE SER1E
FECHA DE COMPRA
CABALLOS DE FUERZA: 6.6
DESPLAZ_AMIENTO: 12.56CU, IN.
CAPACIDAD Y TtPO !,,5 Cuarlos
DE GASOLINA: REGULAR SIN PLOMO
TIPO DE ACEITE: SAE 30 (sobre 32°F)
(API-SF/SG/SH) SAE 5W-30 (debajo 32°F)
CAPACIDAD DE ACEITE: 27 oz. de capacidad
BUJ/A (ABERTURA: .030") CHAMPION RJ19L
TOLERANC1A DE VALVULA: ADMISION: .004 - ,008
DESCARGA: .004..008
SENCENDIDO DE ESIADO
SOLIDO ABERTURA DE AIRE: .0125 IN.
TORSION DEL PERNO
DE LA CUCHILLA: 35-40 FT. LBS.
. El num_ro del nodelo y el de serie se encuentran en la calcomania adjunta ala parte
trasera de la caja de la segadora. Debe registrar tanto el num_ro de serie come la
fecha de compra y rnantengalos en un lugar seguro pare refencia en el futuroo
SEGADORA
Slempre observe las reglas de seguridad
cuando haga el mantenimiento..
LLANTAS
• Mantenga tas llantas sin gasoline, aceite o
substanctas fluimicas pare control de
insectos que pueden dafter la goma..
• Evlte los tocones, las piedras, las grietas
F'rofundas, los ebjetos afilados y o_ros
peligms que pueden daSar alas tlantas.
CUIDADO DE LA OUCHILLA
• Remueva el pemo de la cuchilla girb,ndolo en
el sentido contrmto en que giran ias mantllas
del re_ojo
. Remueva la cuchilla y los articulos de
ferreleria adjunladores (el paine, ta a_andela
de seguridad y la arandela endurecida),,
AVISO: Remueva el adaptador de la cuchilia y
revise el cube interior de la ranura del
adaptador de la cuchftla. La ranura tiene qua
ester en buenas condiciones pare qua funcione
en farina adecuada. Cambie el adaptador si
est& daSado.
Pare obtener los meJores resultados, 15cuchilla
de la segadqra tiene qua mantenerse afilada.
Cambie la cuchilla dobtada o daSada.,
PARA REMOVER LA CUCHILLA
- Desconecte el alambre de la bujfa y p6ngalo
en donde no pueda entrar en conlaclo con
t_sta.
• Flaga descansar ta segadora en su lado_
AsegOres e qua at fillre de aire y qua el
carburador queden mirando hacia arribao
• Use un bloque de madera enlre la cuchilla y
ta caja de la segadora pare evitar qua la
euchlila gire cuando sele qutte et paine.
• Proteja sus manes con guantes y/o envuelva
la cuchilta con una tela gruesa,_
PARA CAMBIAR LA CUCHILLA
•Ponga el adaptador de la cuchilla en el
cigueb,ai dei motor. Aseg,3rese qua la ranura
del adaptador y qua el chavetero del ci#ueSal
est_n atineados.
. Ponga la cuchitla en el adaptador de _sta
alineando los dos (2) agujeros en la cuchiila
con las salientes elevadas en el adaplador,
. Aseg0rese de qua el berde de salida de ]a
cuchilla (opuesto al borde afilado) est6 hacla
arriba hacta el motor.
• Ins|ale el perno de la cuchilla con la arandela
de seguridad y la arandela endurecida en el
adaptador de la cuchitla yet cigueSalo
26
•Use un bloque de madera entre la cuchitla y
la caJa de la segadora y apdete el pemo de la
cuchilta gir_.ndofo en el sentfdo en que giran
tas manillas del reloj.
- La to_si6n para apretar recomendada es de
35-- 40 pies libras.
IMPORTANTE: EL PERNO DE LA CUCHILLA
ES CLASE 8 TRATADO A CALOR.
AVISO: No recomendamos el afilar ta cuchilla -
pero si Io hace, asegQrese de que quede
balanceada.
PARA AFILAR LA CUCHILLA
Se tiene que tenor culdado de manteneda
balaneeada. Una cuchiUa qua no est&
batanceada va a producir eventualmente dare
en ta segadora o en el motor.
•La cuchilla puede afitarse con una lima o en
una rueda rectJficadora. No Irate de aftlafla
mientras se encuentra en la segadora.
•Para revlsar el balance de la cuchilla, clave
un clave en una viga o en la pared. Deje
alrededor de una pulgada de un clave recto
expuesto. Ponga el agujero central de la
cuchitla sabre ta eabeza del clave. Si la
cuchUla esl_. balanceada debe permanecer
en la posici_n horizontal. Si cualquiera de los
extremes de ta cuchl!ta se mueve hacia
abajo, afile el extreme pesado hasta que 8sta
quede balanceada,
Adaptador de ta cuchilla wetero del
cIguenaf
Pemo de
Arandela de
seguridad
enduredda
de la
cuchttla
de saltda
CAJA DE ENGRANAJES
.Para mantener el sistema de tmputsl6n
functonando en farina adecuada, la caja de
engranajes y el Area alrededor de la
Impulst6n tlenen que mantenerse llmptas y
sin acumulaci6n de basur& Limpte debajo de
la cubierta de la imputsi6n dos veces per
temporadao
*La caja de engranajes se Ilena con lubdcante
haste el nivel adecuado en la f&brica. La
Onica vez que et lubricante necesita atenci6n
es cuande sele ha praslado servicio ala caja
de engranajes.,
, Si se necesita lubdeanle, use sotamente
Grasa Texaco Starplex Premium I, ParLe No.
750355. No use substitutes.
RUEDAS DE IMPULSION
Revise las nJedas de imputsi6n delanteras cada
vez antes de segar, pare asegurarse de que se
rnueven libremente..
Si las ruedas no giran tibremente qulere decir
que hay basura, recortes de cesped, etc. en el
_rea de las ruedas de impulsl6n y tienen que
ltmpiarse para liberarlas,.
Es necesarlo limpiar las ruedas de impulsidn;
revise ambas ruedas dalanteras.
• Remueva los tapacubos, las clavijas de
horqutlla y las arandelas,
o Remueva las ruedas de los ajustadores de
las ruedaso
- Remueva la basura y los recortes de c_sped
de dentro de la cubierta centre el polvo, pi_6n
yto de los dientes de los engranajes de las
ruedas de impulsl6no
• Ponga las ruedas de vuelta en su tugaro
. Si despu_s de limplar tas ruedas de
imptllsidn no giran ((bremente, p6ngase en
contacto con su centre de servicio mAs
ceroano,
RECOGEDOR DE CibSPED
- El recogedor de c_sped puede ser rociado
con el ague de la manguera pete tiene que
estar seco cuando se vaya a user.
• Revise su recogedor de c_sped a menudo
para vertficar si est,, da_badoo deterioration,
Se va a desgastar con el use normal. Si se
necesita cambiar el recogedor, c_mblelo
solamente per uno que sea aprobado per el
fabdcante., D_ el nQmero det modele de la
segadora cuando fo ordene°
MOTOR
LUBRICACION
Use solamente aceite de detergente de aJta
catidad clasificado con la clasificaci6n SF o SG
de servicio API. Seleccione la catidad de
viseosidad SAE seg0n su temperature de
o _eraci*bnesperada.
AV!SO; A pesar de que los aceltes de
multivtecosidad (5W30, 10W30, etc_) mejoran el
arranque on clirna fifo, estos aceites de
multiviscosldad van a aumentar el consume de
aceite cuando se usan en temperature& sabre
32_'F. Revise el nivel del aceite del molar m&s a
menudo, pare evitar un posible dare en el
melee, debldo a que no tlene suficiente aceite.
Cambie et acetic despu_s de las dos prlmeras
hares de operact6n y cada 25 hares de ah[ en
adelante, o per io menos una vez al abe, st la
segadora no se usa 25 horas en un aF,o.
O7
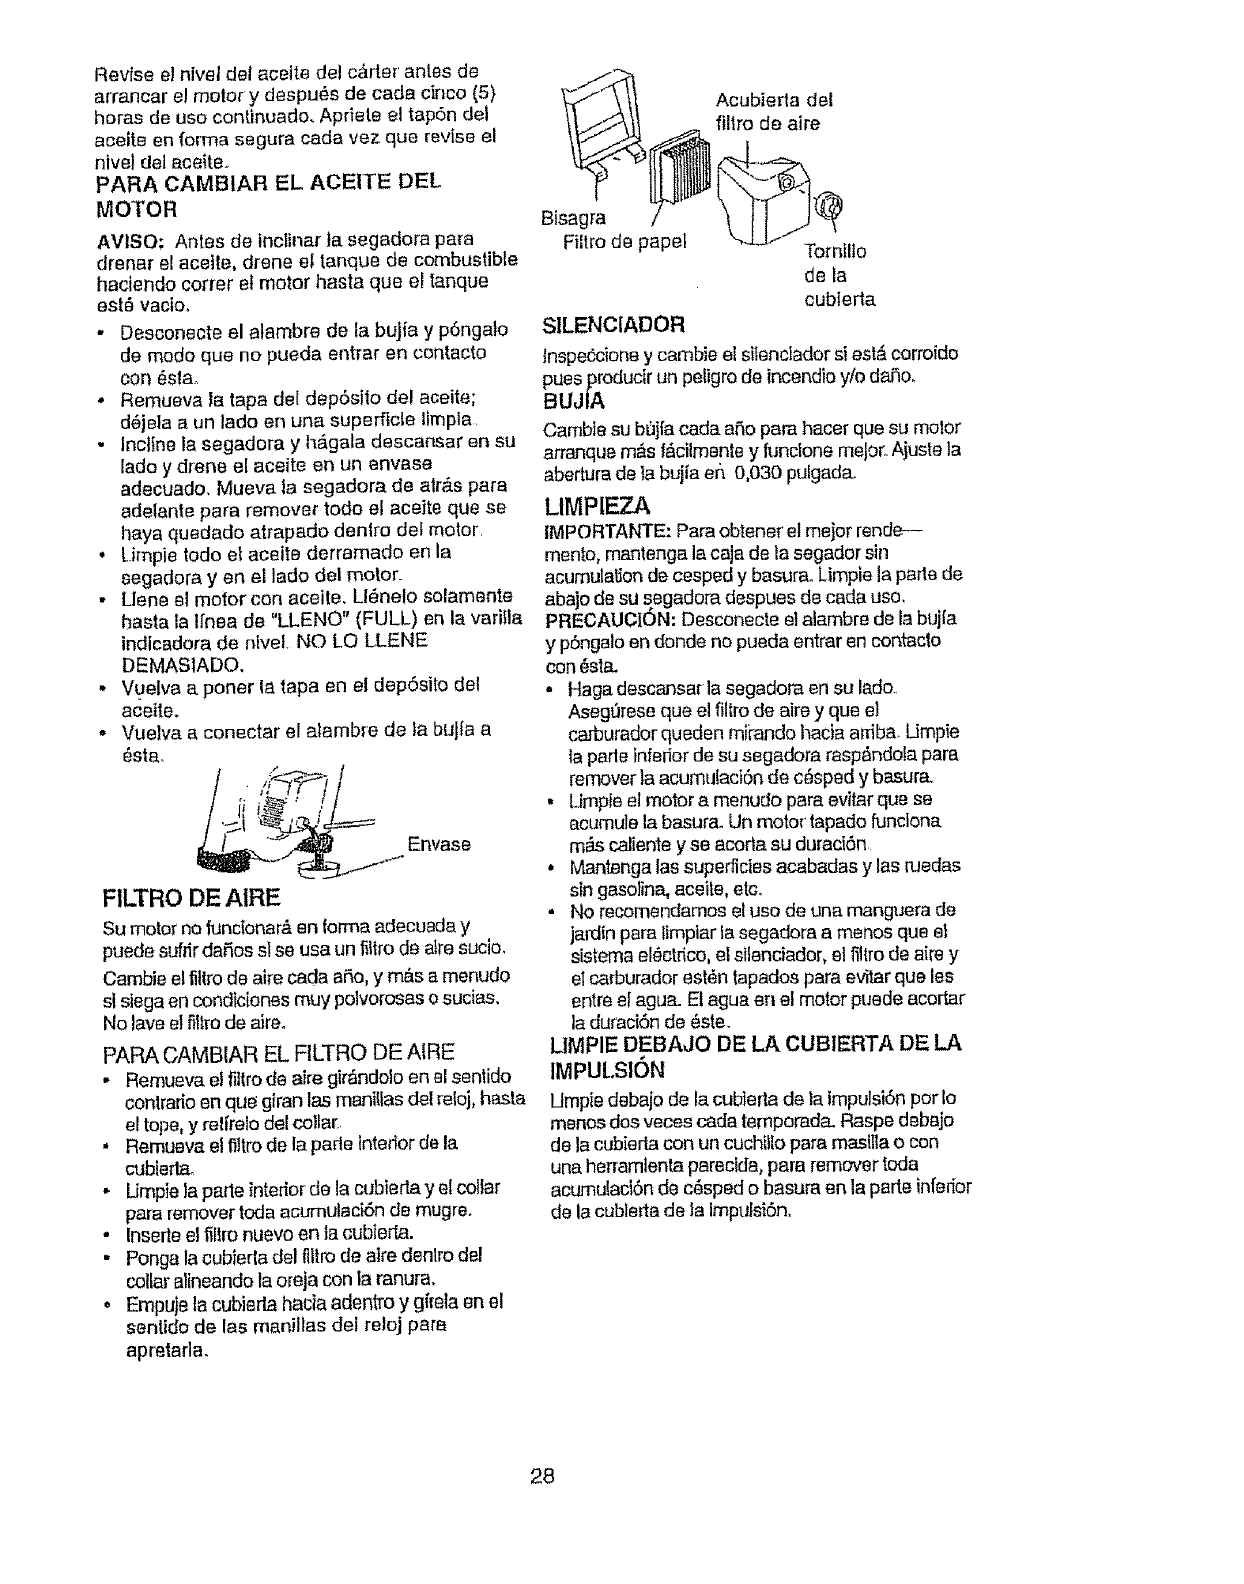
Revise e] nivel del acelte del c&rter antes de
arrancar e! meier y despu_s de cada cinco (5)
heros de use continuado. Apdete el tap6n del
acefte en forma segura coda vez que revise el
nlvel del eceite.
PARA CAMBIAR EL ACEITE DEL
MOTOR
AVISO: Antes de lncTinar ta segadore para
drenar el acette, drone el tanque de combustible
hactendo correr et motor basra que el tanque
est_ vacio,
• Desconecte el alambre de la bujfa y p6ngato
de mode que no pueda entrar en contacto
con _sla..
• Remueva la tapa dei depbslto del aceite;
d6jela a un lade en una superftcle limpla,
- Inctine la segadora y h_gata descensar en su
lade y d_ene e[ aceite en un envase
adecuado, Mueva |a segadora de atr,_s para
adelante pare remover todo el acette que se
haya quedado atrapado den|re dot motor,
, t..impie todo et aceit8 derramado en la
8egadora yen el lade del motor.
• Llene el motor con aceite. Ll_nelo solamente
haste la l[nea de "LLENO" (FULL) en la vari_la
ind|cadora de nivel. NO LO LLENE
DEMASIADO.
,, Vuelva aponer la tapa en el depbsito dot
aceite.
o Vuelva a conectar el a]amb_e de ]a bujia a
_sta.
Envase
FILTRO DE AIRE
Su motor no _unSenar&an forme adecuada y
puede sufiir daQos sl se usa un 51trode atre sucio_
Cambie el fitlro de aire coda aSo, y m&s a menudo
sl siege en condiciones muy polvorosas o sucies,
No lave el filtm de aireo
PAPA CAMBtAR EL FILTRO DE NRE
,, Remueva el _l#o de aire gir_ndolo en el senlido
contrario en que glran tas manitlas del reioj, haste
el tope, y rel#elo dot collar
• Remueva el filtro de la parle Interior de la
cubtertao
•Umpie la parle interior de la cubierf_ y el coliar
pare remover toda acumulad6n de mugre.
. Inserte el f{liro nuevo en la cublerta.
" Ponga la cubierla del filtro de atre denlro del
collar alineando ta oreja con la ranur&
. Empuje la cubierla hacia adentro y gf[eta en el
sen|ido de/as maniltas <:/elreloj pate
apretarla
Acubierla del
filtro de aire
Bisagra
Fiitro de papel
SILENClADOR
Tomillo
de la
eublerle
lnspe_cione y cambie el sttendador si est_ corroido
pues produdr un peligro de incendio y/o dare.,
BUJIA
Cambte su b[_j[acoda are para hacer que su reeler
arranque m&s 1&cilmantey funcione meier. Ajuste ]a
abertura de la buj[a or, 0,030 pulgadao
LIMPIEZA
IMPORTANTE: Pare obtener et meier renrJe---
monroe,mantenga la caja de la segador sin
acumulat_onde cesped y basuraoLimpie Japerle de
abaio de su segadora despues de coda use,
PREOAUCtON; Desconecte el alambre de la buj[a
y p6ngalo en donde no pueda entrar en contacto
con _st_c
o Haga descansa[ la segadora en su lade.,
Asegt_reseque el fllirode aire y que el
carburador queden mii-ando hacie arfiba Umpie
la parle inferior de su segadora rasp_ndola pare
remover le acumulaci6n de c6sped y basura,
• Umpie el motor a menudo pare evitar que se
acumule la besura_ Un motor tapado funclona
mAscaliente y se acorta su duraci6n
• Mantenga los supedicies acabadas y los ruedas
sin gasotina, aceile, etc.
- No recomendamos el use de una manguera de
jard(n pare timpiar ia segedore a menos que el
sistema el_ctrico, el silenciador, el filtm de aire y
elca¢ourador es_n tapados pare eviler que los
entre elague. El ague en el motor puede acortar
la dumci6n de _ste.
LIMPIE DEBAJO DE LA CUBIERTA DE LA
IMPULSI6N
Umpie debajo de la cubterlade la impulsiSnper Io
menos dos vecescoda temporada.Raspe debajo
de la cubier_ con un cuchitlo pare masilla o con
une herramtenta parecida, pa[a remover toda
acumulaci6n de c_sped o basura en la porte in[erior
de la cublerla de la Imputsi6n,
28
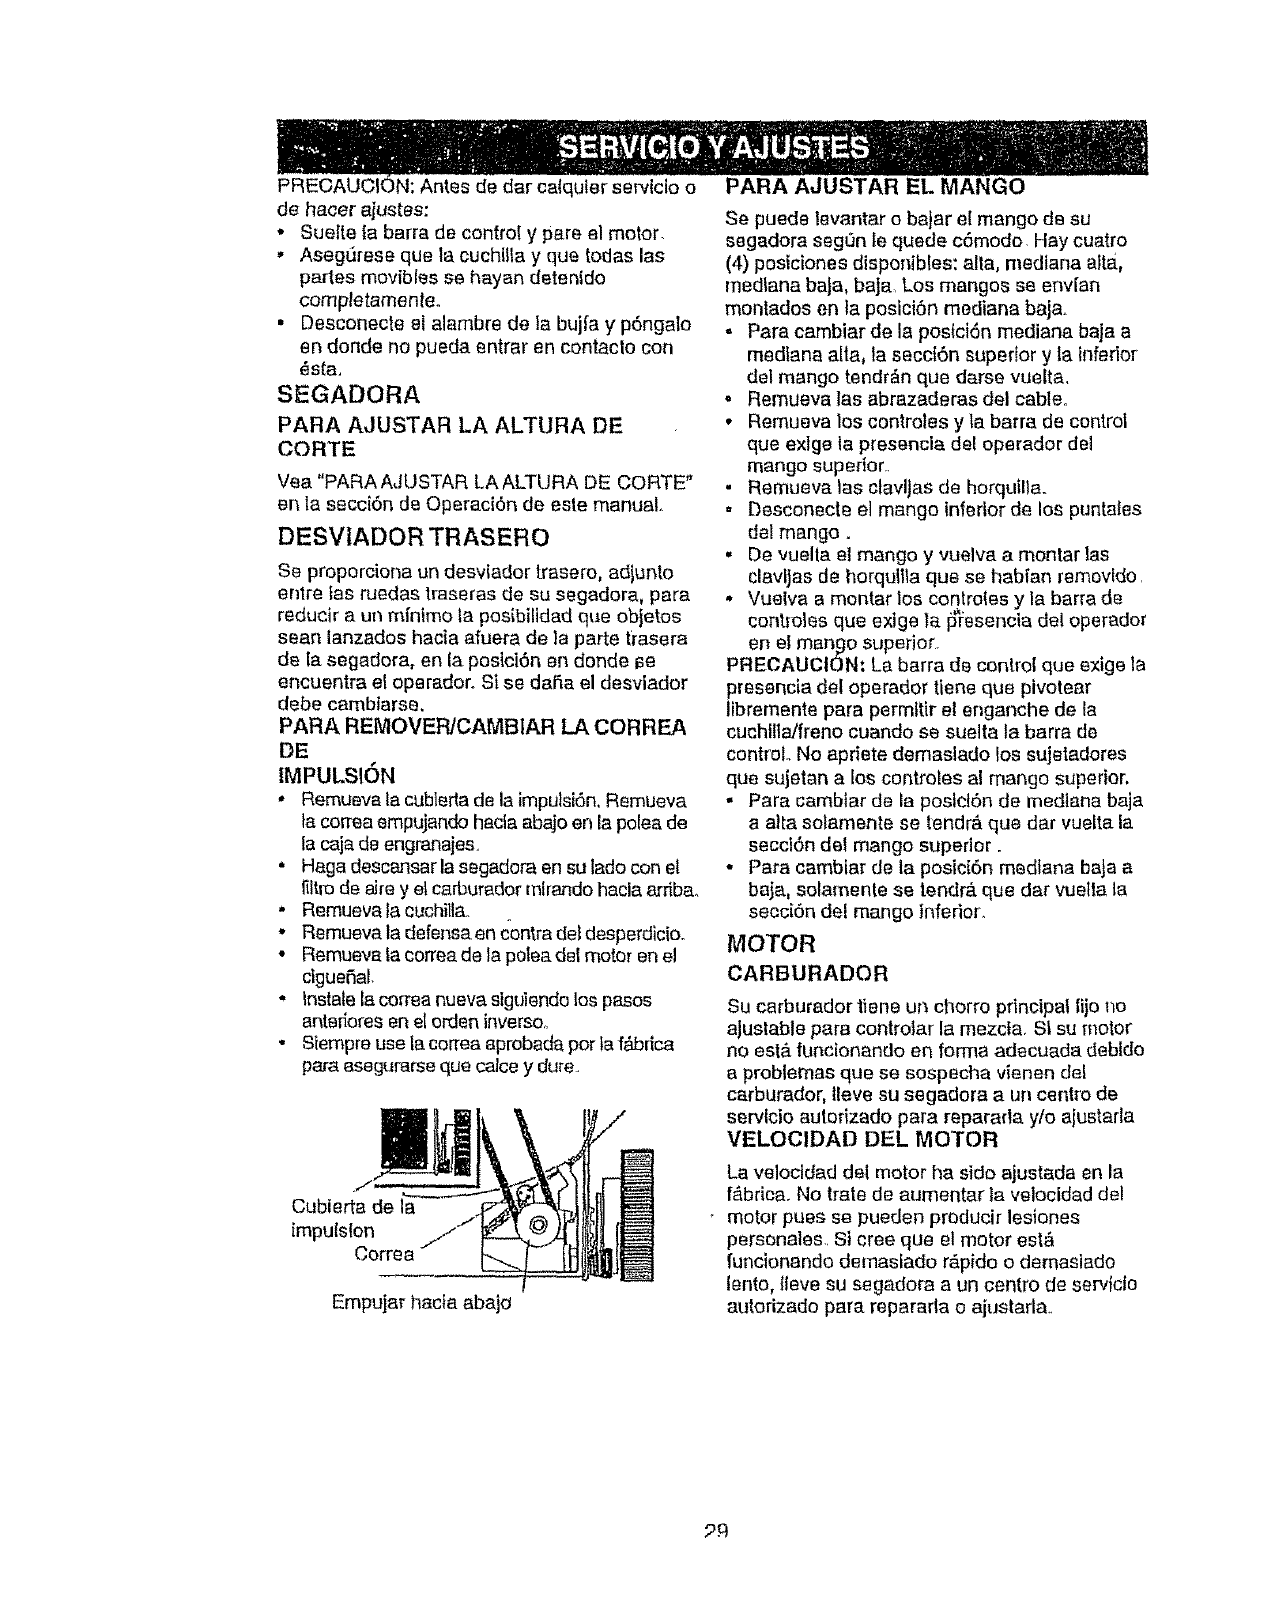
_N;Antes de dar catquier serviclo o
de hater ajustes:
* Suelte fa barra de control y pare el motor.
, AsegRrese que la cuchitla y que todas las
patios movibfes se hayan detenido
completamenleo
• Desconecte el alambre de la bujfa y p6ngalo
en donde no pueda entrar en contacto con
_sta.
SEGADORA
PARA AJUSTAR LA ALTURA DE
CORTE
Vea "PARA AJUSTAR LA ALTURA DE CORTE"
en ta secci6n de Operaci6n de este manual.
DESVtADOR TRASERO
$e proporciona un desviador trasero, adjunto
entre fas ruedas traseras de su segadora, pare
reducir a un mfnimo ta posibilldad que objetos
sean lanzados hacta afuera de la parte ffasera
de la segadora, en la posiciRn en donde f_e
encuentra el operador. Si se dare el desviador
debe cambiarse.
IPARA REMOVER/CAMB1AR LA CORREA
DE
IMPULSION
*Remueva ta cublerla de la impulsi6n. Remueva
la correa empujando hacia abajo en la polea de
la caja de engranajes.
• Haga descansar la segadora en su lado con el
_ltlo de aJrey el carburedor mtrando hacla arriba.
, Remueva la cuchill&
- Remueva la defense en contra del desperdicio.
, Remueva la correa de la polea del motor en el
dgueRaL
o tnstate la con_eanueva slguiendo los pasos
anteriores en e[ orden inverSOo
* Stempre use ta correa aprobada pot la f,_brica
pare esegurarse qua catce y dure.
Cubler
impuis{on
Correa
Empujar hacia abaja
PARA AJUSTAR EL MANGO
Se puede levantar o bajar el mango de su
segadora segt3n le quede cRmodo Flay cuatro
(4) posiciones disponibles: alia, medlana alta,
medlana baJa, baJa. Los mangos se envian
montados en la posiciOn mediana baj&
-Para cambiar de la posici6n mediana baja a
medlana alia, la secclOn superior y la infedor
del mango tendr_n que darse vuelta.
• Remueva las abrazaderas del cable°
• Remueva los controtes y la barra de control
que exlge la presencia del operador del
mango supedor..
, Remueve las ctavlJas de horquilla.
, Desconecte el mango inferior de los puntates
del mango.
, De vuella el mango y vuelva a montar las
clavlJas de horqullla qua se habfan removido.
• Vuelva a montar toe controtes y la barra de
conttoles que exige la 15'_fesenciedel operador
en e! mango superior.
PRECAUCION: La barra de control que exige la
presencia del operador tiene qua pivotear
libremente para permttir el anganche de ta
cuchilla/freno cuando se suelta la barra de
control. No apriete demaslado los sujetadores
qua sujetan a los controles al mango superior,
- Pare cambtar de la postd6n de medtana baja
a alia solamente se tendr& que dar vueita la
seccl6n dei mango superior.
o Para cambiar de la posici6n mediane baja a
baja, solamente se tendr& qua dar vueltla la
secciOn del mango inferior.
MOTOR
CARBURADOR
Su carburador tiene un cllorro pfincipat lijo i_o
ajustable pare controlar la mezcf& Sl su motor
no est#. funcionando en forma adecuada debido
a problemas que se sospecha vienen deL
carburador, lleve su segadora a un cent_o de
serv{cio autorizado pare reparada ylo aiustarla
VELOClDAD DEL MOTOR
La velocldad del motor ha sido ajustada en la
f_,brica. No irate de aumentar la velocidad del
motor pues se pueden producir lesiones
personales.. St cree qua el motor est,5
funcionando demaslado rApido o demaslado
lento, lleve su segadora a un centro de servlcio
autorizado pare repararla o ajustada..
_9
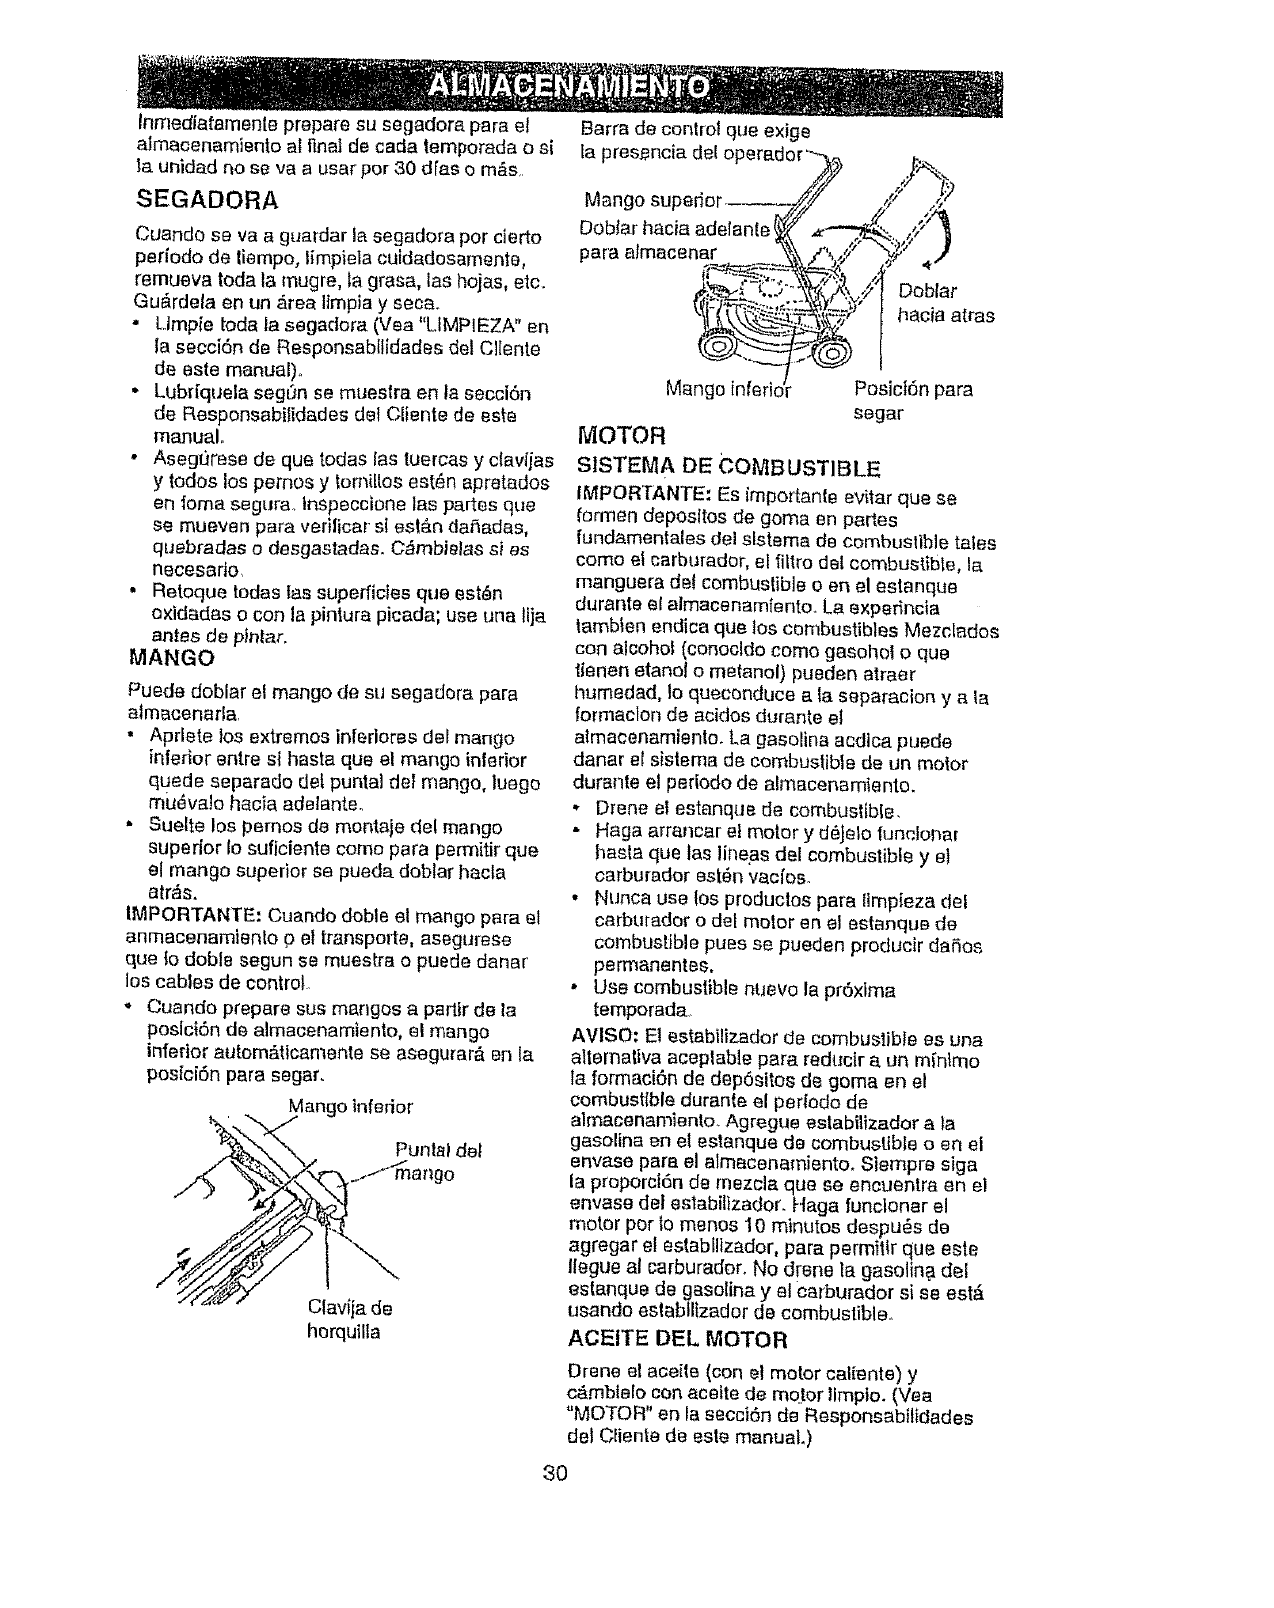
inmediafamenle prepare su segadora pare et
almacenamlento al llnat de cacta tempo[aria o si
}a unidad no se va a user per 30 d[as o rn&s.
SEGADORA
Cuando se va a guardar )a segadora per cierto
per[ode de liempo, limpiela cutdadosamente,
remueva toda ta mugre, la grasa, las hojas, etc.
Gu&rdela en un &rea ltmpia y secao
. L.Impie toda _asegadora (Vea "LIMPIEZA" an
la secci6n de Responsabllldades del Cl[ente
de este manual)°
• Lubr[quela segz'Jnse muestra en la seccidn
de Responsabilidades dot G_iente de este
manual°
• Asegt_rese de qua redes las tuetcas y ctavijas
y redes los pemos y torniltos est_n apretados
en _oma segura, tnspecclone las pastes qua
se mueven para verilicar sl est&n da_adas,
quebradas o desgastadas. O_mbielas si es
necesario,
• Retoque redes }as superficies qua est_n
oxidadas o con la pintura picada; use una ltja
antes de pinta[.
MANGO
Puede doblar el mango de su segadora pare
almacenarla.
• Aprlete }os extremes infedores de_mango
inferior entre sl hasta qua el mango interior
quede separarJo dot puntal de} mango, luego
mi_6vato hac_a ad_lante.
.Suelte los pemos de montaje del mango
superior Io suficiente come para pe_,tir qua
el mango superior se pueda doblar hacia
atr_s.
IMPORTANTE; Cuando dob!e el mango pare el
anmacenamiento o el transports, asegurese
qua to doble segun se muestra e puede dana[
los cables de control
oCuando prepare sus mangos a parltr de la
poslciSn de almaCenamiento, el mango
in|erior autom&t)camente se asegurar& en la
postci6n para segar.
Mango inferior
Puntal del
go
Claviia de
herquilla
Barra de control qua exige
ta pres.encia del operador _---_
Mango superior .... /_"
Dobiar hacia adelante _ ,,_---
pare almacenar _ _/"_,;
Mango inferior
2%
4, 3
i,;2' Doblar
hacia at[as
Posici6n para
segar
MOTOR
SISTEMA DE €OM_,USTIBLE
IMPORTANTE: Es irnportante evitar que se
formen deposltos de goma en partes
fundamentales del slstema de combustible tales
come el carburador, el filtro dot combustlbte, la
manguera dot combustible o en el estanque
durante el almaoenamiento. La exper_ncia
tambfen endica qua los combustibles Mezclados
con alcoho} (conocldo come gasoho! o qua
t_enen etanol o materiel) pueden atraer
humedad, 1oqueconduce ala separacion y ala
to[marion de acidos durante el
a}macenamientOo La gasoline acdica puede
danar el sistema de combustible de un motor
durante el periodo de aimacenam_ento.
.Drone el estanque de combustible.
•Haga arrancar e! motor y d6jelo tun_Jonm
haste que las lineas dei combustible y el
carburador est6n vacios.
,Nunca Use los productos pare Elmpieza del
carburador o dot motor en e] estar_qua de
combustible puss se pueden producir dares
permanentes.
*Use combustible nuevo la pr6xima
temporada..
AVISO" E1estabilizador de combustible es una
alternative acep}able pare redt_cir a un m_n_mo
la formaci6n da dep6sitos de goma en et
combustible durante el periedo de
almacenamiento. Agregue estabflizador _,ta
gasoline en e_estanque de combust{ble o er_el
envase pare el almacenamiento. Slempre siga
la proporci6n de rnezcla qua se encuentra en el
envase del estabilizador. Haga funclonar el
motor per Io manes 10 minutes despu_s de
agregar el estabflizador, pare permitlr qua este
Ilegue al carburador. No drone la gasolina del
estanque de gasoline y el carburador si se est&
usando eslabfltzador de combustible.
ACEITE DEL MOTOR
Drone et ace{to (,con el motor caliente) y
c&mbtelo oon aceite de mqtor limpio. (Vea
_MOTOR' en {asecci6n de Responsabilidades
del Clients de este manual,)
3O
CILINDRO
* Remueva la buji'a,
- Vac[e una onza (29 ml) de aceite a tray,s del
agujero de la buji'a an et cilindro.
. Tire la mani/la de arranque lentamente unas
cuantas veces para dlstribulr el aceite.
* Vuelva a montar ta nueva bujfao
OTROS
oNo guarde la gasoltna de una temporada a la
olra.
* Cambie el envasa de la gasolina si se
empieza a oxtdar. La oxidacidn y/o la mugre
en su gasolina producir_n probtemas,
,Si es posible, guarde su unidad en un reclnto
cerrado y c_brala para protegeda contra el
poivo y la mugre_
-Cubra su unidad con un forro proleclor
adecuado qua no retenga la humedad_ No
use pl&stico. El pl&stico no puede respirar, Io
qua permite la formacl6n de condensacl6n, lo
qua producir_l Faoxidaci6n de su untdado
IMPORTANTE: Nunca oubra la segadora
nientras el motor y las areas de escape todavta
estan callentes.
PRECAUCI6N: Nunca aImacene la segadora
con gasotina en el estanque dentro de un
edilicio en donde los gases pueden alcanzar
una llama expuesta o una chispa. Permita que
se enfrie el motor antes de almacenarla en
algt_n rectnto cerrado.
IDENTIFICACI6N DE PROBLEMAS
PROBLEMA CAUSA
No arranca • Filtro de aire sucio,
•Sin combustible.
•Combustible rancio,
•Agua en el combusllble.
•Alambre de la bujla
desconectadoo
•Bujia mala.
•Cuclitlla suella o adaptador
de la cuchilla quabrado.
•Barra de control en ta poslci6n
suelta.
.Falta de fuarza •Barra de control defecluosao
•Parle trasera de la cajacuchilla
de la segadora arrastr_ndose
an el c_sped pesado.
• Est& certando mucho c_sped.
• Ftltro de atre suclo.
oAcumulacl6n de c_sped, hojas
y basura debajo de ta saga-
dora,
-Demaslado aceite an el motor.
CORRECClON
J
iI
!
Limpte/cambie el iiltro de atre,
Llene el estanque de combustible.
Drene el estanque y vuelva a
Ilenarlo con combustible limpio y
nuevo.
Drone e! astanque de combuslible y
et carburadory vuelva a Ilenar el
estanque con gaselina nueva.
Conecte el afambre a la bujfa.
Gamble la bujia.
Apdete el perno de la cuchiila o
camble el adaptador de la cuchilla.
Presione ta barra de control hacia el
mango.
Camble la barra de control.
:## Ajuste a ta poslcl6n do "Cotte m_s
altoo"
Ajuste a la posicl6n de "Code m#
alto."
• Ltmpia/cambie el fillro de alto.
,' Limpie ia parle infedor de la caia de
la segadora.
• Revisa el nivel del aceite.
• Corte a una velocldad de recorrido
m&s lenta.
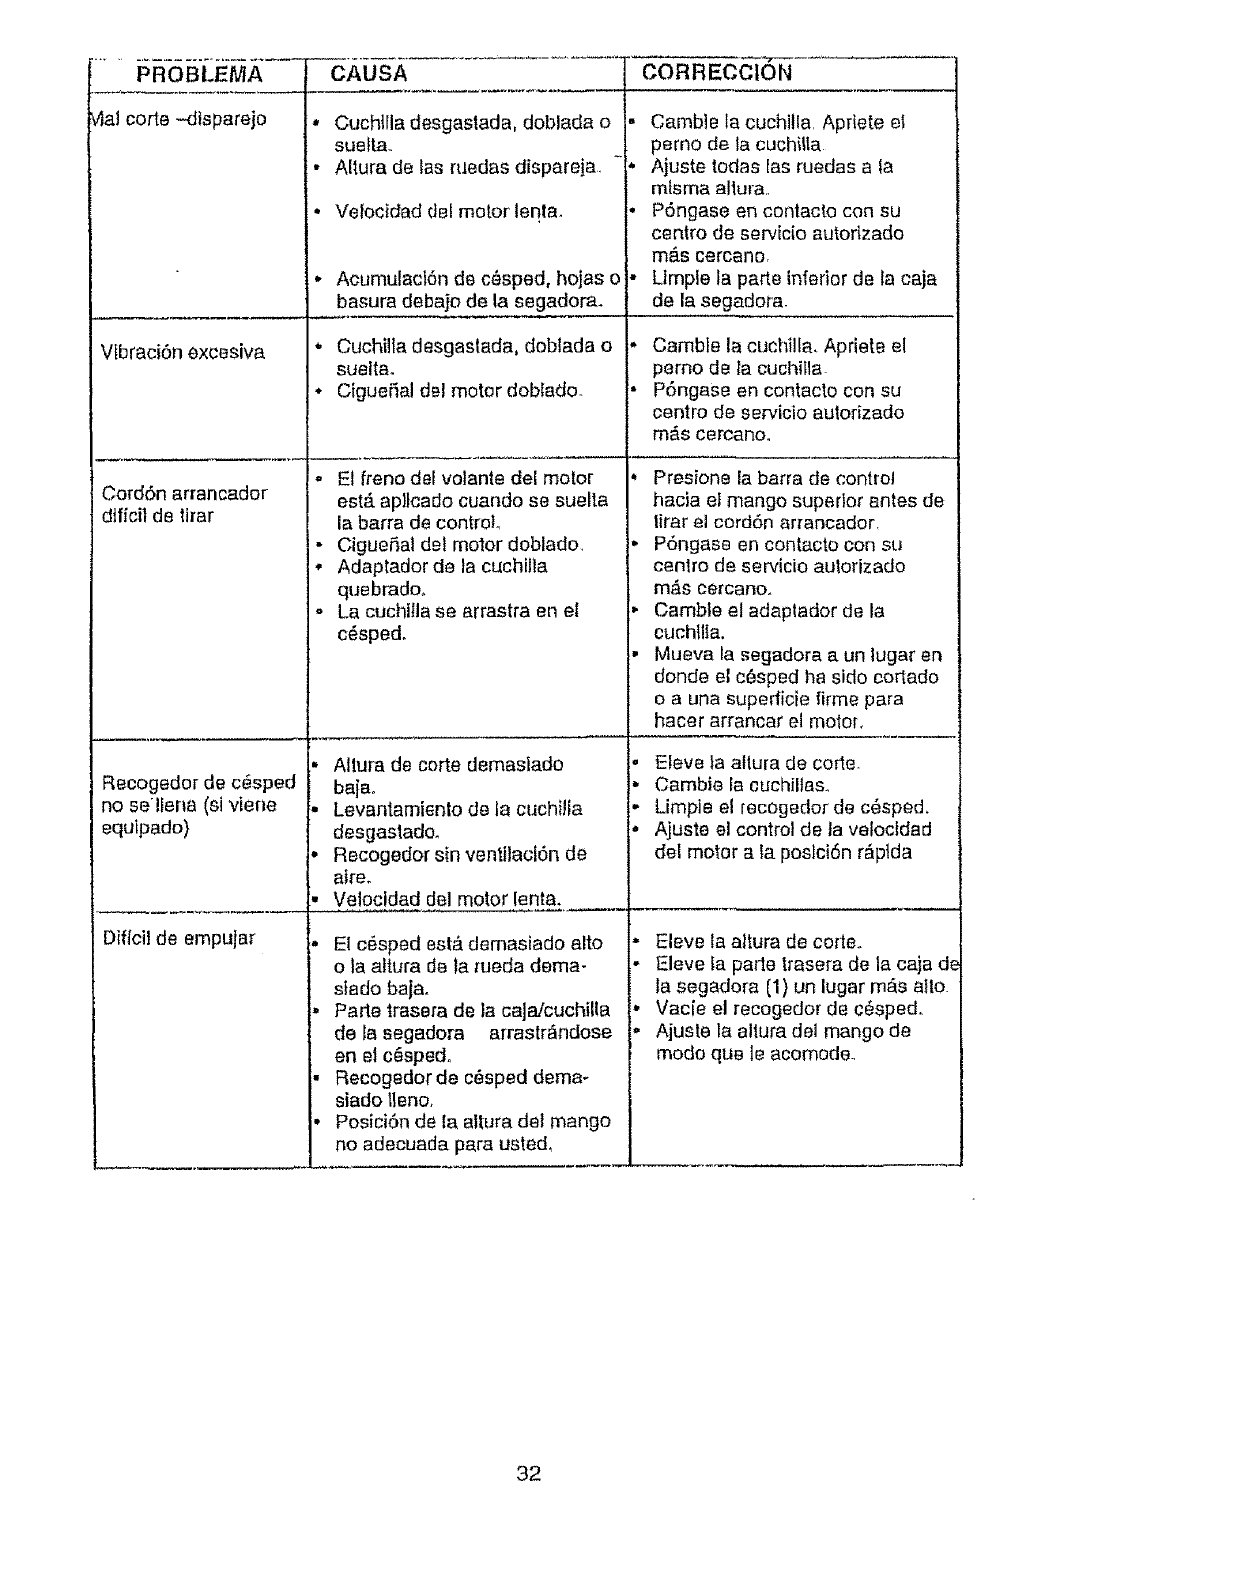
PROBLEMA
vlal code --disparejo
Vlbrad6n excesiva
Cord6n arrarlcador
:ttficil de t#ar
Recogedor de c_sped
no sellena (si viene
equtpado)
Diflcil de empujar
CAUSA
• Cuchllla desgastada, doblada o
suella..
• Altura de las ruedas dispareja.
•VefocicYadde! motor' leqta.
Acumulacl6n de c_sped, hojas
basura debajo de la segadora.
Cuchilla desgaslada, doblada o
sueltao
Cigue5al del motor doblado-
- El freno deevolante del motor
est& apltcado cuando se suelta
la barra de control
-CigueS,aldet motor doblado.
• Adaptador de la cuchilla
quebrado.
o La cuchltla se arrastra en el
c_sped.
Altura de corte demasiado
bajao
Leventamiento de la cuchiJia
desgastade.
Recogedor sin ventllact6n de
afre.
Velocldad del motor lenta.
El c6sped est,. demasiado alto
o la altura de la rueda dema-
stado baja°
Parle trasera de la caJa.icuchilla
de la segadora arrastr,Sndose
en el c_spedo
Recogedor de c_sped dema-
siado lleno°
PoslciSn de ta attura del mango
no adecuada pare uste&
7
CORRECCION
Camble la cuchilla. Apriete el
perno de la cuch{lla
Ajuste lodes las ruedas ala
mtsma altura..
P6ngase en contacto con su
centre de servicio autoflzado
m_.s cercano.
Ltmple la parte interior de fa caja
de la segadora.
Camble la cuchi!la. AprieLe el
perno de ta cuchitla.
P6ngase en contacto con su
centre de servicio autodzado
m_,s cercaRo,
Presione la barra de control
hacia el mango supador antes de
liter el cord6n arrancador,
P6ngase en contacto con su
centre de servicio aulorizado
m_s cercano.
Camble el adaplador de la
cuchtlfa.
Mueva la segadora a un lugar en
donde el c6sped ha side eortado
o a una supedicie firme para
hacer arrancar el motor,
Eleveta allura de code
Cambie la cuchiltas_
Limpie el recogedor de c6sped.
Ajuste el control de ta velocidad
del motor ata poslci6n r&ptda
Eleve la altura de code,.
Eleve Ia parte trasera de la caja de
la segadora (1) un lugar m_s alto.
Vacie el reeogedor de c_sped,
Ajuste la altura del mango de
mode qua le acomode.
32
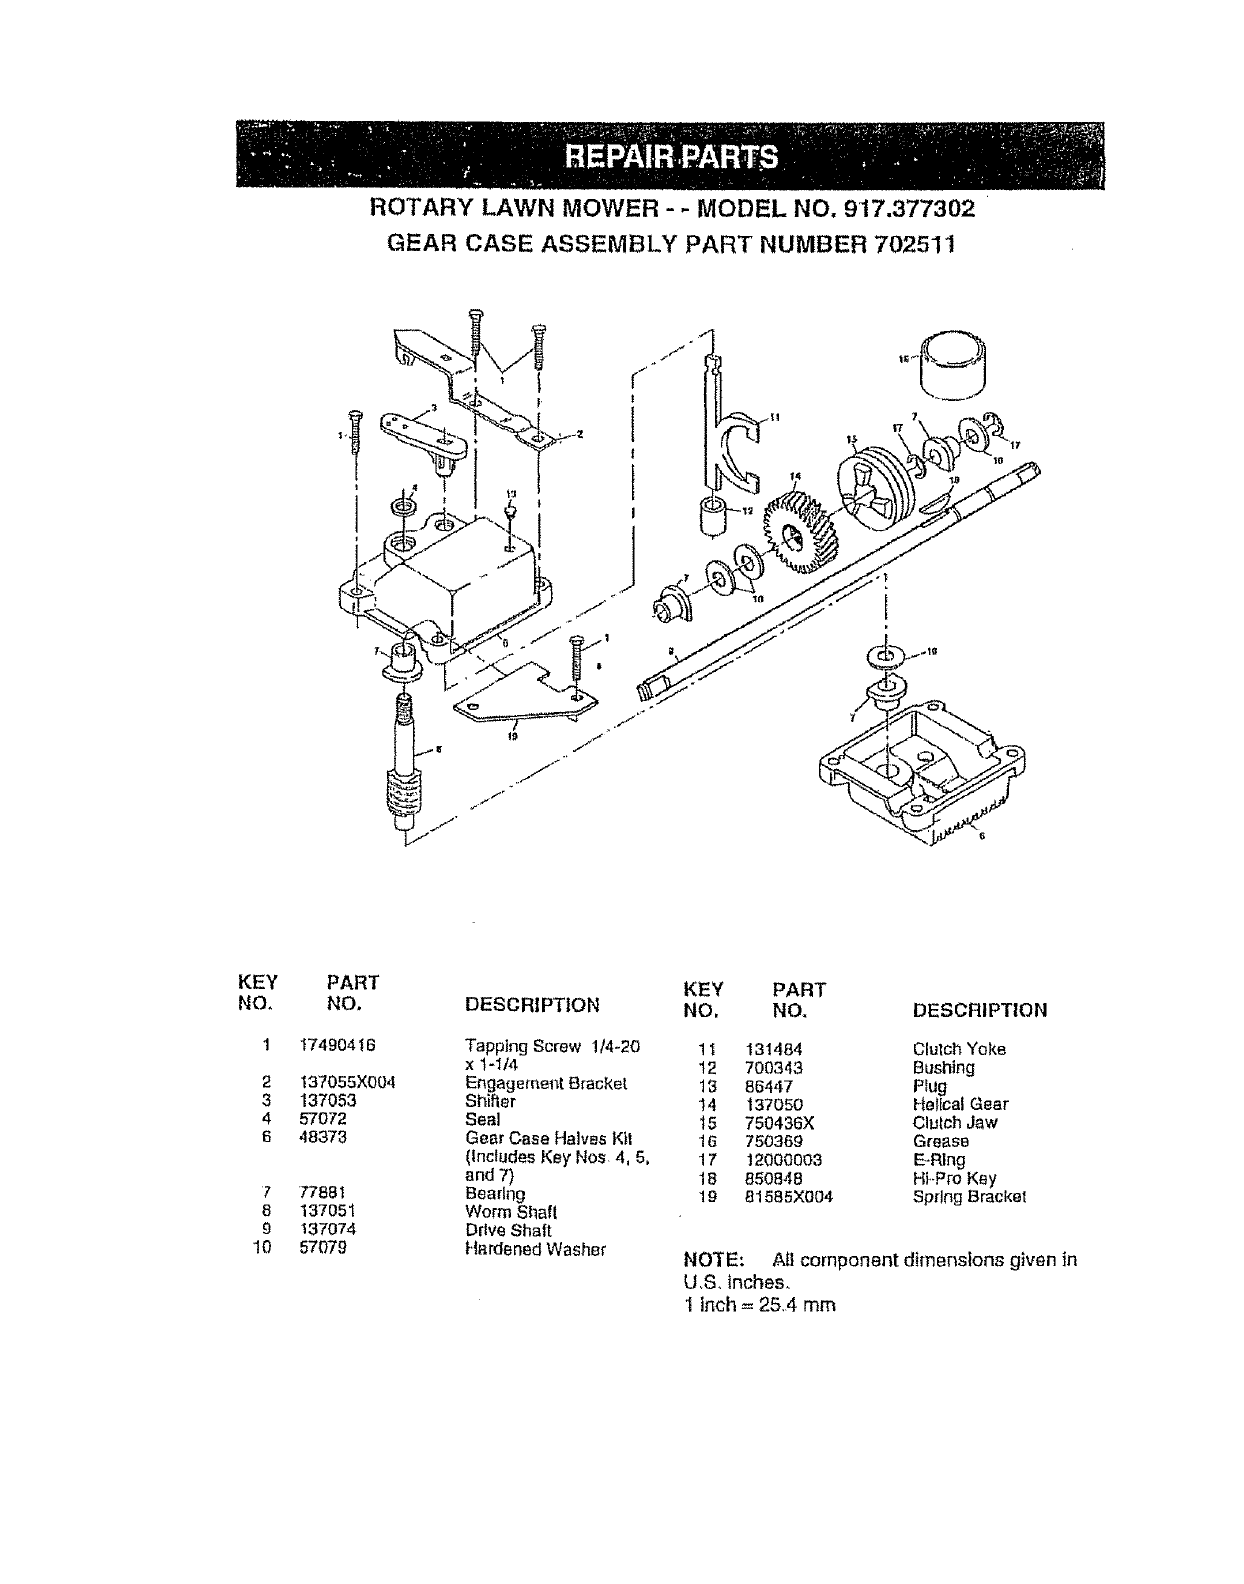
ROTARY LAWN MOWER - - MODEL NO. 917.377302
GEAR CASE ASSEMBLY PART NUMBER 702511
KEY PART
NO. NO. KEY PART
DESCRIPTION NO, NO. DESCRIPTION
1 17490416 Tapping Screw 1/4-20 11 131484 Clutch Yoke
x 1-1/4 t2 700343 Bushing
2 137055X004 Engagement Bracket 13 86447 P_ug
3 137053 Shifter t4 137050 Helical Gear
4 57072 Seal 15 750436X Clutch Jaw
648373 Gear Case Halves Kit 16 750369 Grease
(includes Key' Nos, 4, 5, 17 12000003 E-Ring
and 7) 18 850848 Hi,-Pro Key
777881 Bearing 19 81585X004 Spring Bracket
8 137051 Worm Shaft
9137074 Drive Shaft
10 57079 Hardened Washer NOTE: All component dimension,_ given in
U.S. inches.
1 inch = 25,4 mm
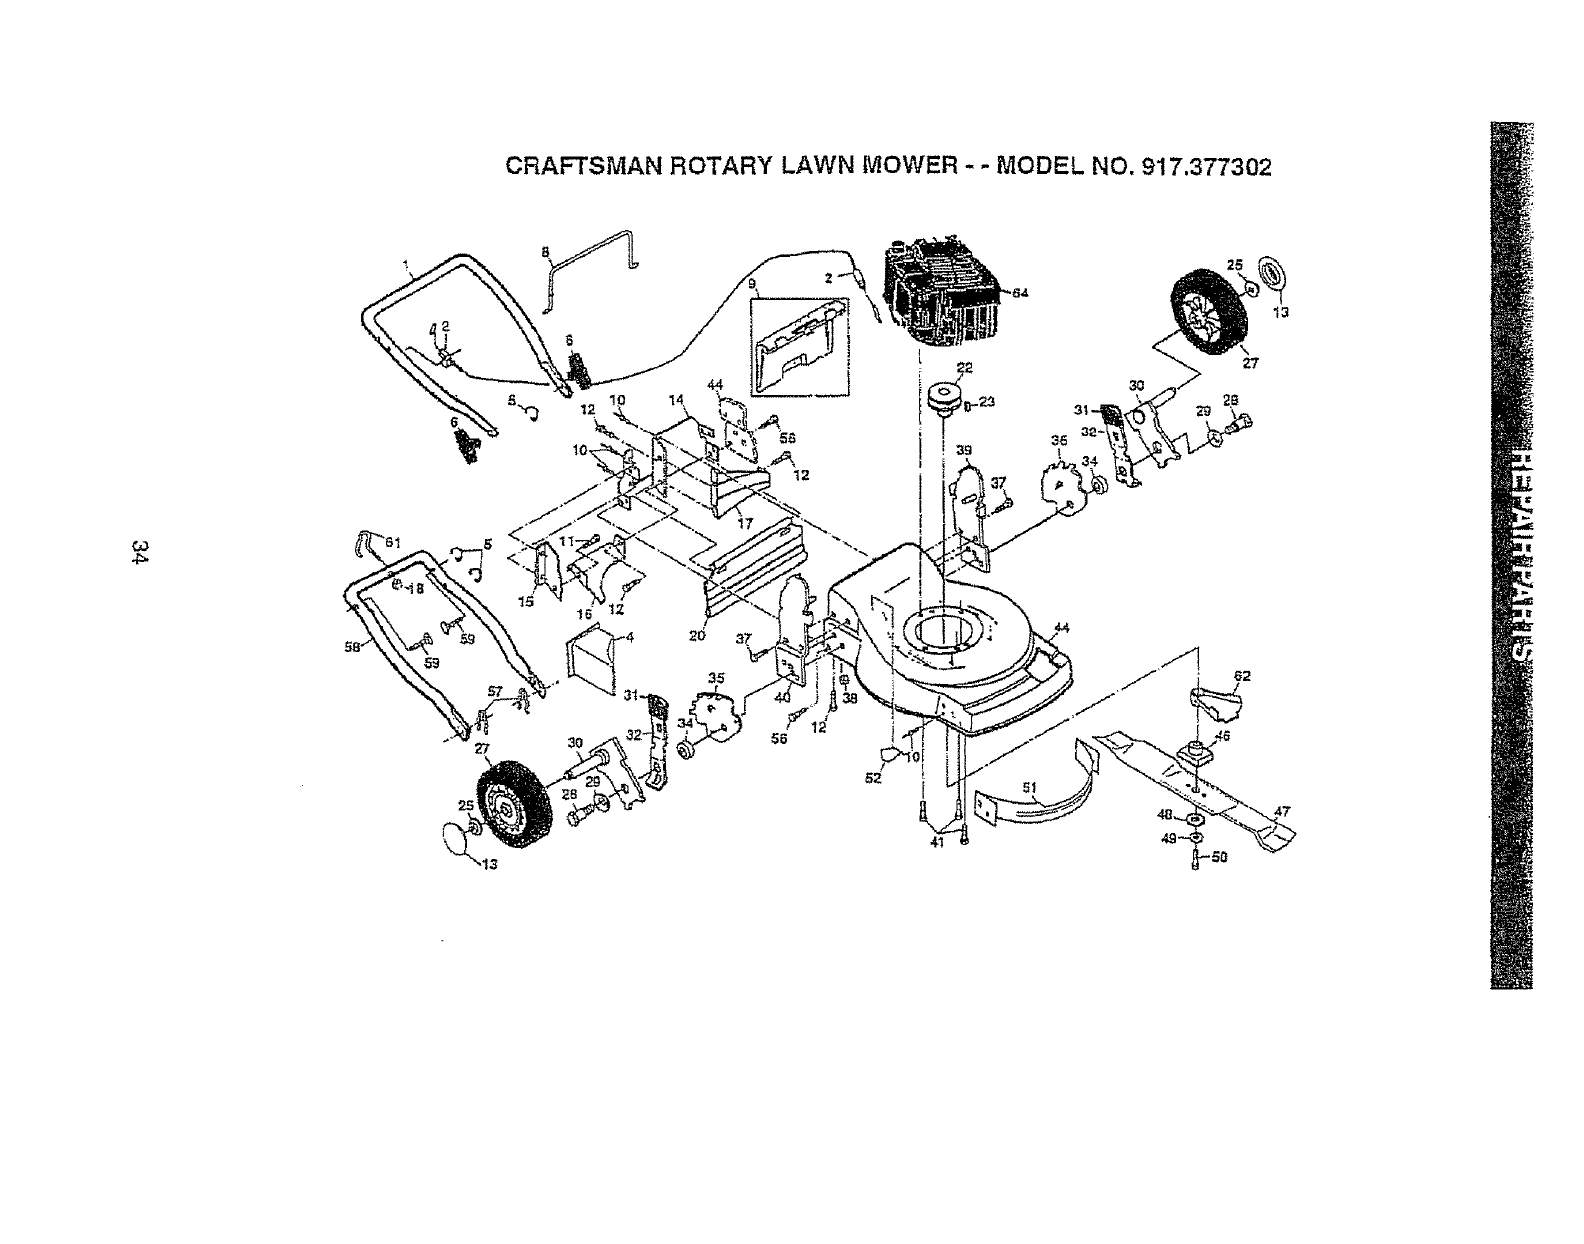
CRAFTSMAN ROTARY LAWN MOWER -- MODEL NO, 917.377302
27
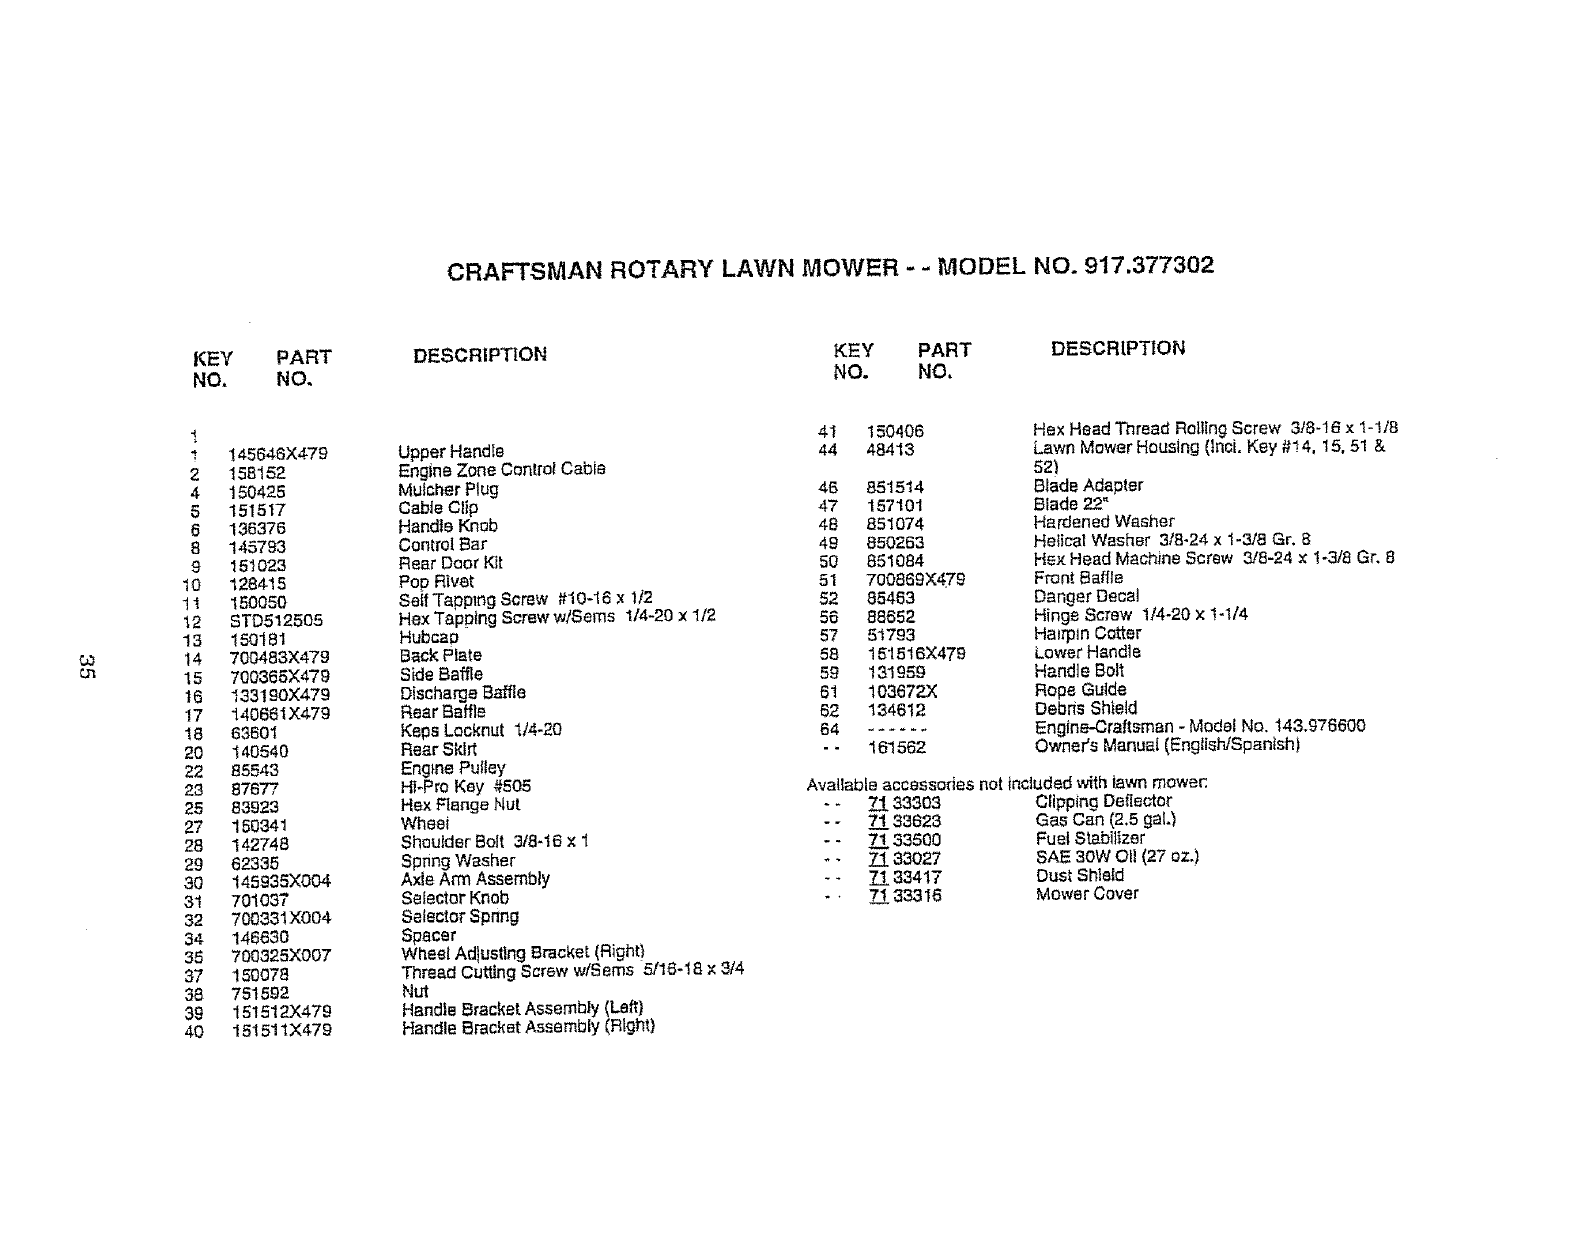
CRAFTSMAN ROTARY LAWN MOWER - -MODEL NO. 917.377302
KEY PART
NO. NO.
DESCRIPTION KEY PART DESCRIPTION
NO. NO.
O3
rat
I
! ! 45646X479
2 158152
4 150425
5151517
6 136376
8 145793
9 15t 023
10 128415
! t 150050
12 STD512505
13 150181
14 700483X479
15 700385X479
t6 133190)(479
17 14086IX479
18 63601
20 t 40540
22 85543
23 87677
28 83923
27 150341
28 142748
29 62335
30 145935X004
31 701037
32 700331 )(004
34 146630
35 700325X007
37 156078
38 751592
39 151512X479
40 151511 X479
Upper Handle
Engine Zone Controt Cabie
Mutcher Plug
Cable Clip
Handie Knob
Control Bar
Rear Door Kit
Pop Rivet
Self Tapping Screw #10-16 x 112
He× Tapping Screw w/Sems 1/4-20 x 112
HubcatD
Back Plate
Side Baffle
Discharge Baffle
Rear Baffle
Keps Lecknut t/4-20
Rear Skirt
Eng}ne Pulley
HI*Pro Key #505
Hex Flange Nut
Wheel
Shoulder Belt 3/8-16 x 1
Spring Washer
Axts Arm Assembly
Selector Knob
Selector Spring
Spacer
Wheel Adtustlng Bracket (Right}
Thread Cutting Screw w/Sems 5/16-18 x 3/4
Nut
Handle 8racket AssembJy (Left}
Handle Bracket Assembly (Right)
41 150406
44 48413
46 851514
47 157101
48 851074
49 850263
50 851084
51 700869X479
52 85463
56 88652
57 51793
58 151516X479
59 131959
61 103672.X
62 134612
64 ......
-- 161562
Hex Head Thread Rolling Screw 318-16 × 1-1/8
Lawn Mower Housing (tncL Key #!4, 15, 51 &
52)
Blade Adapter
Blade 22"
Hardened Washer
He{icat Washer 3/8-24 x 1-3/8 Gr. 8
He×Head Machine Screw 3/8-24 x 1-3/8 Gn 8
Front Baffle
Danger Decal
Hinge Screw 114-20 x 1-1/4
Ha_tn Cotter
Lower Handle
Handle Belt
Rope Guide
DebrwsShield
Engine-Craftsman - Model No. t43.976600
Owner's Manual (English/Spanish)
Available accessories not included with iawn mowec
- - Z! 33303 Cfipping Deflector
- - 7"133623 Gas Can (2,5 geL)
- - 71 33500 Fuel stabilizer
. - 71 33027 SAE 30W 01 (27 oz.)
- - 71 33417 Dusl Shield
-. 7"1333 I6 Mower Cover
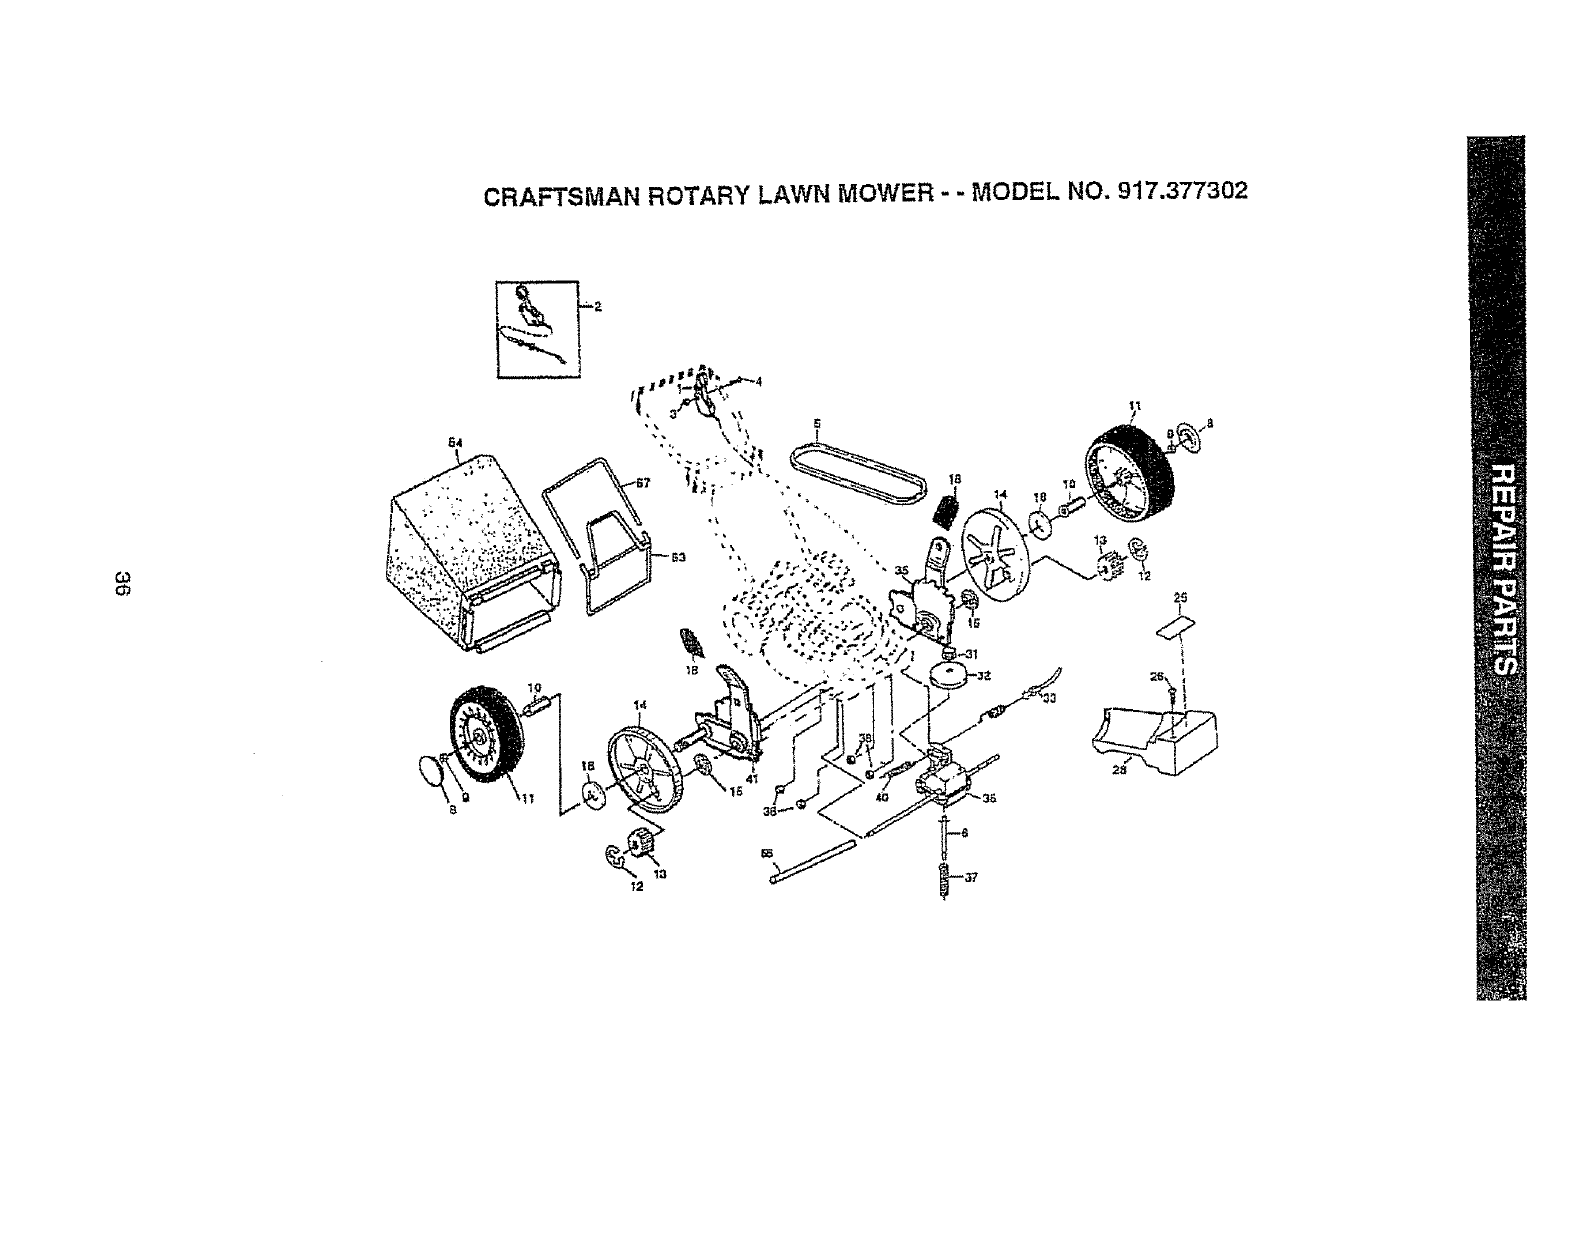
CRAFTSMAN ROTARY LAWN MOWER- - MODEL NO. 917.377302
03
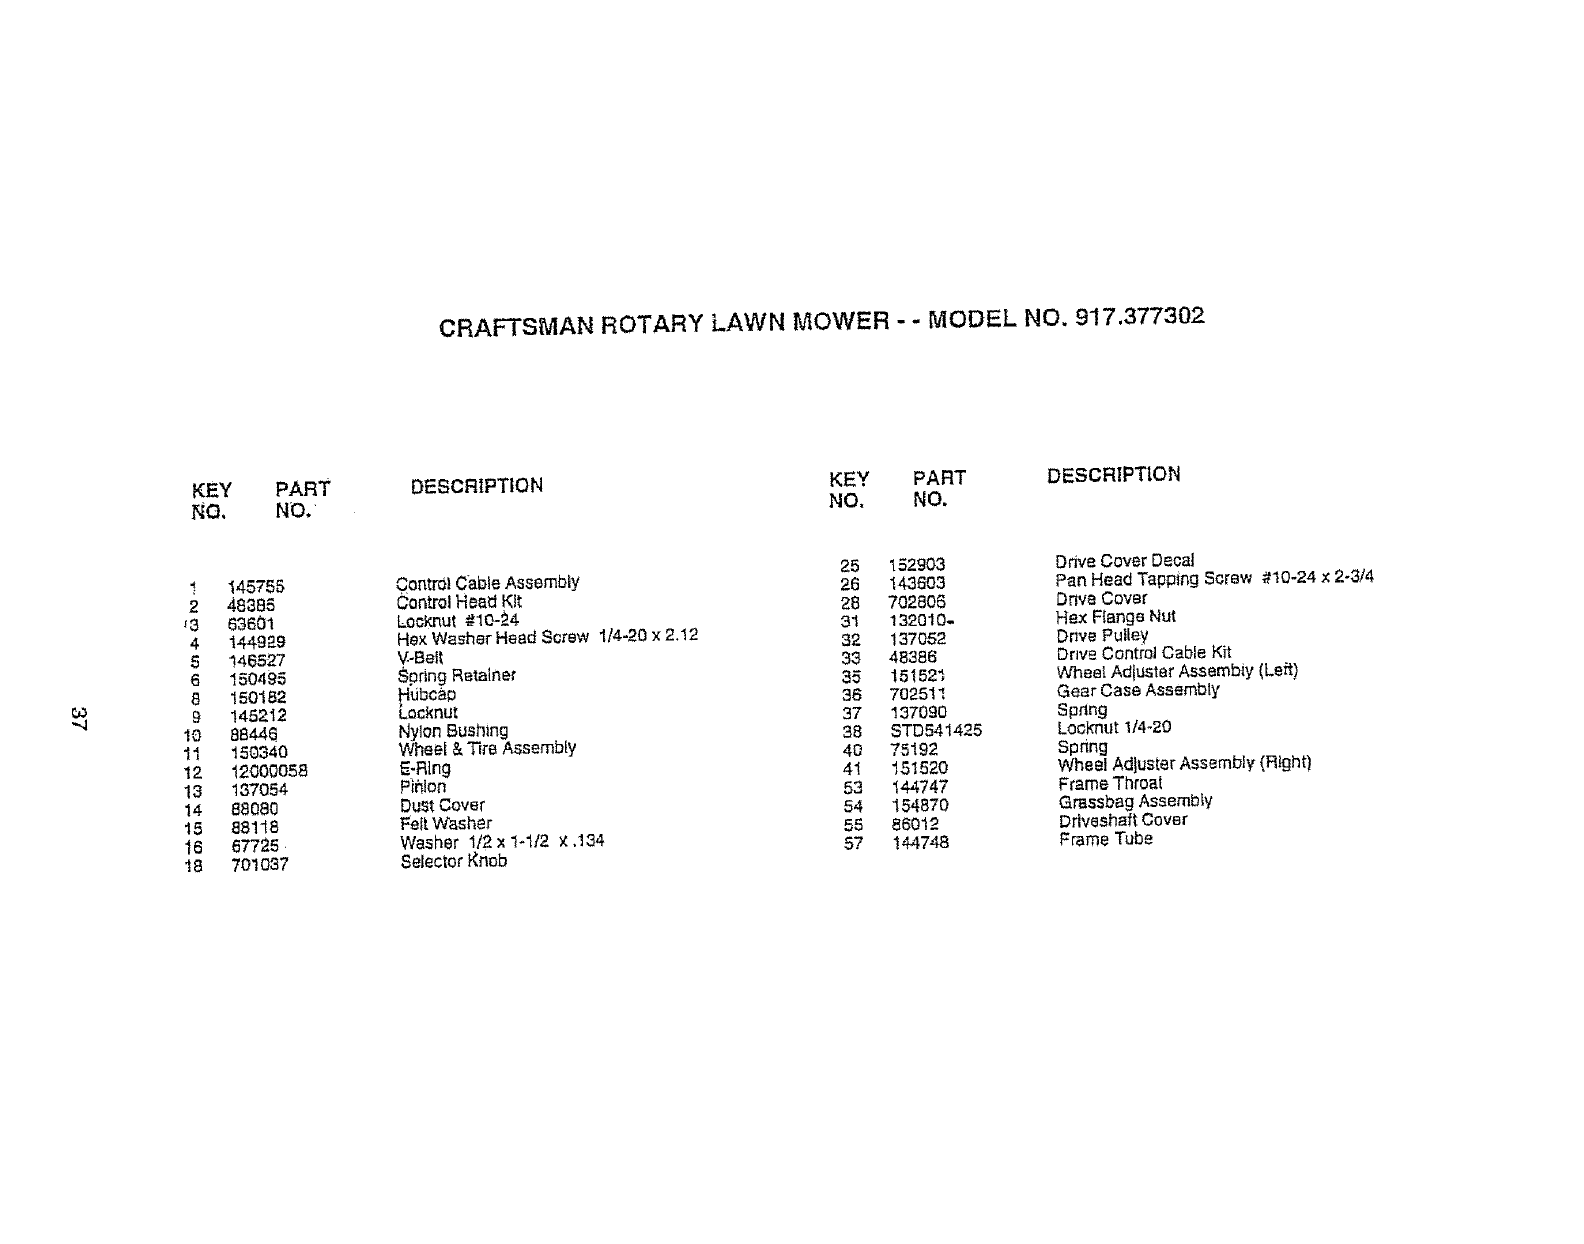
CRAFTSMAN ROTARY LAWN MOWER -- MODEL NO. 917.377302
KEY PART
NO, NO. DESCRIPTION KEY PART DESCRIPTION
NO. NO.
"-4
t 145755
2 48885
r3 63601
4 144929
S 146527
6 150495
8 150182
9 145212
!8 88446
11 150340
12 12000058
13 137054
14 88080
15 88118
16 87725
18 701087
Corttr_l Cable Assembly 25 t 52903
• 26 143S03
GentrolHead Kit 28 702806
Locknut #10-!4 3t 132010-
He:<Washer Heed Screw 114-20 x 2.12 32 137052
V.-Belt 33 48386
Spring Retainer 35 151521
Hdbcap 36 70251!
Locknut 37 137090
Nyton Bushing 38 STDS41425
Wheat & Tfra Assembly 40 75192
E-Ring 41 151520
Pihlen 53 144747
DuStCovet 54 154870
FeI_[Washer
Washer 1/2 xt-1/2 X.134 55 86012
SeJector _tleb 57 144748
Drive Cover Decal
Pen Head Tapping Screw #10-24 x 2.3/4
DriveCover
Hex Flange Nut
Dnve Pulley
Drive Control Cable K_t
Wheet Adjuster Assemb|y (Left)
Gear Case Assembt¥
Spang
Loeknut 1/4-20
Spnng
Wheel Adjuster Assembly (Right)
Frame Threat
Grassbag Assembt¥
Driveshaft Cover
Frame Tube
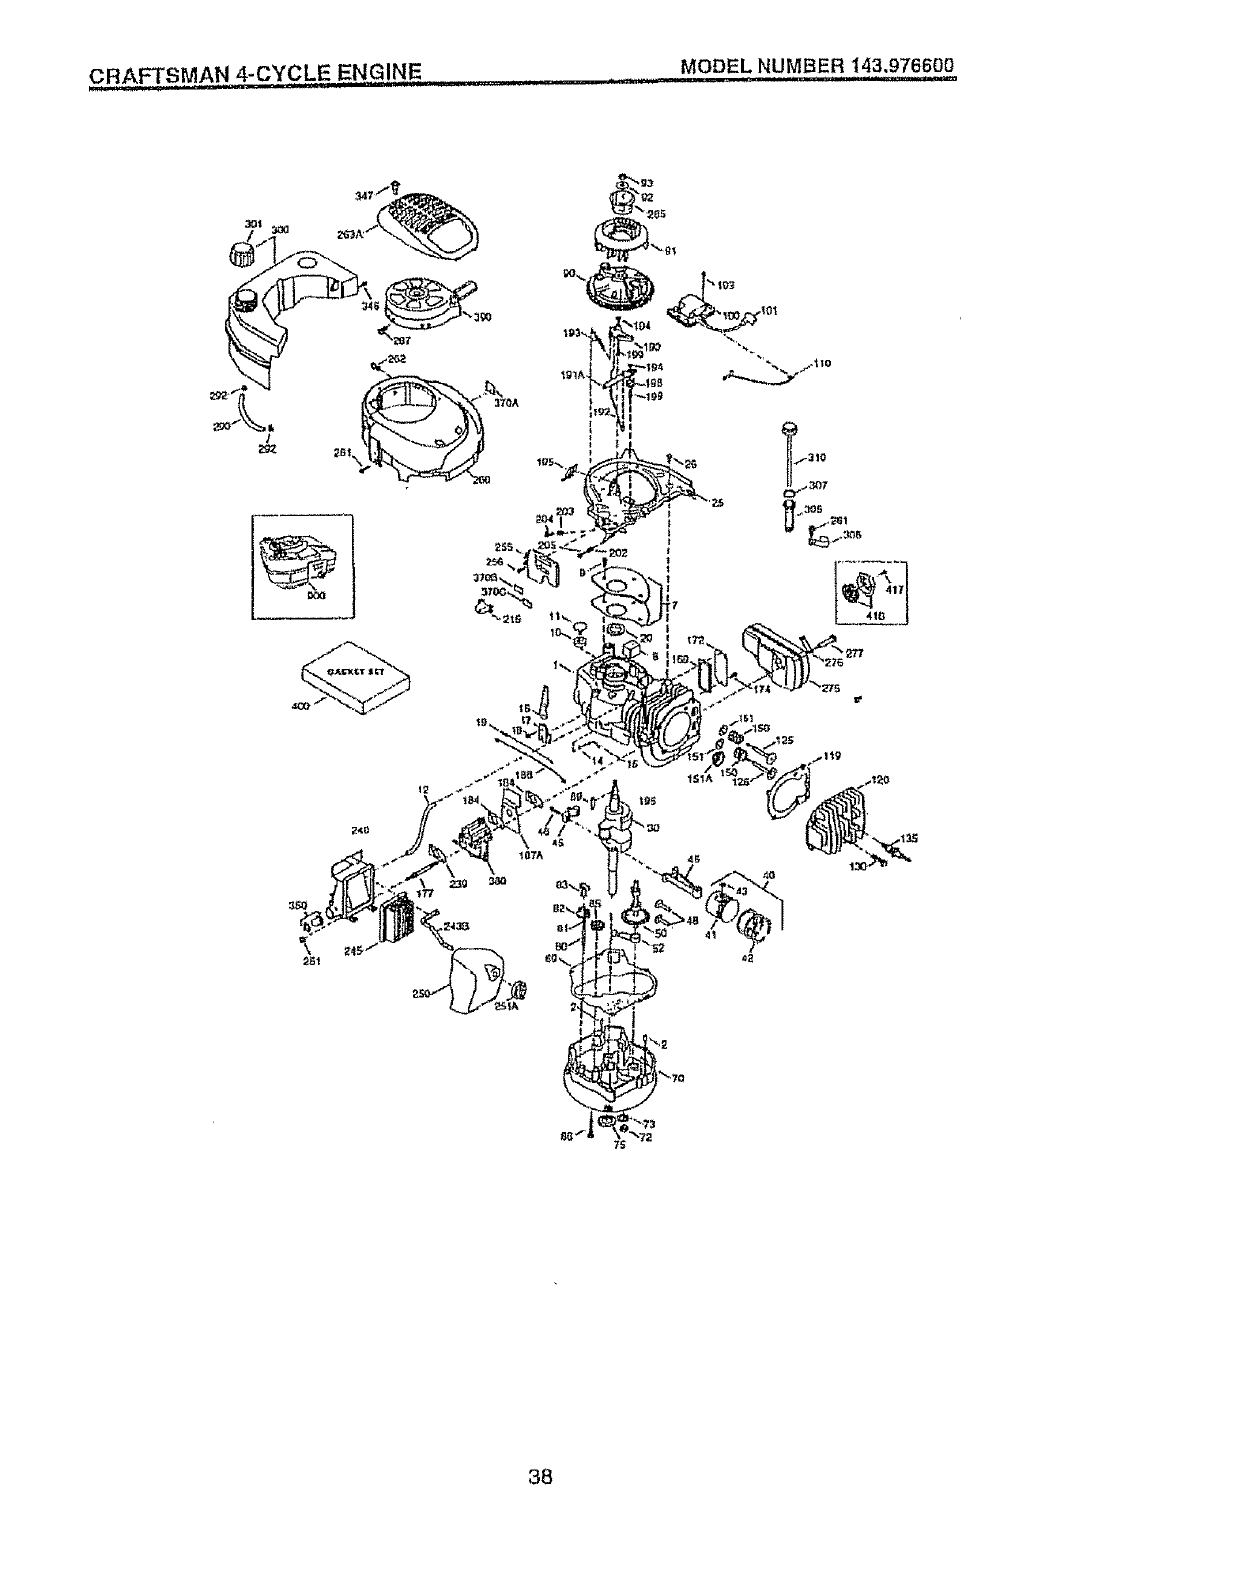
CRAFTSMAN 4-CYCLE ENGINE MODEL NUMBER 143,976600
! HH,,..... .... ".....i i 'l'k'll'HII _1 _- ii,lll,,ll, I J J
38
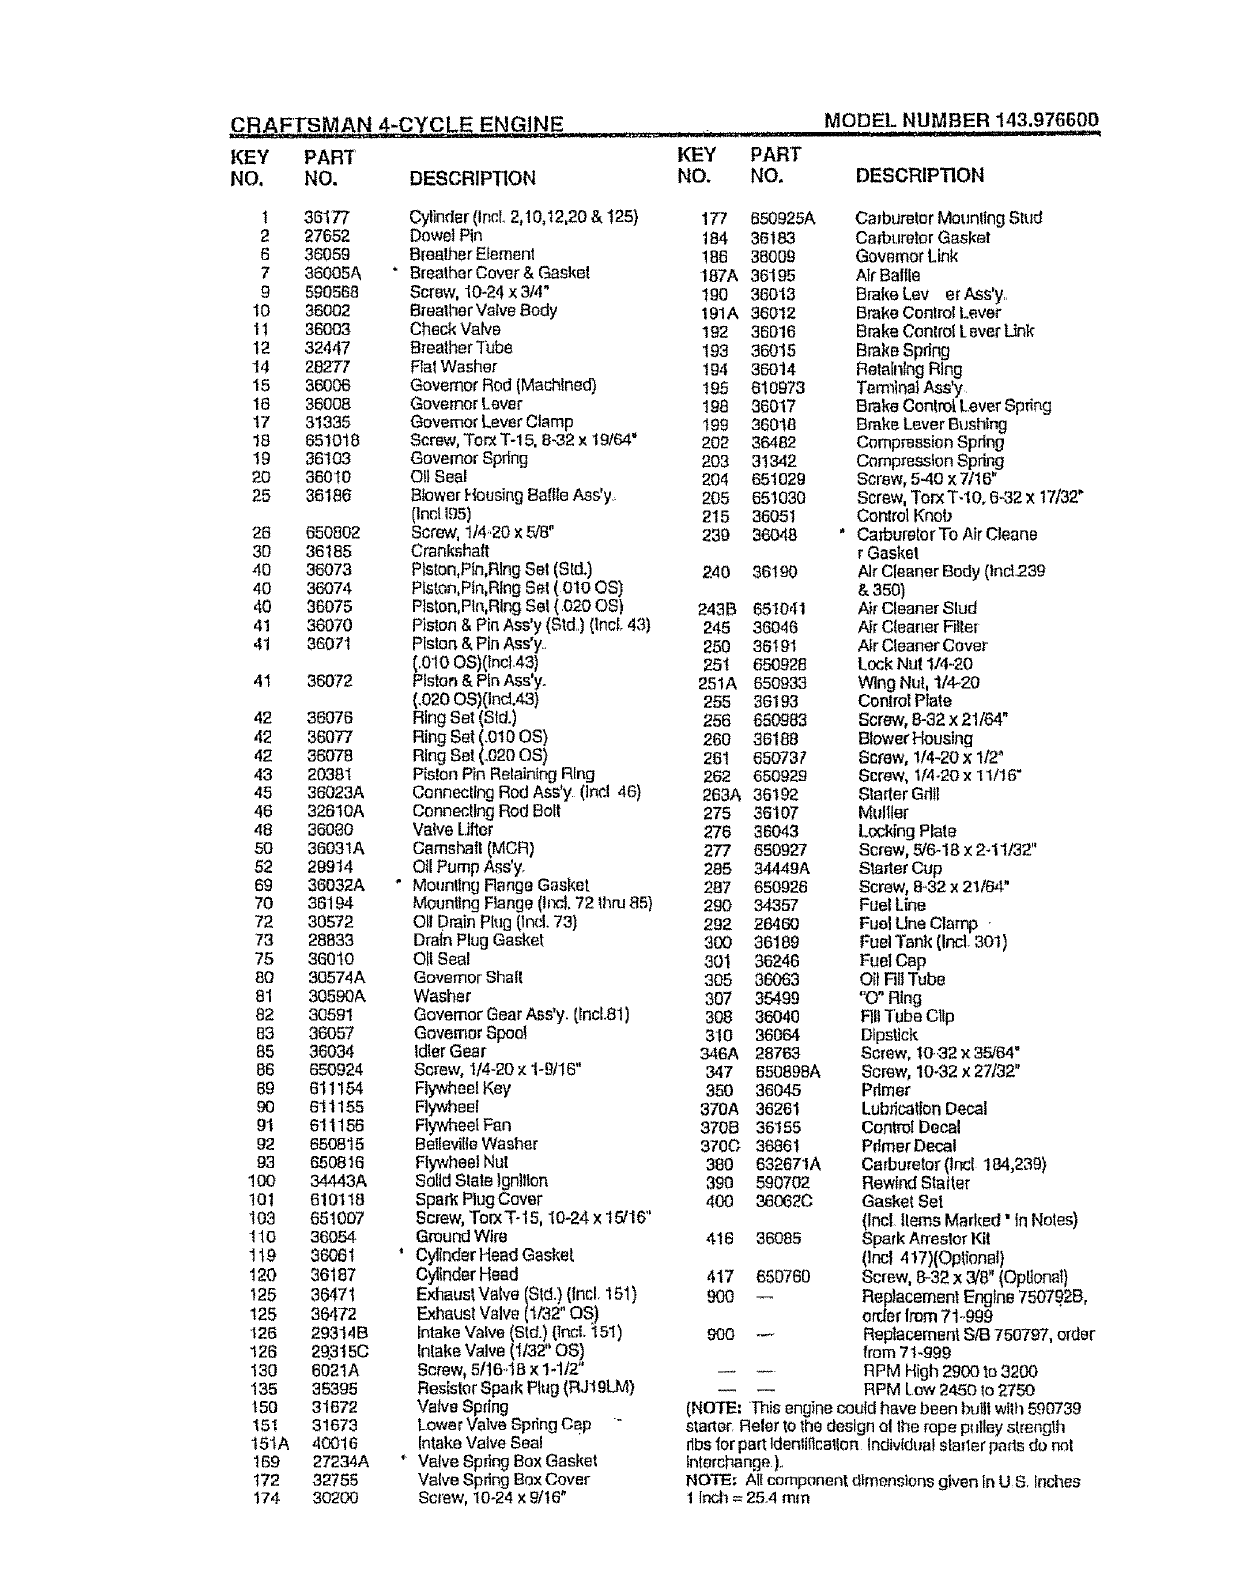
CRA_%CYCLE ENGIN E ....................... ,_ . ,
KEY PART KEY PART
NO. NO. DESCRIPTION NO. NO.
MOD,EL NUMBER,,1,,43.976600
DESCRIPTION
I 36177 Cylinder (IncL2,10,12,20 & !25) 177 650925A
2 27652 Dowel Pin 184 36183
5 36059 Bmalhar Element !86 38009
7 36005A * BreatherCover & Gasket 187A 36195
9590568 Screw, 10-24 x 3/4" t90 36013
10 36002 Brealher Valve Body 191A 36012
11 36003 Check Vah/e 192 35016
12 32447 Breather Tube 193 36015
14 28277 Ral Washer 194 36014
15 36006 Governor Rod (Machined) 195 610973
16 36008 Governor Lever 198 36017
17 31335 Goveraor LeverClamp 199 36018
16 651018 Screw, Torx T-15, 8-32 x 19/64" 202 36482
19 36103 GovernorSpdng 203 31342
20 36019 Oil Seal 204 651029
25 36186 EtiowerHousing Baflle Ass'y. 205 651030
(tnc1195) 215 36051
25 650602 Screw, 1/4_.20×528" 239 36048
30 36185 Crankshalt
40 36073 Pts[on,P_q,RlngSet (Sld.) 240 38190
40 36074 Piston,Pin,Ring Set ( 010 OS)
40 36075 Piston,Pin,Ring Set (.020 OS) 243B 651041
41 36070 Piston & Pin Ass'y (Std..)(tncl.43) 245 36046
41 36071 Plslon & Pin Ass'y. 250 36I 91
(.010 OS)(lnct.43) 25t 650928
41 36072 Piston & Pin Ass'y. 251A 650933
(.020 OS)(ind.43) 255 36193
42 36076 Ring Set (Std.) 256 650983
42 35877 Ring Set (.010 OS) 260 36188
42 36078 Ring Set (°620OS) 28t 650737
43 20361 Pis!en Pin RelaintngRfng 262 650929
45 36023A Connecting Rod Aes'y (Inc! 46) 263A 36192
46 326t0A Connecting Rod Bolt 275 36107
48 36080 Valve Uftor 276 36043
50 36031A Camshatt (MCR) 277 650927
52 29914 OII Pump Ass'y. 285 34449A
69 36032A " Mounting Range Gasket 287 650926
70 36194 Mounting Range (Ir_, 72 thru 85) 290 34357
72 30572 Oli Drain Plug 0n(;I.73) 292 26460
73 28833 DraTnPlug Gasket 300 36189
75 36010 OII Seal 301 36246
80 30574A Governor Shall 305 36063
81 30590A Washer 307 35499
62 30591 Governor GearAss'y. (lncL81) 308 36040
83 36057 GovernorSpoot 310 36064
85 36034 Idler Gear 346A 28763
86 650924 Screw, i/4-20 x 1-9tl 6" 347 650898A
69 611154 Flywheel Key 360 36045
£0 811155 Flywheel 370A 36261
91 611156 FlywheelFan 3706 36155
92 650815 Belierilia Washer 3700 36861
93 650816 Flywheel Nut 380 632671A
1(30 34443A Solid State )gni_lon 390 590702
101 610118 Spark PlugCover 400 36062C
103 661007 Screw, TorxT-15, 10_24x 15/16"
110 36054 GroundWire 416 36085
1t9 36061 ' Cylinder Head Gasket
120 36187 Cylinder Head 417 650760
125 3647"{ Exha_astVafve (Std.!.(lncL 151) 900 --
125 36,I72 Exhaust Valve (1/'32 OS)
t26 29314B Intake Valve(Std.) (Tnct.151) 900 *--
126 29.3t5C Intake Valve (tt32" OS)
130 6021A Screw_5!16.,18× 14t2"
135 38395 Reslstor Spalk Pltlg (RJIgLM)
150 31672 Valve Spdng
t5I 31673 Lower Valve SpSngCap
151A 40016 Intake Valve Seal
169 27234A * Valve Spring Box Gasket
172 32755 Valve Spdng Box Cover
174 30200 Screw, 10-24 x 9/16"
Cmburelor Mounting Stud
Ca,_buretorGasket
GovernorLink
Air Bal|le
Brake Lay er Ass'y..
Brake Control Lever
Brake Conlrol I.ever Link
Brake Spdng
Retellltng Ring
Tera_inatAss'y
Brake ContnotLever Spring
Brake Lever Bushing
Compression Spdng
Compression Spdng
Screw,5-40 x 7116"
Screw, TerxT-10. 6-32 × 17/32"
Control Knob
• Carburetor To Air Cleane
r Gasket
Air Cleaner Body (tnd239
&350)
A_rCleaner Slud
Air Cleaner F_lter
Air Cleaner Cover
Lock Nut 1,'4-.20
Wing Nut, 1/4.20
Control Plate
Screw, 8-32 x 21164"
Blower Housing
Screw, 1/4-20 x 112"
Screw, 1/4-20x 11/16"
Sta_lerGdii
Multter
LockingPlate
Screw, 5/6-18 × 241t32"
Sta_er Cup
Screw,8_32x 21164"
Fuel Line
Fuel Line Clamp •
Fuel Tank (IncL 301)
Fuel Cap
O_tFlit Tube
"(3" Ring
Fill Tube Clip
Dipstick
Screw, tO.32 x 35/64"
Screw, 10_32x 27/32"
Pdmer
Lub_icatienDecal
Control Deca!
PdmerDecal
Ca_burelor (lncl 184,239)
Rew}rrJ Stai(er
Gasket Set
(Inc! Items Marked" inNotes)
Spark Arrestor I(il
(]nc_417)(Optional)
Screw, 8-.32x3/8" (Optional)
Rep)acement Engine 7507928,
order Imm 71-.999
Replacement SfB 750797, order
from 71-999
RPM High 2900 to 3200
RPM Low 24501o 2750
(NOTE; This engine could have been built with 590739
starter, Reler to the design el lhe rope pnlley strengLh
dbs 1orpadldenltftcatton Individual statler pads do not
interchange ).,
NOTE; AII component d|menstons given in US, Inches
1 inch = 25.4 mm
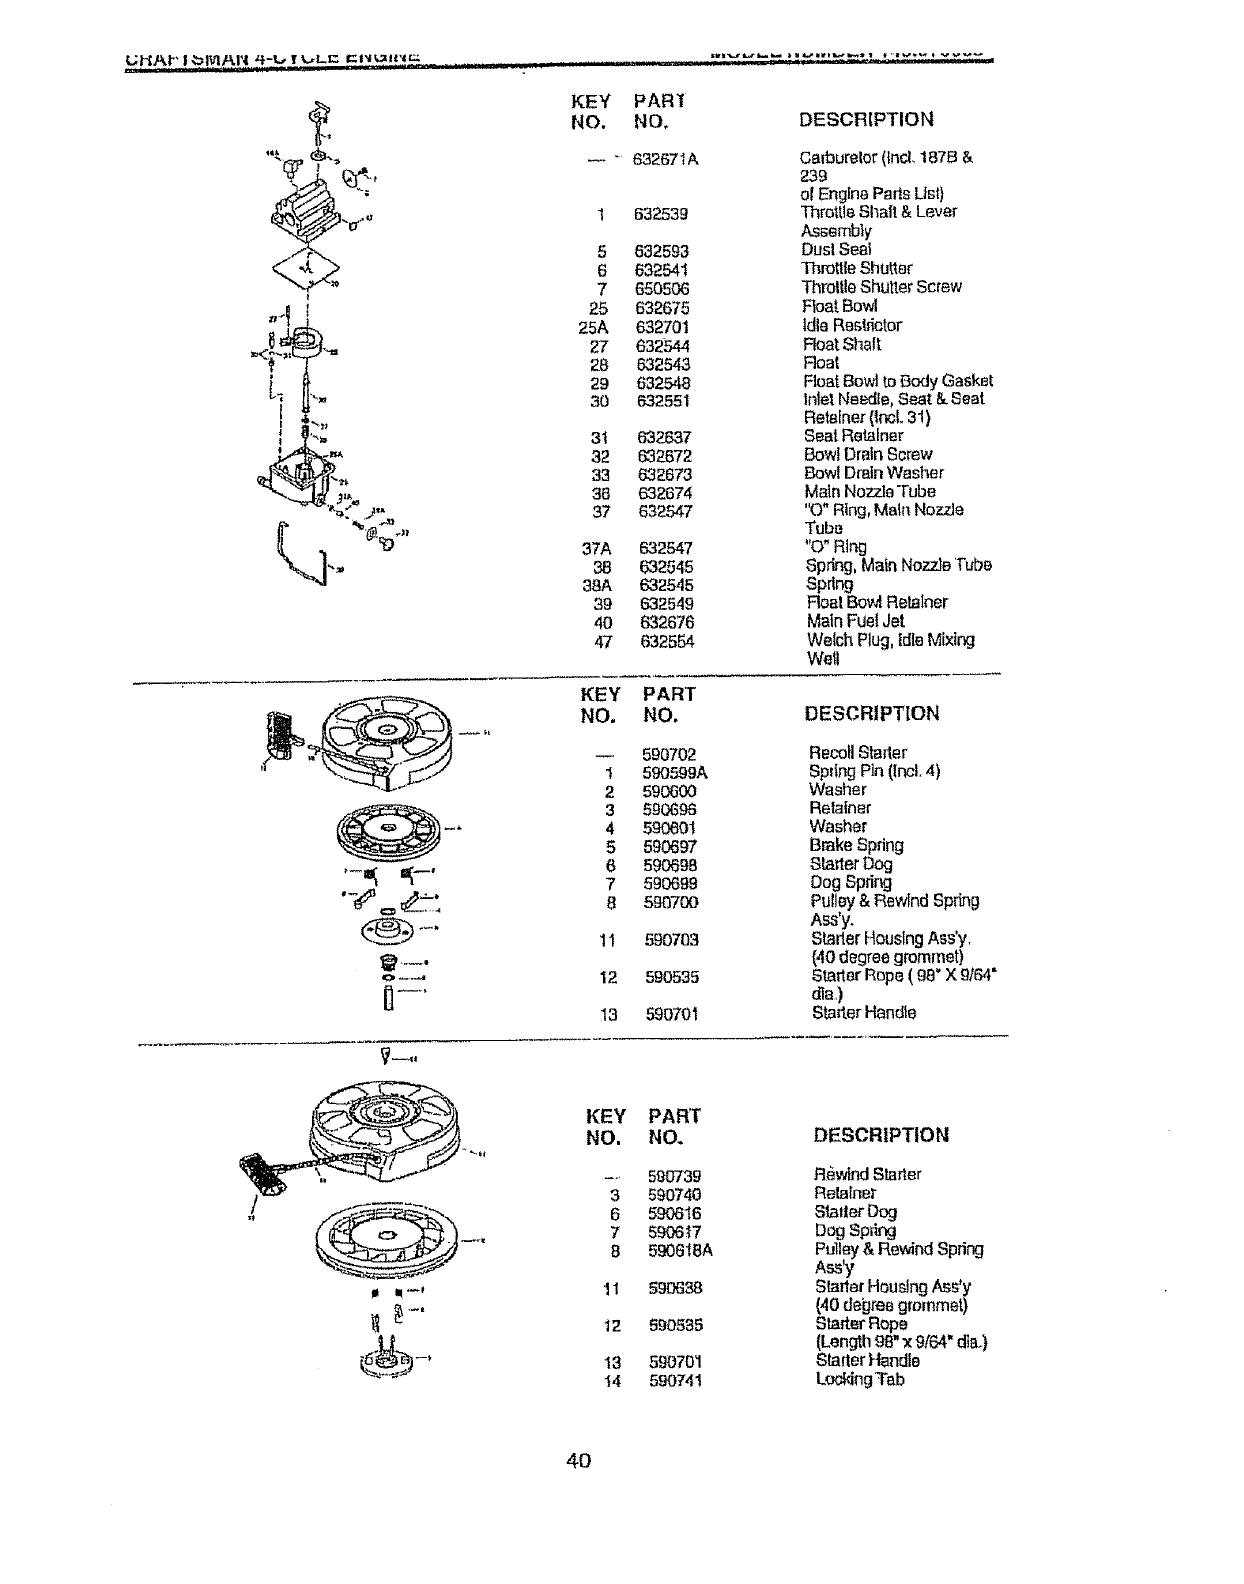
KEY PARt
NO. NO. DESOFIIPTION
632671A Cerbureler (IncL187B &
239
ot Engine Parts List)
632538 "rnrottle Shall & Lever
Assembly
632593 Dusl Seal
632541 Throttle Shutter
650506 Throllle Shutter Screw
632675 Float Bowl
632701 Idle Re_tricter
632544 Float Shall
632543 Roar
632548 Floa_Bowl to Body Gasket
632551 Inlel Needla_Seat & Seal
Retainer (|r_L 31)
632.637 Seal Retainer
632672 Bowl Drain Screw
632673 Bowl Drain Washer
632674 Main Nozzle Tube
632547 "O" Ring, Main Nozzle
Tube
632547 "O" Ring
632545 Spring, Main Nozzle Tube
632545 Spring
632549 F!oal Bowl Retainer
632676 Main Fuel Jet
632554 Welch Plug, Idle Mixing
Well
,__ KEY
NO.
1
2
_6 4
5
=;-, 6
7
o.... 12
13
PART
NO. DESCRIPTION
590702 Recoil Starter
59O599A Sptfng Pin (Incl 4)
590600 Washer
590698 Retainer
590601 Washer
590697 Brake Spdng
590698 Starlet Dog
590699 Dog Spring
590700 Pulley & Rewind Spring
Ass'y.
590763 Starter Housing Ass'y
(40 degree grommet)
590535 Starter Rope ( 98" X 9164"
dla,,)
590701 Starter Handle
KEY
NO,
3
6
7
B
11
12
13
14
PAR'[
NO. DESCRIPTION
590739 R§wind Slarter
590740 Retainer
590616 Starter Dog
590617 Dog Spring
590616A Pulley& Rewind Spring
Ass'y
_;90638 StarterHousing Ass'y
(40 degree grommet)
590535 Starter Rope
(Length 98" x9164"dis.}
590701 Starter Handle
590741 LockJngTeb
4O


42

43

For the repair or replacement parts you need
delivered directly to your home
Catl 7 am -7 pro, 7 days a week
1-800-366-PART
(1-800-366-7278)
Para ordenar piezas con entrega a
domicilio -- 1-800-659-7084
For in-house major brand repair service
Call 24 hours a day, '7 days a week
1-800-4-REPAIR
(1_800-473-7274)
Para pedir servicio de reparaci6n a
domicilio .- 1-800-676-5811
For the location of a Sears Parts and
Repair' Center in your area
Call 24 hours a day, 7 days a week
1-800-488-1222
For information on purchasing a Sears
Maintenance Agreement or to inquire
about an existing Agreement
Call 9 am - 5 pro, Monday-Saturday
1-800-827-6655
When requesting service or ordering
parts, always provide the folJowing
information:
•Product Type *Part Number
. Model Number *Part Description
S ARS
Amenc_ sRepair Specialfsts
161562 0'7,29.97 VB Printed in U,SoA.
