Craftsman 917377303 User Manual ROTARY LAWN MOWER Manuals And Guides L1005607
User Manual: Craftsman 917377303 917377303 CRAFTSMAN ROTARY LAWN MOWER - Manuals and Guides View the owners manual for your CRAFTSMAN ROTARY LAWN MOWER #917377303. Home:Lawn & Garden Parts:Craftsman Parts:Craftsman ROTARY LAWN MOWER Manual
Open the PDF directly: View PDF ![]() .
.
Page Count: 44
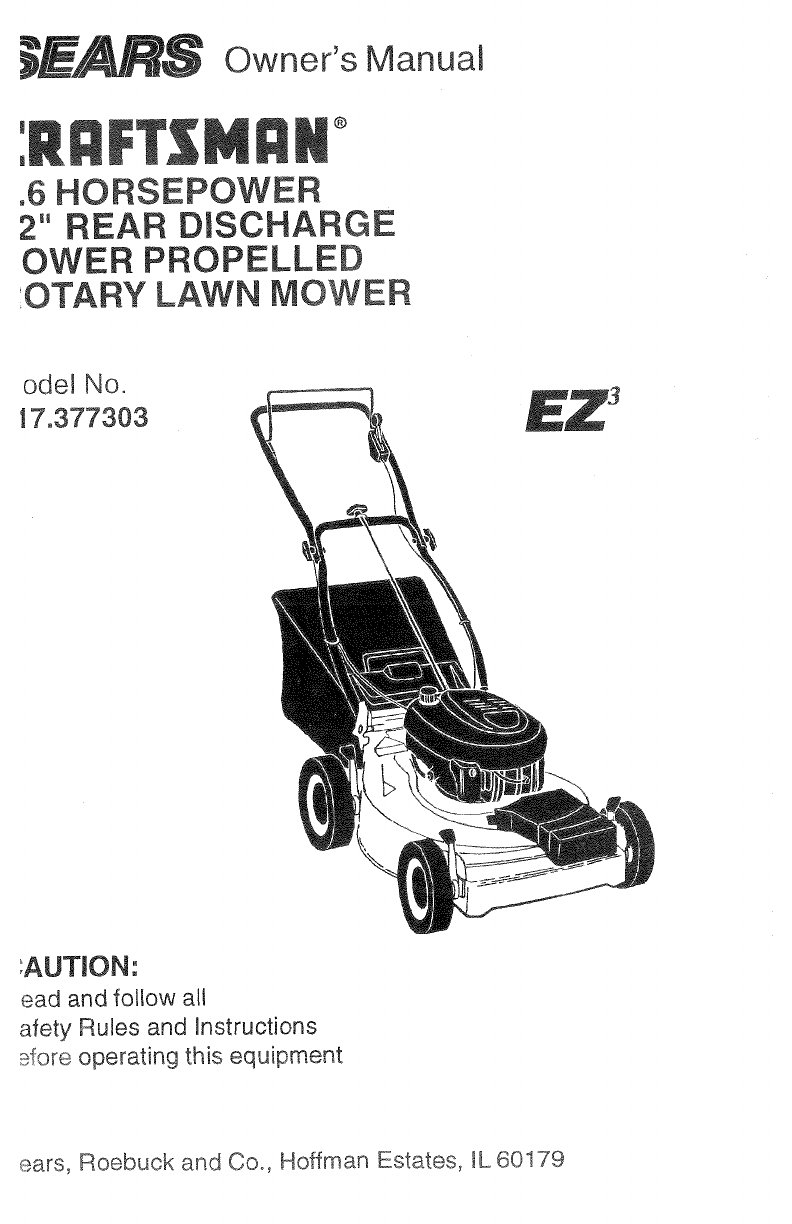
Owner's Manual
.6 HORSEPOWER
2" REAR DISCHARGE
OWER PROPELLED
OTARY LAWN MOWER
odel No.
| 7.377303
:AUTJON:
ead and follow alt
afety Rules and instructions
9fore operating this equipment
_ars, Roebuck and COo, Hoffman Estates, IL60179

Warranty 2 Product Specifications 1
Safety Rules 2 Service and Adjustments 1
Assembly 4 Storage 1
Operation 6 Troubleshooting 1
Maintenance Schedule 10 Repair Parts 3
Maintenance 10 Parts Ordering Back Cove
LIMITED TWO YEAR WARRANTY ON CRAFTSMAN POWER MOWER
For two years from date of purchase, when this Craftsman Lawn Mower is maintained,
lubricated, and tuned up according to the operating and maintenance instructions in the
owner's manual, Sears will repair free of charge any defect in material or workmanship.
If this Craftsman Lawn Mower is used for commercial or rental purposes, this warranty
applies for only 90 days from the date of purchase.
This Warranty does not cover:
• Expendable items which become worn during normal use, such as rotary mower
blades, blade adapters, belts, air cleaners and spark plug.
• Repairs necessary because of operator abuse or negligence, including bent crank-
shafts and the failure to maintain the equipment according to the instructions con-
tained in the owner's manual.
Warranty service is available by returning the craftsman power mower to the nearest
sears service center/department in the united states. This warranty applies only while
this product is in use in the united states.
This Warranty gives you specific legal rights, and you may also have other rights which
vary from state to state.
SEARS, ROEBUCKAND CO., D/817 WA, HOFFMAN ESTATES, ILLINOIS 60179
TRAINING:
.Read this operator's manual carefully.
Become familiar with the controls and
know how to operate your mower
properly. Learn how to quickly stop
mower.
Do not allow children to use your mower.
Never allow adults to use mower without
proper instructions.
o Keep the area of operation clear of all
persons, especially small children and
pets.
Use mower only as the manufacturer
intended and as described in this manual.
'Do not operate mower if it has been
dropped or damaged in any manner.
Always have damage repaired before
using your mower.
® Do not use accessory attachments that
are not recommended by the manufac-
turer. Use of such attachments may be
hazardous.
• The blade turns when the engine is
running.
PREPARATION:
- Always thoroughly checkthe area to be
mowed and clear it of all stones, sticks,
wires, bones, and other foreign objects.
These objects will be thrown by the blade
and can cause severe injury.
= Always wear safety glasses or eye
shields when starting and while using
your mower.
Dress properly. Do not operate mower
when barefoot or wearing open sandals.
Wear only solid shoes with good traction
when mowing.
Check fuel tank before starting engine.
Do not fill gas tank indoors, when the
engine is running or when the engine is
,inutesbeforefillingthegastank.Clean
f anyspitledgasolinebeforestartingthe
lgine.
Iwaysmakewheelheightadjustments
dore starting your mower. Never
_empt to do this while the engine is
inning.
ow only in daylight or good artificial
_ht.
ERATION:
eep your eyes and mind on your mower
nd the area being cut. Do not let other
terests distract you.
o not mow wet or slippery grass. Never
in while operating your mower. Always
e sure of your footing- keep a firm
old on the handles and walk.
o not put hands or feet near or under
_tating parts. Keep clear of the discharge
pening at all times.
Iways stop the engine whenever you
_ave or are not using your mower; or
efore crossing driveways, walks, roads,
nd any graveP-covered areas.
lever direct discharge of material toward
ystanders nor allow anyone near the
_ower while you are operating it.
iefore cleaning, inspecting, or repairing
our mower, stop the engine and make
bsolutely sure the blade and all moving
arts have stopped. Then disconnect the
park plug wire and keep it away from the
park plug to prevent accidental starting.
)o not continue to run your mower if you
it a foreign object. Fcitow the procedure
utlined above, then repair any damage
,efore restarting and operating you
lower.
)o not change the governor settings or
,verspeed the engine. Engine damage or
ersonal injury may result.
)o not operate your mower if it vibrates
_bnormally. Excessive vibration is an
]dication of damage; stop the engine,
afety check for the cause of vibration
_ndrepair as required.
)o not run the engine indoors. Exhaust
umes are dangerous.
4ever cut grass by pulling the mower
owards you. Mow across the face of
;lopes, never up and down or you might
ose your footing. Do not mow exces-
;ivetysteep slopes. Use caution when
)perating the mower on uneven terrain or
good footing.
• Never operate your mower without
proper guards, plates, grass catcher or
other safety devices in place.
MAINTENANCE AND STORAGE:
- Checkthe blade and the engine mount-
ing bolts often to be sure they are
tightened properly.
• Check all bolts, nuts and screws at
frequent intervals for proper tightness to
be sure mower is In safe working
condition.
•Keep all safety devices in place and
working.
•To reduce fire hazard, keep the engine
free of grass, leaves or excessive grease
and oil.
o Check grass catcher often for deteriora-
tion and wear and replace worn bags.
Use only replacement bags that are
recommended by and comply with
specifications of the manufacturer of your
mower.
,, Always keep a sharp blade on your
mower.
Allow engine to cool before storing in any
enclosure.
Never store mower with fuel in the tank
inside a building where fumes may reach
an open flame or an ignition source such
as a hot water heater, space heater,
clothes dryer, etc.
CAUTION: Always disconnect spark plug
wire and place wire where it cannot
contact spark plug in order to prevent
accidental starting when setting up,
transporting, adjusting or making repairs.
WARNING
The engine exhaust from this product
contains chemicals known to the State of
California to cause cancer, birth defects, or
other reproductive harm.
Theseaccessorieswereavailablewhenthislawnmowerwasproduced.Theyarealsoavailabl
atmostSearsretailoutletsandservicecenters.MostSearsstorescanalsoorderrepairpartsf
you,whenyouprovidethemodelnumberofyourlawnmower.Someoftheseaccessoriesma_
notapplytoyourlawnmower.
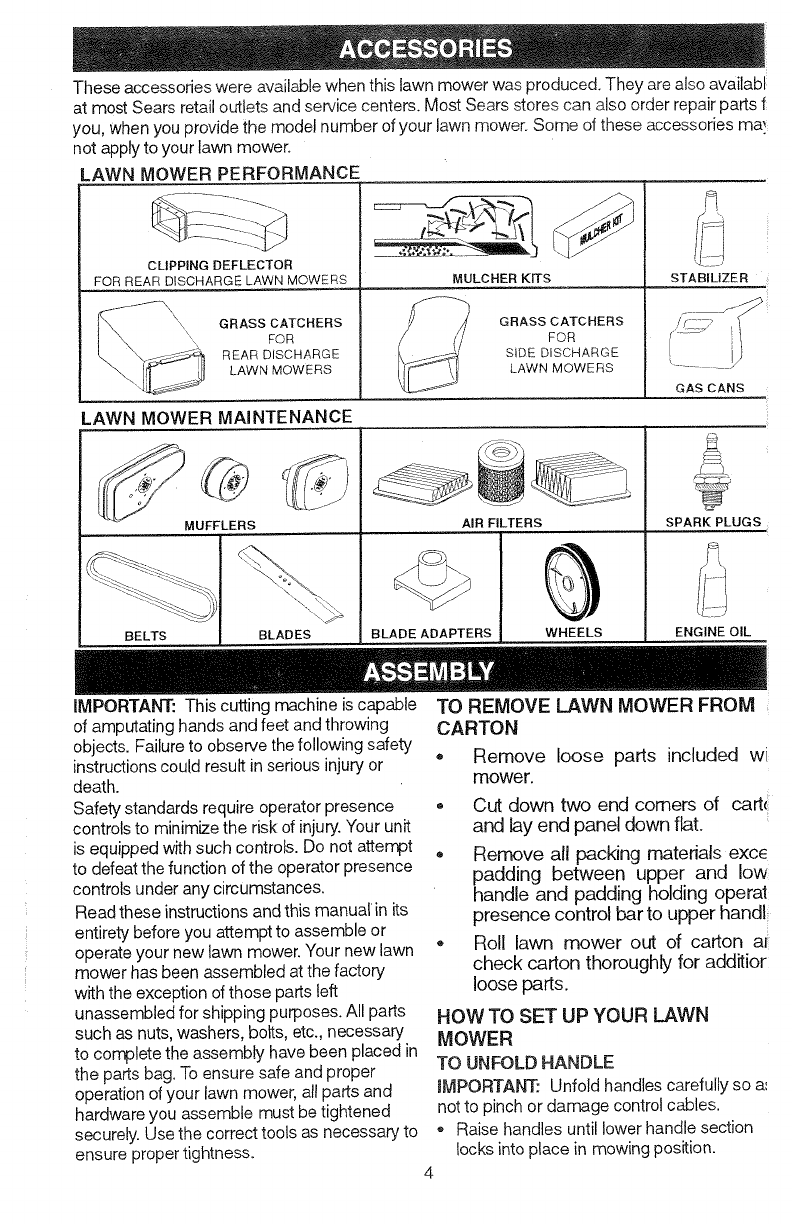
LAWNMOWERPERFORMANCE
CLIPPING DEFLECTOR
FOR REAR DISCHARGE LAWN MOWERS
GRASS CATCHERS
FOR
REAR DISCHARGE
LAWN MOWERS
MULCHER KITS
GRASS CATCHERS
FOR
SiDE DISCHARGE
LAWN MOWE RS
STABILIZER
GAS CANS
LAWN MOWER MAINTENANCE
BELTS
@
MUFFLERS
BLADES
AIR FILTERS
BLADE ADAPTERS WHEELS
SPARK PLUGS
ENGINE OIL
IMPORTANT: This cutting machine iscapable
of amputating hands and feet and throwing
objects. Failure to observe the following safety
instructions could result in serious injury or
death.
Safety standards require operator presence
controls to minimize the risk of injury. Your unit
is equipped with such controls. Do not attempt
to defeat the function of the operator presence
controls under any circumstances.
Read these instructions and this manual' in its
entirety before you attempt to assemble or
operate your new lawn mower. Your new lawn
mower has been assembled at the factory
with the exception of those parts left
unassembled for shipping purposes. All parts
such as nuts, washers, bolts, etc., necessary
to complete the assembly have been placed in
the parts bag. To ensure safe and proper
operation of your lawn mower, all parts and
hardware you assemble must be tightened
securely. Use the correct tools as necessary to
ensure proper tightness_
TO REMOVE LAWN MOWER FROM
CARTON
•Remove loose parts included wi
mower.
•Cut down two end comers of cart_
and lay end panel down flat.
Remove a!l packing materials exc_
padding between upper and low
handle and padding holding operal
presence control bar to upper handl
• Roll lawn mower out of carton a_
check carton thoroughly for additior
loose parts.
HOW TO SET UP YOUR LAWN
MOWER
TO UNFOLD HANDLE
IMPORTANT: Unfold handles carefully so a_
not to pinch or damage control cables.
• Raise handles until lower handle section
locks into piece in mowing position.
4
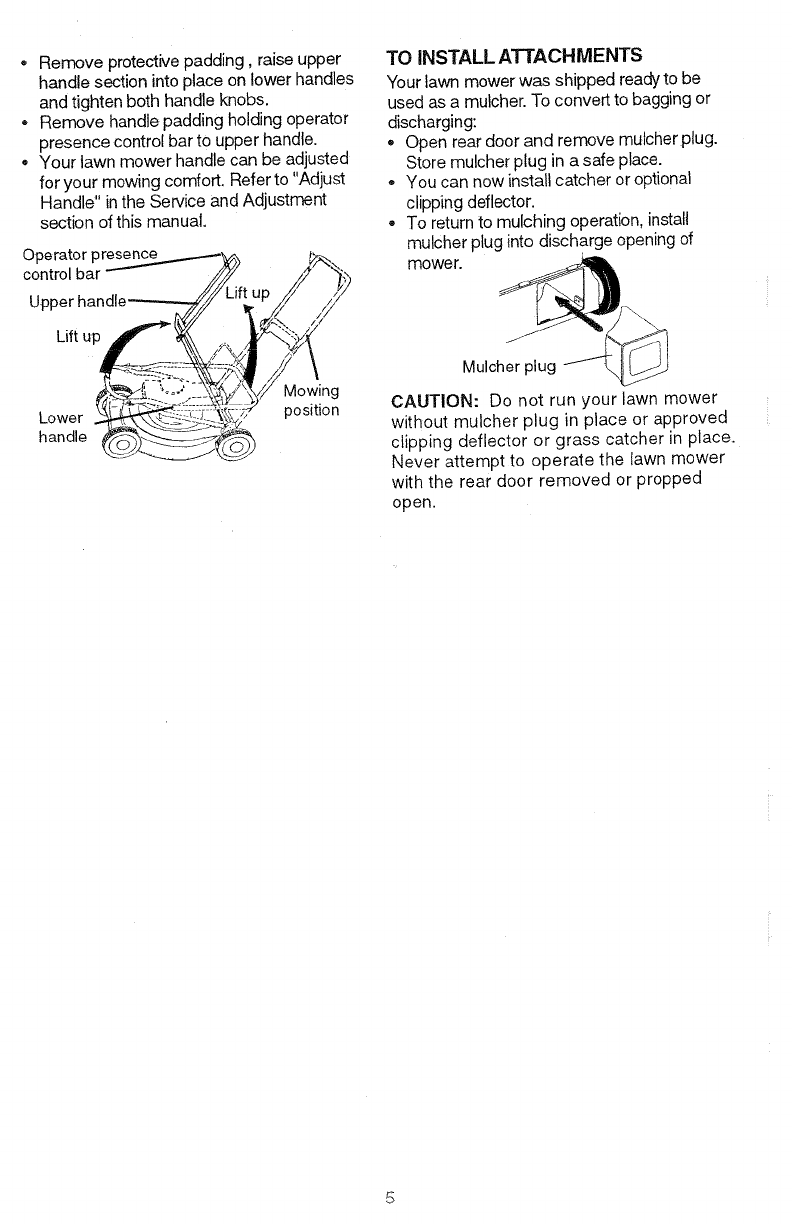
- Removeprotectivepadding,raiseupper
handlesectionintoplaceonlowerhandles
andtightenbothhandleknobs.
• Removehandlepaddingholdingoperator
presencecontrolbartoupperhandle.
o Yourlawnmowerhandlecanbeadjusted
foryourmowingcomfort.Referto',Adjust
Handle"intheServiceandAdjustment
sectionofthismanual.
Operator presence
control bar
Up[
Lift up
Lower
handle
Mewing
position
TO INSTALL ATTACHMENTS
Your lawn mower was shipped ready to be
used as a mulcher. To convert to bagging or
discharging:
* Open rear door and remove mulcher plug.
Store mulcher plug in a safe place.
- You can now install catcher or optional
clipping deflector.
. To return to mulching operation, install
mulcher plug into discharge opening of
mower. ,__
Mulcher plug _ k_.J
v
CAUTION: Do not run your lawn mower
without mulcher plug in place or approved
clipping deflector or grass catcher in place.
Never attempt to operate the lawn mower
with the rear door removed or propped
open.
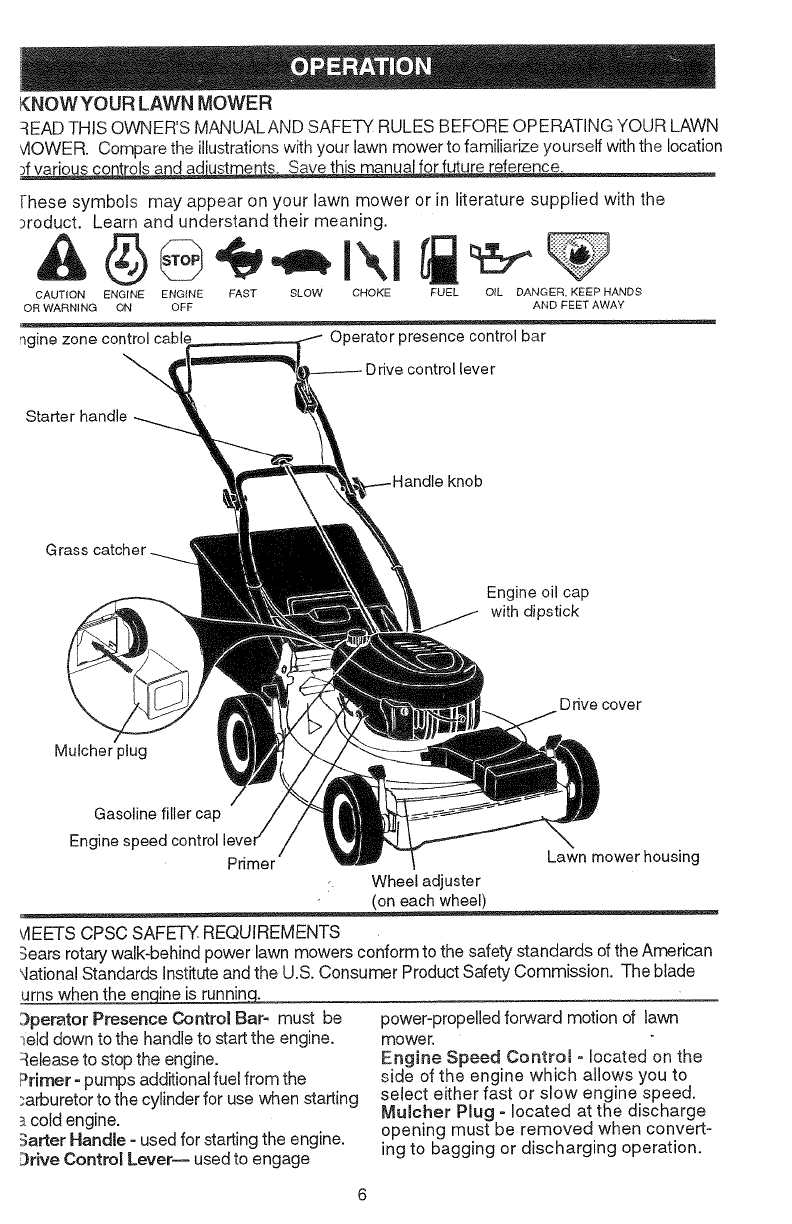
I{NOWYOUR LAWN MOWER
::{EAD THIS OWNER'S MANUALAND SAFETY RULES BEFORE OPERATING YOUR LAWN
vIOWER. Compare the illustrationswith your lawn mower to familiarize yourself with the location
ure reference.
Fhese symbols may appear on your lawn mower or in literature supplied with the
)roduct. Learn and understand their meaning.
CAUTION ENGINE ENGINE
OR WARNING ON OFF
ngine zone control
FAST SLOW CHOKE FUEL OIL DANGER, KEEP HANDS
AND FEET AWAY
Operator presence control bar
control lever
Starter handle
andle knob
Grass catcher
Engine oil cap
with dipstick
Mutcher plug
D rive cover
Gasoline filler cap
Engine speed control
Primer Lawn mower housing
j Wheel adjuster
(on each wheel)
VIEETS CPSC SAFFY. REQUIREMENTS
Sears rotary walk-behind power lawn mowers conform to the safety standards of the American
qational Standards Institute and the U.S. Consumer Product Safety Commission. The blade
urns when the encjine is runnino__
3perator Presence Control Bar= must be
_elddown to the handle to start the engine.
:{elease to stop the engine.
Primer- pumps additional fuel from the
;arburetor to the cylinder for use when starting
3.cold engine.
3after Handle oused for starting the engine.
3rive Control Lever-- used to engage
power-propelled forward motion of lawn
mower.
Engine Speed Control - located on the
side of the engine which allows you to
select either fast or slow engine speed.
Mulcher Plug - located at the discharge
opening must be removed when convert-
ing to bagging or discharging operation.
_inobjectsthrownintotheeyes,whichcan
tinsevere eye damage. Always wear
y glasses or eye shields while operating
lawn mower or performing any adjust-
Lsor repairs. We recommend a wide
1safety mask over the spectacles or
.tardsafety glasses.
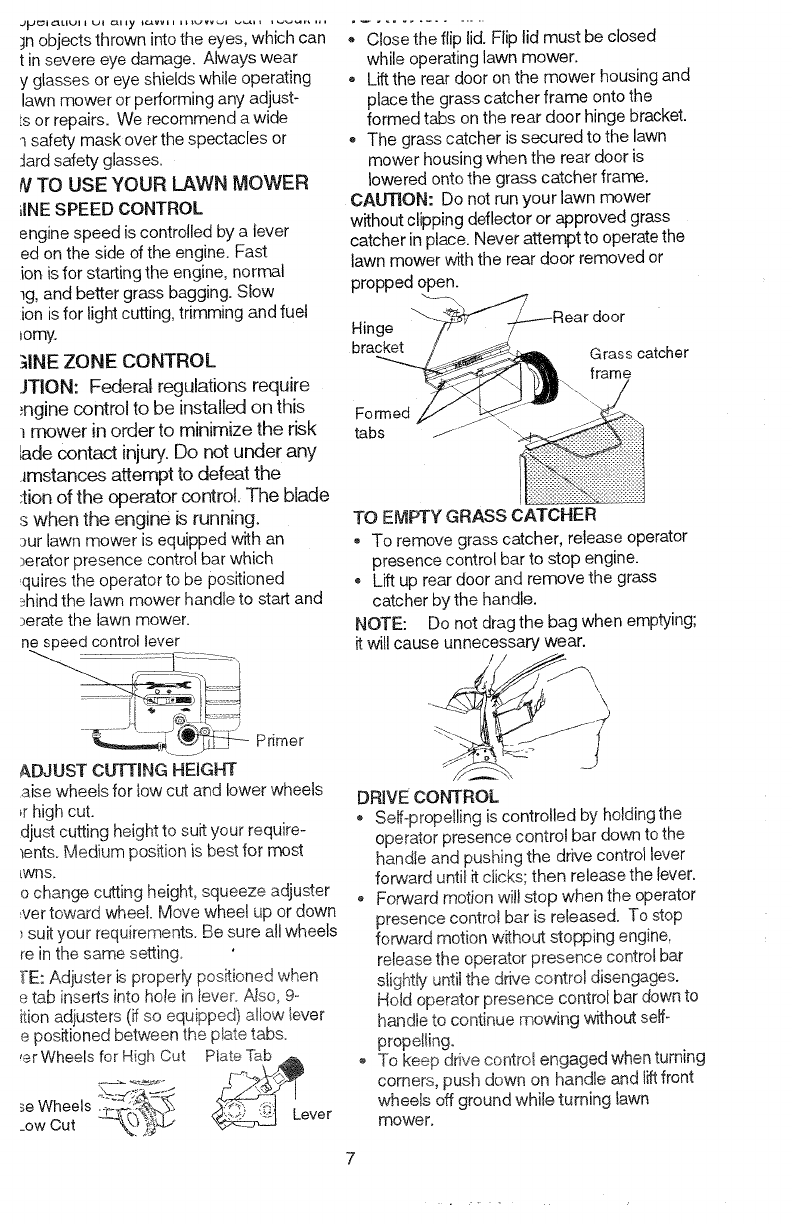
!V TO USE YOUR LAWN MOWER
iiNE SPEED CONTROL
engine speed is controlled by a lever
ed on the side of the engine. Fast
ion is for starting the engine, normal
lg, and better grass bagging. Stow
ion isfor light cutting, trimming and fuel
_omy.
;INE ZONE CONTROL
JTION: Federal regulations require
_ngine control to be installed on this
! mower in order to minimize the risk
_adecontact injury.Do not under any
lmstances attempt to defeat the
;tion of the operator control. The blade
s when the engine Lsrunning.
')ur lawn mower is equipped with an
)erator presence control bar which
quires the operator to be positioned
_hind the lawn mower handle to start and
)erate the lawn mower.
Primer
ADJUST CUT'EBNGHEJGFF[
aise wheels for iow cut and lower wheels
,rhigh cut.
djust cutting height to suit your require-
_ents.Medium position is best for most
_wns,
o change c_¢tingheight, squeeze adjuster
,vet toward wheel. Move wheel up or down
, suit your requirements. Be sure all wheels
re in the same setting.
[E: Adjuster is property positioned when
e tab inserts into hole in lever. Also, G
ition adjusters (_fso equipped) a!}ow lever
e positioned between the plate tabs.
,÷rWheels for High Cut Plate Tab
_eWheels E_
Close the flip lid. Flip lid must be closed
while operating lawn mower.
Lift the rear door on the mower housing and
place the grass catcher frame onto the
formed tabs on the rear door hinge bracket.
, The grass catcher is secured to the lawn
mower housing when the rear door is
lowered onto the grass catcher frame.
CAUI]ON: Do not run your lawn mower
without clipping deflector or approved grass
catcher in place. Never attempt to operate the
lawn mower with the rear door removed or
propped open.
Hinge
bracket Grass catcher
frame
Formed
tabs
TO EMPTT GRASS CATCHER
• To remove grass catcher, release operator
presence control bar to stop engine.
Lift up rear door and remove the grass
catcher by the handle.
NOTE: Do not drag the bag when emptying;
it will cause unnecessary wear.
DRIVE CONTROL
. Self-propelling is controlled by holding the
operator presence control bar do_m to the
handle and pushing the drive control lever
fo_'ard until it dicks; then release the lever.
Forward motion will stop when the operator
presence control bar is released. To stop
forward motion w_thoutstopping engine,
release the operator presence control bar
slightS' until the drive control disengages.
Hold operator presence control bar down to
handle to continue mowing without self-
propelling.
To keep ddve control engaged when turning
corners, push down on handle and liftfront
wheels off ground white turning lawn
mower.
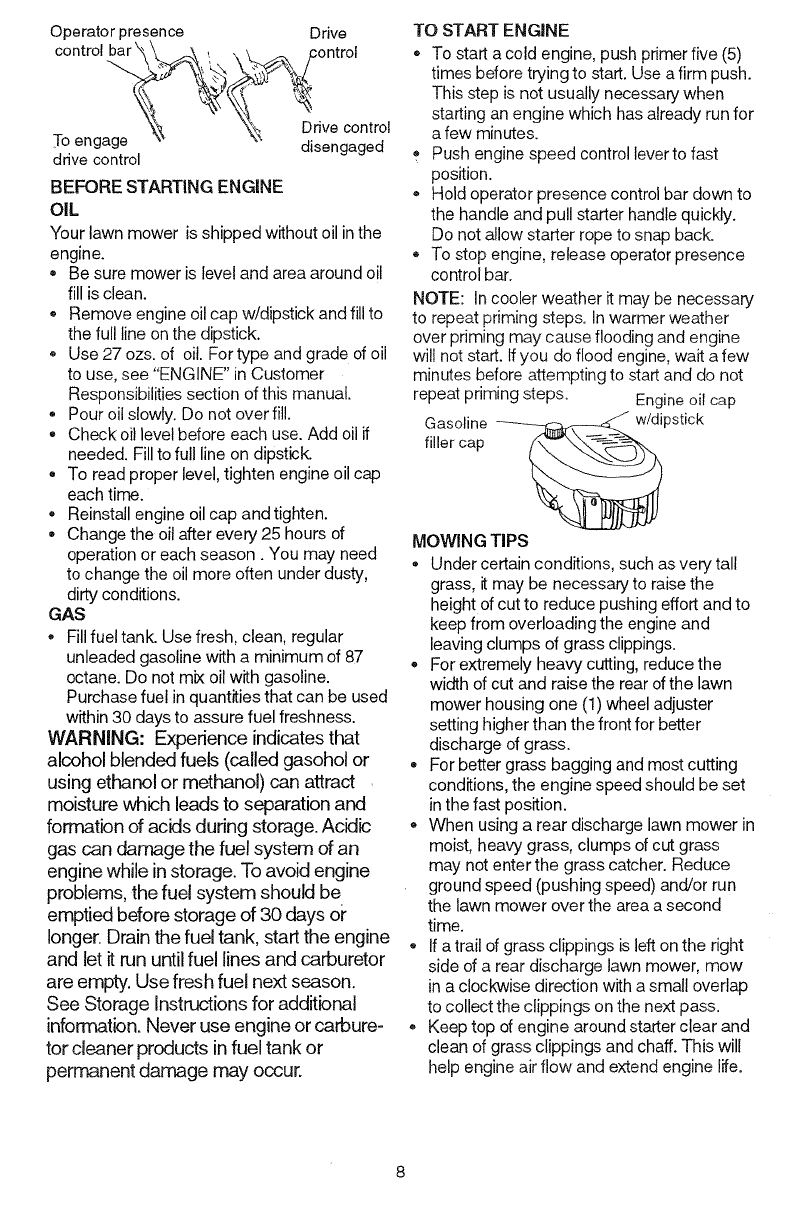
Operatorpresence Drive
controlbar"_,,._ _ _ ,control
_,_ "_, "_ Drivecontrol
mengage _ disengaged
drivecontrol
BEFORESTARTINGENGINE
OIL
Yourlawnmowerisshippedwithoutoilinthe
engine.
Besuremowerislevelandareaaroundoil
fillisclean.
, Removeengineoilcapw!dipstickandfillto
thefulllineonthedipstick.
Use27ozs.ofoil.Fortypeandgradeofoil
touse,see"ENGINE"inCustomer
Responsibilitiessectionofthismanual.
• Pouroilslowly.Donotoverfill.
• Checkoillevelbeforeeachuse.Addoilif
needed.Filltofulllineondipstick.
. Toreadproperlevel,tightenengineoilcap
eachtime.
• Reinstallengineoilcapandtighten.
• Changetheoilafterevery25hoursof
operationoreachseason.Youmayneed
tochangetheoilmoreoftenunderdusty,
dirtyconditions.
GAS
Fillfueltank.Usefresh,clean,regular
unleadedgasolinewithaminimumof87
octane.Donotmixoilwithgasoline.
Purchasefuelinquantitiesthatcanbeused
within30daystoassurefuelfreshness.
WARNING:Experienceindicatesthat
alcoholblendedfuels(calledgasoholor
usingethanolormethanol)canattract
moisturewhichleadstoseparationand
formationofacidsduringstorage.Acidic
gascan damage the fuel system of an
engine while in storage. To avoid engine
problems, the fuel system should be
emptied before storage of 30 days oi"
longer. Drain the fuel tank, star/the engine
and let it run until fuel lines and carburetor
are empty. Use fresh fue! next season.
See Storage Instructions for additional
information. Never use engine or carbure-
tor cleaner products in fuel tank or
permanent damage may occur.
TO START ENGINE
- To start a cold engine, push primer five (5)
times before trying to start. Use a firm push.
This step is not usually necessary when
starting an engine which has already run for
a few minutes.
Push engine speed control lever to fast
position.
Hold operator presence control bar down to
the handle and puff starter handle quickly.
Do not allow starter rope to snap back.
To stop engine, release operator presence
control bar.
NOTE: In cooler weather it may be necessary
to repeat priming steps. In warmer weather
over priming may cause flooding and engine
wil! not start. If you do flood engine, wait a few
minutes before attempting to start and do not
repeat priming steps. Engine oil cap
Gasoline ._pstick
filler cap
MOWING TIPS
• Under certain conditions, such as very tall
grass, it may be necessary to raise the
height of cut to reduce pushing effort and to
keep from overloading the engine and
leaving clumps of grass clippings.
• For extremely heaW cutting, reduce the
width of cut and raise the rear of the lawn
mower housing one (1) wheel adjuster
setting higher than the front for better
discharge of grass.
. For better grass bagging and most cutting
conditions, the engine speed should be set
in the fast position.
When using a rear discharge lawn mower in
moist, heaWgrass, clumps of cut grass
may not enter the grass catcher. Reduce
ground speed (pushing speed) and/or run
the lawn mower over the area a second
time.
• If a trail of grass clippings is left on the right
side of a rear discharge lawn mower, mow
in a clockwise direction with a small overlap
to collect the clippings on the next pass.
• Keep top of engine around starter clear and
clean of grass clippings and chaff. This will
help engine air flow and extend engine life.
. Poresinclothgrasscatcherscanbecome
filledwithdirtanddustwfthuseand
catcherswillcollectlessgrass.Toprevent
this,regularlyhosecatchersoffwithwater
andletdrybeforeusing.
MULCHINGMOWINGTIPS
IMPORTANT:Forbestperformance,keep
mowerhousingfreeofbuilt-upgrassandtrash.
CleanUNDERSIDEOFMOWERHOUSING
aftereachuse.See"Cleaning"inCUSTOMER
RESPONSIBILITIESsectionofthismanual.
• Thespecialmulchingbladewillrecutthe
grassclippingsmanytimesandreduce
theminsizesothatastheyfallontothe
lawntheywilldisperseintothegrassand
notbenoticed.Also,themulchedgrasswill
biodegradequicklytoprovidenutrientsfor
thelawn.Alwaysmulchwithyourhighest
engine(blade)speedasthiswillprovidethe
bestrecuttingactionoftheblades.
• Avoidcuttingyourlawnwhenitiswet.Wet
grasstendstoformclumpsandinterferes
withthemulchingaction.Thebesttimeto
mowyourlawnistheearly afternoon. At this
time the grass has dried and the newly cut
area will not be exposed to the direct sun.
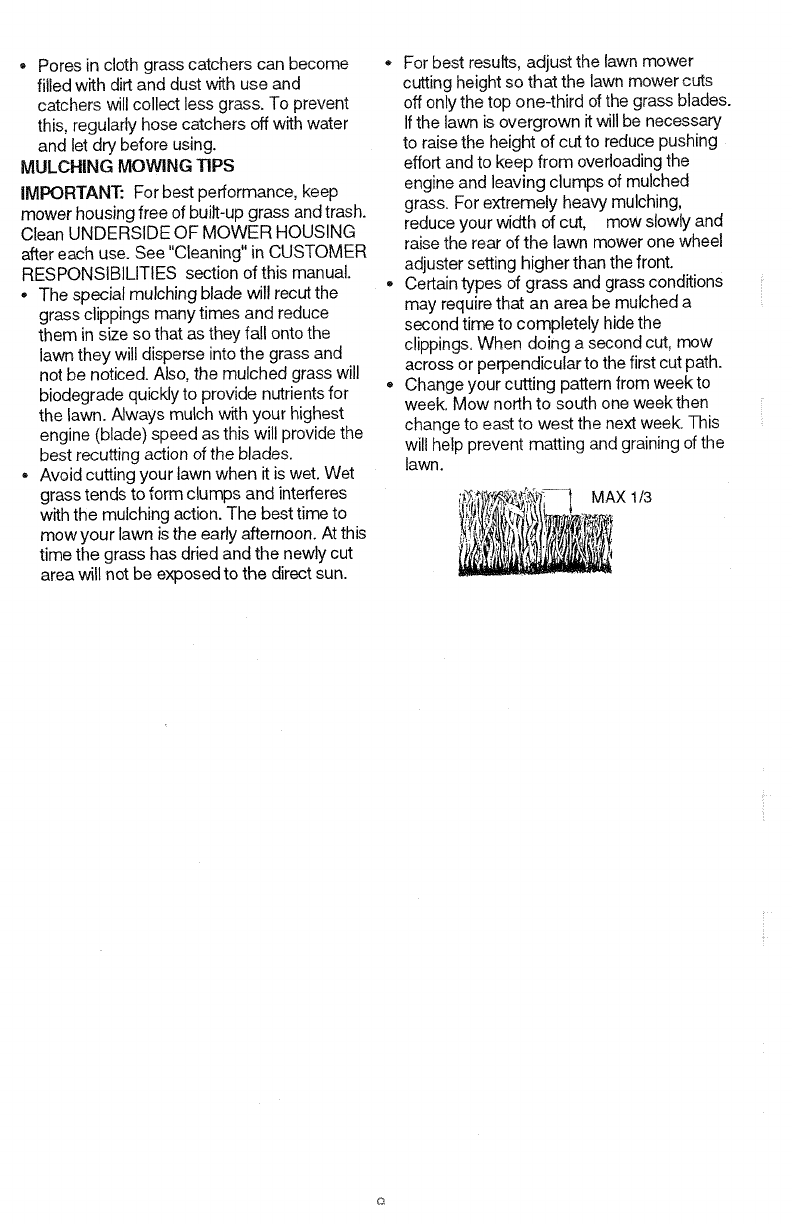
*For best results, adjust the lawn mower
cutting height so that the lawn mower cuts
off only the top one-third of the grass blades.
Ifthe lawn is overgrown itwill be necessary
to raise the height of cut to reduce pushing
effort and to keep from overloading the
engine and leaving clumps of mulched
grass. For extremely heavy mulching,
reduce your width of cut, mow slowly and
raise the rear of the lawn mower one wheel
adjuster setting higher than the front.
o Certain types of grass and grass conditions
may require that an area be mulched a
second time to completely hide the
clippings. When doing a second cut, mow
across or perpendicular to the first cut path.
Change your cutting pattern from week to
week. Mow north to south one week then
change to east to west the next week. This
will help prevent matting and graining of the
lawn.
MAX 1/3
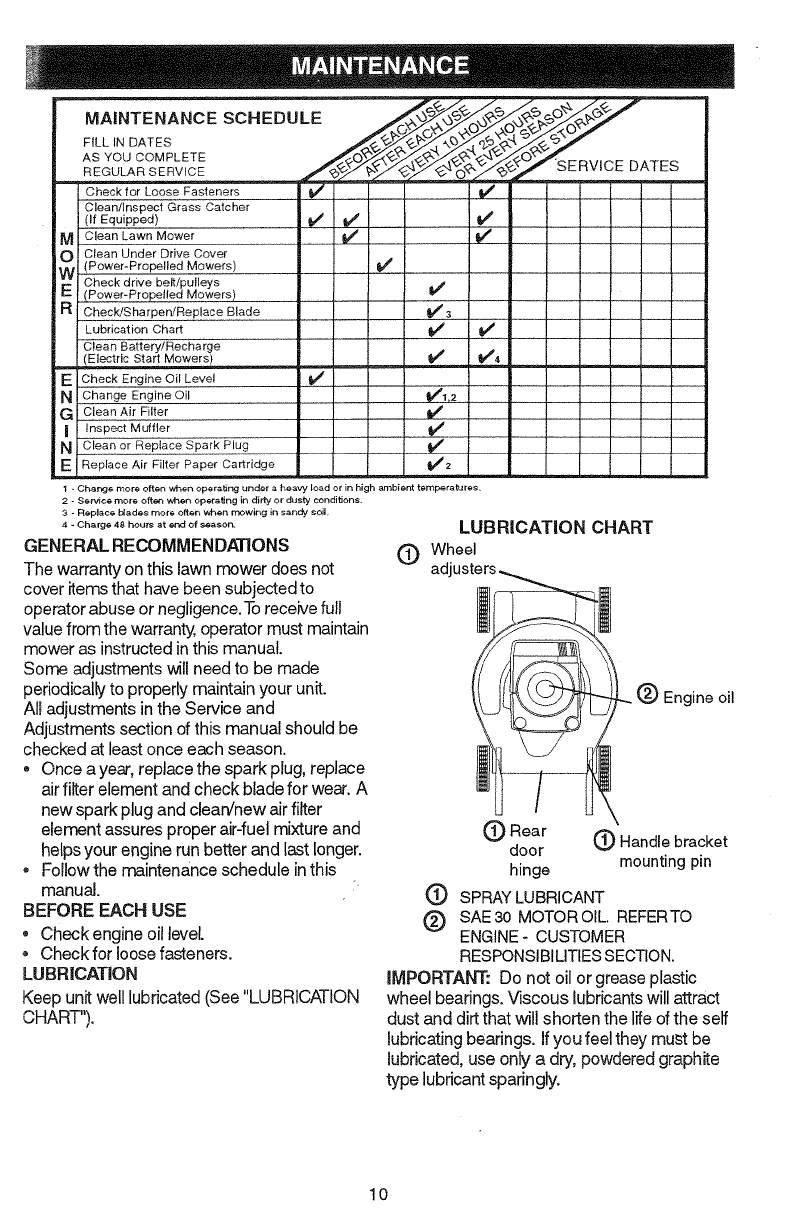
MAINTENANCE SCHEDULE
FILL IN DATES
AS YOU COMPLETE
REGULAR SERVICE
_eck for Loose Fasteners
Cleanllnspect Grass Catcher
(If Equipped)
M Clean Lawn Mower
Clean Under Drive Cover
(Power-Propelled Mowers)
. Check drive belt!pulleys
_ __Power-Propelted Mowers)
Check/Sharpen/Replace Blade
i Lubrication Chart
Clean Battery/Recharge
_ M_owers_)
' Check Engine Oil Level
Change Engine Oil
Clean Air Filter
I Inspect Muffler
N clean or Replace Spark Plug
E I Replace Air Filter Paper Cartridge
v'
J
v'3
'SERVmCE DATES
I - Charge more often when operating under a heavy load or in high ambient temperatures.
2 - Sen4ce more oftet_ when operating in dirty or dusty conditions,
3 - Replace b_ades more often when mowing in sand! soil,
4 - Charge 48 hours at end of season.
GENERAL RECOMMENDATIONS
The warranty on this lawn mower does not
cover items that have been subjected to
operator abuse or negligence. To receive full
value from the warranty, operator must maintain
mower as instructed in this manual.
Some adjustments will need to be made
periodically to properly maintain your unit.
All adjustments in the Service and
Adjustments section of this manual should be
checked at least once each season.
® Once a year, replace the spark plug, replace
air filter element and check blade for wear. A
new spark plug and clean/new air filter
element assures proper air-fuel mixture and
helps your engine run better and last longer.
• Follow the maintenance schedule inthis
manual.
BEFORE EACH USE
• Checkengine oil level.
• Checkfor loose fasteners.
LUBRICATION
Keep unit well lubricated (See "LUBRICATION
CHART").
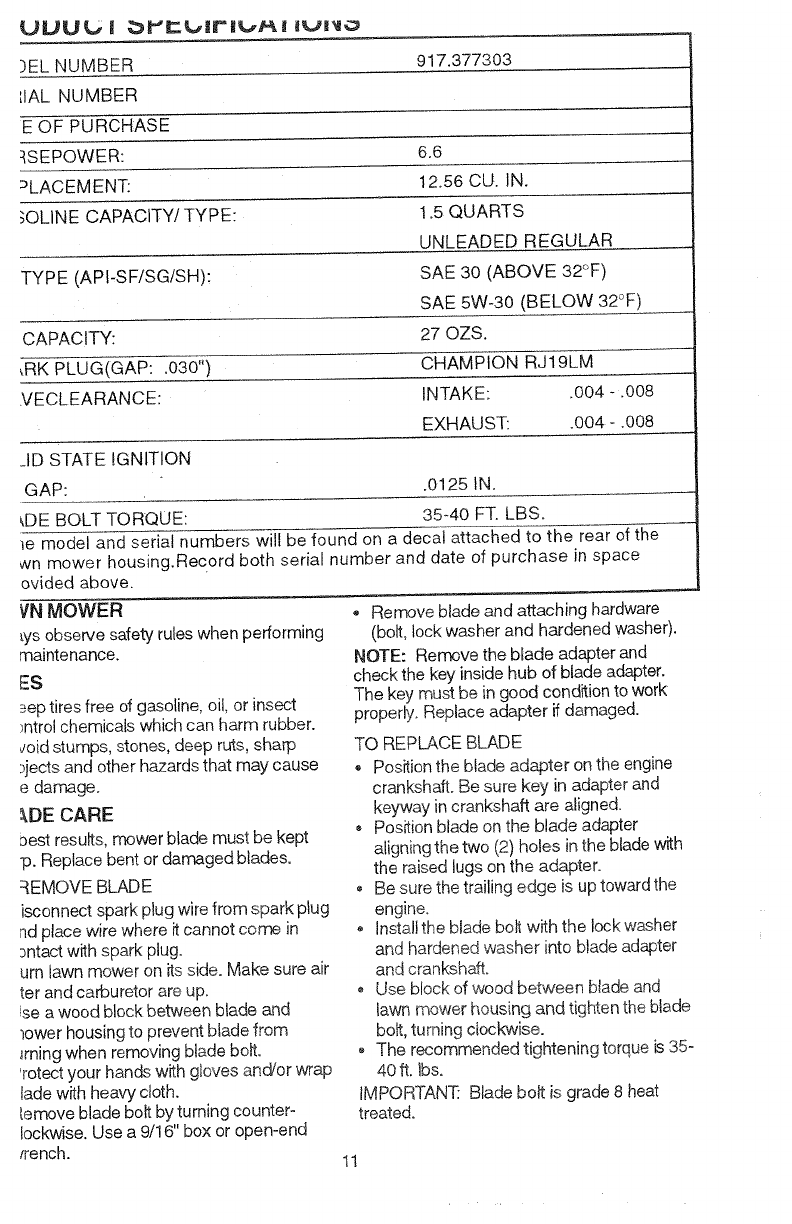
LUBRICATION CHART
(_) Wheel
(_ Engine oil
(]) Rear (]) Handle bracket
door
hinge mounting pin
(]) SPRAY LUBRICANT
(_) SAE30 MOTOROIL REFERTO
ENGINE- CUSTOMER
RESPONSIBILITIES SECTION.
IMPORTANT." Do not oil or grease plastic
wheel bearings. _scous lubricants will attract
dust and dirt that will shorten the life of the self
lubricating bearings. If you feel they must be
lubricated, use only a dry, powdered graphite
type lubricant sparingly.
10
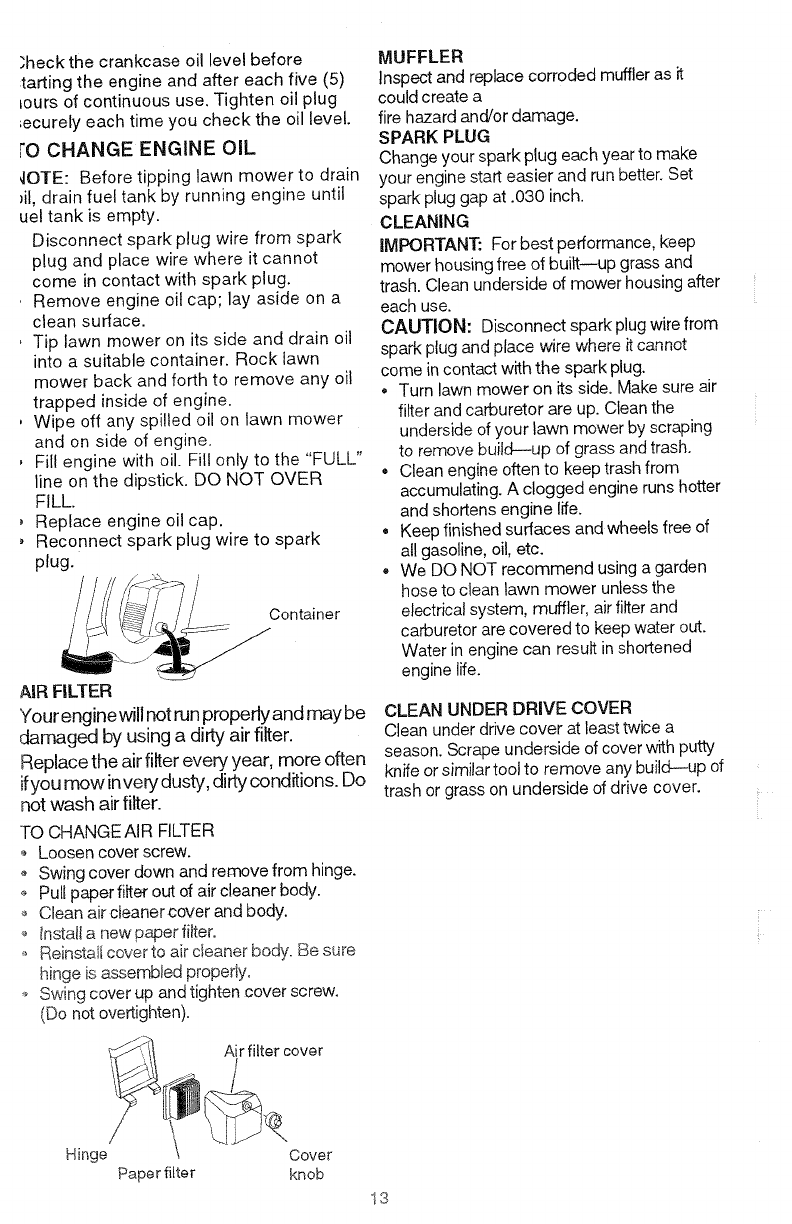
)ELNUMBER 917.377303
_IALNUMBER
EOFPURCHASE
:_SEPOWER: 6.6
3LACEMENT: 12.56CU.iN.
;OLINE CAPACITY/TYPE: 1.5 QUARTS
UNLEADED REGULAR
TYPE (APt-SF/SG/SH): SAE 30 (ABOVE 32°F)
SAE 5W-30 (BELOW 32°F)
CAPACITY: 27 OZS.
,RK PLUG(GAP: .03o") CHAMPION RJ19LM
VECLEARANCE: INTAKE: .004 - .008
EXHAUST: .004 -.008
_ID STATE IGNITION
GAP: .0125 IN.
DE BOLT TORQUE: 35-40 FT. LBS°
_e model and serial numbers will be found on a decal attached to the rear of the
wn mower housing.Record both serial number and date of purchase in space
ovided above.
VN MOWER
_ysobserve safety rules when performing
maintenance.
ES
_;eptires free of gasoline, oil, or insect
_ntro!chemicals which can harm rubber.
void stumps, stones, deep ruts, sharp
:_jectsand other hazards that may cause
e darr_ge.
_,DE CARE
vest results, mower blade must be kept
-p.Replace bent or damaged blades.
:_EMOVE BLADE
isconnect spark plug wire from spark plug
nd place wire where it cannot come in
3ntact with spark plug.
urn lawn mower on its side. Make sure air
ter and carburetor are up.
ise a wood block between blade and
lower housing to prevent btade from
_rningwhen removing blade bok°
'rotect your hands with gloves and/or wrap
lade with heavy cloth.
/emove blade bolt by turning counter_
Iockwise. Use a 9/16" box or open-end
/rench.
o Rerr_ve blade and attaching hardware
(bolt, lock washer and hardened washer).
NOTE: Remove the blade adapter and
check the key inside hub of blade adapter.
The key must be in good condition to work
properly. Replace adapter if damaged.
TO REPLACE BLADE
, Position the blade adapter on the engine
crankshaft. Be sure key in adapter and
keyway in crankshaft are aligned.
*Position blade on the blade adapter
aligning the two (2) holes in the blade with
the raised lugs on the adapter.
Be sure the trailing edge is up toward the
engine.
o Install the blade bolt with the lock washer
and hardened washer into blade adapter
and crankshaft.
,Use block of wood between blade and
lawn mower housing and tighten the blade
bolt, turning clockwise.
The recommended tightening torque is 35-
40 ft. Ibs.
IMPORTANT." Blade bo_t is grade 8 heat
treated.
11

NOTE:Wedonotrecommendsharpening
blade-butifyou do, be sure the blade is
balanced.
TO SHARPEN BLADE
Care should be taken to keep the blade
balanced. An unbalanced blade will cause
eventual damage to lawn mower or engine.
, The blade can be sharpened with a file or
on a grinding wheel. Do not attempt to
sharpen while on the mower.
• To check blade balance, drive a nail into a
beam or wail. Leave about one inch of the
straight nail exposed. Place center hole of
blade over the head of the nail. if blade is
balanced, it should remain in a horizontal
position, if either end of the blade moves
downward, sharpen the heavy end until the
blade isbalanced.
GRASS CATCHER
- The grass catcher may be hosed with
water, but must be dry when used.
• Checkyou r grass catcher often for damage
or deterioration. Through normal use it will
wear. If catcher needs replacing, replace
only with a manufacturer approved
replacement catcher. Give the lawn mower
model number when ordering.
Blade Crank shaft
adaptor
Blade
Bolt Crank
Lockwasher Hardened Blade shaft
washer Trailing adaptor
edge
GRASS CATCHER
, The grass catcher may be hosed with
water, but must be dry when used.
- Check your grass catcher often for
damage or deterioration. Through
normal use it wi!l wear. If catcher needs
replacing, replace only with a manufac-
turer approved replacement catcher.
Give the lawn mower model number
when ordering.
DRIVE WHEELS
Check front drive wheels each time before
you mow to be sure they move freely.
The wheels not turning freely means trash,
grass cuttings, etc. are in the drive wheel
area and must be cleaned to free drive
wheels.
If necessary to clean the drive wheels,
check both front wheels.
, Remove hubcaps, hairpin cotters and
washers.
o Remove wheels from wheel adjusters.
• Remove any trash or grass cuttings from
inside the dust cover, pinion and/or drive
wheel gear teeth.
Put wheels back in place.
• If after cleaning, the drive wheels do not
turn freely, contact your nearest
authorized service center.
GEAR CASE
. To keep your drive system working
properly, the gear case and area around
the drive should be kept clean and free
of trash build--up. Clean under the drive
cover twice a season.
• The gear case is filled with lubricant to
the proper level at the factory. The only
time the lubricant needs attention is if
service has been performed on the gear
case.
• If lubricant is required, use only Texaco
Starplex Premium 1 Grease, Part No.
750355. Do not substitute.
ENGINE
LUBRICATION
Use only high quality detergent oil rated
with API service classification SF, SH or
SG. Select the oil's SAE viscosity grade
according to your expected operating
temperature.
SAE VISCOSITY GRADES
I
NOTE: Although multi--viscosity oils
(5W30, 10W30 etc.) improve starting in
cold weather, these multi--viscosity oils
will result in increased oil consumption
when used above 32°F. Check your
engine oil level more frequently to avoid
possible engine damage from running low
on oil.
Changethe oil after every 25 hours of opera-
tion or at least once a year if the lawn mower
is not used for 25 hours in one year.
12
;heckthecrankcaseoillevelbefore
tarringtheengineandaftereachfive(5)
Loursofcontinuoususe.Tightenoilplug
',ecurelyeachtimeyouchecktheoillevel.
rOCHANGEENGINEOIL
_OTE:Beforetippinglawnmowertodrain
)il, drain fuel tank by running engine until
uel tank is empty,
Disconnect spark plug wire from spark
plug and place wire where it cannot
come in contact with spark plug.
Remove engine oil cap; lay aside on a
clean surface.
Tip lawn mower on its side and drain oil
into a suitable container. Rock lawn
mower back and forth to remove any oil
trapped inside of engine.
Wipe off any spilled oil on lawn mower
and on side of engine.
Fill engine with oil. Fill only to the "FULL"
line on the dipstick. DO NOT OVER
FILL.
, Replace engine oil cap.
, Reconnect spark plug wire to spark
plug.
Container
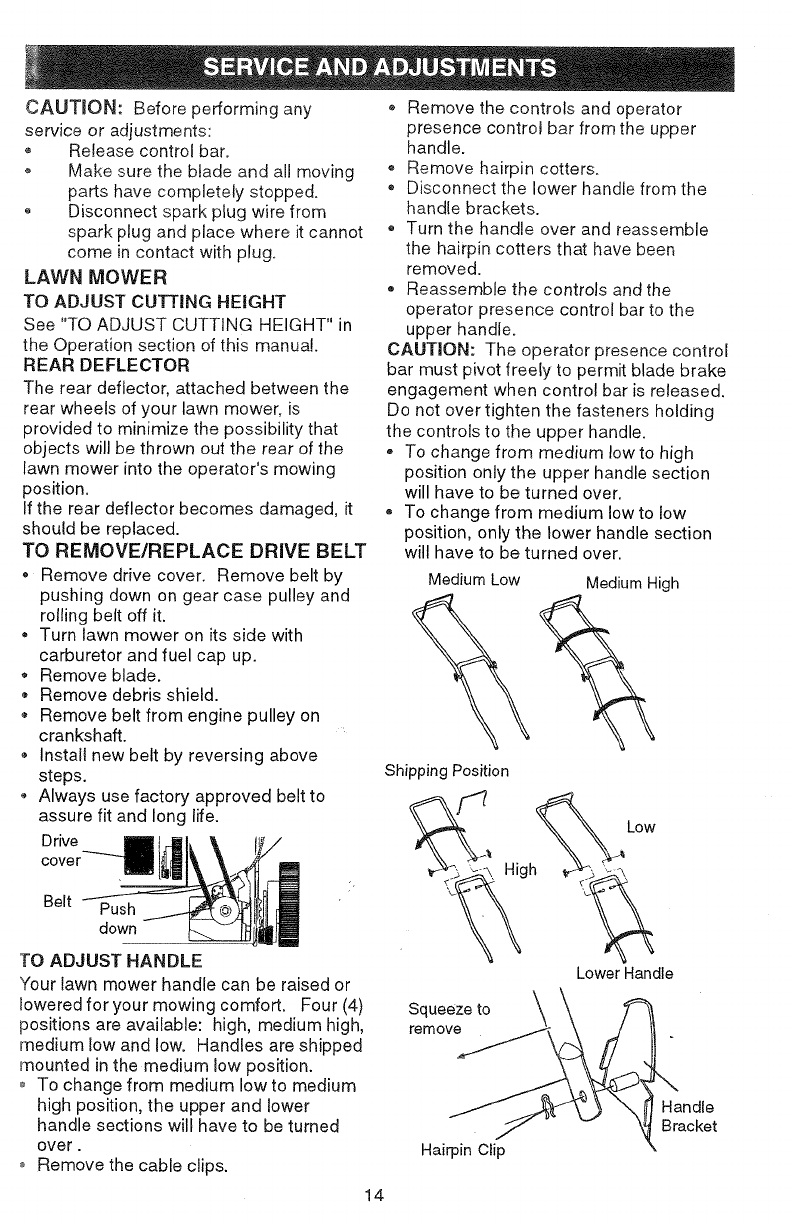
AIRFILTER
Yourengine will not runproperly and may be
damaged by using a dirty air filter.
Replace the air filter every year, more often
ifyou mow invery dusty, dirtyconditions. Do
not wash air filter.
TO CHANGE AIR FILTER
o Loosen cover screw.
o Swing cover down and remove from hinge.
o Pull paper filter out of air cleaner body,
._ Clean air cieanercover and body.
., lnstaJla new paper filter.
Reinsta/i cover to air cleaner body. Be sure
hinge is assembled properiy.
.;, Swing cover up and tighten cover screw.
(Do not overtighten).
Air filter cover
MUFFLER
Inspect and replace corroded muffler as it
could create a
fire hazard and/or damage.
SPARK PLUG
Change your spark plug each year to make
your engine start easier and run better. Set
spark plug gap at .030 inch.
CLEANING
IMPORTANT: For best performance, keep
mower housing free of built--up grass and
trash. Clean underside of mower housing after
each use.
CAUTION: Disconnect spark plug wire from
spark plug and place wire where it cannot
come in contact with the spark plug.
• Turn lawn mower on its side. Make sure air
filter and carburetor are up. Clean the
underside of your lawn mower by scraping
to remove buildi-up of grass and trash.
. Clean engine often to keep trash from
accumulating. A clogged engine runs hotter
and shortens engine life.
• Keep finished surfaces and wheels free of
all gasoline, oil, etc.
• We DO NOT recommend using a garden
hose to clean lawn mower unless the
electrical system, muffler, air filter and
carburetor are covered to keep water out.
Water in engine can result in shortened
engine life.
CLEAN UNDER DRIVE COVER
Clean under drive cover at least twice a
season. Scrape underside of cover with putty
knife or similar tool to remove any build--up of
trash or grass on underside of drive cover.
Hinge Cover
Paperfiiter knob
13
CAUTION: Before performing any
service or adjustments:
Release control bar.
o Make sure the blade and all moving
parts have completely stopped.
o Disconnect spark plug wire from
spark plug and place where it cannot
come in contact with plug.
LAWN MOWER
TO ADJUST CUTTING HEIGHT
See "TO ADJUST CUTTING HEIGHT" in
the Operation section of this manual.
REAR DEFLECTOR
The rear deflector, attached between the
rear wheels of your lawn mower, is
provided to minimize the possibility that
objects will be thrown out the rear of the
lawn mower into the operator's mowing
position.
If the rear deflector becomes damaged, it
should be replaced.
TO REMOVE/REPLACE DRIVE BELT
,, Remove drive cover. Remove belt by
pushing down on gear case pulley and
roiling belt off it.
Turn lawn mower on its side with
carburetor and fuel cap up.
• Remove blade.
•Remove debris shield.
Remove belt from engine pulley on
crankshaft.
Install new belt by reversing above
steps.
Always use factory approved belt to
assure fit and long life.
Drive
cover
Belt Push
down
TO ADJUST HANDLE
Your lawn mower handle can be raised or
lowered for your mowing comfort. Four (4)
positions are available: high, medium high,
medium low and low. Handles are shipped
mounted in the medium low position.
o To change from medium low to medium
high position, the upper and lower
handle sections will have to be turned
over.
o Remove the cable clips.
o Remove the controls and operator
presence control bar from the upper
handle.
o Remove hairpin cotters.
® Disconnect the lower handle from the
handle brackets.
• Turn the handle over and reassemble
the hairpin cotters that have been
removed.
o Reassemble the controls and the
operator presence control bar to the
upper handle.
CAUTION: The operator presence control
bar must pivot freely to permit blade brake
engagement when control bar is released.
Do not over tighten the fasteners holding
the controls to the upper handle.
-To change from medium Iowto high
position only the upper handle section
will have to be turned over.
- To change from medium low to low
position, only the lower handle section
will have to be turned over.
Medium Low Medium High
Shipping Position
FLow
High
Squeeze to
remove
Lower Handle
Hairpin Clip
Handle
Bracket
14
_JRETOR
arburetor has a non-adjustable fixed
let for mixture control. If your engine
not operate properly due to sus-
d carburetor problems, take your
_ower to an authorized service
r for repair or adjustment.
Your engine speed has been factory set.
Do not attempt to increase engine speed
or it may result in personal injury. If you
believe that the engine is running too fast
or too slow, take your lawn mower to an
authorized service center for repair and
adjustment.
Jately prepare your lawn mower for
te at the end of the season or ifthe unit
,t be used for 30 days or more.
N MOWER
lewn mower is to be stored for a period
D,dean itthoroughly, remove all dirt,
e. leaves, etc. Stere in a clean, dry area.
a__entire lawn mower (See "CLEANING"
_eCustomer Responsibilities section of
rnanuat).
)ricate as shown inthe Customer
sponsibilJties section of this manual.
su_'ethat all nuts, bolts, screws, and pins
sec-urelyfastened. Inspect moving
ts for damage, breakage and wear.
pbce if necessary.
_ch up all rusted or chipped paint
faces; sand lightly before painting.
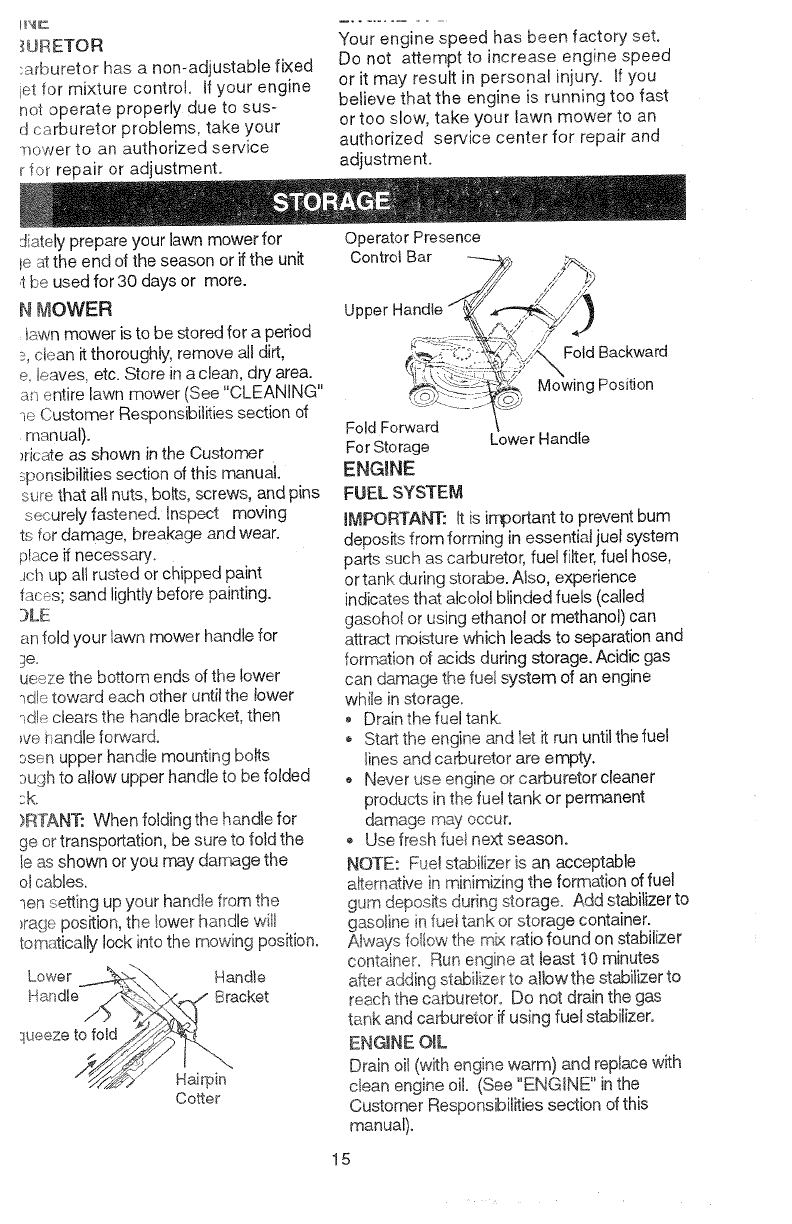
:_}LE
an fold your lawn mower handle for
ueeze the bottom ends of the lower
"_dk.toward each other until the lower
_dle clears the handle bracket_then
we handle fo_,ard.
ssen upper handle mounting boRs
:_ughto allow upper handle to be folded
sk.
)RTANT: When folding the handle for
ge ortransportation, be sure to fold the
Ie as shown or you may damage the
oJcables.
_en setting up your handle from the
_rageposition, the lower handle wtI
tomatical[y lock into the mowing position.
Lower _-_., "_ Handle
H,ar_dle-,__._ _.. "- Bracket
Cotter
Operator Presence
Control Bar
Upt
Fold Backward
Mowing Position
Fold Forward
ForStorage
ENGINE
FUEL SYSTEM
Lower Handle
iMPORTANT: Jtis important to prevent bum
deposRs from forming in essential fuel system
parts such as carburetor, fuel filter, fuel hose,
or tank during storabe. Also, experience
indicates that alcolo! blinded fuels (called
gasohol or using ethanol or methanol) can
attract moisture which leads to separation and
formation of acids during storage. Acidic gas
can damage the fuel system of an engine
while in storage.
Drain the fuel tank
Start the engine and let it run untilthe fue!
tinesand carburetor are empty.
* Never use engine or carburetor cleaner
products in the fuel tank or permanent
damage may occur.
Use fresh fuet next season.
NOTE: Fue! stabilizer is an acceptable
aRernative in minimizing the formation of fuel
gum deposits during storage. Add stabilizerto
gasoline in fue_tank or storage container.
Always follow the mN ratio found on stabilizer
container. Run engine at least 10 minutes
a_er adding stabilizer to a_towthe stabilizer to
reach the carburetor. Do not drain the gas
tank and carburetor [f using fuel stabilizer.
ENGINE OiL
Drain oit (with engine warm) and replace with
clean engine oil (See "ENGINE" inthe
Customer Responsibilities section of this
manual).
15
CYLINDER
o Removesparkplug.
Pouroneounce(29mt)ofoiathroughspark
plugholeintocylinder.
• Pultstarterhandleslowlyafewtimesto
distributeoil.
Replacewithnewsparkplug.
OTHER
QDonotstoregasolinefromoneseasonto
another.
Replaceyourgasolinecanifyourcanstarts
torust.Rustand!ordirtinyour gasoline wil!
cause problems.
• If possible, store your unit indoors and cover
it to give protection from dust and dirt.
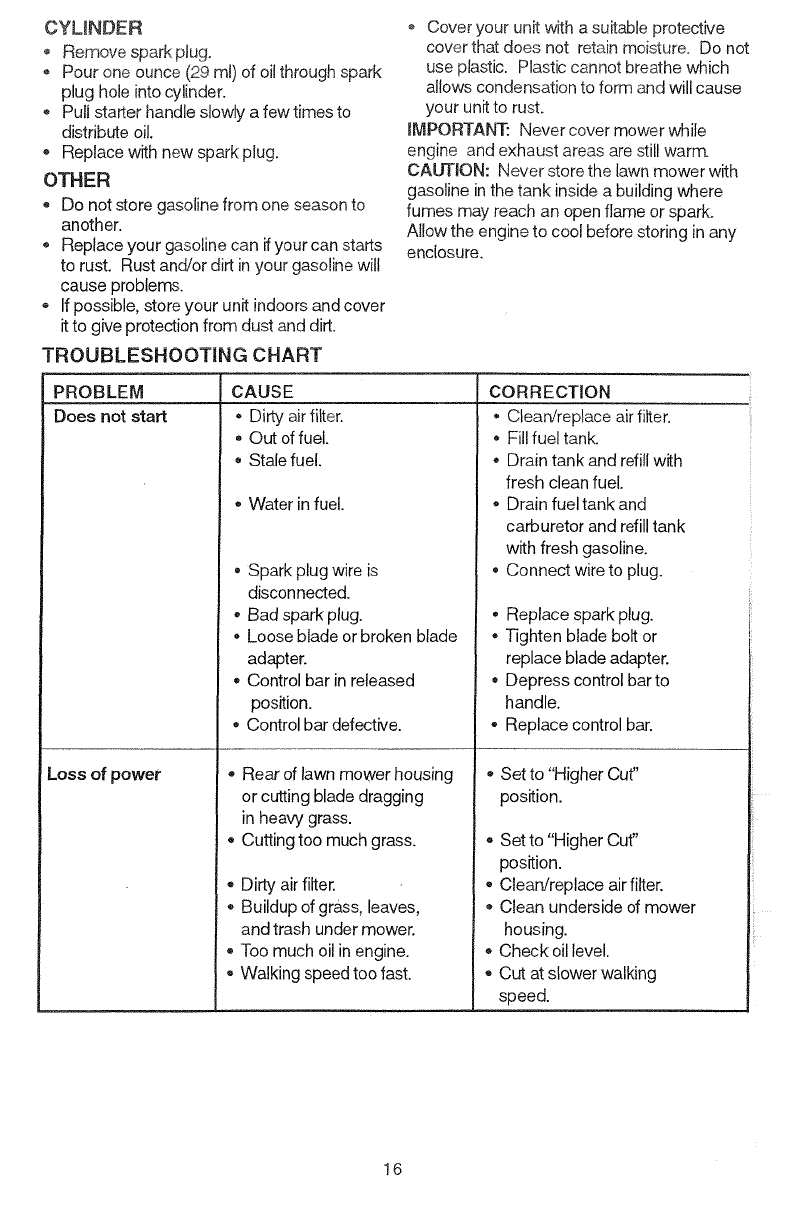
TROUBLESHOOTING CHART
o Cover your unit.with a suitable protective
cover that does not retain moisture. Do not
use plastic. Plastic cannot breathe which
allows condensation to form and will cause
your unit to rust.
iMPORTANT: Never cover mower while
engine and exhaust areas are still warm.
CAUTION: Never store the lawn mower with
gasoline inthe tank inside a building where
fumes may reach an open flame or spark.
Allow the engine to cool before storing in any
enclosure.
PROBLEM
Does not start
CAUSE
•Dirty airfilter.
. Out of fuel.
• Stale fuel.
, Water in fuel.
• Spark plug wire is
disconnected.
•Bad spark plug.
, Loose blade or broken blade
adapter.
• Control bar in released
position.
• Control bar defective.
Rear of lawn mower housing
or cutting blade dragging
CORRECTION
• Clean!replace air filter.
- Fill fuel tank.
• Drain tank and refill with
fresh clean fuel.
, Drain fuel tank and
carburetor and refilltank
with fresh gasoline.
• Connect wire to plug.
oReplace spark plug.
• Tighten blade bolt or
replace blade adapter.
• Depress control bar to
handle.
• Replace control bar.
•Set to "Higher Cut"
position.
in heavy grass.
* Cutting too much grass.
o Dirty airfilter.
Buildup of grass, leaves,
and trash under mower.
Too much oil in engine.
o Walking speed too fast.
•Set to "Higher Cut"
position.
• Clean/replace airfilter.
Clean underside of mower
housing.
Check oillevel.
Cut at slower walking
speed.
Loss of power
16

ROUBLESHOOTING CHART
ROBLEM _AUSE
_oor cut -- uneven
_xcessive
ribration
_3tarter rope hard
:o pull
3rass catcher
-_otfilling (ff so
_uipped)
Hard to push
CORRECTION
•Wheel heights uneven.
-Low engine speed.
•Buildup of grass, leaves
and trash under mower.
,Worn, bent or loose blade.
, Bent engine crankshaft.
Worn, bent or loose blade, • Replace blade. Tighten
blade bolt.
® Set all wheels at same
height
, Set engine speed control
in fast position.
•Clean underside of
mower housing.
Engine flywheel brake is on
when control bar is released.
Bent engine crankshaft.
e
o
o
Blade adapter broken.
Blade dragging in grass.
Cutting height too low.
- Lift on blade worn off.
•Catcher notventing air.
Low engine speed.
• Grass istoo high or wheel
height istoo low.
• Rear of lawn mower
housing or blade dragging
ingrass.
, Grass catcher too full.
, Handle height poskion not
right for you,
- Replace blade. Tighten
blade bolt.
•Contact an authorized
service center.
, Depress control bar to
upper handle before
pulling starter rope.
o Contact an authorized
service center.
* Replace blade adapter.
e Move lawn mower to cut
grass or to hard surface
to start engine,
• Raise cutting height.
o Replace blade.
-Clean grass catcher.
Set engine speed control
_osition.
Raise cutting height.
Raise rear of lawn mower
housing one (1) setting
higher.
Empty grass catcher.
Adjust handle height to
suit.
CRAFTSMAN Model No. 917.377303
Garantfa 17 Especificaciones del Producto 25
Regtas de Seguridad 17 Servido y Adjustes 27
Me nta.je 19 Aimacenamiento 28
Operacidn 20 Identificacidn de problemas 30
Mantenimiento 24 Partes de repuesto Vea el manual
Programa de Mantenimiento 24 ingles del dueSo
Orden de Partes Contratapa
GARANT[A LIMITADA DE DOS AiC4OSPARA LA SEGADORAA MOTOR CRAFTSMAN
Per dos (2) e&os, a partJrde ta fecha de cempra, cuando esta. Segadora Craftsma nse mantenga, lubnque
y afine segdn las instruociones pare la operaci6n y el manterimiento en et manual del dueSo, Sears
reparar#, gratis todo defecto on el material y la mane de obra.
Si la Segadora Craftsman se usa pare fines comerciales o de arfiendo esta garant[a s61ose aplica per
noventa (90) dies a partir de la fecha de compra.
Esta Garant[a no cubre:
o Art[cutos que se desgastan durante el use normal tales come las cuchiitas segadoras rotatorias, los
adaptaderes de la cuchilla, las coffees, los fi]tros de alre y las buj[as.
o Reparaciones necesafias debido al abuse o a la negligencia del operador, incluy_ndose a los
cigQeRales doblados y ala falta de mantenimiento de! equipo segdn las instrucciones que se inctuyen
en el manual del due5o.
EL SERVICIO DE GARANT[A ESTA DISPONIBLE al devoiver la segadpra a motor Craftsman al centre/
departmento de servicio Sears mas cercano en los estados unidos. Esta garant[a se aptica solamente
mientras el producto este en use en los estades unidos.
Est,':_GaFantfa le otorga derechos legales espec[ficos, y puede que tambien tenga otros derechos que
vaffan de estado a estade.
Sears, Roebuckand Co., D/817WA, Hoffman Estates, IL 60179 USA
Los est_drams de seguridad exigen la presencia
det operator en los controles pare reducJra un
minimo et nesgo de lesionarse. S u unidad viene
equipada con dichos controles. Per ningun motive
trate del eliminar ie funci6n de los controles que
ex]gen la presencia de] operader.
ENTRENAMIENTO:
o Lea este manual dei operador
cuidadosamente, Familiaffcese con los
controles y aprenda a operar su segadoFa en
forma adecuada. Aprenda a parer su
segadera r'_pidamente.
,_ No permita que los niSos usen su segadora.
Nunca permita que los adultos operen la
se,_dora sin center con tas instrucciones
ad_uadas.
Mantenga ei _.reade operad6n despejada
de gente, especialmente de niSos pequeSos
y de animales domSsticos.
+_ Use la segadora sotamente pare los
fines propuestos per el fabricante y
segdn las explicaciones descritas en
este manual.
No opere la segadera si se ha ca[do o daSado
en cuatquiera form& Siempre repare los da_os
antes de usarla
o No use accesorios que no hayan side
recomendados porel fabricante. El use de
dichos accesories puede ser peligroso.
o La cuchitla gira cuando el motor estb,
funcionando.
PREPARAC!ON:
o Siempre revise cuidadosamente el _rea que
se va a segar y desp_jela de todas las piedras,
palos, alambres, huesos y otros objetos
extraSos. Estos objetos ser'b,nlanzades con la
cuchilla y pueden produdr lesiones graves.
o Siempre use anteojos de seguddad o
protectores de ojos cua_qdo arranque y du-
rante et tiempo que use la segadora.
° V[stase en forma adecuada. No opere la
segadora sin zapatos o con sandalias
abiertas. Use sotamente zapatos s6tidos con
buena tracci6n _Jando siegue.
18
._rarrancar et motor. No ilene e! estanque
iasolina en recintos cerrados,
Jando el motor estA funcionando o cuando
caliente, Permita que el motor se enfr[e
ratios minutos antes de Ilenar ei estanque
lasolina. Limpie toda la gasolina
amada antes de hacer arrancar el motor.
npre haga los aiustes de altura de las
Jas antes de hacer arrancar su
_dora. Nunca trate de hacer _sto
ltras que el motor estb. funcionando.
]ue siempre durante el d[a o con buena
artificial.
{ACION:
ffenga sus ojos y su mente en la
adora yen el &rea que se estb, cortando.
3em_ita que otros intereses Io distraigan,
:-orte cesped mojado o resbaloso. Nunca
a mientras est_ operando su segadora.
_qpreasegLirese de mantener et equitibrio
_ntenga el mango agarrado firmemente y
fine.
ponga las manos o los pies cerca odebajo
as partes rotatorias. Mant_ngase
ado de la abertura de descarga en todo
nento.
mpre pare el motor cuando se vaya
ando no este usando su segadora, o
_s de atravesar _asentradas para autos,
senderos, caminos y _,reas cubiertas de
3.
_ca didja la descarga det material hacia
espectadores ni permita a nadie cerca de
egadora mientras la est4 operando.
es de limpiar, inspeccionar o de reparar f
agadora, pare el motor y est4
npletamente seguro de que Ja cuch#Ja y
todas tas partes que se mueven se
an detenido. Luego, desconecte el
mbre de la buj[a y mant_ngato alejado de
a para evitar el arranque pot accidente.
continde haciendo funcionar su segadora
-_;pega a un objeto extra,So. Siga el
cedimiento descdto anteriormente, tuego
,are cualquier daSo antes de volver a
_ncar y de operar su segadora.
cambie los ajustes del regulador o
jaque el motor ande a una velocidad
:esiva. Se pueden preducir da¢_osen et
,tory I esiones personales.
opere su segadora si vibra fuera de Io
final. La vibracidn excesiva es una
!icacidn de daSo; pare el motor, revise en
ma segura la causa de a v braci6n y haga
eparaciones segdn sea necesario.
haga funcionar el motor en
:intoscerrados. Los gases de escape son
iigrosos.
_ncacorte el c_sped tirando la segadora
las pendientes, nunca hacia arriba o hacia
abajo pues puede perder el equilibrio. No
siegue pendientes demasiado empinadas.
Tenga cuidado cuando opere la segadora en
terreno disparejo o cuando cambie de
direcci6n - mantenga un buen equilibrio.
*Nunca opere la segadora sin las
protecciones adecuadas, las planchas, el
recogedor de c_sped y otros dispositivos de
segufidad en su lugar.
MANTENIlVIIENTOY ALMACENAMIEN-
TO:
*Revise la cuchilla y los pemos de montaje
del motor a menudo, para asegurarse que
estAn apretados en la forma adecuada.
.Revise todos los pemos, tuercas y tomillos a
intei_,_aiosfrecuentes, para verificar si est_n
apretados en forma adecuada, y
asegu rarseque la segadora se encuentra en
condiciones de funcionamiento seguro.
oMantenga todos los dispositivos de
seguridad en su lugar y listos para funcionar.
.Par& reducir el peligro de incendio,
mantenga e! motor sin celsped, hojas y grasa
o aceite en exceso.
® Revise el recogedorde c6sped a menudo
para verificar si hay deterioro y desgaste y
cambie las bolsas desgastadas. Use
solamente las boisas de repuesto
recomendadas pot el fabricante de su
segadora o que cumplen con las
especificaciones de 6ste.
- Siempre mantenga una cuchilla afilada en su
segadora.
*Siempre permita que e! motor se enfn'e
antes de guardada en cualquier recinto
cerrado.
Nunca guarde la segadora con combustible
en el estanque dentro de un edificio endonde
los gases pueden atcanzar una llama
expuesta o una _aente de ignici6n, tal como
e! caientador de agua, la estufa de
calefacci6n, la secadora de ropa, etc.
PRECAUCION: Siempre desconecte el
alambre de la bui(a y pdngalo donde no pueda
entrar en contacto con la bujfa, para evit_r el
arranque por accidente, durante ta preparaci6n,
et transporte, et ajuste o cuando se hacen
reparaciones.
PRECAUCI(_N: Es conocido pot el Estado de
California que los gases de escape del motor
de este productor contienen quimicos los
cuates a ciertos niveles, pueden ocasionar,
cancer, defectos de nacimiento, y otros dahos
a! sistema reproductivo.
19
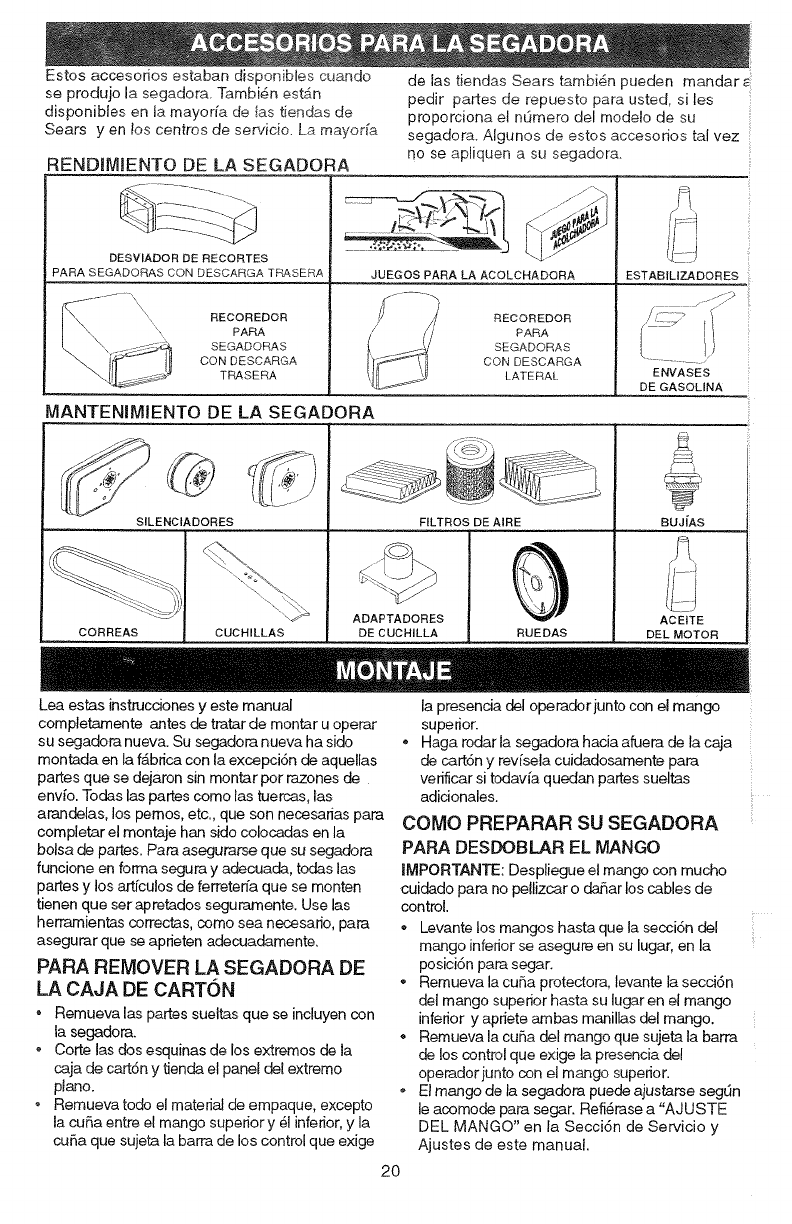
Estos accesorios estaban disponibles cuando
so produjo la segadora. Tambi6n estAn
disponibles en la mayofia de las tiendas de
Sears yen los centms de servicio. La mayor[a
de las tiendas Sears tambi_n pueden mandar s
pedir partes de repuesto para usted, si les
proporciona el nLimero del modelo de su
segadora. Algunos do estos accesorios tal vez
RENDIMIENTO DE LA SEGADORA
//\
....... .............
DE SV lAD OR DE RECORTES _-_ :_Y
PARA SEGADORAS CON DESCARGA TRASERA JUEGOS PARA LA ACOLCHADORA
no se apliquen a su segadora.
RECOREDOR
PARA
SEGADORAS
CON DESCARGA
LATERAL
ESTABILtZADORES
ENVASES
DE GASOLINA
X\ RECOREDOR
PARA
SEGADORAS
CON DESCARGA
TRASERA
MANTENIMIENTO DE LA SEGADORA
CORREAS CUCHILLAS
FILTROS DE AIRE
ADAPTADORES
DE CUCHILLA RUEDAS
BUJiAS
ACEtTE
DEL MOTOR
Lea estas instrucciones y este manual
completamente antes de tratar de montar u operar
su segadora nueva. Su segadora nueva ha side
montada en la f_.brica con la excepci6n de aquellas
partes que se dejaran sin montar por razones de
env[o. Todas las partes come las tuercas, las
arandelas, los pemos, etc., que son necesarias para
completar el montaje hart side colocadas en la
balsa de partes. Para asegurarse que su segadora
funcione an forma segura y adecuada, todas las
partes y los art[culos de ferreten'a que se monten
tienen que set apretados seguramente. Use las
herr-_'nientas correctas, como sea necesario, para
asegurar que se aprieten adecuadamente.
PARA REMOVER LA SEGADORA DE
LA CAJA DE CARTON
, Remueva las partes sueitas que se incluyen con
la segadora.
° Corte las dos esquinas de los extremes de la
caja de cart6n y tienda el panel del extreme
plane.
Remueva todo el material de empaque, excepto
la cuSa entre el mango superior y _l inferior, y la
cuSa que sujeta la barra de los control que exige
la presenda del operadorjunto con el mango
superior.
Haga rodar la segadora hacia afuera de la caja
de cart6n y revfsela cuidadosamente para
verificar si todav[a quedan partes sueltas
adicionales.
2O
COMO PREPARAR SU SEGADORA
PARA DESDOBLAR EL MANGO
IMPORTANTE: Despliegue el mango con mucho
cuidedo para no pallizcar o daSar los cables de
control.
. Levante los mangos hasta que la seccidn del
mango inferior se asegure en su lugar, en la
posici6n para segar.
Remueva la cuSa protectora, tevante la secci6n
dei mango superior hasta su lugar en el mango
inferior y apriete ambas manillas del mango.
o Remueva la cu5a del mange que sujeta la barra
de los control que exige la presencia del
operadorjunto con el mango superior.
*El mango de la segadora puede ajustarse segdn
le acomode para segar. Refi_rase a "AJUSTE
DEL MANGO" en la Secoidn de Servicio y
Ajustes de este manual.
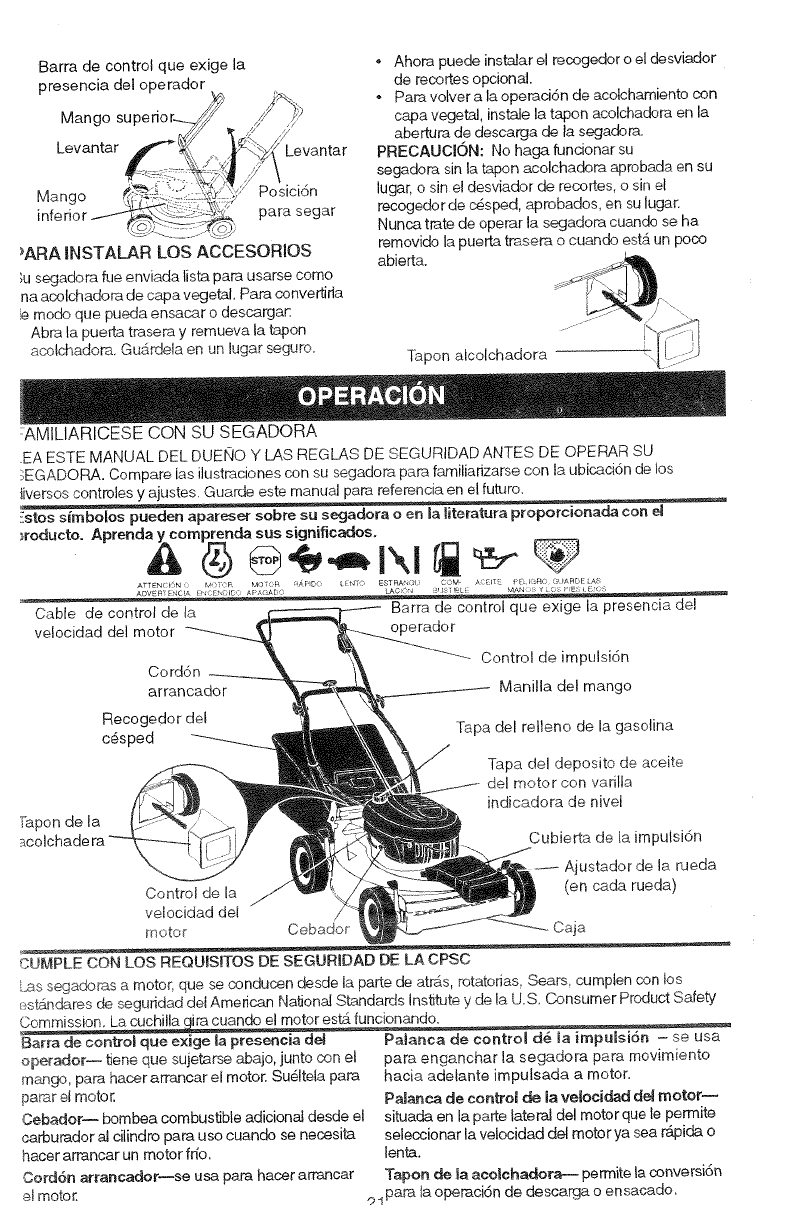
Barradecontrolqueexigela
presenciadeloperador
Mango
Levantar
Mango Posicidn
parasegar
_AFIAINSTA_RLOSACCESORIOS
_usegadopafueenviada lista para usarse como
na acolchadora de capa vegetal. Papaconvertirla
!e mode que pueda ensacar o descargar.
Abra la puerL-4trase_ y remueva la tapon
acxstchadora. GuA_deta en un Jugarseguro.
Ahora puede instalar el recogedor o el desviador
de recortes opcionat.
oPare votver ala operaci6n de acotchamiento con
cape vegetal, instale la tapon acolchadora en la
abertura de descarga de ta segadora.
PREOAUOION: No haga funcionar su
segadora sin la tapon acolchadora aprobada en su
lugar, o sin el desviador de recortes, o sin el
recogedor de obsped, aprobados, en su lugar.
Nunca trate de operar la segadora cuando se ha
removido la puerta trasepa o cuando estg,un poco
abierta.
-[i_pon alcolchadora
:AMILIARICESE CON SU SEGADORA
EA ESTE MANUAL DEL DUENO Y LAS REGLAS DE SEGURIDAD ANTES DE OPERAR SU
:;EGADORA. Compare las ilustraciones con su segadora pare familiarizarse con la ubicaci6n de los
iiversos controles y ajustes. Guarde este manua! para referencia en el futuro_
!!stos simbolos pueden apareser sobre su secjadora o en Jaliteratura proporcionacla con el
_roducto. Aprenda ycomprenda sus significadoso
ArTENC_0N <, _,:> ,:: a _O r ,CF_ ?¢r _D<:, L_t4 r,-_ ESTaAr 3_ COM A: II pE _( r_o G_AF_[E kAS
ADVE_?'ENCra }N,_:lr DI£_:; _:P/,O,'_[)O LACON ?H TtaLI MAN:,;YLOS 'rE _£(x
Cable de control de la Barra de control que exige la presencia dd
velocidad del motor
Cord6n Control de impulsi6n
arrancador Manilla del mango
Recogedor del
c@sped Tapa del relleno de la gasotina
iapon de la
Control de la
velocidad del /
moto_ Cebador
Tape del deposito de aceite
del motor con vanlla
indicadora de nJvel
Cubierta de la impulsi6n
Ajustador de la rueda
(en cada rueda)
Caia
CUMPLE CON LOS REQUISITOS DE SEGURRDAD _ LA CPSC
L_s s÷gado_s a motor, que se eonducen desde la parte de arras, rotatodas, Seals, cumpten con _os
est:_dares de seguridad det American Nationa! Standards Institute y de la U.S. Consumer Product Safety
Commission. La cechilla ira cuando el motor estA funcionando.
Barra de controJ que exige la presen¢ia de4
o_ador-- tiene que sujetarse abajo, junto con et
me_sgo,pare hacer arraacar el motor. Su_lteia papa
pabst el motor.
Cebador-- bombea combustible adicional desde el
carbupador al cilindro pare uso cuando se necesita
hacer arrancar un motor fn'o.
Cord6n arrancador_se usa papa hacer arpancar
el motor.
Panance de contro_ de la impu_siSr_ - se usa
papa enganchar la segadopa pare movimiento
hacia adetante imputsada a motor.
Panance de control de la veloeidad de_metor_
situada en la parte tater'at del motor que te permite
seleccionar la vetocidad del motor ya sea rApida o
lenta.
Tapon de _aaeo_ehadora--permite la conversi6n
o spare la operacidn de desca_a o en secede.
Laoperacidndecualquiersegadorapuede
hacerquesattenobjetosextraSosdentrodesus
c]os,Ioquepuedeproducirda_osgravesen_stos.
Siempreuseanteojosdeseguridadoprotecci6n
paralosojosmientrasoperasusegadoraocuando
hagaajustesoreparaciones.Recomendamosuna
mascaradeseguridaddevisidnamplia,parauso
espejuelosoanteojosdeseguddedestandarte
COMO USAR SU SEGADORA
CONTROL DE LA VELOC1DAD DEL
MOTOR
La veloddad del motor se controla por medio de
una palanca ubicada en el lado de! motor. La
posid6n de r_pido se usa para arrancar et motor,
para el corte norrna_y un mejor ensacamiento del
c6sped. La posici6n lento es para corte IMa_qo,
recorte y para economizar combustible.
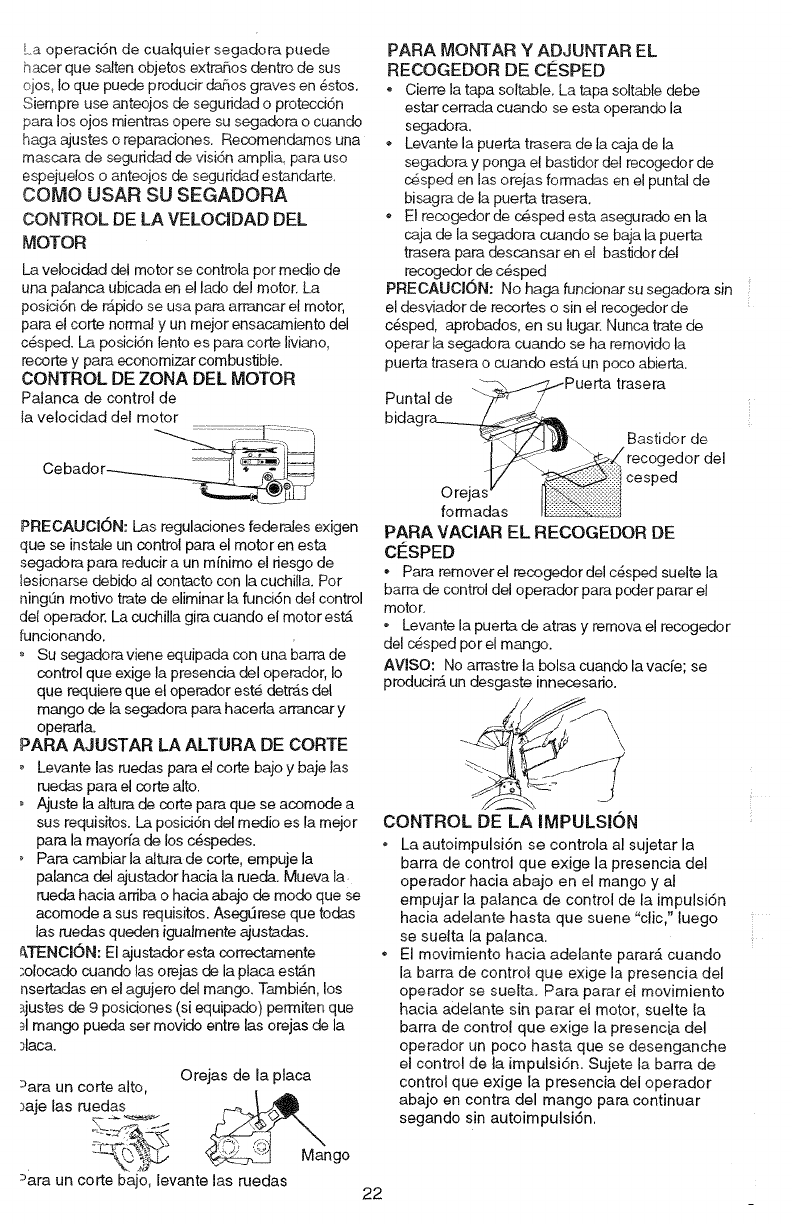
CONTROL DE ZONA DEL MOTOR
Palanca de control de
la velocidad del motor
PRECAUCKSN: l_as regulaciones federaJes exigen
que se instaJeun control para el motor en esta
segadora para reducir a un m[nimo el desgo de
lesionarse debido al contacto con la cuchilla. Pot
ningLin motivo trate de eliminar la funci6n del control
del operador. La cuchilla gira cuando el motor est_
funcionando.
o Su segadora viene equipada con una barra de
control que exige la presencia del operador, Io
que requiere que el operador est_ detrAs del
mango de la segadora para hacerla arrancar y
operarla.
PARA AJUSTAR LA ALTURA DE CORTE
oLevante las ruedas para el corte bajo y baje las
ruedas para el corte alto.
, Ajuste la alt_Jrade corte para que se acomode a
sus requisitos. La posid6n del medio es la mejor
para la mayor;a de los c_,spedes.
PaPacambiar la aJturade core, empuje la
palanca del ajustador hacia la rued& Mueva la
rueda hacia arriba o hacia abajo de mode que se
acomode a sus requisitos. Asegdrese que todas
las rued.as queden igualmente ajustadas.
_TENCION: El ajustador esta correctamente
_olocado cuando tas orejas de la ptaca estAn
nsertadas en el agujero del mango. TambiSn los
_justes de 9 posiciones (si equipado) permiten que
_1mango pueda ser movide entre las orejas de la
_lacao
Orejas de la placa
:_ara un corte alto,
._aje las ruedas __-_ n go
Dara un corte bajo, levante las ruedas 22
PARA MONTAR YADJUNTAR EL
RECOGEDOR DE CESPED
o Cierre la tapa soltable. La Lapasoltable debe
estar cerrada cuande se esta operande la
segadera.
*Levante la puerta trasera de la caja de la
segadora y ponga el bastidor del recogedor de
cesped en las orejas formades en el puntal de
bisagra de la puerta trasera.
,El recogedor de c_sped esta asegurade en la
caia de la segadora cuando se baja la puerta
trasera para descansar en el bastidor del
recogedor de c#sped
PRECAUOION: No haga fundonar su segadora sin
el desviador de recortes o sin el recogedor de
c_sped, aprobados, en su lugar. Nunca trate de
operar la segadora cuando se ha removido la
puerta trasera o cuando est&.un poco abiert&
trasera
Puntalde " ....
Bastidor de
*recogedor del
cesped
formadas
PARA VAClAR EL RECOGEDOR DE
CESPED
, Para remover el recogedor del e_sped suelte la
barra de control del operador para poder parar et
motor.
Levante la puerta de atras y remova el recogeder
del c_sped porel mango.
AWSO: No arrastre la bolsa cuando la vade; se
produci_ un desgaste innecesario.
CONTROL DE LA |MPUkSION
, ka autoimpulsi6n se oontrola al sujetar la
barra de control que exige la presencia del
operador hacia abajo en el mango y al
empujar la palanca de control de la impulsidn
hacia adelante basts que suene "clic," luego
se suelta la palanca.
-El movimiento hacia adelante pararb, cuando
la barra de control que exige la presencia del
operador se suelta. Para parar el movimiento
hacia adelante sin parar el motor, suelte la
barra de control que exige la presenci.a de!
operador un poco hasta que se desenganche
el control de la impulsi6n. Sujete la barra de
control que exige la presencia del operador
abajo en oontra del mango para continuar
segando sin autoimpulsidn.
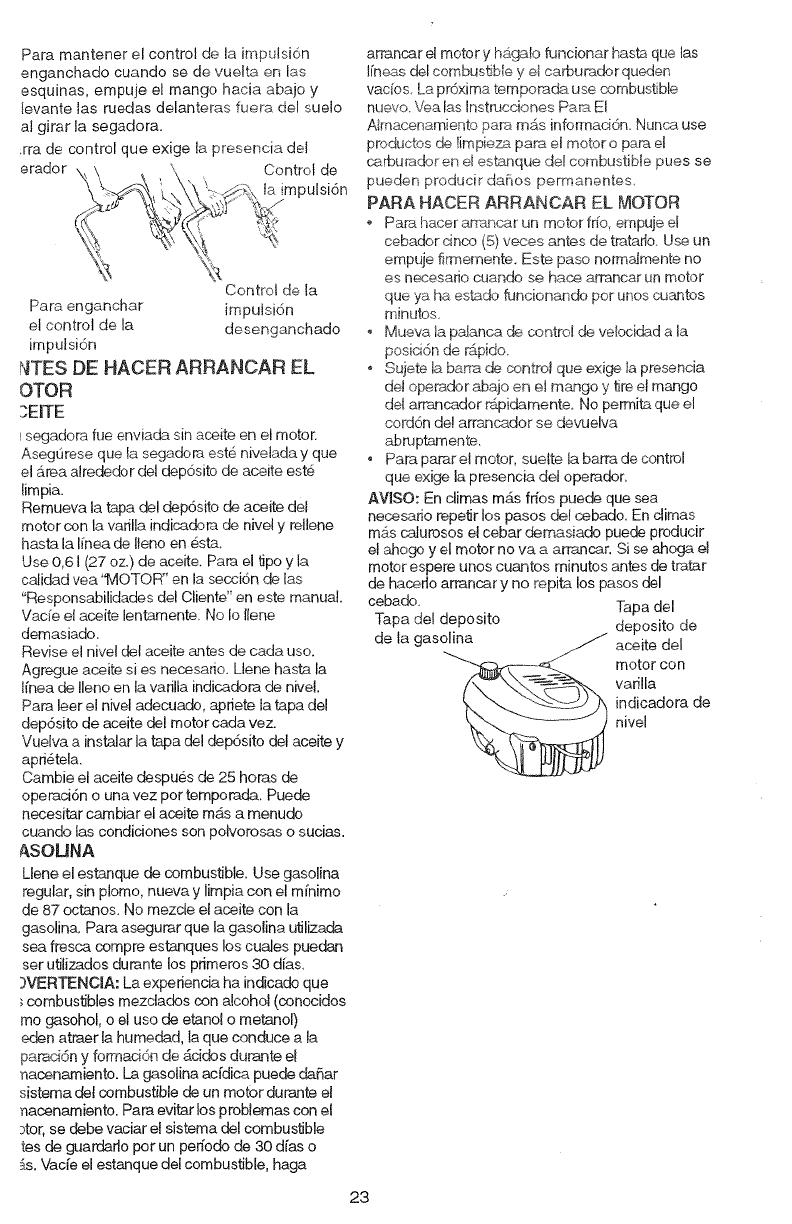
Paramantenerelcontrolde[aimpulsi6n
enganchadocuandosedevueltaenlas
esquinas,empujeelmangoheciaabajey
fevante[asruedasdelanterasfuerade[sueJo
algirarlasegadora.
rradecontrolqueexigelapresenciadel
erador_ Controlde
taimpulsi6n
Controldela
Para enganchar impuisi6n
et control de la desenganchado
impu[si6n
_aTESDE HACER ARRANOAR EL
OTOR
3EITE
!segadora fue enviada sin aceite en el motor.
Asegurese que [a segadora est6 nivelada y que
el Area a[rededor del dep6sito de ace!to este
[impia.
Remueva la tapa del dep6sito de aceite de!
motor con la varilla indic,adora de nivel y reJlene
hasta la I[nea de Iteno an esta.
Use 0,61 (27 oz.) de aceite. Para el tipo y la
calidad vea "MOTOR" en la secci6n de las
"Responsabilidades del Cliente" an este manual.
Vade el aceite lentamente. No Io Ilene
demasiado.
Revise el nJveldel ace!to antes de cada uso.
Agregue aceite si es necesario. Llene hasta la
I[nea de Ileno en ta vanlla indicadera de nivel.
Para leer el nivel adecuado, apriete la tapa de!
dep6sito de aceite del motor cada vez.
Vuelva a instalar la tapa del dep6sito del aceite y
apri@tela.
Cambie el aceite despues de 25 heras de
operaci6n o una vez pot temporada. Puede
necesitar carnbiar el aceite m4s a menudo
cuando las condiciones son potvorosas o sucias.
ASOUNA
Ltene el estanque de combustible. Use gasolina
regular, sin plomo, nueva y I[mpia con el mfnimo
de 87 octanes. No mezcle el aceite con la
gasolina. Para asegurar que la gasolina utilizada
sea fresca compre estanques los cuales pueden
ser u61izados durante los primeros 30 d[as.
)VERTENCIA: La experiencia ha indicado que
combustibles mezclades con alcohol (conocidos
me gasohol, o el uso de etanol o metanol)
eden atraer la humedad, la que conduce a Ja
parad6n y fonnacidn de 4cidos du_qte e!
nacenamiento. La gasolina acfdica puede daSar
sistema del combustible de un motor durante el
nacenamiento. Para evitar los problemas con el
>tor,se debe vaciar el sistema de[ combustible
tes de guardarlo porun per[ode de 30 d[as o
_s. Vade el estanque de! combustible, haga
arrancar e[ motor y hd_ga!ofuncionar hasta que tas
I[neas de! combus_bIe yet carburador queden
vados La pr6xima tempo_,_ use combustible
nuevo. Vea las Instmcdones Para El
Atmacenamiente para rn4s inferrnad6n. Nunca use
preductos de limpieza para el motor o para el
carbu_ador en et est_nque de combustible Rues se
pueden producir dafios permanentes
PARA HACER ARRANOAR EL MOTOR
Para hacer ame,ncar un meter fri:o,empuje el
cebader dnco (5) veces antes de tratalto. Use un
empuje %memento. Este paso nolrndmente no
es necesado cuando se hace a_car un motor
que ya ha estado fiJncion_mdo por unos cuantes
minutes.
Mueva ta p_anca de contro! de veDcidad a [a
posiddn de r&pido.
o Sujete la bar_ de cYmtrol que exige ia presenda
de! operador abajo en el mango y fire el mango
del arr&ncador _pidamente. No permita que el
cord6n de! arr&ncador se devuelva
abruptamente.
° Para parar el motor, suette Ia barra de control
que exige la presenela del operador.
AVISO: En climas m_.sfffos puede que sea
necesafio repetir los pasos de! cebado. En climas
mAs caturesos el cebar demasiado puede producir
el ,-_ogo y el motor no va a arm_can Si se ahoga el
motor espere unos cuantos minutos antes de tr_tar
de hacerlo arrancar y no _epit,a los pasos del
cebado. Tapa del
Tapa de! deposito
de la gasolina _ aceitedep°sJt°delde
_-__ motor con
vadlla
indicadora de
nivel
23
CONSEJOSPARASEGAR
• Ba_ociertascondiciones,talcomoc_spedmuy
alto,puedesernecesarioelelevar la altura del
corte para reducir el esfuerzo necesario pars
empujar la segadora y para evitar sobrecargar el
motor, dejando montones de recortes de c_sped.
• Pars un coke muy pesado, reduzca et ancho del
corte pasando parcialmente pot encima del lugar
anteriormente cortado y siegue tentamente.
- Pars un mejor ensacade del c_sped y pars la
mayon'a de las condiciones de corte, la velocidad
de! motor debe ajustarse a la posicidn de r'Jq3ido.
Cuande use una segadora con descarga trasera
en c_sped hdmede y pesado, los montones det
c_sped cortado puede que no entrenen el
recogedor de c_sped. Reduzca la ve!ocidad del
recorddo (velocidad de empuje) y/o hags
fundonar ta segadora sobre el Area por segunda
vez,
.Si queda una hue!la de cortes en et lado derecho
de una segadora con descarga trasera, siegue
en la direcci6n en que gim_nlas manillas del reloj,
solapando un poco para recaudar los recortes en
la pr6xima pasada.
- Los poros en los recogederes de c_sped de tela
pueden Ilenarse con mugre y polvo con e! use y
los recogedores recauder'&n menos c_sped.
Pars evitar _sto, roc[e e! recogedor con la
manguera de agua regularmente y dejelo
secarse antes de usarlo.
• Mantengd la parte superior del motor, alrededor
del arrancador, despejada y sin recortes de
cesped y paja. Esto ayuder_ el flujo del aire del
motor y extender& la durad6n 8ste.
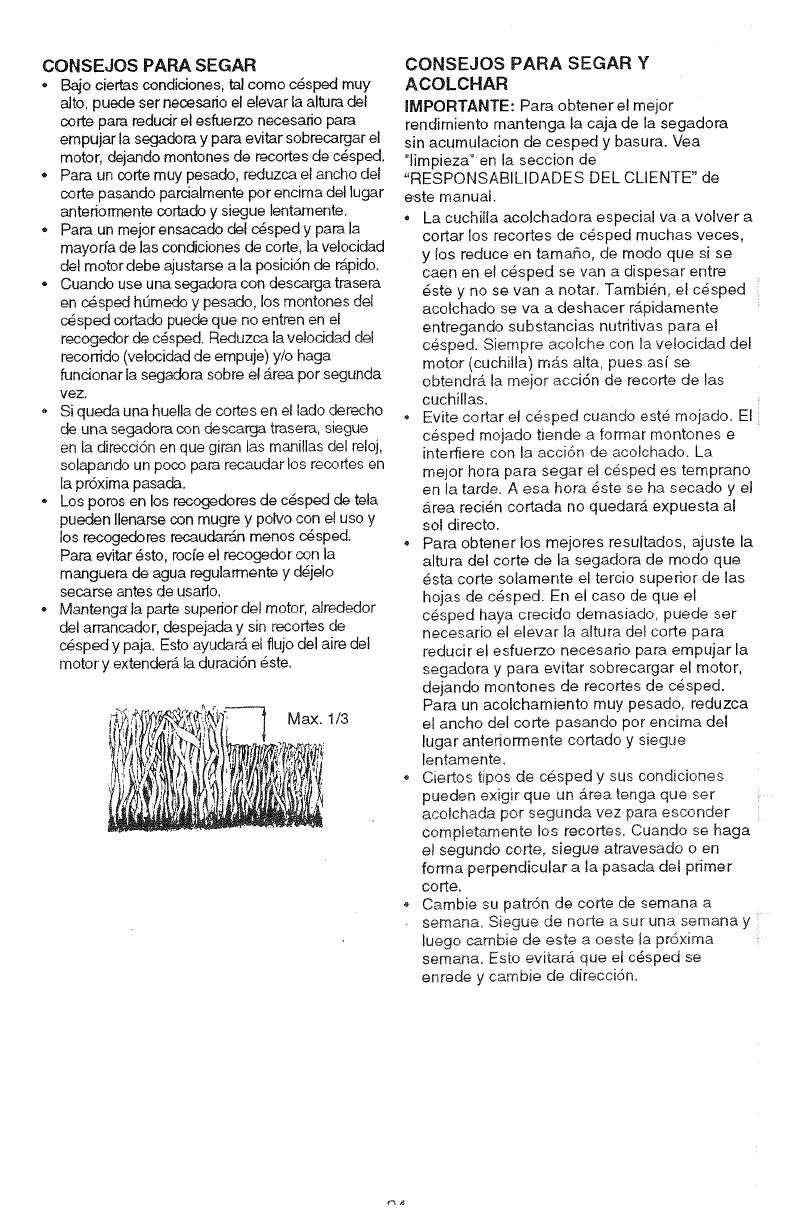
Max. 1/3
CONSEJOS PARA SEGAR Y
ACOLCHAR
IMPORTANTE: Pars obtener el mejor
rendimiento mantenga la caja de la segadora
sin acumulacion de cesped y basura. Yea
"limpieza" en la seccion de
"RESPONSABILIDADES DEL CLIENTE" de
este manual.
* La cuchiila acolchadora especial va a volver a
cortar los recortes de c_sped muchas veces,
y los reduce en tamaSo, de modo que si se
caen en et c_sped se van a dispesar entre
_ste y no se van a notar. Tambien, el c_sped
acolchado se va a deshacer rApidamente
entregando substancias nutritivas para el
c#sped. Siempre acolche con la vetocidad de!
motor (cuchilla) mAs alta_ pues as[ se
obtendrA la mejor acci6n de recorte de las
cuchi!las.
* Evite certar el c6sped cuando est# mojado. El
c_sped mojado tiende a format montones e
[nterfiere con la accidn de acolchado. La
mejor hora para segar el c6sped es temprano
en la tarde. A esa hera _ste se ha secado y el
Area reci_n cortada no quedarA expuesta al
sol directo.
- Para obtener los mejores resultados, ajuste la
altura del corte de la segadora de mode que
_sta corte solamente el tercio superior de las
hojas de c_sped. En el caso de que el
cesped haya crecido demasiado, puede ser
necesario e! elevar la altura del corte pars
reducir el esfuerzo necesario pars empujar la
segadora y pars evitar sobrecargar el motor,
dejando montones de recortes de c_sped.
Para un acolchamiento muy pesado, reduzca
el ancho del corte pasando por encima del
lugar anteriormente cortado y siegue
lentamente.
o Ciertos tipos de cesped y sus condiciones
pueden exigir que un Area tenga que set
acolchada per segunda vez pars. esconder
completamente los recortes. Cuando se hags
e! segundo core, siegue atravesado o en
forma perpendicular a la pasada det primer
corte.
Cambie su patr6n de corte de semana a
semana. Siegue de notre a sur una semana y
luego cambie de este a oeste la pr6xima
semana. Esto evitara queet c6sped se
enrede y cambie de direccidn.
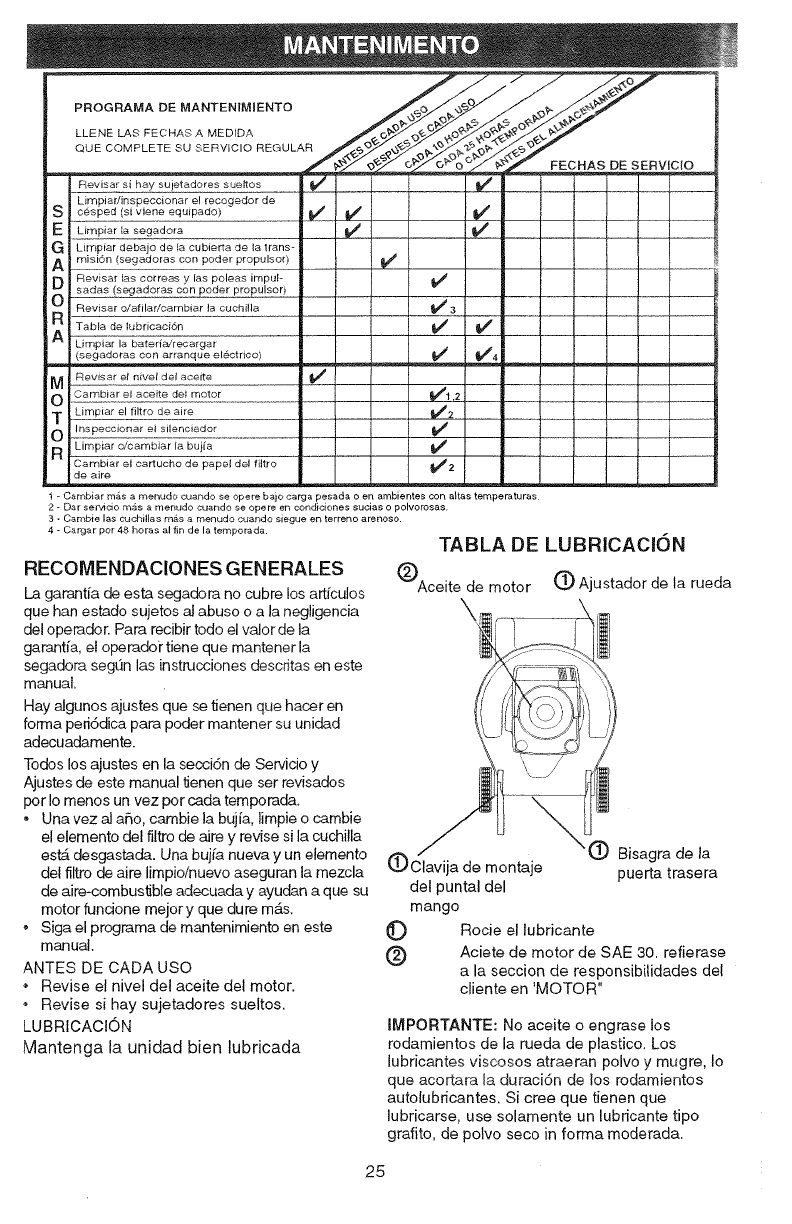
PROGRAMA DE MANTENIMIENTO
Sl
El
_J
GI
AI
DI
OI
RI
AI
IMI
OI
T!
OI
RI
LLENE LAS FECHAS A MEDfDA
QUE COMPLETE SU SERVICIO REGULAR
Revisar si hay sujetadores sueltos
qpiar/inspeccionar el recogedor de r.
_ped (si viene equipado) iv"
'_piar la segadora
_oiar debajo de !a cubierta de la trans-
_idn (segadoras con poder propulsor)
visar ias correas y las poleas impul-
_as (segadoras con poder propulsor)
visar o/afilar/cambiar ta cuchilla
_la de tubricaci0¢t
_piar la bater_a/recarger
(segaderes con arranque electrico)
_dsar et nivet del acelte
"nbiar el acelte det motor
Limpiar el filtro de aire
Inspeccienar et silenciedor
Limpier o/cambiar la buj[a
_rlbiar el cartucho de papel de! filtro
_ire
FECHAS DE SERVlClO
e/ iv'
V'3
_1,2
V'2
V'
_2
1 - Camb}ar rn_s a menudo cuaf_do se opere baio carga pesada o en ambientes con altas temperaturas
2 - Oar ser,_lcJo rn_s a menudo cuando se opere en condic4ones sucias o polvorosas.
3 - Cambie las cud_illas m_s a mefludo cuando siegue en terreno arenoso.
4 - Cargar por 48 horas al f_n de la ternporada.
RECOMENDAClONES GENERALES
La garantia de esta segadora no cubre los artfculos
que han estado sujetos al abuso o a la negligencia
del operador. Para recibir todo el valor de la
garantJ'a,et operador tiene que mantener la
segadora segQn las instrucciones descdtas en este
manual.
Hay algunos ajustes que se tienen que hacer en
forma peri6dica para poder mantener su unided
adecuadamente.
Todos los ajustes en la secci6n de Servicio y
Ajustes de este manual tJenenque ser revisados
por Io menos un vez por cada temporada.
• Unavez al aho, cambie la bujia, timpie o cambie
el elemento del filtro de aire y revise si la cuchilla
estA desgastada. Una buj_anueva y un elemento
del filtro de aire limpioinuevo aseguran la mezcla
de aire-combustible adecuada y ayuden a que su
motor funcione mejor y que du re m__s.
• Siga el programa de mantenimiento en este
manual.
ANTES DE CADA USO
Revise el nivel del aceite del motor.
Revise si hay sujetadores sueltos.
LUBRICACtON
Mantenga la unidad bien lubricada
TABLA DE LUBRICAClON
(_)Aceite de motor (_ Ajustador de la rueda
_.4jtf_"_'avi=ade montaje _) Bisagra de la
puerta trasera
del puntal del
mango
(D Rocie el lubricante
(_) Aciete de motor de SAE 30. refierase
a la seccion de responsibilidades del
cliente en 'MOTOR"
IMPORTANTE: No aceite o engrase los
rodamientos de la rueda de plastico. Los
lubricantes viscosos atraeran polvo y mugre, Io
que acortara la duraci6n de los rodamientos
autolubrioantes. Si cree que tienen que
lubricarse, use solamente un lubricante tipo
grafito, de polvo seco in forma moderada.
25
:_l_lF_!i_irlt._t4tl_lUlllF__il IJlil- rrluUtt!!_ ! t;!
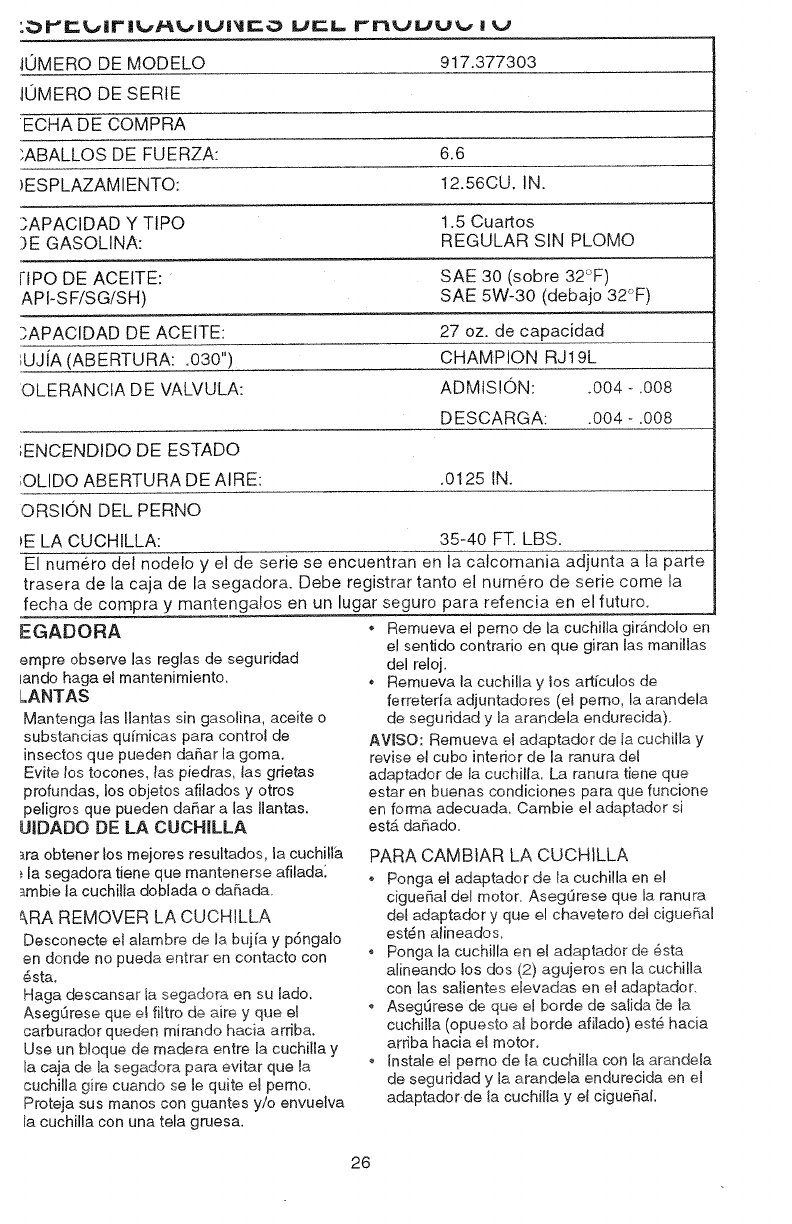
10MERO DE MODELO 917.377303
JOMERO DE SERtE
ECHA DE COMPRA
;ABALLOS DE FUERZA: 6.6
)ESPLAZAMIENTO: 12.56CU. IN.
3APACIDAD Y TIPO 1.5 Cuartos
)E GASOLINA: REGULAR SIN PLOMO
ftPO DE ACEITE: SAE 30 (sobre 32°F)
API-SF/SG/SH) SAE 5W-30 (debajo 32°F)
I;APACIDAD DE ACEITE: 27 oz. de capacidad
;UJ[A (ABERTURA: .030") CHAMPION RJ19L
OLERANClA DE VALVULA: ADMtSION: .004 - ,008
DESCARGA: .0O4 - .008
;ENCENDIDO DE ESTADO
;OLIDO ABERTURA DE AIRE: .0125 IN.
ORSION DEL PERNO
_ELA CUCHILLA: 35-40 FT. LBS.
El numero del nodelo y el de serie se encuentran en la catcomania adjunta a la parte
trasera de la caja de la segadora. Debe registrar tanto el num6ro de serie come la
fecha de compra y mantengalos en un lugar seguro para refencia en el futuro.
EGADORA • Remueva el pemo de la cuchitta girb.ndoloen
el sentido contrario en que giran las manillas
del reloj.
•Remueva la cuchilla y los artfculos de
ferreterfa adjuntadores (el pemo, la arandela
de seguridad y la arandela endurecida),
AVISO: Remueva el adaptador de la ccschiilay
revise el cubo interior de la ranura del
adaptador de la cuchilla. La ranura tiene que
estar en buenas condiciones para que funcione
en forma adecuada. Cambie el adaptador si
estD.daffado.
empre observe las reglas de seguridad
lando haga el mantenimiento.
LANTAS
Mantenga las Ilantas sin gasolina, aceite o
substancias qufmicas para control de
insectos que pueden daffar la goma.
Evite los tocones, las piedras, las grietas
profundas, los objetos afilados y otros
peligros que pueden dafiar a las Ilantas.
LIIDADO DE LA CUCHILLA
_ra obtener los mejores resultados, la cuchill_.
;la segadom tiene que mantenerse afiladal
_mbie la cuchitJa doblada o daflada.
&RA REMOVER LA CUCHILLA
Desconecte et alambre de la buj[a y p6ngalo
en donde no pueda entrar en contacto con
_sta.
Haga descansar Ia segadora en su lado.
AsegOrese que e! fittre de aire y que el
earburador queden mirando hacia arriba.
Use un b!oque de madera entre la cuchilia y
la caja de la segadora para evitar que la
cuchiNa 9ire cuando sete qctite el pemo.
Proteja sus manos con guantes y/o envuelva
la cuchilla con una tela gruesa.
PARA CAMBIAR LA CUCHILLA
o Ponga el adaptador de la cuchi!la en el
ciguel_al del motor. Asegtlrese que la ranura
del adaptador y que el chavetero del ciguef_lal
est_n alineados.
• Ponga la cuchilla en el adaptador de 6sta
alineando los dos (2) agujeres en la cuchilla
con las satientes elevadas en el adaptador.
o Asegcirese de que el borde de salida de la
cuchilla (opuesto al borde afilado) est_ hacia
arfiba hacia el motor.
o [nstale el pemo de ia cuehilla con la arandela
de seguridad y la arandela endurecida en el
adaptador de la cuchilla y et cigueSal.
26
UseunbloquedemaderaentretacucMIlay
lacajadetasegadorayaprieteelpemodela
cuchiHagirSndoloenelsenfidoenqueg[ran
lasmanillasdelreJoj.
Latorsidnpareapretarrecomendadaesde
35- 40pieslibras.
IPORTANTE:ELPERNODELACUCHILLA
-}CLASE8TRA-rADOACALOR.
JJSO:Norecomendamoselafiiarlacuchilta-
_rosi1ohace,eseg[iresedequequede
_lanceada.
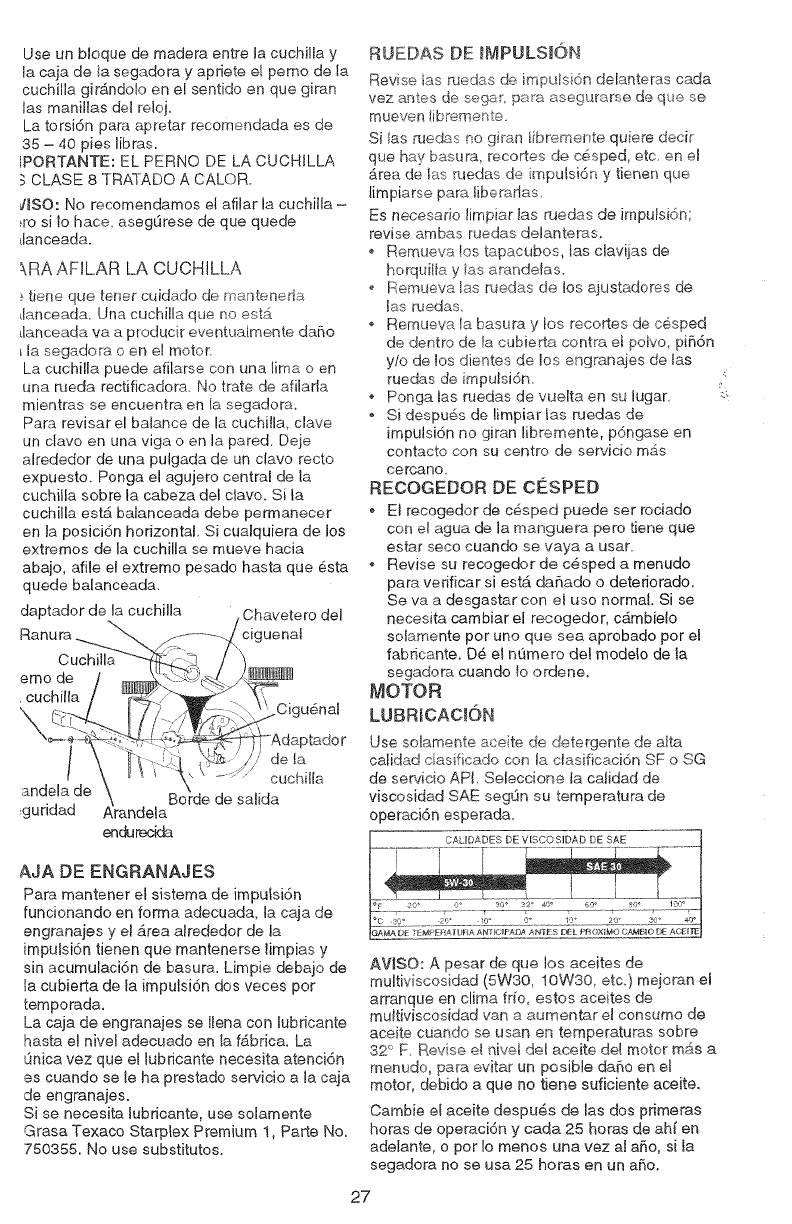
\RA AFIL.AR LA CUCHILLA
tiene que tenet cuidado de manteneda
Llanceada, Una cuchilla que no estA
4anceada vaa p_oducir eventuatmente daffo
la segadora o en el motor,
La cuchilla puede afilarse con una lima o en
una Pdeda rectificadora, No trate de afilarla
mientras se encuentra en la segadora.
Para reviser el balance de la cuchitla, clave
un clave en una viga o en ia pared. Deje
alrededor de una pulgada de un clavo recto
expuesto. Ponga el agujero central de la
cuchiila sobre la cabeza del clavo. Si la
cuchJlla estd_balanceada debe permanecer
en la posicidn horizontal, Si cualquiera de los
extremos de la cuchilla se mueve hacia
abajo, afile el extremo pesado hasta que 6sta
quede balanceada,
daptador de la cuchilla
Cuchilb
emo de
. cuchilla
Chavetero del
ciguenaJ
.Cigu@nai
/
andela de
guridad
£ador
de la
cuchilla
Borde de satida
enchredda
AJA DE ENGRANAJES
Pare mantener el sistema de imputsi6n
funcionando en forma adecuada, la caja de
engranajes y el 5tea alrededor de la
impulsi6n tienen que mantenerse limpias y
sin acumulaci6n de basura. Limpie debajo de
la cubierta de la imputsidn dos veces pot
temporada,
La caja de engranajes se llena con tubdcante
hasta el nivel adecuado en la fd_brica. La
t_inicavez queet lubdcante necesita atenci6n
es cuando se le ha prestado servicio a la caja
de engranajes.
Si se necesita tubricante, use soJamente
Grasa Texaco Starplex Premium 1, Parte No.
750355. No use substitutos.
RUEDAS DE _MPULSJON
Revise tas medas de [mpulsi6ndeJanteras cada
vez antes de separ, pare asepurarse de que se
mueven %remente
SJlas m_edas no giran iibremer te quiere decJr
que hay basura recortes de c6sped_ etc. en el
5rea de k_s _edas de impulsidn y tJenen que
limpiarse pare liberarlas
Es necesario limpiar las n4edas de irnpulsidn
revise ambas ruedas delanteras,
, Remueva !os tapacubos, tas clavijas de
horquilIa y tas arandelas.
o Remueva [as ruedas de los e:iustadores de
[as ruedas
Remueva la basura y los recortes de c6sped
de dentro de la cubJe_ta contra et poJve pi66n
yio de los dientes de los engranajes de tas
ruedas de imputsi6n,
Ponga tas n_edas de vueIta en su lugar
Si despu6s de limpiar Jas nsedas de
irnpulsi6n no giran libremente, pdngase en
contacto con su centro de servJcJo m&s
cercano
RECOGEDOR DE CESPED
* El recogedor de c_sped puede set rociado
con eI ague de la manguera pero tiene que
ester seco cuando se vaya a usan
Revise su recogedor de c_sped a menudo
pare vedficar si est4. daffado o deteriorado.
Se va a desgastar con et uso normal. Si se
necesita cambiar el recogedor, c4mbielo
solamente por uno que sea aprobado por el
fabr[cante. D_ el nQmero del modelo de la
segadora cuando !o ordene.
MOTOR
LUBRICAC!ON
Use sdamente aceite de detergente de a[ta
calidad dasificado con la dasificacJ6n SF o SG
de sewicio API, Seleccione la calidad de
viscosidad SAE segqn su temperature de
operaci6n esperada
*}--- 2o_ .......... 3_ so* s2* 4o_ 600 _o o 1) °
AVJSO: A pesar de que los aceites de
muitiviscosidad (5W30, 10W30, etc.) mejoran el
arranque en clime fr[o, estos aceites de
multiviscesidad van a aumentar el consumo de
aceite cuando se usan en temperatures sobre
32 <_F Revise e! hive[ del aceite de_ motor raps a
menudo, pare evitar un posJble daSo en el
motor, debido a que no tiene suficiente aceite,
Cambie el aceJte despuSs de las dos primeras
horas de operaci6n y cada 25 horas de ah[ en
adefante, o por lo menos una vez al aRo, sila
segadora no se usa 25 bores en un a_o.
27

Reviseelniveldelaceitedelcarterantesde
arrancarelmotorydespu6sdecadacinco(5)
horasdeusocontinuado,Aprieteeltap6ndel
aceiteenformaseguracadavezquereviseel
niveldelaceite.
PARA CAMBIAR EL ACEITE DEL
MOTOR
AVISO: Antes de inclinar la segadora para
drenar el aceite, drene el tanque de combustible
haciendo correr el motor hasta que el tanque
est6 vacio.
• Desconecte el alambre de la bujfa y p6ngalo
de mode que no pueda entrar en contacto
con 6sta,
- Remueva la tapa del depdsito de! aceite;
d_jela a un lado en una superficie limpia,
•Incline la segadora y h_gala descansar en su
lado y drene el aceite en un envase
adecuado. Mueva la segadora de atr&s para
adelante para remover todo et aceite que se
haya quedado atrapado dentro del motor.
• Limpie todo el aceite derramado en la
segadora y en el lado del motor.
• Llene el motor con aceite, LI6nelo sotamente
hasta la Ifnea de "LLENO" (FULL) en la varilla
indicadora de nive!. NO LO LLENE
DEMASlADO,
• Vuelva a poner la tapa en el dep6sito dei
aceite,
- Vuelva a conectar el alambre de la bujfa a
6sta. /
Envase
FILTRO DE AIRE
Su motor no funcionara en forma adecuada y
puede sufrir dafios si se usa un filtro de aire sucio.
Cambie el filtro de aire cada afio, y m&sa menudo
si siega en condiciones muy polvorosas o sucias.
No lave el filtro de aJre.
PARA CAMBIAR EL FILTRO DE AIRE
*Remueva el filtro de aire gir_ndoio en el senlJdo
contrrario en que giran las manitlas del retoj, hasta
el tope, y retffelo de! collar.
. Remueva eJfiJtrode Japarte interior de Ja ,
cubieC'_a.
-Umpie ta parte interior de ta cubierta y el collar
pare. remover toda acumulacidn de mugre.
° Inserte el filtro nuevo en la cubierta.
* Ponga la cubierta det fittro de aire dentro del
collar atineando la oreja con ta ranura.
o Empuje ta cubierta hac4aadentro y g[rela en et
sentido de las manillas del reloj para
apretarla.
Acubierta del
filtro de aire
Bisagra
Fittro de papel Tomillo
de la
cubierta
SILENClADOR
Inspeccione y cambie el sitenciador siestA corroido
pues joroducir un peligro de incendio y/o dafio.
BUJIA
Cambie su bujia cada afio para hacer que su motor
arranque m&s f&cilmente y funcione mejor. Ajuste la
abertura de la bujfa en 0,030 pulgada.
LIMPIEZA
IMPORTANTE: Para obtener el mejor rende--
mento, mantenga la caja de la segador sin
acumulatJon de cesped y basura. Limpie la parte de
abajo de su segadora despues de cade uso.
PRECAUCI(:DN: Desconecte el aJambrede la bujfa
y p6ngalo en donde no pueda entrar en contacto
con _sta.
- Haga descansar la segadora en su lado.
Asegt_rese que el filtro de aire y que el
carburador queden mirando hacia arfiba. Limpie
la parte inferior de su segadora raspb,ndola para
remover la acumulaci6n de c_sped y basura.
- Umpie el motor a menudo para evitar que se
acumule la basura. Un motor tapado funciona
mAs caliente y se acorta su duraci6n.
, Mantenga las superficies acabadas y las ruedas
sin gasolina, aceite, etc.
*No recomendamos el uso de una manguera de
jar@'npara timpiar la segadora a menos que el
sistema el6ctrico, el silenciador, el filtro de aire y
el carburador est6n tapados para evitar que les
entre el agua. El agua en el motor puede acortar
la duracidn de 6ste.
LIMPIE DEBAJO DE LA CUBIERTA DE LA
IMPULSION
Umpie debajo de la cubierta de la impulsi6n por Io
menos dos veces c,3da temporada, Raspe debajo
de la cubierta con un cuchillo para masitla o con
una herramienta parecida, para remover toda
acumulaci6n de cesped o basura en la parte infenor
de la cubierta de la impulsi6n.
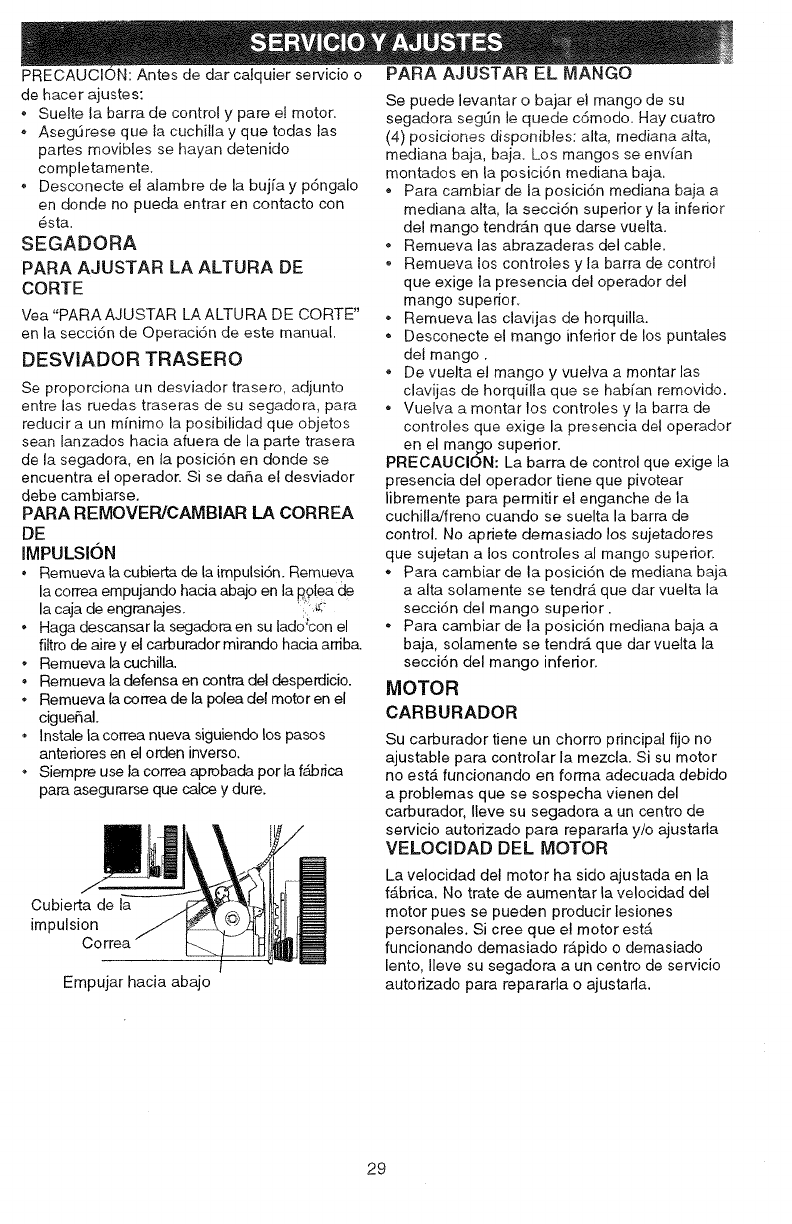
PRECAUCION:Antesdedarca[quierservicioo
dehacerajustes:
* Sueltelabarradecontrolypareetmotor.
o Asegdresequelacuchitlayquetodaslas
partesmoviblessehayandetenido
completamente,
Desconecteelalambredelabujfayp6ngalo
endondenopuedaentrarencontactocon
_sta.
SEGADORA
PARA AJUSTAR LA ALTURA DE
CORTE
Vea "PARAAJUSTAR LA ALTURA DE CORTE"
en la secci6n de Operaci6n de este manual.
DESVIADOR TRASERO
Se proporciona un desviador trasero, adjunto
entre las ruedas traseras de su segadora, para
reducir a un m[nimo la posibilidad que objetos
sean tanzados hacia afuera de la parte trasera
de la segadora, en la posici6n en donde se
encuentra el operador. Si se daffa el desviador
debe cambiarse.
PARA REMOVEPJCAMBIAR LA CORREA
DE
[MPULSI(SN
Remueva la cubierta de la impulsiSn. Remueva
la correa empujando hacia abajo en la p_tea de
la caja de engranajes, _;,_
* Haga descansar la segadora en su tadoicon el
filtro de aire y el carburador mirando hacia arriba,
o Remueva la cuchilla,
, Remueva la defensa en contra del desperdicio.
Remueva la correa de la polea de[ motor en el
cigueffal.
, Instale la correa nueva siguiendo los pasos
anteriores en el orden inverso.
* Siempre use la correa aprobada por la f_brica
para asegurarse que calce y dure.
Cubierta de la
impulsion
Correa
Empujar hacia abajo
PARA AJUSTAR EL MANGO
Se puede levantar o bajar el mango de su
segadora segOn le quede c6modo. Hay cuatro
(4) posiciones disponibles: alta, mediana alta,
mediana baja, baja. Los mangos se envfan
montados en la posici6n mediana baja.
, Para cambiar de la posici6n mediana baja a
mediana alta, [a seccidn superior y la inferior
del mango tendrAn que darse vuelta.
Remueva las abrazaderas del cable.
o Remueva los controles y la barra de control
que exige la presencia del operador del
mango superior.
Remueva las clavijas de horquilla.
Desconecte el mango inferior de los puntales
det mango.
* De vuelta el mango y vuelva a montar las
clavijas de horquilla que se hab[an removido.
, Vuelva a montar los controles y la barra de
controles que exige la presencia del operador
en el man_lo superior.
PRECAUClON: La barra de control que exige la
presencia del operador tiene que pivotear
libremente para permitir el enganche de la
cuchillaJfreno cuando se suelta la barra de
control. No apriete demasiado los sujetadores
que sujetan a los controles al mango superior.
o Para cambiar de la posici6n de mediana baja
a alta solamente se tendr_, que dar vuelta la
seccidn del mango superior.
o Para cambiar de la posici6n mediana baja a
baja, solamente se tendr_, que dar vuelta la
secci6n del mango inferior.
MOTOR
CARBURADOR
Su carburador tiene un chorro principal fijo no
ajustable para controlar la mezcla. Si su motor
no estA funcionando en forma adecuada debido
a problemas que se sospecha vienen del
carburador, Ileve su segadora a un centro de
servicio autorizado para repararla yio ajustaria
VELOClDAD DEL MOTOR
La velocidad del motor ha sido ajustada en la
fAbrica. No trate de aumentar la velocidad del
motor pues se pueden producir lesiones
personales. Si cree que el motor estA
funcionando demasiado rApido o demasiado
lento, Ileve su segadora a un centro de servicio
autorizado para repararla o ajustaria.
29
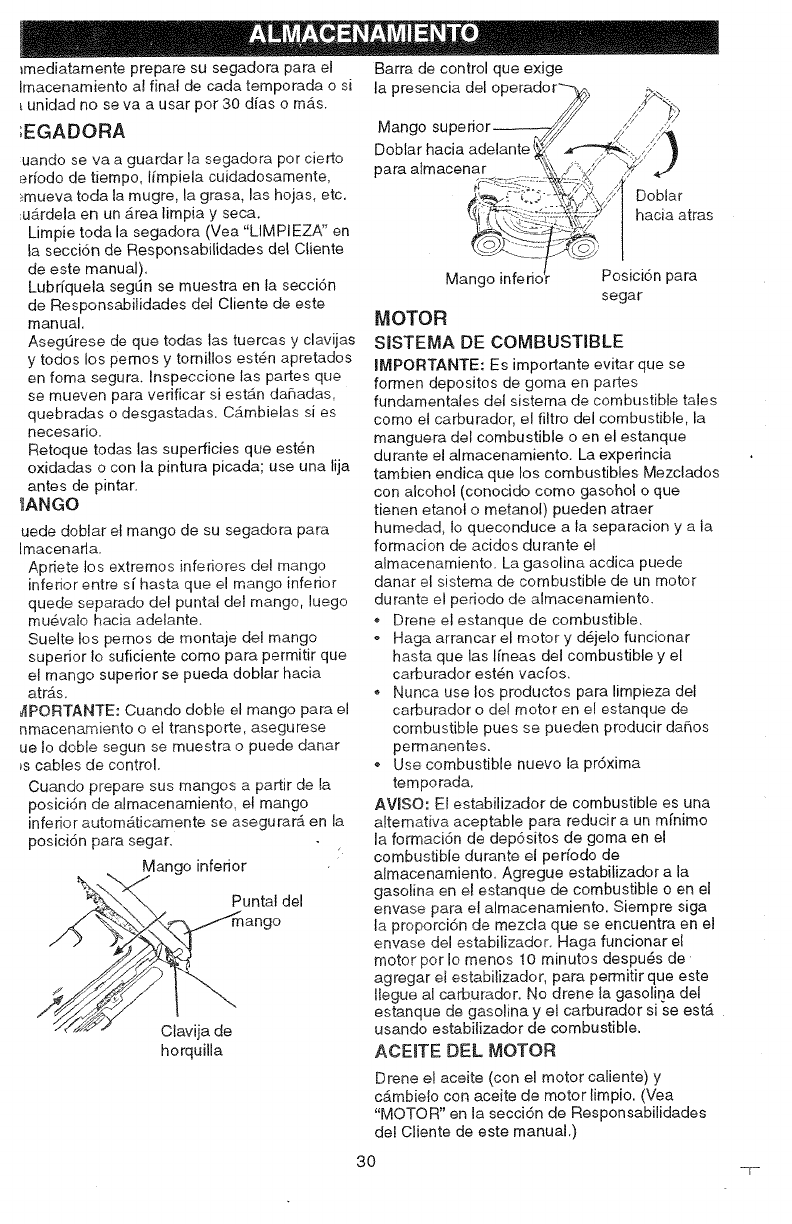
imediatamentepreparesusegadoraparael
[macenamientoa!finaldecadatemporadaosJ
unidadnosevaausarpot30dfasom4s.
;EGADORA
uando se va a guardar la segadora por cierto
arfodo de tiempo, I[mpiela cuidadosamente,
)mueva toda la mugre, la grasa, las hojas, etc,
ud_rdela en un _rea limpia y seca.
Limpie toda la segadora (Vea "LIMPIEZA" en
la secci6n de Responsabilidades del Cliente
de este manual).
Lubr[quela segdn se muestra en la secci6n
de Responsabilidades det Cliente de este
manual.
AsegtJrese de que todas las tuercas y clavijas
y todos los pemos y tomillos est#n apretados
en foma segura. Inspeccione tas partes que
se mueven para verificar si est&.n da6adas,
quebradas o desgastadas. Cb_mbielas si es
necesario.
Retoque todas las superficies que est_n
oxidadas o con la pintura picada; use una lija
antes de pintar.
_ANGO
uede doblar el mango de su segadora para
lmacenaria.
Apriete los extremos inferiores del mango
inferior entre s[ hasta que el mango inferior
quede separado del puntal det mango, hego
mu6vale hacia adelante.
Suelte los pemos de montaje de! mango
superior Io suficiente como para permitir que
el mango superior se pueda doblar hacia
atr&s.
2[PORTANTE: Cuando doble el mango para el
nmacenamiento o el transporte, asegurese
ue to deble segun se muestra o puede danar
_scables de control.
Cuando prepare sus mangos a partir de la
posicidn de almacenamiento, e! mango
Jnfedor autom_ticamente se asegurar4 en la
posicidn para segar.
Mango inferior
Puntal del
Clavija de
horquilJa
Barra de control que exige
la presencJa
Mango sul:
Doblar hacia adelante i
para atmacenar
Doblar
hacia atras
Mango inferidr Posici6n para
segar
MOTOR
SlSTEMA DE COMBUSTIBLE
IMPORTANTE: Es importante evitar que se
formen depositos de goma en partes
fundamentales del sistema de combustible tales
como el carburador, e! filtro del combustible, la
manguera del combustible o en el estanque
durante el almacenamiento. La expedncia
tambien endica que los combustibles Mezclados
con alcohol (conocido como gasohol o que
tienen etanol o metanol) pueden atraer
humedad, to quecenduce a ta separacion y a la
formacion de acidos durante el
almacenamiento. La gasolina acdica puede
danar el sistema de combustible de un motor
durante el pedodo de almacenamiento.
°Drene el estanque de combustible.
•Haga arrancar el motor y d_jelo funcionar
hasta que las I[neas del combustible y el
carburador est_n vac[os.
Nunca use los productos para limpieza del
carburador o de[ motor en e[ estanque de
combustible pues se pueden producir daffos
permanentes.
• Use combustible nuevo la pr6xima
temporada.
AV[SO: El estabilizador de combustible es una
attemativa aceptable para reducir a un m[nimo
la formacidn de dep6sitos de goma en el
combustible durante el perfodo de
aimacenamiento. Agregue estabilizador a la
gasoJina en e[ estanque de combustible o en e[
envase para el almacenamiento. Siempre siga
la proporci6n de mezcla que se encuentra en el
envase del estabilizador. Haga funcionar el
motor por Io menos !0 minutos despu_.s de
agregar eJestabilizador, para perrnitir que este
[legue al carburador. No drene [a gasolina deJ
estanque de gasolina y e[ carburador si se est_
usando estabilizador de combustible,
AOEITE DEL MOTOR
Drene el aceite (con el motor caliente) y
c4mbie[o con aceite de motor limpio. (Vea
"MOTOR" en la secci6n de Responsabilidades
deJ Cliente de este manual.)
30 q-
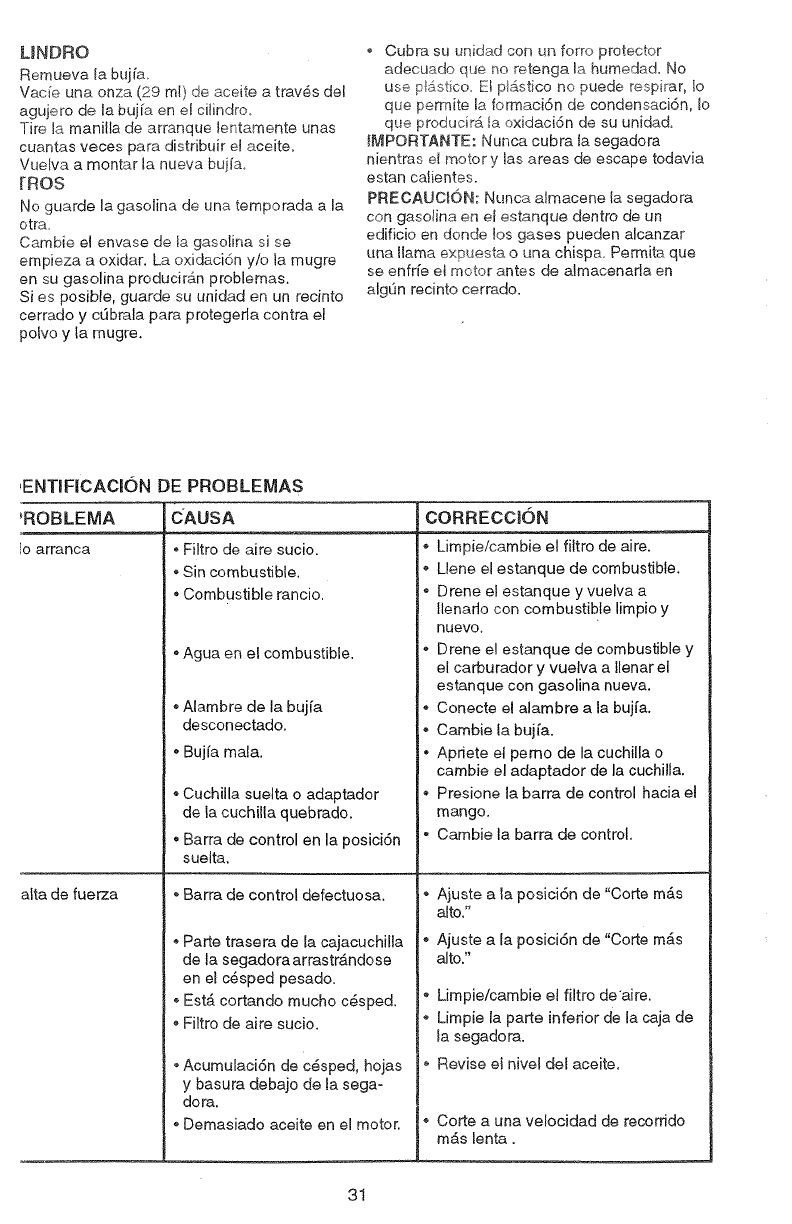
UNDRO
Remuevafabujfa.
Vac[eunaonza(29ml)deaceiteatrav6sdel
agujerodelabujfaene!cilindro.
Tirelamanilladearranquelentamenteunas
cuantasvecesparadistribuiretaceite.
Vue{vaamontarlanuevabui[a.
IReS
Noguardelagasolinadeunatemporadaala
otra.
CambieelenvasedeJagasolinasise
empiezaaoxidar.Laoxidaci6nyiolamugre
ensugasolinaproducirb_nprobiemas.
Siesposible,guardesuunidadenunrecinto
cerradoycdbralaparaprotegerlacontrael
polvoytamugre.
Cubrasuunidad con un forro protector
adecuade que no retenga la humedad, No
use p_Astico. ELptr_stico no puede respirar, lo
qt_e permke ta formaci6n de condensaci6n, !o
que producirA ta oxidaci6n de su unidad.
IMPORTANTE: Nunca cubra ta segadora
nJentras el motory 1asareas de escape todavia
estan calientes.
PREOAUC_ON: Nunca almacene la segadora
con gasolina en el estanque dentro de un
edificio en donde Uosgases pueden alcanzar
una llama expuesta o una chispa Permita que
se enfffe et motor antes de almacenafla en
algQn recinto cerrado.
,ENTIFICACK)N DE PROBLEMAS
"ROBLEMA C'AUSA
Io arranca
.Buj[a mala.
alta de fuerza
• Filtro de aire sucio.
•Sin combustible.
. Combustible rancio.
*Agua en el combustible.
.Alambre de la buj[a
desconectado.
Cuchilla suelta o adaptador
de la cuchilla quebrado.
Barra de control en la posici6n
suelta.
o Barra de control defectuosa.
*Parte trasera de la cajacuchilta
de la segadora arrastrAndose
en el c6sped pesado.
* Est,. cortando mucho c_sped,
. Filtro de aire sucio.
o Acumulaci6n de c6sped, hojas
y basura debajo de la sega-
dora.
Demasiado aceite en el motor.
CORRECCION
* Limpie/cambie el filtro de aire.
* Ltene el estanque de combustible.
Drene el estanque y vuelva a
Ilenarlo con combustible limpio y
nuevo,
. Drene el estanque de combustible y
el carburador y vuelva a Ilenar el
estanque con gasolina nueva.
.Conecte el alambre a la bujfa.
* Cambie la buj[a.
- Apriete el pemo de la cuchilla o
cambie el adaptador de la cuchilla.
* Presione la barra de control hacia el
mango.
- Cambie la barra de control.
Ajuste a laposici6n de "Corte mAs
alto."
Ajuste a la posicidn de "Corte mAs
alto."
o Limpie/cambie el filtro de'aire,
o Limpie la parte inferior de la caja de
la segadora.
oRevise et nivel del aceite.
Corte a una velocidad de recorrido
mAs lenta.
31
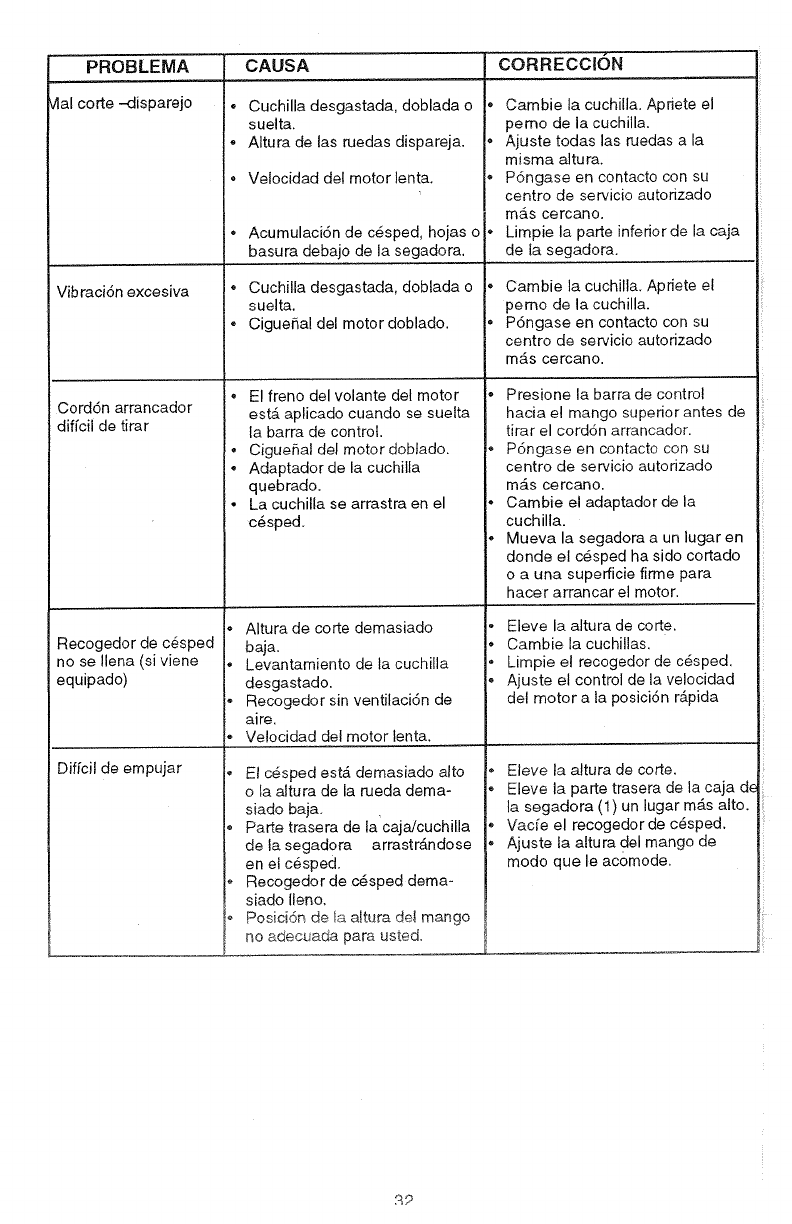
PROBLEMA
dial corte -disparejo
Vibraci6n excesiva
Cord6n arrancador
diffcil de tirar
Recogedor de c_sped
no se Ilena (si viene
equipado)
Diffcil de empujar
CAUSA
•Cuchilla desgastada, doblada o
suelta.
• Altura de las ruedas dispareja.
Velocidad del motor lenta.
• Acumulaci6n de c6sped, hojas o
basura debajo de la segadora.
• Cuchilla desgastada, doblada o
suelta.
• CigueRal del motor doblado.
° El freno del volante det motor
estb, aplicado cuando se suetta
la barra de control.
*Cigue5al del motor dobtado.
* Adaptador de la cuchilla
quebrado.
- La cuchilla se arrastra en el
c6sped.
Altura de corte demasiado
baja.
Levantamiento de ta cuchilla
desgastado.
Recogedor sin ventilacidn de
aire.
Velocidad del motor tenta.
El c6sped est_ demasiado alto
o ta altura de la rueda dema-
siado baja.
Parte trasera de la'caja/cuchilla
de la segadora arrastrAndose
en el c6sped,
Recogedor de c6sped dema-
siado Ifeno.
Posici6n de _a altura det mango
no adecuada para usted.
CORRECClON
Cambie la cuchilla. Apfiete el
pemo de la cuchilla.
Aiuste todas las ruedas a la
misma altura.
P6ngase en contacto con su
centro de servicio autorizado
m&s cercano.
Limpie la parte inferior de la caja
de la segadora.
Cambie la cuchilla. Apriete el
perno de la cuchilla.
P6ngase en contacto con su
centro de servicio autorizado
m_,s cercano.
Presione la barra de control
hacia e! mango superior antes de
tirar el cord6n arrancador.
P6ngase en contacto con su
centro de servicio autorizado
mAs cercano.
Cambie el adaptador de la
cuchilla.
Mueva la segadora a un lugar en
donde el c6sped ha sido cortado
o a una superficie firme para
hacer arrancar el motor.
Eleve la altura de corte.
Cambie la cuchillas.
Limpie el recogedor de c6sped.
Ajuste et control de la velocidad
del motor a ta posici6n r_ipida
Eleve la altura de corte.
Eleve ia parte trasera de la caja d_
la segadora (1) un lugar m_.s alto.
Vacfe el recogedor de c6sped.
Ajuste ta altura dei mango de
modo que le acomode.
R_
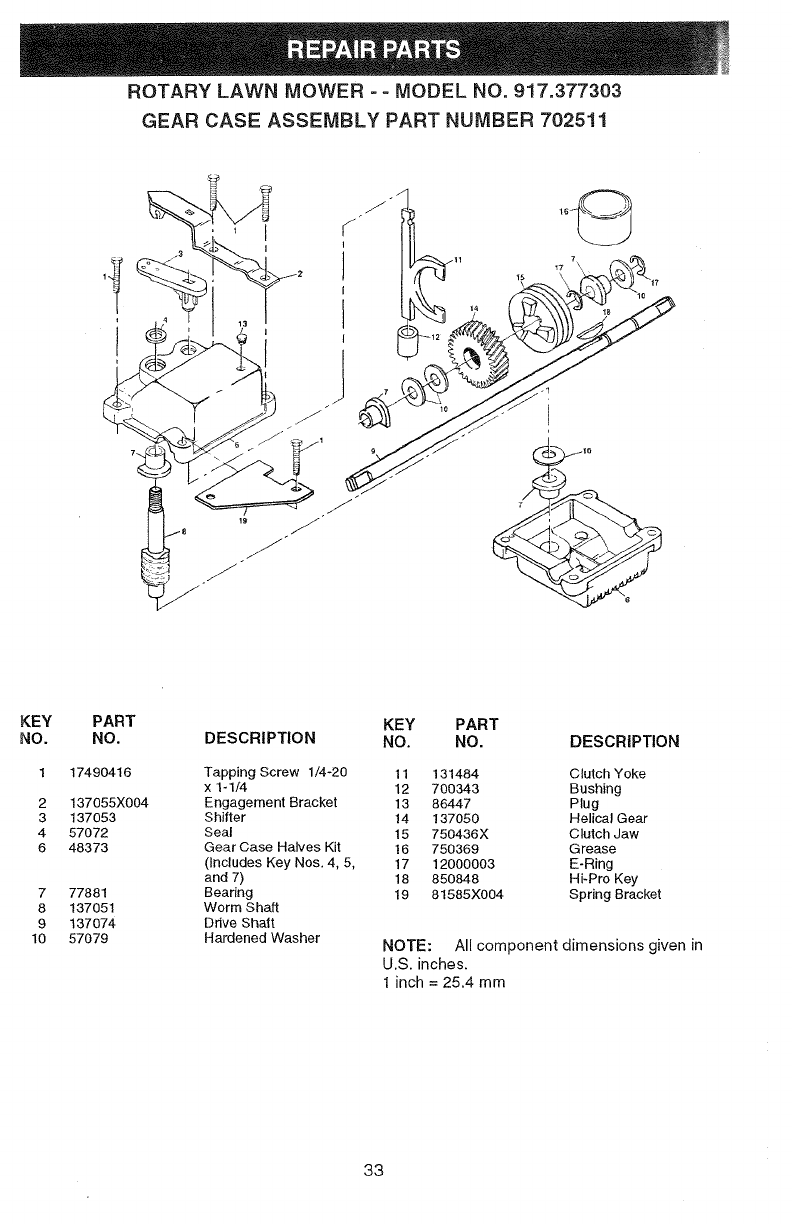
ROTARY LAWN MOWER =- MODEL NO. 917.377303
GEAR CASE ASSEMBLY PART NUMBER 702511
KEY PART
NO. NO.
1 17490416
2 137055X004
3 137053
4 57072
6 48373
7 77881
8 137051
9 137074
10 57079
KEY PART
DESCRIPTION NO. NO. DESCRIPTION
Tapping Screw 1/4-20 11 131484 Clutch Yoke
x 1-1/4 12 700343 Bushing
Engagement Bracket 13 86447 Plug
Shifter !4 137050 Helical Gear
Seal 15 750436X Clutch Jaw
Gear Case Halves Kit 16 750369 Grease
(Includes Key Nos. 4, 5, 17 12000003 E-Ring
and 7) 18 850848 Hi-Pro Key
Bearing 19 81585X004 Spring Bracket
Worm Shaft
Drive Shaft
Hardened Washer NOTE: All component dimensions given in
U.S. inches.
1inch = 25.4 mm
33
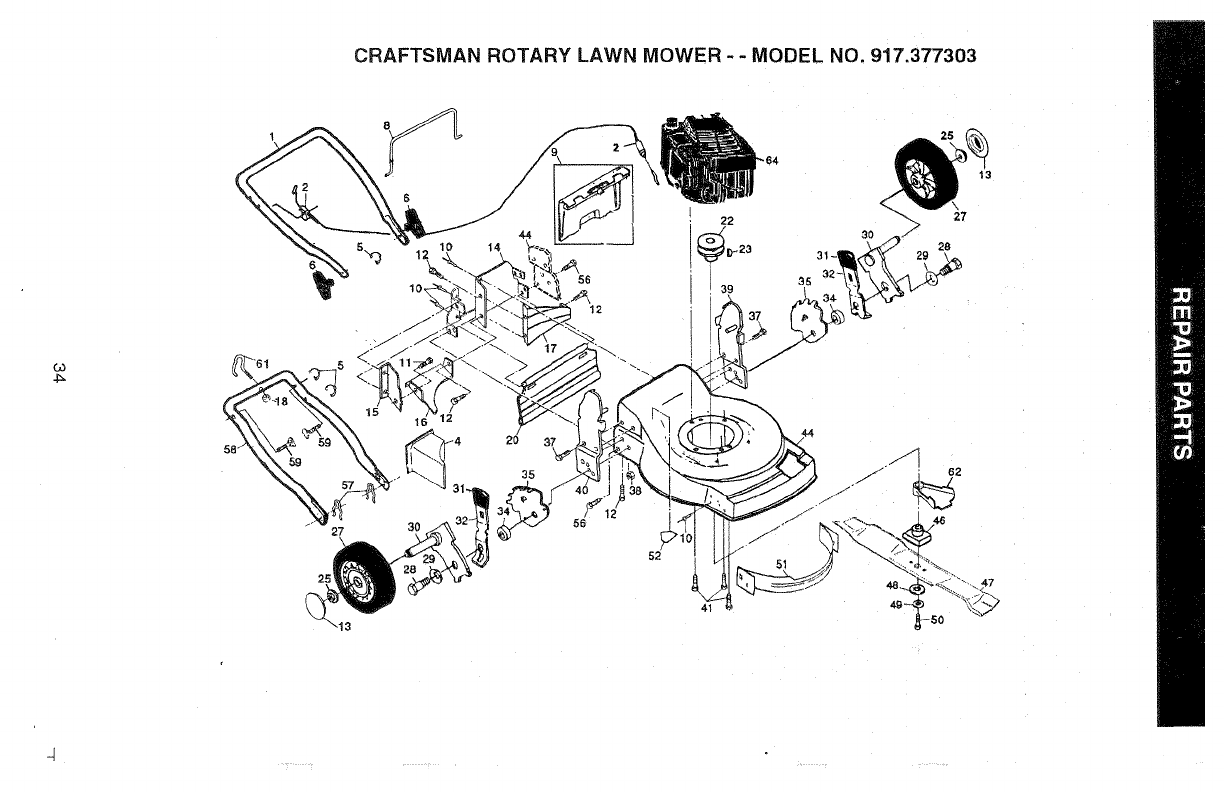
CRAFTSMAN ROTARY LAWN MOWER - - MODEL NO, 917.377303
03
27
44
5. 10 14
56 35
10_ 39
12
16 12
30
2O
35
37
52
22 27
_23 28
13
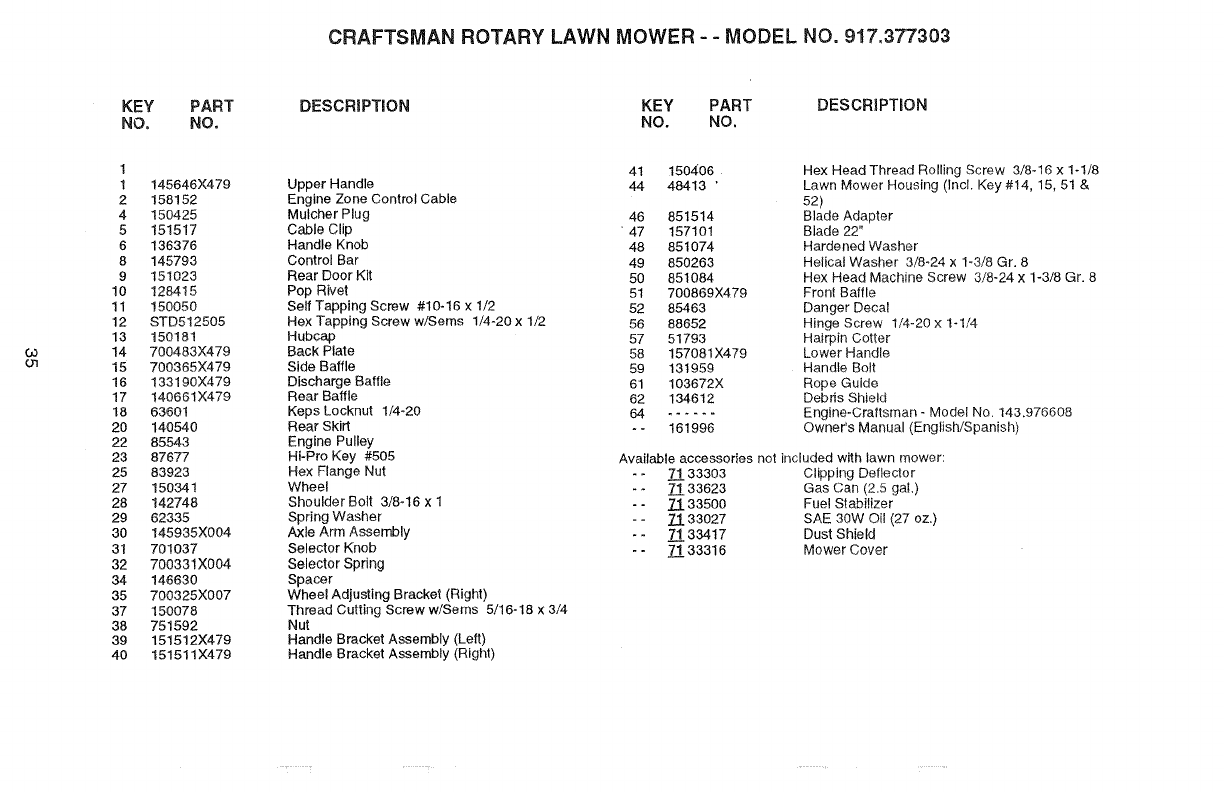
CRAFTSMAN ROTARY LAWN MOWER - - MODEL NO. 917.377303
KEY
NO.
PART
NO. DESCRIPTION KEY PART DESCRIPTION
NO. NO.
Co
o'1
1
1
2
4
5
6
8
9
lO
11
12
13
14
15
16
17
18
2o
22
23
25
27
28
29
3O
31
32
34
35
37
38
39
40
145648X479
158152
15O425
151517
136376
145793
151023
128415
150050
STD512505
150181
700483)(479
700365)(479
133190X479
140661X479
63601
140540
85543
67677
83923
150341
142748
62335
145935X004
701037
700331X004
146630
700325X007
150078
751592
151512X479
151511X479
Upper Handle
Engine Zone Control Cable
Mutcher Plug
Cable Clip
Handle Knob
Control Bar
Rear Door Kit
Pop Rivet
Self Tapping Screw #10-16 x 1/2
Hex Tapping Screw w/Seres 1/4o20 x 1/2
Hubcap
Back Plate
Side Baffle
Discharge Baffle
Rear Baffle
Keps Locknut 1/4-20
Rear Skirt
Engine Pulley
HFPro Key #505
Hex Flange Nut
Wheel
Shoulder Bolt 3/8o16 x 1
Spring Washer
Axle Arm Assembly
Selector Knob
Selector Spring
Spacer
Wheel Adjusting Bracket (Right)
Thread Cutting Screw w/Seres 5/16-18 x 3/4
Nut
Handle Bracket Assembly (Left)
Handle Bracket Assembly (Right)
41 150406
44 48413 '
46 851514
47 157101
48 851O74
49 850263
50 851084
51 700869X479
52 85463
56 88652
57 51793
58 157081X479
59 131959
61 103672X
62 134612
64 ......
-o 161996
Hex Head Thread Rolling Screw 3/8q6 x 1-1/8
Lawn Mower Housing (incl. Key #14, 15, 51 &
52)
Blade Adapter
Blade 22"
Hardened Washer
Helical Washer 3/8-24 x 1-3/8 Gr. 8
Hex Head Machine Screw 3/8-24 x 1-3/8 Gr. 8
Front Baffle
Danger Decal
Hinge Screw 1/4_20 x I-1/4
Hairpin Cotter
Lower Handle
Handle Bolt
Rope Guide
Debris Shield
Engine-Craftsman - Model No. 143,976608
Owner's Manual (EnglisWSpanish)
Available accessories not included with lawn mower:
- - 7_.!133303 Clipping Deflector
- - Z! 33623 Gas Can (2,5 ga!,)
- - .7_l33500 Fuel Stabilizer
- - Z.t 33027 SAE 30W Oil (27 oz.)
- - 7_!133417 Dust Shield
- - Z.!. 33316 Mower Cover
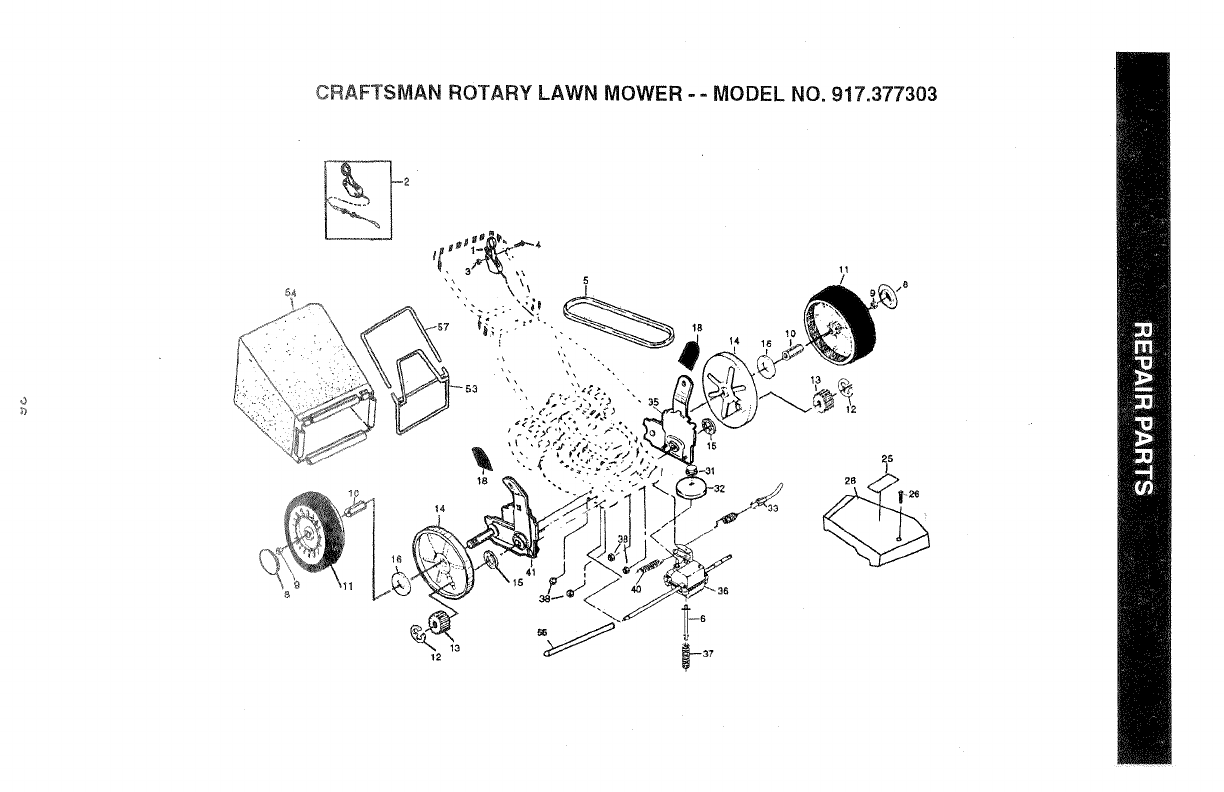
CRAFTSMAN ROTARY LAWN MOWER -- MODEL NO. 917.377303
18
15
/8
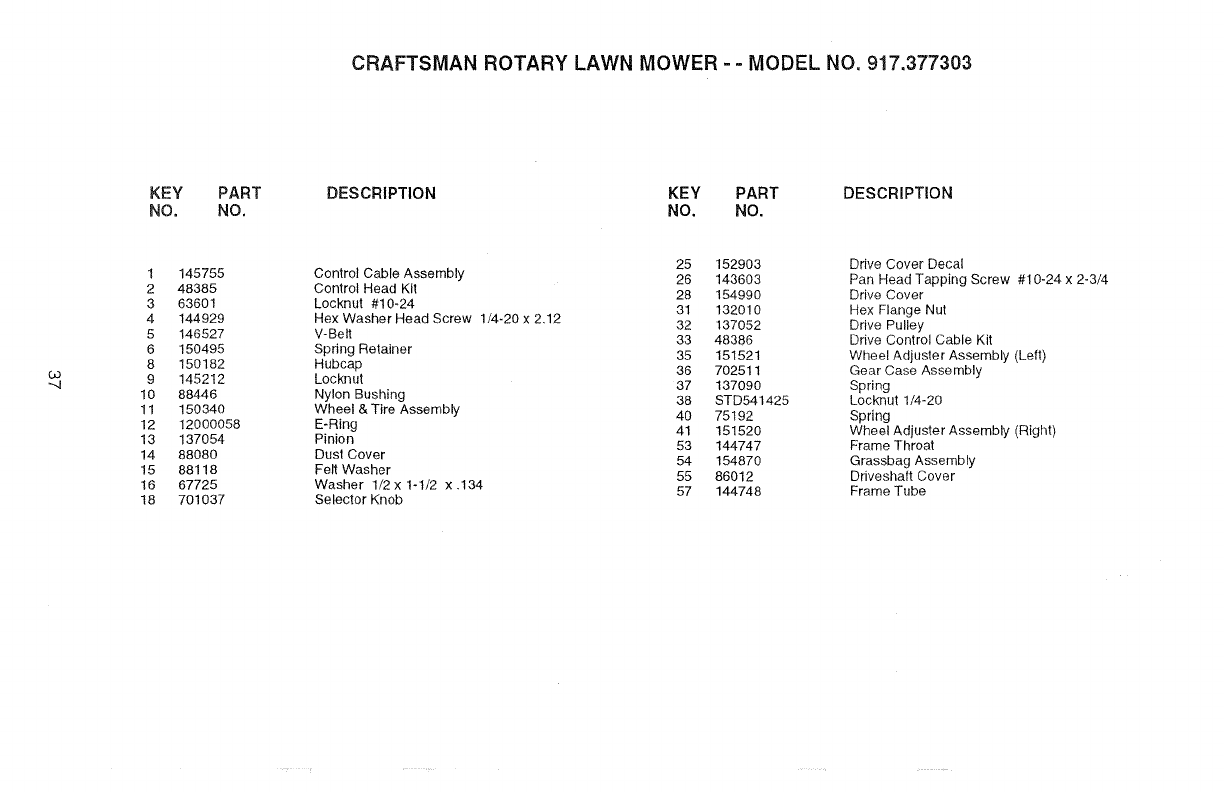
CRAFTSMAN ROTARY LAWN MOWER - - MODEL NO. 917.377303
KEY PART
NO. NO.
DESCRIPTION KEY PART DESCRIPTION
NO. NO.
1 145755
2 48385
3 63601
4 144929
5 146527
6 150495
8 150182
co 9 145212
..-,,I 10 88446
11 150340
12 12oooo58
13 137054
14 88080
15 88118
16 67725
18 701037
25 152903
Control Cable Assembly 26 143603
Control Head Kit 28 154990
Locknut #10-24 31 132010
Rex Washer Head Screw 1/4-20 x 2.12 32 137052
V-Belt 33 48386
Spring Retainer 35 151521
Hubcap 36 702511
Locknut 37 137090
Nylon Bushing 38 STD541425
Wheel & Tire Assembly 40 75 t92
E-Ring 41 151520
Pinion 53 144747
Dust Cover 54 154870
Felt Washer 55 86012
Washer 1/2 x I-t/2 x .134 57 144748
Selector Knob
Drive Cover Decal
Pan Head Tapping Screw #10-24 x 2-3/4
Drive Cover
Hex Flange Nut
Drive Pulley
Drive Control Cable Kit
Wheel Adjuster Assembly (Left)
Gear Case Assembly
Spring
Locknut 1/4-20
Spring
Wheel Adjuster Assembly (Right)
Frame Throat
Grassbag Assembly
Driveshaft Cover
Frame Tube
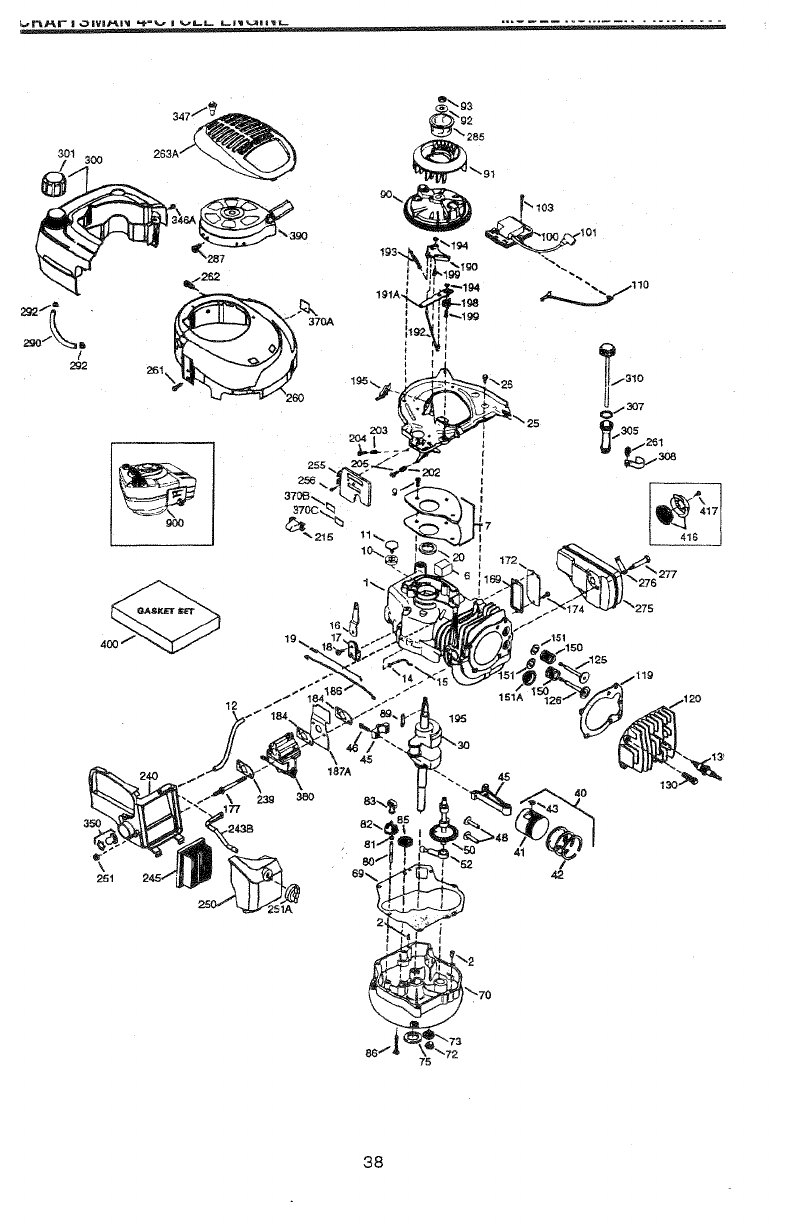
_R_PI _111_1'!1 'Lil'"l_" I t,,.lll,..t,,., i..,.llil--..,lllll.. ...........................
!
\
'26O
12
_277
_" 151A
\
251
38O
77
187,4
82-,
40
38
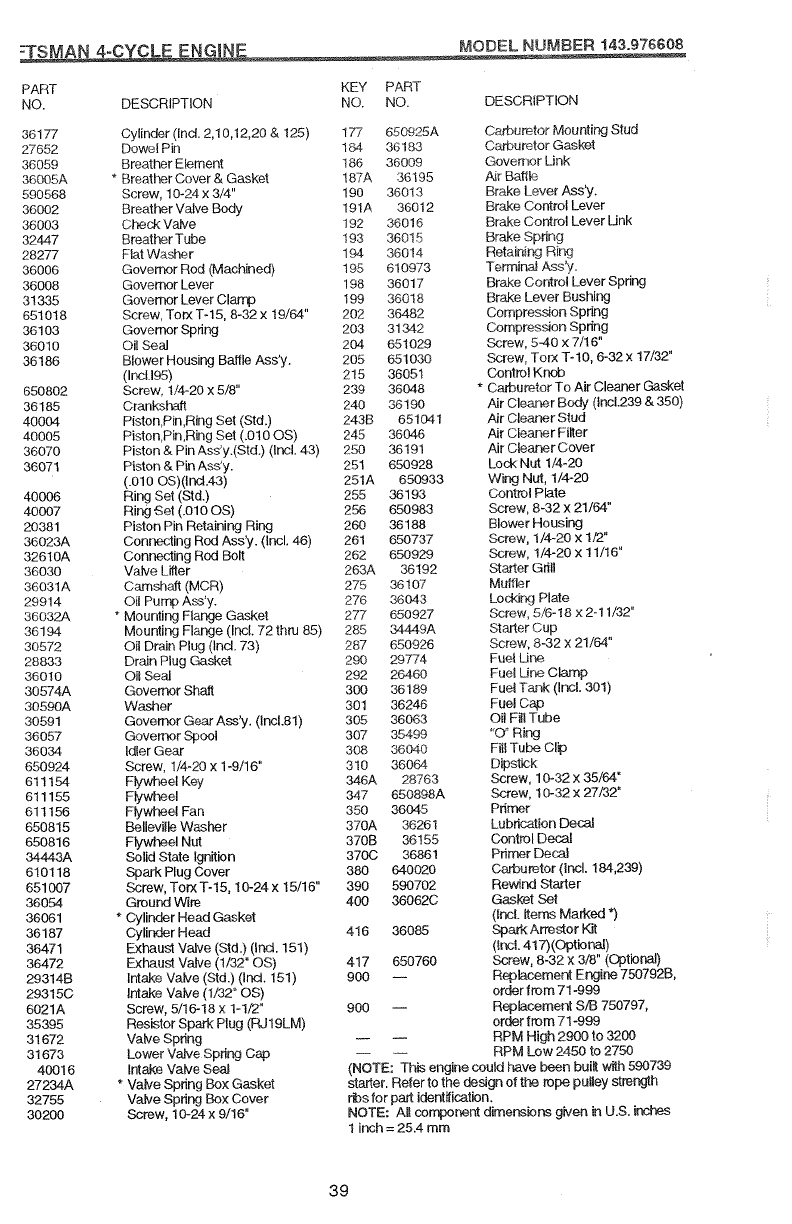
-TS AN 4-CYCLE N N r_ODEL NUMBER !43.976608
PART KEY PART
NO. DESCRIPTION NO. NO. DESCRIPTION
36177 Cylinder (Ind. 2,10,12,20 & 125) 177 650925A Carburetor Mounting Stud
27652 Dowel Pin 184 36183 Cad_urotor Gasket
36059 Breather Element 186 36009 Governor Link
36005A * Breather Cover & Gasket 187A 36195 Air Baf_h
590568 Screw, 10-24 x 3/4" 190 36013 Brake Lever Ass'y.
36002 Breather Valve Body 191A 36012 Brake Control Lever
36003 Check Valve 192 36016 Brake Control Lever Unk
32447 Breather Tube 193 36015 Brake SprJr_9
28277 Flat Washer 194 3,8014 Retaining Ring
36006 Governor Rod (Machined) 195 610973 Terminal Ass'y.
36008 Governor Lever 198 36017 Brake Control Lever Spring
31335 Governor Lever Clamp 199 36018 Brake Lever Bushing
651018 Screw, Torx T-15, 8-32 x 19/64" 202 36482 Compres_on Spring
36103 Governor Spring 203 31342 Compression Spring
36010 Oil Seal 204 651029 Screw, 5-40 x 7/16"
36186 Blower Housing Baffle Ass'y. 205 651030 Screw, Torx T-1O, 6-32 x 17/32"
(Inct.195) 215 36051 Control Knob
650802 Screw, 1/4-20 x 5/8" 239 36048 * Carburotor To Air Cleaner Gasket
36185 Crankshaft 240 36190 Air Clea,qer B c_._'(_ncl.239 & 350)
40004 Piston Pin,Ring Set (Std.) 243B 651041 Air Cleaner Sfud
40005 Piston,Fin,Ring Set (.010 OS) 245 36046 Air Cleaner Filter
36070 Piston & Pin Ass'y.(Std.) (Incl. 43) 250 36191 Air Cleaner Cover
36071 Piston & Pin Ass'y. 251 650928 Lock Nut 1/4-20
(.010 OS)(Ind.43) 251A 650933 Wing Nut, 1/4-20
40006 Ring Set (Std.) 255 36193 Control Plate
40007 Ring 'Set (.010 OS) 256 650983 Screw, 8-32 x 21/64"
20381 Piston Pin Retaining Ring 260 36188 Blower Housing
36023A Connecting ROdAss_]. (Incl. 46) 261 654:)737 Screw, 1/4-20 x 1/2"
32610A Connecting ROd Belt 262 650929 Screw, !/4-20 x 11/16"
36030 Valve L_er 263A 36192 Starter Grill
36031A Camshaft (MCR) 275 36!0-7 Muffler
29914 Oil Pump Ass'y. 276 36043 Lockir_g Plate
36032A * Mounting Flange Gasket 277 650927 Screw, 5/6-18 x 2-11/32"
36194 Mounting Flange (Incl. 72 thPJ 85) 285 34449A Starter Cup
30572 Oil Drain Plug (Ind. 73) 287 650926 Screw, 8-32 x 21164"
28833 Drain Plug Gasket 290 2"9774 Fue{ Line
36010 Oil Seal 292 26460 Fuel Une Clamp
30574A Governor Shall 300 36189 Fuel Tank; (Incl. 301 )
30590A Washer 301 36246 Fuel Cap
30591 Governor Gear Ass'y. (Incl.81) 305 36063 Oil Fill Tube
36057 Governor Spool 307 35499 "0 _Rir_J
36034 Idler Gear 308 36040 Fill Tube C1_3
650924 Screw, 1/4-20 x 1-9/16" 310 36064 Dipstlek
611154 Flywheel Key 346A 28763 Screw, 10-32 x 35/64"
611155 Flywheel 347 650898A Screw, 10-32 x 27/32"
611156 Flywheel Fan 350 36045 Primer
650815 Belleviite Washer 370A 36261 Lubncation Decal
650816 Flywheel Nut 370B 36155 Control Decal
34443A Solid State Ignition 3700 36861 Ptfmer Decal
610118 Spark Plug Cover 380 640020 Carburetor (Incl. 184,239)
651007 Screw, Torx T-15, 10-24 x 15/16" 390 590702 Rev_nd Starter
36054 Ground Wire 400 36062C Gasket Set
36061 *Cylinder Head Gasket (Incl. items Marked *)
36187 Cylir_ler Head 416 36085 Spark Arrestor
36471 Exhaust Valve (Sld.) (ind. 151) (Incl. 417)(Optiollal)
36472 Exhaust Valve (1/32" OS) 417 650760 Screw, 8-32 x 3/8" (Optional)
29314B Intake Valve (Std.) (Ind. 151) 900 -- Replacement Ermine 750792B,
29315C Intake Valve (1/32" OS) order from 71-999
6021A Screw, 5/16-18 x 1-1/2" 900 -- Replacement S/B 750797,
85395 Resistor Spark Plug (RJ 19LM) order from 71-999
31672 Valve Spring RPM High 2900 to 3200
31673 Lower Valve Spring Cap RPM Low 2450 to 2750
40016 Intake Valve Seal (NOTE: This engine could have been built with 590739
27234A * Valve Spdng Box Gasket starter. Refer to the design of the rope pulley stretch
32755 Valve Spring Box Cover rbs for partidentiticatbn.
30200 Screw, 10-24 x 9/16" NOTE: All compor_ent dimensions given ill U.S. inches
1 inch =25.4 mm
39
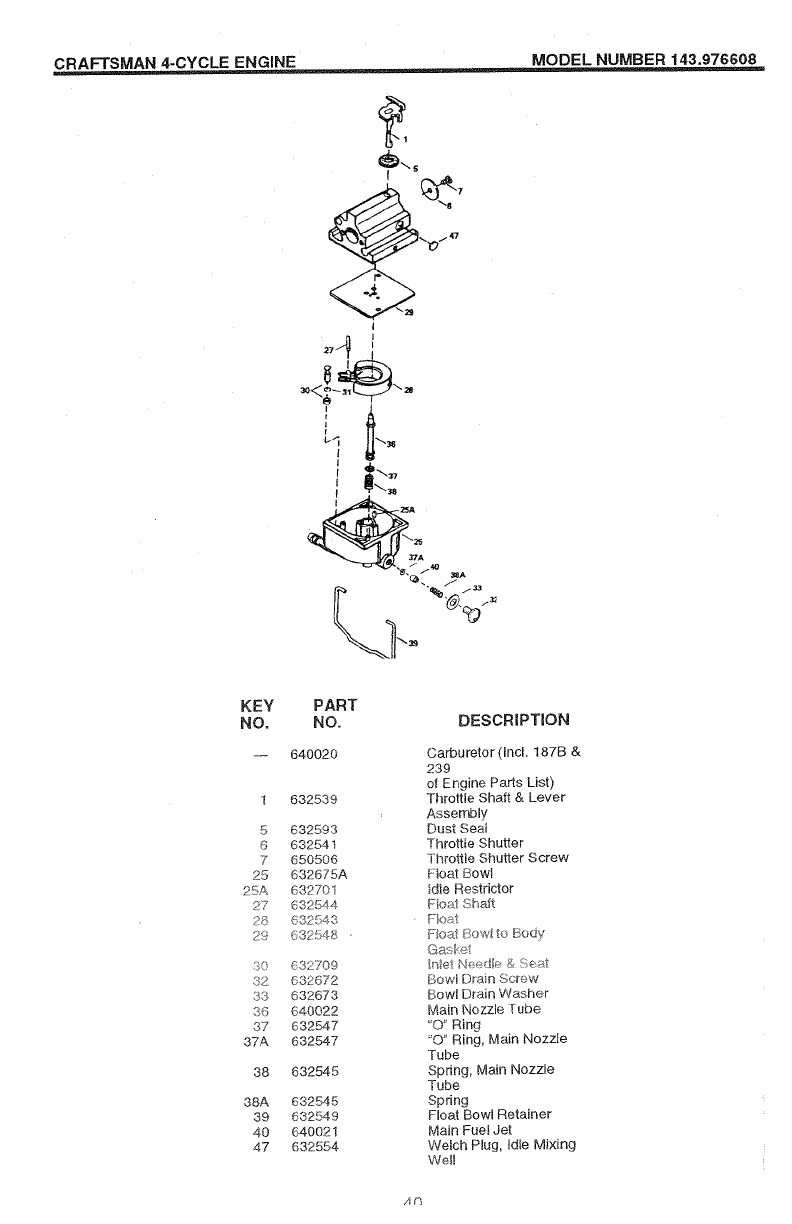
CRAFTSMAN 4-CYCLE ENGINE MODEL NUMBER 143.976608
1_ ""O/
I
KEY
NO.
5
6
7
25
25A
9_7
28
29
30
32
33
36
37
37A
38
38A
89
40
47
PART
NO.
640020
632539
632593
632541
650506
632675A
632701
632544
632543
632548 ,
632709
632672
632673
640022
632547
632547
632545
632545
632649
640021
632554
DESCRIPTION
Carburetor (Incl. 187B &
239
of Engine Parts List)
Throttle Shaft & Lever
Assembly
Dust Sea_
Throttle Shutter
Throttle Shutter Screw
Ftoat Bow_
Idle Restrictor
F_oat Shaf!
Fbat
_: o_2!Bowl to Body
Ga@,et
ln_et Heedle & Seat
[5owl Drain Screw
Bowl Drain Washer
Main NoZZle [ube
"O" Ring
'o" Ring, Main Nozzle
Tube
Spring, Main Nozzle
Tube
Spdng
Float Bowl Retainer
Main Fuei Jet
Welch Plug, ldte Mixing
Wel!
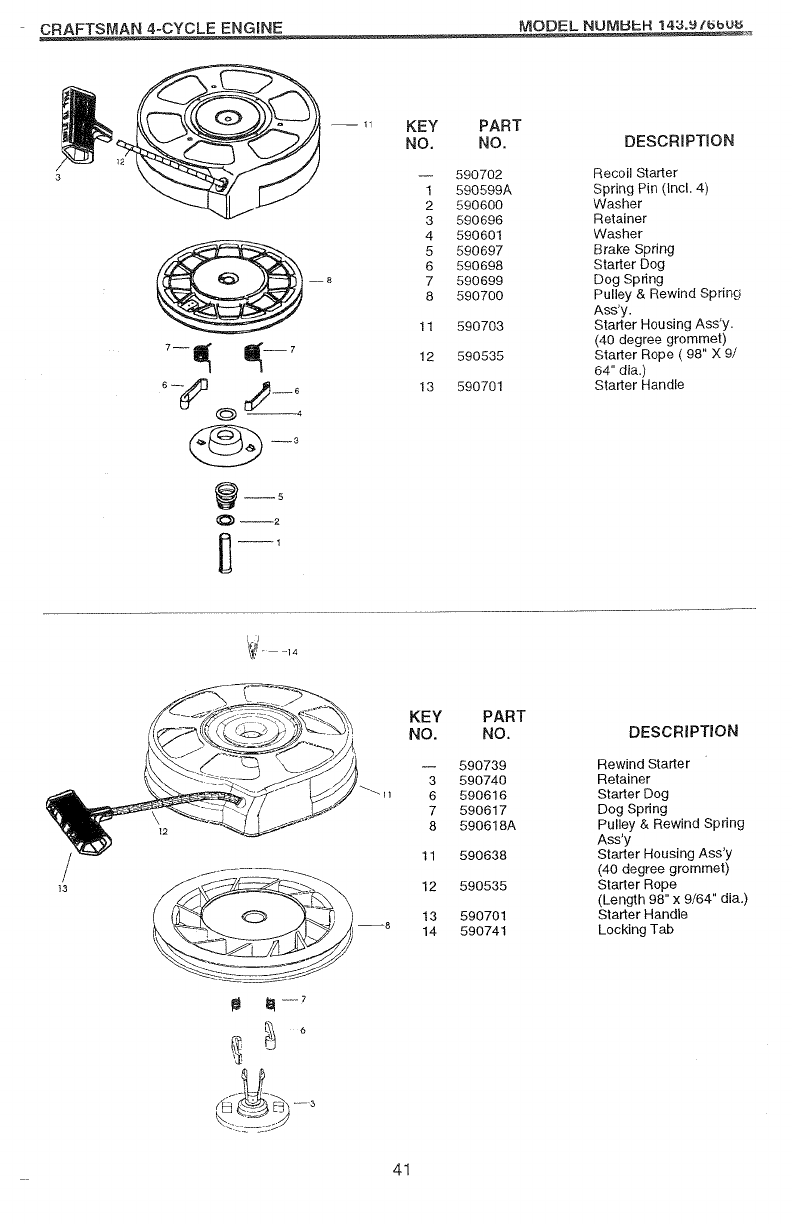
CRAFTSMAN 4-CYCLE ENGINE MODEL NUMBe:H 14:_.9[bbu_ _
KEY
NO.
1
2
3
4
5
6
7
8
11
12
13
PART
NO.
590702
590599A
590600
590696
590601
590697
590698
590699
590700
590703
590535
590701
DESCRIPTION
Recoil Starter
Spring Pin (Incl. 4)
Washer
Retainer
Washer
Brake Spring
Starter Dog
Dog Spring
Pulley & Rewind Spring
Ass'y.
Starter Housing Ass'y.
(40 degree grommet)
Starter Rope ( 98" X 9/
64" dia.)
Starter Handle
_l -7
KEY
NO.
3
6
7
8
11
12
13
14
PART
NO.
590739
590740
590616
590617
590618A
590638
590535
590701
59O741
DESCRIPTION
Rewind Starter
Retainer
Starter Dog
Dog Spring
Pulley & Rewind Spring
Ass'y
Starter Housing Ass'y
(40 degree grommet)
Starter Rope
(Length 98" x 9/64" dia.)
Starter Handle
Locking Tab
41

42

43
)r the repair or replacement parts you need
;livered directly to your home
_lJ7 am -7 pm, 7 days a week
°800-366-PART
..-800-366-7278)
_ra ordenar piezas con entrega a
_micHio - 1-800-659W084
;r in-house major brand repair service
_lJ24 hours a day, 7 days a week
-800-4-REPAmR
_800-,473o7274)
_ra pedir servicio de reparaci6n a
_micHio - 1-800-676-581 !
_rthe Jocation of a Sears Parts and
)pair Center in your area
d124 hours a day, 7 days a week
o800o488ol222
_rinformation on purchasing a Sears
_intenance Agreement or to inquire
,out an existing Agreement
_tl 9 am - 5 pm, Monday-Saturday
o800-827-6655
hen requesting service or ordering
;rts, always provide the following
ormation:
_roduct Type o Part Number
Jlodet Number o Part Description
Amenc,3 s Repair Specmfmts
1996 09.23.97 REV.1 VB Printed in U.S.A.
