Craftsman 917377540 User Manual ROTARY MOWER Manuals And Guides L0810026
CRAFTSMAN Walk Behind Lawnmower, Gas Manual L0810026 CRAFTSMAN Walk Behind Lawnmower, Gas Owner's Manual, CRAFTSMAN Walk Behind Lawnmower, Gas installation guides
User Manual: Craftsman 917377540 917377540 CRAFTSMAN ROTARY MOWER - Manuals and Guides View the owners manual for your CRAFTSMAN ROTARY MOWER #917377540. Home:Lawn & Garden Parts:Craftsman Parts:Craftsman ROTARY MOWER Manual
Open the PDF directly: View PDF ![]() .
.
Page Count: 44
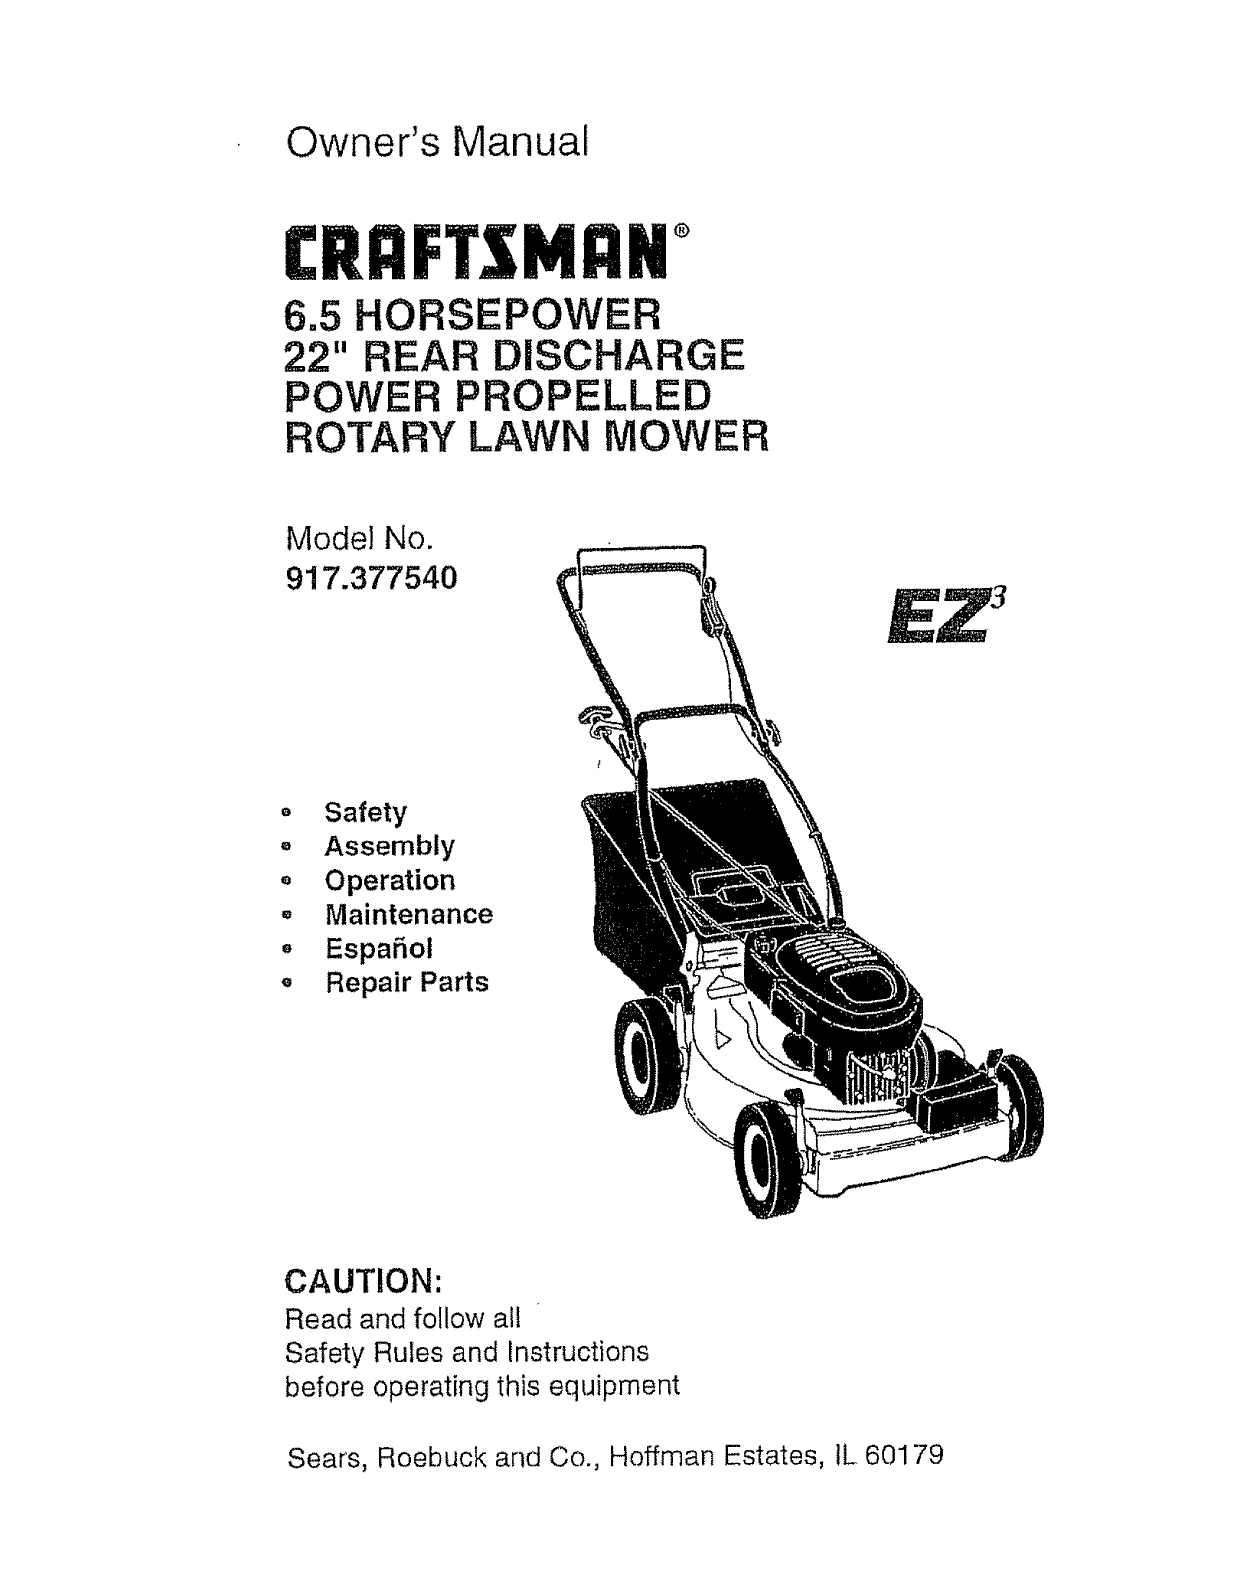
Owner's Manual
£RRFTSMI:INo
6.5 HORSEPOWER
22" REAR DISCHARGE
POWER PROPELLED
ROTARY LAWN MOWER
Model No.
917.377540
Safety
- Assembly
Operation
,, rVlaintenance
. Espar3ol
Repair Parts
CAUTION:
Read and follow all
Safety Rules and Instructions
before operating this equipment
Sears, Roebuck and Co., Hoffman Estates, IL 60179
Warranty 2 Product Specifications 11
Safety Rules 2 Service and Adjustments !4
Assembly 4 Storage 15
Operation 6 Troubleshooting 16
Maintenance Schedule 10 Repair Parts 35
Maintenance 10 Parts Ordering Back Cover
L,IMITED TWO YEAR WARRANTY ON CRAFTSMAN POWER MOWER
For two years from date of purchase, when this Craftsman Lawn Mower is maintained,
lubricated, and tuned up according to the operating and maintenance instructions in the
owner's manual, Sears will repair free of charge any defect in material or workmanship.
if this Craftsman Lawn Mower is used for commercial or rental purposes, this warranty
applies for only 90 days from the date of purchase_
This Warranty does not cover:
• Expendable items which become worn during normal use, such as rotary mower
blades, blade adapters, belts, air cleaners and spark plug.
o Repairs necessary because of operator abuse or negligence, including bent crank-
shafts and the failure to maintain the equipment according to the instructions con-
tained in the owner's manual,
Warranty service is available by returning the Craftsman power mower to the nearest
Sears Service Center/Department in the United States. This warranty applies only while
this product is in use in tile United States.
This Warranty gives you specific legal rights, and you may also have other rights whicll
van,, from state to state_
SEARS, ROEBUCK AND CO., D/817 WA, HOFFMAN ESTATES, ILLINOIS 60179
TRAINING:
• Read this operator's manual carefully.
Become familiar with the controls and
know how to operate your mower
properly. Learn how to quickly stop
mower.
o Do not allow children to use your mower.
Never allow adults to use mower without
proper instructions.
oKeep the area of operation clear of all
persons, especially small children and
pets.
° Use mower only as the manufacturer
intended and as described in this manual.
• Do not operate mower if it has been
dropped or damaged in any manner°
Always have damage repaired before
using your mower.
• Do not use accessory attachments that
are not recommended by the manufac-
turer. Use of such attachments may be
hazardous°
° The blade turns when the engine is
running.
PREPARATION:
° Always thoroughly check the area to be
mowed and clear it of all stones, sticks,
wires, bones, and other foreign objects.
These objects will be thrown by the blade
and can cause severe injury_
,, Always wear safety glasses or eye
shields when starting and while using
your mower_
• Dress properly. Do not operate mower
when barefoot or wearing open sandals,
Wear only solid shoes wilh good traction
when mowing.
, Check fuel tank before starting engine,
Do not fill gas tank indoors, when the
engine is running or when the engine is
2
hoLAltowtheenginetocoolforseveral
mlnutesbeforefillingthegastank,Clean
offanyspilledgasolinebeforestartingthe
engine,
Alwaysmakewheelheightadjustments
beforestartingyourmower.Never
attempttodothiswhiletheengineis
running.
Mowonlyindaylightorgoodartificial
light,
OPERATION:
o Keepyoureyesandmindonyourmower
andtheareabeingcuLDonotletother
interestsdistractyou.
• Donotmowwetorslipperygrass.Never
runwhileoperatingyourmower.Always
besureofyourfooting-- keepafirm
holdonthehandlesandwalk.
o Donotputhandsorfeetnearorunder
rotatingparts..Keepclearofthedischarge
openingat alltimes.
•Always stop the engine whenever you
leave or are not using your mower, or
before crossing driveways, walks, roads,
and any gravel--covered areas_
° Never direct discharge of material toward
bystanders nor allow anyone near the
mower while you are operating iL
,, Before cleaning, inspecting, or repairing
your mower, stop the engine and make
absolutely sure the blade and atl moving
parts have stopped. Then disconnect the
spark plug wire and keep it away from lhe
spark plug to prevent accidental starting,
o Do not continue to run your mower if you
hit a foreign object. Follow the procedure
outlined above, then repair any damage
before restarting and operating you
mower.
° Do not change the governor settings or
overspeed the engine. Engine damage or
personal injury may result.
° Do not operate your mower if it vibrates
abnormally. Excessive vibration is an
indication of damage; stop the engine,
safely check for the cause of vibration
and repair as required..
° Do not run the engine indoors. Exhaust
fumes are dangerous.
,, Never cut grass by pulling the mower
towards you. Mow across the face of
slopes, never up and down or you might
lose your footing. Do not mow exces-
sively steep slopes. Use caution when
operating the mower on uneven terrain
or when changing directions -- mainlain
good footing_
° Never operate your mower without
proper guards, plates, grass catcher or
other safety devices in ptace_
MAINTENANCE AND STORAGE:
o Check the blade and the engine mount-
ing bolts often to be sure they are
tightened properly. _,
° Check all bolts, nuts and screws at
frequent intervals for proper tightness to
be sure mower is in safe working
condition
o Keep all safety devices in place and
working.
• To reduce fire hazard, keep the engine
free of grass, leaves or excessive grease
and oil.
• Check grass catcher often for deteriora-
tion and wear and replace worn bags.
Use only replacement bags that are
recommended by and comply with
specifications of the manufacturer of your
mower_
° Always keep a sharp blade on your
mowen
°Allow engine to cool before storing in any
enclosure.
° Never store mower with fuet in the tank
inside a building where fumes may reach
an open flame or an ignition source suctl
as a hot water heater, space heater,
clothes dryer, etc_
CAUTION: Always disconnect spark
plug wire and place wire where it
cannot contact spark plug in order to
prevent accidental starting when
setting up, transporting, adjusting or
making repairs.
WARNING
The engine exhaust from this product
contains chemicals known to the State
of California to cause cancer, birth
defects, or other reproductive harm_
3
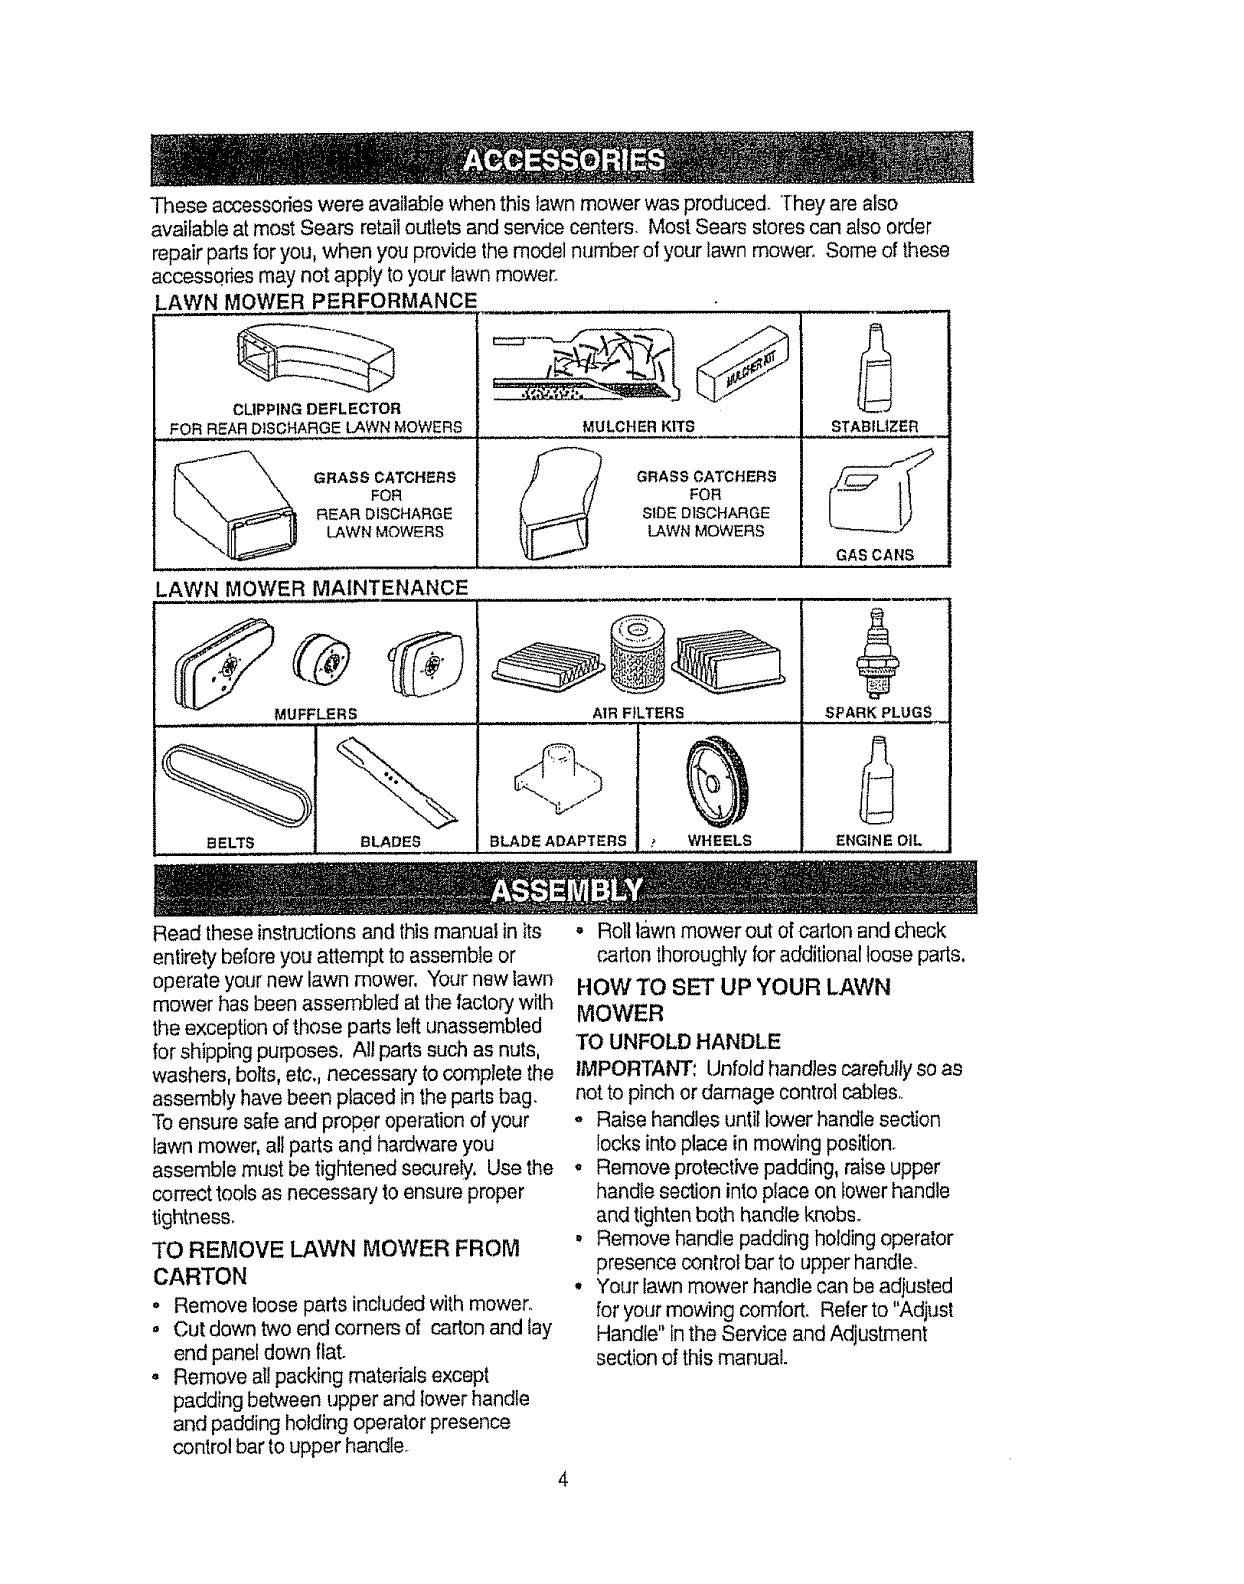
Theseaccessorieswereavailablewhenthisfawn mower was produced. "[hey are also
available at most Sears retail outlets and service centers. Most Sears stores can also order
repair parts for you, when you provide the model number of your lawn mower° Some of these
accessories may not apply to your lawn mower.
LAWN MOWER PERFORMANCE
CLIPPING DEFLECTOR
FOR REAR DISCHARGE LAWN MOWERS
ii
GRASS CATCHERS
FOR
REAR DISCHARGE
LAWN MOWERS
MULCHER KITS
,_ GRASS CATCHERS
FOR
SIDEDISCHARGE
LAWN MOWERS
STABILIZER
GAS CANS
LAWN MOWER MAINTENANCE
MUFFLERS AIR FILTERS
! ,,, ,,,,,........ • ................................. ,,,,, SPARK PLUGS
BE LTS BLADES BLADE ADAPTERS WHEELS ENGINE OIL
Read these instructions and thismanual in its
entirety before you attempt to assemble or
operate your new lawn mower, Your new lawn
mower has been assembled at the factory with
the exception of those parts left unassembled
for shipping purposes. All parts such as nuts,
washers, bolts, etc,, necessary to complete the
assembly have been placed in the parts bag.
To ensure safe and proper operation of your
fawn mower, all parts and hardware you
assemble must be tightened securely, Use the
correct tools as necessary to ensure proper
tightness.
TO REMOVE LAWN MOWER FROM
CARTON
° Remove loose parts included with mower.
•Cut down two end comers of carton and lay
end panel down fiat.
,, Remove all packing materials except
padding between upper and lower handle
and padding holding operator presence
control bar to upper handle,
• Roll lawn mower out of carton and Check
carton thoroughly for additional loose parts,
HOW TO SET UP YOUR LAWN
MOWER
TO UNFOLD HANDLE
IMPORTANT; Unfold handles carefully so as
not to pinch or damage control cables.
=Raise handles until lower handle section
locks into place in mowing position.
•Remove protective padding, raise upper
handle section into place on lower hand]e
and tighten both handle knobs.
,Remove handle padding holding operator
presence control bar to upper handle.
°Your lawn mower handle can be adjusted
for your mowing comfort, Refer to "Adjust
Handle" inthe Service and Adjustment
section of this manual.
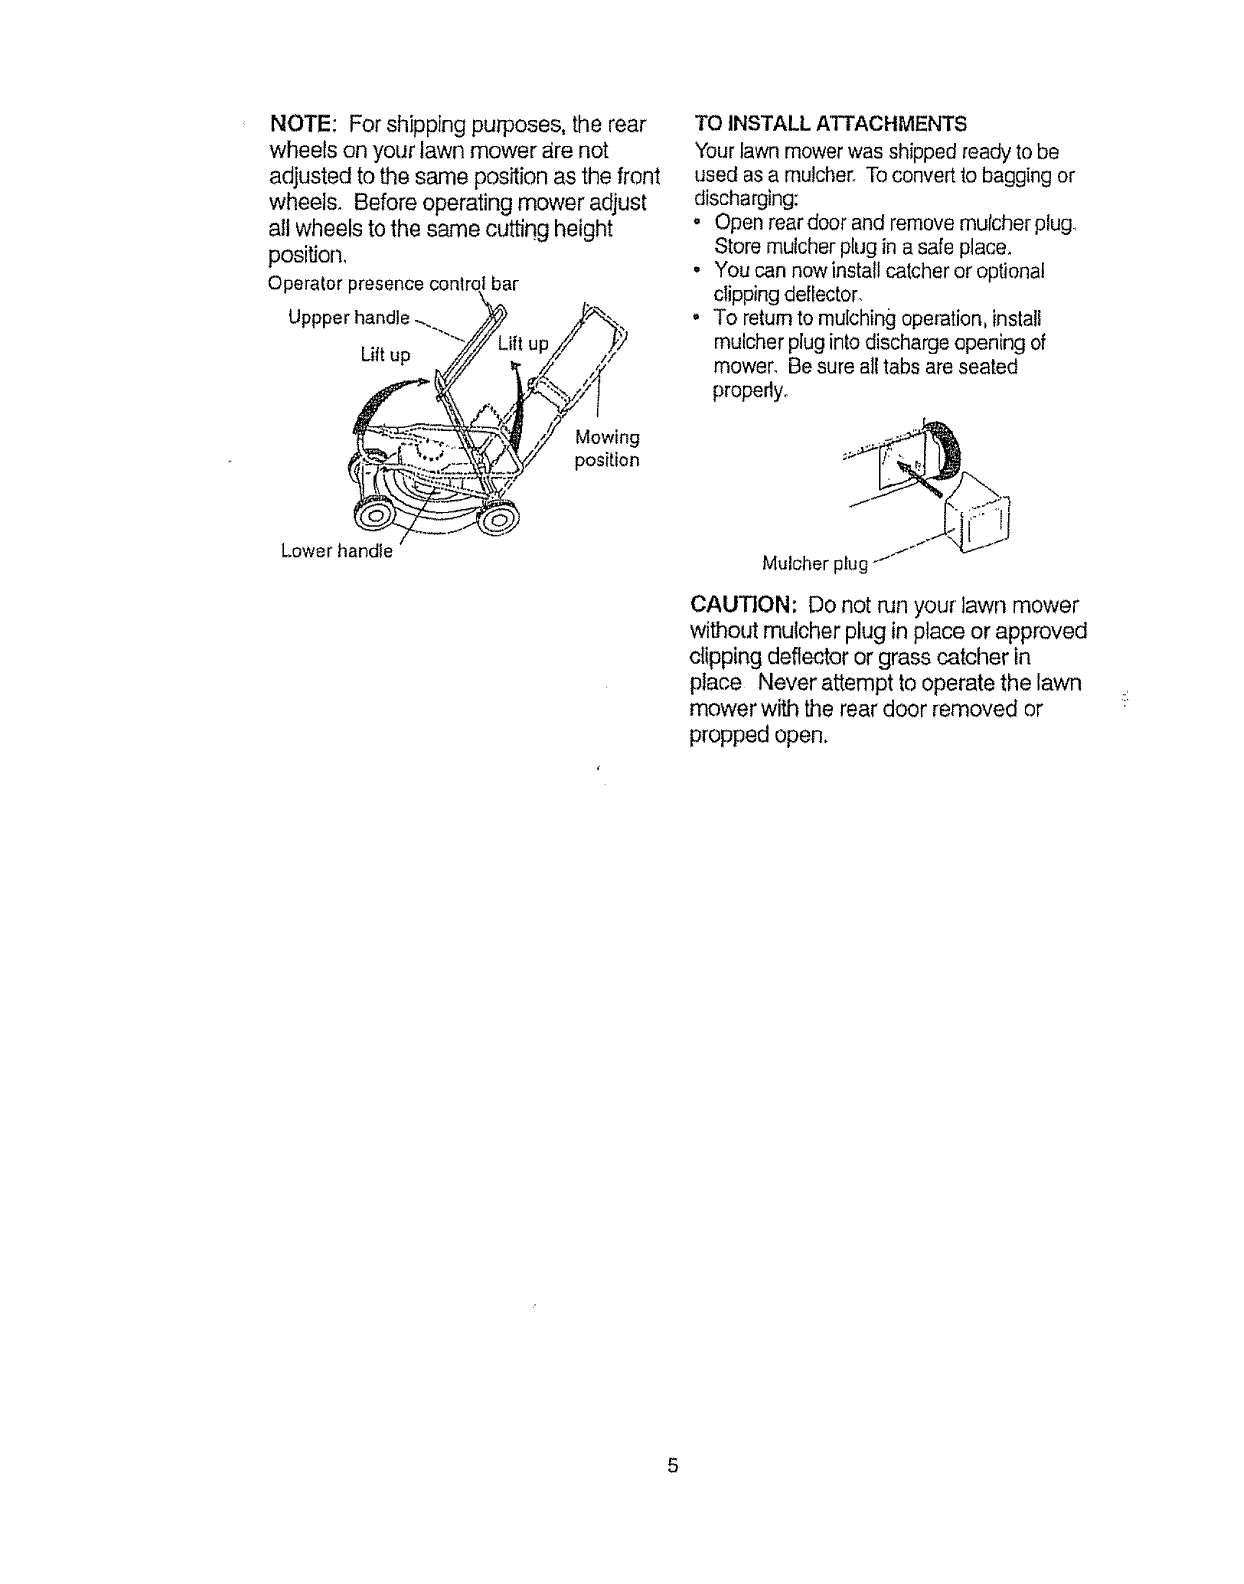
NOTE: For shipping purposes, the rear
wheels on your lawn mower _re not
adjusted to the same position as the front
wheels. Before operating mower adjust
all wheels to the same cutting height
position,
Operalor I:
Uppper handle _.
Lift up
Mowing
position
Lower handle
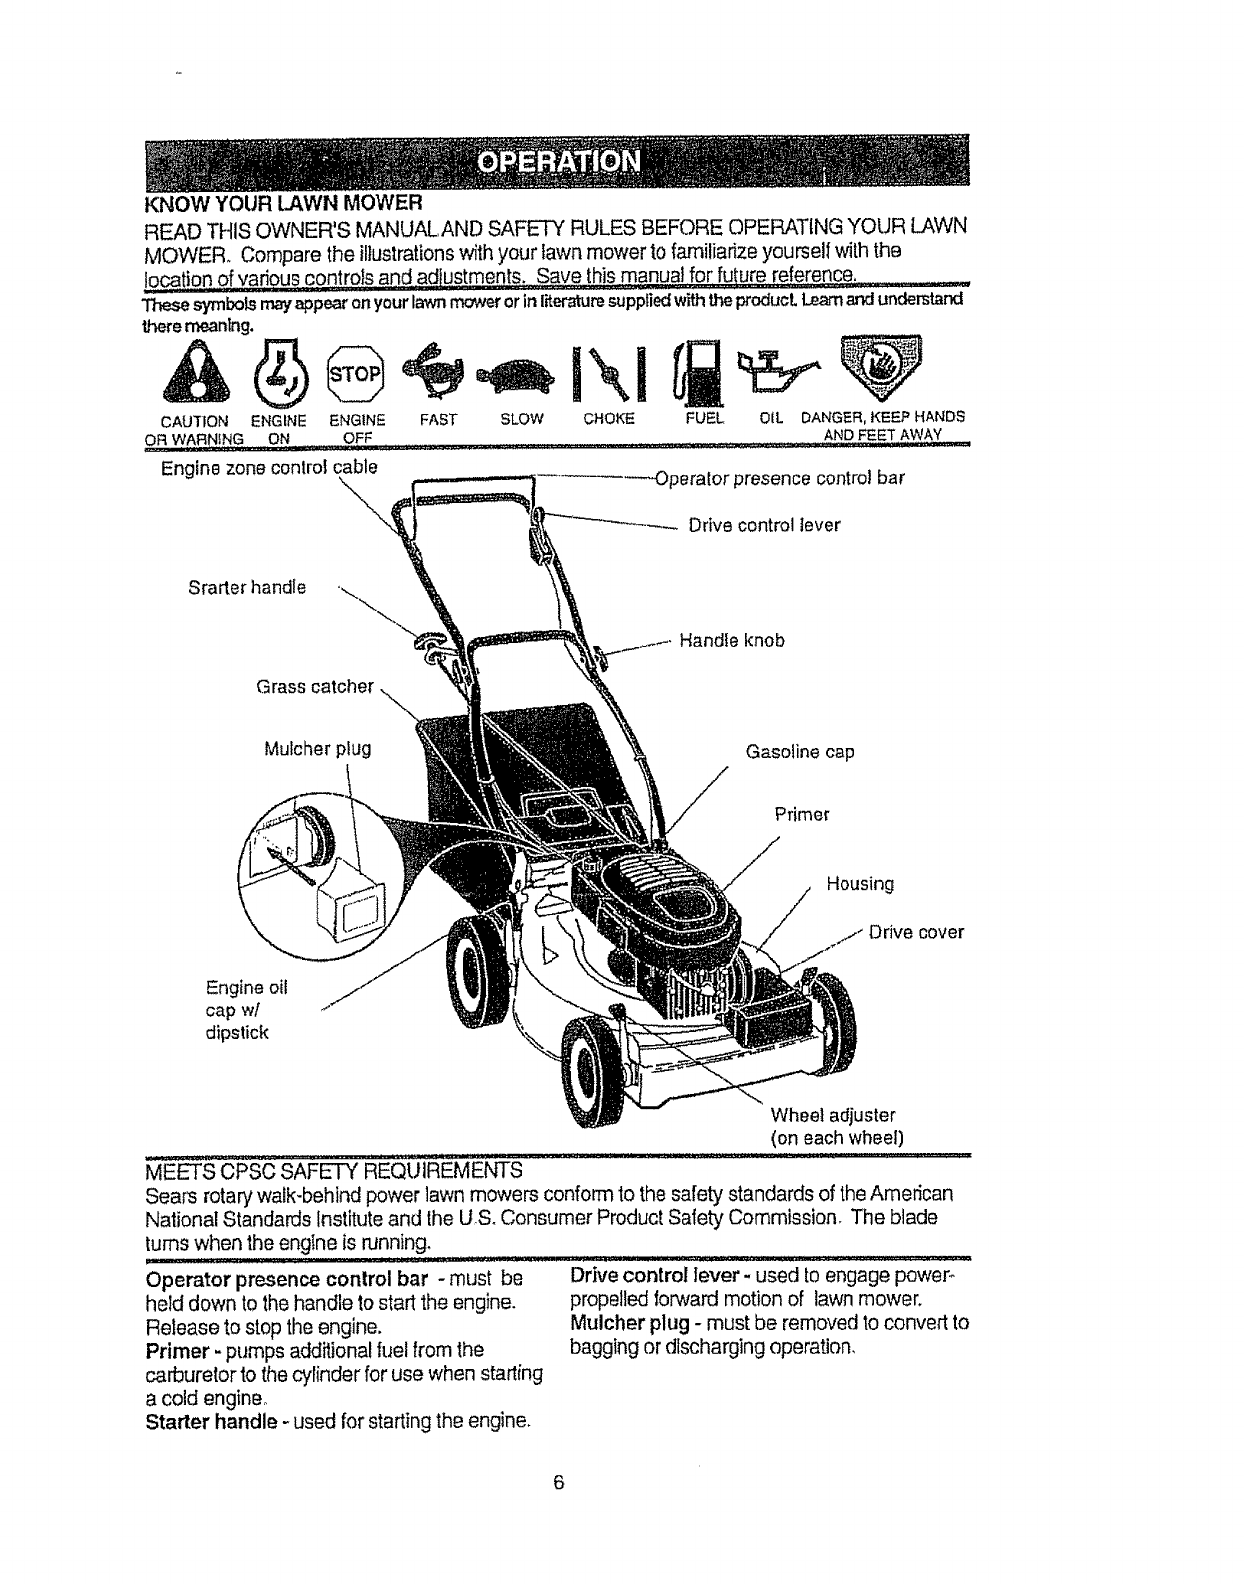
TO INSTALL ATTACHMENTS
Your lawn mower was shipped ready to be
used as a mulchero To convert to bagging or
discharging:
• Open rear door and remove mutcher plug.,
Store mulcher plug in a safe place.
• You can now install catcher or optional
clipping deflector.
• To return to mulching operation, install
mulcher plug into discharge opening of
mower. Be sure all tabs are seated
propedy_
_j
Mulcher plug
CAUTION; Do not run your lawn mower
without mulcher plug in place or approved
clipping deflector or grass catcher in
place Never attempt to operate the lawn
mower with the rear door removed or
propped open.
5
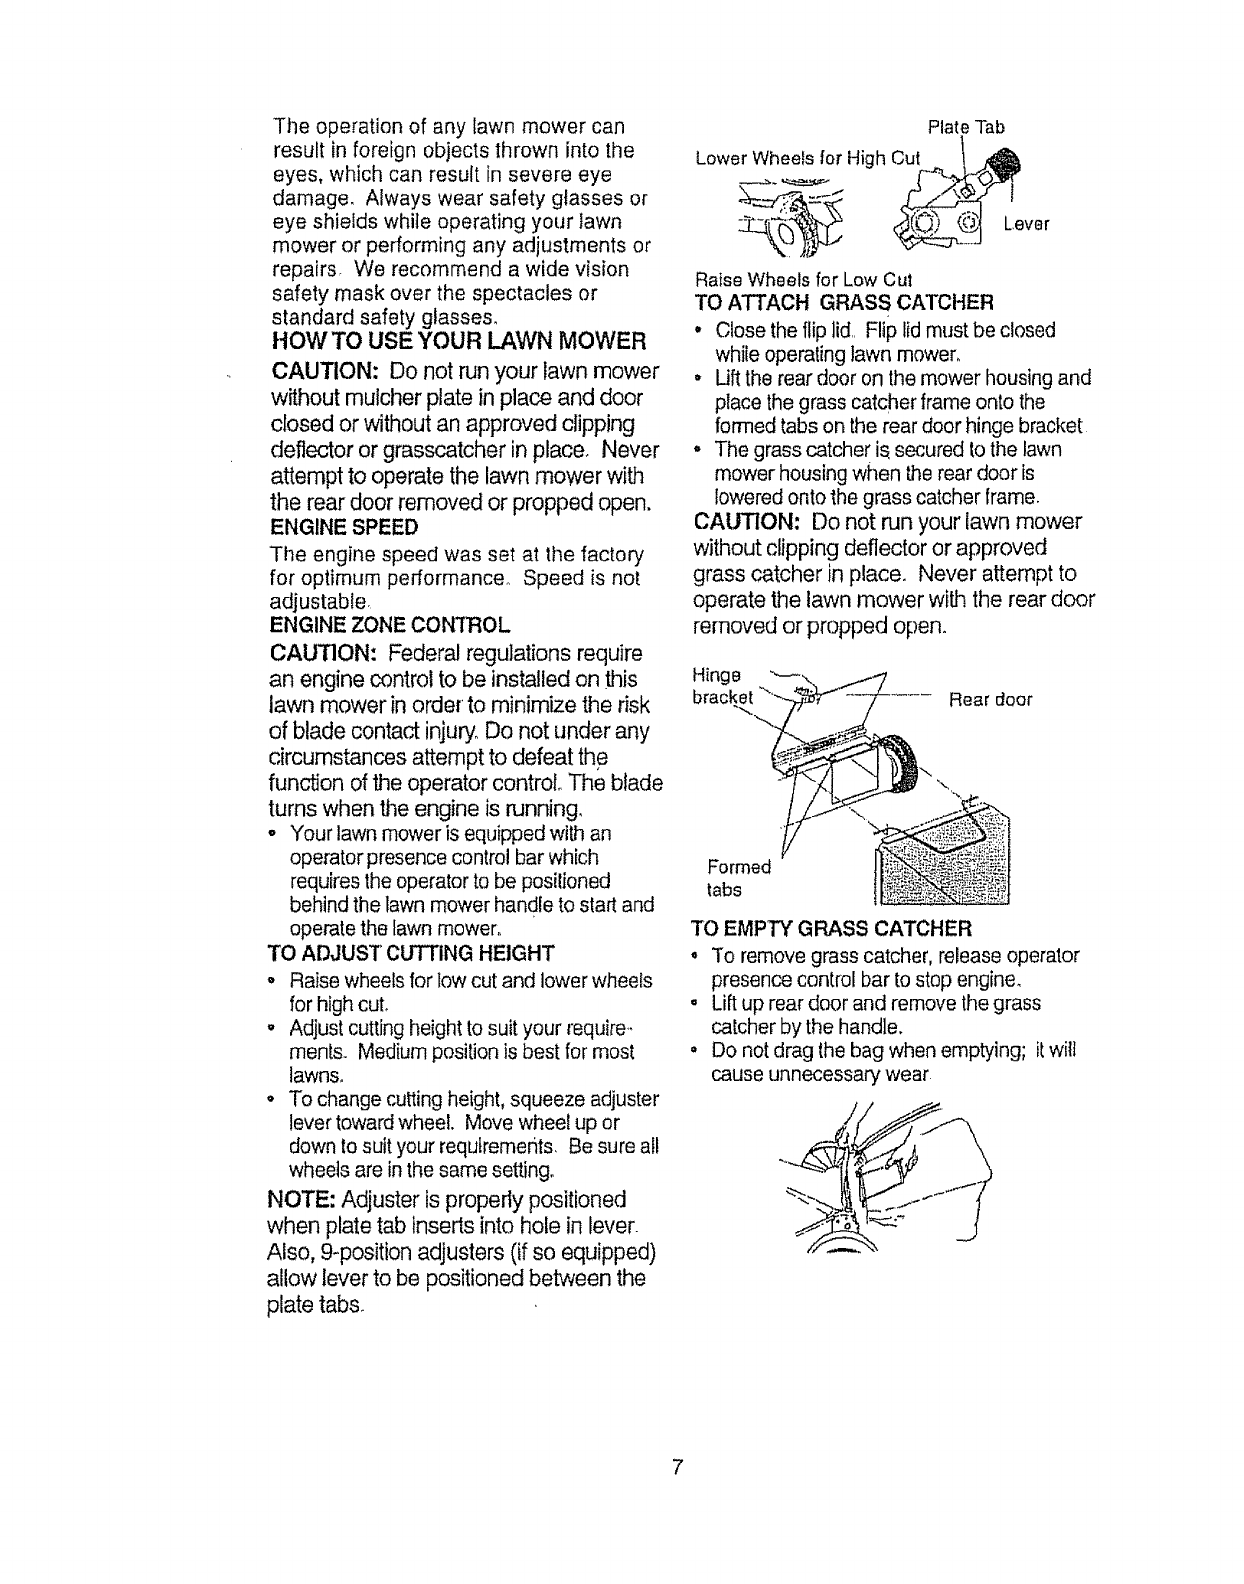
KNOWYOURLAWNMOWER
READTHISOWNER'SMANUALANDSAFETYRULESBEFOREOPERATINGYOURLAWN
MOWER.Comparetheillustrationswithyourlawnmowertofamiliarizeyourselfwiththe
loc_tionofvadouscontrolsandadlustments,Savethismanualforfuturereference, ____,,,
symbo_ may appear on your lawn mower or in l_er-aturesupplied with the product, Learn and understand
there meaning.
CAU'HON ENGINE ENGINe: FAST SLOW CHOKE FUEL O{L DANGER, KEEP HANDS
OR WARNING ON OFF AND FEET AWAY
Engine zone control cable
"_'x Opera!or presence control bar
Drive control lever
Srarter handle
Grass catcher
Hand{e knob
Mulcher plug Gasoline cap
Primer
Housing
Drive cover
Engine oil
cap wl
dipstick
Wheel adjuster
(on each wheel)
MEETS CPSC SAFETY REQUIREMENTS
Sears rotary walk-behind power lawn mowers conform to the safety standards of the American
National Standards Institute and the U S_Consumer Product Safety Commission_ The blade
turns when the engine is running,
Operator presence control bar- must be Drive control lever 'usecJ [o engage power_
held down to the handle to start the engine, propelled lorward motion of lawn mower.
Release to stop the engine. Mulcher plug - must be removed to convert to
Primer - pumps additional fuel from the bagging or discharging operation,
carburetor to the cylinder for use when starting
a cold engine,
Starter handle - used for starting the engine.
Theoperationof anylawnmowercan
resultinforeignobjectsthrownintothe
eyes,whichcanresultinsevereeye
damage.Alwayswearsafetyglassesor
eyeshieldswhileoperatingyourlawn
moweror performinganyadjustmentsor
repairs Werecommendawidevision
safetymaskoverthespectaclesor
standardsafetyglasses.
HOWTO USEYOURLAWNMOWER
CAUTION;Donotrunyourlawnmower
withoutmutcherplateinplaceanddoor
closedorwithoutanapprovedclipping
deflectororgrasscatcherinplace. Never
attemptto operatethelawnmowerwith
the reardoorremovedor proppedopen.
ENGINESPEED
Theenginespeedwassetat tile factor.i
for optimumperformance°Speedis not
adjustable.
ENGINE ZONE CONTROL
CAUTION: Federal regulations require
an engine control to be installed on this
lawn mower in order to minimize the risk
of blade contact injury° Do not under any
circumstances attempt to defeat the
function of the operator control The blade
turns when the engine is running,
oYour lawn mower is equipped with an
operator presence control bar which
requires the operator to be positioned
behind the lawn mower handle to start and
operate the lawn mower°
TO ADJUST CUTTING HEIGHT
o Raise wheels for low cut and lower wheets
for high cuL
o Adjust cutting height to suit your require.,
ments. Medium position is best for most
lawns.
o To change cutting height, squeeze adjuster
lever toward wheel. Move ,wheel up or
down to suit your requiremer_ts, Be sure ail
wheels are in the same setting.
NOTE: Adjuster is properly positioned
when plate tab inserts into hole in lever.
Also, 9-position adjusters (if so equipped)
allow lever to be positioned between the
plate tabs.
Plate Tab
Lower Wheels for High Cut
Raise Wheels for Low Cut
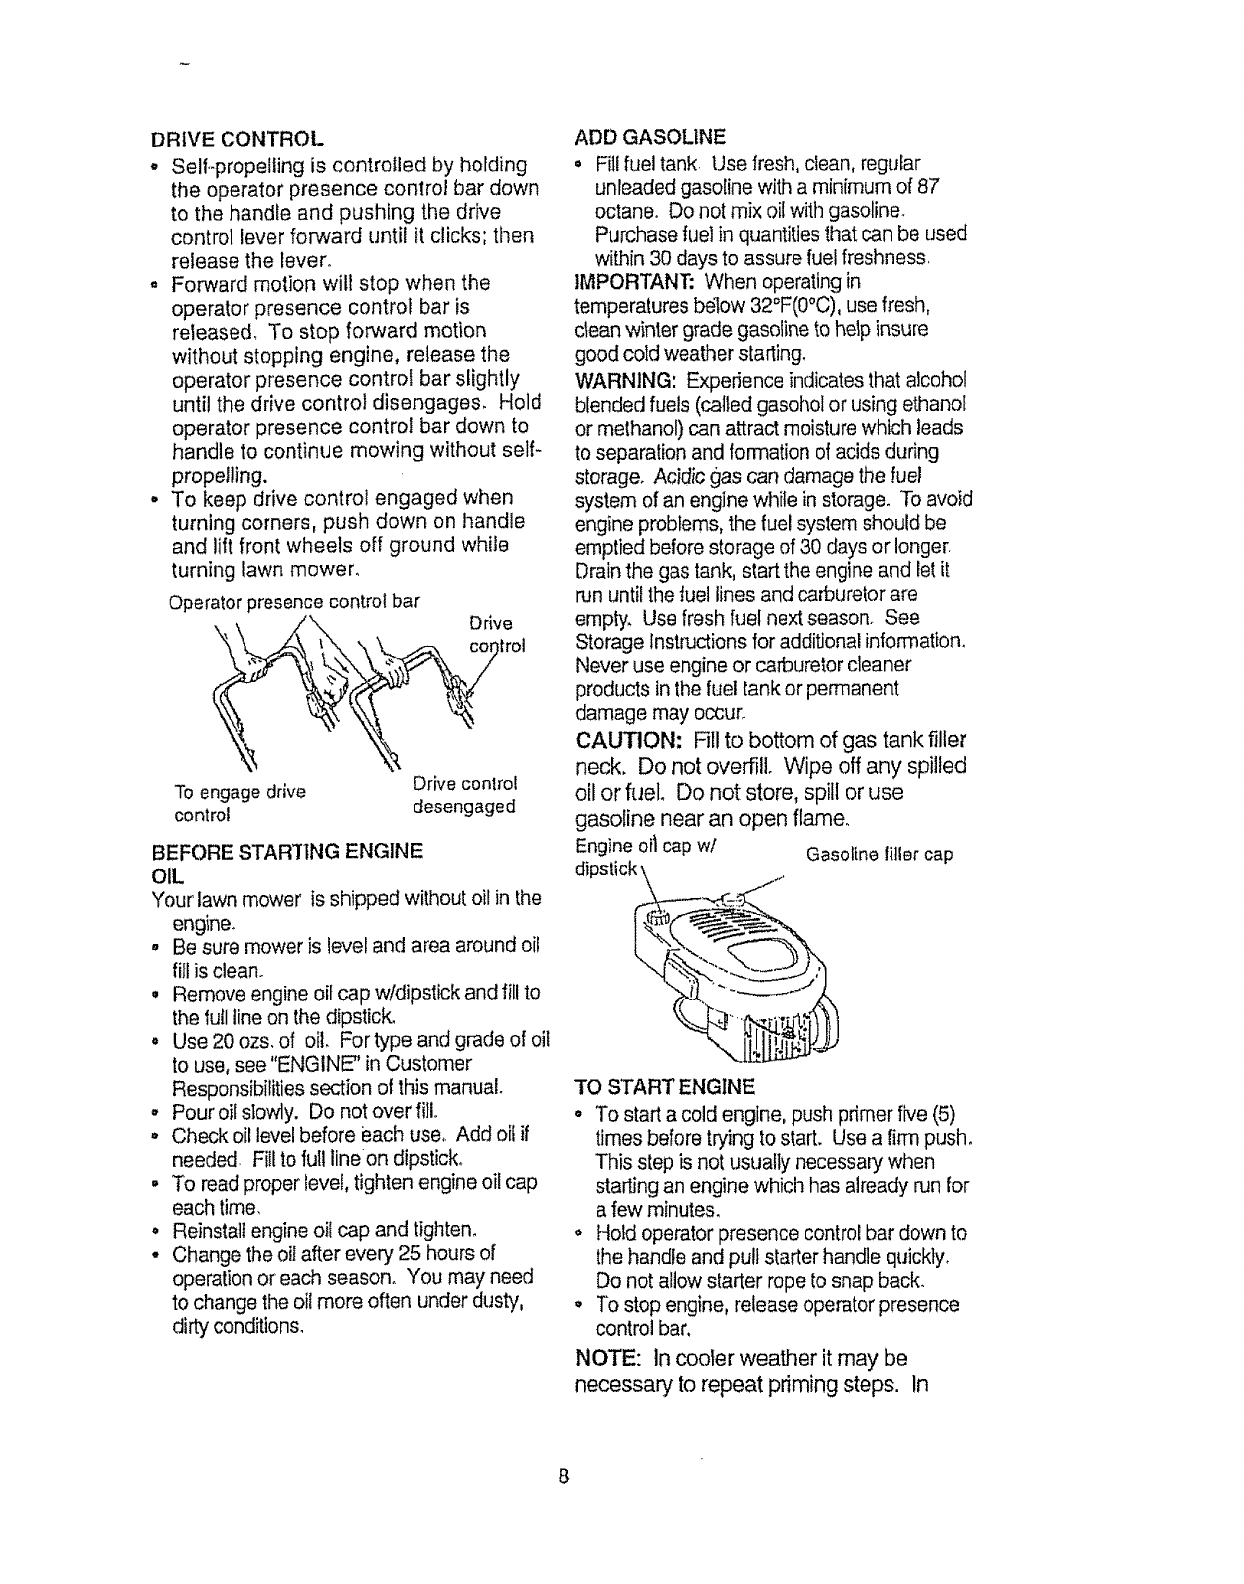
TO ATTACH GRASS CATCHER
o
Lever
Close the flip lid Flip lid must be dosed
while operating lawn mower.
Uft the rear door on the mower housing and
place the grass catcher frame onto the
formed tabs on the rear door hinge bracket
The grass catcher is secured to the lawn
mower housing when the rear door Is
Iowered onto the grass catcher frame.
CAUTION: Do not run your lawn mower
without clipping deflector or approved
grass catcher in place. Never attempt to
operate the lawn mower with the rear door
removed or propped open.
Hinge
bracket
Formed
tabs
TO EMPTY GRASS CATCHER
,, To remove grass catcher, release operator
presence control bar to stop engine.
. Lift up rear door and remove the grass
catcher by the handle.
° Do not drag the bag when emptying; it will
cause unnecessary wear
DRIVECONTROL
. Self.-propeilingis controlledbyholding
theoperatorpresencecontrolbardown
to thehandleandpushingthedrive
controlleverforwarduntilit clicks;then
releasethelever°
° Forwardmotionwillstopwhenthe
operatorpresencecontrolbaris
released,To stopforwardmotion
withoutstoppingengine,releasethe
operatorpresencecontrolbarslightly
untilthedrivecontroldisengages.Hold
operatorpresencecontrolbardownto
handletocontinuemowingwithoutself-
propelling.
• To keepdrivecontrolengagedwhen
turningcorners,pushdownonhandle
andliftfrontwheelsoffgroundwhile
turninglawnmower,
Operatorpresencecontrolbar
\_ \ /",,. Drive
To engage drive Drive contro!
control desengaged
BEFORE STAR'lr]NG ENGINE
OIL
Your lawn mower is shipped without oil in the
engine.
,, Be sure mower is level and area around oil
fill is clean.
• Remove engine oil cap w/dipstick and fill to
the full line on the dipstick.
• Use 20 ozs. of oil. Fortype and grade of oil
to use, see "ENGINE" in Customer
Responsibilities section ot this manual.
o Pour oil slowly. Do not over fill.
,, Check oil level before each use,. Add oil if
needed Fill to full lineon dipstick°
• To read proper level, tighten engine oil cap
each time,
• Reinstall engine oil cap and tighten.
• Change the oil after every 25 hours of
operation or each season. You may need
to change the oil more often under dusty,
dirty conditions.
ADD GASOLINE
• Fill fuel tank Use fresh, clean, regular
unleaded gasoline with a minimum of 87
octane. Do not mix oil with gasoline.
Purchase fuel in quantities that can be used
within 30 days to assure fuel freshness,
IMPORTANT: When operating in
temperatures below 32°F(0°C), use fresh,
clean winter grade gasoline to help insure
good cold weather starting,
WARNING: Experience indicates that alcohol
blended fuels (called gasohol or using ethanol
or methanol) can attract moisture which leads
to separation and formation of acids during
storage. Acidic gas can damage the fuel
system of an engine while in storage. To avoid
engine problems, the fuel system should be
emptied before storage of 30 days or longer.
Drain the gas tank, start the engine and let it
ran until the fuel lines and carburetor are
empty. Use fresh fuel next season. See
Storage Instructions for additional information_
Never use engine or carburetor cleaner
products in the fuel tank or permanent
damage may occur.
CAUTION: Fill to bottom of gas tank filler
neck. Do not overfill Wipe off any spilled
oil or fuel Do not store, spill or use
gasoline near an open flame.
Engine oil cap w/ Gasoline filler cap
TO START ENGINE
• To start a cold engine, push primer five (5)
times before trying to start. Use a firm push.
This step is not usually necessary when
starting an engine which has already run for
a few minutes.
° Hold operator presence control bar down to
the handle and pull starter handle quickty_
Do not allow slarter rope to snap back.
o To stop engine, release operator presence
control bar,
NOTE: In cooler weather it may be
necessary to repeat priming steps, In
8
warmer weather over priming may cause
flooding and engine will not st_.rt, if you
do flood engine, wait a few minutes before
attempting to start and do not repeat
priming steps°
MOWING TIPS
•Under certain conditions, such as very tail
glass, it may be necessary to raise the
height of cut to reduce pushing effort and to
keep from overloading the engine and
leaving clumps of grass clippings.
oFor extremely heavy cutting, reduce the
width of cut and raise the rear of the lawn
mower housing one (1) whee! adjuster
setting higher than the front for better
discharge of grass.
° When using a rear discharge lawn mower in
moist, heavy grass, clumps of cut grass
may not enter the grass catcher. Reduce
ground speed (pushing speed) and!or run
the lawn mower over the area a second
time_
•If a trail of grass clippings is left on the right
side of arear discharge lawn mowerl mow
in a clockwise direction with a small overlap
to collect the clippings on lhe next pass.,
•Keep top of engine around starter clear and
clean of grass clippings and chaff, "]"hiswilt
help engine air flow and extend engine life.
° Pores in cloth grass catchers can become
filled with dirt and dust with use and
catchers will collect less grass_ To prevent
this, regularly hose catchers off with water
and let dry before using..
MULCHING MOWING TIPS
IMPORTANT: For best performance, keep
mower housing free of built-up grass and
trash. See "Cleaning" in CUSTOMER
RESPONSIBILITIES Section of this manual
• The special mulching blade will recur the
grass clippings many times and reduce
them in size so that as they fail onto the
lawn they will disperse into the grass and
not be noticed, Also, the mulched grass will
biodegrade quickly to provide nutrients for
the lawn. Always mulch with your highest
engine (blade) speed as this wilf provide the
best recutling action of the blades,
° Avoid cutting your fawn when it is wet. Wet
grass tends to form Clumps and interferes
with the mulching action. The best time to
mow your lawn is the eady afternoon. At
this time the grass has dried and the newly
cut area will not be exposed to the direct
SUR.
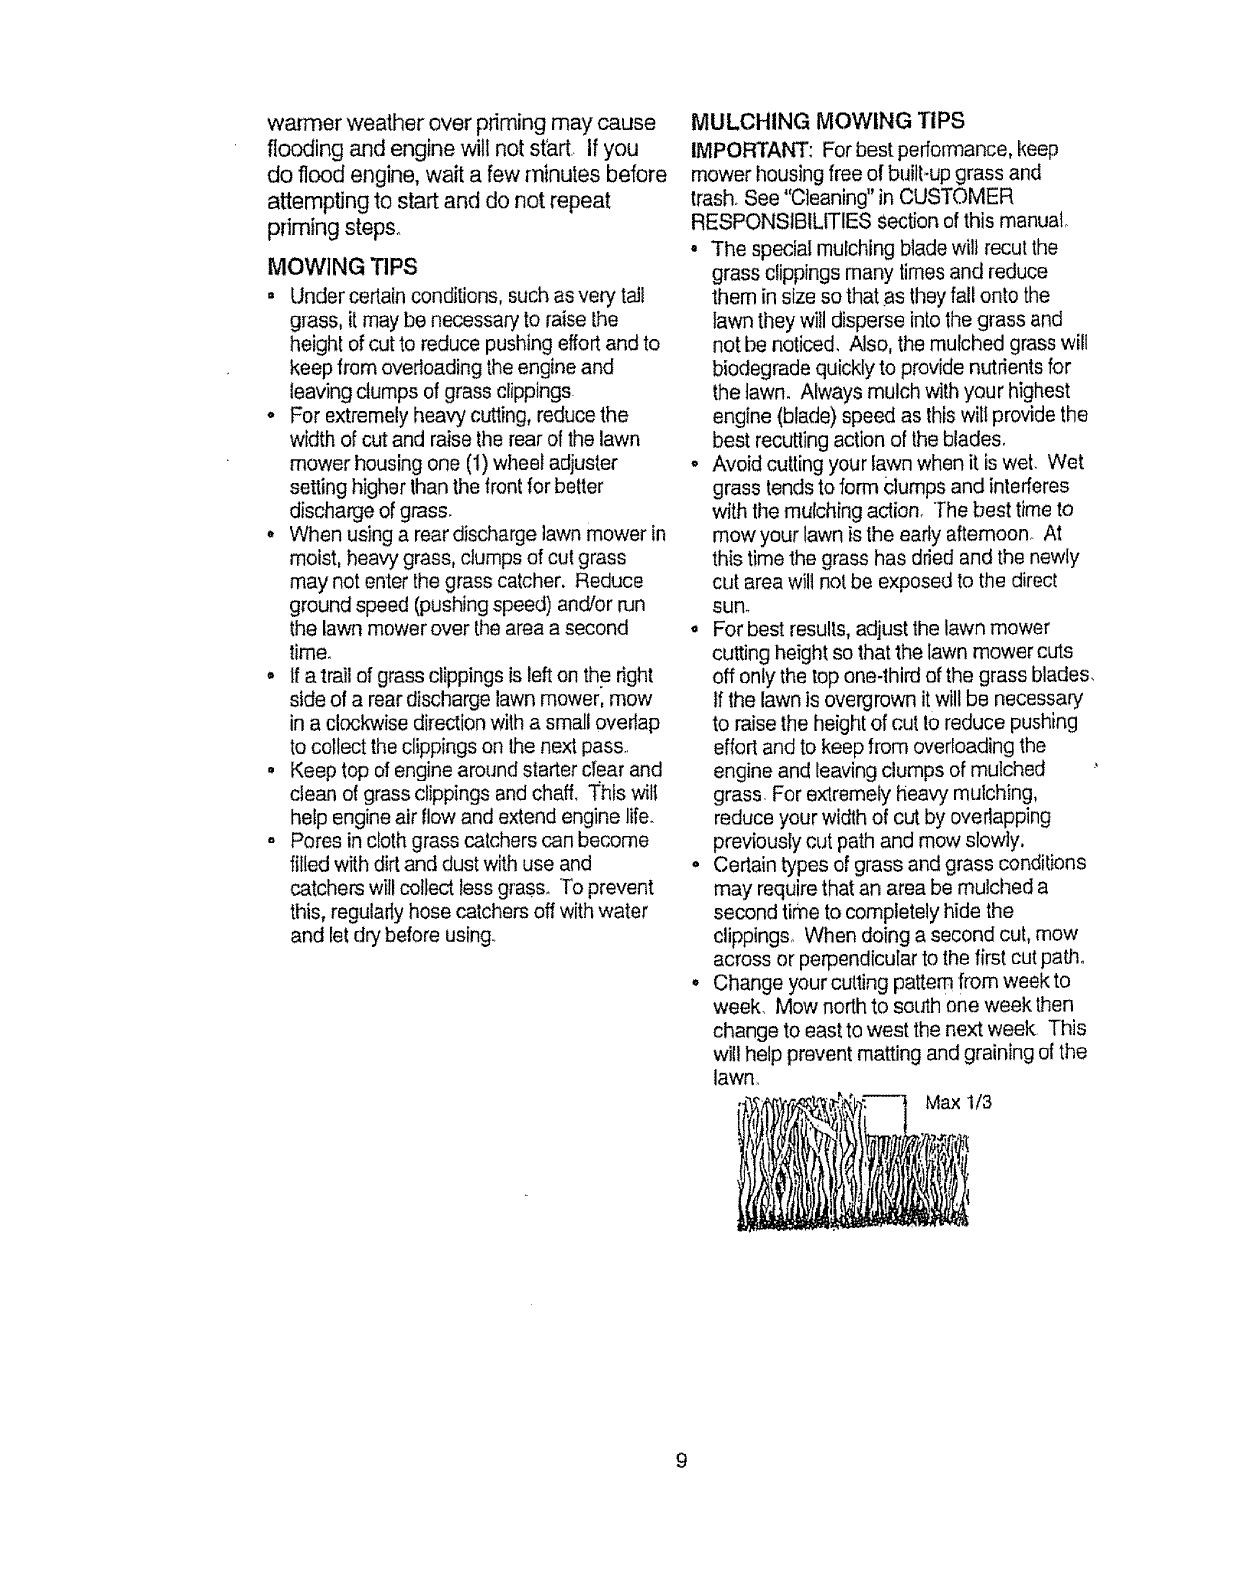
°For best results, adjust the lawn mower
cutting height so that the lawn mower cuts
off only the top one4hird of the grass blades,
tf the lawn is overgrown it will be necessary
to raise the height of cut to reduce pushing
effort and to keep from overloading the
engine and leaving dumps of mulched -'
grass. For exlremely heavy mulching,
reduce your width of cut by overlapping
previously cut path and mow slowly,
° Certain types of grass and grass conditions
may require that an area be mulched a
second time to completely hide the
clippings° When doing a second cut, mow
across or perpendicular to the first cut path°
,, Change your cutting pattern from week to
week, Mow north to south one week then
change to east to west the next week. This
will help prevent matting and graining of the
lawn_
Max !/3
MA,.TE.A.O SO"EOU'E7 > .O OY "
F)LL IN DATES /_t__
ASYOUCOMPLETE .,'__.:_O_'.Y_._,,,_,_- _,
REGULAR SERVICE _Y_._..._q_Y£.'4'_,_ _£.._ SERVICE OATES
..... J__ ",_._ 'r SERVICE D ..............
Check for Loose Fasteners Iv' ) i ¢I t. ..................... . ,, ' ,,,,,I i ' '
Clean!Inspect Grass Catcher
(!f Equipped)
M CleanLawn Mower
Clean Under Drive Cover
(Power-Propelldd Mowers)
Check drive belVpulieys
E (Power-Prope!led Mowers)
RChecitJSharpenlRepIace B)ade
Lubrication Chart
i/ t/ i/ =........._---,-+------t----_ ....
V # = i, v'
v'
Clean Battery/Recharge ................................ __
(Electric Start Mowers) _ 6,/'4
E Check Engine O!! Level _ ...........................
N._ .......................................... vg _ ,. _ ............
GCtear_,A ir Filler ................... _ .......,t ........
IInspect Mulller V' .
N€)_ or ReplaceSpark Plug I_ ................
E Replace Air Filler Paper Cartridge 6/_ ,j
t ,, C;)_enga more often when eperafing under aheavy le_d or it) high ambfen_ tomperalures
2-Service mere often when operating indirbt or dus_ c_dillons
3 ,, POp,lee b_ades more often when mew_ng in sandy sou
4., Ohezge 48 hours at arld of season,,
GENERAL RECOMMENDATIONS
The warranty on this lawn mower does not
cover items that have been subjected to
operator abuse or negligence, To receive
full value from the warranty, ope[ator must
maintain mower as instructed in this
manual
Some adjustments will need to be made
periodically to properly maintain your uniL
A!l adjustments in the Service and
Adjustments section o_ this manual should
be checked at least once each season.
. Once a year, replace the spark plug,
replace air filter element and check
blade for wear.. A new spark plug and
clean/new air filter element assures
proper air4uel mixture and helps your
engine ran better and last longer,
° Follow the maintenance schedule in this
manual.
BEFORE EACH USE
•Check engine oil level.
• Check for loose fasteners.
LUBRICATION
Keep unit we)I lubricated (See "LUBRICA-
TION CHART"),
10
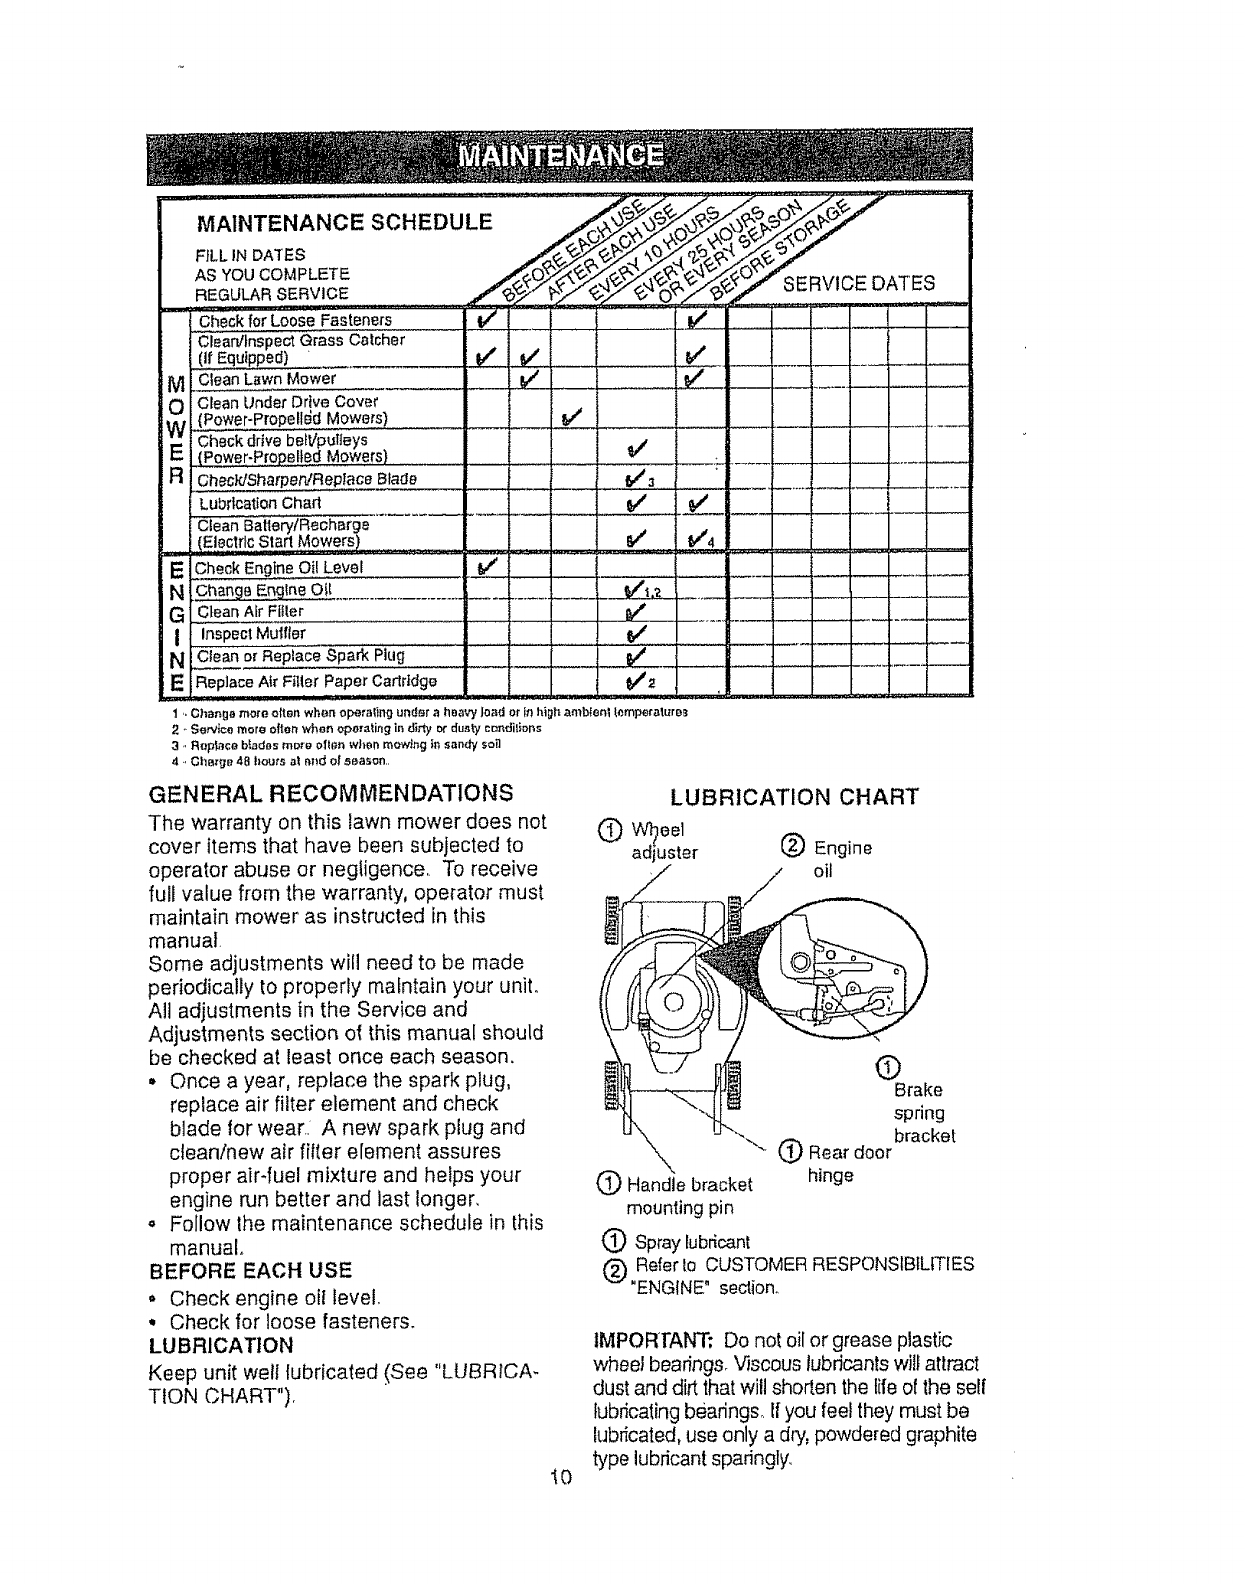
LUBRICATION CHART
© oe,
adjuster (_) Engine
oil
(9
Brake
spring
bracket
"" (_ Rear door
1_ Handle bracke_ hinge
mounting pin
(_ Spray lubricant
(_) Referto CUSTOMER RESPONSIBILITIES
"ENGINE" section.,
1MPORrANT: Do not oil or grease plastic
wheel bearings, Viscous lubricants will attract
dust and dirt that will shorten the tife of the self
lubricating bearings, If you feel they must be
lubricated, use only a d)y, powdered graphite
type lubricant sparingly,
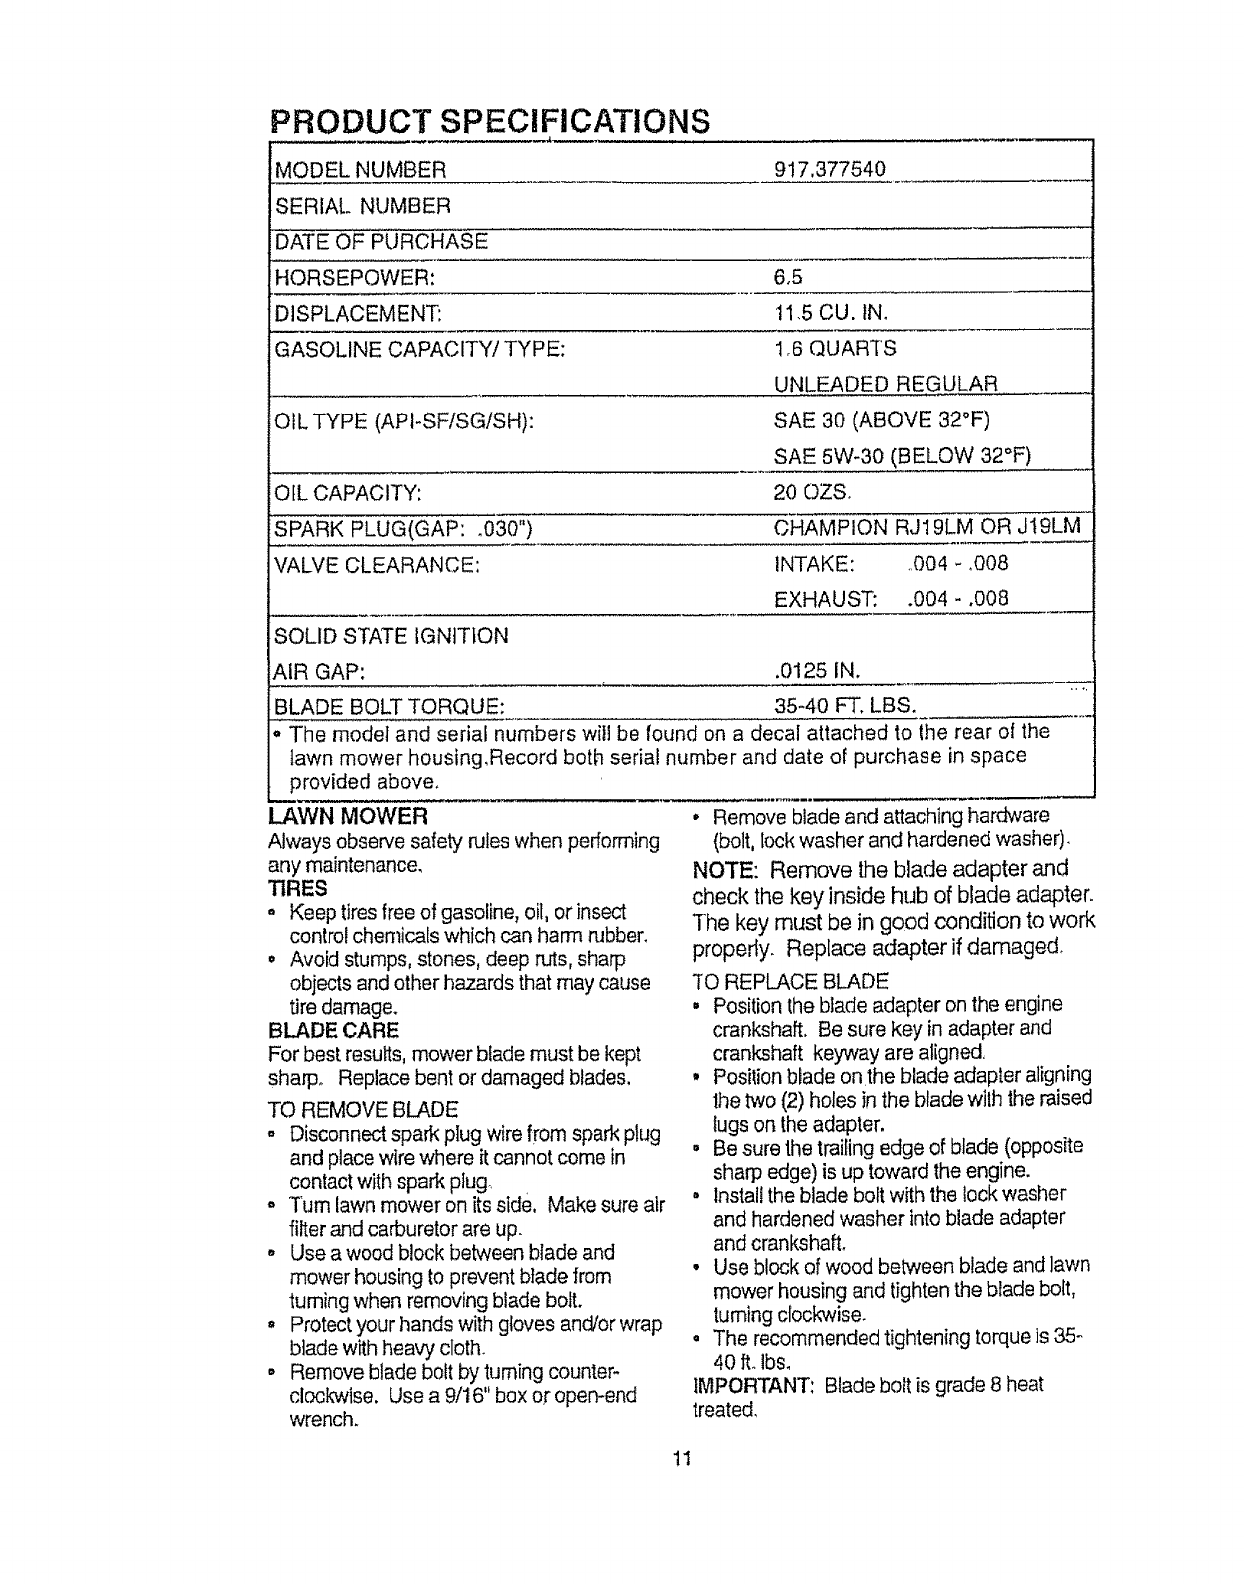
PRODUCT SPECIFICATIONS
MODEL NUMBER 917,377540
SERIAl.. NUMBER
DATE OF PURCHASE
HORSEPOWER: 6,5
DISPLACEMENT: tl .5 CU. tN_
GASOLINE CAPACITY/TYPE: 1_6QUARTS
UNLEADED REGULAR
OIL TYPE (API-SFiSG/SH): SAE 30 (ABOVE 32°F)
SAE 5W-30 (BELOW 32°F)
OIL CAPACITY: 20 OZS
SPARK PLUG(GAP: _030") CHAMPION RJ19LM OR J19LM
V'ALVE CLEARANCE: INTAKE: 004 - .008
EXHAUST: .004 -.008
SOLID STATE IGNITION
AIR GAP: .0125 IN.
BLADE BOLT TORQUE: 35-40 FT. LBS.
The model and serial numbers will be found on a decal attached to the rear of the
lawn mower housing,Record both serial number and date of purchase in space
provided above.
LAWN MOWER
Always observe safety rules when performing
any maintenance.
TIRES
° Keep tires free of gasoline, oil, or insect
control chemicals which can harm rubber.
• Avoid stumps, stones, deep ruts, sharp
objects and other hazards that may cause
tire damage.
BLADE CARE
For best results, mower blade must be kept
sharp. Replace bent or damaged blades,
TO REMOVE BLADE
,, Disconnect spark plug wire from spark plug
and place wire where it cannot come in
contact with spark plug.
,, Turn lawn mower on its side. Make sure air
filter and carburetor are up.
o Use a wood block between blade and
mower housing to prevent blade from
turning when removing blade bolt.
, Protect your hands with gloves and/or wrap
blade with heavy cloth.
° Remove blade bolt by turning counter-
clockwise. Use a 9/t6" box of open-end
wrench.
• Remove blade and attaching hardware
(bolt, lock washer and hardened washer).
NOTE: Remove the blade adapter and
check the key inside hub of blade adapter.
The key must be in good condition to work
properly. Replace adapter if damaged.
70 REPLACE BLADE
° Position the blade adapter on the engine
crankshaft. Be sure key in adapter and
crankshaft keyway are aligned.
, Position blade onthe blade adapter aligning
the two (2) holes in the blade wilh the raised
lugs on the adapter.
• Be sure the trailing edge of blade (opposite
sharp edge) is up toward the engine.
•Install the blade bolt with the lock washer
and hardened washer into blade adapter
and crankshaft.
° Use block of wood between blade and lawn
mower housing and tighten the blade bolt,
turning clockwise.
• The recommended tightening torque is 35-
40 ft. lbs.
IMPORTANT: Blade bolt is grade 8 heat
treated,
11
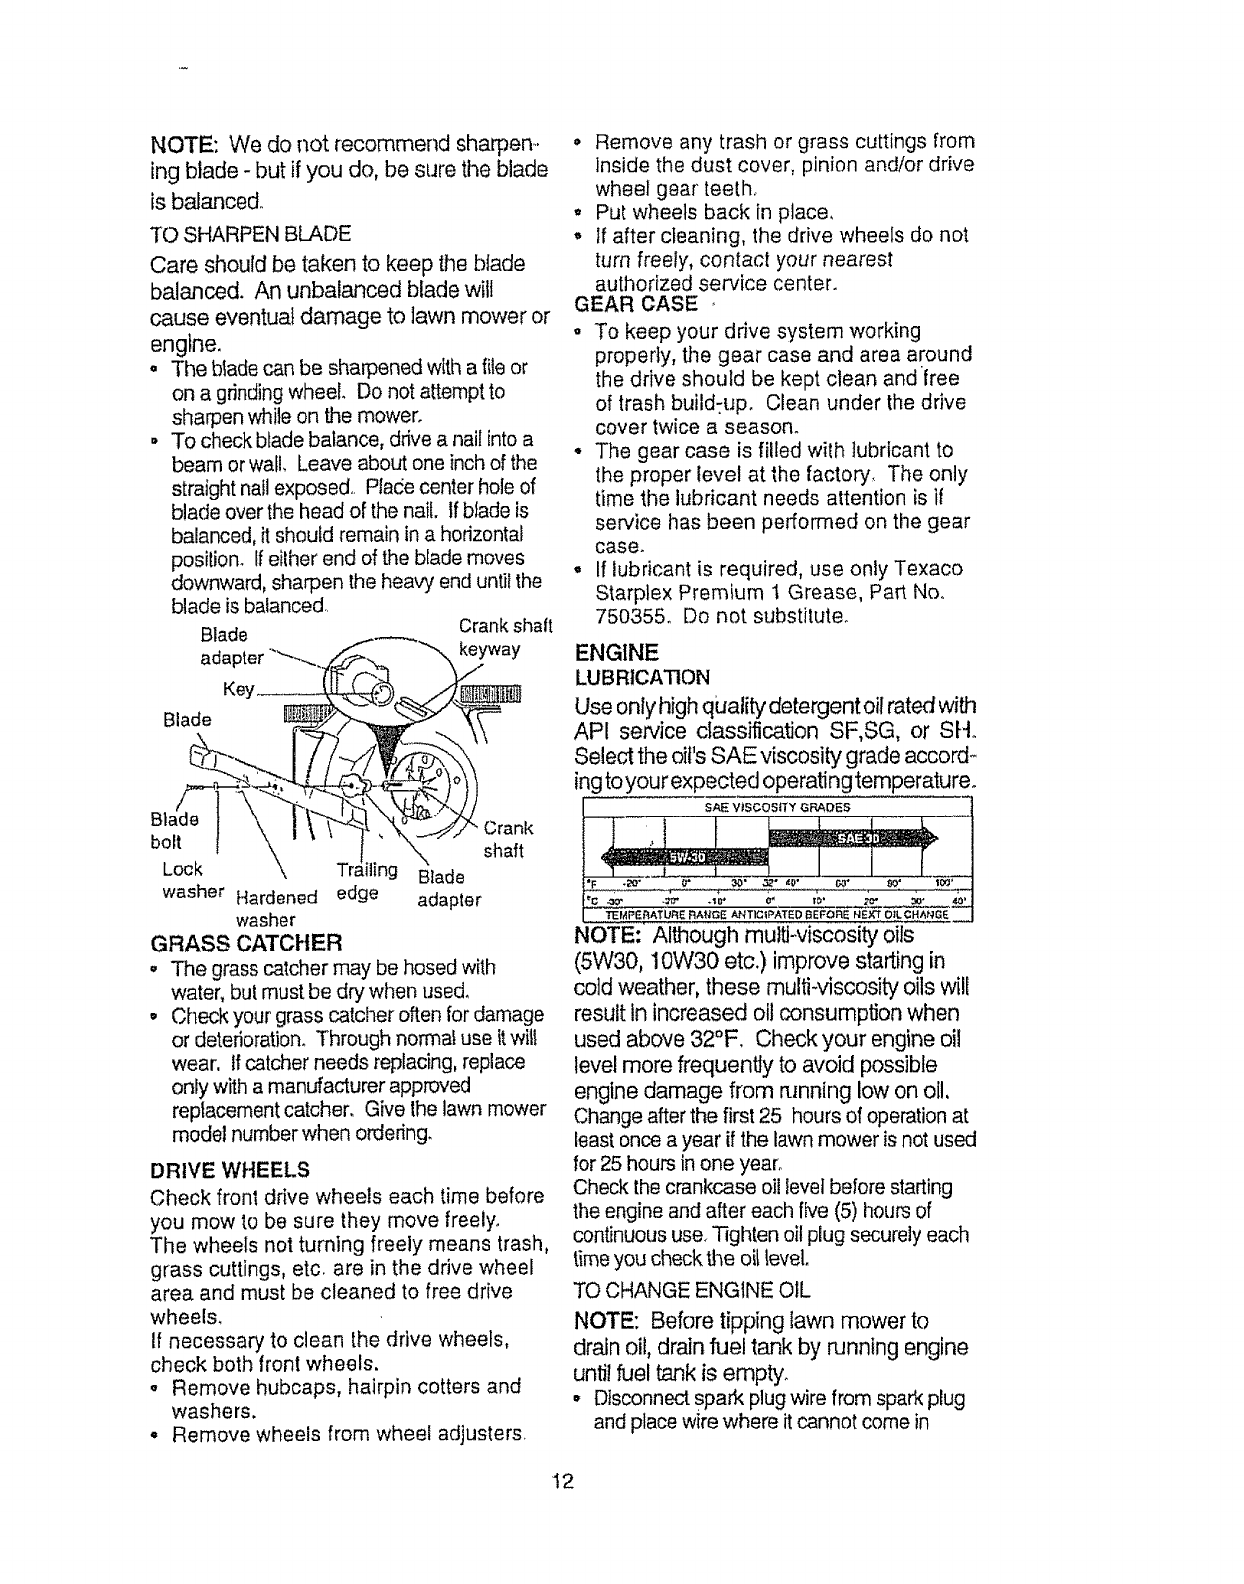
NOTE: We do not recommend sharpen-.
ing blade - but if you do, be sure the blade
is balanced.
TO SHARPEN BLADE
Care should be taken to keep the blade
balanced. An unbalanced blade will
cause eventual damage to lawn mower or
engtne.
. The blade can be sharpened with a file or
on a grinding wheel. Do not attempt to
sharpen while on the mower.
• To check blade balance, drive a nail into a
beam or wall, Leave about one inch of the
straight nail exposed.. Place center hole of
blade over the head of the nail. If blade is
balanced, it should remain in a horizontal
position_ If either end of the blade moves
downward, sharpen the heavy end until the
blade is balanced,.
Blade Crank sha|t
adapter '"---....7_'--"" ""_ way
Boll I \ " " I "\- shaft
Lock \ Trailing 13lade
washer Hardened edge adapter
washer
GRASS CATCHER
° The grass catcher may be hosed with
water, but must be dr.,/when used,
° Check your grass catcher often for damage
or deterioration. Through normal use it wil!
wear, If catcher needs replacing, replace
only with a manufacturer approved
replacement catcher. Give the lawn mower
model number when ordering.
DRIVE WHEELS
Check fron! drive wheels each time before
you mow to be sure they move freely.
The wheels not turning freely means trash,
grass cuttings, etc, are in the drive wheel
area and must be cleaned to free drive
wheels.
If necessary to clean the drive wheels,
check both front wheels.
°Remove hubcaps, hairpin cotters and
washers.
° Remove wheels from wheel adjusters.
° Remove any trash or grass cuttings from
inside the dust cover, pinion and/or drive
wheel gear teeth..
,, Put wheels back in place,
,, If after cleaning, the drive wheels do not
turn freely, contact your nearest
authorized service center.
GEAR CASE
o To keep your drive system working
properly, the gear case and area around
the drive should be kept clean and free
of trash build-upo Clean under the drive
cover twice a season.
o The gear case is filled with lubricant to
the proper level at the factor'.,/, The only
time the lubricant needs attention is if
service has been performed on the gear
case.
• If lubricant is required, use only Texaco
Starpiex Premium I Grease, Part No.
750355° Do not substitute°
ENGINE
LUBRICATION
Use only high quality detergent oil rated with
API service classification SF,SG, or SH.
Select the oil's SAE viscosity grade accord-
ing to your expected operating temperature.
SAE VISCOSITY GRADES
TEMPERATURE RANGE ANTICIPATED BEFORE NEXt OIL CHA_#GE
NOTE: Although mutU-viscosity oils
(5W30, 10W30 etc.) improve starting in
cold weather, these multi-viscosity oils will
result in increased oil consump{bn when
used above 32°F. Check your engine oil
level more frequently to avoid possible
engine damage from running low on oil,
Change after the first 25 hours of operation at
least once a year if the lawn mower is not used
for 25 hours in one year_
Check the crankcase oil level before starting
the engine and after each five (5) hours of
continuous use. Tighten oil plug securely each
time you check the oil Level.
TO CHANGE ENGINE OIL
NOTE: Before tipping lawn mower to
drain oil, drain fuel tank by running engine
until fuel tank is empty.
° Disconnect spark plugwire from sparkplug
and placewire where it cannot come in
12
contactwithsparkplug..
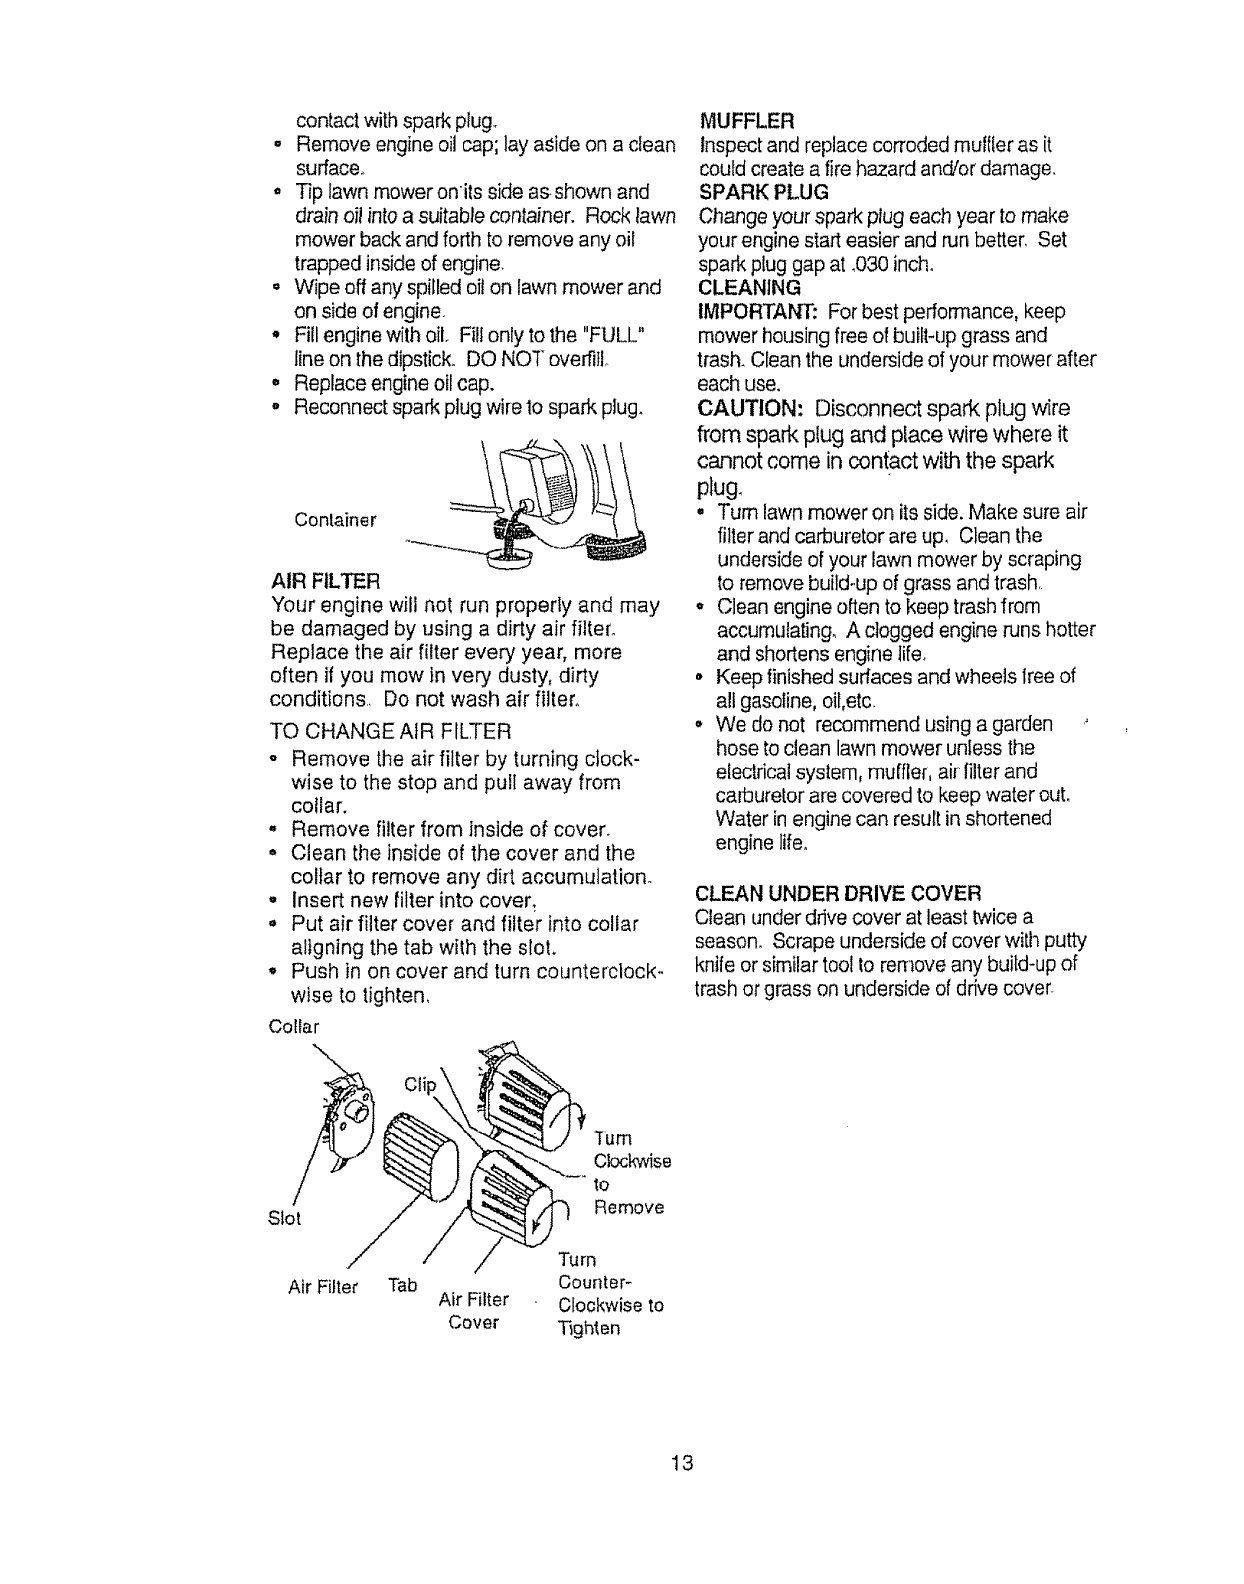
o Removeengineoilcap;layasideonadean
surface.
o Tiplawnmoweronitssideasshownand
drainoilintoasuitablecontainer.Rocklawn
mowerbackandforthtoremoveanyoil
trappedinsideofengine.
o Wipeoffanyspilledoilonlawnmowerand
onsideofengine.
* Fillenginewithoil.Fillonlytothe"FULL"
lineonthedipstick.DONOToverfill°
o Replaceengineoilcap.
° Reconnectsparkplugwire1osparkplug.
Container
AIR FILTER
Your engine will not run properly and may
be damaged by using a dirty air filter°
Replace the air filter every year, more
often if you mow in very dusty, dirty
conditions. Do not wash air filter°
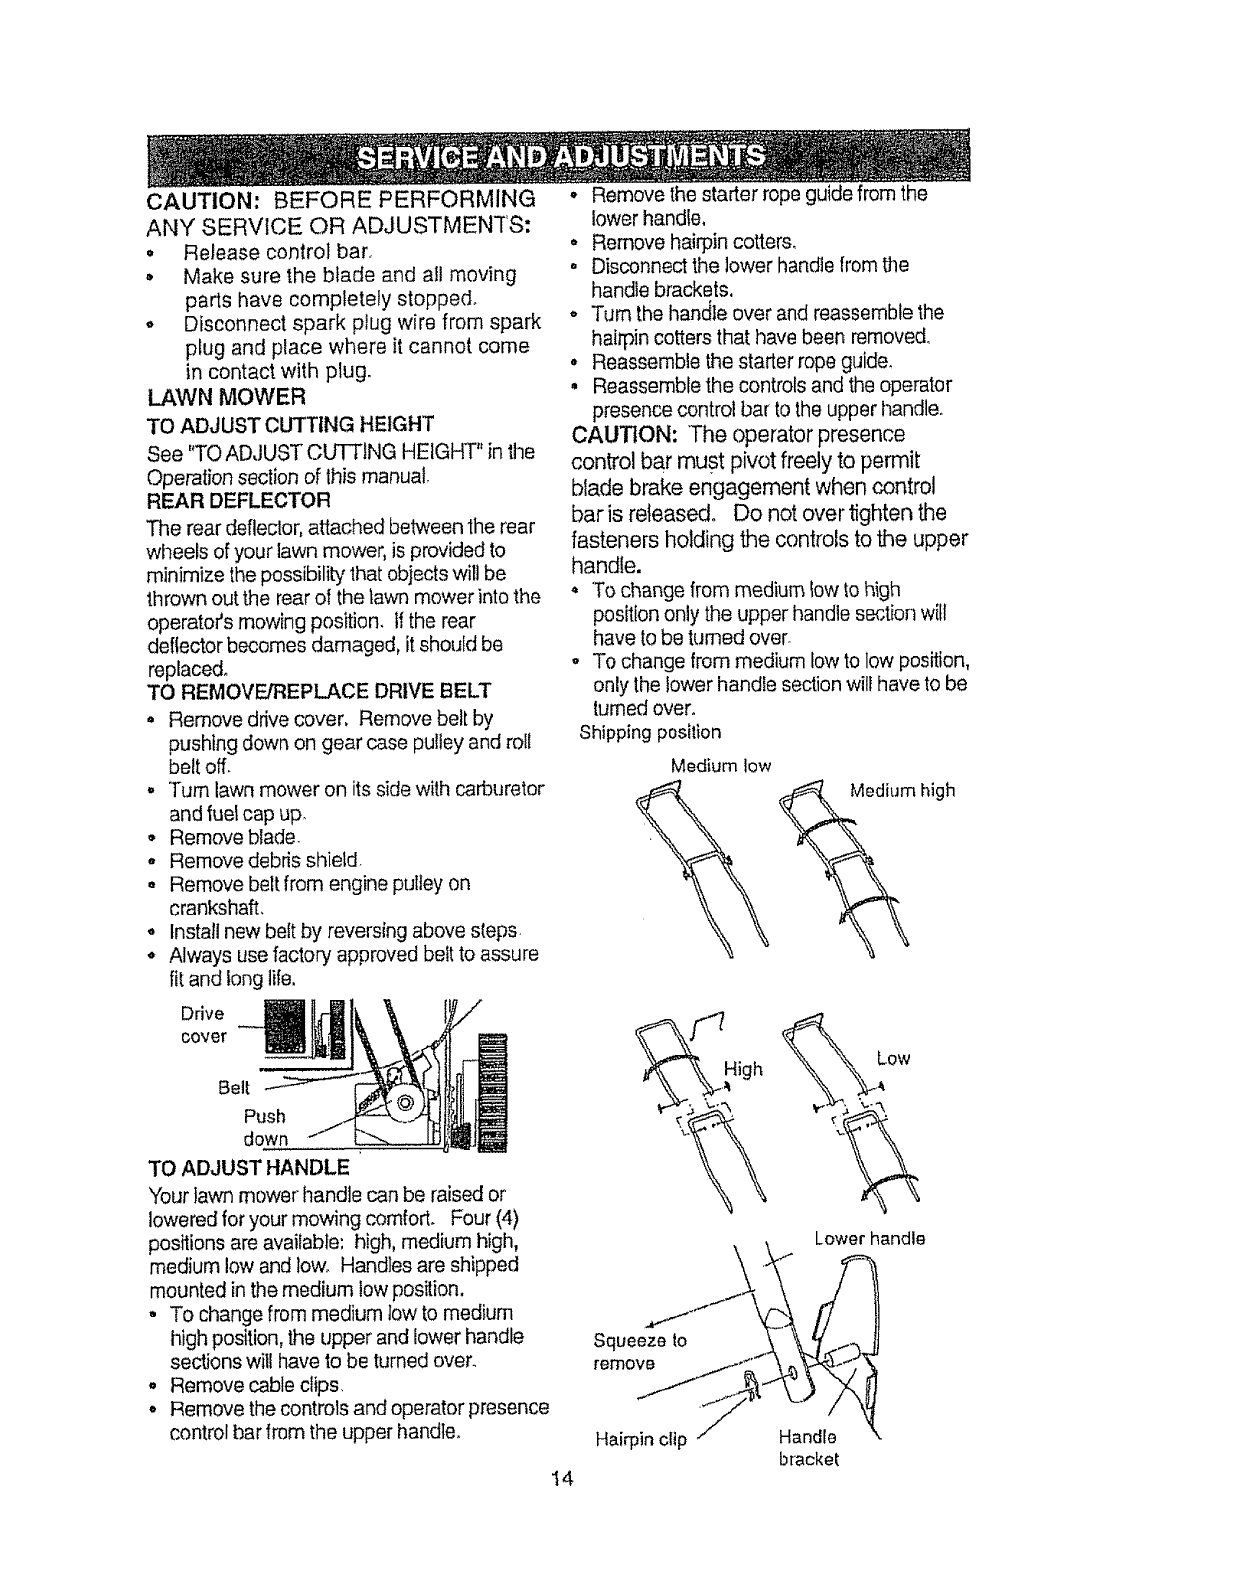
TO CHANGE AIR FILTER
oRemove the air filter by turning clock-
wise to the stop and pull away from
collar.
°Remove filter from inside of cover°
° Clean the inside of the cover and the
collar to remove any dirt accumulation.
• Insert new filter into cover.
- Put air filter cover and filter into collar
aligning the tab with the slot.
-Push in on cover and turn counterclock-
wise to tighten,
Collar
/
Slot
Air Filter
Clip _\,,
Tab Air Filter
Cover
_'fum
tco
/_ Turn Rern°ve
Counter-
Clockwise to
"Rghten
MUFFLER
Inspect and replace corroded muflfer as it
could create a fire hazard and/or damage.
SPARK PLUG
Change your spark plug each year to make
your engine start easier and run better, Set
spark plug gap at ,030 inch.
CLEANING
IMPORTANT: For best performance, keep
mower housing free of built-up grass and
trash. Clean the underside of your mower after
each use.
CAUTION: Disconnect spark plug wire
from spark plug and place wire where it
cannot come in contact with the spark
plug.
• Turn lawn mower on its side. Make sure air
filter and carburetor are uF Clean the
underside of your lawn mower by scraping
to remove build-up of grass and trash,
• Clean engine often to keep trash from
accumulating, A clogged engine runs hotter
and shortens engine life,
• Keep finished surfaces and wheels lree of
all gasoline, oil,etc.
o We do not recommend using a garden .'
hose to clean lawn mower unless the
electrical system, mu{fler, air' filter and
carburetor are covered to keep water out.
Water in engine can result, in shortened
engine life,.
CLEAN UNDER DRIVE COVER
Clean under drive cover at least twice a
season. Scrape underside of cover with putty
knife or similar tool to remove any buitd-up of
trash or grass on underside of drive cover-
13
CAUTION: BEFORE PERFORMING
ANY SERVICEOR ADJUSTMENTS:
• Releasecontrolbar_
•Make sure the blade and all moving
parts have completely stopped.
o Disconnect spark plug wire from spark
plug and place where it cannot come
in contact with plug.
LAWN MOWER
TO ADJUST CUTTING HEIGHT
See "TO ADJUST CUTTING HEIGHT" in the
Operation section of this manual
REAR DEFLECTOR
The rear deflector, attached between the rear
wheels of your lawn mower, is provided to
minimize the possibility that objects will be
thrown out the rear of the lawn mower into the
operator's mowing position. If the rear
deflector becomes damaged, it should be
replaced.
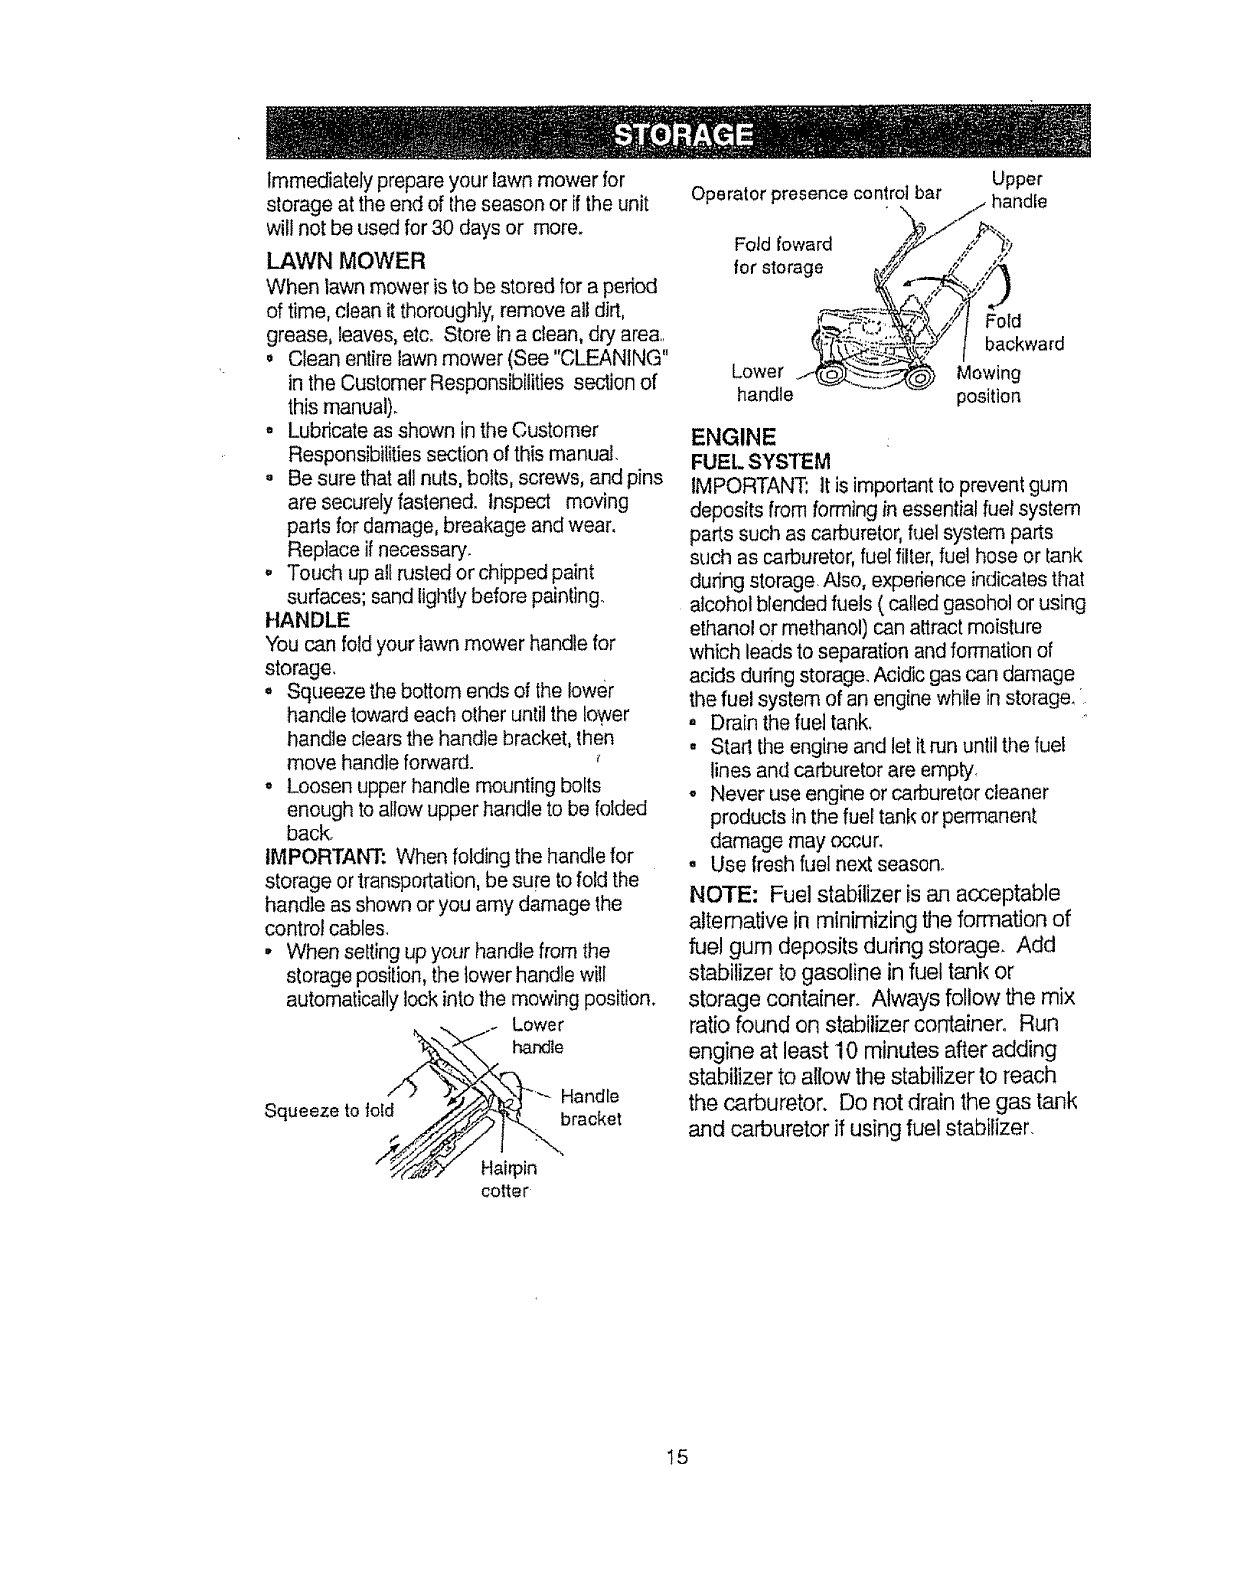
TO REMOVE/REPLACE DRIVE BELT
. Remove drive cover, Remove bell by
pushing down on gear case pulley and roll
belt off.
.Turn lawn mower on its side with carburetor
and fuel cap up.
° Remove blade.
oRemove debris shield
o Remove belt from engine pulley on
crankshaft,
o Install new belt by reversing above steps
°Always use factor,,: approved belt to assure
fit and long life.
o Remove the starter rope guide from the
lower handle,
° Remove hairpin cotter&
•Disconnect the lower handle from the
handle brackets.
o Turn the handle over and reassemble the
hairpin cotters that have been removed,
° Reassemble the starter rope guide,
• Reassemble the controls and the operator
presence control bar to the upper handle,
CAUTION" The operator presence
control bar must pivot freely to permit
blade brake engagement when control
bar is released° Do not over tighten the
fasteners holding the controls to the upper
handle.
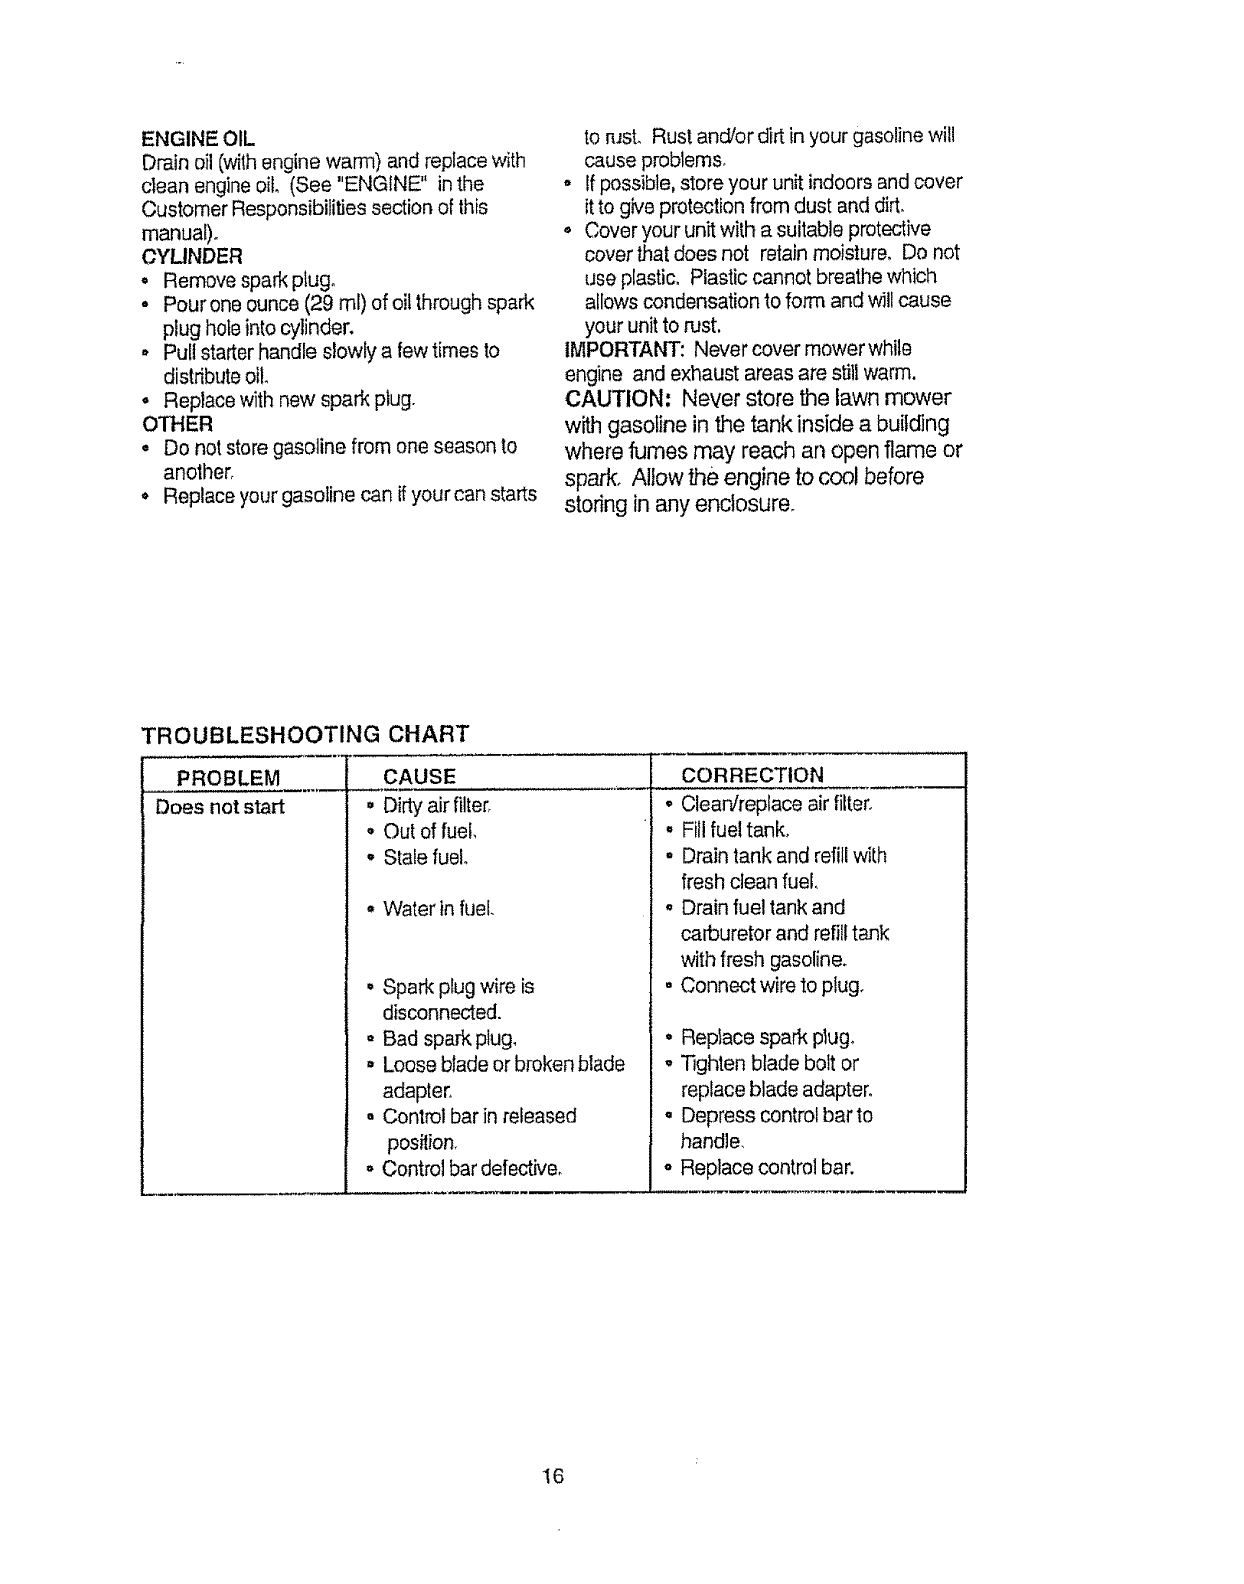
o To change from medium low to high
position only the upper handle section wily
have to be turned over.
oTo change from medium low to low position,
only the lower handle section will have to be
turned over.
Shipping position
Medium low
Drive
cover
Belt
Push
down
TO ADJUST HANDLE
Your lawn mower handle can be raised or
lowered for your mowing comfort. Four (4)
positions are available: high, medium high,
medium low and lowo Handles are shipped
mounted in the medium low position.
• To change from medium low to medium
high position, the upper and lower handle
sections will have to be turned over.
.Remove cable clips.
•Remove the controls and operator presence
control bar from the upper handle.
14
High Low
Lower handle
Hairpin clip _'/ .andl: _\
bracket
Immediately prepare your lawn mower for
storage at the end of the season or if the unit
will not be used for 30 days or more.
LAWN MOWER
When lawn mower is to be stored for a period
of time, clean it thoroughly, remove all dirt,
grease, leaves, etc. Store in a clean, dry are&
,, Clean entire lawn mower (See "CLEANING"
in the Customer Responsibilities section of
thismanual).
•Lubricate as shown in the Customer
Responsibilities section of this manual.
° Be sure that all nuts, bolts, screws, and pins
are securely fastened. Inspect moving
parts for damage, breakage and wear,
Replace if necessary.
.Touch up all rusted or chipped paint
surfaces; sand lightly before painting.
HANDLE
You can fold your lawn mower handle for
storage.
° Squeeze the bottom ends of the lower
handle toward each other until the lower
handle clears the handle bracket, then
move handle forward.
° Loosen upper handle mounting bolts
enough to allow upper handle to be folded
back.
IMPORTAhrF: When folding the handle for
storage or transportation, be sure to fold the
handle as shown or you amy damage the
control cables,
• When selling up your handle from the
storage position, the lower handle wiil
automatically lock into the mowing position.
• .-I Lower
• / f J._'_l ..... Handle
Squeeze to iota _/_/2.S,_[_.._ bracket
cotter
Upper
Operator presence control bar
.../... _'_,andle
Lower ,__ Mowing
handle position
ENGINE
FUEL SYSTEM
IMPORTANT: ]t is importantto prevent gum
deposits from forming in essential fuel system
parts such as carburetor, fuel system parts
such as carburetor, fuel filter, fuel hose or tank
during storage, Also, experience indicates that
alcohol blended fuels ( called gasohol or using
ethanol or methanol) can attract moisture
which leads to separation and formation of
acids during storage. Acidic gas can damage
the fuel system of an engine while in storage.
.Drain the fuel tank,
,, Stad the engine and let it run until the fuel
lines and carburetor are empty,
oNever use engine or carburetor cleaner
products tn the fuel tank or permanen[
damage may occur.
•Use fresh fuel next season°
NOTE: Fuel stabilizer is an acceptable
alternative in minimizing the formation of
fuel gum deposits during storage. Add
stabilizer to gasoline in fuel tank or
storage container. Always follow the mix
ratio found on stabilizer container. Run
engine at least 10 minutes after adding
stabilizer to allow the stabilizer to reach
the carburetor. Do not drain the gas tank
and carburetor if using fuel stabilizer.
I5
ENGINEOIL
Drainoil(withenginewarm)andreplacewith
cIeanengineoil,(See"ENGINE"inthe
CustomerResponsibilitiessectionofthis
manual).
CYLINDER
•Remove spark plugo
•Pour one ounce (29 ml) of oil through spark
plug hole into cylinder.
°Pull starter handle slowly a few times to
distribute oil.
° Replace with new spark plug..
OTHER
•Do not store gasoline from one season to
another,
•Replace your gasoline can if your can starts
to nJsto Rust and/or dirt in your gasoline will
cause problems,
" If possible, store your unit indoors and cover
it to give protection from dust and dirt.
•Cover your unit wiih a suitable protective
cover l.hatdoes not retain moisture, Do not
use plastic, Plastic cannot breathe which
allows condensation to form and will cause
your unit to rust,
IMPORTANT: Never cover mower while
engine and exhaust areas are still warm,
CAUTION: Never store the lawn mower
wi'_ gasoline in the tank inside a building
where fumes may reach an open flame or
spark. Allow the engine to cool before
storing in any enclosure.
TROUBLESHOOTING CHART
PROBLEM
Does not start
a
°
CAUSE
• Dirty air filter_
°Out of fuel,
° Stale fuel.
° Water in fuel.
Spark plug wire is
disconnected.
Bad spark plug,
Loose blade or broken blade
adapter.
Control bar in released
position,
Control bar defective.
CORRECTION
o Clean/replace air filter.
° Fill fuel tank,
° Drain tank and refill with
fresh clean fuel
o Drain fuel tank and
carburetor and refill tank
with fresh gasoline.
• Connect wire to plugo
•Replace spark plugo
,, "lighten blade bolt or
replace blade adapter,
° Depress control bar to
handle.
o Replace control bar.
16
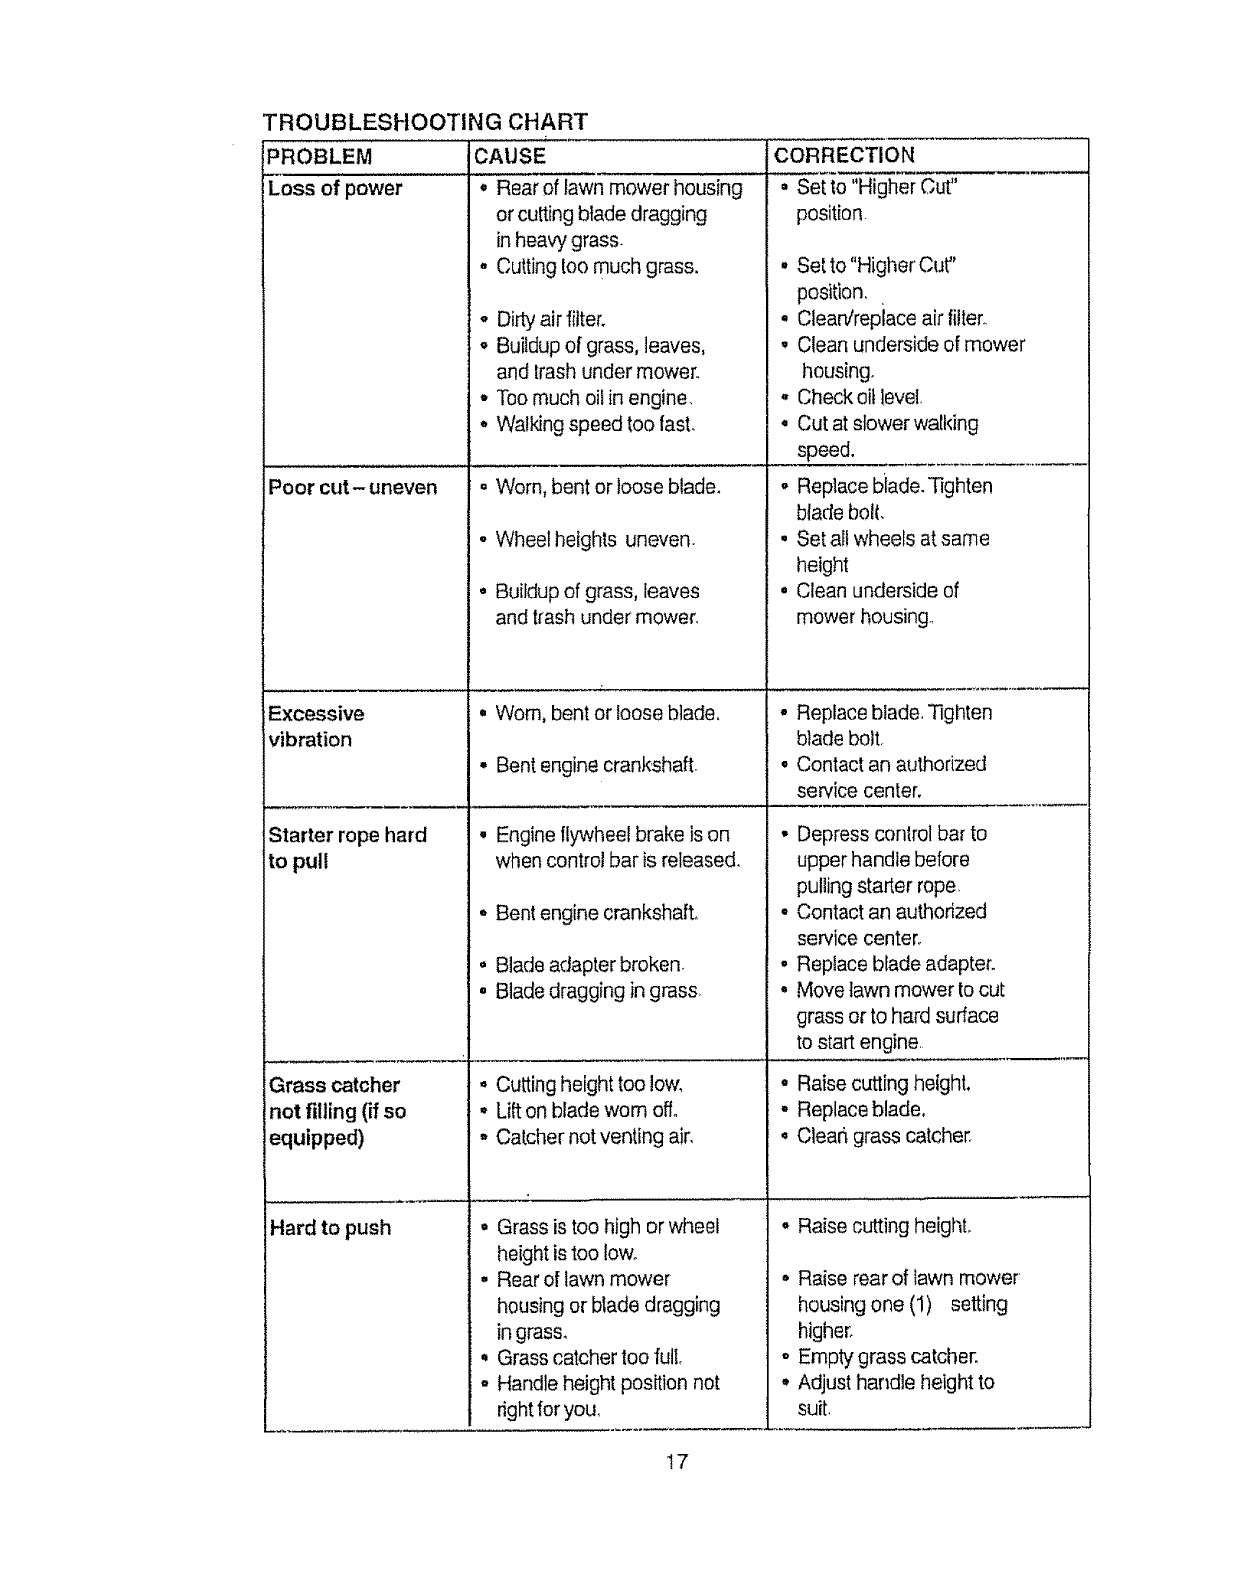
PROBLEM
iLoss of power
TROUBLESHOOTING CHART
CAUSE
•Rear of lawn mower housing
or cutting blade dragging
in heavy grass.
•Cutting too much grass.
Poor cut- uneven
Excessive
vibration
Starter rope hard
to pull
Grass catcher
not filling (if so
equipped)
Hard to push
oDirty air filter.
oBuildup of grass, leaves,
and trash under mower.
• Too much oil in engine.
o Walking speed too fast.
. Worn, bent or loose blade_
-Wheel heights uneven.
• Buildup of grass, leaves
and trash under mower,
•Worn, bent or loose blade,
•Bent engine crankshaft.
° Engine flywheel brake is on
when control bar is released.
°Bent engine crankshaft.
° Blade adapter broken.
,Blade dragging in grass
o Cutting height too low,
°Lift on blade worn off°
° Catcher not venting air.
° Grass is too high or wheel
height is too Iowo
° Rear of lawn mower
housing or blade dragging
in grass,
, Grass catcher too full
,, Handle height position not
right for you,
i COFIRECTION
° Set to "Higher Cut"
position.
, Set to "Higher Cut"
position,
• Clean/repiace airfiiter_
° Clean underside of mower
housing.
,, Check oit level
• Cut at slower walldng
speed.
° Replace biade. Tighten
blade bolt.
° Set all wheels at same
height
° Clean underside of
mower housing.,
• Replace blade. Tighten
b}ade bolt..
° Contact an authorized
service center.
- Depress control bar to
upper handle before
pulling starter rope,
° Contact an authorized
service center.
• Replace blade adapter.
,, Move lawn mower to cut
grass or to hard surface
to start engine
° Raise cutting height.
° Replace blade,
° Clear_ grass catcher
°Raise cutting height.
,, Raise rear of lawn mower
housing one (1) setting
higher.
° Empty grass catcher.
• Adjust handle height to
suit.
17
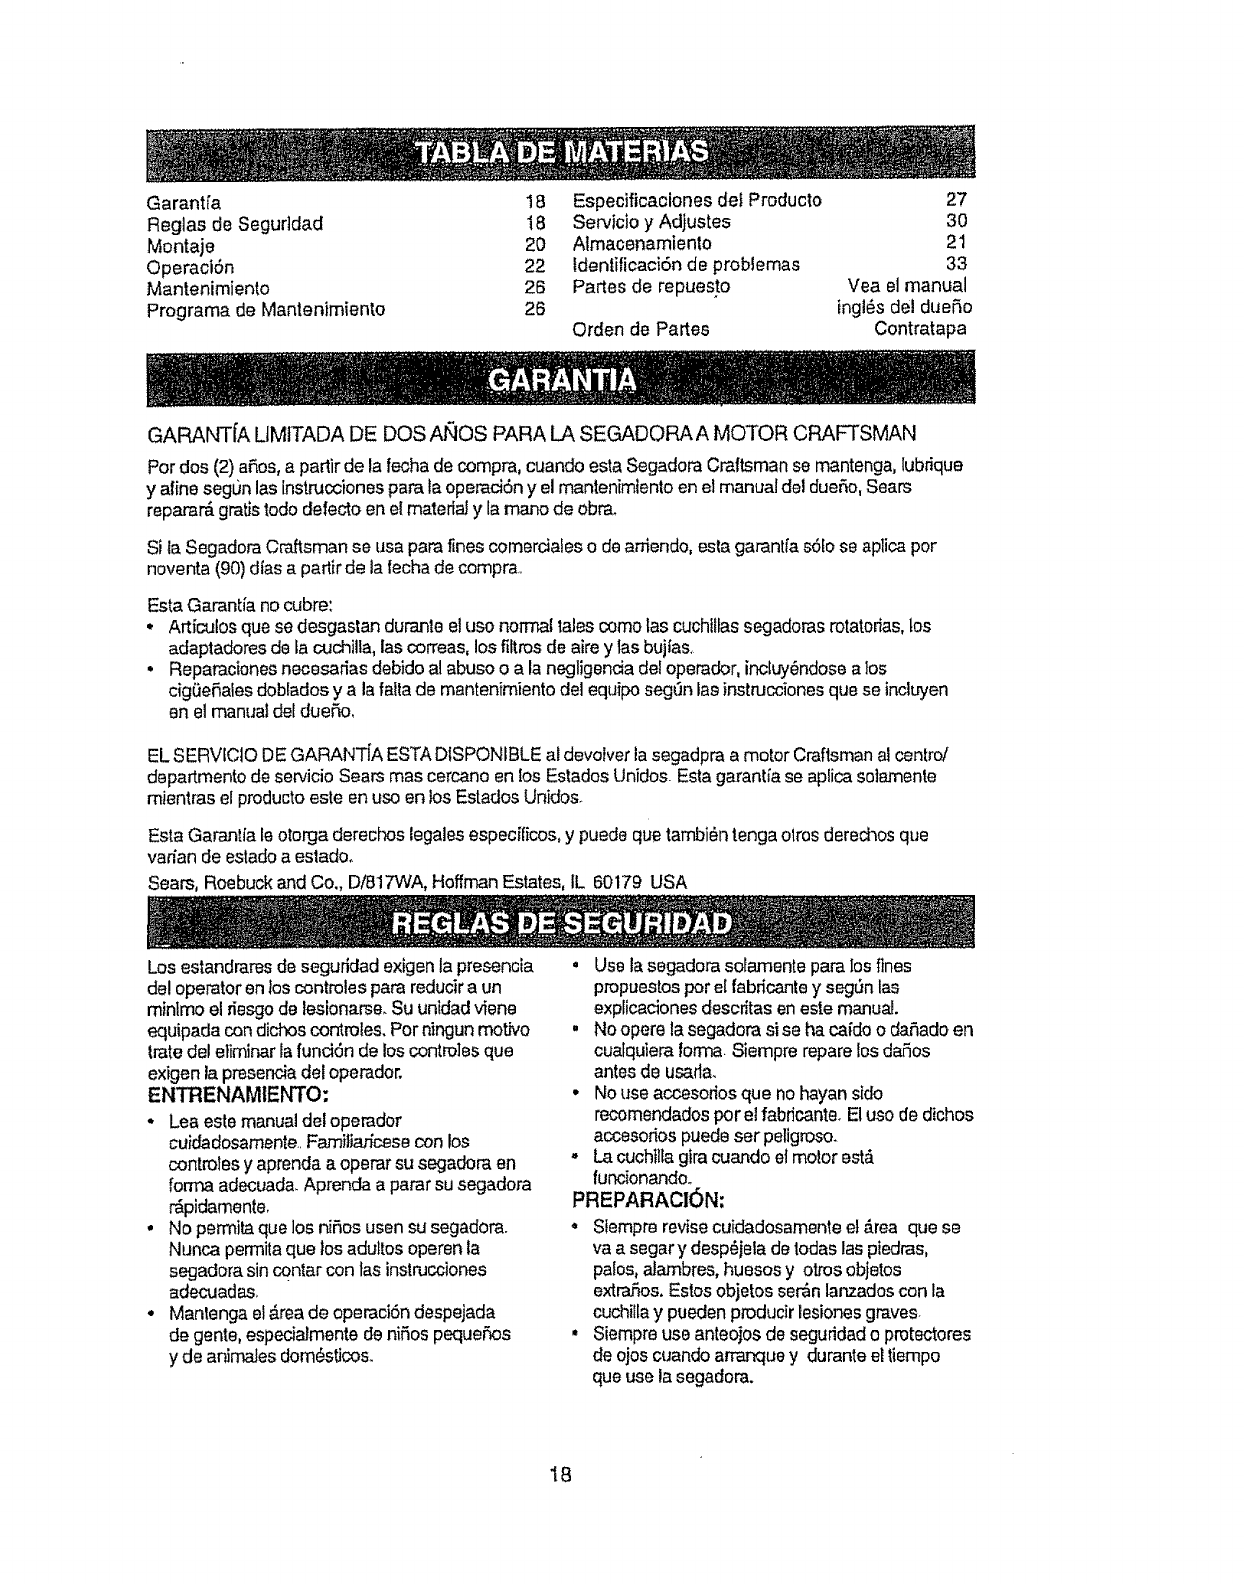
Garantl'a 18 Especificaciones def Producto 27
Reglas de Segurtdad 18 Servicio y Adjustes 30
Montaje 20 Almacenamiento 21
Operaci6n 22 tdentificaci6n de problemas 33
Mantenimiento 26 Partes de repuesto Vea el manual
Programa de Mantenimiento 26 ingles del duefio
Orden de Partes Contratapa
GARANT[A LIMtTADA DE DOS At_IOS PARA LA SEGADORA A MOTOR CRAFTSMAN
Perdos (2) aries,a partir de la fechade compra, cuando esta SegadoraCraftsman se rnantenga,lubrique
y aline segtJnlas instn.tccionespara laoperaci6n y el mantenimlentoen el manual del duefio,Sears
reparam gratisrode defecto en el materialy la mane de obr&
Si la SegadoraCraftsman se usa paralines comerdales o de arriendo,esta garantfas6lo se aplica per
noventa (90)dfas a partir de lafechade compra
Esta Garantia no cubre:
•Articles que se desgastan duranle el use normal tales come las cuchfltas segadoras rotatorias, _os
adaptadores de la cuchilla, las correas, los filtros de aire y las bujfas,
• Reparaciones necesarias debido al abuse o ala negligencia del operador, incluy_ndose a los
cigQefiales dobfados y ala falta de mantenimiento del equipo seg_3nlas instrucclones que se inclwen
an el manual del duefio,
EL SERVICIO DE GARANT[A ESTA DISPONIBLE al devolver ia segadpra a motor Craftsman al centre/
departmento de servicio Sears mas cercano en los Estados Unidos Esta garantia se aplica sotamente
mientras el producto este en use en los Estados Unidos.
Esta Garantfa le otorga derechos legales especificos, y puede que tambi6n tenga olros derechos que
varian de estado a estado,
Sears, Roebuck and Co., D/81TWA, Hoffman Estates, IL 60179 USA
Los estandraresde seguridad exigen la presencia
del operator en los controles pare reducira un
mintmo el riesgode lesionarse.Su unldadviene
equipada con dichoscontroles.Perningun mot;'vo
Iratedel eliminarla fund6n de los contro]esque
exigen la preserr'Jadel operador.
ENTRENAMIENTO:
- Lea este manualde! operador
cuidadosamente FamilJaricesecon los
controlesy aprendaa operar su segadora en
fen'haadecuad& AprencJaa parersu segadora
r_pidamente.
• No permitaquelos nifios usen su segadom.
Nunca pen'nitaque los adullos operenla
segadora sin contarcon tasinstrucciones
adecuada&
• Mantenga el#.reade operaci6ndespejada
de genre, especialmentede nifios pequefios
y de animalesdom6stico&
° Usela segadora solamente parelos fines
propuestos pere[ fabricantey seg_n las
explicacionesdescritas enes|e manual
. No opere la segadora si se ha caido o dafiado en
cualquteraton'ha Siempre reparelos defies
antesde usarta.
• No use aocesodosque no hayan side
recomendadosper et fabdcante.Eluse de dichos
accesoriospuedeser petigroso.
,, La cuchtllagiracuando et molor est_
funclonandoo
PREPARACI(_N:
, Slempra revisecuidadosamenteet _.rea que se
va a segar y desp6jela delodes las piedras,
palos,alambres,huesos y otrosobjetos
extrafios, Estesobjetos ser'&nlanzadoscon la
cuchillay pueden producirlesionesgraves
• Siemprause anteojosde seguridado protectores
de ojos cuando arrar_ue y durante eltiempo
queuse lasegadora.
18
• Vfstase en forma adecuada_ No opere +a
segadora sin zapatos o con sandalias
mientras que el motor est_ funcionando.
• Siegue siempre durante el dfa 0 con buena
tuz artificial.
OPERACION:
" Mantenga sus ojos y su mente en la
segadora yen et _tea que se est,_ cortando.
No permita que otros intereses Io distraigan,
• No code c_sped mojado o resbaloso. Nunca
corra mientras est_ operando su segadora
Siempre asegSrese de mantener el equilibrio
- mantenga el mango agarrado firmemente y
camineo
• No ponga las manes o los pies cerca odebajo
de tas partes rotatorias+ Mant_ngase
alejado de la abertura de descarga en rode
memento+
. Siempre pare el motor cuando se vaya
ocuando no est6 usando su segadora, o
antes de alravesar las entradas para autos,
los senderos, caminos y ,_reas cubiertas de
riplo+
,, Nunca dfrUa la descarga del material hacia
los espectadores ni permita a nadie cerca de
la segadora mientras Ja est_ operando+
• Antes de limpiar, inspeccionar o de reparar I
a segadora, pare et motor y est_
completamente seguro de que la cuchilia y
que todas las partes que se mueven se
hayan detenido, Luego, desconecte e!
aJambre de la bujfa y mant_ngato alejado de
_sta para evilar el arranque per aecidente..
• No contin_3e haciendo funcionar su segadora
si le paga a un objeto extra5o. Siga el
procedimiento descrito anteriorrnente, luego
repare cualquier daSo antes de volver a
arrancar y de operar su segadora,.
-No eatable los ajustes del regufador o
hagaque el motor ande a una velocidad
excesiva. Se pueden producir daSos en el
motor y I esiones personales,.
• No opere su segadora si vibra fuera de lo
normal. La vibraci6n excesiva es una
indicaci6n de dafo; pare el motor, revise en
forma segura la causa de la vibraci6n y haga
tas reparaciones segQn tea necesario+
• No haga funcionar et motor en
recinioscerrados. Los gases de escape son
peligrosos.
- Nunca corIe el c6sped tirando ia segadora
hacia usted Siegue a travSs de la cara de
las pendienles, nunca hacia arriba o hacia
abajo pues puede perder el equilibdo, No
siegue pendientes demasiado empinadas.
Tenga cuidado cuando opere +asegadora en
terreno disparejo o cuando cambie de
direcci6n _1mantenga un buen equilibrio,
, Nunca opere la segadora sin las
protecciones adecuadas, las planchas, et
recogedor de c_sped y otros dispositivos de
seguridad en su tugar+
MANTENIMIENTO Y ALMACENAMIEN-
TO:
• Revise la cuchitla y los pemos de montaje
det motor a menudo, para asegurarse que
est_n apretados an la forrna adecuada.
• Revise todos los pemos, tuercas y tomillos a
intervatos ]recuentes, para verificar si est&n
apretados en forma adecuada, y
asegurarseque la segadora se encuentra en
condiciones de funcionamiento seguro.
•Mantenga redes los dlspositivos de seguridad
en su lugar y lislos para funcionar.
,Para reducir el peligro de incendio,
mantenga el motor sin c_sped, hojas y grasa
o aceite en exceso
• Revise el recogedor de c_sped a menudo
para verificar si hay deterioro y desgaste y
cambie lax bolsas desgastadas. Use
solamente las bolsas de repuesto
recomendadas per et fabricante de su
segadora o que cumplen con las
especiticaciones de ,_sf,e+
° Siempre mantenga una cuchitla afi[ada en su
segadora+
- Siempre perrnila que el motor se enfrfe
antes de guardarla en cualquier recinto
cerrado.
° Nunca guarde ta segadora con combustible
en el estanque dentro de un edificio endonde
los gases pueden alcanzar una llama
expuesta o una fuente deignici6n, tal come el
calentador de agua, la estufa de
calefacci6n, la secadora de ropa, etc,
PRECAUCI_N: Siempre desconecte el
alambre de la bujfa y p6ngalo donde no pueda
entrar en contacto con [a buj[a, para evitar el
arranque per accidente, duranle la preparaci6n,
el transpode, el ajuste o cuando se hacen
reparaciones+
PREOAUClON: Es conocido per el Estado de
Califomia que los gases de escape del motor de
este productor contienen qul'micos los cuales a
ciertos niveles, pueden ocasionar, c&ncer,
det'ectos de nacimiento, y otros daSos al sistema
reproductive,
19
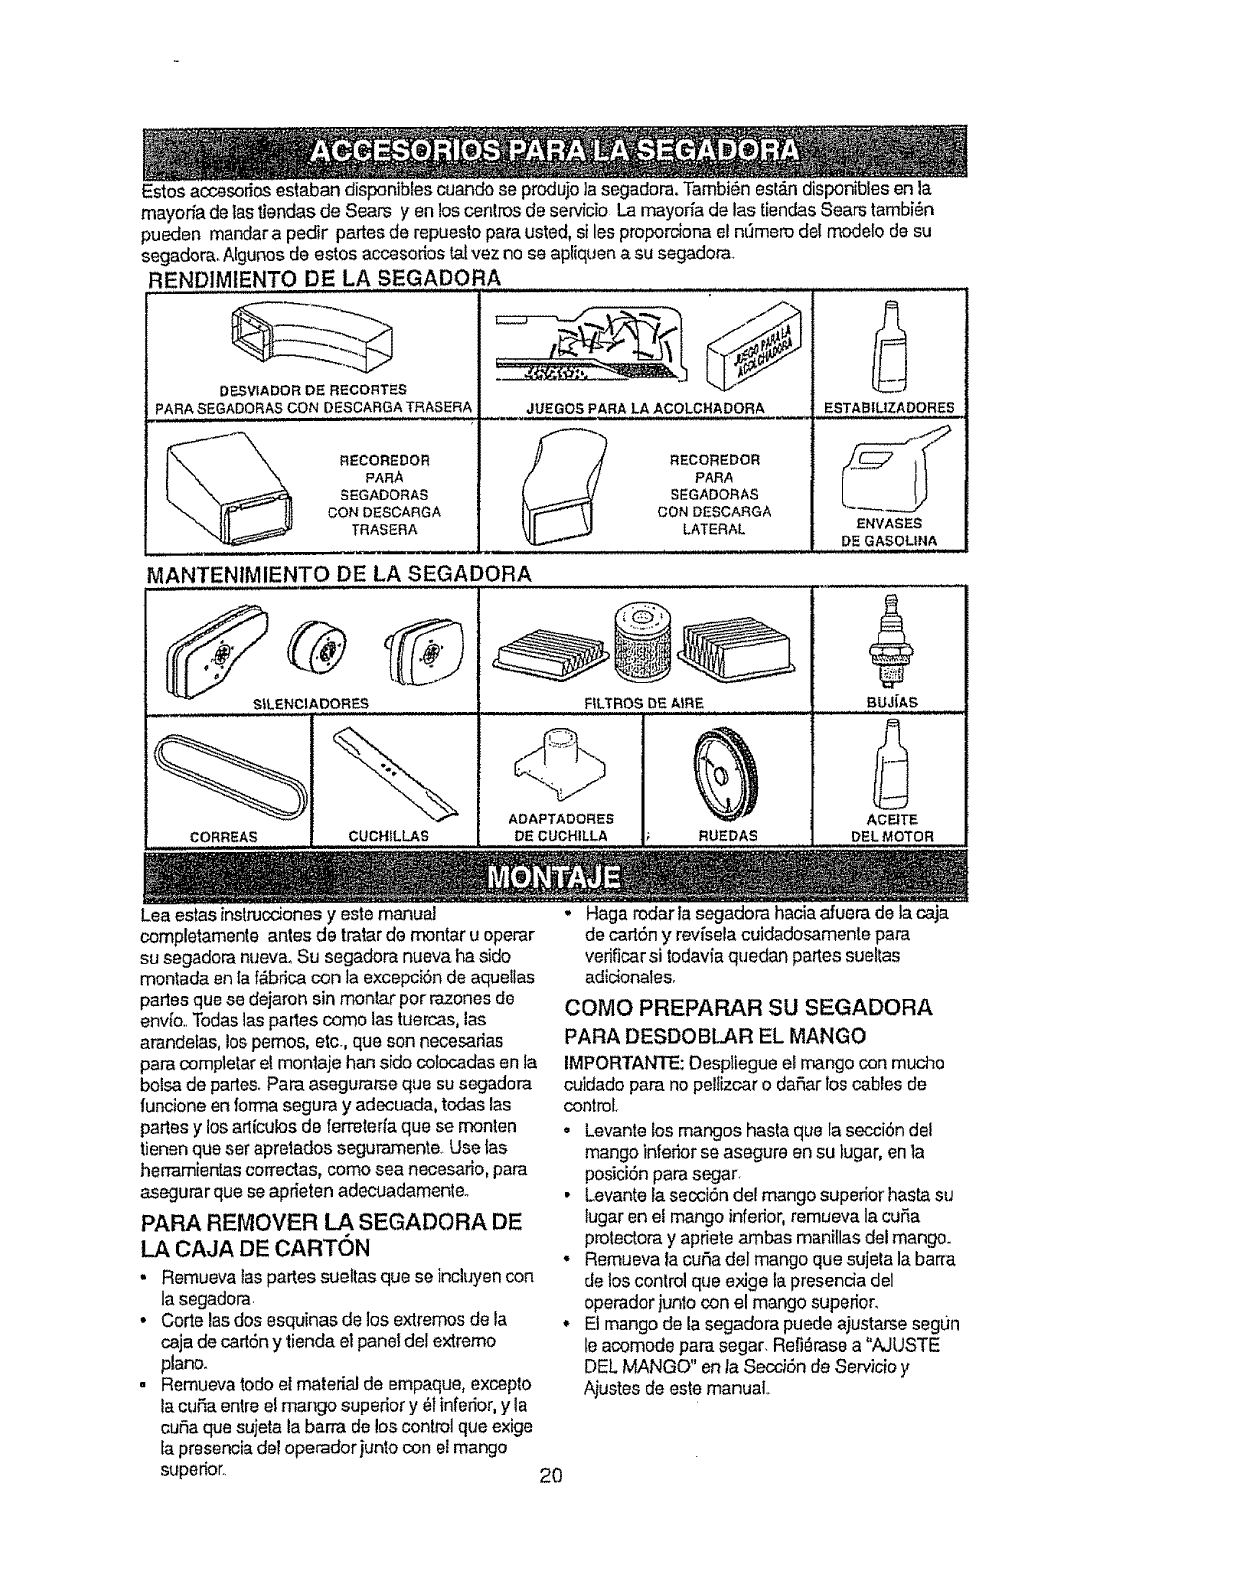
Estos accesorios estaban disponib{es cuando se produja ]a segadora. Tambi6n est#.n disponibles en la
mayofia de las tiendas de Sears yen los centros de servicio La mayorfa de las tiendas Sears tambi_n
pueden mandar a pedir partes de repuesto para usted, si les proporciona el ndmero del modelo de su
segadora. Algunos de estos accesorios ta[ vez no se apliquen a su segador&
RENDIMIENTO DE LA SEGADORA
/.---'C/h
DESVIADOR DE RECORTES
_ARA SEGADORAS CON DESCAROA TRASERA JUEGOS PARA LA ACOLCHADORA
RECOREDORpARA _ RECOREDORpARA
SEGADORAS SEGADORAS
CON DESCARGA CON DESCARGA
TRASERA LATERAL
MANTEN1MIENTO DE LA SEGADORA
HJl,J
S_LENCIADORES RLTROS DE AIRF.
CORREAS CUCHILLAS
AOAPTADORES
DE CUCHILLA ,RUEDAS
ESTAB[LtZADORES
ENVASES
DE GASOLINA
BUJ[AS
2
ACFJTE
DEL MOTOR
Lea estas instrucciones yeste manual ,,
completamente antes de tratar de montar u operar
su segadora nueva° Su segadora nueva ha side
montada en {a f_brica con la excepci6n de aquellas
partes que se dejaron sin montar per razones de
env[o.. Todas las parles come las tuercas, las
arandetas, los pemos, etc., que sen necesarias
para completar el montaje hart side cotocadas en ia
belsa de partes. Para asegurarse que su segadora
tuncione en forma segura y adecuada, todas las
pastes y los art{culos de ferreterfa que se monten
tienen que set apretados seguramente Use fas
herramientas correctas, come sea necesario, para
asegurar que se aprieten adecuadamenteo
PARA REMOVER LA SEGADORA DE
LA CAJA DE CARTON
oRemueva ias partes sueltas que se incluyen con
la segadora
•Corte las des esquinas de los extremes de la
caja de cart6n y tienda el panel de[ extreme
piano.
. Remueva _.odoel material de Bmpaque, excepto
la curia entre el mango superior y 61inferior, y la
curia que sujeta la barra de los control que exige
la preseneia dal operador junto con el mango
superior.. 20
Haga rodarta segadora haoiaafuera de lacaja
de cart6ny rev[sela cuidadosamenle para
verificarsi todaviaquedan partessueltas
adidonales,
COMe PREPARAR SU SEGADORA
PARA DESDOBLAR EL MANGO
IMPORTANTE: Desptiegue el mango con touche
cuidado para no peliizcar o dafiar los cables de
control
• Levante los mangos basra que la secci6n del
mango inferior se asegure en su tugar, en ta
posiciSn para segar
• Levante la secci6n del mango superior hasta su
lugar en el mango inferior, remueva la cuiia
protectora y apriete ambas manillas del mange.
,, Remueva la curia del mango que sujeta la barra
de los control que exige ta presencia del
operador junto con el mango superior.
,, El mango de la segadora puede ajustarse segun
le acomode para segar. Refi_rase a "AJUSTE
DEL MANGO" en la Secci6n de Servicio y
Ajustes de este manual.
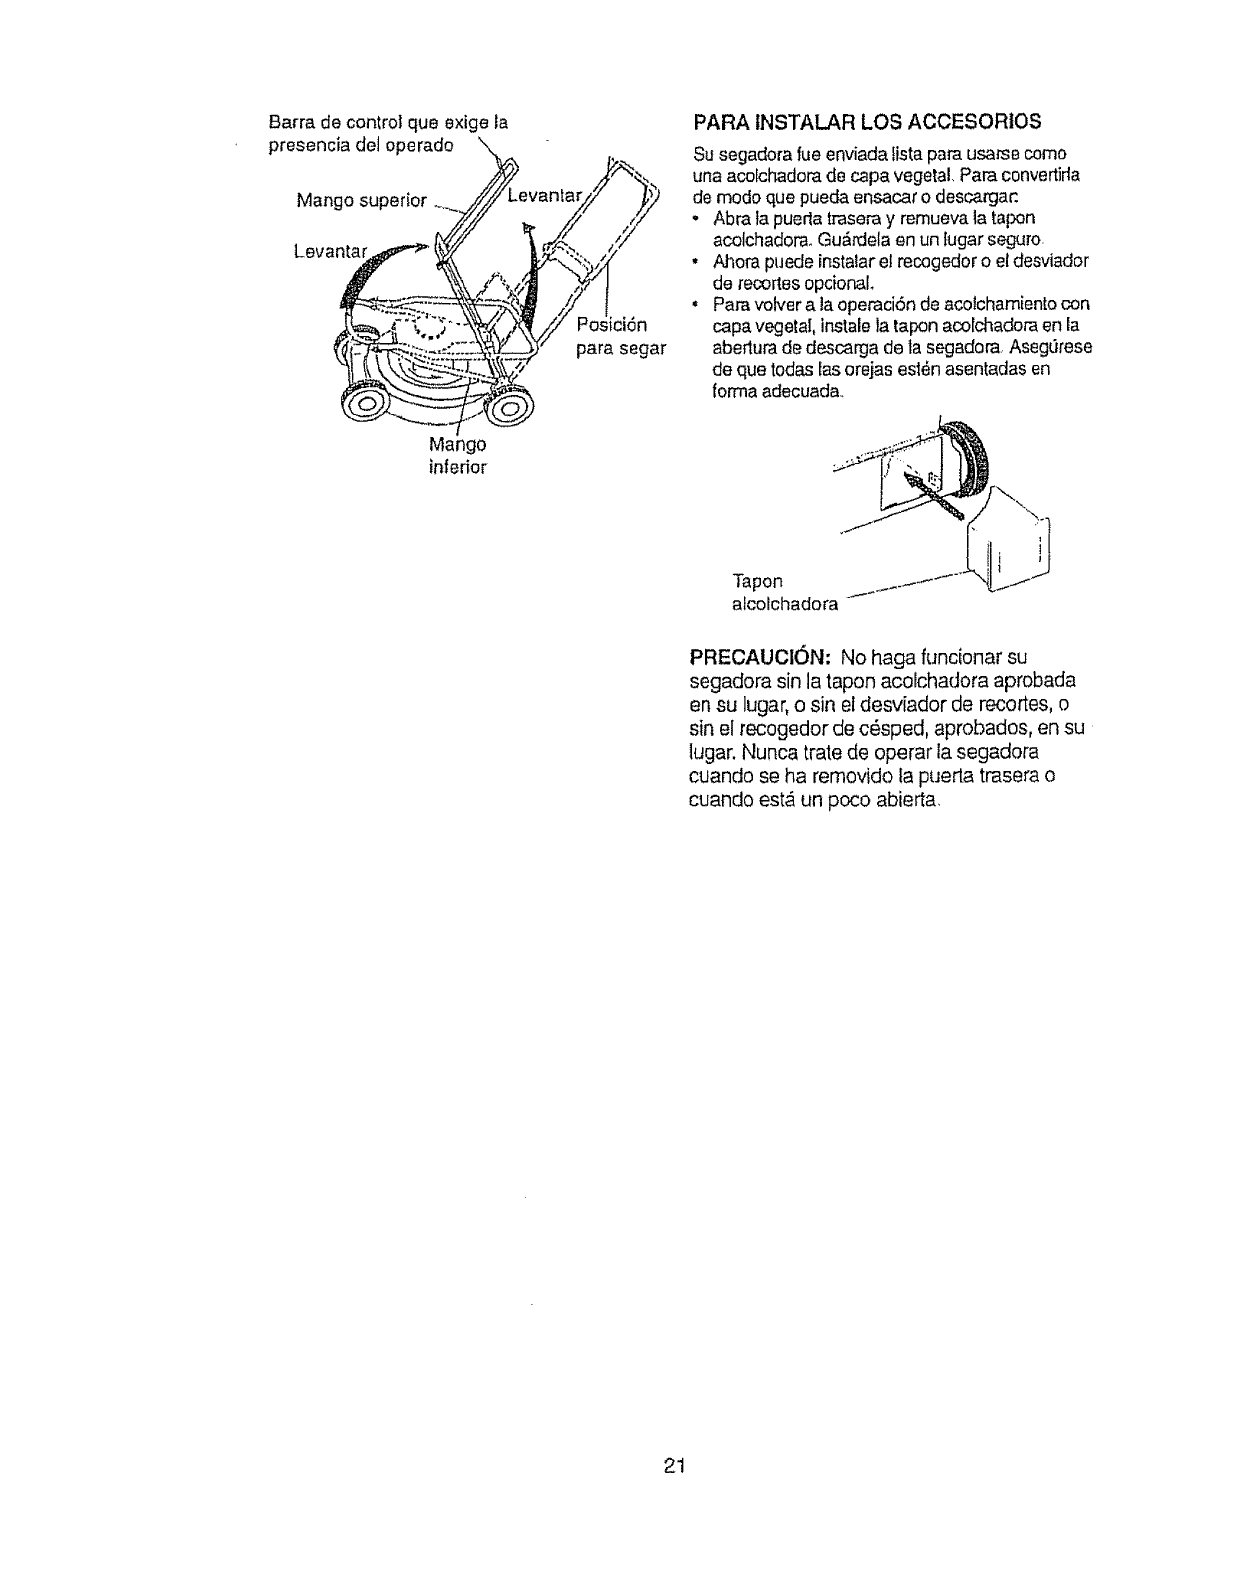
Barra de control que exige la
presencia det operado
Mango superior
Levantar
Mango
inferior
ostciSn
para segar
PARA INSTALAR LOS ACCESORIOS
Su segadora rue enviada fista para usage como
una acolchadora de capa vegetal, Para convertNa
de modo que pueda ensacar o descargac
- Abra ]a pueda trasera y remueva la tapon
acolchador& Gu_rdela en un fugar seguro,
• Ahora puede instalar ef recogedor o el desviador
de recortes opcionaL
, Para volver a la operaciSn de acotchamiento con
capa vegetal, instale la tapon acoEchadora en la
aberlura de descarga de la segadora, AsegOrese
de que todas las orejas esl_n asenladas en
forma adecuad&
Tapon f_-_-'
alcolchadora
PRECAUCi6N: No haga funcionar su
segadora sin la tapon acolchadora aprobada
en su lugar, o sin el desviador de recortes, o
sin el recogedor de c6sped, aprobados, en su
tugar. Nunca trate de operar ia segadora
cuando se ha removido la puerta trasera o
cuando est,_ un poco abierta.
21
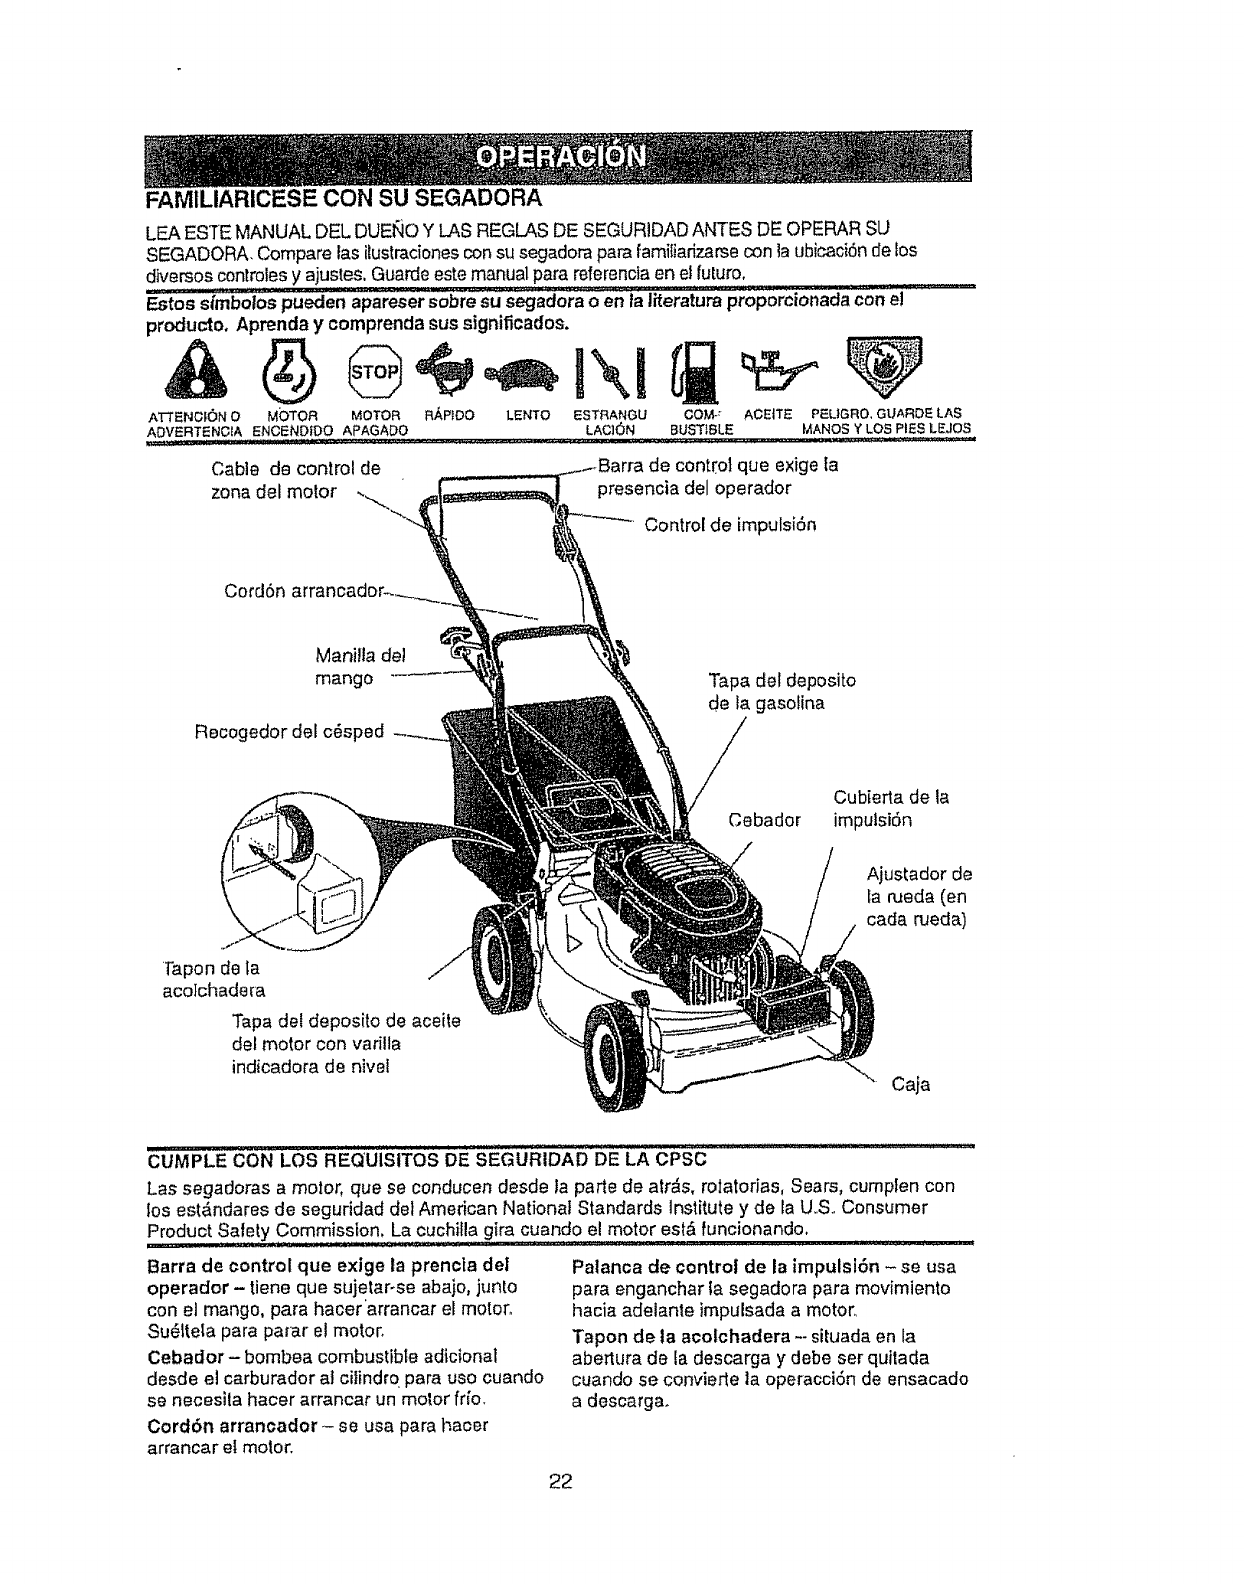
FAMILIARICESE CON SU SEGADORA
LEA ESTE MANUAL DEL DUENO Y LAS REGLAS DE SEGUR1DADANTES DE OPERARSU
SEGADORA. Compare tas ilustracionescon su segsdora pare familiarizarsecon la ubicaci6nde los
diversos controlesy ajustes, Gusrde este manual pare referenciaen el future,
Estos st'mbolos pueden apareser sobre su segadora o en ta literature proporcionada con et
producto, Aprenda y comprenda sus significados,
A_ENC_]ON O MC)TOR MOTOR RAPIDO LENTO ESTRANGU COM-: ACEITE PEL|GRO, GLIARDE LAS
ADVERTENOIA ENCENDtDO APAGADO LAG]ON BUST_BLE MANES YLOS PIES LEJOS
Cable de control de :o1qua exigeta
zone del motor presencia del operador
Control de impulsi6n
Manilla de!
mango
Recogedordelc6sped
Tapa del deposito
de la gasofina
Cebador
Cub[e_a deia
impulsiSn
Tapon de la
acolchadera
Tapa de{ deposito de aceite
del motor con varilla
indicadora de nivel
Ajustador de
la rueda (en
cads rueda)
Caja
CUMPLE CON LOS REQ'UISITOS DE SEGURIDAD DE LA CPS'C""
Las segadoras a reeler, que se conducen desde Ia parte de atr_s, rotatorias, Sears, cumpfen con
los est&ndares de seguridad del American National Standards Institute y de la U..S..Consumer
Product Safety Commission, La cuchifla g{ra cuando el motor est& funcionando,
Barra de control que exlge ta prencla del
operador - tiene que sujetar-se abajo, junto
con el mango, para hacer'arrancar el motor.
Su_ltela pars parer el motor.
Cebador- bombea combustible adicionsl
desde el carburador at cilindro pare use cuando
se necesila hscer arrancar un motor fri'o.
Cordbn arrancador - se usa pare hacer
arrancar el motor.
Palanca de control de la impulst6n - se usa
para enganchar ta segadora para movimiento
hacia adelante impulsada a motor°
Tapon de Is acolchadera -- situada en la
aberlura de la descarga y debe ser quitada
cuando se convierte la operacci6n de ensacado
a descarga.
22
La operaci6n de cualquier segadora puede
hacer que salten objelos extraSos denlro de sus
ojos, Io que puede producir daSos graves en
6stos. Siempre use anteojos de seguddad o
protecci6n para los ojos mientras opere su
segadora o ouando haga ajustes o
reparaciones. Recomendamos una mascara de
seguridad de visi6n amptia, para uso espejuelos
o anteojos de seguridad estandade.
COMO USAR SU SEGADORA
PREOAUOION: No haga funcionar su
segadora sin et desviador de recortes o sin el
recogedor de c_sped, aprobados, en su
lugar. Nunca trate de operar la segadora
cuando se ha removido la pueda trasera o
cuando est& un poco abiert&
VELOClDAD DE[. MO'I'OR
La velocidad det motor se estableci6 en la
tEibrica para un rendimJento 6plimo. La
ve!ocidad no se puede ajustar,,
CONTROL DE ZONA DEL MOTOR
PRECAUCION" Las regulaciones federales
exigen que se instale un control para el motor
en esta segadora para reducir a un mfnimo el
desgo de lesionarse debido al contacto con fa
cuchilla, Pot ning0n motivo trate de eliminar
la funci6ndel control del operador. La cuchilta
gira cuando el motor e_t_ funcionando
• Susegadora viene equipada con una barrade
control que exige ta presencia det operador, 1o
que requiereque eloperador estedetrAsdel
mango de [a segadora para hacer_a arrancar y
operarl&
PARA AJUSTAR LA ALTURA DE CORTE
• Levante las ruedas para el corte bajo y baje fas
ruedas parael corte alto.
. Ajuste la altura de corte para que se acomode a
sus requisitos, La posici6n del med_o es la mejor
para lamayofia de los c_spede&,
• Paracambiar la altura de code, empuje la
palanca del ajustador hacia larued& Mueva la
nleda hada ardbao hacia abajode modo que
se acomode a sus requisitos Asegurese que
todaslas ruedas queden iguafmenteajustadas.
ATENClON: El ajustador esta correctamente
colocado cuando las orejas de la placa est,_n
lnsedadas en el agujero de] mango,
Tambi_,n, los ajustes de 9 posiciones (st
equipado) permiten que el mango pueda ser
movido entre las oreias de la ptaca
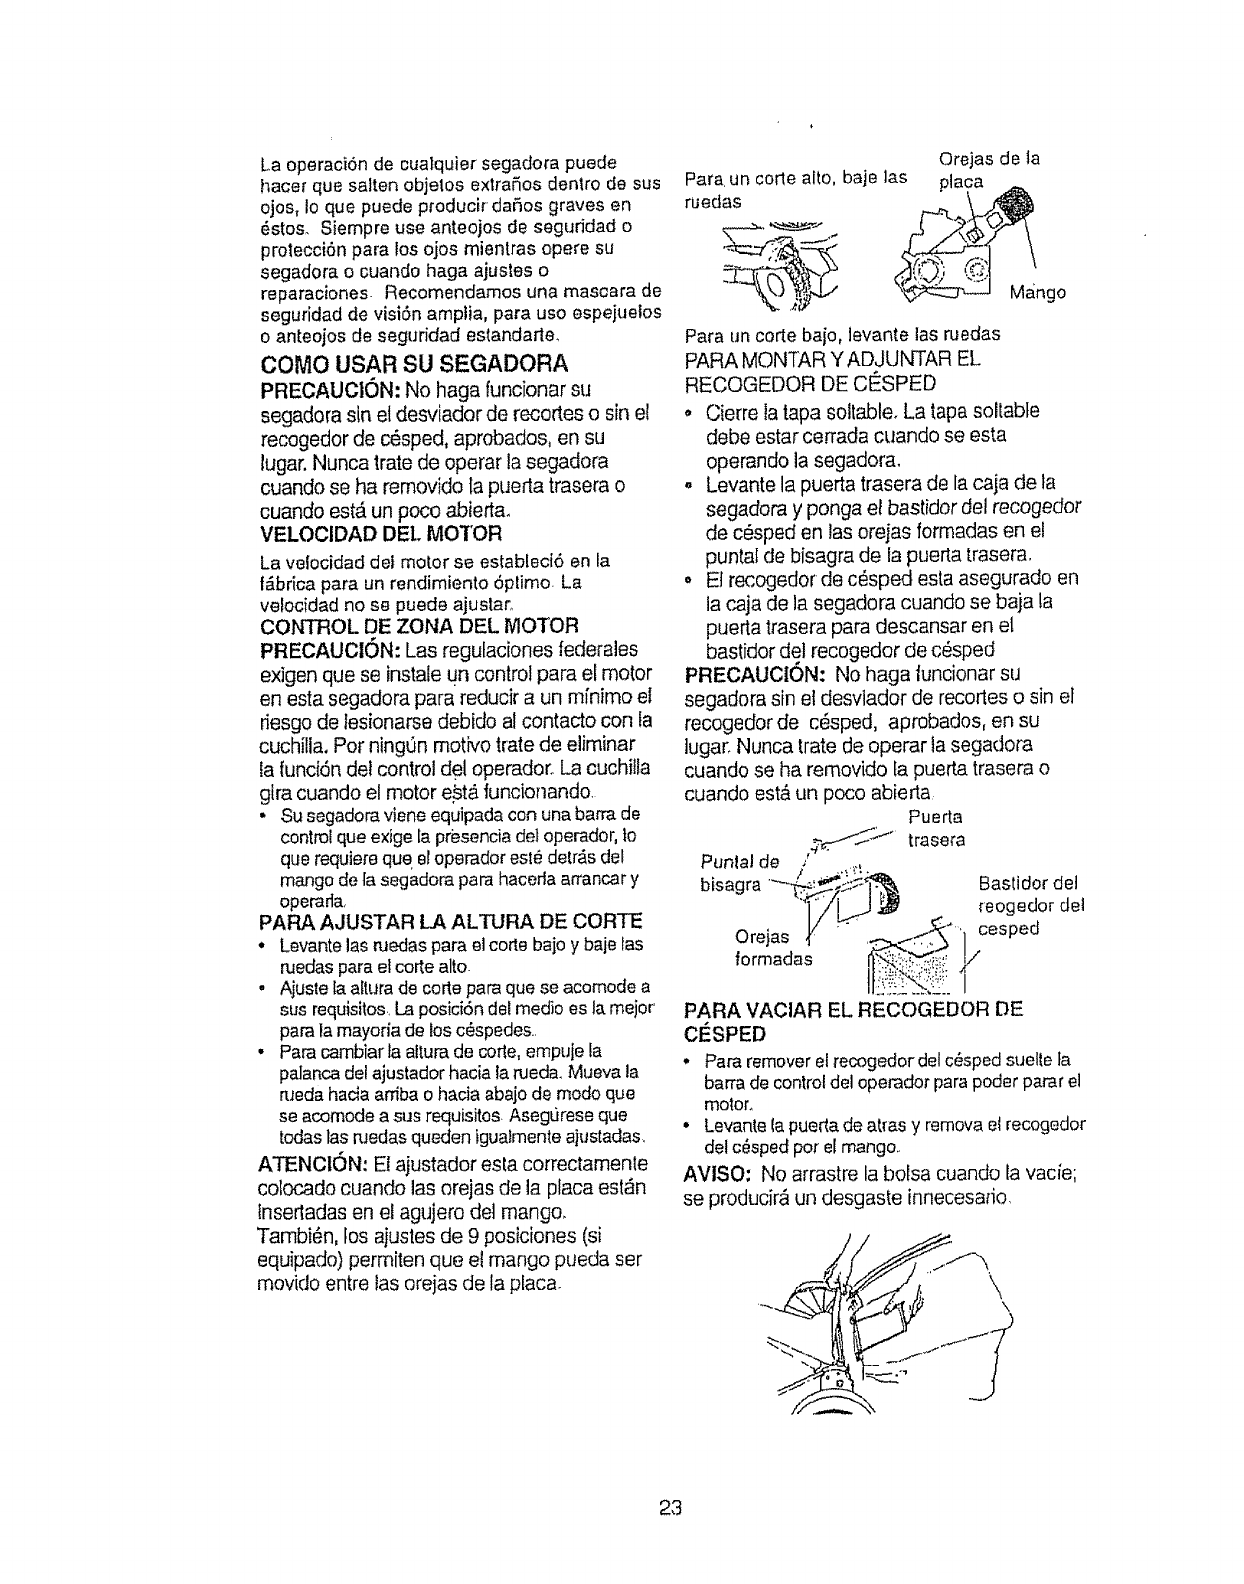
Orejas de ta
Para un corte alto, baje ]as placa
ruedas __Man
%. _a_- go
Para un code baio, levante las ruedas
PARA MONTAR YADJUNTAR EL
RECOGEDOR DE CE_SPED
• Cierre la tapa soltable. La tapa soltabte
debe estar cerrada cuando se esta
operando la segadora,
.Levante la puerta trasera de la caja de ta
segadora y ponga et bastidor del recogedor
de cSsped en las oreias formadas en el
puntal de bisagra de la puerta trasera,
o EJrecogedor de c#sped esta asegurado en
la caja de la segadora cuando se baja la
puerta trasera para descansar en el
bastidor del recogedor de c_sped
PRECAUCtON: No haga tuncionar su
segadora sin et desvlador de recortes o sin el
recogedor de c_sped, aprobados, en su
lugar, Nunca irate de operar la segadora
cuando se ha removido fa puerta trasera o
cuando est,_ un poco abierta
Puerta
Punlal de ."¢_:f_J" trasera
bisagra
Orejas .. .....-.'_ ", cesped
formadas _,'-' F
PARA VACIAR EL RECOGEDOR DE
ClaSPED
Bastidor del
reogedor det
• Pararemoveret recogedor delc_sped suelle ta
barrade control deloperador para poder pararel
motor°
• Levante_apuerta de arras y remora et recogedor
delc_sped por el mango.,
AVISO: No arrastre la botsa cuando ta vacie;
se producir& un desgaste innecesado,
23
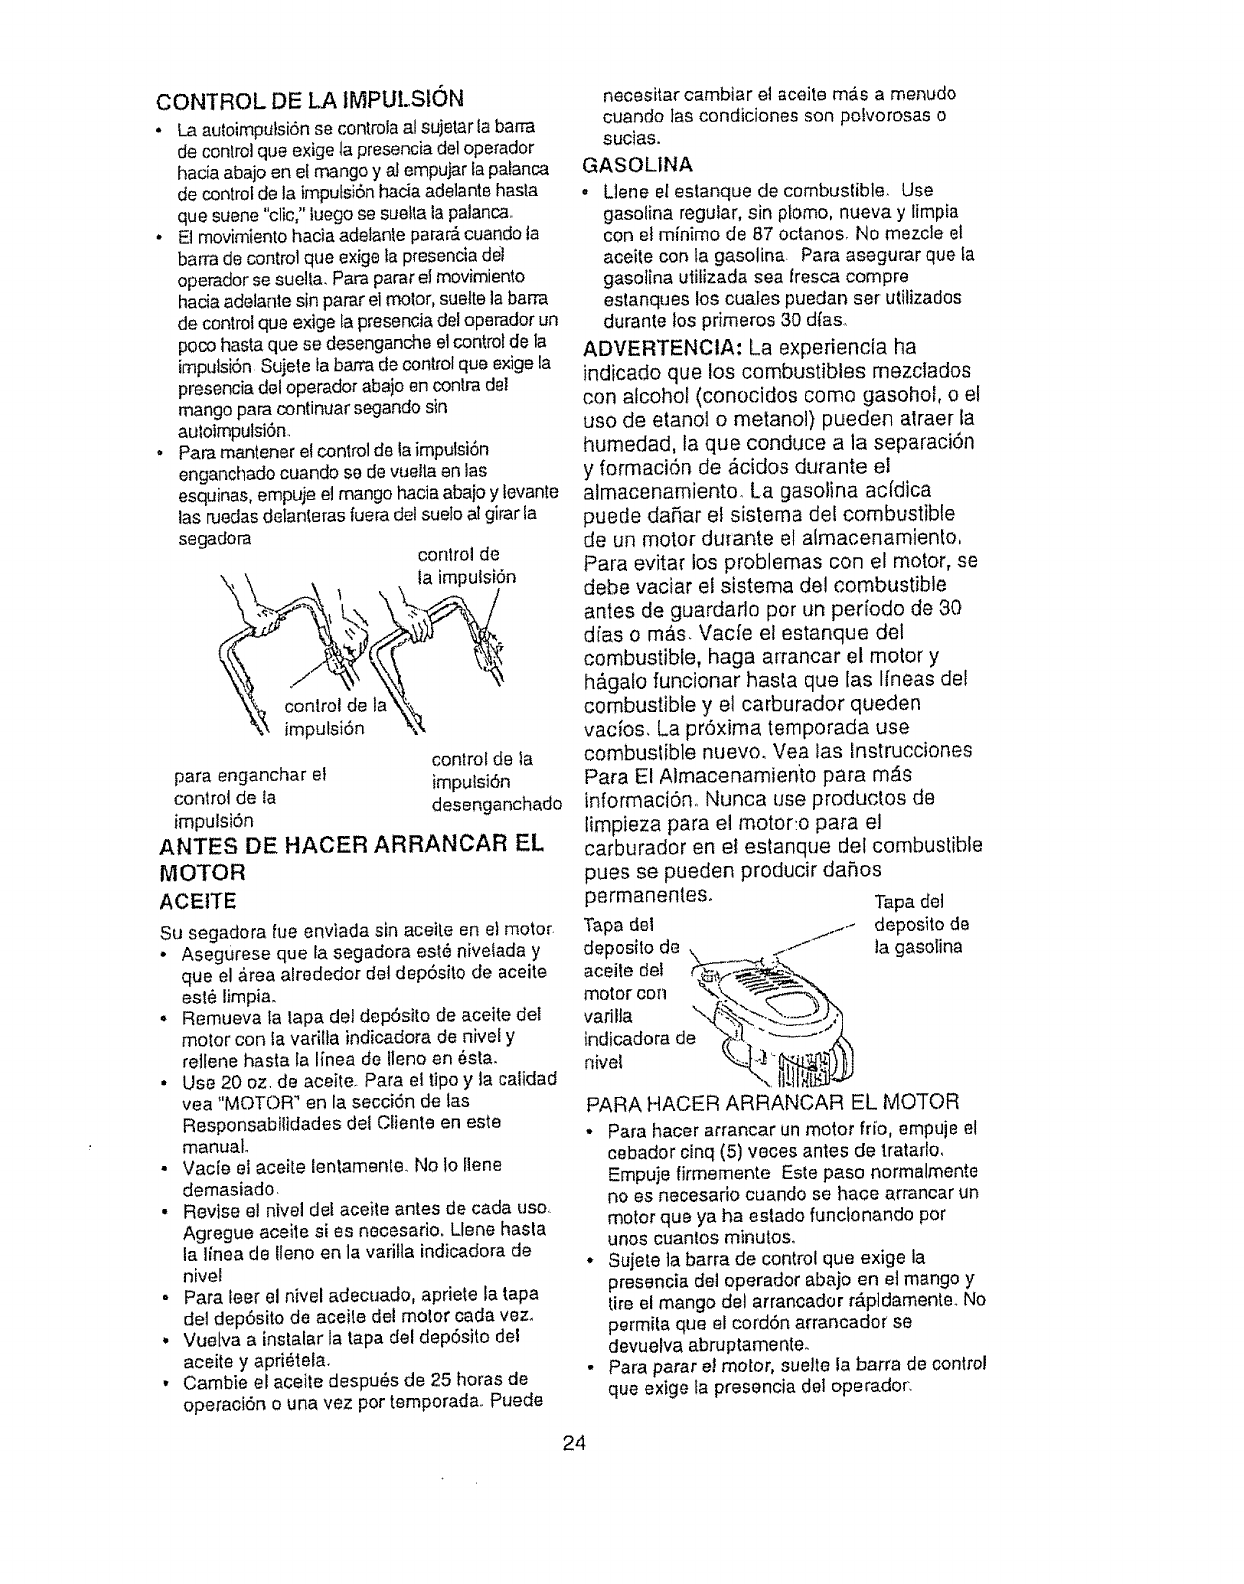
CONTROLDELA IMPULSION
• La autoimpulsiSn se controla al sujetar la barra
de conlrol que exige la presencia del operador
hacia abajo en el mango y aJempujar la patanca
de control de la imputsi6n hacia adelante hasla
que suene "clic," luego se suetta la palancao
• Et movimiento hacia adelante parar_ cuando fa
barra de control que exige fa presencia del
operador se suelta, Pare parar e! movimiento
hacia adetante sin parer el rnolor, suelte la barra
de control que exige ta presencia del operador un
poco haste que se desenganche el control de ta
impulsi6n Sujete la barra de control que exige la
presencia del operador abajo en contra del
mango para continuar segando sin
autoimpulsi6n.
" Pare mantener el control de la imputsi6n
eaganchado cuando se de vuelta an las
esquinas, empuje el mango hacia abaio y levante
las ruedas delanteras fuera del suelo at girar ta
segadora control de
ta impulsi6n
conlrol de la
imputsi6n
control de ta
pare enganchar et imputsi6n
control de la desenganchado
impulsidn
ANTES DE HACER ARRANCAR EL
MOTOR
ACEITE
Su segadora rue enviada sin aceite en e} motor.
•Asegurese que la segadora est_ nivelada y
que el area alrededor del dep6sito de aceite
est_ limpia.
• Remueva la lapa de! dep6sito de aceite del
motor con fa varilta indicadora de nivel y
rellene haste la linea de Ileno en _sta.
• Use 20 oz. de aceite. Para el lipo y la caiidad
yea "MOTOR _ en la secci6n de las
ResponsabI/idades del Cliente en este
manual
•Vacie el aceite lentamente,. No 1o llene
demasiado.
• Revise el nivel det aceite antes de cada use,
Agregue aceite si es necesario. Llene hasta
la linea de lleno en la varifla indicadora de
nivel
" Pare leer el nivel adecuado, apriete la tape
del dep6sito de aceite del meier cada vez.
, Vuelva a instalar la tapa del dep6sito del
aceite y apri6tela.
• Cambie el aceite despu_s de 25 horas de
operaci6n o una vez per temporada.. Puede
necesitar cambiar el aceite m&s a menudo
cuando ]as condiciones son poivorosas o
sucias.
GASOLINA
• Llene el estanque de combustible. Use
gasoline regular, sin plomo, nueva y limpia
con el minimo de 87 oclanos. No mezcle et
aceite con la gasoline. Pare asegurar que fa
gasolina ufilizada sea fresca compre
estanques los cuates puedan ser utilizados
durante los primeros 30 dies.,
ADVERTENCIA: La experiencia ha
indicado que los combustibles mezclados
con alcohol (conocidos come gasohol, o el
use de etano[ o metanol) pueden atraer la
humedad, la que conduce a la separacidn
y formaci6n de _cidos durante el
almacenamiento La gasolina actdica
puede daffar el sistema del combustible
de un motor durante el almacenamiento,
Pare evitar los problemas con el motor, se
debe vaciar el sistema del combustible
antes de guardarlo per un pedodo de 30
dies o rob,s. Vacfe el estanque del
combustible, haga arrancar el motor y
h#.galo funcionar haste que las Ifneas del
combustible y el carburador queden
vaclos, La prSxima temporada use
combustible nuevo. Vea las Instrucciones
Para El Almacenamieffto para m_s
informaciOn,, Nunca use productos de
limpieza para el rnotor:o para el
carburador en el estanque del combustible
pues se pueden producir daffos
permanentes. Tapa det
Tape del deposito de
deposito de la gasolina
aceite det
motor con
varilta \,
indicadora de
nivel
PARA HAOER ARRANCAR EL MOTOR
• Para hacer arrancar un motor fifo, empuje e!
cebador cinq (5} veees antes de tratarlo,
Empuje firmemente Este paso normalmente
no es necesario cuando se hace arrancar un
reeler que ya ha estado functonando per
unos cuantos minute&
• Suiete ta barra de control que exige la
presencia del operador abajo en el mango y
tire el mango del arrancador r_pldamente. No
permita que el cordSn arrancador se
devuelva abruptamenteo
•Pare parer et motor, suelte la barra de control
que exige la presencia del operador,
24
AVlSO:Enclimasm&sfriespuedeque
seanecesariorepetirlospasosdel
cebado_Enclimasmb,s calurososelcebar
demasiadopuedeproducirelahogoy el
motornova a arrancar.Siseahogael
motorespereunoscuantosminutesantes
detratardehacerioarrancary norepita
lospasosdelcebado.
CONSEJOS PARA SEGAR
• Bajo ciertas condiciones, tal come c_sped muy
alto, puede ser necesario el elevar la altura del
corte para reducir et esluerzo necesario para
empujar la segadora y para evitar sobrecargar el
motor, dejando montones de recedes de c6spedo
Puede que sea necesario reducir la veIocidad del
recomdo y/o haga tuncionar la segadora sobre el
_,rea per segunda vez
• Para un corte muy pesado, reduzca el ancho del
code pasando parcialmente per encima d0] lugar
anteriorrnente cortado y siegue lentamenle
• Cuando use una segadora con descarga trasera
en c_sped humedo y pesado, los montones del
c_sped codado puede que no entren en el
recogedor de c_sped., Reduzca la velocidad del
reconido (velocidad de empuje) y/o haga
tuncionar la segadora sobre et _rea per segunda
veZ.
• Si queda una huelia de cortes en el lade derecho
de una segadora con descarga trasera, siegue
en la direcci6n en que giran las manillas del reloj,
solapando un poco para recaudar los recortes en
ta pr6xima pasad&
• Los pores en los recogedores de c_sped de tela
pueden llenarse con mugre y polvo con et use y
los recogedores recaudar_ menos c_sped.
Para evitar _sto, rocfe el recogedor con la
manguera de agua regutarmente y d6jeto
secarse antes de usado_,
,, Mantenga la parte superior del motor, alrededor
del arrancador, despejada y sin recortes de
c,_sped y paja. Esto ayudar_ el !lujo de] aire del
motor y extender& su duraci6n
CONSEJOS PARA SEGAR Y ACOLCHAR
IMPORTANTE: Para ebtener ef meier rendimeinto
mantenga la caia de la segador a sin acumladon de
cesped y basura Vea "LIMPIEZA" en seccion
de"RESPONSABILIDADES DEL CLIENTE" de este
manual, _.
• La cuchilla aootchadora especial va a volver a
cedar los recedes de c_sped muchas veces, y
los reduce en tamaffo, de mode que si se caen
en el c6sped se van a dispesar entre este y no
se van a notar.. fambi_n, el c_sped acolchado se
va a deshacer r_pidamente entregando
substancias nutritivas para el c_sped.. Siempre
acolche con la veloddad del motor (cuchilla) ross
alta, pues as[ se obtendr_ la meier acci6n de
recede de las cuchillas.
•Evite cortar et c_sped cuando est_ mojado. Et
c6sped me}ado tiende a formar montones e
inted]ere con la acci0n de acolchado. La meier
hera para segar el c_sped es temprano en la
tarde, A esa hera _sle se ha secado y el _rea
reci_n cortada no quedar_ expuesta al so!
directo.
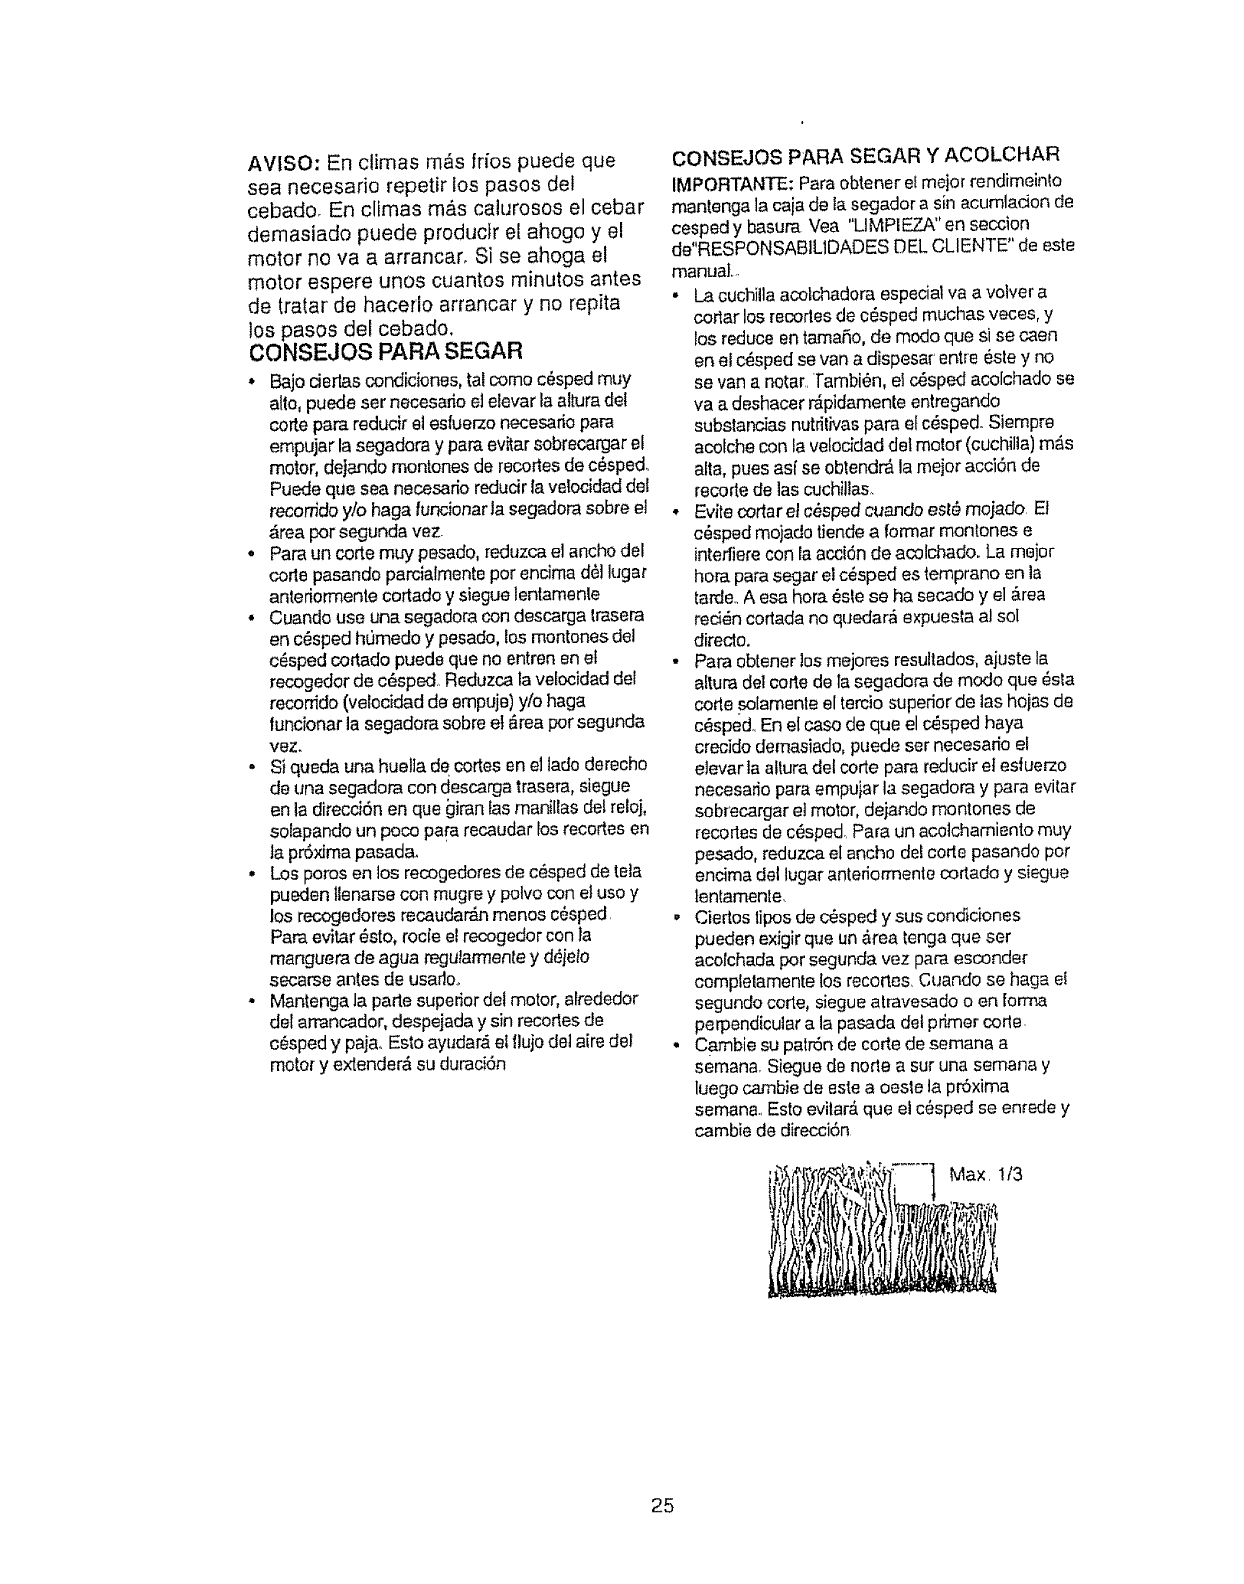
• Para obtener los mejores resultados, ajuste la
altura del code de la segadora de mode que _sta
cofle solamente el tercio superior de las hoias de
c_sped.. En el case de que el c_sped haya
crecido demasiado, puede ser necesario el
elevar la altura del code para reducir et esiuerzo
necesado para empujar la segadora y para evitar
sob_ecargar el motor, dejando rnontones de
recorles de c_sped, Para un acotchamiento muy
pesado, reduzca el ancho del code pasando per
encima del lugar anteriormente codado y siegue
lentamenle.
,, Ciedes tipos de c_sped y sus condiciones
pueden exJgir que un _,rea tenga que ser
acolchada per segunda vez para esconder
completamente los recortes. Cuando se haga ei
segundo cod,e, siegue atravesado oen forma
perpendicular a la pasada del primer corle.
• Cambie su patr6n de corte de semana a
semana. Siegue de nofle a sur una semana y
luego cambie de este a oesle la pr6xima
semana.. Esto evilar_, que el c._sped se enrede y
cambie de direcci6n
Max. 1/3
25
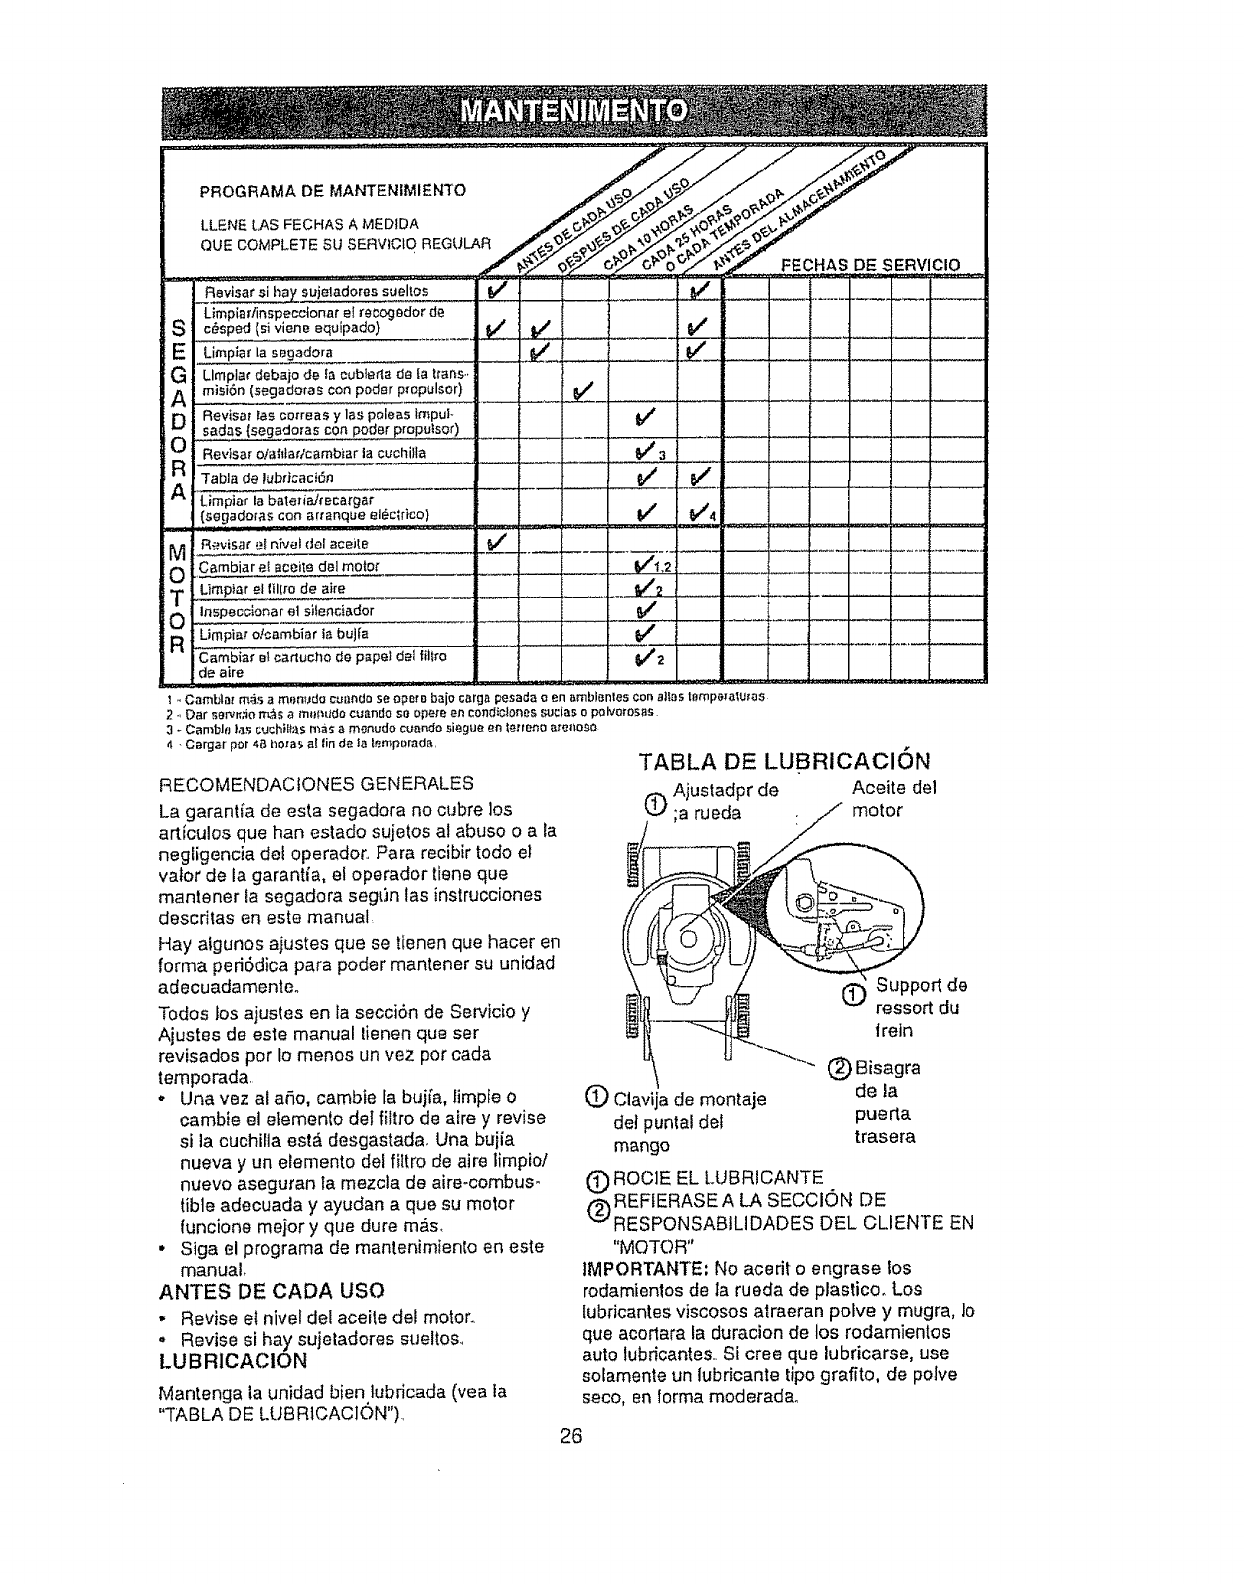
PROGRAMA DE MANTENIMIENTO
LLENE [.,AS FECHAS A MEDIDA
QUE COMPLETE SU SERVtCIQ REGULAR
FECHAS DE SERVIClO
Ravisar si ha_ sujetadores sueltos
Limpiartinspecclonar el J*ecogedor de
S c_sped (si viene .equ!pado) ...................V' :Vp._ ...... r
ELimplal' la sagadora . _ _ ..........................
G Llmp lar debajo de la cubleria de la trans,,
AmJsfon (segadoras con podar p_opulsor) ._ __-_ .........................
og RevisaF ias correas y las poleas ImpuI,,
sadas (segadoras con poder proputsor) ..........................
Revisar o/afltar/cambtar la cuchitla ...... _ 3_
AR Tabla de lubdcaci6n _' V_
Limpiar la bateriaJrBcargar
{segadoras con artanque el_c_rico) V' I_4
R_.Jvisarel nivel del aceite ._ _._4 ...................................
O Cambiarel _ceit_ del motor _._ _=, ....... :, I,_1.2 _ ......... . ............;.......... ,,,_..__._...... _.
L]mptar el lillro de aire _ _ ........
om In_;peccionar el sitenciador _/
R..............Limpi,r olcambiar la bujia '"' ....... ' .... T ...........................
Cambiar el carlucho de papeI del fi]Iro $/2
de aire
t. Camb|az rods a monudo cuanda se opere baio carga pesacla o en arnblenles con alias t_)mpezaIu[as
2., Dar Barytonern,_,_am_#_udocu[mdo so opera en condiclones suclas opolveros_s
3-CamblrJ I,:_sc,achilt;_smas a menudo cuando siegue en terraria atenoso
4-C_rgar pot4B bo_a_,altinde lalemp{)mda,
RECOMENDACtONES GENERALES
La garantia de esta segadora no cubre los
articulos que han estado sujetos al abuse o a la
negligencia det operation, Para recibir todo el
valor de la garanffa, el operador tiene que
mantener la segadora seg[)n las instrucciones
descritas en este manual,
Hay aigunos ajustes que se tienen que hacer en
forma ped6dica para poder mantener su unidad
adecuadamente.
Todos los ajustes en la seeci6n de Servicio y
Ajustes de este manual lienen queser
revisades per Io menos un vez per cada
temporada,
.Una vez al aifio, cambie la bujia, limpie 0
cambie el etemento del filtro de aire y revise
si la cuchilla est_ desgastada. Una buiia
nueva y un elemento del filtro de aire limpiol
nuevo aseguran la mezcla de aire-combus-
tible adecuada y ayudan a qua su motor
(uncione major y que dure re&s,
• Siga el programa de mantenimiento en este
manual.
ANTES DE CADA use
• Revise et nivel del aceile del motor.
.Revise si hay sujetadores eueltos,
LUBRICACION
Mantenga la unidad bien ]ubricada (yea la
"TABLA DE LUBR1CACION"),
TABLA DE LUBRiCAClON
Ajustadpr de Aceite del
(_ ;a rueda . motor
(_ Support de
ressort du
trein
(_) Bisagra
(D Clavija de montaje de la
dei punta! del puerta
trasera
mango
(_)ROC]E EL LUBRICANTE
REFIERASE A LA SECClON DE
RESPONSABtLIDADES DEL CLIENTE EN
"MOTOR"
IMPORTANTE: No acerit o engrase los
rodamientos de ia rueda de plastico° Los
lubficantes viscosos atraeran polve y mugra, 1o
que acortara la duracion de los rodamientos
auto lubricantes,, Si cree qua lubricarse, use
solamente un lubricante tipo grafito, de polve
seco, en farina moderada.
26
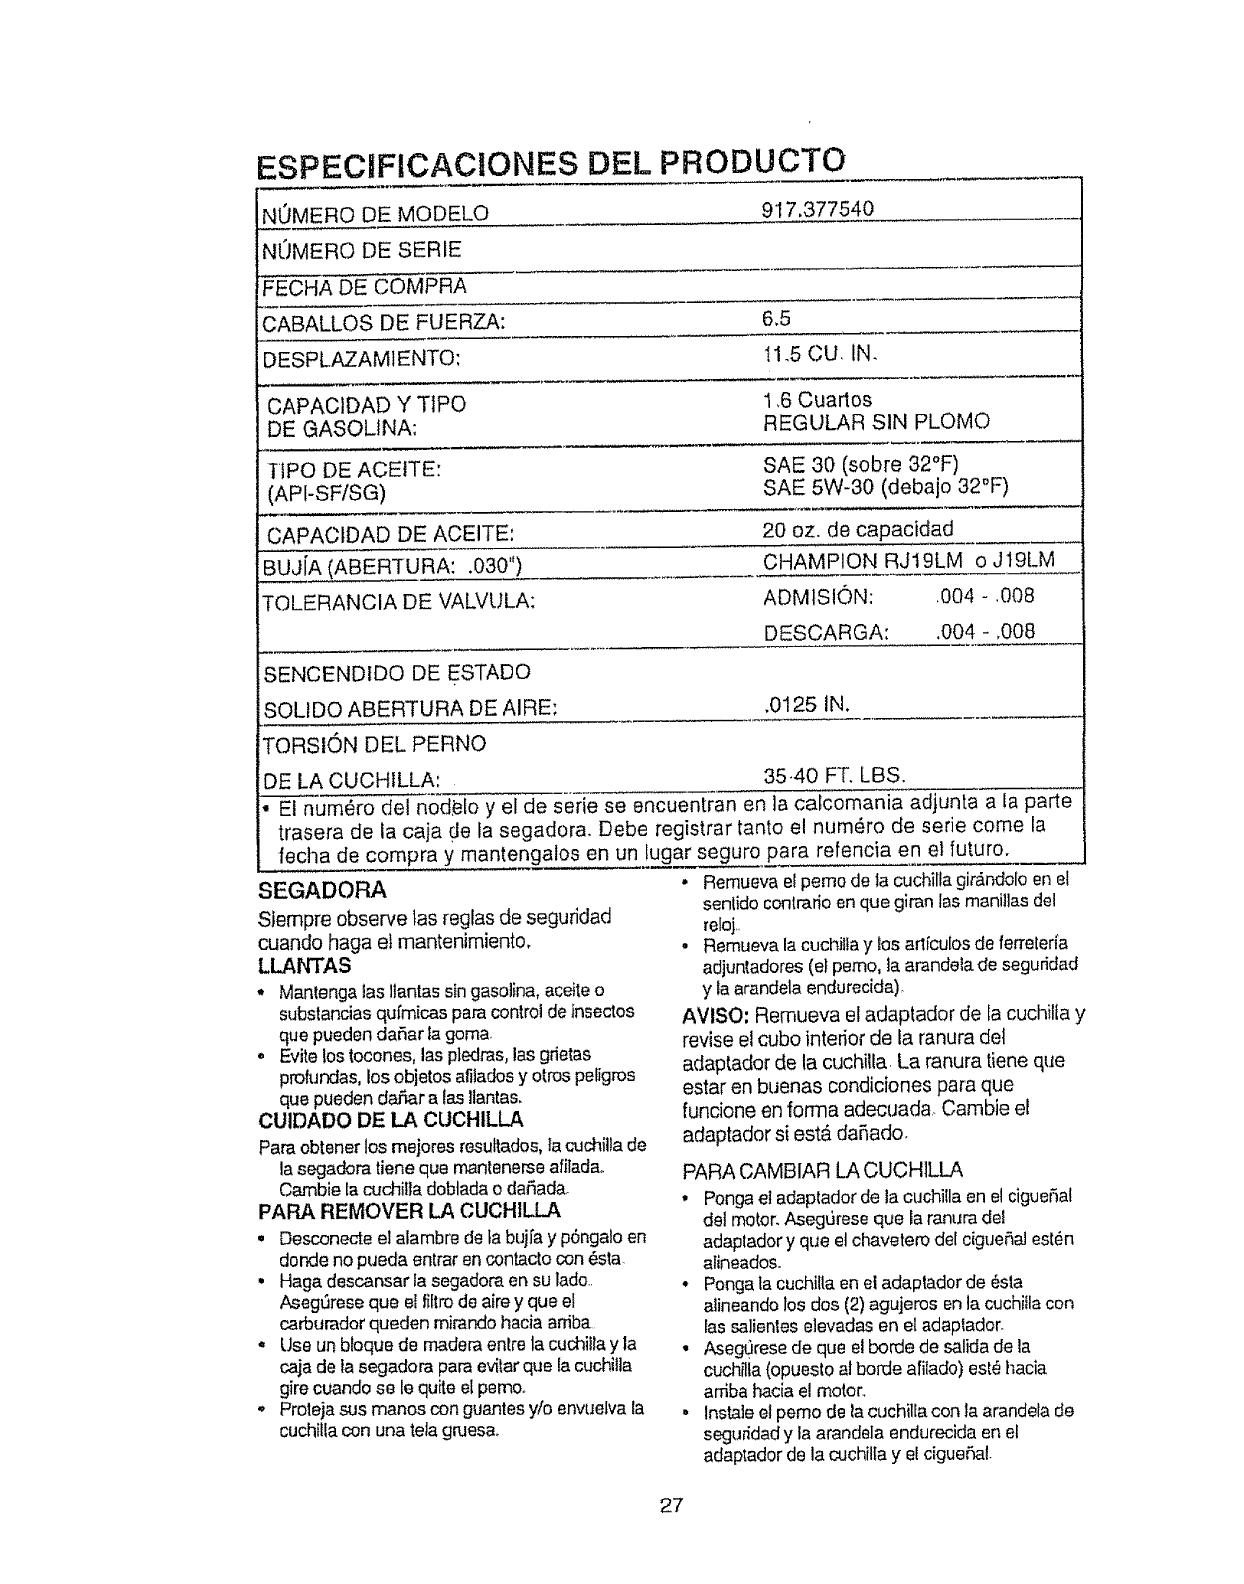
ESPECIFICACIONES DEL PRODUCTO
NOMERO DE MODELO 917,377540
NOMERO DE SERIE
FECHA DE COMPRA
CABALLOS DE FUERZA: 6.5
DESPLAZAMIENTO: I1.5 CU, IN.
CAPACIDAD Y TIPO 1,6 Cuartos
DE GASOLINA; REGULAR SIN PLOMO
TiPO DE ACEITE: SAE 30 (sobre 32°F)
(API-SF/SG) SAE 5W-30 (debajo 32°F)
CAPACIDAD DE ACEITE: 20 oz. de capacidad
BUJ[A (ABERTURA: .030") CHAMPION RJ19LM o Jt9LM
TOLERANC/A DE VALVULA: ADM/SION: ,004 - ,008
DESCARGA: .004 - ,008
SENCENDIDO DE ESTADO
SOLIDO ABERTURA DE AIRE; .0125 IN.
TORSION DEL PERNO
DE LA CUCHILLA: 35.40 FT. LBS.
• El num_ro del nod,ale y el de serie se encuentran en la calcomania adjunta a la parte
trasera de la caja de la segadora+ Debe registrar tanto el num_ro de serie come la
fecha de compra y mantengalos en un fugar seguro para refencia en el future.
SEGADORA
Sfempre observe las reglas de seguridad
cuando haga et mantenimientoo
LLANTAS
,, Mantenga tas ltantas sin gasolina, aceite o
substancias qufrnicas paracontrolde insectos
qua pueden daSar_agoma+
o Evite los tocones, las pledras,las grietas
profundas, los objetos afitados y otros petigros
qua pueden dariar aias llantas+
CUIDADO DE LA CUCHILLA
Para obtener los rnejoresresultados,la cuchillade
lasegadora tiene qua mantenerseafilada+
Cambie lacuchifla dobtadao daSada,
PAPA REMOVER LA CUCHtLLA
•Desconecte el alambre de ta buj[a y p6ngalo en
donde no pueda entrar encontactocon _sta.
• Haga descansar la segadora en su lade..
AsegSreseque el f_ltrodeairey qua et
carburador queden mkando hacia ardba
,, Use un btoque de rr_dera entre la cuchillay la
caja de ta segadora para avatarque ta cuc,hilla
girecuando sele quite el pemo°
"Prolejasus manes con guantes y!o envuetva la
cuchilla con una tela g_uesa.
,' Remuevaelpeme de la cuchillagir_ndoloen et
sentido contradoen que giran las manillasdel
re!oj..
o Remuevala cuchitfay los arl[cu[osde ferreteria
adjuntadores(el pemo, ]a arandetade seguridad
y taarandela endurecida)+
AVISO'. Remueva el adaptador de la cuchiila y
revise el cube interior de ta ranura det
adaptador de la cuchitta. La ranura tiene qua
estar en buenas condiciones para qua
funcione en forma adecuada Cambie el
adaptador si esta daP,ado,
PARA CAMBIAR LA CUCHILLA
• Ponga et adaptador de la cuchilla en et cigueSat
del motor.Asegureseque la rantJradel
adaplador y que el chavetero det cigueSaJ asian
alineados+
° Ponga lacuchilla en el adaptador de _sta
a_ineando _osdos (2) agujeros enla cuchilla con
rassalientes elevadasen e[ adaptador.
° Aseg0rese de que el horde de salidade la
cuchilta(opuesto al borde afitado)estehacia
arfiba hada el motor,,
• Insta]e el perno de la cuchilfacon la arandela de
seguridad y la arandelaendurecida en el
adaptador de la c_Jchiltayet cigueSal.
27
.Use un bloque de madera entre la cuchitfa y la
caja de ta segadofa y apriele e! pemo de la
cuchitla gi_ndolo en el sentido en que giran 1as
manillas de! reloj.,
o La torsion para aprelar recomendada es de 35-
40 pies tibras,
IMPORTANTE: EL PERNO DE LACUCHfLLA ES
CLASE 8 TRATADO A CALOR
AVISO: No recomendamos el afilar ta cuchilla
- pero si Io hace, asegurese de que quede
balanceadao
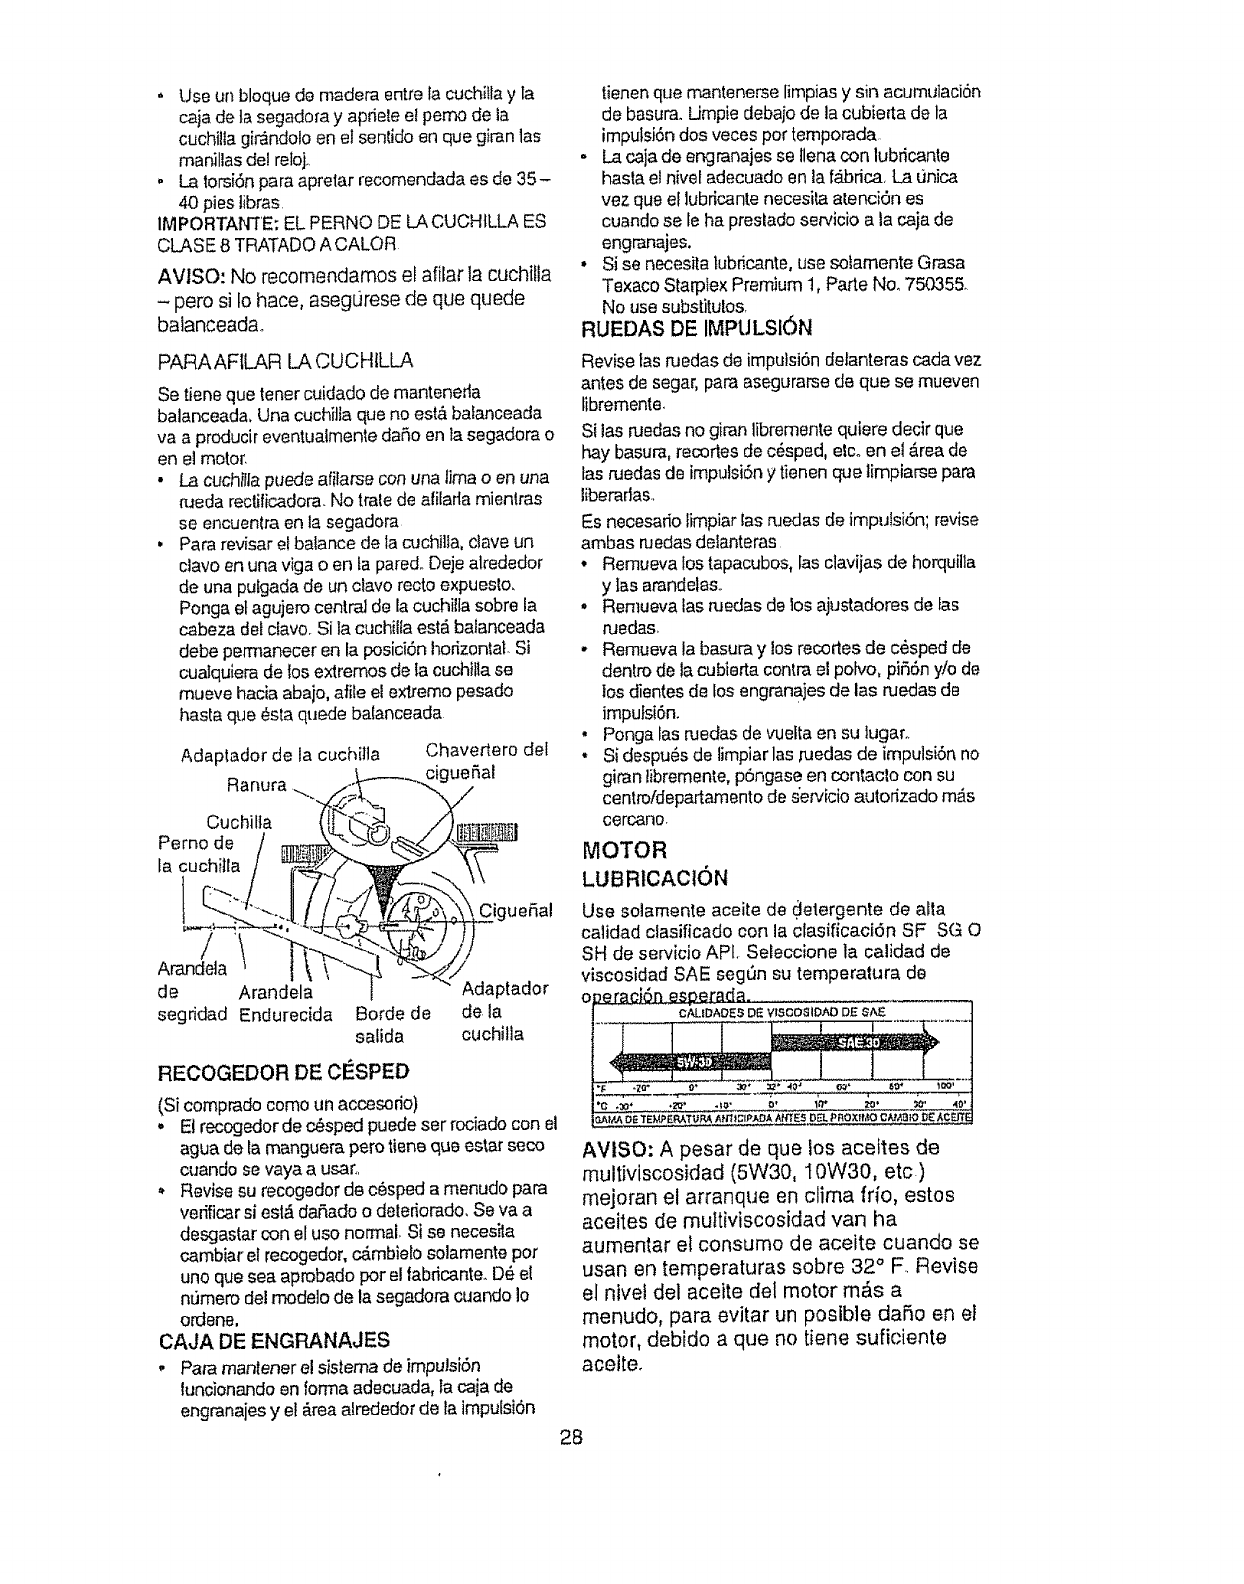
PARAAFILAR LA CUCHILLA
Se tiene que tener cuidado de mantenerta
balanceada, Una cuchitia que no esl,5 balanceada
va a producir eventualmente daOo en la segadora o
en el motor,
• La cuchilfa puede afilarse con una lima o en una
rueda rectificadora. No trale de atilarla mienlras
se encuentra en la segadora
• Pare revisar el balance de la cuchilla, clave un
clave en una viga o en la pared.. Deje alrededor
de una pufgada de un ctavo recto expuesto.
Ponga et agujero centre] de la cuchilla sobre la
cabeza det clave. Si la cuchitla est_ balanceada
debe permanecer en la position horizontal. Si
cuatquiera de los exlremos de ta cuchtlla se
mueve hacia abajo, re'lie el extreme pesado
hasta que 6sta quede balanceada
Adaplador de la cuchilta Chavertero del
Ranura ..../1_!_ _'_ cigueRal
Cuchilta ('i[<t"q-_
Perno de /_,,._..._-_"_-::_
la cuchilla /_/_"/>"_
fI
de Arandela
segridad Endurecida Borde de de la
salida cuchilla
RECOGEDOR DE C_SPED
(Si comprado come un accesodo)
', El recogedor de c_sped puede ser rociado con el
ague de la manguera pete tiene que ester seco
cuando se vaya a usar.,
,, Revise su recogedor de cOsped a menudo pare
verificar si est_ daOado o deleriorado. Se va a
desgastar con el use normal, Si se necesila
cambiar el recogedor, c_mbiefo solamente per
uno que sea aprobado per el fabric.ante. D_ el
n_Jmerodet rr_delo de la segadora cuando 1o
ordene,
CAJA DE ENGRANAJES
. Pare manlener el sistema de impulsi6n
tuncionando en forrna adecuada, la caja de
engranaies y el _.reaalrededor de la impulsion
tienen que mantenerse limpias y sin acumulaciOn
de basura. L.impie debajo de la cubierta de ta
imputsi6n dos veces par temporada
,, La caia de engranajes se llena con lubficante
haste el nivel adecuade en la f_ibrica, La Qnica
vez que el lubricante necesita atenciOn es
cuando se le ha preslado servieio ala caja de
engranajes.
• Si se necesita lubricante, use solamente Grasa
Texaco Starpfex Premium t, Parte No. 75('x35&
No use substitutes
RUEDAS DE IMPULSION
Revise las ruedas de impulsion detanteras cada vez
antes de segar, pare asegurarse de que se mueven
libremente.
Si las _edas no giran libremente quiere decir que
hay basura, recortes de cOsped, etcoen el _.reade
las ruedas de impulsi6n y tienen que limpiarse para
liberadas,
Es necesario limpiar las ruedas de impulsiOn; revise
ambas ruedas deianteras
• Remueva fos tapacubos, tas clavijas de horquilla
y ]as arandelas.,
• Remueva las nJedas de los ajustadores de las
ruedas
,, Remueva la basura y los recortes de c6sped de
dentro de la cubierta centre el potvo, pi56n yio de
los dientes de los engranajes de las ruedas de
impufsi6n.
• Ponga las ruedas de vuelta en su lugaro
• Si despuOs de limpiar las _uedas de impulsion no
giran libremente, pOngase en contaclo con su
centro/departamento de s'er¢icio autorizado mAs
cercano
MOTOR
LUBRICAClON
Use solamente aceite de _etergente de alia
calidad clasificado con la clasificaciOn SF SG O
SH de ser,,icio API, Seleccione la calidad de
,iscosidad SAE seg0n su temperature de
o _eraci6n esperada
--- ctctD^OESD_v,soosID^ODEsAE ]
........... I ...................
_ _IPADA _E_ DE't. p FIOX|I,_O _2N,_IO _}£ _¢Er_J
AVISO: A pesar de que los acettes de
multiviscosidad (5W30, 10W30, etc.)
mejoran el arranque en clima fifo, estos
aceites de multiviscosidad van ha
aumentar el consume de aceite cuando se
usan en temperaturas sobre 32 ° F,, Revise
el nivef del aceite del motor mAs a
menudo, pare evitar un poslble da_o en et
motor, debido a que no tiene suficiente
acelte,
28
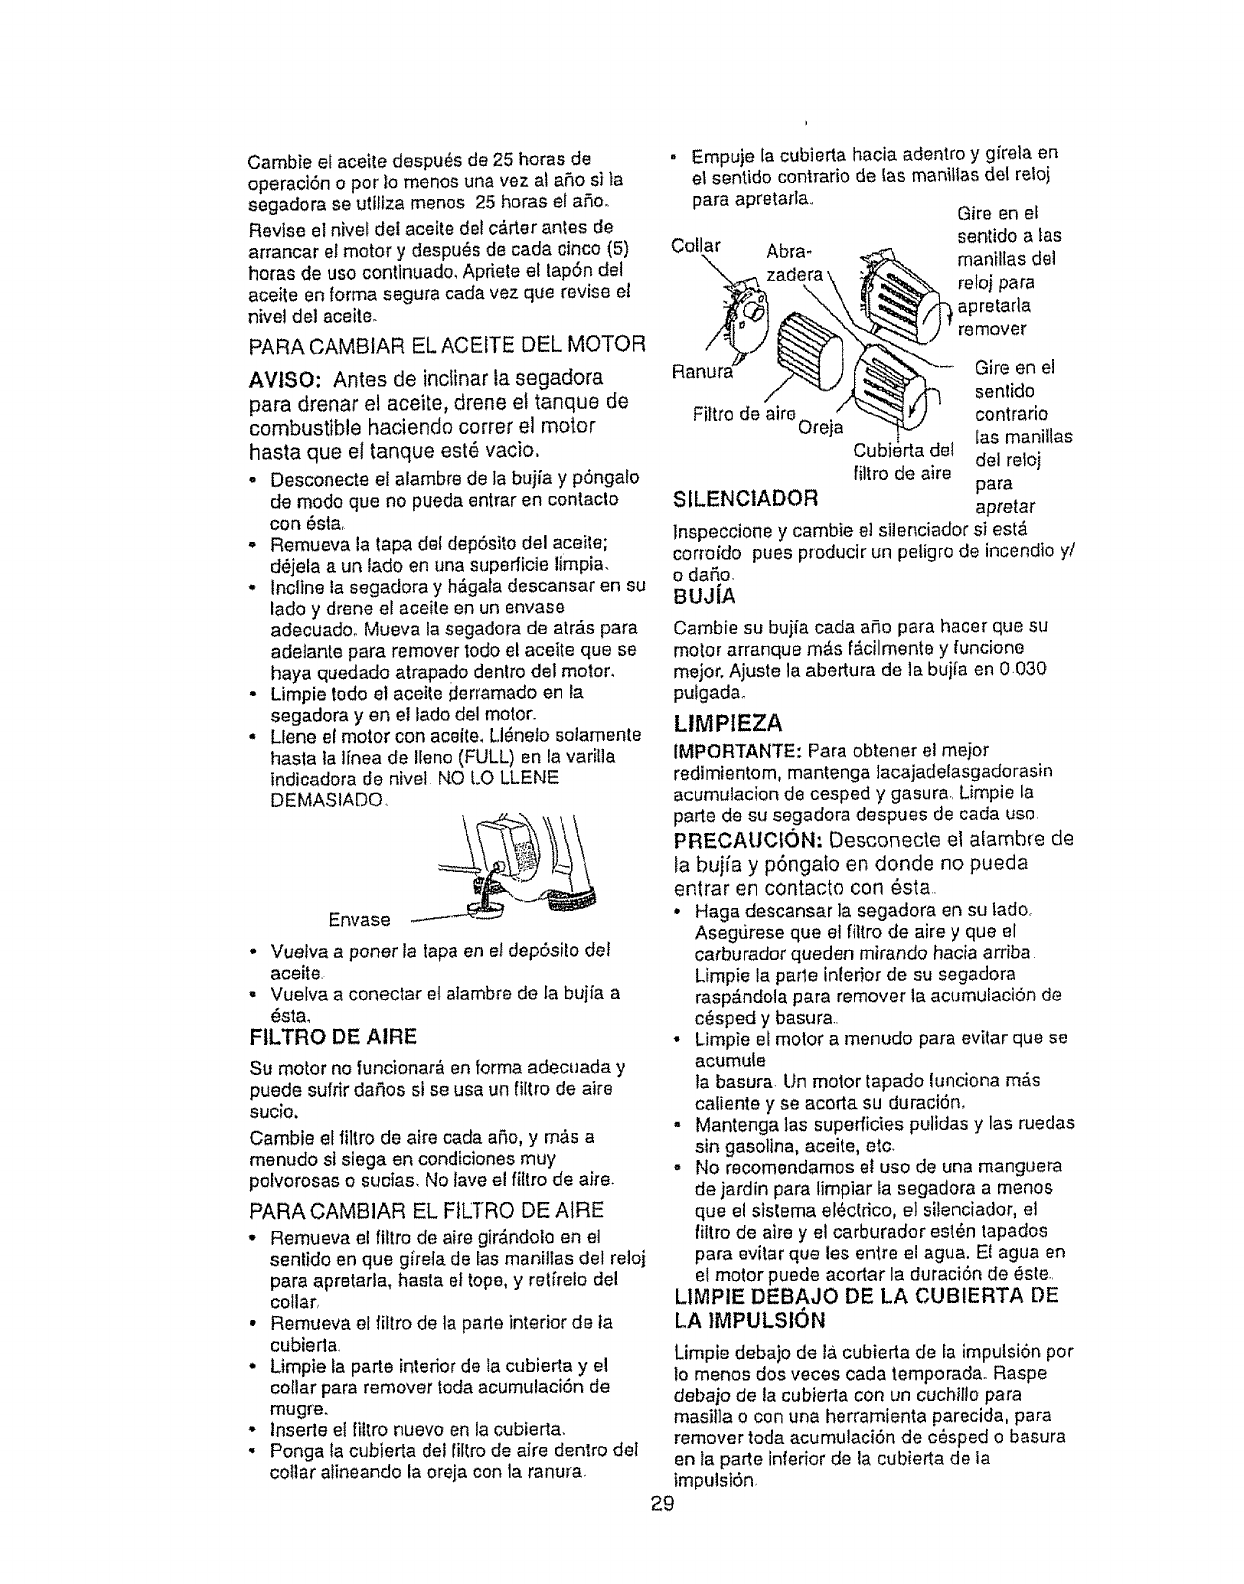
Cambie el aceite despu_s de 25 horas de
operation o per Io menos una vez at are si la
segadora se utiltza menos 25 horas el aOoo
Revise el nivel del aceite del c&rter antes de
arrancar el motor y despu_s de cada cinco (5)
horas de use contlnuado, Apriete el tapOn del
aceite en [orma segura cada vez que revise el
hive! del aceite.
PARA CAMBIAR EL ACEITE DEL MOTOR
AVISO: Antes de inclinar ta segadora
para drenar el aceite, drene el tanque de
combustible haciendo correr el motor
hasta que el tanque est_ vacio.
o Desconecte e! alambre de ta bujia y pOnga!o
de mode que no pueda entrar en contacto
con _sta,
o Remueva la fapa de| depOsito del aceile;
d_jela a un lade en una superficie limpia.
- incline la segadora y h_gala descansar en su
lade y drone el aceite en un envase
adecuado. Mueva la segadora de atr&s para
ade]ante para remover rode el aceite que se
haya quedado atrapado denlro del motor.
- Limpie rode et aceite derrarnado en la
segadora y en e! Lade del motor.
• Llene el motor con aceite. Ll_nelo sotamente
hasta ta ]fnea de IIeno (FULL) en Ja varil]a
indicadora de nivel NO LO LLENE
DEMASIADO,
Envase
- Vuetva a porter ta tapa en et depOsi[o dot
aceite
, Vuetva a conectar et atambre de la bujfa a
_sla_
FILTRO DE AIRE
Su motor no funcionar& en forma adecuada y
puede su#ir da_os s} se usa _n tiltro de a}re
sucio.
Cambie el liltro de aire cada aOo,y m&s a
menudo st slega en condiciones muy
polvorosas o suctas, No lave el filtro de aire,
PARA CAMBIAR EL FILTRO DE AIRE
,, Remueva el filtro de aife girAndolo en el
senlido en que g_reiade fas maniflas del reloj
para apretarla, hasta el tope, y ret[relo del
collar,
• Rernueva el filtro de la parle interior de ta
cubieda
• Limpie ta parle interior de Ia cubierta y el
collar para remover toda acumulaci0n de
mugre.
', lnserle el fiitro nuevo en la cubierta.
, Ponga Ia cubierta del filtro de aire den_.rodel
coIlar a_ineandola oreja con la ranura,
I1
para apretarla..
Ranura __
Filtro de aireorei a
Cubk
Empuje la cubierta hacia adentro y g/re]a en
el sentido contrario de las maniltas del role i
Gire en el
sentido a tas
manilias del
reloj para
_'/,_ apretarla
:_:_j remover
"'--- Gire en el
) sentido
contrario
las manillas
!adel del reloj
filtro de aire
SILENClADOR para
apretar
Inspeccione y carnbie e] silenc]ador si est,.
corm,_do pues producir un peligro de incendio y/
o daOo.
aua/A
Cambie su bujia cada are para hacer que su
me,or arranque rn&s l_,_cilmente y funcione
mejor. Ajuste la abertura de ]a bujfa en 0030
pulgadao
LIMPIEZA
IMPORTANTE: Para obtener el meier
redimientom, mantenga ]acajadelasgadorasin
acumulacion de cesped y gasura. Limpie la
parte de su segadora despues de cada use,
PRECAUCf(ON: Desconecte el alambre de
la bujfa y pOngato en donde no pueda
entrar en contacto con 6sta,
• Haga descansar ]a segadora en su tado,.
Aseg,Jrese que et fillro de aire y que el
carburador queden mirando hacia arriba
Limpie la pade interior de su segadora
rasp_ndola para remover la acumulaciOn de
c_sped y basura
• Limpie et motor a menudo para evitar que se
acumule
la basura, Un motor lapado lunciona m_s
caliente y se acorta su duraciOn.
- Mantenga las superficies pulidas y las ruedas
sin gasolina, aceite, etc.
• No recomendamos el use de una manguera
de jardin para limplar la segadora a menos
que el sislerna elL_ctdco, e] silenciador, e]
filtro de aire y el carburador estOn tapados
para evitar que los entre el agua. El agua en
el motor puede acortar la duraciOn de este
LIMPIE DEBAJO DE LA CUBIERTA DE
LA IMPULSION
Limpie debajo de la cubieda de fa impulsion per
lo menos dos veces cada temporadao Raspe
debajo de la cubierla con un cuchiflo para
masil]a o con una herramienta parecida, para
remover toda acumutaciOn de cOsped o basura
en la parle inferior de la cubierta de la
impulsion,
29
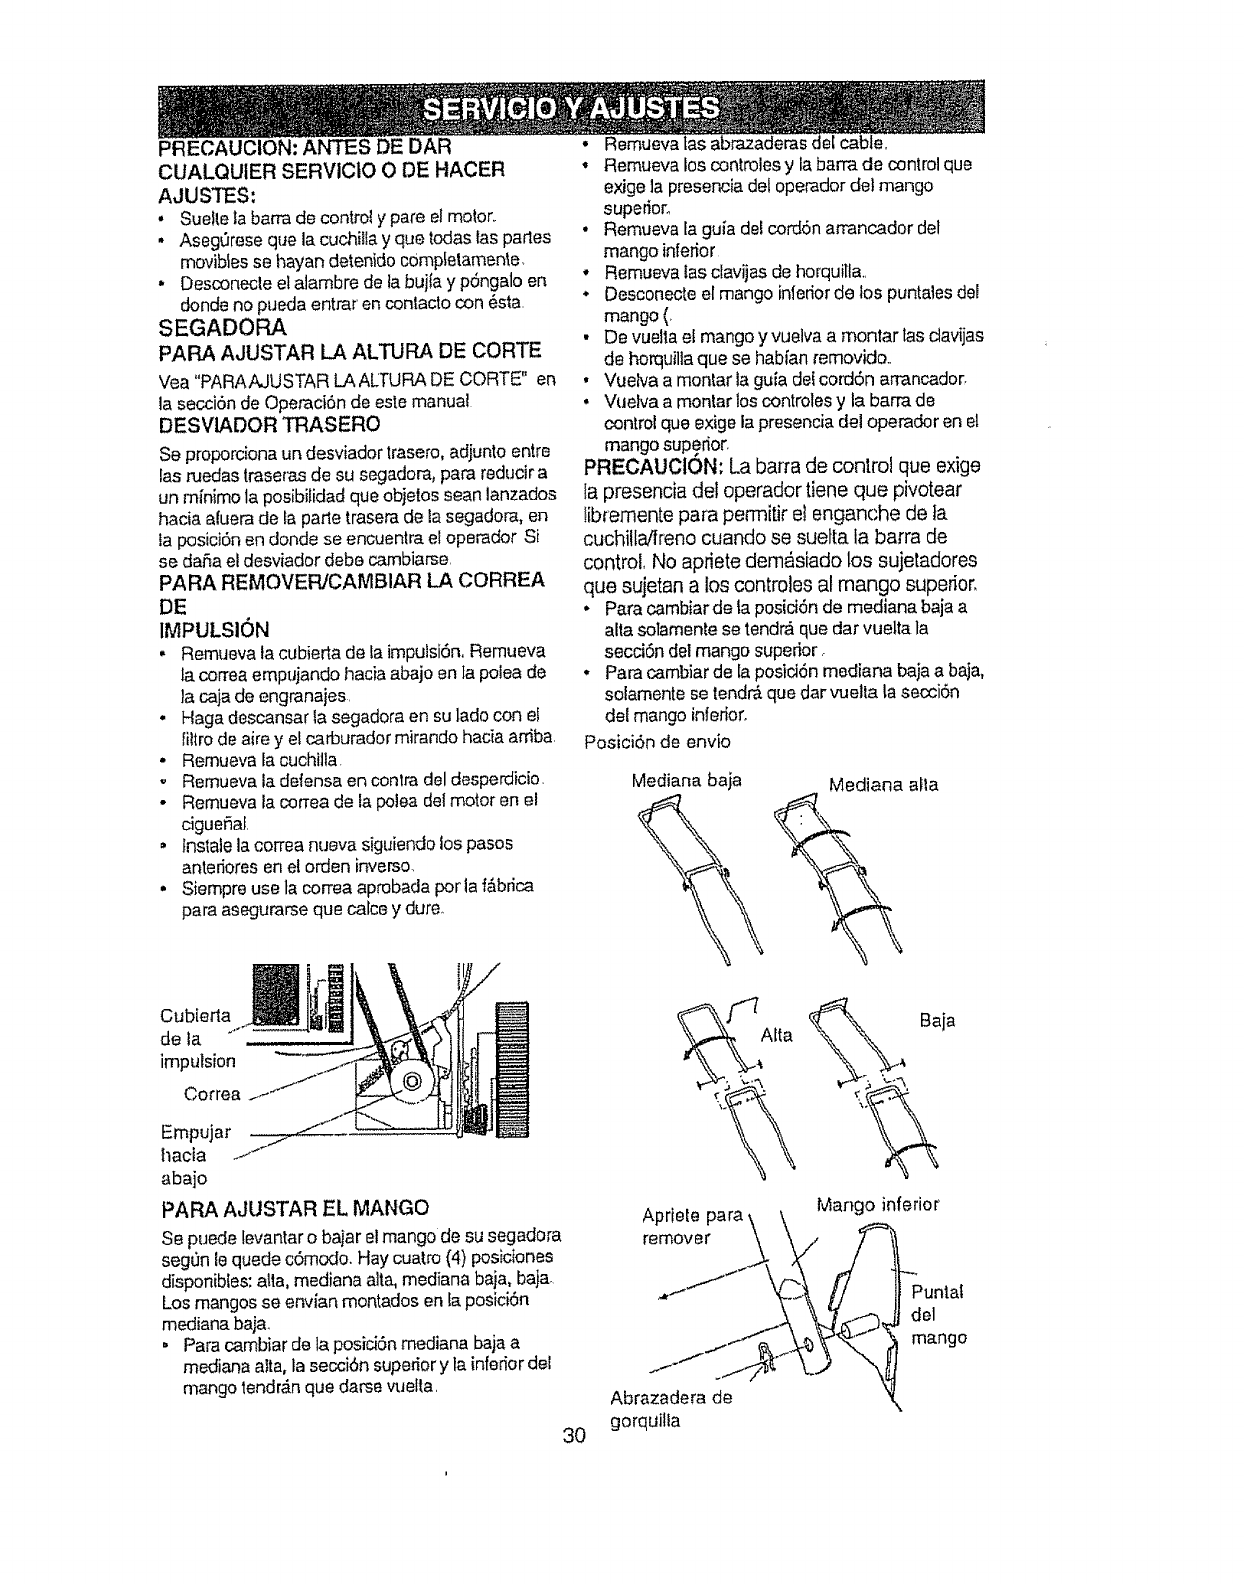
PRECAUClON: At',,q"ES DE DAR
CUALQUtER SERVIClO O DE HACER
AJUSTE$:
• Suettela barrade controly pare elmotor,.
, Aseg0reseque la cuchitlay que todaslas parles
movibfesse hayan detenidoc0mpfelamen'ie_
,' Desconecle elalambre de ta bujlay p6ngalo en
donde no puedaentrar enconlacto con 6sta.
SEGADORA
PAFIA AJUSTAR LA ALTURA DE CORTE
Vea "PARAAJUSTAR LAALTURA DE CORTE" en
la secci6n de Operaci6n de este manua!
DESVIADOR TRASERO
Se proporciona un desviador trasero, adjunto entre
las ruedas Iraseras de su segadora, pare reducir a
un minimo la posibilidad que objelos sean lanzados
hacia afuera de fa parle trasera de la segadora, en
ia posici6n en donde se encuentra el operador Si
se daiSa el desviador debe cambiarse.
PARA REMOVER/CAMBIAR LA CORREA
DE
IMPULSION
• Remueva ta cubierta de la impulsi6n, Remueva
la correa empujando hacia abajo en ta polea de
la caja de engranaies,
• Haga descansar la segadora en su ]ado con el
fittro de a(re y el carburador mirando hacia ardba.
- Remueva la cuchilla
o Remueva ia defense en contra del d_sperdicio.
• Remueva la con-ea de ia polea del motor en el
ciguefial.
• lnstale la correa nueva siguiendo los pasos
antedores en el orden inverso.
• Siempre use la correa aprobada por la f_brica
pare asegurarse que calce y dure.
• Remueva Ins abrazaderas
,Remueva los controles y la barra de control que
exige la preseneia del operador del mango
superior°
• Remueva la guia del cord6n arrancador def
mango inferior
• Remueva Ins ctavijas de horquiIl&
• Desconecte el mango inferior de los puntales del
mango (_
• De vuella el mango y vuelva a montar fas ctavijas
de horquilla que se habfan removido..
• Vuelva a montar la guia det cord6n arrancador.
• Vuelva a montar los controles y la barra de
control que exige la presencia del operador en el
mango superior.
PRECAUCI6N: La barra de control que exige
Ia presencia del operador tiene que pivotear
tib_emente para permitir el enganche de la
cuchilla/freno cuando se suetta la barra de
control, No apdete dern_siado los sujetadores
que sujetan a los controles al mango superior,
•Pare cambiarde ta posid6n de mediana baja a
alla solamente se tendm que dar vuelta la
secci6n del mango supedor ..
•Para cambiar de la posidSn mediana baja a baja,
solamente se tendr'& que dar vuelta la secci6n
del mango inferior,
Posici6nde envio
Mediana baia Mediana alia
Cubierta
de la
impulsion
Correa
Empujar
hacia
abaio
PARA AJUSTAR EL MANGO
Se puede levantar o bajar el mango de su segadora
seg0n le quede c6modo. Hay cuatro (4) posiciones
disponibles: all& mediana alia, mediana baja, bale.
Los mangos se envian montados en fa posiciSn
me'diana bai&
•Para cambiar de la posici6n mediana baja a
mediana alta, la secci6n superior y la inferior del
mango tendr_,n que darse wJelta,
30
Apriele para
remover
Abrazadera de
gorquilla
Bale
Mango inferior
Puntal
del
mango
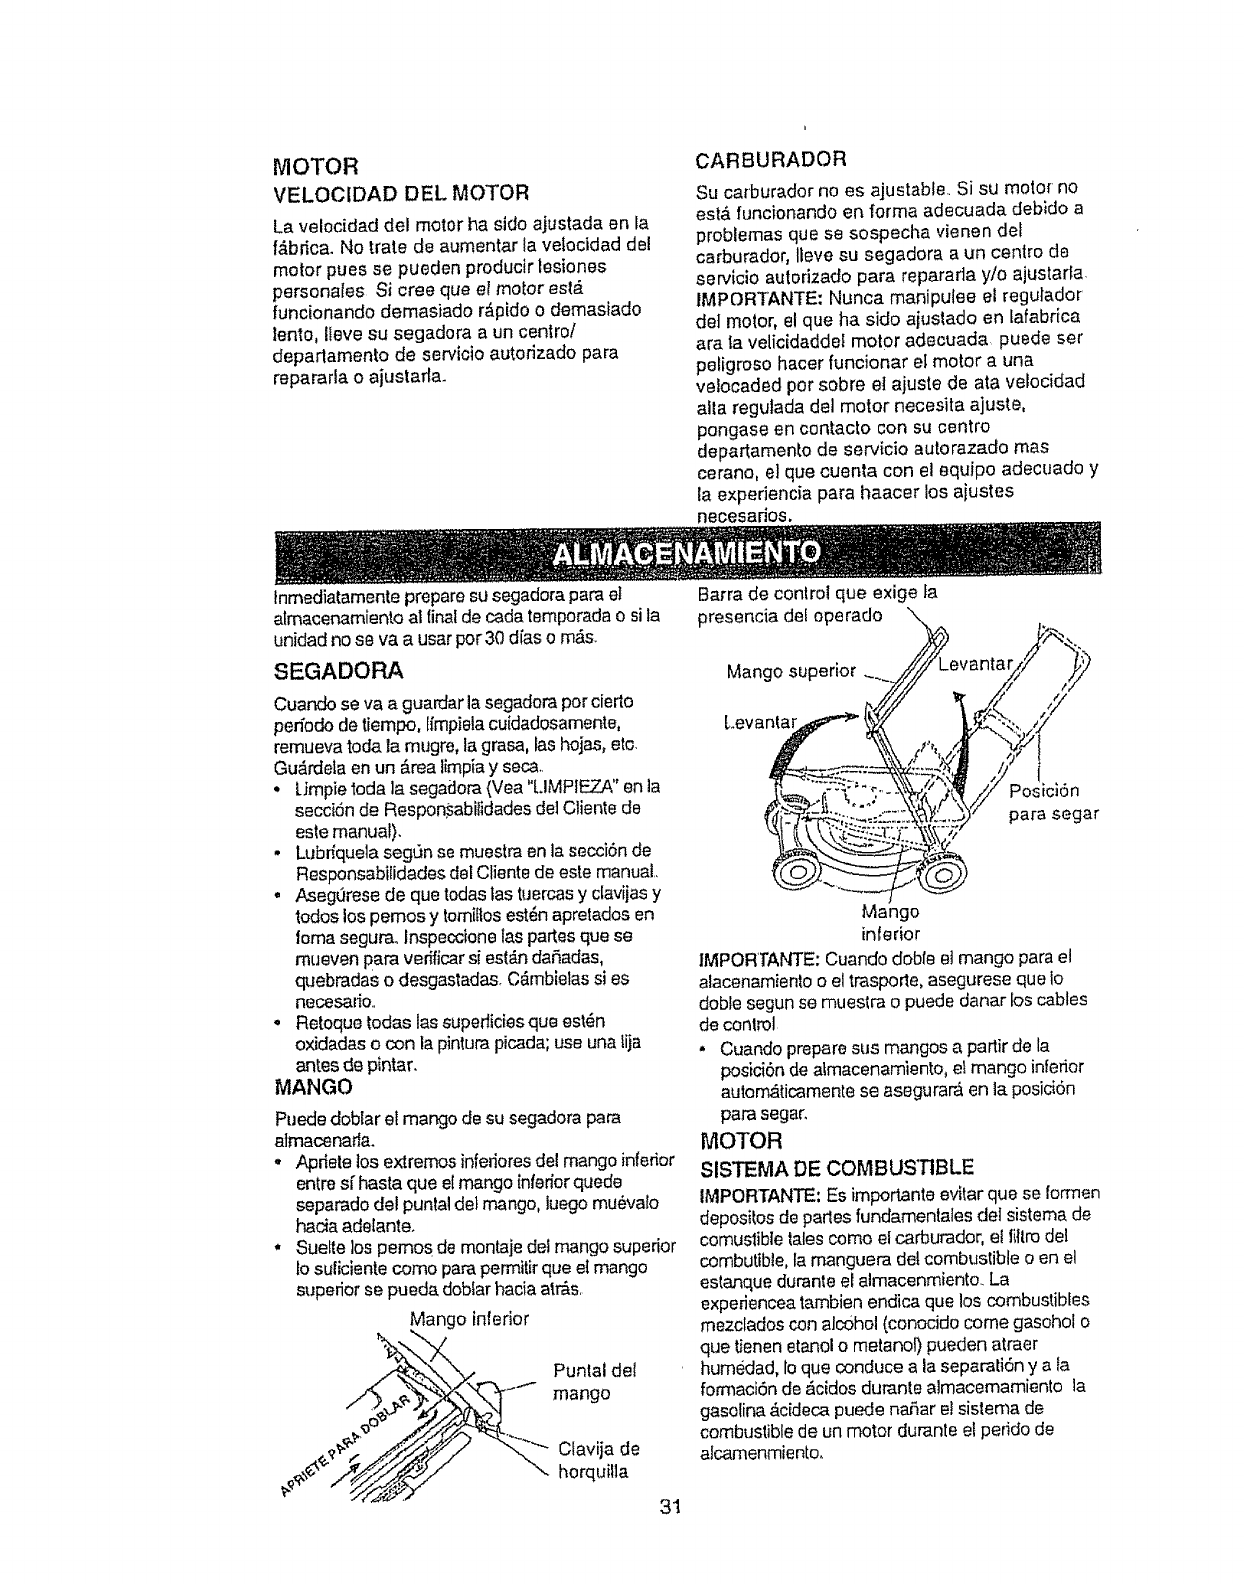
MOTOR
VELOCIDAD DEL MOTOR
La velocidad del motor ha side ajustada en la
f_brica. No trate de aumentar la veiocidad de!
motor pues se pueden producirlesiones
personales Si cree qua et motor est_
funcionando demasiado r&pido o demasiado
lento, lieve su segadora aun centre!
deparlamento de servicio autorizado para
repararla o ajustarla.
CARBURADOR
Su ca_burador no es ajustable.. Si su motor no
est& funcionando en forma adecuada debido a
problemas qua se sospecha vienen def
carburador, Ileve su segadora a un centre de
servicio autorizado para reparada y/o ajustada.
IMPORTANTE: Nunca maniputee el regulador
del motor, el qua ha side ajustado en lafabrica
ara ta velicidadde! motor adecuada puede set
peligroso hacer funcionar el motor a una
velocaded per sobre e! ajuste de ata velocidad
alia regutada del motor necesita ajuste,
pongase en contacto con su centre
departamento de servicio autorazado mas
cerano, e] que cuenta con el equipo adecuado y
la expedencia para haacer los ajustes
necesados.
tnmediatamentepreparesu segadora parae!
almacenamiento al finalde cada temporadao si la
unidad no se va a usar per30 dias o m&s.
SEGADORA
Cuando se va a guardar la segadera per cierto
pan'ode de tiempo, limpiela cuidadosamente,
remueva toda la mugre, la grasa, las hojas, ere.
Gu_rdela en un #.rea limpiay seca..
•LJmpieloda ta segadora (Vea "LIMPIF_ZA" en la
secci6n de Respon_abiiidades dei Cliente de
este manual).
• Lubdqueia segCtn se muestra en la secciSn de
Responsabtlidades del Clients de este manual
• Aseg(_rese de qua todas las tuercas y clavijas y
redes los pemos y tomiflosest6n agretados en
foma segurao Inspeccione [as gaffes qua se
rnuevan para verificar si est_n dafiadas,
quebradas o desgastadas. Cdmbieias si es
necesado..
• Retoque todas las superlicies qua est_,n
oxidadas o con la pintura picada; use una lija
antes de pintar.
MANGO
Puede dobtar el mango de su segadora para
almacenarla.
,, Apriete los extremes infefiores del mango inlerior
entre sf basra qua e(mango inferior queda
separado del puntaI del mango, luego mu_valo
hacia adetante.
* Suette los pemos de montaje dei mango superior
1osuliciente come para permWrqua et mango
superior se pueda dobiar hacia alr&s.
Mango inferior
Punlal del
mango
Clavija de
horquilla
31
Barra de control qua exige la
presencia dei operado
Mango superior
Levantar tY
ostci6n
para segar
Mango
inferior
IMPORTANTE: Cuando dobfe el mango para el
alacenamiento o el traspode, asegurese qua Io
doble segun se muestra o puede danar los cables
de conlrol
•Cuando prepare sus mangos a partir de la
posiciOn de a_macenamiento, et mango inferior
autom_,ticamente se asegurarA en ia posici6n
para segar.
MOTOR
SISTEMA DE COMBUSTIBLE
IMPORTANTE: Es importante evitar que se formen
deposilos de parles fundamentales del sistema de
comuslible tales come el carburador, et ]iltrodel
combutibie, ta manguera det combustible o en el
estanque durante el almacenmiento.. La
experiencea tambien endica que los combustibles
mezclados con atcohel (conocido come gasohol o
que tienen etanol o metano0 pueden atraer
humedad, to qua conduce a la separati6n y a Ia
fon'naciOn de &cidos durante almacemamiento la
gasolina Acideca puede na.,3arel sistema de
combustible de un motor durante el pefido de
alcamenmiento.
• Dreneelestanquedecombustible.
• Hagaarrancarelmotory d_jelofundonarhasla
quelastfneasdelcombustibleyelcarburador
estenvacios
- Nuncauselosproductosparalimpiezadel
carburadorodelmotorenelestanquede
combusliblepuessepuedenproducirdaSos
permanentes
• Usecombustiblenuevolapr6ximatemporada
AVlSO: El estabilizador de combuslibfe es
uaa alternativa aceptable para reducir a un
minimo la formaci6n de dep6sitos de goma en
el combustible durante el per[odo de
almacenamiento,, Agregue estabilizador a la
gasolina en el estanque de combuslible o en
el envase para el almacenamiento, Siempre
siga la proporci6n de mezcla que se
encuentra en et envase del estabilizador.
Haga funcionar et motor por fo menos 1o
minutos despues de agregar el estabilizador,
para permitir que este llegue al carburador, No
drene la gasofina del estanque de gasolina y
el carburador si se est& usando estabitizador
de combustible.
ACEITE DEL MOTOR
Drene el aceite (con et motor cafiente) y c&mbielo
con aceite de motor ]tropic., (Yea "MOTOR" en la
secci6n de Responsabifidades del Cliente de este
manual)
CIUNDRO
, Remueva la bujfa.
• Vacfe una onza (29 ml) de aceile a tray,s del
agujero de la bujia en el cilindro,
• Tire la manilla de arranque lenlamenle unas
cuantas veces para distribuir el aceite,,
• Vuetva a monfar la nueva bujta,
OTROS
• No guarde la gasolina de una temporada a la
otra+
• Cambie el envase de la gasolina si se empieza a
oxidar, La oxJdaci6n y/o ]a mugre en su gasolina
producir_n problemas
, Si es posible, guarde su unidad en un recinto
cerrado y cObrala para protegerla conlra el potvo
y la mugre.
• Cubra su unidad con un !otto protector adecuado
que no retenga la humedad, No use plAstico., El
pl_stico no puede respirar, to que permite la
formaci6n de condensaci6n, 1oque produdr_ la
oxidaci6n de su unidad,
IMPORTANTE: NUNCA CUBRA LA SEGADORA
MIENTRAS EL MOTOR Y LAS AREAS DE
ESCAPE TODAVIA ESTAN CALtENTES.,
PRECAUCI6N; Nunca aJmacene Ja segadora
con gasolina en el estanque dentro de un
edificio en donde los gases pueden alcanzar
una llama expuesta o una chispa, Permita que
se enfrfe el motor antes de almacenada en
algt_n recinto cerrado,
32
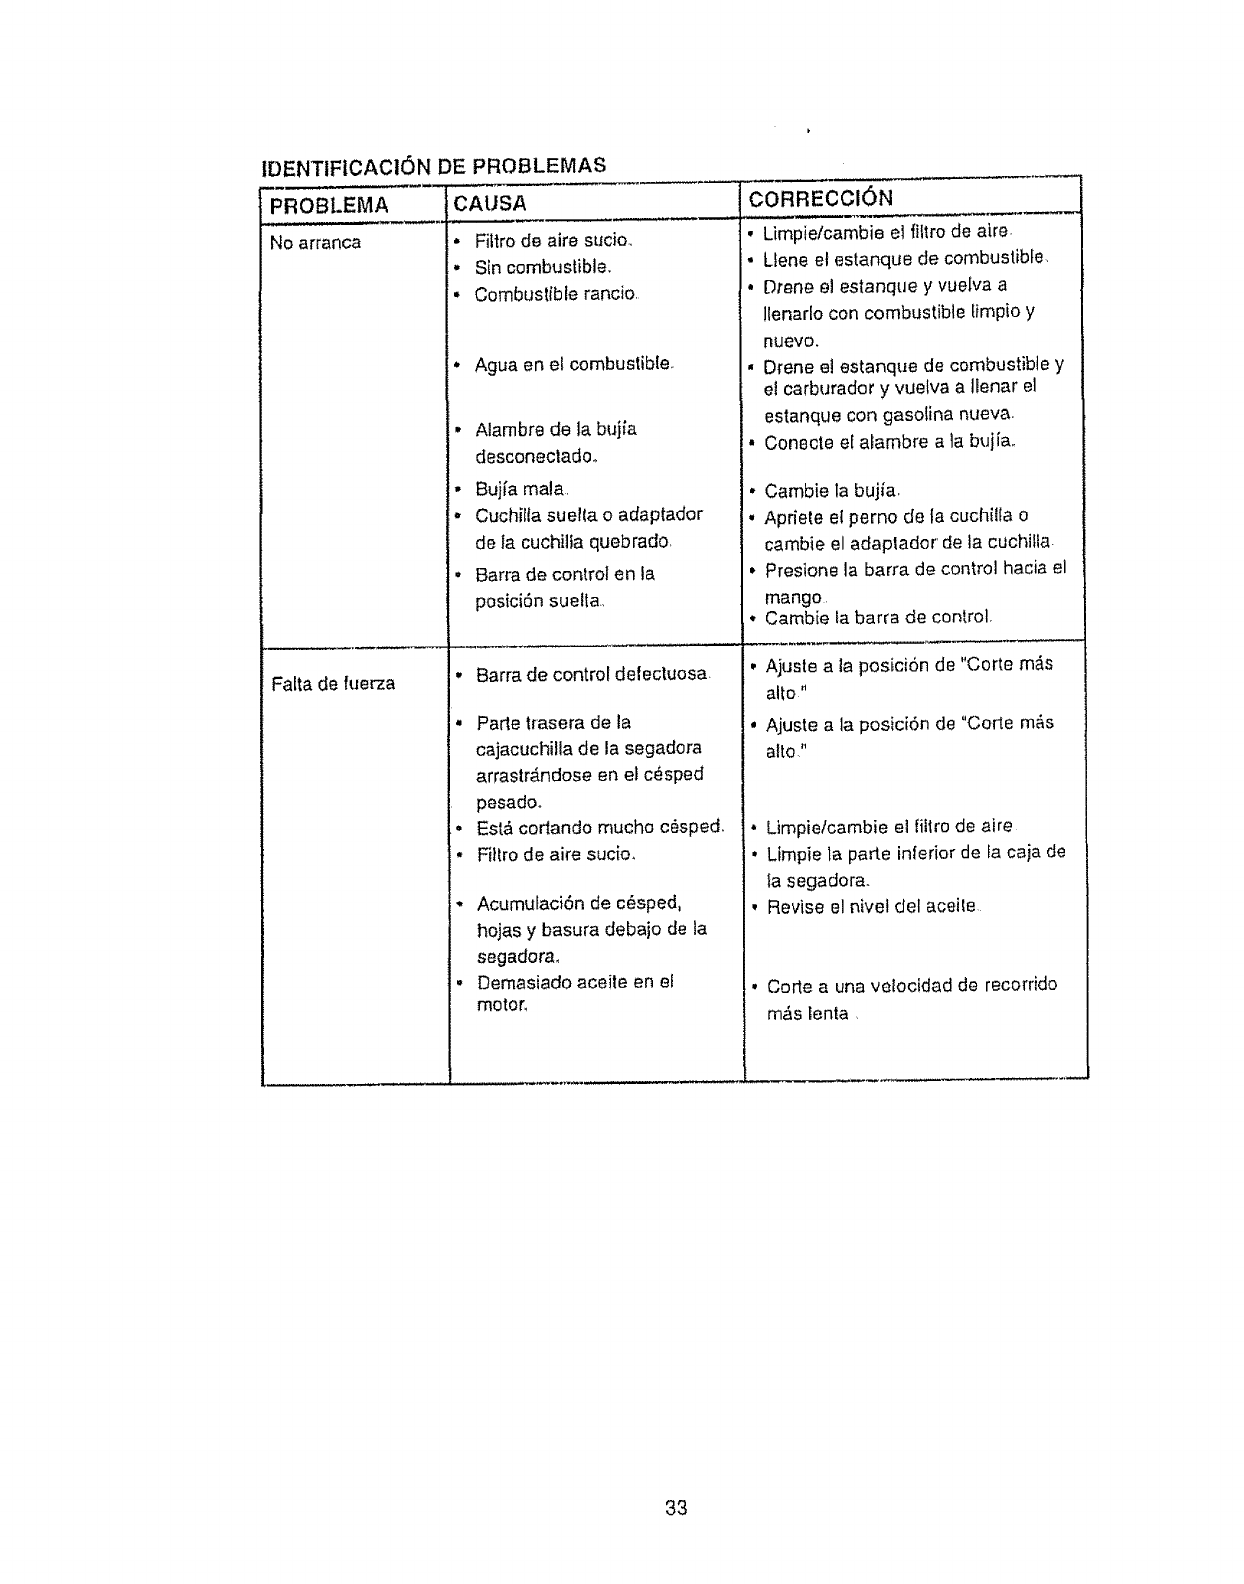
IDENTIFICAC16N
PROBLEMA
No arranca
Falta de fuerza
:)E PROBLEMAS
CAUSA
,, Fittro de aire sucio.
,, Sin combustible._
,, Combustible rancio.
" Agua en el combustible.
• Alambre de la bujfa
desconecladoo
• Bujfa mala.
,, Cuchilla suella o adaptador
de la cuchilla quebrado.
• Barra de control en la
posici6n suelta,
Barra de control defecluosa
Parle trasera de la
cajacuchilla de la segadora
arrastr_.ndose en el c_sped
pesadoo
Est& codando mucho c_sped.
Filtro de aire sucio_
,, Acumufaci6n de c_sped,
hojas y basura debajo de ta
segadora,
•Demasiado aceite en el
motor,
"_RRECCl6N
• Limpie/cambie el 1'iltrode aire.
• Lfene et estanque de combustible.
• Drene el estanque y vuelva a
Ilenarlo con combustible fimpio y
nuevo.
°Drene e] estanque de combustible y
el carburador y vuetva a Ilenar el
estanque con gasolina nueva.
• Conecte el alambre a la bujia..
•Cambie la bujia,
•Apdete el perno de ta cuchilla o
cambie el adaplador de la cuchilla.
,Presione la barra de control hacia el
mango
Cambie ia barra de control,
, Ajuste a la posici6n de "Corte m6s
alto"
, Ajuste a la posici6n de "CoNe m&s
alto."
° Limpielcambie el fillro de aire
, Limpie la parte inferior de la caja de
la segadora.
, Revise el nivel del aceile
• Corte a una velocidad de recorrido
m_s lenta
33
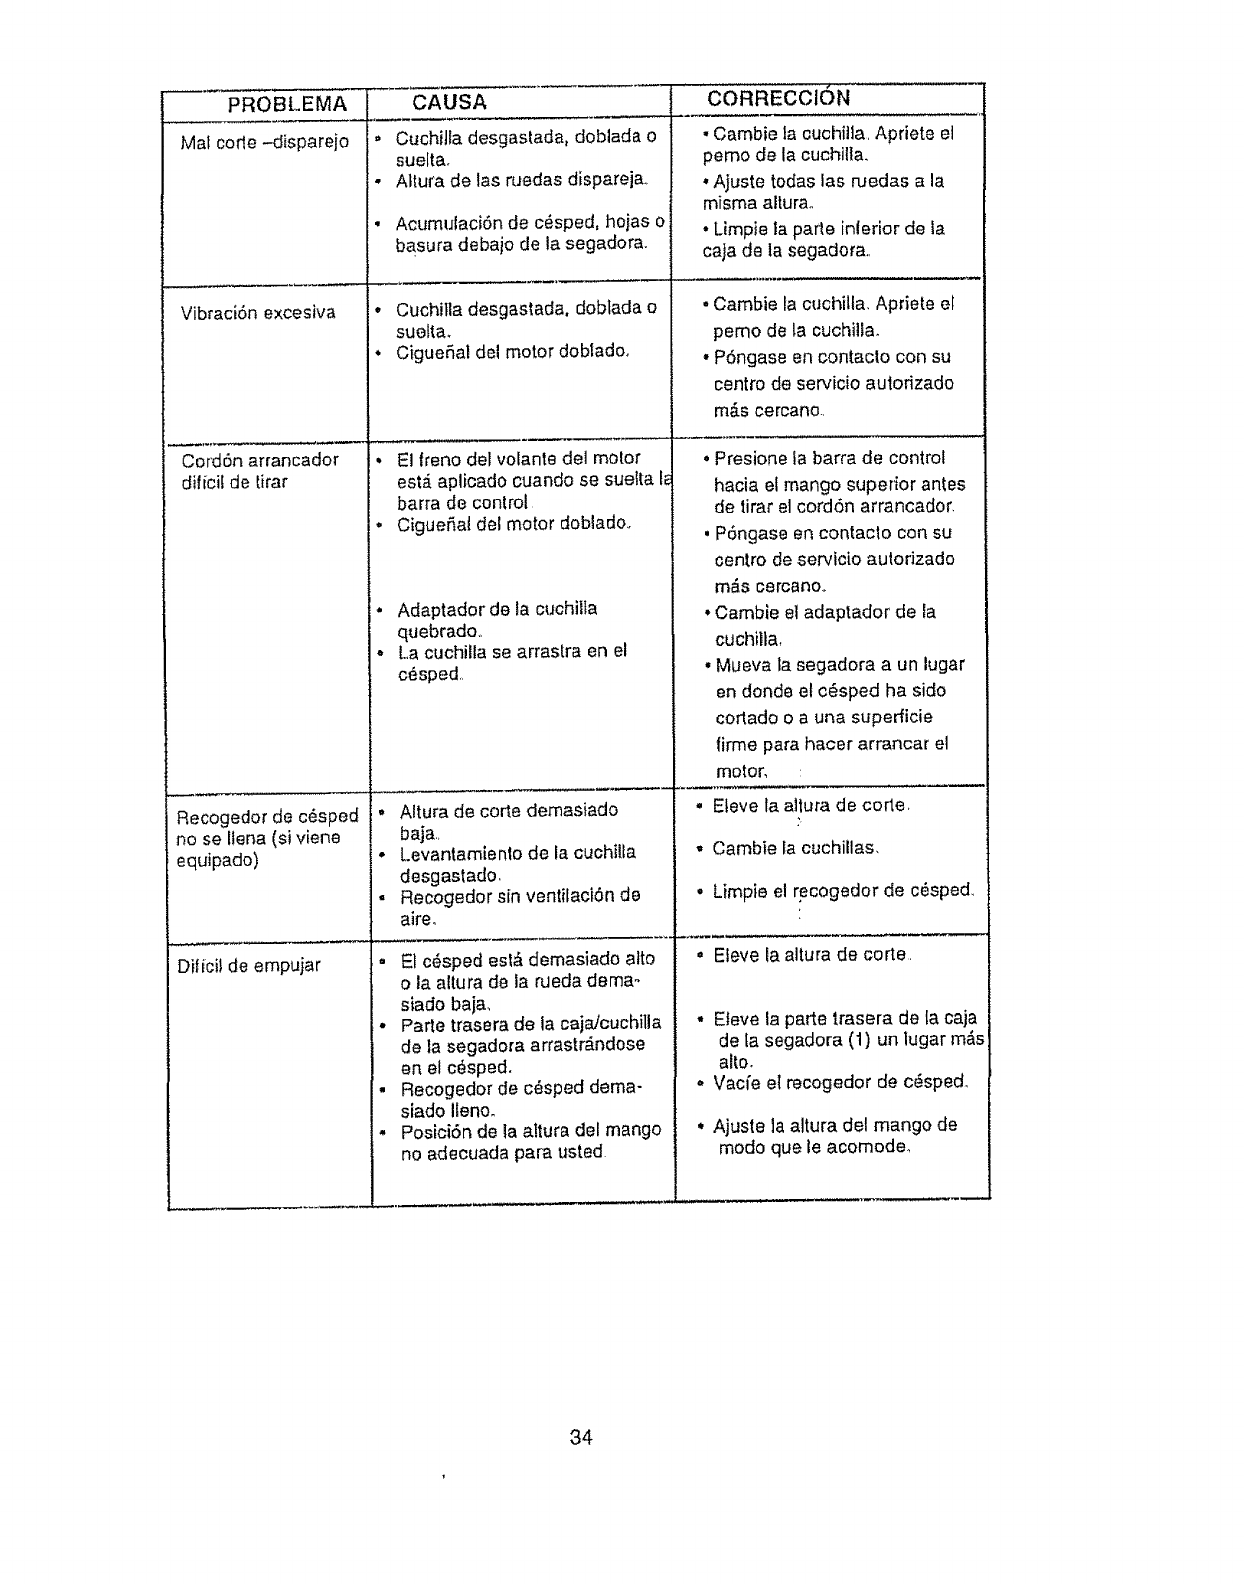
PROBLEMA CAUSA
Mat code-disparejo "
B
VibraciSn excesiva
Cord6n arrancador
difiCii de tirar
Recogedor de c_}sped
no se Itena (si viene
equipado)
Dificil de empujar
Cuchilla desgastada, doblada o
suelta
Altura de las ruedas dispareja
° Acumulaci6n de c#sped, hojas o
basura debajo de la segadora
. Cuchilla desgastada, dobtada o
sue!ta
. Ciguefal del motor dobladoo
•El freno del volante del motor
est_ aplicado cuando se suelta I;
barra de control
,, Cigue_a! del motor dobiado..
• Adaptador de la cuchilta
quebrado
-La cuehilla se arrastra en el
o_sped,.
, Altura de core demasiado
baja
• Levantamienlo de la cuchilla
desgastado,
- Recogedor sin ventilaciOn de
aireo
, El c_sped esl_ demasiado alto
o la altura de la rueda dema°
siado baja,
• Parte trasera de la cajaJcuchilla
de la segadora arrastr_.ndose
en el c_sped,
. Recogedor de c{_sped dema-
siado ileno.
,, Posici6n de la altura del mango
no adecuada para usted
• Cambie la ouchitla Apriete el
pemo de la cuchilla
° Ajuste todas las ruedas a la
misma al|ura
• Limpie la parle inlerior de la
caja de la segadora
• Cambie la cuchilla, Apriete el
pemo de la cuchillao
• P6ngase en contacto con su
centro de servicio autorizado
m_s cercano..
•Presione la barra de control
hacia el mango superior antes
de tirar el cordSn arrancador,
, POngase en contaclo con su
oentro de servicio autofizado
m_s cercano,
• Cambie el adaptador de la
cuchilla,
• Mueva la segadora a un lugar
en donde el c_sped ha sido
cortado o a una superficie
firme para hacer arrancar el
motor,
• Eteve la a]tura de corte
,, Cambie la cuchiilas,
• Limpie el recogedor de c6sped,
o Eleve la altura de core.
,, Eleve la parte trasera de [a caja
de ta segadora (1) un lugar m_s
alto.
,, Vacfe el recogedor de c_sped_
° Ajuste ]aaltura del mango de
modo que le acomode_
34
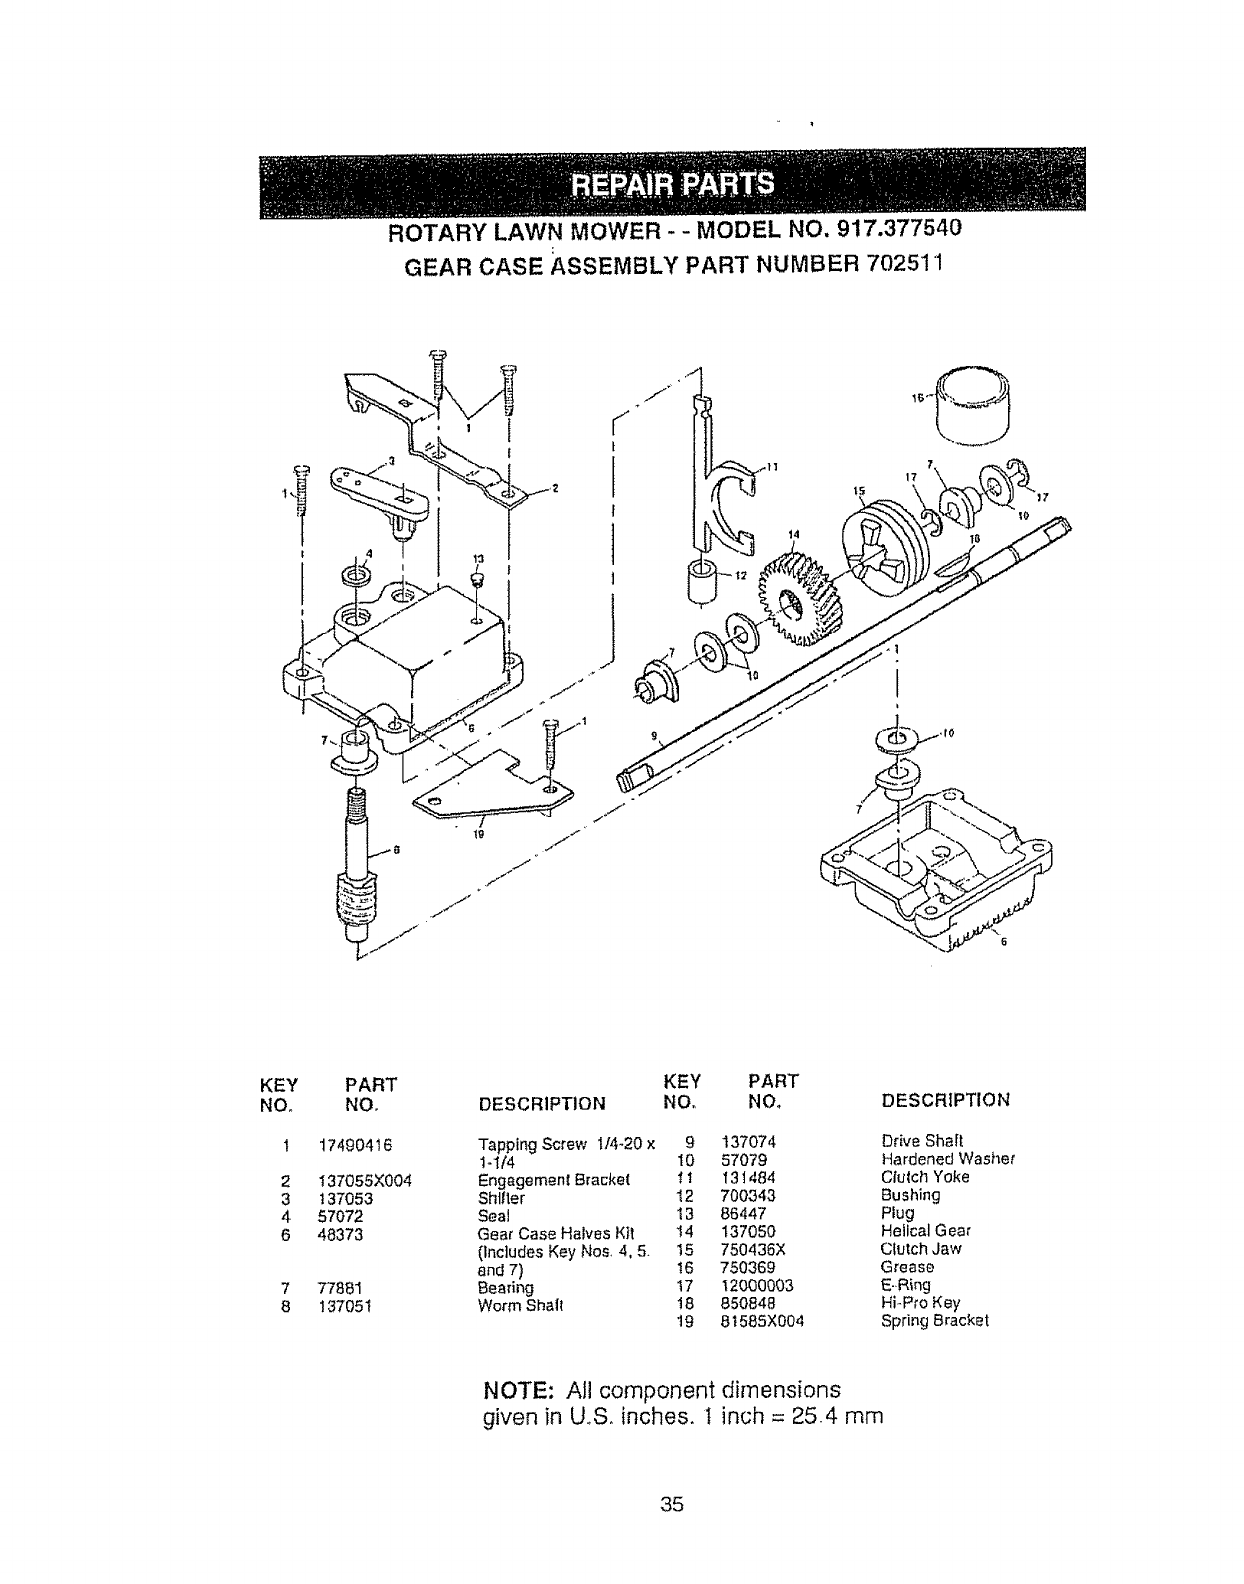
ROTARY LAWN MOWER- -MODEL NO. 917.377540
GEAR CASE ASSEMBLY PART NUMBER 702511
' I
1
17
KEY
NO,
2
3
4
6
7
8
PART
NO,
17490416
I37055X004
137053
57072
48373
T78BI
137051
KEY PART
DESCRIPTION NO_ NO,
Tapping Screw t/4-20 x 9 137074
1-1/4 10 57079
Engagemenl Bracke( _ t I3 t 484
Shtlter 12 700343
SeaJ 13 86447
Gear Case Halves Kit !4 137050
(Includes Key Nos. 4, 5. t5 7504367,
and 7) !6 750369
Bearing t7 12000003
Worm Shall 18 850848
19 8t585X004
DESCRIPTION
Drive Shalt
Hardened Washer
Clutch Yoke
Bushing
Plug
Helical Gear
Clutch Jaw
Grease
E-.P,ing
Hi-Pro Key
Spring Bracket
NOTE: All component dimensions
given in U_S. inches, t inch = 25.4 mm
35
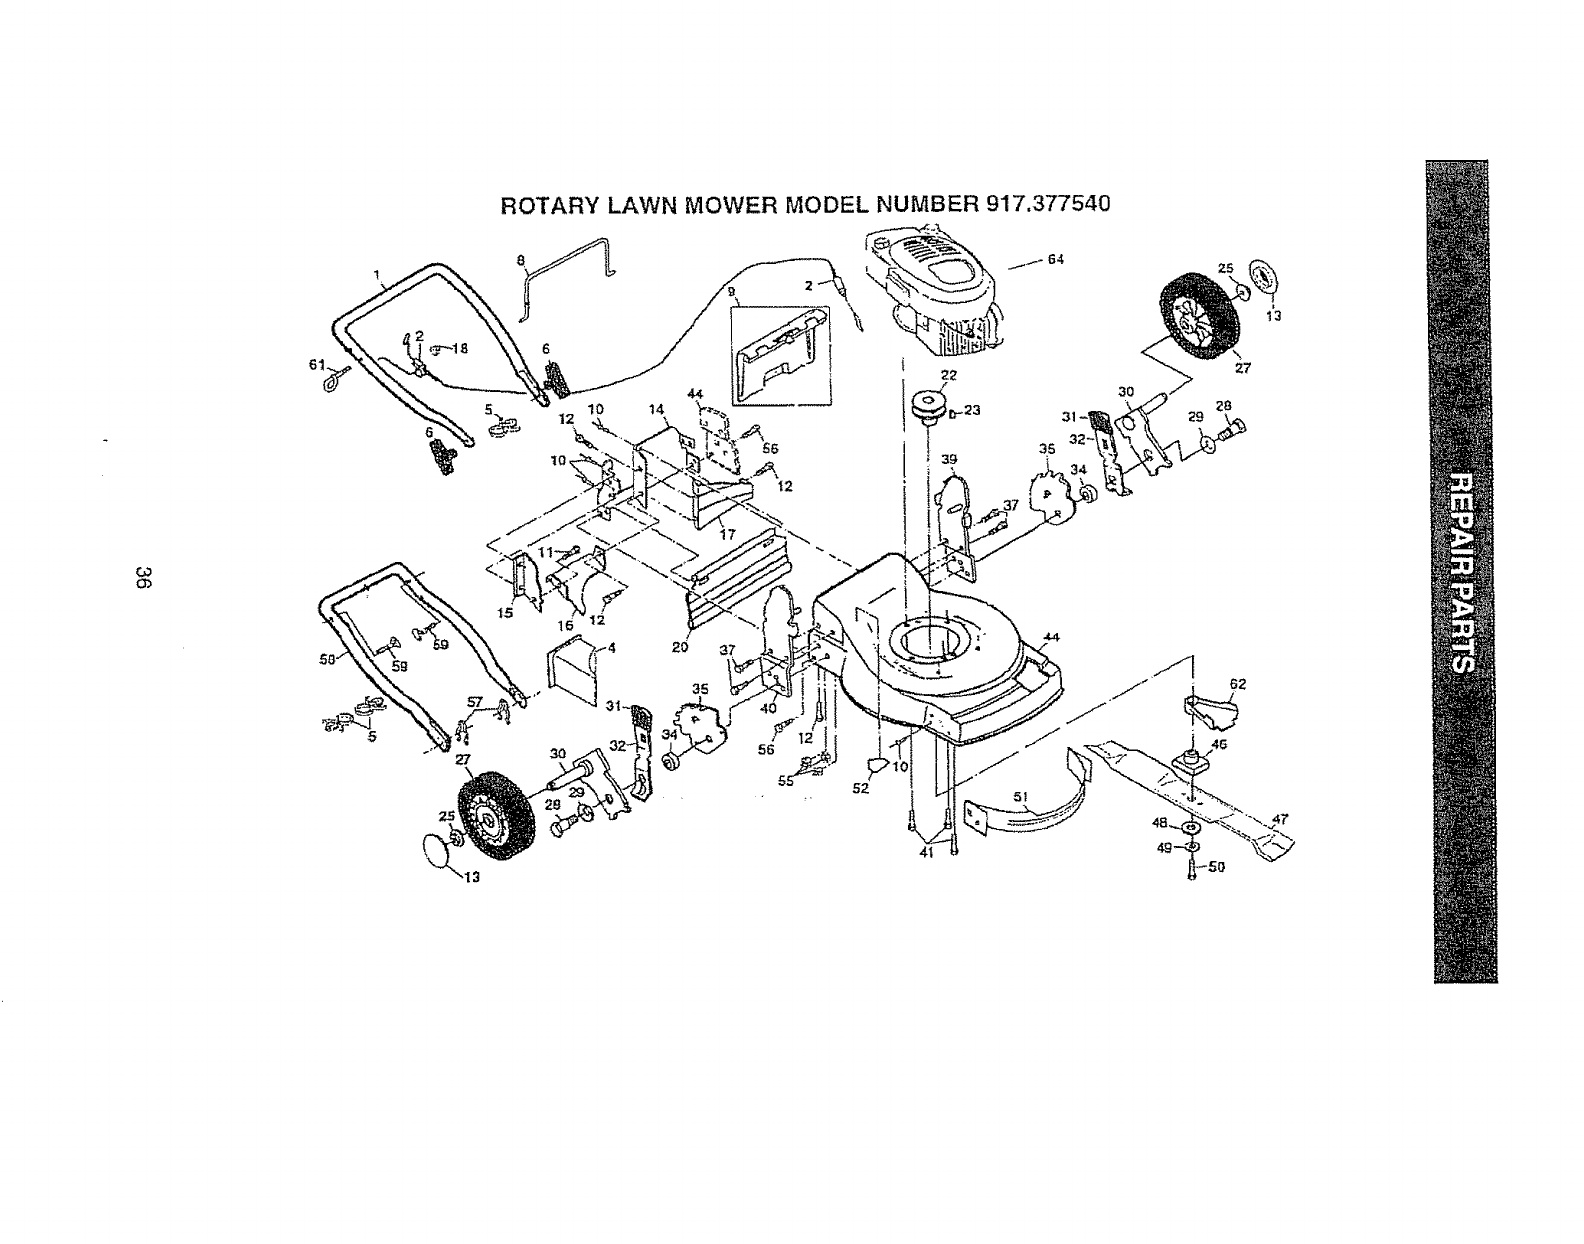
G3
O)
ROTARY LAWN MOWER MODEL NUMBER 917.377540
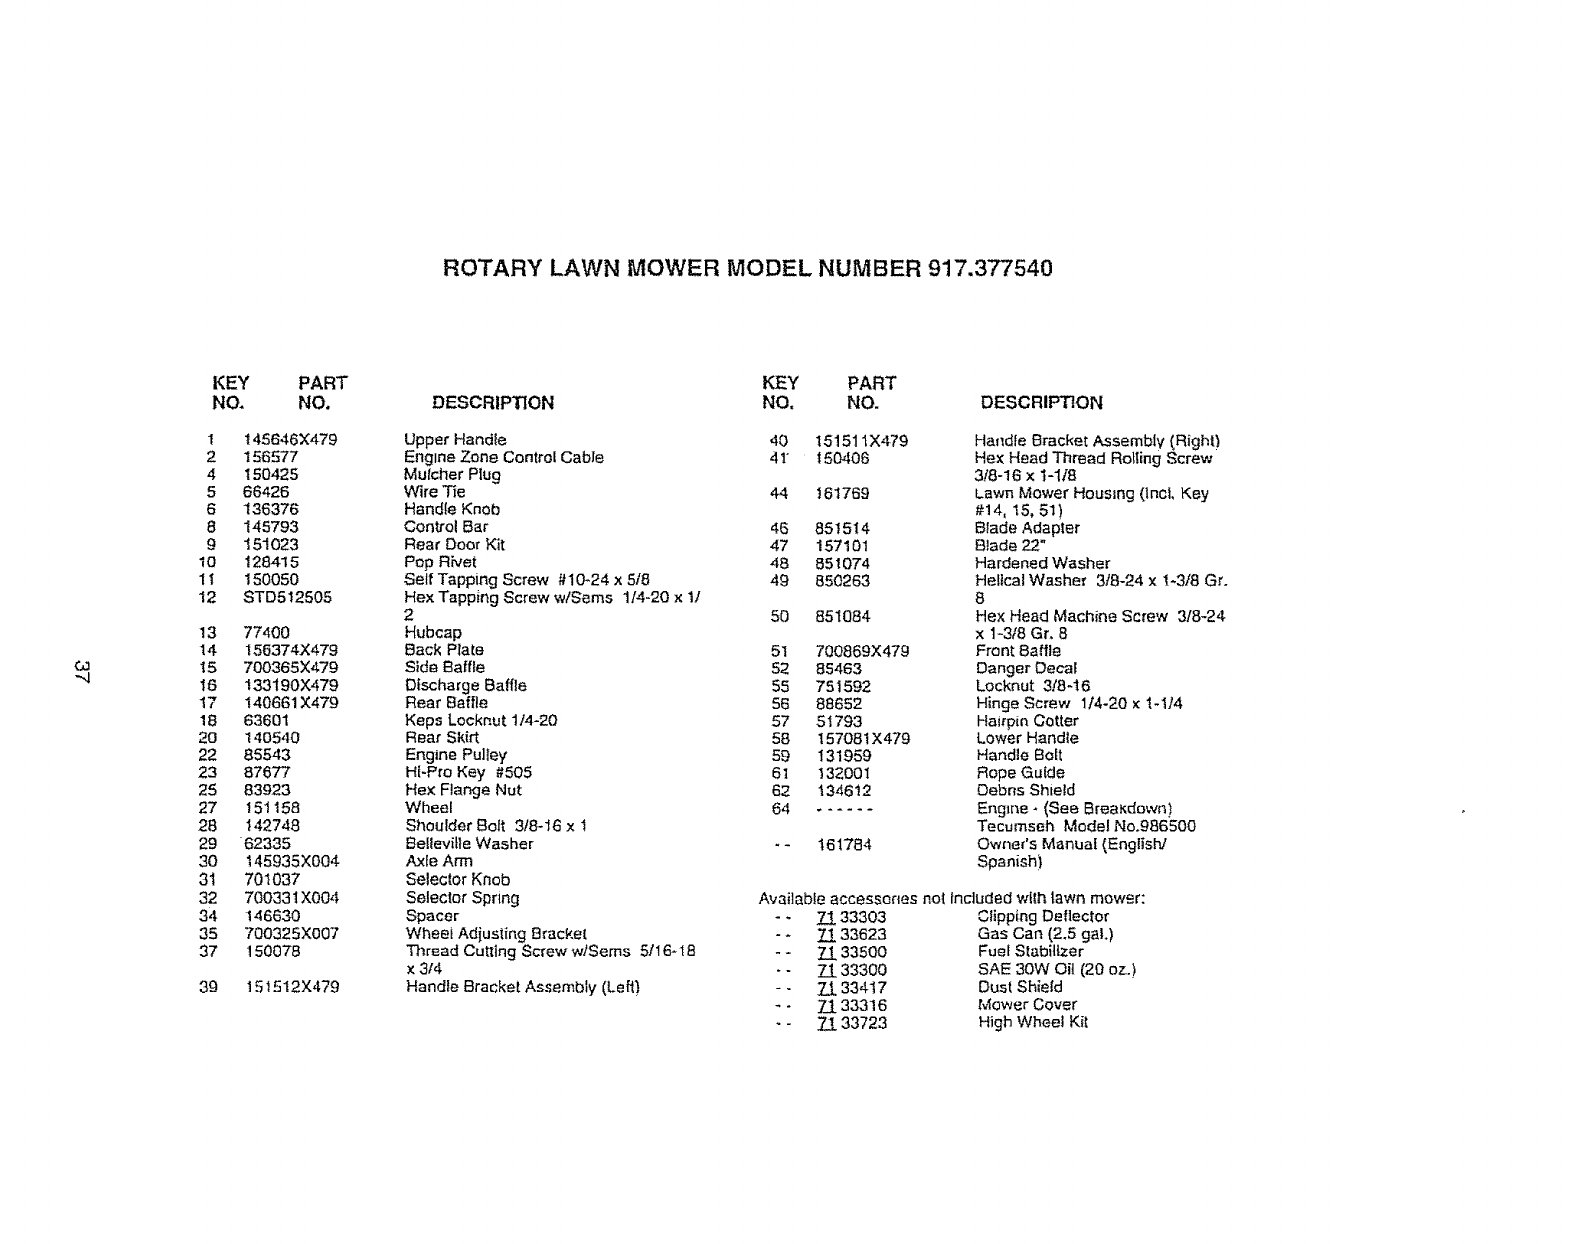
ROTARY LAWN MOWER MODEL NUMBER 917.377540
G3
"4
KEY PART
NO. NO.
I 145646X479
2 156577
4 150425
5 66426
6 136376
8 145793
9 151023
10 128415
1t 150050
12 STD5!2505
13 77400
14 156374)(479
15 700365X479
16 133190X479
17 140661X479
18 63601
20 140540
22 85543
23 87677
25 83923
27 151158
28 142748
29 62335
30 t45935X004
31 701037
32 70033tX004
34 146630
35 700325X007
37 150078
39 151512X479
KEY PART
DESCRIP_ON NO. NO. DESCRIFrION
Upper Handte 40
Engine Zone Control Cable 41"
Mutcher Plug
Wire Tie 44 161769
Handie Knob
Control Bar 46 851514
Roar Door Kit 47 157101
Pop Rivet 48 85t 074
Self Tapping Screw #10_24 x 5/8 49 850263
Hex Tapping Screw wtSems 1t4-20 × 1,/
2 50 8511384
Hubcap
Back Plate 51
Side Baffle 52
Discharge Baffle 55
Rear Baffle 56
Keps Locknut 114-20 57
Rear Skirt 58
Engine Pulley 59
Hi-Pro Key #505 6t
He× Flange Nut 62
Wheel 64
Shoulder Bolt 3/8-I6 x I
Hellevit}e Washer - - 161784
Axle Arm
Selector Knob
Selector Spring
Spacer
Wheei Adjusting Bracket
ThrBad Cutting Screw w/Seres 5/16-I 8
× 3/4
Handle Bracket Assembly (Left}
151511X479 HaT]die Bracket Assembly (Right)
t50406 He× Head Thread Rolling Screw
3f8-16 x 1-1/8
Lawn Mower Housing {tnci, Key
#14, 15, 51)
Blade Adapter
Blade 22"
Hardened Washer
He!tcal Washer 3!8-24 x 1-3/8 Gr.
8
Hex Head Machine Screw 3/8-24
x 1-3t8 Gr. 8
700869X479 Front Baffle
85463 Danger Decal
751592 Locknut 318-I6
88652 Hinge Screw 114-20 x t-114
5I 793 Hairpin Cotter
157081 X479 Lower Handle
131959 Handle Bolt
132001 Rope Guide
1346 t2 Debris Shield
Engine * (See BreaKdowns)
Tecumseh Model No.986500
Owner's Manual {English/
Spanish)
Available accessories not tncluded with lawn mower:
- - ]_!. 33303 Clipping Deflector
-*71. 33623 Gas Can (2.5 gal.)
-*Z1 33500 Fuel Stabilizer
- - 71 33300 SAE 3OW Oit (20 oz.)
- - Zi 334t7 Dust Shield
- - 7_/33316 Mower Cover
- - 7/33723 High Wheel Kit
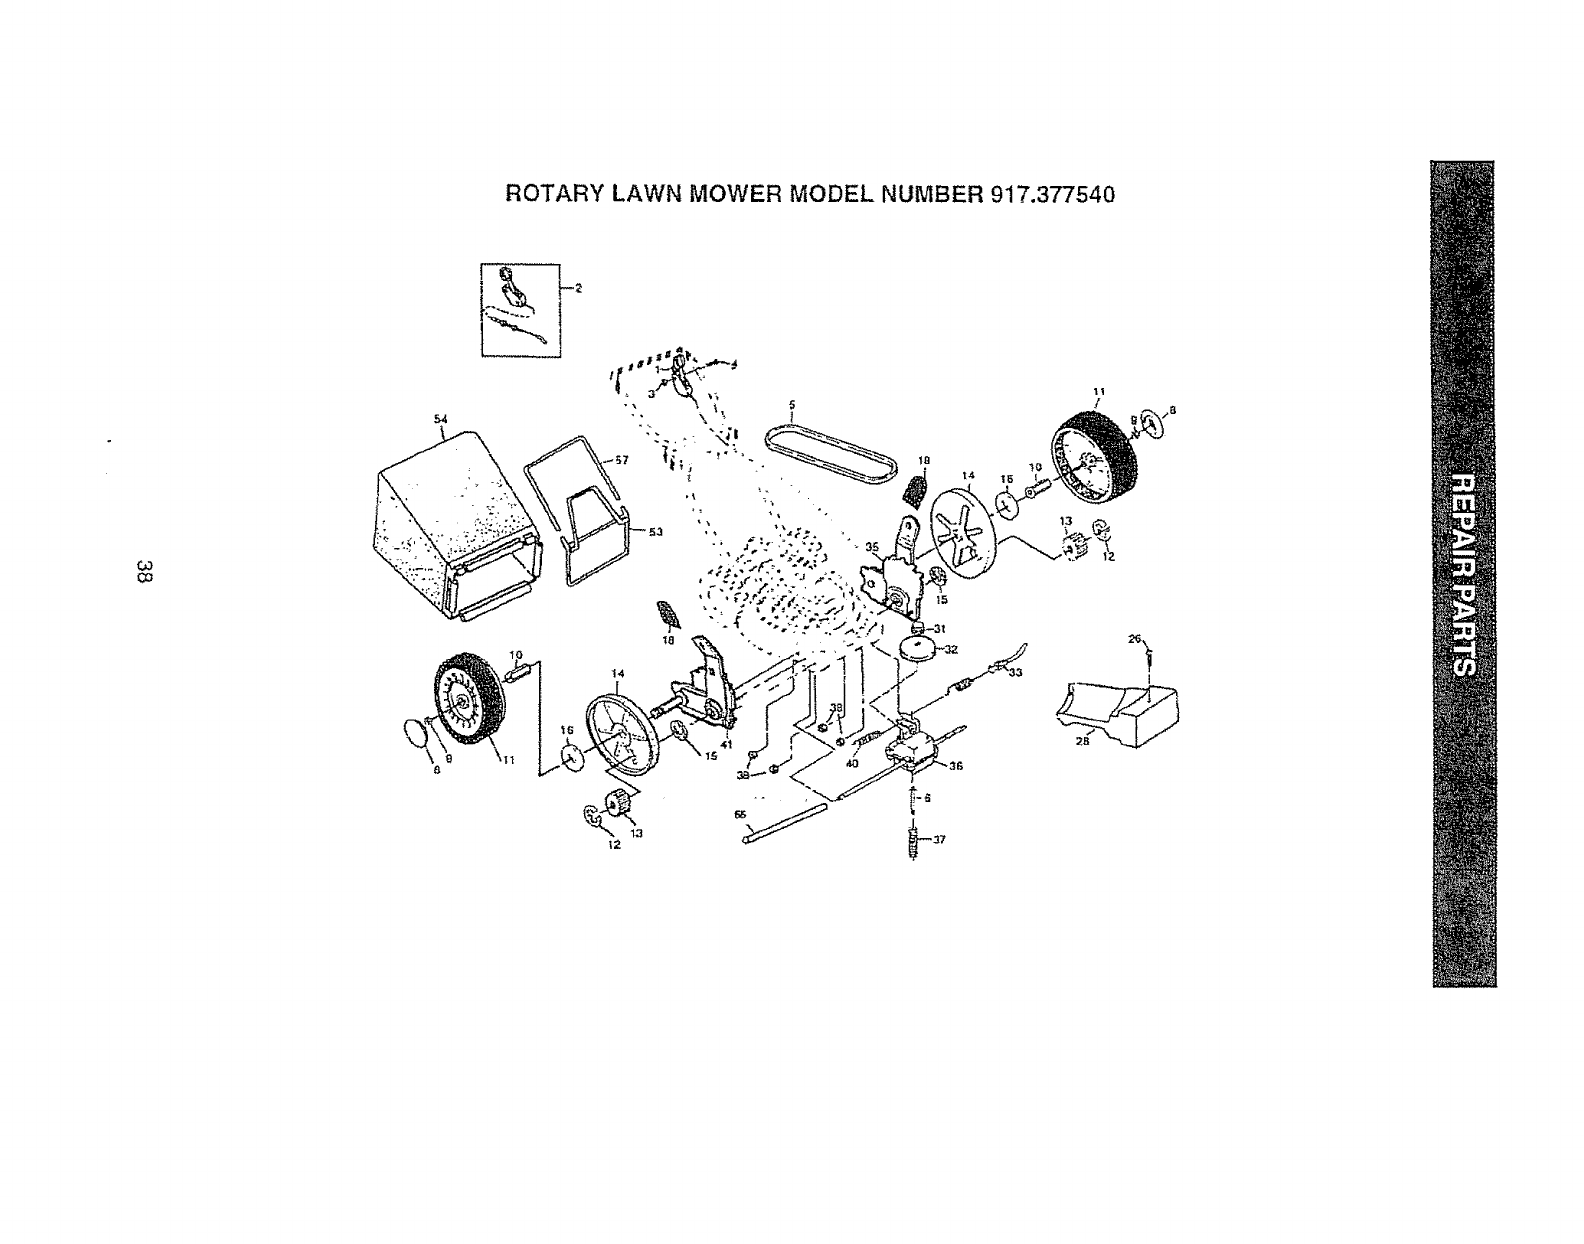
ROTARY LAWN MOWER MODEL NUMBER 917.377540
03
CO
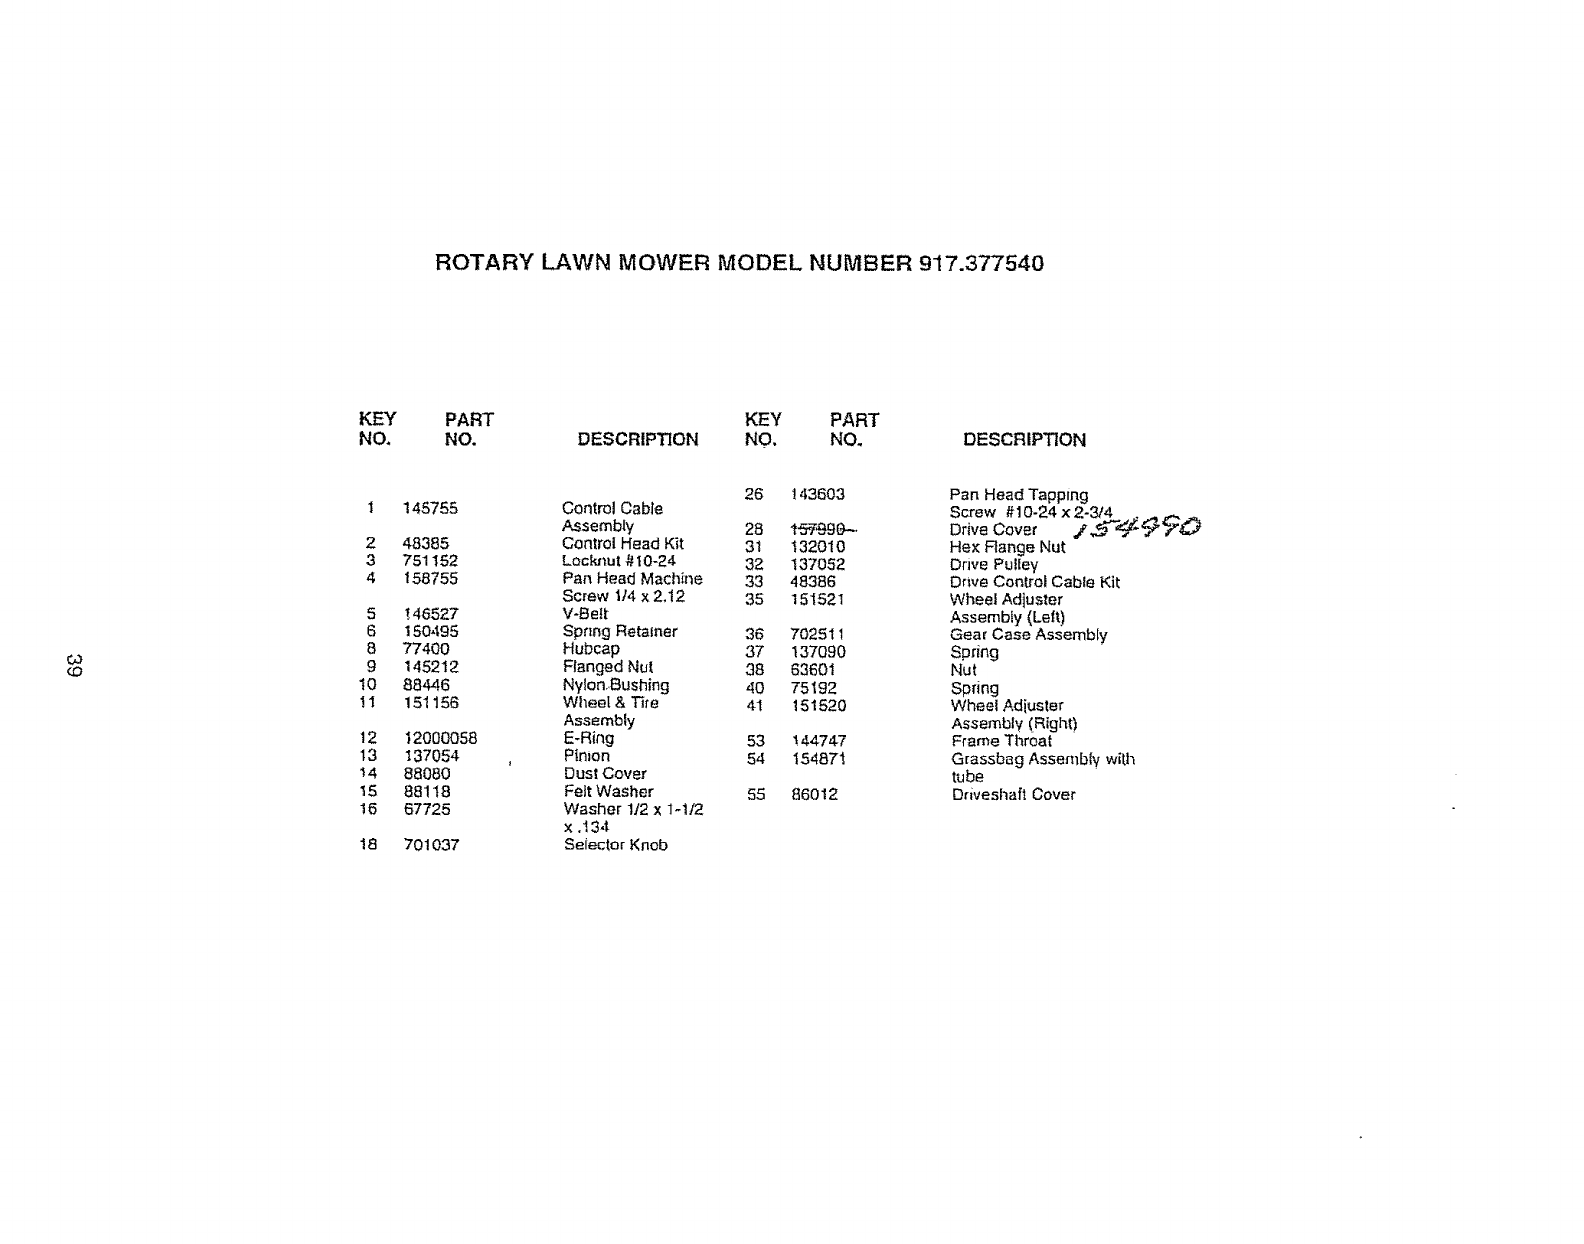
ROTARY LAWN MOWER MODEL NUMBER 917.377540
KEY
NO. PART KEY PART
NO. DESCRIPTION NO, NO. DESCRIPTION
O3
£O
5
6
8
9
t0
11
12
13
!4
15
16
18
1145755
2 48385
3 751152
4 158755
146527
150495
77400
145212
88446
151156
12000058
137054
88080
88118
67725
701037
26 t 43603 Pan Head Tapping
Control Cable Screw #10-24 x 2-3/4 ....
Assembly 28 _5¥_J9_ -- Drive Cover .Z _-_¢_j_ _7"_._',_
Control Head Kit 3t 132010 Hex Flange Nut
Locknut # 10-24 32 137052 Drive Pulley
Pan Head Machine 33 48386 Drive Conlrol Cable Kit
Screw 1t4 x2,t2 35 151521 Wheel Adiuster
V-Belt Assembly (Left)
Spnng Retainer 36 7025_ 1 Gear Case Assembly
Hubcap 37 137090 Spring
Flanged Nut 38 63601 Nut
Nylon,Bushing 40 75192 Spring
Wheel & Ti_'e 4I t 51520 Wheel Adiuster
Assembly Assembly (_Right)
E-Ring 53 _44747 Frame Throat
Pinion 54 154871 Grassbag Assembi¥ with
Dust Cover tube
Felt Washer 55 86012 Drivesilaft Cover
Washer 1./2 x 1-1/2
x.t34
Seiector Knob
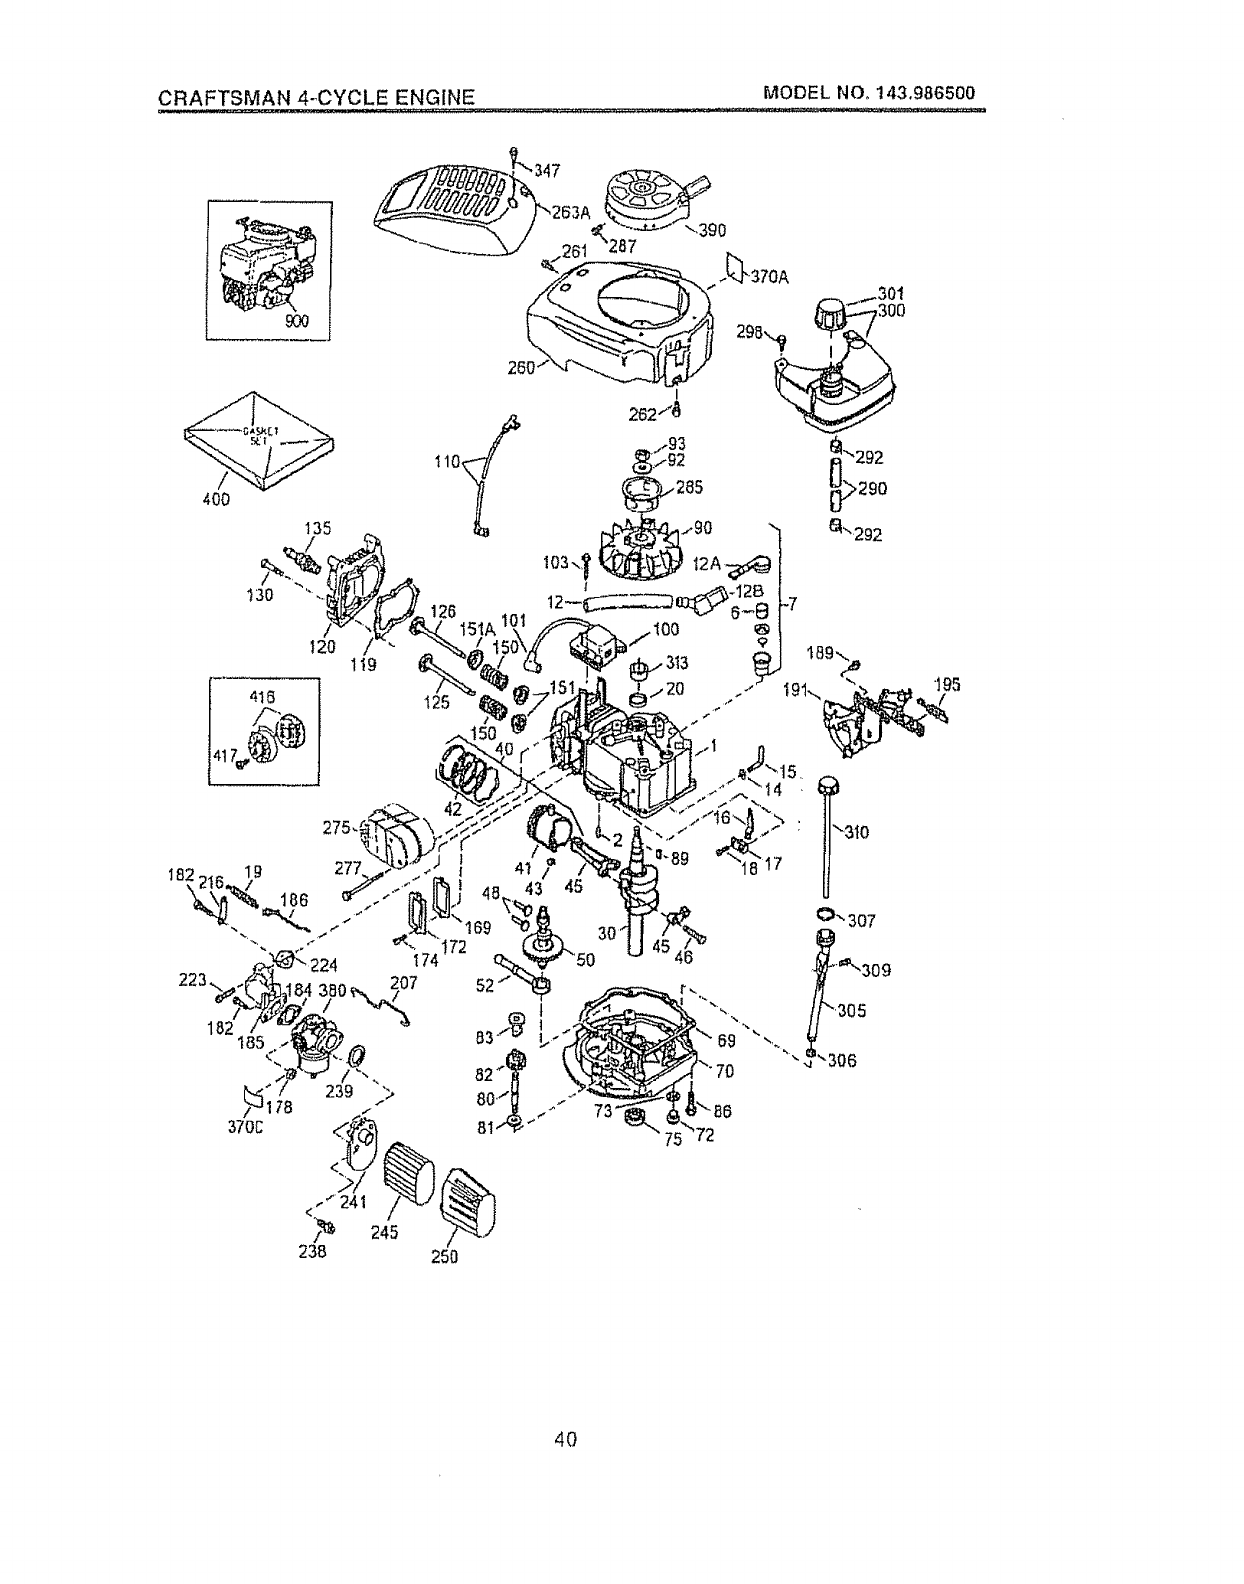
CRAFTSMAN. 4-..CYCLE ENGU".IE MODELNO_.! 43198650_
900
1"t9
275-
120
4t
238 250
40
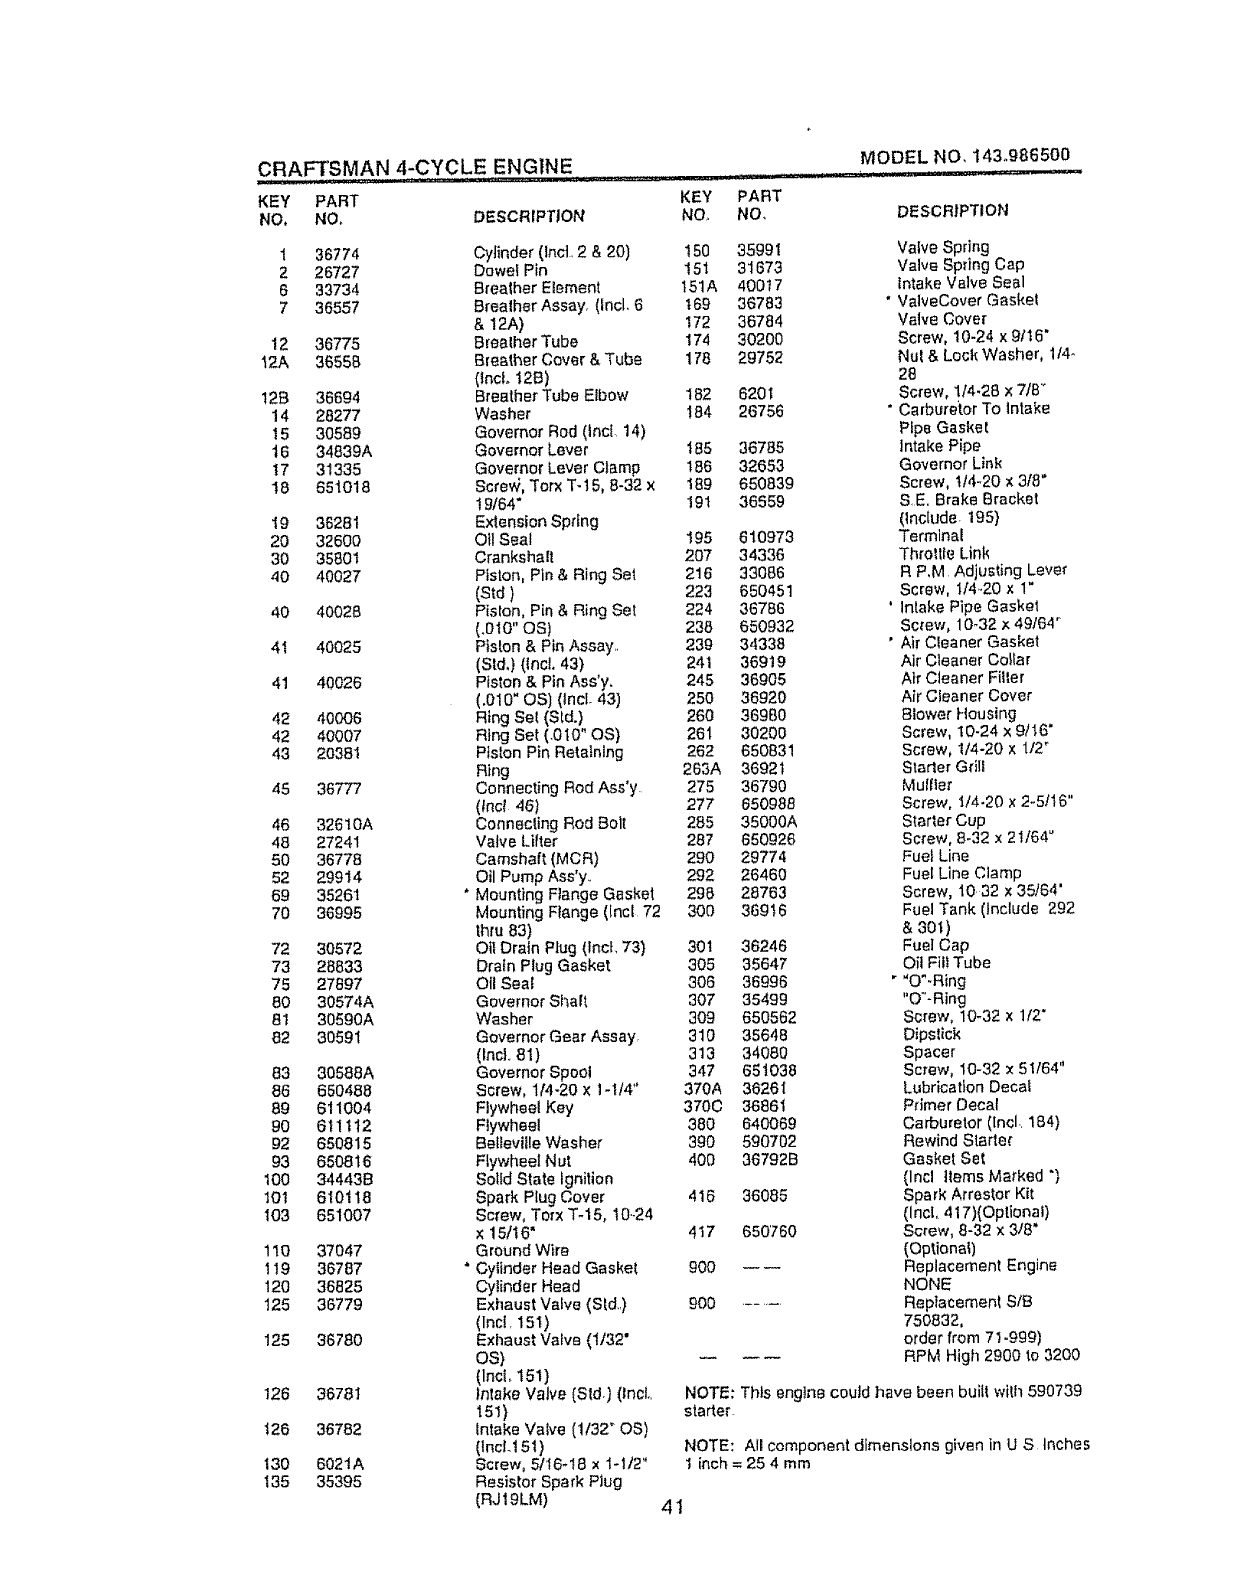
CRAFTSMAN 4-CYCLE ENGINE
KEY PART
NO, NO, DESCRIPTION
1
2
6
7
12
12A
128
14
i5
16
i7
18
_9
20
30
40
4O
4I
41
42
42
43
45
46
48
50
52
69
7O
72
73
75
80
81
82
83
86
89
90
92
93
100
101
I03
11o
If9
120
125
125
126
t26
130
i36
36774
26727
33734
36557
36775
36558
36694
28277
30589
34839A
31335
651018
36281
32600
35801
40027
40028
40025
40026
40006
40007
20381
38777
32610A
27241
36778
29914
35261
36995
30572
28833
27897
30574A
30590A
30591
30588A
650488
611004
611112
650815
650816
344438
610118
651007
37047
36787
36825
36779
36780
36781
36782
6021A
35395
KEY PART
NO_ NO.
MODEL NO, 143.986500
........ .1
DESCRIPTION
Cylinder (IncL 2&20) 150 35991 Valve Spring
Dowel Pin 15I 31673 Valve Sp_ing Cap
Brealher Element 15tA 40017 intake Valve Seal
Brealher Assay. (Incl, 6 t 69 36783 " ValveCover Gasket
& 12A) t72 36784 Valve Cover
Brealher Tube 174 30200 Screw, 10-24 x 9/t6"
Breather Cover & Tube 178 29752 Nul & Lock Washer, 114.
(lncL 128) 28
Breather Tube Elbow t82 620t Screw, 1/4.28 x 7/8 _
Washer !84 26756 * Carbure'tor To intake
Governor Rod (tnc{ 14) Pipe Gasket
Governor Lever t85 36785 Intake Pipe
Governor Lever Clamp 186 32653 Governor Link
Scre,,_, Torx T- t 5, 8-32 x 189 650839 Screw, t14-20 x 3/8"
I9/64" 191 36559 S.E. Brake Bracket
Extension Spring (Include. 195}
Oil Seal 195 610973 Terminal
Crankshalt 207 34336 Throltte Link
Piston, Pin &Ring Set 216 33086 R P,M Adjusting Lever
(Std) 223 650451 Screw, 1/4-20 x !"
Pislon, Pin & Ring Set 224 36786 ° Intake Pipe Gasket
(.0I 0" OS} 238 650932 Screw, t 0-32 x 49/6.1 r
Piston & Pin Assay.. 239 34336 ' Air Cleaner Gasket
(Sial,) (incl. 43) 241 36919 Air Cleaner Collar
Piston & Pin Ass'y. 245 36905 Air Cleaner Filler
(.010" OS) (Incl. 43) 250 36920 Air Cieaner Cover
Ring Se{ (SIdJ 260 36960 Blower _-tousing
Ring Sef: (.0t0" OS) 261 30200 Screw, t0-24 x 9116"
Piston Pin Retaining 262 650831 Sc='ew, 1/4-20 x 1/2_
Ring 263A 3692_ Starter Grill
Connecting Rod Ass'y. 275 36790 MuIIter
(tncl 46) 277 650988 Screw, t/4.20 x 2-5!16"
Connecling Rod Bolt 285 35000A Starter Cup
Valve Litter 287 650926 Screw, 8-32 x 21/64 °
Camshaft (MCR} 290 29774 Fuel Line
Oil Pump Ass'y.. 292 26460 Fuel Line Clamp
•Mounting Flange Gasket 298 28763 Screw, 10.32 x 35/64'
Mounting Flange (Incl 72 300 36916 Fuel Tank (Include 292
thru 83) & 301)
Of! Drain Plug (tncL 73} 301 36246 Fuel Cap
Dra{n Plug Gasket 305 35647 Oil Fill Tube
Otl Seal 306 36996 ""O%Ring
Governor Shall 307 35499 "O"-Ring
Washer 309 650562 Screw, 10-32 x1/2"
Governor Gear Assay, 310 35648 Dipstick
(Inc|. 81) 313 34080 Spacer
Governor Spool 347 651038 Screw, 10-32 x 51/64"
Screw, 1/-'I-20 ×1-1/4" 370A 36261 Lubrication Decal
Flywheel Key 3700 36861 Primer Decal
Flywheel 380 640069 Carburetor (Incl.. 184)
Betleviile Washer 390 590702 Rewind Starlet
Flywheel Nut 400 367928 Gasket Set
Solid State Ignition (Incl Items Marked "}
Spark Ptug Cover 416 36085 Spark Arrestor Kit
Sc_'ew, Torx T-15, 10.-24 (IncL 417){Optional)
x 15/t6" 4t7 650760 Screw, 8-32 x 3/8"
Ground Wire (Optional)
" Cylinder Head Gaske( g00 _ _ Replacement Engine
Cylinder Head NONE
Exhaust Valve (S[d..) 900 ....... Replacement S/B
(lncf. 151) 750832,
Exhaust Valve (1/32" order from 71-999)
OS) RPM High 2900 to 3200
(lnci_ 151)
)nlat_e Valve (Std.) (IncL NOTF-: Thts engine coutd have been built with 590739
151) starter
intake Valve (1/32 _ OS)
(IncLt51) NOTE: All component dimensions given in U S Inches
Screw, 6/I6-18 x I-1/2" t inch = 25 4 mm
Resistor Spark Plug
(RJ 19LM) 4 1
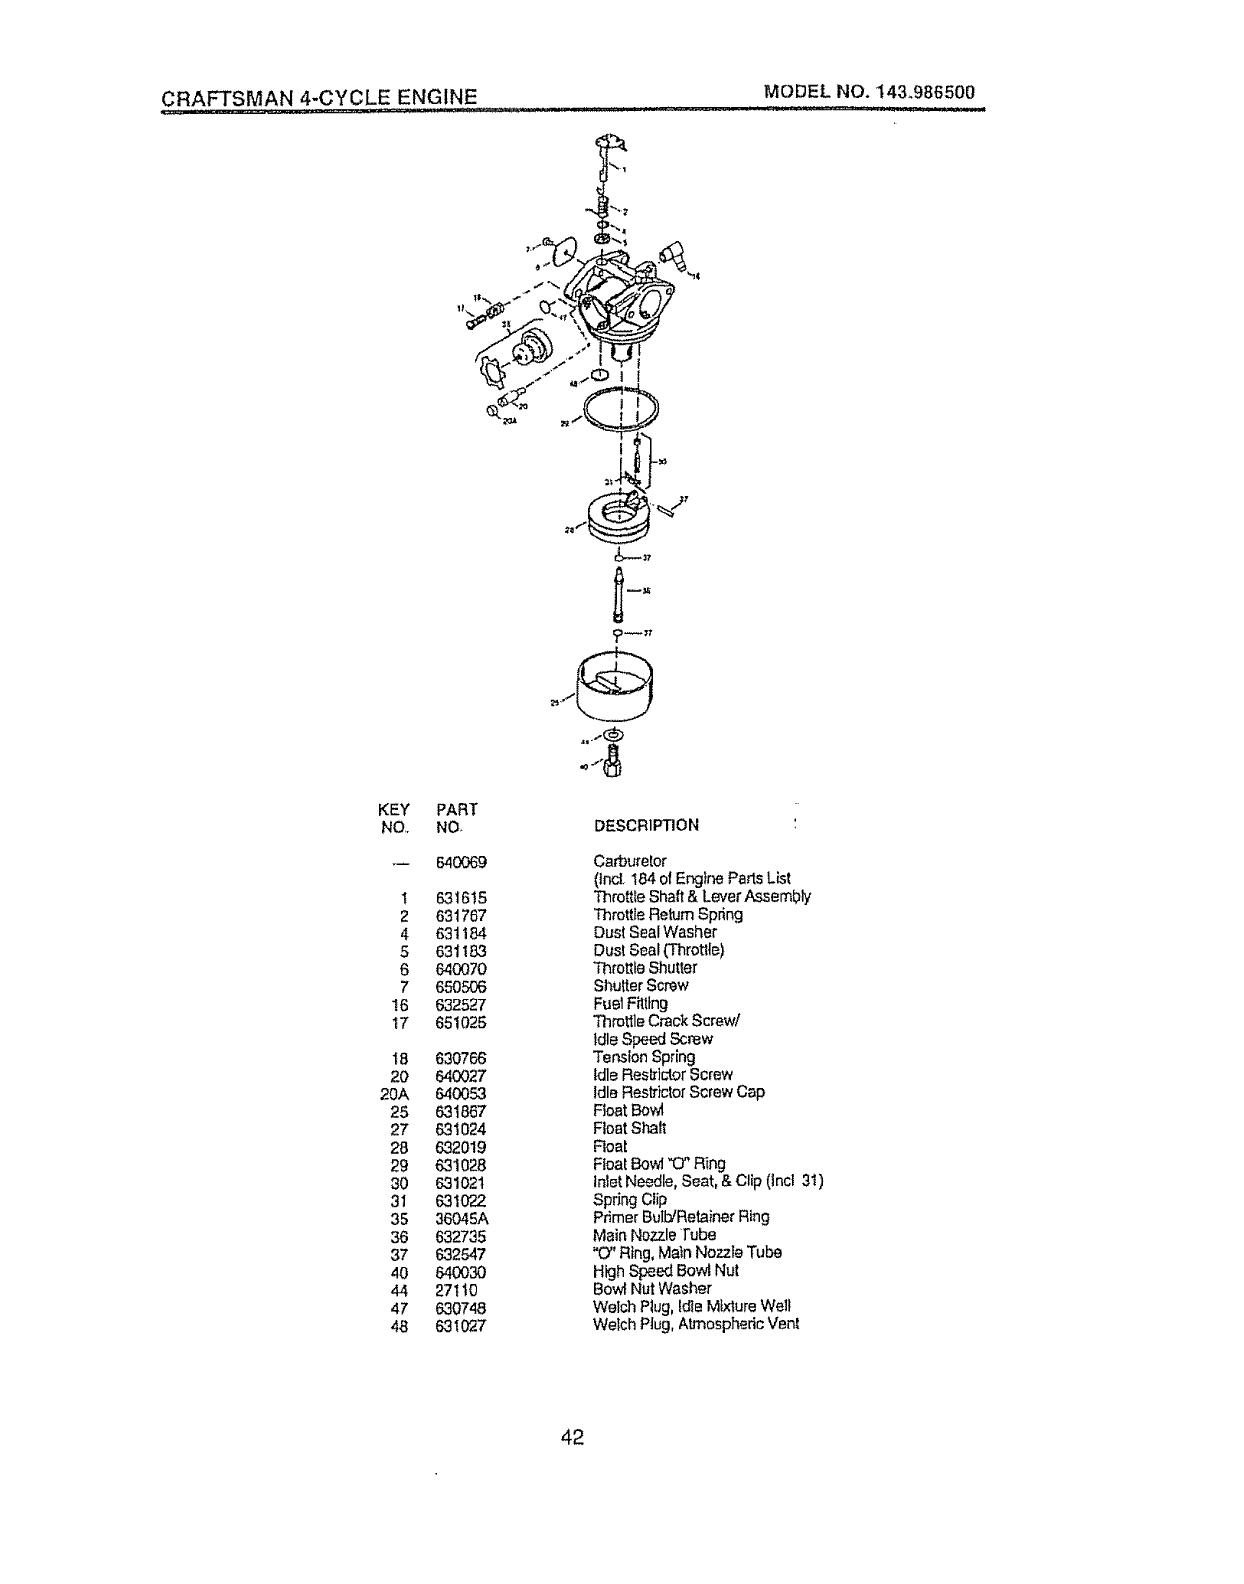
CRAFTSMAN 4-CYCLE ENGINE MODEL NO. t43.986500
%*1
2_f_
KEY
NO..
t
2
4
5
6
7
16
17
I8
2O
20A
2S
27
28
29
3O
3t
35
36
37
4O
44
47
48
PART
NOr
640O69
631615
631767
631184
6311183
640070
650506
632527
65! 025
630766
640027
640053
631867
631024
632019
631028
631021
631022
36045A
632735
632547
64O03O
27110
630748
631O27
DESCRIPTION
Carburetor
(tnc[ 184,o! Engine Parts List
ThrottteShaft & LeverAssembly
Throf:tfeReturnSpdng
Dust SealWasher
DustSeal(Throtlt_)
ThrottleShutter
ShutterScrew
Fu_IFilttng
ThrottleCrack Screw/
IdleSpeedScrew
Tension Spring
Idle Resb:IctorScrew
tdle Res_ictorScrew Cap
FloatBowl
FloatShalt
Roar
F_oat_wl "O" R{ng
InletNeedle,Seat, & Clip (lncl 3t)
SpringClip
P_mer Bulb/RetainerR_g
Main NozzleTube
"(7' Ring,Ma_nNozzle Tube
High SpeedBow! Nut
BowlNut Washer
Welch Plug,IdleM_xtureWell
Welch Plug,AtmosphericVent
42
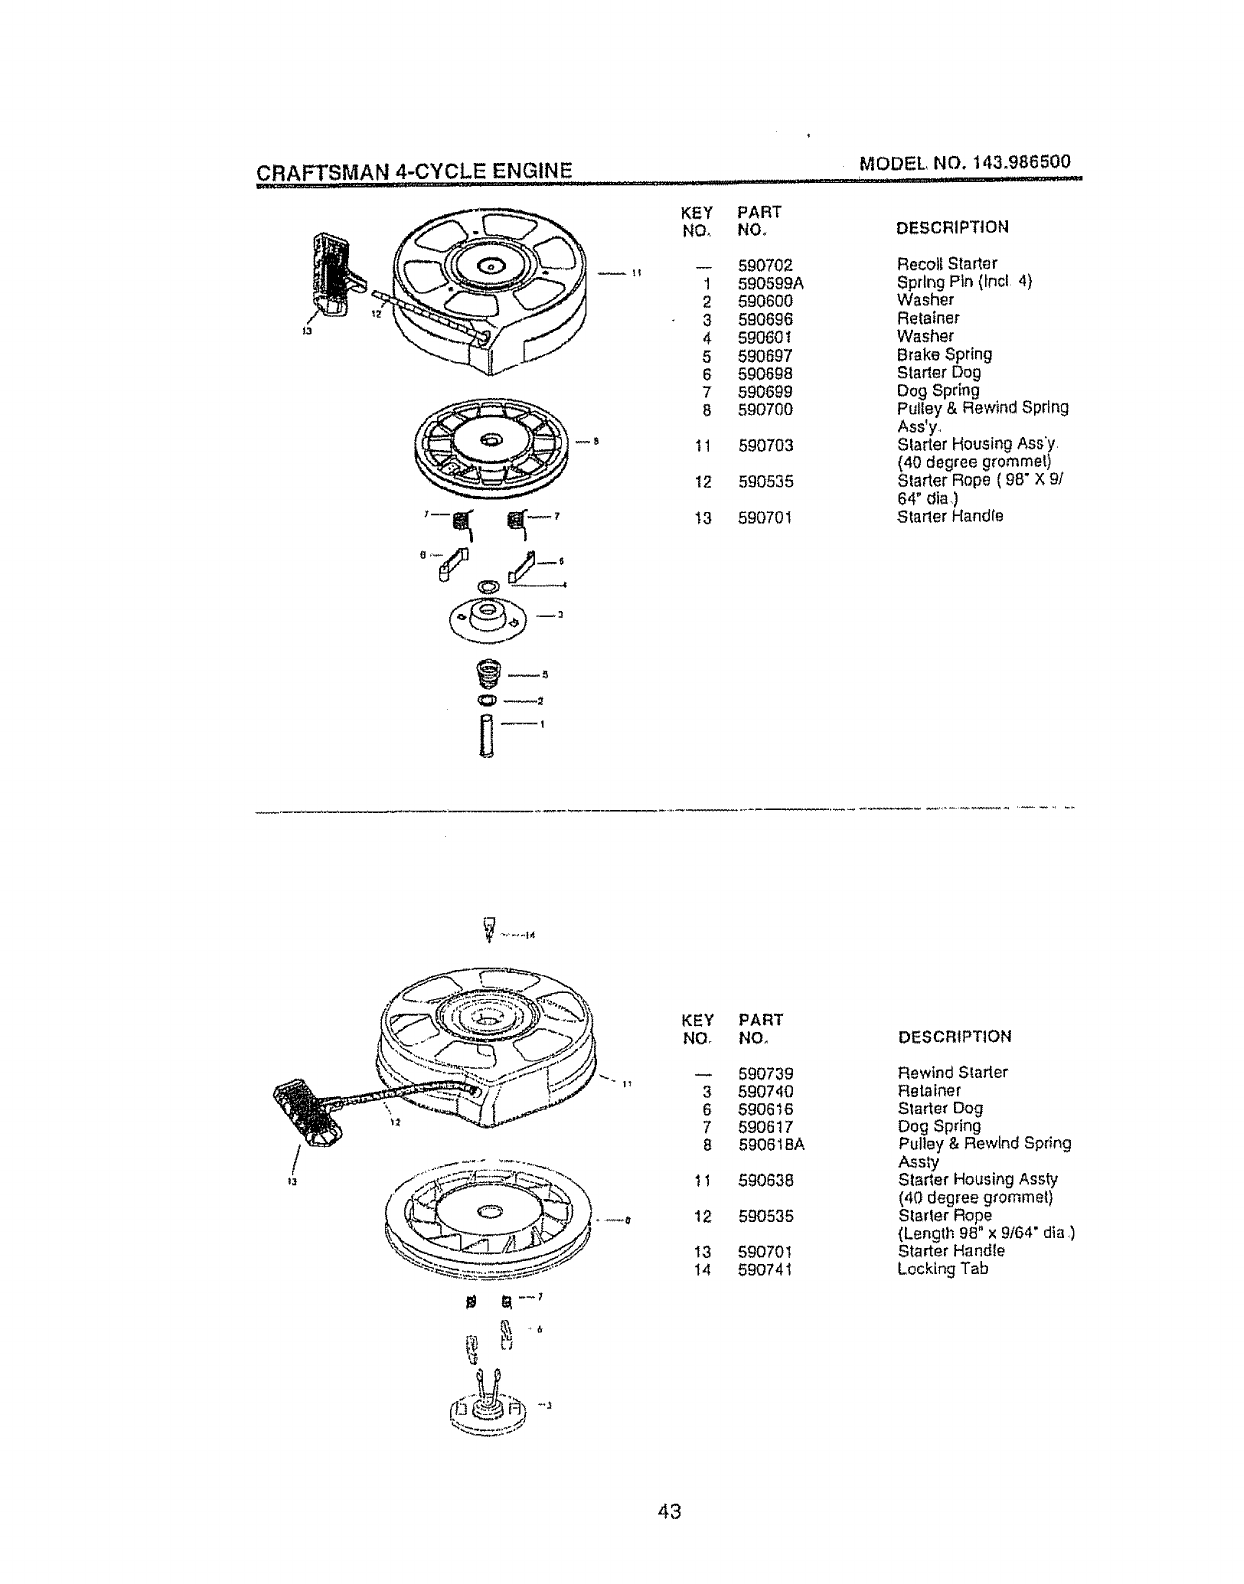
CRAFTSMAN4-CYCLEENGINE
• i I ...... ,11_ ,LL I Ilq 'IIII J IIIIII '
MODEL, NO. 143.986500
KEY PART
NO, Nee DESCRIPTION
590702 Recolt Starter
1590599A Spring Pin (tncl 4}
2 590600 Washer
3590696 Retainer
4 590601 Washer
5 590697 Brake Spring
6 590698 Starter Dog
7590699 Dog Spring
6 590700 Pultey & Rewind Spring
Ass'y,
t t 590703 Slarter Housing Ass'y,
(40 degree grommet)
12 590535 Starter Rope ( 98" X 9/
64" din,)
13 590701 Starter Handle
KEY PART
NQ NO, DESCRIPTION
-- 590739 Rewind Starter
3 590740 Retainer
6 5906 t 6 Start e_"Dog
75906 t7Dog Spring
8 590618A Pulley & Rewind Spring
Assay
t 1 590638 Starter Housing Assty
(40 degree grommet)
12 590535 Star_er Rope
(Length 98" x 9/64" din ,)
I3 590701 Starter Han{JIe
14 590741 Locking Tab
43
Fortherepairor replacementpartsyouneed
delivereddirectlytoyourhome
Call7am- 7 pro,7 daysaweek
1-800-366-PART
(1-800-366-7278)
Para ordenar piezas con entrega a
domicitio - 1-800-659W084
For in-house major brand repair service
Ca!l 24 hours a day, 7 days a week
1-800-4.-REPAIR
(1-800-473-7274)
Para pedir servicio de reparaci6n a
domicilio - 1-800-676-5811
For the location of a Sears Parts and
Repair Center in your area
CalJ 24 hours a day, 7 days a week
1-800-488-1222
For informatlion on purchasing a Sears
Maintenance Agreement or to inquire
about an existing Agreement
Call 9 am - 5 pm_ Monday-Saturday
1-800-827.-6655
When requesting service or ordering
parts, always provide the following
information:
• Product Type , Part Number
• Model Number ° Part Description
Amertca s Repair SpecialiSts
161784 04.29,98 REV.3 VB Printed in U,S,A,
