Craftsman 917377563 User Manual ROTARY MOWER Manuals And Guides L0804019
CRAFTSMAN Walk Behind Lawnmower, Gas Manual L0804019 CRAFTSMAN Walk Behind Lawnmower, Gas Owner's Manual, CRAFTSMAN Walk Behind Lawnmower, Gas installation guides
User Manual: Craftsman 917377563 917377563 CRAFTSMAN ROTARY MOWER - Manuals and Guides View the owners manual for your CRAFTSMAN ROTARY MOWER #917377563. Home:Lawn & Garden Parts:Craftsman Parts:Craftsman ROTARY MOWER Manual
Open the PDF directly: View PDF ![]() .
.
Page Count: 48

wner s Manual
£RRFTSMRN°
6.5 HORSEPOWER _
22" REAR DISC HAR GE
POWER :PROPE LLED "
ROTARYLAWN MOWER
Model No.
917.377563
oSafety
°Assembly
o OPeration
°, Maintenance
•EspaSol
•Repair Parts
CAUTION:
Read and follow all
Safety Rules and Instructions
before operating this equipment
Sears, Roebuck and Co., Hoffman Estates, IL 60179
Warranty 2 Product Specifications 11
Safety Rules 2 Service and Adjustments !4
Assembly 4 Storage 16
Operation 6 Troubleshooting 17
Maintenance Schedule 10 Repair Parts 37
Maintenance 10 Parts Ordering Back Cover
LIMITED TWO YEAR WARRANTY ON CRAFTSMAN POWER MOWER
For two years from date of purchase, when this Craftsman Lawn Mower is maintained,
lubricated, and tuned up according to the operating and maintenance instructions in the
owner's manual, Sears witl repair free of charge any defect in material or workmanship.
If this Craftsman Lawn Mower is used for commercial or rental purposes, this warranty
applies for only 90 days trom the date of purchase.
This Warranty does not cover:
• Expendable items which become worn during normal use, such as rotary mower
blades, blade adapters, belts, air cleaners and spark plug.
• Repairs necessary because of operator abuse or negligence, including bent crank-
shafts and the failure to maintain the equipment according to the instructions con-
tained in the owner's manual.
Warranty service is available by returning the CraftSman power mower to the nearest
Sears Service Center/Department in the United States. This warranty applies only while
this product is in use in the United States.
This Warranty gives you specific legal rights, and you may also have other rights which
vary from state to state.
SEARS, ROEBUCK AND CO., D/817 WA, HOFFMAN ESTATES, ILLINOIS 60179
Safety standards require eperator
presence controls to minimize the
risk of injury. Your uniLis equipped
with such controls. Do not attempt to
defeat the function of the operator
presence controls under any
circumstances.
TRAINING;
• Read this operator's manual carefully°
Become familiar with the controls and
know how to operate your mower
propedy_ Learn how to quickly stop
mower.
:Do not allow children to use your mower.
Never allow adults to use mower without
proper instructions.
• Keep the area of operation clear of all
persons, especially small children and
pets,
• Use mower only as _he manufacturer
intended and as described in this manual.
- Do not operate mower if it has been
dropped or damaged in any manner°
Always have damage repaired before
using your mower.
• Do not use accessory attachments that
are not recommended by the manufac-
turer. Use of such attachments may be
hazardous.
• The blade turns when the engine is
running.
PREPARATION:
• Always thoroughly check the area to be
mowed and clear it of atl stones, sticks,
wires, bones, and other foreign objects.
These objects will be thrown by the blade
and can cause severe injury.
• Always wear safety glasses or eye
shields when starting and while using
your mower.
•Dressptol_edy, DOnot operate mower
when barefoot or wearing open sandals.
Wear only solid shoes with good traction
when mowing_
.Check fuel tank before starting engine.
Do not till gas tank indoors, when the
engine is running or when the engine is
hot. Allow the engine to cool for several
minutes before filling the gas tank. Clean
off any spilled gasoline before starting the
engine,
. Always make wheel height adjustments
before Starting your mower° Never "'
attempt to do this while the engine is
running°
. Mow only in daylight or good artificial
light.
OPERATION:
• Keep your eyes and mind on your mower
and the area being cut. Do not let other
interests distract you.
,, Do not mow wet or slipper! grass_ Never
run while operating your mower° Always
be sure of your footing -- keep a firm
hold on the handles and walk.
-Do not put hands or feet near or under
rotating parts. Keep clear of the discharge
opening at all times.
° Always stop the engine whenever you
leave or are not using your mower, or
before crossing driveways, walks, roads,
and any gravel--<:ovel_ed areas.
° Nevei" direct discharge of material toward
bystanders nor allow anyone near the
mower while you are operating it.
° Before cleaning, inspecting, or repairing
your mower, stop the engine and make
absolutely sure the blade and all moving
parts have stopped_ Then disconnect the
spark plug wire and keep it away from the
spark plug to prevent accidental starting°
• Do not continue to run your mower if you
hit a foreign object. Follow the procedure
outlined above, then repair any damage
before restarting and operating you
mower.
• Do not change the governor settings or
overspeed the engine. Engine damage or
personal injury may result,
. Do not operate your mower if it vibrates
abnormally, Excessive vibration is an
indication of damage; stop the engine,
safely check for the cause of vibration
and repair as required.
• Do not run the engine indoors. Exhaust
fumes are dangerous.
° Never cut grass by pulling the mower
towards you. Mow across the face of
slopes, never up and down or you might
lose your footing. Do not mow exces-
sively steep slopes. Use caution when
operating the mower on uneven terrain
or when changing directions M maintain
good footing.
• Never operate your mower without
proper guards, plates, grass catcher or
other safety devices in place.
MAINTENANCE AND STORAGE:
° Check the blade and the engine mount-
ing bolts often to be sure they are
tightened properly.
° Check all bolts, nuts and screws at
frequent intervals for proper tightness to
be sure mower is in safe working
condition.
•Keep all safety devices in place and
Working.
• To reduce fire hazard, keep the engine
free of grass, leaves or excessive grease
and oft,
• Check grass catcher often for deteriora-
tion and wear and replace worn bags,
Use only replacement bags that are
recommended by and comply with
specifications of the manufacturer of your
mower.
. Always keep a sharp blade on your
mower,
°Allow engine to cool before storing in any
enclosure.
• Never store mower with fuel in the tank
inside a building where fumes may reach
an open flame or an ignition source such
as a hot water heater, space heater,
clothes dryer, etc.
&CAUTION: Always disconnect spark
plug wire and place wire where it cannot
contact spark plug in order to prevent
accidental starting when setting up,
transporting, adjusting or making repairs.
WARNING
The engine exhaust from this product
contains chemicals known to the State of
California to cause cancer, birth defects,
or other reproductive harm.
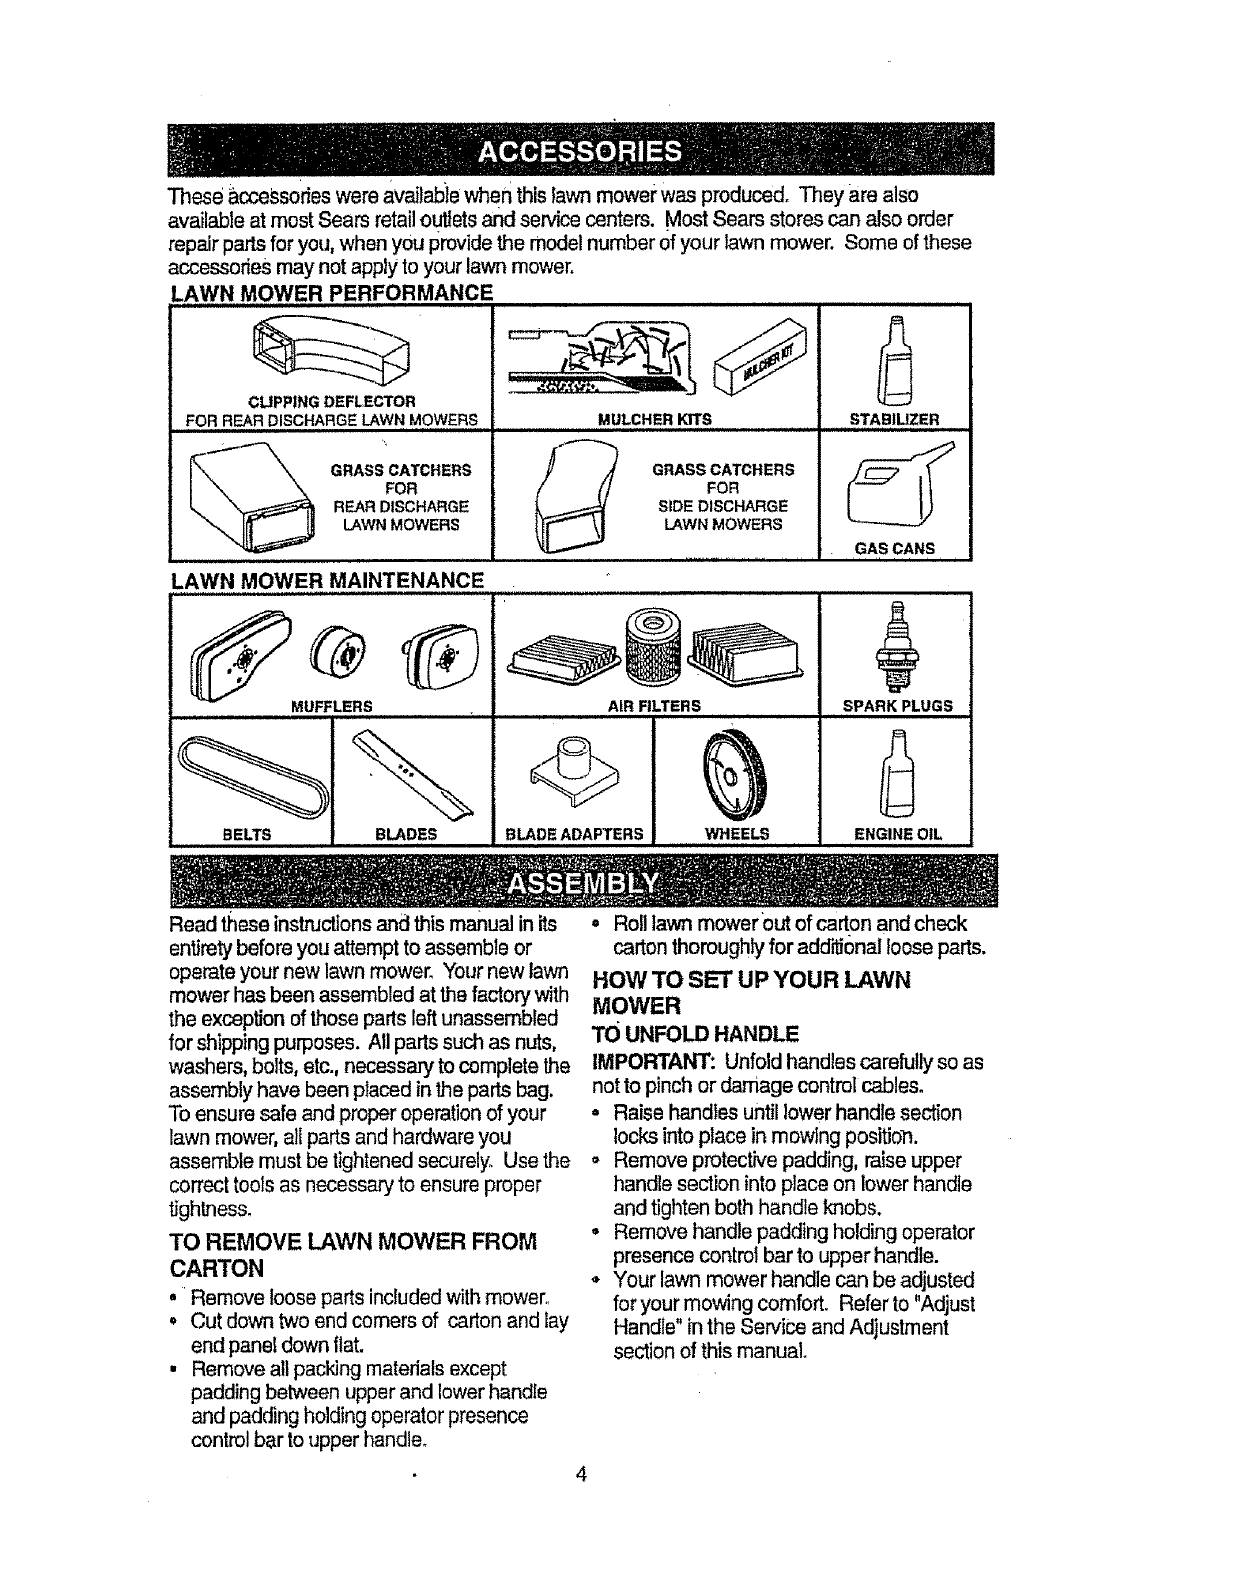
Theseaccessorieswereavailablewhenthisfawn mower was produced. They are also
available at most Sears retail outlets and service centers. Most Sears stores can also order
repair parts for you, when you provide the model number of your lawn mower. Some of these
accessories may not apply to your lawn mower.
LAWN MOWER PERFORMANCE
CLIPPING DEFLECTOR
FOR REAR DISCHARGE LAWN,,MOWERS ...........................................MULCHER KITS STABILIZER
GRASS CATCHERS
FOR
REAR DISCHARGE
LAWN MOWERS GRASS CATCHERS
FOR
SIDE DISCHARGE
LAWN MOWERS
LAWN MOWER MAINTENANCE
MUFFLERS
BELTS
AIR FILTERS
BLADES BLADE ADAPTERS WHEELS
GAS CANS
SPARK PLUGS
ENGINE OIL
Read these instructions and this manual in its
entirety before you attempt to assemble or
operate your new lawn mower. Your new lawn
mower has been assembled at the factory with
the exception of those parts left unassembled
for shipping purposes. All parts such as nuts,
washers, bolts, etc., necessary to complete the
assembly have been placed in the pads bag.
To ensure safe and proper operation of your
lawn mower, all parts and hardware you
assemble must be tightened securely. Use the
correct tools as necessary to ensure proper
tightness.
TO REMOVE LAWN MOWER FROM
CARTON
, Remove loose parts included with mower.
• Cut down two end comers of carton and lay
end panel down flat.
• Remove all packing materials except
padding between upper and lower handle
and padding holding operator presence
control bar to upper handle.
4
• Roll lawn mower0ut of carton andcheck
carton thoroughlyfor additional loose parts.
HOW TO SET UP YOUR LAWN
MOWER
TO UNFOLD HANDLE
IMPORTANT: Unfold handles carefully so as
not to pinch or damage control cables.
• Raise handles until lower handle section
locks into place in mowing position.
o Remove protective padding, raise upper
handle section into place on lower handle
and tighten both handle knobs.
,, Remove handle padding holding operator
presence control bar to upper handle.
• Your lawn mower handle can be adjusted
for your mowing comfort° Refer to "Adjust
Handle" in the Sewice and Adjustment
section of this manual.
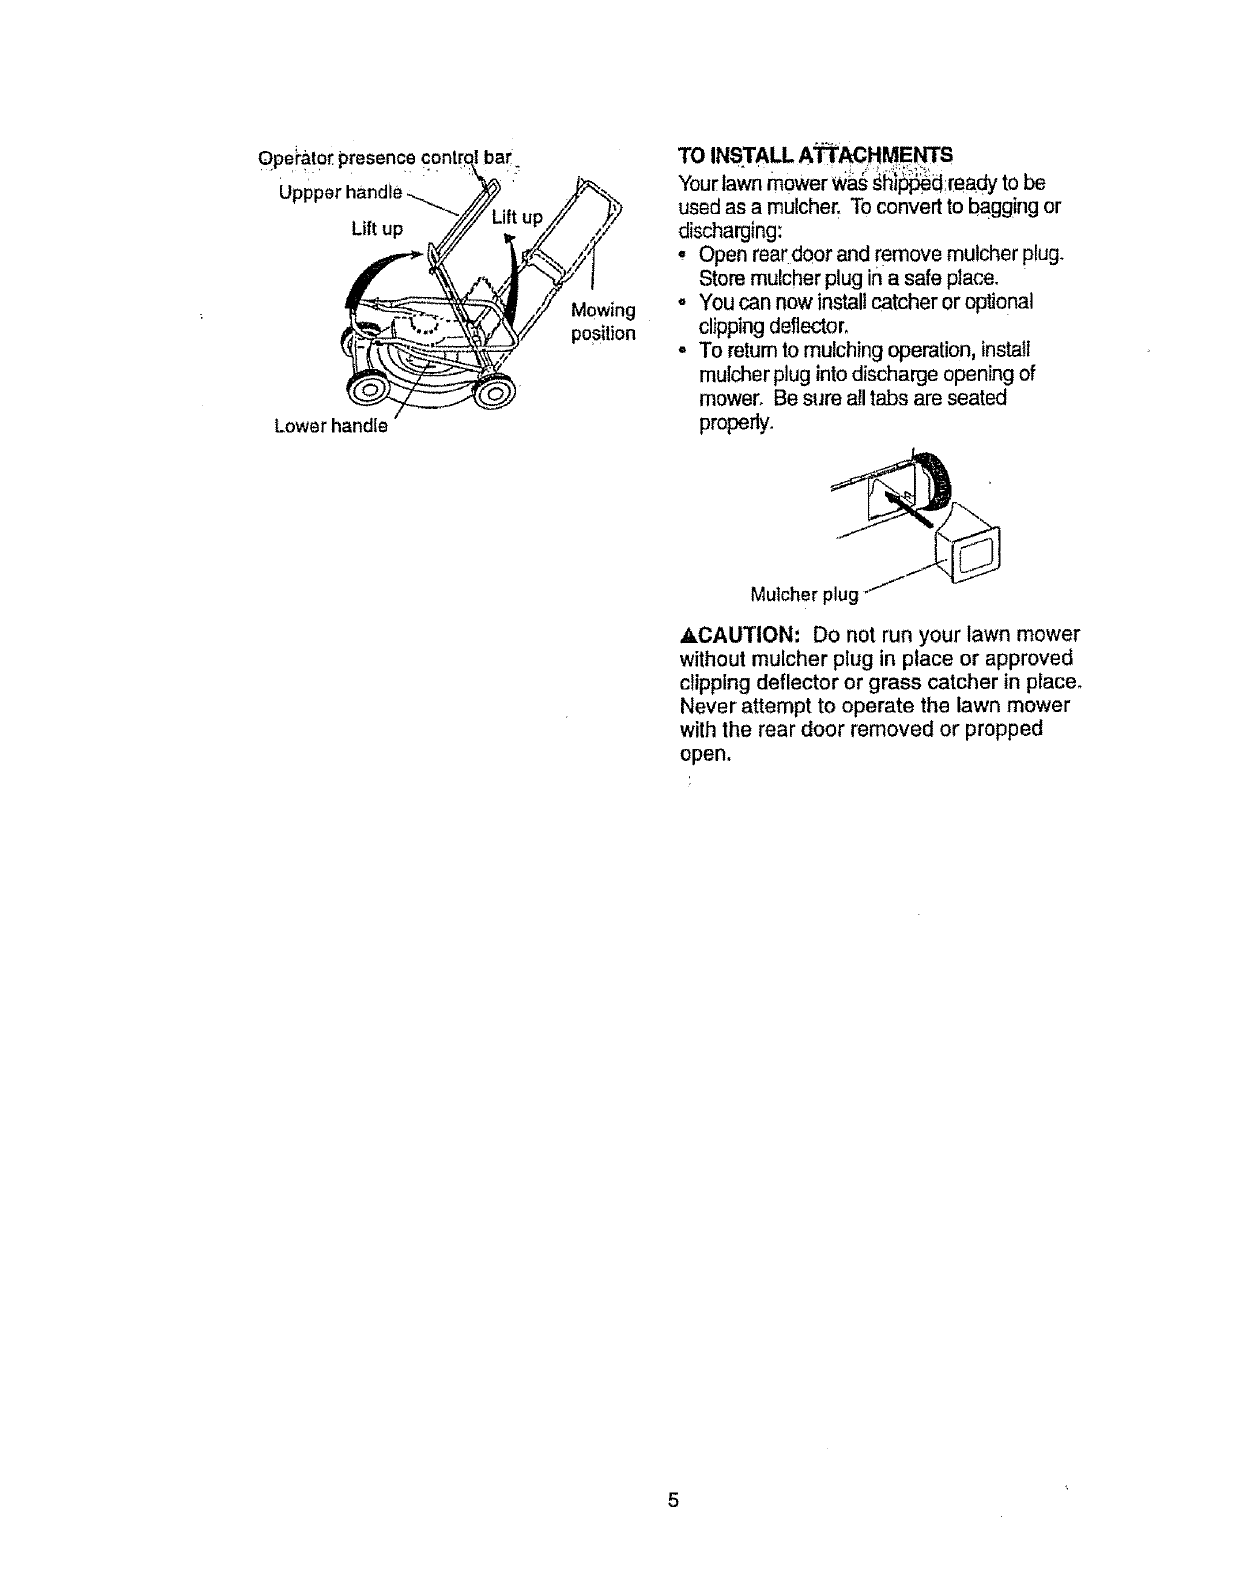
Operator,presence
Uppper handle ._.....
Lift up
Lower handfe
bar
Mowing
position
TO INSTALL A_HMENTS
Your lawn mower W_.$_hi_d readyto be
used as a mulcher. To convert to bagg!ng or
discharging:
• Open rear door and remove mulcher plug.
Store mulcher plug in a safe place.
oYou can now install catcher or optional
clipping deflector,
- To returnto mulching operation, install
mulcher plug into discharge opening of
mower° Be sure all tabs are seated
properly.
Mulcher plug
ACAUTION: Do not run your lawn mower
without mulcher plug in place or approved
clipping deflector or grass catcher in place°
Never attempt to operate the lawn mower
with the rear door removed or propped
open,
5
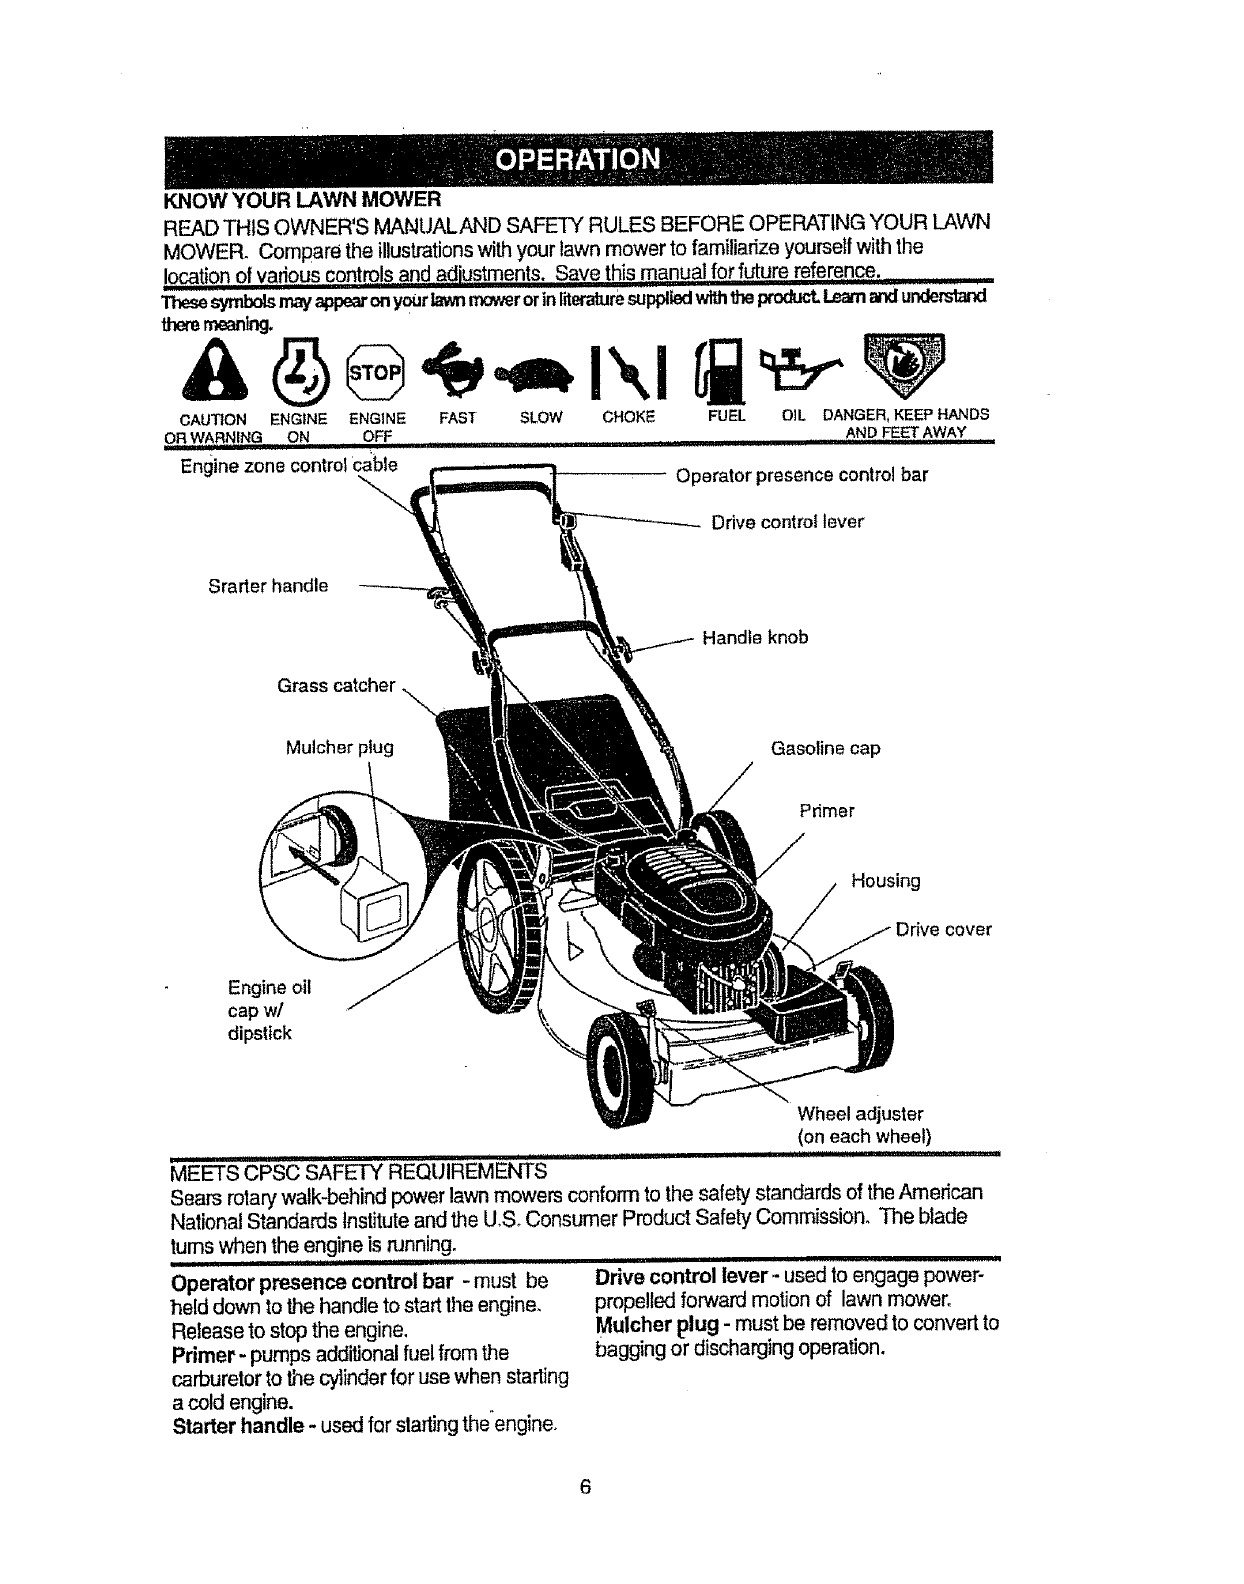
KNOW YOUR LAWN MOWER
READ THIS OWNER'S MANUALAND SAFETY RULES BEFORE OPERATING YOUR LAWN
MOWER_ Compare the illustrations with your lawn mower to familiarize yourself with the
!ocation of yari,ou,s,,,controlsand adiustments. Save this ,_anqal for future reference.
ThesesymbolsmayappearonyourL_tn mowerorinliteraturesuppliedwiththe product,Learnandu_
theremeanlng.
CAUTION ENGINE ENGINE FAST SLOW CHOKE FUEL OIL DANGER, KEEP HANDS
OR WARNING ON OFF ................................. AND FEET AWAY , ,
Engine zone control cable Operator presence control bar
Drive control lever
Srarter handle
Grass catcher
Handle knob
Mulcher plug Gasoline cap
Primer
Housing
COVer
Engine oil
cap w/
dipstick
Wheel adjuster
(on each wheel)
'_ "........... SAFETY REQUIREMENTS .............................
MEETS CPS
Sears rotary walk-behind power lawn mowers conform to the safety standards of the American
National Standards Institute and the U_& Consumer Product Safety Commission, The blade
turns when the engine is running.
i iii ii ,111ii ,111]11
Operator presence control bar - must be
held down to the handle to start the engine,
Retease to stop the engine.
Primer- pumps additional fuel from the
carburetor to the cylinder for use when starting
a cold engine.
Starter handle- used for starting theengine,
i, iiiii ii /
Drive control lever- used to engage power-
propelled forward motion of lawn mower°
Mulcher plug - must be removed to convert to
bagging or discharging operation.
6
The operation of any lawn mower can
result in foreign objects thrown into the
eyes, which can result in severe eye
damage. Always wear safety glasses or
eye shields while operating your lawn
mower or performing any adjustments or
repairs. We recommend a wide vision
safety mask over spectacles or standard
safety glasses,
HOW TO USE YOUR LAWN MOWER
ENGINE SPEED
The engine speed was set at the factory
for optimum performance. Speed is not
adjustable_
ENGINE ZONE CONTROL
ACAUTION: Federal regulations require
an engine control to be Installed on this
lawn mower in order to minimize the risk of
blade contact injury. Do not under any
circumstances attempt to defeat the
function of the operator control. The blade
turns when the engine is running.
- Your lawn mower is equipped with an
operator presence control bar which
requires the operator to be positioned
behind the lawn mower handle to start and
operate the lawn mower.
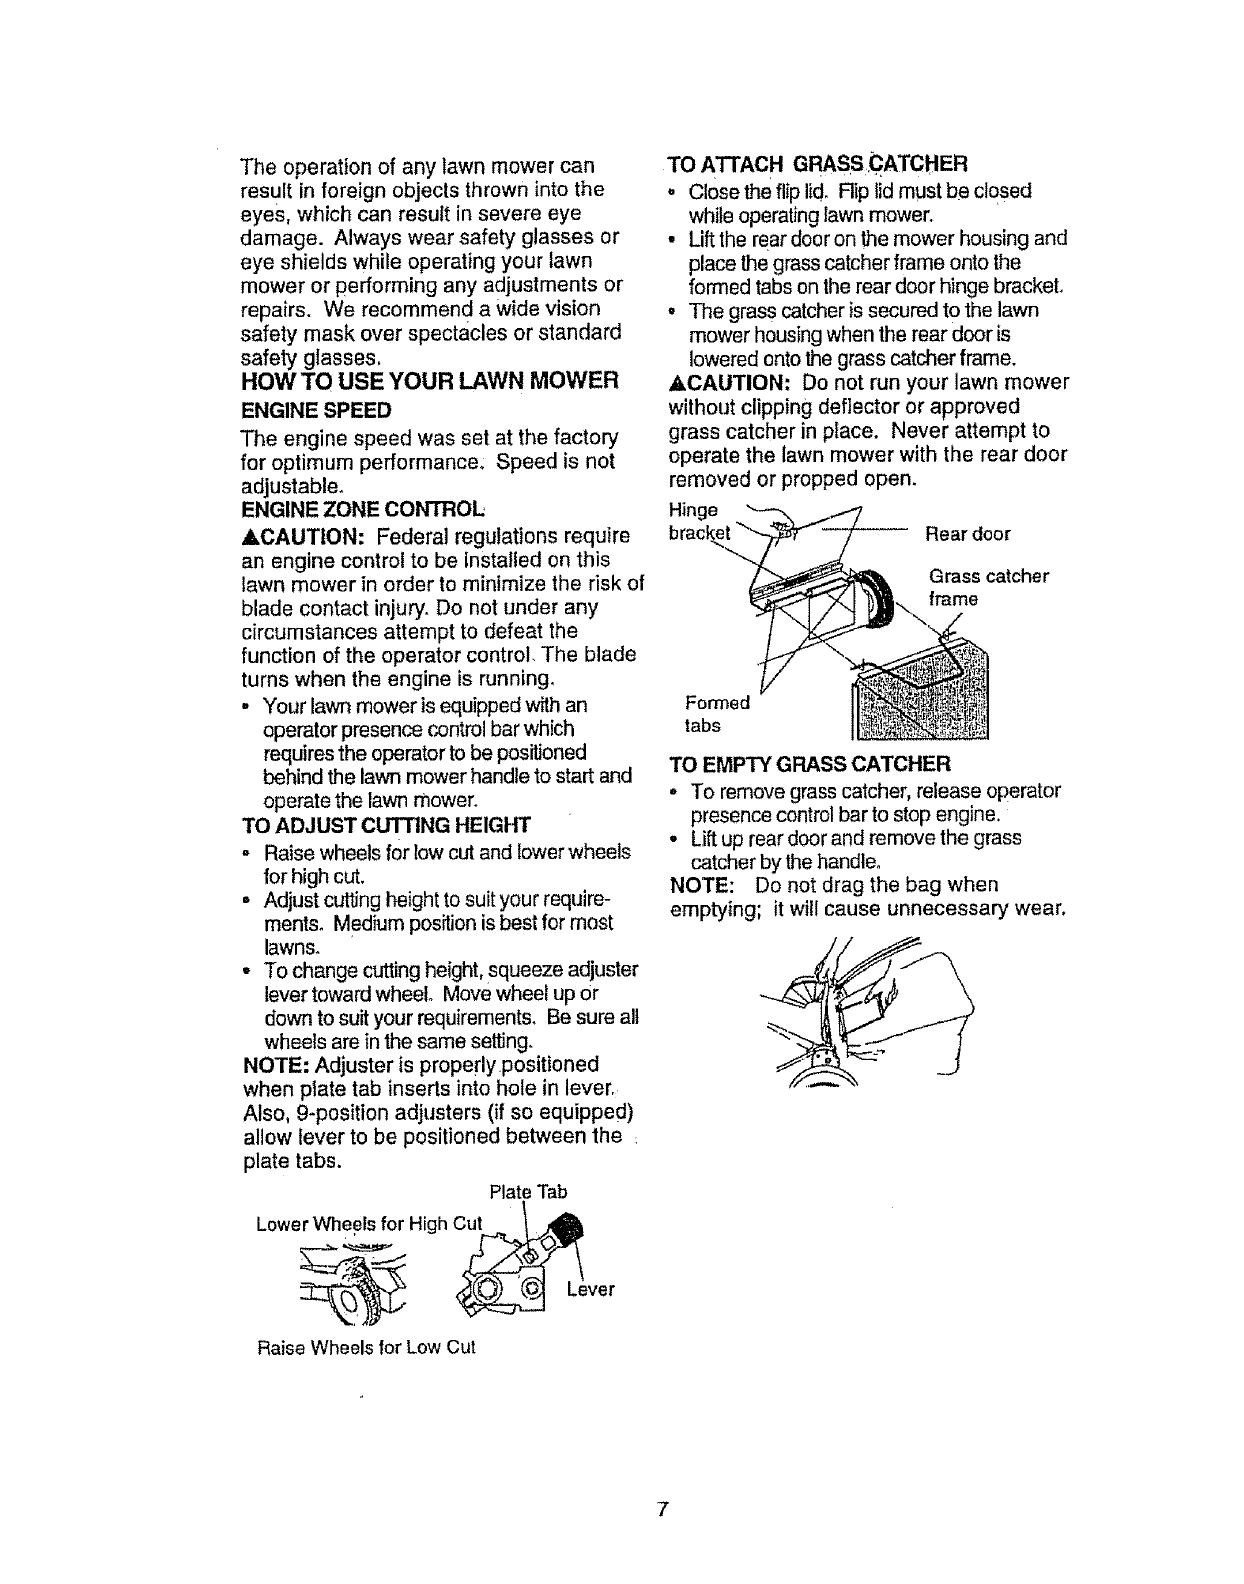
TO ADJUST CUTTING HEIGHT
° Raise wheels for tow cut and lower wheels
for high cut.
• Adjust cutting height to suit your require-
ments. Medium position is best for most
lawns.
-To change cutting height, squeeze adjuster
lever toward wheel. Move wheel up Or
down to suit your requirements. Be sure all
wheels are in the same setting°
NOTE: Adjuster is properly positioned
when plate tab inserts into hole in lever.
Also, 9-position adjusters (if so equipped)
allow lever to be positioned between the
plate tabs.
Plate Tab
Lower Wheels for High Cut _ _
-over
Raise Wheels for Low Cut
TO ATTACH GRASS.CATCHER
.Close the flip lid. Flip lid must be closed
while operating lawn mower.
•Lift the rear doer on the mower housing and
place the grass catcher frame onto the
formed tabs on the rear door hinge bracket.
•The grass catcher is secured to the lawn
mower housing when the rear door is
lowered onto the grass catcher frame.
_kCAUTION: Do not run your lawn mower
without clipping deflector or approved
grass catcher in place. Never attempt to
operate the lawn mower with the rear door
removed or propped open.
Hinge
Rear door
Grass catcher
frame
Formed
tabs
TO EMPTY GRASS CATCHER
. To remove grass catcher, release operator
presence control bar to stop engine,
•Lift up rear door and remove the grass
catcher by the handle°
NOTE: Do not drag the bag when
emptying; it will cause unnecessary wear.
7
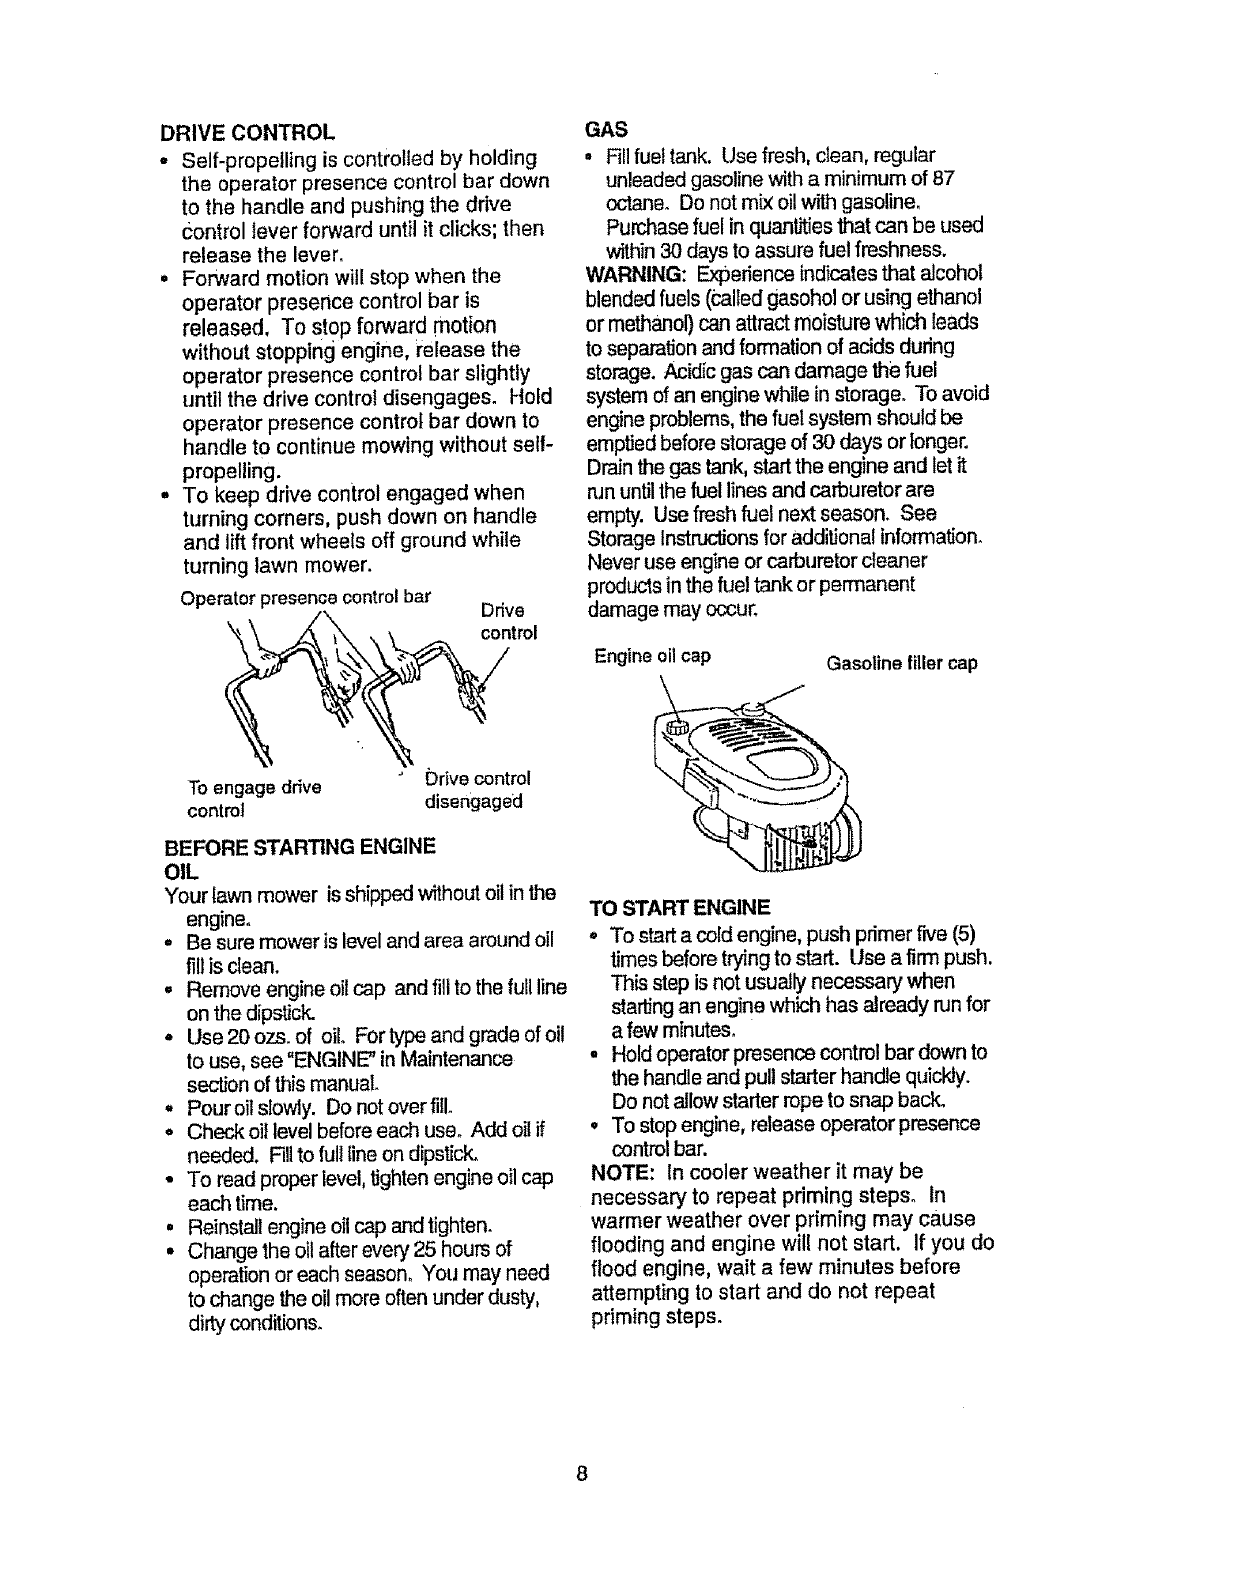
DRIVECONTROL
° Self-propellingiscontrolledbyholding
the operatorpresencecontrolbardown
to thehandleandpushingthedrive
Controlleverforwarduntilit clicks;then
releasethelever.
° Forwardmotionwillstopwhenthe
operatorpresencecontrolbaris
released,Tostopforwardmotion
withoutstoppingengine,releasethe
operatorpresencecontrolbarslightly
untilthedrivecontroldisengages.Hold
operatorpresencecontrolbardownto
handleto continuemowingwithoutself-
propelling.
, To keepdrivecontrolengagedwhen
turningcomers,pushdownonhandle
andliftfrontwheelsoffgroundwhile
turninglawnmower.
Operatorpresencecontrolbar Drive
k_ control
GAS
° Fill fuel tank. Use fresh, dean, regular
unleaded gasoline with a minimum of 87
octane. Do not mix oil with gasoline.
Purchase fuel in quantities that can be used
within 30 days to assure fuel freshness.
WARNING: Experience indicates that alcohol
blended fuels (called gasohol or using ethanol
or methanol) can attract moisture which leads
to separation and formation of acids during
storage. Acidic gas can damage the fuel
system of an engine while in storage. To avoid
engine problems, the fuel system should be
emptied before storage of 30 days or longer.
Drain the gas tank, start the engine and let it
nJn until the fuel lines and carburetor are
empty. Use fresh fuel next season. See
Storage Instructions for additional information_
Never use engine or carburetor cleaner
products in the fue! tank or permanent
damage may occur.
Engine oil cap Gasoline filler cap
To engage drive Drive control
control disengaged
BEFORE STARTING ENGINE
OIL
Your lawn mower is shipped without oil in the
engine.
° Be sure mower is level and area around oil
till is dean.
• Remove engine oil cap and fill to the full line
on the dipstick.
• Use 20 ozs. of oil. For type and grade of oil
to use, see "ENGINE" in Maintenance
section of this manual.
, Pour oil slowly. Do not over fitL
, Check oil level before each use. Add oil if
needed. Fill to full line on dipstick.
° To read proper level, tighten engine oil cap
each time.
° Reinstall engine oil cap and tighten.
• Change the oil after every 25 hours of
operation or each season_ You may need
to change the oil more often under dusty,
dirty conditions.
TO START ENGINE
° To start a cold engine, push primer frye (5)
times before trying to start. Use a firm push.
This step is not usually necessary when
starting an engine which has already run for
a few minutes.
• Hold operator presence control bar down to
the handle and pull starter handle quickly.
Do not allow starter rope to snap back.
•To stop engine, release operator presence
control bar.
NOTE: tn cooler weather it may be
necessary to repeat priming steps. In
warmer weather over priming may cause
flooding and engine will not start. If you do
flood engine, wait a few minutes before
attempting to start and do not repeat
priming steps.
MOWING TIPS
• Under certain conditions, such as very
tall grass, it may be necessary to raise
the height of cut to reduce pushing effort
and to keep from overloading the engine
and leaving clumps of grass clippings, it
may also be necessary to reduce
ground speed and!or run the lawn
mower over the area a second time.
= For extremely heavy cutting, reduce the
width of cut by overlapping previously
cut path and mow slowly.
• For better grass bagging and most
cutting conditions, the engine speed
should be set in the fast position.
•When using a rear discharge lawn
mower in moist, heavy grass, clumps of
cut grass may not enter the grass
catcher. Reduce ground speed (push-
ing speed) and!or run the lawn mower
over the area a second time.
°If a trail of clippings is left on the right
side of a rear discharge mower, mow in
a clockwise direction with a small
overlap to collect the clippings on the
next pass.
°Pores in cloth grass catchers can
become filled with dirt and dust with use
and catchers will collect less grass. To
prevent this, regularly hose catcher off
with water and let dry before using.
• Keep top of engine around starter ctear
and clean of grass clippings and chaff,
This will help engine air flow and extend
engine life.
MULCHING MOWING TIPS
IMPORTANT: For best performance, keep
mowe_ housing free of built-up grass and
trash. See =Cleaning_ in Maintenance section
of this manual.
•The special mulching blade will recut the
grass clippings many times and reduce
them insize so that as they fall onto the
lawn they willdisperse into the grass and
not be noticed. Also, the mulched grass will
biodegrade quicklyto provide nutrients for
the lawn= Always mulch with your highest
engine (blade) speed as this will provide the
best recutting action of the blades.
, Avoid cuttingyour lawn when it iswet. Wet
grass tends to form dumps and interferes
withthe mulchingaction. The best time to
mow your lawn Is the early aftemeen. At
thistime the grass has dried and the newly
cut area will notbe exposed to the direct
sun,
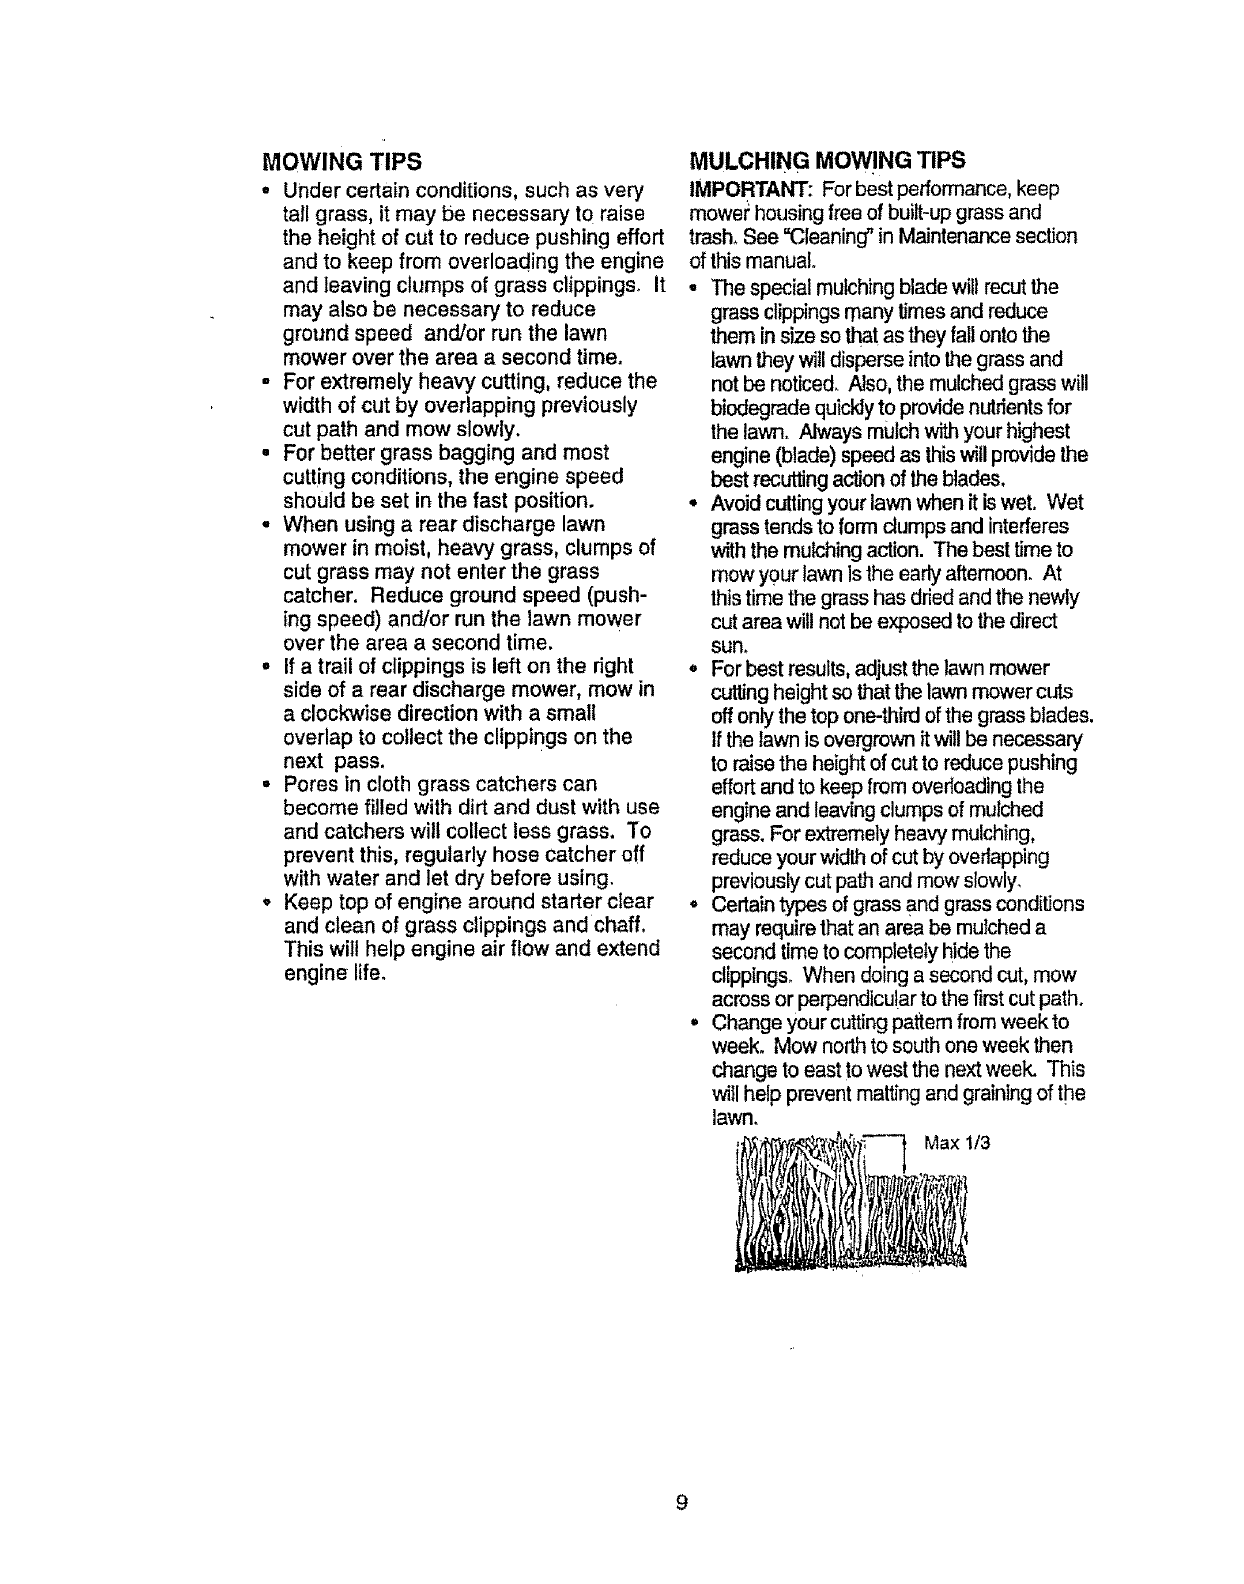
°For best results, adjust the lawn mower
cuttingheight so that the lawn mower cuts
off only the top one-third of the grass blades.
if the lawn is overgrown it will be necessary
to raise the heightof cut to reduce pushing
effort and to keep from overloading the
engine and leaving clumps of mulched
grass. For extremely heavy mulching,
reduce your width of cut by overlapping
previously cut path and mow slowly.
°Certain types of grass and grass conditions
may require that an area be mulched a
second time to completely hide the
clippings. When doing a second cut, mow
across or perpendicular to the firstcut path.
°Change your cuttingpa_em from week to
week. Mow north to south one week then
change to east to west the next week, This
will help prevent matting and graining of the
lawn.
Max 1/3
9

MAINTENANCE SCHEDULE .,,/___°_ ''/
REGULA,FISERVICE .___. _£X_/_" SERVl CE DATES
Check for LooseFasteners t_ J _ ! V' I..
Clea_tlnspecl Grass Catcher
,,(,IfEquipped) ..............
M Clean Lawn Mower
OC_ean Under Drive Cover
(Power-Propelled Mowers)
Check drive betlZpu!ieys
iE (Power-Propelled Mowers)
a ChecldSharpeWReplace Blade ..............
Lubrication Chart
v'
v'
....CieanSatterylRecharge _ i
IEleclnc Start Mowers V'
! ,, _j
Ei Check Engine Oil Level , _ i
N i Change Engine Oil ..........
Gclean Air Filter . ,
IInspecl Muffler
NiClean or Replace Spark Plug
EReplaceFll!e F,apar I
"_oChange mete elten when operating under a hea'_3_|ned et #t h_ghamNent temperelut_,
2- Service more e|ten when operating in d_rty or duaty cond_tisn_
3 - Replace bladoe more elten when mowing in _andy soil
4.. Charg_ 4B hours _t _nd of season..
Vf ...
v'.
_,2 ..
_2
v'
v'2
GENERAL RECOMMENDATIONS
The warranty on this lawn mower does not
cover items that have been subjected tO
operator abuse or negligence, To receive
full value from the warranty, operator must
maintain mower as instructed in this
manual°
Some adjustments will need to be made
periodically to properly maintain your unit.
All adjustments in the Service and
Adjustments section of this manual should
be checked at least once each season.
•Once a year, replace the spark plug,
replace air filter element and check
blade for wear. A new spark plug and
clean/new air filter element assures
proper air-fuel mixture and helps your
engine run better and last longer.
, Follow the maintenance schedute in this
manual.
BEFORE EACH USE
oCheck engine oil leve_
o Check for loose fasteners..
LUBRICATION
Keep unit well iubdcated (See "LUBRiCA-
TION CHART")..
10
LUBRICATION CHART
!_) Wheel
adjuster (_) Engine
oil
(_) Hand'_ebracket
mounting pin
(_ Spray lubricant
(b
Brake
spdng
(_Reardoor bracket
hinge
Referlo Maintenance "ENGINE"
section,
IMPORTANT: Do not oil or grease plastic
wheel bearings. V_scous lubricants wilt attract
dust and dirt that will shod.on the li[e of the setf
lubricating bearings, tf you feel they must be
lubricated, use only a dry, powdered graphite
type lubricant sparingly.
PRODUCT SPECIFICATIONS
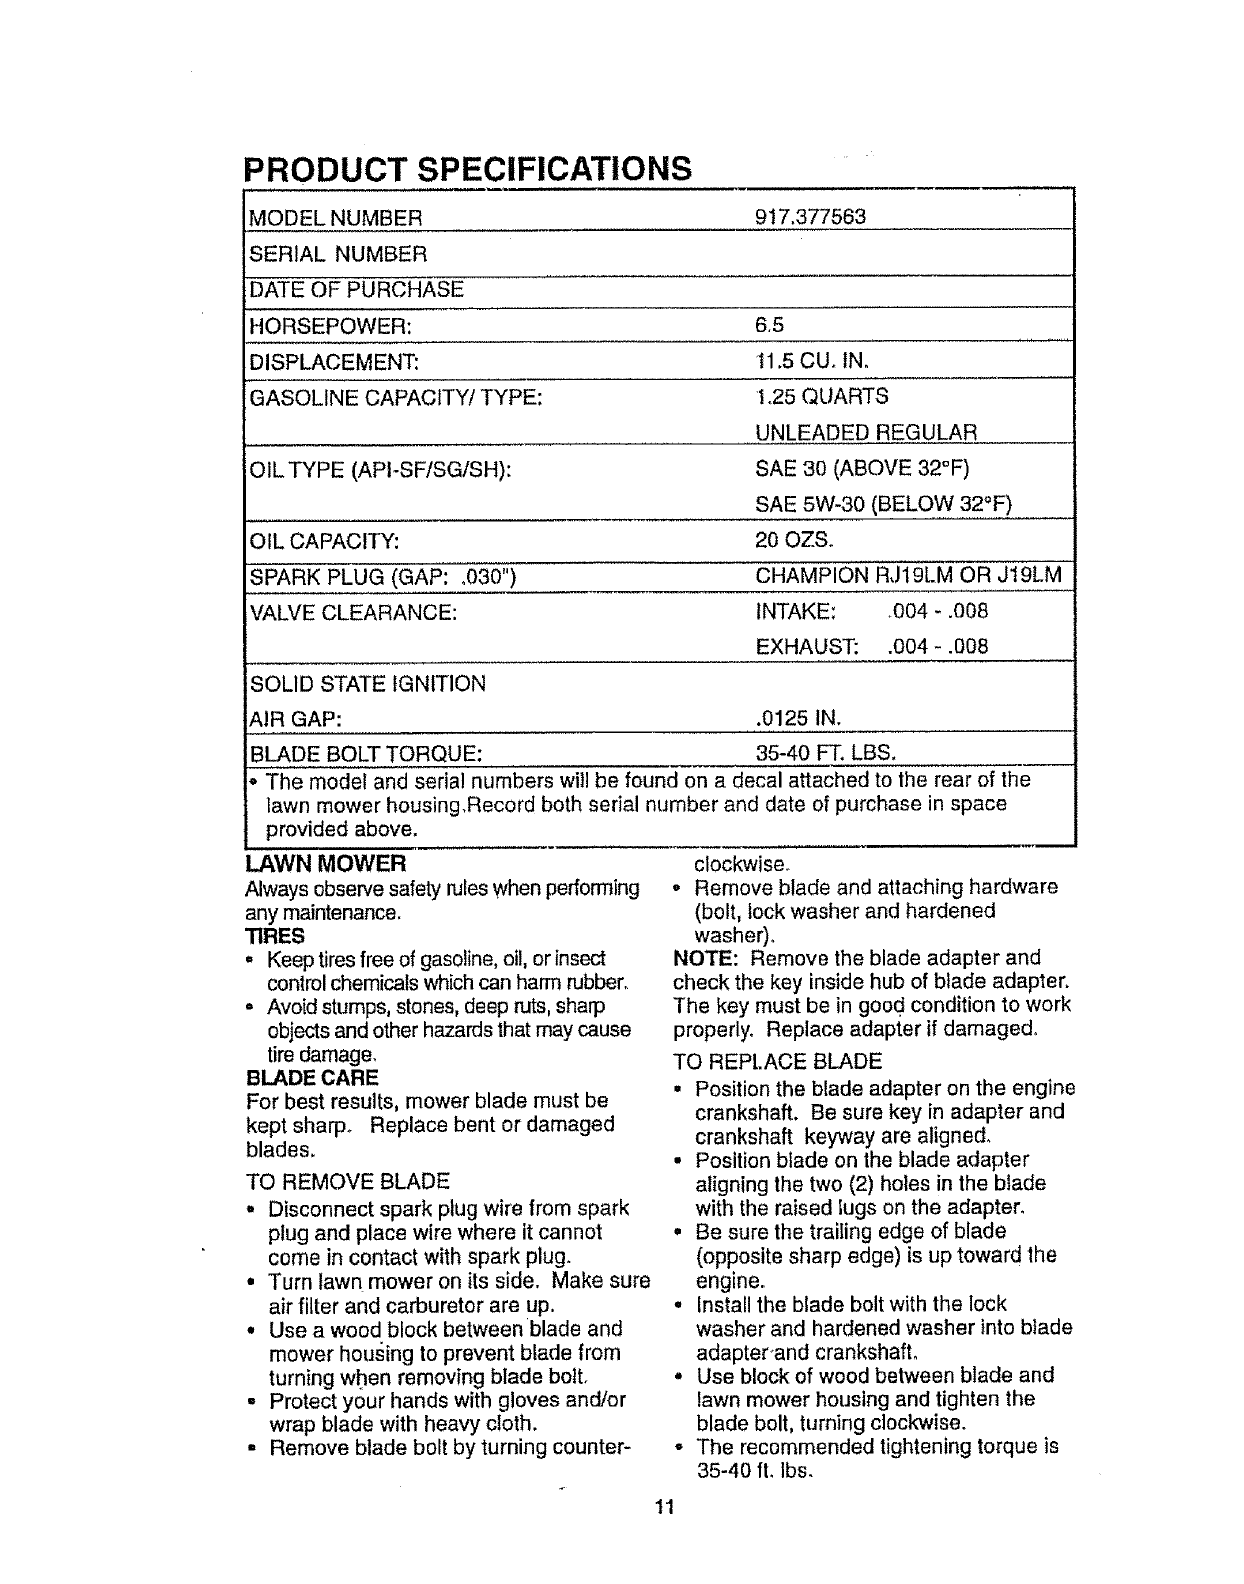
vlODEL NUMBER 9t7.377563
SERIAL NUMBER
DATE OF PURCHASE
HORSEPOWER: 65
DISPLACEMENT: !1.5 CU_ IN,
GASOLINE CAPACITY/TYPE: t 25 QUARTS
UNLEADED REGULAR
OIL TYPE (API-SF/SG/SH): SAE 30 (ABOVE 32°F)
SAE 5W-30 (BELOW 32°F)
OIL CAPACITY: 20 OZS.
SPARK PLUG (GAP: °030") CHAMPION RJ19LM OR J19LM
VALVE CLEARANCE: INTAKE: .004 - .008
EXHAUST: .004 - .008
SOLID STATE IGNITION
AIR GAP: ,0125 IN.
BLADE BOLT TORQUE: 35-40 FT. LBS,
The model and serial numbers will be found on a decal attached to the rear of the
lawn mower housing,Record both serial number and date of purchase in space
provided above.
LAWN MOWER
Always observe safety rules when performing
any maintenance.
TIRES
=Keep tires free of gasoline, oil, or insect
control chemicals which can harm rubber,
= Avoid stumps, stones, deep ruts, sharp
objects and other hazards that may cause
tire damage,
BLADE CARE
For best results, mower blade must be
kept sharp° Replace bent or damaged
blades.
TO REMOVE BLADE
= Disconnect spark plug wire from spark
plug and place wire where it cannot
come in contact with spark plug.
•Turn lawn mower on its side. Make sure
air filter and carburetor are UP"
° Use a wood block between blade and
clockwise.
oRemove blade and attaching hardware
(bolt, lock washer and hardened
washer).
NOTE: Remove the blade adapter and
check the key inside hub of blade adapter.
The key must be in good condition to work
properly° Replace adapter if damaged°
TO REPLACE BLADE
, Position the blade adapter on the engine
crankshaft. Be sure key in adapter and
crankshaft keyway are aligned_
, Position blade on the blade adapter
aligning the two (2) holes in the blade
with the raised lugs on the adapter_
° Be sure the trailing edge of blade
(opposite sharp edge) is up toward the
engine.
• Install the blade bolt with the lock
washer and hardened washer into blade
mower housing to prevent blade from
turning when removing blade bolt.
- Protect your hands with gloves and/or
wrap blade with heavy cloth.
- Remove blade bolt by turning counter-
adapter_and crankshafL
•Use block of wood between blade and
lawn mower housing and tighten the
blade bolt, turning clockwise.
- The recommended tightening torque is
35-40 It, Ibs.
tl
IMPORTANT: Blade bolt is grade 8 heat
treated.
TO SHARPEN BLADE
NOTE: We do not recommend sharpening
blade - but if you do, be sure the blade is
balanced°
Care should be taken to keep the blade
balanced. An unbalanced blade will cause
eventual damage to lawn mower or
engine,
• The blade can be sharpened with a file
or on a grinding wheel. Do not attempt
to sharpen while on the mower.
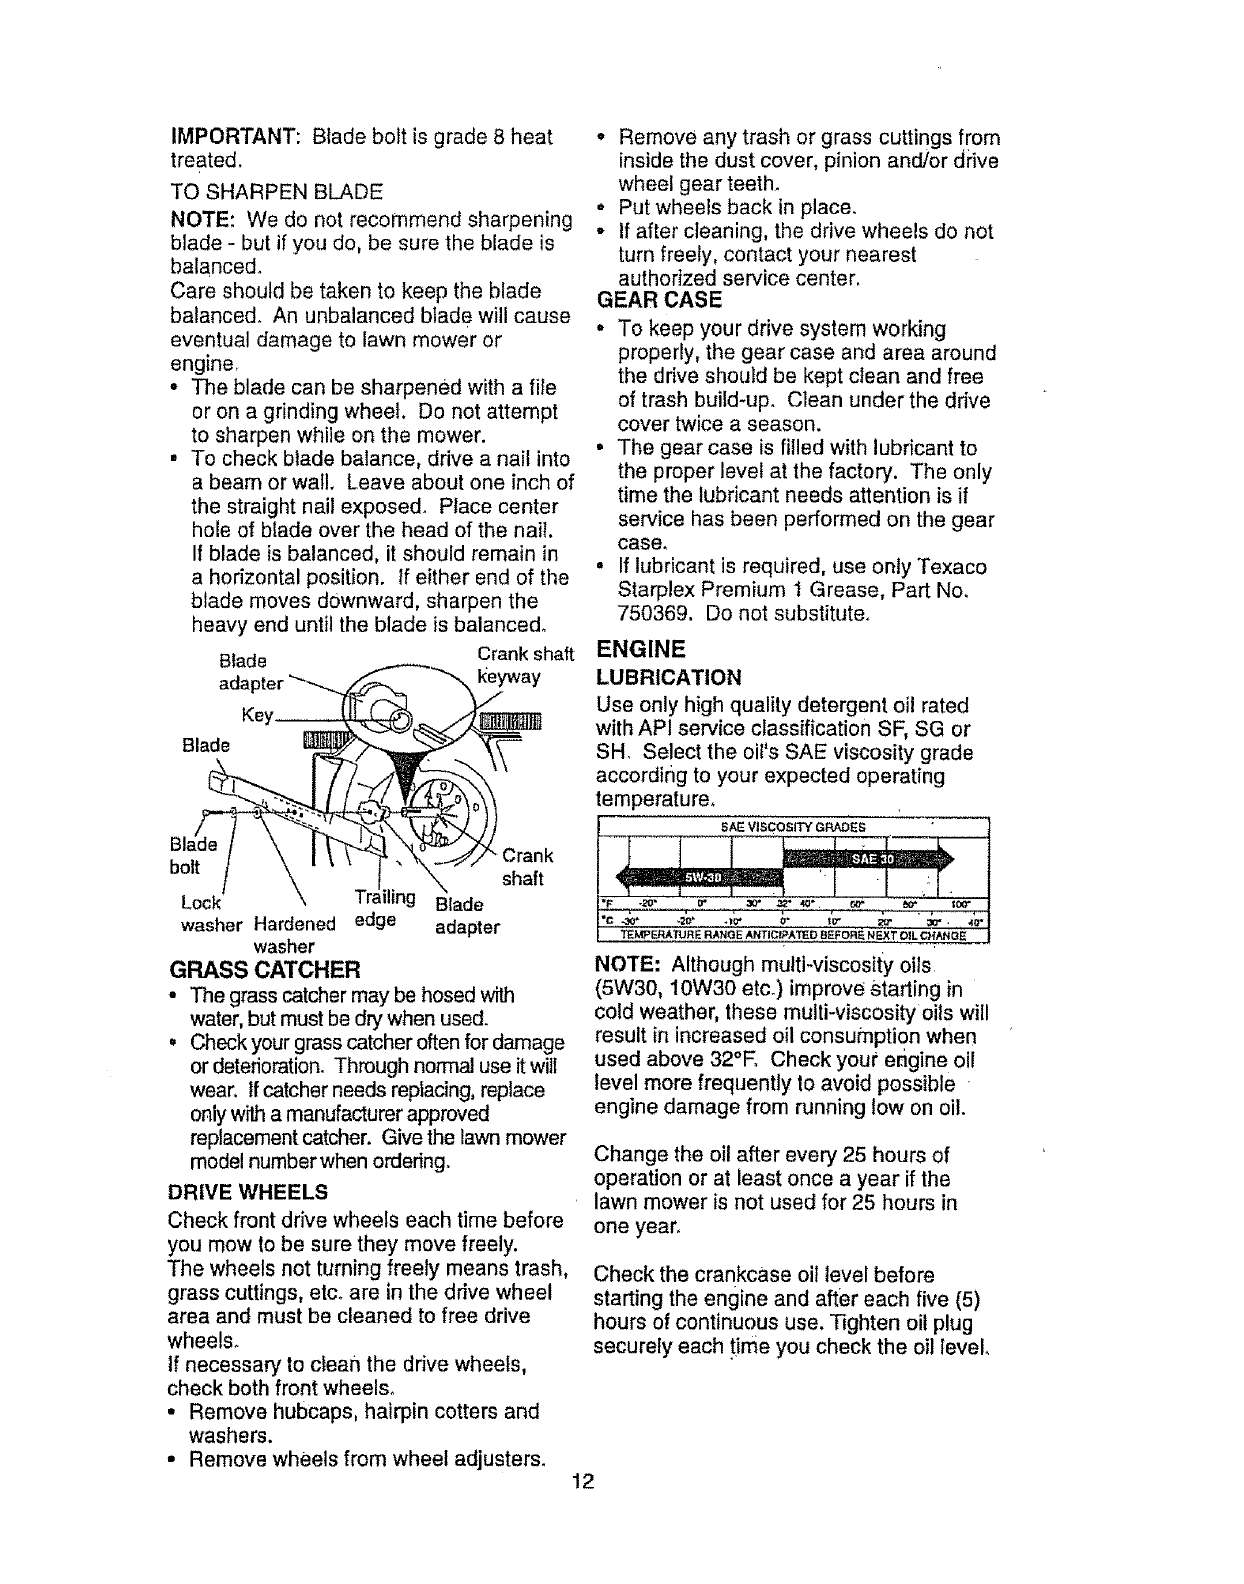
• To check blade balance, drive a nail into
a beam or wall. Leave about one inch of
the straight nail exposed. Place center
hole of blade over the head of the nail.
If blade is balanced, it should remain in
a horizontal position. If either end of the
blade moves downward, sharpen the
heavy end until the blade is balanced.
Blade Crank shaft
adapter ._"_._yway
Key
B! Crank
bolt /\ ' ''I " _ shaft
Lock' \Trailin[ Blade
washer Hardened edge adapter
washer
GRASS CATCHER
•The grass catcher may be hosed with
water, but must be dry when used.
.Check your grass catcher often for damage
or deterioration. Through normal use it will
wear, tf catcher needs replacing, replace
only with a manufacturer approved
replacement catcher. Give the lawn mower
model number when ordedngo
DRIVE WHEELS
Check front drive wheels each time before
you mow to be sure they move freely.
The wheels not turning freely means trash,
grass cuttings, etc. are in the drive wheel
area and must be cleaned to free drive
wheels_
If necessary to clean the ddve wheels,
check both front wheels.
•Remove hubcaps, hairpin cotters and
washers.
•Remove wheels from wheel adjusters.
•Remove any trash or grass cuttings from
inside the dust cover, pinion and/or diive
wheel gear teeth.
• Put wheels back in place.
•If after cleaning, the drive wheels do not
turn freely, contact your nearest
authorized service center.
GEAR CASE
•To keep your drive system working
properly, the gear case and area around
the drive should be kept clean and free
of trash build-up. Clean under the drive
cover twice a season.
•The gear case is filled with lubricant to
the proper level at the factory, The only
time the lubricant needs attention is if
service has been performed on the gear
case,
•If lubricant is required, use only Texaco
Starplex Premium t Grease, Part No.
750369. Do not substitute.
ENGINE
LUBRICATION
Use only high quality detergent oil rated
with API service classification SF, SG or
SH. Select the oil's SAE viscosity grade
according to your expected operating
temperature.
BAE VJScosn'Y"GRADES
-20" D"
TEMPERAT',JRE RANGE ANTICIPATED BEFORE NEXT O_LCHANGE
NOTE: Although multi-viscosity oils
(5W30, 10W30 etc.) improve Starting in
cold weather, these multi-viscosity oils will
result in increased oil consumption when
used above 32°F_ Check your er_gine oil
level more frequently to avoid possible •
engine damage from running low on oil.
Change the oil after every 25 hours of
operation or at least once a year if the
lawn mower is not used for 25 hours in
one year.
Check the crankcase oil level before
starting the engine and after each five (5)
hours of continuous use. Tighten oil plug
securely each time you check the oil level.
12
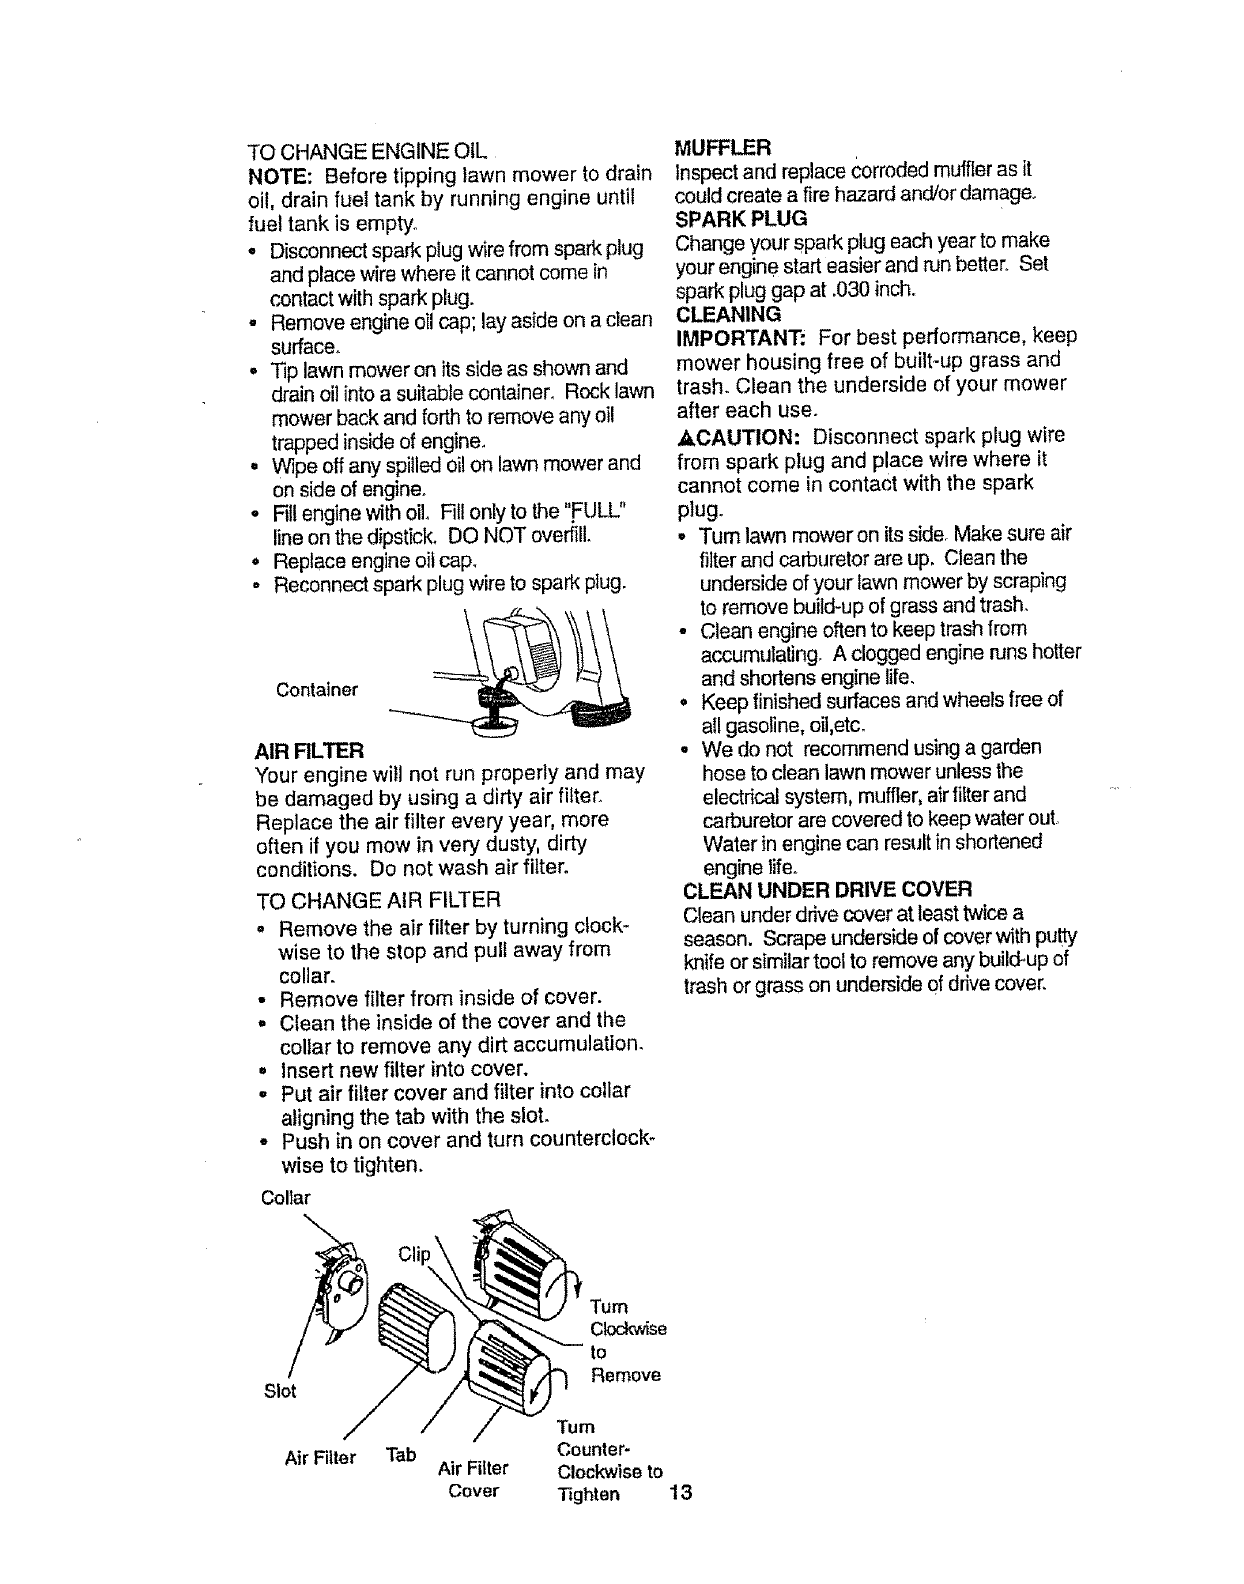
TOCHANGEENGINEOIL
NOTE:Beforetippinglawnmowertodrain
oil,drainfueltankby runningengineuntil
fueltankisempty.
• Disconnectsparkplugwirefromsparkplug
andplacewirewhereitcannotcomein
contact with spark plug.
• Remove engine oil cap; lay aside on a clean
surface.
. Tip lawn mower on its side as shown and
drain oil into a suitable container. Rock lawn
mower back and forth to remove any oi!
trapped inside of engine.
• Wipe off any spilled oil on lawn mower and
on side of engine.
• Fill engine with oil. Fill only to the ".FULU'
line on the dipstick. DO NOT overfill.
o Replace engine oil cap.
. Reconnect spark plug wire to spark plug.
Container
AIR FILLER
Your engine will not run properly and may
be damaged by using a dirty air filter.
Replace the air filter every year, more
often if you mow in very dusty, dirty
conditions. Do not wash air filter.
TO CHANGE AIR FILTER
• Remove the air filter by turning clock-
wise to the stop and pull away from
collar.
• Remove filter from inside of cover.
• Clean the inside of the cover and the
collar to remove any dirt accumulation.
, Insert new filter into cover.
- Put air filter cover and filter into collar
aligning the tab with the slot.
- Push in on cover and turn counterclock-
wise to tighten,
Collar
MUFFLER
tnspect and replace Corroded mutfler as it
could create a fire hazard and!or damage.
SPARK PLUG
Change your spark plug each year to make
your engine start easier and run better, Set
spark plug gap at .030 inch,
CLEANING
IMPORTANT: For best performance, keep
mower housing free of built-up grass and
trash. Clean the underside of your mower
after each use.
,&,CAUTION: Disconnect spark plug wire
from spark plug and place wire where it
cannot come in contact with the spark
plug.
• Tum lawn mower on its side. Make sure air
filter and carburetor are up. Clean the
underside of your lawn mower by scraping
to remove build-up of grass and trash.
• Clean engine often to keep trash from
accumuialing. A clogged engine runs hotter
and shortens engine life.
• Keep finished surfaces and wheels free of
all gasoline, oil,etc.
. We do not recommend using a garden
hose to clean lawn mower unless the
electrical system, muffler, air filter and
carburetor are covered to keep water out
Water in engine can result in shortened
engine life.
CLEAN UNDER DRIVE COVER
Clean under drive cover at least twice a
season. Scrape underside of cover with pu_
knife or similar tool to remove any build-up of
trash or grass on underside of drive cover.
Slot
Air F'ilter Tab Air Filter
Cover
rum
Clod_se
to
Remove
"rum
Counter-
Clockwise to
Tighten 13
_CAUTION: Beforeperformingany
serviceandadjustments:
°Release control bar and stop engine.,
- Make sure the blade and all moving
parts have completely stopped,
° Disconnect spark plug wire from spark
plug and place where it cannot come
in contact with plugo
LAWN MOWER
TO ADJUST CUTTING HEIGHT
See q'O ADJUST CUTTING HEIGHT" in the
Operation section of this manual.
REAR DEFLECTOR
The rear deflector, attached between the rear
wheels of your lawn mower, is provided to
minimize the possibility that objects will be
thrown out the rear of the lawn mower into the
operators mowing position, if the rear
deflector becomes damaged, it should be
replaced.
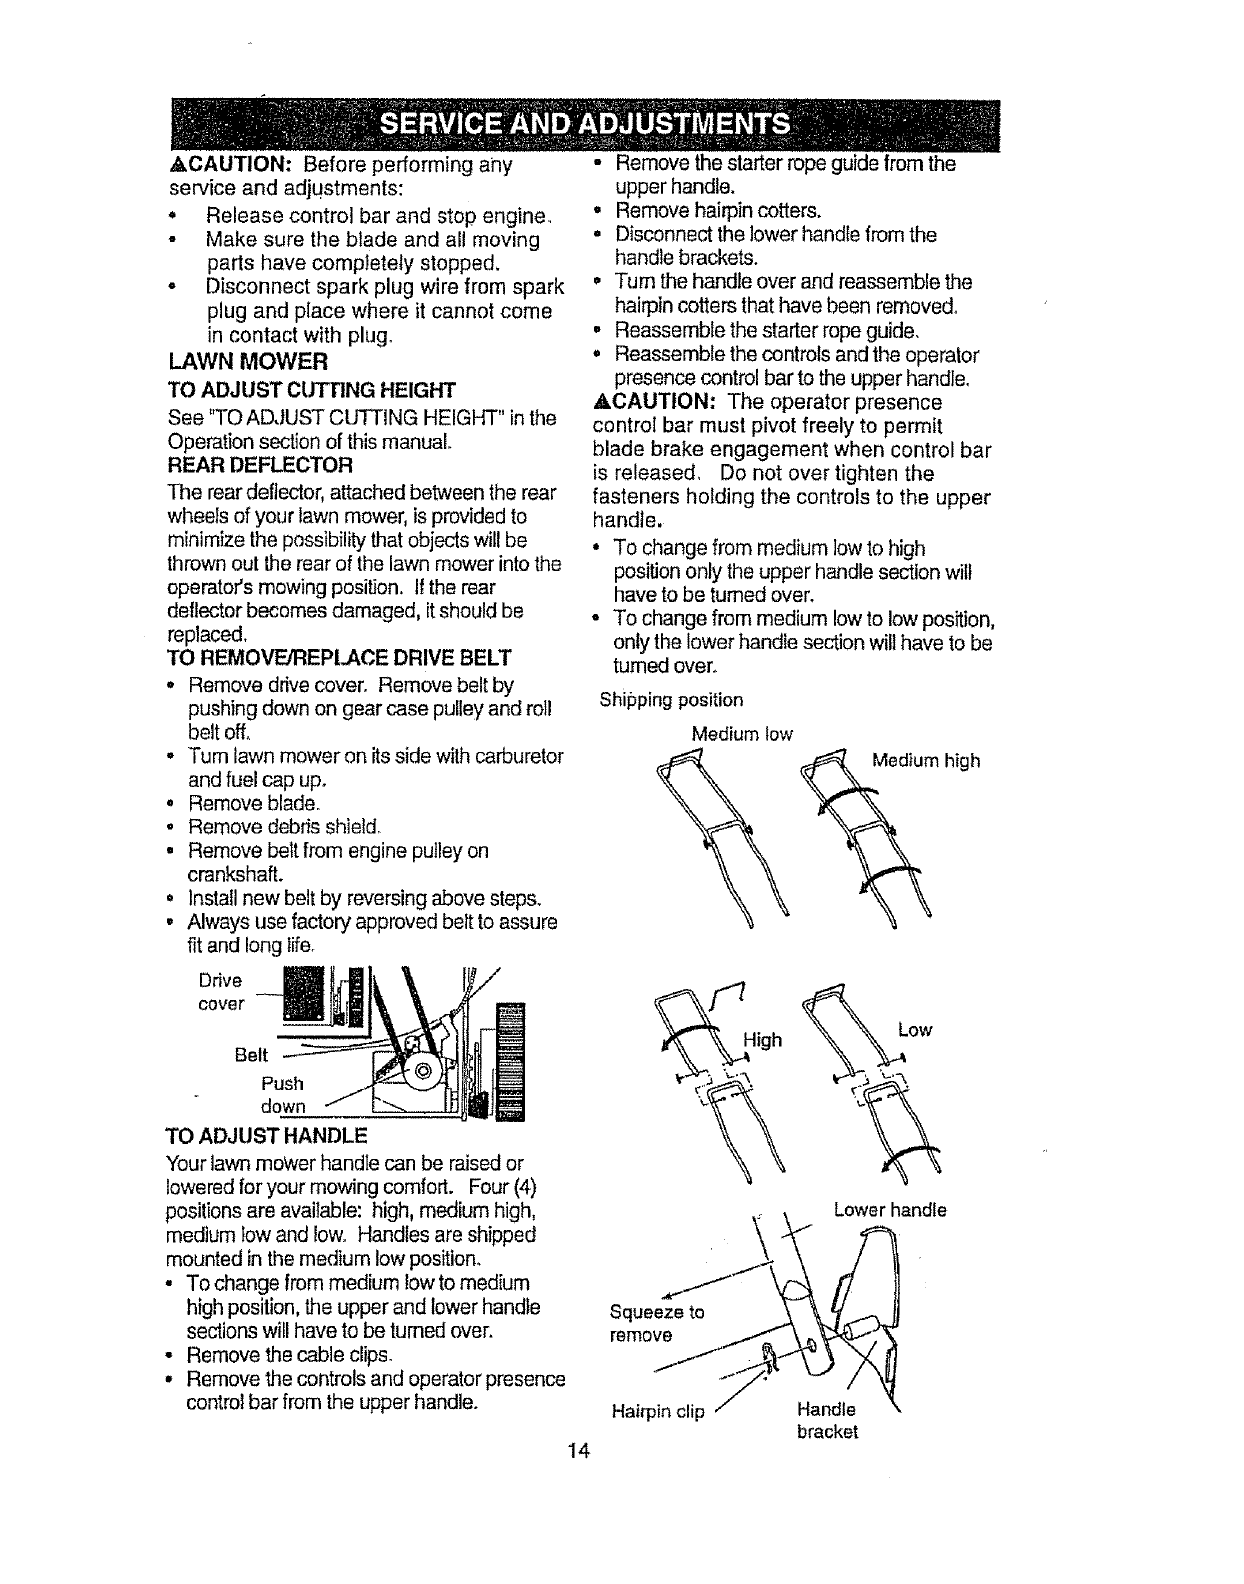
TO REMOVE/REPlACE DRIVE BELT
*Remove drive cover. Remove belt by
pushing down on gear case pulley and roll
belt off,
- Turn lawn mower on its side with carburetor
and fuel cap up.
, Remove blade.
oRemove debris shield.
.Remove bert from engine pulley on
crankshaft.
,Install new belt by reversing above steps.
.Always use factory approved belt to assure
fit and long life.
Drive
cover
Belt
Push
down
TO ADJUST HANDLE
Your lawn moWer handle can be raised or
lowered for your mowing comfort. Four (4)
positions are available: high, medium high,
medium tow and Iowo Handles are shipped
mounted in the medium low position.
•To change from medium low to medium
high position, the upper and lower handle
sections will have to be turned over.
•Remove the cable clips.
• Remove the controls and operator presence
control bar from the upper handle.
14
-Remove the starter rope guide from the
upper handle.
•Remove hairpin cotters.
• Disconnect the lower handle from the
handle brackets.
° Turn the handle over and reassemble the
hairpin cotters that have been removed,
,Reassemble the starter rope guide,
= Reassemble the controls and the operator
presence control bar to the upper handle,
,_CAUTION: The operator presence
control bar must pivot freely to permit
blade brake engagement when control bar
is released, Do not over tighten the
fasteners holding the controls to the upper
handle.
•To change from medium low to high
position only the upper handle section wilt
have to be turned over.
• To change from medium low to low position,
only the lower handle section will have to be
turned over.
ShiI_ping position
Medium tow
Mediu_n high
High Low
Lower handle
Squeeze to
remove
Hairpin clip Handle
bracket
ENGINE SPEED
Your engine speed has been factory set.
Do not attempt to increase engine speed
or it may result in personal injury. If you
believe that the engine is running too fast
or too slow, take your lawn mower to an
authorized service center for repair and
adjustment.
CARBURETOR
Your carburetor has a nomadjustable fixed
main jet for mixture control. If your engine
does not operate properly due to sus-
pected carburetor problems, take your
lawn mower to an authorized service
center for repair and/or adjustment.
IMPORTANT: Never tamper with the
engine governor, which is factory set for
the proper engine speed° Overspeeding
the engine above the factory high speed
scan be dangerous. If you think the
engine-governed high speed needs
adjusting, contact your nearest authorized
service center, which has proper equip-
ment and experience to make any
necessarY adjustments.
TO ASSEMBLE GRASS CATCHER
• Insert leg of tubular frame through front
opening of grass catcher and thread
frame into sewn hem of bag°
NOTE: Keep bag hem gathered on the
straight leg of the tubular frame.
• When frame comes out the other end of
sewn hem, immediately work the end of
frame down inside the bag as shown in
inset.
•Slide sewn hem evenly around the
tubular frame until both ends of frame
are exposed out of the front opening.
• Assemble lower frame to t;dbutar frame
as shown. Be sure handle is outside of
bag and frames are fully seated as
shown in inset.
= Slip vinyl bindings over frame.
NOTE: If vinyl bindings are too stiff, hold
them in warm water for a few minutes. If
bag gets wet, let it dry before using.
•Close the flip lid. Flip lid must be closed
while operating lawn mower°
•,CAUTION: Do not run your lawn mower
without clipping deflector or approved
grass catcher in place. Never attempt to
operate the lawn mower with the rear door
removed or propped open_
15
Immediatelyprepareyourlawnmowerfor
storageattheendoftheseasonorifthe unit
will not be used for 30 days 5r more.
LAWN MOWER
When lawn mower is to be stored for aperiod
of time, clean itthoroughly, remove all dirt,
grease, leaves, etc. Store in a clean, dry area.
, Clean entire lawn mower (See "CLEANING"
in the Maintenance section of this manual).
,, Lubricate as shown inthe Maintenance
section of this manual.
.Be sure that all nuts, bolts, screws, and pins
are securely fastened. Inspect moving
parts for damage, breakage and wear.
Replace if necessary.
• Touch up all rusted or chipped paint
surfaces; sand lightly before painting.
HANDLE
You can foldyour lawn mower handle for
storage.
° Squeeze the bottom ends of the lower
handIe toward each other until the lower
handle clears the handle bracket, then
move handle forward.
= Loosen upper handle mounting bolts
enough to allow upper handle to be folded
back.
IMPORTANT: When folding the handle for
storage or transportation, be sure to fold the
handle as shown or you any damage the
control cables.
• When setting up your handle from the
storage position, the lower handle will
automatically lock intothe mowing position.
Lower
handle
Squeeze to fold
Hairpin
corer
bracket
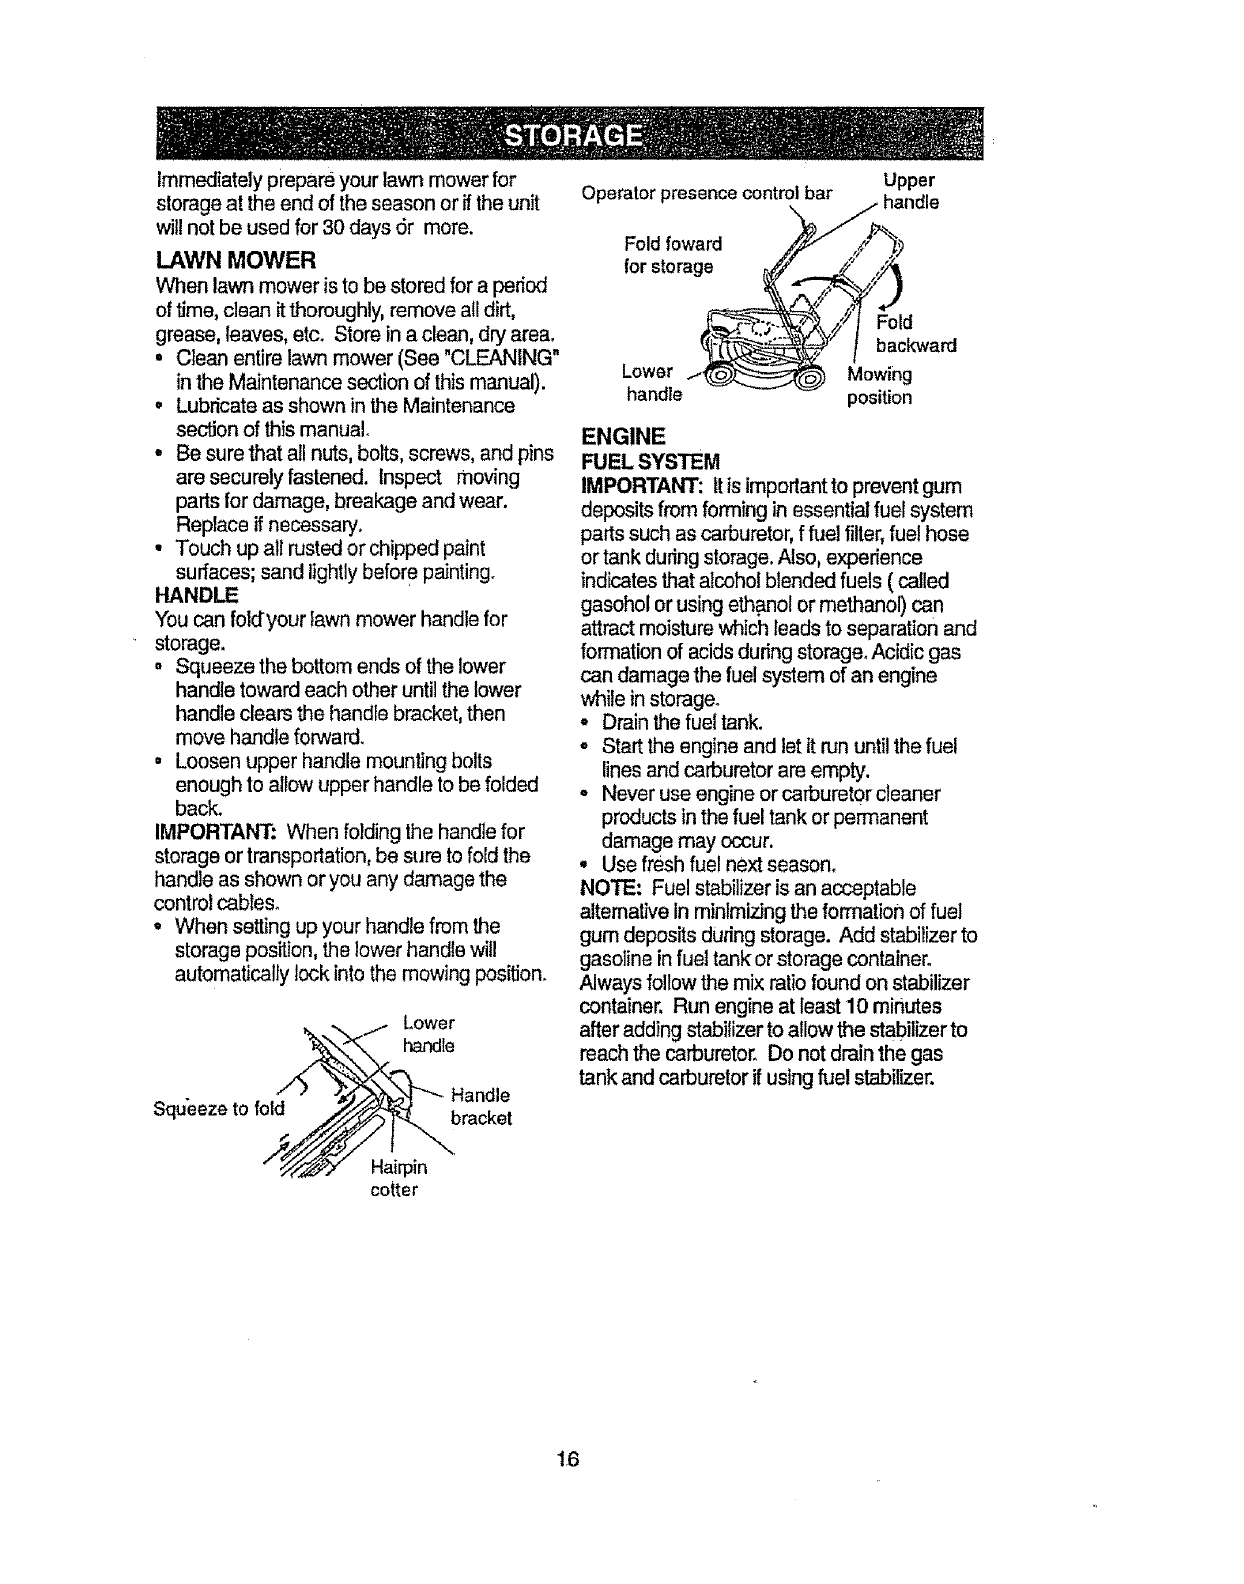
Operator presencecontrol bar
Fold foward
for storage
Upper
Fold
backward
Lower Mowing
handle position
ENGINE
FUEL SYSTEM
IMPORTANT: it is important to prevent gum
deposits from forming in essential fuel system
parts such as carburetor, f fuel filter, fuel hose
or tank during storage. Also, experience
indicatesthat alcohol blended fuels (called
gasohol or using ethanol or methanol) can
attract moisture which leads to separation and
formation of acids during storage. Acidic gas
can damage the fuel system of an engine
while in storage.
.Drain the fuel tank.
oStart the engine and let it run until the fuel
lines and carburetor are empty.
° Never use engine or carburetor cleaner
products in the fuel tank or permanent
damage may occur.
° Use fresh fuel next season.
NOTE: Fuel stabilizer is an acceptable
alternative in minimizing the formation of fuel
gum deposits during storage. Add stabilizer to
gasoline in fuel tank or storage container°
Always follow the mix ratio found on stabilizer
container. Run engine at least 10 minutes
after adding stabilizer to allow the stabilizer to
reach the carburetor, Do not drain the gas
tank and carburetor if using fiJel stabilizer.
16
ENGINEOIL
Drainoil(withenginewarm)andreplacewith
cleanengineoil.(See"ENGINE"inthe
Maintenancesectionofthismanual).
CYLINDER
• Removesparkplugo
• Pouroneounce(29ml)ofoilthroughspark
plughereintocylinder.
° Pullstarterhandleslowlyafewtimesto
distributeoil.
° Replacewithnewsparkplugo
OTHER
. Donotstoregasolinefromoneseasonto
another.
• Replaceyourgasolinecanif your can starts
to rust. Rust and/or dirt in your gasoline will
cause problems.
°If possible, store your unit indoors and cover
it to give protectionfrom dust and dirt.
,, Cover your unit with a suitable protective
cover that does not retain moisture, Do not
use plastic° Plastic cannot breathe which
allows condensation to form and will cause
your unit to hist.
IMPORTANT: Never cover mower while
engine and exhaust areas are still warm.
•.CAUTION: Never store the lawn mower
with gasoline in the tank inside a building
where fumes may reach an open flame or
spark. Allow the engine to cool before
storing in any enclosure.
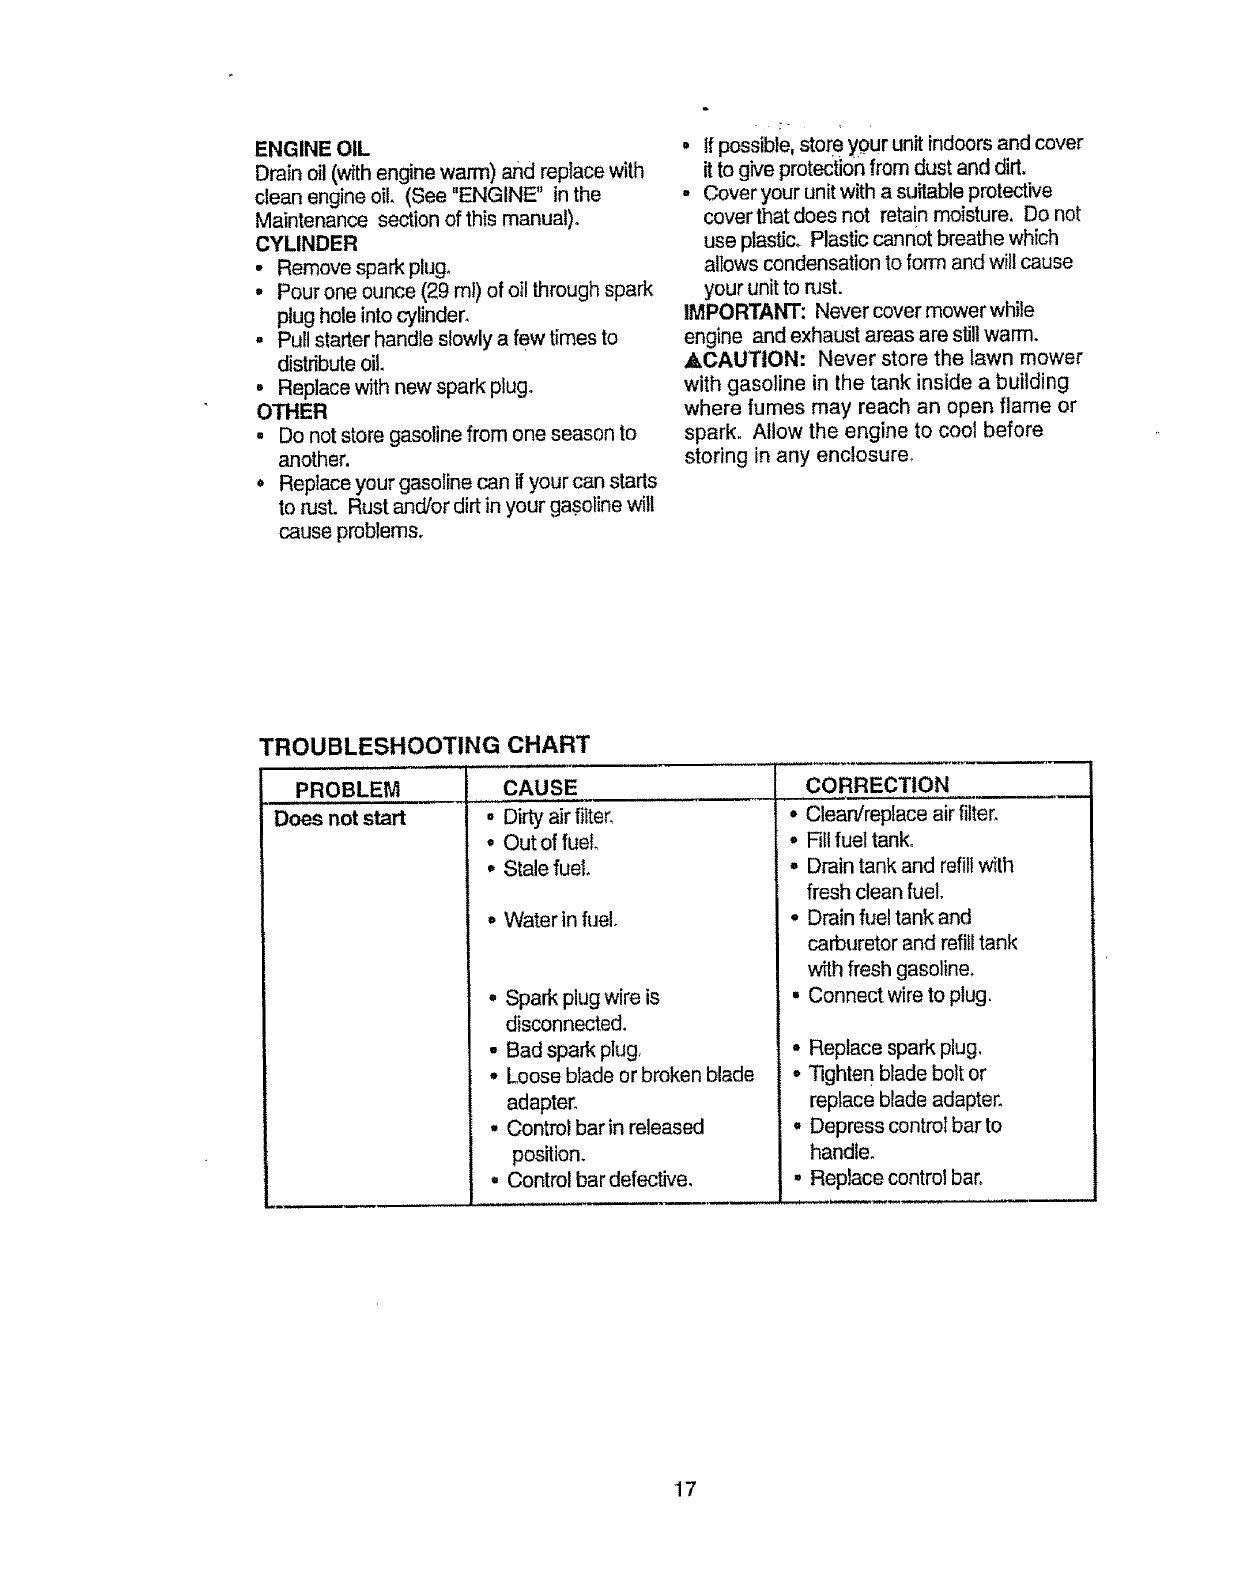
TROUBLESHOOTING CHART
,,,,,,
PROBLEM CAUSE
Does not start . Dirty air fi_ter_
•Out of fuel
°Stale fuel.
° Water in fuelo
° Spark plug wire is
disconnected.
-Bad spark plug,
°Loose blade or broken blade
adapter.
• Control bar in released
position.
°Control bar defective.
CORRECTION
° Clear/replace air filter_
•Fill fuel tank.
= Drain tank and refill with
fresh clean fuel.
oDrain fuel tank and
carburetor and refill tank
with fresh gasoline.
• Connect wire to plug.
• Replace spark plug.
°Tighten blade bolt or
replace blade adapter.
° Depress control bar to
handie.
•Reptace control bar.
17
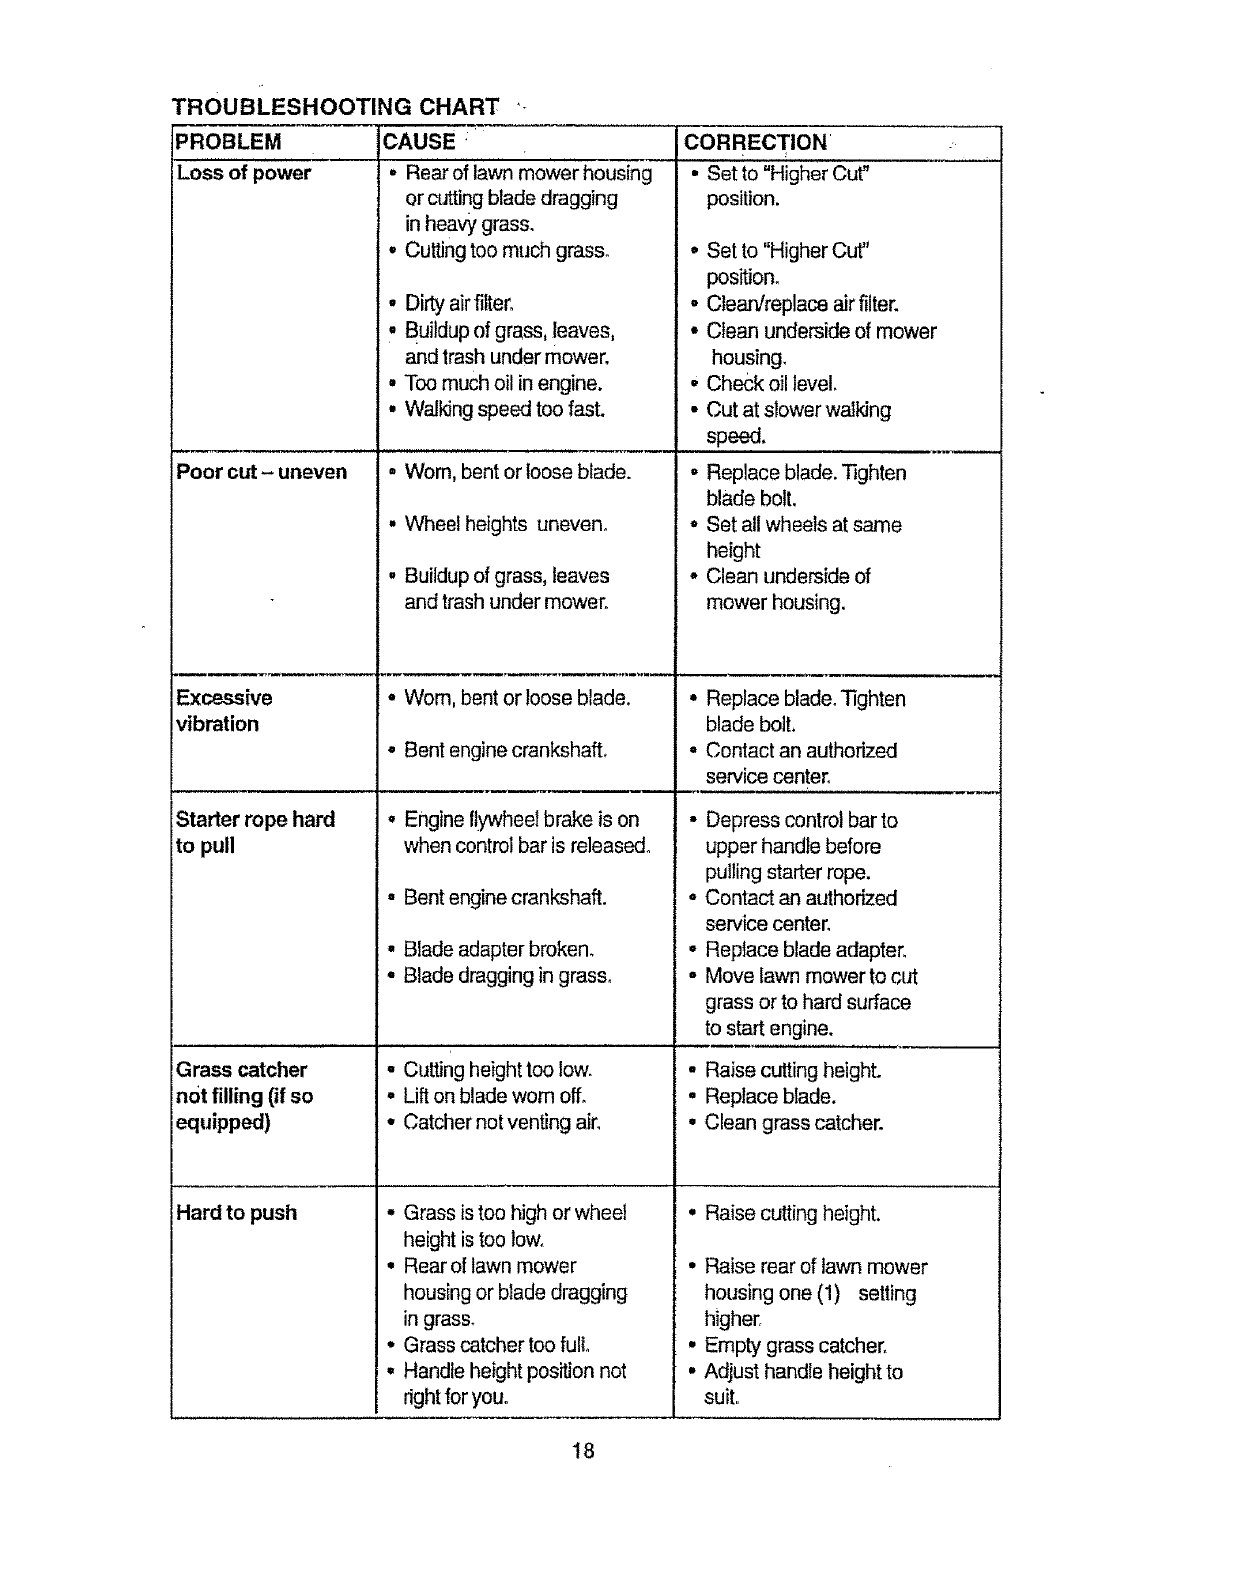
TROUBLESHOOTING CHART
PROBLEM
Loss of power
Poor cut - uneven
Excessive
vibration
Starter rope hard
to pull
Grass catcher
not filling (if so
equipped)
Hard to push
CAUSE
.Rear of lawn mower housing
Qrcutting blade dragging
in heavy grass.
•Cutting too much grass.
•Dirty alrfiiter+
. Buildup of grass, leaves,
and trash under mower.
• Too much oil in engine+
•Walking speed too fast.
• Wom, bent or loose blade.
.Whee! heights uneven+
. Buildup of grass, leaves
and trash under mower.
-Wom, bent or loose blade.
•Bent engine crankshaft+
• Engine flywheeTbrake is on
when control bar is released+
= Bent engine crankshaft.
•Blade adapter broken+
•Blade dragging in grass°
•Cutting height too low.
•Lift on blade worn off.
•Catcher not venting alr_
• Grass is too high or wheel
height is too low+
•Rear of lawn mower
housing or blade dragging
in grass+
• Grass catcher too full
• Handle height position not
right for you+
CORRECTION
• Set to "Higher Cut"
position.
•Set to "Higher Cut"
position.
•Clean/replace airfilter.
• Clean underside of mower
housing.
• Check oil level.
•Cut at slower walking
speed.
• Replace blade. _ghten
blade bolt.
• Set all wheels at same
height
- Clean underside of
mower housing.
•Replace blade. _ghten
blade bolt,
•Contact an authorized
service center°
• Depress control bar to
upper handle before
pulling starter rope.
o Contact an authorized
service center.
• Replace blade adapter_
• Move lawn mower to cut
grass or to hard surface
to start engine.
.Raise cutting height.
° Replace btade.
•Clean grass catcher+
Raise cutting height,
Raise rear of lawn mower
housing one (1) setting
higher.
Empty grass catcher.
Adjust handle height to
suit.
18
Qa antfa 19 Espo ifi oior,esde1F; oduoto 28
Reglas de Seguddad 19 Servicio y Adjustes 31
Montaje 21 Almacenamiento 33
Operacidn 23 Identificacidn de problemas 34
Mantenimiento 27 Partes de repuesto Vea el manual
Programa de Mantenimiento 27 inglds del duefio
Orden do Partes Contratapa
GARANT[A LIMtTADA DE DOS AtqOS PARA LA SEGADORAA MOTOR CRAFTSMAN
Par dos (2) aSos,a partirde la fecha do compra, cuando esta SegadoraCraftsrnanse mantenga, lubrique
yafineseg_n las inst]uccionespara laopemcidn yel manlenimiento en el manual del duaSo,Sears
reparar_ gratisrodedefecto enel materialy la mane de obra.
Si la SegadoraCraftsman se usa parafines comerciales o de arriendo, esta garant[asdlo se aplica par
noventa (90)d[as a partir de lafecha de compra.
Esla Garantfano cubre:
• ArticuFosquase desgastan durante el usa normal talescome las cuchillassegadoras mtatorias, los
adaptadoresde la cuchilta,las correas, losfiltms de alre y las bujfas.
• Reparacionesnecesarias dobidoal abuse o a la negligencia del operador,inclwdndesa a los
dgfieSales dobladosy a lafalta de mantanimientodel equipo seg_n las instnJccionesqua se inclwen
en el manual det dueSOo
EL SERVICIODE GARANTIAESTA DISPONIBLEal devolverla segadpra a motorCraftsman al Centre/
Departmentode Se_do Sears mas cercano en los Estados Unidos. Esta garant[asa aplica solamente
mientras el productoesteen usa en los Estados Unidos.
Esta Garantl'ale otorga derechos legatesespecfficos,y puedequa tambidntenga aires derechosqua
vafian de estadoa estadoo
Sears, Roebuck and Co., D/817WA,Hoffman Estates, tL 60179 USA
Los estandraresdesegur_dadexigenla presencia
dal operator enlos contmlespara reducir a un
minima el riesgode lesionaree.Su unidadviano
equipadacon dichoscontroles.Par ningun motive
trate del eliminarla funci6nde los controtesqua
exigen la prasenciade! 0parader.
ENTRENAMIENTO.*
•Lea estemanual del operador
culdadosamenteoFami]iaficesecon los
controlesy aprenda a operarsu segadora en
forma adecuada.Aprenda a pararsu segadora
r_pidamente.
•No permitaque losniSosusen su segadora.
Nuncapermitaque losadullos operenla
segadom sin contar con las instrucciones
adecuadas.
• Mantengael &tea de operaciSndespejada
de gante, especialmentede nifios pequefios
y de animalesdom_sticos.
o Use la segadora solarnenteparalos fines
propuestos par elfabricante y seg_n las
explicacionesdescritas en estemanual.
•No opere la segadora si se ha cafdo o daSadoen
cualquiemforrna. Siempre repare los daSos
antes de usada
• No use accesoriosque no hayan side
recomendadospar el fabficante°El usa de dichos
accesoriespuedaser peiigroso.
• La cuchiltagira cuando el motor est&
funcionando.
PREPARACION:
•Siempre revise cuidadosamenteel &rea qua se
va asegar y desp_jala de todas las piedras,
palos,alarnbres,huesosy otros objetos
extrafios. Estos objetos_,er_nlanzados con la
cuchillay pueden producir les}onesgraves.
, Siampre use anteojosde segufidad o protectores
de ojos cuando armnqua y duranteel tiempo
qua use lasegadora.
19
• Vistaseenform!adecuada,Nqopere:la "
segadorasinzapatosocer}-sandalias
mientrasquaelmob/"e_{&funcionando..
,, Siegue siempre durante el d{a o con buena
luz artificial.
OPERACIrN:
- Mantenga sus ojes y su mente en ia
sag!dora y en el _rea que se est& cortandoo
No pen-nitaqua otros intereses Io distraigan.
•No corte cSsped mojado o resbalosooNunca
corra mientras est_operando su segadora,
Siempre asegt_rese de mantener el equilibriO
- mantenga el mango agarrado firmemente y
camine.
• No ponga las manes o los pies cerca odebajo
de las partes rotatorias. Mant_ngase
alejado de la abertura de descarga en tcdo
memento°
• Siempre pare el motor cuando se vaya
ocuando no est6 usando su segadora, o
antes de atravesar las entradas para autos,
los senderos, caminos y _.reascubiertas de
dpio.
• Nunca dirija la descarga det materi!l hacia
los espectadcres ni pen'nit! a nadie cerca de
la segadora mientras ta est_ operandoo
•Antes de limpiar, inspeccionar o de reparar I
a segadora, pare el motor y est_
completamente seguro de que la cuchilta y
que todas las partes qua se mueven se
hayan detenido. Luego, desconecte el
alambre de la bujia y mantrngalo alejado de
_sta para evitar el arranque per acc}dente.
•No continSe haciendo funcionar su segadora
si le peg! a un objeto extrafio. Siga el
procedimiento descrito anteriormente, luego
rap!re cuatquier dafio antes de volver a
arrancar y de operar su segadorao
•No eambie los ajustes del regulador o
hagaque el motor ande a una velocidad
excesivaoSe pueden producir daSos en el
metory ! esiones personales.
° No opera su segadora si vibra fuera de Io
normal, La vibracirn excesiva es una
indicaciSn de ratio; pare el motor, revise en
forma segura la cause de la vibraci6n y hag!
.. las reparaciones seg_n sea necesario.
•No hag! funcionar el motor en
recintoscerrados. Los gases de escape son
peligrosos.
•Nunca code el crsped tirando I! segadom
hacia usted. Siegue a trav_s de la care de
lee pendientes, nunca hacia arriba ohacia
abajo pues puede perder el equUibrio.No
siegue pendientes demasiado empinadas.
Tenga cuidado cuando opera la sag!dora en
terreno disparejo O cuando ca_mbiede
direcci6n - mantenga Unbuen equilibrio.
•Nunca opere la segadora sin las
protecciones adecuadas, 1asplanchas, el
recogedor de c_sped y otros dispositivos de
seguridad en su lugar.
MANTENIMIENTO YALMACENAMIEN-
TO:
•Revise la cuchilla y los pemos de montaje
del motor amenudo, pare aseguirarse qua
est#,napretados en la form! adecuada,
• Revise todes lospemos, tuercas y families a
intervalos frecuentes, pare verificar si est&n
!pretados en form! adecuada, y
asegurarseque la segadora se encuentra en
condicicnes de funcionamiento seguro.
• Mantenga redes los dispositivos de seguridad
en su lugar y listos para funcionar.
•Para reducir el peligro de incendb,
mantenga el motor sin c_sped, hojas y grasa
o aceite en exceso.
•Revise el recogedor de c_sped a menudo
pare vefilicar si hay deterioro y desgaste y
cambie tas bolsas desgastadas° Use
solamente las bolsas de repuesto
recemendadas per e! fabdcante de su
segadora o qua cumplen con las
especificaciones de _ste.
•Siempre mantenga una cuchilla afitada en su
segadora.
•Siempre permita qua el motor se enfrie
antes de guardarla en cualquier recinto
cerrado.
•Nunca guarde la sag!dora con combustible
en el estanque dentro de un edificio endonde
los gases pueden alcahzar una llama
expuesta o una fuente de_igniciSn, tel come el
calentador de agua, la estufa de
calefaccirn, la secadora de ropa, etc.
A.PRECAUCION: Siempre desconecte e!
alambre de la buj[a y p6ngalo donde no pueda
entrar en contacto con la buji!, p!ra evitar ef
arranque per acciclente, durante la preparacirn,
el transporte, el ajuste e cuando se hacen
reparaciones.
_.PRECAUClON: Es conocido per el Estado de
California qua los gases de escape det motor de
este productor contienen quimicos }os cuales a
ciertos niveles, pueden ocasionar, c#,ncer,
defectos de nacimiento, y otro_ dares al
sistema reproductive.
2O
Estosaccesodosestabandisponiblescuande se produjela segadora_Tambienest_tndispon_bfesen la
mayon'ade las tiendasde Sears yen loscentros de se_cio. La rnayorfade las UendasSears tambi6n
pueclen n__ndara pedir partesde repuestopara usted,si les pmporclonael n_mem de!mode!ode su
segadora_AJgunosde estos accasodos tal vez no se apliquen a su segadora.
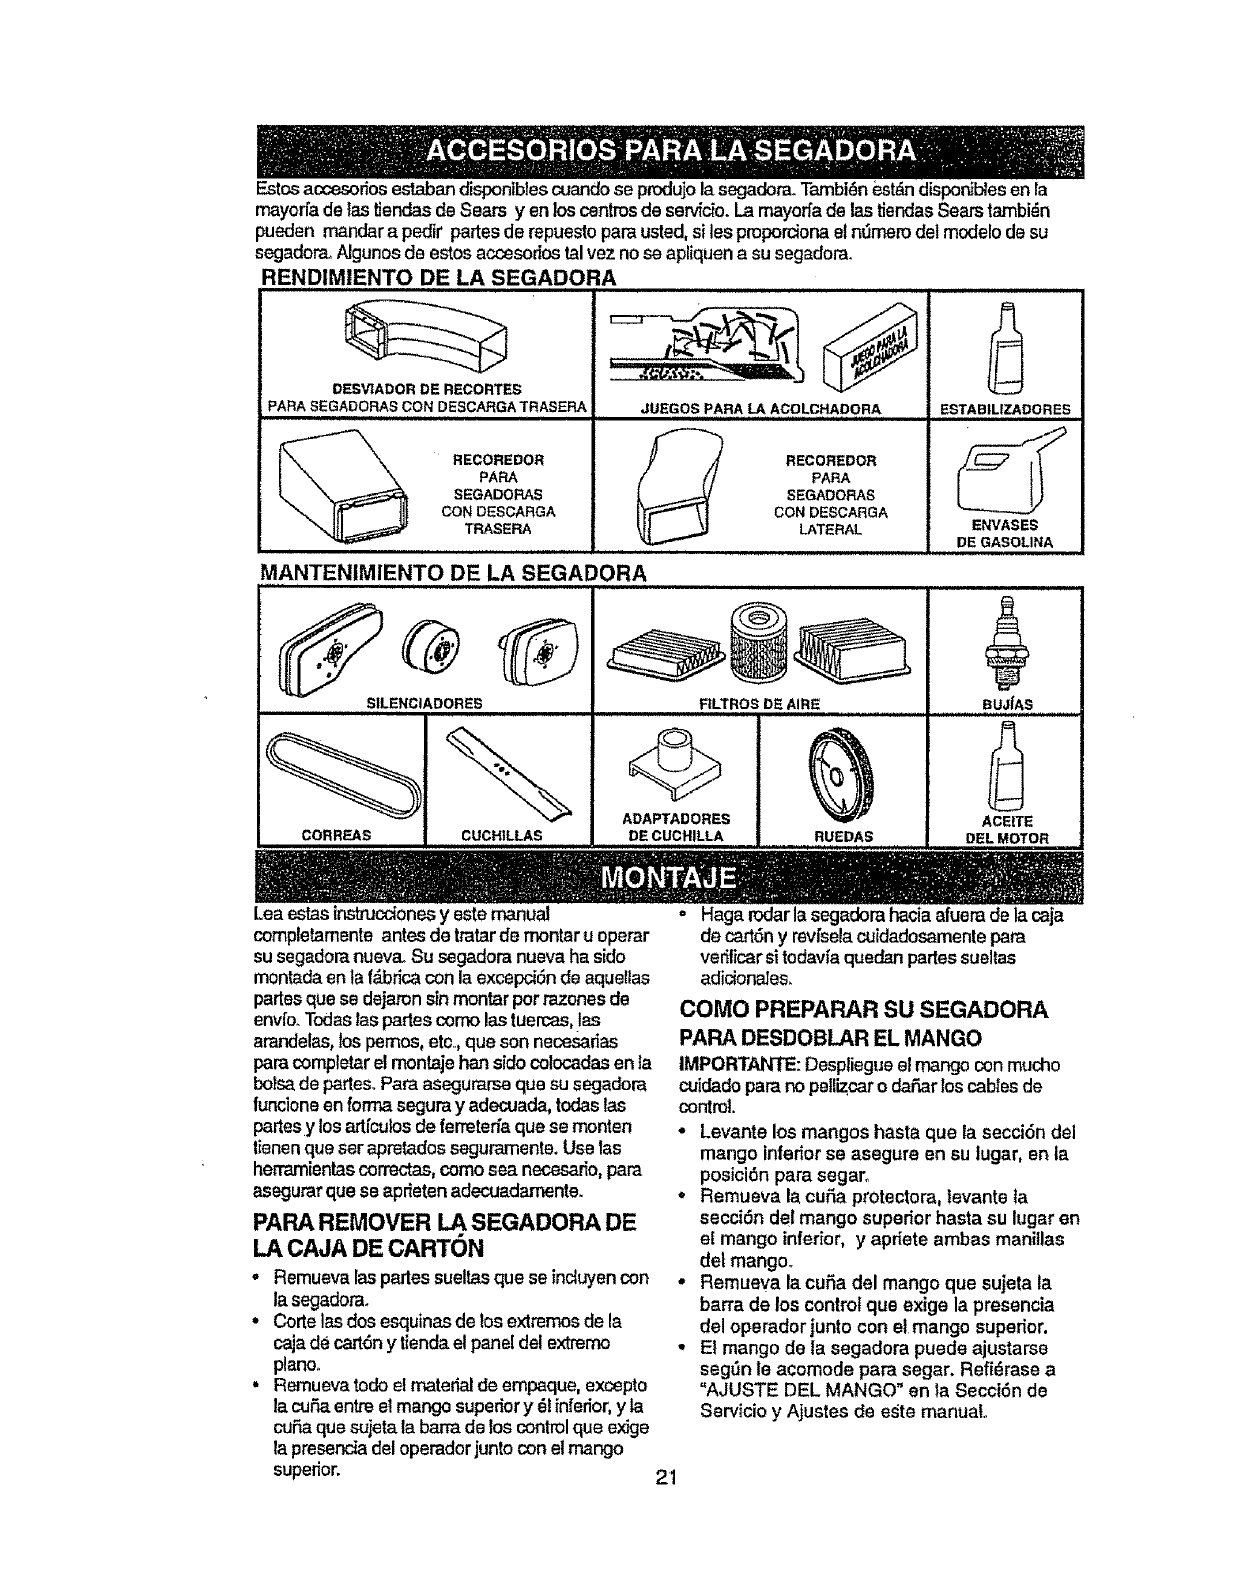
RENDIMIENTO DE LA SEGADORA
r
DESV1ADOR DE RECORTES
PARA SEGADORAS CON DESCARGA TRASERA JUEGOSPARALAACOLCHADORA
SEGADORAS SEGADORAS
CON DESCARGA CON DESCARGA
TRASERA _TERAL
MANTENIMIENTO DE LA SEGADORA
SILENCIADeRES
CORREAS CUCHtLLAS
RLTROS DE AIRE
ADAPTADORES
DE CUCHILLA
ESTABILIZADORES
ENVASES
DE GASOLINA
BUJfAS
ACEITE
RUEDAS eEL MOTOR
Leaes_s instnJccionesy este manuaJ
completamente antesde tratarde rnontar uoperar
su segadoranueva. Su segadora nueva ha s[do
montadaenla f_brica conla excepci6nde aque!las
partesque se dejamn sinmontar por razonesde
envlooTodaslaspartes corno lastuercas,las
arandelas,lospemos, etco,que son necesadas
para comptetarel montaje hart sidocolocadas en ]a
bolsa de partes. Para esegurarseque su segadora
funcioneen fon'r_segura y adecuada,todas tas
partesy losart{culosde ferreterfaque se rnonten
lienen queser apretadosseguramente. Uselas
herramientascorrectas,comosea necesa_e, para
asegurarque se aprieten adecuadamente.
PARA REMOVER LA SEGADORA DE
LA CAJA DE CARTON
-Remueva les partessueltas que se incluyencon
la segadora_
•Corte lasdosesquinesde losextremosde la
caja de ca,'t6ny tienda el panel del extremo
planoo
• Remuevatodoel materialde empaque, excepto
la cuea.entre e! mango supe_or y el inferior,y la
cuea que sujeta la barra de los controlque exige
la presenc_adet operadorjunto con etmango
superior.
Haga rodar la segadora P_.ciaafuera de la caja
de caden yrevfselacu[dadosamentepara
vedticarsitodav{aquedanpades sue!tas
adiciena_es_
COMO PREPARAR SU SEGADORA
PARA DESDOBLAR EL MANGO
IMPORTANTE:Despliegueel mangocon touche
cuidado para no pe!l_car o daear los cablesde
control.
• Levante los mangos hasia que la seccien de!
mango inferiorse asegure en su lugar, en la
position para segaro
• Remueva la cu£1aprotectora, levante Ia
secoidn del mange supedor hasta su lugar en
el mango inferior, y apdete ambas manitlas
det mango°
•Remueva la cuea del mango que sujeta la
barra de los control que exige la presencia
del operador junto con el mango superior,
•El mango de la segadora puede ajustarse
segdn le acomode para segar. Refi_rase a
"AJUSTE DEL MANGO" en la Secci6n de
Servicio y Ajustes de este manual.
21

Barradecontrolqueexige la
presencia del operador
Mango superior
Levantar
parasegar
PARA INSTALAR LOS ACCESOR]OS
SU.segadora rub enviada lista para usarsecomo
una acolchadorade capa vegetal,Paraconvertida
de modo que pueda ensacaro descargar:
• Abra la puertatraseray remuevala tapon
acolchadora. Gu_dela en un lugarseguroo
• Ahora puedeinstala?el recogedoro el desviador
de recortes opcional,
•Para volver a laoperaciSnde acolchamienlo con
capa vegetal, instalelatapon acolchadoraenla
abertura de descargade la segadora.Aseg_rese
de que todas tasorejas est_nasentadas en
formaadecuada.<
Mango
infedor
Tapon
alcolchadora
,APRECAUCI6N: No haga funcionar su
segadora sin la tapon acolchadora aprobada en
su lugar, o sin el desviador de recortes, o sin el
recogedor de c_sped, aprobados, en su lugar,
Nunca trate de operar la segadora cuando se
ha removido la puerta trasera o cuando est& un
poco abierta..
22
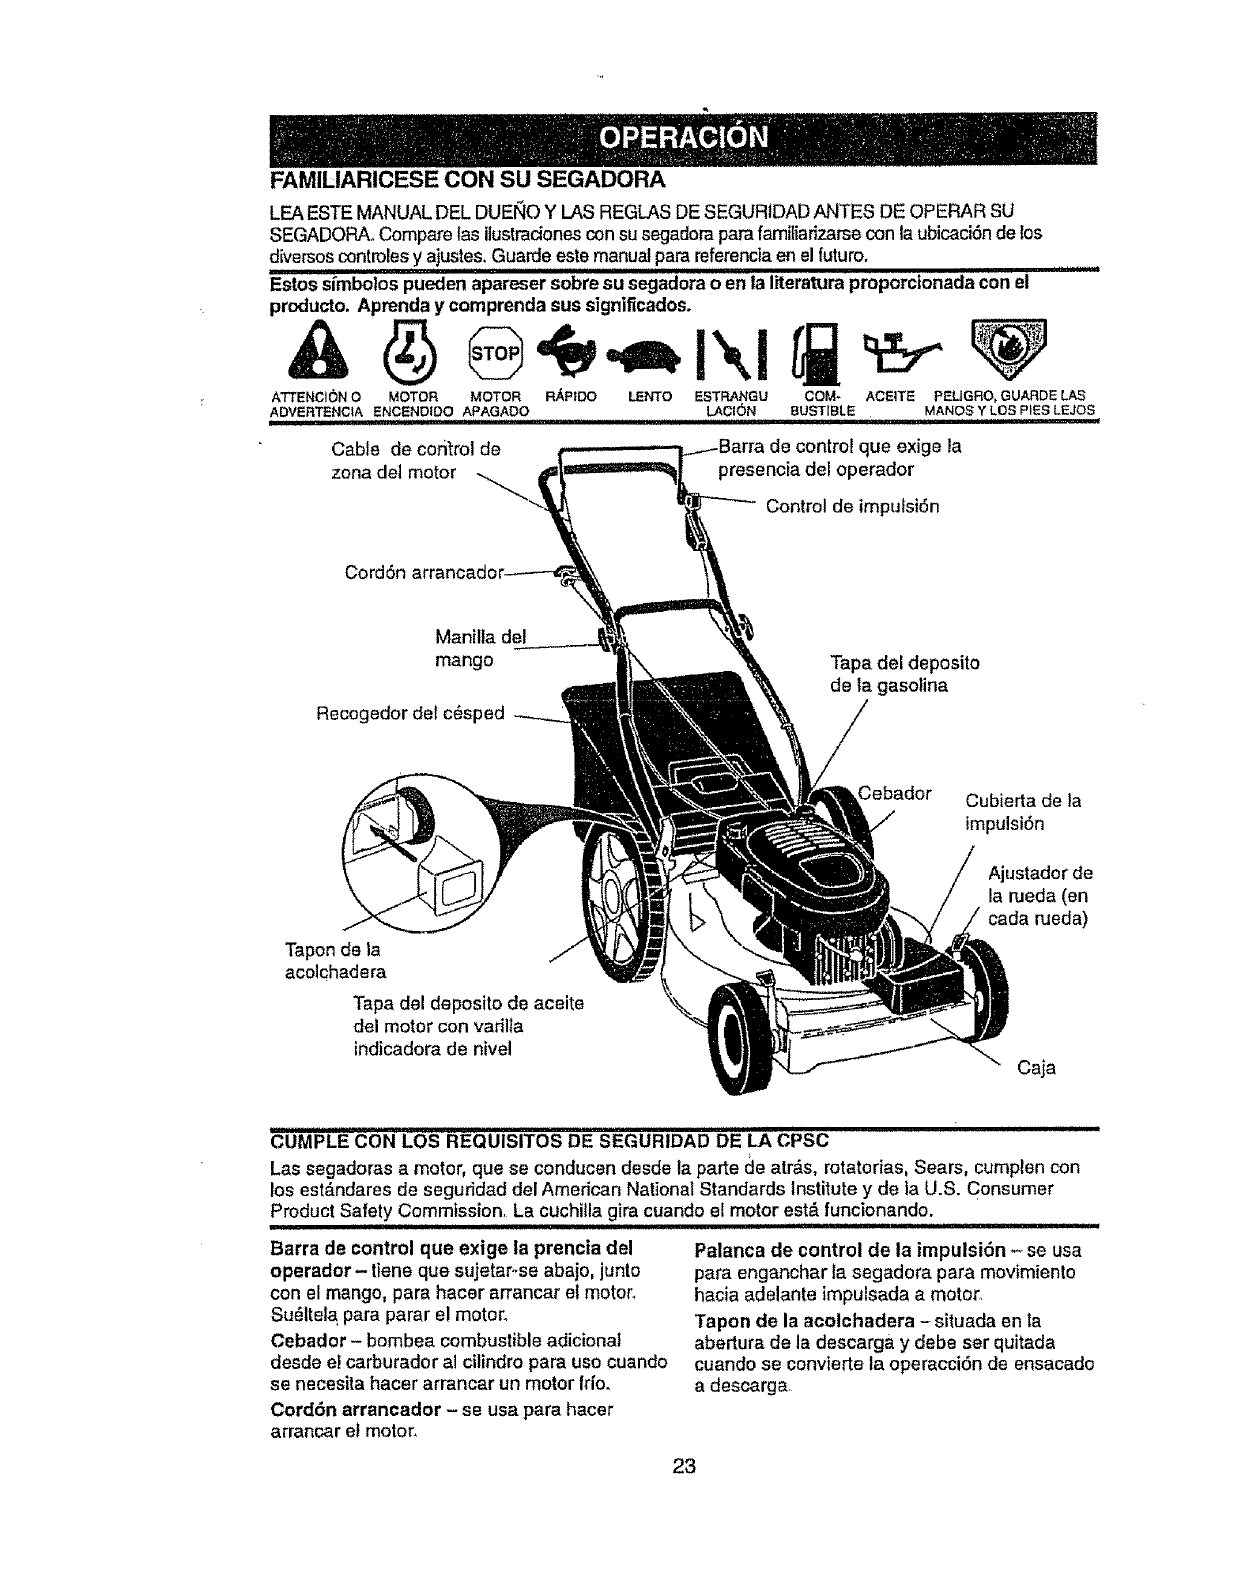
FAMILIARICESE CON SU SEGADORA
LEA ESTE MANUAL DEL DUEhlOY I.AS REGLAS DE SEGURtDAD ANTES DE OPERAR SU
SEGADORAoCompare las ilustracionescon su segadora parafamiliarizarsecon la ubicaci6nde los
dhtersoscontrolesy ajustes.Guarde este manual para referenciaen elfuturo.
Estossi'mbo'lospueden"aparesersobre su segadora o en la literatura proporcionada con el
producto. Aprenda y comprenda sus significados.
ATTENCI_N O MOTOR MOTOR FL_PIDO LENTO ESTRANGU COM- ACEITE PELtGRO, GUARDE LAS
ADVERTENCIA ENCENOlOO APAGADO LACION 8UST_BLE MANOSYL.OSpIES LEJOS
Cable de corltrol de
zona del motor de control que exige la
presencia del operador
Control de impulsi6n
Cord6n arranc
Manilla del
mango
Recogedor del c_sped
Tapa del deposito
de la gasolina
Tapon de la
acolchadera
Tapa del depositode aceite
del motor con varilta
indicadorade nivel
Cebador Cubierta de la
impulsi6n
Ajustador de
la rueda (en
cada rueda)
Caja
..................................... ii iiiiiii
CUMPLE CON LOS REQUISITOS DE SEGURIDAD DE LA CPSC
Las segadoras a motor,que se conducen desde ta parte cle atr_s, rotatorias, Sears, cumpten con
los est&ndares de seguddad del American National Standards Institute y de la U.S. Consumer
Product Safety Commission, La cuchilla gira cuando el motor est& funcionando.
i II,,..H..... H ..H..
Barra de control que exige la prencia del
operador- tiene que sujetaroseabajo, junto
con el mango, para hacer arrancar el motor,
Sudltela para parar el motor.
Cebador - bombea combustible adicional
desde el carburador al cilindro para use cuando
se necesita hacer arrancar un motor fr[o.
Cord6n arrancador - se usa para hacer
arrancar el motor.
Palanca de control de la impulsi6n - se usa
para enganchar ta segadora para movimiento
hacia adelante impulsada a motor.
Tapon de la acolchadera - situada en la
abertura de la descarga y debe ser quitada
cuando se convierte la operacci6n de ensacado
a descarga,
23
Laoperaci6ndecualquiersegadorapuede
hacerquesaltenobjetosextraSOsdentrodesus
ojos,ioquepuedeproducirdaSosgraves en
_stos. Siempre use anteojos de seguridad o
protecci6n para los ojos mientms opera su
segadora ocuando haga ajustes o
reparaciones. Recomendamos una mascara de
seguridad de visi6n amptia, para use espejuelos
o anteojos de seguridad estandarteo
COMe USAR SU SEGADORA
VELOClDAD DEL MOTOR
La velocidad def motor se establed6 en la
f&brica para un rendimiento 6primo. La
ve!ocidad no se puede ajustar.
CONTROL DE ZONA DEL MOTOR
,_.PREOALICI6N: Las regulaciones federales
exigen qua se instafe un control para el motor
en esta segadora para reducir a un minimo el
riesgode lesionarse debido al contacto con la
cuchilla. Per ningt_n motive Irate de eliminar la
lunci6n del control del operador. La cuchilla
gira cuando el motor est& funcionando.
• Su segadora viene equipada con una barra de
controlque exige la presenciadelopen,dot, Io
qua requiem que eloperador est_detr'_sdel
mango de lasegadora parahacerla arrancar y
operafla.
PAPA AJUSTAR LA ALTURA DE COR"I'E
• Levantelas ruedaspara el corteba]o y baje las
medas para el corte alto.
- Ajuste laaltura de cortepara cluese acomode a
sus requisites.La posici6ndel medio es ia major
para la mayoffa de los c_spedes_
• Paracambiar la atturade corte, empuje la
palanca del ajustadorhacia la nJeda.Mueva la
rueda hada arribao hada abajade mode qua
se acomodea sus requisites.Aseg_resequa
todas tasruedasqueden igualmenteajustadas.
AVISO-*El ajustador esta correctamente
colocado cuand0 tas orejas de la placa est&n
insertadas en el agujem del mango. Tambi_n,
los ajustes de 9posiciones (si equipado)
permiten que el mango pueda ser movido
entre las orejas de la placa.
Orejas de la
Para un corte alto, baje las
ruedas
Mango
Para un corte bajo, levante las ruedas
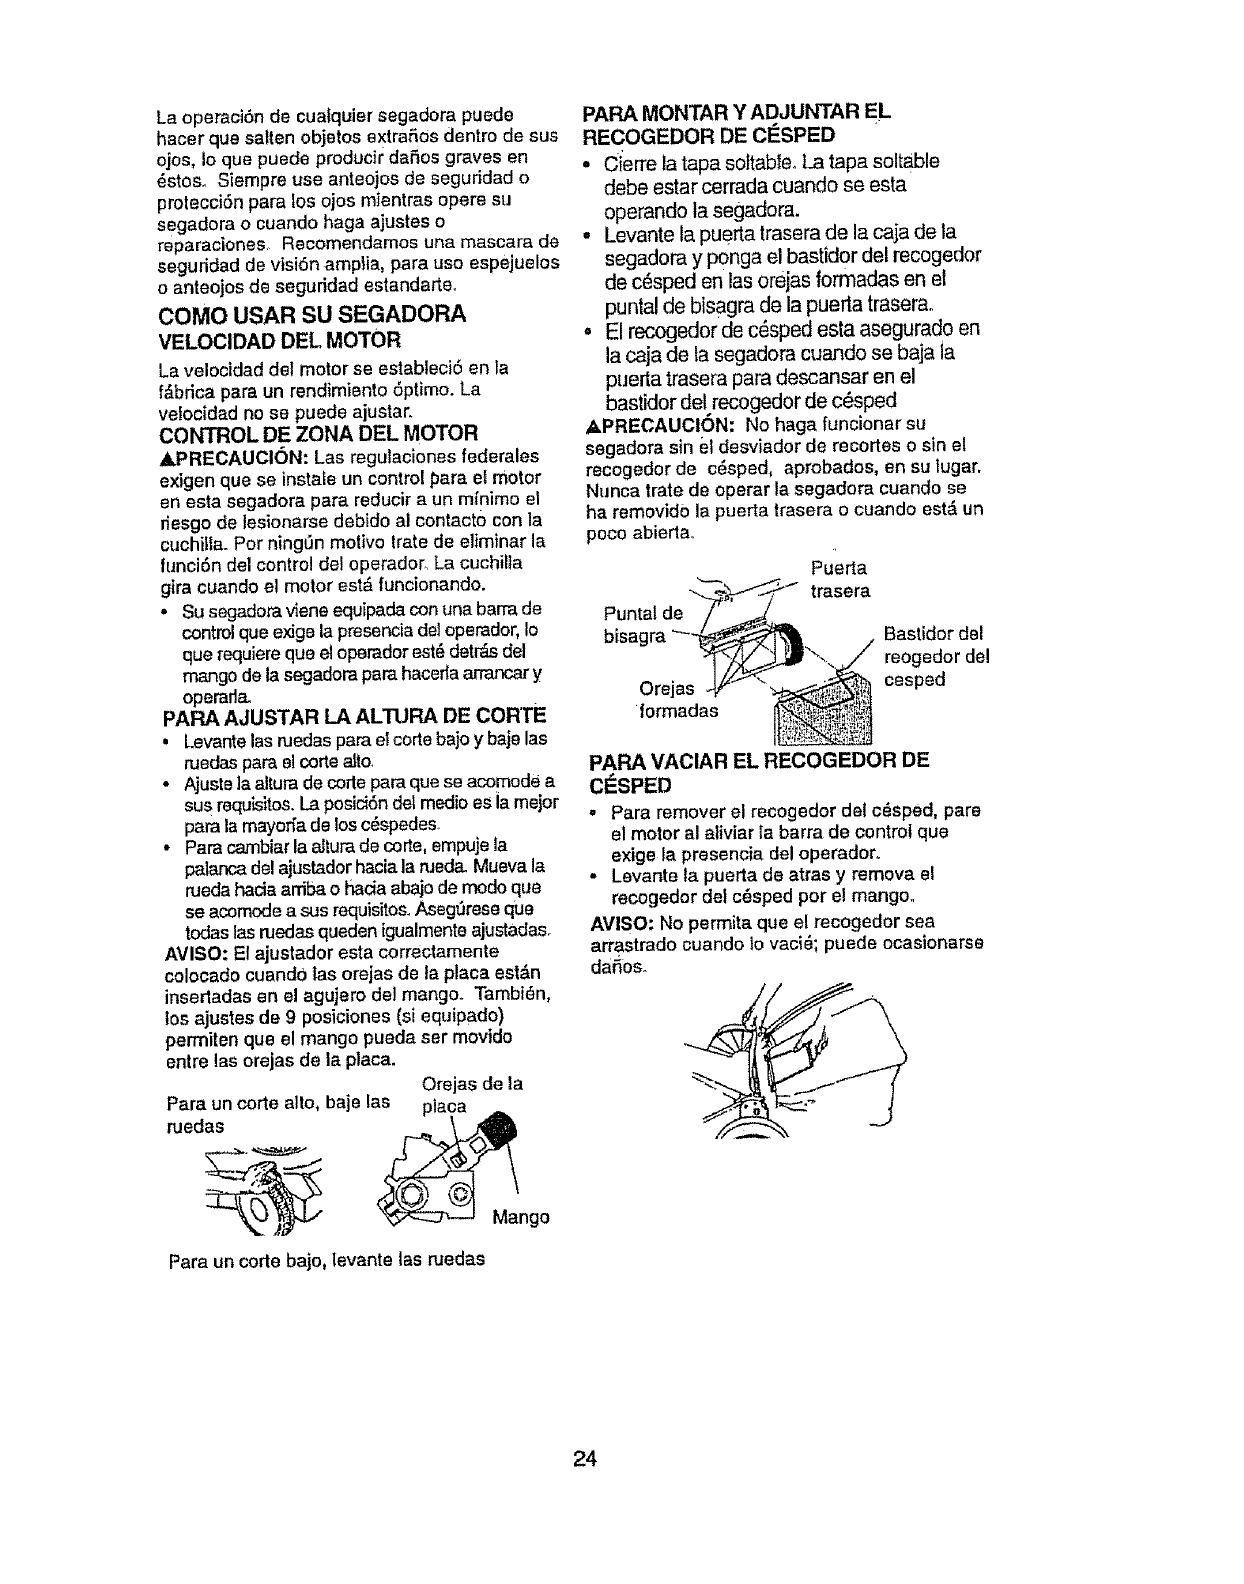
PAPA MONTAR Y ADJUNTAR EL
RECOGEDOR DE CESPED
•Cierre la tapa softableo La tapa soltable
debe estar cerrada cuando se esta
operando la segadora.
• Levante la puerta trasera de la caja de la
segadora y P0nga el baslidor del recogedor
de c_sped en las orejas formadas en el
puntal de bisagrade la puerta traserao
• El recogedorde c_sped esta asegurado en
la caja de la segadora cuando se baja ia
puerta trasera para descansar en el
bastidor del recogedor de c_sped
_kPREGAUCION: No haga funcionar su
segadora sin el desviador de recortes o sin el
recogedor de c6sped, aprobados, en su lugar.
Nunca Irate de operar la segadora cuando se
ha removido la puerta trasera o cuando est& un
poco abierta..
Puerta
trasera
Puntal de
bisagra
Orejas
lormadas
Bastidor del
reogedor de!
cesped
PARA VACIAR EL RECOGEDOR DE
ClaSPED
° Para remover el recogedor del c_sped, pare
el motor al aliviar ia barra de control que
exige ta presencia del operador,,
°Levante la puerta de atras yremova el
recogedorde! c_spedpor el mango,,
AVISO: No permita que el recogedorsea
arrastradocuando 1ovaci_; puede ocasionarse
dafios.
24
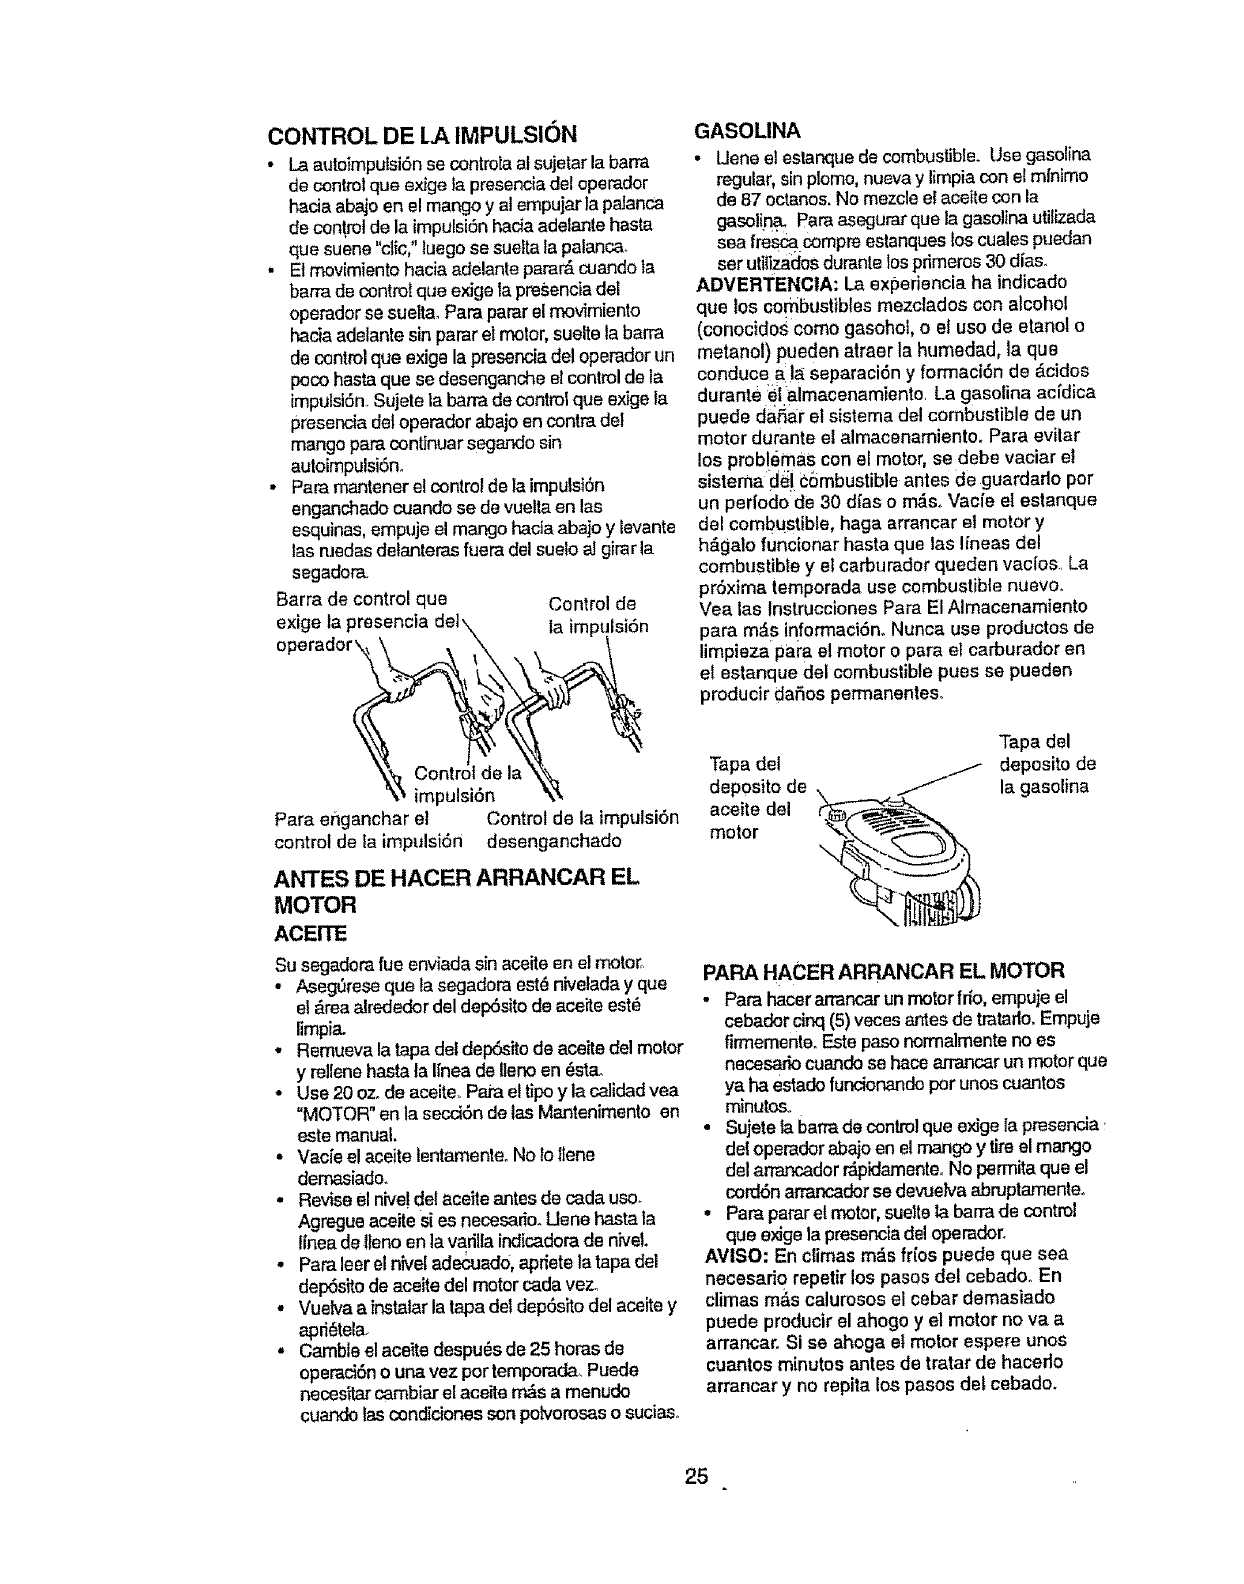
CONTROL DE LA IMPULSION
- La autoimpulsi6n se contro[aal sujetarla barra
de control qua exige Ia presenciadel operador
hacia abajo en el mango y al empujar la palanca
de controlde la impulsi6nhaciaadelante haste
que suene"clic,"luegose sueltala palanca.
• El movimiento hacia adelante para_ cuando la
ban'adecontrolque exiga ia pre,senciadel
opemdorse suelta_Para pararel movimiento
hacia adelante sin parar el motor, sueltela barra
de controlqua exige la presenciadel operador un
poco hastaqua se desenganche el controlde ta
impulsi6nSujete la barrade controlque exige la
presenciadei opemdor abajo en contra del
mango paracontinuar segando sin
autoimpulsi6n.
• Pare mantener el controlde la impulsi6n
enganchadocuando se de vuelta en las
esquinas,empuje el mango hacia abajo y levante
las ruedasdetanteras [uera del suelo al gimr la
segadora,
Barra de control qua Control de
exige ta presencia la impulsi6n
operador_
impulsi6n
Para enganchar el Control de la impt,lsi6n
control de la impulsi6n desenganchado
ANTES DE HACER ARRANCAR EL
MOTOR
ACEITE
Su segadora rueenviada sin aceite en el motor.
• Aseg6mse qua fa segadom est_ nivelada y qua
el _.reaalrededordel dep6sito de aceite est_
limpia.
• Remueva la tapedel dep6sitode aceitedel motor
y mllene haste la I[neade Ilenoen _sta.
- Use 20 oz. de aceiteoPara eltipo y la calidadyea
"MOTOR"en la secci6n de tasMantenimentoen
este manual.
• Vacfe e!aceite lentamenteoNo lo llene
demasiado.
•Revise el nive!del aceite antesde cada usa.
Agregue aceite si es necesario.Uene hastela
llnea de llenoen la vadllaindicadora de nivel,
•Para leerelnivel adecuad0,aprietela tapadel
del_sitode aceitedel motorcada vezo
•Vuelvaa instatar la tape det depOsitodel aceitey
apri6tela.
• Camble elaceite despu6s de 25 hares de
operaci6n o una vez partemperada_Puede
necesitar cambiarel ace_.,terr_s amenudo
cuandolas condicionesson polvorosaso sucias.
GASOLINA
. Uena el eslanque de combustible. Use gasolina
regular,sin piomo,nueva y limpia con el minima
de 87 octanos. No mezcle el aceitecon la
ga,._lina. Pareas_lurar qua la gasoline utilizada
sea fresca sompreestanqueslos cuales puedan
ser utii!zaclasdumntelos pdmeros 30 all'as.
ADVERTENCIA: La exl_eriencia ha indicado
que los combustiblesmezclados con alcohol
(conocidos coma gasohol, o el usa de etanol o
metanol) pueden atraer la humedad, la qua
conduce a la_separaei6n y formaci6n de _cidos
durante ...._1elmacenamiento La gasoline acfdica
puede defer et sistema del combustible de un
motor durante el almacenamiento. Para eviler
los prob!6mas con el motor, se debe vaciar el
sistema de! Combustibleantes de guardado per
un perfodo de 30 dias o m_s. Vacie el estanque
dal combustible, haga arrancar el motor y
h&galo funcionar haste que las lineas del
combustible y et carburador queden vacfos La
pr6xima lemporada use combustible nuevoo
Vea las Instrucciones Para ElAlmacenamiento
para m_s informaci6n. Nunca use productos de
limpieza para el motor o pare el carburador en
el estanque del combustible pues se pueden
producir dafios permanenteso
Tape del
deposito de
aceite del
motor
Tapa del
depasito de
la gasoline
PAPA HACER ARRANCAR EL MOTOR
•Para haceran'ancarun motorfifo,empuje el
cebadorcinq (5)veces antes de tratado_Empuje
fin_emenle. Estepaso notTnalmenteno es
nacesariocuandose hacearrancar unmotorqua
ya ha estado luncionandoperunoscuantos
minutoso
• Sujete la barrade control qua exige la presencia
del opemdor abajo en el mangoy tire el mar',,go
del armr_..adorr_pidamenle, No permita que el
cord6n arrancadorse devuelva abruptamenteo
•Para parar el motor,sueltela barrade control
qua exJgolapresenciadel operedor.
AVISO: En climes m_s frios puede que sea
necesario repetir los pasos del cebado, En
climas m&s calurosos el cebar demasiado
puede producir el ahogo y el motor no va a
arrancar. Si se ahoga el motor espere unos
cuantos minutos antes de tratar de hacerlo
arrancar y no repita los pesos det cebado.
25
CONSEJOS PARA SEGAR
oBajo ciertas condiciones,tal come c_spad
muy atto, puede ser necesario el elevar la
allura det corte pare reducir el esfuerzo
necesario para empujar la sagadora y pare
avitar sobracargar et motor, dejando
montones de recortes de c_spedo Puede que
sea necesario reducir la velocidad del
recorrido y/o haga funcionar la sagadora
sobre et &rea per segunda vez,
• Para un corle muy pesado, raduzca el ancho
del corte pasando parcialmente per encima
del lugar anteriormente cortado y siegue
lentamente.
• Pare un mejor ensacado del c6sped y pare la
mayoria de las condiciones de corte, la
velocidad del motor debe ajustarse a la
posici6n de r_pido,
• Cuando use una segadora con descarga
trasera en c_sped hSmedo y pesado, los
montonas del c_spad cortado puede que no
entren en el recogedor de c6sped..Reduzca
la velocidad del recorrido (velocidad de
empuje) ylo haga funcionar la segadora
sobre el ,_rea per segunda vez.
oSi queda una huella de cortes an el tado
derecho de una segadora con dascarga
trasara, siegue en la direcci6n en quegiran
las manillas del reloj, solapando un poco para
recaudar los recortes an ta pr6ximapasada.
• Los pores en los recogedores de c_sped de
teia pueden Ilenarse con mugre y polvo con
el use y los recogedores recaudar&n manes
c_sped, Pare evitar _sto, rocfe el recogeder
con la manguera de agua regularmenta y
d_jelo secarse antes de usadoo
• Mantenga ta parte superior del motor,
alrededor del arrancador, despejada y sin
recortes de c_sped y paja. Esto ayudar_ el
ftujo del aire del motor y extender#, su
duraci6n.
CONSEJOS PAPA SEGAR Y ACOLCHAR
IMPORTANTE: Pareobtener el major rendimeinto
rnantengala caja de la segador a sin acumlacion de
cespedy basur& Vea "LIMPIEZA"en seccion
de"Mantenimento"de este manual
• La cuchillaacelchadoraespecial va avolvar a
cedar los recortesde c_sped muchas veces, y
los reduceen tar'na£_,de mode que si se caen
en el c_spedse van a dispesarentre Ostey no
se van a notar_Tambi_n, el c_sped acolchadose
va a deshacer r'&pidamenteentregando
substancias nutdlivas parael c_sped. Siampre
acolchecon la velocidaddel motor (cuchilla)rr_s
affa, pues as[ se obtendr_la major acciSnde
recortede las cuchiItas.
• Evitecorlar el c,._.spadcuando est_ mojado..[]
c_sped mojado tiendaa formarmontones e
intadiere con la acciOnde acolchadooLa major
hera pare segar el c_spedes temprano an la
tarda.A esahera _stesa hasacado y'el _rea
reci_n cortada no quedar_expuesta aJsol
direclo.
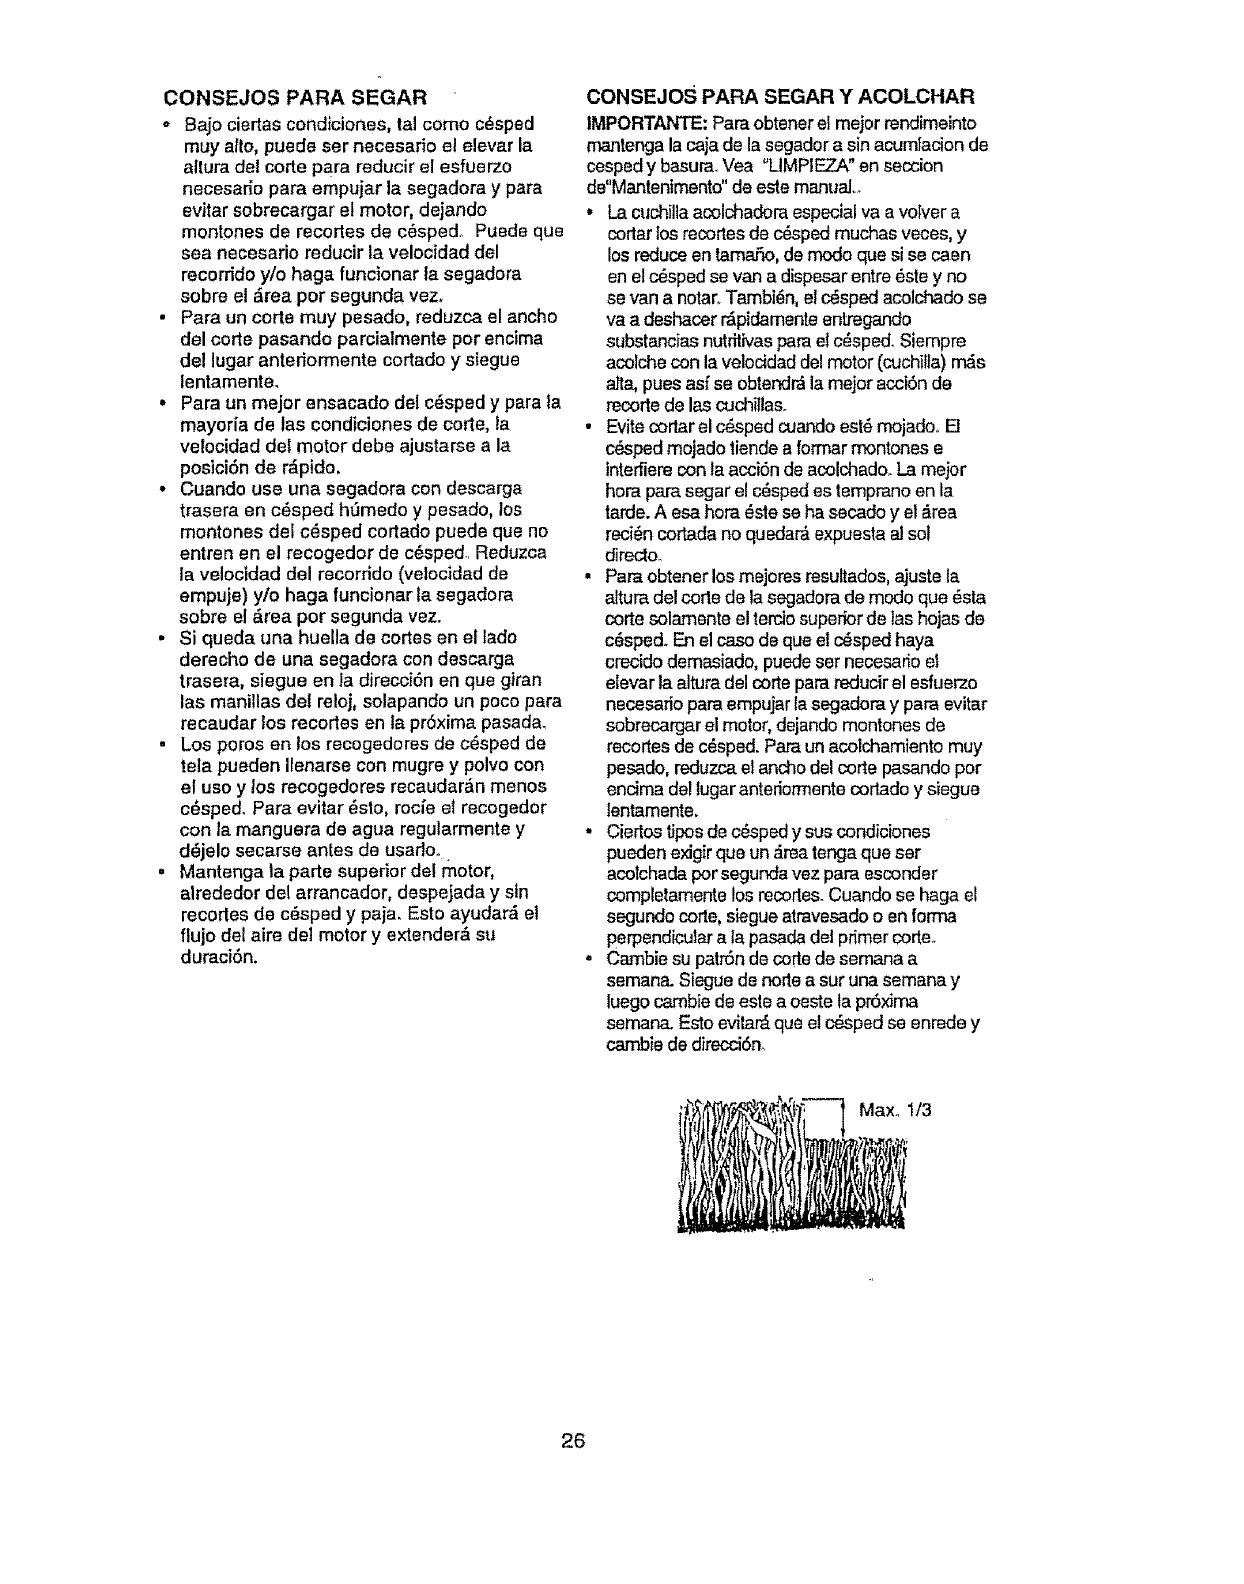
• Pare obtener los mejoresresultados,ajuste la
altura dal corta de la segadorade mode qua _sta
corte solamente el terciosuperiorde las hojas de
c_sped. En elcase de queel c_sped haya
crecido demasiado, puedeser necesarioel
elevar la altura deleerie parereducir el esfuerzo
necesario pare empujarla segadora y pare evitar
sobrecargar elmotor, dejando montones de
recortasde c_sped. Pareun acolchamiento muy
pesado, reduzcael anchodel corte pasando per
encima dellugar anteriormantecortado y siegua
tentamente.
. Ciertos tiposde c_spedy sus condiciones
puedenexigir qua un _reatengaque ser
acotchadapor segundavez para esconder
completamentelos recorte&Cuando se haga el
segundo corte, siegueatravesado o en fom",a
perpendiculara la pasadadel primercode_
= Cambie su patr6n de cortede semana a
semana. Sieguede notre a sur una semana y
luegocarnbie de esle a oeste la pr6x_ma
seman& Estoevitar_que el c_.spedse enredey
cambie de dfrecci6n.
Max° 1/3
26
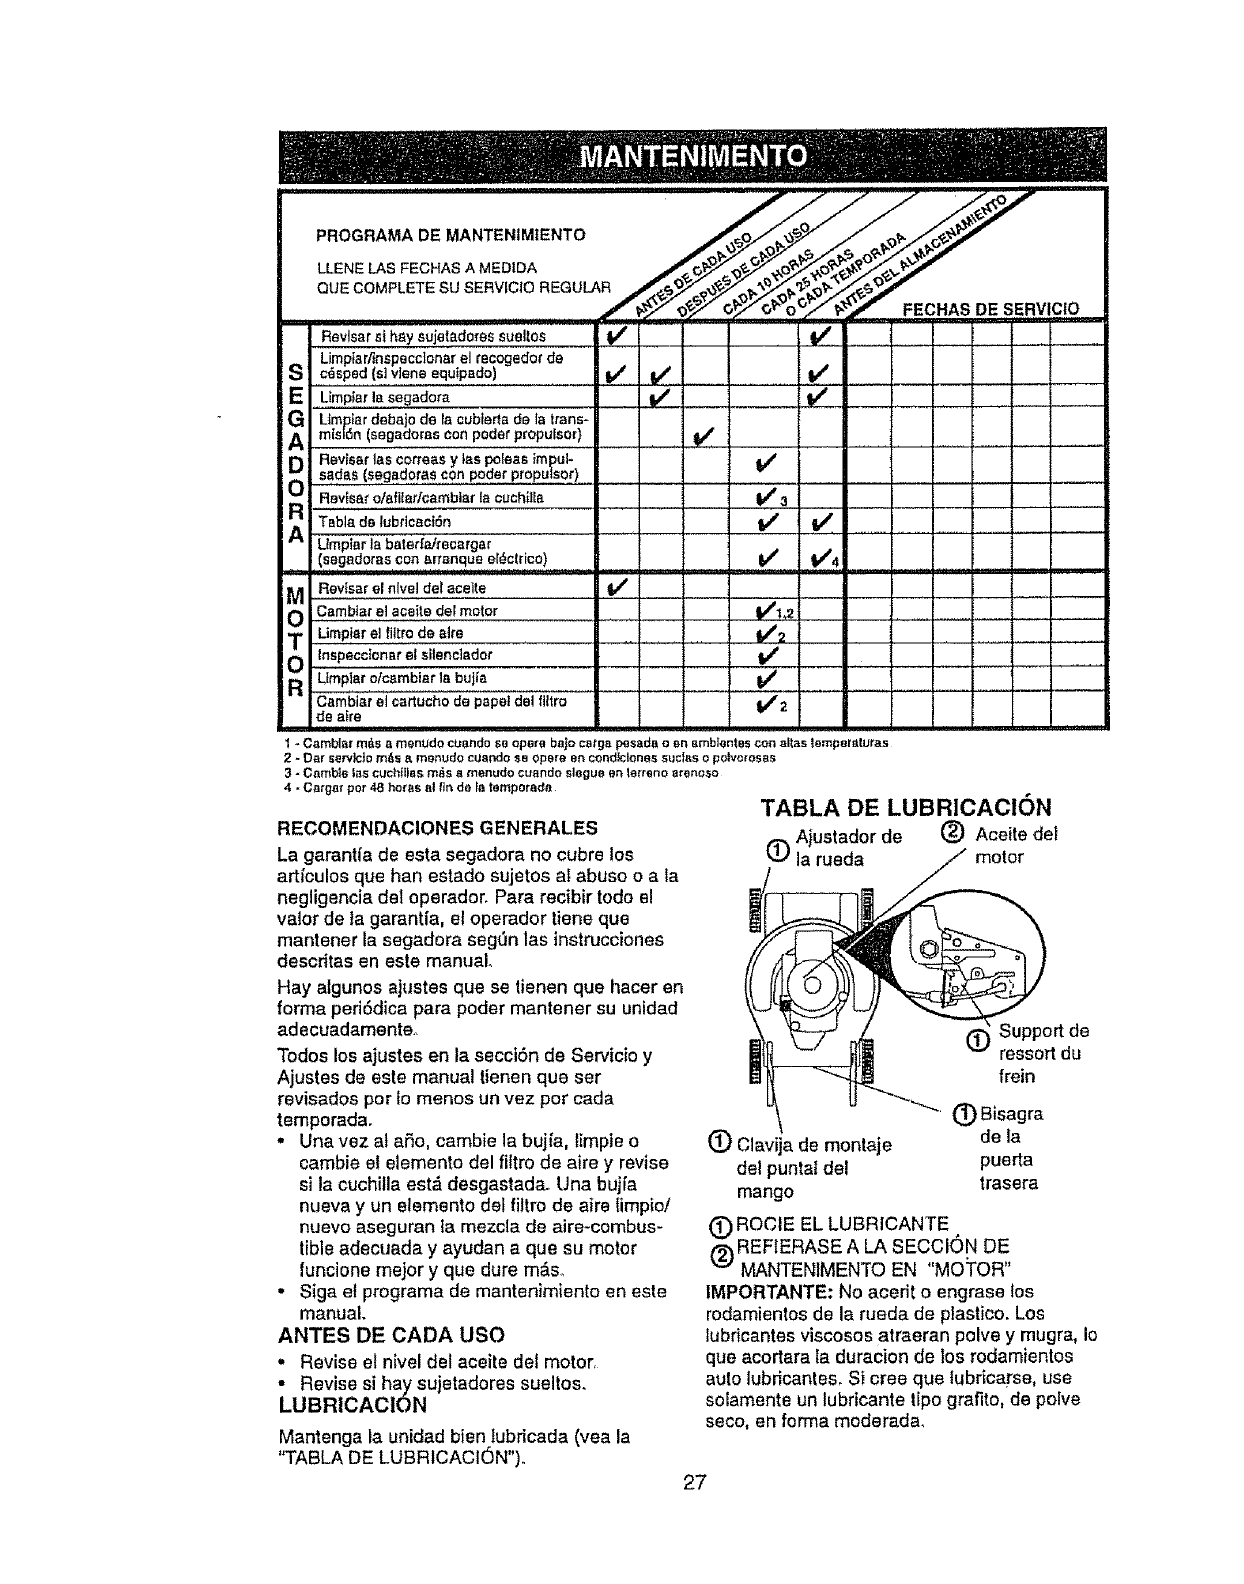
/_/_2"__S" FECHASDE SERVICIO
Revlsars!hay sujetad0res suellos If _ .....
IS Limpiar/tnspeccionar el recogedof de
E Limplarla segadora frj I_
GUmplar debajo de la cubtertade la trans-misl6n (segadoras con poder proputsor} If
8Revis_r las correas y las poroasimpul- V'
sadas (segadqta,s,,C0n,poder proputso,r)
Revfsar ofafilarloambt_rts cuch_lla Ikf 3
RTabla de lubficaciSn V'
Limpiarla bater_aJrecargar
(segadoras con _,rranqueel_clrico) V_V'4
EiRevlsar el nlvel del acelte _ ...........
TO Cambtarel aceite del motor 1_1,2
Limpiarel fiitrodo alre .............. 1_2
OInspecc_onar el stlenclador I_
Limp!atotc,mbiar !. bulfa if .....
Cambtar elcartucho do papeldel flttro _/2
de atre
1-Cambiar rn6s a menUdo cuando se opera bajo cstga pesada o rm arnblentescon alias ternpetaturas
2- Oar servk:lo mAs s rnonudo cuando so oporo en condtclonos suctas o polvoros_s
3-Cambie fas cuchliias m_s amenudo cuando sloguo en torrono aronoso
4*Carga_ pot 48 horas _tl_irtdo F_tomporada
RECOMENDACIONES GENERALES
La garantfa de esta segadora no cubre los
artfculosque han estado sujetos al abuse oa ta
negligencia de! operador. Para recibir todo e!
valor de la garantfa, el operadortiene que
mantener la segadora seg0n las instrucciones
desoritasen este manual.
Hay algunos ajustes que se tienen que hacer en
forma peri6dica para poder mantener su unidad
adecuadamente_
Todos los ajustes en la secciOn de Servicio y
Ajustes de este manual tienen qua set
revisados per to menos un vez per cada
temporada.
•Una vez at aSo, cambie la buj[a, timpieo
cambie et elemento del filtro de aire y revise
si la cuchilla est& desgastada.. Una bujia
nueva y un elemento del filtro de aire limpio/
nuevo aseguran la mezcia de aire-combus-
tible adecuada y ayudan a que su motor
funcione meier y que dure m_.so
•Siga el programa de mantenimiento en este
manual.
ANTES DE CADA use
• Revise el nivel del aceite del motor.
• Revise si hay sujetadores sueltos.
LUBRICAClON
Mantenga la unidad bien Iubricada (yea la
"TABLA DE LUBRICACI6N").
TABLA DE LUBRICACION
tT_ Ajustador de (_) Aceite det
____/__= t_ Supportde
_____ "-" ressort du
frein
-" l_BisagrL! -""_ _ " a
(_) Clavija de montaje de la
del puntat del puerta
trasera
mango
(_ ROCIE EL LUBRICANTE
(_) REFtERASE A LA SECCIC)N DE
MANTENIMENTO EN "Me'FOR"
IMPORTANTE: No acedt o engrase los
rodamientos de la rueda de plastice. Los
lubricantes viscosos atraeran polve y mugra, Io
que acortara ta duracion de los rodamientos
auto lubricantes_ Si cree que tubrica_'se,use
sotamente un lubricante ripe grafito, de polve
seco, en forrna moderada_
27
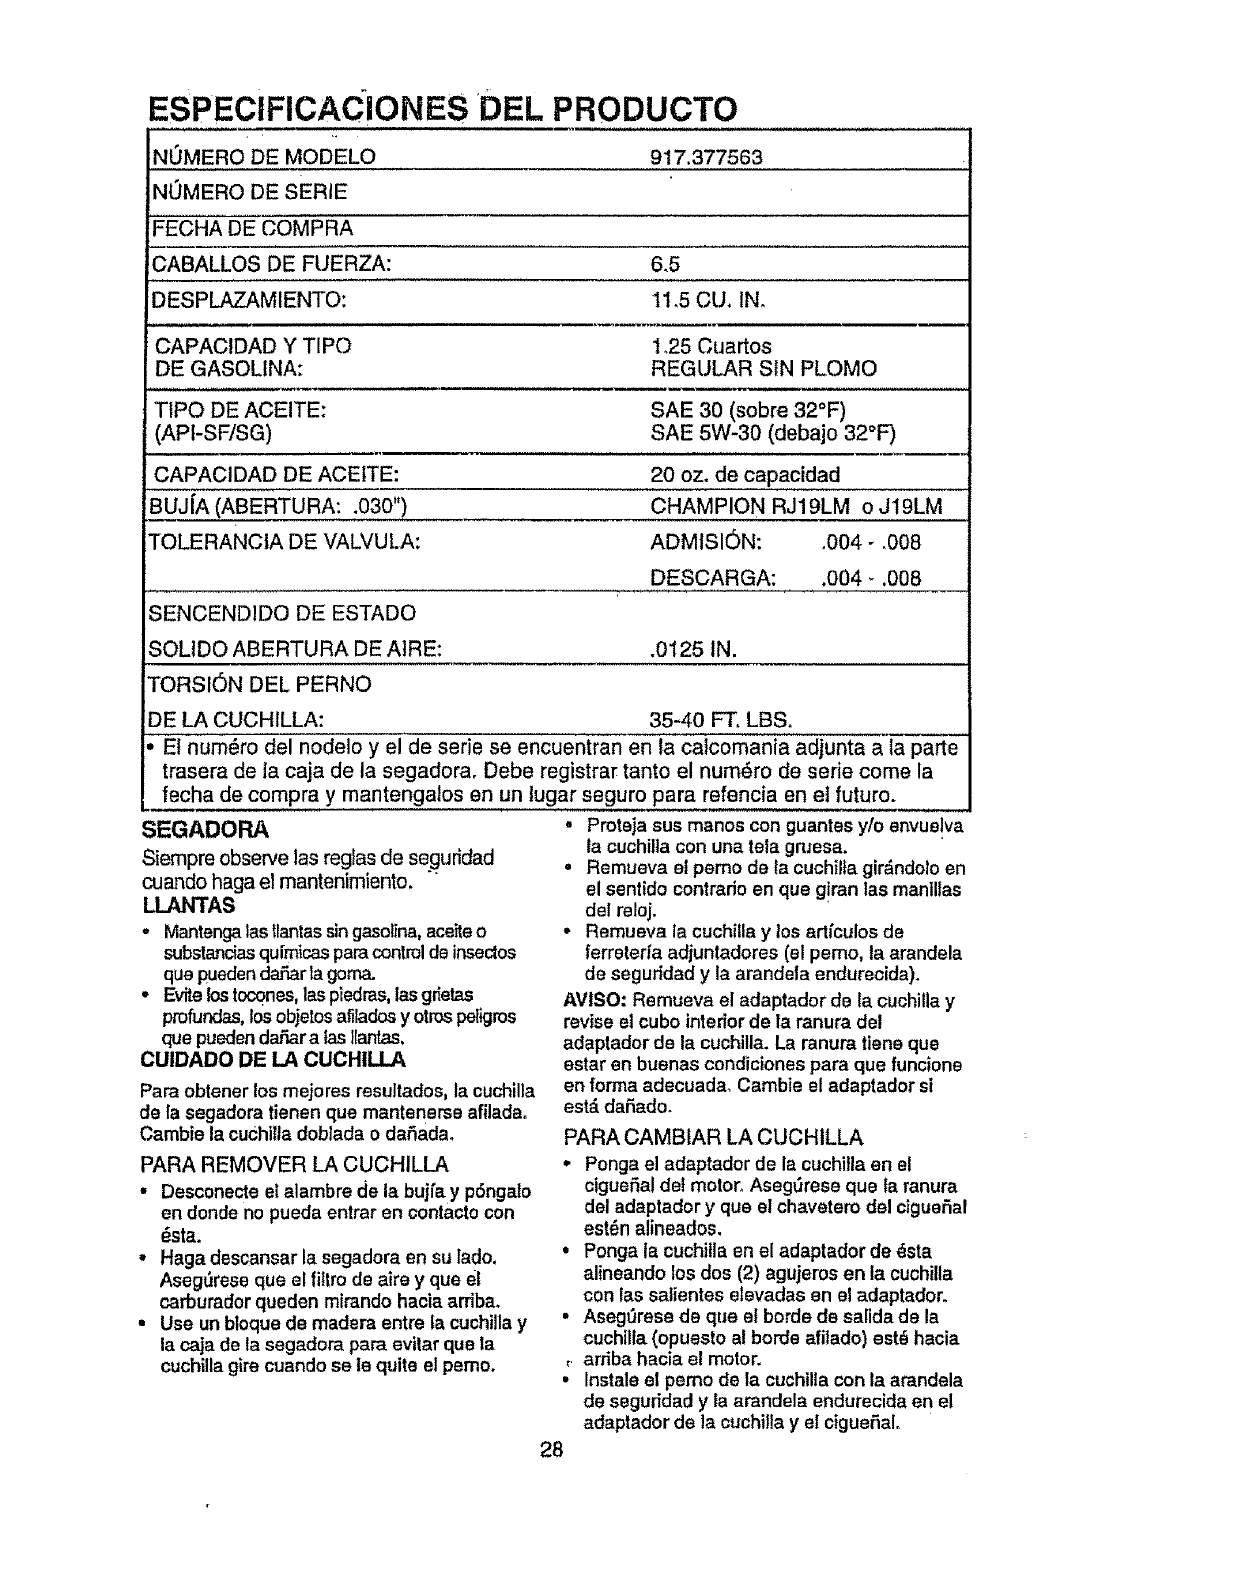
ESPECIFICAC|ONES DEL PRODUCTO
NOMERO DE MODELO 917.377563
NOMERO DE SERIE
FECHA DE COMPRA
CABALLOS DE FUERZA: 6.5
DESPLAZAMIENTO: tl .5 CU, IN.
CAPACIDAD Y TIPO 125 Cuartos
DE GASOLtNA: REGULAR SiN PLOMO
TtPO DE ACEITE: SAE 30 (sobre 32°F)
(APt-SF/SG) SAE 5W-30 (debajo 32°F)
CAPACIDAD DE ACEtTE:
BUJ[A (ABERTURA: .030")
TOLERANCIA DE VALVULA:
20 oz. de capacidad
CHAMPION RJ19LM o J19LM
ADMISI6N: ,004 - ,008
DESCARGA: .004 _.008
SENCEND1DO DE ESTADO
SOLtDO ABERTURA DE AtRE: .0125 IN.
TORSION DEL PERNO
DE LA CUCHILLA: 35-40 FT, LBS.
Et num_ro del nodelo y el de serie se encuentran en la calcomania adjunta a fa parte
trasera de la caja de la segadora. Debe registrar tanto el num_ro de serie come la
fecha de compra y mantengalos en un lugar seguro para refencia en et futuro.
SEGADORA
Siempre observe las reglas de seguridad
cuando haga el mantenimiento, "
LLANTAS
-Mantengalasllantas singasoline, ace_teo
substanciasqufrnicasparecontrolde insec_os
que ,euedendaSar_ goma.
•Evite!ostocqnes,las piedras,las gr_etas
pmfundas,los objetosafiladosyotrospeligros
que puedenda_,aratas llantas,
CUIDADO DE LA CUCHILLA
Pard obtenerlos mejores resultados, la cuchilla
de la segadora tienen que mantenerse afilada°
Cambie la cuchilladobiada o daSadao
PARA REMOVER LA CUCHILLA
• Desconecte el alambre de la bujra y p6ngalo
en dondeno pueda entrar en contactocon
_sta.
•Haga descansar la segadora en su lado,
Aseg_rese que el filtro de aire y que e_l
carburadorqueden mirando hacia arriba.
• Use un bloque de madera entre la cuchilla y
la caja de la segadora pare eviler clue Ia
cuchilla gire cuando se le quite el pemo.
, Proteja sus manos con guantes y/o envue!va
ta cuchilta con una tela gruesa.
• Remueva el pemo de la cuchilia gir,_ndolo en
el sentido contrado en que g!ran las mantllas
del reloj.
• Remueva la cuchilla y los artfculos de
ferreterfa adjuntadores (el pemo, ta arandela
de seguridad y la arandela endurecida).
AVISO: Remueva el adaptador de la cuchilla y
revise el cubo interior de la ranura del
adaptador de la cuchilla. La ranura tiene que
estar en buenas condiciones para que funcione
en forrna adecuada. Cambie el adaptador si
est_ daSado.
PARA CAMBIAR LA CUCH1LLA
,, Ponga el adaptador de la cuchilla en el
ciguefial det motor, Aseg0rese que fa ranura
del adaptador y que el chavetem del cigueSal
est6n alineados.
• Ponga la cuchilla en el adaptador de _sta
alineando los dos (2) egujeros en la cuchilla
con las salientes elevadas en el adaptador.
• Aseg0rese de que el borde de salida de la
cuchilla (opuesto al borde afilado) est_ hacia
_ arriba hacia el motor.
• Instale el pemo de la cuchilla con la arandela
de seguddad y ta arandela endurecidaen el
adaptador de la cuchilla y el ciguefialo
28
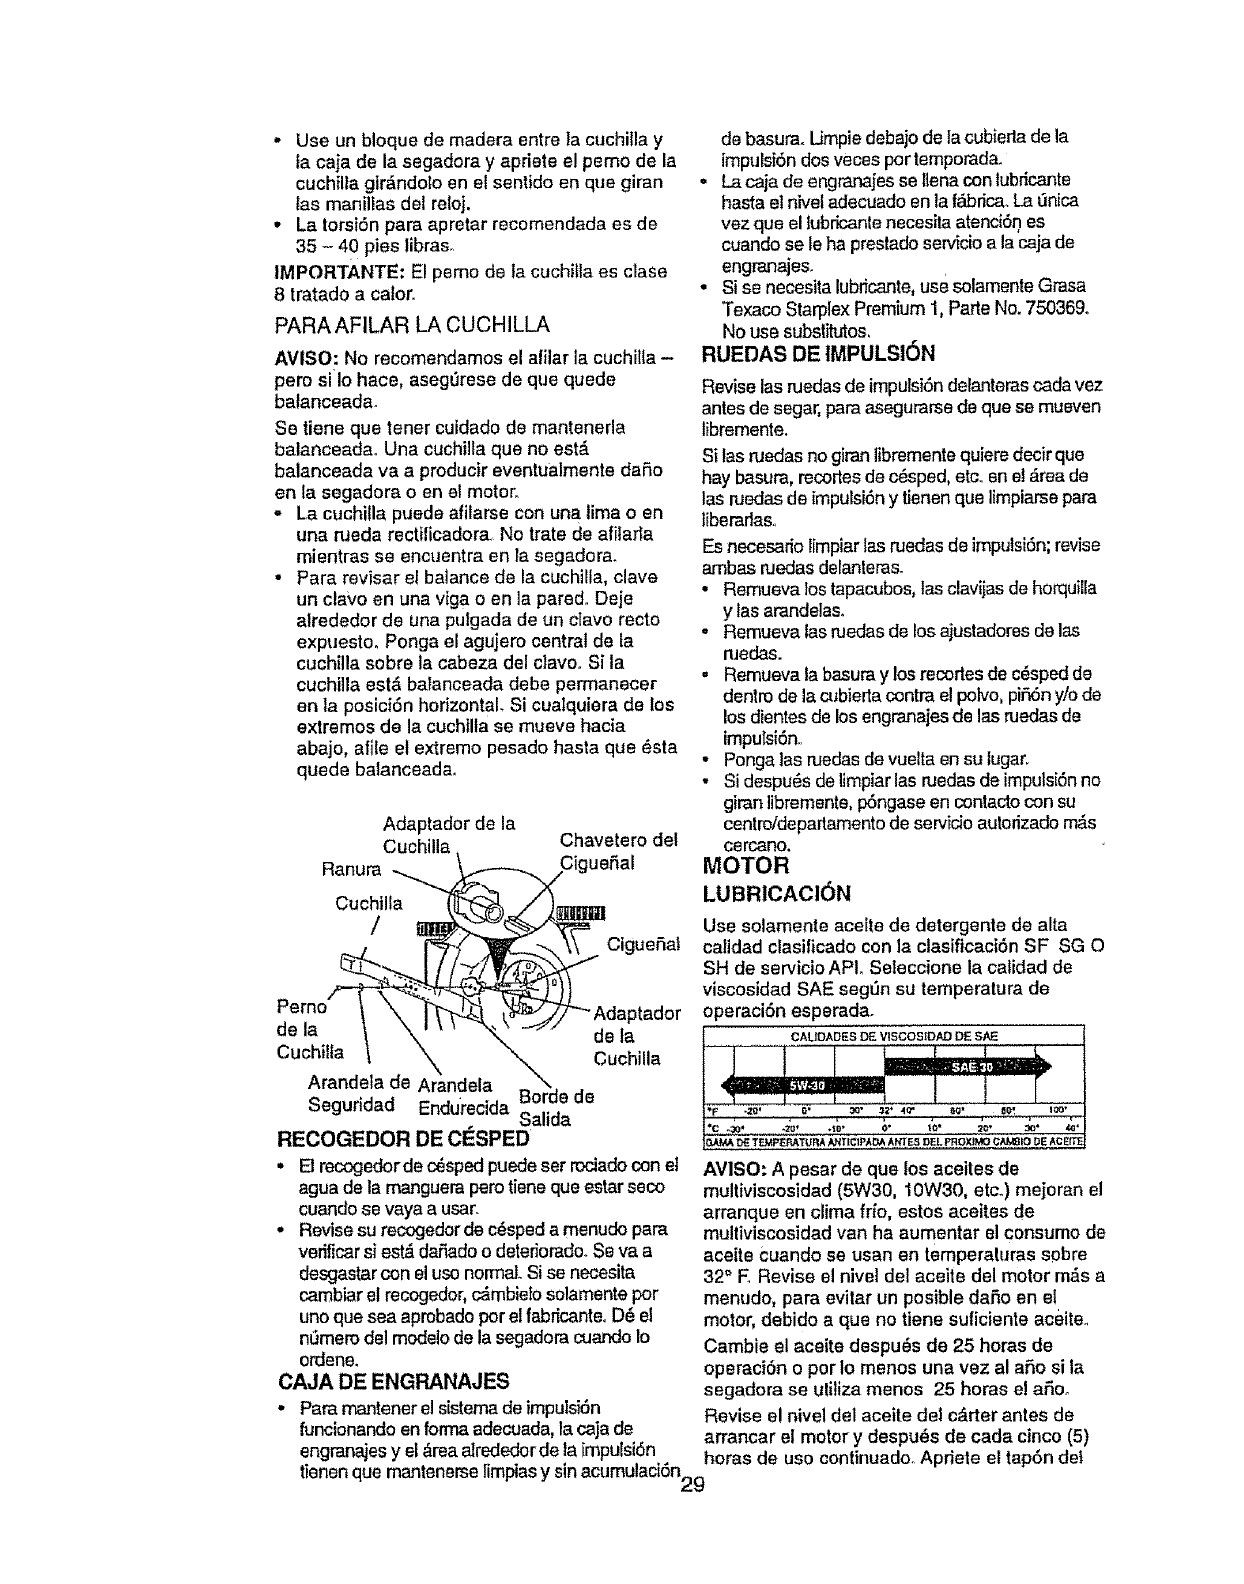
*Use un bloque de madera entre la cuchilla y
la caia de la segadora y apriete el pemo de la
cuchilla gir&ndolo en el sentido en que giran
tas manillas del reloj.
° La torsi6n para apretar recomendada es de
35 - 40 pies libraso
IMPORTANTE: El psmo de la cuchilla es clase
8 tratado a cater.
PARA AFILAR LA CUCHILLA
AVISO" No recomendamos el alilar la cuchilta -
pero silo hace, aseg0rese de que quede
balanceada.
Se tiene que tener cuidado de manteneda
balanceadao Una cuchilla que no est,.
balanceada va a producir eventualmente dare
en la segadora o en el motor.
° La cuchiIla puede afilarse con una lima o en
una rueda rectiticadora No trate de afitada
mientras se encuentra en la segadora.
• Para revisar el batance de la cuchiEla,clave
un clave en una viga o on la pared. Deje
afrededor de una pulgada de un cTavorecto
expuestoo Ponga el agujero central de ta
cuchilla sobre la cabeza del clave. Si la
cuchilla est,, balanceada debe permanecer
en la posici6n horizontal Si cualquiera de los
extremes de la cuchilta se mueve hacia
abajo, atile el extreme pesado hasta que _sta
quede balanceada,.
Adaptador de la
Cuchilla. Chavetero de!
Ranura -..._ _ _.....x/Cig uefial
CuehiJSa
/___,_ Ciguefial
Pernori \__ t_._j--- Adaptador
dela _ _.J _' -"' deta
Cuchilfa \ '_ Cuchilla
Arandela de Arandela
Seguddad Endurecida Salida
RECOGEDOR DE ClaSPED
•E1recogedorde c_spedpuede ser rociadocon et
agua de la manguera pero tiene queestar seco
cuandose vaya a usar.
•Revise su recogedorde c_sped a menudo para
verific_r si est_ dafado o deteriorado.Seva a
desgastar con eluse normal Si se necesita
cambiar el recogedor,c_mbietosolamente per
uno que sea aprobadoper elfabdcanteoD8 el
nSmerodel modeiode la segadora cuando Io
ordene.
CAJA DE ENGFIANAJES
.Paramantener el sistemade impulsi6n
funcionando enforma adecuada,la caja de
engranajesy el &reaalrededorde taimpulsiSn
de basura. Umpie debajo de lacubierla de la
impulsi6n dos veces pertemporada.
• La caja de engranajes se Ilena con lubdcante
hasta et K_el adecuado enla f_dca_ La 0nica
vez que el lubricanlenecesita atenciSnes
cuando se leha prestadosewicio a lacaja de
engranajes.
• Si se necesita lubricante,use solamente Grasa
Texaco Starplex Premium 1, Parte No.750369_
No use substitutes.
RUEDAS DE tMPULSI6N
Revise las ruedasde impulsi6ndelanterascada vez
antes de segar,para asegurarsedo que se mueven
libremente.
Si las ruedas no giranlibrementequiere decir que
hay basura, recorlesde c_sped, etc_en e! _.reade
las ruedas de impulsi6ny tienenque limpiarsepara
tiberadaso
Es necesario limpiarlas ruedas do imputsiSn;revise
ambas ruedasdelanteras.
• Remueva los tapacubos,las clavijasde horquilla
y las arandelas.
- Remueva las ruedas de los ajustadoresdo las
niedas.
. Remueva labasura y los recorles de c_ispedde
dentro de la cubiertacontra el polvo,pif6n y/ode
los dientes de los engranajesde las ruedasde
impulsion.
•Pongalas ruedasde vuella en su lugar.
,Si despu_s de limpiarlas ruedas de impulsionno
giran ]ibremente,p6ngase en contactocon su
centro/departamentode servicio autorizadom_s
cercano.
MOTOR
LUBRICACl6N
Use solamente aceite de detergente de alta
calldad clasilicado con la ctasificaci6n SF SG O
SH de servicio API. Seleccione la catidad de
viscosidad SAE seg_n su temperatura de
operaciOn esperada.
c^uoAo_sD_wscos_e_DEs_
AVISO: A pesar de que los aceites de
multiviscosidad (5W30, 10W30, etco)mejoran el
arranque en clima trio, estos aceites de
mulliviscosidad van ha aumentar el consume de
aceite Cuandose usan en temperaluras sebre
32" E Revise el nivel del aceite del motor m_s a
menudo, para evilar un posible date on el
motor, debido a que no tiene suliciente acoite.
Cambie el aceite despu_s de 25 horas do
operaci6n o perle menos una vez al ate si la
segadora so uliliza menos 25 horas e! ate,
Revise el nivel del aceite del c_.rter antes de
arrancar el motor y despu_s de cada cinco (5)
horas de use continuadooApdete e! tap6n det
tienenque mantenerselimpiasy sin acumulaci6n29
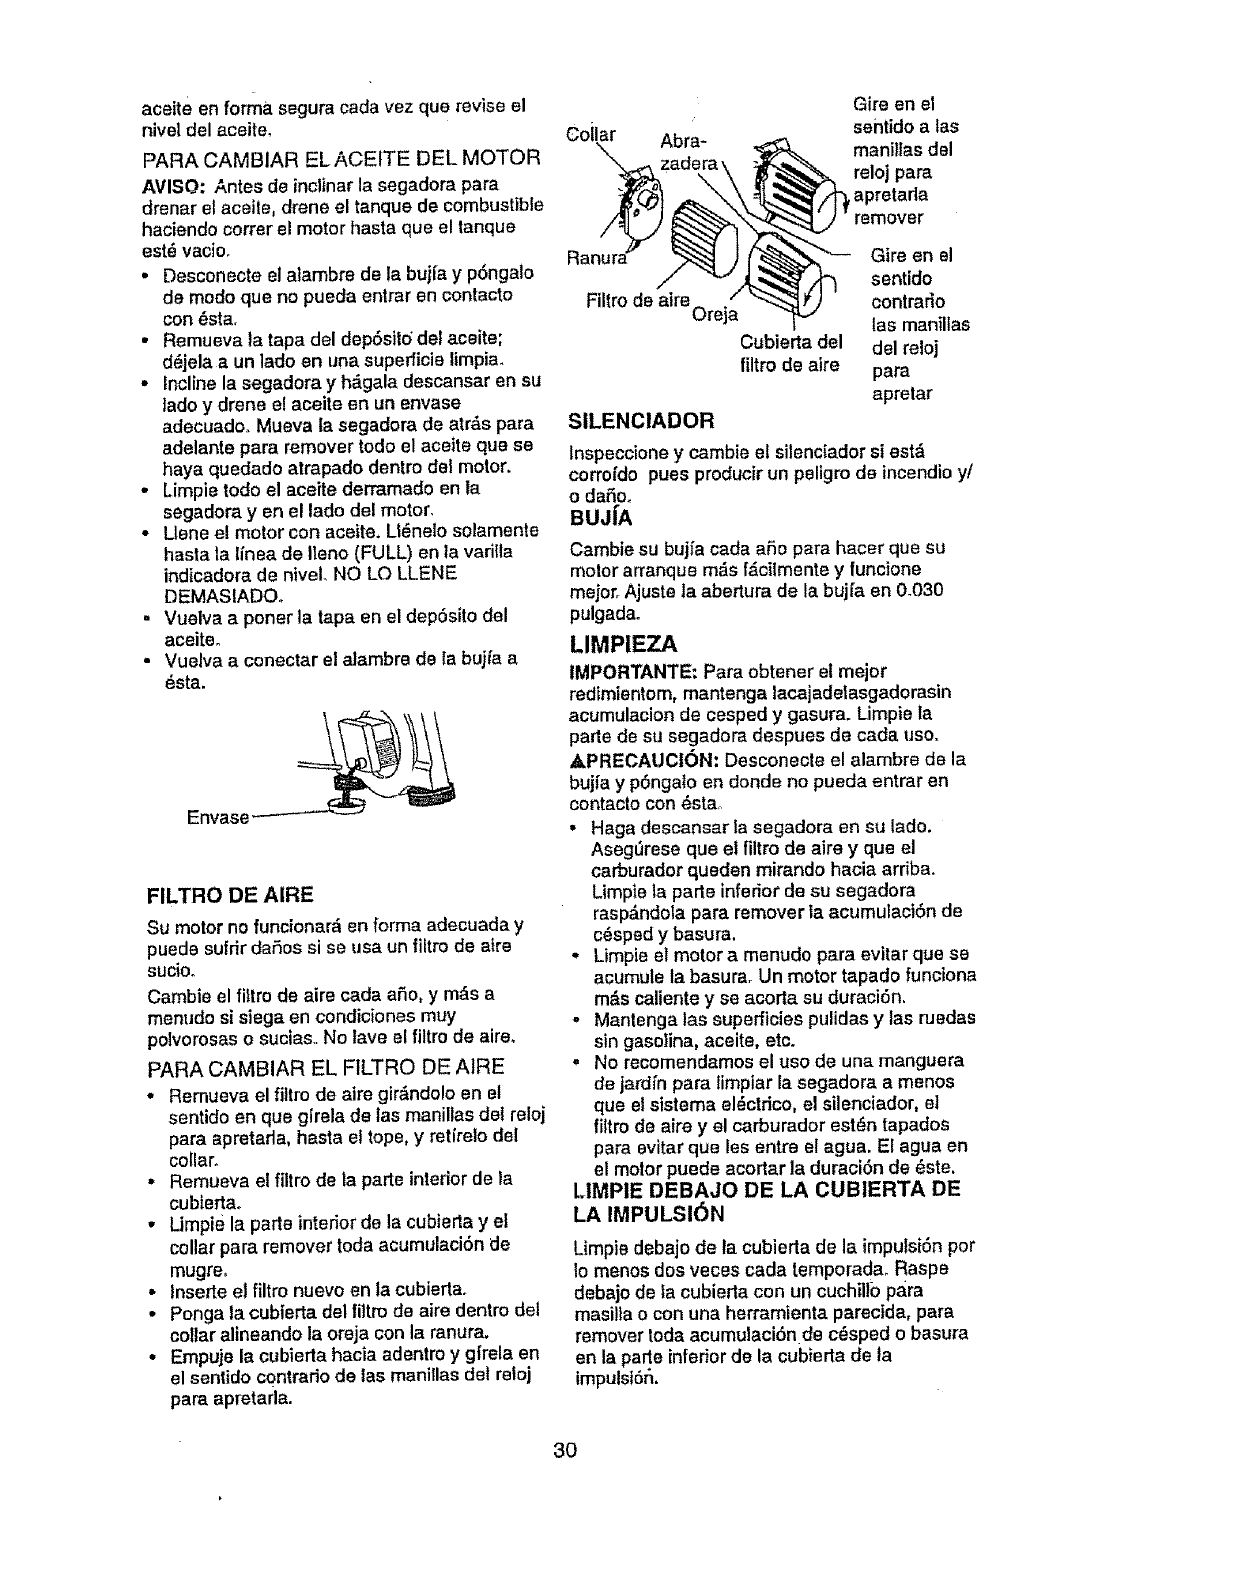
aceiteenformaseguracadavezquareviseel
niveldelaceite,
PARACAMBIARELACEITEDELMOTOR
AVISO:Antesdeinclinarlasegadorapara
drenarelaceile,droneeltanquedecombustible
haciendoCOtTerelmotorhastaqueeltanque
est_vacioo
• Desconecteelalambredelabujfay p6ngalo
demodequenopuedaentrarencontacto
con6sta.
• Remuevalatapadeldep6sitodelaceite;
d_jelaaunladeenunasuperficielimpia.
• Inclinelasegadorayh_.galadescansarensu
tadoydroneelaceiteenunenvase
adecuadooMuevatasegadoradeatr&spara
adelantepararemoverrodeelaceitequase
hayaquedadoatrapadodentrodelmotor.
• Limpierodeelaceitederramadoenla
segadorayenelladede!motor.
•Llene elmotorconaceite.U_nelosolamente
hastalatfneadellano(FULL)enlavarilla
indicadoradeniveLNOLOLLENE
DEMASIADOo
- Vuelvaaponerlatapaeneldep6sitodel
aceiteo
• Vuelvaaconectarelalambredelabujiaa
_sta.
FILTRODE AIRE
su motor nofuncionar_en forma adecuada y
puede sufrir da_os si se usa un fiitm de atre
sucioo
Cambie el filtro de aire cada aSo, y m_s a
menudo si siega en condiciones muy
polvorosas o sucias,. No lave el filtro de aire.
PARA CAMBIAR EL FILTRO DE AIRE
• Remueva el fittro de aire gir&ndo!o en el
sentido en que girela de las manillas del reloj
para apretada, hasta e! tope, y retfrelo de!
collar_
• Remueva el filtro de la parte interior de la
cublertao
• Limpie la parte interior de la cubierta y et
collar para remover toda acumulaci6n de
mugre,
• Inserte el filtro nuevo en la cubierta.
• Ponga la cubierta del filtro de aire dentro del
collar alineando la oreja con la ranura.
• Empuje la cubierta hacia adentro y gfrela en
el sentido contrado de las maniIlas del retoj
para apretariao
Abra-
Gire en el
sentido a tas
manillas del
reloj para
,apretada
remover
Filtro de aireorej a
Cubierta del
filtro de aire
SILENC1ADOR
Gire en el
sentido
contrar_o
tas manillas
del reloj
para
apretar
Inspeccione y cambie el silenciador si est_
corrofdo pues producir un peligrode incendio yl
o da_o.
BUJIA
Cambie su bujfa cada aSo para hacer qua su
motor arranque m_.sf_cilmente y funcione
mejor_Ajuste la abertura de la bujfa en 0_030
pulgadao
LIMPIEZA
IMPORTANTE: Para obtener el major
redimientom, mantenga lacajadetasgadorasin
acumulacion de cesped y gasura. Umpie ta
parle de su segadora despues de cada usoo
APREOAUCI6N: Desconecte el alambre de la
bujfa y p6ngalo en donde no pueda entrar en
contacto con _stao
• Haga descansar la segadora en su lade.
AsegOrese qua el filtro de aire y que el
carburador queden mirando hacia arriba.
Limpie la parte inferior de su segadora
rasp&ndola para remover ia acumuiaci6n de
c6sped y basura.
- Limpie el motor a menudo para evitar que se
acumule la basura. Un motor tapado funciona
m&s caliente y se acorta su duraci6n,
•Mantenga las superficiespulidas y las ruedas
sin gasolina, aceite, etc.
= No recomendamos el use de una manguera
de jardfn para timpiar la segadora a menos
que el sistema el_ctrico, el silenciador, el
filtro de aire y el carburador est_n tapados
para evitar qua les entre el agua. El agua en
el motor puede acortar la duraci6n de _ste.
LIMPIE DEBAJO DE LA CUBIERTA DE
LA IMPULSl6N
Umpie debajo de la cubierta de la impulsi6nper
Io menos dos veces cada temporada, Raspe
debajo de la cubierta con un cuchillo para
masilla o con una herramienta parecida, para
remover todaacumulaci6n de c_sped o basura
en la parte inferiorde la cubieda de ta
impulsi6r_.
30
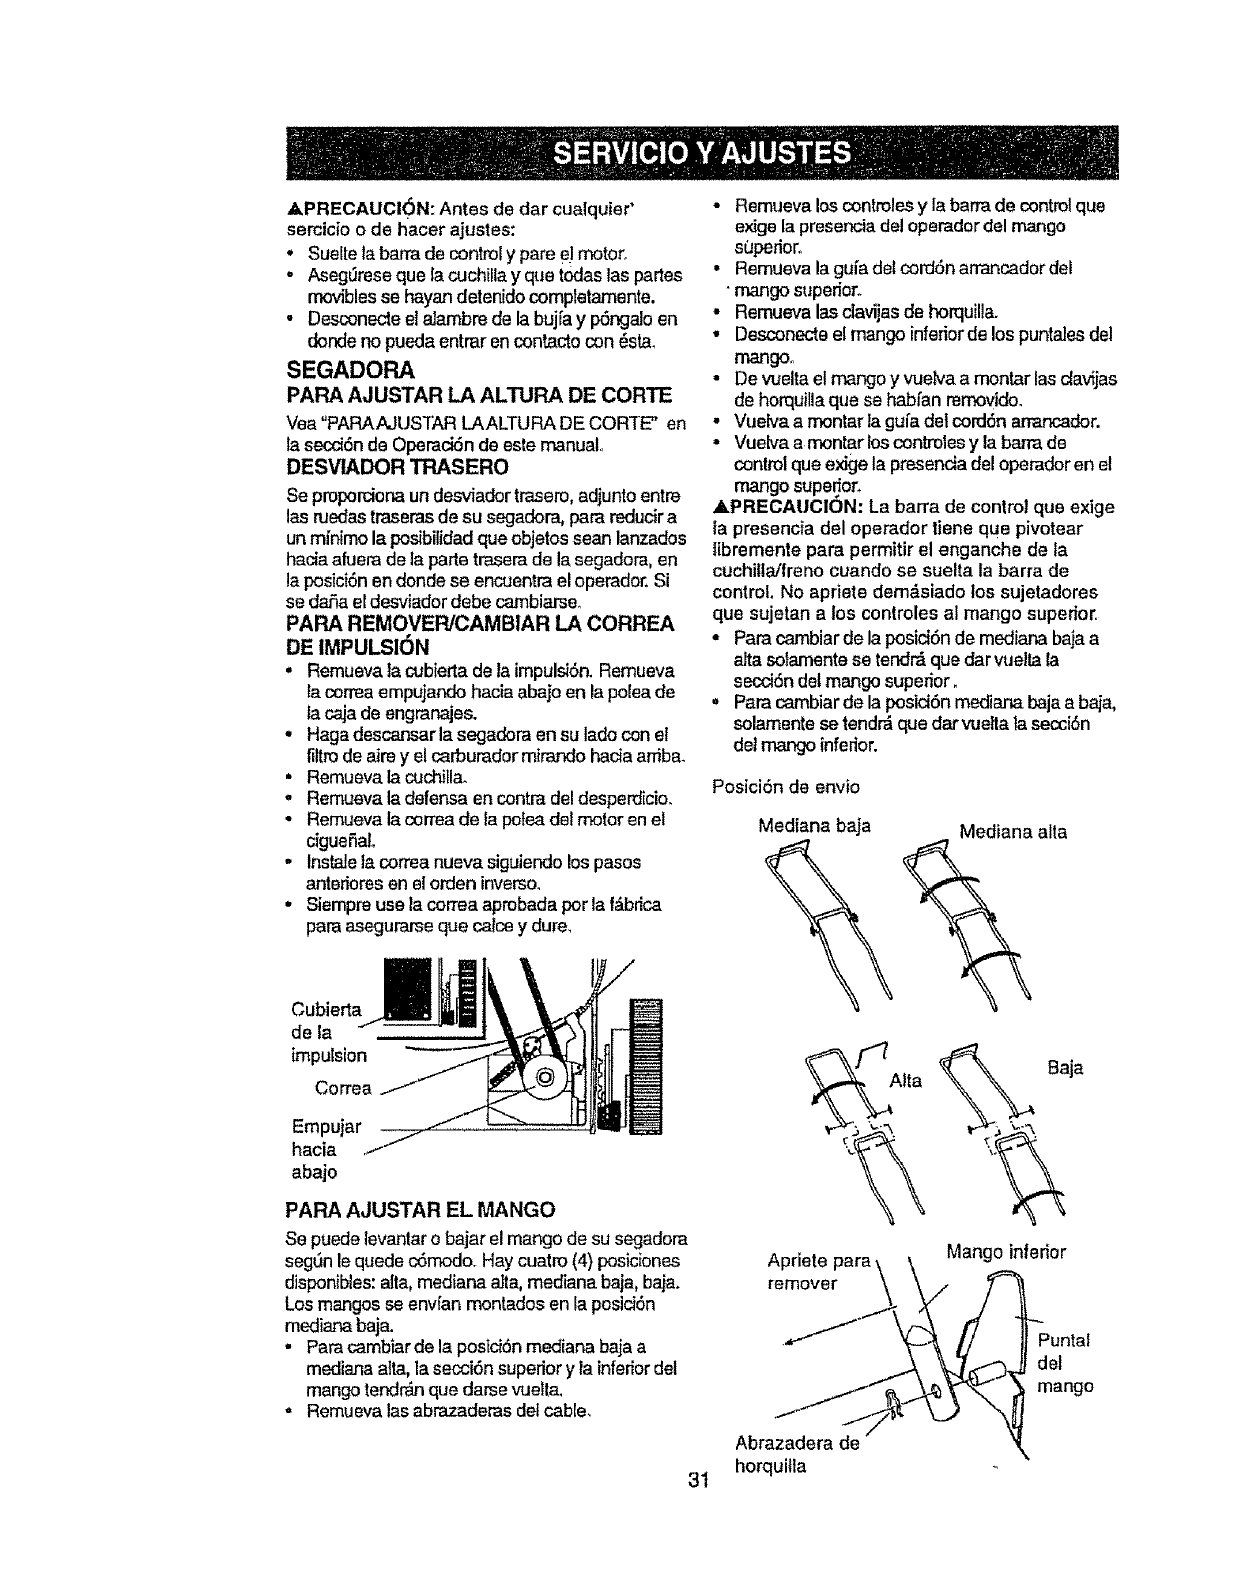
,APRECAUCleN: Antes de dar cualquier'
semicio o de hacer ajustes:
• Sueltela barra de controly pare e]motor.
oAsegSreseque lacuchiilay que t0daslas partes
moviblesse hayandetenidocompietamente.
• Desconecteel alambre de labuj[a y pengaloen
dondeno puedaentrarencontactocon_sta.
SEGADORA
PARA AJUSTAR LA ALTURA DE CORTE
Vea "PARAAJUS'I'ARLAAETURADE CORTE" en
la secciende Operecien de este manual°
DESVlADOR TRASERO
Se pmpordona un desviadortresem, adjunto entre
las ruedastraseras de su segadora,para reducir a
unmfnimo laposibilidadque objetossean lanzados
haciaafuera de laparle traserade la segadora,en
laposicien endonde se encuantra el operador.Si
se daha eldesviador debe cambiarse_
PAPA REMOVER/CAMBIAR LA CORREA
DE IMPULSIeN
•Remueva ta cubierla de la impulsien.Remueva
la correaempujando hacia abajo en lapolea de
la caja de engranajes.
, Haga descansar la segadora en su lado con el
filtrode airey el carburedor mirr_'_dohacia arriba_
• Remusvala cuchilla.
, Remueva la defense en contra deldesperdicio.
• Remueva la correa de ta pofea del motor en el
ciguefiaL
,, tnstalefacorreanueva siguiandolospasos
anterioresen elorden inverso,
• Siempreuse la correaaprobadaporla f&brica
pareasegurarseque calcey dure,
Cubierta
de la
impulsion
Correa
Empujar
hacia
abajo
PAPA AJUSTAR EL MANGO
Se puedelevantaro bajar el mango de su segadora
seg0n le quedecemodo. Haycuatro (4) posiciones
disponibles:atta,mediana ella, mediana baja, baja.
Los mangos se envfan montados en la posicien
medianabaja.
• Parecambiarde la posicienmediana baja a
medianaalia, la secci6n superior y la inferiordel
mango tendr'_nque darse vuelta,
, Remueva las abrazaderas delcable.
• Remueva los controles y la bamade controlque
exige la presenciadel operador del mango
s0perioro
• Remueva la gui'adet cord6n arrencador del
mango superior.
•Remueva las clavijas de horquilla.
• Desconecte el mango infedorde los puntales del
mango°
• De vuelta el mal_o y vuelva a montar las dav_jas
de horquillaque se habfan removido.
, Vuelva a montar la gufa del corden arrancador.
• Vuelva a montar los controles y la barm de
control que exige la presencia del operadoren e!
mango supeffor_
APRECAUCION: La barra de control que exige
la presencia del operador tiene que pivotear
libremente pare permitir el enganche de la
cuchitlaJfreno cuando se suelta la barra de
control, No apdete dem&siado los sujetadores
que sujetan a los controlesal mango superior.
• Parecambiar de la posici6nde mediana baia a
alta solamentese tendra quedarwJeltala
secci6n det mango supedor o
• Parecambiar de la posicien mediana bajaa baja,
solamente se tendr_quedar vuelta ta seccien
del mango inferior.
Posici6n de envio
Mediana baja Mediana alta
Alta Baja
Apriete pare,
remover
Mango inferior
Puntal
del
mango
Abrazadera de
3i horquifla
MOTOR
VELOCIDAD DEL MOTOR
La velocidad del motor ha sldo ajustada en la
f__brica.No trate de aumentar la velocidad det
motor pues se pueden produc!rlesiones
personales, Si cree qua el motor est_
funcionando demasiado r_p}do o demasiado
lento, Ileve su segadora a un centro/
departamento de servicio autorizado para
reparada o ajustada.
CARBURADOR
Su carburador no es ajustabte. Si su motor no
est& funcionandoen forma adecuada debido a
problemas que se sospecha vienen del
carburador, Ileve su segadora a un centro de
servicio autorizado para reparada yto ajustarla,
IMPORTANTE: Nunea manipulee el regulador
del motor, el qua ha sido ajustado en la frabdca
para la velocidad delm adecuadao Puede set
peligraso hacer funcionar el motor a una
vetocidad por sobre el ajuste de alta velocidad
de la fabdca. Si cree que la velocldad alta
regulada de! motor necesita ajuste, pongase en
contacto con su centro/departamento de
servicio autodzado mas ceroano, el qua cuenta
con el equipo adecuado y la experiencia para
hacer los ajustesa necesarioso
PARA MONTAR Y ADJUNTAR EL
RECOGEDOR IDE ClaSPED
°Inserla la pierna det marco tubular en ta
abertura del recogedor de c_sped y deslice lo
entre la costura de la bolsa.
AVISO: Mantenga la costura de la bolsa
recogida sobre la piema recta del marco.
• Cuando el marco salga del otro tado de la
costura, insertaJnmediatamenleel extremo
del marco adentro de la bolsa como
mostrado en la intercalaciOn.
o DesUcela eostura iguatal rededor del marco
tubular, al mismo tiempo trabaje e! marco
adentro del recogedor de c_spedo
= Monte el marco inferior al marco tubular
como demostrado.
• Deslice los sugetadores de vinilio sobre el
marco.
AVISO: Si los sujetadores de viniiio est_,n muy
duros, m_talos en agua caliente°
. Cierre la tapa soltab]eo La tapa soltable debe
estar cerrada cuando se esta operando la
segadorao
APRECALtCI6N: No haga {uncionar su
segadora sin el desviador de recortes osin el
recogedorde c_sped, aprobados, an su lugar.
Nunca irate de operar la segadora cuandose
ha removido la puerta trasera o cuando est,. un
poco abierlao
32
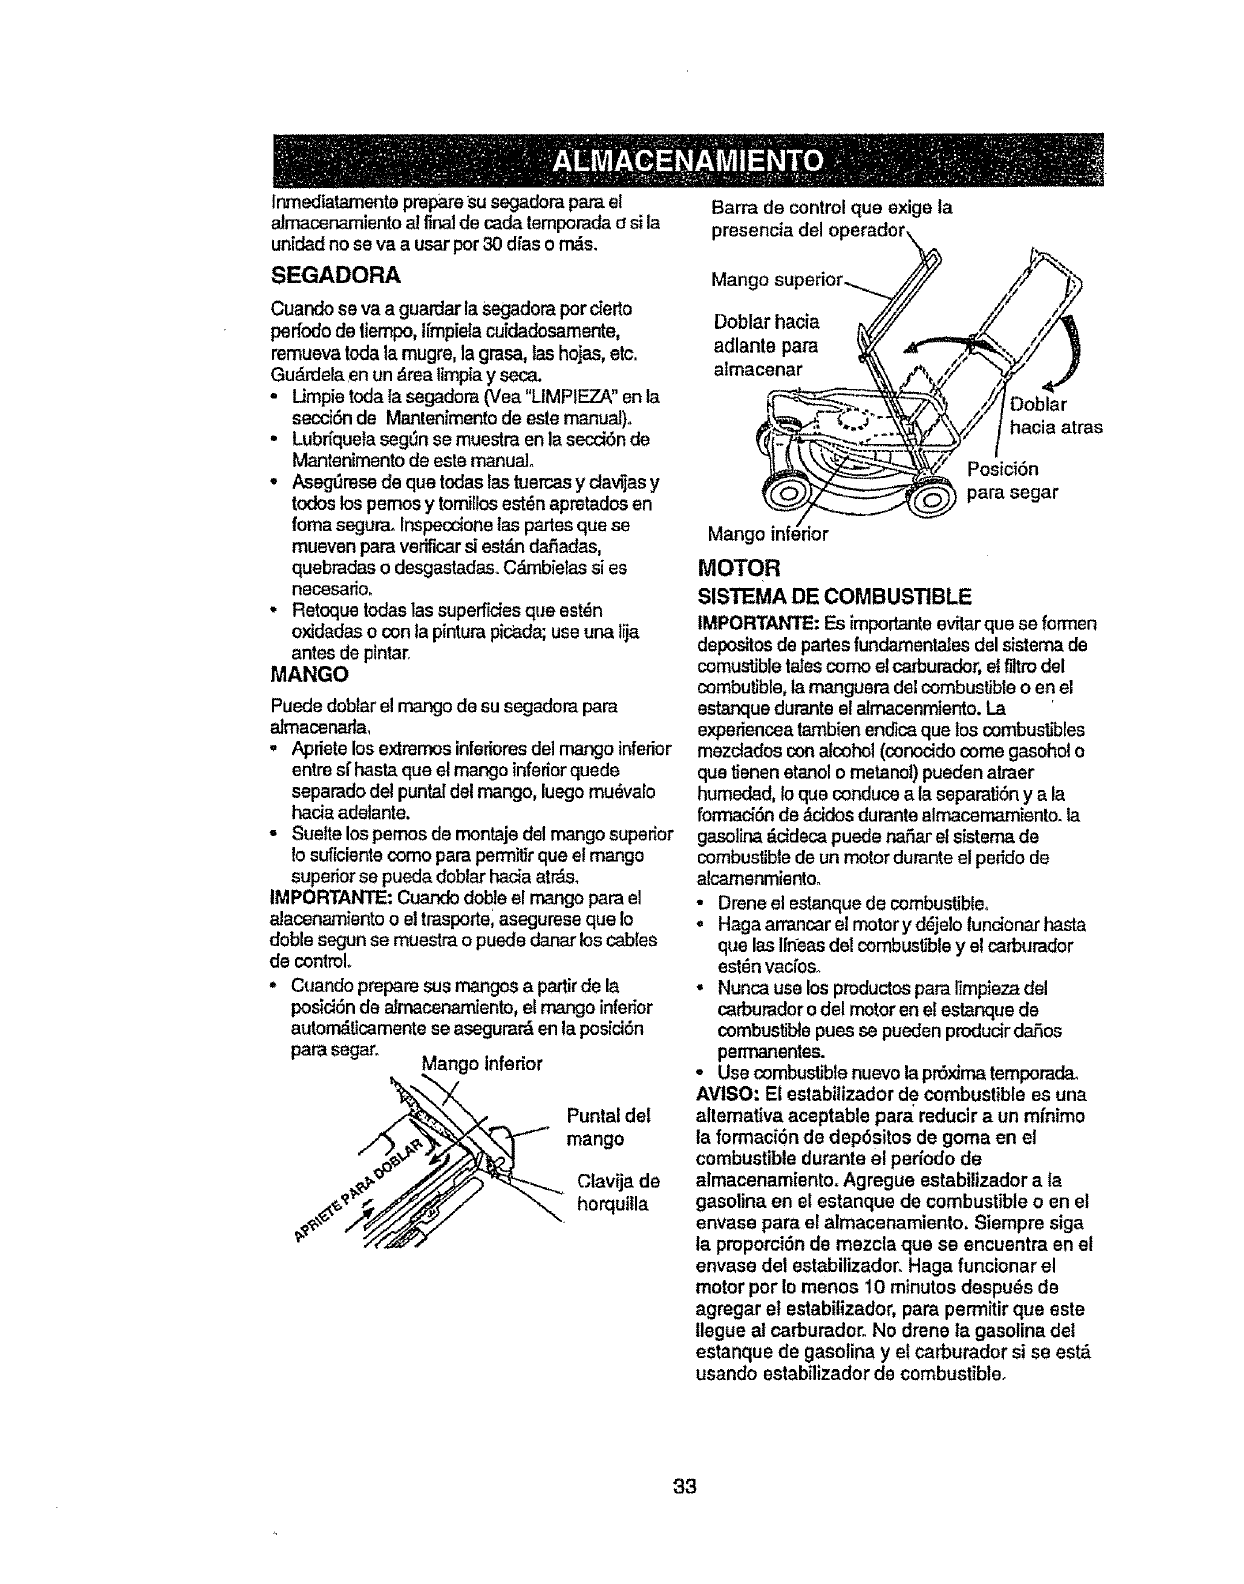
Inmediatamentepreparesu segaderapara el
almacenarnientoal final de cada lemporada _ si la
unldad no se va a usar per 30 dias o n_s,
SEGADORA
Cuando se va a guarder laSegadoraper cierto
perfodo de liempo, lmpiela cuidadosamente,
remueva toda la mugre, la grasa,las hojas,etc.
Gu_'deraen un _rea limpiay seca.
• Umpie toda la segadora (Vea "LIMPIF_.ZA"enla
secci6nde Mantenlmentode este manual).
•Lubffquelaseglln se muestra enla secci6n de
Mantenimentode este manual
• Aseg_resede que lodeslas tuerces y cta_as y
redes los pernosy tomilos est_n apretadosen
rome seguraoInspecdone tas partesque se
mueven pareverificar si est_lndafiadas,
quebradas o desgastadas..C_wnbielassi es
necesario_
, Retoquetodaslas superficiesque est_n
oxidadaso conla pinturapicada;useuna lija
antesde ptntar.
MANGO
Puede doblarel mango de su segadora pare
aJmaconarla,
• Apriete los extrernosinferioresdel mango inferior
entresf hasteque elmango inferiorquede
separado del puntaldel mango, luego mu_valo
hacia adelante.
• Suefte los pemos de montaje del mango superior
1osuficientecomeparepermitirque el mango
superior se puedadebtar hacia atr'_s,
IMPORTANTE: Cuande doble el mango loamel
alacenamianto o el trasportel asegureseque lo
doble segun se muestra o puede danar los cables
de control.
° Cuando preparesusmangosa pattir de la
posici6nde almacenamiento,el mangoinferior
autorr_ticamenteso asegurar'&en la posiciOn
parasegar. Mango inferior
Puntal det
mango
Clavija do
horquilla
Barra de control que exige la
presencia del operador\
Mango superior-...__ ,//,_)_
//
Ooblar,aeiaJii
adlanle para _ _ • #"
almacenar 1- /7 " _/
_ _'Posici6n
_ para segar
Mango inferior
MOTOR
SISTEMA DE COMBUSTIBLE
IMPORTANTE: Esimportanteevitar que se formen
depositos de partesfundamentaJesdelsistemade
comustibletalescome elcarburador,elfilm del
combutible,la rnangueradelcombustibleo en el
estanquedurante el almacenmiento. La
experienceatambien end'_caque los combustbles
mezclados con alcohol (conocidocome gasoho! o
que tenen etanol o metanol) pueden alraer
humedad, !oque conduce ala separatiSny a la
forrnaciSnde _r_cidosdurante elmace_iento, la
ga..,_lina_cidecepuede nailer el sistemade
combustiblede un motor durante el perido de
alcamenmiento.
• Drene el estanquede combustible,
,Haga arranoarel rnotory d_jelofuncionar haste
que las lineas del combus£bley el carburador
est_n vacfoso
, Nunca use los pmductos parelimpiezadel
carburador odel motor en el estarque de
combustiblepues se pueden producirdafos
permanentes.
° Use combustiblenuevo lapr6xima temporada_
AVISO: El estabilizador de combustiblees una
alternative aeeptable para_reducir a un mfnimo
la forrnaci6n de depOsitos do goma en el
combustible durante el perfodode
almacenamiento. Agregue estabilizador ala
gasoline en el estanque de combustible o en el
envase pare el almaeenamiento, Siempre siga
ta pmporci6n do mezcla que se encuentra en el
envase del estabilizador. Haga funcionar el
motor per Io menos 10 minutes despu_s de
agregar el estabilizador, pare permitir que este
llegue al carburadoro No drone la gasoline det
estanque de gasoline y el carburador si se est&
usando estabilizador de combustible°
33
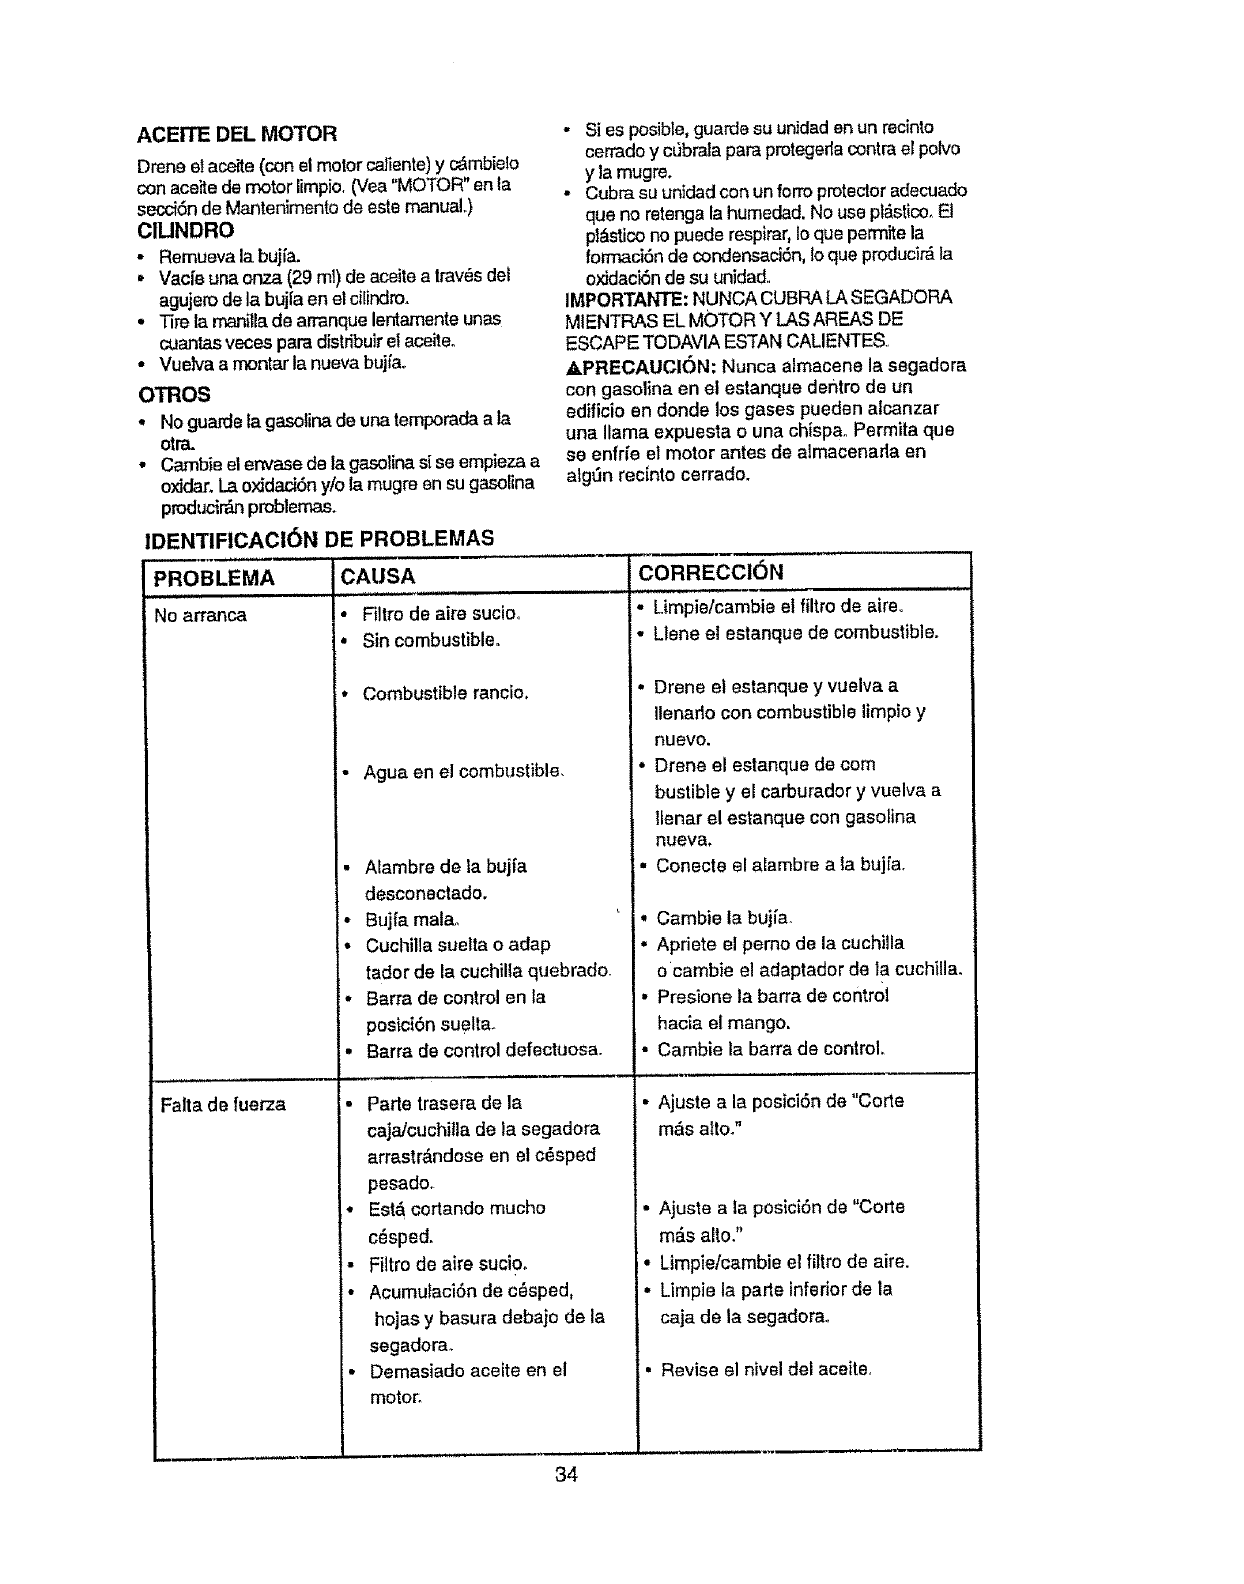
ACEn'E DEL MOTOR
Drene et aceite(con el motor catiente)y c_mbieto
con aceite demotor limpio (Yea MOTOR" enla
secciSn de Mantenimentode esle manual..)
ClBNDRO
• Remueva la bujia
• Vac[eunaonza (29 ml) de aceitea tray, s del
agujerode la bujia en el cilindro
•Tire la rnani/lade arranque lenlamente unas
cuantas veces para distribuirel aceiteo
• Vuelva a montar la nueva bujfa
OTROS
• Noguardela gasolinade unatemporadaa la
etra,
•Cambie elenvase de la gasolina s{se empiezaa
oxidar. LaoxJdaci6ny/o la mugre en su gasolina
producir_J_problemas.
IDENTIFICACI6N DE PROBLEMAS
PROBLEMA
,,J ,1,1
No arranca
Falta de {uerza
CAUSA
,l, 1, ,Hi 11
•Filtro de airs sucioo
•Sin combustible°
•Combustible rancio
• Agua en el combustible
• Alambre de la buj[a
desconectado.
• Buj{a mata
•Cuchilla suelta o adap
tador de la cuchilla quebrado
.Barra de control en la
posic{6nsuelta.
- Barra de control defectuosa.
• Parle trasera de ia
caja/cuchitlade la segadora
arrastr&ndose en el c_sped
pesado
°Est_ eortando mucho
c_sped
•Filtro de airs sucio_
•AcumutaciSn de c_sped,
hojas y basura debajo de la
segadorao
• Demasiado aceite en el
motor
34
• Si es posible,guards su unidad enun recinto
cerrado y cSbraJaparaprotegeda contrael polve
yla mugre.
• Cubra su untdad con un forre proteclor adecuado
que no retenga la humedad No use p_stico FJ
pI&sticono puede respirar,leque perrnite la
formaciSnde condensaciSn,Ioque producir_ la
oxJdaci6nde su unidado
IMPORTANTE: NUNCA CUBRA LASEGADORA
MIENTRAS EL MOTOR Y LASAREAS DE
ESCAPE TODAVIA ESTANCALIENTES
,a,PRECAUCI6N: Nunca almacene la segadera
con gasolina en el estanque dentin de un
edificio en donde los gases pueden atcanzar
una llama expuesta ouna chispa. Permita que
se enfr[e el motor antes de almaeenarla en
alg_n reeintocerrado
CORRECCI6N
•Limpie/cambie el filtre de airs
• Llene el estanque de combustibJe.
•Drene el estanque y vuelva a
Ilenado con combustible limpio y
nuevo.
*Drene el estanque de corn
bustible y el carburador y vuelva a
llenar el estanque con gasoiina
nueva,
- Conecte el alambre a ta buj[a,
*Cambie la bujia
*Apriete el pemo de la cuchilla
ocambie el adaptador de la cuchiUa.
,Presione ta barra de control
hacia el mango
•Cambie la barra de control
•Ajuste a la posiciSn de 'Corle
m&s alto."
•Ajuste a ta posiciOn de "Corte
m_s alto"
• Limpie/cambie et _tro de aire
•Limpie la parle inferior de la
caja de la segadora
• Revise el nivel del aceite
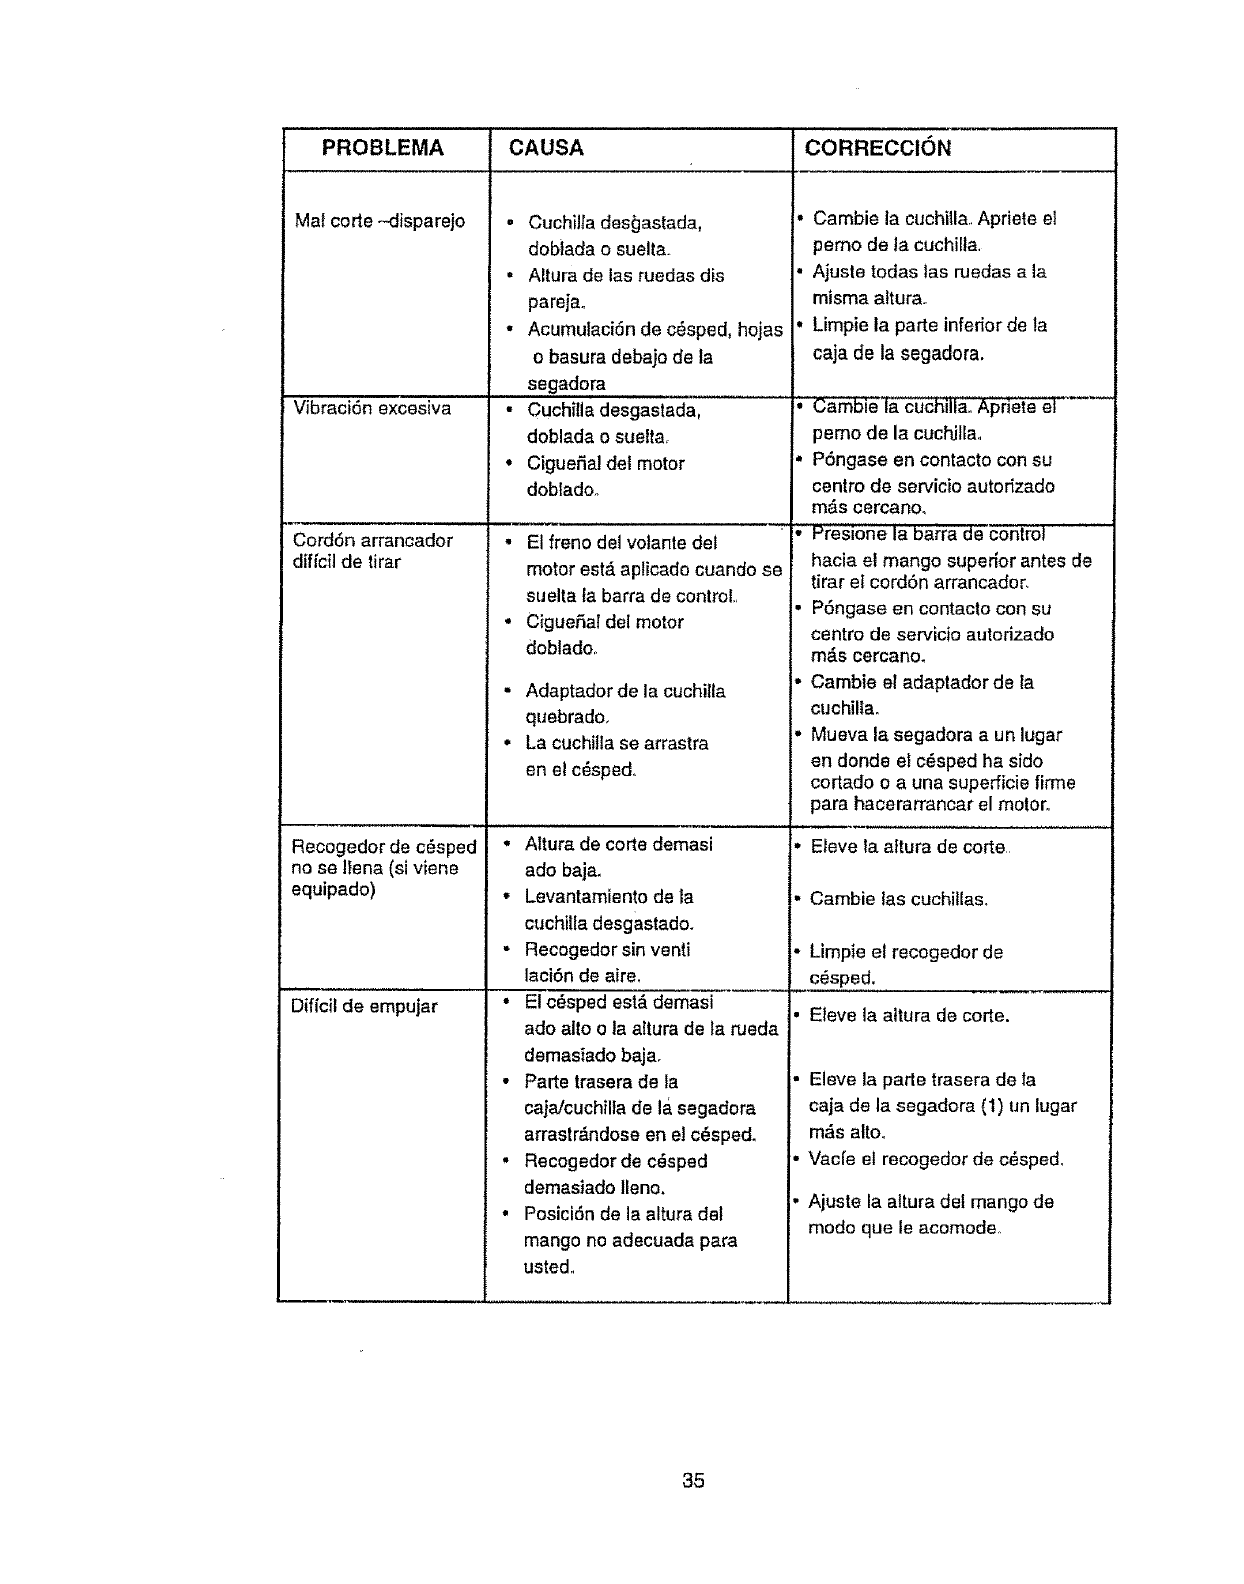
PROBLEMA
Mal corte -disparejo
Vibraci6n excesiva
CordSn arrancador
diffcil de tirar
Recogedor de c_sped
no se Ifena (si viene
equipado)
Dif(cil de empujar
CAUSA
• Cuchilta des_]astada,
dobiada o suelta.,
= Altura de las ruedas dis
parejao
• Acumulacidn de c6sped, hojas
o basura debajo de la
segadora
• Cuchilla desgastada,
doblada o suelta.
• CigueSa! det motor
doblado_
, , ,,,
•El freno del volante del
motor estdaplicado cuando se
suelta la barra de control,,
•CigueSal del motor
doblado_
• Adaptador de la cuchilla
quebrado.
,' La cuchitla se arrastra
en el c_sped.
• Attura de corte demasi
ado baja.
• Levantamiento de la
cuchilla desgastado.
- Recogedorsinventi
laci6n de aire.
• El c_sped est,. demasi
ado alto o la altura de ta rueda
demasiado bajao
• Parte trasera de la
caja!cuchilfa de la segadora
arrastr=_.ndoseen e! c_spedo
• Recogedorde c_sped
demasiado lleno.
• Posici6n de la altura del
mango noadecuada para
usted,,
CORRECCION
° Cambie la cuchilla, Apriete el
pemo de la cuchirla,
• Ajuste todas tas ruedas a ta
misma alturao
•Limpie la parte inferior de la
caja de la segadora.
•Cambie la cuchilla,, Apriete el
pemo de la cuchJlla,,
. P6ngase en contacto con su
centro de servicio autodzado
m_s cercano.
•Presione la Ioarrade control '
hacia el mango superior antes de
tirar el cordSn arrancador.
•P6ngase en contacto con su
centro de servicio autorizado
m_.s cercano.
• Cambie el adaptador de la
cuchilta.
• Mueva la segadora a un lugar
en donde el c_sped ha sido
cortado o a una superficie firme
para hacerarrancar el motor.
•Eleve ta altura de corte
•Cambie tas cuchillas.
• Limpie el recogedor de
c_sped.
• Eleve la altura de corte.
•Eleve la parte trasera de la
caja de la segadora (1) un lugar
mrs alto.
• Vaci'e el recogedor de cdsped,
i• Ajuste la attura def mango de
modo que le acomode,,
35

36
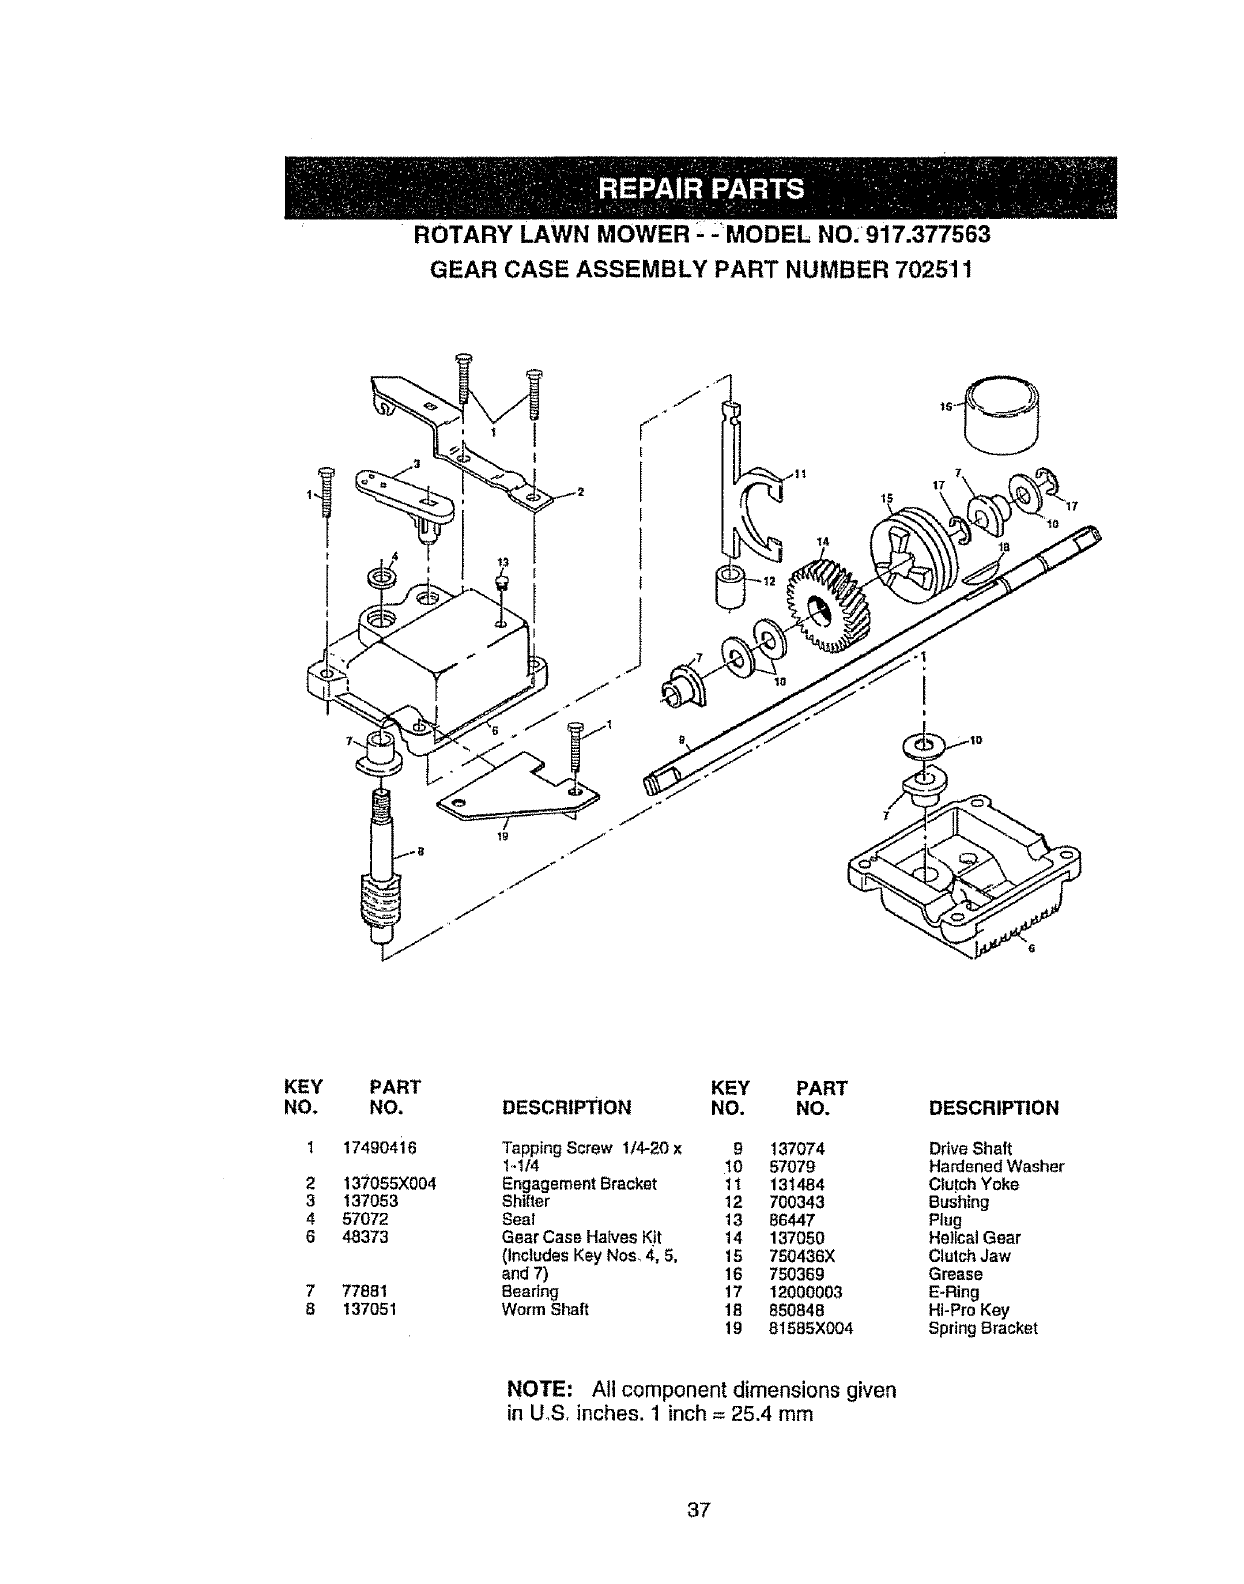
"ROTARY LAWN MOWER _-MODEL NO.917.377563
GEAR CASE ASSEMBLY PART NUMBER 702511
J
G
KEY PART
NO. NO. KEY PART
DESCRIPTION NO. NO. DESCRIPTION
1 174904:16 Tapping Screw I/4-20 x 9137074 Drive Shaft
1,-1/4 10 57079 Hardened Washer
2 13"7055X004 Engagement Bracket 1 t 131484 Clutch Yoke
3 137053 Shifter 12 700343 Bushing
4 57072 Seal 13 86447 Plug
6 48373 Gear Case Haives Kit 14 137050 He)ical Gear
(Includes Key Nos,, 4, 5, 15 750436X Ciulch Jaw
and 7) 16 750369 Grease
777881 Bearing 17 12000003 E-Ring
8137051 Worm Shaft 18 850848 Hi-Pro Key
19 81595X004 Spring Bracket
NOTE: All component dimensions given
in U_S. inches. 1 inch = 25.4 mm
37
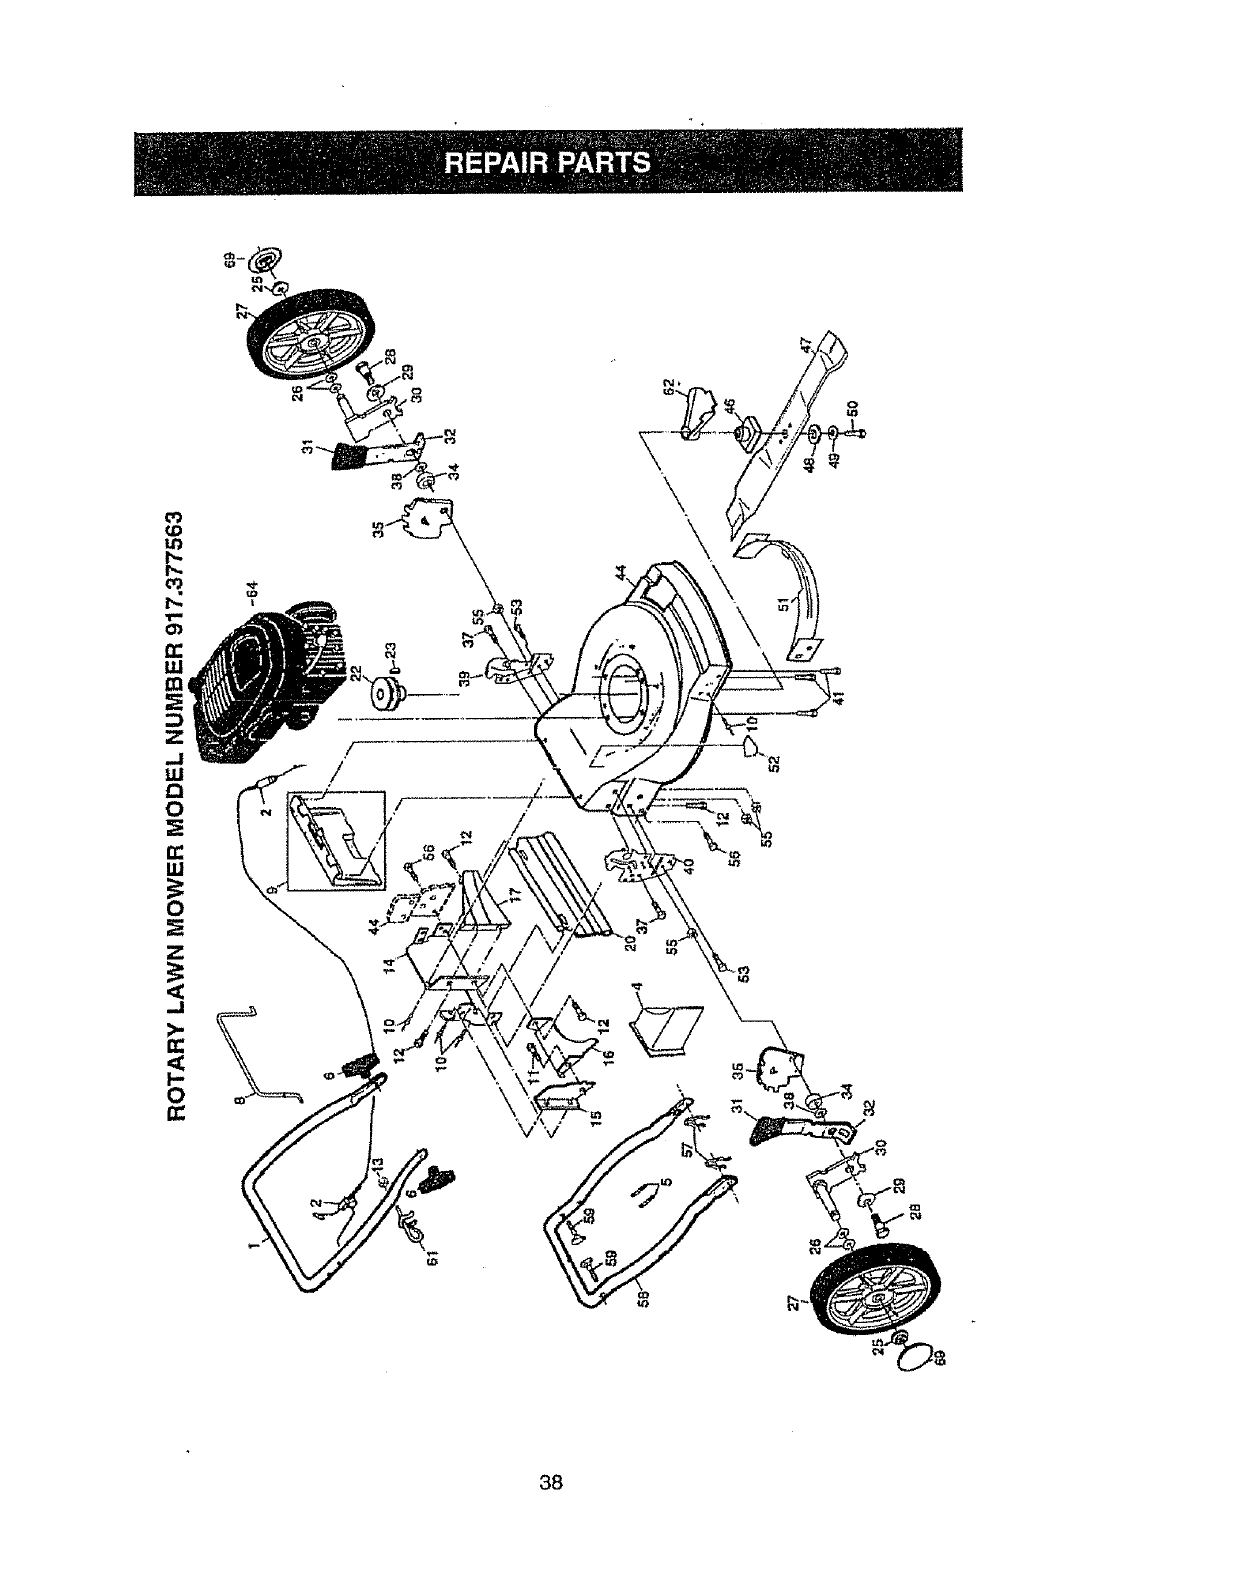
u'_
O_
n-
W
m_
:=)
Z
..t
ILl
n-
LU
0
0
/
/
38
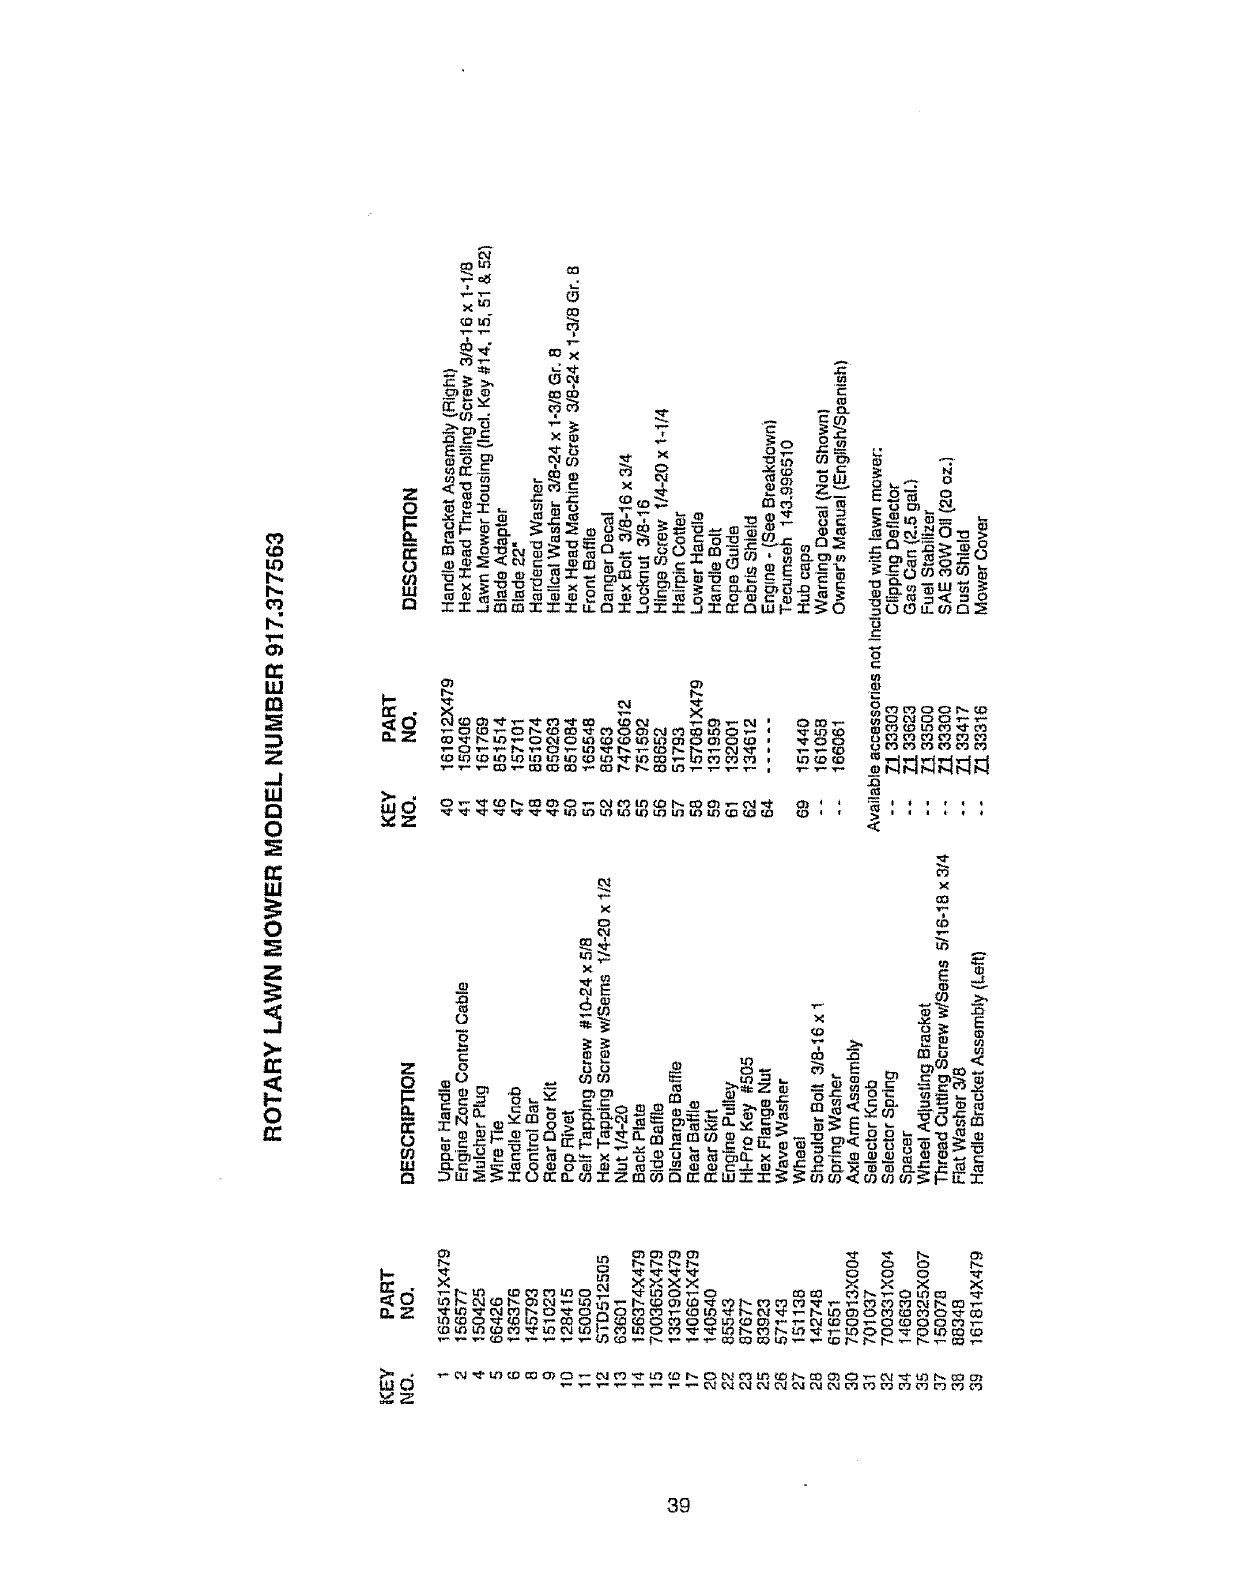
cO
lO
W-
h-
n-
111
m
Z
.J
tU
8
Ill
0
Z
.J
>.
0
z
0
o
llt
z
0
iu
a
x_
N
L_
::I:: : : ._ O] m:E: "T" "r U- 0::_ -a :E "r" -J :E _-_ L_ l_ F" -s. :_" __0 _9_' _0 0 7_
"0
c:
X ,,-. X _0 o:oo _- _--
.o
xxxx x x__
39
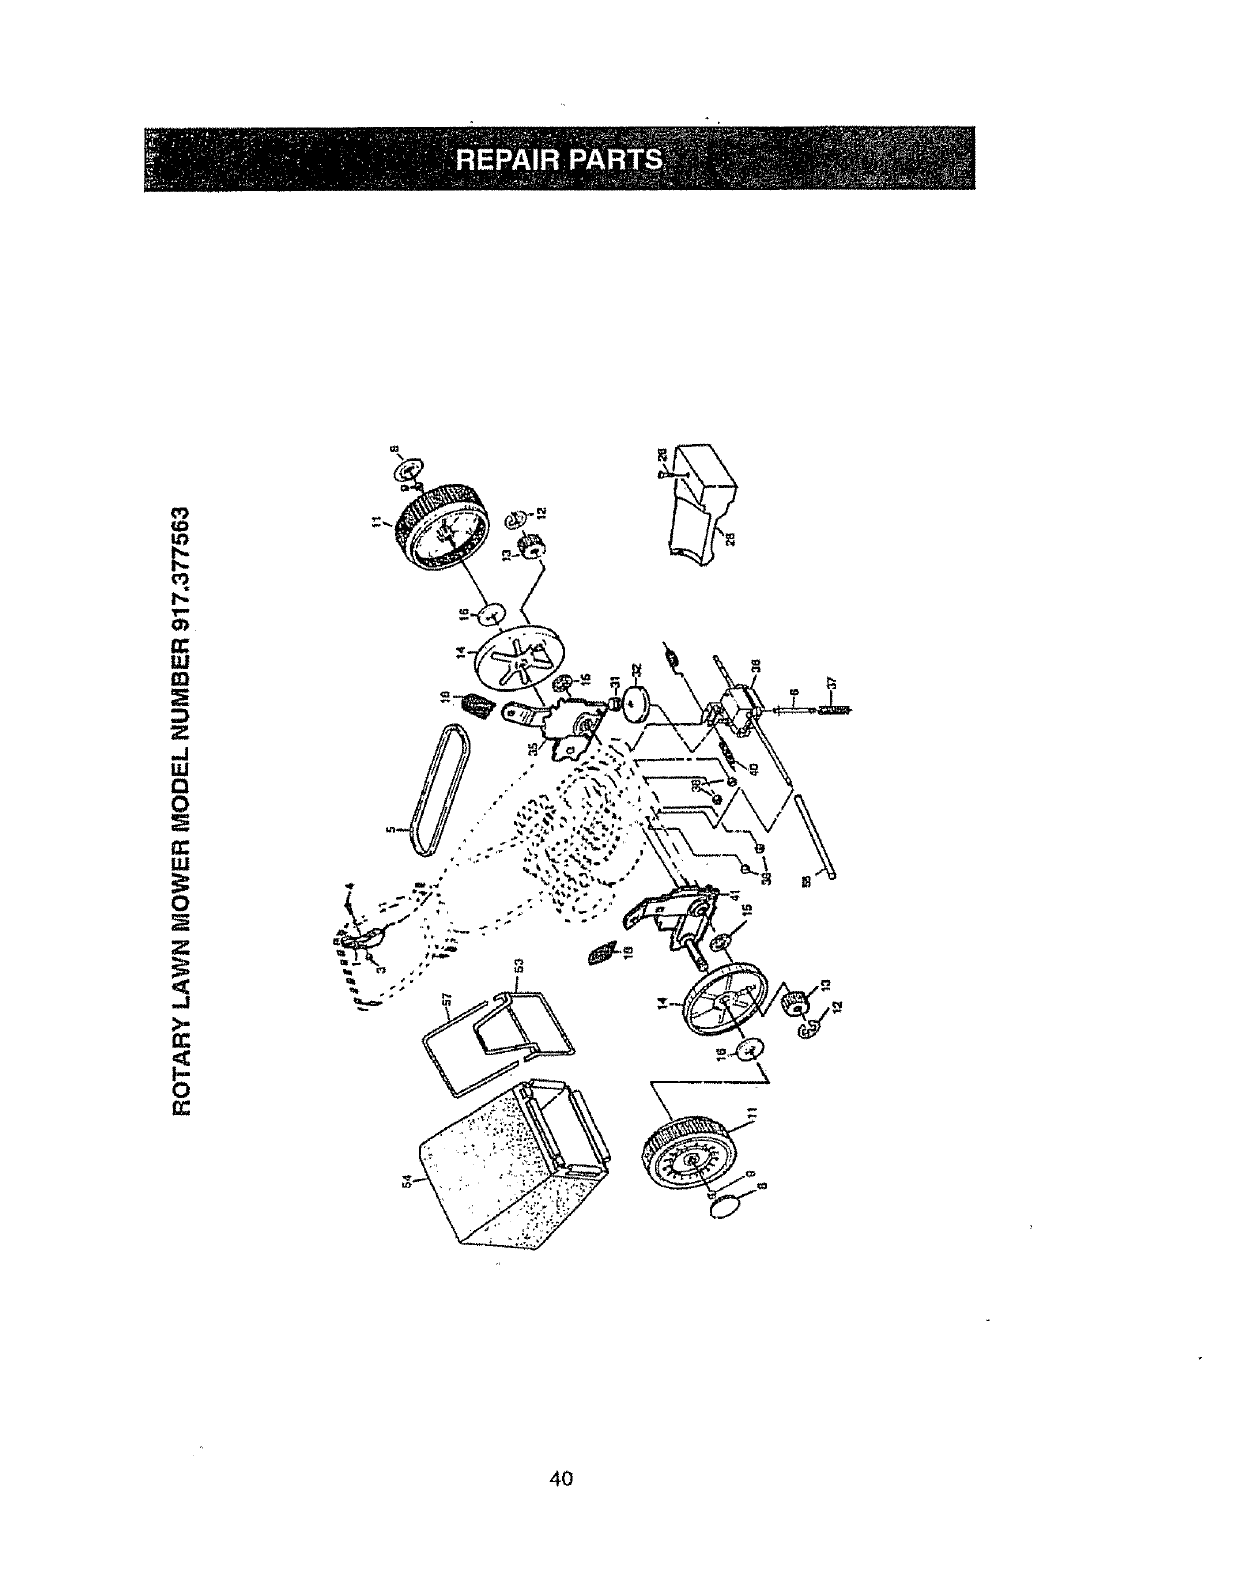
Tm
t_
LU
_0
Z
-i
LLI
O
Q_
W
0
n"
_m
0\
40

ROTARY LAWN MOWER MODEL NUMBER 917.377563
4>*
KEY
NO.
1
3
4
5
6
8
9
11
12
13
14
15
16
18
28
28
PART
NO.
145755
751152
158755
146527
150495
150182
145212
150340
12000058
137054
88080
88118
67725
701037
143603
154990
DESCRIPTION
KEY PART
NO. NO. DESCRIPTION
ControlCable Assembly 31 !32010
Locknut#10-24 32 137052
Pan Head MachineScrew 1t4 x 20 35 151521
V-Be]it 36 702511
Spring Retainer 37 137090
Hubcap 38 STD541425
FtangedNut 40 75192
Wheel & Tire Assembly 41 151520
E-Rfng "53 144747
P|nlon 54 166069
Dust Cover 55. 86012
Fair Washer 57 144748
Washer tt2 x t-1/2 x,134
Selectoi"Knob
Hex Washer Head Screw #10-24 x 3/4
Drive Cover
Hex FlangeNut
Drive Pulley
Wheel Adjuster Assembly (Left)
Gear Case Assembly
Spring
Locknut 1/4-20
Spring
Whee! Adjuster Assembly (Right)
Frame Throat
Grassbag
Dr_veshaftCover
Frame Tube

CRAFTSMAN 4*CYCLE ENGINE MODEL, NO. 143,996510
i i i1,,i ii,,111 ,i iiiifllll i'1 ........................
9OO
400
!30
120 !19
416
275 -
182216 19
126 151A 1(
125
_74172
3O
46
182
/
178
70
42
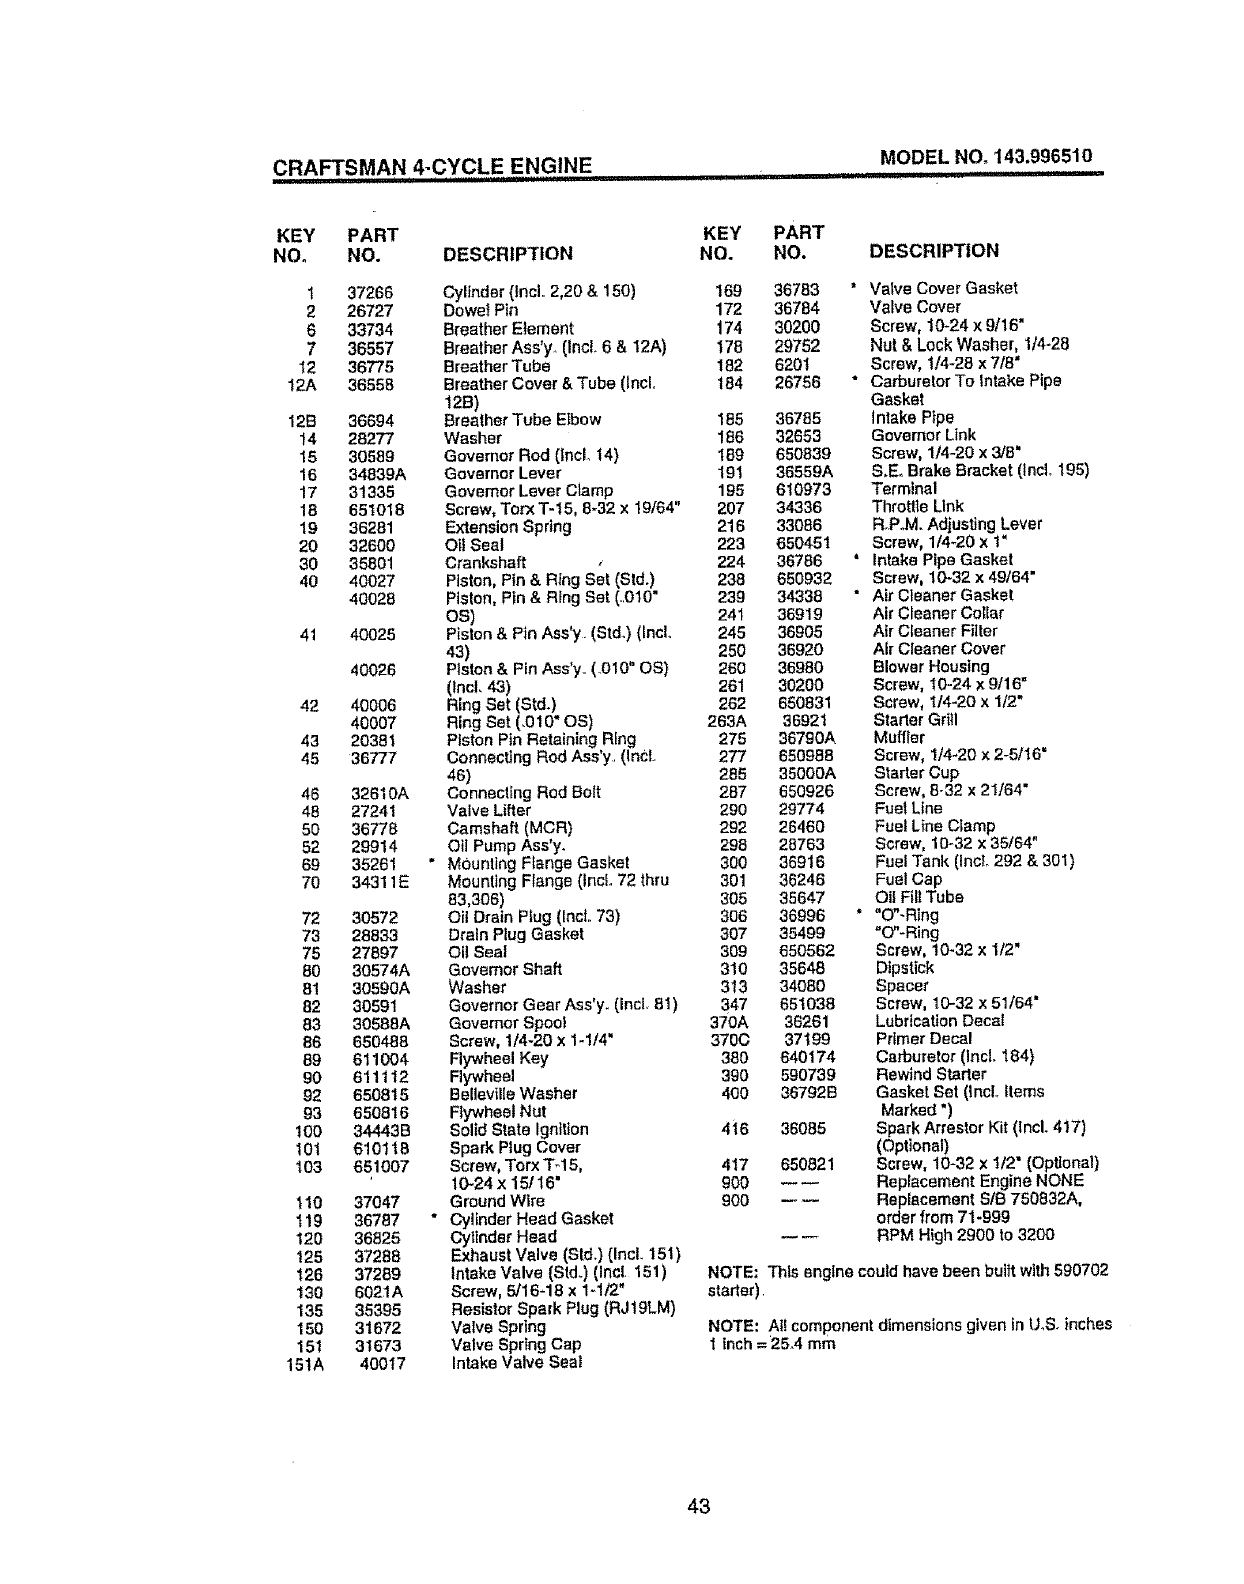
CRAFTSMAN 4-CYCLE ENGINE ,, MODEL NOw143.996510
iiii i ,.H
KEY PART
NO. NO. DESCRIPTION
I 37266
2 26727
633734
736557
I2 36775
12A 36558
12B
14
15
16
17
18
19
20
30
40
41
42
43
45
46
48
50
52
69
70
72
73
75
80
81
82
83
86
89
90
92
93
100
10t
103
110
t19
t20
125
!26
130
135
150
151
15tA
36694
28277
30589
34839A
31335
651018
36281
32600
35801
40027
40028
40025
40026
40006
40007
20381
36777
32610A
27241
36778
29914
35261
34311E
30572
28833
27897
30574A
30590A
30591
30588A
650488
611004
611112
650815
650816
34443B
610118
651007
37047
36787
36825
37288
37289
6021A
35395
31672
31673
40017
KEY
NO. PART
NO.
Cylinder {lncL 2,20 & 150) 169 36783
Dowet Pin 172 36784
Breather Element 174 30200
Breather Ass'y (Inct. 6 & 12A) I78 29752
Breather Tube 182 620t
Breather Cover & Tube (IncL 184 26756
12B)
Breather Tube EIbow 185 36785
Washer 186 32653
Governor Rod (IncL t4) 189 650839
Governor Lever 191 36559A
Governer Lever Clamp 195 610973
Screw, Torx 3"-15, 8-32 x 19/64" 207 34336
Extension Spring 216 33086
Oil Seal 223 650451
Crankshaft 224 36786
Piston, Pin & Rfng Set (Std.) 238 650932
Piston, Pin & Ring Set (..010" 239 34338
OS) 241 36919
Piston & Pin Ass'y (St&) (IncL 245 36905
43) 250 36920
Piston &Pin Ass'y. (.010" OS) 260 36980
(Incl. 43) 261 30200
Ring Set (Std.) 262 650831
Ring Set (.010" OS) 263A 36921
Piston Pin Retaining Ring 275 367gOA
Connecting Rod Ass'y.. (IncL 277 650988
46) 285 35000A
Connecting Rod Bolt 287 650926
Valve Lifter 290 29774
Camshaft (MCR) 292 26460
Oil Pump Ass'y. 298 28763
Mounting F_ange Gasket 380 36916
Mounting Flange (IncL 72 thru 301 36246
83,306) 305 35647
Oil Drain Plug (IncL 73) 306 36996
Drain Plug Gasket 307 35499
Oil Seal 309 650562
Governor Shaft 310 35648
Washer 313 34080
Governor Gear Ass'y. (Incl. 81 ) 347 651038
Governor Spool 370A 36261
Screw, t/4-20 x 1-1/4" 3700 37199
Flywheel Key 380 640174
Flywheel 390 590739
Belteville Washer 400 36792B
Flywheel Nut
Solid State Ignition 446 36085
Spark Plug Cover
Screw, Torx T-15, 417 650821
10-24 x 15/16" 900 ---
Ground Wire 900
Cylinder Head Gasket
Cylinder Head _ --
Exhaust Valve (Std.) {IncL 151)
Intake Valve (Std.) (Inc[ 151 )
Screw, 5/164 8 x 1-1/2"
Resistor Spark Plug (RJ 19LM)
VaNe Spring
Valve Spring Cap
Intake Valve Seat
DESCRIPTION
i
Valve Cover Gasket
Valve Cover
Screw, 10-24 x 9/16"
Nut &Lock Washer, 1/4-28
Screw, 114_28 x 7/8"
Carburetor To Intake Pipe
Gasket
intake Pipe
Governor Link
Screw, 1/4_20 x 3/8 =
S,E. Brake Bracket (IncL 195)
Terminal
Throttle Link
RoP.M. Adjusting Lever
Screw, 1/4-20 x 1"
Intake Pipe Gasket
Screw, 10-32 x49164"
Air Cl_eaner Gasket
Air Cieaner Collar
Air Cleaner Filter
Air Cleaner Cover
Blower Housing
Screw, 10.24 x 9/16"
Screw, tt4-20 x 1t2"
Starter Grill
Muffler
Screw, I/4-20 x 2-5/16"
Starter Cup
Screw, 6-32 x 21/64"
Fuel Line
Fuel Line Clamp
Screw, 16-32 x 35/64"
Fuel Tank (Incto 292 & 301)
Fuel Cap
Oil Fill Tube
"O"-Ring
"O"-Ring
Screw, 10.32 x 1t2"
Dipstick
Spacer
Screw, 10-32 x 51/64"
Lubrication Decal
Primer Decal
Carburetor (IncL 184)
Rewind Starter
Gasket Set (IncL Items
Marked ")
Spark Arrestor Kit (tncL 417)
(Optional)
Screw, 10-32 x 1/2" (Optional)
Replacement Engine NONE
Replacement BIB 750832A,
order from 71-999
RPM High 2900 to 3200
NOTE: This engine could have been buiit with590702
starter)
NOTE: Afl componentdimensionsgiven in t.t,S,inches
t inch = 25.4 mm
43
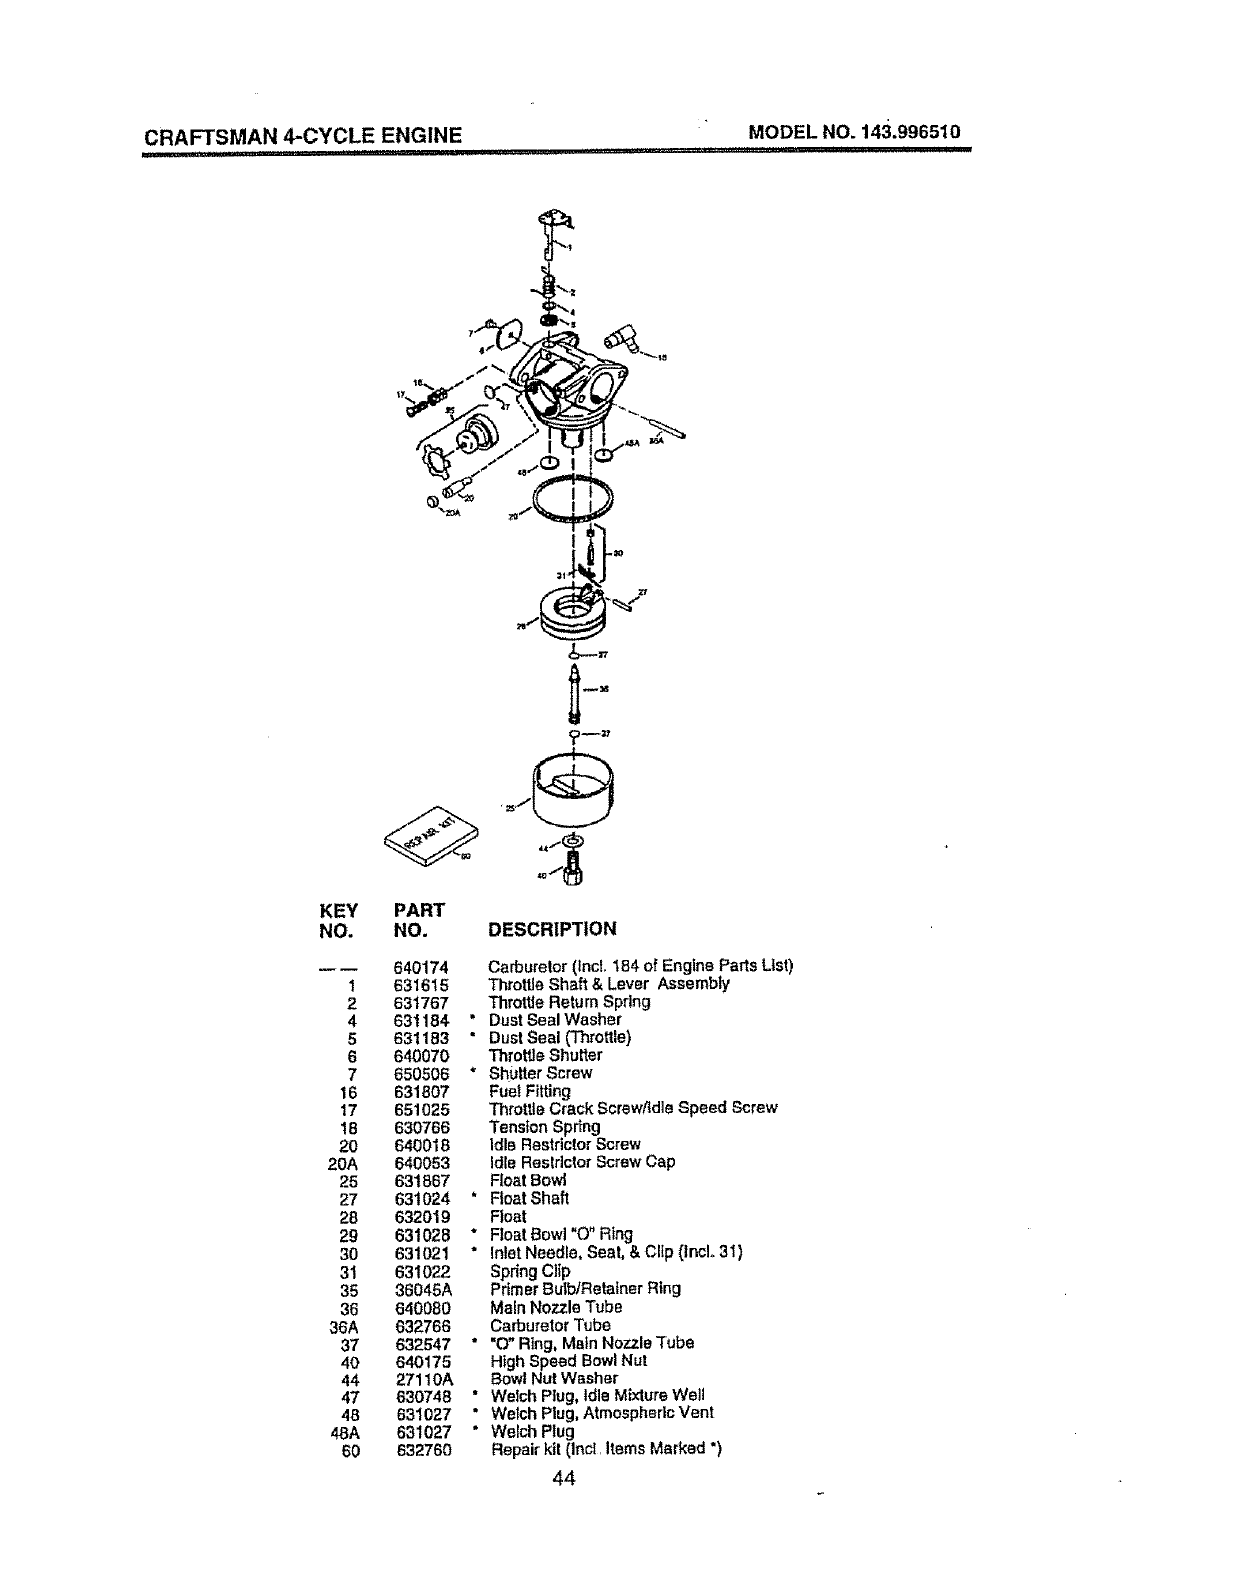
CRAFTSMAN 4-CYCLE ENGINE MODEL NO. 143.996510
.... I! iiiij I i,
I
KEY
NO.
1
2
4
5
6
7
16
17
16
20
20A
25
27
26
29
3O
31
35
36
36A
37
40
44
47
48
48A
60
PART
NO.
640174
631615
631767
631184 "
631183 "
640070
650506 *
631807
651025
630766
640018
640053
631867
63t024 *
632019
631028 *
631021 *
631022
36045A
640080
632766
632547 *
640175
27110A
630748 "
631027 "
631027 *
632760
t.o
DESCRIPTION
Carburetor (incl. t84 of Engine Parts List)
Throttle Shaft& Lever Assembly
Throttle Return Spring
DustSeal Washer
Dust Seal (Throttle)
Throttle Shutter
Shutter Screw
Fuel Fitting
Throttle Crack Screw/Idle Speed Screw
Tension Spr_ng
Idle Restrictor Screw
IdleRestrlctor Screw Cap
FtoatBowl
Float Shaft
Float
Float Bowl "0" Ring
InletNeedle, Seat, & Clip (IncL 31}
SpringCl{p
PrimerBulblRetatner Ring
MainNozzle Tube
CarburetorTube
"0" Ring, Main Nozzle Tube
HighSpeed Bowl Nut
BowlNut Washer
Welch P]ug,Idle MixtureWell
Welch Plug, Atmospheric Vent
Welch Plug
Repairkit (Incl ItemsMarked ")
44
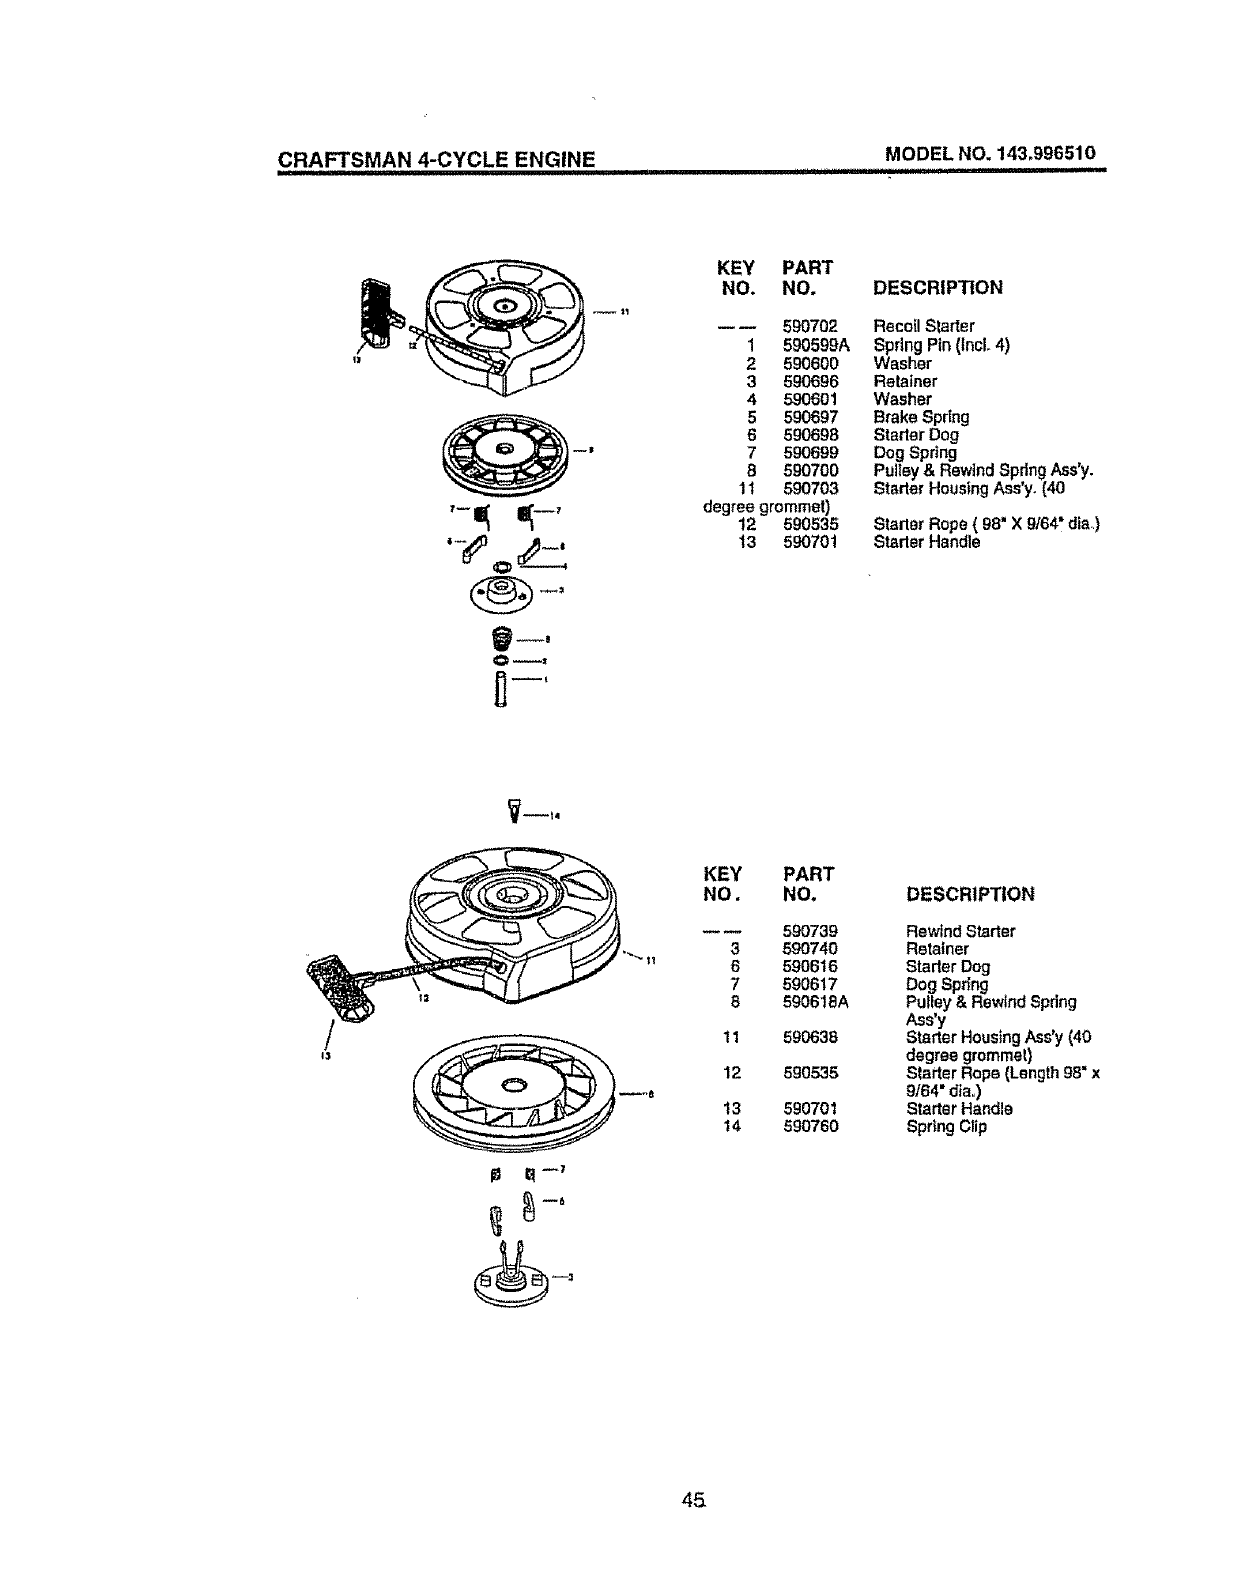
CRAFTSMAN 4-CYCLE ENGINE MODEL NO. 143_996510
o
O--=
KEY PART
NO. NO.
-- -- 590702
1 590599A
2 590600
3 590696
4 590501
5 590697
6 590698
7 590699
8 590700
11 590703
degree grommet)
12 590535
13 590701
DESCRIPTION
Recoil Starter
Spring Pin (lncL4)
Washer
Retainer
Washer
Brake Spdng
Starter Dog
Dog Spdng
Pulley & Rewind SpringAss'y.
Starter HousingAss'y+[40
Starter Rope( 98" X 9/64"dis+)
Starter Handle
V--t4
KEY PART
NO. NO.
---- 590739
3 590740
"_'" 6 590816
7590617
8 590618A
11 590638
12 590535
13 590701
14 590760
DESCRIPTION
Rewind Starter
Retainer
Starter Dog
Dog Spdng
Pulley & Rewind Spring
Ass'y
Starter HousingAss'y(40
degree grommet)
Starter Rope(Length98=x
9/64" alia,,)
StarterHandle
Spring Clip
45

46

47
For the repair or replacement pads you need
delivered directly to your home
Call 7 am - 7 pro, 7 days a week
1-800-366-PART
(1-800-366-7278)
Para ordenar piezas con entrega a
domicilio - 1-800-659-7084
For in-house major brand repair service
Call 24 hours a day, 7 days a week
1-800-4-REPAIR
(1-800-473-7274)
Para pedir servicio de reparaci6n a
domicilio - 1-800-676-5811
For the location of a Sears Parts and
Repair Center in your area
Call 24 hours a day, 7 days a week
1-800-488-1222
For information on purchasing a Sears
Maintenance Agreement or to inquire
about an existing Agreement
Call 9 am -_5 pm, Monday-Saturday
1"800-827-6655
When requesting service or ordering
parts, always provide the following
information:
• Product Type ,Part Number
•Model Number • Part Description
America's Repair Speciatlsts
166061 10,21.98 VB Printed in UoS.A
