Craftsman 917387151 User Manual LAWN MOWER Manuals And Guides L0109052
CRAFTSMAN Walk Behind Lawnmower, Gas Manual L0109052 CRAFTSMAN Walk Behind Lawnmower, Gas Owner's Manual, CRAFTSMAN Walk Behind Lawnmower, Gas installation guides
User Manual: Craftsman 917387151 917387151 CRAFTSMAN LAWN MOWER - Manuals and Guides View the owners manual for your CRAFTSMAN LAWN MOWER #917387151. Home:Lawn & Garden Parts:Craftsman Parts:Craftsman LAWN MOWER Manual
Open the PDF directly: View PDF ![]() .
.
Page Count: 40

SEARS Owner'sManual
£RRFTXMRN°
5.5 HORSEPOWER
22" REAR DISCHARGE
ROTARY LAWN MOWER
Model No
917.387151
•Safety
•Assembly
•Operation
•Maintenance
• Espa_ol
•Repair Parts
CAUTION:
Read and follow all
Safety Rulesand Instructions
beforeoperatingthisequipment
For answers to your
questions about this product:
Call 7 am--7 pm, Mon---Sat;
Sun, 10 am--7 pm
1-800-235-5878
Sears, Roebuck and Co., Hoffman Estates, IL 60179
Warranty 2Product Specifications 11
Safety Rules 2 Service and Adjustments 13
Assembly 4 Storage 14
Operation 6 Troubleshooting 15
Maintenance Schedule 10 Repair Parts 32
Maintenance 10 Parts Ordering Back Cover
LIMITED TWO YEAR WARRANTY ON CRAFTSMAN POWER MOWER
For two years from date of purchase, when this Craftsman Lawn Mower is maintained,
lubricated, and tuned up according to the operating and maintenance instructions in the
owner's manual, Sears will repair free of charge any defect in matedal or workmanship.
if this Craftsman Lawn Mower is used for commercial or rental purposes, this warranty
applies for only 90 days from the date of purchase.
This Warranty does not cover:
• Expendable items which become worn during normal use, such as rotary mower
blades, blade adapters, belts, air cleaners and spark plug.
• Repairs necessary because of operator abuse or negligence, including bent crank-
shafts and the failure to maintain the equipment according to the instructions con-
tained in the owner's manual.
Warranty service is available by returning the craftsman power mower to the nearest
sears service center/department in the united states. This warranty applies only while
this product is in use in the united states.
This Warranty gives you specific legal rights, and you may also have other rights which
vary from state to state.
SEARS, ROEBUCKAND CO., D/817 WA, HOFFMAN ESTATES, ILLINOIS 60179
TRAINING;
•Read this operator's manual carefully.
Become familiar with the controls and
know how to operate your mower
properly. Learn how to quickly stop
mower.
• Do not allow children to use your mower.
Never allow adults to use mower without
proper instructions.
• Keep the area of operation clear of all
persons, especially small children and
pets.
• Use mower only as the manufacturer
intended and as described in this manual.
• Do not operate mower if it has been
dropped or damaged in any manner.
Always have damage repaired before
using your mower.
•Do not use accessory attachments that
are not recommended by the manufac-
turer. Use of such attachments may be
hazardous.
• The blade tums when the engine is
running.
PREPARATION:
• Always thoroughly check the area to be
mowed and clear it of all stones, sticks,
wires, bones, and other foreign objects.
These objects will be thrown by the blade
and can cause severe injury.
• Always wear safety glasses or eye
shields when starting and while using
your mower.
•Dress propedy. Do not operate mower
when barefoot or weadng open sandals.
Wear only solid shoes with good traction
when mowing.
•Check fuel tank before starting engine.
Do not fill gas tank indoors, when the
engine is running or when the engine is
2
hot. Allow the engine to cool for several
minutes before filling the gas tank. Clean
off any spilled gasoline before starting the
engine.
• Always make wheel height adjustments
before starting your mower. Never
attempt to do this while the engine is
running.
• Mow only in daylight or good artificial
light.
OPERATION:
• Keep your eyes and mind on your mower
and the area being cut. Do not let other
interests distract you.
•Do not mow wet or slippery grass. Never
run while operating your mower. Always
be sure of your footing -- keep afirm
hold on the handles and walk.
• Do not put hands or feet near or under
rotating parts. Keep clear of the discharge
opening at all times.
• Always stop the engine whenever you
leave or are not using your mower, or
before crossing driveways, walks, roads,
and any gravel_covered areas.
• Never direct discharge of material toward
bystanders nor allow anyone near the
mower while you are operating it.
• Before cleaning, inspecting, or repairing
your mower, stop the engine and make
absolutely sure the blade and all moving
parts have stopped. Then disconnect the
spark plug wire and keep it away from the
spark plug to prevent accidental starting.
• Do not continue to run your mower if you
hit a foreign object. Follow the procedure
outlined above, then repair any damage
before restarting and operating you
mower.
• Do not change the governor settings or
overspeed the engine. Engine damage or
personal injury may result.
• Do not operate your mower if it vibrates
abnormally. Excessive vibration is an
indication of damage; stop the engine,
safely check for the cause of vibration
and repair as required.
• Do not run the engine indoors. Exhaust
fumes are dangerous.
• Never cut grass by pulling the mower
towards you. Mow across the face of
slopes, never up and down or you might
lose your footing. Do not mow exces-
sively steep slopes. Use caution when
operating the mower on uneven terrain or
when changing directions -- maintain
good footing.
• Never operate your mower without
proper guards, plates, grass catcher or
other safety devices in place.
MAINTENANCE AND STORAGE:
•Check the blade and the engine mount-
ing bolts often to be sure they are
tightened properly.
•Check all bolts, nuts and screws at
frequent intervals for proper tightness to
be sure mower is in safe working
condition.
•Keep all safety devices in place and
working.
•To reduce fire hazard, keep the engine
free of grass, leaves or excessive grease
and oil.
•Check grass catcher often for deteriora-
tion and wear and replace worn bags.
Use only replacement bags that are
recommended by and comply with
specifications of the manufacturer of your
mower.
•Always keep a sharp blade on your
mower.
•Allow engine to cool before storing in any
enclosure.
•Never store mower with fuel in the tank
inside a building where fumes may reach
an open flame or an ignition source such
as a hot water heater, space heater,
clothes dryer, etc.
CAUTION: Always disconnect spark
plug wire and place wire where it
cannot contact spark plug in order to
prevent accidental startingwhen setting
up, transporting,adjusting or making
repairs.
WARNING
The engine exhaust from this product
contains chemicals known to the State
of California to cause cancer, birth
defects, or other reproductive harm.
3
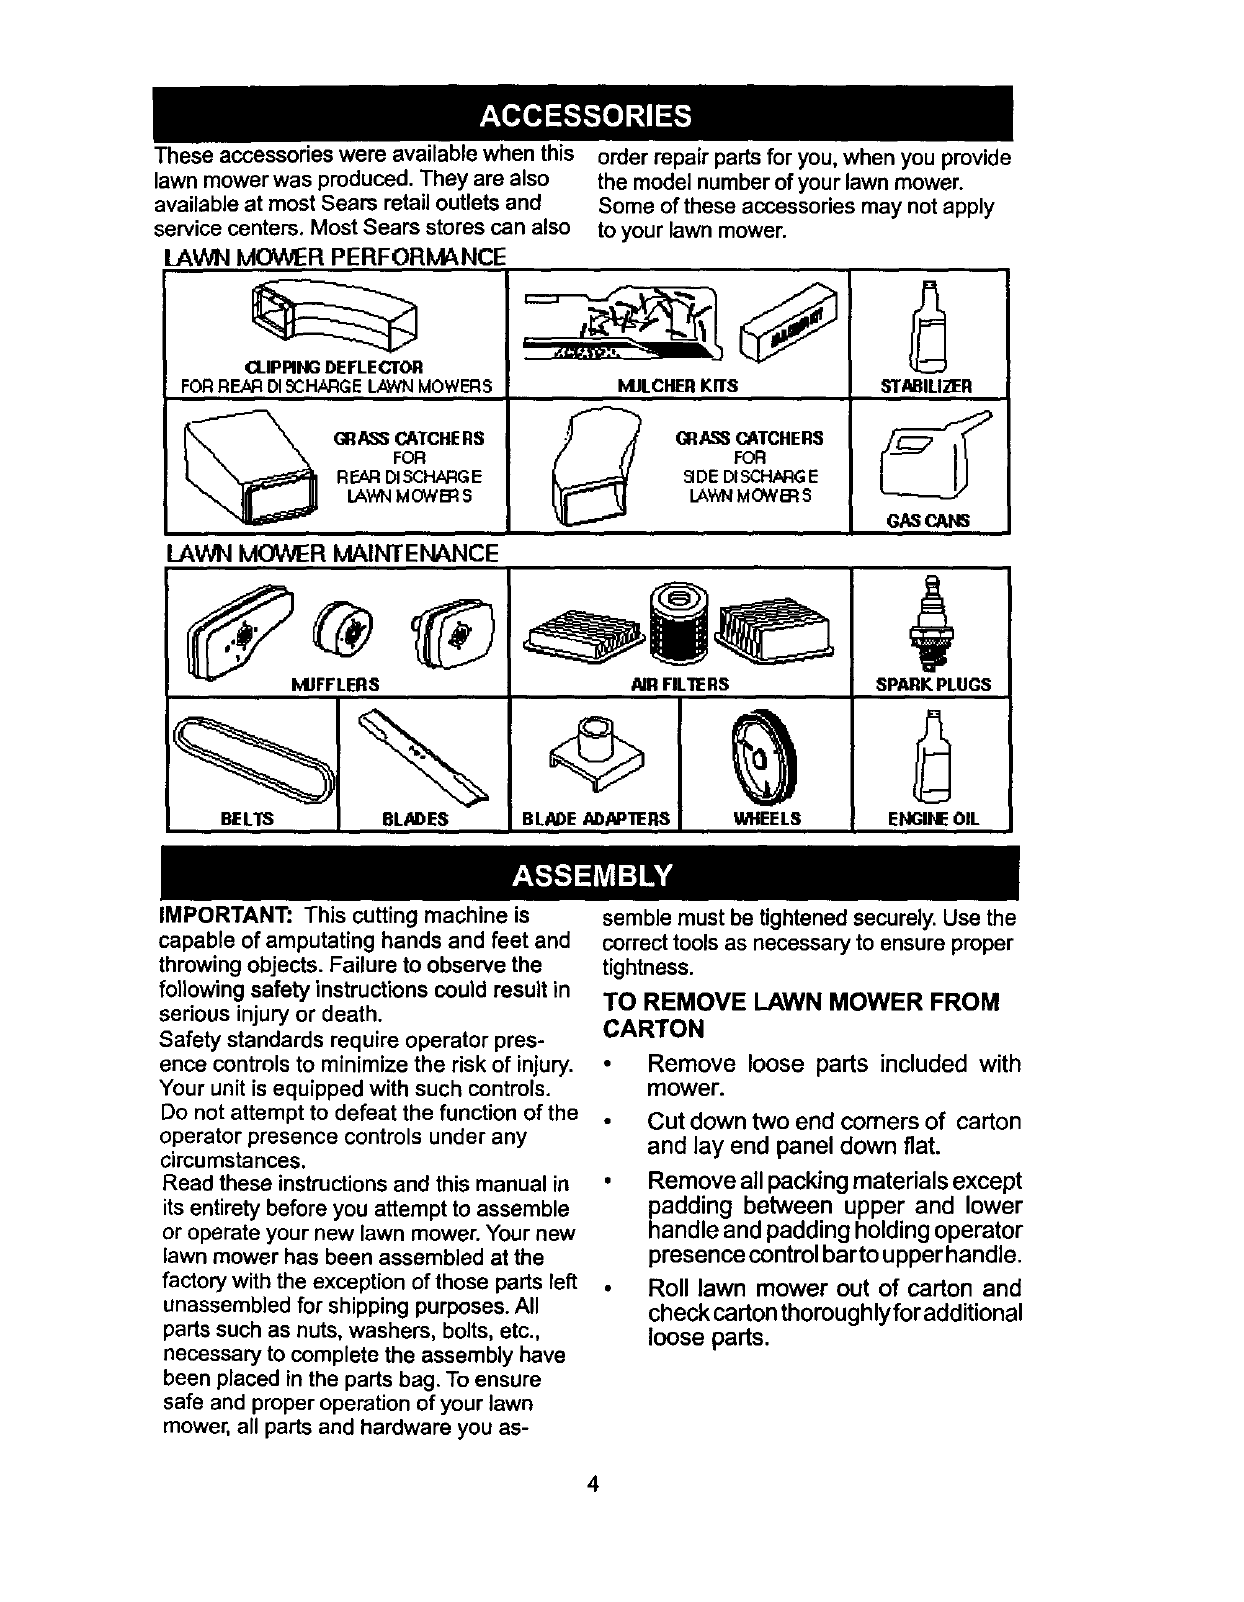
These accessories were available when this
lawn mower was produced. They are also
available at most Sears retail outlets and
service centers, Most Sears stores can also
LAVvlq MOWER PERFORMANCE
order repair parts for you, when you provide
the model number of your lawn mower.
Some of these accessories may not apply
CLIPPING DEFLECTOR
FORREhR DI:_:HARGE LAWN MOWERS
to your lawn mower.
GRASS CATCHERS
FOR
REAR DISCHARGE
LAV_NMOWER S
1,4JLCHERKITS
GRASSCA,TCHERS
FOR
I_IDEDISCHARGE
IJkWNMOWB_S
LAWN MOWER MAINrENANCE
E4UFELERS
BELTS BLADES BLN)E ADPP11ERS 'rM"IEELS
SPARK PLUGS
ENGINE OIL
IMPORTANT: This cutting machine is
capable of amputating hands and feet and
throwing objects. Failure to observe the
following safety instructions could result in
serious injury or death.
Safety standards require operator pres-
ence controls to minimize the risk of injury.
Your unit is equipped with such controls.
Do not attempt to defeat the function of the
operator presence controls under any
circumstances.
Read these instructions and this manual in
its entirety before you attempt to assemble
or operate your new lawn mower. Your new
lawn mower has been assembled at the
factory with the exception of those parts left
unassembled for shipping purposes. All
parts such as nuts, washers, bolts, etc.,
necessary to complete the assembly have
been placed in the parts bag. To ensure
safe and proper operation of your lawn
mower, all parts and hardware you as-
semble must be tightened securely. Use the
correct tools as necessary to ensure proper
tightness.
TO REMOVE LAWN MOWER FROM
CARTON
Remove loose parts included with
mower.
Cut down two end comers of carton
and lay end panel down fiat.
Remove allpacking materials except
padding between upper and lower
handle and padding holding operator
presence control barto upper handle.
Roll lawn mower out of carton and
check carton thoroughlyfor additional
loose parts.
4
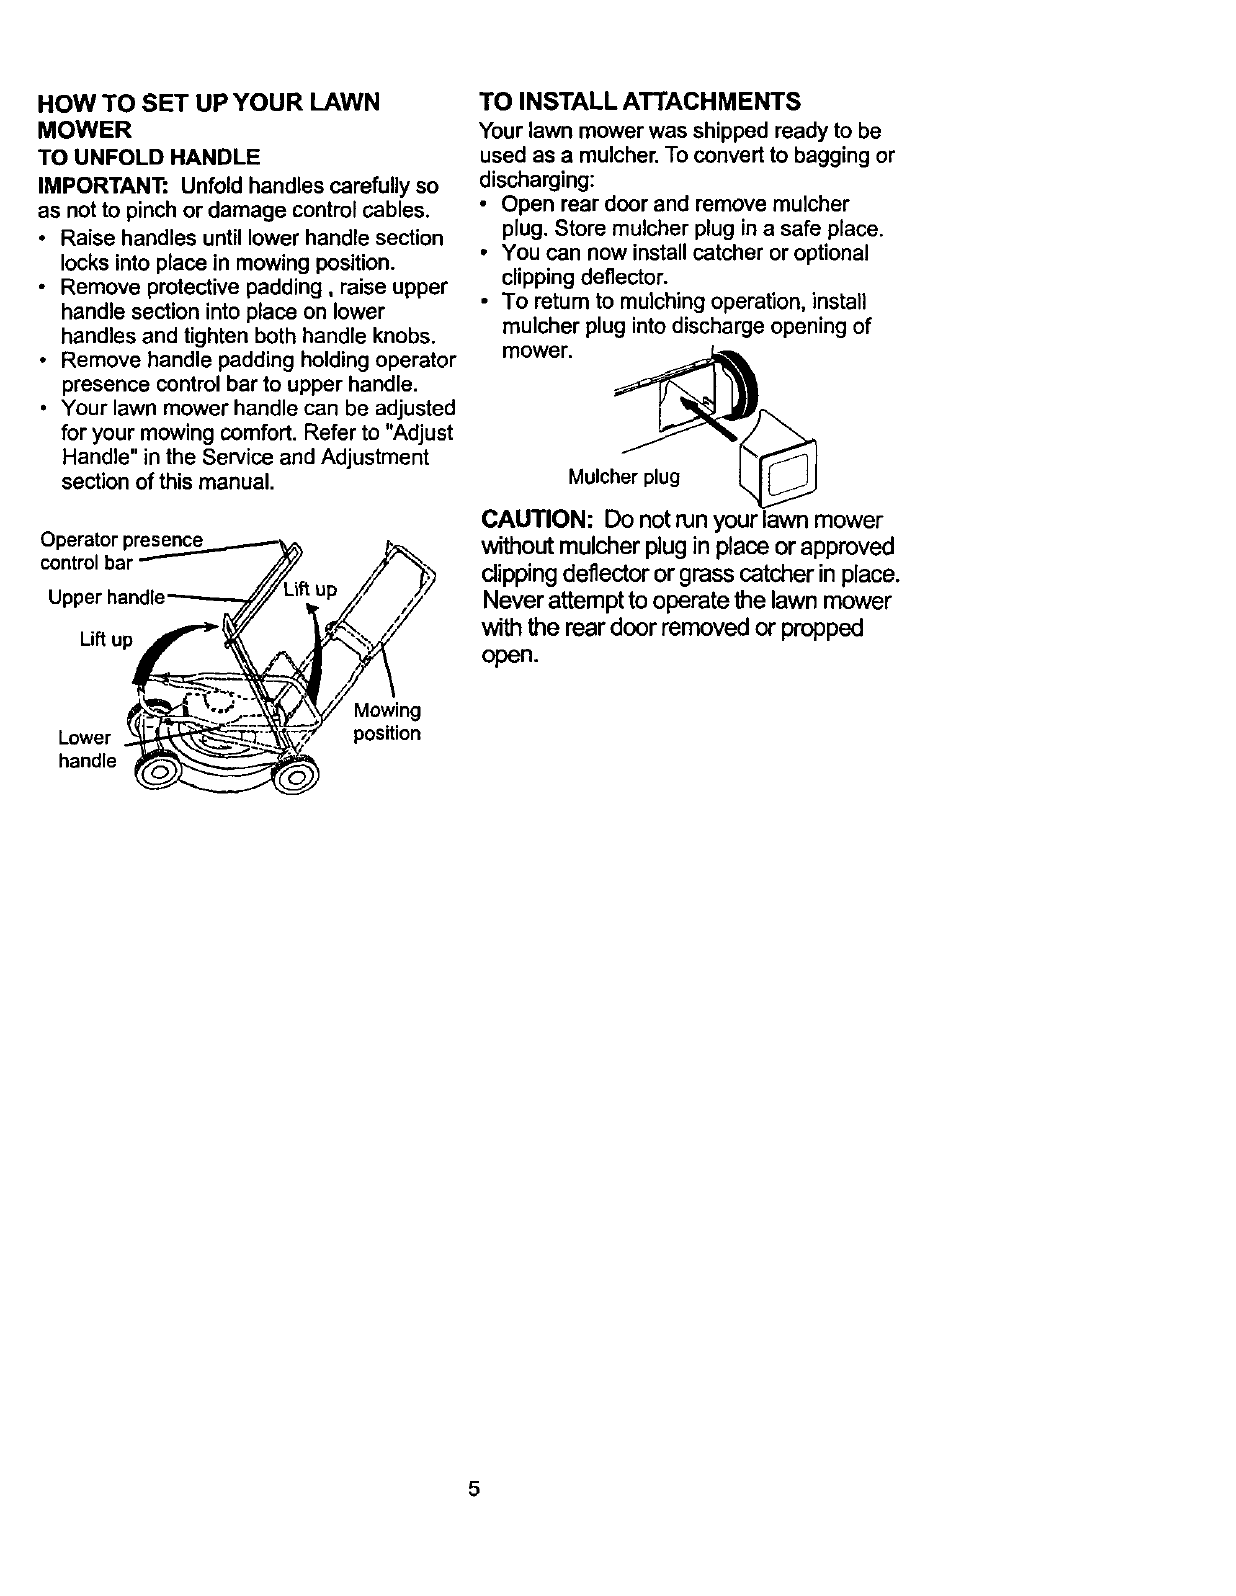
HOW TO SET UP YOUR LAWN
MOWER
TO UNFOLD HANDLE
IMPORTANT: Unfold handles carefully so
as not to pinch or damage control cables.
•Raise handles until lower handle section
locks into place in mowing position.
•Remove protective padding, raise upper
handle section into place on lower
handles and tighten both handle knobs.
• Remove handle padding holding operator
presence control bar to upper handle.
•Your lawn mower handle can be adjusted
for your mowing comfort. Refer to "Adjust
Handle" in the Service and Adjustment
section of this manual.
Operator presence
control bar
Upper handl,
Liftup
TO INSTALL ATTACHMENTS
Your lawn mower was shipped ready to be
used as amulcher. To convert to bagging or
discharging:
•Open rear door and remove mulcher
plug. Store mulcher plug in a safe place.
• You can now install catcher or optional
clipping deflector.
•To retum to mulching operation, install
mulcher plug into discharge opening of
mower.
Mulcher plug
CAUTION: Do not run your lawn mower
without mulcher plug in place or approved
dipping deflector or grass catcher in place.
Never attempt to operate the lawn mower
with the rear door removed or propped
open.
Lower
handle
Mowing
position
5
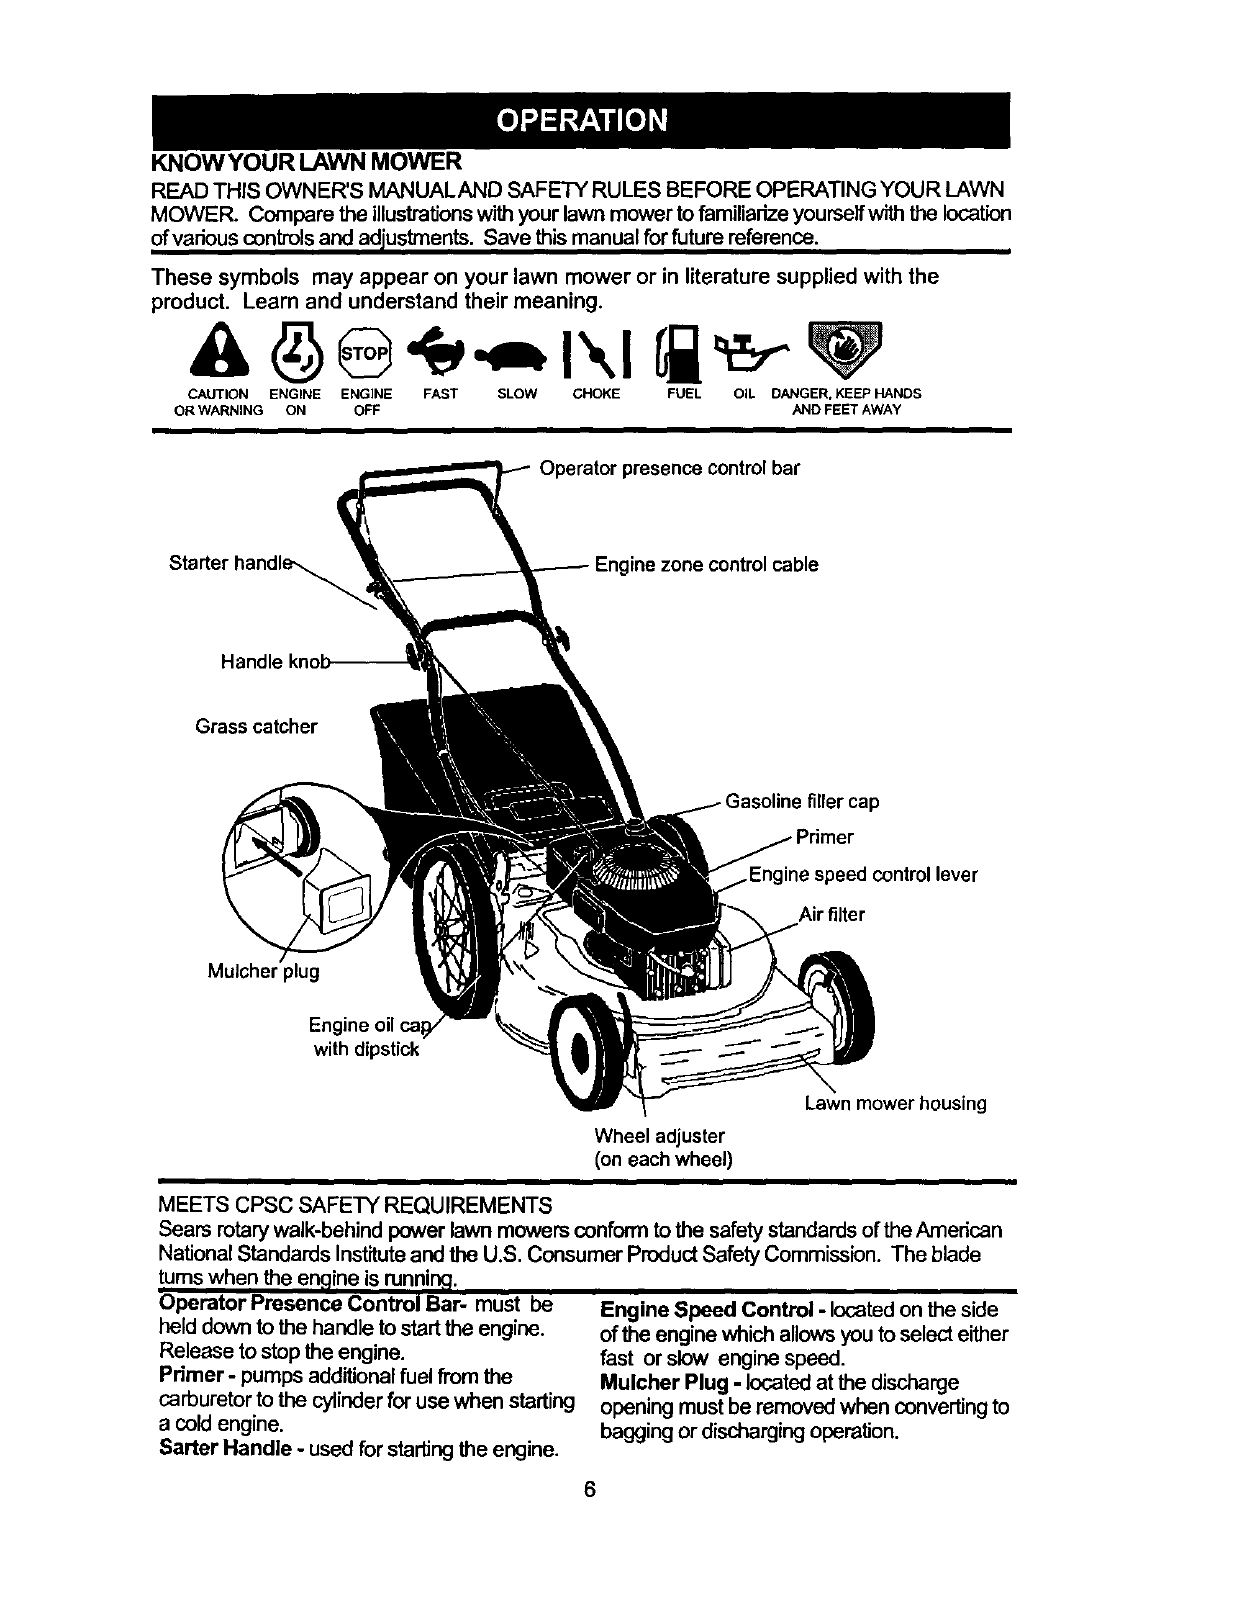
KNOWYOUR LAWNMOWER
READTHIS OWNER'S MANUALAND SAFETY RULES BEFORE OPERATING YOUR LAWN
MOWER. Compare the illustrationswith your lawn mower to familiarize yourself with the location
of various controls and adjustments. Save this manual for future reference.
These symbols may appear on your lawn mower or in literature supplied with the
product. Learn and understand their meaning.
CAUTION ENGINE ENGINE FAST SLOW CHOKE FUEL OIL DANGER, KEEP HANDS
OR WARNING ON OFF AND FEET AWAY
Operator presence control bar
control cable
Handle
Grass catcher
Air filter
Mulche
Engine
with dipstick
Lawn mower housing
Wheel adjuster
(on each wheel)
MEETS CPSC SAFETY REQUIREMENTS
Sears rotary walk-behind power lawn mowers conform to the safety standards of the American
National Standards Institute and the U.S. Consumer Product Safety Commission. The blade
turns when the enaine is runnine.
niII hi
Operator Presence Control Bar. must be
held down to the handle to start the engine.
Release to stop the engine.
Primer- pumps additional fuel from the
carburetor to the cylinder for use when starting
a cold engine.
Sarter Handle -used for starting the engine.
Engine Speed Control - located on the side
of the engine which allows you to select either
fast or slow engine speed.
Mulcher Plug -located at the discharge
opening must be removed when converting to
bagging or discharging operation.
6
The operation of any lawn mower can result in
foreign objects thrown into the eyes, which can
result in severe eye damage. Always wear
safety glasses or eye shields while operating
your lawn mower or performing any adjust-
ments or repairs. We recommend a wide
vision safety mask over the spectacles or
standard safety glasses.
HOWTO USEYOUR LAWN MOWER
ENGINESPEED CONTROL
The engine speed is controlled by alever
located on the side of the engine. Fast
position is for sta_ng the engine, normal
cutting, and better grass bagging. Slow
position is for light cutting, trimming and fuel
economy.
ENGINE ZONE CONTROL
CAUTION: Federal regulations require
an engine controlto be installedon this
lawnmowerin orderto minimizethe risk
of bladecontactinjury. Do notunderany
circumstances attempt to defeat the
fun_on of the operator control. The blade
tums when the engineis running.
• Your lawn mower is equipped with an
operator presence control bar which
requires the operator to be positioned
behind the lawn mower handle to start and
operate the lawn mower.
Engine speed control lever
tl _ _ Primer
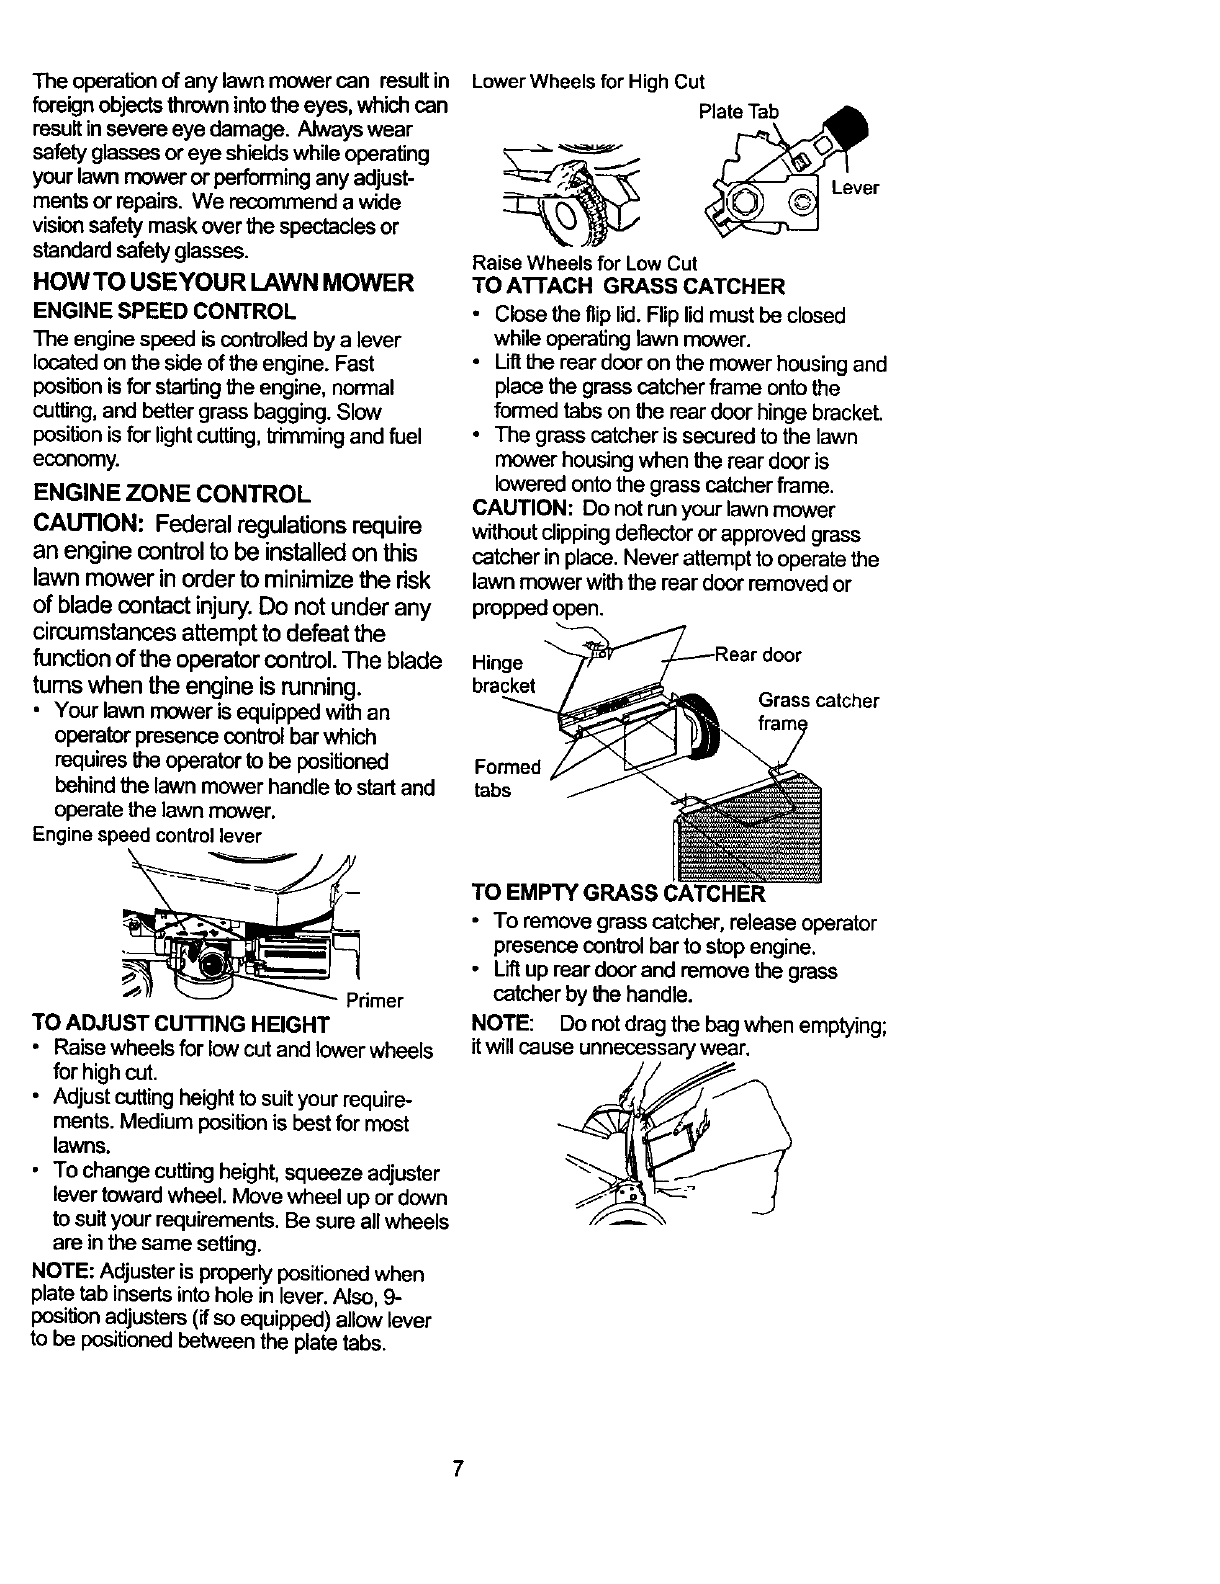
TO ADJUST CUTFING HEIGHT
•Raise wheels for low cut and lower wheels
for high cut.
• Adjust cutting height to suit your require-
ments. Medium position is best for most
lawns.
• To change cutting height, squeeze adjuster
lever toward wheel. Move wheel up or down
to suit your requirements. Be sure all wheels
are in the same setting.
NOTE: Adjuster is properly positioned when
plate tab inserts into hole in lever. Also, 9-
position adjusters (if so equipped) allow lever
to be positioned between the plate tabs.
Lower Wheels for High Cut
Lever
Raise Wheels for Low Cut
TO A'n'ACH GRASS CATCHER
• Close the flip lid. Flip lid must be closed
while operating lawn mower.
•Lift the rear door on the mower housing and
place the grass catcher frame onto the
formed tabs on the rear door hinge bracket.
• The grass catcher is secured to the lawn
mower housing when the rear door is
lowered onto the grass catcher frame.
CAUTION: Do not run your lawn mower
without clipping deflector or approved grass
catcher in place. Never attempt to operate the
lawn mower with the rear door removed or
preppedopen.
Hinge
bracket Grass catcher
Formed
tabs
TO EMPTY GRASS CATCHER
•To remove grass catcher, release operator
presence control bar to stop engine.
•Liftup rear door and remove the grass
catcher by the handle.
NOTE: Do not drag the bag when emptying;
it will cause unnecessary wear.
7
BEFORESTARTINGENGINE
OIL
Your lawnmower is shippedwithout oil in the
engine.
•Be sure mower is level and area around oil
fill is clean.
• Remove engine oil cap w/dipstick and fillto
the full line on the dips_ck.
• Use20ozs. of oil. Fortypeandgradeofoil
to use, see =ENGINE"in Customer
Responsibilities section of this manual.
• Pour oil slowly. Do not over fill.
• Check oil level before each use. Add oil if
needed. Fill to full line on dipstick.
• To read proper level, tighten engine oil cap
each time.
•Reinstallengine oil cap and tighten.
• Change the oil after every 25 hours of
operation oreach season. You may need
to change the oil more often under dusty,
dirty conditions.
GAS
•Fillfuel tank. Use fresh, clean, regular
unleaded gasoline with a minimum of 87
octane. Do not mix oil with gasoline.
Purchase fuel in quantities that can be used
within 30 days to assure fuel freshness.
WARNING: Experience indicates that
alcohol blended fuels (called gasohol or
using ethanol or methanol) can attract
moisture which leads to separation and
formation of acids during storage. Acidic
gas can damage the fuel system of an
engine while in storage. To avoid engine
problems, the fuel system should be
emptied before storage of 30 days or
longer. Drain the fuel tank, start the engine
and let it run until fuel lines and carburetor
are empty. Use fresh fuel next season.
See Storage Instructions for additional
information. Never use engine or carbure-
tor cleaner products in fuel tank or
permanent damage may occur.
TO START ENGINE
• To start acold engine, push primer five (5)
times before tnjing to start. Use a firm push.
This step is not usually necessary when
starting an engine which has already run for
a few minutes.
• Push engine speed control lever to fast
position.
• Hold operator presence control bar down to
the handle and pull starter handle quickly.
Do not allow starter rope to snap back.
• To stop engine,1 release operator presence
control bar.
NOTE: In cooler weather it may be necessary
to repeat priming steps. In warmer weather
over priming may cause flooding and engine
will not starL If you do flood engine, wait a few
minutes before attempting to start and do not
repeat priming steps.
MOWING TIPS
•Under certain conditions, such as very fall
grass, it may be necessary to raise the
height of cut to reduce pushing effort and to
keep from overloading the engine and
leaving clumps of grass clippings.
•For extremely heavy cutting, reduce the
width of cut and raise the rear of the lawn
mower housing one (1) wheel adjuster
setting higher than the front for better
discharge of grass.
•For better grass bagging and most cutting
conditions, the engine speed should be set
in the fast position.
•When using a rear discharge lawn mower in
moist, heavy grass, dumps of cut grass
may not enter the grass catcher. Reduce
ground speed (pushing speed) and/or run
the lawn mower over the area a second
time.
• If a trail of grass clippings is left on the right
side of a rear discharge lawn mower, mow
in a clockwise direction with a small overlap
to collect the clippings on the next pass.
• Keep top of engine around starter clear and
clean of grass clippings and chaff. This will
help engine air flow and extend engine life.
• Pores in cloth grass catchers can become
tilled with dirt and dust with use and
catchers will collect less grass. To prevent
this, regularly hose catchers off with water
and let dry before using.
MULCHING MOWING TIPS
IMPORTANT." For best performance, keep
mower housing free of built-up grass and trash.
Clean UNDERSIDE OF MOWER HOUSING
after each use. See "Cleaning" in CUSTOMER
RESPONSIBILITIES section of this manual.
•The special mulching blade will recut the
grass clippings many times and reduce
them in size so that as they fall onto the
lawn they will disperse into the grass and
not be noticed. Also, the mulched grass will
biedegrade quickly to provide nutrients for
the lawn. Always mulch with your highest
engine (blade) speed as this will provide the
best recurring action of the blades.
• Avoid cutting your lawn when it is wet. Wet
grass tends to form clumps and interferes
with the mulching action. The best time to
mow your lawn is the early aftemoon. At this
time the grass has dried and the newly cut
area will not be exposed to the direct sun.
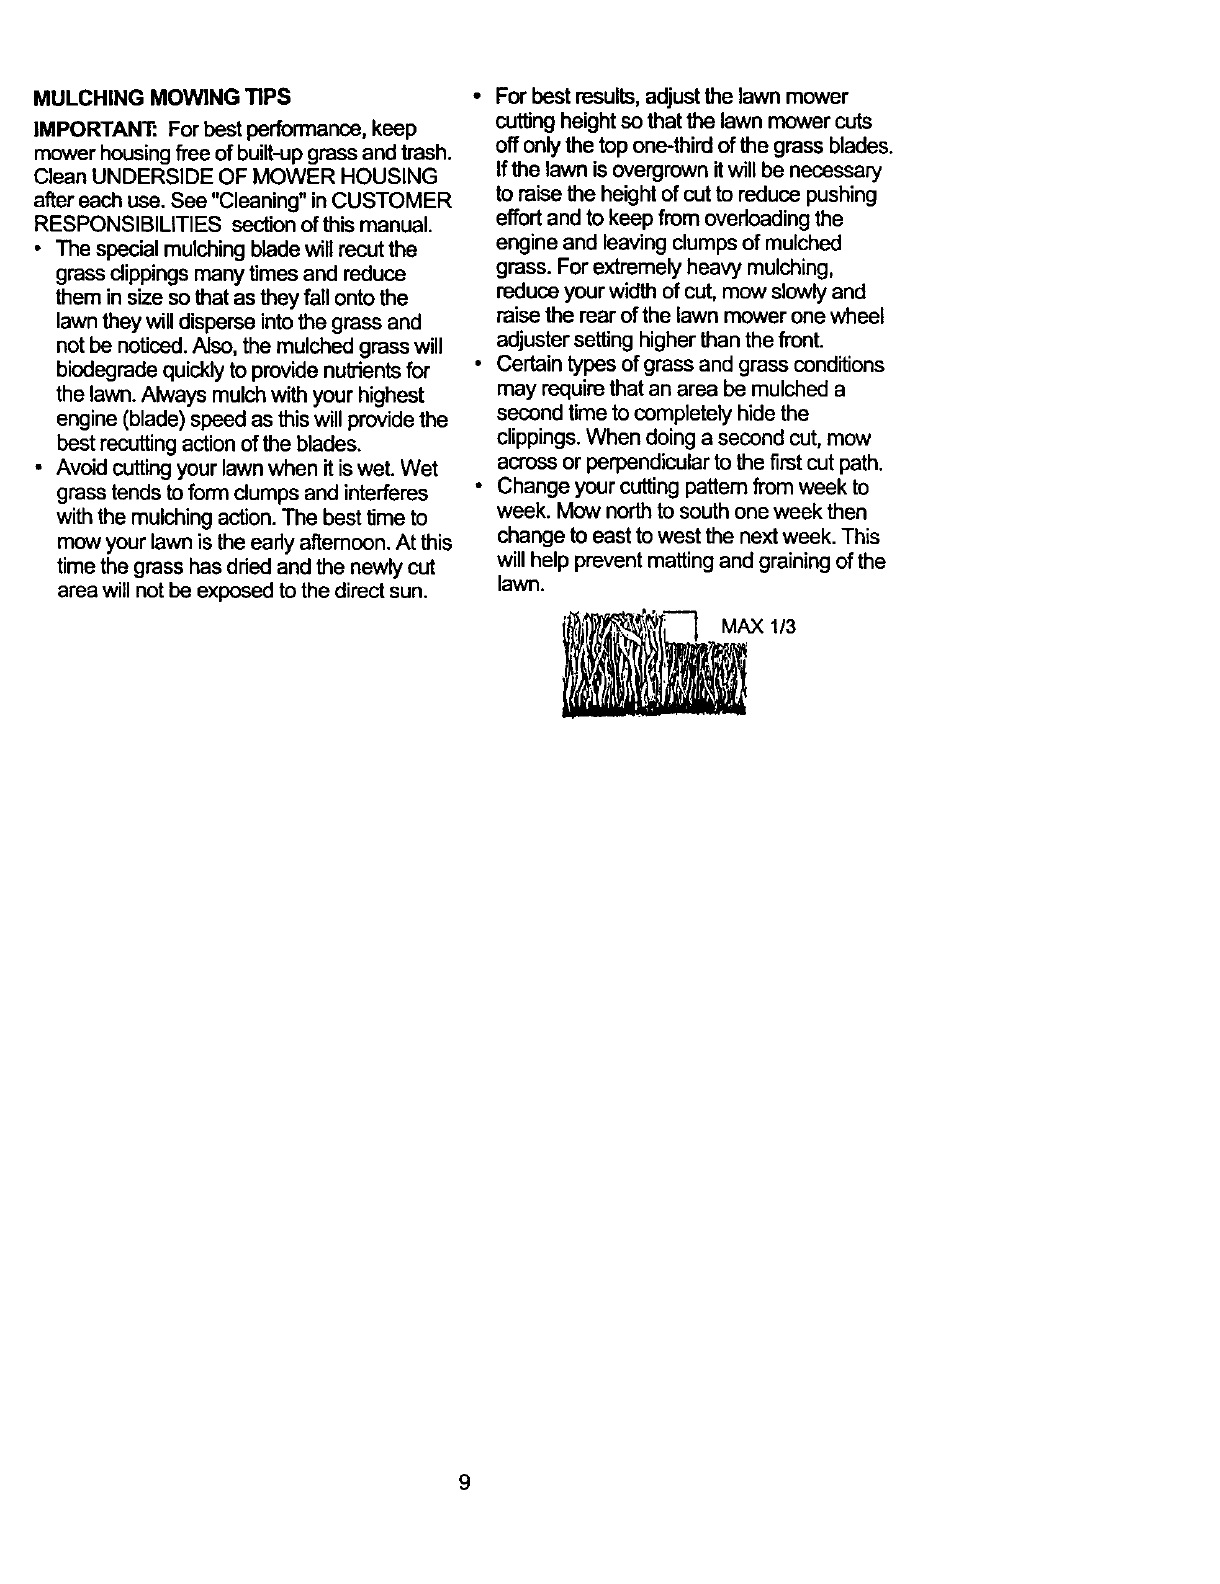
•For best results, adjust the lawn mower
cutting height so that the lawn mower cuts
off only the top one-third of the grass blades.
If the lawn is overgrown itwill be necessary
to raise the height of cut to reduce pushing
effort and to keep from overloading the
engine and leaving clumps of mulched
grass. For extremely heavy mulching,
reduce your width of cut, mow slowly and
raise the rear of the lawn mower one wheel
adjuster setting higher than the front.
•Certain types of grass and grass conditions
may require that an area be mulched a
second time to completely hide the
clippings. When doing a second cut, mow
across or perpendicular to the first cut path.
•Change your cutting pattern from week to
week. Mow north to south one week then
change to east to west the next week. This
will help prevent matting and graining of the
lawn.
9
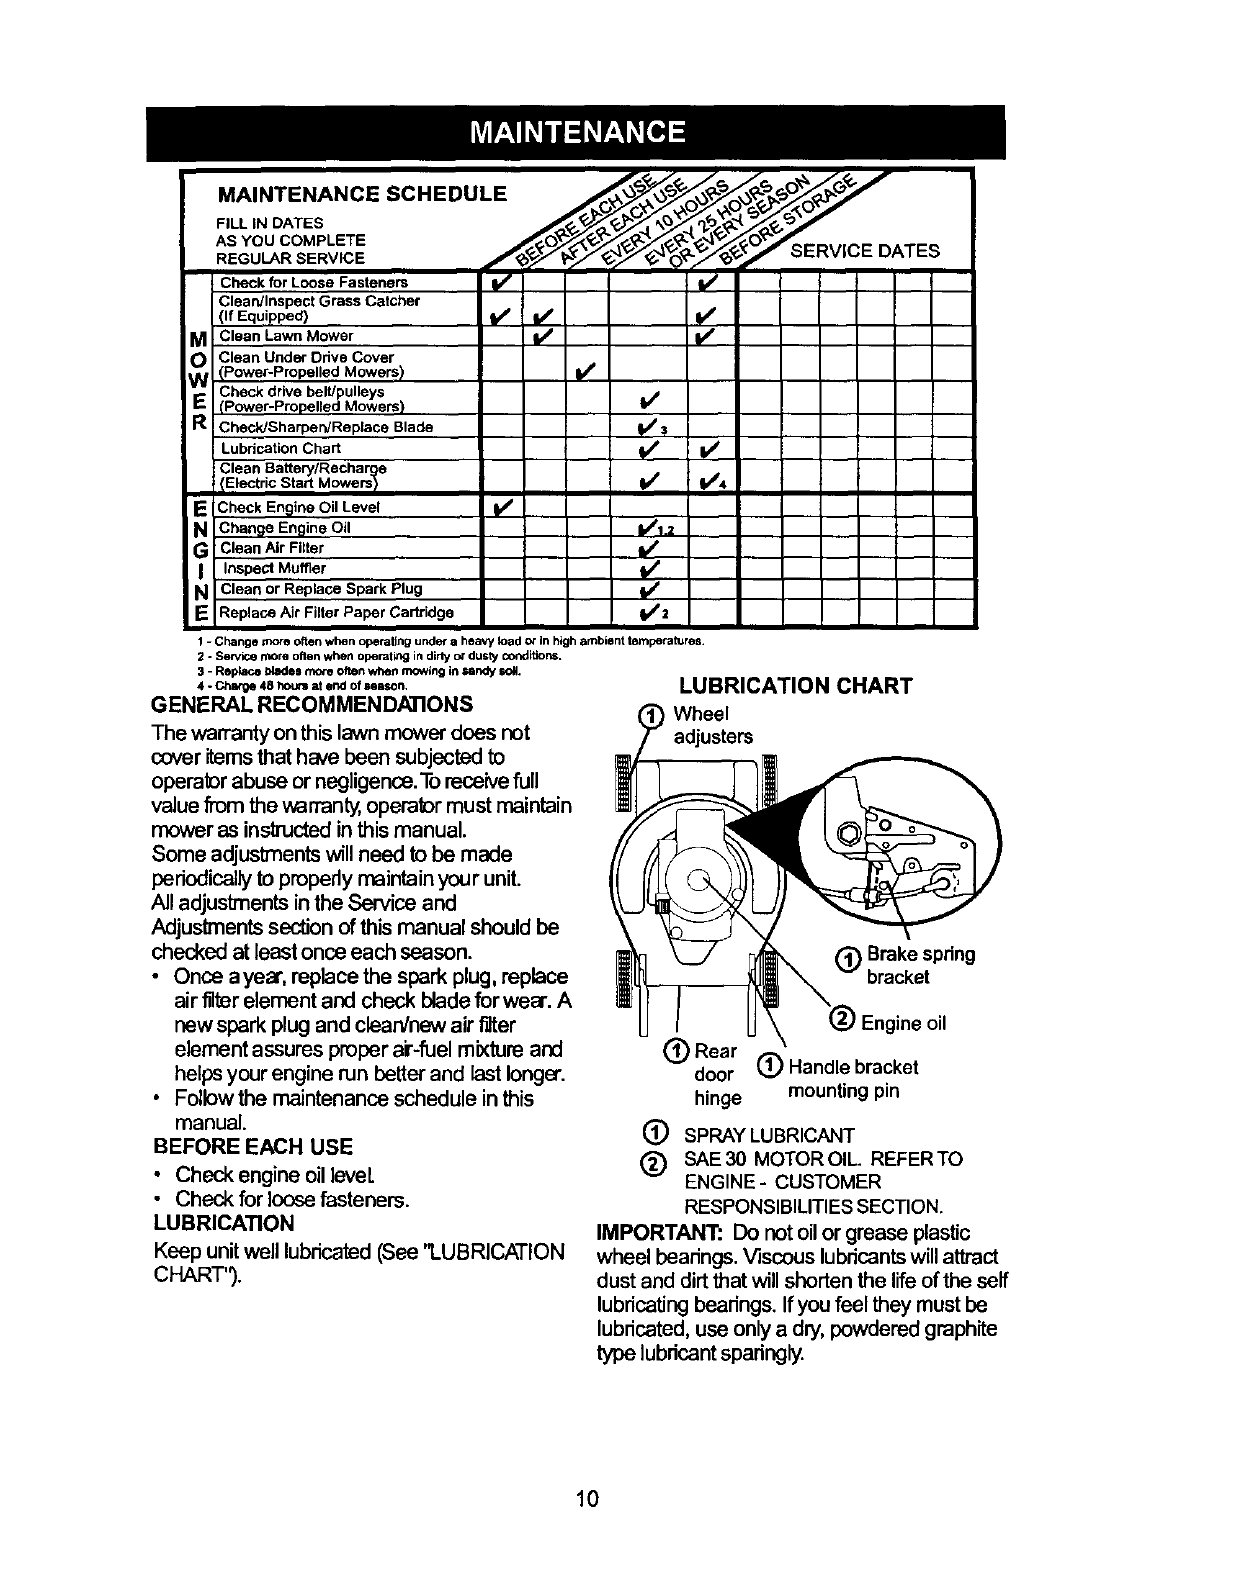
AS YOU COMPLETE
.EOU 'RSERV,CE y ,/BERV'CE DATES
Check for Loose Fasteners IV#' ll/
Clean/Inspect Grass Catcher
(If Equipped) If _ i__
oi Clean Lawn Mower
Clean Under Drive Cover
Power-Propelled Mowers) il/
W Check drive belUpulleys
(Power-Propelled Mowers) I_
R ChecWSharperVReplace Blade _=/:1
Lubrication Chart !l/if
Clean eattery/Rechar e
Electric Start Mowe_ IV/ I,/4
ECheck Engine Oil Level It/
GN Change Engine Oil I/1.2
Clean Air Filter
I lnspect Muffler _i_
Clean or Replace Spark Plug I/'i/2
EReplace Air Filter Paper Cartridge
1 - Change more often when operating under a heavy lOad or In high ambient temperatures,
2 - Service more often when operating in dirly _dusty conditions,
3-Rep_ce blades m(_e often when mowing in sandy so_.
4 - C_ 48 heu{i at end of season.
GENERAL RECOMMENDATIONS
The warranty on this lawn mower does not
cover items that have been subjected to
operator abuse or negligence. To receive full
value from the warranty, operator must maintain
mower as instructed in this manual.
Some adjustments will need to be made
periedically to properly maintain your unit.
All adjustTnents in the Service and
Adjustments section of this manual should be
checked at least once each season.
• Once a year, replace the spark plug, replace
air filter element and check blade for wear. A
new spark plug and clearVnaw air liter
element assures proper ai-fuel mixture and
helps your engine run better and last longer.
•Fallow the maintenance schedule in this
manual.
BEFORE EACH USE
•Check engine oil level
• Check for loose fasteners.
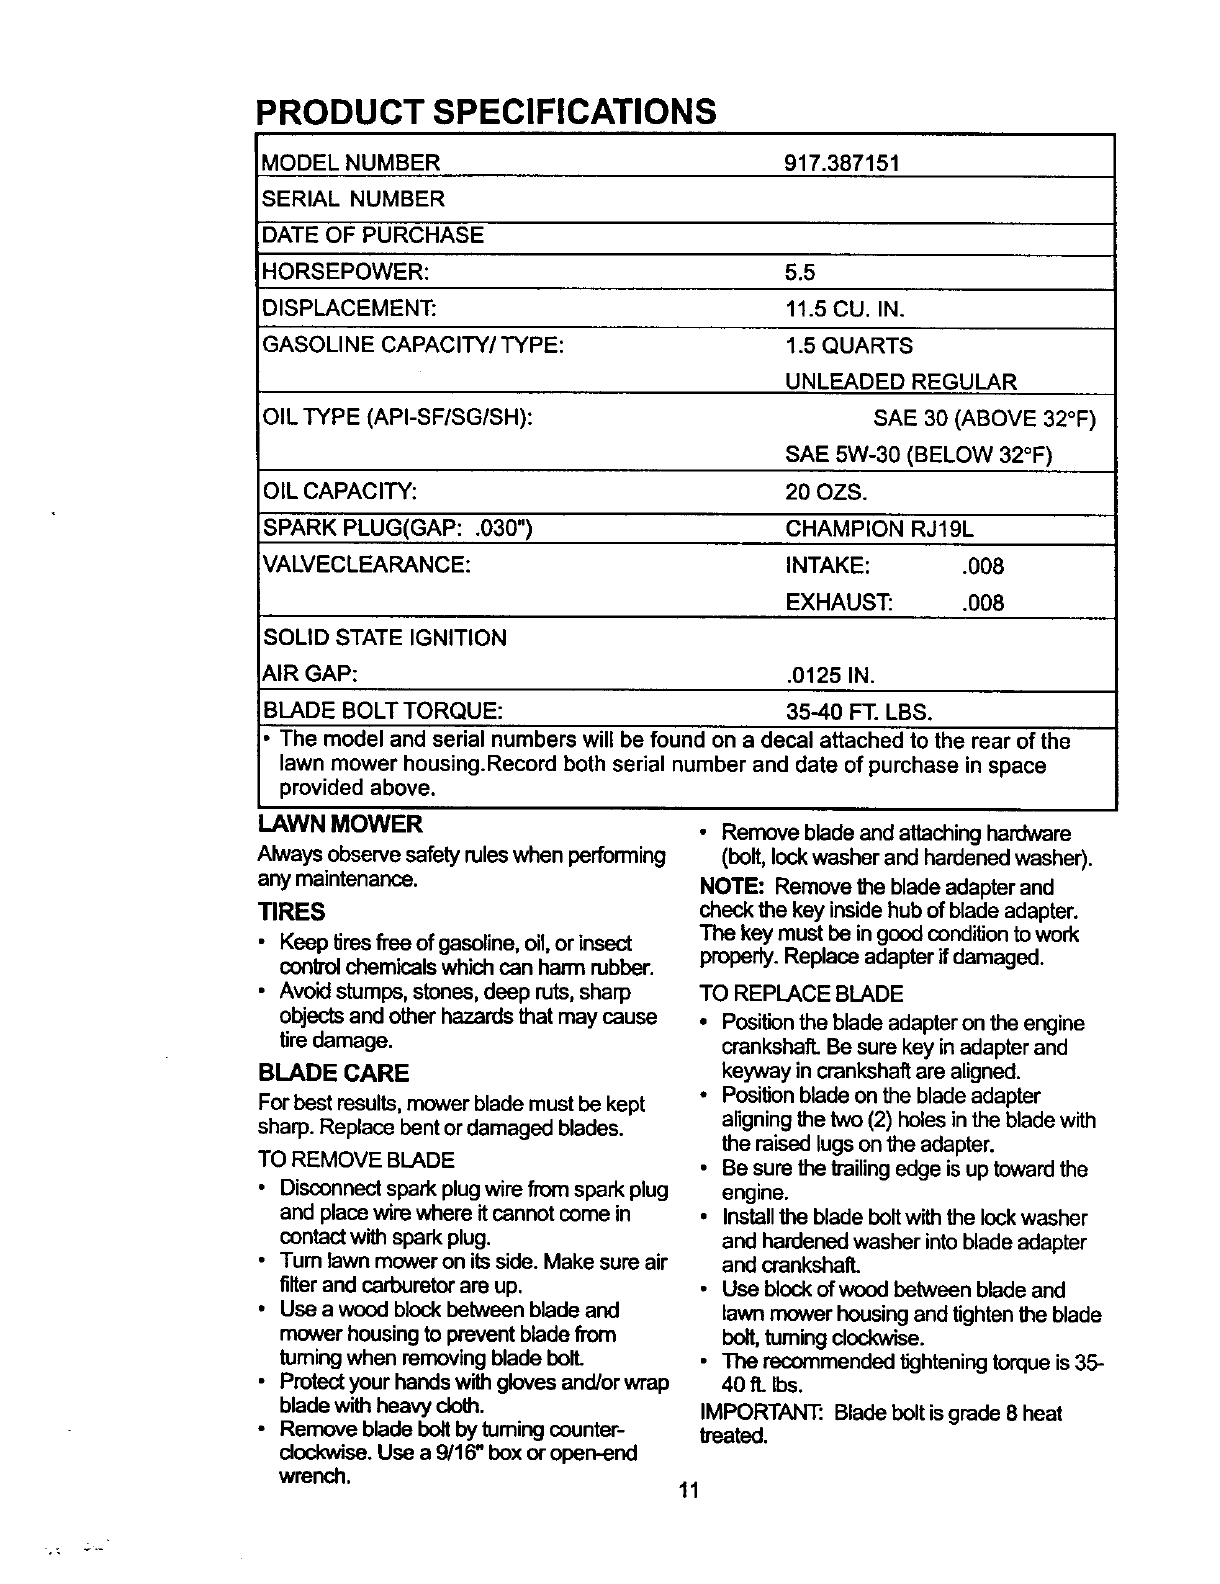
LUBRICATION
Keep unit well lubricated (See 'I_UBRICATION
CHART").
LUBRICATION CHART
Wheel
adjusters
Brake spring
/
(_) Rear
door (_ Handle bracket
hinge mounting pin
(_) SPRAY LUBRICANT
(_ SAE30 MOTOROIL. REFERTO
ENGINE- CUSTOMER
RESPONSIBILITIES SECTION.
IMPORTANT: Do not oil or grease plastic
wheel bearings. Viscous lubricantswill attract
dust and dirt that will shorten the life of the self
lubricating bearings. If you feel they must be
lubricated, use only a d_J,powdered graphite
type lubricant sparingly.
10
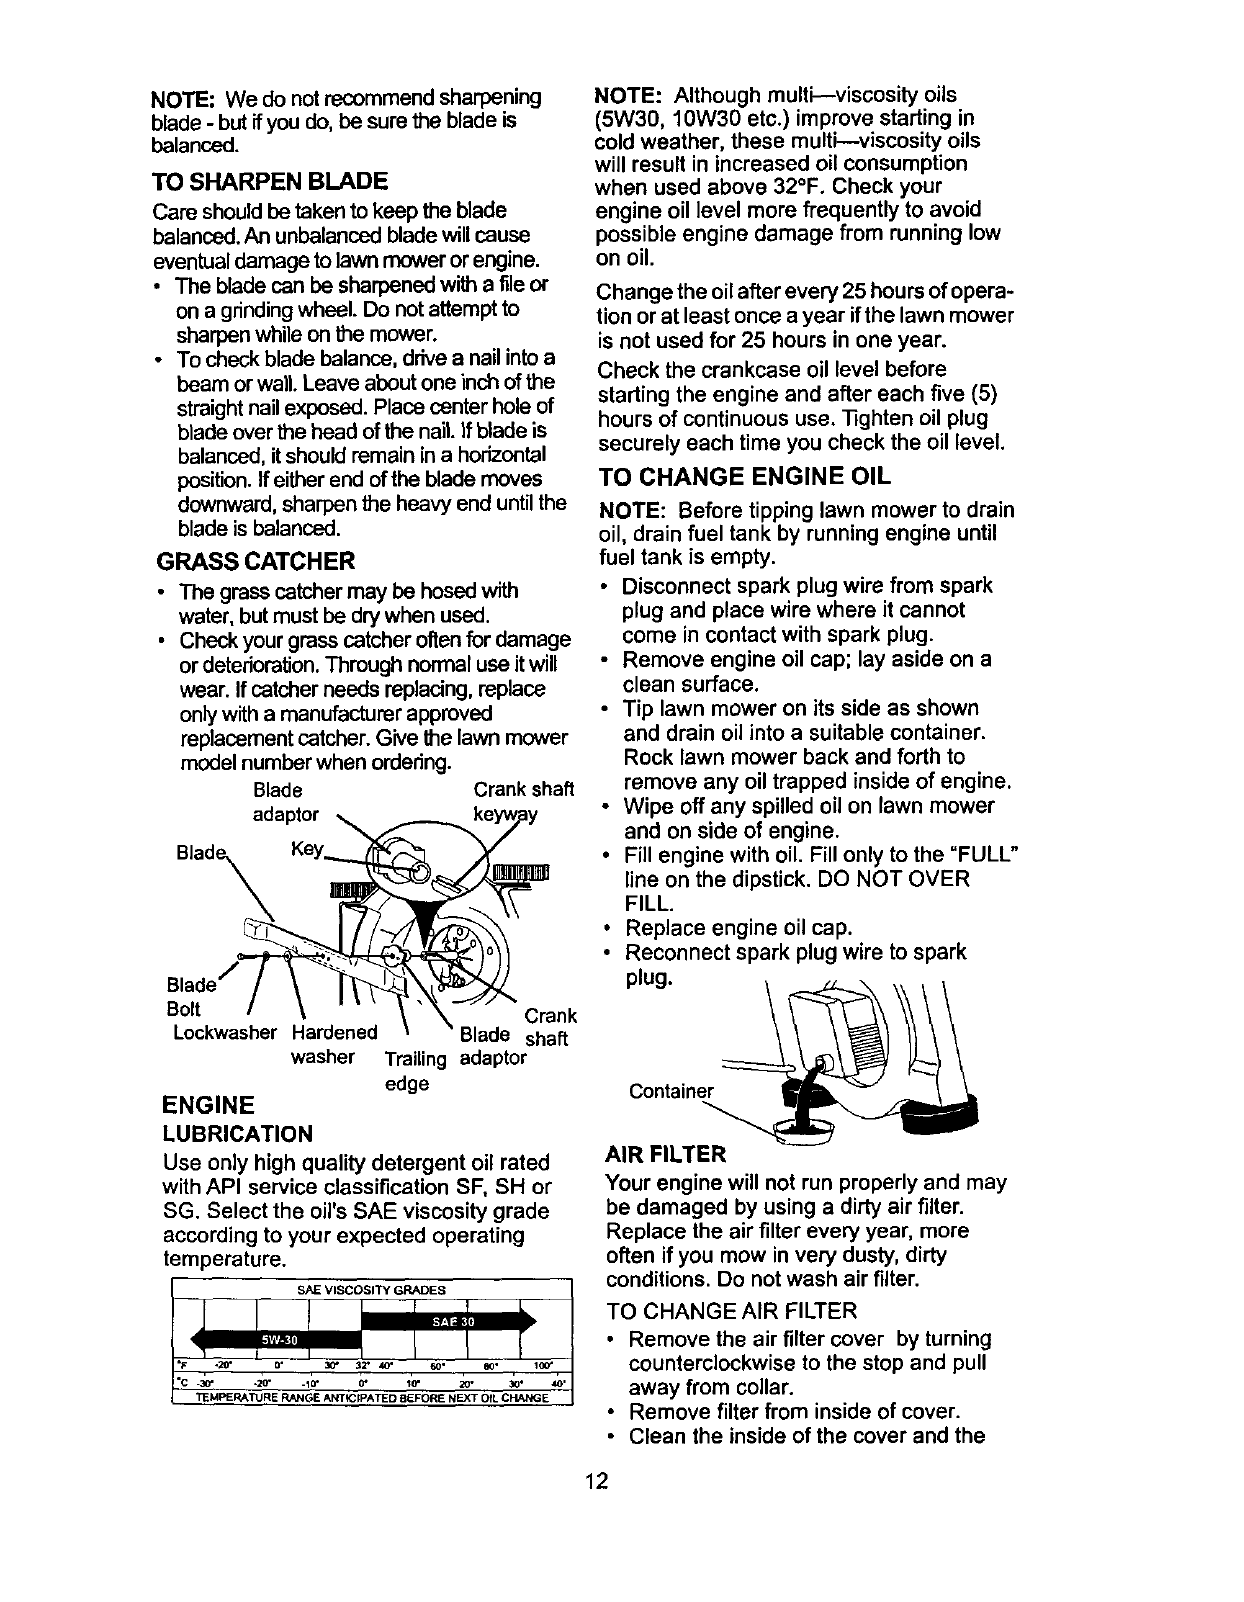
PRODUCT SPECIFICATIONS
MODEL NUMBER 917.387151
SERIAL NUMBER
DATE OF PURCHASE
HORSEPOWER: 5.5
DISPLACEMENT: 11.5 CU. IN.
GASOLINE CAPACITY/TYPE: 1.5 QUARTS
UNLEADED REGULAR
OIL TYPE (API-SF/SG/SH): SAE 30 (ABOVE 32°F)
SAE 5W-30 (BELOW 32°F)
OiL CAPACITY: 20 OZS.
SPARK PLUG(GAP: .030") CHAMPION RJ19L
VALVECLEARANCE: INTAKE: .008
EXHAUST: .008
SOLID STATE IGNITION
_IR GAP: .0125 IN.
BLADE BOLT TORQUE: 35-40 FT. LBS.
The model and serial numbers will be found on a decal attached to the rear of the
lawn mower housing.Record both serial number and date of purchase in space
provided above.
LAWN MOWER • Remove blade and attaching hardware
(bolt, lock washer and hardened washer).
NOTE: Remove the blade adapter and
check the key inside hub of blade adapter.
The key must be in good condition to work
properly. Replace adapter if damaged.
Always observe safety rules when performing
any maintenance.
TIRES
•Keep tires f'me of gasoline, oil, or insect
control chemicals which can harm rubber.
• Avoid stumps, stones, deep ruts, sharp
objects and other hazards that may cause
tire damage.
BLADE CARE
For best results, mower blade must be kept
sharp. Replace bent or damaged blades.
TO REMOVE BLADE
• Disconnect spark plug wire from spark plug
and place wire where it cannot come in
contact with spark plug.
•Turn lawn mower on its side. Make sure air
filter and carburetor are up.
•Use a wood block between blade and
mower housing to prevent blade from
turning when removing blade boll
•Protect your hands with gloves and/or wrap
blade with heavy cloth.
•Remove blade bolt by turning counter-
clockwise. Use a 9/16" box or open--end
wrench.
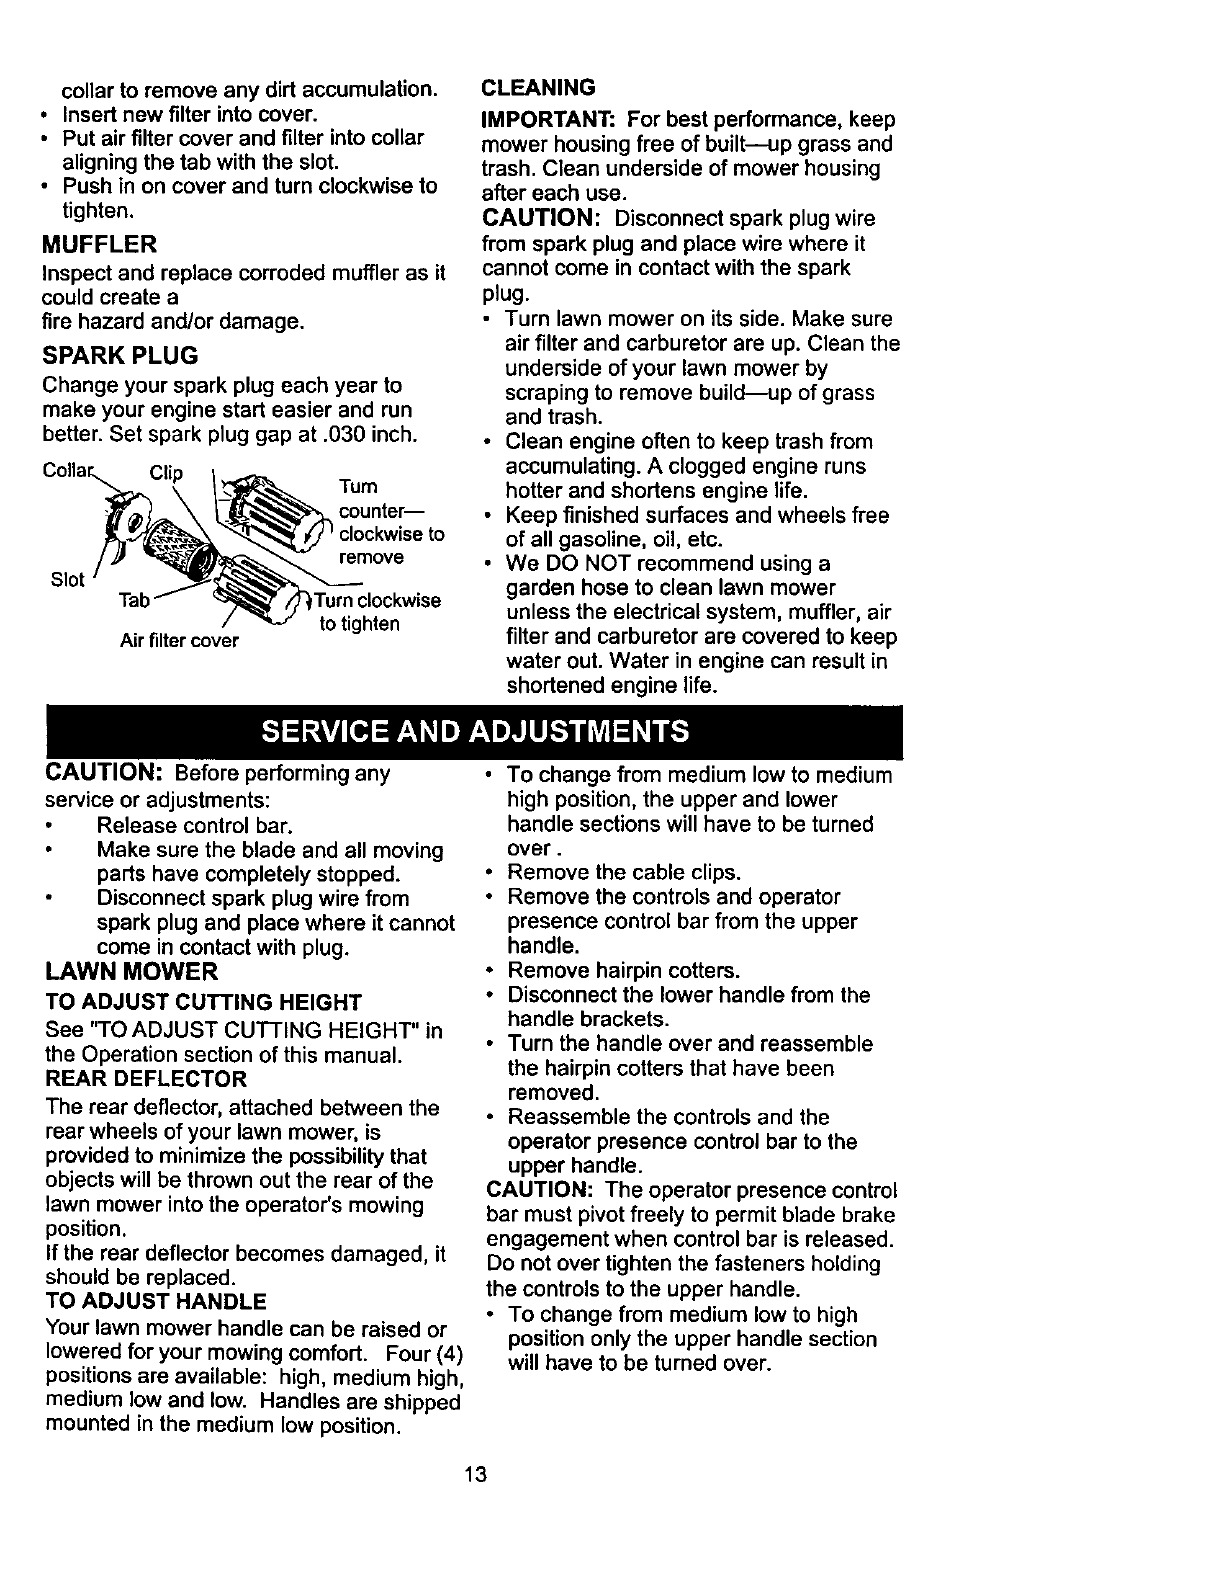
TO REPLACE BLADE
•Position the blade adapter on the engine
crankshaft. Be sure key in adapter and
keyway in crankshaft are aligned.
•Position blade on the blade adapter
aligning the two (2) holes in the blade with
the raised lugs on the adapter.
•Be sure the trailing edge is up toward the
engine.
•Install the blade bolt with the lock washer
and hardened washer into blade adapter
and crankshaft.
•Use block of wood between blade and
lawn mower housing and tighten the blade
bolt, turning clockwise.
•The recommended tightening torque is 35-
40 fL Ibs.
IMPORTANT." Blade bolt is grade 8 heat
treated.
11
NOTE" We do not recommend sharpening
blade - but if you do, be sure the blade is
balanced.
TO SHARPEN BLADE
Care should be taken to keep the blade
balanced. An unbalanced blade will cause
eventual damage to lawn mower or engine,
•The blade can be sharpened with a file or
on a grinding wheel. Do not attempt to
sharpen while on the mower.
• To check blade balance, drive a nail into a
beam or wall. Leave about one inch of the
straight nail exposed. Place center hole of
blade over the head of the nail. If blade is
balanced, it should remain in a horizontal
position. If either end of the blade moves
downward, sharpen the heavy end until the
blade is balanced.
GRASS CATCHER
•The grass catcher may be hosed with
water, but must be dry when used.
• Check your grass catcher often for damage
or deterioration. Through normal use it will
wear. If catcher needs replacing, replace
only with a manufacturer approved
replacement catcher. Give the lawn mower
model number when ordering.
Blade Crank shaft
adaptor
Bolt Crank
Lockwasher Hardened Blade shaft
washer Trailing adaptor
edge
ENGINE
LUBRICATION
Use only high quality detergent oil rated
with API service classification SF, SH or
SG. Select the oil's SAE viscosity grade
according to your expected operating
temperature.
SAE VISCOSITY GRADES
.20" .IO, O' 30.
TEMPERA_JRE RANGE ANTICipATE D BEFORE NEXT OfL CHANGE
NOTE: Although multi--viscosity oils
(5W30, 10W30 etc.) improve starting in
cold weather, these multi---viscosity oils
will result in increased oil consumption
when used above 32°F. Check your
engine oil level more frequently to avoid
possible engine damage from running low
on oil.
Change the oil after every 25 hours of opera-
tion or at least once a year if the lawn mower
is not used for 25 hours in one year.
Check the crankcase oil level before
starting the engine and after each five (5)
hours of continuous use. 13ghten oil plug
securely each time you check the oil level.
TO CHANGE ENGINE OIL
NOTE: Before tipping lawn mower to drain
oil, drain fuel tank by running engine until
fuel tank is empty.
•Disconnect spark plug wire from spark
plug and place wire where it cannot
come in contact with spark plug.
•Remove engine oil cap; lay aside on a
clean surface.
• Tip lawn mower on its side as shown
and drain oil into a suitable container.
Rock lawn mower back and forth to
remove any oil trapped inside of engine.
•Wipe off any spilled oil on lawn mower
and on side of engine.
•Fill engine with oil. Fill only to the "FULL"
line on the dipstick. DO NOT OVER
FILL.
•Replace engine oil cap.
•Reconnect spark plug wire to spark
plug.
Container
AIR FILTER
Your engine will not run properly and may
be damaged by using a dirty air filter.
Replace the air filter every year, more
often if you mow in very dusty, dirty
conditions. Do not wash air filter.
TO CHANGE AIR FILTER
• Remove the air filter cover by turning
counterclockwise to the stop and pull
away from collar.
• Remove filter from inside of cover.
• Clean the inside of the cover and the
12
collar to remove any dirt accumulation.
• Insert new filter into cover.
• Put air filter cover and filter into collar
aligning the tab with the slot.
•Push in on cover and turn clockwise to
tighten.
MUFFLER
Inspect and replace corroded muffler as it
could create a
fire hazard and/or damage.
SPARKPLUG
Change your spark plug each year to
make your engine start easier and run
better. Set spark plug gap at .030 inch.
Slot
Clip mum
counter--
clockwise to
remove
Tab ,Turn clockwise
to tighten
Air filter cover
CLEANING
IMPORTANT: For best performance, keep
mower housing free of built--up grass and
trash. Clean underside of mower housing
after each use.
CAUTION: Disconnect spark plug wire
from spark plug and place wire where it
cannot come in contact with the spark
plug.
• Turn lawn mower on its side. Make sure
air filter and carburetor are up. Clean the
underside of your lawn mower by
scraping to remove build_up of grass
and trash.
•Clean engine often to keep trash from
accumulating. Aclogged engine runs
hotter and shortens engine life.
•Keep finished surfaces and wheels free
of all gasoline, oil, etc.
•We DO NOT recommend using a
garden hose to clean lawn mower
unless the electrical system, muffler, air
filter and carburetor are covered to keep
water out. Water in engine can result in
shortened engine life.
CAUTION: Before performing any
service or adjustments:
•Release control bar.
Make sure the blade and all moving
parts have completely stopped.
Disconnect spark plug wire from
spark plug and place where it cannot
come in contact with plug.
LAWN MOWER
TO ADJUST CUTTING HEIGHT
See "TO ADJUST CUTTING HEIGHT" in
the Operation section of this manual.
REAR DEFLECTOR
The rear deflector, attached between the
rear wheels of your lawn mower, is
provided to minimize the possibility that
objects will be thrown out the rear of the
lawn mower into the operator's mowing
position.
If the rear deflector becomes damaged, it
should be replaced.
TO ADJUST HANDLE
Your lawn mower handle can be raised or
lowered for your mowing comfort. Four (4)
positions are available: high, medium high,
medium low and low. Handles are shipped
mounted in the medium low position.
•To change from medium low to medium
high position, the upper and lower
handle sections will have to be turned
over.
•Remove the cable clips.
• Remove the controls and operator
presence control bar from the upper
handle.
• Remove hairpin cotters.
• Disconnect the lower handle from the
handle brackets.
• Turn the handle over and reassemble
the hairpin cotters that have been
removed.
•Reassemble the controls and the
operator presence control bar to the
upper handle.
CAUTION: The operator presence control
bar must pivot freely to permit blade brake
engagement when control bar is released.
Do not over tighten the fasteners holding
the controls to the upper handle.
• To change from medium low to high
position only the upper handle section
will have to be turned over.
13
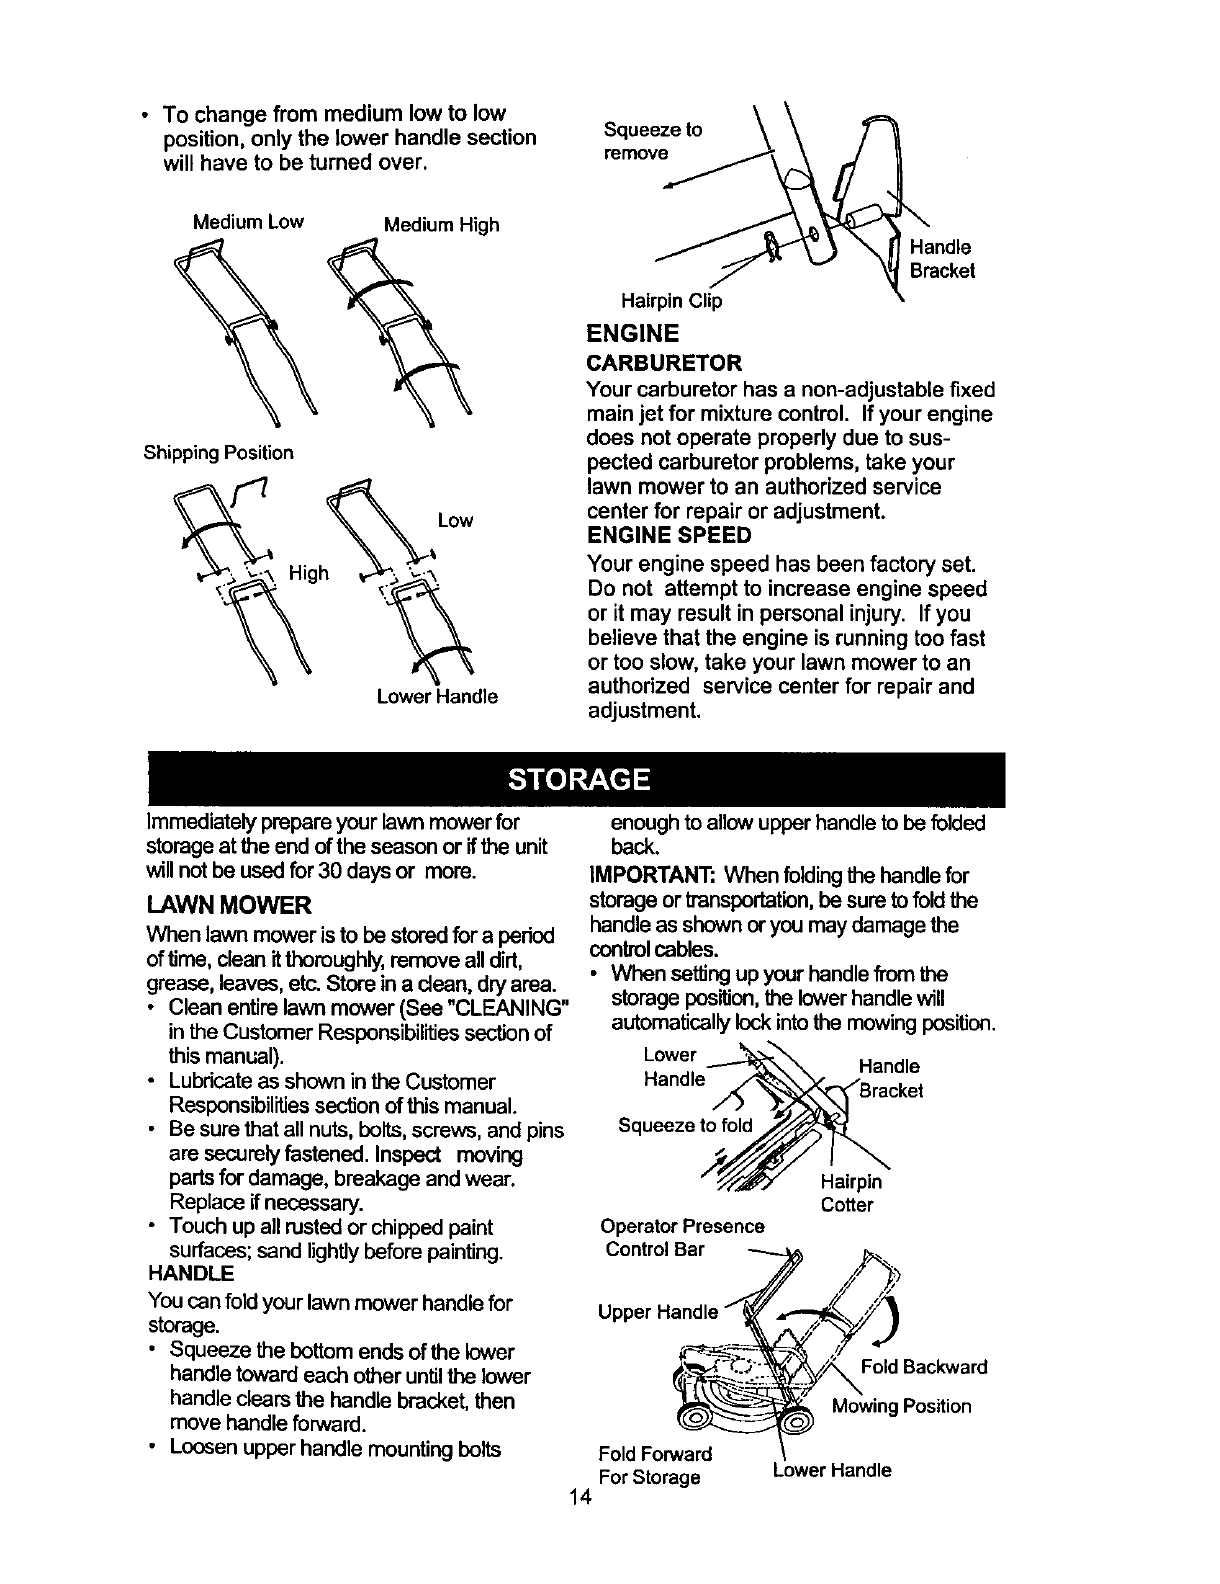
• To change from medium low to low
position, only the lower handle section
will have to be turned over.
Squeeze to
remove
Medium Low
Shipping Position
Medium High
Low
High
Lower Handle
Handle
Bracket
Hairpin Clip
ENGINE
CARBURETOR
Your carburetor has a non-adjustable fixed
main jet for mixture control. If your engine
does not operate properly due to sus-
pected carburetor problems, take your
lawn mower to an authorized service
center for repair or adjustment.
ENGINE SPEED
Your engine speed has been factory set.
Do not attempt to increase engine speed
or it may result in personal injury. If you
believe that the engine is running too fast
or too slow, take your lawn mower to an
authorized service center for repair and
adjustment.
Immediately prepareyour lawn mowerfor
storage atthe end ofthe seasonor ifthe unit
willnotbe usedfor 30 days or more.
LAWN MOWER
When lawn mower is to be stored for aperiod
of time, clean it thoroughly, remove all dirt,
grease, leaves, etc. Store in a clean, dry area.
•Clean entire lawn mower (See "CLEANING"
in the Customer Responsibilities section of
this manual).
• Lubricate as shown in the Customer
Responsibilities section of this manual.
•Be sure that all nuts, bolts, screws, and pins
are securely fastened. Inspect moving
parts for damage, breakage and wear.
Replace if necessary.
•Touch up all rusted or chipped paint
surfaces; sand lightly before painting.
HANDLE
You can fold your lawn mower handle for
storage.
• Squeeze the bottom ends of the lower
handle toward each other untilthe lower
handle dears the handle bracket, then
move handle forward.
•Loesen upper handle mounting bolts
14
enoughtoallow upperhandle to be folded
beck.
IMPORTANT: When folding the handlefor
storageortransportation,be suretofoldthe
handleas shownor you may damage the
controlcables.
•When setting up yourhandle fromthe
storageposition,the lowerhandlewill
automaticallylockinto the mowing position.
Lower Handle
Handle
Squeeze to fold
Operator Presence
Control Bar
Upper Handle
Fold Forward
For Storage
Hairpin
Cotter
_Fold Backward
Mowing Position
Lower Handle

ENGINE
FUEL SYSTEM
IMPORTANT." It is important to prevent bum
deposits from forming in essential joel system
parts such as carburetor, fuel filter,fuel hose,
or tank during storabe. Also, experience
indicates that alcolol blinded fuels (called
gasohol or using ethanol or methanol) can
attz'act moisture which leads to separation and
formation of acids during storage. Acidic gas
can damage the fuel system of an engine
while in storage.
•Drain the fuel tank.
• Start the engine and let it run until the fuel
lines and carburetor are empty.
• Never use engine or carburetor cleaner
products in the fuel tank or permanent
damage may occur.
• Use fresh fuel next season.
NOTE: Fuel stabilizer is an acceptable
altemative in minimizing the formation of fuel
gum deposits during storage. Add stabilizer to
gasoline in fuel tank or storage container.
Always follow the mix ratio found on stabilizer
container. Run engine at least 10 minutes
after adding stabilizer to allow the stabilizer to
reach the carburetor. Do not drain the gas
tank and carburetor if using fuel stabilizer.
ENGINE OIL
Drain oil (with engine warm) and replace with
clean engine oil. (See "ENGINE" in the
Customer Responsibilities section of this
manual).
TROUBLESHOOTING CHART
CYLINDER
• Remove spark plug.
•Pour one ounce (29 ml) of oil through spark
plug hole into cylinder.
• Pull starter handle slowly a few times to
distribute oil.
• Replace with new spark plug.
OTHER
•Do not store gasoline from one season to
another.
•Replace your gasoline can if your can starts
to rust. Rust and/or dirt in your gasoline will
cause problems.
•If possible, store your unit indoors and cover
it to give protection from dust and dirt.
•Cover your unit with a suitable protective
cover that does not retain moisture. Do not
use plastic. Plastic cannot breathe which
allows condensation to form and will cause
your unit to rust.
IMPORTAN'R Never cover mowerwhile
engine and exhaust areas are still warm.
CAUTION: Never store the lawn mower with
gasoline in the tank inside a buildingwhere
fumes may reach an open flame or spark.
Allow the engine to cool before storing in any
enclosure.
PROBLEM CAUSE
Does not start • Dirty air tilter.
•Out of fuel.
• Stale fuel.
Water in fuel.
•Spark plug wire is
disconnected.
• Bad spark plug.
•Loose blade or broken blade
adapter.
•Control bar in released
position.
• Control bar defective.
CORRECTION
•Clean/replace air filter.
• Fill fuel tank.
•Drain tank and refillwith
flesh clean fuel.
•Drain fuel tank and
carburetor and refilltank
with fresh gasoline.
•Connect wire to plug.
•Replace spark plug.
• lighten blade bolt or
replace blade adapter.
•Depress control bar to
handle.
•Replace control bar.
15
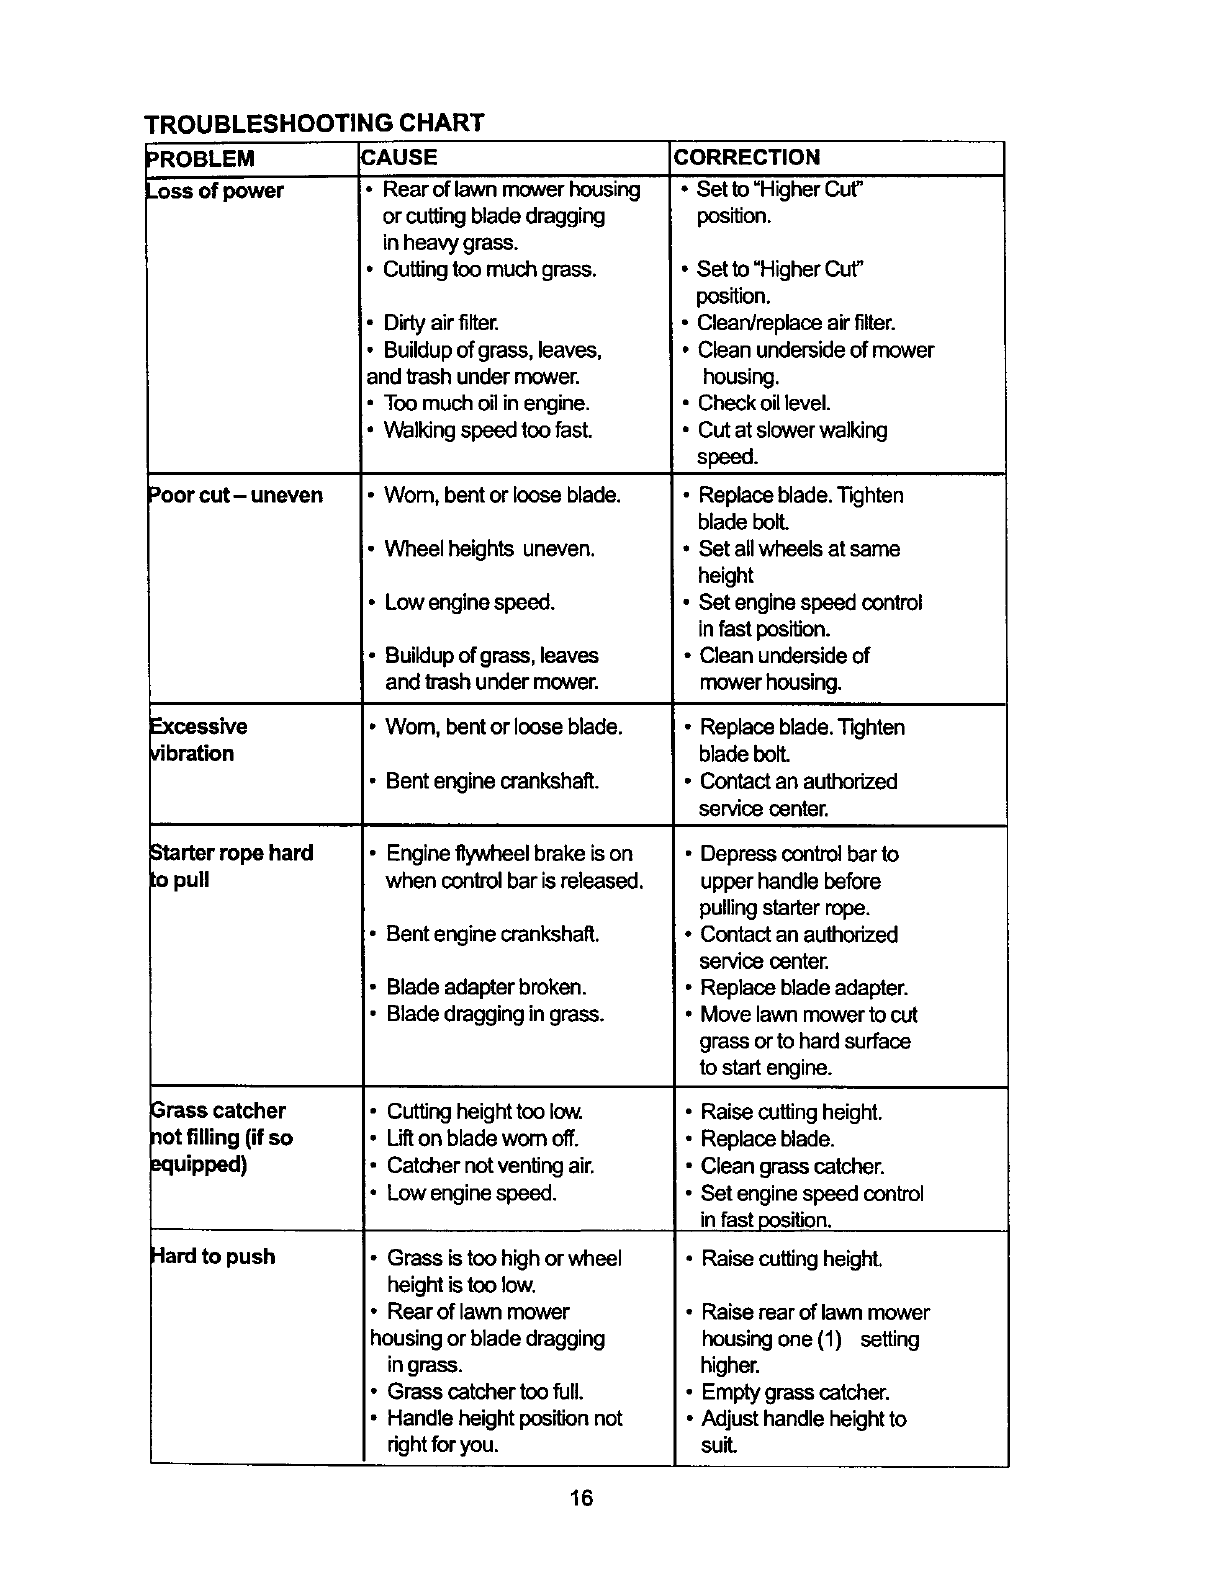
_ROBLEM
_oss of power
TROUBLESHOOTING CHART
CAUSE
•Rear of lawn mowerhousing
or cuttingbladedragging
inheavy grass.
•Cuttingtoomuchgrass.
Poorcut-uneven
_cessive
4bration
_'larter rope hard
o pull
3rass catcher
lot filling (if so
_uipped)
_ardtopush
•Dirty air filter.
•Buildup of grass, leaves,
and bash under mower.
•Too much oil in engine.
•Walking speed too fast.
•Wom, bent or loose blade.
• Wheel heights uneven.
Low engine speed.
• Buildup of grass, leaves
and bash under mower.
•Wom, bent or loose blade.
• Bent engine crankshaft.
• Engine flywheel brake is on
when control bar is released.
• Bent engine crankshaft.
•Blade adapter broken.
• Blade dragging in grass.
• Cutting height too low.
•Lift on blade worn off.
• Catcher not venting air.
• Low engine speed.
• Grass is too high or wheel
height is too low.
•Rear of lawn mower
housing or blade dragging
ingrass.
•Grass catcher too full.
• Handle height position not
dght for you.
CORRECTION
• Set to =Higher Cur
position.
• Set to "Higher Cur
position.
• Clean/replace air filter.
• Clean underside of mower
housing.
• Check oil level.
• Cut at slower walking
speed.
• Replace blade. Tighten
blade belL
• Set all wheels at same
height
• Set engine speed control
in fast position.
• Clean underside of
mower housing.
i. Replace blade. Tghten
blade bolL
• Contact an authorized
service center.
•Depress control bar to
upper handle before
pullingstarterrope.
• Contact an authorized
service center.
•Replace blade adapter.
•Move lawn mower to cut
grass or to hard surface
to start engine.
•Raise cutting height.
•Replace blade.
• Clean grass catcher.
• Set engine speed control
in fast position.
• Raise cutting height.
•Raise rear of lawn mower
housing one (1) setting
higher.
• Empty grass catcher.
•Adjust handle height to
suit.
16
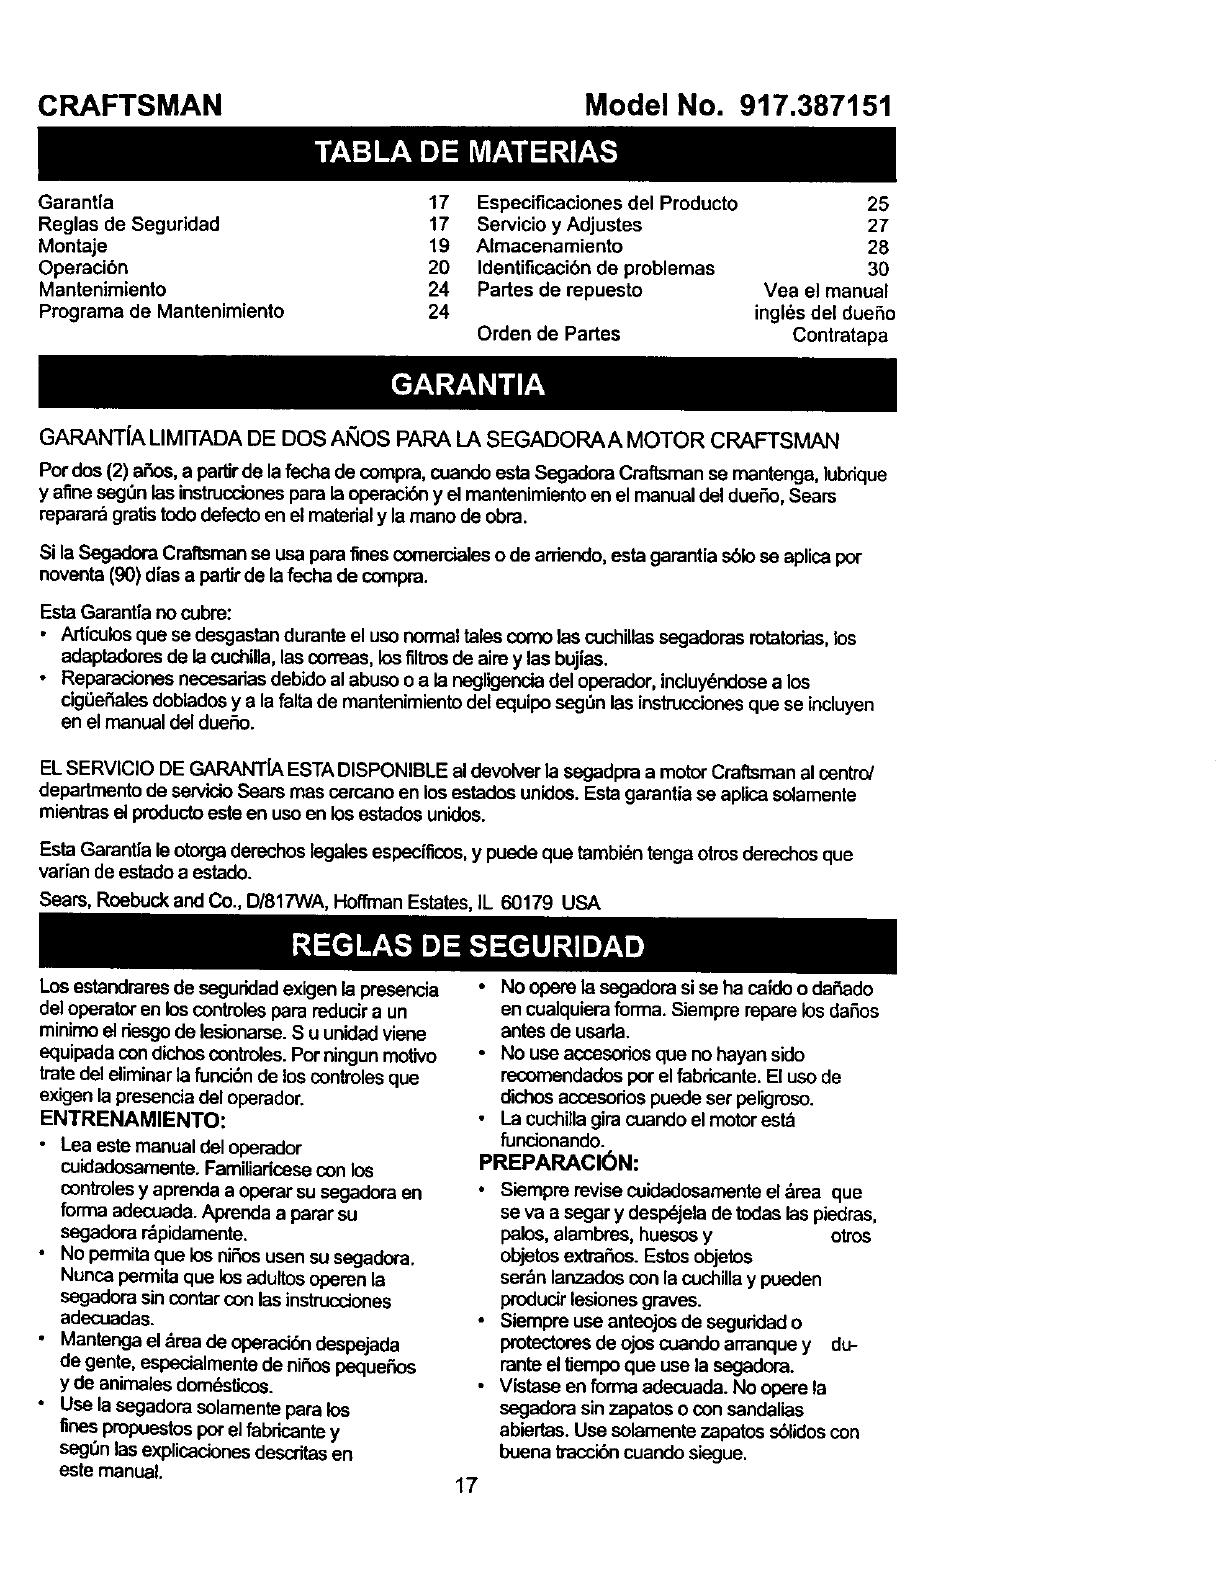
CRAFTSMAN Model No. 917.387151
Garant[a
Reglas de Seguridad
Montaje
Operacibn
Mantenimiento
Pregrama de Mantenimiento
17 Especificaciones del Producto 25
17 Servicio y Adjustes 27
19 AImacenamiento 28
20 Identificacibnde problemas 30
24 Partes de repuesto Vea el manual
24 ingles del duefio
Orden de Partes Contratapa
GARANTJA LIMITADA DE DOS AI_IOS PAPA LA SEGADORAA MOTOR CRAFTSMAN
Por dos(2) afios, a parlJrde la fecha de compra,cuandoesta Segadora Craftsman se rnantenga,lubrique
yafinesegOnlas instruccionespara la operacibny el mantenimientoen el manualdeldueSo,Sears
repararagratistododefectoen el materialy la mano de obra.
Si la SegadoraCraftsmanse usa para finescomercialeso de ardendo,esta garantiasblose aplicapar
neventa (90) dias a parlJrde lafecha de compra.
Esta Garantia nocubra:
• Artfculos quese desgastanduranteel usenormal tales comolas cuchillassegadorasrotatodas,los
adaptadoresde la cuchilla,las correas,losfiltros de airay las bujias.
• Reparadones necesadasdebidoal abuseo a la negligenciadel operador,induy6ndosea los
cigeefialosdobladosy a la falta de mantenimientodelequiposegi3nlas instruccionesque se incluyen
en el manualdel dueSo.
EL SERVIClO DE GARANTIA ESTADISPONIBLE al devolverla segadpraa motorCraftsman al control
departmentode servicioSears mas corcano en losestades unidos.Estagarantiase aplicaselamente
mientrasel productoesle en use en losestadosunidos.
Esta Garantla le otorgaderechos legalesespecificos,y puede quetambidntengaotrosderechosque
varian de estadoa estado.
Sears, Roebuckand Co., D/817WA, HoffmanEstates, IL 60179 USA
Losestandraresde seguridadexigen la presencia
del operatoren loscontrolespara reducira un
minimael riesgode lesionarse.S u unidadviene
equipadacond_ coekoles.Por ningun motivo
tra!edel eliminerla funcibn de los controlesque
exEjenla presenciadel operador.
ENTRENAMIENTO:
• Lea estemanual deloperador
cuidedosamente.Familiaricoseconlos
controles y aprendaa operarsu segadoraen
forma adecuada.Aprendaa pararsu
segadorar'&pidamente.
• No permitaque losnifiosusensu segadora.
Nunca permitaque los adultosoperanla
segadorasincontar con lasinstrucciones
adecuadas.
• Mantenga el &raade operacibndespejada
de genta, especialmentade nifiospequefios
y de animalesdom_sficos.
• Use la segadorasolamentepara los
fines propuestospor el fabricante y
seg_n lasexplicacionesdescritasen
este manual.
• No opere la segadorasi se ha osldo o dafiado
en cualquieraforma. Siempre repare los dafios
antes de usada.
•No use accesenosque no hayansido
recomendadospar el fabricanta.El use de
dichosaccosoriospuede ser peligroso.
La cuchillagiracuandoel motorest&
funclonando.
PREPARAClON:
Siempre revisecuidadosamenteel drea que
se va asegar y desl:_jela de tndas laspiedras,
palos,alambres,huesosy otros
objetosextrafios.Estosobjetos
ser_nlanzadosconla cuchillay pueden
produdrlesiones graves.
Siempreuse anteojosde seguddado
protectoresde ojoscuandoarranquey du-
ranteel ttampoque use la segadora.
Vistase en forma adecuada.No opare la
segadorasinzapatoso consandalias
abiertas.Use solamentezapatossblidoscon
buena traccibncuandosiegue.
17
• Revise el estanque de combustibleantes de
hacer arrencar el motor. No Ilene el estanque
de gasolina en recintos cerrados,
ni cuando el motor estd funcionando o cuando
estd caliente. Permita que el motor se enfr[e
por varios minutos antes de Ilenar el estanque
de gasolina. Limpie toda la gasolina
derramada antes de hacer arrancar el motor.
• Siempre haga los ajustes de altura de las
ruedas antes de hacer arrancar su
segadora. Nunca trate de hacer 6sto
mientres que el motor estd funcionando.
•Siegue siempre durante el dfa o con buena
luz artificial.
OPERACl6N:
Mantenga sus ojos ysu mente en la
segadora yen el =_reaque se est_ cortando.
No permita que otros intereses Io distraigan.
No corte c6sped mojado o resbaloso. Nunca
corra mientras estd operando su segadora.
Siempre asegOrese de mantener el equilibdo
- mantenga el mango agarrado firmemente y
camine.
•No ponga las manos o los pies cerca odebajo
de las partes rotatodas. Mant6ngase
alejado de la abertura de descarga en todo
momento.
•Siempre pare el motor cuando se vaya
ocuando no est_ usando su segadora, o
antes de atravesar las entradas para autos,
los sendems, caminos y dreas cubiertas de
ripio.
•Nunca didja la descarga del material hacia
los espectadores ni permita a nadie cerca de
la segadora mientras la estd operando.
•Antes de limpiar,inspeccionar o de reparar I
a segadora, pare el motor y estd
completamente seguro de que la cuchillay
que todas las partes que se mueven se
hayan detenido. Luego, desconecte el
alambre de la bujfa y mant(_ngalo alejado de
_sta para evitar el arranque pot accidente.
•No continde haciendo funcionar su segadora
si le pega a un objeto extraSo. Siga el
procedimientodescritoantedormente, luego
repare cualquier da_o antes de volver a
arrancar y de operar su segadora.
•No cambie losajustes del regulador o
hagaque el motor ande a una velocidad
excesiva. Se pueden producirdaSos en el
motor y I esiones personales.
•No opere su segadora si vibra fuera de Io
normal. La vibrecibnexcesiva es una
indicacibnde da£=o;pare el motor, revise en
forma segura la causa de la vibracibny haga
las reparaciones segOnsea necesario.
• No haga funcionar el motor en
recintoscerrados. Losgases de escape son
peligrosos.
• Nunca corte el c_sped tirando la segadora
hada usted. Siegue a travds de la cara de
las pendientes, nunca hacia arriba o hacia
abajo pues puede perder el equilibrio. No
siegue pendientes demasiado empinadas.
Tenga cuidado cuando opere la segadora en
terreno disparejo o cuando cambie de
direcoi6n - mantenga un buen equilibrio.
• Nunca opere la segadora sin las
protecciones adecuadas, las planchas, el
recogedor de c_sped y otros disposiUvosde
seguridad en su lugar.
MANTENIMIENTO Y ALMACENAMIEN-
TO:
•Revise la cuchiilay los pemos de montaje
del motor amenudo, para asegurarse que
est&n apretados en la forma adecuada.
• Revise todos los pemos, tuercas y tomillos a
intervalos frecuentes, para verificar si est_n
apretados en forma adecuada, y
asegurerseque la segadora se encuentra en
condiciones de funcionamiento seguro.
• Mantenga todos los disposiUvos de seguridad
en su lugar y listes para funcionar.
• Para reducir el peligre de incandio,
mantenga el motor sin c_sped, hojas y grasa
o aceite en excaso.
• Revise el recogedor de c_sped a menudo
para verificar si hay deterioro y desgaste y
cambie las bolsas desgastadas. Use
solamente las bolsas de repuesto
recomendadas por el fabricante de su
segadora o que cumplen con las
especificaciones de 6ste.
• Siempre mantenga una cuchilla afilada en su
segadora.
• Siempre permita que el motor se enfr{e
antes de guardada en cualquier recinto
cerrado.
• Nunca guarde la segadora con combustible
en el estanque dentro de un edificio endonde
los gases pueden alcanzar una llama
expuesta o una fuente de ignici6n, tal como el
calentador de agua, la estufa de
calefaccibn, la secadora de ropa, etc.
PRECAUCI(SN: Siempre desconecte el
alambre de la bujia ypongalo donde no
pueda entrar en contacto con la bujia, para
evitar el arranque por accidente, durante la
preparacibn, el transporte, el ajuste o
cuando se hacen reparaciones.
PRECAUCI(_N: Es conocido porel Estado de
Califomia que los gases de escape del motor de
este productorcontienen quimicos los cuales a
ciertos niveles, pueden ocasionar,c_ncer,
defectos de nacimiento,y otros daSos al sistema
reproductivo.
18
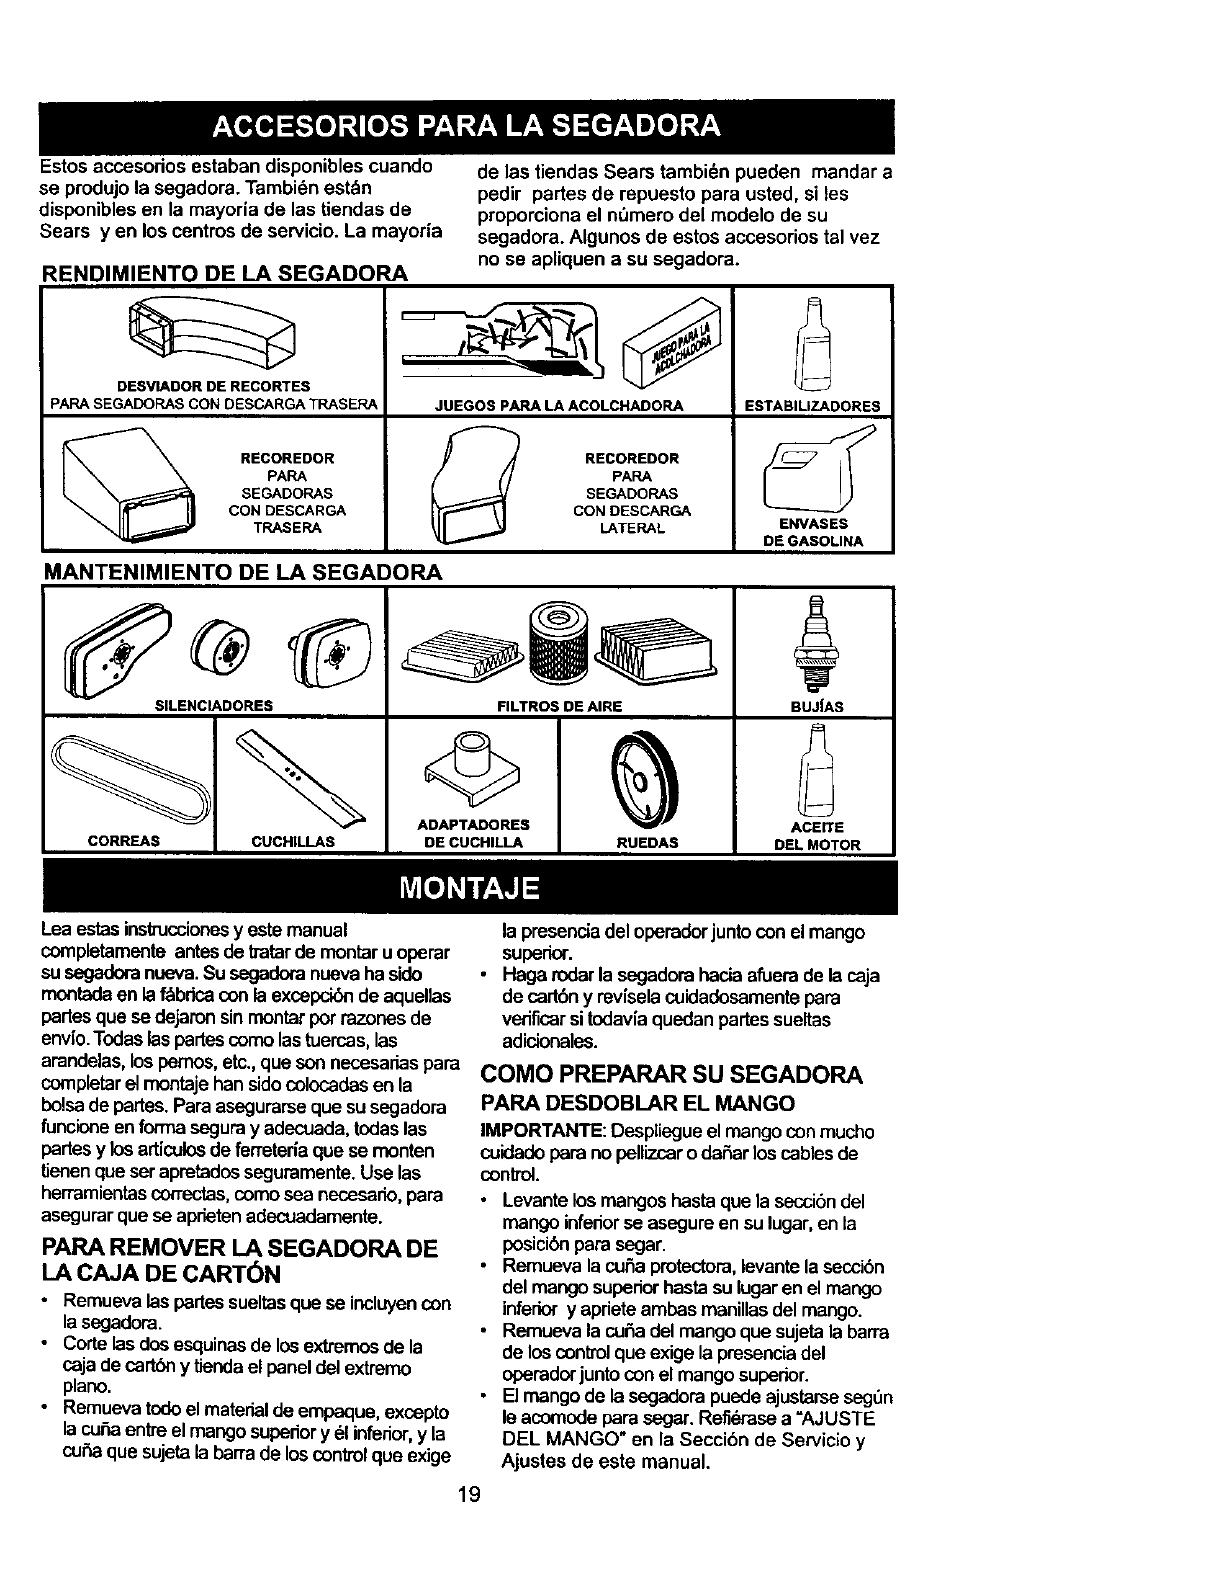
Estos accesorios estaban disponibles cuando
se produjo la segadora. Tambi6n estdn
disponiblesen la mayoria de las tiendas de
Sears yen los centros de servicio. La mayoria
RENDIMIENTO DE LA SEGADORA
de las tiendas Sears tambidn pueden mandar a
pedir partes de repuesto para usted, si les
proporciona el n_mero del modelo de su
segadora. Algunos de estos accesorios tal vez
DESVIADOR DE RECORTES
PARA SEGADORAS CON DESCARGA TRASERA
RECOREDOR
PARA
SEGADORAS
CON DESCARGA
TRASERA
no se apliquen a su segadora.
JUEGOS PARA LA ACOLCHADORA
RECOREDOR
PAPA
J SEGADORAS
CON DESCARGA
LATERAL
ESTABILIZADORES
E_ASES
DE GASOLINA
MANTENIMIENTO DE LA SEGADORA
SILENCIADORES
COR_S CUCHILLAS
ADAPTADORES
DE CUCHILLA
FILTROS DE AIRE
RUEDAS
BUJ|AS
ACEr_E
DEL MOTOR
Lea estasinstruccionesy este manual
completamenle antesde tratarde montaru operar
su segadoranueva.Su segadoranuevaha side
montadaen laf_brica conla excepck_ de aquellas
partesque se dejaronsinmontar por razonesde
env[o.Todaslas partescomolastuercas,las
arandelas,lospemos,etc.,queson necesariaspara
completarel montaje han sidecolocadasen la
bolsade partes.Para asegurarseque su segadera
funcione en forma seguray adecuada,todaslas
partesy losarticulosde ferreteria que se monten
tienenque ser apretadosseguramente.Use las
herramientascon'ectas,comosea necesado,para
asegurarque se aprietenadecuadamente.
PARA REMOVER LA SEGADORA DE
LA CAJA DE CARTON
• Remueva las partessueltasque se incluyencon
la segadora.
• Corte lasdosesquinasde losextremosde la
osja de cartbnytJendael paneldel extremo
piano.
•Remuevatodoel materialde empaque,excepto
la cuSaentreel mangosupadory 61infenor,y la
curiaque sujetala barrade loscontrol que exige
19
la pmsencia del operador juntoconel mango
superior.
•Haga rodarla segadorahaciaafuerade la caja
de cartbny rev{selacuidadesamentepara
verificarsitodavia quedanpartessueltas
adicionales.
COMO PREPARAR SU SEGADORA
PARA DESDOBLAR EL MANGO
IMPORTANTE: Despliegue el mango conmucho
cuidadopara no pellizcaro daSarloscablesde
control.
•Levantelos mangos hasta que la secci6ndel
mango infedorse asegureen su lugar,en la
posicibn para segar.
•Remueva la cuSa protectora, levante la seccibn
del mango superior hasta su lugar en el mango
inferiory apriete ambas manillas del mango.
• Rernueva la cuSa del mango que sujeta la barra
de los control que exige la presencia del
operador junto con el mango superior.
• El mango de la segadorapuede ajustarse seg_n
le acomode parasegar. Refidrasea =AJUSTE
DEL MANGO" en la Seccibn de Servicio y
Ajustes de este manual.
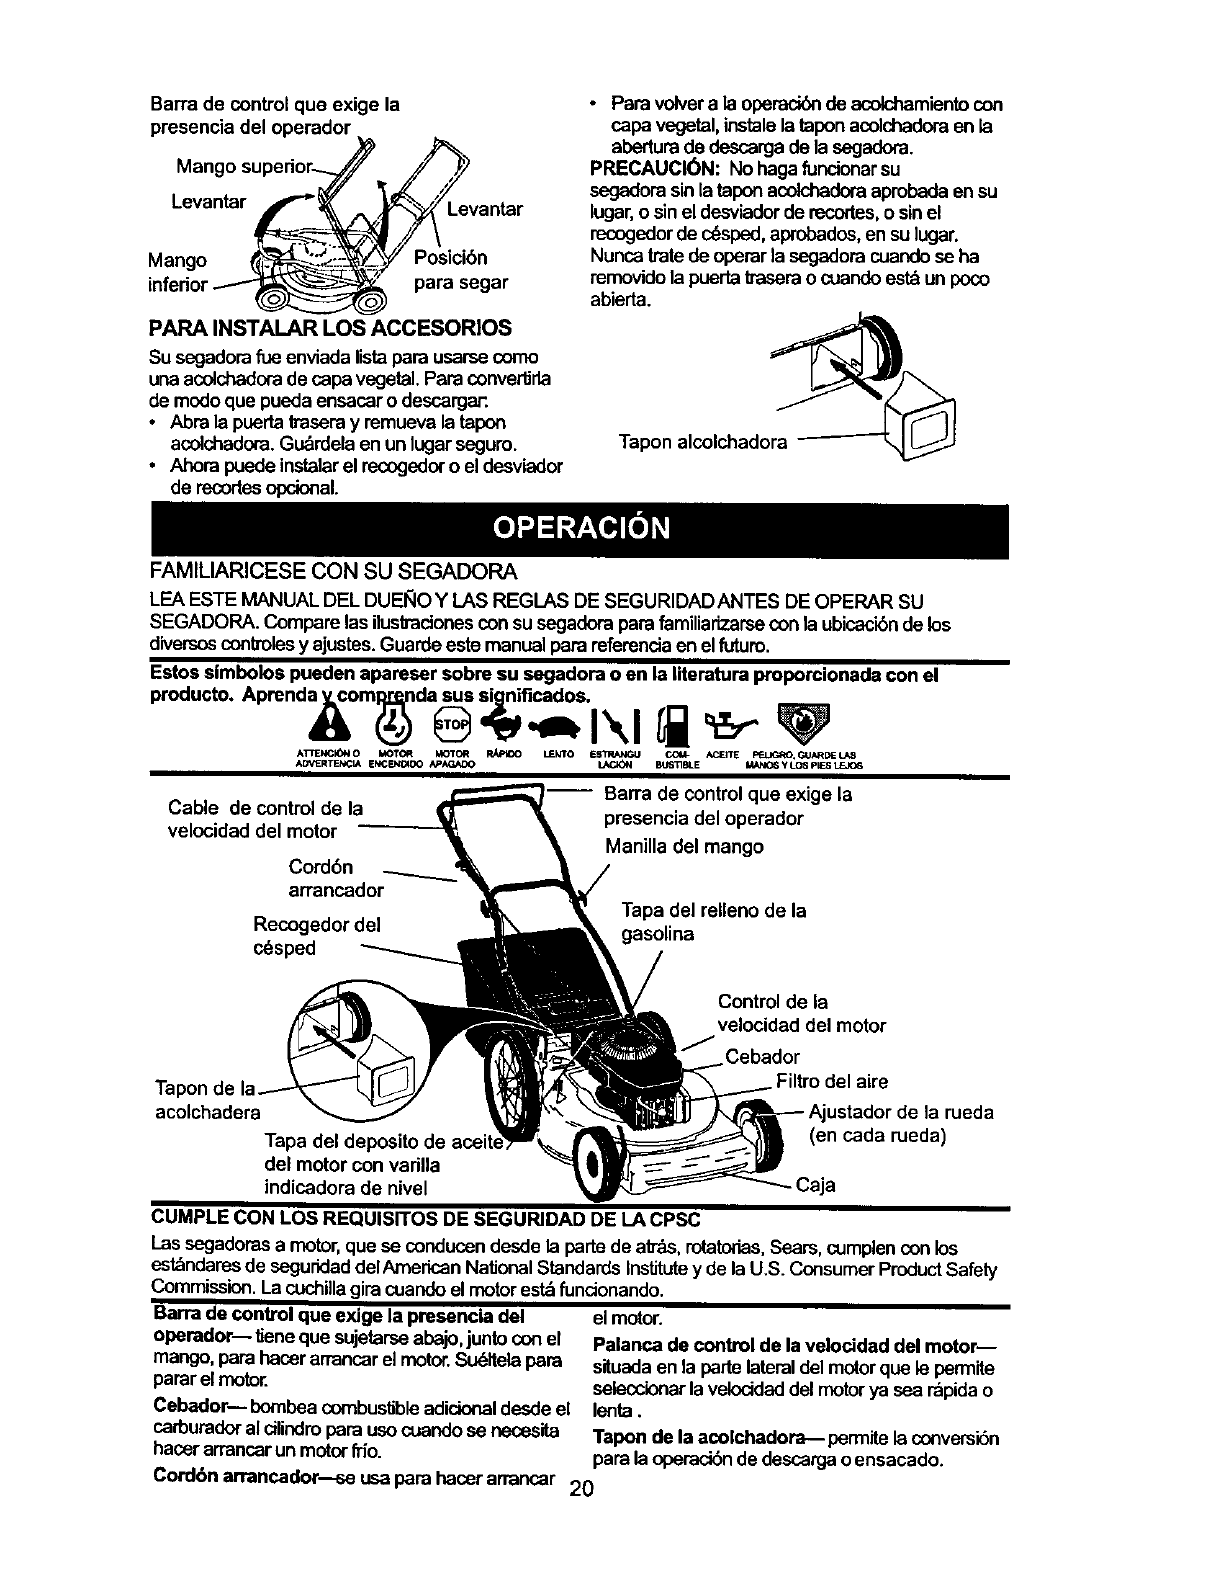
Barradecontrolqueexigela
presenciadeloperador
Mangosupedorj
Levantar L_____
Mango
inferior
//
L_vantar
,#" Posicibn
para segar
PAPA INSTALAR LOS ACCESORIOS
Su segadorafue enviada listapara usarsecomo
unaacolchaderade capa vegetal. Para convedirla
de modoque pueda ensacaro descarga_.
• Abra la puerta lraseray remuevala tapon
acolohadora.Gubrdelaen un legarseguro.
• Ahora puede instalarel recogedoro el desviador
de recortesopcional.
• Para volvera la operacibnde acolohamientocon
capa vegetal, instalela tapon acolchadomen la
aberturade descargade la segadera.
PRECAUCl6N: Nohagafuncionar su
segadorasinle taponacolchadomapmbada en su
lagar, o sinel desvledorde recortes,o sinel
recegedorde c_sped,aprobados, en su lugar.
Nunca tratede operarla segadoracuandese ha
removidola puertatrasera o cuandoest&un poco
abierta.
Tapon alcolchadora
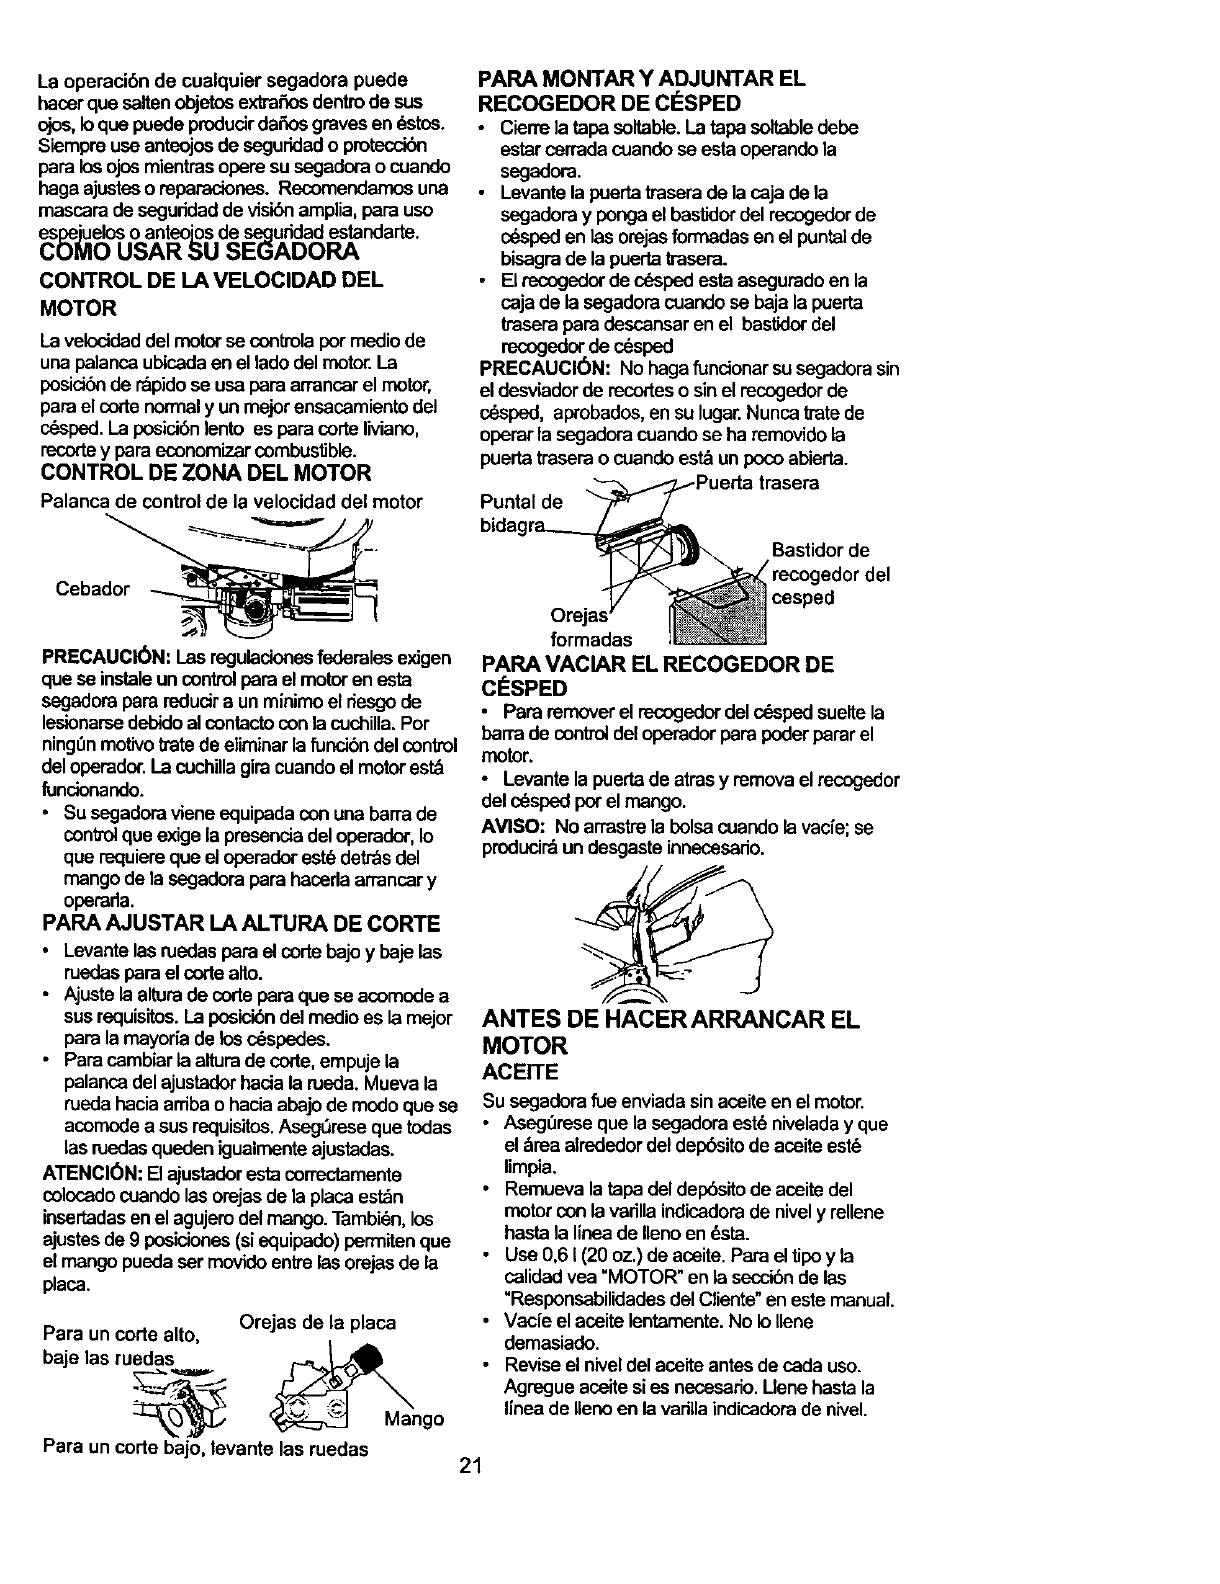
FAMILIARICESE CON SU SEGADORA
LEA ESTE MANUAL DEL DUERO Y LAS REGLAS DE SEGURIDADANTES DE OPERAR SU
SEGADORA. Compare las iluskaciones con su segadera para familiartzarse con la ubicacibn de los
diversos conlzoles y ajustes.Guarde esto manual para referenda en el future.
Estos simbolos pueden apareser sobre su segadora o en la literatura proporcionada con el
producto. Aprend_om_da_ _fi_s. I _1_1 _j_ _ I_
ATrENCI(_I OMOT_ k_TOR _LENTO i_$TRANCU CC_d- ACERE P_cLIGRO. G.UARDE LAB
ADVERTENCIA ENCENDIDO ApAG_DO _BL_IrISLE MANO6yLc_pIESLEJO6
Cable de control de la
velocidad del motor
Cord6n
arrancador
Recogedor del
c_sped
-- Barra de control que exige la
presencia del operador
Manilla del mango
Tapa del relleno de la
gasolina
Control de la
velocidad del motor
Cebador
Filtro del aire
Jstador de ta rueda
(en cada rueda)
Tapon
acelchadera
Tapa del deposito de ace
del motor con varilla
indicadora de nivel ~ Caja
CUMPLE CON LOS REQUISITOS DE SEGURIDAD DE LA CPSC
I_assegadorasa motor,que se conducen desde la partede a_, rotatorias,Sears, cumplenconlos
estandaresde seguridaddelAmedcan NationalStandardsInstitutey de la U.S. ConsumerProductSafety
Commission. La cuchillagira cuandoel motor est_funcionando.
Barra de control que exige la presencia del el motor.
operador-- lJeneque sujetarseabajo,juntocon el
mango,parahacerarrancarel motor.Su_Helapara
parar el motor.
Cebador--bombea combustibleadicionaldesdeel
carburadoral dlindropara usocuandose necesita
hacerarmncerun motor f_o.
Palanca de control de la velocidad del motor--
situadaen la parle lateraldel motorque le permite
selecclonarla velocidaddel motorya sea rapidao
lenta.
Tapon de la acolchadora---permite le conversi6n
para la opemdbn de descergao ensacado.
Cordbn arrancador---se usa para hacerarrancar 20
Laoperacibndecualquiersegadorapuede
hacerquesaltenobjetosextrafiosdentrodesus
ojos,Ioquepuedeprodudrdafiosgravesen_stos.
Siempreuse anteojosde seguridado proteccibn
paralosojosmientrasopera susegadorao cuando
hagaajusteso reparaciones. Recomendamosuna
mascara de seguridadde visibnamplia,parausa
_sl_el_lelOso anteojosde seguddadestandarte.
O USAR SU SEGADORA
CONTROLDELAVELOCIDADDEL
MOTOR
La veloddaddel motorsa controlapor mediode
una palancaubicadaen el ledo del motor. La
posicibnde rapidose usa para arrancarel motor,
parael corle nomnaly un mejorensacamientodel
c_sped. La posicibn lento es para corte IMano,
recorte ypara economizar combustible.
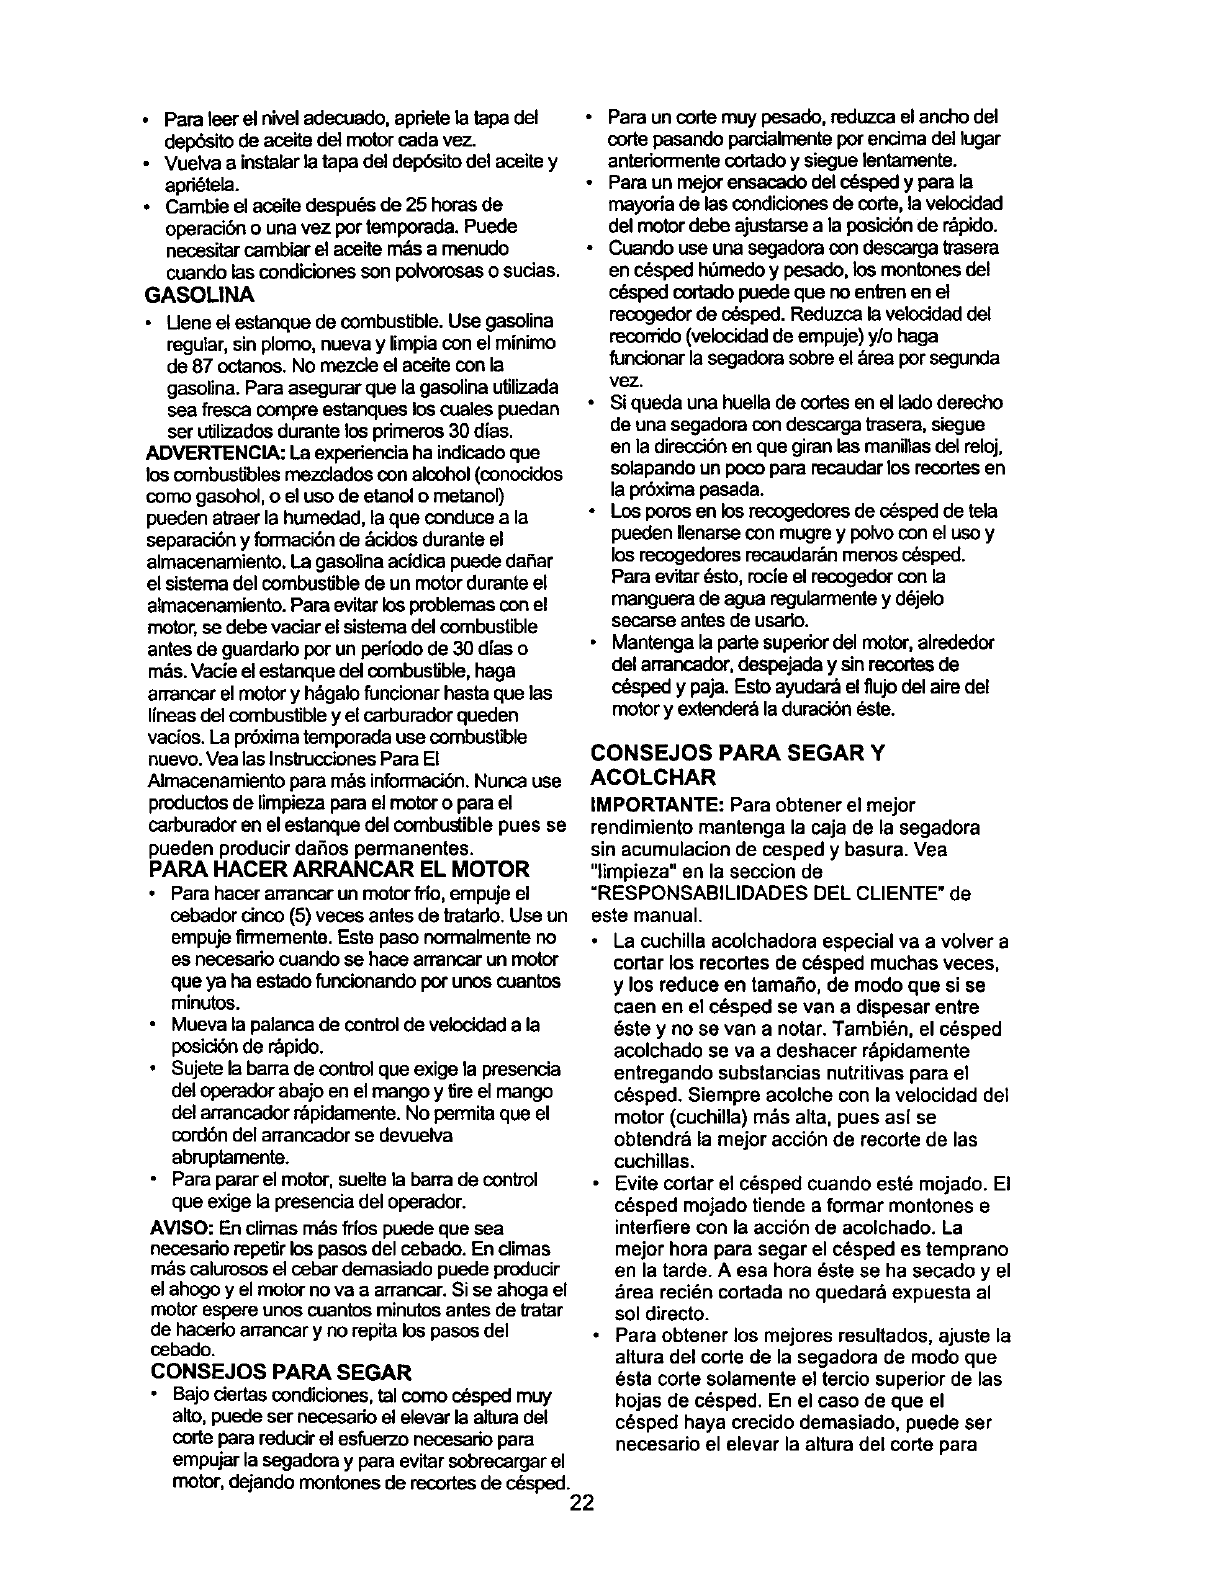
CONTROL DE ZONA DEL MOTOR
Palanca de control de la velocidad del motor
PAPA MONTAR Y ADJUNTAR EL
RECOGEDOR DE CO:SPED
•Cierre la tapa soltable.La tape soltabledebe
estarcerrada cuandosa esta operandola
segadora.
Levantela puertatrasarade la caja de le
segadoray pongael bastidordel recogedorde
c_,speden las orejasformadas en el puntalde
bisagrade la puerta lrasera.
• El recogedorde c6spedesta aseguradoen la
saja de la segadoracuandose bajala puerta
traserapara descansaren el bastidordel
recogedorde c_sped
PRECAUCl6N: No hagafuncionar su sagadora sin
el desviadorde recorteso sinel recogedorde
cesped, aprobados,en su lugar.Nuncatrate de
operarla segadoracuandose ha removidola
puertatraserao cuandoest&unpoco abierta.
Puntal de
Cebador
Bastidor de
trecogedor del
cesped
PRECAUCI6N: Las regulaciones federalesexigen
que se instaleun control pare el motor en esta
segadoraparareducira unminimo el riesgode
lesionarse debidoal contacto con la cuchilla.Por
ningl3nmotivoIrate de elimlearla funcibn del control
deloperador.La cuchillagiracuandoel motorestd
funcionando.
•Su segadoravieneequipadacon unabarra de
cont]olque exigela presenciadel operador,Io
que requiemque el operadorest_ detrdsdel
mangode le segadorapara hacedaarransary
operada.
PARA AJUSTAR LA ALTURA DE CORTE
• Levante las ruedaspara el cortebajoy baje les
ruedasparael code alto.
•Ajustala alturade codepera que sa acomode a
susrequisltos.La posicibndel medioes la mejor
parala mayor{a de los cdspedes.
•Para cambiarla alturade code,empuje la
palancadelajustadorhaciala rueda. Mueva la
ruedahaciaarribao haciaabajo de modoque se
acomodea sus requisitos.Asegl3raseque todas
las ruedasqueden igualmenteajustadas.
ATENClON: El ajustadorestacorrectamenta
colecadocuandolas orejes de la placaest_n
insertadas en el agujerodelmango. Tambi6n,los
ajustasde 9 posiciones(si equipado)permlten que
el mango pueda ser movido entre las orejasde le
placa.
Para un corte alto, Orejas de la placa
baje las ruedas_ __-_-_ ngo
Para un corte bajo, levante las ruedas
formadas
PAPA VACIAR EL RECOGEDOR DE
ClaSPED
•Para removerel recngedordelc_spedsueltela
barra de osntrol del operador parapoderpararel
motor.
•Levantela puertade atras y removael recogedor
del c_spedpor el mango.
AVISO: No arrastrela bolsacuandole vacfe;se
producirdun desgasteinnecesario.
21
ANTES DE HACERARRANCAR EL
MOTOR
ACE_E
Su segadorarueenviadasinaceite en el motor.
• Aseg_resa que la segadoraestd nivelada y que
el &raa atrededordeldepbsitode aceiteest_
limpia.
•Remueva la tape deldepOsitode aceite del
motor conla varillaindicadorade nively rellene
hasta la Iinea de Ilenoen dsta.
•Usa 0,61 (20 oz.) de aceite.Para el tipoy ta
calidadvea =MOTOR" en la seccibnde las
"Responsabilidades delCliente"en este manual.
•Vacie el aceite lentamenta.No Io Ilene
demasiado.
•Reviseel niveldelacelte antesde cada uso.
Agregue aceite si es necesario.Uene hastala
linea de Ilenoen lavarillaindicadorade nivel.
• Pareleerelniveladesuado,apdetelatapedel
del:xSsitodeaceltedelmotorcadavez.
• Vuelvaainstalerle tapa del del:x_itodel aceitey
apri6tela.
•Cambie el acelte despu_sde 25 horasde
operacibno unavez portemperada. Puede
necesltarcambiarel aceite r'n_sa menudo
cuandolas condicionesson polvorosaso sucias.
GASOLINA
•Llene el estanquede combustible.Use gasolina
regular,sinplomo,nuevay limpiacon el minimo
de 87 octanos.No mezcleel aceltecon le
gasolina.Pare asegurarque la gasolinautilizada
sea fresca compreestanquesloscuales puedan
ser utilLzadosdurentelosprimeros30 dias.
ADVERTENClA: La experienciaha indicadoque
loscombustibles mezcladoscon alcohol(conocidos
como gasohol,o el uso de etanol o metanol)
puedenatraerla humedad, la que conducea la
separacibny formaci6n de _cidos durenteel
almacenamiento.La gasolinaacidicapuededaSar
el sistemadel combustiblede un motor duranteel
atmacenamiento. Para evitarlos problemas con el
motor, se debe vaciar el sistema del combustible
antes de guardarlopor un perledo de 30 dias o
rnds.Vacie el estanque del combustible, haga
arrancar el motor y h&galofuncionar hasta que las
lineas del combustible y el carburador queden
vaelos. La pr6xima temporada use combustible
nuevo.Vea las Instrucciones Pare El
Almacenamientopara rn&sinformad6n. Nunca use
productos de limpieza para el motor o para el
carburador en el estanque del combustible pues se
pueden proclucir daSos permanentes.
PARA HACER ARRANCAR EL MOTOR
• Para hacerarrancarun motorfi'io, empujeel
cebadorcinco(5) veces antes de tratado.Use un
empujefirmemente. Este paso normalmente no
es necesariocuandoso hace arrancarunmotor
queya ha estadofuncionandopot unoscuantos
minutos.
•Muevala palancade controlde velocidada la
posi_n de rapido.
•Sujete la barrade control que exigela presencia
del operadorabajo en el mangoy tire el mango
del arrancadorrdpidamente.No permitaque el
cordendelarrancaderse devuelva
abruptamente.
Para pararel motor,sueltela barrade control
queexige la presenciadel operador.
AVISO: En climasm&sfrios puede quesea
necesedorepatir los pasosdel cebado. En climes
rnds calurosos el cebar demasiado puede producir
el ahogo y el motor no va a arrancar. Si se ahoga el
motor espere unos cuantos minutos antes de tratar
de hacerlo arrancar y no repitalos pasos del
sebado.
CONSEJOS PARA SEGAR
•Bajodertas condiclenes, tal come cesped muy
alto, puede sor necesario el elevar le altura del
code parereducirel esfue_o necesario para
empujarla segadoray pare evitarsobrecargarel
motor, dejandomontones de recortesde crisped.
22
•Pare un corte muy pesedo,reduzcael anchodel
code pasendo parcialmente par encimadel lugar
anteriormentecortadoy sleguelentamente.
•Para un mejorensacadodel crispedy para la
mayodade las condicionesde corte,la velocidad
delmotor debe ajustarsea la posici6nde r_pido.
•Cuando use una segadoracon descargatrasera
en c6spedht_medoy pesado,losrnontonesdel
cortadopuede que noentrenen el
recogedorde c_sped. Reduzcala velecidaddel
recorrido(velocidadde empuje) y/ohaga
funcionar la segadorasobre el &rea par segunda
vez.
• Si queda una huellade cortes en el ladederecho
de una segadoracon descargatrasera,slegue
en la direccibnen que giranles manillasdel reloj,
solapandoun paco para recaudarlos recortesen
la pr6ximapasada.
•Losparos en los recogedoresde crispedde tela
puedenIlenarsecon mugrey polvocon el usoy
losrecogedoresrecaudar'&nmenosc_sped.
Pare evitar _sto, rocieel recogedorcon la
manguerade agua regularmentey dejelo
secarseantes de usado.
•Mantengala parte superiordel motor, alrededor
delarrancador,despejaday sinrecortesde
crispedy paja. Estoayudar_ el flujo del airedel
motory extender&la duracibn€_..ste.
CONSEJOS PARA SEGAR Y
ACOLCHAR
IMPORTANTE: Para obtener el mejor
rendimiento mantenga la caja de la segadora
sin acumulacion de cesped y basura. Vea
"limpieza" en la seccion de
"RESPONSABILIDADES DEL CLIENTE" de
este manual.
•La cuchilla acolchadora especial va a volver a
cortar los recortes de cdsped muchas veces,
y los reduce en tamaSo, de modo que si se
caen en el c_sped se van a dispesar entre
6ste y no se van a notar. Tambi6n, el c6sped
acolchado se va a deshacer r&pidamente
entregando substancias nutritivas para el
c_sped. Siempre acolche con la velocidad del
motor (cuchilla) m&s alta, pues as[ se
obtendrd la mejor acci6n de recorte de las
cuchillas.
•Evite cortar el cdsped cuando estd mojado. El
c6sped mojado tiende a formar montones e
interSere con la acci6n de acolchado. La
mejor hora para segar el c_sped es temprano
en la tarde. A esa hora dste se ha secede y el
area reci_n cortada no quedar& expuesta al
sol directo.
•Para obtener los mejores resultados, ajuste la
altura del corte de la segadora de modo que
6sta corte solamente el tercio superior de las
hojas de cdsped. En el caso de que el
c6sped haya crecido demasiado, puede ser
necesario el elevar la altura del corte para
reducir el esfuerzo necesario para empujar la
segadora y para evitar sobrecargar el motor,
dejando montones de recortes de crisped.
Para un acolchamiento muy pesado, reduzca
el ancho del corte pasando por encima del
lugar anteriormente cortado y siegue
lentamente.
•Ciedos tipos de c6sped y sus condiciones
pueden exigir que un area tenga que ser
acolchada por segunda vez para esconder
completamente los recortes. Cuando se haga
el segundo code, siegue atravesado o en
forma perpendicular a la pasada del primer
code.
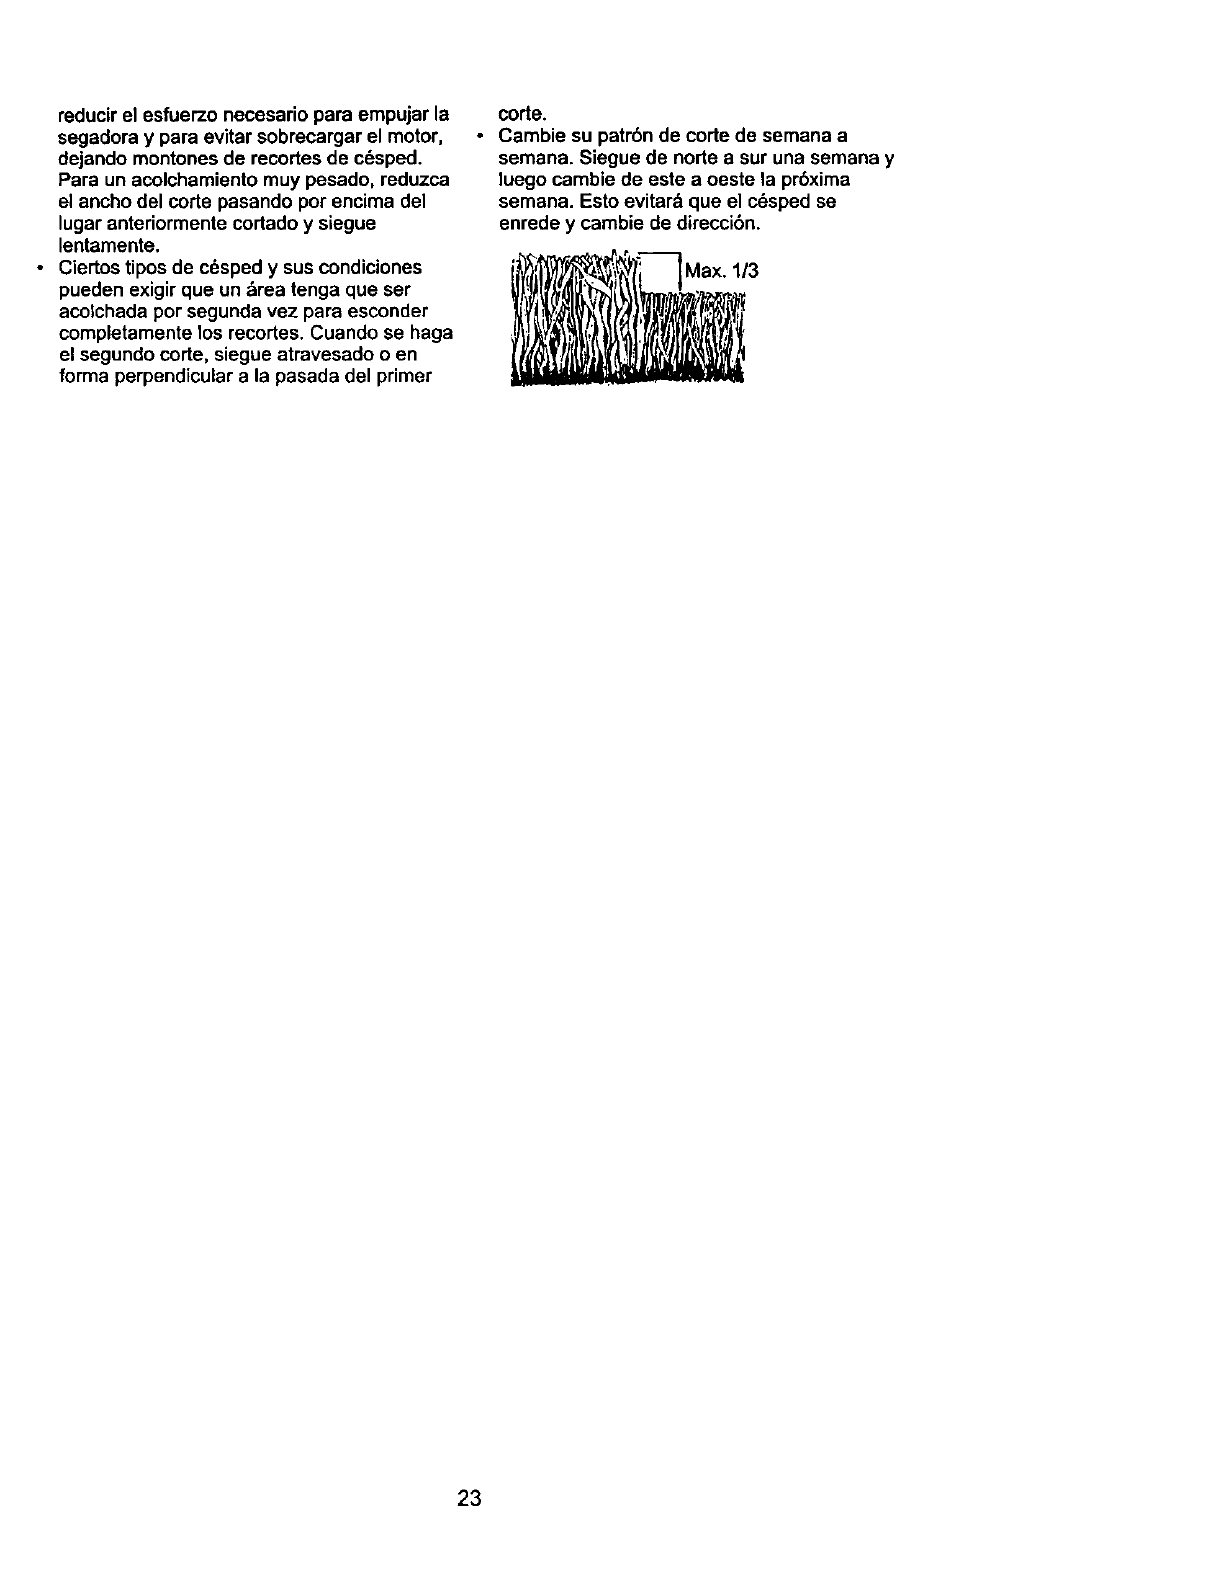
•Cambie su patrbn de corte de semana a
semana. Siegue de node a sur una semana y
luego cambie de este a oeste la pr6xima
semana. Esto evitard que el c_sped se
enrede y cambie de dkeccibn.
3
23
QUE COMPLETE SU SERVICIO REGULAR_'_._L_O__O_ ,_,_ _._ _ t_ _o"_ ..s v,c,o
Revisar si ha)' suietadores sueltos _J I_
Limpiar/inspeccionar el fecogedor de
Limpiar la segadota
G LImpiar deba o de la cubierta de la b'ans-rnisibn (segadoras con poder propu sot) i/
sadas (seQadoras cot= poder propu_or) _b/3
O Revisar las con'eas y las poteas im u6
Revlsar o/afilarlcambiar la cuchilla
R Tabta de lubticacibn v'
Limpiar la bateria/recargar
(segadoras con arranque ekY_kico) II_ 1_14
iRevisat el nivel del aceite _1/
O cambiar el aceite del m°t°r 1_12,2
Limpiar el filtro de alre
O 'nspecci°nar e' silenciad°r
Umpiat o/cambiar la bujla
Cambiar el cartucho de papel del filtro 2
de aire
1- Cambiar mf_sa menudo cuando se of)ere bajo carga pesada o en ambkJntescoil altas temperaturas.
2 * Dar sen.'ido rn6s e menudo =uando =e opere en cor,dlciones sucla= o polvoto_a=.
3 oCambie tas cuchillas _a menudo cuando siegue en terteno arenoso.
4 - Csrgat pot 48 horas al finde la temporada.
RECOMENDACIONES GENERALES
La garant[ade estasegadora nocubre losartfculos
que hanestadosujetosal abuso o a la negligencia
del operador.Para redbirtodo el valorde la
garantfa,el operadortieneque mantener la
segadorasegt_nlas insb'uccionesdescritasen este
manual.
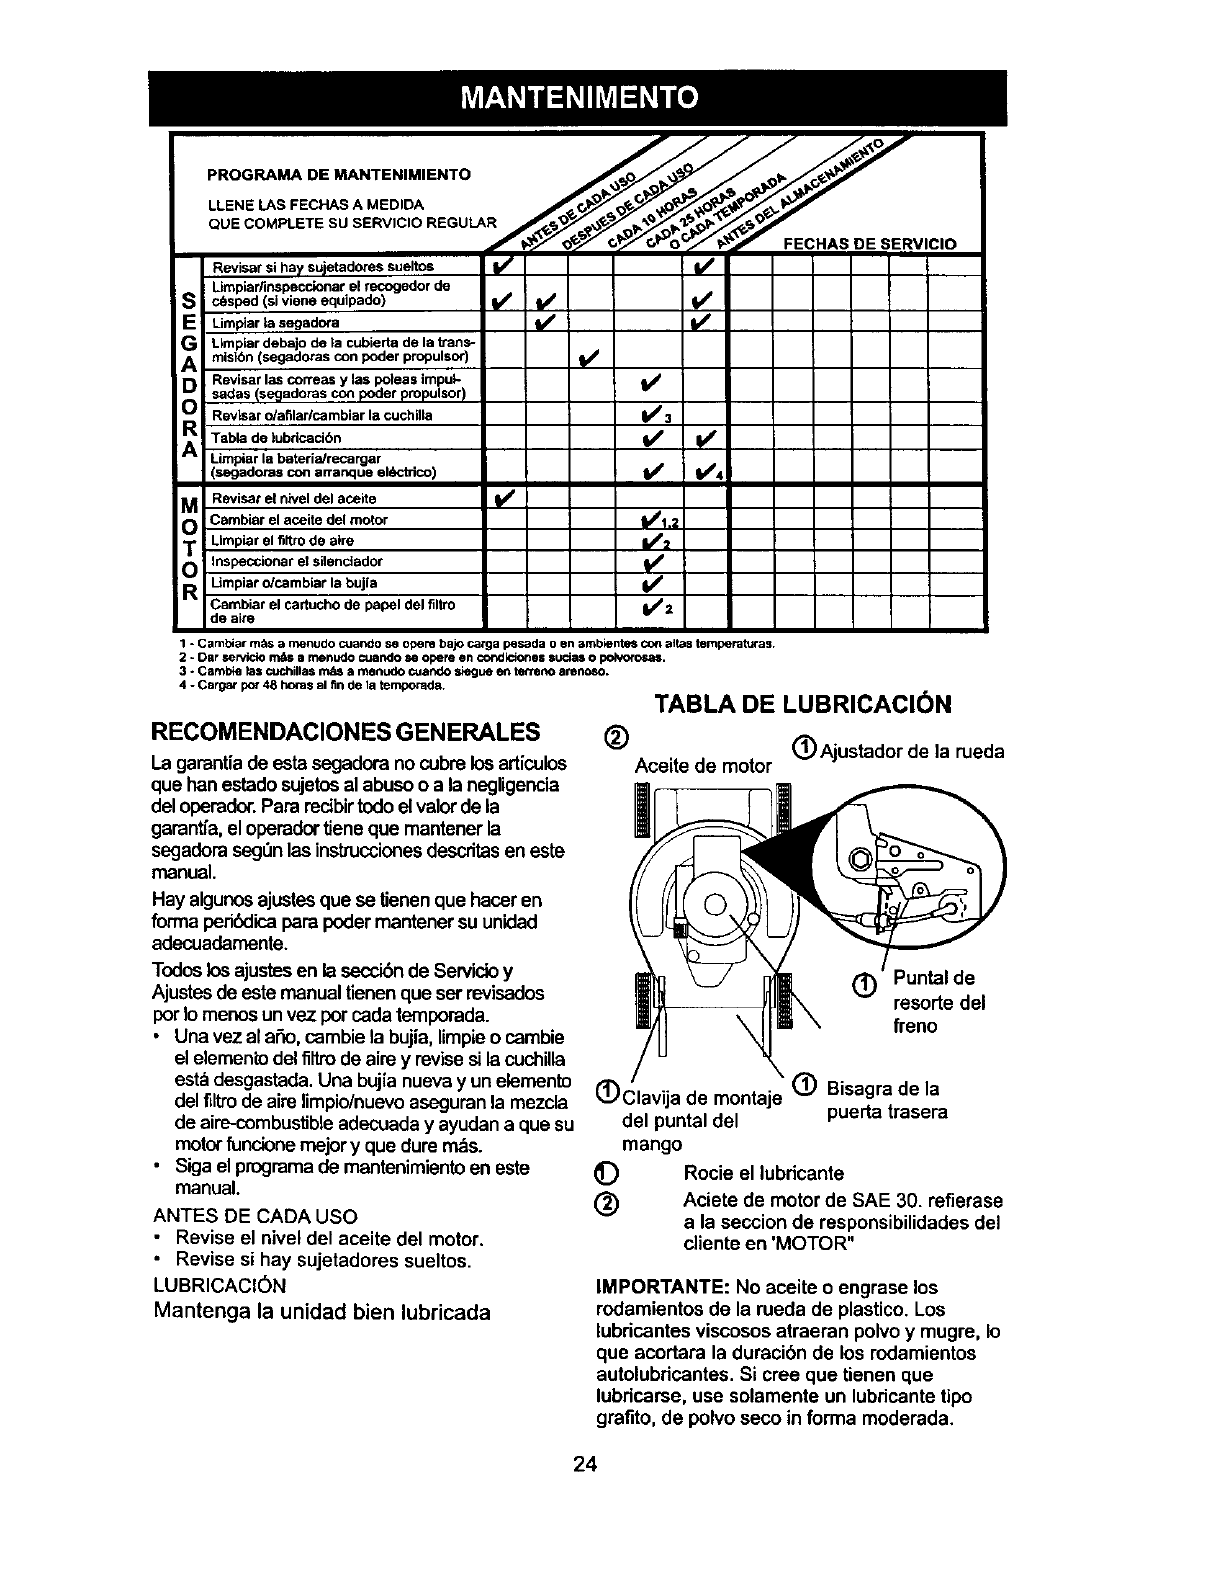
TABLA DE LUBRICACION
(_ (_)Ajustador de la rueda
Aceite de motor
Hay algunosajustesque se lienen que haceren
forma peribdicaparapodermantenersu unidad
adecuademente.
Todos losajustesen la seccibnde Servicioy
Ajustes de este manual tienen que ser mvisados
porIo menos unvez por cada temporada.
• Una vez al aSo,cambie la bujia, limpieo cambie
el elemen_odelfiltro de aim y revisesi la cuchilla
estadesgastada.Una bujia nuevay un elemento
delfiltrode airelimpio/nuevoaseguranla mezcla
de aim-combustibleadecuada y ayudan a que su
motorfuncione mejory que dure m,;_s.
• Siga elprogramade mantenimientoen este
manual.
ANTES DE CADA USO
• Revise el nivel del aceite del motor.
•Revise si hay sujetadores sueltos.
LUBRICACl6N
Mantenga la unidad bien lubricada
(_) Puntal de
resorte del
freno
O Bisagra de la
(_)Clavija de montaje
del puntal del puerta trasera
mango
(_) Rocie el lubdcante
(_) Aciete de motor de SAE 30. refierase
a la seccion de responsibilidades del
cliente en 'MOTOR"
IMPORTANTE: No aceite o engrase los
rodamientos de la rueda de plastico. Los
lubdcantes viscosos atraeran polvoy mugre, Io
que acortara la duracibn de los rodamientos
autolubdcantes. Si cree que tienen que
lubdcarse, use solamente un lubricantetipo
graflto, de polvo seco in forma moderada.
24
ESPECIFICACIONES DEL PRODUCTO
NOMERO DE MODELO 917.387151
NOMERO DE SERIE
FECHA DE COMPRA
CABALLOS DE FUERZA: 5.5
DESPLAZAMIENTO: 11.5 CU. IN.
CAPAClDAD Y TIPO 1.5 Cuartos
DE GASOLINA: REGULAR SIN PLOMO
TIPO DE ACEITE: SAE 30 (sobre 32°F)
API-SF/SG) SAE 5W-30 (debajo 32°F)
CAPACIDAD DE ACEITE:
BUJIA (ABERTURA: .030")
TOLERANClA DE VALVULA:
20 oz. de capacidad
CHAMPION RJ19L
ADMISION: .008
DESCARGA: .008
SENCENDIDO DE ESTADO
SOLIDO ABERTURA DE AIRE: .0125 IN.
TORSION DEL PERNO
DE LA CUCHILLA: 35-40 FT. LBS.
El num6ro del nodelo y el de serie se encuentran en la calcomania adjunta a la parte
trasera de la caja de la segadora. Debe registrar tanto el num6ro de serie come la
fecha de compra y mantengalos en un lugar seguro para refencia en el futuro.
SEGADORA •Remueva el perno de la cuchilla gir&ndolo en
Siempre observe las reglas de seguridad
cuando haga el mantenimiento.
LLANTAS
•Mantenga las Ilantas sin gasolina, aceite o
substancias quimicas para control de
insectos que pueden dafiar la goma.
•Evite los tocones, las piedras, las grietas
profundas, los objetos afilados y otros
peligros que pueden dafiar alas Ilantas.
CUIDADO DE LA CUCHILLA
Para obtener los mejores resultados, la cuchilla
de la segadora tiene que mantenerse afilada.
Cambie la cuchina doblada o dafiada.
PAPA REMOVER LA CUCHILLA
• Desconecte el alambre de la bujia y p6ngalo
en donde no pueda entrar en ¢ontacto con
6sta.
• Haga descansar la segadora en su lado.
Aseg_rese que el flitro de aire y que el
carburador queden mirando hacia arriba.
• Use un bloque de madera entre la cuchUla y
la caja de la segadora para evitar que la
cuchiUa gire cuando se le quite el perno.
• Proteja sus manos con guantes y/o envuelva
la cuchilla con una tela gruesa.
25
el sentido contrario en que giran las manillas
del reloj.
• Remueva la cuchilla y los articulos de
ferreter[a adjuntadores (el perno, la arandela
de seguridad y la arandela endurecida).
AVISO: Remueva el adaptador de la cuchnlay
revise el cubo interior de la ranura del
adaptador de la cuchilla. La ranura tiene que
estar en buenas condiciones para que funcione
en forma adecuada. Cambie et adaptador si
est:_ dafiado.
PARA CAMBIAR LA CUCHILLA
• Ponga el adaptador de la cuchilla en el
ciguefial del motor. Aseg_rese que la ranura
del adaptador y que el chavetero del ciguefial
est6n alineados.
• Ponga la cuchilla en el adaptador de 6sta
alineando los dos (2) agujeros en la cuchilla
con las salientes elevadas en el adaptador.
• Aseg_rese de que el borde de salida de la
cuchilla (opuesto al borde afilado) est_ hacia
arriba hacia el motor.
Instale el perno de la cuchiltacon la arandela
de seguridad y la arandela endurecida en el
adaptador de la cuchillay el ciguefial.
Use un bloque de madera entre la cuchilla y
la caja de la segadora y apriete el perno de la
cuchilla gir_ndolo en el sentido en que giran
lasmanillasdelreloj.
• Latorsibnparaapretarrecomendadaesde
35- 40pieslibras.
IMPORTANTE:ELPERNODELACUCHILLA
ESCLASE8TRATADOA CALOR.
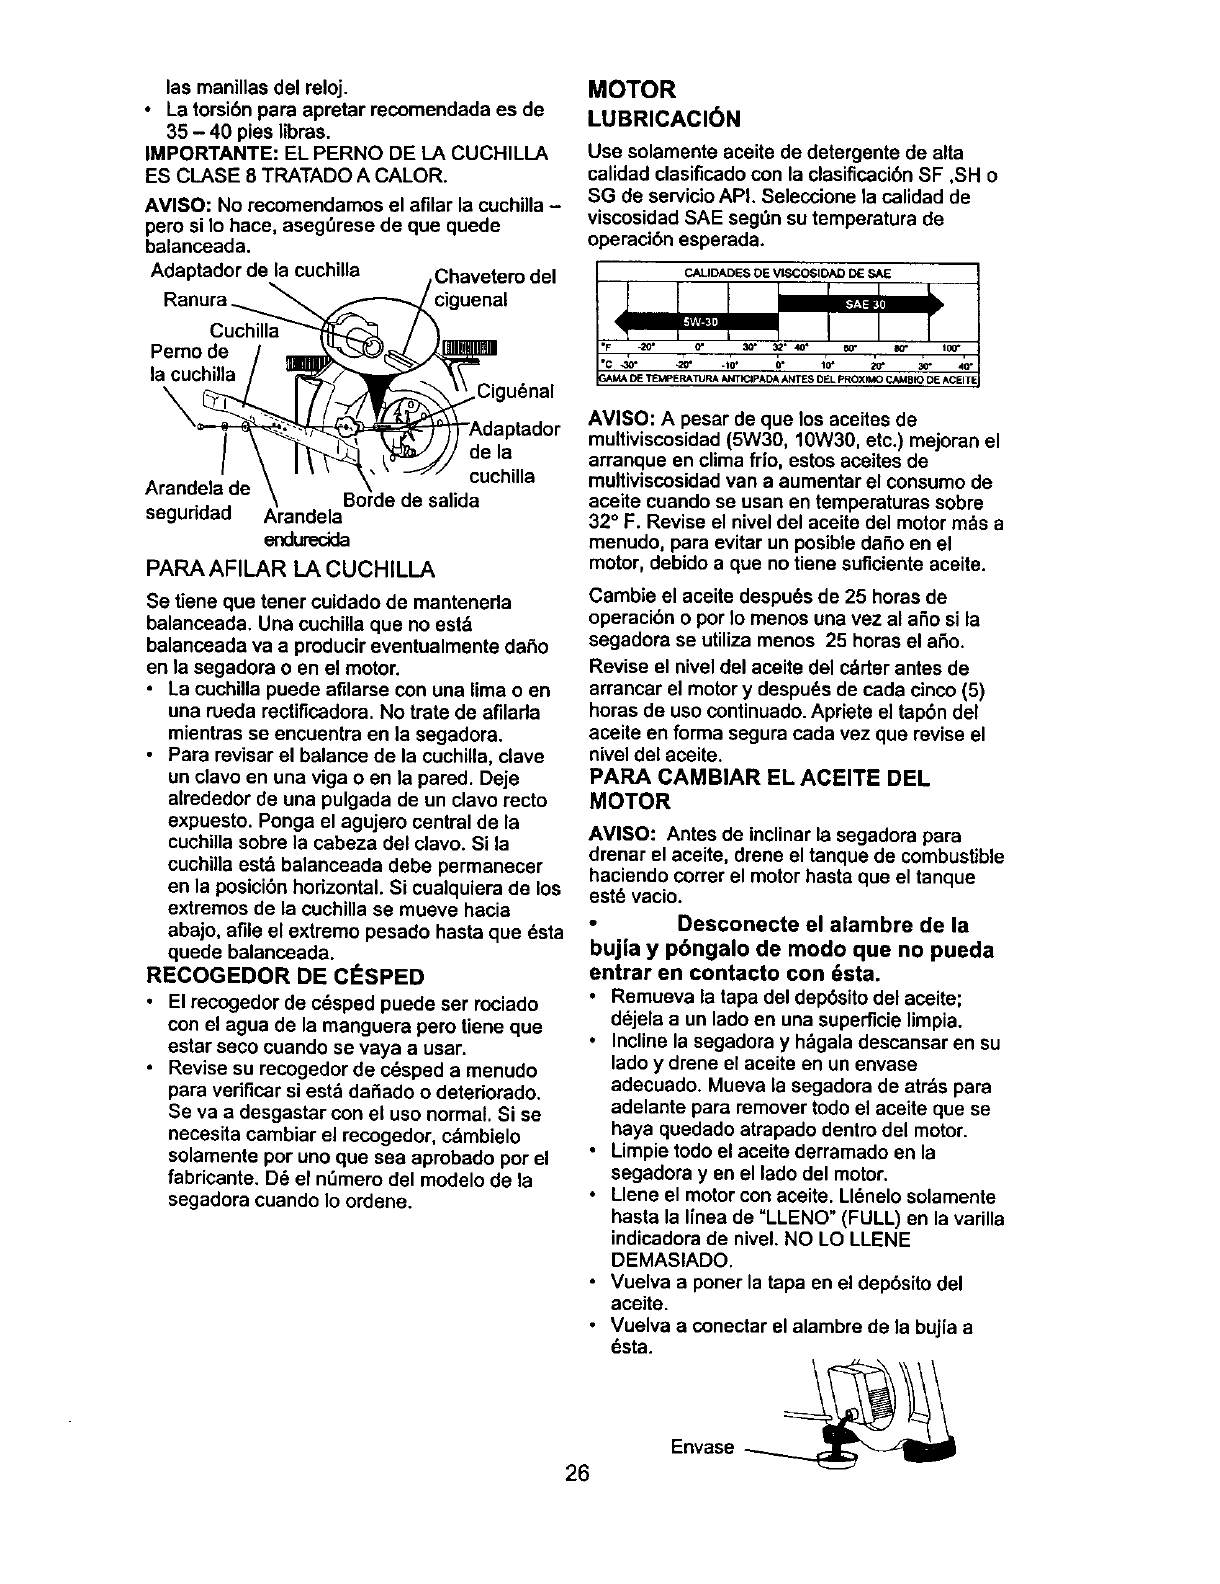
AVISO:Norecomendamoselafilar la cuchilla -
pero si Io hace, aseg_rese de que quede
balanceada.
Adaptador de la cuchiUa Chavetero det
uenal
Cuchilla
Pemo de
la cuchilla .Cigu_nal
de la
cuchilla
Arandela de Borde de salida
seguridad Arandela
enduredda
PAPA AFILAR LA CUCHILIA
Se tiene que tener cuidado de manteneda
balanceada. Una cuchilla que no est_
balanceada va aproducir eventualmente daSo
en la segadora o en el motor.
• La cuchilla puede afilarse con una lima o en
una rueda rectificadora. No trate de afilada
mientras se encuentra en la segadora.
•Para revisar el balance de la cuchilla, clave
un clavo en una viga o en la pared. Deje
alrededor de una pulgada de un clavo recto
expuesto. Ponga el agujero central de la
cuchilla sobre la cabeza del clavo. Si la
cuchilla estd balanceada debe permaneoer
en la posicibn horizontal. Si cualquiera de los
extremos de la cuchilla se mueve hacia
abajo, afile el extremo pesado hasta que 6sta
quede balancoada.
RECOGEDOR DE ClaSPED
•El recogedor de cdsped puede ser rociado
con el agua de la manguera pero tiene que
estar seco cuando se vaya a usar.
•Revise su recogedor de c6sped a menudo
para vedficar si estd daSado o detedorado.
Se va a desgastar con el uso normal Si se
necesita cambiar el recogedor, c_mbielo
solamente por uno que sea aprobado por el
fabricante. D_ el nL_merodel modelo de la
segadora cuando Io ordene.
MOTOR
LUBRICACKSN
Use solamente aceite de detergente de alta
calidad clasificado con la clasificacibnSF ,SH o
SG de servicioAPI. Seleccione la calidad de
viscosidad SAE segdn su temperatura de
operacibn esperada.
CALIDADES OE VISCOSIOAD DdESAlE
AVISO: A pesar de que los aceites de
multiviscosidad(5W30, 10W30, etc.) mejoran el
arranque en clima frio, estos aceites de
multiviscosidadvan a aumentar el consomo de
aceite cuando se usan en temperaturas sobre
32° F. Revise el nivel del aceite del motor m_s a
menudo, para evitar un posibteda_o en el
motor, debido a que no tiene suficiente aceite.
26
Cambie el aceite despu6s de 25 horas de
operacibn o por Io menos una vez al aSo si la
segadora se utiliza menos 25 horas el aSo.
Revise el nivel del aceite del c_rter antes de
arrancar el motor y despues de cada cinco (5)
horas de uso continuado.Apriete el tap6n del
aceite en forma segura cada vez que revise el
nivel del aceite.
PARA CAMBIAR EL ACEITE DEL
MOTOR
AVISO: Antes de inclinar la segadora para
drenar el aceite, drene el tanque de combustible
haciendo cotter el motor hasta que el tanque
est_ vacio.
•Desconecte el alambre de la
bujia y pbngalo de modo que no pueda
entrar en contacto con 6sta.
•Remueva la tapa del dep6sito del aceite;
d_jela a un lado en una superficie limpia.
•Incline la segadora y h:_galadescansar en su
lado y drene el aceite en un envase
adecuado. Mueva la segadora de atr._spara
adelante para remover todo el aceite que se
haya quedado atrapado dentro del motor.
•Limpie todo el aceite derramado en la
segadora yen el lado del motor.
Llene el motor con aceite. Lldnelo solamente
hasta la linea de "LLENO" (FULL) en la varilla
indicadora de nivel. NO LO LLENE
DEMASlADO.
•Vuelva a porter la tapa en el dep6sito del
aceite.
•Vuelva a conectar el alambre de la bujia a
t_sta.
Envase _
FILTRO DE AIRE
Su motor no funcionar& en forma adecuada y
puede sufrirdaSos si se usa un filtro de aire
sucio.
Cambie el filtro de aire cada aSo, y mds a
menudo si siega en condiciones muy
polvorosaso sucias. No lave el filtro de aire.
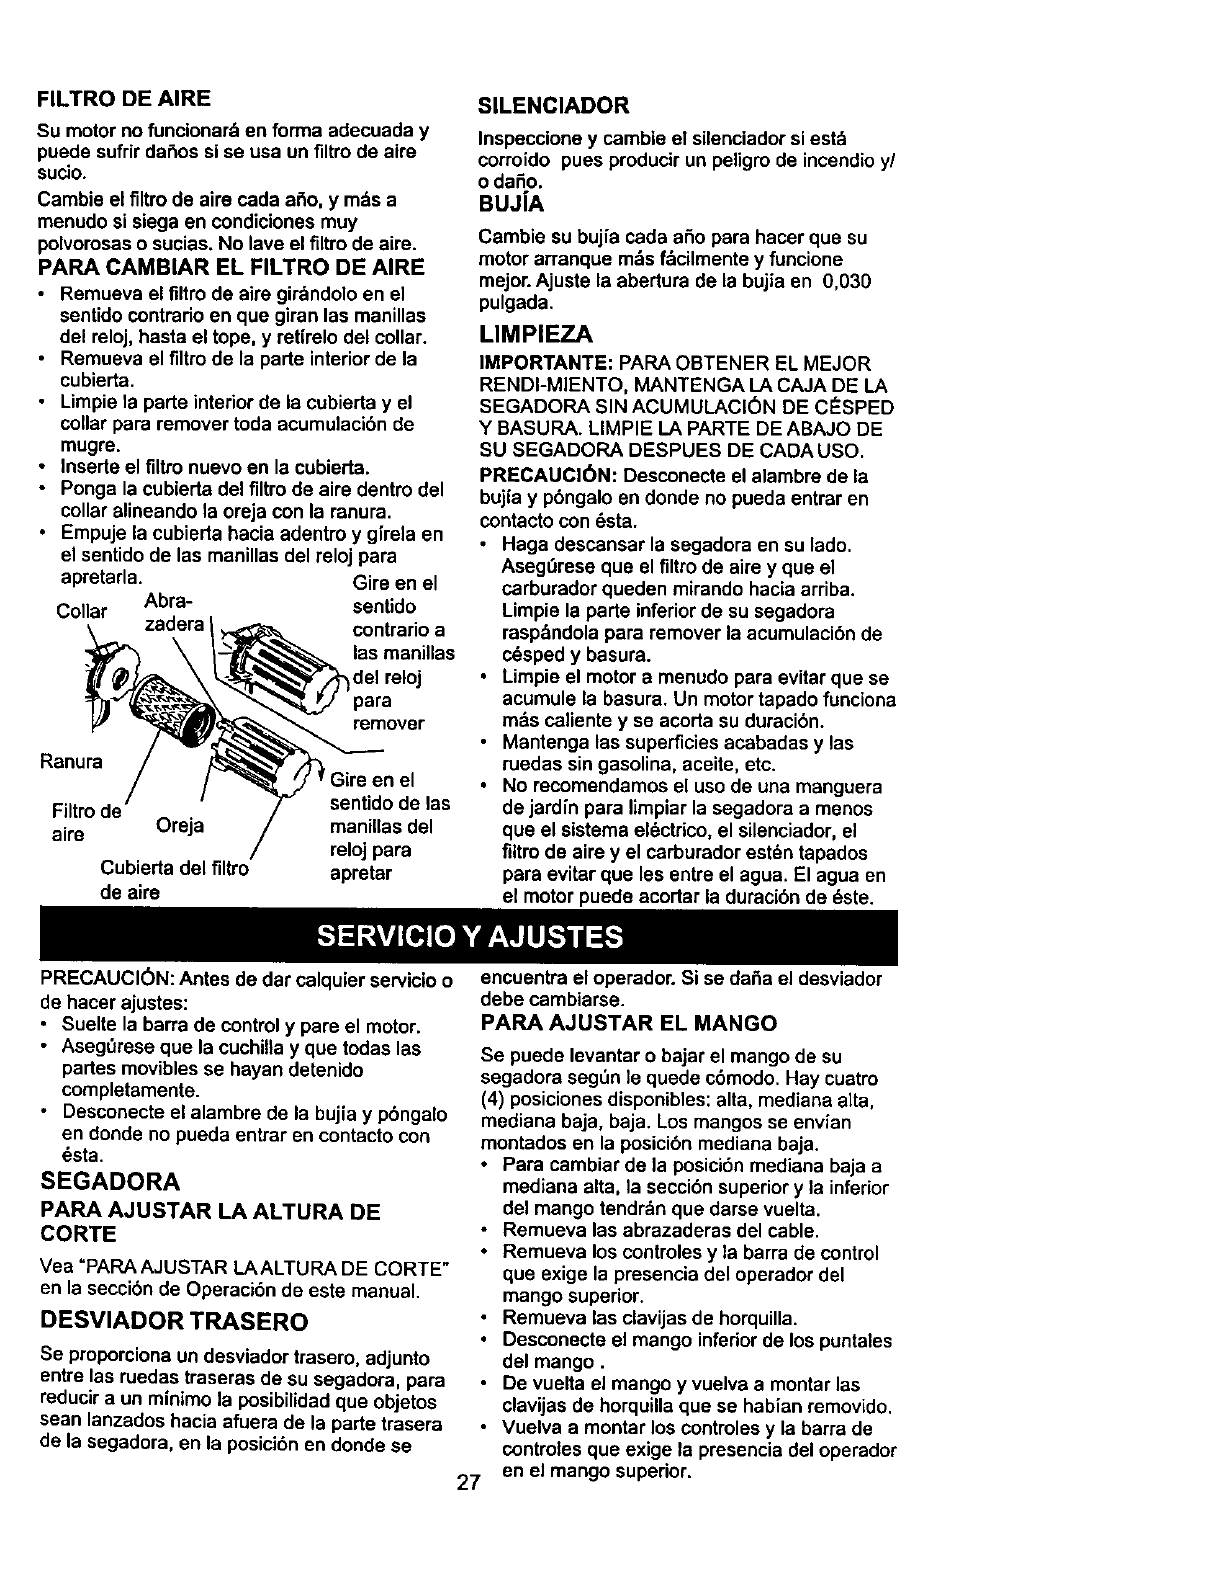
PARA CAMBIAR EL FILTRO DE AIRE
•Remueva el filtrode aire girdndolo en el
sentido contrarioen que giran las manillas
dei reloj, hasta el tope, y refirelo del collar.
•Remueva el filtrode la parte interiorde la
cubierta.
•Limpie la parte interior de la cubierta y el
collar para remover toda acumulaci6n de
mugre.
•Inserte el filtro nuevo en la cubierta.
•Ponga la cubierta del filtrode aire dentro del
collar alineando la oreja con la renura.
•Empuje la cubierta hacia adentro y g|rela en
el sentido de las manillas del reloj para
apretarla. Gire en el
Collar Abra- sentido
zadera contrario a
las manillas
del reloj
para
remover
Ranura
Filtro de sentido de las
aire Oreja maniUasdel
reloj para
Cubierta del filtro apretar
de aire
SILENClADOR
Inspeccione y cambie el silenciador si est:_
corroido pues producir un peligro de incendio y/
o daSo.
BUJJA
Cambie su buj[a cada aSo para hacer que su
motor arranque m&s Mcilmente y funcione
mejor.Ajuste la aberture de la bujia en 0,030
pulgada.
LIMPIEZA
IMPORTANTE: PAPA OBTENER EL MEJOR
RENDI-MIENTO, MANTENGA LA CAJA DE LA
SEGADORA SIN ACUMULACI6N DE C_SPED
Y BASUPA. LIMPIE LA PARTE DE ABAJO DE
SU SEGADOPA DESPUES DE CADA USO.
PRECAUClON: Desconecte el alambre de la
bujia y pbngalo en donde no pueda entrar en
contacto con 6sta.
•Haga descansar la segadora en su lado.
Aseg0rese que el flltro de aire y que el
carburador queden mirando hacia arriba.
Limpie la parte inferiorde su segadora
rasp_ndola para remover la acumulacibn de
cdsped y basure.
•Limpie el motor a menudo para evitar que se
acumule la basure. Un motor tapado funciona
rods caliente y se acorta su duracibn.
•Mantenga las superficies acabadas y las
ruedas sin gasolina, aceite, etc.
•No recomendamos el uso de una manguera
de jard[n para limpiar la segadora a menos
que el sistema el_ctdco, el silenciador, el
filtm de aire y el carburador est_n tapados
para evitar que les entre el agua. El agua en
el motor puede acortar la durecibn de dste.
PRECAUCION: Antes de dar calquier servicio o
de hacer ajustes:
•Suelte la barra de control y pare el motor.
• Aseg0rese que la cuchilla y que todas las
partes movibles se hayan detenido
completamente.
Desconecte el alambre de la bujia y pbngalo
en donde no pueda entrar en contacto con
_sta.
SEGADORA
PARA AJUSTAR LA ALTURA DE
CORTE
Vea "PAPA AJUSTAR LAALTUPA DE CORTE"
en la seccibn de Operaci6n de este manual.
DESVIADOR TRASERO
Se proporciona un desviador trasero, adjunto
entre las ruedas traseras de su segadore, para
reducir a un minimo la posibilidadque objetos
sean lanzados hacia afuera de la parte trasera
de la segadora, en la posici6n en donde se
encuentre el operador. Si se daSa el desviador
debe cambiarse.
PARA AJUSTAR EL MANGO
Se puede levantar o bajar el mango de su
segadora segl3n ie quede c6modo. Hay cuatro
(4) posicionesdisponibles: alta, mediana alta,
mediana baja, baja. Los mangos se envian
montados en la posici6n mediana baja.
•Pare cambiar de la posici6n mediana baja a
mediana alta, la seccibn superiory la inferior
del mango tendrdn que darse vuelta.
•Remueva las abrezaderas del cable.
•Remueva los controles y la barra de control
que exige la presencia del operador del
mango superior.
Remueva las clavijas de horquilla.
Desconecte el mango inferiorde los puntales
del mango.
De vuelta el mango y vuelva a montar las
clavijas de horquilla que se habian removido.
Vuelva a montar los controles y [a barra de
controles que exige la presencia del operador
en el mango superior.
27
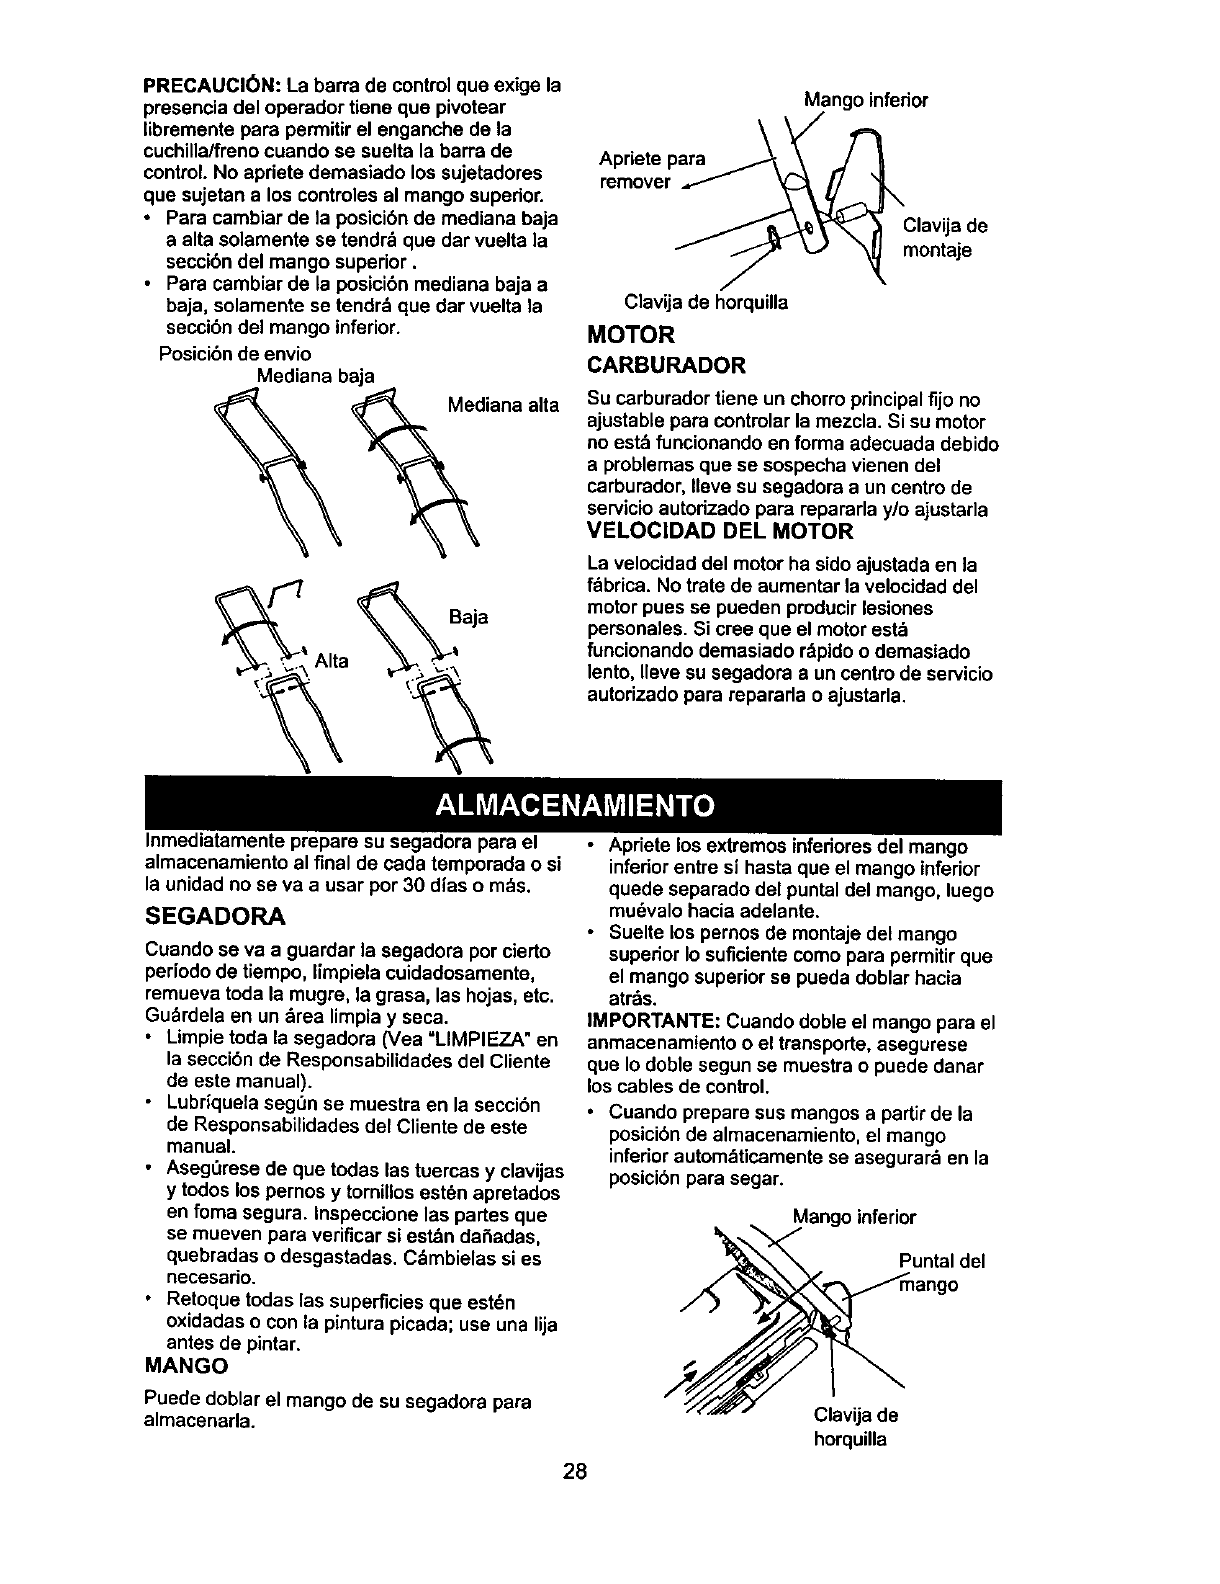
PRECAUC|6N: La barra de control que ex",geta
presencia del operador tiene que pivotear
libremente para permitir el enganche de la
cuchilla/freno cuando se suelta la barra de
control.No apriete demasiado los sujetadores
que sujetan a los contreles al mango superior.
•Para cambiar de ta posicibn de mediana baja
a alta solamente se tendrd que dar vuelta la
seccibn del mango superior.
• Pare cambiar de la posicibn mediana baja a
baja, solamente se tendrb quedar vuelta la
secci6n del mango inferior.
Posicibn de envio
Mediana beja
diana alta
Baja
Alia
Mango inferior
Apriete para
remover
Clavija de
montaje
Clavija de horquilla
MOTOR
CARBURADOR
Su carburador tiene un chorro principal fijo no
ajustable pare controlar la mezcla. Si su motor
no est& funcionando en forma adecuada debido
a problemas que se sospecha vienen del
carburador, Ileve su segadora aun centro de
servicio autorizado para repararla y/o ajustaria
VELOCIDAD DEL MOTOR
La velocidad del motor ha side ajustada en la
f_brica. No trate de aumentar la velocidad del
motor pues se pueden producir lesiones
personales. Si cree que el motor est_
funcionando demasiado rdpidoo demasiado
lento, Ileve su segadora a un centro de servicio
autorizado para reparada o ajustarla.
Inmediatamente prepare su segadora para el
almacenamiento al final de cada temporada o si
la unidad no se va a usar pot 30 dias o mds.
SEGADORA
Cuando se va a guardar la segadora por cierto
periodo de tiempo, limpiela cuidadosamente,
remueva toda la mugre, la grasa, las hojas, etc.
Gu_rdela en un drea limpia y seca.
•Limpie toda la segadora (Vea "LIMPIEZA" en
la seccibn de Responsabilidades del Cliente
de este manual).
• Lubriquela segen se muestra en la seccibn
de Responsabilidades del Cliente de este
manual.
• AsegOrese de que todas las tuercas y clavijas
y todos los pernos y tornillos est_n apretados
en foma segura. Inspeccione las partes que
se mueven para verificar si est&nda_adas,
quebradas o desgastadas. Cdmbielas si es
necesario.
•Retoque todas las superficies que est6n
oxidadas o con la pintura picada; use una lija
antes de pintar.
MANGO
Puede dobtar el mango de su segadora pare
almacenarla.
28
•Apriete los extremos inferiores del mango
inferiorentre si hasta que el mango inferior
quede separado del puntal del mango, luego
mu_valo hacia adelante.
•Suelte los pernos de montaje del mango
superior Io suficiente como para permitir que
el mango superior se pueda doblar hacia
atr=_s.
IMPORTANTE: Cuando doble el mango para el
anmacenamiento o el transporte, asegurese
que Io doble segun se muestra o puede danar
los cables de control.
•Cuando prepare sus mangos a partirde la
posicibnde almacenamiento, el mango
inferior autom_ticamente se asegurar_ en la
posici6n para segar.
Mango inferior
Puntal del
Clavija de
horquilla
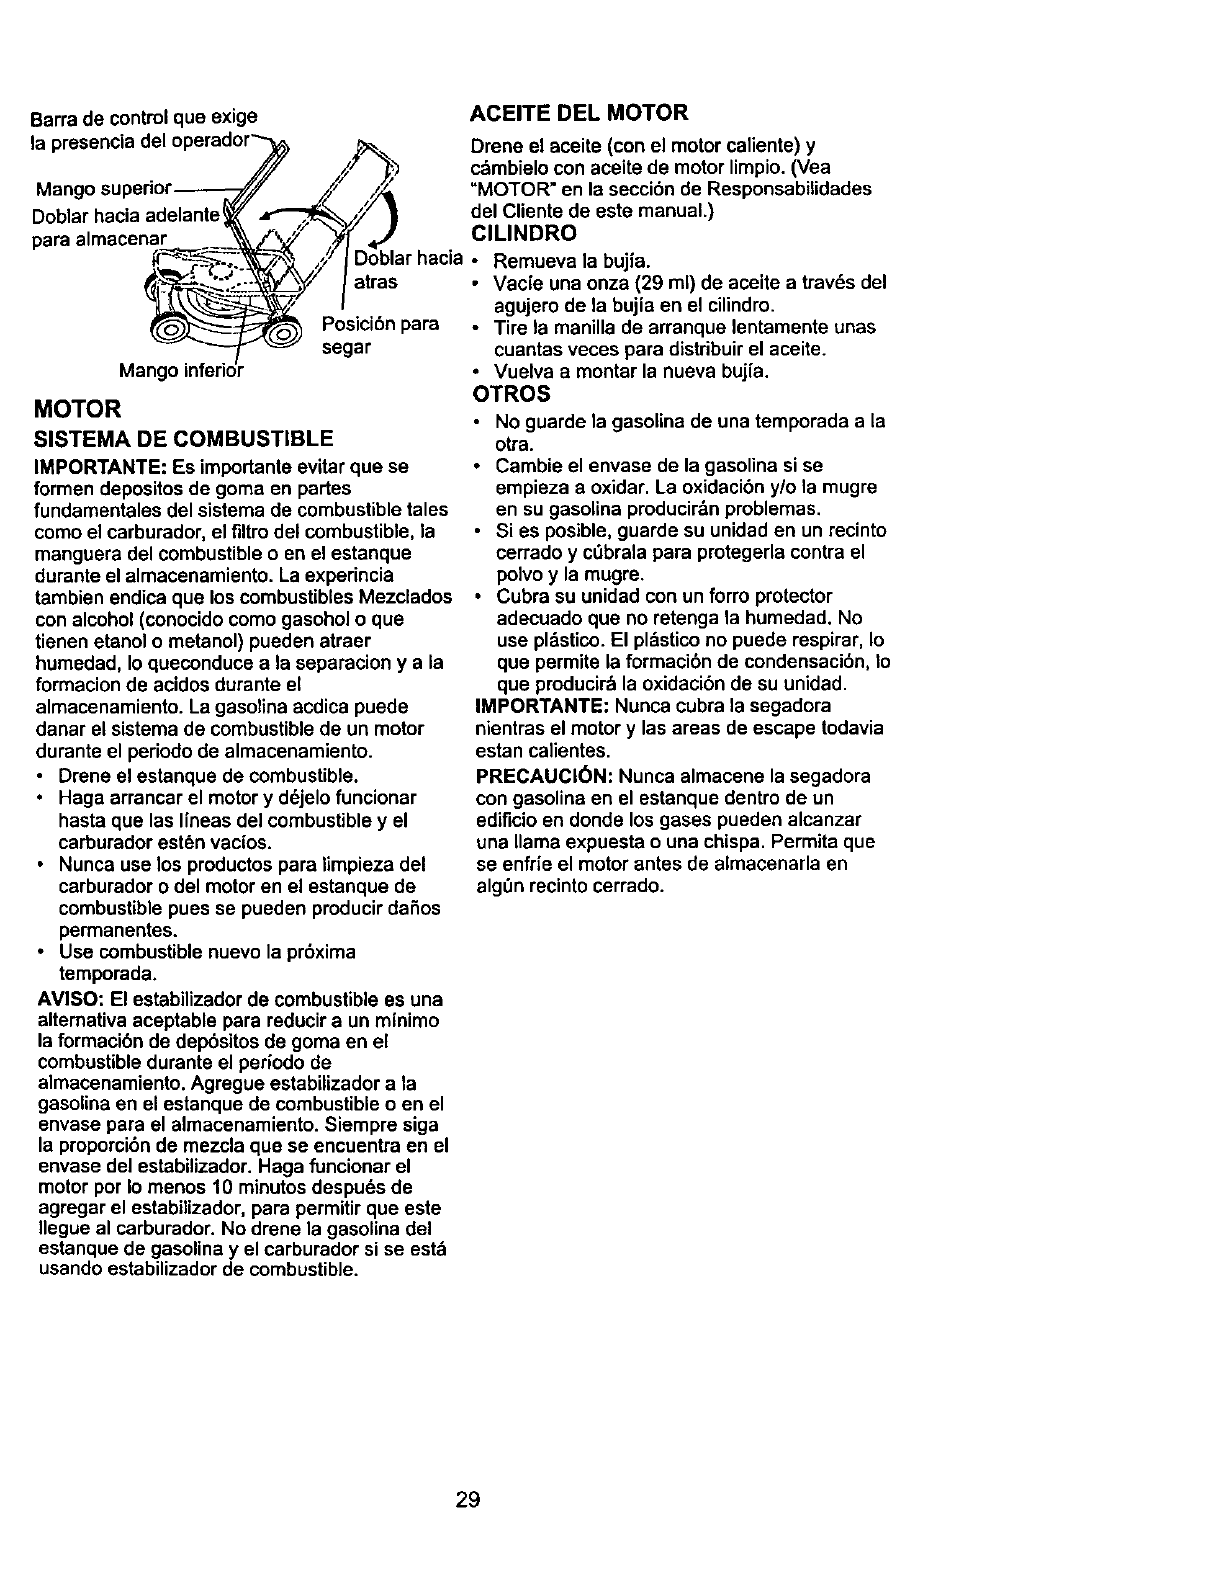
Barradecontrolque exige ACEITE DEL MOTOR
la presencia del operador"_ _Drene el aceite (con el motor caliente) y
/// .r L'.') c_mbielo con aceite de motor limpio. (Vea
Mango superior_ f_" ,_ ,_ "MOTOR" en la secci6n de Responsabilidades
Doblar hacia adelante_ y _,_/_ del Cliente de este manual.)
para almacenar ___ ____,"" _ _,r., /ClLINDRO
:_-_, _.p,_ /7 Doblar hacia •Remueva la bujia.
_.__. _--_-_'y/ atras •Vacfe una onza (29 ml) de aceite a trav6s del
_..._ _/ agujero de la bujia en el cilindro.
_Posicibn para * Tire la manilla de arranque lentamente unas
-- _ _ segar
Mango inferidr
MOTOR
SlSTEMA DE COMBUSTIBLE
IMPORTANTE: Es importante evitar que se
formen depositos de goma en partes
fundamentales del sistema de combustible tales
como el carburador, el filtrodel combustible, la
manguera del combustibleo en el estanque
darante el almacenamiento. La experincia
tambien endica que loscombustibles Mezclados
con alcohol (conocido como gasohol o que
tienen etanol o metanol) pueden atraer
humedad, Ioqueconduce a la separacion y a la
formacion de acidos durante el
almacenamiento. La gasolina acdica puede
danar el sistema de combustible de un motor
durante el periodo de almacenamiento.
•Drone el estenque de combustible.
•Haga arrancar el motor y d_jelo funcionar
hasta que las lineas del combustible y el
carburador est6n vacios.
• Nunca use los productos para limpieza del
carburador o del motor en el estanque de
combustible pues se pueden producir daSos
permanentes.
• Use combustible nuevo la prbxima
temporada.
AMISO: El estabilizador de combustible es una
altemativa aceptable para reducir a un minimo
la formacibn de depbsitos de goma en el
combustible durante el periodo de
almacenamiento. Agregue estabilizador a la
gasolina en el estanque de combustible o en el
envase para el almacenamiento. Siempre siga
la proporcibn de mezcla que se encuentra en el
envase del estabilizador. Haga funcionar el
motor per Io menos 10 minutosdespu6s de
agregar el estabilizador, para permitir que este
Ilegue al carburador. No drene la gasolina del
estanque de gasolina y el carburador si se est&
usando estabilizador de combustible.
cuantas veces para distribuir el aceite.
•Vuelva a montar la nueva buj{a.
OTROS
• No guarde la gasolina de una temporada a la
otra.
• Cambie el envase de la gasonna si se
empieza a oxidar. La oxidacibn y/o la mugre
en su gasolina producir&n problemas.
• Si es posible, guarde su unidad en un recinto
cerrado y cObrala para protegerla contra el
polvoy la mugre.
• Cubra su unidad con un forro protector
adecuado que no retenga la humedad. No
use pl&stico.El pldsticono puede respirar, Io
que permite la formaci6n de condensaci6n, Io
que producir_ la oxidacibn de su unidad.
IMPORTANTE: Nunca cubra la segadora
nientras el motor y las areas de escape todavia
estan calientes.
PRECAUCl6N: Nunca almacene la segadora
con gasolina en el estanque dentro de un
edificio en donde losgases pueden alcanzar
una llama expuesta o una chispa. Permita que
se enfrie el motor antes de almacenarla en
alg_n recinto cerrado.
29
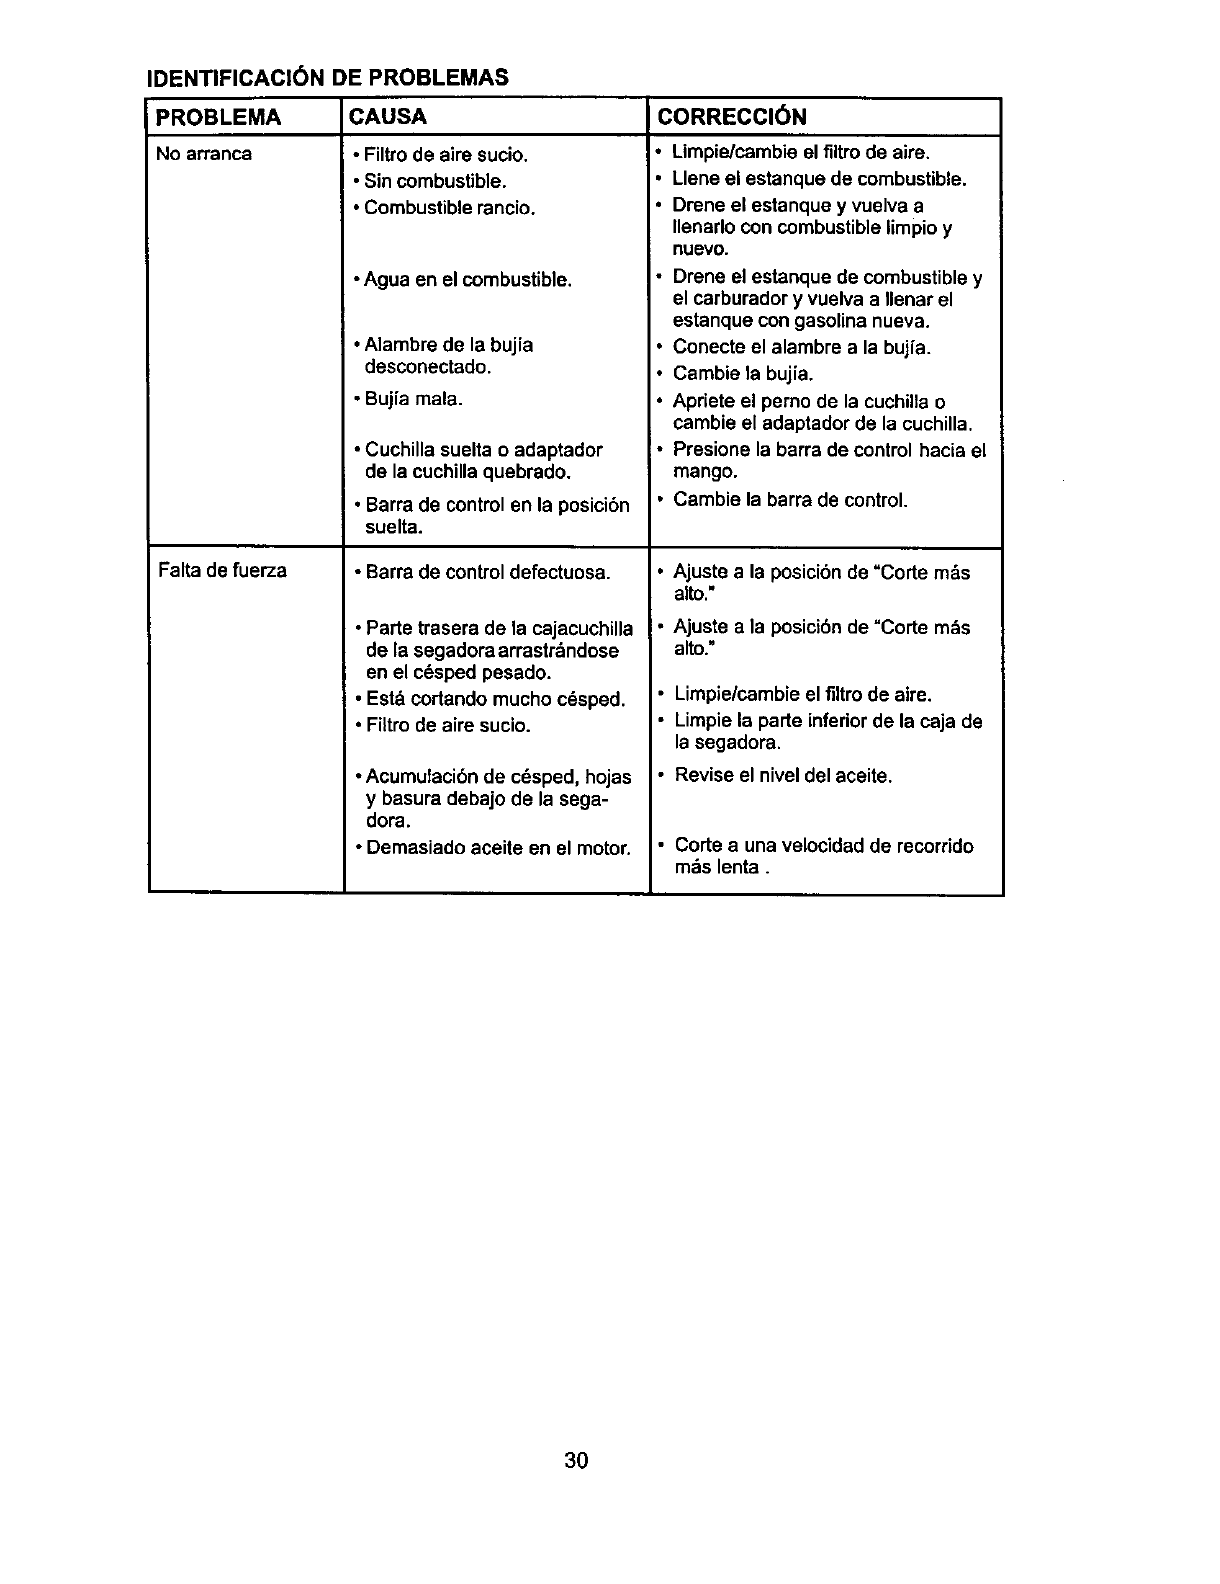
IDENTIFICACI(_N DE PROBLEMAS
PROBLEMA
No arranca
Falta de fuerza
CAUSA
•Filtro de aire sucio.
•Sin combustible.
•Combustible rancio.
•Agua en el combustible.
• Alambre de la bujia
desconectado.
•Bujia mala.
• Cuchilla suelta o adaptador
de la cuchilla quebrado.
•Barra de control en la posici6n
suelta.
• Barra de control defectuosa.
•Parte trasera de la cajacuchilla
de la segadora arrastr_indose
en el c6sped pesado.
•Esta cortando mucho cdsped.
•Filtro de aire sucio.
•Acumutacibn de cdsped, hojas
y basura debajo de la sega-
dora.
•Demasiado aceite en el motor.
CORRECCION
Limpie/cambie el filtrode aire.
Llene el estanque de combustible.
Drene el estanque y vuelva a
Ilenarlo con combustible limpio y
nuevo.
Drene el estanque de combustible y
el carburador y vuelva a Ilenar el
estanque con gasoline nueva.
Conecte el alambre ala bujfa.
Cambie la bujia.
Apriete el perno de la cuchilla o
cambie el adaptador de la cuchilla.
Presione la barra de control hacia el
mango.
Cambie la barra de control.
Ajuste a la posicibn de "Corte m&s
alto.•
!" Ajuste a la posicibnde "CoKe m&s
alto."
•Limpie/cambie el filtro de aire.
•Limpie la parte inferiorde la caja de
la segadora.
•Revise el nivel del aceite.
• Corte a una velocidad de recorrido
m,_s lenta.
3O
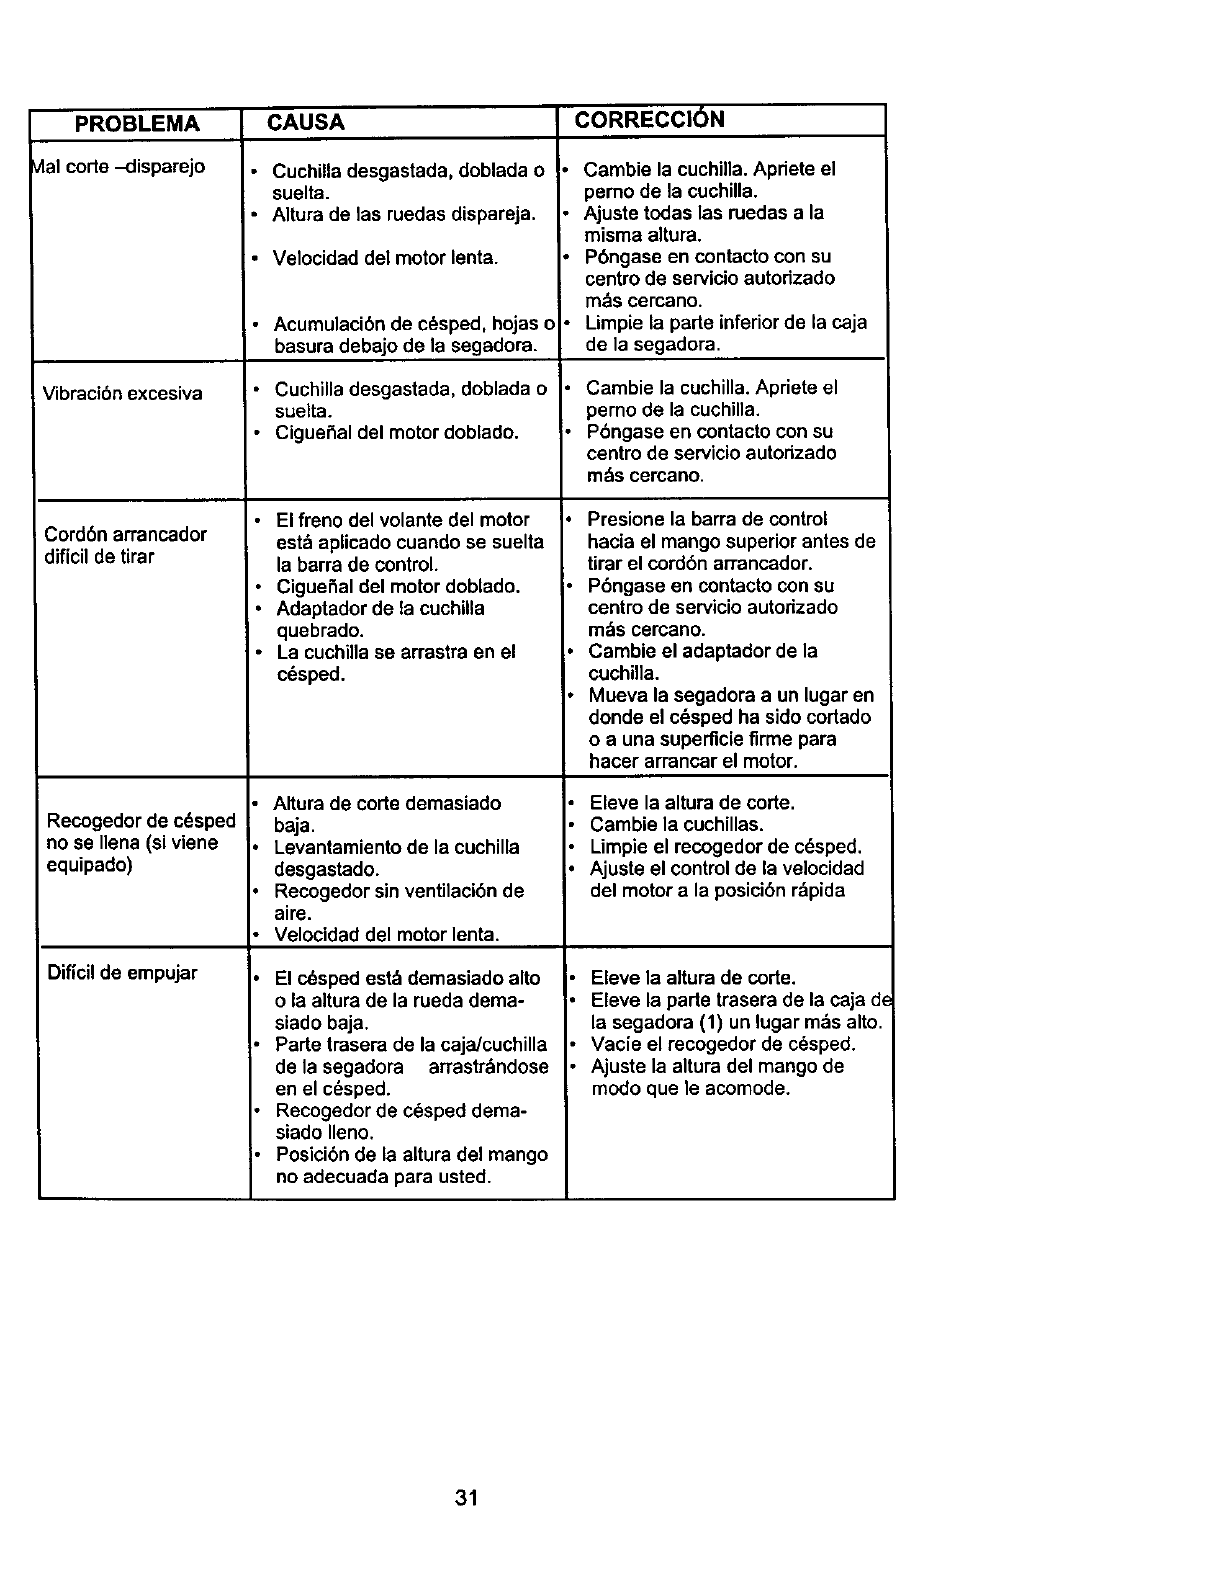
PROBLEMA
Vialcorte -disparejo
Vibraci6n excesiva
Cord6n arrancador
dificil de tirar
Recogedor de c_sped
no se nena (si viene
equipado)
Dificil de empujar
CAUSA
• Cuchilla desgastada, doblada o
suelta.
•Altura de las ruedas dispareja.
• Velocidad del motor lenta.
• Acumulaci6n de c_sped, hojas e
basura debejo de la segadora.
Cuchilla desgastada, doblada o
suelta.
CigueSal del motor doblado.
•El freno del volante del motor
est_laplicado cuando se suelta
la barra de control.
•CigueSal del motor doblado.
•Adaptador de la cuchilla
quebrado.
• La cuchilla se arrastra en el
c_sped.
Altura de corte demasiado
baja.
Levantamiento de la cuchilla
desgastado.
Recogedor sin venfilaci6n de
aire.
Velocidad del motor lenta.
El c_sped est_ demasiado alto
o la altura de la rueda dema-
siado baja.
Parte trasera de la caja/cuchilla
dela segadora arrastr&ndose
en el cesped.
Recogedor de c6sped dema-
siado Ileno.
Posici6n de la altura del mango
no adecuada para usted.
CORRECClON
Cambie la cuchilla. Apriete el
perno de la cuchilla.
Ajuste todas las ruedas a la
misma altura.
Pbngase en contacto con su
centro de servicioautorizado
m&s cercano.
Limpie la parte infedor de la caja
de la segadora.
Cambie la cuchilla.Apriete el
pemo de la cuchilla.
P6ngase en contacto con su
centro de servicio autorizado
m&s cercano.
• Presione la barra de control
hacia el mango superior antes de
tirar el cord6n arrancador.
•Pbngase en contacto con su
centro de servicio autodzado
m_s cercano.
•Cambie el adaptador de la
cuchina.
• Mueva la segadora a un lugar en
donde el c6sped ha sido cortado
o a una superflcie firme para
hacer arrancar el motor.
Eleve la altura de corte.
Cambie la cuchillas.
Limpie el recogedor de c_sped.
Ajuste el control de la velocidad
del motor a la posici6n r&pida
Eleve la altura de corte.
Eleve la parte trasera de la caja dc
la segadora (1) un lugar m_is alto.
Vacfe el recogedor de c_sped.
Ajuste la altura del mango de
modo que le acomode.
31
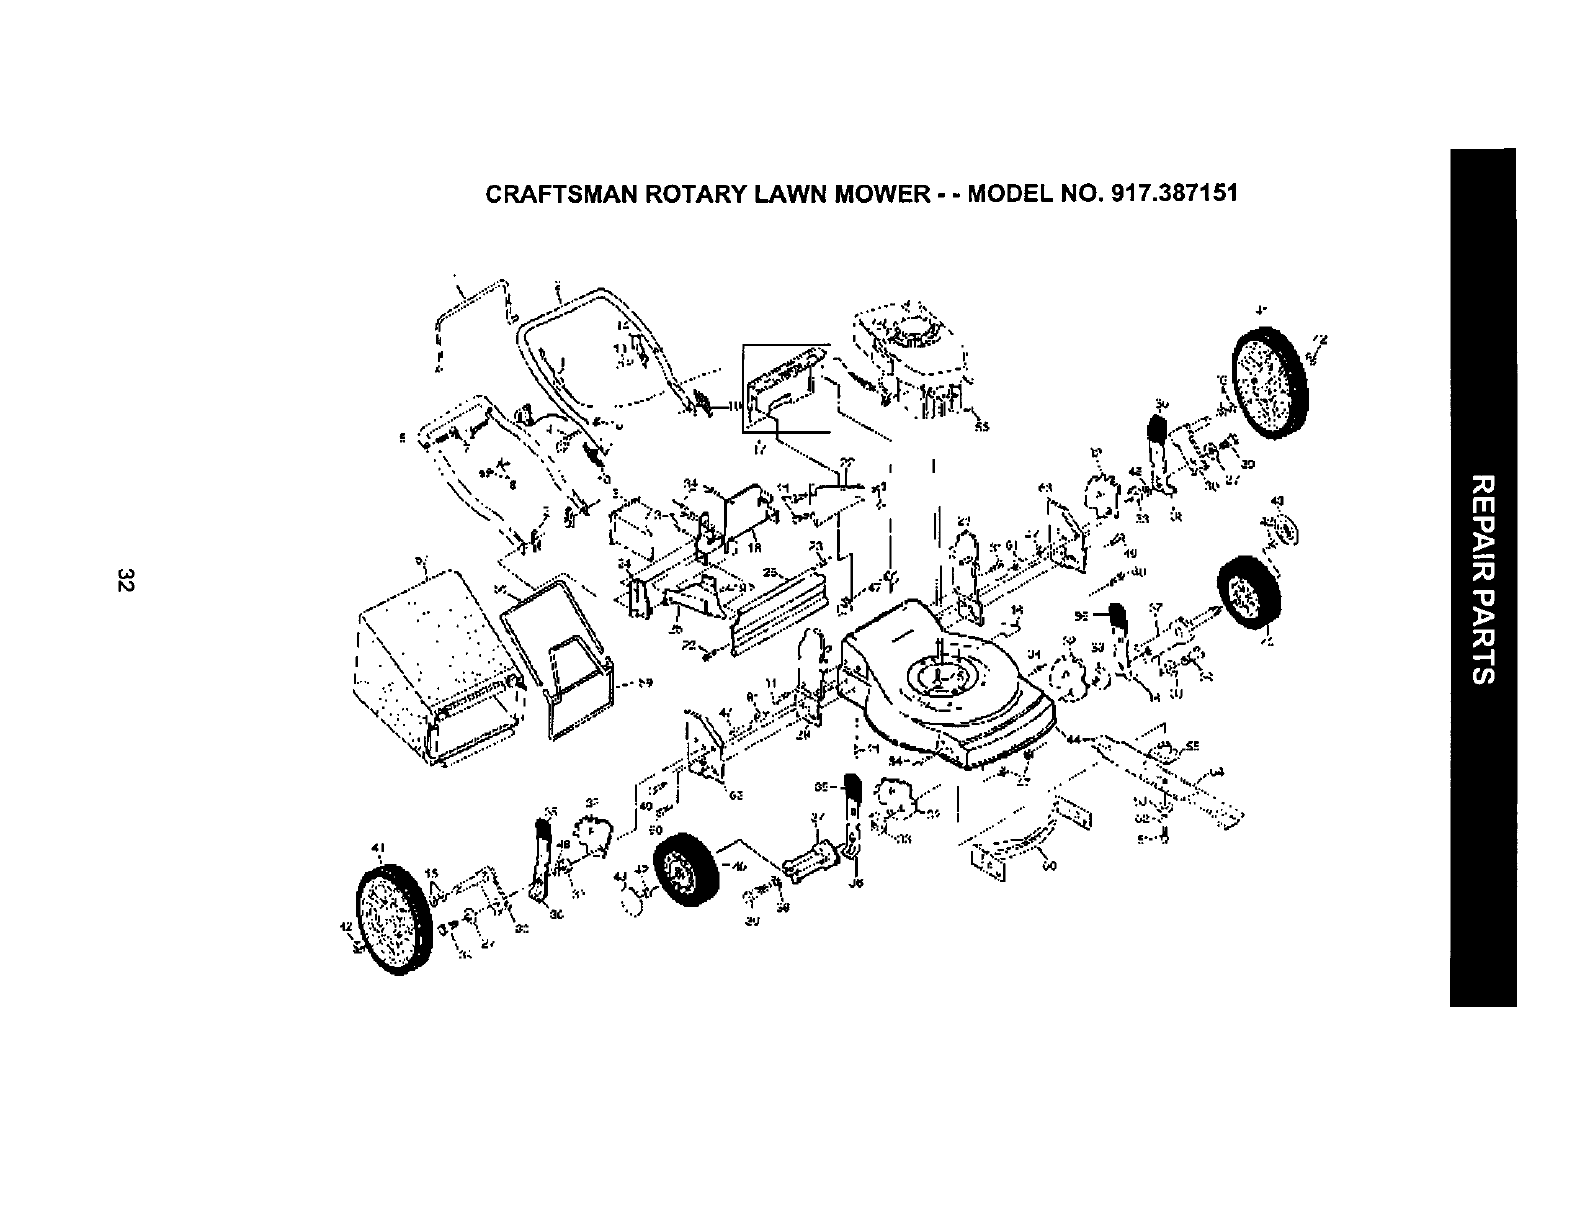
CRAFTSMAN ROTARY LAWN MOWER - - MODEL NO. 917.387151
t_
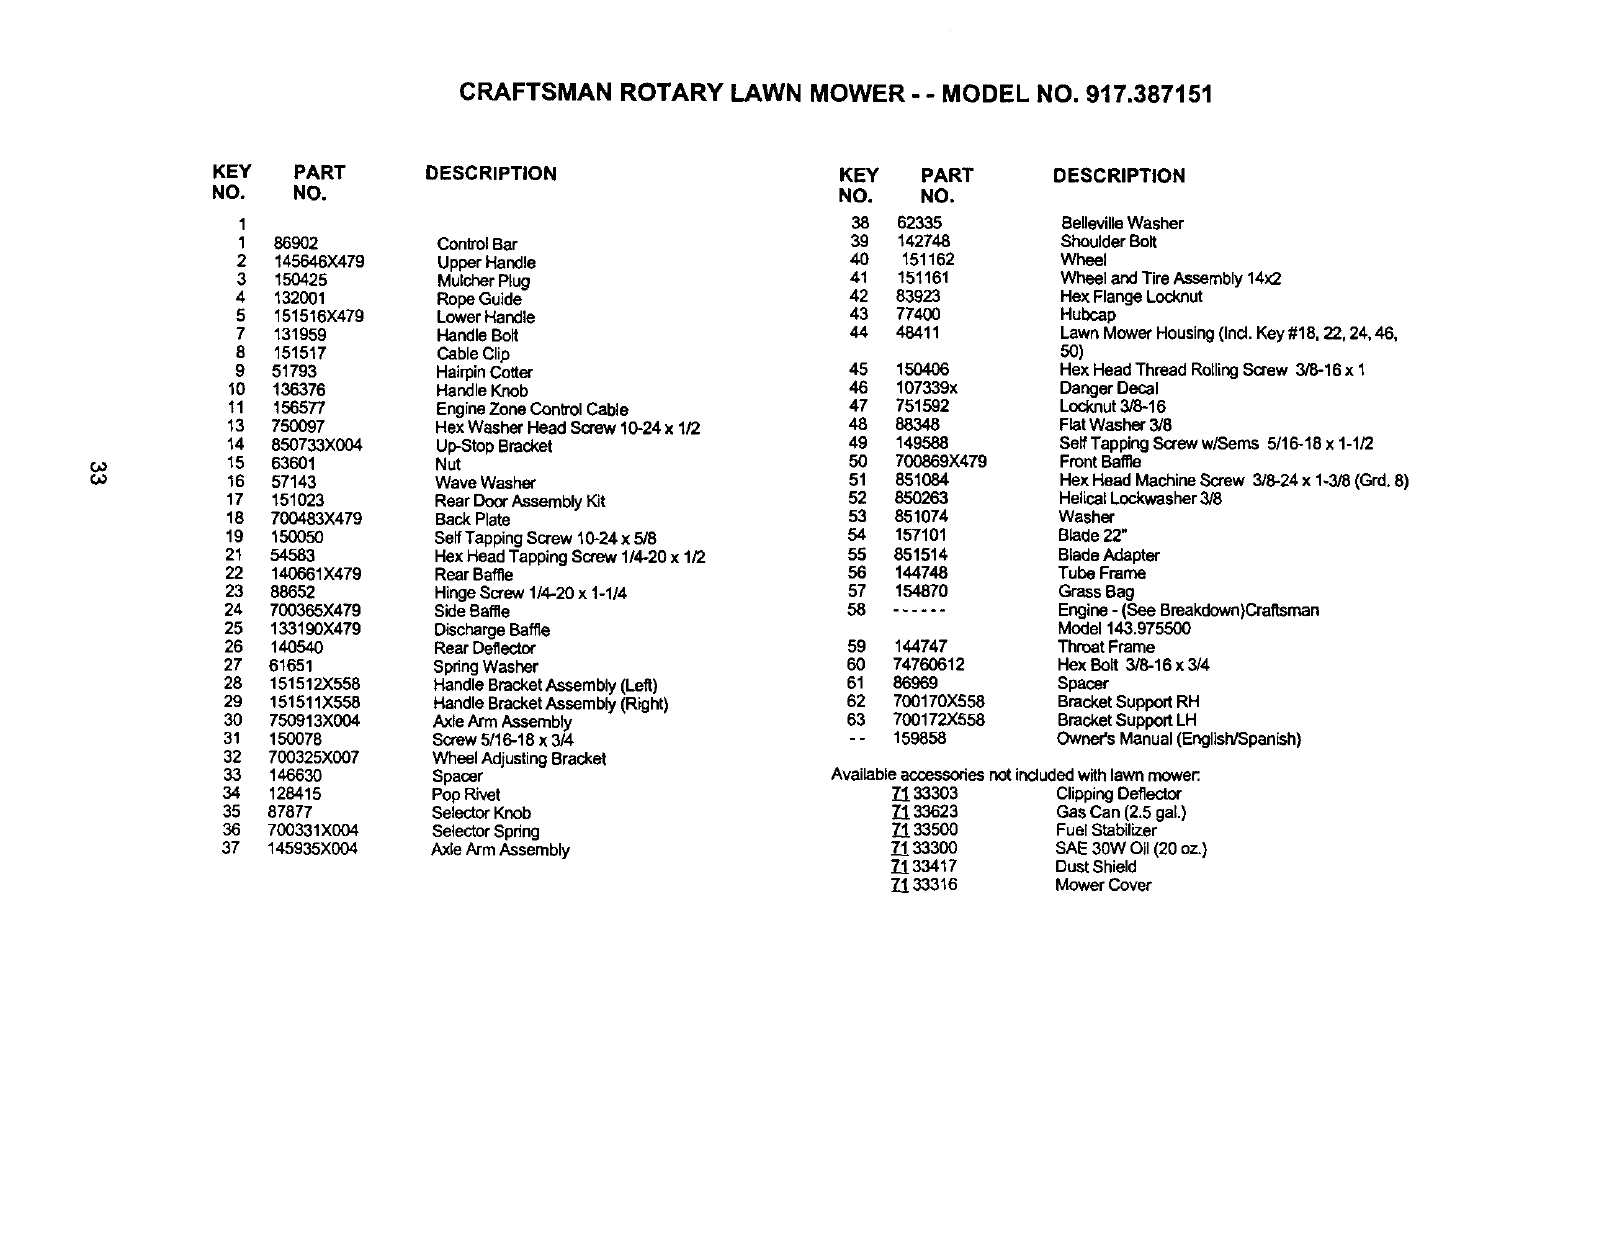
CRAFTSMAN ROTARY LAWN MOWER -- MODEL NO. 917.387151
b)
¢0
KEY
NO.
1
1
2
3
4
5
7
8
9
10
11
13
14
15
16
17
18
19
21
22
23
24
25
26
27
28
29
3O
31
32
33
34
35
36
37
PART
NO.
869O2
145646)(479
150425
132001
151516X479
131959
151517
51793
136376
156577
750097
850733X004
63601
57143
151023
700483)(479
15O05O
54583
140661)(479
88652
700365X479
133190X479
140540
61651
151512.X558
151511X558
750913X004
150078
700325X007
14663O
128415
87877
700331X004
145935X004
DESCRIPTION
Conf_olBar
UpperHandle
MulcherPlug
RopeGuide
LowerHandle
HandleBolt
CableClip
HairpinCott_"
HandleKnob
EngineZoneCon_ol Cable
Hex Washer Head Screw 10-24 x 1/2
Up-StopBracket
Nut
Wave Washer
RearDoorAssemblyKit
BackPlate
SelfTappingScrew 10-24 x 5/8
Hex Head TappingScrew 114-20x 1/2
RearBaffle
HingeScrew 1/4-20 x 1-1/4
SideBaffle
DischargeBaffle
RearDeflector
SpnngWasher
Handle BracketAssembly(Left)
Handle BracketAssembly (Right)
Axle Arm Assembly
Screw5/16-18 x 3/4
WhealAdjustingBracket
Spacer
PopRivet
SelectorKnob
SelectorSphng
Axle Arm Assembly
KEY PART
NO. NO.
38 62335
39 142748
40 151162
41 151161
42 83923
43 77400
44 48411
45 1504O6
46 107339x
47 751592
48 88348
49 149588
50 700869X479
51 851084
52 850263
53 851074
54 157101
55 851514
56 144748
57 154870
58 ......
59 144747
60 74760612
61 86969
62 700170X558
63 700172X558
- - 159858
DESCRIPTION
SellevilleWasher
Shoulder Bolt
Wheel
Wheel andTire Assembly 14x2
Hex Flange Locknut
Hubcap
LawnMower Housing(Ind. Key#18, 22, 24, 46,
5O)
Hex Head Thread RoilingScrew 3/8-16 x 1
Danger Decal
Locknut3/8-16
FlatWasher 3/8
Self TappingScreww/Seres 5/16-18 x 1-1/2
FrontBaffle
Hex Head MachineScrew 3/8-24 x 1-3/8 (Grd.8)
HelicalLockwasher3/8
Washer
Blade22"
BladeAdapter
Tube Frame
GrassBag
Engine-(See Breakdown)Craftsman
Model 143.975500
ThroatFrame
Hex Bolt 3/8-16 x3/4
Spacer
BracketSupportRH
BracketSupportLH
Owner'sManual (Engllah/Span[sh)
Availableaccessoriesnotincludedwithlawnmower:
!_!_33303 Clipping Deflector
33623 GasCan (2,5 gaL)
.7_!,33500 FuelStabilizer
71 33300 SAE 30W Oil (20 oz.)
_1_33417 Dust Shield
Z.I.33316 Mower Cover
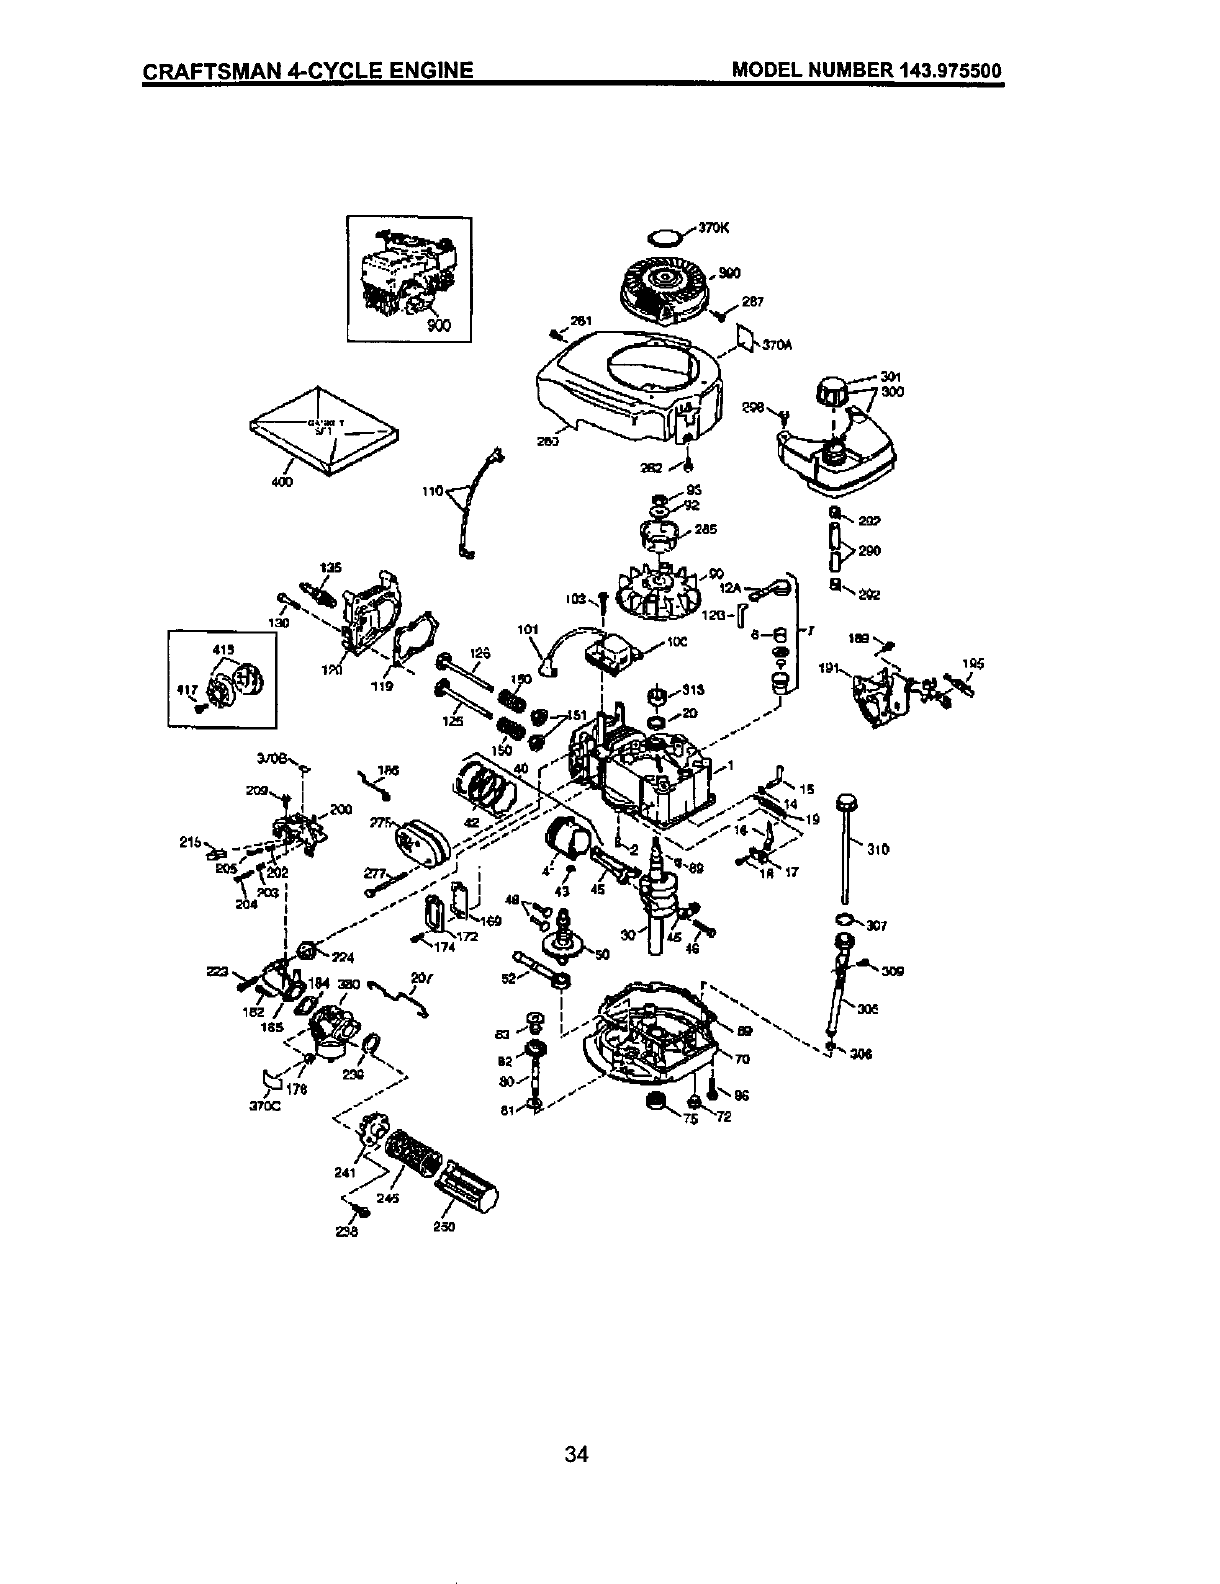
CRAFTSMAN 4-CYCLE ENGINE MODEL NUMBER 143.975500
34
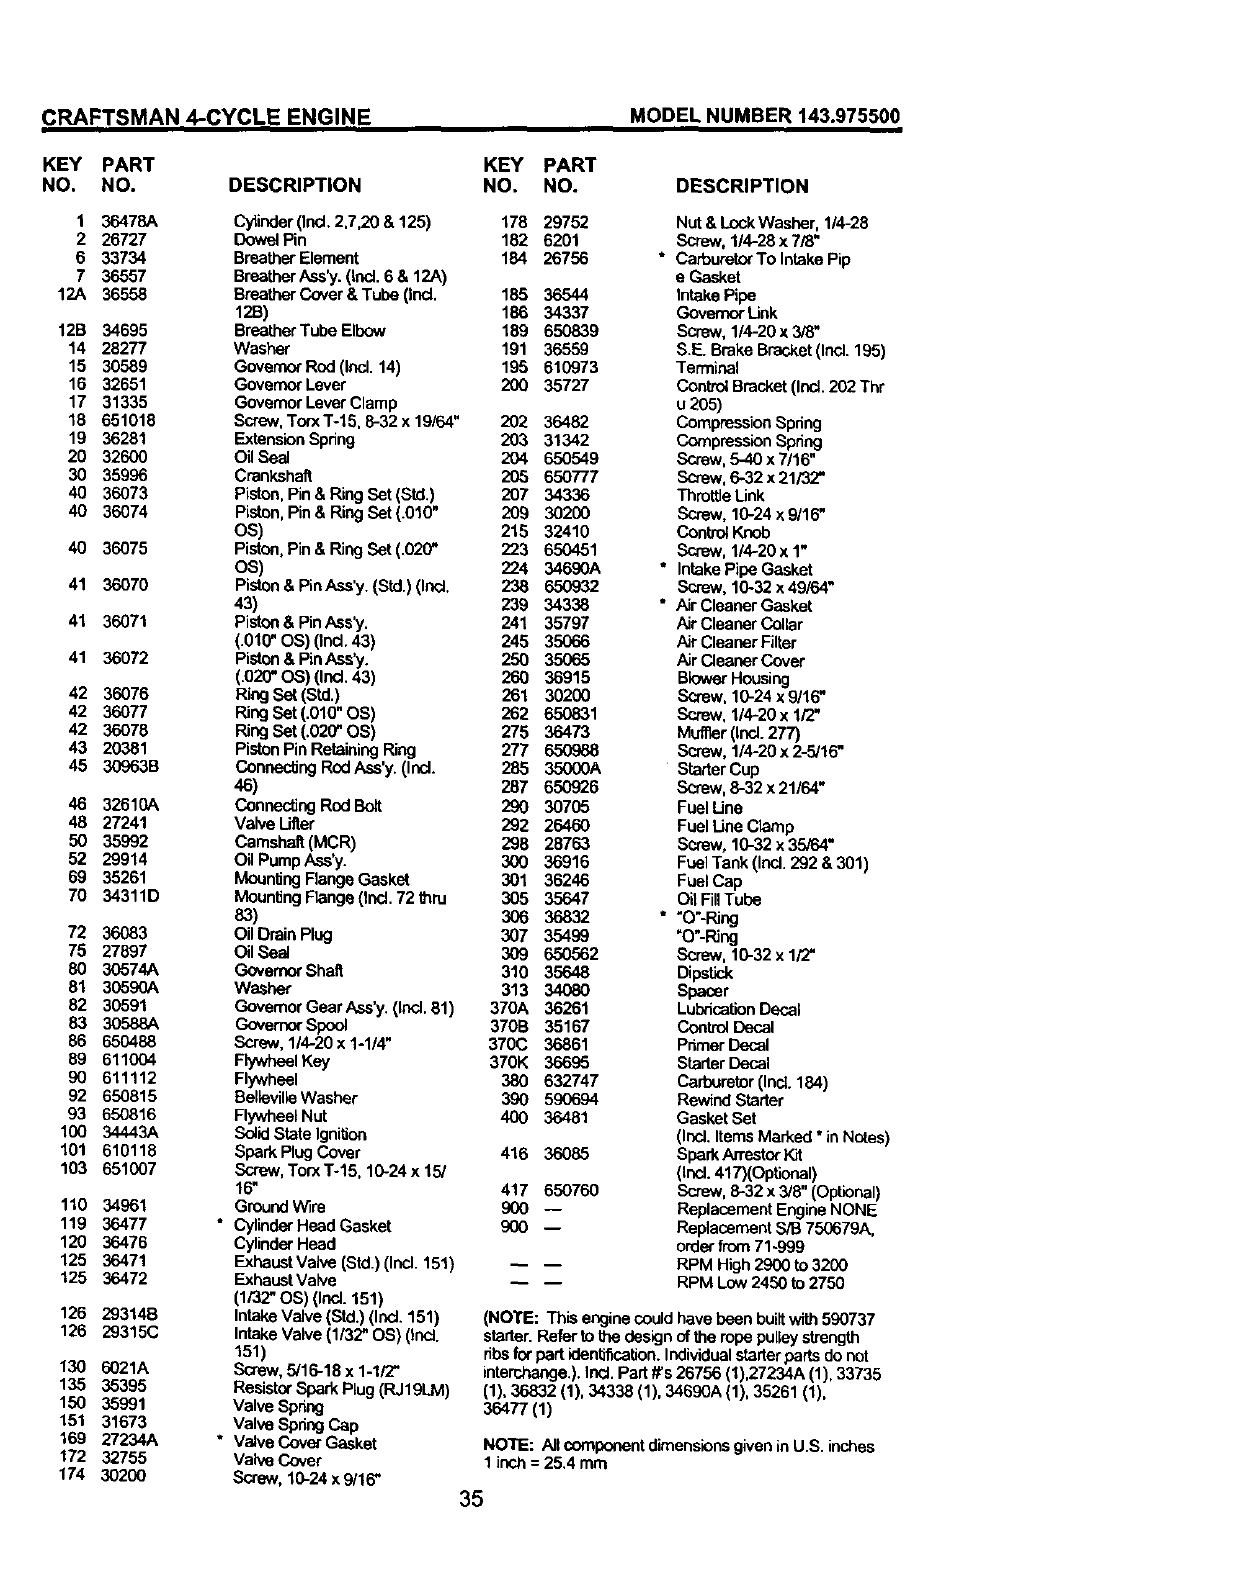
CRAFTSMAN 4-CYCLE ENGINE MODEL NUMBER 143.975500
KEY PART
NO. NO. DESCRIPTION
1 36478A
2 26727
6 33734
7 36557
12A 36558
12B 34695
14 28277
15 30589
16 32651
17 31335
18 651018
19 36281
20 32600
30 36996
40 36073
40 36074
40 36075
41 36070
41 36071
41 36072
42 36076
42 36077
42 36076
43 20381
45 30963B
46 32610A
48 27241
50 35992
52 29914
69 35261
70 34311D
72 36083
75 27897
80 30574A
81 30590A
82 30591
83 30588A
86 650488
89 611004
90 611112
92 650815
93 650816
100 34443A
101 610118
103 651007
110 34961
119 36477
120 36476
125 36471
125 36472
126 29314B
126 29315C
130 6021A
135 35395
150 35_:J1
151 31673
169 27234A
172 32755
174 30200
KEY PART
NO. NO. DESCRIPTION
Cylinder (Incl.2,7,20 & 125) 178 29752 Nut& Lock Washer, 1/4-28
DowelPin 182 6201 Screw, 1/4-28 x 7/8"
BreatherElement 184 26756 * Carbureto_TolntakePip
BreatherAes_. (Incl. 6 & 12A) e Gasket
BreatherCover & Tube (Incl. 185 36544 IntakePipe
12..B) 186 34337 Governer Link
BreatherTube Elbow 189 650839 Sorew,1/4-20 x 3/6"
Washer 191 36559 S.F- BrakeBracket(Ind. 195)
GovernorRed (incl. 14) 195 610973 Terminal
Governor Lever 200 35727 Control Bracket (Ind. 202 Thr
Governor LeverClamp u 205)
Screw, Torx T-15, 6-32 x 19/64" 202 36482 Compression Spdng
Extension Spring 203 31342 Compression Spring
OilSeal 204 650549 Screw, 5-40 x 7/16"
Crankshaft 205 650777 Screw, 6-32 x 21/32"
Piston, Pin & Ring Set (Std.) 207 34336 Thro_e Unk
Piston, Pin & Ring Set (.010" 209 30200 Screw, 10-24 x 9116"
OS) 215 32410 Control Knob
Piston, Pin &Ring Set (.020" 223 650451 Screw, 1/4-20 x 1"
OS) 224 34690A * Intake Pipe Gasket
Piston & Pin Ass'y. (Std.) (Incl. 238 650932 Screw, 10-32 x49/64"
43) 239 34338 * Air Cleaner Gasket
Piston & Pin Ass_. 241 35797 Air Cleaner Collar
(.010" OS) (Ind. 43) 245 35066 Air Cleaner Filtar
Piston & Pin Ass'y. 250 35065 Air Cleaner Cover
(.020" aS) (Incl. 43) 260 36915 BlowerHousing
RingSet (Std.) 261 30200 Screw, 10-24 x 9/16"
RingSet (.010"OS) 262 650831 Sc]ew, 1/4-20 x 1/2"
Ring Set (.020"OS) 275 36473 Mufner(Incl.277)
PistonPin RetainingRing 277 650988 Screw, 1/4-20 x 2-5/16"
coneec_ng RodAss'y.(Incl. 285 35000A StarterCup
46) 287 650926 Screw, 8-32 x 21164"
ConnectingRod Bolt 290 30705 Fuel Line
Valve Ulter 292 26460 Fuel Line Clamp
Camshaft (MCR) 296 28763 Screw, 10-32 x 35/84"
Oil PumpAss'y. 300 36916 FuelTank (Incl.292 & 301)
MountingFlangeGasket 301 36246 Fuel Cap
MountingFlange(ind. 72 thru 305 35647 Oil FillTube
83) 306 36832 *"O"-Ring
OilDrain Plug 307 35499 "O"-PJng
OilSeal 309 650562 Screw, 10-32 x 1/2"
GovernorShalt 310 35648 Dipstk:.k
Washer 313 34080 Spacer
GovernorGearAss'y.(Incl.61) 370A 36261 LubricationDecal
GovernerSpool 370B 35167 ControlDecal
Screw,114-20x1-1/4" 370(3 36861 PnmerDecal
FlywheelKey 370K 36695 StarterDecal
Flywheel 380 632747 Carburetor(IncL184)
BelidvilleWasher 390 590694 Rew;ndStarter
FlywheelNut 400 36481 Gasket Set
SolidState Ignition (Incl.ItemsMarked* in Notes)
SparkPlugCover 416 36085 SparkArrestorKit
Screw,TorxT-15, 10-24 x 15/ (Incl.417)(Optional)
16" 417 650760 Screw,8-32 x 3/8"(Optional)
GroundWire 900 -- Replacement Engine NONE
•CylinderHead Gasket 900 -- ReplacementS/t]750679A,
CylinderHeed orderfrom 71~999
ExhaustValve (Std.)(Incl. 151) RPM High2900 to 3200
ExhaustValve RPM Low2450 to 2750
(1/32"OS) (Ind. 151)
IntakeValve(Std.) (Incl.151) (NOTE: This enginecouldhavebeen builtwith590737
IntakeValve(1/32" OS) (Incl. starter.Refer to the designofthe ropepulleystrength
151) ribs forpart identification. Individualstarter parts do not
Screw, 5/16-18 x 1-1/2" interchange.). Incl.Part ffs 26756 (1),27234A (1),33735
Resistor Spark Plug (RJ19LM) (1), 36832 (1), 34338 (1), 34690A (1), 35261 (1),
Valve Spnng 36477 (1)
Valve Spdng Cap
• Valve Cover Gasket NOTE: All componentdimensions given in U.S. inches
Valve Cover 1 inch = 25.4 mm
Screw, 10-24 x 9/16" 35
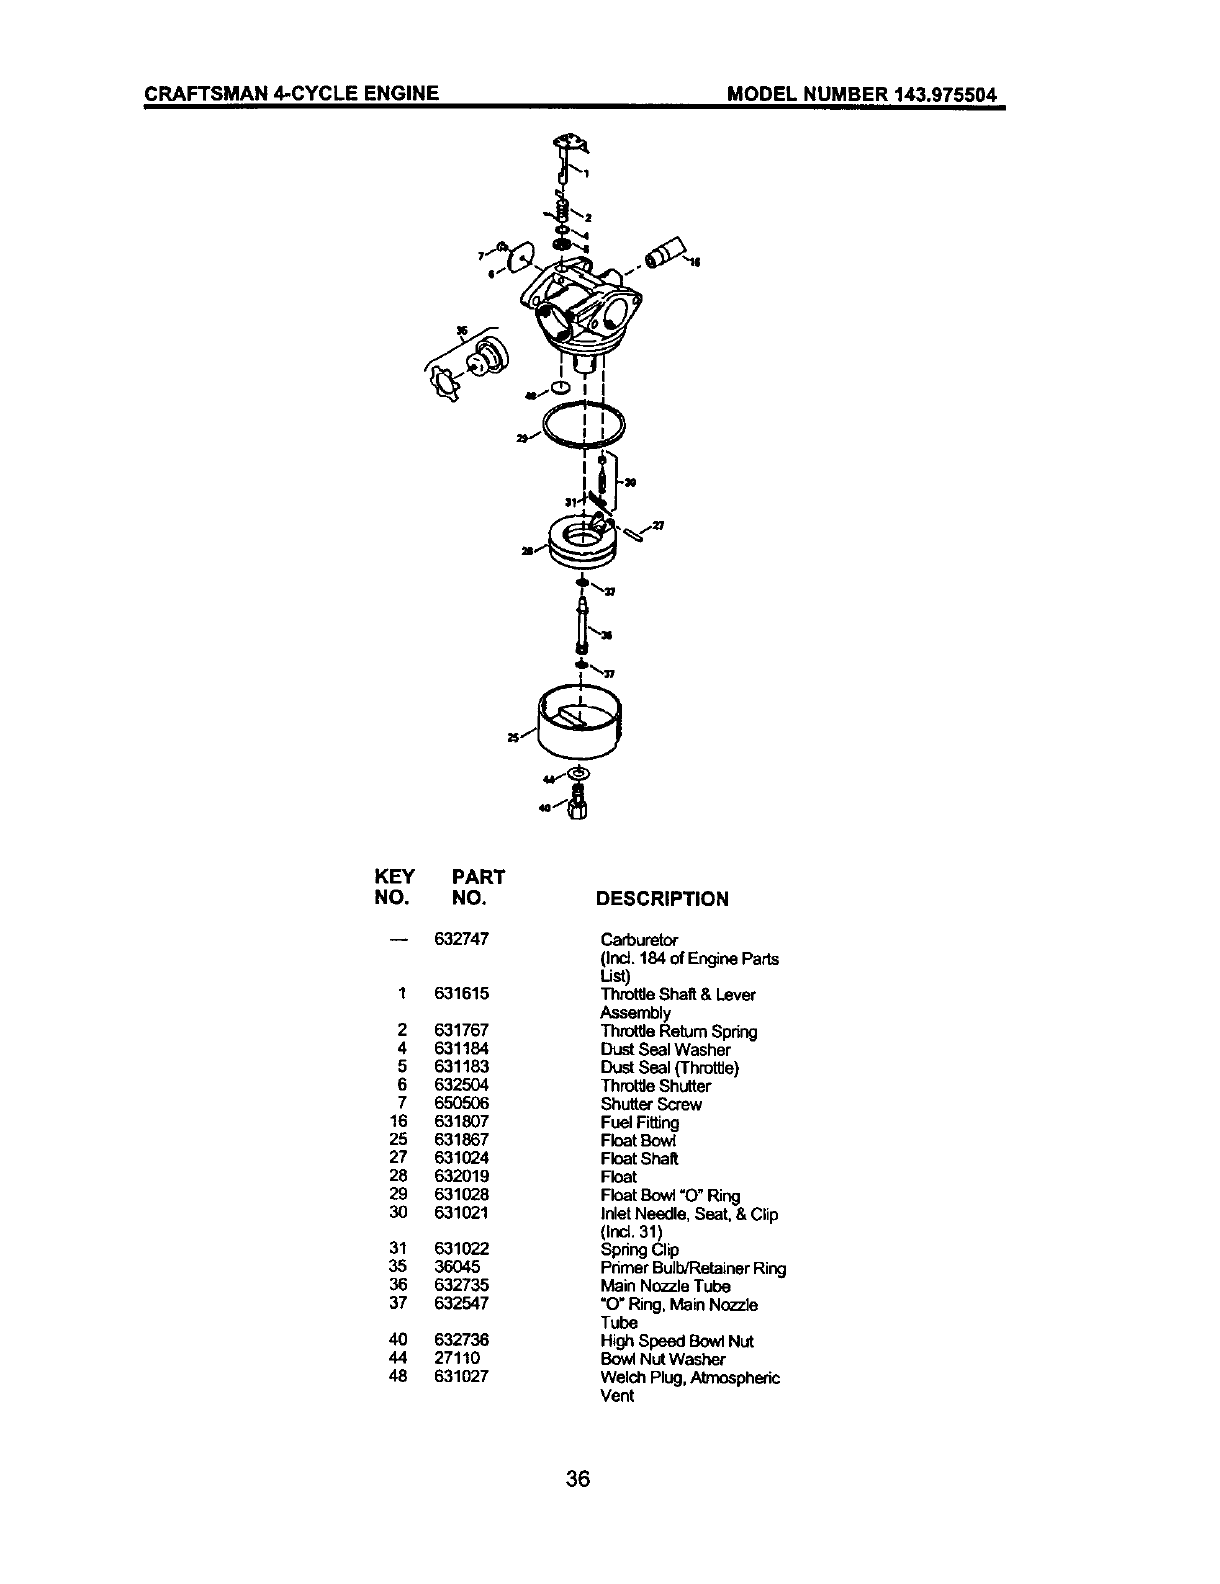
CRAFTSMAN 4-CYCLE ENGINE MODEL NUMBER 143.975504
4O
KEY PART
NO. NO.
-- 632747
1 631615
2 631767
4 631184
5 631183
6 632504
7 650506
16 631807
25 631867
27 631024
28 632019
29 631028
30 631021
31 631022
35 36O45
36 632735
37 632547
40 632736
44 27110
48 631027
DESCRIPTION
Carburetor
(Incl. 184 of EngineParts
List)
ThrottleShaJt& Lever
Assembly
Throttle ReturnSpnng
DustSealWasher
DustSeal ('rhrottJe)
ThrottleShutter
ShutterScrew
Fuel Fitting
Float Bow_
Float Shalt
Float
FloatBow1"0" PJng
Inlet Needle, Seat. & Clip
(Incl.31)
SpringClip
PrimerBulb/RetainerRing
Main NozzleTube
"O"Ring, Main Noz7Je
Tube
Hi_n SpeedBowlNut
BowlNutWasher
Welch Plug,Atmospheric
Vent
36
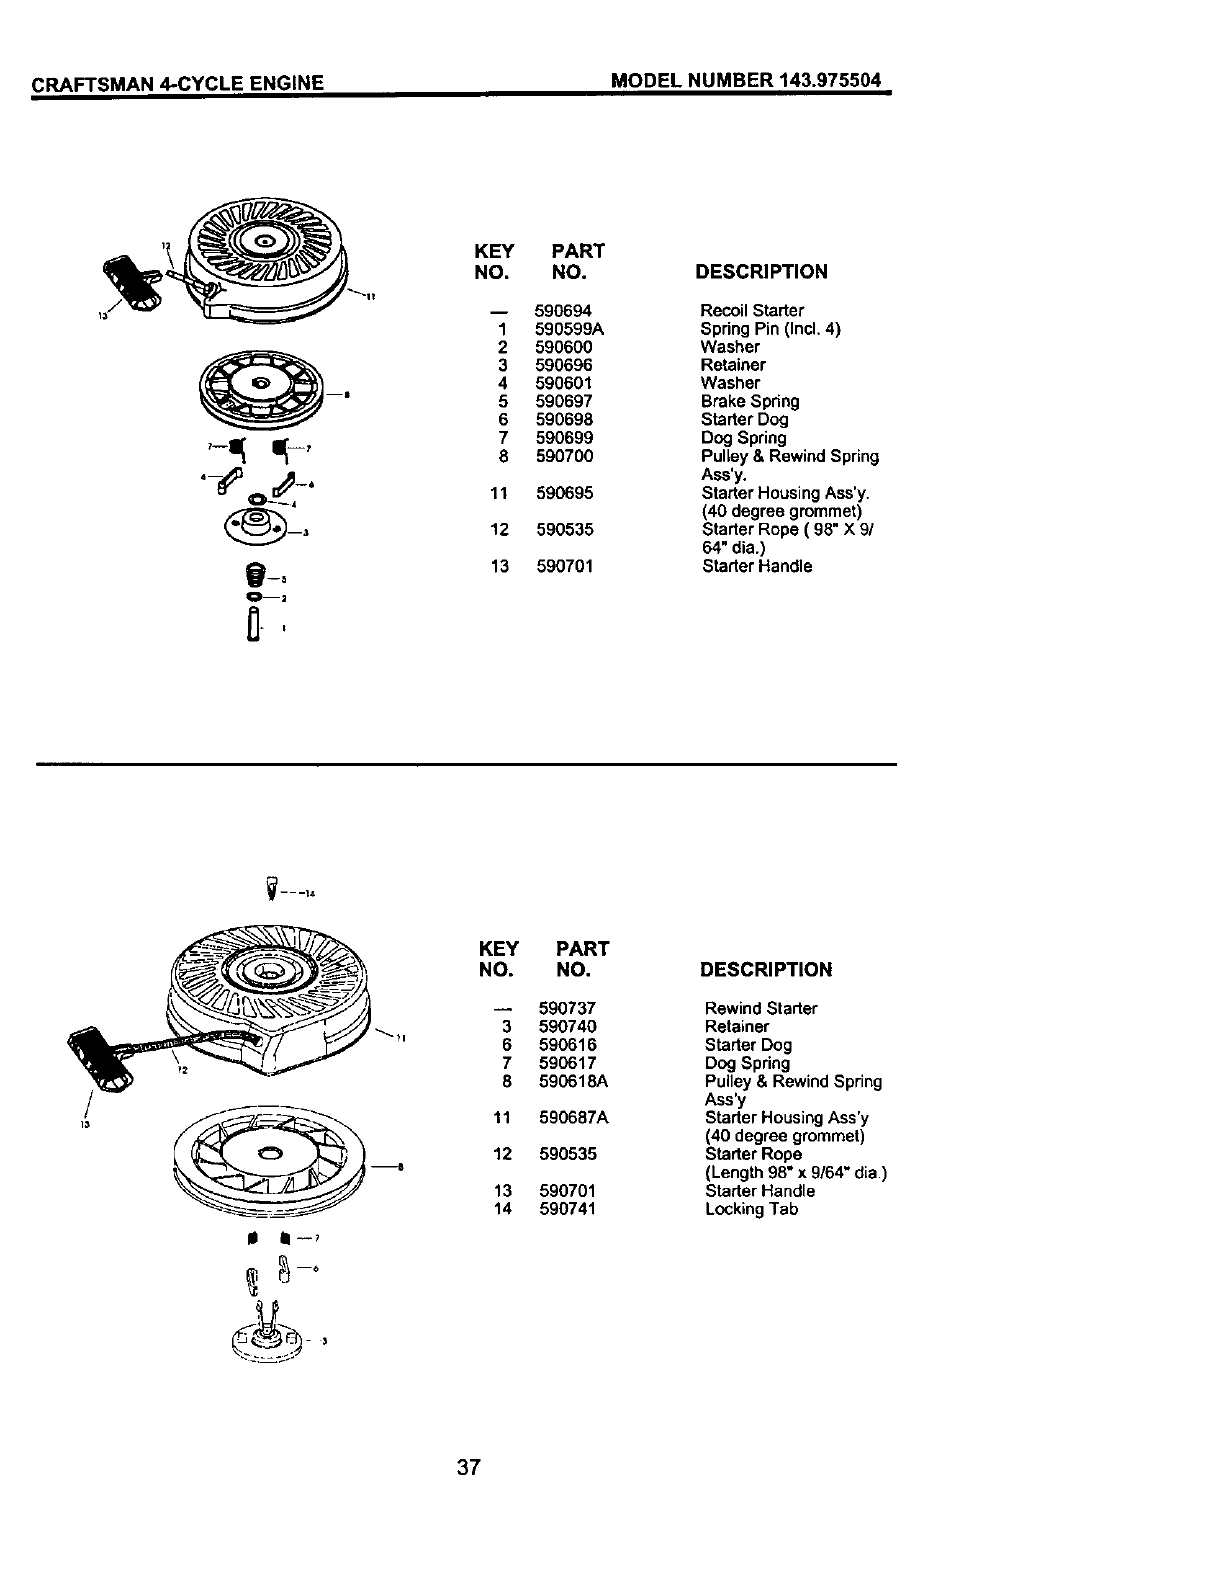
CRAFTSMAN 4-CYCLE ENGINE MODEL NUMBER 143.975504
Om2
KEY PART
NO. NO.
-- 590694
1 590599A
2 590600
3590696
4590601
5590697
6 590698
7 590699
8 590700
11 590695
12 590535
13 590701
DESCRIPTION
Recoil Starter
Spring Pin (Incl, 4)
Washer
Retainer
Washer
Brake Spring
Starter Dog
Dog Spring
Pulley & Rewind Spring
Ass'y.
Starter HousingAss'y.
(40 degree grommet)
Starter Rope ( 98" X 9/
64" alia.)
Starter Handle
_- -f4
m8
II 11--7
KEY
NO.
3
6
7
8
11
12
13
14
PART
NO.
590737
590740
590616
590617
590618A
590687A
590535
590701
590741
DESCRIPTION
Rewind Starter
Retainer
Starter Dog
Dog Spring
Pulley & Rewind Spring
Ass'y
Starter Housing Ass'y
(40 degree grommet)
Starter Rope
(Length 98" x 9/64" dia,)
Starter Handle
LockingTab
37

38

39

Forthe repair or replacement parts you need
delivered directly to your home
Call 7 am - 7 pm, 7 days a week
1-800-366-PART
(t -800-366-7278)
Para ordenar piezas con entrega a
domicilio - 1-800-659-7084
For in-house major brand repair service
Call 24 hours a day, 7 days aweek
1-800-4-REPAIR
(1-800-473-7274)
Para ped|r servic|o de reparacibn a
domicilio - 1-800-676-5811
For the location of a Sears Parts and
Repair Center in your area
Call 24 hours a day, 7 days a week
1-800-488-1222
/lI_mn
mmmmmm
For information on purchasing a Sears
Maintenance Agreement or to inquire
about an existing Agreement
Call 9 am - 5 pro, Monday-Saturday
1-800-827-6655
When requesting service or ordering
parts, always provide the following
information:
•Product Type • Part Number
• Model Number • Part Description
SEeARS
159858 05.08.97 REV.3 VBL Printed in U.S.A.
