Craftsman 917388151 User Manual ROTARY LAWN MOWER Manuals And Guides L0710145
CRAFTSMAN Walk Behind Lawnmower, Gas Manual L0710145 CRAFTSMAN Walk Behind Lawnmower, Gas Owner's Manual, CRAFTSMAN Walk Behind Lawnmower, Gas installation guides
User Manual: Craftsman 917388151 917388151 CRAFTSMAN ROTARY LAWN MOWER - Manuals and Guides View the owners manual for your CRAFTSMAN ROTARY LAWN MOWER #917388151. Home:Lawn & Garden Parts:Craftsman Parts:Craftsman ROTARY LAWN MOWER Manual
Open the PDF directly: View PDF ![]() .
.
Page Count: 40

__'/__-_ Owner's Manual
£Ri:IFTSMgN°
5.0 HORSEPOWER
22" REAR DISCHARGE
ROTARY LAWN MOWER
Model No.
917.388151
•Safety
•Assembly
° Operation
oMaintenance
•EspaSoi
• Repair Parts
CAUTION:
Read and follow all
Safety Rules and Instructions
before operating this equipment
For answers to/your
questions about this product:
Call 7 am--7 pm, Mon--Sat;
Sun, I0 am--7 pm
1-800-235..5878
Sears, Roebuck and Co., Hoffman Estates, IL 60179
Warranty 2 Product Specifications 11
Safety Rules 2 Service and Adjustments 13
Assembly 4 Storage 14
Operation 6 Troubleshooting 15
Maintenance Schedule 10 Repair Parts 32
Maintenance t0 Parls Ordering Back Cover
LIMITED TWO YEAR WARRANTY ON CRAFTSMAN POWER MOWER
For two years from date of purchase, when this Craftsman Lawn Mower is maintained,
lubricated, and tuned up according to the operating and maintenance instructions in the
owner's manual, Sears wilt repair free of charge any defect in material or workmanship.
If this Craftsman Lawn Mower is used for commercial or rental purposes, this warranty
applies for only 90 days from the date of purchase.
This Warranty does not cover:
• Expendable items which become worn during normal use, such as rotary mower
blades, blade adapters, belts, air cleaners and spark plug.
• Repairs necessary because of operator abuse or negligence, including bent crank-
shafts and the failure to maintain the equipment according to the instructions con-
tained in the owner's manual.
Warranty service is available by returning the craftsman power mower to the nearest
sears sen,ice centeddepartment in the united staleso This warranty applies only while
this product is in use in the united states.
This Warranty gives you specific legal rights, and you may also have other rights which
vary from state to state°
SEARS, ROEBUCK AND CO., D/817 WA, HOFFMAN ESTATES, _LLINOIS 60179
TRAINING:
• Read this operator's manual carefully.
Become familiar with the controls and
know how to operate your mower
properly. Learn how to quickly stop
mower.
• Do not allow children to use your mower.
Never allow adults to use mower without
proper instructions.
• Keep the area of operation clear of all
persons, especially small children and
pets.
• Use mower only as the manufacturer
intended and as described in this manual.
• Do not operate mower if it has been
dropped or damaged in any manner.
Always have damage repaired before
using your mower
• Do not use accessory attachments that
are not recommended by the manufac,
turer. Use of such attachments may be
hazardous.
• The blade turns when the engine is
running,
PREPARATION:
, Always thoroughly check the area to be
mowed and clear it of all stones, sticks,
wires, bones, and other foreign objects.
These objects will be thrown by the blade
and can cause severe injury,
° Always wear safely glasses or eye
shields when starting and while using
your mower.
• Dress properly. Do not operate mower
when barefoot or wearing open sandals.
Wear only solid shoes with good traction
when mowing.
• Check fuel tank before starting engine_
Do not filt gas tank indoors, when lhe
engine is running or when the engine is
hoLAllowtheenginetocool for several
minutes before filling the gas tank Clean
off any spilled gasoline before starting the
engine.
• Always make wheel height adjustments
before starting your mower° Never
attempt to do this while the engine is
running,
• Mow only in daylight or good artificial
light.
OPERATION:
° Keep your eyes and mind on your mower
and the area being cut, Do not let other
interests distract you,
•Do not mow wet or slippery grass, Never
run while operating your mower, Always
be sure ol your footing -- keep a firm
hold on the handles and walko
• Do not put hands or feet near or under
rotating parts, Keep clear of the discharge
opening at all times,
• Always stop the engine whenever you
leave or are not using your mower, or
before crossing driveways, walks, roads,
and any gravel--covered areas.
• Never direct discharge of material toward
bystanders nor allow anyone near the
mower while you are operating ito
° Before cleaning, inspecting, or repairing
your mower, stop the engine and make
absolutely sure the blade and all moving
parts have stopped. Then disconnect the
spark plug wire and keep it away from the
spark plug to prevent accidental starting.
• Do nol continue to run your mower if you
hit a foreign object. Follow the procedure
outlined above, then repair any damage
before restarting and operating you
mower.
• Do not change the governor settings or
overspeed the engine. Engine damage or
personal injury may result.
• Do not operate your mower if it vibrates
abnormally. Excessive vibration is an
indication of damage; stop the engine,
safely check for the cause of vibration
and repair as required.
• Do not run the engine indoors. Exhaust
fumes are dangerous.
•Never cut grass by pulling the mower
towards you. Mow across the face of
slopes, never up and down or you might
lose your footing. Do not mow exces-
sively steep slopes. Use caution when
operating the mower on uneven terrain or
when changing directions -- maintain
good footing.
° Never operate your mower without
proper guards, plates, grass catcher or
other safety devices in place.
MAINTENANCE AND STORAGE:
• Check the blade and the engine mount-
ing bolts often to be sure they are
tightened properly.
, Check all bolts, nuts and screws at
frequent intervals for proper tightness to
be sure mower is In safe working
condition°
• Keep all safety devices in place and
working°
•To reduce fire hazard, keep the engine
free of grass, leaves or excessive grease
and oil
• Check grass catcher often ior deteriora-
tion and wear and replace worn bags.
Use only replacement bags that are
recommended by and comply with
specifications of the manufacturer of your
mower.
• Always keep a sharp blade on your
mower.
•Allow engine to cool before storing in any
enclosure.
° Never store mower with fuel in the tank
inside a building where fumes may reach
an open flame or an ignition source such
as a hot water heater, space heater,
clothes dryer, etc.
CAUTION: Always disconnect spark plug
wire and place wire where it cannot contact
spark ptug in order to prevent'accidental
starting when setting up, transporting,
adjusting or making repairs.
WARNING
The engine exhaust from this product
contains chemicals known to the State of
California to cause cancer, birth defects, or
other reproductive harm.
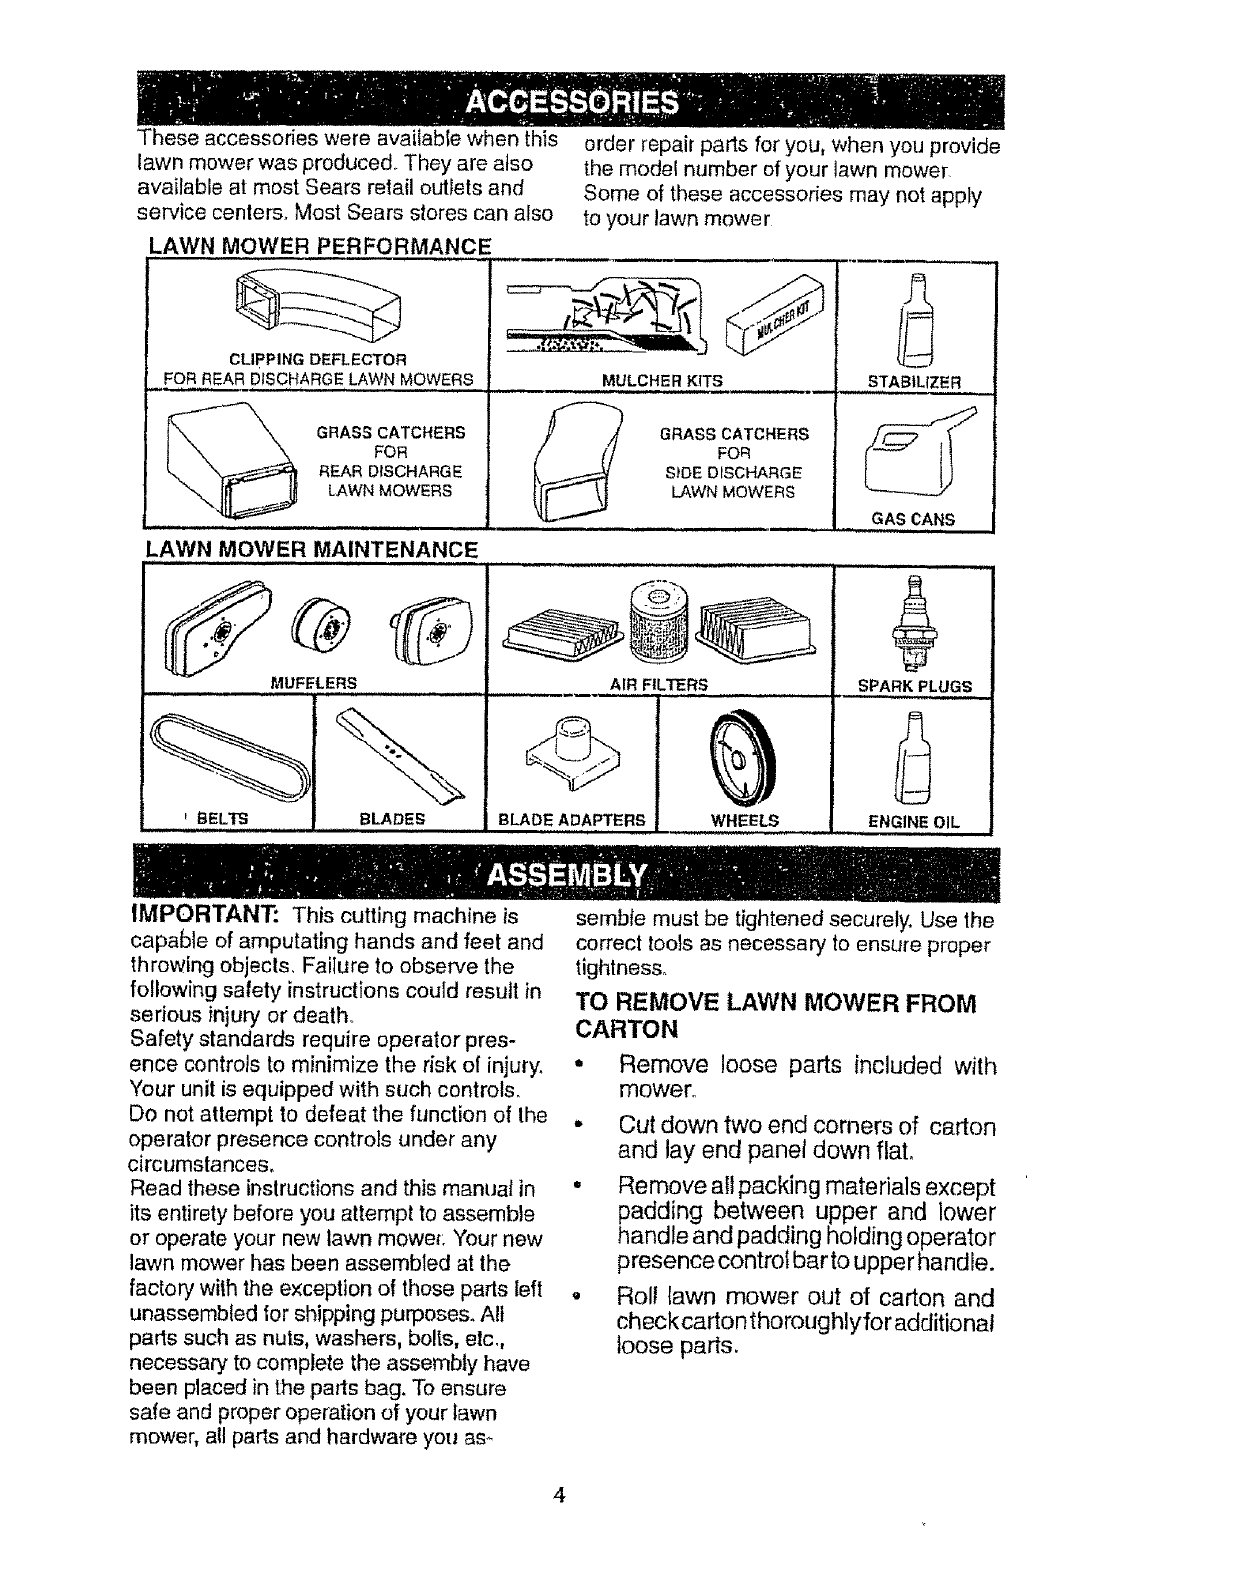
Theseaccessorieswereavai{ablewhenthis
lawnmowerwasproduced.Theyarealso
availableat mostSearsretailoutletsand
servicecenters°MostSearsstorescanaFso toyourlawnmower
LAWN MOWER PERFORMANCE
CLIPPING DEFLECTOR
FOR REAR DISCHARGE LAWN MOWERS
GRASS CATCHERS
FOR
REAR DISCHARGE
LAWN MOWERS
order repair parts for you, when you provide
the model number of your lawn mower.
Some of these accessories may not apply
MULCHER KiTS
GRASS CATCHERS
FOR
SfDE DrSCHARGE
LAWN MOWERS
STABILIZER
GAS CANS
LAWN MOWER MAINTENANCE
u,, ,
MUFELERS
BELTS
AIR FILTERS SPARK PLUGS
BLADES BLADE ADAPTERS WHEELS ENGINE OIL
IMPORTANT: This cutting machine is
capable of amputating hands and feet and
throwing objects. Failure to observe the
following safety instructions could result in
serious injury, or death.
Safety standards require operator pres-
ence controls to minimize the risk ol injury.
Your unit is equipped with such controls.
Do not attempt to defeat the function of the
operator presence controls under any
circumstances.
Read these instructions and this manual in
its entirety before you attempt to assemble
or operate your new lawn mowe_: Your new
lawn mower has been assembled at the
factory with the exception of those parts left
unassembled |or shipping purposes. All
parts such as nuts, washers, bolts, etc.,
necessary to complete the assembly have
been placed in the parts bag. To ensure
safe and proper operation of your lawn
mower, all parts and hardware you as.-
sembte must be tightened securely. Use the
correct tools as necessary to ensure proper
tightness.
TO REMOVE LAWN MOWER FROM
CARTON
*Remove loose parts included with
mower°
• Cut down two end corners of carton
and lay end panel down flat,
° Remove all packing materials except
padding between upper and lower
handle and padding holding operator
presence control bar to upper handle.
• Roll lawn mower out of carton and
checkcarton thoroughly for additional
loose parts.
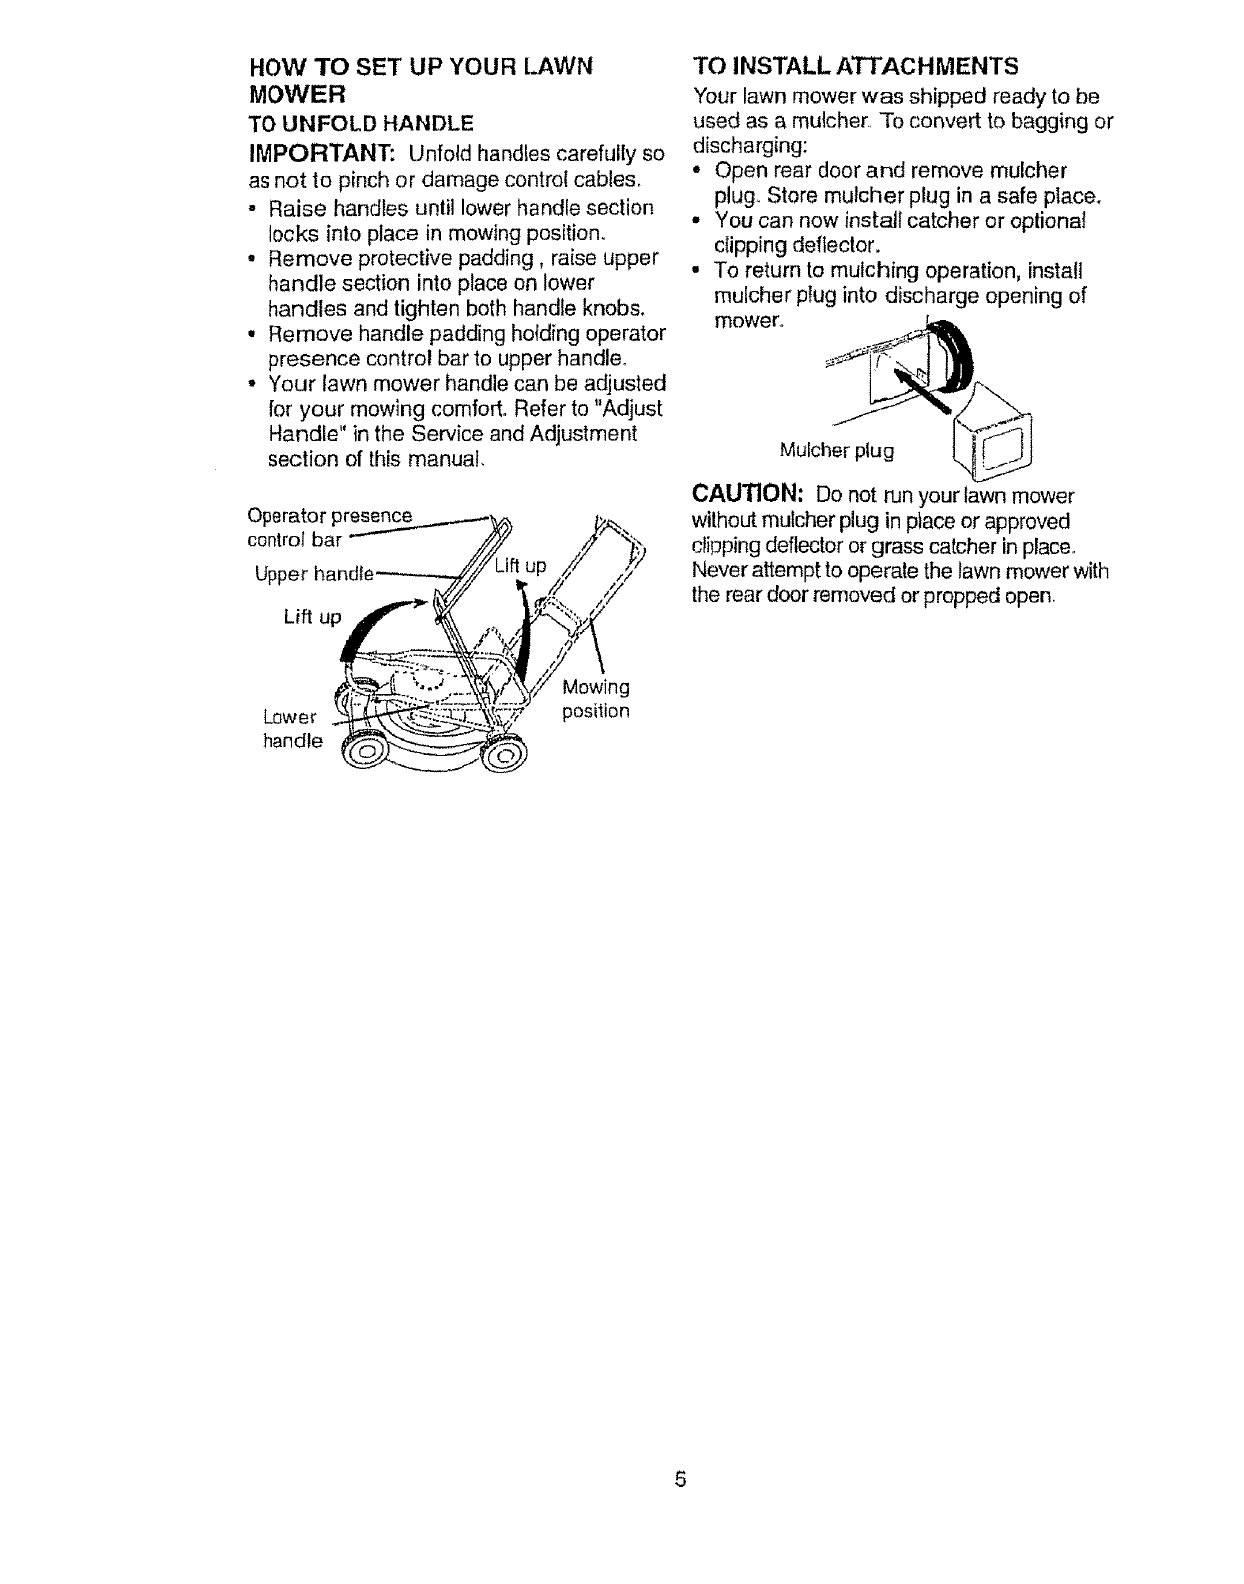
HOW TO SET UP YOUR LAWN
MOWER
TO UNFOLD HANDLE
IMPORTANT: Unfold handles carefully so
as not to pinch or damage control cables.
• Raise handles until lower handle section
locks into place in mowing position.
• Remove protective padding, raise upper
handle section into place on lower
handles and tighten both handle knobs.
, Remove handle padding holding operator
presence control bar to upper handle°
• Your lawn mower handle can be adjusted
for your mowlng comfort. Refer to "Adjust
Handle" in the Service and Adjustment
section of this manual
Operator presence
control bar
Upper handle ,ift up
Lift up
TO INSTALL ATTACHMENTS
Your lawn mower was shipped ready to be
used as a mulcher.. To convert to bagging or
discharging:
• Open rear door and remove mulcher
plug. Store mulcher plug in a safe place.
• You can now install catcher or optional
dipping deflector.
• To return to mulching operation, install
mulcher plug into discharge opening of
mower. _,_
Mulcher ptug ....
CAUTION: Donot run your lawn mower
without mutcher plug in place or approved
clipping deflector or grass catcher in place.
Never attempt to operate the lawn mower with
the rear door removed or propped open,
Mowing
position
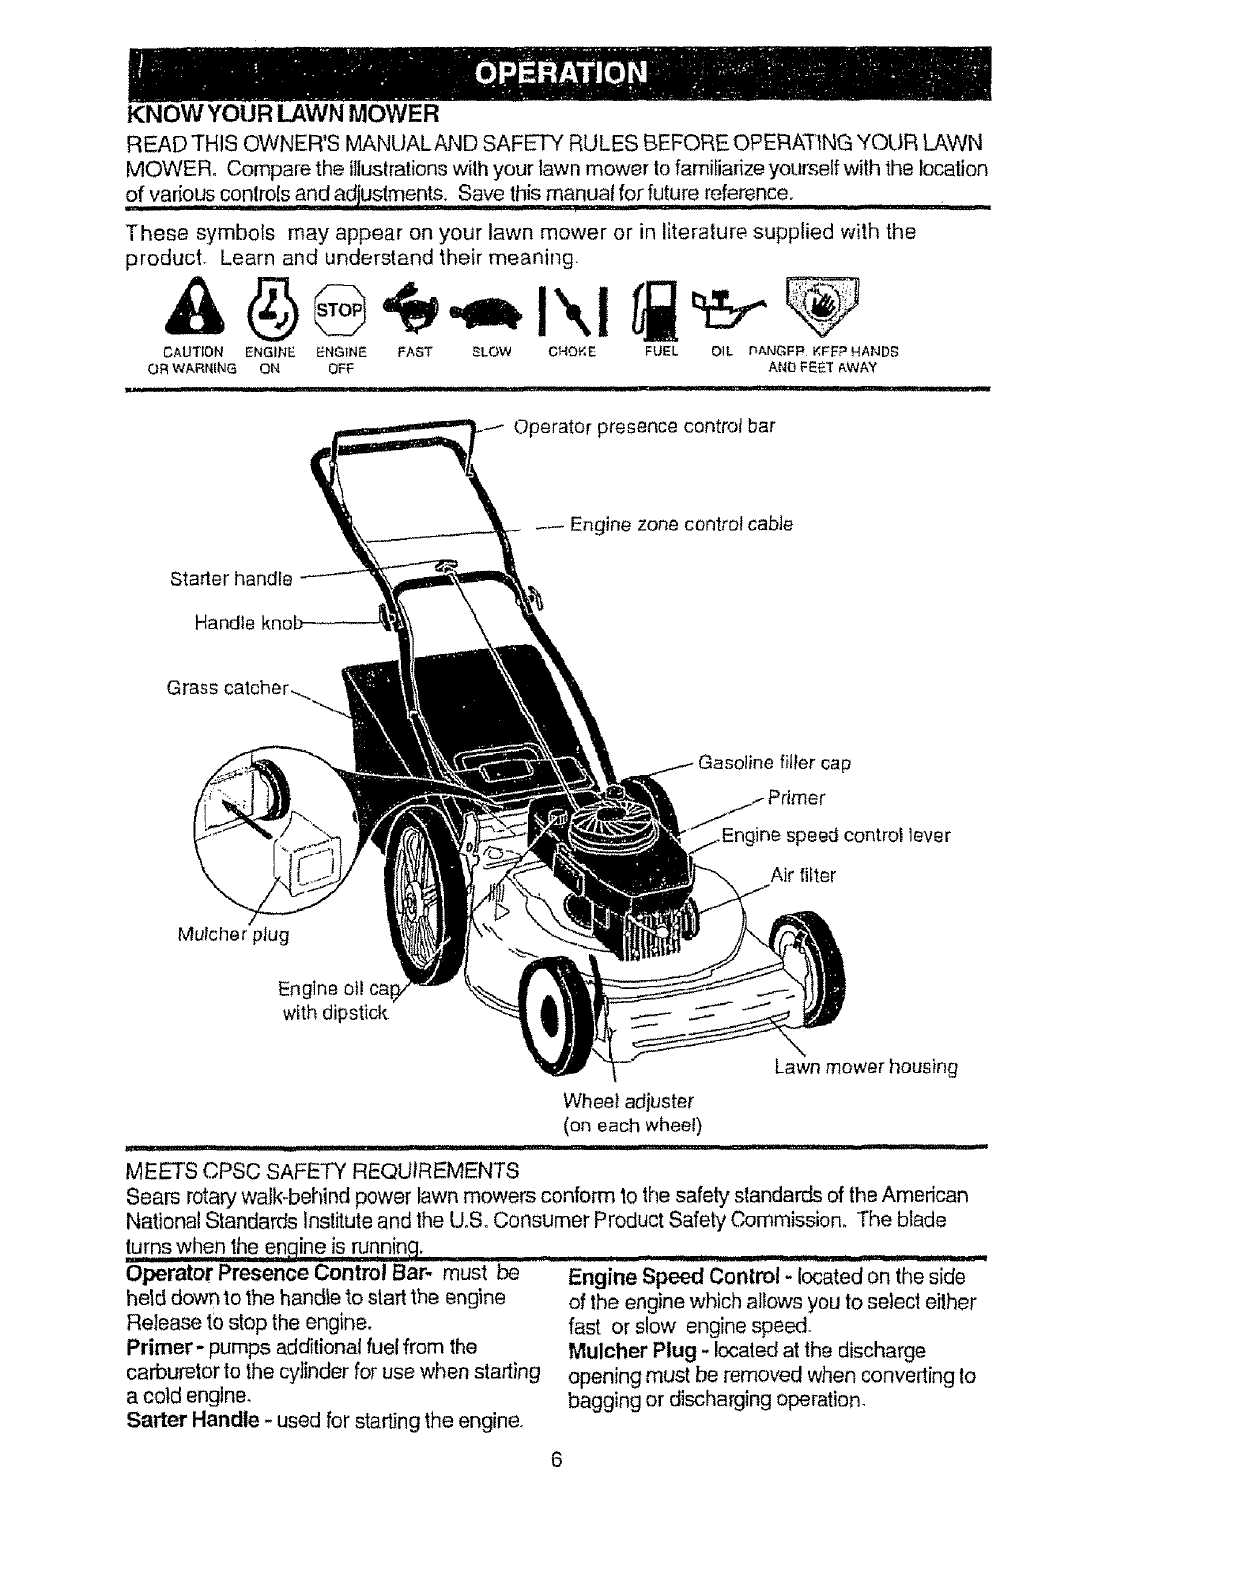
KNOW YOUR LAWN MOWER
READ THIS OWNER'S MANUALAND SAFETY RULES BEFORE OPERATING YOUR LAWN
MOWER. Compare the illustrations with your lawn mower to familiarize yourself with the location
of various conlrols _a_ndiadjvstments. Say e this manual for fu!ure !eference.
These symbols may appear on your fawn mower or in literature supplied with the
product. Learn and understand their meaning,
CAUTION ENGINE _NGINIE FAST _LOW CHOKE FUEL OIL nANGFP KFIFP HANDS
OR Wf,.RNING ON OFF ANO FEET AWAY
...................... iii .................... I II II _I
Operator presence control bar
Starter handle
Handle knob_
--- Engine zone control cable
fil_er cap
)eed contro! lever
Air filter
Mulcher plug
Engine otl
with dipstick
Lawn mower housing
Wheel adjuster
(on each whee 0
.1 [,111,,iii1,11 iii iiii ,11 i,iii
MEETS CPSC SAFETY REQUIREMENTS
Sears rotary walk-behind power lawn mowers conform to the safety standards of the American
National Standards Institute and the U.So Consumer Product Safety Commission. The blade
turns when the engine is runninq.
ii ii i, i ii .... II l/ . jI . III III
Operator Presence Control Bar- must be
held down to the handle to start the engine
Release to stop the engine.
Primer- pumps additional fuel from the
carburetor to the cyJinder for use when starting
a cold engine.
Salter Handle - used for starting the engine.
Engine Speed Control - located on the side
of the engine which allows you to select either
fast or slow engine speed.
Mulcher Plug - located at the discharge
opening must be removed when converting Io
bagging or discharging operation.
Theoperationofanylawnmowercan resultin
foreignobjectsthrownintotheeyes,whichcan
resultinsevereeyedamage,Alwayswear
safetyglassesoreye shields while operating
your lawn mower or performing any adjust-
merits or repair& We recommend awide
vision safety mask over the spectacles or
standard safety glasses.
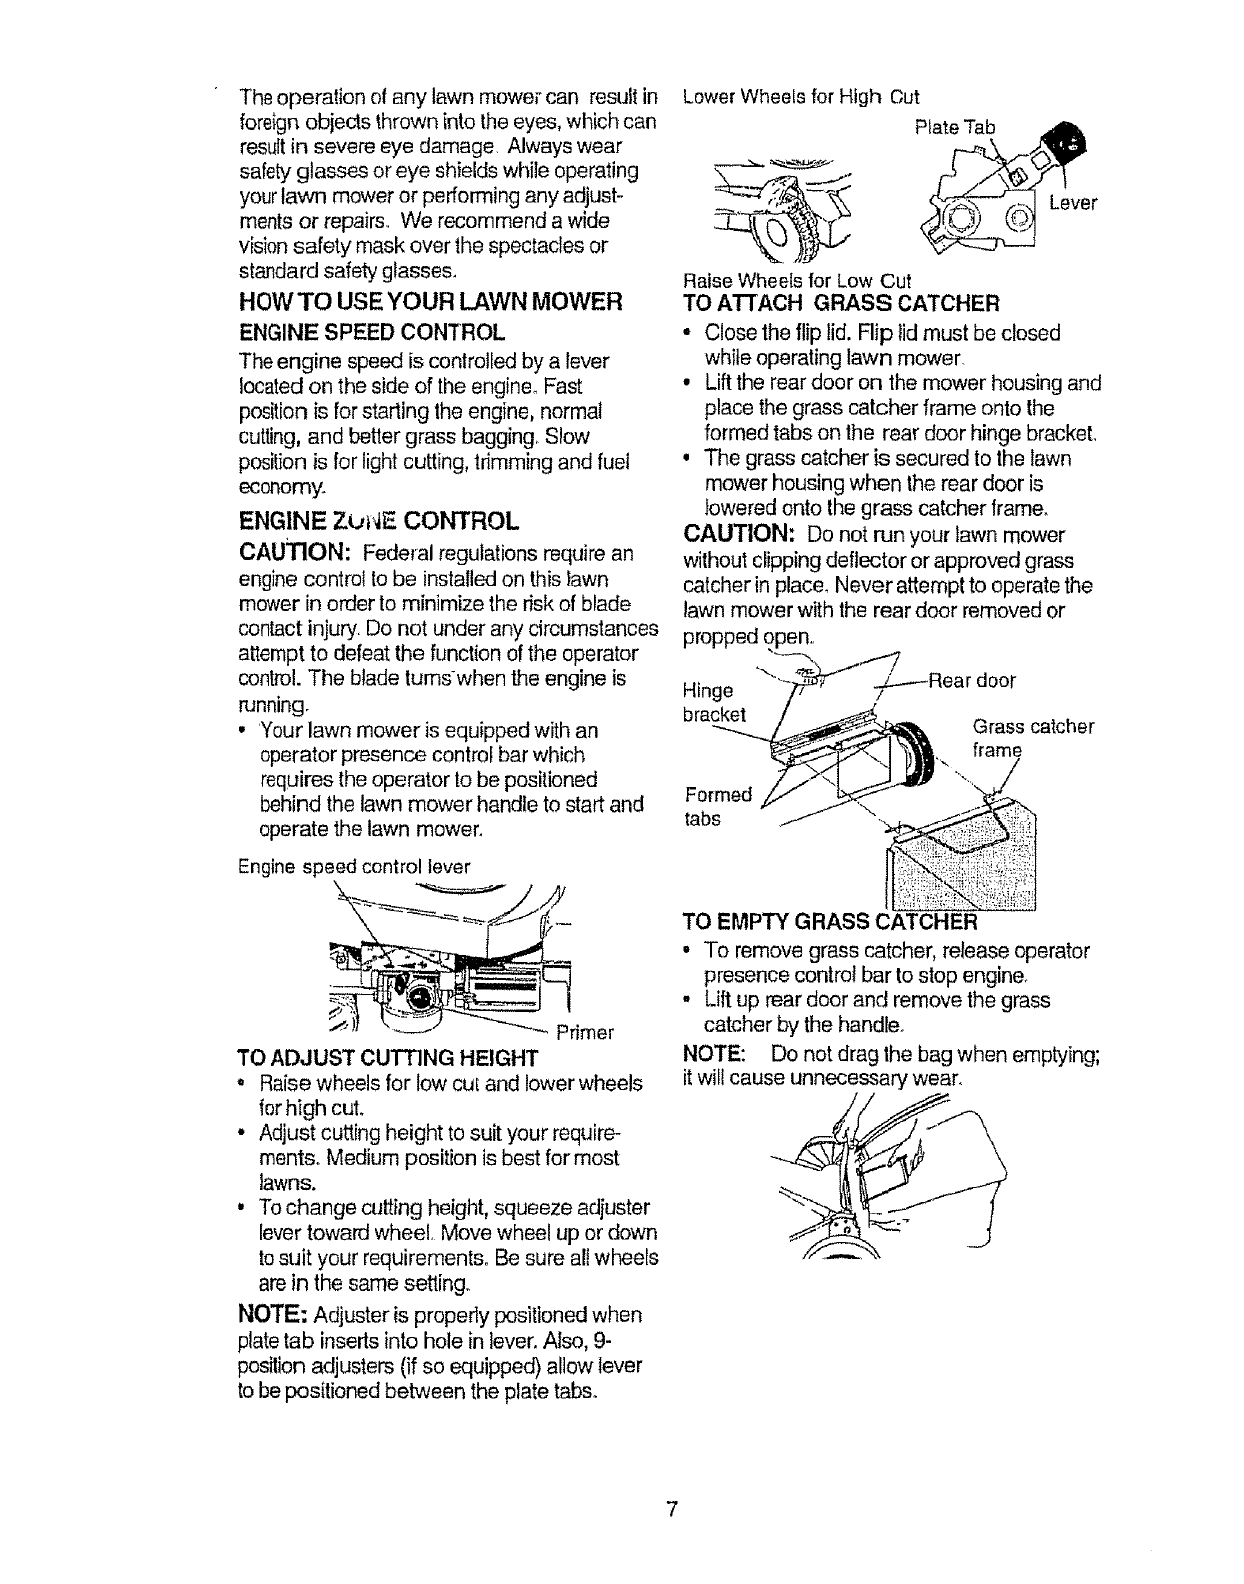
HOW TO USE YOUR LAWN MOWER
ENGINE SPEED CONTROL
The engine speed is controlled by a lever
located on the side of the engine° Fast
position is for stading the engine, normal
cutting, and better grass bagging, Slow
position is for light cutting, tdmming and fuel
economy.
ENGINE Z_JNE CONTROL
CAUTION: Fedelal regulations require an
engine control to be installed on this lawn
mower in order to minimize the risk of blade
contact injury. Do not under any circumstances
attempt to defeat the function of the operator
control. The blade tumswhen the engine is
running.
• Your lawn mower isequippedwithan
operator presence control bar which
requires the operator to be positioned
behind the lawn mower handle to start and
operate the lawn mower.
Engine speed control tever
--V
Primer
TO ADJUST CUTTING HEIGHT
• Raise wheels for low cu[ and lower wheels
for high cut.
• Adjust cutting height to suit your require-
ments. Medium position is best for most
lawns.
• To change cutting height, squeeze adjuster
lever toward wheel. Move wheel up or down
to suit your requirements° Be sure all wheels
are in the same setting.
NOTE: Adjuster is properly positioned when
plate tab inserts into hole in lever. Also, 9-
position adjusters (if so equipped) allow lever
to be positioned between the plate tabs.
Lower Wheels for High Cut
Plate Tab
__._ Lever
Raise Wheels for Low Cut
TO ATTACH GRASS CATCHER
° Close the flip lid. Flip lid must be closed
while operating lawn mower.
• Lift the rear door on the mower housing and
place the grass catcher frame onto the
formed tabs on the rear door hinge bracket.
, The grass catcher is secured to the lawn
mower housing when the rear door is
lowered onto the grass catcher frame.
CAUTION: Do not run your lawn mower
without clipping deflector or approved grass
catcher in placed Never attempt to operate the
lawn mower with the rear door removed or
propped _
_Z----Rear door
Hinge /
bracket Grass catcher
frame
Formed
tabs
TO EMPTY GRASS CATCHER
• To remove grass catcher, release operator
presence control bar to stop engine.
. Lilt up rear door and remove the grass
catcher by the handle.
NOTE: Do not drag the bag when emptying;
it will cause unnecessary wear.
BEFORESTARTINGENGINE
OIL
Your lawn mower is shipped without oil in the
engine.
• Be sure mower is level and area around oil
fill is dean.
. Remove engine oil cap w]dipstick and fill to
the full line on the dipstick_
• Use 20 ozs, of oil. For type and grade of oil
to use, see "ENGINE" in Customer
Responsibilities section of this manual.
• Pour oi! slowly, Do not over fill.
,, Check oil level before each use. Add oil if
needed.. Fill to full line on dipstick,
• To read proper level, tighten engine oi! cap
each time.
oReinstall engine oil cap and tighten.
- Change the oil after every 25 hours of
operation or each season, You may need
to change the oi! more often under dusty,
dirty conditions.
GAS
• Fill fuel tank. Use fresh, clean, regular
unleaded gasoline with a minimum of 87
octane. Do not mix oil with gasoline.
Purchase fuel in quantities that can be used
within 30 days to assure fuel freshness.
WARNING: Experience indicates that
alcohol blended fuels (called gasohol or using
ethanol or methanot) can attract moisture
which leads to separation and formation of
acids during storage. Acidic gas can damage
the fuel system of an engine while in storage.
To avoid engine problems, the fuel system
should be emptied before storage of 30 days
or longer, Drain the fuel tank, start the engine
and let it run until fuel lines and carburetor are
empty. Use fresh fuel next season. See
Storage Instructions for additional information.
Never use engine or carburetor cleaner
products in fuel tank or permanent damage
may occur.
TO START ENGINE
,To start a cold engine, push primer five (5)
times before trying to start Use a firm push.
This step is not usually necessary when
startin§ an engine which has already run for
a few minutes
° Push engine speed control lever to fast
position.
' Hold operator presence control bar down to
the handle and pull starter handle quickly°
Do not allow starter rope to snap back.
, To stop engine,1 release operator presence
control bar..
NOTE: In cooler weather it may be neces-
sary to repeat priming steps, In warmer
weather over priming may cause flooding and
engine will not starL If you do flood engine,
wait a few minutes before attempting to start
and do not repeat priming steps.
MOWING TIPS
° Under certain conditions, such as very tall
grass, it may be necessary to raise the
height of cut to reduce pushing effort and to
keep from overloading Ihe engine and
leaving dumps of grass clippings.
° For extremely heavy cutting, reduce the
width of cut and raise the rear of the lawn
mower housing one (1) wheel adjuster
setting higher lhan the front for belier
discharge of grass.
• For better grass bagging and most cutting
conditions, the engine speed should be set
in the fast position_
° When using a rear discharge lawn mower in
moist, heavy grass, clumps of cut grass
may not enter the grass catcher. Reduce
ground speed (pushing speed) and/or run
the lawn mower over the area a second
time.
• If a trail of grass clippings is left on the right
side of a rear discharge lawn mower, mow
in a clockwise direction with a small overlap
to collect the clippings on the next pass.
• Keep top of engine around starter clear and
clean ol grass clippings and chaff. This will
help engine air flow and extend engine life.
•Pores in cloth grass catchers can become
filled with dirt and dust with use and
catchers will collect less grass. To prevent
this, regularly hose catchers off with water
and let dry before using.
MULCHING MOWING TIH_
IMPORTANT: For best performance, keep
mower housing free of built-up grass and trash°
Clean UNDERSIDE OF MOWER HOUSING
after each use See "Cleaning '' in CUSTOMER
RESPONSIBILITIES section of this manual,
• The special mulching blade will recur the
grass clippings many times and reduce
lhern in size so that as they fail onto the
lawn they will disperse into the grass and
not be noticed, Also, the mulched grass wilt
biodegrade quickly to provide nutrients for
the lawn. Always mulch with your highest
engine (blade) speed as this will provide the
best recutting action of the blades.
• Avoid cutting your lawn when it is wet Wet
grass tends to form clumps and interferes
with the mulching action. The best time to
mow your lawn is the eady afternoon, At this
time the grass has dried and the newly cut
area will not be exposed to the direct sun
• r-or pest resum[s,aalus_ the lawn mower
cutting height so that the lawn mower cuts
off only the top one-third of the grass blades.
tf the lawn is overgrown it will be necessary
to raise the height of cut to reduce pushing
effort and to keep from overbading the
engine and leaving dumps of mulched
grass, For extremely heavy mulching,
reduce your width of cut, mow slowly and
raise the rear of the lawn mower one wheel
adjuster setting higher than the front
• Certain types of grass and grass conditions
may require that an area be mulched a
second time to completely hide the
clippings. When doing a second cut, mew
across or perpendicular to the first cut path.
° Change your cutting pattern from week to
week, Mow north to south one week then
change to east to west the next week. This
will help prevent matting and graining of the
tawn_
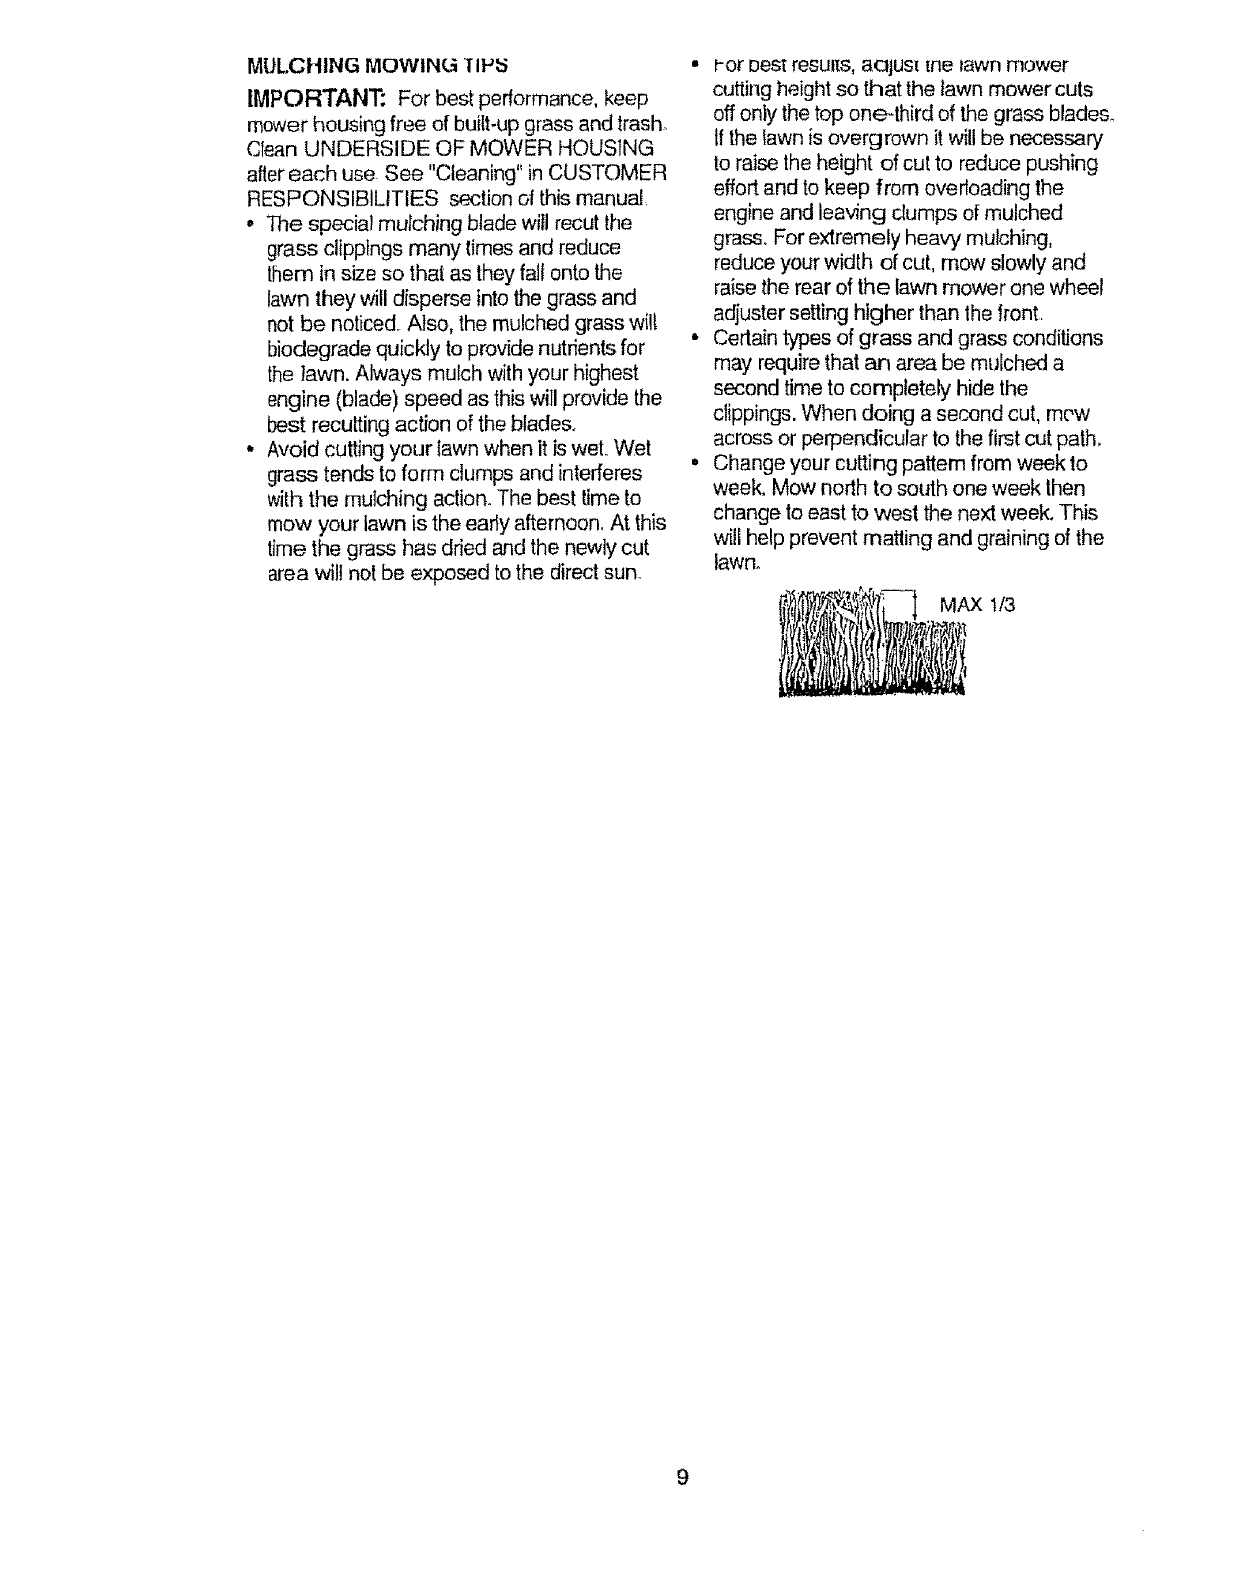
_AX 1/3
9

,LL,.DATES
.............REa_!L,A,_,,S,E,m'!CE..................
IClean/lnspec! Grass Catcher
(If Equipped) If I_
M CleanLa_ Mower _I/
Clean Under Drive Cover
(Power-Propelled Mowers) V _'
Cl_eck drive belVpuHeys .......
Check/Sharpen/Replace Blade I/a
Lubdcalion Chart if
Clean Battery/Recharge
(Eteclrlc Start Mowers} _ If4
E Check Engine OH Level
NChang e Engine Oil $/i.:z
GCte_i__AJi./_Filler ................ ' ...... I/
IInspe(,'l Mu_el ......V', ,,
N_ieanOiRepiac_esp_rk,,,P!ug iv"
EReplace kit' Filter Paper Cactddge V"_
IChange _r_or_ ohm, whm; op_atmti _e, _a heavy load ot fil h_gh arab;an! _empefature$
,, S¢_P,zJt_rt i3Y3r_t r3fte]'i whe_ O_13fatit'ff_f _rt d_tl I_r _[_s_y CC'F_J|i_S
3_B_lecebla_ rt_ore ott._ when mo_ng in r_md_' sott
- Charge, 48 hours at endef _8_Sf_FI
GEN ERAL RECOMMENDATIONS
]'he warranty on this lawn mower does not
cover items that have been subjected to
operator abuse or negligence. To receive full
value from the warranty, operator must maintain
mower as instructed in this manual.
Some adjustments will need to be made
periodically to properly maintain your unit,
All adjustments in the Service and
Adjustments section of this manua] should be
checked at least once each season.
* Once a year, replace the spark plug, replace
air filter element and check blade for wear A
new spark plug and clean/new air filter
element assures proper air4uel mixture and
helps your engine run better and last longer.
Follow the maintenance schedub in this
LUBRICATION CHART
?Wheat
adjusters
Brake spring
manual
BEFORE EACH USE
• Check engine oil level
• Check for loose fasteners
LUBRICATION
Keep unit well lubricated (See LUBRICATION
CHART")
Engine oil
(_) Rear (_ Handle bracket
door
hinge mounting pin
(_) SPRAY LUBRICANT
(_) SAE 30 MOTOR OIL REFERTO
ENGINE- CUSTOMER
RESPONSIBILITIES SECTION
IMPORTANT Do not oil or grease plastic
wheel bearings Viscous lubricants will attract
dust and dirt that wilt shorten the life of the seif
lubricating bearings° If you feel they must be
lubricated, use only a dry, powdered graphite
type lubricant sparingly
10
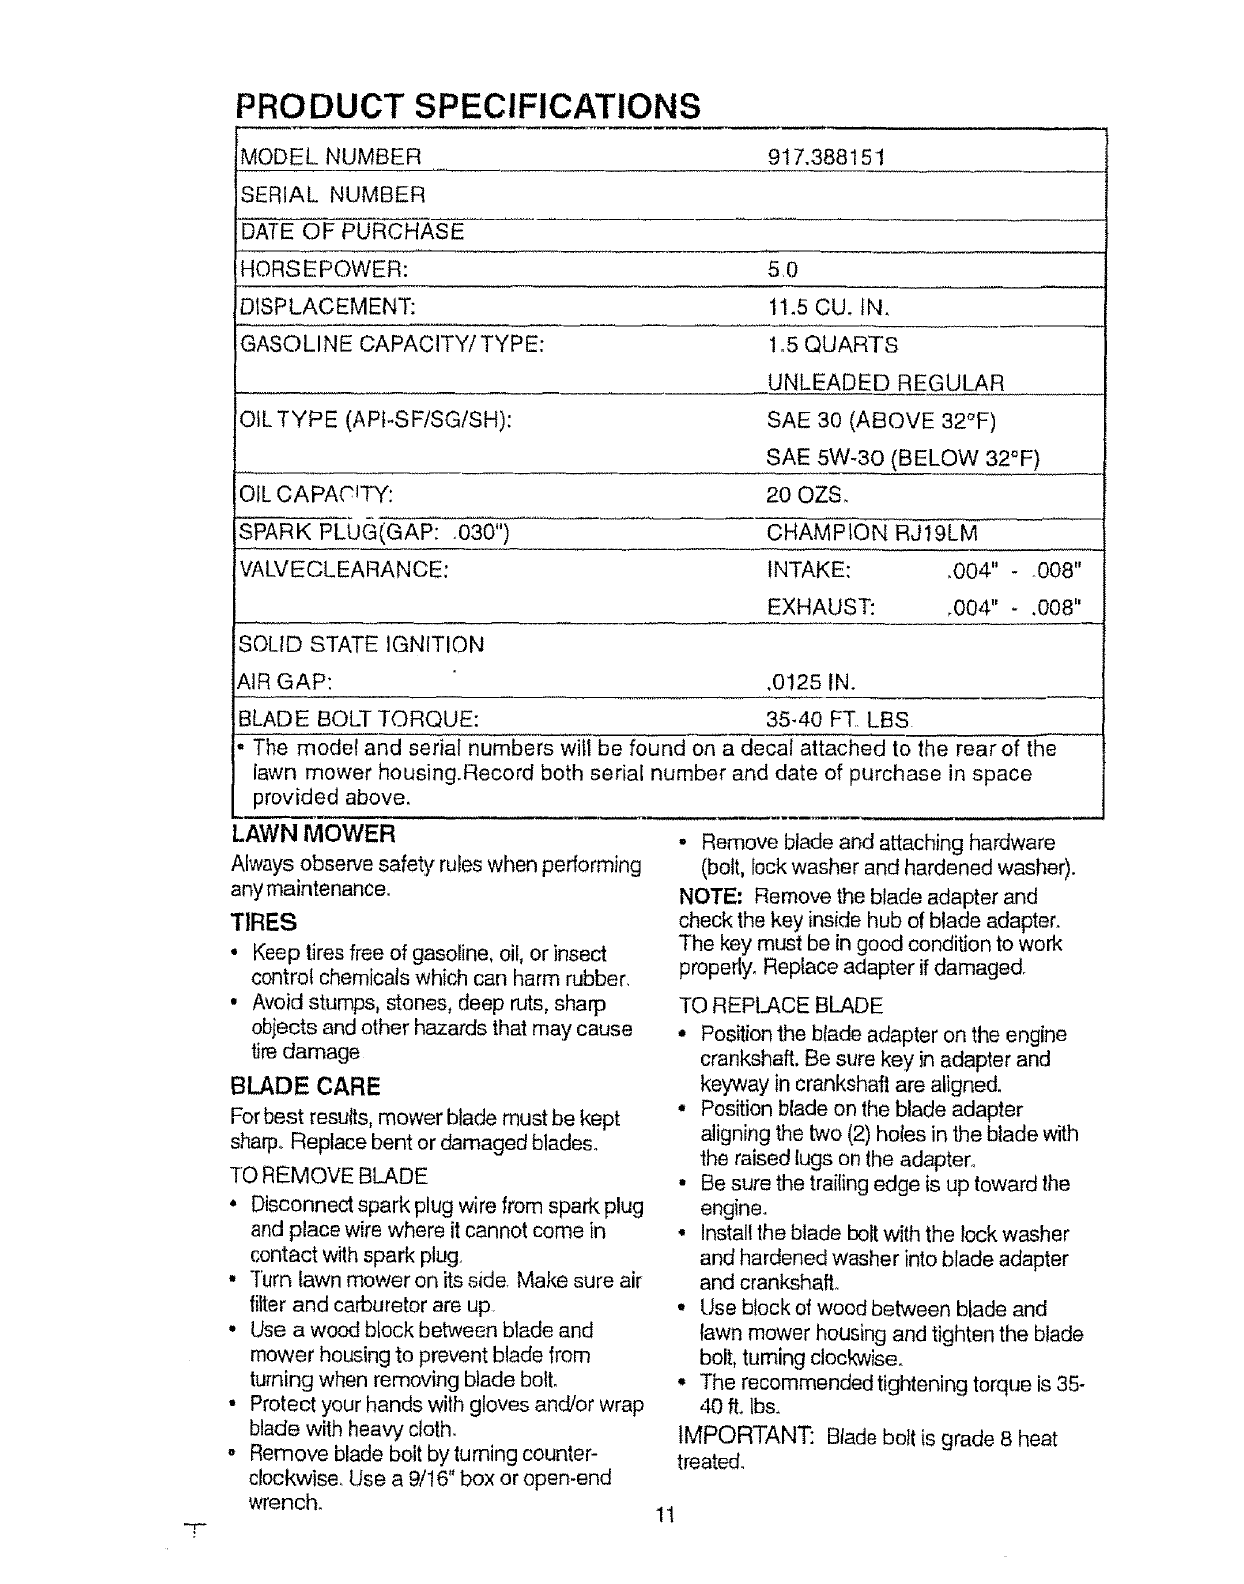
PRODUCT SPECIFICATIONS
MODEL NUMBER 917.388151
SERIAL NUMBER
DATE OF PURCHASE
HORSEPOWER: 5,0
DISPLACEMENT: 11.5 CU. IN,
GASOLINE CAPACITY/TYPE: 1o5 QUARTS
UNLEADED REGULAR
OIL TYPE (APFSF/SGISH):
OIL CAPACITY:
SPAR K-PTUG(GAP: _030")
_ARANCE:
SAE 30 (ABOVE 32°F)
SAE 5W-30 (BELOW 32°F)
20 OZS.
CHAMPION RJIgLM
INTAKE: ,004" - _008"
EXHAUST: ,004" - ,008"
SOLID STATE IGNITION
AIR GAP: ,0125 IN.
BLADE BOLT TORQUE: 35-40 FT. LBS
The model and serial numbers will be found on a decal attached to the rear of the
lawn mower housing.Record both serial number and date of purchase in space
provided above,
LAWN MOWER
Always observe safety rules when performing
any maintenance_
TIRES
• Keep tires free of gasoline, oil, or insect
control chemicals which can harm rubber.
• Avoid stumps, stones, deep ruts, sharp
objects and other hazards that may cause
tire damage
BLADE CARE
For best results, mower blade must be kept
sharp. Replace bent or damaged blades.
TO REMOVE BLADE
• Disconnect spark plug wire from spark plug
and place wire where it cannot come in
contact with spark plug
• Turn lawn mower on its side. Make sure air
filter and carburetor are up.
• Use a wood block between blade and
mower housing to prevent blade from
turning when removing blade bolt.
• Protect your hands wilh gloves and/or wrap
blade with heaw cloth.
• Remove blade bolt by turning counter-
clockwise. Use a 9/16" box or open-end
wrench.
• Remove blade and attaching hardware
(bolt, lock washer and hardened washer).
NOTE; Remove the blade adapter and
check the key inside hub of Made adapter.
The key must be in good condition to work
properly. Replace adapter if damaged°
TO REPLACE BLADE
• Position the blade adapter on the engine
crankshaft, Be sure key in adapter and
keyway in crankshaft are aligned.
° Position blade on the blade adapter
aligning the two (2) holes in the blade with
the raised lugs on the adapter°
• Be sure the trailing edge is up toward the
engine.
° Install the blade bolt with the lock washer
and hardened washer into blade adapter
and crankshafL
• Use block of wood between blade and
lawn mower housing and tighten the blade
bolt, turning clockwise.
• The recommended tightening torque is 35-
40 ff_Ibs.
IMPORTANT: Blade bolt is grade 8 heat
treated.
11
NOTE: We do not recommend sharpening
blade - but if you do, be sure the blade is
balanced,
TO SHARPEN BLADE
Care should be taken to keep the blade
balanced,, An unbalanced blade wil! cause
eventual damage to lawn mower or engine.
• The blade can be sharpened with a file or
on a grinding wheel. Do not attempt to
sharpen while on the mower
• To check blade balance, drive a nail into a
beam or wall Leave about one inch of the
straight nail exposed. Place center hole of
blade over the head of the nail. If blade is
balanced, it should remain in a horizontal
position,, If either end of the blade moves
downward, sharpen the heavy end until the
blade is balanced.
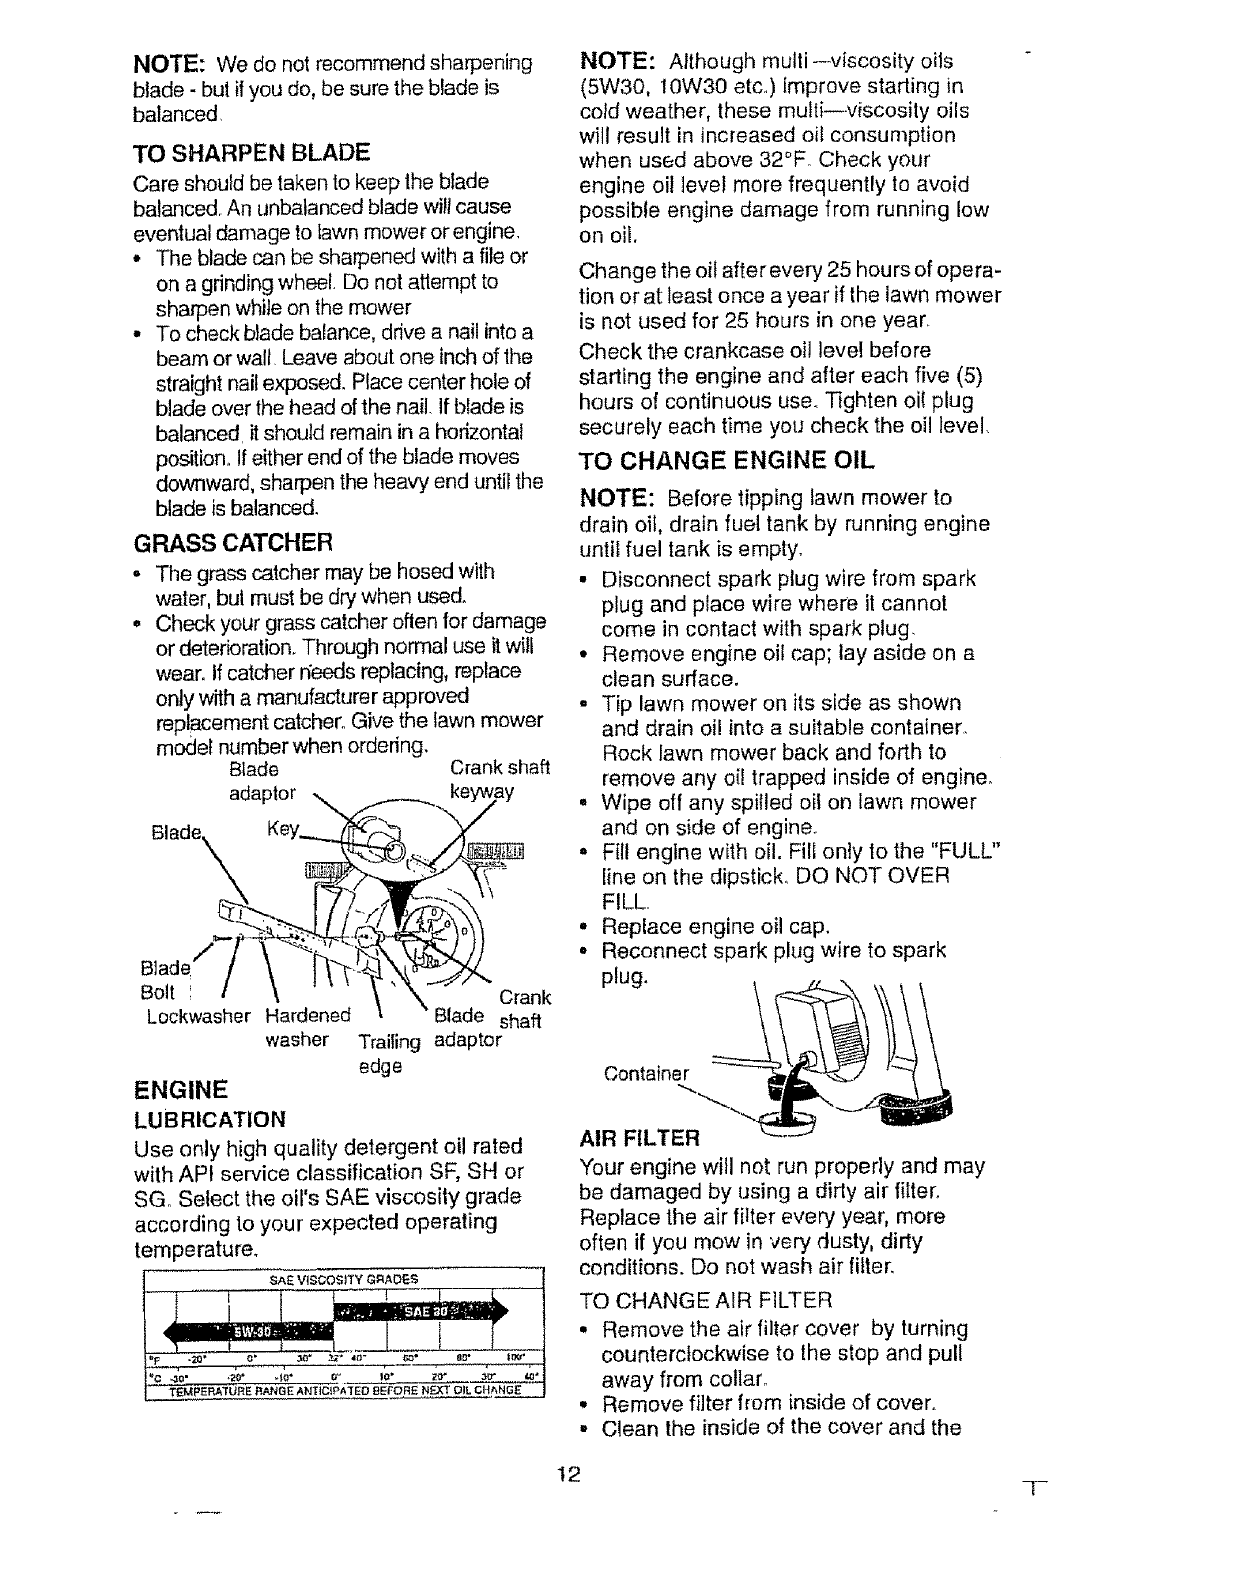
GRASS CATCHER
• The grass catcher may be hosed with
water, bul must be dry when used.
. Check your grass catcher often for damage
or deterioration. Through normal use it will
wear. If catcher needs replacing, replace
only with a manufacturer approved
replacement catcher° Give the lawn mower
model number when ordering.
Blade Crank shaft
adaptor ._ .....f__.......... fkeyway
Blade. Key_ _ .,4v
LOcKwasner Haraene Blaae shaft
washer Trailing adaptor
edge
ENGINE
LUBRICATION
Use only high quality detergent oil rated
with APt service classification SF, SH or
SG, Select the oil's SAE viscosity grade
according to your expected operating
temperature.
NOTE: Although multi--viscosity oils
(5W30, IOW30 etCo) improve starting in
coldweather, these multi--.viscosityoils
willresultin increased oilconsumption
when used above 32°Fo Check your
engine oil level more frequently to avoid
possible engine damage from running low
on oil.
Change the oil after every 25 hours of opera-
tion or at least once a year if the lawn mower
is not used for 25 hours in one year.
Check the crankcase oil leve! before
starting the engine and after each five (5)
hours of continuous use_ Tighten oil plug
securely each time you check the oil level.
TO CHANGE ENGINE OIL
NOTE: Before tipping lawn mower to
drain oil, drain fuel tank by running engine
until fuel tank is empty.
• Disconnect spark plug wire from spark
plug and place wire where it cannot
come in contact with spark plug.
• Remove engine oil cap; lay aside on a
clean surface.
- Tip lawn mower on its side as shown
and drain oil into a suitable container.
Rock Iawn mower back and forth to
remove any oil trapped inside of engine°
°Wipe off any spilled oil on lawn mower
and on side of engine.
= Fill engine with oil. Fill only to the "FULL"
line on the dipstick° DO NOT OVER
FILL.
° Replace engine oil cap.
°Reconnect spark plug wire to spark
plug.
Container
AIR FILTER
Your engine will not run properly and may
be damaged by using a dirty air filter.
Replace the air filter every year, more
often if you mow in very dusty, dirty
conditions. Do not wash air filter.
TO CHANGE AIR FILTER
° Remove the air filter cover by turning
counterclockwise to the stop and pull
away from collar°
° Remove filter from inside of cover,,
° C!ean the inside of the cover and the
I2 q-
collarto removeanydirtaccumulation.
o Insertnewfilterintocover°
• Putair filtercoverandfilterinto collar
aligningthetab with the slot.
° Push in on cover and turn clockwise to
lighten,
MUFFLER
Inspect and replace corroded muffler as it
could create a
fire hazard and/or damage.
SPARK PLUG
Change your spark plug each year to
make your engine start easier and run
better. Set spark plug gap at .030 inch.
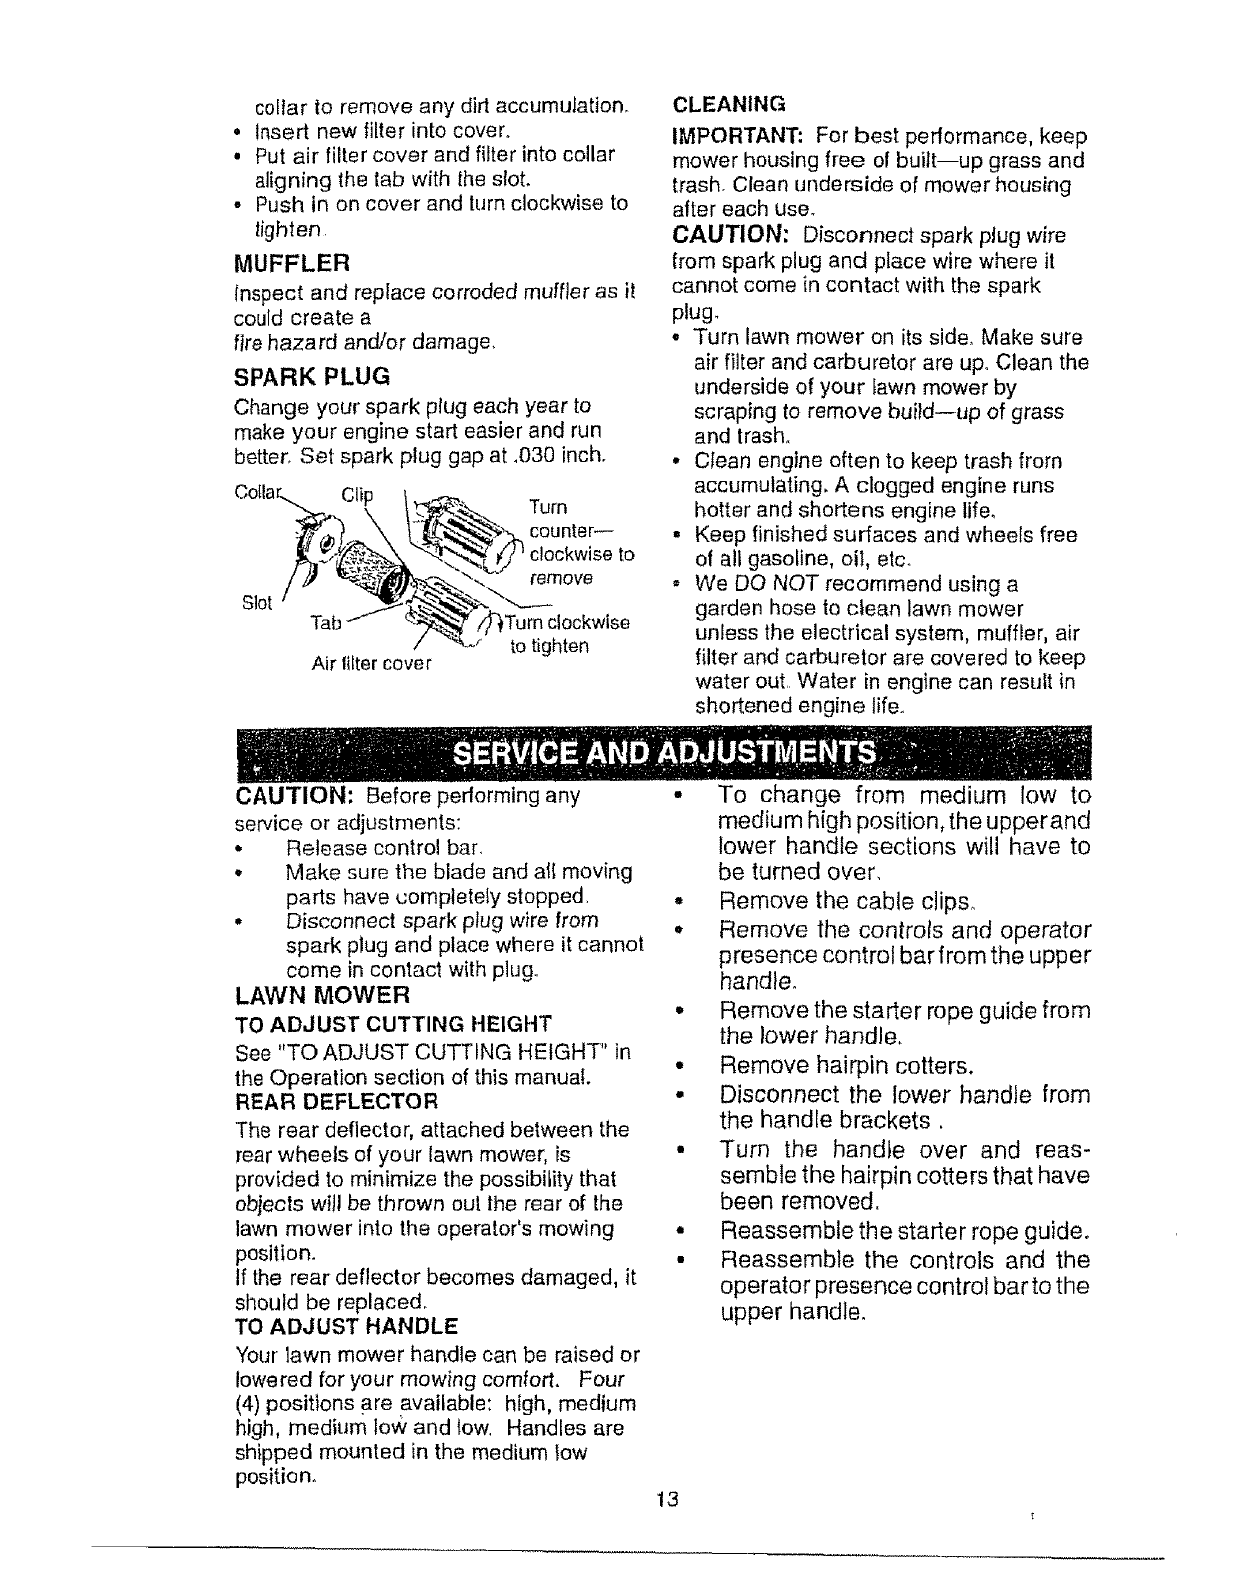
Slot Tab
Air lilter cover
Turn
courter--
clockwise to
remove
CLEANING
IMPORTANT: For best performance, keep
mower housing free of built--up grass and
trash. Clean underside of mower housing
after each use.
CAUTION: Disconnect spark plug wire
from spark plug and place wire where it
cannot come in contact with the spark
plug.
•Turn lawn mower on its side. Make sure
air filter and carburetor are up. Clean the
underside of your fawn mower by
scraping to remove build--up of grass
and trash°
•Clean engine often to keep trash from
accumulating, A clogged engine runs
hotter and shortens engine life.
• Keep finished surfaces and wheels free
of all gasoline, oil, etc.
,, We DO NOT recommend using a
garden hose to clean lawn mower
unless the electrical system, muffler, air
filter and carburetor are covered to keep
water out Water in engine can result in
shortened engine life.
CAUTION: Before pedorming any
service or adjustments:
* Release control bar.
° Make sure the blade and all moving
parts have completely stopped
,, Disconnect spark plug wire from
spark plug and place where it cannot
come in contact with plug.
LAWN MOWER
TO ADJUST CUTTING HEIGHT
See "TO ADJUST CUTTING HEIGHT" in
the Operation section of this manual.
REAR DEFLECTOR
The rear deflector, attached between the
rear wheels of your lawn mower, is
provided to minimize the possibility that
objects will be thrown ou! the rear of the
lawn mower into the operator's mowing
position.
If the rear deflector becomes damaged, it
should be replaced.
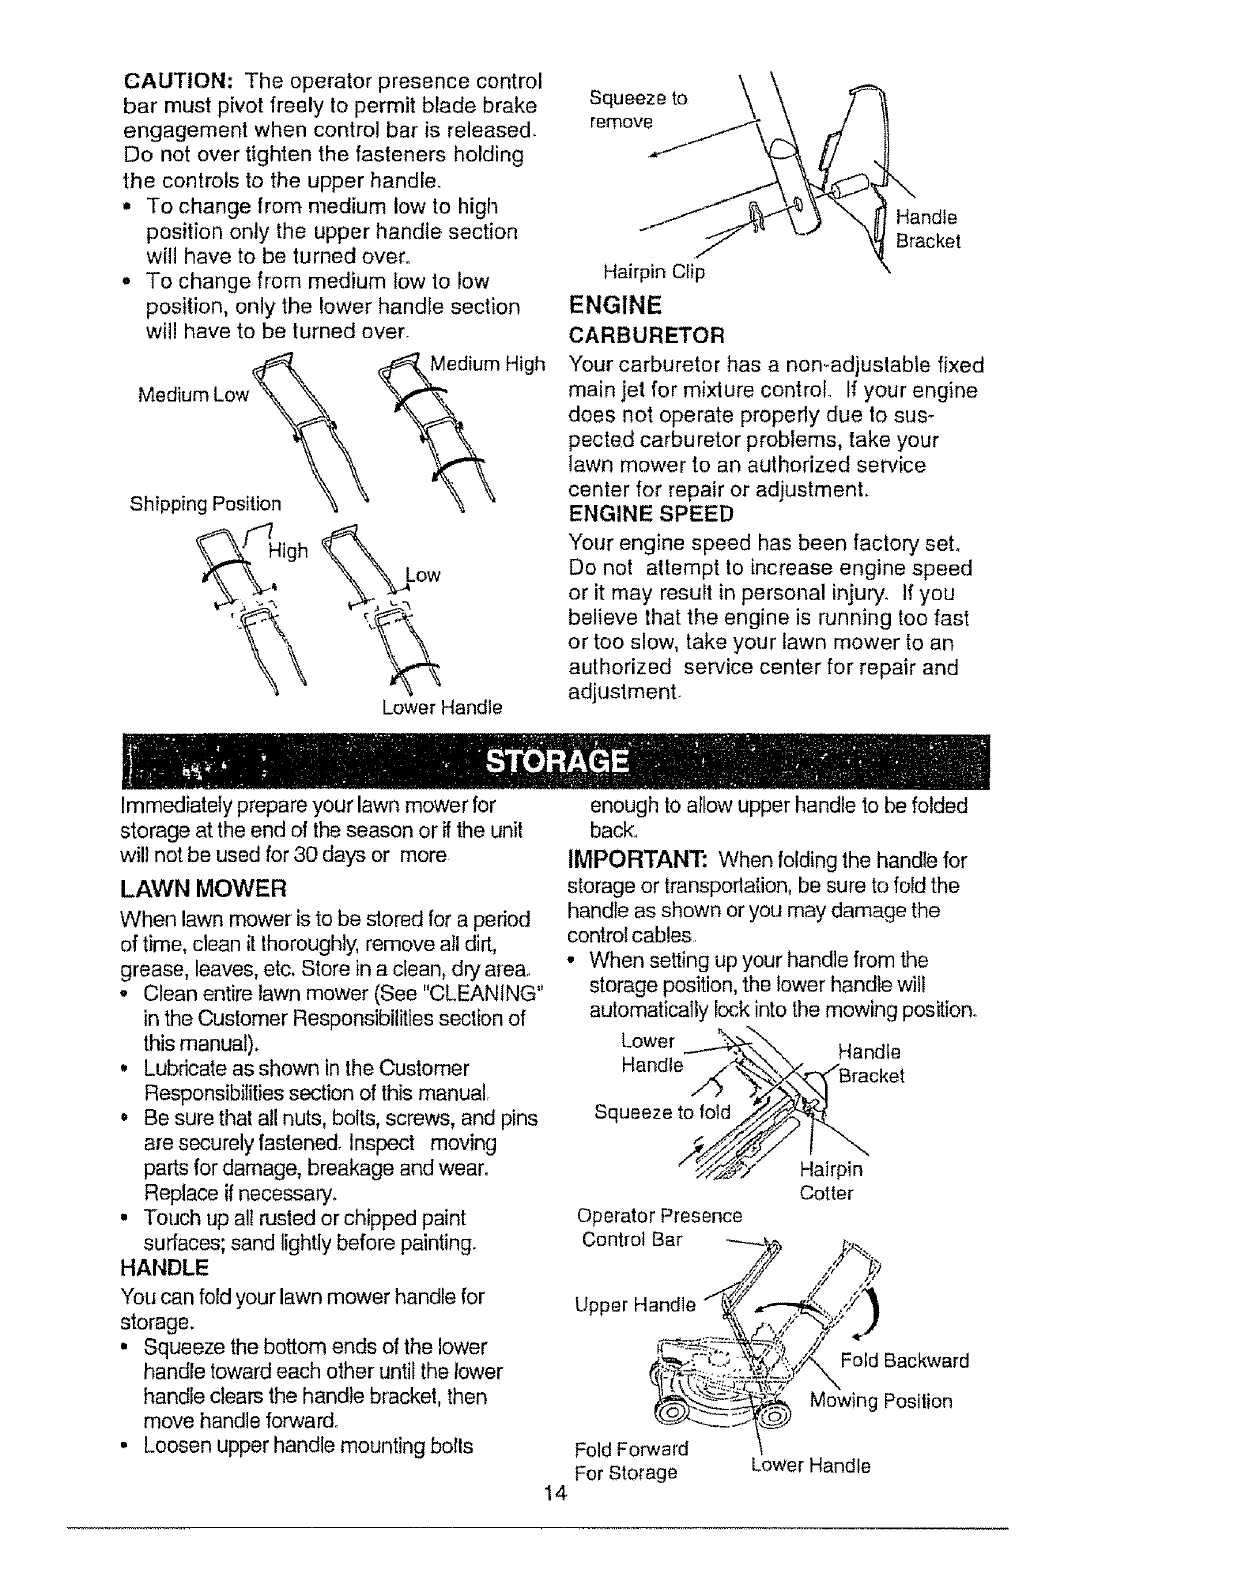
TO ADJUST HANDLE
Your lawn mower handle can be raised or
lowered for your mowing comfort. Four
(4) positions are available: high, medium
high, medium low and tow Handles are
shipped mounted in the medium tow
position. 13
• To change from medium low to
medium high position, the upperand
lower handle sections will have to
be turned over,
• Remove the cable clips,
• Remove the controls and operator
presence control bar from the upper
handle.
• Remove the starter rope guide from
the lower handle,
• Remove hairpin cotters.
• Disconnect the lower handle from
the handle brackets.
• Turn the handle over and reas-
semble the hairpin cotters that have
been removed,
• Reassemble the starter rope guide°
• Reassemble the controls and the
operator presence control barto the
upper handle,
CAUTION: The operator presence control
bar must pivot freely to permit blade brake
engagement when control bar is released.
Do not over tighten the fasteners holding
the controls to the upper handle.
,, To change from medium low to high
position only the upper handle section
will have to be turned over.
• To change from medium tow to low
position, only the lower handle section
will have to be turned over
High
Shipping Position
Lower Handle
Squeeze te
remove
Handle
Bracket
Hairpin Clip
ENGINE
CARBURETOR
Your carburetor has a non.-adjustable fixed
main jel for mixture control If your engine
does not operate properly due to sus-
pected carburetor problems, take your
lawn mower to an authorized service
center for repair or adjustment.
ENGINE SPEED
Your engine speed has been factory seL
Do not attempt to increase engine speed
or it may result in personal injury. If you
believe that the engine is running too fast
or too slow, take your lawn mower to an
authorized service center for repair and
adjustment.
Immediately prepare your lawn mower for
storage at the end of the season or if the unit
will not be used for 30 days or more
LAWN MOWER
When lawn mower is to be stored for a period
of time, clean it lhoroughly, remove all dirt,
grease, leaves, etc, Store in a clean, dry are&
•Clean entire lawn mower (See "CLEANING"
in the Customer Responsibilities section of
this manual).
• Lubricate as shown in the Customer
Responsibilities section of this manual.
° Be sure that all nuts, bolls, screws, and pins
are securely fastened. Inspect moving
parts for damage, breakage and wear.
Replace if necessary.
• Touch up all rusted or chipped paint
surfaces; sand lightly before painting.
HANDLE
You can fold your lawn mower handle for
storage.
• Squeeze the bottom ends of the lower
handle toward each other until the lower
handle clears the handle bracket, then
move handle forward.
• Loosen upper handle mounting bolls
14
enough to allow upper handle to be folded
back.
IMPORTANT: When folding the handle for
storage or transportation, be sure to fold the
handle as shown or you may damage the
control cables.
• When setting up your handle from the
storage position, the lower handle will
automatically Joc,k into the mowing position.
ower __ Handle
aodle .2",r'<'Bracket
Squeeze to ,o;d_._._O_, _
/_/H_air_
Cotter
Operator Presence
Control Bar
Upper Handle
Fold Forward
For Storage
Fold Backward
Mewing Position
Lower Handle
_NGINt_
FUEL SYSTEM
IMPORTANT: It is important to prevent bum
deposits from forming in essential juel system
parts such as carburetor, fuel filter, fuel hose,
or tank du ring sle rabe Also, experience
indicates that dcotol blinded fuels (called
gasohol or using ethanol or methanol) can
attract moisture which leads to separation and
formation of acids during storage. Acidic gas
can damage the fuel system of an engine
while in storage.
• Drain the fuel tank,.
° Start the engine and let it run until the fuel
lines and carburetor are empty.
° Never use engine or carburetor cleaner
products in the fuel tank or permanent
damage may occur,
° Use fresh fuel next season.
NOTE: Fuel stabilizer is an acceptable
allemative in minimizing the formation of fuel
gum deposits during storage. Add stabilizer to
gasoline in fuel lank or storage container.
Always follow the mix ratio found on stabilizer
container° Run engine at least 10 minutes
after adding stabilizer to allow the stabilizer to
reach the carburetor. Do not drain the gas
tank and carburetor if using fuel slabilizer.
ENGINE OIL
Drain oil (with engine warm) and replace with
clean engine oit. (See "ENGINE" in the
Customer Responsibilities section of this
manual),
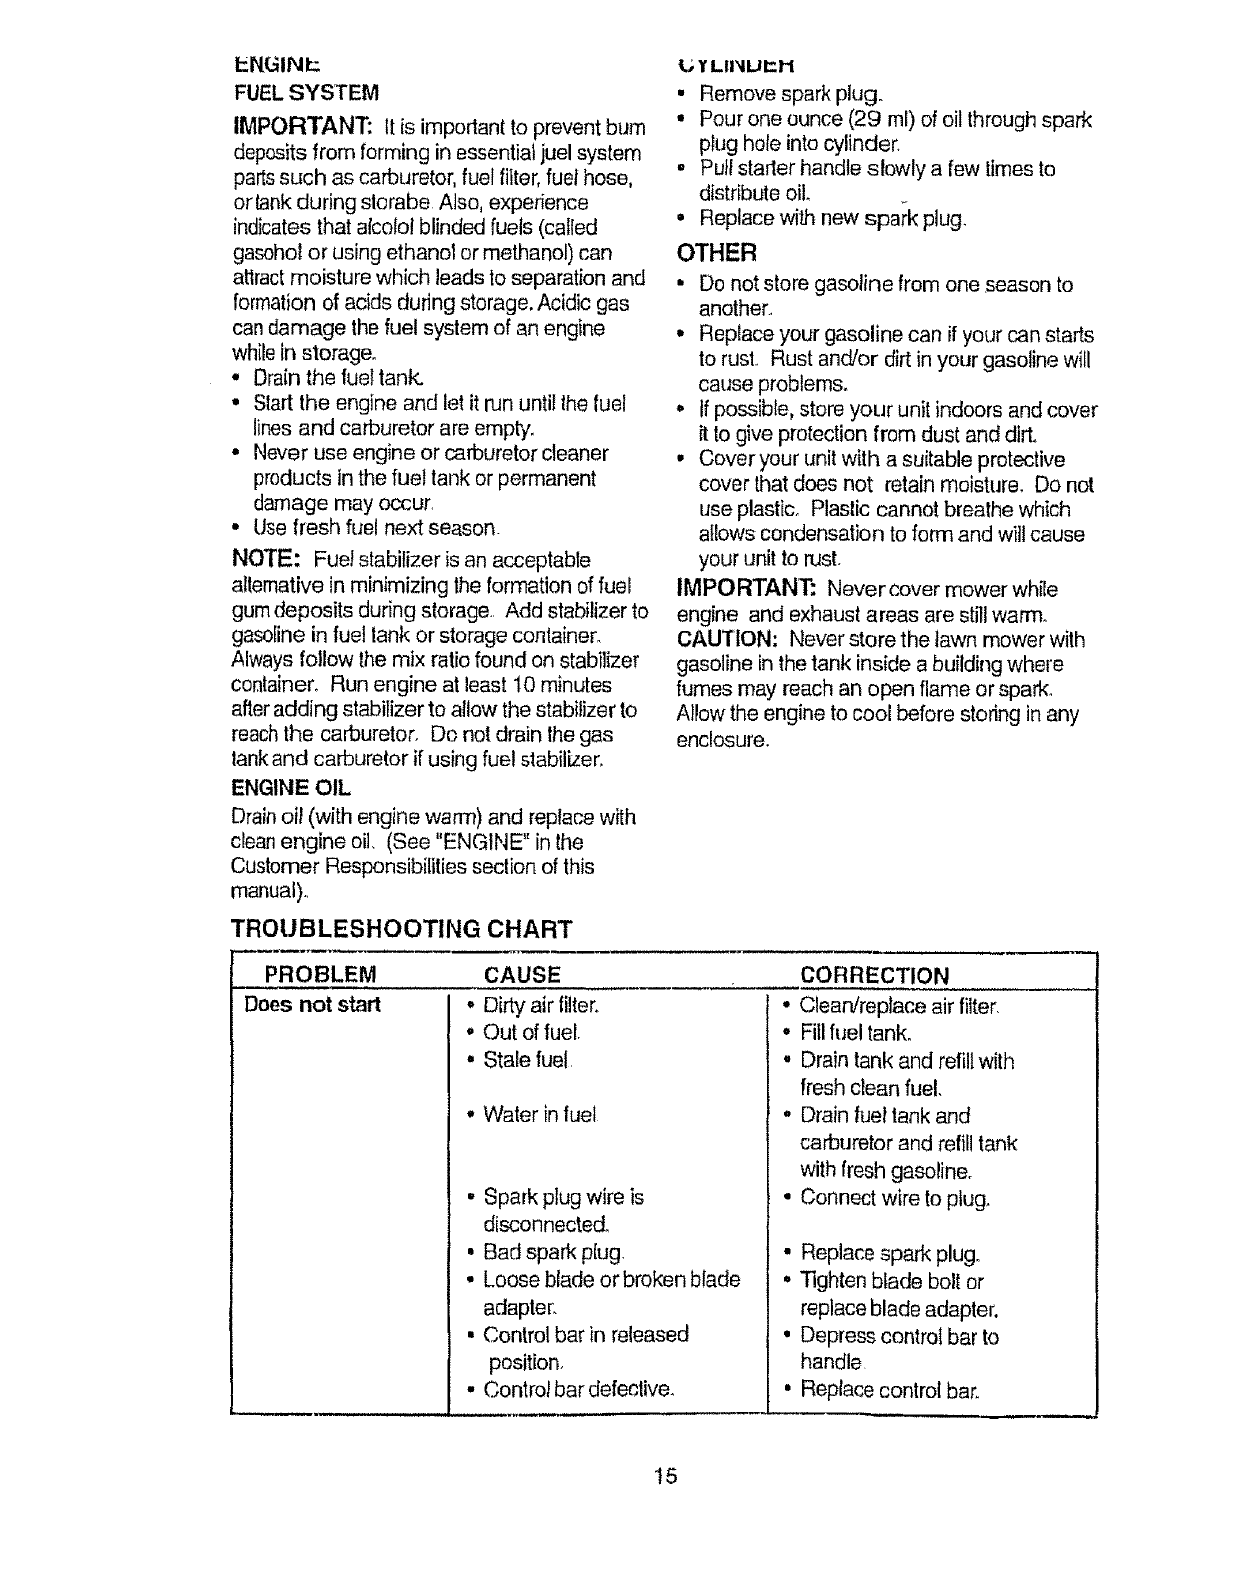
TROUBLESHOOTING CHART
L; Y LiI_iL!I=M
• Remove spark plug.
° Pour one ounce (29 ml) of oil through spark
pkJg hole into cylinder.
,, Pull starter handle slowly a few times to
distribute oE
• Replace with new spaik plug.
OTHER
• Do not store gasoline from one season to
another,
° Replace your gasoline can if your can starts
to rust., Rust and/or dirt in your gasoline will
cause problems.
o If possible, store your unit indoors and cover
it to give protection from dust and dirt,
• Cover your unit with a suitable protective
cover that does not retain moisture, Do not
use plastic_ Plastic cannot breathe which
allows condensation to form and will cause
your unit to rust.
IMPORTANT: Nevercover mower while
engine and exhaust areas are still warm°
CAUTION: Never store the lawn mower with
gasoline in the tank inside a building where
fumes may reach an open flame or spark,,
Allow the engine to cool before storing in any
enclosure,
PROBLEM
Does not start
CAUSE
• Dirty air tilter.
•Out of fuel.
° Stale fuel,
•Water in fuel
•Spark plug wire is
disconnected°
• Bad spark plug.
• Loose blade or broken blade
adapter.
• Control bar in released
position,
• Control bar defective.
CORRECTION
° Clean/replace air filter.
° Fill fue! tank.
• Drain tank and refill with
fresh dean fuel.
, Drain fuel tank and
carburetor and refill tank
with fresh gasoline.
• Connect wire to ptug_
• Replace spark plug.
• Tighten blade bolt or
replace blade adapter.
• Depress control bar to
handle
• Replace control bar.
15

=ROBLEM
_ossof power
TROUBLESHOOTING CHART
CAUSE
oRear of lawn mower housing
or cutting blade dragging
in heavy grass_
•Cutting too much grass
Poor cut- uneven
=.Excessive
_ibration
Starter rope hard
[o pull
3rass catcher
lot filling (if so
_quipped)
Hard to push
•Dirty air filter
• Buildup of grass, leaves,
and trash under mower,
•Too much oil in engine_
•Walking speed too fast°
_m
Worn, bent or loose blade°
CORRECTION
• Set to "Higher Cut"
position.
. Setto "Higher Cut"
position
Clean/replace air filter.
• Clean underside of mower
housing,
•Checkoil level.
. Cul at slower walking
speed°
• Replace btade_ Tighten
blade bolt
Wheel heights uneven°
Low engine speed.
Buildup of grass, leaves
and trash under mower.
• Set alt wheels at same
height
o Set engine speed control
in fast position°
• Clean underside of
mower housing,
• Worn, bent or loose blade.
•Bent engine crankshaft.
. Engine flywheel brake is on
when control bar is release&
Bent engine crankshaft.
Blade adapter broken.
Blade dragging in grass,
° Cutting height too low
• Lift on blade worn off,
•Catcher not venting air,
•Low engine speed.
•Grass is too high or wheel
height is too bw
• Rear of lawn mower
housing or blade dragging
in grass.
• Grass catcher too ful!.
• Handle height position not
right for you.
• Replace blade Tighten
blade bolt.
• Contact an authorized
service center.
• Depress control bar to
upper handle before
pulling starter rope.
° Contad an authorized
service center,
° Replace blade adapter.
• Move lawn mower to cut
grass or to hard surface
to start engine,
• Raise cutting height,
• Replace btade_
• Clean grass catcher.
• Set engine speed control
in fast position.
• Raise cutting height.
;° Raise rear of lawn mower
housing one (!) setting
higher.
• Empty grass catcher.
• Adjust handle height to
suit.
16
CRAFTSMAN Model No. 917.388151
Garantia 17 Especfficaciones del Producto 25
Reg]as de Seguridad 17 Servicio y Adjustes 27
Monlaje 19 Afmacenamiento 28
Operaci6n 20 Identificaci6n de problemas 30
Mantenimiento 24 Partes de repuesto Vea er manual
Programa de Mantenimiento 24 ingF_sdel due_o
Orden de Partes ContraTapa
GARANTiA LIMtTADA DE DOS A_IOS PARA LA SEGADORA A MOTOR CRAFTSMAN
Pordos (2) ado.s,a partir da la fecha de compra, cuando esta Segadora Craftsman se mantenga, lubdque
y af_neseg0n los instrucciones para ta operaci6n y el mantenimiento en el manual del due,5o,Sears
reparar_,gratis todo defecto en el material y la mano de obra.
SitaSegadora Craftsman se usa para fines comerciales o de arriendo, esta garantfa s6Io se aplba pot
noventa (g0) dias a partir de la fecha de compra
EstaGarantia no cubre:
• Articu!os qua se desgastan durante el uso normal tales como los cuchiltas segadoras rotatofias, los
adaptadores de la cuchilla, los correas, los fillros de aire y los I]uiias.
• Reparaciones necesarias debido al abuso o a ta negligencia del operador, inc]uyendose a los
cigQeC_alesdoblados y a la falta de mantenimiento de[ equipo segQnlos instmcciones que se induyen
en el manual det duefio
ELSERVICIO DE GARANTiA ESTA DISPONtBLE al devolver [asegadpra a motor Craftsman al centro/
departmento de servicio Sears mas cercano en los estados unidos Esta garant[a se aplica solamente
mientras et producto este en uso en los estados unidos
EstaGarantfa le otorga derechos legales especifices, ypuede que tambien tenga olros derechos que
vadan de estado a eslado
Sea_s,Roebuck and Co, D/817WA, Hoffman Estates, fL 601 ;9 USA
Losestandrares de seguridad exigen la presencia
def operator en los controles para reducira un
minimo e! riesgo de lesion_se. S u unidad viene
equipada con dichos controles. Por ningun moSvo
1ratedel etiminar la fund6n de los contro]es que
exigen ta presencia del operador
ENTRENAMIENTO:
• Lea este manual del operador
cu[dadosamente Farnilian'cesecon los
controles y aprenda a operar su segadora en
Tormaadecuada. Aprenda a parar su
segadora r_pidamente.
• No permita que los niSos usen su segadora
Nunca pemlita que los adultos operen la
segadora sin contar con los instrucciones
adecuadas
• Mantenga el area de operad6n despejada
de genre, especialmente de ni£tospequeSos
yde animales dem_st_cos.
• Use la segadora solamente para los
finespropuestos por et fabricante y
seg0n las explicaciones descritas en
este manual.
° No opere la segadora sl se ha cafdo o daP_ado
en cua_quierafon"na..Siempre repare los da5os
antes de usaria
° No use accesofios qua no hayan sido
recomendados por e[ fabric.ante.E[ uso de
dichos accesorios puede set peligroso.
, La cuchilta gira cuando el motor esta
funcionando
PREPARACION:
• Siempre revisecuidadosamente el _rea que
se va a segar y desp_jela de todas los ptedras,
paJos,atambres, huesos y otros
objelos exlraSos Estos objetos
seran lanzados con ta cuchilla y pueden
producir tesiones graves
• Siempre use anteojos de segufidad o
protectores de ojos cuando arranque y du-
ranle el fiempo qua use la segadora
• Vislase en forma adecuada No opere la
segadora sin zapatos o con sandalias
abiertas, Use solamente zapatos s6lidos con
buena tracci6n cuando siegue
17
•Revise el estanque de combusUble antes de
hacer arrancar el motor No Hene el estanque
de gasolina en recintos cerrados,
ni cuando el motor esl& funcionando o euando
estA caliente. Permita que el motor se enfde
per vados minutes antes de Ilenar e! estanque
de gasotina. Limpie toda ta gasolina
derramada antes de hacer arrancar el motor.
. Siempre haga ios ajustes de aitura de Las
ruedas antes de hacer arrancar su
segadora Nunca kate de hacer #sto
mtentras que el motor estA funcionando
• Siegue siempre durante el d[a o con buena
luz artificial.
OPERAClON:
• Mantenga sus ojos y su mente en la
segadora yen el &tea que se est_ certando.
No permita que otros intereses Io dlstraigan.
.No corte c_sped mojado o resbaleso. Nunca
corra mientras est_ operando su segadora.
Siempre aseg0rese de mantener el equilibrio
mantenga el mango agarrado firmemente y
camine
• No ponga las manes o los pies cerca odebajo
de tas panes rotatorias. Mantengase
alejado de ta abertura de descarga en rode
memento.
° Siempre pare el meier cuando se vaya
ocuando no est@usando su segadora, o
antes de atravesar tas entradas para autos,
los senderos, caminos y _reas cubiertas de
ripio.
. Nunca dirija la descarga del material hacia
los espectadores ni permita a nadie cerca de
la segadora mientras la est_ operando
• Antes de limpiar, inspeccionar o de reparar l
a segadora, pare el motor y esl@
completamente seguro de que la cuchilla y
que todas tas parles que se mueven se
hayan detenido. Luego, desconecte et
alambre de ia bujfa y mant_ngalo atejado de
_sia para evitar el arranque per accidente.
• No continL)e haciendo funcionar su segadora
si le pega a un objeto exlraSo_ Siga el
procedimiento descrito anteriormente, luego
repare cualquier daffo antes de votver a
arrancar y de operar su segador&
° No cambie los ajustes del regulador o
hagaque el motor ande a una vefocidad
excesivao Se pueden producir daffos en el
motor y 1esiones personales.
- No opere su segadora si vibra tuera de to
normal, La vibraci6n excesiva es una
indicaci6n de daSo; pare el motor, revise en
forma segura la causa de la vibraci6n y haga
las reparaciones seg0n sea necesario°
• No haga funcionar e! motor en
recintoscerrados.. Los gases de escape son
peligrosos.
• Nunca corse el c_sped tirando la segadora
hacia usted. Siegue a tray, s de la cara de
tas pendientes, nunca hacia arriba o hacia
abajo pues puede perder el equilibrie No
siegue pendientes demasiado empinadas
Tenga cuidado cuando opere la segadora en
terrene disparejo o cuando cambie de
direccirbn - mantenga un buen equilibrio
, Nunca opere la segadora sin las
protecciones adecuadas, las p/anchas, eJ
recogedor de c_sped y otros disposilivos de
seguridad en su lugar
MANTENIMIENTO Y ALMACENAMIEN-
TO:
• Revise la cuchitla y los pernos de montaje
det motor a menudo, para asegurarse que
est_n apretados en Ia forma adecuada
• Revise redes los pernos, tuercas y tornilios a
inteP.,alos frecuentes, para verificar si est_n
apretados en forma adecuada, y
asegurarseque la segadora se encuentra en
condiciones de funcionamiento seguro..
. Mantenga lodes los dispositivos de seguridad
en su lugar y [istos para funcionar
,, Para reducir el pelfgro de incendio,
mantenga el motor sin cesped, hojas y grasa
o aceite en exceso
• Revise el recogedor de cOsped a menudo
para verificar si hay detedoro y desgaste y
cambie las bofsas desgastadas. Use
solamente las bolsas de repuesto
recomendadas per el fabricante de su
segadora o que cumplen con las
especificaciones de Oste
° Siempre mantenga una cuchilla afitada en su
segadora.
- Siempre permita que el motor se enfrie
antes de guardarla en cualquier recinto
cerrado
• Nunca guarde la segadora con combustible
en el estanque dentro de un edificio endonde
ios gases pueden aicanzar una llama
expuesta o una fuente de igniciSn, tal come el
catentador de agua, la estufa de
catefacciOn, la secadora de ropa, etc.
PRECAUCtON: Siempre desconecte el
alambre de la buiia y p6ngalo donne no pueda
entrar en contacto con la bujia, para evitar el
arranque per accidente, durante la preparaciOn,
et lransporte, el ajuste o cuando se hacen
reparaciones.
PRECAUClON: Es conocido per el Estado de
California que los gases de escape del motor de
este productor contienen qu[mices los cuales a
ciertos niveies, pueden ocasionar, c,_ncer,
defectos de nacimiento, y otros daSos at sistema
reproductivoo
18
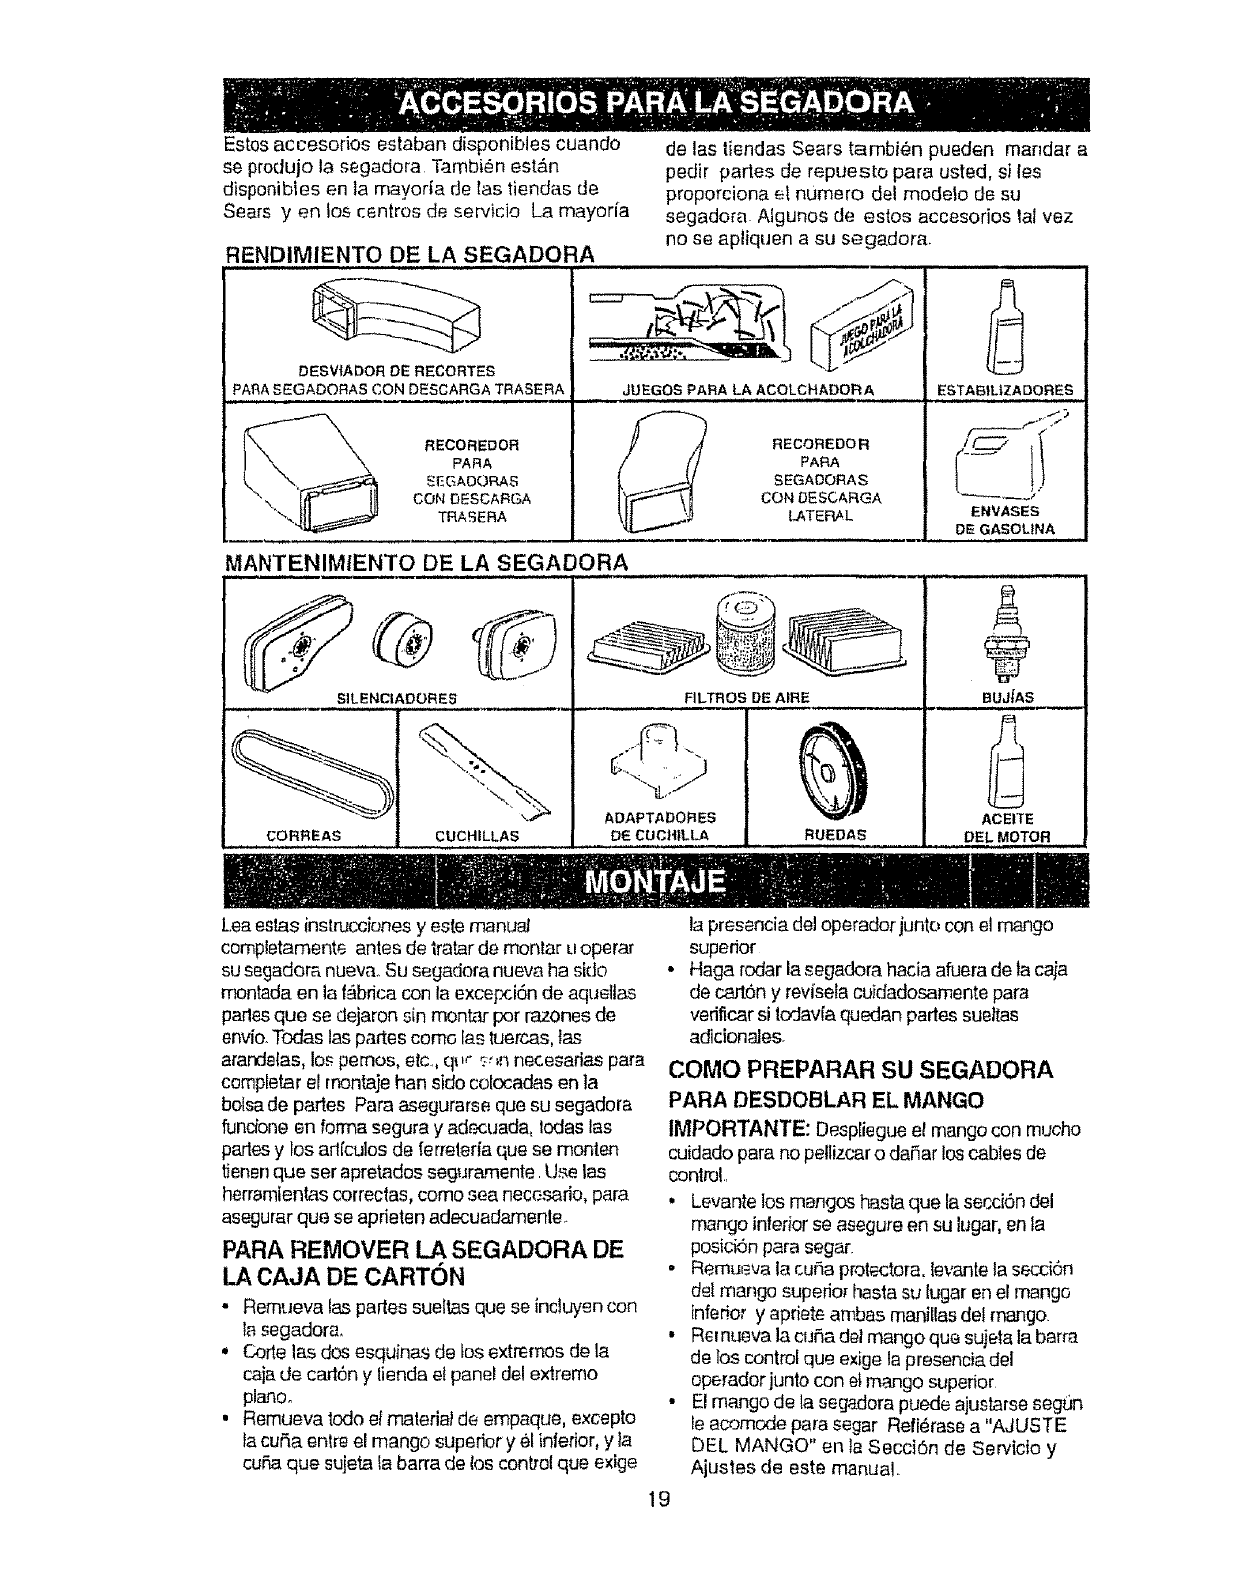
Estos accesodos estaban disponibies cuando
se produjo la segadora Tambi_n est#,n
disponibles en la rnayoria de las tienrJas de
Sears yen los centros de servicio La mayoria
RENDIMIENTO DE LA SEGADORA
J, ,, ,, t ,,,,
DESV|ADOR DE RECORTES
PARA SEGADORAS CON DESCARGA TRASERA
RECOREDOR
PARA
_EGADORAS
CON DESCARGA
TRA£ERA
de las liendas Sears tambien pueden mandar a
pedir partes de repuesto para usted, siles
proporciona el numero del modelo de su
segadora Algunos de estos accesorios lal vez
no se apliquen a su segadora.
JUEGOS PARA LA ACOLCHADORA
RECOREDOR
PARA
SEGADORAS
CON DESCARGA
LATEF'_L
ESTABIL|ZA BORES
_ .... /
ENVASES
DE GASOLINA
MANTENIMIENTO DE LA SEGADORA
SILENCIADORES
CORREAS ! CUCHILLAS
FILTROS DE AIRE
ADAPTADORES
DE CUCHILLA RUEDAS
A
BUJ_AS
ACEITE
DEL MOTOR
Lea estas instruccfones y este manua/
completamente antes de 1tatardo montar u operar
su segadora nueva. Su segadora nueva ha sido
montada en la f._brk:acon la excepci6n de aquellas
panes qua se dejaron sin mont,_ par razones de
envio.Todas las parsescoma las tuercas,tas
arandetas, los pemos, etc, qur c-.'=;_necesarias para
completar el montaje han sido colocadas en la
bolsade partes Para asegurarse qua su segadora
fundone en farina segura y ad_uada, Iodas las
pades y los ad[culos de ferrelerfaqua semonten
tiensn qua ser apretados seguramente Use las
herramientas correctas, coma sea nece._3rio,para
asegurar qua se aprieten adecuadamenle.
PARA REMOVER LA SEGADORA DE
LA CAJA DE CARTON
• Remueva las partes sueltas qua se induyen con
la segadora.
, Code las dos esquin&s de los extremos de la
caia de cart6n y lienda el panel del extremo
planoo
•Remueva todo ei material de empaque, excepto
la cuSa entre el mango superior y el inferior, y ia
cuRaque sujeta la barra de los control que exige
la presencia del operador junto con el mango
supedor
• Haga radar la segadora hacia afuera de la caja
de cart6n y revisela cuidadosamente para
vedficar si todavia quedan partes sueltas
adicionales.
19
COMO PREPARAR SU SEGADORA
PARA DESDOBLAR EL MANGO
IMPORTANTE: Desp[iegue el mango con mucho
cuidado para no petlizcar o daSar los cables de
control,
• Levante los mangos hasta que la secci6n del
mango inferior se asegure en su lugar, enla
posidSn para segar
• Remu_=_vala cuSa protectora, levante la secci6n
del rnango superio_ hasta su lugar en el mange
inferi'or y apfiete ambas maniIlas del mango
• Remueva la cuSa del mango qua sujeta la barra
de los control que exige la presencia del
operader junto con etmango superior
• Elmango de la segadora puede ajustarse seg0n
Ie acomode para segar Refierase a "AJUSTE
DEL MANGO" en la Secci6n de Servicto y
Ajustes de este manual.
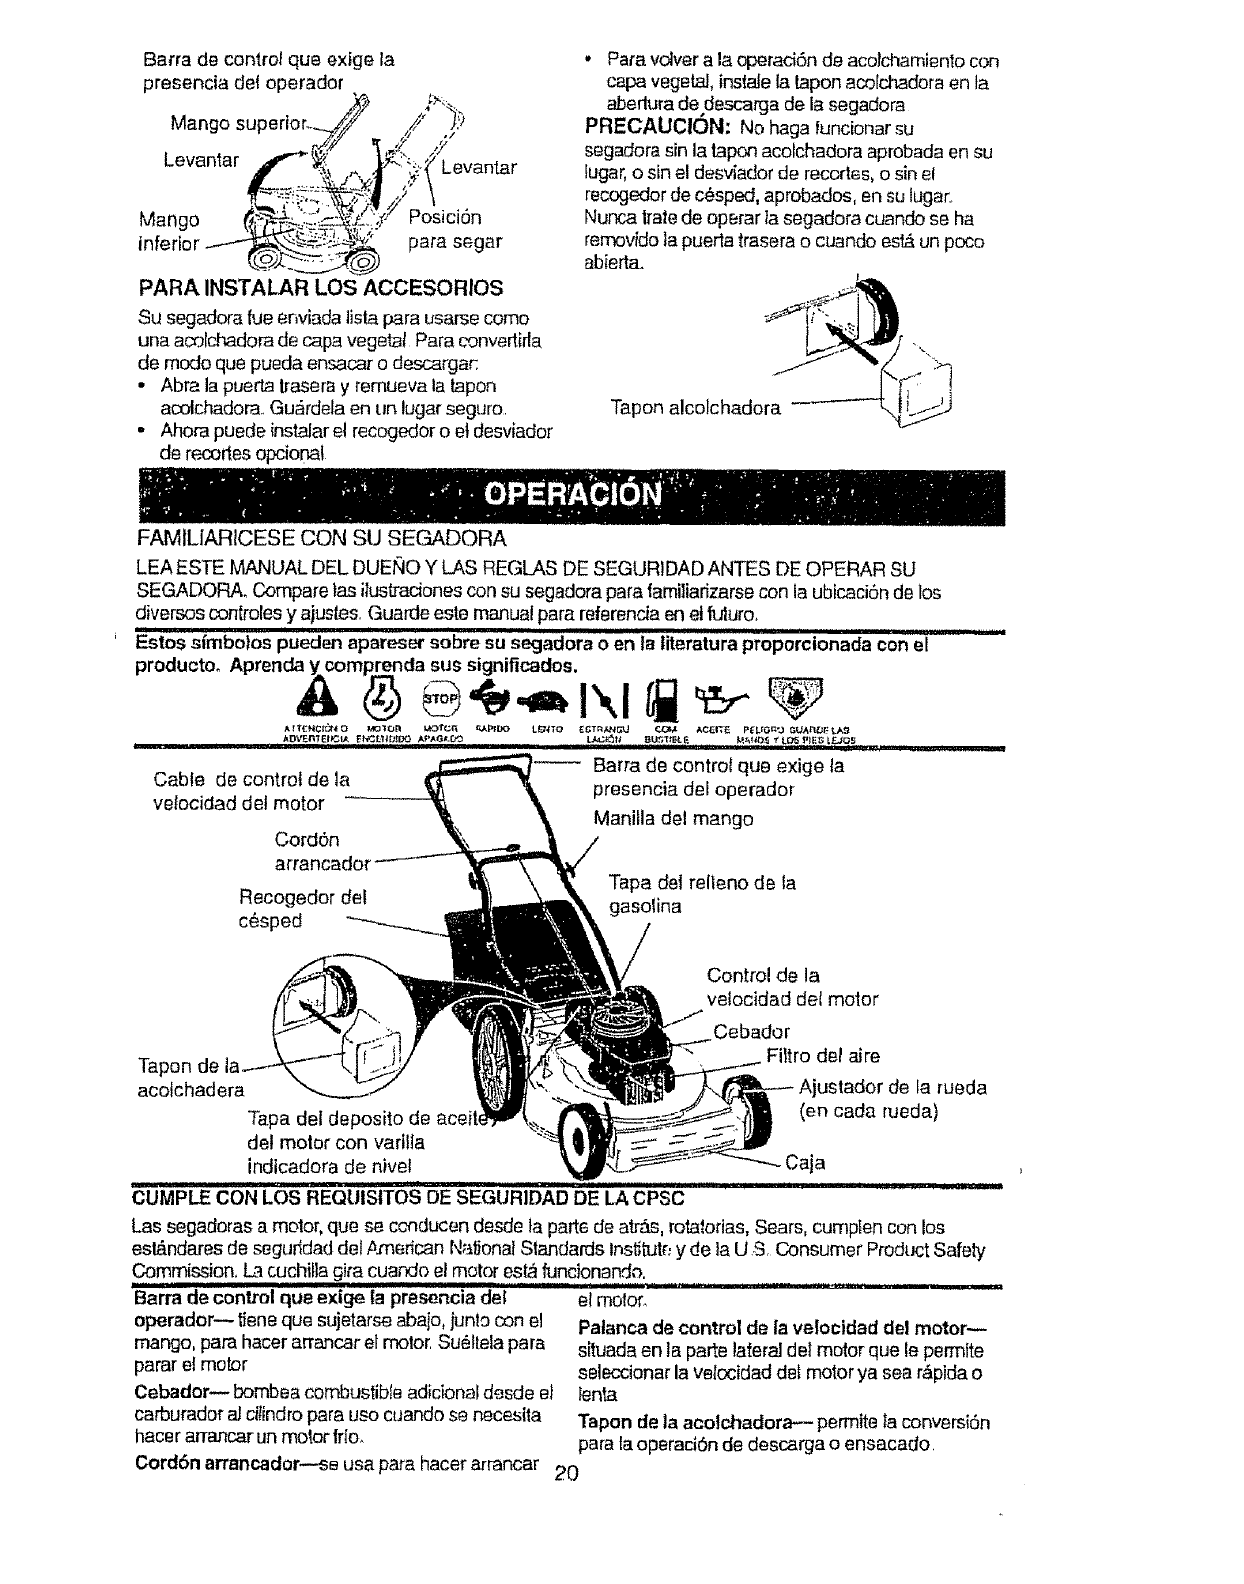
Barradecontrolqueexigera
presenciadeloperador
Mangost.
Levantar +evantar
)go Posici6n
para segar
PARA INSTALAR LOS ACCESORIOS
Su segadora [ue enviada lista para usarse como
una acotc.hadorade capa vegetal Para convertirla
de modo que pueda ensacar o descarga_
•Abra la puerto Irasera y remueva la tapon
acotchadora+Guardela en un lugar seguro
•Ahora puecle instalar el recogedor o el desviador
de recortes opcionat
• Para volver a la operaci6n de acotchamiento con
capa vegetal, instaJela taponacotchadora en la
aberlura de descarga de la segadora
PRECAUC|ON: No haga funcionar su
segadora sin la lapon acolchadora aprobada en su
fugar,o sin e! desviador de recortes, o sin e!
recogedor de cesped, aprobados, en su lugar.,
Nunca Iratede operar ta segadora cuando se ha
removido la puerta trasera o cuando es_ un poco
abierta+
1---(.,.[_. 'q..,._-? *q
Tapon a colchadora -- '-'--'-_!i .._J
FAMILIARICESE CON SU SECM_DORA
LEA ESTE MANUAL DEL DUEt_O Y LAS REGLAS DE SEGURIDAD ANTES DE OPERAR SU
SEGADORA_ Compare letsifustmdones con su segadora para familiarizarse con la ubicaci6n de los
diversos conlrotes y ajusles, Guards este manual para reterenda en et futuro+
EstOSsfmb01os pueden apareser sobre su segadora o en fa titeratura proporc'i'onadacon el
productoo Aprenda ycomprenda sus significados,
AIT_NC_O MJO'IOR _'rCA f.APTbO L_TO [GTR_',_Gt, J_ &CEDE P_L_O_'3 _LfA_J_t_
= AO'CEI3/EIP+JtA Ft4=£tlg[BO _I,P_G_P.r,Y3 l+,&_|,t 8_t6L6 I'IIIII' M_['4D_ "t LC'5't+IES III .... I
Cable de control de ta
velocidad del motor
Cord6n
arrancadot
Recogedor de!
c_sped
I-- Barra de control qua exige la
presencia del operador
Manilla del mango
Tapa dst relleno de la
gasolina
Control de la
velocidad del motor
Cebador
Filtro del aJre
acoichadera Ajustador de ia rueda
Tapa det de (en cacta rueda)
del motor con variila
indicadora de nivel Caja
CUMPLECON"'I.OSREQUIStT0§ DESEGURIDADDE LA CPSC ..........................
Las segadoras a motor, que se conducen desde }aparte de a#Bs, rota_orias,Sears, cumplen con los
eslAndares de segufidad de! #znericanNa_ona} Standards Instant[:y de la U Sr Consumer Product Safety
Commission. &'_cuchMa cjiracuando el motor esta funcionando.
............. _,_!IIH, I II1,11,111 I ,III
Barra de control que extge la presencia del
operador_ tieneque sujetarse abajo, junto con el
mango, para hacer arrancar el rnolo_Su_ltela para
parar el motor
Cebador_ bombea combustible adicional desde el
carburador a_cilindro para uso cuando se neceslta
hacer arrancar un motor ]rio.
el motor,
Palanca de control de la velocidad del motor_
situada en la parte latera] dot motor que le permite
seleccionar la velocidaddel motor ya sea r,_pidao
_enta
Tapon de la acolchadora-- permite la conversi6n
para _aoperad6n de descarga o ensacado
Cord6n arrancador--se usa para hacer arrancar 20
La operaci6n de cualquier segadora puede
hacer qua salten obielus exlra_os dentro de sus
ojos, loque puede producir daSos graves en _stos.
Siempre use anleojos de seguridad o protecci6n
pare los oios mienlras opere su segadora o cuando
haga ajustes o reparaciones Recomendamos una
mascara de seguridad de visi6n ampfia, pare use
espeiuelos o anleoios de secluddadestandarte.
COMO USAR SU SEGADORA
CONTROL DE LA VELOCIDAD DEL
MOTOR
La velocidaddel motor se controla per medic de
una palanca ubicada en el lade del motor..La
posid6n de r&pido se usa pare arrancar el motor,
pare el corte normal y un meier ensacamiento de!
c_-sped.La posicbn lento es para code liviano,
recede y para economizer combustibler
CONTROL DE ZONA DEL MOTOR
Palanca de control de la velocidad dot motor
Cebador
PRECAUCION: Las regulaciones federales
exigen que se instale un control para el motor en
esta segadara pare reducir a un minimo el riesgode
lesionarse debido a] contacto con la cuchiUa..Per
ningun motive trate de eliminar la tund6n del control
del operador. La cuchitlagira cuando el motor estA
funcionando.
• Su segadoraviene equipada con una barra de
control que exige la presencia del operador, to
que requiere que el operador est# detrbs del
mango de ta segadora para haceda arrancar y
operarla
PARA AJUS/AR LA ALTURA DE CORTE
,, Levan_ las ruedaspare el corte bajo y baje los
ruedas pare el code alto
•Ajuste la aftura de corte para que se acomode a
sus requisites La posici6n del medic es la meier
para la mayoria de los c&._edes.
* Para cambiar la allure de code, empuje la
paJancadot ajustador hada ta rued& Mueva la
rueda hacia arfiba o hacia abaja de mode que se
acomode a sus requisites Asegurese que todas
las ruedasqueden igualmente ajustadas.
ATENClON: El ajustador esta colTectamente
colocado cuando las orejas de la place est&n
tnserladasen elagujero det mango Tambien, los
ajustes de 9 posiciones (s[equipado) permiten que
el mango pueda set movtdo entre los orejas de ta
placa
Para un corte alto, Orejas de la place
baje Jasruedas.___...._.,_.,._-.-.._.._"" _ M'_an
Para un corte bajo, levante las ruedas
PARA MONTAR Y ADJUNTAR EL
RECOGEDOR DE CESPED
• Cierre la tapa soltable La tapa soltab{edebe
estar cerrada cuando se esta operando la
segadora
,, Levante ta puerta trasera de la ca_ade la
segadora y ponga el bastidor del recogedor de
cesped en los orejas formadas en el punta!de
bisagra de Ia puerto trasera.
• El recogedor de c_sped esta asegurado en la
caja de la segadora cuando se baja la puedca
traserapara descansar en e! baslJdordel
recogedor de c_sped
PRECAUCtON: No haga fundonar su segadora
sin el desviador de recortes esin el recogedor de
c6sped, aprobados, en su lugar. Nunca _'ate de
operarta segadora cuando se ha removido la
puerto traserao cuando est_ un pace abieda
.--_#._'....-Puerta trasera
Puntal de /-_ '.
2t
Bastidor de
•del
cesped
Oreja:
formadas
PARA VACIAR EL RECOGEDOR DE
ClaSPED
• Pare remover el recogedor det cesped suelte la
barra de control del operador pare poder parar el
motor
• Levante la puerla de arras y remove et recogedor
de] c6sped per e! mango
AV|SO: No arrastre la boise coando la vacie; se
producir_,un desgaste innecesario,
ANTES DE HACER ARRANCAR EL
MOTOR
ACEITE
Su segadora rue enviada sin aceite en el motor.
• Aseg0rese que la segadora est_ nivelada y que
el _rea aJrededardel dep6sita de aceite est6
limpi&
• Remueva fa tape del dep6sito de aceite del
motor con la varilla indicadora de nively rellene
haste ta linea de i]eno en 6sta
• Use 0,61 (20 oz )de aceite,,Pare el tipo y la
calidad yea "MOTOR" en la seccidn de los
"Responsabilidades def Cliente" en este manual.
• Vacie el aceite lentamente° No [o Ilene
demesiado.
• Revise el hive! del aceite antes de coda use
Agregue aceite si es necesario Uene haste la
[ineade Iteno en la variita indicadora de nlvel.
.Pars leerel nivet adecuado, apriele la taps del
dep6sito de aceite del motor cada vez
• Vuelva a inslalar la taps del dep6sito del acei/e y
aprietela
• Cambie el aceite despu6s de 25 horas de
operaci6n o una vez per temporada Puede
necesilar cambiar el aceite mas a menudo
cuando las cond_cionesson polvorosas o sucias
GASOLINA
• Ltene el estanque de combustible Use gasolina
regular, sin p!omo, nueva y timpiacon el minimo
de 87 octanes. No mezcle el aceite con la
gasolina Pars asegurar que ta gasolina utilizada
sea fresca compre estanques los cuales puedan
set utilizados durante los pfimeros 30 dfas
ADVERTENClA: La experienda ha indicado que
los combustibles mezclados con alcohol (conocidos
come gasoho], o el use de etano! o metanol)
pueden atraer la humc:_'lad,la que conduce a la
separacion y formaci6n de _ctdos durante el
almacenamiento La gaso]ina acidica puede da_ar
el sistema del combustible de un motor durante el
almacenamiento Pars evitar los prob]emas con ei
motor, ee debe vaciar el sistema del combustible
antes do guardado per un periodo de 30 dias o
m_s. Vacie et estanque del combustible, hags
arrancar el meier y hagalo luncionar hasta que las
lineas del combuslibld y el carburador queden
vacfos. La pr6xima temporada use combustible
nuevo. Yealas ]nslmccionesPara Et
AJmacenamiento pars mas infom_aci6n. Nunca use
productos de limpteza para el motor o pars el
carburador en e! estanque de! combuslible pues so
pueden producir da.5os permanenles.
PARA HACER ARRANCAR EL MOTOR
•Pars hacerarrancarun motor frio, empuje et
cebador cince (5) veces anles de trataflo Use un
empuje lirmemenle. Esle paso no_malmente no
es necesario cuando se hace arrancar un motor
que ya ha estado funcionando per unos cuantos
minutes
• Mueva _apalanca de control de velocidad a la
poslcbn de rapido.
• Sujete la barra de control que exige la plesencis
del operador abajo en el mango y fire el mango
del arrancador r,'_pidarnente.No permits que el
cord6n del arrancador se devuelva
abn.iptamente..
• Pars parar el motor, suelte Jabarfs de control
que exige la presencia de! operador.
AVISO: En climas mas frlc_._puede que sea
necesario repetir los pasos del cebado. En climas
m_s calurosos el cebar demasiado puede producir
el ahogo y el motor no va a arrar_']r Si se ahoga el
molor espere unos cuantos minutes antes de tratar
de hacerlo arrancar y no repita los pesos del
cebado.
CONSEJOS PARA SEGAR
,, Baio ciertas condiciones, Isl come cesped muy
alto, puede set necesario el elevar la altura del
corte pars reducir _,1esfuerzo necesario pars
empujar la segadora y para evitar sobrecargar el
motor, dejando rnontones de recedes do c6sped
- Pars un code muy pesado, reduzca el arlcho del
code pasando parcialrnenfe per _ncima det lugar
antenon_ente cortado y sieyue lentamente..
• Pars un meier ensacado del cespeo y para la
mayorfa de las condiciones de code, ]a velocidad
del motor debe aiuslarse a fa pesici6r_de r_pido
• Cuando use una segadora con descarga trasera
en c_sped h_Jmedoy pesado, los montones del
c_sped cortado puede que no entren en el
recogedor de c_sped Reduzca lavelocidad de[
recorfido (veiocidad de empuje) y/o hags
funcionar la segadora sobre el area per segunda
vez_
•Si queda una huefla de codes en ellade derecho
de una segadora con descarga Irasera, siegue
en la direcci6n en que giran las mani!]as del reioj,
sobpando un poco para recaudar los recedes en
la pr6xima pasada
,' Los pores en los recogedores de c_sped de tela
pueden Ilenarse con mugre y polvo con e! use y
los recogedores recaudar&q manes c_sped.
Pars e,,41ar6sto, rccie et recogedor con la
manguera de ague regu]armente y d_jelo
secarse antes do usarlo
• Mantenga la parle superior del motor, alrededor
del arranr.ador, despejada ysin recedes de
cesped y paja Esto ayudara el ttujo del sire del
motor y exlendera la duraci6n este.
CONSEJOS PARA SEGAR Y
ACOLCHAR
IMPORTANTE: Para obtener el meier
rendimienlo mantenga la caja de la segadora
sin acumutacion de cesped y basura Vea
"limpieza" en la seccion de
"RESPONSABILIDADES DEL CLIENTE" de
esle manual
- La cuchilla acolchadora especial va a volver a
cortar los recortes de cesped muchas veces,
y los reduce en tama5o, de mode que sise
caen en el c_sped so van a dispesar entre
_ste y no se van a notar TambJen, et c#sped
acolchado se va a deshacer r#,pidamente
entregando substancias nutritivas para el
c_sped Siempre acolche con Ia velocidad del
motor (cuchills) m,cs aila, pues asl se
obtendra fa mejor acci6n de recorte de las
cuchitlas.
° Evite cortar el cesped cuando este mojado. El
c6sped mojado tiende a fon'nar montones e
interfiere con la acci6n de acolchado. La
mejor hora para segar el c6sped es temprano
en la tarde. A esa hera 6ste se ha secado y el
Area reci#.n corlada no quedar_ expuesta ai
sol directo.
o Para obtener los mejores resultados, ajuste ta
altura del corte de la segadora de mode que
_sta corte solamente el tercio superior de las
hojas de cesped.. En el case de que el
c_-sped hays crecido demasiado, puede ser
necesario el elevar la altuta del corte para
22
reducir el esfuerzo necesario para empujar la
segadora y para evitar sobrecargar el motor,
dejando montones de recortes de c_sped
Para un acolchamiento muy pesado, reduzca
eLancho del corte pasando pot encima det
Jugar anteriormente cortado y siegue
tentamente.
• Ciertos tipos de cesped y sus condiciones
pueden exigir que un &rea tenga que ser
acolchada pot segunda vez para esconder
compietamente los recortes Cuando se haga
el segundo corte, siegue atravesado o en
forma perpendicular a fa pasada det primer
corteo
. Cambie su patr6n de code de semana a
semana. Siegue de norte a sur una semana y
luego cambie de este a oeste la pr6xima
semana. Es_o evitara que e_cesped se
enrede y cambie de direcciSn;
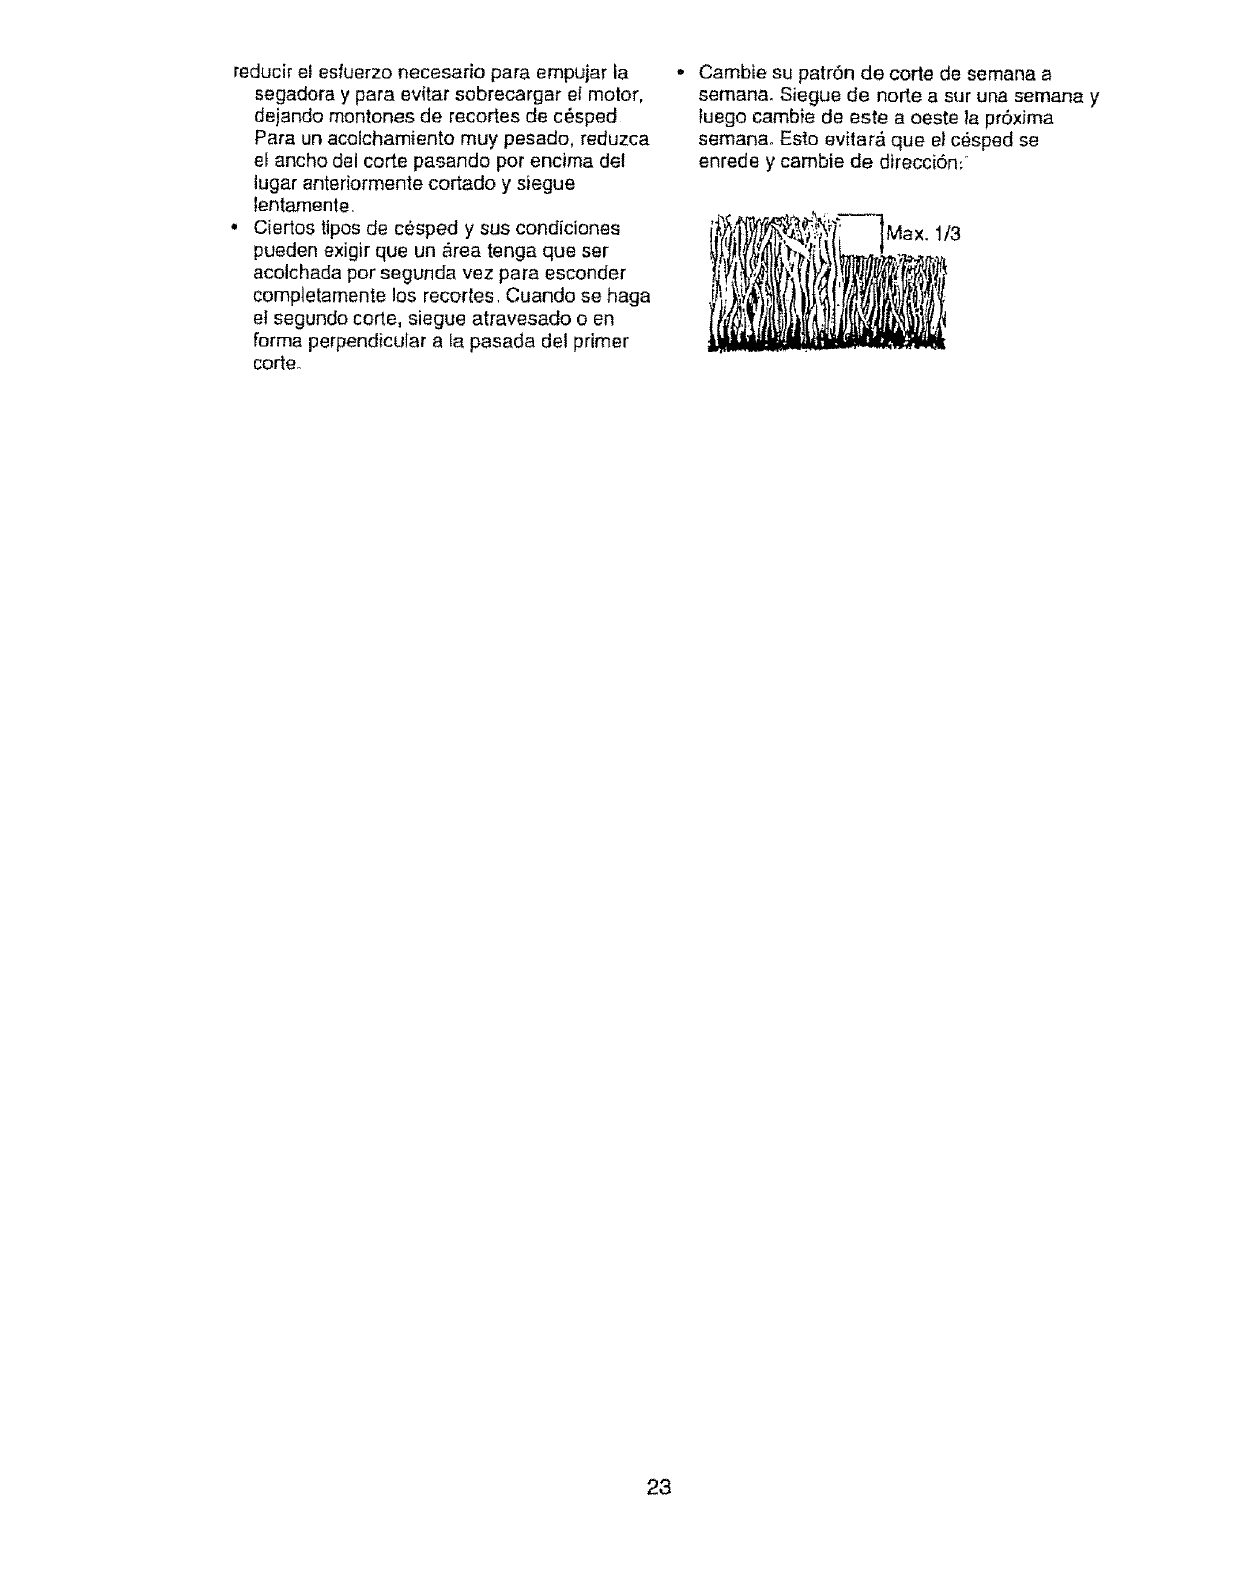
Max. 1/3
23
Revisst 1_ ,.-'_rreag y to,_-_tea_ impu/-
_adas {seg_ldoras con porJer prop.., ,. , u_sDr}
--P,evisa_ o/afilartcambi_t la. cuchilla
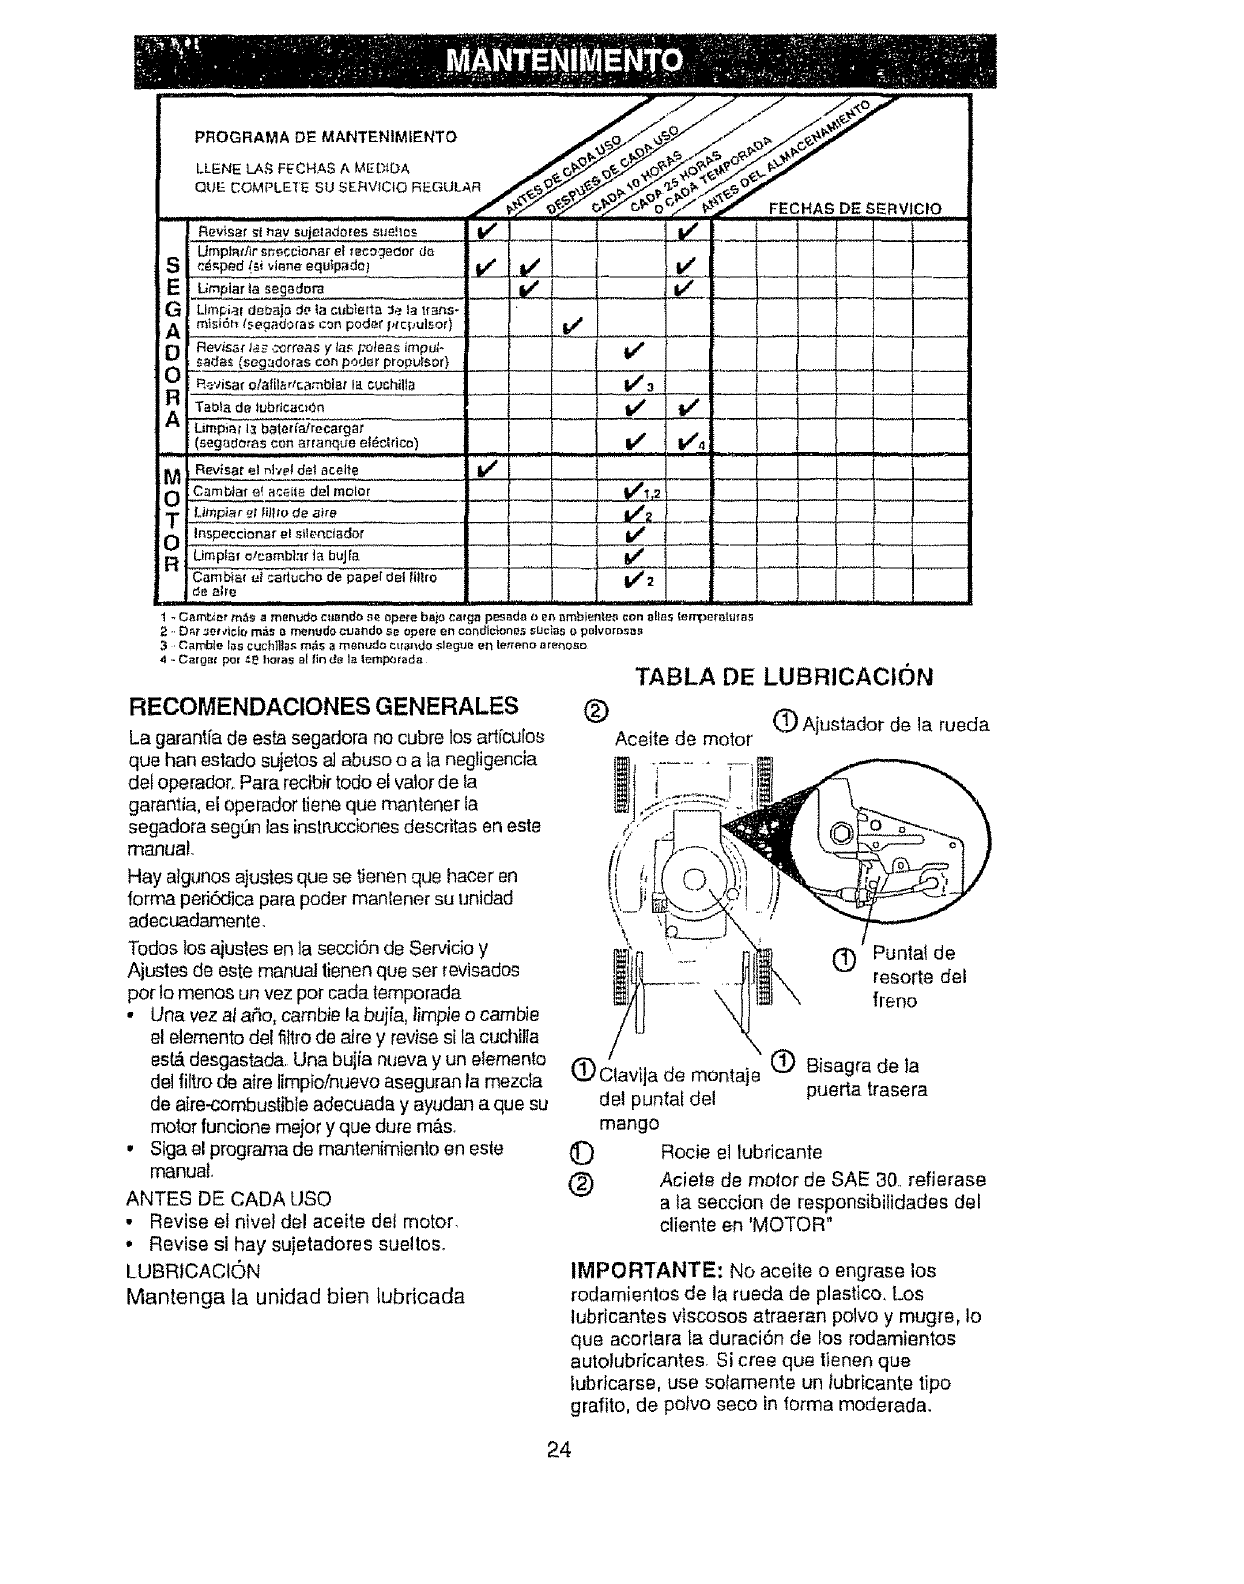
AR Tabta de lubrication
Limpia; I:_ baleria/recargat
(segadoras con arranqde ef_clrico)
.... .d,,,°/"
PFiOGRAMA DE MANTENtMiENTO _O// /'// .. >_Y
Reviser _t hay sujeladores. S_e!IOS V _ _--._1.--
Umpt_t,,qr sr_eccionar el rec_;teOor do !
c&_ped (_i vione equ_pado_ If Ik_ V_
Limpiar ta sega_ora _-- _ V_
Llmpialdobajo de la ct_b_etta :_e la lrens-
mlsi6h _egadotas con poder l,tq_ulsor)
m__
v"
V#3 :
'/'/ I t
...... V' v"_ ,,
MRevisar el Nve! del acelte tf t
OCambtaf acei|e del rrlolor
I
Limp}at _illlo de ,3ire 11/2 I J
Inspe_cionar el sllenciador _ I
Limpla r o!cambi;{f labuJla I_
deatreCambialt_t callucho de papel _et lttlro ! t I
t-Camb_o_ m&s a menudo m_ando se opera baio ca_ga pesada o en _mbiente_ con alias {e[roemtufas
2 " O_r '_Ot_'t¢lO m&s a menudo cu_r_do se opere en cSRdl_{On85 SUCiaS O polvorasa_
3Corolla los CUChllIBsm_s a menudo ctfal_do slegue en teneno arenoso
4--Cargo( pot =_ hotas al fin de la lempo_ada
RECOMENDAClONES GENERALES
La garant[a de esta segadora no cubre los art[culos
qua han estado sujetos aJabuso o a ta negligencia
del operation Pare recibi_todo el valor de Ia
garantia, el operador liana que mantener la
segadora segSn los instruccbnes descritas en este
manual, '"
Hay algunos ajustes que se tienen qua hacer en ((
{orma peri6dica pare poder manIener su unidad
adecuadamente,
Tados los ajustes an la secci6n de Servicia y _'
Ajustes de este manual lienen qua set revisados
por lo menos un vez pot cada temporada
• Una vezal afio, cambie la buiia, limple o cambie
el elemento del filtro de aire y revise sila cuchilla
eslA desgastada. Una bujia nueva y un elemento
del filtro de aire limpio/nuevo aseguran la mezcla
de aire-combustible adecuada y ayudan aque su
motor funcione major y que dure mAs,
, Siga el programa de mantenimiento en este (D
manual, (_)
ANTES DE CADA USO
• Revise el nivel del aceite del motor.
• Revise si hay sujetadores sueltoso
LUBRICACION
Mantenga la unidad bien lubricada
TABLA DE LUBRICACtON
(_) (_ Ajustador de la rueda
Aceite de motor
C) Punlal de
resorte del
freno
(DClavija de monta}e (_ Bisagra de ta
del puntaf del puerto trasera
mango
Rocie el lubricante
Aciete de motor de SAE 30, refierase
ala seccion de responsibilidades del
cliente en 'MOTOR"
IMPORTANTE: NO aceite o engrase los
rodamienios de la rueda de plastico. Los
lubdcantes viscosos atraeran polvo y mugra, Io
qua acorlara la duraci6n de los rodamientos
autolubricantes. Si cree que tienen que
tubdcarse, usa sotamente un tubricante tipo
grafito, de polvo seco in torma moderada.
24
ESPECIFICACIONIS:5 L)I:::L PHUi.)UU !U
NUMERO DE MODELO 917,3881 5!
NUMERO DE SERIE
FECHA DE COMPRA i
CABALLOS DE FUERZA: &0
DESPLAZAMIENTO: 11,5 CU. IN.
CAPACIDAD Y TIPO 1o5 Cuartos
DE GASOLINA: REGULAR SIN PLOMO
TIPO DE ACEITE: SAE 30 (sobre 32°F) :
(API-SF/SG/SH) SAE 5W-30 (debajo 32°F)
CAPACIDAD DE ACEITE: 20 oz. de capacidad
BUJ[A (ABERTURA: .030") CHAMPION RJ19LM:
TOLERANCIA DE VALVULA: ADMISiON: ,004" - ,008"
DESCARGA: .004" - .008"
SENCENDIDO DE ESTADO
SOLIDO ABERTURA DE AtRE: O!25 IN.
TORSION DEL PERNO
DE LA CUCHILLA: 35-40 FT. LBS,
El num_ro del nodelo y et de serie se encuentran en la calcomania adjunt# a la parte
trasera de la caja de la segadorao Debe registrar tanto el num6ro de serie come la
fecha de compra y mantengalos en un tugar seguro para refencia en el futuro
SEGAIDORA •Remueva el perno de la cuchilla girAndo]o en
Siempre observe tas regtas de seguridad
cuando haga et mantenfmiento.
LLANTAS
° Mantenga tas Ilantas sin gasotina, aceite o
substancias quimicas para control de
insectos que pueden daSar la goma.
• Evite los tocones, las piedras, las grielas
profundas, los objetos afilados y otros
pe!igros que pueden da5ar alas llantas.,
CU1DADO DE LA CUCHILLA
Para obtener los mejores resultados, la cuchitla
de la segadora tiene que mantenerse afilada.
Cambie la cuchi/ia doblada o daSada,
PARA REMOVER LA CUCHILLA
•Desconecte el alambre de la bujfa y p6nga{o
en donde no pueda entrar en contacto con
_sta.
• Haga descansar la segadora en su lado
Aseg0rese que el filtro de aim y que el
carburador queden mirando hacia arriba,
•Use un bloque de madera entre la cuchitla y
la caia de la segadora para evitar que la
cuchilla gire cuando se le quite el perno.
•Proteja sus manos con guanles y/o envuelva
la cuchitla con una tela gruesa,
el sentJdo contrario en que giran tas manillas
del reloj..
• Remueva la cuchi!la y los artfcu os de
ferrete#a adjuntadores (e perno, la arandeta
de seguridad y fa arandela endurecida).
AVlSO: Remueva el adaptador de la cuchilla y
revise el cubo interior de la ranura del
adaptador de la cuchilla La ranura tiene que
eslar en buenas condiciones para que funcione
en forma adecuada Cambie el adaptador si
est_ daP_ado
PARA CAMBIAR LA CUCHILLA
• Ponga el adaptador de la cuchifla en el
cigueSal de! motor. Asegurese que la ranura
def adaptador y que el chavetero del cigue5al
est_n alineados.
• Ponga la cuchilla en el adaptador de _sta
alineando los dos (2) agujeros en la cuchilia
con las salientes elevadas en el adaptador.
• Aseg0rese de que el horde de satida de la
euchilta (opuesto al borde afilado) est6 hacia
arriba hacia el motor,
• lnstale el perno de la cuchilla con la arandela
de seguridad y la arandela endurecida en el
adaptador de la ct_chilta y el cigueSai,
Use un bloque de madera entre la cuchitla y
la caja de la segadora y apriete el perno de la
25
cuchiliagir&ndoloenelsentimoenquegiran
lasmanillasdelrelo].
• Latorsi6nparaapretarrecomendadaesde
35- 40pieslibras.
IMPORTANTE:ElpernodelacuchiIlaes
ctase8tratadoacalor_
AVlSO: No recomendamos el afilar ta cuchilla
- pero si Io hace, asegt_rese de que quede
balanceada.
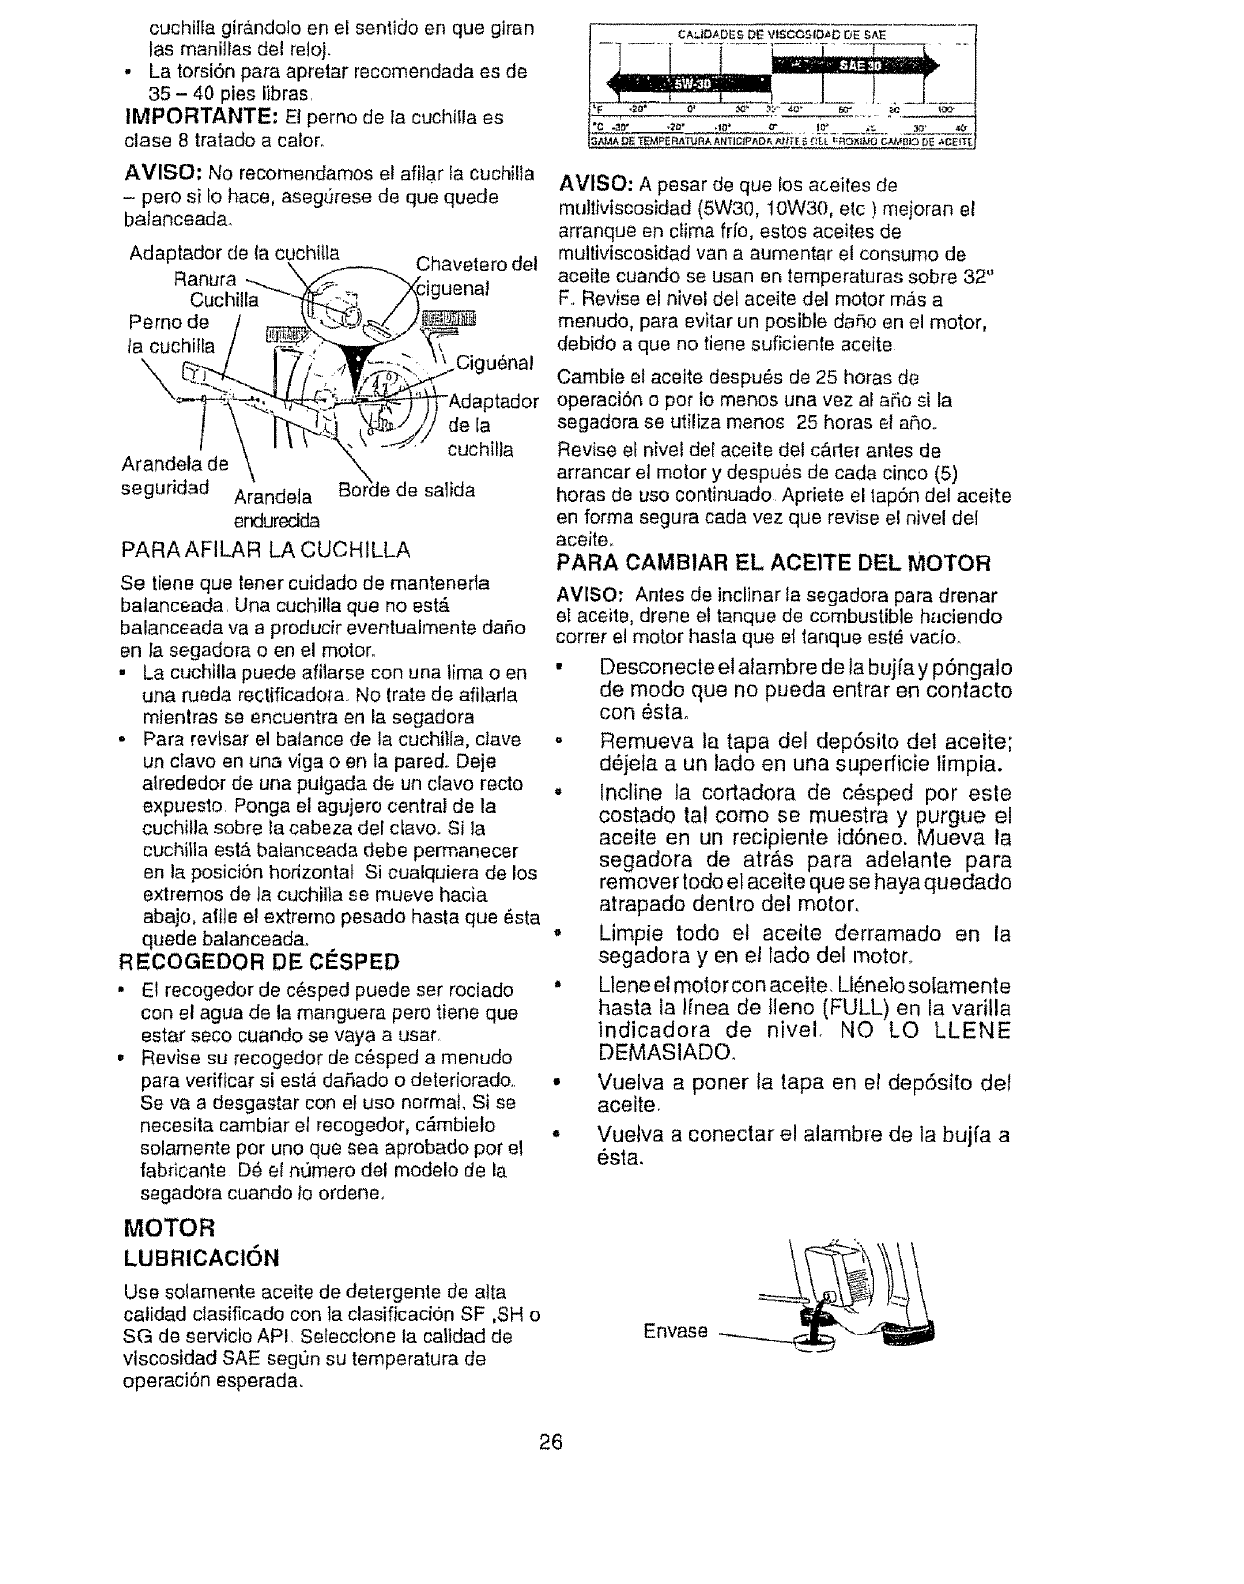
Adaptador de (a cuchi{la
Ranura -.....
Cuchii[a
Perno de
ta cuchilla
Chavetero del
)tador
de [a
cuchiPta
Arandela de
seguridad Arandela saiida
enduredda
PARAAFILAR LA CUCHILLA
Se tiene que loner culdado de mantenefia
balanceada, Una cuchilla que no est_
balanceada va a producir eventualmente dafio
en ta segadora o en el motor°
• La cuchilla puede afitarse con una lima o en
una rueda rectificadora No trate de afilafla
mientras se encuentra en la segadora
.Para rev_sar el balance de la cuchitfa, clave
un davo en una viga o en la pared.. Deje
alrededor de una pulgada de un clavo recto
expuesto Ponga el agujero central de la
cuchilla sobre la cabeza del clavo. Si la
cuchilla est,. balanceada debe permanecer
en la posiciSn horizontal Si cualquiera de los
extremos de la cuchilla se mueve hacia
aba]o, atile el extremo pesado hasta que 6sta
quede balancead&
RECOGEDOR DE ClaSPED
• El recogedor de c_sped puede ser rociado
con el agua de la manguera pero tiene que
estar seco cuando se vaya a usar_
oRevise su recogedor de c6sped a menudo
para veriflcar si esta da,Sado o deteriorado..
Se va a desgastar con ef uso normal Si se
necesita cambiar el recogedor, c_mbieto
solamente por uno que sea aprobado por el
fabficante D_ el numero del modelo de la
segadora cuando to ordene.
MOTOR
LUBRICAClON
Use solamente aceite de detergente de alta
calidad clasificado con ta clasificaciOn SF ,SH o
SG de servicfo API, Selecctone ta caltdad de
vtscosidad SAE segun su temperatura de
operaciSn esperada.
AVISO: A pesar de que tos aceifes de
mulliviscosidad (5W30, 10W30, elc ) mejoran el
arranque en clima fifo, estos aceites de
multiviscosidad van a aumentar el consumo de
aceite cuando se usan en temperaturas sobre 32"
Fo Revise el nivel det aceite del motor m,_s a
menudo, para evitar un posible dafio en el motor,
debido a que no tiene suficiente aceite
Cambie el aceite despu6s de 25 horas de
operaciSn o pot Io menos una vez al aSo si la
segadora se utiliza menos 25 horas el aho.
Revise el nivel de[ aceite del c&de[ antes de
arrancar et motor y despues de cada cinco (5)
horas de uso continuado Apriete el lapSn del aceite
en forma segura cada vez que revise el nivel del
ace/te_
PARA CAMBIAR EL ACEITE DEL MOTOR
AVISO: Antes de inclinar la segadora para drenar
eI aceite, drene el tanque de combustible haciendo
correr el motor hasla que el ianque est_ vacio.
• Desconecle el alambre de la bujfa y pSngalo
de modo que no pueda entrar en contacto
con esta.
• Remueva la tapa del dep6sito del aceite;
deiela a un lado en una superficie limpia.
• Incline la cortadora de c_sped por este
costado tal como se muestra y purgue el
aceite en un recipiente idSneo. Mueva la
segadora de atr&s para adelante para
remover redo el aceite que se haya quedado
atrapado dentro del motor.
• Limpie todo et aceite derramado en la
segadora y en el iado del motor.
• Llene el motor con aceite. Li6nelo sotamente
hasta la I[nea de lleno (FULL) en la varilla
lndicadora de nivel. NO LO LLENE
DEMASIADOo
• Vuelva a poner la tapa en et dep6sito del
aceite,
• Vuelva a conectar el alambre de la bujfa a
6sta.
Envase
26

FILTRO DE AIRE
Su motor no funcionar_ en forma adecuada y
puede sufrir daSos sf se usa un filtro de aire
sucJo.
Cambie e[ fittro de aire cada aSo, y m,_s a
menudo si siega en condiciones muy
polvorosas o sucias. No lave el filtro de aire.
PARA CAMBIAR EL FILTRO DE AIRE
• Remueva el filtro de aire gir&ndo[o en e!
sentido contrado en que giran tas maniilas
del reloj, haste et tope, y retire[o de} collar.
• Remueva el filtro de ta parte interior de la
cubierta..
• Limpie la parte intedor de la cubieda y el
collar para remover toda acumulaci6n de
mugre.
• lnserte et nitro nuevo en ta cubierta
• Ponga la cubieda del tiltro de aire dentro de]
collar alineando ta oreja con la ranura.
•Empuje [a cubierta hacia adentro y girela en
el sentido de las mani[las del reloj para
apretarla Gire en el
Collar Abra- sentido
zadera ! contrario a
las maniflas
del re_oj
pare
remover
Ranura Gire en el
Fi[tro de' senttdo de tas
aire Oreia maniltas de[
reloi para
Cubierla del fiitro apretar
de aire
S1LENCIADOR
lnspeccione y cambie el silenciador si estfi
corroi'do pues producir un peligro de incendio y/
o da5o.
BUJ[A
Cambie su bujia cada afio pare hacer que su
motor arranque m,_s f_,cilmente y funcione
mejor. Ajuste la abertura de ta buj[a en 0,030
pulgada
LIMPIEZA
IMPORTANTE: Para obtener el mejor rendi-
miento, mantengal ta caja de la segadora sin
acumulaci6n de c_sped y basura. Limpie la
parle de adajo de su segadora despues de
cada uso
PRECAUClON: Desconecte ei alambre de la
buj[a y p6ngalo en donde no pueda entrar en
contacto con #sta
• Haga descansar ta segadora en su lado
Aseg0rese que et filtro de aire y que el
carburador queden mirando hacia arriba.
Limpie [a parle inferior de su segadora
rasp_ndoIa para remover la acumulaci6n de
c_sped y basura.
• Limpie el motor a menudo para evitar que se
acumule la basura. Un motor tapado funciona
mas caliente y se acorta su duract6n.
• Mantenga las superficies acabadas y las
ruedas sin gasolina, aceite, etc
• No recomendamos el uso de una manguera
de jardin para ltmpiar la segadora a menos
que e] sistema electrico, el silenciador, el
filtro de aire y el carburador est_n tapados
para evitar que [es entre el ague El agua en
el molor )uede acortar [a duraci6n de _ste.
PRECAUC|ON: Antes de dar catquier servicio
o de hacer ajustes:
• Suelte la barra de control y pare el motor.
• Aseg0rese que la cuchilla y que todas [as
partes movibles se hayan detenido
compietamente
• Desconecte et aIambre de la buj[a y p6nga[o
en donde no pueda entrar en contacto con
#.sta,
SEGADORA
PARA AJUSTAR LA ALTURA DE
CORTE
Vea "PARA AJUSTAR LA ALT URA DE CO RTE"
en {a secci6n de Operaci6n de este manual.
DESVIADOR TRASERO
Se proporciona un desviador trasero, adjunto
entre las ruedas traseras de su segadora, para
reducir a un mfnimo la posibilidad que objetos
sean lanzados hacia afuera de la parte trasera
de la segadora, en la posic{6n en donde se
i
27
encuentra el operadoL Si se dafia el desvlador
debe cambiarse
PARA AJUSTAR EL MANGO
Se puede [evantar o bajar el mango de su
segadora segun le quede c6modo Hay cuatro
(4) posiciones d[sponibles: alta, mediana afta,
mediana baja, baja. Los mangos se envian
montados en fa posici6n mediana baja
• Para cambiar de ta posici6n mediana baja a
mediana alia, Ia secci6n superior y [a inferior
de{ mango tendr_n que darse vueItao
•Remueva las abrazaderas del cable
• Remueva los controtes y {a barra de control
que exige ta presencia del operador det
mango superior,
Remueva las claviias de horquil_a,
Desconecte e! mango inferior de los puntates
det mango
De vuelta el mango y vuelva a montar las
clavijas de horquilla que se habfan removido.
Vue[va a montar los controies y la barra de
controles que exige [a presencia del operador
en el mango superior

PRECAllCI(_N;Labarradecontrolquaexige
la presencia de; operador tiene qua pivotear
libremente para permitir el engancha de la
ctjchi![a/freno cuando se suelta la barra de
control. No apriete demaslado los sujetadores
qua suietan a los controles al mango superior,
• Pare cambiar de la posiciSn de mediana baja
a alta soiamente se tendr& que dar vuelta [a
secci6n del mango superior,
. Pare cambiar de la posici6n mediana baja a
baja, solamente se lendr& que Oar vuella la
secci6n del mango inferior
Posici6n de envio
Mediana ba]a
__ Mediana alta
Mango inferior
Apriete pare
remover
Clavija de
montaje
Clavija de horquilla
MOTOR
CARBURADOR
Su carburador tiene un chorro principal fijo no
ajustable pare controlar la mezcla. Si su motor
no est_ funcionando en forma adecuada debido
a problemas qua se sospecha vienen del
carburador, tleve su segadora a [Jncentre de
servicio autodzado para reparafla y/o ajustarla
VELOCIDAD DEL MOTOR
La vetocidad det motor ha side ajustada en ]a
f&brica, No trate de aumentar la velocidad de[
motor pues se pueden producir tesiones
personales. Si cree que el motor esta
funcionando demasiado r,_pido o demasiado
lento, ]leve su segadora a un centre de servicio
autorizado pare reparada o aiustarla.
Inmediatamente prepare Sl.jsegadora para el
almacenamtento al final de cada temporada o si
la urlidad no se va a usar per 30 d_as o m_So
SEGADORA
Cuando se va a guardar la segadora per cierto
periode de ttempo, t[mplela cuidadosamente,
remueva toda la mugre, ta grasa, las hoias, etc°
Gu,Srdela en un &rea limpia y saca
.Limpie toda la segadora (Vea"LIMPIEZA" en
la secci6n de Responsabilidades del Ctiente
de este manuaf).
,, Lubrlquela seg_n se muestra en la secci6n
de Responsabttidades del Oliente de esle
manual
• Asegt_rese de qua todas las tuercas y ctavijas
y redes los pernos y tornillos est6n apretados
en foma segura Inspeccione las parles que
se mueven para verificar si estb.n daSadas,
quebradas o desgastadas. CAmbielas si es
necesario..
• Retoque lodes las superficies qua est_n
oxidadas o con la pintura picada; use una lija
antes de pintar°
MANGO
Puede doblar el mango de su segadora para
almacenarla.
28
• Apriete los extremes inferiores del mango
inferior entre si haste qua el mango inferior
quede separado del puntal del mango, luego
mu_valo hacia adelante.
* Suefte los pernos de montaje det mango
superior to suficiente come pare permitir qua
el mango superior se pueda doblar hacia
atr_s+
IMPORTANTE: Cuando doble el mango para
el anmacenamiento o e! transporte, asegurese
qua Io doble segun se muestra o puede danar
los cables de cent+el
. Cuando prepare sus mangos a parflr de la
posici6n de almacenamiento, el mango
inferior autom_.ticamente se asegurar#, en la
postci6n para sager
Mango inferior
__N_ Puntai del
_,_.....J_qango
horquitla

Barradecontrolqueextge
lapresenciadeloperador---_ t>'_,
Z7 "i;>
Mango superior------Swi/_ _ ,(&
Doblar hacia adelante _ E _ ,_e,,
para atmacenar ..... _ ;7 _ _ ._
_;_;_', ,'2 Doblarhaca
arras
Posici .p ra
"=" "-'--J_ _"" segar
Mango inferior
MOTOR
SISTEMA DE COMBUSTIBLE
IMPORTANTE: Es importante evitar que se
formen deposilos de goma en partes
fundamentates del sistema de combustible tales
como el carburador, el fiitro del combustible, la
manguera del combustible o en el estanque
durante el atmacenamiento. La experincia
tambien endica que los combustibles Mezclados
con alcohol (conocido como gasohol o qua
tienen etanol o metanol) pueden atraer
humedad, Io queconduce a la separacion y a la
formacion de acidos durante el
almacenamiento,. La gasolina acdi_;a puede
danar el slstema de combustible de un motor
durante el periodo de almacenamiento,
° Drene el estanque de combustible.
• Haga arrancar el motor y d6jelo funcionar
hasta que las tfneas del combustible y el
carburador est_n vacfos,
•Nunca use los produclos para limpieza de!
carburador o del motor en el estanque de
combustible pues se pueden producir daSos
permanentes,,
• Use combustible nuevo la pr6xlma
temporada,
AVISO: El estabilizador de combustible es una
atternativa aceptabte para reducir a un mfnimo
la formaci6n de dep6sttos de goma en el
combustible durante e! perfodo de
almacenamiento., Agregue estabilizador a ta
gasolina en el estanque de combustible o en et
envase para el almacenamiento. Siempre stga
ta proporci6n de mezcla que se encuentra en el
envase del eslabilizador Haga funcionar el
motor por Io menos 10 mlnutos despu_s de
agregar el estabilizador, para permit# qua este
llegue al carburador. No drene la gasolina de!
estanque de gasolina y el carburador si se est&
usando estabitizador de combustible.
ACEITE DEL MOTOR
Drene ei aceite (con el motor caliente) y
c_mbielo con aceite de motor timpio. (Yea
"MOTOR" en la secci0n de Responsabilidades
del Cllente de este manual )
ClLINDRO
i Remueva ta buj[a.
Vacfe una onza (29 mt) de aceite a trav_s del
agujero de la bujia en e! citindro
Tire ta manilla de arranque lentamente unas
cuantas veces para distribuir el aceite.
• Vuelva a montar la nueva bujfa.
OTROS
• No guarde la gasolina de una temporada a la
otra
• Cambie et envase de la gasolina si se
empieza a oxidar. La oxidaci6n y/o la mugre
en su gasolina producir_n problemas_
• Si es posible, guarde su unidad en un recinto
cerrado y c0brala para protegerla contra el
polvo y la mugre
, Cubra su unidad con un forro protector
adecuado que no retenga la humedad No
use pl,Sstico_El pt_stico no puede l'espirar, Io
que permlte ta formaci6n de condensaci6n, 1o
que producir_ la o×idacion de su unidado
IMPORTANTE: Nunca cubra la segadora
nientras el motor y las areas de escape todavia
estan calientes.
PRECAUClON: Nunca almacene la segadora
con gasolina en el estanque dentro de un
edificio en donde los gases pueden alcanzar
una llama expuesta o una chispa Permtta que
se enfr[e el motor antes de almacenarla en
algQn recinto cerradoo
29
IDENTIFICAClONDEPROBLEMAS
PROBLEMA CAUSA CORRECClON
Noarranca
Falta de fuerza
• Filtro de aire sucioo
, Sin combustible
• Combustible ranc{o.
, Agua en el combustible
• Aiambre de la bujia
desconectado,
• Bujia malao
• Cuchilla suella o adaplador
de la cuchilta quebrado_
• Barra de conlrof en la posici6n
suelta.
, Barra de control defectuosa.
• Parle trasera de la cajacuchilla
de la segadora arrastr#.ndose
en el c_sped pesado
. Est_ corlando mucho c_sped_
• Filtro de aire sucto
..Acumulaci6n de c_sped, hoJas
y basura debajo de la sega-
dora.
..Demasiado aceite en el motor o
• Limpie/cambie el filtro de aire.
• Llene el estanque de combuslible
• Drene el estanque y vuelva a
llenarlo con combustible limpio y
Ruevo.
• Drene el estanque de combustible y
el carburador y vuelva a ilenar el
estanque con gasolina nueva,
• Conecte ef alambre a la bu}ia.
• Cambie la bujia,
•Apriete el perno de la cuchilta o
cambie el adaptador de la cuchilla
•Presione ta barra de control hacia el
mango,
• Cambie la barra de control
Ajuste a la posici6n de "Corte m6s
allo,"
Ajuste a la posici6n de "Corte m_s
allo"
Limpie/cambie el fittro de aire
Limpie la parle inferior de fa caja de
la segadora,
Revise el nivel de! aceile
Corte a una velocidad de recorrido
m6s lenta,
3O
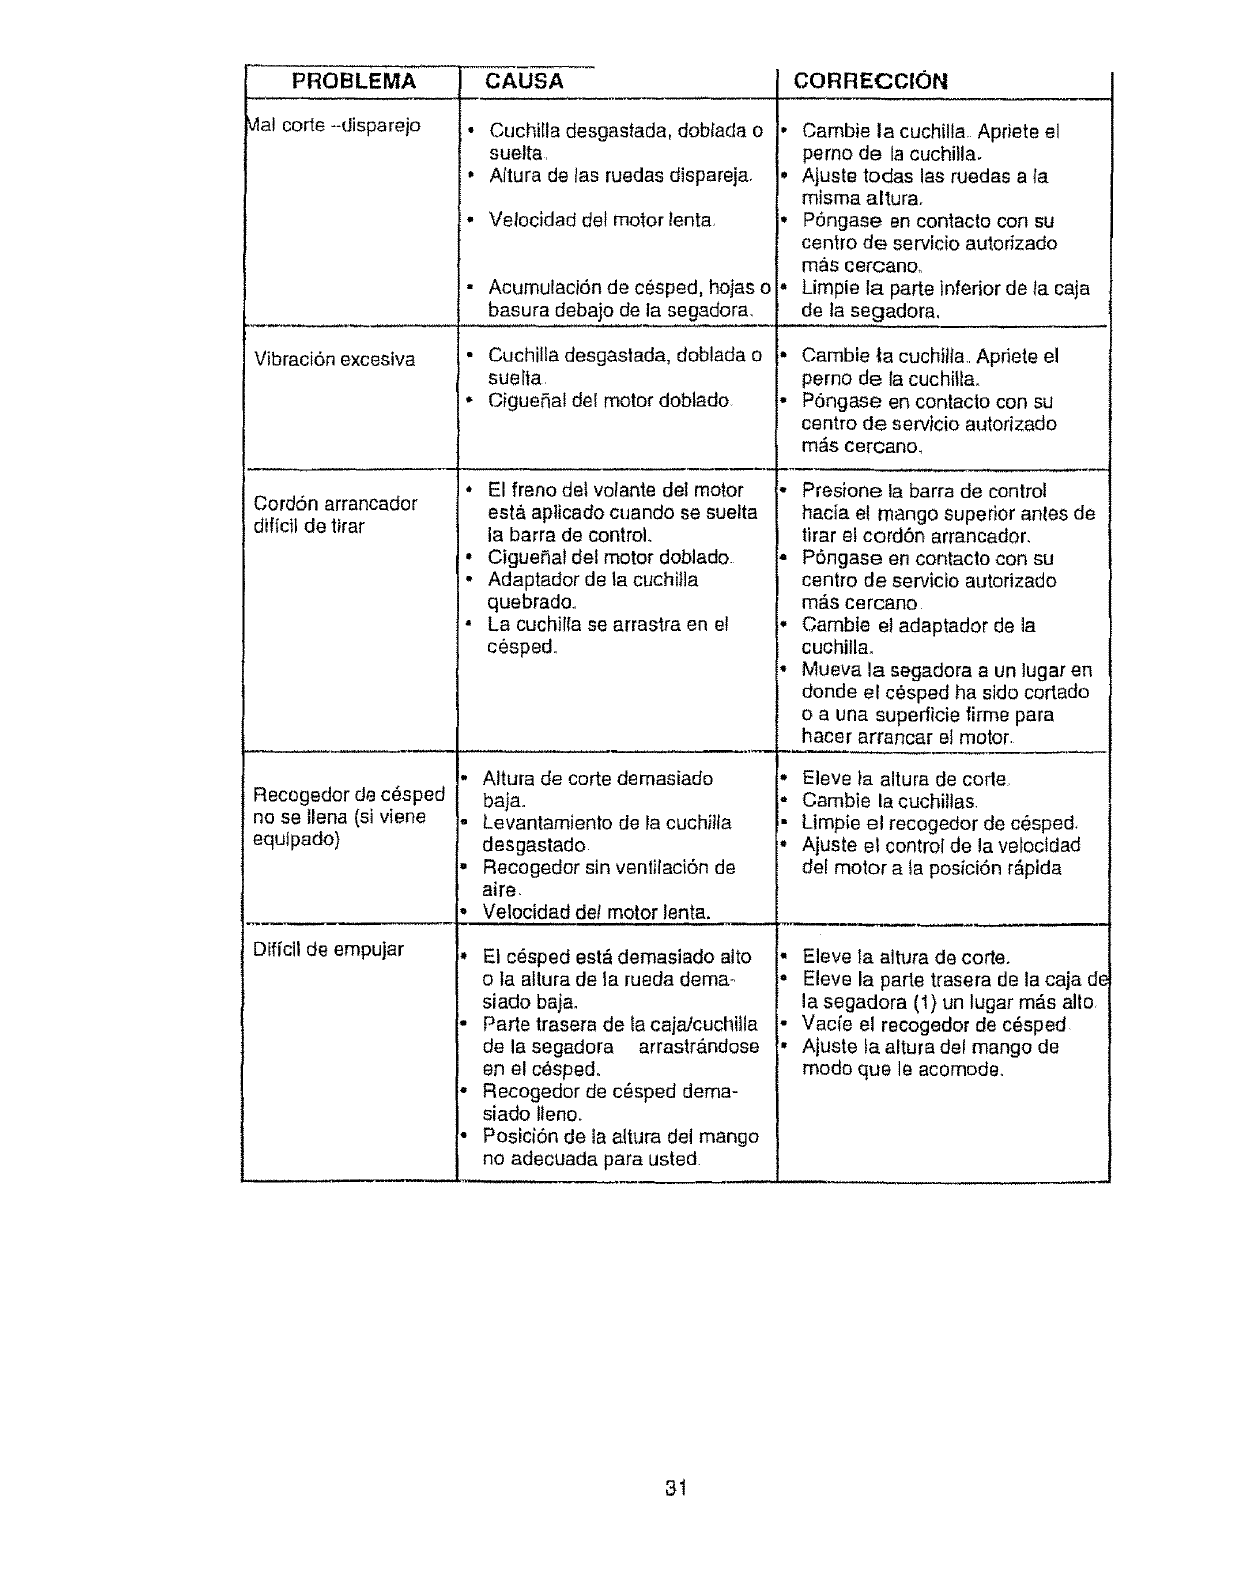
PROBLEMA
_al corte --disparejo
Vibracidn excesiva
CordSn arrancador
diffcil de tirar
Recogedor de c_sped
no se llena (si viene
equtpado)
Diffcil de empujar
CAUSA
l
Cuchilla desgastada, dobfada o
suelta.
Attura de aasruedas dispareja.
Velocidad det motor lenta.
•AcumulaciSn de c_sped, hojas o
basura debajo de la segador&
•Cuchilia desgastada, doblada o
suelta.
, CigueSa! del motor doblado
• El freno det volante det motor
est& apticado cuando se suelta
la barra de control.
• Ciguenal det motor doblado
- Adaptador de la cuchilla
quebrado..
• La cuchilla se arrastra en el
c6sped.
Altura de corte demasiado
baja.
Levantamiento de la cuchilta
desgastado
Recogedor sin ventilacidn de
aire.
Velocidad det motor lenta.
El c_sped est& demasiado alto
o ta attura de la rueda dema-
siado bajao
Parte trasera de tacajaJcuchilla
de la segadora arrastr&ndose
en el cesped.
Recogedor de c6sped dema-
siado lteno,
Posici6n de la aitura del mango
no adecuada para usted.
CORRECClON
Cambie la cuchtlla Apriete el
perno de la cuchilla,
Ajuste todas las ruedas ata
misma al_ura°
P6ngase en contacto con su
centro de servicio autorizado
mas ceroanoo
Limpie la parte inferior de la caja
de la segadora,
Cambie la cuchilla Apriete el
perno de la cuchill&
PSngase en contacto con su
centro de servicio autorizado
m&s cercano,
Presione la barra de control
hacia el mango superior antes de
tirar et cord6n arrancador.
PSngase en contacto con su
centro de servicio autorizado
mAs cercano
Cambie el adaptador de la
cuchitlao
Mueva la segadora a un lugar en
donde el cesped ha sido cortado
o a una supedicie firme para
hacer arrancar el motor,
Eleve }a altura de code,
Cambie la cuchiltas.
Limpie el recogedor de cesped,
Ajuste el control de la velocidad
del motor ata posici6n r&pida
Eleve ta altura de corte.
Eleve la parte trasera de la caja de
la segadora (1) un lugar m_s allo,
Vacie el recogedor de c6sped
Ajuste ta altura del mango de
mode que ]e acomodeo
3t
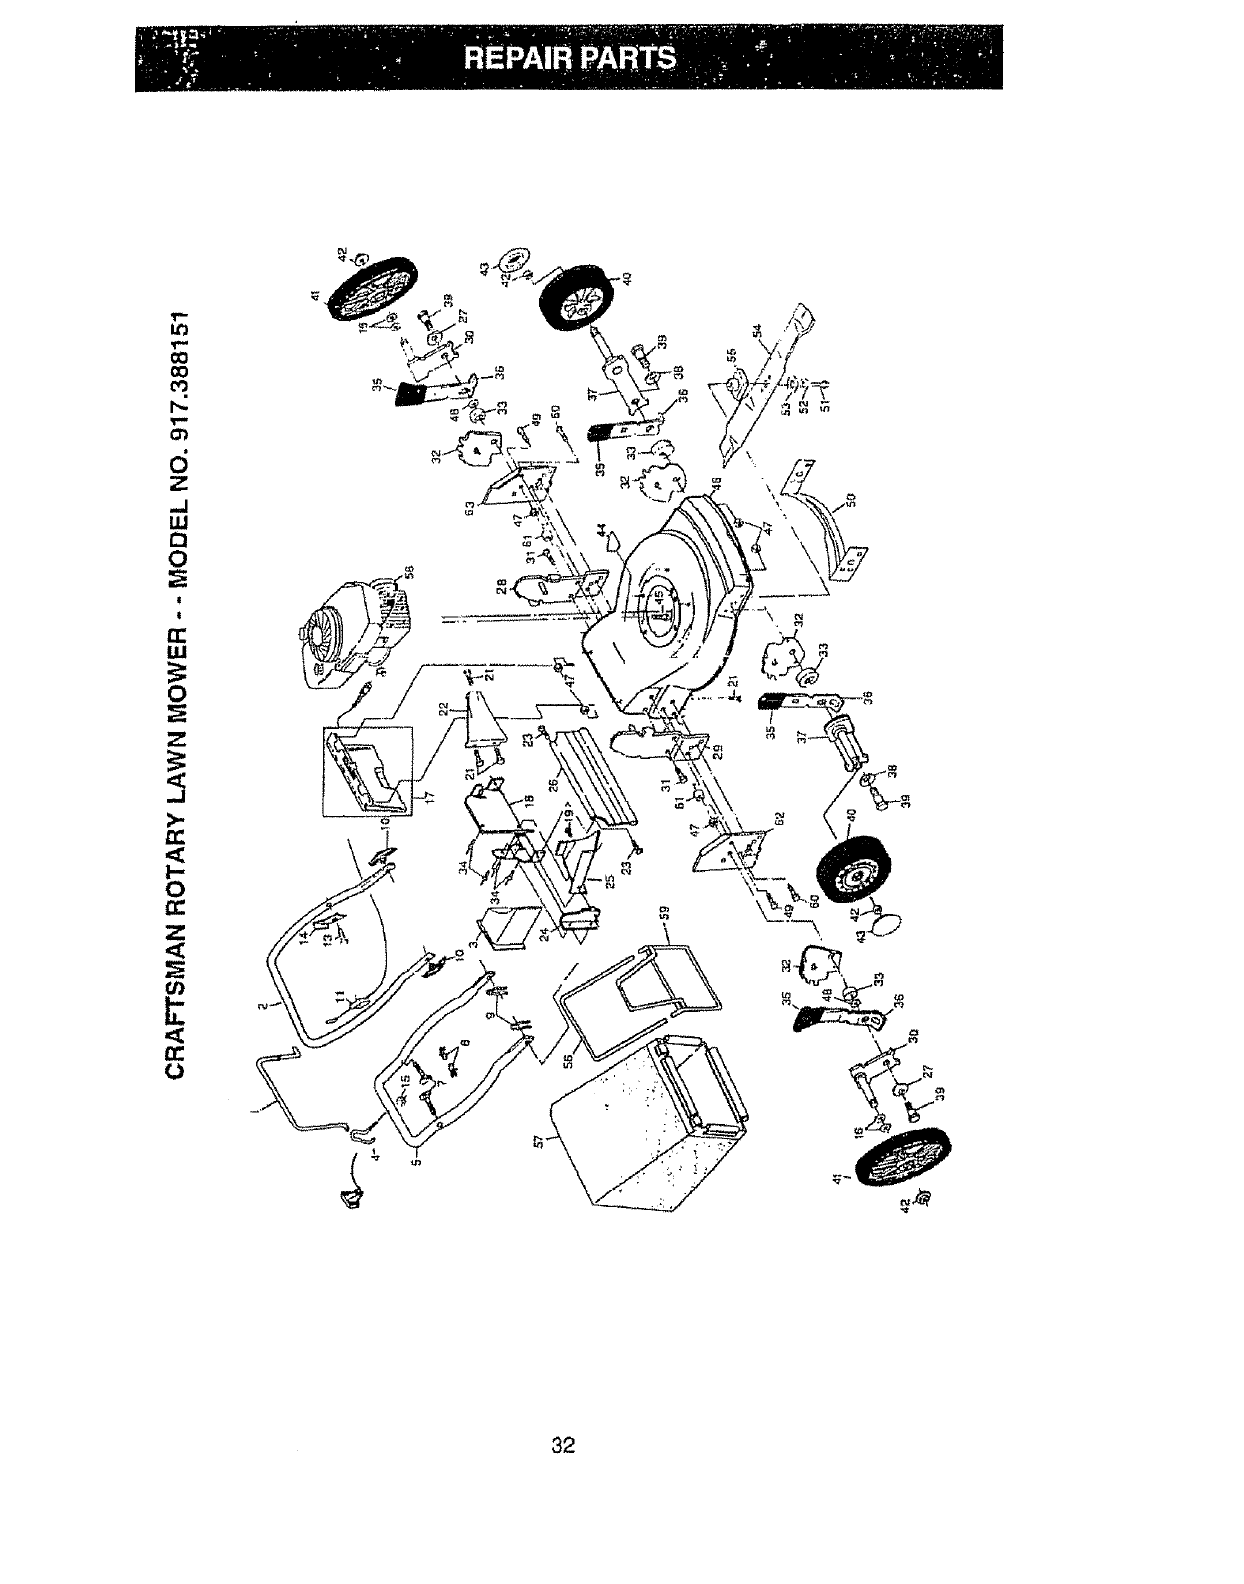
oo
o0
d
Z
,.,I
C3
0
t
I
rr
ILl
0
rr
_C
rr
_€
co)
rr
o\
32
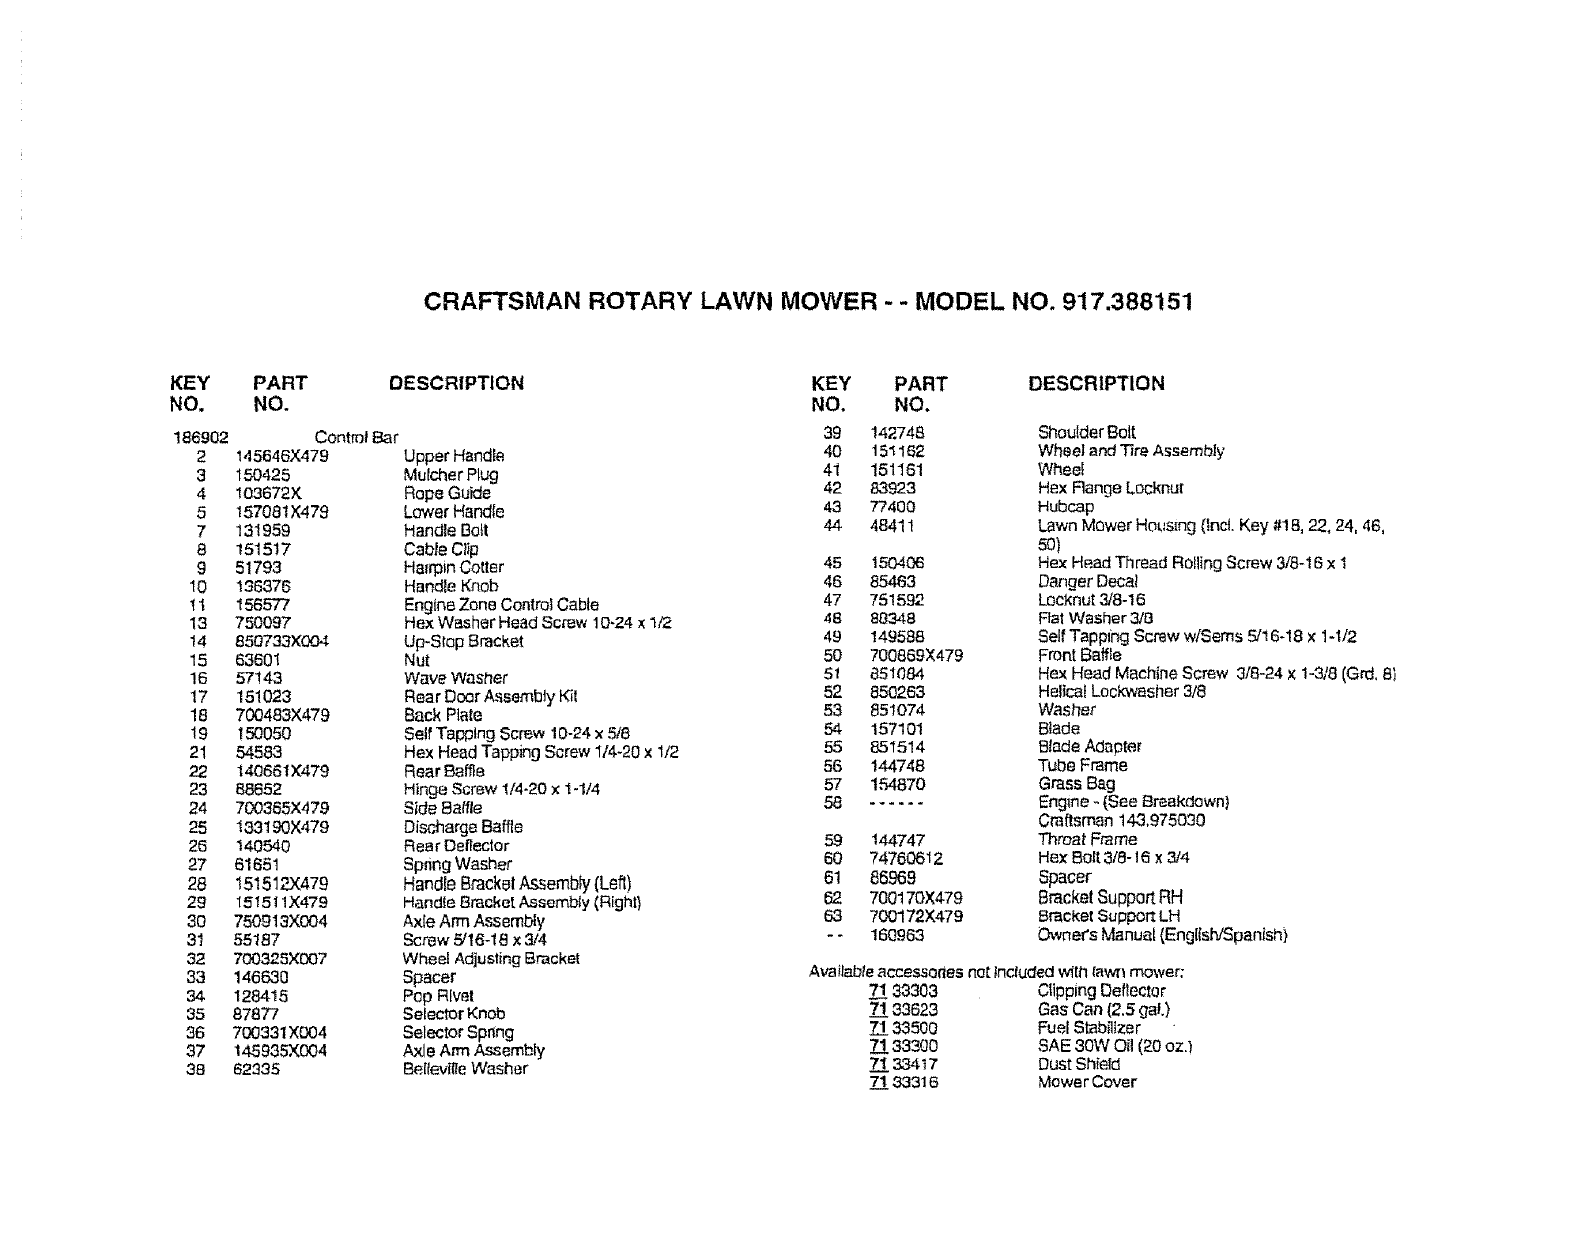
CRAFTSMAN ROTARY LAWN MOWER - - MODEL NO. 917.388151
KEY PART DESCRIPTION
NO. NO.
186902 Control Bar
2 145646X479 Upper Handle
3 150425 Mulcher Plug
4 !03672X Rope Guide
5 157081X479 Lower Handte
7 131959 Handle Bo_t
8 151517 Cable Clip
9 51793 Hairpin Cotter
t0 136376 Handle Knob
11 156577 Engine Zone Control Cable
13 750097 Hex Washer Head Screw 10-24 x1t2
14 850733X004 Up-Stop Bracket
15 63601 Nut
16 57!43 Wave Washer
17 151023 Rear Doer A._sembty Kit
18 700483X479 Back Rate
19 150050 Setf Tapptng Screw 10-24 x 5/8
21 54583 Hex Head Tapping Screw 1/4-20 x 1/2
22 140661 )(479 Rear 8ame
23 88662 Hinge Screw 1/4-20 x 1-1/4
24 700365X479 Side Baffle
25 !33190X479 Discharge Baffle
26 140540 Rear Deflector
27 61651 Spnng Washer
28 15t512X479 Handle Bracket Assembly(Loll)
29 15151 lX479 Handle Bracket Assembty (Right)
30 750913X004 Axle Arm Assembly
31 55187 Screw 51t6-18 x3/4
32 700325X007 Wheel Adjusting Bracket
33 146630 Spacer
34 128415 Pop R[vet
35 87877 Selector Knob
36 700331XD04 Selector Spring
37 145935X004 Axle Arm Assembly
38 62335 Bellevii_e Washer
KEY PART
NO. NO.
39 142748
40 151162
41 151161
42 83923
43 77400
44 48411
45 150406
46 85463
47 751592
48 88348
49 149588
50 700889X479
51 851084
52 850263
53 851074
54 157101
55 851514
58 144748
57 1.54870
58 ......
59 144747
60 74700612
61 86969
62 700t 70X479
63 700172.)(479
-- 160963
DESCRIPTION
Shoulder Bolt
Wheel and _re Assembly
Wheel
Hex Range Locknut
Hubcap
Lawn Mower Housing (Incl. Key #18, 22, 24, 46,
501
Hex Head Thread Rolling Screw 3/8-16 x 1
Danger Decal
Lecknut 3/8-10
Flat Washer 318
Self Tapping Screw w/Seres 5/16-18 x 1-1/2
Front Baffle
Hex Head Machine Screw 3/8-24 x 1-318 (Grd, 8_
Helica! Lockwasher 3/8
Washer
Btade
Blade Adapter
Tube Frame
Grass Bag
Engine - (See Breakdown)
Craftsman 143,975030
Throat Frame
He): Bolt 3/8-16 x 3/4
Spacer
BracketSupportRH
Bracket Support LH
Owner's Manual (EngiislVSpanish)
Available accassones net Included wfth fawn mower;
7!1 33303 Clipping Deflector
7_!133623 Gas Can (2.5 gal.)
71 33500 Fuel Stabatzer
7"133300 SAE 30W Oil (20 ozJ
71 334t7 Dust Shield
71 33316 Mower Cover
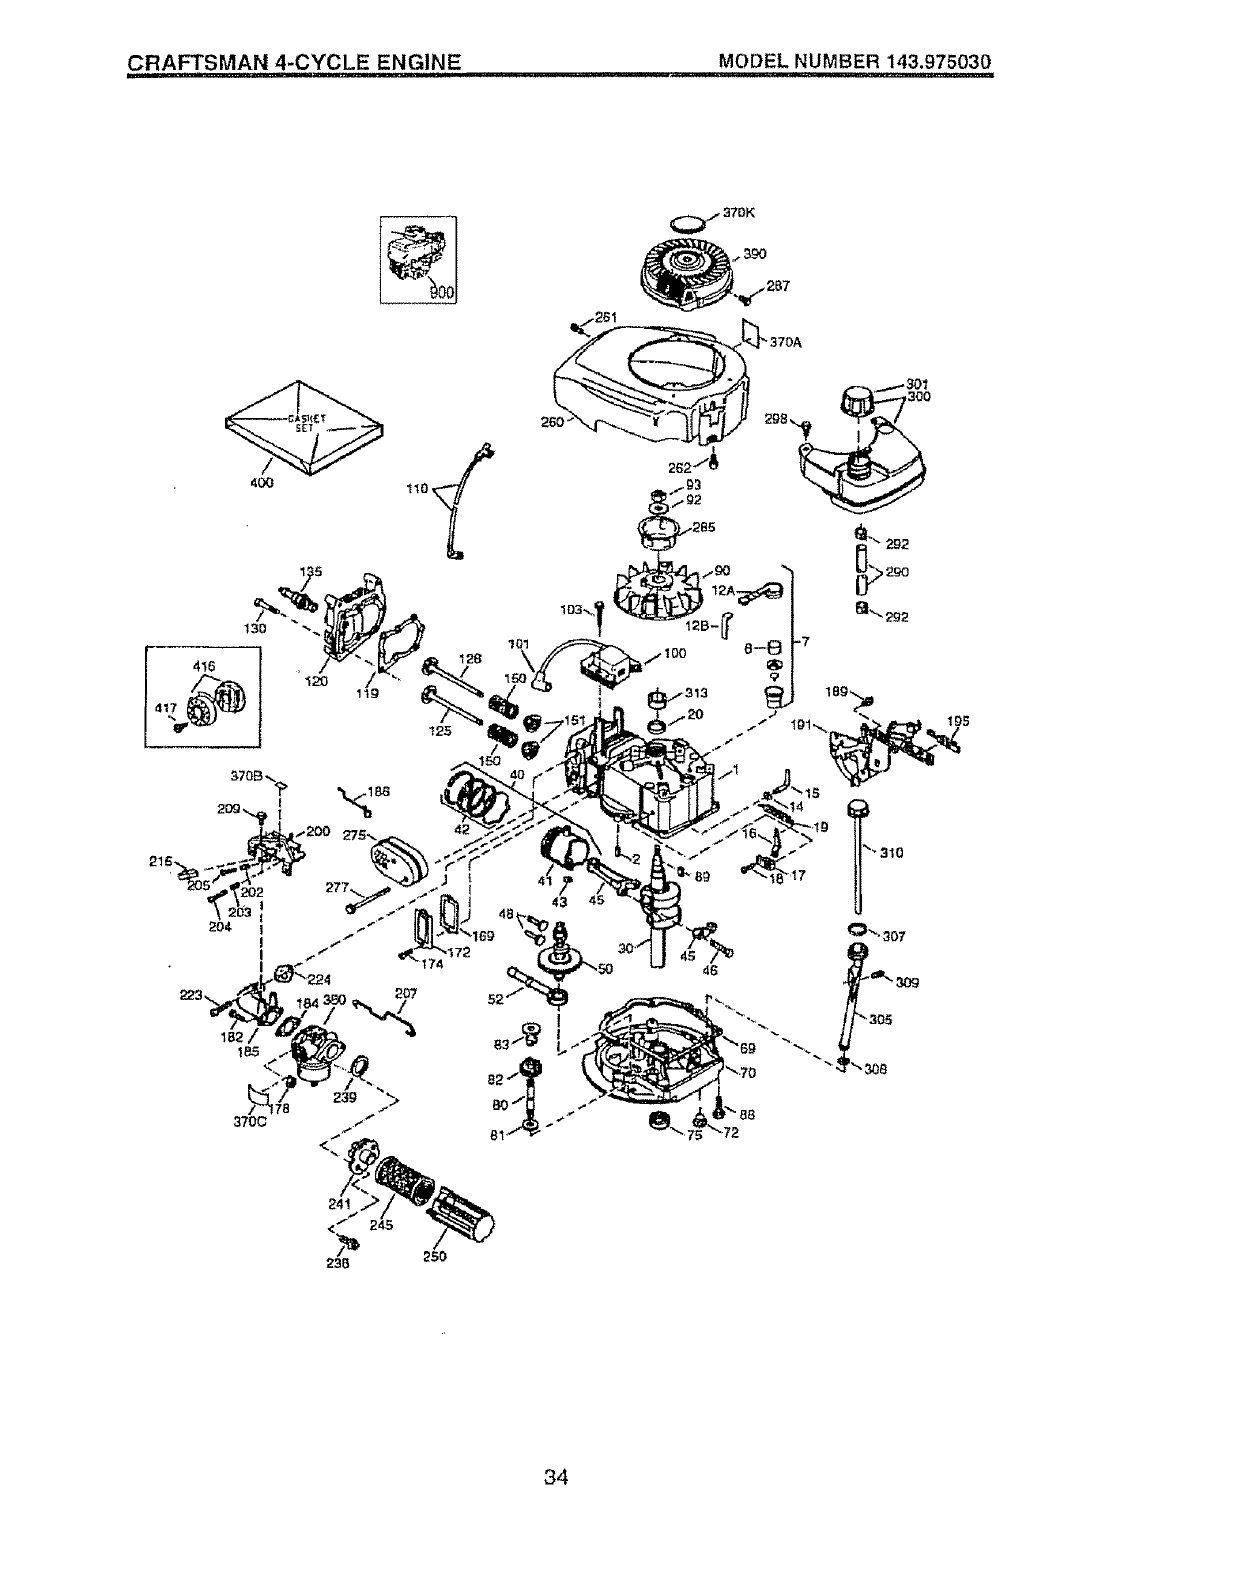
CRAFTSMAN 4-CYCLE ENGINE MODEL NUMBER 143.975030
130
I
34
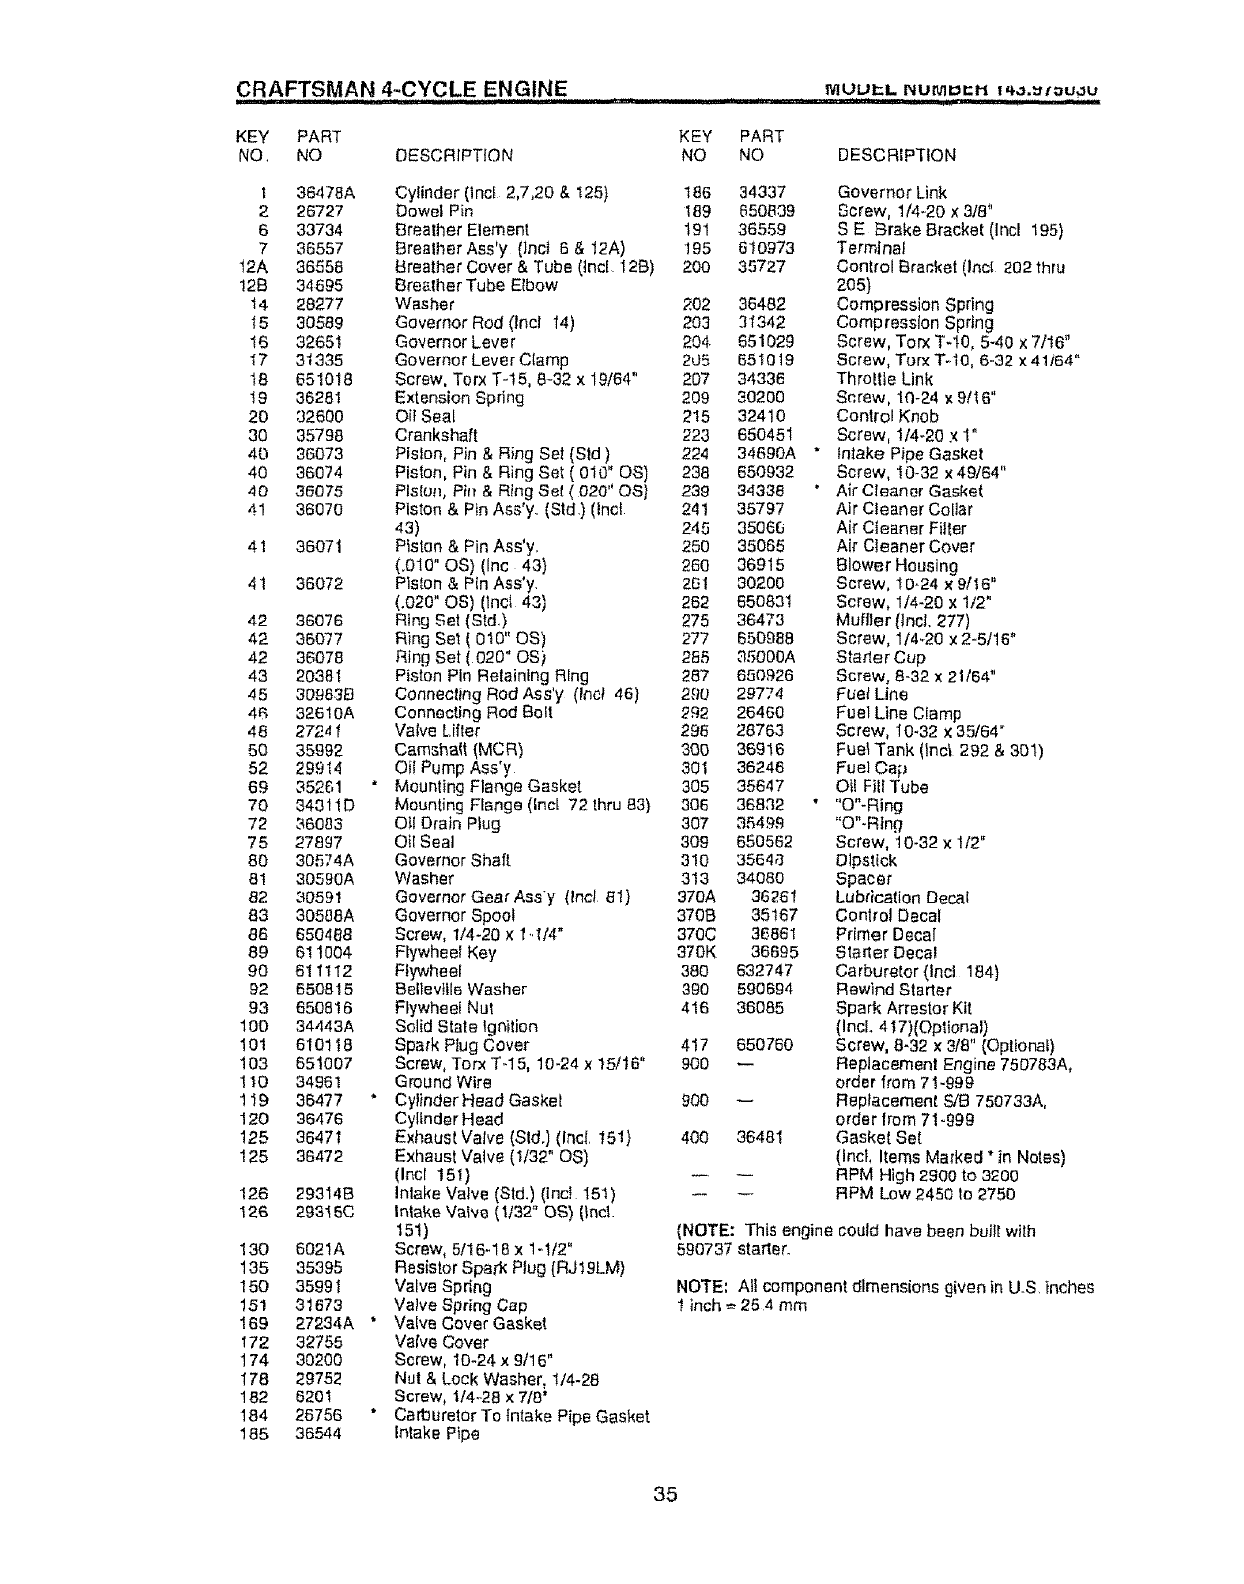
CRAFTSMAN 4:CYCLE ENGINE .......... P,_uut'L r+umuctt ,'+_._+'=U,_u
KEY PART
NO, NO DESCRIPTION
t36478A Cylinder (Incf 2,7,20 &125)
2 26727 Dowel Pin
6 33734 Breather Element
736557 8realher Ass'y (Inc+ 6&12A)
12A 36558 Breather Cover & Tube (tncl 128)
128 34695 Breather Tube Elbow
14 28277 Washer
f530589 Governor Rod (lncl 14)
t6 32651 Governor Lever
I7 31335 Governor Lever C(amp
t8 651018 Screw, Torx T-15, 8+32 x 19/64"
! 9 36281 Extension Spring
20 32600 Oil Seal
30 35798 Crankshaft
40 36073 Pfslon, Pin &Ring Set (Std)
40 36074 Piston, Pin & Ring Set ( 010" OS)
40 36075 Plslon, Pi++& R_ng Sol ( 020" OS/
41 36070 Piston & Pin Ass'y (Std) (lnc!
43)
41 36071 Piston &Pin Ass'y.
(.010" OS) (Inc 43)
41 36072 Piston & Pin Ass'y.
(,020"OS) (Inct 43)
42 36076 Ring Set (Std.)
42 36077 Ring Set ( 010" OS)
42 36078 Ring Set (020" OS)
43 20381 Piston Pin Retaining Ring
45 309638 Connecting Rod Ass'y (Inc_ 46)
46 32610A Connecting Rod Boil
48 2724 f Valve Lifter
50 35992 Camsha{t (MCR)
52 29944 Oil Pump Ass'y
69 35261 * Mounting Flange Gasket
70 34311D Mounting Flange (Inc_ 72 thru 83)
72 36083 Ott Drain Ptug
75 27897 Oii Seat
80 30574A Governor Shaft
81 30590A Washer
82 30591 Governor GearAss'y (Inc! 8!)
83 30588A Governor Spool
86 650488 Screw, 1/4-20 x 1 ..114"
89 6! 1004 Rywheei Key
90 611 t 12 Flywheel
92 650815 Bellevttle Washer
93 650816 Flywheel Nut
100 34443A Solid State Ignition
101 6101 I8 Spark Plug Cover
103 651007 Screw, Torx T-15, 10-24 x 15116"
110 34961 Ground Wire
119 36477 " Cylinder Head Gasket
120 36476 Cylinder Head
125 36471 Exhaust Valve (Sld.) (Inc{. t51)
125 36472 Exhaust Valve (1/32" OS)
(Inct t5!)
126 293148 Intake Valve (Std.) (Ind 151)
126 29315C Intake VaNe (1f32" OS) (incl.
151)
130 6021A Screw, 51!6-18 x 1-tt2"
135 35395 Resistor Spark Plug (RJ19LM)
150 35991 Valve Spring
15! 31673 Valve Spring Cap
169 27234A "Valve Cover Gasket
172 32755 Valve Cover
174 30200 Screw, 10-24 x 9/16"
178 29752 Nut & Lock Washer, 1/4-28
182 6201 Screw, t/4-28 x 7/8'
184 26756 * Carburetor To Intake Pipe Gasket
185 36544 intake Pipe
KEY PART
NO NO DESCRIPTION
186 34337 Governor Link
189 650839 Screw, 1/4-20 x 3/8"
191 36559 S E E_rake Bracket (Inct 195)
195 610973 Terminal
200 35727 Control Bracket (lnct 202 thru
205)
202 36482 Compression Spring
203 31342 Compression Spdng
204 651029 Screw, Torx T.10, 5-40 x 7/16"
2_J5 551019 Screw, Torx T-.10, 6-32 x41i64"
207 34336 Throltte Link
209 30200 Screw, 1q-24 x 9!16"
215 32410 Control Knob
223 650451 Screw, 1/4-20 x 1"
224 34690A " Intake Pipe Gasket
238 650932 Screw, 10-32 x 49164"
239 34338 • Air Cleaner Gasket
241 35797 Air Cleaner Collar
245 35066 Air Cleaner Filter
250 35066 Air Cleaner Cover
260 36915 Blower Housing
261 80200 Screw, 1 O.24 x 9fl 6"
262 650831 Screw, 1/4-20 x 1/2"
275 36473 Muf|ler llncL 277)
277 650988 Screw, 114+20 x 2-5116"
265 35000A Statler Cup
287 650926 Screw, 8-32 x 21/64"
2.90 29774 Fue_ Line
292 26460 Fuel Line Clamp
296 28763 Screw, I0+32 x 35164"
300 36916 Fuel Tank (lnc'_ 292 &301)
301 36246 Fuel Ca_
305 35647 Ol! Fill Tube
306 36832 " "O"-Ring
307 35499 "O"-Rtng
309 650562 Screw, 10-32 x 1/2"
310 35648 Dipstick
313 34080 Spacer
37OA 36261 Lubrication Decal
3708 35167 Control Decal
370C 36861 Primer Decal
370K 36695 Starter Decal
380 632747 Carburetor (lncl 184)
390 590694 Rewind Starter
416 36085 Spark Arrestor Kit
(IncL 417)(Optional)
417 650760 Screw, 8-32 x 3/8" (Optional)
900 -- Replacement Engine 750783A,
order from 71+999
900 -- Replacement S/B 750733A,
order lrom 71-999
400 36481 Gasket Set
(Incl, Items Marked "in Notes)
RPM High 2900 to 3200
RPM Low 2450 to 2750
(NOTE: This engine could have been built with
590737 starter.
NOTE: At! component dimensions given in U.S tnches
I inch =25 4 mm
35
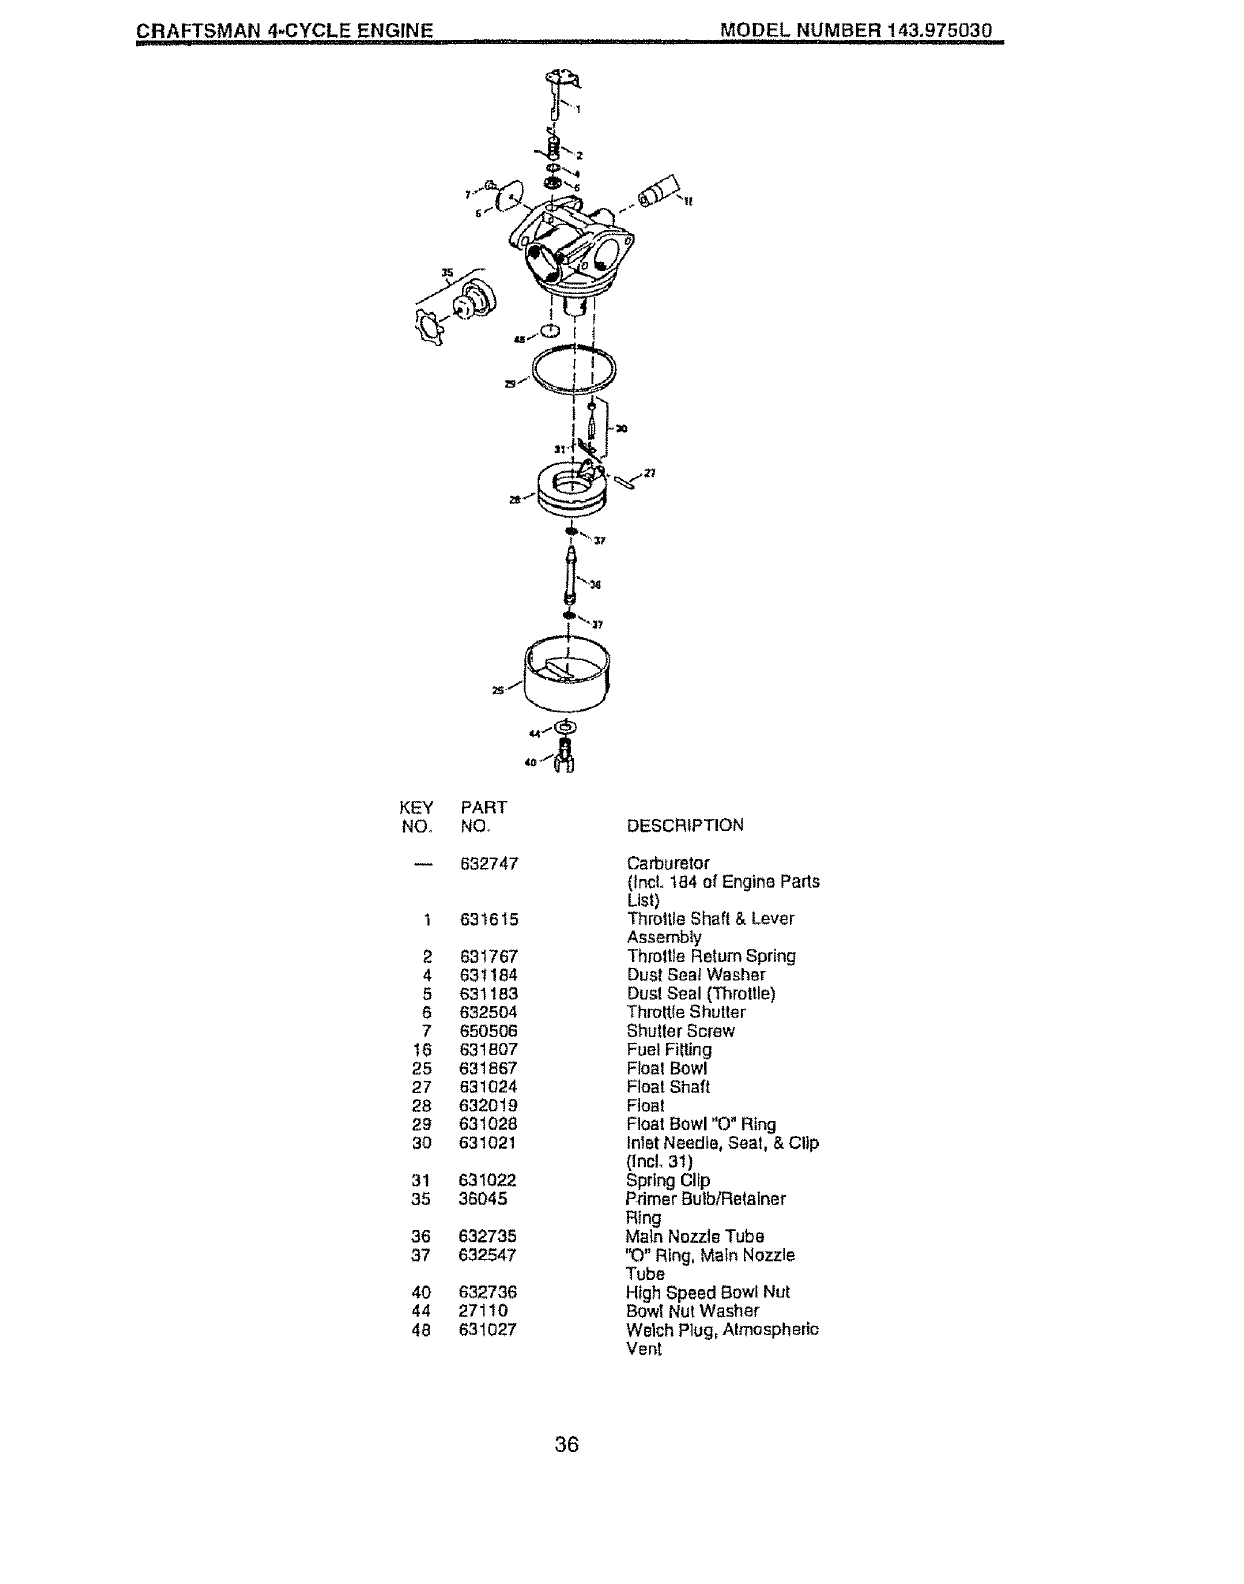
CRAFTSMAN 4-CYCLE ENGINE MODEL NUMBER 143.975030
KEY
NOo
2
4
5
6
7
16
25
27
28
29
30
31
35
36
37
4O
44
48
+%'_37
PART
NO°
632747
631615
631767
631184
631183
632504
650506
631807
631867
631024
632019
631028
631021
631022
36045
632736
632547
632736
27110
631027
DESCRIPTION
Carburetor
(IncL t84 of Engine Parts
List)
Throttle Shaft & Lever
Assembly
Thmttte Return Spring
Dust Seal Washer
Dust Seal (Throttle)
Throttle Shutter
Shutter Screw
Fuel Fitting
Float Bow!
Flea! Shaft
Float
Float Bowl "O" Ring
Inlet Needle, Seat, & Clip
(tncl, 31)
Spring Cltp
Palmer BulbtRelalner
Ring
Main Nozzle Tube
"O" Ring, Main Nozzle
Tube
High Speed Bowl Nut
Bowl Nut Washer
Welch Plug, Almosphedc
Vent
36
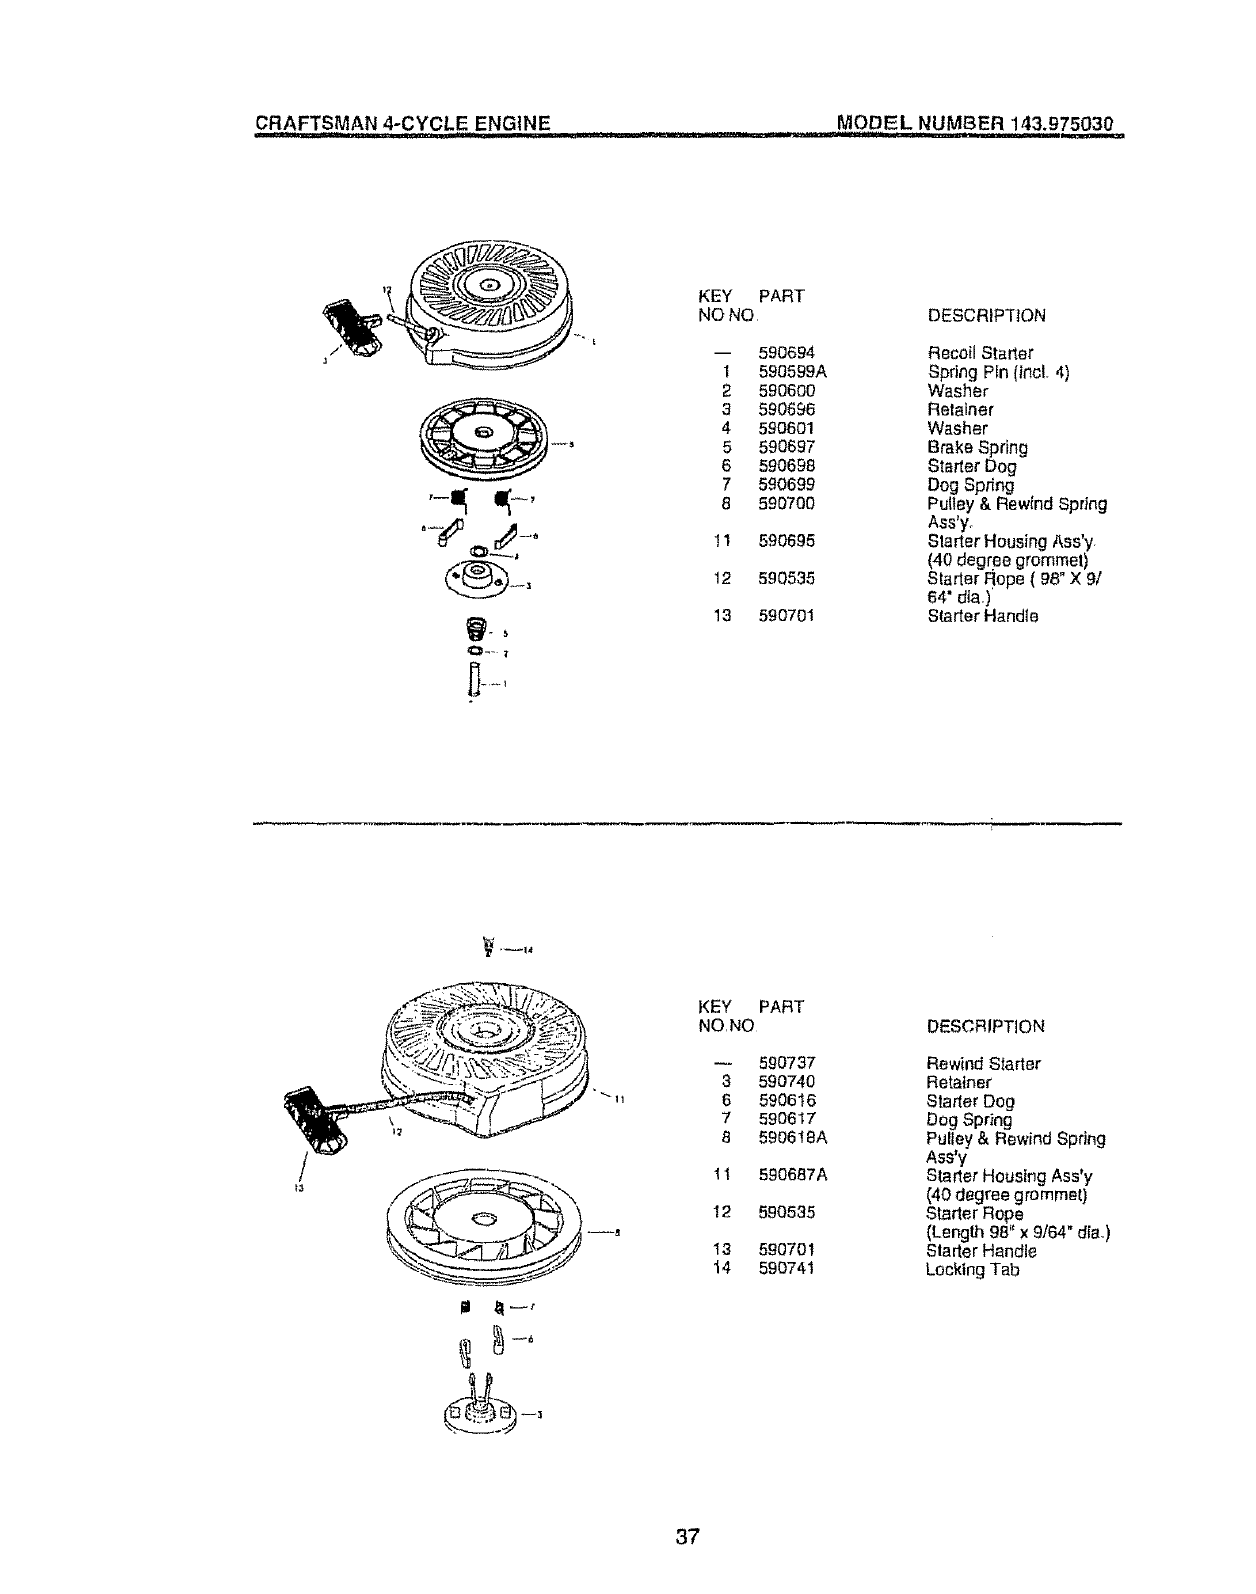
CRAFTSMAN 4-CYCLE ENGINE MODEL NUMBER 143.975030
,11,111................ ... *.,,. *i,.. I = .........
KEY PART
NO NO
-- 590694
1 590599A
2 5906O0
3590696
4 590601
5 590697
6 590698
7 590699
8 590700
!1 590695
12 590535
13 590701
DESCRIP'flON
Recoil Starter
Spring Pin (/ncL 4)
Washer
Retainer
Washer
Brake Spring
Starter Dog
Dog Spdng
Pultey & Rewind Spring
Ass'y_
Starter Housing Ass'y
(40 degree grommet)
Starter Rope ( 98" X 9/
64" dta,)
Starter Handle
/
KEY PART
NO,NO
590737
3 590740
6 590616
7590617
8 5906t8A
11 590687A
12 590535
13 590701
14 590741
DESCRIPTION
Rewind S_arter
Retainer
Starter Dog
Dog Spring
Pulley & Rewind Spring
Ass'y
Starter Housing Ass*y
(40 degree grommet)
Starter Rope
(Length 98" x 9/64" die,,)
Starter Handte
Locking Tab
37

38

39
Forthe repairor replacementpartsyouneed
delivereddirectlyto your home
Call7 am- 7 pm, 7 daysa week
1-800-366-PART
(1-800-366-7278)
Para ordenar piezas con entrega a
domicilio - 1-800-659-7084
For in-house major brand repair service
Call 24 hours a day, 7 days a week
1-800-4-REPAIR
(1-800-473-7274)
Para pedir servicio de reparaci6n a
domicilio - 1-800-676-58t 1
For the location of a Sears Parts and
Repair Center in your area
Call 24 hours a day, 7 days a week
1-800-488-1222
For information on purchasing a Sears
Maintenance Agreement or to inquire
about an existing Agreement
CaLl 9 am -, 5 pm, Monday-Saturday
1-800-827-6655
When requesting service or ordering
parts, always provide the following
information:
• Product Type • Part Number
,, Model Number • Part Description
..$W/.4R,$
160963 REV. 1 06.09.97 BWiVBL
Amenc.a sRepa/f Spe.dta#sts
_rinted in U.S.A.
