Craftsman 247 37683 Operators Manual
12A-469Q799 12A-469Q799 CRAFTSMAN WALK BEHIND LAWNMOWER, GAS^ - Manuals and Guides L0903564 View the owners manual for your CRAFTSMAN WALK BEHIND LAWNMOWER, GAS^ #12A469Q799. Home:Lawn & Garden Parts:Craftsman Parts:Craftsman WALK BEHIND LAWNMOWER, GAS^ Manual
CRAFTSMAN Walk Behind Lawnmower, Gas Manual L0903564 CRAFTSMAN Walk Behind Lawnmower, Gas Owner's Manual, CRAFTSMAN Walk Behind Lawnmower, Gas installation guides
!! Craftsman-31 Craftsman Lawn Mower Manuals - Lawn Mower Manuals – The Best Lawn Mower Manuals Collection
24737683 368204a8-df1a-4bcb-8780-0aad09870bdf Craftsman Lawn Mower 247.37683 User Guide |
2015-01-05
: Craftsman Craftsman-247-37683-Operators-Manual-160859 craftsman-247-37683-operators-manual-160859 craftsman pdf
Open the PDF directly: View PDF ![]() .
.
Page Count: 68
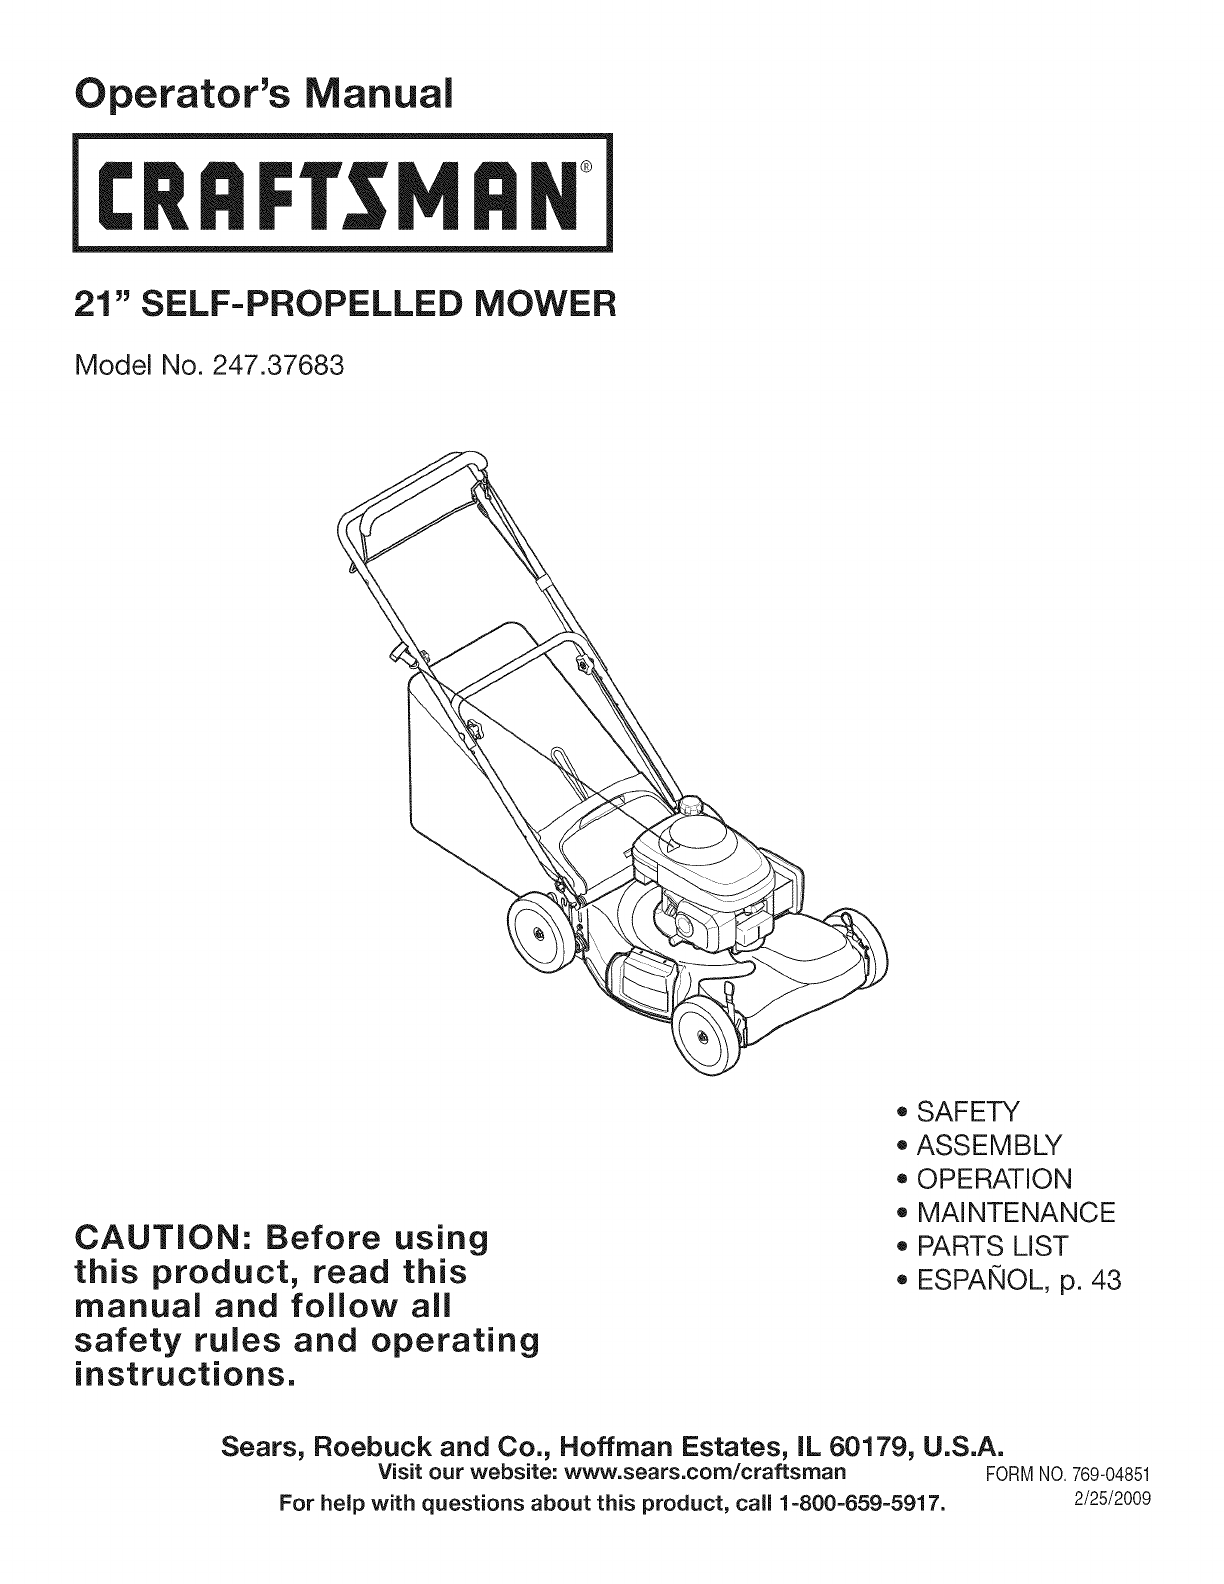
Operator's Manual
CRRFTSMRH
21" SELF=PROPELLED MOWER
Model No. 247.37683
CAUTION: Before using
this product, read this
manual and follow all
safety rules and operating
instructions.
o SAFETY
ASSEMBLY
OPERATION
MAINTENANCE
PARTS LIST
o ESPANOL, p. 43
Sears, Roebuck and Co., Hoffman Estates, IL 60179, U.S.A.
Visit our website: www.sears.com/craftsman FORMNO.769-04851
For help with questions about this product, call 1-800-659-5917. 2/25/2009
Warranty Statement .................................. Page 2
Safe Operation Practices .......................... Pages 3-6
Slope Guide .............................................. Page 7
Safety Labels ............................................ Page 9
Assembly .................................................. Pages 10-13
Operation .................................................. Pages 14-15
Service and Maintenance ......................... Pages 16-20
Off-Season Storage .................................. Page 21
Trouble Shooting ....................................... Page 22
Parts List ................................................... Page 24-39
Espa_ol ..................................................... Page 43
Service Numbers ...................................... Back Cover
Craftsman Full Warranty
Ifthis Craftsmanproductfailsdueto a defectin materialor workmanshipwithintwo yearsfromthedateof purchase,returnit to any Searsstore,
Parts& RepairServiceCenter,orotherCraftsmanoutletinthe UnitedStatesfor free repair(or replacementif repairprovesimpossible).
Thiswarrantyappliesfor only90 daysif thisproductis ever usedforcommercialor rentalpurposes.
Thiswarranty coversONLYdefects in material andworkmanship. Sears will NOTpayfor:
•Expendableitemswhichcan wearout fromnormaluse withinthe warrantyperiod,suchas mowerblades,bladeadapters,belts,filters,or
sparkplugs.
•Repairsnecessarybecauseof accident,suchas bentcrankshafts,or failureto operateor maintainthe productaccordingto all supplied
instructions.
•Preventivemaintenanceor repairsnecessarydueto improperfuelmixture,contaminatedorstalefuel.
Thiswarrantygivesyou specificlegalrights,andyou mayalso haveotherrightswhichvaryfromstateto state.
Sears, Roebuck and Co., NoffmanEstates, IL 60179
EngineOilType: SAE10W-30
EngineOilCapacity: 18ounces
Fuel: UnleadedGasoline
SparkPlug: NGK-BPR5ES
Engine: Honda
Model Number.................................................................
Serial Number.................................................................
Dateof Purchase.............................................................
Recordthe modelnumber,serialnumber
anddateof purchaseabove
©SearsBrands,LLC 2
Thissymbolpointsout importantsafetyinstructionswhich,if not
followed,couldendangerthepersonalsafetyand/orpropertyof
yourselfandothers. Readandfollowall instructionsin thismanual
beforeattemptingto operatethismachine.Failureto complywith
theseinstructionsmayresultin personalinjury.Whenyou seethis
symbol,HEEDITSWARNING!
CALIFORNIA PROPOSITION 65
EngineExhaust,someof itsconstituents,andcertainvehicle
componentscontainoremitchemicalsknownto Stateof California
to causecancerandbirthdefectsorother reproductiveharm.
Batteryposts,terminals,and relatedaccessoriescontainleadand
leadcompounds,chemicalsknownto the Stateof Californiato
causecancerandreproductiveharm.Washhandsafterhandling.
Thismachinewasbuiltto beoperatedaccordingto the safeopera-
tion practicesinthis manual.As withanytypeof powerequipment,
carelessnessorerroron the partof the operatorcan resultin serious
injury.Thismachineis capableof amputatingfingers,hands,toes
andfeetandthrowingdebris.Failureto observethe followingsafety
instructionscouldresultin seriousinjuryor death.
Your Responsibility--Restrict the useof this powermachineto
personswho read,understandandfollowthewarningsand instruc-
tionsin thismanualandon the machine.
SAVE THESE INSTRUCTIONS!
GENERAL OPERATION
*Readthisoperator'smanual carefullyin itsentiretybefore
attemptingto assemblethis machine.Read,understand,and
followall instructionsonthe machineandinthe manuals) before
operation.Keepthismanualina safeplacefor futureand regular
referenceandfor orderingreplacementparts
, Becompletelyfamiliarwiththe controlsandthe properuseof this
machinebeforeoperatingit.
, Thismachineis a precisionpieceof powerequipment,not a
plaything.Therefore,exerciseextremecautionat alltimes.This
machinehas beendesignedto performonejob: to mowgrass.
Do not useit for anyother purpose.
, Neverallowchildrenunder14yearsof ageto operatethis
machine.Children14andover shouldreadandunderstandthe
instructionsandsafeoperationpracticesin thismanualandon
the machineandshouldbetrainedandsupervisedbyan adult.
, Only responsibleindividualswhoarefamiliarwiththeserulesof
safeoperationshouldbe allowedto usethis machine.
, Thoroughlyinspectthe areawherethe equipmentis to be used.
Removeallstones,sticks,wire,bones,toysandotherforeign
objects,whichcould betrippedoverorpickedupandthrownby
the blade.Thrownobjectscancauseseriouspersonalinjury.
, Planyour mowingpatternto avoiddischargeof materialtoward
roads,sidewalks,bystandersandthe like.Also,avoiddischarg-
ingmaterialagainstawall orobstruction,whichmaycause
dischargedmaterialto ricochetbacktowardthe operator.
, Tohelpavoidbladecontactor a thrownobjectinjury,stayin
operatorzonebehindhandlesand keepchildren,bystanders,
helpersandpetsat least75feetfrommowerwhileit is inopera-
tion.Stopmachineif anyoneentersarea.
• Alwayswear safetyglassesor safetygogglesduringoperation
andwhile performingan adjustmentor repairto protectyoureyes.
Thrownobjectswhichricochetcancauseseriousinjuryto the
eyes.
Wearsturdy,rough-soledworkshoesandclose-fittingslacks
and shirts.Shirtsand pantsthatcoverthe armsandlegsand
steel-toedshoesare recommended.Neveroperatethis machine
inbarefeet,sandals,slipperyor light-weight(e.g.canvas)shoes.
Donot put handsor feetnearrotatingpartsor underthe cutting
deck. Contactwith bladecan amputatefingers,hands,toesand
feet.
A missingor damageddischargecovercan causebladecontact
or thrownobjectinjuries.
Manyinjuriesoccuras a resultof the mowerbeingpulledoverthe
footduringafall causedby slippingor tripping.Do not holdon to
the mowerif you arefalling;releasethe handleimmediately.
Neverpullthe mowerbacktowardyouwhileyou arewalking.If
you mustbackthe mowerawayfroma wallor obstructionfirst
lookdownandbehindto avoidtrippingandthen followthese
steps:
1. Stepbackfrommowerto fullyextendyourarms.
2. Besureyouare wellbalancedwithsurefooting.
3. Pullthe mowerbackslowly,no morethan half waytowardyou.
4. Repeatthesestepsas needed.
Donot operatethe mowerwhileunderthe influenceof alcoholor
drugs.
Donot engagethe self-propelledmechanismon machinesso
equippedwhilestartingengine.
3
• The bladecontrolhandleis a safetydevice.Neverattemptto
bypassits operation.Doingso makesthe safetydeviceinopera-
tiveandmayresultin personalinjurythroughcontactwiththe
rotatingblade.The bladecontrolhandlemustoperateeasily
in bothdirectionsandautomaticallyreturnto the disengaged
positionwhenreleased.
• Neveroperatethe mowerinwetgrass.Alwaysbe sureof your
footing. A slip andfall cancauseseriouspersonalinjury.Ifyou
feelyou arelosingyourfooting,releasethe bladecontrolhandle
immediatelyandthe bladewill stop rotatingwithinthreeseconds.
• Mowonly in daylightor goodartificiallight.Walk,neverrun.
• Stopthe bladewhencrossinggraveldrives,walksor roads.
• Ifthe equipmentshouldstart to vibrateabnormally,stopthe
engineandcheckimmediatelyfor the cause.Vibrationis gener-
allya warningof trouble.
• Shutthe engineoff andwaituntilthe bladecomesto a complete
stopbeforeremovingthe grasscatcheror uncloggingthe chute.
Thecuttingbladecontinuesto rotatefor afewsecondsafterthe
bladecontrolis released.Neverplaceany partof the body inthe
bladeareauntilyou aresurethe bladehasstoppedrotating.
• Neveroperatemowerwithoutpropertrail shield,dischargecover,
grasscatcher,bladecontrolhandleor othersafetyprotectivede-
vicesin placeandworking.Neveroperatemowerwithdamaged
safetydevices.Failureto do socan resultinpersonalinjury.
Mufflerandenginebecomehotandcan causea burn.Do not
touch.
• Neverattemptto makea wheelorcuttingheightadjustmentwhile
theengineis running.
• Onlyuse partsand accessoriesmadeforthis machineby the
manufacturer.Failureto do socan resultinpersonalinjury.
• Whenstartingengine,pullcordslowlyuntil resistanceis felt,then
pullrapidly.Rapidretractionof startercord (kickback)willpull
handandarm towardenginefasterthanyoucan let go. Broken
bones,fractures,bruisesor sprainscould result.
• If situationsoccurwhicharenot coveredinthismanual,usecare
andgoodjudgement.Contact1-800-659-5917for informationand
assistance.
SLOPE OPERATION
Slopesare amajorfactor relatedto slipandfall accidents,whichcan
resultinsevereinjury.Operationon slopesrequiresextracaution.If
youfeel uneasyona slope,do not mowit. Foryour safety,usethe
SlopeGuideincludedas partof thismanualto measureslopesbefore
operatingthis machineon a slopedor hillyarea. Ifthe slopeis greater
than 15degrees,donot mowit.
Do:
oMowacrossthefacedslopes;neverupanddown.Exercise
extremecautionwhenchangingdirectiononslopes.
• Watchfor holes,ruts, rocks,hiddenobjects,or bumpswhichcan
causeyou to slip ortrip.Tallgrasscan hideobstacles.
• Alwaysbesureof yourfooting.A slipandfall can causeserious
personalinjury.Ifyou feelyou arelosingyourbalance,release
the bladecontrolhandleimmediatelyandthe bladewillstop
rotatingwithinthree (3) seconds.
DoNot:
•Donot mowneardrop-offs,ditchesor embankments,you could
lose yourfootingor balance.
Donot mowslopesgreaterthan 15degreesas shownon the
slopegauge.
• Donot mowon wetgrass.Unstablefootingcouldcauseslipping.
CHILDREN
Tragicaccidentscan occurif the operatoris not alertto the presence
of children.Childrenareoftenattractedto themowerandthe mowing
activity.Theydonot understandthe dangers.Neverassumethat
childrenwill remainwhereyou lastsawthem.
Keepchildrenout of the mowingareaandunderwatchfulcareof
a responsibleadultotherthan theoperator.
Bealertandturn moweroffif achild entersthe area.
Beforeandwhilemovingbackwards,look behindanddown for
smallchildren.
Useextremecare whenapproachingblindcorners,doorways,
shrubs,trees,orotherobjectsthatmayobscureyourvisionof a
child whomayrunintothe mower.
Keepchildrenawayfromhot or runningengines.Theycan suffer
burnsfroma hot muffler.
Neverallowchildrenunder14yearsof ageto operatethis
machine.Children14andovershouldreadand understandthe
instructionsandsafeoperationpracticesinthis manualandon
the machineand betrainedandsupervisedby an adult.
SERVICE
Safe HandlingOf Gasoline:
•Toavoid personalinjuryor propertydamageuseextremecare
in handlinggasoline.Gasolineis extremelyflammableandthe
vaporsareexplosive.Seriouspersonalinjurycanoccurwhen
gasolineis spilledon yourselfor yourclothes,whichcan ignite.
Washyour skinandchangeclothesimmediately.
• Useonly anapprovedgasolinecontainer.
• Neverfill containersinsidea vehicleoron atruck ortrailer bed
witha plasticliner.Alwaysplacecontainerson thegroundaway
fromyourvehiclebeforefilling.
• Removegas-poweredequipmentfromthetruck ortrailerand
refuelit on the ground.Ifthisis notpossible,then refuelsuch
equipmenton atrailer witha portablecontainer,ratherthanfrom
a gasolinedispensernozzle.
• Keepthe nozzleincontactwiththe rimof the fueltankor
containeropeningat all timesuntilfuelingis complete.Donot use
a nozzlelock-opendevice.
4
• Extinguishall cigarettes,cigars,pipesandothersources
of ignition.
• Neverfuelmachineindoorsbecauseflammablevaporswill
accumulateinthe area.
• Neverremovegas cap oraddfuel whileengineis hotor running.
Allowengineto coolat leasttwo minutesbeforerefueling.
• Neveroverfill fuel tank.Filltankto nomorethan 1inch below
bottomof fillerneckto providefor fuel expansion.
• Replacegasolinecapandtightensecurely.
• If gasolineis spilled,wipe it offthe engineandequipment.Move
machineto anotherarea.Wait5 minutesbeforestartingengine.
• Neverstorethe machineorfuel containernearanopenflame,
sparkor pilot lightas ona waterheater,spaceheater,furnace,
clothesdryer orothergas appliances.
• Toreducefirehazard,keepmachinefreeof grass,leaves,or
otherdebrisbuild-up.Cleanupoil orfuel spillageand removeany
fuelsoakeddebris.
Allowmachineto cool at least5 minutesbeforestoring.
GeneralService:
• Neverrunanengineindoorsor ina poorlyventilatedarea.Engine
exhaustcontainscarbonmonoxide,anodorlessanddeadlygas.
• Beforecleaning,repairing,or inspecting,makecertainthe
bladeandall movingpartshavestopped.Disconnectthe spark
plugwireandgroundagainstthe engineto preventunintended
starting.
Checkthebladeandenginemountingboltsat frequentintervals
for propertightness.Also,visuallyinspectbladefordamage(e.g.,
bent,cracked,worn)Replacebladewiththe originalequipment
manufacture's(O.E.M.)bladeonly,listedinthismanual.Useof
partswhichdo notmeetthe originalequipmentspecificationsmay
leadto improperperformanceandcompromisesafety!
• Mowerbladesare sharpandcan cut. Wrapthe bladeor wear
gloves,anduse extracautionwhen servicingthem.
Keepall nuts,bolts,andscrewstightto be suretheequipmentis
insafeworkingcondition.
Nevertamperwithsafetydevices.Checktheirproperoperation
regularly.
Afterstrikinga foreignobject, stopthe engine,disconnectthe
sparkplugwireand groundagainstthe engine.Thoroughly
inspectthe mowerfor anydamage.Repairthe damagebefore
startingandoperatingthe mower.
Neverattemptto makea wheelorcuttingheightadjustmentwhile
the engineisrunning.
• Grasscatchercomponents,dischargecover,and trailshieldare
subjectto wearand damagewhichcouldexposemovingpartsor
allowobjectsto bethrown.Forsafetyprotection,frequentlycheck
componentsand replaceimmediatelywithoriginalequipment
manufacturer's(O.E.M.)partsonly,listedinthis manual.Useof
partswhichdo notmeetthe originalequipmentspecificationsmay
leadto improperperformanceandcompromisesafety!
Donot changethe engine'sgovernorsettingor over-speedthe
engine.Thegovernorcontrolsthe maximumsafeoperatingspeed
of the engine.
Checkfuel line,tank,cap,andfittingsfrequentlyfor cracksor
leaks.Replaceifnecessary.
Donot crankenginewith sparkplugremoved.
• Maintainor replacesafetyandinstructionlabels,as necessary.
• Observeproperdisposallawsand regulations.Improperdisposal
of fluidsandmaterialscan harmthe environment.
Accordingto theConsumerProductsSafetyCommission(CPSC)
andthe U.S.EnvironmentalProtectionAgency(EPA),this product
hasanAverageUsefulLifeof seven(7)years,or 140hoursof
operation.At the endof theAverageUsefulLifehavethe machine
inspectedannuallyby a Searsorotherqualifiedservicedealer
to ensurethatall mechanicalandsafetysystemsareworking
properlyand notwornexcessively.Failureto doso can resultin
accidents,injuriesor death.
DO NOT MODIFY ENGINE
Toavoidseriousinjuryor death,do not modifyengineinany way.
Tamperingwiththe governorsettingcanleadto a runawayengineand
causeitto operateat unsafespeeds.Nevertamperwithfactorysetting
of enginegovernor.
NOTICE REGARDING EMISSIONS
EngineswhicharecertifiedtocomplywithCaliforniaandfederal
EPAemissionregulationsfor SORE(SmallOff RoadEquipment)are
certifiedto operateon regularunleadedgasoline,and mayinclude
the followingemissioncontrolsystems:EngineModification(EM) and
ThreeWayCatalyst(TWC)ifso equipped.
SPARK ARRESTOR
Thismachineisequippedwithaninternalcombustionengineand
shouldnotbe usedonor nearany unimprovedforest-covered,
brushcoveredor grass-coveredlandunlessthe engine'sexhaust
systemisequippedwitha sparkarrestermeetingapplicablelocalor
statelaws(if any).
Ifa sparkarresterisused,itshouldbemaintainedineffectiveworking
orderby theoperator.Inthe Stateof Californiathe aboveis required
bylaw(Section4442of the CaliforniaPublicResourcesCode).Other
statesmayhavesimilarlaws. Federallawsapplyonfederallands.
A sparkarresterfor the mufflerisavailablethroughyournearestSears
PartsandRepairServiceCenter.

SAFETY SYMBOLS
Thispagedepictsanddescribessafetysymbolsthatmayappearonthisproduct. Read,understand,andfollowall instructionson the machine
beforeattemptingto assembleandoperate.
ii
®
J
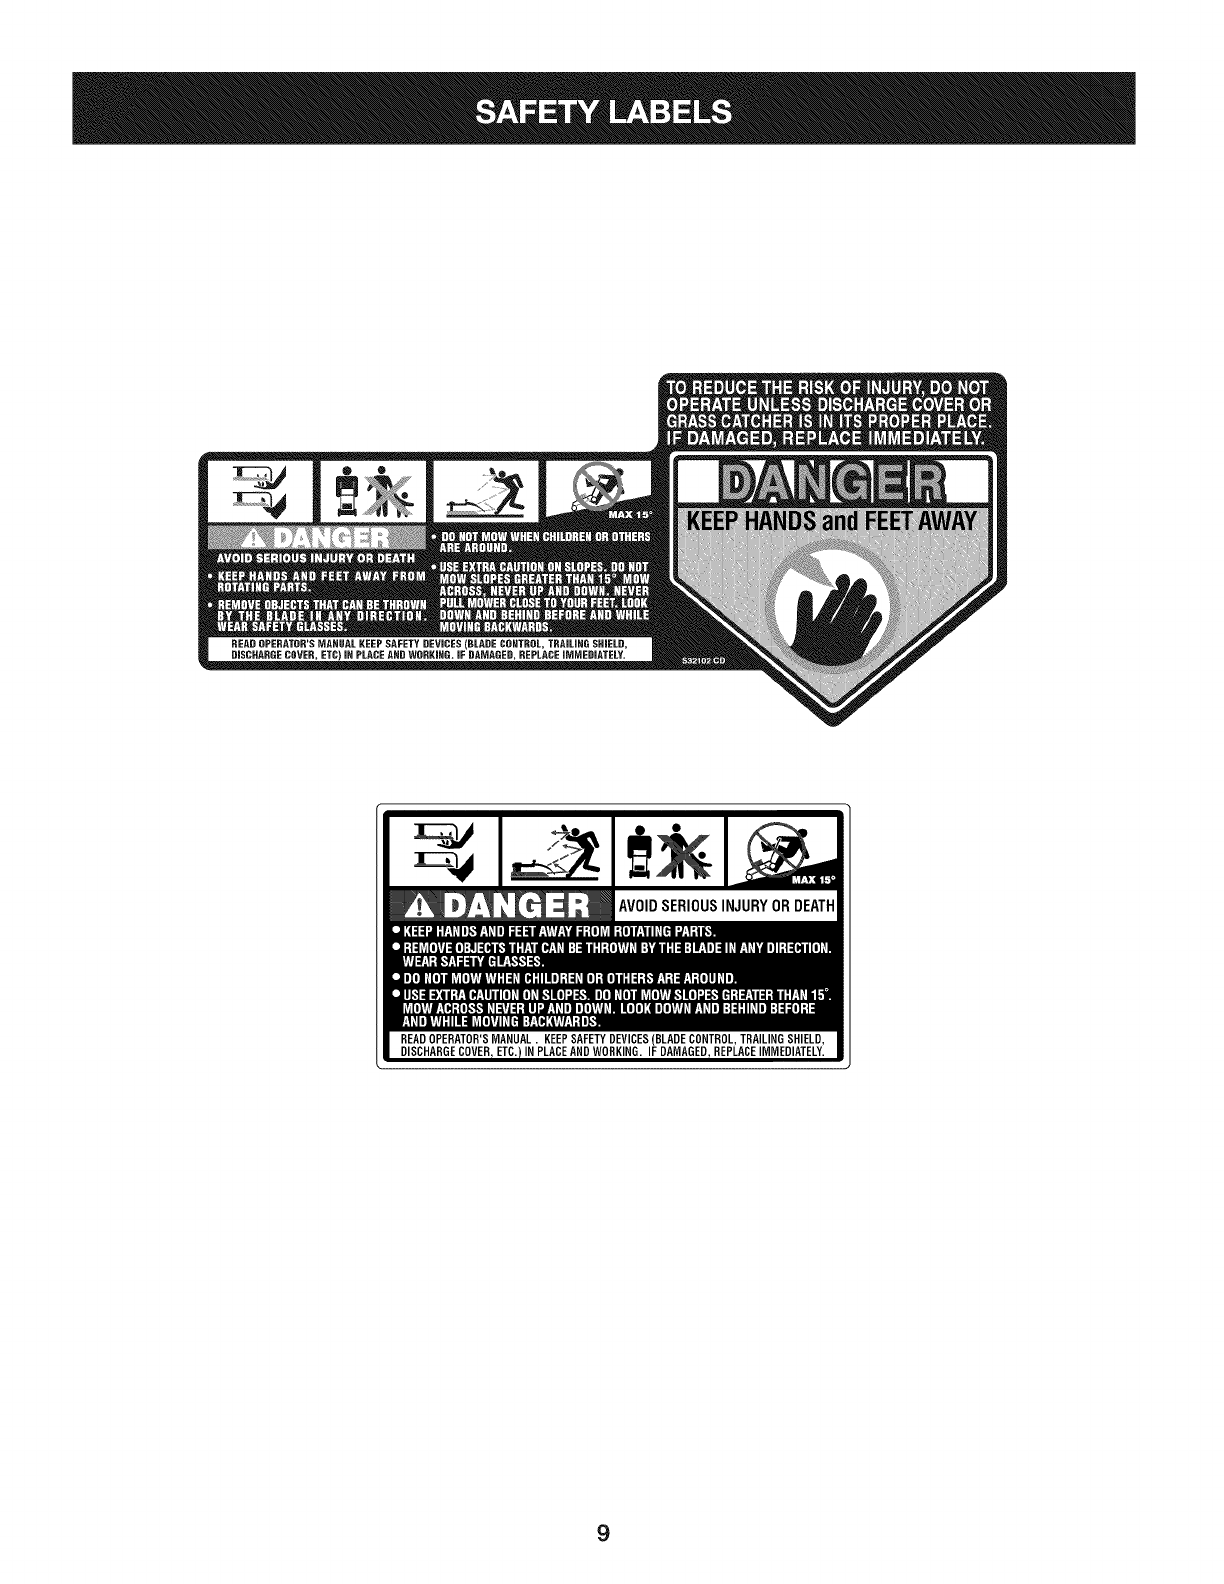
READ THE OPERATOR'S MANUAL(S)
Read, understand, and follow all instructions in the manual(s) before attempting to assemble and
operate
DANGER -- ROTATING BLADES
To reduce the risk of injury, keep hands and feet away. Do not operate unless discharge cover or grass
catcher is in its proper place. If damaged, replace immediately.
DANGER -- BYSTANDERS
Do not mow when children or others are around.
DANGER-- HAND/FOOT CUT
Keep hands and feet away from rotating parts.
DANGER -- THROWN DEBRIS
Remove objects that can be thrown by the blade in any direction. Wear safety glasses.
DANGER -- SLOPES
Use extra caution on slopes. Do not mow slopes greater than 15°.
WARNING--GASOLINE IS FLAMMABLE
Allow the engine to cool at least two minutes before refueling.
WARNING-- CARBON MONOXIDE
Never run an engine indoors or in a poorly ventilated area. Engine exhaust contains carbon
monoxide, an odorless and deadly gas.
WARNING-- HOT SURFACE
Engine parts, especially the muffler, become extremely hot during operation. Allow engine and
muffler to cool before touching.
6
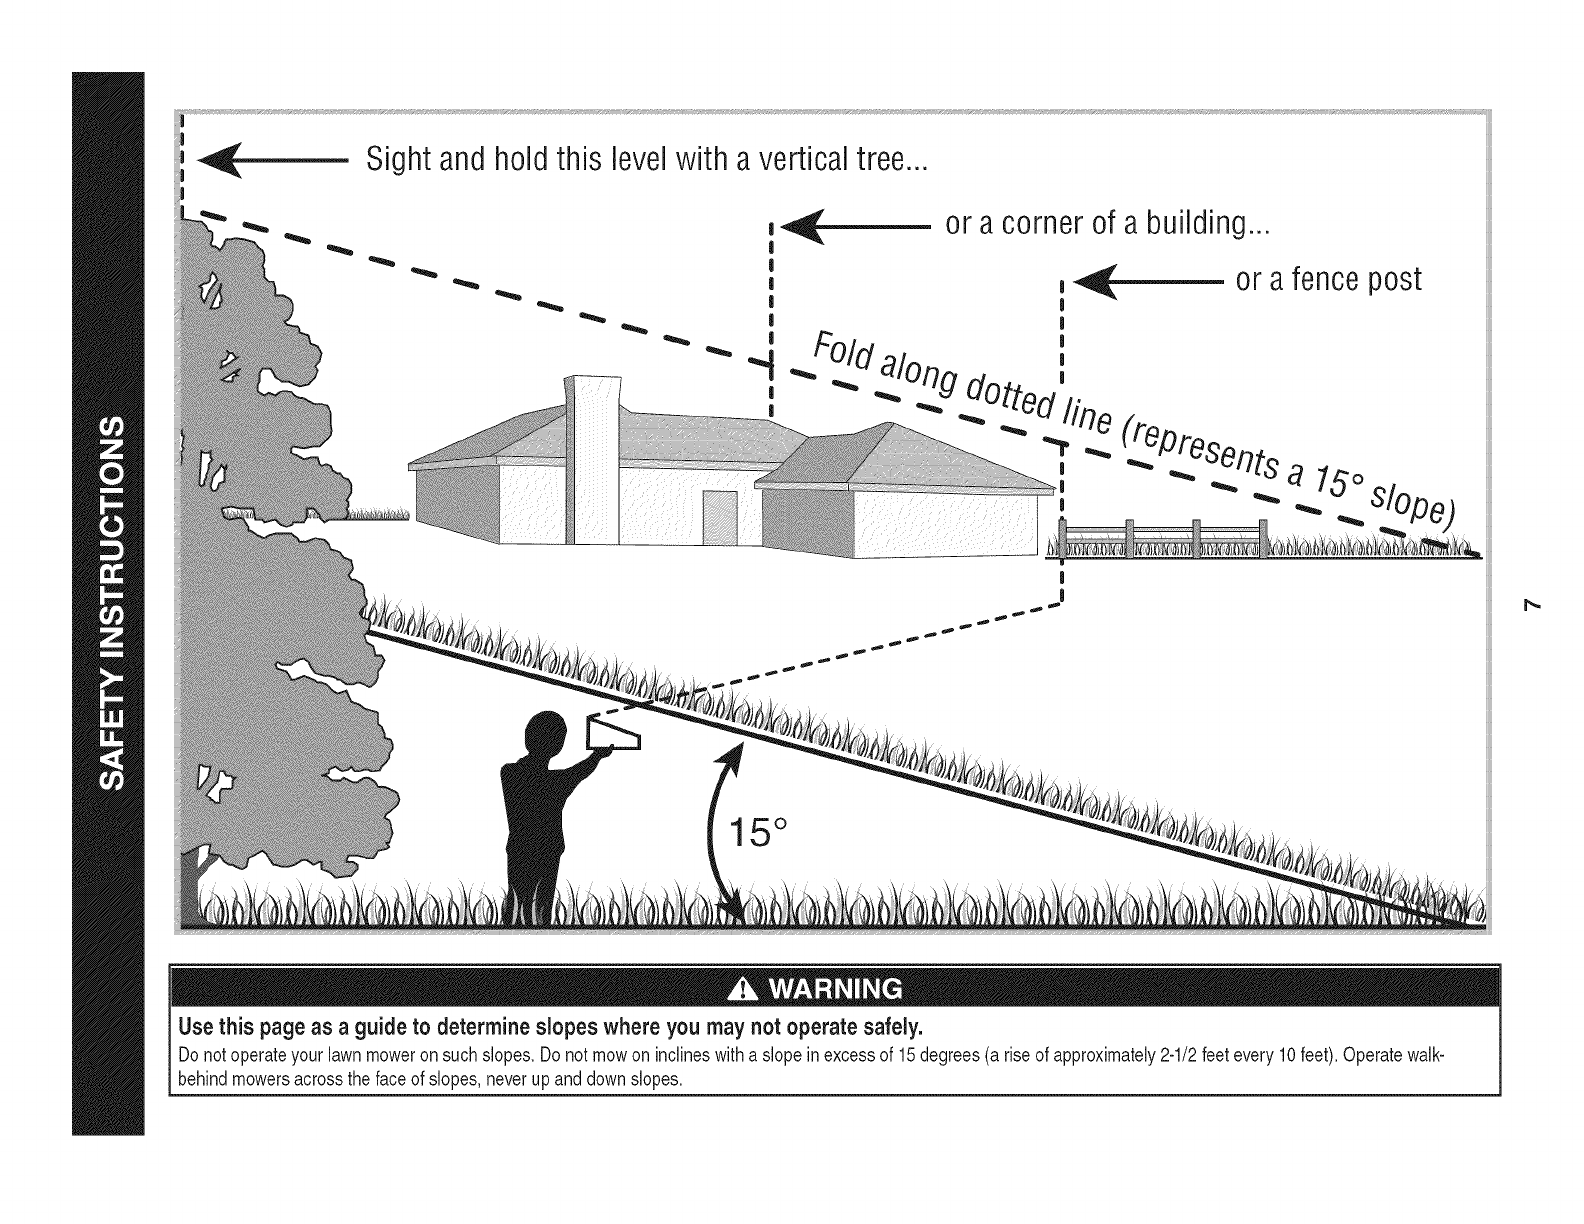
Sight andhold this levelwith a verticaltree...
or a corner of a building...
15 °
Use this page as a guide to determine slopes where you may not operate safely.
Do notoperateyour lawnmoweronsuchslopes.Donot mowon inclineswitha slopeinexcessof 15degrees(a riseof approximately2-1/2feetevery10feet). Operatewalk=
behindmowersacrossthe faceof slopes,neverup anddownslopes.

This page left intentionallyblank.
8
9
IMPORTANT:Thisunit isshippedwithoutgasolineoroil inthe engine.
Becertainto serviceenginewithgasolineandoilas instructedinthe
Operationsectionbeforestartingor runningyourmachine.
NOTE:Referenceto rightand lefthandsideof the LawnMoweris
observedfromthe operatingposition.
OPENING CARTON
1. Cuteachcornerof the cartonverticallyfromtop to bottom.
2. Removeall looseparts.
3. Removeloosepackingmaterial.
REMOVING UNIT FROM CARTON
1. Liftunit fromthe rearto detachit fromunderlyingcartonmaterial
androllunit out of carton.
2. Checkcartonthoroughlyfor anyotherlooseparts.
LOOSE PARTS IN CARTON
•GrassCatcher
• SideDischargeChute
EngineOil
Operator'sManual/HandleHardware
ASSEMBLY
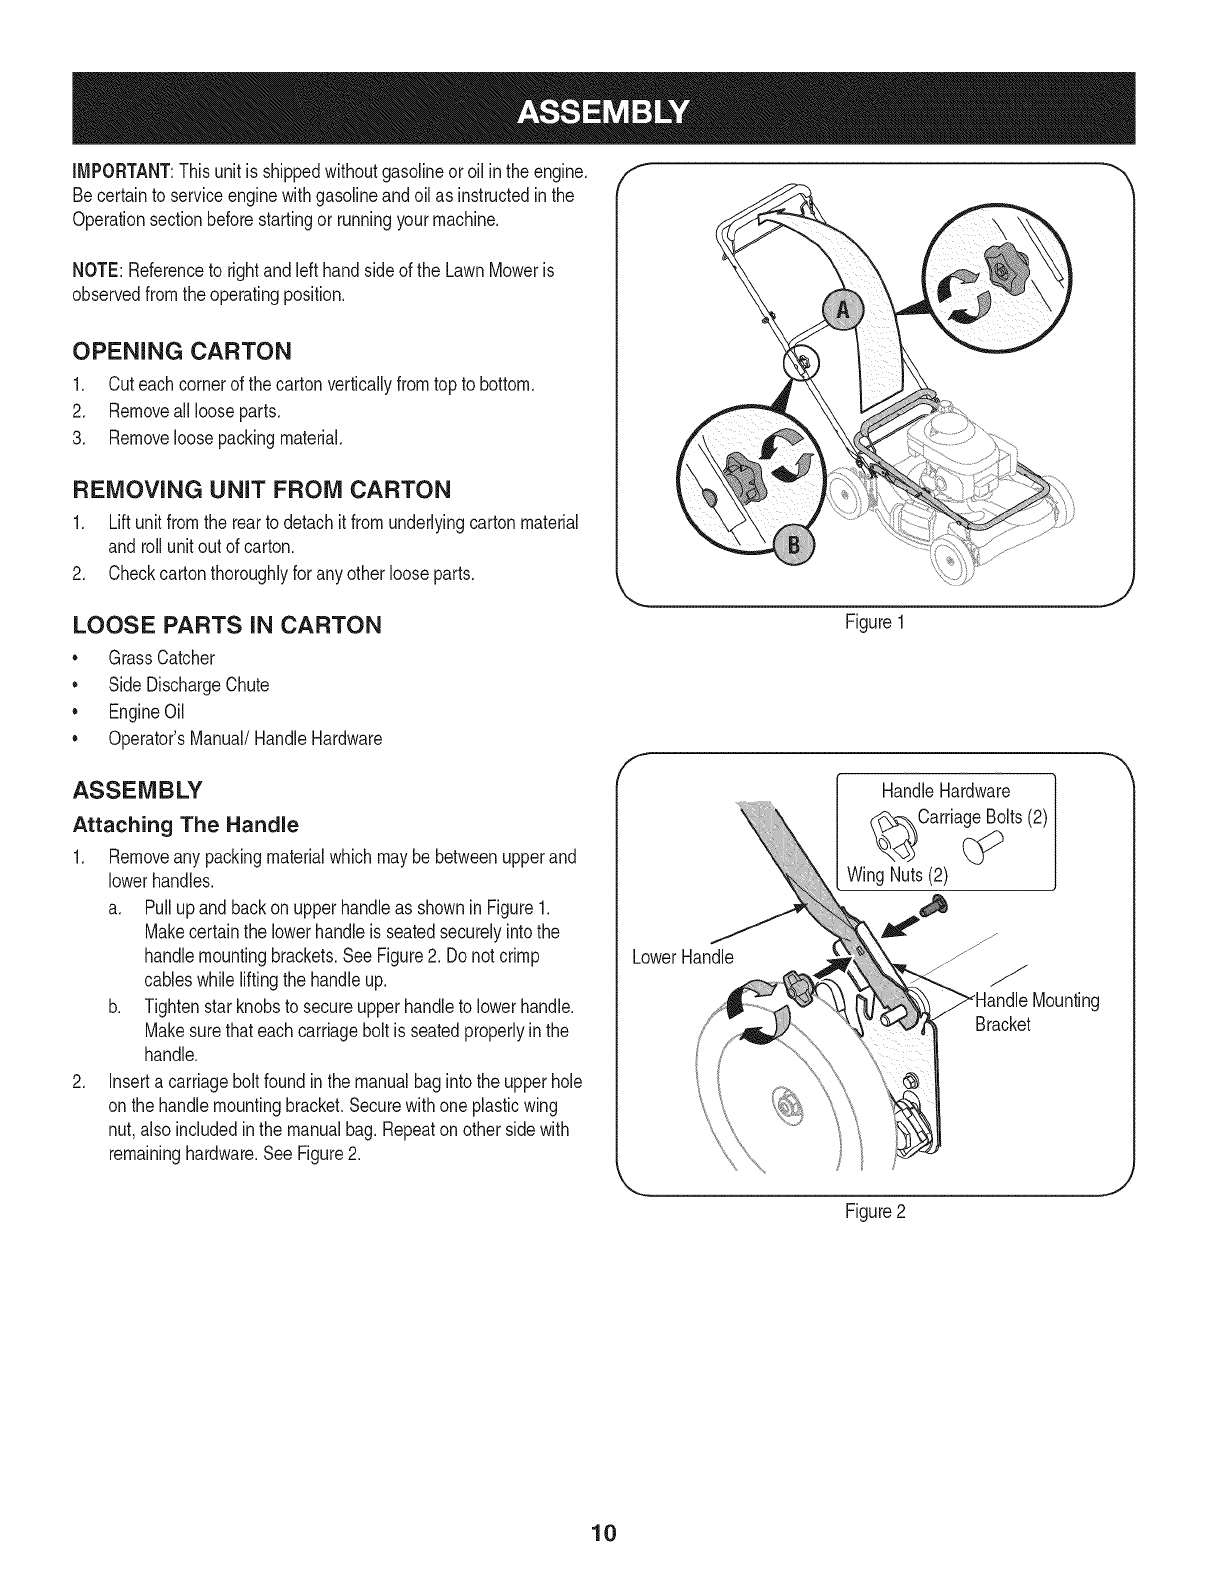
Attaching The Handle
1. Removeany packingmaterialwhichmaybebetweenupperand
lowerhandles.
a. Pullupandbackon upperhandleas showninFigure1.
Makecertainthe lowerhandleisseatedsecurelyintothe
handlemountingbrackets.SeeFigure2. Donot crimp
cableswhile liftingthe handleup.
b. Tightenstarknobsto secureupperhandleto lowerhandle.
Makesurethateach carriagebolt isseatedproperlyinthe
handle.
2. Inserta carriagebolt foundinthe manualbagintothe upperhole
onthe handlemountingbracket.Securewithone plasticwing
nut,also includedinthe manualbag.Repeaton otherside with
remaininghardware.See Figure2.
f
Figure1
J
f
HandleHardware
:_Carriage Bolts (2)
WingNuts(2)
LowerHandle
Bracket
Figure2
10
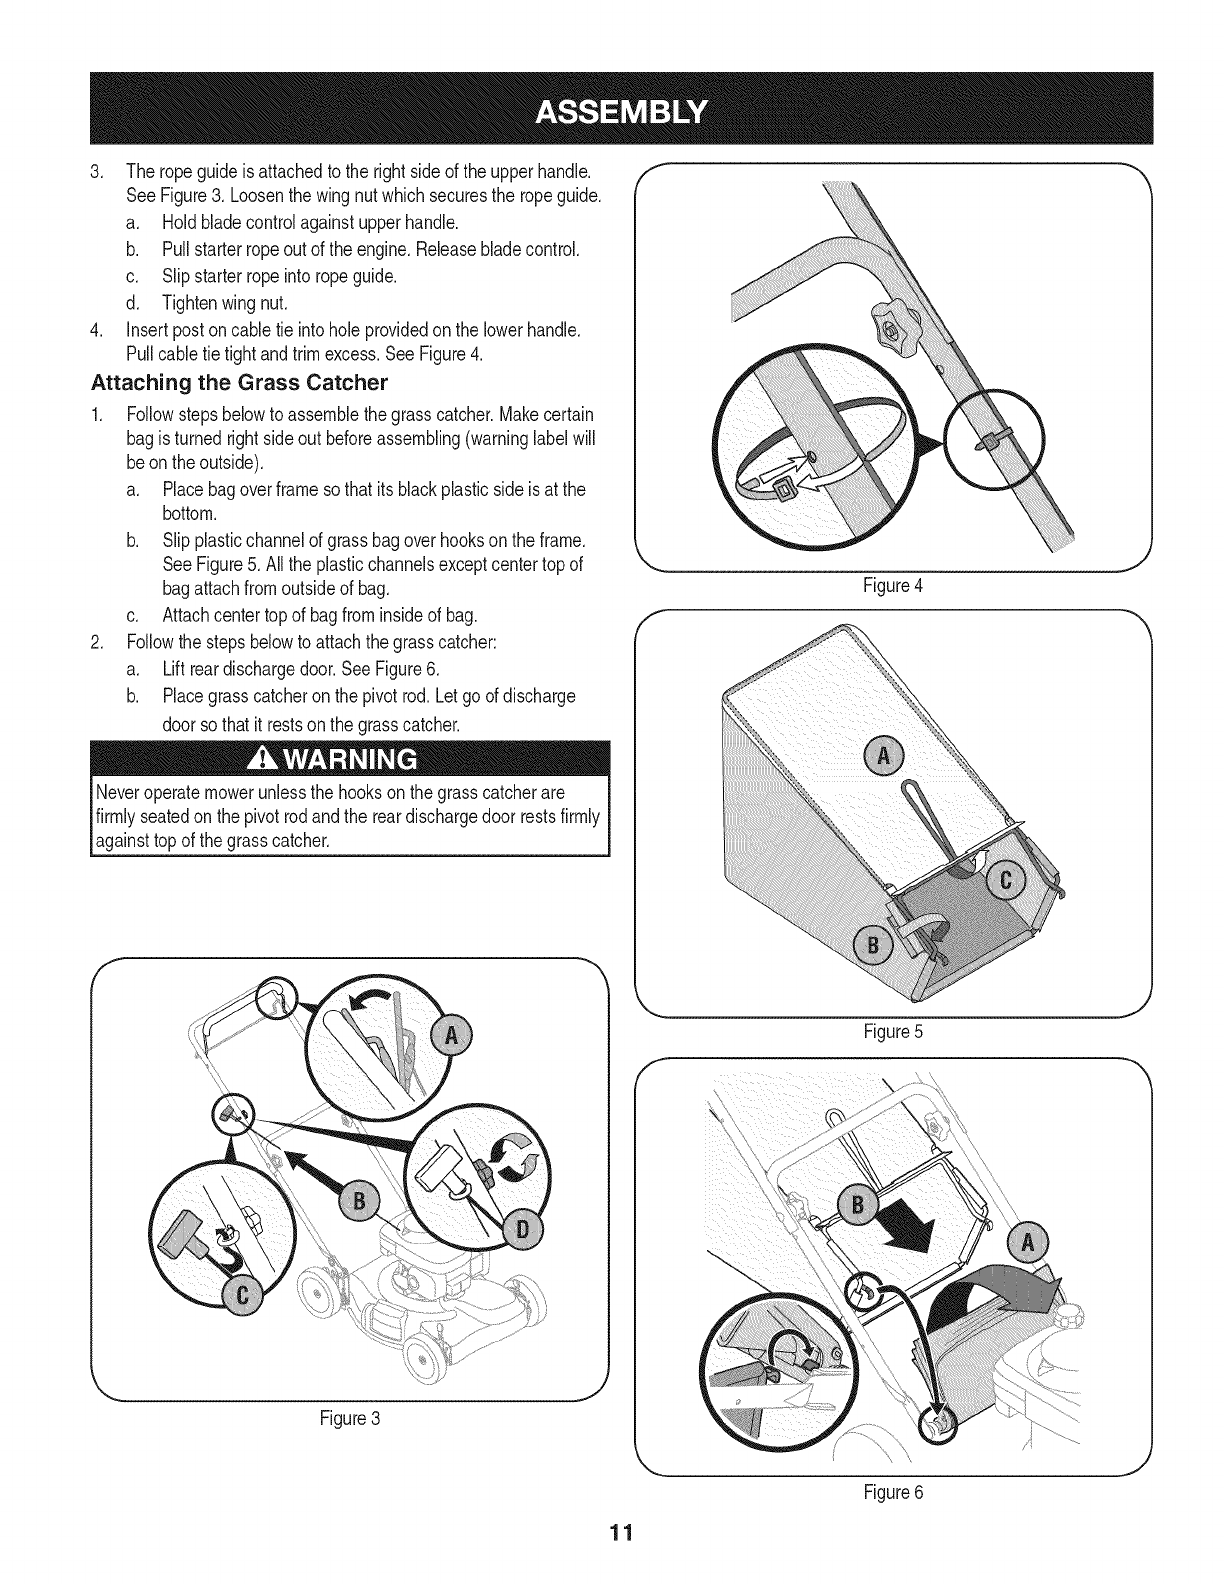
3. The ropeguideis attachedto the right sideof the upperhandle.
SeeFigure3. Loosenthe wingnut whichsecuresthe ropeguide.
a. Holdbladecontrolagainstupperhandle.
b. Pullstarterropeout of the engine.Releasebladecontrol.
c. Slipstarterropeintoropeguide.
d. Tightenwingnut.
4. Insertpostoncable tie intoholeprovidedonthe lowerhandle.
Pullcabletie tightandtrimexcess.See Figure4.
Attaching the Grass Catcher
1. Followstepsbelowto assemblethe grasscatcher.Makecertain
bagis turnedrightside out beforeassembling(warninglabelwill
beon theoutside).
a. Placebagoverframeso thatits blackplasticside is at the
bottom.
b. Slipplasticchannelof grassbagoverhooksonthe frame.
SeeFigure5. All the plasticchannelsexceptcentertop of
bagattachfromoutsideof bag.
c. Attachcentertopof bagfrominsideof bag.
2. Followthe stepsbelowto attachthe grasscatcher:
a. Lift reardischargedoor.SeeFigure6.
b. Placegrasscatcheronthe pivotrod.Let goof discharge
doorso thatit restson the grasscatcher.
Neveroperatemowerunlessthe hooksonthe grasscatcherare
firmlyseatedon the pivotrodandthe reardischargedoor restsfirmly
againsttopof the grasscatcher.
l
Figure4
Figure3
f
11
Figure5
Figure6
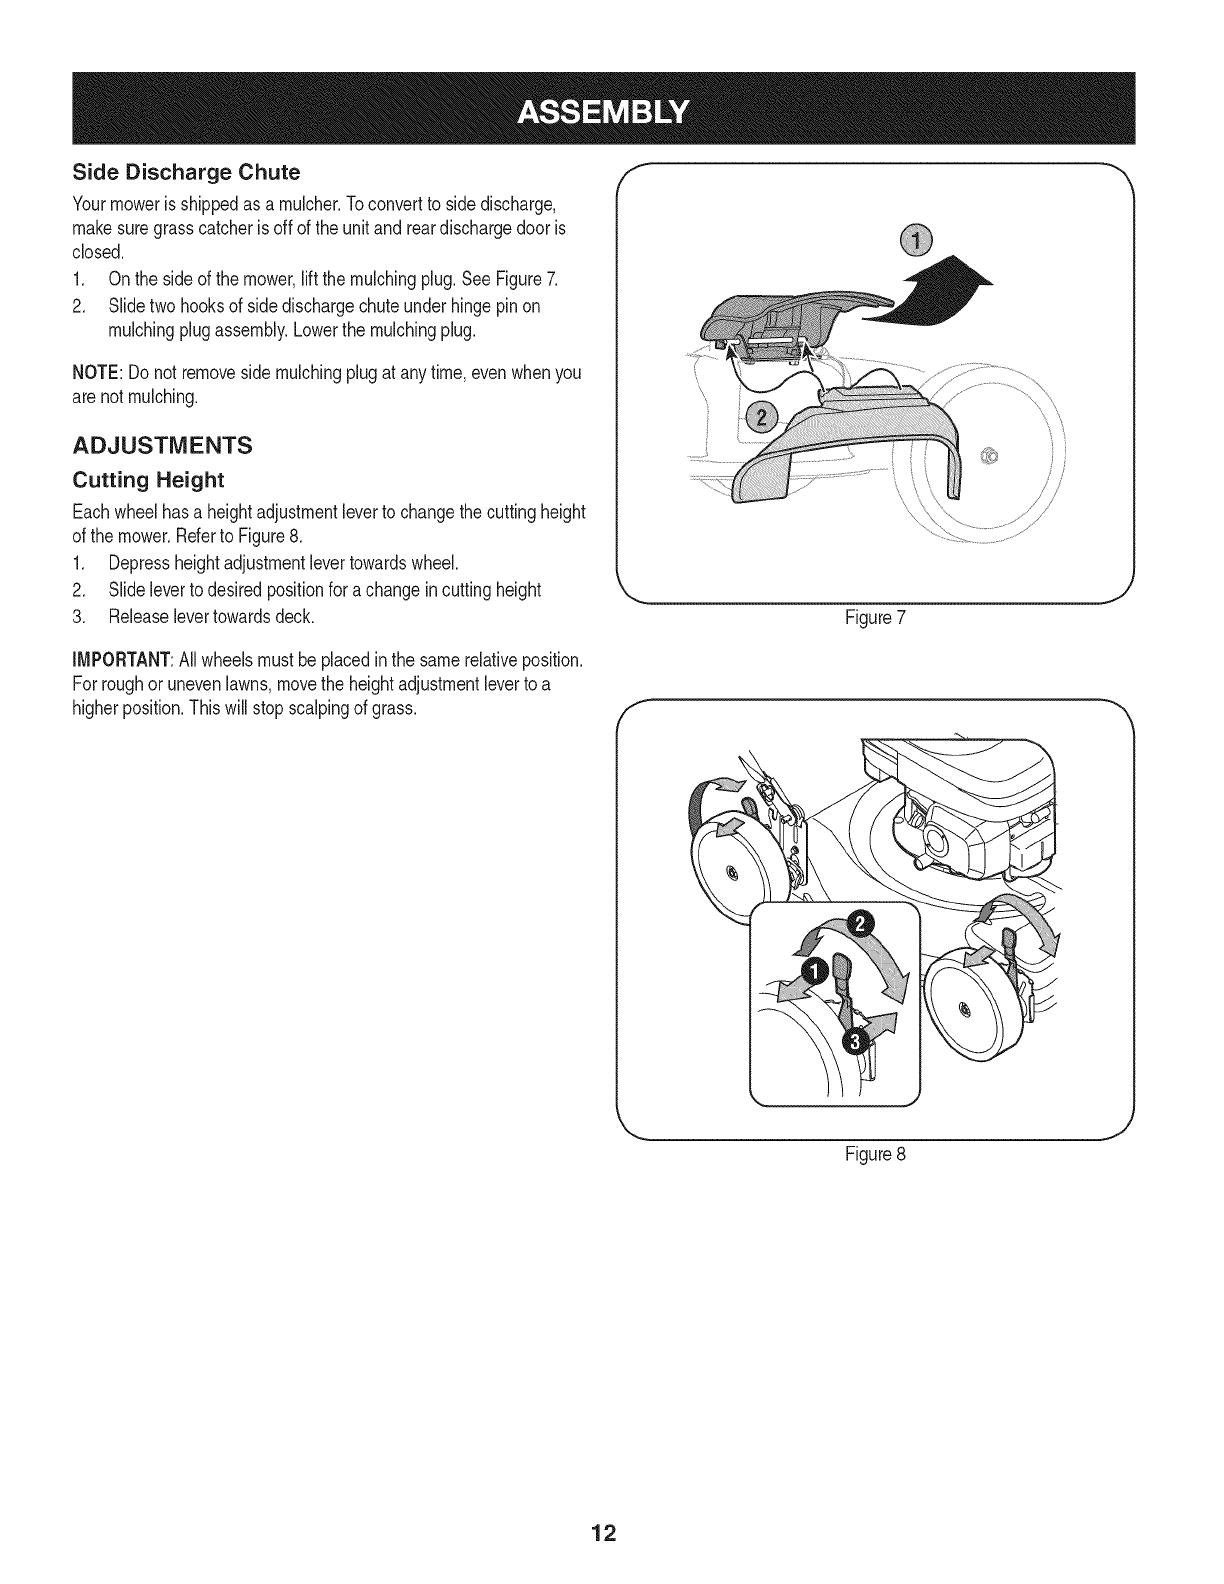
Side Discharge Chute
Yourmowerisshippedasamulcher.Toconverttosidedischarge,
makesuregrasscatcherisoffoftheunitandreardischargedooris
closed.
1. Onthesideofthemower,liftthemulchingplug.SeeFigure7.
2. Slidetwohooksofsidedischargechuteunderhingepinon
mulchingplugassembly.Lowerthemulchingplug.
NOTE:Donotremovesidemulchingplugatanytime,evenwhenyou
arenotmulching.
ADJUSTMENTS
Cutting Height
Eachwheelhasa heightadjustmentleverto changethe cuttingheight
of the mower.Referto Figure8.
1. Depressheightadjustmentlevertowardswheel.
2. Slideleverto desiredpositionfor achangein cuttingheight
3. Releaselevertowardsdeck.
f
Figure7
J
IMPORTANT:Allwheelsmustbeplacedinthe samerelativeposition.
For roughor unevenlawns,movethe heightadjustmentleverto a
higherposition.Thiswill stopscalpingof grass. f
Figure8 J
12
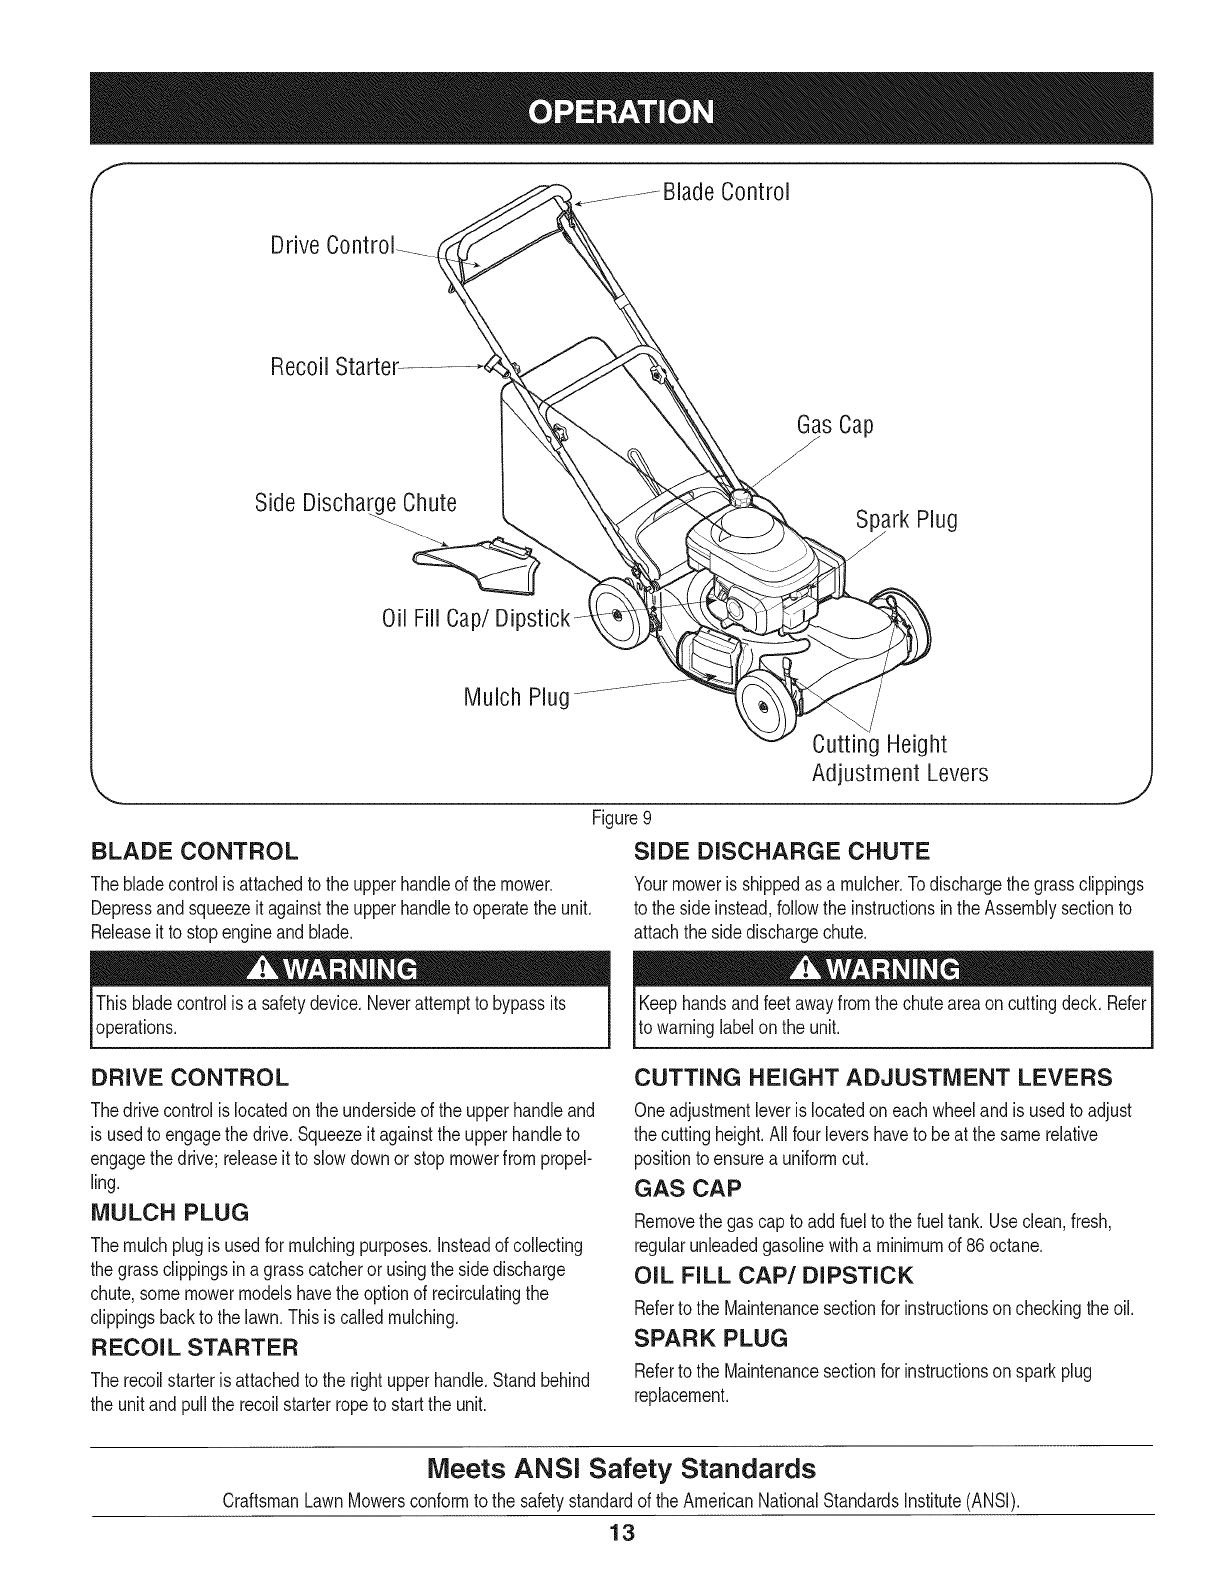
f_de Control
Drive
Recoil Starter
Side Discharge Chute Spark Plug
J
Oil Fill Cap/D
Mulch Plug
BLADE CONTROL
Thebladecontrolis attachedto the upperhandleof the mower.
Depressandsqueezeit againstthe upperhandleto operatethe unit.
Releaseit to stopengineandblade.
Cutting Height
Adjustment Levers
Figure9
SIDE DISCHARGE CHUTE
J
Yourmoweris shippedas a mulcher.Todischargethegrassclippings
to the side instead,followthe instructionsin the Assemblysectionto
attachthe sidedischargechute.
Thisbladecontrolis a safetydevice.Neverattemptto bypassits
operations.
DRIVE CONTROL
Thedrivecontrolis locatedonthe undersideof the upperhandleand
is usedto engagethe drive.Squeezeit againstthe upperhandleto
engagethedrive; releaseit to slowdownorstopmowerfrompropel-
ling.
MULCH PLUG
Themulchplugis usedfor mulchingpurposes.Insteadof collecting
the grassclippingsin agrasscatcheror usingthe sidedischarge
chute,somemowermodelshavetheoptionof recirculatingthe
clippingsbackto the lawn.Thisis calledmulching.
RECOIL STARTER
The recoilstarteris attachedto the rightupperhandle.Standbehind
the unitandpullthe recoilstarter ropeto start the unit.
Keephandsandfeetawayfromthe chuteareaoncuttingdeck. Refer
to warninglabelonthe unit.
CUTTING HEIGHT ADJUSTMENT LEVERS
Oneadjustmentleveris locatedoneach wheeland is usedto adjust
the cuttingheight.All fourlevershaveto beat thesamerelative
positionto ensurea uniformcut.
GAS CAP
Removethe gascap to addfuel to the fueltank. Useclean,fresh,
regularunleadedgasolinewitha minimumof 86 octane.
OIL FILL CAP/DIPSTICK
Referto the Maintenancesectionfor instructionsoncheckingthe oil.
SPARK PLUG
Referto the Maintenancesectionfor instructionsonsparkplug
replacement.
Meets ANSI Safety Standards
CraftsmanLawnMowersconformto the safetystandardof the AmericanNationalStandardsInstitute(ANSI).
13
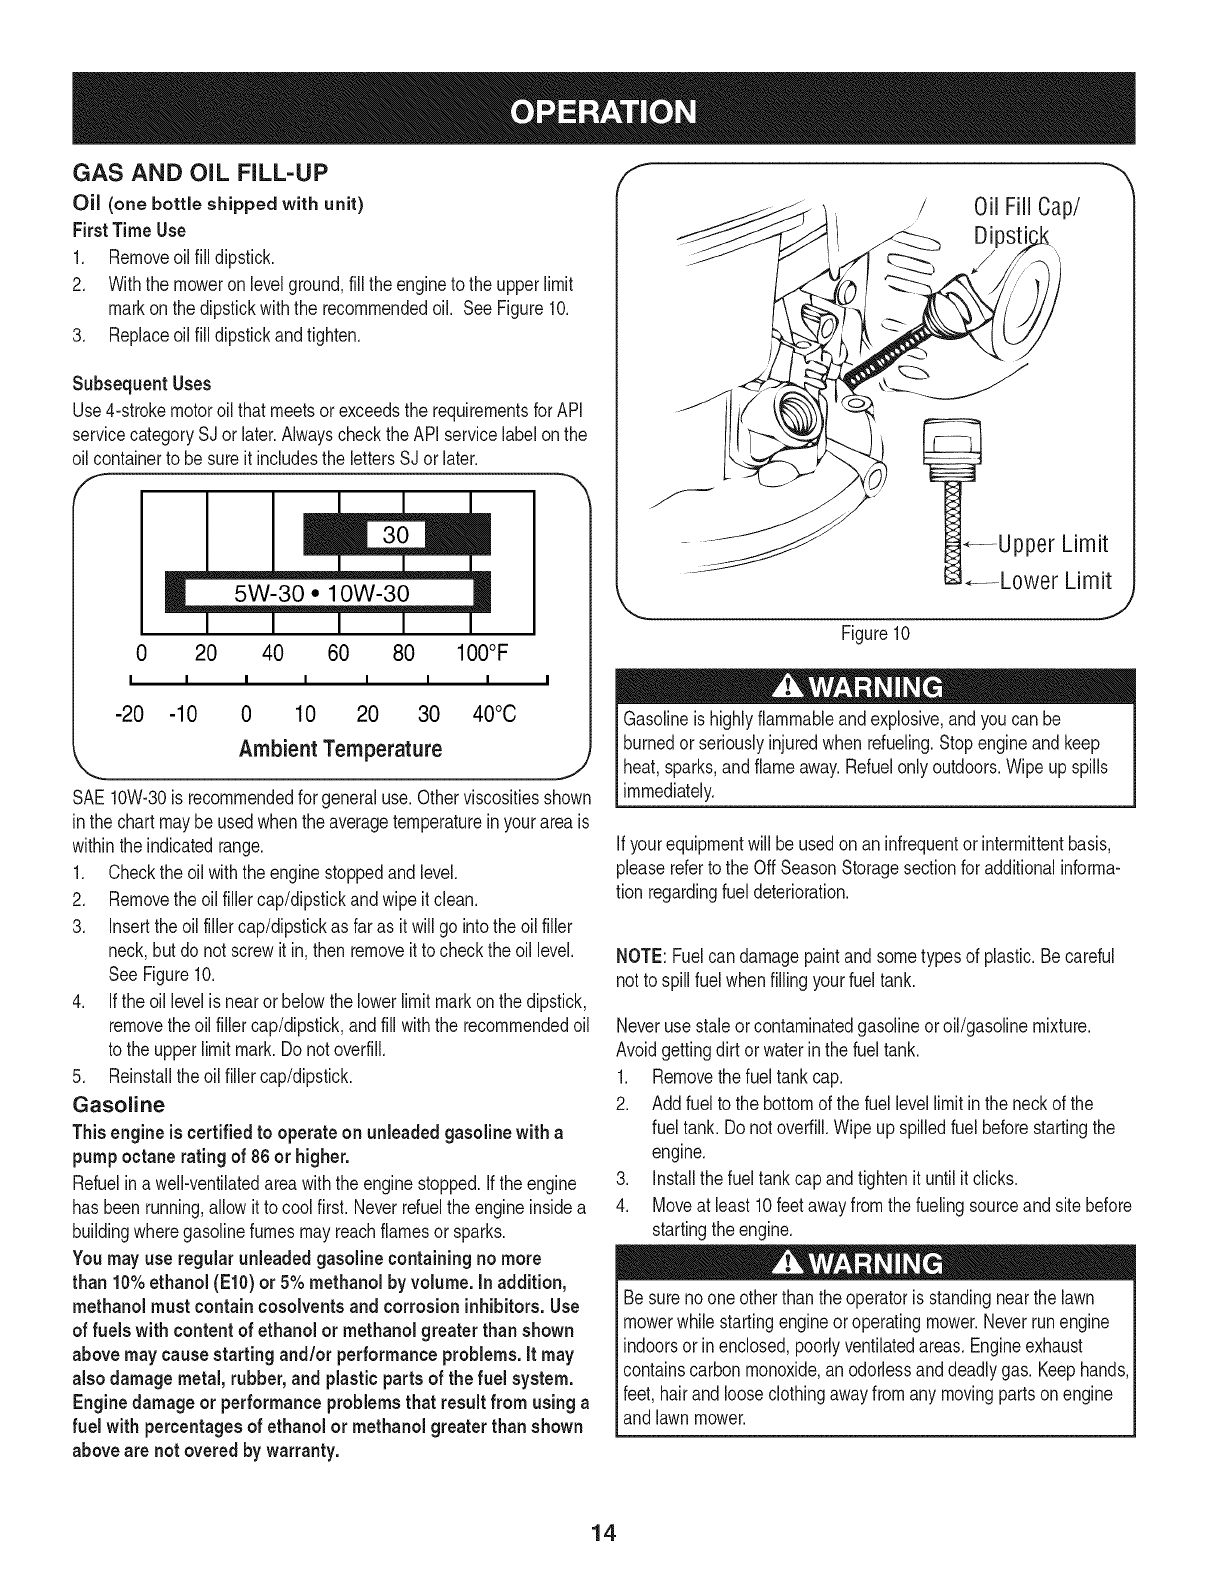
GAS AND OIL FILL-UP
Oil (one bottle shipped with unit)
FirstTimeUse
1. Removeoil fill dipstick.
2. Withthe moweron levelground,fill the engineto the upperlimit
markon the dipstickwiththe recommendedoil. SeeFigure10.
3. Replaceoil fill dipstickandtighten.
Subsequent Uses
Use4-strokemotoroil thatmeetsor exceedsthe requirementsfor API
servicecategorySJ orlater.Alwayscheckthe API servicelabelon the
oilcontainerto besure itincludesthe lettersSJ or later.
0 20 40 60 80 IO0°F
I I I I I I I
-20 -10 0 10 20 30 40°C
Ambient Temperature
SAE10%30 is recommendedforgeneraluse.Otherviscositiesshown
inthe chartmaybeusedwhenthe averagetemperatureinyour areais
withinthe indicatedrange.
1. Checkthe oil withthe enginestoppedand level.
2. Removethe oil fillercap/dipstickandwipeit clean.
3. Insertthe oilfiller cap/dipstickas far as it will go intothe oilfiller
neck,but do notscrewit in, then removeit to checkthe oil level.
SeeFigure10.
4. Ifthe oil levelis nearor belowthe lowerlimitmarkonthe dipstick,
removethe oil fillercap/dipstick,andfill withthe recommendedoil
to the upperlimitmark.Do not overfill.
5. Reinstallthe oilfillercap/dipstick.
Gasoline
This engineis certified to operate on unleaded gasoline with a
pumpoctane ratingof 86 or higher.
Refuelin awell-ventilatedareawiththe enginestopped.Ifthe engine
has beenrunning,allow it to coolfirst. Neverrefuelthe engineinsidea
buildingwheregasolinefumes mayreachflamesor sparks.
Youmay use regular unleaded gasolinecontaining no more
than 10%ethanol (El0) or 5%methanol by volume. In addition,
methanol must contain cosolvents and corrosion inhibitors.Use
of fuels with content of ethanolor methanol greater than shown
above maycause starting and/or performanceproblems. It may
also damage metal, rubber, and plasticpartsof the fuel system.
Engine damageor performanceproblemsthat resultfrom using a
fuel with percentagesof ethanol or methanol greater than shown
above are not overed by warranty.
f
Oil Fill Cap/
Dipst
J
Figure10
Gasolineis highlyflammableandexplosive,andyoucan be
burnedor seriouslyinjuredwhenrefueling.Stopengineand keep
heat,sparks,and flameaway.Refuelonly outdoors.Wipe upspills
immediately.
Ifyourequipmentwill be usedonan infrequentorintermittentbasis,
pleasereferto the Off SeasonStoragesectionfor additionalinforma-
tion regardingfuel deterioration.
NOTE:Fuelcandamagepaintand sometypesof plastic.Becareful
notto spill fuelwhenfilling yourfueltank.
Neverusestaleorcontaminatedgasolineoroil/gasolinemixture.
Avoidgettingdirt orwaterin the fueltank.
1. Removethe fuel tankcap.
2. Addfuel to the bottomof the fuellevellimitin the neckof the
fuel tank. Donot overfill.Wipe upspilledfuel beforestartingthe
engine.
3. Installthe fuel tankcapandtightenit until it clicks.
4. Moveat least10feetawayfromthe fuelingsourceandsitebefore
startingthe engine.
Besurenooneotherthan theoperatoris standingnearthe lawn
mowerwhilestartingengineoroperatingmower.Neverrunengine
indoorsorin enclosed,poorlyventilatedareas.Engineexhaust
containscarbonmonoxide,an odorlessanddeadlygas.Keephands,
feet, hairand looseclothingawayfromany movingpartson engine
andlawn mower.
14
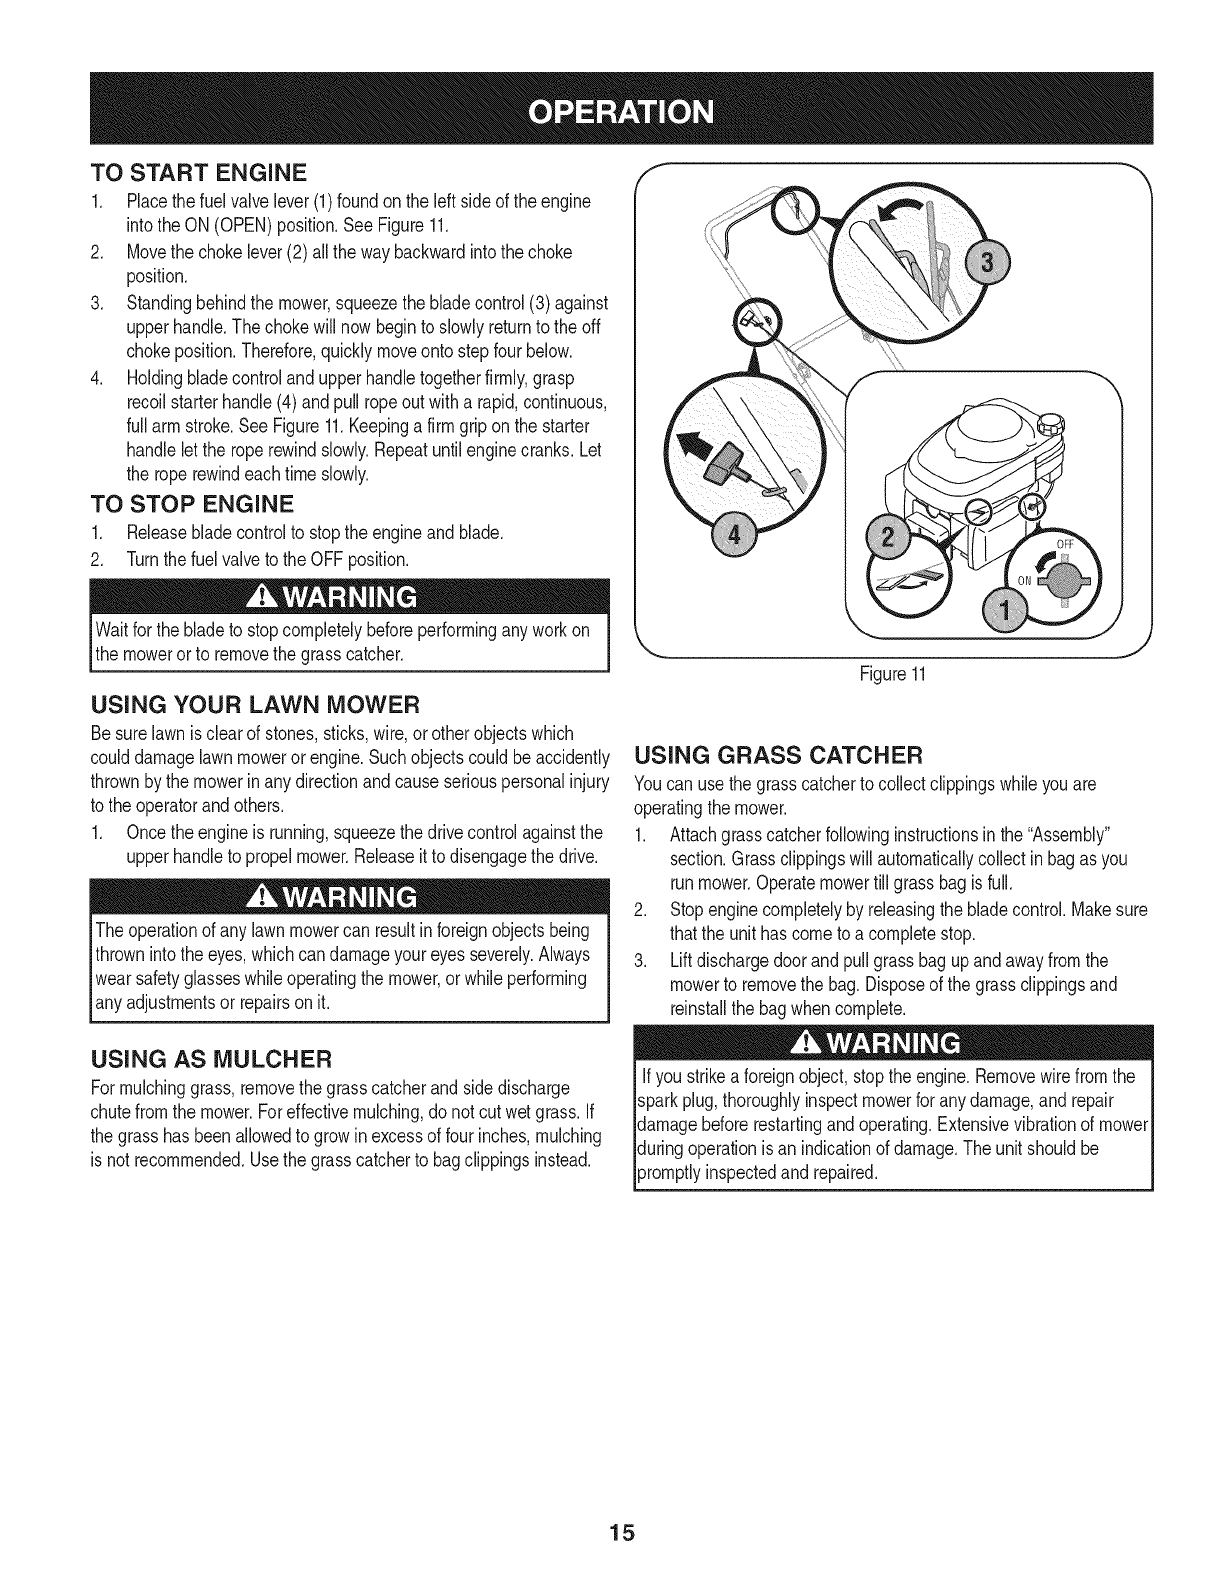
TO START ENGINE
1. Placethefuel valvelever(1)foundon theleft sideof the engine
intothe ON (OPEN)position.See Figure11.
2. Movethe chokelever(2) allthe waybackwardintothe choke
position.
3. Standingbehindthe mower,squeezethe bladecontrol(3) against
upperhandle.The chokewill now beginto slowlyreturnto the off
chokeposition.Therefore,quicklymoveontostepfour below.
4. Holdingbladecontrolandupperhandletogetherfirmly,grasp
recoilstarterhandle(4)and pullropeout witha rapid,continuous,
full armstroke.SeeFigure11.Keepinga firmgripon the starter
handlelet the roperewindslowly.Repeatuntilenginecranks.Let
the roperewindeachtimeslowly.
TO STOP ENGINE
1. Releasebladecontrolto stopthe engineandblade.
2. Turnthe fuel valveto the OFFposition.
Waitfor the bladeto stopcompletelybeforeperformingany workon
the mowerorto removethe grasscatcher.
USING YOUR LAWN MOWER
Besure lawnis clearof stones,sticks,wire,orotherobjectswhich
coulddamagelawnmoweror engine.Suchobjectscouldbeaccidently
thrownby themowerin anydirectionandcauseseriouspersonalinjury
to the operatorandothers.
1. Oncethe engineis running,squeezethe drivecontrolagainstthe
upperhandleto propelmower.Releaseitto disengagethe drive.
The operationof any lawnmowercan resultinforeignobjectsbeing
thrownintothe eyes,whichcandamageyoureyesseverely.Always
wear safetyglasseswhileoperatingthe mower,or whileperforming
any adjustmentsor repairsonit.
USING AS MULCHER
For mulchinggrass,removethe grasscatcherandsidedischarge
chutefromthe mower.Foreffectivemulching,donot cutwetgrass. If
the grasshas beenallowedto grow inexcessof four inches,mulching
is not recommended.Usethe grasscatcherto bagclippingsinstead.
Figure11
USING GRASS CATCHER
Youcanuse the grasscatcherto collectclippingswhileyou are
operatingthe mower.
1. Attachgrasscatcherfollowinginstructionsinthe "Assembly"
section.Grassclippingswill automaticallycollect inbagas you
runmower.Operatemowertill grassbagisfull.
2. Stopenginecompletelyby releasingthe bladecontrol.Makesure
thatthe unit hascometo a completestop.
3. Liftdischargedoorandpullgrassbagupandawayfromthe
mowerto removethe bag.Disposeof the grassclippingsand
reinstallthe bagwhencomplete.
Ifyou strikeaforeignobject,stoptheengine.Removewire fromthe
sparkplug,thoroughlyinspectmowerfor anydamage,andrepair
damagebeforerestartingandoperating.Extensivevibrationof mower
duringoperationisan indicationof damage.Theunit shouldbe
promptlyinspectedandrepaired.
15
MAINTENANCE SCHEDULE
Beforeperforminganytypeofmaintenance/service,disengageall
controlsandstoptheengine.Waituntilallmovingpartshavecometo
acompletestop.Disconnectsparkplugwireandgrounditagainstthe
enginetopreventunintendedstarting.
Followthe maintenanceschedulegivenbelow.Thischartdescribes
serviceguidelinesonly.Usethe ServiceLogcolumnto keeptrackof
completedmaintenancetasks.To locate the nearest Sears Service
Centeror to scheduleservice,simplycontactSears at
1-800-4-MY-HOME®.
EachUse
1stMonthor 5 hours
Annuallyor 25hours
Annuallyor 50hours
200hours
BeforeStorage
.
2.
3.
4.
1.
1.
2.
3.
1.
2.
1.
2.
1.
Engineoillevel
Looseormissinghardware
Aircleaner
Unitandengine.
Engineoil
Aircleaner1
Controllinkages/pivotsandwheels
Undersidedmowerdeck
Engineoil ff
SparkPlug
Sparkplug
AirCleaner
Fuelsystem
Cleanmoreoftenunderdustyconditionsor whenairbornedebrisis
1. Check
2. Tightenor replace
3. Check
4. Clean
1. Change
1. Clean
2. Lubewithlight oil
3. Clean
1. Change
2. Check
1. Replace
2. Replace
1. Runengineuntil itstopsfromlackof
fuel,oraddstabilizerto a full tankof
freshfuel priorto storage.
)resent.Replaceaircleanerifverydirty.
11Changeoil every25 hourswhenoperatingthe engineunderheavyloador inhightemperatures.
16

Alwaysstopengine,disconnectsparkplugwire,andgroundagainst
enginebeforeperformingany typeof maintenanceon yourmachine.
GENERAL RECOMMENDATIONS
•Alwaysobservesafetyruleswhenperformingany maintenance.
• Thewarrantyon thislawnmowerdoesnot coveritemsthathave
beensubjectedto operatorabuseor negligence.To receivefull
valuefromwarranty,operatormustmaintainthe equipmentas
instructedhere.
• Changingof engine-governedspeedwill voidenginewarranty.
• Alladjustmentsshouldbecheckedat leastonceeach season.
• Periodicallycheckall fastenersandmakesurethesearetight.
ENGINE MAINTENANCE
Spark Plug
NOTE:incorrectsparkplugscan causeenginedamage.
f
Electrode SealingWasher
0.028-.030 in. Gap
(0.70-0.80mm)
Figure12
Forgoodperformance,the sparkplugmustbeproperlygappedand
freeof deposits.Checkthe sparkplugevery50 hoursoroncea
season.Replacethe sparkplugevery200 hoursof operation.
1. Disconnectthe cap fromthe sparkplug,andremoveanydirt from
the sparkplugarea.
2. Usethe propersizesparkplugwrenchto removethe sparkplug.
3. inspectthe sparkplug. Replaceit if damaged,badlyfouled,if the
sealingwasheris in poorcondition,or if theelectrodeis worn.
4. Measurethe electrodegapwitha suitablegauge.Thecorrectgap
is 0.028- 0.030in. (0.70- 0.80 ram).See Figure12.If adjustment
is needed,correctthe gapby carefullybendingthe side electrode.
5. installthe sparkplugcarefully,by hand,to avoidcross-threading.
6. Afterthesparkplugis seated,tightenwiththe propersizespark
plugwrenchto compressthe washer.
Wheninstallinga newsparkplug,tighten1/2turn afterthe sparkplug
seatsto compressthe washer.
Whenreinstallingthe originalsparkplug,tighten1/8-1/4turn afterthe
sparkplugseatsto compressthe washer.
NOTE:Properlytightenthe sparkplug.A loosesparkplugcan become
veryhotandcan damagethe engine.Overtighteningthesparkplug
candamagethethreadsin the cylinderhead.
7. Attachthe sparkplugcapto thesparkplug.
Air Cleaner
A dirtyaircleanerwill restrictairflowto the carburetorandcausepoor
engineperformance,inspectthe filtereachtimetheengineis oper-
ated.Youwill needto cleanthe filtermorefrequentlyif youoperatethe
enginein verydusty areas.
Cleantheair cleanerevery25hoursof operationoronce a season.
Replacetheaircleanerevery200 hoursof operation.
NOTE:Operatingthe enginewithoutafilter,or withdamagedfilter,will
allowdirt to enterthe engine,causingrapidenginewear.
Inspection
1. Pressthe latchtabsonthe top of the aircleanercover,and
removethe cover.Checkthe filterto be sureit is cleanand in
goodcondition.SeeFigure13.
2. Reinstallthe filterandaircleanercover.
Cleaning
1. Tapthe filterseveraltimeson a hardsurfaceto removedirt,or
blowcompressedair notexceeding30 psithroughthefilterfrom
the cleanside thatfacestheengine.Nevertryto brushoff dirt.
Brushingwill forcedirt intothe fibers.
2. Wipedirt fromthe aircleanerbodyandcoverusinga moist rag.
Becarefulto preventdirt fromenteringthe airductthatleadsto
the carburetor.
17
Check Engine Oil
Checkoil levelbeforeeachoperation.Besureoil levelis maintained.
1. Checkthe oil withthe enginestoppedand level.
2. Removethe oil fillercap/dipstickandwipeitclean.
3. Insertthe oilfiller cap/dipstickinto theoil filler neckas far as itwill
go, butdo not screwit in,then removeitto checkthe oillevel.
4. Ifthe oil levelisnearor belowthe lowerlimitmarkonthe dipstick,
removethe oil fillercap/dipstick,andfill withthe recommendedoil
to the upperlimitmark.Do not overfill.
5. Reinstallthe oilfillercap/dipstick.
Change Engine Oil
Changeengineoil afterthefirst monthor fivehoursof operation,and
everyfifty hoursoroncea seasonthereafter.
Drainthe engineoilwhenthe engineiswarm.Warmoil drainsquickly
andcompletely.
1. Turnthe fuel valve(Fig. 11)to the OFFpositionto reducethe
possibilityof fuel leakage.
2. Placea suitablecontainernextto the engineto catchthe usedoil.
3. Removethe oil fillercap/dipstickanddrainthe oil intothe
containerby tippingthe enginetowardthe oil fillerneck. See
Figure14.
Usedoilisa hazardouswasteproduct.Disposeof usedoil properly.
IDonot discardwithhouseholdwaste.Checkwithyourlocalauthori-
_tiesor SearsServiceCenterfor safedisposal/recyclingfacilities.
4. Withthe engineina levelposition,fill to the upperlimitmarkon
thedipstickwiththe recommendedoil.
NOTE:Runningtheenginewitha lowoil levelcan causeengine
damage.
5. Reinstallthe oilfiller cap/dipsticksecurely.
Clean Engine
•Dailyor beforeeveryuse,cleangrass,chaffor accumulated
debrisfromengine.Keeplinkage,spring,andcontrolsclean.
Keepareaaroundandbehindmufflerfreeof any combustible
debris.
• Keepingenginecleanallowsairmovementaroundengine.
• Enginepartsshouldbe keptcleanto reducethe riskof overheat-
ingandignitionof accumulateddebris.
Do not usewaterto cleanengineparts.Watercouldcontaminatefuel
system.Usea brushor dry cloth.
Oil Fill/Dipstic
Air Cleaner
Figure14
f
Figure15
LUBRICATION
Blade and Drive Control
Lubricatepivotpointsonthe bladeanddrivecontrolat leastonce
a seasonwithlight oil.Thesecontrolsmustoperatefreelyinboth
directions.SeeFigure15.
Wheels
Lubricatethe wheelsat leastoncea seasonwithlight oil (ormotoroil).
Ifwheelsare removedfor any reason,lubricatesurfaceof the pivot
arm andinnersurfaceof the wheelwithlightoil. SeeFigure15.
Rear Discharge Door/Side Mulch Plug
Lubricatethe torsionspringand pivotpointson the reardischarge
doorandside mulchplugperiodicallywithlightoil to preventrust.See
Figure15.
Transmission
The transmissionis pre-lubricatedandsealedat thefactoryanddoes
not requirelubrication.
18

CLEANING DECK
Cleanundersideof the mowerdeckonce aseasonto preventbuild-up
of grassclippingsor otherdebris.Followstepsbelowfor thisjob.
1. Disconnectsparkplugwire.Draingasolinefromlawn moweror
placea pieceof plasticunderthegas cap.
2. Tip mowersothat it restson the housing,keepingthe mufflerside
down.Holdmowerfirmly.
Nevertip the mowermorethan 900inany directionanddo not leave
the mowertippedfor any lengthof time. Oilcandraininto the upper
partof the enginecausinga startingproblem.
3. Scrapeandcleanthe undersideof thedeckwitha suitabletool.
Donot spraywithwater.
IMPORTANT:Donot usea pressurewasheror gardenhoseto clean
yourunit.Thesemaycausedamageto bearings,orthe engine.The
useof waterwill resultin shortenedlife andreduceserviceability.
4. Putthe mowerbackon itswheelsonthe ground.Ifyou hadput
plasticunderthe gas capearlier,makesureto removeit now.
REPLACING REAR FLAP
To replacerearflap,proceedas follows:
1. Liftreardoor,andpressflapin oneither sideto removefromhole.
SeeFigure16.
2. Removeflapfromoppositeholeandreplacewithnewflap in the
oppositeorderandmannerof removal.
Whenremovingthe cuttingbladefor sharpeningor replacement,
protectyour handswitha pairof heavyglovesoruse a heavyragto
holdthe blade.
BLADE CARE
Periodicallyinspectthe bladeadapterfor cracks,especiallyif you
strikea foreignobject. Replacewhennecessary.Followthe steps
belowfor bladeservice.
1. Disconnectsparkplugbootfromsparkplug.Turnmoweron its
side makingsurethattheair filterandthecarburetorarefacing
up.
2. Removethe boltandthe bladebellsupportwhichholdthe blade
andthe bladeadapterto theenginecrankshaft.SeeFigure17.
3. Removebladeandadapterfromthe crankshaft.
NOTE:When removingtheseitems,the wavewashermayalso break
freefromthe crankshaft.Be sureto makenoteof the orientationof this
itemfor reassembly.
4. Removebladefromthe adapterfor testingbalance.Balancethe
bladeon a roundshaft screwdriverto check.Removemetalfrom
the heavyside untilit balancesevenly.Whensharpeningthe
blade,followthe originalangleof grind.Grindeachcuttingedge
equallyto keepthe bladebalanced.
Figure16
J
Support Bolt ................................
Figure17
J
An unbalancedbladewill causeexcessivevibrationwhen rotatingat I
highspeeds.It maycausedamageto mowerandcould breakcausingI
_persona njury. J
.Lubricatetheenginecrankshaftandthe innersurfaceof the blade
adapterwithlightoil. Slidethe bladeadapterontothe engine
crankshaft.Placethe bladeonthe adaptersuchthatthe sideof
theblademarked"Bottom"(orwithpart number)facesthe ground
whenthe moweris inthe operatingposition.Makesurethatthe
bladeis alignedand seatedon the bladeadapterflanges.
19
6. Placebladebellsupporton the blade.Alignnotcheson the blade
bellsupportwithsmallholesin blade.
7. Replacehexbolt andtightenhexbolt to torque:450in. Ibs.rain.,
600in. Ibs.max.
Toensuresafeoperationof yourmower,periodicallycheckthe blade
boltfor correcttorque.
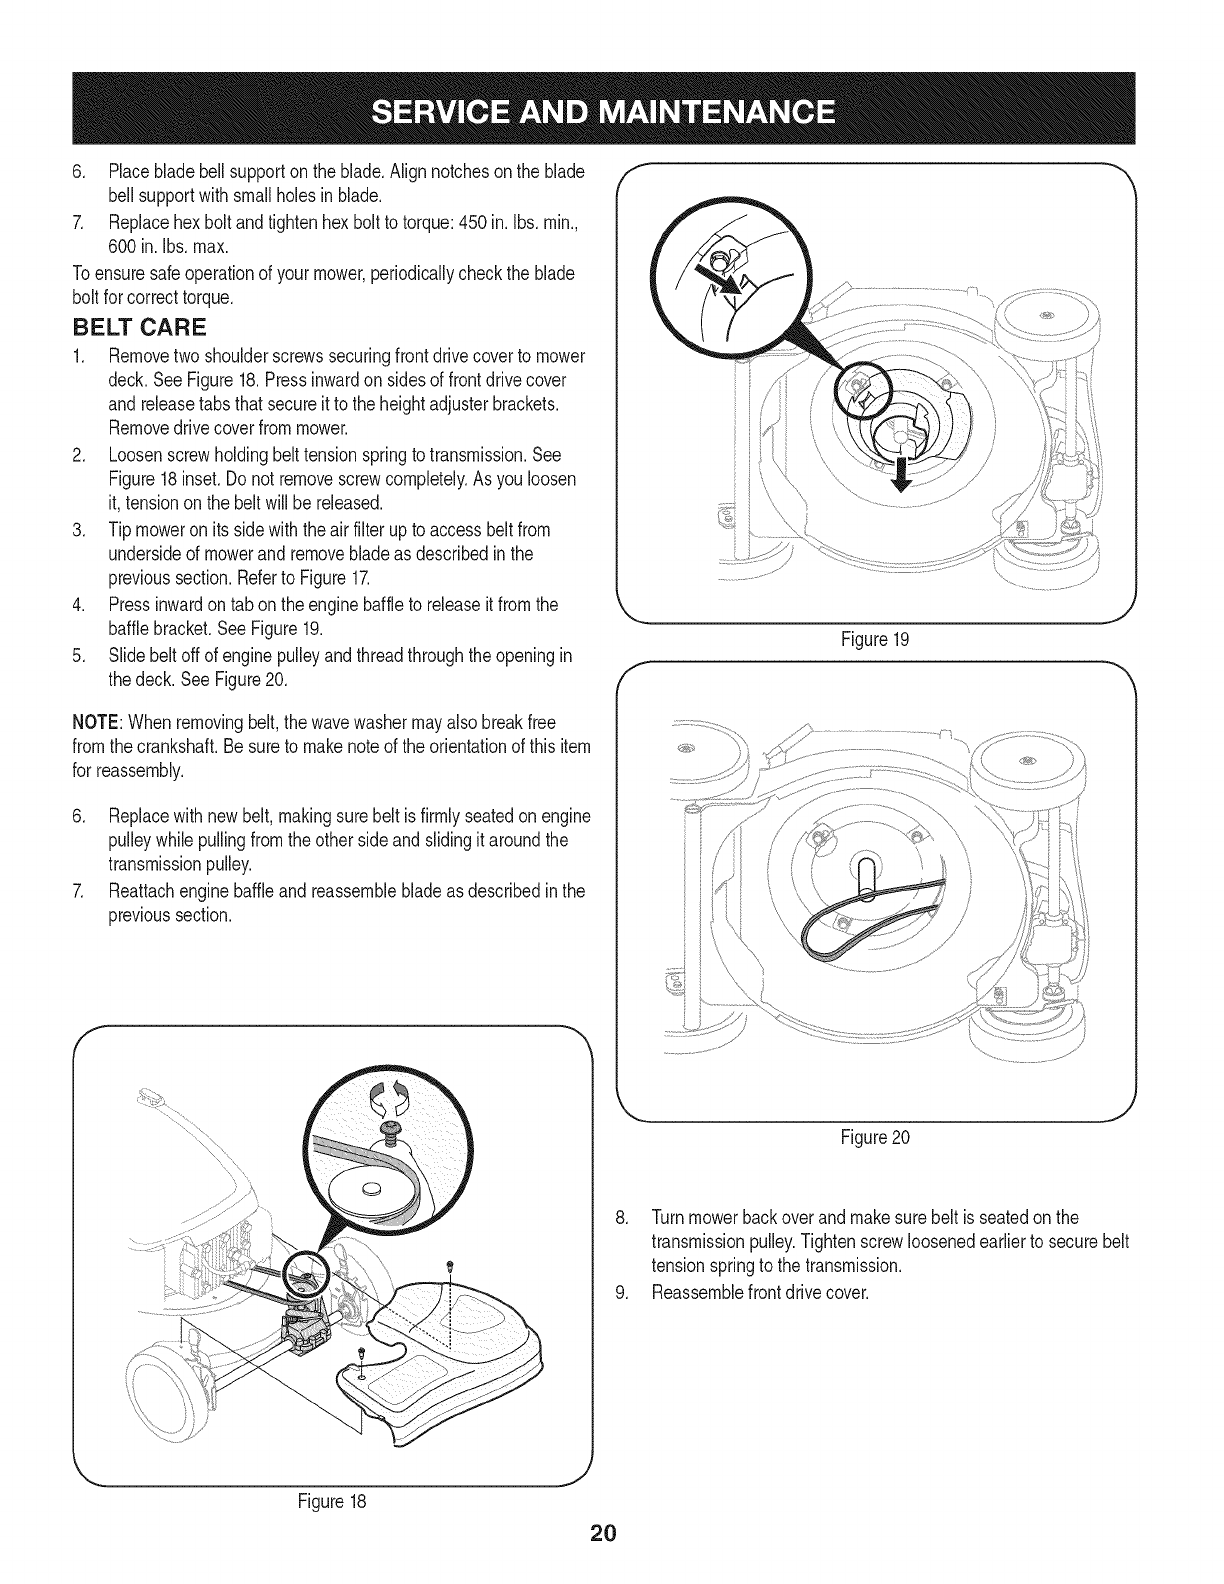
BELT CARE
1. Removetwo shoulderscrewssecuringfrontdrivecoverto mower
deck.SeeFigure18.Pressinwardon sidesof frontdrive cover
andreleasetabsthatsecureit to the heightadjusterbrackets.
Removedrive coverfrommower.
2. Loosenscrewholdingbelttensionspringto transmission.See
Figure18inset.Do notremovescrewcompletely.As you loosen
it,tensionon the beltwill be released.
3. Tip moweron its sidewiththe airfilterupto accessbeltfrom
undersideof mowerand removebladeas describedin the
previoussection.Referto Figure17.
4. Pressinwardon tab onthe enginebaffleto releaseit fromthe
bafflebracket.SeeFigure19.
5. Slidebeltoff of enginepulleyandthreadthroughtheopeningin
thedeck. SeeFigure20.
J
Figure19
NOTE:Whenremovingbelt,thewavewashermayalsobreakfree
fromthe crankshaft.Besureto makenoteof theorientationof this item
for reassembly.
6. Replacewith newbelt,makingsurebelt is firmlyseatedonengine
pulleywhilepullingfromtheother sideandslidingit aroundthe
transmissionpulley.
7. Reattachenginebaffleand reassemblebladeas describedin the
previoussection.
.
.
Figure20
Turnmowerbackoverand makesurebelt is seatedonthe
transmissionpulley.Tightenscrewloosenedearlierto securebelt
tensionspringto the transmission.
Reassemblefrontdrivecover.
Figure18
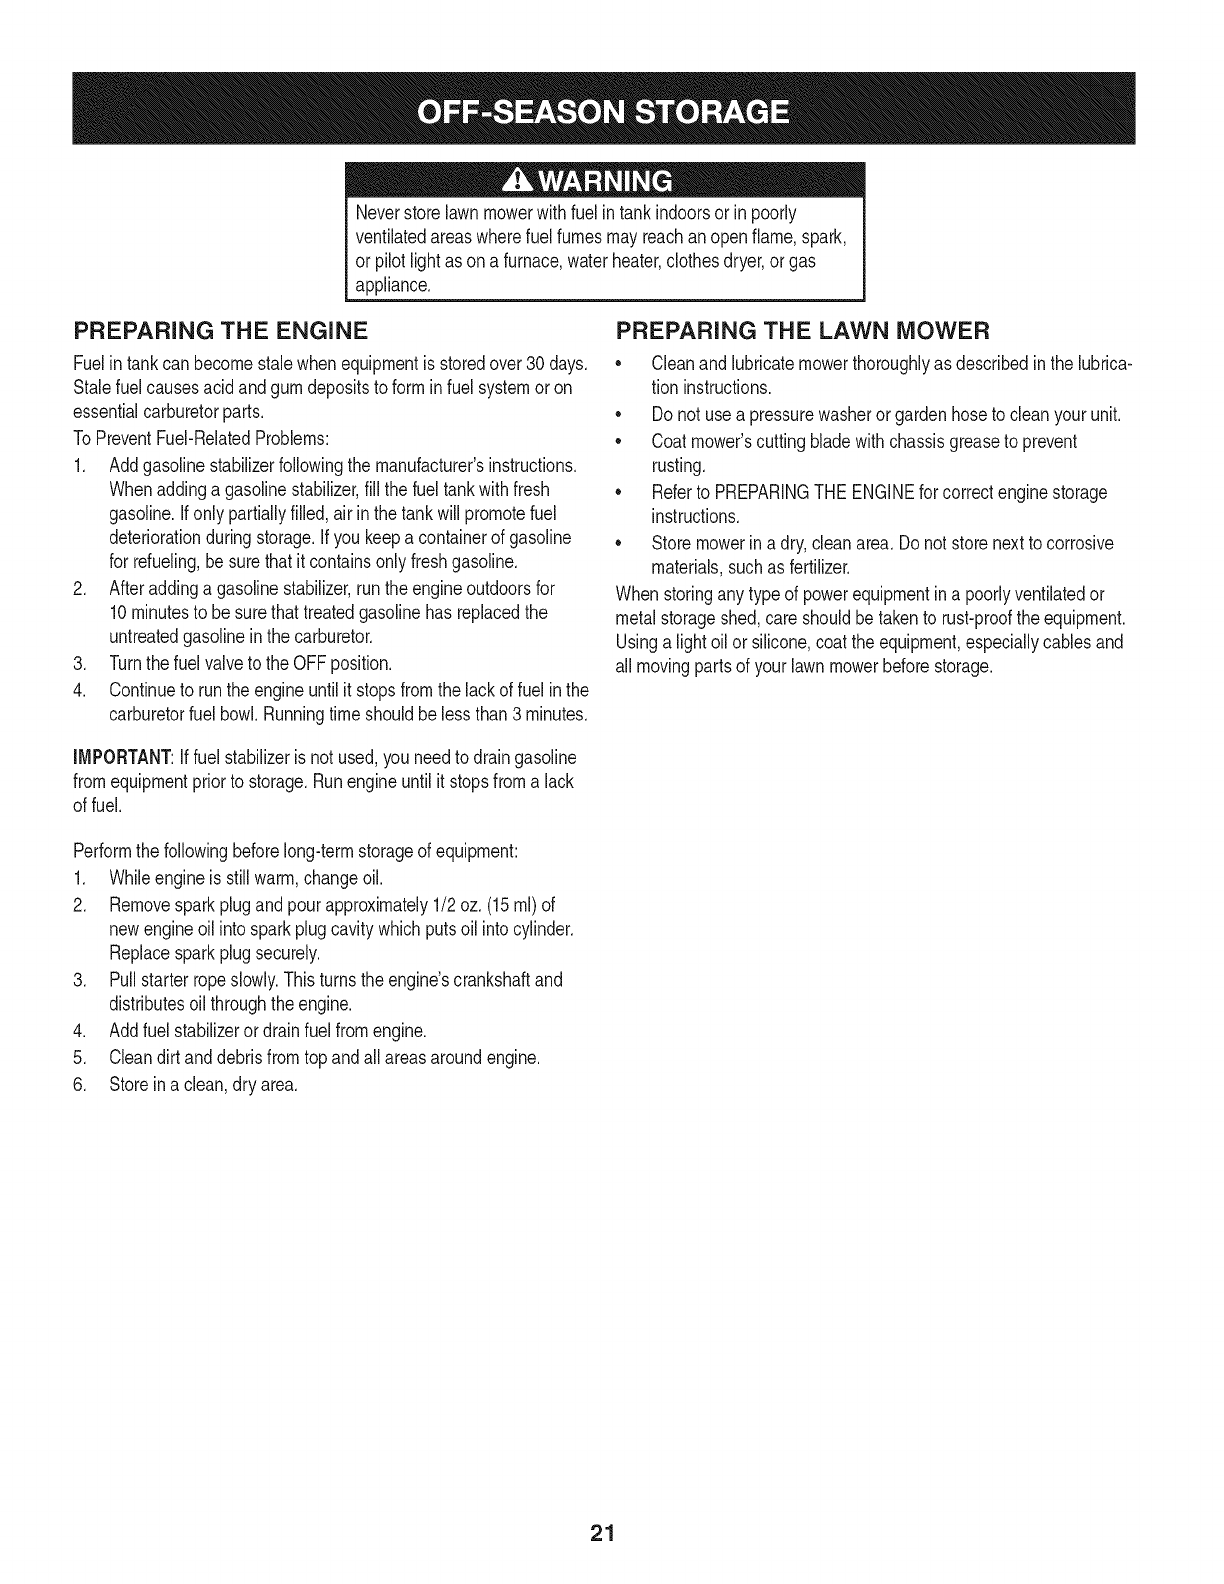
Neverstorelawnmowerwithfuelintankindoorsorin poorly
ventilatedareaswherefuel fumesmayreachan openflame,spark,
or pilot lightas ona furnace,waterheater,clothesdryer,or gas
appliance.
PREPARING THE ENGINE
Fuelin tankcan becomestalewhenequipmentis storedover 30days.
Stalefuel causesacid andgumdepositsto forminfuel systemoron
essentialcarburetorparts.
To PreventFuel-RelatedProblems:
1. Addgasolinestabilizerfollowingthe manufacturer'sinstructions.
Whenaddinga gasolinestabilizer,fill the fueltankwithfresh
gasoline.Ifonly partiallyfilled,air inthe tankwill promotefuel
deteriorationduringstorage.Ifyou keepa containerof gasoline
for refueling,be surethatit containsonly freshgasoline.
2. Afteraddinga gasolinestabilizer,runthe engineoutdoorsfor
10minutesto besurethattreatedgasolinehas replacedthe
untreatedgasolineinthe carburetor.
3. Turnthefuel valveto the OFFposition.
4. Continueto runthe engineuntilit stopsfromthe lackof fuel inthe
carburetorfuel bowl.Runningtimeshouldbelessthan 3 minutes.
PREPARING THE LAWN MOWER
• Cleanandlubricatemowerthoroughlyas describedinthe lubrica-
tion instructions.
• Donot usea pressurewasheror gardenhoseto cleanyour unit.
• Coatmower'scuttingbladewithchassisgreaseto prevent
rusting.
• Referto PREPARINGTHE ENGINEfor correctenginestorage
instructions.
• Store mowerin a dry,cleanarea. Do notstorenexttocorrosive
materials,suchas fertilizer.
Whenstoringany typeof powerequipmentina poorlyventilatedor
metalstorageshed,care shouldbetakento rust-prooftheequipment.
Usinga lightoil orsilicone,coatthe equipment,especiallycablesand
all movingpartsof yourlawnmowerbeforestorage.
IMPORTANT:if fuel stabilizerisnot used,you needto draingasoline
fromequipmentpriorto storage.Runengineuntil itstopsfroma lack
of fuel.
Performthe followingbeforelong-termstorageof equipment:
1. Whileengineis stillwarm,changeoil.
2. Removesparkplugand pourapproximately1/2 oz.(15ml)of
new engineoilintosparkplugcavitywhichputsoil intocylinder.
Replacesparkplugsecurely.
3. Pullstarterropeslowly.Thisturnsthe engine'scrankshaftand
distributesoil throughthe engine.
4. Addfuel stabilizeror drainfuelfromengine.
5. Cleandirt anddebrisfromtopandall areasaroundengine.
6. Storein a clean,dry area.
21
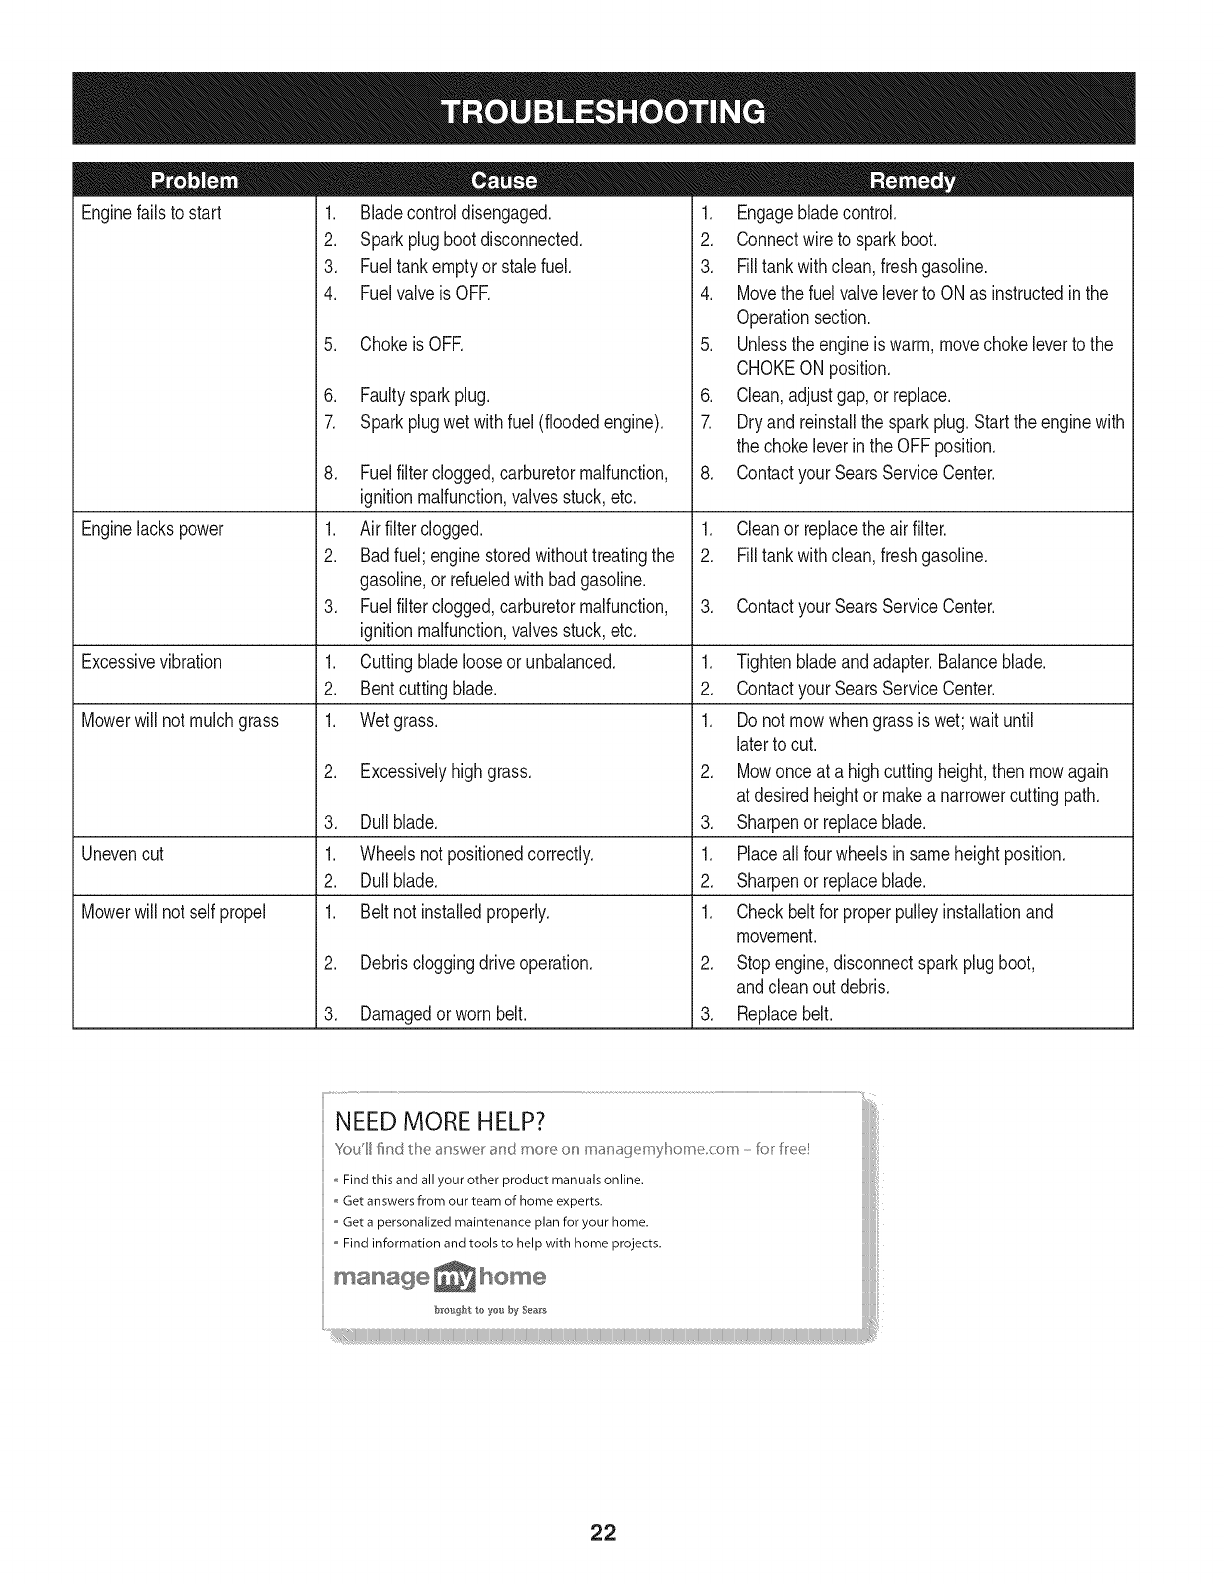
Enginefailsto start
Enginelackspower
Excessivevibration
Mowerwill not mulchgrass
Unevencut
Mowerwill not selfpropel
1. Bladecontroldisengaged.
2. Sparkplugbootdisconnected.
3. Fueltankemptyor stalefuel.
4. Fuelvalveis OFE
5. ChokeisOFE
6. Faultysparkplug.
1. Engagebladecontrol.
2. Connectwireto sparkboot.
3. Filltankwithclean,freshgasoline.
4. Movethe fuelvalveleverto ONas instructedinthe
Operationsection.
5. Unlessthe engineis warm,movechokeleverto the
CHOKEON position.
6. Clean,adjustgap,or replace.
7. Sparkplugwetwithfuel (floodedengine).
8. Fuelfilterclogged,carburetormalfunction,
ignitionmalfunction,valvesstuck,etc.
1. Airfilterclogged.
2. Badfuel;enginestoredwithouttreatingthe
gasoline,or refueledwithbadgasoline.
3. Fuelfilterclogged,carburetormalfunction,
ignitionmalfunction,valvesstuck,etc.
1. Cuttingbladelooseor unbalanced.
2. Bentcuttingblade.
1. Wetgrass.
2. Excessivelyhighgrass.
3. Dullblade.
1. Wheelsnotpositionedcorrectly.
2. Dullblade.
1. Beltnot installedproperly.
2. Debriscloggingdriveoperation.
3. Damagedorworn belt.
7.
8.
1.
2.
3.
1.
2.
1.
2.
3.
1.
2.
1.
2.
3.
Dryandreinstallthe sparkplug.Startthe enginewith
thechokeleverinthe OFFposition.
Contactyour SearsServiceCenter.
Cleanor replacethe air filter.
Filltankwithclean,freshgasoline.
Contactyour SearsServiceCenter.
Tightenbladeandadapter.Balanceblade.
Contactyour SearsServiceCenter.
Do notmowwhengrassis wet;waituntil
laterto cut.
Mowonce at a highcuttingheight,then mowagain
at desiredheightor makea narrowercuttingpath.
Sharpenor replaceblade.
Placeall fourwheelsinsameheightposition.
Sharpenor replaceblade.
Checkbeltfor properpulleyinstallationand
movement.
Stopengine,disconnectsparkplugboot,
andcleanout debris.
Replacebelt.
22

23

Self-Propelled Mower B Model No. 247.37683
47
10
46
9
44 41
24
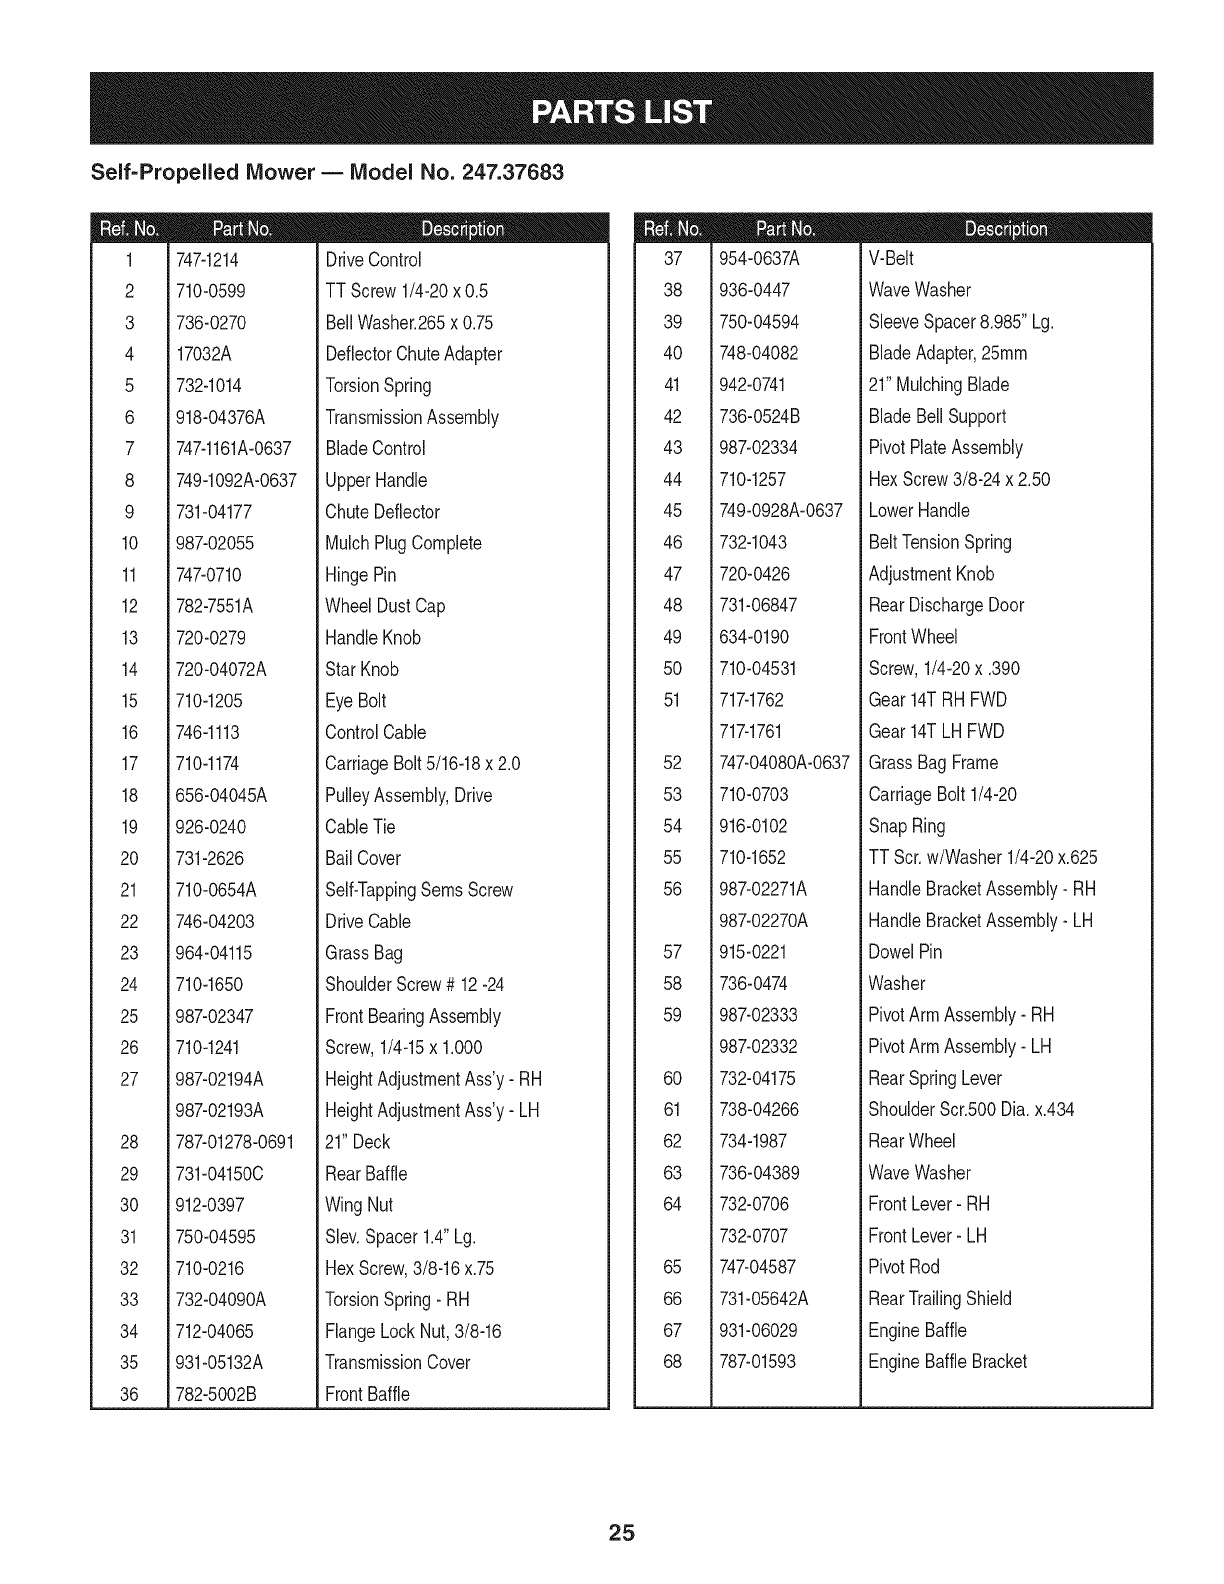
Self=Propelled Mower B Model No. 247.37683
1
2
3
4
5
6
7
8
9
10
11
12
13
14
15
16
17
18
19
2O
21
22
23
24
25
26
27
28
29
30
31
32
33
34
35
36
747-1214
710-0599
736-0270
17032A
732-1014
918-04376A
747-1161A-0637
749-1092A-0637
731-04177
987-02055
747-0710
782-7551A
720-0279
720-04072A
710-1205
746-1113
710-1174
656-04045A
926-0240
731-2626
710-0654A
746-04203
964-04115
710-1650
987-02347
710-1241
987-02194A
987-02193A
787-01278-0691
731-04150C
912-0397
750-04595
710-0216
732-04090A
712-04065
931-05132A
782-5002B
D = I! IJ
DriveControl
TT Screw1/4-20x 0.5
BellWasher.265x 0.75
DeflectorChuteAdapter
TorsionSpring
TransmissionAssembly
BladeControl
UpperHandle
ChuteDeflector
MulchPlugComplete
HingePin
WheelDustCap
HandleKnob
Star Knob
Eye Bolt
ControlCable
CarriageBolt5/16-18x 2.0
PulleyAssembly,Drive
CableTie
BailCover
Self-TappingSeresScrew
DriveCable
GrassBag
ShoulderScrew# 12-24
FrontBearingAssembly
Screw,1/4-15x 1.000
HeightAdjustmentAss'y- RH
HeightAdjustmentAss'y- LH
21"Deck
RearBaffle
Wing Nut
Slev.Spacer1.4"Lg.
HexScrew,3/8-16x.75
TorsionSpring- RH
FlangeLockNut,3/8-16
TransmissionCover
FrontBaffle
37
38
39
4O
41
42
43
44
45
46
47
48
49
5O
51
52
53
54
55
56
57
58
59
6O
61
62
63
64
65
66
67
68
954-0637A
936-0447
750-04594
748-04082
942-0741
736-0524B
987-02334
710-1257
749-0928A-0637
732-1043
720-0426
731-06847
634-0190
710-04531
717-1762
717-1761
747-04080A-0637
710-0703
916-0102
710-1652
987-02271A
987-02270A
915-0221
736-0474
987-02333
987-02332
732-04175
738-04266
734-1987
736-04389
732-0706
732-0707
747-04587
731-05642A
931-06029
787-01593
D = O tl
V-Belt
WaveWasher
SleeveSpacer8.985"Lg.
BladeAdapter,25ram
21"MulchingBlade
BladeBellSupport
PivotPlateAssembly
HexScrew3/8-24x 2.50
LowerHandle
BeltTensionSpring
AdjustmentKnob
RearDischargeDoor
FrontWheel
Screw,1/4-20x .390
Gear14TRH FWD
Gear14TLH FWD
GrassBagFrame
CarriageBolt 1/4-20
SnapRing
TTScr.w/Washer1/4-20x.625
HandleBracketAssembly- RH
HandleBracketAssembly- LH
DowelPin
Washer
PivotArmAssembly- RH
PivotArmAssembly- LH
RearSpringLever
ShoulderScr.500Dia.x.434
RearWheel
WaveWasher
FrontLever- RH
FrontLever- LH
PivotRod
RearTrailingShield
EngineBaffle
EngineBaffleBracket
25
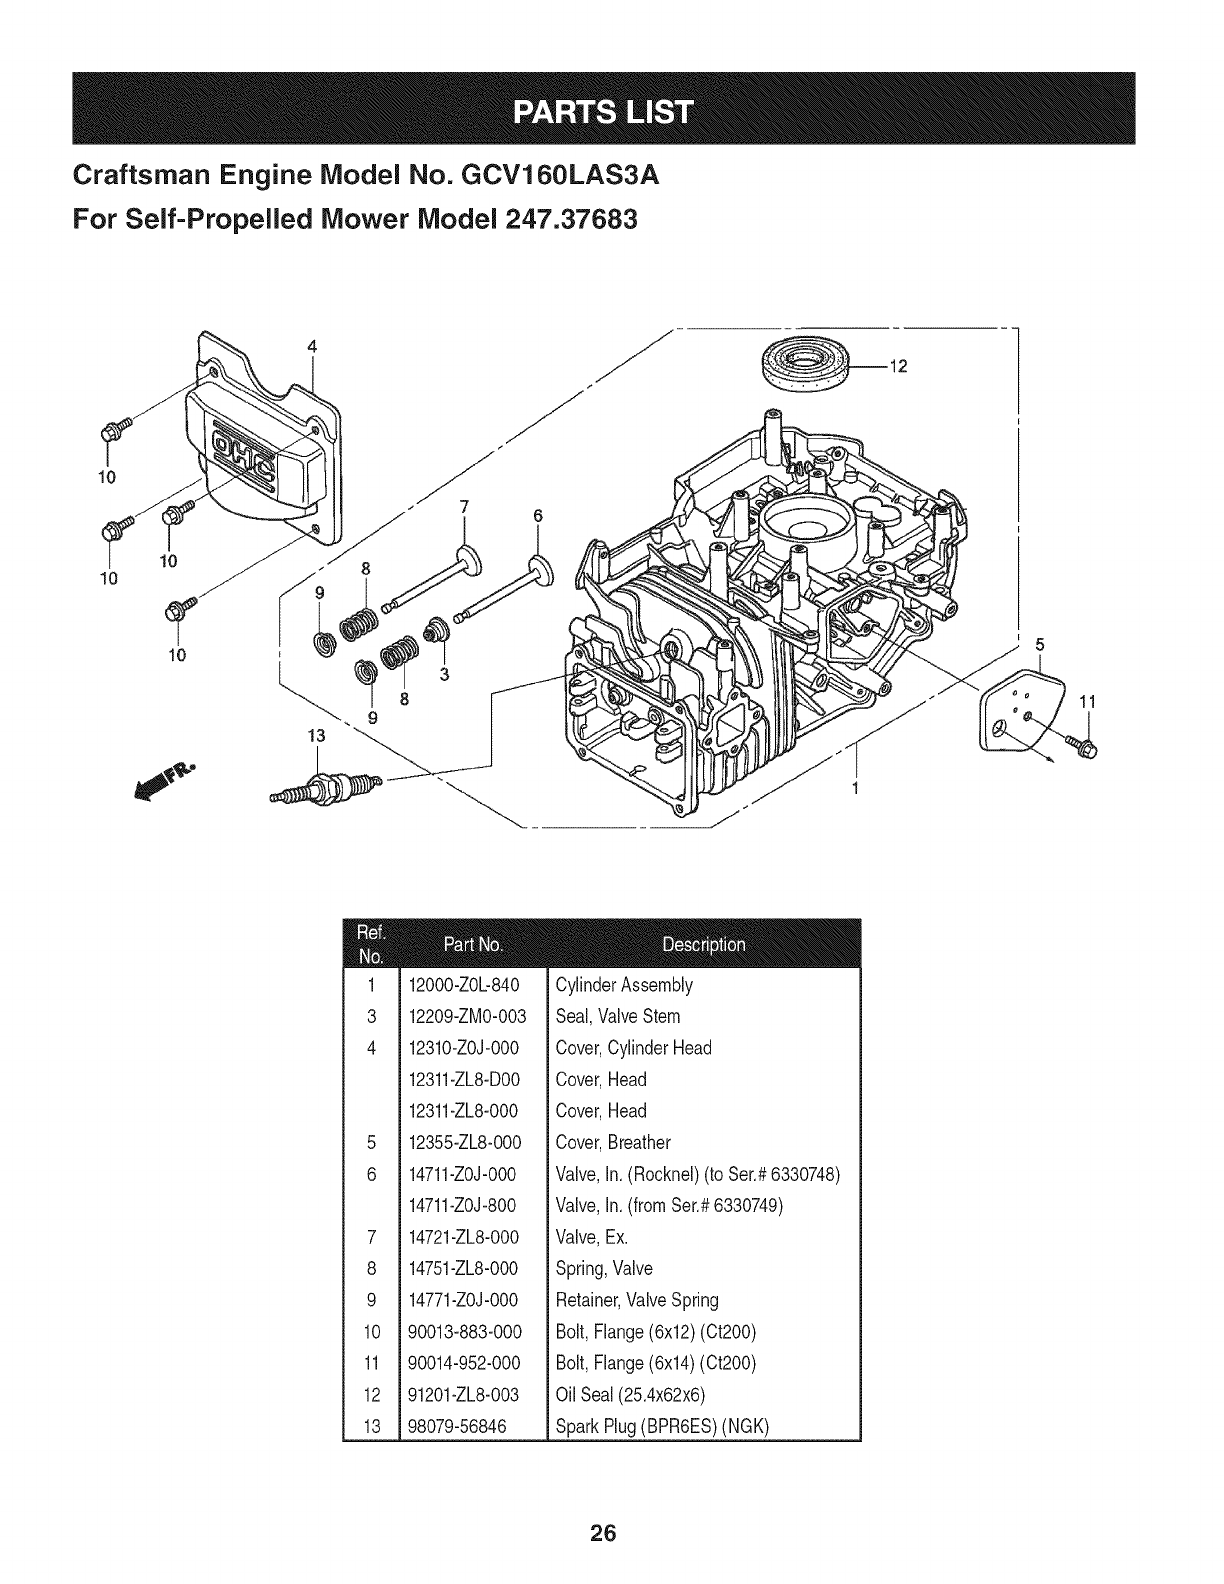
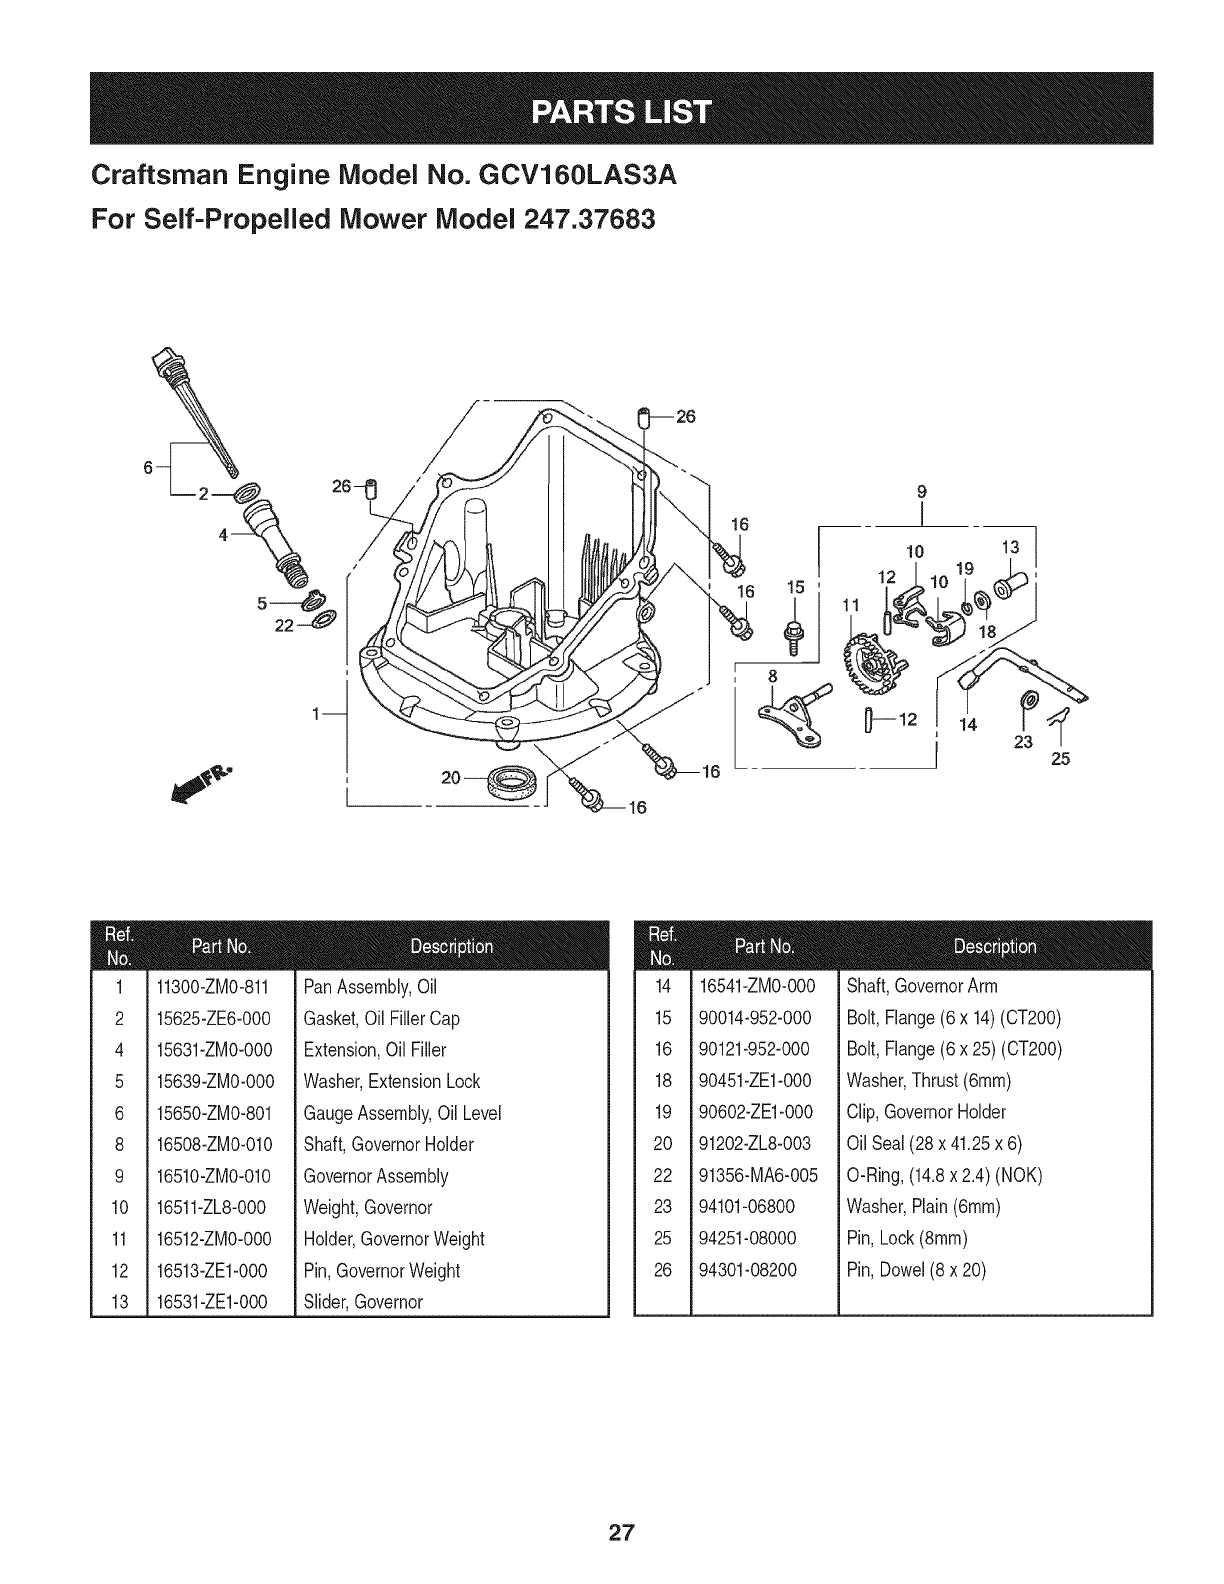
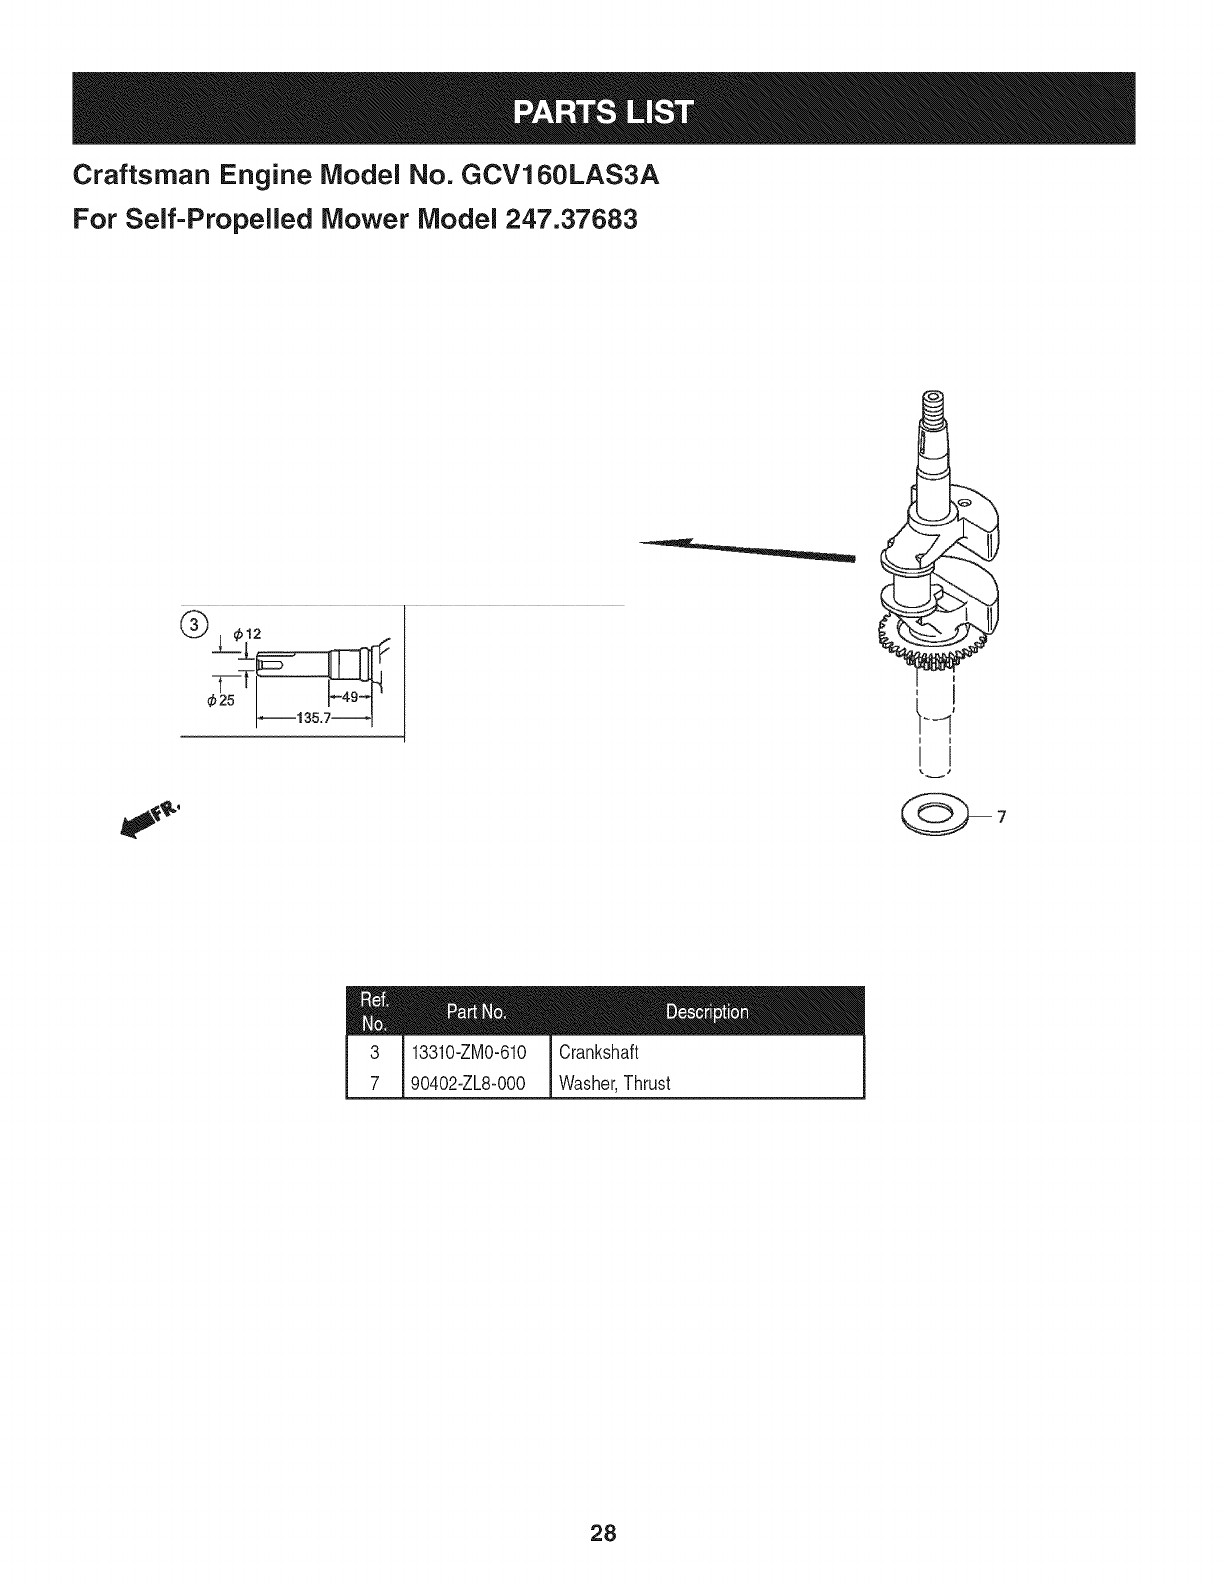
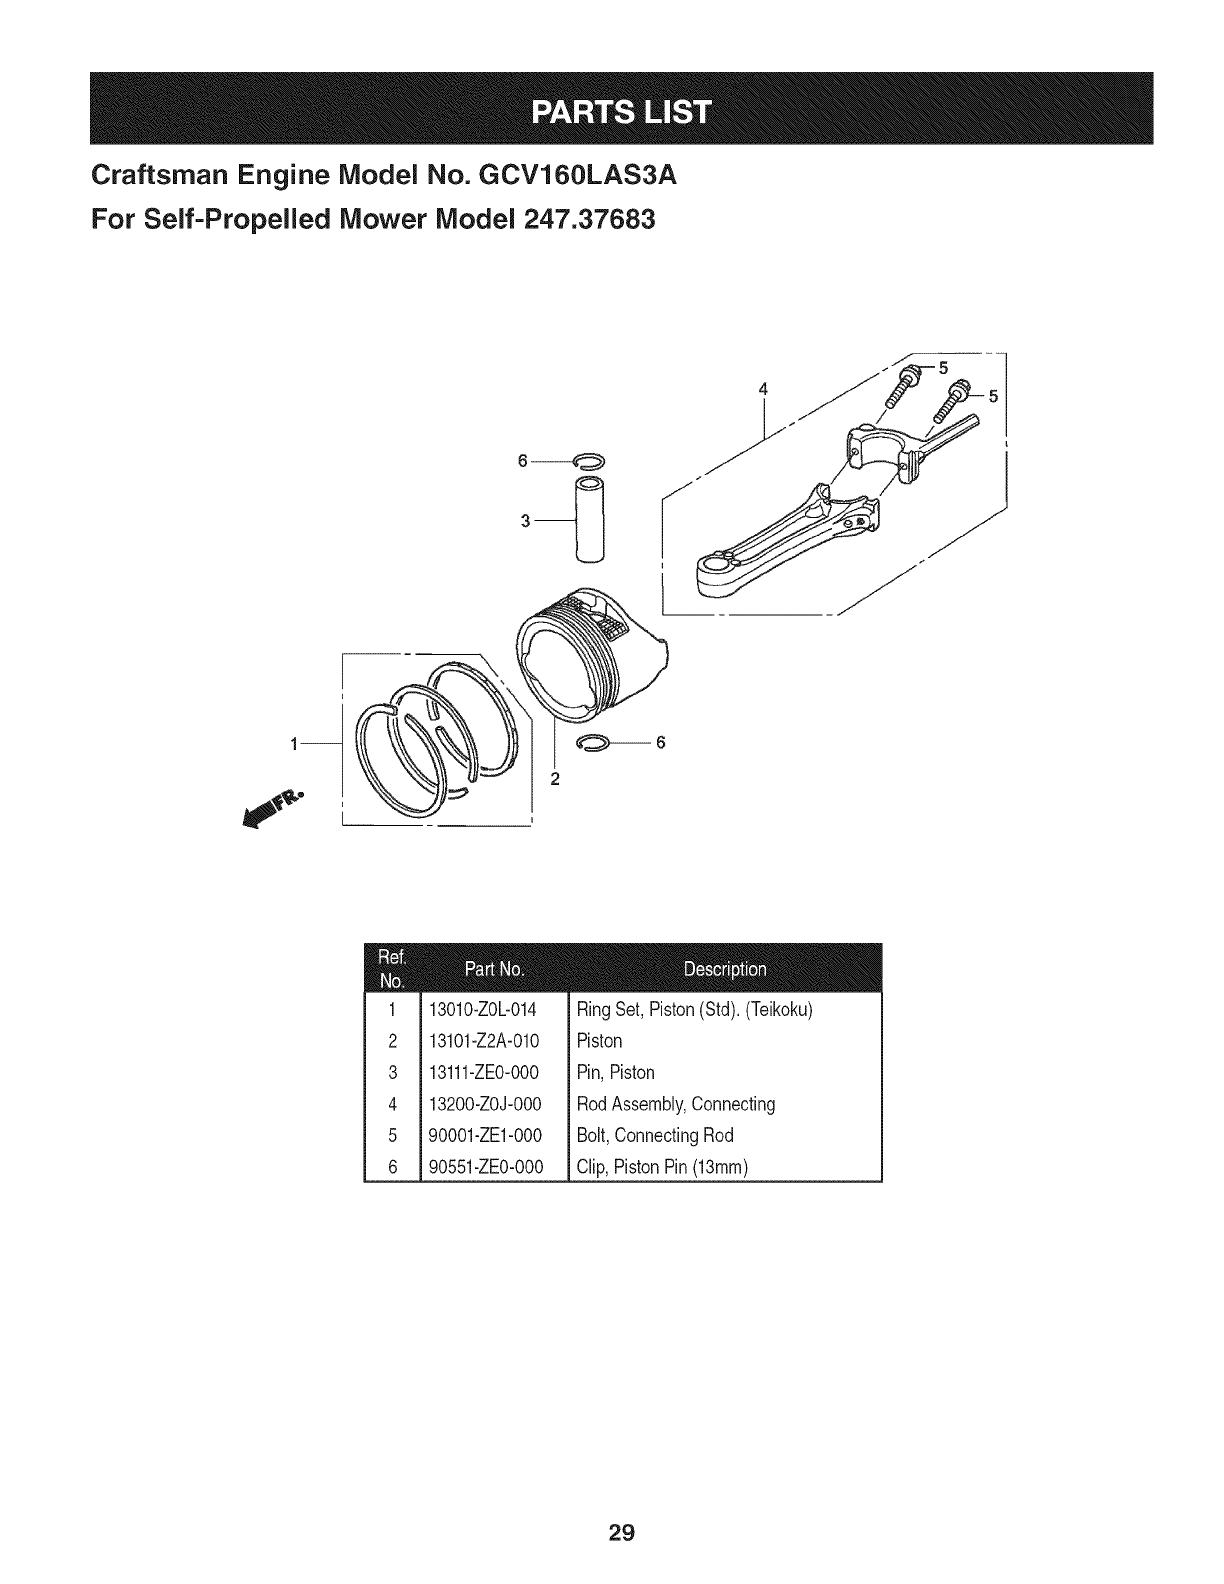
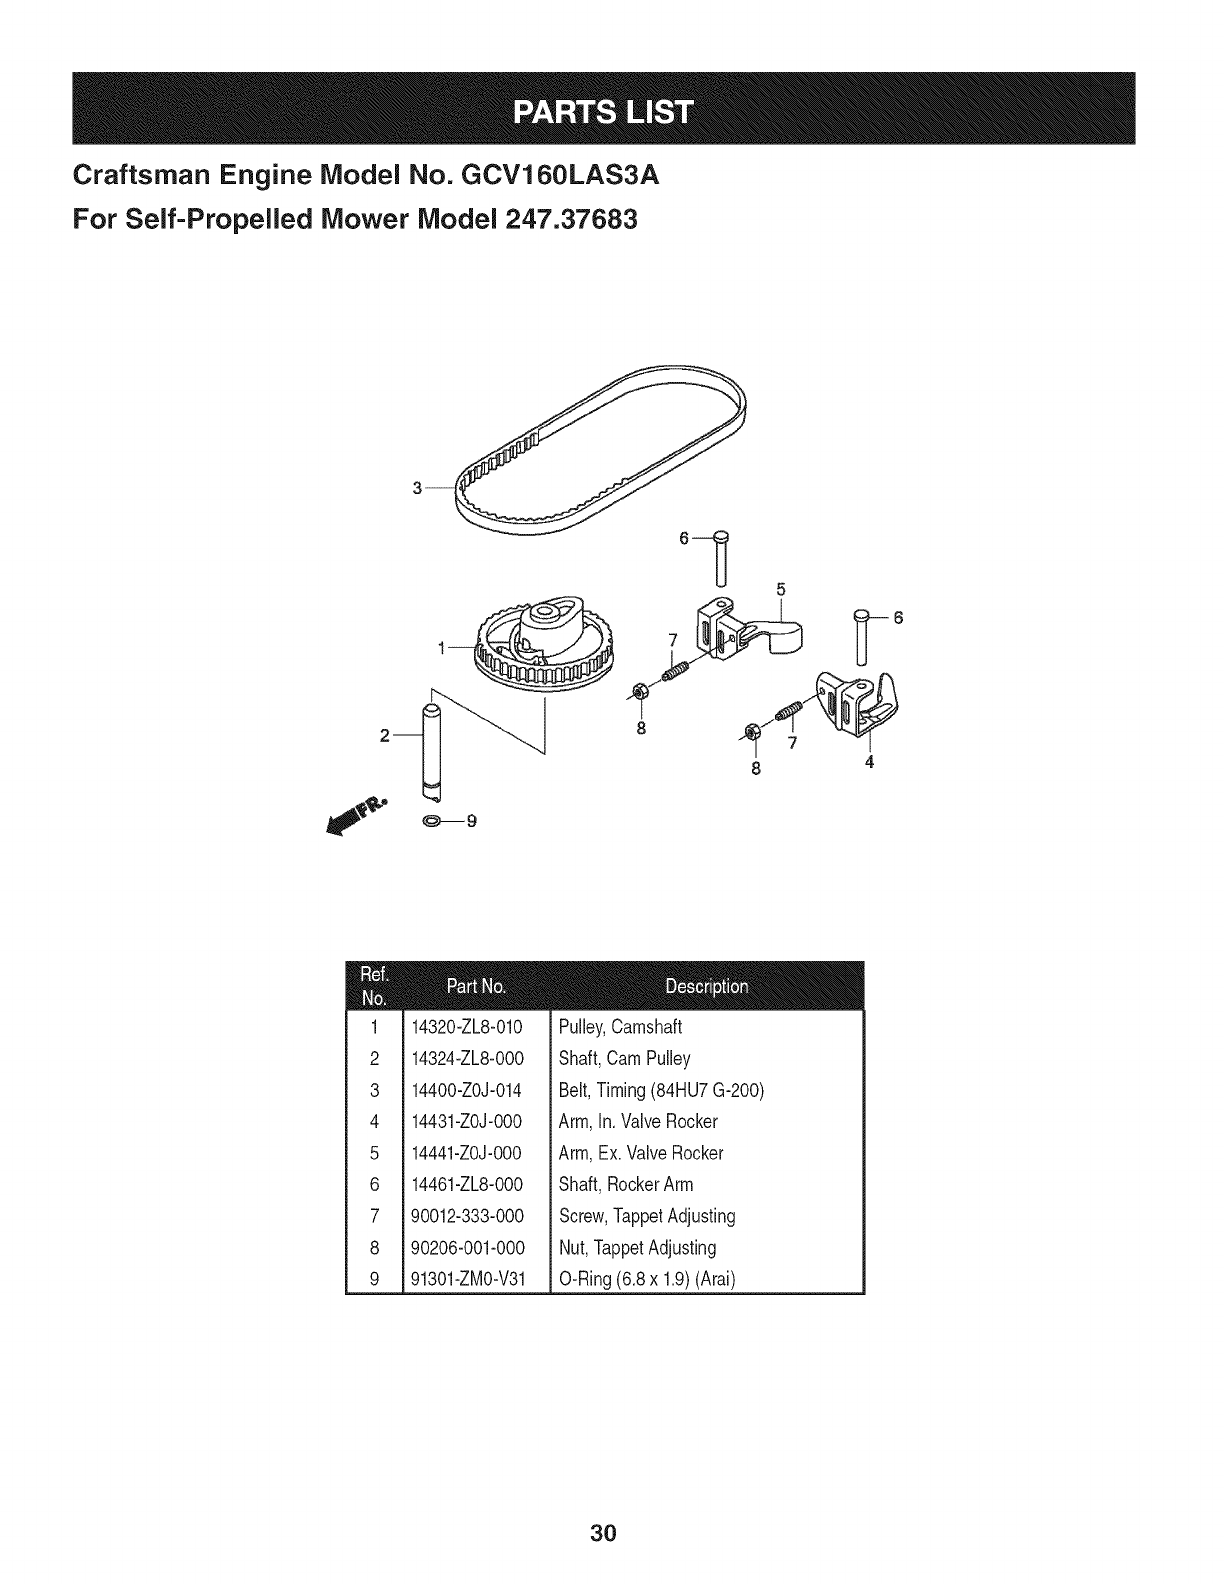
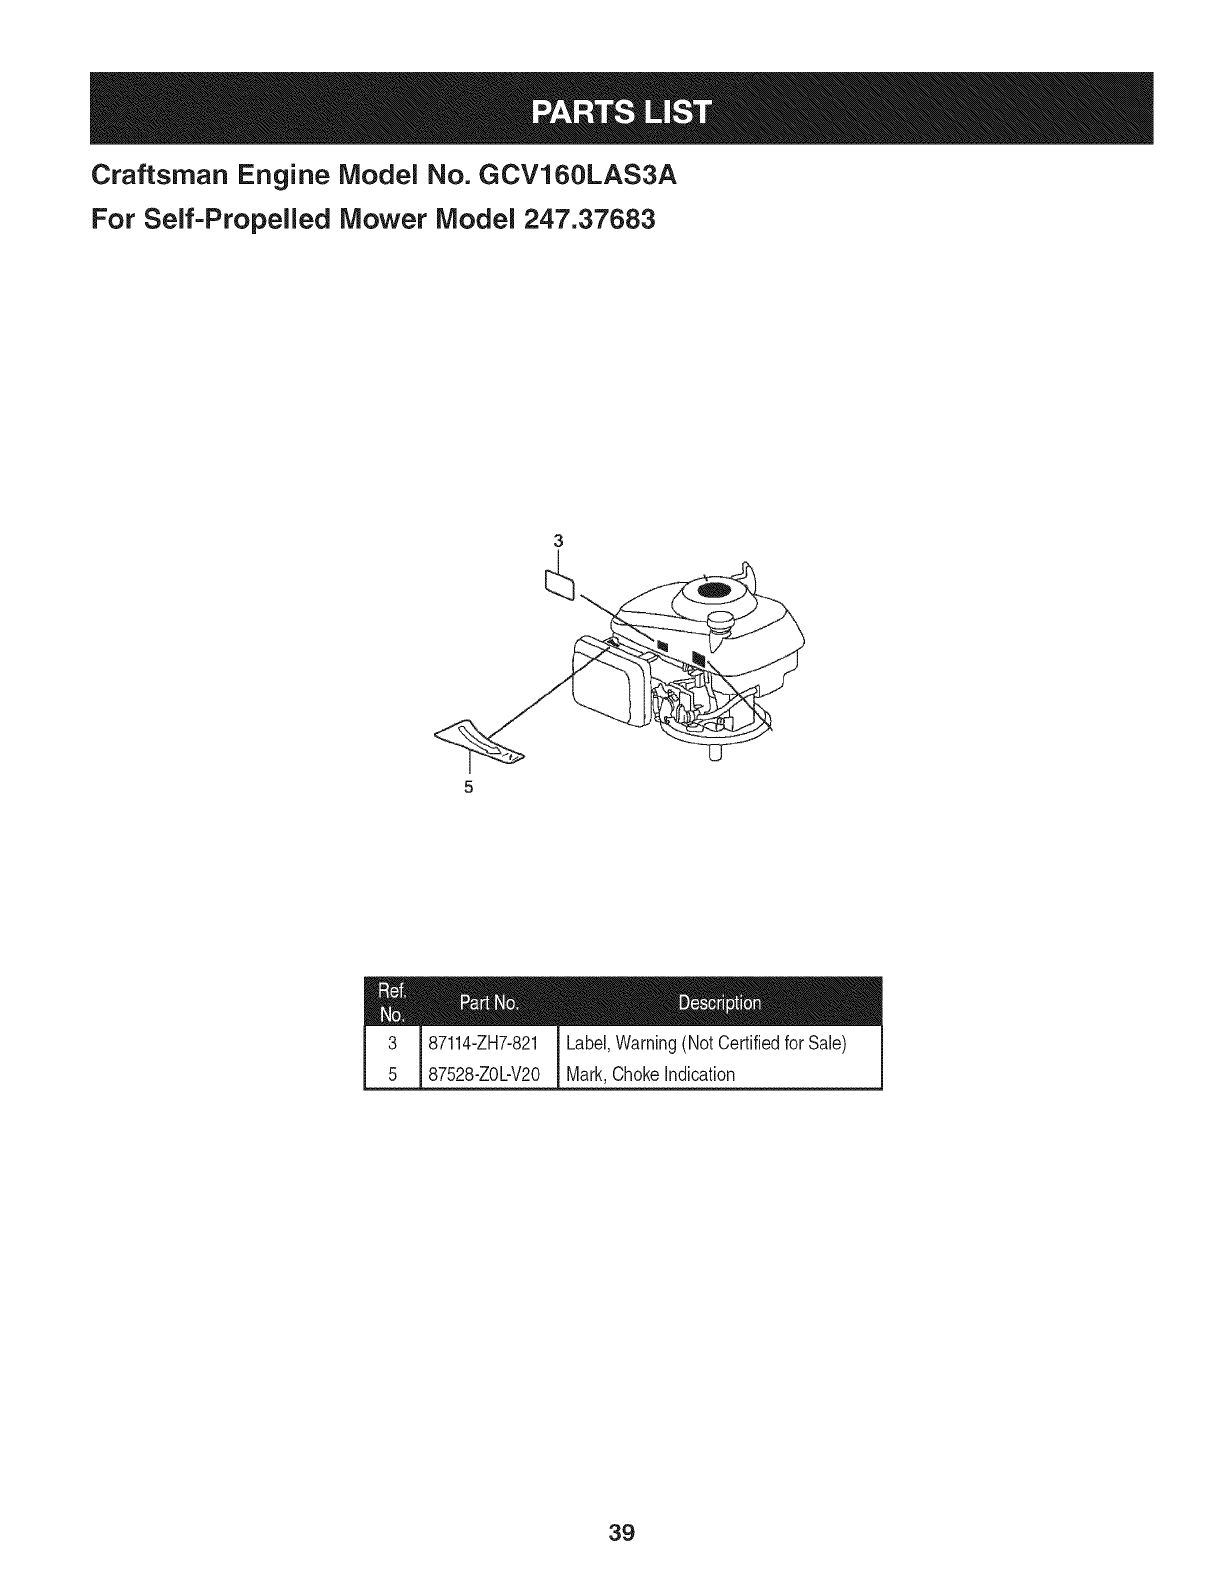
Craftsman Engine Model No. GCV160LAS3A
For Self-Propelled Mower Model 247.37683
10
lO
lO
lo
______F"
11
m
m
1
3
4
5
6
7
8
9
10
11
12
13
12000-ZOb840
12209-ZM0-003
12310-ZOJ-O00
12311-ZL8-DO0
12311-ZL8-000
12355-ZL8-000
14711-ZOJ-O00
14711-ZOJ-800
14721-ZL8-000
14751-ZL8-000
14771-ZOJ-O00
90013-883-000
90014-952-000
91201-ZL8-003
98079-56846
CylinderAssembly
Seal,ValveStern
Cover,CylinderHead
Cover,Head
Cover,Head
Cover,Breather
Valve,In.(Rocknel)(to Ser.#6330748)
Valve,In.(fromSer.#6330749)
Valve,Ex.
Spring,Valve
Retainer,ValveSpring
Bolt,Flange(6x12)(Ct200)
Bolt,Flange(6x14)(Ct200)
Oil Seal(25.4x62x6)
Spark Plug(BPR6ES)(NGK)
26
Craftsman Engine Model No. GCV160LAS3A
For Self-Propelled Mower Model 247.37683
m
m
1
2
4
5
6
8
9
10
11
12
13
11300-ZM0-811
15625-ZE6-000
15631-ZM0-000
15639-ZM0-000
15650-ZM0-801
16508-ZM0-010
16510-ZM0-010
16511-ZL8-000
16512-ZM0-000
16513-ZE1-000
16531-ZE1-000
PanAssembly,Oil
Gasket,Oil FillerCap
Extension,Oil Filler
Washer,ExtensionLock
GaugeAssembly,Oil Level
Shaft,GovernorHolder
GovernorAssembly
Weight,Governor
Holder,GovernorWeight
Pin,GovernorWeight
Slider,Governor
m
m
14
15
16
18
19
20
22
23
25
26
16541-ZM0-000
90014-952-000
90121-952-000
90451-ZE1-000
90602-ZE1-000
91202-ZL8-003
91356-MA6-005
94101-06800
94251-08000
94301-08200
Shaft,GovernorArm
Bolt,Flange(6 x 14)(CT200)
Bolt,Flange(6 x 25)(CT200)
Washer,Thrust(6ram)
Clip,GovernorHolder
OilSeal(28x 41.25x 6)
O-Ring,(14.8x 2.4) (NOK)
Washer,Plain(6ram)
Pin,Lock(8ram)
Pin,Dowel(8 x 20)
27
Craftsman Engine Model No. GCV160LAS3A
For Self-Propelled Mower Model 247.37683
13310-ZM0-610
90402-ZL8-000
Crankshaft
Washer,Thrust
28
Craftsman Engine Model No. GCV160LAS3A
For Self-Propelled Mower Model 247.37683
13010-ZOb014
13101-Z2A-010
13111-ZE0-000
13200-ZOJ-O00
90001-ZE1o000
90551-ZE0-000
RingSet,Piston(Std).(Teikoku)
Piston
Pin, Piston
RodAssembly,Connecting
Bolt,ConnectingRod
Clip,PistonPin(13ram)
29
Craftsman Engine Model No. GCV160LAS3A
For Self-Propelled Mower Model 247.37683
m
m
1
2
3
4
5
6
7
8
9
143201ZL8-010
143241ZL8-000
144001ZOJ-014
14431-ZOJ-O00
14441-ZOJ-O00
144611ZL81000
90012-333-000
90206-001-000
91301-ZMOiV31
Pulley,Camshaft
Shaft,CamPulley
Belt,Timing(84HU7G-200)
Arm,In.ValveRocker
Arm,Ex.ValveRocker
Shaft,RockerArm
Screw,TappetAdjusting
Nut,TappetAdjusting
O-Ring(6.8x 1.9)(Arai)
3O
Craftsman Engine Model No. GCV160LAS3A
For Self-Propelled Mower Model 247.37683
I 8--s
3
m
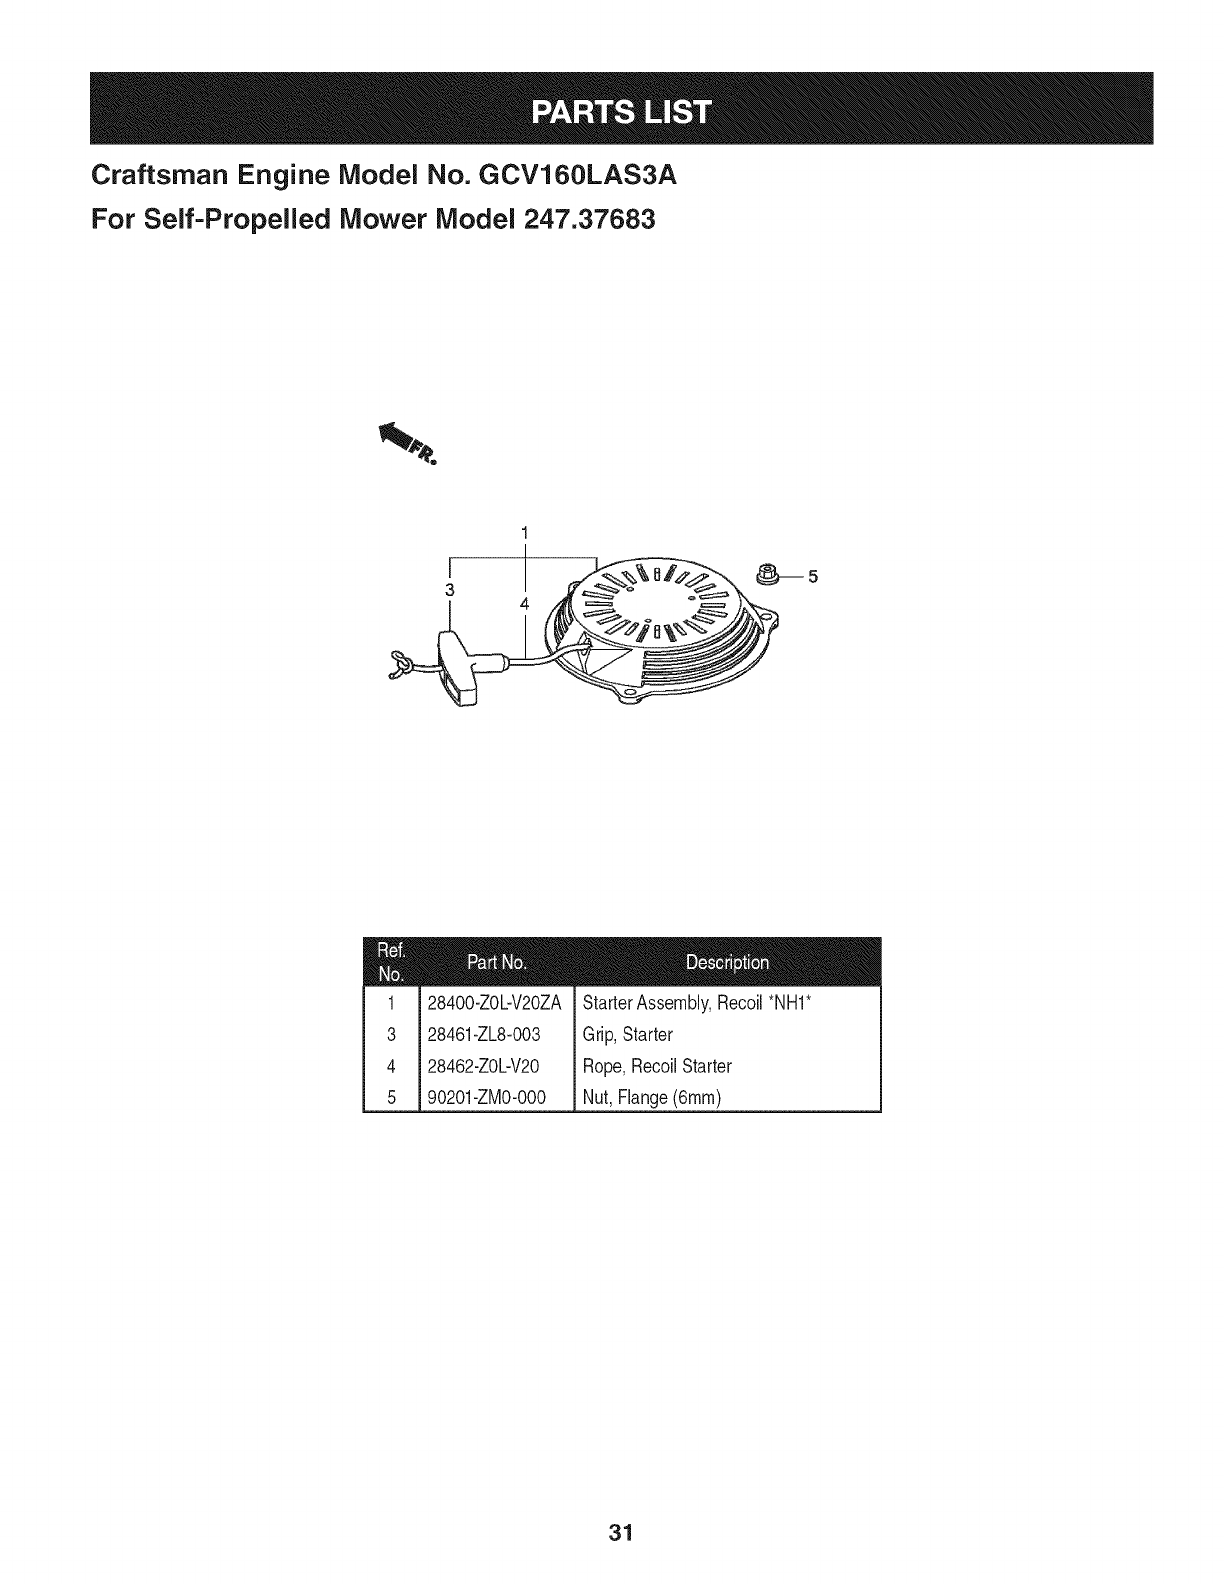
1 28400-ZObV20ZA StarterAssembly,Recoil*NHI*
3 28461-ZL8o003 Grip,Starter
4 28462-ZObV20 Rope,RecoilStarter
5 90201-ZM0-000 Nut, Flange(6ram)
31
Craftsman Engine Model No. GCV160LAS3A
For Self-Propelled Mower Model 247.37683
11
9
41 38
42
29
4O
10
19 2O
m
m
3
5
6
7
8
9
10
11
12
13
14
16
17
19
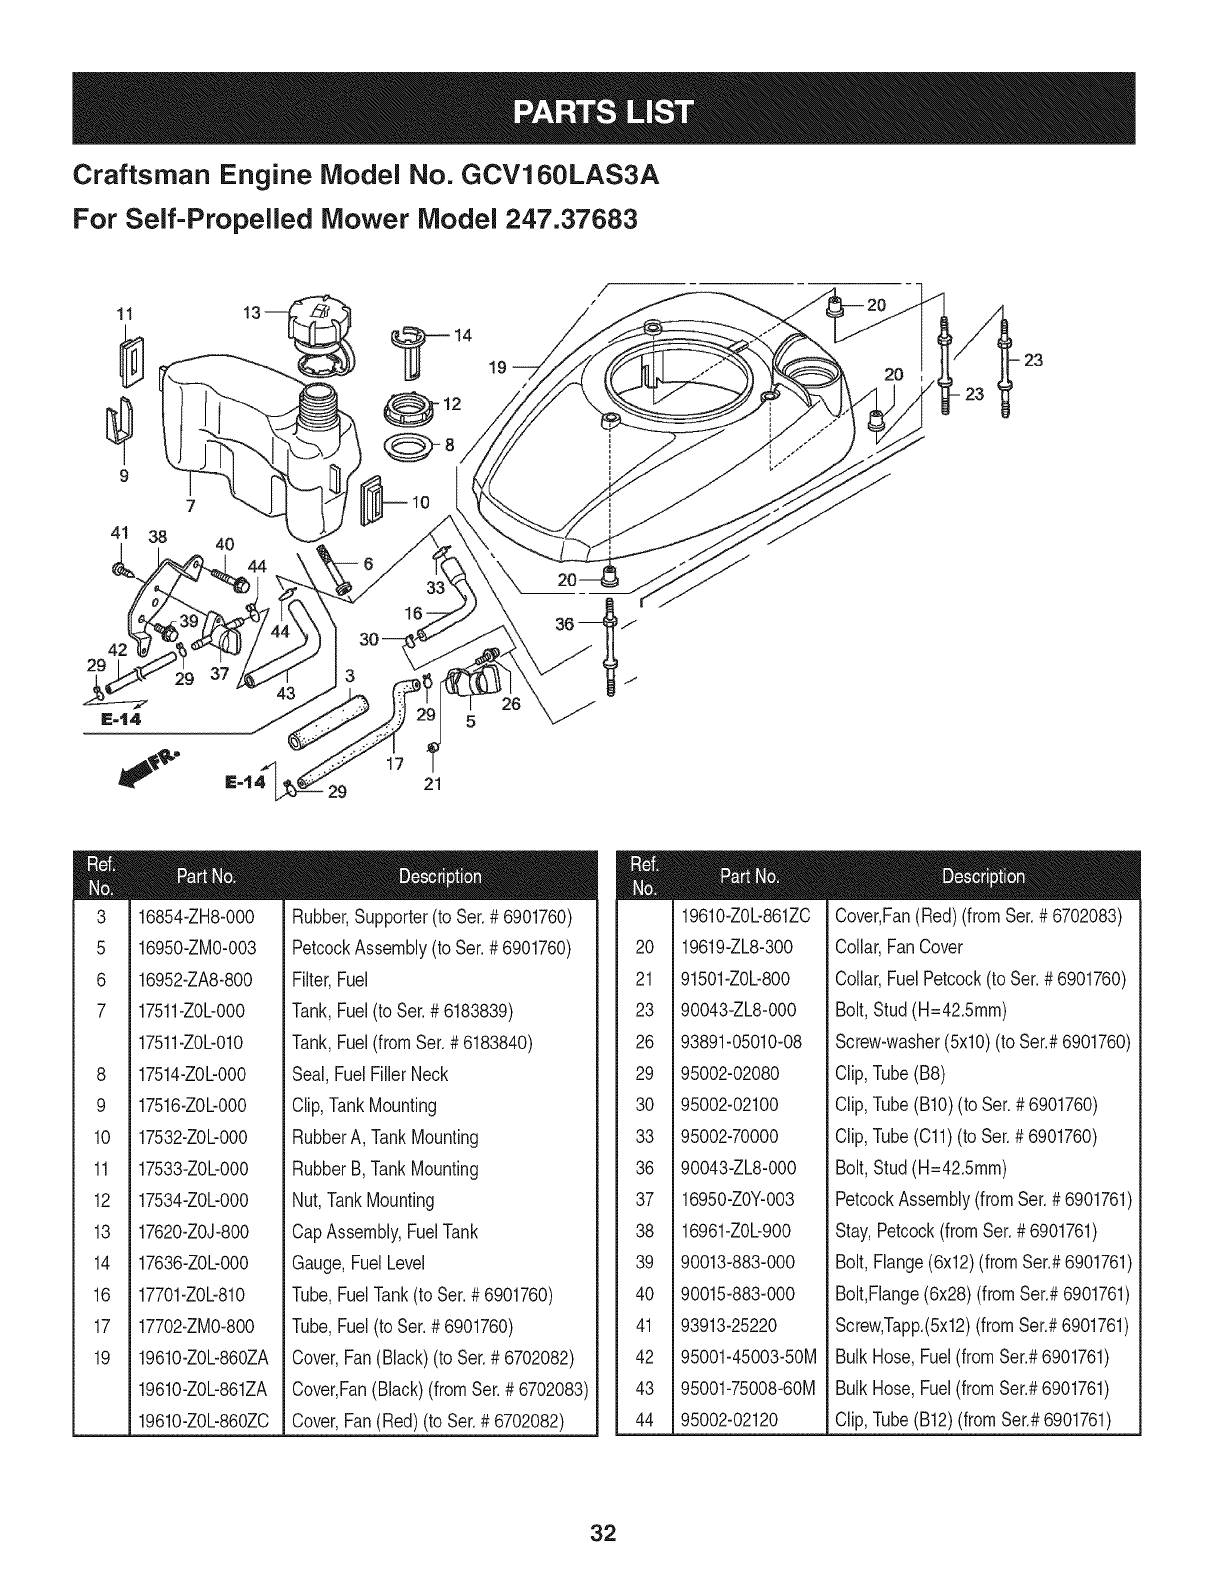
16854-ZH8-000
16950-ZM0-003
16952-ZA8-800
17511-ZOL-O00
17511-ZOb010
17514-Z01_-000
17516-Z0L-O00
17532-ZOL-O00
17533-ZOL-O00
17534-ZObO00
17620-ZOJ-800
17636-ZOL-O00
17701-ZOb810
17702-ZM0-800
19610-ZOL-860ZA
19610-ZOL-861ZA
19610-ZOb860ZC
Rubber,Supporter(to Ser.# 6901760)
PetcockAssembly(toSer.# 6901760)
Filter,Fuel
Tank,Fuel(to Ser.# 6183839)
Tank,Fuel(fromSet.# 6183840)
Seal,FuelFillerNeck
Clip,TankMounting
RubberA, TankMounting
RubberB, TankMounting
Nut,TankMounting
CapAssembly,FuelTank
Gauge,FuelLevel
Tube,FuelTank(to Ser.# 6901760)
Tube,Fuel(to Ser.# 6901760)
Cover,Fan(Black)(to Ser.# 6702082)
Cover,Fan (Black)(fromSer.# 6702083)
Cover,Fan(Red)(to Ser.# 6702082)
20
21
23
26
29
30
33
36
37
38
39
40
41
42
43
44
19610-ZOb861ZC
19619-ZL8-300
91501-ZOb800
90043-ZL8-000
93891-05010-08
95002-02080
95002-02100
95002-70000
90043-ZL8-000
16950-ZOY-O03
16961-ZOb900
90013-883-000
90015-883-000
93913-25220
95001-45003-50M
95001-75008-60M
95002-02120
Cover,Fan(Red)(fromSer.# 6702083)
Collar,FanCover
Collar,FuelPetcock(to Ser.# 6901760)
Bolt,Stud(H=42.5mm)
Screw-washer(5x10)(to Ser.#6901760
Clip,Tube(B8)
Clip,Tube(BIO)(to Ser.# 6901760)
Clip,Tube(011)(to Ser.# 6901760)
Bolt,Stud(H=42.5mm)
PetcockAssembly(fromSer.# 6901761
Stay,Petcock(fromSer.#6901761)
Bolt,Flange(6x12)(fromSer.#6901761
Bolt,Flange(6x28) (fromSer.#6901761
Screw,Tapp.(5x12)(fromSer.#6901761)
Bulk Hose,Fuel(fromSer.#6901761)
Bulk Hose,Fuel(fromSer.#6901761)
Clip,Tube(B12)(fromSer.#6901761)
32
Craftsman Engine Model No. GCV160LAS3A
For Self-Propelled Mower Model 247.37683
13
15
20--_
22_ _9
--8
16
m
m
1
2
3
5
6
8
9
10
13
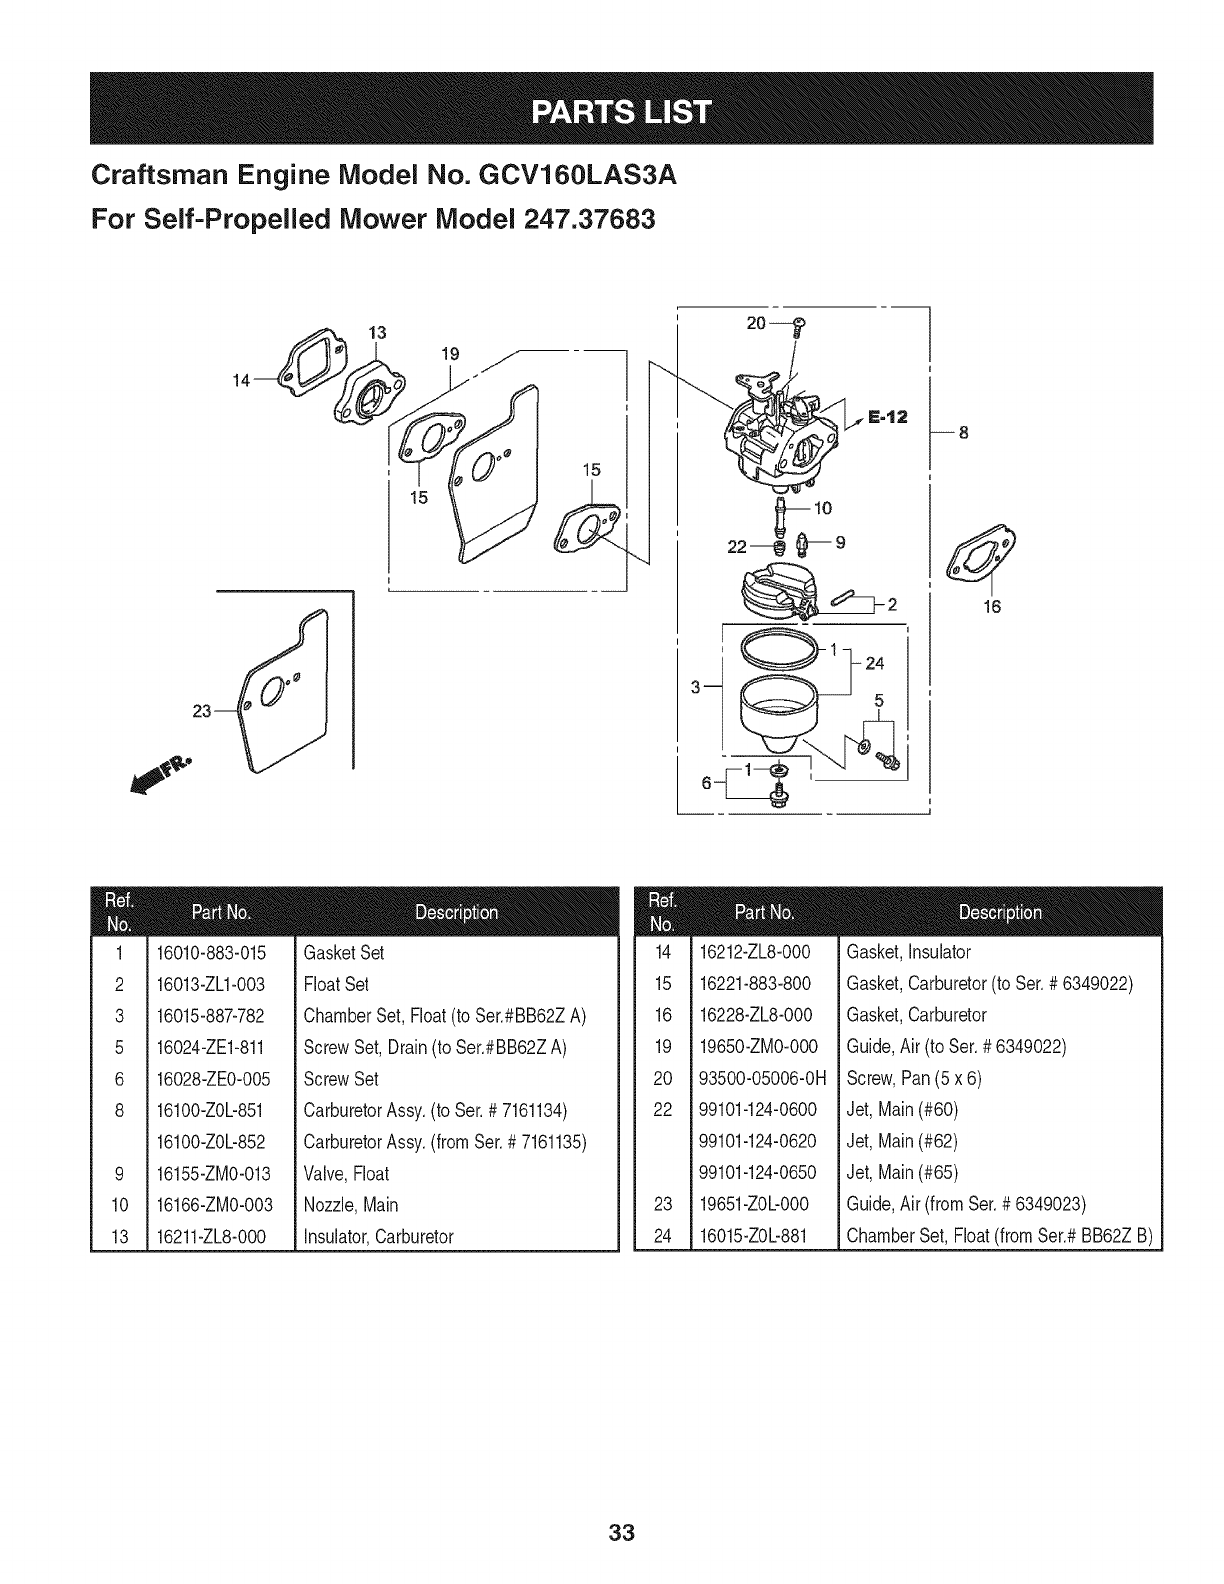
16010-883-015
16013-ZL1-003
16015-887-782
16024-ZE1-811
16028-ZE0-005
16100-Z0L-851
16100-Z06852
16155-ZM0-013
16166-ZM0-003
16211-ZL8-000
GasketSet
FloatSet
ChamberSet,Float(to Ser.#BB62ZA)
ScrewSet,Drain(to Ser.#BB62ZA)
ScrewSet
CarburetorAssy.(to Ser.# 7161134)
CarburetorAssy.(fromSer.# 7161135)
Valve,Float
Nozzle,Main
Insulator,Carburetor
m
m
14
15
16
19
2O
22
23
24
16212-ZL8-000
16221-883-800
16228-ZL8-000
19650-ZM0-000
93500-05006-0H
99101-124-0600
99101-124-0620
99101-124-0650
19651-Z0b000
16015-Z06881
Gasket,Insulator
Gasket,Carburetor(to Ser.# 6349022)
Gasket,Carburetor
Guide,Air (to Ser.#6349022)
Screw,Pan(5x 6)
Jet, Main(#60)
Jet, Main(#62)
Jet, Main(#65)
Guide,Air (fromSer.# 6349023)
ChamberSet,Float(fromSer.#BB62ZB)
33
Craftsman Engine Model No. GCV160LAS3A
For Self-Propelled Mower Model 247.37683
2
7
m
m
1
2
3
4
5
6
7
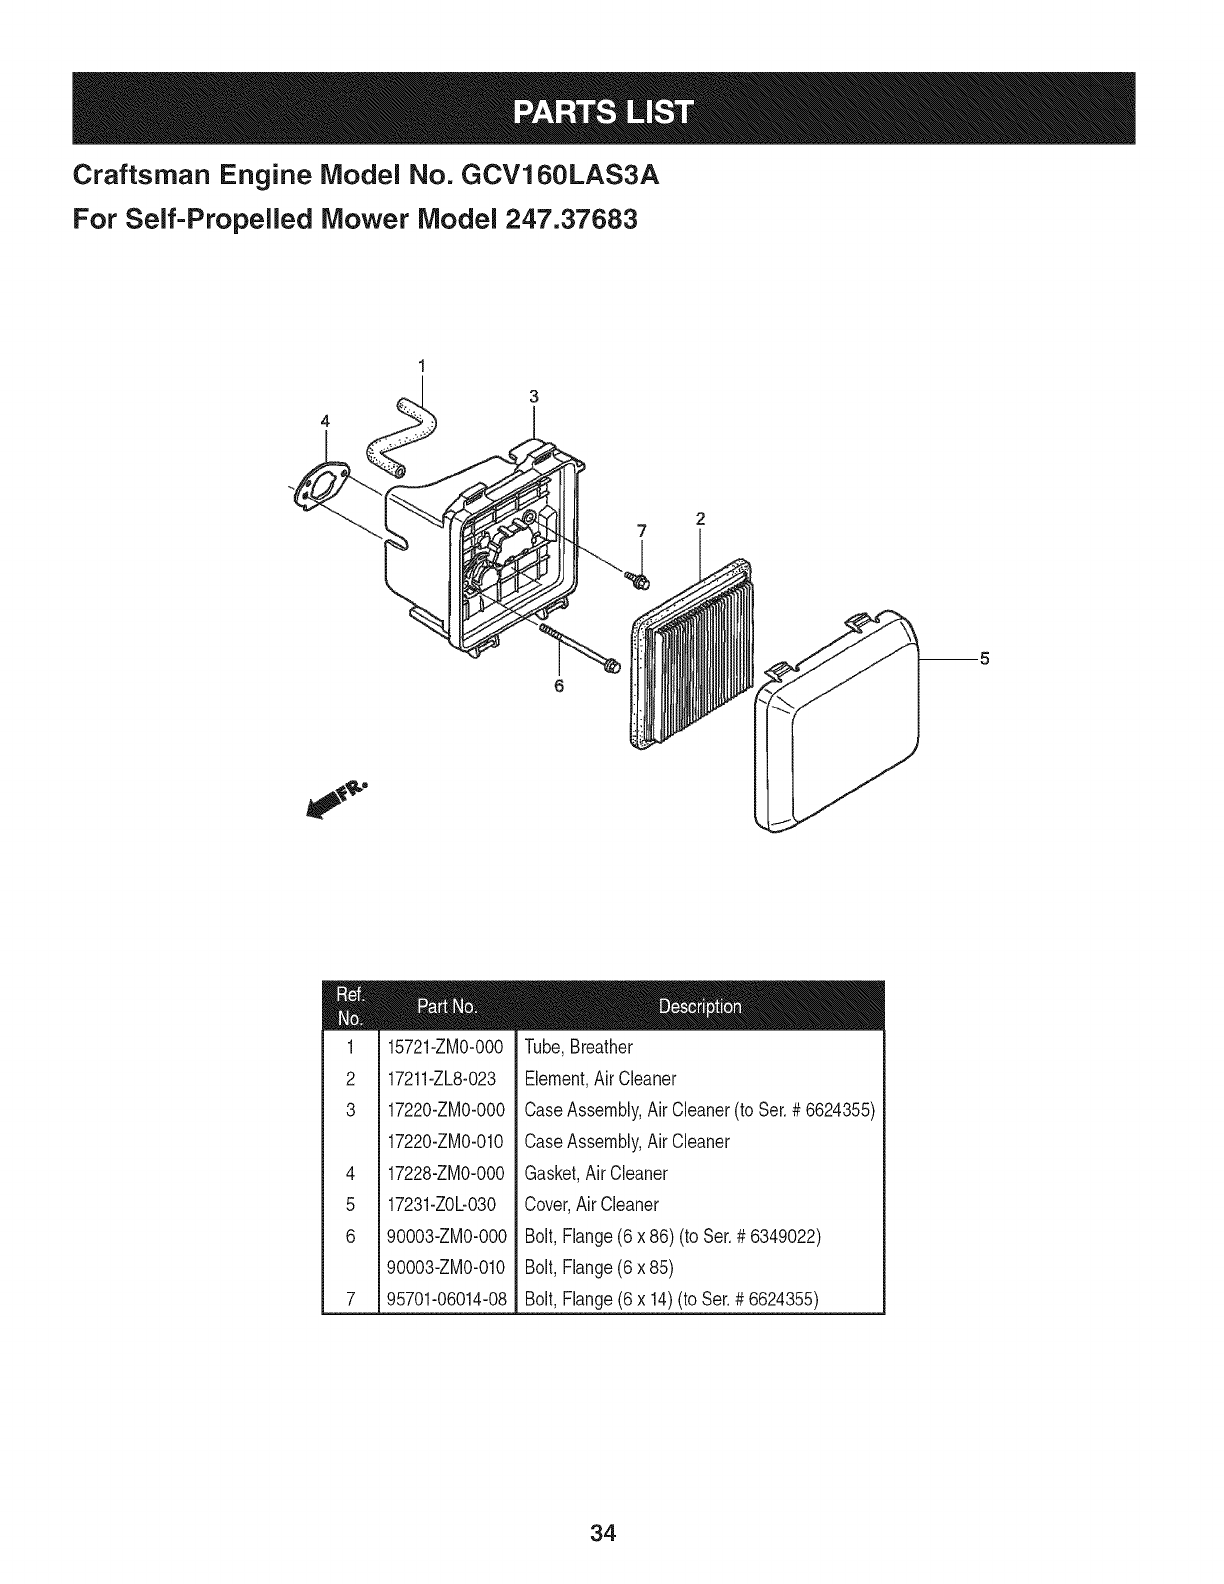
15721-ZM0-000
17211-ZL8-023
17220-ZM0-000
17220-ZM0-010
17228-ZM0-000
17231-Z0b030
90003-ZM0-000
90003-ZM0-010
95701-06014-08
Tube,Breather
Element,Air Cleaner
CaseAssembly,Air Cleaner(to Ser.# 6624355)
CaseAssembly,Air Cleaner
Gasket,Air Cleaner
Cover,AirCleaner
Bolt,Flange(6 x 86) (to Ser.# 6349022)
Bolt,Flange(6 x 85)
Bolt,Flange(6 x 14)(to Ser.# 6624355)
34
Craftsman Engine Model No. GCV160LAS3A
For Self-Propelled Mower Model 247.37683
9 9
m
m
1
2
3
5
6
7
8
9
11
06180-ZOJ-O00
18310-ZM0-000
18321-ZObJO0
18350-ZL8-000
18356-ZL8-000
18381-ZL8-305
90004-ZL8-000
90013-883-000
90055-ZE1-000
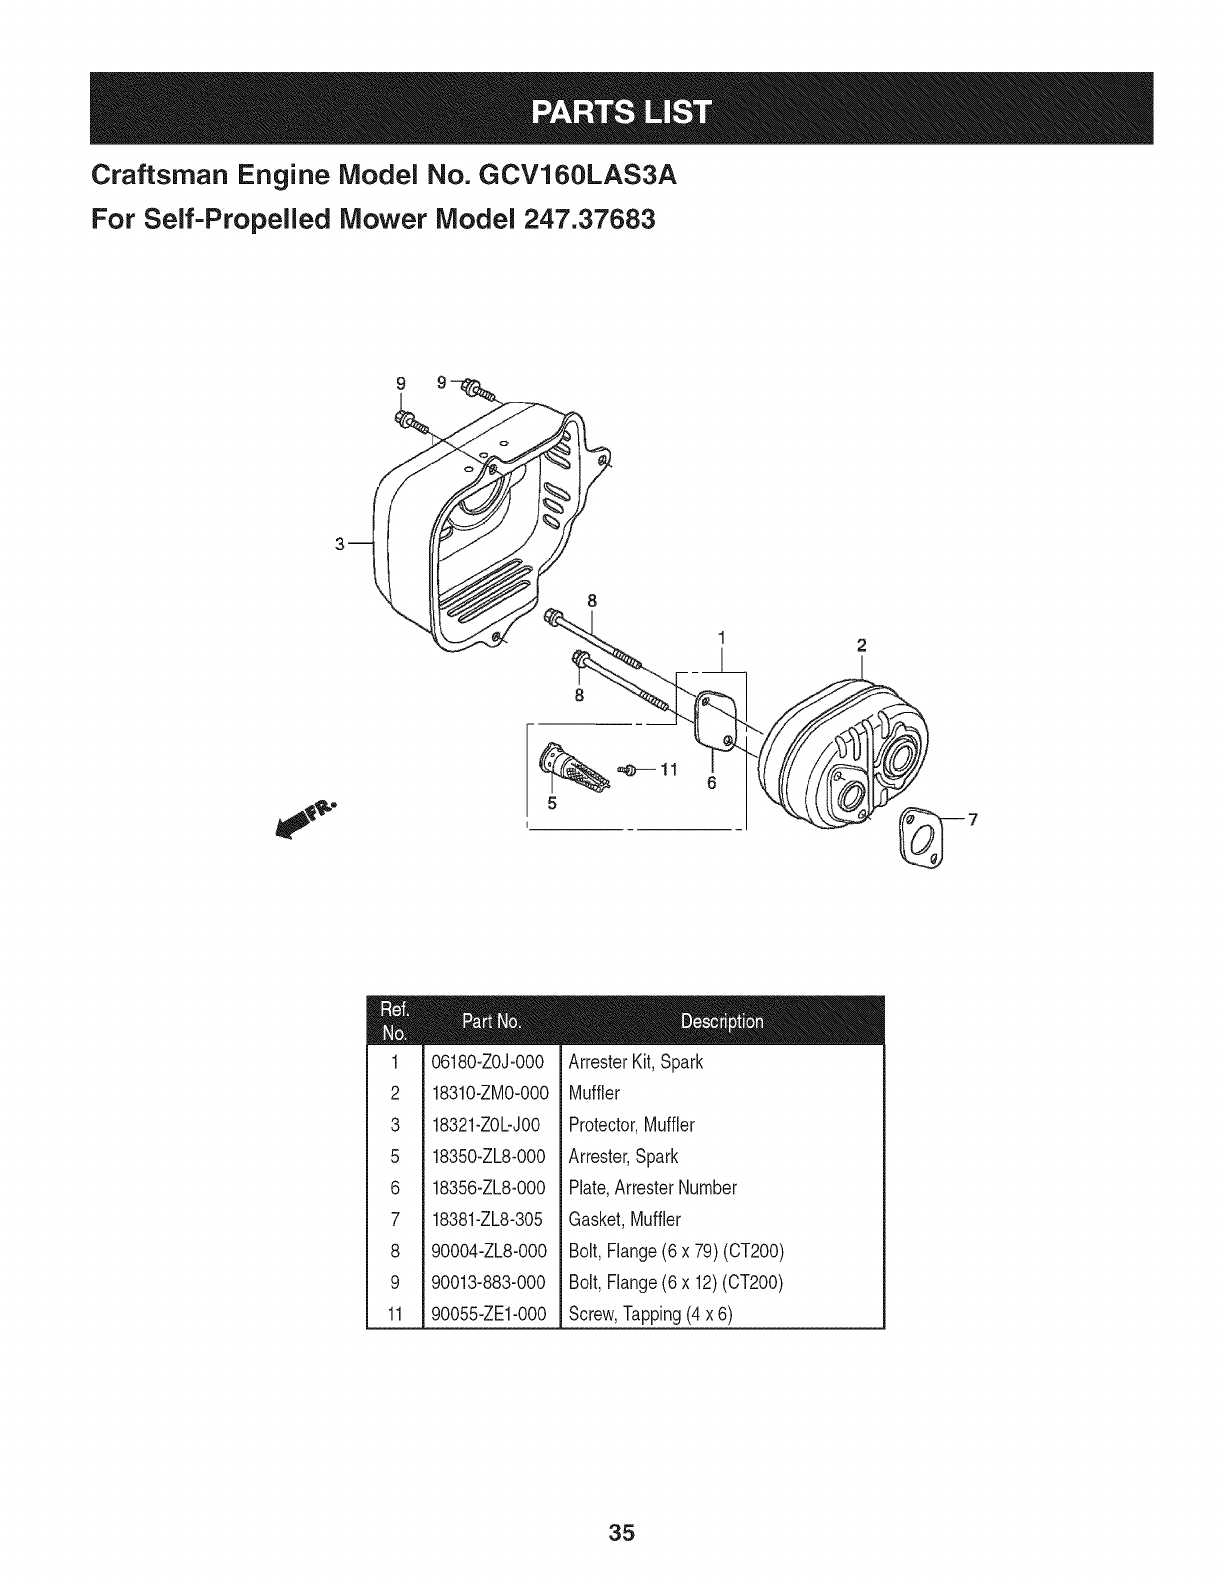
ArresterKit,Spark
Muffler
Protector,Muffler
Arrester,Spark
Plate,ArresterNumber
Gasket,Muffler
Bolt,Flange(6 x 79)(CT200)
Bolt,Flange(6 x 12)(CT200)
Screw,Tapping(4x 6)
35
Craftsman Engine Model No. GCV160LAS3A
For Self-Propelled Mower Model 247.37683
21
15
m
m
1
2
4
5
9
10
11
13
15
16
18
19
20
21
22
23
m
11344-MB0-000
11344-ZOb800
13331-357-000
30500-ZL8-004
31105-ZM0-000
32195-ZM0-800
35120-ZM0-003
51125-ZOL-O03
90681-959-003
75110-ZOb800
75110-ZOY-O00
75113-ZM0-000
90018-ZE1-000
90014-952-000
90018-ZE1-000
90022-888-010
90201-878-003
93892-04012-00
94103-04000
91601-ZOb300
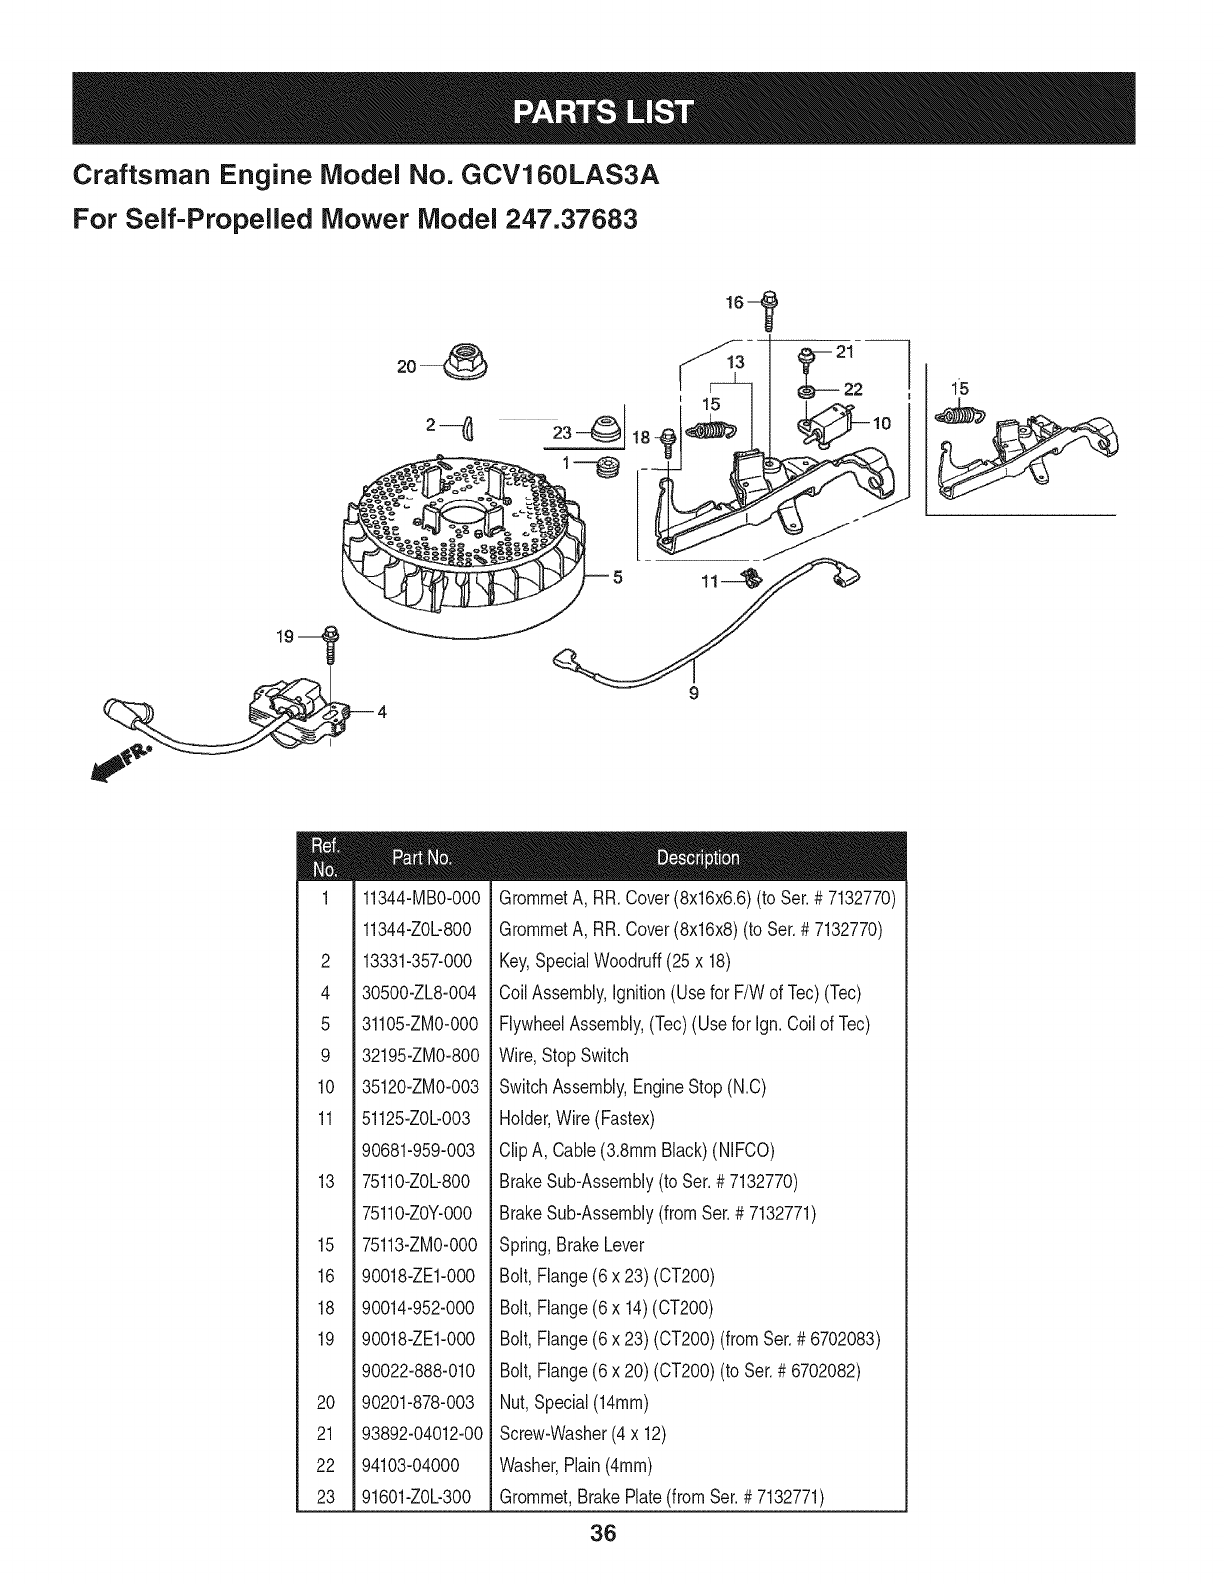
GrommetA, RR.Cover(8x16x6.6)(to Set.# 7132770)
GrommetA, RR.Cover(8x16x8)(to Ser.# 7132770
Key,SpecialWoodruff(25x 18)
CoilAssembly,Ignition(Usefor F/Wof Tec)(Tec)
FlywheelAssembly,(Tec)(Usefor Ign.Coilof Tec)
Wire,Stop Switch
SwitchAssembly,EngineStop(N.C)
Holder,Wire (Fastex)
ClipA, Cable(3.8ramBlack)(NIFCO)
BrakeSub-Assembly(to Ser.# 7132770)
BrakeSub-Assembly(fromSer.# 7132771)
Spring,BrakeLever
Bolt,Flange(6x 23)(CT200)
Bolt,Flange(6x 14)(CT200)
Bolt,Flange(6x 23)(CT200)(fromSer.# 6702083
Bolt,Flange(6x 20)(CT200)(to Ser.# 6702082)
Nut,Special(14ram)
Screw-Washer(4 x 12)
Washer,Plain(4ram)
Grommet,BrakePlate(fromSer.# 7132771)
36
Craftsman Engine Model No. GCV160LAS3A
For Self-Propelled Mower Model 247.37683
2
6
17
4
3
m
1
2
3
4
6
13
14
15
17
16551-ZM0-010
16555-ZOb800
16555-ZOL-801
16561-ZObO00
16562-ZM0-000
16580-ZOb810
90015-ZE5-010
90016-ZE8-000
94050-06000
16221-ZOb900
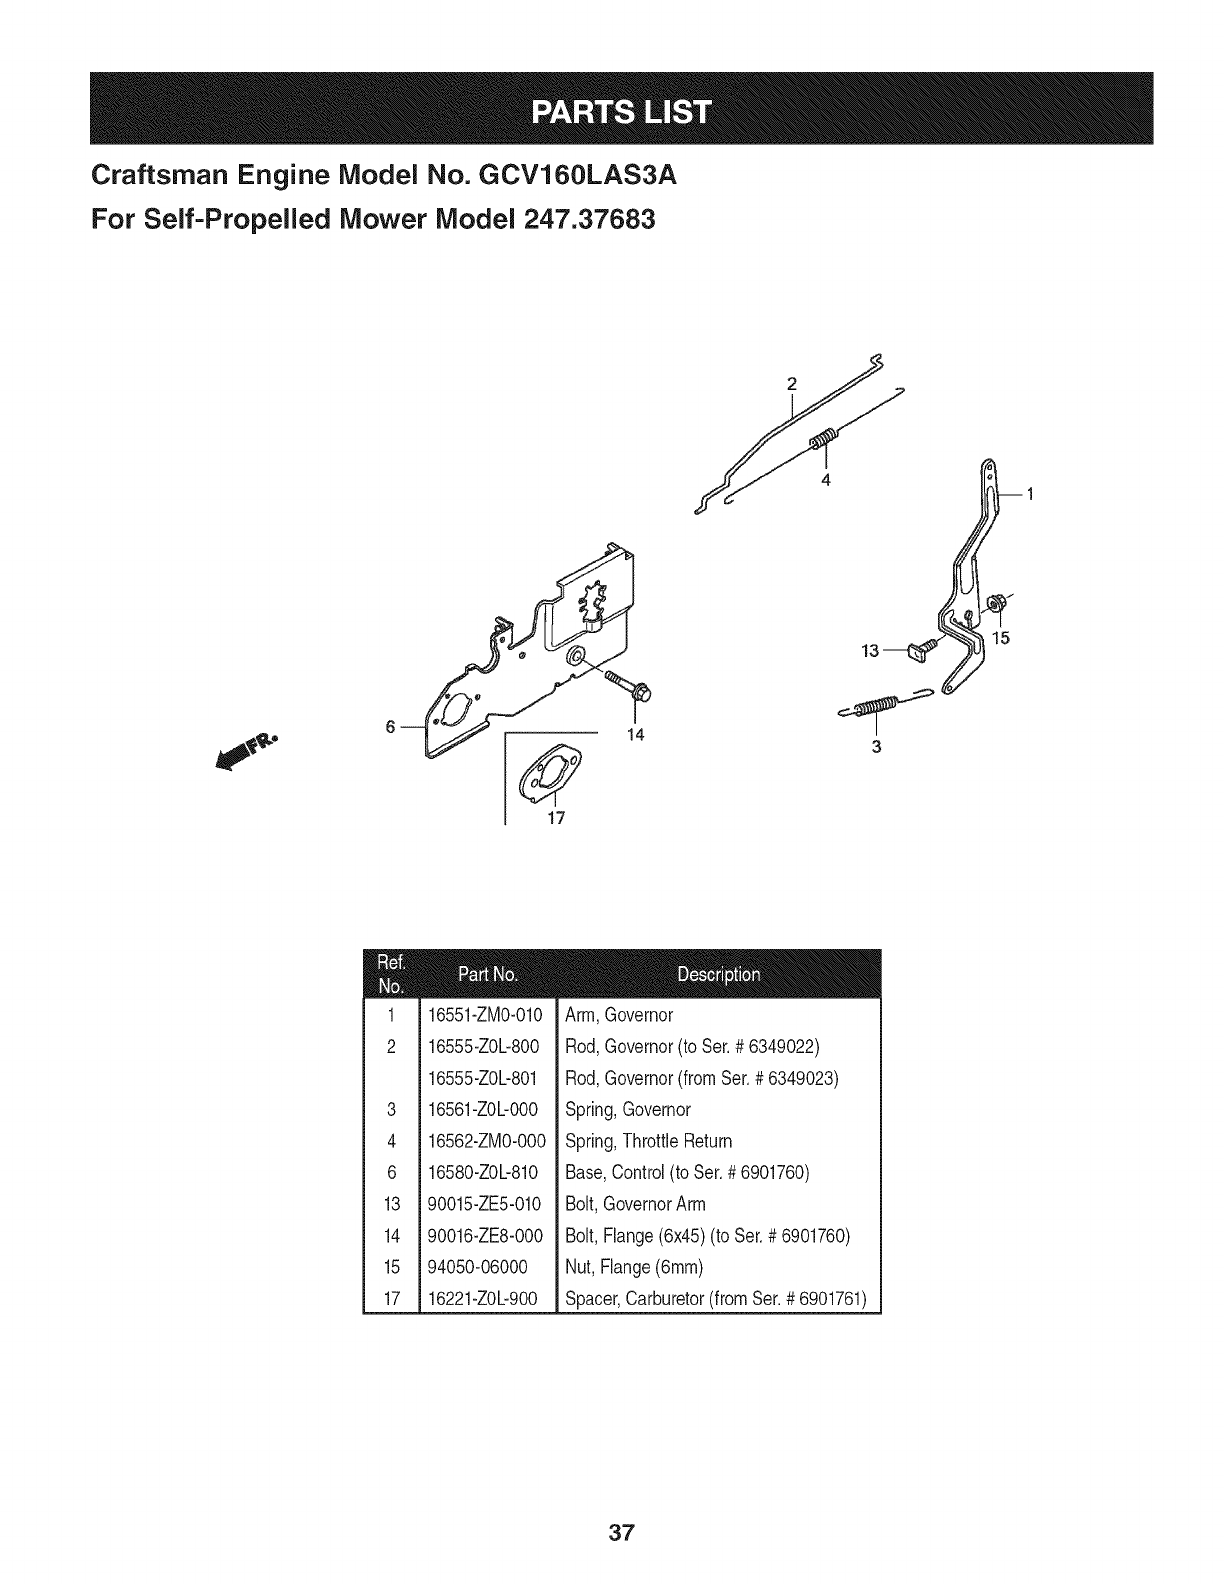
Arm,Governor
Rod,Governor(to Ser.# 6349022)
Rod,Governor(fromSer.# 6349023)
Spring,Governor
Spring,ThrottleReturn
Base,Control(to Ser.# 6901760)
Bolt,GovernorArm
Bolt,Flange(6x45)(to Ser.# 6901760)
Nut, Flange(6ram)
Spacer,Carburetor(fromSer.# 6901761)
37
Craftsman Engine Model No. GCV160LAS3A
For Self-Propelled Mower Model 247.37683
I
I
I I L
i L
,±_J
4
m
m
1
2
3
4
5
m
16592-Z2D-800
16610-Z2D-801
16614-Z2D-800
16632-ZOb800
90022-888-010
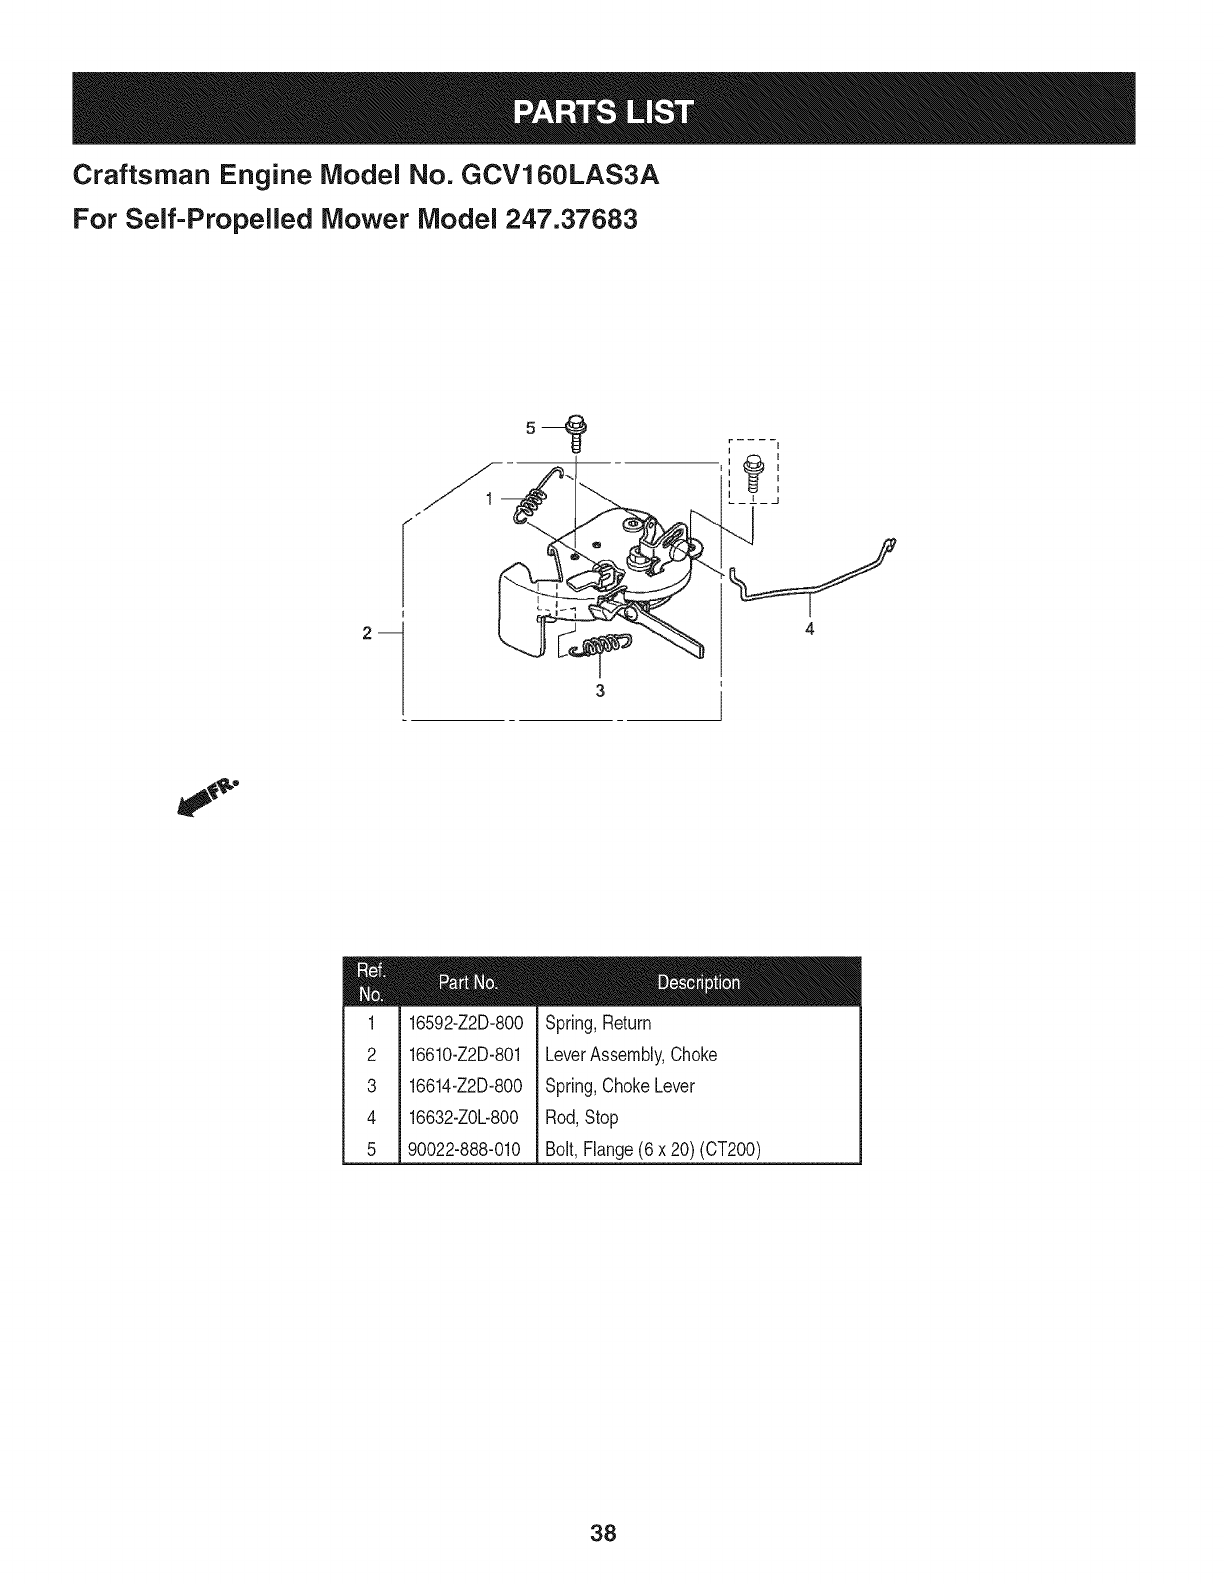
Spring,Return
LeverAssembly,Choke
Spring,ChokeLever
Rod,Stop
Bolt,Flange(6x 20)(CT200)
38
Craftsman Engine Model No. GCV160LAS3A
For Self-Propelled Mower Model 247.37683
87114-ZH7-821 Label,Warning(Not Certifiedfor Sale)
87528-ZObV20 Mark,ChokeIndication
39
(Thispageapplicableinthe U.S.A.and Canadaonly.)
Sears, Roebuck and Co., U.S.A. (Sears), the California Air Resources Board (CARD)
and the United States Environmental Protection Agency (U.S. EPA)
Emission Control System Warranty Statement (Owner's Defect Warranty Rights and Obligations)
EMISSIONCONTROLWARRANTYCOVERAGEISAPPLICABLETOCERTI-
FIEDENGINESPURCHASEDINCALIFORNIAIN1995ANDTHEREAF-
TER,WHICHARE USEDINCALIFORNIA,ANDTOCERTIFIEDMODEL
California and United States Emission
The CaliforniaAir ResourcesBoard(CARD),U.S.EPAand Searsare pleased
to explainthe EmissionControlSystemWarrantyon your modelyear2000and
latersmalloff-roadengine(SORE).In California,newsmall off-roadengines
mustbe designed,builtand equippedto meettheState'sstringentanti-smog
standards.Elsewherein theUnitedStates,newnon-road,spark-ignition
enginescertifiedfor modelyear 1997and latermustmeetsimilarstandardsset
forthbythe U.S.EPA.Searsmustwarranttheemissioncontrolsystemonyour
YEAR1997ANDLATERENGINESWHICHARE PURCHASEDANDUSED
ELSEWHEREINTHEUNITEDSTATES(ANDAFTERJANUARY1,2001 IN
CANADA).
Control Defects Warranty Statement
enginefor theperiodsoftime listedbelow,providedtherehasbeen noabuse,
neglector impropermaintenanceof your smalloff-roadengine.Youremis-
sion controlsystemincludespartssuch as thecarburetor,air cleaner,ignition
system,mufflerand catalyticconverter.Also includedmaybeconnectorsand
otheremissionrelatedassemblies.Wherea warrantableconditionexists,Sears
will repairyour smalloff-roadengineat nocostto you includingdiagnosis,parts
and labor.
Sears Emission Control Defects Warranty Coverage
Smalloff-roadenginesarewarrantedrelativeto emissioncontrolpartsdefects
fora periodof one year,subjectto provisionsset forth below.Ifany covered
Owner's Warranty
Asthe smalloff-roadengineowner,youare responsiblefor theperformanceof
therequiredmaintenancelistedin yourOperatingand MaintenanceInstruc-
tions.Searsrecommendsthatyouretainallyourreceiptscoveringmaintenance
onyoursmalloff-roadengine,butSearscannotdenywarrantysolelyfor the
lackof receiptsorfor yourfailureto ensuretheperformanceof allscheduled
maintenance.As the smalloff-roadengineowner,youshouldhoweverbe
awarethat Searsmaydenyyouwarrantycoverageifyour smalloff-roadengine
ora parthasfaileddueto abuse,neglect,impropermaintenanceor unap-
parton yourengineis defective,the partwillbe repairedorreplacedbySears.
Responsibilities
provedmodifications.Youare responsiblefor presentingyour smalloff-road
engineto anAuthorizedSearsServiceDealeras soonas a problemexists.The
undisputedwarrantyrepairsshouldbe completedina reasonableamountof
time,notto exceed30days.Ifyouhaveanyquestionsregardingyourwarranty
rightsand responsibilities,you shouldcontacta SearsService Representative
at 1-800-469-4663.The emissionwarrantyis a defectswarranty.Defectsare
judgedon normalengineperformance.Thewarrantyis notrelatedto an in-use
emissiontest.
Sears Emission Control Defects Warranty Provisions
ThefollowingarespecificprovisionsrelativetoyourEmissionControlDefectsWarrantyCoverage.ItisinadditiontotheSearsenginewarrantyfornon-regulated
enginesfoundin theOperatingand MaintenanceInstructions.
1. WarrantedParts
Coverageunderthis warrantyextendsonly to the partslistedbelow(the
emissioncontrolsystemsparts)to the extentthese partswere presenton
the enginepurchased.
a. FuelMeteringSystem
• Cold start enrichmentsystem
• Carburetorand internalparts
• FuelPump
b. AirlnductionSystem
• Aircleaner
• Intakemanifold
c. IgnitionSystem
• Sparkplug(s)
• Magnetoignitionsystem
d. CatalystSystem
• Catalyticconverter
• Exhaustmanifold
• Air injectionsystemor pulsevalve
e. MiscellaneousItemsUsedin AboveSystems
• Vacuum,temperature,position,timesensitivevalves
andswitches
• Connectorsandassemblies
2. Lengthof Coverage
Searswarrantsto the initialownerand eachsubsequentpurchaserthat
the WarrantedParts shallbe free fromdefectsin materialsandworkman-
shipwhich causedthefailure of the WarrantedPartsfor a periodof one
yearfromthe datethe engineis deliveredto a retailpurchaser.
3. NoCharge
Repairor replacementof anyWarrantedPartwill beperformedat no
chargeto the owner,includingdiagnosticlaborwhichleadsto the
determinationthata WarrantedPartis defective,ifthe diagnosticworkis
performedat an AuthorizedSears ServiceDealer.Foremissionswarranty
servicecontact yournearestAuthorizedSears ServiceDealeras listed in
the "YellowPages"under"Engines,Gasoline,""GasolineEngines,""Lawn
Mowers,"orsimilarcategory.
4. Claimsand CoverageExclusions
Warrantyclaimsshall be filed in accordancewiththe provisionsof the
SearsEngineWarrantyPolicy.Warrantycoverageshall beexcludedfor
failuresof WarrantedPartswhichare notoriginalSearspartsor because
of abuse,neglector impropermaintenanceas setforth inthe Sears
EngineWarrantyPolicy.Searsis notliableto coverfailuresof Warranted
Partscausedby theuseof add-on,non-original,or modifiedparts.
5. Maintenance
Any WarrantedPart whichis notscheduledfor replacementas required
maintenanceor whichis scheduledonly for regularinspectionto the effect
of "repairor replaceas necessary"shallbe warrantedasto defectsfor the
warrantyperiod.AnyWarrantedPartwhich isscheduledfor replacement
as requiredmaintenanceshallbe warrantedasto defectsonly forthe
periodof time up to the firstscheduledreplacementfor that part.Any
replacementpartthat is equivalentin performanceand durabilitymay
be usedin the performanceof any maintenanceor repairs.The owneris
responsibleforthe performanceof allrequiredmaintenance,as definedin
the SearsOperatingand MaintenanceInstructions.
6. ConsequentialCoverage
Coveragehereundershallextendto thefailureof any enginecomponents
caused bythe failureof any WarrantedPartstill underwarranty.
Inthe USAandCanada,a 24 hourhotline, 1-800-469-4663,has a menu of pre-recordedmessagesofferingyouenginemaintenanceinformation.
GDOC-100188Rev.A
40
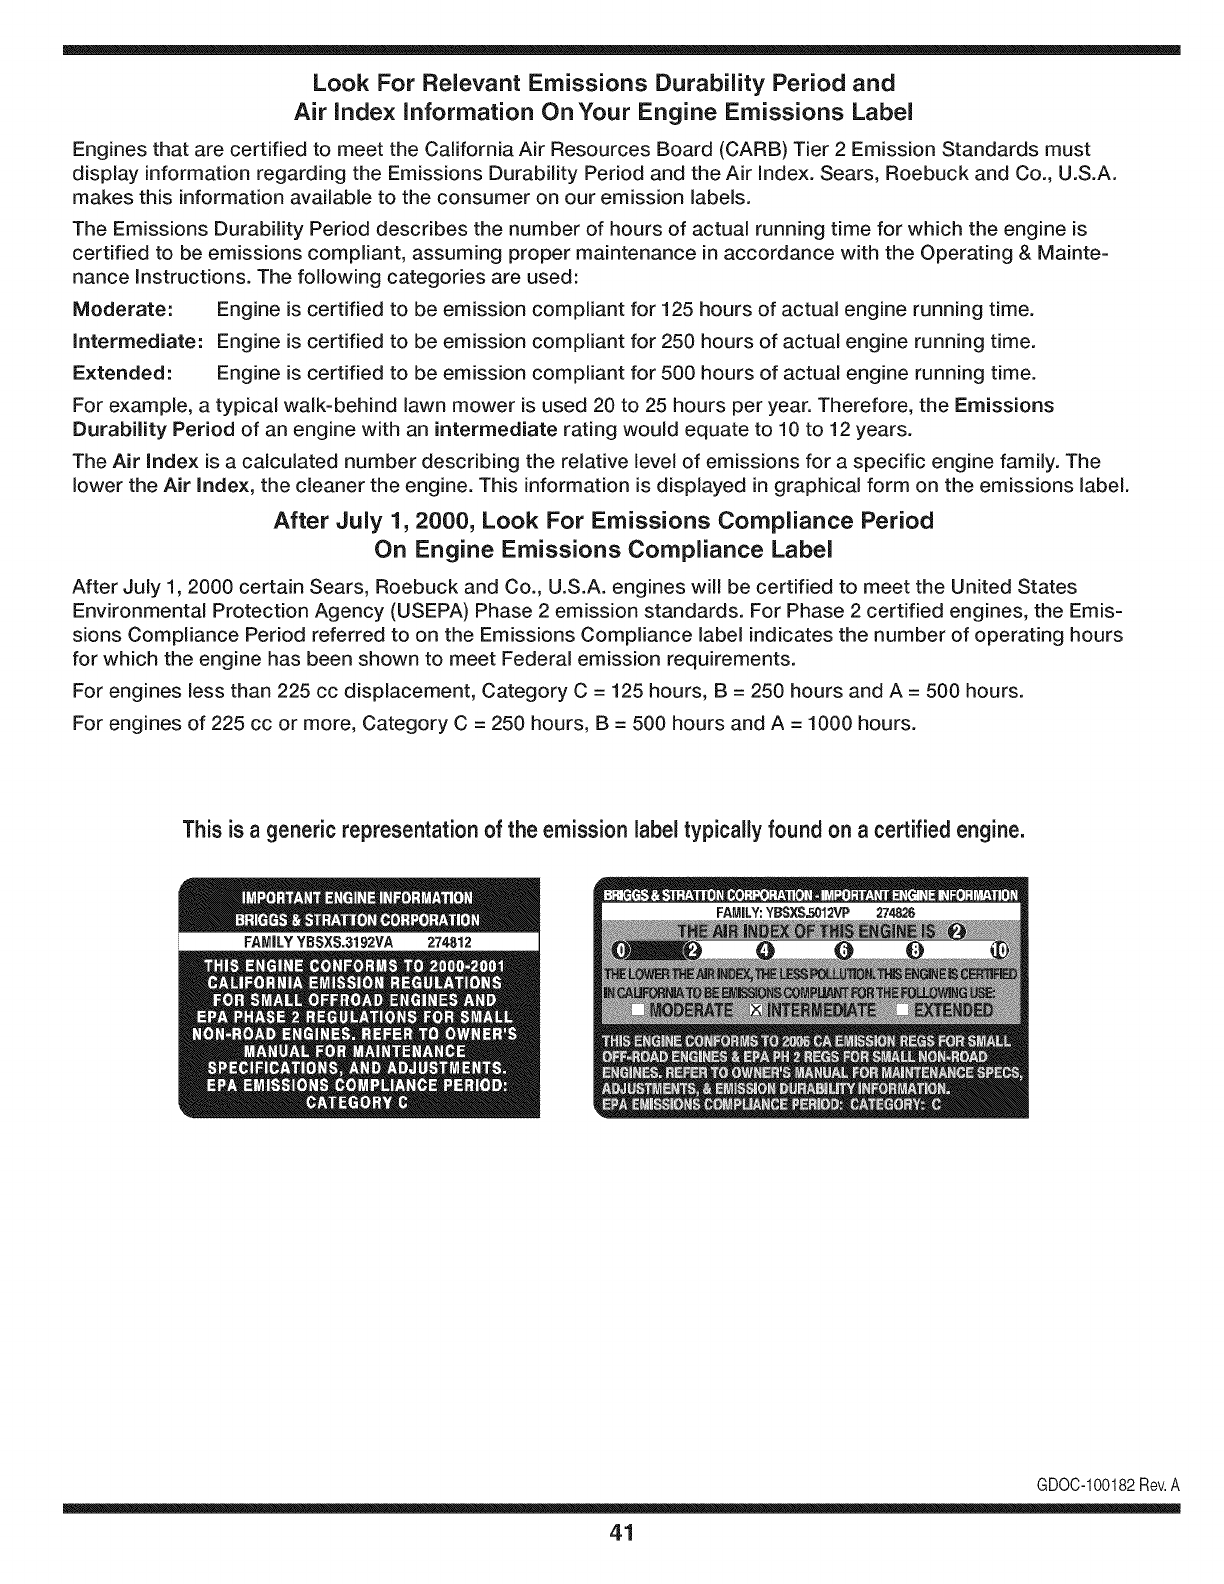
Look For Relevant Emissions Durability Period and
Air index information On Your Engine Emissions Label
Engines that are certified to meet the California Air Resources Board (CARB) Tier 2 Emission Standards must
display information regarding the Emissions Durability Period and the Air Index. Sears, Roebuck and Co., U.S.A.
makes this information available to the consumer on our emission labels.
The Emissions Durability Period describes the number of hours of actual running time for which the engine is
certified to be emissions compliant, assuming proper maintenance in accordance with the Operating & Mainte-
nance Instructions. The following categories are used:
Moderate: Engine is certified to be emission compliant for 125 hours of actual engine running time.
Intermediate: Engine is certified to be emission compliant for 250 hours of actual engine running time.
Extended: Engine is certified to be emission compliant for 500 hours of actual engine running time.
For example, a typical walk-behind lawn mower is used 20 to 25 hours per year. Therefore, the Emissions
Durability Period of an engine with an intermediate rating would equate to 10 to 12 years.
The Air Index is a calculated number describing the relative level of emissions for a specific engine family. The
lower the Air Index, the cleaner the engine. This information is displayed in graphical form on the emissions label.
After July 1,2000, Look For Emissions Compliance Period
On Engine Emissions Compliance Label
After July 1, 2000 certain Sears, Roebuck and Co., U.S.A. engines will be certified to meet the United States
Environmental Protection Agency (USEPA) Phase 2 emission standards. For Phase 2 certified engines, the Emis-
sions Compliance Period referred to on the Emissions Compliance label indicates the number of operating hours
for which the engine has been shown to meet Federal emission requirements.
For engines less than 225 cc displacement, Category C = 125 hours, B = 250 hours and A = 500 hours.
For engines of 225 cc or more, Category C = 250 hours, B = 500 hours and A = 1000 hours.
This is ageneric representation of the emission label typically found on a certified engine.
FAMILYYBSXS.3192VA 274812
GDOC-100182Rev.A
41
Congratulationson makinga smartpurchase.YournewCraftsman@
productis designedandmanufacturedfor yearsof dependableopera-
tion.But likeall products,it mayrequirerepairfromtimeto time.That's
whenhavinga RepairProtectionAgreementcansaveyoumoneyand
aggravation.
Here'swhatthe RepairProtectionAgreement*includes:
* Expert service byour 10,000professionalrepairspecialists
oUnlimitedserviceand no chargefor partsand laboron all
coveredrepairs
o Product replacementupto $1500if yourcoveredproductcan't be
fixed
•Discountof 10%from regularprice of serviceand relatedinstalled
partsnotcoveredby theagreement;also,10%off regularpriceof
preventivemaintenancecheck
• Fast help by phone- we call it RapidResolution- phonesupport
froma Searsrepresentative.Thinkof usas a "talkingowner's
manual."
Onceyou purchasethe Agreement,a simplephonecall is all thatit
takesfor youto scheduleservice.Youcan call anytimedayor night,or
schedulea serviceappointmentonline.
The RepairProtectionAgreementis a risk-freepurchase.If youcancel
for any reasonduringthe productwarrantyperiod,wewill provideafull
refund.Or,a proratedrefundanytimeafterthe productwarrantyperiod
expires.Purchaseyour RepairProtectionAgreementtoday!
Somelimitationsand exclusionsapply. For pricesand additional
informationin the U.S.A.call 1-800-827-6655.
*Coverage inCanadavaries on some items.Forfull details call
Sears Canadaat 1-800-361-6665.
Sears Installation Service
ForSearsprofessionalinstallationof homeappliances,garagedoor
openers,waterheaters,andothermajorhomeitems,in the U.S.A.or
Canadacall 1-800-4-MY-HOME®.
42
Declaraci6n de garantia .................................................. 43
Instrucciones de seguridad ....................................... 44-48
Guia de cuesta ................................................................ 49
Etiquetas de seguridad ..................................................... 9
Montaje ..................................................................... 50-53
Operaci6n .................................................................. 54-55
Servicio y Mantenimiento ......................................... 56-60
Almacenamiento fuera de temporada ............................ 61
Soluci6n de problemas ................................................... 62
NOmero de servicio ............................... Cubierta posterior
Garantia integro de Craftsman
SiesteproductoCraftsmanfalla debidoa undefectoen los materialeso la manodeobradentrodelos dos a_osde lafechade compra,sirvase
devolverloa cualquiertiendaSears,Centrode servicioSears,uotro puntodeventaCraftsmanen los EstadosUnidosparasu reparaci6nsin
cargo(o reemplazosi la reparaci6ndemuestraimposible).
Estagaranfias61otendr_validezdurante90 dias si esteproductose utilizaen cualquiermomentoparafinescomercialeso de alquiler.
Esta garantiacubreSOLOdefectos en matedal y habilidad.Sears no pagar_para:
•Articulosde duraci6nlimitadaquepuedendesgastarsebajocondicionesnormalesdeuso duranteel periododegarantia,talescomo
cuchillasdecortadorarotativas,adaptadoresdelamisma,correas,filtrosdeaire,y bujiasdeencendido.
•Las reparacionesrequeridasdebidoa abusoo negligenciadeloperador,incluiyendoabolladurasdel cig(Je_aly nooperaro mantenerel
equipodeacuerdoconlas instruccionessuministradas.
•Mantenimientopreventivoo reparacionesnecesariasdebidoa mezcladecombustibleimpropia,combustiblecontaminadoo a_ejo.
Estagarantialeotorgaderechoslegalesespecificos,peroustedpodriagozarde otrosderechosen raz6nde su lugarde residencia.
Sears, Roebuck and Co., HoffmanEstates, IL 60179
Aceitedelmotor: SAE10W-30
Capacidaddeaceitedel motor: 18onzas
Combustible: Gasolinasin plomo
Bujia: NGK-BPR5ES
Motor: Honda
NSmerode modelo ..........................................................
N_mero de serie ..............................................................
Fechade compra .............................................................
RegistreelnQmerode modelo,nQmerode seriey fechade compra
m&sarriba.
© SearsBrands,LLC 4.3
Lapresenciade estesirnboloindicaque setratade instrucciones
irnportantesde seguridadquese debenrespetarparaevitar
ponerenpeligrosu seguridadpersonaly/o materialy lade otras
personas.Leay sigatodaslasinstruccionesdeestemanualantes
de poneren funcionarnientoestarn_.quina.Si no respetaestas
instruccionespodriaprovocarlesionespersonales.Cuandoveaeste
sirnbolo,ipresteatenci6na la advertencia!
PROPOSICION 65 DE CALIFORNIA
Elescapedel motorde esteproducto,algunosdesuscornponentes
y algunoscornponentesdelvehiculocontieneno liberansustancias
quirnicasqueelestadode Californiaconsideraque puedenproducir
c_.ncer,defectosde nacirnientouotrosproblernasreproductivos.
Losbornesdela bateriay losaccesoriosdines contienenplornoy
cornpuestosde plorno,sustanciasqdrnicas quesegOnIoestableci-
do pot el EstadodeCaliforniacausanc_.ncery da_osenel sisterna
reproductivo.Ldveselas manos despu_sde estaren contacto
con estoscomponentes.
Estarn_.quinarueconstruidaparaseroperadadeacuerdocon
las reglasde seguridadcontenidasenestemanual.AI igualque
concualquiertipo deequipornotorizado,undescuidoo errorpor
partedeloperadorpuedeproducirlesionesgraves.Estarn_.quina
es capazde arnputarrnanosy piesy dearrojarobjetoscon gran
fuerza.De norespetarlas instruccionesde seguridadsiguientesse
puedenproducirlesionesgraveso la rnuerte.
Su responsabilidad--Restrinja el usode estarn_.quina
rnotorizadaalas personasque lean,cornprendany respetenlas
advertenciase instruccionesqueaparecenenestemanualyen la
rn_.quina.
iGUARDEESTASINSTRUCCIONES!
FUNCIONAIVIIENTO
Funcionarnientogeneral:
•Leay siga todaslas instruccionescontenidasen estemanual
antesde intentarensarnblarestarn_.quina.Lea,cornprenday
sigatodaslas instruccionesque figuranen la rn_.quinayen el o
los rnanualesantesde intentaroperarla.Farniliaricesecornpleta-
rnentecon loscontrolesy conel uso apropiadodeestarn_.quina
antesde operarla.Guardeestemanualenun lugarseguropara
referenciasfuturasy regulatesy parasolicitarrepuestos.
•Estarn_.quinaes unapiezade equipode precisi6n,no unjuguete.
Portanto,tengala maximaprecauci6nen todornornento.Su
unidadha sidodise_adapararealizarunatarea:cortarel c_sped.
No la utilicecon ningOnottoprop6sito.
•No perrnitanuncaque losni_os rnenoresde 14a_osoperenesta
rn_.quina.Los ni_osde 14a_osy rn_.sdebenleery cornprender
las instruccionescontenidasenestemanualy debenser
capacitadosy supervisadospor unode los padres.Onicarnente
los individuosresponsablesque se hayanfarniliarizadocon
estasreglasdeseguridadparalaoperaci6ndeber_.nusaresta
rn_.quina.
•Inspeccionerninuciosarnenteel _.reaendondeutilizar_,el equipo.
Saquetodaslas piedras,palos,cables,huesos,juguetesy otros
objetosextra_oscon los quepodriatropezaro quepodrianser
arrojadosporla cuchilla.Losobjetosarrojadosporla rn_.quina
puedenproducirlesionesgraves.Planifiqueel patr6nen elque
va a ir descargandoel recorteparaevitarquela descargade
materialse realicehacialoscarninos,las veredas,losobserva-
dotes,etc. Eviteadern_.sdescargarmaterialcontralas paredesy
obstruccionesquepodrianprovocarqueel materialdescargado
rebotecontrael operador.
•Paraayudara evitarel contactocon lacuchillao unalesi6npor
un objetoarrojado,rnant_ngaseen lazonadeloperadordetr_.s
de las rnanijasy rnantengaa los ni_os,observadores,ayudantes
y rnascotasapartadosal rnenos25 metrosde la podadora
rnientrasest,.en operaci6n.Detengala rn_.quinasi alguienentra
en lazona.
•Paraprotegerselosojos utilicesiernpreanteojoso antiparras
de seguridadrnientrasoperala rn_.quinao rnientrasla ajusta
o repara.Losobjetosarrojadosquerebotanpuedenlesionar
gravernentelavista.
•Utilicezapatosde trabajoresistentes,desuelafuertey panta-
Ionesy carnisasajustados.Se recorniendautilizarcarnisasy
pantalonesquecubranlos brazosy las piernas,asi cornocalzado
con puntasreforzadasen acero.Nuncaopereesta rn_.quinacon
los pies desnudos,sandalias,o conzapatosligeroso con losque
se puedaresbalar(porejernplo,calzadode Iona).
•Nopongalas rnanoso los piescercade las piezasrotatoriaso
en latolvade lacortadora.Elcontactocon las cuchillaspuede
producirlaarnputaci6nde rnanosy pies.
44
• Unacubiertade descargafaltanteo da_adapuedeprovocarel
contactocon la cuchillao lesionesporobjetosarrojados.
Muchaslesionesocurrencornoresultadode pasarlacortadora
sobrelos piesduranteunacaida provocadaporderrapeso
tropiezos.No se sostengade la podadorasi se est,.cayendo,
sueltela rnanijainmediatarnente.
Nuncatire haciaustedlapodadorarnientrascarnina.Sidebe
retrocederla podadoraparaevitarunaparedu obst_.culo,mire
prirneroabajoy atr_.sparaevitartropezarsey luegosigaestos
pasos:
1. Retrocedade la podadorahastaestirarcornpletarnentesus
brazos.
2. AsegOresequeest,. bienequilibradoy bienparado.
3. Tirede la podadoralentarnentehaciausted,norn_.sall_.de la
rnitadde ladistanciaentreustedy lapodadora.
4. Repitaestospasoscornose requiera.
• No opereestarn_.quinaestandobajolosefectosdelalcoholo de
drogas.
• No ernbragueel mecanisrnode autopropulsi6nen unidadescon
esteequipornientrasarrancael motor.
• Elrnecanisrnodecontroldela cuchillaes undispositivode
seguridad.Nuncaintentedesviarsede su funcionarniento.De
hacerlono funcionarianlos dispositivosde seguridady podrian
producirselesionespersonalesporel contactocon lascuchillas
giratorias.Lasrnanijasdecontrolde lacuchilladebenfuncionar
bienenarnbasdireccionesy regresarautorn_.ticarnentea la
posici6ndedesengranecuandose las suelta.
• Nuncaoperelapodadoraen c_spedhOrnedo.Siernpreest_
segurode su equilibrio.Si tropiezay cae puedelesionarse
gravernente.Sisienteque pierdeelequilibrio,suelteinrnediata-
rnentela rnanijade controlde lacuchillay lacuchilladejar_,de
girarentressegundos.
• Corteel cespedsolarnentecon luz dedia o con unabuenaluz
artificial.Carnine,nuncacorra.
• Detengala cuchillacuandocrucecarninosde gravilla,pasoso
andadores.
• Si larn_.quinacornenzaraa vibrarde rnaneraanorrnal,detenga
el motor,y busqueinrnediatarnentelacausa.Lavibraci6nporIo
generales unaadvertenciadealgQnproblerna.
• Apagueelmotory esperehastaquela cuchillase detenga
cornpletarnenteantesde retirarla guardaparael recortede
cespedo desatorarlatolva. LacuchillacontinOagirandopor
unoscuantossegundosdespu_squeel motorse haapagado.
Nuncacoloqueningunapartedel cuerpoen el_.reade lacuchilla
hastaqueest_seguroquelacuchillahadetenidosu rnovirniento
rotatorio.
Nuncaoperela cortadorasin las guardasapropiadas,cubiertade
descarga,guardapararecorte,rnanijadecontroldela cuchilla
y otrosdispositivosde seguridady protecci6nensu lugary
funcionando.Nuncaoperelacortadorasi los dispositivosde
seguridadest_.nda_ados.Si noIo hace,estopuedetenetcorno
resultadolesiones.
• Elsilenciadory el motorse calientany puedenproducirquerna-
duras.Nolos toque.
• Utilicesolarnentepartesy accesoriosfabricadosespecialrnente
paraestarn_.quina,originalesdelfabricante(OEM).Sino Io
hace,estopuedetenercornoresultadolesionespersonales.
• Paraencenderel motor,jale dela cuerdalentarnentehastaque
sientaresistencia,luegojale r@idarnente.Elreplieguer@idode
lacuerdadearranque(tensi6nde retroceso)lejalar_,larnanoy
el brazohaciael motorrn_.sr@idode Ioque ustedpuedesoltar.
Elresultadopuedenser huesosrotos,fracturas,hernatornaso
esguinces.
Sise presentansituacionesquenoest_.nprevistaseneste
manualseacuidadosoy useel sentidocornQn.Contacto1-800-
659-5917parainforrnaci6ny asistencia.
DIENTES
Laspendientessonun factorirnportantequese relacionacon los
accidentesproducidosporderrapesy caidasy quepuedenpro@@
lesionesgraves.La operaci6nen pendientesrequieremayorpre-
cauci6n.Sino se sienteseguroen unapendiente,nola pode.Para
seguridad,use el rnedidordependientesquese incluyecornopartede
estemanualpararnedirla pendienteantesdeoperarlaunidaden una
zonainclinada.Si lapendientesuperalos 15grados,nola pode.
HagaIo siguiente:
• Muevala podadoraa travesde las carasde la pendiente,nunca
haciaarribay abajo.Tengacuidadocuandocarnbiededirecci6n
cuandooperela rn_.quinaenpendientes.
• Est_atentoa los agujeros,raices,rocas,objetosocultoso
abultarnientosquepuedanprovocarque sederrapeo se tropiece.
Elc_spedalto puedeocultarobst_.culos.
Siernpreest_segurodesu equilibrio.Sitropiezay cae puede
lesionarsegravernente.Si sJentequepier@el equilibrio,suelte
inrnediatarnentelarnanijadecontrolde lacuchillay lacuchilla
dejar_,degirarentres(3) segundos.
No hagaIo siguiente:
• I/o corteel cespedcercade pozos,hundirnientos,bancos,podria
perderel equilibrio.
• Nopodependientesrnayoresde 15gradoscornoIo indicael
rnedidorde pendientes.
• Nopodeel cespedhOrnedo.Si noest,.firrnernenteparado,puede
resbalarse.
45
N QOS
Puedenocurriraccidentestr_.gicossi eloperadornoest,.atentoa la
presenciade ni_os.PorIogenerala los ni_osles atraenlas podadoras
y la actividadde podarel c_sped.Noentiendenlos riesgosnilos
peligros.Nuncad_porsentadoquelos ni_osperrnanecer_.nen el
rnisrnolugardondelosvio por Oltirnavez.
• Mantengaa los ni_osfuera delAreadetrabajoy bajoestricta
vigilanciade unadultoresponsableadern_.sdeloperador.
Est_alerta y apaguela podadorasi un ni_oingresaal Area.
Antesy rnientasse est,.rnoviendohaciaatr_.s,mirehaciaatr_.sy
cuidequeno hayani_os.
Tengaextrernaprecauci6ncuandoseaproxirnea esquinas
ciegas,entradasdepuertas,_.rbolesu otrosobjetosque puedan
obstaculizarlelavista deun ni_oque pudiesecorrerhaciala
podadora.
Mantengaalejadosa los ni_osdelos rnotoresenrnarchao
calientes.Puedensufrirquernadurascon un silenciadorcaliente.
Nuncaperrnitaqueni_osrnenoresde 14a_osoperenesta
rn_.quina.Los ni_osrnayoresde 14a_osdebenleery entender
las instruccionesde operaci6ny reglasdeseguridadcontenidas
enestemanualy debenser entrenadosy supervisadospor sus
padres.
SERVIClO
Manejo segurode la gasolina:
• Paraevitarlesionespersonaleso daSosrnaterialessea
surnarnentecuidadosoal rnanipularlagasolina.Lagasolinaes
altarnenteinflarnabley losvaporesson explosivos.Sepuede
lesionargravernentesi derrarnagasolinasobreustedo sobrela
ropaya quese puedeencender.
• Utilices61orecipientesparagasolinaautorizados.
• NuncaIlenelos contenedoresenel interiordeunvehiculo
ocarni6nocaja decarnionetacon recubrirnientospl_.sticos.
Coloquesiernprelos recipientesenel pisoy lejosdelvehiculo
antesde Ilenarlos.
• Retireel equipoa gasolinadelcarni6no rernolquey II_neloen
el piso.Si estonoes posible,entoncesIlenedichoequipoenun
rernolquecon un recipienteport_.til,en vezdedesdeundispen-
sadordegasolina.
• Mantengala boquillade Ilenadoencontactocon elhordedela
entradadeltanquede gasolinaocontenedoren todornornento
hastaqueest_Ileno.No utiliceundispositivoparaabrir/cerrarla
boquilla.
• Apaguetodoslos cigarrillos,cigarros,pipasy otrasfuentesde
cornbusti6n.
• Nuncacarguecombustibleen larn_.quinaen interioresporque
Losvaporesinflarnablespodrianacurnularseen el_.rea.
Nuncasaquelatapadel gasni agreguecombustiblernientrasel
motorest,.calienteo en rnarcha.Dejequeel motorse enfriepor
Io rnenosdos rninutosantesde volvera cargarcombustible.
• Nuncarecargueel tanquedecombustible.Lleneel tanqueno
rn_.sde 1 pulgadapor debajodela basedelcuellode Ilenado
paradejarespacioparala expansi6ndelcombustible.
• Vuelvaa colocarlatapade la gasolinay ajOstelabien.
• Lirnpiela gasolinaderrarnadasobreel motory el equipo.Traslade
la rn_.quinaa otrazona.Espere5 rninutosantesde encenderel
motor.
• Nuncaalrnacenela rn_.quinao el recipientede combustibleen
unespaciocerradodondehayafuego,chispaso aparatoscon
pilotocornoporejernplo,calentadoresde agua,calentadores,
hornos,secadoresde ropau otrosaparatosagas.
• Parareducirel riesgode incendiornantengala rn_.quinalirnpia
de pasto,hojasy deacurnulaci6nde otrosescornbros.Lirnpielos
derrarnesde aceiteo combustibley saquetodoslosdesechos
ernbebidoscon combustible.
• Dejeque la rn_.quinase enfrie5 rninutospor Iornenosantesde
alrnacenarla.
Funcionamientogenerah
• Nuncaenciendaunmotoren espacioscerradoso en unazona
con pocaventilaci6n.Elescapedel motorcontienernon6xidode
carbono,ungas inodoroy letal.
• Antesde lirnpiar,repararo inspeccionarlarn_.quina,cornpruebe
que lacuchillay todaslas partesquese rnuevense handetenido.
Desconecteel cablede la bujiay p6ngalode rnaneraque haga
rnasacontrael motorparaevitarquese enciendade rnanera
accidental.
• Reviselos pernosde rnontajede lacuchillay delmotora
intervalosfrecuentesparaverificarqueest_nbienapretados.
Inspeccioneadern_.svisualrnentela cuchillaenbuscade daSos
(abolladuras,desgaste,roturas,etc.).Reernplacelacuchillacon
equipooriginaldel fabricante(OEM)listadoenestemanual.La
utilizaci6nde partesquenocurnplancon lasespecificacionesde
equiposoriginalespodriatenetcornoresultadoun rendirniento
incorrectoy adern_.sla seguridadpodriaestarcornprornetida.
• Lascuchillasde las podadorasson rnuyafiladasy podrian
cortarlo.Envuelvalacuchillao utiliceguantesy extremeprecau-
clonescuandole de servicio.
• Mantengatodoslos pernos,tuercasy tornillosbienajustados
paraasegurarsequela rn_.quinaseencuentraen condiciones
segurasdeoperaci6n.
• Nuncarnanipulelosdispositivosde seguridaddernanera
irnprudente.Controleperi6dicarnentequefuncionendeforrna
adecuada.
46
• Despu_sdegolpearcon algOnobjetoextrafio,detengael motor,
desconecteelcablede la bujfay conecteel motora rnasa.
Inspeccionerninuciosarnentela rn_.quinaparadeterrninarsi est,.
dafiada.Repareel dafio antesdeencenderlay operarla.
• Nuncatratedeajustaruna ruedao laalturade corternientrasel
motorest,.en rnarcha.
• Loscornponentesde latolvapararecorte,cubiertade descargay
escudode riel,est_.nsujetosa desgastey dafiosquepodriadejar
expuestaspartesquese rnueveno perrnitirquese arrojenobje-
tos. Paraprotegersu seguridad,verifiquefrecuenternentetodos
los cornponentesy reernpl_.celoss61ocon partesde losfabri-
cantesde equiposoriginales(O.E.M.)listadasenestemanual.
La utilizaci6nde partesquenocurnplancon las especificaciones
deequiposoriginalespodriatenercornoresultadoun rendirniento
incorrectoy adern_.sla seguridadpodriaestarcomprornetida.
• No carnbielaconfiguraci6ndel reguladordelmotorni acelere
dernasiadoelrnisrno.Elreguladorcontrolalavelocidadrn_.xirna
segurade operaci6ndel motor.
• Verifiquefrecuenternentela Ifneadecombustible,eltanque,el
tap6n,y losaccesoriosbuscandorajaduraso perdidas.Reern-
placedeset necesario.
• No d_arranqueal motorsi noest,.la bujfadeencendido.
• Mantengao reernpiace[asetiquetasde seguridad,segOnsea
necesario.
• Observelasleyesy norrnasaplicablesparadisponeradecu-
adarnentedelos desechos.Ladescargainapropiadadeliquidos
o rnaterialespuededafiar e[ medicarnbiente.
• SegOnla Cornisi6nde Seguridadde Productosparael Consu-
rnidordelos EstadosUnidos(CPSC)y laAgenciade Protecci6n
Arnbientalde los EstadosUnidos(EPA),esteproductotiene una
vidadtil media desiete(7)afios, 6 140horasdefuncionarniento.
AI finaiizar[avida dtilmedia, adquieraunarn_.quinanuevao
hagainspeccionaranualrnente_staSearsporunou otrodis-
tribuidorde serviciosparacerciorarsedequetodoslos sisternas
rnec_.nicosy de seguridadfuncionancorrectarnentey no tienen
excesivodesgaste.Si no1ohace,puedenproducirseaccidentes,
[esionesornuerte.
NO MODIFIQUE EL MOTOR
Paraevitarlesionesgraveso larnuerte,nornodifiqueel motorbajo
ningunacircunstancia.Si carnbiala configuraci6ndel reguladorde[
motorelmotorpuededescontrolarsey operara velocidadesinsegu-
ras.Nuncacarnbielaconfiguraci6ndef_.bricadelreguladordel motor.
AVISO REFERIDO A EMISIONES
Losrnotoresqueest&ncertificadosy curnplencon las regulaciones
de ernisionesfederalesEPAy de CaliforniaparaSORE(Equipos
pequefiostodoterreno)est_.ncertificadosparaoperarcon gasolina
cornOnsinplornoy puedenincluirlossiguientessisternasde control
de ernisiones:Modificaci6ndemotor(EM) y catalizadorde tresvias
(TWO)si est_.nequipadosde esa rnanera.
GUARDACHISPAS
Estarn&quinaest,.equipadacon unmotorde cornbusti6ninternay
nodebeser utiiizadaen o cercade unterrenoagrestecubiertopor
bosque,rnalezaso hierbaexceptosi el sisternade escapedelmotor
est,.equipadocon unarnortiguadorde chispasquecurnplaconlas
[eyeslocaleso estataiescorrespondientes,encasodehaberlas.
Sise utiiizaun arnortiguadordechispasel operadorIo debernantener
en condicionesde usoadecuadas.Enel Estadode California[as
rnedidasanteriorrnenternencionadassonexigidasporley (Arficulo
4442del C6digode RecursosPOblicosde California).Es posible
queexistanleyessirnilaresenotrosestados.Lasleyesfederalesse
aplicanenterritoriosfederaies.
Puedeconseguirelarnortiguadorde chispasparael silenciadora
travesde sudistribuidorautorizadode rnotoreso poni_ndoseen
contactocon elcentrode servicioSears.
4.7
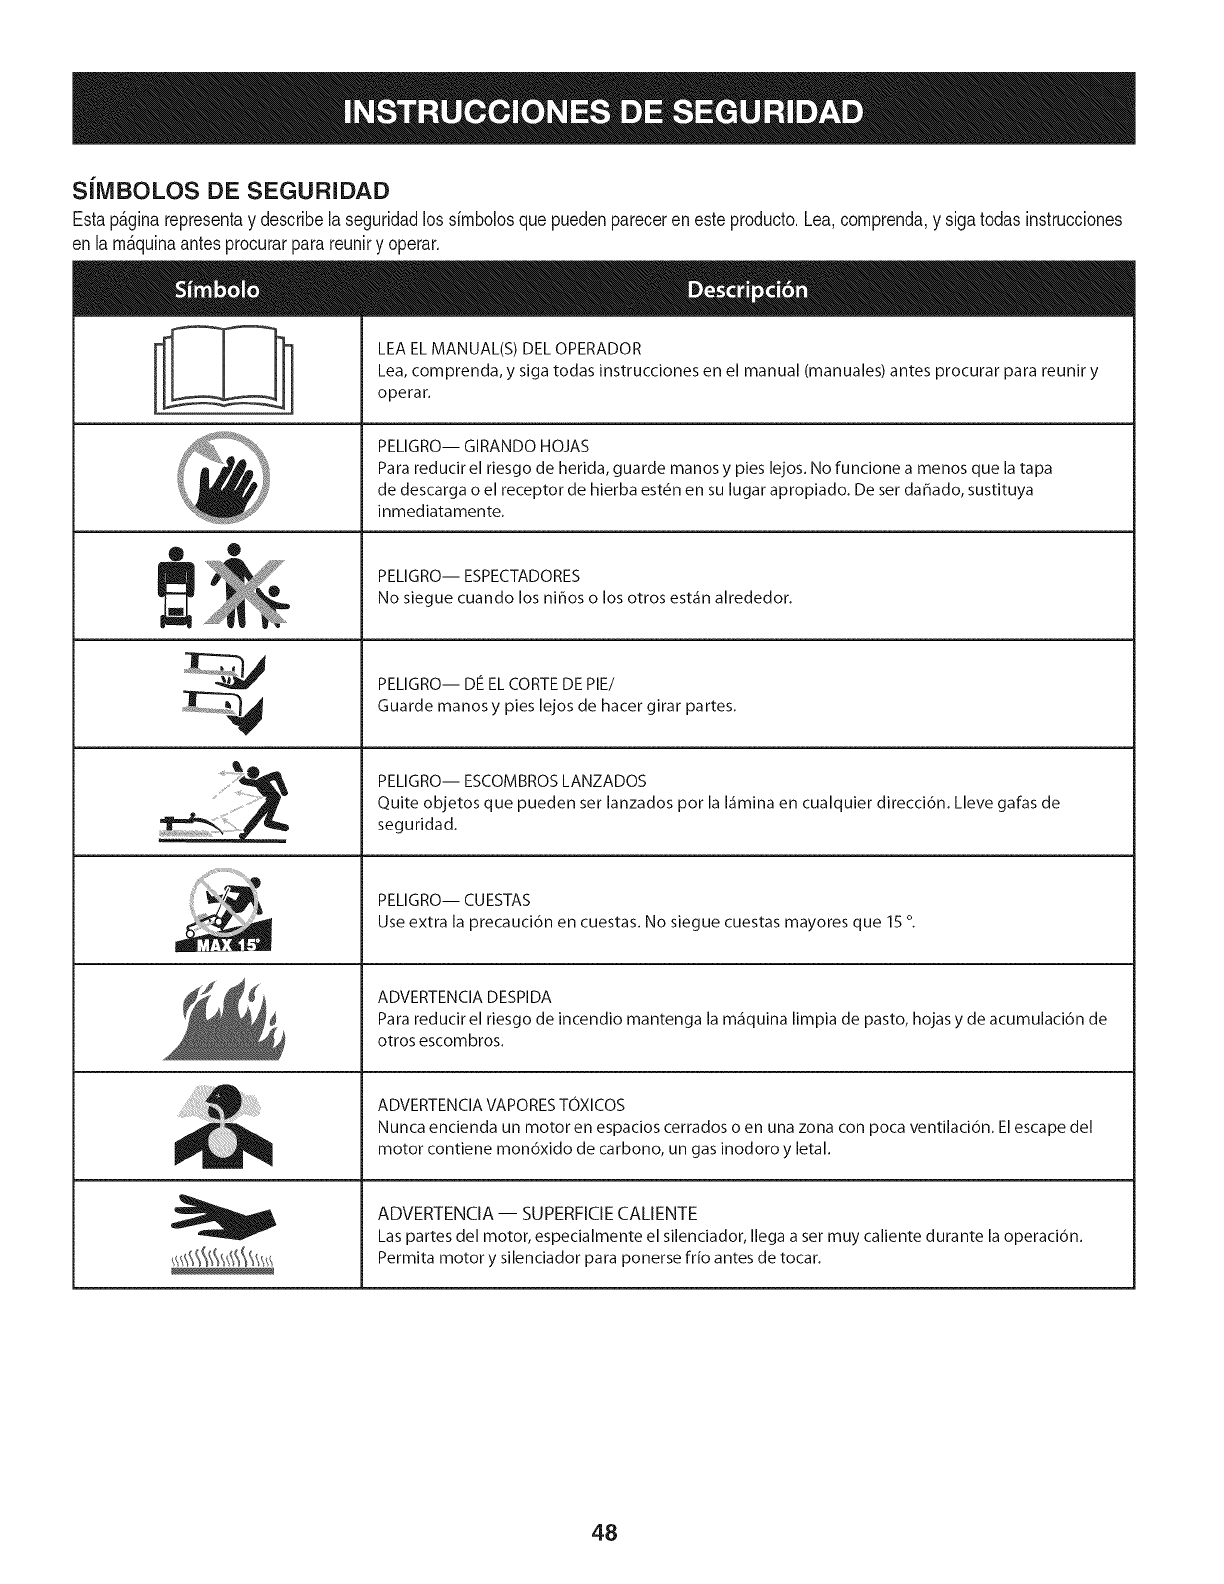
SilVIBOLOS DE SEGURIDAD
Estap&ginarepresentay describelaseguridadlos simbolosquepuedenpareceren esteproducto.Lea,comprenda,y sigatodasinstrucciones
en lam_quinaantesprocurarparareuniry operar.
ii
®
LEA EL MANUAL(S) DEL OPERADOR
Lea, comprenda, y siga todas instrucciones en el manual (manuales) antes procurar para reunir y
operar.
PELIGRO-- GIRANDO HOJAS
Para reducir el riesgo de herida, guarde manos y pies lejos. No funcione a menos que la tapa
de descarga o el receptor de hierba est_n en su lugar apropiado. De ser dahado, sustituya
inmediatamente.
PELIGRO-- ESPECTADORES
No siegue cuando los nihos o los otros est_in alrededor.
PELIGRO-- DE EL CORTE DE PIE/
Guarde manos y pies lejos de hacer girar partes.
PELIGRO-- ESCOMBROS LANZADOS
Quite objetos que pueden ser lanzados por la I_imina en cualquier direcci6n. Lleve gafas de
seguridad.
PELIGRO-- CUESTAS
Use extra la precauci6n en cuestas. No siegue cuestas mayores que 15 o
ADVERTENCIA DESPIDA
Para reducir el riesgo de incendio mantenga la m_iquina limpia de pasto, hojas y de acumulaci6n de
otros escombros.
ADVERTENCIA VAPORES TOXICOS
Nunca encienda un motor en espacios cerrados o en una zona con poca ventilaci6n. Elescape del
motor contiene mon6xido de carbono, un gas inodoro y letal.
ADVERTENCIA-- SUPERFICIE CALIENTE
Las partes del motor, especialmente el silenciador, Ilega a set muy caliente durante la operaci6n.
Permita motor y silenciador para ponerse frio antes de tocar.
48
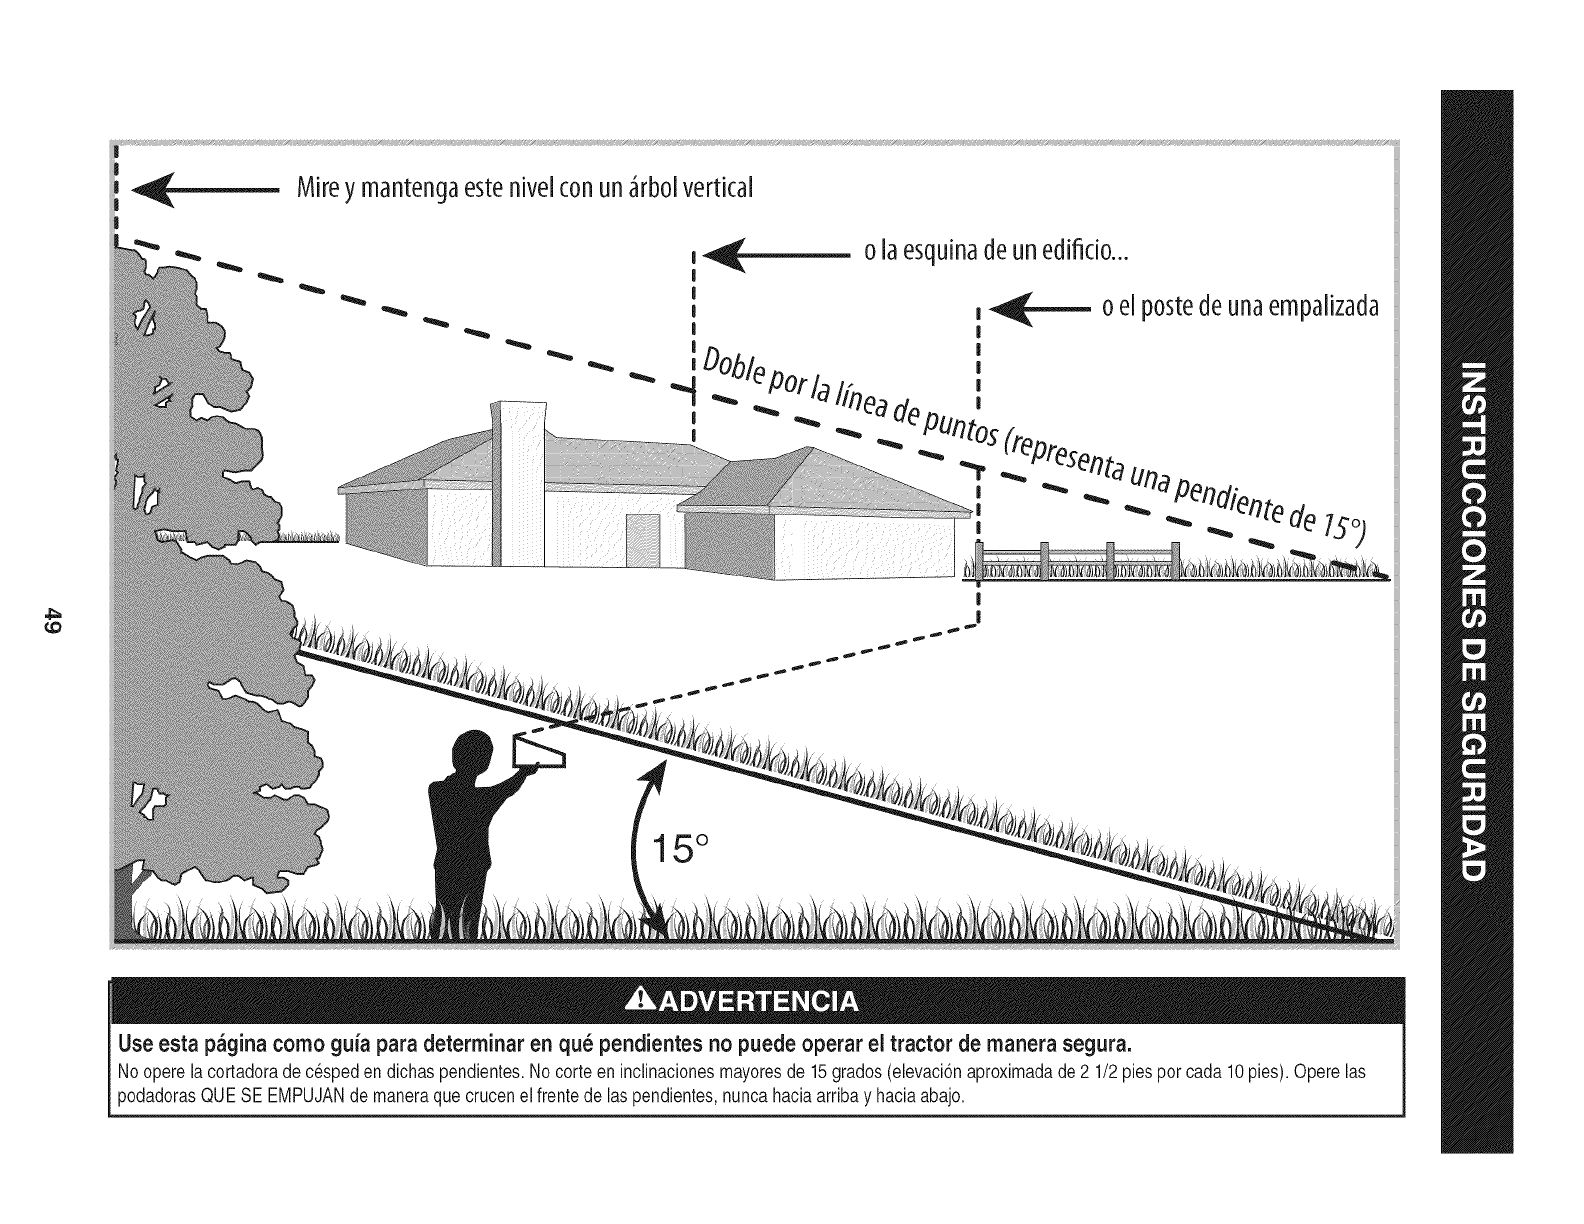
Mireymantenc3aestenive[conun_rbo[vertical
Use esta pagina como guia para determinar en qu_ pendientes no puede operar eI tractor de manera segura.
Nooperelacortadoradec_speden dichaspendientes.No corteen inclinacionesmayoresde 15grados(elevaci6naproximadade 2 1/2 piespercada 10pies).Operelas
podadorasQUESE EMPUJANde maneraquecrucenel frentede las pendientes,nuncahaciaarribay haciaabajo.
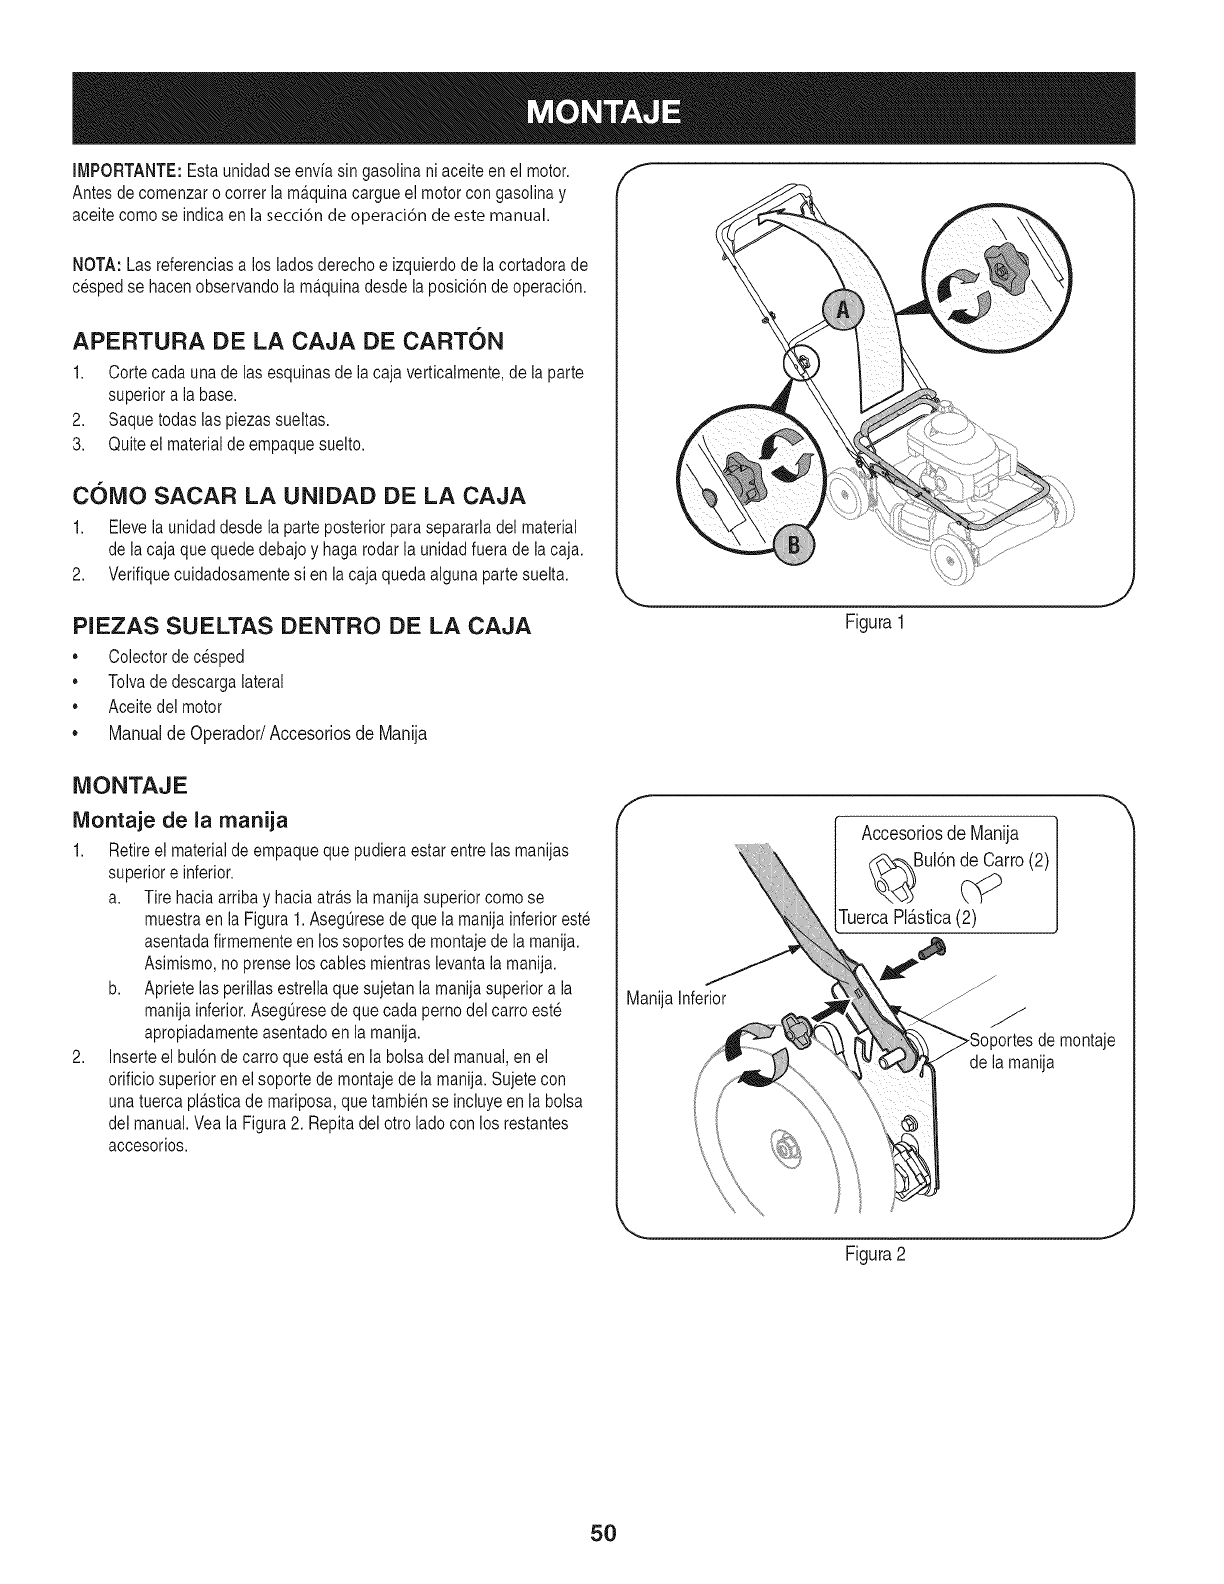
IMPORTANTE: Esta unidad se envfa sin gasolina ni aceite en el motor.
Antes de comenzar o correr ia ma.quinacargue el motor con gasolina y
aceite como se indica en la secci6n de operaci6n de este manual.
NOTA: Las referencias a los ladosderecho e izquierdo de ia cortadora de
cespedse hacen observando la ma.quinadesde la posici6n de operaci6n.
APERTURA DE LA CAJA DE CARTON
1. Corte cada una de ias esquinas de la caja verticaimente, de la parte
superiora la base.
2. Saque todas las piezassueltas.
3. Quite el material de empaque suelto.
C61VIO SACAR LA UNIDAD DE LA CAJA
1. Eleve la unidaddesde la parte posterior parasepararla del material
de ia caja que quede debajo y haga rodaria unidadfuera de ia caja.
2. Verifique cuidadosamente si en la caja queda aiguna parte suelta.
PIEZAS SUELTAS DENTRO DE LA CAJA
Colectorde cesped
Tolvade descarga lateral
Aceite del motor
• Manual de Operador/Accesorios de Manija
f
Figura1
J
MONTAJE
IViontaje de la manija
1. Retire el material de empaque que pudiera estar entre las manijas
superiore inferior.
a. Tire haciaarriba y hacia atra.sia manija superior como se
muestraen la Figura 1.Asegurese de que ia manija inferior este
asentadafirmemente en los soportes de montaje de ia manija.
Asimismo,no prense los cables mientras levanta la manija.
b. Apriete las periiias estrelia que sujetan la manija superior a ia
manija inferior. Asegurese de que cada perno del carro este
apropiadamenteasentado en la manija.
2. Inserte el bul6n de carro que est,. en la bolsa del manual,en el
orificio superior enel soporte de montaje de ia manija. Sujete con
una tuerca pla.sticade mariposa, que tambien se incluye en la bolsa
del manual.Vea la Figura 2. Repita del otto lado con los restantes
accesorios.
f
Manija inferior
Accesoriosde Manija
_Bul6n _rro (2)
TuercaPl_.stioa(2)
/
de montaje
de la manija
Figura2
J
50

3. Laguia de la cuerda esta.unida al costadoderechode la manija
superior.Afloje latuerca de mariposaque sujeta la guiade la cuerda.
Veala Figura3.
a. Sostengala manija de control de la cuchilla contra la manija
superior.
b. Jale la cuerda de arranque parasacarla del motor. Suelte el
control de la cuchilla.
c. Deslice la cuerda dearranque en la guia.
d. Ajustelatuerca mariposa.
4. Inserte los pasadoresde ias unionesde cables dentro de Los
orificios de la manija inferior.Tire de las unionesdel cable
apreta.ndolasy recortando ei exceso. Vea la Figura 4.
Conexi6n de la colectora de c_sped
1. Paraensamblar el colector de cesped (de ser necesario), Hagael
cierto bolso es die vuelta a la derecha el lade antes de reunir (la
advertencia de la etiqueta sera.pot fuera).
a. Coloque ia bolsa sobre el marco con el lade negro de pla.stico
en el rondo.
b. Deslice el canal de pl_.sticosobre los ganchos del marco.
Vea la Figura 5. Todos los canales excepto la parte superior
central de la bolsa se acoplan desde el exterior.
c. El centro de la bolsa se acopla desde el interior.
2. Paraacoplar el colector de cesped:
a. Levante ia puerta de descarga posterior.Vea la Figura6.
b. Coloqueei colectorde cesped en ia variiia de pivote. Suelte ia
puerta dedescarga de mode que descanse sobre el colector
de cesped.
Nuncaopere ia podadoraa menos que los ganchos dei colector de
cesped esten firmemente asentados en las ranurasde los montajes de
la mensula de la manija y la puerta de descarga posterior descanse
f rmementecontra a parte super or de co ector de cesped.
Figura3
li
J
Figura 4
f
Figura 5
_. ,.J
Figura6
51

Canal de Descarga Lateral
Su podadora ha side enviadacome abonadora. Si hace ia conversi6n a
descarga lateral,asegQresede que el colectorde cesped este fuera de la
unidad y que ia puerta de descarga trasera este cerrada.
1. Enel costadode la podadora, levante el adaptador para abono. Vea
la Figura7.
2. Deslice los dos ganchos del canal de descarga lateraldebajo del
pasadorde bisagrasobre el montaje del adaptador para abono. Baje
el adaptador para abono.
NOTA: No extraiga la clavija para abono lateral encualquier momento,
aQncuando no este abonando.
AJUSTES
Ajuste de la altura de corte
Una placade ajuste y una palanca encada rueda proporcionan el ajuste
de la altura de corte. Vea la Figura 8.
1. Presione la palanca hacia la rueda.
2. Mu_vala a cualquier de las posiciones para la altura de corte
deseado.
3. Libere la palanca hacia la cubierta de la podadora.
IMPORTANTE: Todas las ruedas deben set colocadasen la misma
posici6n relativa. Cuandoei terreno es agreste o irregular cambie ia
palanca de ajuste de la aitura a una posici6n ma.salta. De esta manerase
cuida ma.sel cesped.
f
Figura7
J
f
Figura8
J
52
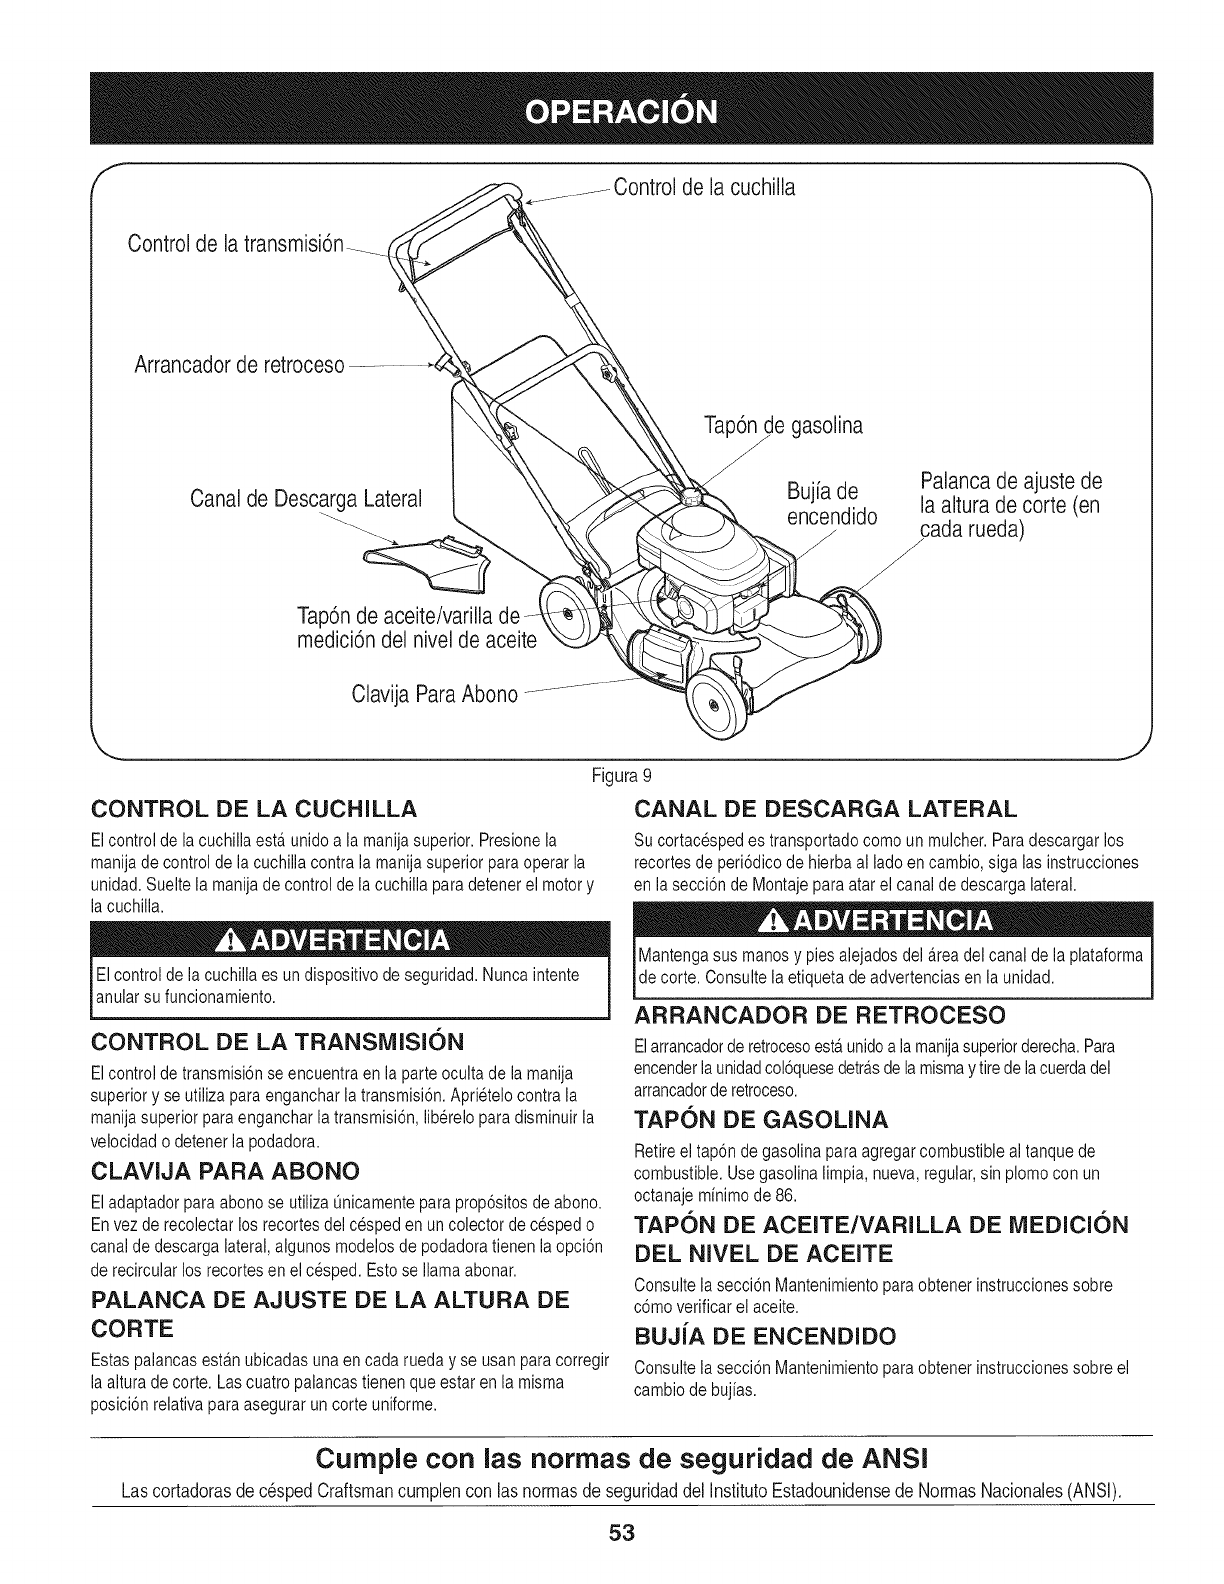
fde la cuchilla
Control de la transmisi6n__
Arrancadorde retroceso
Canal de Descarga Lateral
Tap6n de
medici6ndel nivel de aceite
Tap6nde gasolina
/Bujfa de Palanca de ajuste de
encendido la altura de corte (en
cada rueda)
/y
Clavija ParaAbono
J
Figura 9
CONTROL DE LA CUCHILLA
El control de la cuchilla est,. unido a la manija superior. Presione la
manija de control de la cuchilla contra la manija superior paraoperar la
unidad. Sueltela manija de control de la cuchilla para detenerel motor y
la cuchilla.
El control de ia cuchiiia es un dispositivo de seguridad. Nunca intente
anular su funcionamiento.
CONTROL DE LA TRANSMISI6N
El control de transmisi6nse encuentra en la parte oculta de la manija
superiory se utiiiza para enganchar ia transmisi6n. Aprietelo contra ia
manija superior para enganchar la transmisi6n,liberelo para disminuir la
velocidado detener ia podadora.
CLAVIJA PARA ABONO
El adaptador paraabono se utiiiza Qnicamentepara prop6sitos de abono.
Envez de recolectar los recortes del cesped en un colector decesped o
canal de descarga lateral,aigunos modelos de podadora tienen laopci6n
de recircular los recortesen el cesped. Estose llama abonar.
PALANCA DE AJUSTE DE LA ALTURA DE
CORTE
Estas paiancas esta.nubicadas una en cada rueda y se usan paracorregir
la altura de corte. Las cuatro palancastienen que estar en la misma
posici6n relativa paraasegurar un corte uniforme.
CANAL DE DESCARGA LATERAL
Su cortacesped es transportado como un mulcher. Para descargar los
recortesde peri6dico de hierbaai lado en cambio,siga ias instrucciones
en la secci6n de Montaje para atarel canalde descarga lateral.
Mantenga sus manosy pies alejadosdel area del canal de la plataforma
de corte. Consulte la etiqueta de advertencias en la unidad.
ARRANCADOR DE RETROCESO
Elarrancadorde retrocesoesta.unidoa la manijasuperiorderecha.Para
encenderla unidadcol6quesedetra.sde lamismay tirede lacuerdadel
arrancadorde retroceso.
TAPON DE GASOLINA
Retireel tap6n de gasolina para agregar combustible ai tanque de
combustible. Use gasolina limpia, nueva, regular,sin plomo con un
octanaje mfnimode 86.
TAPON DE ACEITE/VARILLA DE MEDICI6N
DEL NIVEL DE ACEITE
Consulte ia secci6n Mantenimiento para obtener instrucciones sobre
c6mo verificarel aceite.
BUJiA DE ENCENDIDO
Consulte la secci6n Mantenimiento para obtener instrucciones sobre el
cambio de bujfas.
Cumple con las normas de seguridad de ANSI
Las cortadoras de c_sped Craftsman cumplen con las normas de seguridad del Instituto Estadounidense de Normas Nacionales (ANSI).
53
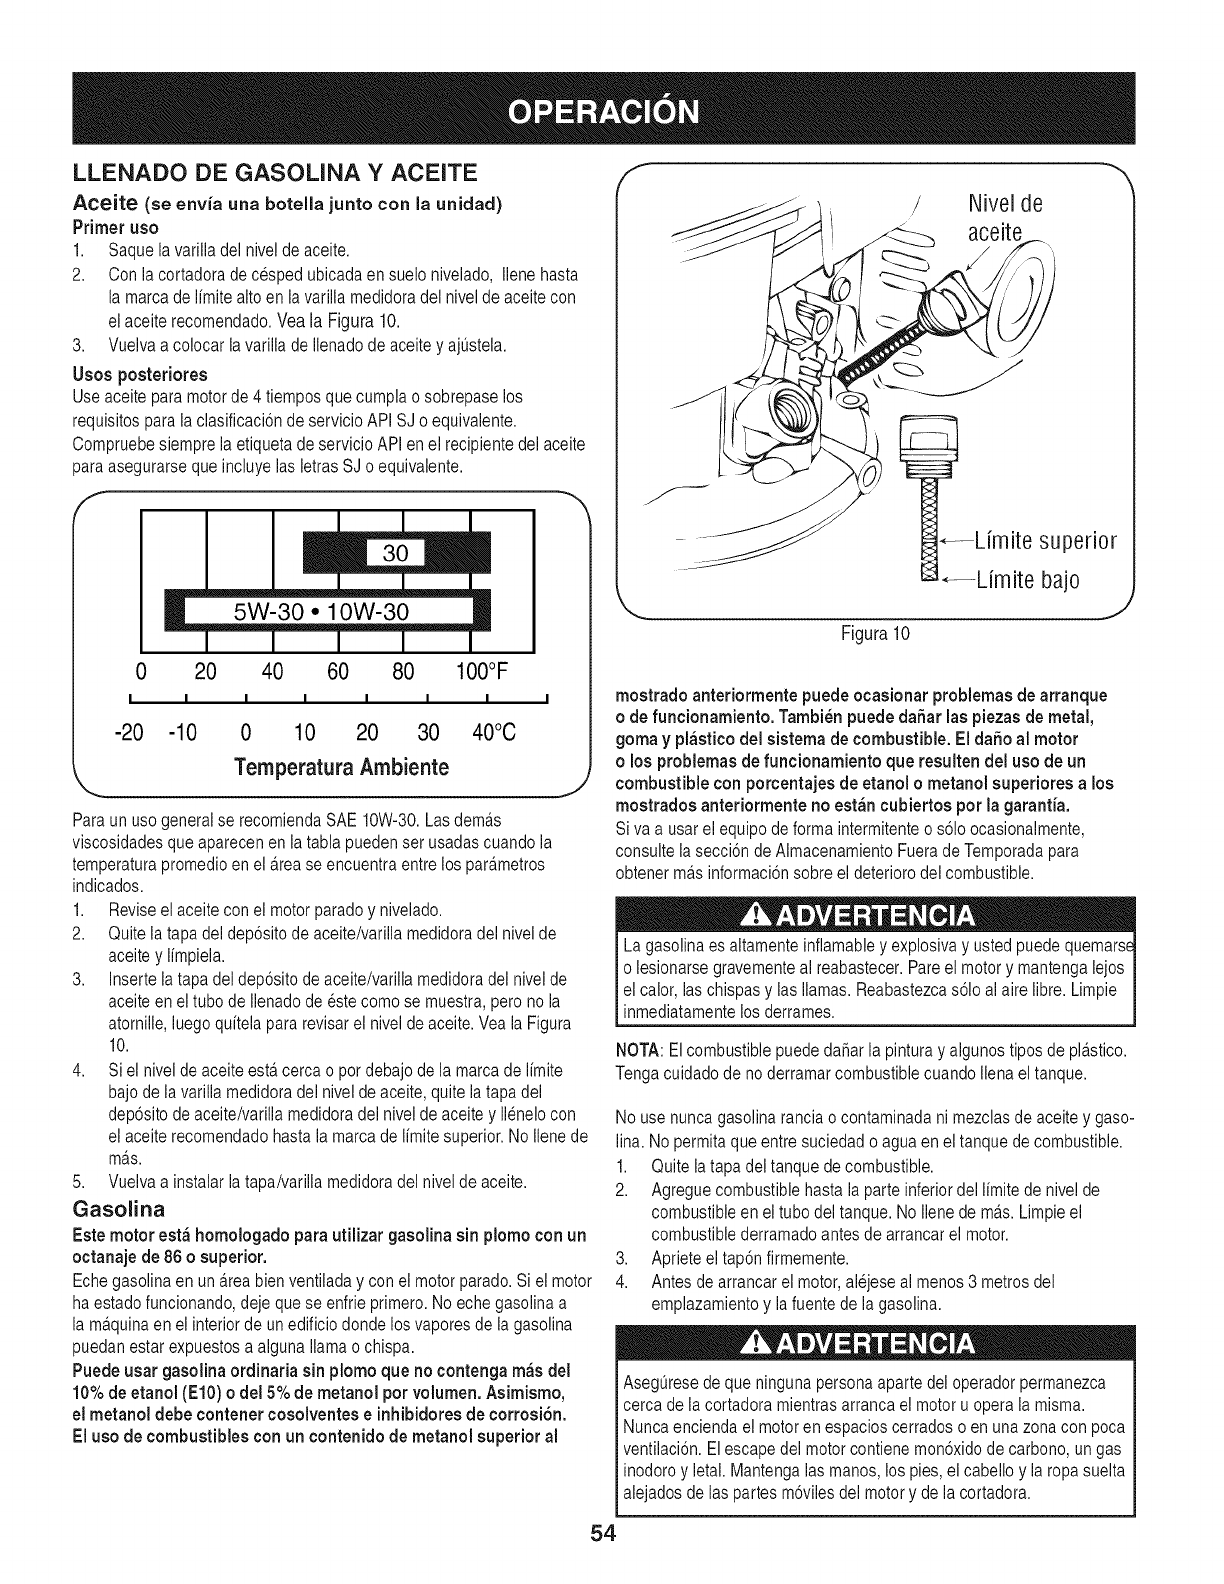
LLENADO DE GASOUNA YACEITE
Aceite (se envia una botella junto con la unidad)
Primer uso
1. Saque la varilla del nivel de aceite.
2. Con ia cortadora de cesped ubicada en suelo nivelado, iiene hasta
la marca de iimite altoen ia variila medidora del nivel de aceite con
el aceite recomendado. Vea la Figura 10.
3. Vuelva a colocar la varilla de Ilenadode aceite y ajQstela.
Usos posteriores
Use aceite para motor de 4 tiempos que cumpla o sobrepase los
requisitos para ia clasificaci6n de servicio API SJ o equivaiente.
Compruebesiempre ia etiqueta de servicio API en el recipiente dei aceite
para asegurarseque incluye ias ietras SJ o equivalente.
0 20 40 60 80 IO0°F
I I I I I I I
-20 -10 0 10 20 30 40°C
TemperaturaAmbiente
.,._ J
Para un uso general se recomienda SAE 10W-30.Las demas
viscosidadesque aparecen en ia tabla pueden set usadas cuando ia
temperaturapromedio en el a.rease encuentra entre los para.metros
indicados.
1. Revise el aceite con ei motor paradoy nivelado.
2. Quite ia tapa del dep6sito de aceite/varilla medidora del nivel de
aceite y limpiela.
3. Inserte ia tapa dei dep6sito de aceite/variiia medidora dei nivei de
aceite en el tubo de ilenado de este como se muestra, pero no ia
atornille, luego quitela para revisarel nivel de aceite. Vea la Figura
10.
4. Si el nivel deaceite esta.cerca o pot debajo de la marcade limite
bajo de la varilla medidora del nivel de aceite, quite la tapa del
dep6sito de aceite/varilia medidoradei nivei de aceite y ilenelo con
el aceite recomendado hasta la marca de limitesuperior. No Ilene de
ma.s.
5. Vueiva a instalar la tapa/varilla medidora del nivel de aceite.
Gasolina
Este motor est_ homologado para utilizar gasolina sin plomo con un
octanaje de 86 osuperior.
Eche gasolina en una.reabien ventiiada y con ei motor parado. Si el motor
ha estadofuncionando, deje que se enfrie primero. No eche gasolina a
la ma.quinaen ei interior de un edificiodonde los vapores de la gasolina
puedan estar expuestos a aiguna llamao chispa.
Puede usar gasolina ordinaria sin plomo que no contenga m_s del
10% de etanol (El0) o del 5% de metanol pot volumen. Asimismo,
el metanol debe contener cosolventes e inhibidores de corrosi6n.
El usode combustibles con un contenido de metanol superior al
f
Nivelde
aceite
_Lfmite superior
Limite bajo
Figura10
mostrado anteriormente puede ocasionar problemas de arranque
o de funcionamiento. Tambi_n puede daSar las piezas de metal,
goma y plastico del sistema de combustible. El daSo al motor
o los problemas de funcionamiento que resulten del uso de un
combustible con porcentajes de etanol o metanol superiores a los
mostrados anteriormente no est_n cubiertos por la garanfia.
Siva a usar ei equipo de forma intermitenteo s61oocasionalmente,
consulte ia secci6n de Aimacenamiento Fuera de Temporada para
obtener ma.sinformaci6n sobre el deterioro del combustible.
Lagasolina es aitamente inflamable y explosiva y usted puede quemars_
o iesionarse gravementeai reabastecer. Pare el motor y mantenga iejos
el calor, las chispas y las llamas. Reabastezcas61oai aire libre. Limpie
inmediatamente los derrames.
NOTA: El combustiblepuede daSar la pintura y algunos tipos de plastico.
Tenga cuidado de no derramar combustible cuando Ilenael tanque.
No use nunca gasolina ranciao contaminada ni mezclasde aceite y gaso-
lina. No permita que entre suciedad o agua en el tanque de combustible.
1. Quite iatapa dei tanque de combustible.
2. Agregue combustible hasta ia parte inferior del iimite de nivel de
combustible en ei tubo del tanque. No iiene de ma.s.Limpie el
combustible derramado antes de arrancar el motor.
3. Aprieteeltap6n firmemente.
4. Antes dearrancar el motor, aiejese al menos3 metros del
emplazamiento y la fuente de la gasolina.
AsegQresede que ninguna persona aparte dei operador permanezca
cerca de ia cortadora mientrasarranca el motor u opera la misma.
Nunca encienda el motor en espacios cerrados o en una zona con poca
ventilaci6n. El escape del motor contiene mon6xido de carbono, un gas
inodoro y ietai. Mantenga ias manos, los pies, el cabello y la ropa suelta
alejados de las partes m6viles del motor y de la cortadora.
54
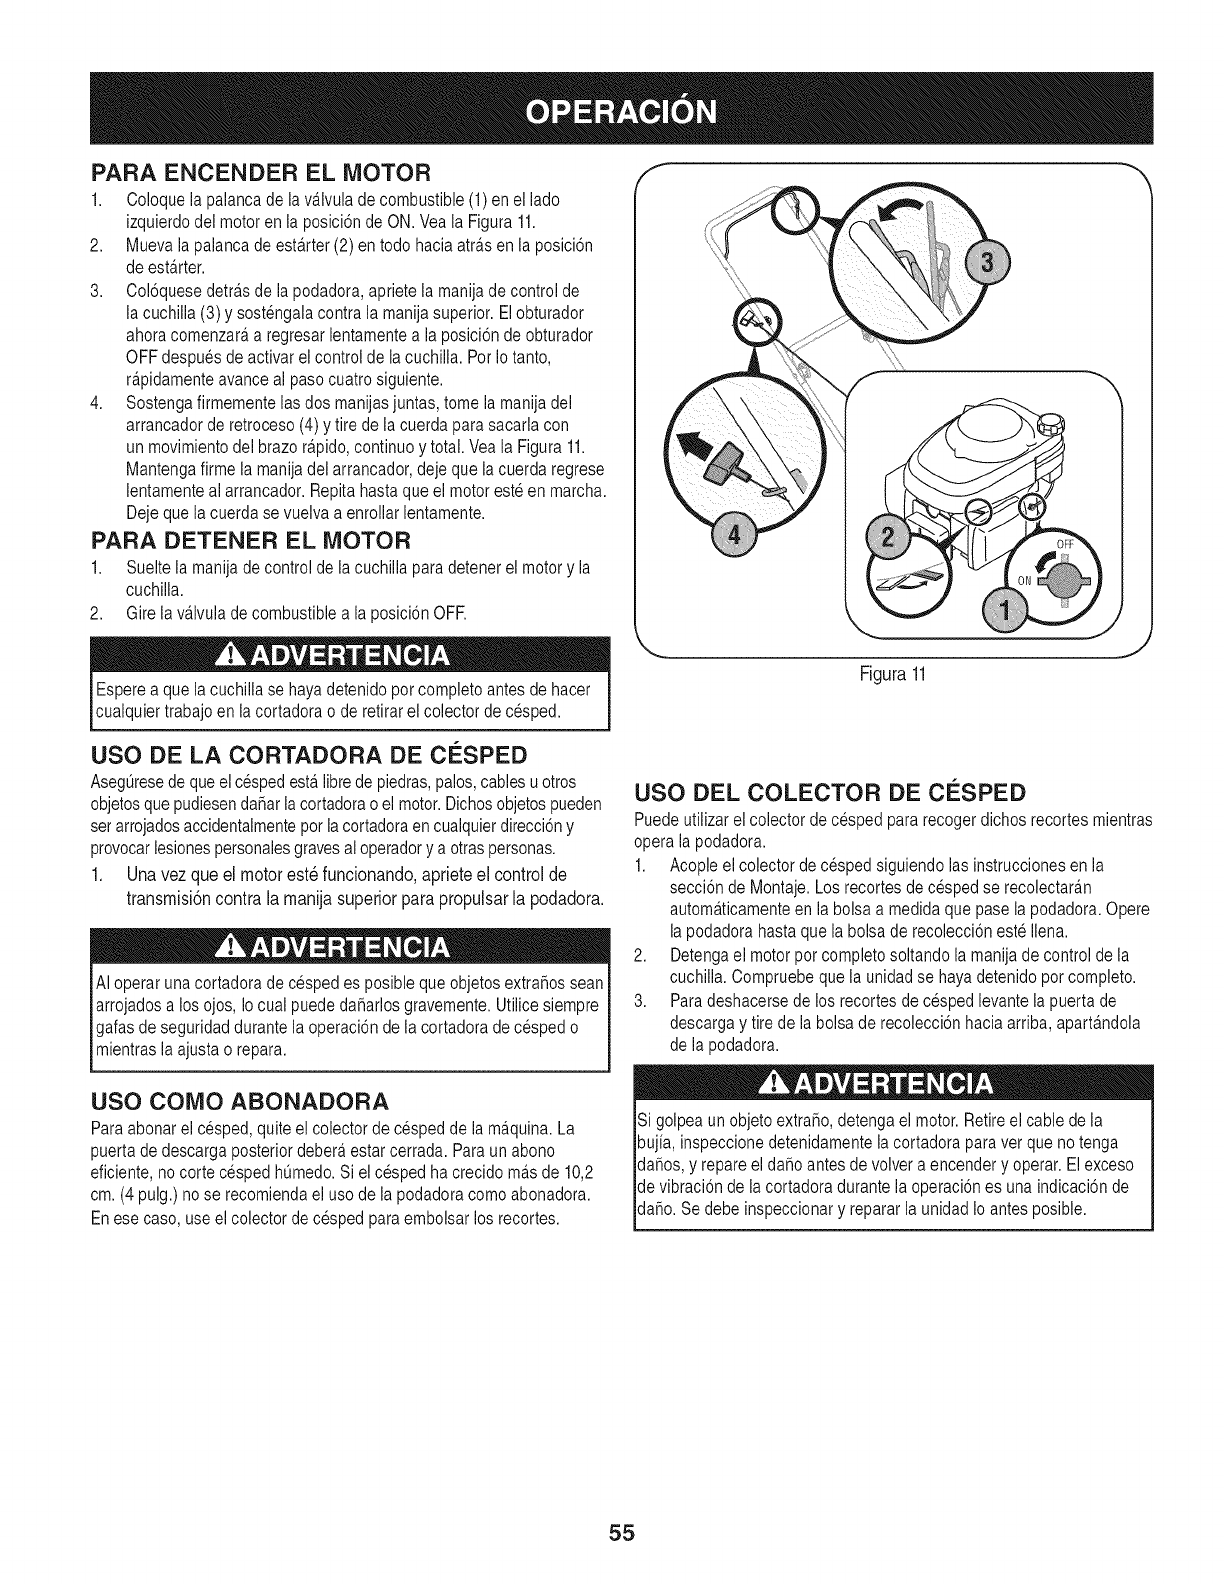
PARA ENCENDER EL MOTOR
1. Coloque la palancade la va.lvulade combustible (1)en el lado
izquierdo del motor en ia posicidn de ON. Vea la Figura 11.
2. Mueva la palancade esta.rter(2) en todo hacia atra.sen la posici6n
de esta.rter.
3. Col6quese detra.sde la podadora, apriete la manija de control de
la cuchilla (3) y sostengala contra la manija superior. El obturador
ahora comenzara,a regresar ientamentea ia posici6n de obturador
OFFdespues deactivar ei control de ia cuchiiia. PotIo tanto,
ra.pidamenteavance ai paso cuatro siguiente.
4. Sostengafirmemente las dos manijas juntas, tome la manija del
arrancador de retroceso (4) y tire de la cuerda para sacarla con
un movimientodel brazo ra.pido,continuo y total. Vea la Figura 11.
Mantenga firme la manija del arrancador, deje que la cuerda regrese
lentamente ai arrancador. Repita hasta que el motor este en marcha.
Deje que la cuerda se vuelva a enrollar lentamente.
PARA DETENER EL MOTOR
1. Sueltela manija de control de la cuchilla paradetener el motor y la
cuchilla.
2. Gire la va.ivulade combustible a la posici6n OFE
Espere a que ia cuchilla se haya detenido pot completo antes de hacer
cualquier trabajo en la cortadora o de retirarel colector de cesped.
USO DE LA CORTADORA DE ClaSPED
Aseg_resedeque el cespedesta.librede piedras,palos, cablesu otros
objetosque pudiesendafiar la cortadorao el motor.Dichos objetospueden
set arrojadosaccidentalmentepot la cortadora encualquier direcci6ny
provocariesionespersonalesgravesai operadory a otras personas.
1. Una vez que el motor est6 funcionando, apriete el control de
transmisi6n contra la manija superior para propulsar la podadora.
AI operar una cortadora de cespedes posible que objetos extrafios sean
arrojados a los ojos, Io cual puede dafiarlos gravemente. Utilice siempre
galas de seguridad durante la operaci6n de la cortadora de cesped o
mientras la ajusta o repara.
USO COIVIO ABONADORA
Paraabonar el cesped, quite el colector de cespedde la ma.quina.La
puerta de descarga posterior debera estarcerrada. Para un abono
eficiente, nocorte cesped hQmedo.Si el cesped ha crecido ma.sde 10,2
cm. (4 pulg.) no se recomienda el uso de la podadora como abonadora.
Enese caso, use el colector de cesped para embolsarlos recortes.
Figura11
USO DEL COLECTOR DE ClaSPED
Puedeutilizar el colector de cesped para recoger dichos recortes mientras
opera la podadora.
1. Acople el colector de cesped siguiendo las instrucciones en la
secci6n de Montaje. Los recortesde cesped se recolectara.n
automa.ticamenteen la bolsa a medida que pase ia podadora.Opere
la podadorahasta que ia bolsa de recolecci6n este Ilena.
2. Detengaei motor pot completo soltando la manija de control de la
cuchilla. Compruebe que la unidad se hayadetenido por completo.
3. Paradeshacerse de los recortes de cesped ievante ia puerta de
descarga y tire de la bolsade recolecci6n hacia arriba, aparta.ndola
de la podadora.
Si golpea un objeto extrafio, detenga ei motor. Retire el cable de ia
bujia, inspeccione detenidamente la cortadora para vet que no tenga
dafios, y repare el dafio antes de volver a encender y operar. Elexceso
de vibraci6n de la cortadora durante la operaci6n es una indicaci6n de
dafio. Se debe inspeccionar y reparar la unidad Ioantes posible.
55
PROGRAMA DE iVlANTENllVllENTO
Antesde realizarcuaiquiertipode mantenimientoo servicio,desenganche
todos loscontrolesy detengael motor.Esperea que sedetengancomple-
tamentetodas laspiezasm6viles.Desconecteelcane de labujiay p6ngalo
haciendomasacontrael motorparaevitarque se enciendaaccidentaimente.
Siga el cronograma de mantenimientoque se presenta a continuaci6n.
Estatabla s61odescribe pautasde servicio. Utiiice ia columna Registro
de Servicio para hacer ei seguimientode las tareas de mantenimiento
completadas. Para ubicar el Centro de Servieio Sears m_s cercano o
para programar un servieio, simplemente comuniquese con Sears al
tel_fono 1-800-4-MY-HOME®.
Cada uso
lras rues o 5 horas
Anuaimente o 25 horas
1. Nivelde aceite dei motor
2. Piezassueltasofaltantes
3. Depuradordeaire
4. Unidad y motor
1. Aceitedei motor
1. Depuradordeaire t
2. Varillajes/pivotesde control y ruedas
3. La parte inferior de ia plataformade
ia cortadora de cesped
Aceite del motor tt
Bujia de encendido
Bujia de encendido
Depuradorde aire
Sistemade combustible
1. Verificar
2. Ajustaroreemplazar
3. Verificar
4. Limpie
1. Oambiar
1. Limpiaroreemplazar
2. Lubricarcon aceiteligero
3. Limpie
Anuaimenteo 50 horas 1. 1. Cambiar
2. 2. Verificar
200 horas 1. 1.
2. 2.
Antes de almacenar 1. 1.
Reemplazar
Reemplazar
Hacer funcionar el motor hasta que se
detenga por falta de combustible o ahadir
estabilizadorde un tanque Ileno de
combustible nuevo antes de su aimace-
namiento.
Limpiom_.sa menudoen condicionespolvorientaso cuandolos escombrosaerotransportadosest_.npresentes.Sustituyaelfiltrode airede
ser muysucio.
tt Cambieel petr61eocada25 horaswherefuncionamientodel motorbajolacargapesadaoen temperaturasaltas.
56
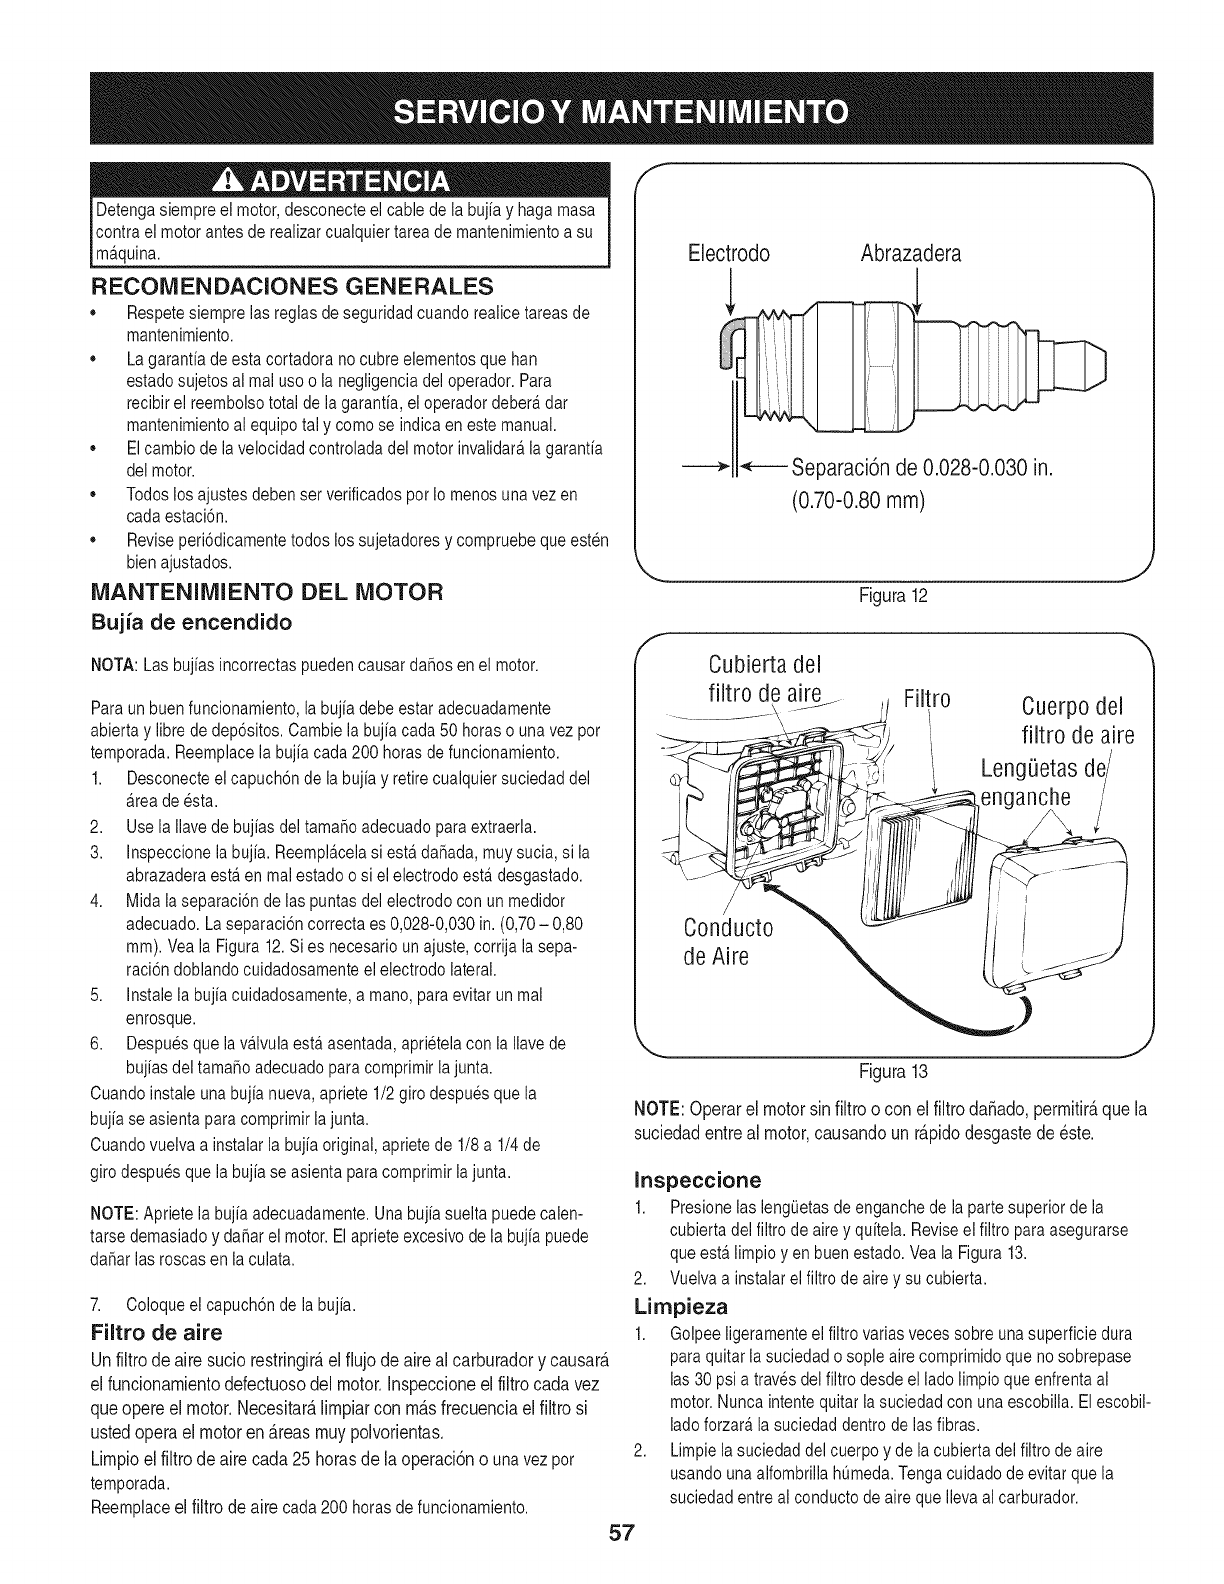
Detengasiempre el motor,desconecte el cable de la bujiay haga masa
contra el motor antes de reaiizarcuaiquier tareade mantenimientoa su
mfiquina.
RECONIENDACIONES GENERALES
•Respetesiempre las reglas de seguridad cuando realice tareas de
mantenimiento.
•La garanfia deesta cortadora nocubre elementos que han
estado sujetos al mal uso o la negligencia del operador. Para
recibirel reembolso total de la garantia, ei operador deberfi dar
mantenimientoai equipotai y como se indica en este manual.
•El cambio de la velocidad controlada del motor invalidarfi la garantia
dei motor.
•Todoslos ajustes deben ser verificados pot Io menosuna vez en
cada estaci6n.
•Revise peri6dicamente todos los sujetadores y compruebe que esten
bien ajustados.
MANTENIMIENTO DEL MOTOR
Bujia de encendido
NOTA: Lasbujias incorrectas pueden causarda_os en el motor.
Para unbuen funcionamiento, la bujia debe estar adecuadamente
abierta y libre dedep6sitos. Cambie la bujia cada 50 horaso una vez por
temporada. Reemplace la bujiacada 200 horas de funcionamiento.
1. Desconecte el capuch6n de la bujia y retire cualquier suciedad del
firea deesta.
2. Use la Ilavede bujias del tama_o adecuado para extraerla.
3. Inspeccione la bujia. Reemplficela si estfi da_ada, muy sucia, si la
abrazadera estfi en mai estado o si el electrodo estfi desgastado.
4. Mida ia separaci6n de las puntasdel electrodo con un medidor
adecuado. La separaci6ncorrecta es 0,028-0,030 in. (0,70- 0,80
ram). Vea la Figura 12.Si es necesario un ajuste,corrija la sepa-
raci6n doblando cuidadosamente el electrodo lateral.
5. Instale la bujia cuidadosamente, a mano, para evitar un mal
enrosque.
6. Despues que ia vfiivula estfi asentada, aprietela con la Ilave de
bujias del tama_o adecuado para comprimir la junta.
Cuando instale una bujia nueva,apriete 1/2 giro despues que la
bujia se asienta para comprimir la junta.
Cuandovuelva a instalar la bujia original, apriete de 1/8 a 1/4 de
giro despues que la bujia se asienta para comprimir lajunta.
NOTE: Apriete la bujia adecuadamente. Una bujia suelta puede calen-
tarse demasiadoy dahar el motor. El apriete excesivo de la bujia puede
da_ar las roscas en la culata.
7. Coloqueel capuch6n de la bujia.
Filtro de aire
Un filtro de aire sucio restringir& el fiujo de aire al carburador y causar&
el funcionamiento defectuoso del motor. Inspeccione el filtro cada vez
que opere el motor. Necesitar_.limpiar con m_.sfrecuencia el filtro si
usted opera el motor en fireas muy polvorientas.
Limpio el filtro de aire cada 25 horas de la operaci6n o una vez por
temporada.
Reemplace el filtro de aire cada 200 horasde funcionamiento.
f
Electrodo Abrazadera
---_ _ Separaci6nde 0.028-0.030in.
(0.70-0.80mm)
J
Figura12
Cubiertadel
filtro de a_ Filtro Cuerpodel
filtro de aire
Leng_etas dc
anche
coo cto
de A_re
Figura 13
57
J
NOTE:Operarel motorsin filtroo conel filtroda_ado,permitir_,que la
suciedadentreal motor,causandoun r_.pidodesgastede _ste.
Inspeccione
1. Presione las leng_etas de enganche de la parte superior de la
cubierta del fiitro de aire y quitela. Revise el fiitro para asegurarse
que estfi limpio yen buen estado. Vea ia Figura 13.
2. Vuelva a instaiarel filtro de aire y su cubierta.
Lirnpieza
1. Golpeeligeramente el filtro varias vecessobre una superficie dura
paraquitar la suciedad o sople aire comprimido que nosobrepase
las 30 psi a tra%s dei fiitro desde el lado iimpioque enfrenta ai
motor.Nunca intentequitar ia suciedad con una escobilla. Elescobil-
ladoforzarfi la suciedad dentro de las fibras.
2. Limpie la suciedad del cuerpo y de ia cubierta del fiitro deaire
usando una alfombrilla hQmeda.Tenga cuidadode evitar que la
suciedad entre ai conducto de aire que Ilevaai carburador.
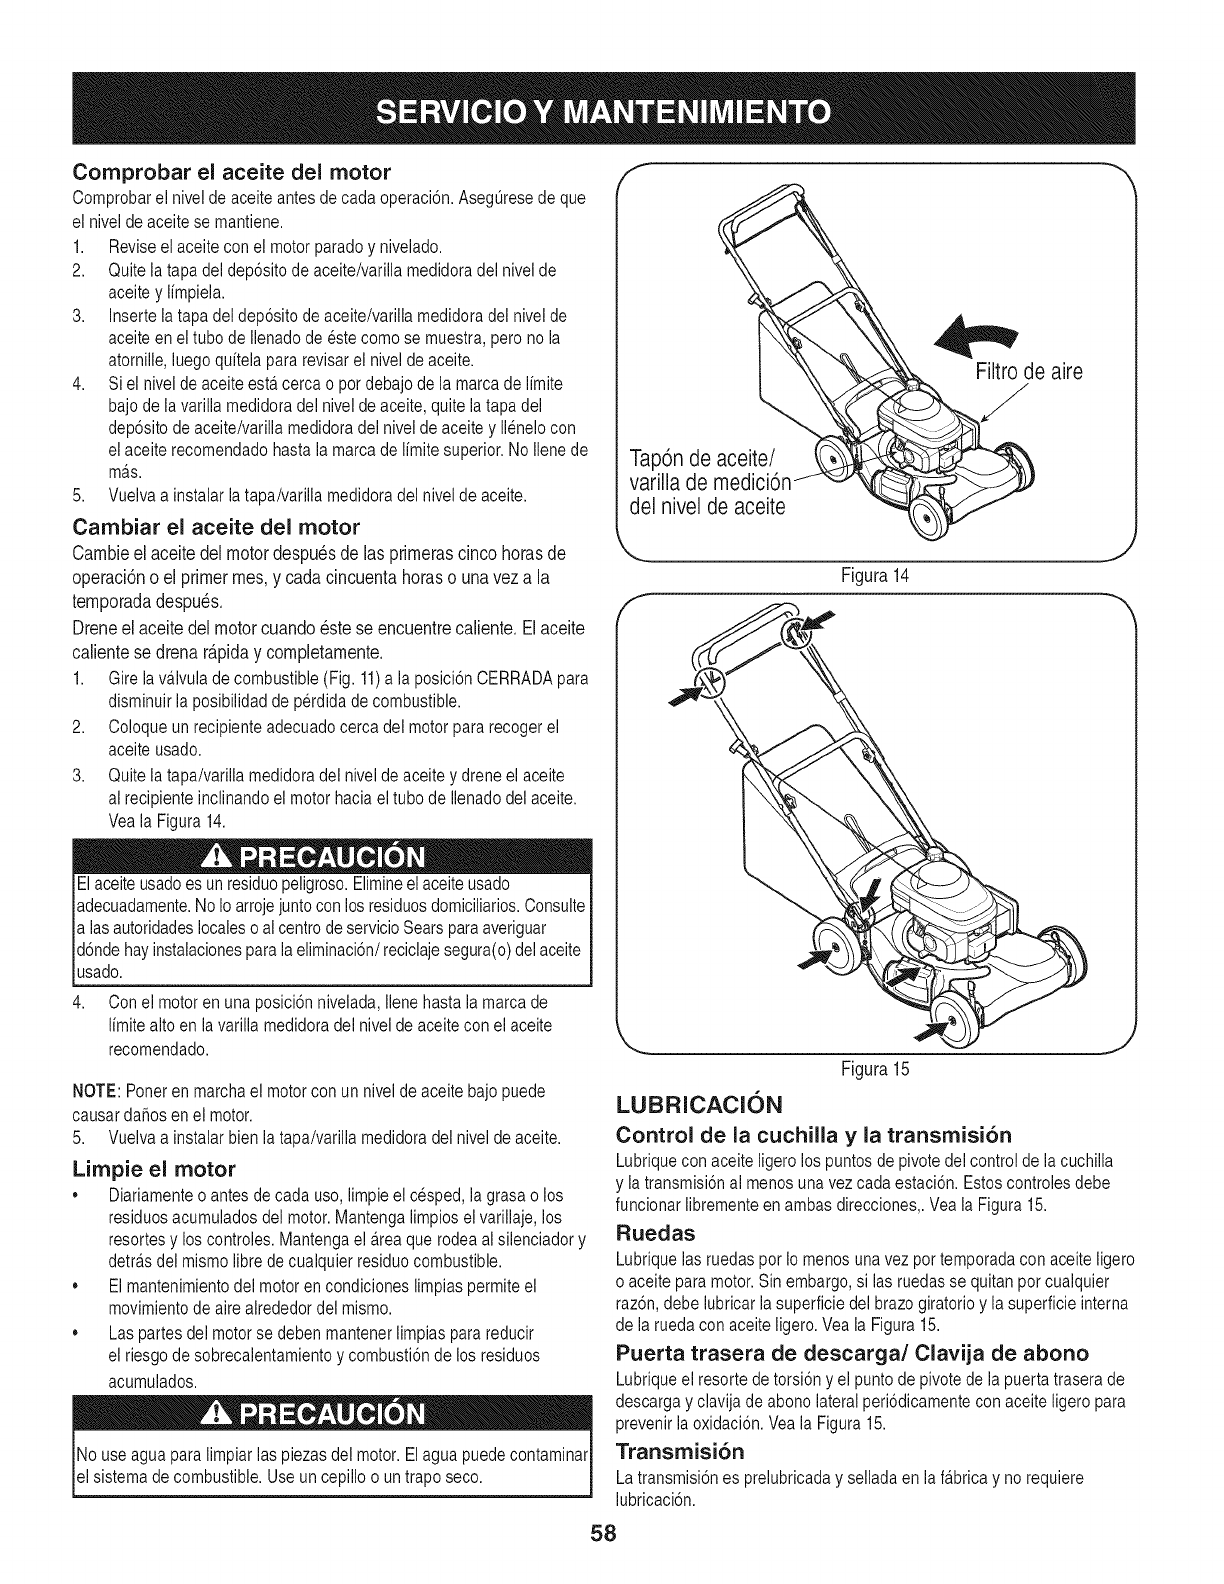
Comprobar el aceite del motor
Comprobarel nivel de aceite antes de cada operaci6n. Aseg_resede que
el nivei de aceite se mantiene.
1. Revise el aceite con ei motor paradey nivelado.
2. Quite ia tapa del dep6sito de aceite/varilla medidora del nivel de
aceite y limpiela.
3. Inserte ia tapa dei dep6sito de aceite/variiia medidora dei nivei de
aceite en el tube de ilenado de este come se muestra, pero no la
atornille, luego quiteia para revisarei nivel de aceite.
4. Si el nivel deaceite esta.cerca o pot debajo de la marcade limite
bajo de la varilla medidora del nivel de aceite, quite la tapa del
dep6sito de aceite/varilia medidoradei nivei de aceite y ilenelo con
el aceite recomendado hasta la marca de limitesuperior. No Ilene de
ma.s.
5. Vueiva a instaiar la tapa/varilla medidora del nivel de aceite.
Cambiar el aceite del motor
Carnbie el aceite del motor despu6s de las prirneras cinco horas de
operaci6n o el primer rnes, y cada cincuenta horas o una vez a la
ternporada despu6s.
Drene el aceite del motor cuando 6ste se encuentre caliente. El aceite
caliente se drena r@ida y cornpJetarnente.
1. Gire la va.ivulade combustible (Fig. 11)a la posici6n CERRADApara
disminuir ia posibilidad de perdida de combustible.
2. Coloque unrecipiente adecuadocerca del motor para recoger el
aceite usado.
3. Quite la tapa/varilla medidora del nivel de aceite y drene el aceite
al recipiente inclinandoel motor hacia el tube de Ilenadodel aceite.
Vea la Figura 14.
El aceite usadoes unresidue peligroso.Elimineel aceite usado
adecuadamente.No Io arroje juntocon los residuesdomiciliarios.Consulte
alas autoridades localeso al centrede servicioSears paraaveriguar
d6nde hay instalacionesparala eliminaci6n/reciclaje segura(o)del aceite
usado.
4. Conei motor en una posici6n nivelada, ilene hasta ia marca de
limite are en lavarilla medidoradel nivel de aceite con el aceite
recomendado.
NOTE: Poneren marcha el motor con un nivel de aceite bajo puede
causarda_os en el motor.
5. Vueiva a instaiar bien la tapa/varilla medidora del nivel de aceite.
Limpie el motor
Diariamenteo antes de cada uso, limpieel cesped, ia grasao los
residuos acumulados dei motor.Mantenga limpios ei varillaje, los
resortesy los controles. Mantenga el a.reaque rodea al silenciador y
detra.sdei mismo iibre de cualquier residue combustible.
El mantenimientodel motor en condiciones limpias permite el
movimientode aire alrededor del mismo.
Las partes dei motor se @ben mantener limpias parareducir
el riesgo de sobrecalentamientoy combusti6nde los residues
acumulados.
No use agua para limpiar ias piezas dei motor. El agua puedecontaminar
el sistema decombustible. Use un cepillo o untrapo seco.
Filtro de aire
Tap6n de aceite/
varilla de medicid
del nivel de aceite
Figura14
J
j
Figura 15
LUBRICACION
Control de la cuchilla y la transmisi6n
Lubriquecon aceite ligero los puntos de pivote del control de la cuchilla
y la transmisi6nal menosuna vez cada estaci6n. Estos controles debe
funcionar iibremente en ambas direcciones,. Vea la Figura 15.
Ruedas
Lubriqueias ruedas per Io menos una vez per temporada con aceite ligero
o aceite para motor. Sin embargo, si las ruedas se quitanper cuaiquier
raz6n, debe lubricar ia superficie del brazegiratorio y la superficie interna
de la rueda con aceite ligero. Vea ia Figura 15.
Puerta trasera de descarga/Clavija de abono
Lubriqueel resorte de torsi6n y ei puntode pivote de ia puertatrasera de
descarga y clavija de abono lateral peri6dicamente con aceite ligero para
prevenir ia oxidaci6n. Veala Figura 15.
Transmisi6n
Latransmisi6n es prelubricaday sellada en la fa.bricay norequiere
lubricaci6n.
58
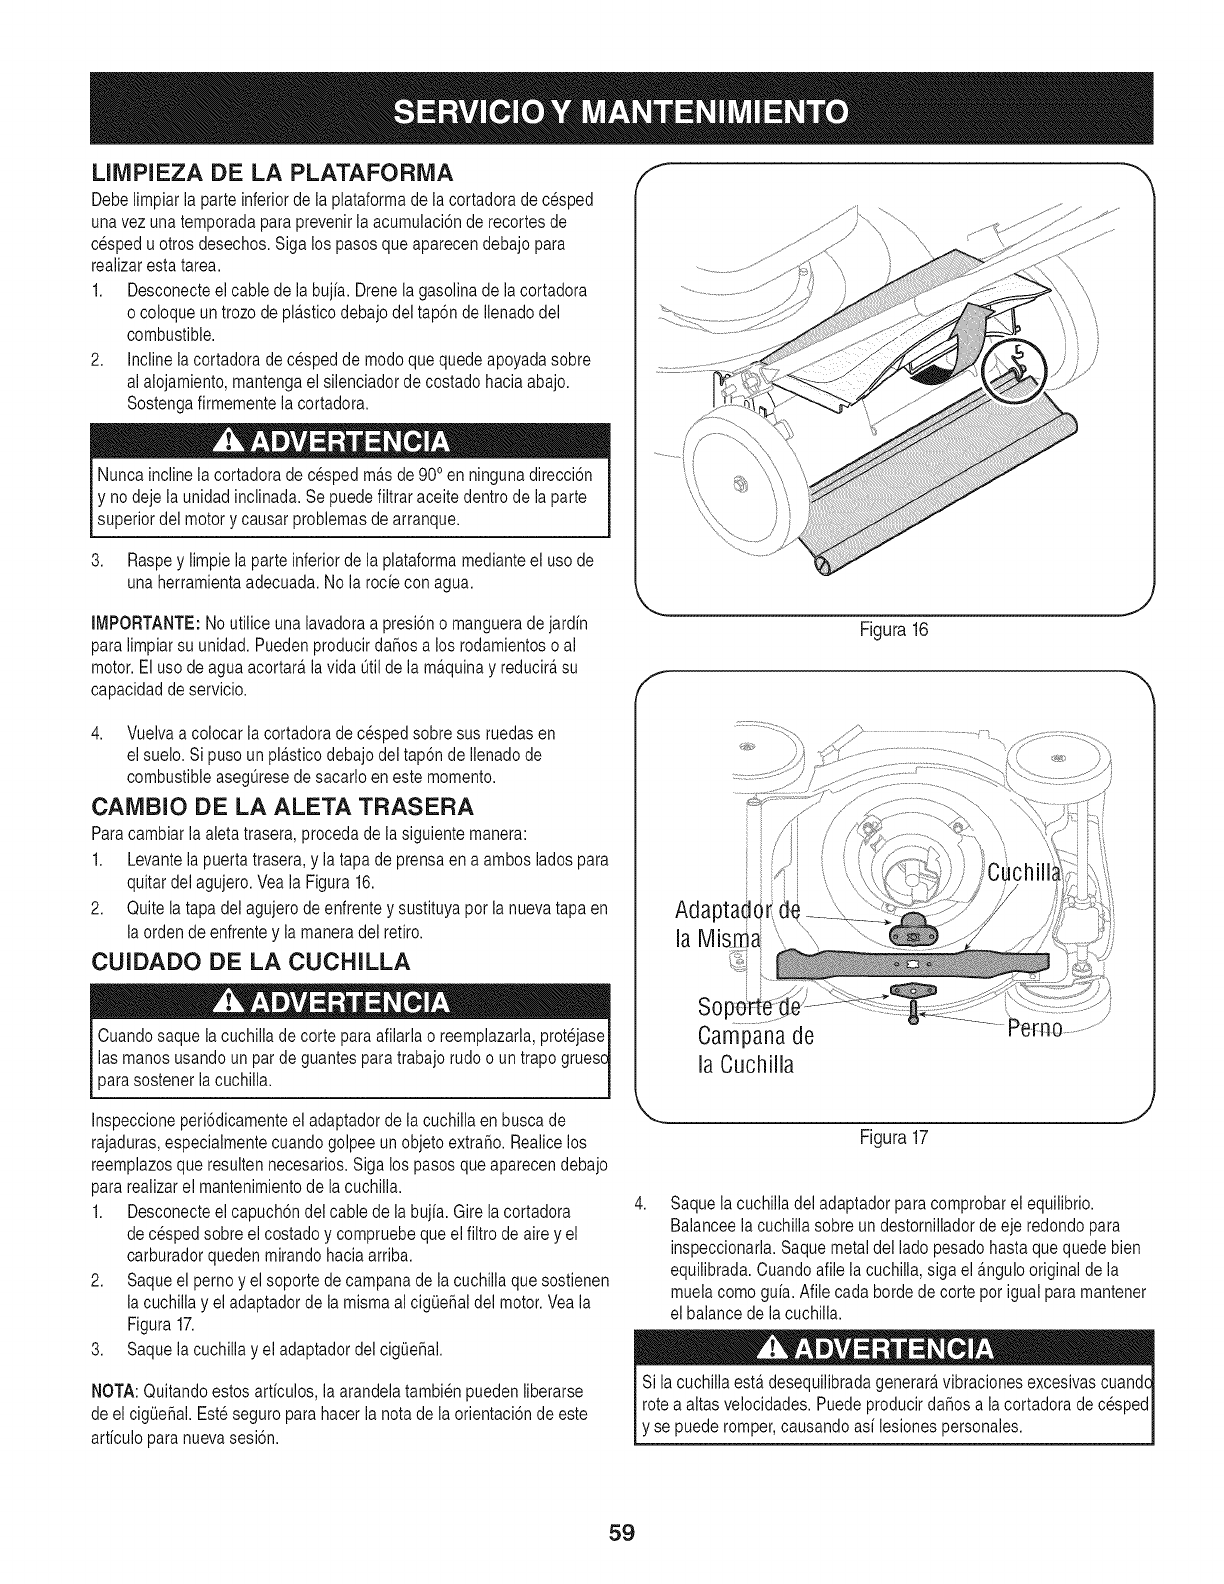
LIIVIPIEZA DE LA PLATAFORiVlA
Debelimpiar la parte inferior de la plataforma de la cortadora decesped
una vez una temporada para prevenir la acumulaci6n de recortes de
cesped u otros desechos. Siga los pasosque aparecen debajo para
realizar esta tarea.
1. Desconecteel cable de la bujia. Drene la gasolinade lacortadora
o coloque untrozo de pla.sticodebajo del tap6n de Ilenado del
combustible.
2. Inclinela cortadora de cesped de modo que quede apoyadasobre
al alojamiento, mantenga el silenciador de costado hacia abajo.
Sostengafirmemente la cortadora.
Nunca inclineia cortadora de cesped ma.sde 900en ninguna direcci6n
y no deje la unidad inclinada. Sepuede filtrar aceite dentro de la parte
superior del motor y causar problemas de arranque.
3. Raspey iimpie ia parte inferior de la plataforma medianteel uso de
una herramientaadecuada. No la rocie conagua.
IMPORTANTE: No utilice una lavadora a presi6n o manguerade jardin
para limpiar su unidad. Pueden producir daSosa los rodamientos o al
motor. El use de agua acortara,la vida _til de la ma.quinay reducira,su
capacidad de servicio.
4. Vuelva a colocar ia cortadora de cesped sobre sus ruedas en
el suelo. Si puso un pla.sticodebajo deltap6n de Ilenado de
combustible asegQresede sacarlo en este memento.
CAIVIBIO DE LA ALETA TRASERA
Paracambiar la aleta trasera, proceda de la siguiente manera:
1. Levantela puerta trasera, y la tapa de prensa en a ambos lades para
quitar del agujero.Vea la Figura 16.
2. Quite la tapa del agujero de enfrente y sustituya per la nuevatapa en
la orden de enfrentey ia manera del retire.
CUIDADO DE LA CUCHILLA
las manos usando un par de guantes para trabajo rudo o un trapo
parasostener la cuchilla.
Figura16
J
Adaptadc
la Mism_
So
Campana de
la Cuchilla
-Perno.......................
Inspeccione peri6dicamente el adaptador de la cuchiiia en busca de
rajaduras, especialmente cuando golpee un objeto extra_o. Realice los
reemplazos que resulten necesarios.Siga los pasos que aparecen debajo
para realizar ei mantenimiento de la cuchilla.
1. Desconecteel capuch6n del cable de la bujia. Gire la cortadora
de cesped sobreel costado y compruebe que el filtro de aire y el
carburador queden mirando hacia arriba.
2. Saque el perno y el soporte decampana de ia cuchiiia que sostienen
la cuchilla y el adaptador de la misma ai cigQe_aidel motor. Vea la
Figura 17.
3. Saque la cuchilla y el adaptador del cigQe_ai.
NOTA:Quitando estos articulos, la arandela tambien pueden iiberarse
de ei cigQe_ai.Este seguro para hacer la nota de la orientaci6n de este
articulo para nueva sesi6n.
Figura17
4. Saque ia cuchiiia del adaptador para comprobarel equilibrio.
Balancee la cuchilla sobre undestornillador de eje redondo para
inspeccionarla. Saque metal dei lade pesado hasta que quede bien
equilibrada. Cuandoafile la cuchilla, siga el a.ngulooriginal de la
muelacomo guia. Afiie cada horde de corte per igual para mantener
el balance de la cuchilla.
Si ia cuchiiia esta.desequiiibradagenerara,vibraciones excesivas cuand4
rotea aitas velocidades. Puedeproducir da_os a ia cortadora de cespedI
y se puede romper, causando asi lesiones personales. J
59
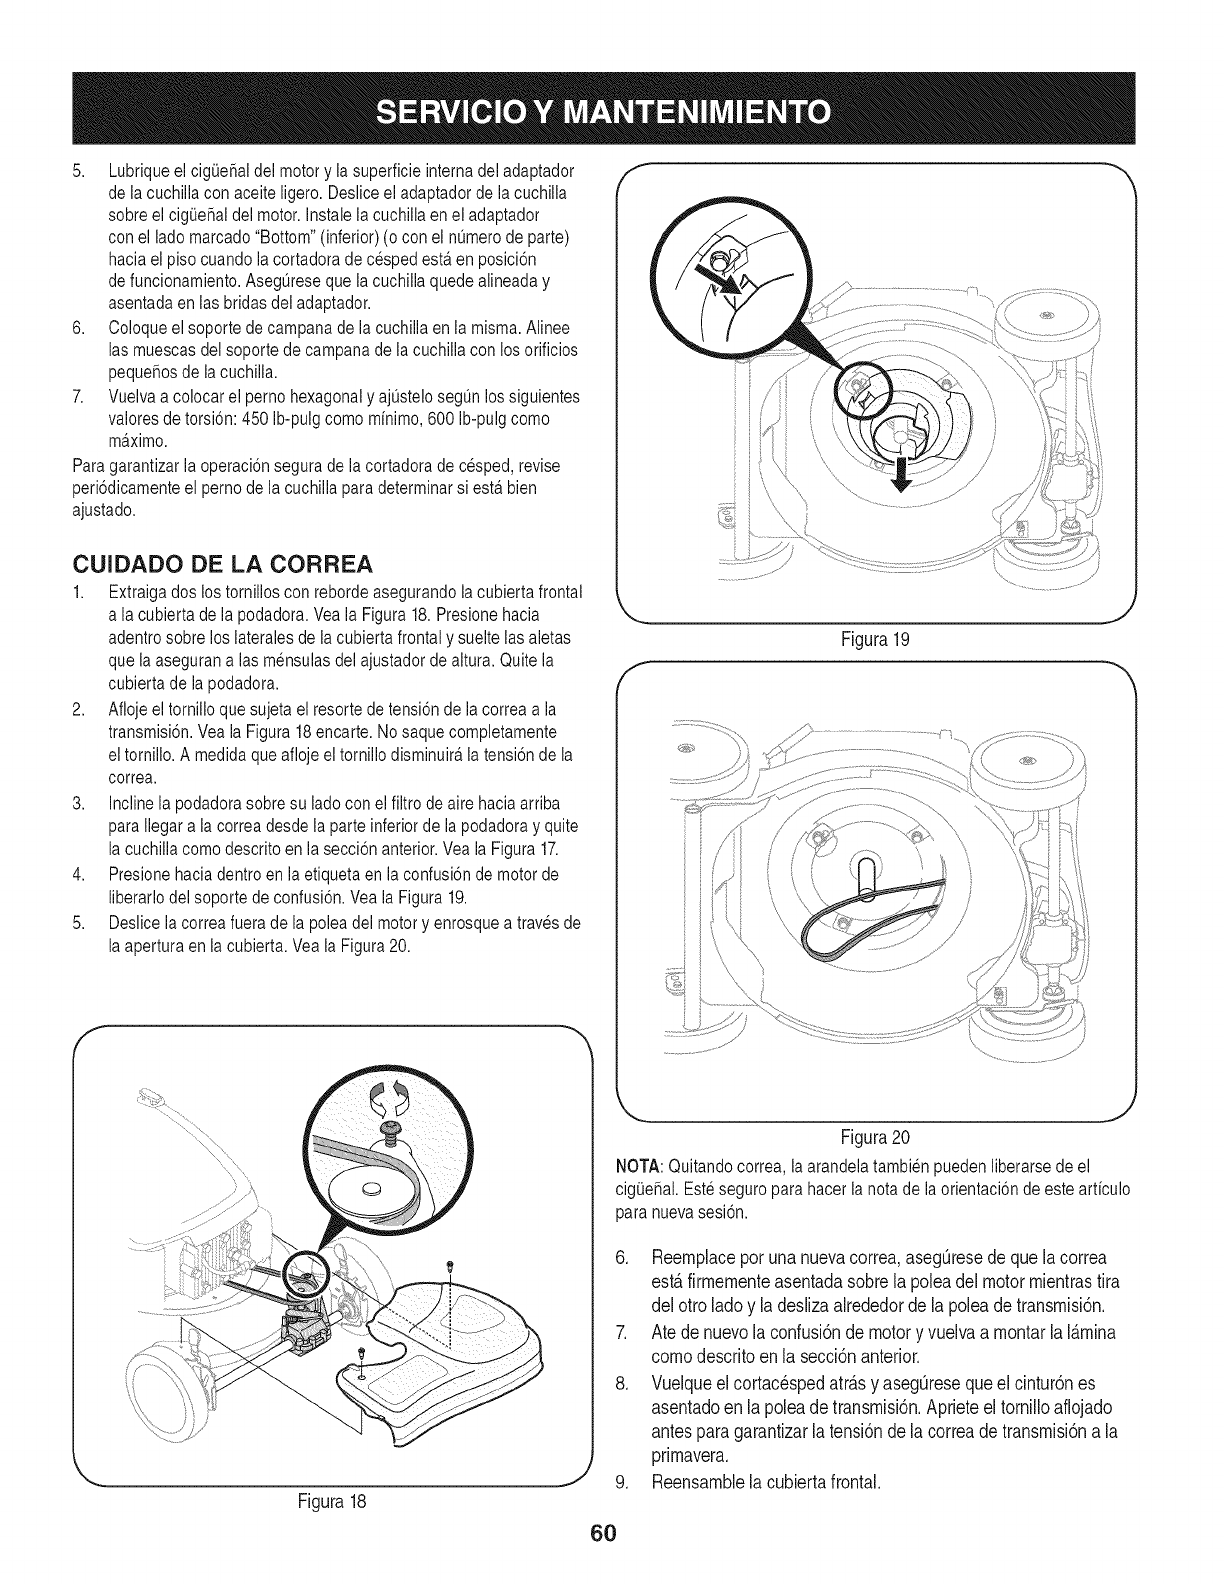
5. Lubrique el cigQehaldel motor y la superficie interna del adaptador
de ia cuchilla con aceite iigero. Desliceel adaptadorde la cuchilla
sobre el cigQe_aidel motor. Instale ia cuchiiia en ei adaptador
con el lado marcado "Bottom" (inferior) (o con el numerode parte)
hacia ei piso cuando ia cortadora de cespedesta.en posici6n
de funcionamiento.AsegQreseque la cuchilla quede aiineaday
asentadaen ias bridas del adaptador.
6. Coloqueel soporte de campana de la cuchilla en ia misma. Aiinee
las muescas del soporte de campana de la cuchillacon los orificios
peque_osde la cuchilla.
7. Vuelva a colocar el pemo hexagonaly ajQstelosegQnlos siguientes
valoresde torsi6n: 450 Ib-pulg como minimo,600 Ib-pulg como
ma.ximo.
Paragarantizar ia operaci6n segura de la cortadora de cesped, revise
peri6dicamente el perno de la cuchilla paradeterminar si esta.bien
ajustado.
CUIDADO DE LA CORREA
1. Extraiga dos los tornillos con reborde asegurando la cubierta frontal
a la cubierta de la podadora.Vea la Figura 18. Presione hacia
adentro sobre los laterales de la cubierta frontal y suelte ias aletas
que la aseguran a las mensulas del ajustador de altura. Quite la
cubierta de ia podadora.
2. Afloje el tomillo que sujeta el resorte de tensi6n de lacorrea a la
transmisi6n.Vea la Figura 18encarte. No saque completamente
el tomillo. A medida que afloje el tornillo disminuira,la tensi6n de la
correa.
3. Incline ia podadora sobresu iado con el fiitro de aire haciaarriba
para liegar a ia correa desde la parte inferior de ia podadora y quite
la cuchiiia como descrito en la secci6n anterior. Vea ia Figura 17.
4. Presione hacia dentroen ia etiqueta en la confusi6n de motor de
liberarlo del soporte deconfusi6n. Vea la Figura 19.
5. Deslice ia correa fuera de la polea dei motor y enrosque a traves de
la apertura en la cubierta. Vea la Figura 20.
.... .y
Figura18
J
Figura 19
Figura 20
NOTA: Quitando correa, la arandela tambien pueden liberarse de el
cigQe_ai.Esteseguro para hacer la nota de la orientaci6n de este articulo
para nuevasesi6n.
6. Reemplaceporunanuevacorrea,asegQresedeque lacorrea
est,.firmementeasentadasobrela poleadel motormientrastira
del otroladoy ladeslizaalrededorde la poleade transmisi6n.
7. Ate denuevolaconfusi6nde motory vuelvaa montarla I_.mina
comodescritoen la secci6nanterior.
8. Vuelqueelcortacespedatr_.sy asegQresequeel cintur6nes
asentadoen la poleade transmisi6n.Aprieteel tornilloaflojado
antesparagarantizarlatensi6nde lacorreadetransmisi6na la
primavera.
9. Reensamblelacubiertafrontal.
6O
Nunca almacene la cortadora de cesped con combustible en el tanque
en unespacio cerrado o en fireas con poca ventilaci6n,donde los
gases dei combustible puedan alcanzar el fuego, chispaso una luz
pilotocomo ia que tienen algunos hornos, calentadores de agua,
secadores de ropa o aigQnotto dispositivo a gas.
PREPARACION DEL MOTOR
Elequipo almacenado con el combustible puede enranciarse cuando
almacenado mils de 30 dias. Elcombustible a_ejo hace que ficido y
dep6sitos de goma se forme en el sistemade combustible o en partes de
carburador esenciales.
Paraimpedir prolemas relacionadoscon ei combustible:
1. Agregue ei estabilizador para la gasolina siguiendo las instrucciones
del fabricante. Cuando agregue un estabilizador para la gasolina,
Ilene el tanque de combustible con gasolina fresca. Si s61oestfi
parcialmente Ileno,eiaire en ei tanque promoverfi el deterioro del
combustible duranteei aimacenaje.Si usted mantiene un recipiente
con gasolina para el reabastecimiento,asegQreseque s61ocontiene
gasolina fresca.
2. Despuesde agregar el estabilizador paraia gasolina, ponga en
marcha el motor ai aire libre por 10minutos paraasegurarse que la
gasolina tratada reemplaz6a ia gasolina no tratada en el carburador.
3. Gire lavfiivula de combustible a ia posici6n.
4. Siga haciendo funcionarel motor hasta que se pare pot faita de
combustible en la taza de combustible del carburador. Eltiempo de
funcionamiento debe ser menor que 3 minutos.
PREPARACION DE LA CORTADORA DE
CO'SPED
•Limpie y iubrique la cortadora como se describe en las instrucciones
de lubricaci6n.
•No utilice una lavadora a presi6n ni una manguera de jardin para
limpiar su unidad.
•Cubra la cuchilla de la cortadora con grasa parachasis para impedir
la oxidaci6n.
•Refierasea la PREPARACIONDEL MOTOR para instrucciones de
almacenaje de motor correctas.
•Almacene la unidad en una zona limpia y seca. No la almacene
cerca de materialescorrosivos como pot ejemplo fertilizantes.
Cuando almacenecuaiquier tipode equipo motorizadoen un gaip6n
de dep6sito met_.iicoo con poca ventilaci6n,tenga especial cuidado
de realizarle un tratamiento antioxidanteal equipo. Use aceite ligero o
silicona para recubrir ei equipo, especialmente los cables y partes m6viles
de su cortadora antes de aimacenarla.
IMPORTANTE: Si el estabilizador de combustible no es usado,usted
tiene que drenar la gasolina del equipo antes del almacenaje. Poner en
marcha el motor hasta que se detenga de una falta de combustible.
Realice el siguiente antes del almacenajea largo plazodel equipo:
1. Mientras ei motor es todavia caliente, petr61eode cambio.
2. Quite la bujia y vierta aproximadamente 1/2 la onz. (15 ml) del nuevo
petr61eode motor en la cavidad de bujiaque pone el petr61eoen el
cilindro. Sustituyala bujia bien.
3. Cuerda de juez desalida de tir6n despacio. Este gira el cigQe_aldel
motor y distribuye el petr61eopot ei motor.
4. A_ada el estabilizador de combustibleo drene el combustible del
motor.
5. Suciedad limpiay escombros de cumbre y todas las fireas airededor
de motor.
6. Tienda en un firea limpia, seca.
61
Elmotor noarranca
Elmotor notiene
potencia suficiente
1,
2.
3.
4.
5.
6.
7.
8.
Controlde ia cuchilla desenganchado.
Se ha desconectado el capuch6n de la bujia.
El dep6sito de combustible esta.vacio o el
combustible se ha echado a perder.
Va.ivulade combustible CERRADA.
Cebador CERRADO.
La bujia no funciona correctamente.
Bujia mojada con combustible (motor ahogado).
Filtro de combustible bloqueado, mai funcionamiento
dei carburador, del encendido, va.ivulastrabadas,
etc.
1. Filtro bloqueado.
2. Combustible malo, motor aimacenado sin tratar, o
reabastecidocon gasolina mala.
3. Filtrode combustible bloqueado, mai funcionamiento
dei carburador, del encendido, va.ivulastrabadas,
etc.
Demasiada vibraci6n 1. Cuchilla de corte floja o descentrada. 1.
2. Cuchilla abollada. 2.
1. Cesped h_medo. 1.
La cortadora de
cesped no regresa
el recorte de cesped
como abono 2. Cesped demasiadoalto.
1. Engraneel control de ia cuchiila.
2. Conecteel cable al capuch6n de la bujia.
3. Llene el tanque con gasolina limpia y nueva.
4. Muevala palancaa la posici6nABIERTA se explic6 en la
secci6n Funcionamiento.
5. Muevaia palancadei cebador a ia posici6n CEBADOR
ABIERTOa menosque el motor este caiiente.
6. Limpie,ajuste la separaci6n, o cambie la bujia.
7. Seque y vuelva a instalar la bujia. Arranque el motorcon
la palanca del cebadoren la posici6n CERRADA.
8. Comuniquese con el centro de servicio Sears.
1. Limpieoreemplace elfiltro.
2. Reabastezca con gasolinafresca.
3. Comuniquese con el centro de servicio Sears.
2.
Apriete ia cuchiiia y el adaptador Balancee ia cuchiiia.
Comuniquese con el centro de servicio Sears.
No corte el cesped cuando este mojado, espere hasta
que sea ma.starde para hacerlo.
Corte una vez a aitura de corte elevada, luego vueiva a
cortar a ia altura deseada o haga un sendero de corte
mas angosto.
Afile o cambie la cuchilla.3. La cuchiiiade ia cortadora no esta.afiiada. 3.
Corte desigual 1. La posici6n de las ruedas no es correcta. 1. Coloqueias cuatro ruedas en la misma posici6n de aitura.
2. La cuchiiiade ia cortadora no esta.afiiada. 2. Afiie o cambie ia cuchiiia.
1. Correa malinstalada.La cortadora no
avanzapot si misma
2. Haydesechos bloqueando el funcionamiento de la
transmisi6n.
3. Correadafiadaodesgastada.
1. Compruebeia correa para vet si ia polea esta.bien
instaladay se muevecorrectamente.
2. Detengael motor, desconecteel capuch6n de la bujia y
limpie los desechos.
3. Reemplace correa.
/1/ECESITA MAS AYU DA? iiii
[{:r_c:or_tl'_l'_ I_ re_pue_b_ y _r_ er_ managemy.com - isin cargo!
o En Lfnea podr_ encontrar este manual ylos manuales de todos los otros productos que posea.
oSus preguntas ser_n respondidas por nuestro equipo de espedalistas,
oObtenga un plan de mantenimiento personalizado para suhogar.
oEncuentre iniormaci6n yherramientas que Io ayudar_n con los proyectos de su hogar.
b*te_._¢_t_ to yelz my $ea_"
.......!!i!ii!i!!_!i!ii!!!!ii!!!!ii!!!!ii!!!!ii!!!!ii!!!!ii!!!!ii!!!!ii!!!!ii!!!!ii!!!!ii!!!!ii!!!!ii!!!!ii!!!!ii!!!!ii!!!!ii!!!!ii!!!!ii!!!!ii!!!!ii!!!!ii!!!!ii!!!!ii!!!!ii!!!!ii!!!!ii!!!!ii!!!!ii!!!!ii!!!!ii!!!!ii!!!!ii!!!!ii!!!!ii!!!!ii!!!!ii!!!!ii!!!!ii!!!!ii!!!!ii!!!!ii!!!!ii!!!!ii!!!!ii!!!!ii!!!!ii!!!!ii!!!!ii!!!!ii!!!!ii!!!!ii!!!!ii!!!!ii!!!!ii!!!!ii!!!!ii!!!!ii!!!!ii!!!!ii!!!!ii!!!!ii!!!!ii!!!!ii!!!!i
62
(Esta p_.ginase aplica s61oen EE.UU. y Canada.).
Sears, Roebuck and Co., U.S.A. (Sears), el Consejo de Recursos Arnbientales de California (CARB)
y la Agencia de Protecci6n Arnbiental de los Estados Unidos (EPA)
Declaraci6n de garantia del sistema de control de emisiones (derechos y obligaciones de la garantia de defectos del propi=
etario)
LACOBERTURADE LA GARANTJADECONTROLDEEMISIONESES Y PARALOSMODELOSCERTIFICADOSDELANO 1997YPOSTERIORES,
APLIOABLEA LOSMOTORESCERTIFICADOSCOMPRADOSENCALIFOR- QUESE COMPRENY UTILICENENCUALQUIERPARTEDE LOSESTADOS
NIA EN1995Y POSTERIORMENTE,QUESE UTILIZANENCALIFORNIA, UNIDOS(Y A PARTIRDEL 1 DE ENERODE2001 ENCANADA).
Declaraci6n de garanfia sobre defectos en el control de ernisiones para California y los Estados Unidos
ElConsejode RecursosAmbientalesde California(CARB),la EPA(Agencia
de Protecci6nAmbientaldelos EE.UU.)y Searstienenel gusto deexplicarla
garantiadel sistemade controldeemisionesparamotoresdela_o 2000y para
elfuturo conrelaci6na motorespeque_ostodo terreno(SORE).En California,
los nuevosmotorespeque_ostodo terrenodebenestar dise_ados,construidos
y equipadosparacumplirconlas rigurosasnormasanti-smogdelestado.En
el restode los EstadosUnidos,losmotoresnuevostodoterrenodeencendido
porchispacertificadosparael a_o 1997debencumplirest_ndaressimilares
establecidospot la EPA.Sears debegarantizarel sistemade controldeemis-
ionesdesu motorparalosperiodosde tiempoenumeradosa continuaci6n,
siemprequeno hayaabuso,negligenciao mantenimientoindebidode su
motortodoterrenopeque_o.Susistemade controlde emisionespuedeincluir
piezastalescomoel carburador,el filtrodeaire, elsistemade encendido,el
silenciadoryel conversorcatalitico.Tambienpuedeincluirconectoresyotras
unidadesrelacionadascon lasemisiones.Dondeexistaunacondici6ncubierta
por la garantia,Searsreparar_su peque6omotortodo terrenosin costoalguno
incluyendodiagn6stico,piezasy manodeobra
Cobertura de la garantJa Sears para defectos en el control de ernJsiones
Losmotorestodo terrenopeque6osest_ngarantizadosenIorelativoalcontrol a lasdisposicionesque se indiquena continuaci6n.Si una partedesu motor
deemisionesparadefectosenpiezasduranteun per[odode dosa_os,sujeto cubiertapot lagaranfiaes defectuosa,Searsreparar_o sustituir_dichaparte.
Responsabilidades del propietario en relacibn con la garantia
Comopropietariodel motortodo terrenopeque_o,Ud.es responsabledela
realizaci6ndel mantenimientorequeridoquese incluyeen las instrucciones
deoperaci6ny mantenimiento.Searsrecomiendaquese conserventodoslos
recibosrelativosal mantenimientodesu motortodoterrenopeque_o,pero
nopude denegarla garantiasimplementepor la faltade los mismos,o por su
incumplimientodel mantenimientoprogramatic.Comopropietariodel motor
peque_otodoterrenodebe saberque, sinembargo,Searslepuedenegar
lacoberturade lagarantiasi su motortodoterrenopeque6oouna piezadel
mismohanfalladodebidoa abuso,negligencia,mantenimientoindebidoo
a modificacionesno aprobadas.Ud.es responsabledepresentarsu motor
todoterrenopeque6oa undistribuidorde serviciosSearsautorizadotan pronto
comoaparezcaunproblema.Lasreparacionesdela garantiasinconflicto
debencompletarseen unplazodetiemporazonable,nosuperiora 30dias.Si
tienealgunapreguntarespectoa sus derechosy responsabilidadesreferen-
tes a la garantia,debe contactarconun representantedeserviciosSearsal
1--800--469--4663.La garantiadeemisioneses unagarantiapor defectos.Los
defectosse juzgande acuerdoconelfuncionamientonormalde un motor.La
garantiano est_relacionadacon unapruebade emisionesenuso.
Disposiciones de la garantJa Sears para defectos en el control de emJsiones
Lassiguientessondisposicionesespecificasrelacionadasconla coberturade lagarantiaparadefectosenel controldeemisiones.Esuna_adidoa lagarantiade
motorSearsparamotoresnoreguladosque seencuentraen lasinstruccionesdefuncionamientoy mantenimiento.
1. Piezascongarantia
Lacoberturadeesta garantiase extiendeL]nicamentealas piezas
queaparecena continuaci6n(las partesde lossistemasde controlde
emisiones),siempreque dichaspiezasestuvieranya enel motoren el
momentode su compra.
a. Sistemademedici6nde combustible
•Sistemadeenriquecimientoparaarranqueenfrio
•Carburadory partesinternas
•Bombade combustible
b. Sistemade inducci6nde aire
•Filtrode aire
•Colectorde admisi6n
c. Sistemadeencendido
•Bujia(s)deencendido
•Sistemadeencendidomagneto
d. Sistemadelcatalizador
•Convertidorcatalitico
•Colectorde escape
•Sistemadeinyecci6nde aireo v_lvulade impulsos
e. Elementosvariadosusadosenlos sistemasanteriores
•Wlvulas devacio,sensiblesa temperatura,posici6ny tiempo
e interruptores
•Conectoresy montajes
2. AIcancedela cobertura
Searsgarantizaal poseedorinicialy a loscompradoressubsiguientes
quelas piezascongarantiano tendr_ndefectosen materialesni mano
deobraque provoquenla falla delas mismasduranteun periodode
dosaSosa partirde la fechaen queel motorse entregaa uncomprador
particular.
3. Sin cargo
Lareparaci6no reemplazode cualquierpartecongarantiase realizar_
sin cargoalgunoparael poseedor,incluyendotareasdediagn6sticoque
permitandeterminarsi una partecongarantiaes defectuosa,siempreque
dichodiagn6sticose realiceenun distribuidorde serviciosSearsautoriza-
do. Parael serviciode lagarantiadeemisiones,contacteal distribuidorde
serviciosSearsautorizadom_scercanoincluidoen las"P_ginasamarillas"
en lascategorias"Motores,gasolina","Motoresdegasolina","Podadoras
de cesped",o similares.
4. Reclamacionesyexclusionesa la cobertura
Las reclamacionesde lagarantia debenenviarsedeacuerdocon las
disposicionesdela politicade garantiaparamotoresSears.Lacobertura
de lagarantiaexcluir_defectosen piezascon garantiaquenoscan partes
originalesSears,o abuso,negligenciao mantenimientoincorrecto,tal y
como se estableceen lapoliticade garantiaparamotoresSears.Searsno
es responsablede lasfallas enpiezascongarantia provocadaspor el uso
de partesa_adidas,que no scan originaleso quese hayan modificado.
5. Mantenimiento
Cualquierpartecongarantiaque no esteprogramadaparaserreem-
plazadacomomantenimientorequerido,o que s61odebainspeccionarse
regularmentealefecto de"inspeccioneo reemplacesegL]nsea necesario",
estar_garantizadacontradefectosduranteel periodode la garantia.Todas
las piezasgarantizadasqueesten programadasparasu reemplazopara
cumplircon los requisitosde mantenimientoestar_ngarantizadass61o
por el periodoanterioral primerreemplazoprogramaticparadicha pieza.
Cualquierpiezade recambioquesea equivalenteenfuncionamientoy
durabilidadpuedeusarsepararealizarmantenimientoo reparaciones.El
propietarioes responsablede realizartodoel mantenimientorequerido,tal
y comose defineen las instruccionesde funcionamientoy mantenimiento
Sears
6. Coberturaindirecta
Porla presente,la coberturase extiendea la falla decualquiercomponente
de motorprovocadapot lafallade unapiezacon garantiaque estetodavia
en periododegarantia.
Enlos EstadosUnidosy Canad_hayunalineadeatenci6nde24 horas,1-800-469--4GG3,quecuentacon unmenL]con mensajespre-grabadosque contienen
informaci6nparael mantenimientode motores.
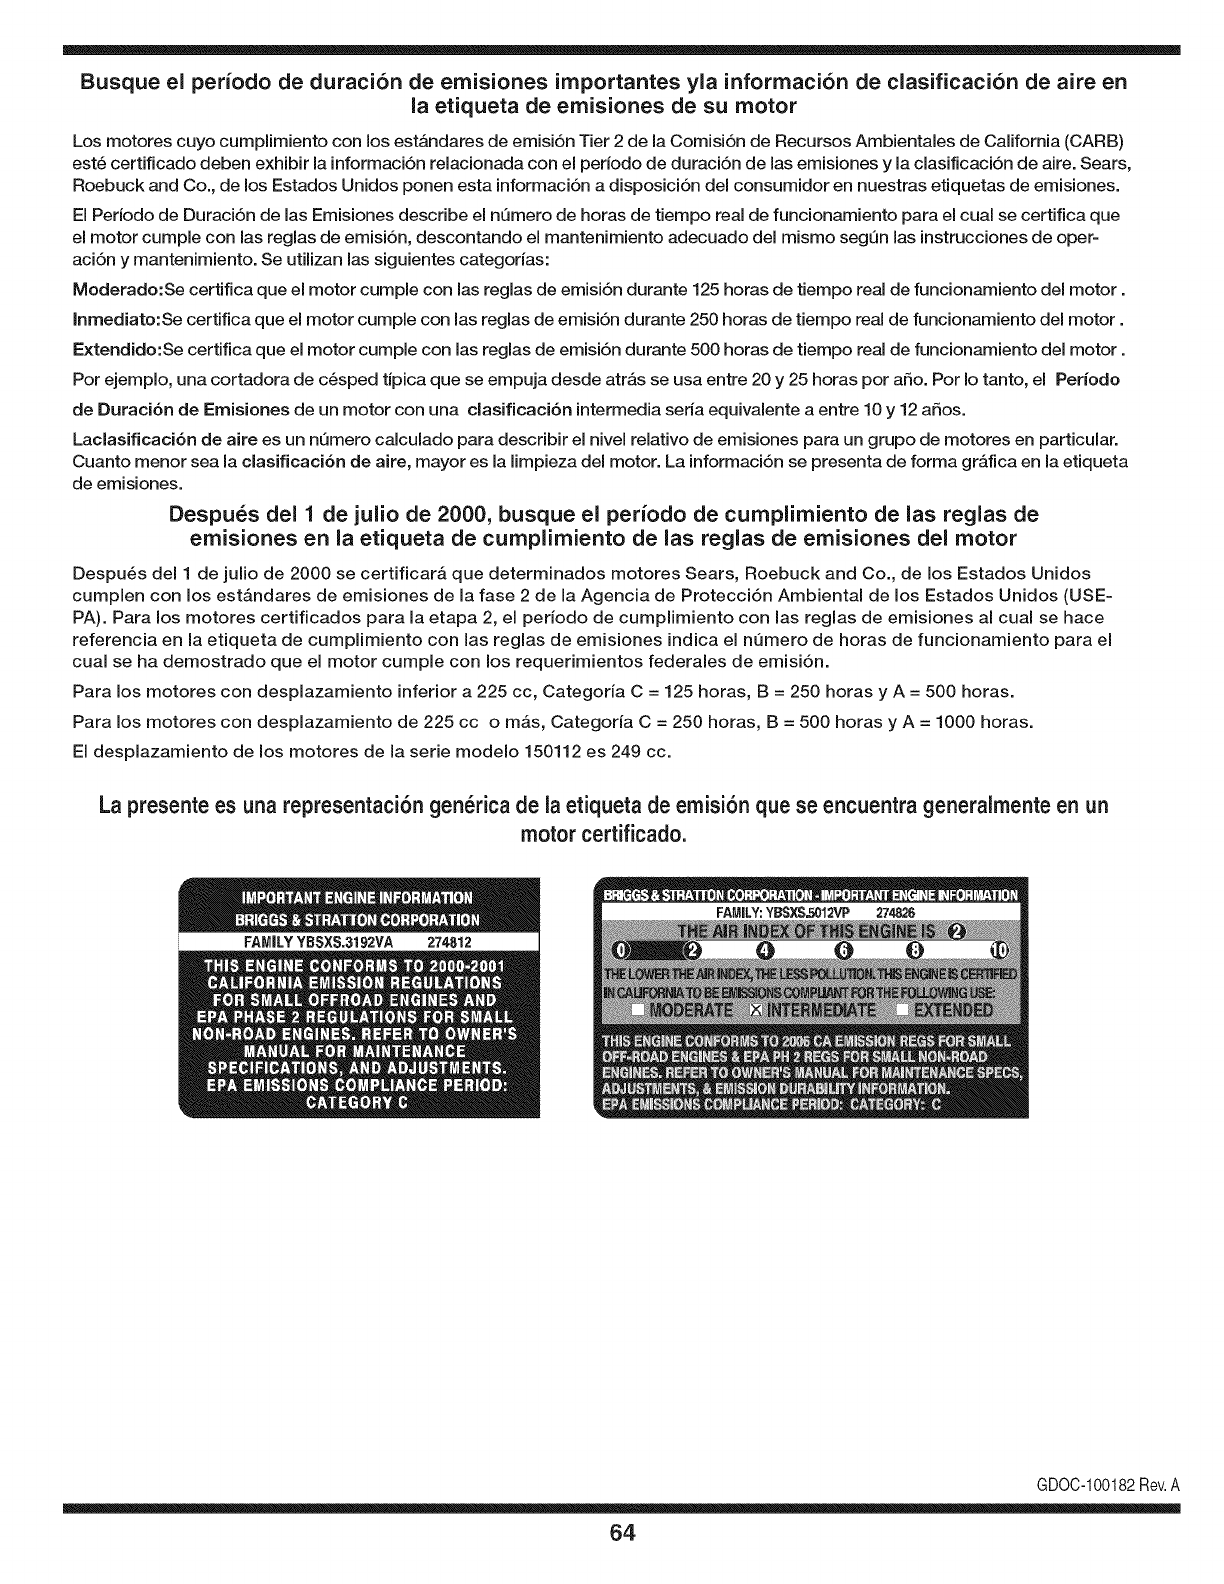
Busque el periodo de duraci6n de emisiones importantes yla informaci6n de clasificaci6n de aire en
la etiqueta de emisiones de su motor
Los motores cuyo cumpiimiento con los estAndares de emisi6n Tier 2 de la Comisi6n de Recursos Ambientales de California (CARB)
est6 certificado deben exhibir la informaci6n relacionada con el perJodo de duraci6n de las emisiones y la clasificaci6n de aire. Sears,
Roebuck and Co., de los Estados Unidos ponen esta informaci6n a disposici6n deJ consumidor en nuestras etiquetas de emisiones.
El Periodo de Duraci6n de las Emisiones describe el nQmero de horas de tiempo real de funcionamiento para el cual se certifica que
el motor cumple con las reglas de emisi6n, descontando el mantenimiento adecuado deJmismo segQn las instrucciones de oper-
aci6n y mantenimiento. Se utilizan las siguientes categorias:
Moderado:Se certifica que el motor cumpie con las reglas de emisi6n durante 125 horas de tiempo real de funcionamiento deJ motor.
Inmediato:Se certifica que el motor cumple con las reglas de emisi6n durante 250 horas de tiempo real de funcionamiento deJ motor.
Extendido:Se certifica que el motor cumple con las reglas de emisi6n durante 500 horas de tiempo real de funcionamiento deJmotor.
Por ejemplo, una cortadora de c6sped tJpica que se empuja desde atrAs se usa entre 20 y 25 horas por afio. Por Io tanto, el Periodo
de Duraci6n de Emisiones de un motor con una clasificaci6n intermedia seria equivalente a entre 10 y 12 afios.
Laclasificaci6n de aJre es un nQmero calculado para describir eJnivel reiativo de emisiones para un grupo de motores en particular.
Cuanto menor sea Jaclasificaci6n de aire, mayor es JaJimpieza deJmotor. La informaci6n se presenta de forma gr&fica en Jaetiqueta
de emisiones.
Despu_s del 1 de julio de 2000, busque el periodo de cumplimiento de las reglas de
emisiones en la etiqueta de cumplimiento de las reglas de emisiones del motor
Despu_s deJ 1 de julio de 2000 se certificar_, que determinados motores Sears, Roebuck and Co., de los Estados Unidos
cumpien con los estAndares de emisiones de la fase 2 de la Agencia de Protecci6n Ambiental de los Estados Unidos (USE-
PA). Para los motores certificados para la etapa 2, el periodo de cumpiimiento con las reglas de emisiones al cual se hace
referencia en la etiqueta de cumpiimiento con las reglas de emisiones indica el nQmero de horas de funcionamiento para el
cuaJ se ha demostrado que el motor cumpie con los requerimientos federales de emisi6n.
Para los motores con desplazamiento inferior a 225 cc, Categoria C = 125 horas, B = 250 horas y A = 500 horas.
Para los motores con desplazamiento de 225 cc o mAs, Categoria C = 250 horas, B = 500 horas y A = 1000 horas.
El despiazamiento de los motores de la serie modelo 150112 es 249 cc.
La presente es una representaci6n gen_rica de la etiqueta de emisi6n que se encuentra generaimente en un
motor certificado.
FAMILYYBSXS.3192VA 274812
GDOC-100182Rev.A
64
Felicitacionespor haberrealizadounaadquisici6ninteligente.El
productoCraftsman@queha adquiridoest_dise_adoy fabricado
parabrindarrnuchosa_osde funcionarnientoconfiable.Perocorno
todoslos productosa vecespuederequerirde reparaciones.Esen
esernornentocuandoel disponerde unAcuerdode protecci6npara
reparacionesle puedeahorrardineroy problernas.
A continuaci6nsedetallanlos puntosincluidosenel Acuerdo:
•Servicio experto prestadopornuestros10,000especialistasen
reparacionesprofesionales
•Servicio ilirnitadosincargoparalaspiezasy la rnanodeobraen
todaslas reparacionescubiertas
•Reernplazodel productohasta1500d61aressi no es posible
repararel productocubierto
• Descuentode 10%del precionormaldel servicioy delas piezas
relacionadascon el rnisrnoqueno est_ncubiertasporel acuerdo;
adern&s,10%del precionormalde laverificaci6nde rnanten-
irnientopreventivo
• Ayudar_pidapottel_fono- IoIlarnarnosResoluci6nR_pida- el
apoyotelef6nicode unCharnuscaal representante.Pienseen
nosotroscornoel manual"de undue_ohablador."
Unavezadquiridoel Acuerdo,puedeprograrnarel serviciocon
tan s61orealizarunaIlarnadatelef6nica.PuedeIlarnarencualquier
mornentodeldia o dela nocheo prograrnarun servicioen linea.
ElAcuerdode Protecci6nde Reparaci6nes unacornprasin riesgo.
Siustedanulaporalgunaraz6nduranteel periodode garantiade
producto,proporcionarernosun reernbolsoIleno.O,un reernbolso
prorrateadoencualquiermornentodespu_sdelperiodode garantia
de productoexpira,iAdquieraboysu acuerdode protecci6npara
reparaciones!
Seaplican deterrninadaslimitaciones y exclusiones.Paraobtener
inforrnaci6nadicional y preciosen los Estados UnidosIlarne al
1-800-827-6655.
El*Coverage en Canad_variaen algunosarticulos. Paradetalles
Ilenosla IlarnadaCharnuscaCanad_en 1-800-361-6665.
Servicio de instalaci6nde Sears
Sideseasolicitarla instalaci6nprofesionalde Searsde aparatos
dorn_sticos,dispositivosparaabrirportones,calentadoresde agua
y otrosarficulosdorn_sticosirnportantes,en los EstadosUnidoso
Canad_Ilarneal 1-800-4-MY-HOME®.
65

66

67

Your Home
For expert troubleshooting and home solutions advice:
www.managemyhome.com
For repair - in your home - of all major brand appliances,
lawn and garden equipment, or heating and cooling systems,
no matter who made it, no matter who sold it!
For the replacement parts, accessories and
owner's manuals that you need to do-it-yourself.
For Sears professional installation of home appliances
and items like garage door openers and water heaters.
1-800-4-MY-HOME ®(1-800-469-4663)
Call anytime, day or night (U.S.A. and Canada)
www.sears.com www.sears.ca
Our Home
For repair of carry-in items like vacuums, lawn equipment,
and electronics, call anytime for the location of your nearest
Sears Parts & Repair Service Center
1-800-488-1222 (U.S.A.) 1-800-469-4663 (Canada)
www.sears.com www.sears.ca
To purchase a protection agreement on a product serviced by Sears:
1-800-827-6655 (U.S.A.) 1-800-361-6665 (Canada)
Para pedir servicio de reparaci6n
a domicilio, y para ordenar piezas:
1-888-SU-HOGAR ®
(1-888-784-6427)
Au Canada pour service en fran£ais:
1-800-LE-FOYER M°
(1-800-533-6937)
www.sears.ca
® Registered Trademark /TMTrademark /SM Service Mark of Sears Brands, LLC
SM
® Marca Registrada /TMMarca de F&brica /Marca de Servicio de Sears Brands, LLC
MCMarque de commerce /MDMarque depos6e de Sears Brands, LLC © Sears Brands, LLC
