Craftsman 315 115042 Users Manual
315115042 315115042 CRAFTSMAN SANDER - Manuals and Guides L0306295 View the owners manual for your CRAFTSMAN SANDER #315115042. Home:Tool Parts:Craftsman Parts:Craftsman SANDER Manual
CRAFTSMAN Sander Manual L0306295 CRAFTSMAN Sander Owner's Manual, CRAFTSMAN Sander installation guides
315.115042 L0306295
315115042 c210bd06-69a2-4db4-8e12-fbdddd1ab0ab Craftsman Sander 315.115042 User Guide |
2015-01-05
: Craftsman Craftsman-315-115042-Users-Manual-161061 craftsman-315-115042-users-manual-161061 craftsman pdf
Open the PDF directly: View PDF ![]() .
.
Page Count: 14

Owner's Manual
7 in. Disc Sander
DoubleInsulated
Model No.
315.115042
Save this manual for
future reference
_CAUTION: Read and follow all
Safety Rules and Operating
Instructions before first use of
this product.
Customer Help Line: 1-800-932-3188
Sears, Roebuck and Co., Hoffman Estates, IL 60179 USA
Visit the Craftsman web page: www.sears.com/craftsman
972000-897
• Tableof Contents
• Introduction
• Safety
•Operation
Maintenance (_
Repair Parts

• Table of Contents .......................................................................................................................................... 2
• Warranty and Introduction ............................................................................................................................. 2
• Rules for Safe Operation ............................................................................................................................ 3-4
• Operation .................................................................................................................................................... 5-9
• Accessories ................................................................................................................................................... 9
• Maintenance ................................................................................................................................................ 10
• Notes ........................................................................................................................................................... 11
• Exploded View and Parts List ................................................................................................................. 12-13
• PadsOrdedng/Service .............................................................................................................................. 14
FULL ONE YEAR WARRANTY ON CRAFTSMAN DISC SANDER
if this rRIIFTSMA II Disc Sander failsto give completesatisfactionwithinoneyear from the date of purchase,
RETURNIT TO THE NEAREST8EAR8 STOREINTHE UNITEDETATES,and Seers will repairit, free of charge.
If this rRAFTSHIIN Disc Sander is usedfor commemial or rental purposes,this warrantyappliesfor only90 clays
from the date of purchase.
Thiswarranty givesyou specificlegal dghts, and you may also have other rightswhich vary from stateto state.
Sears, Roebuck and Co., Dept. 817 WA, Hoffman Estates, IL 60179
Your sander has many features for making your sanding
operationmore pleasant and enjoyable. Safety,
performanceand dependabilityhave been given top
priorityinthe designof this tool making it easy to maintain
and operate.
_. CAUTION: Carefully read through this entire
owner's manual before usingyour new sander. Pay
close attentionto the Rules for Safe Operation,
Warningsand Cautions. If you usathis tool pmpedy
and onlyfor what it is intended,youwill enjoy years
of safe, reliable service.
PRODUCT SPECIFICATIONS:
Size of Sanding Disc 7 in.
Size of Rubber Back-up Pad 3-1/2 in.
Input 10Amperes
Rating 120 Volts, 60Hz, AC only
Spindle Size 5/8 in.
No Load Speed 4,600 RPM
Look for this symbol to point out important safety precautions, It
means attentionl!! Your safety is involved,
_k WARNING:
The operation of any sander can result inforeign objects being thrown into your eyes, which
can result in severe eye damage. Before beginning powertool operation, always wear
safety goggles or safety glasses with side shieldsand a full face shield when needed, We
recommend Wide Vision Safety Mask for use over eyeglasses or standard safety glasses
with side shields. Always wear eye protectionwhich is marked to comply with ANSI Z87.1.
The purposeofsafety symbolsisto attract yourattentionto possible dangers,The safetysymbols, andthe explanationswith
them, deserve your careful attentionand understanding,The safetywarningsdo not by themselves eliminateany danger.
The instructionsor warnings they give are notsubstitutesfor properaccident preventionmeasures.
SYMBOL
AMEANING
SAFETY ALERT SYMBOL:
Indicatesdanger,warning,orcaution. May beused inconjunctionwithother symbols orpictographs.
ADANGER: Failureto obeya safetywarningwillresultinseriousinjuryto yourselforto others,Always
follow the safety precautionsto reducethe riskoffire, electdc shockand personalinjury.
WARNING: Failureto obeya safetywarningcan resultinseriousinjurytoyourselforto others.Always
follow the safety precautionsto reduce the riskof fire, electdc shockand personalinjury.
NOTE:
CAUTION: Failure to obey a safety warning may result in property damage or personal injuryto
yourselforto others.Alwaysfollowthe safety precautionsto reducethe riskof fire, electdcshockand
personal injury.
Advises you of informationor instructionsvitalto the operationor maintenanceof the equipment.
DOUBLE INSULATION
Double insulationis aconcept in safety, in electric power
tools,which eliminatesthe need for the usualthree-wire
groundedpower cord. All exposed metal partsare
isolatedfrom internalmetal motor componentswith
protectinginsulation,Double insulatedtools do not need
to be grounded.
,_ WARNING: The double insulated system is
intendedto protectthe userfrom shockresulting
from a break in the tool's internalwiring,Observe all
normalsafety precautionsrelated to avoiding
electricalshock.
READ ALL INSTRUCTIONS
•KNOW YOUR POWER TOOL Read the owner's
manual carefully. Learn the tool's applications and
limitationsas well as the specificpotential hazards
relatedto thistool.
• GUARD AGAINST ELECTRICAL SHOCK by
preventingbody contactwith groundedsurfaces. For
example: pipes, radiators,ranges,refdgeretor
enclosures,
•KEEP GUARDS IN PLACE and inworkingorder.
•KEEP WORK AREA CLEAN. Cluttered areas and
benchesinvite accidents.
•DO NOT USE IN DANGEROUS ENVIRONMENTS. Do
not use power tools near gasoline or other flarnmabie
liquids,in damp or wet locations,or exposeto rein.
Keep work area well lit,
•KEEP CHILDREN AND VISITORS AWAY. All visitors
shouldwear safetyglassesand be kept a safe distance
from work area, Do not let visitorscontacttool or
extension cord.
IMPORTANT
Sen,icingrequires extreme care and knowledgeof the
system and shouldbe performedonly by a qualified
servicetechnician.For service we suggestyou returnthe
tool to your nearest Sears store or repair centerfor repair.
Alwaysuse originalfactory replacementpartswhen
servicing,
_, WARNING: Do notattempt to operate thistool
untilyou have read thoroughlyand understand
completelyall instructions,safety rules, etc.
contained in thismanual, Failure to comply can
resultin accidents involvingfire, electric shock, or
seriouspersonal injury,Save owners manual and
reviewfrequentlyfor continuingsafe operationand
instructingotherswho may use this tool.
•STORE IDLE TOOLS. When not in use,tools should
be stored in a dry, highor locked-upplace - out of
reachof children.
•DON'T FORCE TOOL. It will do the job better and safer
at the rata forwhich it was intended.
USE RIGHT TOOL, Don1 fome smalltool or attachment
to dothe job of a heavy dutytool. Don't use tool for
purposenot intended- for example -don'tuse circular
saw for cuttingtree limbsor logs,
WEAR PROPER APPAREL. Do not wear loose
clothingor jewelrythat can get caught inthe moving
partsand cause personalinjury,Rubber glovesand
non-skidfootwear are recommendedwhen working
outdoors.Wear protectivehair covedngto containlong
hair.
• ALWAYS WEAR SAFETY GLASSES, Everyday
eyeglasseshave onlyimpact-resistantlenses;they are
NOT safetyglasses,
• PROTECTYOUR LUNGS. Weara face ordust mask if
operationis dusty.

•PROTECTYOUR HEARING, Wear haaring protection
duringextended periodsof operation.
•DON'T ABUSE CORD. Never cam/tool by cordor
yank itto disconnectfrom receptacle. Keep cord from
heat,oil and sharp edges,
BSECURE WORK. Use clampsor a vise to holdwork.
It's safer than usingyour hand and it frees both hands
to operate tool.
•DON'T OVERREACH. Keepproperfooting and
balance at all times, Do not use on a ladderor unstable
support,
•MAINTAIN TOOLS WITH CARE. Keep tools sharpand
clean for Petterand safer performance. Follow
instructionsfor lubricatingand changingaccessories.
•DISCONNECT TOOLS. When notin use, before
servicing,or when changingattachments, blades, bits,
cutters,etc., all tools shouldbe disconnectedfrom
power supply.
•REMOVE ADJUSTING KEYS AND WRENCHES.
Form habitof checkingto see that keys and adjusting
wrenches are removed from tool beforeturningit on.
•MAKE SURE YOUR EXTENSION CORD IS IN GOOD
CONDITION. When using an extensioncord, be sureto
use one heavy enough to carrythe currentyour product
will draw. An undersizedcord will cause a dropin line
voltage resultinginlossof power and overheating,A
wire gage size (A.W,G.) of at least 16 is recommended
for an extensioncord 100 feet or less in length,A cord
exceeding10Ofeat is not recommended.If indoubt,
use the next heavier gage. The smallerthe gage
number,the heavierthe cord,
=OUTDOOR USE EXTENSION CORDS, Whentool is
used outdoors,use onlyextensioncords intendedfor
use outdoorsand so marked, Outdoorapprovedcords
are markedwiththe suffixW-A, for example - SJ'n/V-A
or SJOW-A,
BNEVER USE THIS OR ANY POWER SANDER FOR
WET SANDING, Failure to comply can result in
electricalshockcausing seriousinjuryor worse.
•KEEP HANDS AWAY FRO• SANDING AREA.
•INSPECT TOOL CORDS PERIODICALLY and if
damaged, have repaired at an authorizedservice
center. Stay constantlyaware of cord location.
BCHECK DAMAGED PARTS. Before further use of the
tool, a guard or other part that is damaged shouldbe
carefullycheckedto determinethat itwill operate
properlyand peflorm its intended function,Chackfor
alignmentof movingparts, bindingof movingparts,
breakage of parts, mounting,and anyother conditions
that may affect itsoperation. A guardor other part that
is damaged shouldbe preperly repaired or replacedby
an authonzedservicecenter unlessindicated
elsewhere inthis instructionmanual.
• NEVER USE IN AN EXPLOSIVE ATMOSPHERE.
Normalsparkingof the motorcould ignitefumes.
•INSPECT EXTENSION CORDS PERIODICALLY and
replace if damaged,
• STAY ALERT. Watch what you are doingand use
commonsense. Do notoperate tool when you are tired.
Do not rush.
•KEEP HANDLES DRY, CLEAN, AND FREE FRO•
OIL AND GREASE. Always use a cleanclothwhen
cleaning, Never use brakefluids, gasoline, petroleum-
based productsor any strongsolventsto clean your
tool.
•AVOID ACCIDENTAL STARTING. Don't carrytool with
fingeron switch.Be sureswitch is off when pluggingin,
•DO NOT USE TOOL IF SWITCH DOES NOTTURN IT
ON AND OFF. Have defectiveswitchesreplacedby an
authorizedservice canter.
•INSPECT FOR and removeall nails from lumberbefore
sanding.
•DRUGS, ALGOHOI., MEDICATION. Do notoperate
tool while underthe influenceof drugs, alcohol,orany
medication.
lWHEN SERVICING USE ONLY IDENTICAL
CRAFTSMAN REPLACEMENT PARTS.
• POLAR_ED PLUGS. To reduce the riskof electric
shock,thistool has a polarizedplug (one blade iswider
than the other). This plugwillfit in a polarized outlet
only one way, If the plugdoes not fit fully inthe outlet,
reversethe plug.If it still does notfit, contact a qualified
electricianto installthe properoutlet. Do notchange the
pluginany way.
•SAVE THESE INSTRUCTIONS. Reviewthem
frequentlyand use them to instructothers who may use
thistool.If you loan someonethis tool, loanthem these
instructionsalso.
AWARNING: Some dust created by power sanding,
sawing, grinding, drilling, and other construction
activities contains chemicalsknownto cause cancer,
birth defects or other reproductive harm. Some
examplesof these chemicalsare:
• lead from lead-based paints,
•crystalline silica from bricks and cement
and other masonry products, and
•arsenic and chromium from chemically-
treated lumber.
Your risk from these exposures varies, depending
on how often you do this type of work. To reduce
your exposure to these chemicals: work in awell
ventilated area, and work with approved safety
equipment, such as those dust masks that are
specially designed to filter out microscopic
particles.
SAVE THESE INSTRUCTIONS
WARNING: Always wear safetygoggles or safety
glasseswith side shieldswhen operatingyour
sander. Failure to do so could result in dust,
shavings, loose particlesor foraign objects being
throwninto your eyes, causing possible serious
injury.
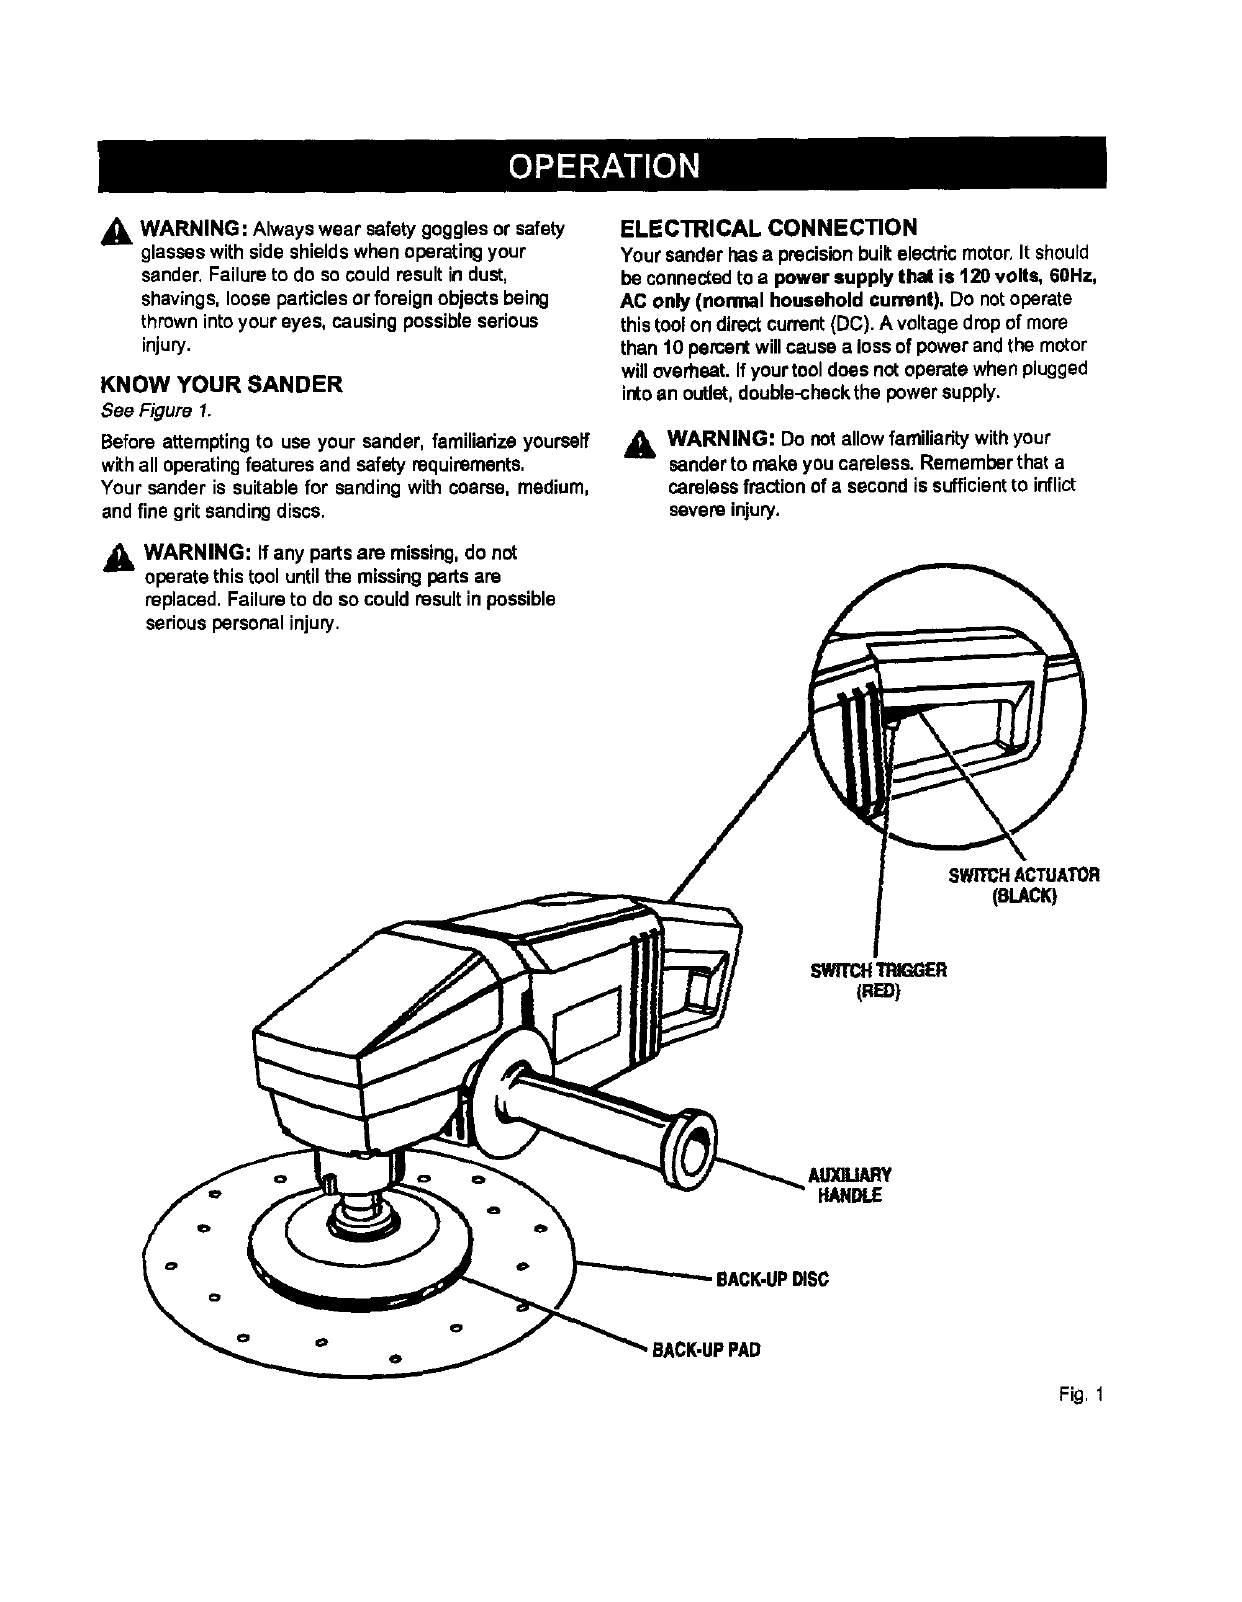
KNOW YOUR SANDER
See Figure 1.
Before attemptingto use your sender, familiarizeyourself
withall operatingfeatures and safety requirements.
Your sender is suitable for sanding with coarse, medium,
andfine grit sanding discs.
WARNING: If any partsare missing,do not
operate this tool untilthe missingparts are
replaced. Failure to do so couldresult in possible
seriouspersonal injury.
ELECTRICAL CONNECTION
Your sander has a precisionbuiltelectric motor,it should
be connectedto apower supply that is 120 volts, 60Hz,
AC only (nonmal household eunmnt), Do notoperate
thistool on directcurrent(DC). A voltage dropof more
than 10 percentwill cause a lossof power and the motor
will overheat. If your tool does not operate when plugged
intoan outlet,double-checkthe power supply.
WARNING: Do notallow familiaritywithyour
sender to make you careless. Remember that a
carelessfraction of a second is sufficientto inflict
severeinjury.
SWITCHACTUATOR
(BLACK)
AtI'XlI.I_H
HANDLE
BACK-UPDISC
BACK-UPPAD
Fig, 1
_, WARNING: Your sander shouldnever be
connectedto power supplywhen you are
assembling parts,making adjustments,cleaning,or
when not in use. Disconnectingsender will prevert
accidentalstartingthat couldcause sedous
personal injury.
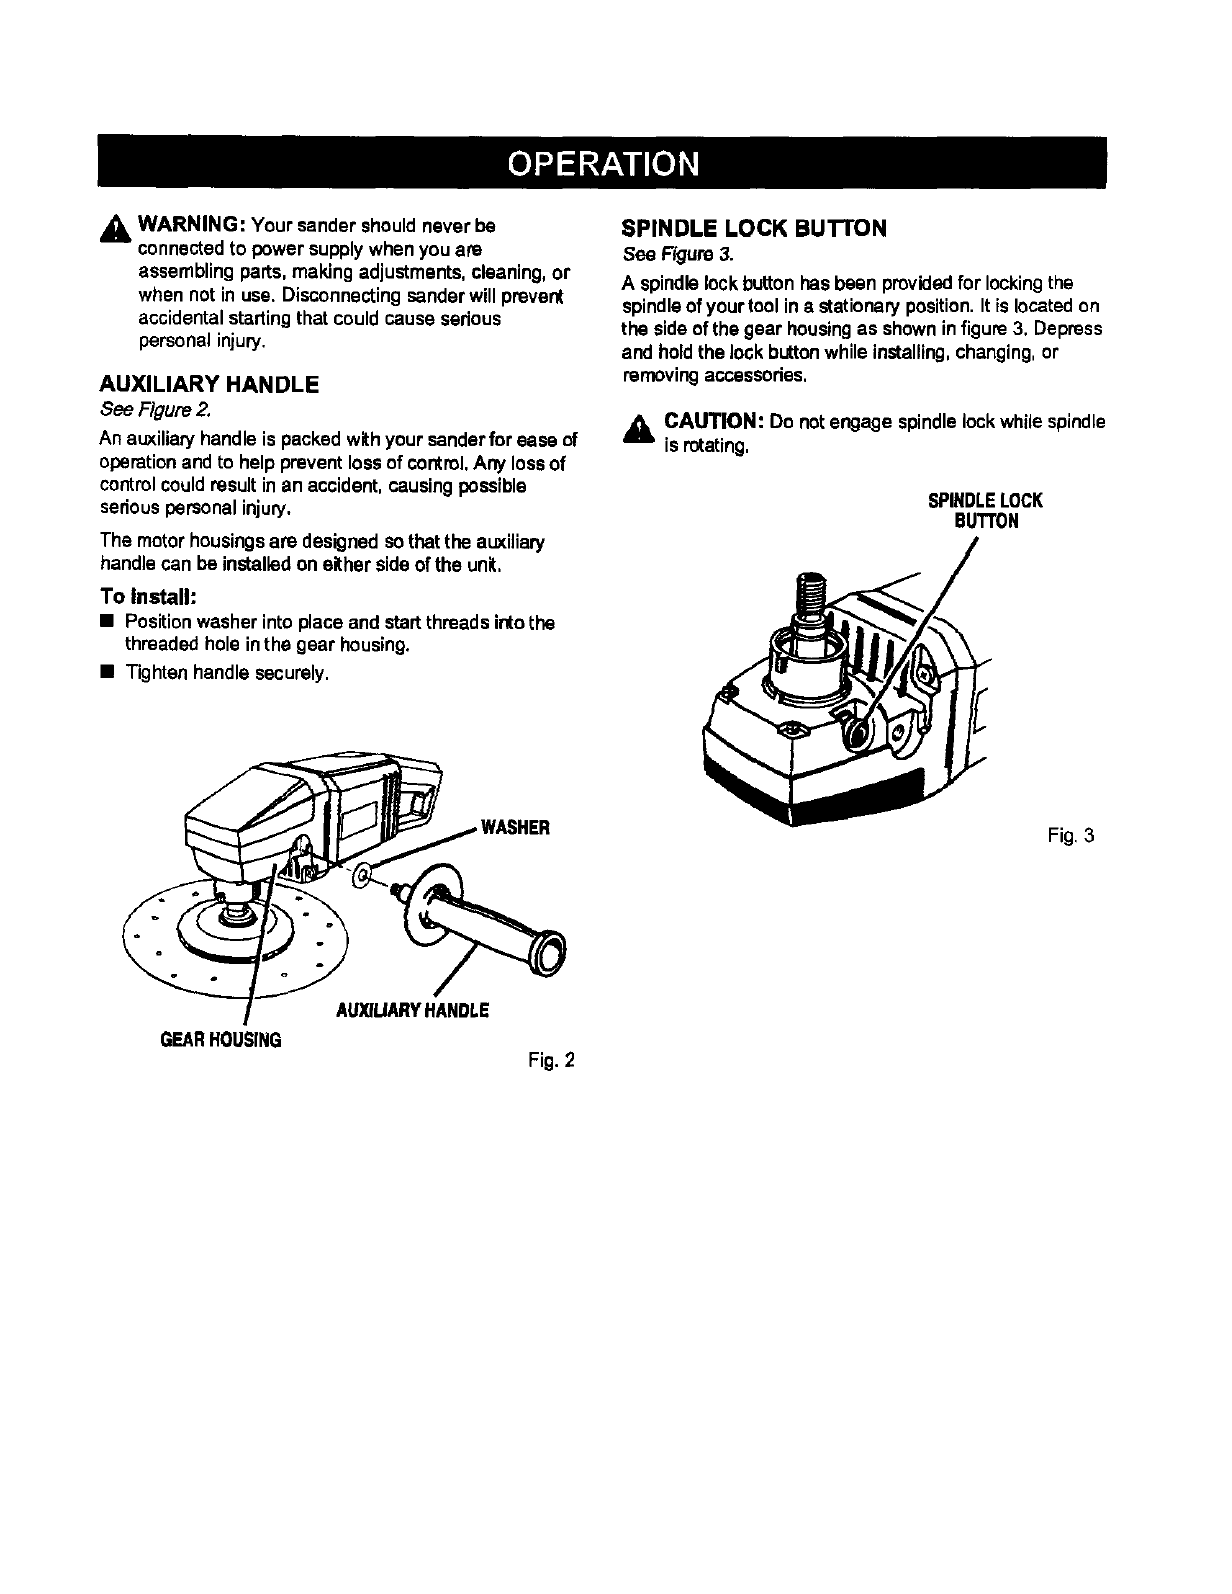
AUXILIARY HANDLE
See Figure 2.
An a_._iliaryhandle is packed withyour sanderfor ease of
operationand to help prevent lossof control,Any lossof
controlcouldresult inan accident, causingpossible
seriouspersonal injury,
The motor housingsam designed so that the aL_iliary
handlecan be installedon either sideof the unit,
To Install:
•Positionwasher into place and startthreads intothe
threaded hole inthe gear housing.
•Tighten handle securely.
SPINDLE LOCK BU'I'I'ON
See F/gum 3.
A spindlelockbuttonhas been providedfor lockingthe
spindleof your toct ina stationary position.It is locatedon
the sideof the gear housingas shown infigure 3, Depress
and holdthe lockbuttonwhile installing,changing,or
removingaccessories,
,_ CAUTION: Do notengage spindlelockwhile spindle
isrotating.
SPINDLELOCK
BUTTON
Fig.3
AUXIUARY HANDLE
GEARHOUSING Fig.2
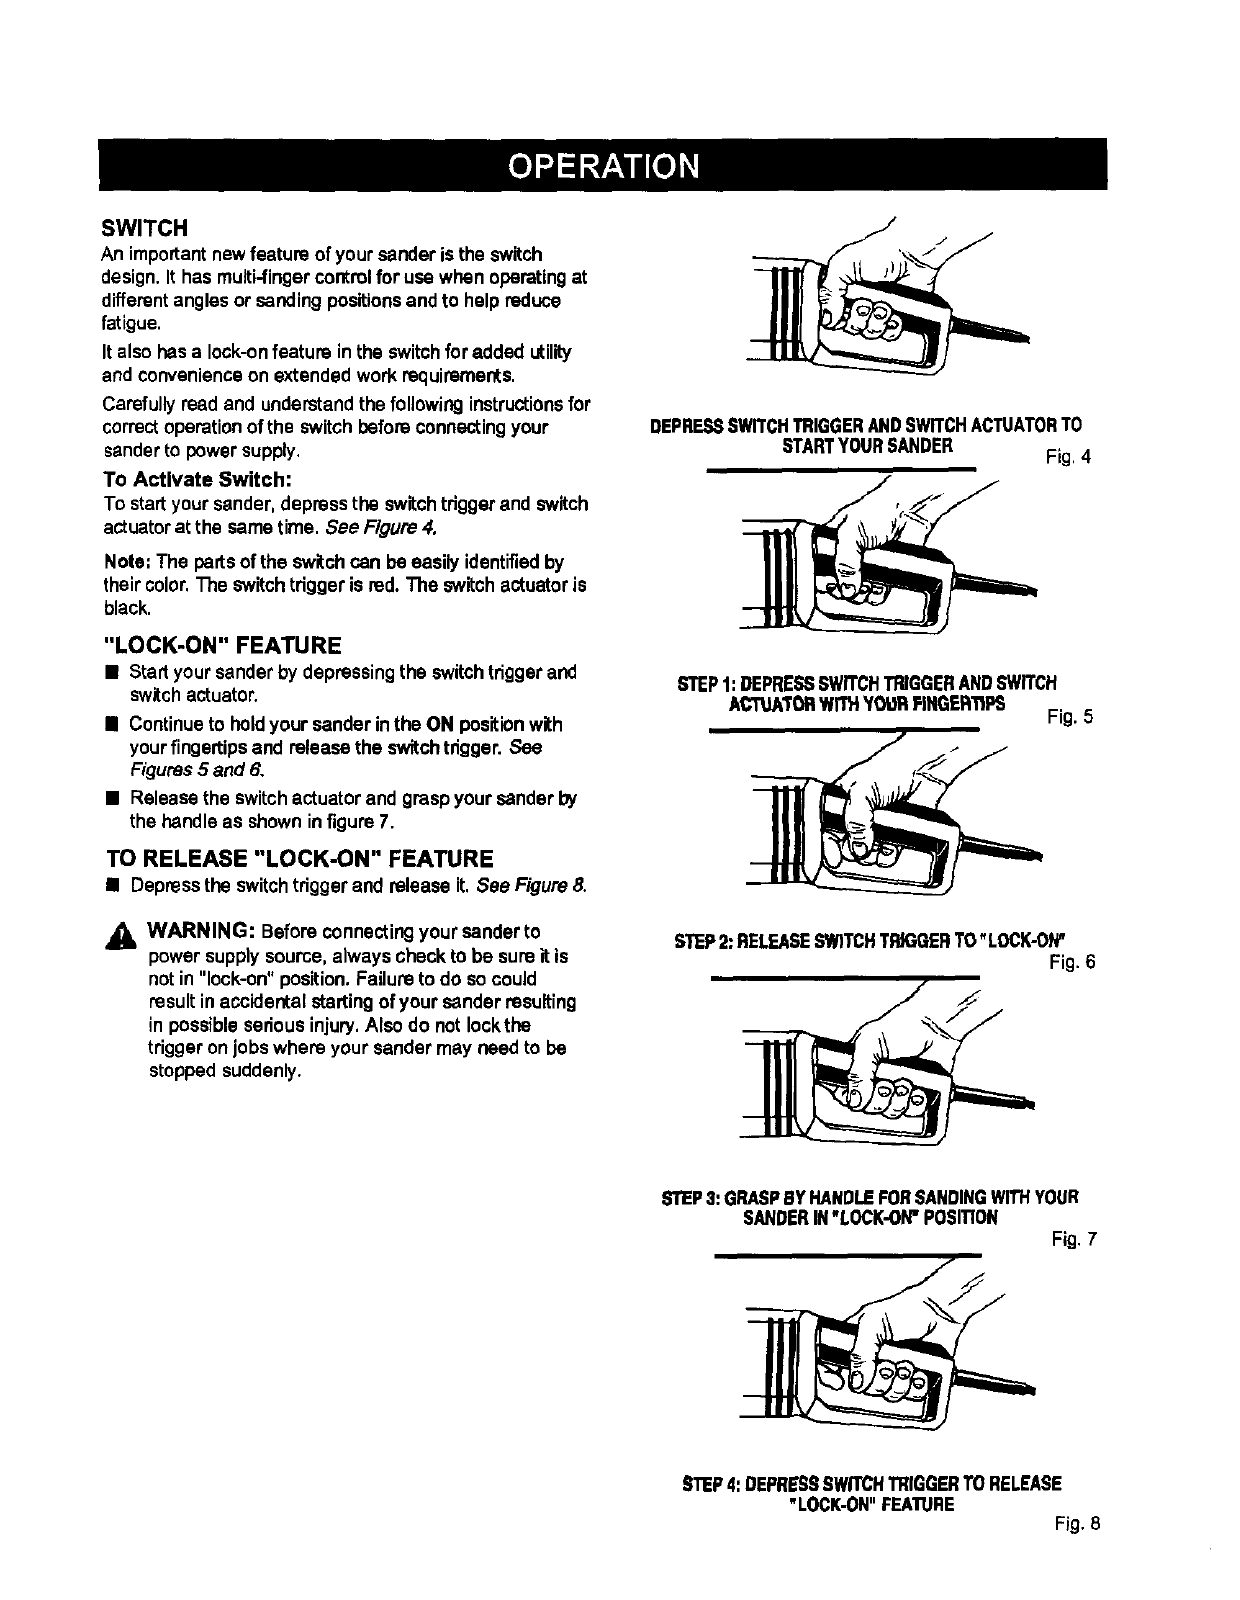
SWITCH
Animportantnewfeature of your sander is the switch
design. It has multi-finger controlfor use when operatingat
differentangles or sandingpositionsand to help reduce
fatigue.
It also has a lock-onfeature in the switchfor added utility
and convenienceon extended work requirements.
Carefullyread and understandthe following instructionsfor
correctoperationof the switchbeforeconnectingyour
senderto powersupply.
To Activate Switch:
To startyour sander, depress the switch triggerand switch
actuatorat the sametime. See Figure 4.
Note: The partsof the switchcan be easily identifiedby
their color.The switch trigger is red. The switch actuator is
black.
"LOCK-ON" FEATURE
•Start your sanderby depressingthe switch triggerand
switchactuator.
•Continueto holdyour sander inthe ON positionwith
your fingertipsand release the switchtrigger. See
Figures5 and 6.
•Release the switchactuatorand grasp your sander by
the handleas shown infigure7.
TO RELEASE "LOCK-ON" FEATURE
•Depress the switch trigger and release it. See Figure 8.
,_ WARNING: Before connectingyour sender to
power supplysource, always check to be sure it is
not in"lock-on" position.Failure to do so could
result inaccidental startingof your sander resulting
in possible seriousinjury.Also do not Iockthe
trigger on jobs where your sander may need to be
stopped suddenly.
DEPRESSSWITCHTRIGGERANDSWITCHACTUATORTO
STARTYOURSANDER Fig.4
STEP1:DEPRESSSWITCHTRIGGERANDSWITCH
ACTUATORwn1._YO'u'RPINGER'IIPS Fig. 5
STEP2:RELEASESWITCHTflJGGERTO"LOCK-ON"
Fig.6
STEP3:GRASPBYHANDLEFORSANDINGwrrl.IYOUR
SANDERIN"LOCK-ON"POSITION Fig.7
STEP4:DEPRESSSWITCHTRIGGERTO RELEASE
"LOCK-ON"FEATURE Fig. 8
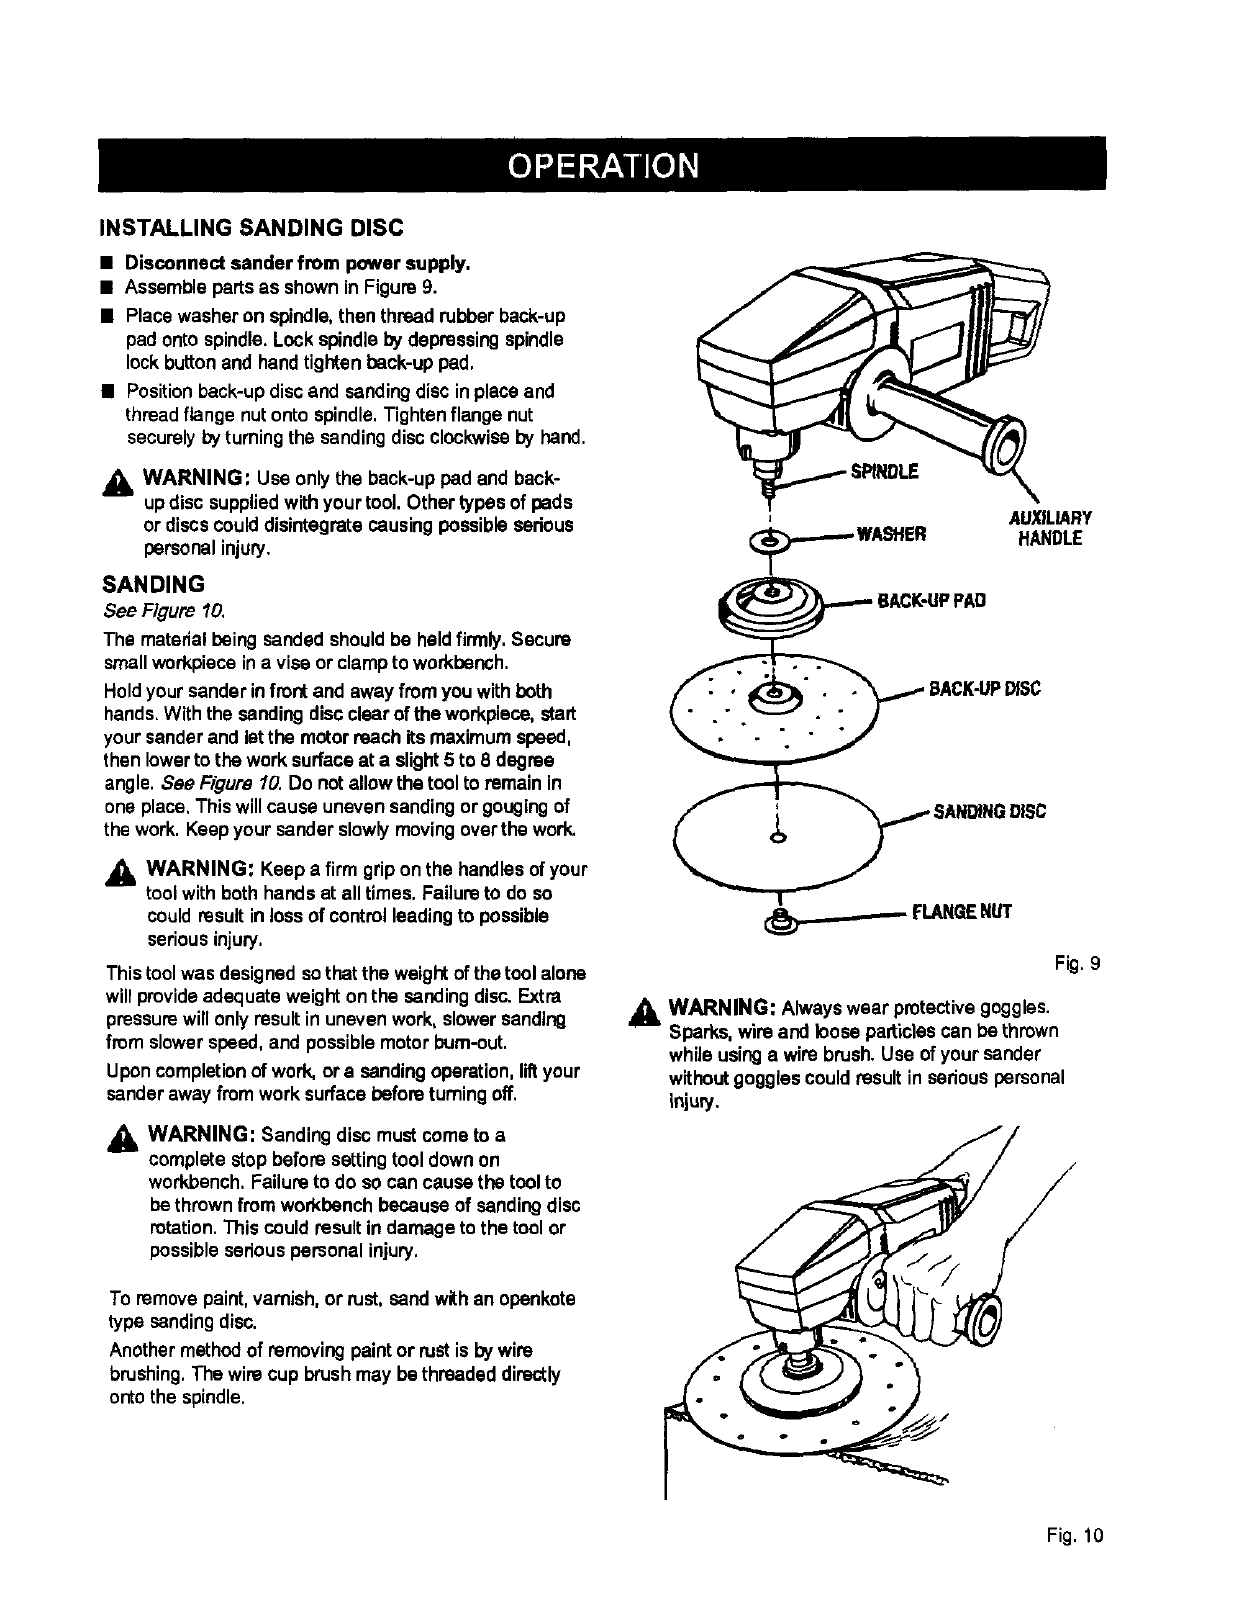
INSTALLING SANDING DISC
• Disconnect sanderfrom power supply,
•Assemble partsas shown in Figure 9.
• Place washer on spindle,then thread rubber back-up
pad onto spindle.Lock spindleby depressingspindle
lockbuttonand handtighten beck-up pad.
•Positionback-up discand sanding discin place and
threadflange nutonto spindle.Tighten flange nut
securely byturningthe sandingdisc clockwiseby hand.
,_ WARNING: Use only the back-up pad and back-
updisc suppliedwithyour tool, Other types of pads
or discscould disintegratecausingpossible sedous
personalinjury.
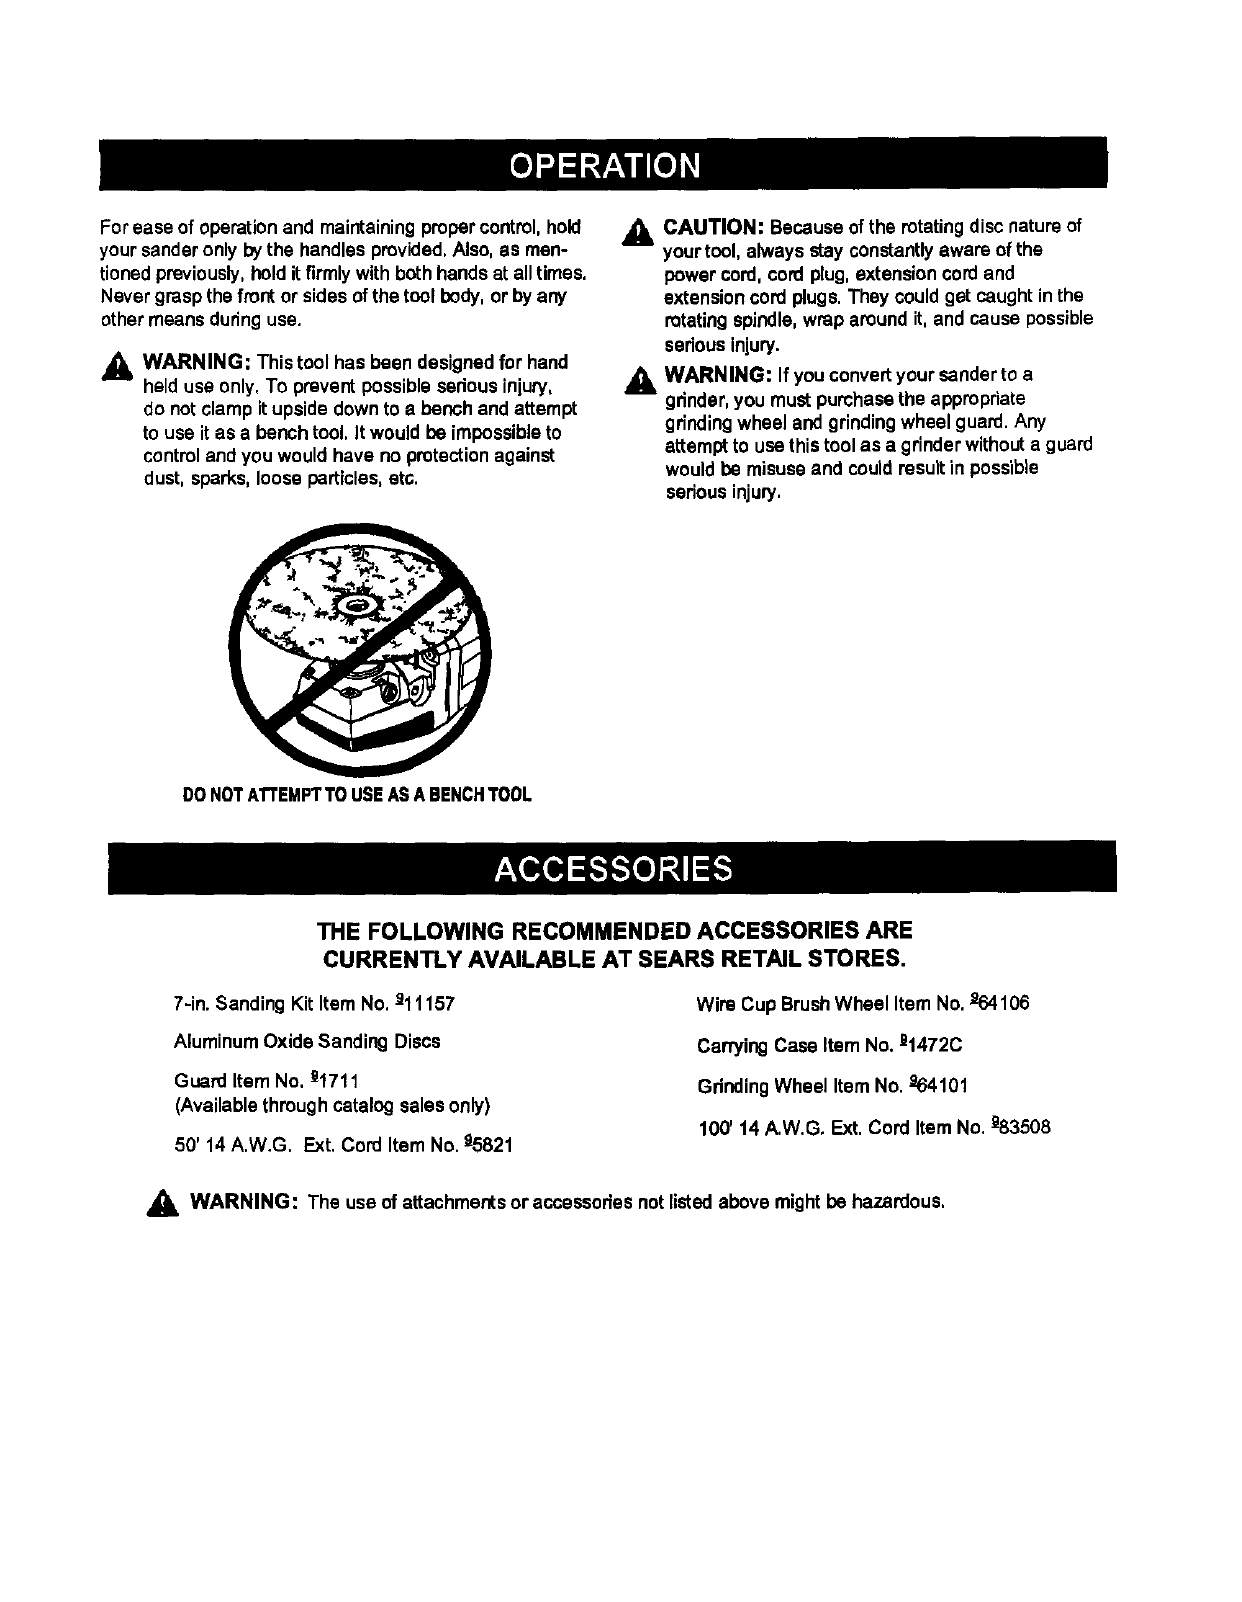
SANDING
See Figure 10,
The matedal beingsanded shouldbe held firmly,Secure
smallworkpiece ina vise orclamp to workbench.
Hold your sander infront and away from you with both
hands.With the sendingdisc clearof the workpieca, start
your sander and letthe motor reach its maximumspeed,
then lowerto the work surfaceat a slight5 to 8 degree
angle. See Figure 10. Do notallow the tool to remain in
one place, This willcause uneven sandingor gougingof
the work. Keepyour sander slowly movingoverthe work.
_l, WARNING: Keep a firm grip on the handlesof your
tool withboth hands at alltimes, Failure to do so
could result in lossof control leadingto possible
seriousinjury,
This toolwas designed sothat the weight of the tool alone
will provideadequate weight onthe sandingdisc. Extra
pressurewill only result in unevenwork, slowersanding
from slower speed, and possiblemotor bum-out,
Uponcompletionof work, or a sending operation,liftyour
sander away from work surface beforeturningoff.
_lh WARNING: Sanding disc must come to a
complete stop before setting tool down on
workbench, Failureto do so can cause the tool to
be thrownfrom workbench because of sending disc
rotation.This couldresult in damage to the tool or
possible sedous personal injury,
To removepaint,varnish, or rust, send withan opankote
type sandingdisc.
Another method of removingpaint or rustis by wire
brushing,The wirecup brushmay be threaded directly
ontothe spindle,
AUXILLeIRY
HANDLE
FLANGENUT
Fig.9
_, WARNING: Always wear protectivegoggles.
Sparks, wire and loose particlescan be thrown
while usinga wire brush. Use of your sander
withoutgogglescould result in seriouspersonal
injuwy.
Fig. 10
For ease of operationand maintainingpropercontrol,hold
your sander only bythe handlesprovided.Also,as men-
tionedpreviously,holdit firmlywith both hands at alltimes.
Never grasp the front or sides of the tool body,or by any
other means duringuse.
A WARNING: This tool has been designed for hand
held usa only. To prevent possiblesedous injury,
do notclamp it upside downto a bench and attempt
to use it as abench tool. It would be impossibleto
controland you would have no protectionagainst
dust, sparks, loose particles,etc.
CAUTION: Because of the mtaUng disc nature of
your tool, always stayconstantlyaware of the
A
power cord, cord plug, extension cord and
extension cord plugs. They couldget caught in the
rotatingspindle,wrap around it,and cause possible
sedous injury.
WARN ING: If youconvert your sander to a
gdnder,you must purchasethe appropriate
gdndingwheel and grindingwheel guard. Any
attempt to use this tool as a grinderwithouta guard
wouldbe misuseand couldresult in possible
seriousinjuw.
DONOTA'I'TEMPTTO USEASABENCHTOOL
THE FOLLOWING RECOMMENDED ACCESSORIES ARE
CURRENTLY AVAILABLE AT SEARS RETAIL STORES.
7-in. Sanding Kit Item No. 911157
AluminumOxide Sanding Discs
Guard Item No, =1711
(Available throughcatalog sales only)
50' 14 A.W.G. Ext. Cord Item No. _5821
Wire Cup BrushWheel Item No. Jl64106
Carrying Case Item No. _1472C
GdndingWheel Item No. _64101
100' 14 A.W.G. Ext. Cord Item No. _83508
,_ WARNING: The use of attachments or accessories notlisted above might be hazardous,

_. WARNING: When servicinguse only identical
Craftsman replacement parts. Use of any other
partsmay create a hazard or cause product
damage.
GENERAL
Only the parts shownon partslist, page 13. are intended
to be repaired or replaced by the customer.All other parts
represent an importantpart of the double insulationsystem
and shouldbe serviced only at a qualifiedservicecenter.
Avoid usingsolventswhen cleaning plasticparts. Most
plasticsare susceptibleto varioustypes of commercial
solventsand may be damaged by their use. Usa clean
clothsto remove dirt,carbondust, etc.
WARNING: Do notat any time let brakefluids,
gasoline, petroleum-based products,penetrating
oils,etc. come in contactwith plasticparts. They
containchemicals that can damage, weaken, or
destroy plastic.
When electric tools are usedon fiberglass boats, sports
cars,wallboard, spacklingcompounds,or plaster, it has
been found that they are subjectto acceleratedwear and
possibleprematurefailure, as the fiberglass chipsand
grindings are highlyabrasive to beatings, brushes,
commutators,etc. Consequently it is notrecommended
that thistool be usedfor extended work on any fiberglass
material, wallboard,spacklingcompounds,or plaster.
Duringany use on these materials,it is extremely
importantthat the tool is cleaned frequently by blowing
withan airjet.
_i, WARNING: Always wear safetygoggles,or safety
glasses with side shieldsduringpower tool
operation orwhen blowingdust. If operation is
dusty, alsowear a dust mask.
EXTENSION CORDS
The use of any extensioncord will cause some lossof
power. To keep the lossto a minimumand to preventtool
overheating,followthe recommendedcord sizeson the
chart below.When tool is used outdoors,use only
extension cords suitablefor outdooruse and so marked.
Extensioncordsare availableat Sears Retail Stores.
Length of Extension Cord Wire Size (A.W.G.)
Up to 50 feet 16
50-100 feat 14
_b, CAUTION: Keep extensioncords away from the
sanding area and positionthe cord sothat itwill not
get caught on lumber, tools,etc., duringsanding
operation.
_lb WARNING: Check extensioncords beforeeach
use. If damaged, replace immediately. Never use
toolwith a damaged cord sincetouchingthe
damaged area couldcause electricalshock resulting
in seriousinjury.
LUBRICATION
All of the bearings inthistool are lubricatedwith a suffi-
cientamount of highgrade lubricantfor the lifeof the unit
under normaloperatingconditions.Therefore, no further
lubricationis required,

i
I
i i
i i I
i i
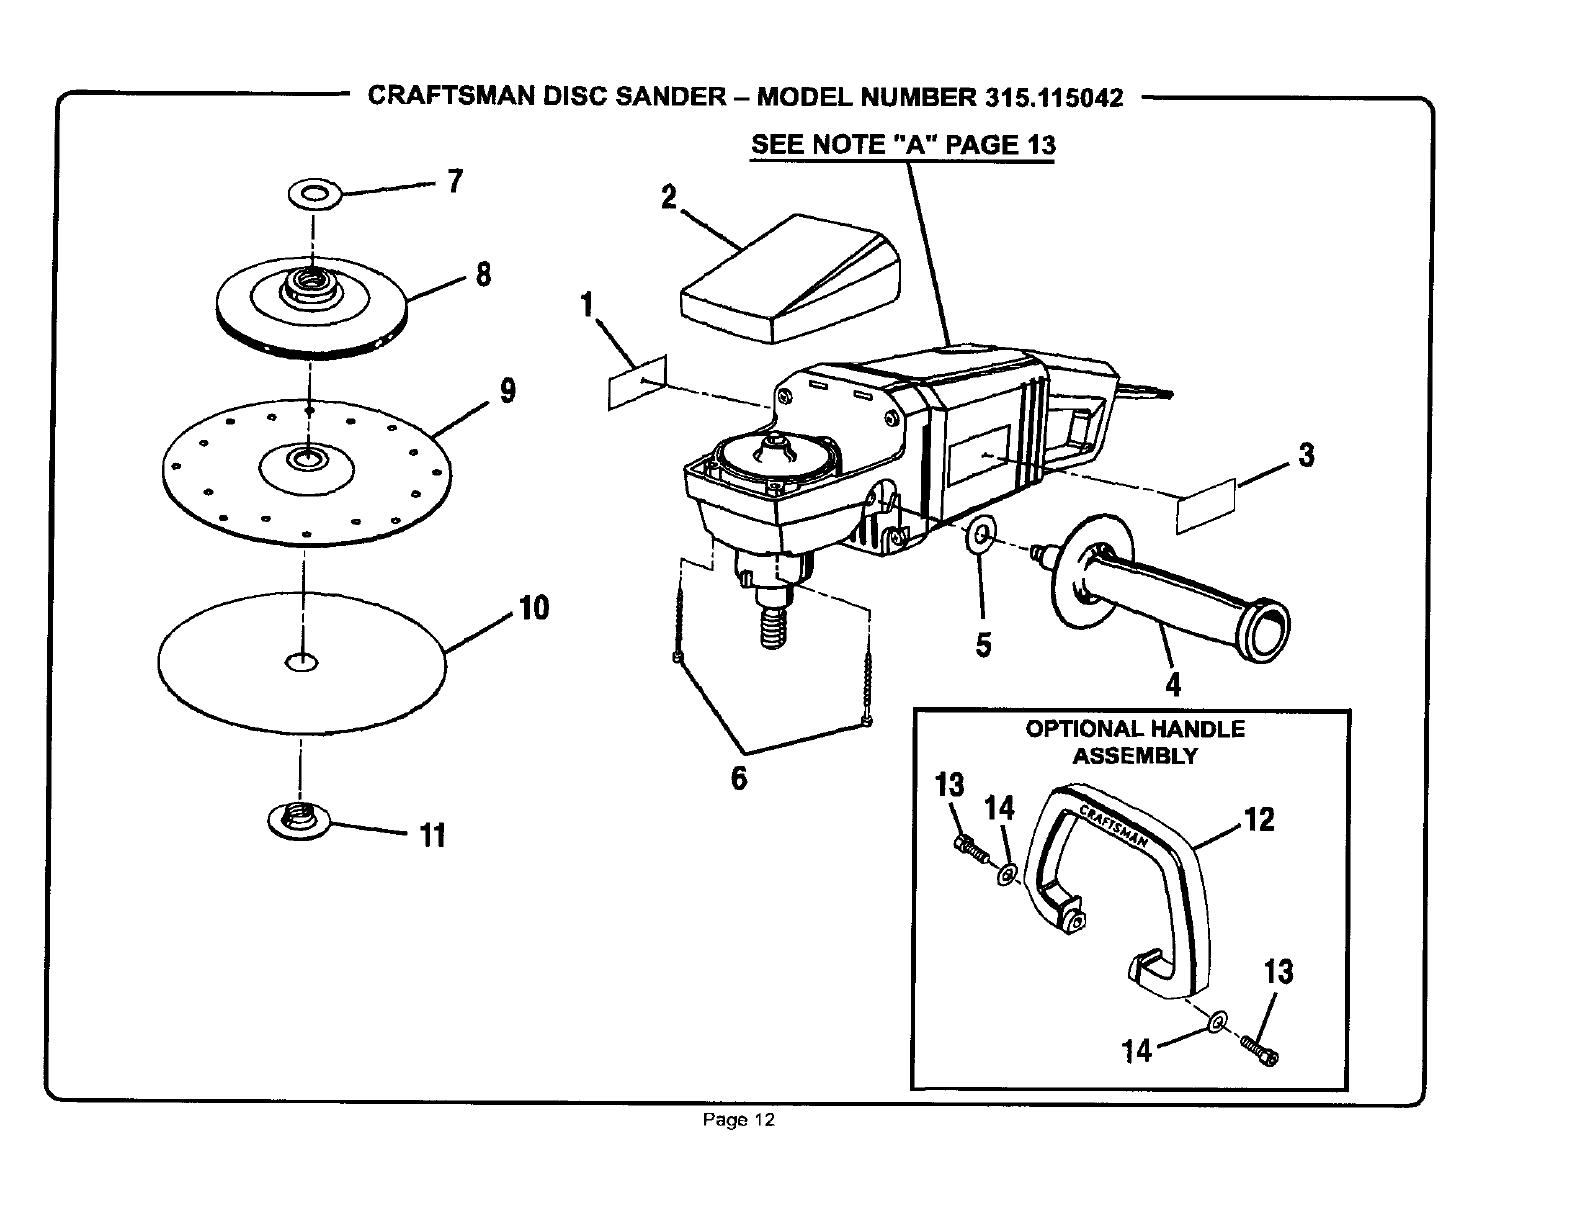
CRAFTSMAN DISC SANDER- MODEL NUMBER 315.115042
I
I
8 1
I
I
11
2
SEE NOTE "A" PAGE 13
OPTIONAL HANDLE
ASSEMBLY
3
13
Page12
CRAFTSMAN DISC SANDER - MODEL NUMBER 315.115042
,i1
Ihe model number will be found on a plate attached to the motor housing.Always mentionthe model number in all correspondence regarding your |CRAFTSMAN DISC SANDER or when orderieg repair parts. J
PARTS LIST
KEY PART
NO. NUMBER DESCRIPTION QUAN.
1
2
3
4
5
6
7
8
9
9827890O 1
998174-001
998182-001
972895-003
621721-002
Data Plate ...................................................... 1
Gear Housing Cover ..................................... 1
LogoPlate ..................................................... 1
AuxiUa_ Hand(e ............................................ 1
Washer .......................................................... 1
989592-004 * Sorew (#8-10 x 2 In. Fil. Hd.) ........................ 2
622141-013
617291-001
622839-000
Washer .......................................................... 1
Back-Up Pad ................................................. 1
Back-Up Disc................................................. 1
KEY PART
NO. NUMBER DESCRIPTION QUAN.
10 .1.,
11 617294-001
12 967862-000
13 967656-002
14 703776-035
972000-897
7 Inch Sanding Discs with 7/8 in. hole
(Item Nos, 9-25299 Fine Grit,
9-25291 Medium Grit, and
9-25292 Coarse Gdt) .................................... 1
Flange Nut ..................................................... 1
Optional Handle Assembly
(Includes Key Nos. 13 and 14) ...................... 1
* Cap Screw (#3/8-24 x 1 In. See. Hd.) ........... 2
Washer .......................................................... 2
Owner's Manual
i
NOTE'A": Th_assemb_y_h_wnrepre_entsanimp_rtantpart_fth_D_ub_e_n_u_ated_yst_m.T_v_idthep_bi_ity_fa_t_rat_n_rdamag_
to the system, service should be performed by your nearest Sears Repair Center, Contact your nearest Sears Retail Store for
service center Information.
* Standard Hardware Item -- May Be Purchased Locally
** Available From DIv. 98 -- Source 980,00
Page 13

®Registered Ttadem_k ITM Trademark ofSears, ROebuCkand Co.
©Sears,Roebud_andCo. ®MercaRe_lrada /Metcade F_dca deSe=rs,Roebud__qdCo.
