Craftsman 315 79889 Users Manual
315798890 315798890 CRAFTSMAN HEDGE TRIMMER - Manuals and Guides L9080049 View the owners manual for your CRAFTSMAN HEDGE TRIMMER #315798890. Home:Lawn & Garden Parts:Craftsman Parts:Craftsman HEDGE TRIMMER Manual
CRAFTSMAN Hedge Trimmer, Electric Manual L9080049 CRAFTSMAN Hedge Trimmer, Electric Owner's Manual, CRAFTSMAN Hedge Trimmer, Electric installation guides
31579889 813dfa86-174b-4440-8acb-5f63695c445f Craftsman Trimmer 315.79889 User Guide |
2015-01-05
: Craftsman Craftsman-315-79889-Users-Manual-161271 craftsman-315-79889-users-manual-161271 craftsman pdf
Open the PDF directly: View PDF ![]() .
.
Page Count: 14
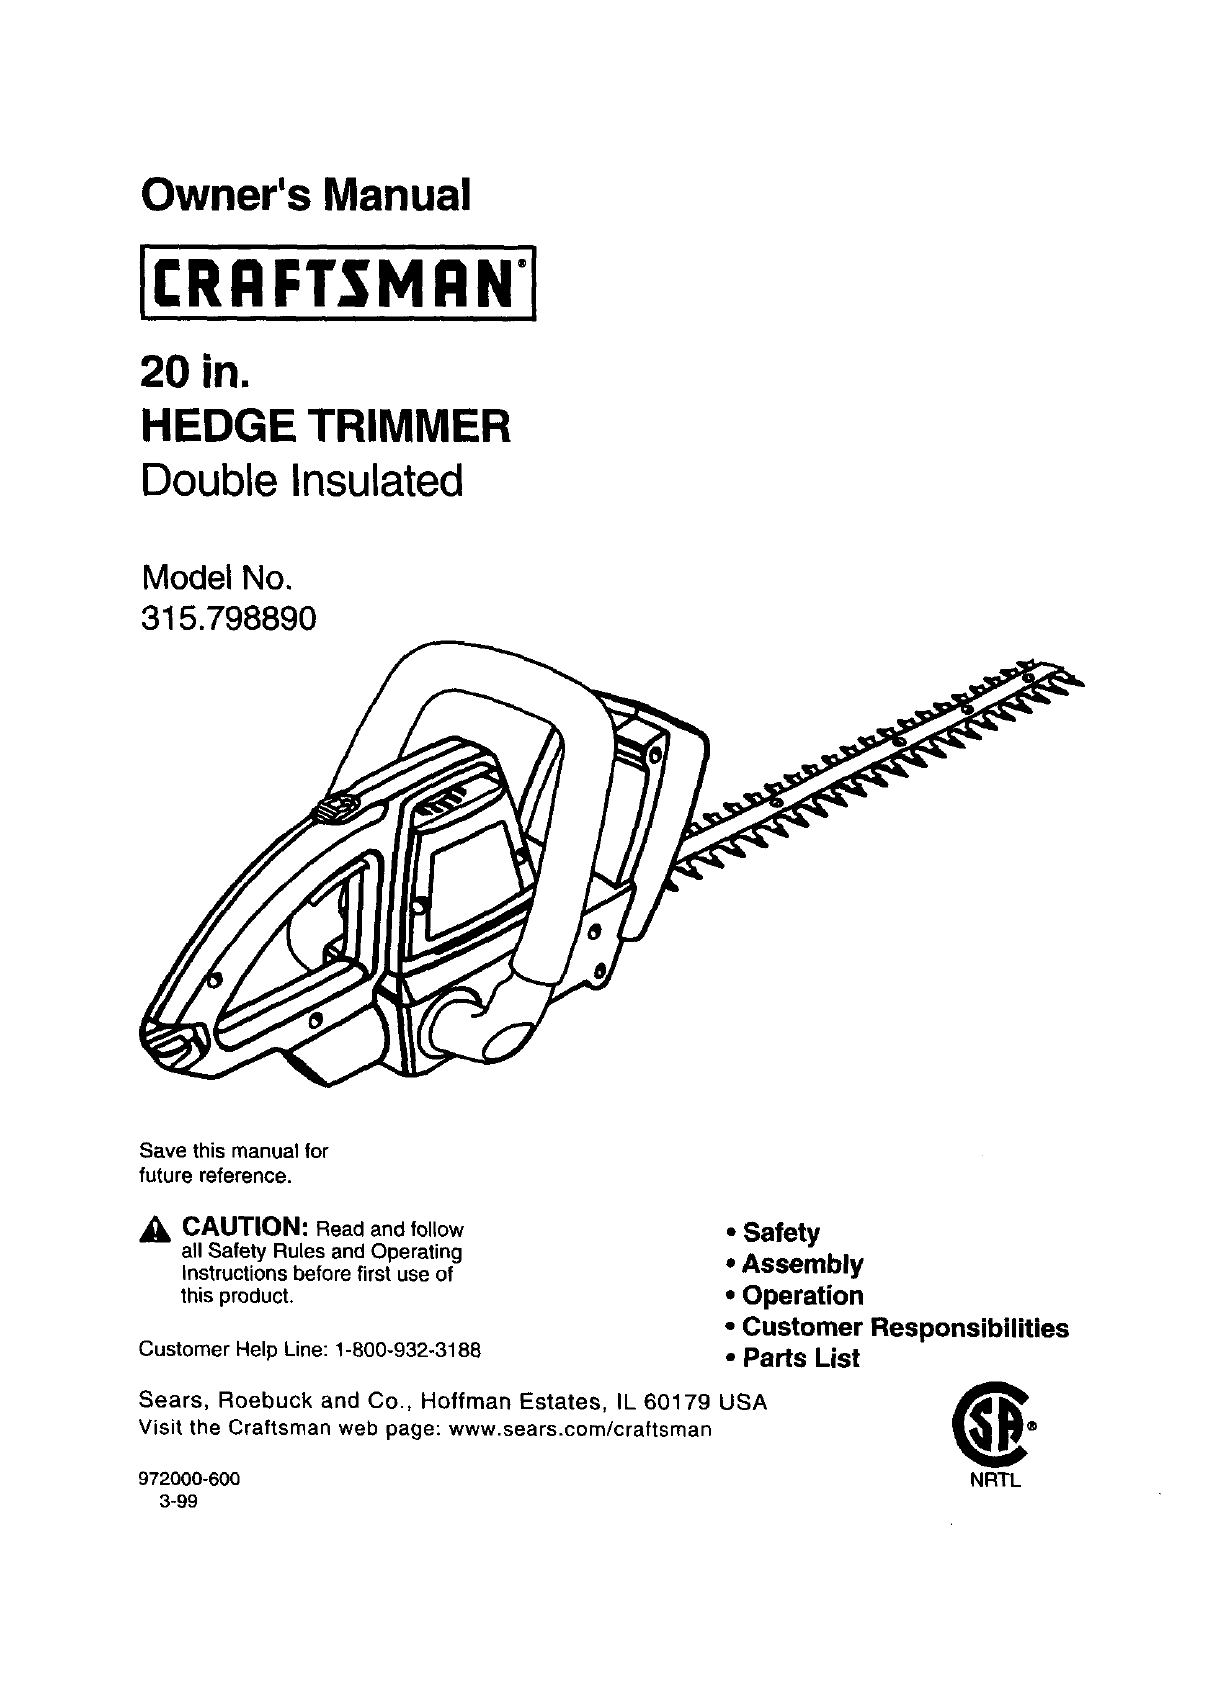
Owner's Manual
20 in.
HEDGE TRIMMER
Double Insulated
Model No,
315.798890
Save this manual for
future reference.
CAUTION: Read and follow
all Safety Rules and Operating
Instructions before first use of
this product.
Customer Help Line: 1-800-932-3188
•Safety
°Assembly
°Operation
•Customer Responsibilities
•Parts List
Sears, Roebuck and Co., Hoffman Estates, IL 60179 USA
Visit the Craftsman web page: www.sears.com/craftsman
972000-600 NRTL
3-99
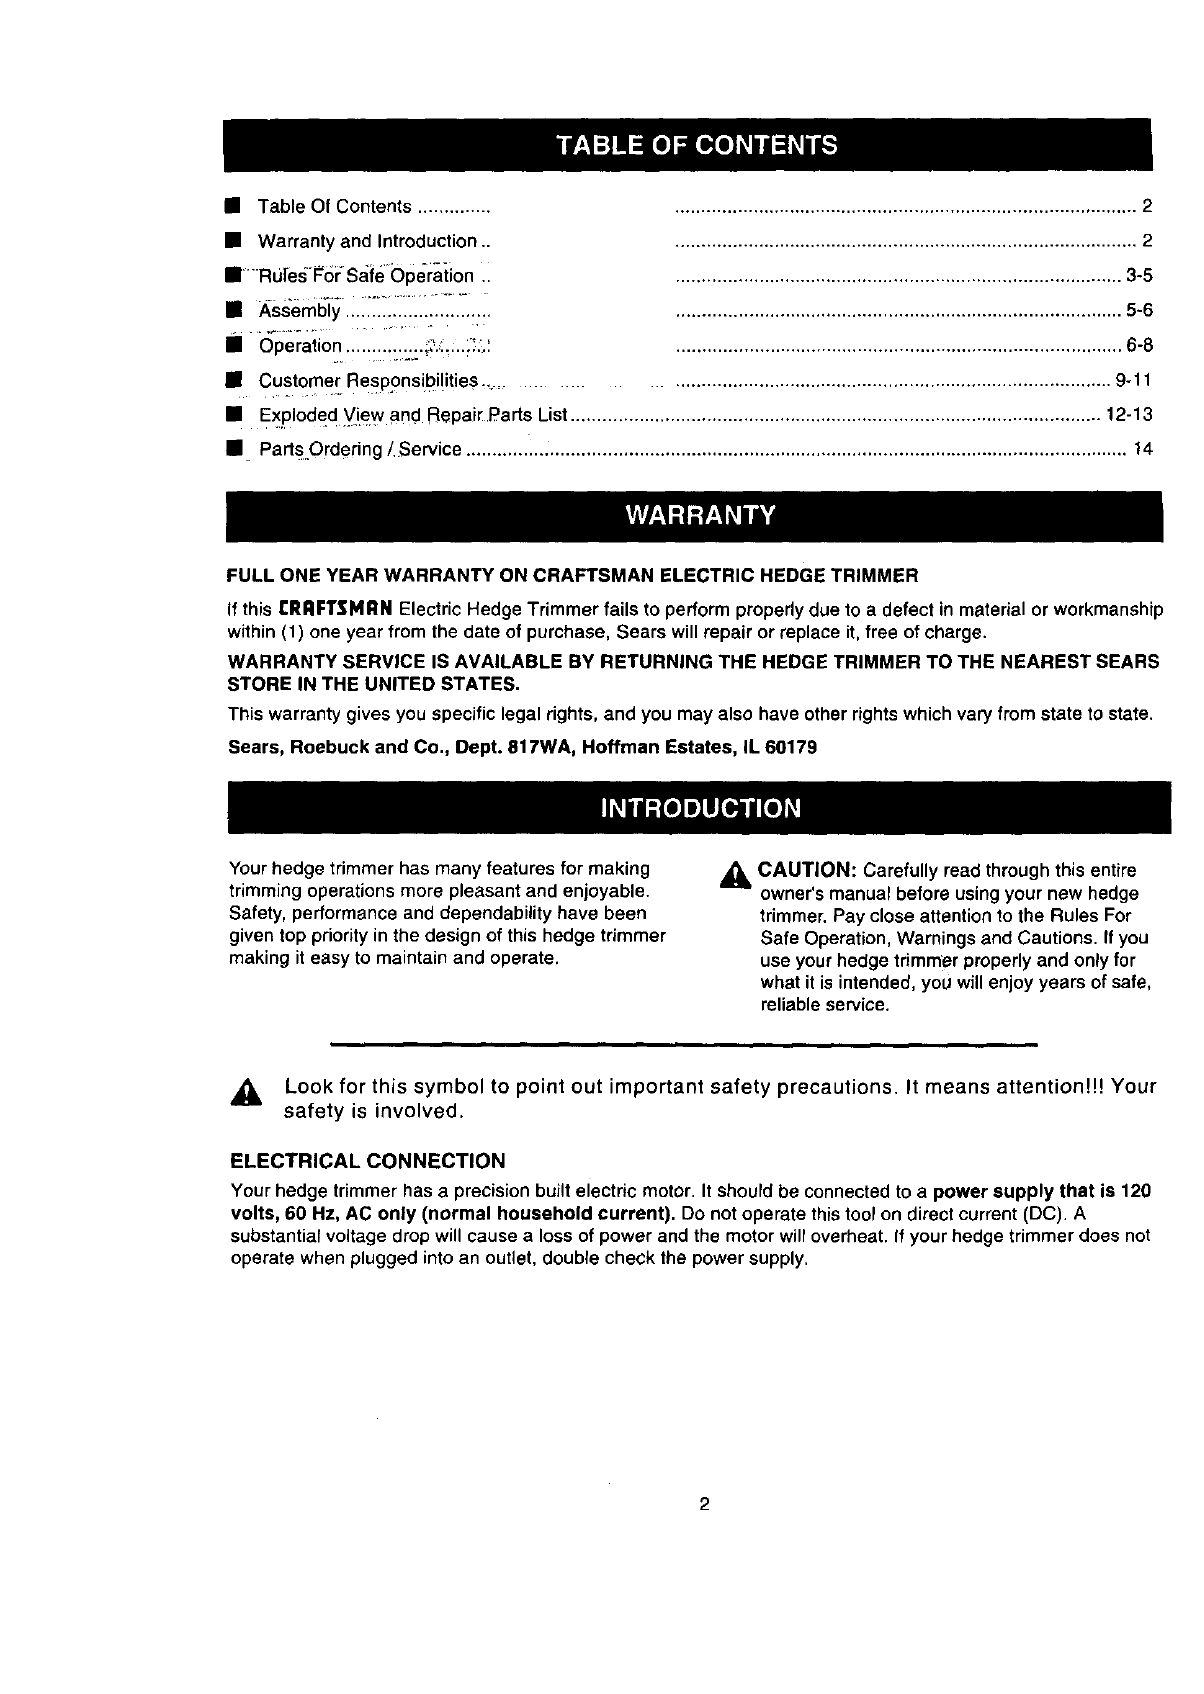
• Table Of Contents .............. ............................................................................... *......... 2
• Warranty and Introduction,.
• ' -R Ulesl_0r: Safe' 0peraiion
• ,Ss'er"bi I.IYTIYIIITTLIILTTTI..I
......................................................................................... 2
...................................................................................... 3-5
...................................................................................... 5-6
................................................................................ ,.,,,, 6-8
.................................................................................... g_11
• Operation....:::::::-.:._?.i_:..:::o:
• Customer Responsil_i!ities.....
•E:<plodedView and FlepairParts List...................................................................................................... 12-13
• PartsOrdering !Service ............_.................................................................................................................. 14
FULL ONE YEAR WARRANTY ON CRAFTSMAN ELECTRIC HEDGE TRIMMER
If this CRRFTSMI1N Electric Hedge Trimmer fails to perform properly due to a defect in material or workmanship
within (1) one year from the date of purchase, Sears will repair or replace it, free of charge.
WARRANTY SERVICE IS AVAILABLE BY RETURNING THE HEDGE TRIMMER TO THE NEAREST SEARS
STORE IN THE UNITED STATES.
This warranty gives you specific legal rights, and you may also have other rights which yaw from state to state.
Sears, Roebuck and Co., Dept. 817WA, Hoffman Estates, IL 60179
Your hedge trimmer has many features for making
trimming operations more pleasant and enjoyable.
Safety, performance and dependability have been
given top priority in the design of this hedge trimmer
making it easy to maintain and operate.
_1= CAUTION: Carefully read through this entire
owner's manual before using your new hedge
trimmer. Pay close attention to the Rules For
Safe Operation, Warnings and Cautions. If you
use your hedge trimmer properly and only for
what it is intended, you will enjoy years of safe,
reliable service.
,_ Look for this symbol to point out important safety precautions, It means attention!!! Your
safety is involved.
ELECTRICAL CONNECTION
Your hedge trimmer has a precision built electric motor. It should be connected to a power supply that is 120
volts, 60 Hz, AC only (normal household current). Do not operate this tool on direct current (DC). A
substantial voltage drop will cause a loss of power and the motor wilt overheat. If your hedge trimmer does not
operate when plugged into an outlet, double check the power supply.

The purpose of safety symbols is to attract your attention to possible dangers. The safety symbols, and
the explanations with them, deserve your careful attention and understanding. The safety warnings do
not by themselves eliminate any danger. The instructions or warnings they give are not substitutes for
proper accident prevention measures.
SYMBOL MEANING
SAFETY ALERT SYMBOL:
_ndi_atesdanger_waming__rcauti_n_Maybeu_edinconjuncti_nwith_ther_ymb_i__rpict_graph_.
DANGER: Failure to obey a safety warning willresult in seriousinjuryto yourselfor to others.
Always followthe safety precautionsto reduce the riskof fire, electricshockand personal injury.
,_. WARNING: Failure to obey a safetywarningcan resultin seriousinjuryto yourselfor to others.
Always follow the safety precautions to reduce the risk of fire, electric shock and personal injury.
ACAUTION: Failure to obey a safetywarning may resultin propertydamageor personal injuryto
yourselfor to others.Alwaysfollow the safety precautionstoreduce the riskof fire, electricshockand
personal injury.
NOTE: Advises you of informationorinstructionsvitalto theoperationor maintenanceof the equipment.
DOUBLE INSULATION
Double insulationis a concept in safety, in electric
power tools which eliminatesthe need for the usual
three-wire grounded power cord. All exposed metal
parts are isolated from internal metal motor
componentswith protectinginsulation.Double
insulatedtools do not need to be grounded.
_I, WARNING: Do not attemptto operate thistool
untilyou have read thoroughly and understand
completelyall instructions,safety rules,etc.
contained in this manual. Failure to complycan
resultin accidents involvingfire, electric shock,
or seriouspersonal injury.Save owner'smanual
and review frequently for continuingsafe
operation, and instructingothers who may use
thistool.
,_ WARNING: When using electric hedge
trimmers,basic safety precautions should always
be followedto reduce the riskof fire, electric
shock, and personal injury,includingthe
following:
READ ALL INSTRUCTIONS
•KNOW YOUR POWER TOOL. Read
owner's manual carefully. Learn its applica-
tions and limitations as well as the specific
potential hazards related to this tool.
•DRESS PROPERLY. Do not wear loose
clothing or jewelry. They can be caught in
moving parts. Use of sturdy gloves and
IMPORTANT
Servicing of a tool withdouble insulationrequires
extreme care and knowledgeof the systemand
shouldbe performedonly by a qualifiedservice
technician.For servicewe suggest you returnthe tool
to your nearest Seam Storefor repair. Always use
originalfactory replacementpartswhen servicing.
substantial footwear is recommended when
working outdoors. Wear protective hair
covering to contain long ha r!
USE SAFETY GLASSES. Always use face
or dust mask if operation is dusty.
STAY ALERT. Watch what you are doing
and use common sense. Do not operate
trimmer when you are tired.
DANGER: Risk of cut or shock - Keep
hands away from blades. Keep both
hands on handles when power is on. Do
not attempt to remove cut material nor
hold material to be cut when blades are
moving. Make sure the trimmer is
unplugged and the switch is off when
clearing jammed material from blades.
Do not grasp the exposed cutting blades
or cutting edges of trimmer.
CAUTION'. Blades will
• _k coast after
trimmer is turned off.
3
RULES FOR SAFE OPERATION (Continued)
R
II
_1= WARNING: Avoid dangerous
environment and guard against electric
shock hazard. Don't use trimmer in rain,
in damp or wet locations, or on wet
hedges and shrubbery. Use only
extension cords in good condition and
marked "suitable for use with outdoor
appliances" having electrical rating not
less than rating of trimmer. Do not use
damaged extension cords. Inspect cords
periodically and replace if damaged. Do
not abuse cord. Never carry trimmer by
cord. Do not yank cord to disconnect
from receptacles. Keep cord away from
heat, oil, sharp edges, and moving
blades.
_L WARNING: To reduce the risk of electric
shock, use only with an extension cord
intended for outdoor use, such as SW-A,
SOW-A, STW-A, STOW-A, SJW-A,
SJOW-A, SJTW-A or SJTOW-A.
WHEN OPERATING YOUR TRIMMER -
keep extension cord behind trimmer.
Never drape it over hedge being trimmed.
KEEP CHILDREN AWAY, Do not permit
children to contact trimmer or extension
cord. Keep children asafe distance from
work area.
USE TRIMMER PROPERLY, Use only for
trimming the type of shrub, growth, etc,
described in the operating instructions, Do
not abuse trimmer
DON'T FORCE HEDGE TRIMMER. It will
do the job better and with less likelihood of
a risk of injury at the rate for which it was
designed.
DON'T OVERREACH OR STAND ON
UNSTABLE SUPPORT. Keep good footing
and balance at all times Do not use on
ladder.
AVOID UNINTENTIONAL STARTING OF
TRIMMER. Before plugging in trimmer, be
sure trimmer switch is off. Don't carry
trimmer with finger on switch.
DISCONNECT (UNPLUG) TRIMMER
FROM POWER SUPPLY. Disconnect the
hedge trimmer from power supply when not
in use, before servicing, when changing
accessories such as blades, when cleaning,
and the like,
MAINTAIN TRIMMER WITH CARE. Keep
cutting edge sharp and clean for best
performance and to reduce the risk of injury.
Follow instructions for lubricating and
changing accessories. Inspect hedge
trimmer cord periodically, and if damaged.
have it repaired by an authorized service
facility. Inspect extension cord periodically
and replace if damaged. Keep handles dry,
clean, and free from oil and grease.
STORE TRIMMER INDOORS. When not in
use, store trimmer indoors in a dry place
where not accessible to children.
CHECK DAMAGED PARTS. Before futher
use of the hedge trimmer, a guard or other
part that is damaged should be carefully
checked to determine that it will operate
properly and perform its intended function.
Check for alignment of moving parts, bind-
ing of moving parts, breakage of parts,
mounting, and any other condition that may
affect its operation. A guard or other part
that is damaged should be properly repairec
or replaced by an authorized service center
unless indicated elsewhere in this manual.
DO NOT ATTEMPT TO REPAIR TRIM-
MER. For service or repair return the trim-
mer to your nearest Sears store. See that
only identical replacement parts are used.
KEEP WORK AREA CLEAN. Cluttered
areas and benches invite accidents.
WARNING: Do not use without front
handle in place. Keep both hands on
handles when tool is on.
•WEAR HEARING PROTECTION DURING
EXTENDED PERIODS OF OPERATION.
•NEVER USE IN AN EXPLOSIVE ATMO-
SPHERE. Normal sparking of the motor
could ignite fumes.
•WHEN SERVICING USE ONLY IDENTI-
CAL CRAFTSMAN REPLACEMENT
PARTS.
GROUND FAULT CIRCUIT INTER-
RUPTER (GFCI) PROTECTION SHOULD
BE PROVIDED ON THE CIRCUIT(S) OR
OUTLET(S) TO BE USED FOR YOUR
HEDGE TRIMMER. Receptacles are avail-
able having built-in GFCI protection and
may be used for this measure of safety.
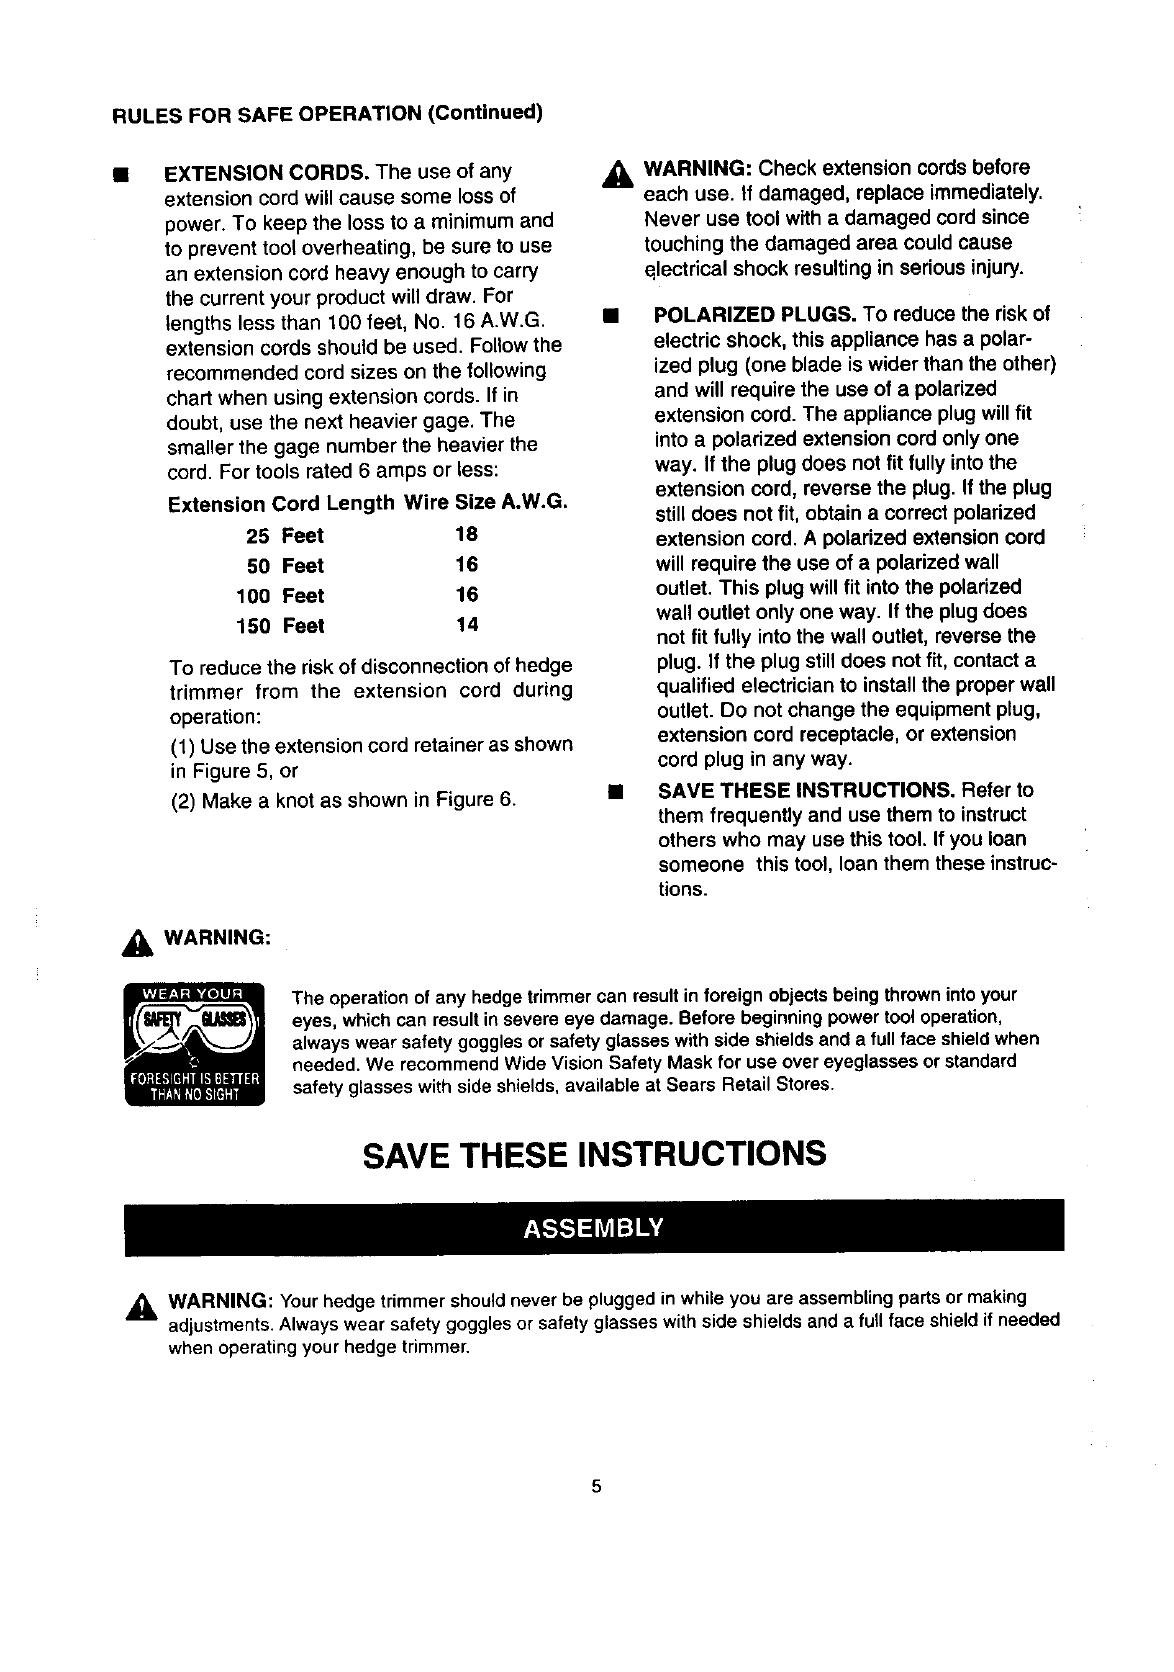
RULESFORSAFEOPERATION(Continued)
EXTENSION CORDS. The use of any
extension cord will cause some loss of
power. To keep the loss to a minimum and
to prevent tool overheating, be sure to use
an extension cord heavy enough to carry
the current your product will draw. For
lengths less than 100 feet, No. 16 A.W.G.
extension cords should be used. Follow the
recommended cord sizes on the following
chart when using extension cords. If in
doubt, use the next heavier gage. The
smaller the gage number the heavier the
cord. For tools rated 6 amps or less:
Extension Cord Length Wire Size A.W.G.
25 Feet 18
50 Feet 16
100 Feet 16
150 Feet 14
To reduce the risk of disconnection of hedge
trimmer from the extension cord during
operation:
(1) Use the extension cord retainer as shown
in Figure 5, or
(2) Make a knot as shown in Figure 6.
_, WARNING: Check extension cords before
each use. If damaged, replace immediately.
Never use tool with a damaged cord since
touching the damaged area could cause
qlectrical shock resulting in serious injury.
POLARIZED PLUGS. To reduce the risk of
electric shock, this appliance has a polar-
ized plug (one blade is wider than the other)
and will require the use of a polarized
extension cord. The appliance plug will fit
into a polarized extension cord only one
way. If the plug does not fit fully into the
extension cord, reverse the plug. If the plug
still does not fit, obtain a correct polarized
extension cord. A polarized extension cord
will require the use of a polarized wall
outlet. This plug will fit into the polarized
wall outlet only one way. If the plug does
not fit fully into the wall outlet, reverse the
plug. If the plug still does not fit, contact a
qualified electrician to install the proper wall
outlet. Do not change the equipment plug,
extension cord receptacle, or extension
cord plug in any way.
SAVE THESE INSTRUCTIONS. Refer to
them frequently and use them to instruct
others who may use this tool. If you loan
someone this tool, loan them these instruc-
tions.
WARNING:
The operation of any hedge trimmer can result in foreign objects being thrown into your
eyes, which can result in severe eye damage. Before beginning power tool operation,
always wear safety goggles or safety glasses with side shields and a full face shield when
needed. We recommend Wide Vision Safety Mask for use over eyeglasses or standard
safety glasses with side shields, available at Sears Retail Stores.
SAVE THESE INSTRUCTIONS
_i, WARNING: Your hedge trimmer should never be plugged in while you are assembling parts or making
adjustments. Always wear safety goggles or safety glasses with side shields and afull face shield if needed
when operating your hedge trimmer,
5
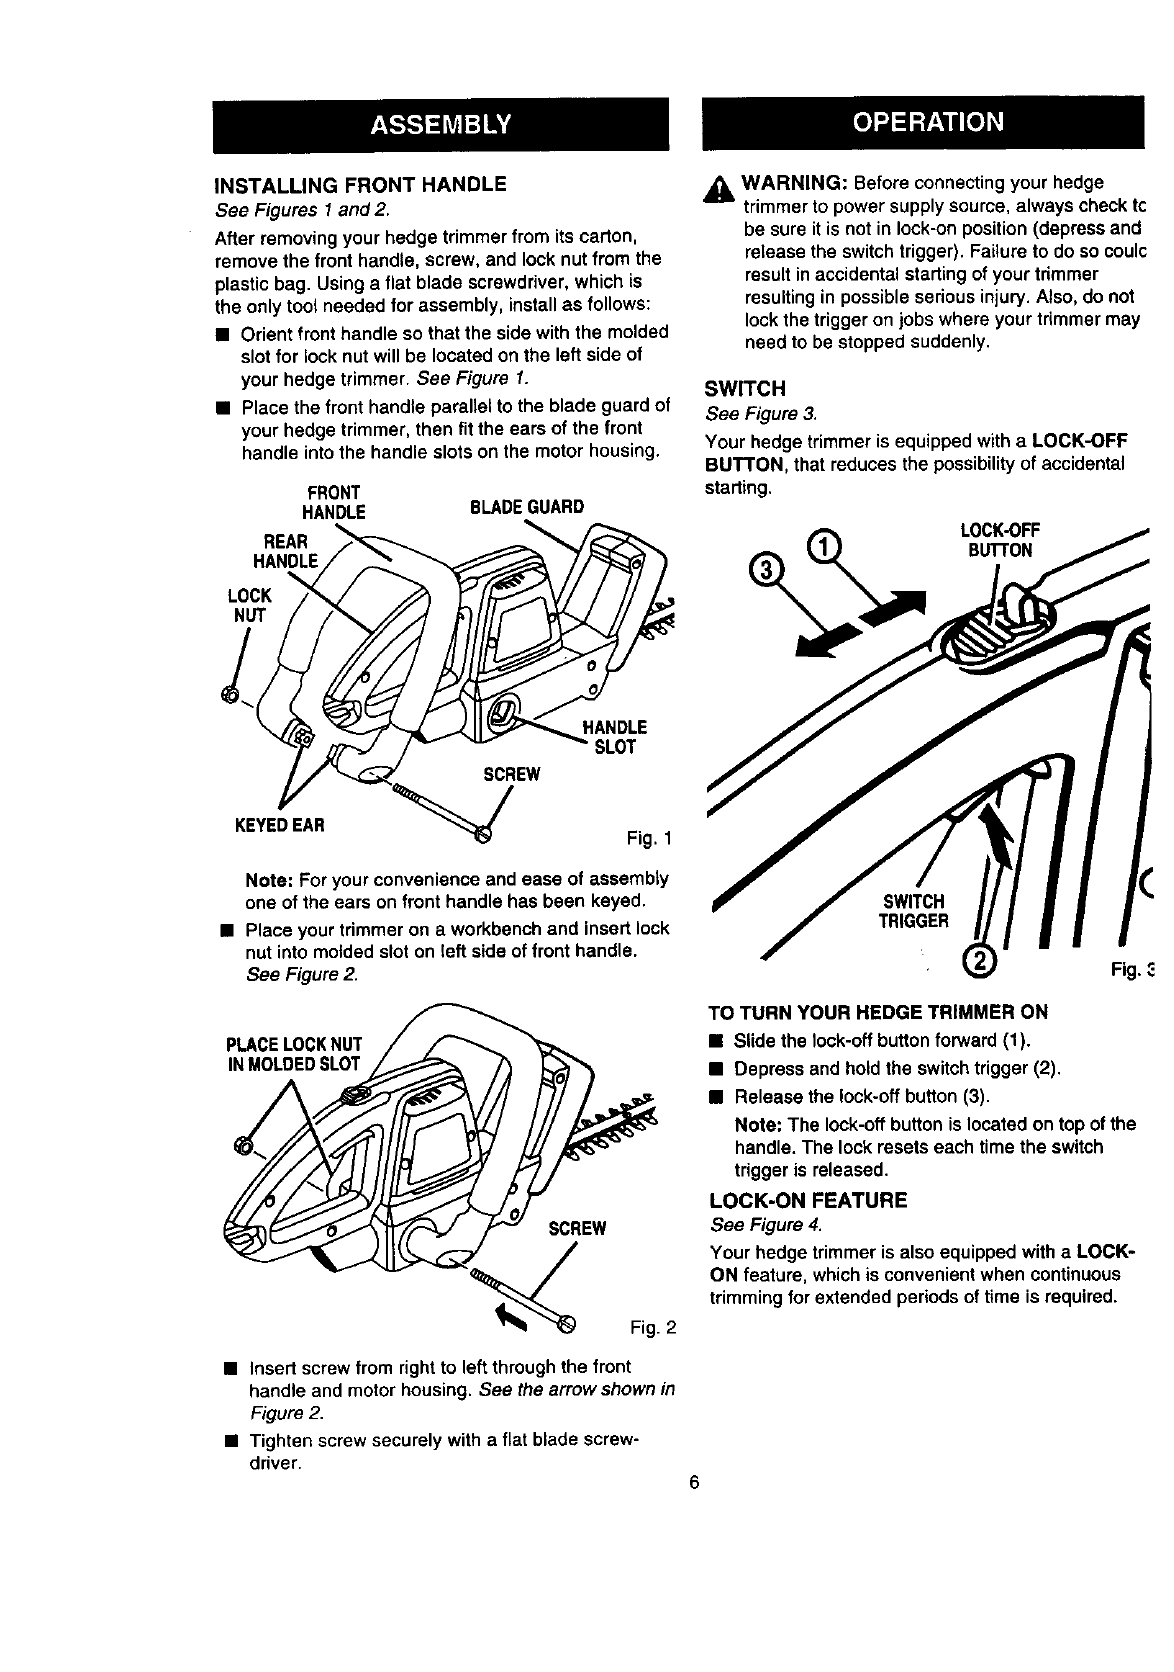
INSTALLING FRONT HANDLE
See Figures 1and 2.
After removingyour hedge trimmer from its carton,
remove the front handle, screw, and locknut from the
plastic bag. Using a flat blade screwdriver,which is
the only tool needed for assembly, installas follows:
•Orient front handle so that the side withthe molded
slotfor lock nutwill be located on the left side of
your hedge trimmer. See Figure I.
•Place the front handle parallel to the blade guard of
your hedge trimmer, then fit the ears of the front
handle intothe handle slots on the motor housing.
FRONT
HANDLE
REAR
HANDLE
LOCK
NUT
BLADEGUARD
HANDLE
SLOT
SCREW
KEYEDEAR Fig. 1
Note: For your convenience and ease of assembly
one of the ears on front handle has been keyed.
•Place your trimmer on a workbench and insert lock
nut into molded slot on left side of front handle.
See Figure 2.
PLACELOCKNUT
INMOLDEDSLOT
SCREW
Fig. 2
•Insert screw from right to left through the front
handle and motor housing. See the arrow shown in
Figure 2.
• Tighten screw securely with a flat blade screw-
driver.
_, WARNING: Before connectingyour hedge
trimmerto power supplysource, always check tc
be sure it is not in lock-onposition(depress and
release the switchtrigger).Failure to do so coulc
result inaccidentalstartingof your trimmer
resultingin possibleseriousinjury.Also,do not
lockthe triggeron jobs where your trimmer may
need to be stoppedsuddenly.
SWITCH
See Figure 3.
Your hedge trimmer is equipped with a LOCK-OFF
BUTTON, that reduces the possibilityof accidental
starting.
LOCK-OFF
BUTTON
Fig.
TO TURN YOUR HEDGE TRIMMER ON
•Slide the lock-off buttonforward (1).
•Depress and holdthe switchtrigger (2).
•Release the lock-offbutton (3).
Note: The lock-offbuttonis located on top of the
handle. The lock resets each time the switch
trigger is released.
LOCK-ON FEATURE
See Figure 4.
Your hedge trimmer is also equippedwithaLOCK-
ON feature, which is convenientwhen continuous
trimmingfor extended periods of time is required.
6
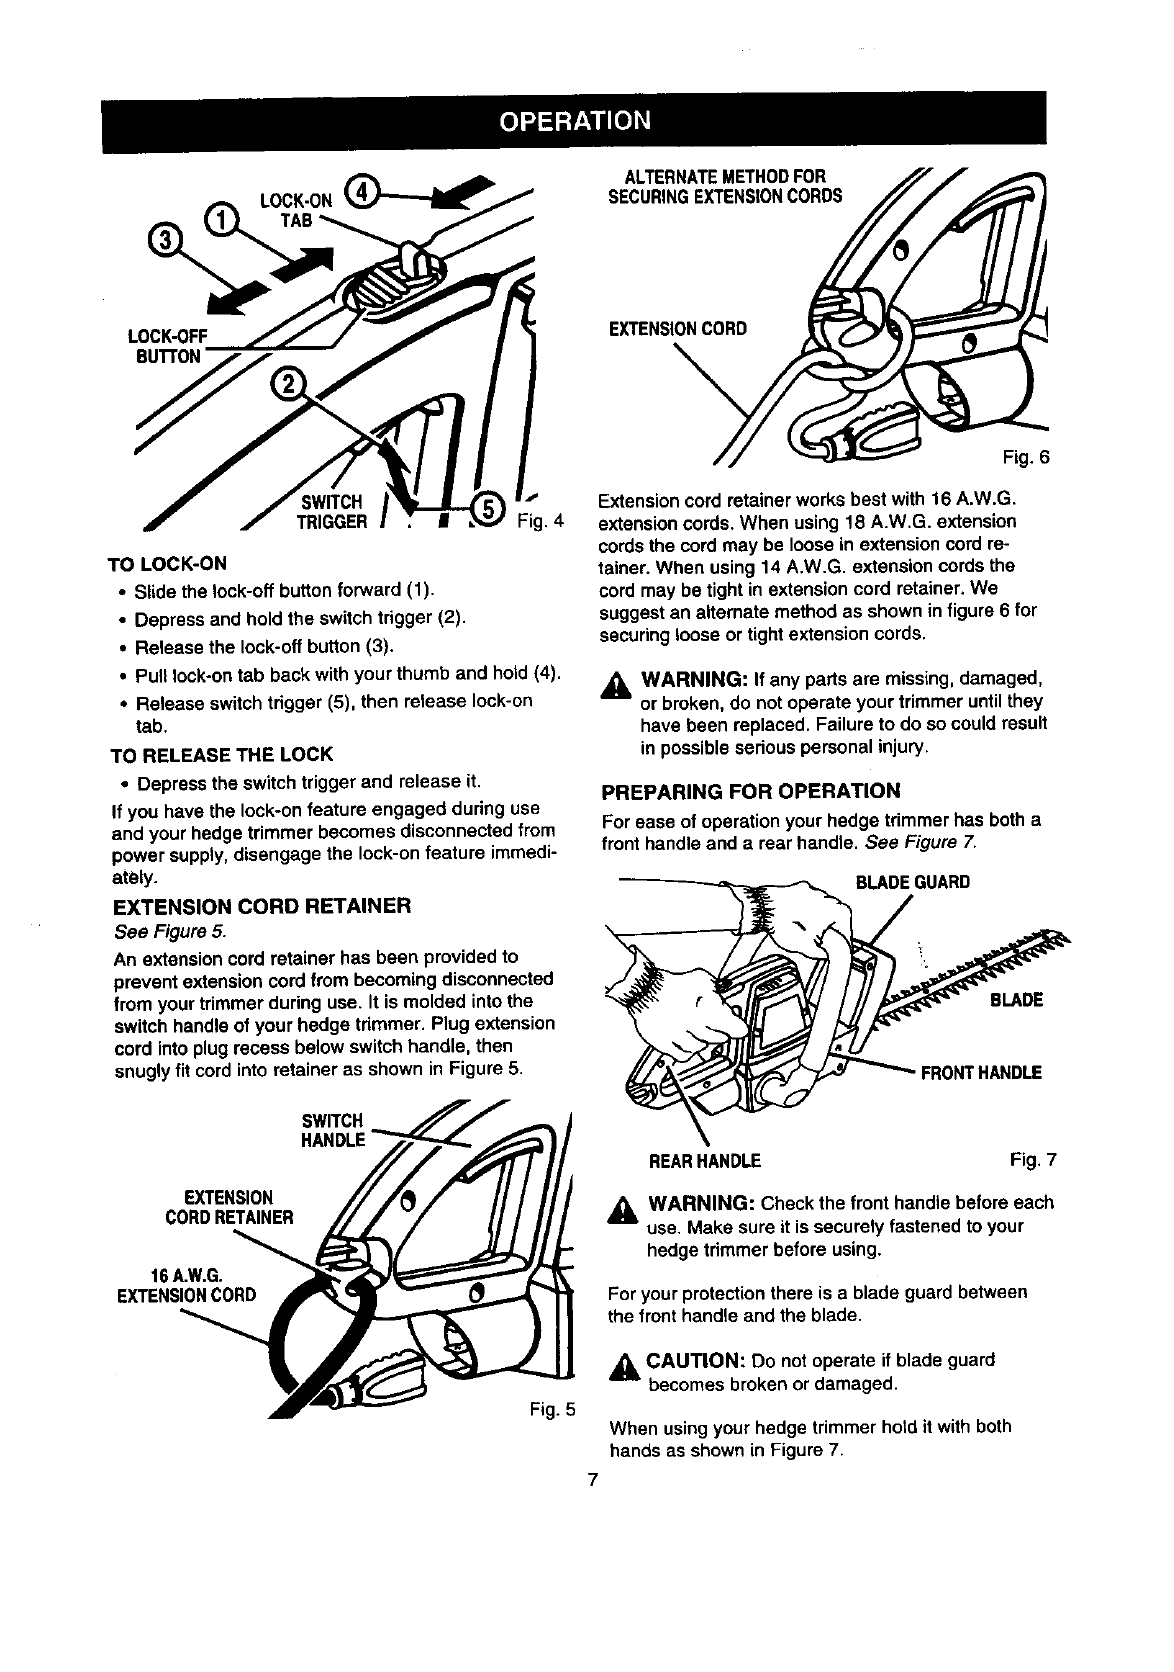
LOCK-ON
TAB
ALTERNATEMETHODFOR
SECURINGEXTENSIONCORDS
LOCK_FF
BU'l'rON EXTENSIONCORD
\
IGGER Fig. 4
TO LOCK-ON
• Slide the lock-off button forward (1).
•Depress and holdthe switchtrigger (2).
•Release the lock-offbutton (3).
•Pull lock-on tab back withyour thumb and hold (4).
• Release switch tdgger (5), then release lock-on
tab.
TO RELEASE THE LOCK
•Depress the switchtrigger and release it.
If you have the lock-onfeature engaged during use
and your hedge trimmer becomes disconnectedfrom
power supply,disengage the lock-on feature immedi-
ately.
EXTENSION CORD RETAINER
See Figure5.
An extensioncord retainer has been providedto
prevent extensioncord frombecoming disconnected
from your trimmerduring use. It is molded into the
switch handleof your hedge tdmmer. Plug extension
cord into plug recess below switchhandle, then
snuglyfit cord into retaineras shown in Figure 5.
SWITCH
EXTENSION
CORDRETAINER
16A.W.G.
EXTENSIONCORD
Fig. 5
Fig. 6
Extension cord retainerworks best with 16 A.W.G.
extension cords.When using 18 A.W.G. extension
cords the cord may be lOOsein extensioncord re-
tainer. When using 14 A.W.G. extensioncords the
cord may be tight in extensioncord retainer.We
suggestan alternate method as shown in figure 6for
securingloose or tight extensioncords.
,_ WARNING: If any parts are missing, damaged,
or broken, do notoperate your trimmeruntilthey
have been replaced. Failure to do so couldresult
in possiblesedous personal injury.
PREPARING FOR OPERATION
For ease of operationyour hedge trimmer has both a
front handleand arear handle. See Figure 7.
BLADE GUARD
BLADE
FRONTHANDLE
REARHANDLE Fig. 7
_1, WARNING: Check the front handlebefore each
use. Make sure it is securely fastenedto your
hedge trimmer before using.
For your protection there is a blade guard between
the front handle and the blade,
_CAUTION: Do notoperate if blade guard
becomes broken or damaged.
When using your hedge trimmer hold it with both
hands as shown in Figure 7.
7
,_ CAUTION: Do not use blade guard as a
gripping surface.
_k WARNING: Stay alert and watch what you are
doing. Do notoperate trimmer whenfatigued.
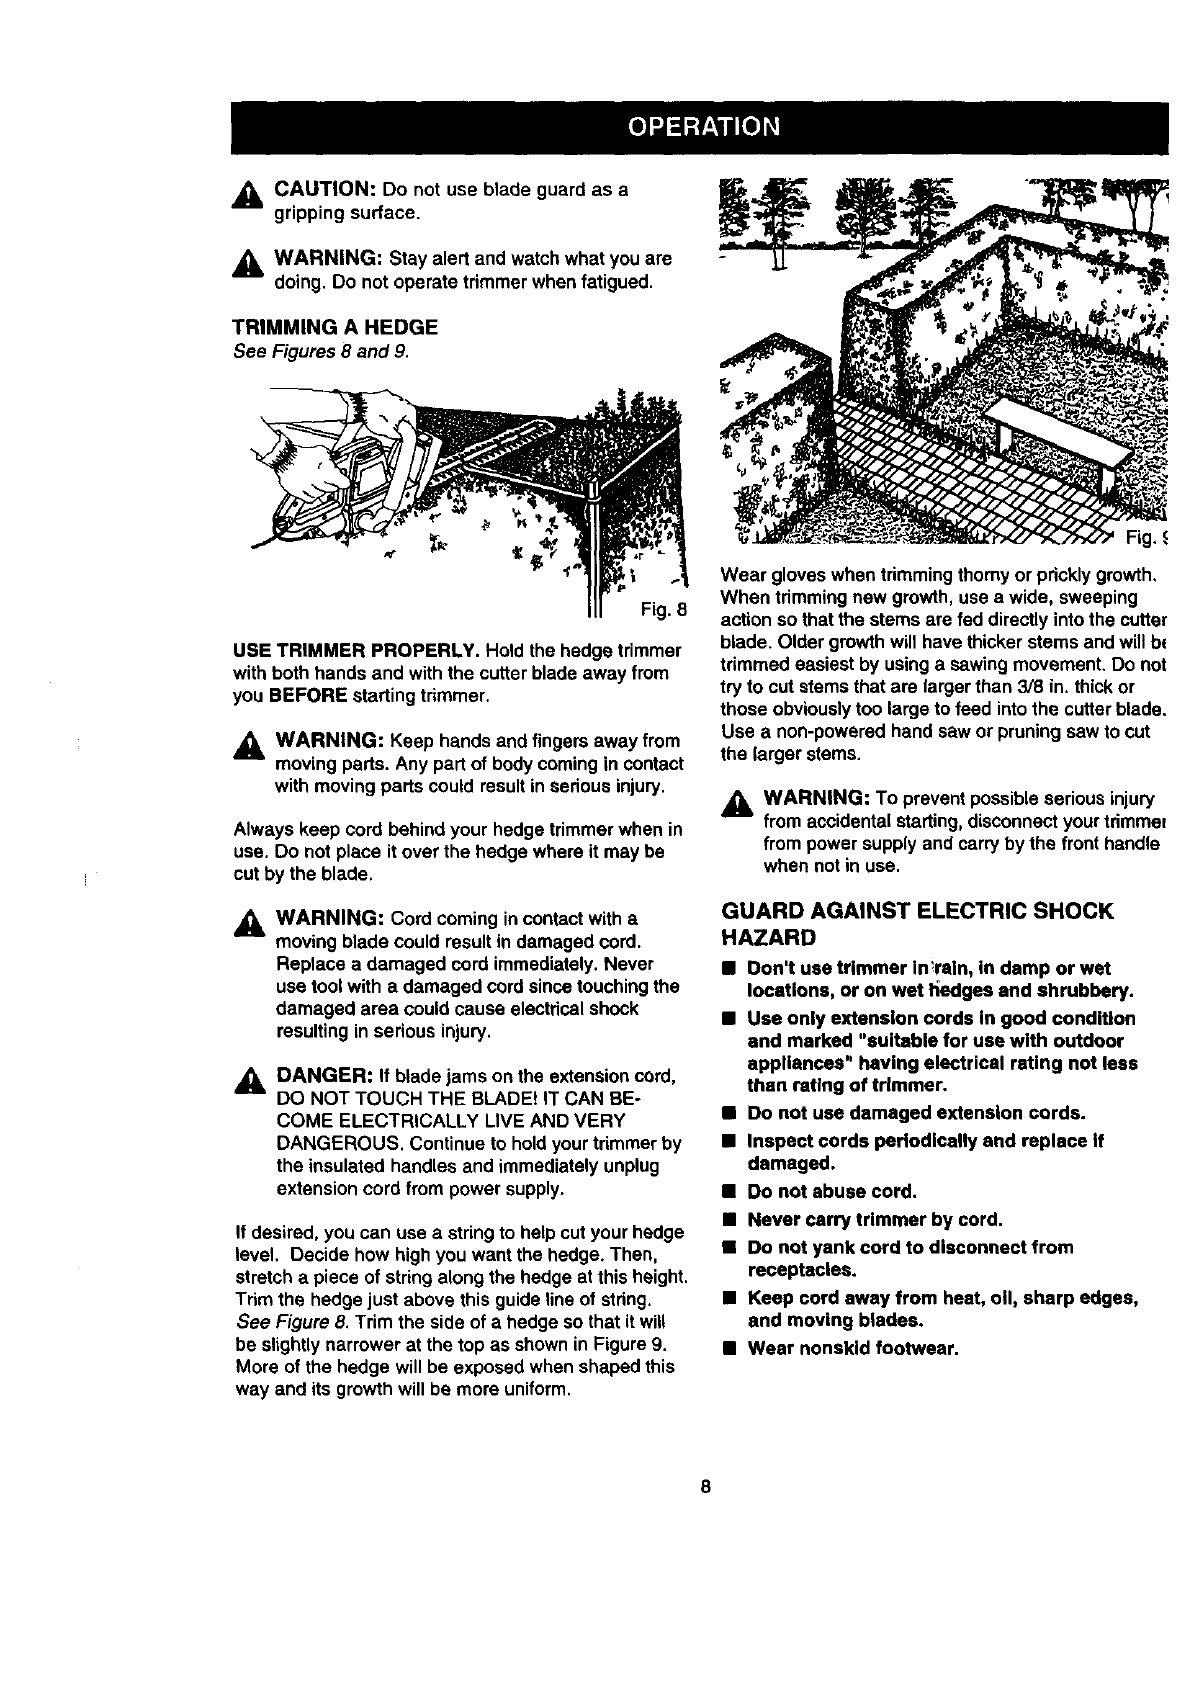
TRIMMING A HEDGE
See Figures 8 and 9.
Fig. 8
USE TRIMMER PROPERLY. Holdthe hedge trimmer
with both hands and withthe cutter blade away from
you BEFORE startingtrimmer.
_k WARNING: Keep hands and fingersaway from
moving parts. Any part of bodycomingin contact
with movingparts could resultin sedous injury.
Always keep cord behind your hedge trimmerwhen in
use. Do not place it over the hedge where it may be
cut by the blade.
_1, WARNING: Cord coming incontactwitha
moving blade could result in damaged cord.
Replace a damaged cord immediately. Never
use tool with a damaged cord sincetouchingthe
damaged area could cause electricelshock
resultinginserious injury.
_. DANGER: If blade jams on the extensioncord,
DO NOT TOUCH THE BLADE! IT CAN BE-
COME ELECTRICALLY LIVE AND VERY
DANGEROUS. Continue to holdyour trimmerby
the insulated handles and immediatelyunplug
extensioncord from power supply.
If desired, you can use a string to help cut your hedge
level. Decide how high you want the hedge. Then,
stretch a piece of string along the hedge at this height.
Trim the hedge just above this guide line of string.
See Figure 8. Trim the side of a hedge so that it will
be slightly narrower at the top as shown in Figure 9.
More of the hedge will be exposed when shaped this
way and its growth will be more uniform.
Wear gloves when trimmingthornyor pricklygrowth,
When trimmingnew growth,use a wide, sweeping
action so that the stems are fed directlyinto the cutter
blade. Older growthwill have thickerstems and willb(
trimmed easiest by usinga sawingmovement. Do not
try to cut stemsthat are largerthan 3/8 in. thickor
those obviouslytoo large to feed intothe cutterblade.
Use anon-poweredhand sawor pruning sawto cut
the larger stems.
_1, WARNING: To prevent possibleseriousinjury
from accidentalstarting, disconnectyourtrimme(
from power supplyand carryby the front handle
when notin use.
GUARD AGAINST ELECTRIC SHOCK
HAZARD
•Don't use trimmer In'rain, In damp or wet
locations, or on wet I_edgesand shrubbery.
•Use only extension cords in good condition
and marked "suitable for use with outdoor
appliances" having electrical rating not less
than rating of trimmer.
•Do not use damaged extension cords.
•Inspect cords periodically and replace If
damaged.
•Do not abuse cord.
•Never carry trimmer by cord.
•Do not yank cord to disconnect from
receptacles.
•Keep cord away from heat, o11,sharp edges,
and moving blades.
•Wear nonskid footwear.
8

_i, WARNING: When servicinguse only identical
Craftsman replacementparts. Use of any other
parts may create ahazard or cause product
damage.
SHARPENING THE CUTTER BLADE
See Figure 10.
•Allowyour hedge trimmer to come to a stopwith
the cutterblade and guard positionedas shown in
Figure 10. This will allow clearance for the file
between cutterteeth and guard teeth.
BLADE LUBRICATION
See Figure 11.
Disconnect hedge trimmer from power supply.
For easier operationand longer blade life, lubricate
the hedge trimmer blade before and after each use.
Before lubricating,be sure the switch is in the OFF
positionand the tool is disconnectedfromthe power
supply.Apply lightmachine Oilalong the edge of the
topstrap as shown in Figure 11.
Your trimmer should be stopped, disconnected,and
oiledoccasionallyduringuse,
CUTLERBLADE GUARD OILCAN
TOP BLADE
STRAP
Fig. 10
•Disconnect Hedge Trimmer from power supply.
•Clamp the blade assembly in a vise and file the
exposed cutting sudace of each blade tooth with
an 8 inch smooth round file, 1/4 in. or 7/32 in,
diameter. Be sure to retain the original angle of
tooth when filing.
•Remove the hedge trimmer from the vise, restart it,
and stop it so that the unsharpened edges of the
blade teeth are exposed.
•Disconnect the tool and repeat the sharpening
procedure as described above,
LUBRICATION
All of the bearingsin thistool are lubricatedwitha
sufficientamount of highgrade lubricantfor the life of
the unit undernormaloperatingconditions.Therefore,
no further lubricationis required.
Fig. 11
GENERAL
Avoidusingsolvents when cleaning plasticparts.
Most plasticsare susceptibleto damage from various
types of commercialsolvents and m_y be damaged
by their use. Use clean clothsto remove dirt,carbon
dust, etc.
_WARNING: Do not at any time let brake fluids,
gasoline, petroleum-based products, penetrating
oils, etc. come in contact with plastic parts. They
contain chemicals that can damage, weaken, or
destroy plastic.
Only the parts shown on partslist, page 13, are
intendedto be repaired or replacedby the customer.
All other parts representan importantpart of the
double insulationsystem and shouldbe serviced only
by a qualifiedSears servicetechnician.
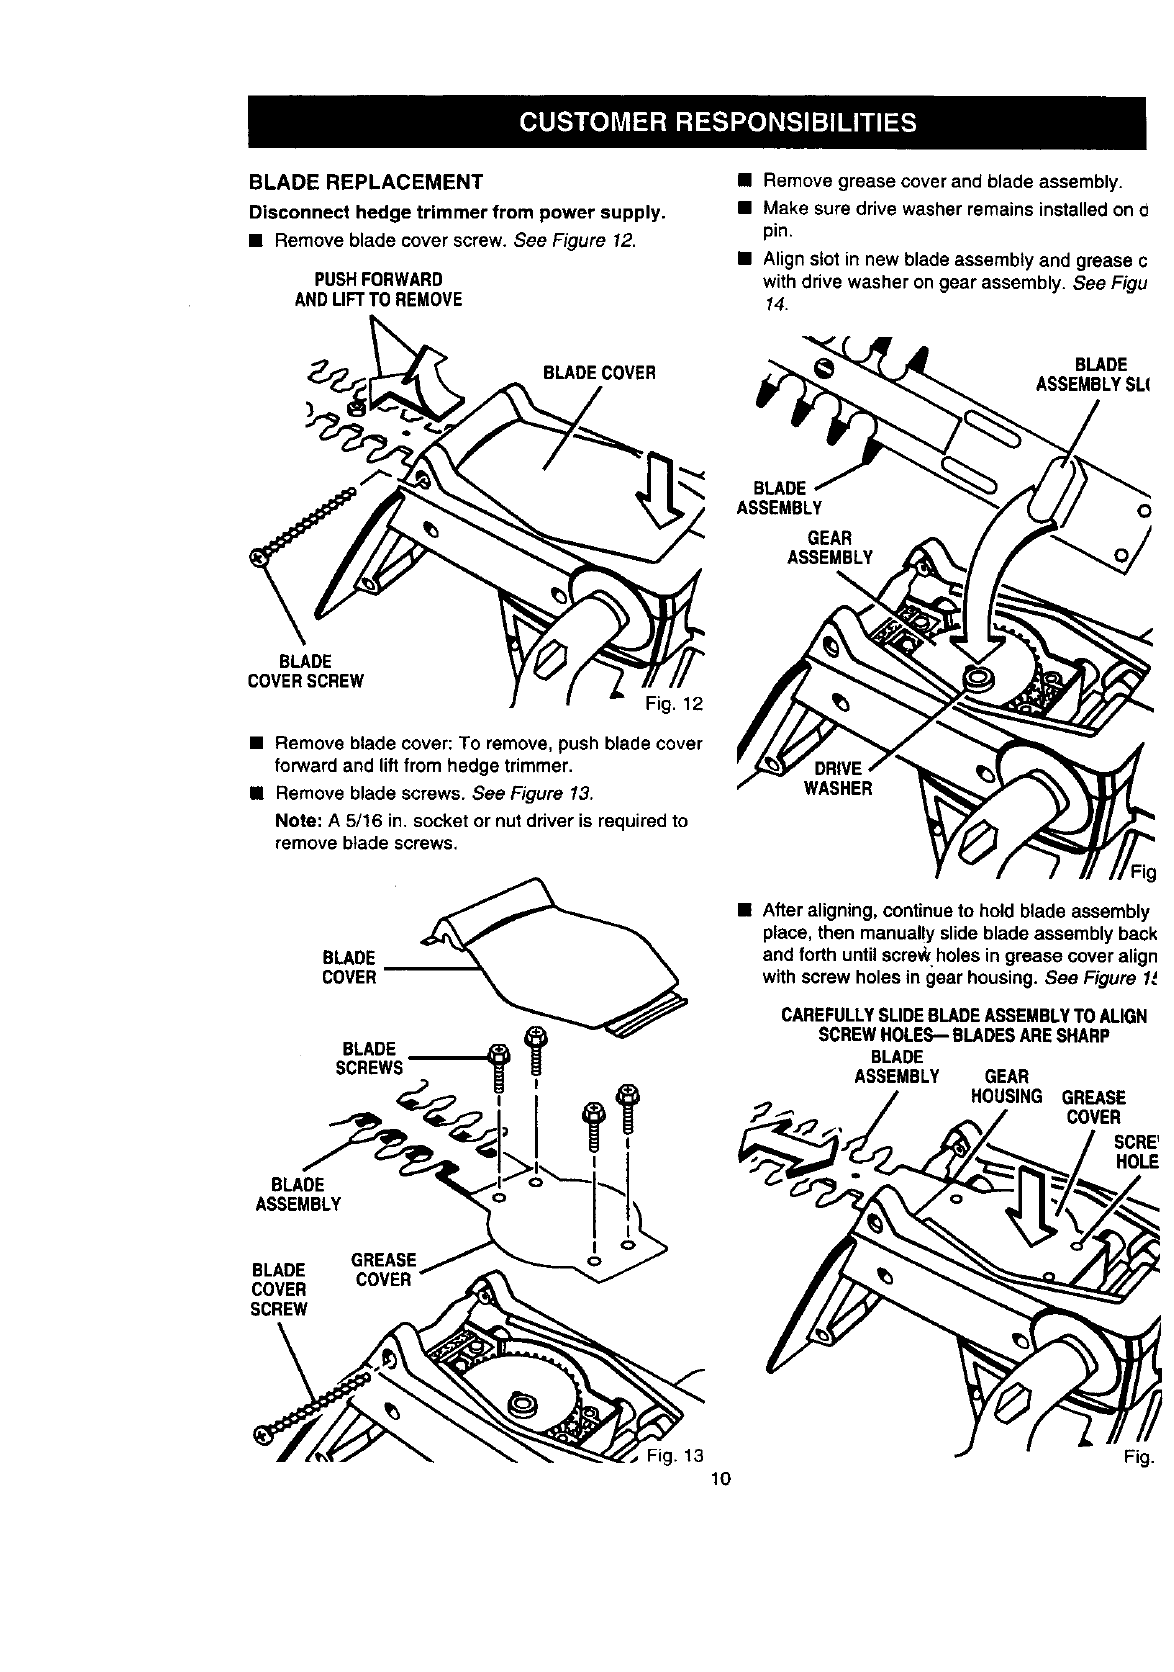
BLADE REPLACEMENT
Disconnect hedge trimmer from power supply.
•Remove blade cover screw. See Figure 12,
PUSHFORWARD
ANDLIFTTO REMOVE
•Remove grease cover and blade assembly.
• Make sure drive washer remains installed on d
pin.
• Align slot in new blade assembly and grease c
with drive washer on gear assembly. See Figu
14.
BLADECOVER
BLADE
COVERSCREW
Fig. 12
• Remove blade cover: To remove, push blade cover
forward and lift from hedge trimmer.
• Remove blade screws. See Figure 13.
Note: A 5/16 in. socket or nut driver is required to
remove blade screws.
BLADE
ASSEMBLYSt.(
BLADE
ASSEMBLY O
GEAR
ASSEMBLY
WASHER
BLADE
COVER
BLADE ?
SCREWS
BLADE
ASSEMBLY
BLADE
COVER
SCREW
O
•Afteraligning, continueto hold blade assembly
place, then manually slide blade assembly back
and forth until screw holes in grease cover align
with screw holes in gear housing. See Figure 1A.
CAREFULLYSLIDEBLADEASSEMBLYTOALIGN
SCREWHOLES--BLADESARESHARP
BLADE
ASSEMBLY GEAR
HOUSING GREASE
COVER
SCRE'
HOLE
Fig. 13 Fig.
10

BLADE REPLACEMENT (Continued)
WARNING: Blades are sharp. When manually
slidingblade assembly, do not place your hand
or fingersbetween blades or in any position
where they couldget pinchedor cut,
•Replace blade screws. Tighten screws securely.
• Replace blade cover screw. See Figure 16.
Note: Do net tighten untilblade cover has been
replaced.
BLADECOVER
REARTAB
BLADE
BLADE
SCREWS
Fig. 16
•Replace blade cover. Place rear tab insidehous-
ing, align front tabs with slotsin housing,then slide
blade cover back intoits correct position.Sea
Figure 17.
FRONTTABS
BLADECOVER
SUDEBLADECOVER
BACKINTOPosmoN
•Tighten blade coverscrew securely.
Fig. 17
_1= WARNING: Make sure blade coveris replaced
before connectingyour hedge trimmerto power
supply. Failureto do so will expose internalparts
whichcould cause an accident or electrical
shock resuttinginseriousinjury,
Note: If binding occursafter replacingblade
assembly, repeat the stepsabove for reassembly.
11
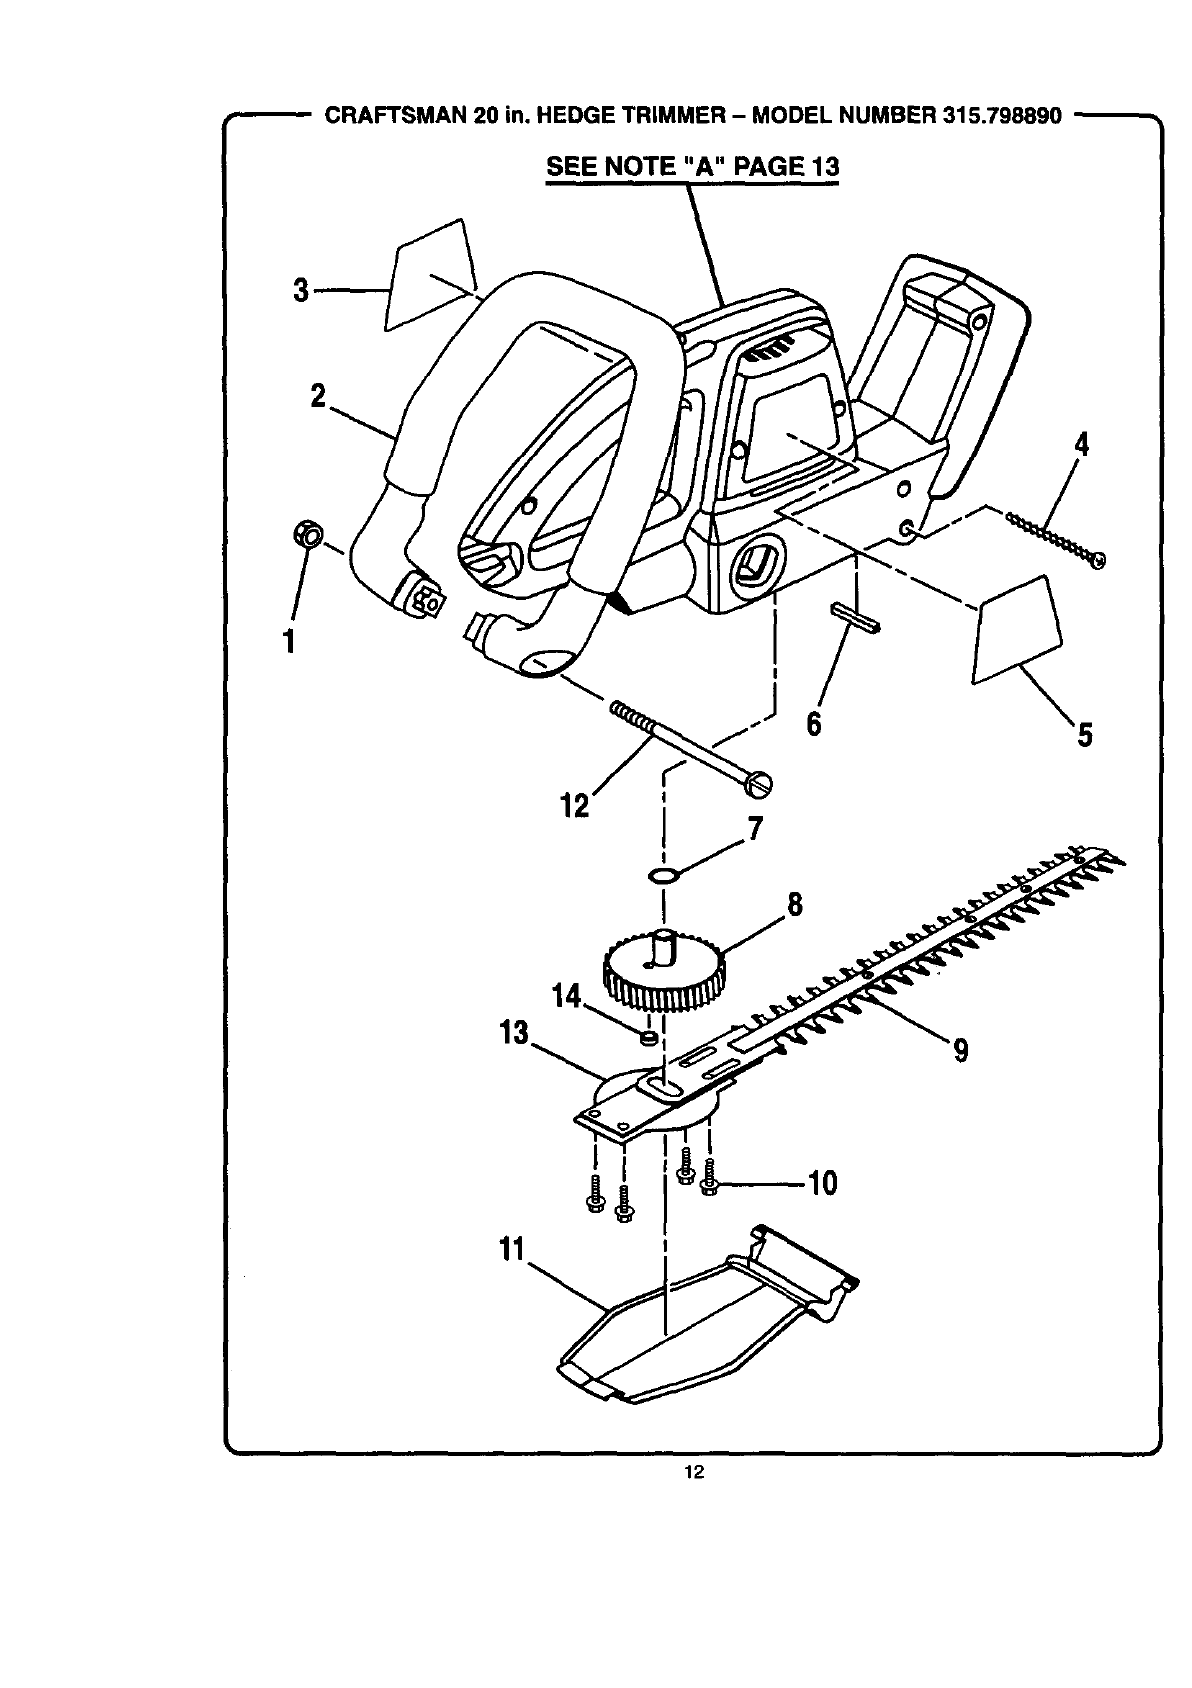
CRAFTSMAN 20 in. HEDGE TRIMMER - MODEL NUMBER 315.798890
SEE NOTE "A" PAGE 13
2
4
13 14
9
I I 10
11 i
12
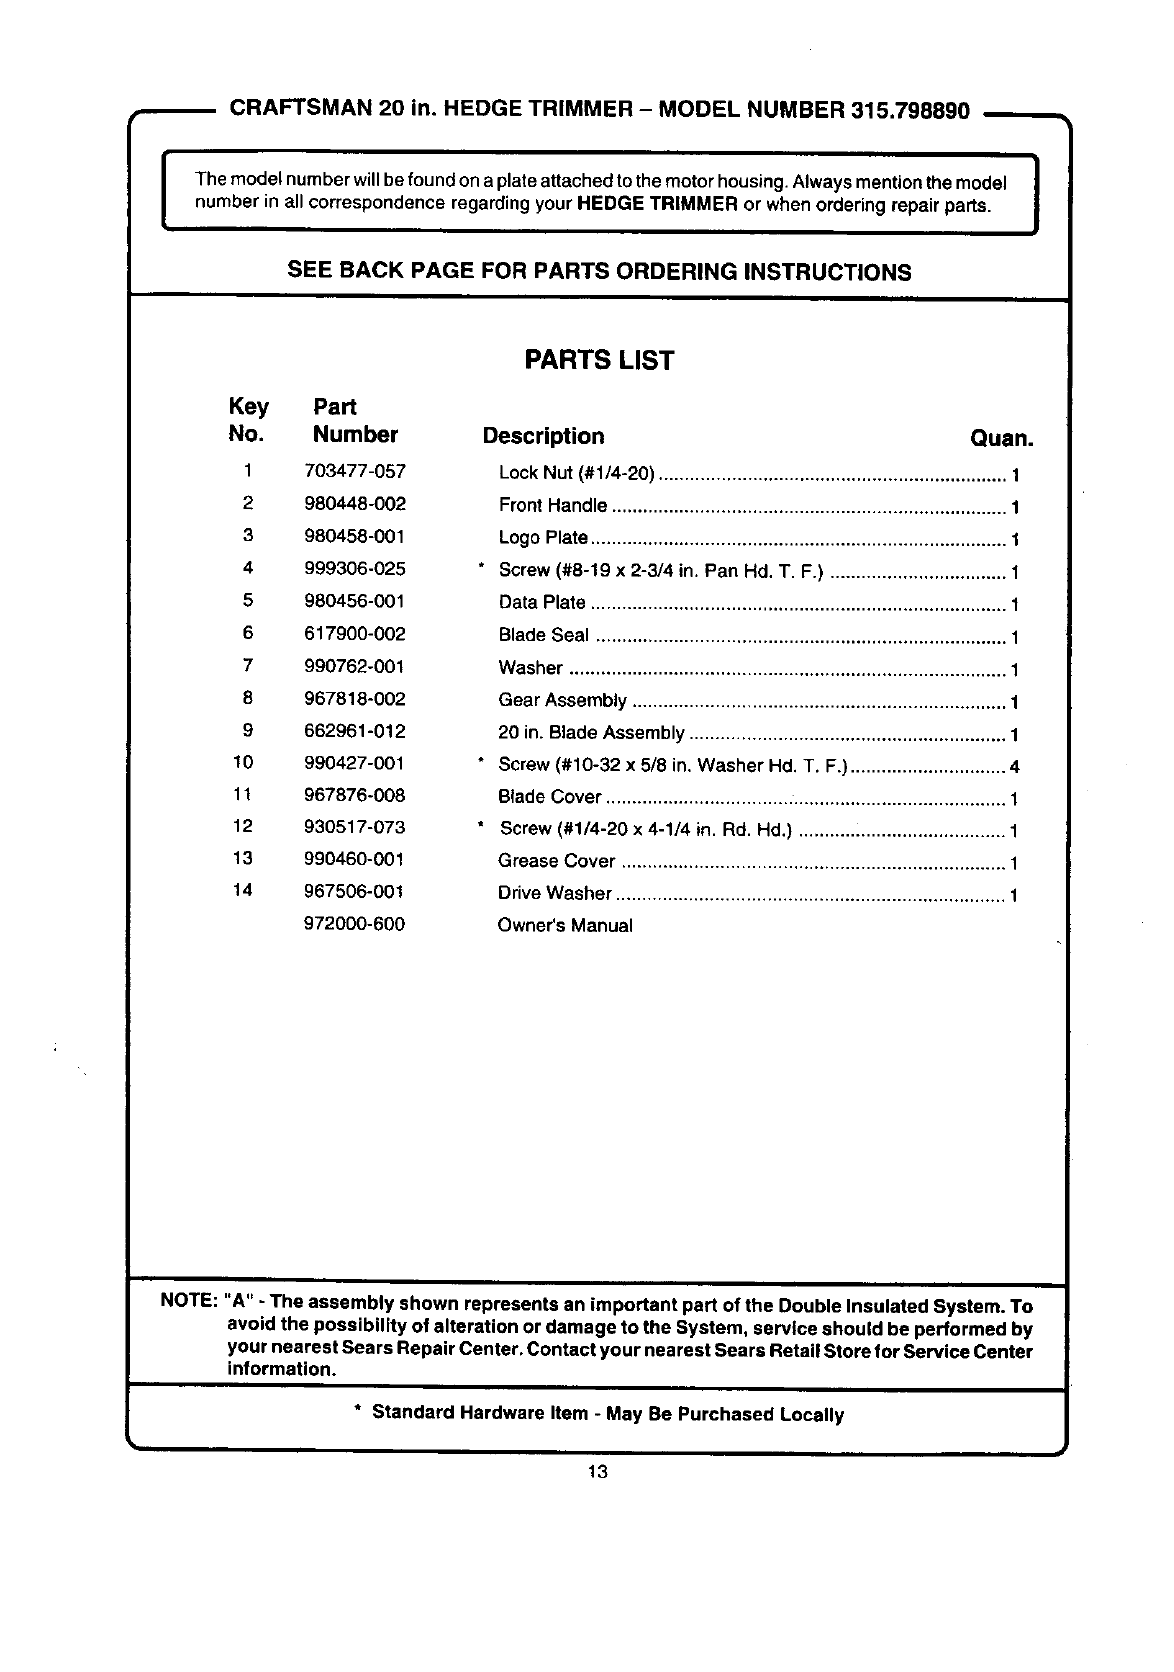
CRAFTSMAN 20 in. HEDGE TRIMMER - MODEL NUMBER 315.798890
IThe model number will be found on a plate attached to the motor housing. Always mention the model |
I
number in all correspondence regarding your HEDGE TRIMMER or when ordering repair parts. I
SEE BACK PAGE FOR PARTS ORDERING INSTRUCTIONS
Key Pa_
No. Number
1 703477-057
2 980448-002
3 980458-001
4 999306-025
5 980456-001
6 617900-002
7 990762-001
8 967818-002
9 662961-012
10 990427-001
11 967876-008
12 930517-073
13 990460-001
14 967506-001
972000-600
PARTS LIST
Description Quan.
Lock Nut (#1/4-20) ................................................................... 1
Front Handle ............................................................................ 1
Logo Plate ................................................................................ 1
* Screw (#8-19 x 2-3/4 in. Pan Hd, T, F.) .................................. 1
Data Plate ................................................................................ 1
Blade Seal ............................................................................... 1
Washer .................................................................................... 1
Gear Assembly ........................................................................ 1
20 in. Blade Assembly ............................................................. 1
• Screw (#10-32 x 5/8 in. Washer Hd. T. F.) .............................. 4
Blade Cover ............................................................................. 1
Screw (#1/4-20 x 4-1/4 in. Rd. Hd.) ........................................ 1
Grease Cover .......................................................................... 1
Drive Washer ........................................................................... 1
Owner's Manual
NOTE: "A" - The assembly shown represents an important part of the Double Insulated System. To
avoid the possibility of alteration or damage to the System, service should be performed by
your nearest Sears Repair Center. Contact your nearest Sears Retail Store for Service Center
information.
*Standard Hardware Item -May Be Purchased Locally
13

For in-home major brand repair service:
Call 24 hours a day, 7 days a week
1-800-4-MY-HOME s. (1-800-469-4663)
Para pedir servicio de reparacibn a domicilio - 1-800-676-5811
In Canada for all your service and parts needs call - 1-800-665-4455
Au Canada pour tout le service ou les pi_ces
For the repair or replacement parts you need:
Call 6 am - 11 pm CST, 7 days a week
PartsDirects.
1-800-366-PART (1-800-366-7278)
Para ordenar piezas con entrega a domicilio - 1-800-659-7084
For the location of a Sears Parts and Repair Center in your area:
Call 24 hours a day, 7 days a week
1-800-488-1222
For information on purchasing a Sears Maintenance Agreement
or to inquire about an existing Agreement:
Call 9 am - 5 pm, Monday -Saturday
1-800-827-6655
The Service Side of Sears
