Craftsman 40V Brushless Snow Thrower Owners Manual
2015-03-28
: Craftsman Craftsman-40V-Brushless-Snow-Thrower-Owners-Manual-661562 craftsman-40v-brushless-snow-thrower-owners-manual-661562 craftsman pdf
Open the PDF directly: View PDF ![]() .
.
Page Count: 36
1-888-266-7096
1-888-266-7096
www.craftsman.com
www.craftsman.com
Model No.
138.88784
Número de modelo
138.88784
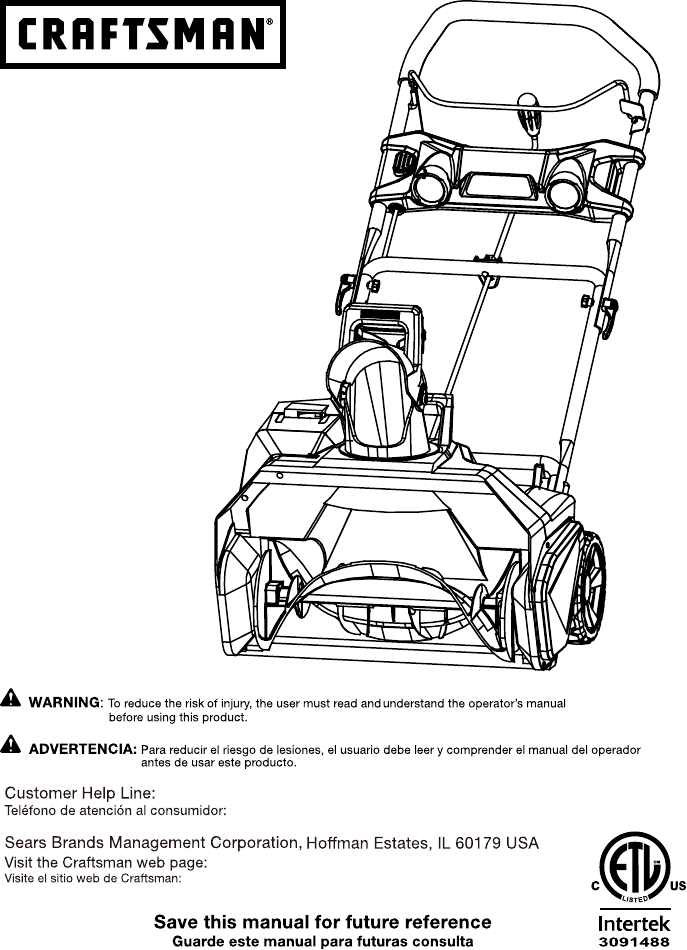
OPERATOR'S MANUAL
MANUEL DEL OPERADOR
20 in. 40 VOLT
SNOW THROWER
508 mm (20 pulg.) 40 V
MÁQUINA QUITANIEVE

TABLE OF CONTENTS / ÍNDICE DE CONTENIDO
INTRODUCTION / INTRODUCCIÓN
ENGLISH ESPAÑOL
■ Warranty.................................................................. 2
■ Introduction..............................................................2
■ Important Safety Instructions................................3-5
■ Symbols................................................................6-7
■ Specications..........................................................7
■ Assembly.................................................................8
■ Operation...........................................................9-10
■ Maintenance.....................................................11-12
■ Troubleshooting.....................................................13
■ Illustrated parts list...........................................14-17
■ Illustrations...........................................................i-vi
■ Garantía............................Sección de Inglés pág. 2
■ Introducción......................Sección de Inglés pág. 2
■ Instrucciones de seguridad importantes...............3-6
■ Símbolos............................................................. 7-8
■ Especicaciones.....................................................8
■ Armado....................................................................9
■ Funcionamiento...............................................10-11
■ Mantenimiento.................................................12-13
■ Corrección de problemas......................................14
■ Figura numeras (ilustraciones).............................i-vi
CRAFTSMAN LIMITED WARRANTY
FOR FOUR YEARS from the date of sale, this power tool is warranted against defects in material or workmanship.
FOR TWO YEARS from the sale date, a supplied battery pack or charger is warranted against material or
workmanship defects.
WITH PROOF OF SALE, a defective product will be replaced free of charge.
For warranty coverage details to obtain free replacement, visit the web page: www.craftsman.com/warranty
This warranty does not cover blades, which are expendable parts that can wear out from normal use within the
warranty period.
This warranty is void if this product is ever used while providing commercial services or if rented to another person.
This warranty gives you specic legal rights, and you may also have other rights which vary from state to state.
Sears Brands Management Corporation, Hoffman Estates, IL 60179
GARANTÍA DE CRAFTSMAN
DURANTE CUATRO AÑOS a partir de la fecha de adquisición, esta herramienta eléctrica cuenta con garantía frente
a defectos de material o mano de obra. Durante dos años y a partir de la fecha de compra, el conjunto de la batería
o el cargador que se proporciona está garantizado ante los defectos materiales o de fábrica.
Adjuntando la prueba de compra, se reemplazará gratuitamente el producto defectuoso.
Para detalles sobre la cobertura de la garantía para el reemplazo gratuito, visite la página web: www.craftsman.com/
warranty
Esta garantía no cubre las hojas, que son piezas consumibles que pueden desgastarse con el uso normal durante el
período de garantía.
Esta garantía se anula si se utiliza este producto durante la prestación de servicios comerciales o si se alquila a otra
persona.
Esta garantía le otorga derechos legales especícos y también puede tener otros derechos que varían de estado a
estado.
Sears Brands Management Corporation, Hoffman Estates, IL 60179
This tool has many features for making its use more pleasant and enjoyable. Safety, performance, and
dependability have been given top priority in the design of this product making it easy to maintain and operate.
Esta herramienta ofrece numerosas características para hacer más agradable y placentero su uso. En el
diseño de este producto se ha conferido prioridad a la seguridad, el desempeño y la abilidad, por lo cual se
facilita su manejo y mantenimiento.
2 — English
* * *
* * *

IMPORTANT SAFETY INSTRUCTIONS
READ AND UNDERSTAND ALL
INSTRUCTIONS. Failure to follow all
instructions listed below and on the machine
may result in electric shock, re, and/or serious
personal injury.
WARNING!
FOLLOW THESE RULES WHILE
OPERATING THE SNOW THROWER
• Walk. Do not run.
• Verify that the snow thrower is not in contact
with anything before turning it on.
• Stay away from the discharge opening at all
times. Keep face, hands, and feet away from
concealed, moving, or rotating parts.
• Be attentive when using the snow thrower,
and stay alert for holes in the terrain and
other hidden hazards or trafc.
• Do not use the snow thrower on a gravel or
crushed rock surface. Use extreme caution
when crossing gravel/crushed rock drives,
walks, or roads.
• Move up and down slopes when clearing
snow. Do not go across a slope. Use caution
when changing direction. Do not use this
snow thrower to clear snow from steep
slopes.
• Do not attempt to use the snow thrower on
a roof or on any steeply inclined slippery
surface.
• Do not operate the snow thrower if the
guards, plates, and other safety protective
devices are not in place.
• Do not operate the snow thrower near glass
enclosures, automobiles, trucks, window
wells, drop-offs, etc. without properly
adjusting the angle of the snow discharge.
Keep children and pets away from the work
area.
• Do not force or overload the snow thrower.
The snow thrower will perform better and
safer when it is used at the rate that it was
designed to work at.
• Do not operate the snow thrower at high
speeds on slippery surfaces. Look behind,
and exercise caution when backing up.
• Do not direct the discharge toward people,
and do not allow anyone to move in front of
the snow thrower while it is in use.
• Wear safety glasses or goggles that meet
ANSI Z87.1 standards, and wear ear/hearing
protection when using this snow thrower.
• Use the snow thrower in daylight or in good
articial light.
• Avoid accidental start-ups. Remain in the
starting position when turning the snow
thrower on. The operator and the snow
thrower must be in a stable position during
start-up.
• Use the proper tool. Only use this snow
thrower for the purpose that it was designed
for.
• Do not overreach. Always keep proper
footing and balance.
• Hold the snow thrower with both hands while
it is in use. Keep a rm grip on the handles
or the grips.
• Keep hands, face, and feet away from all
moving parts. Do not touch or try to stop the
impeller while it is rotating.
• If the impeller does not rotate freely due to
frozen ice, thaw the snow thrower thoroughly
before attempting to use it.
• Keep the impeller clear of debris.
• Do not attempt to clear the impeller while
the motor is running. Turn the motor off and
remove the battery.
• Keep clothing and body parts away from the
impeller.
• Do not operate the motor at a faster speed
than necessary. Do not run the motor at high
speed while not clearing snow.
• Stop the motor when snow clearing is
delayed or when moving from one location to
another.
• Remove the battery when it is being
transported and when it is not in use.
• After striking a foreign object, turn the snow
thrower off and remove the battery, and then
inspect it for damage. Repair any damage
before restarting and using the snow thrower.
• If the snow thrower starts to vibrate
abnormally, stop the snow thrower
immediately and attempt to determine the
cause. Vibration is generally an indication of
danger.
• Stop the motor and remove the battery
whenever the operator is not in the operating
position, before unclogging the impeller, and
before making any repairs, adjustments, or
inspections.
3 — English

• Do not discharge snow onto public roads or
near moving trafc.
• Allow the snow thrower to run for a few
minutes after clearing snow in order to
prevent moving parts from freezing.
• Use only the manufacturer's original
replacement parts and accessories for this
snow thrower. The use of unauthorized parts
or accessories could lead to serious injury to
the user or damage to the snow thrower, and
will void the warranty.
• Do not use the snow thrower in the hand held
position. Do not pick up the snow thrower
while it is running. The snow thrower is
designed to travel along the ground.
GENERAL SAFETY RULES
• Verify that the snow thrower is secure while
transporting.
• Store the snow thrower in a dry area, locked
up or high enough to prevent unauthorized
use or damage, and out of the reach of
children.
• Do not douse or squirt the unit with water or
any other liquid. Keep handles dry, clean,
and free of debris. Clean the snow thrower
after each use.
• If the labels on the snow thrower become
defaced or start to lift off, contact the toll-free
helpline, at 1-888-266-7096.
• Keep these instructions in a safe place for
future reference. Refer to them often, and
use them to instruct other users. Anyone
who uses this snow thrower must read these
instructions carefully.
• Maintain the snow thrower with care. Follow
the instructions for lubricating and changing
accessories.
BATTERY & CHARGER
BATTERY SAFETY RULES
• Battery tools do not have to be plugged into
an electrical outlet; therefore, they are always
in operating condition. Be aware of possible
hazards when not using your battery tool or
4 — English
when changing accessories. Following this
rule will reduce the risk of electric shock, re,
or serious personal injury.
• Do not place battery tools or their batteries
near re or heat. This will reduce the risk of
explosion and possibly injury.
• Do not crush, drop or damage battery pack.
Do not use a battery pack or charger that
has been dropped or received a sharp blow.
A damaged battery is subject to explosion.
Properly dispose of a dropped or damaged
battery immediately.
• Batteries can explode in the presence of a
source of ignition, such as a pilot light. To
reduce the risk of serious personal injury,
never use any cordless product in the
presence of open ame. An exploded battery
can propel debris and chemicals. If exposed,
ush with water immediately.
• Do not charge battery tool in a damp or wet
location. Following this rule will reduce the
risk of electric shock.
• For best results, your battery tool should be
charged in a location where the temperature
is more than 45°F but less than 104°F. To
reduce the risk of serious personal injury, do
not store outside or in vehicles.
• Under extreme usage or temperature
conditions, battery leakage may occur. If
liquid comes in contact with your skin, wash
immediately with soap and water. If liquid
gets into your eyes, ush them with clean
water for at least 10 minutes, then seek
immediate medical attention. Following this
rule will reduce the risk of serious personal
injury.
• When battery pack is not in use, keep it away
from other metal objects like: paper clips,
coins, nails, screws, or other small metal
objects that can make a connection from
one terminal to another. Shorting the battery
terminals together may cause sparks, burns,
or a re.
• Always remove battery pack from your tool
when you are assembling parts, making
adjustments, cleaning, or when not in
use. Removing battery pack will prevent
accidental starting that could cause serious
personal injury.
IMPORTANT SAFETY INSTRUCTIONS
Use only Craftsman replacement batteries;
other batteries may cause injury or damage to
the unit.
CAUTION!
5 — English
IMPORTANT SAFETY INSTRUCTIONS
• Always remove battery pack before storing
the device. When battery becomes fully
charged, unplug the charger from the power
supply and remove the battery pack from the
charger.
• Always wear eye protection with side shields
marked to comply with ANSI Z87.1. Failure
to do so could result in objects being thrown
into your eyes and other possible serious
injuries.
• Keep battery pack dry, clean, and free from
oil and grease. Always use a clean cloth
when cleaning. Never use brake uids,
gasoline, petroleum-based products, or any
solvents to clean battery pack.
PROPER CARE FOR BATTERY
Off-season storage
To obtain the longest possible battery life, we
suggest the following:
• Remove the battery pack from the charger
once it is fully charged and ready for use.
For battery pack storage longer than 30
days:
• Store the battery pack where the temperature
is below 80°F and away from moisture.
• Store battery packs in a 30%-50% charged
condition.
• Every six months of storage, charge the pack
as normal.
CHARGER SAFETY RULES
• DO NOT ABUSE THE CHARGE CORD.
Never carry the charger by the cord.
• Do not use a damaged charger. Replace the
charger cords or the charger immediately.
• Keep the charger away from water, heat
sources (radiators, heaters, stoves, etc.),
ames, and chemicals.
• Make sure the battery pack is secured in the
charger before beginning operation.
• The battery pack will become slightly warm
to the touch while charging. This is normal
and does not indicate a problem.
• Do not place the charger and battery pack
in an area of extreme heat or cold. They will
work best at normal room temperature.
• When batteries become fully charged,
unplug the charger from the power supply
and remove the battery pack.
When transporting or servicing unit, always
remove the battery.
WARNING!
Some dust created by power sanding,
sawing, grinding, drilling, and other
construction activities contains chemicals
known to cause cancer, birth defects or
other reproductive harm. Some examples of
these chemicals are:
• lead from lead-based paints
• crystalline silica from bricks and cement
and other masonry products
• arsenic and chromium from chemically-
treated lumber
Your risk from these exposures varies,
depending on how often you do this type
of work. To reduce your exposure to these
chemicals: work in a well ventilated area,
and work with approved safety equipment,
such as dust masks that are specially
designed to lter out microscopic particles.
WARNING!
PROPOSITION 65

SYMBOL DESIGNATION/EXPLANATION
V Volts
A Amperes
Hz Hertz
W Watts
Hrs Hours
Precautions that involve your safety.
To reduce the risk of injury, user must read and understand user’s manual before
using this product.
Before beginning power tool operation, always wear safety goggles or safety
glasses with side shields.
Pay attention that bystanders are not injured through foreign objects thrown from
the snow thrower.
Stop the machine before leaving the machine.
Danger – Keep hands and feet away from spinning impeller. Spinning impeller
can cause severe injury.
Keep hands, feet away from the discharge area.
Keep bystanders a safe distance from the machine.
Stay away from moving parts, keep all guards and shields in place.
The charger is intended for indoor use only.
This product uses Lithium-ion (Li-ion) batteries. Local, state or federal laws may
prohibit disposal of batteries in ordinary trash. Consult your local waste authority
for information regarding available recycling and/or disposal options.
SYMBOLS
6 — English
Some of the following symbols may be used on this product. Please study them and learn
their meaning. Proper interpretation of these symbols will allow you to operate the product
better and safer.
STOP
STOP
SYMBOLS
PRODUCT SPECIFICATIONS
7 — English
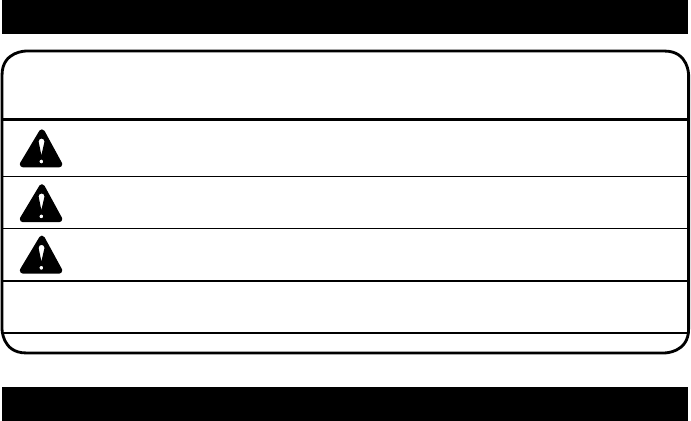
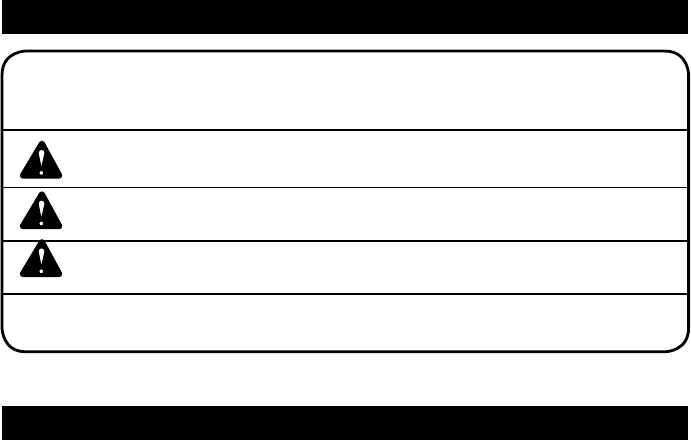
The following signal words and meanings are intended to explain the levels of risk associated with this
product.
SYMBOL SIGNAL MEANING
DANGER Indicates an imminently hazardous situation, which, if not
avoided, will result in death or serious injury.
WARNING Indicates a potentially hazardous situation, which, if not avoided,
could result in death or serious injury.
CAUTION Indicates a potentially hazardous situation, which, if not avoided,
may result in minor or moderate injury.
CAUTION (Without Safety Alert Symbol) Indicates a situation that may
result in property damage.
Battery .....................................................................................................................40V Lithium-ion
No-load speed ................................................................................................... 1800 r/min. (RPM)
Clearing width .........................................................................................................................20 in.
Clearing depth ................................................................................................................up to 10 in.
Discharge distance .........................................................................................................up to 20 ft.
Impeller size ............................................................................................................................16 in.
Wheel size .................................................................................................................................7 in.
Unit Weight (without batteries) ...............................................................................................33 lbs

ASSEMBLY
8 — English
UNPACKING
This product requires assembly.
■ Carefully remove the product and any
accessories from the box. Make sure that all
items listed in the packing list are included.
■ Inspect the product carefully to make sure no
breakage or damage occurred during shipping.
■ Do not discard the packing material until
you have carefully inspected and satisfactorily
operated the product.
■ If any parts are damaged or missing, please
call 1-888-266-7096 for assistance.
PACKING LIST
■ Snow Thrower
■ Middle Handle
■ Chute Deector
■ 40V Battery
■ 40V Charger
■ (2) Chute Control Rod Pieces
■ (2) Cam Locks
■ (2) Wing Nuts
■ (2) Bolts
■ (2) Handle Knobs
■ (1) Hitch Pin
■ Operator’s Manual
ASSEMBLING THE HANDLE
See Figure 2.
• Align the holes on the middle handle and the
lower handle. Insert the bolts, and use the
handle knobs to tighten them.
• Align the hole on the middle handle and
the upper handle. Insert the cam locks and
tighten them with the wing nuts provided.
ASSEMBLING THE DISCHARGE CHUTE
See Figure 3
Push the chute deector until the latching tabs
on both sides click into the restrict slots and
the position-joints on both sides click into the
keyed holes.
INSTALLING THE CHUTE CONTROL ROD
See Figure 4-8.
• Position the discharge chute so that it faces
forward.
NOTE: Align the arrow on the discharge chute
with the arrow on the housing.
• Align the holes on the directional chute arm
with the holes on the lower directional chute
arm. Insert the hitch pin. Insert the end of
the chute control rod through the keyed hole
in the bracket that is attached to the top of
the middle handle.
• Ensure that the handle of the chute control
rod points upward, and insert the rod into the
keyed hole in the back of the housing.
• Firmly push the rod into the keyed hole in the
back of the housing until it snaps into place.
• Move the handle on the chute control rod to
ensure that it moves in the same direction as
the chute.
If any parts are damaged or missing do
not operate this product until the parts are
replaced. Failure to heed this warning could
result in serious personal injury.
Do not attempt to modify this product or create
accessories not recommended for use with this
product. Any such alteration or modication
is misuse and could result in a hazardous
condition leading to possible serious personal
injury.
Do not insert battery pack until assembly
is complete. Failure to comply could result
in accidental starting and possible serious
personal injury.
To prevent accidental starting, do not make any
adjustments or installations with the battery
pack inserted.
WARNING!
WARNING!
WARNING!
WARNING!
Make sure that the chute deector locks
completely onto the discharge chute. An
opening between the discharge chute and the
chute deector may allow foreign objects to be
picked up by the snow thrower and thrown in
the direction of the operator causing serious
bodily injury.
WARNING!

OPERATION
9 — English
This product will accept Craftsman 40V lithium-
ion battery packs only.
For complete charging instructions, refer to the
Operator’s Manuals for your Craftsman battery
pack and charger models.
BATTERY PROTECTION FEATURES
Craftsman lithium-ion batteries are designed
with features that protect the lithium-ion cells
and maximize battery life.
If the tool stops during use, release the bail
switch to reset and resume operation. If the
tool still does not work, the battery needs to be
recharged.
TO INSTALL BATTERY PACK
See Figure 9.
• Open the battery compartment cover.
• Slide the battery down to lock it into position.
• Close the battery compartment cover.
TO REMOVE BATTERY PACK
See Figure 9.
• Release your grip on the ON/OFF switch bar
lever to stop the snow thrower.
• Press and hold the battery latch button at the
bottom of the battery pack.
• Remove battery pack from the snow thrower.
POWERING ON AND OFF
See Figure 10.
• To power on, rst press the safety switch
button.
• While pressing the safety switch button
with one hand, use your other hand to
simultaneouly pull the ON/OFF switch bar
lever toward you. Once the machine powers
on, release the safety switch button and
proceed with operation. The snow thrower
can only be started by pressing the safety
switch button rst, followed by squeezing the
ON/OFF switch bar lever; reverse sequence
will not start the machine.
• To power off, release your grip on the ON/
OFF switch bar lever.
UTILIZING THE LED LIGHTS
See Figure 11.
• To utilize the LED light for nighttime snow
removal, activate the LED light switch.
NOTE: After you have nished using your
snow thrower, remember to turn off the light
switch.
Do not allow familiarity with products to make
you careless. Remember that a careless
fraction of a second is sufcient to inict
serious injury.
Always remove battery pack(s) from your
tool when you are assembling parts, making
adjustments, cleaning, or when not in use.
Removing battery pack will prevent any chance
of accidental starting that could cause serious
personal injury.
Make sure the latch on the bottom of the
battery pack snaps in place and the battery
pack is fully seated and secure in the snow
thrower’s battery compartment before
beginning operation. Failure to securely seat
the battery pack could cause the battery pack
to fall out.
Always wear eye protection with side shields
marked to comply with ANSI Z87.1. Failure to
do so could result in objects being thrown into
your eyes resulting in possible serious injury.
Always inspect snow thrower for missing or
damaged parts and blade for damage, uneven,
or excessive wear prior to use. Use of the
snow thrower with damaged or missing parts
can result in serious personal injury.
WARNING!
WARNING!
WARNING!
WARNING!
WARNING!
OPERATION
10 — English
OPERATING TIPS
• Keep the area of operation free of foreign
objects that can become thrown by the
impeller. Perform a thorough inspection of
the area since some objects may be hidden
from view by surrounding snow. lf the snow
thrower hits an obstruction or picks up a
foreign object during use, stop the snow
thrower, remove the battery, remove the
obstruction, and inspect the unit for damage.
Repair or replace any damaged part before
restarting and operating the unit.
• Keep children, pets, and bystanders away
from the area of operation. Be aware that the
normal noise of the machine when turned
on may make it difcult for you to hear
approaching people.
• When moving the snow thrower, use the
wheels on one side as the pivot point.
Slightly tilt the snow thrower on this pivot
point to move it forward or backward.
• Start your clearing path outward, throwing
snow in a back and forth motion. To clear
in the opposite direction, pivot the snow
thrower on its wheels. Make sure to overlap
clearing paths.
• Note the wind direction. If possible, move
in the same direction as the wind so that
the snow is not thrown against the wind and
blown back into your face and onto the just
cleared path.
• Do not push the snow thrower with excessive
force. You should push the machine gently
and evenly in accordance with the unit's
throw rate.
• Some parts of the snow thrower may freeze
under extreme temperature conditions. Do
not attempt to operate the snow thrower
with frozen parts. If the parts freeze while
the snow thrower is in use, stop the snow
thrower, remove the battery, and inspect for
frozen parts. Free all parts before restarting
or operating the snow thrower. Never force
controls that have frozen.
• When working on pebbles, gravel, or
unpaved surfaces, avoid throwing loose
surface material along with the snow by
pushing down on the handle to raise the
scraper at the base of the unit above the
pebbles or gravel.
ADJUSTING THE DISCHARGE CHUTE AND
CHUTE DEFLECTOR
See Figure 12
• To adjust the discharge chute, rotate the
handle on the chute control rod in the
direction that you wish to direct the snow
stream.
• To adjust the chute deector (and therefore
the height of the snow stream), squeeze the
trigger and raise or lower the chute deector.
If the snow thrower hits a foreign object while
it is in use, the object could be thrown in
the direction of the operator or a bystander.
Thrown objects could cause serious personal
injury. Keep the area cleared free of all foreign
objects that may be picked up and thrown by
the impeller.
Never direct the snow discharge chute at
the operator, bystanders, vehicles, or nearby
windows. The discharged snow and foreign
objects accidentally picked up and thrown by
the snow thrower can cause serious damage
and personal injury.
WARNING!
WARNING!

MAINTENANCE
11 — English
LIFETIME LUBRICATION
Lubrication is not necessary and may damage
the unit. The snow thrower is lubricated for
lifetime use at the factory before shipment.
GENERAL MAINTENANCE TIPS
• Do not attempt to repair the machine unless
you have the proper tools and instructions
for disassembly and repair of the machine.
• Check bolts and screws at frequent intervals
for proper tightness to ensure that equipment
is in safe working condition.
• After each snow removal session, run the
snow thrower for a few minutes to prevent
the collector/impeller from freezing. Shut
off the motor, wait for all revolving parts to
stop completely, and wipe residual ice and
snow off the unit. Rotate the chute deector
several times to remove any excess snow.
REPLACING THE SCRAPER BAR
See Figures 13.
• The scraper bar is located at the base of the
snow thrower beneath the impeller housing.
• Remove the 5 screws that secure the right
side cover to the frame of the snow thrower.
Remove the right side plate.
• Remove the 5 screws that secure the left
side plate to the frame of the snow thrower.
Remove the left side plate.
• Detach the worn scraper bar from the snow
thrower by removing the 3 screws that hold it
in place.
• Install the new scraper bar and fasten it
securely to the snow thrower with 3 screws.
• Reinstall the right side cover and left side
cover.
REPLACING THE DRIVE BELT
See Figures 14.
• Remove the 5 screws that secure the left
side cover to the frame of the snow thrower.
Remove the cover.
• Remove the old belt from the small pulley
and large pulley.
• Loop one end of the new belt over the small
pulley.
• Install the new belt by rotating the impeller
with the left hand while positioning the belt
on the large pulley with the right hand.
• Install the left side cover, and secure it using
the 5 screws.
REPLACING THE IMPELLER
See Figures 15.
• Remove the 5 screws that secure the right
side cover to the frame of the snow thrower.
• Remove the axle nut.
• Remove the 5 screws that secure the left
side cover to the frame of the snow thrower.
• Remove the belt.
• Using a 23 mm socket, remove the large
pulley.
• Remove the 5 screws that secure the left
side plate and remove the left side plate.
• Pull the axle and remove the old impeller.
• Install the new impeller.
• Reinstall the left side plate, large pulley, belt
and left side cover.
• Reinstall the nut and right side cover.
Make sure to turn off the switch and remove
the battery before performing any maintenance
task on your snow thrower.
WARNING!

STORAGE
• Run the snow thrower for a few minutes in
order to melt any snow that may be left on
the snow thrower.
• Remove the battery and store it in a cool
dry location, if possible. Charge the battery
every two months when not in use in order
to increase its life.
• Inspect the snow thrower thoroughly for
worn, loose, or damaged parts. If any parts
must be repaired or replaced, contact the
Toll-Free Helpline, at 1-888-266-7096.
• Store the snow thrower in a clean, dry
place. Cover it in order to provide added
protection.
MAINTENANCE
12 — English

TROUBLESHOOTING
13 — English
IF THESE SOLUTIONS DO NOT SOLVE THE PROBLEM CONTACT A QUALIFIED SERVICE
DEALER.
PROBLEM POSSIBLE CAUSE SOLUTION
The handle is not The bolts are not properly Adjust the height of the handle, and verify
in position. seated. that the carriage bolts are properly seated.
Handle knobs not tightened. Tighten the knobs.
The snow thrower The battery is not charged. Charge the battery.
does not start.
The switch is defective. Replace the switch. (Call the tollfree
helpline, at 1-888-266-7096)
The battery is not attached to Check the connection between the motor
the motor. connector and the battery.
Battery may require service or Call toll free helpline, at 1-888-266-7096
replacement. or replace battery.
The motor is on, but The belt is damaged. Replace the belt (see the section entitled
the impeller does Inspecting/Replacing the Drive Belt).
not turn.
The snow thrower The scraper is worn. Replace the scraper (see the section
leaves a thin layer of entitled Replacing the Scraper).
snow behind.

CRAFTSMAN 20in. 40V SNOW THROWER – MODEL NUMBER 138.88784
The model number will be found on a label attached to the unit.
TO PURCHASE REPLACEMENT PARTS, CALL 1-888-266-7096
14 — English
ITEM NO. PART NO. DESCRIPTION QTY
1 332041205 Left side cover 1
2 32205877 Screw 20
3 329151205 Belt 1
4 32206575 Screw M5x8 4
5 3290250 Washer 4
6 31101630 Front cover assembly 1
7 31102630 Rear cover assembly 1
8 361011201 Motor 1
9 332031205 Motor clamp 1
10 3410801 Wire clamp 1
11 3290135 Split pin 2
12 33101498 7" wheel assembly 2
13 332151205 Rubber sleeve 2
14 332021205 Wheel bracket assembly 1
15 32201699 Screw 4
16 333031205 Lower handle 1
17 32222301A Nut M6 4
18 3410835-4 Knob 4
19 332051205 Right side cover 1
20 32204234 Bolt M6x35 4
21 333041205 U bolt 4
22 333021205 Middle handle 1
23 32226121 Screw 1
24 341131205 Bracket for the chute control rod 1
25 32219121 Nut 1
26 31103630 Handle bar assembly 1
27 31104630 Chute control rod assembly 1
The model number will be found on a label attached to the unit.
15 — English
TO PURCHASE REPLACEMENT PARTS, CALL 1-888-266-7096
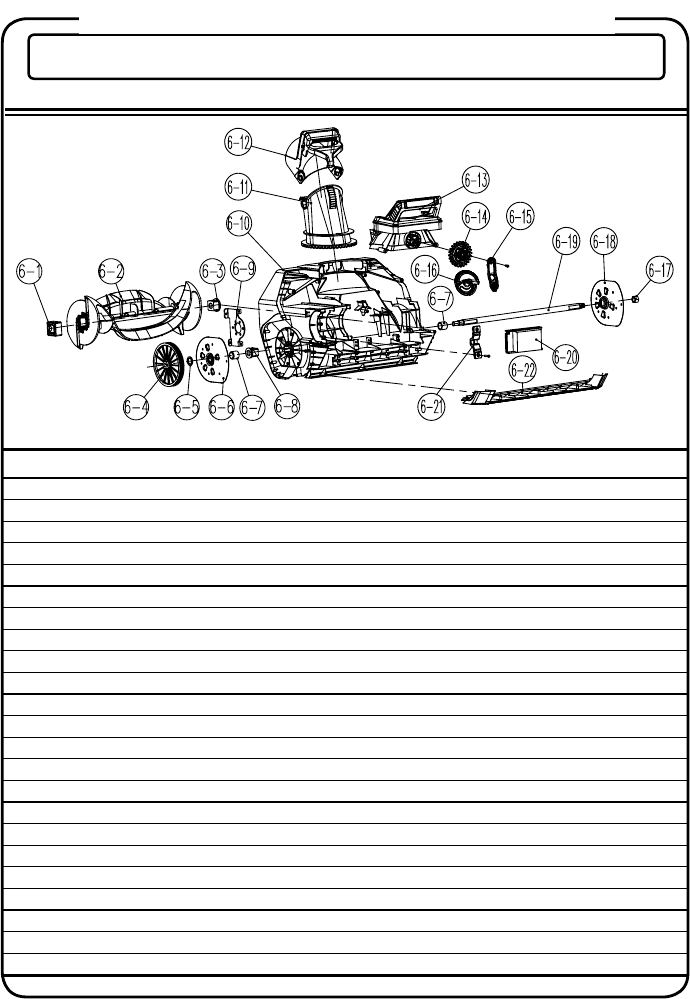
CRAFTSMAN 20in. 40V SNOW THROWER – MODEL NUMBER 138.88784
ITEM NO. PART NO. DESCRIPTION QTY
6 31101630 Front cover assembly 1
6-1 332061205 Link block 1
6-2 341171205-3 Impeller 1
6-3 339011205 Right driving block 1
6-4 34109100-12 Drive wheel 1
6-5 32217100 Washer 1
6-6 311111205 Left side plate 1
6-7 332111205 Bushing 2
6-8 339021205 Left driving block 1
6-9 332011205 Motor support 1
6-10 341011205 Front cover 1
6-11 341031205 Discharge chute 1
6-12 31121205 Chute deector 1
6-13 341061205 Discharge chute base 1
6-14 341071205 Small gear 1
6-15 341091205 Gear seat 1
6-16 341081205 Big gear 1
6-17 32902250A Nut M12 1
6-18 311131205 Right side plate 1
6-19 332121205 Axle for the impeller 1
6-20 36201630 PCB board 1
6-21 341101205 Motor support 1
6-22 341111205 Scraper 1
The model number will be found on a label attached to the unit.
16 — English
TO PURCHASE REPLACEMENT PARTS, CALL 1-888-266-7096
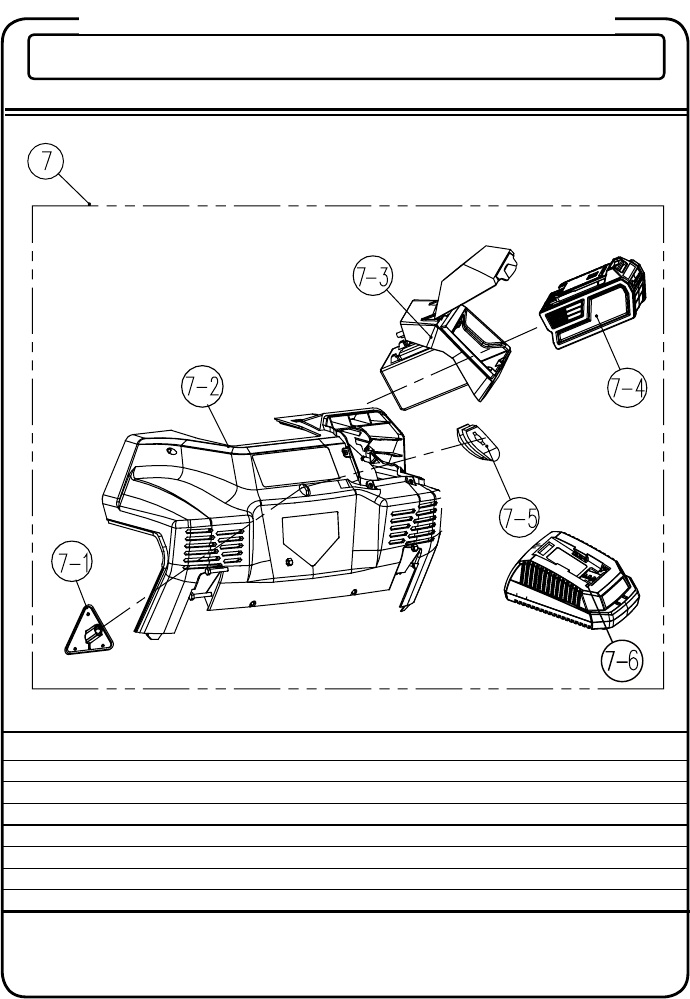
CRAFTSMAN 20in. 40V SNOW THROWER – MODEL NUMBER 138.88784
ITEM NO. PART NO. DESCRIPTION QTY
7 31102630 Rear cover assembly 1
7-1 341121205 Connecting base 1
7-2 341021205 Rear housing 1
7-3 31105630 Battery compartment assembly 1
7-4 31103997 Craftsman 40V battery pack 1
7-5 342011205 Rubber bushing 1
7-6 31101998 Craftsman 40V charger 1
The model number will be found on a label attached to the unit.
17 — English
TO PURCHASE REPLACEMENT PARTS, CALL 1-888-266-7096
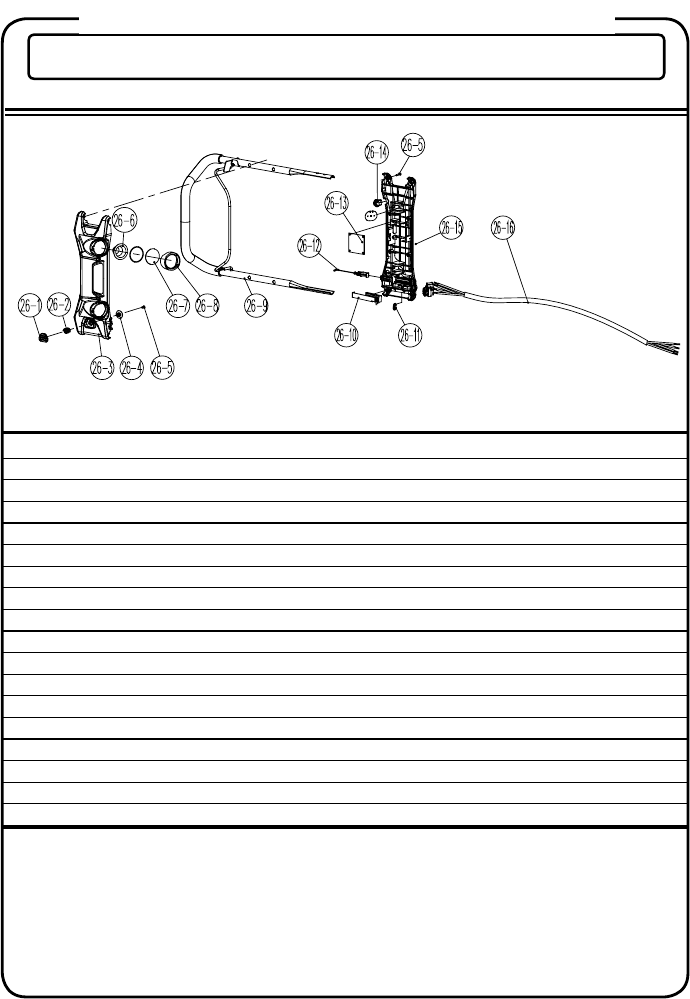
CRAFTSMAN 20in. 40V SNOW THROWER – MODEL NUMBER 138.88784
ITEM NO. PART NO. DESCRIPTION QTY
26 31103630 Handle bar assembly 1
26-1 34136486-2 Safety switch button 1
26-2 33401229A Spring 1
26-3 341141205 Faceplate 1
26-4 341201205 Switch pressure head 1
26-5 32205877 Screw 17
26-6 333011108 Parabolic reector 2
26-7 341051108 Lamp screen 2
26-8 341061108-3 Light head housing 2
26-9 311071205 Upper handle assembly 1
26-10 311081205 Slider block assembly 1
26-11 3410801 Wire clamp 2
26-12 311091205 Start cable assembly 1
26-13 36202630 Circuit board 1
26-14 363051205 Switch 1
26-15 341151205 Lower cover 1
26-16 311101205 Cord assembly 1
i
See this section for all of the gures referenced in the
operator’s manual.
Consulte esta sección para ver todas las guras a las que se hace
referencia en el manual del operador.
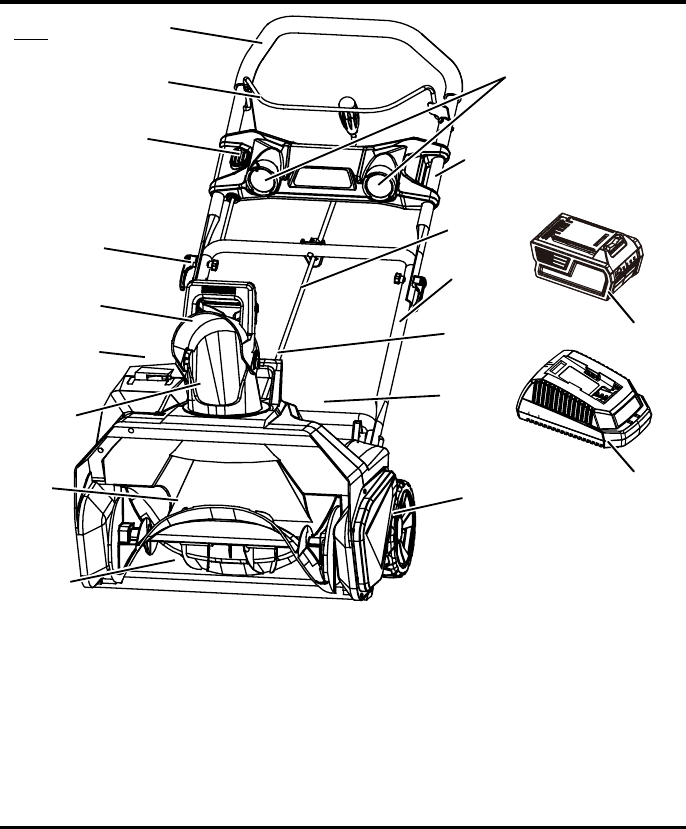
Fig. 1
A - Upper handle (manija superior)
B - Middle handle (manija central)
C - Lower handle (manija inferior)
D - Chute control rod (barra de control del canal de descarga)
E - Carrying or lifting handle (mango para transporte o levante)
F - Wheel (ruedas)
G - Scraper (raspador)
H - Impeller (impulsor)
I - Discharge chute (canal de descarga)
P
Q
B
C
F
G
H
I
J
K
L
R
M
N
O
A
D
E
J - Battery compartment (compartimiento de batería)
K - Chute deflector (deflector del canal)
L - Safety switch button (interruptor de seguridad)
M - ON/OFF switch bar lever (Barra de seguridad para
encendido/appagado)
N - Handle bar (manillar)
O - LED lights (luz LED)
P - Craftsman 40V battery pack (Batería de 40V Craftsman)
Q - Craftsman 40V charger (Cargador de 40V Craftsman)
R - Cam lock (Sujetador de leva)
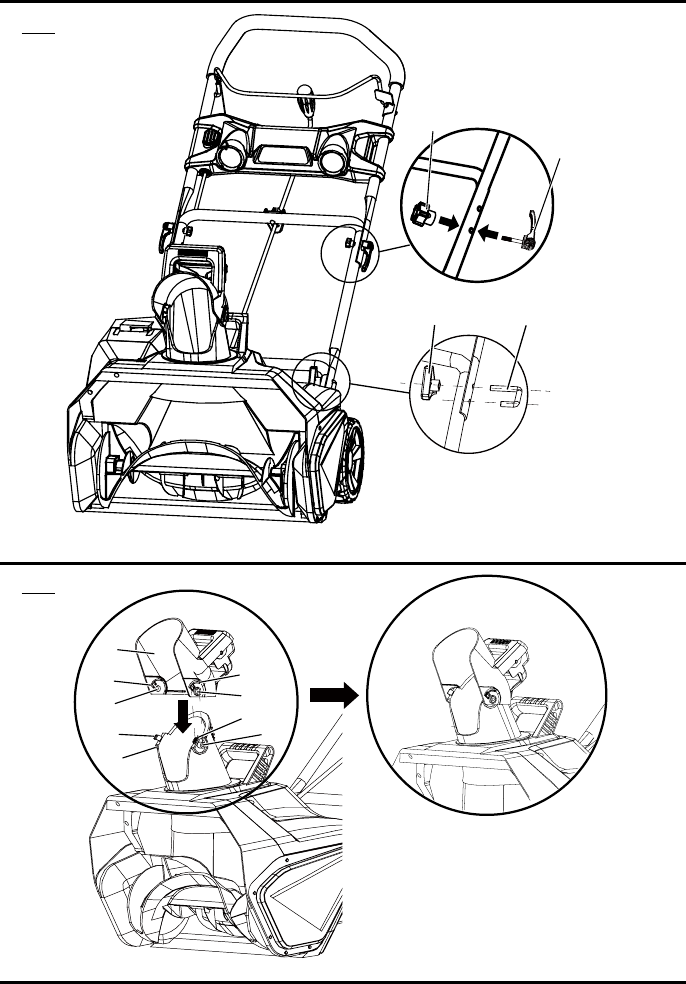
Fig. 2
Fig. 3
ii
A - Handle knobs (perillas de la manija)
B - Bolts (pernos)
C - Wing nuts (tuercas de mariposa)
D - Cam locks (sujetadors de leva)
A - Chute deflector (deflector del canal)
B - Latching tabs (lengüetas de seguridad)
C - Restrict slots (restringir ranuras)
D - Position-joints (posición-articulaciones)
E - Keyed holes (orificios con llave)
B
D
A
C
A
B
DD
C
EE
C
B

Fig. 4
Fig. 6
Fig. 7 Fig. 8
Fig. 6
iii
A - Discharge chute
(canal de descarga)
B - Arrow (arrows) A - Keyed hole (orificio con llave)
A - Hole (orificio)
B - Directional chute arm
(brazo direccional de
tobogán)
C - Lower directional
chute arm (brazo
direccional más bajo de
tobogán)
D - Hitch pin (pasadores
de enganche)
E - Chute control rod
(barra de control del
canal de descarga)
F - Keyed hole (orificio
con llave)
A - Chute control rod
handle (mango de la
barra de control del
canal de descarga)
A
A
B
A
AB
D
C
E
F
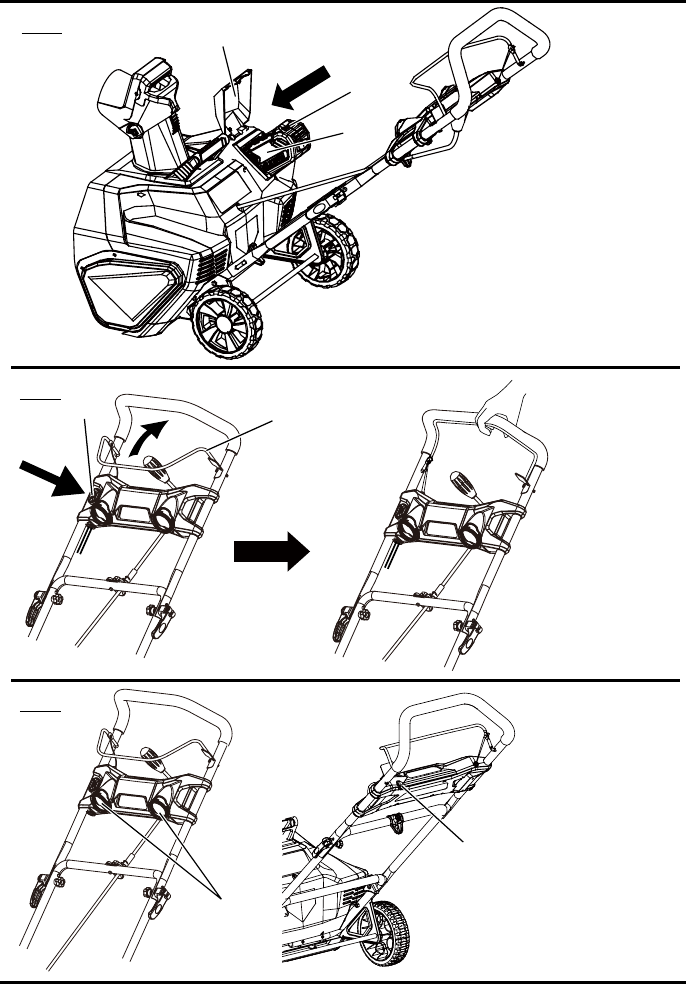
Fig. 9
iv
A - Battery compartment (compartimiento de batería)
B - Craftsman 40V battery pack (batería de 40V Craftsman)
C - Latch (pestillo)
A - Safety switch button
(interruptor de seguridad)
B - ON/OFF switch bar lever
(Barra de seguridad para
encendido/appagado)
A - LED lights (luz LED)
B - LED light switch (interruptor de luz LED)
Fig. 10
Fig. 11
A
A
A
B
B
B
C
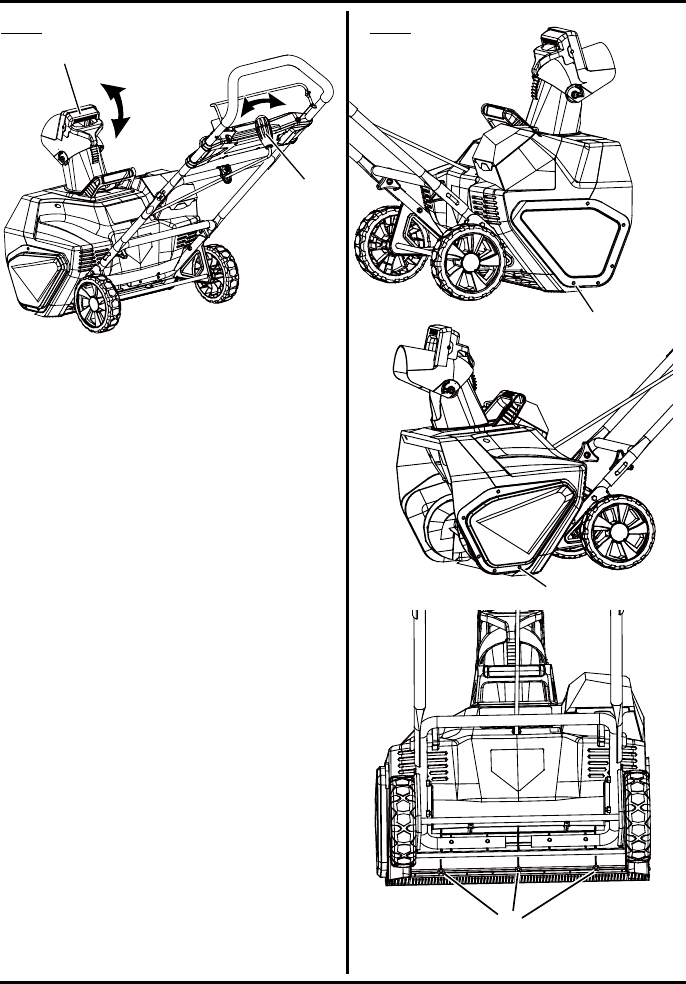
Fig. 13
v
Fig. 12
A - Screws (tornillos)
A - Chute deflector trigger (gatillo deflector del canal)
B - Chute control rod handle (mango de la barra de control del
canal de descarga)
A
B
A
A
A

vi
Fig. 14
Fig. 15
AB
C
D
E
A - Screws (tornillos)
B - Left side cover (cubierta lateral izquierda)
C - Large pulley (polea grande)
D - Belt (correa)
E - Small pulley (polea pequeña)
A - Screws (tornillos)
B - Right side cover (cubierta lateral derecha)
C - Axle nut (tuerca del eje)
D - Screws (tornillos)
E - Left side cover (cubierta lateral izquierda)
F - Belt (correa)
G - Large pulley (polea grande)
H - Screws (tornillos)
I - Left side plate (cubierta lateral izquierda)
J - Axle (eje)
K - Impeller (impulsor)
D
C
E
FG
H
I
J
K
A
B

INSTRUCCIONES DE SEGURIDAD IMPORTANTES
3 — Español
LEA Y COMPRENDA TODAS LAS
INSTRUCCIONES. El incumplimiento de las
instrucciones señaladas abajo y en la máquina
puede causar descargas eléctricas, incendios
y/o lesiones serias.
¡ADVERTENCIA!
OBSERVE ESTAS REGLAS AL OPERAR LA
MÁQUINA QUITANIEVE
• Camine. No corra.
• Antes de encender la máquina quitanieve
compruebe que no está haciendo contacto
con cualquier cosa.
• En todo momento manténgase alejado de la
apertura para descarga. Aleje la cara, manos
y pies de las piezas ocultas, en movimiento o
rotatorias.
• Ponga mucha atención al usar la máquina
quitanieve, y manténgase alerta de baches
en el terreno y otros peligros u objetos
ocultos.
• No use el la máquina quitanieve en
supercies con grava o roca triturada. Tenga
extrema precaución al cruzar entradas,
andenes o calles con grava o roca triturada.
• Al limpiar la nieve muévase de arriba abajo
en las pendientes. No cruce las pendientes
lateralmente. Tenga precaución al cambiar
de dirección. No use la máquina quitanieve
para quitar nieve de pendientes muy
inclinadas.
• No trate de usar la máquina quitanieve
en techos ni en cualquier supercie muy
inclinada.
• No use la máquina quitanieve si las cubiertas
protectoras, placas y otros dispositivos de
protección por seguridad no se encuentran
en su lugar.
• No use la máquina quitanieve cerca de
recintos con vidrio, automóviles, camiones,
vidrieras, bajadas escarpadas, etc. sin
ajustar apropiadamente el ángulo de la
descarga de nieve. Mantenga alejados del
área de trabajo a los niños y las mascotas.
• No fuerce ni sobrecargue la máquina
quitanieve. La máquina quitanieve hará
mejor su trabajo y de una forma más segura
a la velocidad para la cual fue diseñado.
• No haga funcionar la máquina quitanieve a
alta velocidad sobre supercies lizas. Mire
hacia atrás y tenga precaución al retroceder.
• No dirija la descarga hacia la gente y no
permita que nadie se mueva al frente del la
máquina quitanieve mientras esté en uso.
• Al usar la máquina quitanieve use anteojos
o gafas de seguridad que cumplan con las
normas ANSI Z87.1, y use protección para
los oídos.
• Use la máquina quitanieve con luz solar o
con luz articial buena.
• Evite los arranques accidentales. Al
encender la máquina quitanieve permanezca
en la posición de arranque. El operador y
la máquina quitanieve deben estar en una
posición estable durante el arranque.
• Use las herramientas adecuadas. Use
la máquina quitanieve solamente para el
propósito para el cual se le diseñó.
• No extienda su cuerpo más allá de su
alcance natural. Asiente siempre bien los
pies y mantenga su equilibrio.
• Al utilizar la máquina quitanieve sosténgalo
con ambas manos. Tome con seguridad las
manijas o agarraderas.
• Mantenga alejadas las manos, la cara y los
pies de todas las piezas móviles. No toque
ni trate de detener el impulsor cuando esté
girando.
• Si el impulsor no gira libremente debido a
hielo pegado, descongele completamente la
máquina quitanieve antes de intentar usarlo.
• Mantenga el impulsor libre de desechos.
• No trate de limpiar el impulsor cuando el
motor esté funcionando. Apague el motor y
retire el paquete de baterías.
• Mantenga alejados del impulsor la ropa y las
partes del cuerpo.
• No haga funcionar el motor a una mayor
velocidad que la necesaria. No opere el
motor a alta velocidad al no estar limpiando
nieve.

4 — Español
• Pare el motor al suspender las operaciones
de limpieza de nieve y al moverse de un
lugar a otro.
• Retire el paquete de baterías al transportarlo
y cuando no lo esté usando.
• Luego de golpear algún objeto extraño,
apague la máquina quitanieve, retire el
paquete de baterías y revise si no se ha
dañado. Repare cualquier daño antes
de volver a arrancar y usar la máquina
quitanieve.
• Si la máquina quitanieve comienza a vibrar
anormalmente, párelo inmediatamente y
trate de establecer la causa. La vibración es
generalmente una indicación de peligro.
• Pare el motor y retire el paquete de baterías
siempre que el operador no se encuentre en
la posición de operación, antes de limpiar el
impulsor así como antes de hacer cualquier
reparación, ajuste o inspección.
• No descargue nieve en las calles públicas ni
cerca del tráco en movimiento.
• Deje que la máquina quitanieve funcione por
algunos minutos luego de limpiar la nieve
para evitar que sus piezas se congelen.
• Use sólo repuestos y accesorios originales
del fabricante para este máquina quitanieve.
Usar repuestos o accesorios no autorizados
podría provocar lesiones graves al usuario o
dañar la máquina quitanieve, además anula
la garantía.
• No use la máquina quitanieve en la posición
de sostén manual. No levante la máquina
quitanieve cuando esté funcionando. La
máquina quitanieve ha sido diseñado para
ser transportado sobre el suelo.
REGLAS GENE RALES DE SEGURIDAD
• Compruebe que la máquina quitanieve esté
seguro al transportarlo.
• Almacene la máquina quitanieve en un área
seca, bajo llave o lo sucientemente alta
como para evitar el uso inautorizado y los
daños, y fuera del alcance de los niños.
• Nunca remoje ni empape la unidad con agua
ni cualquier otro líquido. Mantenga las manijas
secas, limpias y libres de basura. Limpie la
máquina quitanieve después de cada uso.
• Si las viñetas del la máquina quitanieve
se han borrado o comienzan a levantarse,
póngase en contacto con la línea telefónica
gratis para ayuda, al 1-888-266-7096.
• Guarde estas instrucciones en un lugar
seguro para referencia futura. Léalas a
menudo y úselas para capacitar a los
demás usuarios. Toda persona que use
este la máquina quitanieve debe leer estas
instrucciones cuidadosamente.
• Mantenga cuidadosamente la máquina
quitanieve. Siga las instrucciones para
lubricación ycambio de accesorios.
BATERÍA Y CARGADOR
NORMAS DE SEGURIDAD DE LA BATERÍA
• No se necesita conectar a una toma de
corriente las herramientas de baterías; por
lo tanto, siempre están en condiciones de
funcionamiento. Esté consciente de los
posibles peligros cuando no esté usando
la herramienta de baterías o cuando esté
cambiando los accesorios de la misma. Con
el cumplimiento de esta regla se reduce el
riesgo de una descarga eléctrica, incendio o
lesión corporal seria.
• No coloque herramientas de baterías ni las
baterías mismas cerca del fuego o del calor.
De esta manera se reduce el riesgo de
explosiones y de lesiones.
• No aplaste, deje caer o dañe la batería.
Nunca utilice una batería o cargador que
se ha caído, aplastado, recibido un golpe
contundente o ha sido dañado(a) de alguna
manera. Las baterías dañadas pueden
sufrir explosiones. Deseche de inmediato
toda batería que haya sufrido una caída o
cualquier daño.
• Las baterías pueden explotar en presencia
de una fuente de inamación, como una
luz guía. Para reducir el riesgo de lesiones
corporales serias, nunca use un producto
INSTRUCCIONES DE SEGURIDAD IMPORTANTES
Utilice baterías de repuesto únicamente.
Otras baterías pueden ocasionar daños a la
máquina quitanieve.
¡PRECAUCIÓN!

5 — Español
inalámbrico en presencia de llamas vivas.
La explosión de una batería puede lanzar
fragmentos y compuestos químicos. Si ha
quedado expuesto a la explosión de una
batería, lávese de inmediato con agua.
• No cargue ninguna batería en lugares
mojados o húmedos. Con el cumplimiento
de esta regla se reduce el riesgo de una
descarga eléctrica.
• Para obtener resultados óptimos, debe
cargarse la batería en un lugar donde la
temperatura esté entre 45°F (7°C) y 104°F
(40°C). No la guarde a la intemperie ni en el
interior de vehículos.
• En condiciones extremas de uso o
temperatura las baterías pueden emanar
líquido. Si el líquido llega a tocarle la piel,
lávese de inmediato con agua y jabón. Si le
entra líquido en los ojos, láveselos con agua
limpia por lo menos 10 minutos, y después
busque de inmediato atención médica. Con
el cumplimiento de esta regla se reduce el
riesgo de lesiones corporales serias.
• Cuando no esté utilizándose el paquete
de baterías, manténgalo lejos de otros
objetos metálicos, como clips, monedas,
clavos, tornillos o otros objetos metálicos,
pequeños que puedan establecer conexión
entre ambas terminales. Establecer una
conexión directa entre las dos terminales
de las baterías puede causar quemaduras o
incendios.
• Siempre retire el paquete de baterías de
la herramienta cuando esté ensamblando
partes, realizando ajustes, limpiando o
cuando ésta no esté en uso. Si retira el
paquete de baterías, evitará arranques
accidentales que podrían provocar lesiones
graves.
• Siempre retire el paquete de baterías antes
de guardar el dispositivo.
• Cuando la batería esté completamente
cargada, desconecte el cargador del
suministro de corriente y retire el paquete de
baterías del cargador.
• Siempre póngase protección ocular
con protección lateral con la marca de
cumplimiento de la norma ANSI Z87.1. Si
no cumple esta advertencia, los objetos
que salen despedidos pueden producirle
lesiones serias en los ojos.
• Mantenga el paquete de baterías seco,
limpio y sin aceite ni grasa. Use siempre un
paño limpio para limpiar. Nunca use líquido
de frenos, gasolina, productos derivados del
petróleo o solvente para limpiar el paquete
de baterías.
CUIDADO ADECUADO DE LA BATERÍA
Almacenamiento fuera de temporada
Para lograr la más larga duración posible de
las baterías, se sugiere lo siguiente:
• Retire el paquete de baterías del cargador
una vez cargado completamente y listo para
usarse.
Para guardar el paquete de baterías más de
30 días:
• Guarde la batería donde la temperatura sea
inferior a 27°C (80°F) y lejos de la humedad.
• Guarde el paquete de baterías cargado
30%-50%.
• Cargue la batería de manera normal, cada
seis meses de almacenamiento.
NORMAS DE SEGURIDAD PARA EL
CARGADOR
• No maltrate el cable del cargador. Nunca
transporte el cargador del cable.
• No utilice un cargador dañado. Cambie los
cables o el cargador de inmediato.
• Mantenga el cargador alejados de agua,
fuentes de calor (radiadores, calentadores,
estufas, etc.), llamas y químicos. No incinere
este producto ya que las baterías en su
interior podrían explotar o sufrir fugas.
• Asegúrese de que el paquete de baterías se
asegura en el cargador antes de utilizar.
• El paquete de baterías se siente un
poco caliente al tocarse mientras está
cargándose. Esto es normal y no indica
ningún problema.
INSTRUCCIONES DE SEGURIDAD IMPORTANTES

6 — Español
INSTRUCCIONES DE SEGURIDAD IMPORTANTES
• No coloque el cargador ni el paquete de
baterías en ningún área extremadamente
calurosa o fría. Funcionan mejor a la
temperatura normal del interior.
• Una vez cargadas completamente las
baterías, desconecte el cargador del
suministro de corriente y del paquete de
baterías.
Al transportar o dar servicio a la unidad, quite
siempre la batería.
¡ADVERTENCIA!
Algo del polvo provocado por las lijas,
sierras, trituradoras y taladros eléctricos, y
otras actividades de construcción Contiene
químicos reconocidos como causantes
de cáncer y defectos congénitos u otros
daños en el aparato reproductivo. Algunos
ejemplos de estos químicos son:
• plomo de pinturas con base de plomo
• sílice cristalina de ladrillos, cemento y
otros productos de mampostería
• arsénico y cromo de madera tratada con
químicos
El riesgo que corre a la exposición de
estos químicos varía dependiendo de la
frecuencia con que realiza estos tipos de
trabajos. Para reducir la exposición a estos
químicos: trabaje en un área bien ventilada
y con el equipamiento de seguridad
aprobado, como por ejemplo máscaras
especialmente diseñadas para ltrar
laspartículas microscópicas.
¡ADVERTENCIA!
PROPUESTA 65

SÍMBOLO DENOMINACIÓN/EXPLICACIÓN
V Voltios
A Amperios
Hz Hertzios
W Vatios
Hrs Horas
Precauciones para su seguridad.
Para reducir el riesgo de lesiones, el usuario debe leer y entender el manual del
usuario antes de utilizar este producto.
Antes de iniciar la operación de herramientas de corriente, siempre utilice gafas
de seguridad, gafas de seguridad con protección lateral.
Cualquier objeto lanzado puede rebotar y producir lesiones personales o daños
físicos.
Pare la máquina antes de dejarla.
Hojas giratorias: no use las manos para desatascar el conducto. Detenga el
motor antes de retirar residuos.
¡PELIGRO! Mantenga las manos y pies alejados de las aberturas mientras la
máquina esté funcionando.
Mantenga a los espectadores a una distancia segura de la herramienta.
Manténgase alejado de las piezas móviles, mantener todas las protecciones en
su lugar.
El cargador está diseñado para uso en interiores.
Este producto contiene baterías de iones de litio (Li-ion). Es posible que algunas
leyes municipales, estatales o federales prohíban desechar las baterías en la
basura normal. Consulte a las autoridades reguladoras de desechos para
obtener información en relación con las alternativas de reciclado y desecho
disponibles.
SÍMBOLOS
7 — Español
Es posible que se empleen en este producto algunos de los siguientes símbolos. Le
suplicamos estudiarlos y aprender su significado. Una correcta interpretación de estos
símbolos le permitirá utilizar mejor y de manera más segura el producto.
STOP
STOP
SÍMBOLOS
ESPECIFICACIONES
Las siguientes palabras de señalización y sus significados tienen el objeto de explicar los
niveles de riesgo relacionados con este producto.
SÍMBOLO SEÑAL SIGNIFICADO
PELIGRO Indica una situación peligrosa inminente, la cual, si no se evita,
causarála muerte o lesiones serias.
ADVERTENCIA Indica una situación peligrosa posible, la cual, si no se evita,
podríacausar la muerte o lesiones serias.
PRECAUCIÓN Indica una situación potencialmente peligrosa la cual, si no se
evita, puede causar lesiones leves o moderadas.
PRECAUCIÓN (Sin el símbolo de alerta de seguridad) Indica una situación que
puede producir daños materiales.
8 — Español
Batería ................................................................................................................Ión de litio de 40 V
Velocidad en vacío ............................................................................................ 1,800 r/min. (RPM)
Ancho de limpieza .............................................................................................................. 20 pulg.
Profundidad de limpieza ...........................................................................................Hasta 10 pulg.
Distancia de descarga ..................................................................................................Hasta 20 pi.
Tamaño del impulsor............................................................................................................16 pulg.
Ruedas ..................................................................................................................................7 pulg.
Peso (sin baterías) .................................................................................................................33 lbs
ARMADO
9 — Español
DESEMPAQUETADO
Este producto requiere armarse.
■ Extraiga cuidadosamente de la caja la
herramienta y los accesorios. Asegúrese
de que estén presentes todos los artículos
enumerados en la lista de empaquetado.
■ Inspeccione cuidadosamente la herramienta
para asegurarse de que no haya sufrido
ninguna rotura o daño durante el transporte.
■ No deseche el material de empaquetado
sin haber inspeccionado cuidadosamente la
herramienta y haberla utilizado satisfactoriamente.
■ Si hay piezas dañadas o faltantes, le
suplicamos llamar al 1-888-266-7096, donde
le brindaremos asistencia.
LISTA DE EMPAQUETADO
■ Máquina quitanieve
■ Manija central
■ Deector del canal
■ 40V Batería
■ 40V Cargador
■ (2) Piezas control de la dirección de descarga
■ (2) Sujetadors de leva
■ (2) Tuercas de mariposa
■ (2) Pernos
■ (2) Perillas de la manija
■ (1) Pasadores de enganche
■ Manual del operador
DESPLEGAR Y AJUSTAR EL CONJUNTO
DE MANGOS Vea la gura 2.
Alinee los agujeros de la manija central
y de la manija inferior. Meta los pernos y
apriételos con las perillas de la manija que se
suministran.
• Alinee los agujeros entre la manija superior
y la manija central. Inserte los sujetadores
de leva y apriételos con las tuercas de
mariposa que se suministran.
ENSAMBLADO DEL CONDUCTO DE DESCARGA
Vea la gura 3.
Empuje el deector del canal de descarga
hasta que las lengüetas de seguridad laterales
encajen en las ranuras y las barras de
sustitución laterales encajen en los oricios de
referencia.
INSTALACIÓN DE LA BARRA DE CONTROL
DEL CANAL DE DESCARGA
Vea la gura 4 y 8.
• Coloque el canal de descarga mirando hacia
delante.
NOTA: Alinee la echa del canal de descarga
con la echa de la carcasa.
• Alinee los hoyos en el brazo direccional de
tobogán con los hoyos en el brazo direccional
más bajo de tobogán. Inserte los pasadores de
enganche. Introduzca el extremo de la barra
de control del canal de descarga en el oricio
de referencia del soporte que está acoplado a
la parte superior del mango central.
• Asegúrese de que el mango de la barra de
control del canal de descarga apunta hacia
arriba e inserte la barra en el oricio de
referencia de la parte posterior de la carcasa.
• Empuje rmemente la barra en el oricio de la
parte posterior de la carcasa hasta que encaje
en su sitio.
• Gire el mango de la barra de control del canal
de descarga para asegurarse de que se mueve
en dirección mismo al canal de descarga.
Si hay piezas
dañadas o faltantes, no utilice este producto
sin haber reemplazado todas las piezas. La
inobservancia de esta advertencia podría
causar lesiones serias.
No intente modicar
este producto ni hacer accesorios no
recomendados para el mismo. Cualquier
alteración o modicación constituye maltrato y
puede causar una condición peligrosa, y como
consecuencia posibles lesiones serias.
No introduzca la
paquete de baterías sin haber terminado
de armarla. De lo contrario la unidad puede
ponerse en marcha accidentalmente, con el
consiguiente riesgo de lesiones serias.
Para evitar que la
podadora arranque inadvertidamente, no haga
ningún ajuste ni instalación mientras esté
insertada la paquete de baterías.
¡ADVERTENCIA!
¡ADVERTENCIA!
¡ADVERTENCIA!
¡ADVERTENCIA!
Asegúrese de que el
deector del conducto se trabe completamente
sobre el conducto de descarga. Una abertura
entre el conducto y su deector puede permitir
que objetos extraños sean recogidos por la
máquina quitanieve y arrojados a la dirección del
operador, causando serias lesiones personales.
¡ADVERTENCIA!
FUNCIONAMIENTO
Este producto acepta los paquetes de baterías
de iones de litio de 40 V.
Para ver las instrucciones de carga completas,
consulte los manuales del operador del
paquete de baterías Craftsman y los modelos
de cargador.
CARACTERÍSTICAS DE PROTECCIÓN DE
LAS BATERÍAS
Las baterías de iones de litio Craftsman están
diseñadas con características que protegen
las celdas de iones de litio y maximizan la
duración de las baterías.
Si la herramienta se detiene durante el uso,
suelte el interruptor de agarre para reiniciarla
y reanude el funcionamiento. Si aun así no
funciona, se debe recargar la batería.
INSTALACIÓN DEL PAQUETE DE BATERÍAS
Vea la gura 9.
• Levante la tape del compartimiento de la
batería.
• Deslice la batería hacia abajo para trabarla
en su posición correcta.
• Cierre la cubierta del compartimiento de la
batería.
EXTRAER LA BATERÍA
Vea la gura 9.
• Deje de apretar la barra de encendido/
apagado y detenga la máquina quitanieve.
• Mantenga pulsado el botón de bloqueo de
la batería situado en la parte inferior de la
batería.
• Retire la batería del producto.
ENCENDIDO Y APAGADO
Vea las guras 10.
• Para el encendido, primero presione el botón
interruptor de seguridad que se encuentra al
lado de la carcasa del interruptor.
• Mientras presiona el botón interruptor de
seguridad con una mano, use la otra mano
para simultáneamente jalar la barra de
encendido/apagado hacia usted. Una vez
que la máquina se encienda, suelte el botón
interruptor de seguridad y proceda con
la operación. La máquina quitanieve solo
puede ser encendida presionando primero
el botón interruptor de seguridad y luego
apretando la barra de encendido/apagado.
Lo inverso no encenderá la máquina.
• Para apagarla, deje de apretar la barra de
encendido/apagado.
No permita que su familarización con este
tipo de producto lo vuelva descuidado. Tenga
presente que un descuido de un instante es
suciente para causar una lesión grave.
Retire siempre el paquete de batería(s) de
la herramienta antes de instalar las piezas,
realizar ajustes. limpiarla o cuando no la utilice.
Retirar el paquete de baterías evitará que la
unidad se accione accidentalmente y provoque
lesiones graves.
Asegúrese de que el pestillo en la parte inferior
del paquete de baterías entre adecuadamente
en su lugar y que el paquete de baterías esté
bien colocado y asegurado en el puerto de
batería de la máquina quitanieve antes de que
encenderla. Una falla en colocar el paquete de
baterías de forma segura puede causar que el
paquete de baterías se desprenda y termine
provocando lesiones corporales serias.
Siempre utilice protección ocular con
protección lateral con la marca de
cumplimiento de la norma ANSI Z87.1, como
así también protección auditiva cuando utilice
este equipo. Si no cumple esta advertencia,
los objetos que salen despedidos pueden
producirle lesiones serias en los ojos.
Antes de cada uso, inspeccione todo el
producto para detectar algún daño, partes
faltantes o sueltas la cuchilla no esté dañada o
desgastada. El funcionamiento de la máquina
quitanieve con piezas dañadas o faltantes
puede ocasionar lesiones graves.
¡ADVERTENCIA!
¡ADVERTENCIA!
¡ADVERTENCIA!
¡ADVERTENCIA!
¡ADVERTENCIA!
10 — Español

FUNCIONAMIENTO
11 — Español
UTILIZANDO LAS LUZ LED
Vea las guras 11.
• Para usar la luz LED durante trabajos
nocturnos de retiro de nieve, active el
interruptor de luz LED.
NOTA: después de acabar de usar su
máquina quitanieve, no se olvide de APAGAR
la luz LED.
CONSEJOS PARA LA OPERACIÓN
• Mantenga el área de operación libre de
objetos extraños que puedan ser arrojados
por las hojas del impulsor. Lleve a cabo
una inspección completa del área, ya que
algunos objetos pueden estar ocultos
por la nieve que los rodea. Si la máquina
quitanieve golpea una obstrucción o atrapa
un objeto extraño durante su uso, detenga la
máquina quitanieve, retire la batería, retire
la obstrucción e inspeccione la unidad en
busca de dañada antes de volver a encender
y operar la unidad.
• Mantenga a las mascotas, niños y
espectadores alejados del área de
operación. Tenga en cuenta que el ruido
normal de la máquina al estar encendida
puede hacer difícil para usted el oír a las
personas o mascotas acercarse.
• Al mover la máquina quitanieve, use las
ruedas en un lado como punto de pivote.
Incline ligeramente la máquina quitanieve
sobre este punto de pivote para moverla
hacia adelante o hacia atrás.
• Empiece su ruta de limpieza hacia afuera,
lanzando la nieve en un movimiento hacia
adelante y hacia atrás. Para limpiar en la
dirección opuesta, pase por sobre el cordón
y gire la máquina quitanieve sobre sus
ruedas. Asegúrese de superponer las rutas
de limpieza.
• Tenga en cuenta la dirección del viento. De
ser posible, muévase en la misma dirección
que el viento de manera que la nieve no sea
lanzada contra el viento (y por tanto lanzada
hacia su cara y por sobre la ruta recién
limpiada).
• No empuje la máquina quitanieve con
demasiada fuerza. Usted debe empujar
la máquina cuidadosamente y de forma
uniforme, de acuerdo con la velocidad de
lanzamiento de la unidad.
• Algunas partes de la máquina quitanieve
se pueden congelar bajo condiciones de
temperatura extremas. No intente operar la
máquina quitanieve con partes congeladas.
Si las partes se congelan mientras la
máquina quitanieve está siendo usada,
detenga la máquina quitanieve, desenchufe
el cordón de extensión e inspeccione las
partes congeladas. Libere todas las partes
antes de volver a encender u operar la
máquina quitanieve. Nunca fuerce los
controles que se hayan congelado.
• Al trabajar sobre piedras, grava o supercies
sin pavimentar, evite lanzar material suelto
de supercie junto con la nieve empujando
hacia abajo el mango para levantar el
raspador en la base de la unidad por sobre
las piedras o grava.
AJUSTE DEL CANAL DE DESCARGA Y DEL
DEFLECTOR DEL CANAL DE DESCARGA
Vea las guras 12.
• Para ajustar el canal de descarga, gire el
mango de la barra de control del canal de
descarga en la dirección que desee dirigir el
ujo de nieve.
• Para ajustar el deector del canal (y, por
tanto, la altura del ujo de nieve), apriete el
gatillo y suba o baje el deector del canal.
Nunca apunte el conducto de descarga de
nieve al operador, espectadores, vehículos o
ventanas cercanas. El lanzar nieve y objetos
extraños recogidos accidentalmente por la
máquina quitanieve puede causar daños y
lesiones personales severas.
¡ADVERTENCIA!

12 — Español
MANTENIMIENTO
LUBRICACIÓN DE POR VIDA
La máquina quitanieve ha sido lubricada en la
fábrica para un uso de por vida. La lubricación
no es necesaria y puede dañar la unidad.
CONSEJOS PARA EL MANTENIMIENTO
• No intente reparar la máquina a no ser que
usted tenga las herramientas e instrucciones
apropiadas para desensamblar y reparar la
máquina.
• Verique en intervalos frecuentes que
todos los pernos y tornillos tengan un ajuste
correcto y asegurarse de que el equipo esté
en una condición de trabajo segura.
• Luego de cada trabajo de retiro de nieve,
haga funcionar la máquina quitanieve por
algunos minutos para evitar que el colector/
impulsor se congele. Agague el motor,
espere que todas las partes giratorias se
detengan por completo, y retire el hielo
y nieve residuales de la unidad. Gire
el deector del conducto mediante el
interruptor remoto varias veces para quitar
cualquier exceso de nieve.
REEMPLAZO DE LA BARRA RASPADORA
Vea las guras 13.
• La barra raspadora está localizada en la
base de la máquina quitanieve, debajo de la
carcasa del impulsor.
• Quite los 5 tornillos que aseguran la placa
lateral izquierda al chasis de la máquina
quitanieve. Quite la placa lateral izquierda.
• Quite los 5 tornillos que aseguran la placa
lateral derecha al chasis de la máquina
quitanieve. Quite la placa lateral derecha.
• Saque la barra raspadora gastada de la
máquina quitanieve retirando los 3 tornillos
que la sostienen en su lugar.
• Instale la nueva barra raspadora y ajústela
bien a la máquina quitanieve con los cuatro
tornillos.
• Coloque la cubierta lateral izquierda y la
cubierta lateral derecha.
REEMPLAZO DE LA CORREA
Vea las guras 14.
• Quite los 5 tornillos que aseguran la placa
lateral izquierda al chasis de la máquina
quitanieve. Quite la placa lateral.
• Saque la correa de la polea pequeña y polea
grande.
• Lazo un extremo de la nueva correa sobre la
polea pequeña.
• Instale la nueva correa haciendo girar la
impulsor con la mano izquierda mientras
coloca la correa en la polea grande con la
mano derecha.
• Coloque la cubierta lateral izquierda y
asegúrela con los 5 tornillos.
REEMPLAZO EL IMPULSOR
Vea las guras 15.
• Quite los 5 tornillos que aseguran la placa
lateral derecha al chasis de la máquina
quitanieve y quite la placa lateral derecha.
• Quite la tuerca.
• Quite los 5 tornillos que aseguran la placa
lateral izquierda al chasis de la máquina
quitanieve.
• Retire la correa.
• Con una llave de 23 mm, retire el de la polea
grande.
• Quite los 5 tornillos que aseguran la placa
lateral izquierda al chasis de la máquina
quitanieve y quite la placa lateral izquierda.
• Extraiga el eje y quite el viejo impulsor.
• Instale la nueva impulsor.
• Reinstalar la placa lateral izquierda, polea
grande, correa y la cubierta lateral izquierda.
• Reinstalar la tuerca y cubierta lateral derecha.
Asegúrese de apagar el interruptor y retirar la
batería antes de llevar a cabo cualquier tarea
de mantenimiento en su máquina quitanieve.
¡ADVERTENCIA!

ALMACENAMIENTO
• Haga funcionar de la máquina quitanieve
por unos minutos para derretir cualquier
nieve que pudiera haber quedado en la
máquina quitanieve
• Saque la batería y almacénela en un lugar
fresco y seco, si es posible. Para aumentar
la vida útil de la batería cárguela cada dos
meses al no estar en uso.
• Compruebe detalladamente que de
la máquina quitanieve no tiene piezas
desgastadas, sueltas o dañadas. Si es
necesario reparar o reemplazar cualquier
pieza, póngase en contacto con la línea
telefónica gratis para ayuda, al 1-888-266-
7096.
• Almacene de la máquina quitanieve en un
lugar limpio y seco. Cúbralo para protegerlo
mejor.
13 — Español
MANTENIMIENTO

CORRECCIÓN DE PROBLEMAS
SI CON ESTAS SOLUCIONES NO SE RESUELVE EL PROBLEMA, COMUNÍQUESE CON EL
CONCESIONARIO DE SERVICIO CALIFICADO DE SU PREFERENCIA.
14 — Español
PROBLEMA CAUSA POSIBLE SOLUCIÓN
La manija no está Los pernos de soporte no están Ajuste la altura de la manija y verique que
en su posición. apropiadamente asentados. los pernos de soporte estén asentados
apropiadamente.
Las perillas de la manija no Apriete las perillas.
están apretadas.
La máquina La batería no tiene carga. Cargue la batería.
quitanieve no
arranca. El interruptor de control está Reemplace el interruptor de control.(Llame
dañado. a la línea telefónica gratis para ayuda
(1-888-266-7096))
La batería no es conectada al Revise la conexión entre el conector del
motor. motor y la batería.
La batería puede requerir Llame a la línea telefónica gratis para
servicio o reemplazo. ayuda (1-888-266-7096) o reemplace la
batería.
El motor está La correa está dañada. Remplace la correa (vea la sección
encendido, pero el titulada Cómo inspeccionar o remplazar la
impulsor no gira. correa de impulsión).
La máquina El raspador está desgastado Reemplace el raspador (vea la sección
quitanieve deja una titulada Cómo reemplazar el raspador).
capa delgada de
nieve.

1-888-266-7096
