Creative Labs VNIVF0340 Video Conferencing Device User Manual FatPipe CES 2 samples
Creative Labs Inc Video Conferencing Device FatPipe CES 2 samples
Contents
- 1. Users Manual
- 2. Addition to Users Manual
Users Manual
Welcome
We are pleased to present the latest Video Conferencing experience from Creative. Read on to get the most out of your new inPerson™.
Key Features
• High video quality (up to VGA resolution and 2 Mbps bit-rate)
• Excellent low light performance
• Wide-angle lens
• Dual Microphones with Acoustic Echo Cancellation and Noise
Reduction
•Wi-Fi
• Rechargeable, removable Lithium-ion battery
•Auto Login
• Auto Answer
•Screen Saver
• Speed dial
• Call History
•Contact List
Usage Scenarios
• Built-in dual microphones, and audio output to external speakers (not
included) with the bundled RCA cables.
• Built-in dual microphones and internal speaker.
• For privacy: bundled microphone and earphones.
• Viewing on a larger screen: video output to TV with the bundled RCA
cables.
FatPipe_CES_2_samples.fm Page 1 Friday, November 23, 2007 2:11 PM
2
Table of Contents
A Tour of Your inPerson and Remote Control ........................ 3
Power Options ......................................................................... 8
Getting Started ........................................................................ 9
During a Call ............................................................................ 13
Connecting Your inPerson to a TV .......................................... 14
Managing Photos ..................................................................... 15
Managing Your Contact List .................................................... 16
Managing Your Calls ............................................................... 18
Personalizing Your inPerson .................................................. 20
Managing Video Conferencing Settings .................................. 21
Video Conferencing Tips .......................................................... 21
Managing Network Settings .................................................... 22
Upgrading Firmware ............................................................... 23
FAQs/Troubleshooting ............................................................ 24
Information Diagrams ............................................................. 25
Recovery Menu ........................................................................ 25
Specifications .......................................................................... 27
Safety ....................................................................................... 28
Regulatory ............................................................................... 29
FatPipe_CES_2_samples.fm Page 2 Friday, November 23, 2007 2:11 PM
A Tour of Your inPerson and Remote Control 3
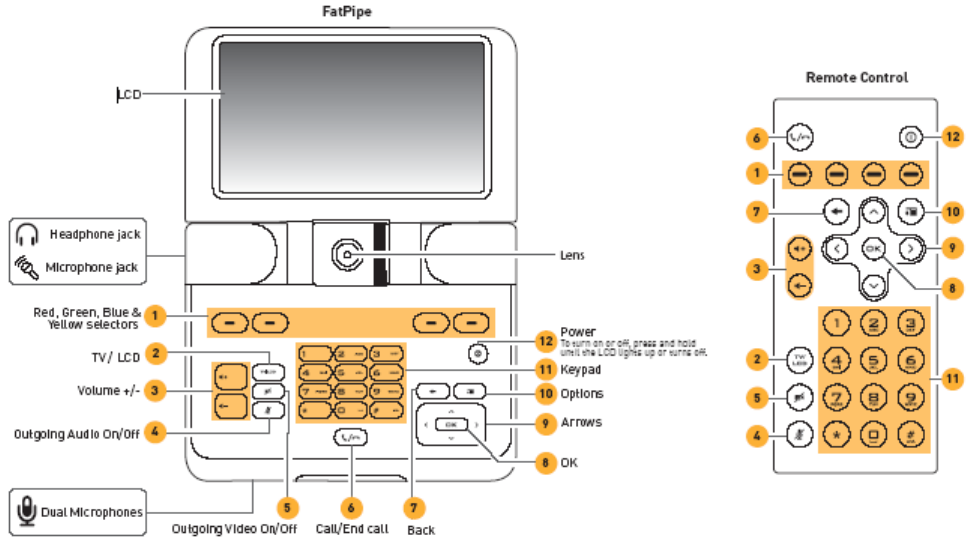
A Tour of Your inPerson and Remote Control
FatPipe_CES_2_samples.fm Page 3 Friday, November 23, 2007 2:11 PM
4 A Tour of Your inPerson and Remote Control
NETWORK
5V DC IN AV OUTPUT
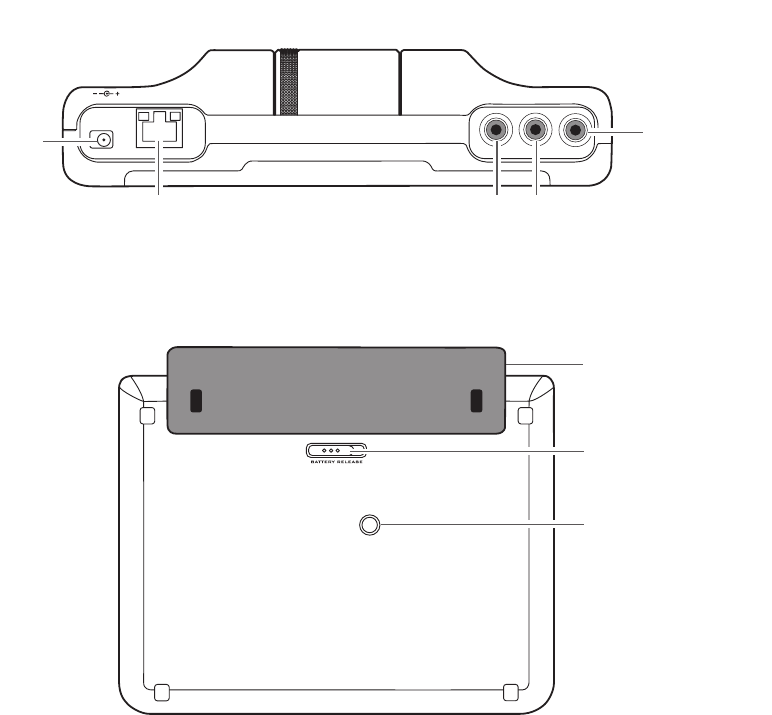
Back
Power
Network port Yellow -
Video In jack
Red -
Audio In (Right) jack
Bottom
Removable Battery
Battery Release switch
Tripod mount
White -
Audio In (Left) jack
FatPipe_CES_2_samples.fm Page 4 Friday, November 23, 2007 2:11 PM
A Tour of Your inPerson and Remote Control 5
The color selectors
Press the red, green, blue or yellow selector on inPerson corresponding to the same color button you want to select on your inPerson’s LCD.
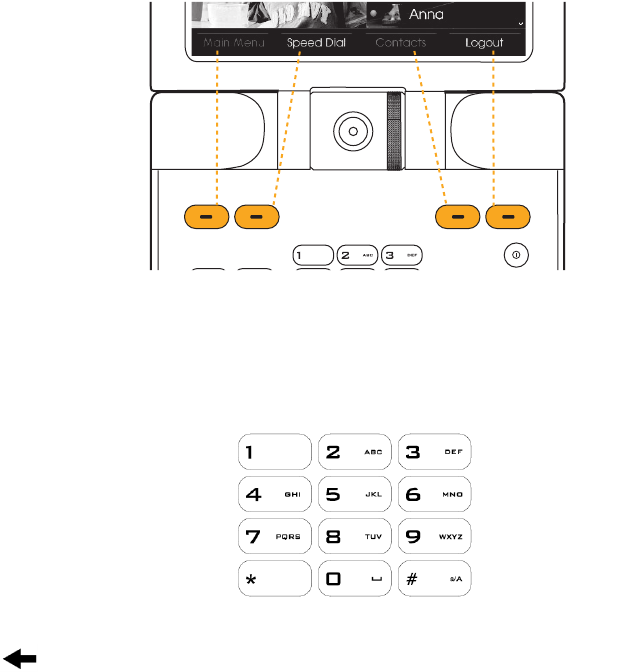
Entering characters
To enter a number, press and hold the numeric button.
To enter an alphabet letter, press the letter's button continuously until the desired letter appears.
To enter symbols, press the * button.
To switch between upper and lower case, press the # button.
Deleting characters
Press the Back button .
FatPipe_CES_2_samples.fm Page 5 Friday, November 23, 2007 2:11 PM
6 A Tour of Your inPerson and Remote Control
We use the term “Highlight“ in this manual to mean the following action:
To move up and down a menu to highlight an item, press the up and down arrows button
Using the Arrows and OK buttons to edit menu items
Highlight the menu item that you want.
To edit a highlighted menu item, press the OK button .
Using the keypad, edit the menu item.
After editing the menu item, press the OK button again.
FatPipe_CES_2_samples.fm Page 6 Friday, November 23, 2007 2:11 PM

A Tour of Your inPerson and Remote Control 7
Using the Options button
Pressing the Options button displays additional options in the following menu screens. To exit from the Options menu, press the Back button
or press the Options button again.
• Video Conferencing screen
• User Account
•During a call
•Contacts
•Main Menu→ System→ Network Settings→ Wi-Fi (Wireless Network)
•Main Menu→ Date & Time→ Display Clock
• Speed Dial
•Photos
• Call history
FatPipe_CES_2_samples.fm Page 7 Friday, November 23, 2007 2:11 PM

8 Power Options
Power Options
There are two power options available for your inPerson:
•Direct power source via the power outlet: if you are near a power outlet, we recommend you to use the power adapter.
The Direct Power icon appears on the LCD.
•Portable removable battery: if you want the convenience of portability, use the rechargeable Lithium-ion battery.
The Battery Charging icon flashes on the LCD indicating that the battery is charging. When the charging is complete, the Battery Full (but
still charging) icon appears on the LCD. You can then disconnect the power adapter.
To use the removable battery
Attach the battery to your inPerson before proceeding to "Getting Started". You can charge the battery and use your inPerson at the same time.
To remove your battery later
Move the battery lock as shown to release the battery.
Battery charging time Up to five hours.
Battery life Up to two hours (50% LCD brightness).
Up to five hours (connected to TV).
FatPipe_CES_2_samples.fm Page 8 Friday, November 23, 2007 2:11 PM
Getting Started 9
Getting Started
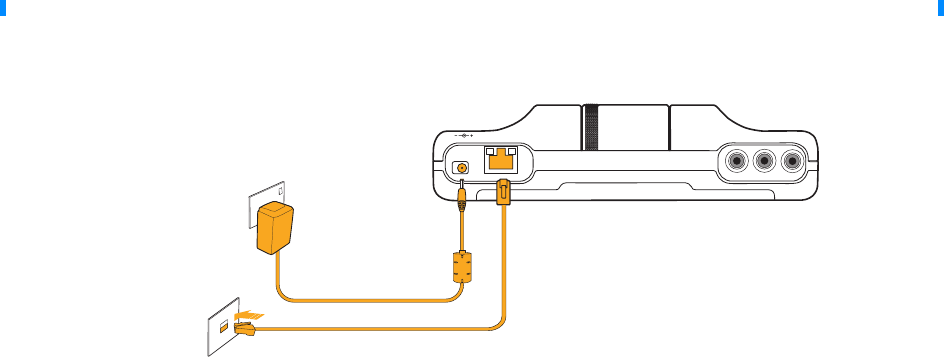
Step 1: Set up your inPerson
1Connect the ethernet cable as shown below.
2Connect your inPerson to a power outlet using the power adapter.
Your inPerson turns on and the LCD lights up after the power adapter is plugged in.
NOTE You do not need to connect the ethernet cable if you are using a Wi-Fi connection.
NETWORK
5V DC IN AV OU TPUT
FatPipe_CES_2_samples.fm Page 9 Friday, November 23, 2007 2:11 PM

10 Getting Started
Step 2: Set Date & Time
After your inPerson turns on for the first time, you need to set the date and time. Using the Arrows button , set the date and time and then
select Next. After setting the date and time, the Network Settings screen appears.
Step 3: Connect to the network
Connecting via Ethernet/LAN (Wired Network)
1Highlight Ethernet/LAN (Wired Network) and press the OK button .
2To automatically enable your Internet Service Provider (ISP) to assign you an IP address, highlight Automatic.
To manually assign a fixed IP address, highlight Manual.
3Press the OK button .
If you selected Manual
i. Enter the IP Address, Subnet Mask, Default Gateway and Preferred DNS Server (See “Using the Arrows and OK buttons to edit menu items” on page 6).
ii. Select Next.
When successfully connected to the network, the Ethernet/LAN icon appears on the LCD.
Connecting via Wi-Fi (Wireless Network)
1Highlight Wi-Fi (Wireless Network) and press the OK button .
2Enter a Profile Name for your Wi-Fi connection and select Ok.
Your configured Wi-Fi settings will be saved under this name for convenient selection in the future.
3Select Scan for available wireless networks or Manual Settings.
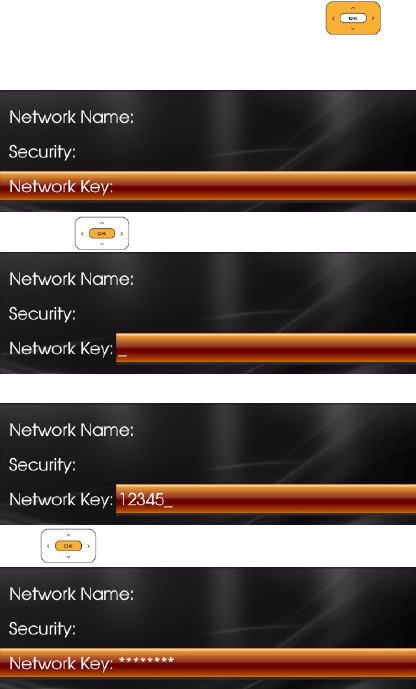
To scan for available wireless networks
i. Highlight the Wi-Fi connection that you want, and press the OK button .
ii. Highlight the Network Name, Security or Network Key menu item you want to edit.
iii. Press the OK button and use the keypad to edit the menu item.
iv. After editing the field, press the OK button again.
v. Repeat steps ii. to iv. to edit the other menu items if necessary.
vi. Select Save.
When network connection is successful, the Wi-Fi icon appears on the LCD.
NOTE • If your inPerson is connected to the network using both Ethernet and Wi-Fi, the Ethernet connection will be used.
• Wi-Fi networks requiring a webpage login are not supported.
FatPipe_CES_2_samples.fm Page 10 Friday, November 23, 2007 2:11 PM
Getting Started 11
To configure Manual Settings
i. Highlight Network Name or Security (if the network is security enabled).
ii. Press the OK button to edit the menu item.
iii. After editing the menu item, press the OK button again.
iv. Select Ok.
When network connection is successful, the Wi-Fi icon appears on the LCD.
Step 4: Sign-in to your account
1Please wait as your inPerson automatically signs in to your account. This may take up to a few minutes. The following will appear:
nUser ID: your ID. This can also be viewed User Details in the CVC conferencing screen.
nDisplay Name: the name your contacts will see. If no display name is entered, your User ID will be displayed.
nPhoto: you can add a display photo to your account after completing the Setup Wizard and when you have a photo library. See “Take a photo of yourself”
on page 13.
2Select Finish.
The User Account screen appears.
3Select Login.
The Video Conferencing screen appears.
Video Conferencing screen
FatPipe_CES_2_samples.fm Page 11 Friday, November 23, 2007 2:11 PM

12 Getting Started
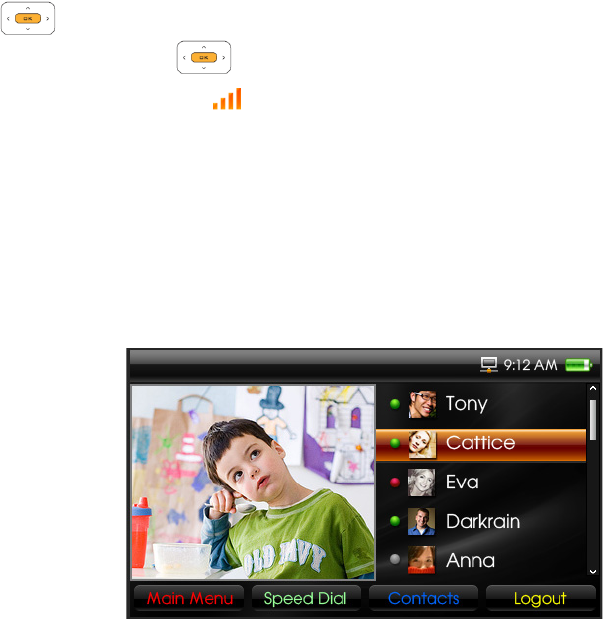
Step 5: Making a call
1If you already have a contact list in your SightSpeed account, your existing contacts will appear.
If you want to add contacts, see “Add a contact” on page 16.
2Highlight the contact you want.
3Press the Call/End Call button .
When a call is established, you will automatically start receiving and sending audio. To start sending video, press the Video On/Off button .
4To end the call, press the Call/End Call button .
TIP To automatically send and receive video for all future calls, select Main Menu→ System→ User Settings→ Default Conferencing Mode→ Audio/
Video On.
FatPipe_CES_2_samples.fm Page 12 Friday, November 23, 2007 2:11 PM

During a Call 13
During a Call
Adjust volume
Press the Volume +/- buttons .
Activate Privacy options
1To turn the outgoing audio on or off, press the Audio On/Off button .
2To turn the outgoing video on or off, press the Video On/Off button .
Switch display views
The default view is non-full screen (aspect ratio: 4 x 3).
1To display full screen video (aspect ratio: 16 x 9), select Switch View.
2To display full screen video (aspect ratio: 4 x 3), select Switch View again.
3To switch back to the default view, select Switch View again.
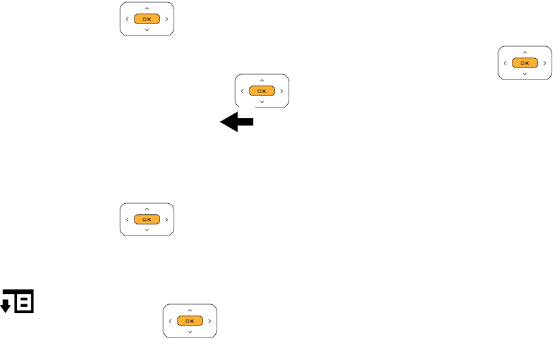
Take a photo of the incoming video
1While video conferencing, press the Options button
2Highlight Photoshot and press the OK button . The photo is taken in about 3 seconds.
3To use this photo as your contact’s display photo. See “Attach a photo to your contact” on page 17.
Take a photo of yourself
1While not video conferencing, press the Options button .
2Highlight Photoshot and press the OK button . The photo is taken in about 3 seconds.
3To use this photo as your display photo. See “Add a display photo to your account” on page 20.
NOTE By default, the outgoing video is turned off when video conferencing starts.
TIP
• To switch views during a call, you can also press the Arrows button .
• To move the outgoing video window when viewing full screen incoming video, press the OK button .
• To show the menu while viewing full screen video, press the yellow selector.
FatPipe_CES_2_samples.fm Page 13 Friday, November 23, 2007 2:11 PM
14 Connecting Your inPerson to a TV
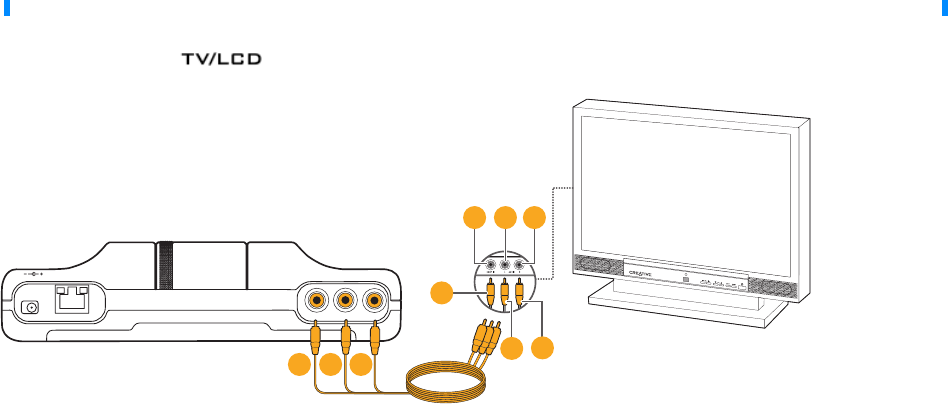
Connecting Your inPerson to a TV
1Connect your inPerson to a TV as shown.
2Press the TV/LCD button .
The LCD will be turned off.
NOTE If you were video conferencing, your inPerson will continue to stream video and audio even if the lid is closed.
NETWORK
5V DC IN AV OUTPUT
4 5 6
89
7
31 2
1Yellow connector
2Red connector
3White connector
4Video In jack - Yellow
5Audio In (Right) jack - Red
6Audio In (Left) jack - White
7Yellow connector
8Red connector
9White connector
FatPipe_CES_2_samples.fm Page 14 Friday, November 23, 2007 2:11 PM
Managing Photos 15
Managing Photos
View photos
1From the User Account or Video Conferencing screen, select Main Menu.
2Highlight Photos and press the OK button .
Thumbnails of your photos are displayed.
To switch display view, press the Options button, highlight Switch View and press the OK button .
3Highlight the photo that you want and press the OK button .
4To return to the thumbnails view, press the Back button .
Delete photos
1From the User Account or Video Conferencing screen, select Main Menu.
2Highlight Photos and press the OK button .
Thumbnails of your photos are displayed.
3Highlight the photo that you want.
4Press the Options button .
5Highlight Delete Photo and press the OK button .
6Select Yes.
FatPipe_CES_2_samples.fm Page 15 Friday, November 23, 2007 2:11 PM
16 Managing Your Contact List
Managing Your Contact List
Add a contact
1Make sure you are logged in to your SightSpeed account.
2From the Main Menu or Video Conferencing screen, select Contacts.
3Select Add.
4Press the OK button to enter your contact’s User ID.
5Using the keypad, enter your contact’s SightSpeed ID (not your contact’s email address).
6After editing, press the OK button again.
If you do not want to associate a display name and photo with your contact, skip to step 12 below.
7Highlight Display Name.
8Following the method described from steps 4 to 6 above, enter the display name for your contact.
9Highlight Photo and press the OK button .
10 Highlight the photo you want.
11 Select Next.
12 Select Save.
Edit your contact’s details
1Make sure you are logged in to your SightSpeed account.
2From the Main Menu or Video Conferencing screen, select Contacts.
3Highlight the contact you want.
4Select Edit.
5Highlight the information you want to edit (User ID cannot be edited).
6Press the OK button .
7Using the keypad, edit your contact’s details.
8After editing, press the OK button again.
FatPipe_CES_2_samples.fm Page 16 Friday, November 23, 2007 2:11 PM

Managing Your Contact List 17
Attach a photo to your contact
1Make sure you are logged in to your SightSpeed account.
2From the Main Menu or Video Conferencing screen, select Contacts.
3Highlight the contact you want.
4Select Edit.
5Highlight Photo.
6Press the OK button .
7Highlight the photo you want.
8Select Next.
9Select Save.
To delete the attached photo, repeat steps 1 to 4 above and select Reset Photo.
Block a contact
1Make sure you are logged in to your SightSpeed account.
2From the Main Menu or Video Conferencing screen, select Contacts.
3Highlight the contact you want.
4Press the Options button , and highlight Block.
5Press the OK button .
Delete a contact
1Make sure you are logged in to your SightSpeed account.
2From the Main Menu or Video Conferencing screen, select Contacts.
3Highlight the contact you want.
4Press the Options button , and highlight Delete.
5Press the OK button .
NOTE All blocked contacts will be unable to contact you.
FatPipe_CES_2_samples.fm Page 17 Friday, November 23, 2007 2:11 PM

18 Managing Your Calls
Managing Your Calls
Add speed dial
1From the User Account or Video Conferencing screen, select Speed Dial.
2Highlight the keypad number you want to assign the speed dial.
3Press the OK button or select Assign.
Your contact list appears.
4Highlight the contact you want assigned to the speed dial.
5Press the OK button .
6Select Yes.
Make a call
1There are several ways to make a call. From the Video Conferencing screen, the following options are available:
nSelect from your Contact list:
i. Select Contacts.
ii. Highlight the contact that you want.
nSpeed dial: Press the pre-assigned keypad number.
nManual SightSpeed ID input:
i. Press any keypad button, and then press the Options button .
ii. Highlight Text and then press the OK button .
iii. Using the keypad, enter your contact’s SightSpeed ID.
2Press the Call/End Call button .
When a call is established, you will automatically start receiving and sending audio. To start sending video, press the Video on/off button .
To automatically send and receive video for all calls, select Main Menu→ System→ User Settings→ Default Conferencing Mode→ Audio On/Video On.
FatPipe_CES_2_samples.fm Page 18 Friday, November 23, 2007 2:11 PM
Managing Your Calls 19
Manage incoming calls
If the incoming call party is on your contacts list, the display name and photo (for contacts with attached photos) will be displayed. For contacts with no
display name, the User ID will be displayed.
To accept a call, select Yes.
To ignore a call, select No.
Enable Auto Answer
This would be useful for remotely monitoring your home or office as your inPerson will automatically answer all calls.
1From the User Account or Video Conferencing screen, select Main Menu.
2Highlight System and press the OK button .
3Highlight User Settings and press the OK button .
4Highlight Auto Answer and press the OK button .
5Highlight the timing you want and press the OK button again.
View your call history
1Make sure you are logged in to your SightSpeed account.
2From the User Account or Video Conferencing screen, select Main Menu.
3Highlight Call History and press the OK button .
4Select < or > to view All Calls, Missed Calls, Incoming Calls, Outgoing Calls.
The type of calls appears at the top of the LCD.
FatPipe_CES_2_samples.fm Page 19 Friday, November 23, 2007 2:11 PM
20 Personalizing Your inPerson
Personalizing Your inPerson
Change Screen Saver settings
1Make sure you are logged in to your SightSpeed account.
2From the User Account or Video Conferencing screen, select Main Menu.
3Highlight System and press the OK button .
4Highlight User Settings and press the OK button .
5Highlight Screen Saver Settings and press the OK button .
Set Date & Time
1Make sure you are connected to the network.
2From the User Account or Video Conferencing screen, select Main Menu.
3Highlight Date & Time and press the OK button .
4Highlight Set Time or Set Date and press the OK button .
5Using the Arrows button , set the date and time and then select Save.
To view the saved time and date, highlight Display Clock and press the OK button .
To change time and date display options, press the Options button .
Add a display photo to your account
1From the Video Conferencing screen, select Logout.
2In the User Account screen that appears, select Edit.
3Enter your SightSpeed password and select Ok.
4Highlight Photo.
5Press the OK button .
NOTE Your inPerson will go into Screen Saver mode after a period of time of non-activity. This time can be changed. You can still receive calls in Screen Saver mode.
FatPipe_CES_2_samples.fm Page 20 Friday, November 23, 2007 2:11 PM

Managing Video Conferencing Settings 21
Managing Video Conferencing Settings
In the Video Conferencing screen, press the Options button to select from the following:
• Video Resolution
• Upload Bandwidth
• Camera Settings
•LCD Brightness
Video Conferencing Tips
Tips for great video
• Avoid strong background light and low light conditions. Example of backlight includes an open window, lamps, lighting, or a white wall behind
you.
• When your face appears too dark or bright, from the video conferencing screen, press the Options button , and then highlight Camera
Settings→ Brightness.
• Avoid using spotlights (for example, table lamp) near your inPerson. Use diffuse light instead (for example, fluorescent light).
• For additional video positioning options, you can attach your inPerson to a tripod.
• When there is an orange or blue cast, from the video conferencing screen, press the Options button , and then highlight Camera Settings→
White Balance.
• When you see your video image flickering, from the video conferencing screen, press the Options button , and then highlight Camera
Settings→ Power Frequency. Check that the correct power frequency is selected. For North America, it should be 60 Hz.
Tips for great audio
• Ensure the openings of the dual-microphones on your inPerson are not blocked by any objects, especially when your inPerson needs to be tilted
at an angle.
• If your contact is not hearing you clearly when you use external speakers with your inPerson, do the following for echo reduction.
i. Move the speakers away from your inPerson.
ii. Ensure that the speakers are not facing the microphones on your inPerson.
iii. Lower the speakers volume.
• If you need to use your inPerson in a noisy environment, we recommend you to use the bundled microphone and earphones.
NOTE If your contact informs you that the audio/video is not as smooth as before, try selecting a lower upload bandwidth and/or lower video resolution.
FatPipe_CES_2_samples.fm Page 21 Friday, November 23, 2007 2:11 PM
22 Managing Network Settings
Managing Network Settings
Set up a Wi-Fi connection
1From the User Account or Video Conferencing screen, select Main Menu.
2Highlight System and press the OK button .
3Highlight Network Settings and press the OK button .
4Highlight Wi-Fi and press the OK button .
To automatically scan for Wi-Fi networks
5Select Scan.
6Highlight the Wi-Fi network you want, and press the OK button .
7Select Save.
To manually add a Wi-Fi network
5Press the Options button and highlight Add.
6Press the OK button .
7Using the keypad, enter a display name for your Wi-Fi network and press the OK button .
8Highlight Manual Settings.
9Select Next.
10 Highlight Network Name or Security (if the network is security enabled).
11 Press the OK button to edit the menu item.
12 After editing the menu item, press the OK button again.
13 Select Ok.
When network connection is successful, the Wi-Fi icon appears on the LCD.
Disable or delete your Wi-Fi connection
1From the User Account or Video Conferencing screen, select Main Menu.
NOTE • If your inPerson is connected to the network using both Ethernet and Wi-Fi, the Ethernet connection will be used.
• Wi-Fi networks requiring a webpage login are not supported.
FatPipe_CES_2_samples.fm Page 22 Friday, November 23, 2007 2:11 PM
Upgrading Firmware 23
2Highlight System and press the OK button .
3Highlight Network Settings and press the OK button .
4Highlight Wi-Fi (Wireless Network) and press the OK button .
5Highlight the Wi-Fi network you want.
To disable a Wi-Fi connection
6Press the Options button and highlight Disable Wi-Fi.
7Press the OK button .
To delete a Wi-Fi profile
6Press the Options button and highlight Delete.
7Press the OK button .
Disconnect your Ethernet connection
Simply unplug the Ethernet cable from your inPerson.
View network settings
1From the User Account or Video Conferencing screen, select Main Menu.
2Highlight System and press the OK button .
3Highlight Network Settings and press the OK button .
4Highlight Ethernet/LAN (Wired Network) or Wi-Fi (Wireless Network).
5Select View Details.
Upgrading Firmware
Your inPerson’s menu interface, features and operations are controlled by its firmware. Sometimes, improvements are made to the firmware and
these firmware upgrades are automatically detected when your inPerson is connected to the network. When a newer firmware version is available, you
may be prompted to upgrade to the new version. Alternatively, you can check if a new firmware version is available, select Main Menu→ System→
Firmware Upgrade.
1Follow the instructions to download and install the new firmware. You will be prompted to restart your inPerson for the changes to take place.
2After restarting, your inPerson will automatically attempt to login to your account.
FatPipe_CES_2_samples.fm Page 23 Friday, November 23, 2007 2:11 PM

24 FAQs/Troubleshooting
FAQs/Troubleshooting
My inPerson is not responding. What do I do?
Try resetting your device.
• Press and hold the Power button to turn off your inPerson, and then turn it on again.
• If your inPerson is connected to the power outlet, remove and re-connect the power adapter from your inPerson.
• If your inPerson is running on battery power, remove and re-attach the battery before turning on your inPerson again.
My inPerson is unable to connect to my Wi-Fi network. What do I do?
From the User Account or Video Conferencing screen, select Main Menu→ System→ Network Settings→ Wi-Fi→ Scan.
Is your Wi-Fi network displayed?
If your Wi-Fi network is displayed, make sure the network name and the security settings are correctly entered. The Wi-Fi signal may also be weak,
or there may be too many people logged in to the network. Try scanning for Wi-Fi networks and logging in again later.
If your Wi-Fi network is not displayed, make sure that:
i. Your Wi-Fi router is turned on.
ii. Wi-Fi is enabled on the router.
iii. Your inPerson is placed nearer to the router.
What does incoming and outgoing video quality depend on?
The video quality depends on the device, video resolution and network bandwidth used by yourself and your contact. In addition, your inPerson
supports the h.264 (higher quality) and h.263 video codecs. If your contact’s device only supports the h.263 video codec, you may experience lower
video quality.
I am not logged in to my SightSpeed account, and cannot access some menu options in Main Menu. Why is this so?
Some menu items can only be accessed when you are logged in to your SightSpeed account.
Main Menu items (logged in to your account): Contacts, Speed Dial, Call History, Photos, Date & Time, System.
Main Menu items (logged out from your account): Photos, Date & Time, System.
I am being prompted to upgrade my inPerson firmware. What do I do?
See “Upgrading Firmware” on page 23.
I have set the date and time, but it is not correct when I restart my inPerson. What do I do?
FatPipe_CES_2_samples.fm Page 24 Friday, November 23, 2007 2:11 PM
Information Diagrams 25
Make sure your inPerson is connected to the network, and then set the date and time again. From the User Account or Video Conferencing screen,
select Main Menu→ Date & Time.
My time display is blinking. What does it mean?
When your time display is blinking, your inPerson is trying to connect to the Internet to retrieve the current time. The time display will stop blinking
when your inPerson is connected to the Internet and the current time has been retrieved.
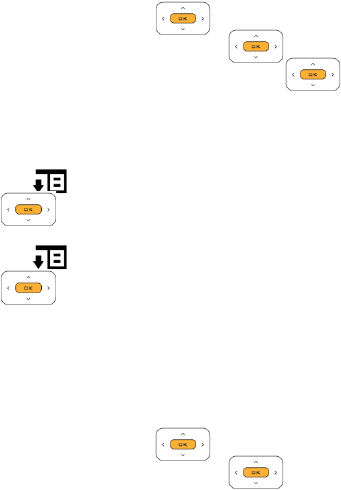
Information Diagrams
Recovery Menu
In the recovery menu, you can select to do the following:
•Clean Up Photo Library: select this when your photos are corrupted and you encounter problems displaying photos in thumbnail view.
•Restore Default Settings (device will restart): select this to reset your personalized settings back to default.
•Format Disk (all files will be deleted & device will restart): select this to reformat your inPerson. Warning: all content will be deleted. After
performing this, your inPerson will restart with the currently installed firmware.
•Reinstall Firmware (device will restart): select this to download and install the latest firmware version. Your personalized settings will not be
deleted.
To enter the recovery menu
1Ensure that your inPerson is turned off.
2While holding down the Call/End Call button , press and release the Power button .
3When the inPerson logo appears, continue to press the Call/End Call button .
4When the Creative logo appears, release the Call/End Call button .
The Recovery Menu appears.
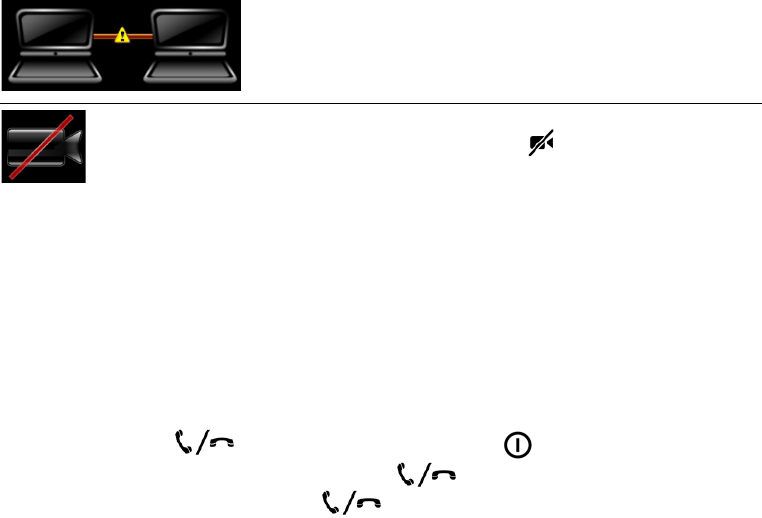
No video due to network congestion.
Outgoing video turned off. To turn on the outgoing video, press
the Video On/Off button .
FatPipe_CES_2_samples.fm Page 25 Friday, November 23, 2007 2:11 PM
26 Recovery Menu
To exit the recovery menu
From the Recovery Menu screen, select Restart.
FatPipe_CES_2_samples.fm Page 26 Friday, November 23, 2007 2:11 PM

Specifications 27
Specifications
Dimensions (W x D x H) 7.6’’ x 5.9’’ x 1.9’’ (194.3 mm x 150.5 mm x 48 mm)
Image Sensor Color VGA CMOS (5.04 µm active square pixels)
Lens Precision glass lens, F/2.0
Field of View 76° ultra wide angle
LCD (Color Display) 7’’diagonal (16.7 million colors)
Microphone Built-in hardware AEC with dual microphones
Video Resolution Maximum 640 x 480 (VGA)
Exposure (brightness) Automatic, manual adjustment
White Balance Automatic, manual (Auto, Fluorescent, Incandescent, Outdoors) adjustment
Video Resolution 640 x 480 (VGA), 352 x 288 (CIF), 320 x 240, (QVGA), 176 x 144 (QCIF)
Effective Focal Range 30 cm to infinity
Video Codec Support H.264, H.263, H.263+
Audio Codec Support dvi4, ilbc, G.711, G.723.1a, G.729ab, telephony tone signalling (rfc2833)
Communication Protocol SIP/SDP, RTP/RTCP, STUN, ICE
Network Protocol UDP, TCP, ARP, DHCP, SNTP, ICMP
Ethernet Connection RJ-45
Ethernet Network Interface 10/100 Base-T
Wireless Standards Compliance IEEE 802.11b and IEEE 802.11g
Wireless Security WEP (64-bits), WEP (128-bits), WPA-PAK (TKIP), WPA-PSK (AES)
Specific Absorption Rate (SAR) 0.138 mW/g
Power Source AC power adapter:100 - 240 VAC, 50/60 Hz, 5 V/2.4 A
Rechargeable Lithium-ion battery: 3.7 V/3500 mAH
Power Consumption 6 W (typical), 12 W (maximum)
FatPipe_CES_2_samples.fm Page 27 Friday, November 23, 2007 2:11 PM
28 Safety
Safety
Refer to the following information to use your product safely, and to reduce the chance of electric shock, short-circuiting, damage, fire, hearing
impairment or other hazards. Improper handling may void the warranty for your product. For more information, read the warranty available with
your product.
• Do not dismantle or attempt to repair your product.
Refer all servicing to authorized repair agents.
• Do not expose your product to temperatures outside the range of 0°C to 40°C (32°F to 104°F).
• Do not pierce, crush or set fire to your product.
• Keep your product away from strong magnetic objects.
• Do not subject your product to excessive force or impact.
• Do not expose your product to water or moisture.
If your product is moisture-resistant, take care not to immerse your product in water or expose it to rain.
Earphones
• When a conductive apparatus such as earphones, is used in close proximity with a CRT television or CRT monitor, the latter may emit an
electrostatic discharge. This electrostatic discharge can be felt as a static shock. While this static shock is usually harmless, it is good practice
to avoid close contact with CRT devices when using earphones.
• Do not listen to audio on your earbuds or headphones at high volume for prolonged periods of time as hearing loss may result. For users in the
United States, go to www.hei.org for more information.
Removable Battery
• The battery must be recycled or disposed of properly. Contact local agencies for recycling and disposal information.
• Do not allow metal objects to touch the terminals of your battery.
• If there is leakage, an offensive odor, discoloration or deformation during charging or use, remove the battery and do not use it again. Clean your
hands well before touching food or sensitive areas, for example, your eyes.
FatPipe_CES_2_samples.fm Page 28 Friday, November 23, 2007 2:11 PM
Regulatory 29
Regulatory
The following sections contain notices for various countries:
CAUTION: This product is intended for use with FCC/CE certified computer equipment. Please check the equipment operating/installation manual and/or with
the equipment manufacturer to verify/confirm if your equipment is suitable prior to the installation or use of the product.
Notice for the USA
FCC Part 15: This equipment has been tested and found to comply with the limits for a Class B digital device, pursuant to Part 15 of the FCC Rules. These limits
are designed to provide reasonable protection against harmful interference in a residential installation. This equipment generates, uses and can radiate radio
frequency energy and, if not installed and used in accordance with the instructions, may cause harmful interference to radio communications. However, there is
no guarantee that interference will not occur in a particular installation. If this equipment does cause harmful interference to radio or television reception, which
can be determined by turning the equipment off and on, the user is encouraged to try to correct the interference by one or more of the following measures:
• Reorient or relocate the receiving antenna.
• Increase the separation between the equipment and receiver.
• Connect the equipment into an outlet on a circuit different from that to which the receiver is connected.
• Consult the dealer or an experienced radio/TV technician for help.
This device complies with part 15 of the FCC Rules. Operation is subject to the following two conditions:
1This device may not cause harmful interference, and
2This device must accept any interference received, including interference that may cause undesired operation.
CAUTION: To comply with the limits of the Class B digital device, pursuant to Part 15 of the FCC Rules, this device must be installed with computer equipment
certified to comply with Class B limits.
All cables used to connect to the computer and peripherals must be shielded and grounded. Operation with non-certified computers or non-shielded cables may
results in interference to radio or television reception.
MODIFICATION: Any changes or modifications not expressly approved by the grantee of this device could void the user's authority to operate the device.
Federal Communication Commission (FCC) Radiation Exposure Statement
This equipment complies with FCC radiation exposure limits set forth for an uncontrolled environment. This transmitter must not be co-located or
operating in conjunction with any other antenna or transmitter.
For body operation, inPerson has been tested and meets the FCC RF exposure guidelines when used directly against the body. Specific Absorption Rate, or SAR
is a measurement of radio frequency energy. The FCC permits a maximum SAR value of 1.6 mW/g. The highest SAR value for this product when used on the
body, as described in this user guide, is 0.138 mW/g.
Notice for Canada
This Class B digital apparatus complies with Canadian ICES-003.
Cet appareil numérique de la classe B est conforme à la norme NMB-003 du Canada.
FatPipe_CES_2_samples.fm Page 29 Friday, November 23, 2007 2:11 PM
30 Regulatory
CANADIAN CLASS B STATEMENT: This digital device does not exceed the Class B limits for radio noise emissions from digital apparatus as set out in the
interference-causing equipment standard entitled "Digital Apparatus," ICES-003 of the Department of Communications.
Cet appareil numerique respecte les limites de bruits radioelectriques applicables aux appareils numeriques de Classe B prescrites dans la norme sur le
materiel brouilleur: "Appareils Numeriques," NMB-003 edictee par le ministre des Communications.
MODIFICATION: Any changes or modifications not expressly approved by the grantee of this device could void the user's authority to operate the device.
Toute modification non approuvée explicitement par le fournisseur de licence de l'appareil peut entraîner l'annulation du droit de l'utilisateur à utiliser
l'appareil.
Information in this document is subject to change without notice and does not represent a commitment on the part of Creative Technology Ltd. No part of this manual may be reproduced or transmitted in
any form or by any means, electronic or mechanical, including photocopying and recording, for any purpose without the written permission of Creative Technology Ltd.
Copyright © 2008 Creative Technology Ltd. All rights reserved. The Creative logo and Live! are trademarks or registered trademarks of Creative Technology Ltd. in the United States and/or other countries.
All other brand and product names listed are trademarks or registered trademarks of their respective holders.
FatPipe_CES_2_samples.fm Page 30 Friday, November 23, 2007 2:11 PM