Crosley CAHE8ER14 User Manual AIR CONDITIONER Manuals And Guides L0808382
FRIGIDAIRE Air Conditioner Room (42) Manual L0808382 FRIGIDAIRE Air Conditioner Room (42) Owner's Manual, FRIGIDAIRE Air Conditioner Room (42) installation guides
User Manual: Crosley CAHE8ER14 CAHE8ER14 CROSLEY AIR CONDITIONER - Manuals and Guides View the owners manual for your CROSLEY AIR CONDITIONER #CAHE8ER14. Home:Heating & Cooling Parts:Crosley Parts:Crosley AIR CONDITIONER Manual
Open the PDF directly: View PDF ![]() .
.
Page Count: 8
INSTALLA]]ONINSTRUC]]ONS
Gatherthe requiredtoolsand partsbe|ore starting installation,
Readand followthe InstTuctlonsprovidedwithany toolslisted
here.
Tools Ele_le_l
m Flat-blade and Phillips [] Tape measure
screwdrivers [] Drillend _/=e"orsrnallerbit
[] Level
Through-the-Wall Installation:
In addition to the toolslistedabove, the [ollowingtoolsare
neededIor through-the-wallinstallation.
[] Saw [] 1" (2,5cm) orthicker
lumber
[] Wood preservative
[] Caulk [] #10x 1" wood screws (7)
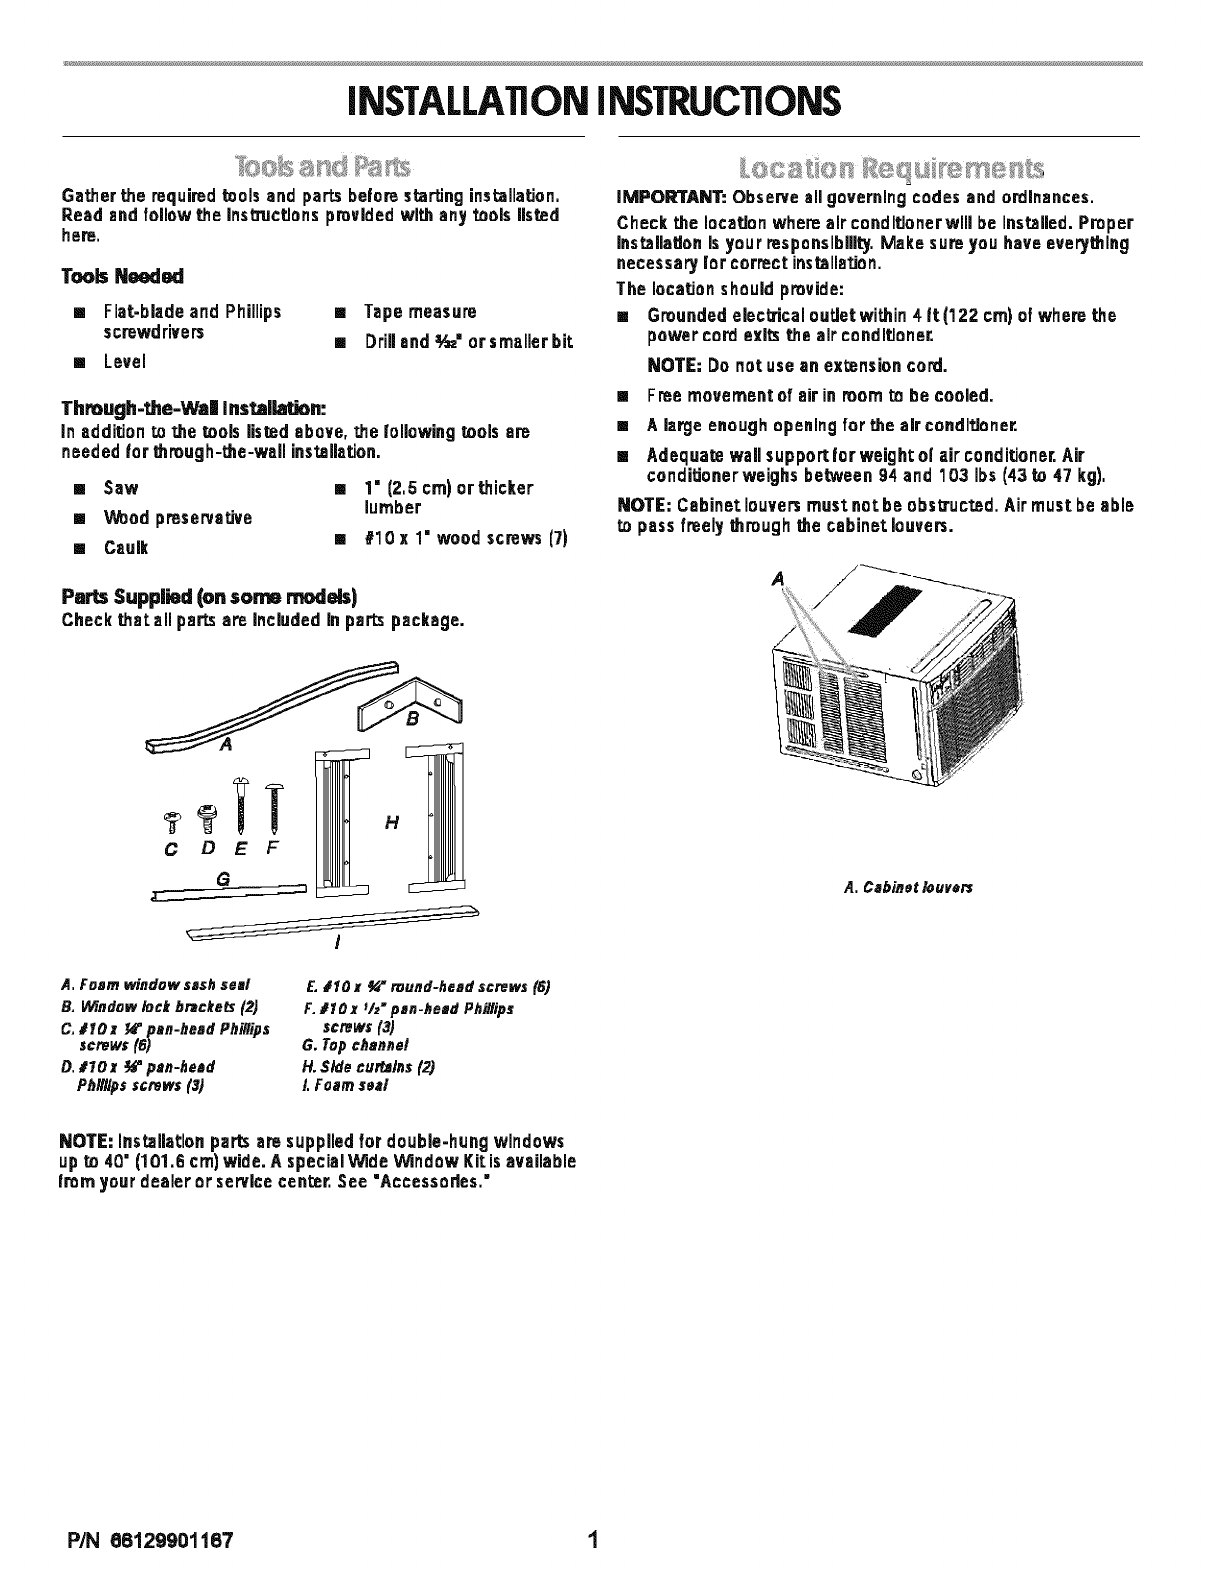
Parts Supplied (on sow==models)
Checkthat all parts ere Included Inpartspackage.
C D E F
H
A. Foam window sash seal
B. [Mndow /oei_brackets {2)
C. #TO x_" pen-head Phillips
SCreWS(6)
D. #lOx _pen-head
Phillips screws (3)
E. 110 x_" round-head screws (6)
F. #TO x_h" pan-head Phillips
SCreWS (3)
G. Top channel
H.Sidecurtains(2)
L Foamseal
IMPORTANT: Observeallgoverningcodesand ordinances.
Checkthe locationwhereair condltJonerwlllbe Installed.Proper
Installation Isyour responsibility.Make sureyou haveeverything
necessarylor correctinstallation.
The locationshouldprovide:
[] GroundedelectzicalouLietwiLhin4 ft(122 cm)of wherethe
power cordexits the airconditioner.
NOTE: Donot usean extensioncord.
[] Freernovementof airinroom to be cooled.
[] A large enoughopeningfor the air conditioner.
[] Adequatewallsupportlorweightol airconditioner.Air
condil_onerweighsbetween94 and 103 Ibs(43to 47 kg),
NOTE: Cabinetlouversmustnot be obstructed. Air mustbe able
to pass freely_reugh _e cabinetlouvers.
A
A. Cabinet louvers
NOTE: Installationpartsare suppliedfor double-hungwindows
upto 40' (101.6 crn)wide. A specialWideWindowKiLlsavailable
fromyour dealeror servicecenter.See "Accessories."
P/N 66129901167 1
--A--T--
B
!I
A.27" (68.6cm) minimum
B. 161/4" (41.3 cm)minimum
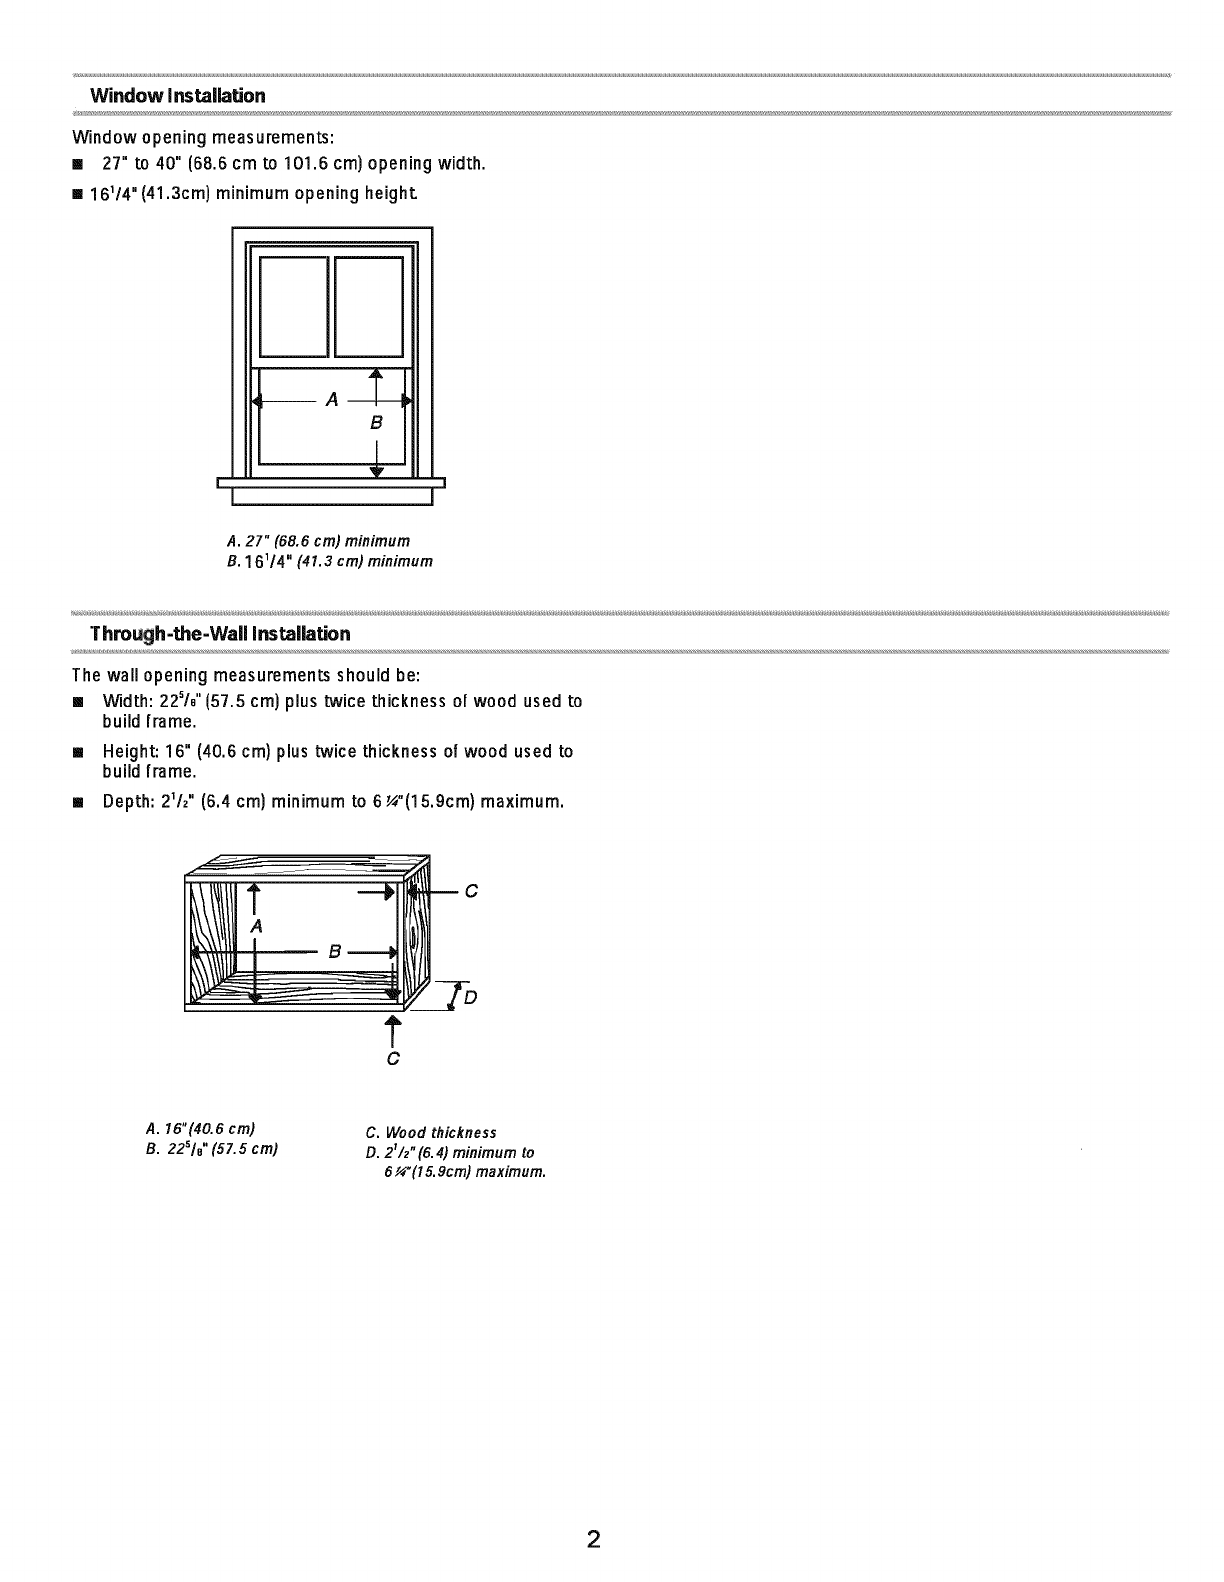
[] Height: 16" (40.6 cm) plustwice thickness o|wood used to
buildframe.
[] Depth: 21/2" (6.4 cm) minimum to 6 ¼"(15.9cm) maximum.
C
A. 16"(40.6 cm)
B. 22Sl8"(57.5 cm) C, Wood thickness
I
D. 2/z" (6.4) minimum to
614"(15.9cm) maximum.
2
INSTALLATION INSTRUCTIONS
E_mlw We,|_t Remove _e windowlock bracketandscrewf_omthe air
condltioner and set aside,Io. some modeIs)
[] Removeand disposeolJmc_clepackaging ma1_rlals,
Remove _pe amd glue residue f_m surfaces before _umlng
en the air cendiUoner Rob aareal! aroeunto[ liquid dishsoap
overtheadhesive withyear finger_,Wipewi_hw_ wa_r
and dry,
[] Do nozuse sharp Ins_umenL% rubbing alcal_ol, flammable
fluids, or abrasive cleaners _remove _pe or glue, These
products can damage the sur_a©eel _oureirconditJonar_
[] HandlethealrcondRionargen_],
I. Removethe air coedlBonerlr_m_e car_n and placei_o_
€_rdboa_d,
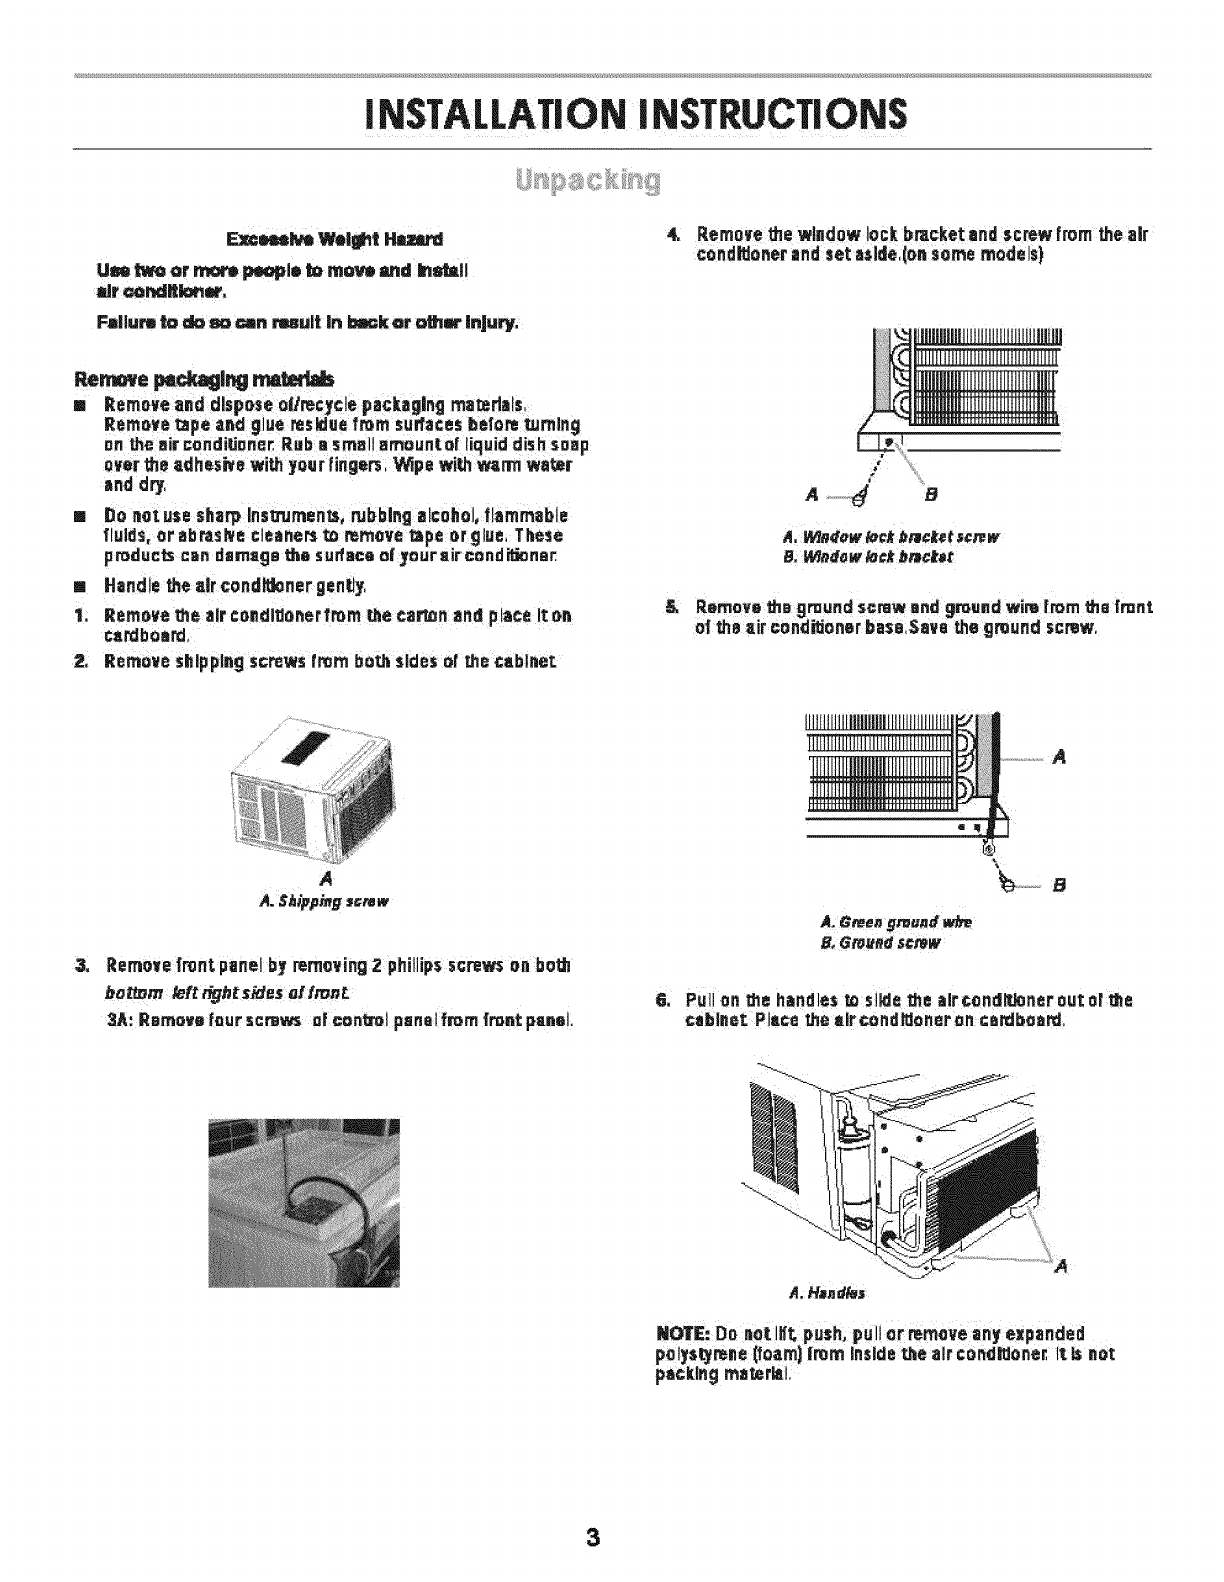
2, Remove sl_lppl_g screws lro_n bombsides o! the ceblmeT.
A _ e
B. _nd_w _¢k b_c_t
._ Remove_e groundscrew andgm_ed wire_romthe fmnf.
of the _ir conditionerbese,$a_athe groundscrew,
3_
...... iii ¸
N
_emo_e fron_ panel by removing 2 philiip_ screws o_ boLh
bot_m teft mjht s_es oHmM.
3A: Remo_e [_ur screw_ a! con_! panelfrom ]r_nt pens].
6_
e, er_eeescrew
Pullon the handles_ slide the al_condIPJonerou_el _Jhe
cabinet Piece the elf tend _ner en co.beard,
3
NOTES:
[] Handle the air conditioner gently.
Bottom view
[] Be sure your air conditioner cabinet does notlalloutol the
opening during installation or removal.
The place where the power cord exits the air conditioner
should be no more than 4 It(122 cm) from a grounded
3 prong outlet.
[] Do not block the louvers on the front panel. A
[] Do not block the louvers on the outside oi the air conditioner.
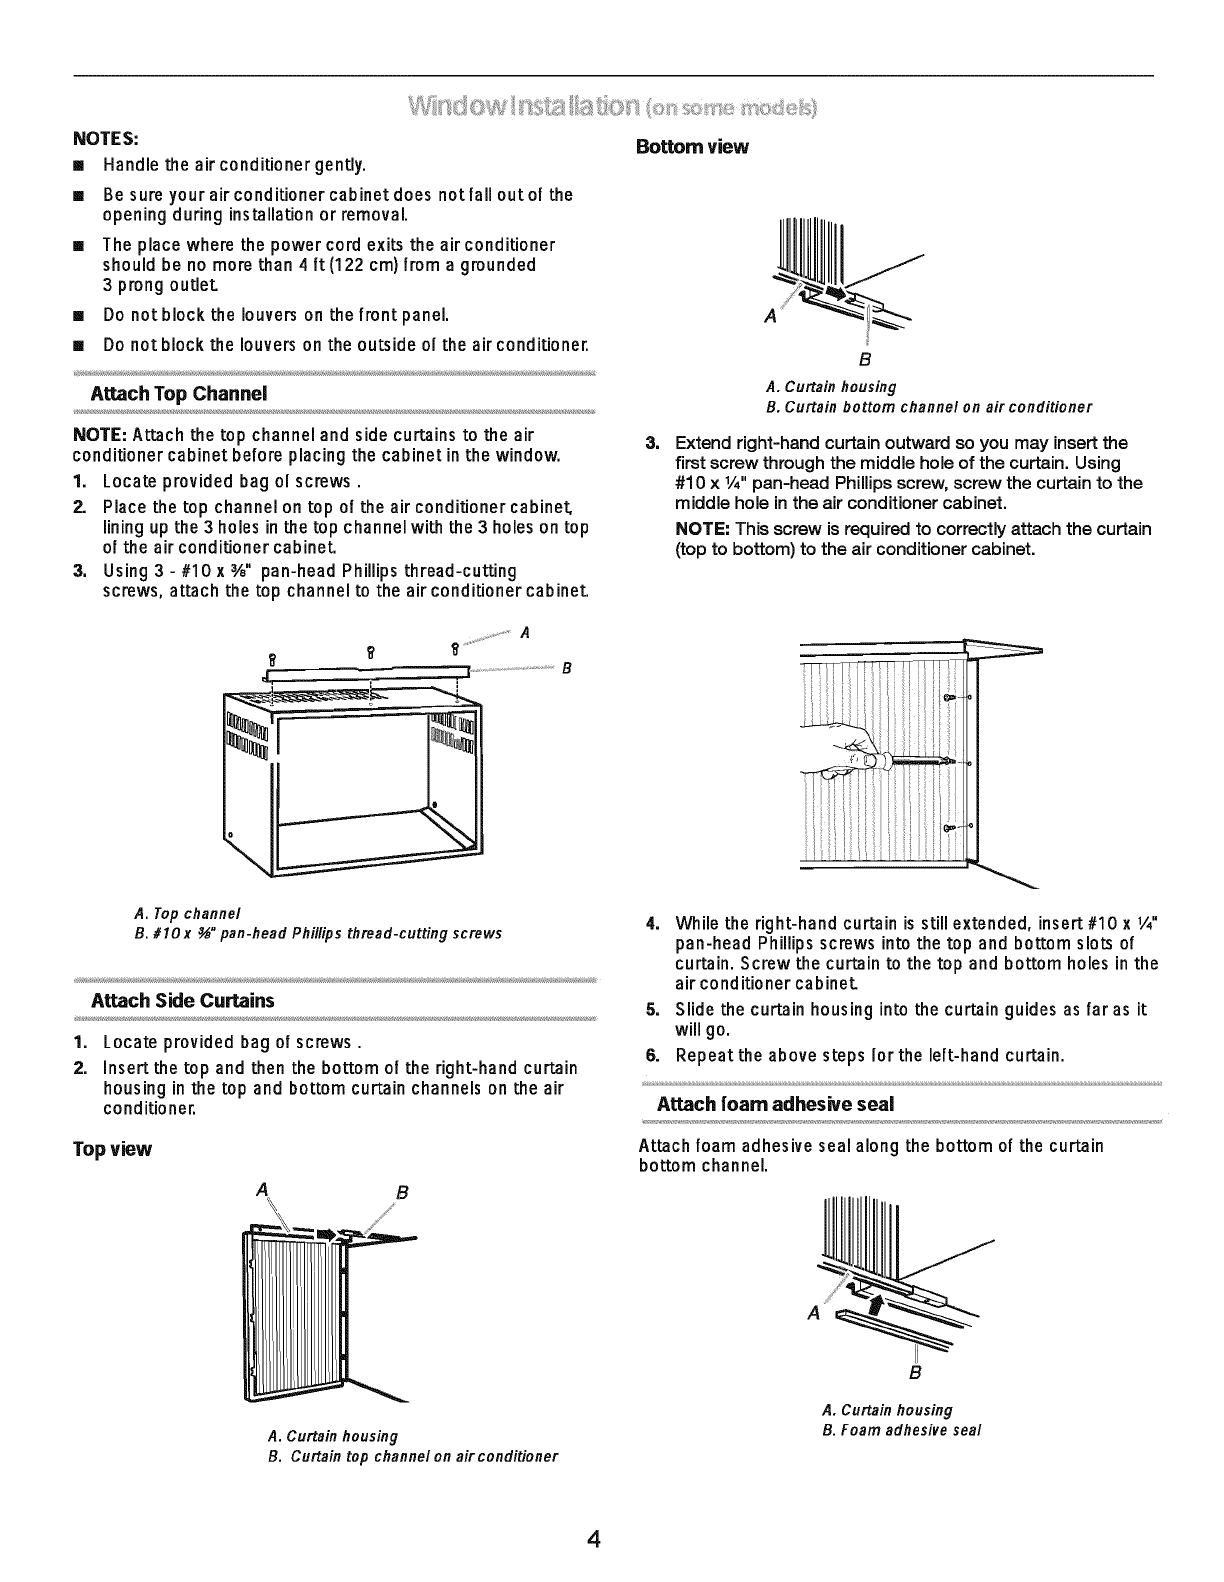
Attach Top Channel
B
A. Curtain housing
B. Curtain bottom channel on air conditioner
NOTE: Attachthe top channeland sidecurtains to the air
conditionercabinetbefore placingthe cabinetinthe window.
1. Locateprovidedbagol screws.
2. Place the top channelontop ol the air conditionercabinet,
liningupthe 3 holesinthe top channelwiththe 3 holeson top
ol the airconditionercabinet.
3. Using3 - #10 x_/s"pan-headPhillips thread-cutting
screws,attach the top channelto the airconditionercabinet.
3, Extend right-hand curtain outward so you may insert the
first screw through the middle hole of the curtain. Using
#10 x V_" pan-head Phillips screw, screw the curtain to the
middle hole in the air conditioner cabinet.
NOTE: This screw is required to correctly attach the curtain
(top to bottom) to the air conditioner cabinet.
_ _ A
,_ _ B
A, Top channel
B, #10 x _" pan-head Phillips thread-cutting screws
Attach Side Curtains
1. Locate provided bag of screws.
2. insert the top and then the bottom ol the right-hand curtain
housing in the top and bottom curtain channels on the air
conditioner.
Top view
A B
4. While the right-hand curtain is still extended, insert #10 xV,"
pan-head Phillips screws into the top and bottom slots of
curtain. Screw the curtain to the top and bottom holes in the
air conditioner cabineL
5. Slide the curtain housing into the curtain guides as faras it
will go.
6. Repeat the above steps lor the lelt-hand curtain.
Attach foam adhesive seal
Attach foam adhesive seal along the bottom of the curtain
bottom channel.
A
A. Curtain housing
B. Curtain top channel on air conditioner
B
A. Curtain housing
B. Foam adhesive seal
4
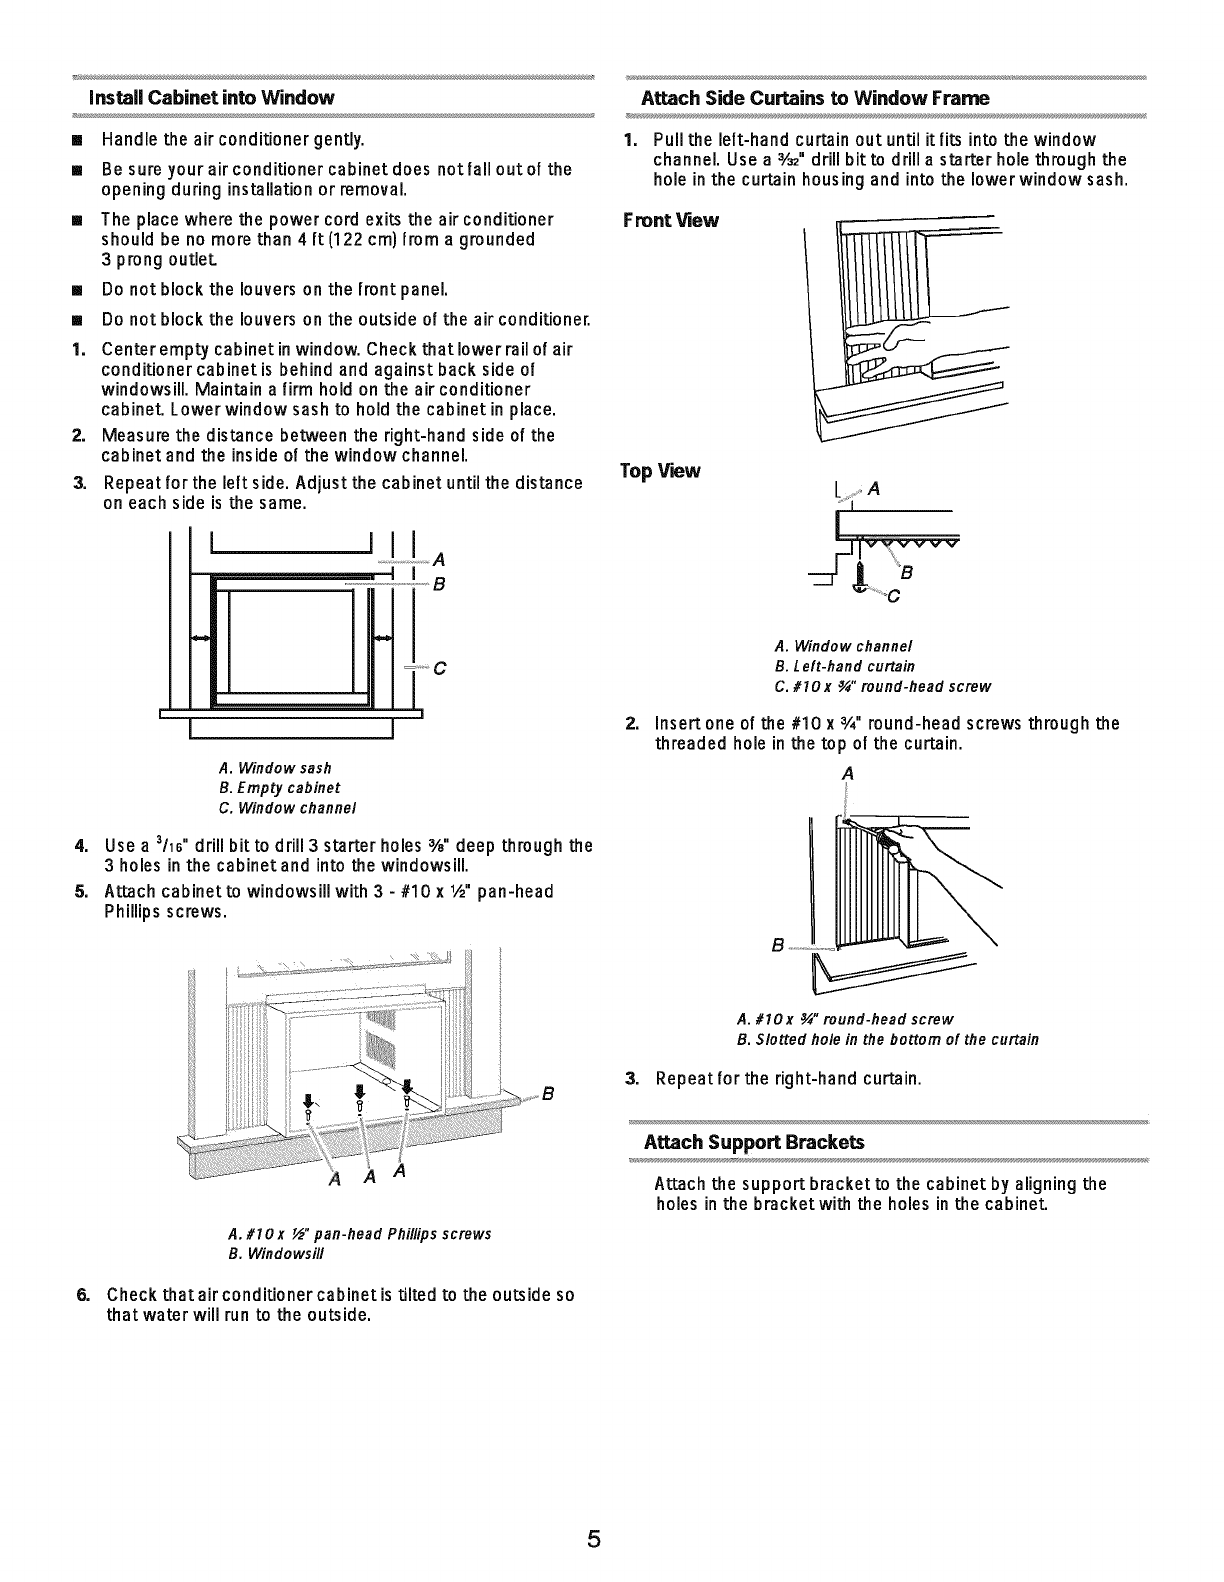
Install Cabinet into Window
[] Handlethe air conditionergently.
[] Be sureyour airconditionercabinetdoesnotfalloutofthe
openingduringinstallationor removal.
[] The placewherethe power cordexits the airconditioner
shouldbe no morethan 4 ft (122 cm)from a grounded
3 prongoutlet.
[] Do notblockthe louversonthe frontpanel.
[] Do notblockthe louversonthe outsideof the air conditioner.
9=
2.
3.
Centarempty cabinetinwindow.Checkthat lowerrailof air
conditionercabinetis behindand againstback sideof
windowsill.Maintaina firmholdon the air conditioner
cabinet.Lower windowsashto holdthe cabinetinplace.
Measurethe distancebetweenthe right-handside of the
cabinet andthe insideof the windowchannel.
Repeatfor the left side.Adjustthe cabinetuntilthe distance
on each sideis the same.
i!
Jl
•=
JA
IB
J
A. Window sash
B. Empty cabinet
C. Window channel
4.
5.
Use a Zh6" drill bitto drill 3 starter holes 3/8"deep through the
3 holes in the cabinetand into the windowsill.
Attachcabinet to windowsillwith3 -#10 x1,_,,pan-head
Phillips screws.
A
6.
A. #10 x ½" pan-head Phillips screws
B. Windowsill
Check that air conditioner cabinet is tilted to the outside so
that water will run to the outside.
Attach Side Curtains to Window Frame
9. Pullthe left-hand curtainout untilit fits intothe window
channel.Use a 3/=,,drillbit to drilla starter holethroughthe
hole inthe curtainhousingand into the lower windowsash.
Frant View
Top View
2=
A. Window channel
B. Left-hand curtain
C. #10 x¾" round-head screw
Insert one of the #10 x3/4"round-head screws through the
threaded hole in the top of the curtain.
A
B
A. #10 x¾" round-head screw
B. Slotted hole in the bottom of the curtain
3. Repeatforthe right-hand curtain.
Attach Support Brackets
Attachthe supportbracketto the cabinet by aligning the
holes inthe bracket with the holes inthe cabinet.
5
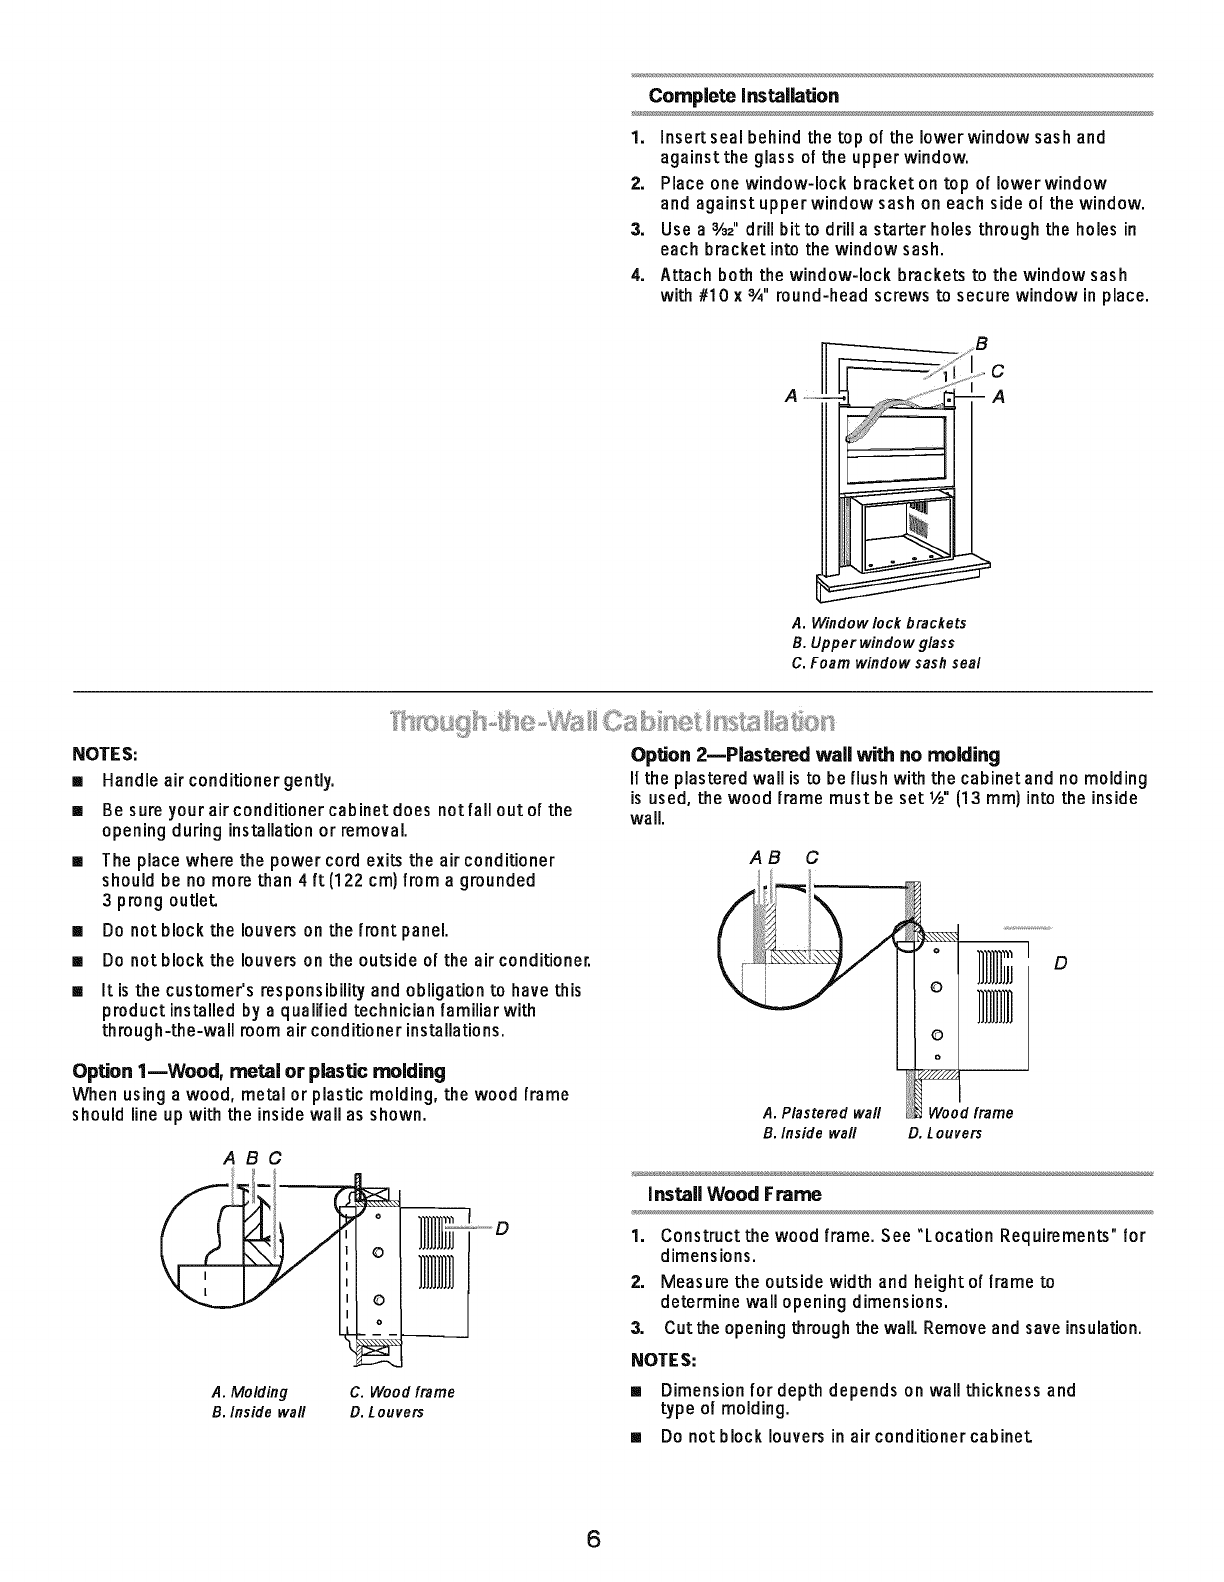
Complete Installation
1. Inser_seal behind the top of the lower window sash and
againstthe glassof the upperwindow.
2. Place onewindow-lockbracketon top of Iowerwindow
and against upperwindowsash on eachside ol the window.
3. Use a 3/32"drillbitto drilla starter holesthroughthe holesin
each bracketintothe windowsash.
4. Attach both the window-lock brackets to the window sash
with#10 x3A"round-headscrews to securewindowin place.
C
A
A. Window lock brackets
B. Upper window glass
C, Foam window sash seal
NOTES:
[] Handle air conditionergently.
[] Be sure yourairconditionercabinetdoes notfall outof the
openingduringinstallationor removal.
[] Theplacewherethe powercord exitsthe air conditioner
should be no more than 4ft(122 cm)froma grounded
3prong outlet
[] Do not block the louverson the [rent panel.
[] Do notblock the louverson the outside of the airconditioner.
[] It isthe customer'sresponsibility and obligationto have this
productinstalledby a qualifiedtechnician familiarwith
through-the-wall roomairconditionerinstallations.
Option I mWood, metal or plastic molding
Whenusingawood,metal or plasticmolding,the wood Irame
shouldline upwiththe insidewailas shown.
ABC
: o ''0
A. Molding
B. Inside wall
C. Wood frame
D. Louvers
Option 2mPlastered wall with no molding
If the plastered wailisto be Ilush withthe cabinetand no molding
is used,the wood Irame must be set 1/2" (13mm) intothe inside
wall.
AB C
D
A. Plastered waft Wood frame
B. Inside wall D. Louvers
Instail Wood Ftame
1.
2.
3.
Construct the wood frame. See "Location Requirements" for
dimensions.
Measure the outside width and height of Irame to
determine wail opening dimensions.
Cut the opening through the wall. Remove and save insulation.
NOTES:
[] Dimension for depth depends on wall thickness and
type of molding.
[] Do notblock louvers in air conditioner cabinet
6
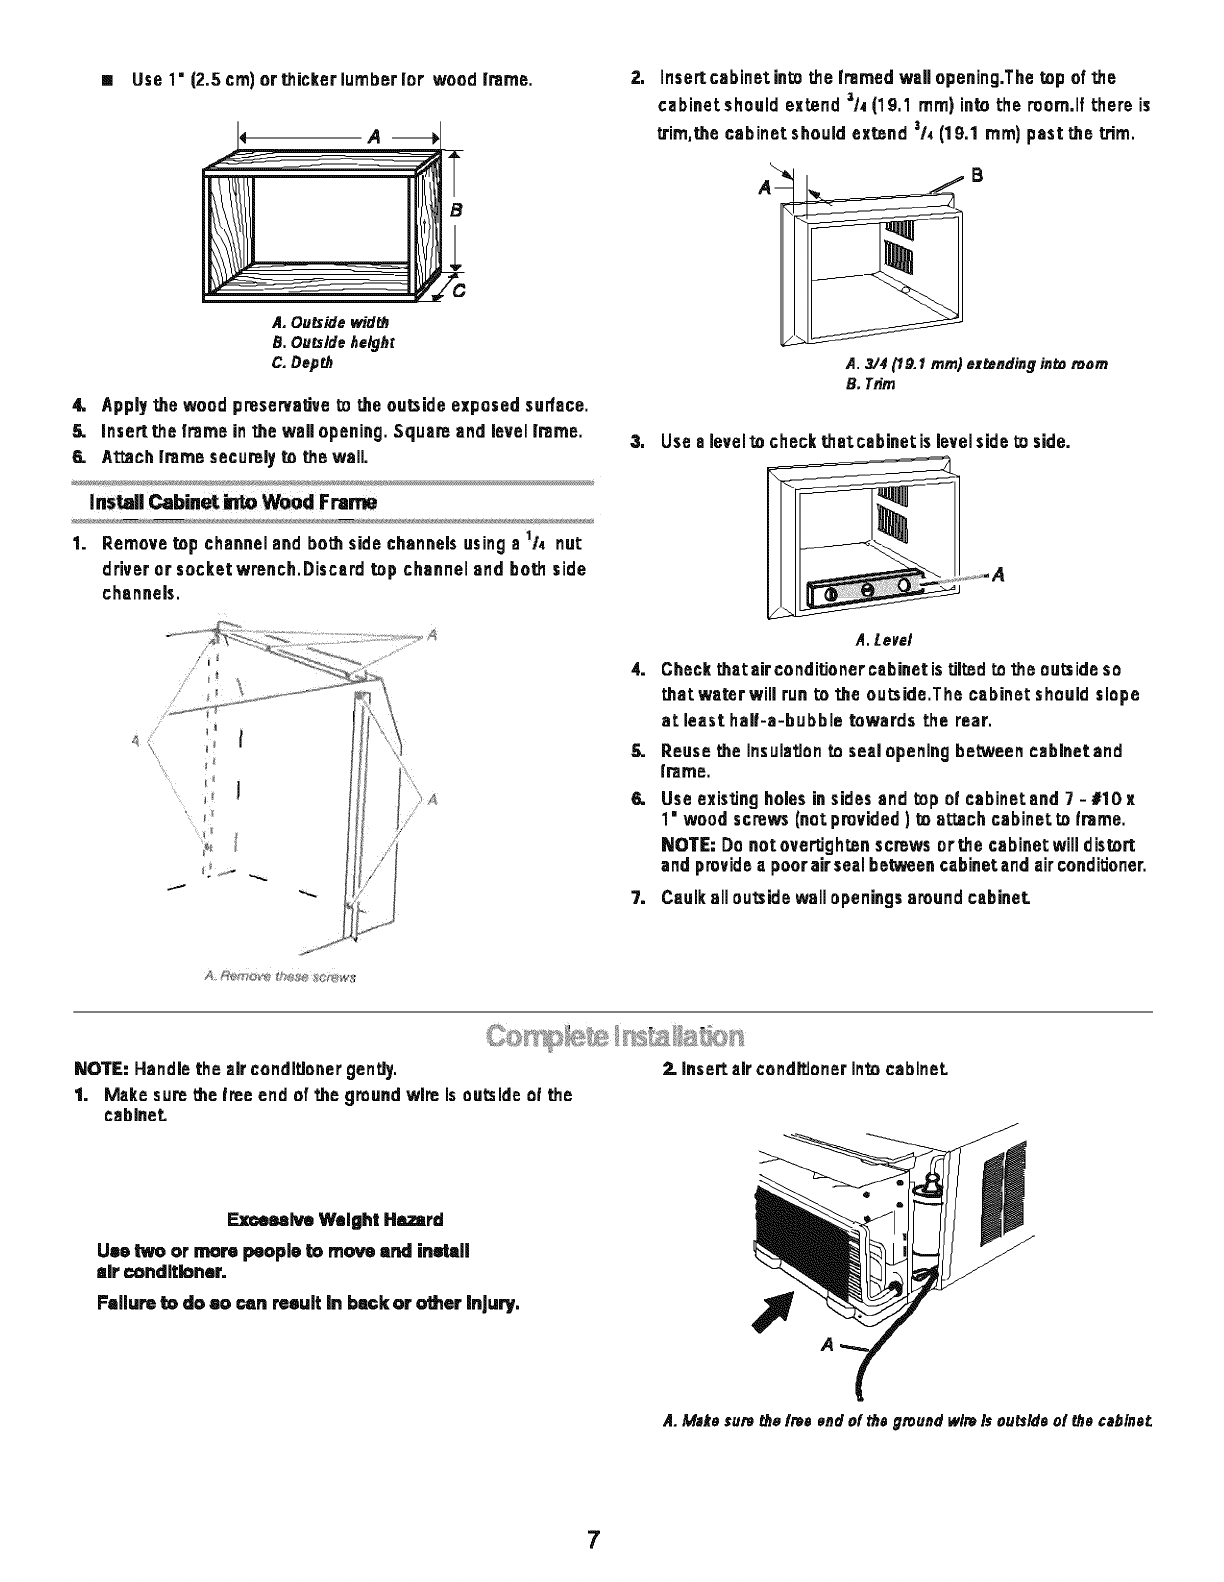
mUse 1" (2.5 cm) or thicker lumber lot wood |reme.
I' A-,I
A, Outside width
B. Outside height
C, Depth
4, Applythe wood preservativeto the outsideexposedsurface.
5. Insertthe frame inthe wallopening.Square and levellrame.
6. Attach|reme securelyto the wall.
install Cabinet _ _od Frarne
1. Removetop channeland bothsidechannelsusinga 1/4 nut
driveror socket wrench.Discardtop channeland both side
channels.
!
21 Insertcabinetint_ the [reinedwallopening.Thetop of the
cabinetshould extend z/4(19.1 ram) intothe room.if there is
trim,the cabinet shouldextend 3/4(19.1 ram) past the trim.
B
A. 3/4 (19.1 rnm) exEending in_ room
B. Trim
3.
4.
5.
6.
7=
Use elevelto checkthat cabinetis levelsidet_ side.
A. Level
CheckthatairconditJonercabinetistilted to the outsideso
that water will run to the outside.The cabinet shouldslope
at least hall-a-bubble towards the rear.
Reusethe Insulationto sealopeningbetweencablnetand
frame.
Use existingholesinsidesand _opof cabinetand 7 -#10 x
1" wood screws(notprovided) to a_ch cabinetto frame.
NOTE. Do notove_ghLen screwsorthe cabinet willdistort
and providea poorairseal betweencabinetandair conditioner.
Caulkall outsidewallopeningsaround cabinet.
A _i_ ¸_ _ _w_
NOTE: Handle the air conditioner gently.
1. Make sure the free end of the ground wire Is outside of the
cabinet.
2. Insert air conditioner Into cabinet
_emlw Weight Hazard
Ueo two or more I_oplo to move and inedall
air conditioner.
Failure to do eo can reeult In back or other Injury.
A
A. Make sure the free end of the ground wire Is outside of the cabinet

iEl_l_l Sth_k _ |
Co.nwt grmm gmu_ _m to gmu.d s=_w.
FMllura W do sa a_ _ult in da_ or al_'.tr_l a_k
2, Connectgroengroundwireto csbineLbesewi_ grounds¢rew,
Posi_ongroundwire poinUngstraightup, Put=excessground
wire between¢oil aad =ircondiUoner cabineL
A
A. Gxeee9mead _
B, Gmued serew NOTE:Forl;h_,gh,_e.w=!] in:_t=lia_ns,il needed,ins=li
molding aroundthe room side or cabinet.
7, P!ugInto_ grounded3p_n9 outer
8, Pres_RESETon the powsrsepply cord,
8
