Cross Match Technologies SMC800IW MOBILE BIOMETRIC DEVICE User Manual 870245 V1 2
Cross Match Tecnologies, Inc. MOBILE BIOMETRIC DEVICE 870245 V1 2
Users Manual

Cross Match® Technologies, Inc.
Be.U Mobile
SMC-800 Series
Mobile Biometric Device
User Manual
Draft
870245 V1.2
© Copyright 2008 Cross Match Technologies, Inc. All rights
reserved. Specifications are subject to change without prior notice.
CROSS MATCH and L SCAN are registered trademarks, and BE.U
MOBILE and the CROSS MATCH TECHNOLOGIES logo are
trademarks, of Cross Match Technologies, Inc. All other trademarks
are the property of their respective owners. No portion of this guide
may be reproduced in any form without the express written
permission of Cross Match Technologies, Inc.
Draft

i
Contents
User tasks
Before you use the Be.U Mobile ................................ 1
Start the Be.U Mobile ............................................... 2
Capture fingerprints ................................................. 2
Take a photo of the person ....................................... 2
Collect personal information .................................... 2
With the keyboard ...............................................3
From a contact card .............................................3
From a contactless card ........................................3
From a bar code ..................................................3
Save a record ........................................................... 4
Send a record ........................................................... 4
Field Reference
Front view of the Be.U Mobile ................................... 5
Rear view of the Be.U Mobile .................................... 6
Key pad .................................................................... 7
LED indicators .........................................................7
Power and batteries ................................................. 8
Install the battery ....................................................8
Use external power ..................................................9
Charge the battery ..................................................9
Battery LED Indicator ......................................... 10
Replace the battery ................................................ 11
External Battery Charger ........................................ 11
Insert a battery into the charger .......................... 12
Status indicator ................................................. 12
Clean the Be.U Mobile ............................................. 13
Clean and prepare the fingerprint sensor .............. 13
Every day ......................................................... 13
Before each touch .............................................. 13
Clean the touch screen ........................................... 13
Clean the card reader ............................................. 13
Clean the two cameras ........................................... 14
Start the Be.U Mobile ............................................. 14
Turn off the Be.U Mobile (suspend) ........................ 15
The keypad method ........................................... 15
The interface method ......................................... 15
Draft
ii Be.U Mobile™ Technical Reference - 870246 V1.2
Automatic shutdown .......................................... 16
Adjust the automatic shutdown delay ...................16
Reset the Be.U Mobile (shutdown) ......................... 16
Reset when the device does not answer .................... 17
The backup battery ................................................ 18
Connect the Be.U Mobile ......................................... 18
The desktop cradle ................................................19
The vehicle cradle .................................................. 20
Before you use the Be.U Mobile .............................. 20
Operating system .................................................. 21
The Control Panel .............................................. 23
Power properties ............................................... 24
Check the battery charge 24
How to adjust the suspend timeout 25
Set the clock ..................................................... 25
Set the date ......................................................26
Set the time ...................................................... 26
Calibrate the touch screen ...................................... 27
User interface features ........................................... 28
Display .................................................................28
Set the duration of the backlight .......................... 29
Adjust the intensity of the backlight ..................... 29
Backlight quick adjustments .................................... 30
Certifications
FCC Statement ........................................................ 31
CE Mark - Compliance Notice .................................. 32
TUV Compliance ..................................................... 32
WEEE recycling program ........................................ 32
Index
Draft

1
1
Chapter 0User tasks
THIS CHAPTER DESCRIBES HOW TO USE THE PRODUCTNAME TO COMPLETE
YOUR BASIC TASKS.
Warning
This restriction applies to those versions of the SMC800
Series Be.U Mobile with RF options (G1. G2. W1. W2, and BT)
built in. The option configuration for your device is shown on
the serial placard located under the battery pack.
This PDA is intended and expected to be operated as a
hand-held and hand-operated-only portable (that is,
relative to hand) device with a separation distance of
at least 8 in (20 cm) from a person’s body.
During operation, the strap is not intended for use as a
belt-clip or a body-worn accessory.
Before you use the Be.U Mobile
Complete the following steps:
1 Clean the device.
•The biometric sensor
•The touch screen
•The card reader
•The barcode reader lens
•The color camera lens.
See “Clean the Be.U Mobile” on page 13.
2 Install the battery in the Be.U Mobile. See “Install the battery”
on page 8 for instructions and illustrations.
3 Connect an external power source if the battery does not
have a full charge. See“Use external power” on page 9.
Draft

Contents
2 Be.U Mobile™ Technical Reference - 870246 V1.2
4 Start the Be.U Mobile. See “Start the Be.U Mobile” on page 14.
The Be.U Mobile also starts when an external power source is
connected.
5 Set the date and time. See “Set the clock” on page 24.
You are prepared to use the Be.U Mobile.
Start the Be.U Mobile
1 Press and hold the power button for two seconds. The desktop
appears.
2 Start your program.
3 Go to the next step in your work flow.
Capture fingerprints
Use the following procedure to capture fingerprints.
1 Start your fingerprint capture program.
2 Turn toward the person you plan to fingerprint.
3 The person must put the finger on the sensor, parallel with the
surface of the sensor. The base of the nail must be even with
the arrows at the sides of the sensor.
4 Start your capture sequence.
5 Go to the next step in your work flow.
Take a photo of the person
Use the following procedure to take a picture of the person (a mug shot).
1 Start your photo capture program.
2 Hold the Be.U Mobile up and point the back of the device
toward the person you want to photograph.
3 Adjust your distance from the person so that the head and
shoulders fill the frame.
4 Capture the photograph.
5 Save the photograph.
6 Go to the next step in your work flow.
Draft
3
Collect personal information
You can use a number of methods to collect personal information about
the person you plan to fingerprint. Use one of the following procedures.
With the keyboard
1 Go to your capture program.
2 Use your keyboard to enter the personal information.
3 Go to the next step in your work flow.
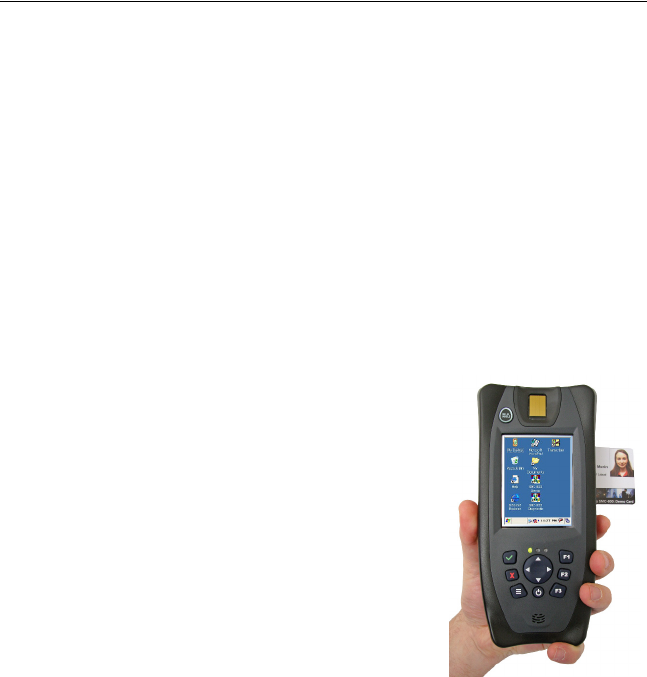
From a contact card
Note
The card reader is an optional feature.
1 Go to your capture program.
2 Make sure the card reader slot on the side
of the device is clean.
3 Slide the contact card into the
Be.U Mobile contact card reader. The
card reader imports the information into
the Be.U Mobile.
4 Select to import the personal information
from the card.
5 Your program can then display the
information.
6 Remove the card from the card reader.
7 Go to the next step in your work flow.
From a contactless card
1 Start your capture program.
2 Hold the Be.U Mobile with the back of the device toward you.
3 Slide the contactless card under the clip for contactless cards on
the back of theBe.U Mobile. The card reader imports the
information into the Be.U Mobile.
4 Select to import the personal information from the card.
5 Your program can then display the information.
6 Remove the card from under the clip.
7 Go to the next step in your work flow.
Draft

Contents
4 Be.U Mobile™ Technical Reference - 870246 V1.2
From a bar code
Note
The bar code reader is an optional feature.
1 Start your capture program.
2 Turn the Be.U Mobile, so that the back of the device is toward
the bar code
3 Select to import the personal information from a bar code.
4 Start the bar code capture sequence.
5 Align the Be.U Mobile with the bar code, so that the device
reads the bar code.
6 Your program can then display the information.
7 Go to the next step in your work flow.
Save a record
Follow the steps in your program to save a record.
Send a record
Follow the steps in your program to send a record to an agency.
Draft

5
2
Chapter 0Field Reference
Front view of the Be.U Mobile
#Description
1Fingerprint Sensor.
2Touch Screen.
3LED Indicators.
4Keypad.
6
1
2
3
4
5
Draft
Contents
6 Be.U Mobile™ Technical Reference - 870246 V1.2
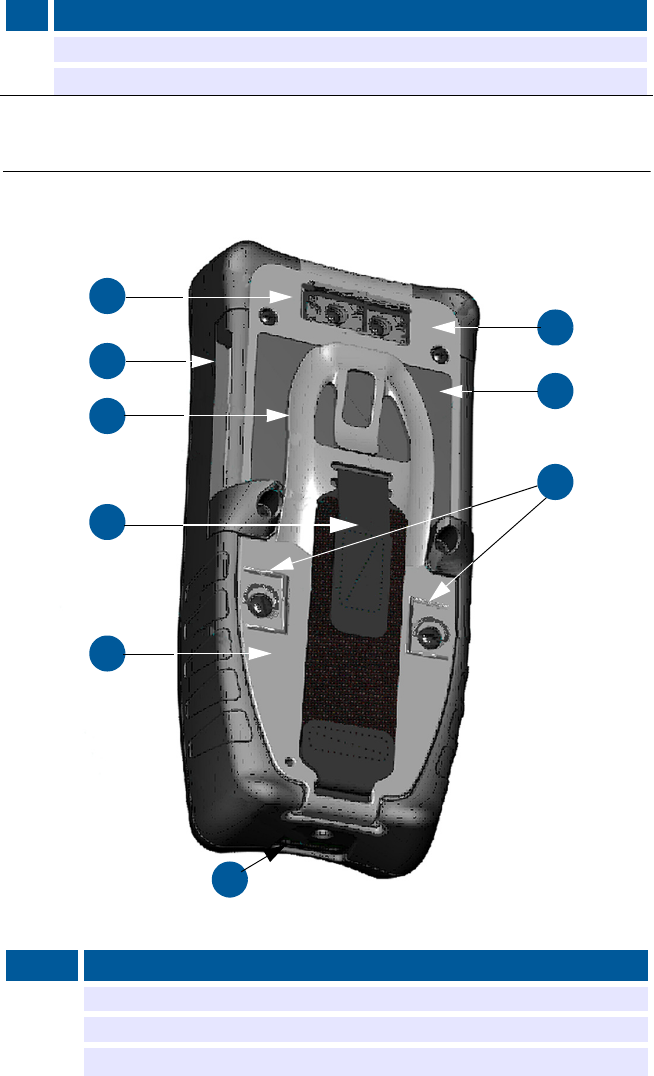
Rear view of the Be.U Mobile
5Speaker.
6 Smart Card Reader (access slot for contact cards).
#Description
1
2
3
4
5
6
7
8
9
1Bar code Scanner (left) and Color Camera (right).
2Smart Card Reader (access slot for contact cards).
3Smart Card Holder (for contactless cards).
#Description
Draft
7
WARNING
If you open the case of an SMC-800 device, or of one of the
accessories, you disable the warranty.
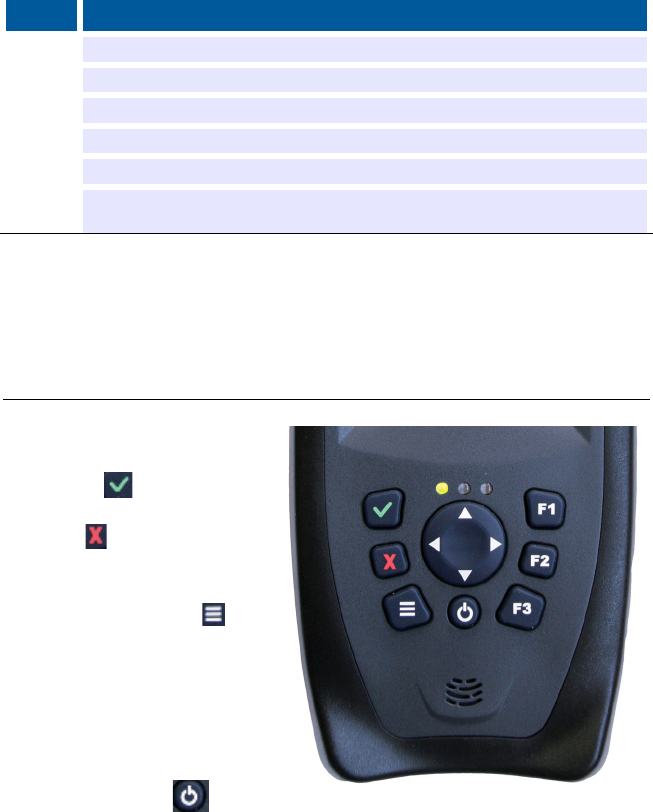
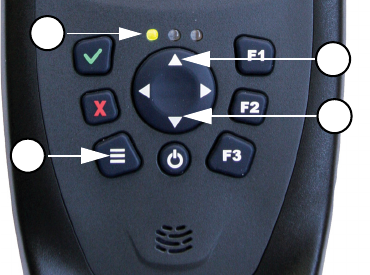
Key pad
There are eight buttons on
the key pad.
The green is the Enter
button and the OK button.
The red is the Escape
button and the Cancel
button.
The three white bars are
the Menu button.
The four arrows on the
center button are like the
keyboard arrows.
The three function buttons
are F1, F2, and F3.
The power button turns
on the device, turns off the
device, and restores the device from the suspend mode.
LED indicators
There are three LED indicators on the Be.U Mobile.One is the battery
LED indicator. See “Battery LED Indicator” on page 10 for a
description of how the indicator shows you the status of the battery. The
other two LEDs are available for programs to use.
4Strap.
5Battery Access Door.
6Communication Port.
7SAM Access Door.
8The antenna for the contactless card.
9Door-Lock Screws. The screws have thumb holds that you rotate to
loosen the screws without a tool.
#Description
Draft
Contents
8 Be.U Mobile™ Technical Reference - 870246 V1.2
Power and batteries
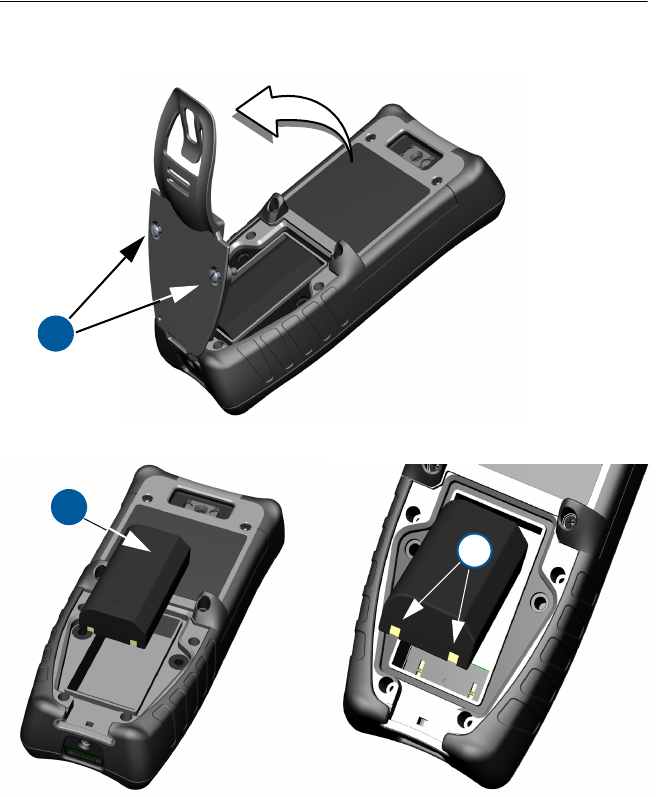
Install the battery
1
To open the battery compartment:
1 Loosen the door lock screws (1).
2 Lift the door. The screws remain attached to the door.
3 When the door is open, remove the door.
4 Remove the battery.
5 Insert the new battery (2) in the compartment behind the door. The flat
side of the battery contacts the Be.U Mobile. The contacts (3) are
toward the bottom of the device
2
3
Draft
9
Note
The battery is rechargeable. You must use the correct battery
for your model. Do not use the battery from a different model
or device.
Use external power
A power supply (or AC adapter) can charge the battery and maintain the
charge while you use the device on the cradle. Use the power supply with
the provided cradle. The Be.U Mobile has a single, proprietary connector.
The cradle allows the power supply to share the connection with other
cables.
Caution
The external power supply is for the SMC-800 series. Do not
use another model of power supply. Do not use the power
supply with other equipment without authorization from Cross
Match.
Warning
The external power supply is for office use. Use or storage of
the power supply in wet conditions cancels the warranty and
can cause dangerous shocks and electrical fires.
Note
The battery charges when a power supply is connected to the
device. See “Charge the battery” for complete information
about the LED indicators and the charge mode.
Charge the battery
The battery charges when you connect the device to a power supply. The
time needed to reach a full charge changes with the level of charge in the
battery. At 22°C, a discharged battery takes from 6 to 6.5 hours to reach
full charge in the device. The action to charge the battery takes longer
when the temperature decreases toward 10°C, or increases toward 45°C.
The temperature of the battery must be more than 10°C and less than
45°C for the battery to accept the charge.
Draft
Contents
10 Be.U Mobile™ Technical Reference - 870246 V1.2
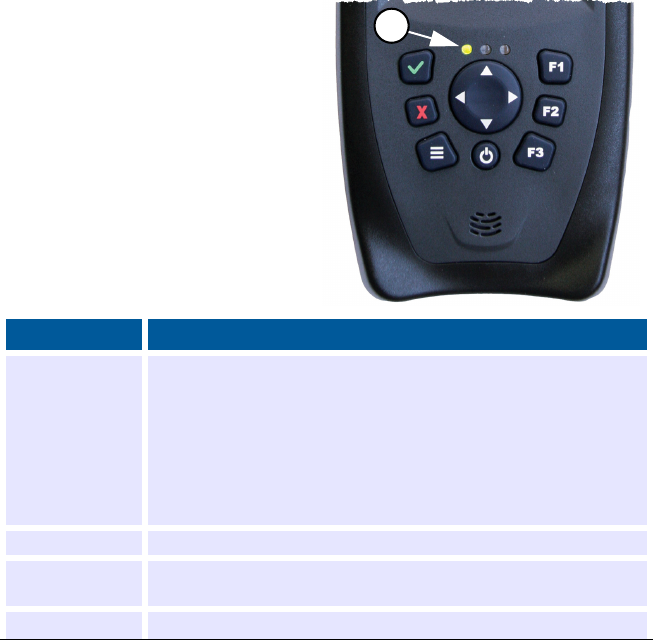
Battery LED Indicator
The top left LED (1) between the
display and the keypad is the
Battery Indicator. The LED lights
when the Be.U Mobile charges
the battery and when the battery
has a full charge. The following
table describes the LED
indications.
Warning
Stop the device and remove the battery if one or more of the
following occurs.
• You detect an odor.
• The battery is hot to the touch.
• The battery color changes.
• The battery does not appear to be normal.
• You see the leaks from the battery package.
Warning
If the battery fluid gets into your eyes, do not touch your
eyes. Immediately clean your eyes with clear water and get
immediate medical help.
LED color Description
There is
no light
The device cannot charge the internal battery.
• The device is not inserted correctly into the cradle.
• The cradle power supply is not connected.
• The battery is not inserted correctly.
• The cable or charging circuitry is damaged.
• The internal charging temperature is outside the
allowed range (0°C-45°C).You cannot charge the
battery.
Amber The battery is not charged.
Amber
flashes
The device is set to operate on the battery and the battery
charge is low.
Green The battery is charged.
1
Draft
11
Replace the battery
During extended service in the field, you must change the main battery.
Use the external battery charger to prepare a set of replacement batteries.
The internal battery helps you to change the main battery without the loss
of your work and your settings. You must change the battery within 5
minutes to prevent the loss of data.
Caution
Always turn off the Be.U Mobile before you remove the main
battery to prevent damage to the device and data loss. See,
“Turn off the Be.U Mobile (suspend)” on page 15 for
instructions.
To replace the battery, open the battery access door as shown in “Install
the battery” on page 8. Do the reverse of the procedure to remove the
battery.
Warning
Personal injuries can occur if you do not replace the batteries
correctly.
•Remove the battery if the battery cannot be used.
•Keep the battery away from direct sunlight and the heat from other
sources.
•Do not open the battery.
•Do not put the battery package in water, or allow the battery to
become wet.
•Do not put the battery on metal objects. Do not keep the battery with
metal objects. Short-circuits can occur between the contact pins and
the metal objects and cause heat, fire and leakage.
•Do not touch the contacts of the battery. The battery does not
function correctly when the contacts are dirty or are damaged,.
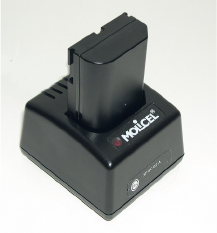
External Battery Charger
You must manage the charge of the batteries
with the external charger and a set of spare
batteries. Cross Match provides an accessory
for this purpose, the battery charger (part no.
SP-BC-02-B).
The operation of the battery charger is
automatic. When you insert a battery in the
charger, the battery charges and continues
until the battery reaches a full charge.
Draft

Contents
12 Be.U Mobile™ Technical Reference - 870246 V1.2
The charger has an AC adapter. Connect the adapter to a correctly
grounded 110/115 VAC power.Then connect the AC adapter into the
back of the charger:
Note
The battery charger is for the batteries of the SMC-800 series.
Do not use another charger. Do not use the charger with
other types of batteries, unless authorized by Cross Match.
Warning
The external battery charger is for office use. Use or storage
of the external charger in wet conditions cancels the warranty
and can cause dangerous shocks and electrical fires.
Insert a battery into the charger
Put the battery into the charger as shown in “External Battery Charger”
on page 11. Make sure that the two contacts on the battery are in the
charger socket.
Status indicator
There is an LED indicator on the top side of the charger that displays the
status of the charger. The following table describes the indications that
the LED gives and describes the meaning of each indication.
Warning
Stop the device and remove the battery if one or more of the
following occurs.:
• You detect an odor
• The battery is hot to the touch
• The battery color changes
• The battery does not appear to be normal
• You see leaks.
If the battery fluid gets into your eyes, do not touch your
eyes. Clean your eyes with clear water and get immediate
medical help.
LED color Description
No light The power supply is not connected. The charge is not
accepted.
Red A battery is detected and has started charge.
Flashes red The temperature is out of range (when the temperature is not
in the range of 10°C-45°C the charge stops).
Green The battery has a full charge.
Draft

13
Clean the Be.U Mobile
Make sure that the Be.U Mobile is clean. The following sections describe
how to clean the biometric sensor, the touch screen, and the card reader.
Clean and prepare the fingerprint sensor
Dirt, oils, or other material on the sensor can cause an unacceptable
fingerprint image. Check how to clean the sensor in “Every day”. How to
clean the sensor before each capture is described in “Before each
touch”.
Every day
Warning
Do not use harsh fluids and abrasive materials to clean the
fingerprint sensor.
Clean the fingerprint sensor. Use a microfiber cloth to apply alcohol
to the surface of the sensor. Move the cloth in a left and right direction
until the sensor surface is clean. Repeat this process as necessary. Make
sure that no dirt remains on the sensor.
Prepare the fingerprint sensor. Use a microfiber cloth to apply
fragrance-free skin lotion to the surface of the sensor. Make sure that you
remove all the visible lotion from the sensor to complete the process. The
lotion improves the quality of the fingerprint image.
Before each touch
Clean the sensor with a microfiber cloth to remove any dirt or finger
marks.
Clean the touch screen
Clean the screen with a microfiber cloth. Use tap water. Do not use
solvents. Always use the stylus or your finger tip to select the items. Do
not use finger nails, pens, or pencil erasers.
Clean the card reader
The smart card reader is an opening in the Be.U Mobile case. During wet
conditions, moisture can enter the card reader. If liquids, dust, or other
particles reach the card reader, do not insert a smart card unless the card
reader is clean and dry.
Draft

Contents
14 Be.U Mobile™ Technical Reference - 870246 V1.2
Clean the two cameras
Wipe the bar code reader camera window and the mug shot camera
window with a microfiber cloth as often as needed. Use tap water. Do not
use strong solvents or powdered cleaners.
Start the Be.U Mobile
To start the device, press and hold the power button for two seconds.
Note
If the device does not turn on:
• You did not install the battery.
• The battery charge is zero when an external power supply
is connected.
• The battery door is not closed and the door screws are not
tightened.
There are different OFF conditions for the device. The performance of the
device depends on the condition at turn off.
The following table describes what occurs when you turn on the device.
The information is arranged by the condition of the device.:
Off state Description
Shut down The device is turned off.
• The device had no battery for more than 7
days.
• You press and hold the power button for
15 seconds.
Suspended The Be.U Mobile appears to be inactive, but not
shut down.The device does not use the screen, the
LEDs, the processing devices or any included
peripheral.
State of the device What happens at turn on
Shut down, the
battery is OK
The device turns on and runs the start sequence:
• The screen turns white for 1 second.
• The product logo appears.
• The device loads the operating system
and a series of digits appears in the
upper-right corner of the screen.
• After three seconds, the Windows CE
workspace appears and the device is
started.
Suspended, the
battery is OK
The device turns on and returns to the condition
before interruption.
Draft
15
Turn off the Be.U Mobile (suspend)
Press the OFF button to put the device in the suspended state. The device
uses minimum power to turn on and continue your work without the loss
of data and program states.There are two methods to turn off the device,
the keyboard and the interface
The keypad method
One method to interrupt the device is to use the keypad.
1 Press and hold the power button until the Power key detected window
appears.
2 Select Release now to suspend, or Hold to turn off the power.
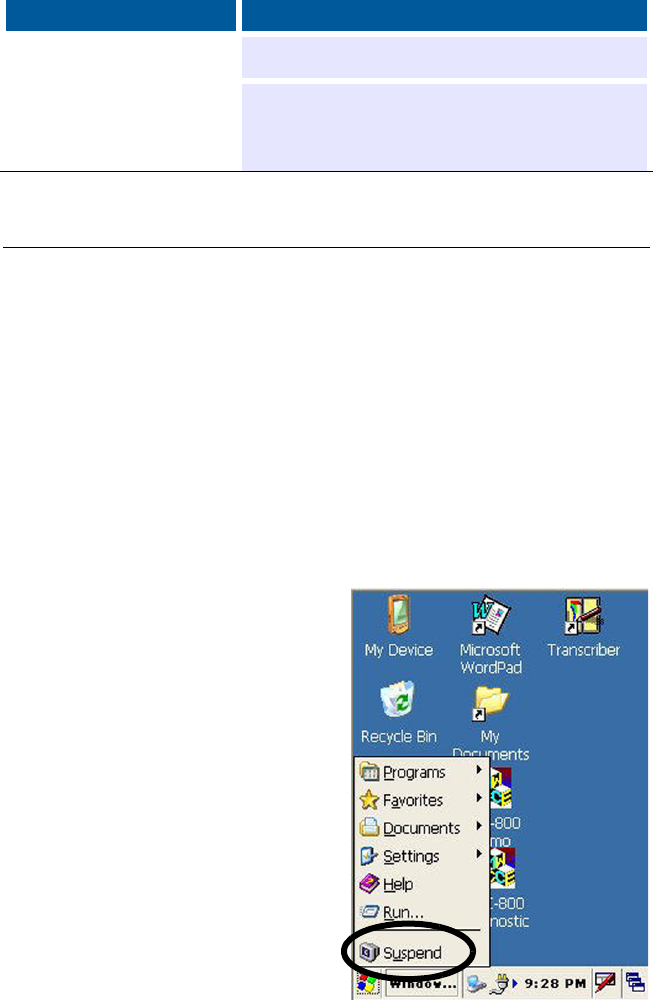
The interface method
You can use the touch screen menu
provided by the operating system to
turn off the Be.U Mobile. Use the
Windows logo button and your
stylus.
1 Tap the Start button to open the
menu.
2 Select the Suspend command.
The screen clears and the device
enters a wait condition. Data is
saved and no program is closed.
When you turn on the device, all
programs return to the previous
condition.
The battery is weak The device does not turn on and the top left LED
indicator blinks amber.
The battery is not
installed or the
battery is
discharged
You cannot turn on the Be.U Mobile.
State of the device What happens at turn on
Draft

Contents
16 Be.U Mobile™ Technical Reference - 870246 V1.2
Note
After you release the power button, a blank screen appears
and the device turns off. There is no data loss. Programs
continue. When you turn on the device, the Be.U Mobile
returns to the previous condition.
Automatic shutdown
The device automatically enters the sleep condition if there is no user
activity for an amount of time that you can set. There is no data loss.
Programs continue. When you turn on the device, the Be.U Mobile
returns to the previous condition.
Adjust the automatic shutdown delay
Read the section “How to adjust the suspend timeout” on page 5 for
complete details and instructions on setting this delay.
Reset the Be.U Mobile (shutdown)
The Be.U Mobile can enter a condition where programs stop, devices
stop, or the Be.U Mobile does not communicate. You must reset the
device to restart or you must turn off then turn on the Be.U Mobile.
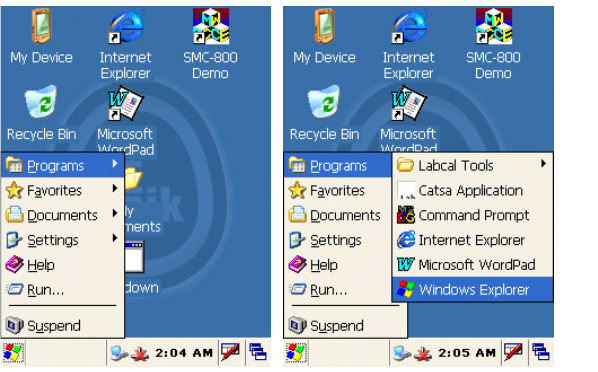
The normal process to reset the Be.U Mobile is as follows.
Draft
17
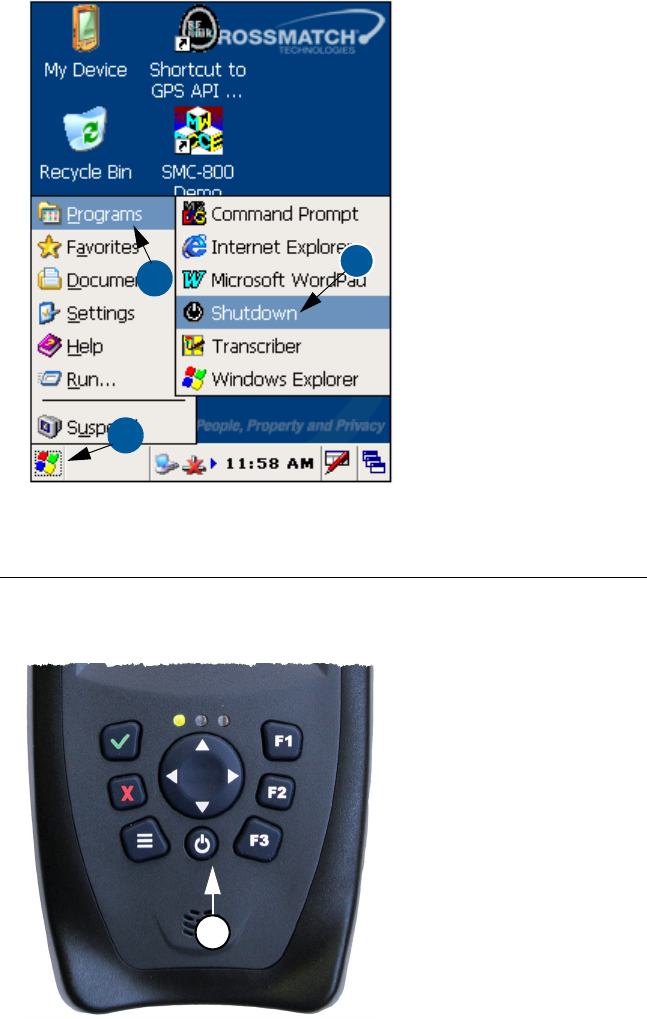
1 From the desktop, press
the Windows Start button
(1). The Start menu
appears.
2 In the Start menu, tap the
Programs command (2).
The Programs menu
appears.
3 In the Programs menu,
tap the Shutdown
command (3). The device
stops immediately.
4 Press and hold the
Power button until the
Be.U Mobile starts.
Reset when the device does not answer
There can be conditions when the Be.U Mobile does not answer your
commands. When you have tried all other methods to control the device,
use the following procedure to reset the Be.U Mobile.
1 Open the battery
compartment door. See
“Install the battery” on
page 8.
2 Remove the battery.
3 Close the battery
compartment door.
4 Press and hold the Power
button (1) for 15 seconds.
5 Open the battery
compartment door.
6 Replace the battery.This is
the reverse of Step 2.
7 Close the battery
compartment door.
8 Press the Power button (1)
until the Be.U Mobile starts.
1
23
1
Draft

Contents
18 Be.U Mobile™ Technical Reference - 870246 V1.2
The turn off sequence, which depends on the condition of the device, can
take 30 seconds. All data that are not saved are lost. All programs are
stopped.
If the procedure does not correct the problem, contact your equipment
administrator.
The backup battery
The SMC-800 devices all have an internal rechargeable backup battery
that provides emergency power to some circuits in the device. The backup
power applies when there is no main battery and when the main battery is
discharged. The purpose is to save the condition of the device.
The backup battery:
• Saves the suspended condition of the device during the battery
replacement, for the time needed to replace the battery.
• Completes the shut down process of the device when the 15 minute
delay without a battery has expired.
• Maintains the internal clock when you store the device without the
battery installed.
Warning
The backup battery is a NiMH battery that the user cannot
replace. An authorized technician must change the battery.
Incorrect installation or programming can cause the battery
to explode.
The backup battery charges automatically when a charged main battery is
installed in the device and you charge the main battery. The backup
battery takes 24 hours to reach a full charge.
Caution
If the backup battery does not have enough charge when you
replace the main battery, you can accidentally reset the
device and erase information.
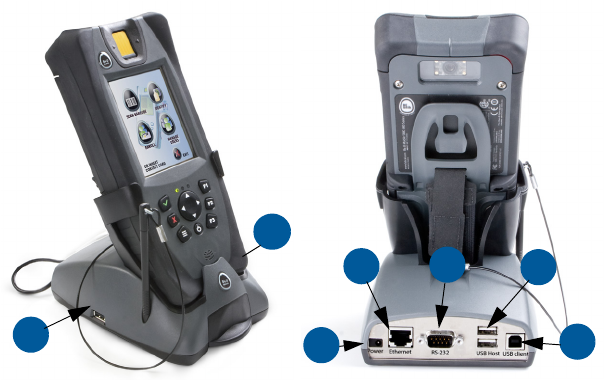
Connect the Be.U Mobile
A connector that transmits USB host, slave, RS-232 and Ethernet
communication signals from the devices is available.There is no cable
(USB, Ethernet or serial) that connects to the Be.U Mobile. You must use
a desktop cradle or a vehicle cradle to connect to those ports. The
following sections describe each cradle.
Draft
19
The desktop cradle
The desktop cradle for the Be.U Mobile is a power charger and
communication base that provides a method to charge the main battery.
The cradle has eight connectors:
• 1 power connector (1)
• 1 Ethernet connector (2)
• 1 serial connector (3)
• 4 USB host connectors (4)
• 1 USB client connector (5)
The power connector allows you to connect the external power supply to
the cradle.
The Ethernet connector allows you to connect to the Internet and to a
local network.
The Serial connector allows you to connect other external devices like
card readers to the Be.U Mobile.
The 4 USB host connectors allow the Be.U Mobile to accept input from
USB devices. You can use a host connector to attach a keyboard or a
mouse to the Be.U Mobile.
The USB client connector allows you to connect the Be.U Mobile to a
USB port on a computer. The computer then becomes the host for the
Be.U Mobile. The connection allows the ActiveSync on the computer to
transfer the data between the computer and the Be.U Mobile. See the
Be.U Mobile Technical Reference.
41
234
5
4
Draft
Contents
20 Be.U Mobile™ Technical Reference - 870246 V1.2
Caution
The desktop cradle is for indoor use. Do not use or keep the
cradle in cold, humid or wet conditions. You can cancel the
warranty and can damage the cradle and the Be.U Mobile.
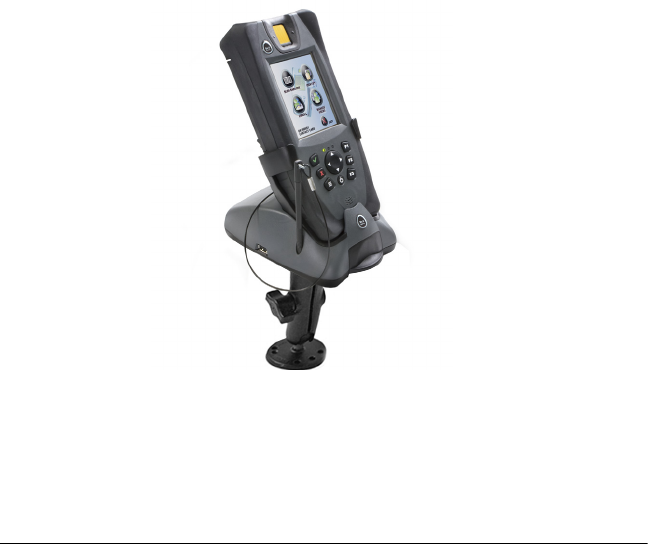
The vehicle cradle
The vehicle cradle for the Be.U Mobile is a power charger and a
communication support device. You can rotate the cradle to set the
Be.U Mobile to different angles.
The vehicle cradle allows you to charge the battery and has the following
ports:
• 1 USB client connector
• 1 serial connector
Warning
The vehicle cradle is for inside use. Do not use or keep the
cradle in cold, humid or wet conditions. You can cancel the
warranty and damage the cradle and the Be.U Mobile.
Before you use the Be.U Mobile
Note
The Be.U Mobile does not operate without a battery
installed.
• Install the battery in the device. See “Install the battery” on page 8
for instructions and illustrations.
Draft
21
• Connect an external power source if the battery does not have a full
charge. See“Use external power” on page 9 for instructions and
illustrations.
• The device automatically turns on when an external power source is
connected. See “Start the Be.U Mobile” on page 2-14.
• Adjust the date and time. See “Set the clock” on page 25 for
instructions.
Operating system
The Be.U Mobile runs on the Windows CE operating system. The
operating system is the host for all other programs that run in the device.
The operating system provides the device components, like the screen and
the keyboard. The operating system also manages the look and feel of the
programs.
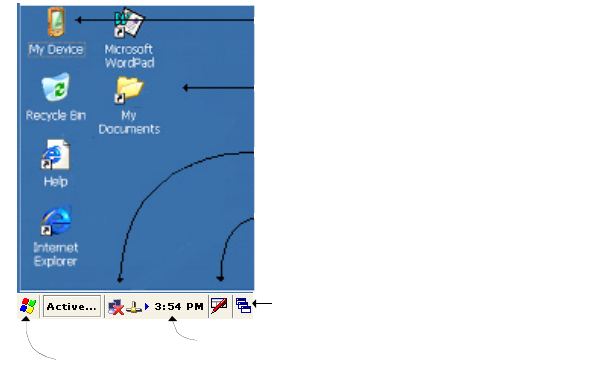
A desktop is the support for programs and for the windows displayed by
programs. This desktop has two parts.
•The task bar at the bottom of the screen contains the main controls
and status icons of the system.
•The desktop background displays icons and program windows,
takes your input, and displays results.
The operating system includes the following components:
•The Windows Explorer is a browser that navigates through the
folders stored in read-only memory. Double-tap the My Device icon
on the desktop to open this browser to examine the root directory of
the file system.
•The Internet Explorer is a browser you use with a network
connection (Ethernet, WiFi, GSM or CDMA). The Internet Explorer
This icon opens a browser on
the storage memory
Workspace background , containing icons,
over which applications show their windows
Taskbar , al ways sho wn
under the workspace
Input Panel con trol (SIP)
Tas k /window swi tche r cont rol
Clock
Windows Menu button
Draft
Contents
22 Be.U Mobile™ Technical Reference - 870246 V1.2
allows you to view Web pages stored on the Internet and on an
Intranet. An icon on the desktop opens the Internet Explorer.
•The Command Prompt is a text method to run the operating
system commands and components.
•The Control Panel allows you to adjust many settings of your
Be.U Mobile.
Use the Windows Menu button to access all these components, and any
program that can be installed on the unit. The Menu button is in the lower
left corner of the screen in the task bar. Use the stylus to tap the button.
The Start menu appears. Select the Programs command. The Programs
menu appears. Select the program you require from the menu.
Draft
23
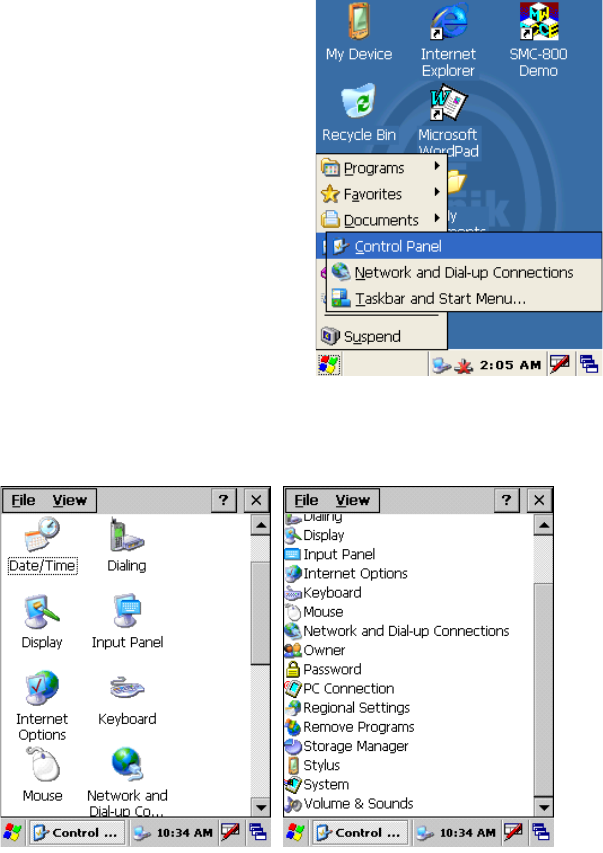
The Control Panel
The Control Panel is in the Settings
menu, where you can find the
commands that allow you to adjust
parts of the operating system.
When you start the Control Panel, a
window appears that shows a list of
icons that match features that you can
adjust. A menu appears at the top of
the screen, with a help button and a
Close button (the X button). Tap the
Close button to leave the control
panel. A scroll bar at the right of the
screen allows you to move to the
content that is not on the screen.
If you tap the View menu, you can go
to other modes, like the List mode
which shows more selections at one
glance.
Double-tap on an icon or a menu item to open a program. The menu
shows you information about that feature and gives you the method to
change the settings.
Draft
Contents
24 Be.U Mobile™ Technical Reference - 870246 V1.2
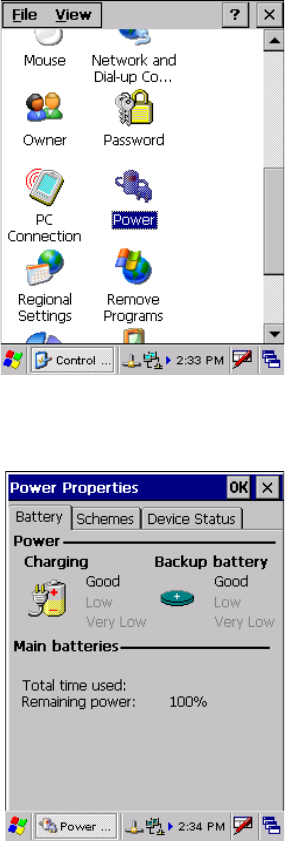
Power properties
The operating system provides some
features that are related to the
management of the power supply and
the batteries. You use these features
through the Control Panel. Tap
Power in the Control Panel:
This program is arranged into tabs that
you can select with a tap on the name.
Check the battery charge
In the Power Properties program, tap
the Battery tab to see the status of the
main battery and of the backup battery:
Draft
25
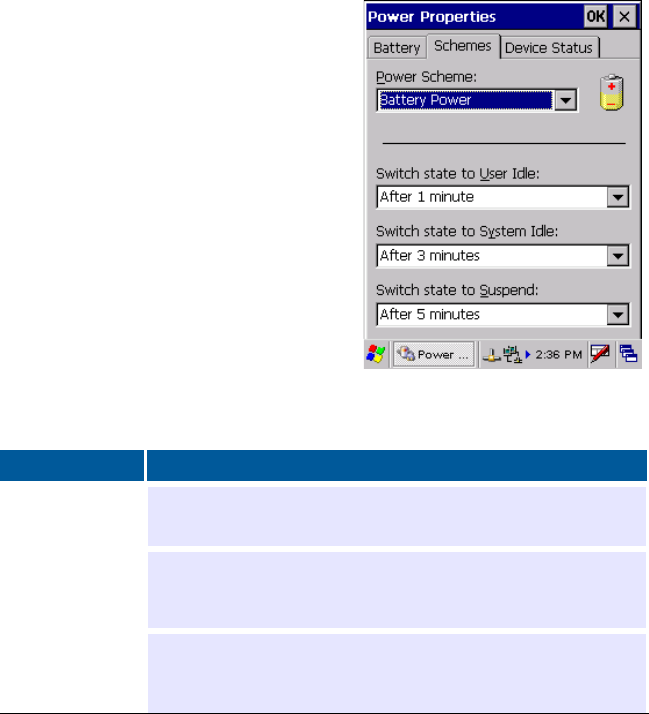
How to adjust the suspend timeout
In the Power Properties program of
the Control Panel, tap the Schemes tab
to see the power schemes. A power
scheme is a set of actions that use the
power efficiently. You can apply these
settings with an external power supply
and with the battery.
When the Be.U Mobile is turned on,
but not in use, the device uses the
power schemes to save the battery
power.
The following table describes the
power management schemes.
Set the clock
The Be.U Mobile has an internal clock that maintains the current date and
time. The operating system uses the date and time for time-tags on files,
mode control, and security. The clock runs continuously, when the device
is in sleep mode or is shut down. The internal clock stops when both the
main battery and the backup battery are discharged.
Scheme Meaning
User Idle The User interface items are deactivated first to save power.
The backlight is turned off. Tap the screen or press a button to
restore the normal mode.
System
Idle
The System Idle scheme is like the User idle scheme. More
components of the operating system and of the device are
disabled, like network interfaces. Tap the screen or press a
button to restore the normal mode.
Suspend The device stops and appears to be shut down. You must turn
on the Be.U Mobile to return to the normal condition. There is
no data lost. Programs are left open. The Suspend condition
saves the maximum amount of power.
Draft
Contents
26 Be.U Mobile™ Technical Reference - 870246 V1.2
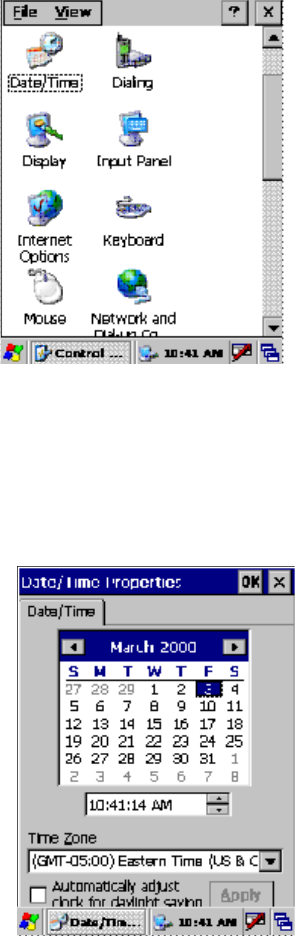
When you turn on the Be.U Mobile,
the current time appears in the task
bar. To adjust the settings of the clock,
double-tap the clock in the task bar or
open the Control Panel. To open the
Control Panel, tap the Start button and
select Settings/Control Panel. Select
Date/Time from the list of features
managed by the panel. The Date/Time
Properties program opens with a
calendar, the time, the time zone, and a
check box for Daylight Savings Time.
Set the date
1 On the calendar, tap the date you require.
2 Tap the arrow buttons at the top of the calendar to move through the
months. You can Tap the year and an arrow allows you to select the
current year.
Set the time
1 Tap the hour, minute, or second to
change.
2 Use the arrows at the right of the time
box to adjust the time.
3 In the Time Zone box, tap the arrow
to see a drop-down list. You must
select your time zone for the
Be.U Mobile to use the correct time
in communications with other
devices.
4 Select the time zone from the list.
5 Select the check box to activate the
Daylight Saving Time rules for your
time zone. The time automatically
changes.
Draft

27
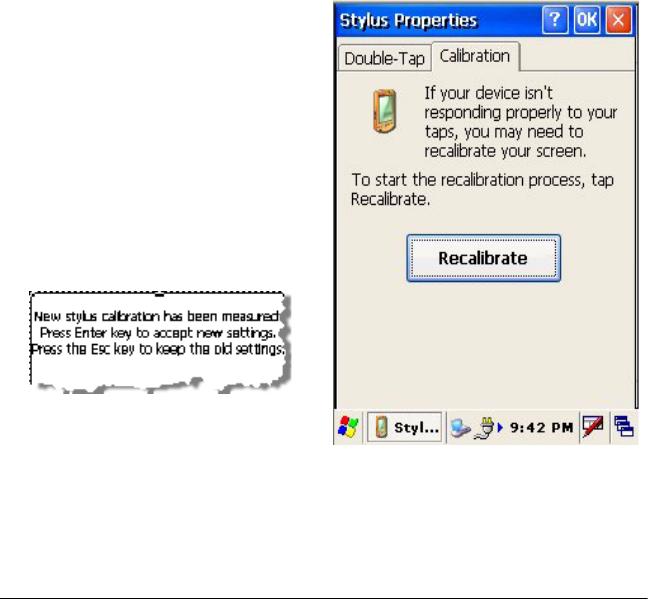
Calibrate the touch screen
The touch screen is the feature of the
Be.U Mobile that you must calibrate
before use. The calibration translates
the touch signals received from the
screen to correct screen positions. If
your taps and stylus positions do
not match on the screen, your touch
screen needs the calibration
procedure. There is a program in the
Control Panel to calibrate the touch
screen.
1 Tap the Windows menu
button.
2 Select the Settings command.
3 Select the Control Panel
command.
4 In the list of commands, tap
the Stylus command. The
Stylus Properties program
opens for touch screen adjustments. The window has two tabs,
Double-Tap and Calibration. Use the first tab to adjust the
operating system to detect the difference between a double-tap
and two taps.
5 Double-tap the upper icon.
6 Double-tap the lower icon to test how the program detects the
double-tap.
7 Repeat Steps 4-5 until you set a good speed for a double-tap. Go
to the next step.
8 Select the Calibration tab to start the touch screen calibration
process. The Calibration tab contains a Recalibrate button.
9 Tap the Recalibrate button to start the process. A cursor in the
shape of a plus sign appears in the center of a white screen
Draft
Contents
28 Be.U Mobile™ Technical Reference - 870246 V1.2
10 You must touch the middle
of the cursor with the
stylus, and hold the stylus
steady. The program gets the
signals for that location and
moves the cursor to another
location on the screen.
11 Repeat Step 9 at the new
location.The procedure
calibrates the touch screen
and displays the following
message:
12 Tap the screen or press the
OK button on the keypad to
accept the new calibration
settings. If you made an error, press the Cancel button to return
to previous settings.
User interface features
The operating system provides the features to manage the display.
Display
These features are in the Display Properties program on the Control
Panel. Tap Display in the Control Panel to start the program.
The program is divided into three tabs: Background, Appearance, and
Backlight. Tap on the name to select a tab. Do not use the backlight
unless required. The backlight can shorten the life of the battery.
Draft

29
Set the duration of the backlight
To set a time period after which the
backlight turns off:
1 Tap the Battery Power check box.
2 Tap the arrow to see a drop-down
list.
3 Select the time until the program
turns off the backlight when the
Be.U Mobile is on battery power.
4 Tap the External Power check
box.
5 Tap the arrow to see the drop-down
list.
6 Tap the time until the program
turns off the backlight when the
Be.U Mobile is on external power.
7 Tap the OK button to save your
selections and return to the
previous window.
Adjust the intensity of the backlight
To set the backlight level, use the
following steps.
1 On the Display Properties window,
tap the Advanced button, The
Advanced Brightness Options
window appears.
2 Tap and hold the slider control.
3 Move the slider to the brightness
you need.
4 Tap the OK button to save your
selection and return to the previous
window
Draft
Contents
30 Be.U Mobile™ Technical Reference - 870246 V1.2
Backlight quick adjustments
You can adjust the brightness
of the backlight as follows.
1Press and hold the Menu
key (1).
2 Then:
• Press the Up arrow (2)
to increase the brightness.
• Press the Down arrow
(3) to decrease the
brightness
Use the feature to adjust the
backlight when you are in low
light and the backlight is set to the minimum value. You can use the
keypad to set the backlight to a good level.
Note
The backlight can shorten the battery life. To increase the
battery life, you must adjust the backlight brightness to the
minimum good level. Turn off the backlight when you use the
Be.U Mobile in daylight.
1
2
3
4
Draft

31
3
3Certifications
THIS CHAPTER DESCRIBES THE CERTIFICATIONS THAT APPLY TO THE BE.U
MOBILE™ DEVICE.
FCC Statement
This equipment has been tested and found to comply with the limits for a
Class B digital device, pursuant to Part 15 of the FCC Rules. These limits
are designed to provide reasonable protection against harmful
interference when the equipment is operated in a residential environment.
This equipment generates, uses, and can radiate radio frequency energy
and, if not installed and used in accordance with the instruction manual,
may cause harmful interference to radio communications. However, there
is no guarantee that interference will not occur in a particular installation.
If this equipment does cause harmful interference to radio or television
reception, which can be determined by turning the equipment off and on,
the user is encouraged to try to correct the interference by one or more of
the following measures:
• Reorient or relocate the receiving antenna.
• Increase the separation between the equipment and receiver.
• Connect the equipment into an outlet on a circuit different from that
to which the receiver is connected.
• Consult the dealer or an experienced radio/TV technician for help.
Operation is subject to the following two conditions: (1) this device may
not cause harmful interferences, and (2) this device must accept any
interferences received, including interference that may cause undesired
operation.
Information to user. The users manual or instruction manual for an
intentional or unintentional radiator shall caution the user that changes or
modifications not expressly approved by the party responsible for
compliance could void the user's authority to operate the equipment. In
cases where the manual is provided only in a form other than paper, such
as on a computer disk or over the Internet, the information required by
this section may be included in the manual in that alternative form,
provided the user can reasonably be expected to have the capability to
access information in that form.
Draft

Contents
32 Be.U Mobile™ Technical Reference - 870246 V1.2
CE Mark - Compliance Notice
This equipment is in conformance with the requirements of the European
Council Directive listed below:
73/23/EEC Low Voltage Directive with amendment 93/68/EEC
89/336/EEC EMC Directive with amendments 92/31/EEC and 93/68/
EEC
TUV Compliance
TUV Mark is an independent product-
safety testing and certification
organization. The TUV Marks may only
be used on or in connection with
products certified by TUV and under the
terms of written agreement with TUV.
An electrical, mechanical or electro-
mechanical product bearing the North
American TUV Listed mark signifies
that it was tested and meets the minimum
requirements of prescribed product
safety standards. Moreover, the mark
indicates that the manufacturer's production site conforms to a range of
compliance measures and is subject to periodic follow-up inspections to
verify continued conformance.
WEEE recycling program
WEEE is the European Commdevices directive 2002/96/EC on waste
electrical and electronic equipment which, together with the RoHS
Directive 2002/95/EC, became European Law in February 2003, setting
collection, recycling and recovery targets for all types of electrical goods.
WEEE means Waste Electrical and Electronic Equipment, products that
run on electrical power.
Due to its nature, any SMC-800 series device and related accessories may
contain small quantities of substances known to be hazardous to the
environment or to human health if released in the environment. For this
reason, Waste Electrical and Electronic Equipment (commonly known as
WEEE) should never be disposed of in the public waste stream. The label
affixed to this product is a reminder to dispose of this product in
accordance with local WEEE regulations.
WEEE-Reg.-No. DE 34468562 for Be.U Mobile.
Draft

Index -1
Index
A
adjust the automatic shutdown delay 16
adjust the backlight 29
amber flashes 10
amber steady light 10
B
backup battery 18
bar code camera 14
battery
check the charge 24
replace 11
battery led indicator 10
Be.U Mobile 1
before first use 20
calibrate the touch screen 27
capture fingerprints 2
clean 1
the barcode reader lens 1
the biometric sensor 1
the card reader 1
the color camera lens 1
the touch screen 1
collect personal information 2
from a bar code 3
from a contactless card 3
with the keyboard 3
connect an external power source 1
device state
battery is weak 15
shut down, the battery is OK 14
suspended, the battery is OK 14
the battery is not installed or the battery is discharged 15
field reference 5
front view 5
install the battery 1
key pad 7
LED indicators 7
off state
shut down 14
suspended 14
operating system 21
power and batteries 8
charge the battery 9
external battery charger 11
install the battery 8
replace the battery 11
status indicator 12
Draft
Index -2 Be.U Mobile™ Technical Reference - 870246 V1.2
use external power 9
rear view 6
save a record 4
send a record 4
set the date and time 2
start 1, 2
take a picture 2
C
calibrate the touch screen 27
cameras
maintenance 14
capture fingerprints 2
card reader maintenance 13
CE compliance notice 32
cellular restriction 1
certifications 31
charge the battery 9
check the battery charge 24
clean the Be.U Mobile
before each touch 13
card reader 13
every day 13
touch screen 13
two cameras 14
clean the fingerprint sensor 13
collect personal information 2
from a contact card 3
color camera
clean the lens 1
take a photo of the person 2
connect the Be.U Mobile 18
vehicle cradle 20
cradle
desktop 19
vehicle 20
D
desktop cradle 19
display 28
backlight
adjust the intensity 29
E
every day
clean the fingerprint sensor 13
prepare the fingerprint sensor 13
external battery charger 11
F
fcc statement 31
field reference 5
Draft
Index -3
front view 5
G
green LED 10, 12
GSM/GPRS cellular restriction 1
H
how to adjust the suspend timeout 25
I
insert a battery 12
install the battery 8
K
key pad 7
L
LEDs 7
M
mug shot camera 14
O
operating system 21
control panel 23
set the clock 25
set the clockset the time 26
set the date 26
P
power properties 24
adjust the suspend timeout properties 25
power status indicator 12
prepare the fingerprint sensor 13
R
rear view 6
red LED 12
Reset (complete shutdown) 16
the device does not answer 17
S
save a record 4
send a record 4
set the clock 25
set the date 26
set the duration of the backlight 29
set the fate and time 2
shut down 14
shutdown delay 16
Draft
Index -4 Be.U Mobile™ Technical Reference - 870246 V1.2
start the Be.U Mobile 1, 14
steady amber light 10
suspend 25
suspend the Be.U Mobile 15
automatic shutdown 16
automatic shutdown delay 16
keypad method 15
user interface method 15
suspended 14
System Idle 25
T
take a photo 2
touch screen calibration 27
touch screen maintenance 13
turn off the Be.U Mobile (suspend) 15
turn on the Be.U Mobile 14
TUV compliance 32
two cameras 14
U
use external power 9
User Idle 25
user interface features 28
adjust the backlight 29
backlight quick adjustments 30
W
WEEE recycling program 32
Draft