CyberBank CB-0800 CELLULAR RANGE SMART PHONE User Manual USERS MANUAL
CyberBank Corp CELLULAR RANGE SMART PHONE USERS MANUAL
USERS MANUAL
Chapter 1. Basic Information for Cybird
Cybird is a palm-size PC that advanced technologies of mobile computing and wireless communications are combined.
Cybird allows data communications as well as data communications to be utilized with a mobile telephone
module (CDMA, AMPS, etc.) incorporated in a portable information terminal everywhere and everytime.
Supporting resolution of VGA (640 x480), Cyber also allows direct wireless access during moving without
changing user’s screen of a conventional Web site or a backbone information system of a company.
While conventional portable information terminals require separate cables, mobile telephones or wireless
modems, etc. for data communications, Cyber perfectly supports voice communications, wireless data
communications and the wireless Internet with only one terminal.
In Chapter 1, the following information is described.
! Cybird Features
Components of Cybird are described.
! Reference to Manual
Reference to this Manual and details of each Chapter is described.
! Application Programs in Cybird
Application programs basically provided in Cybird are introduced.
! Finding Information
The web sites to serve Cybird related information including the Windows CE are described.

Cybird Features
Check first if the following components are included when you purchase Cybird.
Please contact immediately the seller if the Cybird you bought has defects or any of the following components is
not included.
Body (including a battery
pack) Cradle (charger) DC Adapter (220V/60Hz)
Leather Case Stylus & Connection Strap User’s Manual (including a
guarantee sheet)
Quick Reference Customer Registration Card Cybird S/W CD
Win CE Service CD (option) Bluetooth Phone (option) Ear Microphone (option)
DC Connection Cable (option)
Using User’s Manual
This Manual was prepared to guide the Cybird users rapidly and easily using the product.
Each chapter of this Manual is composed of the following.
! Chapter 1. Basic Information for Cybird
Describes components of Cybird and equipped program types, and introduces Internet sites and services
to get Cybird-related information.
! Chapter 2. Starting Cybird
Describes key specification of Cybird and general guides to use the Cybird.
! Chapter 3. Setting and Managing Cybird Environment
Describes Cybird system setting, management of the battery and memories, etc. and explains utilization of
the permanent storage device (IPSM) in the Cybird.
! Chapter 4. Connection to Internet
Cybird is allowed to connect to the Internet through direct telephone connection with an incorporated
mobile telephone module or using a LAN card of the CF type. This chapter describes how to connect
directly to the Internet, and also the Web Browser that is a representative Internet connection program,
and the e-mail program.
! Chapter 5. Using Functions of Mobile Telephone
Cybird provides voice calls and the Short Message Service (SMS) associated with the functions of a mobile
telephone. This chapter describes voice calls, voice call telephone programs and the SMS program to provide
the short message service.
Principle of Notations
Notations in this Manual comply with the following principles to help easy understanding.
! An arrow (•) is used to divide icons and menu items that a user should subsequently select (e.g., Press the
menus “Start • Program• Calculator”).
! (Warning) indicates that information is lost or serious faults are caused to Cybird if the user does not
comply with the instructions.
! (Caution) indicates damages to the equipment or information loss may be caused if the user does not
comply with the instructions.
! (Reference) indicates useful information in using Cybird.
Programs Installed in Cybird
Basic programs provided with Cybird include the following.
1. ROM Installation Program
The programs installed in the ROM of Cybird can not be deleted or reinstalled arbitrarily.
" Phone: The program for voice calls
" SMS: The program for sending/receiving short messages
" Web Browser: Internet Explorer 4.0 Compatible HTML Browser
" MPMail : The program for sending/receiving Internet mails.
" Address Book : The program to control the address books.
" Scheduler : The user manages the schedule.
" Calculator: The program to execute general engineering calculations, measurements conversion, etc.
" Recorder: The program to record necessary memos and important matters.
" Microsoft Pocket Word: The editor for simple documents.
" CF Backup Tool: The program to backup and restore the data stored in the RAM of the Cybird with the
CF card and the permanent storage device (may not be provided depending on the model).

2. Programs Provided with CD
1) Game : Socoban, Puzzle and Mole
2) MP3 Player: The program to play MP3 files.
3) Address Book, Scheduler PC Version or Outlook: One of the Address Book and the Microsoft Outlook
is provided depending on the model. This program(s) is(are) required for synchronization of the Address
Book, the Scheduler program and data installed in Cybird.
4) Microsoft ActiveSync : Is installed in a PC for data synchronization and copy between a PC and Cybird.
(Reference) Another programs may be installed other than the application programs basically provided. For
more detailed information, see the Chapter 4 “Program Installation/Deletion”.
Finding Information (Cybird related information)
If you want to find Cybird-related information rapidly, use details in the following table.
Information Location
Windows CE information http://www.microsoft.com/windows/embedded/ce/
Latest Cybird-related information http://www.cb.co.kr/english/products/cybird_1.asp
http://www.cb.co.kr/korean/products/cybird_1.asp
http://cybird.cb.co.kr
Help for ActiveSync Help of ActiveSync installed on a PC
Help for Cybird “Start → HELP” in Cybird
Wireless Internet service site http://www.cybird.net
Chapter 2 Starting Cybird
In this chapter, basic matters required to use Cybird are described.
The information in this chapter includes the following.
! Cybird Features
introduces components of Cybird and describes suggestions for using Cybird.
! Starting a Cybird
describes steps initially to execute Cybird.
! Cybird On/Off
describes to turn on/off Cybird.
! Hardware Buttons
describes how to use hardware buttons in Cybird.
! Data Entry to Cybird
describes various ways to enter data into Cybird.
Cybird Features
1. Cybird Body
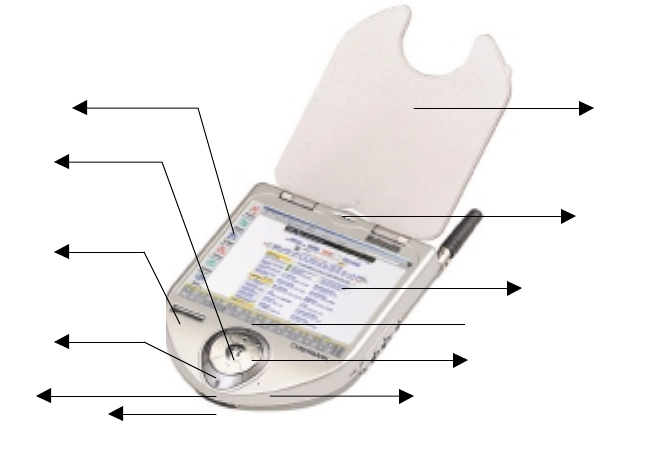
1) Front and Lower Parts
1 Speaker for Voice Calls
outputs the received tone in voice calling.
2 Main LCD Screen
4-inch TFT LCD of 256 colors with resolution of 640x480, displaying the details when application
programs are actually executed.
(Warning) Note that recognition may not be performed due to the damages if you click and damage the
touch screen with sharp objects such as a drill or a knife because the touch screen is made of fine
materials.
3 Ancillary LCD Screen
displays receive sensitivity, current time, remaining amount of the battery, etc.
4 Body Speaker
is incorporated in the Cybird.
(Reference) The speaker does not operate if the ear mic jack is connected.
5 4 Direction Keys
are located under the lower part of the Cybird and allow rapid movement (Up/Down/Left/Right) of the
cursor in icon selection or document edition. One press indicates one cursor move.
6 Enter Key
performs the same functions with the “Enter” key in a general keyboard. That is, the key performs the
function of a selected item.
7 Connection Key
10
1
2
3
4
5
7
8
9
6
11
12
can implement serial communications with a PC using the data cable.
(Reference) The data cable is optional.
8 Cover
Protective cover used to protect the main LCD.
9 LED
blinks in red in the case of cold booting of the Cybird. The LED also blinks in red when voice recording
is in progress and shows normal operation of the system.
(Caution) Check battery connection and battery locking in the back if the booting logo does not appear
on the screen and the LED is continuously on when a battery is initially equipped. Please contact the
Customer Support Center if the LED is continuously on although the battery is normally equipped.
10 Microphone
is used to record voice calls and recorded programs, using the body. This does not operate if the ear mic
jack is connected.
11 Application Program Icons
Abbreviated icons conveniently to execute main application programs (Phone, Web Browser, Mail,
Address Book, Scheduler, SMS, etc.). The program may be executed by selecting an icon of the
corresponding program.
(Reference) Abbreviated icons may change to the application programs used frequently depending on
the Cybird model or the relevant user.
12 Touch Keypad
Cybird provides a soft keyboard program to execute similar functions to the keyboard of a PC. The
touch keypad allows simple figures and alphabets to be entered without executing the soft keyboard as
an ancillary entry means of this soft keyboard.
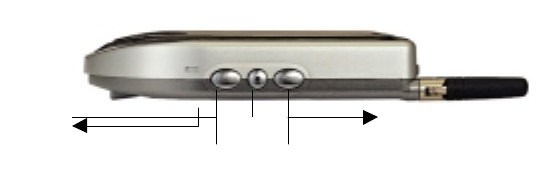
2) Right Side
1 Power Button
is used to turn on/off Cybird. The state that the Cybird is on is called the “Sleep Mode”. In the Mode, all
functions of the Cybird other than the telephone function stop and minimum power for preservation of
data is provided.
(Reference) Turn off Cybird, using this button if you do not use your Cybird. Thus the battery can be
more efficiently used. Although it is off, you can answer the phone because power is supplied to the
telephone. To turn completely off including the power in the telephone, you should turn telephone power
off, using the “Phone” program.
2 Record Button
is used to execute recorder programs or to control recording. If you press this button, the recorder
program is executed and then recording (Rec) starts if you press this button under the state the recorder
program is being executed. If you press this button during recording, this applies to stopping recording.
3 Telephone Button
is used to execute the Phone program or to control telephone calls.
# How to Execute the Phone Program
− If you press this button during Cybird-off, power is provided to the Cybird and the
Phone program is executed simultaneously.
− If you press this button during Cybird-on but when the Phone program is not being
executed, the Phone program is executed. This button, however, does not perform any
action when the Cybird is on and the Phone program is being executed.
# How to Control Telephone Calls
− This button functions like the call key of a mobile phone if a telephone call is directed,
and you can get the call by pressing the telephone button. If you press this button during
a telephone call, the call is terminated.
4 Boozer : generates telephone tone in terminating a telephone call.
123
4
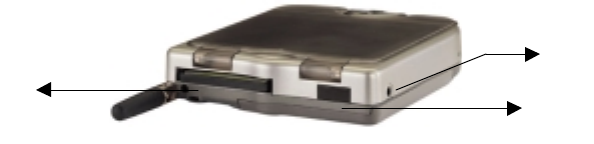
3) Left Side and Top
1 Compact Flash Card Slot (CF Card Slot)
The CF Card Slot is a storage of CF Type, and incorporates a LAN Card, a GPS Receiver, etc. Users can
extend storage space by purchasing CF cards in conformity to the specification or by connecting to the
LAN.
2 Infrared Communication Window
The part for infrared communications. Cybird supports the function to connect to PCs, using infrared
rays. For more information, see Chapter 4 Connection to PC.
3 Ear Mic Jack
is used to connect to the Ear Microphone with functions of an earphone and a microphone. Utilizing this
jack allows you to listen to telephone calls and MP3 music.
1
2
3
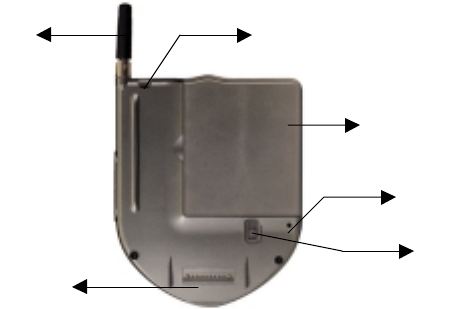
4) Back Part
1 Antenna
For the mobile telephone in the Cybird.
2 Cradle Connection Pin
For power supply and serial communications with a PC when connected to the cradle body.
(Caution) If the pin is damaged, problems in Cybird power charging or connection to a PC may be
caused. Thus be careful of handling the pin.
3 Portable Strap Holder
The part to equip a portable strap. Put the connection strap, that is provided with the Cybird body, on
this holder.
4 Battery
A main battery to supply power to the Cybird. See Chapter 3 Equipping and Changing Battery.
5 Battery Lock
Serves two important roles. This provides locking when equipping the battery pack to the Cybird and
prevents the battery from being separated. This also serves to use the backup battery power inside of the
Cybird for data preservation in changing the battery pack.
(Warning) You should change the battery rapidly and must not raise this device up if no equipped
battery. If the battery lock is raised up or the Cybird is left for long time at the state that the battery is not
equipped, the backup battery is completely discharged and the data stored in the RAM is lost.
(Caution) Do not pull the Battery Lock down to turn off the Cybird. If you pull it down, the data in the
RAM may be lost. Use the “Power” button on the right side of the Cybird to turn off Cybird.
6 Reset
This button is located inside of the product case. Press this button with the Stylus pen and reset the
system if Cybird operation gets slow or misoperates. Soft reset is performed by pressing the Reset
button with the Stylus pen and hard reset by pressing the “Power” button on the right side and the
“Reset” button at the same time. For more detailed information, see Chapter 3 System Reset.
(Note) In soft reset, the data that was not stored is deleted. Thus store the data currently open in the
application programs before soft reset. Since all data stored in the RAM is deleted in hard reset, perform
the hard reset after data backup, using the ActiveSync or the Backup tool. For more detailed information
about backup, see Chapter 5 Backup/Restore Data
6
5
4
3
2
1
2. Accessories
1) Cradle (Rest)
Connects Cybird to a PC and charges the main battery. Connection to a PC is performed through the PC
connection cable attached to the cradle. Charging is performed by combining the DC unit with the cradle and
supplying power to the cradle.
<Figure – Accessories including PC Connection Cable and Others (indicator to show the charging state)>
2) Power Unit
Provides external power to the cradle.
<Connection of Cradle to External Concent>
3) Bluetooth Telephone (Option)
Supports wireless communications with the body and is the component for voice communication with Cybird.
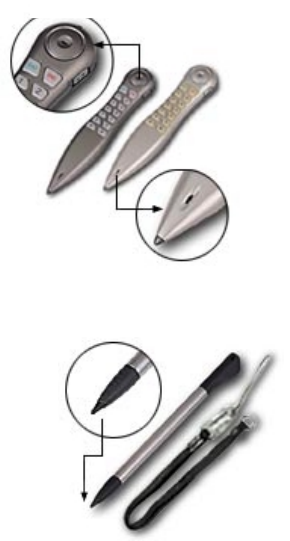
4) Stylus Pen
Performs the program shown on the Cybird screen or is used to press the Reset button.
(Warning) Do not touch the screen with sharp objects or different writing tools other than this Stylus pen.
The screen may be damaged.
3. Suggestions in Handling Cybird
1) Do not put heavy articles on Cybird body. The Cybird may be damaged.
2) Do not keep Cybird near to a strong magnetic material.
3) Cybird may be broken or misoperate if strong impact is given or excessive force is applied.
4) Wetting by rain or beverage spill may cause faults in Cybird.
5) Do not disassemble, repair or assemble Cybird arbitrarily. Contact the seller or the Customer Support
Center if Cybird needs repair.
6) Use the Stylus pen provided with Cybird when using the touch screen. If the screen is damaged by sharp
objects or the tips of fingers, it will cause lowered recognition and faults.
7) Cybird should be used under the following temperature conditions for LCD features. If used under other
temperature conditions, misoperation or faults may be caused. (Temperature: 0~40°C)
8) Use soft cloths for removing dust or dirty substances.
9) Change the battery to the charged battery rapidly or charge the Cybird as possible if battery capacity
lacks. If the battery is completely discharged, important data stored in the memory is lost.
10) Keep the Cybird in the case provided.
Initially Using Cybird
Execute the following steps when you purchase and use the Cybird for the first time.
1. Power Connection to Cybird
Equip the main battery to Cybird. As the main battery may be discharged during transportation, combine the
main battery, and put the Cybird on the cradle after first combining the cradle with the power supply unit and
then supplying power.
2. Check operation of Cybird through the following processes.
1. The CYBIRDBANK logo appears on the screen for the first specified time (within 2 seconds) if you
press the “Power” button after connecting power to Cybird, and then the coordinate setup screen is
shown.
2. The cross (+) moves in the order of center→ left top → left bottom → right bottom → right top.
Coordinates adjustment is to control the recognition coordinates of the touch screen and you must
press exactly the center of the cross (+) along the indication (+) with the Stylus pen. For more detailed
information, see Chapter 3 Setting System Environment.
3. If you finish coordinates setting, the initial screen of Microsoft Windows CE appears. Now you can
use Cybird.
3. Setting Cybird Environment
Set the basic system on the control panel before using Cybird and make an optimum use environment. This step
may be performed during use later. Press the “Start → Setting → Control Panel” and set the environment. For
more detailed information, see Chapter 3 Setting System Environment.
Cybird On/Off
If you use the Power button on the right side of Cybird, you can simply stop or start again the Cybird. Cybird
stops if you press the Power button during use and the current operation state is preserved other than the data
communication (using the Internet). To start the work again, you just press Power button again and then the
details of the work at the time of stop are restored on the screen.
Using Hardware Buttons
1. Phone Key: brings the screen for a telephone call.
2. Record Key: brings the recorder screen if you press it once, and recording starts if you press it again. The
recording is completed if you press it during recording.
(Reference) As the recorded data is stored in the memory as a file, you can listen to the recorded details at any
time. As stored in the memory as a file, recording time depends on the remaining capacity and recording type.
3. Power Key: is used to end or start work of Cybird. If power is on again, the screen to perform the previous
work appears again.
4. Navigation Key: performs the same functions with Up, Down, Left and Right keys on a general keyboard.
5. Enter Key: executes selected programs or items like the “Enter” key on a general keyboard.
Data Entry
Cybird does not have a general keyboard and you can enter data by means of the following 4 ways.
" Entering data using the Soft Keyboard
" Entering data using the Touch Keypad
" Entering data using the Pen and Paper
" Recording voice using the Microphone
1. Using Soft Keyboard
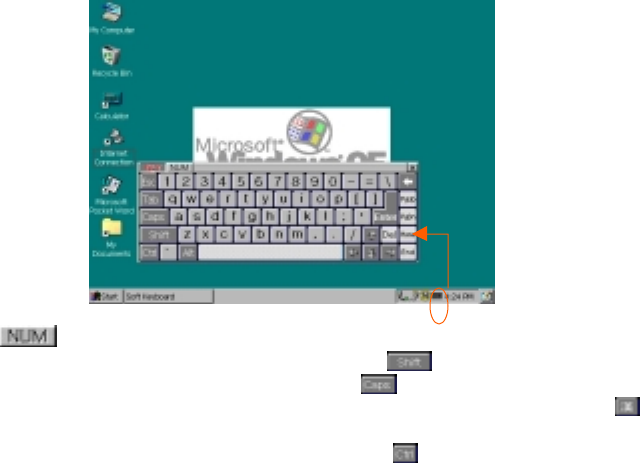
1) If you click the keyboard icon on the task bar, the Softkeyboard similar to a keyboard of a computer
appears on the screen, as shown below.
2) Enter characters using the Stylus pen.
1 Click the key if you want to view only numerals.
2 Click the corresponding characters after pressing the key for entering capitals, special
characters. Enter continuous capitals after pressing the key.
3 To convert the mode to the Chinese mode after entering Korean characters, click the key. Then
the Chinese selection window appears.
4 To use Ctrl+C (copy), Ctrl+V (attach) and so on, press the key and the corresponding function is
executed if you click the corresponding alphabet.
5 Other functions of the keyboard operate in the same way with the keyboard connected to a PC.

2. Using Touch Keypad
You can enter simple numerals or English characters, using the Touch Keypad on the lower part of the Main
LCD screen.
(Reference) The Touch Keypad does not operate when the SoftKeyboard is operating.
3. Recording with Microphone
You can save the sudden flashing ideas or schedule as voice in the Cybird, and can thus efficiently manage
important information without missing. You can use the functions of Play/Start /Stop Recorder programs only by
the record button on the right side of the Cybird.
1) Recording
If you press the record button once, the recorder program is executed. Press the button again, then recording
starts. If you press the button again after recording the saved details, recording finishes and the recorded
details are saved as a temporary file. The process is the same if you press the Recording/Stop button on the
recorder program screen.
2) Saving the Recorded File as a Different File Name
Press the Save button right after finishing recording to save the recorded file as a different name. Select a
saved location on the Search window if the Save File screen appears, and then enter a desired file name.
Press the OK button.
3) Playing
The last recorded details are played if you press the Play button. Press the Play button after pressing the Open
button, finding the corresponding file and selecting the Play button, to bring the previously recorded details.
Press the Stop button to stop and the Pause button to pause during playing.
Chapter 3. Setting and Managing Cybird Environment
This chapter describes how to set and optimize an environment for using Cybird. In addition, it introduces how
to manage power and memory to expand the battery life and protect important information.
This chapter contains following information:
! Settting Cybird Environment
This section describes how to set a basic system environment of Cybird.
! Managing the Battery
This section introduces how to charge the battery and how to manage it efficiently.
! Using and Managing Memory
This section describes the memory areas (RAM, IPSM and external storage device) that Cybird can
use.
! Resetting the System
This section explains Soft Reset and Hard Reset, and the precautions.
Setting Cybird Environment
Before using Cybird, set a basic system environment to create the optimum environment for using Cybird.
Select “Start • Settings • Control Panel”, and then click the corresponding icon to set the concerned
environment.
Apply the change of any setting by clicking OK button in the corresponding setting window.
1. Country Setting
If you change the country setting, display formats or sorting methods of date, time, currency and number using
this setting are all changed accordingly. For Republic of Korea, select Korean and click OK.
2. Date/Time
This option allows setting year, month, date and time. It is possible to change the standard time according to the
area of each country.
Depending on the selection of auto or manual setting of time, the following is applied:
1) Auto Setting: Cybird time is automatically set based on the time that the radio base station sends to the
built-in mobile phone module. This time agrees accurately with the existing mobile phone time.
2) Manual Setting: A user can set time at discretion. (In this case, it may differ from the time displayed on
the LCD indicating the mobile phone state.)
3. Network
This option sets the information about network configuration, such as network driver list, driver properties, and
user name, password and domain for accessing the network.
4. Display
This option sets background screen, screen color scheme and screen saver.
1) Background Screen: Select and set a desired picture (a bitmap file).
2) Screen Color Scheme: Change the color scheme of the screen to the one you want. It is possible to save,
delete or selectively apply the change to/from the configuration table.
3) Screen Saver: When you do not use Cybird for a long time, the screen lights off to save the battery. A
user can set the desired time. When the user use Cybird while the light is off, the light automatically
turns on.
5. Volume and Sound
This option allows setting the strength of each sound to be transmitted to the earphone and the Cybird speaker. A
user can set a desired event or sound.
6. User
With this option, you can enter the information about multiple users and memo.
7. Stylus
This allows adjusting the speed of double clicking, and also readjusting the coordinates of the touch screen while
using Cybird. Coordinate setting is indispensable for adjusting the recognition coordinates of the touch screen.
Hold Stylus lightly and press it correctly on the center of the cross. Press it on “Center → Upper Left → Lower
Left → Lower Right → Upper Right” in order.
8. System
This option displays generation information about the system, with which it is possible to adjust the memory
allocation between storage memory and program memory.
9. Power
This option allows checking the current battery status and its life. With power-off function, a user can set the
time to turn power off, to minimize power consumption of the battery.
10. Making a Telephone Call
This option allows setting the property for making a telephone call, with which it is possible to set the location
from which a telephone call is to be made and how to make a call.
11. Keyboard
This option allows setting the keyboard reaction speed (re-entry time and repetition speed).
12. Communication
This option allows setting the device name used for identifying other computers and user devices, and
controlling the connection between desktop computers.
13. Remove Programs
This option displays the list of programs installed in Cybird in addition to basic programs installed in ROM. If
you select a program and press Remove button, the selected program is removed.
Managing the Battery
Files or data you prepare are saved in RAM, a volatile memory of Cybird, and IPSM or an external storage
medium, a non-volatile memory. When the power of Cybird (main battery and backup battery) is all consumed,
the memory saved in the volatile RAM is all lost. This section describes how to manage power efficiently, to
expand the battery life and secure the safety of data.
Cybird provides two types of power, a main battery and a backup battery. The main battery supplies power to
Cybird during ordinary use, and the backup battery supplies the minimum amount of power to Cybird to
preserve the information saved in RAM when the main battery is replaced or when it is completely discharged.
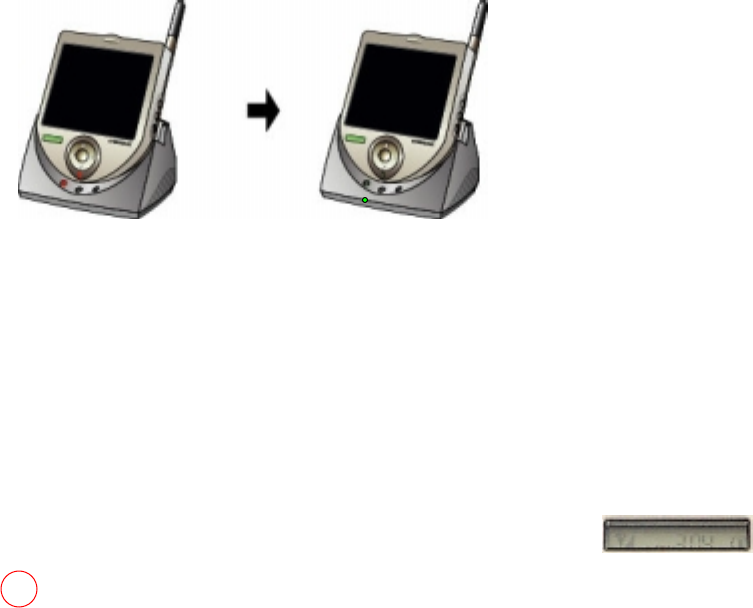
1. Charging the Battery
1) Charging the Main Battery
The main battery is charged at a cradle. The cradle can charge up to two main batteries at the same time.
When the main battery is being charged, the first LED on the left side of the cradle indicates the charging state
of the battery currently mounted to Cybird and the second one indicates that of a backup battery. Full charging
of the main battery takes about two hours though it may differ depending on the remaining battery charging
stage.
$ Red: The battery is being charged
$ Light Green: The battery is completely charged.
(Reference) If the lamp is blinking while charging, the battery is not charged normally. So, remount the
battery or Cybird. If the lamp keeps blinking even after remounting the battery or Cybird, contact the
Customer Support Center for repair.
2) Charging the Backup Battery
The backup battery is automatically charged when Cybird is mounted to the cradle. When Cybird is removed
from the cradle, it is charged by the main battery.
(Reference) It takes long time to charge the backup battery. So, place Cybird on the cradle if possible so that
the backup battery may not be completely discharged.
3) Checking the Battery Charging State
It is possible to check the main battery charging state either at the Ancillary LCD Screen ( ),
the CDMA Status Window, or through the Control Panel. You can check the backup battery charging state
with ‘Power’ option in the Control Panel. Select “Start • Settings • Control Panel • Power”, and the
remaining amount of power is displayed.
(Reference) The battery charging state may be displayed differently for a while depending on the
environment of use. In other words, during the Internet connection or during a call, a large amount of power is
required at a time. In this case, the battery charging state may be indicated as to be very short.
2. Replacing or Mounting the Battery
1) How to Separate the Battery
Put down the battery lock on the back of Cybird, and separate the battery by pushing it aside lightly.
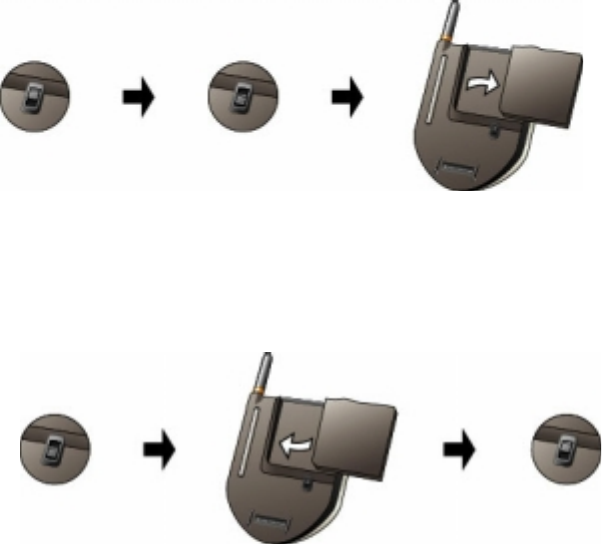
2) How to Mount the Battery
Put the battery into the battery terminal of Cybird with the battery lock on the back of Cybird down, mount it
by pushing it lightly to Cybird, and then put up the battery lock.
(Caution) When putting the battery in Cybird, be careful not to catch a terminal of Cybird. Do not apply
excessive force. It may cause the battery terminal to be damaged.
(Warning) Do not put up the battery lock when the main battery is not mounted to Cybird. In this case,
Cybird uses the backup battery power, and the information saved in RAM may be lost.
3. Time to Replace or Charge the Battery
If a warning message “Very Low Main Battery” is displayed while using Cybird, please replace the main battery
with a fully charged one or charge it by placing it on the cradle.
If you keep using Cybird even after the warning message “Very Low Main Battery” is displayed, Cybird
automatically switches to “Very Low Battery Sleep Mode” and turns off. (In this state, function keys of Cybird
do not work at all.)
(Warning) When separating replacing the main battery with a charged one, replace it as soon as possible after
separating it from Cybird. The backup battery built in Cybird keeps data for a specified time at the time of
battery replacement. For “Very Low Battery Sleep”, mount Cybird to the cradle to charge it as soon as possible.
If the backup battery is completely consumed, data saved in Cybird is lost.
4. Managing the Battery
To extend the main battery life and keep the optimum performance, it is desired to observe the followings:
" Charge the lithium ion battery only at room temperature. If the ambient temperature is lower than 5°C
or higher than 35°C, it is better to quit charging.
" It may take a short time to charge a new lithium ion battery or the one that has been neglected for a long
time, and the usable time may be shortened. Such a phenomenon is a characteristic of the lithium
battery, which can be gone after four or five times of full discharging and charging.
" To keep the optimum performance of the lithium ion battery, carry out full discharging and charging
periodically.
" The lithium ion battery is a consumable that has its own life. Repeated charging and discharging
gradually reduces its life. When the usable time is reduced to about a half of the initial usable time,
replace it with a new lithium ion battery.
5. Effective Method of Using Power
When using the main battery as power source, use Cybird as follows in order to use it for long:
" Place Cybird on the cradle whenever it is possible.
" Set Cybird to be automatically switched to “Sleep Mode” when it is not used for a specified time, if
you supply power to Cybird with the main battery.
− Select “Start • Settings • Control Panel • Power • Power Off”, and set the shortest possible
time.
− Select “Start • Settings • Control Panel • Display • Light Tab”, and set the shortest possible
time.
" Set Cybird not to produce unnecessary sounds.
Select “Start • Settings • Control Panel • Volume and Sound”, and set necessary sounds only.
" When you use Cybird for a long time, use it on the cradle if possible. In particular, when you access
the Internet or make a phone call using Cybird, it is recommended to use it on the cradle.
" When you do not use Cybird, switch “Power” button on the right side of Cybird to “Sleep Mode”.
(Reference) What is “Sleep Mode” of Cybird?
It refers to a state in which Cybird power is off except the minimum power required for indispensable
functions in order to minimize power consumption when a user does not use Cybird. In this state, the
minimum power is supplied to Cybird so as to keep the memory content.
It is possible to switch Cybird to Sleep Mode in one of the following three methods:
" Automatic Sleep by System Setting
Cybird automatically switches to Sleep Mode according to the time set in “Power” option of Control
Panel menu of Windows CE.
" Very Low Battery Sleep Mode
The system automatically switches to Sleep Mode in order to keep data when the main battery
power is almost consumed.
" Sleep Mode Selection using Suspension Command in Start Menu of Windows CE
A user can switch Cybird to Sleep Mode by selecting “Start → Suspend” using Stylus.
(Reference) When Cybird is used on the cradle, its power is supplied from an external source (cradle), so
Auto Sleep is not executed. Auto Sleep Mode is available only when you change the setting in
Control Panel. (See “Power” part in “Setting Cybird Environment”.)
(Reference) Auto Sleep is not executed while a data communication (Internet, mail, etc.) program is
used.
Using and Managing Memory
Memories that a user can use in Cybird are classified into the following three types:
1. RAM Area
RAM is used as a space to save data and/or files and to use programs. In other words, a user can save data and/or
files and install programs in RAM area. RAM is mainly used when a program is executed. For the sake of
performance and safe use of the system, take the following matters into consideration when using Cybird:
1) When several programs are executed at the same time, program execution speed may be lowered due to
insufficiency of memory or when the entire area of RAM is in use, Cybird may not operate normally.
So, be sure to execute only indispensable programs at the same time.
2) Remove unnecessary or insignificant files or data or save them in an IPSM or a CF card whenever
possible, to secure a sufficient RAM area required for program execution.
(Caution) RAM is a volatile memory, so the content saved in RAM is all lost when power is not supplied to
Cybird (both main battery and backup battery are completely discharged) or when the system is reset by Hard
Reset. Therefore, back up data periodically so as to restore the lost data in case of data loss.
2. IPSM Area
IPSM is a nonvolatile permanent memory that plays the same role as the hard disk of a PC. Data stored in IPSM
is not lost even when Cybird is not supplied with power or is reset by Hard Reset. Therefore, it is possible to
secure the safety of data if you copy important data to IPSM from time to time.
(Caution) When IPSM is formatted, all data contained in it is all lost the same as the hard disk formatting of a
PC. Therefore, before formatting IPSM, copy necessary data to a PC using a CF card or ActiveSync in advance.
3. External Storage Device
Cybird supports CF-type memory cards. The CF memory card is an insert/pull-out type storage device like
floppy disks for a PC, which can be inserted to the CF card slot of Cybird to store data. As the CF card memory
can preserve data permanently, it can be used for backing up the data stored in RAM area to preserve it safely.
For more details about how to use the CF card, see Chapter 9 “Compact Flash Card”.
System Reset
When Cybird does not operate normally, it is possible to make it operate normally by resetting the system.
System reset can be performed either by Soft Reset and Hard Reset:
1. Soft Reset
When Cybird execution speed is suddenly lowered or the system does not operate normally for a while, perform
Soft Reset. To perform Soft Reset, press Reset button on the back of Cybird using the Stylus pen.
(Caution) As a result of Soft Reset, files that have been open or data that has not been saved are all lost.
Therefore, perform Software Reset after saving what you have done.
2. Hard Reset
If the system does not recover a normal operating status even after Soft Reset, it is possible to reset the system
by performing Hard Reset. To perform Hard Reset, press Power key on the right side of Cybird and Reset key on
the back of it at the same time. During Hard Reset, Cyberbank logo appears and then a screen for coordinate
setting appears.
(Warning) Hard Reset removes all data saved in RAM. Therefore, before performing Hard Reset, save all data
in RAMs to a nonvolatile storage device (IPSM, CF Card, or hard disk of a PC).
(Warning) Note that, when both main battery and backup battery are all discharged, Cybird is automatically
reset by Hard Reset and all data saved in RAM all programs installed in it are completely lost.