CyberBank CB-0801 PDA With 800MHz CDMA & AMPS Dual Mode Cellular Phone User Manual MANUAL 1 OF 4
CyberBank Corp PDA With 800MHz CDMA & AMPS Dual Mode Cellular Phone MANUAL 1 OF 4
Contents
MANUAL 1 OF 4
User’s Manual
2001. 2.

Copyright
Please be sure to read the following before using your PC-EPhone.
The information contained in this user’s manual is subject to change without notice for
product performance enhancement.
Cyberbank Co., Ltd. shall not be liable for any technical or editorial errors or omissions
contained herein, nor for incidental or consequential damages in connection with the
furnishing, performance, or use of this manual or the examples herein.
This document contains information protected by copyright.
No part of this document may be photocopied, reproduced, adapted, or translated in
any form without the prior written consent of Cyberbank Co., Ltd.
The programs that are used in PC-EPhone are copyrighted and all rights are reserved.
Reproduction, adaptation, or translation of those programs without prior written
permission of Cyberbank Co., Ltd. is also prohibited.
Microsoft, MS, ActiveSync, Active Desktop, Outlook, Windows, and Windows NT are
either registered trademarks or trademarks of Microsoft Corporation in the United
States and/or other countries. Microsoft products are licensed to OEMs by Microsoft
Licensing, Inc., a wholly owned subsidiary of Microsoft Corporation.
The software in this document is offered through program license contracts or
contracts not open to the public. Software may only be used or copied according to
the articles in the above contract. All product names mentioned herein trade names or
registered trademarks of their respective owners.
CYBERBANK CORP.
18th Floor, Mirae Bldg., 1306-6
Seocho-dong, Seocho-gu, Seoul, Korea
February 2001

Table of Contents Page i
Table of Contents
Chapter 1 About PC-EPhone
Product Components ................................................................... 3
Using the Manual ......................................................................... 4
Conventions ................................................................................. 6
Programs Installed in PC-EPhone................................................ 7
Finding Information (PC-EPhone related information) ................ 10
FCC RF Exposure Information ....................................................11
Chapter 2 Getting Started
Product Hardware Features ......................................................... 2
Using your PC-EPhone for the first time..................................... 12
Turning your PC-EPhone ON/OFF............................................. 13
Using Hardware Buttons ............................................................ 13
How to Input Data ...................................................................... 14
Chapter 3 PC-EPhone Customizing and Maintenance
Setting PC-EPhone Preferences .................................................. 2
Managing Battery Power ............................................................ 12
Managing and Applying Memory ................................................ 17
Resetting Systems ..................................................................... 19
Chapter 4 Connecting to a Desktop PC
Installing ActiveSync on your Desktop PC.................................... 2
Establishing Partnership............................................................... 8
Connecting your desktop PC with PC-EPhone............................11
How to Synchronize data between your desktop PC and PC-EPhone...15
How to copy files between your desktop PC and PC-EPhone .... 18
How to Backup/Restore PC-EPhone Data.................................. 19
Installing/Uninstalling Programs using ActiveSync ..................... 20

Page ii Table of Contents
Chapter 5 Backing up and Restoring Data
Backing up and Restoring using ActiveSync ................................ 2
Full Backup and Restoring to a CF Memory Card ........................ 5
Backing up and Restoring by File............................................... 12
Chapter 6 Internet Connection and Use
Connecting to the Internet using a LAN Card ............................... 2
Connecting to the Internet using a Modem................................... 4
PC-EPhone Web Browser............................................................ 7
E-Mail......................................................................................... 13
Chapter 7 Applications
Contacts....................................................................................... 2
Calendar ...................................................................................... 8
Tasks.......................................................................................... 17
Memo......................................................................................... 24
Calculator................................................................................... 27
Recorder .................................................................................... 30
Microsoft Pocket Word ............................................................... 34
Chapter 8 Accessories
CYBERBANK Accessories........................................................... 2
CF (CompactFlash) Memory Card ............................................... 3
Chapter 9 Tips & Troubleshooting
Maintaining your PC-EPhone in its Best Condition ....................... 2
Reset your PC-EPhone................................................................ 3
Backup and Restore Data ............................................................ 5
Troubleshoot basic problems with PC-EPhone............................. 6
Tips for better using PC-EPhone .................................................. 9
Travel Safety of PC-EPhone .......................................................11

Table of Contents Page iii
Chapter 10 Support and Service
Web Sites..................................................................................... 1
Service Center ............................................................................. 1
Purchasing Accessories............................................................... 2
Appendix
A. Using the Character Recognizer
B. Hardware Specifications
C. Glossary
D. Warranty

About PC-EPhone Page 1-1
Chapter 1
About pc-ephone
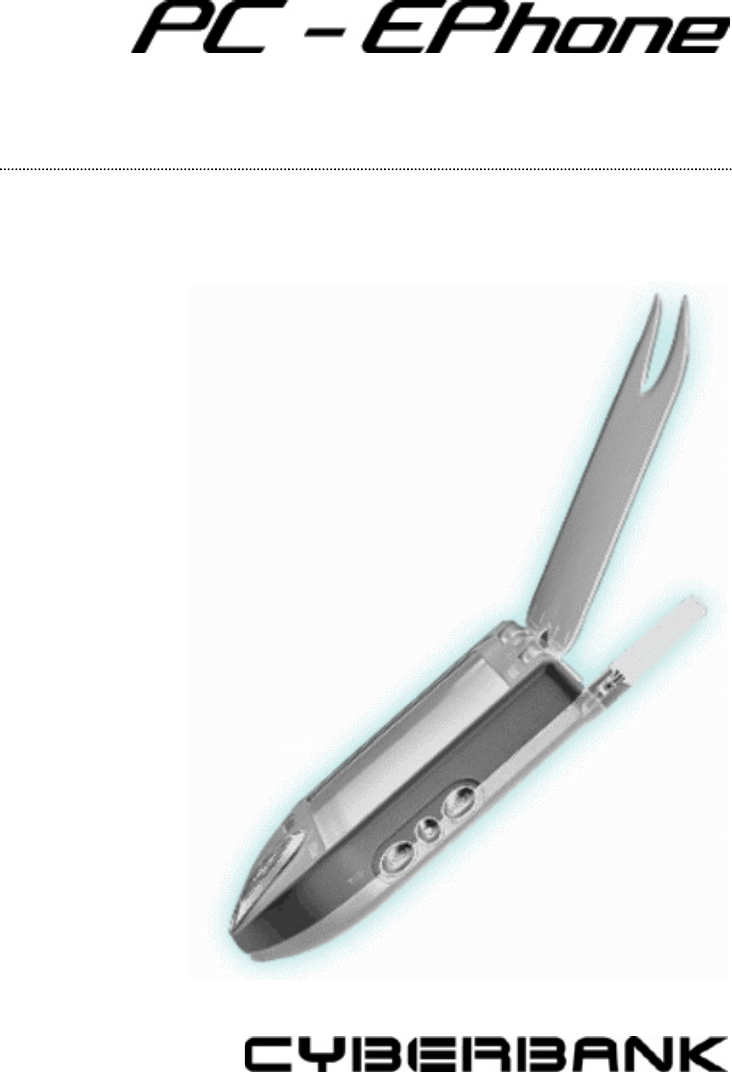
Congratulations on purchasing the PC-EPhone, a Palm-Size PC that is a combination of high
technology from the areas of Mobile Computing and Wireless Communication. PC-EPhone is a mobile
device powered by Microsoft Windows CE OS. The size and capabilities of the PC-EPhone let you
keep your most important business and personal information current and close at hand.
Through the self-developed personal information management programs, PC-EPhone enables you to
check E-mail and manage your appointments and contacts in situations where your desktop PC is
unavailable. This is made possible through a process of downloading the data stored on your desktop
PC to your PC-EPhone by synchronization, and then updating the information you have acquired on
the road back to your desktop PC through yet another synchronization. PC-EPhone offers you the
highest quality in performance and battery life as well as a variety of programs and utilities planned
and designed by CYBERBANK.
In order to stand out from other products in the world, PC-EPhone has installed mobile phone modules
(including CDMA, AMPS) in the Personal Data Assistant(PDA) for voice calls and wireless Internet
communications, anywhere and anyplace.
In addition, by supporting VGA-level resolution (640x480, 200dpi), PC-EPhone offers you direct
wireless access without having to adjust sizes of Web Sites or Information System user screens much.
Also, in contrast to the existing PDA which needed separate cables, mobile phones, or wireless
modems for data communication, PC-EPhone fully supports voice calls, wireless data communication,
and wireless Internet all in one device.
Although PC-EPhone has many features illustrated above, you will have no problems if you are
familiar with Microsoft Windows series.

Page 1-2 Chapter 1
In this chapter, you will find information on:
X Product Components
Introduces PC-EPhone components.
X Using the Manual
Describes how to use this manual and gives an overview of the contents in each chapter.
X Conventions
Describes Notice, Reference, Warning.
X Programs installed in PC-EPhone
Introduces the applications built in PC-EPhone.
X Finding Information
Introduces web sites providing information related to Windows CE and PC-EPhone.
X FCC RF Exposure Information
About PC-EPhone Page 1-3
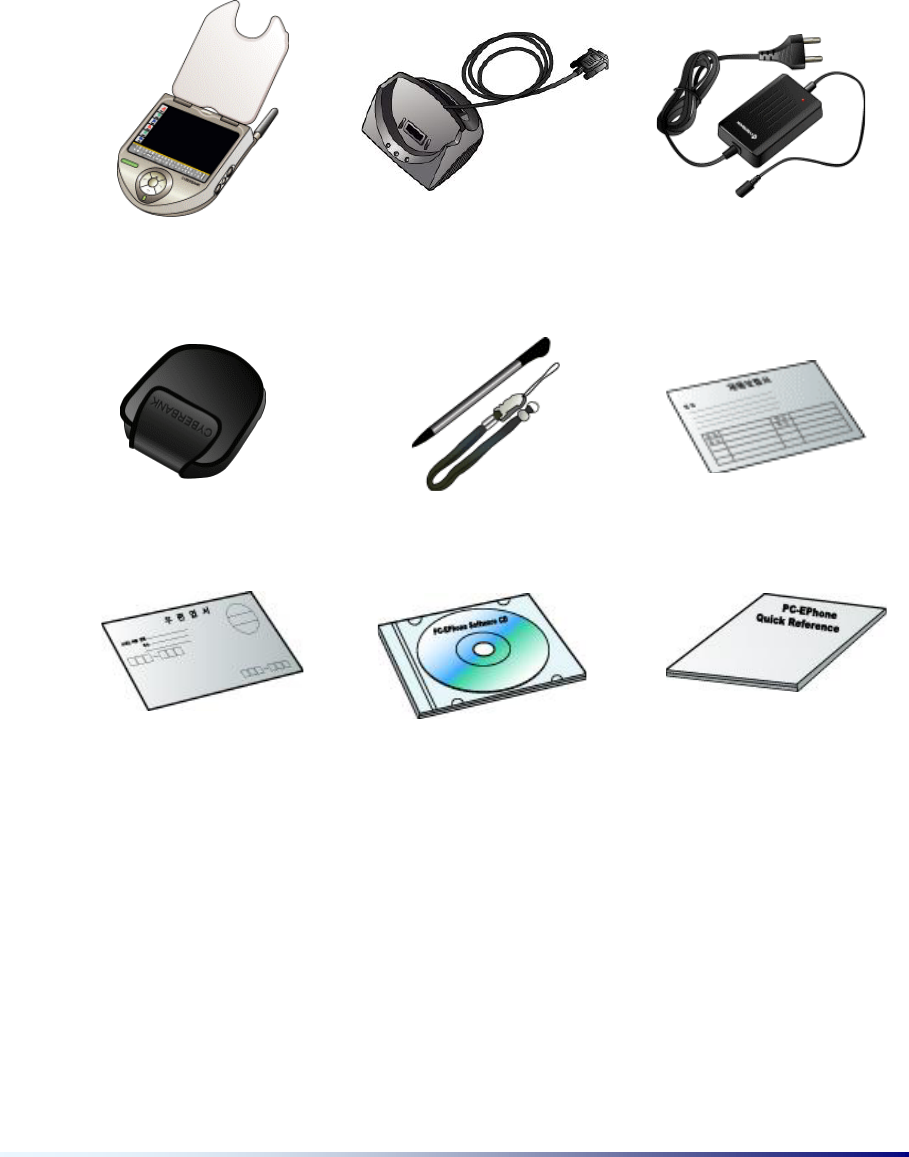
I. Product Components
After purchasing your PC-EPhone, check to see if all the components shown below are included.
If there is a defect in the product or a missing component, please contact the place of purchase
immediately.
PC-EPhone
(Battery included)
Cradle
(Charging and desktop PC
connecting device)
AC adapter
(110 V, 220V/50~60Hz)
Leather case Stylus & Connecting strap Product guarantee
Customer registration Card PC-EPhone Software CD Quick reference

Page 1-4 Chapter 1
II. Using the Manual
This User’s Manual will give you quick and effective guides to using your PC-EPhone more
efficiently and conveniently.
This User’s Manual consists of the following :
XChapter 1 About PC-EPhone
Describes PC-EPhone components and introduces Internet sites and services
where you can get information related to your PC-EPhone.
XChapter 2 Getting Started
Outlines PC-EPhone’s main features and introduces the steps you should
take when first using your PC-EPhone.
XChapter 3 PC-EPhone Customizing and Maintenance
Gives information on PC-EPhone system settings and battery & memory
management. Describes how to utilize the Intel Persistant Storage
Management (IPSM) built in your PC-EPhone.
XChapter 4 Connecting to a Desktop PC
Explains how to connect your PC-EPhone and desktop PC via serial cable or
IrDA ports, and how to synchronize and copy data between your desktop PC
and PC-EPhone using Microsoft ActiveSync. Also explains how to install and
un-install programs in PC-EPhone.
XChapter 5 Backing up and Restoring Data
You need to backup data periodically or when needed to prevent data loss.
This chapter introduces various ways of backing up and restoring data using
ActiveSync and CF Cards.
XChapter 6 Internet Connection and Use
As PC-EPhone has a built-in mobile phone module, you can connect to the
Internet through dial-up connection or a LAN card of CF Type II Card. This
chapter describes how to connect directly to the Internet from your PC-
EPhone and gives information on the Web Browser and the E-mail program.

About PC-EPhone Page 1-5
XChapter 7 Applications
Outlines basic PC-EPhone applications including PC-EPhone Contacts, PC-
EPhone Calendar, PC-EPhone Tasks, Calculator, Memo and Recorder
programs.
XChapter 8 Accessories
Describes accessories provided by CYBERBANK and explains how to use a
CF Card.
XChapter 9 Tips and Troubleshooting
Introduces tips and troubleshooting methods that will come in handy when
using PC-EPhone.
XChapter 10 Support and Service
Gives information on web sites with PC-EPhone related information, and on
customer support.

Page 1-6 Chapter 1
III. Conventions
This User’s Manual uses the following conventions that will help you find and understand the
information easily.
Indicates that failure to follow directions could result in data loss or
damage to equipment.
Indicates that failure to follow directions could result in moderate losses.
Indicates helpful information for using your PC-EPhone.

About PC-EPhone Page 1-7
IV. Programs Installed in PC-EPhone
The following programs are provided with your PC-EPhone.
(1) Programs installed in ROM (Read Only Memory)
You may not voluntarily uninstall and install programs in your PC-EPhone’s ROM.
X Memo
Enables you to create simple written memos using Handwriting Recognizer program.
X Contacts
Manages names, addressed, and phone numbers, and can always be updated
through synchronization with a desktop PC.
X Calendar
Manages important meetings, events, and schedules, and can always be updated
through synchronization with a desktop PC.
X Tasks
Reminds you of tasks by setting off alarms, and can always be updated through
synchronization with a desktop PC.
X E-Mail
Enables you to directly send and receive E-mail along with attachments.
X MineSweeper
Pass the time at the airpport, on the train, or during a not-so-important meeting or
lecture with this classic game.
X Calculator
Provides a scientific calculator as well as a standard calculator. Also, CYBERBANK
has added a weights and measures conversion feature.
X Recorder
Enables you to voice record memos and important items that you can listen to later
through playback.

Page 1-8 Chapter 1
X Backup & Restore
Enables you to backup or restore the data in your PC-EPhone’s RAM (file, DB,
registry) to and from CF Cards and IPSM.
X Short Message Service(SMS)
Enables you to send and receive short messages to and from other mobile phones.
X Phone
Enables you to make voice calls just like a mobile phone.
X Remote Networking
Enables you to connect to an Internet Service Provider(ISP) through a modem.
X Terminal
Used to connect to online services that need VT-100 TTY terminal emulation.
X ActiveSync
Used to exchange data by connecting your PC-EPhone and desktop PC.
X PC Link
Used to connect your PC-EPhone and desktop PC.
X Microsoft Pocket Word
Enables you to download MS Word documents from your desktop PC through
synchronization and to edit them on your PC-EPhone when desktop PC is
unavailable.
X bSpreadSheet
Enables you to view Excel documents and to compute numerical figures.
X PC-EPhone Web Browser (Internet Explorer 4.0 compatible)
Enables you to freely browse Web sites.
X Windows Explorer
Used to find or organize files.

About PC-EPhone Page 1-9
(2) Programs provided in PC-EPhone Software CD
X PC-EPhone PIMSSync
Is S/W needed in synchronizing Outlook 2000 on the desktop PC and PIMS data
(PC-EPhone Calendar, PC-EPhone Tasks, PC-EPhone Contacts) of PC-EPhone
using ActiveSync.
X PDF Viewer (Ansyr Primer)
Enables you to view documents in PDF form on your PC-EPhone.
X AvantGo Client
Enable you to receive AvantGo Channel services.
X Dictionary(Korean/English, English/Korean) (Korean Version Only)
Is installed from PC-EPhone Software CD.
You can also install programs other than the applications that are
basically provided. For more detailed information, see the
“Installing/Uninstalling Programs” section in Chapter 4.

Page 1-10 Chapter 1
V. Finding Information (PC-EPhone related information)
When you need to find other information related to your PC-EPhone, refer to the following :
Synchronizing Data
See Microsoft ActiveSync Help installed on your Desktop PC or your PC-EPhone User’s
Manual
Unfamiliar Technical Terminology
See the technical terminology section in the appendix C
Product Use Guide and Troubleshooting
See your PC-EPhone User’s Manual. (http://www.pc-ephone.co.kr)
Connecting your desktop PC and PC-EPhone
See your PC-EPhone User’s Manual or Microsoft ActiveSync Help
Product Information
http://www.cb.co.kr, http://www.pc-ephone.co.kr
Customer Support
http://www.pc-ephone.co.kr
Product Registration
Customer Registration Card, http://www.pc-ephone.co.kr Online registration
Guarantees and Service Information
Product Guarantee Card
Downloading Latest Updated ActiveSync
http://www.microsoft.com/mobile/pocketpc/downloads/activesync.asp
Microsoft Windows CE Update information
http://www.microsoft.com/mobile

About PC-EPhone Page 1-11
VI. FCC RF Exposure Information
In August 1996 the Federal Communications Commission (FCC) of the United States with its
action in Report and Order FCC 96-326 adopted an updated safety standard for human
exposure to radio frequency electromagnetic energy emitted by FCC regulated transmitters.
Those guidelines are consistent with the safety standard previously set by both U.S. and
international standards bodies. The design of PC-EPhone complies with the FCC guidelines
and these international standards.
Use only the supplied or an approved antenna. Unauthorized antennas, modifications, or
attachments could impair call quality, damage your PC-EPhone, or result in violation of FCC
regulations.
Do not use your PC-EPhone with a damaged antenna. If a damaged antenna comes into
contact with the skin, a minor burn may result. Please contact your local dealer for replacement
antenna.
Body-worn Operation
PC-EPhone was tested for typical body-worn operations using the optional belt-clip / holster
placed 1 inch (2.54cm) from the body. To comply with FCC RF exposure requirements, a
minimum separation distance of 1 inch (2.54cm) must be maintained between the user's body
and PC-EPhone, including the antenna, whether extended or retracted. The use of third-party
belt-clips / holsters with no metallic components that provide the minimum separation distance
of 1 inch (2.54cm) can be used to satisfy FCC RF exposure requirements. The use of non-
tested accessories or other body-worn operations may not comply with FCC RF exposure
requirements and should be avoided. Contact your local dealer for optional accessory items.
For more information about RF exposure, please visit the FCC website at www.fcc.gov

Getting Started Page 2-1
Chapter 2
Getting Started
This chapter provides you with the basic information you need to use your PC-EPhone.
This chapter includes information on:
X Product Hardware Features
Describes PC-EPhone’s features and tips on usage.
X Using your PC-EPhone for the first time
Describes the steps you must take when using PC-EPhone for the first time.
X Turning your PC-EPhone ON/OFF
Explains how to turn your PC-EPhone ON/OFF.
X Using Hardware Buttons
Gives information on PC-EPhone hardware buttons.
X How to input data on PC-EPhone
Describes how to input data on PC-EPhone.
Page 2-2 Chapter 2
I. Product Hardware Features
(1) PC-EPhone
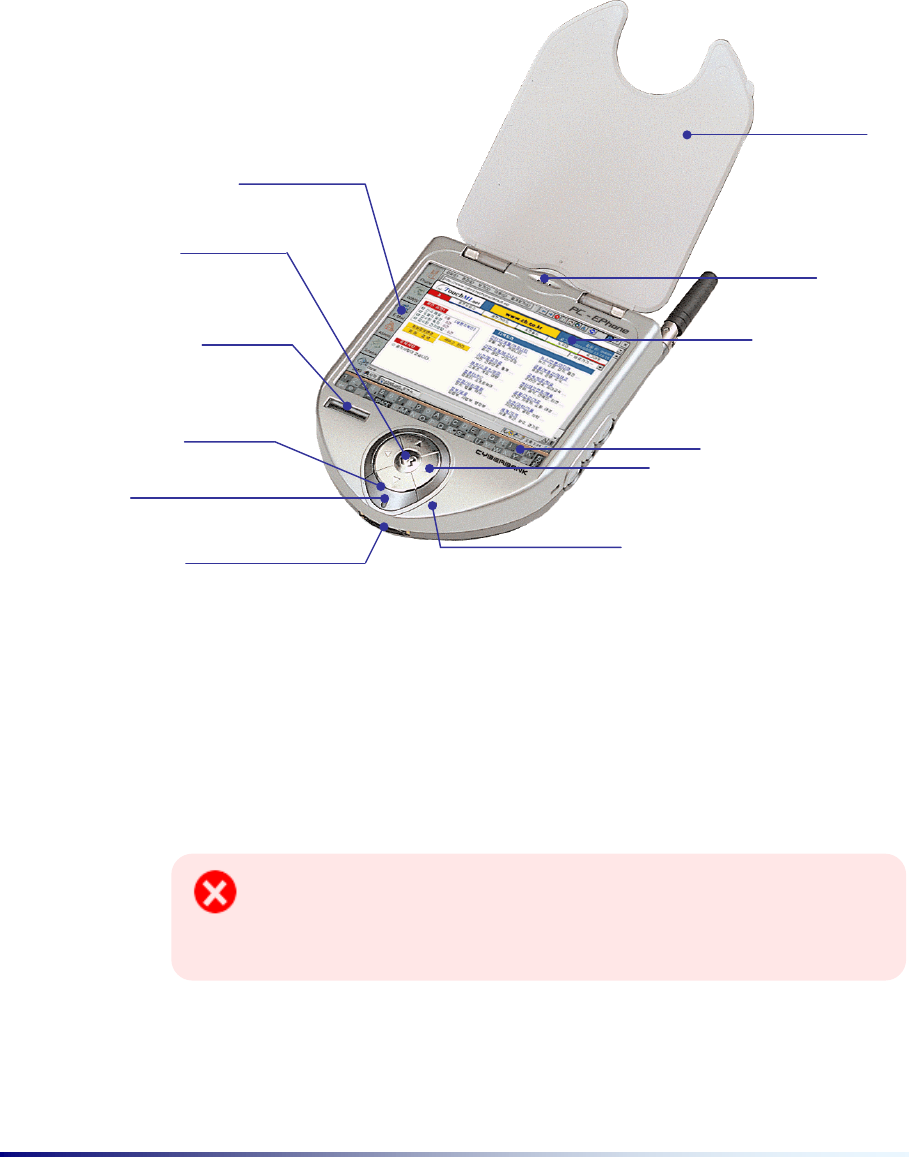
1) Front panel and Bottom edge
1. Voice Call Speaker
Voice comes out when the other speaks.
2. LCD Display Screen
With a 640 x 480 resolution and a 256-color, 4” color TFT LCD, the screen displays
when applications are actually run.
As the touch screen is made of very delicate materials, when
tapped by sharp objects such as a knife or an awl, it is easily
damaged and will no longer be capable of recognition.
3. CDMA Status Display
Displays cellular phone reception intensity, current time, and battery remainder.
⑪
⑧
①
②
⑤
④
③
⑥
⑨
⑦
⑩
⑫

Getting Started Page 2-3
4. Speaker
A speaker built in PC-EPhone.
Does not operate when the headset jack is connected.
5. Navigation button
The four way direction buttons located on the bottom part of your PC-EPhone
allows you to quickly and conveniently move the cursor (up/down/left/right) when
selecting an icon or editing a document.
6. Enter button
Performs the same task as the “Enter” key on the common keyboard. In other
words, it is used to open a selected item.
7. Serial Port
Enables serial communication with your desktop PC through a serial cable.
Serial cable must be purchased separately.
8. Cover
A protective lid to protect the LCD screens.
The purpose of the cover is to protect the LCD screen. It does
not perform the functions of disconnecting communication
(voice and data communications) or converting your PC-
EPhone to the Sleep mode.
9. LED Light
The LED flickers with a Red light when a Hard Reset (Cold Booting) is performed
on your PC-EPhone. A steady Red light indicates that the recording program is
recording a voice message and shows that the system is in a normal running state.
When initially attaching the battery, if the booting logo does not
appear and the LED stays lit, check the battery connection and
the Battery Lock in the back. If the LED continues to light on,
despite a battery is connected in the right way, please contact
the Customer Support Center.
Page 2-4 Chapter 2
10. Microphone
Used for speaking in the phone and voice recordings. The microphone does not
operate when the headset jack is connected.
11. Hot Keys for Applications
Allows one-touch access to main applications (Phone, Web Browser, E-mail,
Contacts, Calendar, SMS). Select the corresponding one-touch Hot Key button to
run a program.
12. Touch Panel Keyboard
A soft keyboard program, which carries out the same functions as a desktop PC
keyboard, is provided in your PC-EPhone. As a supplementary input device of the
soft keyboard, the touch panel keyboard allows you to input simple numbers and
characters without having to run the soft keyboard.
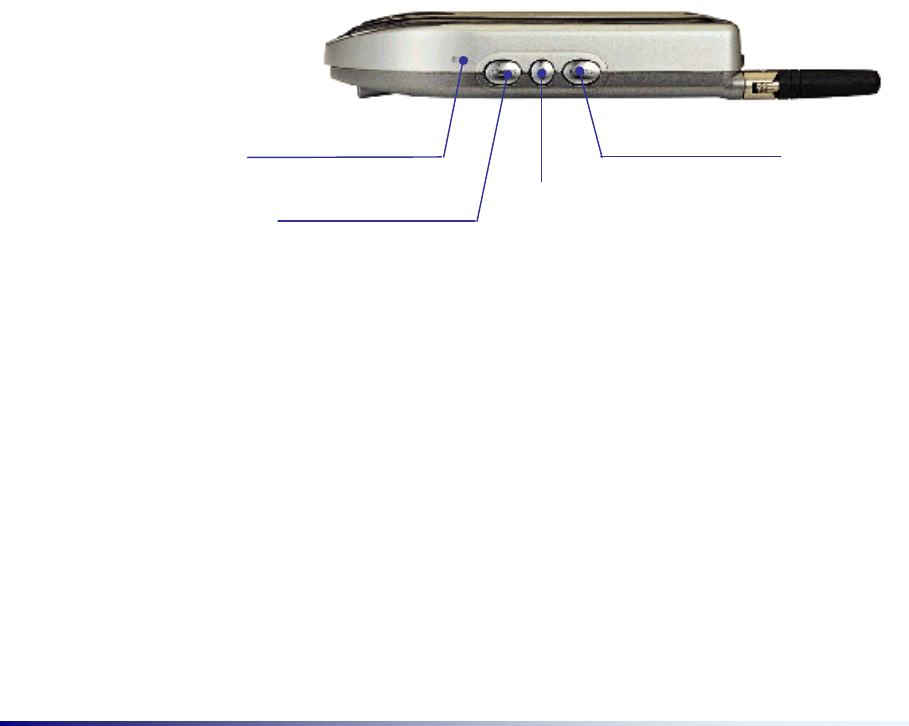
2) Right Side
1. Power button
Used to turn your PC-EPhone ON and OFF. The PC-EPhone is said to be in a
Sleep Mode status when it is turned off. In Sleep Mode, all PC-EPhone functions,
except for the phone function, are suspended and only the least amount of power
needed to preserve data is supplied.
③
①
②
④

Getting Started Page 2-5
When you are not using your PC-EPhone, turn it off using the
Power button so that the battery can be used more efficiently.
Even when the power is turned off, power is continuously
supplied to the Phone so you may receive incoming calls. To
turn the power supplied to the phone completely off, press the
END/PWR button on the phone screen for about 3 seconds and
no data will be shown on the CDMA Status Display as the
phone program is turned off.
2. Record button
Used to run the recording program or control recording functions. More specifically,
when the PC-EPhone is turned on you can run the recording program by pressing
this button, and another press will start recording. Also, you can stop recording by
pressing this button while recording.
3. Phone button
Used to run the Phone program or control phone calls.
z How to run the Phone program
- When your PC-EPhone is turned off, first press the Power button then
press the Phone button to run the Phone program on your PC-EPhone.
- You can run the Phone program by pressing the Phone button when
your PC-EPhone is on. When pressing the Phone button, the last
number you dialed will appear on the Phone program screen. At this
time, pressing the Phone button again will connect you to that phone
number.
z How to control Phone Calls
- To receive an incoming call to your PC-EPhone, press the Phone button
as you would with a cellular phone. If you press the Phone button
during a phone call, the call will be disconnected.
4. Buzzer
The phone bell rings on the arrival of a call.
Page 2-6 Chapter 2
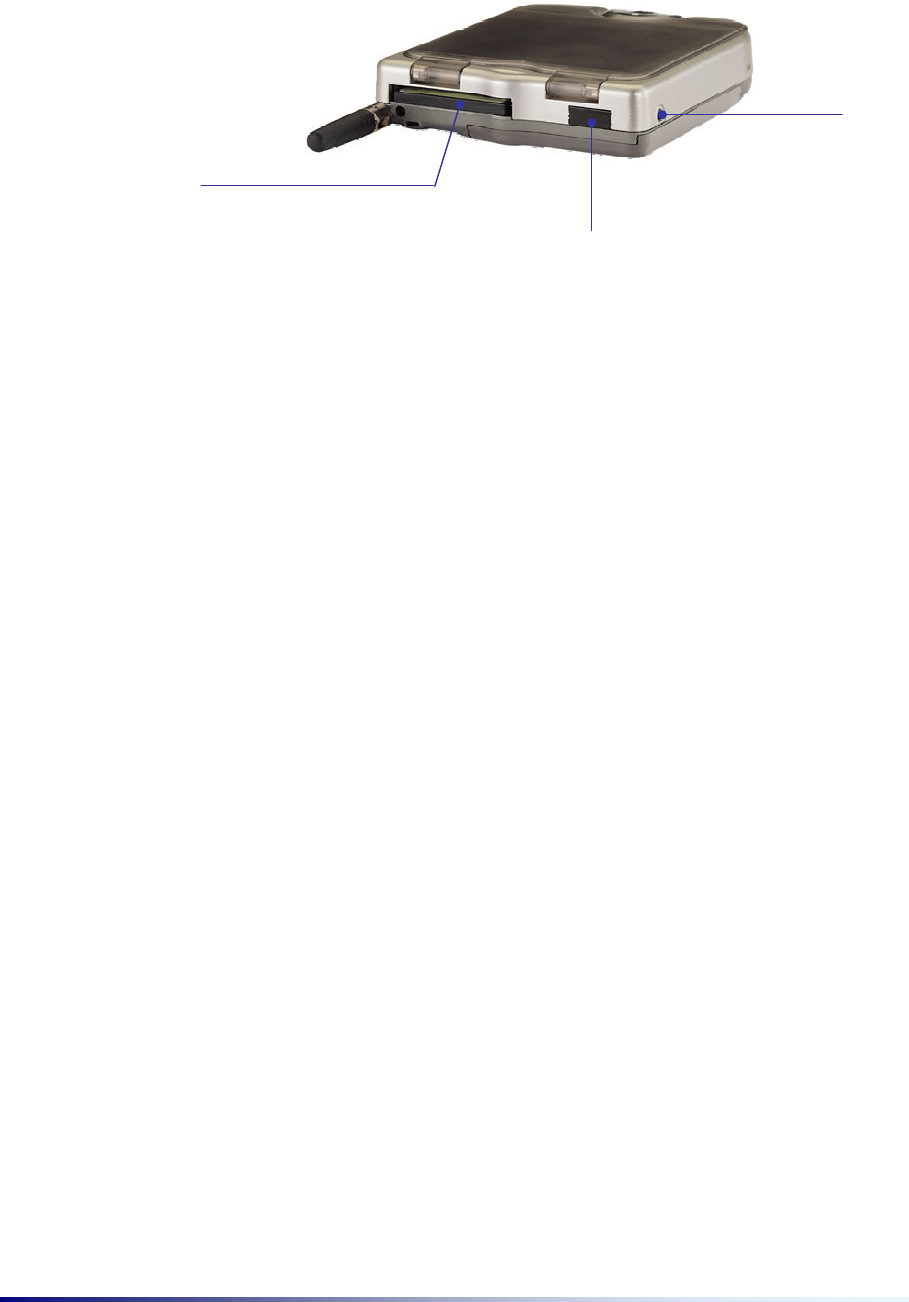
3) Left side and Upper edge
1. CF (CompactFlash) Card Slot
The CF Card Slot is used to install CF Type II Memory Card, LAN Card, and GPS
Receiving Card. You may utilize it to your needs, for example, adding storage
memory by purchasing a CF Card that meets standard requirements or connecting
your PC-EPhone to a LAN.
2. Infrared Port
A communication window that enables infrared communications. Infrared Port
allows you to connect your PC-EPhone to your desktop PC via infrared beam. For
more information, see “Chapter 4 Connecting to a desktop PC”.
3. Headset Jack
The Headset jack is used to connect the headset, which has the functions of
earphone and microphone. You can use this jack to speak on the phone or listen to
MP3 music files.
③
①
②
Getting Started Page 2-7
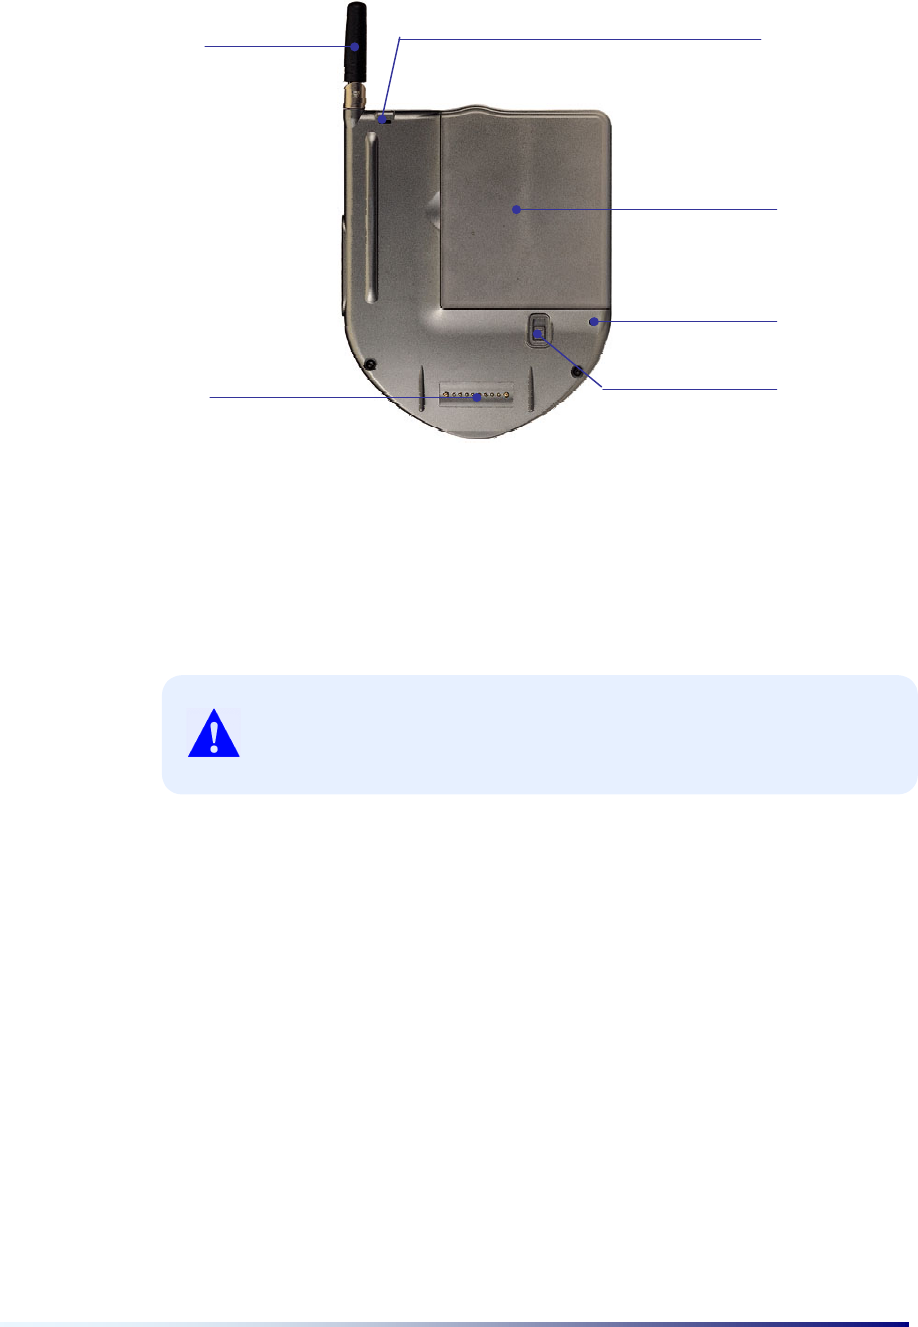
4) Back side
1. Antenna
Used for the Cellular Phone built in your PC-EPhone.
2. Cradle Connection Pin
Enables power supply and serial communication with a desktop PC when your PC-
EPhone is placed in the cradle.
Damages to this pin may result in a defect in charging power to
your PC-EPhone and in connection to a desktop PC.
3. Hook
Is used to tie a string around in order to make your PC-EPhone easier to carry
around.
4. Battery
Is the main battery that supplies power to your PC-EPhone. For more information,
refer to the Exchanging and Installing the Batteries section in chapter 3.
5. Battery Lock
Performs two main functions. This locks the battery into place to prevent it from
being detached, when it is installed on the battery slot of PC-EPhone. Also, it
enables your PC-EPhone to use power from its internal backup battery so as not to
lose data while changing the battery.
③
①
②
④
⑥
⑤

Page 2-8 Chapter 2
Exchange batteries quickly and do not switch the Battery Lock
upward when the battery is detached. If your PC-EPhone is
neglected for a long time with its battery detached, the Backup
Battery becomes fully drained and data stored in the RAM will
be lost.
To turn off your PC-EPhone, do not switch the Battery Lock
downward. Use the POWER button on the right side of your PC-
EPhone.
6. Reset Button
The Reset button is in an inward position to the product case. When your PC-
EPhone is running slow or improperly, use the stylus to press the Reset button to
reset the system. There are three kinds of Resets: Soft Reset, CDMA Reset, and
Hard Reset. You can perform a Soft Reset by pressing the Reset button with the
stylus, and a CDMA Reset by detaching the Main Mattery then attaching it again. A
Hard Reset requires you to simultaneously press the Reset button and the Power
button on the right side, and then let go of the Reset button first and of the Power
button about 0.5 second later. For more information, see the Resetting systems
section in Chapter 3.
When you perform a Soft Reset, you will lose all unsaved data.
Be sure to save all data in open documents or programs
beforehand. Also, when you perform a Hard Reset, you will lose
all information that is stored in the RAM. Be sure to save all
data using ActiveSync or system Backup utility before you
perform a Hard Reset. For more information on backing up data,
refer to ‘Chapter 5 Backing up and Restoring Data’
Getting Started Page 2-9
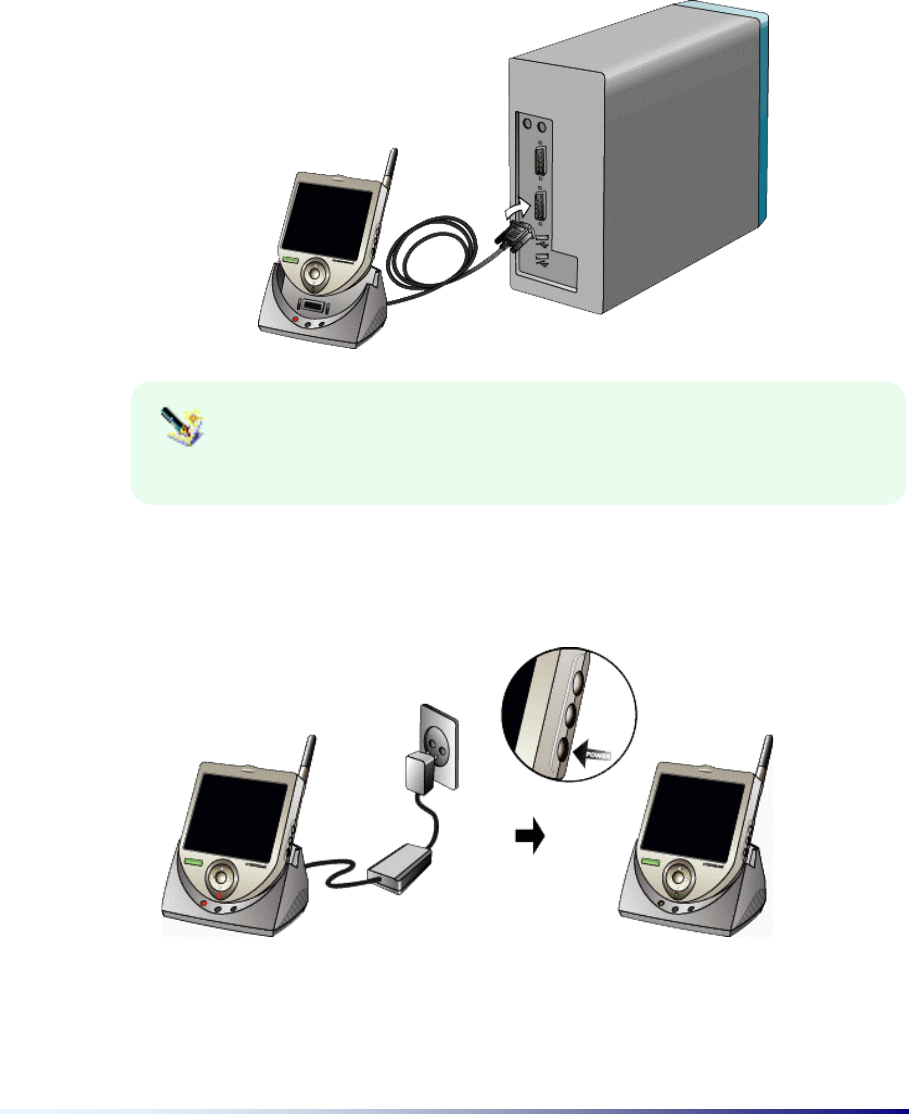
(2) Accessories
1) Cradle (charger and desktop connector)
The Cradle connects your PC-EPhone to your PC partner and also takes on the role of
charging the main battery. Connecting to a desktop PC is accomplished via serial cable,
which is attached to the cradle, Charging is done by connecting a power source to
supply power to the cradle.
You must supply a power source to the cradle before connecting
to your desktop PC. If power is not supplied to the cradle, you will
not be able to establish a connection.
2) A/C Adapter
The A/C Adapter supplies an external power source to the cradle.
Page 2-10 Chapter 2
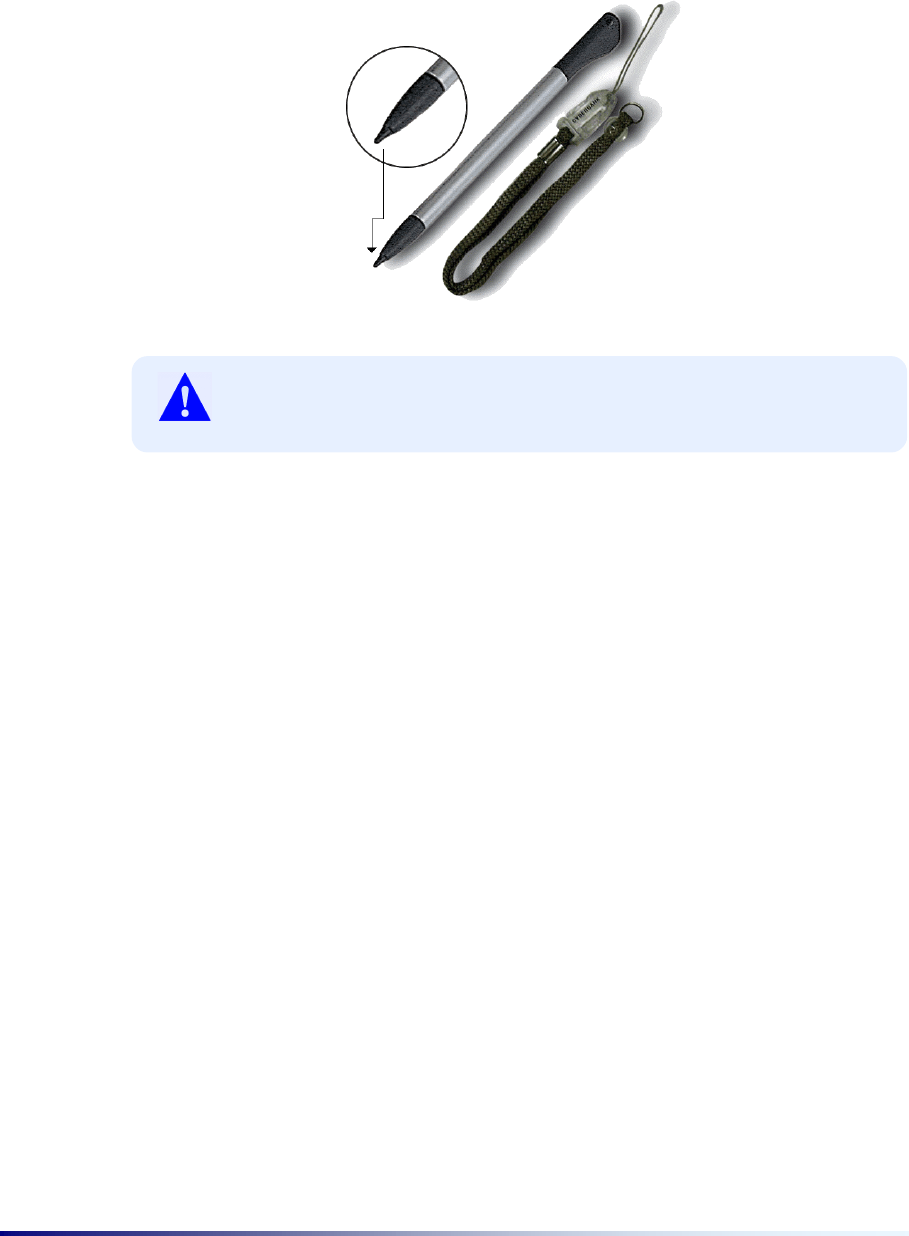
3) Stylus
You can use the stylus in much the same way you would use a mouse on the desktop
PC. Use it to run programs and to press the Reset button.
Do not touch the screen with any other sharp objects other than
the enclosed stylus. The LCD Display screen may be damaged.

Getting Started Page 2-11
(3) Handling cautions for your PC-EPhone
XDo not place heavy objects on your PC-EPhone. Your PC-EPhone may be damaged.
XDo not store near a strong magnetic force.
XDropping your PC-EPhone and creating a strong impact or using excessive force on it
may result in damage or malfunctioning.
XGetting your PC-EPhone wet in the rain or spilling some beverage may result in a
break down.
XDo not voluntarily disassemble, repair, or assemble your PC-EPhone. If it needs to be
repaired, contact the customer support center.
XWhen using the touch screen, be sure to use the stylus that comes with your PC-
EPhone. Using your fingertips or other sharp objects may cause damage to the touch
screen so as to dull the character recognition function and cause other defects.
XYour PC-EPhone must be used in the following temperature conditions due to the
characteristics of the LCD. If used in conditions outside this range, malfunctions and
breakdowns may occur. (Temperature conditions: 0 ~ 40°C / 32 ~ 104°F)
XWhen removing dirt or other residue, use a soft cloth.
XWhen the battery’s capacity is insufficient, either charge it or exchange it with a
charged battery as quickly as possible. Important data stored in the memory will be
lost if the battery is completely drained.
XFor safekeeping, store your PC-EPhone in its original case from purchase.

Page 2-12 Chapter 2
II. Using your PC-EPhone for the first time
Follow the steps in this section to start using your PC-EPhone for the first time.
(1) Connecting the Battery to PC-EPhone
Install the Main Battery to your PC-EPhone as shown below.
Please place the battery in the slot leaving 4 ~ 5 mm space and push it firmly,
and be careful not to get the battery caught in the groove of PC-EPhone’s
battery slot. While inserting the battery, the battery slot can be damaged if
excessive force is used.
The Main Battery may be drained during the transportation from the factory to the
consumer; therefore you should connect AC power to the cradle and place your PC-
EPhone in it in order to charge the battery when using your PC-EPhone for the first time.
(2) Check the following operations of your PC-EPhone
1. After connecting your PC-EPhone to a power source and pressing the Power button, the
CYBERBANK logo will be displayed for approximately 2 seconds, and then gives way to a
display that will help you calibrate the touch screen.
2. A target (+) will move in the order of “center →
→→
→ upper left →
→→
→ lower left →
→→
→ lower right →
→→
→
upper right”, to different locations on your screen. Since calibrating the touch screen has
a direct affect on the recognition ability of your touch screen, be sure to accurately tap the
center of the target (+) with your stylus. For more information, see the Setting PC-
EPhone Preferences section in Chapter 3.
(3) Setting System Preferences
Before using your PC-EPhone, you should customize it to your needs by setting basic
system preferences in the Control Panel. You may also set preferences during use. On

Getting Started Page 2-13
the Start menu, tap Settings, and then point to Control Panel and set system
configurations. For more information, see the Setting PC-EPhone section in Chapter 3.
III. Turning your PC-EPhone ON/OFF
By using the Power button on the right side of your PC-EPhone, you can easily turn off or
restart your PC-EPhone. When you press the Power button while using your PC-EPhone, all
current operations, except for data communication (Internet use), are preserved as their current
conditions even when your PC-EPhone is suspended. Press the Power button once more when
you wish to resume operations, and all operations will be restored on the screen exactly where
you left them.
IV. Using Hardware Buttons
(1) Phone button
Activates the Phone program immediately and you can make a call using this program.
(2) Record button
One press gets you to the recorder screen, and another press starts recording. Recording
is ended if you press the Record button during recording.
Recorded data is stored as a file in the memory allowing you to listen to
it whenever you wish. As it is stored in the memory in file form,
recording time depends on remaining memory space and recording
method.
(3) Power button
Allows you to end or start PC-EPhone operations. When you turn on your PC-EPhone
again, you can resume working right where you left off.
(4) Navigation button
Performs the same actions as the up, down, left, right arrows on a common keyboard.
(5) Enter button
Perform the same actions as the Enter key on a common keyboard.
Page 2-14 Chapter 2
V. How to Input Data
Your PC-EPhone allows you to input data in the following three ways, instead of providing a
separate common keyboard.
f Inputting data using the Touch Panel keyboard
f Inputting data using Diopen
f Recording voice messages with the recorder
(1) Using the Touch Panel Keyboard
You can input simple numbers or alphabet characters using the Touch Panel keyboard on
the bottom of the LCD screen.
(2) Using Diopen
Tap the Diopen/keyboard selection icon ( ), and the Diopen screen appears.
The following gives you information on Diopen, by item.
Diopen item Description
Handwriting
Recognizer mode
A handwriting recognizer program that uses SIP (Simple
Input Panel).
Keyboard mode A soft keyboard input program that uses SIP.
Keyboard/ Handwriting
Recognizer mode
A program that let you write down character and use
keyboard.
Screen Recognizer
mode
Instead of using SIP, a character recognizer program that
lets you write down in any location of screen.
Getting Started Page 2-15
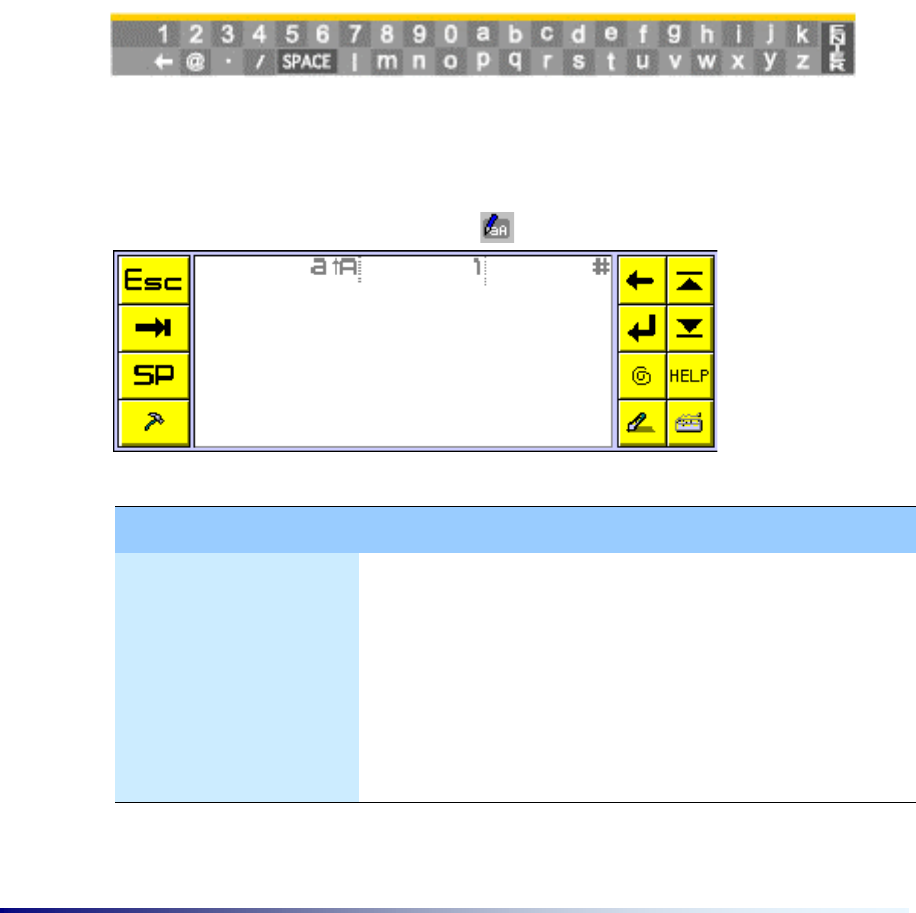
1) Diopen Handwriting Recognizer mode
Diopen’s default mode is the Handwriting Recognizer mode. If Diopen is currently in the
Keyboard mode or Screen Recognizer mode, tap the handwriting recognizer mode
button.
Alphabet Letter input
You must write in the Alphabet writing area. Lower case letters are set as default. To
enter capital letters, you must first input the “Case change gesture” (see Gesture
input).
Case Change
When you perform the “Case change gesture” 2 consecutive times, Caps Lock is
activated. To deactivate Caps Lock, input the “Case change gesture” once more. The
current input character mode is displayed in the lower right-hand corner. Also, to enter
Accented letters, first write the Alphabet and then mark in the Accent Mark in the
adequate location of the Alphabet.
Numeric Letter input
You must write in the Numeric writing area.
Symbol Letter input
You must write in the Symbol writing area. You can input symbols included in the Latin1
Basic character set (US ASCII) and Latin1 Supplement character set, and Euro
Symbol.
‘_’, ‘,’ : Write in the lower part of Symbol writing area
‘’’, ‘”‘ : Write in the upper part of Symbol writing area
‘/’, ‘\’ : Write in the center part of Symbol writing area
Page 2-16 Chapter 2
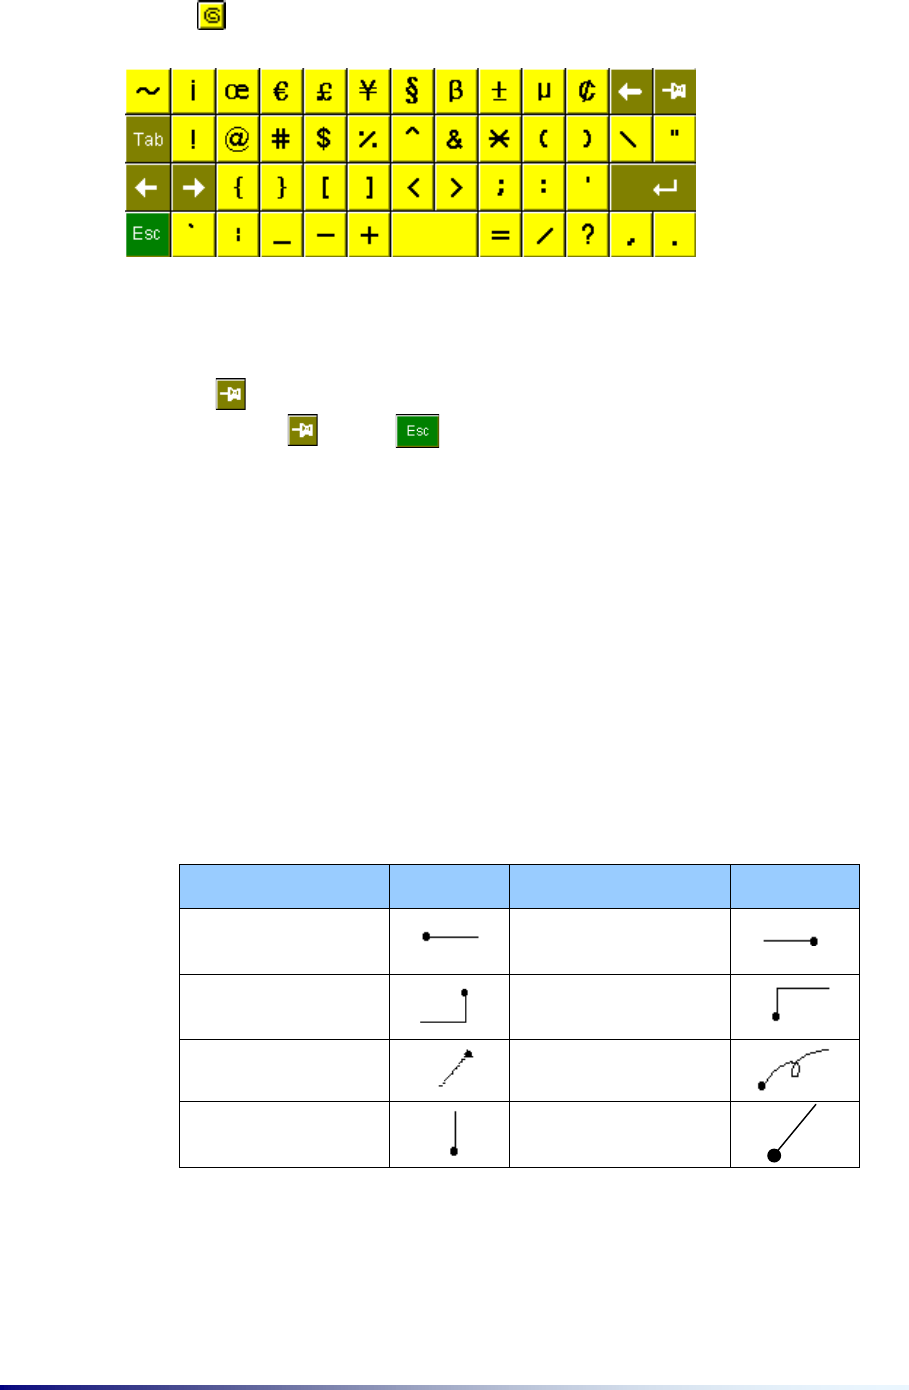
Tap the button and the following symbols keyboard appears.
The symbols keyboard automatically disappears, by default, after inputting one
character.
Tap the key to consecutively input symbols. When you are finished entering
symbols, tap the key or key to return to the writing screen.
Gesture input
Gestures can be used to input commonly used symbols and edit input text, as well as
for Upper case mode change and Hot Key input (see Hot Key input). When you enter
the gestures shown below into the writing screen, the corresponding symbol is input and
the corresponding editing method is executed on the text. You can see gesture strokes
in HELP. The Case Change gesture is only applied to the next entered character
(similar to Shift Key). If you make the Case Change 2 consecutive times(similar to Caps
Lock Key), it is applied until you input the Case Change gesture once more to cancel it.
Command Stroke Command Stroke
Space Back Space
Enter 1 Tab
Enter 2 Delete
Case Change Control
Hot Key input
You can enter “Ctrl + Alphabet Letter” (for example, Ctrl + a, c, x, v, z, q. etc.). Enter
the Alphabet you need after inputting the Control gesture.
Getting Started Page 2-17
Control
A beep sounds when you input the Control gesture.
You can input in the same way in all handwriting recognizer modes. You can input all hot
keys supported in each application. If you input the “Upper case mode change
gesture” once, only the next character will appears in upper case. To consecutively
input upper case letters, write after making the Upper case mode change gesture twice.
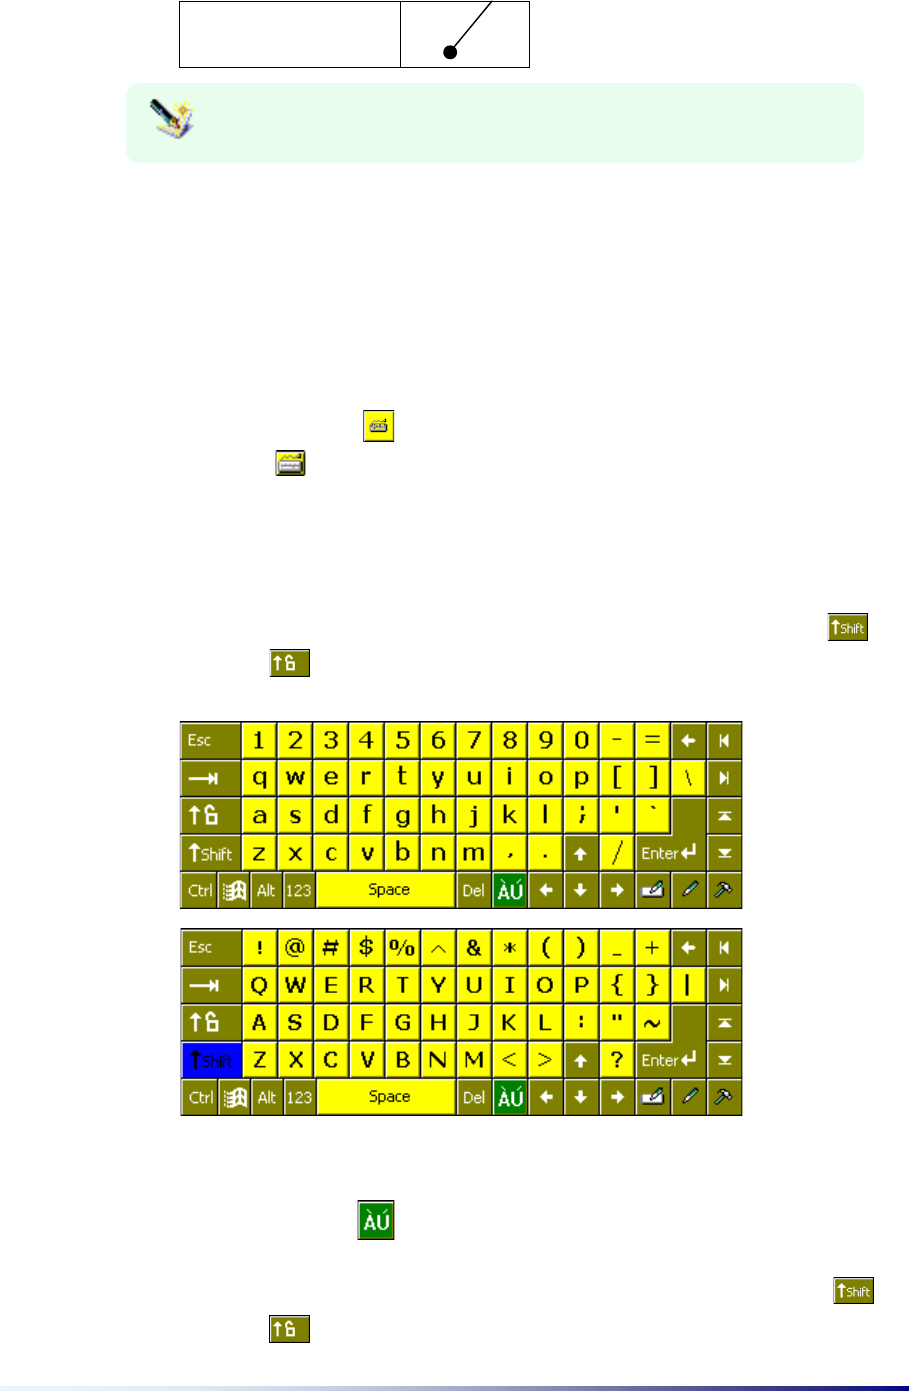
2) Keyboard mode
Tap the keyboard button in the Diopen handwriting recognizer mode or tap the
keyboard button on the screen recognizer toolbar to change to the keyboard mode.
If Keyboard Recognition is not selected in the setting, the Keyboard mode is activated.
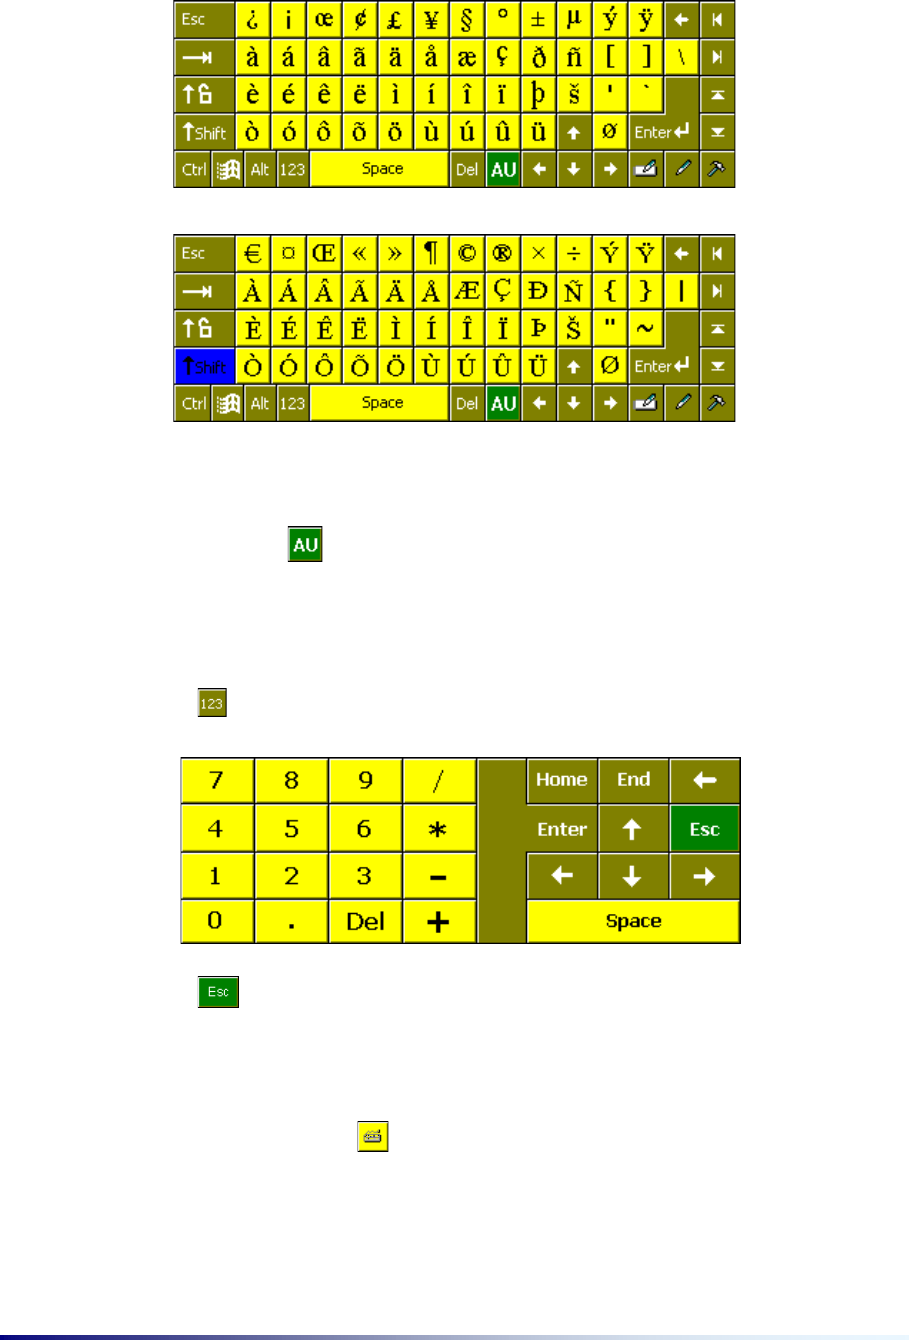
Latin1 Basic Letter keyboard
You can take turns selecting the following screens by tapping the Shift key( ) or
Caps Lock key ( ).
Latin1 Supplement Letter keyboard
When you tap the key on the Latin1 Basic Letter keyboard, the Latin1
Supplement Letter input soft keyboard window appears as shown below.
You can take turns selecting the following screens by tapping the Shift key( ) or
Caps Lock key ( ).
Page 2-18 Chapter 2
It is changed back to the Latin1 Basic Letter keyboard after you enter one character.
Also, if you want to return to the Latin1 Basic Letter keyboard without entering a
character, tap the key.
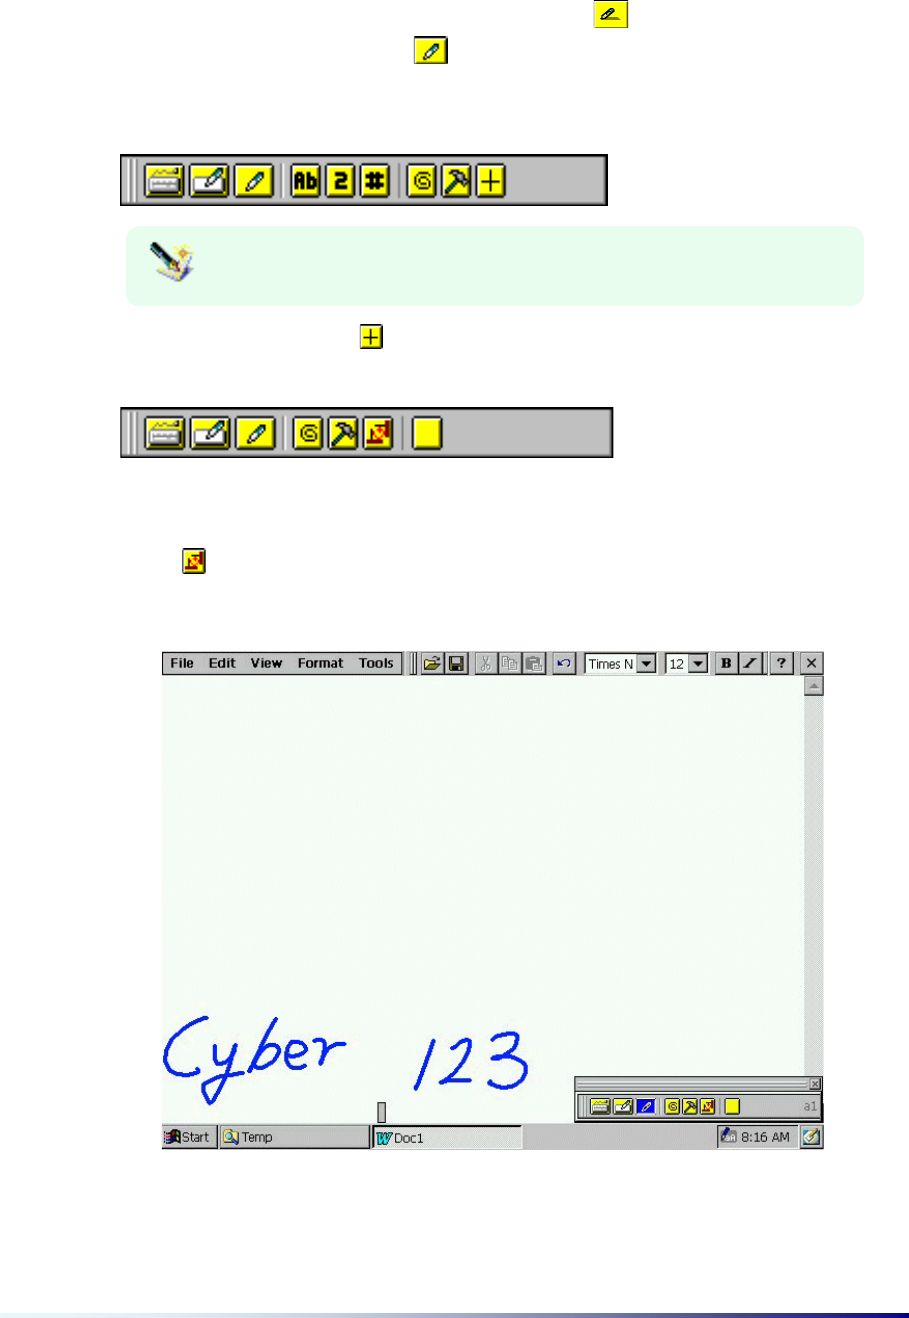
Numeric Letter keyboard
Tap the key and the following Numeric letter keyboard appears.
Tap the key on the numeric keyboard and it will disappear.
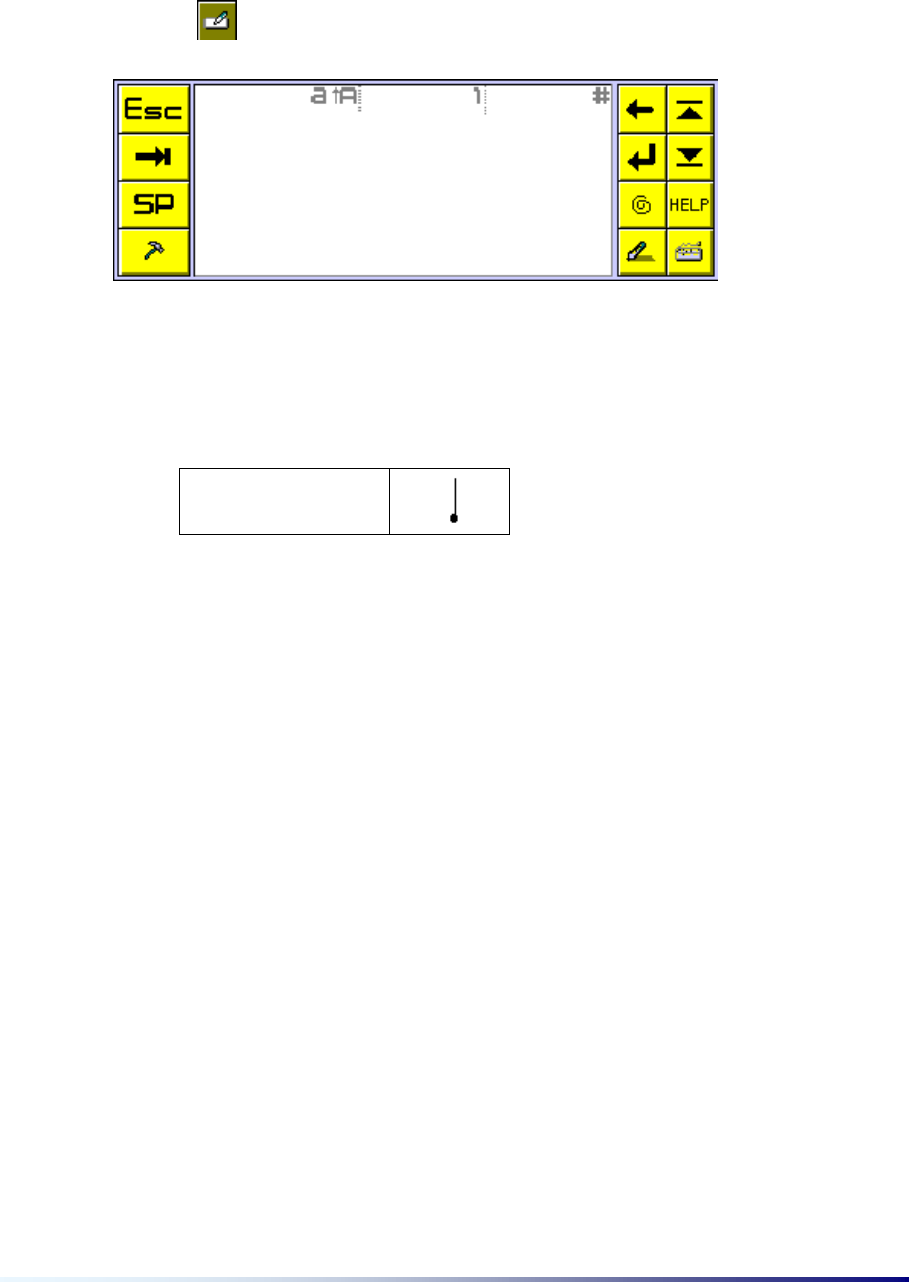
3) Keyboard/Handwriting Recognizer mode
Tap the keyboard button on the Diopen Handwriting recognizer screen or tap the
keyboard button on the screen recognizer toolbar to change to the keyboard mode. If
“Keyboard Recognition” is selected in settings, the Keyboard/Handwriting recognizer
mode is activated (see Diopen user settings).
Getting Started Page 2-19
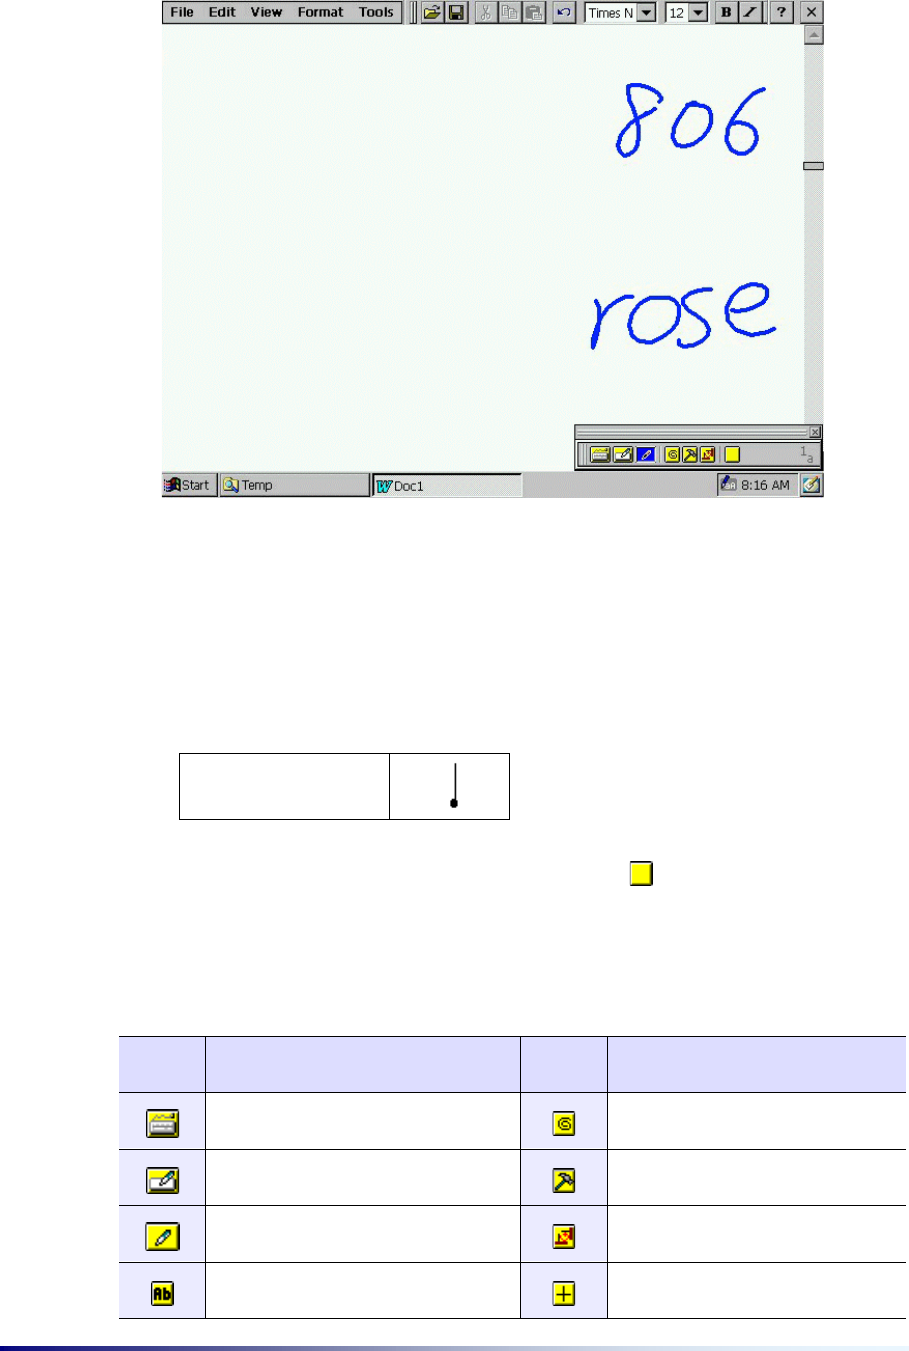
4) Using Diopen Screen Recognizer
To convert to the screen recognizer mode, tap the button in Diopen Handwriting
Recognizer mode, or tap the button in the Keyboard mode, and the following
Diopen toolbar appears.
“Capital change gesture” is activated in English letter input mode.
When tapping this button , the another Diopen toolbar appears as shown below.
You can take turns selecting the horizontal and vertical division mode by tapping
button .
z Horizontal division
In the horizontal division mode, the upper side of the division mark is for writing the
number and the lower side is for writing the letter of Alphabet.
Page 2-20 Chapter 2
z Vertical division
In the vertical division mode, the left side of the division mark is for writing the letter of
Alphabet and the right side of the division mark is for writing the numbers.
Tap “Capital change gesture”
Case Change
and you can input the upper and lower case letters. Tap button and you can go back
to the other toolbar.
The following are descriptions of each button on the Diopen tool bar.
Button Description Button Description
Select Diopen keyboard Open symbols keyboard
Select Diopen Handwriting
recognizer Diopen User Settings
Screen recognizer/Pointing
Mode Conversion Area division type conversion
Select Handwriting recognizer
mode Convert to area division

Getting Started Page 2-21
Select Numeral recognizer mode Convert entire area
Select Symbol recognizer mode
5) Diopen User Settings
When you tap the settings button in each Diopen mode, the following Diopen
Options dialog box appears.
Delay Time
When entering a symbol, if the next stroke is not made within the Delay Time, Diopen
proceeds with the recognition of the previous strokes. In addition, if the Delay Time
passes by after completing writing in Screen Recognizer, the writing ink is deleted. You
are able to set the Delay Time in mSec units, within the range of 100 ~ 5000(mSec).
The default Delay Time is set at 600 mSec.
Ink Width
Indicated the width in which your stroke is displayed on the screen. You can set it in
Pixel units within a range of 1 ~ 5(pixels). The default Ink Width is set at 2 pixels.
Ink Color
Select the color in which you wish your stroke to be displayed on the screen.
Keyboard Recognition
You can input characters by writing on the Diopen keyboard. If it is not selected, you can
only use the Diopen keyboard and not Handwriting Recognizer. The default settings
enable you to use Handwriting Recognizer on the Diopen keyboard.
Page 2-22 Chapter 2
(3) Recording Sounds using Recorder
You can capture and effectively manage ideas of thoughts that suddenly strike you by
saving them in voice message on your PC-EPhone. You can Run, Start Recording,
Stop the Recorder program just by using the Record button on the right side of your PC-
EPhone.
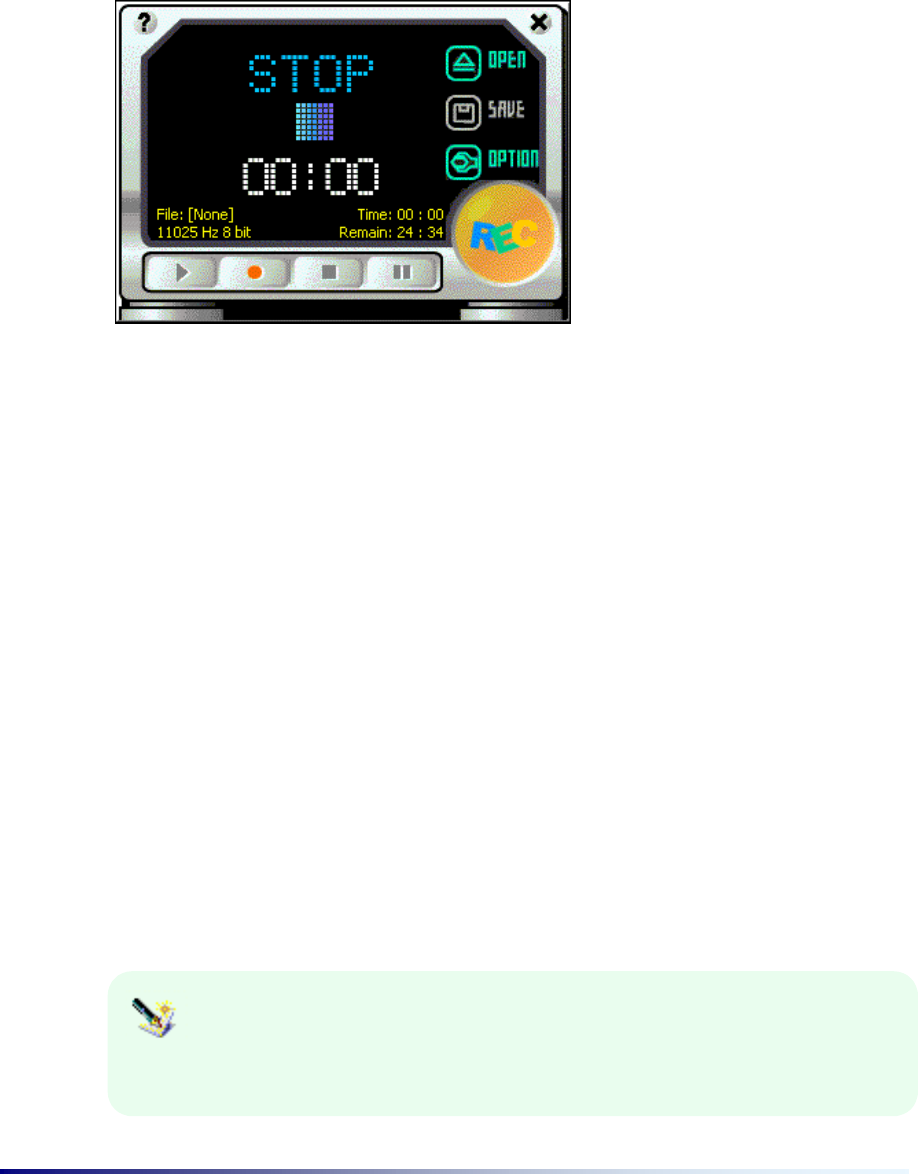
Recording
Press the Record button once to run the recorder program. Press it once more to start
recording. After recording you wish to save using the microphone, press the Record
button again to end recording and save it in a temporary file. You can perform the same
operations by tapping the Rec and Stop buttons on the Recorder display screen.
Saving recorded file as another name
To save the file you have recorded as another name, tap SAVE right after you have
completed recording. When the Save As dialog box appears, select the location you
want to save at, enter the file name, and tap the OK button.
Playing back
When tapping the Play button, the prerecorded file will be played back. To open a
prerecorded file, tap the Open button and after selecting the file of your choice, tap the
Play button. Tap the Stop button to stop in the middle of playback, and the Pause
button to pause in the middle of playback.
For more information on the available recording time, see the Setting
System Memory section in “Chapter 3 PC-EPhone Customizing and
Maintenance”.

PC-EPhone Customizing and Maintenance Page 3-1
Chapter 3
PC-EPhone Customizing & Maintenance
This chapter will provide you with information on how to optimize your PC-EPhone use by setting
general preferences. It will also introduce how to manage the power and batteries, giving you tips
on how to extend battery usage time and protect important data.
This chapter includes the following information:
X Setting PC-EPhone Preferences
Explains how to set basic system preferences before using your PC-EPhone.
X Managing Battery Power
Teaches you how to charge and efficiently manage the battery.
X Managing and Applying Memory
Gives information on the kinds of memory (RAM, IPSM, CF Card) used in your PC-
EPhone.
X Resetting Systems
Explains how to perform a Soft Reset, CDMA Reset and a Hard Reset along with the
precautions you must take.

Page 3-2 Chapter 3
I. Setting PC-EPhone Preferences
Set and adjust basic system settings before using your PC-EPhone to customize it just for
you. On the Start menu, point to Settings, tap Control Panel, and the following display will
appear.
Double-tap on the icon of your selection. A tap on the OK button on the corresponding
settings applies all settings changes.
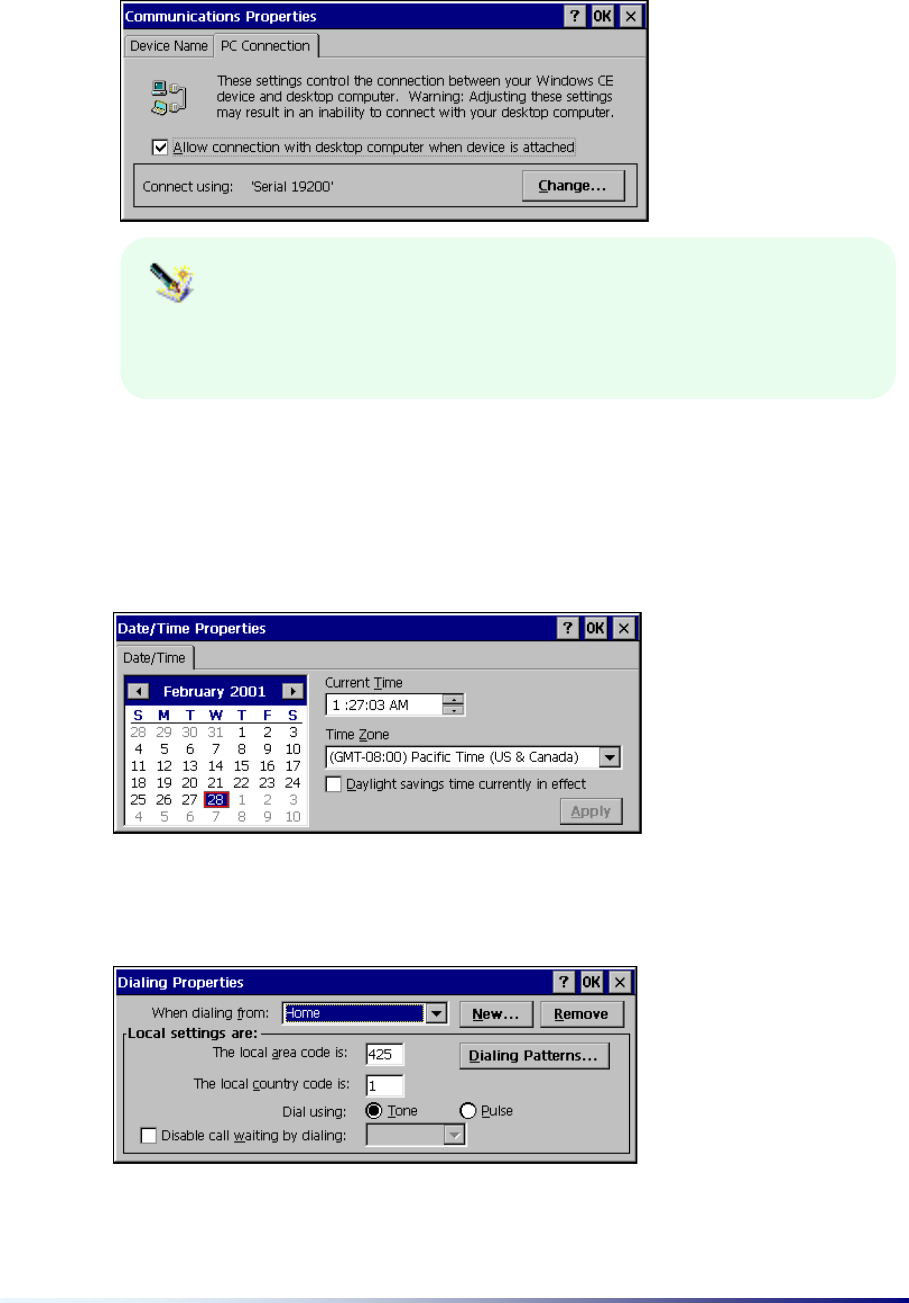
(1) Communications
1) Device Name : Set a device name.
The device name is set as PC-EPhone by default.
PC-EPhone Customizing and Maintenance Page 3-3
2) PC Connection : Set options for establishing a connection to your desktop PC.
PC-EPhone’s Baud Rate is set as 19200 by default. You can also change
this setting after the first synchronization through ActiveSync. For example,
Serial 115000 is recommended in Korea.
(2) Date/Time
Set the Year, Month, Day, Time, and select the Standard Time Zone and Daylight
savings time and press the Apply button and the current time is automatically set.
However, if you want to set time manually, select Manual option box.
(3) Dialing
Dialing properties allows you to create dialing locations and set dialing options.
Page 3-4 Chapter 3
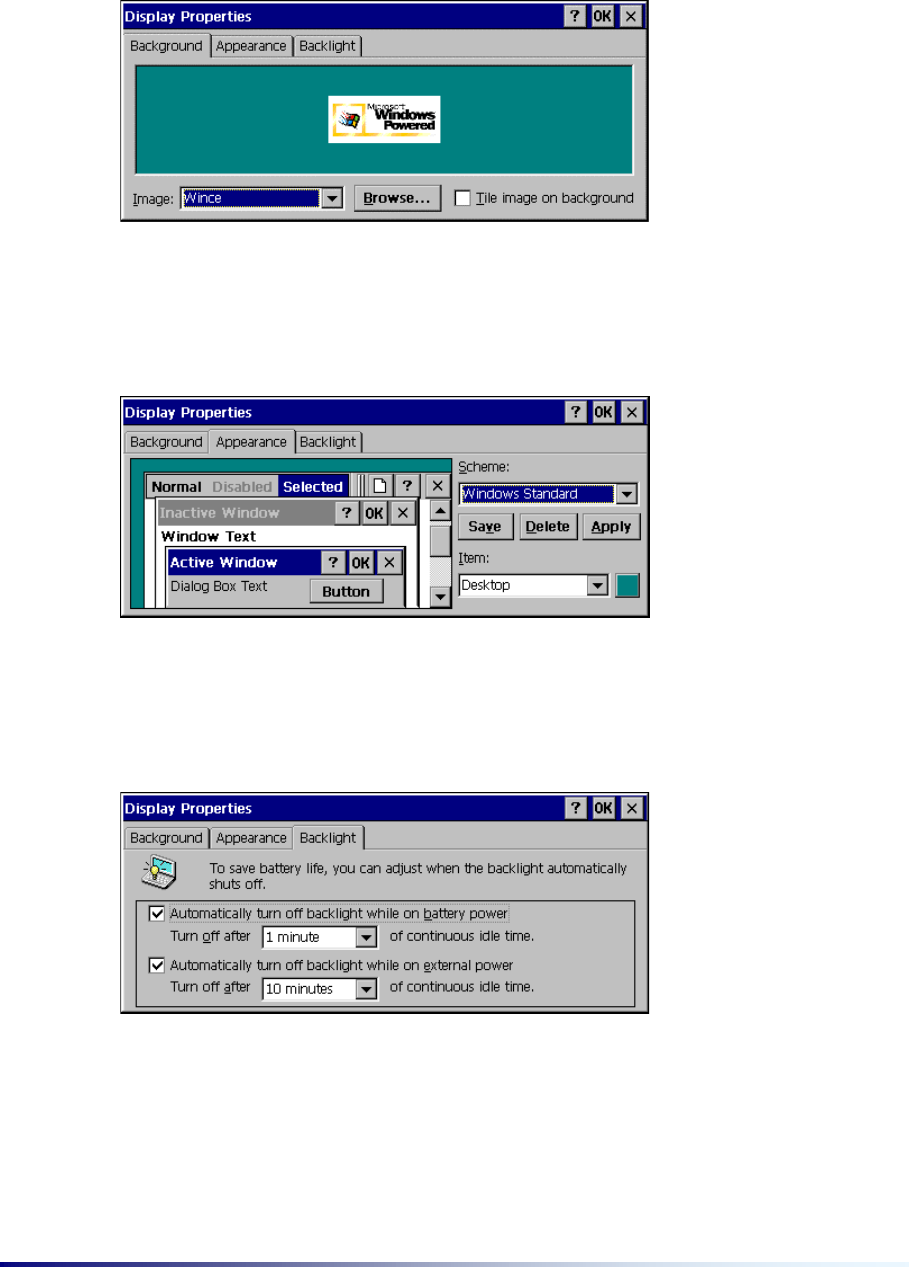
(4) Display
1) Background : You can change the picture file (BMP) using the Browse… button.
2) Appearance : You can change the background color the way you want it. First, select
an item you want from the Scheme drop-down list box and you can apply it as you
want by pressing the Save, Delete, or Apply buttons.
3) Backlight : For battery conservation, the backlight can be set to go off after the preset
time when the your PC-EPhone is not in use. When you resume work on your PC-
EPhone, the backlight automatically turns back on.
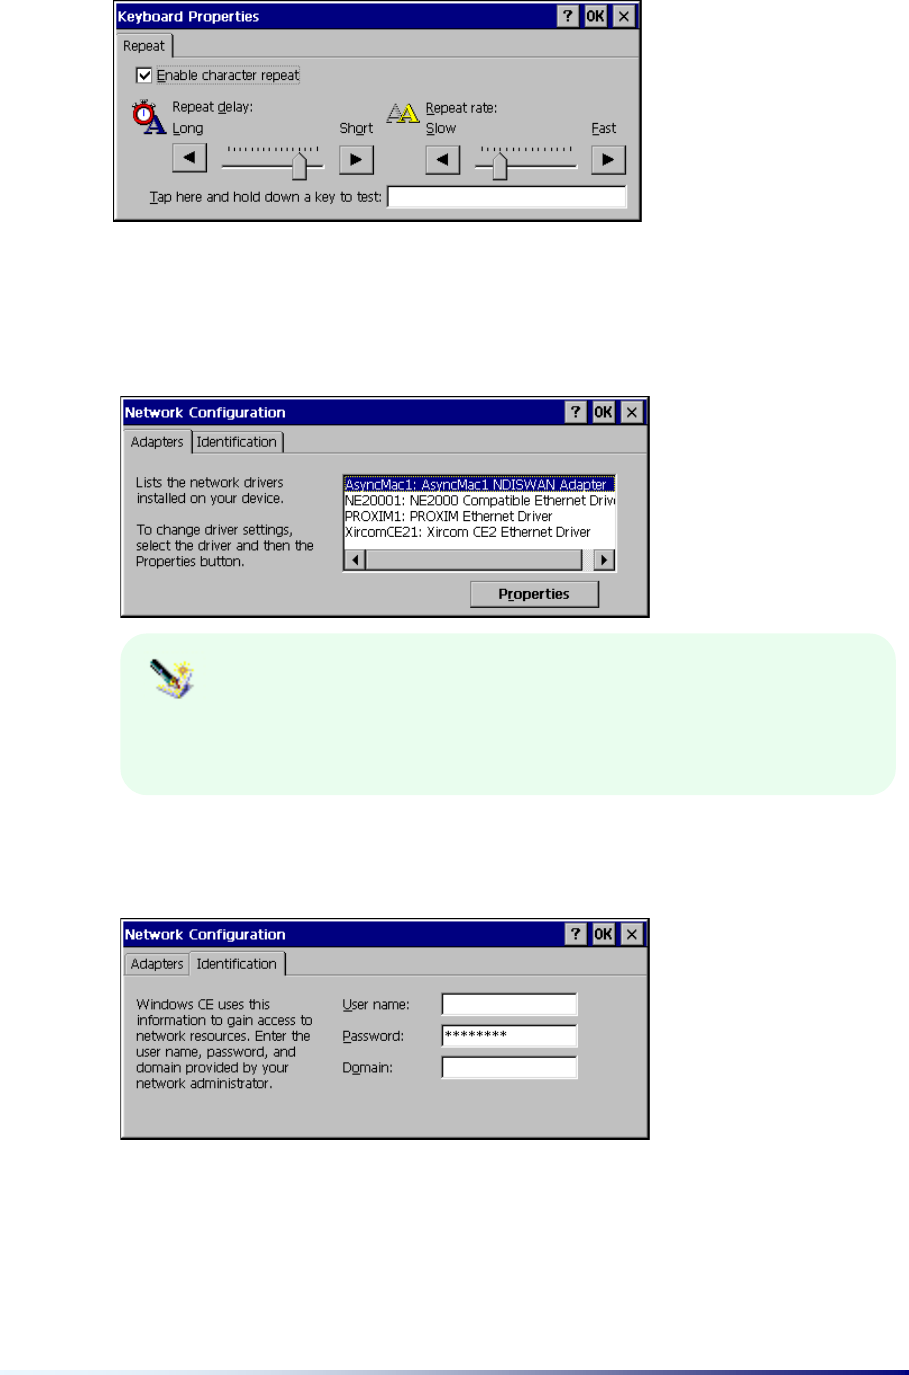
(5) Keyboard
You can control how quickly characters respond to pressing a key on your keyboard
(Repeat delay and Repeat rate).
PC-EPhone Customizing and Maintenance Page 3-5
(6) Network
1) Adapters : To change the network driver settings, tap the Properties button.
PC-EPhone is set as NE20001 by default. If you want to change a Network
Driver other than NE20001, select the one you want and press the
Properties button to set the preference for that driver.
2) Identification : Set the User Name, Password, and Domain used for accessing
networks.
(7) Owner
1) Identification : You can set the general information of the Owner.
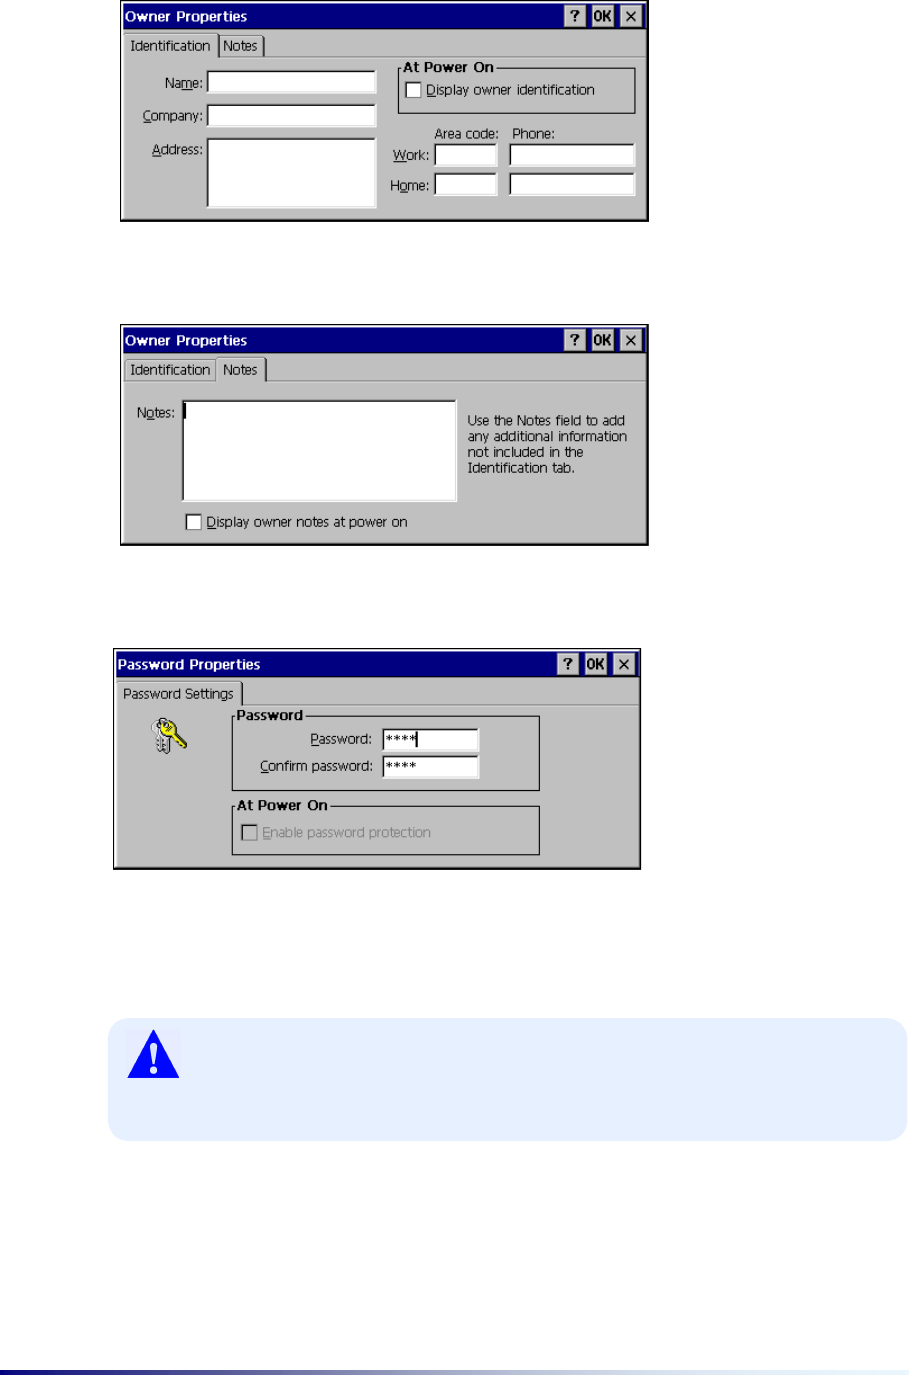
Page 3-6 Chapter 3
2) Notes : You can add any additional information.
(8) Password
You can set password requirements for security while using system. You can set a
new password by inputing a password in the Password and Confirm Password.
However, password is only to consist of 4 digit Numerals.
If you forget your password, you will have to perform a Hard Reset. So
be careful not to forget it. All data (including file, DB data) stored in the
RAM is lost when a hard reset is performed.
(9) Power
1) Battery : Indicates the kinds and status of the battery currently in use, and also the
status of the backup battery.