CyberBank CB-2460 PDA User Manual Majesty contents
CyberBank Corp PDA Majesty contents
Contents
- 1. users manual 1
- 2. users manual 2
users manual 1

U
Us
se
er
r
M
Ma
an
nu
ua
al
l
2002. 9.
Although great care has been taken to ensure the accuracy of procedures and artwork, some of the
screens displayed on your device may be different from the ones that appear in this user
’
s manual.
M
Ma
aj
je
es
st
ty
y
This equipment has been tested and found to comply with the limits for a
Class B digital device, pursuant to part 15 of the FCC Rules. These Limits
are designed to provide reasonable protection against harmful interference
in a residential installation. This equipment generates, use can radiate radio
frequency energy and, if not installed and used in accordance with the
instructions, may cause harmful interference to radio communications.
However, there is no guarantee that interference will not occur in a
particular installation. If this equipment does cause harmful interference by
one or more of the following measures:
- Reorient or relocate the receiving antenna.
- Increase the separation between the equipment and receiver.
- Connect the equipment into an outlet on a circuit different from that to
which the receiver is connected.
- Consult the dealer or an experienced radio/TV technician for help.
This device complies with part 15 of the FCC rules. Operation is subject to
the following two conditions : (1) This device may not cause harmful
interference, and (2) this device must accept any interference received,
including interference that may cause undesired operation.
CAUTION : Changes or modifications not expressly approved by the
manufacturer responsible for compliance could void the user’s authority to
operate the equipment.
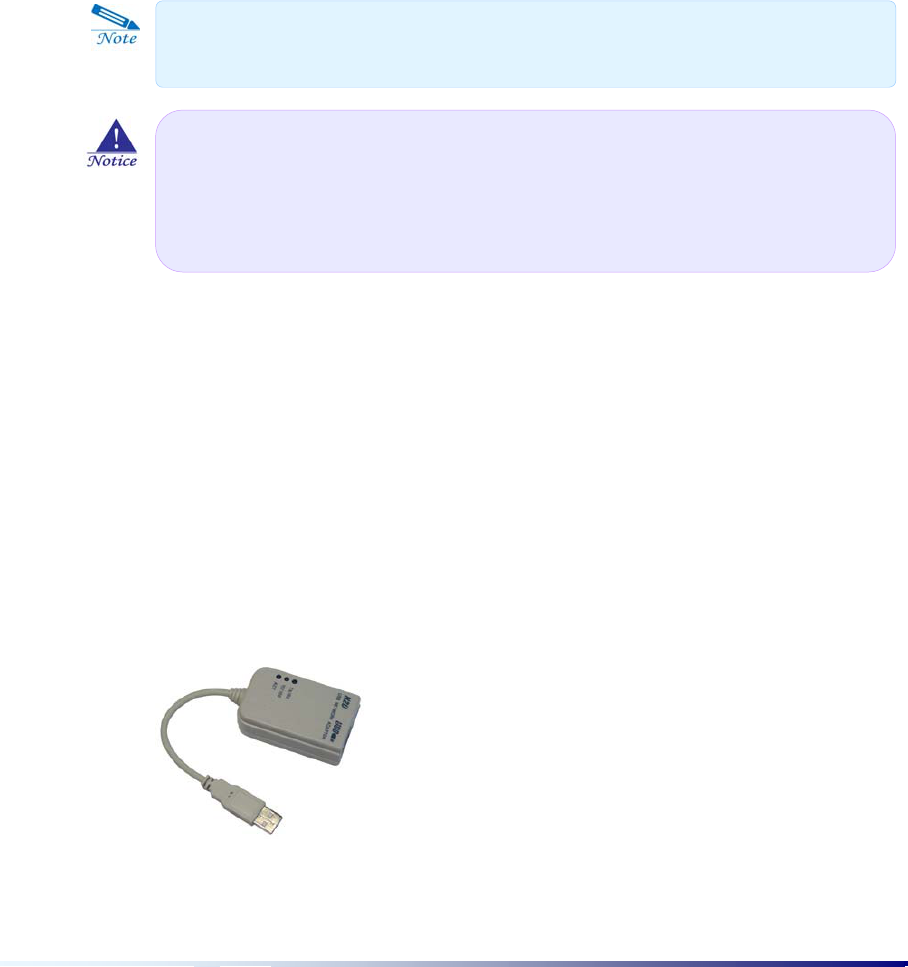
To ensure the product compliance to FCC Rules and regulations, only use
supplied USB cable. Use of any other USB cable may not ensure product
compliance.

Safety Information
Please read these simple guidelines before using your pda. Failure to comply
with these guidelines may be dangerous or illegal.
Only qualified service personnel must install or repair equipment. Breaking the warranty seal
and opening the casing of the phone will void your warranty.
Use only approved accessories and batteries. Do not connect to incompatible products.
Avoid any contact with water and any type of moisture.
Do not place heavy objects on your Majesty. Your Majesty may be damaged.
Do not store near a strong magnetic force.
Dropping your Majesty and creating a strong impact or using excessive force on it may
result in damage or malfunctioning.
Getting your Majesty wet in the rain or spilling some beverage may result in a break down.
Do not voluntarily disassemble, repair, or assemble your Majesty. If it needs to be repaired,
contact the customer support center.
When using the touch screen, be sure to use the stylus that comes with your Majesty. Using
your fingertips or other sharp objects may cause damage to the touch screen so as to dull
the character recognition function and cause other defects.
Your Majesty must be used in the following temperature conditions due to the characteristics
of the LCD. If used in conditions outside this range, malfunctions and breakdowns may
occur. (Temperature conditions: 0 ~ 40°C / 32 ~ 104°F)

When removing dirt or other residue, use a soft cloth.
When the battery’s capacity is insufficient, either charge it or exchange it with a charged
battery as quickly as possible. Important data stored in the memory will be lost if the battery
is completely drained.
For safekeeping, store your Majesty in its original case from purchase.

Congratulations on purchasing the Majesty, a Palm-Size PC that is a combination of high technology
from the areas of Mobile Computing and Wireless Communication. Majesty is a mobile device
powered by Microsoft Windows CE OS. The size and capabilities of the Majesty let you keep your
most important business and personal information current and close at hand.
Through the self-developed personal information management programs, Majesty enables you to
check E-mail and manage your appointments and contacts in situations where your desktop PC is
unavailable. This is made possible through a process of downloading the data stored on your
desktop PC to your Majesty by synchronization, and then updating the information you have
acquired on the road back to your desktop PC through yet another synchronization. Majesty offers
you the highest quality in performance and battery life as well as a variety of programs and utilities
planned and designed by CYBERBANK.
In order to stand out from other products in the world, Majesty has installed a CDMA mobile phone
module in the Personal Data Assistant (PDA) for voice calls and wireless Internet communications,
anywhere and anyplace.
In addition, by supporting VGA-level resolution (640x480, 200dpi), Majesty offers you direct wireless
access without having to adjust sizes of Web Sites or Information System user screens much. Also,
in contrast to the existing PDA which need cables, mobile phones, or wireless modems for data
communication, Majesty fully supports voice calls, wireless data communication, and wireless
Internet all in one device.
Although Majesty has many features illustrated above, you will have no problems if you are familiar
with Microsoft Windows series.
September, 2002
Cyberbank Corp.
18
th
Fl. Mirae B/D, 1306-6
Seocho-Dong, Seocho-Gu, Seoul, Korea 137-855
C
Co
o
p
p
y
y
r
ri
i
g
gh
ht
t

Contents
Page ix
Chapter 1 Getting Started
Hardware Features ....................................................................... 1-1
Using your Majesty for the first time ................................................. 1-5
Soft Reset & Hard Reset ............................................................... 1-7
Microsoft Programs ...................................................................... 1-8
The 3
rd
Party Programs ..................................................................1-9
Chapter 2 Customizing & Maintenance
Setting Majesty Preference ............................................................ 2-1
Managing Battery Power.............................................................. 2-11
Managing and Applying Memory................................................... 2-13
Chapter 3 Connecting to desktop
Installing Microsoft ActiveSync and Establishing a Partnership .............. 3-1
Backup and Restore using Backup/Restore of ActiveSync ................. 3-11
How to install programs using ActiveSync....................................... 3-13
Using Sync Port and Infrared Port ................................................. 3-14
Chapter 4 bUSEFUL Backup Plus
Backup ...................................................................................... 4-1
Restore ...................................................................................... 4-3
Chapter 5 Internet Explorer & Inbox
Internet Explorer........................................................................... 5-1
Inbox ......................................................................................... 5-4
C
Co
on
nt
te
en
nt
ts
s

Page x Contents
Chapter 6 Microsoft Programs
Media Player ............................................................................... 6-1
MSN Messenger ..........................................................................6-5
Remote Desktop Connection ....................................................... 6-13
Terminal Emulator ...................................................................... 6-15
Word Viewer.............................................................................. 6-16
Excel Viewer.............................................................................. 6-18
PowerPoint Viewer...................................................................... 6-21
Image Viewer ............................................................................ 6-24
PDF Viewer ............................................................................... 6-27
Chapter 7 The 3
rd
Party Programs
Contacts .................................................................................... 7-1
Calendar .................................................................................... 7-6
Tasks....................................................................................... 7-12
Memo...................................................................................... 7-15
Calculator ................................................................................. 7-18
Recorder .................................................................................. 7-22
Appendies
A. DioPen User Manual .................................................................A-1
B. Guarantee ..............................................................................B-1
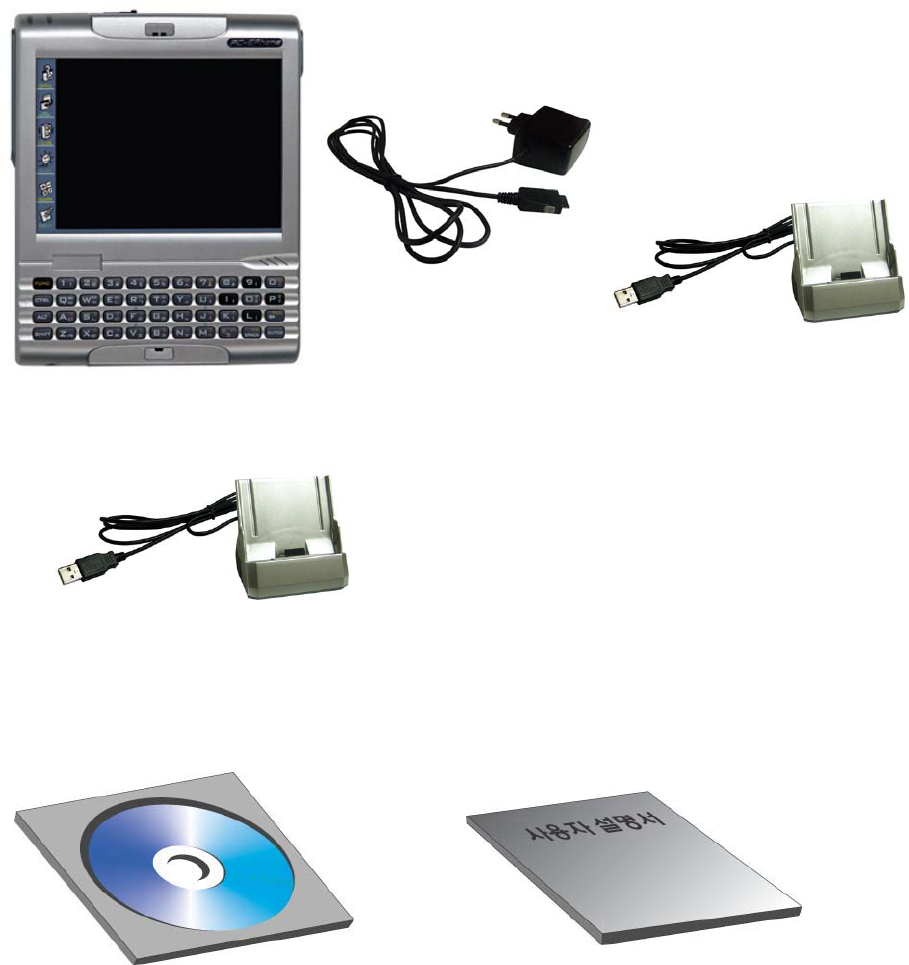
What’s in the box?
Majesty USB Cable
A
C adapte
r
User Manual
Cyberbank CD
Cradle
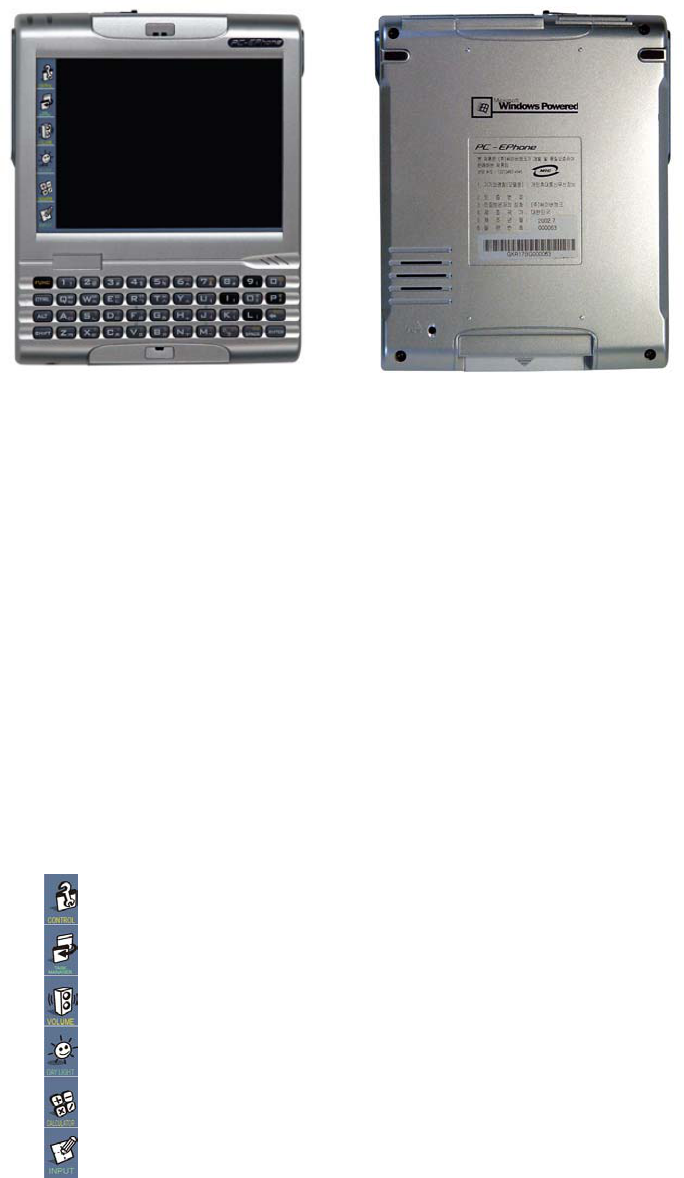
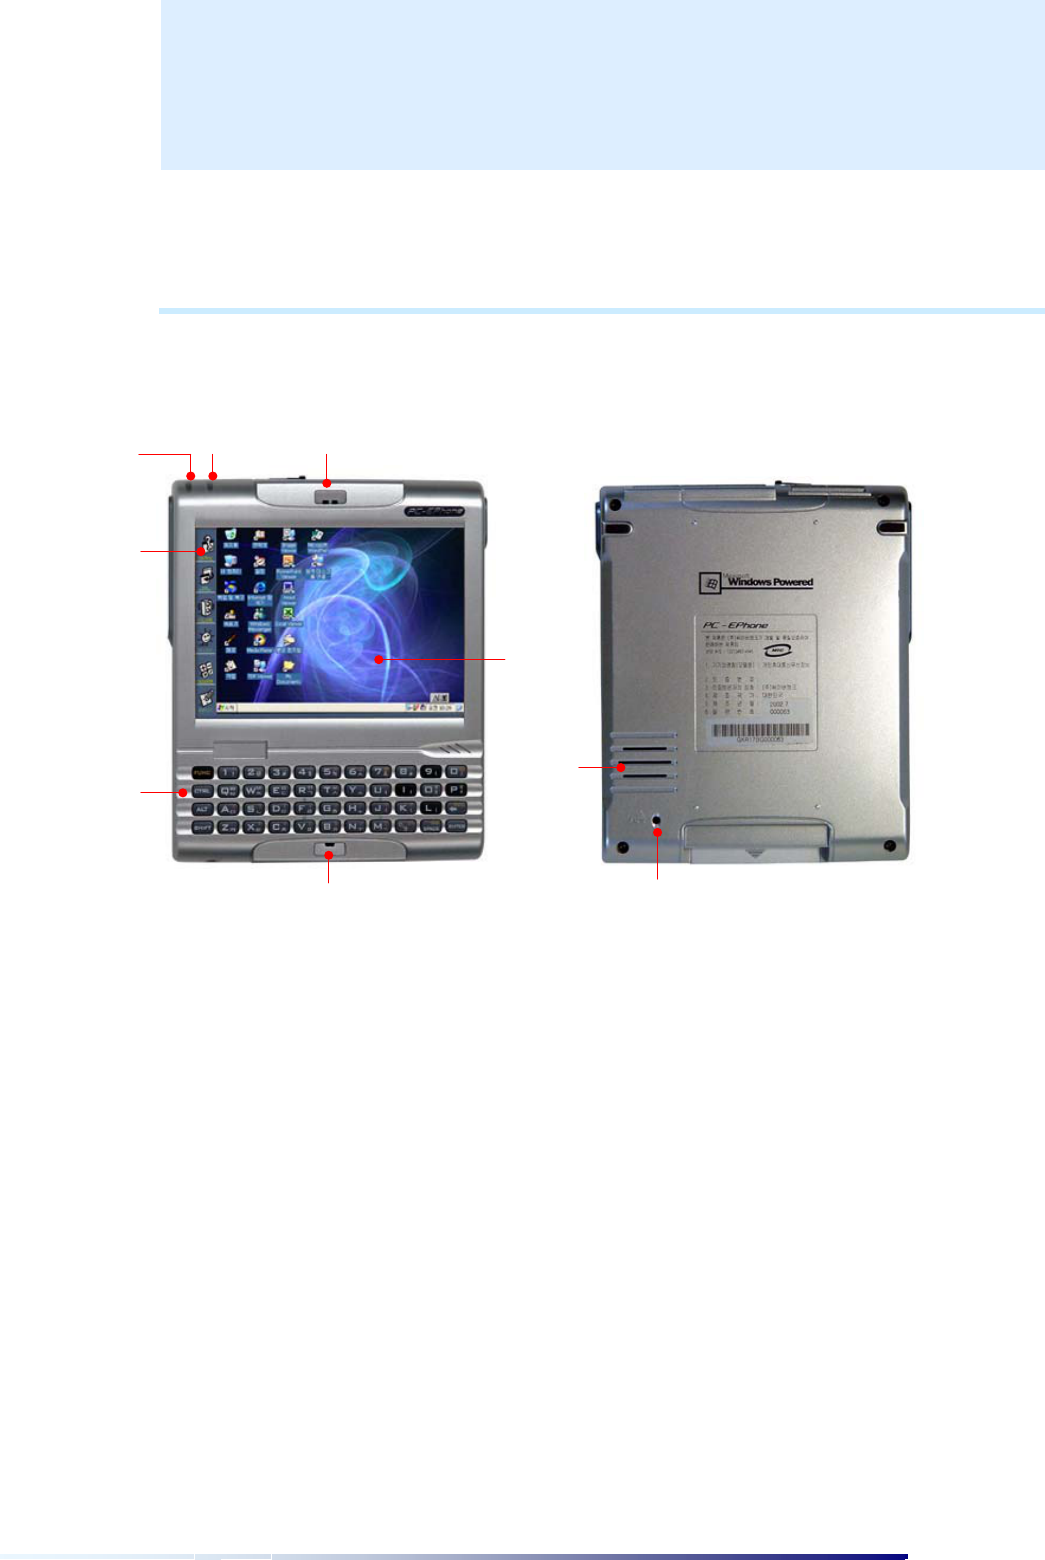
Majesty Hardware Features
Recording & Alarm Status LED / Battery Charging LED
Hot Keys / Keyboard(44 Keys)
Microphone / Touch Screen(LCD)
Speaker / Reset Button
Ear-Set Jack / CF(Compact Flash) Card Slot
SD(Secure Digital) Card Slot / DC Jack for AC power adapter
Power-Cutting Switch / Expansion Pack Connector
Sync Port / Power Button
Recording Button / Internet Button
Infrared Port / Lock Switch
Stylus / USB Host Port
Hot Keys
CONTROL
TASK MANAGER
VOLUME
DAY LIGHT
CALCULATOR
INPUT(DioPen)
⒜
⒝
⒞
⒟
⒠
⒡
①
⒢
⒣
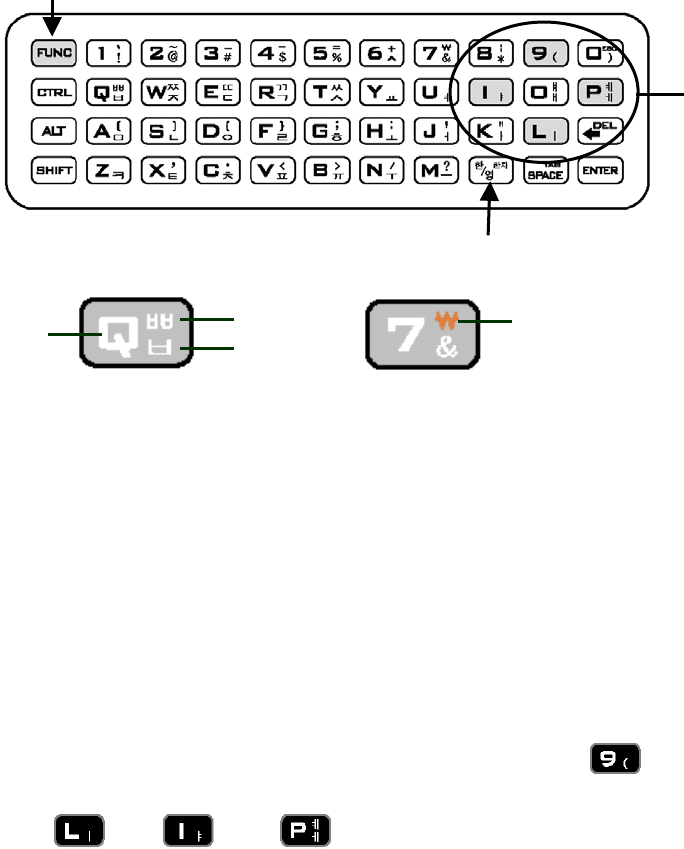
44-Keyboard
The views below will introduce you to how to use the 44-keyboard.
When you press each button, basically
④ value will be entered
. With the
Shift button pressed down, if you press each button, capital letter will be entered.
When you press the ② Korean/English Conversion key
, it becomes the
Korean mode.
In Korean mode, with the Shift button pressed down,
⑤ value will be
entered
.
When you press down the ①
Function button,
⑦
value will be entered.
4-black buttons located in the right side have the navigation function.
When you press down the
①
Function button, you can use the up( ),
down( ), left( ), right( ) buttons.
Just like the keyboard of desktop, you can use the special functions including
the shortened keys with the CTRL button, the shortened keys with the ALT button.
④⑤
⑥
③
⑦
①
②
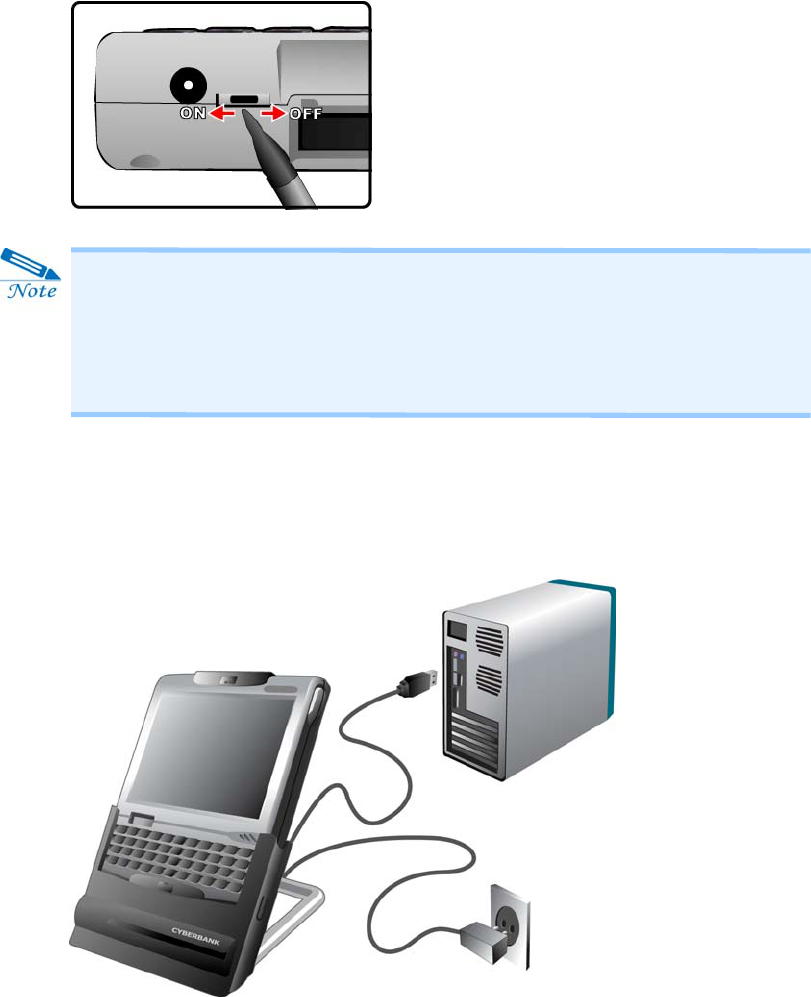
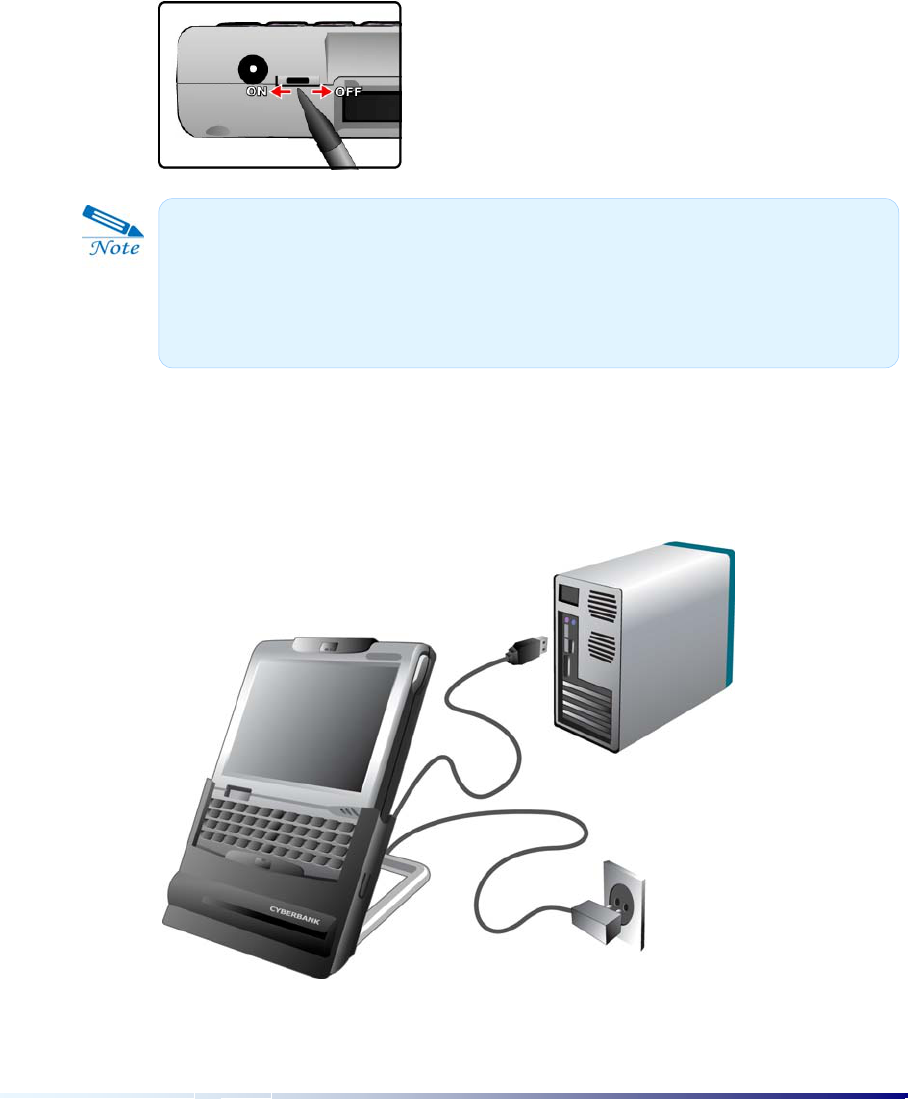
Using your Majesty for the first time
Follow these steps to begin using your Majesty:
When your Majesty comes out from the factory, the Power-Cutting Switch is in the OFF position. If
you use it for the first time, more the Power-Cutting Switch toward the ON position with your
stylus.
Assemble the AC adapter, and connect it to the DC jack on your Majesty. Do not
disconnect your Majesty from AC power until the green Battery Charging LED
indicates that the battery is fully charged.
The battery may be drained during the transportation from the factory to the
consumer; therefore you should connect AC power to the cradle and place your
Majesty in it in order to charge the battery when using your Majesty for the first
time.
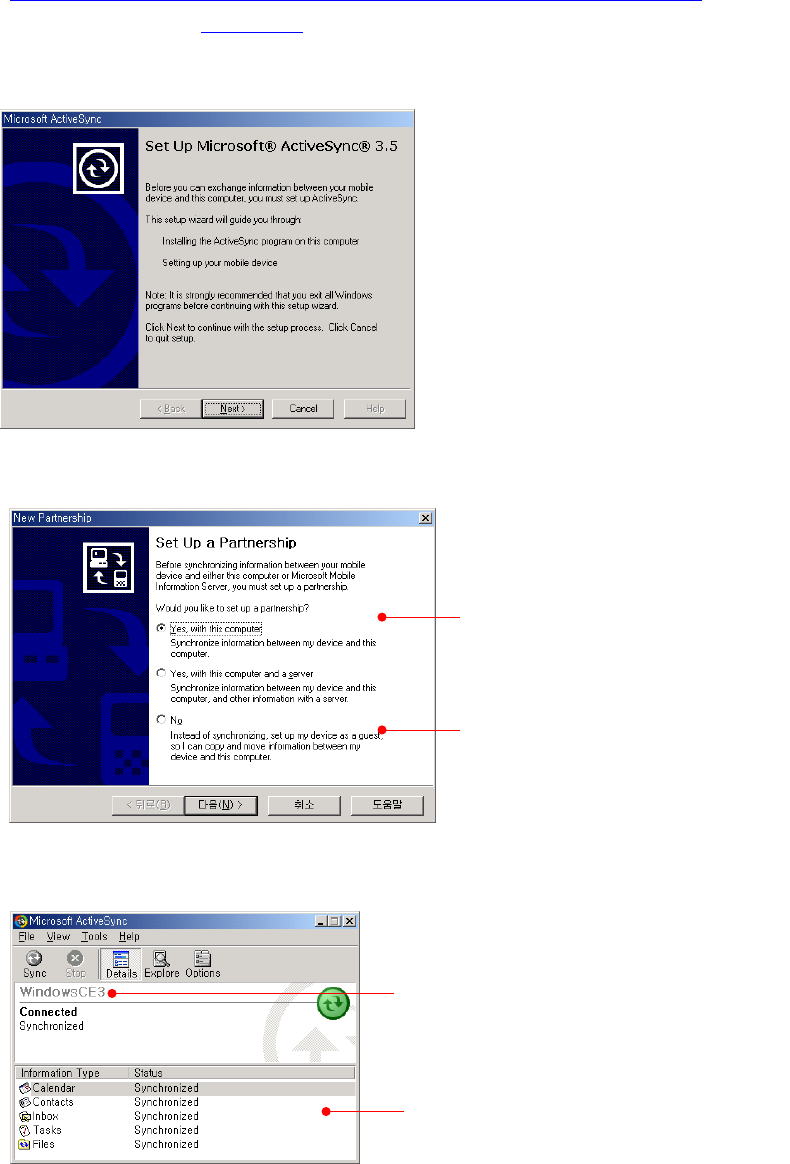
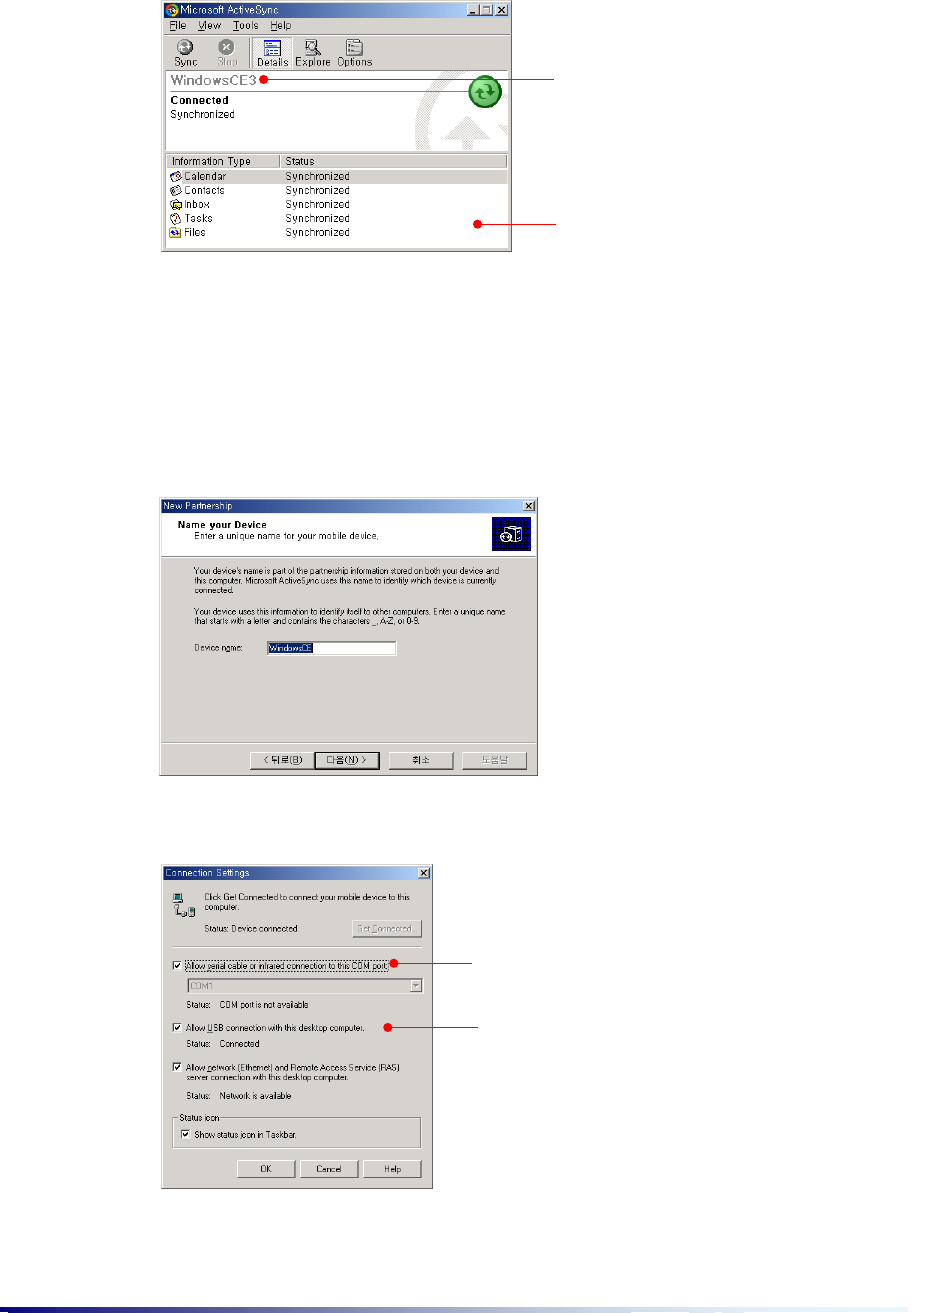
Installing Microsoft ActiveSync and Establishing a Partnership
Install Microsoft ActiveSync 3.5 or later from Cyberbank CD or download at
www.microsoft.com/mobile/pocketpc/downloads. And then install CyberbankUSBupdate.exe
from Cyberbank CD or at www.cb.co.kr.
Install Microsoft ActiveSync
Establishing a Partnership
Now, you are ready to synchronize between your device and desktop and it may take a little
long time to finish synchron9tion.
Select this to establish a partnership
Partnership is not established and your
device is connected to desktop as Guest.
You can copy and move files between
desktop and device.
A partnership name established between
desktop and your device through ActiveSync.
These are the items you have selected for
a partnership.

Specifications
Items Descriptions
Size (mm) 102 x 127 x 19.3
Weight (g) 275
PDA 4 ~ 5 hours
Durations Wireless LAN 3 hours
Battery Li-ion 3.7V, 1800mAh
Screen 640*480 / TFT 65000 Color / 4” Transitive TFT
LCD
CPU COTULLA (PXA250:INTEL)/ 400Mhz
Flash Memory 32Mbyte
NAND Flash Memory 32Mbyte
Memo
ry DRAM SDRAM(64Mbyte)
Battery Charging Red, Green
LED Recording & Alarm
Status Red, Green, Orange
Ear-set Jack Support Stereo
44-keys, Soft Reset Button & Power-Cutting
Switch
Keyboard & Buttons Recording Button, Power Button, Internet Button,
Lock Switch
Microphone & Speaker Microphone for Recording & Mono Speaker
External I/O Connection
12pin sync connector (USB, Serial Sync)
USB Host Controller (2 ports)
Adapter(Input : AC 110/220V, 50/60Hz, Output :
DC 5V +/-5%, ≥2A)
IrDA(up to 115.2Kbps)
CF CF Type II (3.3V only)
External
Expansion MMC/SD MMC Ver2.1 & SPI mode
Memory Card(MMC/SD) & SDIO Card
Cradle
Input : DC 5V +/-5%, ≥2A
Operating Temperature: 0 ~ 50 °C
(Storage Temperature: -40 ~ 80 °C)
Humidity : 0 ~ 80%
Getting Started Page 1-1
G
Ge
et
tt
ti
in
ng
g
S
St
ta
ar
rt
te
ed
d
I. Hardware Features
(A) Recording & Alarm Status LED
displays red during recording your voice in the recording program, flashes green in
LCD-off mode.
(B) Battery Charging LED
displays red in charging battery, displays green when charging has completed. However,
when an error happens, it flashes red.
(C) Hot Keys (See the Quick Reference)
(D) Keyboard(44 Keys) (See the Quick Reference)
(E) Microphone
Speak into the microphone to record voice notes.
(F) LCD Display Screen (LCD)
640 x 480 resolution and 256-color, 4
”
color TFT LCD. Tap on-screen controls or
buttons to select menu commands or input text.
C
CH
HA
AP
PT
TE
ER
R1
1
⒡
①
(a)
(c)
(b)
(f)
(d)
(e)
(g)
(h)
(g)
Page 1-2 Chapter 1
(G) Speaker
Listen to music or set audible reminders and alerts.
(H) Reset Button
When your Majesty is running slow or improperly, use the stylus to press the
Reset
button
to reset the system.
(J) Ear-Set Jack
The Ear-Set jack is used to connect the Ear-set. You can use this jack to speak on
the phone or listen to MP3 music files.
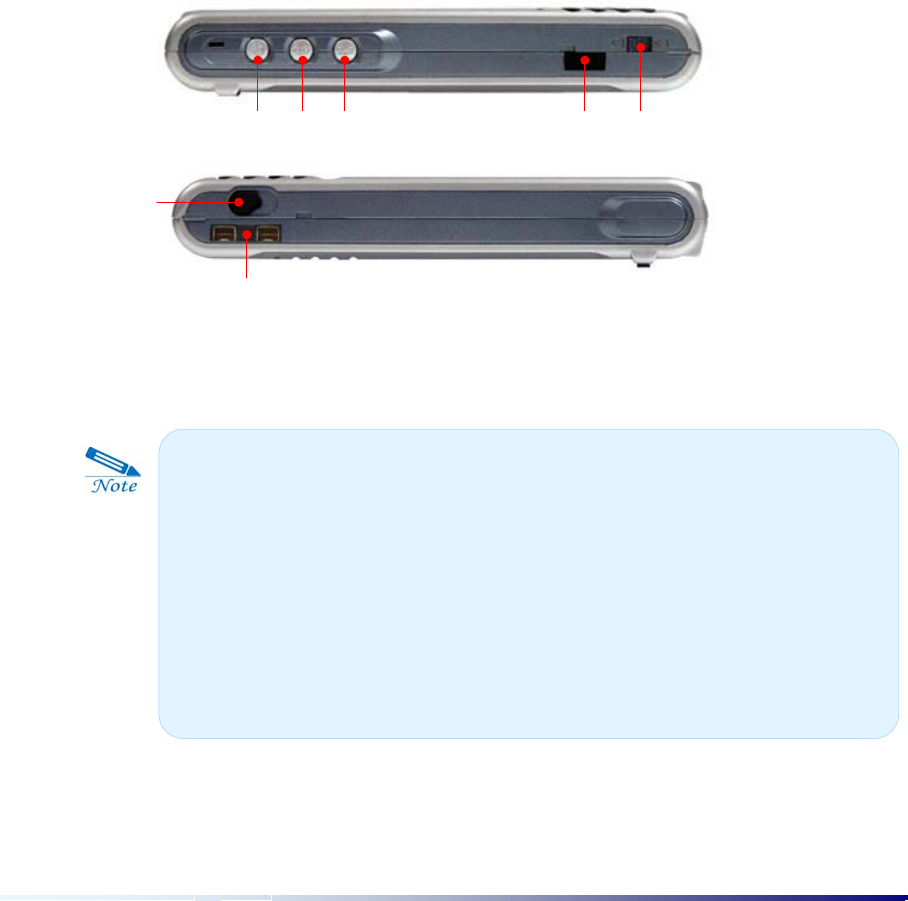
(K) CF(Compact Flash) Card Slot
(L) SD(Secure Digital) Card Slot
You can use CF type memory card,
Wired/Wireless LAN card,
Wired/Wireless modem card.
You can use SD type memory card.
Tap
As the touch screen is made of very delicate materials, when tapped by sharp
objects such as a knife or a ball point pen, it is easily damaged.
(j)
(k) (l) (m)
(n)
(o) (p)
Getting Started Page 1-3
(M) DC Jack for AC power adapter
connected to external power and converted to 5V / 2A.
(N)
Power-Cutting Switch
Push this button to the right side with your stylus to delete all programs and files stored in
RAM.
(O) Expansion Pack Connector
release the screw with screw driver and connect PCMCIA expansion pack.
(P) Sync Port
Enables you to synchronize with your desktop through USB cable and an optional serial
cable you can purchase.
(Q) Power Button
Used to turn your Majesty ON and OFF.
(R) Record button
Used to run the recording program or control recording functions. More specifically,
when the Majesty is turned on, you can run the recording program by pressing this
(q) (
r
) (s) (t) (u)
(v)
(w)
When you press the power button to turn it off, it is called a state of “Sleep
mode”. Even in Sleep mode, a minimum of power is continuously supplied to
maintain data stored in your device.
Besides, if you press down the Power button for about 2~3 seconds when
listening to music through Windows Media Player, it is called the LCD-off
mode where any other functions do not operate so that you can minmize the
usage of battery. At this time, the Recording & Alarm status LED flashes
g
reen.

Page 1-4 Chapter 1
button, and another press will start recording. Also, you can stop recording by pressing
this button while recording.
(S) Internet Button
Used to open the Internet Explorer program.
(T) Infrared Port
Infrared Port allows you to connect your Majesty to your desktop PC via infrared beam.
For more information, see Chapter 3
“
Using USB Port and Infrared Port
”
.
(U) Lock Switch
When this switch is in the lock position, you are not allowed to enter any information
through the touch screen.
(V) Stylus
You can use it in much the same way you would use a mouse on the desktop. In other
words, use it to run programs and to press the
Reset
button.
(W) USB Host Port
allows you to connect 2 USB devices(for example, USB printer, USB Network LAN Card
and USB Storage) to your device at the same time.
Getting Started Page 1-5
II. Using your Majesty for the first time
Follow these steps to begin using your Majesty.
When your Majesty comes out from the factory, the Power-Cutting Switch is in the OFF
position. If you use it for the first time, more the Power-Cutting Switch toward the ON
position with your stylus.
Assemble the AC adapter, and connect it to the DC jack on your Majesty. Do not
disconnect your Majesty from AC power until the green Battery Charging LED indicates
that the battery is fully charged.
Your Majesty is supposed to be turned on when you place it on the cradle. However,
The battery may be drained during the transportation from the factory to the
consumer; therefore you should connect AC power to the cradle and place
your Majesty in it in order to charge the battery when using your Majesty for the
first time.
Page 1-6 Chapter 1
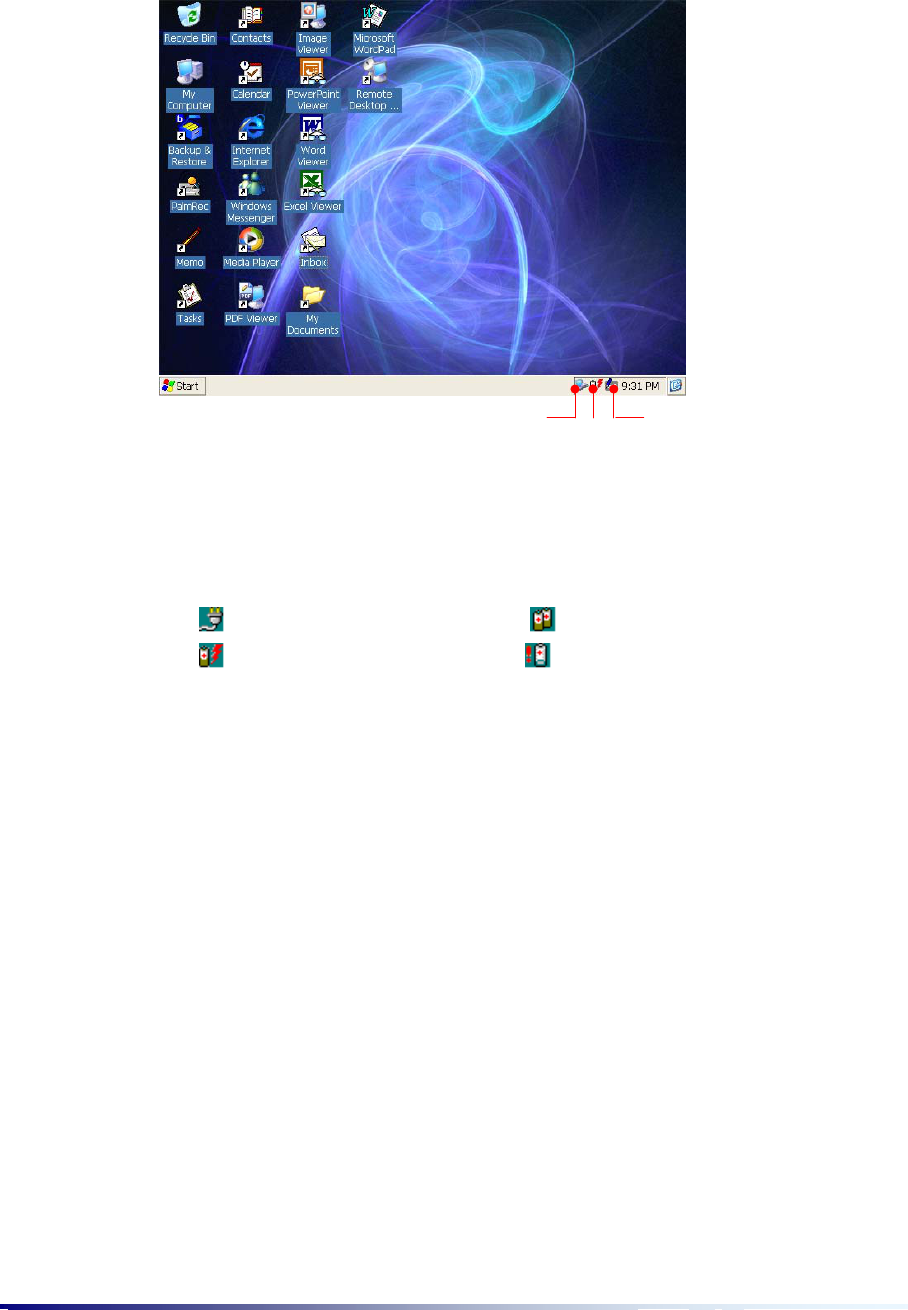
sometimes you have to press the power button after waiting for more than 1 ~ 2 minutes
when your device is drained completely. Then you will see wall paper image as follows :
(1) This icon appears when your device is synchronized with desktop through Microsoft
ActiveSync. This icon will not appear until installing Microsoft ActiveSync.
(2) Battery Charging Status.
: connected to external power, : Battery is insufficient
: Charging Battery , : Battery is very insufficient
(3) DioPen icon: if you tap this icon when the DioPen screen displays, a pop-up menu
appears where you can select other keyboards. For more information, see
Appendix A
“
DioPen Manual
”
.
(2)
(1) (3)
Getting Started Page 1-7
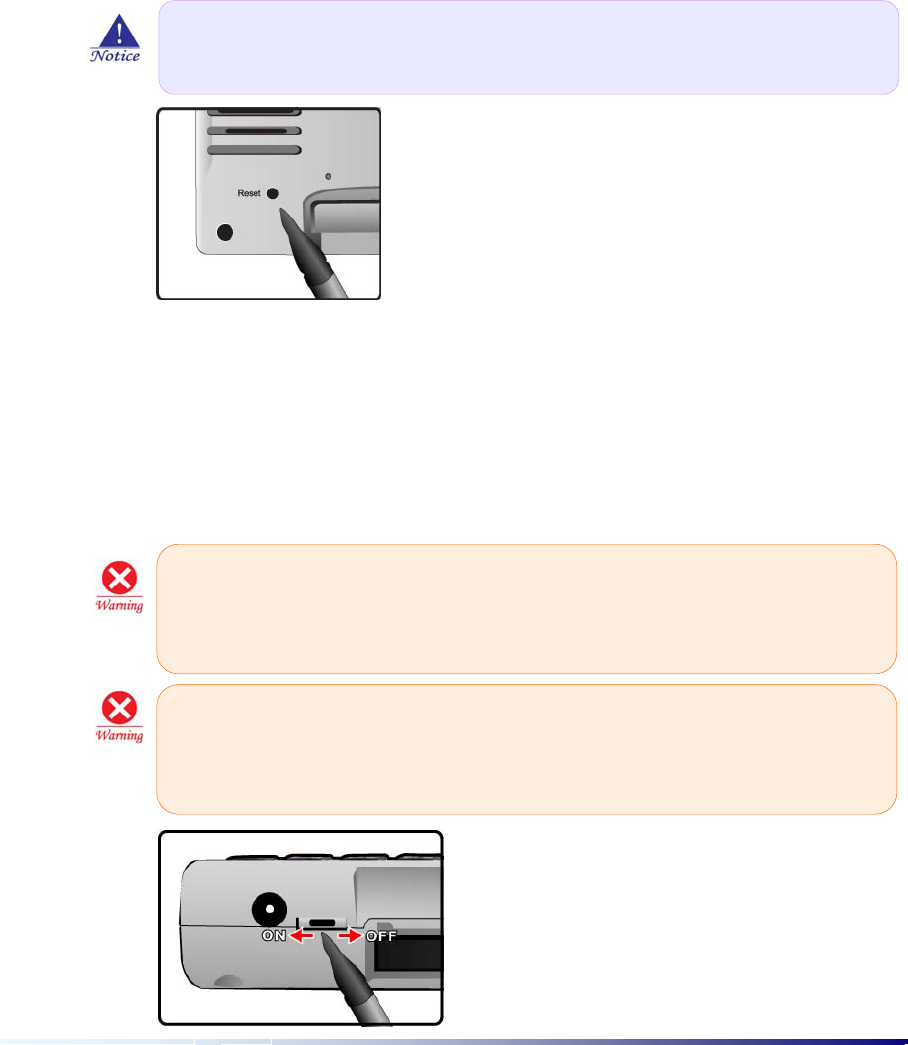
III. Soft Reset & Hard Reset
You can get your Majesty back to normal by performing a system reset when it is not
operating properly. There are 2 types of system resets:
Soft Reset
,
Hard Reset
.
(1) Soft Reset
Performs Soft Reset when your Majesty operating system responds slowly or is
temporarily out of order. To perform Soft Reset, press the
Reset
button on the back of
your Majesty using the stylus.
(2) Hard Reset
You can perform Hard Reset when the system does not return to proper operation even
after performing Soft Reset. To perform Hard Reset, push toward OFF the
Power-
Cutting Switch
of your Majesty with stylus and push it back toward ON. After performing
Hard Reset, device gives way to the touch screen calibration.
When you perform Soft Reset, you will lose unsaved data in all open
documents or programs. Be sure to save all data beforehand.
All data stored in RAM is lost as a result of Hard Reset, so it is best that you
store all RAM data in non-volatile storage devices (Local Storage, SD or CF
memory card, desktop’s hard disk) before performing a Hard Reset.
.
Your Majesty will automatically perform Hard Reset when battery is fully
drained. This will result in a loss of all stored data and installed programs in
RAM.

Page 1-8 Chapter 1
IV. Microsoft Programs
ActiveSync.
Synchronize information (
Calendar, Tasks, Contacts, Inbox, Files
) between your
device and desktop.
Internet Explorer.
Browse the Web and view channels and subscription content.
Inbox.
Send and receive e-mail messages from your device
.
Microsoft WordPad.
Create new documents or view and edit Word documents created on your
desktop
.
Word Viewer.
View Word documents created on your desktop
.
Excel Viewer.
View Excel documents created on your desktop
.
PowerPoint Viewer.
View PowerPoint documents created on your desktop
.
Image Viewer.
View Image created on your desktop
.
PDF Viewer.
View PDF documents created on your desktop
.
Windows Messenger.
Send and receive instant messages with your MSN Messenger.
Windows Media Player.
Play audio and video clips on your device. Window Media Player lets
you play songs and video files that have been recorded in the MP3 or WMA formats.
Terminal Server Client.
Remotely connect to desktop server through wireless LAN.

Getting Started Page 1-9
V. The 3rd Party Programs
The programs listed below are preinstalled in ROM. These preinstalled programs will not be deleted if your
device suffers a loss of power.
Calendar.
Keep track of your appointments and create meeting requests
.
Tasks.
Keep track of your to-do list
.
Contacts.
Keep track of your friends and colleagues
.
Notes.
Create handwritten or typed notes, drawings and recordings
.
Recorder.
Enables you to voice record memos and important items that you can listen to later through
playback.
Calculator.
Provides a scientific as well as a standard calculator. Also, CYBERBANK has added a
weights and measures conversion feature.
bSpreadsheet.
Enables you to view and edit Excel documents created on your desktop.
DioPen.
Enable you to input Korean and English characters.
bBackup.
Enables you to backup or restore the data in your Majesty’s RAM (file, DB, registry) to and
from CF Cards and IPSM.
Task Manager.
Enables you to do the functions similar to the Task Manager on your desktop.
Customizing & Maintenance Page 2-1
C
Cu
us
st
to
om
mi
iz
zi
in
ng
g
&
&
M
Ma
ai
in
nt
te
en
na
an
nc
ce
e
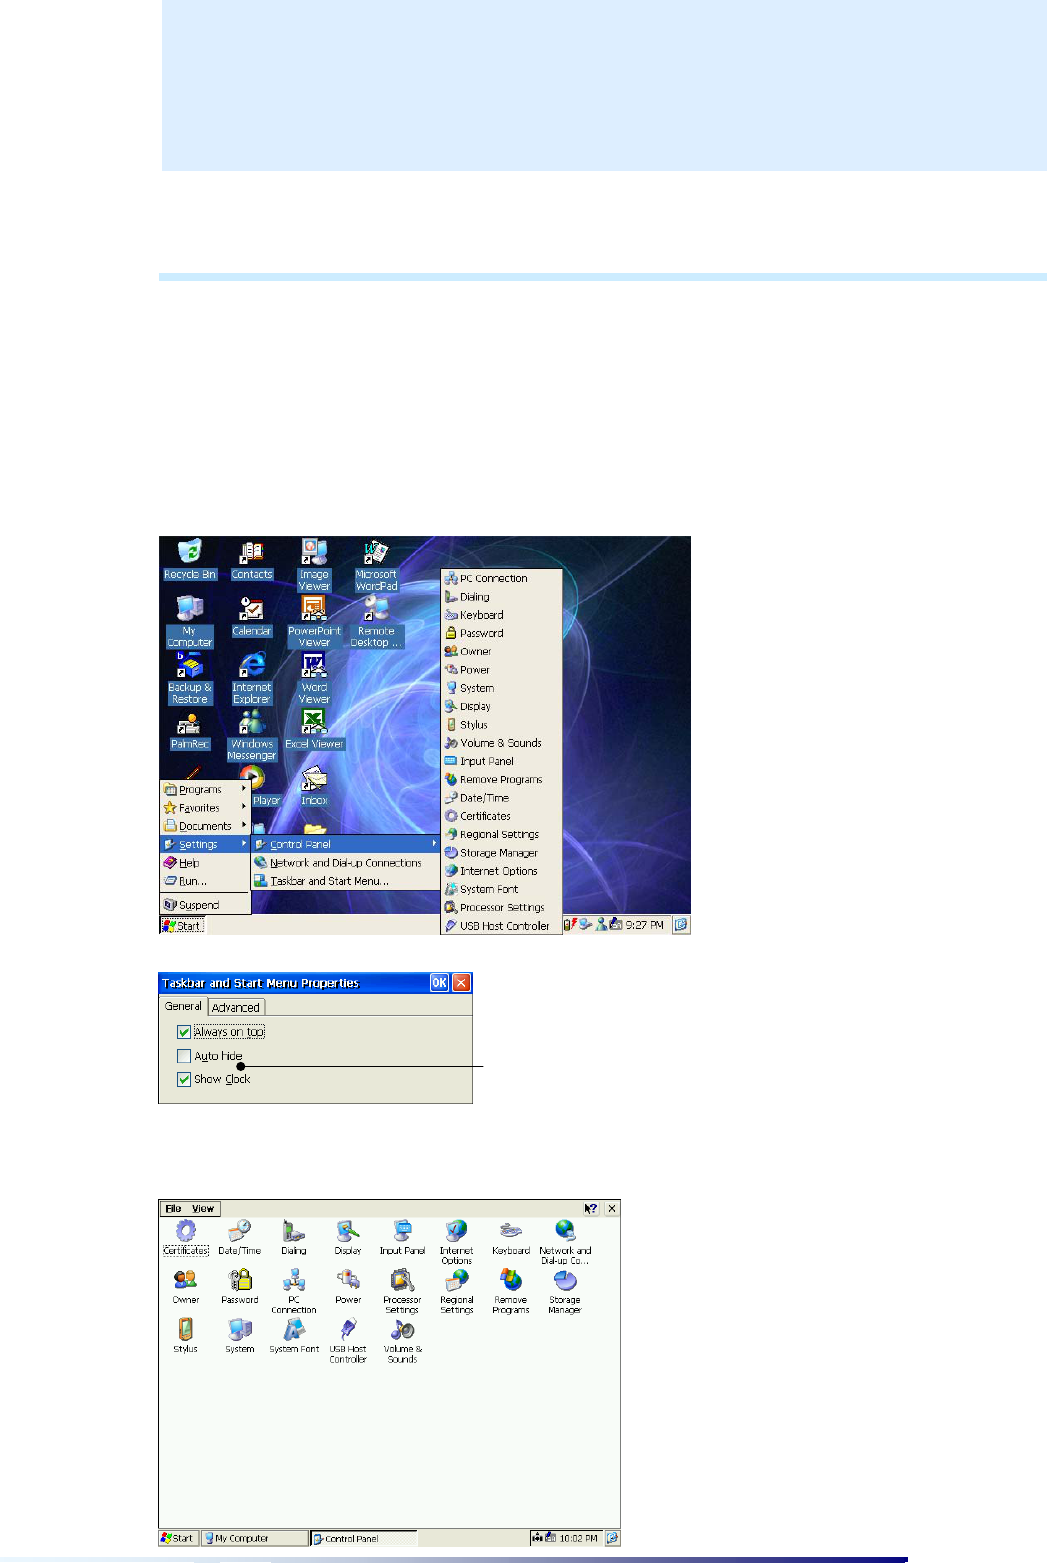
I. Setting Majesty Preferences
This details ways you can optimize your device using the Settings, and describes ways you
can expand features and functionality by adding programs. On the
Start
menu, point to
Settings
, tap
Control Panel
, and the following display will appear.
Select Taskbar & Start menu to display settings icon on one screen.
Now, do this again : on the
Start
menu, point to
Settings
, tap
Control Panel
, and the
following display will appear.
C
CH
HA
AP
PT
TE
ER
R2
2
Deselect the Expand Settin
g
s to
display settings icon on one screen.
Page 2-2 Chapter 2
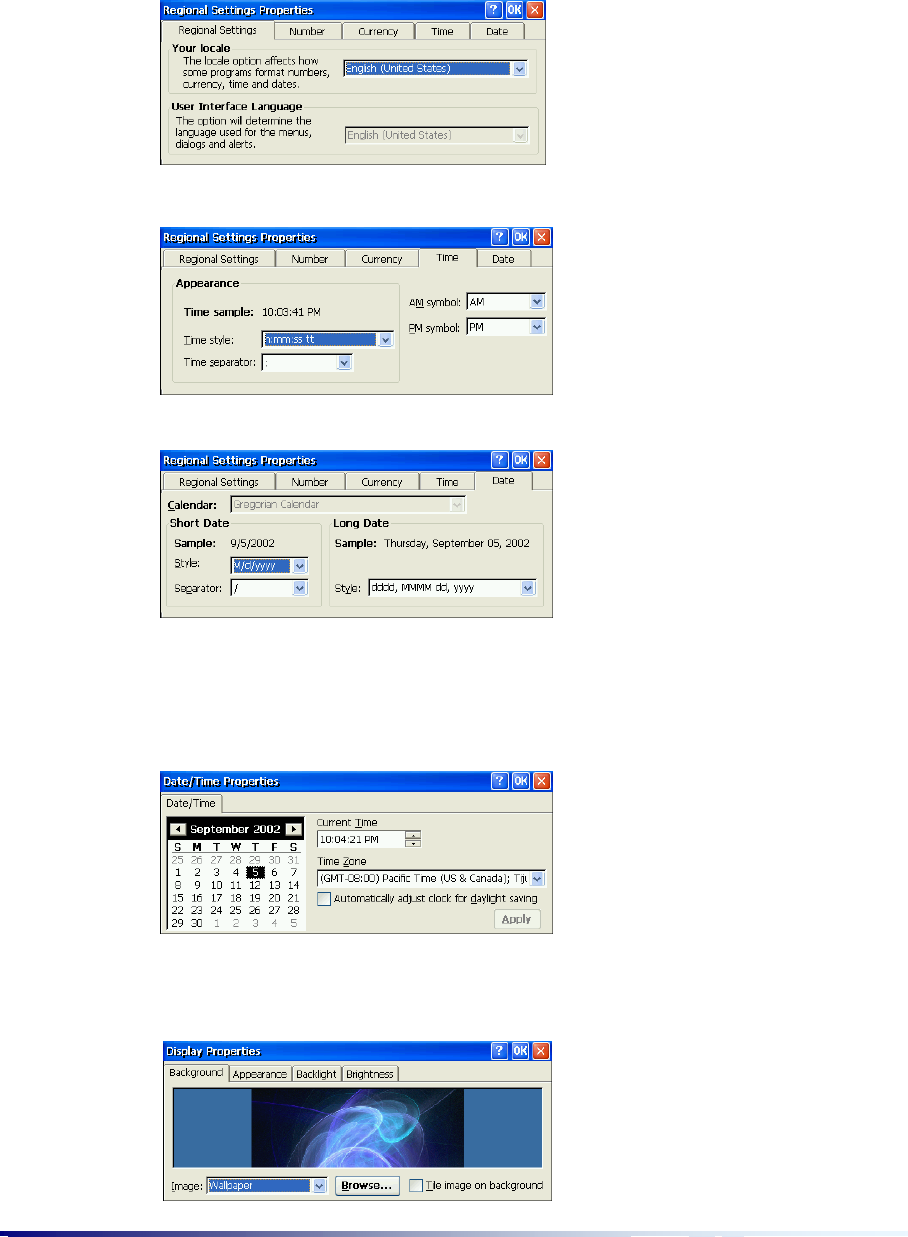
(1) Regional Settings
1) Regional Settings: First choose the national language in order to change program
Date, Time, Currency, and Number display forms and how to line up numbers through
Regional Settings.
2) Time: Set the Time forms used in the system.
3) Date: Set the Date forms used in the system.
(2) Date/Time
Set the Year, Month, Day, Time, and select the Standard Time Zone and Daylight savings
time. And then press the
Apply
button.
(3) Display
1) Background
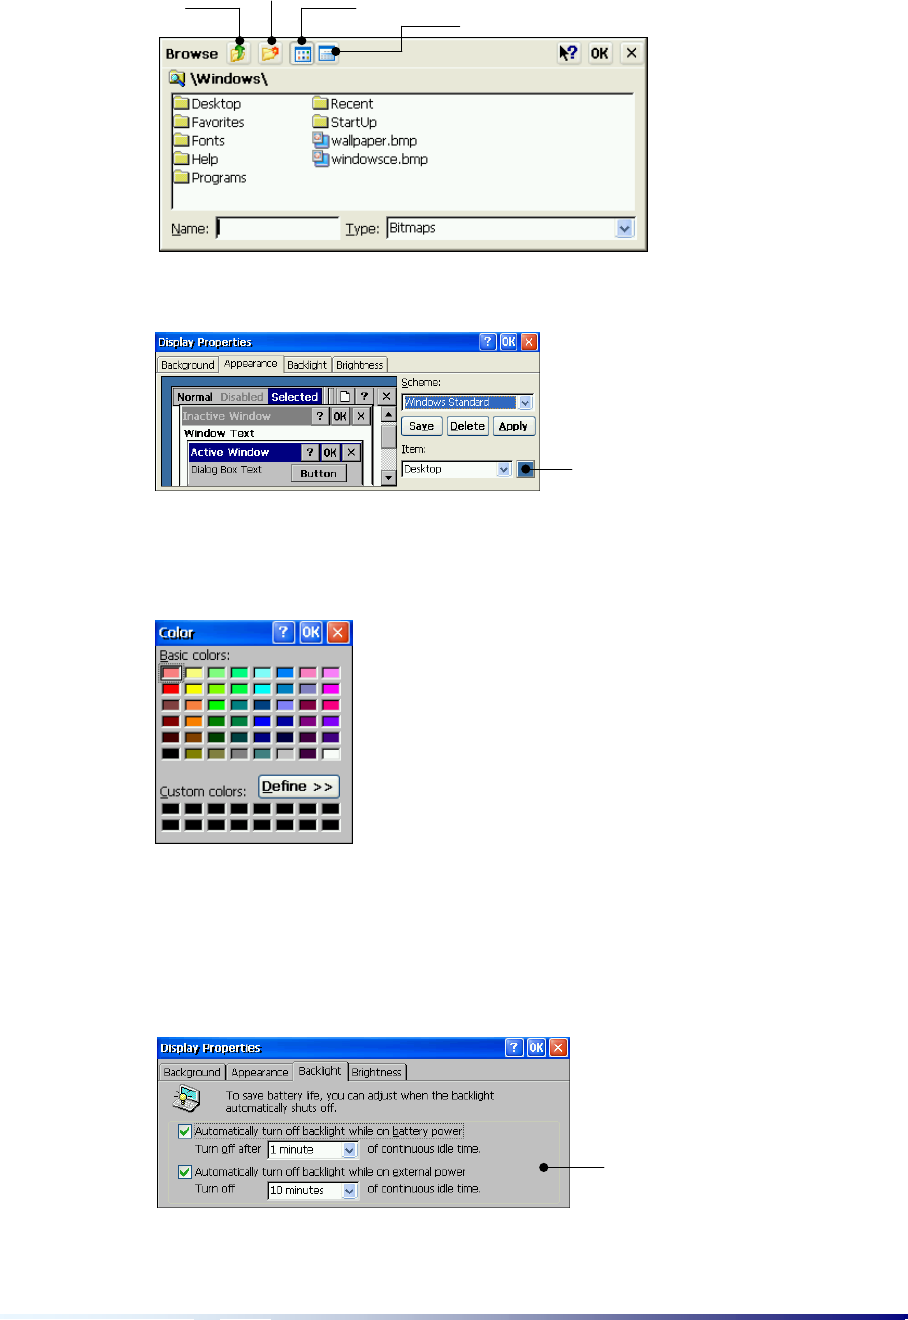
Customizing & Maintenance Page 2-3
You can change the picture file (BMP) using the
Browse
…
button.
2) Appearance
You can change the background color the way you want it. First, select an item you want
from the
Scheme
drop-down list box and you can apply it as you want by pressing the
Save
,
Delete
, or
Apply
buttons.
3) Backlight
For battery conservation, the backlight can be set to go off after the preset time when the
your Majesty is not in use. When you resume work on your Majesty, the backlight
automatically turns back on.
Move to the upper folder
Details
Simple
New folder
Select color
When usin
g
batter
y
or external power,
the backlight goes off after the preset
time when your device is not in use.
Page 2-4 Chapter 2
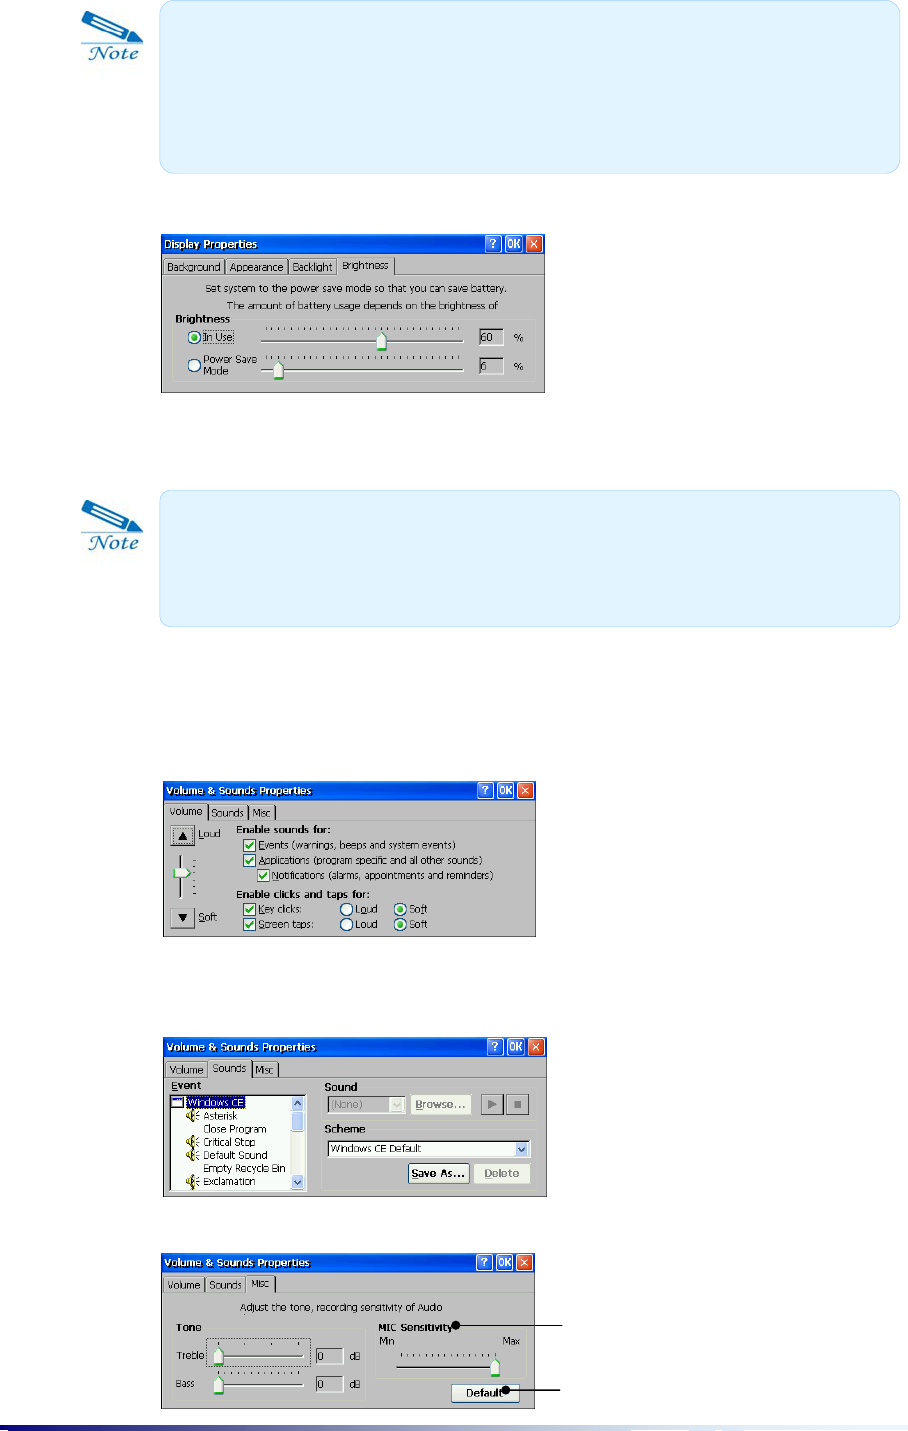
4) Brightness
Enable you to control the brightness of touch screen when using touch screen or in the
LCD-OFF mode.
(4) Volume & Sounds
1)
Volume
:
Allows you to set the volume of sounds coming out through Ear-Set and
your Majesty speakers.
2) Sounds: Allows you to set different sounds associated with different events used in
Windows CE.
3) Misc. : Allows you to set voice level and recording sensitivity.
Select this default button to
go back to the original state.
The higher sensitivity, the
more noise.
When you touch once the DAY LIGHT hot key, the touch screen becomes
bright and when you touch one more time the DAY LIGHT hot key, the touch
screen becomes dark. When backlight is in a bright state, the preset setting
here is applied to controlling backlight.
When you use your device for a long time in a bright state of touch screen,
battery will easily be drained. It is recommended that you use the default
brightness except special cases.
Customizing & Maintenance Page 2-5
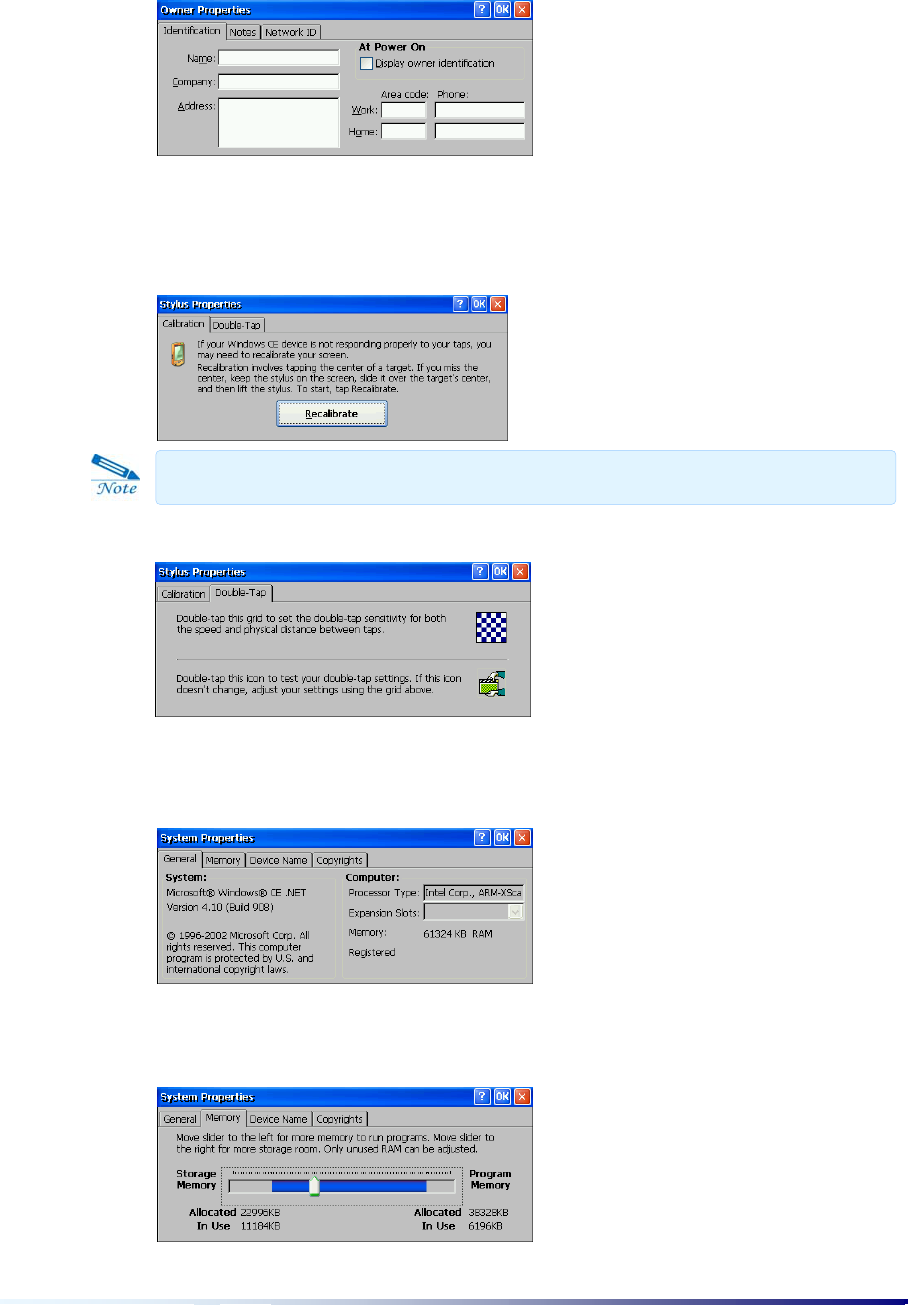
(5) Owner
Identification: You can set the general information of the Owner.
(6) Stylus
1) Calibration: From time to time you may need to recalibrate your Majesty touch screen.
Calibration is essential for adjusting your touch screen
’
s recognition sensitivity.
2) Double-Tap: You can set the double-tap sensitivity for the speed between taps.
(7) System
1) General: Indicates general system information.
2) Memory: Allows you to allocate the memories between storage memory and program
memory by using the slider.
Lightly holding the stylus, tap the exact center of the target (+).
Page 2-6 Chapter 2
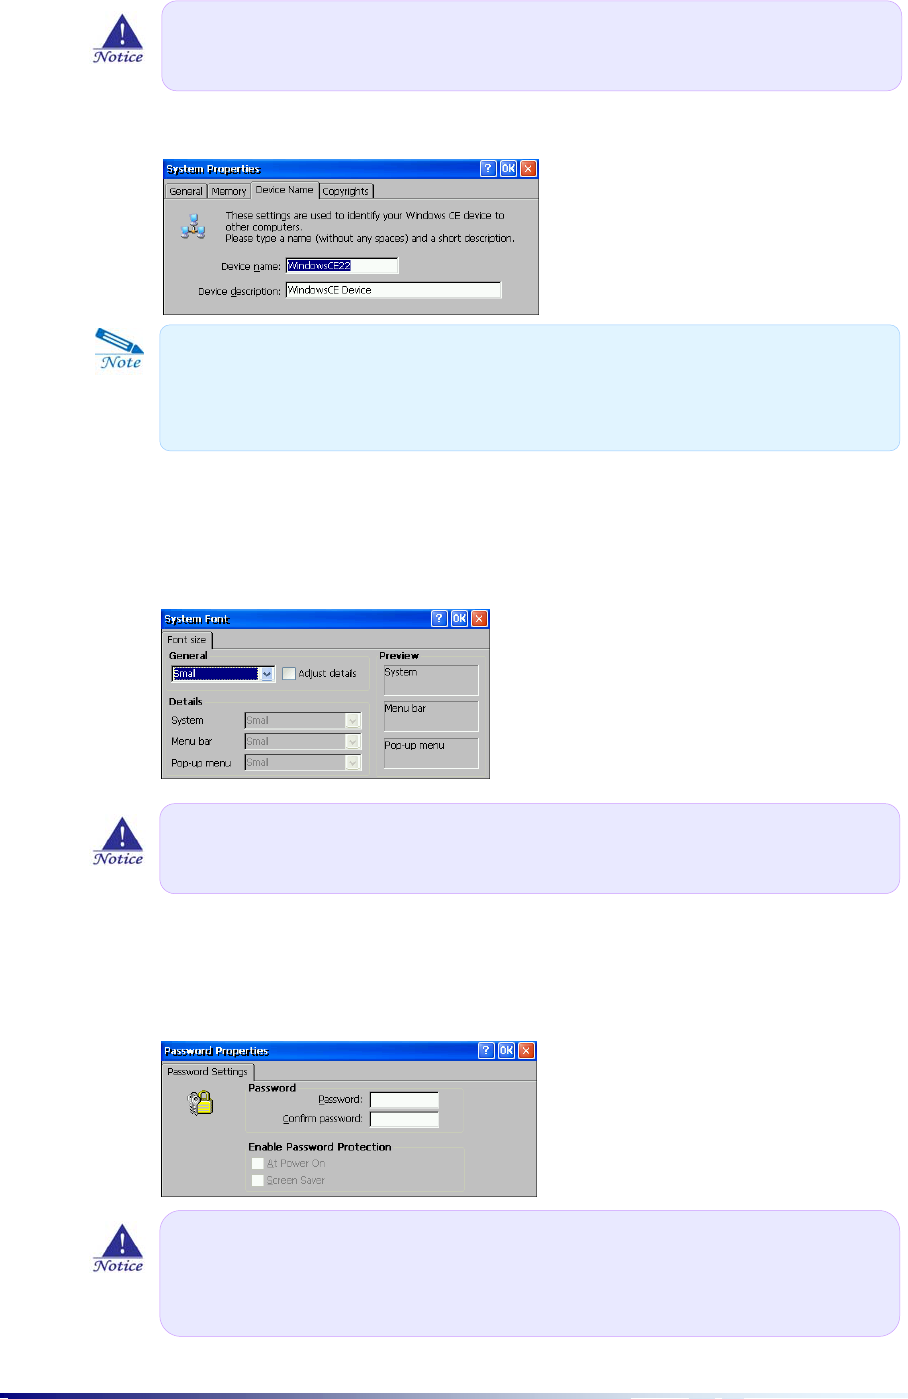
3) Device Name : default name is WindowCE.
(8) System Font
You can adjust system font sizes, and in the Details field, you can adjust the font size of
System, Menu bar and Pop-up menu.
(9) Password
You can set password requirements for security while using system. your password should
be
4-digit number.
As your device needs much more program memories, it is recommended that
you allocate much more memory to
program memory than storage memory
.
The system should be reset after adjusting the System Font, so perform this
task after saving all necessary data.
When you establish a new partnership of your device with desktop, you can not
use the existing names. So make a new name when establishing a new
partnership.
your default password is “0000”. Even after performing Hard Reset, the
changed password does not go back to default number. So be careful not to
forget it.
Customizing & Maintenance Page 2-7
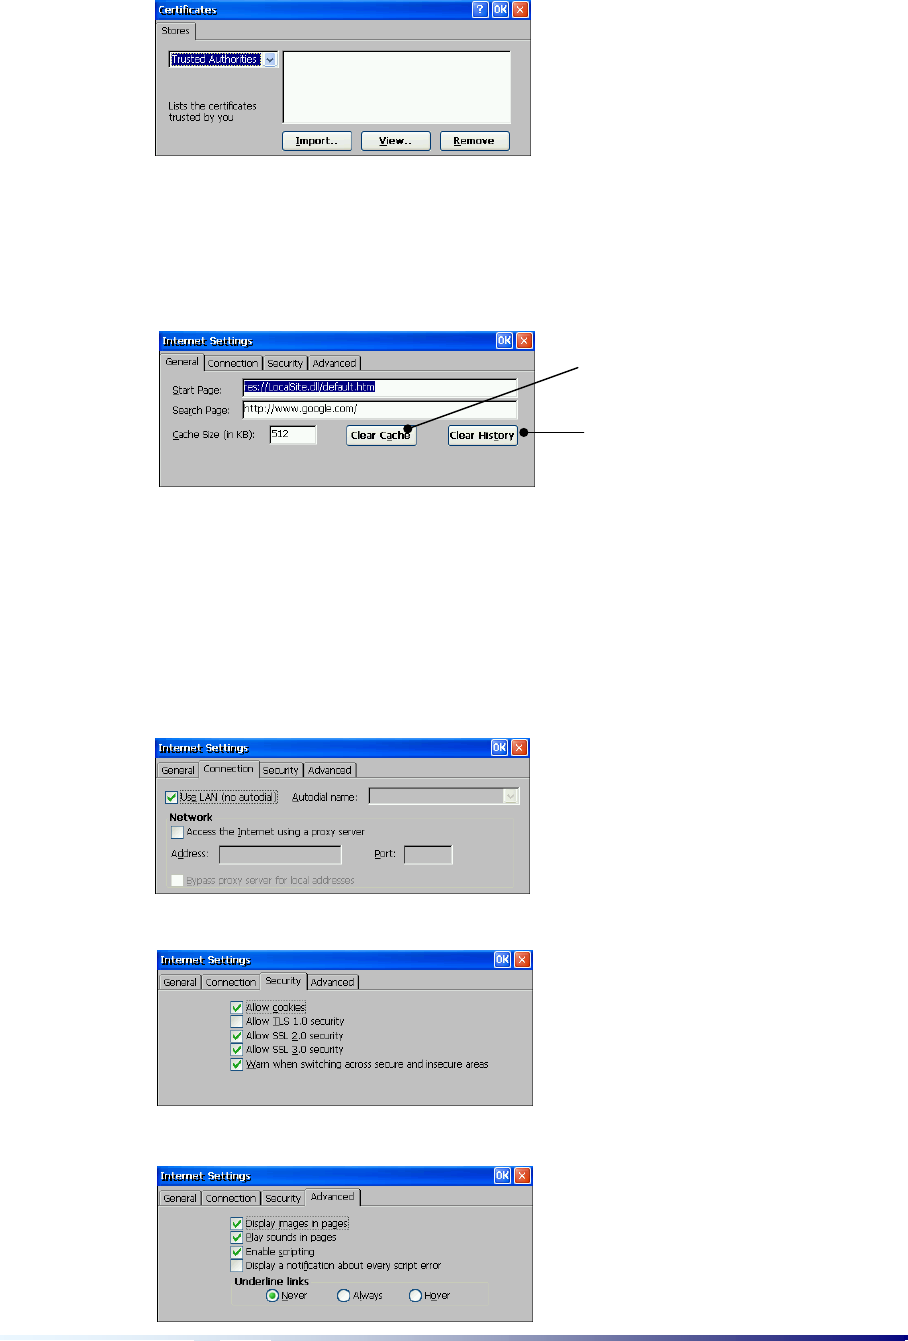
(10) Certificates
Enable you to store or delete certificates you want.
(11) Internet Options
1) General : allows you to set the options of Internet.
2) Connection : allows you to set how to connect and the preference of using LAN card.
3) Security : allows you to set the security.
4) Advanced : allows you to set the advanced settings.
Delete the Web site list
y
ou
have visited before.
Delete all cache stored on
memory.
Page 2-8 Chapter 2
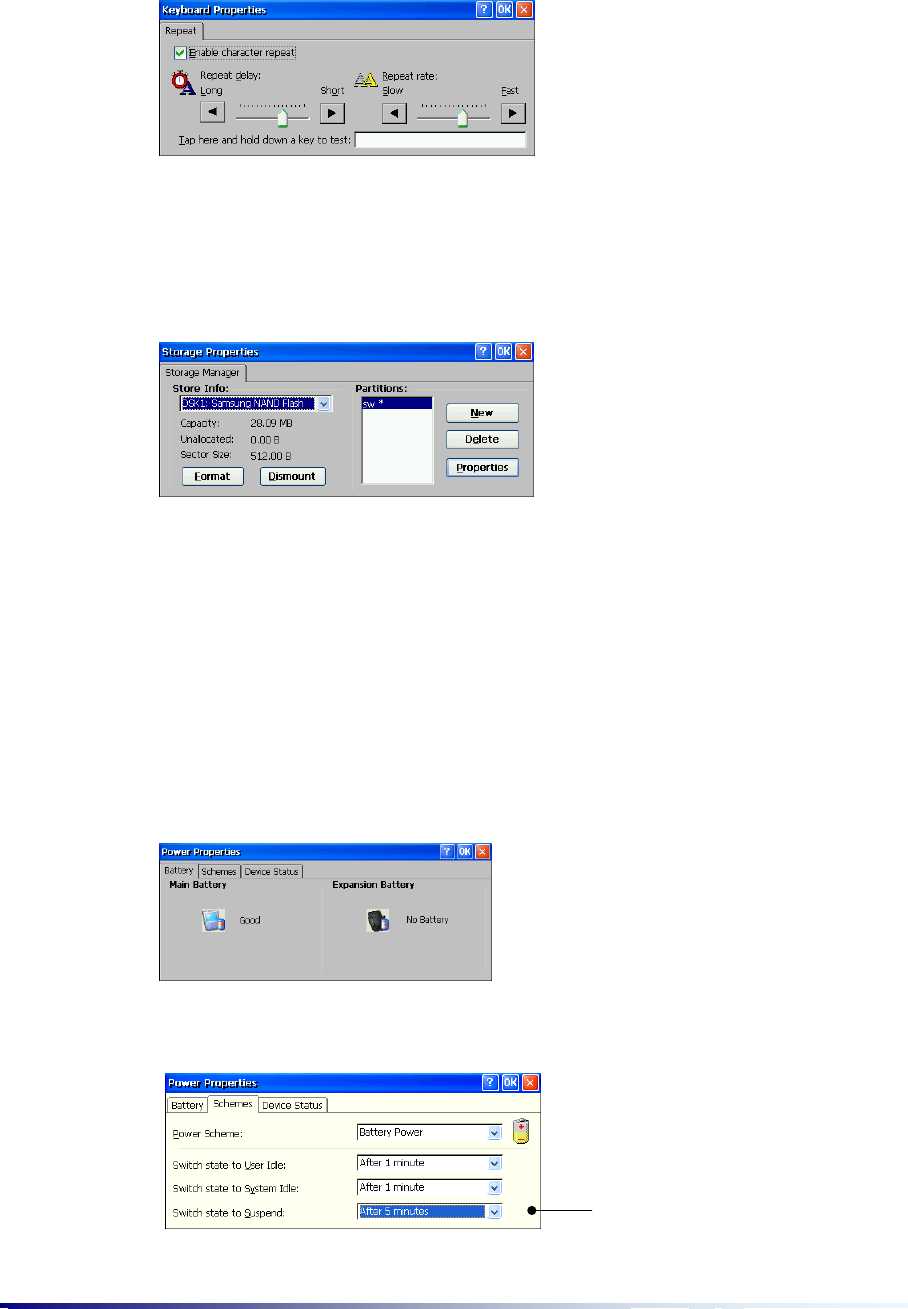
(12) Keyboard
You can control how quickly characters respond to pressing a key on your keyboard.
(13) Memory Manager
Allows you to create or delete a partition of NAND Flash, SD or CF card. When you create
or delete files so many times, you will see some errors on your device. Then format
memory to use it just like brand new.
If you want to format a partition, first select the partition you want and select the
Disassemble button and then the Delete button. Now, you have deleted all contents of
memory and you are ready to format. Select the Format button and select the New button
to make a new partition. If you do not make a new partition here, then system will
automatically make a new partition.
(14) Power
1) Battery: Indicates the kinds and charging status (very low, low, high) of the battery
currently in use.
2) Idle time: You can set the battery power to automatically suspend after a certain period
of continuous idle time to minimize battery drainage.
After the added 3 preset times have
elapsed, your device will
g
oes off.
For example, 9 minutes later
y
ou
r
device is in the suspend mode.
Customizing & Maintenance Page 2-9
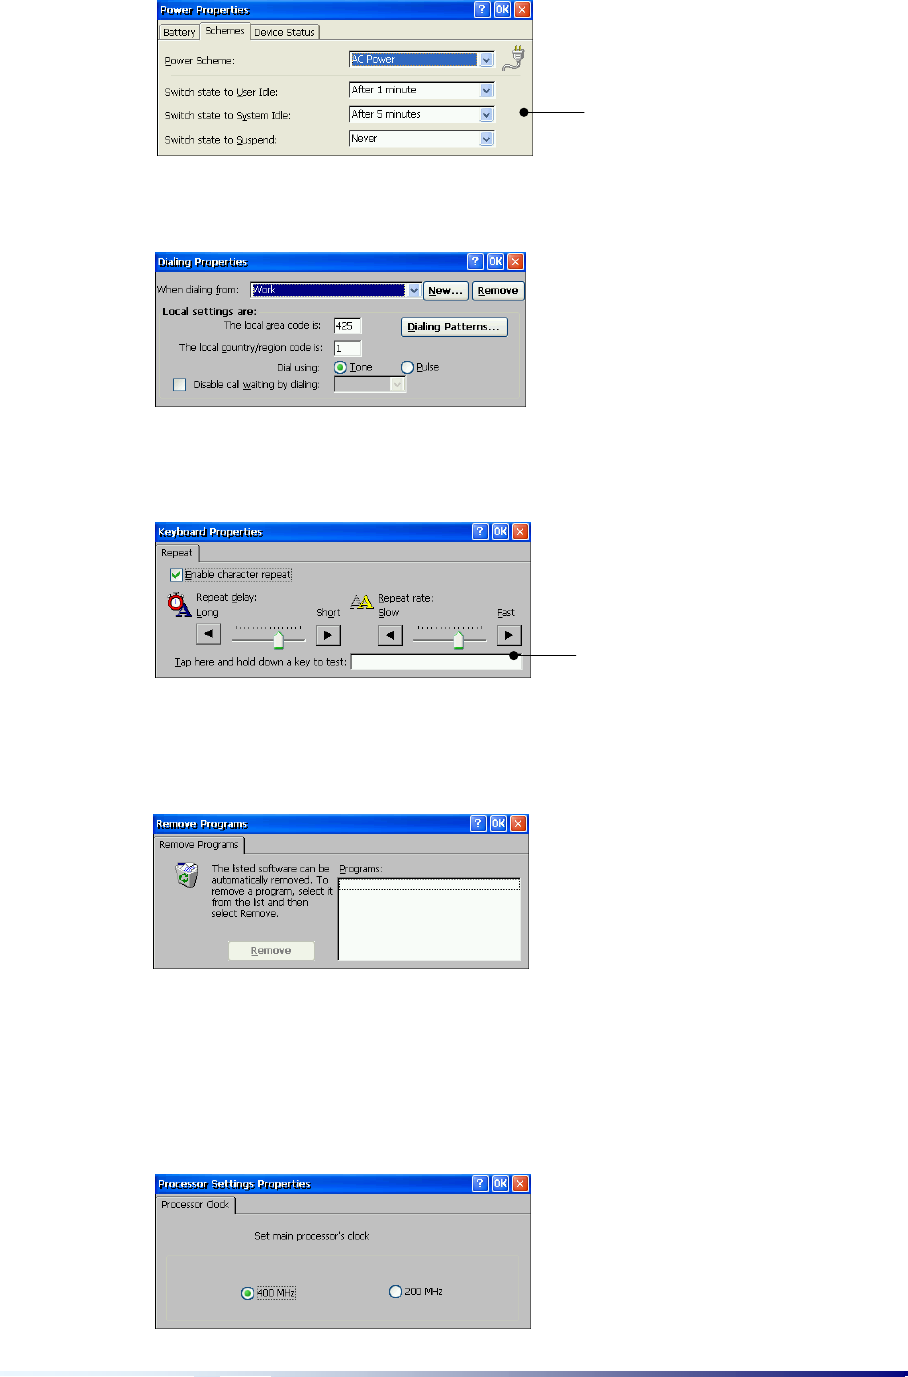
(15) Dialing
Allows you to create dialing locations and set dialing options.
(16) Keyboard
Allows you to control the response speed (re-enter time & repeat speed) of keyboard.
(17) Remove Programs
Allows you to delete or uninstall a program no longer in use.
(18) Processor
It is recommended that you select 200 MHz that is associated with the program speed and
current limitation. However, select 400 MHz when you need much higher speed to play
media file.
Test repeat speed of keyboard.
When None is selected on the 3
rd
item,
y
our device will never be in the
suspend mode.
Page 2-10 Chapter 2
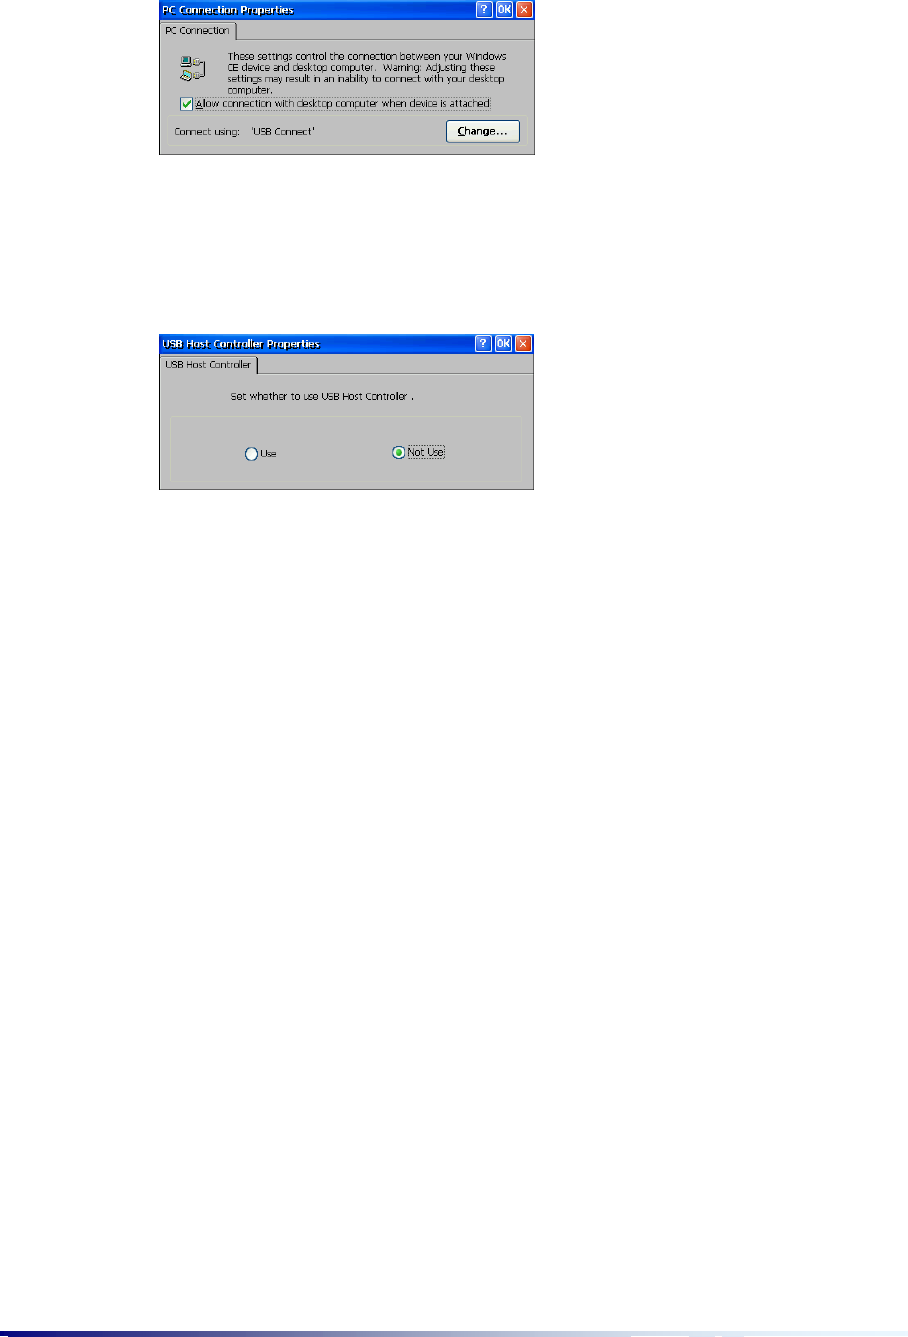
(19) PC Connect
When you want to connect to desktop using the Serial cable, select the Change button
and select Serial ActiveSync from the list.
(20) USB Host Controller
Select the Use option box to connect USB devices (for example, USB printer, USB
Network LAN Card & USB Storage) to USB Host port.

Customizing & Maintenance Page 2-11
II. Managing Battery Power
The files or data you have drawn up are saved in your Majesty
’
s volatile RAM. When your
Majesty
’
s battery (Main Battery and Backup Battery) is fully drained out, all data stored in
the volatile RAM is lost.
(1) Charging Battery
You can charge battery using the cradle. When charging battery, the battery charging LED
displays red and when charging is complete, the battery charging LED displays green.
Although it may differ according to the battery charging status, it takes approximately 3 ~
4 hours to fully charge battery that is fully drained out.
When the very low battery message appears, use the external power or PCMCIA
expansion pack that is fully charged. If you use your device after the very low battery
message appears, your device will be in the Sleep mode.
(2) Battery Maintenance
In order to maximize battery
’
s life span and keep it in its best working state, you should
follow the tips given below.
Charge the Lithium-ion battery in room temperatures. If surrounding temperatures fall below
5
°
C(or 41
°
F) or rise over 35
°
C(or 95(F), you should stop charging.
When charging a new Lithium-ion battery or recharging after a long period of inactivity, the
charging time and usage time may be shortened. This is a characteristic of a Lithium-ion battery, but
4 ~ 5 times repeats of full discharging / full recharging will go back to the normal operation.
For the Lithium-ion battery to maintain its best performance, you should periodically perform full
discharging / full recharging.
A Lithium-ion battery is a consumable good. Battery life will be shortened with repeated
Recharge / Discharge. Therefore, when usage time falls to half of that when you first used it, it is
recommended that you purchase and use a new Lithium-ion battery.
In the Internet connection, so much power will be needed. So, according to the
battery charging status, the very low battery message may appear.
When battery is fully drained out, all data stored in RAM will be lost. So, if your
device is in the Sleep mode, charge your battery as soon as possible.

Page 2-12 Chapter 2
(3) Battery Usage Time
Items Time
Normal PDA functions 4 Hours
Wireless Internet 3 Hours
(4) How to use battery efficiently
When you do not use your device for a continuous period of idle time, your device is
set to automatically convert to the Sleep mode. For more information, see the Setting
Majesty Preference section of this chapter.
Your device is set to turn off the unnecessary sounds. For more information, see the
Setting Majesty Preference section of this chapter.
The battery usage time may differ according to how long you use the Internet
connection or Windows Media Player.
What’s the Sleep mode?
It is a state where your device’s power is off leaving only the minimum amount
of power needed in order to maintain memory data and to conserve battery
power when not in use.
There are 4 ways to put your device into the Sleep mode.
Set system preference
Short of battery power
Select Suspend on the Start menu of Windows CE
Press the Power button located on the left side of your device
Customizing & Maintenance Page 2-13
III. Managing and Applying Memory
There are 5 types of memories in your Majesty that you can use: RAM, Local Storage(part
of ROM), USB Storage connected USB Host Controller, and CF & SD Memory Card.
(1) RAM
RAM is used as storage space where you can store data or files, and as program space.
In other words, you can either save data and files or install programs in RAM.
When running several programs at the same time, running may slow down due to memory
shortage, or when RAM space is being entirely used, your device may not be able to carry
out operations properly. Be sure to run only the programs that you need.
(2) Local Storage
Local Storage, a non-volatile memory, performs the same role as the hard disk of
desktop. As no damage is done to data stored in Local Storage even in the event of
power shortage or Hard Reset, you had better copy important data to Local Storage
(3) USB Storage
An external memory that can be connected to USB Host Controller.
It is recommended that you use Local Storage or the external memory for
saving files or documents.
Since RAM is a volatile memory, all data stored in it is lost when there is no
power supply (full drainage of battery) or when Hard Reset is performed.
Consequently, you should back up your data using Backup Utility from time to
time in order to restore lost data.

Page 2-14 Chapter 2
(4) CF (Compact Flash) Memory Card
CF Memory Card is a device that performs the same functions as the floppy disk of your
desktop. Because CF Memory Card can store data permanently, you can use it to back
up data from RAM to safely preserve it.
(5) SD(Secure Digital) Memory Card
SD Memory Card is a device that performs the same functions as the floppy disk of your
desktop. Because SD Memory Card can store data permanently, you can use it to back
up data from RAM to safely preserve it.
Connecting to desktop Page 3-1
C
Co
on
nn
ne
ec
ct
ti
in
ng
g
t
to
o
d
de
es
sk
kt
to
op
p
Microsoft ActiveSync enables you to synchronize data between device and desktop. Also,
it enables you to back up and restore data of your device to and from desktop and copy
files between device and desktop.
First, install Microsoft ActiveSync before you connect your device to desktop. However,
you don
’
t need to install Microsoft ActiveSync on your device because it was preinstalled.
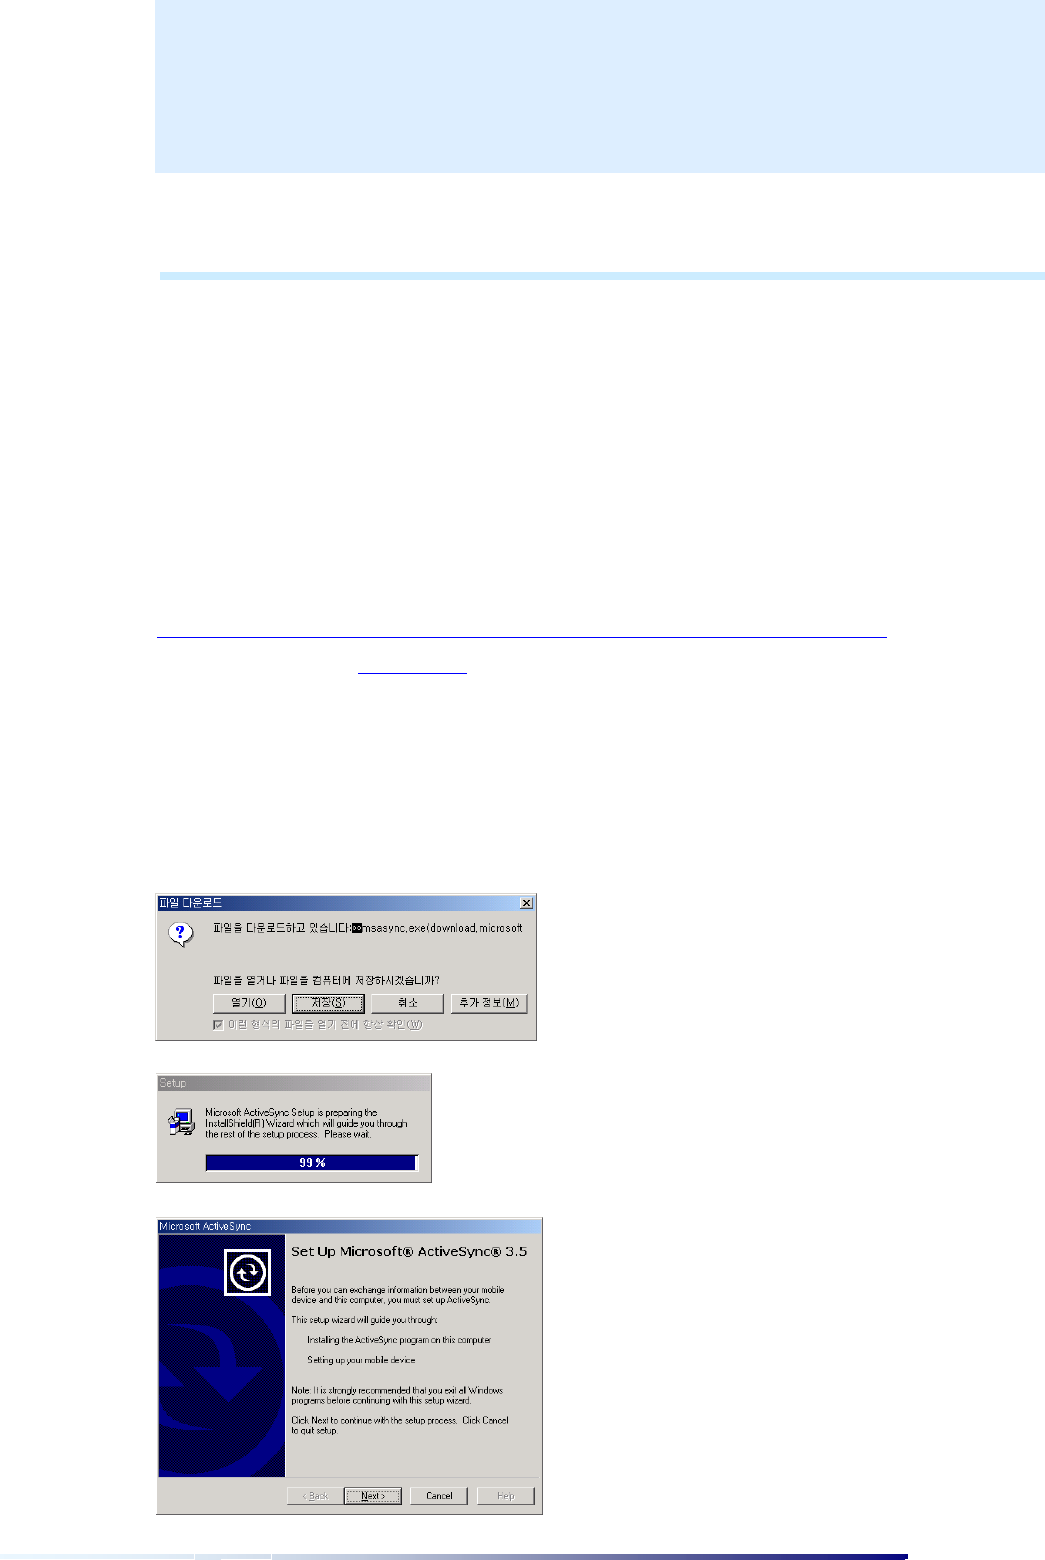
I. Install Microsoft ActiveSync & Establish a Partnership
Install Microsoft ActiveSync 3.5 or later from Cyberbank CD or download at
www.microsoft.com/mobile/pocketpc/downloads. And then install CyberbankUSBupdate.exe
from Cyberbank CD or at www.cb.co.kr.
After installation is complete, the ActiveSync Setup
Wizard helps you connect your device to your desktop, establish a partnership so that you
can synchronize information between your device and your desktop, and customize your
synchronization settings. Your first synchronization process will begin automatically when
you finish the wizard. (the screens below are described on the basis of Windows 2000
Professional, so when you use other OS versions, some parts may be deleted.
Select ActiveSync 3.5 on Microsoft Web site.
Select Open to install it instead of saving.
When the installation process becomes 100%, automatically move to next screen.
C
CH
HA
AP
PT
TE
ER
R3
3
Page 3-2 Chapter 3
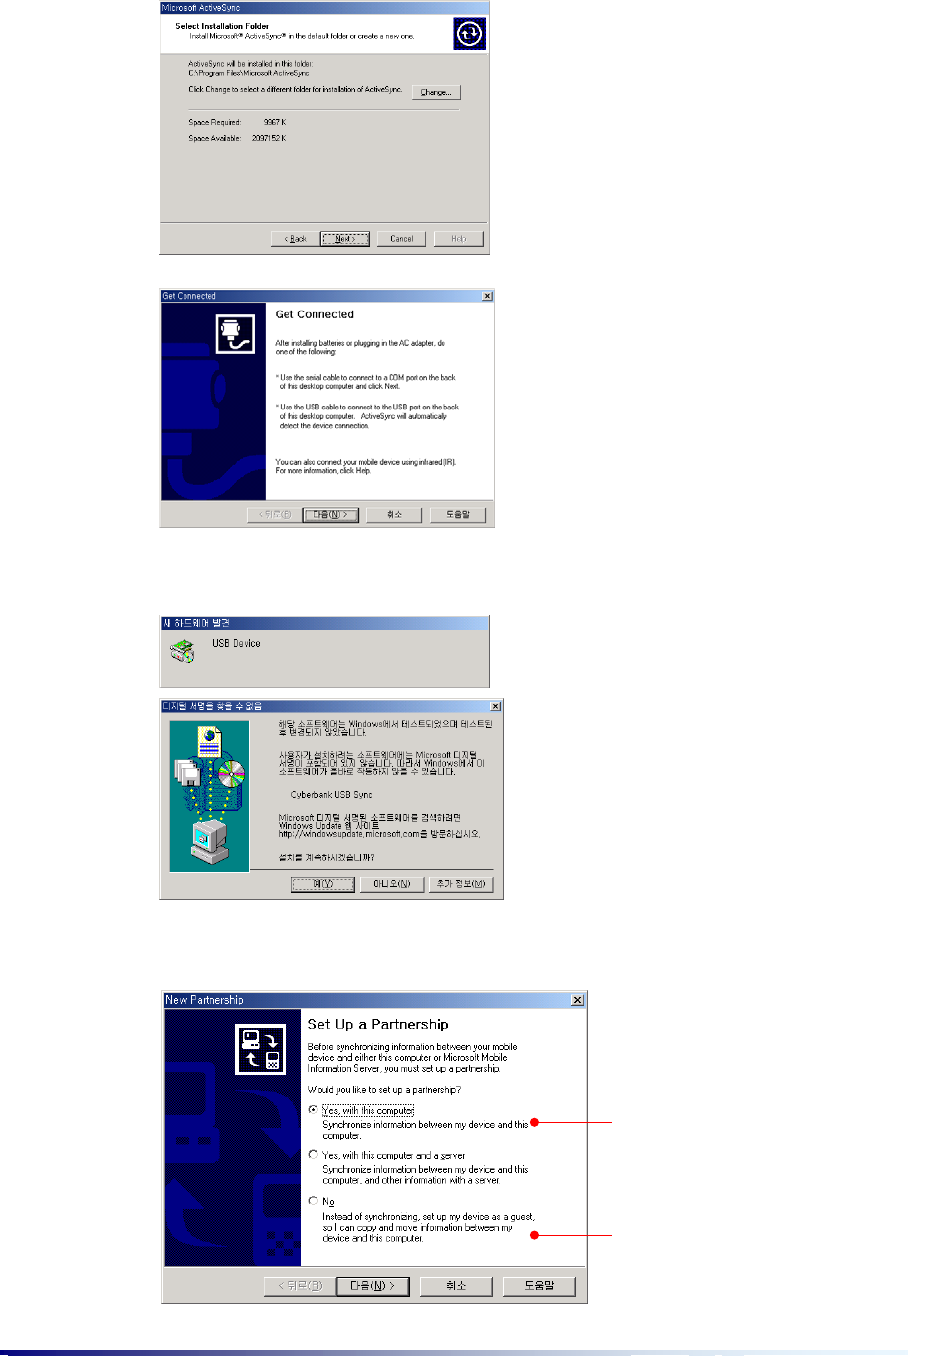
Select the Next button.
Select the Next button.
Place your device on cradle, connect USB cable to desktop and connect the power cable to
power outlet and then select the Next button.
Select the Yes button to establish a partnership before synchronizing data between device and
desktop
.
Select this option to establish a
partnership.
Partnership is not established and your
device is connected to deskto
p
as Guest.
You can copy and move files between
desktop and device.

Connecting to desktop Page 3-3
A desktop can establish partnerships with several devices(but, not at the same time), while
one device can establish partnerships with up to two desktops.
Select the Next button.
Select the Next button.
Select the Finish button.
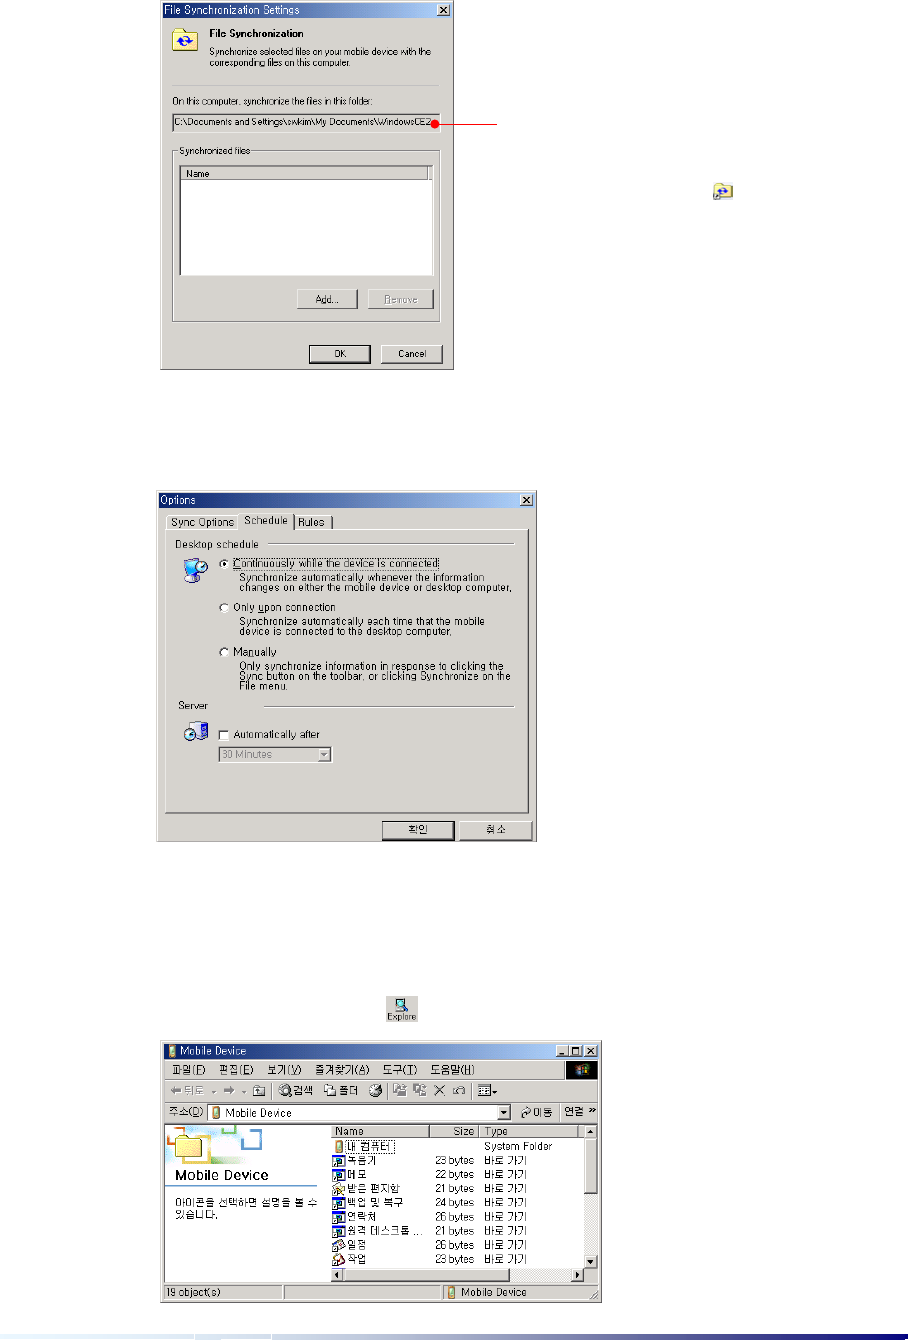
You can find files through pressing the Explore button of toolbar if you are in a state of
Guest. When you delete the existing partnership and establish a new partnership, you will
see the next screen
Select items you want to synchronize,
otherwise, deselect.
Page 3-4 Chapter 3
Select the option box you want and select OK.
You will see Microsoft ActiveSync screen shown below.
Sometimes, you have to hard-reset your device to solve problems that happen on your
device.
If so, you are able to select Delete Partnership of the File menu to delete the existing
partnership such as WindowsCE or change a given partnership name to another (for
example: WindowsCE2, WindowsCE3, or WindowsCE4) when you see the screen shown
below.
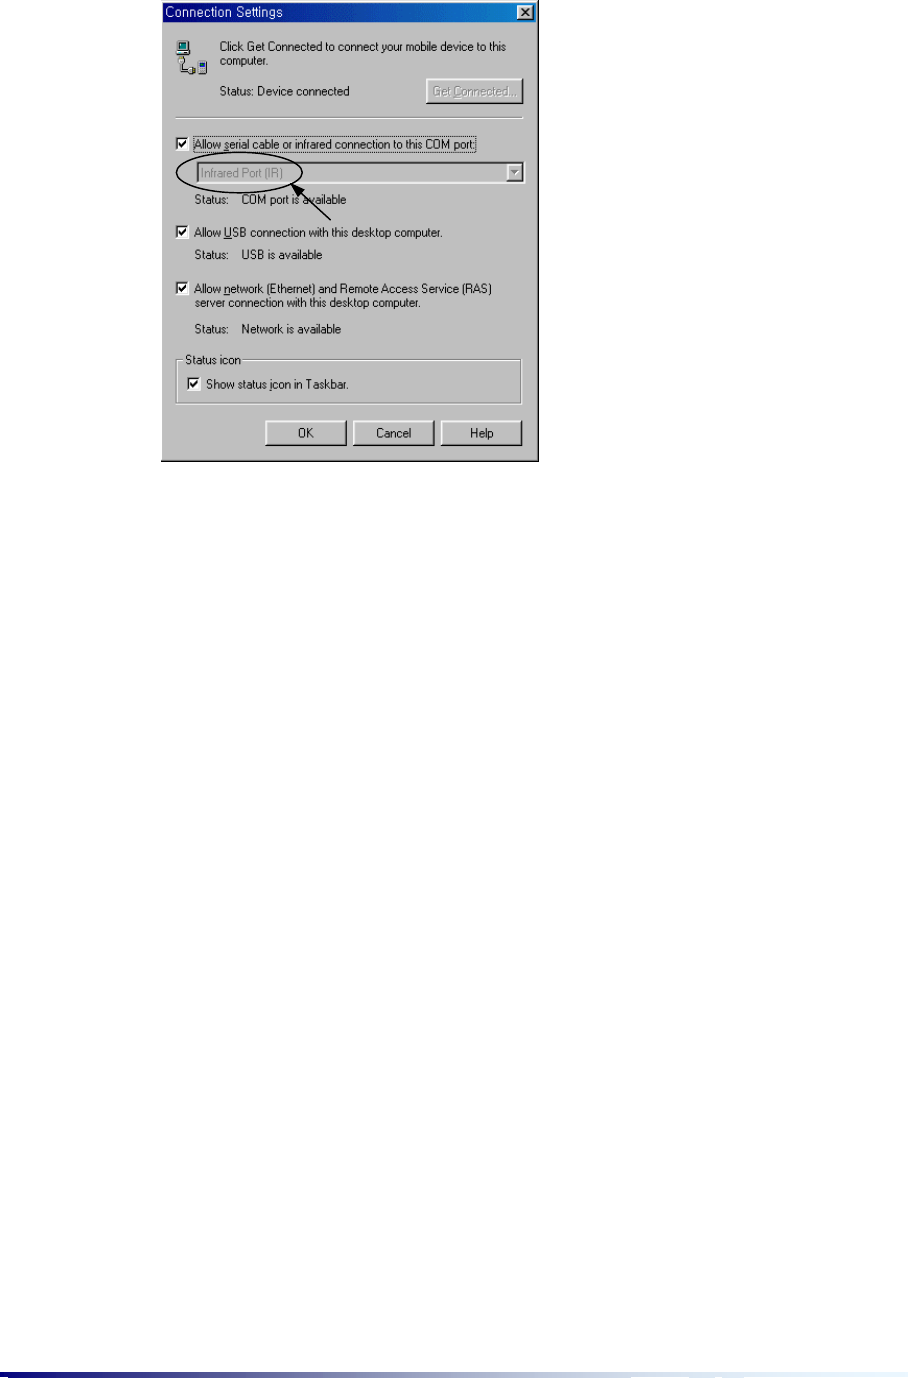
Also, you can select Connection Settings of the File menu to change the Connection
Settings of Microsoft ActiveSync.
Select this option box to use infrared
connection.
Select this option box to use USB
connection.
This is a partnership name established with
desktop through Microsoft ActiveSync.
These are the selected items for synchronization
during establishing a partnership.
Connecting to desktop Page 3-5
Synchronizing Data
Synchronization compares the data on your device with your desktop and updates both
computers with the most recent information. Synchronization with Microsoft Outlook 2002
requires ActiveSync 3.5 or later on the desktop. You can synchronize e-mail messages in your
device Inbox with e-mail messages in Microsoft Outlook on your desktop. And you can copy
favorite Web site addresses and any Web pages you have marked for offline viewing in
Microsoft Internet Explorer to your device. And you can keep your Contacts, Calendar, and
Tasks databases up-to-date by synchronizing your device with Microsoft Outlook data on your
desktop. After you synchronize, the information you have stored on your desktop is copied to
your device so you can take it with you when you go out. Use the ActiveSync options to select
which information types are synchronized and to control how much data is synchronized. By
default, ActiveSync does not automatically synchronize all types of information.
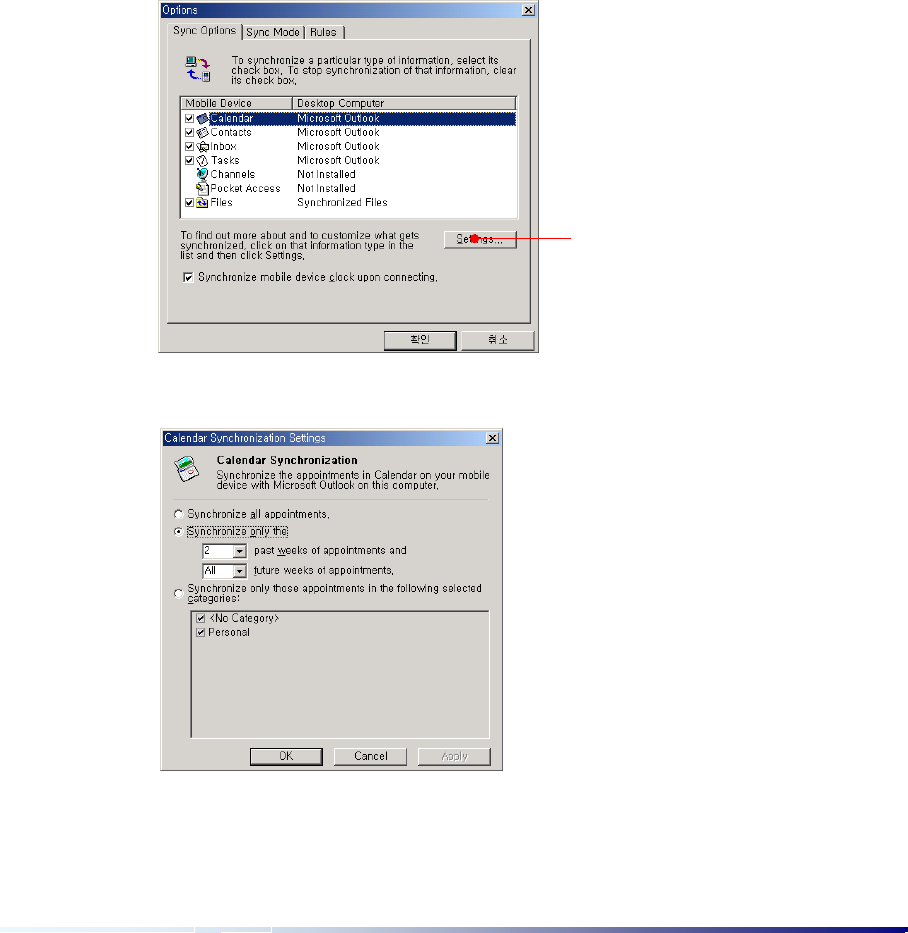
Select Calendar and select the Settings button.
Tap the Settings button after
you select an item.
Page 3-6 Chapter 3
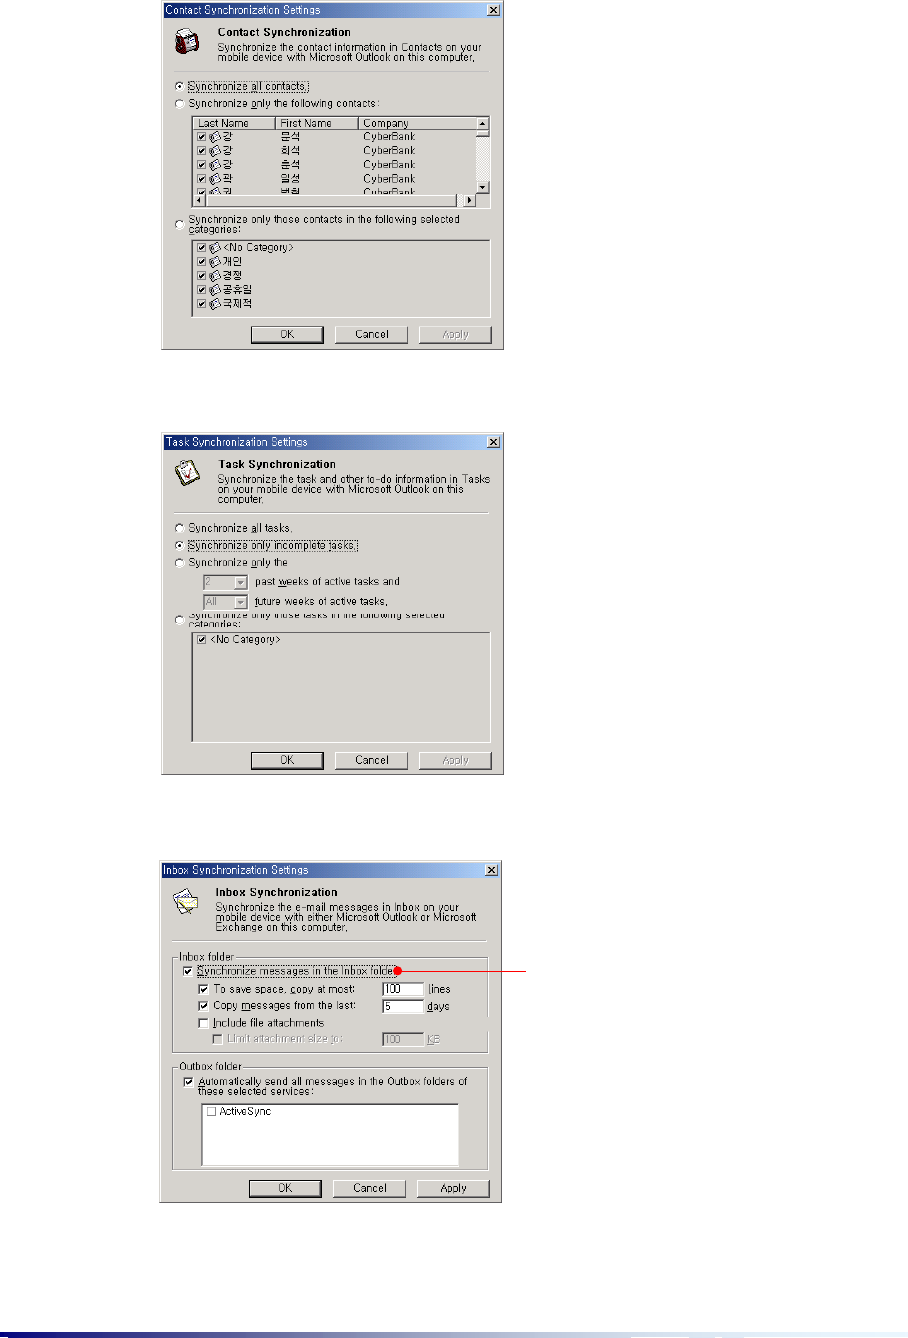
Select Contacts and select the Settings button.
Select Tasks and select the Settings button.
Select Inbox and select the Settings button.
Select this to synchronize messages in
the Inbox folder.
Connecting to desktop Page 3-7
Select Files and select the Settings button.
After you have set up ActiveSync and completed the first synchronization,
you can control when synchronization occurs by selecting a synchronization
mode.
File Copying, Pasting and Converting
First, select the files you want to copy on your desktop, and select Copy of the Edit menu
or select Copy from the pop-up menu shown through right clicking.
Second, select the Explore button of Microsoft ActiveSync.
This is the folder that synchronizes
selected files on your mobile device with
the corresponding files on this desktop.
Select OK, and data will be synchronized
and the short cut to Folder ( ) will
a
pp
ear.
Page 3-8 Chapter 3
Select the folder you want and select Paste of the Edit menu or select Paste from the
pop-up menu shown through right clicking.
Files created on your desktop may need to be converted before you can use
them on your device, and files created on your device may need to be
converted before you can use them on your desktop.
However, when files need not to be converted before you can use them on the other
computer (for example: PowerPoint Viewer, Image Viewer), you can change the settings
as follows:
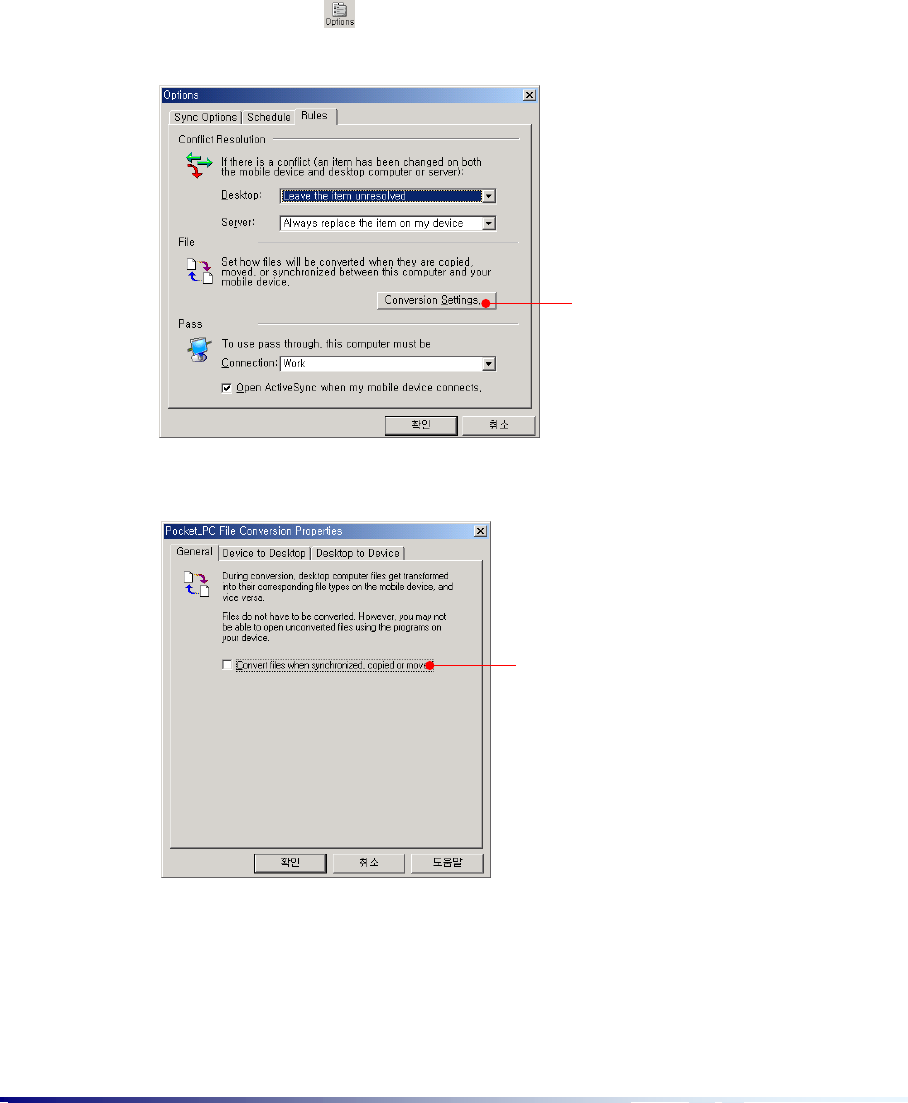
Select the Options ( ) button of Microsoft ActiveSync on your desktop and select the
Rules tab to have the next screen shown.
Select Conversion Settings.
Tap Conversion Settings to set the
options for conversion that needs to be
changed between desktop and your
device while copying, pasting and
synchronizing.
De-select this option not to convert file.
Connecting to desktop Page 3-9
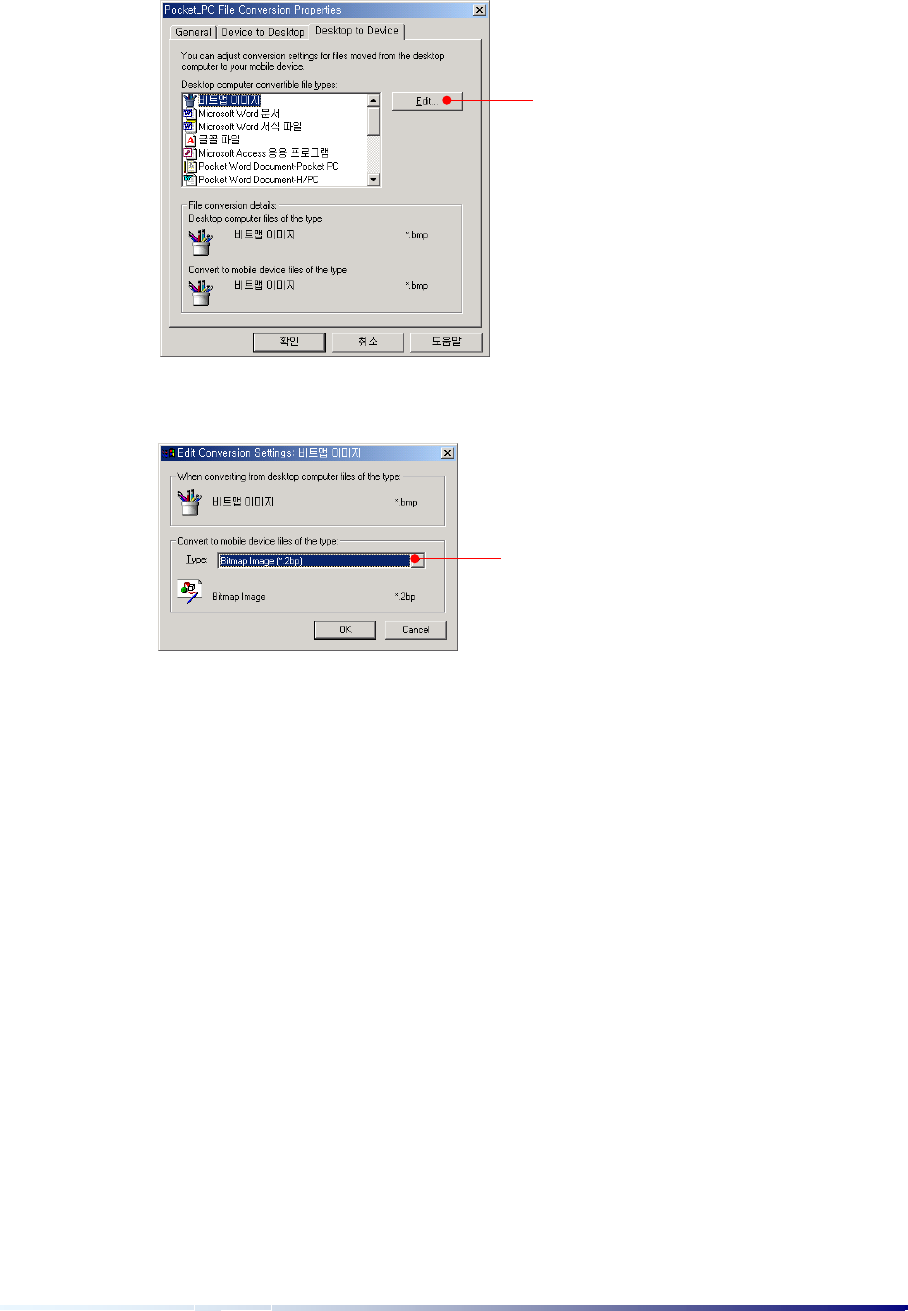
However, if you want your file converted to a specific file extension name through
Microsoft ActiveSync, select the Desktop to Device tab or the Device to Desktop tab.
Select the file type on your desktop and select the Edit button.
When you need to change extension
name, select the file type on your desktop
and select the Edit button.
Select the extension name you want the
original file to be and select OK.
Page 3-10 Chapter 3
II. Backup & Restore using Backup/Restore of ActiveSync
You can back up files created on your device, database, PIM data and programs installed in RAM to
your desktop using Microsoft ActiveSync, and restore them when needed.
Backup can either be performed automatically when your device is connected to your desktop, or
manually whenever needed. Also, you can back up updated or new data only or choose to back up
all data.
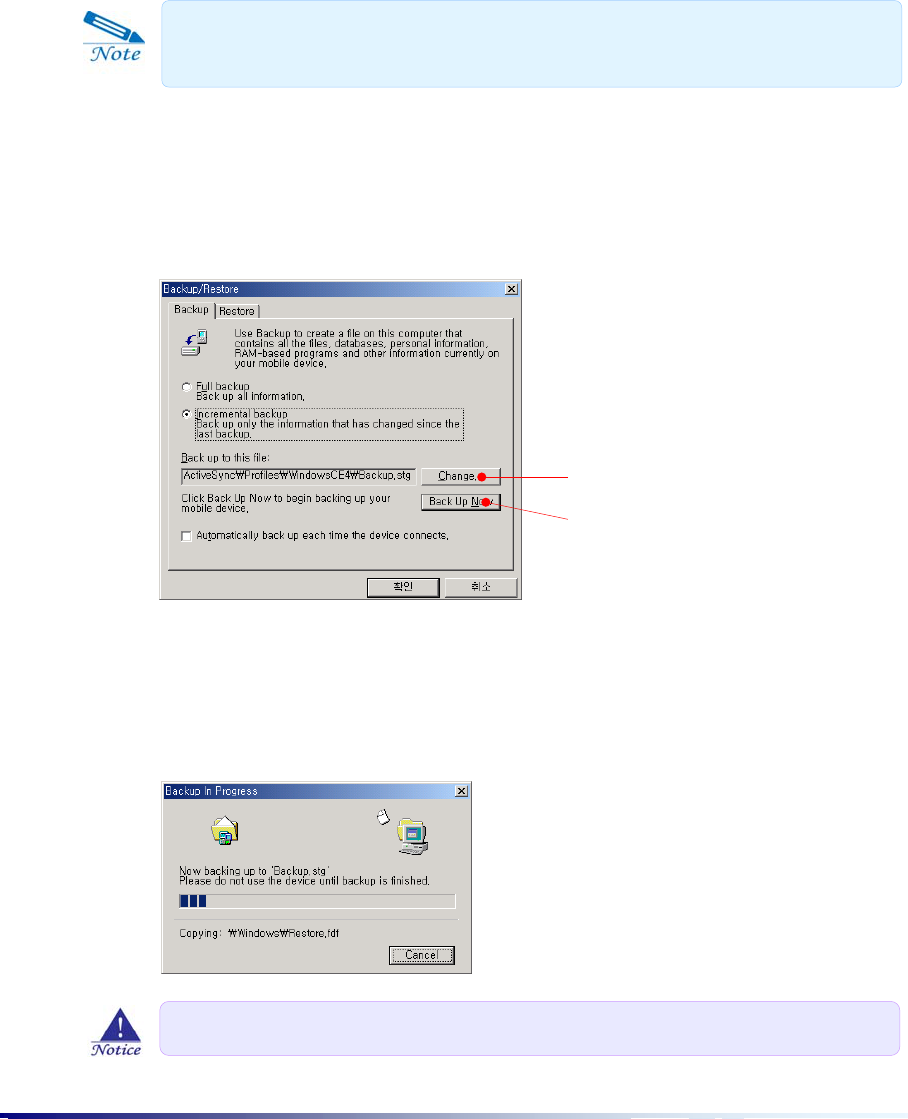
1) Backup
1. Connect your device to desktop PC.
2. Tap
Backup/Restore
on the
Tools
menu of the ActiveSync screen to activate the
Backup/Restore screen.
3. If you want to back up all information, select “Full Backup”, and if you want to
back up only the information that has changed since the last backup, select
“Incremental Backup”.
4. Tap
“
Back Up Now
”
to start the backup.
Tap Change to select another backup.
Tap Back Up Now to start.
Do not remove your device from the cradle during a backup.
As security is not set up for backup files stored in the desktop, you had better
use other security for your backup files if necessary.
Connecting to desktop Page 3-11
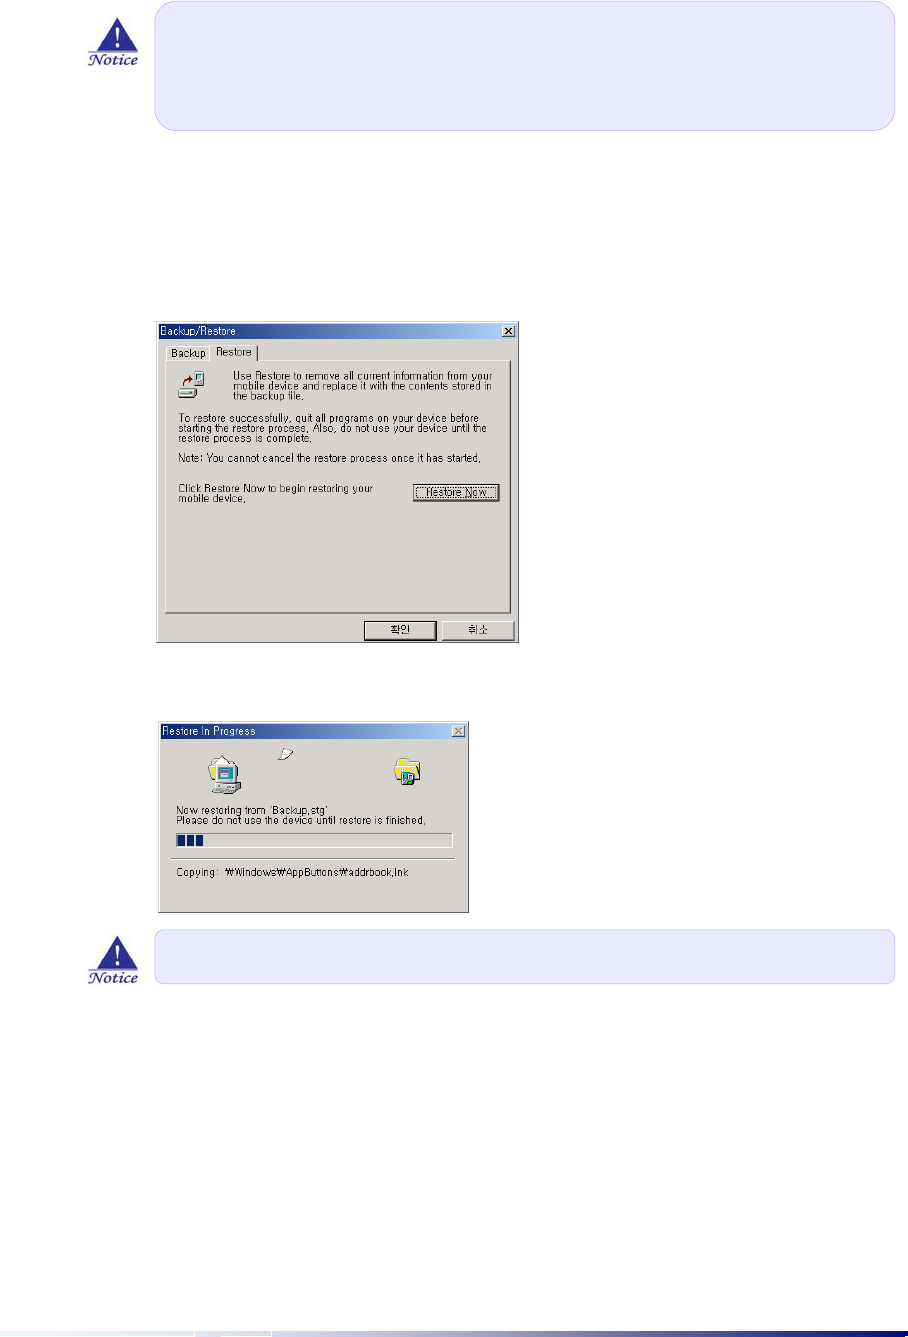
2) Restore
1. Connect your device to desktop PC.
2. Close all programs on your device.
3. Select
Backup/Restore
on the
Tools
menu of the ActiveSync screen to activate the
Backup/Restore screen and select the Restore tab.
4. Tap
“
Restore Now
”
.
5. When Restoring is complete, perform a
Soft Reset
on your device.
As programs or new files newly created on your device since your last backup
will be loast during restoration, you had better move them to your desktop or
CF card, SD card or Local Storage folder before you restore data.
Do not use your device until Restoring is complete.

Page 3-12 Chapter 3
III. How to install programs using ActiveSync
(1) Using Setup.exe or Install.exe
1.
Download the program to your desktop computer (or insert the CD
or disk that contains the program into your desktop computer).
Be sure
to select the program designed for Windows CE and the StrongARM processor.
2. Connect your device to desktop through Microsoft ActiveSync.
3.
If the program includes an installer program (typically named
Setup.exe or Install.exe), double-click the installer program on the
desktop. The installer program copies the necessary files to your
device.
(2) Using cabinet (*.cab)
1. Download the program to your desktop computer (or insert the CD or disk that
contains the program into your desktop computer).
2. Connect your device to your desktop.
3. Use ActiveSync Explore to copy the cabinet (*.cab) file to the Program Files folder
on your device, and, then double-tap the icon to install the program.
4. Refer to the Read Me file or documentation that came with the program to be sure
you have copied the necessary file(s). For more information on copying files using
ActiveSync, see ActiveSync Help.
You may see a single *.exe or *.xip file, a *.zip file, a Setup.exe file, or several
versions of files for different device types and processors.
Connecting to desktop Page 3-13
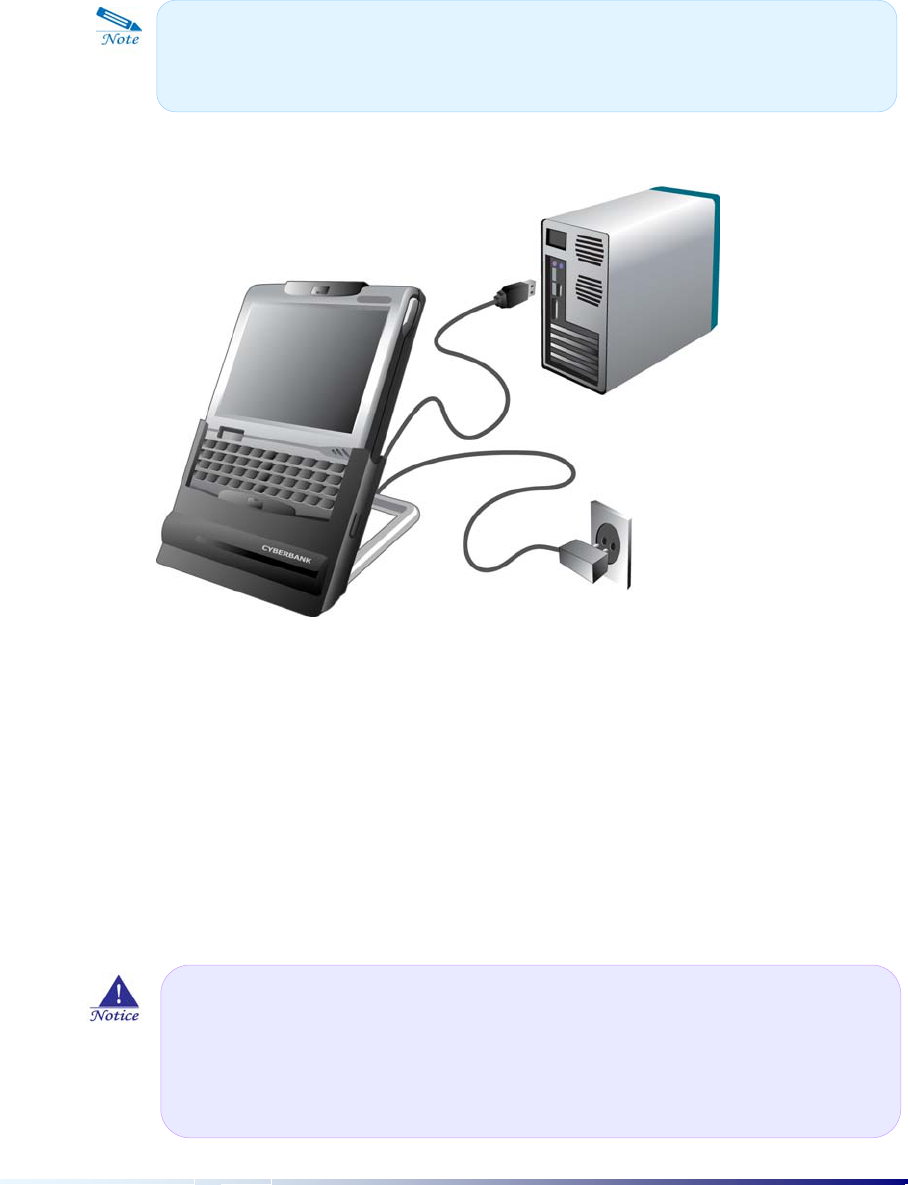
IV. Using Sync Port and Infrared Port
Keep your device in the cradle when you are not carrying it with you, so it is always
charged, synchronized, and ready to go. Turn off your device or remove it from the cradle
before you shut down your desktop.
This is how to connect USB cable and power cable between your device and desktop.
The USB cradle included with your device provides a convenient way to connect to your
desktop PC. In addition to enabling synchronization, the USB cradle charges the battery
on your device.
You can connect your device to an infrared-equipped desktop or notebook PC using the
infrared port. Many notebook PCs have built-in infrared ports; however, you may need to
purchase and install an infrared transmitter for your desktop PC.
For more information on setting infrared ports, see your computer manual or Help file.
Before you connect, be sure of the following: your desktop is on, you have
installed ActiveSync on your desktop, and ActiveSync is configured to allow a USB
connection.
For infrared communication, there must not be any obstruction between
notebook and your device, and the distance between two infrared ports must
be under 1m. Also, you must align infrared ports of both devices so that they
are aimed directly at each other.
Page 3-14 Chapter 3
Backup/Restore Page 4-1
b
bU
US
SE
EF
FU
UL
L
B
Ba
ac
ck
ku
up
p
P
Pl
lu
us
s
You can back up data to internal (RAM) memory on your device; however, if you perform
hard reset or accidentally lose power, the backup file will be erased. To ensure the safety
of your data, it is recommended that you back up Local Storage (a part of non-volatile
Flash ROM), CF memory card (purchase optionally) and SD memory card (purchase
optionally).
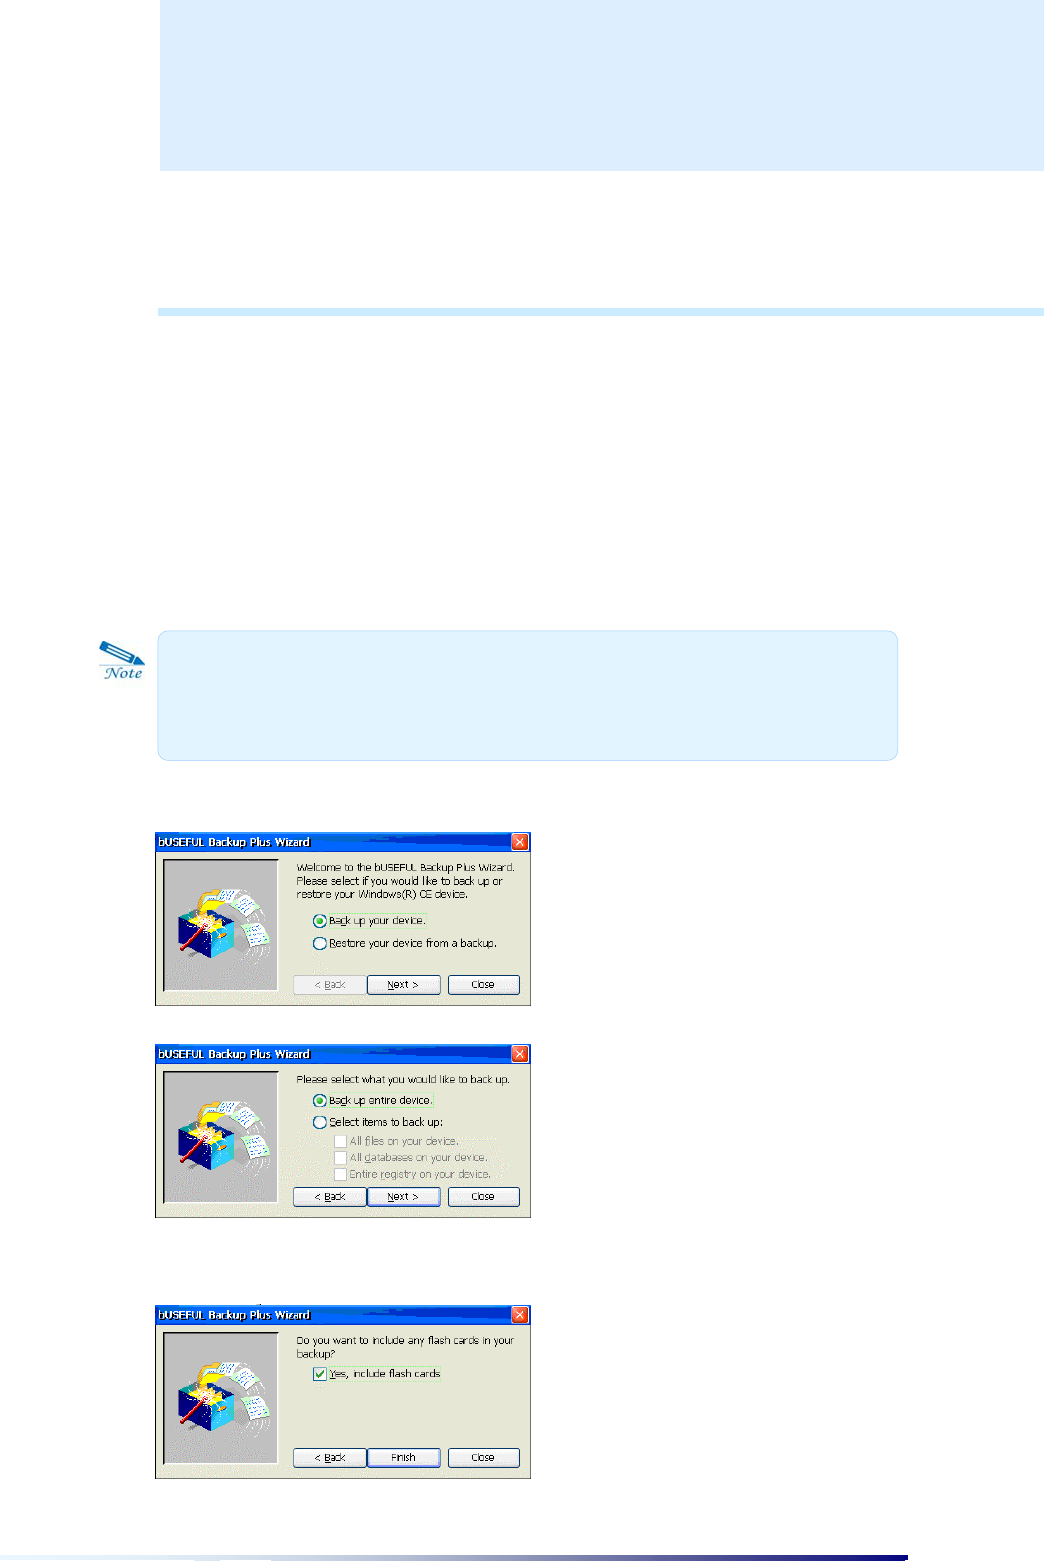
I. Backup
1. Select the Backup & Restore icon to have the bUSEFUL Backup Plus wizard start.
2. Select Back up your device and select the Next button.
We are going to explain the Back up entire device option.
3. select Yes, include flash cards and select the Finish button.
C
CH
HA
AP
PT
TE
ER
R
4
4
The bUSEFUL Backup Plus Wizard is activated. If the “Show Backup/Restore
Wizard on startup” option is selected in the Other tab of Options on the Tool
menu.)
Page 4-2 Chapter 4
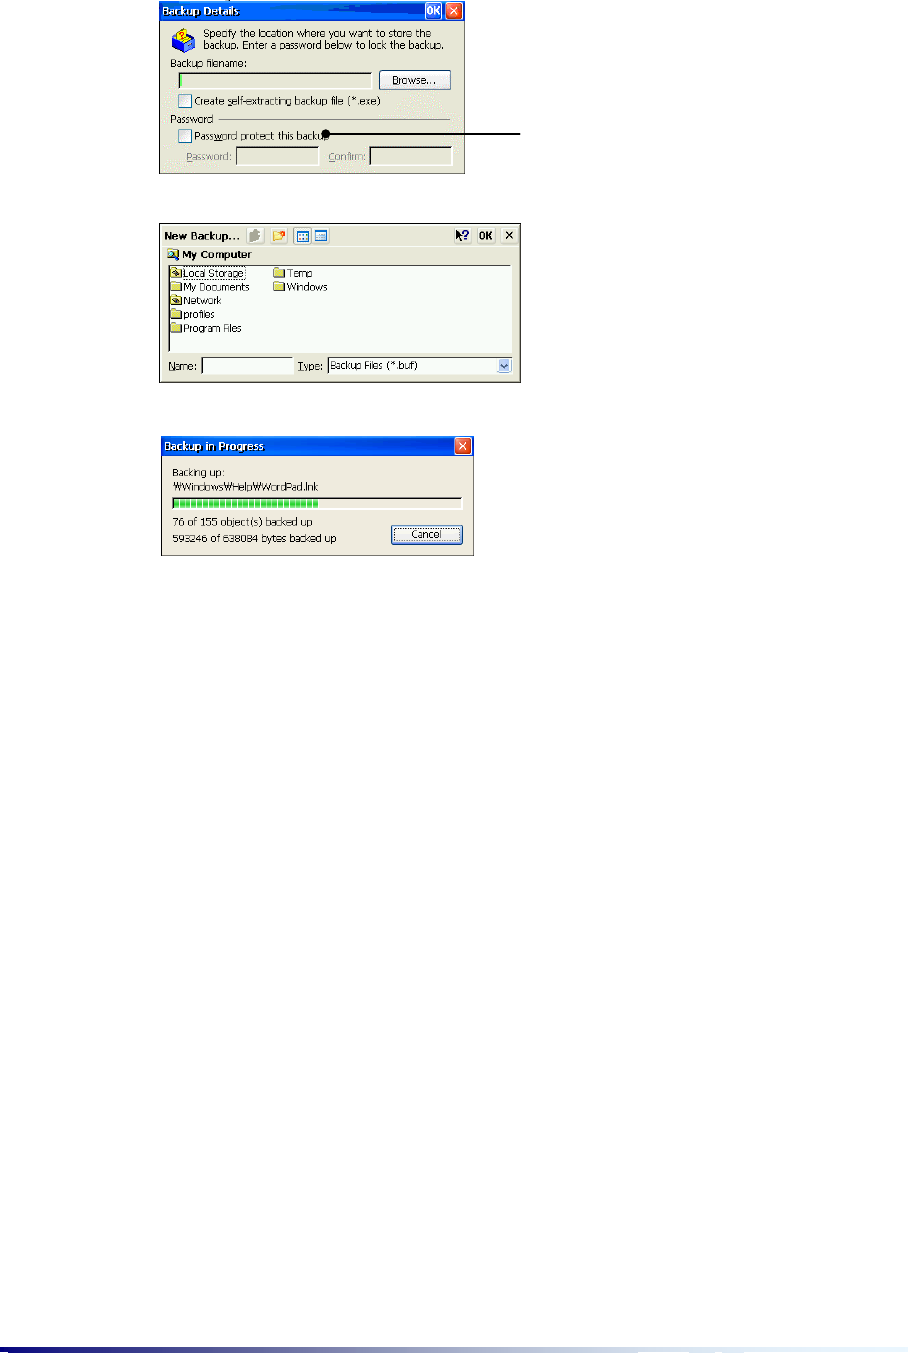
4. Select the Browse button.
5. Select the folder you want to backup and enter the backup file name.
6. Select OK, and then the backup process gets started.
7. After the backup process, make sure that the backup file is in there.
Select this option to use password.
Backup/Restore Page 4-3
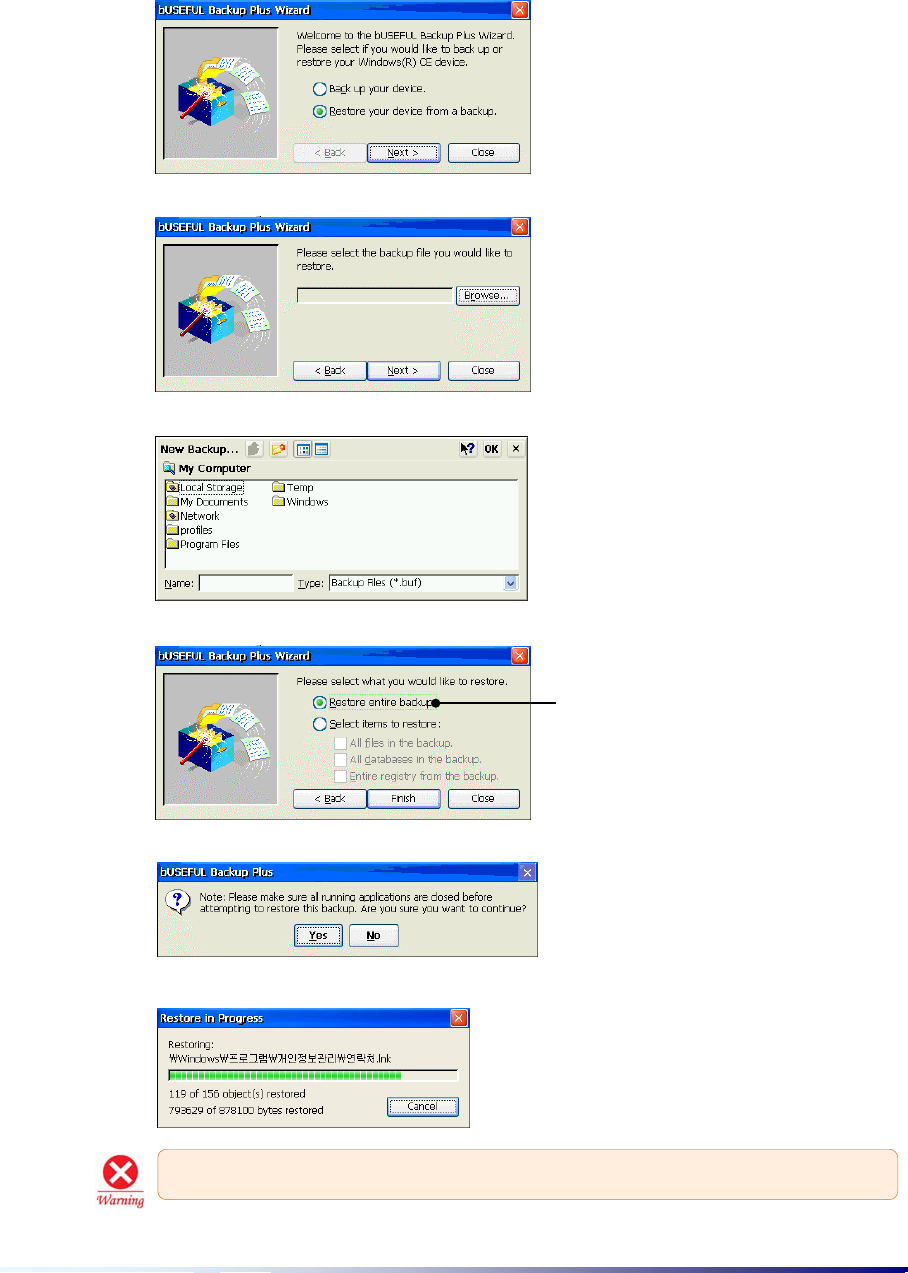
II. Restore
1. Select the Backup & Restore icon to have the bUSEFUL Backup Plus wizard start.
2. Select Restore your device from a backup and select the Next button.
3. Select the Browse button and select the file(*.BUF) you want.
4. Select OK and select the Next button on the previous screen.
5. Select the Finish button.
6. Select the Yes button to have the Restore process get started.
We are going to explain the Restore
entire backup option.
After restoring, perform soft reset with your stylus.
Internet Explorer & Inbox Page 5-1
I
In
nt
te
er
rn
ne
et
t
E
Ex
xp
pl
lo
or
re
er
r
&
&
I
In
nb
bo
ox
x
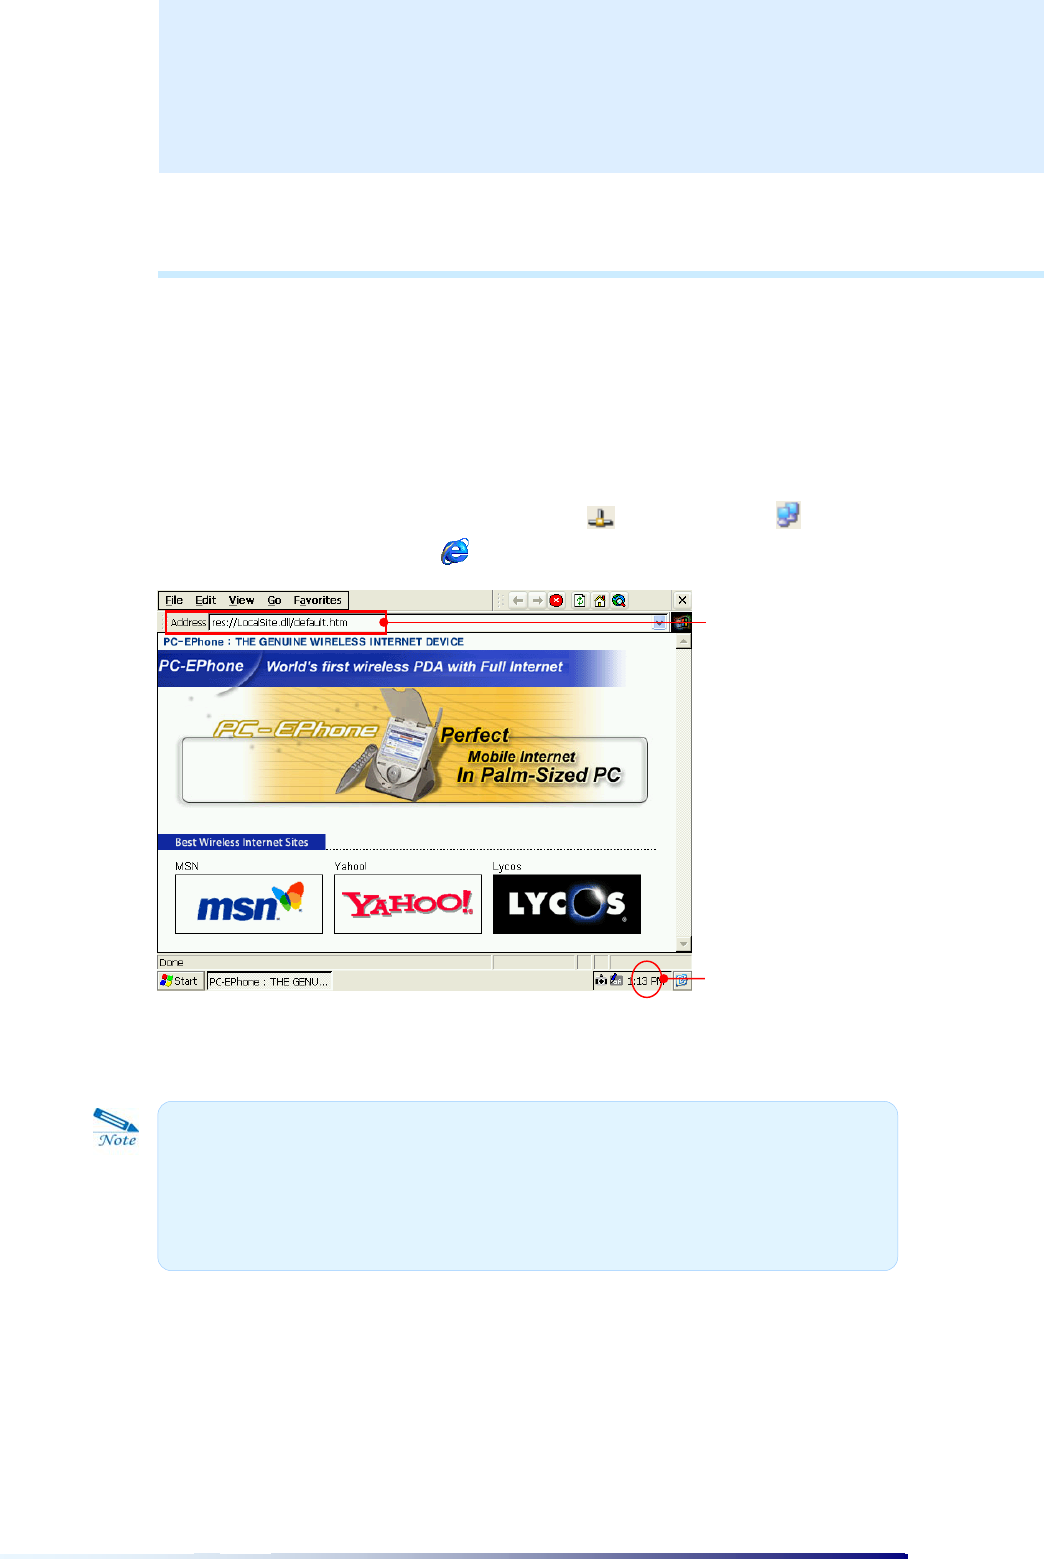
I. Internet Explorer
Device provides an Internet Explorer that is compatible to Microsoft Internet Explorer 4.0 Browser
and supports HTML4.0 and JavaScript.
Insert the wireless or wired LAN card (you have to purchase it optionally.) into CF card slot and see
the corresponding icon on the taskbar.
(
Wired LAN card
: ,
wireless LAN card
: )
Then, select the Internet Explorer ( ) icon.
Select the icon you want on this Internet screen or enter the Internet address on the
Internet Address bar.
C
CH
HA
AP
PT
TE
ER
R5
5
Wired LAN card icon
Address bar
Even though you close the Internet Explorer, the Internet is still connected to
network. If you don’t want to use the Internet Connection, take out the
wireless/wired LAN card from CF card slot. During the wireless LAN card is seated
on CF card slot, you have to pay a optional charge for communication.
Page 5-2 Chapter 5
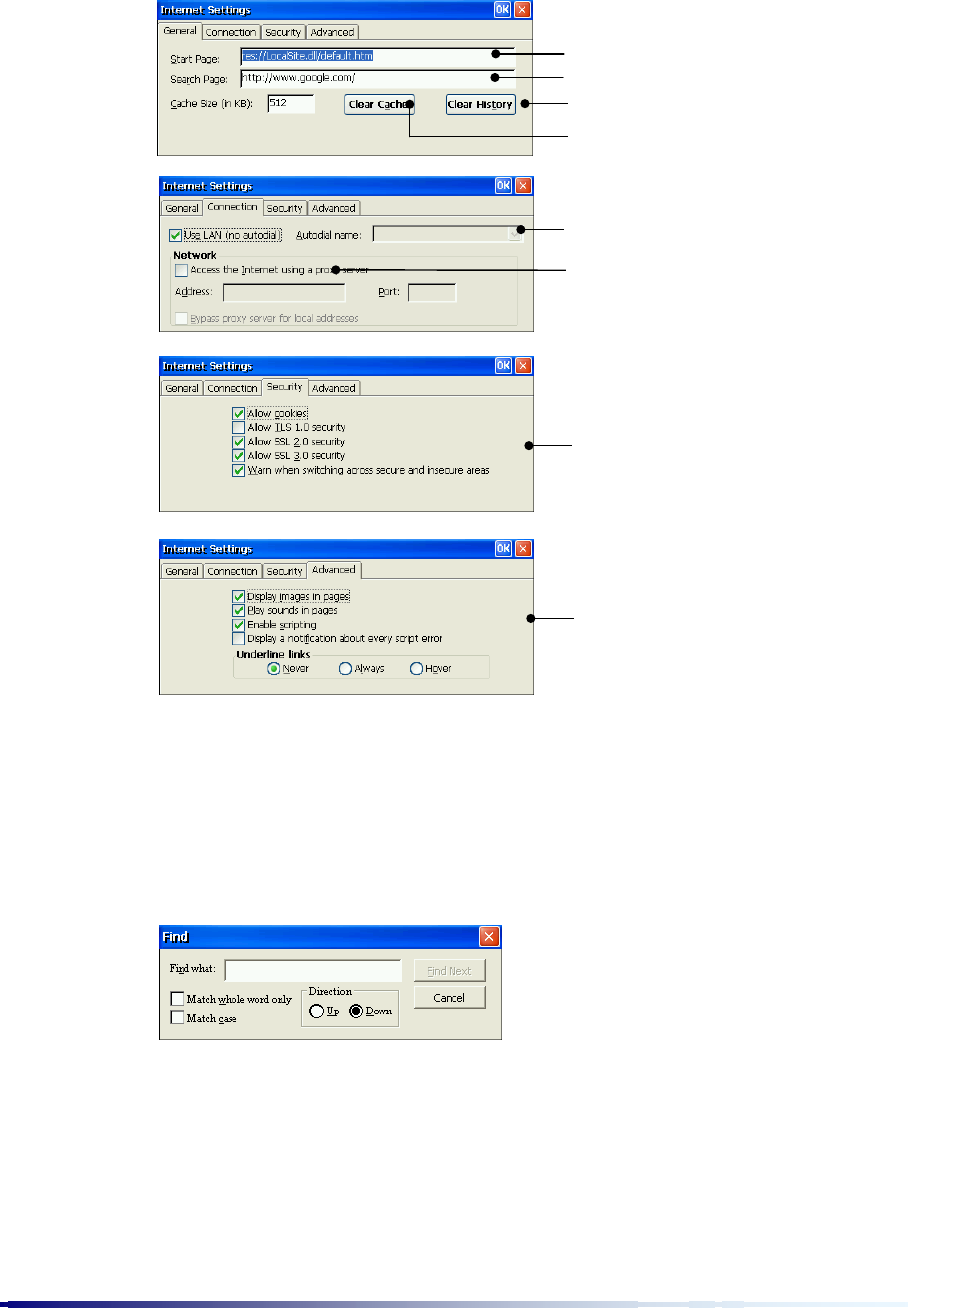
(1) Internet Option
Select Internet Option from the View menu of the Internet Explorer.
(2) Convenient Functions
1) Find
Helps you to quickly find specific text on the current Web page.
1.
Tap
Find
on the
File
menu.
2.
After entering the word you wish to find, tap the
Find Next
button. The cursor finds and places
itself on the corresponding word. If you wish to continue the search, tap
Find Next
.
2) Favorites
1. Go to the homepage you wish to add to Favorites.
2.
Tap
Add to Favorites
on the
Favorites
menu.
Home page
Search page
Delete the existing web site list
Delete cache
Internet Connection
Proxy server during Internet
Connection
Security
Advanced settings for alarm,
script