CyberBank CP-X515 PDA User Manual table of contents
CyberBank Corp PDA table of contents
Contents
- 1. users manual 1
- 2. users manual 2
users manual 1

G
G
Pocket PC/POZ
G
|’GtG
G
G
G
G
{GGGGGGjwT\X\GUG
GG
G
G
G
G
G
G
G
G
G
G
G
G
G
G
G
G
G
G
G
G
G
G
G
G
G
G
G
G
G
G
Copyrig
jG G G G G G G G
G G G G G G G UG hG G
jG G G G G G G G
GGGG G G G G G G SG
GSGGUGiGGGGGGG
TG G G G G G G G G

G
GTable of Contents 2
G
G
{GGGGGGGGˈGˉGGG
GGGGUGjGGGGGGG
GGGGSGSGGGGSGGG
GGGGGGGGUGjG
GGGGGGGGGGGGG
GGGGGGSGSGG
GGGGGGGUG
G
{GGGGGGGGG
UGhGGGUGuGGGGGGG
SGSGSGGGGGG
GGGGGGjSGGGGGG
GUG
G
{GGGGGGGGGGGG
UGySGSGGGGGG
GGGGGjGGGUGtSG
hzSGtzuSGvSG~SG~GtSG~Gu{SGG
G~GGGGGGGGG
tGjGGG|GzGVGGUG
tGGGGGvltGGtGsSGpUSGG
GGGGtGjUG
G
hGGGGGGGGGGGGG
SGGSGSGGGGGG
GUG
G
G
jilyihurUGjvywUG
ZSG[SG\GmUGzGiVkGkTSGrTSGzSGrG

GTable of Contents 3
pGhGX``]GGmGjGjGOmjjPGGG|GzGG
GGGyGGvGmjjG`]TZY]GGGGGGGG
GGGGGGGGmjjGG
UG{GGGGGGGGGGG
G|UzUGGGGUG{GGGwvGGGGmjjG
GGGGUG
|GGGGGGGUG G |¡GSGSGG
GGGGSGGGwvSGGGGGGmjjG
UG
kGGGGwvGGGGUG G pGGGGGGG
GGSGGGGGUGwGGGGGGG
UG
G
wvGGGGGTGGGGGTGVGG
GXU\GGGUG G {GGGmjjGymGGSGGG
GGGXU\G G GGGGGNGGGwvSG
GGSGGGGUG G {GGGTGTGVG
GGGGGGGGGGGG
XU\G G GGGGGmjjGymGGUG G {GGGTG
GGGTGGGGGGmjjGymGG
GGGGUG G jGGGGGGG
UG
G
mGGGGymGSGGGGmjjGGG
UU
G
G
G
{GzhyGGGGGGGGGGGymGGGGG
GGGGGGGUG{GzhyGGGGG G G G G G
GSGGGGUGpGGGGGGymG
G G UG hG G G G G G G G G G G G
UGiGGGSGGzhyGGGGGGGGGGG
GGGmjjUG{GGGGGGGGG GGGG
GG SG GGG GUG~G G G GG G
G G G G G G UG }G G zhyG G G G G
G G UG hG G G G G G SGGGG
GGGUGhGGSGGGzhyGGGG
G G G G G G G UG zhyG G G GGGG
GGXU]~VGGGGGGGGUG
{GGGzhyGGGjwT\X\GaG
G
jkthGGOwGYYPTGoaGWU]X^G~VbGiTaGWU_^[G~VG
G
FCC RF Exposure Information
Specific Absorption Rate(SAR) for Wireless Phones

G
GTable of Contents 4
G
wGGGGGGGGUGmGG
GGGGGGGGU
G
kGGGGGGGGGGbGGGG
UG
G
zGGGGGGGUG{GGGGG
GGGGGGUGpGGGGGG
GUGmGGGGGGGUG
G
~GGGGUGzGGGGG
GUG
G
kGGGGGGGGGGGGSGGG
GGGGGGGUGvGGGG
GGGUG
G
|GGGGGGGGGGGGGGG
GGGGUG
G
vGGGGGGGGUGiG
GGGGGGGGGGGGG
UG
G
|GGGGGUGkGGGG
GUG
G
hGGGGGGGGGU
G
Safety Information

GTable of Contents 5
hGzGwGGGmjjGpGjGuG
G
jG
G
tGGGGGGGGGG
GGG˅GGGGGUG
G
mjjGGpG
G
G
~GGG{GGGGGX\GGmjjGyUG
vGGGGGGGaG
XU {GGGGGGSGG
YU {GGGGGGUG
pGGGGGGUG
G
pGG|G
G
{GGGGGGGGGGGGGGjG
iGGSGwGGGX\GGGmjjGyUG{GG G
G G G G G G G G G G
GUG
G
{GGSGGGGGGmGGSGG
GGGGGGGGSGGGG
GGGUG
oSGGGGGGGGGGGGG
UG pG G G G G G G G G G
GSGGGGGGGGGGG
SGGGGGGGGGGGGGGGG
GGaG
̲G yGGGGGUG
̲G pGGGGGGGG
̲G jGGGGGGGGGGGGGG
GGGUG
G
jGGGGGGV{}GGGUG
USER INFORMATION

G
GTable of Contents 6
G
G
G
G
1 | About Device 1-1
~˅GGGiG XTYG
oGmG XTZG
|GGzG XTXWG
zGyGMGoGyG XTXXG
tGwGwjGzG XTXYG
~GGmGpG XTXZG
|GoGGGkG XTXZG
|G{GtG XTXZG
G
2 | Getting Started 2-1
wGGG YTYG
jGGGG YT[G
jGG~G¡G YT]G
|G{GzG YTXXG
mGlG G YTX^G
tGtG G YTYWG
G
3 | Using Input Panel 3-1
|GpGwG ZTYG
iGy¡GZTZG
rG ZT[G
sGy¡G ZT\G
{G ZT]G
G
4 | Connecting to Desktop 4-1
pGtGhzGGGGG [TYG
mGiGMGyGGiVyGGhzG [TX]G
oGGGGGhzG [TX`G
G
5 | Configuring Device 5-1
zG \TYG
G
6 | Using the Internet & E-mail 6-1
iGG~GGGG ]TYG
zGGyGlTGtG ]T^G
jGkGGlTtGzG]TX[G
Contents

GTable of Contents 7
G
7 | Using the Mobile Phone 7-1
wGwG ^TYG
ztzOzGtGzPG^TG
G
8 | Applications 8-1
wvGsG _TG
wvGtiG _TG
wvGjG _TG
wvGjG _TG
wvGhG _TG
G
9 | Microsoft Pocket Outlook 9-1
jaGzGhGGtG `TYG
jaG{GmGGjG `T_G
{aGrGG{TkGsG `TXYG
uaGjG{GGpG `TX\G
G
10 | Microsoft Programs 10-1
tGwG~G XWTYG
tGwGlG XWT\G
tG~GtGwG XWT^G
|G{GzGjGXWTXYG
wG XWTX\G
tzuGtG XWTY[G
G
11 | Support & Service 11-1
~GzG XXTXG
zG XXTXG
G
Appendix
hUGoGzG hTXG
iUG~G iTXG
jUGnG jTXG
kUG|ziGtGkG kTXG
G

G G G
jGXGhGkG G XTX
#
#
#
jGGGwkhGOGG
VGjwT\X\PGGGG~GtG
YWWZGzGlUGGGGGGGG
GGGGGGGGG
UGGGGtGwGwjGzGYWWZG
GSGGGGGGGtG
wGv´SGGGGGGGTGGGG
GGGGGGUGGGGG
GGGGGGGGGGG
GwjSGGGGGGGGG
GGGGGGGUG{G
GGGGGGGGGG
GGGGGGGGGG
jUG
G
G
pGGGGGGGaG
TG~˅GGGifG
TGoGmG
TG|GzG
TGzGyGMGoGyG
TGtGwGwjGzG
TG~GGmGpG
TG|GoGGGG
TG|G{GtG
G
#
Chapter 1
About Device
The information contained in this document is provided “as is” and is
subject to change without notice.G
G|˅GtG G XTY
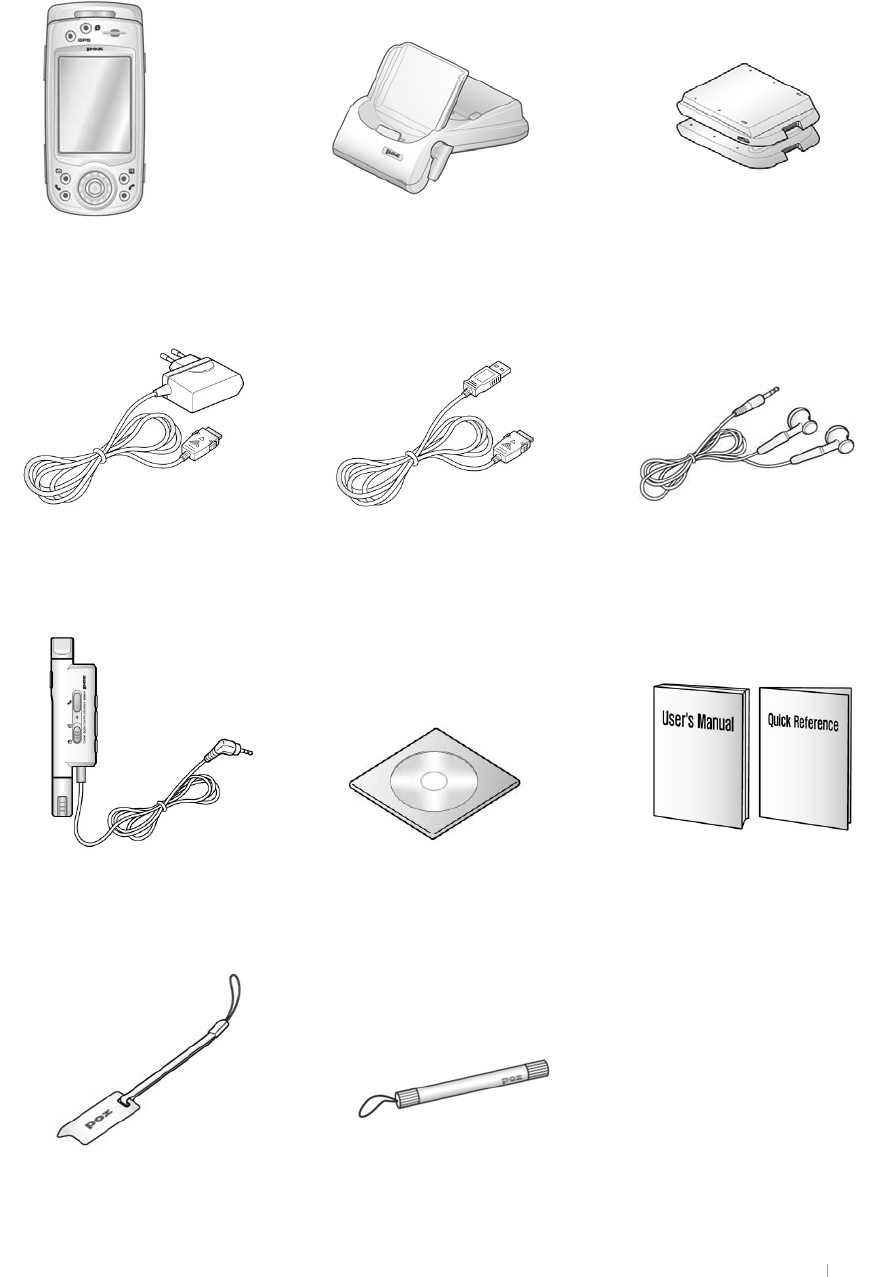
What’s in the Box?
GGGGGGaG
G
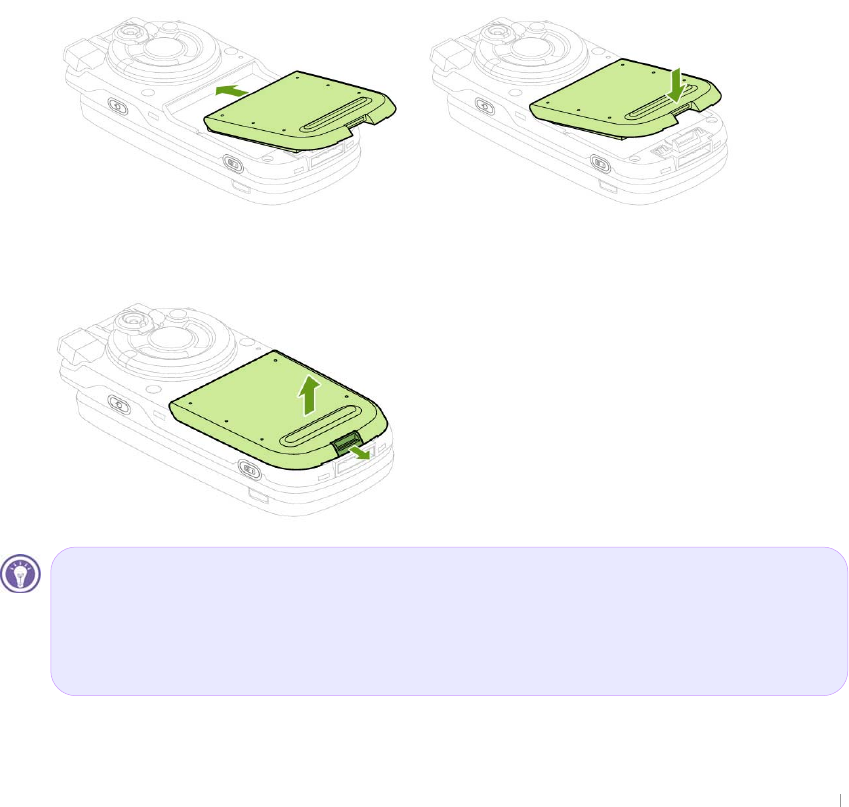
Device Cradle
A
C Adapter Ear-Phone
User Manual & Quick Reference
USB Cable
Companion CD
Battery (slim & standard)
Remote Control
Screen Cleaner Hand Strap Fancy Metal Hand Strap
G G G
jGXGhGkG G XTZ
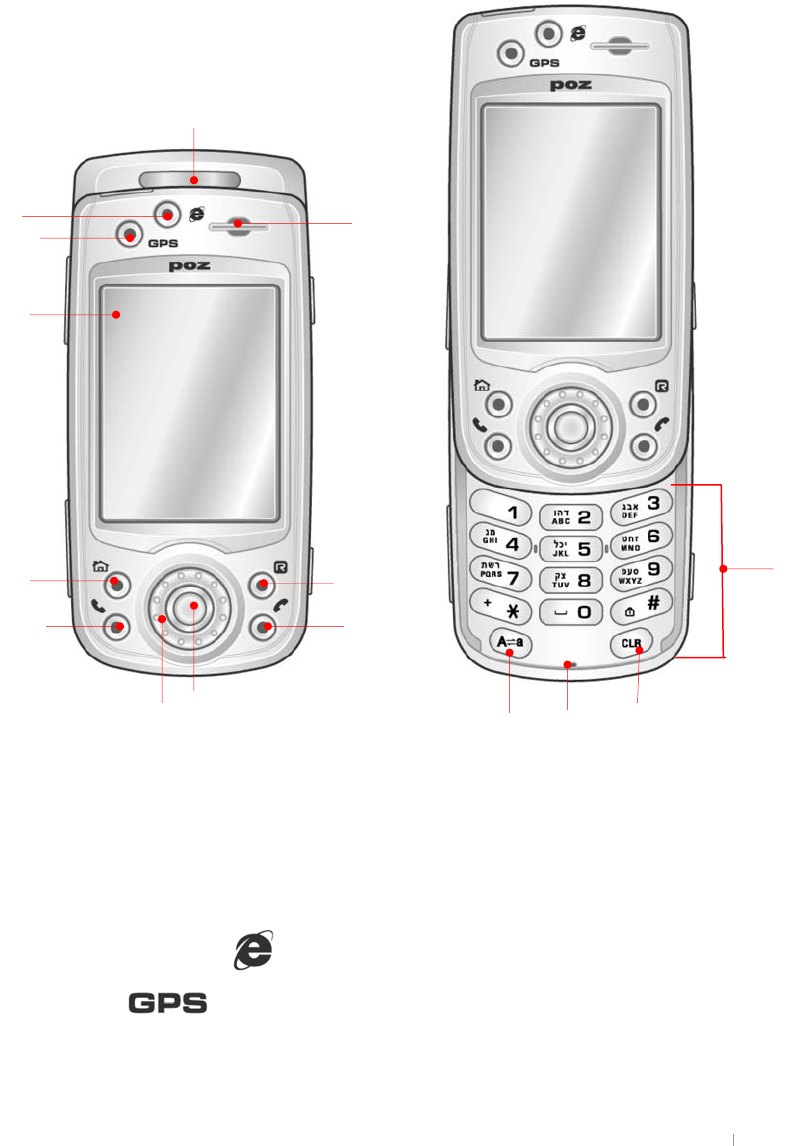
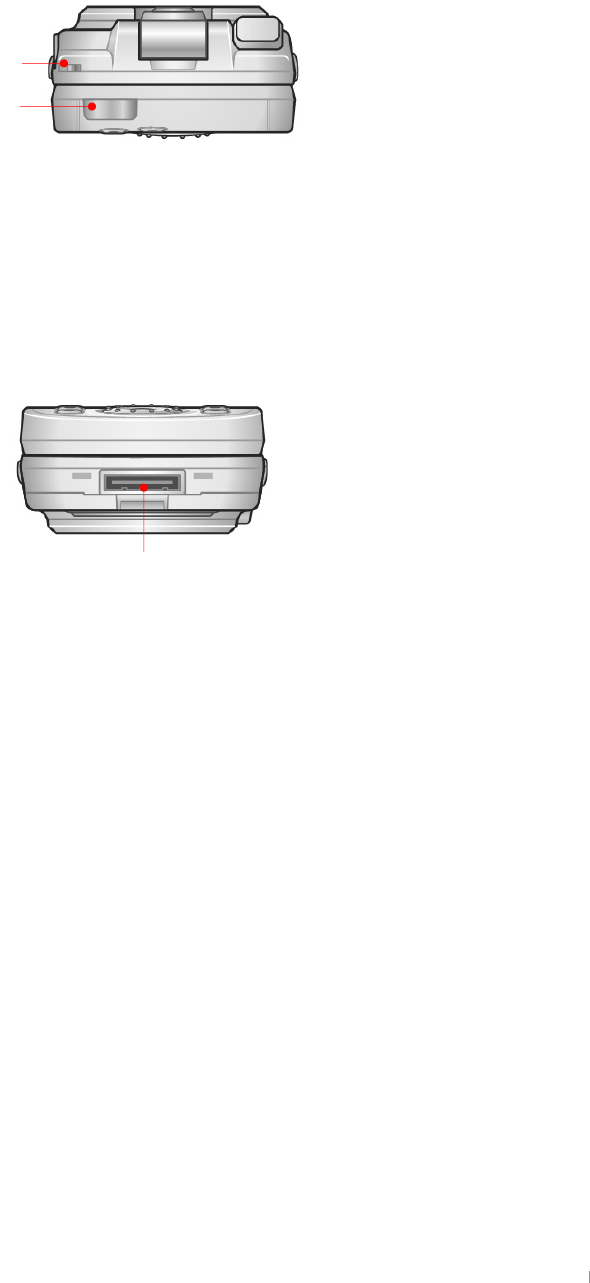
Hardware Features
G
G
{GGGGGGGGGG
GGGGUG
G
:fcbh
G
G
G
G
G
G
G
G
G
G
G
G
G
G
G
G
G
G
G
G
G
G
G
G
G
G
G
G
1. Phone state LED: It flashes when a phone-call comes in and displays the state of
mobile phone. It notifies you of phone state including SMS.
2. Internet Explorer Key( ) : allows you to open Internet Explorer.
3. GPS Key( ) : allows you to open GPS program.
4. Touch screen(TFT LCD): Tap on-screen controls or buttons to select menu
commands or input text.
ྚG
ྞ
ྠ
ྙG
ྜྷG
ྟG
ྛG
ྡGྡྷG
ྣ
ྜG
ྥ
ྤ
ྦྷG
ྦG

G|˅GtG G XT[
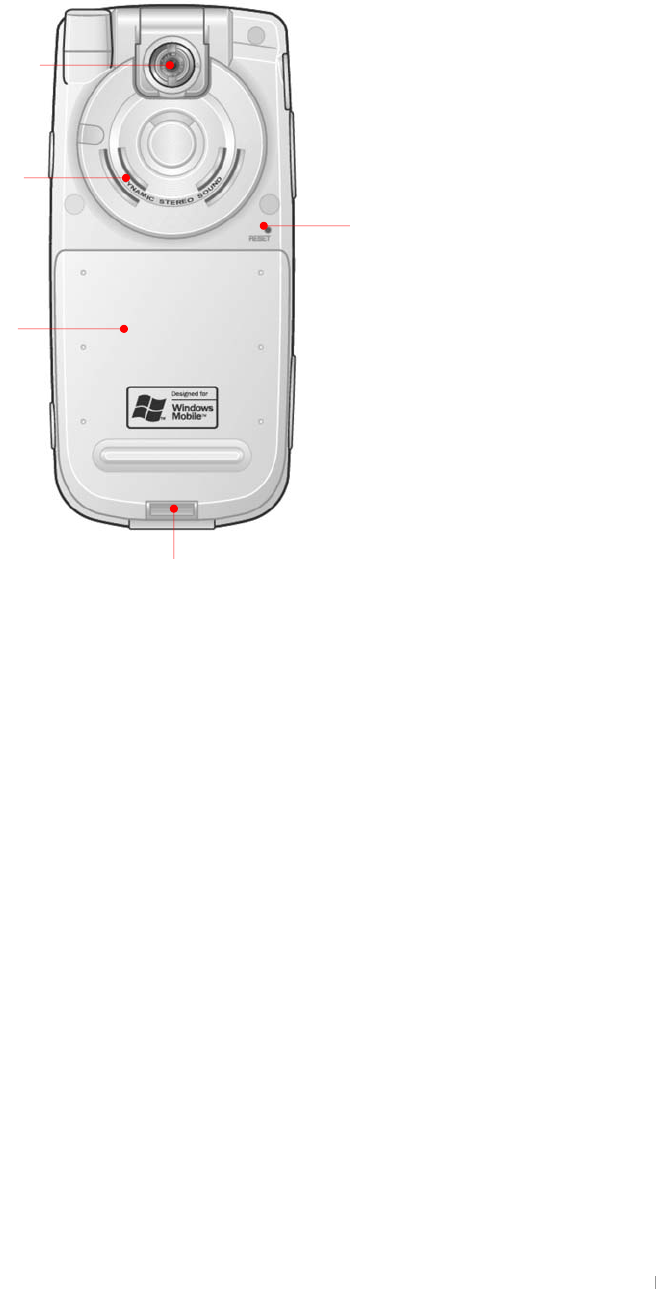
5. Home Key( ) : allows you to open POZ Launcher.
6. Rotate Key( ) : allows you to open POZ Rotate program.
7. Send( ) button : allows you to make a call. Press it once to have the last called
phone number displayed on the phone display with the phone program on.
8. End( ) button : allows you to end a call.
9. Wheel button : allows you to rotate and push down top/bottom/left/right.
10. Action button : allows you to open the selected item.
11. Receiver: allows you to hear the voice while talking over the phone.
12. Phone keypad : allows you to input the phone number.
13. Mode changing key( ) :allows you to change input mode(number, capital letter,
and lower letter) of your keypad.
14. Microphone: allows you to speak into the microphone to record voice notes and
communicate on the mobile phone.
15. Clear key( ) : allows you to delete the characters you input before. When you
hold down the delete key, all characters you have input will be deleted.
Home Key, Rotate Key, Send Key and End Key include Charging State LED.
Charging state LEDs indicate power state while recharging.
(Blue : fully charged, Red : currently charging)
#
G G G
jGXGhGkG G XT\
@YZhG]XY
G
G
G
G
G
G
G
G
G
G
G
G
G
G
G
G
G
G
G
G
G
G
G
XU zGGaGjGGGGUG
YU |VGGaGzGGUG G
ZU tGzkGOzGkPGGaGpGGGGzkGGGG
UGsGGGGGGGGGGGGG
GGGGGGGGGUG
[U ZGGGaGGGSGGGGGGGG
GGGGwvGGUG
\U ZGVGaGGGGGwvGtGUGhGG
GSGGGGGGGUG
]U ZGGaGGGSGGGGGGGGG
GGGwvGGUG
G
G
G
G
ྚG
ྙ
ྛG
ྞG
ྜྷG
ྜG
G|˅GtG G XT]
G
F][\hg]XY
G
G
G
G
G
G
G
G
G
G
G
G
G
G
G
G
G
G
G
G
G
G
G
G
G
XU hG
YU wGaGwGGGGGGGUG G
ZU jGaGGGGGwvGGGGGGUG
[U yGaGGGGGGGGGGG
GGUOwGGjGGGG
GGGGGGGGGUPG
G
ྚG
ྙG
ྛG
ྜG
G G G
jGXGhGkG G XT^
G
IddYf
G
G
G
G
G
G
G
G
G
XU oGG G
YU pGaGiGGGGGUG
G
6chhca
G
G
G
G
G
G
G
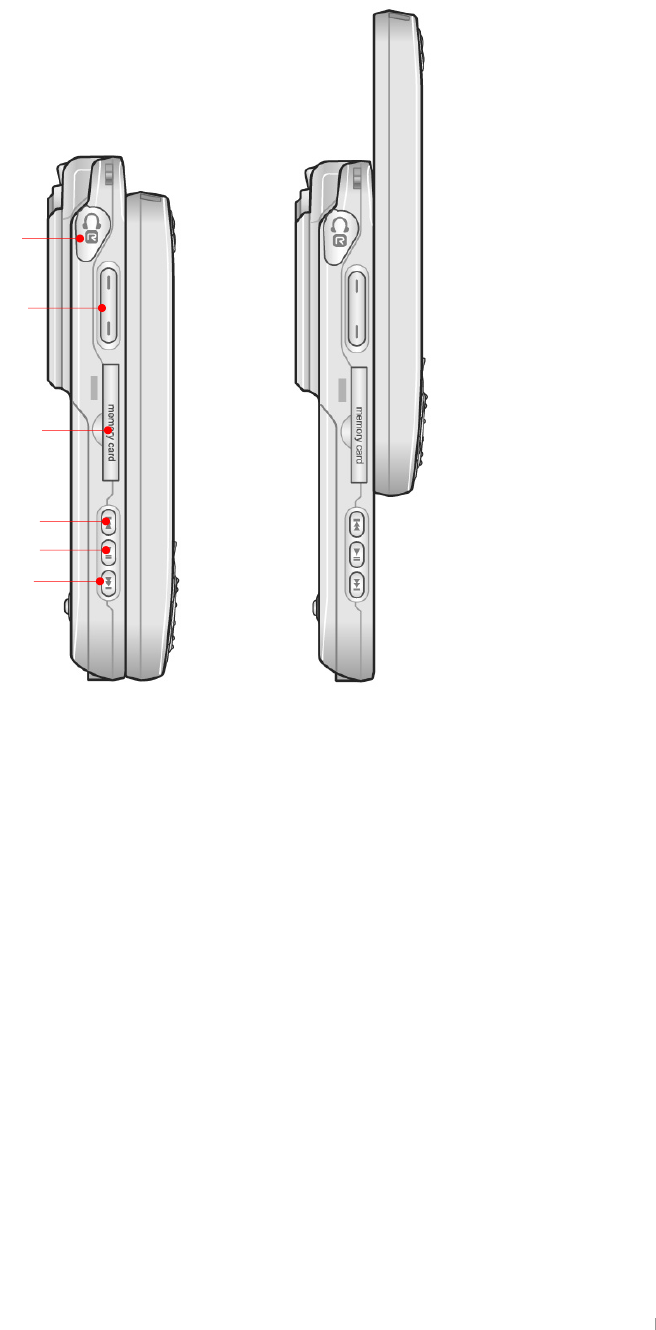
1. USB port: Connect to your desktop PC using the supplied cradle, or directly
through an optional sync cable.
G
G
ྚG
ྙG
ྙ
G|˅GtG G XT_
G
FYUf
G
G
G
G
G
G
G
G
G
G
G
G
G
G
G
G
G
G
G
G
G
G
XU zGjGsGaGGGGGGGGGXUZtGUG
YU kGGGaGGGGGGGGGGG
GGGGGGGGGGGUG
ZU tGO]`WGGXZ_WGhPUG{GGGGGGG
GGGGGGGbGGGG
GhjGGGGGGGGGGGGGGG
GGGGGGGGUG G
[U GGG
\U zGyGaG|GGGGGGGGGGG
GGGGGGGGGUG
ྙG
ྚG
ྛ
ྜ
ྜྷ

G G G
jGXGhGkG G XT`
G
FYachY7cbhfc`
G
G
G
G
G
G
G
G
G
G
G
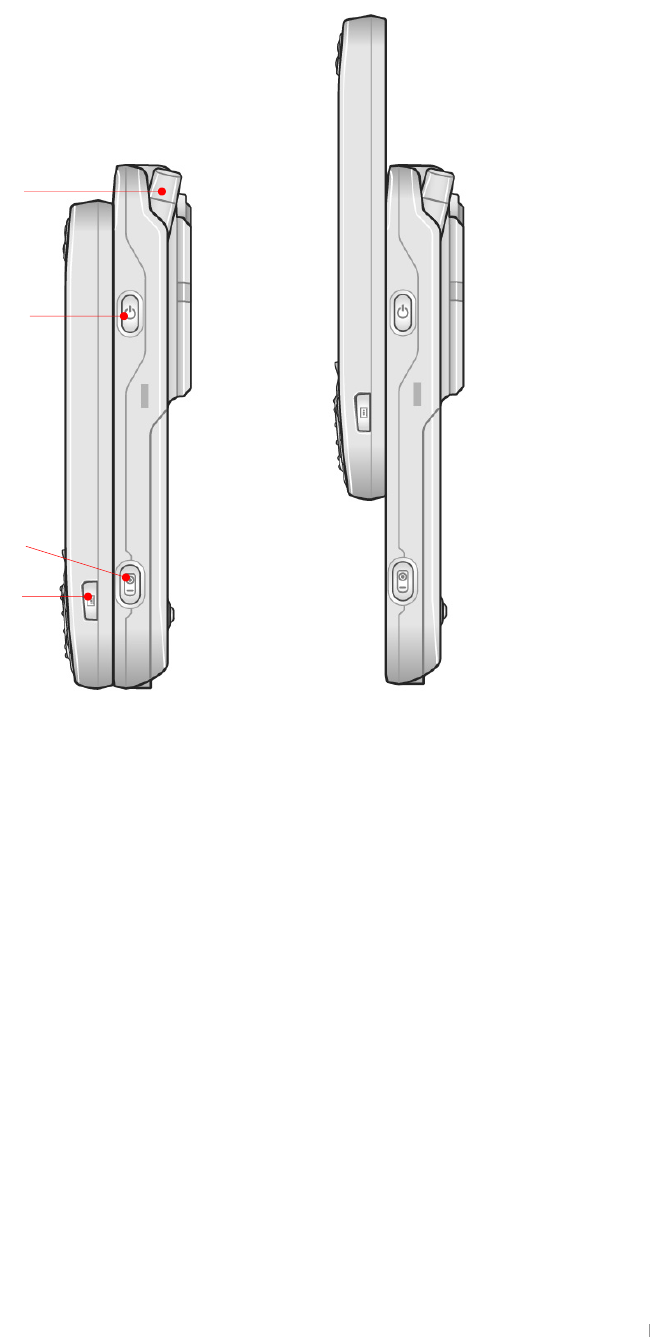
XU zaG|GGGGGGGGUG
YU ovskGaGGwvGtiGGGSGGGGGGGGG
GGGSGGzlukVlukGGGGGG
GUG
ZU zlukVlukGGaGGGGGGGGGGG
GGGGGUG
[U G
\U zGGGaGGGGGGsjkGUG
]U tG
^U uGGaGGGGGGGGGGGwvGtiG
UG
_U wVwGGaGGGGGGGGGG
wvGtiGUG G
`U zGGaGGGGGGGwvGtiGUGG
XWU wGGaGGGGGGGGGGGwvG
tiGUG
G
G
G
ྚ
ྙG
ྛྜ
ྜྷ
ྞG
ྟ
ྠ
ྡྡྷ

G|˅GtG G XTXW
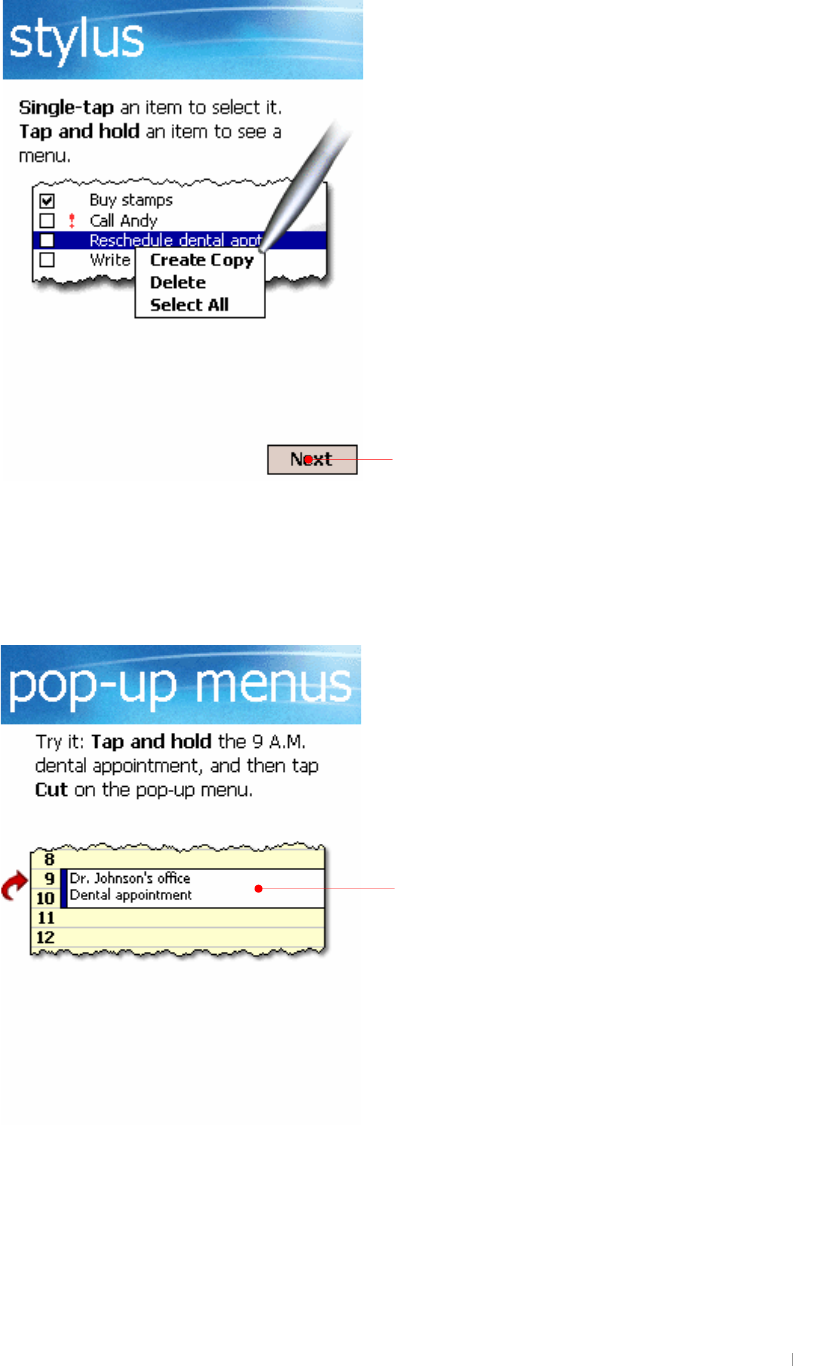
Using the Stylus
|GGGGGGGGGGUG
Wds#dqg#krog#
Tap and hold the stylus on an item to see a list of actions available for that
item. On the pop-up menu that appears, tap the action you want to
perform.
#
Gudj#
Hold the stylus on the screen and drag across the screen to select text and
images. Drag in a list to select multiple items.
#
Wds#
Wrxfk#wkh#vfuhhq#rqfh#zlwk#wkh#vw|oxv#wr#rshq#lwhpv#dqg#vhohfw#
rswlrqv1#
G G G
jGXGhGkG G XTXX
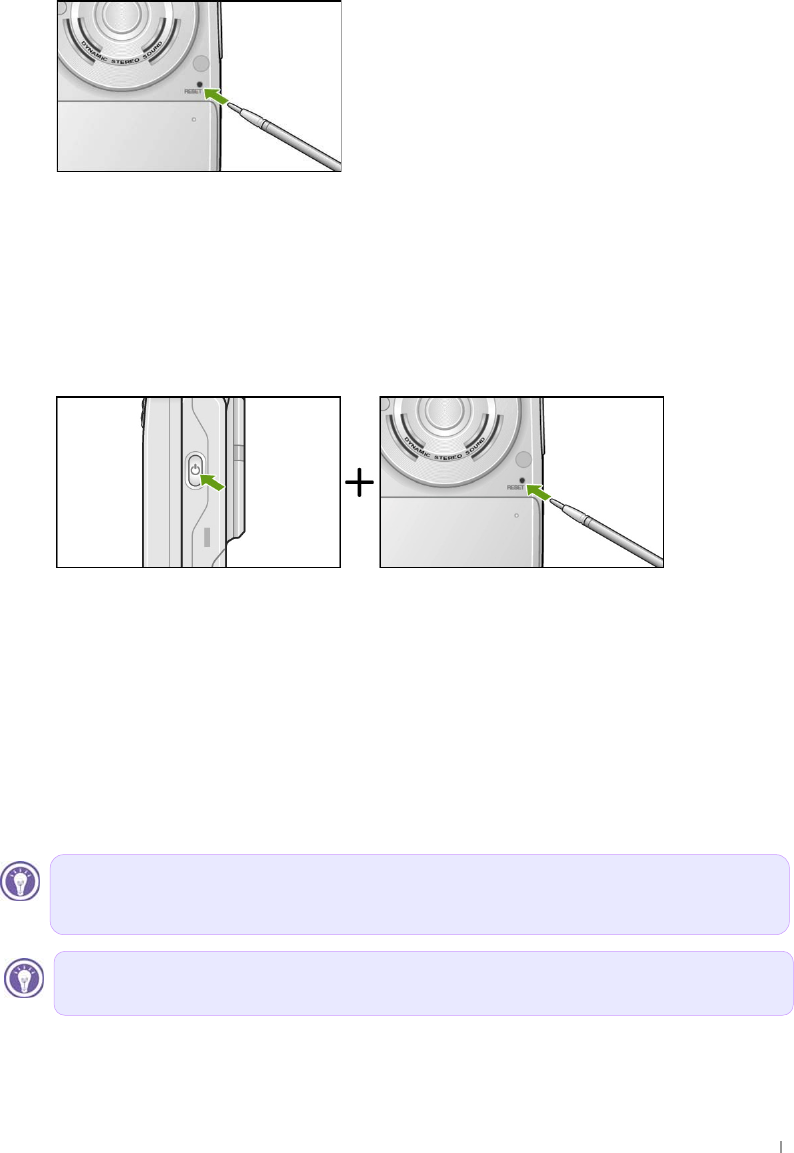
Soft Reset & Hard Reset
~GGGGGGGSGGGGG
GGyGGGGGGGGUG{GG
GˈzGyˉGGGUG~GGGzGySG
GGGGGUGiGGGGGGGG
GGGUG{GGGGGG
yGGGGUG
{GGoGySGGGGGGGaG G
XU kGGGG G
YU wGGGGGGGGGGGG
GGGGyGGGGGGGUG G
G
G
G
G
G
G
G
G
ZU hGGUG
~GGGoGySGGGGGGGG
GGGyhtUGoSGmGzGSGGGGGG
uhukGGSGGGGGGGG
oGyUG
G
G
Eh#vxuh#wr#vdyh#doo#gdwd#xvlqj#DfwlyhV|qf#ru#wkh#Edfnxs#xwlolw|#
ehiruh#|rx#shuirup#Kdug#Uhvhw1#
Xvh#rqo|#wkh#vw|oxv#surylghg#e|#F|ehuedqn1#
G|˅GtG G XTXY
Microsoft Pocket PC Software
GGGGGGGGGGGG
GGGGUG{GGGG
UG
kGGGGGGGUG
{GGGGGGGmGyvtUG{G
GGGGGGGGGGG
GGUG
ActiveSync. z¡GGGGGG
GUG
Calendar. rGGGGGGGG
UG
Tasks. rGGGGTGUG
Contacts. rGGGGGGUG
Notes. jGGGGSGSGG
UG
Inbox. zGGGTGGGGUG
Pocket Word. jGGGGGGG~G
GGGGGwjUG
Pocket Excel. jGGGGGGGlG
GGGGGwjUG
Microsoft Pocket Internet Explorer. iGG~GGG
GGGUG
MSN Messenger.1zGGGGGGG
tzu´GtGUG
Microsoft Windows Media Player for Pocket PC.2wGGG
GGGGUG~Gt˞GwGGG
GGGGGGGGGGGtwZG
G~thGUG
G
GGGGGGGGGGGGGGGGGGGGGGGGGGGGGGGGGGGGGGGGGGGG
1 Requires an account with an Internet service provider.
2 Check the Microsoft Mobile Devices Web site for updates to Windows Media Player, including details on
support for video file formats and streaming audio and video capabilities.#

G G G
jGXGhGkG G XTXZ
Where to Find Information
G
ActiveSync & Acrobat Reader
GGGhzGZU_GGGGjGjkUGpG
GGGGGGjkSGGGGG
GhzGZU_GG
UUVVVGGGGwjUG G
hGGGGhGyGGUUGUG
G
Using Help on Your Device
GGGGGGGGGtGwGwjG
GGGHelp GGStart UG G
G
G
Using This Manual
G
{G|NGGGGGGGGGGG
GGGUGhGGGGGGG
GGGGGGSGGGG
GGGGGGGGGGGG
GGGGG|˅GUG G
G
{G|NGGGGGGGGGG
GGGGGUG
G
G
G
G
G
G
G
Qrwhv#=#Khosixo#lqirupdwlrq#uhodwhg#wr#wkh#wrslf1#
Qrwlfh#=#Wklv#lv#lpsruwdqw#lqirupdwlrq#wkdw#vkrxog#eh#revhuyhg#wr#
suhyhqw#orvv#ri#gdwd#ru#gdpdjh#wr#|rxu#ghylfh1#

GjGYGnGzG G YTX
{GGGGGGGGUGGGG
GGGGGGGGGGGUG~G
GGGSGGGGGGGGGG
GGGGUG
G
G
pGGGGGGGaG G
TGwGGG
TGjGGGG
TGjGG~G~¡G
TG|G{GzG
TGmGlG
TGtGtG
Chapter 2
Gettin
g
Started
The information contained in this document is provided “as is” and is
subject to change without notice.G
G|˅GtG G YTY
Powering up device
G
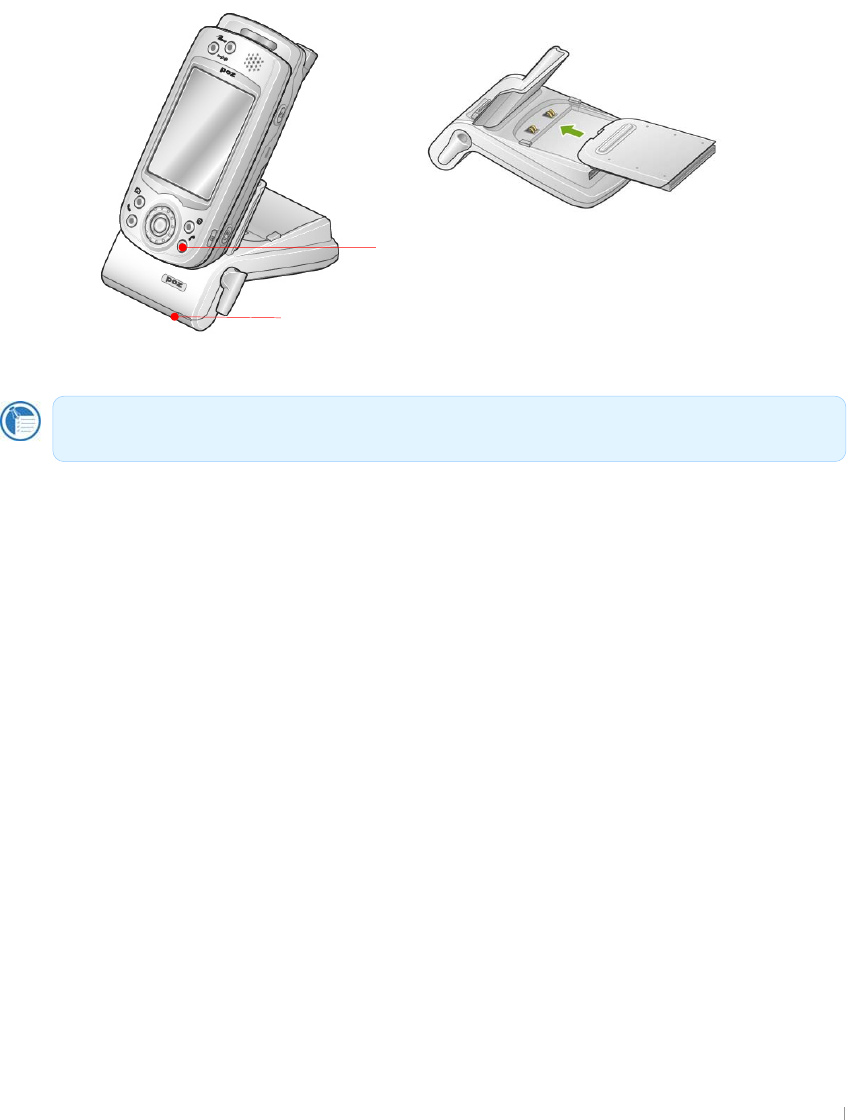
AU]bVUhhYfm@]!Dc`maYf
{GTGGGGGGGGG
GGGGGGUGhGGGGGG
GGGGGUGzGSGGGGGSG
GGSGGGGzkGSGGGG
GGGGGUG
{GGGGGGGGGGGG
GˁGGhjGGGG|ziGUG|SGG
GZGGGGGGGGGGG
UGjGGGGhjGGGGGGGGGG
GGGSGGGGGGGGGGGG
GGGGUG~GGGGGSGGG
bGGGGGGGGGGGGG
GGhjGUG
G
{GGGGGGGUG
hGGSGGGGG
GGGGGU
G
G
G
G
G
G
G
G
G
{GGGGUG
G
G
G
G
G
G
G
G
{GGGGGGGGGG
GGGGbGGGGGhjGG
G G G G G G G G G G G G G
GGGGGGGGUG
GjGYGnGzG G YTZ
57DckYfk]h\7fUX`Y
{GGGGGGSGGGGGGG
hjGGGGGhjGUG{GhjGGGXWWG}G
GY[WG}SGGGGGGhjGGGGGUG
~GGSGGGGGGGG
GSGGGhjGGGGGhjGGG
GGkjGGGGGUG
~GGGGGGhjGSGGGGG
UG{GGGGslkGGGGGGaG G
G
G
G
G
G
G
G
G
G
G
G
G
G
G
G
G
Power Tips
ൟG mGGGGGGGGGGGG
aG
G
{GGGGUG
pGGGGGGGGGGGGG
GSGGGGGGGGGGG
UG G
{GGUG
|GGGGGGSGGGGzGMG
uGGGGGGGGGGG
UG
hGGGzkGGGGGUG
tGGzkGGGGGGGGG
GU
G
G
R
e
d
LED
i
n
di
ca
t
es
th
a
tth
e
b
a
tt
ery
i
s c
h
arg
i
ng, an
d
bl
ue
LED
indicates that the battery is fully charged.
This LEDs indicates the state of main battery.
This LED shows you the state of extra battery that may be seated on the
back of this cradle.
G|˅GtG G YT[
Connecting to your device
G
~GGGGGGGGSGGGG
GGGGG|ziGGGGUG G
G
G
G
G
G
G
G
G
G
G
G
G
G
G
jGGGGGGG|ziGGGG|ziGG
GGGwjGGGUG G
G
G
G
G
G
G
G
G
G
G
G
G
G
G
G
G
G
G
G
G
G
GGGGGGGGGGGG
UG
G
Before you connect to your device, see if your desktop PC is on and
Microsoft ActiveSync program is installed from companion CD.
Port for USB cable
Port for charging cable

GjGYGnGzG G YT\
G
G
G
G
G
G
G
G
G
G
G
G
G
G
G
G
Windows 95 and Windows NT version don’t support beaming
connection.
G|˅GtG G YT]
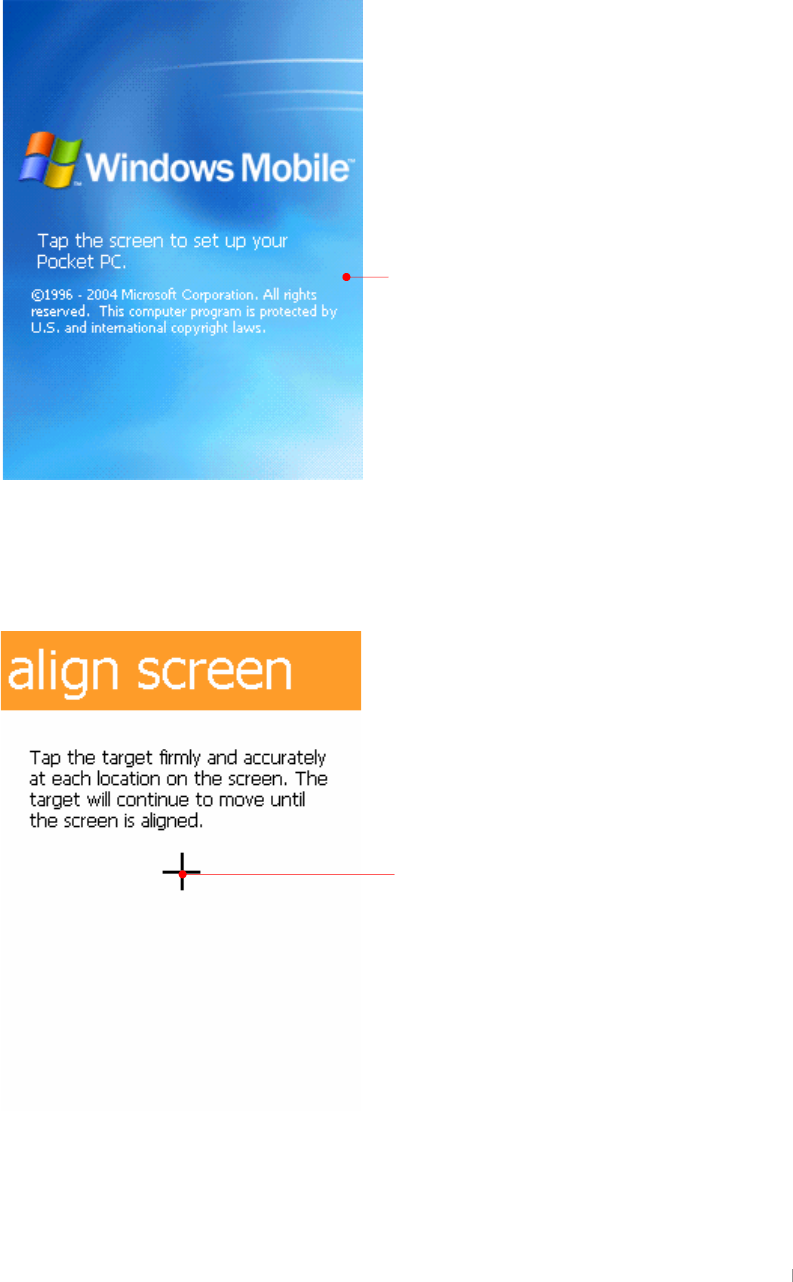
Complete the Welcome wizard
G
mGGGGGGGGGGGGGGG
GGTUG
G
G
G
G
G
G
G
G
G
G
G
G
G
G
G
G
G
G
G
G
G
G
G
G
G
G
G
G
G
G
G
G
G
G
G
G
G
G
G
G
Gently touch the screen with stylus. From now on,
it is called “tap”.
A
target (+) will move in the order of “center oupper
left o lower left o lower right o upper right” on your
screen. Since calibrating the touch screen has a
direct affect on the recognition ability of your touch
screen, be sure to accurately tap the center of the
target (+) with your stylus.
GjGYGnGzG G YT^
G
G
G
G
G
G
G
This is the way of how to single-tap and tap and
hold, tap the Next button.
Tap and hold this location to have next window.
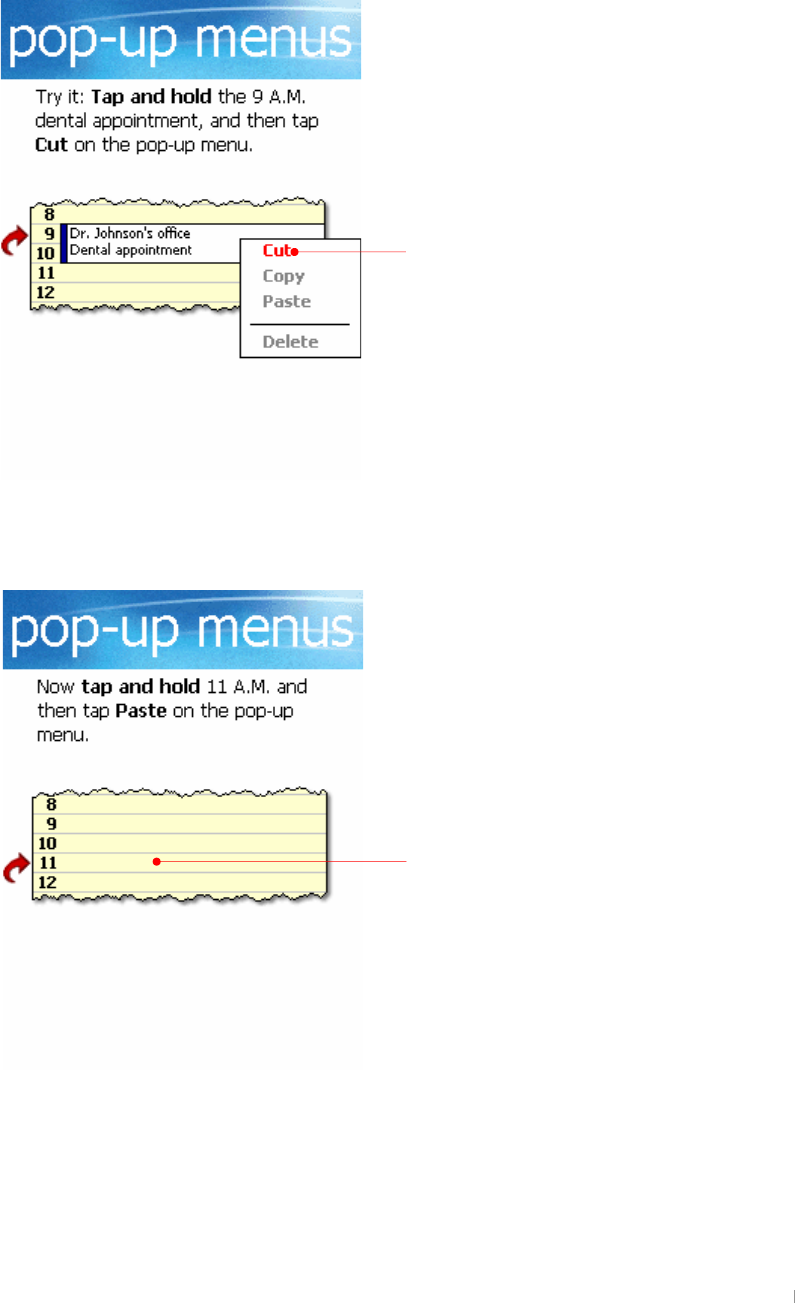
G|˅GtG G YT_
Tap and hold this location next to 11 to paste the
cut contents. Then you will have the new pop-up
menu.
It is called “Pop-up” menu. Select Cut.
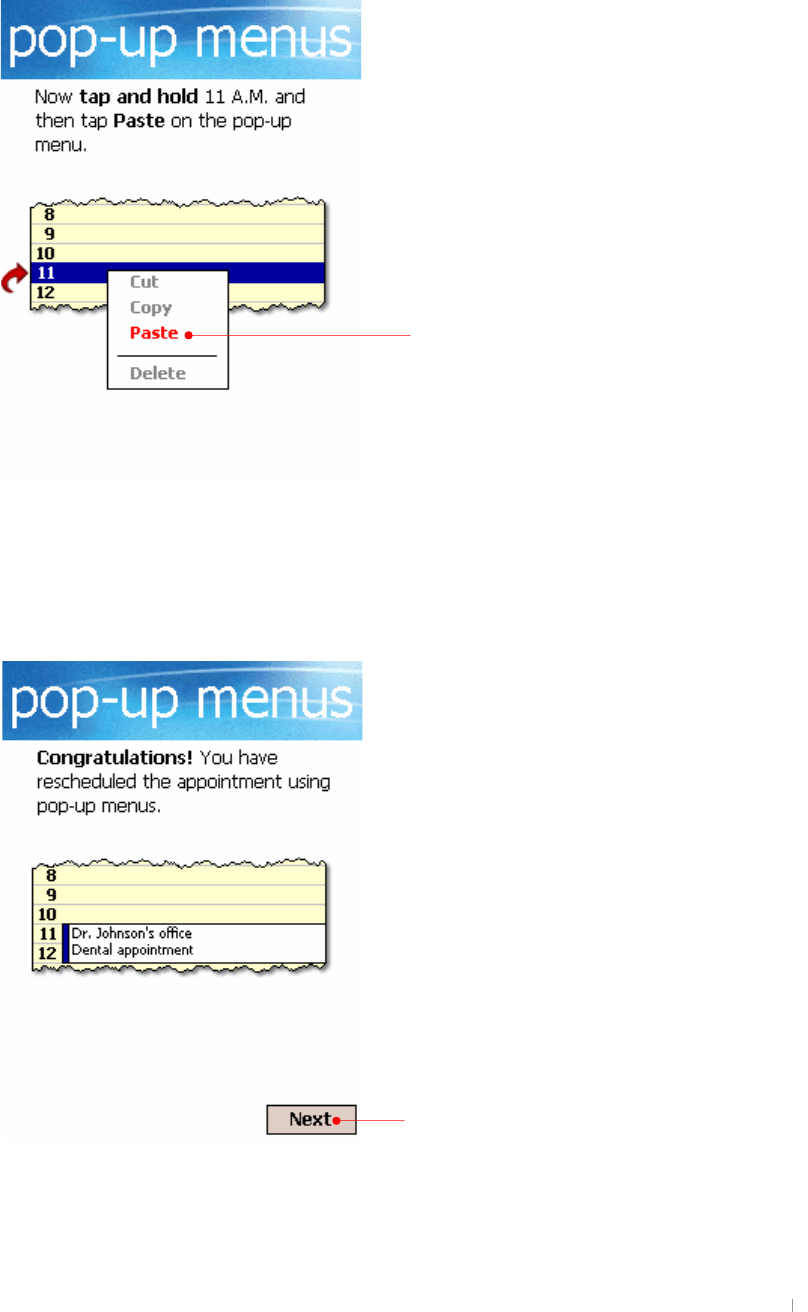
GjGYGnGzG G YT`
Select Paste on this list.
The pasted contents have appeared. Tap the Next
button.
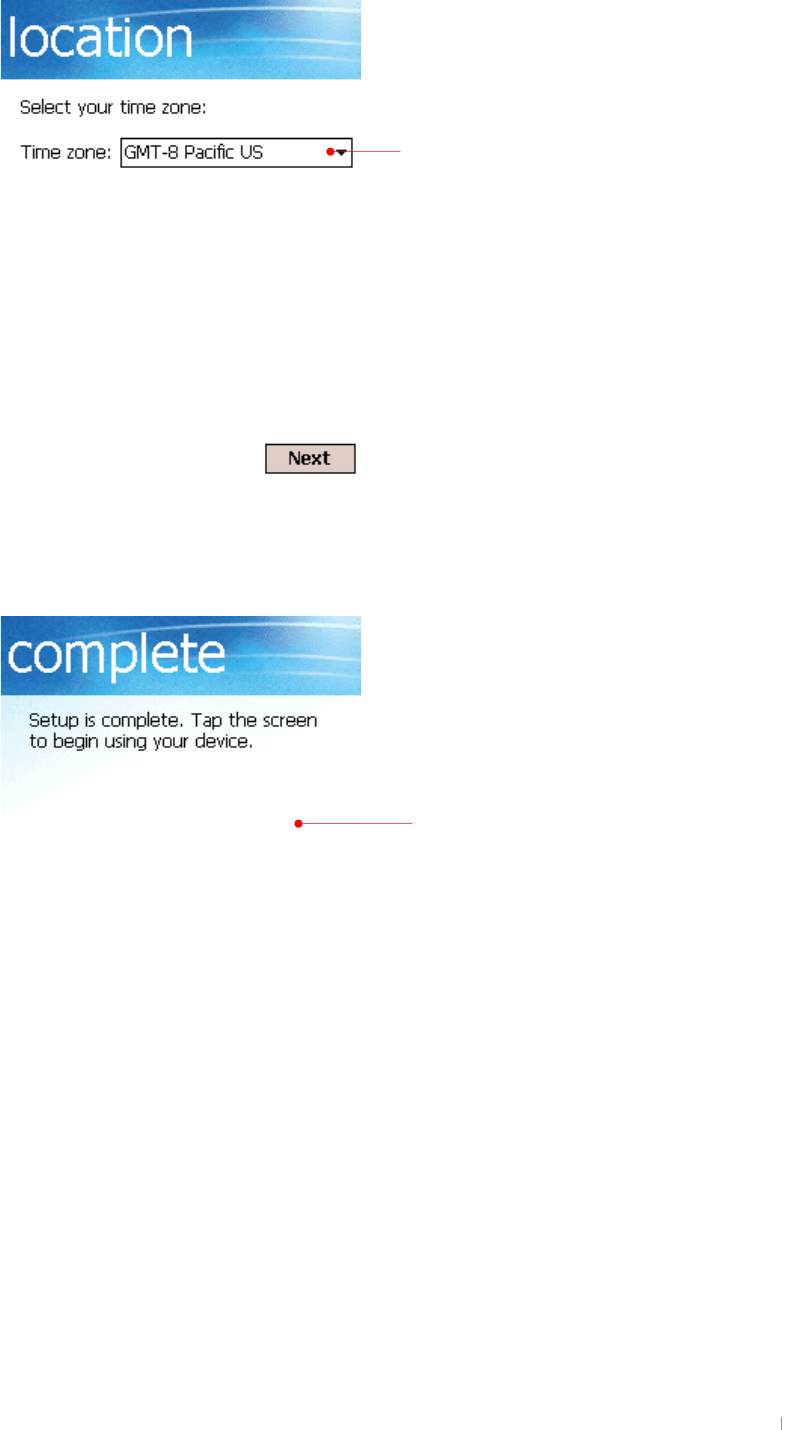
G|˅GtG G YTXW
Select a time zone you stay from the drop-down
list box.
Tap the screen to finish the Welcome wizard.
GjGYGnGzG G YTXX
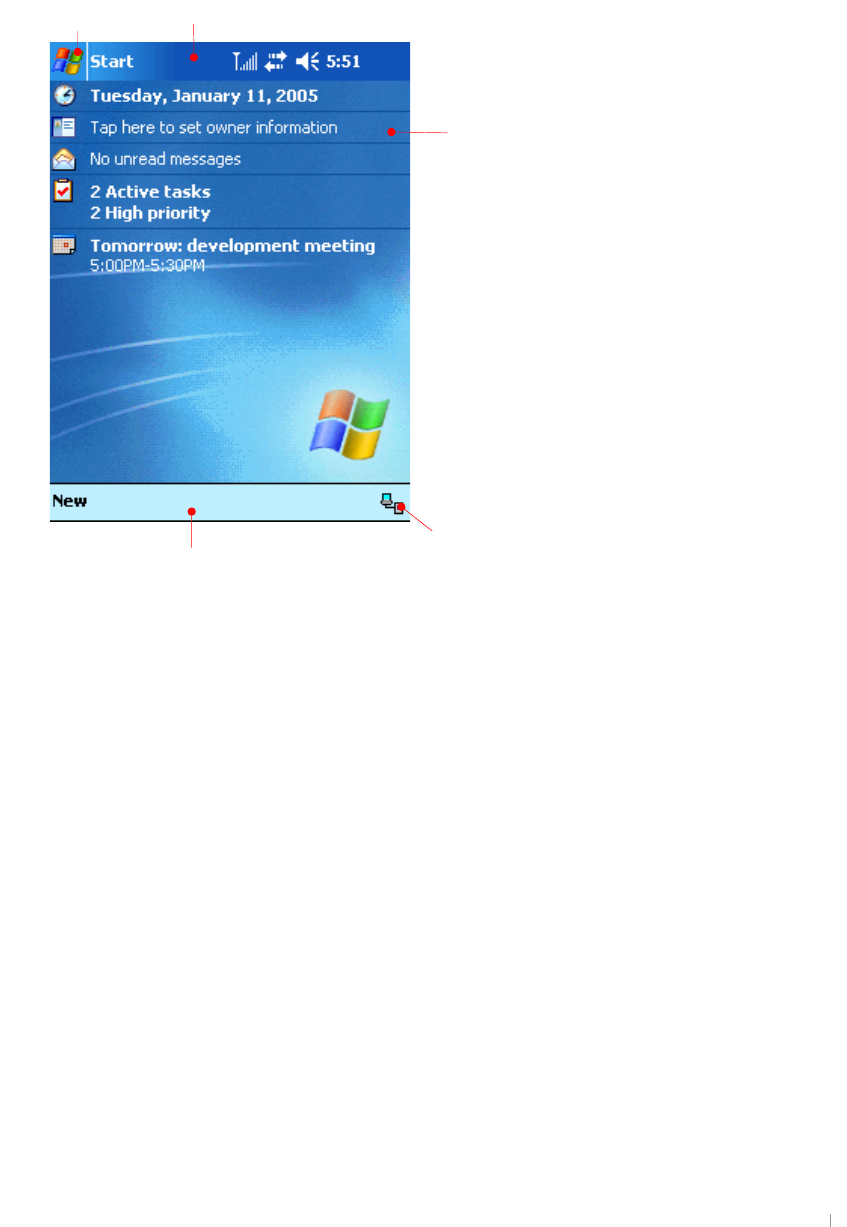
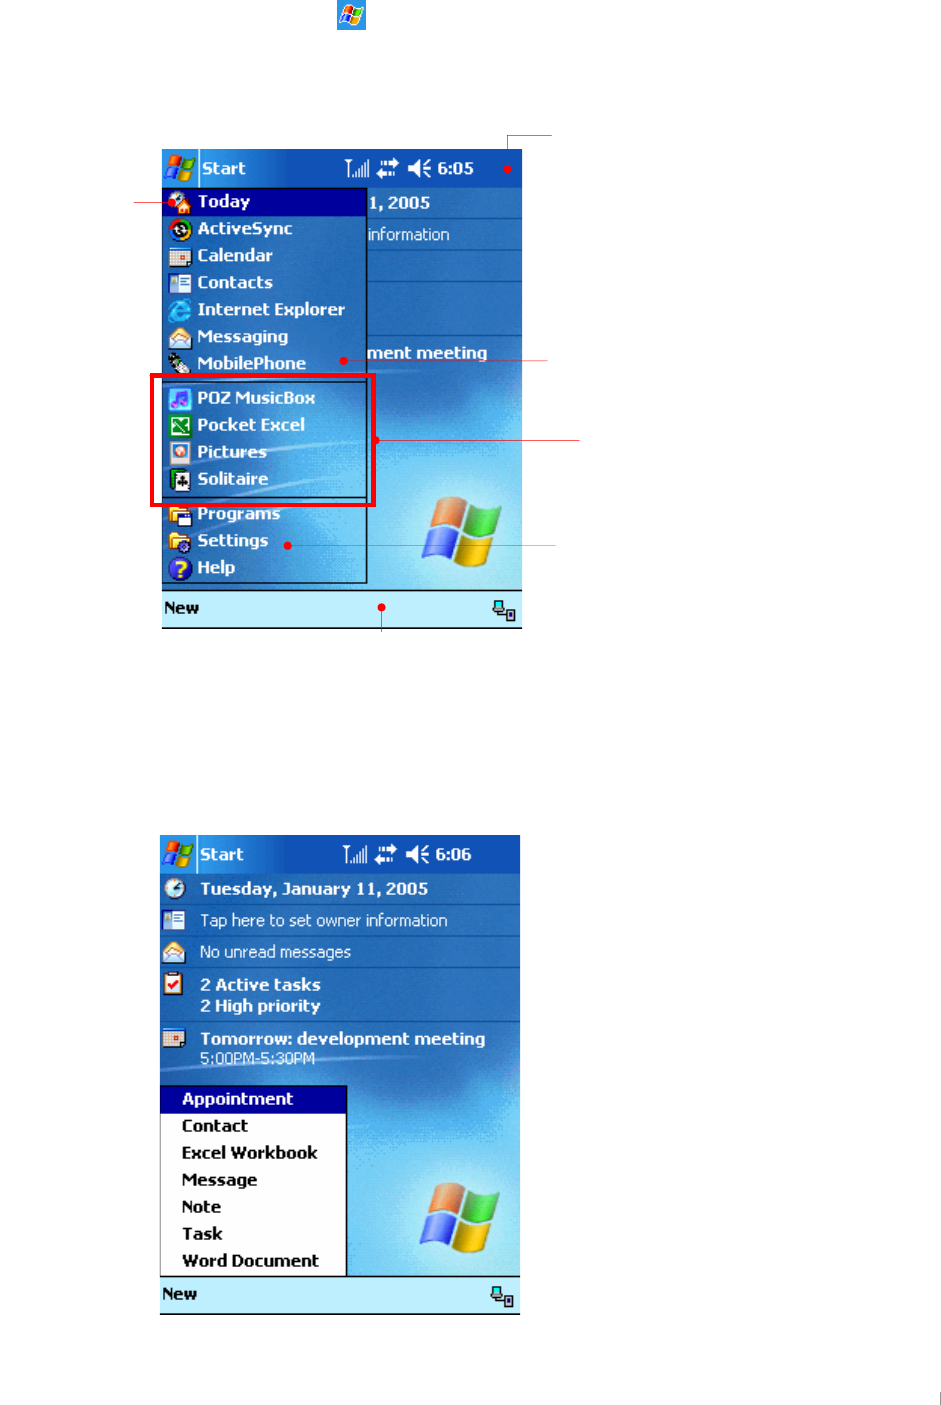
Using Today Screen
hGGG~G¡SGGGGGGG
GGGGwjGGG¡GG
tGhzGGGGGGGUG
G
G
G
G
G
G
G
G
G
G
G
G
G
G
G
G
G
G
G
G
G
G
Enter your personal information which is not
synchronized with your desktop PC.
Start menu
Synchronize today with your desktop PC through
A
ctiveSync.
Command bar
Navigation bar
G|˅GtG G YTXY
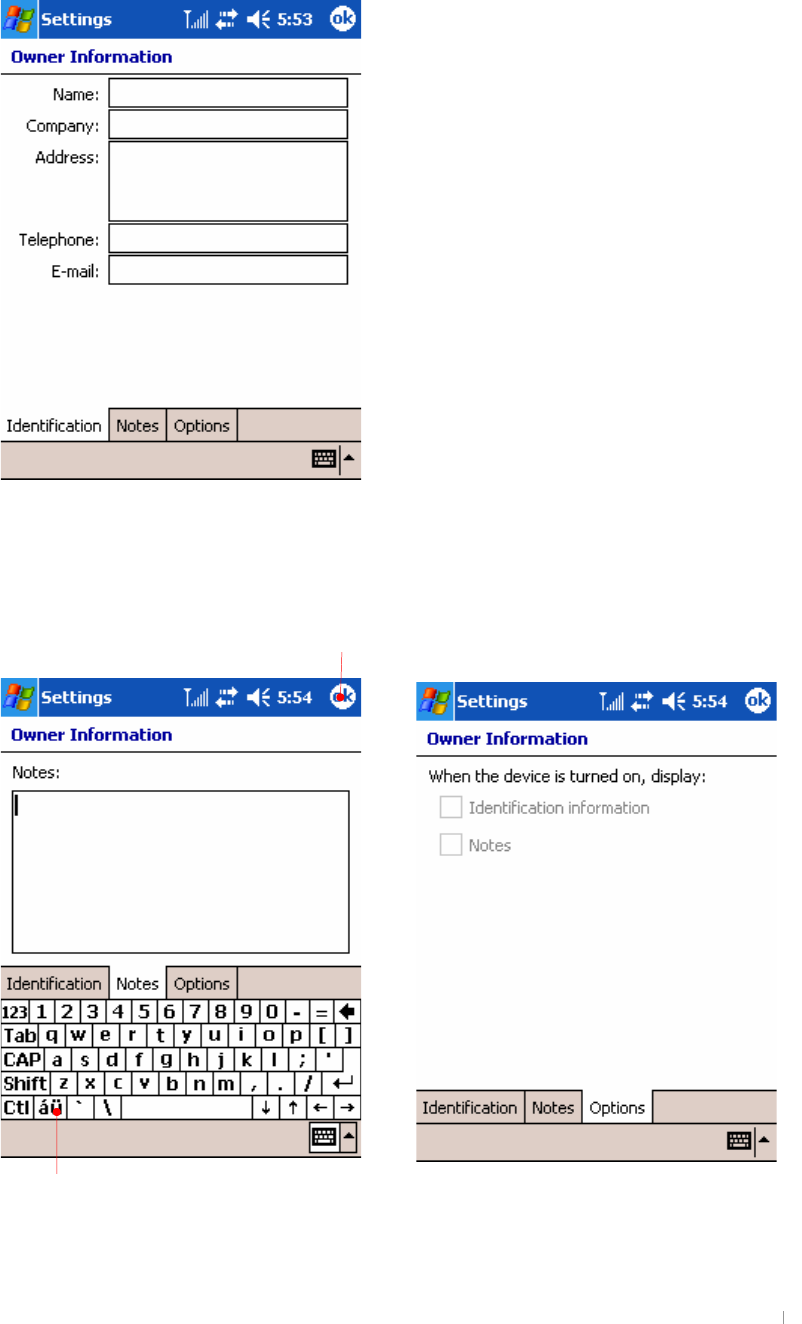
IgYf=bZcfaUh]cb
Now, you are ready to enter Owner information. Tap Owner information to have
next screen.
G
G
G
G
G
G
G
G
G
G
G
G
G
G
G
G
{GGGGGGGGGGGGG
GUGmGGGGGGSGG
GZUG
G
G
G
G
G
G
G
G
G
G
G
G
G
G
G
G
G
G
G
G
special characters
Tap OK to save the current screen.
GjGYGnGzG G YTXZ
Jc`iaY
{GGGGGGGGGGGUG G
G
G
G
G
G
G
G
G
G
G
G
G
G
G
G
G
G
H]aY
{GGGGGGGGGGGGGSGGG
GUG G
G
G
G
G
G
G
G
G
G
G
G
G
G
G
G
G
G
G
G
G
G
}GaGGGGGGGGG
GGGGUG
uGG
G|˅GtG G YTX[
G
{GGGGGGGUG G
G
zGGGGUG
mGSGGGGGUG
#
#
#
#
#
#
#
#
#
#
#
#
#
#
#
#
#
#
GGGGGGGUG
#
#
#
#
GjGYGnGzG G YTX\
CdYbh\YfYWYbh`migYXdfc[fUaghUfhh\Ydfc[fUamcikUbh
XU {GGzG GUG
YU zGGGGGGGGGGzGGGGG
GGGGGUG
G
CdYbdfc[fUaX]fYWh`mmcikUbhZfcah\YHcXUmggWfYYb
{GˈuˉGGGjGGGGGGGGGG
{GUG
G
G
G
G
G
G
G
G
G
G
G
G
G
G
G
G
zGGGGGGGGGUG
uGi
G
zGGG
{GGzGG¡UG
jGiG
zGGGGGGU
G|˅GtG G YTX]
{GzG G G eGzGeGwGGeGtG G GG¡GGzG
GGGuGGGUG
{GvrGGGGUG
GjGYGnGzG G YTX^
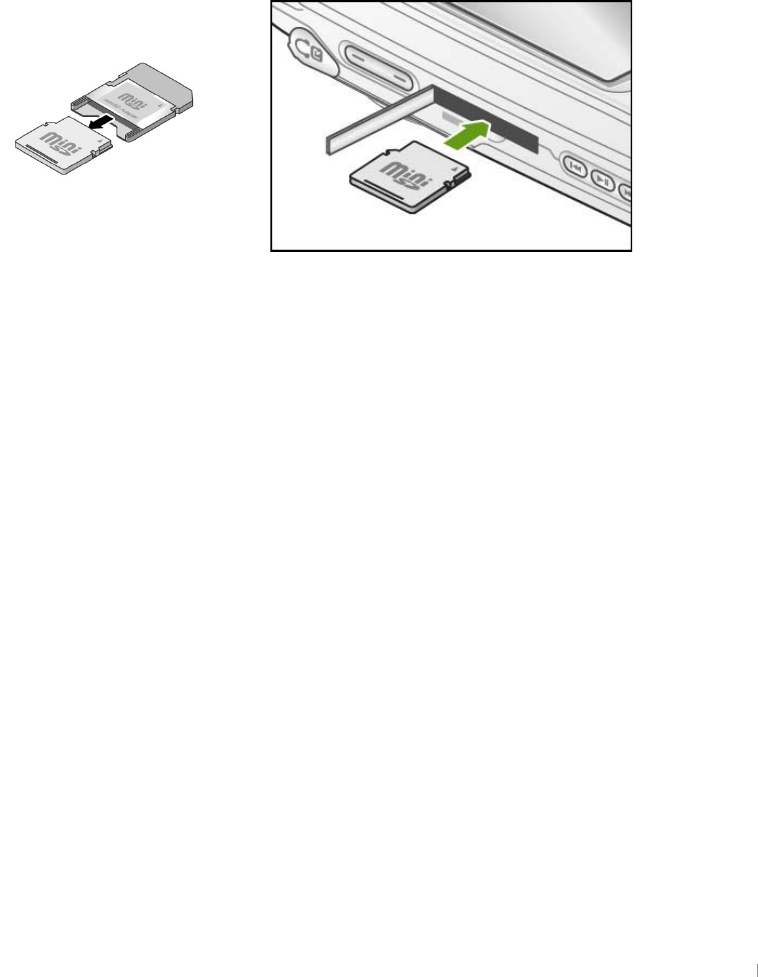
:]`Y9ld`cfYf
{GmGlGGGGGGG~GlGG
GwjUG G
zGGzGGeGwGeGmGlUG
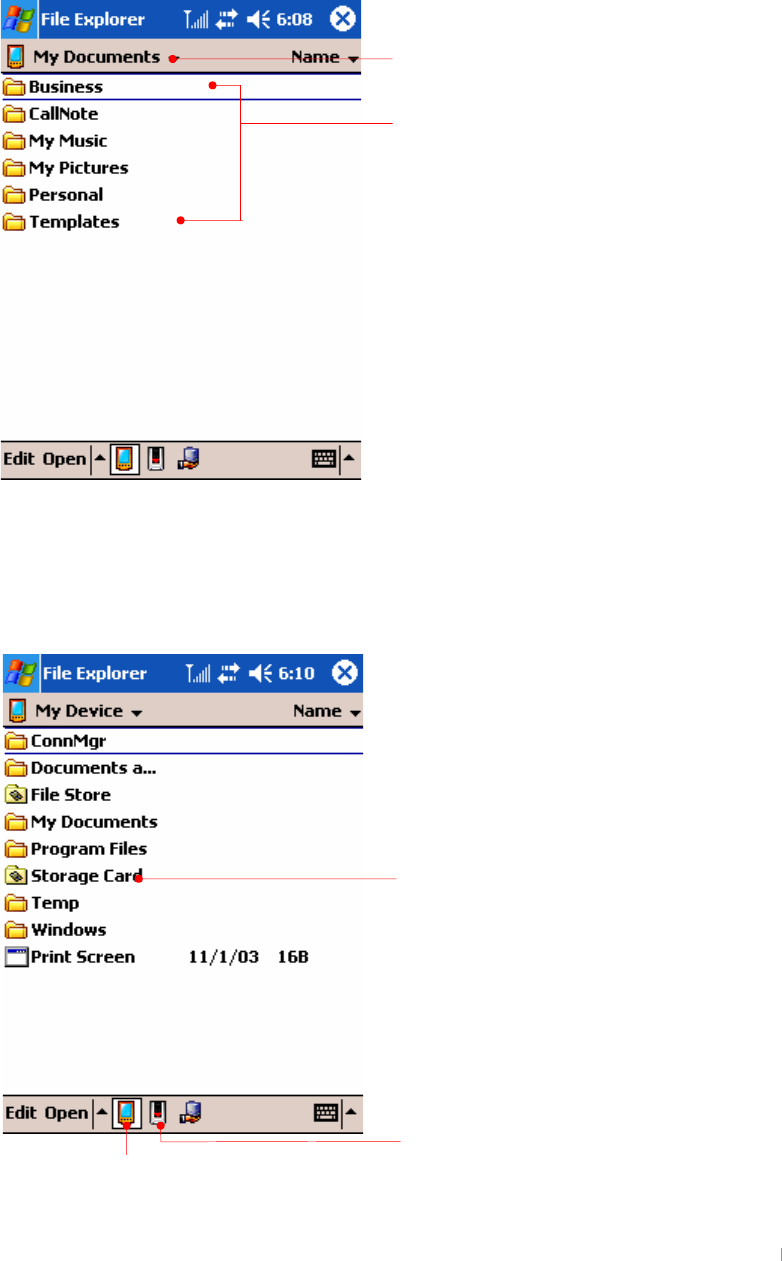
J]Ykh\YWcbhYbhgcZa]b]G8GYWifY8][]hU`WUfX
Insert mini SD cards into the mini SD card slot so that Storage Card folder
appears. Tap this folder to view the contents of mini SD card.
Select to go to the higher level of
a folder.
Select a folder below My
Device you want to move to.
tGzkGjG
tGGG
tGzGGG G
G|˅GtG G YTX_
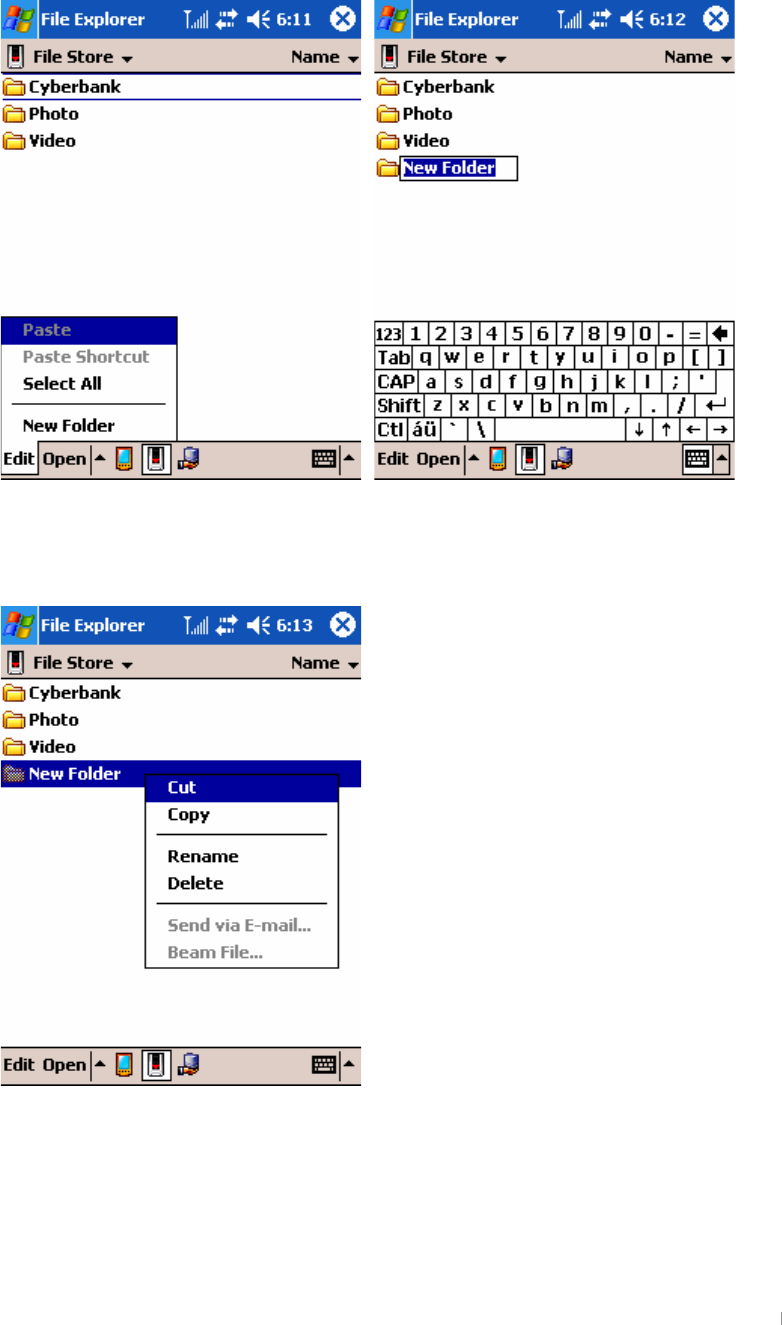
AU_YcfXY`YhYUbYkZc`XYf
Select the new folder on the Edit menu of the Command bar.
G
G
G
G
G
G
G
G
G
G
G
G
G
G
G
G
Enter the new folder name.
Select “Delete” on the pop-up menu you tap and hold on this folder to delete
this folder.
G
G
G
G
G
G
G
G
G
G
G
G
G
G
G
G
G

GjGYGnGzG G YTX`
7cdmUbXDUghY
Tap and hold the file you cut, copy, rename and delete to have Pop-up menu
displayed. Also tap and hold files or folders to have a little different one from a
pop-up menu that includes new folder.
Now we show you an example of process where we copy a file from a folder
and paste it to another folder.
G
Tap and hold a file you copy to have Pop-up menu displayed and tap Copy.
Select My Device you want to paste the copied file to. On the My Device folder,
tap and hold the empty space to have pop-up menu that includes Paste.
Select “Paste” on the text menu.
G
Tap and hold a file you copy to have Pop-up
menu displayed and tap Copy.
{GGGTGG

G|˅GtG G YTYW
G
Managing Memory
Your device includes three kinds of memory:
z 160 MB of ROM,
z 64MB of storage and program memory (RAM),
z optional SD memory cards.
ROM(32MB OS + 128 MB File Store)
This is a nonvolatile memory; that is, it will not be erased even if your device
loses power. In other words, ROM is composed of 32MB memory and 128MB
File Store.
For more information on backing up your device to the File Store, see “Backing
Up and Restoring Data” in chapter 4.
Storage and Program Memory (64MB)
The volatile RAM memory on your device is allocated between storage memory
and program memory. The operating system automatically manages the
allocation between storage and program memory; however, in some
situations—such as when memory is low—it may not be able to adjust the
memory properly. Bad sectors amongst the 64 Mb of RAM memory may cause
shortages of memory.
If you receive a message stating that storage or program memory is
unavailable, try the following solutions.
ൟ To increase storage memory, you can
pGSGGGGGGGmGzUG G
iGGGGzkGGSGGGGGG
GGGUG G
yG~GGGGGGGpGlG
UG
Wkh#Iloh#Vwruh#dsshduv#xqghu#wkh#P|#Ghylfh#iroghu#ri#|rxu#ghylfh1#Ilohv#
vwruhg#lq#wkh#Iloh#Vwruh#duh#qrw#lqfoxghg#zkhq#|rx#edfn#xs#|rxu#ilohv#xvlqj#
DfwlyhV|qf#ru#wkh#srfnhw#edfnxs#dssolfdwlrq1#
Wkh#Iloh#Vwruh#lv#qrq0yrodwloh#phpru|#vr#wkdw#lw#zloo#qrw#eh#hudvhg#diwhu#
shuiruplqj#kdug0uhvhwwlqj1#Krzhyhu/#zkhq#|rx#plvwdnhqo|#hudvh#wkh#vxe0
iroghu#ri#|rxu#Iloh#Vwruh#iroghu#zkhuh#wkh#vrph#surjudpv#duh#lqvwdoohg#iurp#
|rxu#Frpsdqlrq#FG/#|rx#kdyh#wr#uh0lqvwdoo#wkhp#iurp#Frpsdqlrq#FG1#
GjGYGnGzG G YTYX
ൟTo increase program memory, you can
|G{GtGGGtGGGGGGG
GGUGpGGSGGGGG
GGUGoSGGGSGGGGG
GGGGGGSGGGGGGGG
GUG
yGGGGGSGGGGzkGGOG
PSGGGGUG G
Mini SD Memory Cards
Mini SD memory cards are small, removable flash storage cards that enable
you to expand the memory of your device. You can use mini SD memory cards
for backup storage, archives, or to transfer large files to other devices. Mini SD
cards can be purchased from a variety of third-party vendors.
G
G
G
G
G
G

GChapter 3 Pocket PC Overview 3-1
pGGGGGGGa
- Using the Input Panel
- Block Recognizer
- Keyboard
- Letter Recognizer
- Transcriber
Chapter 3
Using Input Panel
The information contained in this document is provided “as is” and is
subject to change without notice.G

GUser’s Manual 3-2
Using the Input Panel
G
Use the Input panel to enter information in any program on your device.
You can write using keyboard, Block Recognizer, Letter Recognizer, or
Transcriber. In any case, the characters appear as typed text on the
screen.
To show or hide the Input panel, tap the Input panel button. Tap the arrow
next to the Input Panel button to see your choice.
G
G
G
G
G
G
G
G
G
G
G

GChapter 3 Pocket PC Overview 3-3
Block Recognizer
XU {GGGGGGpGGSGGGGiG
y¡UG
YU ~GGGGGUG
~GGGGSGGGGGGGG
GGGUGmGGGGGiG
y¡SGGiGy¡SGGGGGG
GGGGGUG
G
G
Punctuation & symbol
S
p
ace
English entry area Number entry area
Return
Back space
Input Panel for Block Recognizer
GUser’s Manual 3-4
Keyboard
G
G
G
G
G
G
G
G
G
G
G
G
G
G
G
G
G
G
G
G
G
G
G
ZU {GGGGGGpGGSGGGG
rUG
[U vGGGGGSGGGGGGUG
G
G
Back space
Return
Space Input Panel for Keyboard
Punctuation entry
GChapter 3 Pocket PC Overview 3-5
Letter Recognizer
G
G
G
G
G
G
G
G
G
G
G
G
G
G
G
G
G
G
G
G
G
G
G
XU {GGGGGGpGGSGGGG
sGy¡UG
YU ~GGGGGUG
~GGGGSGGGGGGGG
GGGUGmGGGGsG
y¡SGGsGy¡GGGGGG
GGGGGUG
G
G
Back space
Return
Space
Punctuation & symbol entry
Number entry areaEnglish upper/lower case entry area
Input Panel for Letter Recognizer
GUser’s Manual 3-6
Transcriber
{GG G GGGGGGGUG
G
G
Tap here to select Transcriber
backs
p
ace
Letter shapes
Settings
Display the current mode.
Mini keyboard.
Selected character
Select one of 3 options according to how often you use
the selected shape.
Tap these arrows to see more choices.

GChapter 3 Pocket PC Overview 3-7
Tap the punctuation & symbol entry button to have the next window
displayed.
With Transcriber you can write anywhere on the screen using the stylus
just as you would on paper. Unlike Letter Recognizer and Block
Recognizer, you can write a sentence or more of information; then, you
pause and let Transcriber change the written characters to typed
characters.
XU {GGGGGGpGGSGGGG
{UG
YU ~GGGGUG
mGGGGG{SGG{G
GGGGGGGGTGGGG
UG

GUser’s Manual 3-8
Tap the Settings button to have the next window displayed.
G
G
G
G
G
G
G
G
G
G
G
G
Select the width of pen and see
sample displayed below
Add space after entry
Move the slide to right/left side to select speed
and quality.

GChapter 4 Connecting to Desktop PC 4-1
To get the most from your device, you will want to connect to your
desktop or notebook PC. This chapter describes how to establish the
connection between your device and your desktop PC, and how to
synchronize and transfer files between your device and your desktop (or
any PC that has Microsoft ActiveSync installed).
G ~GtGYWWYG ~GtGYWWZG G
hzGZU_G ̺G ̺G
hzGZU]G
̺G
G
hzGZU\G
̺G
G
Because Windows Mobile 2003 version is installed on your device, you
have to install ActiveSync 3.8 version or later on your desktop PC instead
of ActiveSync 3.6 or ActiveSync 3.5.
pGGGGGGGa
- Install Microsoft ActiveSync and establish a partnership
- Full Backup & Restore using Backup/Restore of ActiveSync
- How to install programs using ActiveSync
Chapter 4
Connecting to Desktop
The information contained in this document is provided “as is” and is
subject to change without notice.G

GUser’s Manual 4-2
=bghU``A]WfcgcZh5Wh]jYGmbWUbXYghUV`]g\UdUfhbYfg\]d
G
G
G
G
G
G
G
G
G
G
G
G
G
You can download ActiveSync 3.8 or later from followings :
z
jGjkG
z
jGGG
UUU
G
z
tGGG
UUVV
G
ActiveSync 3.8 file is named as Setup.exe on companion CD, and
ActiveSync 3.8 file is named as MSASYNC.EXE when it is downloaded
from web site.
G
G
G
G
To use your device, cradle your device and connect USB cable and the
power cable with your desktop computer physically. Insert the Companion
CD into CD-ROM drive of your desktop computer.
From your initial screen of Companion CD, click the Start button > Install
Microsoft ActiveSync 3.8.
G
G
G
G
G
To get the most from your device, you have to connect to your desktop or
notebook PC. Microsoft ActiveSync enables you to synchronize the
information on your desktop PC with the information on your device. In
addition, you can back up data from your device to your desktop PC and
On desktop computer, if Autorun doesn’t work, Microsoft
ActiveSync setup can be launched by suing the run command.
Click on Start, and then Run. In the text dialog box, enter the path
for the setup file. Typically, you would type X:૪Setup.exe, where
X is the letter for your CD-ROM drive.
zGyG
z
~GYWWWGUG
z
tGvGYWWYGUG
z
vGYWWWGUG
z
tGpG[UWXGzwXGGGUG
z
XYG¥G]\GtiGGGGG G
z
`GGY\TGGSGpkhGGG|ziO|GzGiPG
G G
z
jkTyvtGG
z
}nhGGGGY\]GGGGG
z
rGMGtG
{GGGGGGGGhzGZU_SGG
G~GYWWWGwSGGGGGGGG
GGGGGvzGGGUG
GChapter 4 Connecting to Desktop PC 4-3
restore this data to your device, and copy files between your device and
desktop PC. Before you begin synchronization, install ActiveSync on your
desktop PC from the provided Companion CD. ActiveSync is already
installed on your device.
After installation is complete, the ActiveSync Setup Wizard helps you
connect your device to your desktop PC, establish a partnership so you
can synchronize information between your device and your desktop
computer, and customize your synchronization settings.
This is an explanation on how to install ActiveSync 3.8, based on
Windows 2000 Professional, so you may have a little bit different screen
on the different OS versions from below.
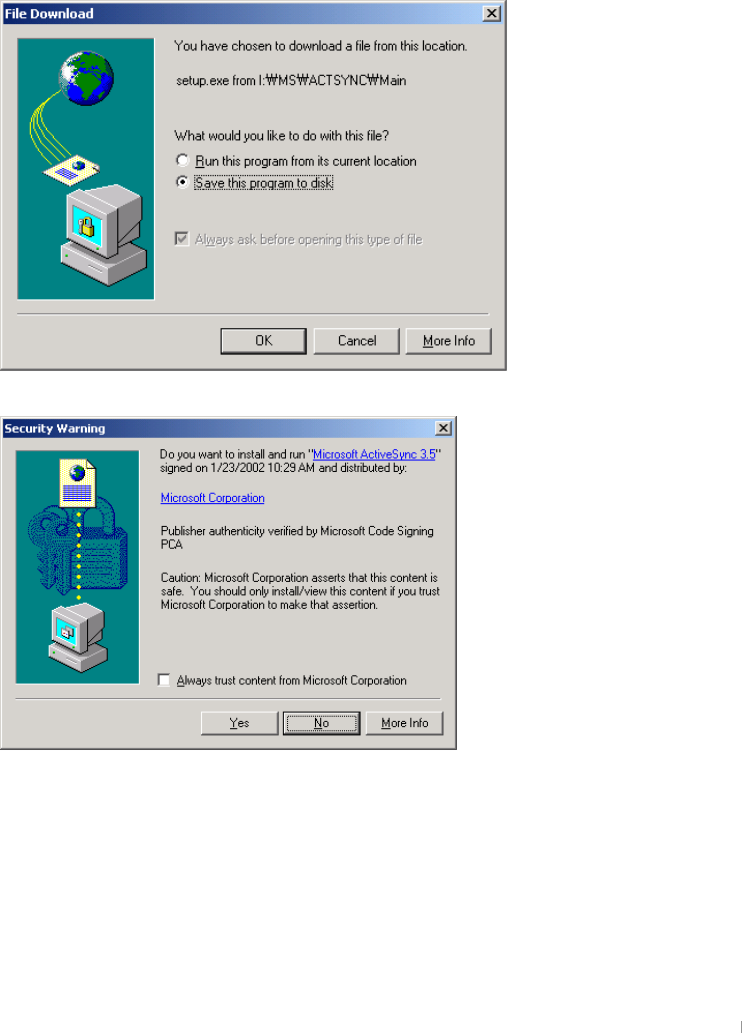
Select Run this program from its current location to install without saving.
GUser’s Manual 4-4
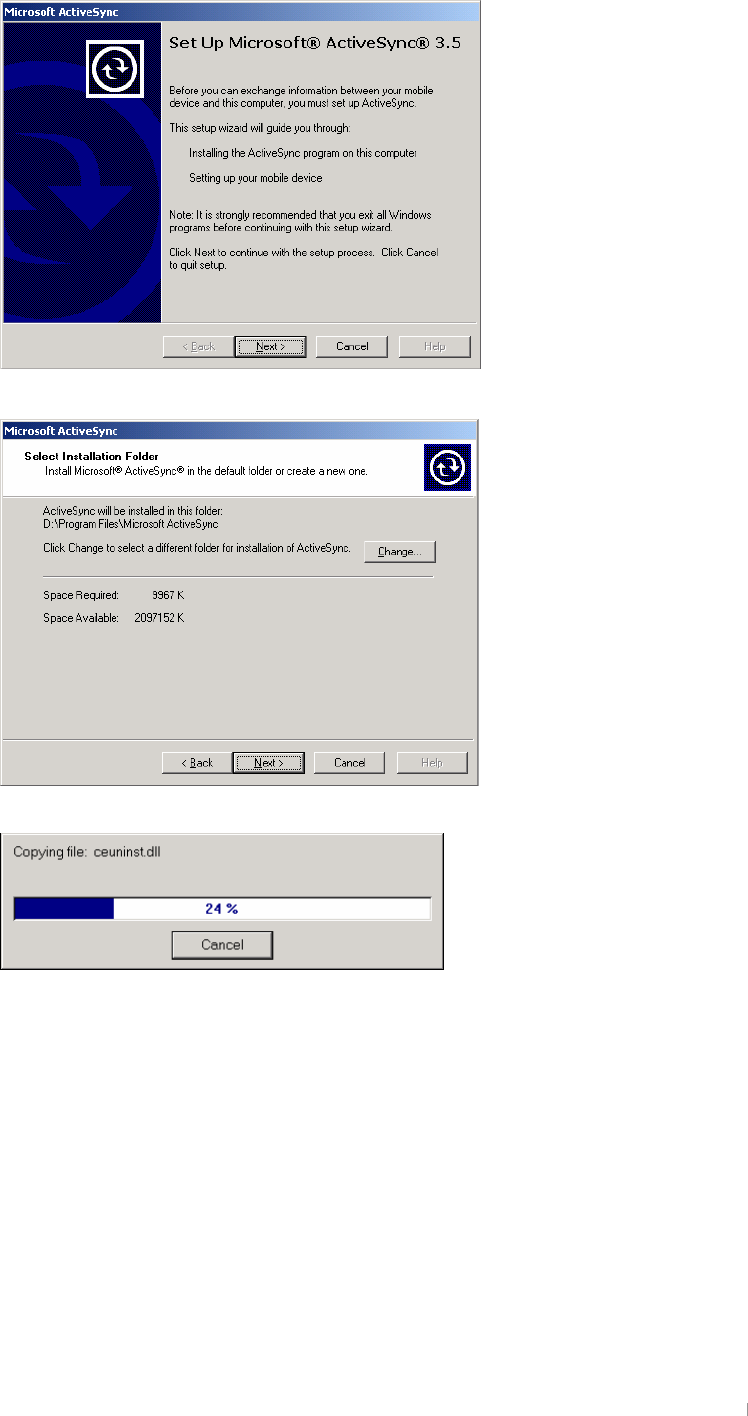
Click Yes to move to the next screen.
Click Next.
Click Next.
When the process becomes 100%, automatically it will go to the next
screen.
GChapter 4 Connecting to Desktop PC 4-5
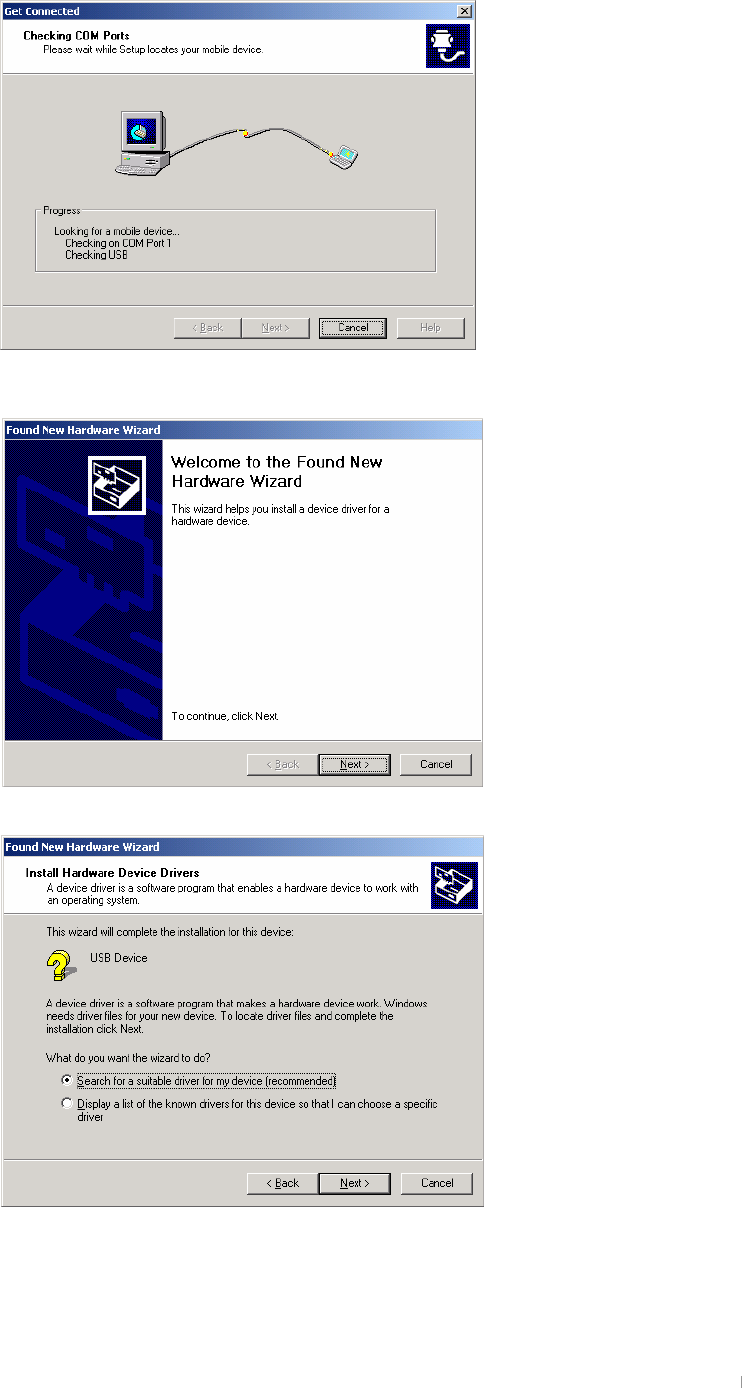
Connect USB port to desktop PC and the power cable to cradle. Then
seat your device into USB cradle.
A wizard of finding a new hardware will begin automatically as below.
Click Next.
Click Next.
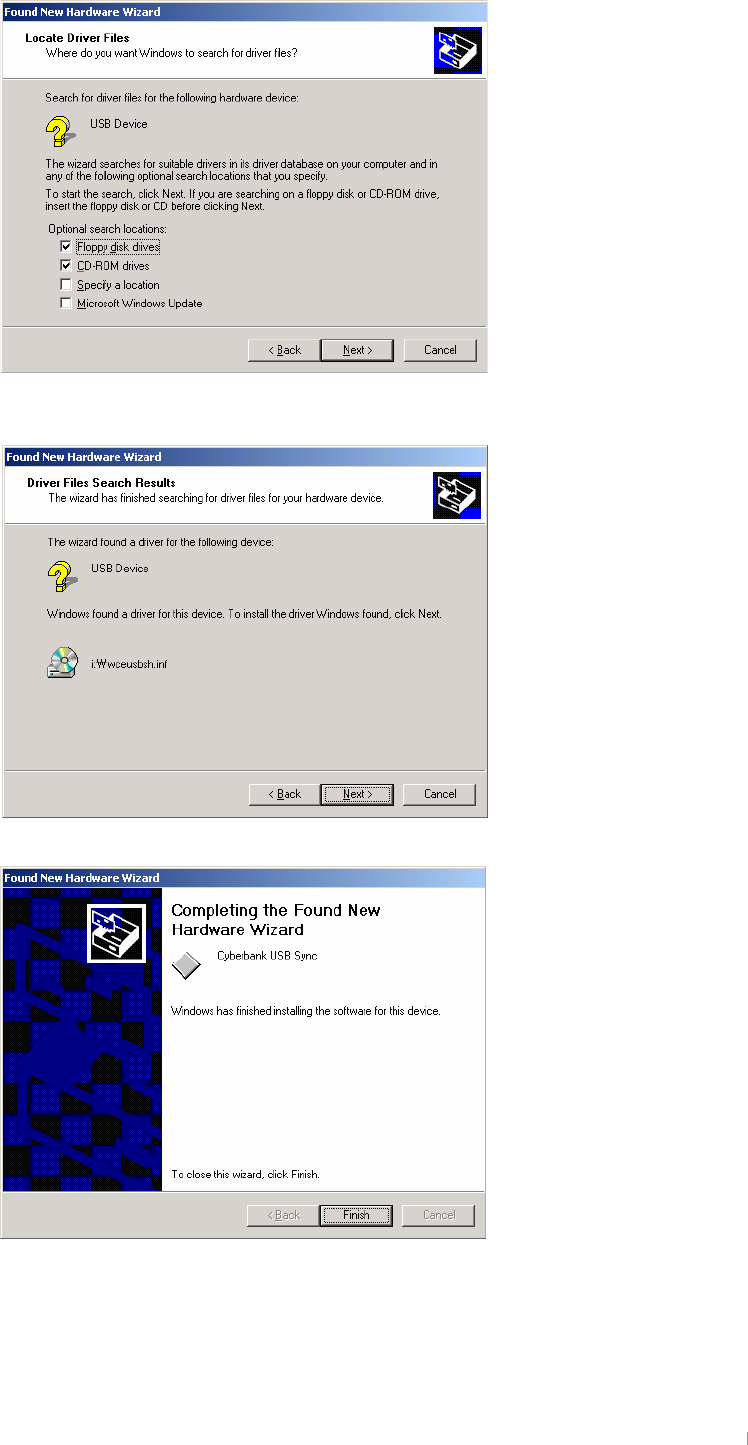
GUser’s Manual 4-6
Select CD-ROM drive and click Next.
Click Next.
GChapter 4 Connecting to Desktop PC 4-7
Click Finish and automatically the synchronization process will begin. And
then the following processes will appear on your desktop PC.
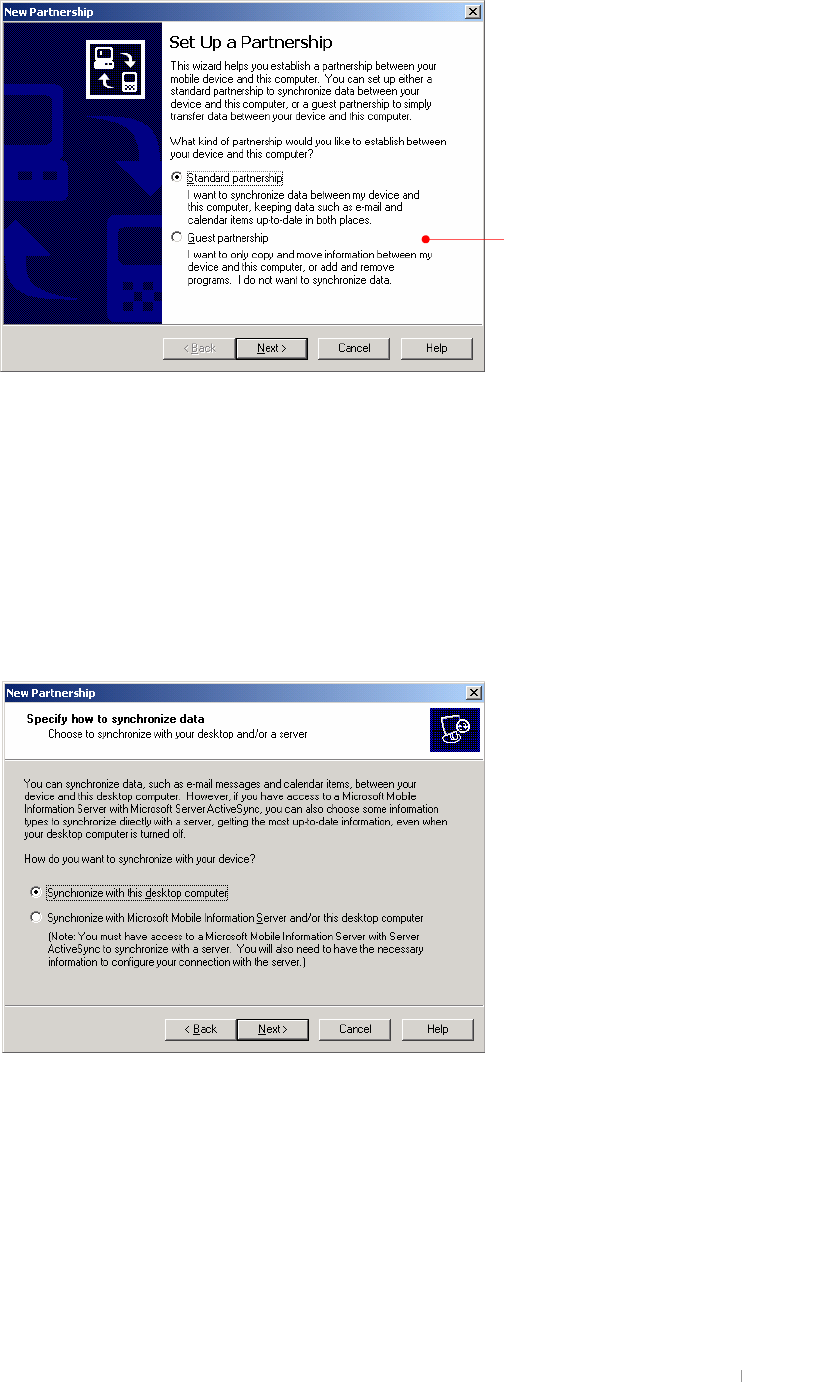
Instead of synchronizing, you may set up your device as guest. Even
though a guest, you may transfer files and data between your device and
your desktop PC.
When you perform hard reset or re-establish a new partnership after
deleting the existing partnership, you can select one of the options.
A desktop PC can establish partnerships with several devices while one
device can establish partnerships with up to two desktop PCs. However,
you cannot synchronize two devices with one desktop PC at the same
time.
Click Next.
Now you are ready to synchronise
between your device and the desktop PC.
It may take a while for synchronisation to
finish. When set up as a Guest, you can
find files by pressing the Explore button
on the Toolbar.
GUser’s Manual 4-8
Click Next.
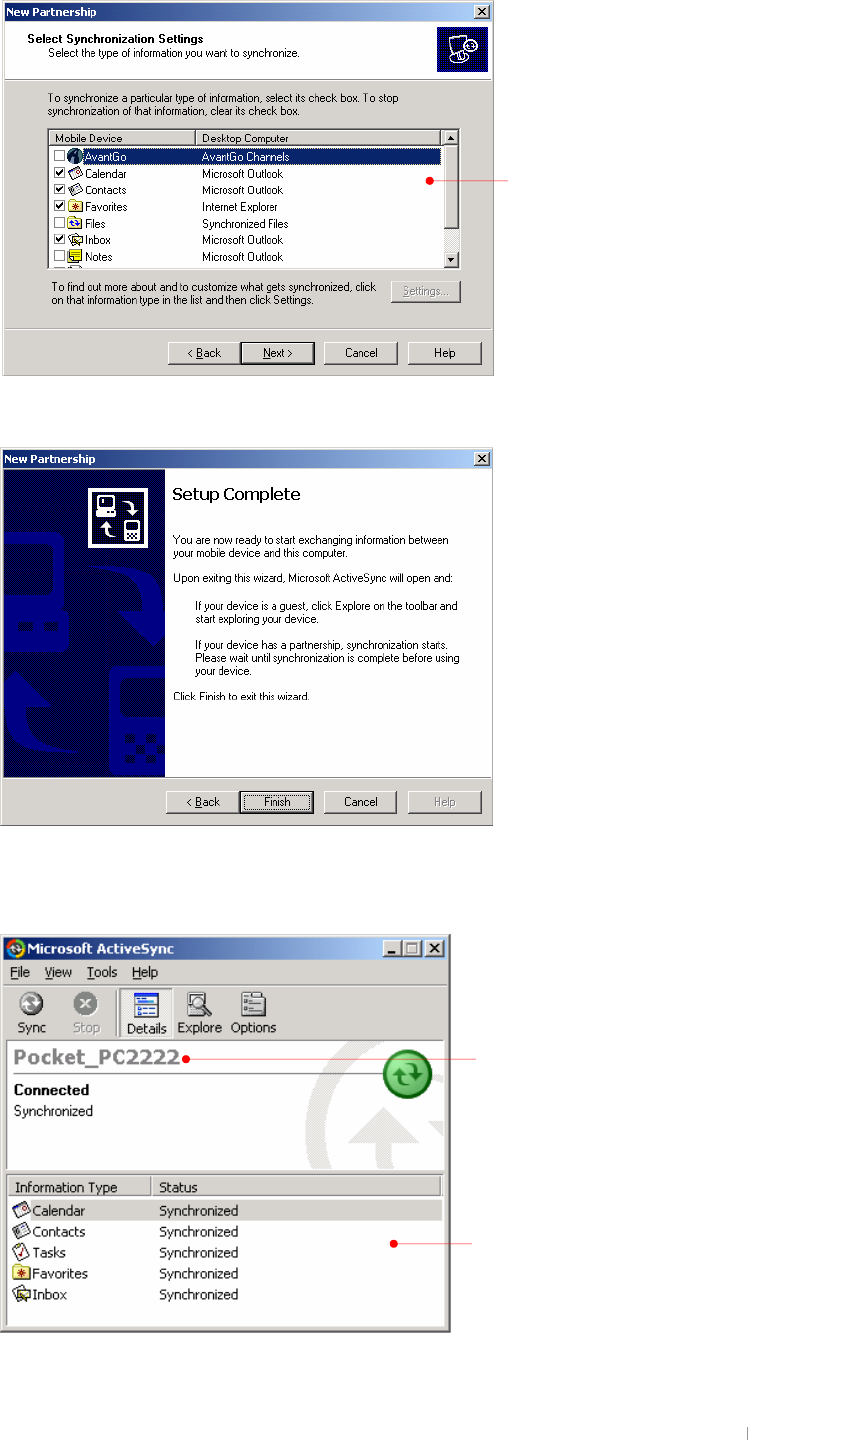
Click Finish. Now, you are ready to establish a new partnership.
You will have the Microsoft ActiveSync screen as shown below.
When you perform hard reset on your device, you need to change the
This is the partnership name that is
established with your desktop PC through
ActiveS
y
nc.
These are the items you have selected for
synchronizing with desktop PC.
Select any items you want to synchronize
and otherwise, deselect the others.
GChapter 4 Connecting to Desktop PC 4-9
partnership name that is preset as Pocket_PC. (for example :
Pocket_PC1, Pocket_PC2, Pocket_PC3, Pocket_PC4)
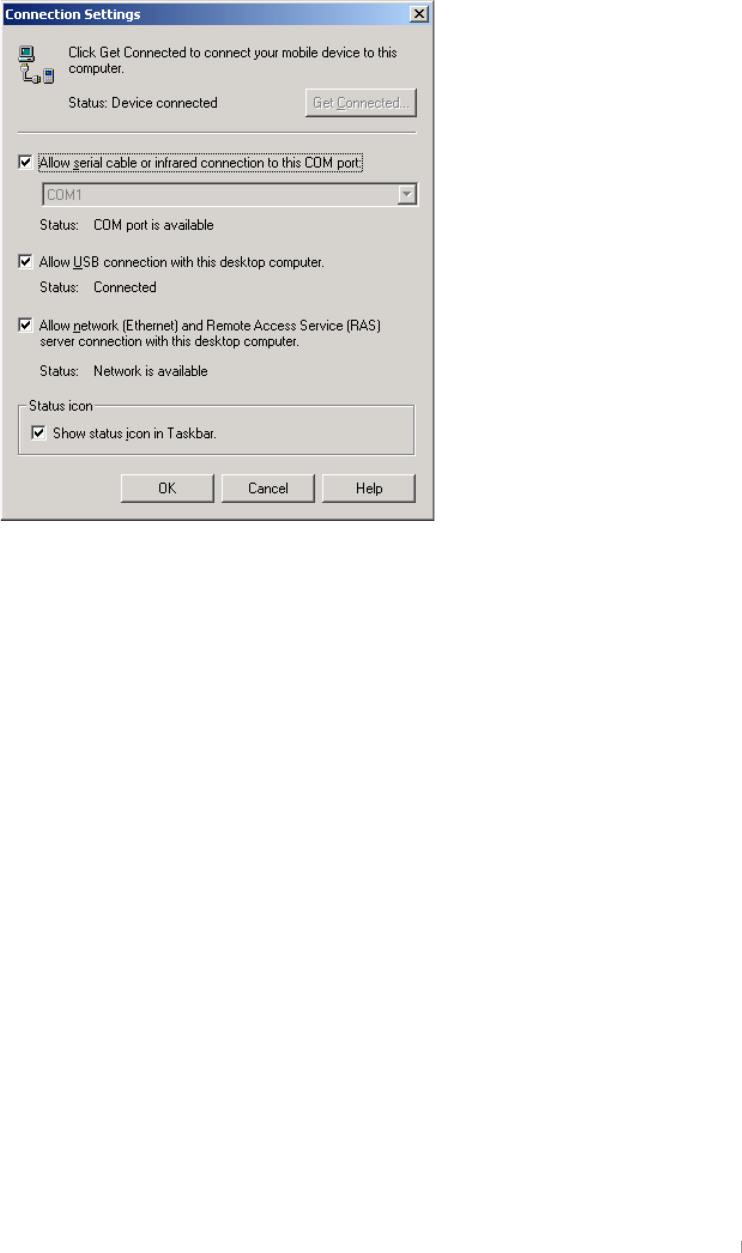
When you have some difficulties synchronizing your device with your
desktop PC, click the Connection Settings on the File menu to have the
Connection Settings screen displayed as below.
GUser’s Manual 4-10
Synchronization compares the data on your device with your desktop PC
and updates both computers with the most recent information. For
example, you can synchronize Microsoft Word and Microsoft Excel files
between your device and desktop PC. Your files are automatically
converted to the correct format. And you can synchronize e-mail
messages in Inbox on your device with e-mail messages in Microsoft
Outlook on your desktop PC. And you can keep your Pocket Outlook
Contacts, Calendar, and Tasks databases up-to-dated by synchronizing
your device with Microsoft Outlook data on your desktop PC. Use the
ActiveSync options to select which information should be synchronized
and to control how much data is synchronized. By default, ActiveSync
does not automatically synchronize all types of information.
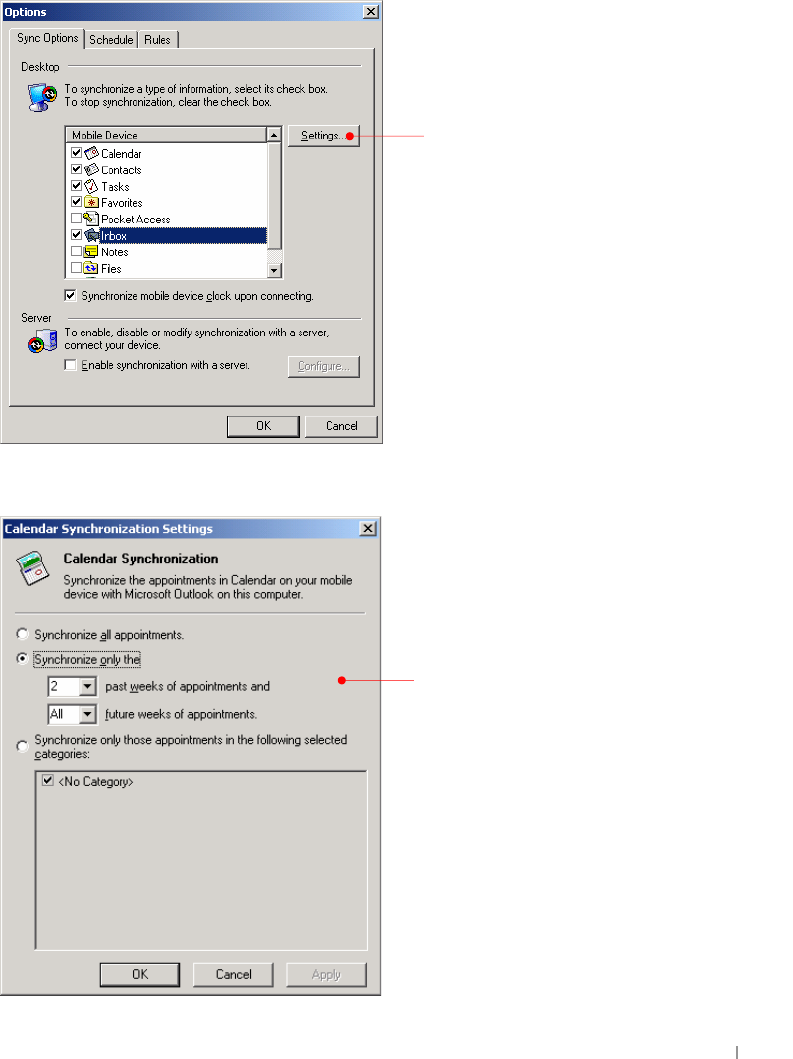
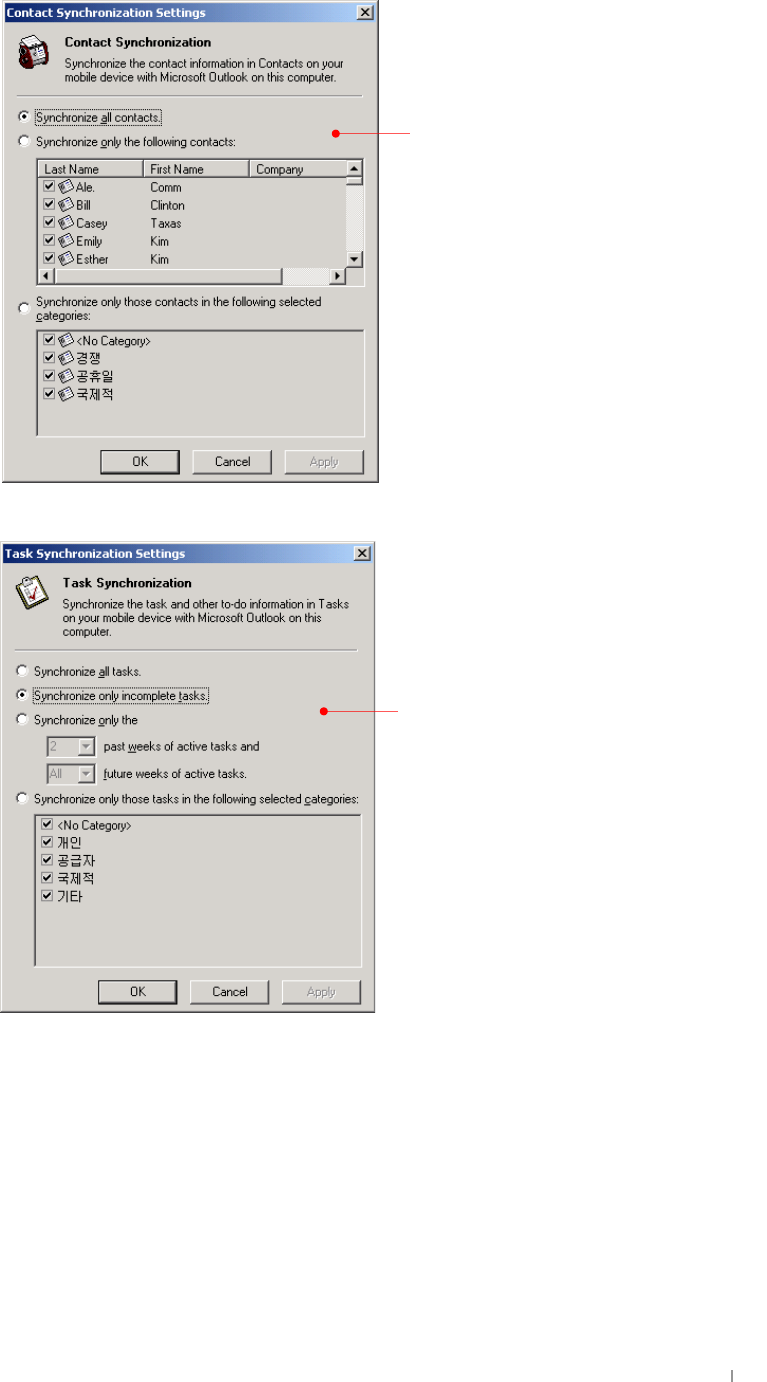
Select Calendar and click the Settings button.
Tap Settings to customize
the selected item.
Select any option you want to
customize Pocket Calendar
during the synchronizations.
GChapter 4 Connecting to Desktop PC 4-11
Select Contacts and click the Settings button.
Select Tasks and click the Settings button.
Select any option you want
to customize Pocket
Select any option you want
to customize Pocket Tasks

GUser’s Manual 4-12
Select Favorites and click the Settings button.
Select Inbox and click the Settings button.
You have to select the
folder you have made to
In this example, while
synchronizing, it is set as
copy at most 100 lines to
GChapter 4 Connecting to Desktop PC 4-13
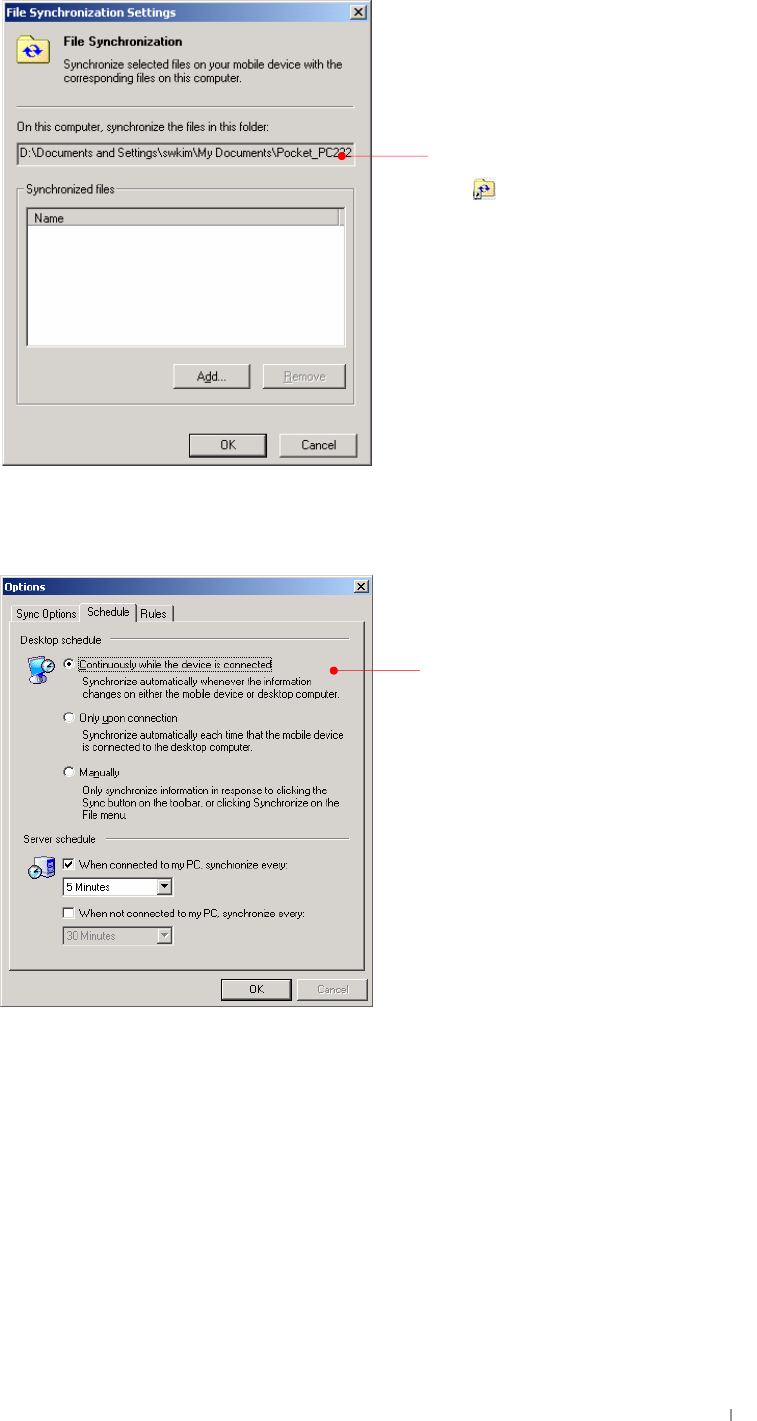
Select Files and click the Settings button.
After you customized ActiveSync and completed the first synchronization,
you can control when synchronization occurs by selecting a
synchronization mode.
Select one of the 3
options: continuously
This is the folder that
includes the file
synchronized with your
GUser’s Manual 4-14
Frs|/#Sdvwh#dqg#wudqvihu#ilohv#
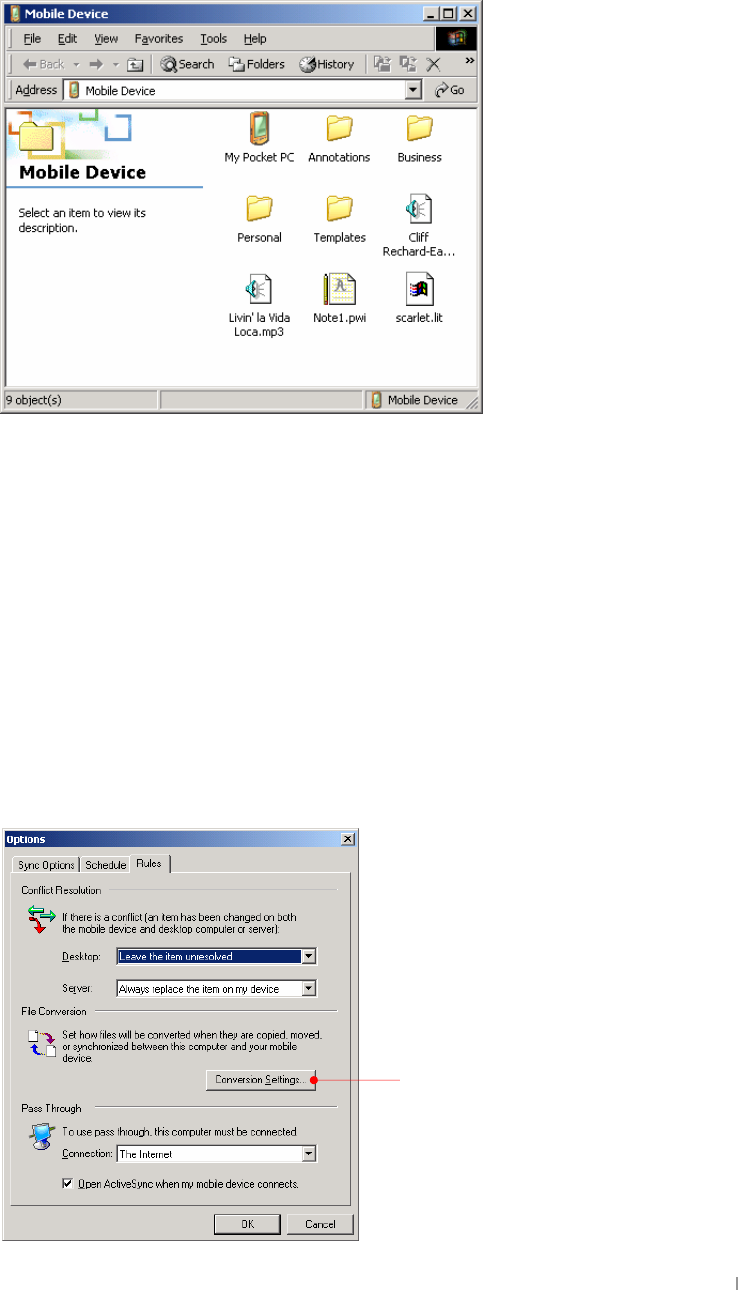
Select the file(s) you want to copy and select Copy on the Edit menu or
select Copy on the pop-up menu. For pasting file(s), select the Explore
button on the Microsoft ActiveSync screen of your desktop PC to have the
Mobile Device screen displayed as below :
First, select the folder you want to paste and select Paste on the Edit
menu or select Paste on the pop-up menu.
However, when you transfer file(s) between desktop PC and your device,
files created on your desktop PC may automatically need to be converted
before you can use them on your device, and also files created on your
device may automatically need to be converted before you can use them
on your desktop PC. However, when you work with software such as
ClearVue Presentations or ClearVue Image, files should not be converted
to the different format. In other words, those software use the format
identical to the corresponding software of your desktop PC. That’s why
we need to change the settings of converting file format when files don’t
need to be converted before you can use them on your device.
You can change the settings as follows :
Tap the Conversion
Settings to change the
options for conversion
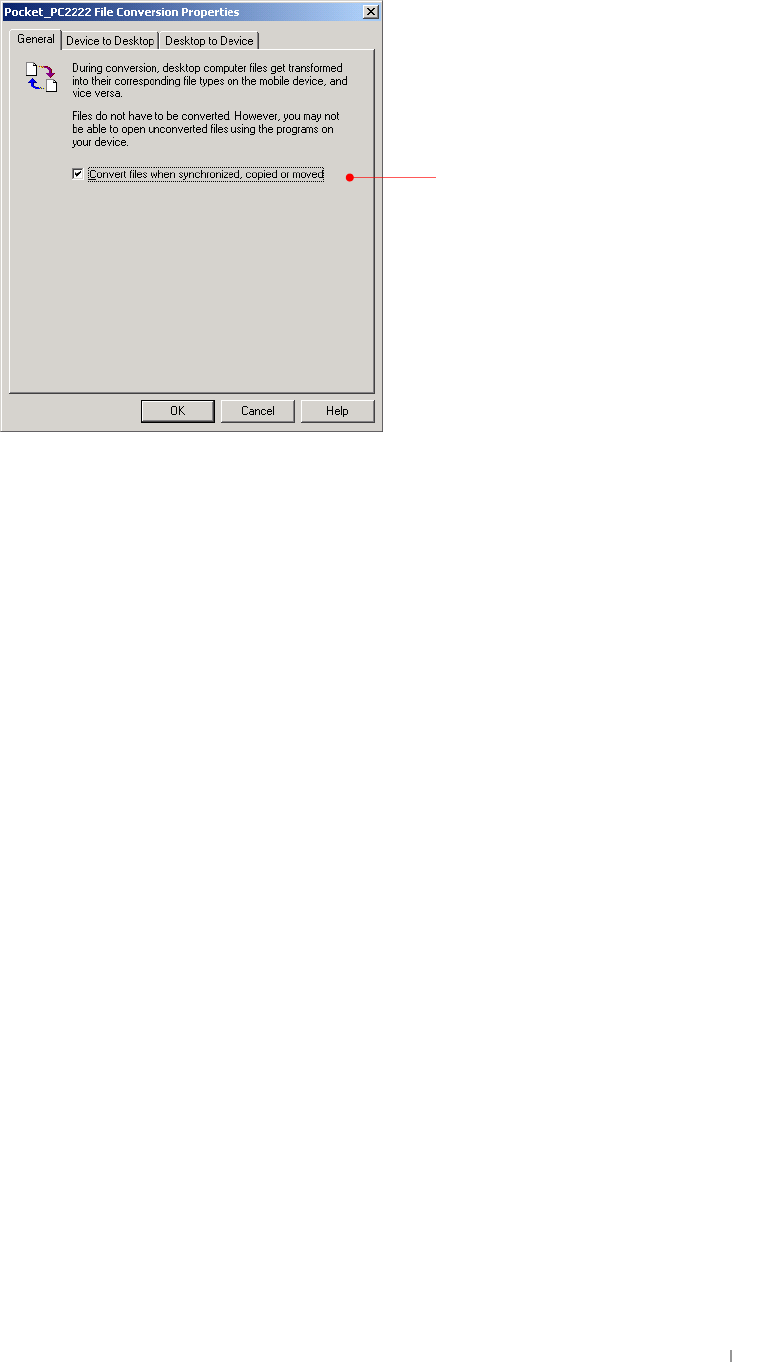
GChapter 4 Connecting to Desktop PC 4-15
Select Conversion Settings.
Deselect this option box
not to chan
g
e the file
GUser’s Manual 4-16
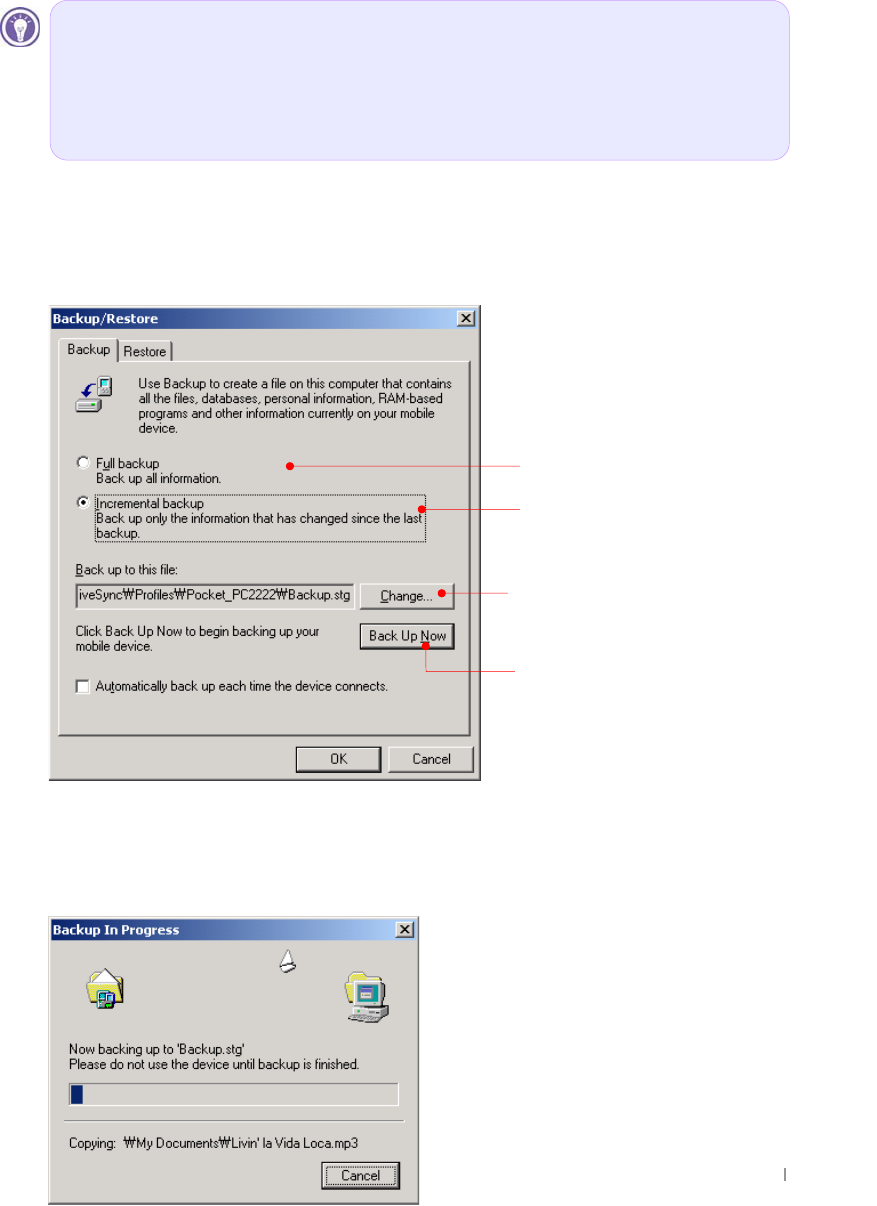
Full Backup & Restore using Backup/Restore of ActiveSync
You can back up files, database, PIM data and programs installed in RAM
to your desktop PC using Microsoft ActiveSync, and restore them when
needed.
Backup can either be performed automatically when your device is
connected to your desktop PC, or manually whenever needed. Also, you
can back up updated or new data only or choose to back up all data.
G
G
Edfnxs#
1. Connect your device to desktop PC.
2. Tap Backup/Restore on the Tools menu of the ActiveSync screen.
3. Select “Full backup” or “Incremental backup” according to your needs.
4. You may need the backup file name and the folder when restoring your
backup file. Tap the Change button to confirm the folder.
5. Tap the Back Up Now button to begin.
Tap Back Up Now to begin.
Tap Change to
chan
g
e backu
p
name.
Full backup
Incremental backup.
Automatic backup is only possible when a Partnership is
established with a desktop PC. Only a manual backup is
possible when the partnership is established as Guest. For
more information on Backup/Restoring to and from a desktop
PC, see Microsoft ActiveSync Help.
GChapter 4 Connecting to Desktop PC 4-17
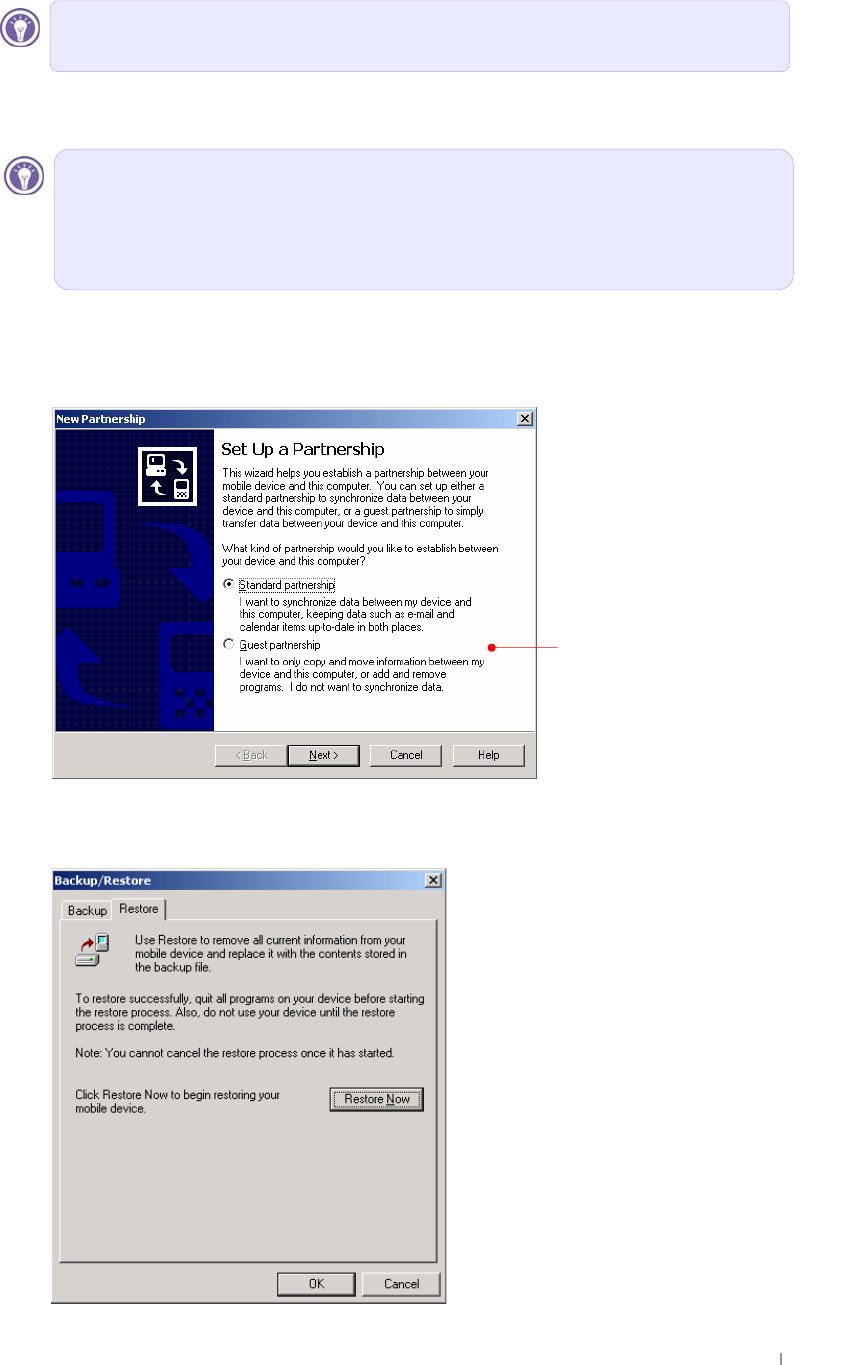
Uhvwruh#
1. Connect your device to desktop PC.
2. Close all programs running on your device.
3. Establish a partnership as Guest.
4. Tap Backup/Restore on the Tools menu of the ActiveSync screen,
and select the Restore tab.
Do not remove your device from the cradle or disconnect the
USB cable during backup.
As newly installed programs or new files created on your
device since your last backup will be lost after restore, you
should move them to your desktop PC or to File Store
(NAND Flash memory) before you restore data.
Select this options box
to set up your device
as guest.
GUser’s Manual 4-18
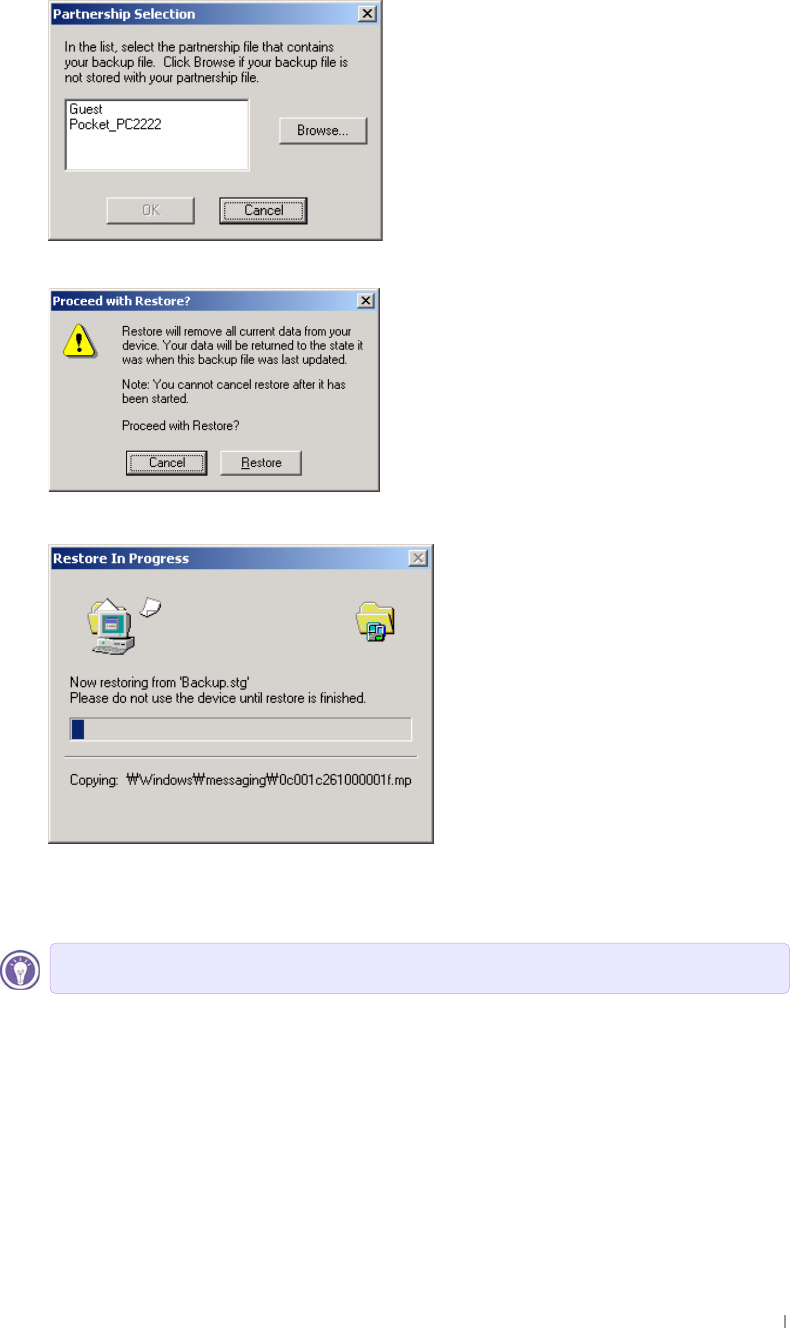
5. Tap the Restore Now button.
6. Select the backup file you want to restore and select OK to begin.
7. Click Restore to begin the restore process.
8. When completed, perform soft Reset on your device with your stylus
and seat your device on your cradle to synchronize.
Do not use your device until Restore is completed.

GChapter 4 Connecting to Desktop PC 4-19
How to install programs using ActiveSync
Xvlqj#Vhwxs1h{h#ru#Lqvwdoo1h{h#
1. Download the program to your desktop computer (or insert the CD or
disk that contains the program into your desktop computer).
2. Connect your device to your desktop PC.
3. If the program includes an installer program (typically named Setup.exe
or Install.exe), double-click the installer program on the desktop PC. The
installer program copies the necessary files to your device.
Xvlqj#fdelqhw#+-1fde,#iloh#
1. Download the program to your desktop computer (or insert the CD or
disk that contains the program into your desktop computer).
2. Connect your device to your desktop PC.
3. Use the ActiveSync Explore button to copy the cabinet (*.cab) file to the
Program Files folder on your device, and then double-tap the icon on your
device to install the program.
4. Refer to the Read Me file or documentation that came with the program
to be sure you have copied the necessary file(s). For more information on
copying files using ActiveSync, see ActiveSync Help.
GG

GChapter 5 Configuring Device 5-1
G
G
G
G
G
G
G
G
G
G
G
G
{GGGGGG¡GGGGG
zSGGGGGGGGG
GGGUG{GGGGG
GGGGGGGGGUG
G
pGGGGGGGaG
TGzG
Chapter 5
Configuring Device
{GGGGGGGGˈGˉGGG
GGGGUG
GUser’s Manual 5-2
Settings
G
vGGzGSGGzUG G GGGZGaGwSG
zGGjUG G
1. the Personal tab
G
G
G
G
G
G
G
G
G
G
G
G
G
G
G
G
GChapter 5 Configuring Device 5-3
{GGiGO PGGGGGGG[GG
GGGGGGUGGGGGG
GGGGGGUG
G
G
G
G
G
G
G
G
G
G
G
G
G
G
G
G
G
G
G
G
G
G
G
G
G
G
G
G
G
G
G
G
G
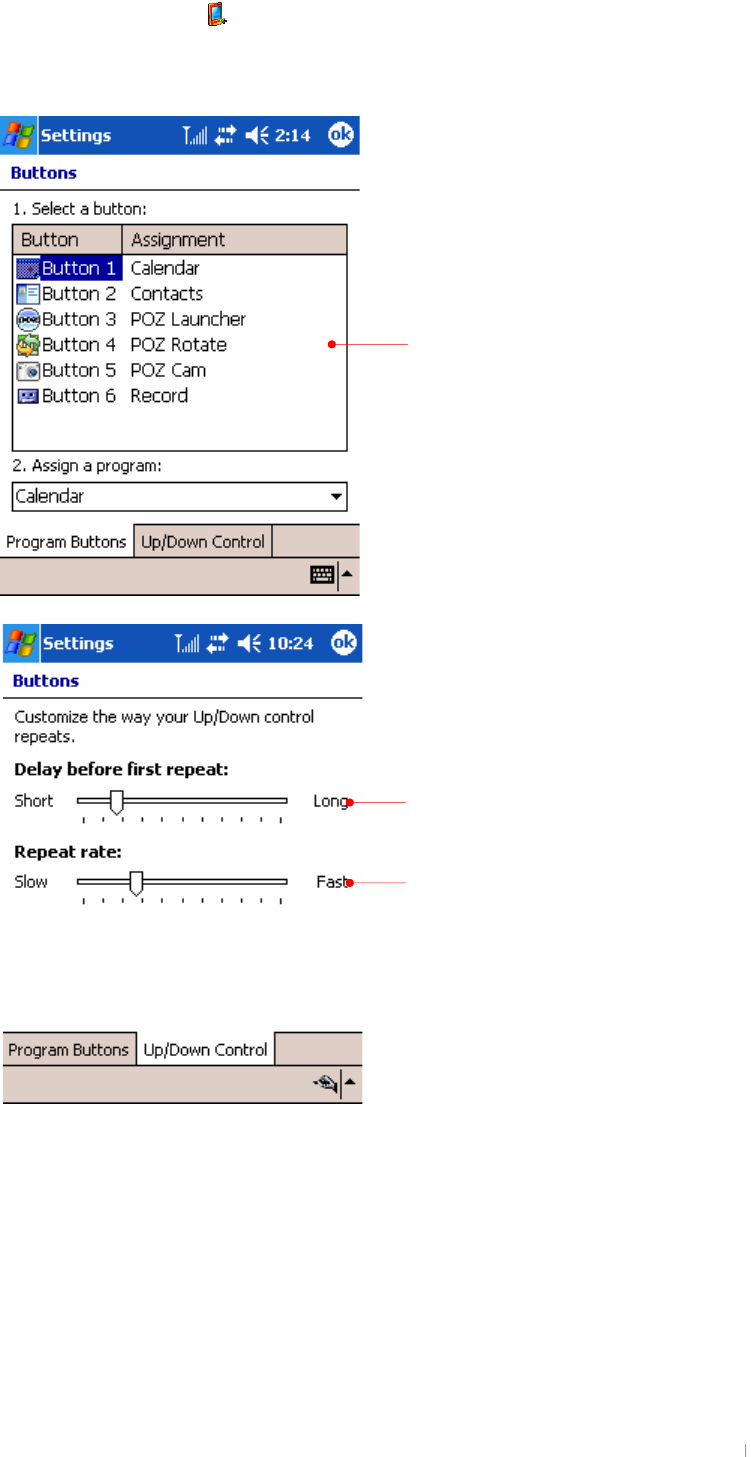
First, select a button among the 4 buttons
and select a program you want for that
button on the assignment.
Move the slide to adjust the delay before
first repeat.
Move the slide to adjust the repeat rate.
GUser’s Manual 5-4
{GGpGO G PGGGGGGGGpGwUG
G
G
G
G
G
G
G
G
G
G
G
G
G
G
G
G
G
G
G
G
G
G
G
G
G
G
G
G
G
G
G
G
G
G
G
G
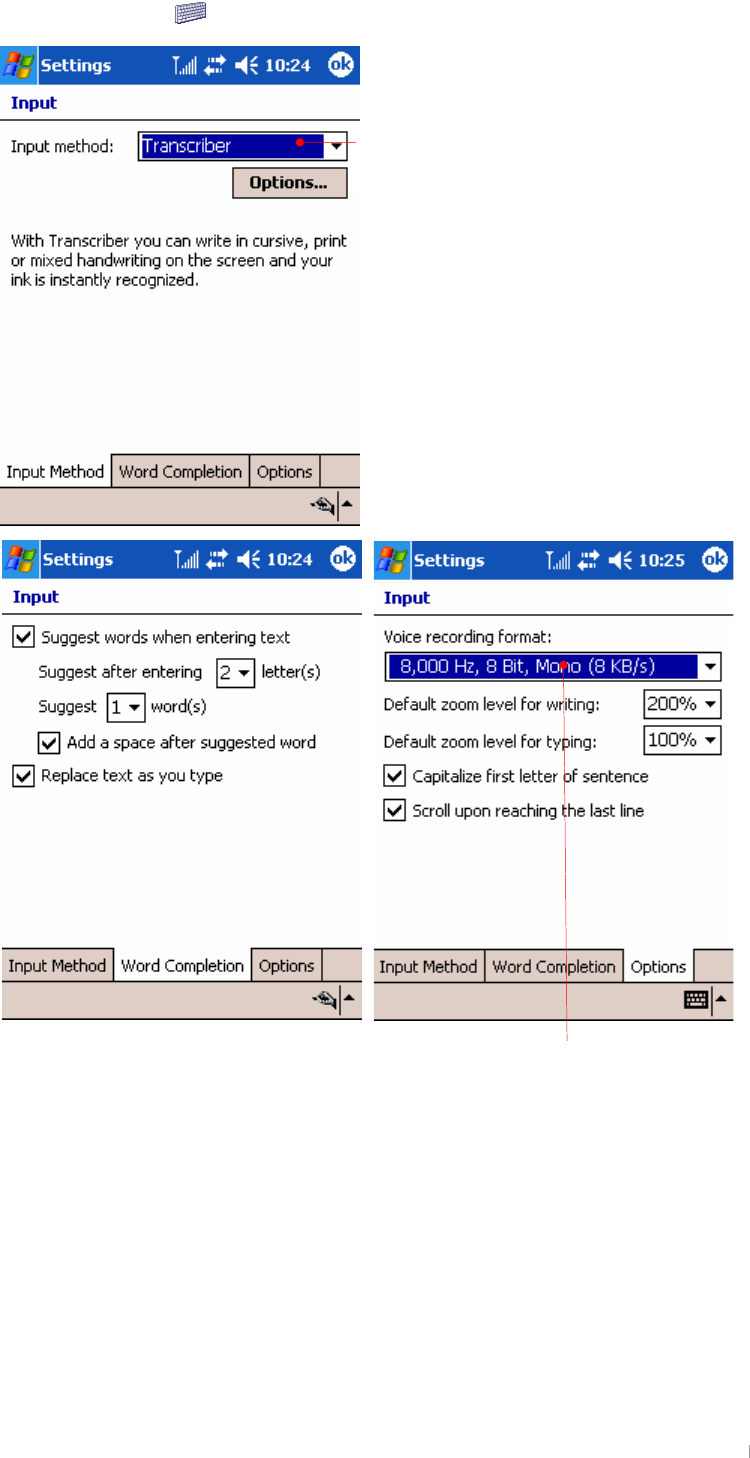
It is recommended that you select the
default mode of voice recording format to
conserve your memory size.
Select the default mode among Block
Recognizer, keyboard, Letter Recognizer,
Phone Dialer and Transcriber.
GChapter 5 Configuring Device 5-5
{GGtGO PGGGGGGGGGzG
GGuGUG
G
G
G
G
G
G
G
G
G
G
G
G
G
G
G
G
G
G
G
G
G
G
G
G
G
G
G
G
G
G
G
G
G
G
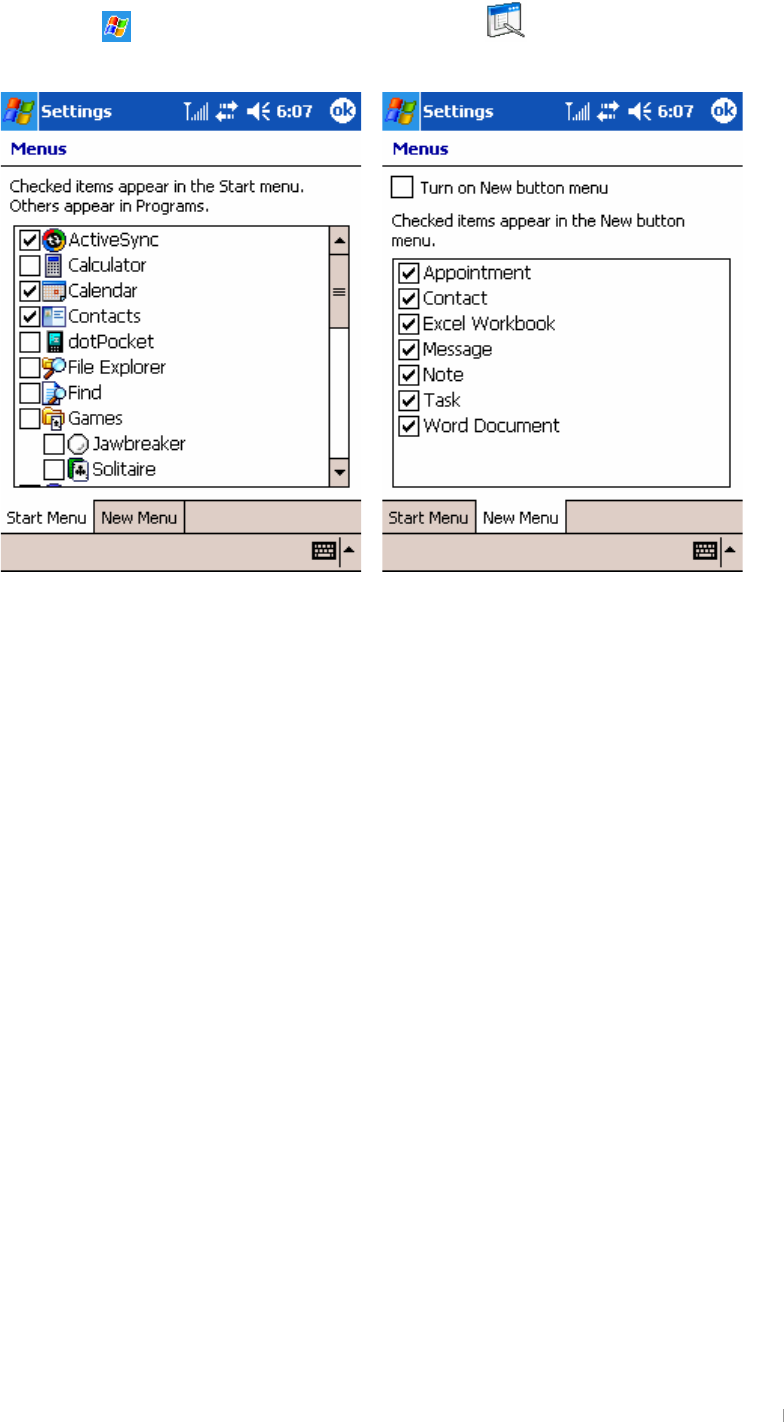
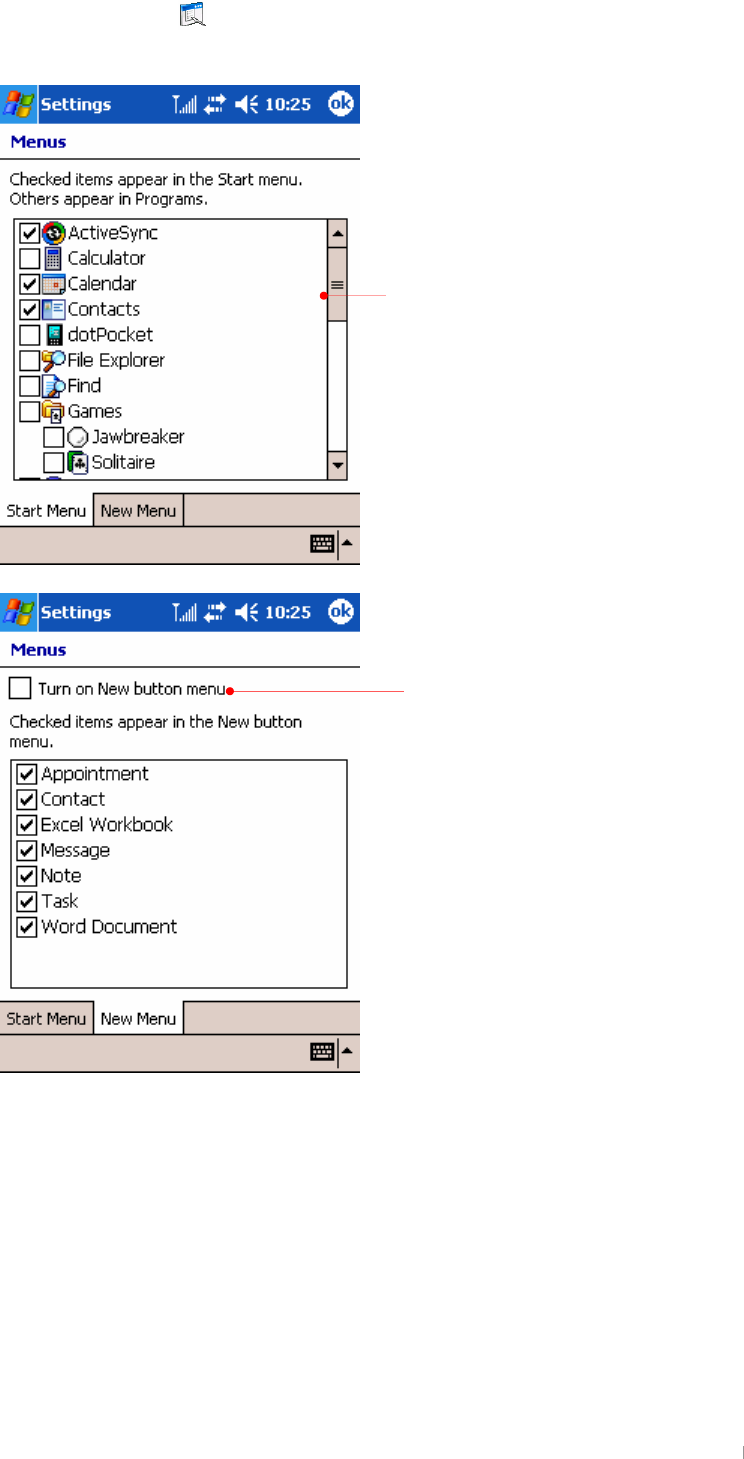
Selected items appear in the Start
menu. Otherwise, the rest appear in
Programs.
Select the Turn on New button menu
item to have the selected items
displayed on the New menu list.
GUser’s Manual 5-6
{GGvGpGO PGGGGGG
UG
G
G
G
G
G
G
G
G
G
G
G
G
G
G
G
G
G
G
G
G
G
G
G
G
G
G
G
G
G
G
G
G
G
G
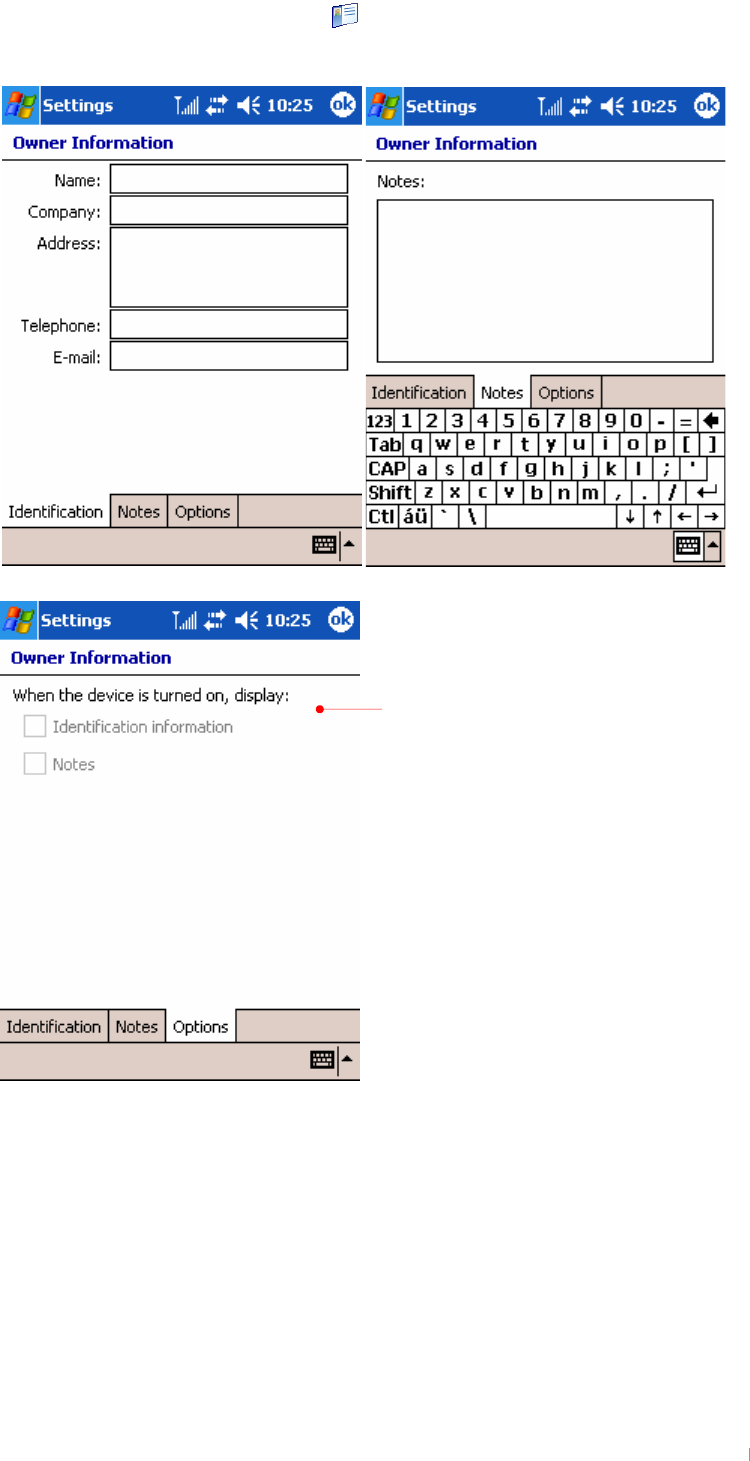
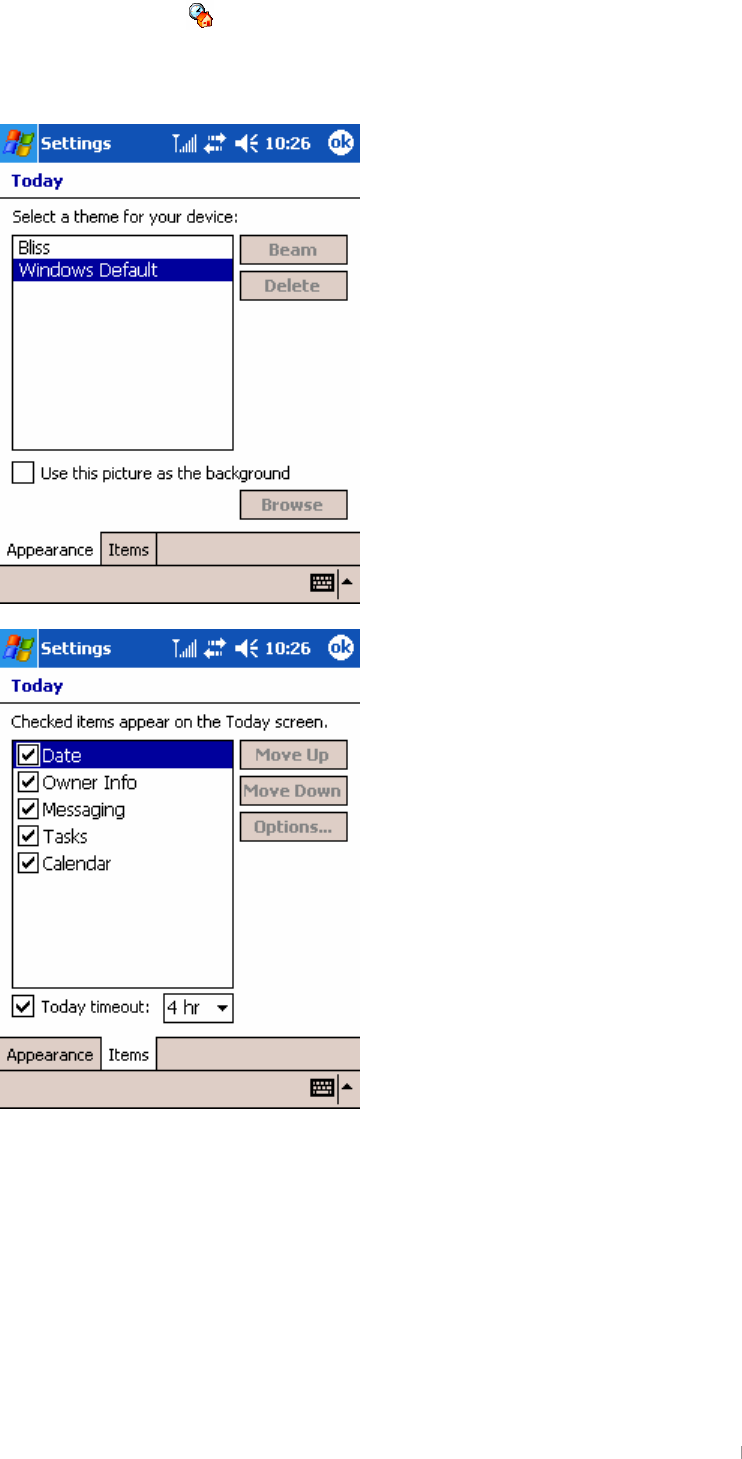
Select this option box to show this
information when device is turned on.
GChapter 5 Configuring Device 5-7
{GGwGO PGGGGGUG
G
G
G
G
G
G
G
G
G
G
G
G
G
G
G
G
G
G
G
G
G
G
G
G
G
G
G
G
G
G
G
G
G
G
G
G
G
G
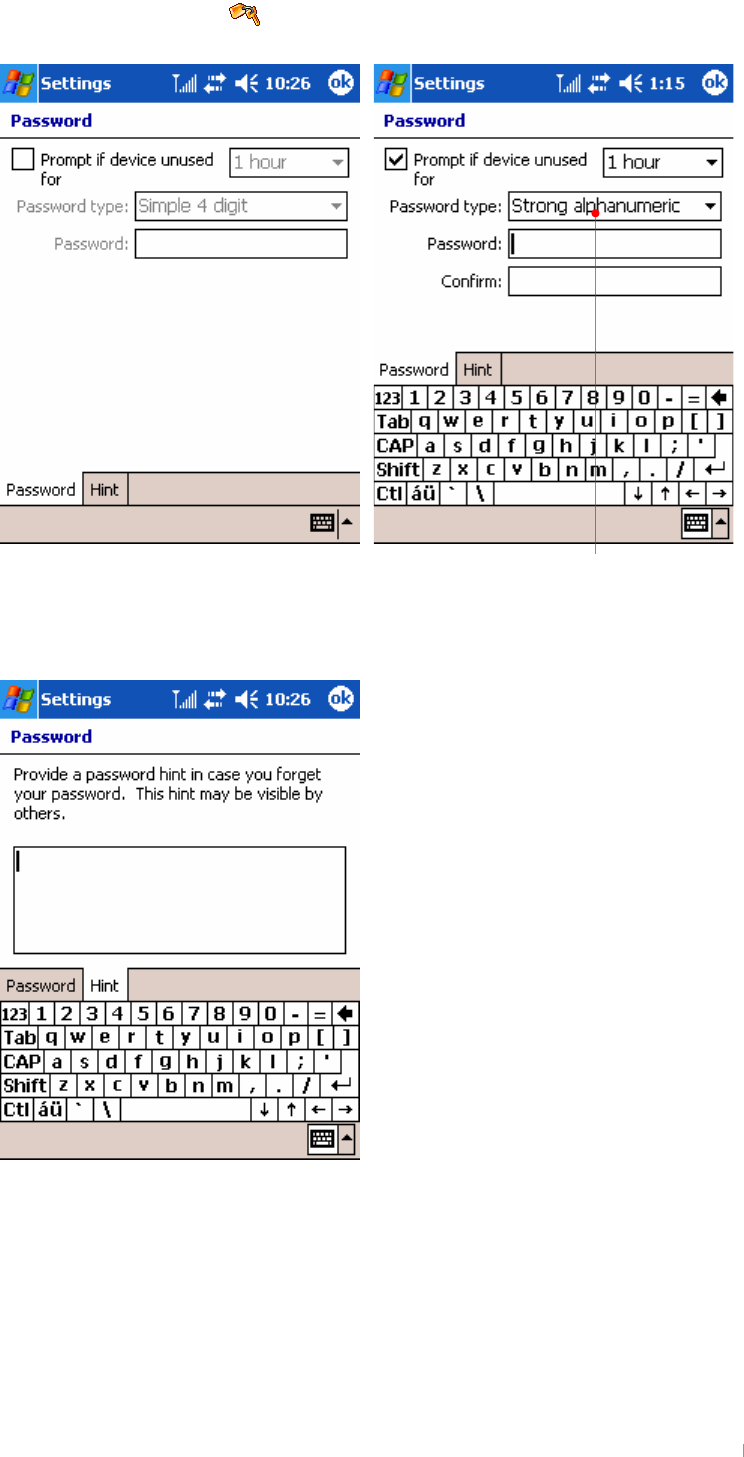
When you select the Strong alphanumeric
password item, you have to enter the 7-digit
password: a combination of the English upper
case and lower case letters.
GUser’s Manual 5-8
{GGzGMGuGO G PGGGGGGG
GGSGSGGGGGUG
G
G
G
G
G
G
G
G
G
G
G
G
G
G
G
G
G
G
G
G
G
G
G
G
G
G
G
G
G
G
G
G
G
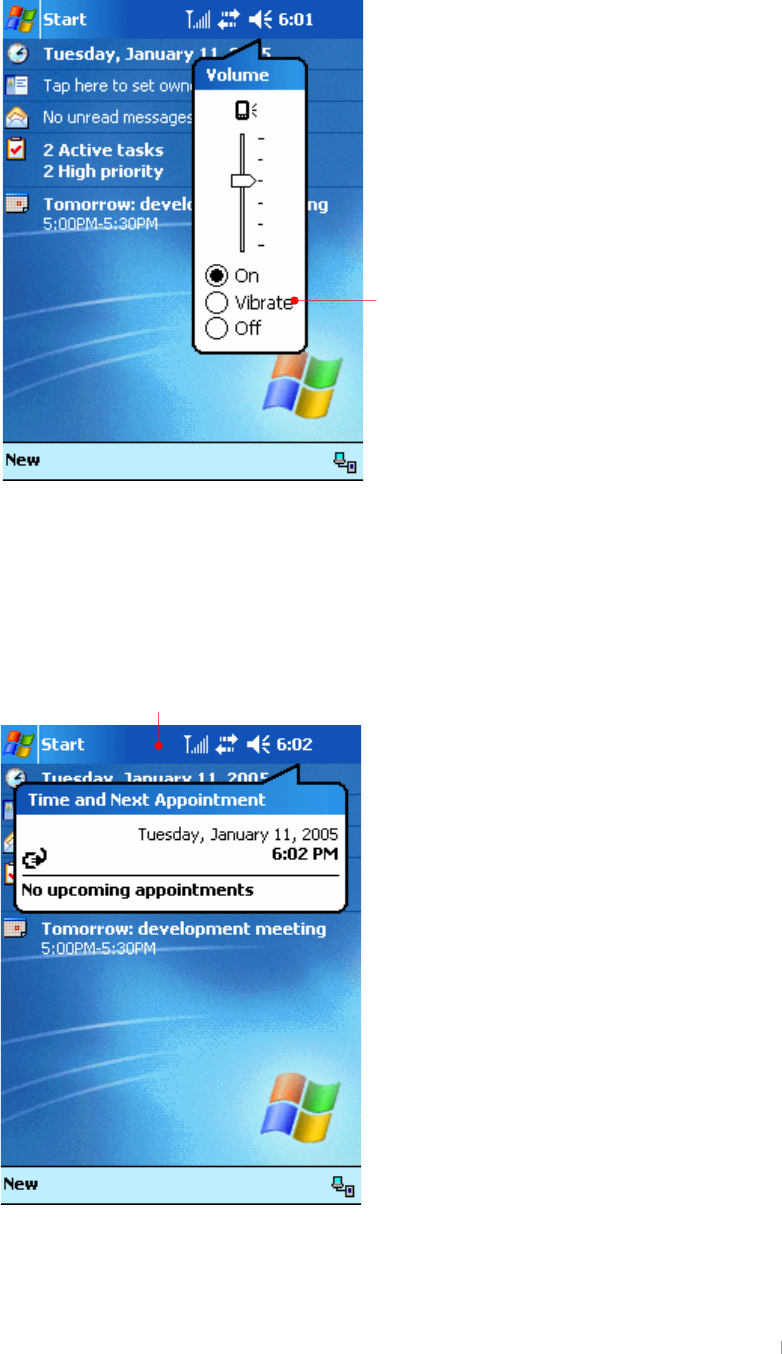
G
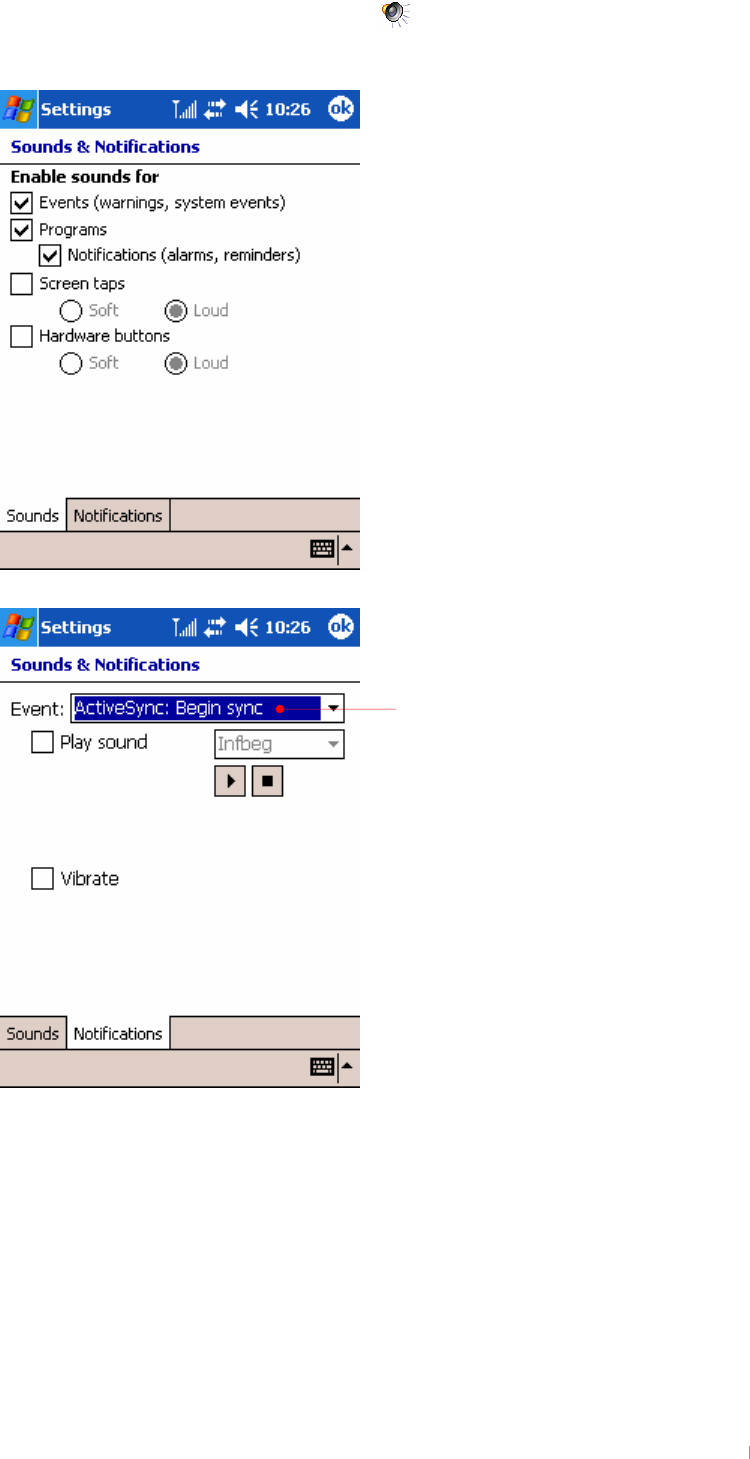
According to each event, select the
corresponding sounds or
notifications.
GChapter 5 Configuring Device 5-9
{GG{GO PGGGGGGGGGGG
GGGGGG{GUG
G
G
G
G
G
G
G
G
G
G
G
G
G
G
G
G
G
G
G
G
G
G
G
G
G
G
G
G
G
G
G
G
G
G
G
GUser’s Manual 5-10
2. the System tab
{GGhGO G PGGGGGGGUG
G
G
G
G
G
G
G
G
G
G
G
G
G
G
G
G
G
G
G
G
G
G
G
G
G
G
G
G
G
G
G
G
G
G
G
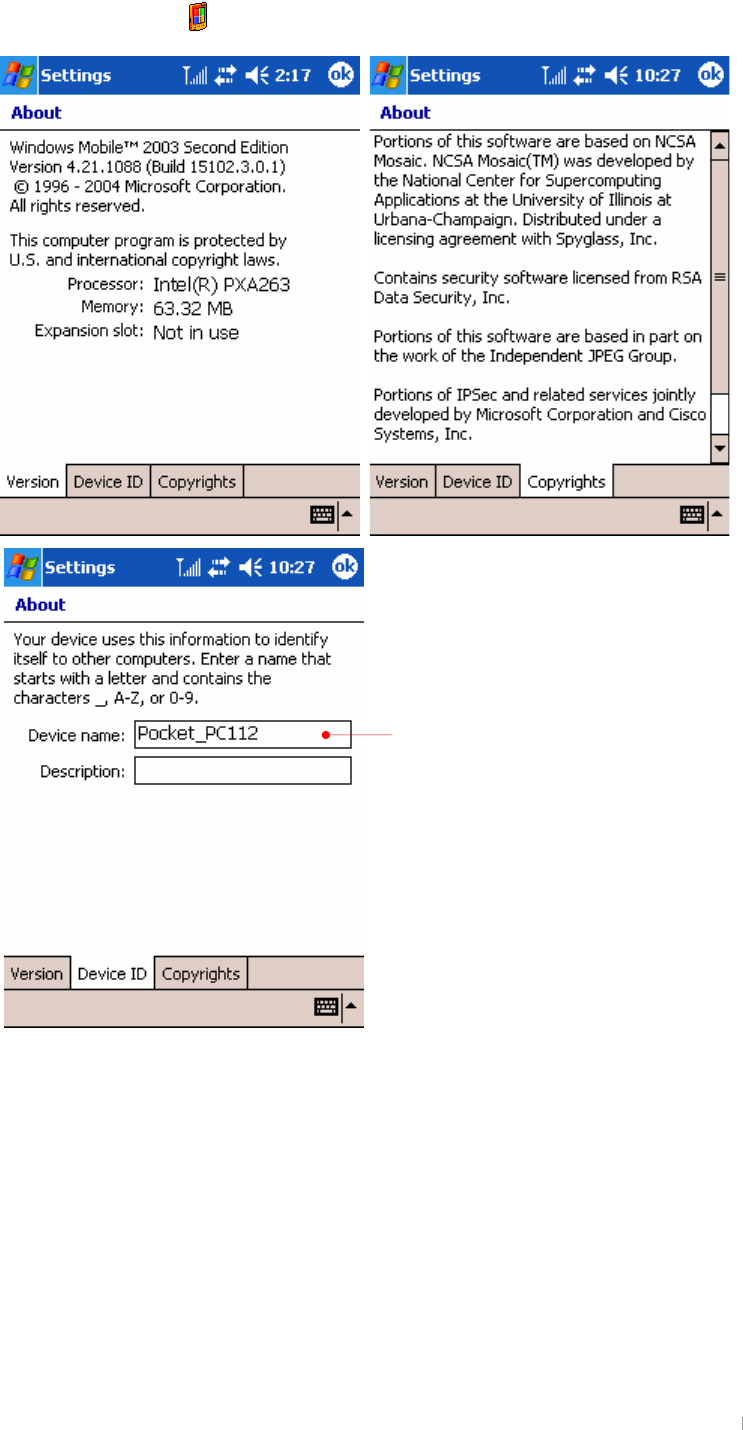
While synchronized, this will be used
for identifying itself and establishing
a
p
artnershi
p
.
GChapter 5 Configuring Device 5-11
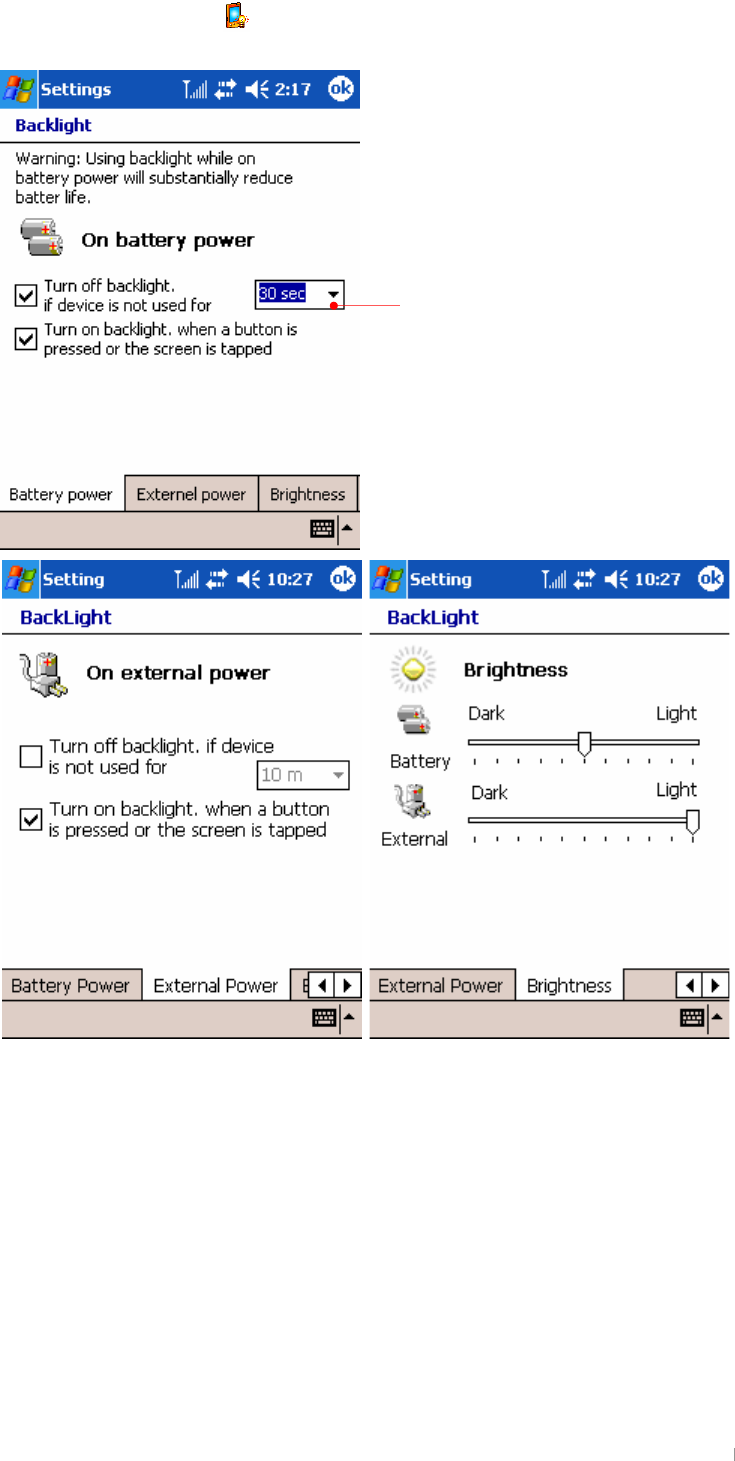
{GGiGO PGGGGGUG
G
It is recommended to conserve your
battery life that you turn off backlight
if device is not used for the time you
select here.
GUser’s Manual 5-12
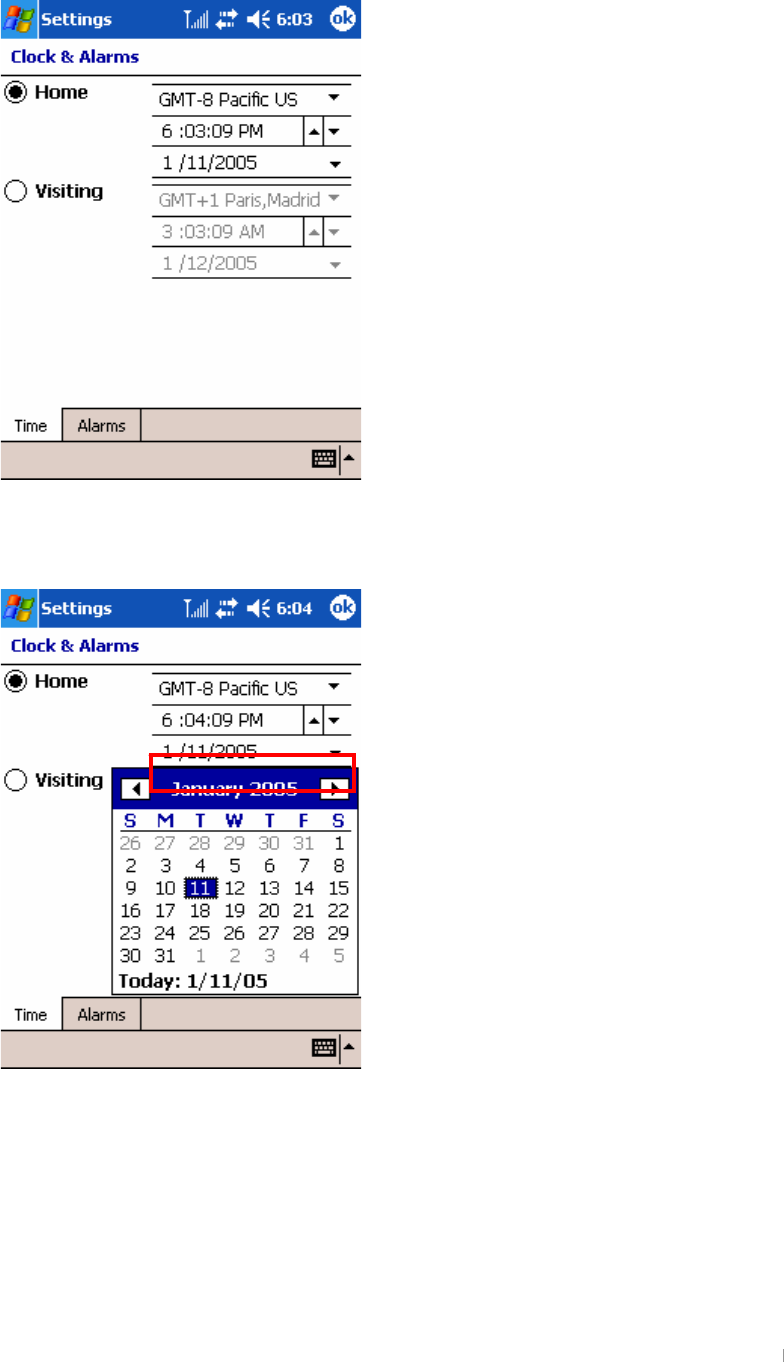
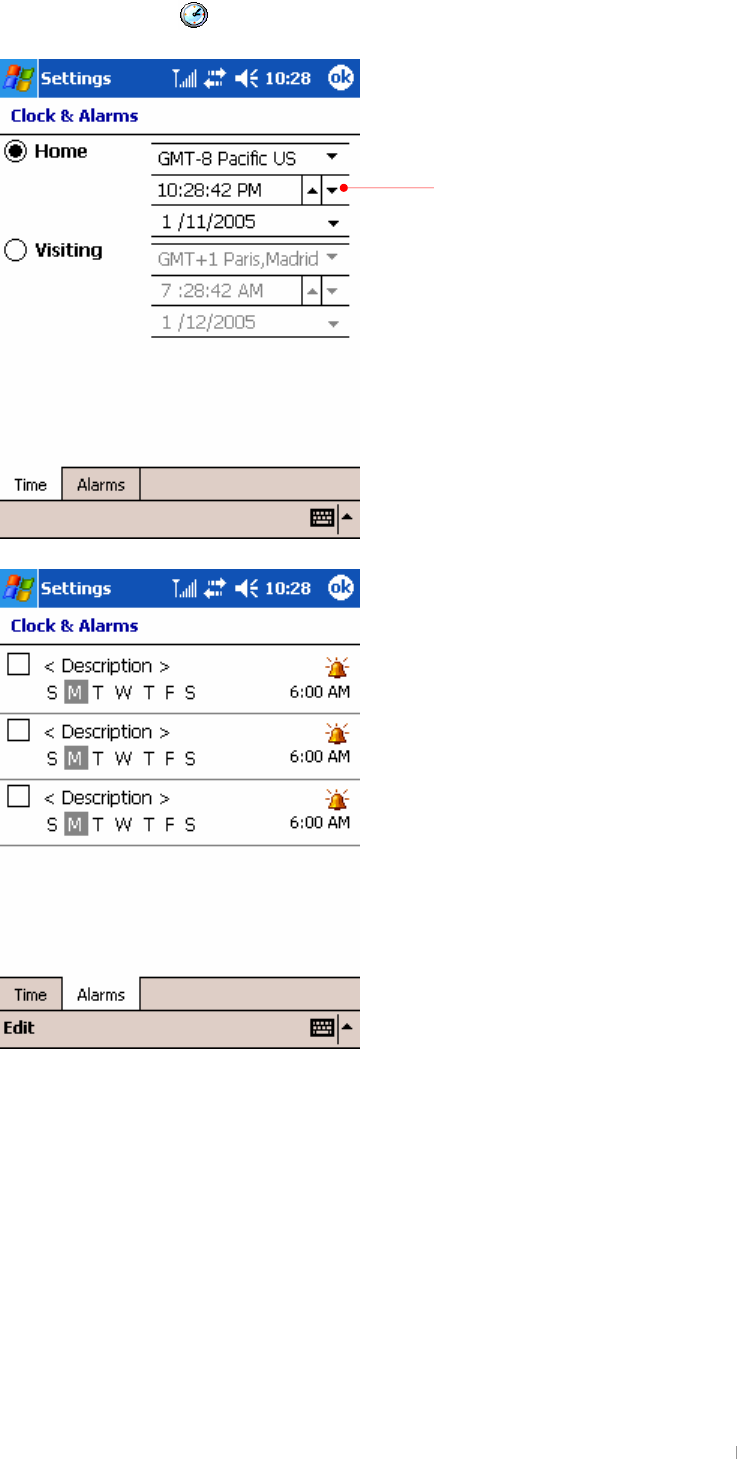
{GGjGO PGGGGGGGGUG
Select the right one according to where
you stay.
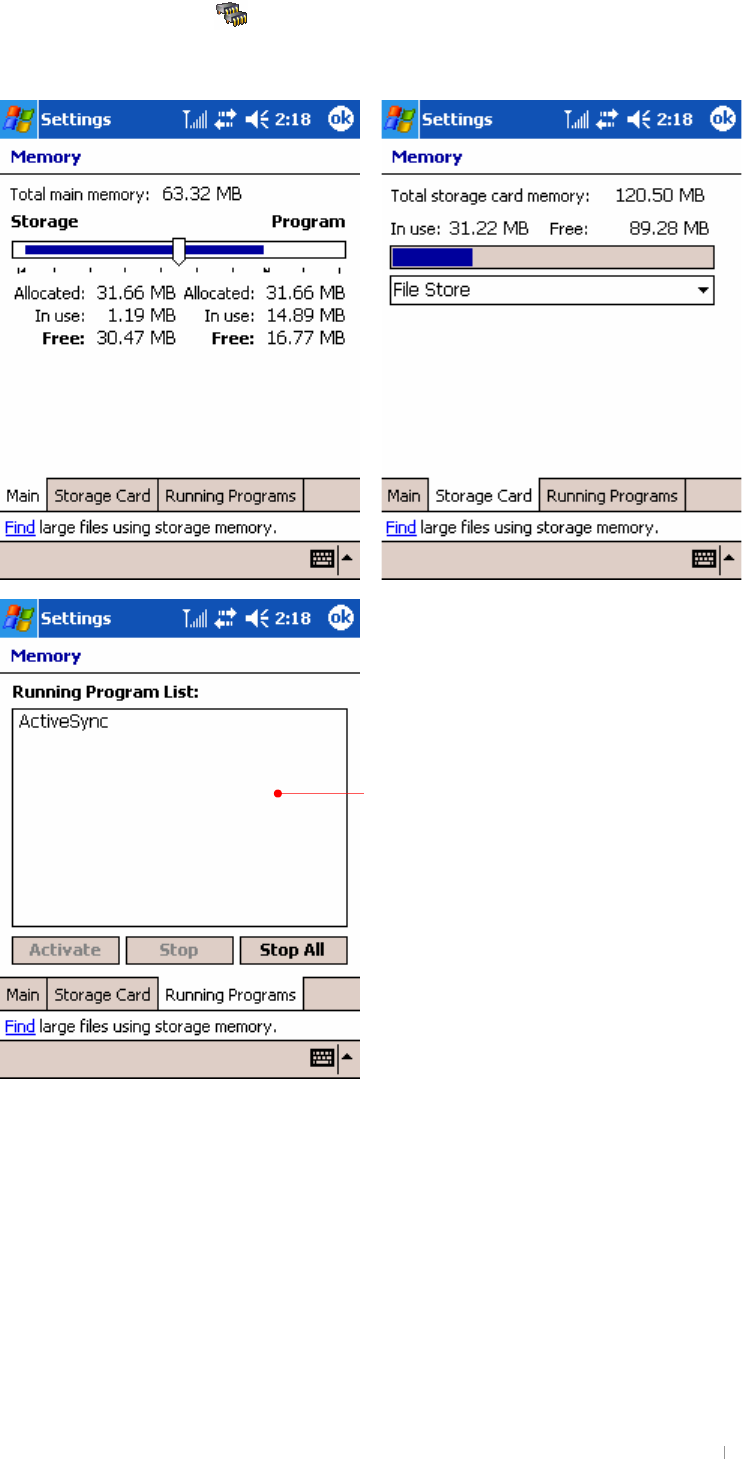
GChapter 5 Configuring Device 5-13
G {GGtGO PGGGGGGGG
UG
To conserve the program memory, you can
stop programs that are not being used.
GUser’s Manual 5-14
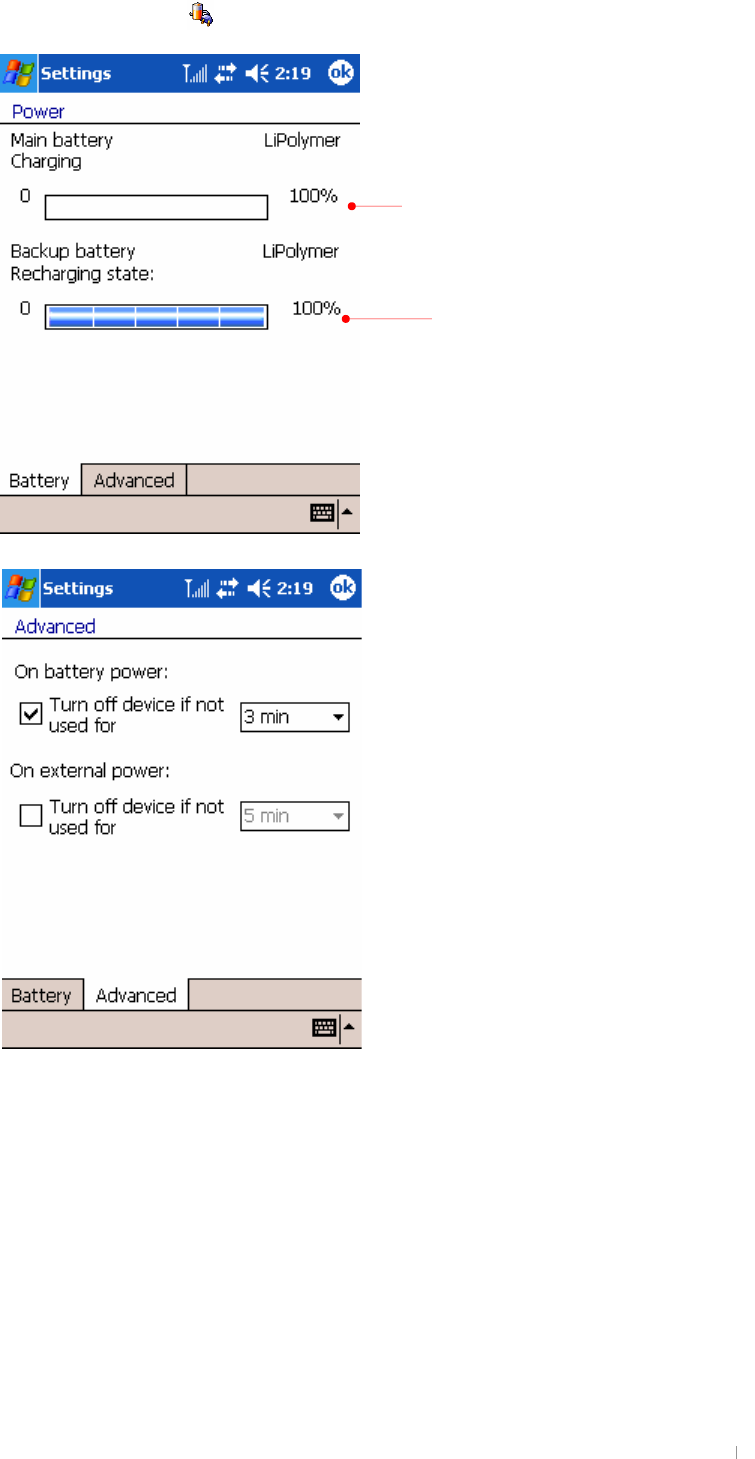
{GGwGO PGGGGGGGUG
G
G
G
G
G
G
G
G
G
G
G
G
G
G
G
G
G
G
Display the state of backup battery.
While being seated on cradle, if main battery
is not fully charged, it will move from 0 to
100% on the charging bar
GChapter 5 Configuring Device 5-15
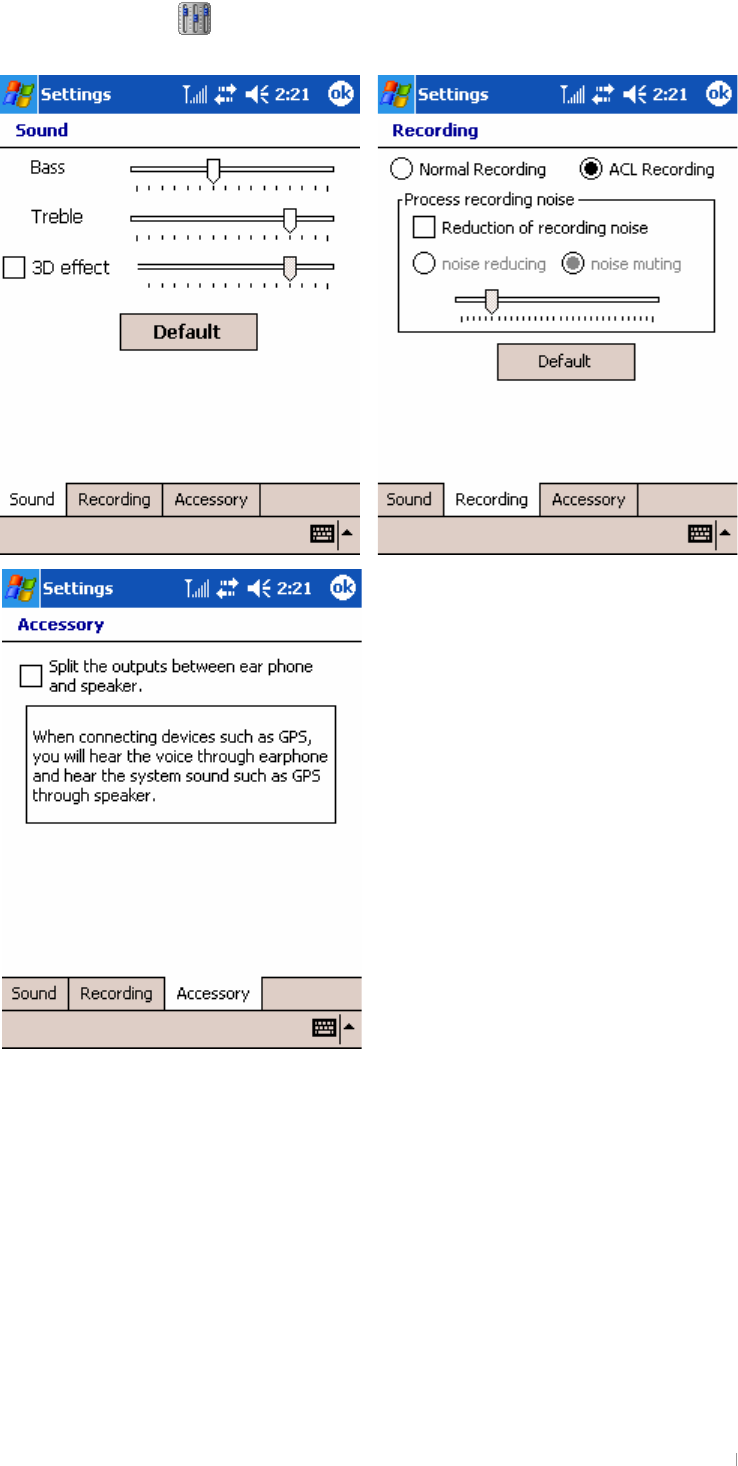
{GGyGzGO PGGGGGSGSG
GSGGGGUG
G
G
G
G
G
G
G
G
G
G
G
G
G
G
G
G
G
Select where you stay.
GUser’s Manual 5-16
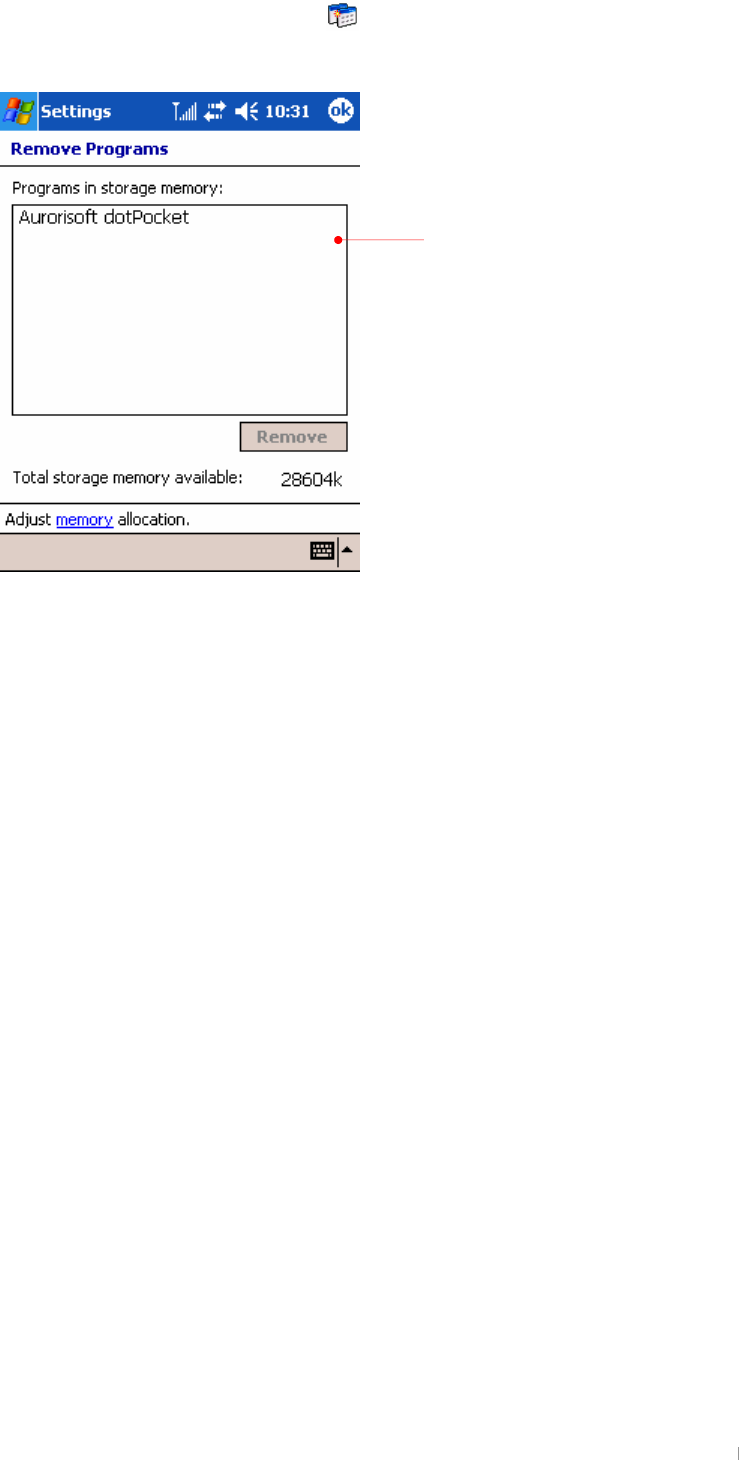
{GGyGwGO G PGGGGGGG
GGGGUG
When the storage memory is
short, remove the program
installed on your device.
GChapter 5 Configuring Device 5-17
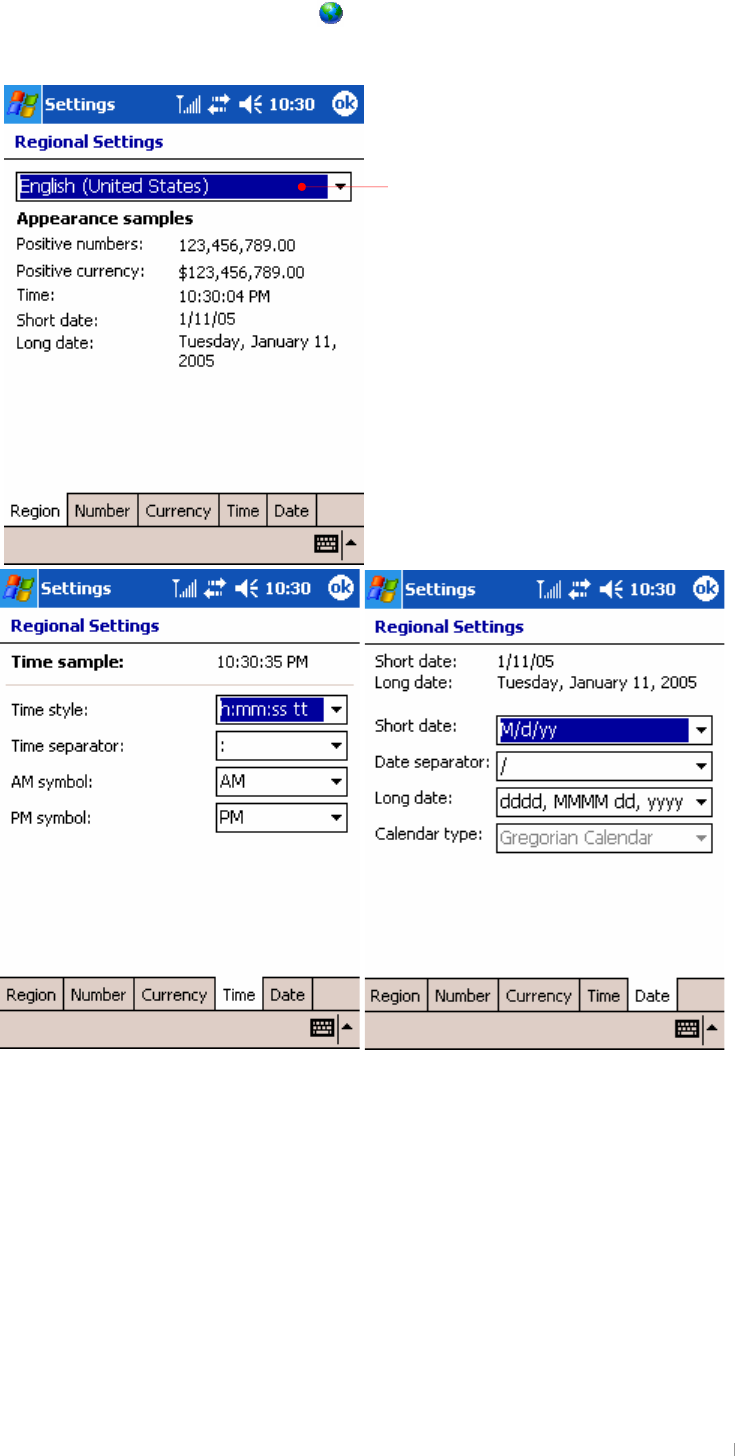
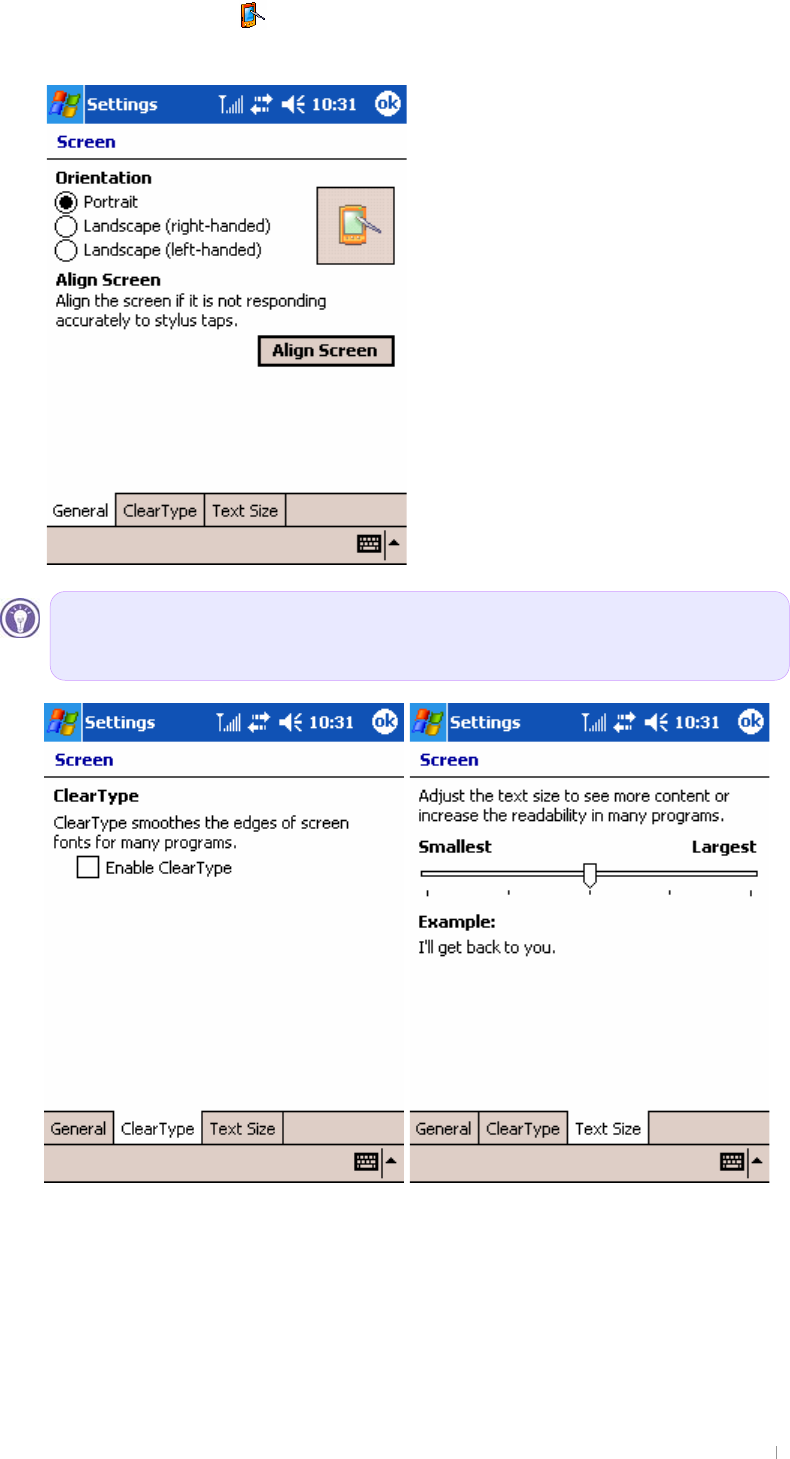
{GGzGO PGGGGGGGGGG
GGGGGGUG
wGGGGGGGVGGGGG
GGGGGGGGGhGzGUG
GUser’s Manual 5-18
{GGzO PGGGGGGUG
GChapter 5 Configuring Device 5-19
{GGzO PGGGGGUG
G
G

GUser’s Manual 5-20
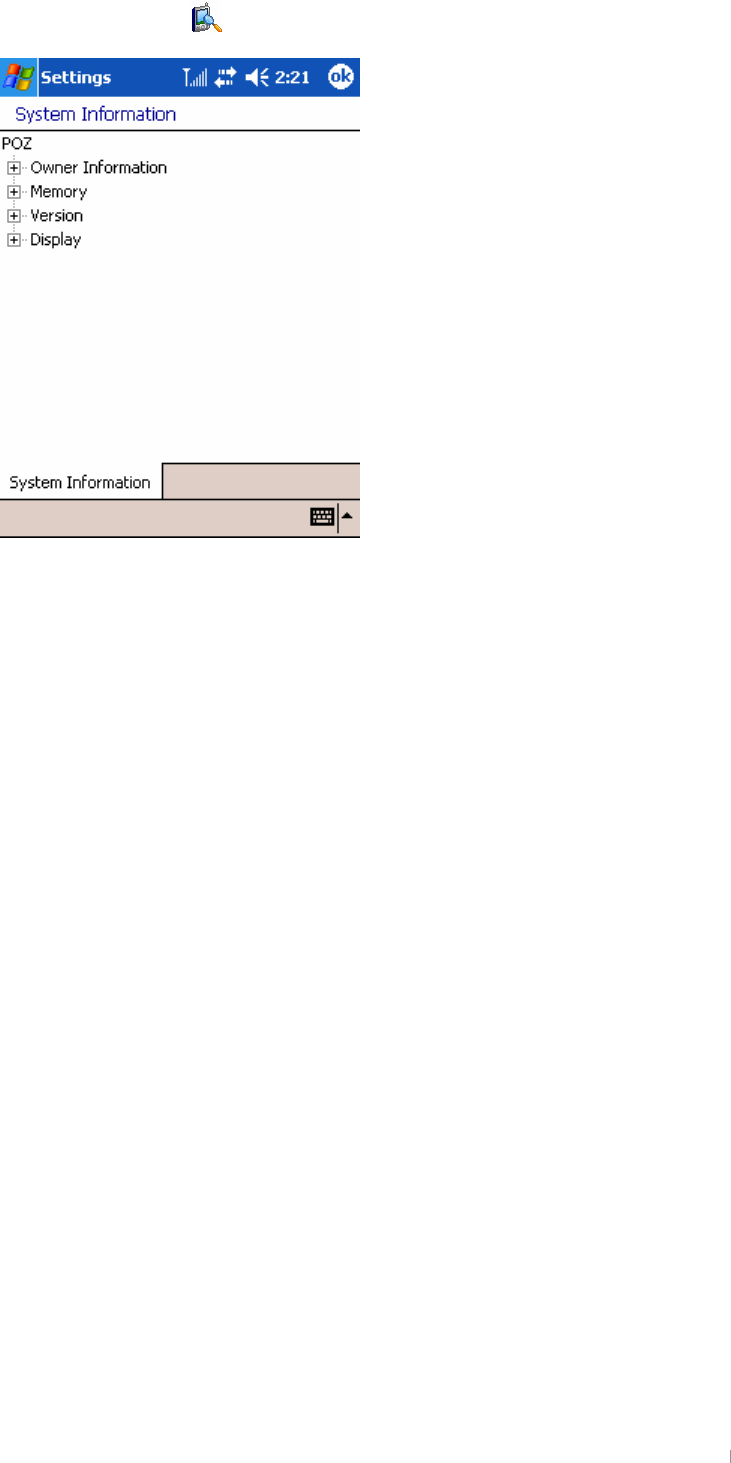
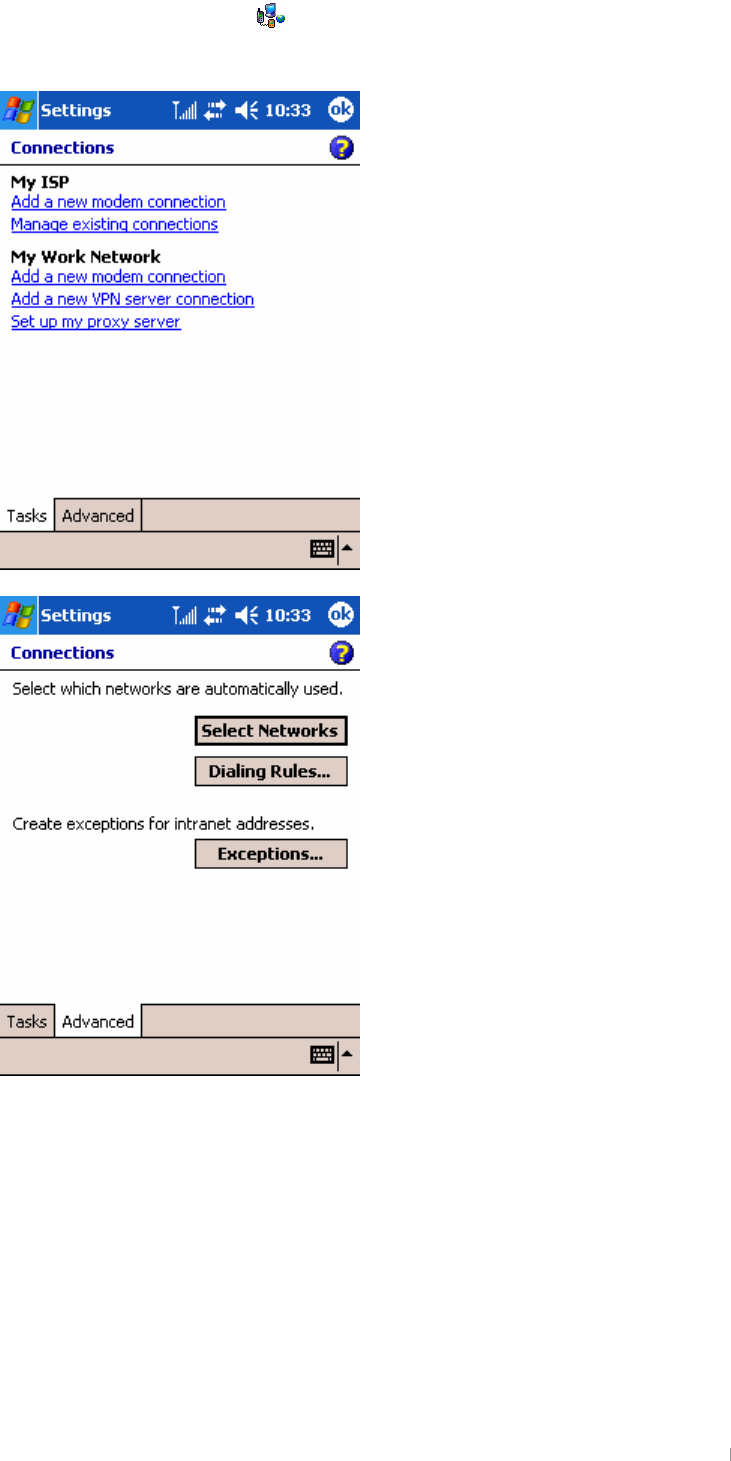
3. the Connections tab
G
{GGiGO PGGGGGGGGGUG
GChapter 5 Configuring Device 5-21
{GGjGO PGGGGGGGGG
UG
GUser’s Manual 5-22
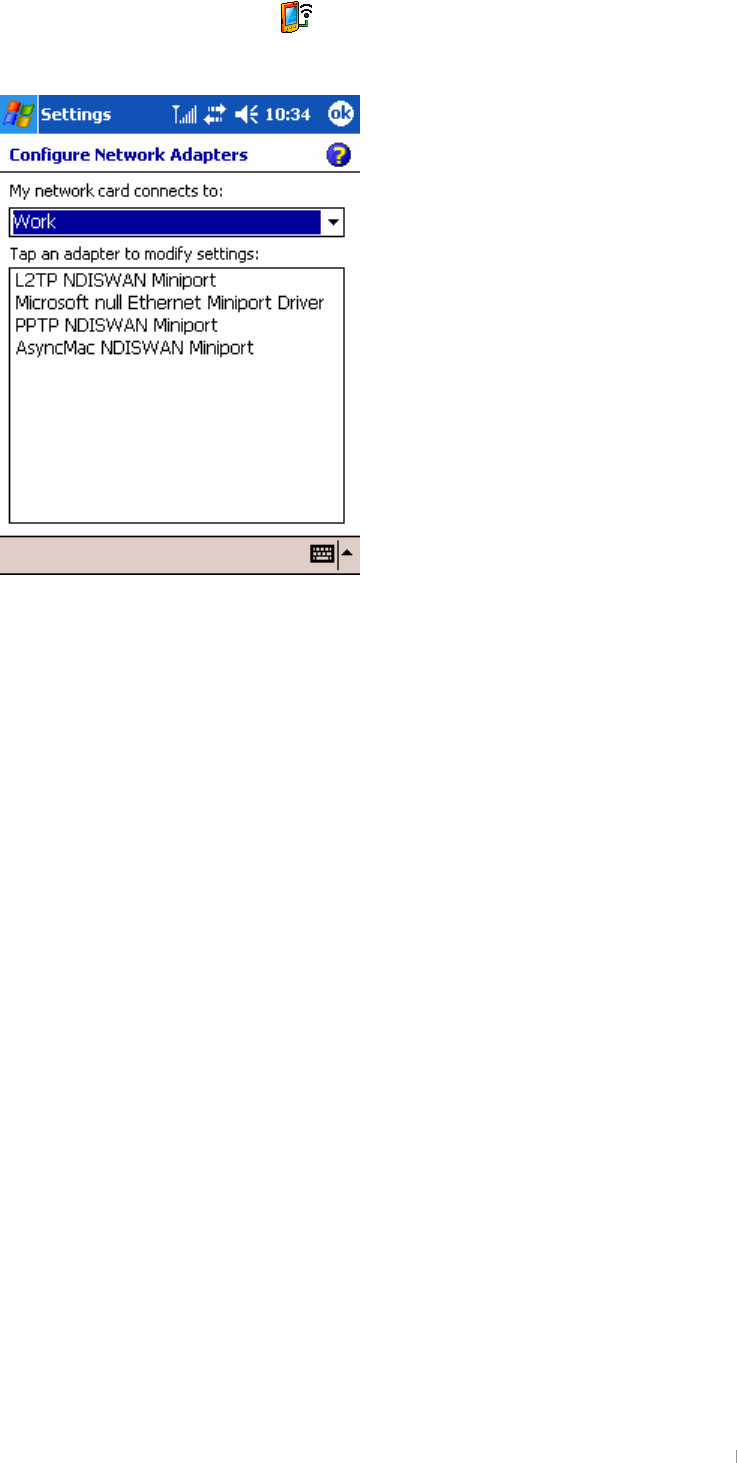
{GGuGjO PGGGGGGGG
UG

GChapter 6 Using the Internet & E-mail 6-1
G
G
G
G
G
G
G
G
G
pGGGGGGGGGwjSGGG
GGGGGGGGGGSG
GGpSGGGGGGGSG
GGGGGGGGUG
ൟG {GGGSGGGGGGGG
GGGpUGGGGGGG
UG
G
}GpGGG~GG~hwGGGwG
pGlUG
zGGGTGGGtUGiGG
GGtSGGGGGGGGG
GGGGTGUG G
zGGGGGGtzuGtUGmG
GSGGˈtzuGtˉGGG`UG
pGGGGGGGaG
G
GG~GGGG
GGGlTtGtG
jGGGlTtGG
Chapter 6
Using the Internet & Messaging
{GGGGGGGGˈGˉGGG
GGGGUG
GUser’s Manual 6-2
Browsing the Web on your device
vGGGGGGpzwGGGGSGGGG
GpGGGGUGGGGGwG
pGlGGG~GG~hwGGGGG
GˁGGGGGGG
GUG
Using Microsoft Pocket Internet Explorer
|GtGwGpGlGGG~GGGG
GGaG
G
jGGGpzwGGGGGG~UG{GGSG
GGGGGGGUG
kG¡GGGGwjSGGG
GGGGGGtGmGGG
pGlGGGGwjUG
~GGGGGGpzwGGSGGGG
GGGGGGpGGGUG
To start Pocket Internet Explorer
1. On the zGmenu, tap pGl.G
YUGvGG}GSGGhGiUG
ZUGlGGGGGGGGGGGGG
Mobile Favorites button
Home button
Refresh button
GChapter 6 Using the Internet & E-mail 6-3
GGGGGGGGGSGGGG
GGGGpGGjkthGUG
[UG~GGGGGSGGG
GOG G PGGGGGGuGUG
\UG{GGGO PGGGGjGGGGGG
GGGGGTGGGGGpGG
UG
Mobile Favorites folder
vGGGGGtGmGGGGmG
GGpGlGGGGwjGGG¡G
GGUG{GGGGGGG
GhzUG
GGGGGGGGGG
¡GGGGwjUGpGGGGG¡G
GGGwjSGGGGGGGmGGGG
UGGGGG¡GGGGwjGGG
GGGGGSGGGGGpGG
GGUG
G
To make Mobile Favorites
XUGzGvGGG{GGGGGvGGG
GGvGGUG{GGGmGG
GGGvrUG
G
G
G
G
G
G
G
G
G
G
G
G
G
G
G
G
GUser’s Manual 6-4
YUGzGjGtGmGGG{GGGtG
pGlGGGGwjUG G
G
G
G
G
G
G
ZUG~GGGvrSGGpGlGGGG
GGGGGUG{GGGGG
O PGGGGGGGGGwjUG
G
G
G
To make the Mobile Favorites button on the Tools menu of
your desktop PC
G
zG{GGeGj¡GGG}GGGtG
pGlGGGGtGmGGGG{G
UG
G
G
G
G
G
G
G
G
G
G
G
zGjGtGmGGGGGGGGhG
GGGGGGGGGGGGG
UG{GGGGGtGmO PGGGG
GGGGtGpGlUG
G
GChapter 6 Using the Internet & E-mail 6-5
To reduce the amount of memory caused by Mobile Favorites
tGGGGGGGGUGmG
GGG¡GGGGGaG
|GhzGGGGGGGGGG
tGmGGGGGGGGG
GGGUGmGGSGG
hzGoUG
G
XUGzGvGGG{GGGGGvGGG
GGvGGUG G
G
G
G
G
G
G
G
G
G
G
G
G
G
G
G
YUG{GGGmGGGGGGzG
UG
G
G
G
G
G
G
G
G
G
G
G
G
G
G
G
ZUGkGGGGGGtGmGGG
vrUG
GUser’s Manual 6-6
G
G
To view Mobile Favorites offline
XUG{GGmGGGwGpGlGGG
GGGGGGUG G
YUGpGGSGGGGGGGUG
Tap the favorite you want to view.
Tap to add or delete a folder or favorite link.
GChapter 6 Using the Internet & E-mail 6-7
Sending and Receiving E-Mail Messages
pGGGGTGGGGpzwGGGGG
SGGGGtGGGGGTG
GGGaG
z¡GGGtGvGGGG
wjUG
zGGGGGGGGGTG
GGGpzwGGGUG
G
Synchronizing E-mail Messages
GG¡GTGGGGGGG
¡GGGGGGGGG
GwjUGmSGGGGpG¡GG
hzUG
zGGvGGGGtGhzGUG
G
G
G
G
G
G
G
G
G
G
G
G
G
G
G
zGpGGGGzGUG
G
G
G
G
G
G
G
G
G
G
G
GUser’s Manual 6-8
G
G
G
G
G
G
G
G
G
G
G
G
G
G
G
G
G
G
G
G
tGGGGGGGvrGGGGpGG
GGGwjGGGpGGGGUG
G
oGGGGGGGGG¡GG
hzUG
G
G
G
G
G
G
G
G
G
G
G
G
G
G
G
G
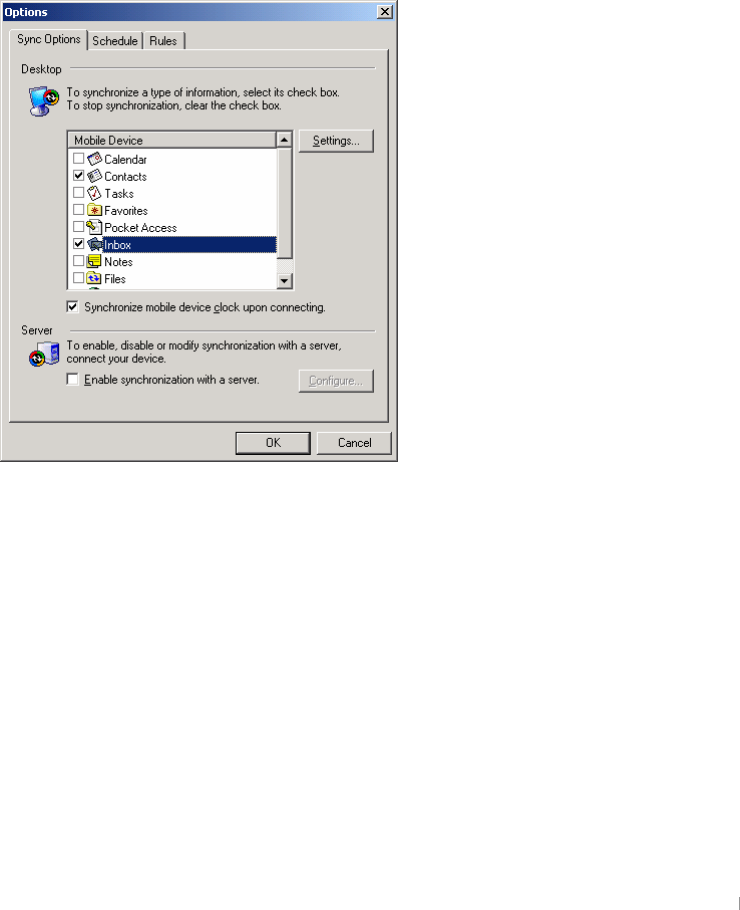
zG {GGGUG
zG {GGGGGGGGGG
UG
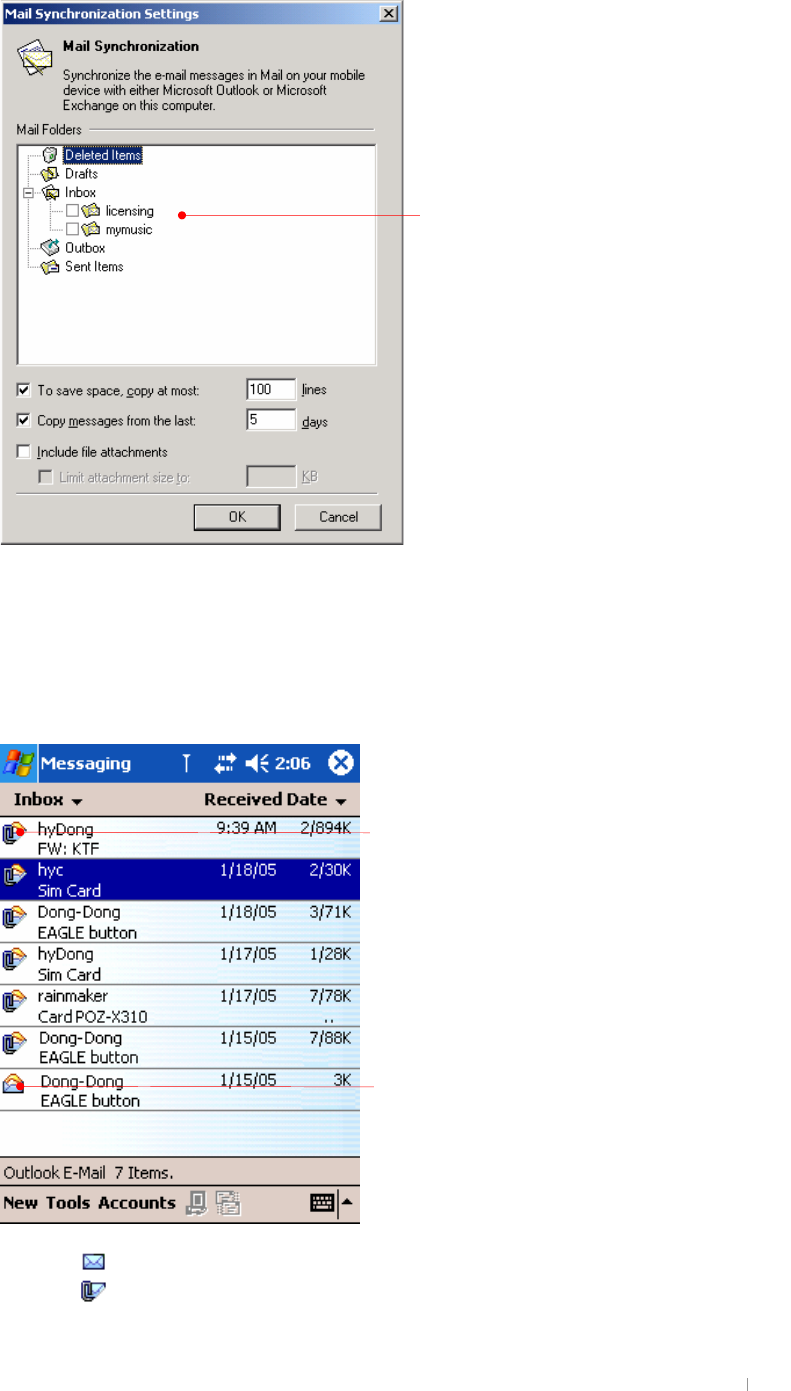
Select the folders you want to synchronize.
Shows you this is a read mail message.
Shows you this is a mail message with attachments
that need to be downloaded.
GChapter 6 Using the Internet & E-mail 6-9
zG {GGGGUG
zG {GGGGGGGGG
UG
G
G
pGGGGGGSGGGGG
GGGGTGGUG{G
GtGGkUG
G
G
G
G
G
G
G
G
G
G
G
G
G
G
G
G
{GG G GGGGG UG
G
GUser’s Manual 6-10
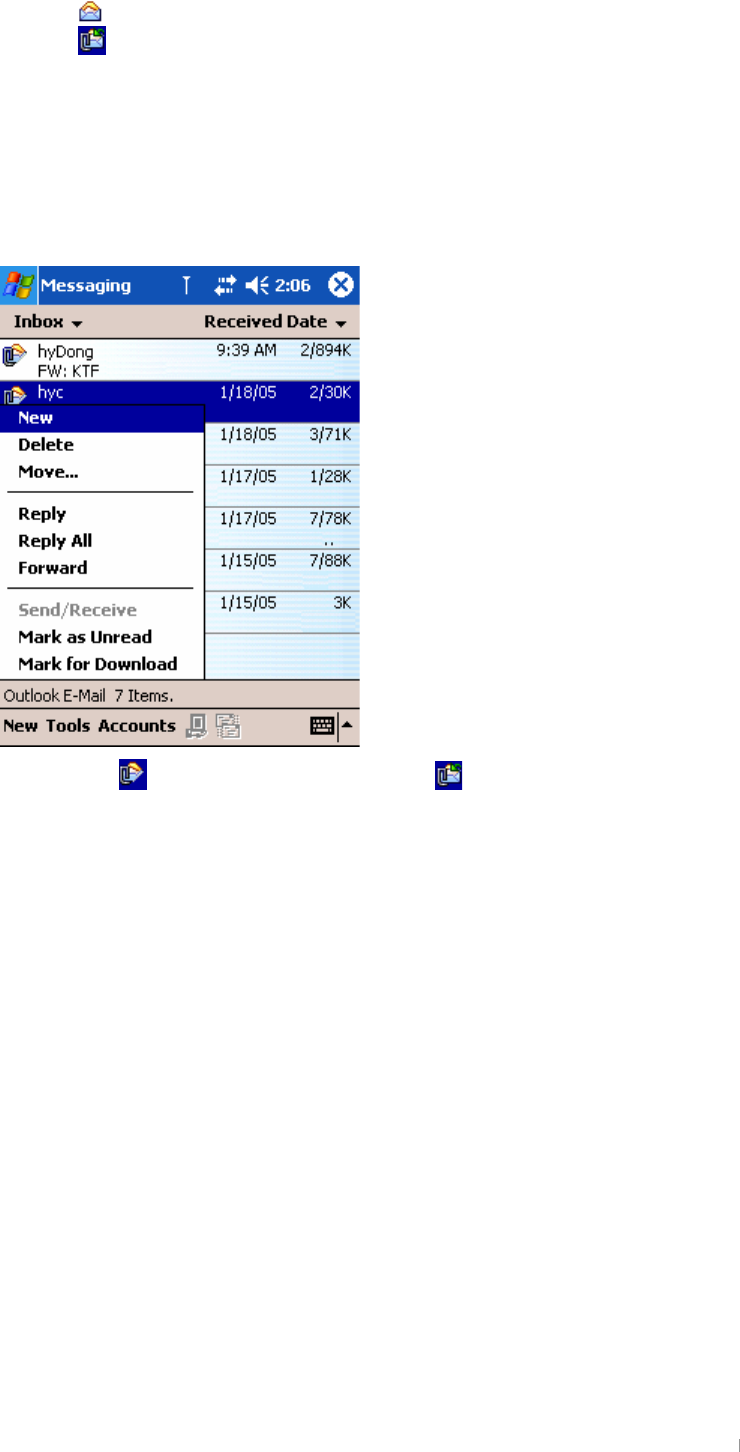
Using the Message List
tGGGGGGGGUGiGSG
GGGGGGGGGGUG
~GGGGSGGGGGUG
G
G
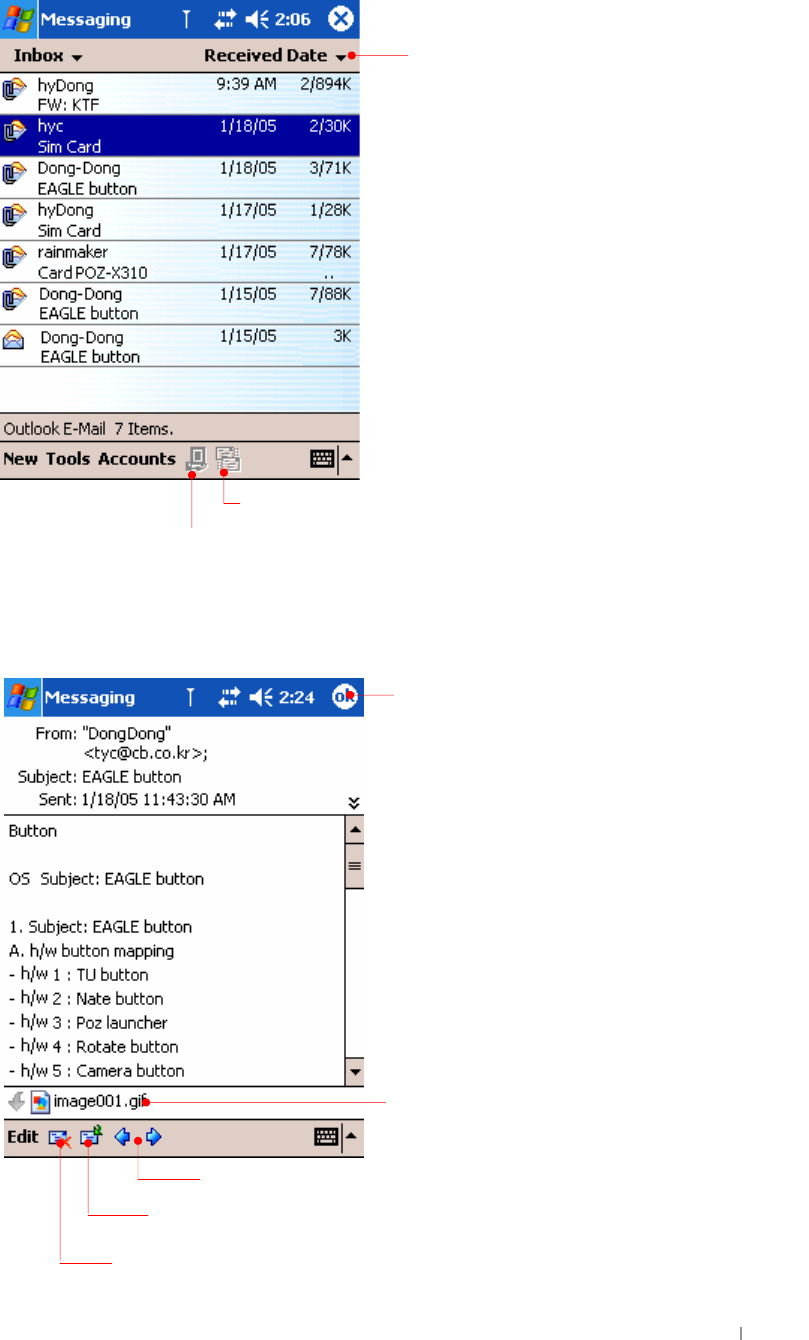
Select the sort order for messages.
Ta
p
to connect and to send and receive e-mail.
Tap to connect to the
selected service.
Tap to return to the message list.
Tap to delete this message.
Tap to view the previous or next message.
Tap to reply to or forward this message.
When you select this message with attachments that
is already downloaded, the message will open with
attachments displayed on the bottom of screen.