CyraCom VT-802C 2.4GHz EDCT CORDLESS PHONE User Manual ClearLink Cordless User Guide indd
CyraCom International Inc. 2.4GHz EDCT CORDLESS PHONE ClearLink Cordless User Guide indd
CyraCom >
Users Manual
© 2008 CyraCom International, Inc. All rights reserved. Version 1.0 12/07/08
User Guide
ClearLink® Cordless
DRAFT
For Internal Use Only

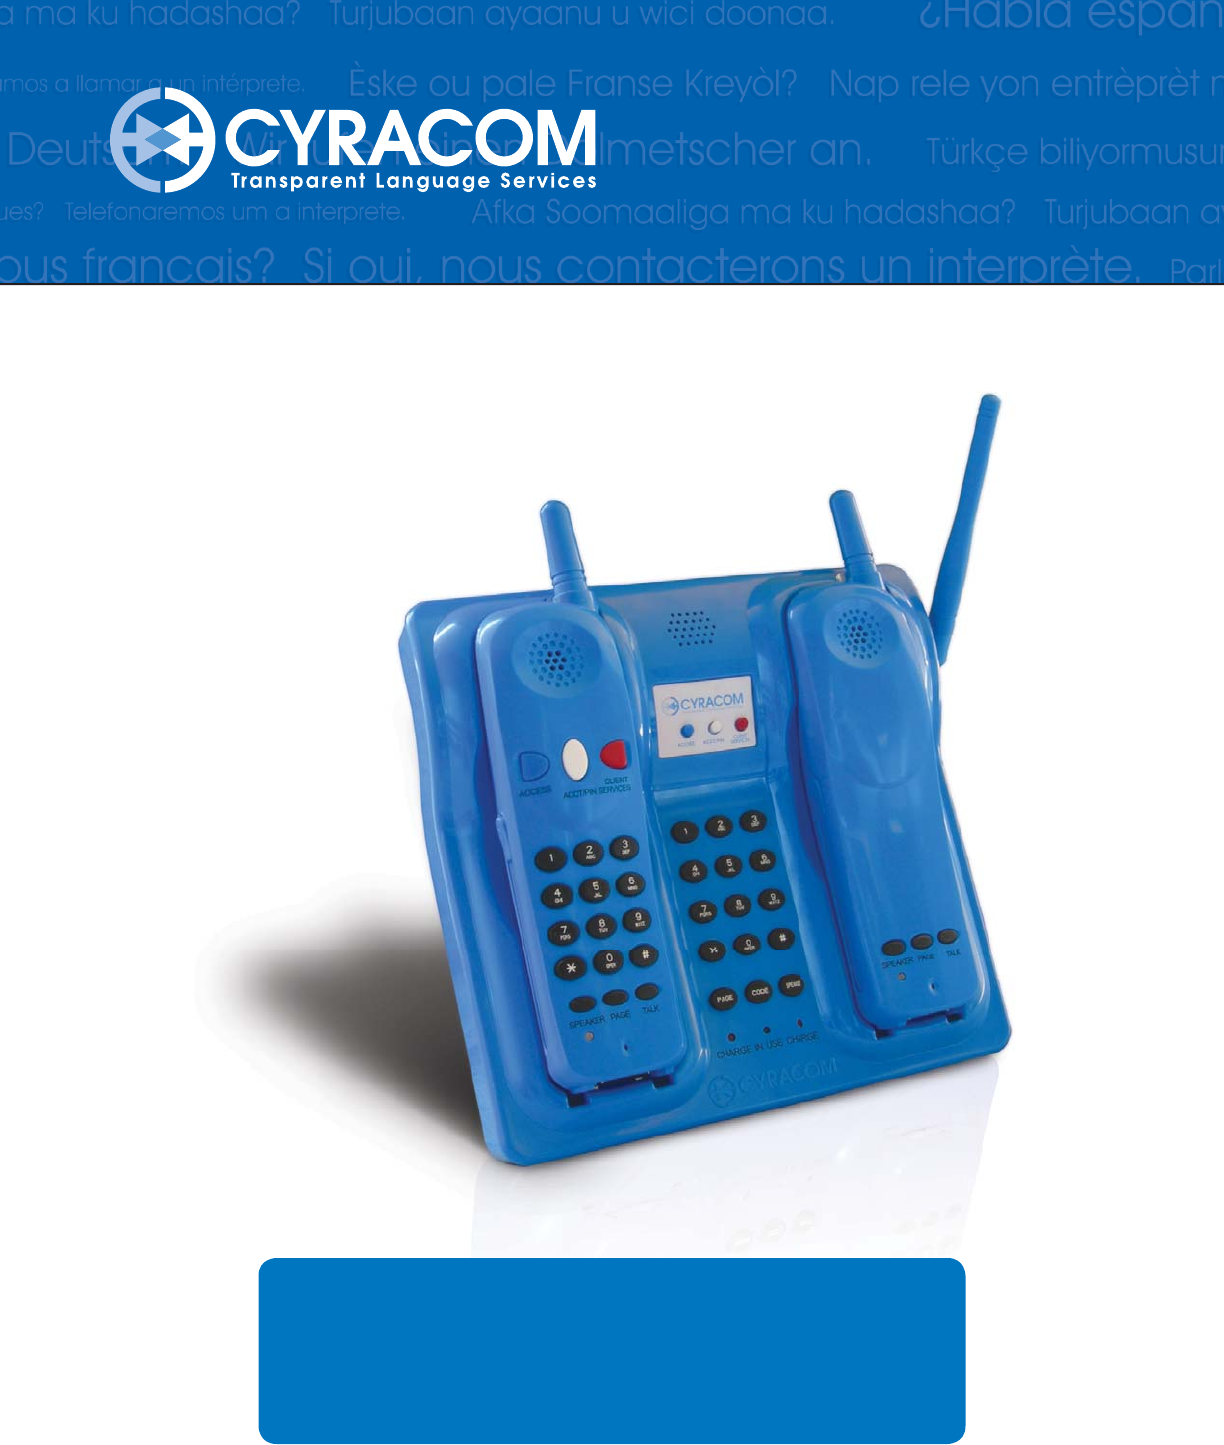
1ClearLink™ Cordless User Guide
ClearLink® Cordless User Guide
ClearLink® Cordless is CyraCom’s patented, dual-handset phone specifi cally designed for medical inter-
pretation in environments where mobility and hands-free communication are critical to the patient care
process. With ClearLink Cordless, you can easily connect to a medical interpreter to communicate with
your Limited English Profi cient patients while moving freely.
Contents
Features 2
Setting up ClearLink® Cordless
Choosing a Location 3
Installing Handset Battery 3
Connecting the Base Unit 4
Placing the Handsets on the Base Unit 4
Checking the Programming and Range 4
Mounting the Base Unit on a Wall (optional) 5
Basic Operation
Accessing an Interpreter 5
Using the Speakerphone 5
Using Headsets 6
Using Belt Clips 6
Making and Receiving calls 6
Paging 7
Volume Control 7
LED Indication 8
CyraCom Internal Section
Manual Programming 9
Pairing Handset 9
Troubleshooting 11
Safety Instructions
Maintenance 12
Important Safety Instructions 12
Battery 13
FCC Information 13
Technical Specifi cations 13
2ClearLink™ Cordless User Guide
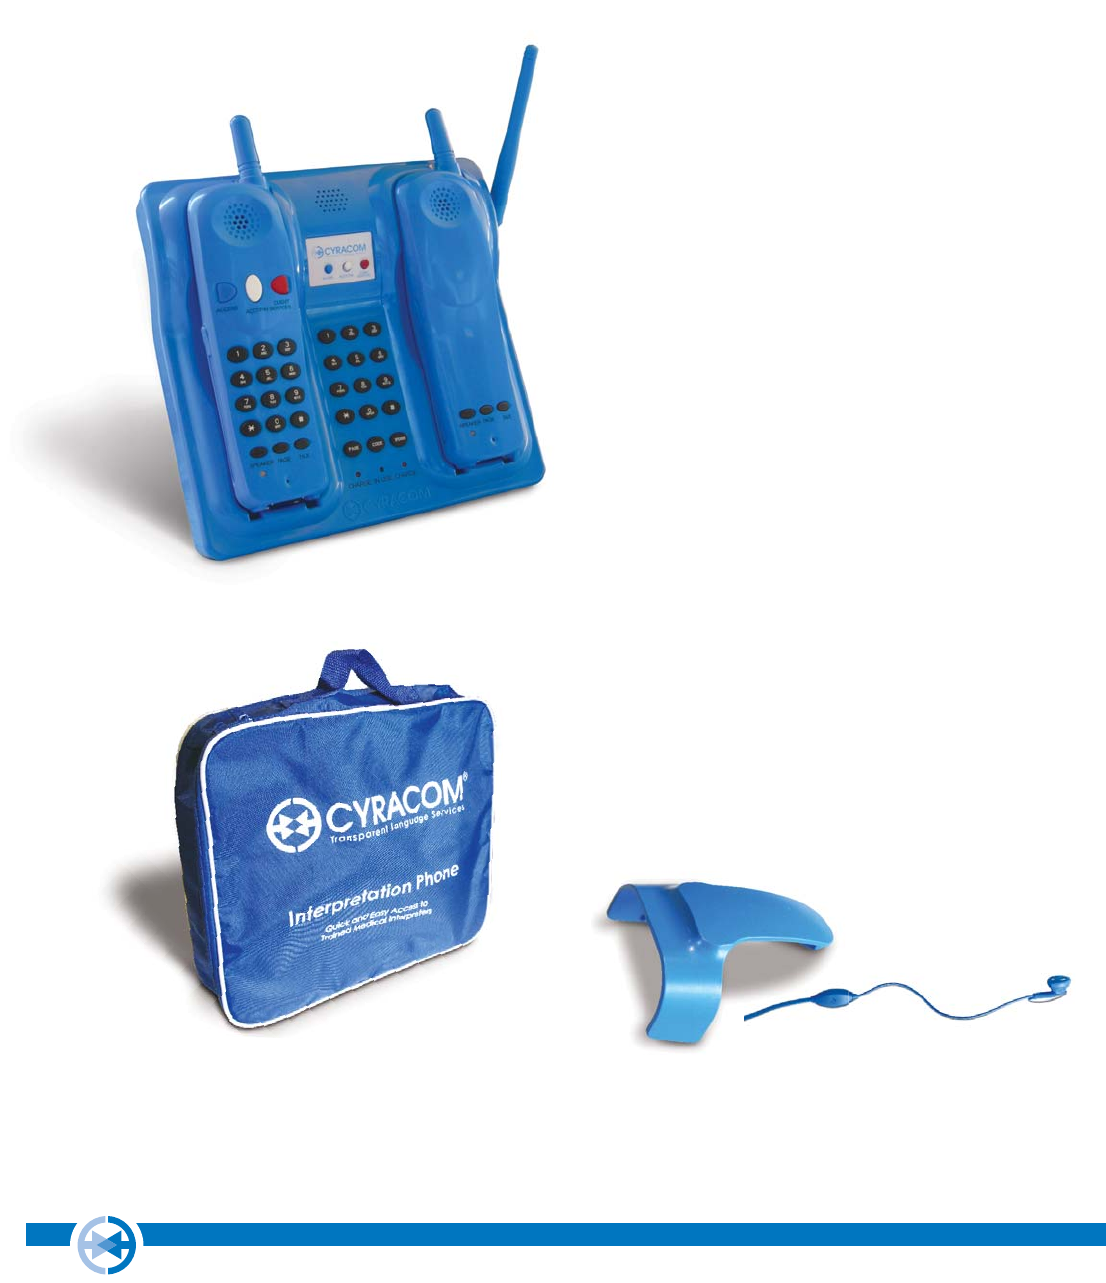
Features
ClearLink® Cordless is CyraCom’s dual-handset cordless phone.
2.4 GHz Digital Phone
Connects to standard analog telephone lines
Cordless Dual-Handsets
Enables natural, continuous and mobile
face-to-face communication
Pre-Programmed Buttons
Fast, easy access to trained
medical interpreters
Individual Volume Controls
Adjust to individual preferences
Smooth Surface
Allows for easy cleaning
Headset Jacks
Accommodate any standard 2.5 mm headset
Speakerphone
Located on both base and handsets to enable
hands-free communication or multiple partici-
pants in the interpretation session
Pager
Allows you to page the handsets from the
base, making them easy to locate
Indicator LEDs
Show battery, charging and in-use status
Ringer Volume Controls
Different levels (off, low, medium, high), with
blinking light in the off-position
Belt Clip and Headset
Provides convenience and hands-free
communication
Durable Carrying Case
Makes moving the phone trouble-free

3ClearLink™ Cordless User Guide
Setting Up ClearLink® Cordless
To begin use of your ClearLink® Cordless phone follow these steps:
1) Choose a location
2) Install handset batteries
3) Connect the base unit
4) Place the handsets on the base unit
5) Check the programming and range
6) Mount the base unit on a wall (optional)
Choosing a location
To ensure the best connection and ease of use consider these guidelines when selecting a location for
your ClearLink® Cordless phone.
• Place the phone at a location where it can be easily accessed
• Choose a location for the base unit to be near an electrical outlet and an analog telephone jack
• Place the phone at an area where there is supervision and thus theft is less likely (e.g. Nurses
station)
• Place the phone at a central location so that range is optimal
• Install the phone away from Wi-Fi access points, personal computers and microwave ovens
• Install the phone away from heat sources and sunlight
• Avoid areas with excessive moisture, dust or extreme cold
Installing Handset Batteries
Each handset comes with its own rechargeable battery that is designed to give you up to 6 hours of talk
time.
To install the handset batteries follow these steps:
1) Open up the cover on the back side of each handsets by sliding it down.
2) Align the socket pins with the two holes in the plug (B: Black, R: Red), then snap the plug into place.
3) Place the battery in the compartment.
4) Replace the cover by sliding it into place.
NOTE: Use only the CyraCom rechargeable battery pack supplied. Batteries should be charged initially
for 24 hours. Afterwards, a maintenance charge of 10 hours is suffi cient.
NOTE: Make sure that the charging lights on the base unit come on every time you place the
handsets on the base unit. A green light indicates handsets with a full charge.

4ClearLink™ Cordless User Guide
Connecting the Base Unit
Your ClearLink® Cordless must be connected to an electrical outlet and an analog telephone jack.
Phone lines in patient rooms are typically analog. Fax machines and insurance card verifi cation lines
are also typically analog lines. Please check with your telecommunications department if you are not
sure if an analog line is available in your department.
To connect the base unit follow these steps:
1) Connect the AC-DC adaptor into the back of the base unit (labeled DC 12V).
2) Plug the AC-DC adaptor into the electrical outlet. A green light will indicate that there is power.
3) Connect the blue phone line into the back of the base unit labeled LINE.
Special note: If you do not see the jack labeled LINE but instead see a jack labeled USB,
please slide the blue plastic cover piece that is to the right of the USB jack to the left and this will
reveal the LINE jack.
4) Plug the phone line into the analog telephone jack on the wall.
NOTE: Be sure the phone is plugged into an analog phone line. Connecting the phone into a digital/
multi-line phone line could damage to your telephone system and/or the phone.
Placing the Handsets on the Base Unit
To ensure maximum daily performance the handsets should be placed on the base unit after every use
to allow for the battery to charge.
To ensure the handsets are properly placed in the base unit follow these steps:
1) Remove the optional belt clips before placing the handsets in the cradle.
2) Place the handsets face-up (buttons showing) in either cradle.
3) Push down on the handsets after placing them into the cradle.
4) Make sure you hear a beep indicating proper placement and that the red charging lights on the
base unit come on. A green light on the handset indicates a full charge.
NOTE: It doesn’t matter on which side to place the main and secondary handsets.
Checking the Programming and Range
A special feature of ClearLink® Cordless is the pre-programmed buttons. The main handset and the
base unit are pre-programmed with your account information for fast and easy access to trained
medical interpreters. There is no need to memorize numbers or have your account information readily
available.
Before initial use of the phone you must fi rst ensure proper programming by following these steps:
1) Pick up the main handset and press TALK to get a dial tone.
2) Press the blue button labeled ACCESS.
3) When prompted, press the white button labeled ACCT/PIN. If you hear the prompt that asks for your
language selection your phone is programmed correctly. If you do not hear this prompt, contact your
CyraCom account representative or call Client Services at 800-481-3289.

5ClearLink™ Cordless User Guide
To ensure you have suffi cient range with your ClearLink® Cordless follow these steps:
1) Pick up the main handset and press TALK. Walk to all areas where you would like to use ClearLink®
Cordless. Make sure that the dial tone is not breaking up. Alternatively, call another person and con-
duct the same test.
Mounting the Base Unit on a Wall (Optional)
ClearLink® Cordless is wall mountable. Please use a standard wall mounting kit or request one from
your CyraCom account representative.
To mount your ClearLink® Cordless follow these steps:
1) Drill two holes in the wall according to wall mounting kit.
2) Attach the base unit to the wall.
3) Lift up the clips in the middle of both handset cradles.
4) Place the handsets into the base unit.
NOTE: Make sure that the clips are in a upright position every time you place the handsets in the
cradle.
Basic Operation
Accessing an Interpreter Using ClearLink® Cordless
You can easily connect to a medical interpreter using ClearLink® Cordless to have hands-free, mobile
communication with your Limited English Profi cient patients. You can access the interpreter from either
the base unit or the cordless dual handsets.
To access an interpreter from the cordless dual handsets follow these steps:
1) Pick up the main handset and press TALK to get a dial tone.
2) Press the blue button labeled ACCESS.
3) When prompted, press the white button labeled ACCT/PIN.
4) Follow the voice prompts to connect to a medical interpreter.
5) When the interpreter comes on the line, pick up the second handset, press TALK.
7) Pass the second handset to the patient.
8) To disconnect from the call, press TALK on the main handset.
9) Return both handsets to the base to charge.
Using the Speakerphone
A speakerphone is located on both the base unit and handsets to enable hands-free communication or
multiple participants in the interpretation session. The handsets can also be taken into patient rooms
and put on speakerphone to be used at a patient’s bedside to allow for hands-free communication.
To access an interpreter from the base unit follow these steps:
1) Press the button labeled SPEAKER to get a dial tone.
2) Press the blue button labeled ACCESS.

6ClearLink™ Cordless User Guide
3) When prompted, press the white button labeled ACCT/PIN.
4) Follow the voice prompts to connect to a medical interpreter.
5) To disconnect from the call, press SPEAKER.
To use the speakerphone on the cordless dual handsets follow these steps:
1) Connect to an interpreter
2) When the interpreter comes on the line, press the button labeled SPEAKER on either handset to
put the call on speakerphone.
NOTE: Only one handset should be used on speakerphone during an interpretation session. Using
both handsets may cause interference.
NOTE: You can adjust the volume by using the volume control buttons on the side of the handset.
Using Headsets
ClearLink® Cordless comes equipped with two headsets to accommodate hands-free communication.
To use headsets from the handsets:
1) Plug back headset cover located on the side of the handset
2) Plug-in headset
3) Connect to an interpreter
Using Belt Clips
ClearLink® Cordless comes equipped with two belt clips that can be attached to the handsets for mo-
bile and hands-free communication. This is ideal for areas such as physical therapy, NICU and Out-Pa-
tient settings or any other area.
To connect your belt clip to a handset
1) Place the belt clips near the top of each handset.
2) Belt clip will click into place.
NOTE: Remove the optional belt clips before placing the handsets in the cradle after each use.
Making and Receiving Calls
In addition to connecting you to a medical interpreter, ClearLink® Cordless also operates as a stan-
dard phone. You can make a call or answer a call from either the handset or the base unit.

7ClearLink™ Cordless User Guide
Paging
The ClearLink® Cordless handsets can be paged in the event that it is misplaced. You can page each
handset from the other, or directly from the base unit.
From Base Unit
1) Press PAGE + ”1” to page main handset.
2) Press PAGE + ”2” to page secondary handset.
3) Answer page by pressing TALK on the handset.
4) Turn off the page from the base unit by pressing PAGE.
From Main Handset
1) Press PAGE + “0” to call the base unit.
2) Press PAGE + “2” call the secondary handset.
3) Answer page by pressing SPEAKER on the base unit.
From Secondary Handset
1) Press PAGE to call the main handset.
NOTE: Only the main handset can be paged.
Volume Control
ClearLink® Cordless has volume control settings that can be adjusted to allow each participant to listen
and talk comfortably to the interpreter.
Base Unit Volume can be adjusted through a slider at the front of the base unit.
Handset Volume can be adjusted through the volume control setting on the side
of the handset. Both handsets can regulate the volume independently
from each other. There are 6 volume levels on the handsets.
Ringer There is a switch at the back of the base unit with 4 ringer volume set-
tings: (high, medium, low, off). The base unit ringer will adjust accord-
ing to the setting.
NOTE: If the handsets are not placed on the base unit they will ring (re-
gardless of the ringer volume).
Keypad Sound The keypad sound adjusts to the ringer volume. If the ringer is off, no
sound will be heard. The keypad sound on the handsets cannot be ad-
justed.
8ClearLink™ Cordless User Guide
LED Light Indication
To ensure proper charging and use, ClearLink® Cordless has LED lights to alert you to its status.
Charging On the base unit there are two red lights labeled CHARGE. These lights indi-
cate that the handsets are charging.
A red light indicates when the handsets are correctly placed in the cradle.
When the phones are removed the LED will turn off.
Both handsets will show a green light when fully charged and in the base
unit.
If the battery is not fully charged the handset lights will be off.
Battery Level If the handsets are fully charged and in the cradle the lights on both hand-
sets will be green.
If handsets are taken out of the cradle the light will turn off.
If the battery is low, the light on the handset will blink red every 5 seconds.
If the phone is in use a warning beep will sound every 15 seconds until the
phone turns off.
In Use If the phone is in use the IN USE light on the base unit will constantly be
green.
On both handsets the light will be green for 10 seconds at the start of using
the phone and then turn off.

9ClearLink™ Cordless User Guide
CyraCom Internal Section
Manual Programming
In order to manually program your ClearLink® Cordless you will need a tool to assist with pushing the
programming buttons such as a paper clip or push pin. THIS IS DIFFERENT PROGRAMMING INSTRUC-
TIONS FROM CLEARLINK.
To manually program ClearLink® Cordless follow these steps:
1) Phone must be in standby mode:
- Power supply plugged in
- No dial tone
2) Make sure the IN USE light on the base unit is NOT on.
3) Remove the faceplate on the base unit (both the plastic and the paper). You will see two holes to the
left side of the blue button. The top button is STORE, the lower button is PAUSE.
4) Enter the digits to be stored (Access, ACCT/PIN, or Client Services).
5) Press the STORE button with a paper clip (this needs to be done within 15 seconds after having
entered the last digit).
6) A single beep will confi rm that the STORE button has been pressed. Three tones in succession will
indicate failure.
7) Press respective “memory” button within 15 seconds after having pressed the “Store” button. A confi r-
mation tone with confi rm success. Three tones in succession will indicate failure.
For example: Enter 50101XXXX1234, STORE, ACCT/PIN.
NOTE: The handsets do NOT need to be programmed. The base will transfer saved data to the handset.
The handsets will confi rm the transmission of the data through a quick appearance of the green LED.
Pairing Handsets
ClearLink® Cordless will be paired prior to shipping. It is possible for the handsets to loose their pairing.
“Pairing” refers to programming each handset to correspond with the base unit. It is necessary to do this
with ClearLink® Cordless because it has two handsets that need to communicate with the base and with
each other.
To test proper pairing, follow these steps to page the handset:
1) Press PAGE on the base unit then “1” to page the main handset. The base and handset should emit a
ring tone. Press PAGE on the base unit to cancel the page.
2) Press PAGE on the base unit then “2” to page the secondary handset. The base and handset should
emit a ring tone. Press PAGE on the base unit to cancel the page.
If the base unit emits a failure tone (three quick beeps) after pressing either “1” or “2”, the pairing has
been lost. If the pairing is lost you will also get the failure tone on the handsets when pressing TALK in-
stead of getting a dial tone.

10ClearLink™ Cordless User Guide
To pair the handsets with the base unit you must fi rst follow these steps:
1) Unplug the power cord from the back of the phone.
2) Wait ten seconds.
3) Plug the power cord back in and ensure that both handsets are in the base unit and the CHARGE lights
are lit.
4) Remove both handsets from base.
To pair the main (provider) handset:
1) Phone must be in standby mode:
- Power supply plugged in
- No dial tone
2) Press and hold the CODE button on the base until you hear a beep.
3) Press and hold the “1” on the base until you hear a beep.
4) Press and hold the PAGE button on the main handset until you hear two beeps. The LED light on the
main handset will begin blinking after the fi rst beep. Continue to hold the PAGE button until the
second beep occurs and the LED light stops blinking. NOTE: This may take 30-60 seconds – DO NOT
release until you hear the second beep!
5) Confi rm pairing of handset by paging handset (see instructions above).
6) DO NOT place handsets back on base.
To pair the secondary (patient) handset:
1) Phone must be in standby mode:
-Power supply plugged in
-No dial tone
2) Press and hold the CODE button on the base until you hear a beep.
3) Press and hold the “2” on the base until you hear a beep.
4) Press and hold the PAGE button on the main handset until you hear two beeps. The LED light on the
main handset will begin blinking after the fi rst beep. Continue to hold the PAGE button until the
second beep occurs and the LED light stops blinking. NOTE: This may take 30-60 seconds – DO NOT
release until you hear the second beep!)
5) Confi rm pairing of handset by paging handset (see instructions above).

11ClearLink™ Cordless User Guide
Troubleshooting
Why am I not getting a dial tone with my ClearLink® Cordless phone?
First, make sure that the ClearLink® Cordless is plugged into an analog phone jack and that the power
cord is connected. Check to see if you get a dial tone on the base unit by pressing SPEAKER and on the
main handset by pressing TALK. If you press TALK on the main handset and there is no dial tone, the bat-
teries may need to be recharged.
Why is my ACCESS or ACCT/PIN button not working?
The ACCESS button may have been deprogrammed. You can still access an interpreter by
manually dialing 800-481-3293 and entering your account number and PIN. Contact Client
Services for assistance with reprogramming the button.
What if I cannot hear the interpreter?
First, adjust the volume on the side of the handset. Also be sure the handsets are not near metal objects
or appliances and that you are not too far from the phone’s base unit.
What if there is noise interference or the conversation is breaking up?
Keep the handset away from computers, intercoms, fl uorescent lights and other cordless/
wireless appliances. Make sure that you are not too far from the phone’s base unit.
How do I locate a misplaced handset?
Use the phone’s paging feature by pressing PAGE followed by “1” to make the main handset ring or by
pressing PAGE followed by “2” to make the second handset ring.
What if the handsets are not charging?
Make sure that the red charge light is illuminated. If it is not, check if the power cord is
connected, the handsets are properly seated in the cradle and the batteries are properly
attached inside the battery unit of the handsets.

12ClearLink™ Cordless User Guide
Safety Instructions
Maintenance
Taking care of your telephone: your cordless telephone contains sophisticated electronic parts, so it
must be treated with care.
Cleaning your telephone: your telephone has a durable plastic casing that should retain its luster for
many years. Clean it with disinfecting wipes, or a soft cloth slightly dampened with water or a mild
soap. Do not use excess water or cleaning solvents of any kind.
Avoid rough treatment: place the handset down gently.
Avoid water: your telephone can be damaged if it gets wet. Do not use the handset outdoors in the
rain, or handle it with wet hands.
Electrical storms: electrical storms can sometimes cause power surges harmful to electronic equip-
ment. For your own safety, use caution when using electric appliances during storms.
Important Safety Instructions
When using your telephone equipment, basic safety precautions should always be followed to reduce the
risk of fi re, electric shock, and injury, including the following:
1. Read and understand all instructions.
2. Follow all warnings and instructions marked on the product.
3. Unplug this product from the wall outlet before cleaning. Do not use liquid or aerosol cleaners. Use a
damp cloth for cleaning.
4. Do not use this product near water (for example, near a bathtub, kitchen sink, or swimming pool).
5. Do not place this product on an unstable surface, such as a table, shelf or stand. The product may fall,
causing serious damage.
6. Slots and openings in the back or bottom of the base unit and handset are provided for ventilation.
To protect them from overheating, these openings must not be blocked by placing the product on a soft
surface such as a bed, sofa, or rug. This product should never be placed near or over a radiator or heat
register. This product should not be placed in any area where proper ventilation is not provided.
7. This product should be operated only from the type of power source indicated on the marking label. If
you are not sure of the type of power supply in your home, consult your dealer or local power company.
8. Do not allow anything to rest on the power cord. Do not install this product where the cord may have
anyone walking on it.
9. Never push objects of any kind into this product through slots in the base or handset as they may touch
dangerous voltage points or short out parts that could result in a risk of fi re or electric shock.
10. Never spill liquid of any kind on the product.
11. To reduce the risk of electric shock, do not disassemble this product, but take it to an authorized
service facility. Opening or removing parts of the base or handset other than specifi ed access doors may
expose you to dangerous voltages or other risks. Incorrect reassembling can cause electric shock when
the product is subsequently used.
12. Do not overload wall outlets and extension cords as this can result in the risk of fi re or electric shock.
13. Unplug this product from the wall outlet and refer servicing to an authorized service facility under the
following conditions:
• When the power supply cord or plug is damaged or frayed.
•
•
•
•
•

13ClearLink™ Cordless User Guide
• If liquid has been spilled onto the product.
• If the product has been exposed to rain or water.
• If the product does not operate normally by following the operating instructions. Adjust only those con-
trols that are covered by the operating instructions, as improper adjustment of other controls may result
in damage and often requires extensive work by an authorized technician to restore the product to normal
operation.
• If the product has been dropped and the base and/or handset has been damaged.
• If the product exhibits a distinct change in performance.
14. Avoid using a telephone (other than cordless) during an electrical storm. There is a remote risk of
electric shock from lightning.
15. Do not use the telephone to report a gas leak in the vicinity of the leak.
16. Only put the handset of your telephone next to your ear when it is in normal talk mode.
Battery
To reduce the risk of fi re or injury to persons, read and follow these instructions:
Use only the battery(ies) specifi ed.
Do not dispose of the battery(ies) in a fi re. They may explode.
Check with local waste management codes for special disposal instructions.
Do not open or mutilate the battery(ies).
Released electrolyte is corrosive and ay cause burns or injury to the eyes or skin. The electrolyte may
be toxic if swallowed.
Exercise care when handling the battery(ies). Do not allow conductive materials such as rings, brace-
lets or keys to touch the battery(ies), otherwise a short circuit may cause the battery(ies) and/or the
conductive material to overheat and cause burns.
Charge the battery(ies) provided with or identifi ed for use with this product only in accordance with the
instructions and limitations specifi ed in this manual.
FCC Information
FCC Part 15
This device complies with Part 15 of the FCC Rules. Operation is subject to the following two conditions:
(1) this device may not cause harmful interference, and (2) this device must accept any interference re-
ceived, including interference that may cause undesired operation.
This equipment has been tested and found to comply with the requirements for a Class B digital device
under Part 15 of the Federal Communications Commission (FCC) rules. These requirements are intended
to provide reasonable protection against harmful interference in a residential installation. This equipment
generates, uses and can radiate radio frequency energy and, if not installed and used in accordance with
the instructions, may cause harmful interference to radio communications. However, there is no guarantee
that interference will not occur in a particular installation. If this equipment does cause harmful interfer-
ence to radio or television reception, which can be determined by turning the equipment off and on, the
user is encouraged to try to correct the interference by one or more of the following measures:
* Reorient or relocate the receiving antenna.
* Increase the separation between the equipment and receiver.
* Connect the equipment into an outlet on a circuit different from that to which the receiver is connected.
* Consult the dealer or an experienced radio/TV technician for help. Changes or modifi cations to this
equipment not expressly approved by the party responsible for compliance could void the user’s authority
•
•
•
•
•
•
•

14ClearLink™ Cordless User Guide
to operate the equipment.
To ensure safety of users, the FCC has established criteria for the amount of radio frequency energy that
can be safely absorbed by a user or bystander according to the intended usage of the product. This prod-
uct has been tested and found to comply with the FCC criteria. The handset may be safely held againstthe
ear of the user. The base unit shall be installed and used such that parts of the user’s body other than
the hands are maintained at a distance of approximately 20 cm (8 inches) or more. If you choose to use a
clipping device, please make sure to only use the supplied belt clip.
Warning: Changes or modifi cations to this unit not expressly approved by the party responsible for com-
pliance could void the user authority to operate the equipment.
SAR
1. The equipment complies with FCC RF radiation exposure limits set forth for an uncontrolled environ-
ment, under 47 CFR 2.1093 paragraph (d)(2).
2. This Transmitter must not be co-located or operating in conjunction with any other antenna or transmit-
ter
The 2.4 GHz EDCT CORDLESS PHONE has been tested to the FCC exposure requirements (Specifi c Absorb-
tion Rate).
FCC Part 68 and ACTA
This equipment complies with Part 68 of the FCC rules and with technical requirements adopted by the
Administrative Council for Terminal Attachments (ACTA). The label on the back or bottom of this
equipment contains, among other things, a product identifi er in the format US:AAAEQ##TXXXX. This
identifi er must be provided to your local telephone company upon request.
The plug and jack used to connect this equipment to premises wiring and the telephone network must
comply with applicable Part 68 rules and technical requirements adopted by ACTA. A compliant telephone
cord and modular plug is provided with this product. It is designed to be connected to a compatible modu-
lar jack that is also compliant. An RJ11 jack should normally be used for connecting to a single line and an
RJ14 jack for two lines. See Installation Instructions in the user’s manual.
The Ringer Equivalence Number (REN) is used to determine how many devices you may connect to your
telephone line and still have them ring when you are called. The REN for this product is
encoded as the 6th and 7th characters following the US: in the product identifi er (e.g., if ## is 03, the
REN is 0.3). In most, but not all areas, the sum of all RENs should be fi ve (5.0) or less. For more
information, please contact your local telephone company.
This equipment may not be used with Party Lines. If you have specially wired alarm dialing equipment
connected to your telephone line, ensure the connection of this equipment does not disable your alarm
equipment. If you have questions about what will disable alarm equipment, consult your telephone com-
pany or a qualifi ed installer.
If this equipment is malfunctioning, it must be unplugged from the modular jack until the problem has

15ClearLink™ Cordless User Guide
been corrected. Repairs to this telephone equipment can only be made by the manufacturer or its
authorized agents. For repair procedures, follow the instructions outlined under the Limited Warranty.
If this equipment is causing harm to the telephone network, the telephone company may temporarily
discontinue your telephone service. The telephone company is required to notify you before interrupting
service. If advance notice is not practical, you will be notifi ed as soon as possible. You will be given the
opportunity to correct the problem and the telephone company is required to inform you of your right to
fi le a complaint with the FCC. Your telephone company may make changes in its facilities, equipment, op-
eration, or procedures that could affect the proper functioning of this product. The telephone company is
required to notify you if such changes are planned.
If this product is equipped with a corded or cordless handset, it is hearing aid compatible. If this product
has memory dialing locations, you may choose to store emergency telephone numbers (e.g., police, fi re,
medical) in these locations. If you do store or test emergency numbers, please:
* Remain on the line and briefl y explain the reason for the call before hanging up.
* Perform such activities in off-peak hours, such as early morning or late evening.

16ClearLink™ Cordless User Guide