D Link 2002090025-1 802.11b WLAN USB Adapter User Manual WUS B12 Manual draft
D Link Corporation 802.11b WLAN USB Adapter WUS B12 Manual draft
D Link >
Contents
- 1. Part 1
- 2. Revised Part 2
Revised Part 2
Networking Basics
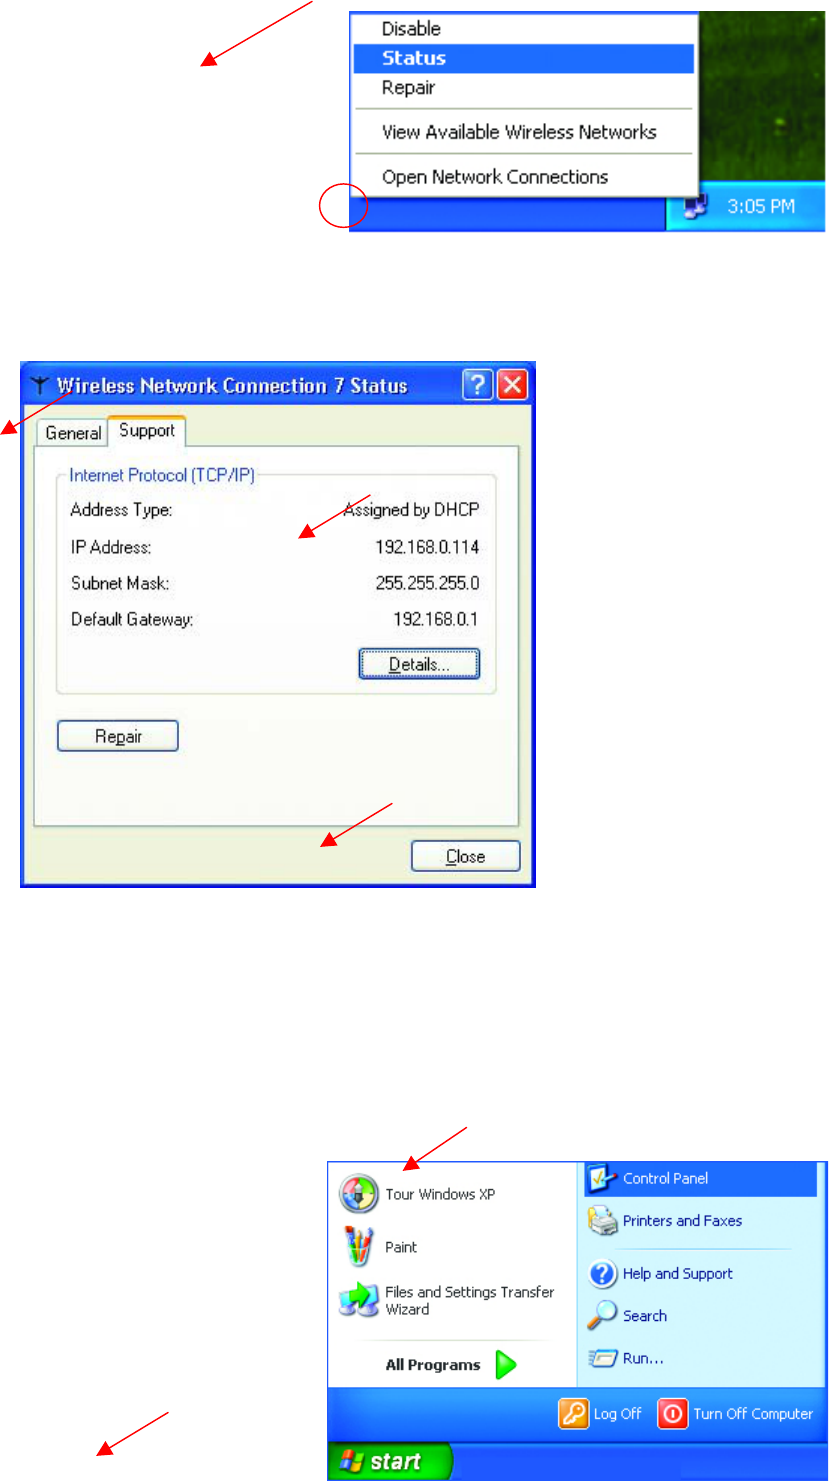
Checking the IP Address in Windows XP
The following window will display
• Click the Support tab.
• Click Close
Networking Basics
Assigning a Static IP Address
Note: Residential Gateways/Broadband Routers will automatically assign IP Addresses to the computers on the network,
using DHCP (Dynamic Host Configuration Protocol) technology. If you are using a DHCP-capable Gateway/Router you will
not need to assign Static IP Addresses.
If you are not using a DHCP capable Gateway/Router, or you need to assign a Static IP Address, please follow these
instructions:
• Go to START
• Double-click on
Control Panel
• Right-click on the
networking icon in
the task bar
• Click on Status
46
Networking Basics
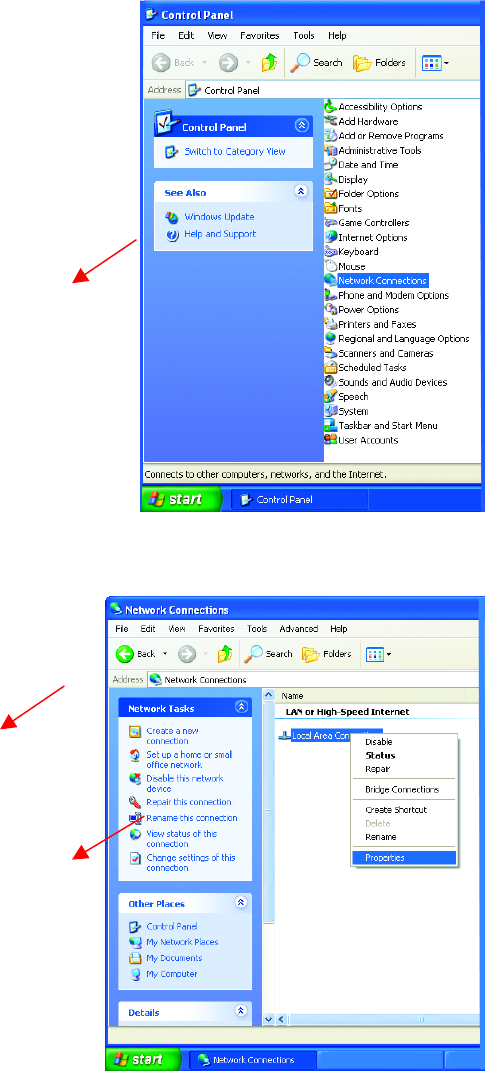
Assigning a Static IP Address
• Double-click on
Network Connections
• Right-click on Local
Area Connections.
• Double-click
Properties
Networking Basics
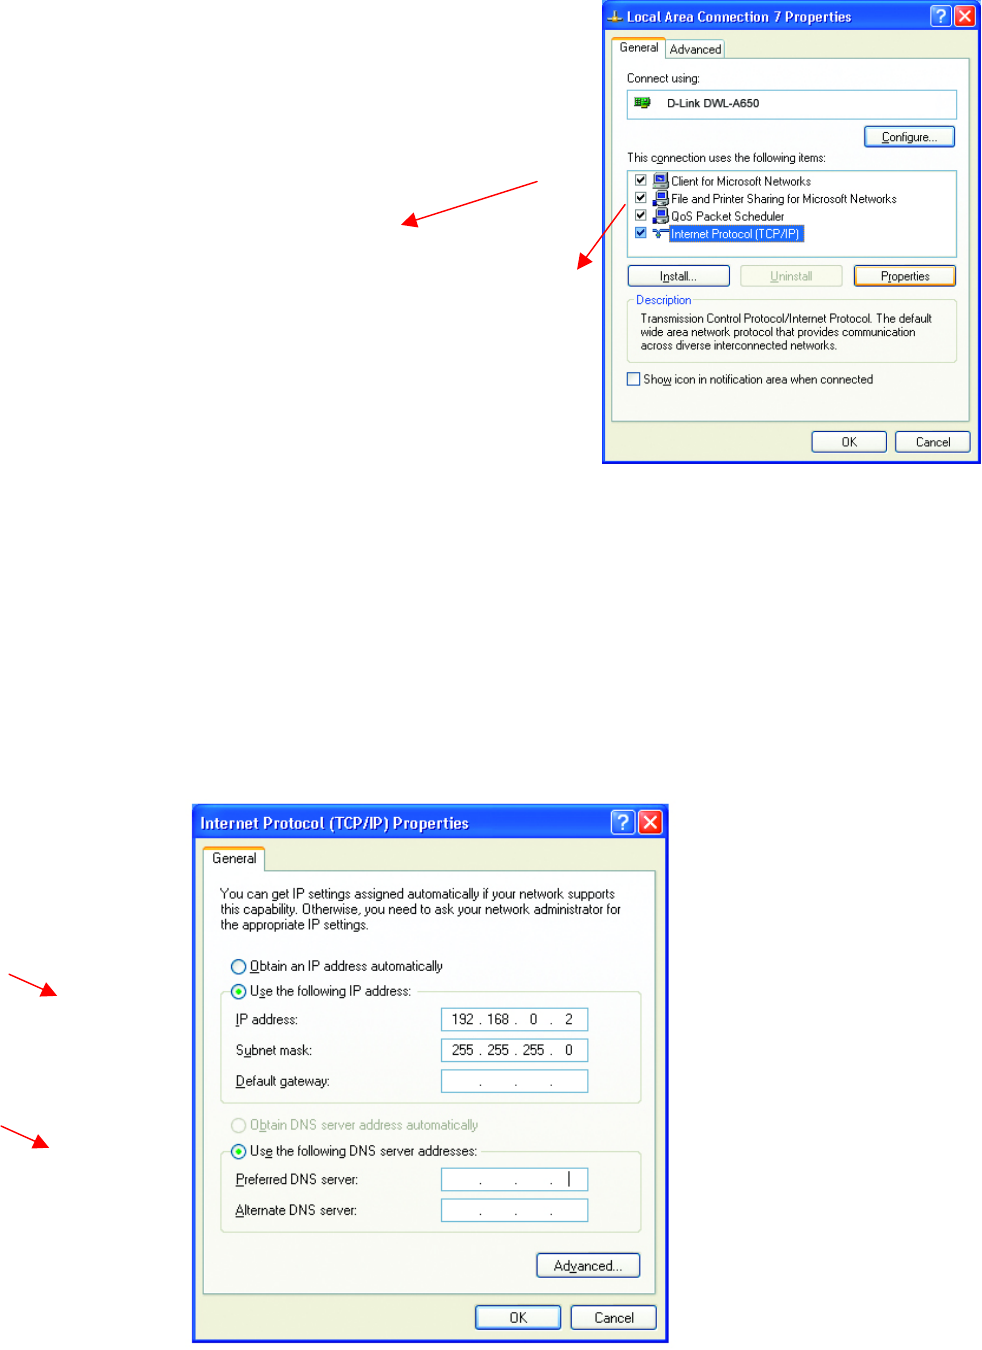
Assigning a Static IP Address
• Select Use the following IP address
in the Internet Protocol (TCP/IP) Properties window,
• Input your IP address and subnet mask. (The IP Addresses on your network must be within the same range.
For example, if one computer has an IP Address of 192.168.0.2, the other computers should have IP
Addresses that are sequential, like 192.168.0.3 and 192.168.0.4. The subnet mask must be the same for all
the computers on the network.)
• Input your DNS server addresses. (Note: If you are entering a DNS server address, you must enter the
IP Address of the Default Gateway.)
• Click OK
The DNS server information will be provided by your ISP (Internet Service Provider.)
You have completed the assignment of a Static IP Address. (You do not need to assign a Static IP Address if you have a
DHCP-capable Gateway/Router.)
Networking Basics
Adding and Sharing Printers in Windows XP
• Highlight Internet
Protocol (TCP/IP)
• Click Properties
48
After you have run the Network Setup Wizard on all the computers in your network (please see the Network
Setup Wizard section at the beginning of Networking Basics,) you can use the Add Printer Wizard to add or
share a printer on your network.
Whether you want to add a local printer (a printer connected directly to one computer,) share an LPR printer (a
printer connected to a print server) or share a network printer (a printer connected to your network through a
Gateway/Router,) use the Add Printer Wizard. Please follow the directions below:
First, make sure that you have run the Network Setup Wizard on all of the computers on your network.
We will show you 3 ways to use the Add Printer Wizard
1. Adding a local printer
2. Sharing an network printer
3. Sharing an LPR printer
Adding a local printer
(A printer connected directly to a computer)
A printer that is not shared on the network and is connected directly to one computer is called a local printer. If
you do not need to share your printer on a network, follow these directions to add the printer to one computer.
Networking Basics
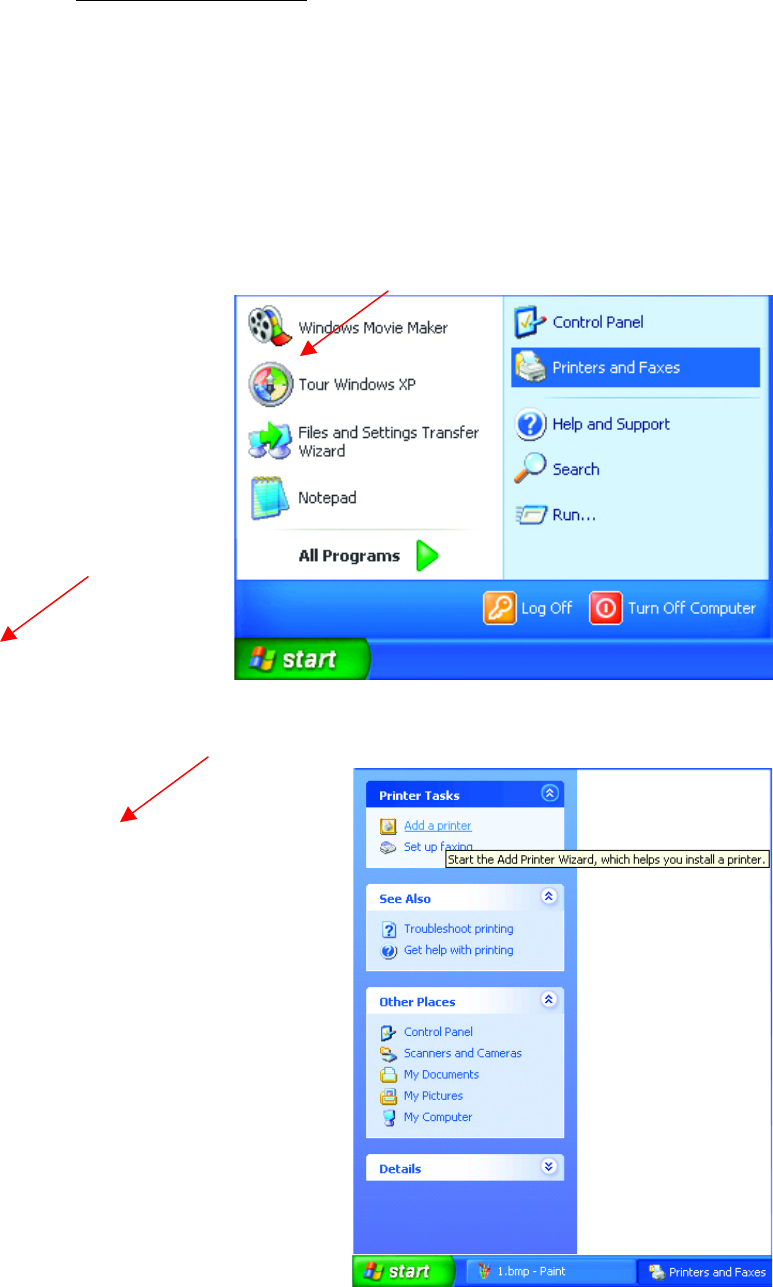
Adding a local printer
• Go to Start>
Printers and
Faxes
• Click on Add a printer
Networking Basics
Adding a local printer
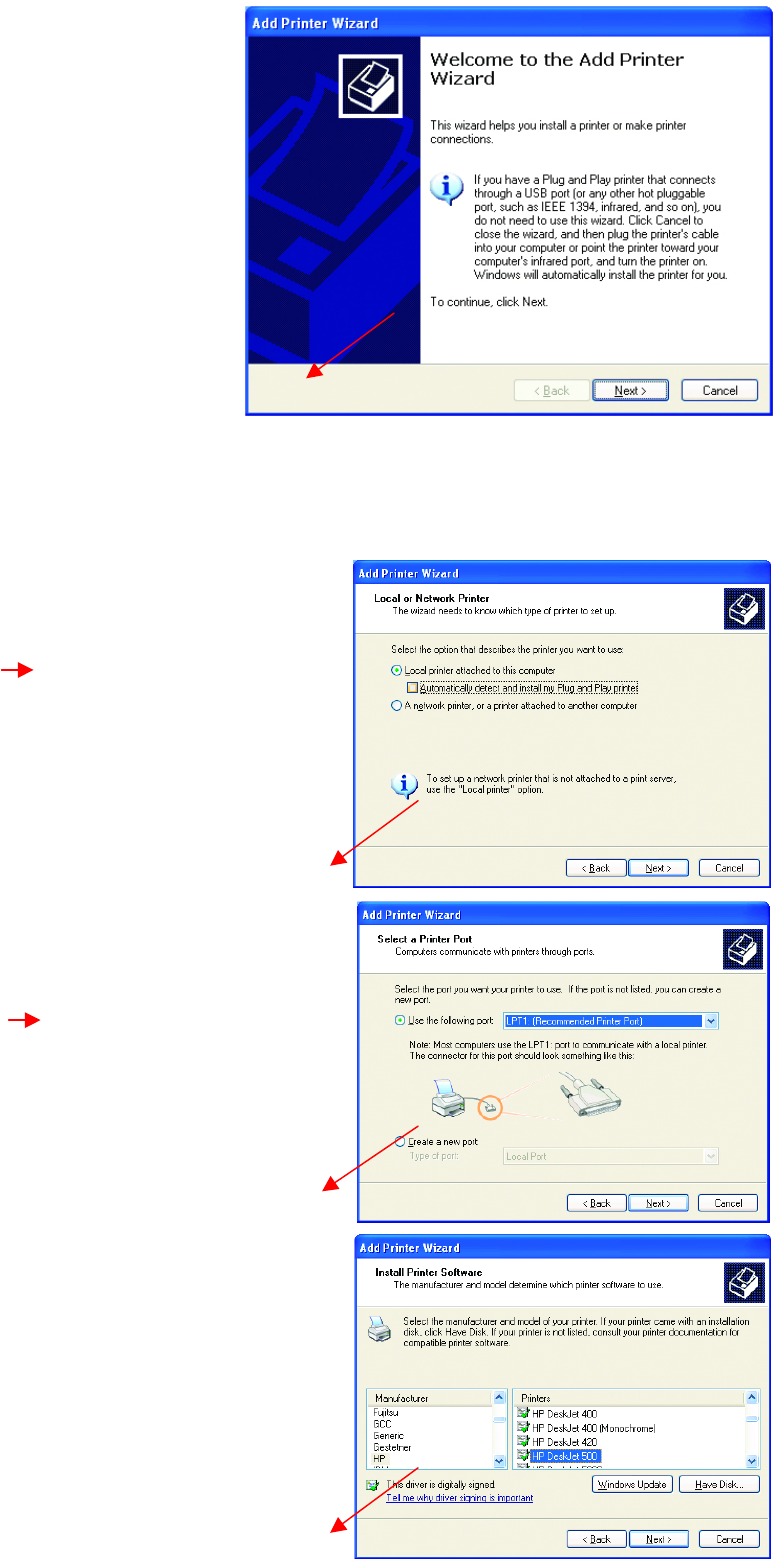
• Click Next
• Select Local printer
attached to this computer
• (Deselect Automatically detect
and install my Plug and Play
printer if it has been selected.)
• Click Next
• Select Use the
following port:
• From the pull-down
menu select the
correct port for your
printer
(Most computers use the
LPT1: port, as shown in
the illustration.)
• Click Next
• Select and highlight the
correct driver for your
printer.
• Click Next
(If the correct driver is not
displayed, insert the CD or
floppy disk that came with your
printer and click Have Disk.)
50
Networking Basics
Adding a local printer
Networking Basics
Adding a local printer
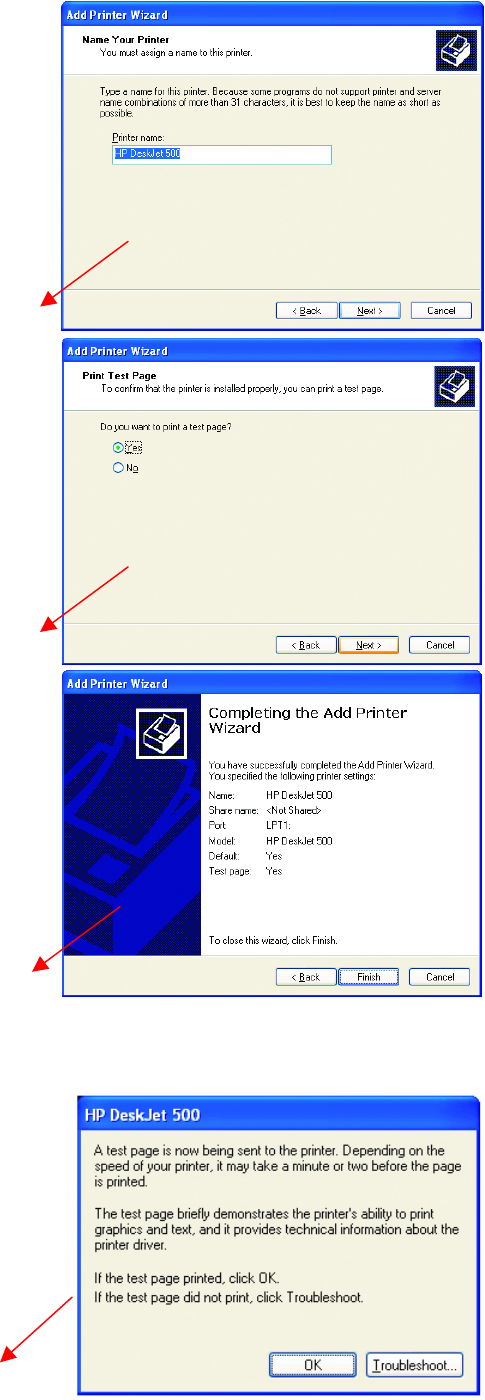
• At this screen, you can
change the name of the
printer (optional.)
• Click Next
• Select Yes, to print a
test page. A
successful printing will
confirm that you have
chosen the correct
driver.
• Click Next
This screen gives you
information about your
printer.
• Click Finish
When the test page has
printed,
• Click OK
Networking Basics
Sharing a network printer
After you have run the Network Setup Wizard on all the computers on your network, you can run the Add
Printer Wizard on all the computers on your network. Please follow these directions to use the Add Printer
Wizard to share a printer on your network:
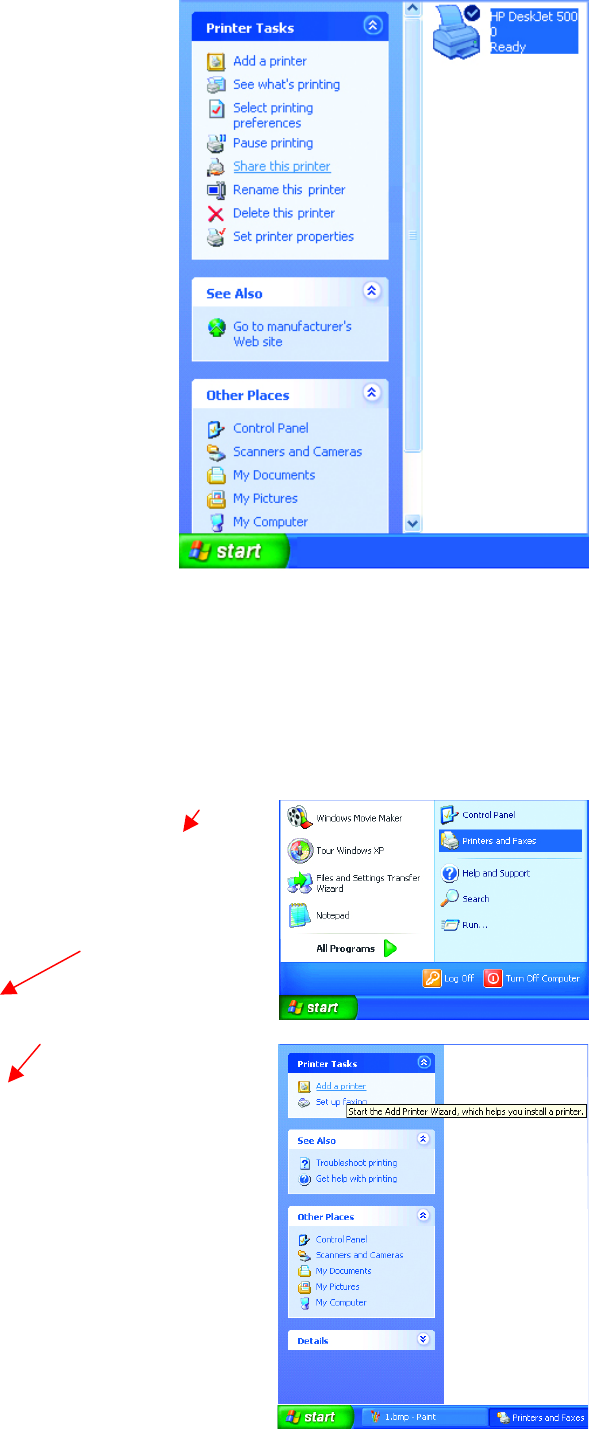
• Go to Start> Printers and
Faxes
A
successful installation wil
l
display the printer icon a
s
shown at right.
You have successfully added a
local printer.
• Go to Start>
Printers and Faxes
• Click on Add a Printer

52
Networking Basics
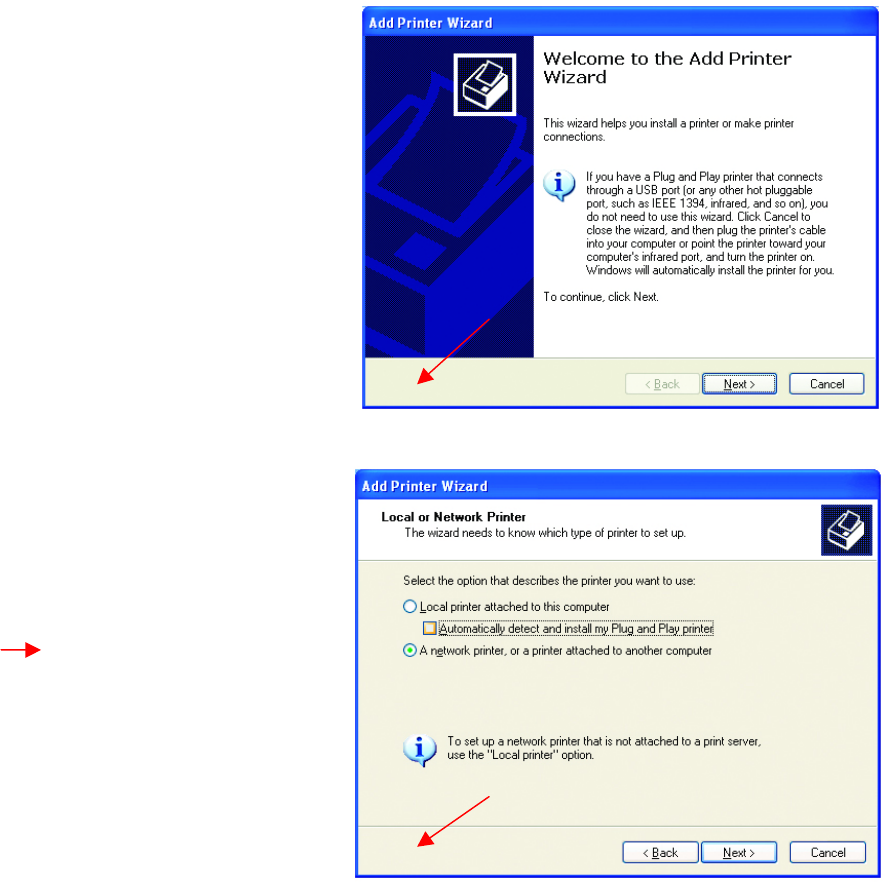
Sharing a network printer
• Click Next
• Select Browse for a printer
• Click Next
• Select the printer you
would like to share.
• Click Next
• Click Finish

Networking Basics
Sharing a network printer
To check for proper installation:
• Go to Start>
Printers and Faxes
The printer icon will appear
at right, indicating proper
installation.
You have completed
adding the printer.
To share this printer on
your network:
• Remember the
printer name
• Run the Add Printer
Wizard on all the
computers on your
network.
• Make sure you have
already run the
Network Setup
Wizard on all the
network computers.
After you run the Add
Printer Wizard on all the
computers in the
network, you can share
the printer.
54
Networking Basics
Sharing an LPR printer
To share an LPR printer (using a print server,) you will need a Print Server such as the DP-101P+ or the DP-313 or a
Gateway/Router with a printer port such as the DI-713P. Please make sure that you have run the Network Setup Wizard
on all the computers on your network. To share an LPR printer, please follow these directions:
• Go to Start>
Printers
and Faxes
• Click on
Add a Printer
The screen to the
right will display.
• Click Next
• Select
A Network
Printer
• Click Next
Networking Basics
Sharing an LPR printer
Networking Basics
Sharing an LPR printer
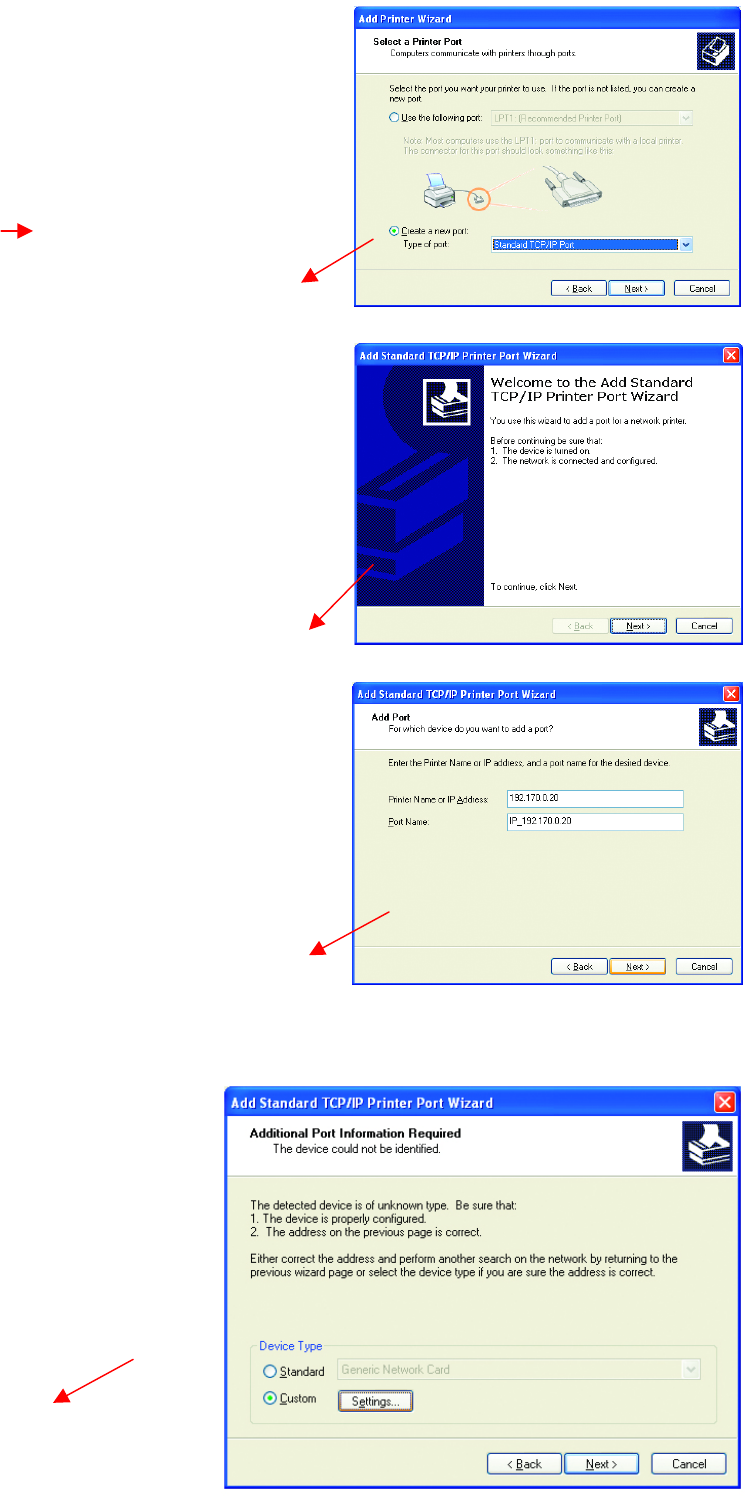
• Select Create a new port
• From the pull-down menu,
select Standard TCP/IP
Port, as shown.
• Click Next
• Please read the instructions
on this screen.
• Click Next
• Enter the Printer IP
Address and the Port
Name, as shown.
• Click Next
• In this screen,
select Custom.
• Click Settings
56
Networking Basics
Sharing an LPR printer
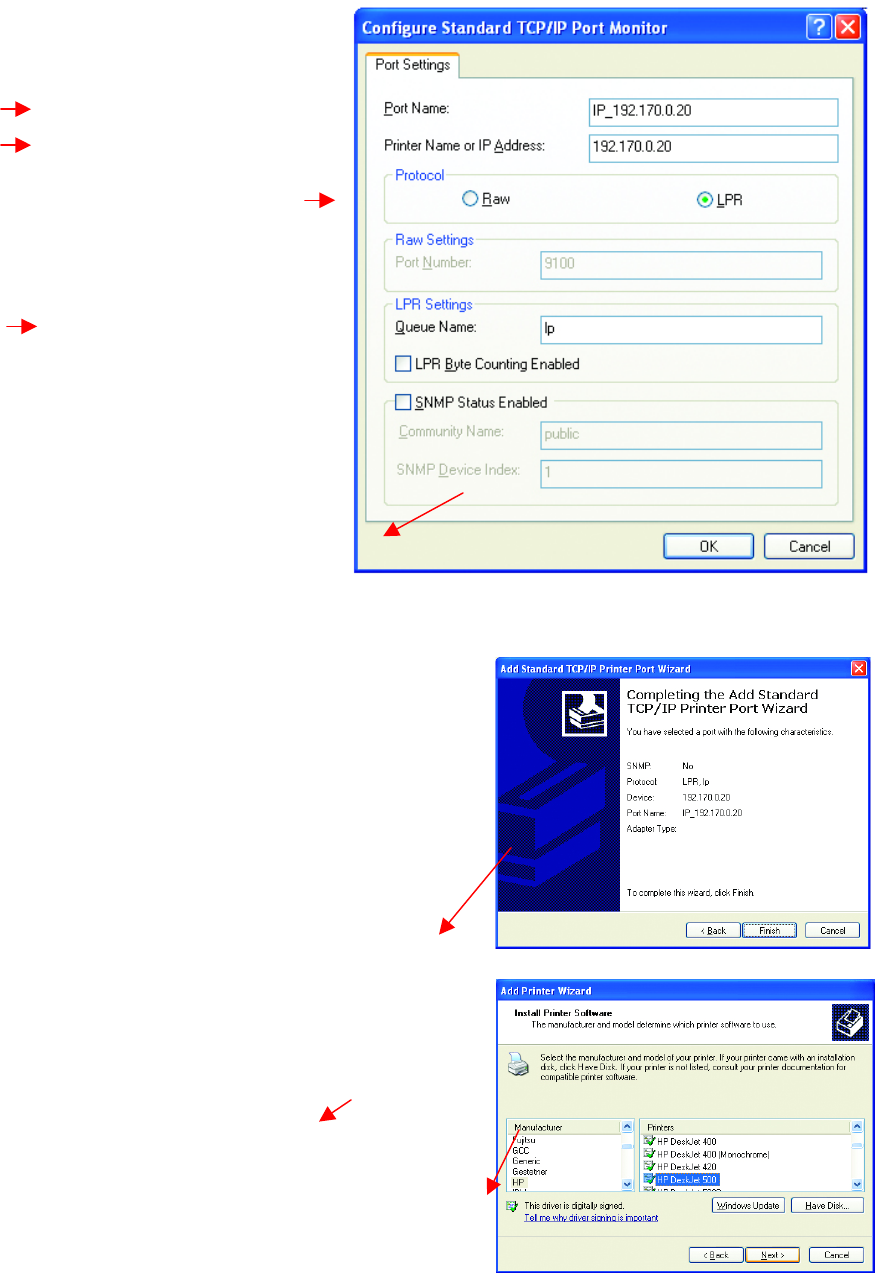
• Enter the Port
Name and the
Printer Name or
IP Address.
• Select LPR
• Enter a Queue
Name. If there
is more than
one port on the
print server, you
must name the
Queue.
• Click OK
• This screen will show
you information
about your printer.
• Click Finish
• Select the printer
you are adding from
the list of Printers.
• Insert the printer
driver disk that came
with your printer.
• Click Have Disk
Networking Basics
Sharing an LPR printer
Networking Basics
Other Tasks
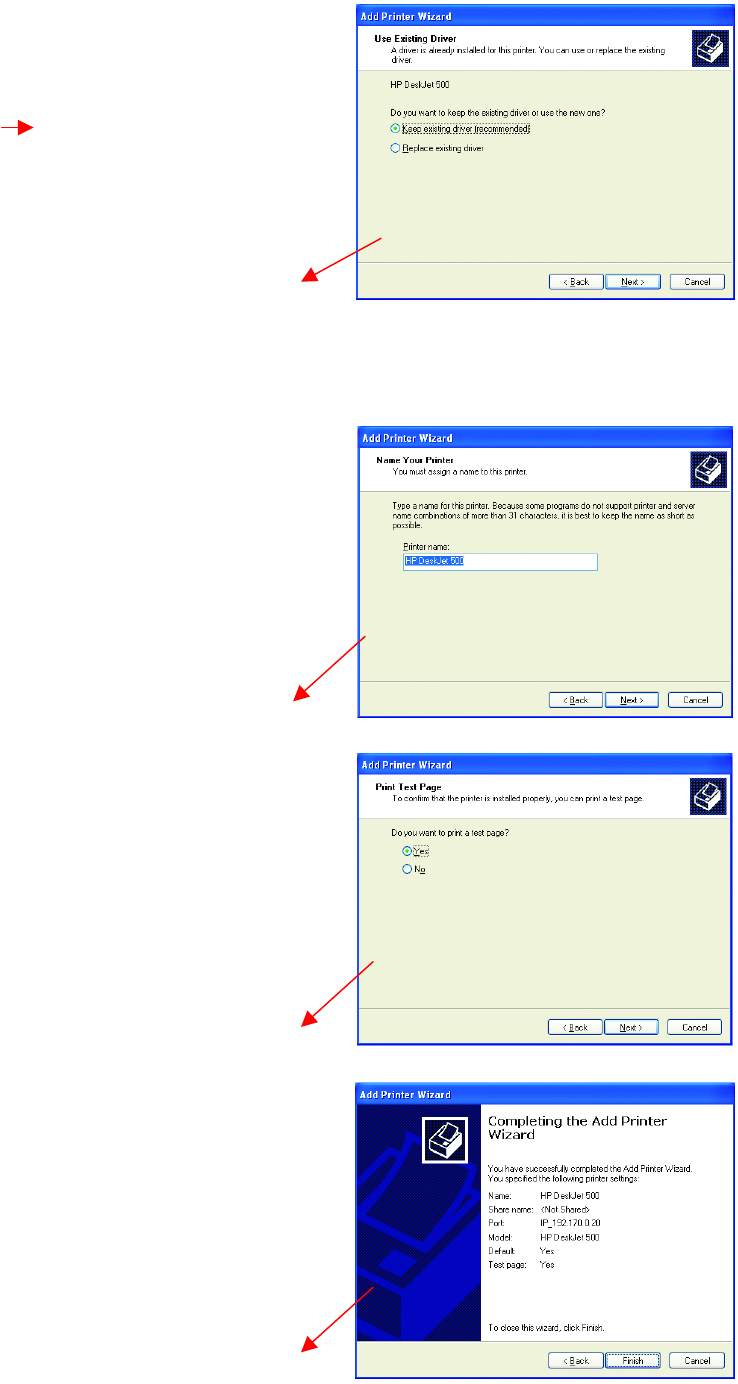
If the printer driver is already
installed,
• Select Keep existing
driver
• Click Next
• You can rename your
printer if you choose. It
is optional.
Please remember the name of
your printer. You will need this
information when you use the
Add Printer Wizard on the
other computers on your
network.
• Click Next
• Select Yes, to print a
test page.
• Click Next
This screen will display
information about your
printer.
• Click Finish to
complete the
addition of the
printer.
• Please run the
Add Printer
Wizard on all the
computers on your
network in order to
share the printer.
Note: You must run the Network Setup Wizard
on all the computers on your network before you
run the Add Printer Wizard.
58
For help with other tasks in home or small office networking, see Using the Shared Documents folder and
Sharing files and folders in the Help and Support Center in Microsoft Windows XP.
Troubleshooting
This chapter provides solutions to problems that can occur during the installation and operation of the WUS-B12
Wireless USB Adapter. Read the following descriptions if you are having problems.
1. Checking the Installation of the Drivers for the Wireless Adapter
Troubleshooting (continued)
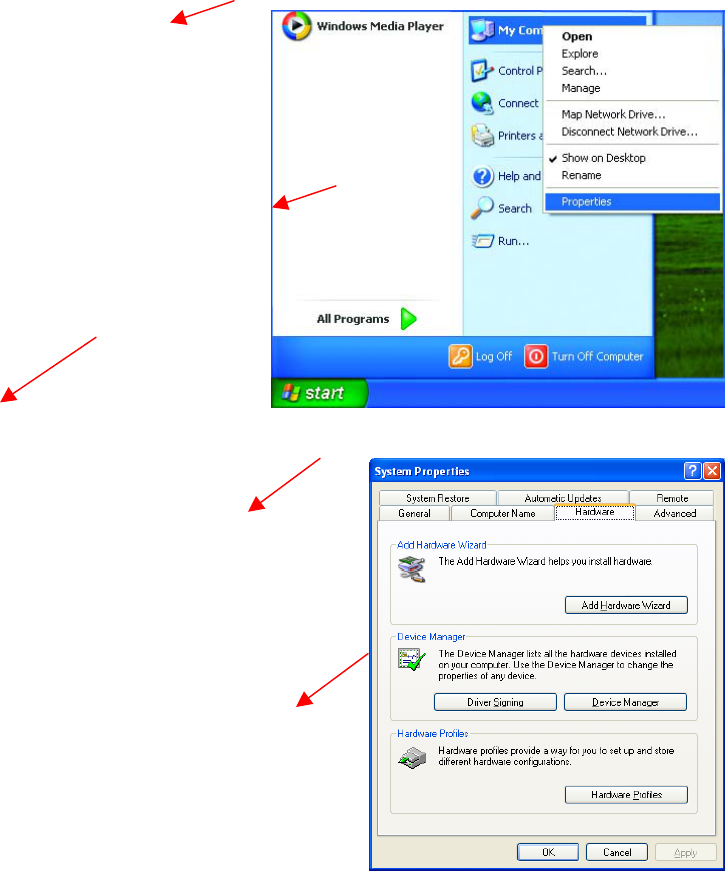
• Go to Start
• Right-click on
My Computer
• Click Properties
• Select the Hardware Tab
• Click Device Manager
60
Troubleshooting (continued)
2. The computer does not recognize the WUS-B12 802.11b Wireless USB Adapter.
• Make sure that the WUS-B12 Wireless USB Adapter is properly seated in the computer’s USB port.
• If Windows does not detect the hardware upon insertion of the adapter, make sure to completely remove
drivers that were previously installed. To remove the drivers, do the following:
A. Under Tools> select Folder Options…> select View > under Hidden files and folders >
select Show hidden files and folders
B. Uncheck Hide extension for known file types > click on Apply
C. Search for the files NetA3AB.inf and A3AB.sys. Remove these files from the INF and
SYSTEM32 (DRIVERS) folders in the Windows directory. Note: Windows XP and Windows
2000 will rename .inf files that have not received certification into oem.inf files (e.g., oem1.inf.)
3. The WUS-B12 802.11b Wireless USB Adapter does not work properly after the driver is installed.
• Restart the computer. (In some cases, it will be necessary to restart the computer after installing the
drivers.)
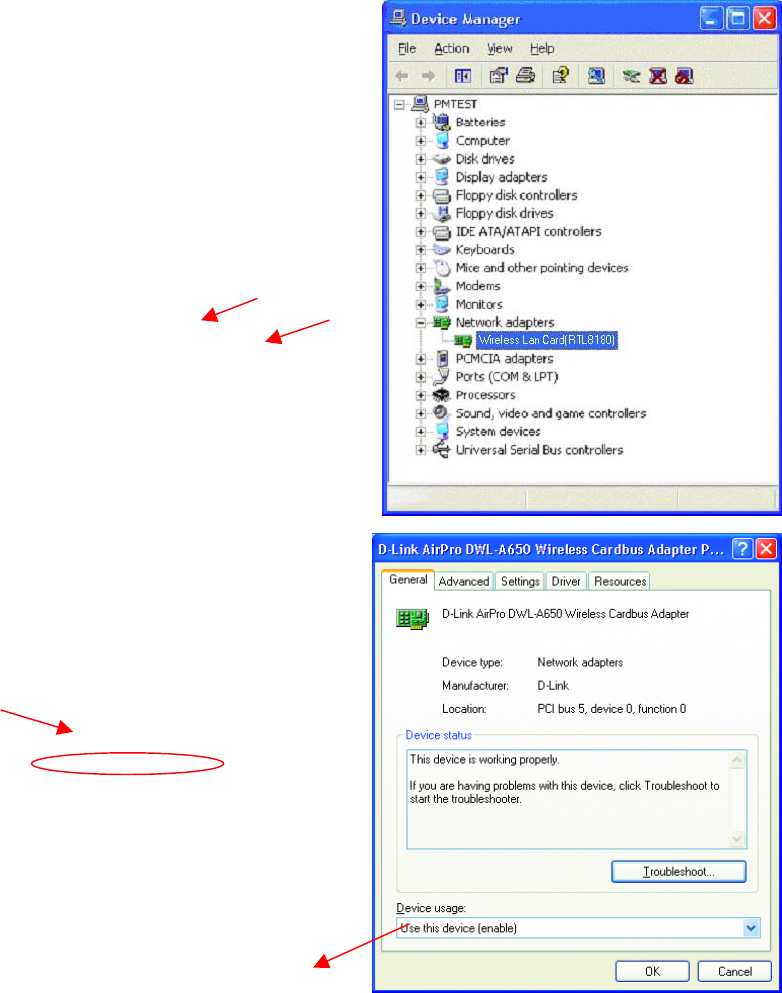
• Click on Network
Adapters
• Right-click on WUS-B12
Wireless LAN Card
• Select Properties to check
that the drivers are
installed properly.
• Look under Device
Status
to check that the
device is working
properly.
• Click OK
WUS-B12 Wireless USB Adapter
• In Windows XP, go to Start>Control Panel>System>Hardware Tab> click on the Device Manager
Tab> click on Network Adapters> double click on D-Link AirPro WUS-B12 Wireless USB Adapter>
make sure that “This device is working properly” is displayed under Device Status under the General
Tab. (Please refer to Checking the Installation of the Drivers for the Wireless Adapter in the
Networking Basics section of this manual for more information.)
• If the device is not working properly and a yellow exclamation mark is displayed, then there is probably a
resource conflict. In this case, make sure the computer system has a free IRQ and if necessary, uninstall
the drivers, restart the system, and repeat the driver installation procedure.
Troubleshooting (continued)
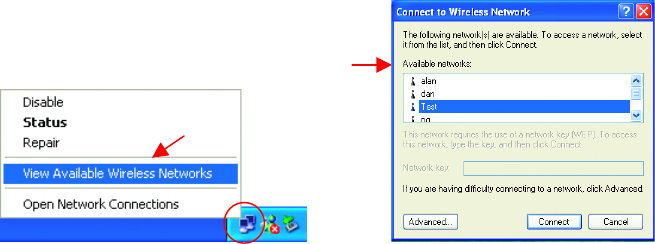
4. The wireless client cannot access the Internet in the Infrastructure mode.
• Make sure the wireless client is associated and joined with the correct Access Point. To check this
connection: Right-click on the Networking Icon in the taskbar> select View Available Wireless
Networks. The Connect to Wireless Network screen will appear. Please make sure you have selected
the correct available network, as shown in the illustrations below.
• Check that the IP Address assigned to the wireless adapter is within the same IP Address range as the
access point and gateway. (For example: if one computer has an IP Address of 192.168.0.2, the other
computers should have IP Addresses that are sequential, like 192.168.0.3 and 192.168.0.4. The subnet
mask must be the same for all the computers on the network.) To check the IP Address assigned to the
wireless adapter, double-click on the Network Connection Icon in the taskbar > select the Support tab
and the IP Address will be displayed. (Please refer to Checking the IP Address in the Networking
Basics section of this manual.)
If it is necessary to assign a Static IP Address to the wireless adapter, please refer to the appropriate section in
Networking Basics. If you are entering a DNS Server Address, you must also enter the Default Gateway
Address. (Remember that if you have a DHCP-capable router, you will not need to assign a Static IP Address.
See Networking Basics: Assigning a Static IP Address.)
62
Technical Specifications
Standards
• IEEE 802.11b (Wi-Fi)
Adapter Type
• USB 1.0
Supported OS
• Windows XP
• Windows 2000
• Windows ME
• Windows 98
• Windows 95
Frequency Range
• 2400 ~ 2497MHz ISM Band
Data Rates
• 1, 2, 5.5, 11 Mbps
Modulation Technology
• Direct Sequence Spread Spectrum (DSSS)
Modulation Techniques
• DBPSK (Differential Binary Phase Shift Keying)
• DQPSK (Differential Quadrature Phase Shift Keying)
• CCK (Complementary Code Keying)
Data Security
• 64, 128-bit WEP (Wired Equivalent Privacy) Encryption
Media Access Control
• CSMA/CA with ACK
Diagnostic LED
• Power
• Link
Current Consumption
• Sleep mode - 80mA
• Transmit mode - 350mA
• Receive mode - 200mA
Operating Voltage
• 3.3VDC ± -5%
Network Architecture
• Ad-Hoc Mode and 802.11 Ad-hoc Mode for network configurations that do not have any access
points.
• Infrastructure Mode for network configurations with access points.
Antenna Type
• Printed PCB antenna
Available Channels:
• 12 non-overlapping channels for US and Canada
• 4 non-overlapping channels for Japan
• 19 non-overlapping channels for US
MBTF (Mean Time Between Failure)
• 30,000 hours
Physical Dimensions
• L ~ 82.5 mm
• W ~ 27.2 mm
• H ~ 12 mm
Temperature
• Operating: 0ºC to 55ºC (32ºF to 131ºF)
• Storing: -20ºC to 75ºC (-4ºF to 167ºF)
Humidity:
• 10%-90%, non-condensing
Emissions:
• FCC part 15b
• UL1950-3
Warranty
• Three Years
Federal Communication Commission Interference Statement
This equipment has been tested and found to comply with the limits for a Class B digital device, pursuant to Part 15
of the FCC Rules. These limits are designed to provide reasonable protection against harmful interference in a
residential installation. This equipment generates, uses and can radiate radio frequency energy and, if not installed
and used in accordance with the instructions, may cause harmful interference to radio communications. However,
there is no guarantee that interference will not occur in a particular installation. If this equipment does cause
harmful interference to radio or television reception, which can be determined by turning the equipment off and on,
the user is encouraged to try to correct the interference by one of the following measures:
- Reorient or relocate the receiving antenna.
- Increase the separation between the equipment and receiver.
- Connect the equipment into an outlet on a circuit different from that
to which the receiver is connected.
- Consult the dealer or an experienced radio/TV technician for help.
This device complies with Part 15 of the FCC Rules. Operation is subject to the following two conditions: (1) This
device may not cause harmful interference, and (2) this device must accept any interference received, including
interference that may cause undesired operation.
FCC Caution: Any changes or modifications not expressly approved by the party responsible for compliance could
void the user's authority to operate this equipment.
IMPORTANT NOTE:
FCC Radiation Exposure Statement:
This equipment complies with FCC radiation exposure limits set forth for an uncontrolled environment.
This transmitter must not be co-located or operating in conjunction with any other antenna or transmitter.