D Link AP1353B1 RANGEBOOSTER N 650 ACCESS POINT User Manual DAP 1353 B1 Manual
D Link Corporation RANGEBOOSTER N 650 ACCESS POINT DAP 1353 B1 Manual
D Link >
Users Manual


2D-Link DAP-1353 User Manual
Table of Contents
Product Overview........................................................ 4
Package Contents ................................................... 4
System Requirements ............................................. 4
Introduction.............................................................. 5
Features .................................................................. 7
Wireless Basics ........................................................... 8
Standards-Based Technology ................................. 9
Wireless Installation Considerations...................... 10
Four Operational Modes ........................................... 11
Getting Started...........................................................12
%QPſIWTCVKQP............................................................. 14
Home > Basic Settings .......................................... 16
Wireless .......................................................... 16
Access Point mode ...................................... 16
WDS with AP mode ..................................... 18
WDS mode................................................... 20
Wireless Client mode ................................... 22
Open System/Shared Key authentication .... 23
WPA-Personal authentication ...................... 24
WPA-Enterprise authentication .................... 25
LAN ................................................................. 26
Home > Advanced Settings ................................... 27
Performance .................................................... 27
Multi-SSID........................................................ 29
VLAN ............................................................... 31
VLAN List ..................................................... 31
Port List ........................................................ 32
Add/Edit VLAN ............................................. 33
PVID Setting................................................. 34
Intrusion ........................................................... 35
Schedule.......................................................... 36
QoS.................................................................. 37
DHCP Server ..................................................39
Dynamic Pool Settings ................................. 39
Static Pool Setting........................................ 41
Current IP Mapping List ............................... 43
Filters ............................................................... 44
Wireless MAC ACL ...................................... 44
WLAN Partition............................................. 45
Home > Status ......................................................46
Device Information........................................... 46
Client Information............................................. 47
WDS Information .............................................48
Stats................................................................. 49
Ethernet........................................................ 49
WLAN........................................................... 50
Log................................................................... 51
Table of Contents

3D-Link DAP-1353 User Manual
Table of Contents
View Log ...................................................... 51
Log Settings ................................................. 52
Maintenance ......................................................... 53
Administrator Settings...................................... 53
Limit Administrator ....................................... 54
System Name Settings................................. 55
Login Settings .............................................. 56
Console Settings .......................................... 57
SNMP Settings............................................. 58
(KTOYCTGCPF55.%GTVKſECVKQP7RNQCF ................ 59
%QPſIWTCVKQP(KNG .................................................. 60
Time and Date .......................................................61
System............................................................. 62
System Settings ........................................... 62
Help ....................................................................... 63
Troubleshooting ........................................................ 64
Networking Basics .................................................... 66
Check your IP address .......................................... 66
Statically Assign an IP address ............................. 67
6GEJPKECN5RGEKſECVKQPU........................................... 69
4D-Link DAP-1353 User Manual
Section 1 - Product Overview
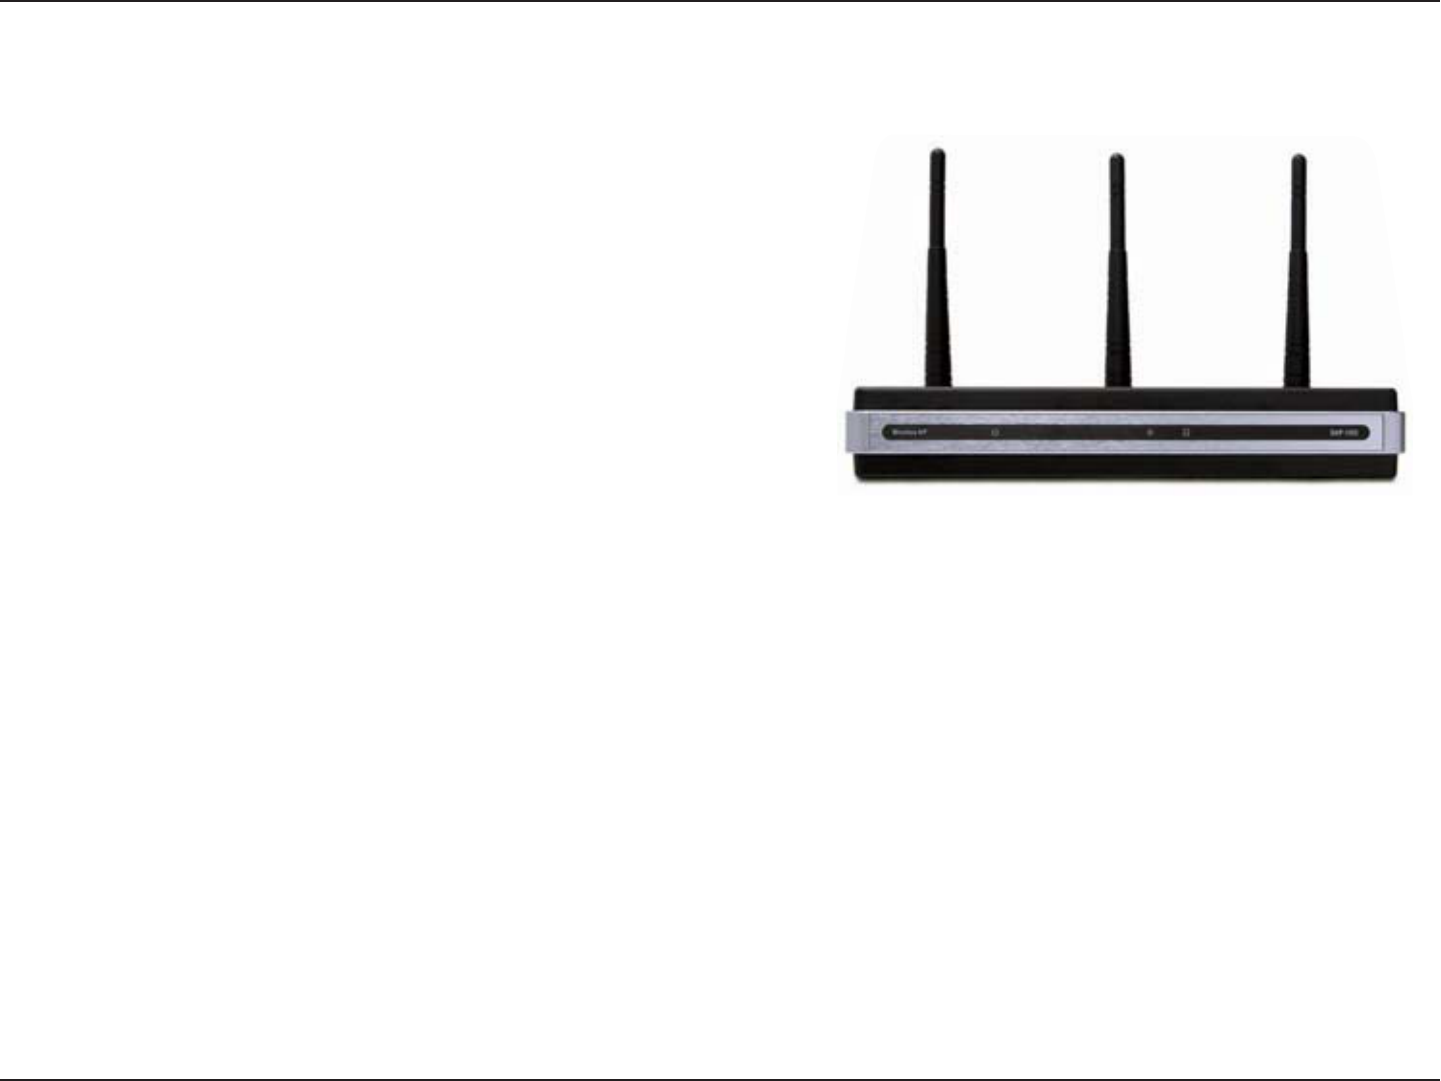
Ŗ&.KPMKTGNGUU0#EEGUU2QKPV
Ŗ2QYGT#FCRVGT
Ŗ%#6'VJGTPGV%CDNG
Ŗ%&41/YKVJ7UGT/CPWCN
Ŗ3WKEM+PUVCNN)WKFG
Ŗ&GVCEJCDNG#PVGPPCU
System Requirements
Ŗ%QORWVGTUYKVJ9KPFQYU®, Macintosh®QT.KPWZDCUGFQRGTCVKPIU[UVGOUYKVJCPKPUVCNNGF'VJGTPGV
Adapter
Ŗ+PVGTPGV'ZRNQTGT8GTUKQPQT(KTGHQZCPF#DQXGHQTEQPſIWTCVKQP
Product Overview
Package Contents
Note: 7UKPICRQYGTUWRRN[YKVJCFKHHGTGPVXQNVCIGTCVKPIVJCPVJGQPGKPENWFGF
with the DAP-1353 will cause damage and void the warranty for this product.

5D-Link DAP-1353 User Manual
Section 1 - Product Overview
Introduction
6JGP)*<#2KPETGCUGURTQFWEVKXKV[D[CNNQYKPI[QWVQYQTMHCUVGTCPFOQTGGHſEKGPVN[9KVJVJG
DCPFYKFVJKPVGPUKXGCRRNKECVKQPUNKMGITCRJKEUQTOWNVKOGFKCYKNNDGPGſVUKIPKſECPVN[DGECWUGNCTIGſNGU
CTGPQYCDNGVQOQXGCETQUUVJGPGVYQTMSWKEMN[
6JGKUECRCDNGQHQRGTCVKPIKPQPGQHHQWTFKHHGTGPVYKTGNGUUPGVYQTMKPIOQFGUCEEGUURQKPV9&59KTGNGUU
&KUVTKDWVKQP5[UVGOYKVJ#29&5QT9KTGNGUU%NKGPVOQFG
#PKFGCNUQNWVKQPHQTSWKEMN[ETGCVKPICPFGZVGPFKPICYKTGNGUUNQECNCTGCPGVYQTM9.#0KPQHſEGUQTQVJGTYQTMRNCEGU
VTCFGUJQYUCPFURGEKCNGXGPVUVJGRTQXKFKPIFCVCVTCPUHGTTCVGUWRVQ/DRU6JGPUVCPFCTFKU
DCEMYCTFUEQORCVKDNGYKVJICPFDFGXKEGU
92#92#KUQHHGTGFKPVYQƀCXQTU'PVGTRTKUGWUGFHQTEQTRQTCVKQPUCPF2GTUQPCNWUGFHQTJQOGWUGTU
92#2GTUQPCNCPF92#2GTUQPCNCTGFKTGEVGFVQYCTFUJQOGWUGTUYJQFQPQVJCXGVJGUGTXGTDCUGFGSWKROGPV
TGSWKTGFHQTWUGTCWVJGPVKECVKQP6JGOGVJQFQHCWVJGPVKECVKQPKUUKOKNCTVQ9'2DGECWUG[QWFGſPGCő2TG5JCTGF
-G[ŒQPVJGYKTGNGUUTQWVGT#21PEGVJGRTGUJCTGFMG[KUEQPſTOGFCPFUCVKUſGFCVDQVJVJGENKGPVCPFCEEGUURQKPV
CEEGUUKUVJGPITCPVGF6JGGPET[RVKQPOGVJQFWUGFKUTGHGTTGFVQCUVJG6GORQTCN-G[+PVGITKV[2TQVQEQN6-+2YJKEJ
offers per-packet dynamic hashing. It also includes an integrity checking feature which ensures that the packets were
not tampered with during wireless transmission.
92#'PVGTRTKUG CPF 92#'PVGTRTKUG CTG KFGCN HQT DWUKPGUUGU VJCV CNTGCF[ JCXG GZKUVKPI UGEWTKV[ KPHTCUVTWEVWTGU
GUVCDNKUJGF/CPCIGOGPVCPFUGEWTKV[KORNGOGPVCVKQPECPPQYDGEGPVTCNK\GFQPCUGTXGTRCTVKEKRCVKPIQPVJGPGVYQTM
7VKNK\KPIZ YKVJ C4#&+75 4GOQVG #WVJGPVKECVKQP &KCNKP 7UGT 5GTXKEG UGTXGT CPGVYQTM CFOKPKUVTCVQT ECP
FGſPGCNKUVQHCWVJQTK\GFWUGTUYJQECPCEEGUUVJGYKTGNGUU.#09JGPCVVGORVKPIVQCEEGUUCYKTGNGUU.#0YKVJ
92#'PVGTRTKUGEQPſIWTGFVJGPGYENKGPVYKNNDGTGSWGUVGFVQGPVGTCWUGTPCOGYKVJCRCUUYQTF+HVJGPGYENKGPV
KUCWVJQTK\GFD[VJGCFOKPKUVTCVKQPCPFGPVGTUVJGEQTTGEVWUGTPCOGCPFRCUUYQTFVJGPCEEGUUKUVJGPITCPVGF+P
VJGECUGYJGTGCPGORNQ[GGNGCXGUVJGEQORCP[VJGPGVYQTMCFOKPKUVTCVQTKUCDNGVQTGOQXGVJGRTGXKQWUGORNQ[GG
HTQOVJGCWVJQTK\GFNKUVVQCXQKFEQORTQOKUKPIVJGPGVYQTM

6D-Link DAP-1353 User Manual
Section 1 - Product Overview
'#2'ZVGPUKDNG#WVJGPVKECVKQP2TQVQEQNKUCXCKNCDNGVJTQWIJVJG9KPFQYU® XP operating system. You will need to
use the same type of EAP protocol on all devices in your network when using the 802.1x feature.
/CZKOWOYKTGNGUUUKIPCNTCVGFGTKXGFHTQO+'''5VCPFCTFURGEKſECVKQPU#EVWCNFCVCVJTQWIJRWVOC[XCT[0GVYQTMEQPFKVKQPU
CPFGPXKTQPOGPVCNHCEVQTUKPENWFKPIXQNWOGQHPGVYQTMVTCHſEDWKNFKPIOCVGTKCNUCPFEQPUVTWEVKQPCPFPGVYQTMQXGTJGCFECPNQYGTCEVWCN
data throughout rate.

7D-Link DAP-1353 User Manual
Section 1 - Product Overview
Ŗ Four different operation modes - %CRCDNGQHQRGTCVKPIKPQPGQHHQWTFKHHGTGPVQRGTCVKQPOQFGUVQOGGV[QWT
YKTGNGUUPGVYQTMKPIPGGFU#EEGUU2QKPV9&5YKVJ#29&5QT9KTGNGUU%NKGPV
Ŗ (CUVGTYKTGNGUUPGVYQTMKPIYKVJVJGPFTCHVUVCPFCTFVQRTQXKFGCOCZKOWOYKTGNGUUUKIPCNTCVGQHWRVQ
/DRU
Ŗ %QORCVKDNGYKVJVJGDUVCPFCTF VQRTQXKFGCYKTGNGUUFCVCTCVGQHWRVQ/DRUCNNQYKPI[QWVQOKITCVG
[QWTU[UVGOVQVJGPFTCHVCPFIUVCPFCTFUQP[QWTQYPUEJGFWNGYKVJQWVUCETKſEKPIEQPPGEVKXKV[
Ŗ Better security with WPA - 6JGECPUGEWTGN[EQPPGEVYKTGNGUUENKGPVUQPVJGPGVYQTMWUKPI92#9K(K
2TQVGEVGF#EEGUUVQRTQXKFGCOWEJJKIJGTNGXGNQHUGEWTKV[HQT[QWTFCVCCPFEQOOWPKECVKQPUVJCPKVURTGXKQWU
versions.
Ŗ AP Manager II management software - The real-time display of the network's topology and AP’s information
OCMGUPGVYQTMEQPſIWTCVKQPCPFOCPCIGOGPVSWKEMCPFUKORNG
Ŗ SNMP for management 6JG  KU PQV LWUV HCUV DWV CNUQ UWRRQTVU 50/2 X HQT DGVVGT PGVYQTM
OCPCIGOGPV5WRGTKQTYKTGNGUU#2OCPCIGTUQHVYCTGKUDWPFNGFYKVJVJGHQTPGVYQTMEQPſIWTCVKQP
CPF ſTOYCTG WRITCFG 5[UVGOU CFOKPKUVTCVQTU ECP CNUQ UGV WR VJG  GCUKN[ YKVJ VJG 9GDDCUGF
EQPſIWTCVKQP#&.KPM&8KGYOQFWNGYKNNDGFQYPNQCFCDNGHQTPGVYQTMCFOKPKUVTCVKQPCPFTGCNVKOGPGVYQTM
VTCHſEOQPKVQTKPIYKVJ&.KPM&8KGYUQHVYCTG
Ŗ 7VKNK\GU1(&/VGEJPQNQI[1TVJQIQPCN(TGSWGPE[&KXKUKQP/WNVKRNGZKPI
Ŗ Supports one 10/100/1000M Ethernet port.
Ŗ 1RGTCVGUKPVJG`)*\HTGSWGPE[TCPIGU
Ŗ 9GDDCUGFKPVGTHCEGHQTOCPCIKPICPFEQPſIWTKPI
/CZKOWOYKTGNGUUUKIPCNTCVGFGTKXGFHTQO+'''5VCPFCTFURGEKſECVKQPU#EVWCNFCVCVJTQWIJRWVOC[XCT[0GVYQTMEQPFKVKQPUCPFGPXKTQPOGPVCNHCEVQTU
KPENWFKPIXQNWOGQHPGVYQTMVTCHſEDWKNFKPIOCVGTKCNUCPFEQPUVTWEVKQPCPFPGVYQTMQXGTJGCFECPNQYGTCEVWCNFCVCVJTQWIJQWVTCVG
Features

8D-Link DAP-1353 User Manual
Section 2 - Installation
Wireless Basics
&.KPMYKTGNGUURTQFWEVUCTGDCUGFQPKPFWUVT[UVCPFCTFUVQRTQXKFGJKIJURGGFYKTGNGUUEQPPGEVKXKV[VJCVKUGCU[VQ
WUGYKVJKP[QWTJQOGDWUKPGUUQTRWDNKECEEGUUYKTGNGUUPGVYQTMU&.KPMYKTGNGUURTQFWEVURTQXKFGU[QWYKVJCEEGUU
VQVJGFCVC[QWYCPVYJGPGXGTCPFYJGTGXGT[QWYCPVKV'PLQ[VJGHTGGFQOVJCVYKTGNGUUPGVYQTMKPIECPDTKPIVQ
you.
9.#0WUGKUPQVQPN[KPETGCUKPIKPDQVJJQOGCPFQHſEGGPXKTQPOGPVUDWVKPRWDNKECTGCUCUYGNNUWEJCUCKTRQTVU
EQHHGGUJQRUCPFWPKXGTUKVKGU+PPQXCVKXGYC[UVQWVKNK\G9.#0VGEJPQNQI[CTGCNNQYKPIRGQRNGVQYQTMCPFEQOOWPKECVG
OQTGGHſEKGPVN[+PETGCUGFOQDKNKV[CPFVJGCDUGPEGQHECDNKPICPFQVJGTV[RGUQHſZGFKPHTCUVTWEVWTGJCXGRTQXGPVQ
DGDGPGſEKCNVQOCP[WUGTU
Wireless adapter cards used on laptop and desktop systems support the same protocols as Ethernet adapter cards,
allowing wireless users to use the same applications as those used on a wired network.
2GQRNGWUG9.#0VGEJPQNQI[HQTOCP[FKHHGTGPVRWTRQUGU
Mobility - productivity increases when people can have access to data in any location within the operating range of their
9.#0/CPCIGOGPVFGEKUKQPUDCUGFQPTGCNVKOGKPHQTOCVKQPECPUKIPKſECPVN[KORTQXGVJGGHſEKGPE[QHCYQTMGT
Low implementation costs - WLANs are easy to set up, manage, change and relocate. Networks that frequently
EJCPIGECPDGPGſVHTQO9.#0UGCUGQHKORNGOGPVCVKQP9.#0UECPQRGTCVGKPNQECVKQPUYJGTGKPUVCNNCVKQPQHYKTKPI
OC[DGKORTCEVKECN
Installation and network expansion D[CXQKFKPIVJGEQORNKECVKQPUQHVTQWDNGUQOGECDNGUC9.#0U[UVGOECPDG
HCUVCPFGCU[FWTKPIKPUVCNNCVKQPGURGEKCNN[UKPEGKVECPGNKOKPCVGVJGPGGFVQRWNNECDNGVJTQWIJYCNNUCPFEGKNKPIU
9KTGNGUUVGEJPQNQI[RTQXKFGUOQTGXGTUCVKNKV[D[GZVGPFKPIVJGPGVYQTMDG[QPFVJGJQOGQTQHſEG
Inexpensive solution - wireless network devices are as competitively priced as conventional Ethernet network devices.
6JGUCXGUOQPG[D[RTQXKFKPIWUGTUYKVJOWNVKHWPEVKQPCNKV[EQPſIWTCDNGKPHQWTFKHHGTGPVOQFGU
Scalability %QPſIWTCVKQPUECPDGGCUKN[EJCPIGFCPFTCPIGHTQO2GGTVQ2GGTPGVYQTMUUWKVCDNGHQTCUOCNNPWODGT
QHWUGTUVQNCTIGT+PHTCUVTWEVWTGPGVYQTMUVQCEEQOOQFCVGJWPFTGFUQTVJQWUCPFUQHWUGTUFGRGPFKPIQPVJGPWODGT
of wireless devices deployed.

9D-Link DAP-1353 User Manual
Section 2 - Installation
Standards-Based Technology
6JGKTGNGUU#EEGUU2QKPVWVKNK\GUVJGDICPFPFTCHVUVCPFCTFU
6JG+'''PFTCHVUVCPFCTFKUCPGZVGPUKQPQHVJGDCPFIUVCPFCTFUVJCVECOGDGHQTGKV+VKPETGCUGU
VJGOCZKOWOYKTGNGUUUKIPCNTCVGWRVQ/DRUYKVJKP)*\DCPFUWVKNK\KPI1(&/VGEJPQNQI[
6JKUOGCPUVJCVKPOQUVGPXKTQPOGPVUYKVJKPVJGURGEKſGFTCPIGQHVJKUFGXKEG[QWYKNNDGCDNGVQVTCPUHGTNCTIGſNGU
SWKEMN[QTGXGPYCVEJCOQXKGKP/2')HQTOCVQXGT[QWTPGVYQTMYKVJQWVPQVKEGCDNGFGNC[U6JKUVGEJPQNQI[YQTMU
D[VTCPUOKVVKPIJKIJURGGFFKIKVCNFCVCQXGTCTCFKQYCXGWVKNK\KPI1(&/1TVJQIQPCN(TGSWGPE[&KXKUKQP/WNVKRNGZKPI
VGEJPQNQI[1(&/YQTMUD[URNKVVKPIVJGTCFKQUKIPCNKPVQOWNVKRNGUOCNNGTUWDUKIPCNUVJCVCTGVJGPUKOWNVCPGQWUN[
VTCPUOKVVGFCVFKHHGTGPVHTGSWGPEKGUVQVJGTGEGKXGT1(&/TGFWEGUVJGCOQWPVQHETQUUVCNMKPVGTHGTGPEGKPUKIPCN
transmissions.
6JG&.KPMYKNNCWVQOCVKECNN[UGPUGVJGDGUVRQUUKDNGEQPPGEVKQPURGGFVQGPUWTGVJGITGCVGUVRQUUKDNG
speed and range.
PQHHGTUVJGOQUVCFXCPEGFPGVYQTMUGEWTKV[HGCVWTGUCXCKNCDNGVQFC[KPENWFKPI92#
/CZKOWOYKTGNGUUUKIPCNTCVGFGTKXGFHTQO+'''5VCPFCTFURGEKſECVKQPU#EVWCNFCVCVJTQWIJRWVOC[XCT[0GVYQTMEQPFKVKQPUCPFGPXKTQPOGPVCNHCEVQTUKPENWFKPIXQNWOGQHPGVYQTMVTCHſEDWKNFKPI
materials and construction, and network overhead can lower actual data throughout rate.

10D-Link DAP-1353 User Manual
Section 2 - Installation
Wireless Installation Considerations
The D-Link AirPremier N wireless access point lets you access your network using a wireless connection from virtually
CP[YJGTGYKVJKPVJGQRGTCVKPITCPIGQH[QWTYKTGNGUUPGVYQTM-GGRKPOKPFJQYGXGTVJCVVJGPWODGTVJKEMPGUUCPF
NQECVKQPQHYCNNUEGKNKPIUQTQVJGTQDLGEVUVJCVVJGYKTGNGUUUKIPCNUOWUVRCUUVJTQWIJOC[NKOKVVJGTCPIG6[RKECN
TCPIGUXCT[FGRGPFKPIQPVJGV[RGUQHOCVGTKCNUCPFDCEMITQWPF4(TCFKQHTGSWGPE[PQKUGKP[QWTJQOGQTDWUKPGUU
6JGMG[VQOCZKOK\KPIYKTGNGUUTCPIGKUVQHQNNQYVJGUGDCUKEIWKFGNKPGU
1-GGRVJGPWODGTQHYCNNUCPFEGKNKPIUDGVYGGPVJGCEEGUURQKPVCPFQVJGTPGVYQTMFGXKEGUVQCOKPKOWO
'CEJYCNNQTEGKNKPIECPTGFWEG[QWTCFCRVGTŏUTCPIGHTQOHGGVOGVGTU2QUKVKQP[QWTFGXKEGU
UQVJCVVJGPWODGTQHYCNNUQTEGKNKPIUKUOKPKOK\GF
2$G CYCTG QH VJG FKTGEV NKPG DGVYGGP PGVYQTM FGXKEGU # YCNN VJCV KU HGGV VJKEM OGVGTU CV C
FGITGGCPINGCRRGCTUVQDGCNOQUVHGGVOGVGTVJKEM#VCFGITGGCPINGKVNQQMUQXGTHGGV
OGVGTUVJKEM2QUKVKQPFGXKEGUUQVJCVVJGUKIPCNYKNNVTCXGNUVTCKIJVVJTQWIJCYCNNQTEGKNKPIKPUVGCF
QHCVCPCPINGHQTDGVVGTTGEGRVKQP
3. Building Materials make a difference. A solid metal door or aluminum studs may have a negative effect
on the range. Try to position access points, wireless routers, and computers so that the signal passes
VJTQWIJFT[YCNNQTQRGPFQQTYC[U/CVGTKCNUCPFQDLGEVUUWEJCUINCUUUVGGNOGVCNYCNNUYKVJKPUWNCVKQP
YCVGTſUJVCPMUOKTTQTUſNGECDKPGVUDTKEMCPFEQPETGVGYKNNFGITCFG[QWTYKTGNGUUUKIPCN
4-GGR[QWT RTQFWEV CYC[ CV NGCUV HGGV QT OGVGTU HTQO GNGEVTKECN FGXKEGU QT CRRNKCPEGU VJCV
generate RF noise.
5+H[QWCTGWUKPI)*\EQTFNGUURJQPGUQT:YKTGNGUURTQFWEVUUWEJCUEGKNKPIHCPUNKIJVUCPF
JQOGUGEWTKV[U[UVGOU[QWTYKTGNGUUEQPPGEVKQPOC[FGITCFGFTCOCVKECNN[QTFTQREQORNGVGN[/CMG
UWTG[QWT)*\RJQPGDCUGKUCUHCTCYC[HTQO[QWTYKTGNGUUFGXKEGUCURQUUKDNG6JGDCUGVTCPUOKVU
a signal even if the phone in not in use.
11D-Link DAP-1353 User Manual
Section 2 - Installation
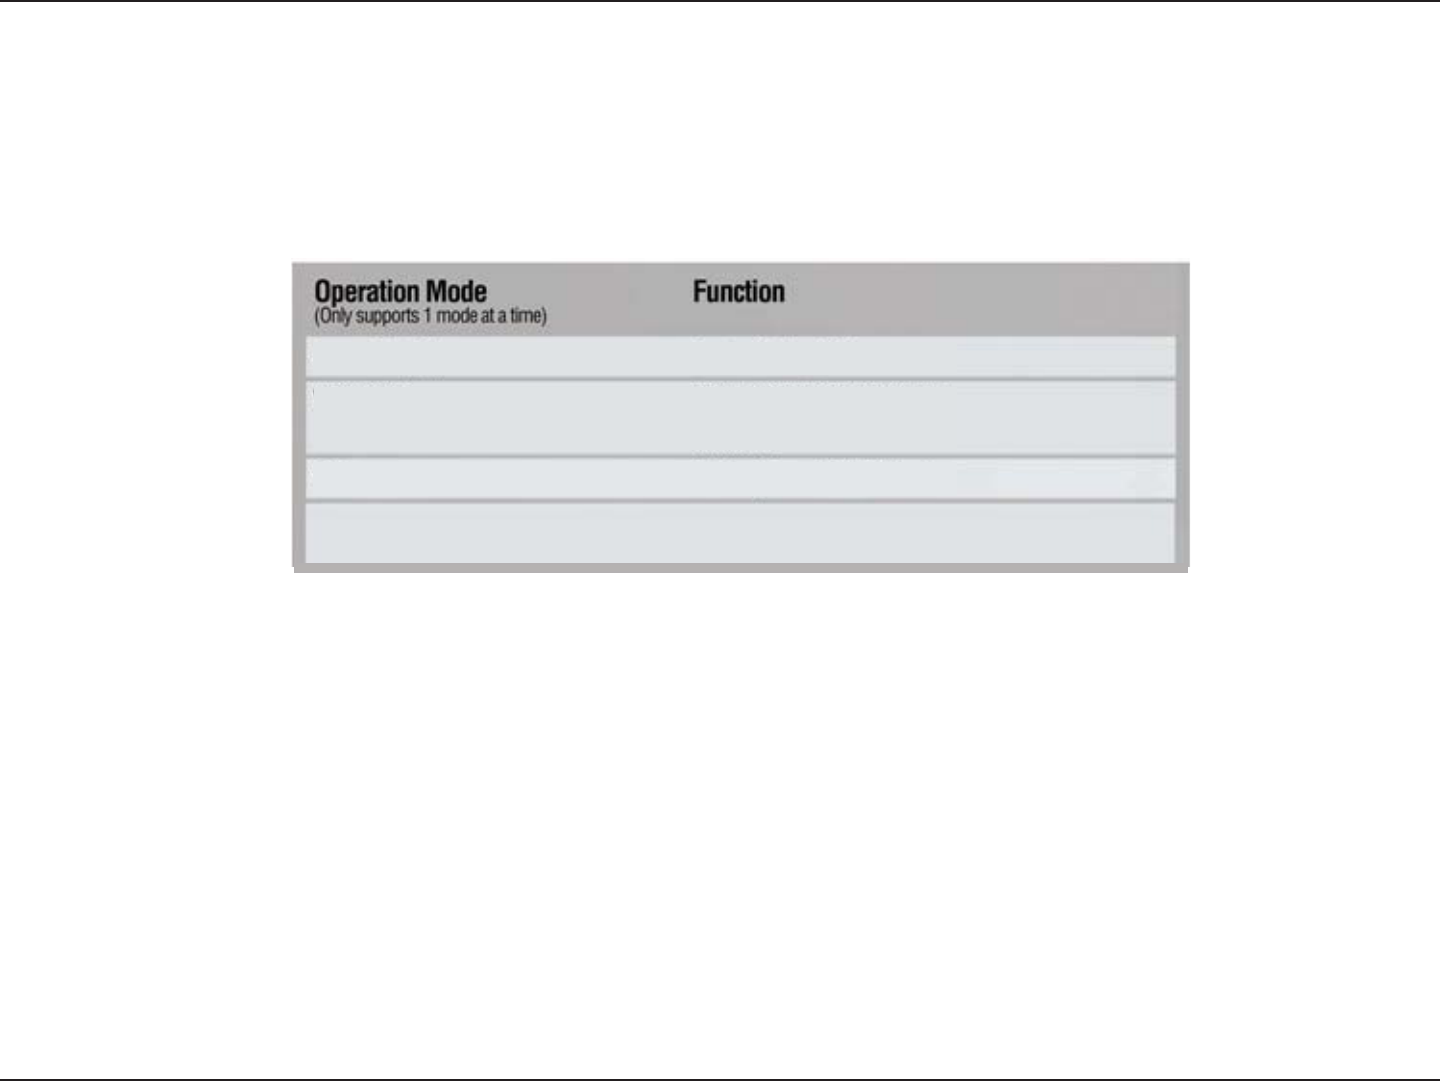
Wireless Client AP acts as a wireless network adapter for your Ethernet-enabled
device
Access Point (AP) Create a wireless LAN
WDS with AP Wirelessly connect multiple networks while still functioning
as a wireless AP
WDS Wirelessly connect multiple networks
Four Operational Modes
12D-Link DAP-1353 User Manual
Section 2 - Installation
Getting Started
;QWYKNNPGGFDTQCFDCPF+PVGTPGVCEEGUU
%QPUWNVYKVJ[QWTECDNGQT&5.RTQXKFGTHQTRTQRGTKPUVCNNCVKQPQHVJGOQFGO
%QPPGEVVJGECDNGQT&5.OQFGOVQCTQWVGT5GGVJGRTKPVGF+PUVCNN)WKFGKPENWFGFYKVJ[QWTTQWVGT
+H[QWCTGEQPPGEVKPICFGUMVQREQORWVGTVQ[QWTPGVYQTMKPUVCNNCYKTGNGUU2%+CFCRVGTKPVQCPCXCKNCDNG
PCI slot on your desktop computer.
5. Install the drivers for your wireless CardBus adapter into a laptop computer.

13D-Link DAP-1353 User Manual
Section 2 - Installation
%QPPGEVQPGGPFQHCP'VJGTPGVECDNGKPENWFGFYKVJ[QWTRCEMCIGVQVJG.#0RQTVQPVJGCPFVJGQVJGTGPF
QHVJG'VJGTPGVECDNGVQ[QWTEQORWVGT6JG#2ECPDGRQYGTGFQPD[VJGRQYGTCFCRVGTUJKRRGFYKVJVJG#2
14D-Link DAP-1353 User Manual
Section 3 - Configuration
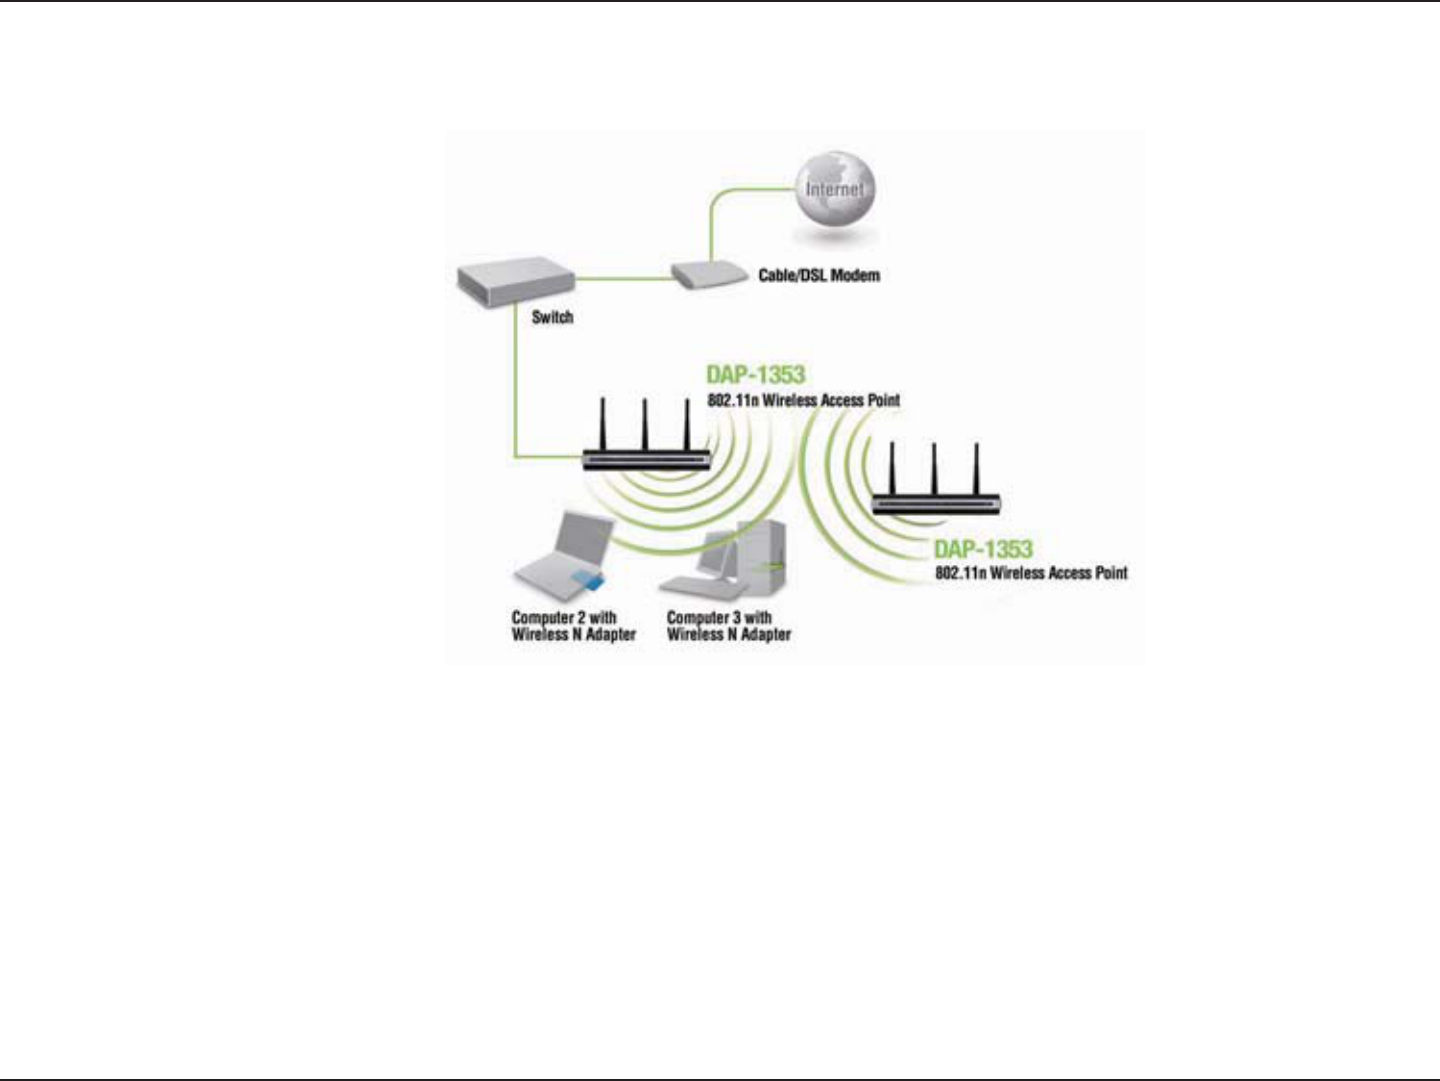
Configuration
6QEQPſIWTGVJGWUGCEQORWVGTVJCVKUEQPPGEVGFVQVJGYKVJCP'VJGTPGVECDNGUGGVJG
Network
Layout diagram
(KTUVFKUCDNGVJGAccess the Internet using a proxy server HWPEVKQP6QFKUCDNGVJKUHWPEVKQPIQVQ Control Panel >
Internet Options > Connections > LAN SettingsCPFWPEJGEMVJGGPCDNGDQZ
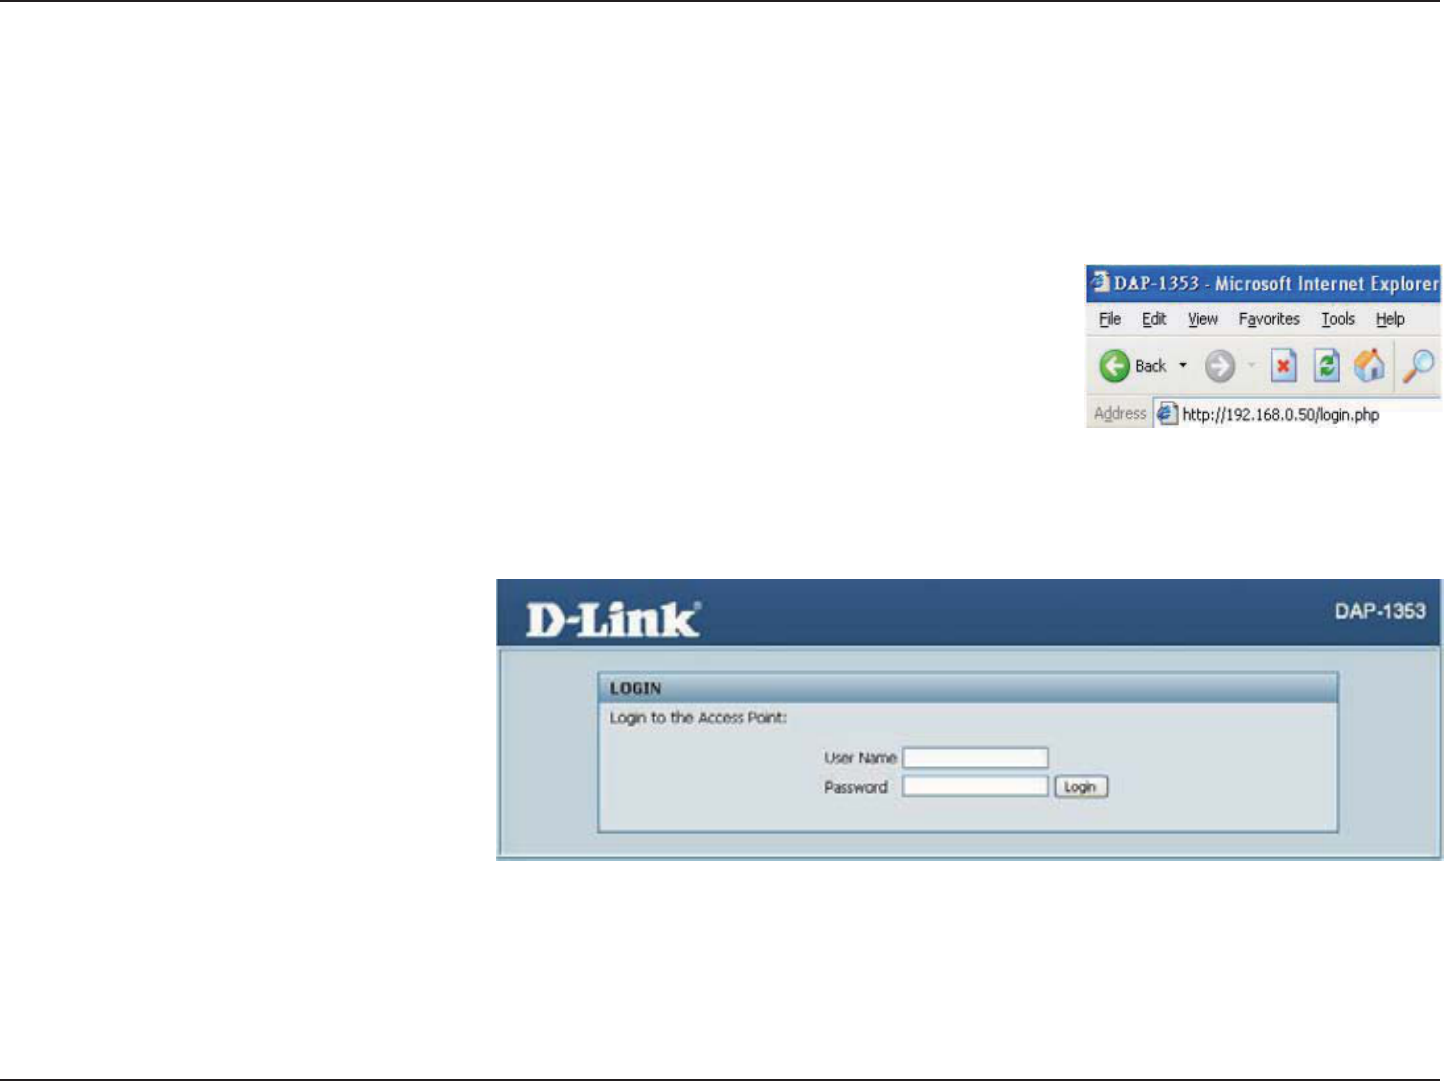
5VCTV[QWTYGDDTQYUGTRTQITCO+PVGTPGV'ZRNQTGT/Q\KNNC(KTGHQZ
6[RGVJG+2CFFTGUUCPFJVVRRQTVQHVJGKPVJGCFFTGUUſGNFhttp://192.168.0.50
and press Enter. Make sure that the IP addresses of the DAP-1353 and your computer
CTGKPVJGUCOGUWDPGV
Note: If you have changed the default IP address assigned to the DAP-1353, make sure
to enter the correct IP address.
'PVGTVJGWUGTPCOGadminCPF[QWT
RCUUYQTF .GCXG VJG RCUUYQTF ſGNF
DNCPMD[FGHCWNVCPFENKEMLogin.
Note: If you have changed the password, make sure to enter the correct password.
15D-Link DAP-1353 User Manual
Section 3 - Configuration
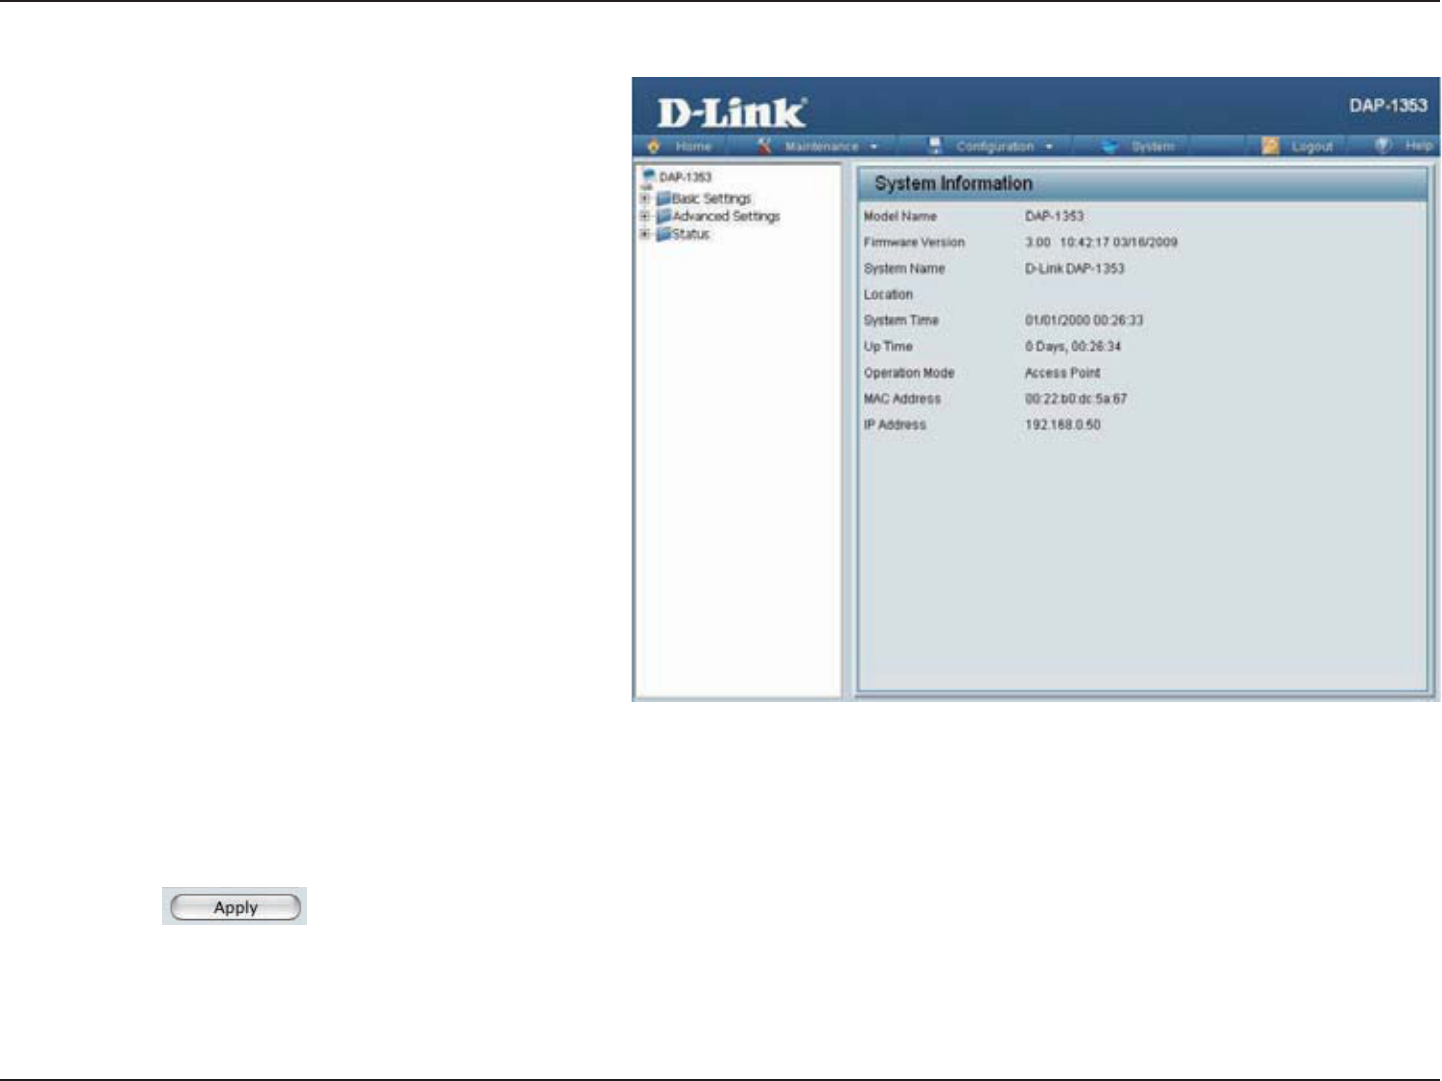
#HVGTUWEEGUUHWNN[NQIIKPIKPVQVJGVJGHQNNQYKPIUETGGPYKNNCRRGCT
9JGPOCMKPIEJCPIGUQPOQUVQHVJGEQPſIWTCVKQPUETGGPUKPVJKUUGEVKQPWUGVJGApplyDWVVQPCVVJGDQVVQOQHGCEJ
UETGGPVQUCXG[QWTEQPſIWTCVKQPEJCPIGU
Click the ApplyDWVVQPVQEQPſIWTGEJCPIGU
16D-Link DAP-1353 User Manual
Section 3 - Configuration
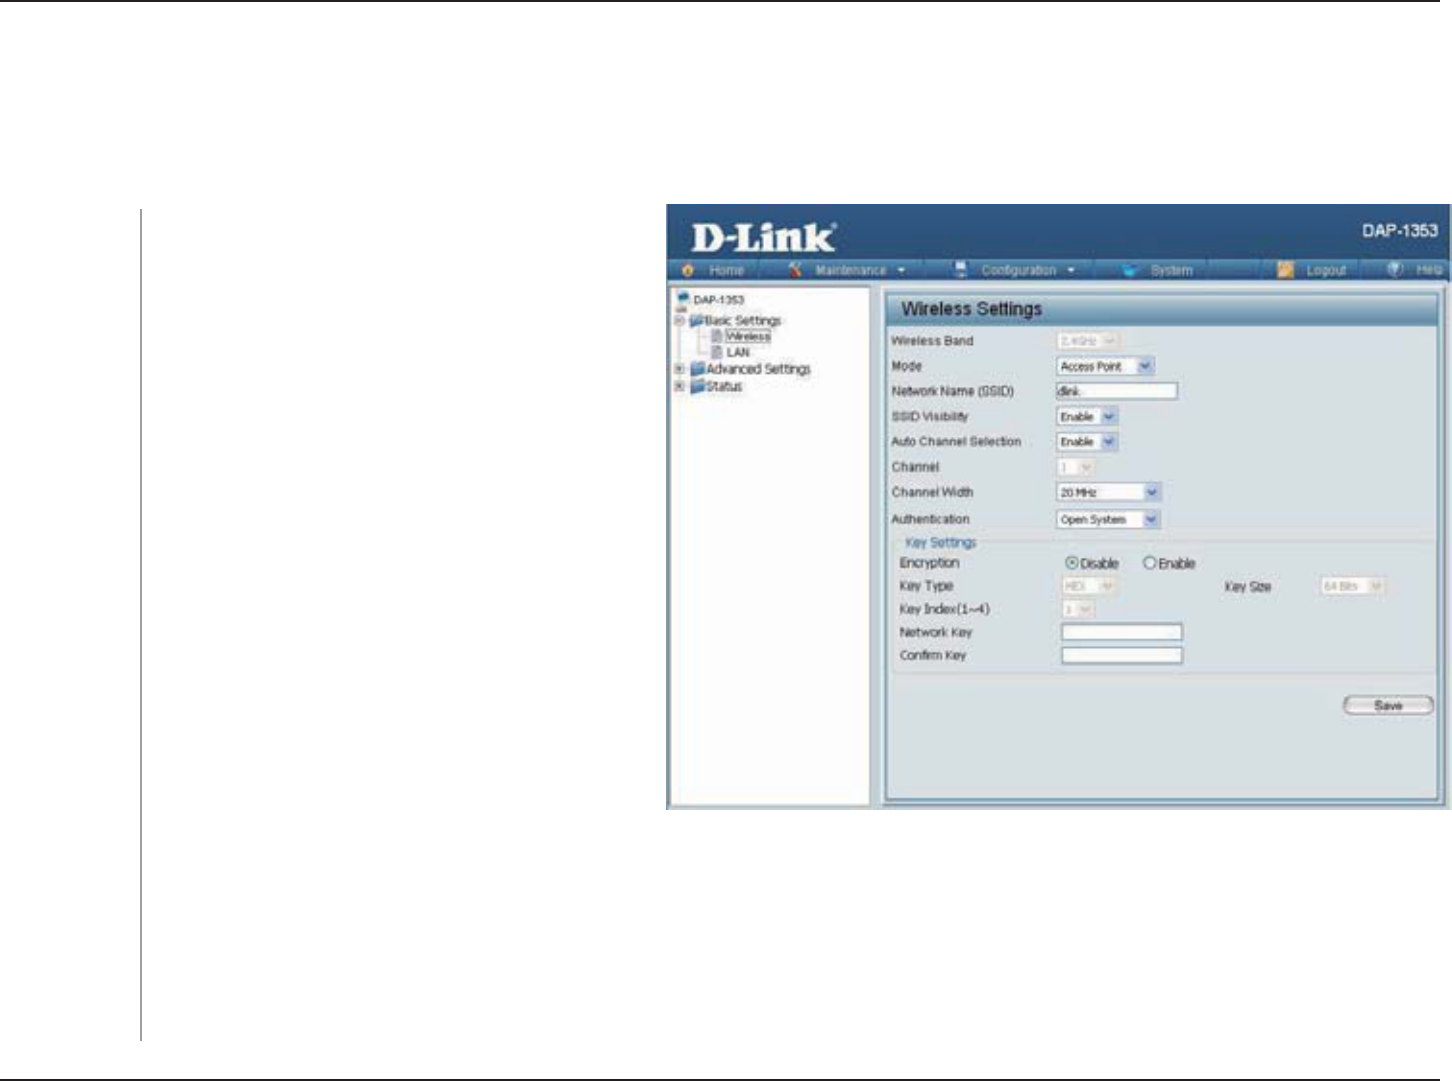
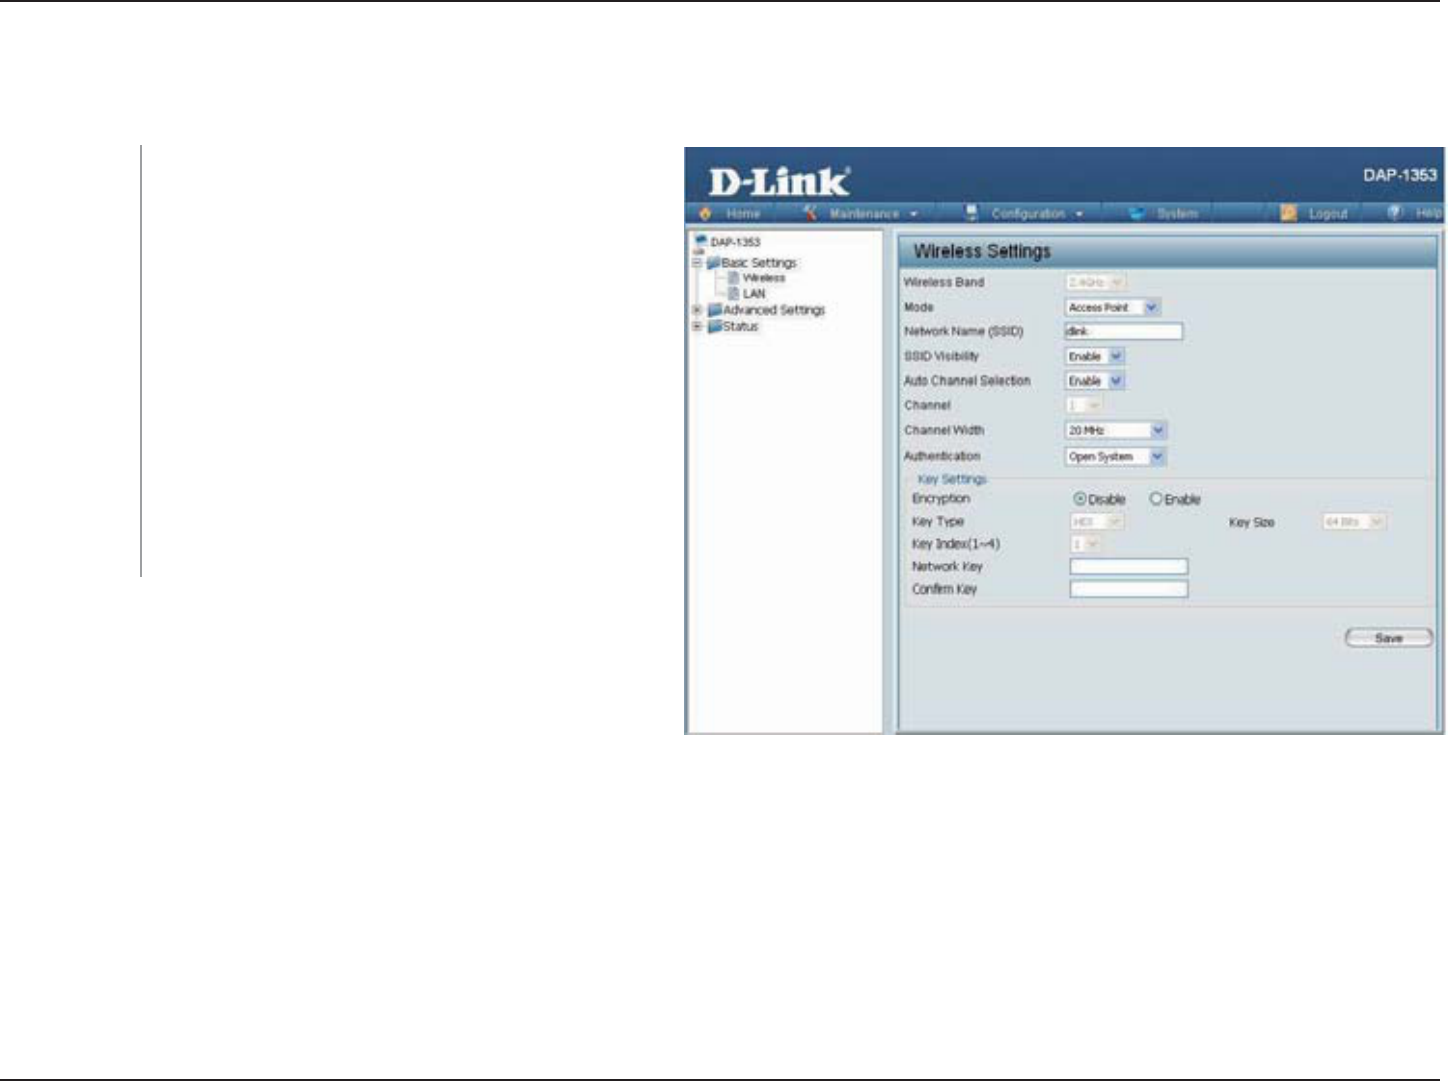
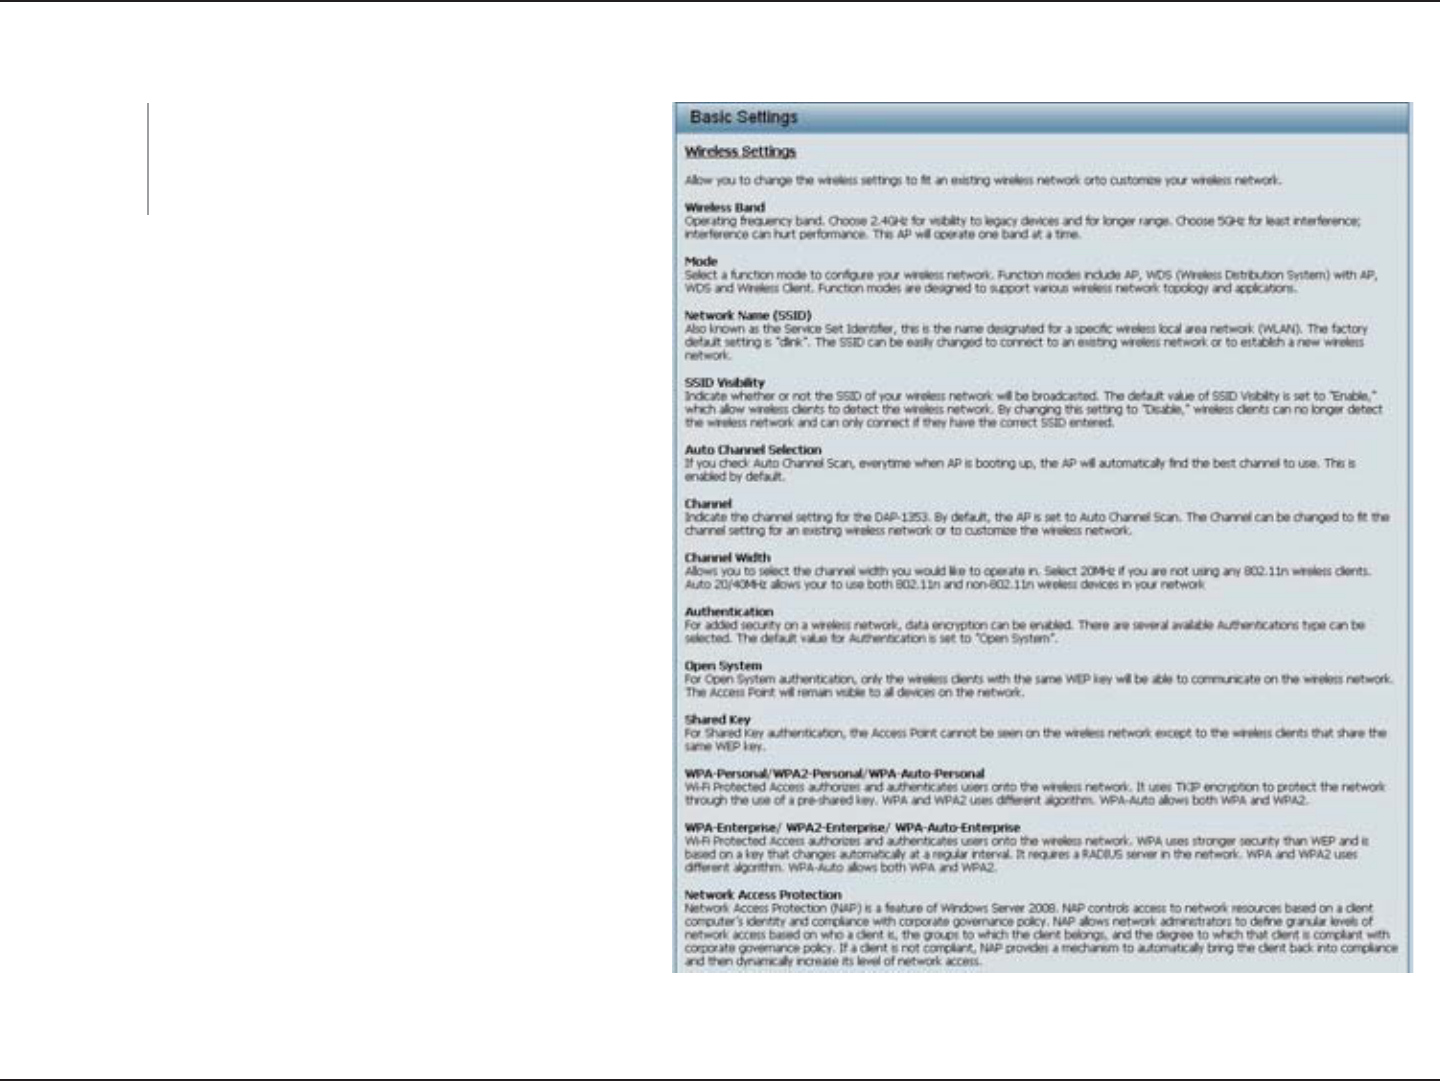
Home > Basic Settings
Wireless
Access Point mode
Select Access Point from the pull-down menu.
The other three choices are WDS with AP,
WDS, and Wireless Client.
5GTXKEG 5GV +FGPVKHKGT 55+& KU VJG PCOG
FGUKIPCVGF HQT C URGEKſE YKTGNGUU NQECN CTGC
PGVYQTM 9.#0 6JG 55+&ŏU HCEVQT[ FGHCWNV
setting is dlink6JG55+&ECPDGGCUKN[EJCPIGF
to connect to an existing wireless network or to
GUVCDNKUJCPGYYKTGNGUUPGVYQTM6JG55+&ECP
DGWRVQEJCTCEVGTUCPFKUECUGUGPUKVKXG
Enable or Disable55+&XKUKDKNKV['PCDNKPIVJKU
HGCVWTGDTQCFECUVUVJG55+&CETQUUVJGPGVYQTM
VJWUOCMKPIKVXKUKDNGVQCNNPGVYQTMWUGTU
'PCDNKPI VJKU HGCVWTG CWVQOCVKECNN[ UGNGEVU
VJG EJCPPGN VJCV RTQXKFGU VJG DGUV YKTGNGUU
performance. Enable KU UGV D[ FGHCWNV 6JG
channel selection process only occurs when the
#2KUDQQVKPIWR
#NNFGXKEGUQPVJGPGVYQTMOWUVUJCTGVJGUCOGEJCPPGN6QEJCPIGVJGEJCPPGNſTUVVQIINGVJG#WVQ%JCPPGN5GNGEVKQP
setting to Disable, and then use the pull-down menu to make the desired selection.
Note: The wireless adapters will automatically scan and match the wireless settings.
Mode:
Network Name
(SSID):
SSID Visibility:
Auto Channel
Selection:
Channel:
Wireless Band: 2.4 GHz

17D-Link DAP-1353 User Manual
Section 3 - Configuration
Channel Width:
Authentication:
Allows you to select the channel width you would like to operate in. Select 20 MHz if you are not using any 802.11n wireless
clients. Auto 20/40 MHz CNNQYU[QWVQEQPPGEVVQDQVJPCPFDIYKTGNGUUFGXKEGUQP[QWTPGVYQTM
7UGVJGRWNNFQYPOGPWVQEJQQUGOpen System,Shared Key,WPA-Personal, or WPA-Enterprise.
Select Open System to communicate the key across the network.
Select Shared KeyVQNKOKVEQOOWPKECVKQPVQQPN[VJQUGFGXKEGUVJCVUJCTGVJGUCOG9'2UGVVKPIU+HOWNVK55+&KUGPCDNGF
VJKUQRVKQPKUPQVCXCKNCDNG
Select WPA-Personal VQ UGEWTG [QWT PGVYQTM WUKPI C RCUUYQTF CPF F[PCOKE MG[ EJCPIGU 0Q 4#&+75 UGTXGT KU
required.
Select WPA-EnterpriseVQUGEWTG[QWTPGVYQTMYKVJVJGKPENWUKQPQHC4#&+75UGTXGT

18D-Link DAP-1353 User Manual
Section 3 - Configuration
WDS with AP mode
WDS with AP mode is selected from the pull-down
menu.
5GTXKEG5GV+FGPVKſGT55+&KUVJGPCOGFGUKIPCVGFHQTC
URGEKſEYKTGNGUUNQECNCTGCPGVYQTM9.#06JG55+&ŏU
factory default setting is dlink6JG55+&ECPDGGCUKN[
changed to connect to an existing wireless network or to
GUVCDNKUJCPGYYKTGNGUUPGVYQTM
Enable or Disable55+&XKUKDKNKV['PCDNKPIVJKUHGCVWTG
DTQCFECUVUVJG55+&CETQUUVJGPGVYQTMVJWUOCMKPIKV
XKUKDNGVQCNNPGVYQTMWUGTU
'PCDNKPIVJKUHGCVWTGCWVQOCVKECNN[UGNGEVUVJGEJCPPGN
VJCV YKNN RTQXKFG VJG DGUV YKTGNGUU RGTHQTOCPEG 6JKU
feature is not supported in WDS with AP mode. The
channel selection process only occurs when the AP is
DQQVKPIWR
All devices on the network must share the same channel. To change the channel, use the pull-down menu to make the
FGUKTGFUGNGEVKQP0QVG6JGYKTGNGUUCFCRVGTUYKNNCWVQOCVKECNN[UECPCPFOCVEJVJGYKTGNGUUUGVVKPIU
Allows you to select the channel width you would like to operate in. Select 20 MHz if you are not using any 802.11n wireless
clients. Auto 20/40 MHz CNNQYU[QWVQEQPPGEVVQDQVJPCPFDIYKTGNGUUFGXKEGUQP[QWTPGVYQTM
Mode:
Network Name
(SSID):
SSID Visibility:
Auto Channel
Selection:
Channel:
Channel Width:
Wireless Band:
In WDS with AP mode, the DAP-1353 wirelessly connects
multiple networks while still functioning as a wireless AP.
2.4GHz.

19D-Link DAP-1353 User Manual
Section 3 - Configuration
'PVGTVJG/#%CFFTGUUGUQHVJG#2UQP[QWTPGVYQTMVJCVYKNNUGTXGCUDTKFIGUVQYKTGNGUUN[EQPPGEVOWNVKRNGPGVYQTMU
Click on the ScanDWVVQPVQUGCTEJHQTCXCKNCDNGYKTGNGUUPGVYQTMUVJGPENKEMQPVJGCXCKNCDNGPGVYQTMVJCV[QWYCPVVQ
connect with.
7UGVJGRWNNFQYPOGPWVQEJQQUGOpen System,Shared Key, or WPA-Personal.
Select Open System to communicate the key across the network.
Select Shared KeyVQNKOKVEQOOWPKECVKQPVQQPN[VJQUGFGXKEGUVJCVUJCTGVJGUCOG9'2UGVVKPIU+HOWNVK55+&KUGPCDNGF
VJKUQRVKQPKUPQVCXCKNCDNG
Select WPA-Personal VQ UGEWTG [QWT PGVYQTM WUKPI C RCUUYQTF CPF F[PCOKE MG[ EJCPIGU 0Q 4#&+75 UGTXGT KU
required.
Remote AP MAC
Address:
Site Survey:
Authentication:
20D-Link DAP-1353 User Manual
Section 3 - Configuration
WDS mode
In WDS mode, the DAP-1353 wirelessly connects multiple
networks, without functioning as a wireless AP.
WDS is selected from the pull-down menu.
5GTXKEG 5GV +FGPVKHKGT 55+& KU VJG PCOG
designated for a specific wireless local area
PGVYQTM 9.#0 6JG 55+&ŏU HCEVQT[ FGHCWNV
setting is dlink6JG55+&ECPDGGCUKN[EJCPIGF
to connect to an existing wireless network or to
GUVCDNKUJCPGYYKTGNGUUPGVYQTM
Enable or Disable55+&XKUKDKNKV['PCDNKPIVJKU
HGCVWTGDTQCFECUVUVJG55+&CETQUUVJGPGVYQTM
VJWUOCMKPIKVXKUKDNGVQCNNPGVYQTMWUGTU
'PCDNKPI VJKU HGCVWTG CWVQOCVKECNN[ UGNGEVU
VJG EJCPPGN VJCV YKNN RTQXKFG VJG DGUV YKTGNGUU
performance. This feature is not supported in
WDS mode.
All devices on the network must share the same
channel. To change the channel, use the pull-down
menu to make the desired selection.
7UGVJGRWNNFQYPOGPWVQEJQQUG20 MHz or Auto 20/40 MHz.
'PVGTVJG/#%CFFTGUUGUQHVJG#2UQP[QWTPGVYQTMVJCVYKNNUGTXGCUDTKFIGUVQYKTGNGUUN[EQPPGEVOWNVKRNGPGVYQTMU
Mode:
Network Name
(SSID):
SSID Visibility:
Auto Channel
Selection:
Channel:
Channel Width:
Remote AP MAC
Address:
Wireless Band: 2.4GHz.

21D-Link DAP-1353 User Manual
Section 3 - Configuration
Click on the ScanDWVVQPVQUGCTEJHQTCXCKNCDNGYKTGNGUUPGVYQTMUVJGPENKEMQPVJGCXCKNCDNGPGVYQTMVJCV[QWYCPVVQ
connect with.
7UGVJGRWNNFQYPOGPWVQEJQQUGOpen System,Shared Key, or WPA-Personal.
Select Open System to communicate the key across the network.
Select Shared Key to limit communication to only those devices that share the same WEP settings.
Select WPA-Personal VQ UGEWTG [QWT PGVYQTM WUKPI C RCUUYQTF CPF F[PCOKE MG[ EJCPIGU 0Q 4#&+75 UGTXGT KU
required.
Site Survey:
Authentication:
22D-Link DAP-1353 User Manual
Section 3 - Configuration
Wireless Client mode
Mode:
Network Name
(SSID):
SSID Visibility:
Auto Channel
Selection:
Channel:
Channel Width:
Site Survey:
Authentication:
Wireless Band: 2.4 GHz
Wireless Client is selected from the pull-down
menu.
5GTXKEG5GV+FGPVKſGT55+&KUVJGPCOGFGUKIPCVGF
HQTCURGEKſEYKTGNGUUNQECNCTGCPGVYQTM9.#0
The SSID’s factory default setting is dlink. The SSID
ECP DG GCUKN[ EJCPIGF VQ EQPPGEV VQ CP GZKUVKPI
wireless network.
6JKUQRVKQPKUWPCXCKNCDNGKPWireless Client mode.
'PCDNKPIVJKUHGCVWTGCWVQOCVKECNN[UGNGEVUVJGEJCPPGN
VJCVYKNNRTQXKFGVJGDGUVYKTGNGUURGTHQTOCPEG6JKU
feature is not supported in Wireless Client mode.
6JGEJCPPGNWUGFYKNNDGFKURNC[GFCPFOCVEJGU
the AP that the DAP-1353 is connected to when set
to Wireless Client mode.
7UGVJGRWNNFQYPOGPWVQEJQQUG20 MHz or Auto
20/40 MHz.
Click on the ScanDWVVQPVQUGCTEJHQTCXCKNCDNGYKTGNGUUPGVYQTMUVJGPENKEMQPVJGCXCKNCDNGPGVYQTMVJCV[QWYCPVVQEQPPGEV
with.
7UGVJGRWNNFQYPOGPWVQEJQQUGOpen System or WPA-Personal.
Select Open System to communicate the key across the network.
Select WPA-Personal VQUGEWTG[QWTPGVYQTMWUKPICRCUUYQTFCPFF[PCOKEMG[EJCPIGU0Q4#&+75UGTXGTKUTGSWKTGF
23D-Link DAP-1353 User Manual
Section 3 - Configuration
Open System/Shared Key Authentication
Encryption:
Key Type*:
Key Size:
Key Index (1-4):
Key:
7UG VJG TCFKQ DWVVQP VQ FKUCDNG QT GPCDNG
encryption.
Select HEX or ASCII.
Select 64 Bits or 128 Bits.
5GNGEV VJG UV VJTQWIJ VJG VJ MG[ VQ DG VJG
active key.
Input up to four keys for encryption. You will
select one of these keys in the Key Index
pull-down menu.
**Hexadecimal (HEX) digits consist of the numbers 0-9 and the letters A-F.
*ASCII (American Standard Code for Information Interchange) is a code that represents English letters using numbers
ranging from 0-127.
24D-Link DAP-1353 User Manual
Section 3 - Configuration
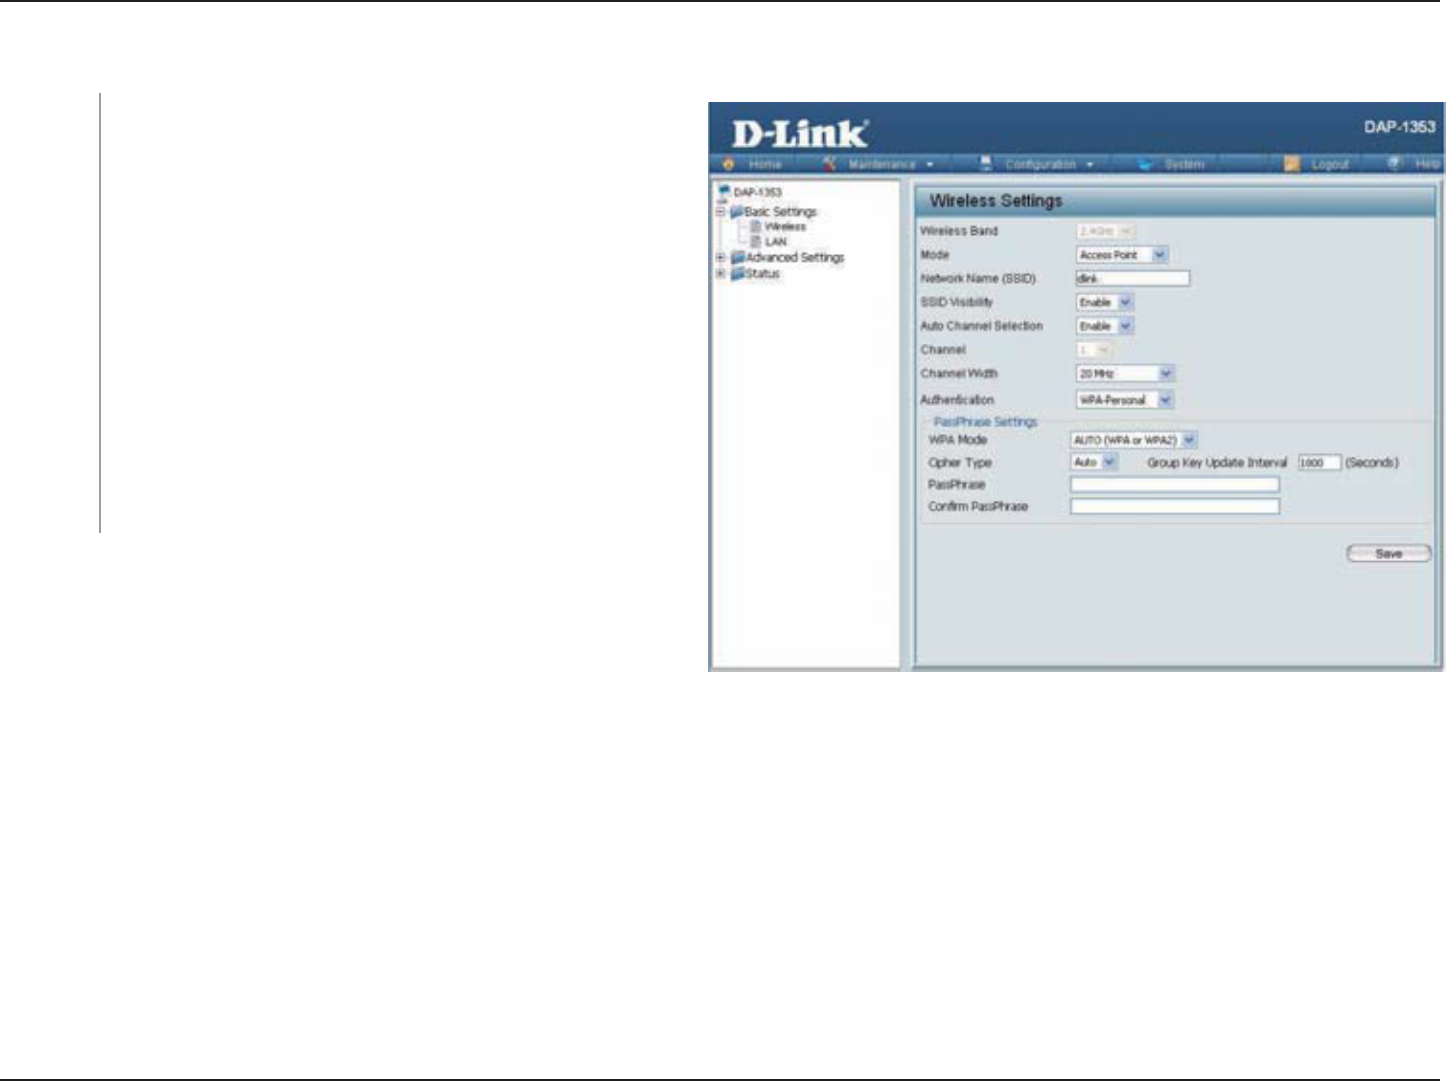
WPA-Personal authentication
When WPA-Personal is selected for Authentication
type, you must also select a WPA mode from the pull-
FQYPOGPWAUTO (WPA or WPA2),WPA2 Only, or
WPA Only. WPA and WPA2 use different algorithms.
AUTO (WPA or WPA2) CNNQYU [QW VQ WUG DQVJ 92#
and WPA2.
When you select WPA-Personal, you must also select
AUTO, AES, or TKIP from the pull down menu.
5GNGEVVJGKPVGTXCNFWTKPIYJKEJVJGITQWRMG[YKNNDG
valid. The default value of 1800 is recommended.
When you select WPA-Personal, please enter a
PassPhrase KPVJGEQTTGURQPFKPIſGNF
WPA Mode:
Cipher Type:
Group Key
Update:
PassPhrase:
25D-Link DAP-1353 User Manual
Section 3 - Configuration
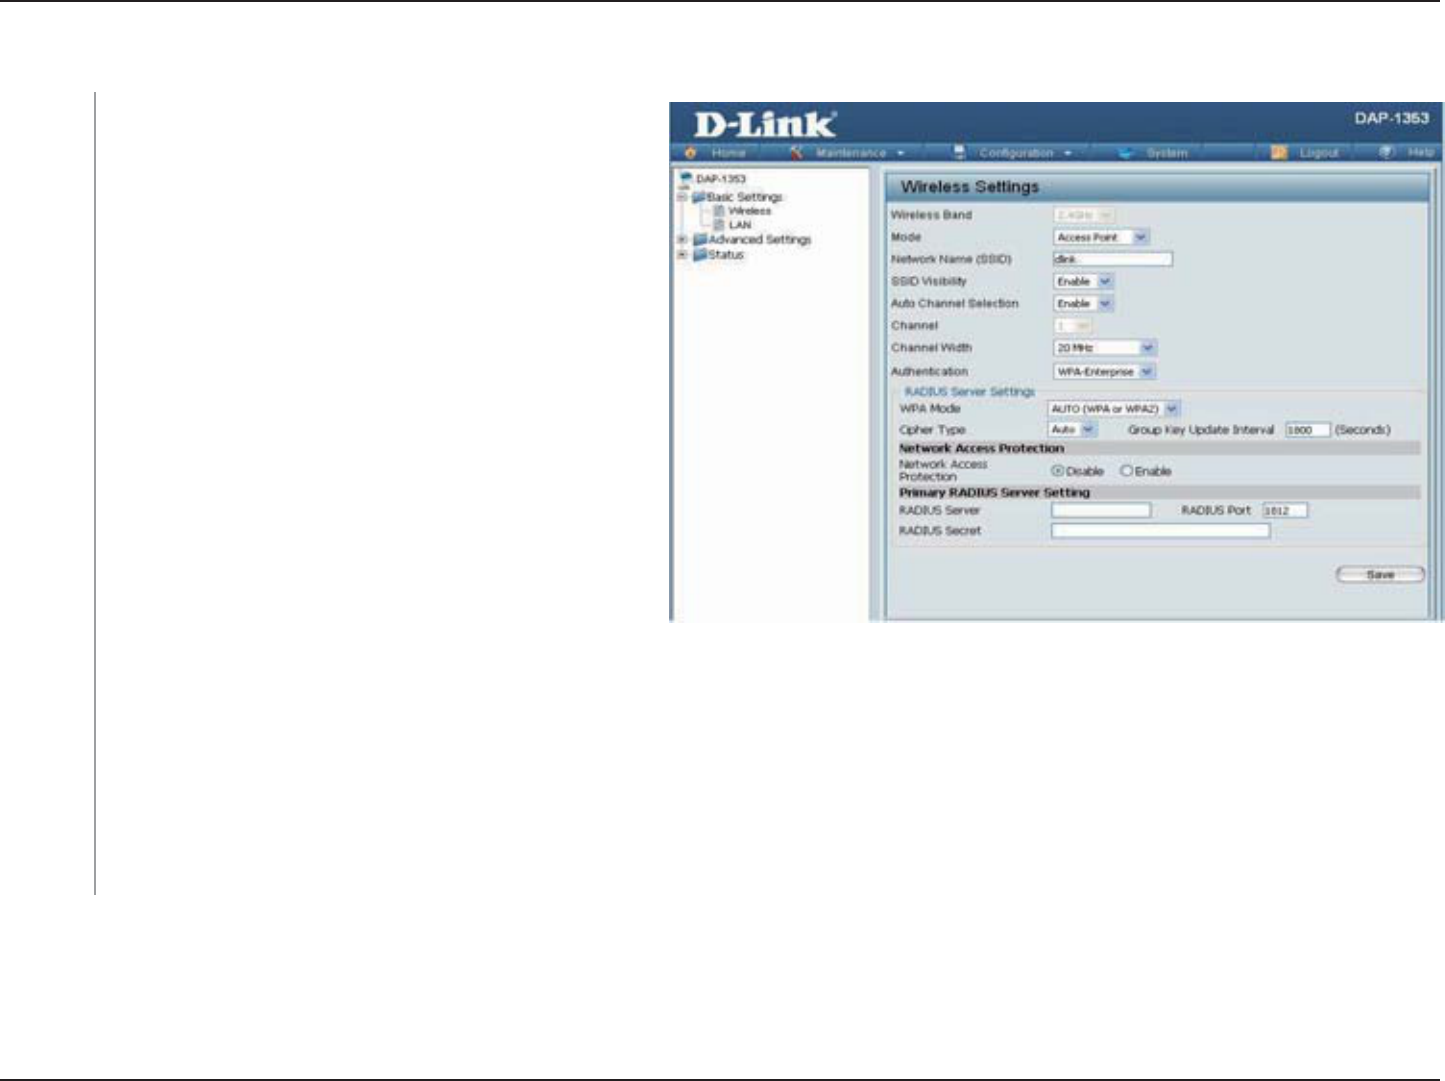
WPA-Enterprise authentication
When WPA-Enterprise is selected, you must also
UGNGEVC92#OQFGHTQOVJGRWNNFQYPOGPWAUTO
(WPA or WPA2),WPA2 Only, or WPA Only. WPA
and WPA2 use different algorithms. AUTO (WPA or
WPA2)CNNQYU[QWVQWUGDQVJ92#CPF92#
When WPA-Enterprise is selected, you must also
UGNGEVCEKRJGTV[RGHTQOVJGRWNNFQYPOGPWAuto,
AES, or TKIP.
Select the interval during which the group key will
DGXCNKF1800 is the recommended value as a lower
interval may reduce data transfer rates.
'PCDNG QT FKUCDNG /KETQUQHV 0GVYQTM #EEGUU
Protection.
'PVGTVJG+2CFFTGUUQHVJG4#&+75UGTXGT
'PVGTVJG4#&+75RQTV
'PVGTVJG4#&+75UGETGV
WPA Mode:
Cipher Type:
Group Key
Update
Interval:
Network
Access
Protection:
RADIUS
Server:
RADIUS
Port:
RADIUS
Secret:
26D-Link DAP-1353 User Manual
Section 3 - Configuration
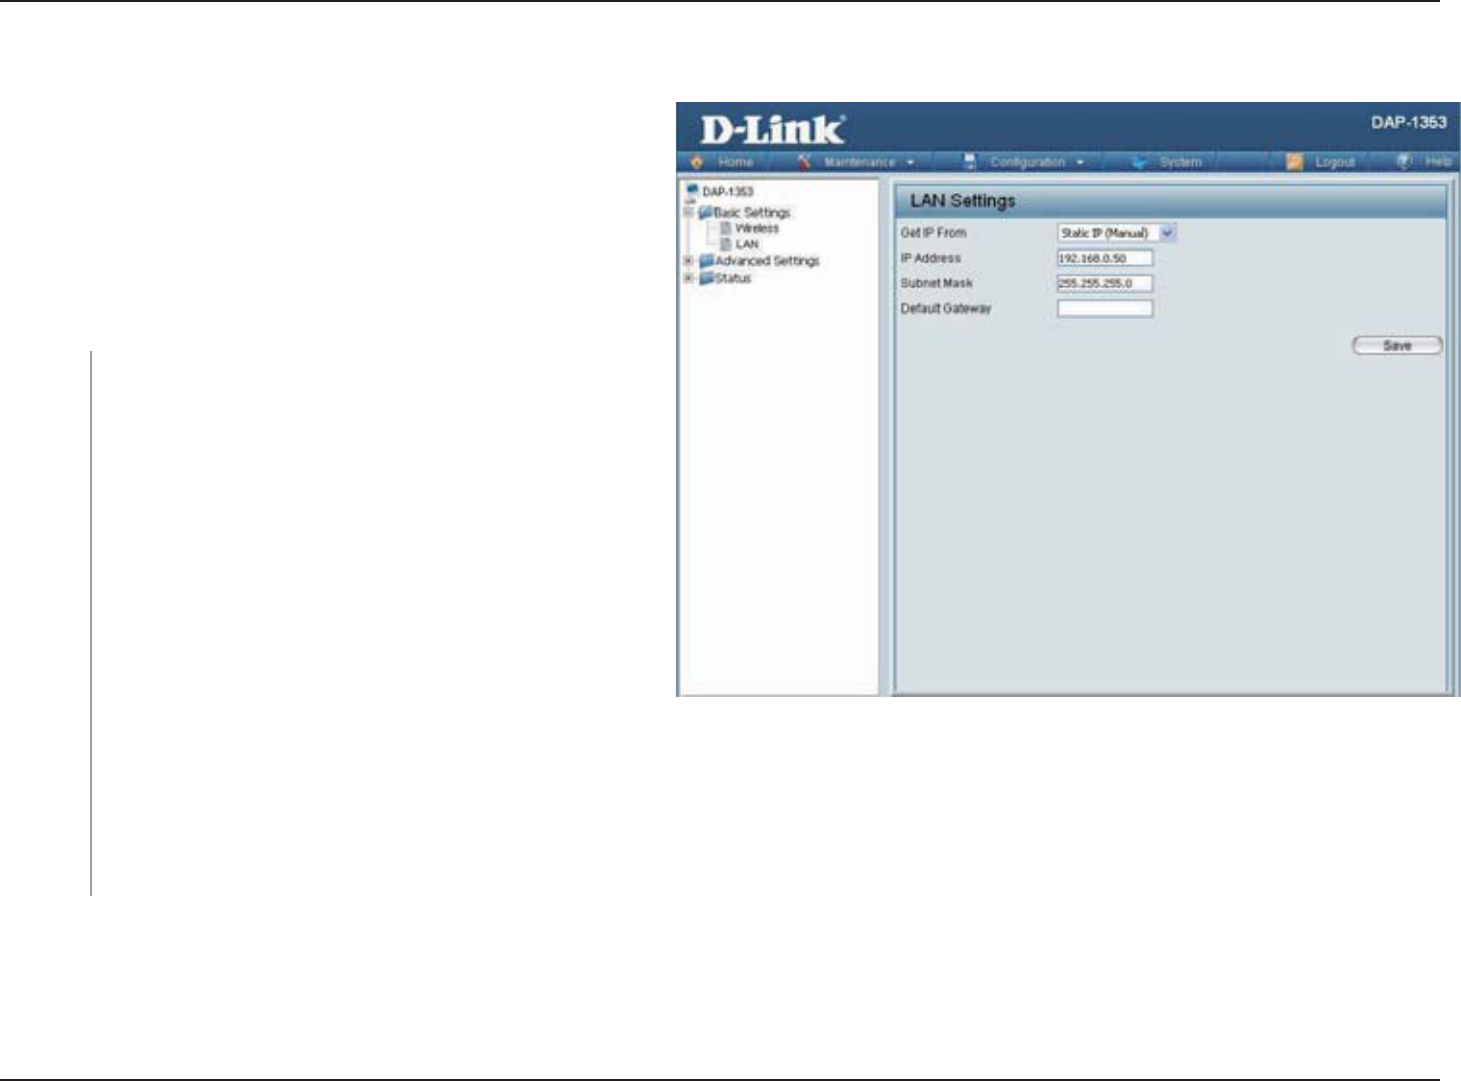
Static IP (Manual) is chosen here. Choose this option
if you do not have a DHCP server in your network,
or if you wish to assign a static IP address to the
DAP-1353. When Dynamic IP (DHCP) is selected,
VJGQVJGTſGNFUJGTGYKNNDGITC[GFQWV2NGCUGCNNQY
CDQWVOKPWVGUHQTVJG&*%2ENKGPVVQDGHWPEVKQPCN
once this selection is made.
The default IP address is 192.168.0.50. Assign a
static IP address that is within the IP address range
of your network.
'PVGT VJG UWDPGV OCUM #NN FGXKEGU KP VJG PGVYQTM
OWUVUJCTGVJGUCOGUWDPGVOCUM
Enter the IP address of the gateway in your network. If there is a gateway in your network, please enter an IP address within
the range of your network.
LAN
Get IP From:
IP Address:
Subnet
Mask:
Default
Gateway:
LAN is short for Local Area Network. This is considered
your internal network. These are the IP settings of the
LAN interface for the DAP-1353. These settings may
DGTGHGTTGFVQCU RTKXCVGUGVVKPIU;QWOC[EJCPIG
the LAN IP address if needed. The LAN IP address is
RTKXCVGVQ[QWTKPVGTPCNPGVYQTMCPFECPPQVDGUGGP
on the Internet.
27D-Link DAP-1353 User Manual
Section 3 - Configuration
Home > Advanced Settings
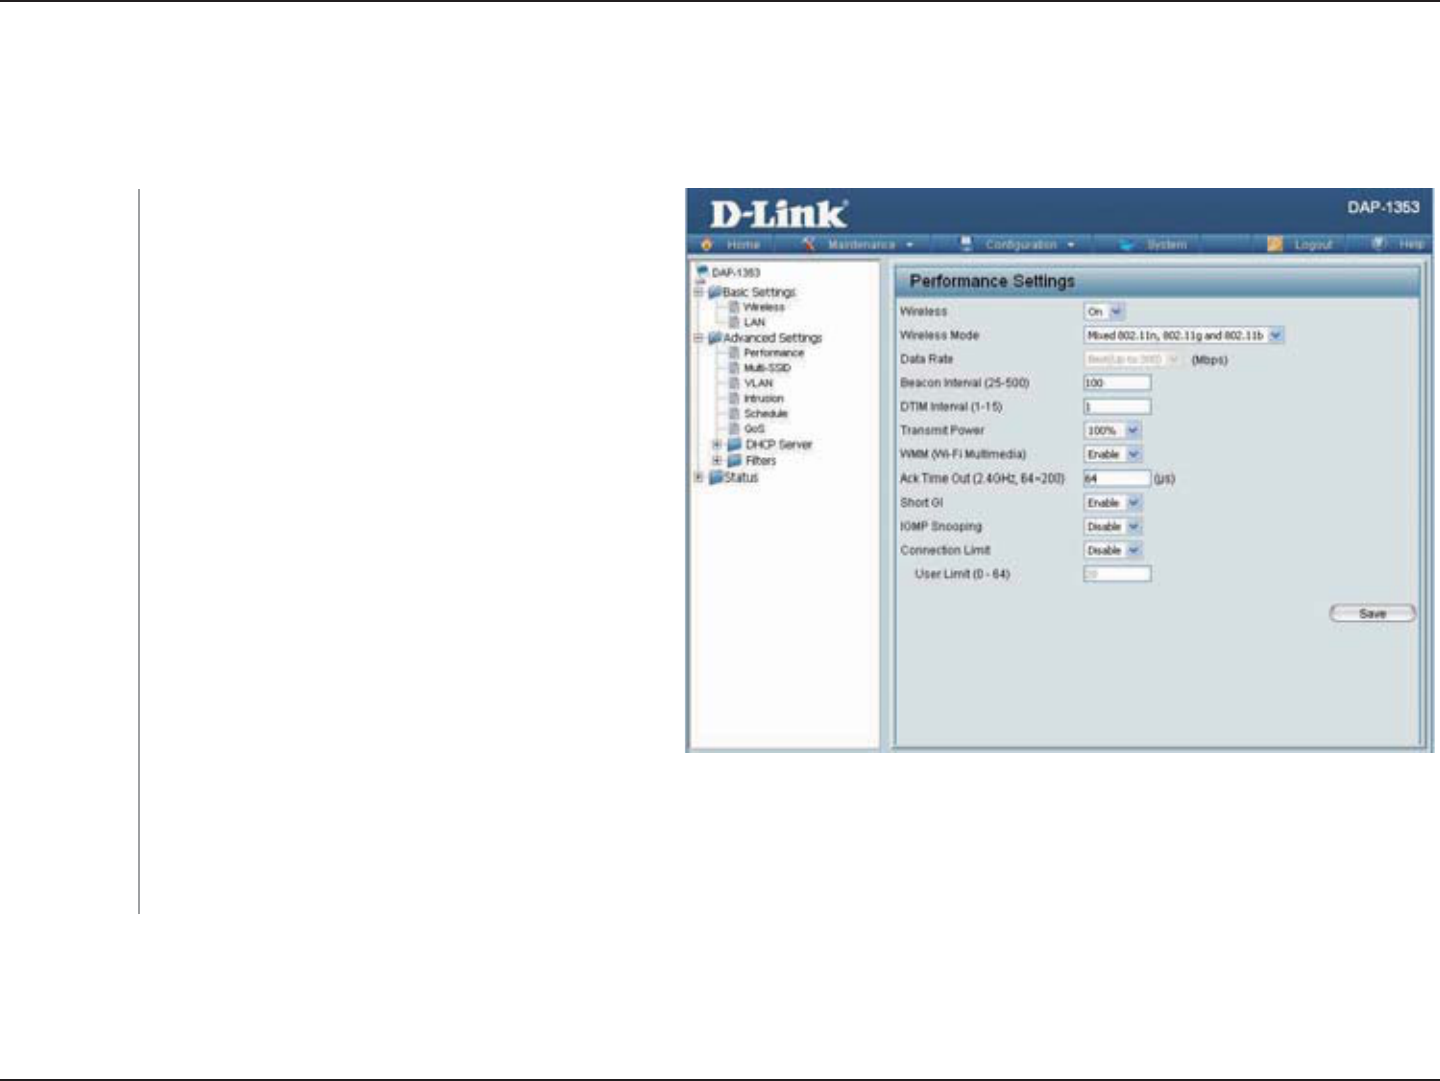
Performance
/CZKOWOYKTGNGUUUKIPCNTCVGFGTKXGFHTQO+'''5VCPFCTFURGEKſECVKQPU#EVWCNFCVCVJTQWIJRWVOC[XCT[0GVYQTMEQPFKVKQPUCPFGPXKTQPOGPVCNHCEVQTU
KPENWFKPIXQNWOGQHPGVYQTMVTCHſEDWKNFKPIOCVGTKCNUCPFEQPUVTWEVKQPCPFPGVYQTMQXGTJGCFECPNQYGTCEVWCNFCVCVJTQWIJQWVTCVG
Wireless:
Wireless Mode:
Data Rate*:
7UGVJGRWNNFQYPOGPWVQVWTPVJGYKTGNGUUHWPEVKQP
On or Off.
6JG FKHHGTGPV EQODKPCVKQP QH ENKGPVU VJCV ECP
DG UWRRQTVGF KPENWFG Mixed 802.11n, 802.11g
and 802.11b, Mixed 802.11g and 802.11b and
802.11n Only KPVJG)*\DCPF2NGCUGPQVG
VJCVYJGPDCEMYCTFUEQORCVKDKNKV[KUGPCDNGFHQT
NGICE[IDENKGPVUFGITCFCVKQPQHP
FTCHVYKTGNGUURGTHQTOCPEGKUGZRGEVGF
+PFKECVGVJGDCUGVTCPUHGTTCVGQHYKTGNGUUCFCRVGTU
on the wireless LAN. The AP will adjust the
DCUGVTCPUHGTTCVGFGRGPFKPIQPVJGDCUGTCVGQH
VJG EQPPGEVGF FGXKEG +H VJGTG CTG QDUVCENGU QT
interference, the AP will step down the rate. This
QRVKQPKUGPCDNGFKPMixed 802.11g and 802.11b
OQFG6JGEJQKEGUCXCKNCDNGCTG Best (Up to 54),
54,48,36,24,18,12,9,6, 11,5.5,2or 1.

28D-Link DAP-1353 User Manual
Section 3 - Configuration
$GCEQPUCTGRCEMGVUUGPVD[CPCEEGUURQKPVVQU[PEJTQPK\GCYKTGNGUUPGVYQTM5RGEKH[CXCNWGKPOKNNKUGEQPFU6JG
FGHCWNV100KUTGEQOOGPFGF5GVVKPICJKIJGTDGCEQPKPVGTXCNECPJGNRVQUCXGVJGRQYGTQHYKTGNGUUENKGPVUYJKNGUGVVKPI
a lower one can help a wireless client connect to an access point faster.
5GNGEVC&GNKXGT[6TCHſE+PFKECVKQP/GUUCIGUGVVKPIDGVYGGP1 and 15.1 is the default setting. DTIM is a countdown inform-
KPIENKGPVUQHVJGPGZVYKPFQYHQTNKUVGPKPIVQDTQCFECUVCPFOWNVKECUVOGUUCIGU
6JKUUGVVKPIFGVGTOKPGUVJGRQYGTNGXGNQHVJGYKTGNGUUVTCPUOKUUKQP6TCPUOKVVKPIRQYGTECPDGCFLWUVGFVQGNKOKPCVG
QXGTNCRRKPIQHYKTGNGUUCTGCEQXGTCIGDGVYGGPVYQCEEGUURQKPVUYJGTGKPVGTHGTGPEGKUCOCLQTEQPEGTP(QTGZCORNGKH
wireless coverage is intended for half of the area, then select 50%CUVJGQRVKQP7UGVJGRWNNFQYPOGPWVQUGNGEV100%,
50%,25%, or 12.5%.
9//UVCPFUHQT9K(K/WNVKOGFKC'PCDNKPIVJKUHGCVWTGYKNNKORTQXGVJGWUGTGZRGTKGPEGHQTCWFKQCPFXKFGQCRRNKECVKQPU
over a Wi-Fi network.
6QGHHGEVKXGN[QRVKOK\GVJTQWIJRWVQXGTNQPIFKUVCPEGNKPMUGPVGTCXCNWGHQT#EMPQYNGFIGOGPV6KOG1WVDGVYGGP64 to
200OKETQUGEQPFUKPVJG)*\KPVJGſGNFRTQXKFGF
Select Enable or Disable'PCDNKPICUJQTVIWCTFKPVGTXCNECPKPETGCUGVJTQWIJRWV*QYGXGTDGCYCTGVJCVKVECPCNUQ
increase the error rate in some installations due to increased sensitivity to radio-frequency installations.
Select Enable or Disable+PVGTPGV)TQWR/CPCIGOGPV2TQVQEQNCNNQYUVJG#2VQTGEQIPK\G+)/2SWGTKGUCPFTGRQTVU
UGPVDGVYGGPTQWVGTUCPFCP+)/2JQUVYKTGNGUU56#9JGP+)/2UPQQRKPIKUGPCDNGFVJG#2YKNNHQTYCTFOWNVKECUV
RCEMGVUVQCP+)/2JQUVDCUGFQP+)/2OGUUCIGURCUUKPIVJTQWIJVJG#2
Select Enable or Disable.+HVJG'VJGTPGVEQPPGEVKQPDGVYGGPVJG.#0CPFVJG#2KUFKUEQPPGEVGFGPCDNKPIVJKUHGCVWTG
YKNNECWUGVJGYKTGNGUUUGIOGPVCUUQEKCVGFYKVJVJG#2VQDGFKUCUUQEKCVGFHTQOVJG#2
Select Enable or Disable6JKUKUCPQRVKQPHQTNQCFDCNCPEKPI6JKUFGVGTOKPGUYJGVJGTVQNKOKVVJGPWODGTQHWUGTU
CEEGUUKPIVJKUFGXKEG6JGGZCEVPWODGTKUGPVGTGFKPVJG7UGT.KOKVſGNFDGNQY6JKUHGCVWTGCNNQYUVJGWUGTVQUJCTGVJG
YKTGNGUUPGVYQTMVTCHſECPFVJGENKGPVWUKPIOWNVKRNG#2U+HVJKUHWPEVKQPKUGPCDNGFYJGPVJGPWODGTQHWUGTUGZEGGFU
this value, the DAP-1353 will not allow clients to associate with the AP.
5GVVJGOCZKOWOCOQWPVQHWUGTUVJCVCTGCNNQYGFCEEGUU0-64WUGTU6QWUGVJKUHGCVWTGVJG%QPPGEVKQP.KOKVCDQXG
OWUVDGGPCDNGF(QTOQUVWUGTUCNKOKVQH10 is recommended. The default setting is 20.
Beacon Interval
(25-500):
DTM Interval
(1-15):
Transmit Power:
WMM (Wi-Fi
Multimedia):
Ack Time Out
(2.4 GHZ, 64~200) :
Short GI:
IGMP Snooping:
Link Integrity:
Connection Limit:
User Limit (0-64):
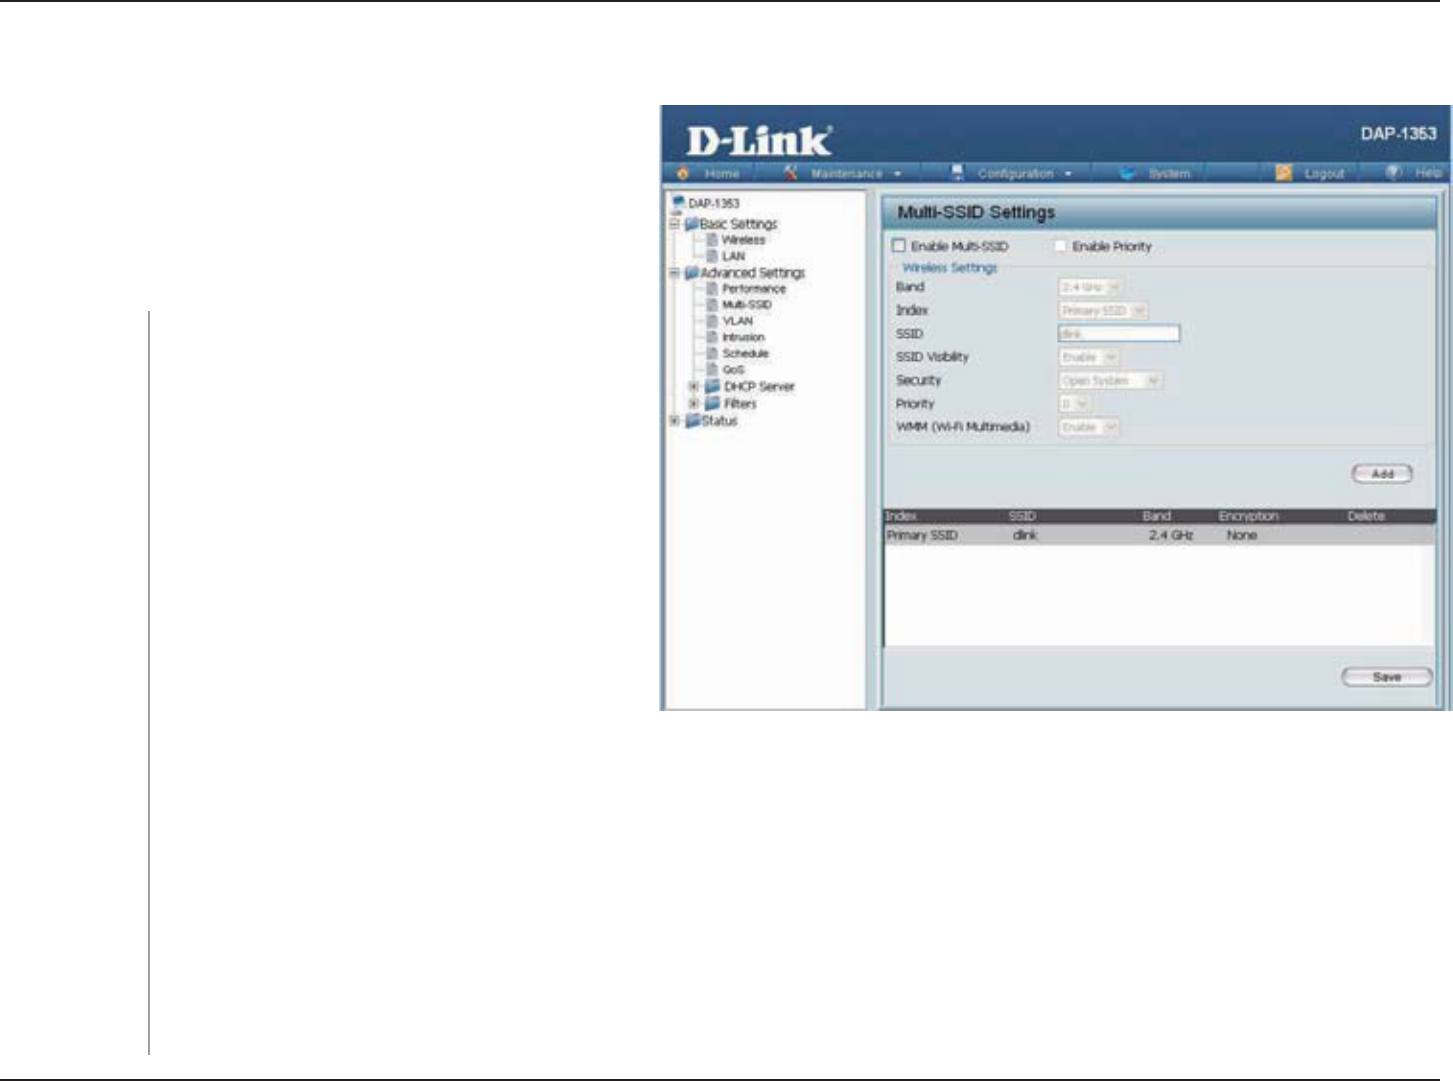
29D-Link DAP-1353 User Manual
Section 3 - Configuration
The device supports up to four multiple Service Set
+FGPVKſGTU;QWECPUGVVJG2TKOCT[55+&KPVJGBasic
>Wireless section. The SSID’s factory default setting
is dlink6JG55+&ECPDGGCUKN[EJCPIGFVQEQPPGEV
VQCPGZKUVKPIYKTGNGUUPGVYQTMQTVQGUVCDNKUJCPGY
wireless network.
%JGEMVQGPCDNGUWRRQTVHQTOWNVKRNG55+&U
6JKU TGCFQPN[ XCNWG KU VJG EWTTGPV DCPF
setting.
You can select up to three multi-SSIDs. With
the Primary SSID, you have a total of four
multi-SSIDs.
5GTXKEG 5GV +FGPVKHKGT 55+& KU VJG PCOG
FGUKIPCVGF HQT C URGEKſE YKTGNGUU NQECN CTGC
PGVYQTM 9.#0 6JG 55+&ŏU HCEVQT[ FGHCWNV
setting is dlink.6JG55+&ECPDGGCUKN[EJCPIGF
to connect to an existing wireless network or to
GUVCDNKUJCPGYYKTGNGUUPGVYQTM
Enable or Disable55+&XKUKDKNKV['PCDNKPIVJKUHGCVWTGDTQCFECUVUVJG55+&CETQUUVJGPGVYQTMVJWUOCMKPIKVXKUKDNGVQ
all network users.
6JG/WNVK55+&UGEWTKV[ECPDGOpen System,WPA-Personal, or WPA-Enterprise. For a detailed description of the
Open System parameters please go to page 23. For a detailed description of the WPA-Personal parameters please go
to page 24. For a detailed description of the WPA-Enterprise parameters please go to page 25.
Enable
Multi-SSID:
Band:
Index:
SSID:
SSID Visibility:
Security:
Multi-SSID

30D-Link DAP-1353 User Manual
Section 3 - Configuration
Select Enable or Disable.
When you select Open SystemVQIINGDGVYGGPEnable and Disable. If EnableKUUGNGEVGFVJG-G[6[RG-G[5K\G-G[
+PFGZ`-G[CPF%QPſTO-G[UOWUVCNUQDGEQPſIWTGF
Select HEX or ASCII.
Select 64 Bits or 128 Bits.
5GNGEVHTQOVJGUVVQVJMG[VQDGUGVCUVJGCEVKXGMG[
Input up to four keys for encryption. You will select one of these keys in the Key Index pull-down menu.
When you select either WPA-Personal or WPA-Enterprise[QWOWUVCNUQEJQQUGC92#OQFGHTQOVJGRWNNFQYPOGPW
AUTO (WPA or WPA2),WPA2 Only, or WPA Only. WPA and WPA2 use different algorithms. AUTO (WPA or WPA2)
CNNQYU[QWVQWUGDQVJ92#CPF92#+PCFFKVKQP[QWOWUVEQPſIWTG%KRJGT6[RGCPF)TQWR-G[7RFCVG+PVGTXCN
Select Auto, AES, or TKIP from the pull-down menu.
5GNGEVVJGKPVGTXCNFWTKPIYJKEJVJGITQWRMG[YKNNDGXCNKF6JGFGHCWNVXCNWGQH1800 seconds is recommended.
When you select WPA-Personal, please enter a PassPhrase KPVJGEQTTGURQPFKPIſGNF
When you select WPA-Personal, please re-enter the PassPhrase entered in the previous item KPVJGEQTTGURQPFKPIſGNF
When you select WPA-EnterpriseGPVGTVJG+2CFFTGUUQHVJG4#&+75UGTXGT+PCFFKVKQP[QWOWUVEQPſIWTG4#&+75
2QTVCPF4#&+755GETGV
'PVGTVJG4#&+75RQTV
'PVGTVJG4#&+75UGETGV
WMM (Wi-Fi
Multimedia):
Encryption:
Key Type:
Key Size:
Key Index (1-4):
Key:
WPA Mode:
Cipher Type:
Group Key Update
Interval:
PassPhrase:
Confirm
PassPhrase:
RADIUS Server:
RADIUS Port:
RADIUS Secret:
31D-Link DAP-1353 User Manual
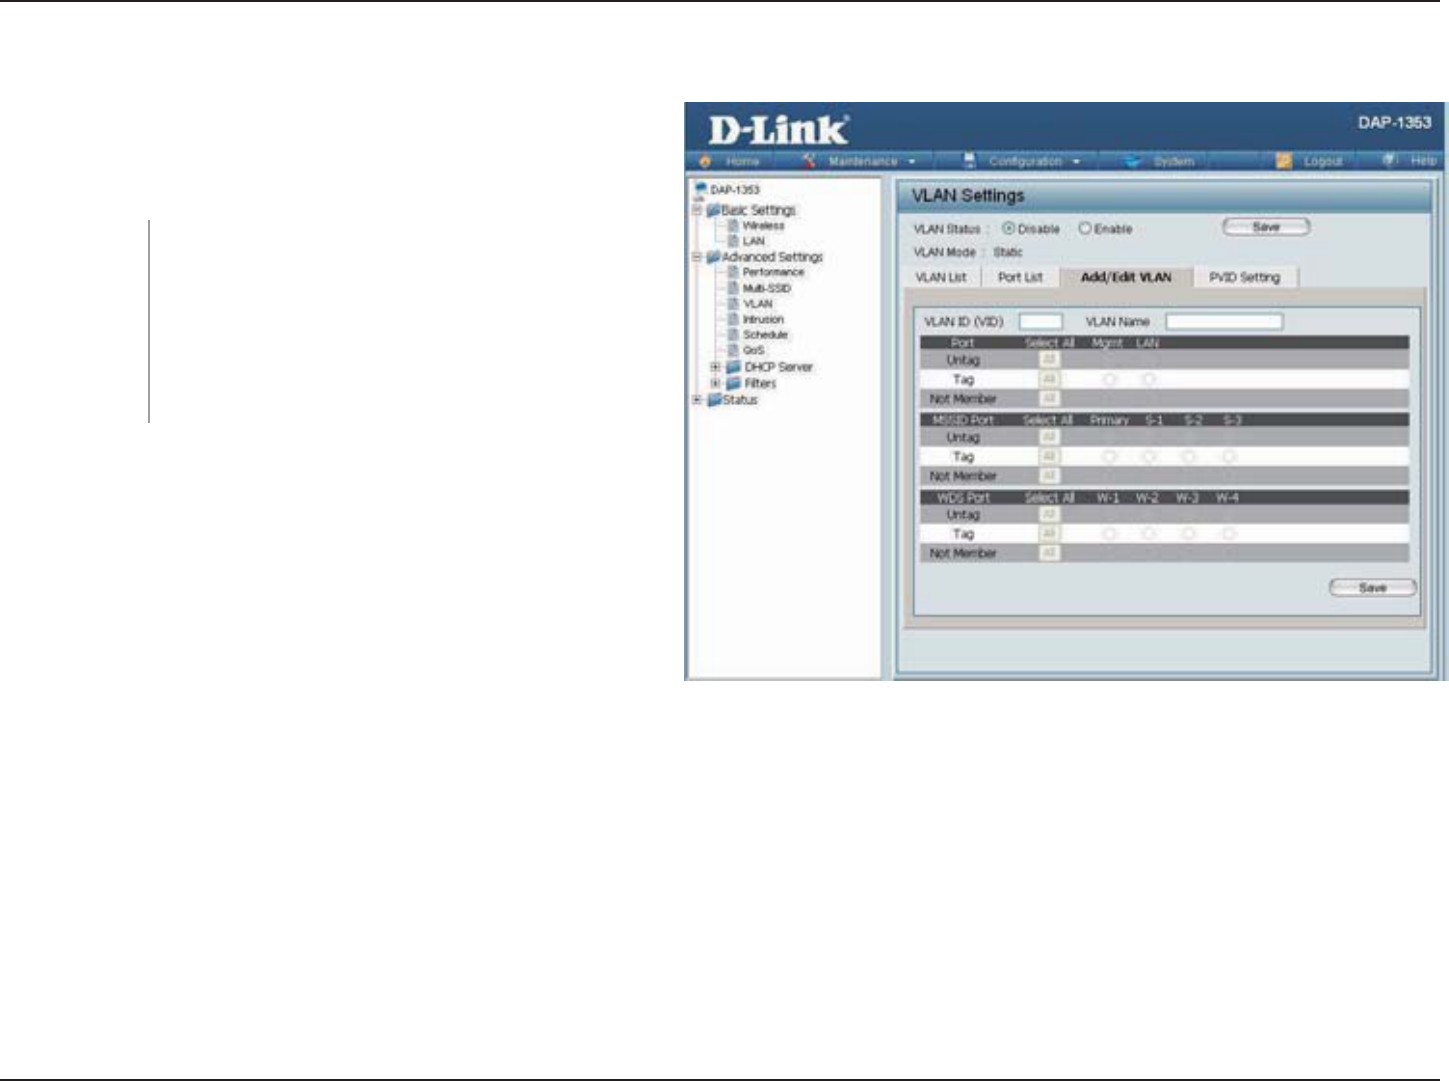
Section 3 - Configuration
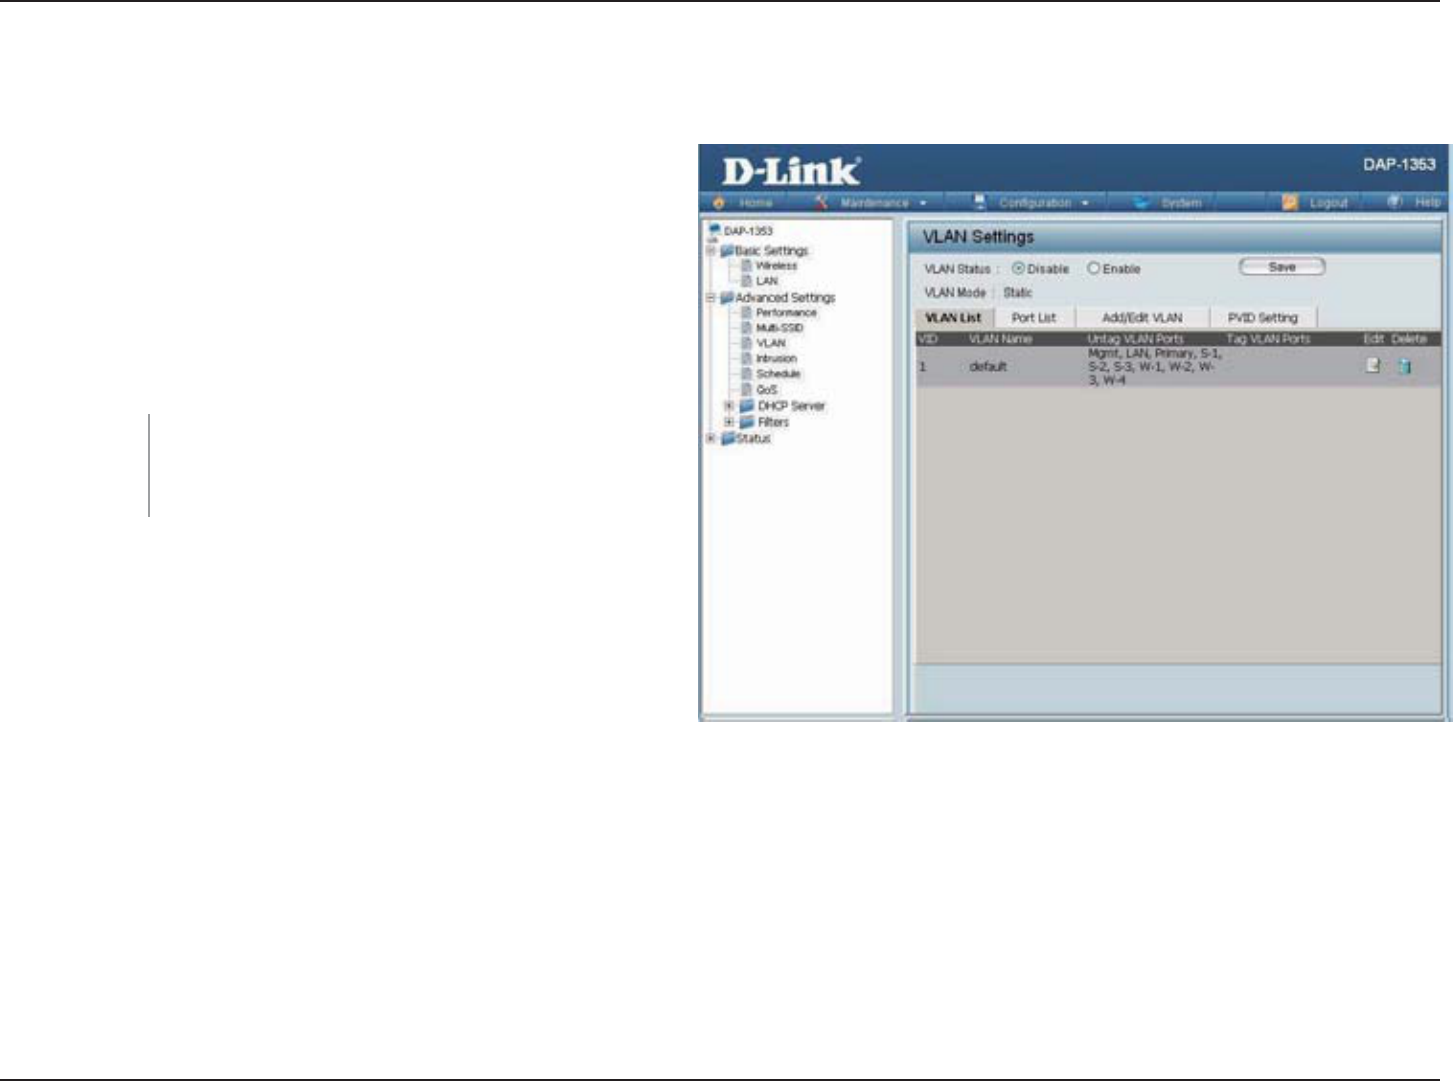
VLAN
VLAN List
6JGUWRRQTVU8.#0U8.#0UECPDGETGCVGF
YKVJC0COGCPF8+&/IOV6%2UVCEM.#02TKOCT[
/WNVKRNG55+&CPF9&5EQPPGEVKQPECPDGCUUKIPGF
to VLANs as they are physical ports. Any packet which
enters the DAP-1353 without a VLAN tag will have a
VLAN tag inserted with a PVID.
6JG8.#0.KUVVCDFKURNC[UVJGEWTTGPV8.#0U
7UGVJGTCFKQDWVVQPVQVQIINGDGVYGGPEnable
or Disable. Next, go to the Add/Edit VLANVCDVQ
add or modify an item on the VLAN ListVCD
VLAN Status:
32D-Link DAP-1353 User Manual
Section 3 - Configuration
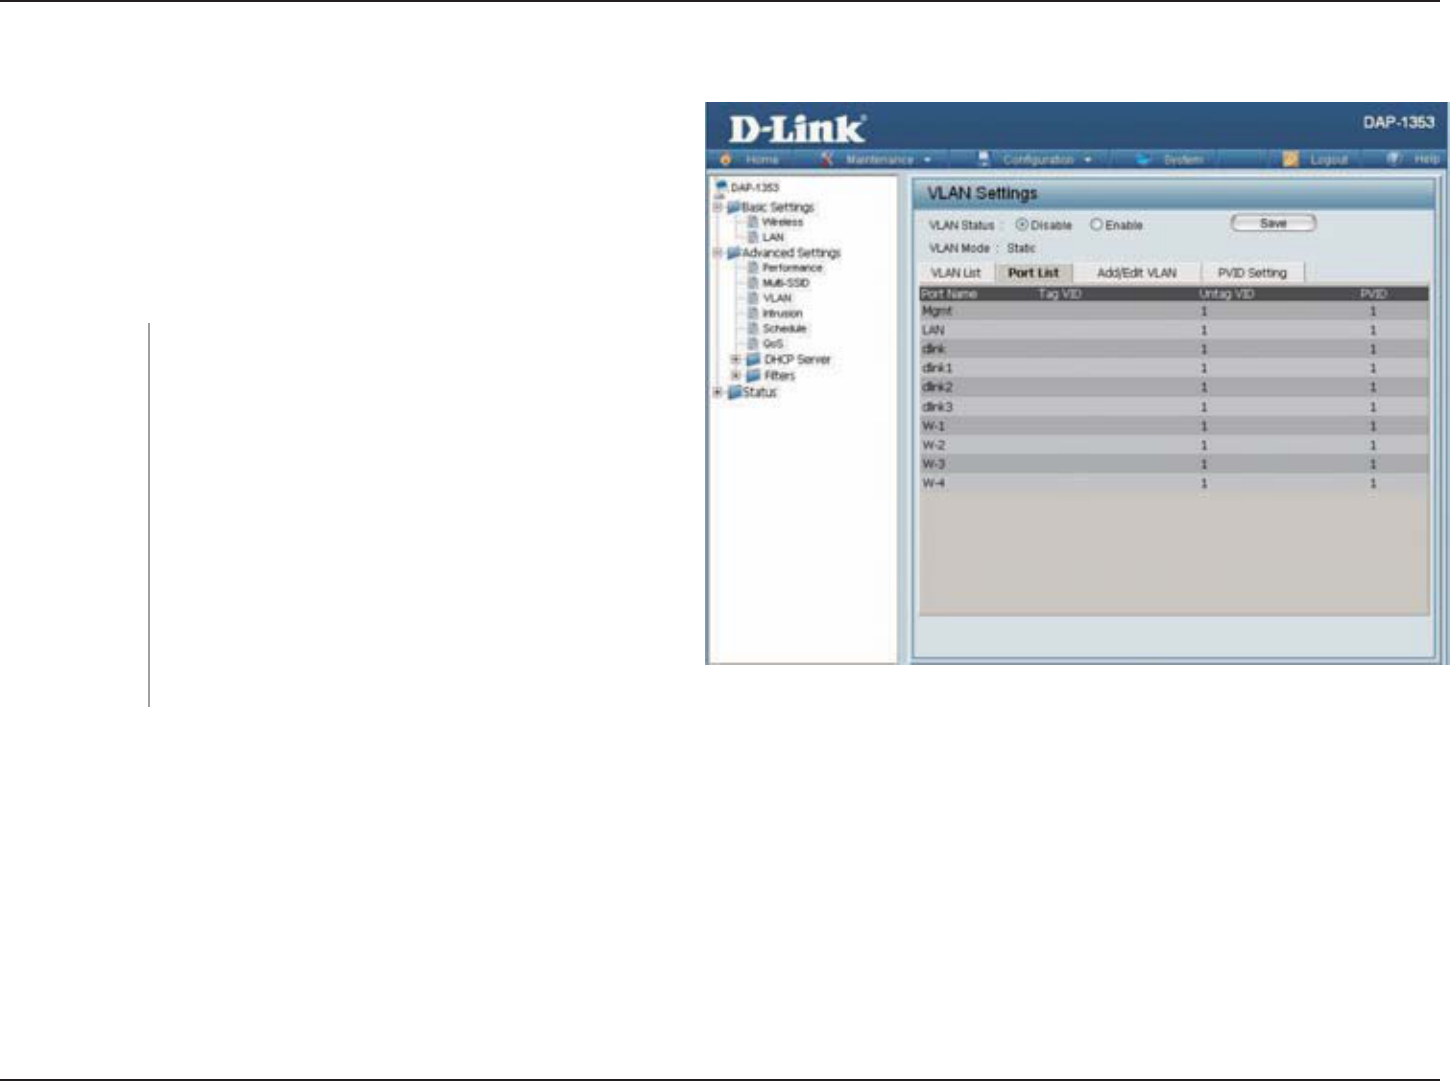
Port List
6JG2QTV.KUVVCDFKURNC[UVJGEWTTGPVRQTVU+H[QWYCPV
VQEQPſIWTGVJGIWGUVCPFKPVGTPCNPGVYQTMUQPC8KTVWCN
.#0 8.#0 VJG UYKVEJ CPF &*%2 UGTXGT [QW CTG
using must also support VLANs. As a prerequisite step,
EQPſIWTGCRQTVQPVJGUYKVEJHQTJCPFNKPI8.#0VCIIGF
RCEMGVUCUFGUETKDGFKPVJG+'''3UVCPFCTF
7UGVJGTCFKQDWVVQPVQVQIINGVQ'PCDNG0GZV
go to the Add/Edit VLANVCDVQCFFQTOQFKH[
an item on the VLAN ListVCD
The name of the port is displayed in this
column.
The Tagged VID is displayed in this column.
6JG7PVCIIGF8+&KUFKURNC[GFKPVJKUEQNWOP
6JG 2QTV 8.#0 +FGPVKſGT KU FKURNC[GF KP VJKU
column.
VLAN Status:
Port Name:
Tag VID:
Untag VID:
PVID:
33D-Link DAP-1353 User Manual
Section 3 - Configuration
Add/Edit VLAN
The Add/Edit VLANVCDKUWUGFVQEQPſIWTG8.#0U
Once you have made the desired changes, click the
ApplyDWVVQPVQNGV[QWTEJCPIGUVCMGGHHGEV
7UGVJGTCFKQDWVVQPVQVQIINGVQ'PCDNG
2TQXKFGCPWODGTDGVYGGP1 and 4094 for the
Internal VLAN.
Enter the VLAN to add or modify.
VLAN Status:
VLAN ID:
VLAN Name:

34D-Link DAP-1353 User Manual
Section 3 - Configuration
PVID Setting
The PVID SettingVCDKUWUGFVQGPCDNGFKUCDNGVJG
2QTV 8.#0 +FGPVKſGT #WVQ #UUKIP 5VCVWU CU YGNN CU
VQEQPſIWTGXCTKQWUV[RGUQH28+&UGVVKPIU%NKEMVJG
Apply DWVVQPVQNGV[QWTEJCPIGUVCMGGHHGEV
7UGVJGTCFKQDWVVQPVQVQIINGDGVYGGPEnable
and Disable.
7UGVJGTCFKQDWVVQPVQVQIING28+&CWVQCUUKIP
UVCVWUVQ'PCDNG
VLAN Status:
PVID Auto Assign
Status:
35D-Link DAP-1353 User Manual
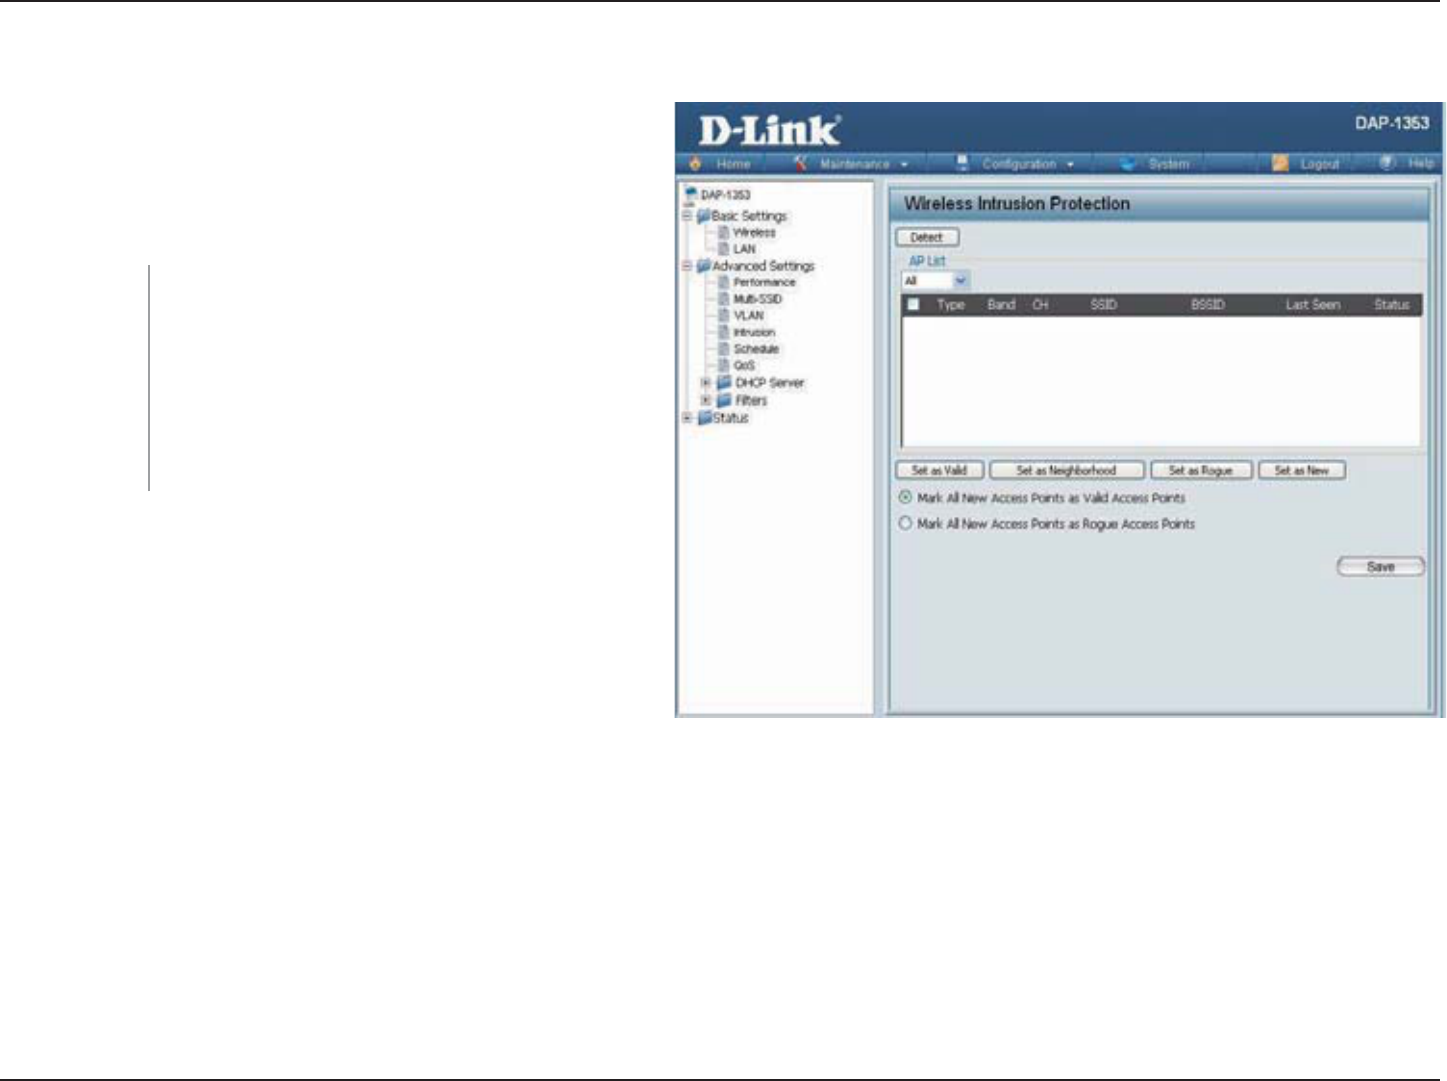
Section 3 - Configuration
Intrusion
The Wireless Intrusion Protection window is used to
set APs as All,Valid,Neighborhood,Rogue, and
New. Click the Apply DWVVQPVQNGV[QWTEJCPIGUVCMG
effect.
The choices include All,Valid,Neighbor,
Rogue, and New.
%NKEM VJKU DWVVQP VQ KPKVKCVG C UECP QH VJG
network.
AP List:
Detect:
36D-Link DAP-1353 User Manual
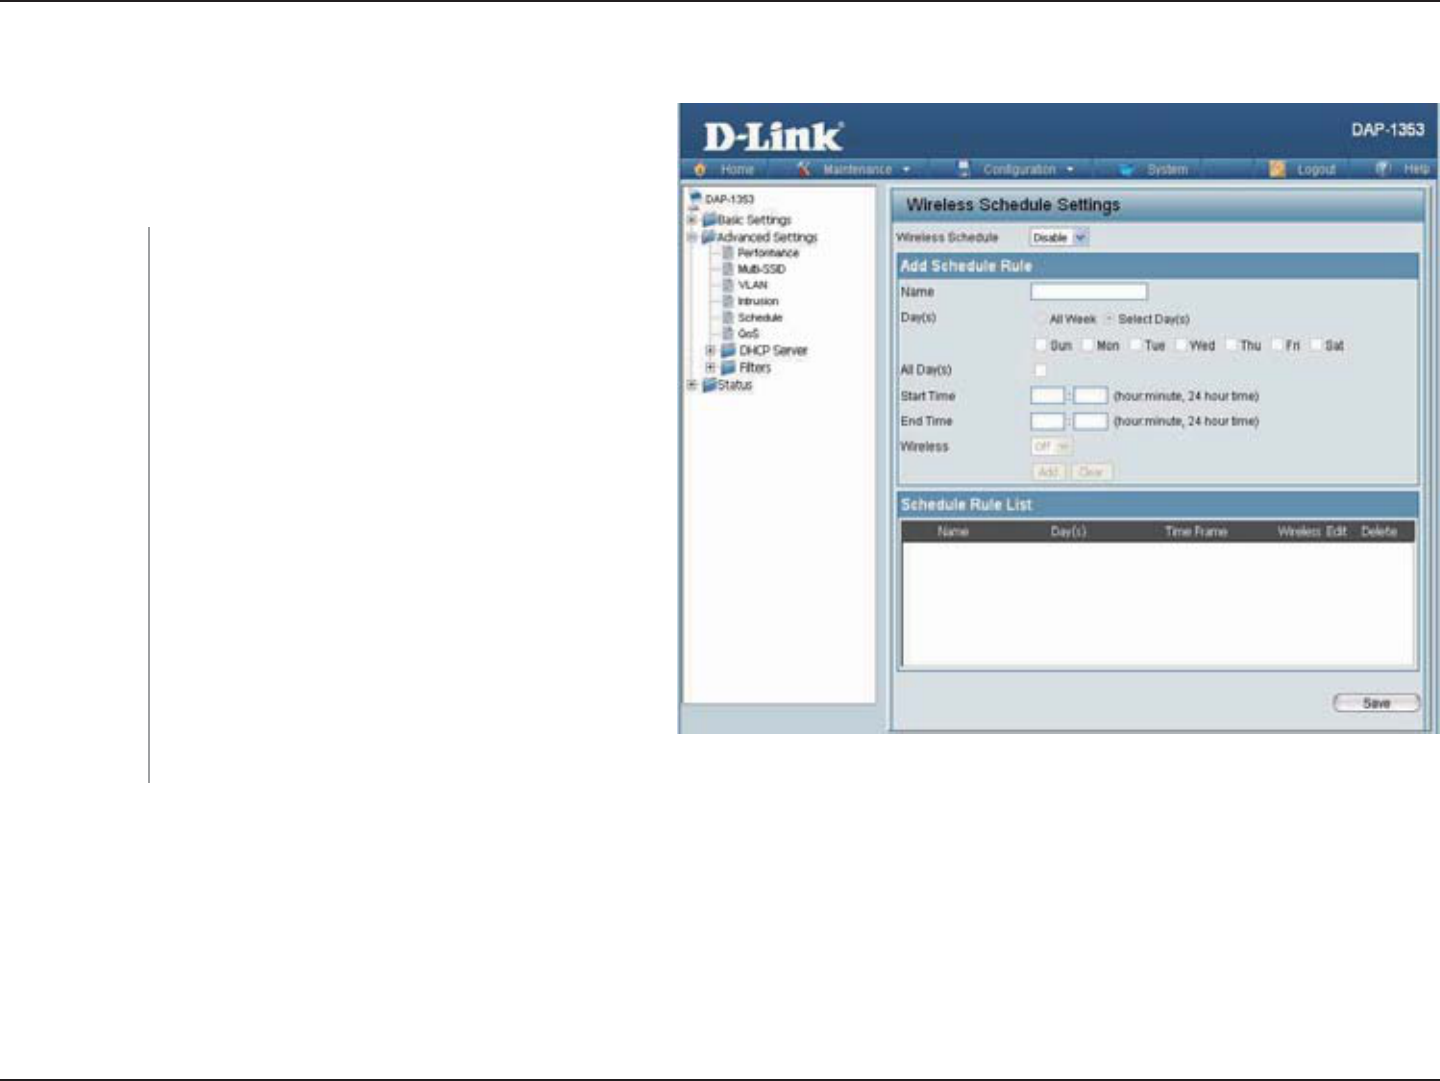
Section 3 - Configuration
Schedule
The Wireless Schedule Settings window is used to add
and modify scheduling rules on the device. Click the
Apply DWVVQPVQNGV[QWTEJCPIGUVCMGGHHGEV
7UGVJGRWNNFQYPOGPWVQGPCDNGVJGFGXKEGŏU
scheduling feature.
Enter a name for the new scheduling rule in the
ſGNFRTQXKFGF
6QIINGVJGTCFKQDWVVQPDGVYGGPAll Week and
Select Day(s). If the second option is selected,
EJGEMVJGURGEKſEFC[U[QWYCPVVJGTWNGVQDG
effective on.
%JGEMVJKUDQZVQJCXG[QWTUGVVKPIUCRRN[
hours a day.
6QIINGVJG RWNNFQYP OGPWDGVYGGP Off and
On.
Wireless
Schedule:
Name:
Day(s):
All Day(s):
Wireless:
37D-Link DAP-1353 User Manual
Section 3 - Configuration
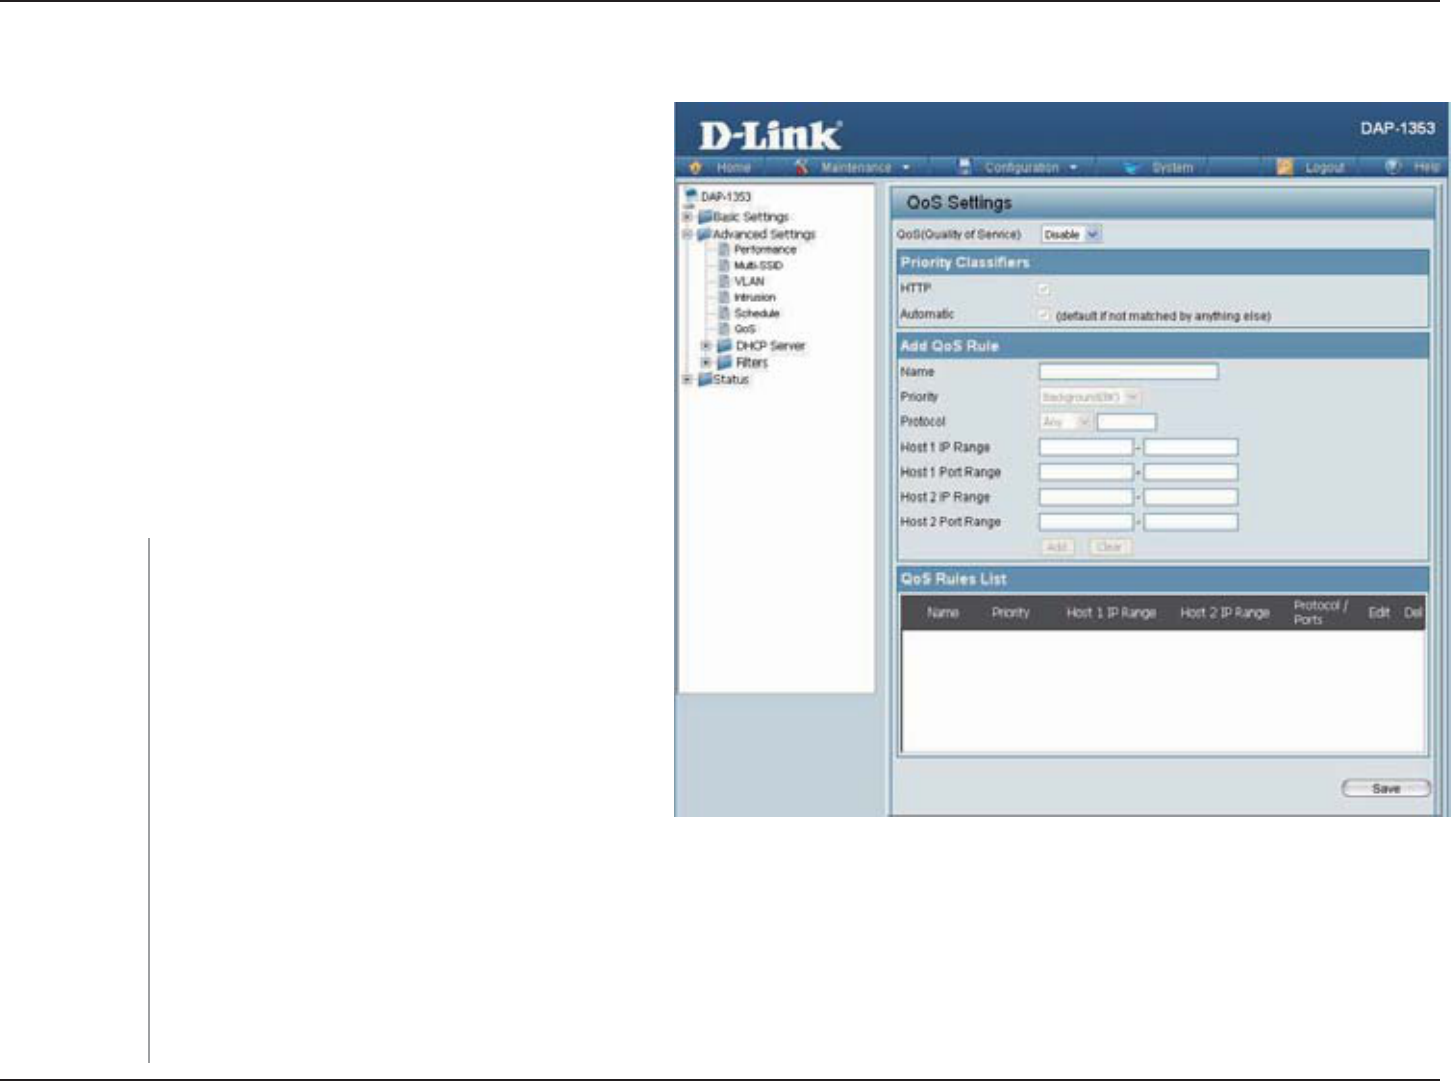
QoS
3WCNKV[QH5GTXKEG3Q5GPJCPEGUVJGGZRGTKGPEGQH
WUKPICPGVYQTMD[RTKQTKVK\KPIVJGVTCHſEQHFKHHGTGPV
applications.
#3Q54WNGKFGPVKſGUC URGEKſE OGUUCIG ƀQYCPF
CUUKIPUCRTKQTKV[VQVJCVƀQY(QTOQUVCRRNKECVKQPU
VJGRTKQTKV[ENCUUKſGTUGPUWTGVJGTKIJVRTKQTKVKGUCPF
URGEKſE3Q54WNGUCTGPQVTGSWKTGF
3Q5UWRRQTVUQXGTNCRUDGVYGGPTWNGU+HOQTGVJCP
QPGTWNGOCVEJGUCURGEKſEOGUUCIGƀQYVJGTWNG
YKVJVJGJKIJGUVRTKQTKV[YKNNDGWUGF
'PCDNGVJKUQRVKQPKH[QWYCPVVQCNNQY3Q5VQ
RTKQTKVK\G[QWTVTCHſE
2TKQTKV[%NCUUKſGTU
#NNQYU VJG CEEGUU RQKPV VQ TGEQIPK\G *662
transfers for many common audio and video
UVTGCOUCPFRTKQTKVK\GVJGOCDQXGQVJGTVTCHſE
5WEJ UVTGCOU CTG HTGSWGPVN[ WUGF D[ FKIKVCN
media players.
9JGPGPCDNGF VJKUQRVKQPECWUGU VJGCEEGUU RQKPVVQCWVQOCVKECNN[ CVVGORVVQ RTKQTKVK\GVTCHſE UVTGCOUVJCVKV FQGUPŏV
QVJGTYKUGTGEQIPK\GDCUGFQPVJGDGJCXKQTVJCVVJGUVTGCOUGZJKDKV6JKUCEVUVQFGRTKQTKVK\GUVTGCOUVJCVGZJKDKVDWNM
VTCPUHGTEJCTCEVGTKUVKEUUWEJCUſNGVTCPUHGTUYJKNGNGCXKPIKPVGTCEVKXGVTCHſEUWEJCUICOKPIQT8Q+2TWPPKPICVCPQTOCN
priority.
QoS (Quality of
Service):
HTTP:
Automatic:

38D-Link DAP-1353 User Manual
Section 3 - Configuration
'PVGTCPCOGHQTVJGPGY3Q5TWNGKPVJGſGNFRTQXKFGF
7UGVJGRWNNFQYPOGPWVQUGNGEVVJGFGUKTGFRTKQTKV[Background (BK),Best Effort (BE),Video (VI), or Voice (VO).
7UGVJGRWNNFQYPOGPWVQEJQQUGVJGCRRTQRTKCVGRTQVQEQNWUGFD[VJGOGUUCIGUAny,TCP,UDP,Both,IMCP, or
Other.
6JGTWNGCRRNKGUVQCƀQYQHOGUUCIGUHQTYJKEJQPGEQORWVGTŏU+2CFFTGUUHCNNUYKVJKPVJGTCPIGUGVJGTG
6JGTWNGCRRNKGUVQCƀQYQHOGUUCIGUHQTYJKEJJQUVŏURQTVPWODGTKUYKVJKPVJGTCPIGUGVJGTGYJGPVJG2TQVQEQNKUUGV
to TCP,UDP, or Both.
6JGTWNGCRRNKGUVQCƀQYQHOGUUCIGUHQTYJKEJVJGQVJGTEQORWVGTŏU+2CFFTGUUHCNNUYKVJKPVJGTCPIGUGVJGTG
6JGTWNGCRRNKGUVQCƀQYQHOGUUCIGUHQTYJKEJJQUVŏURQTVPWODGTKUYKVJKPVJGTCPIGUGVJGTGwhen the Protocol is set
to TCP,UDP, or Both.
Name:
Priority:
Protocol:
Host 1 IP Range:
Host 1 Port
Range:
Host 2 IP Range:
Host 2 Port
Range:
39D-Link DAP-1353 User Manual
Section 3 - Configuration
DHCP Server
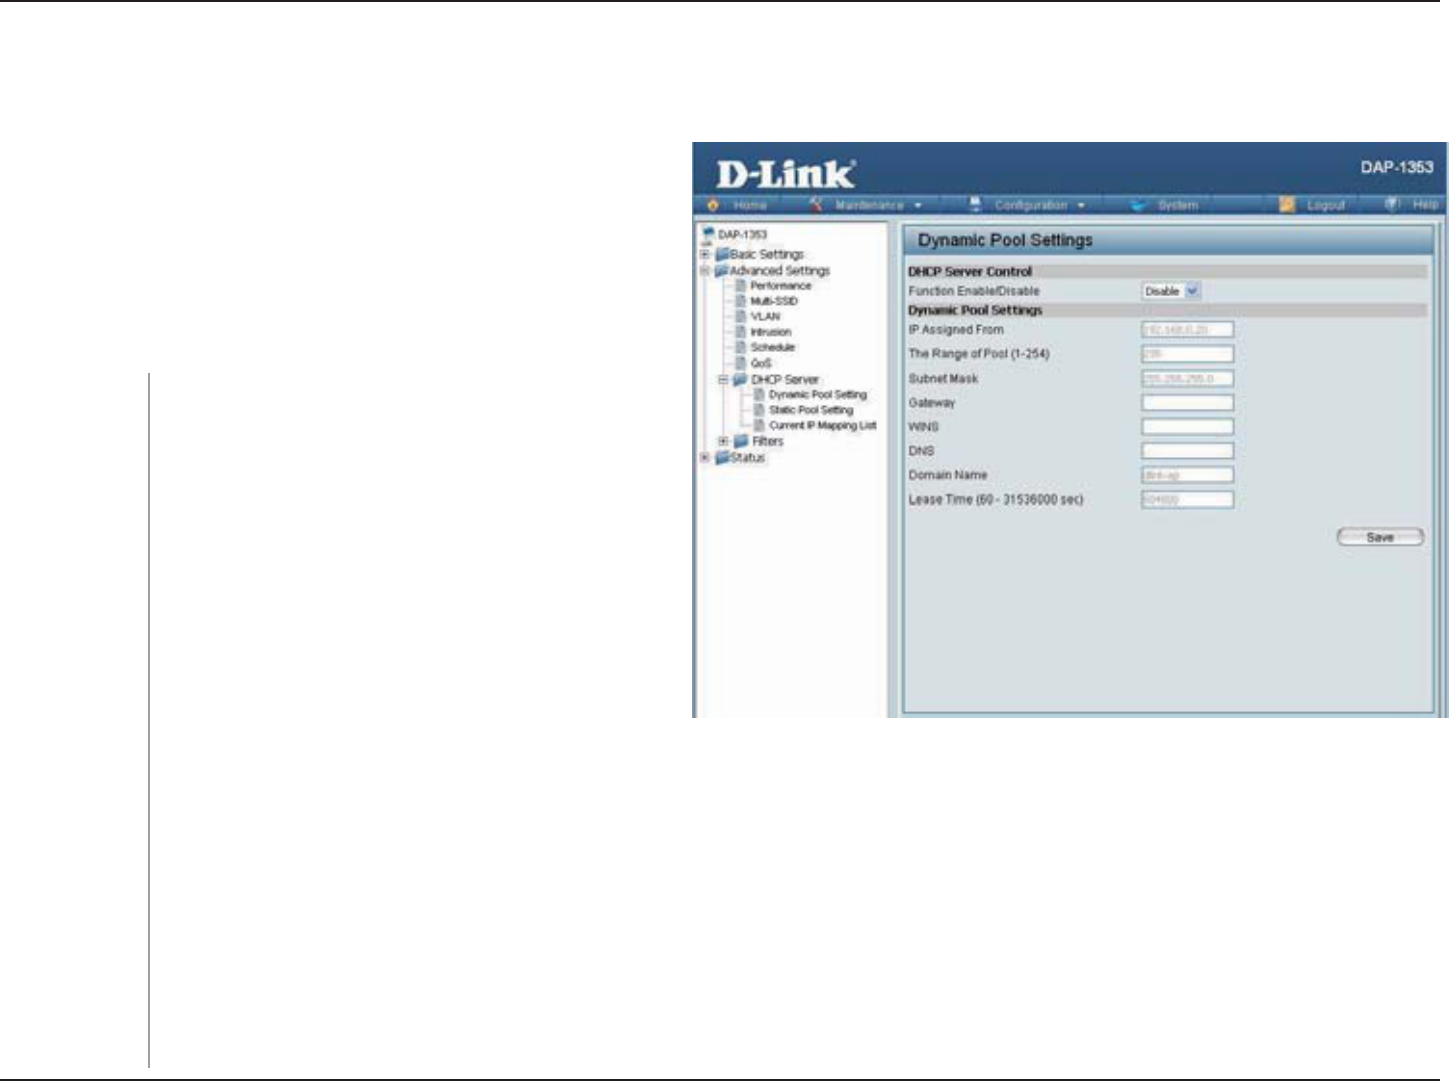
Dynamic Pool Settings
6JG &*%2 CFFTGUU RQQN FGſPGU VJG TCPIG QH VJG
+2 CFFTGUU VJCV ECP DG CUUKIPGF VQ UVCVKQPU KP VJG
network. A Dynamic Pool allows wireless stations
VQTGEGKXGCPCXCKNCDNG+2YKVJNGCUGVKOGEQPVTQN+H
needed or required in the network, the DAP-1353 is
ECRCDNGQHCEVKPICUC&*%2UGTXGT
&[PCOKE*QUV%QPſIWTCVKQP2TQVQEQN&*%2
assigns dynamic IP addresses to devices on
VJG PGVYQTM 6JKU RTQVQEQN UKORNKſGU PGVYQTM
management and allows new wireless devices
to receive IP addresses automatically without
the need to manually assign new IP addresses.
Select Enable to allow the DAP-1353 to function
as a DHCP server.
+PRWVVJGſTUV+2CFFTGUUCXCKNCDNGHQTCUUKIPOGPV
on your network.
'PVGTVJGPWODGTQH+2CFFTGUUGUCXCKNCDNGHQT
CUUKIPOGPV+2CFFTGUUGUCTGKPETGOGPVUQHVJG+2CFFTGUUURGEKſGFKPVJGő+2#UUKIPGF(TQOŒſGNF
#NNFGXKEGUKPVJGPGVYQTMOWUVJCXGVJGUCOGUWDPGVOCUMVQEQOOWPKECVG'PVGTVJGUWDOCUMHQTVJGPGVYQTMJGTG
Enter the IP address of the gateway on the network.
5RGEKH[VJG9KPFQYU+PVGTPGV0COKPI5GTXKEG9+05UGTXGTCFFTGUUHQTVJGYKTGNGUUPGVYQTM9+05KUCU[UVGOVJCV
determines the IP address of a network computer that has a dynamically assigned IP address.
Function Enable/
Disable:
IP Assigned
From:
The Range of
Pool (1-254):
Subnet Mask:
Gateway:
WINS:

40D-Link DAP-1353 User Manual
Section 3 - Configuration
'PVGTVJG+2CFFTGUUQHVJG&QOCKP0COG5[UVGO&05UGTXGT6JG&05UGTXGTVTCPUNCVGUFQOCKPPCOGUUWEJCU
www.dlink.com into IP addresses.
'PVGTVJGFQOCKPPCOGQHVJGPGVYQTMKHCRRNKECDNG#PGZCORNGQHCFQOCKPPCOGKUYYYFNKPMEQO
6JGNGCUGVKOGKUVJGRGTKQFQHVKOGDGHQTGVJG&*%2UGTXGTYKNNCUUKIPPGY+2CFFTGUUGU
DNS:
Domain Name:
Lease Time
(60-31536000 sec):
41D-Link DAP-1353 User Manual
Section 3 - Configuration
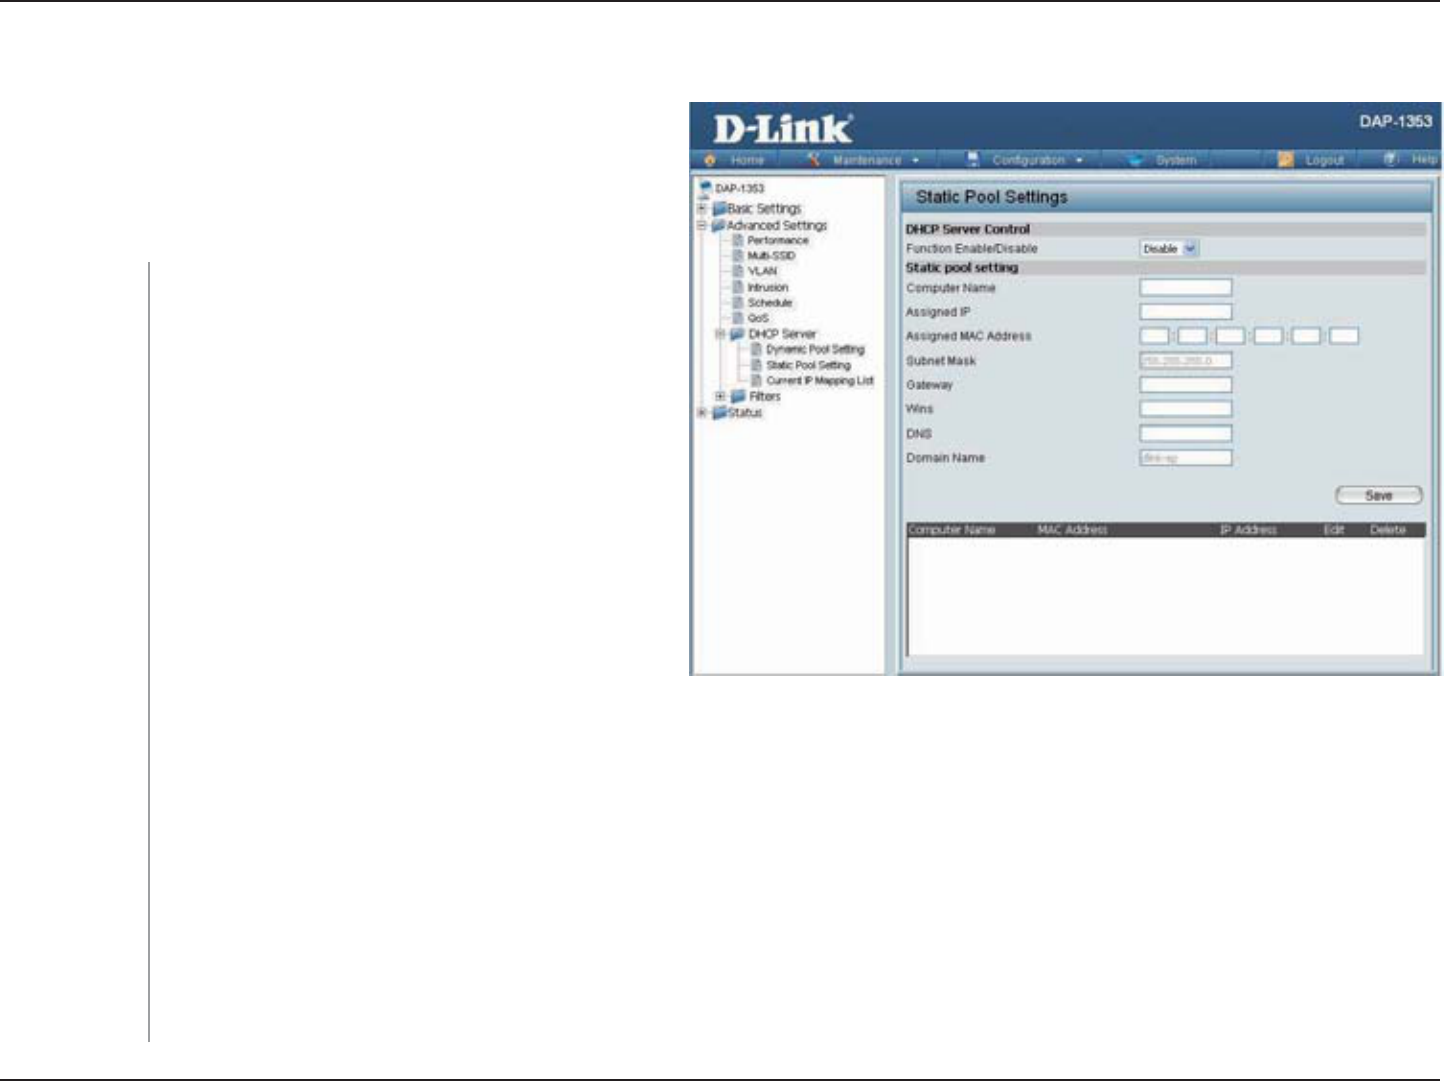
Static Pool Setting
6JG &*%2 CFFTGUU RQQN FGſPGU VJG TCPIG QH +2
CFFTGUUGU VJCV ECP DG CUUKIPGF VQ UVCVKQPU QP VJG
PGVYQTM#UVCVKERQQNCNNQYUURGEKſEYKTGNGUUUVCVKQPU
VQTGEGKXGCſZGF+2YKVJQWVVKOGEQPVTQN
&[PCOKE*QUV%QPſIWTCVKQP2TQVQEQN&*%2
assigns IP addresses to wireless devices on
VJG PGVYQTM 6JKU RTQVQEQN UKORNKſGU PGVYQTM
management and allows new wireless devices
to receive IP addresses automatically without
the need to manually assign IP addresses.
Select Enable to allow the DAP-1353 to
function as a DHCP server.
7UGVJG5VCVKE2QQN5GVVKPIUVQCUUKIPVJGUCOG
IP address to a device every time you start up.
The IP addresses assigned in the Static Pool
NKUVOWUV016DGKPVJGUCOG+2TCPIGCUVJG
Dynamic Pool. After you have assigned a static
IP address to a device via its MAC address, click
ApplyVJGFGXKEGYKNNCRRGCTKPVJG#UUKIPGF
5VCVKE2QQNCVVJGDQVVQOQHVJGUETGGP;QWECP
edit or delete the device in this list.
Enter the MAC address of the device requesting association here.
&GſPGVJGUWDOCUMQHVJG+2CFFTGUUURGEKſGFKPVJGő+2#UUKIPGF(TQOŒſGNF
Function Enable/
Disable:
Assigned IP:
Assigned MAC
Address:
Subnet Mask:

42D-Link DAP-1353 User Manual
Section 3 - Configuration
5RGEKH[VJG)CVGYC[CFFTGUUHQTVJGYKTGNGUUPGVYQTM
Specify the Windows Internet Naming Service9+05UGTXGTCFFTGUUHQTVJGYKTGNGUUPGVYQTM9INS is a system that
FGVGTOKPGUVJG+2CFFTGUUQHCPGVYQTMEQORWVGTYKVJCF[PCOKECNN[CUUKIPGF+2CFFTGUUKHCRRNKECDNG
'PVGTVJG&QOCKP0COG5[UVGO&05UGTXGTCFFTGUUHQTVJGYKTGNGUUPGVYQTM6JG&05UGTXGTVTCPUNCVGUFQOCKPPCOGU
such as www.dlink.com into IP addresses.
Specify the domain name for the network.
Gateway:
WINS:
DNS:
Domain Name:
43D-Link DAP-1353 User Manual
Section 3 - Configuration
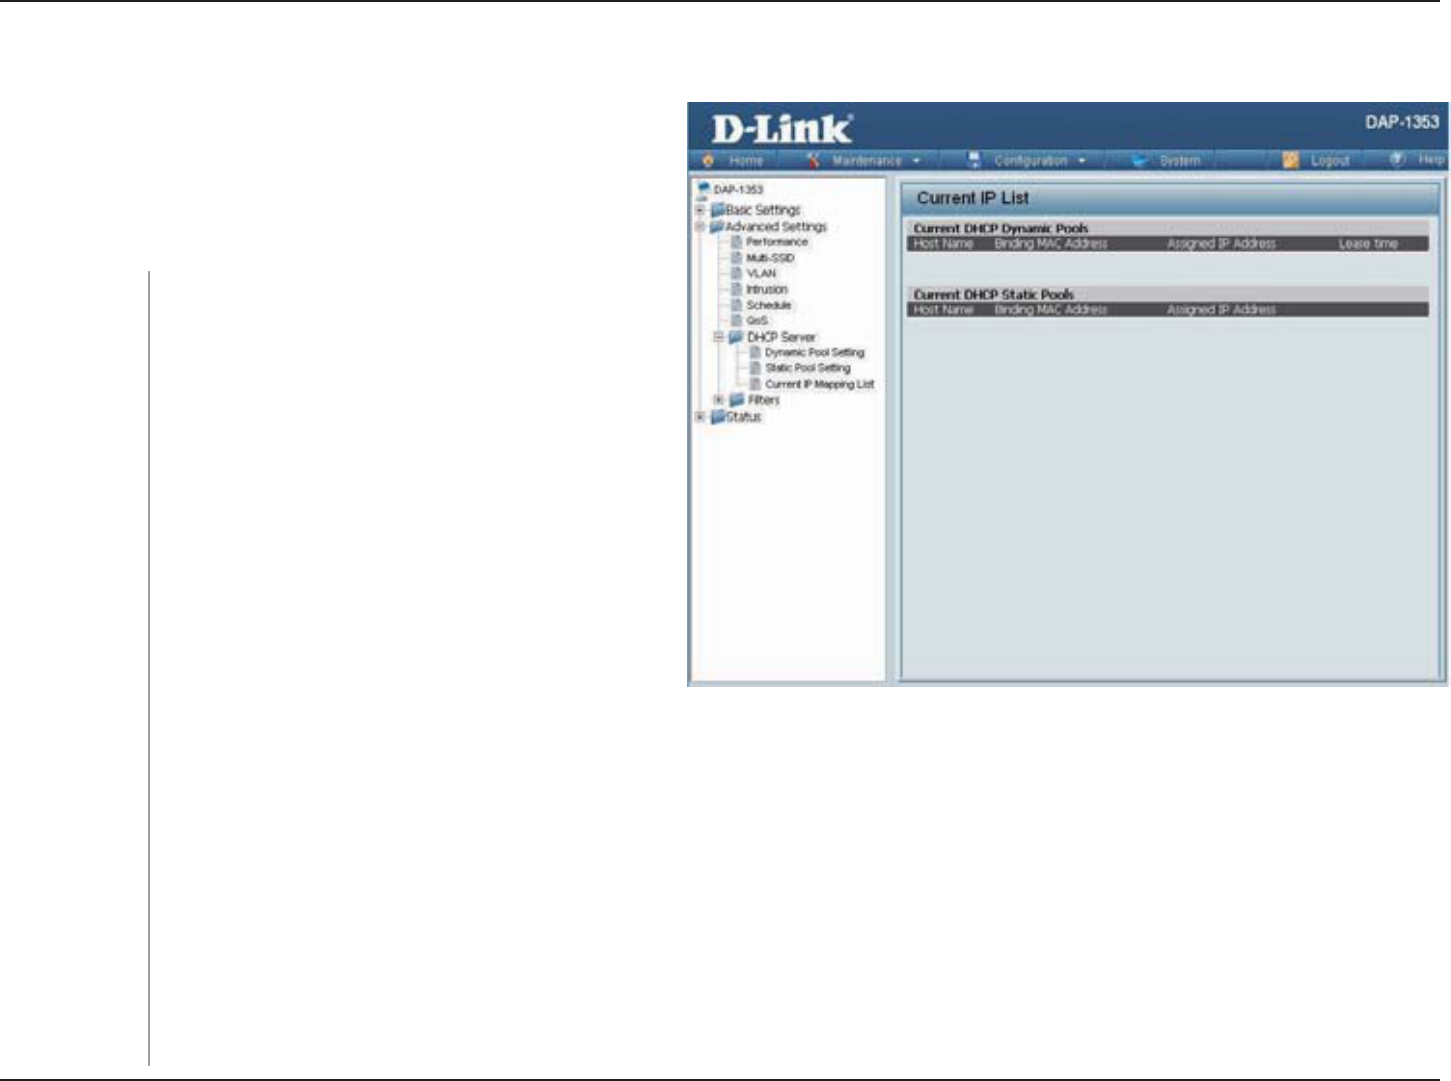
Current IP Mapping List
6JKUYKPFQYFKURNC[U KPHQTOCVKQP CDQWV VJGEWTTGPV
assigned DHCP dynamic and static IP address pools.
6JKUKPHQTOCVKQPKUCXCKNCDNGYJGP[QWGPCDNG&*%2
server on the AP and assign dynamic and static IP
address pools.
These are IP address pools the DHCP server
has assigned using the dynamic pool setting.
The MAC address of a device on the network
that is assigned an IP address from the DHCP
dynamic pool.
The current corresponding DHCP-assigned IP
address of the device.
The length of time that the dynamic IP address
YKNNDGXCNKF
These are the IP address pools of the DHCP
server assigned through the static pool
settings.
The MAC address of a device on the network that is within the DHCP static IP address pool.
The current corresponding DHCP-assigned static IP address of the device.
The MAC address of a device on the network that is assigned an IP address from the DHCP dynamic pool.
The current corresponding DHCP-assigned static IP address of the device.
Current DHCP
Dynamic Profile:
Binding MAC
Address:
Assigned IP
Address:
Lease Time:
Current DHCP
Static Pools:
Binding MAC
Address:
Assigned IP
Address:
Binding MAC
Address:
Assigned IP
Address:
44D-Link DAP-1353 User Manual
Section 3 - Configuration
Filters
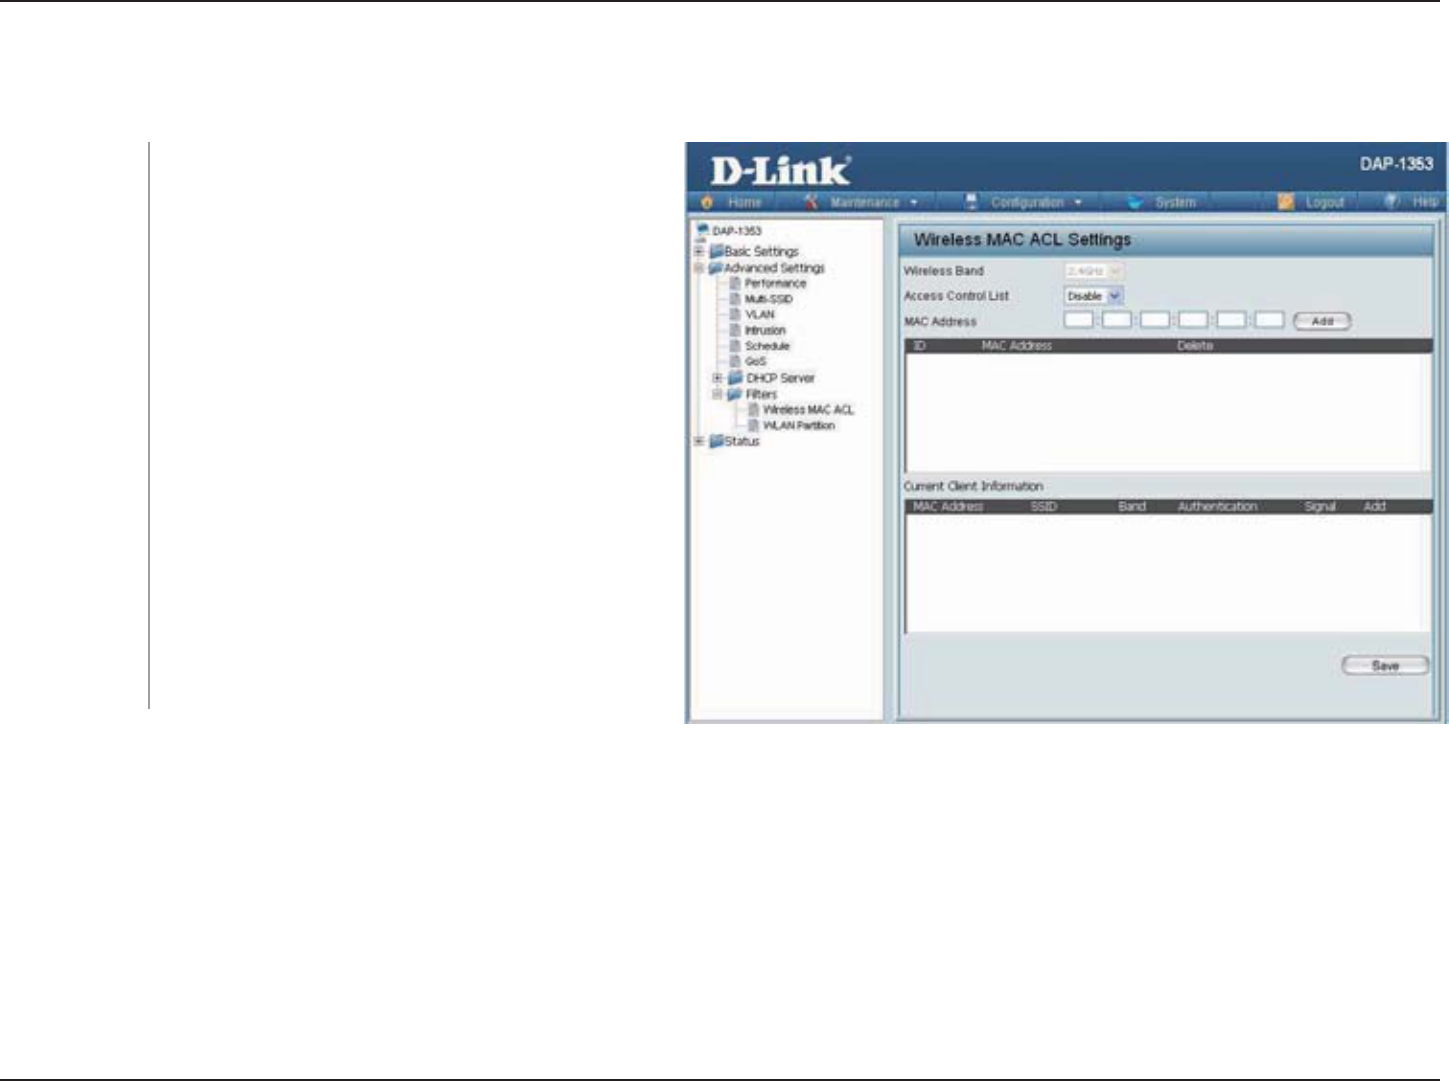
Wireless MAC ACL
&KURNC[UVJGEWTTGPVYKTGNGUUDCPFTCVG
Select Disable VQFKUCDNGVJGſNVGTUHWPEVKQP
Select Accept to accept only those devices
with MAC addresses in the Access Control
.KUV #NN QVJGT FGXKEGU PQV QP VJG NKUV YKNN DG
rejected.
Select Reject to reject the devices with MAC
addresses on the Access Control List. All other
FGXKEGUPQVQPVJGNKUVYKNNDGCEEGRVGF
Enter each MAC address that you wish to
KPENWFGKP[QWTſNVGTNKUVCPFENKEMApply.
When you enter a MAC address, it appears
in this list. Highlight a MAC address and click
Delete to remove it from this list.
Wireless Band:
Access Control
List:
MAC Address:
MAC Address
List:
45D-Link DAP-1353 User Manual
Section 3 - Configuration
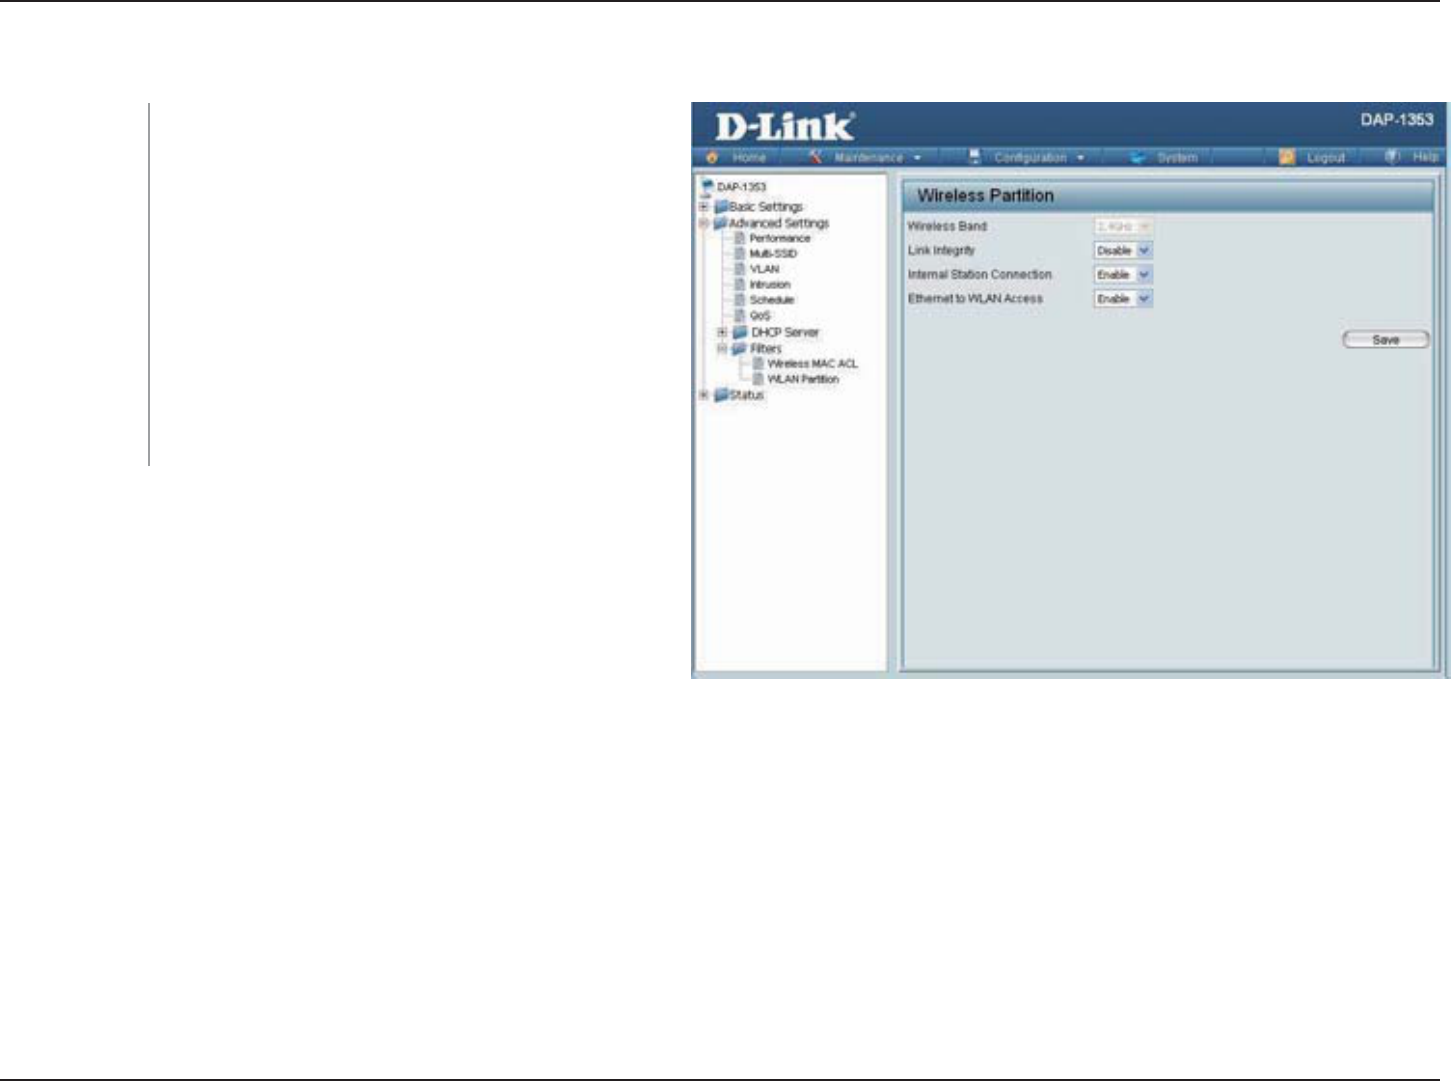
WLAN Partition
&KURNC[UVJGEWTTGPVYKTGNGUUDCPFTCVG
The default value is Enable, which allows
UVCVKQPUVQKPVGTEQOOWPKECVGD[EQPPGEVKPIVQ
CVCTIGV#29JGPFKUCDNGFYKTGNGUUUVCVKQPU
cannot exchange data through the AP.
The default is Enable9JGPFKUCDNGFCNNFCVC
from the Ethernet to associated wireless devices
YKNNDGDNQEMGF9KTGNGUUFGXKEGUECPUVKNNUGPF
data to the Ethernet.
Wireless Band:
Internal Station
Connection:
Ethernet WLAN
Access:
46D-Link DAP-1353 User Manual
Section 3 - Configuration
Home > Status
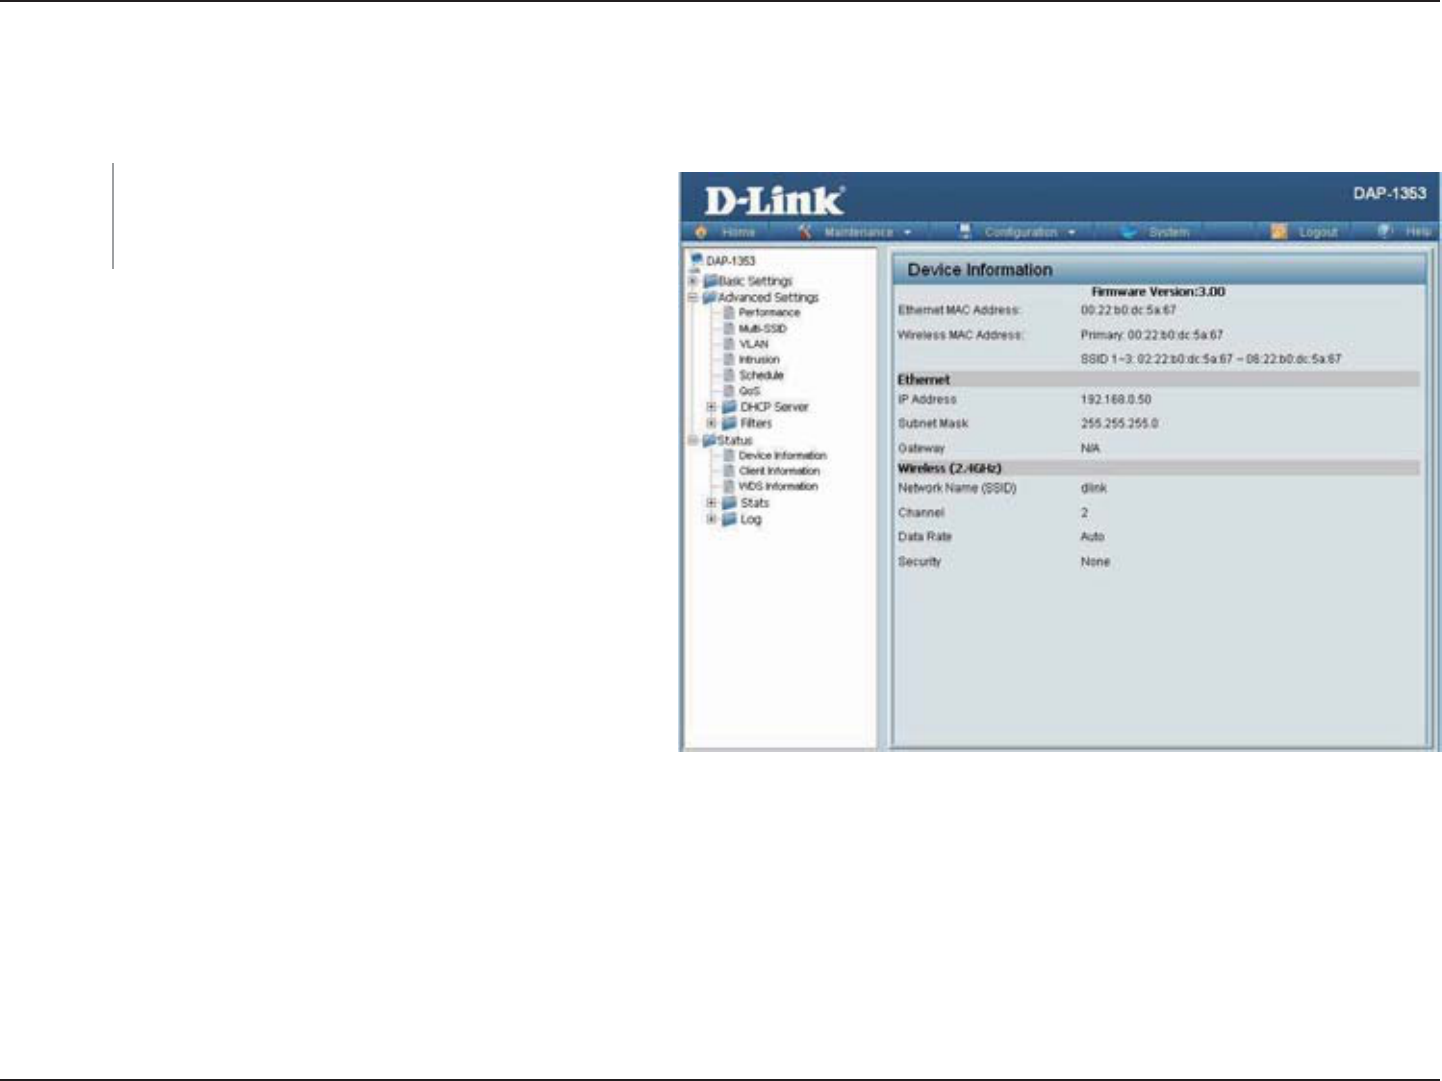
Device Information
6JKUTGCFQPN[YKPFQYFKURNC[UVJGEQPſIWTCVKQP
UGVVKPIUQHVJGKPENWFKPIVJGſTOYCTG
version and the device's MAC address.
Device
Information:

47D-Link DAP-1353 User Manual
Section 3 - Configuration
6JGHQNNQYKPIKPHQTOCVKQPKUCXCKNCDNGHQTGCEJENKGPV
communicating with the DAP-1353.
Client Information
This window displays the wireless client
information for clients currently connected to
the DAP-1353.
Client
Information:
Displays the SSID of the client.
Displays the MAC address of the client.
&KURNC[U VJG YKTGNGUU DCPF VJCV VJG ENKGPV KU
connected to.
&KURNC[UVJGV[RGQHCWVJGPVKECVKQPDGKPI
used.
Displays the client's signal strength.
Displays the status of the power saving feature.
SSID:
MAC:
Band:
Authentication:
Signal:
Power Saving
Mode:
48D-Link DAP-1353 User Manual
Section 3 - Configuration
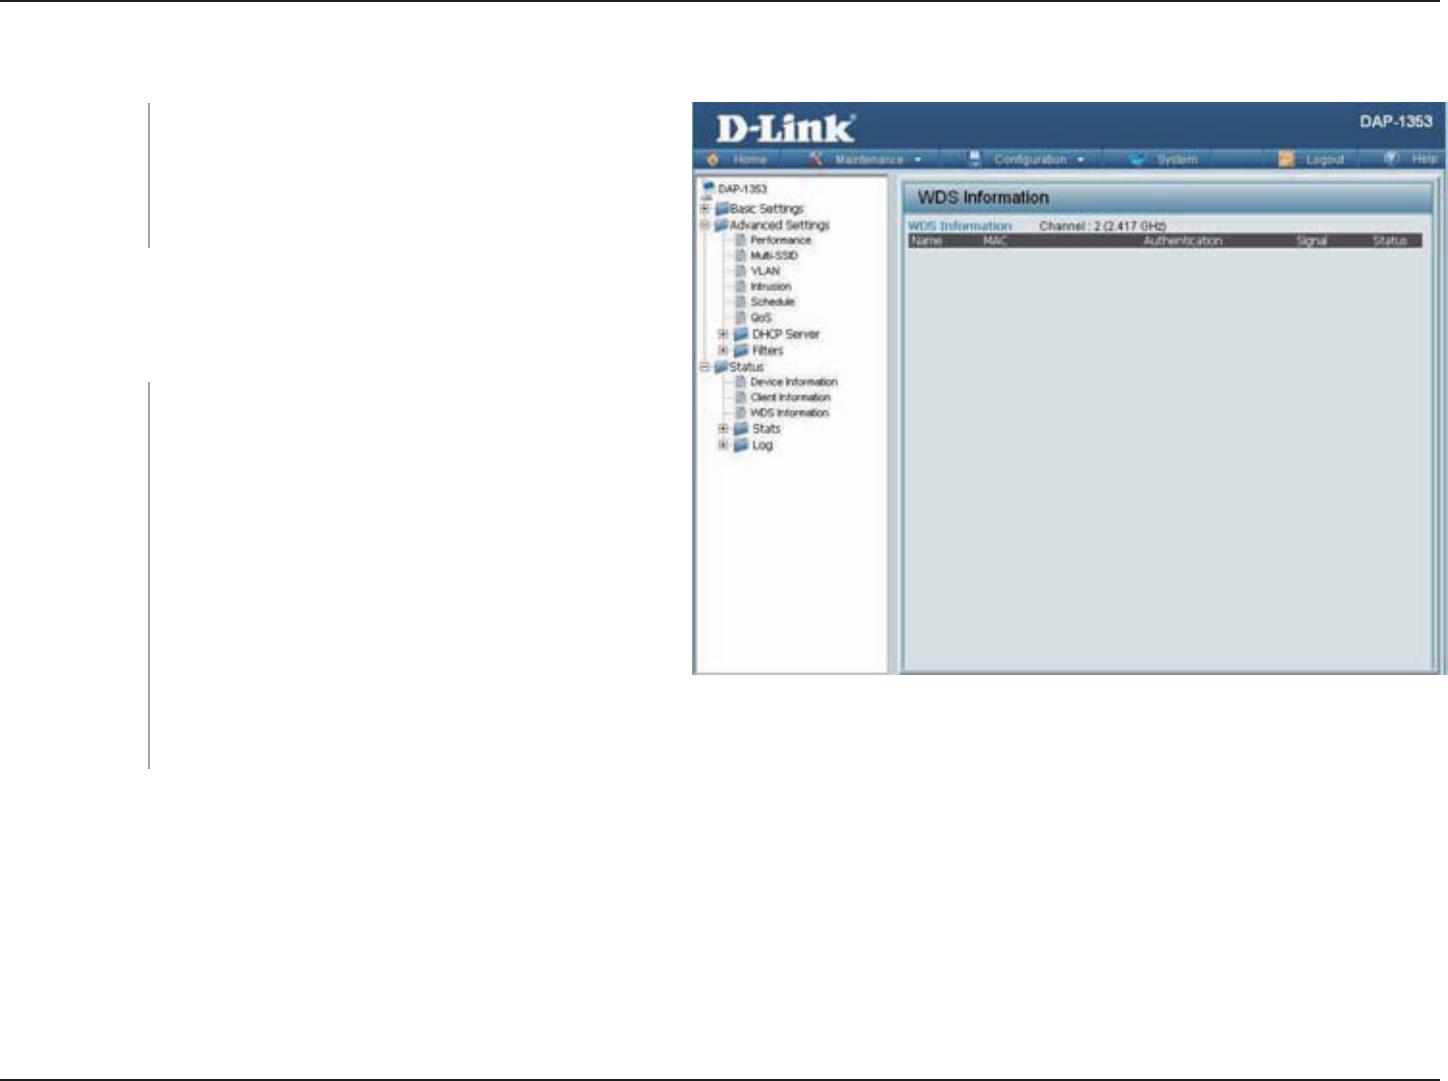
WDS Information
6JGHQNNQYKPIKPHQTOCVKQPKUCXCKNCDNGHQTGCEJENKGPV
communicating with the DAP-1353.
6JKUYKPFQYFKURNC[UVJG9KTGNGUU&KUVTKDWVKQP
System information for clients currently
connected to the DAP-1353.
WDS
Information:
Displays the SSID of the client.
Displays the MAC address of the client.
&KURNC[UVJGV[RGQHCWVJGPVKECVKQPDGKPI
used.
Displays the client's signal strength.
Displays the status of the power saving
feature.
Name:
MAC:
Authentication:
Signal:
Status:
49D-Link DAP-1353 User Manual
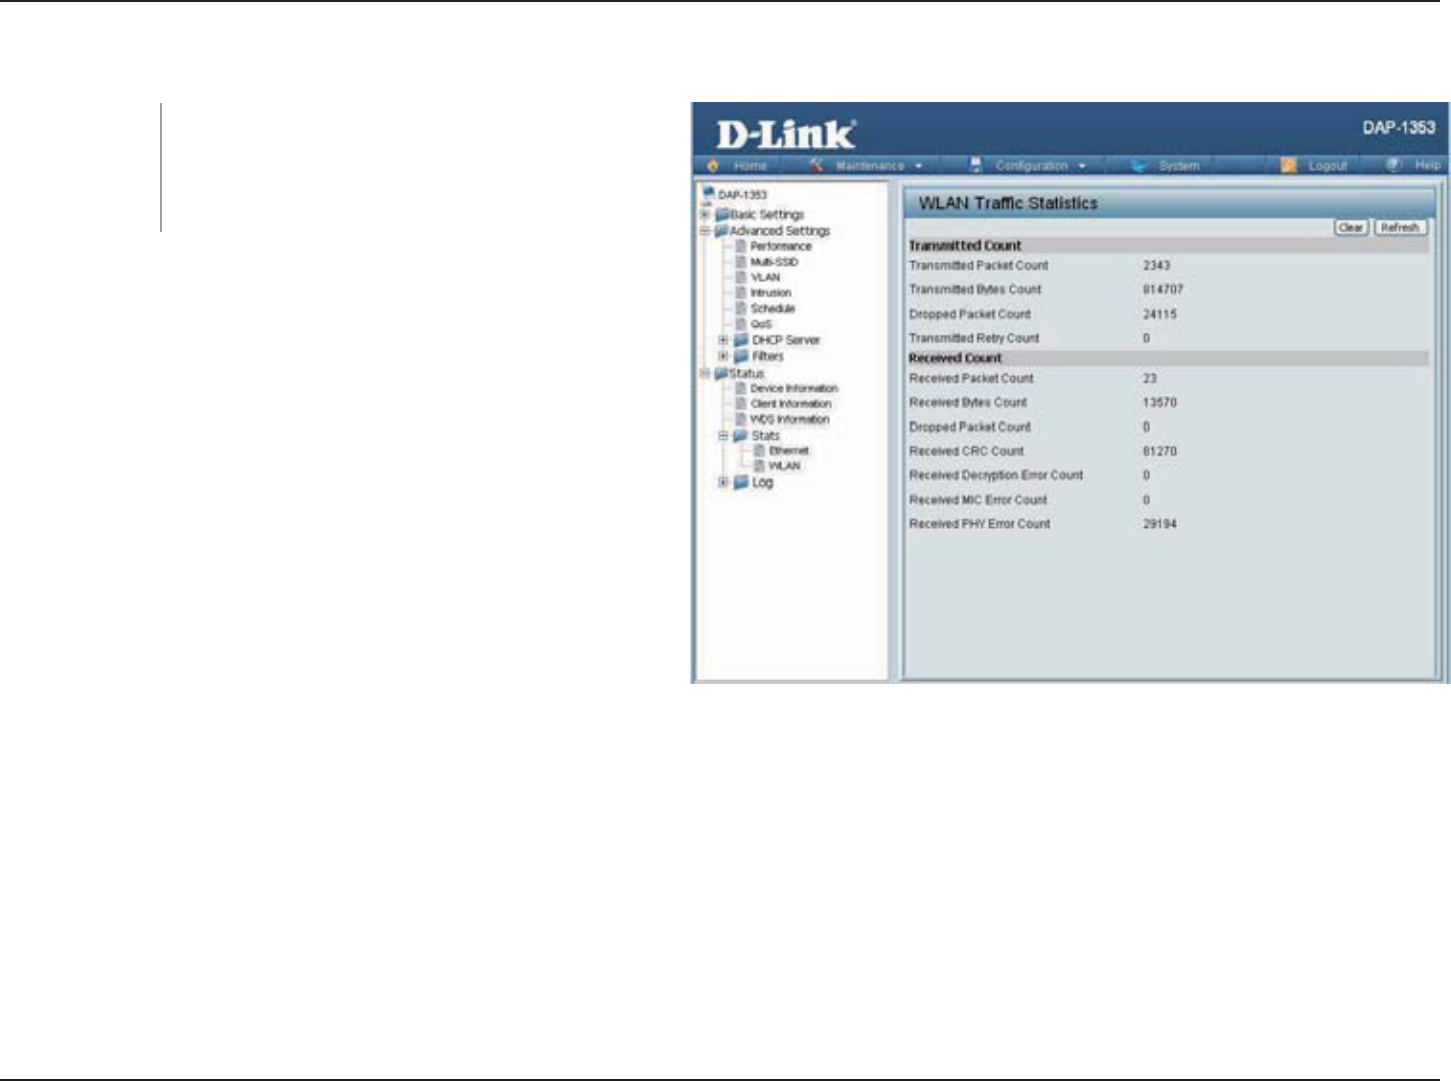
Section 3 - Configuration
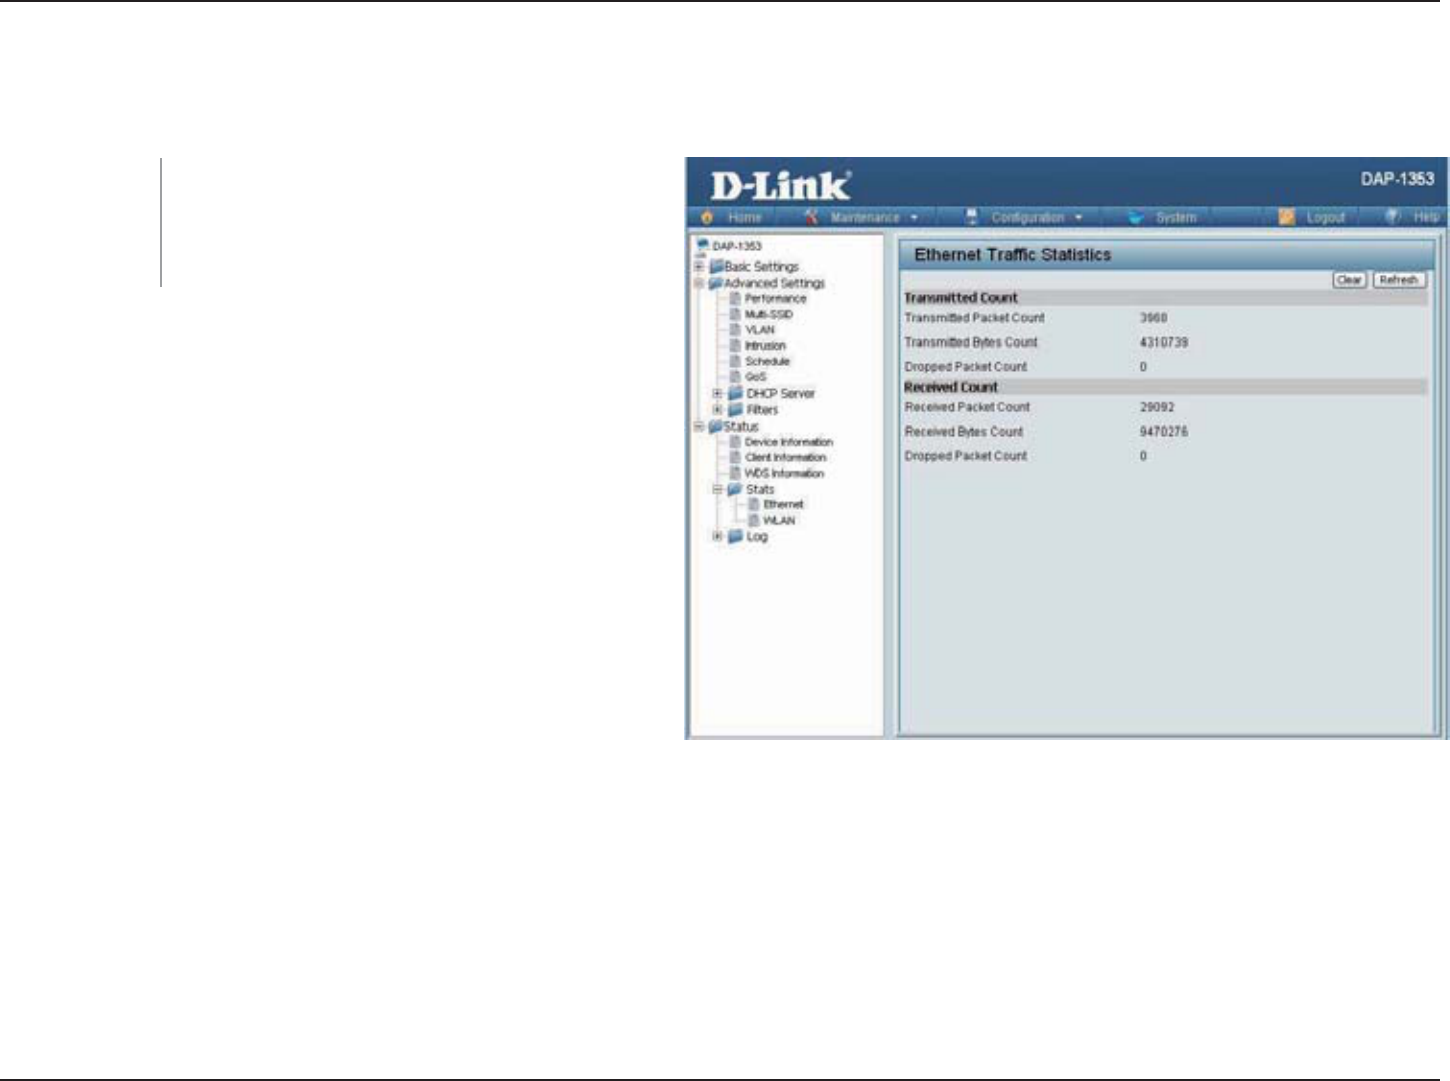
Stats
Ethernet
This page displays transmitted and received
EQWPVUVCVKUVKEUHQTRCEMGVUCPFD[VGU
Ethernet Traffic
Statistics:
50D-Link DAP-1353 User Manual
Section 3 - Configuration
WLAN
This page displays wireless network statistics
for data throughput, transmitted and received
frames, and frame errors.
WLAN Traffic
Statistics:
51D-Link DAP-1353 User Manual
Section 3 - Configuration
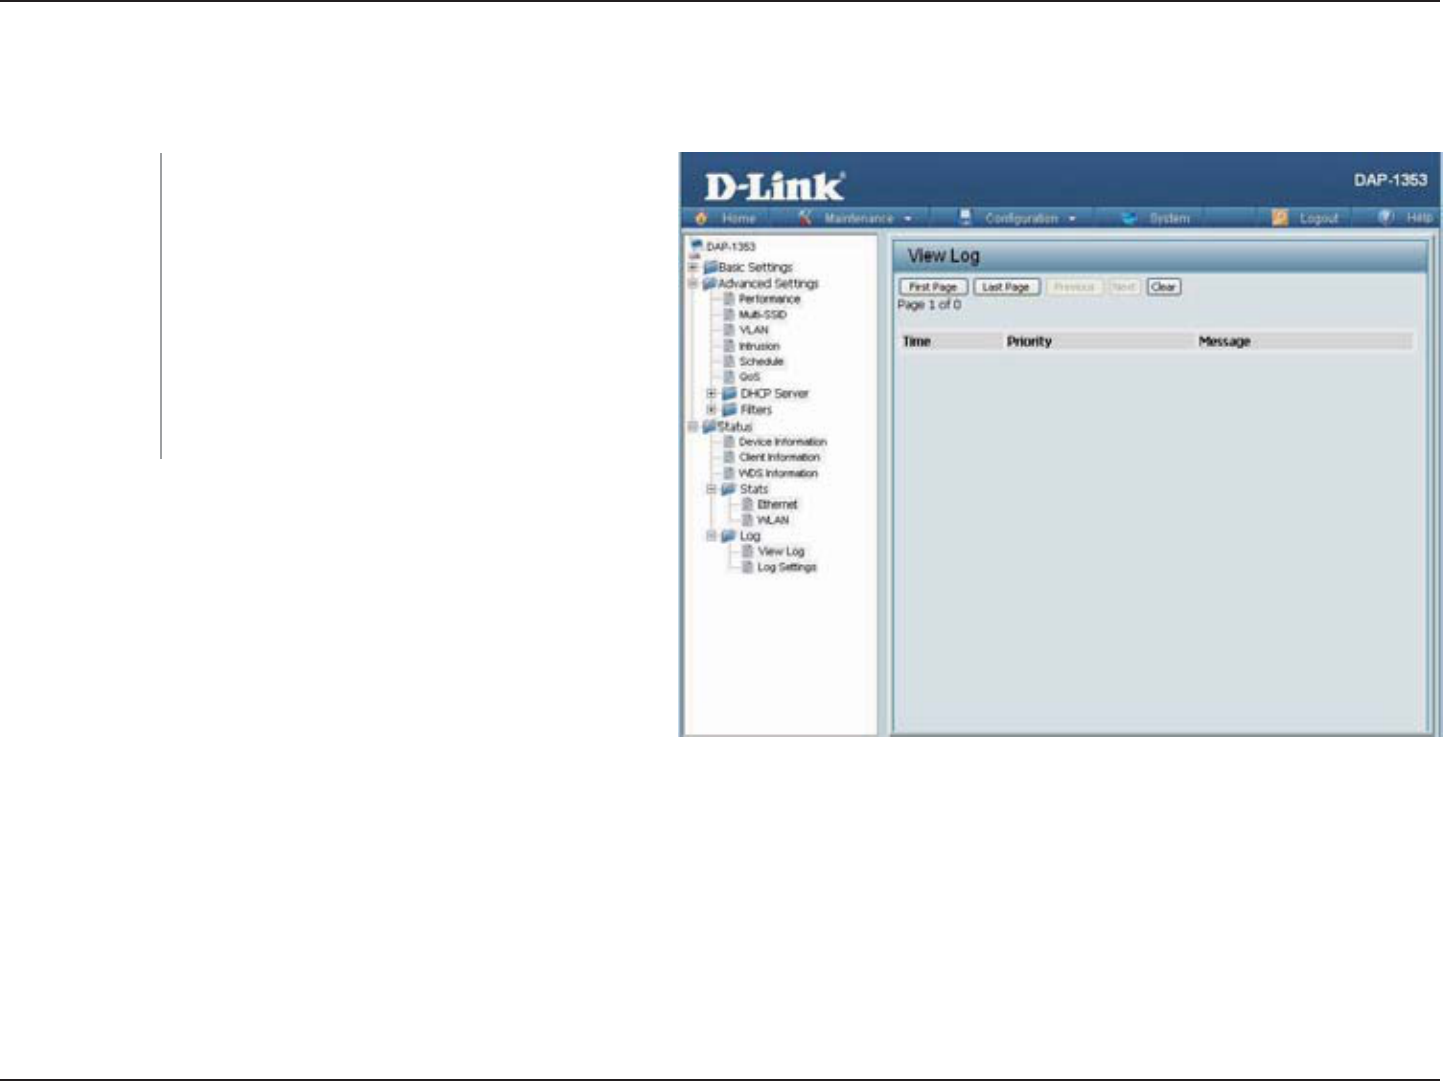
Log
View Log
6JG#2ŏUGODGFFGFOGOQT[FKURNC[UU[UVGO
and network messages including a time
stamp and message type. The log information
KPENWFGU DWV KU PQV NKOKVGF VQ VJG HQNNQYKPI
KVGOU EQNF UVCTV #2 WRITCFKPI ſTOYCTG
client associate and disassociate with AP,
CPF YGD NQIKP 6JG YGD RCIG JQNFU WR VQ
500 logs.
View Log:
52D-Link DAP-1353 User Manual
Section 3 - Configuration
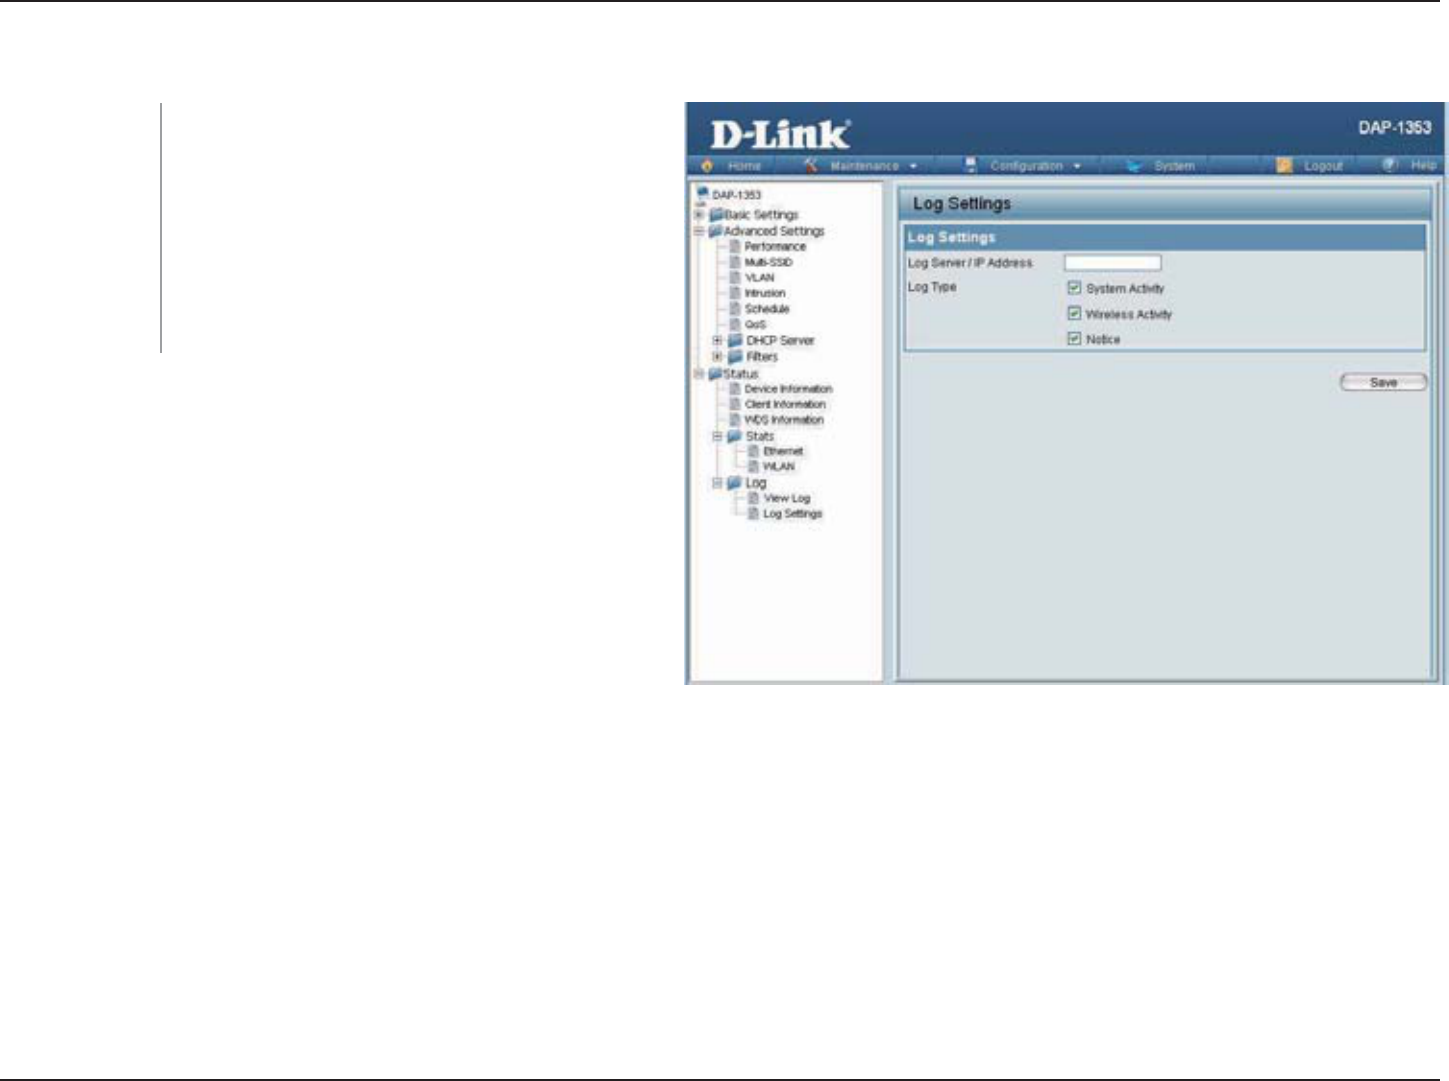
Log Settings
Enter the IP address of the server you would
like to send the DAP-1353 log to.
%JGEMVJGDQZHQTVJGV[RGQHCEVKXKV[[QWYCPV
VQNQI6JGTGCTGVJTGGV[RGU5[UVGO#EVKXKV[
Wireless Activity, and Notice.
Log Server/IP
Address:
Log Type:
53D-Link DAP-1353 User Manual
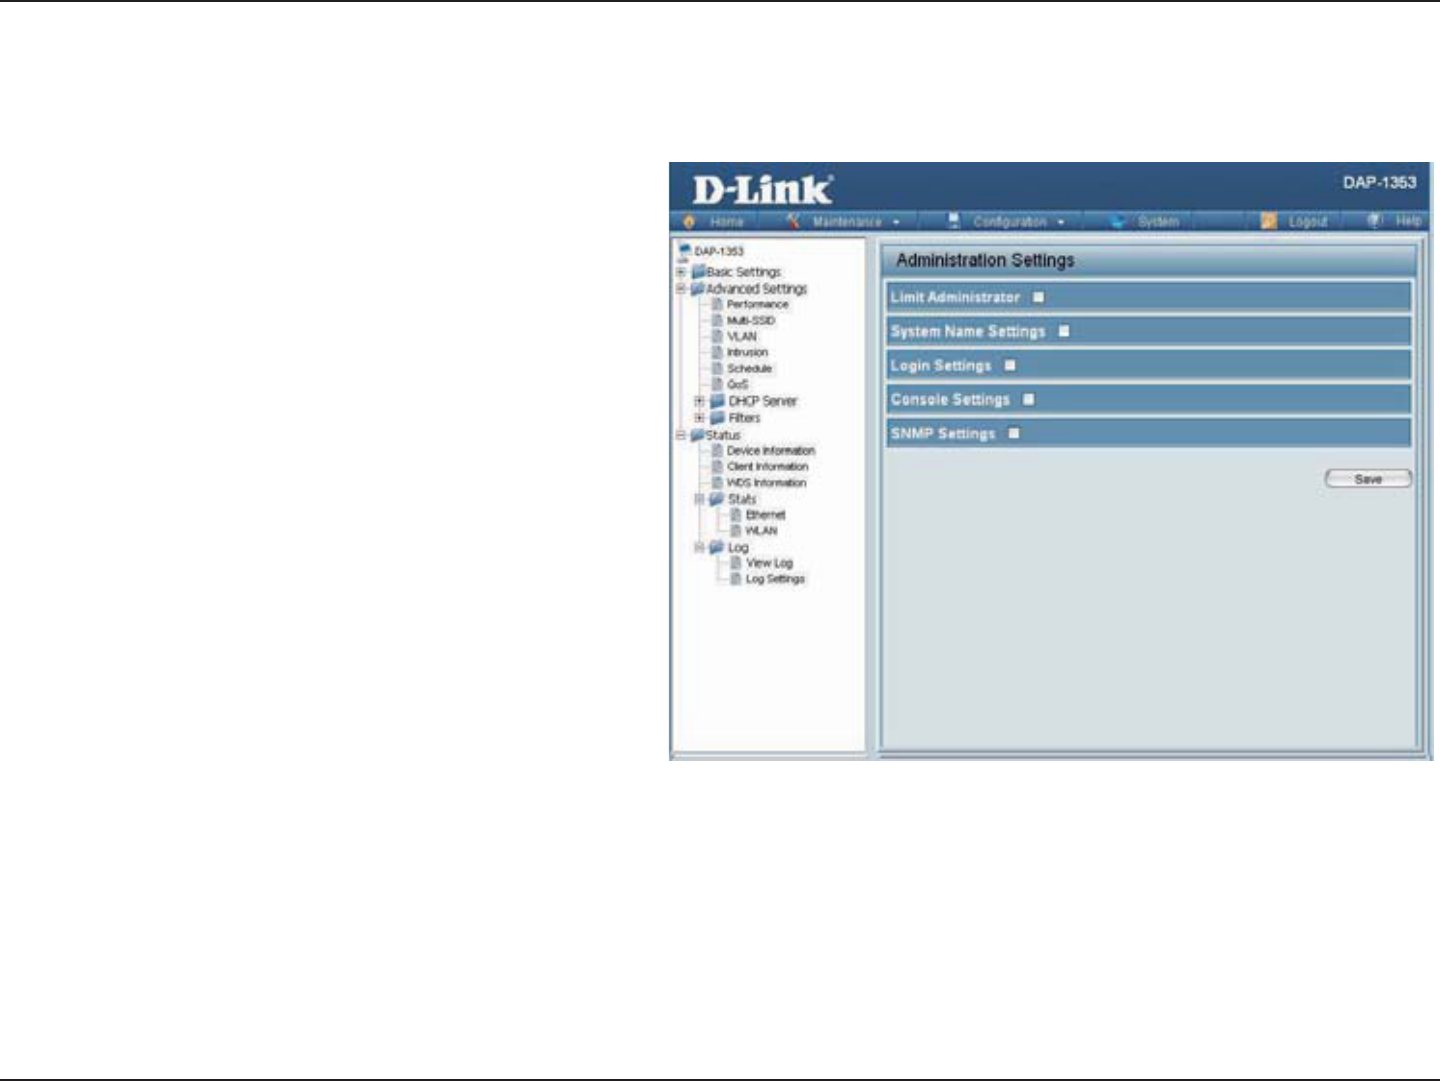
Section 3 - Configuration
Check one or more of the five main categories to
display the various hidden administrator parameters
CPFUGVVKPIUFKURNC[GFQPVJGPGZVſXGRCIGU
Maintenance
Administrator Settings
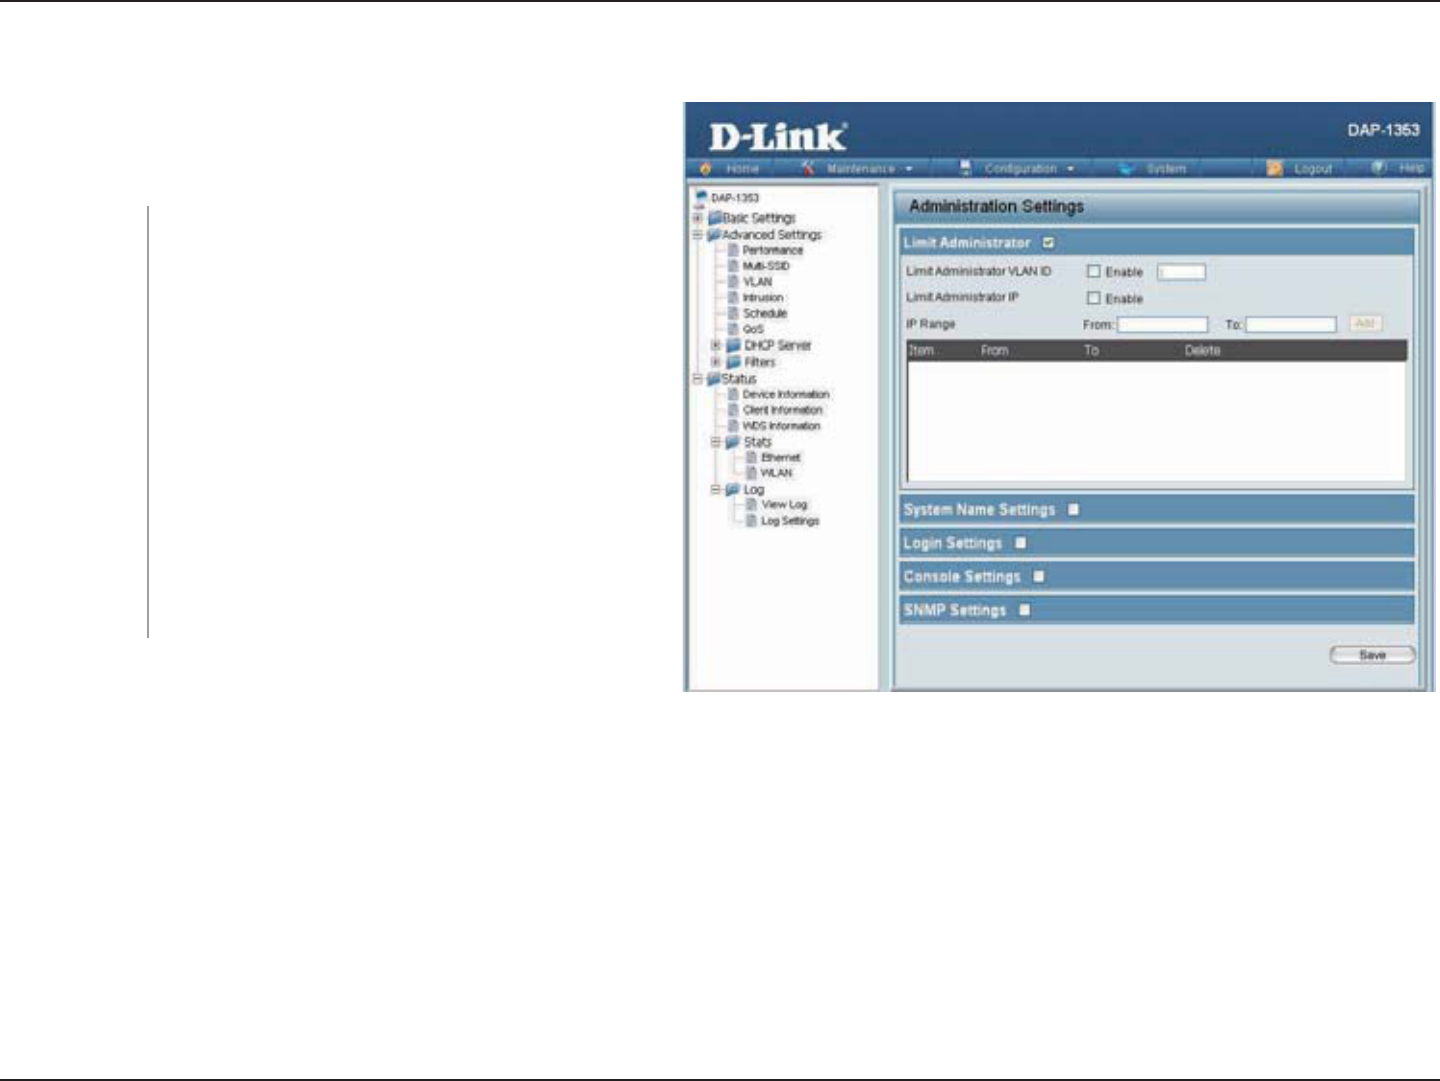
54D-Link DAP-1353 User Manual
Section 3 - Configuration
Limit Administrator
Each of the five main categories display various
hidden administrator parameters and settings.
%JGEM VJG DQZ RTQXKFGF CPF VJG GPVGT VJG
URGEKſE8.#0+&VJCVVJGCFOKPKUVTCVQTYKNNDG
allowed to log in from.
%JGEM VQ GPCDNG VJG .KOKV #FOKPKUVTCVQT +2
address.
Enter the IP address range that the administrator
YKNNDGCNNQYGFVQNQIKPHTQOCPFVJGPENKEMVJG
#FFDWVVQP
Limit
Administrator
VLAN ID:
Limit
Administrator
IP:
IP Range:
55D-Link DAP-1353 User Manual
Section 3 - Configuration
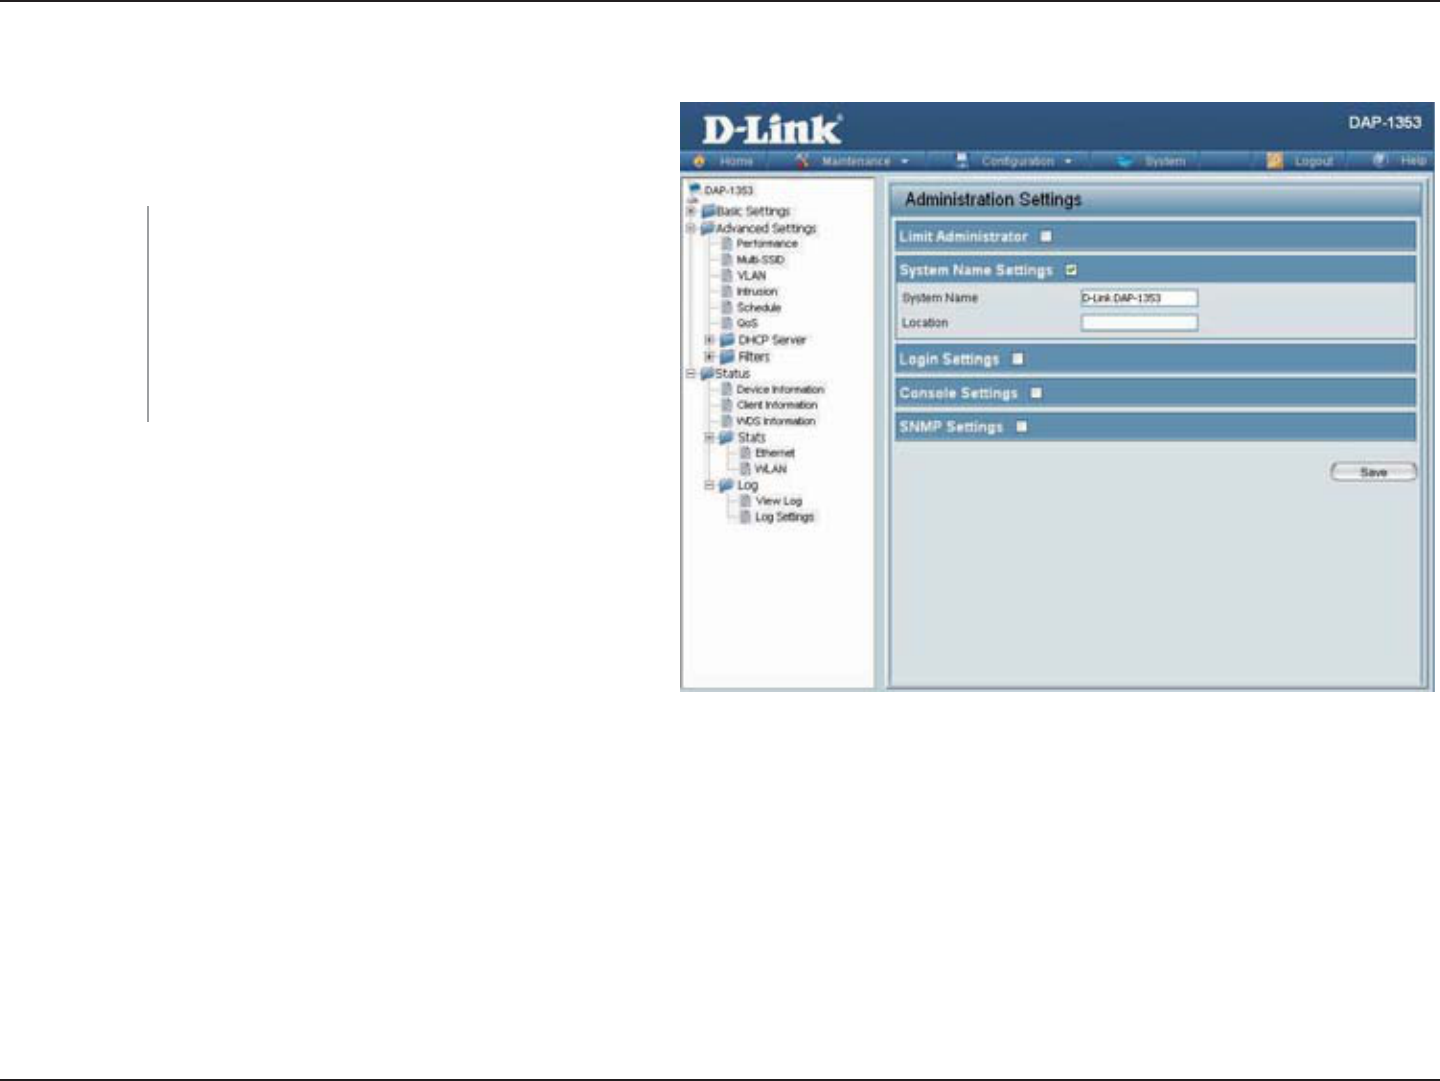
System Name Settings
Each of the five main categories display various
hidden administrator parameters and settings.
The name of the device. The default name is
D-Link DAP-1353.
The physical location of the device, e.g. 72nd
Floor, D-Link HQ.
System Name:
Location:
56D-Link DAP-1353 User Manual
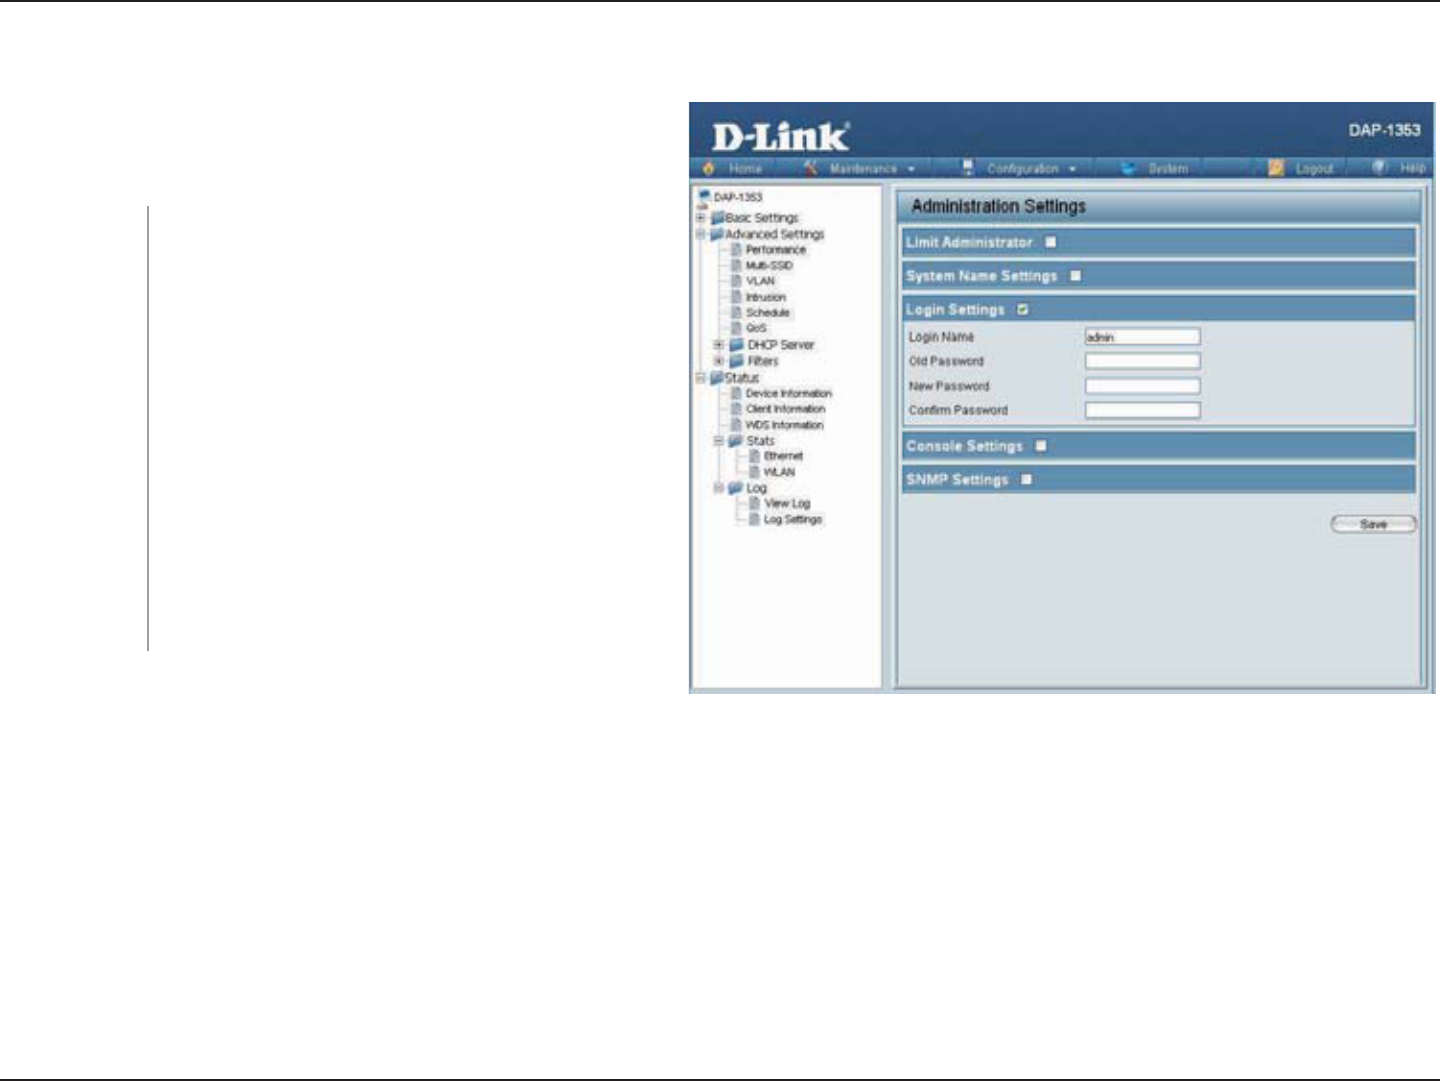
Section 3 - Configuration
Login Settings
Each of the five main categories display various
hidden administrator parameters and settings.
Enter a user name. The default is admin.
When changing your password, enter the old
password here.
When changing your password, enter the new
password here. The password is case-sensitive.
ő#ŒKUCFKHHGTGPVEJCTCEVGTVJCPőCŒ6JGNGPIVJ
UJQWNFDGDGVYGGPCPFEJCTCEVGTU
Enter the new password a second time for
EQPſTOCVKQPRWTRQUGU
User Name:
Old Password:
New Password:
Confirm
Password:
57D-Link DAP-1353 User Manual
Section 3 - Configuration
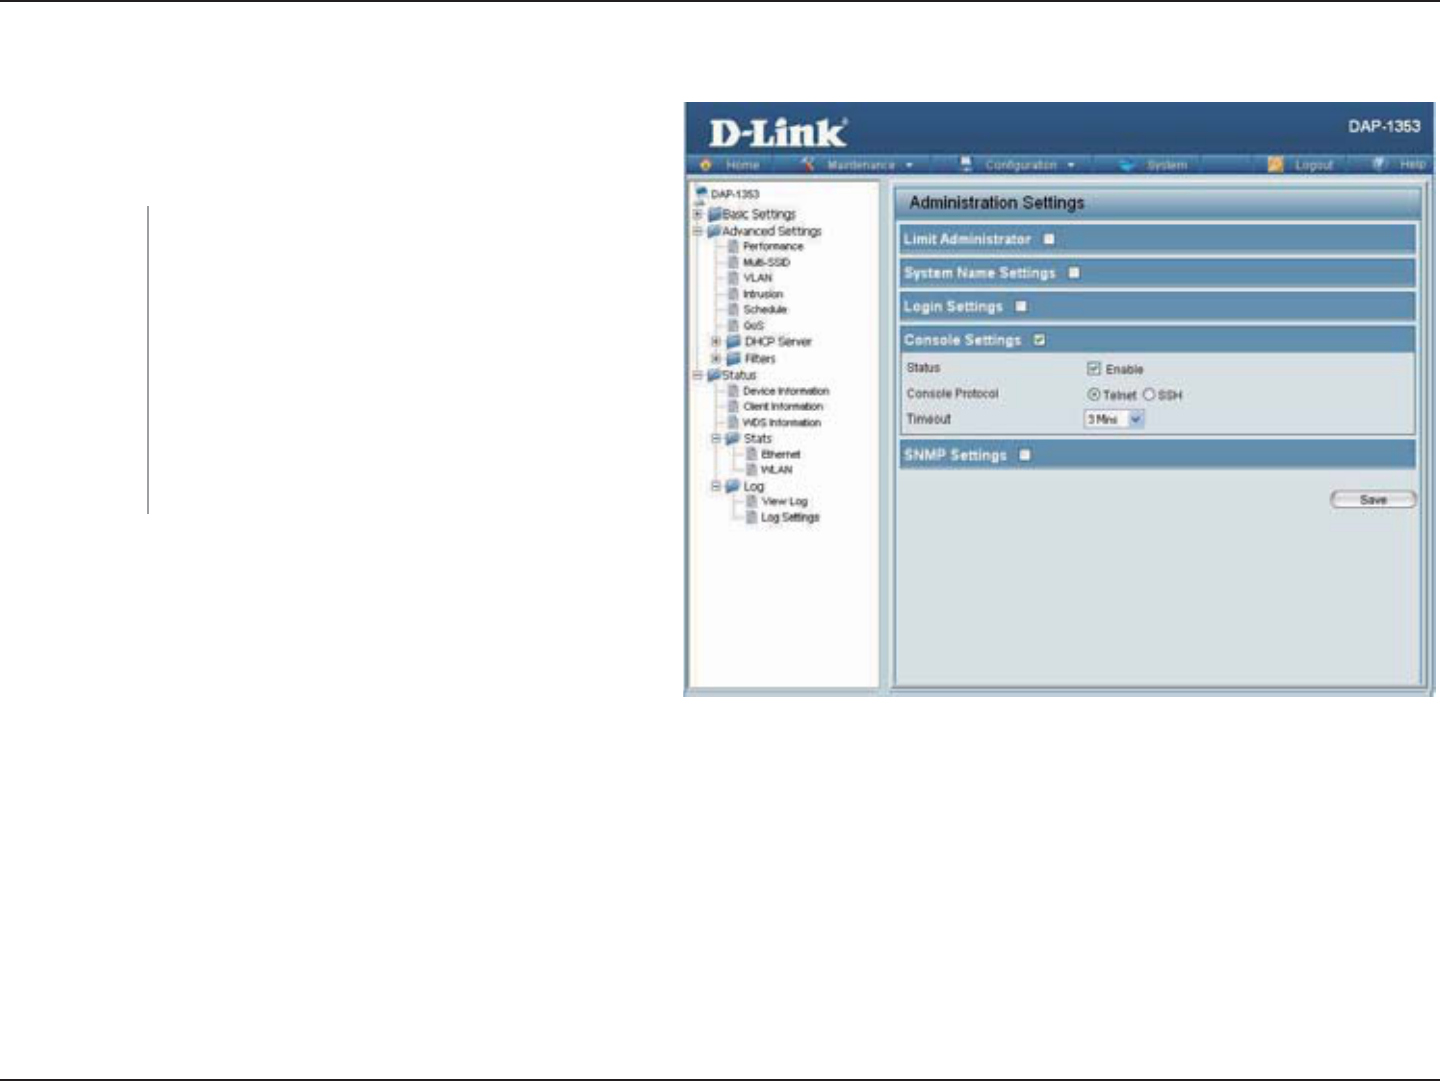
Console Settings
Each of the five main categories display various
hidden administrator parameters and settings.
5VCVWUKUGPCDNGFD[FGHCWNV7PEJGEMVJGDQZ
VQFKUCDNGVJGEQPUQNG
Select the type of protocol you would like to
use, Telnet or SSH.
Set to 1 Min,3 Mins,5 Mins,10 Mins,15 Mins
or Never.
Status:
Console
Protocol:
Timeout:
58D-Link DAP-1353 User Manual
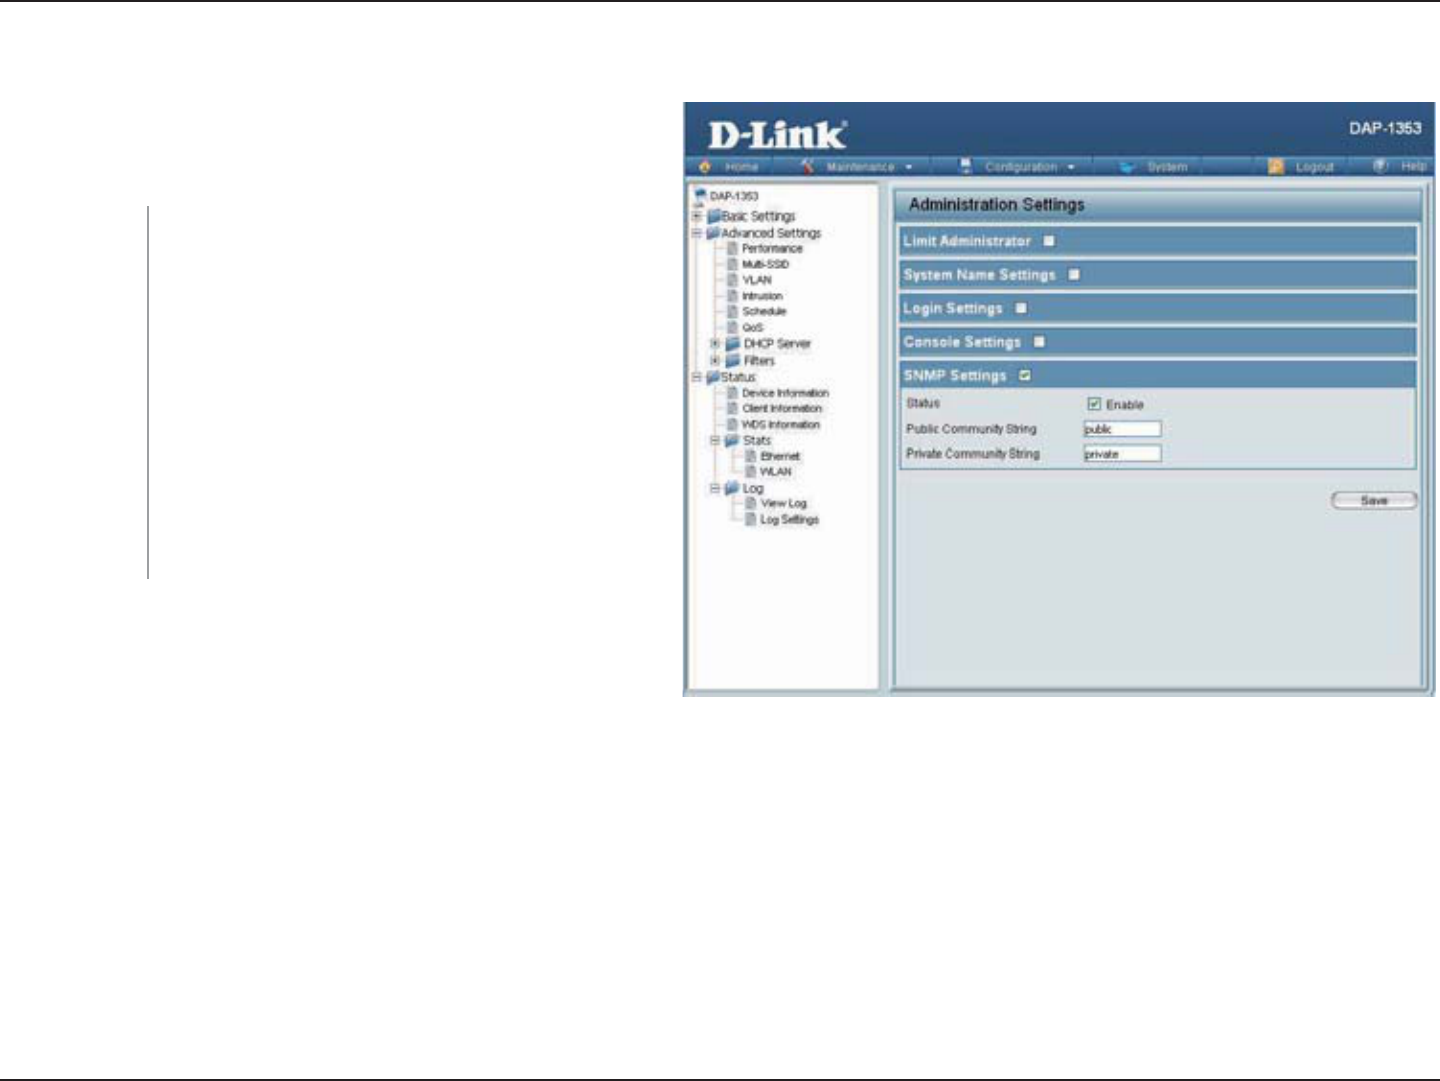
Section 3 - Configuration
SNMP Settings
Each of the five main categories display various
hidden administrator parameters and settings.
%JGEMVJGDQZVQGPCDNGVJG50/2HWPEVKQPU
6JKUKUGPCDNGFD[FGHCWNV
'PVGTVJGRWDNKE50/2EQOOWPKV[UVTKPI
Enter the private SNMP community string.
Status:
Public
Community
String:
Private
Community
String:
59D-Link DAP-1353 User Manual
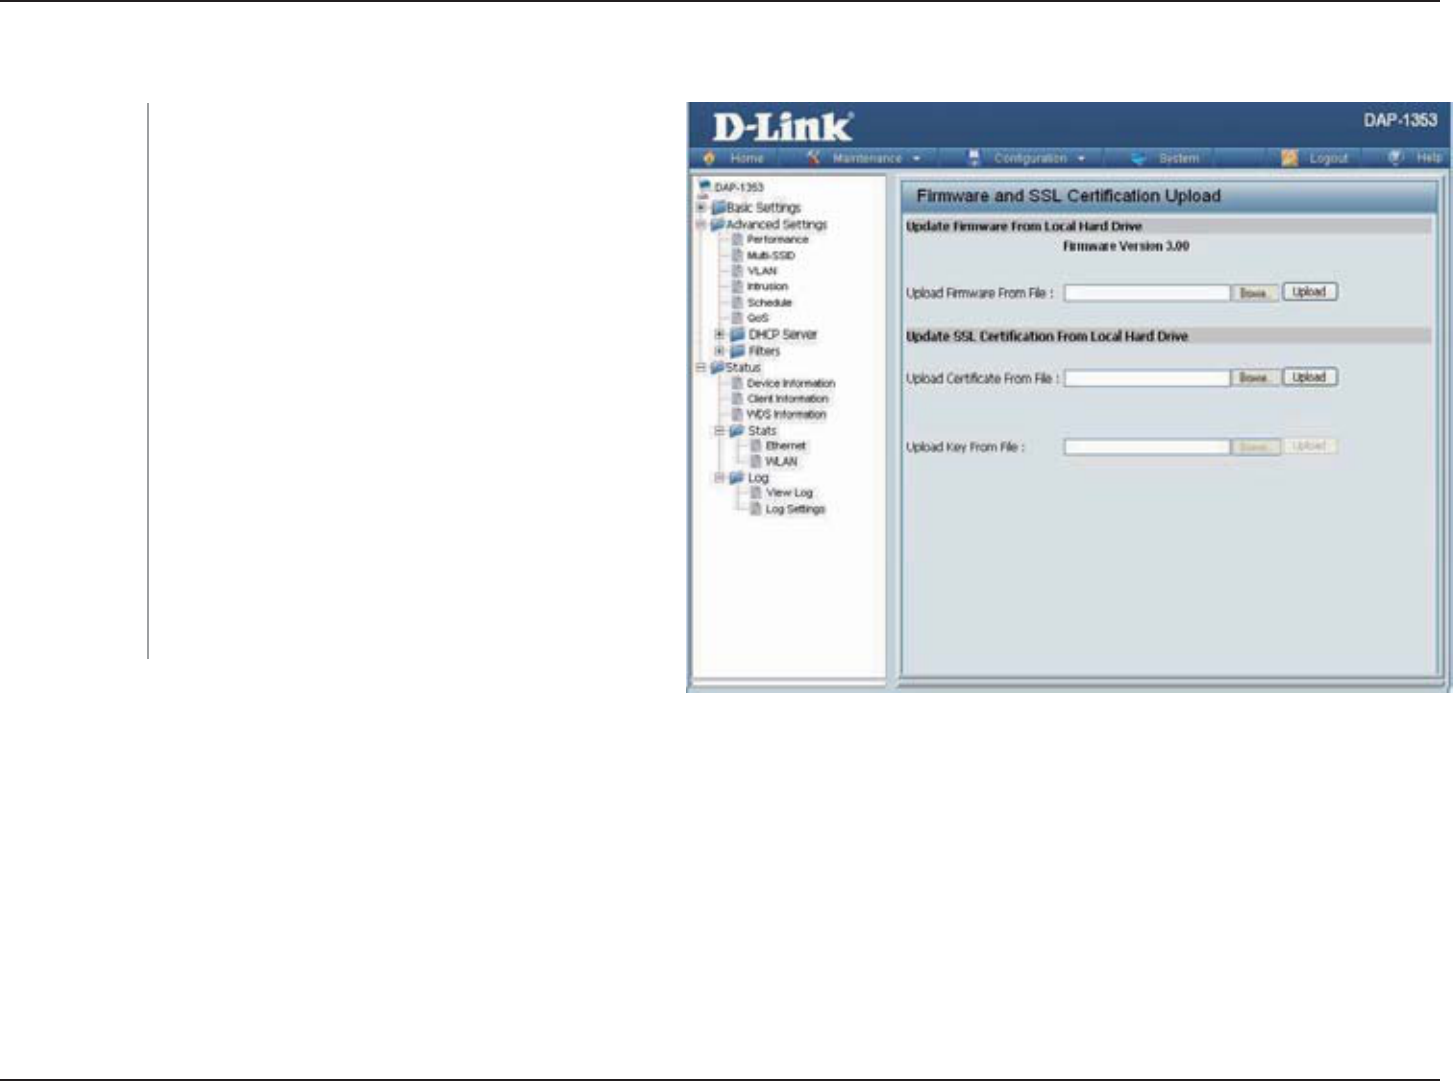
Section 3 - Configuration
Firmware and SSL Certification Upload
The current firmware version is displayed
CDQXGVJGſNGNQECVKQPſGNF#HVGTFQYPNQCFKPI
VJG OQUV TGEGPV XGTUKQP QH ſTOYCTG HQT VJG
 HTQO JVVRUWRRQTVFNKPMEQO VQ
your local computer, use the BrowseDWVVQPVQ
NQECVGVJGſTOYCTGſNGQP[QWTEQORWVGT%NKEM
UploadVQWRFCVGVJGſTOYCTGXGTUKQP2NGCUG
don’t turn the power off while upgrading.
Click BrowseVQ NQECVG VJG55. %GTVKſECVKQP
ſNGQP[QWTNQECNEQORWVGT#HVGTUGNGEVKPICPF
QRGPKPIVJGſNGENKEMUploadVQWRNQCFVJGſNG
to the DAP-1353.
Upload Firmware
From Local Hard
Drive:
Upload SSL
Certification
From Local Hard
Drive:
60D-Link DAP-1353 User Manual
Section 3 - Configuration
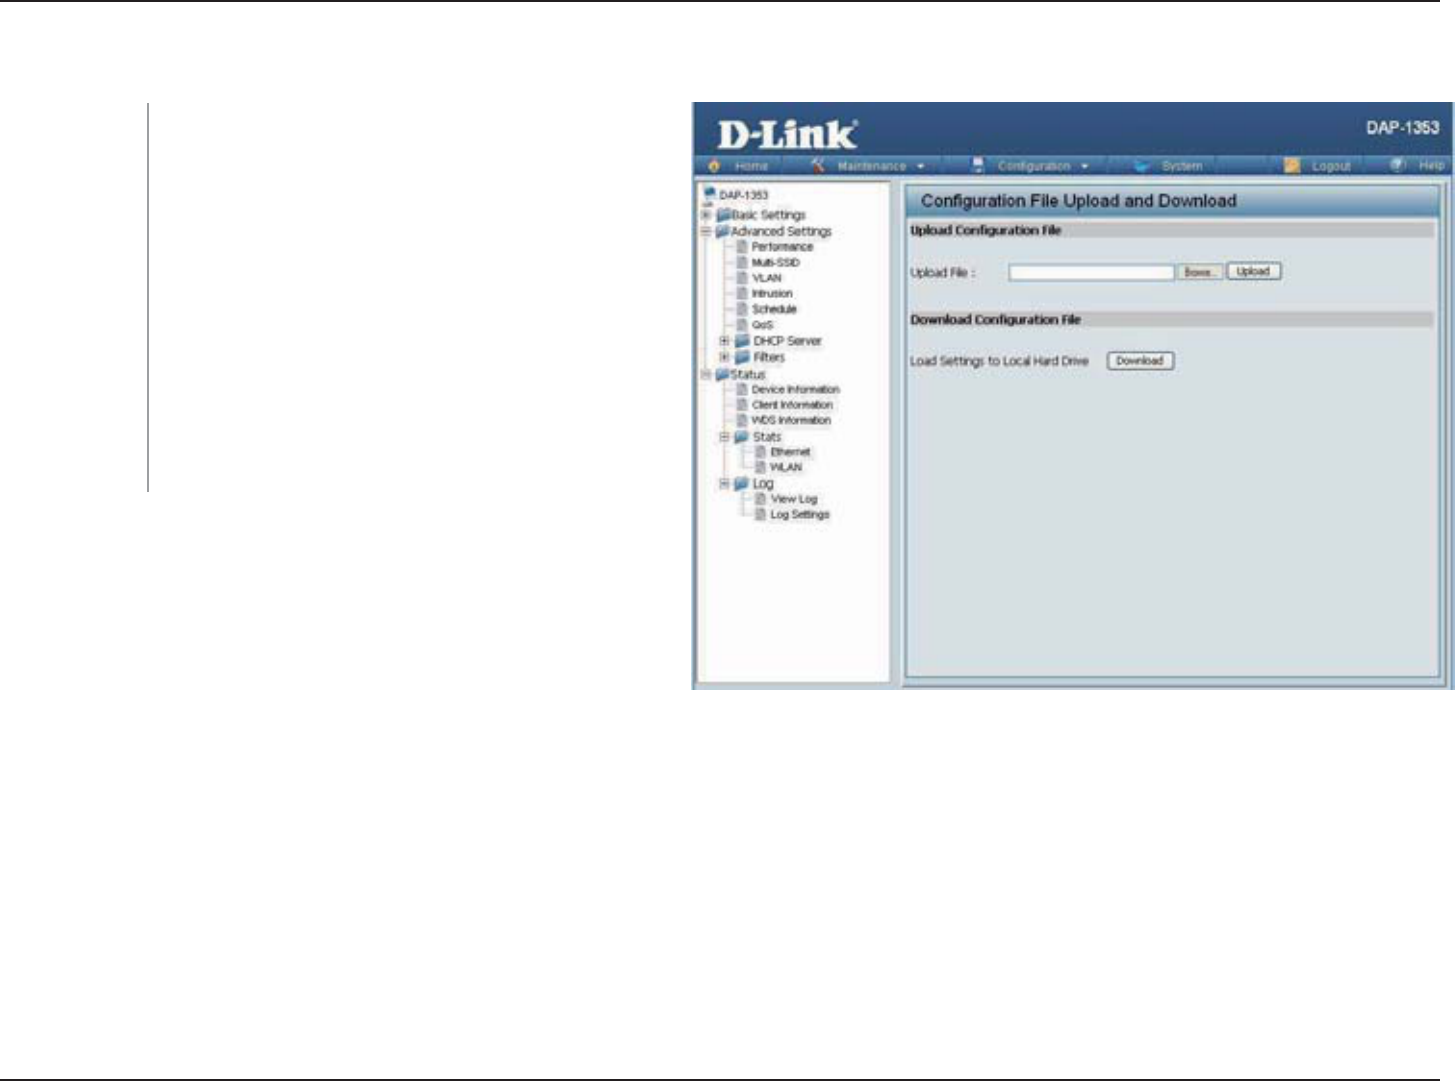
Configuration File
Click the BrowseDWVVQPVQNQECVGCRTGXKQWUN[
UCXGFEQPſIWTCVKQPſNGQP[QWTNQECNEQORWVGT
#HVGTUGNGEVKPIVJGſNGENKEMUpload to apply the
EQPſIWTCVKQPUGVVKPIUVQVJG
Click Download to save the current DAP-1353
configuration to your local computer. Note
that if you save one configuration with the
administrator’s password now, after resetting
your DAP-1353, and then updating to this saved
EQPſIWTCVKQPſNGVJGRCUUYQTFYKNNDGIQPG
Upload File:
Download
Configuration
File:
61D-Link DAP-1353 User Manual
Section 3 - Configuration
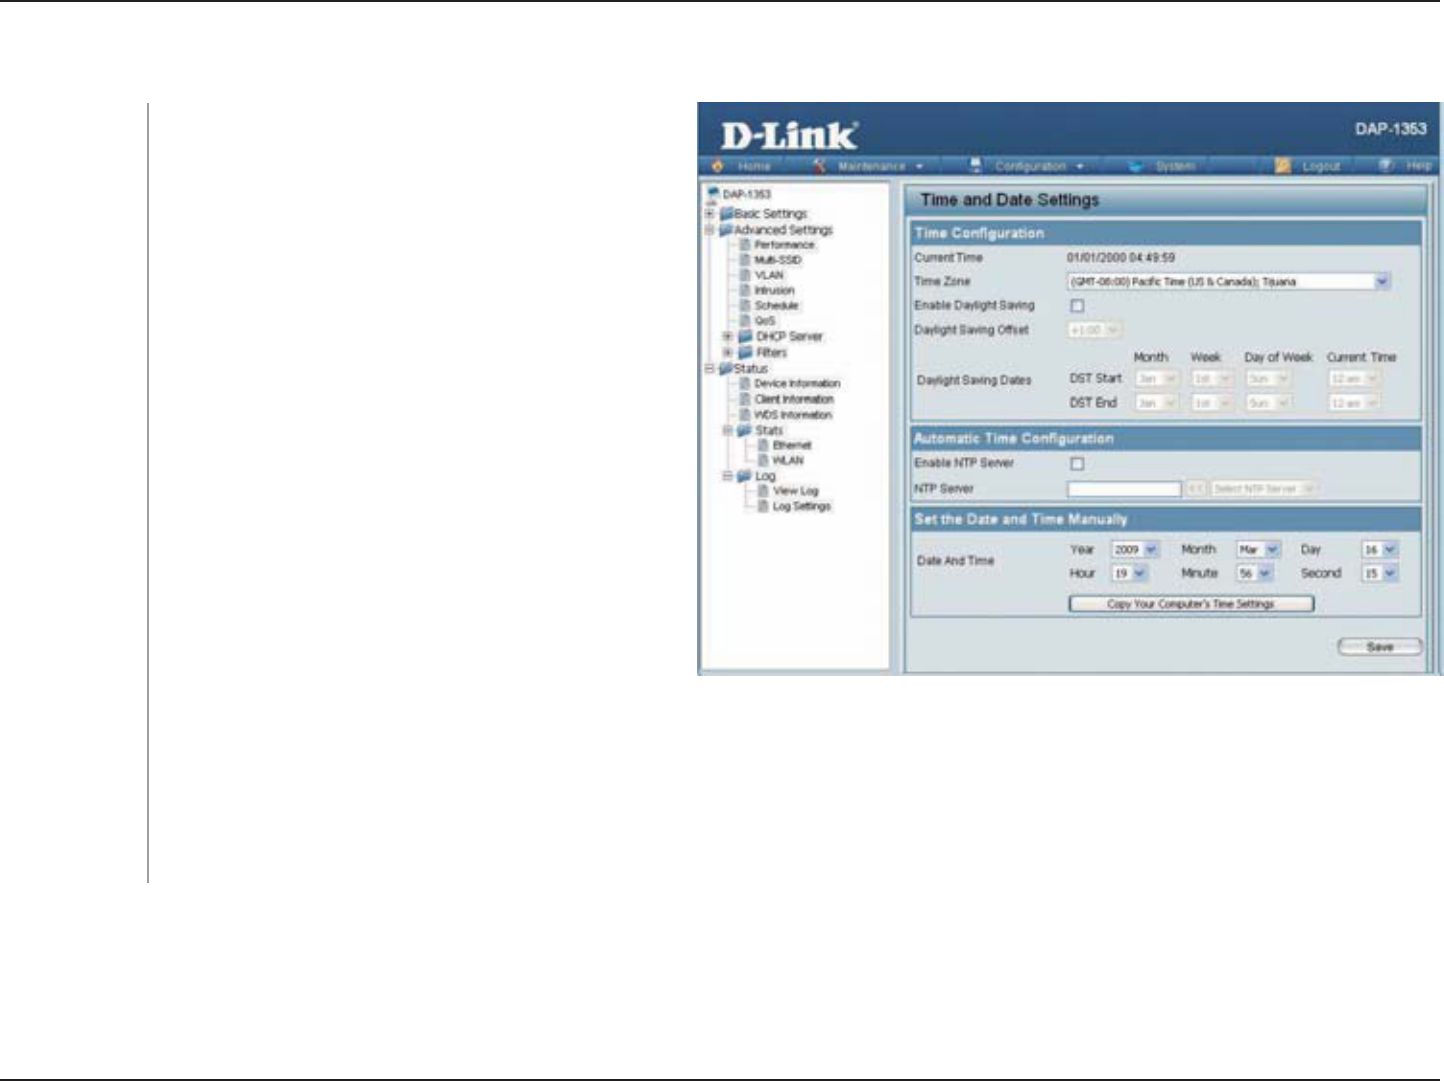
Time and Date
Displays the current time and date settings.
7UGVJGRWNNFQYPOGPWVQUGNGEV[QWTEQTTGEV
6KOG<QPG
%JGEMVJGDQZVQ'PCDNG&C[NKIJV5CXKPI6KOG
7UG VJG RWNNFQYP OGPW VQ UGNGEV VJG EQTTGEV
Daylight Saving period.
7UG VJG RWNNFQYP OGPW VQ UGNGEV VJG EQTTGEV
Daylight Saving offset.
%JGEMVQGPCDNGVJG#2VQIGVU[UVGOVKOGHTQO
an NTP server.
Enter the NTP server IP address.
You can either manually set the time for your
AP here, or you can click the Copy Your
Computer’s Time SettingsDWVVQPVQEQR[VJG
VKOG HTQO VJG EQORWVGT [QW CTG WUKPI /CMG
UWTGVJCVVJGEQORWVGTŏUVKOGKUUGVEQTTGEVN[
Current Time:
Time Zone:
Enable Daylight
Saving:
Daylight Saving
Offset:
Daylight Saving
Dates:
Enable NTP
Server:
NTP Server:
Set the Date and
Time Manually:

62D-Link DAP-1353 User Manual
Section 3 - Configuration
System
System Settings
Click Restart to restart the DAP-1353.
Click RestoreVQTGUVQTGVJGDCEM
to factory default settings.
Restart the
Device:
Restore to
Factory Default
Settings:
63D-Link DAP-1353 User Manual
Section 3 - Configuration
Help
Scroll down the Help page for topics and
explanations.
Help:

64D-Link DAP-1353 User Manual
Section 6 - Troubleshooting
Troubleshooting
6JKUEJCRVGTRTQXKFGUUQNWVKQPUVQRTQDNGOUVJCVECPQEEWTFWTKPIVJGKPUVCNNCVKQPCPFQRGTCVKQPQHVJG
4GCFVJGHQNNQYKPIFGUETKRVKQPUKH[QWCTGJCXKPIRTQDNGOU6JGGZCORNGUDGNQYCTGKNNWUVTCVGFKP9KPFQYU® XP. If
[QWJCXGCFKHHGTGPVQRGTCVKPIU[UVGOVJGUETGGPUJQVUQP[QWTEQORWVGTYKNNNQQMUKOKNCTVQVJGHQNNQYKPIGZCORNGU
9J[ECPŏV+CEEGUUVJGYGDDCUGFEQPſIWTCVKQPWVKNKV[!
9JGPGPVGTKPIVJG+2CFFTGUUQHVJG&.KPMCEEGUURQKPVHQTGZCORNG[QWCTGPQVEQPPGEVKPIVQC
YGDUKVGQPVJG+PVGTPGVQTJCXGVQDGEQPPGEVGFVQVJG+PVGTPGV6JGFGXKEGJCUVJGWVKNKV[DWKNVKPVQC41/EJKRKPVJG
FGXKEGKVUGNH;QWTEQORWVGTOWUVDGQPVJGUCOG+2UWDPGVVQEQPPGEVVQVJGYGDDCUGFWVKNKV[
Ŗ/CMGUWTG[QWJCXGCPWRFCVGF,CXCGPCDNGFYGDDTQYUGT9GTGEQOOGPFVJGHQNNQYKPI
Ŗ+PVGTPGV'ZRNQTGTQTJKIJGT
Ŗ0GVUECRGQTJKIJGT
Ŗ(KTGHQZQTJKIJGT
Ŗ8GTKH[RJ[UKECNEQPPGEVKXKV[D[EJGEMKPIHQTUQNKFNKPMNKIJVUQPVJGFGXKEG+H[QWFQPQVIGVCUQNKFNKPMNKIJVVT[WUKPI
CFKHHGTGPVECDNGQTEQPPGEVVQCFKHHGTGPVRQTVQPVJGFGXKEGKHRQUUKDNG+HVJGEQORWVGTKUVWTPGFQHHVJGNKPMNKIJVOC[
PQVDGQP
Ŗ&KUCDNGCP[KPVGTPGVUGEWTKV[UQHVYCTGTWPPKPIQPVJGEQORWVGT5QHVYCTGſTGYCNNUUWEJCU<QPG#NCTO$NCEM+EG
Sygate, Norton Personal Firewall, and Windows®:2ſTGYCNNOC[DNQEMCEEGUUVQVJGEQPſIWTCVKQPRCIGU%JGEMVJG
JGNRſNGUKPENWFGFYKVJ[QWTſTGYCNNUQHVYCTGHQTOQTGKPHQTOCVKQPQPFKUCDNKPIQTEQPſIWTKPIKV

65D-Link DAP-1353 User Manual
Section 6 - Troubleshooting
Ŗ%QPſIWTG[QWT+PVGTPGVUGVVKPIU
Ŗ)QVQStart > Settings > Control Panel&QWDNGENKEMVJGInternet Options Icon. From the SecurityVCD
ENKEMVJGDWVVQPVQTGUVQTGVJGUGVVKPIUVQVJGKTFGHCWNVU
Ŗ%NKEMVJGConnectionVCDCPFUGVVJGFKCNWRQRVKQPVQ0GXGT&KCNC%QPPGEVKQP%NKEMVJG.#05GVVKPIU
DWVVQP/CMGUWTGPQVJKPIKUEJGEMGF%NKEMOK.
Ŗ)QVQVJGAdvancedVCDCPFENKEMVJGDWVVQPVQTGUVQTGVJGUGUGVVKPIUVQVJGKTFGHCWNVU%NKEMOK three
times.
Ŗ%NQUG[QWTYGDDTQYUGTKHQRGPCPFQRGPKV
Ŗ#EEGUUVJGYGDOCPCIGOGPV1RGP[QWTYGDDTQYUGTCPFGPVGTVJG+2CFFTGUUQH[QWT&.KPMCEEGUURQKPVKPVJG
CFFTGUUDCT6JKUUJQWNFQRGPVJGNQIKPRCIGHQT[QWTVJGYGDOCPCIGOGPV
Ŗ+H[QWUVKNNECPPQVCEEGUUVJGEQPſIWTCVKQPWPRNWIVJGRQYGTVQVJGCEEGUURQKPVHQTUGEQPFUCPFRNWIDCEMKP
9CKVCDQWVUGEQPFUCPFVT[CEEGUUKPIVJGEQPſIWTCVKQP+H[QWJCXGOWNVKRNGEQORWVGTUVT[EQPPGEVKPIWUKPIC
different computer.
9JCVECP+FQKH+HQTIQVO[RCUUYQTF!
+H[QWHQTIQV[QWTRCUUYQTF[QWOWUVTGUGV[QWTCEEGUURQKPV7PHQTVWPCVGN[VJKURTQEGUUYKNNEJCPIGCNN[QWTUGVVKPIU
DCEMVQVJGHCEVQT[FGHCWNVU
6QTGUGVVJGCEEGUURQKPVNQECVGVJGTGUGVDWVVQPJQNGQPVJGTGCTRCPGNQHVJGWPKV9KVJVJGCEEGUURQKPVRQYGTGF
QPWUGCRCRGTENKRVQJQNFVJGDWVVQPFQYPHQTUGEQPFU4GNGCUGVJGDWVVQPCPFVJGCEEGUURQKPVYKNNIQVJTQWIJ
KVUTGDQQVRTQEGUU9CKVCDQWVUGEQPFUVQCEEGUUVJGCEEGUURQKPV6JGFGHCWNV+2CFFTGUUKU9JGP
logging in, the username is adminCPFNGCXGVJGRCUUYQTFDQZGORV[
66D-Link DAP-1353 User Manual
Appendix B - Networking Basics
Networking Basics
Check your IP address
#HVGT[QWKPUVCNN[QWTPGVYQTMCFCRVGTD[FGHCWNVVJG6%2+2UGVVKPIUUJQWNFDGUGVVQQDVCKPCP+2CFFTGUUHTQOC
&*%2UGTXGTKGYKTGNGUUTQWVGTCWVQOCVKECNN[6QXGTKH[[QWT+2CFFTGUURNGCUGHQNNQYVJGUVGRUDGNQY
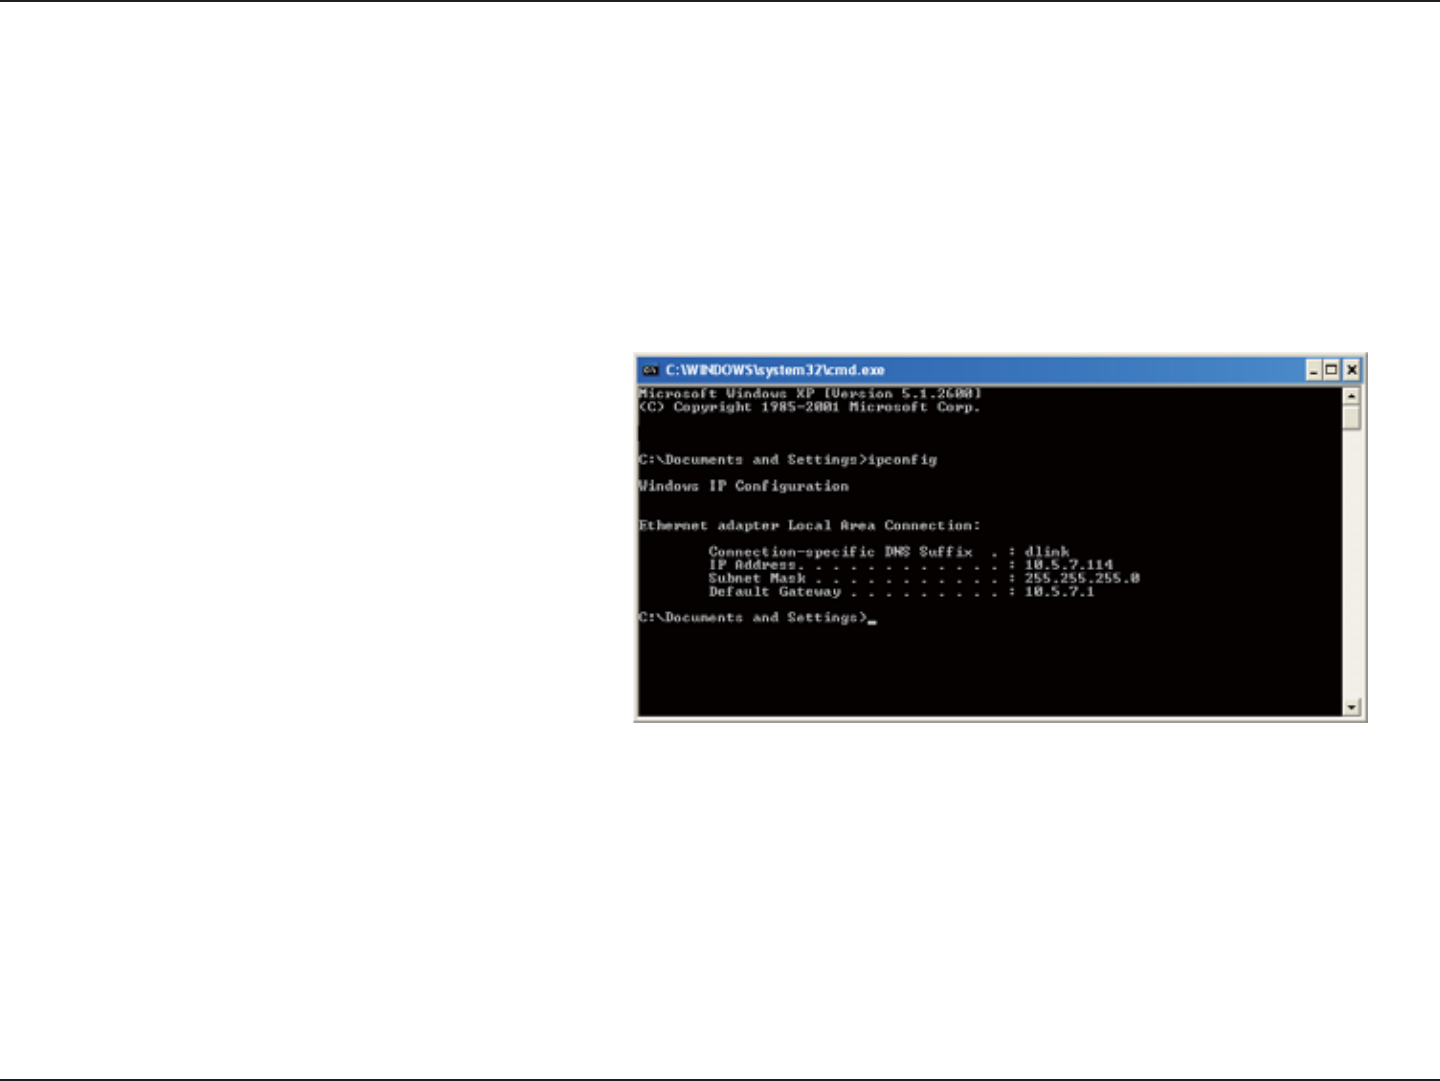
Click on Start > Run+PVJGTWPDQZV[RGcmd and click OK.
At the prompt, type ipconfig and press Enter.
6JKUYKNNFKURNC[VJG+2CFFTGUUUWDPGVOCUMCPF
the default gateway of your adapter.
If the address is 0.0.0.0, check your adapter
installation, security settings, and the settings
QP[QWTTQWVGT5QOGſTGYCNNUQHVYCTGRTQITCOU
OC[ DNQEM C &*%2 TGSWGUV QP PGYN[ KPUVCNNGF
adapters.
If you are connecting to a wireless network at a
JQVURQVGIJQVGNEQHHGGUJQRCKTRQTVRNGCUGEQPVCEVCPGORNQ[GGQTCFOKPKUVTCVQTVQXGTKH[VJGKTYKTGNGUUPGVYQTM
settings.

67D-Link DAP-1353 User Manual
Appendix B - Networking Basics
Statically Assign an IP address
+H[QWCTGPQVWUKPIC&*%2ECRCDNGICVGYC[TQWVGTQT[QWPGGFVQCUUKIPCUVCVKE+2CFFTGUURNGCUGHQNNQYVJGUVGRU
DGNQY
Step 1
Windows®%NKEMQPStart > Settings > Control Panel > Network Connections
9KPFQYU:2%NKEMQPStart > Control Panel > Network Connections
Windows Vista®%NKEMQPStart > Control Panel > Network and Internet > Network and Sharing Center > Manage
network connections
Step 2
Right-click on the Local Area Connection which represents your network adapter and select Properties.
Step 3
Highlight Internet Protocol (TCP/IP) and click Properties.
Step 4
Click Use the following IP addressCPFGPVGTCP+2CFFTGUUVJCVKUQPVJGUCOGUWDPGVCU[QWTPGVYQTMQTVJG.#0
IP address on your router.
'ZCORNG+HVJGTQWVGTŏU.#0+2CFFTGUUKUOCMG[QWT+2CFFTGUU:YJGTG:KUCPWODGTDGVYGGP
CPF/CMGUWTGVJCVVJGPWODGT[QWEJQQUGKUPQVKPWUGQPVJGPGVYQTM5GV&GHCWNV)CVGYC[VJGUCOGCUVJG
.#0+2CFFTGUUQH[QWTTQWVGT
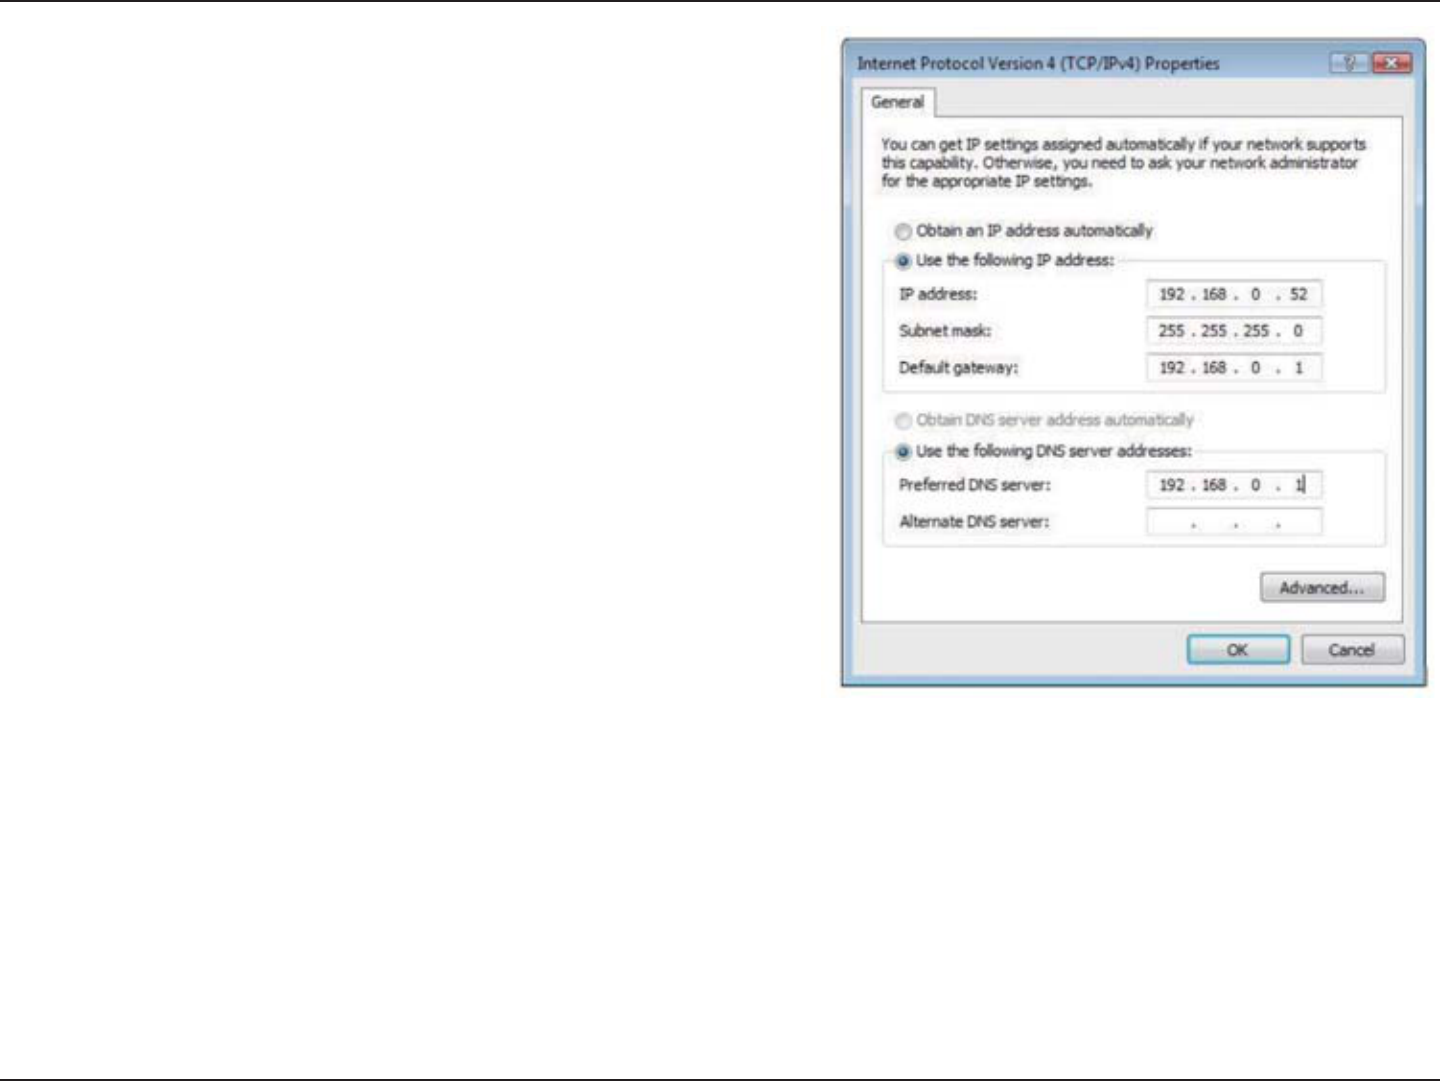
68D-Link DAP-1353 User Manual
Appendix B - Networking Basics
Set Primary DNS the same as the LAN IP address of your router
6JG 5GEQPFCT[ &05 KU PQV PGGFGF QT [QW OC[
enter a DNS server from your ISP.
Step 5
Click OK twice to save your settings.
This device complies with RSS 210 of Industry Canada.
"Operation is subject to the following two conditions: (1 ) this device
may not cause interference, and (2) this device must accept any
interference, including interference that may cause undesired
operation of the device."
NCC Warning Statement
Article 12
Without permission, any company, firm or user shall not alter the frequency, increase the power, or change
the characteristics and functions of the original design of the certified lower power frequency electric
machinery.
Article 14
The application of low power frequency electric machineries shall not affect the navigation safety nor
interfere a legal communication, if an interference is found, the service will be suspended until
improvement is made and the
interference no longer exists.
低功率電波輻射性電機管理辦法
第十二條 經型式認證合格之低功率射頻電機,非經許可,公司、商號或使用者均不
得擅自變更頻率、加大功率或變更原設計之特性及功能。
第十四條 低功率射頻電機之使用不得影響飛航安全及干擾合法通信;經發現有干擾
現象時,應立即停用,並改善至無干擾時方得繼續使用。
前項合法通信,指依電信法規定作業之無線電通信。
低功率射頻電機須忍受合法通信或工業、科學及醫療用電波輻射性電機設備
之干擾。