D Link AP2320A1 802.11N Ceiling Mount PoE Access Point User Manual
D Link Corporation 802.11N Ceiling Mount PoE Access Point
D Link >
User Manual

2D-Link DAP-2320 User Manual
Table of Contents
Product Overview ........................................................ 4
Package Contents ...................................................4
System Requirements ..............................................4
Introduction ..............................................................5
Features ...................................................................7
Wireless Basics ........................................................... 8
Standards-Based Technology .................................9
Wireless Installation Considerations ......................10
Physical Installation for Your Access Point ............11
Connect Power over Ethernet (PoE) ................12
Four Operational Modes ........................................... 13
Getting Started ...........................................................14
Conguration ............................................................. 15
Save and Activate Settings....................................16
Basic Settings ........................................................17
Wireless ..........................................................17
Access Point mode ......................................17
WDS with AP mode .....................................19
WDS mode ...................................................21
Wireless Client mode ...................................23
Open System/Shared Key Authentication ...24
WPA/WPA2-Personal Authentication ............ 25
WPA/WPA2-Enterprise Authentication ..........26
802.11x Authentication ................................27
LAN .................................................................28
Advanced Settings .................................................... 29
Performance .................................................... 29
Multi-SSID ........................................................ 31
VLAN ................................................................33
VLAN List .....................................................33
Port List ........................................................34
Add/Edit VLAN .............................................35
PVID Setting .................................................36
Intrusion ........................................................... 37
Schedule ..........................................................38
QoS ..................................................................39
AP Array ...........................................................41
Wireless Basic Settings ................................ 42
Wireless Advanced Settings ........................42
Multiple SSID & VLAN ..................................43
Advanced Functions ....................................43
Administration Settings ................................ 43
ARP Spoofing Prevention .................................44
DHCP Server ..................................................45
Dynamic Pool Settings .................................45
Static Pool Setting ........................................47
Current IP Mapping List ...............................49
Filters ...............................................................50
Wireless MAC ACL ....................................... 50
WLAN Partition ............................................. 51
Table of Contents

3D-Link DAP-2320 User Manual
Table of Contents
Status ....................................................................52
Device Information ........................................... 52
Client Information ............................................. 53
WDS Information .............................................. 54
Stats .................................................................55
Ethernet ........................................................55
WLAN Traffic ................................................56
Log ...................................................................57
View Log.......................................................57
Log Settings .................................................58
Maintenance ......................................................... 59
Administration Settings .................................... 59
Limit Administrator ....................................... 60
System Name Settings .................................61
Login Settings .............................................. 62
Console Settings ..........................................63
SNMP Settings ............................................. 64
Firmware and SSL Certification Upload ................65
Configuration File Upload ...................................... 66
Time and Date .......................................................67
System ............................................................. 68
System Settings ...........................................68
Help .......................................................................69
Troubleshooting ........................................................ 70
Networking Basics .................................................... 72
Check your IP address .......................................... 72
Statically Assign an IP address .............................73
Technical Specications........................................... 75
Contacting Technical Support ................................. 77
Warranty .....................................................................78
Registration ................................................................80
4D-Link DAP-2320 User Manual
Section 1 - Product Overview
• 802.11N Ceiling Mount PoE Access Point
• Power Adapter
• CAT5 Ethernet Cable
• CD-ROM with User Manual
• Install Guide
System Requirements
• Computers with Windows®, Macintosh®, or Linux-based operating systems with an installed Ethernet
Adapter
• For configuration, the following web browsers are supported:
• Microsoft® Internet Explorer® 6.0 and higher
• Mozilla Firefox 3.0 and higher
• Google™ Chrome 2.0 and higher
• Apple Safari 3.0 and higher
Product Overview
Package Contents
Note: Using a power supply with a different voltage rating than the one included
with the DAP-2320 will cause damage and void the warranty for this product.

5D-Link DAP-2320 User Manual
Section 1 - Product Overview
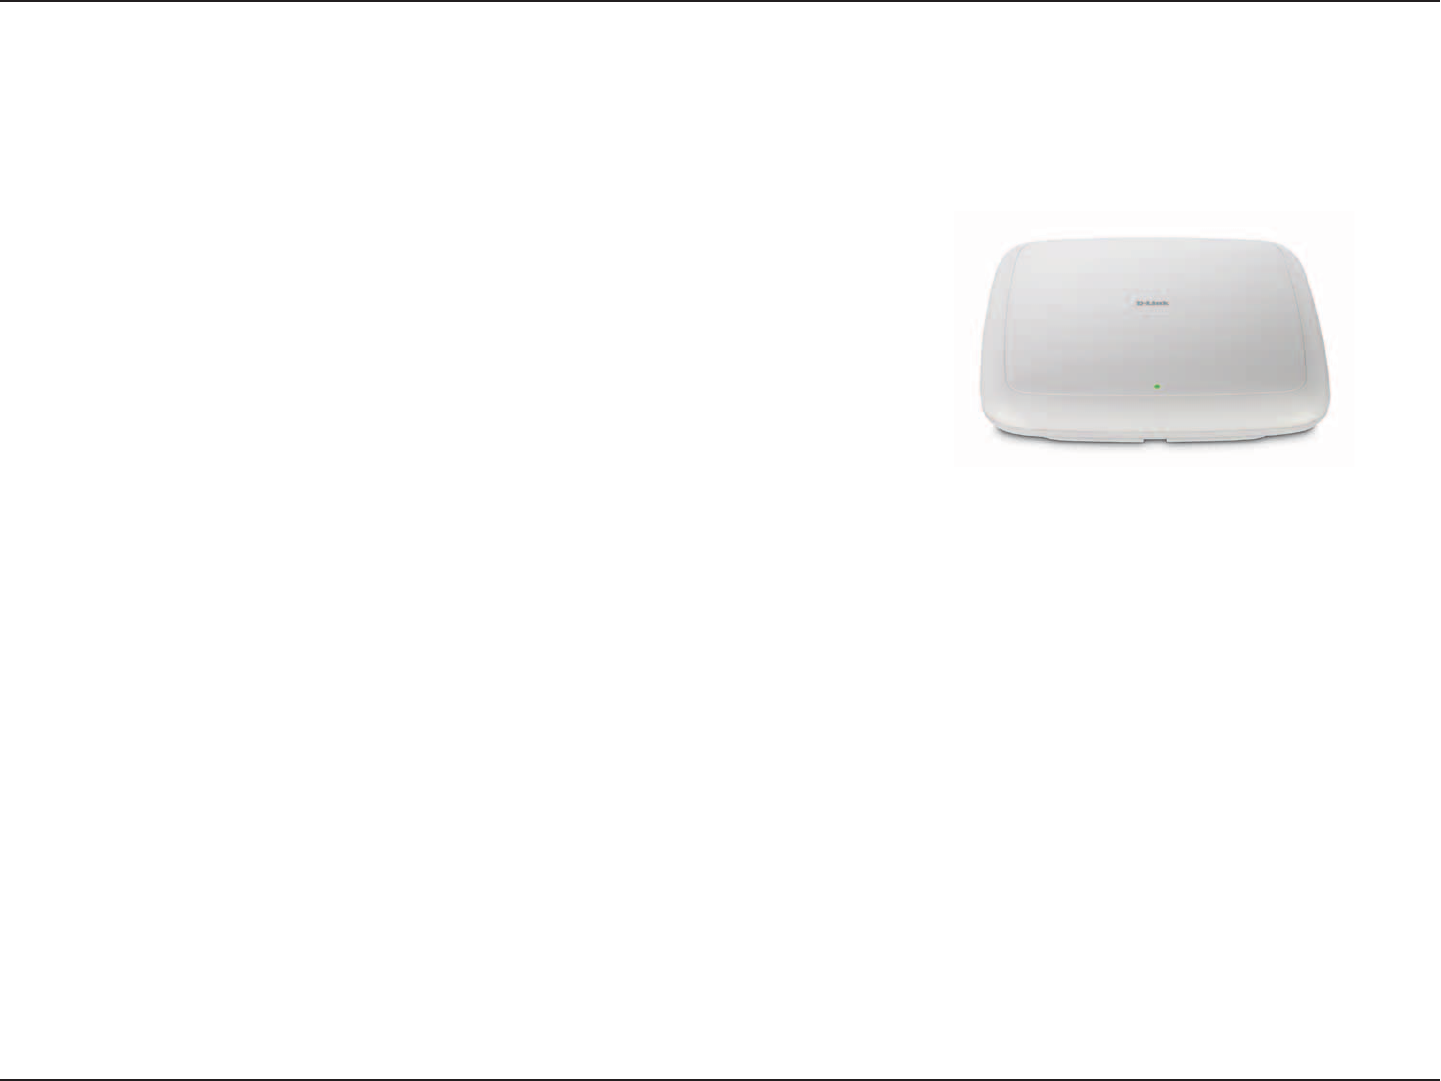
Introduction
The DAP-2320 802.11n selectable AP increases productivity by allowing you to work faster and more efficiently. With
the DAP-2320, bandwidth-intensive applications like graphics or multimedia will benefit significantly because large
files are now able to move across the network quickly.
The DAP-2320 is capable of operating in one of four different wireless networking modes: access point, WDS (Wireless
Distribution System) with AP, WDS, or Wireless Client mode.
Use less wiring, enjoy increased flexibility, save time and money with PoE (Power over Ethernet). With PoE, the DAP-2320
shares power and data over the CAT5 cable, making the setup of your network less expensive and more convenient.
An ideal solution for quickly creating and extending a wireless local area network (WLAN) in offices or other workplaces,
trade shows, and special events, the DAP-2320 provides data transfer rates up to 300Mbps. (The 802.11n standard
is backwards compatible with 802.11g, and 802.11b devices.)
WPA/WPA2 is offered in two options: Enterprise (used for corporations) and Personal (used for home users).
WPA-Personal and WPA2-Personal are directed towards home users who do not have the server-based equipment
required for user authentication. This method of authentication is similar to WEP because you define a “Pre-Shared
Key” on the wireless router/AP. Once the pre-shared key is confirmed and satisfied at both the client and access point,
access is then granted. The encryption method used is referred to as the Temporal Key Integrity Protocol (TKIP), which
offers per-packet dynamic hashing. It also includes an integrity checking feature which ensures that the packets were
not tampered with during wireless transmission.

6D-Link DAP-2320 User Manual
Section 1 - Product Overview
WPA-Enterprise and WPA2-Enterprise are ideal for businesses that already have existing security infrastructures
established. Management and security implementation can now be centralized on a server participating on the
network. Utilizing 802.1X with a RADIUS (Remote Authentication Dial-in User Service) server, a network administrator
can define a list of authorized users who can access the wireless LAN. When attempting to access a wireless LAN
with WPA-Enterprise configured, the new client will be requested to enter a username with a password. If the new
client is authorized by the administration, and enters the correct username and password, then access is granted. In
the case where an employee leaves the company, the network administrator is able to remove the previous employee
from the authorized list to avoid compromising the network.
EAP (Extensible Authentication Protocol) is available through the Windows® XP operating system. You will need to
use the same type of EAP protocol on all devices in your network when using the 802.1X feature.
*Maximum wireless signal rate derived from IEEE Standard 802.11 specifications. Actual data throughput may vary. Network conditions
and environmental factors, including volume of network traffic, building materials and construction, and network overhead can lower
actual data throughout rate.

7D-Link DAP-2320 User Manual
Section 1 - Product Overview
• Four different operation modes - Capable of operating in one of four different operation modes to meet your
wireless networking needs: Access Point, WDS with AP, WDS, or Wireless Client.
• Faster wireless networking with the 802.11n standard to provide a maximum wireless signal rate of up to 300
Mbps*.
• Compatible with the 802.11b standard to provide a wireless data rate of up to 11Mbps, allowing you to migrate
your system to the 802.11n and 802.11g standards on your own schedule without sacrificing connectivity.
• Compatible with the 802.11g standard to provide a wireless data rate of up to 54Mbps in the 2.4GHz frequency
range.
• Better security with WPA - The DAP-2320 can securely connect wireless clients on the network using WPA (Wi-Fi
Protected Access) to provide a much higher level of security for your data and communications than its previous
versions.
• AP Manager II management software - The real-time display of the network's topology and AP’s information
makes network configuration and management quick and simple.
• SNMP for management - The DAP-2320 is not just fast, but also supports SNMP v.3 for better network
management. Superior wireless AP manager software is bundled with the DAP-2320 for network configuration
and firmware upgrade. Systems administrators can also set up the DAP-2320 easily with the Web-based
configuration. A D-Link D-View 6.0 module will be downloadable for network administration and real-time
network traffic monitoring with D-Link D-View 6.0 software.
• Utilizes OFDM technology (Orthogonal Frequency Division Multiplexing).
• Supports 802.3af Power over Ethernet.
• Supports one 10/100/1000M Ethernet port.
• Operates in the 2.4~2.5GHz and 5.15~5.85GHz** frequency ranges.
• Web-based interface for managing and configuring.
*Maximum wireless signal rate derived from IEEE Standard 802.11 specifications. Actual data throughput may vary. Network conditions and environmental factors,
including volume of network traffic, building materials and construction, and network overhead can lower actual data throughout rate.
**Please note that operating frequency ranges vary depending on the regulations of individual countries and jurisdictions. The DAP-2320 is not supported in the
5.25~5.35 GHz and 5.47 ~ 5.725 GHz frequency ranges in some regions.
Features

8D-Link DAP-2320 User Manual
Section 2 - Installation
Wireless Basics
D-Link wireless products are based on industry standards to provide high-speed wireless connectivity that is easy
to use within your home, business or public access wireless networks. D-Link wireless products provides you with
access to the data you want, whenever and wherever you want it. Enjoy the freedom that wireless networking can
bring to you.
WLAN use is not only increasing in both home and office environments, but in public areas as well, such as airports,
coffee shops and universities. Innovative ways to utilize WLAN technology are allowing people to work and communicate
more efficiently. Increased mobility and the absence of cabling and other types of fixed infrastructure have proven to
be beneficial to many users.
Wireless adapter cards used on laptop and desktop systems support the same protocols as Ethernet adapter cards,
allowing wireless users to use the same applications as those used on a wired network.
People use WLAN technology for many different purposes:
Mobility - productivity increases when people can have access to data in any location within the operating
range of their WLAN. Management decisions based on real-time information can significantly improve the
efficiency of a worker.
Low implementation costs - WLANs are easy to set up, manage, change and relocate. Networks that frequently
change can benefit from WLAN's ease of implementation. WLANs can operate in locations where installation
of wiring may be impractical.
Installation and network expansion - by avoiding the complications of troublesome cables, a WLAN system
can be fast and easy during installation, especially since it can eliminate the need to pull cable through walls
and ceilings. Wireless technology provides more versatility by extending the network beyond the home or office.
Inexpensive solution - wireless network devices are as competitively priced as conventional Ethernet network
devices. The DAP-2320 saves money by providing users with multi-functionality configurable in four different
modes.
Scalability - Configurations can be easily changed and range from Peer-to-Peer networks, suitable for a small
number of users to larger Infrastructure networks to accommodate hundreds or thousands of users, depending
on the number of wireless devices deployed.

9D-Link DAP-2320 User Manual
Section 2 - Installation
Standards-Based Technology
The DAP-2320 Wireless Access Point utilizes the 802.11b, 802.11g, and 802.11n standards.
The IEEE 802.11n standard is an extension of the 802.11b, and 802.11g standards that came before it. It increases
the maximum wireless signal rate up to 300Mbps* within the 2.4GHz band, utilizing OFDM technology.
This means that in most environments - within the specified range of this device - you will be able to transfer large files
quickly, or even watch a movie in MPEG format over your network without noticeable delays. This technology works by
transmitting high-speed digital data over a radio wave utilizing OFDM (Orthogonal Frequency Division Multiplexing)
technology. OFDM works by splitting the radio signal into multiple smaller sub-signals that are then simultaneously
transmitted at different frequencies to the receiver. OFDM reduces the amount of crosstalk (interference) in signal
transmissions.
The D-Link DAP-2320 will automatically sense the best possible connection speed to ensure the greatest possible
speed and range.
IEEE 802.11n offers the most advanced network security features available today, including WPA.
*Maximum wireless signal rate derived from IEEE Standard 802.11 specifications. Actual data throughput may vary. Network conditions and environmental factors, including volume of network traffic,
building materials and construction, and network overhead can lower actual data throughout rate.

10D-Link DAP-2320 User Manual
Section 2 - Installation
Wireless Installation Considerations
The D-Link AirPremier N wireless access point lets you access your network using a wireless connection from virtually
anywhere within the operating range of your wireless network. Keep in mind, however, that the number, thickness and
location of walls, ceilings, or other objects that the wireless signals must pass through, may limit the range. Typical
ranges vary depending on the types of materials and background RF (radio frequency) noise in your home or business.
The key to maximizing wireless range is to follow these basic guidelines:
1. Keep the number of walls and ceilings between the access point and other network devices to a
minimum. Each wall or ceiling can reduce your adapter’s range from 3-90 feet (1-30 meters). Position
your devices so that the number of walls or ceilings is minimized.
2. Be aware of the direct line between network devices. A wall that is 1.5 feet thick (.5 meters), at a
45-degree angle appears to be almost 3 feet (1 meter) thick. At a 2-degree angle, it looks over 42 feet
(14 meters) thick! Position devices so that the signal will travel straight through a wall or ceiling (instead
of at an angle) for better reception.
3. Building Materials make a difference. A solid metal door or aluminum studs may have a negative
effect on the range. Try to position access points, wireless routers, and computers so that the signal
passes through drywall or open doorways. Materials and objects such as glass, steel, metal, walls
with insulation, water (fish tanks), mirrors, file cabinets, brick, and concrete will degrade your wireless
signal.
4. Keep your product away (at least 3-6 feet or 1-2 meters) from electrical devices or appliances that
generate RF noise.
5. If you are using 2.4GHz cordless phones or X-10 (wireless products such as ceiling fans, lights, and
home security systems), your wireless connection may degrade dramatically or drop completely. Make
sure your 2.4GHz phone base is as far away from your wireless devices as possible. The base transmits
a signal even if the phone in not in use.
11D-Link DAP-2320 User Manual
Section 2 - Installation
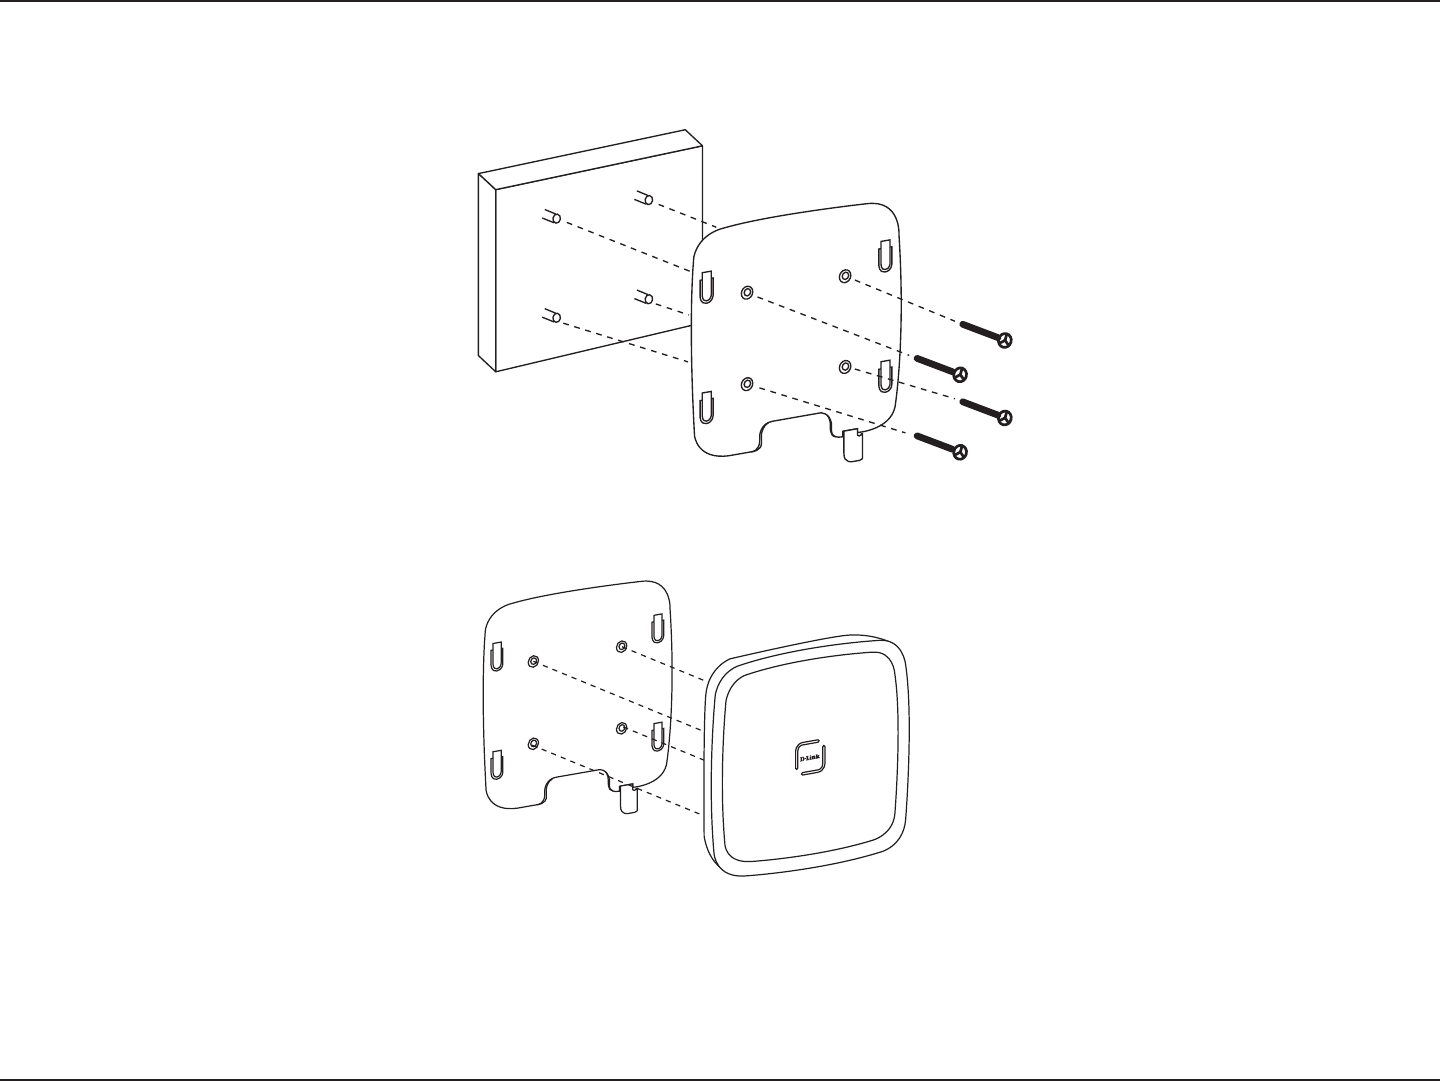
Physical Installation for Your Access Point:(optional)
Solid Wall or Ceiling Installation:
1.Mount the bracket on the appropriate position on the wall or Ceiling.
2.Mount the AP to the bracket on the wall or ceiling.
Junction Box Installation:
1.Attach the bracket to the junction box.
2.attach the DAP-2320 to the mounting bracket.

12D-Link DAP-2320 User Manual
Section 2 - Installation
Connect Power over Ethernet (PoE)
Connect one end of an Ethernet cable (included with your access point) to the LAN port on the DAP-2320 and the other end of the Ethernet
cable to either your computer or to your PoE switch. The AP can be powered on by a PoE switch or by the power adapter shipped with
the AP.
13D-Link DAP-2320 User Manual
Section 2 - Installation
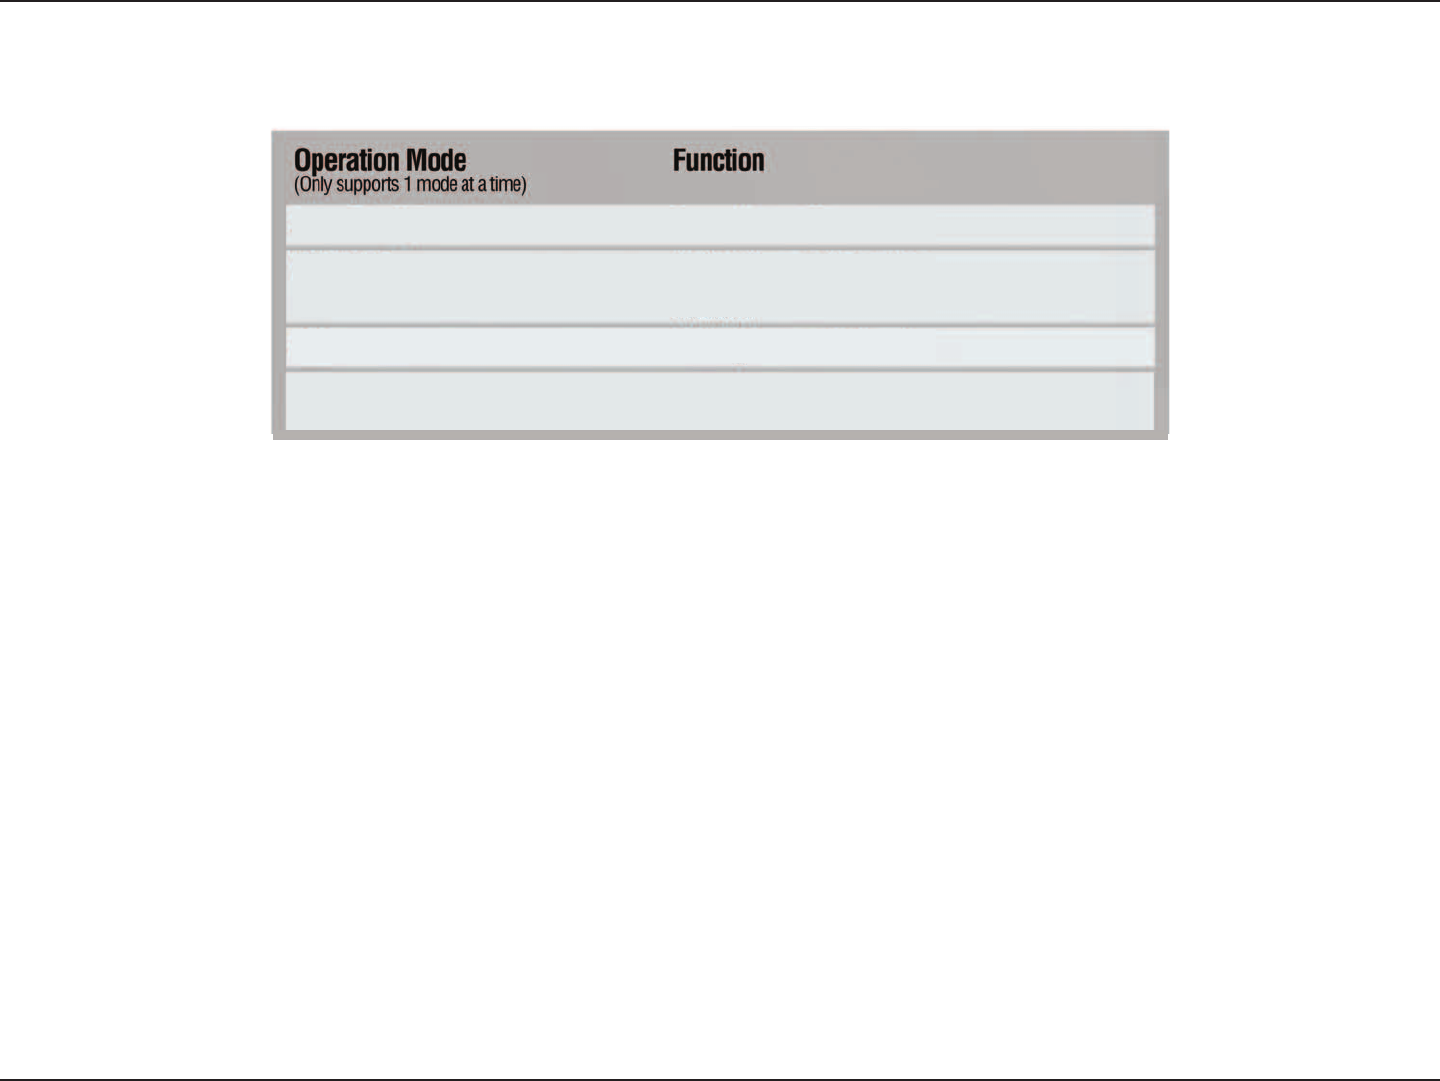
Wireless Client AP acts as a wireless network adapter for your Ethernet-enabled device
Access Point (AP) Create a wireless LAN
WDS with AP Wirelessly connect multiple networks while still functioning as a
wireless AP
WDS Wirelessly connect multiple networks
Four Operational Modes
14D-Link DAP-2320 User Manual
Section 2 - Installation
Getting Started
1. You will need broadband Internet access.
2. Consult with your cable or DSL provider for proper installation of the modem.
3. Connect the cable or DSL modem to a router. See the printed Install Guide included with your router.
4. If you are connecting a desktop computer to your network, install a wireless PCI adapter into an available
PCI slot on your desktop computer.
5. Install the drivers for your wireless CardBus adapter into a laptop computer.
15D-Link DAP-2320 User Manual
Section 3 - Configuration
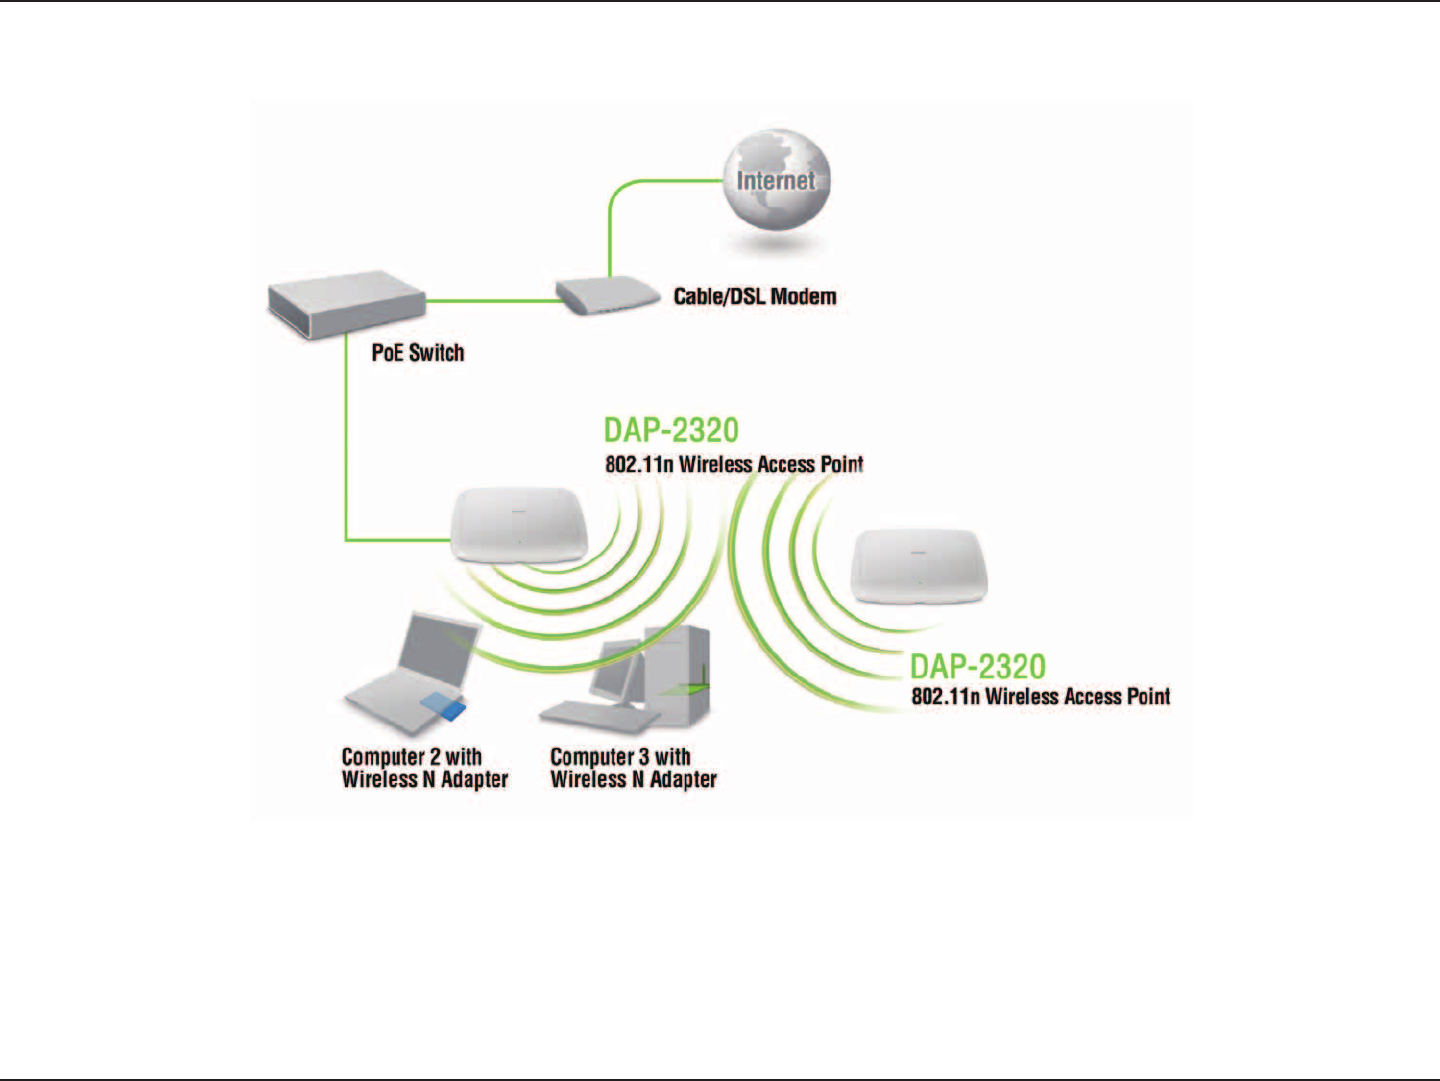
Configuration
To configure the DAP-2320, use a computer that is connected to the DAP-2320 with an Ethernet cable (see the
Network Layout diagram
).
First, disable the Access the Internet using a proxy server function. To disable this function, go to Control
Panel > Internet Options > Connections > LAN Settings and uncheck the enable box.
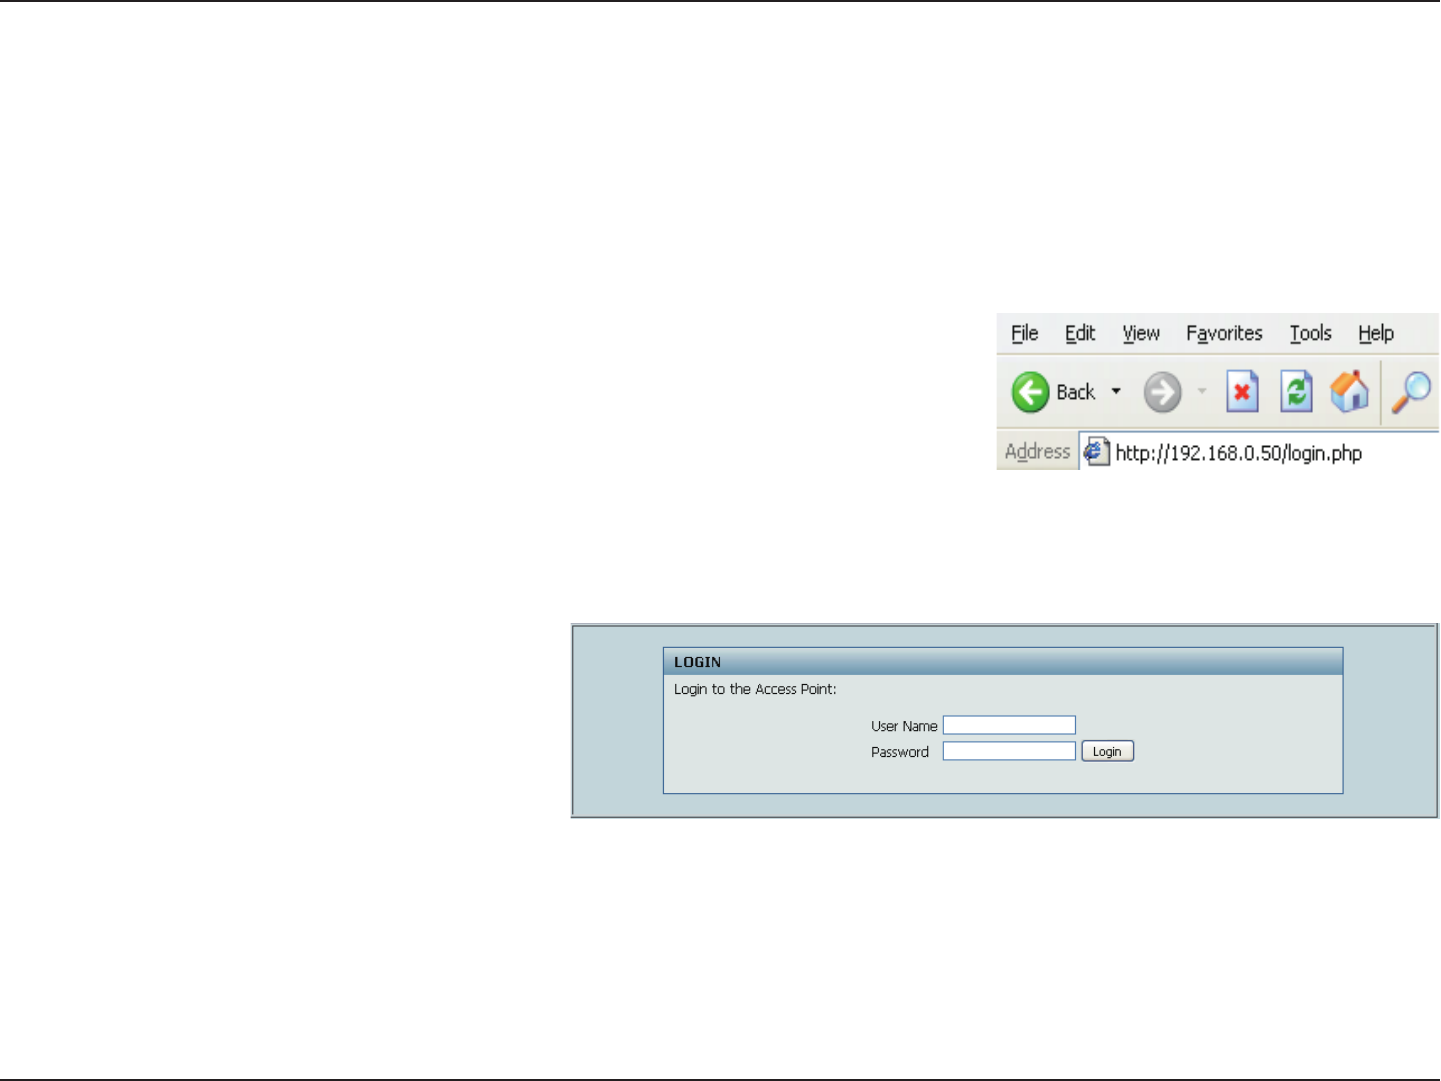
Launch your web browser.
Type the IP address and http port of the DAP-2320 in the address field
(http://192.168.0.50) and press Enter. Make sure that the IP addresses of the
DAP-2320 and your computer are in the same subnet.
Note: If you have changed the default IP address assigned to the DAP-2320,
make sure to enter the correct IP address.
Enter the user name (admin) and your password. Leave the password field blank by default, and click Login.
Note: If you have changed the password,
make sure to enter the correct password.
16D-Link DAP-2320 User Manual
Section 3 - Configuration
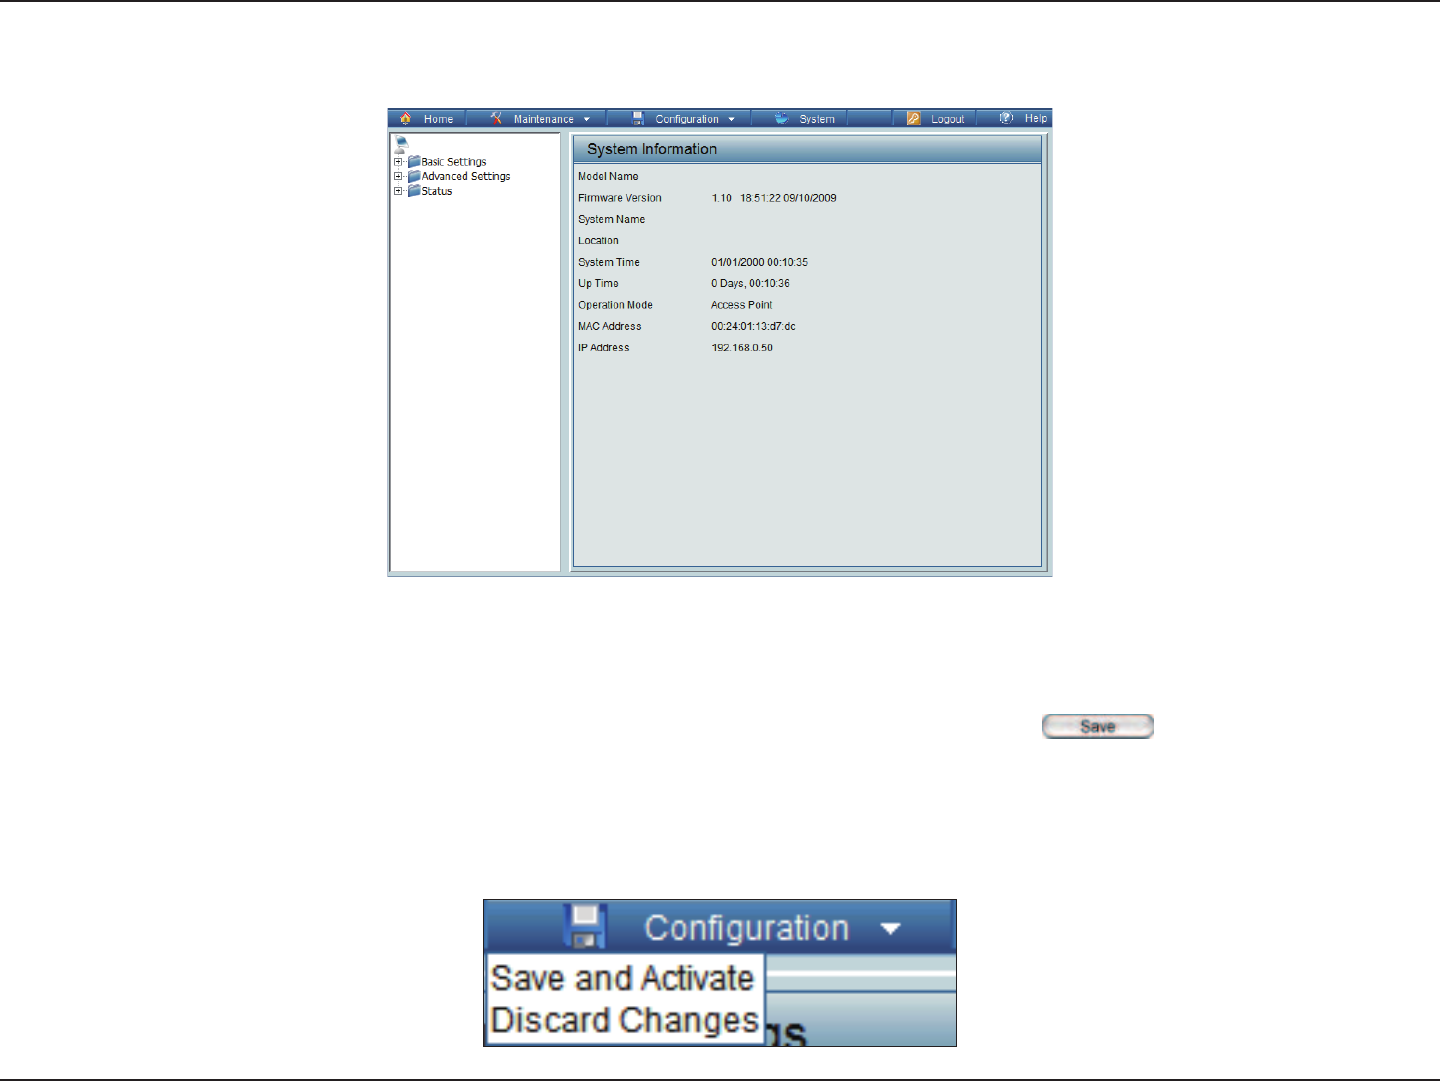
After successfully logging into the DAP-2320, the following screen will appear:
When making changes on most of the configuration screens in this section, use the button at the bottom of
each screen to save (not activate) your configuration changes.
You may change settings to multiple pages before activating. Once you are finished, click the Conguration button
located at the top of the page and then click Save and Activate.
Save and Activate Settings
DAP-2320
DAP-2320
D-Link DAP-2320
17D-Link DAP-2320 User Manual
Section 3 - Configuration
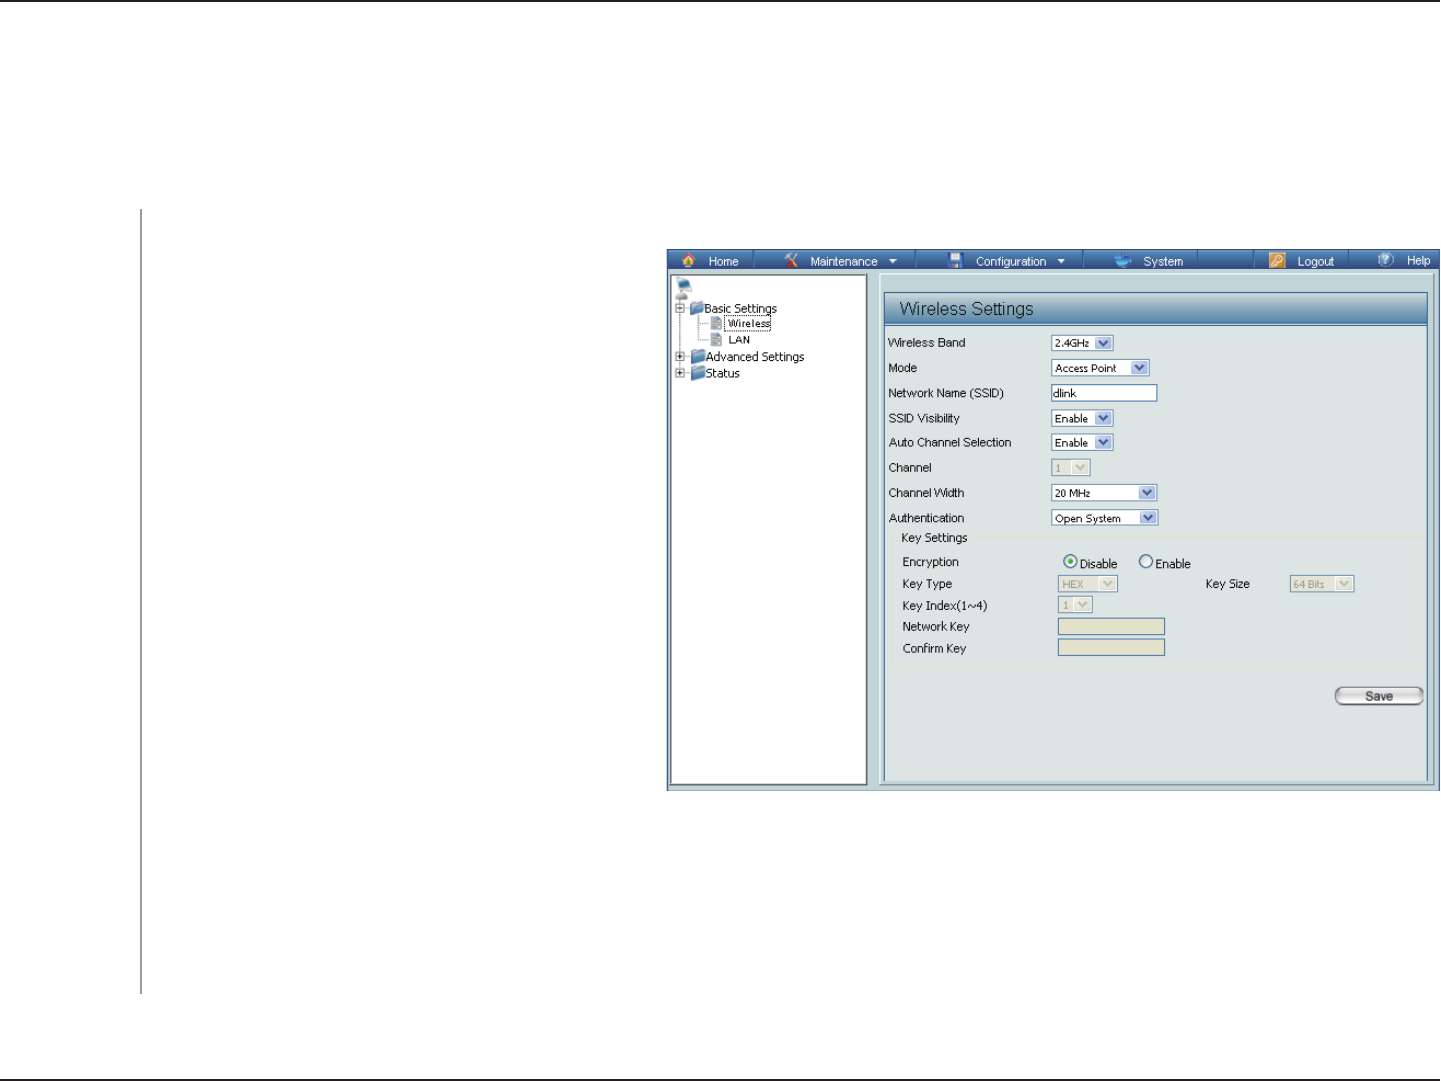
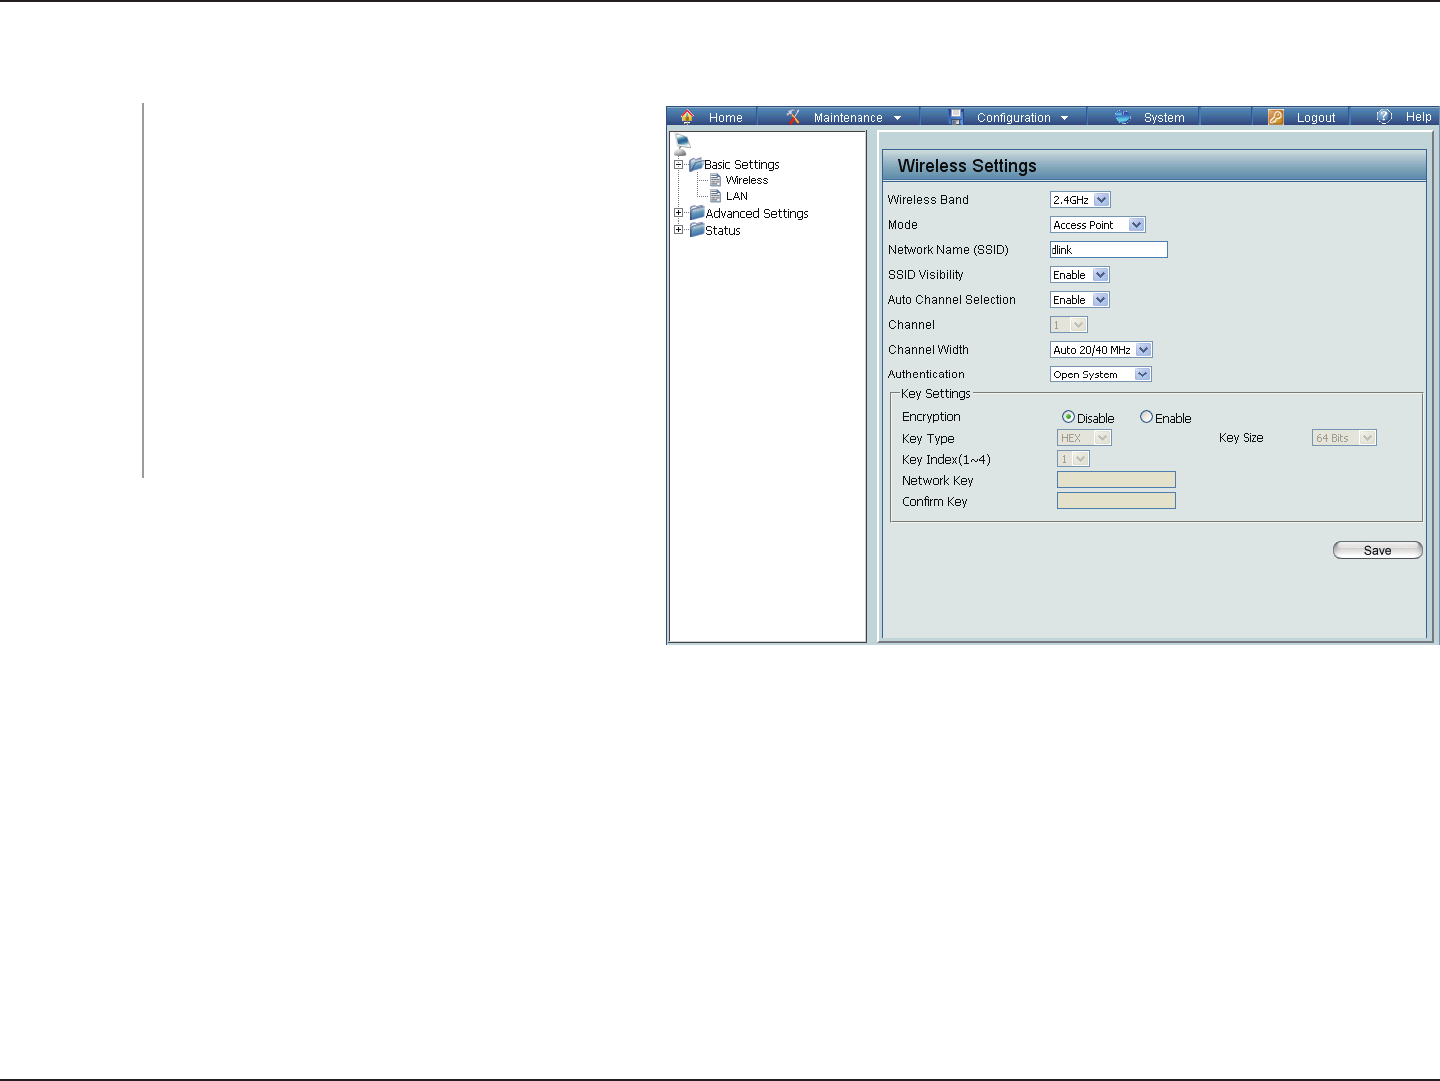
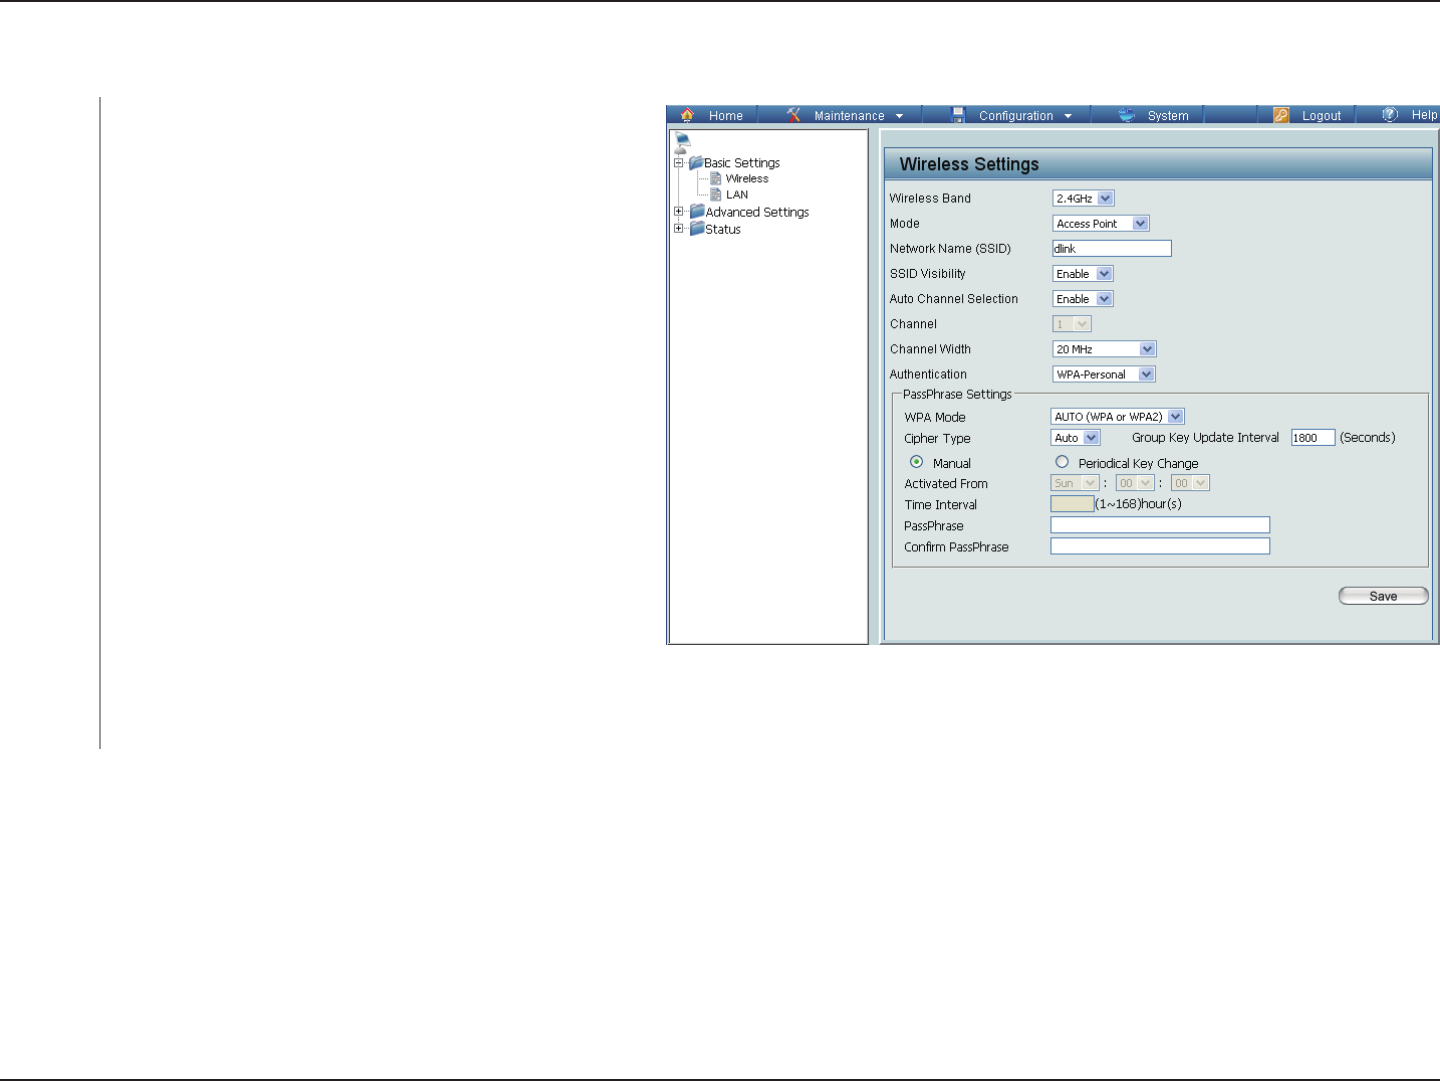
Basic Settings
Wireless
Access Point mode
Enabling this feature automatically selects the channel that provides the best wireless performance. Enable is set by
default. The channel selection process only occurs when the AP is booting up.
All devices on the network must share the same channel. To change the channel, first toggle the Auto Channel Selection
setting to Disable, and then use the drop-down menu to make the desired selection.
Note: The wireless adapters will automatically scan and match the wireless settings.
Mode:
Network Name
(SSID):
SSID Visibility:
Auto Channel
Selection:
Channel:
Wireless Band: Select 2.4GHzfrom the drop-down menu.
DAP-2320
Select Access Point from the drop-down
menu. The other three choices are WDS with
AP, WDS, and Wireless Client.
Service Set Identifier (SSID) is the name
designated for a specific wireless local area
network (WLAN). The SSID’s factory default
setting is dlink. The SSID can be easily
changed to connect to an existing wireless
network or to establish a new wireless network.
The SSID can be up to 32 characters and is
case-sensitive.
Enable or Disable SSID visibility. Enabling
this feature broadcasts the SSID across the
network, thus making it visible to all network
users.

18D-Link DAP-2320 User Manual
Section 3 - Configuration
Channel Width:
Authentication:
Allows you to select the channel width you would like to operate in. Select 20 MHz if you are not using any 802.11n wireless
clients. Auto 20/40 MHz allows you to connect to both 802.11n and 802.11b/g wireless devices on your network.
Use the drop-down menu to choose Open System, Shared Key, WPA-Personal, WPA-Enterprise, or 802.11x.
Select Open System to communicate the key across the network.
Select Shared Key to limit communication to only those devices that share the same WEP settings. If multi-SSID is enabled,
this option is not available.
Select WPA-Personal to secure your network using a password and dynamic key changes. No RADIUS server is required.
Select WPA-Enterprise to secure your network with the inclusion of a RADIUS server.
Select 802.11x to secure your network using 802.11x authentication.
19D-Link DAP-2320 User Manual
Section 3 - Configuration
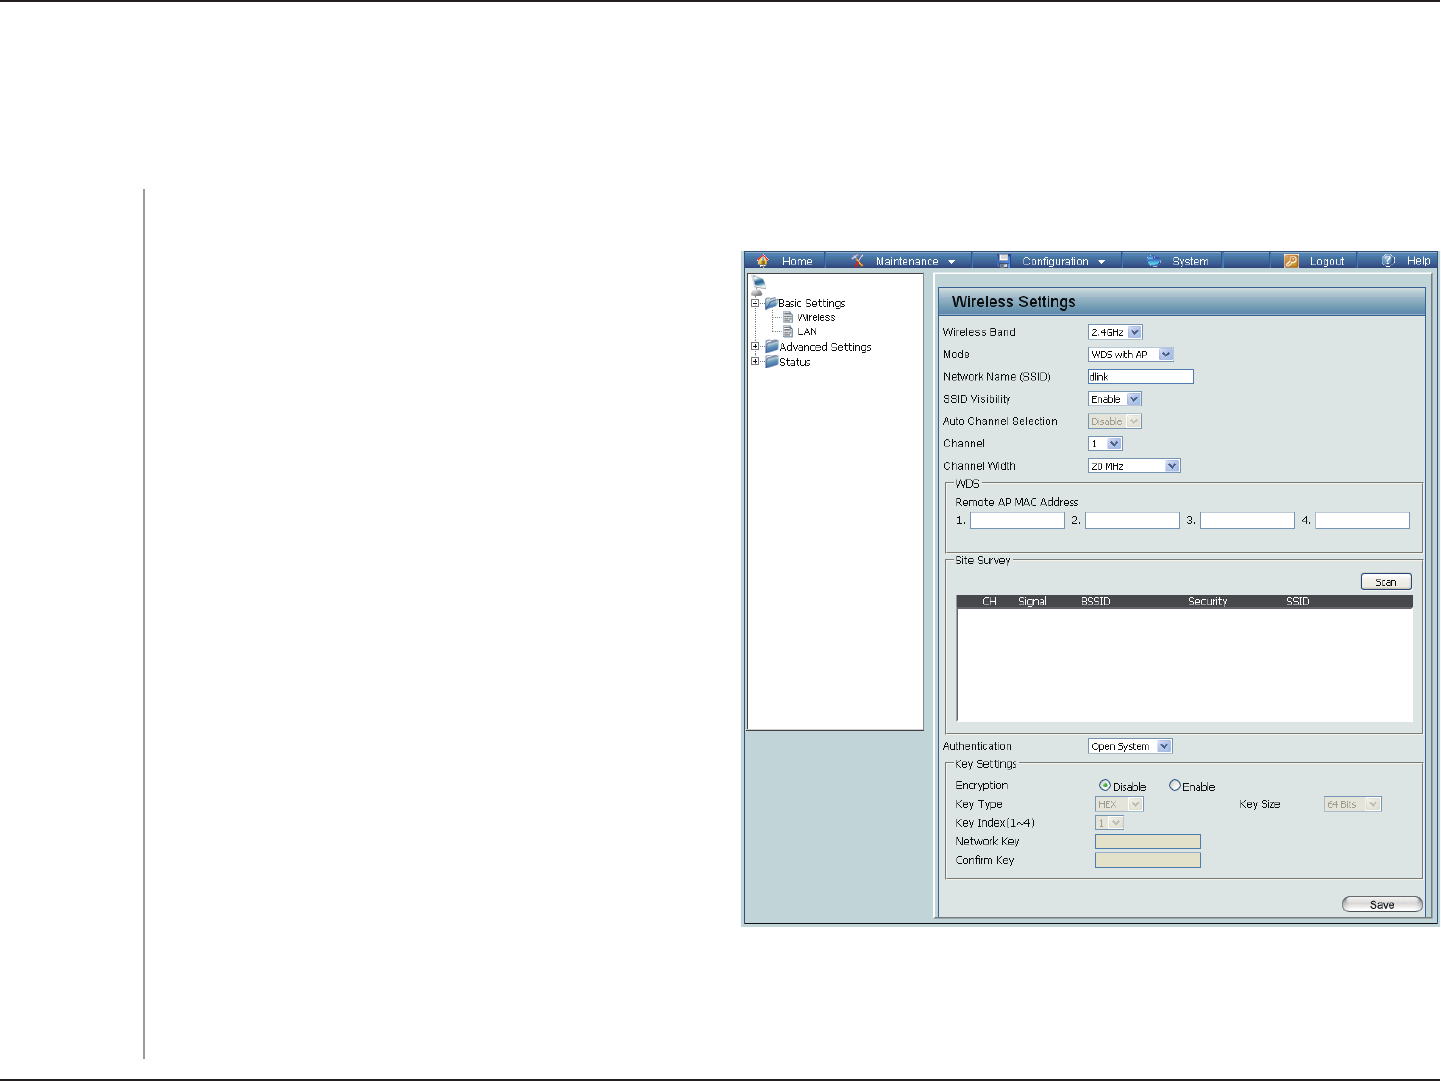
WDS with AP mode
Allows you to select the channel width you would like to operate in. Select 20 MHz if you are not using any 802.11n wireless
clients. Auto 20/40 MHz allows you to connect to both 802.11n and 802.11b/g wireless devices on your network.
Mode:
Network Name
(SSID):
SSID Visibility:
Auto Channel
Selection:
Channel:
Channel Width:
Wireless Band:
In WDS with AP mode, the DAP-2320 wirelessly connects multiple networks while still functioning as a wireless AP.
Select 2.4GHz from the drop-down menu.
DAP-2320
WDS with AP mode is selected from the drop-down
menu.
Service Set Identifier (SSID) is the name designated
for a specific wireless local area network (WLAN). The
SSID’s factory default setting is dlink. The SSID can
be easily changed to connect to an existing wireless
network or to establish a new wireless network.
Enable or Disable SSID visibility. Enabling this feature
broadcasts the SSID across the network, thus making
it visible to all network users.
Enabling this feature automatically selects the channel
that will provide the best wireless performance. This
feature is not supported in WDS with AP mode. The
channel selection process only occurs when the AP
is booting up.
All devices on the network must share the same
channel. To change the channel, use the drop-down
menu to make the desired selection. (Note: The
wireless adapters will automatically scan and match
the wireless settings.)

20D-Link DAP-2320 User Manual
Section 3 - Configuration
Enter the MAC addresses of the APs on your network that will serve as bridges to wirelessly connect multiple networks.
Click on the Scan button to search for available wireless networks, then click on the available network that you want to
connect with.
Use the drop-down menu to choose Open System, Shared Key, or WPA-Personal.
Select Open System to communicate the key across the network.
Select Shared Key to limit communication to only those devices that share the same WEP settings. If multi-SSID is enabled,
this option is not available.
Select WPA-Personal to secure your network using a password and dynamic key changes. No RADIUS server is required.
Remote AP MAC
Address:
Site Survey:
Authentication:
21D-Link DAP-2320 User Manual
Section 3 - Configuration
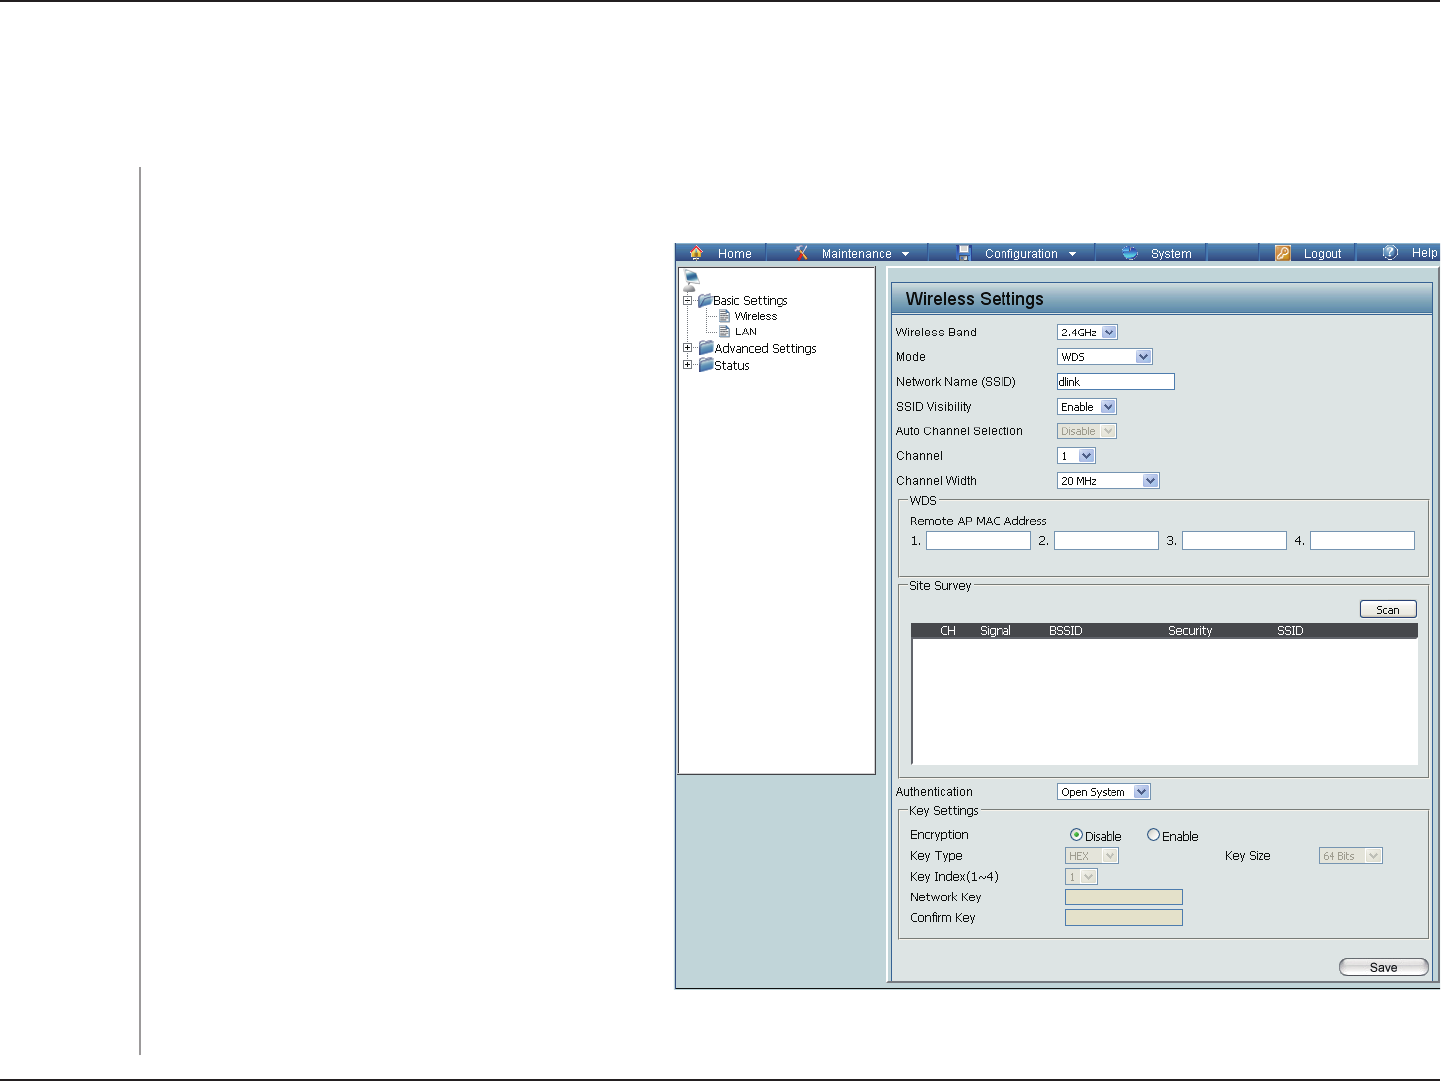
WDS mode
In WDS mode, the DAP-2320 wirelessly connects multiple networks, without functioning as a wireless AP.
WDS is selected from the drop-down menu.
Service Set Identifier (SSID) is the name designated
for a specific wireless local area network (WLAN).
The SSID’s factory default setting is dlink. The
SSID can be easily changed to connect to an
existing wireless network or to establish a new
wireless network.
Enable or Disable SSID visibility. Enabling this
feature broadcasts the SSID across the network,
thus making it visible to all network users.
Enabling this feature automatically selects
the channel that will provide the best wireless
performance. This feature is not supported in
WDS mode.
All devices on the network must share the
same channel. To change the channel, use the
drop-down menu to make the desired selection.
Use the drop-down menu to choose 20 MHz or
Auto 20/40 MHz.
Enter the MAC addresses of the APs on your
network that will serve as bridges to wirelessly
connect multiple networks.
Mode:
Network Name
(SSID):
SSID Visibility:
Auto Channel
Selection:
Channel:
Channel Width:
Remote AP MAC
Address:
Wireless Band: Select 2.4GHz from the drop-down menu.
DAP-2320

22D-Link DAP-2320 User Manual
Section 3 - Configuration
Click on the Scan button to search for available wireless networks, then click on the available network that you want to
connect with.
Use the drop-down menu to choose Open System, Shared Key, or WPA-Personal.
Select Open System to communicate the key across the network.
Select Shared Key to limit communication to only those devices that share the same WEP settings.
Select WPA-Personal to secure your network using a password and dynamic key changes. No RADIUS server is required.
Site Survey:
Authentication:
23D-Link DAP-2320 User Manual
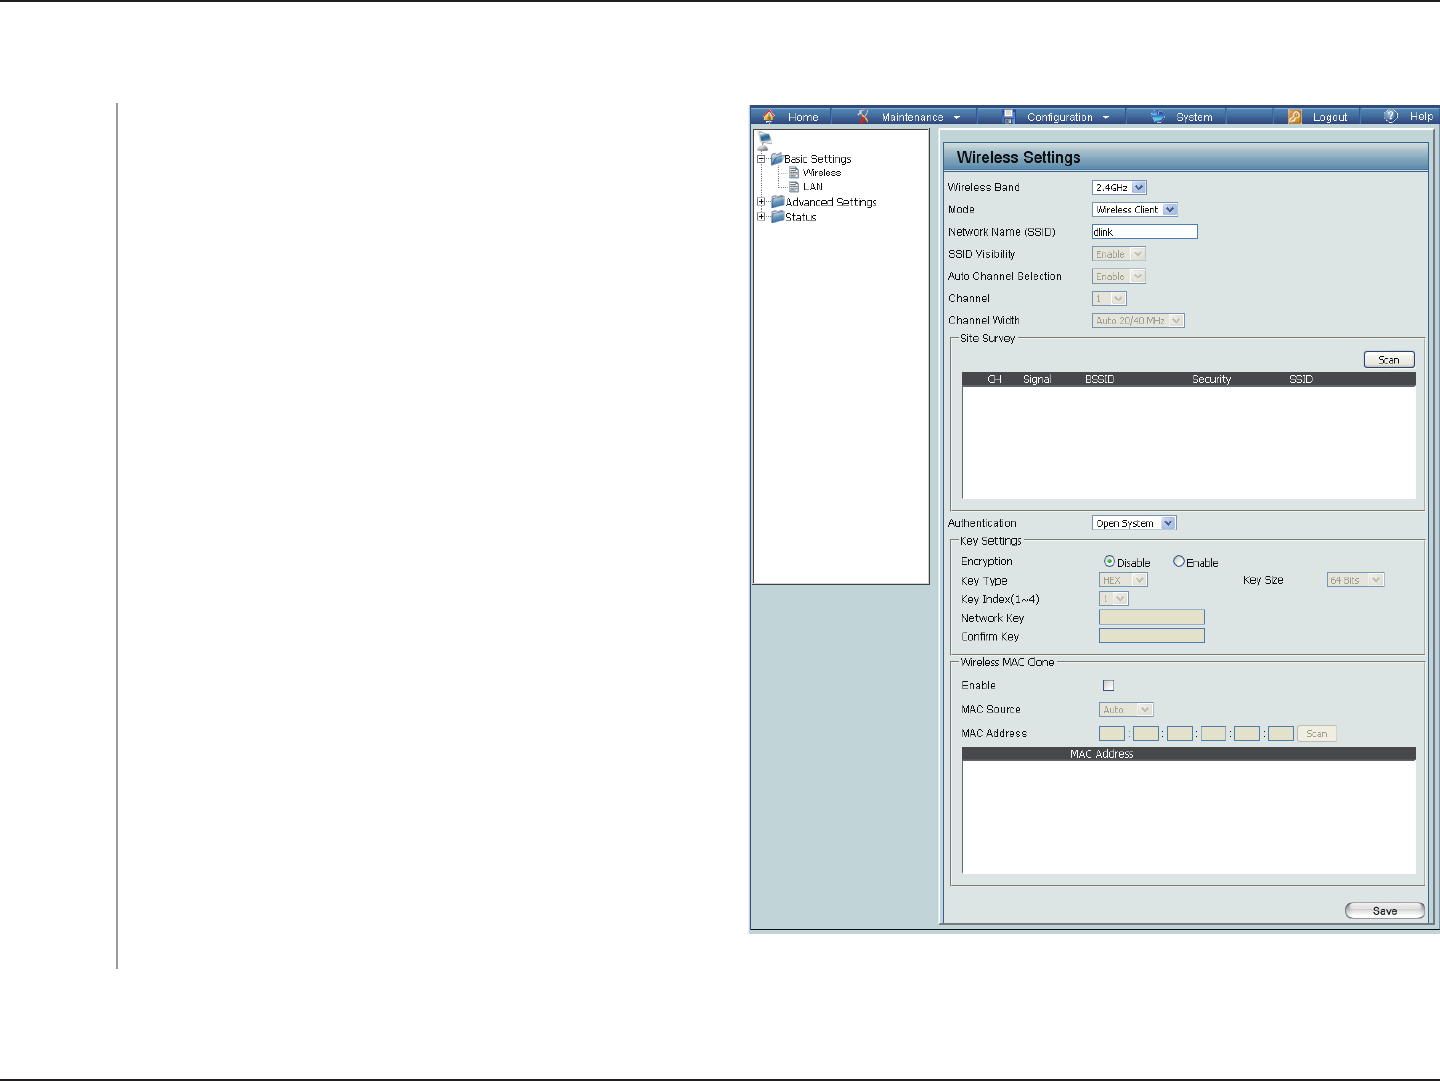
Section 3 - Configuration
Wireless Client mode
Mode:
Network Name
(SSID):
SSID Visibility:
Auto Channel
Selection:
Channel:
Channel Width:
Site Survey:
Authentication:
Enable:
MAC Source:
MAC Address:
Wireless Band: Select 2.4GHz from the drop-down menu.
Wireless Client is selected from the drop-down menu.
Service Set Identifier (SSID) is the name designated for a specific
wireless local area network (WLAN). The SSID’s factory default
setting is dlink. The SSID can be easily changed to connect to an
existing wireless network.
This option is unavailable in Wireless Client mode.
Enabling this feature automatically selects the channel that will
provide the best wireless performance. This feature is not supported
in Wireless Client mode.
The channel used will be displayed, and matches the AP that the
DAP-2320 is connected to when set to Wireless Client mode.
Use the drop-down menu to choose 20 MHz or Auto 20/40 MHz.
Click on the Scan button to search for available wireless networks,
then click on the available network that you want to connect with.
Use the drop-down menu to choose Open System or
WPA-Personal.
Select Open System to communicate the key across the network.
Select WPA-Personal to secure your network using a password and
dynamic key changes. No RADIUS server is required.
Check to enable clone MAC. This feature will allow you to change
the MAC address of the access point to the MAC address of a client.
Select the MAC source from the drop-down menu.
Enter the MAC address that you would like to assign to the access
point.
DAP-2320
24D-Link DAP-2320 User Manual
Section 3 - Configuration
Open System/Shared Key Authentication
Encryption:
Key Type*:
Key Size:
Key Index (1-4):
Key:
Use the radio button to disable or enable
encryption.
Select HEX or ASCII.
Select 64 Bits or 128 Bits.
Select the 1st through the 4th key to be the
active key.
Input up to four keys for encryption. You will
select one of these keys in the Key Index
drop-down menu.
DAP-2320
**Hexadecimal (HEX) digits consist of the numbers 0-9 and the letters A-F.
*ASCII (American Standard Code for Information Interchange) is a code that represents English letters using numbers
ranging from 0-127.
25D-Link DAP-2320 User Manual
Section 3 - Configuration
WPA/WPA2-Personal Authentication
When WPA-Personal is selected for Authentication
type, you must also select a WPA mode from the
drop-down menu: AUTO (WPA or WPA2), WPA2
Only, or WPA Only. WPA and WPA2 use different
algorithms. AUTO (WPA or WPA2) allows you to
use both WPA and WPA2.
When you select WPA-Personal, you must also
select AUTO, AES, or TKIP from the drop-down
menu.
Select the interval during which the group
key will be valid. The default value of 1800 is
recommended.
Select Manual to enter your key (PassPhrase).
You can select Periodical Key Change to have
the access point automatically change your
PassPhrase. Enter the Activate From time and the
time in hours to change the key.
When you select WPA-Personal, please enter a
PassPhrase in the corresponding field.
WPA Mode:
Cipher Type:
Group Key
Update:
Periodical
Key Change:
PassPhrase:
DAP-2320
26D-Link DAP-2320 User Manual
Section 3 - Configuration
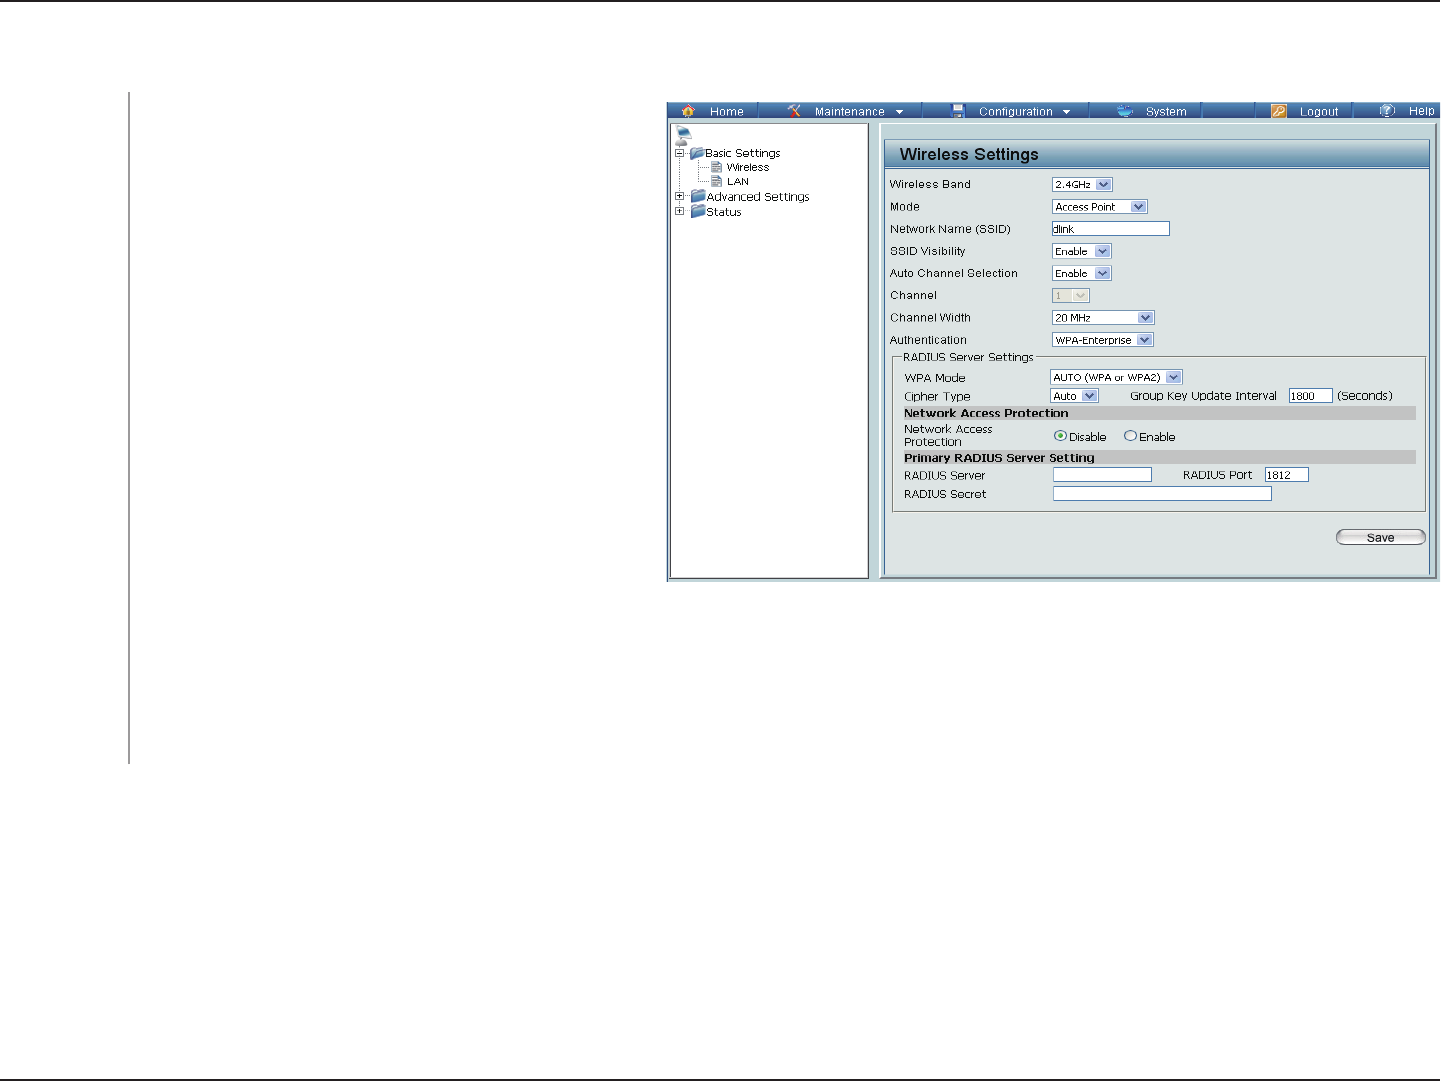
WPA/WPA2-Enterprise Authentication
When WPA-Enterprise is selected, you must
also select a WPA mode from the drop-down
menu: AUTO (WPA or WPA2), WPA2 Only,
or WPA Only. WPA and WPA2 use different
algorithms. AUTO (WPA or WPA2) allows you
to use both WPA and WPA2.
When WPA-Enterprise is selected, you must
also select a cipher type from the drop-down
menu: Auto, AES, or TKIP.
Select the interval during which the group key
will be valid. The recommended value is 1800.
A lower interval may reduce data transfer rates.
Enable or disable Microsoft Network Access
Protection.
Enter the IP address of the RADIUS server.
Enter the RADIUS port.
Enter the RADIUS secret.
WPA Mode:
Cipher Type:
Group Key
Update Interval:
Network Access
Protection:
RADIUS Server:
RADIUS Port:
RADIUS Secret:
DAP-2320
27D-Link DAP-2320 User Manual
Section 3 - Configuration
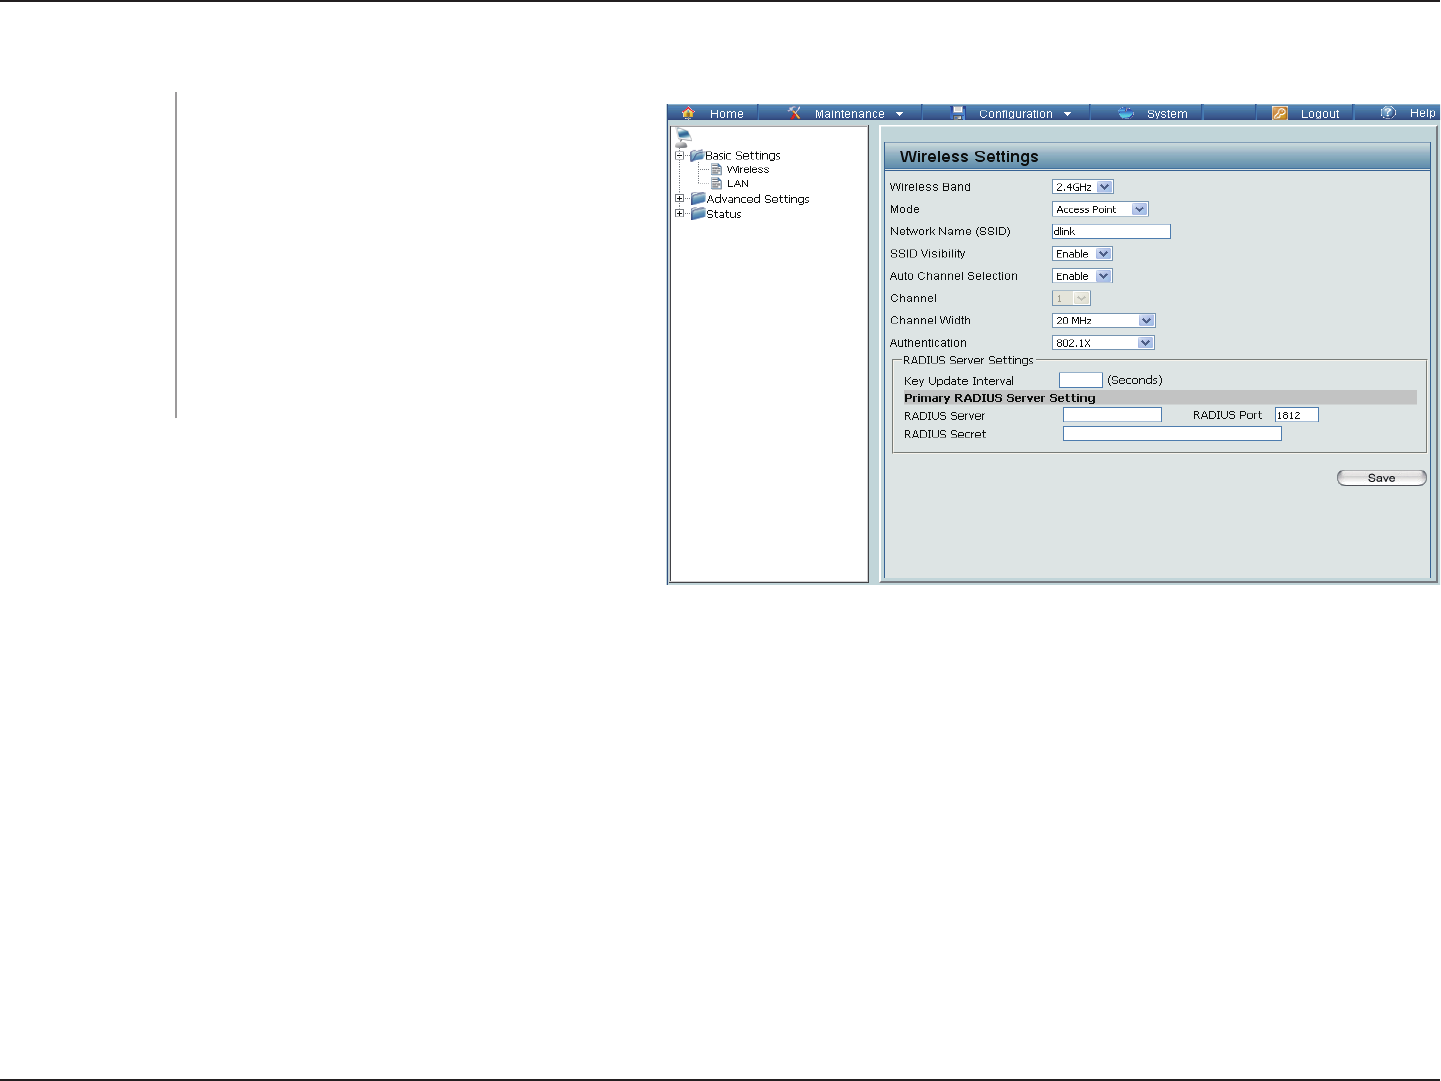
802.11x Authentication
Select the interval during which the group
key will be valid (1800 is the recommended
value). A lower interval may reduce data
transfer rates.
Enter the IP address of the RADIUS server.
Enter the RADIUS port.
Enter the RADIUS secret.
Key Update Interval:
RADIUS Server:
RADIUS Port:
RADIUS Secret:
DAP-2320
28D-Link DAP-2320 User Manual
Section 3 - Configuration
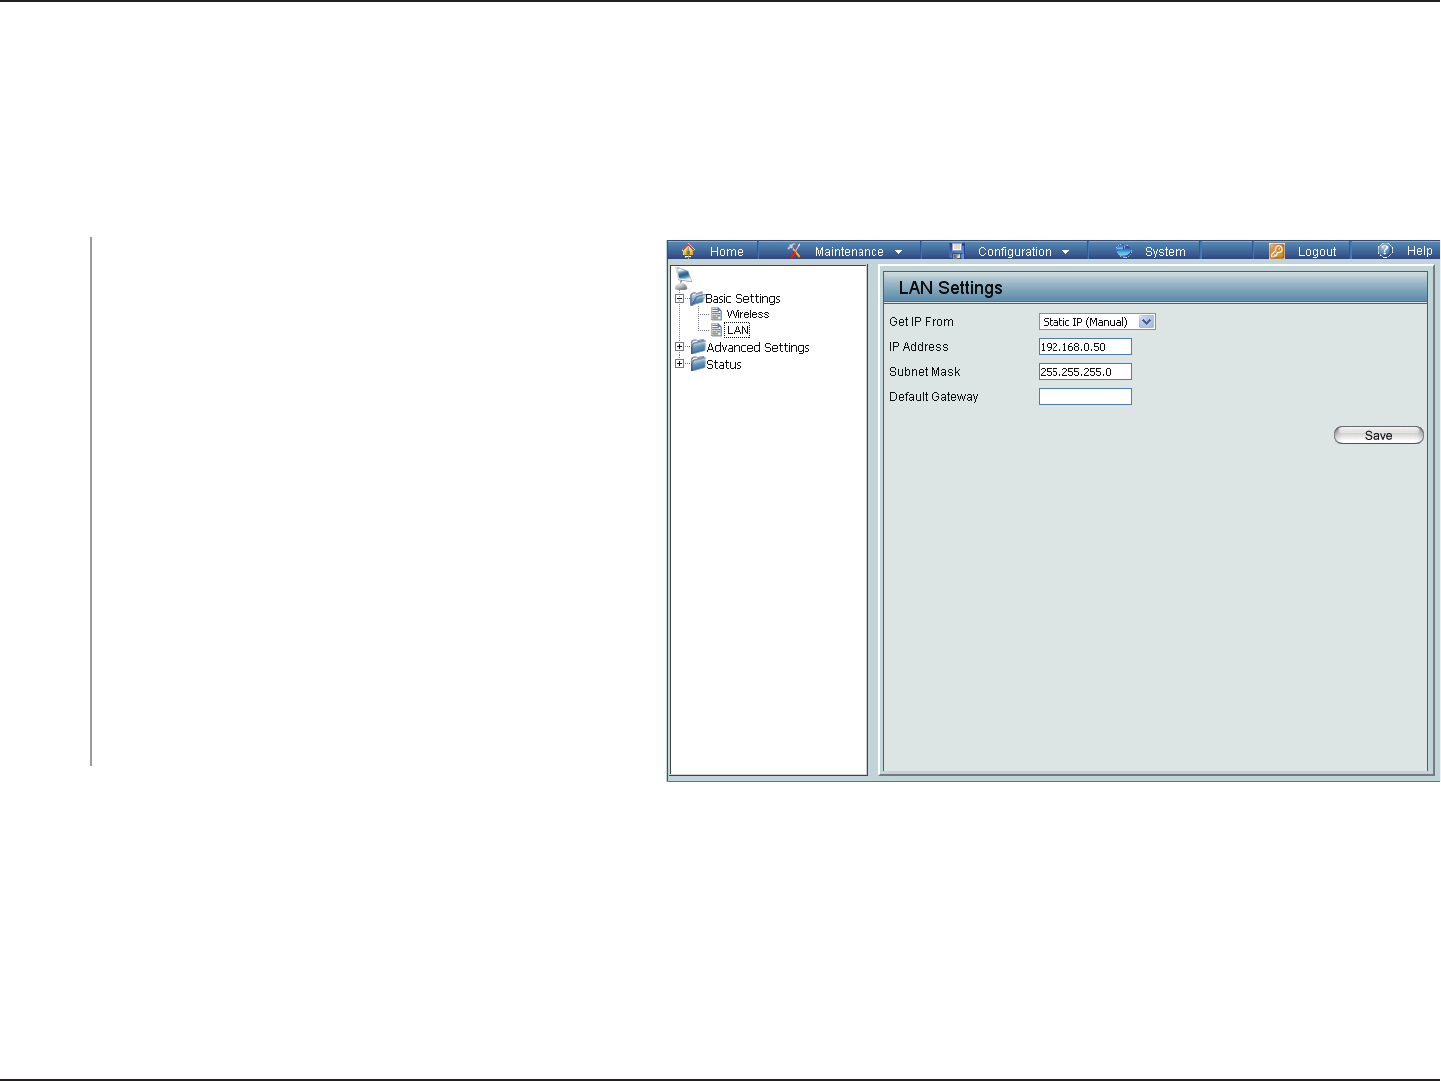
Static IP (Manual) is chosen here. Choose this
option if you do not have a DHCP server in your
network, or if you wish to assign a static IP address
to the DAP-2320. When Dynamic IP (DHCP) is
selected, the other fields here will be grayed out.
Please allow about two minutes for the DHCP client
to be functional once this selection is made.
The default IP address is 192.168.0.50. Assign a
static IP address that is within the IP address range
of your network.
Enter the subnet mask. All devices in the network
must share the same subnet mask.
Enter the IP address of the gateway in your network.
If there is a gateway in your network, please enter
an IP address within the range of your network.
LAN
Get IP From:
IP Address:
Subnet
Mask:
Default
Gateway:
LAN is short for Local Area Network. This is considered your internal network. These are the IP settings of the LAN
interface for the DAP-2320. These settings may be referred to as private settings. You may change the LAN IP address
if needed. The LAN IP address is private to your internal network and cannot be seen on the Internet.
DAP-2320
29D-Link DAP-2320 User Manual
Section 3 - Configuration
Advanced Settings
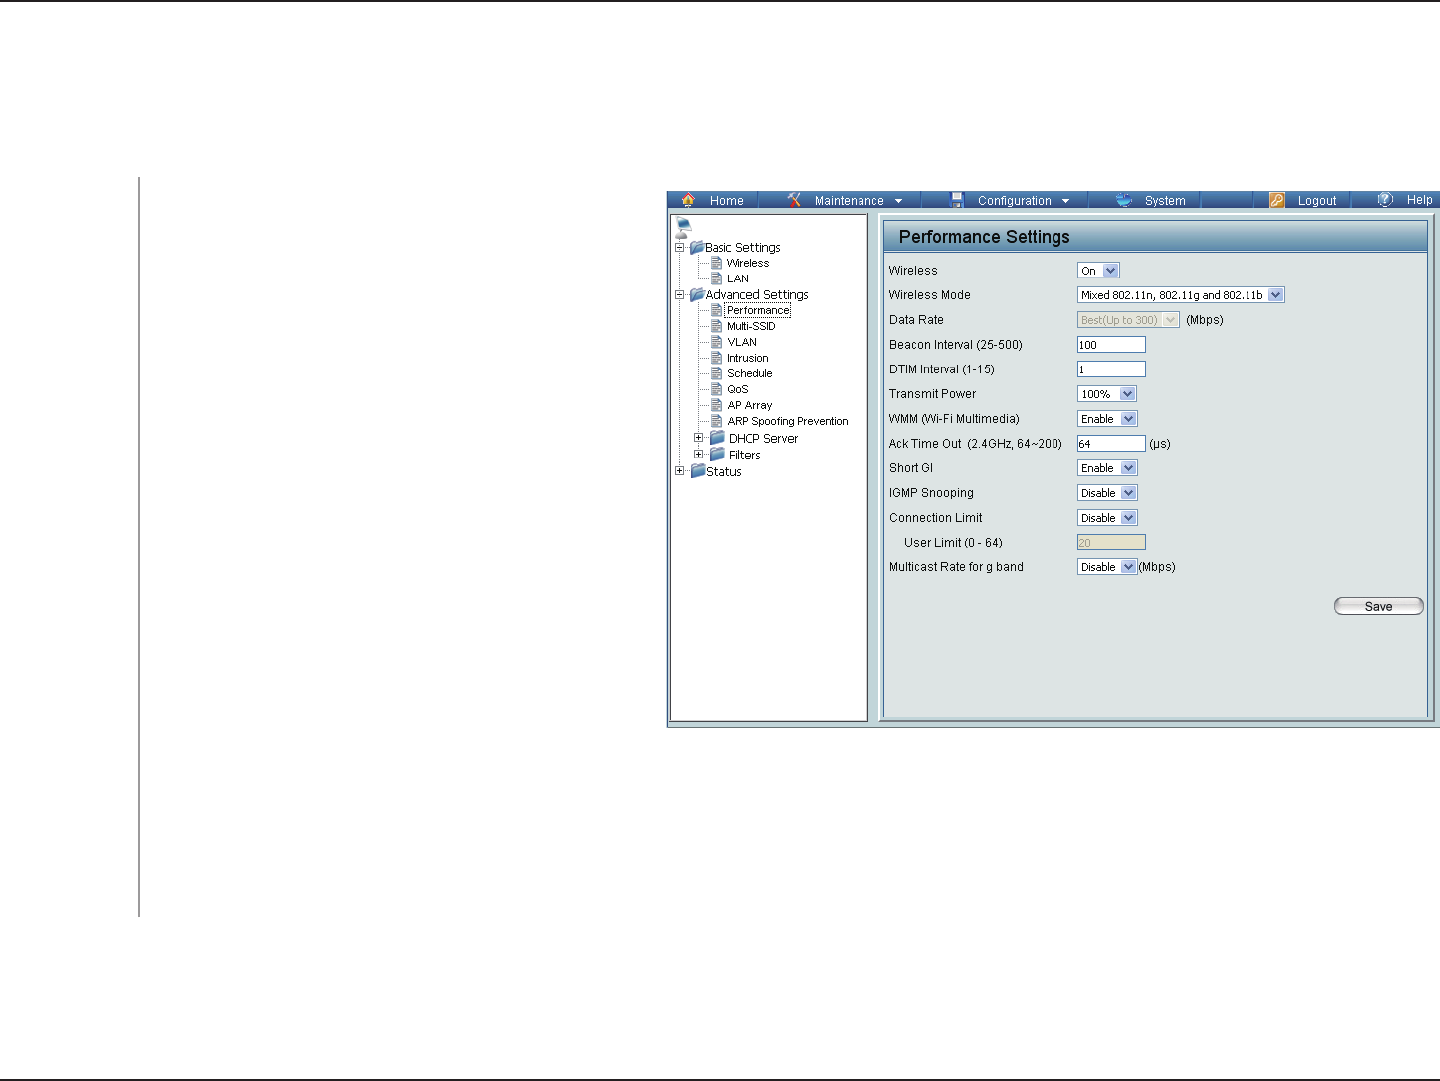
Performance
*Maximum wireless signal rate derived from IEEE Standard 802.11 specifications. Actual data throughput may vary. Network conditions and environmental factors,
including volume of network traffic, building materials and construction, and network overhead can lower actual data throughout rate.
Wireless:
Wireless Mode:
Data Rate*:
Use the drop-down menu to turn the wireless
function On or Off.
The different combination of clients that can
be supported include Mixed 802.11n, 802.11g
and 802.11b, Mixed 802.11g and 802.11b
and 802.11n Only in the 2.4 GHz band and
Mixed 802.11n only, and 802.11n Only in the
5 GHz band. Please note that when backwards
compatibility is enabled for legacy (802.11g/b)
clients, degradation of 802.11n (draft) wireless
performance is expected.
Indicate the base transfer rate of wireless
adapters on the wireless LAN. The AP will
adjust the base transfer rate depending on
the base rate of the connected device. If there
are obstacles or interference, the AP will step
down the rate. This option is enabled in Mixed
802.11g and 802.11b mode (for 2.4 GHz) Only
mode (for 5 GHz). The choices available are
Best (Up to 54), 54, 48, 36, 24, 18, 12, 9, 6 for
5 GHz and Best (Up to 54), 54, 48, 36, 24, 18,
12, 9, 6, 11, 5.5, 2 or 1 for 2.4 GHz.
DAP-2320

30D-Link DAP-2320 User Manual
Section 3 - Configuration
Beacons are packets sent by an access point to synchronize a wireless network. Specify a value in milliseconds. The
default (100) is recommended. Setting a higher beacon interval can help to save the power of wireless clients, while
setting a lower one can help a wireless client connect to an access point faster.
Select a Delivery Traffic Indication Message setting between 1 and 15. The default value is 1. DTIM is a countdown inform-
ing clients of the next window for listening to broadcast and multicast messages.
This setting determines the power level of the wireless transmission. Transmitting power can be adjusted to eliminate
overlapping of wireless area coverage between two access points where interference is a major concern. For example,
if wireless coverage is intended for half of the area, then select 50% as the option. Use the drop-down menu to select
100%, 50%, 25%, or 12.5%.
WMM stands for Wi-Fi Multimedia. Enabling this feature will improve the user experience for audio and video applications
over a Wi-Fi network.
To effectively optimize throughput over long distance links, enter a value for Acknowledgement Time Out between 25 and
200 microseconds for 5 GHz or from 64 to 200 microseconds in the 2.4 GHz in the field provided.
Select Enable or Disable. Enabling a short guard interval can increase throughput. However, be aware that it can also
increase the error rate in some installations due to increased sensitivity to radio-frequency installations.
Select Enable or Disable. Internet Group Management Protocol allows the AP to recognize IGMP queries and reports
sent between routers and an IGMP host (wireless STA). When IGMP snooping is enabled, the AP will forward multicast
packets to an IGMP host based on IGMP messages passing through the AP.
Select Enable or Disable. This is an option for load balancing. This determines whether to limit the number of users
accessing this device. The exact number is entered in the User Limit field below. This feature allows the user to share the
wireless network traffic and the client using multiple APs. If this function is enabled, when the number of users exceeds
this value, the DAP-2320 will not allow clients to associate with the AP.
Set the maximum amount of users that are allowed access (0-64 users). To use this feature, the Connection Limit above
must be enabled. For most users, a limit of 10 is recommended. The default setting is 20.
Beacon Interval
(25-500):
DTM Interval
(1-15):
Transmit Power:
WMM (Wi-Fi
Multimedia):
Ack Time Out
(2.4 GHZ, 64~200)
or Ack Time Out
(5 GHZ, 25~200):
Short GI:
IGMP Snooping:
Connection Limit:
User Limit (0-64):
31D-Link DAP-2320 User Manual
Section 3 - Configuration
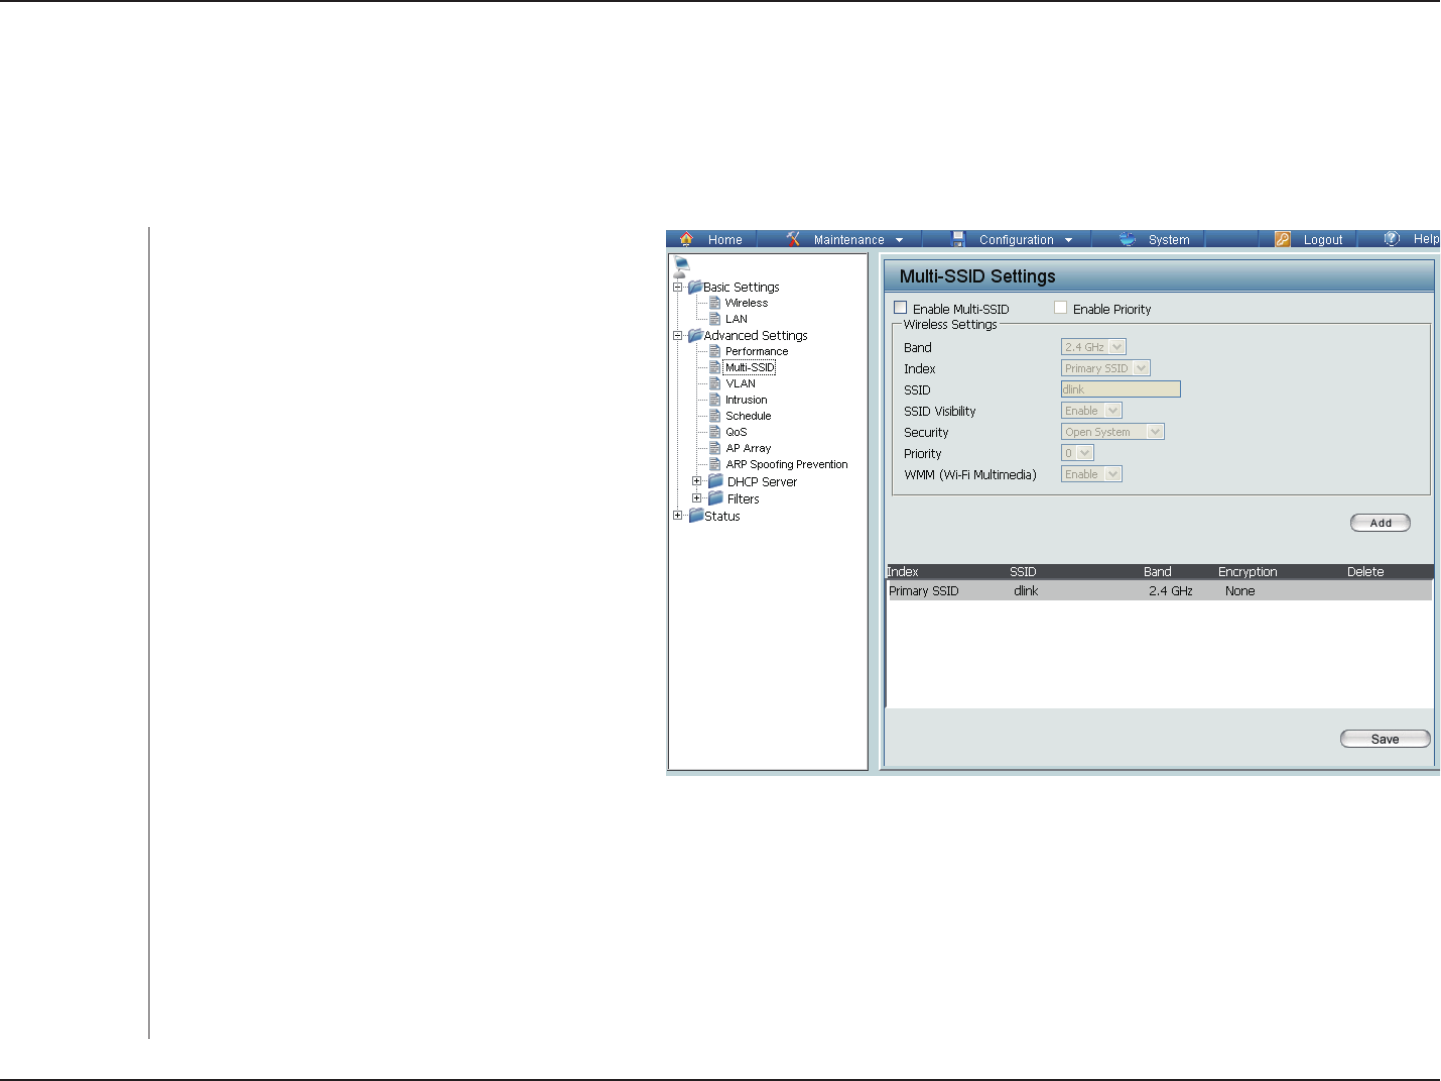
The device supports up to four multiple Service Set Identifiers. In the Basic > Wireless section, you can set the
Primary SSID. The SSID’s factory default setting is dlink. The SSID can be easily changed to connect to an existing
wireless network or to establish a new wireless network.
Check to enable support for multiple SSIDs.
This read-only value is the current band
setting.
You can select up to three multi-SSIDs. With
the Primary SSID, you have a total of four
multi-SSIDs.
Service Set Identifier (SSID) is the name
designated for a specific wireless local area
network (WLAN). The SSID’s factory default
setting is dlink. The SSID can be easily
changed to connect to an existing wireless
network or to establish a new wireless
network.
Enable or Disable SSID visibility. Enabling
this feature broadcasts the SSID across the
network, thus making it visible to all network
users.
The Multi-SSID security can be Open System,
WPA-Personal, or WPA-Enterprise. For a
detailed description of the Open System
parameters, please go to page 23. For a
detailed description of the WPA-Personal
parameters, please go to page 24. For a
detailed description of the WPA-Enterprise
parameters, please go to page 25.
Enable
Multi-SSID:
Band:
Index:
SSID:
SSID Visibility:
Security:
Multi-SSID
DAP-2320

32D-Link DAP-2320 User Manual
Section 3 - Configuration
Check the Enable Priority box at the top of this window to enable. Select the priority from the drop-down menu.
Select Enable or Disable.
When you select Open System, toggle between Enable and Disable. If Enable is selected, the Key Type, Key Size, Key
Index (1~4), Key, and Confirm Keys must also be configured.
Select HEX or ASCII.
Select 64 Bits or 128 Bits.
Select from the 1st to 4th key to be set as the active key.
Input up to four keys for encryption. You will select one of these keys in the Key Index drop-down menu.
When you select either WPA-Personal or WPA-Enterprise, you must also choose a WPA mode from the drop-down menu:
AUTO (WPA or WPA2), WPA2 Only, or WPA Only. WPA and WPA2 use different algorithms. AUTO (WPA or WPA2)
allows you to use both WPA and WPA2. In addition, you must configure Cipher Type and Group Key Update Interval.
Select Auto, AES, or TKIP from the drop-down menu.
Select the interval during which the group key will be valid. The default value of 1800 seconds is recommended.
When you select WPA-Personal, please enter a PassPhrase in the corresponding field.
When you select WPA-Personal, please re-enter the PassPhrase entered in the previous item in the corresponding field.
When you select WPA-Enterprise, enter the IP address of the RADIUS server. In addition, you must configure RADIUS
Port and RADIUS Secret.
Enter the RADIUS port.
Enter the RADIUS secret.
Priority:
WMM (Wi-Fi
Multimedia):
Encryption:
Key Type:
Key Size:
Key Index (1-4):
Key:
WPA Mode:
Cipher Type:
Group Key Update
Interval:
PassPhrase:
Confirm
PassPhrase:
RADIUS Server:
RADIUS Port:
RADIUS Secret:
33D-Link DAP-2320 User Manual
Section 3 - Configuration
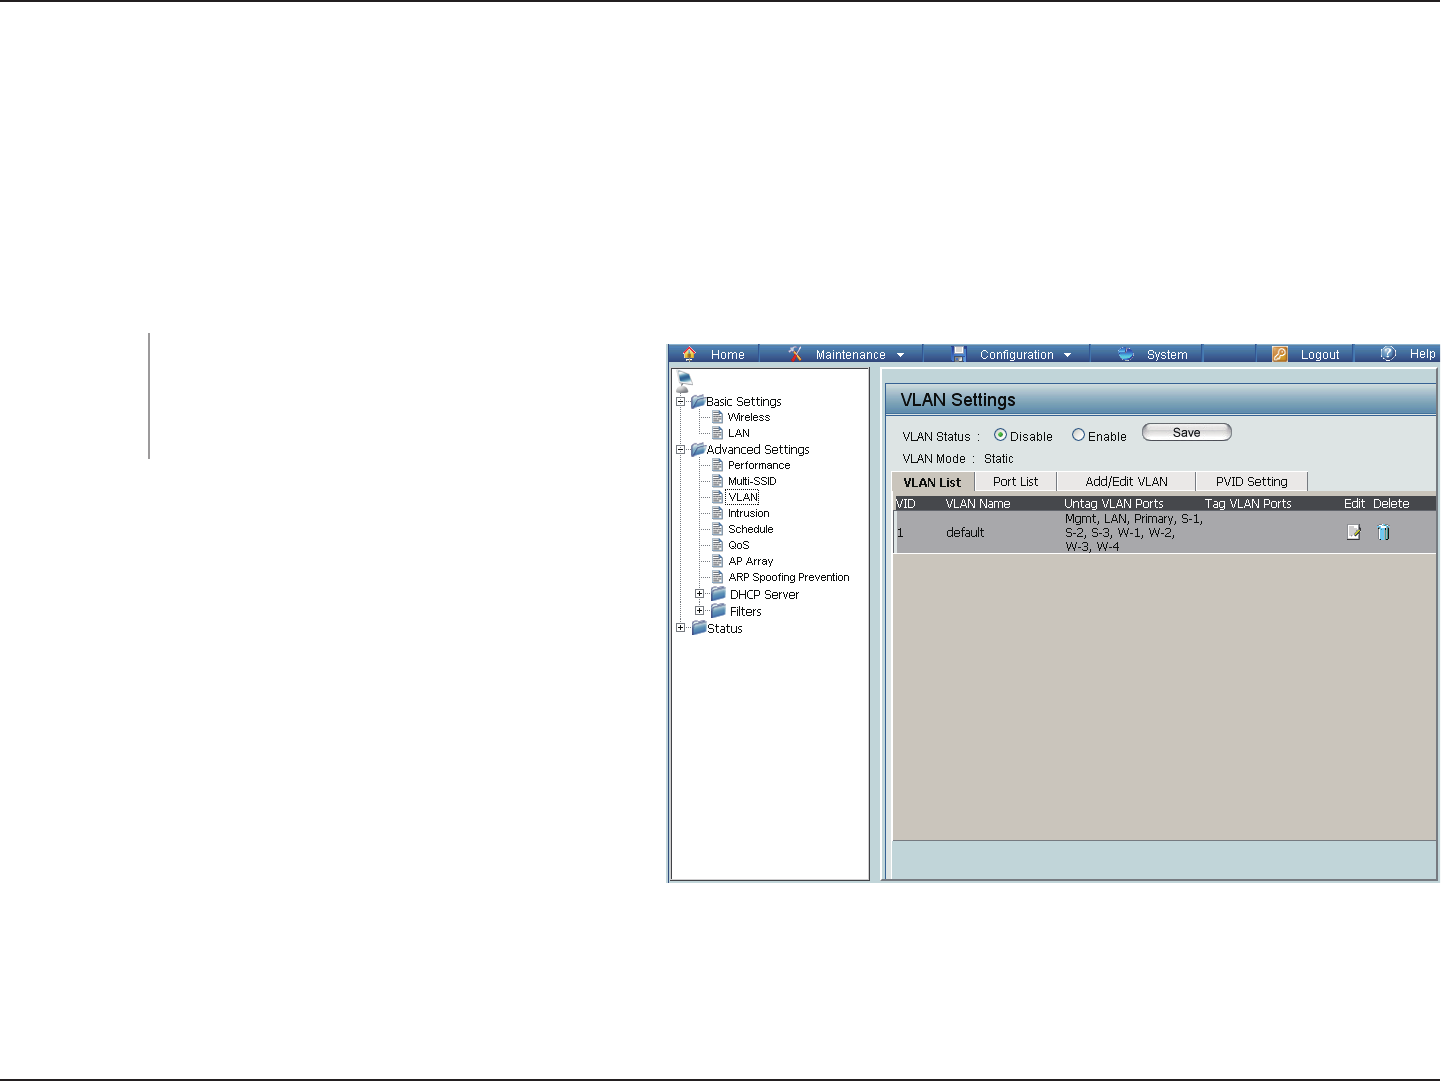
VLAN
VLAN List
The DAP-2320 supports VLANs. VLANs can be created with a Name and VID. Mgmt (TCP stack), LAN, Primary/
Multiple SSID, and WDS connection can be assigned to VLANs as they are physical ports. Any packet which enters the
DAP-2320 without a VLAN tag will have a VLAN tag inserted with a PVID.
The VLAN List tab displays the current VLANs.
Use the radio button to toggle between
Enable or Disable. Next, go to the Add/Edit
VLAN tab to add or modify an item on the
VLAN List tab.
VLAN Status:
DAP-2320
34D-Link DAP-2320 User Manual
Section 3 - Configuration
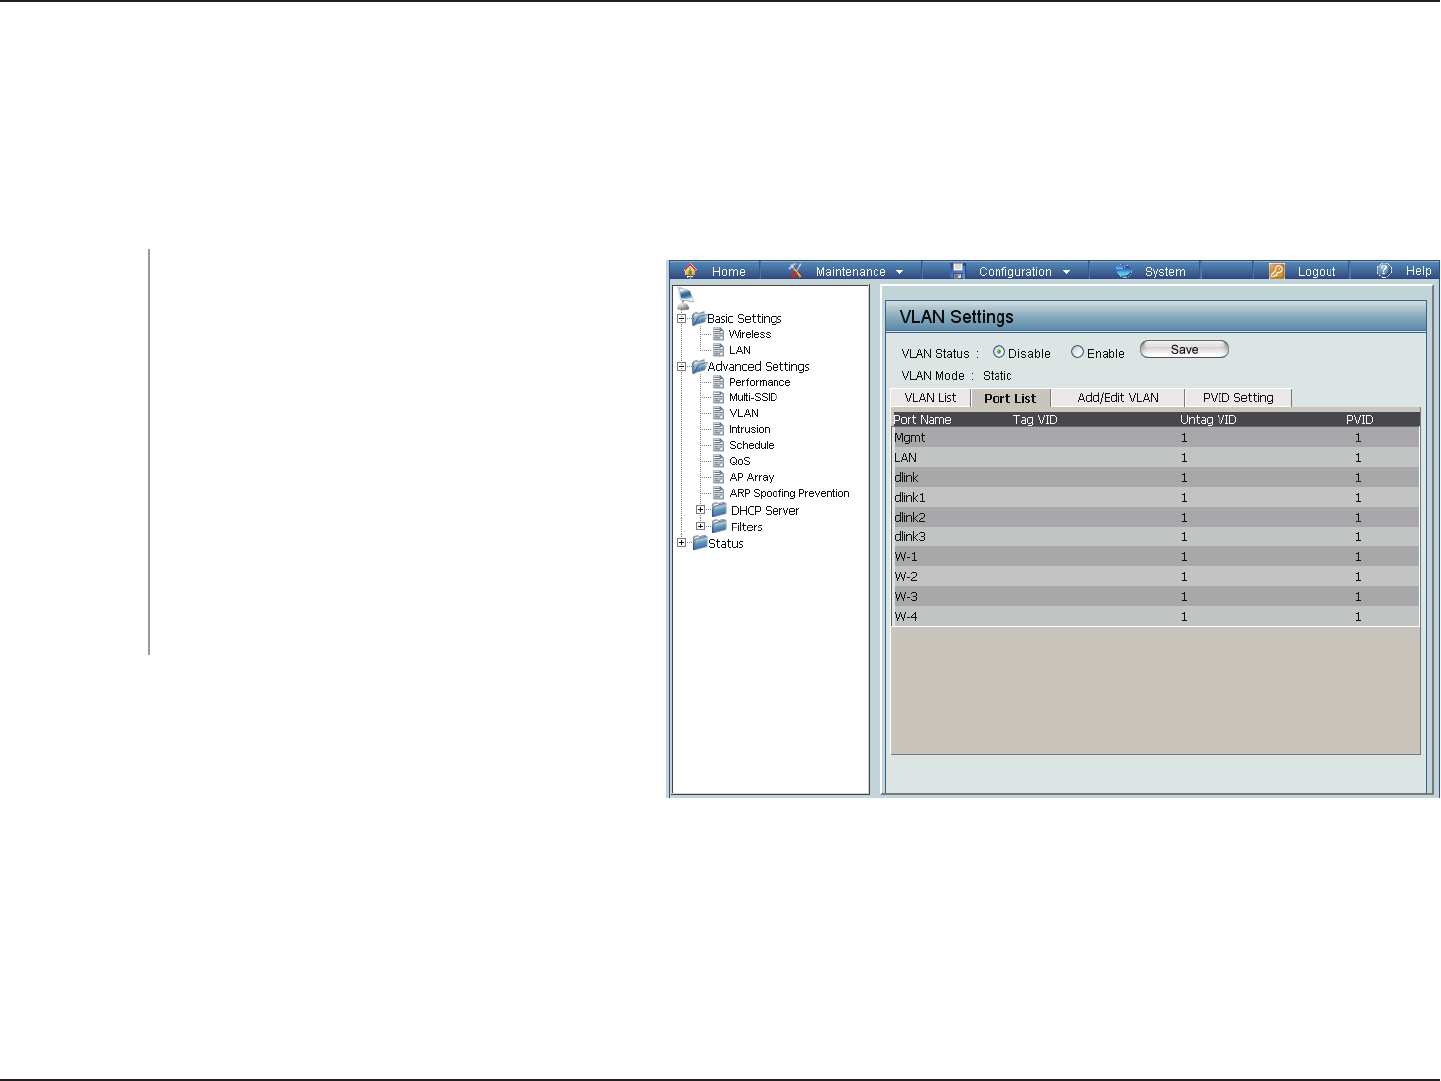
Port List
The Port List tab displays the current ports. If you want to configure the guest and internal networks on a Virtual LAN
(VLAN), the switch and DHCP server you are using must also support VLANs. As a prerequisite step, configure a port
on the switch for handling VLAN tagged packets as described in the IEEE 802.1Q standard.
Use the radio button to toggle to Enable.
Next, go to the Add/Edit VLAN tab to add or
modify an item on the VLAN List tab.
The name of the port is displayed in this
column.
The Tagged VID is displayed in this column.
The Untagged VID is displayed in this
column.
The Port VLAN Identifier is displayed in this
column.
VLAN Status:
Port Name:
Tag VID:
Untag VID:
PVID:
DAP-2320

35D-Link DAP-2320 User Manual
Section 3 - Configuration
Add/Edit VLAN
The Add/Edit VLAN tab is used to configure VLANs. Once you have made the desired changes, click the Save button
to let your changes take effect.
Use the radio button to toggle to Enable.
Provide a number between 1 and 4094 for
the Internal VLAN.
Enter the VLAN to add or modify.
VLAN Status:
VLAN ID:
VLAN Name:
DAP-2320
36D-Link DAP-2320 User Manual
Section 3 - Configuration
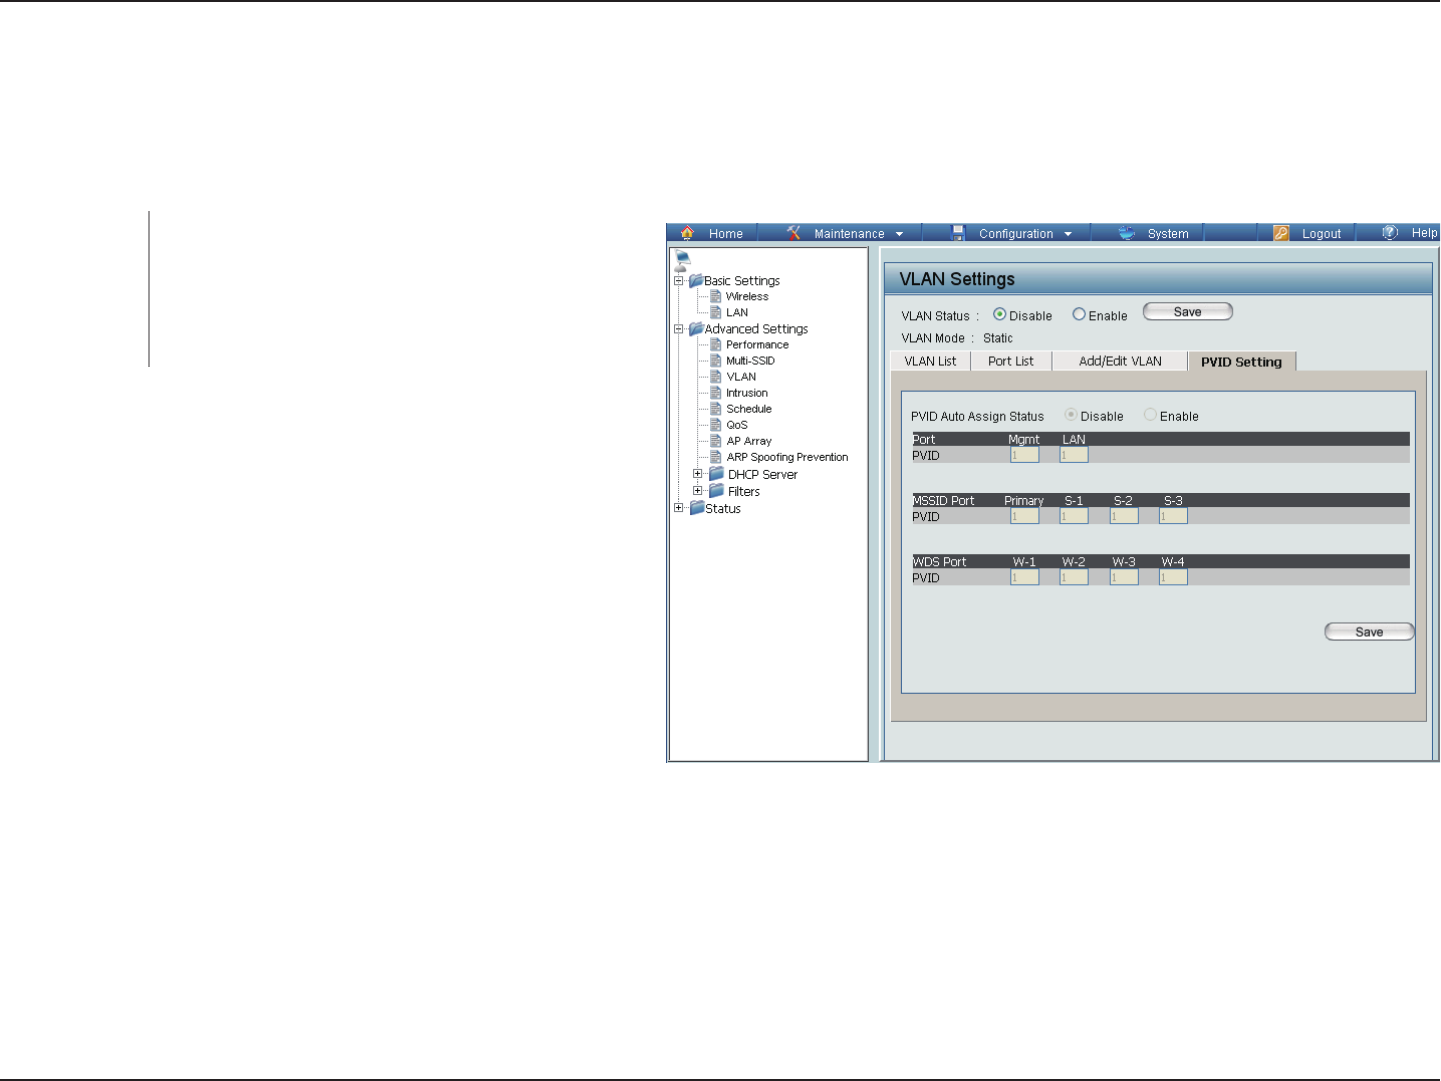
PVID Setting
The PVID Setting tab is used to enable/disable the Port VLAN Identifier Auto Assign Status as well as to configure
various types of PVID settings. Click the Save button to let your changes take effect.
Use the radio button to toggle between
Enable and Disable.
Use the radio button to toggle PVID auto
assign status to Enable.
VLAN Status:
PVID Auto Assign
Status:
DAP-2320
37D-Link DAP-2320 User Manual
Section 3 - Configuration
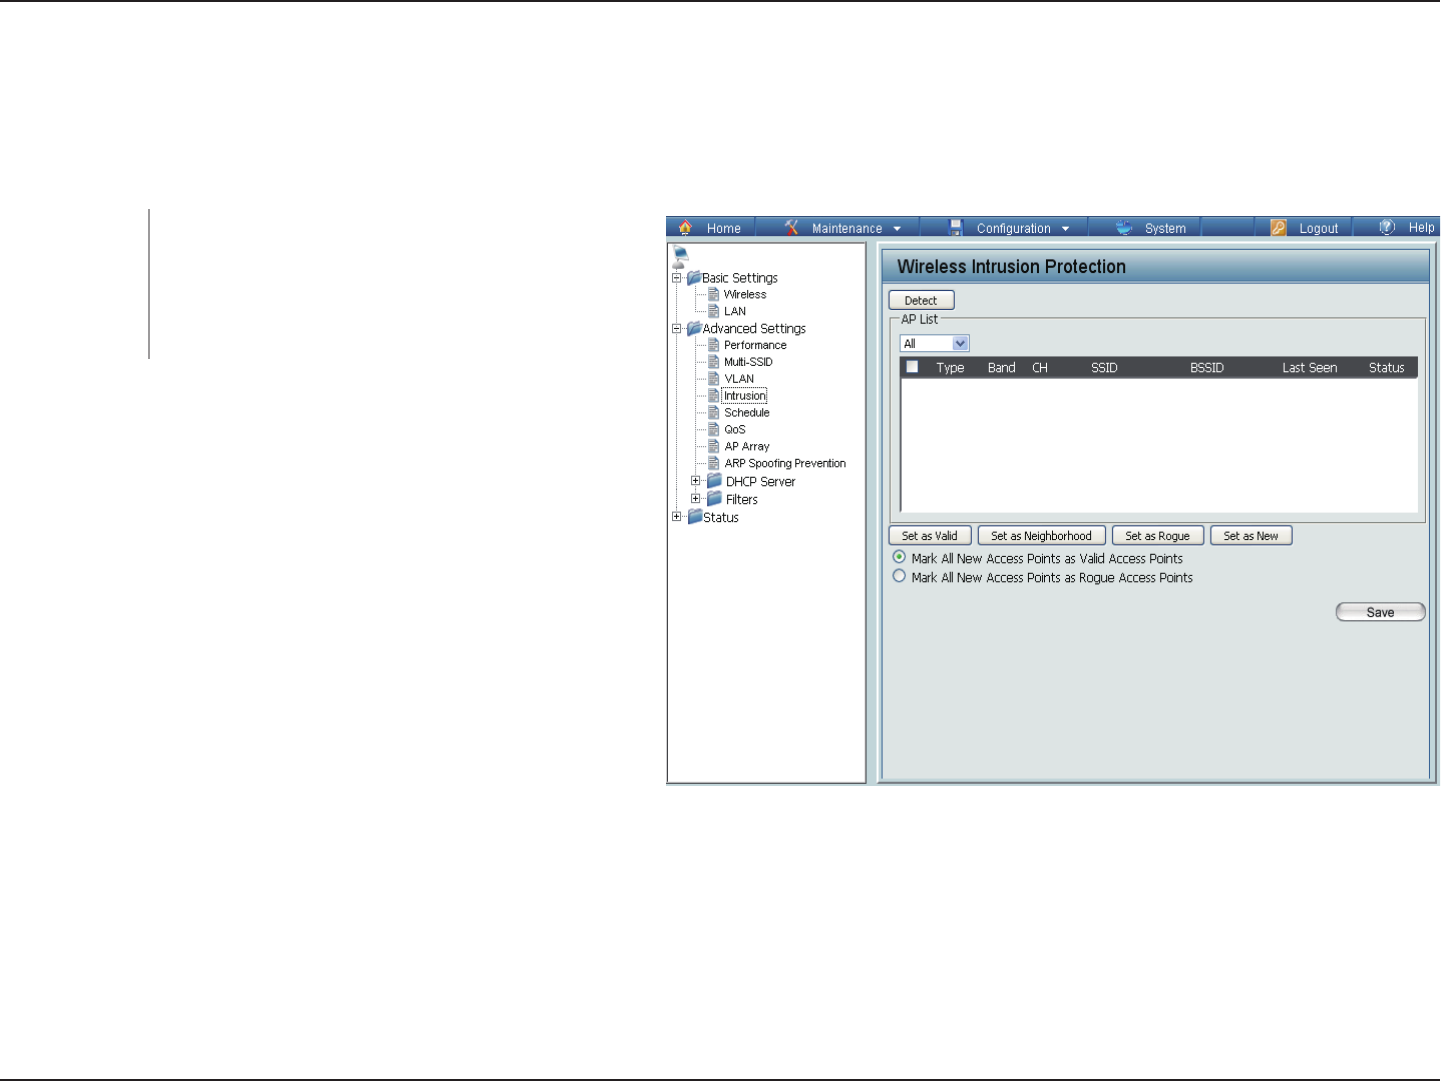
Intrusion
The Wireless Intrusion Protection window is used to set APs as All, Valid, Neighborhood, Rogue, and New. Click
the Save button to let your changes take effect.
The choices include All, Valid, Neighbor,
Rogue, and New.
Click this button to initiate a scan of the
network.
AP List:
Detect:
DAP-2320
38D-Link DAP-2320 User Manual
Section 3 - Configuration
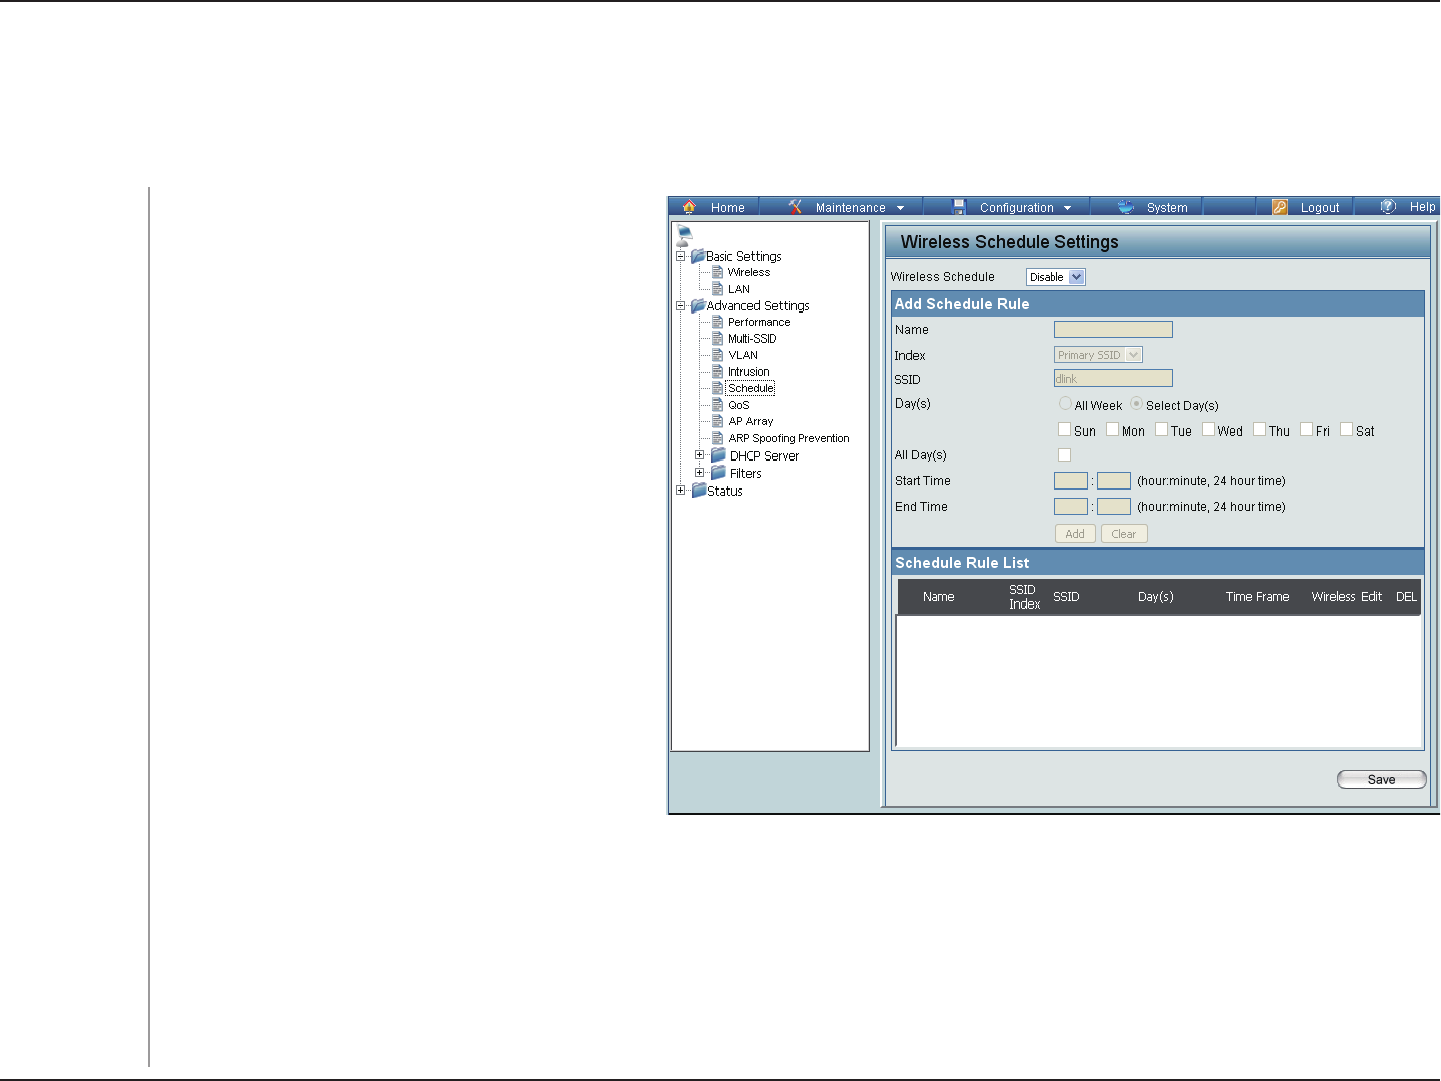
Schedule
The Wireless Schedule Settings window is used to add and modify scheduling rules on the device. Click the Save
button to let your changes take effect.
Use the drop-down menu to enable the
device’s scheduling feature.
Enter a name for the new scheduling rule in
the field provided.
Select the index from the drop-down menu.
Enter the name of your wireless network
(SSID).
Toggle the radio button between All Week
and Select Day(s). If the second option is
selected, check the specific days you want
the rule to be effective on.
Check this box to have your settings apply
24 hours a day.
Enter the start time for your rule. If you
selected All Day, this option will be greyed
out.
Enter the end time for your rule.
Click to add the rule to the list.
This section will display the list of created
schedules.
Click the Save button to save your created
rules.
Wireless
Schedule:
Name:
Index:
SSID:
Day(s):
All Day(s):
Start Time:
End Time:
Add:
Schedule Rule
List:
Save:
DAP-2320
39D-Link DAP-2320 User Manual
Section 3 - Configuration
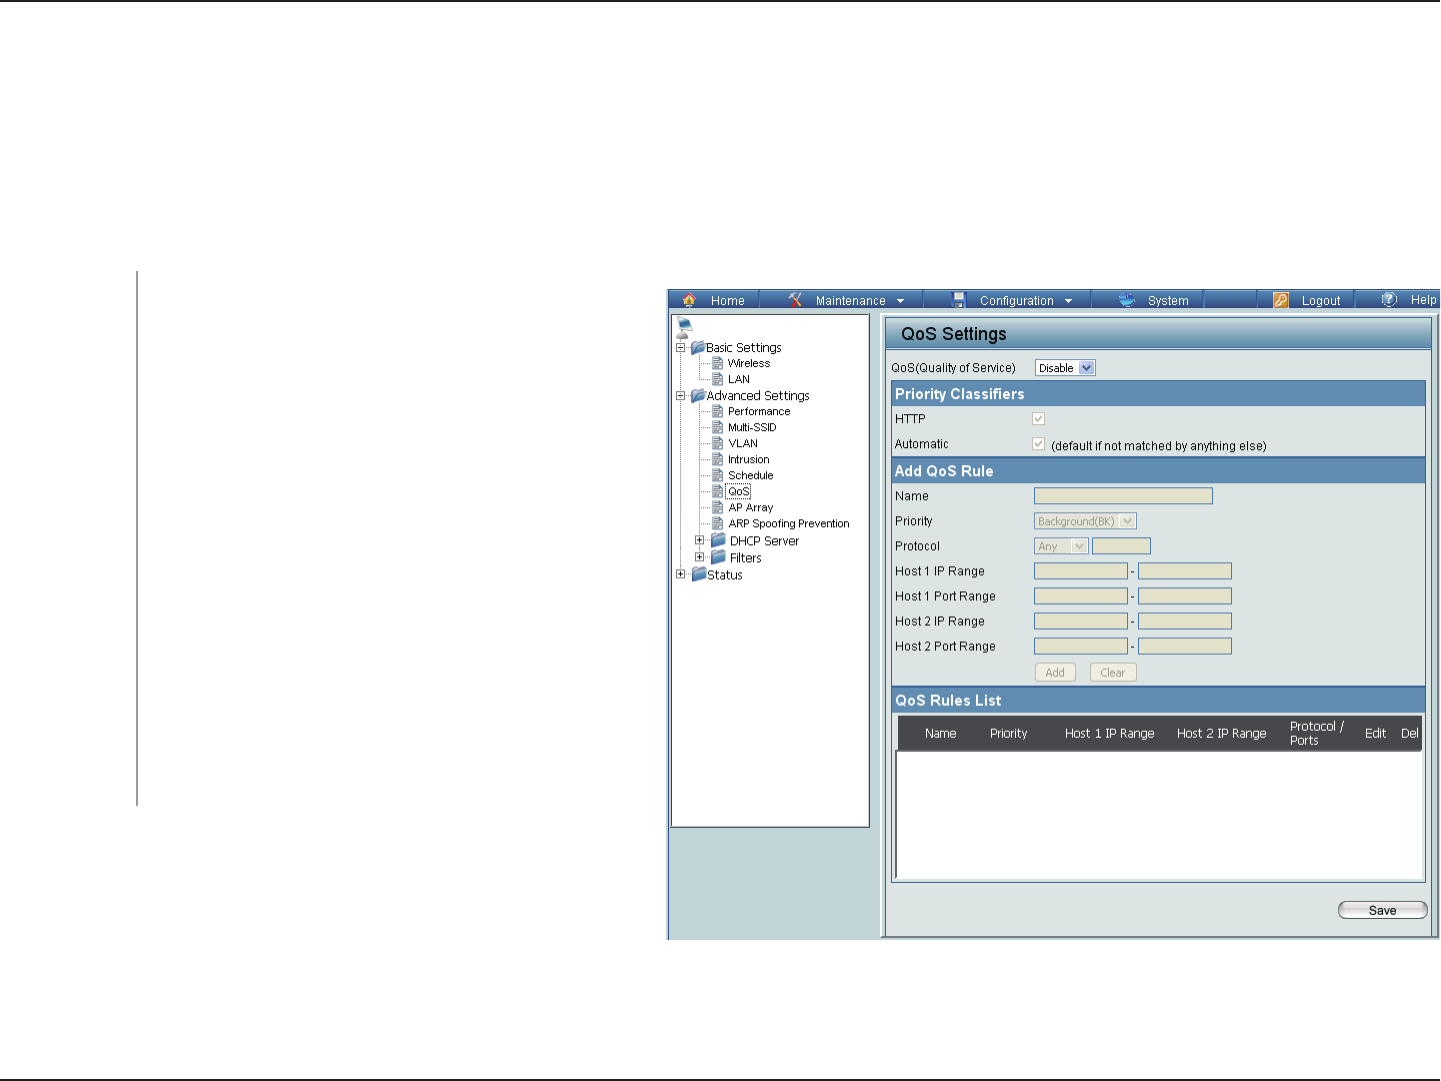
QoS
Quality of Service (QoS) enhances the experience of using a network by prioritizing the traffic of different applications.
A QoS Rule identifies a specific message flow and assigns a priority to that flow. For most applications, the priority
classifiers ensure the right priorities and specific QoS Rules are not required. QoS supports overlaps between rules.
If more than one rule matches a specific message flow, the rule with the highest priority will be used.
Enable this option if you want to allow QoS to
prioritize your traffic Priority Classifiers.
Allows the access point to recognize HTTP
transfers for many common audio and video
streams and prioritize them above other traffic.
Such streams are frequently used by digital
media players.
When enabled, this option causes the access
point to automatically attempt to prioritize traffic
streams that it does not otherwise recognize,
based on the behavior that the streams exhibit.
This acts to de-prioritize streams that exhibit
bulk transfer characteristics, such as file
transfers, while leaving interactive traffic, such
as gaming or VoIP, running at a normal priority.
QoS (Quality of
Service):
HTTP:
Automatic:
DAP-2320

40D-Link DAP-2320 User Manual
Section 3 - Configuration
Enter a name for the new QoS rule in the field provided.
Use the drop-down menu to select the desired priority: Background (BK), Best Effort (BE), Video (VI), or Voice (VO).
Use the drop-down menu to choose the appropriate protocol used by the messages: Any, TCP, UDP, Both, IMCP, or
Other.
The rule applies to a flow of messages for which one computer’s IP address falls within the range set here.
The rule applies to a flow of messages for which host 1’s port number is within the range set here when the Protocol is
set to TCP, UDP, or Both.
The rule applies to a flow of messages for which the other computer’s IP address falls within the range set here.
The rule applies to a flow of messages for which host 2’s port number is within the range set here when the Protocol is
set to TCP, UDP, or Both.
Name:
Priority:
Protocol:
Host 1 IP Range:
Host 1 Port
Range:
Host 2 IP Range:
Host 2 Port
Range:
41D-Link DAP-2320 User Manual
Section 3 - Configuration
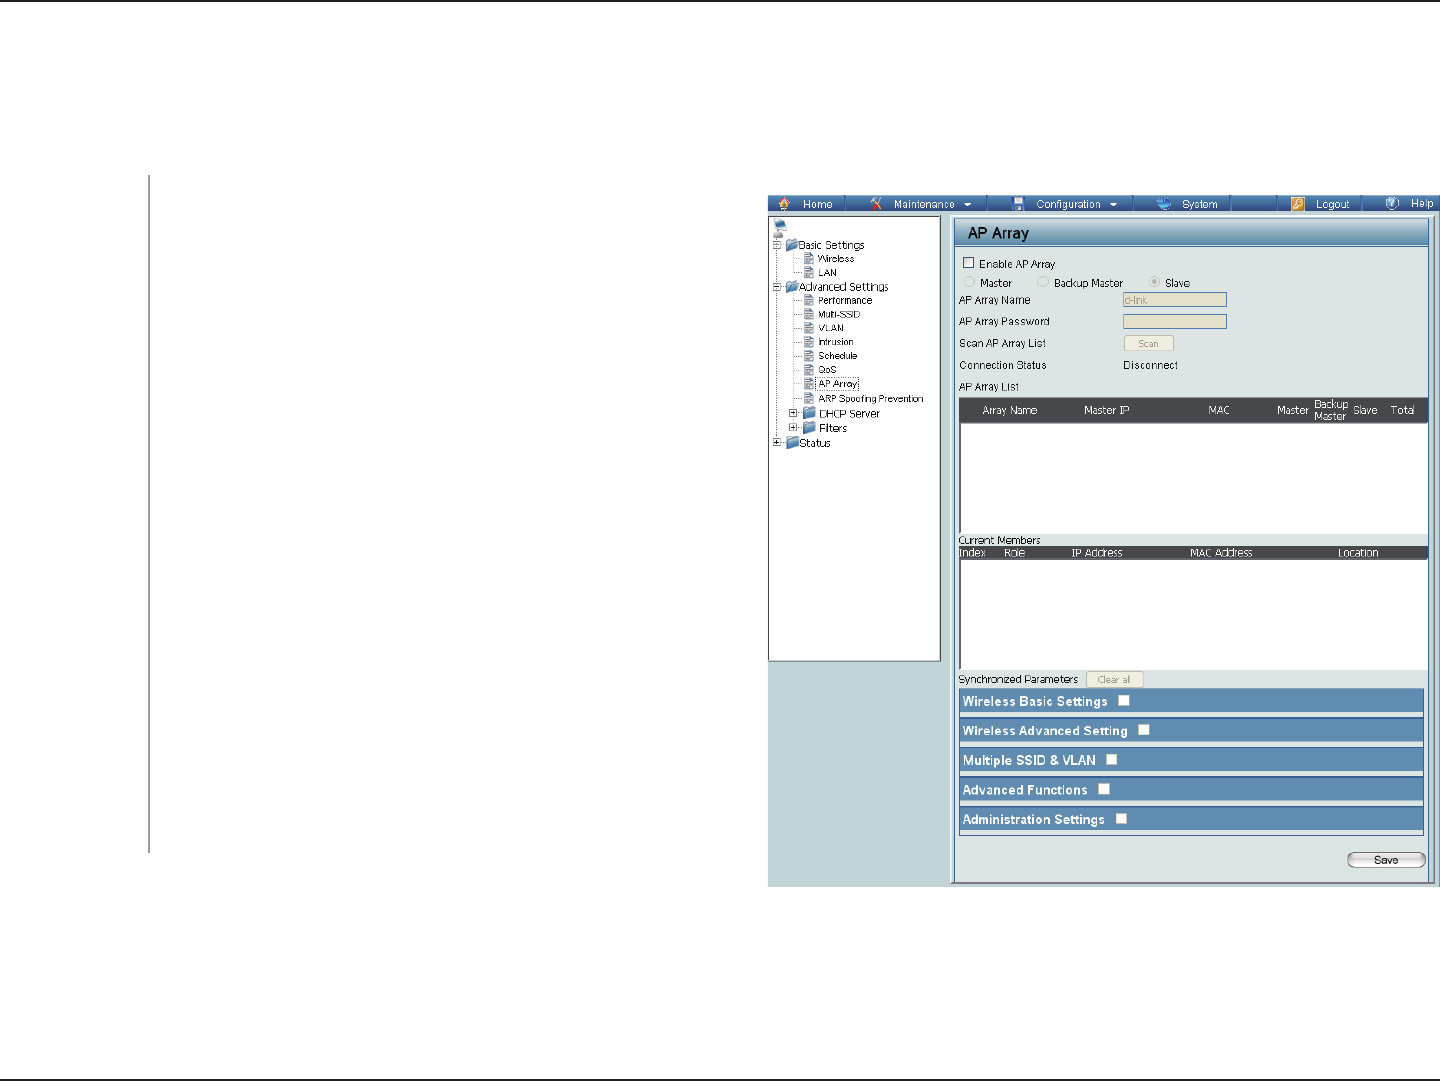
AP Array
An AP array is a set of devices on a network that are organized into a single group to increase ease of management.
This check box allows the user to enable the AP array
function. The three modes that are available are Master,
Backup Master, and Slave. APs in the same array will
use the same configuration. The configuration will
sync the Master AP to the Slave AP and the Backup
Master AP when a Slave AP and a Backup Master AP
join the AP array.
Enter a name for the AP array you have created.
Enter a password that will be used to access the AP
array you have created.
Click this button to initiate a scan of all the available
APs currently on the network.
This table displays the current AP array status for the
following parameters: Array Name, Master IP, MAC,
Master, Backup Master, Slave, and Total.
This table displays all the current array members. The
DAP-2320 AP array feature supports up to eight AP
array members.
Enable Array:
AP Array Name:
AP Array
Password:
Scan AP Array
List:
AP Array List:
Current Array
Members:
DAP-2320
42D-Link DAP-2320 User Manual
Section 3 - Configuration
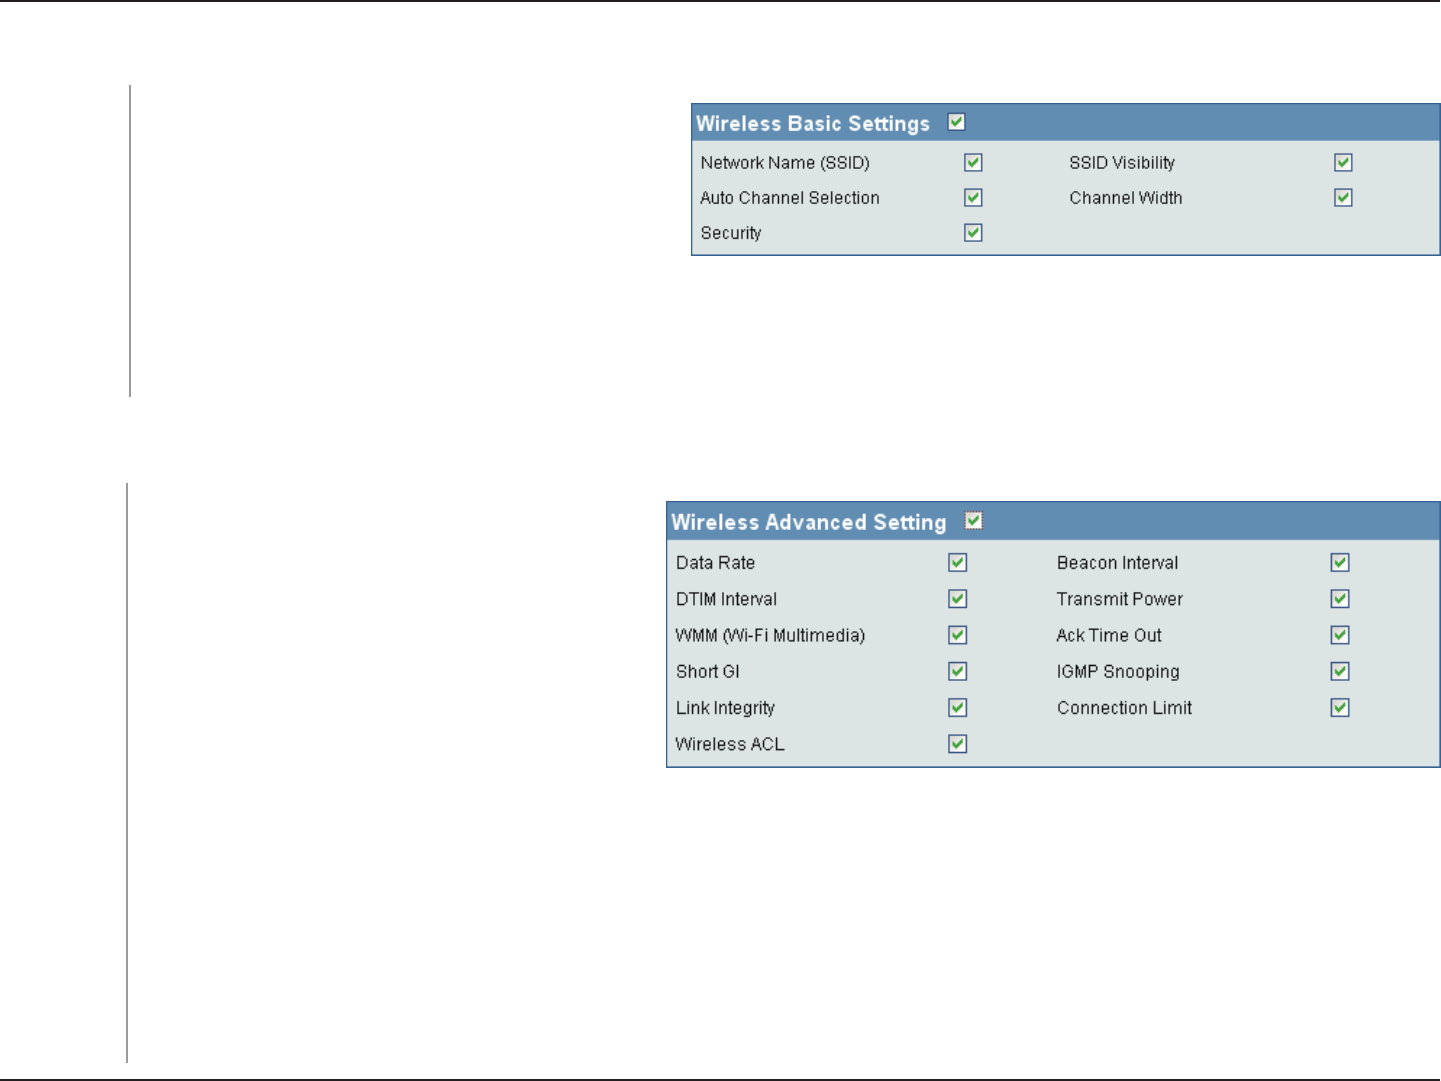
Select this option to use a Network Name (SSID).
Select this option to enable SSID Visibility.
Select this option to use Auto Channel Selection.
Select this option to specify the Channel Width.
Select this option to use Wireless Security.
Select this option to specify the Data Rate.
Select this option to specify the Beacon Interval.
Select this option to specify the DTIM Interval.
Select this option to specify the Transmit Power.
Select this option to use WMM.
Select this option to use Ack Time Out.
Select this option to use a Short GI.
Select this option to enable IGMP Snooping.
Select this option to use Link Integrity.
Select this option to use a Connection Limit.
Select this option to use Wireless ACL.
Network Name
(SSID):
SSID Visibility:
Auto Channel
Selection:
Channel Width:
Security Data:
Rate:
Beacon Interval:
DTIM Interval:
Transmit Power:
WMM (Wi-Fi
Multimedia):
Ack Time Out:
Short GI:
IGMP Snooping:
Link Integrity:
Connection Limit:
Wireless ACL:
Wireless Basic Settings
Wireless Advanced Settings
43D-Link DAP-2320 User Manual
Section 3 - Configuration
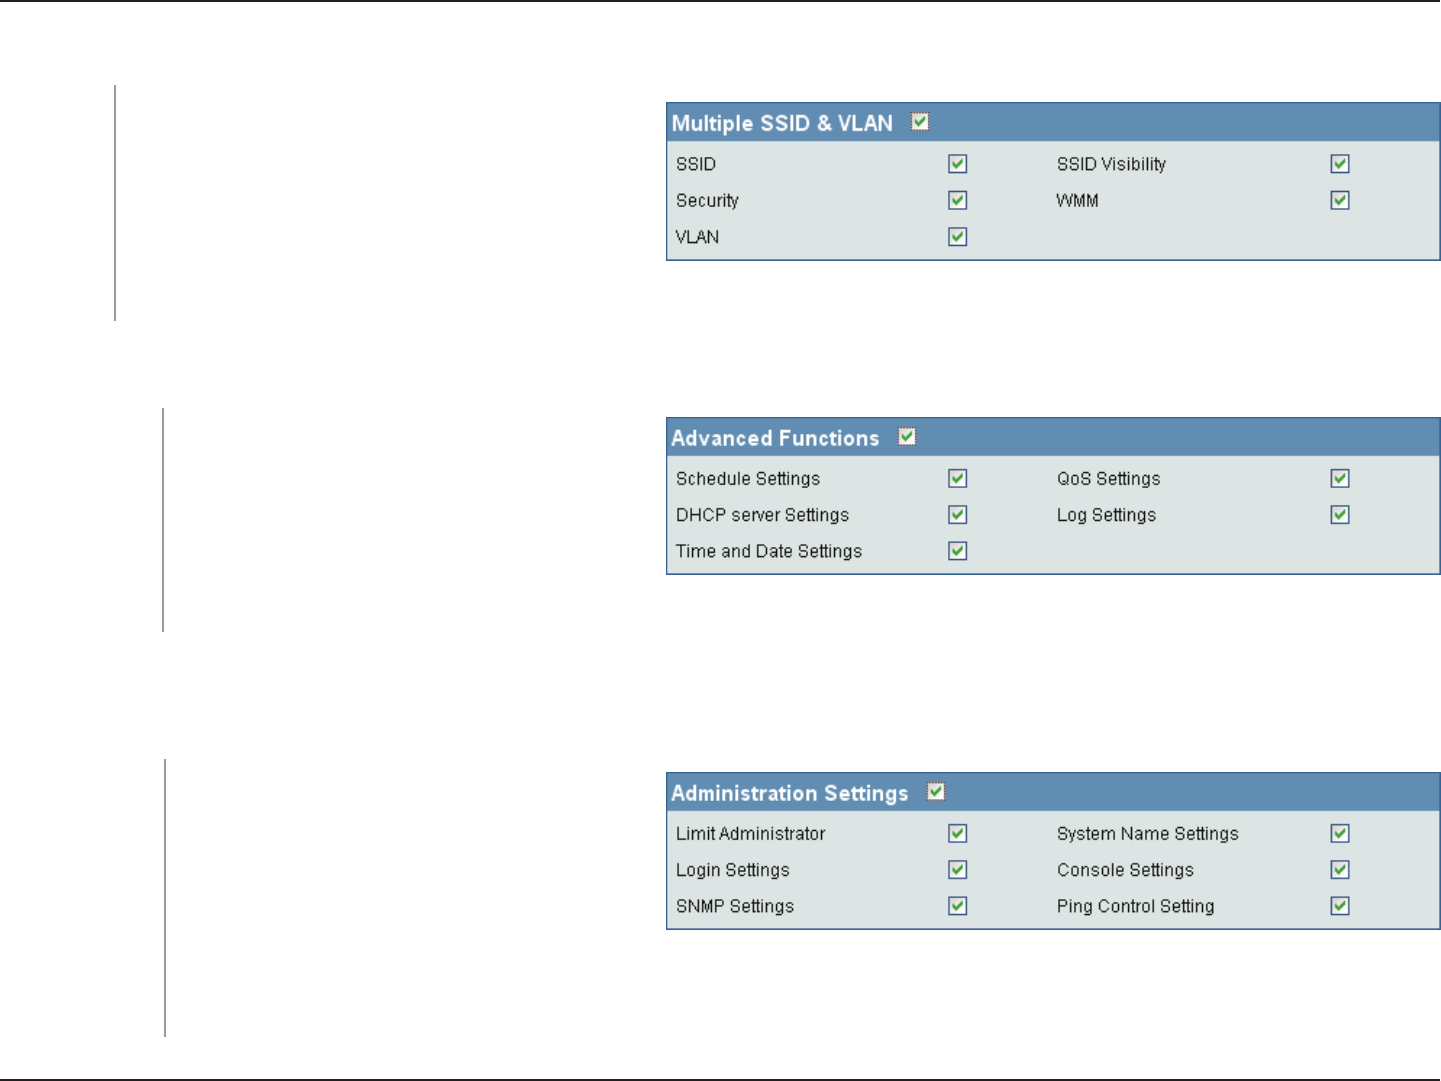
Select this option to use an SSID.
Select this option to make the SSID Visible.
Select this option to use Wireless Security.
Select this option to use WMM.
Select this option to use VLAN.
SSID:
SSID Visibility:
Security:
WMM:
VLAN:
Multiple SSID & VLAN
Select this option to use Scheduled Settings.
Select this option to use Quality of Service.
Select this option to use DHCP.
Select this option to enable the Log Settings.
Select this option to use the Time and Date Settings.
Schedule Settings:
QoS Settings:
DHCP Server Settings:
Log Settings:
Time and Date Settings:
Advanced Functions
Select this option to enable Limited Administrator.
Select this option to use a System Name.
Select this option to use Login Settings.
Select this option to enable Console Settings.
Select this option to enable SNMP Settings.
Select this option to enable Ping Control.
Limit Administrator:
System Name Settings:
Login Settings:
Console Settings:
SNMP Settings:
Ping Control Settings:
Administration Settings
44D-Link DAP-2320 User Manual
Section 3 - Configuration
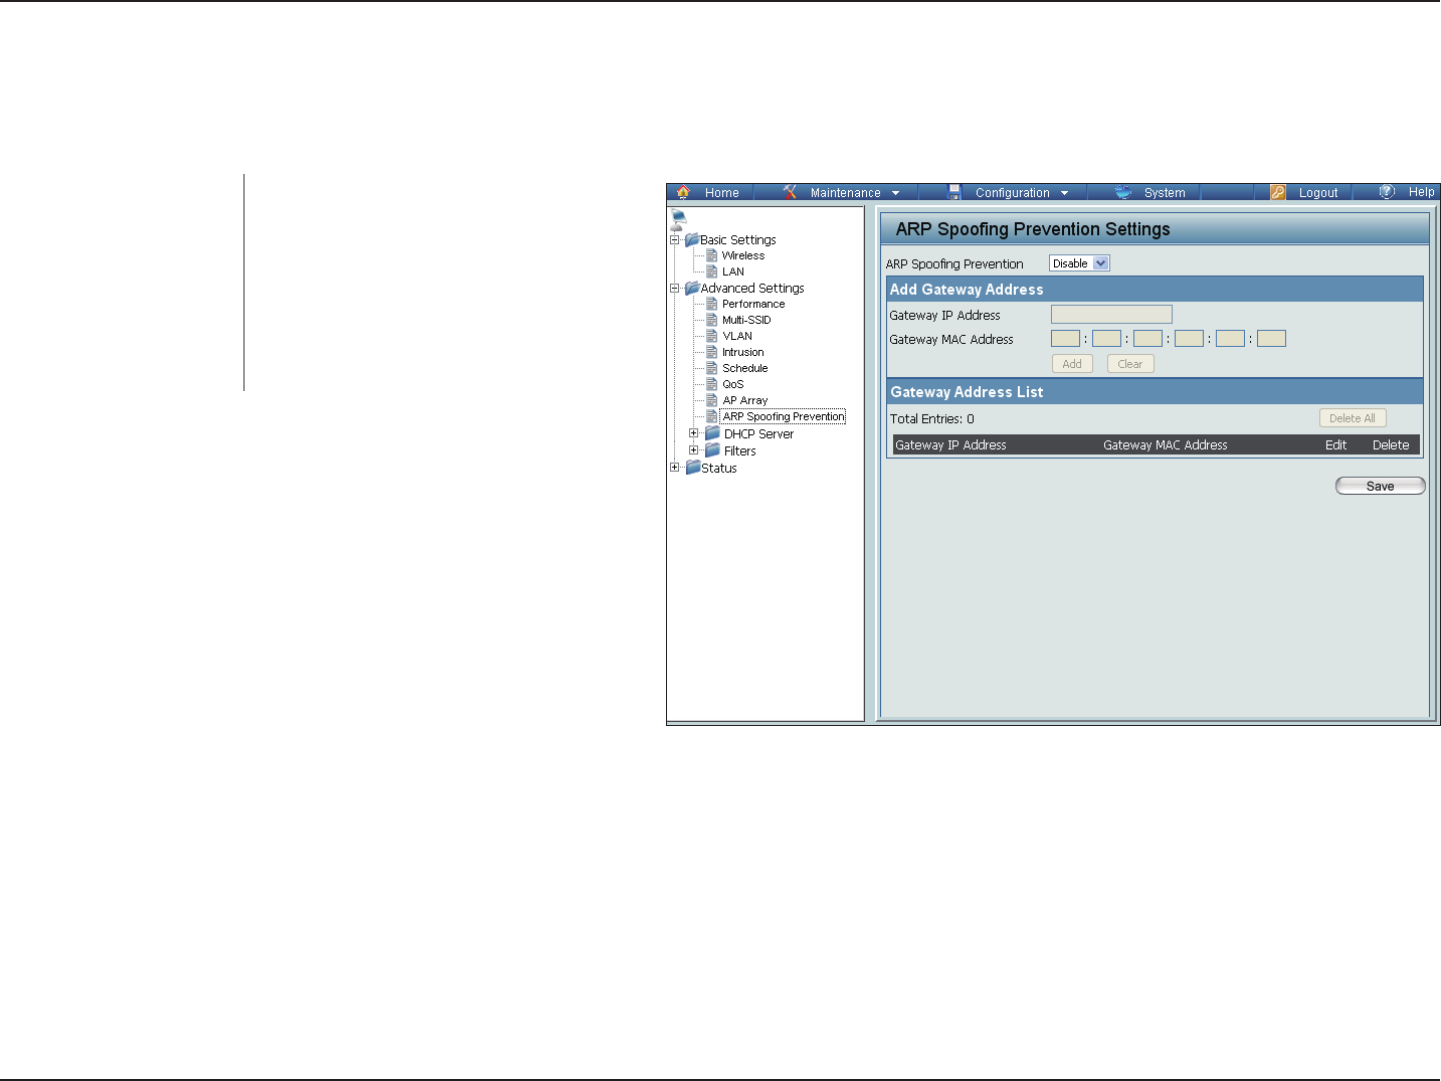
ARP Spoofing Prevention
The ARP Spoofing Prevention feature allows users to add IP/MAC address mapping to prevent ARP spoofing attack.
This check box allows you to
enable the ARP spoofing prevention
function.
Enter a gateway IP address.
Enter a gateway MAC address.
ARP Spoofing Prevention:
Gateway IP Address:
Gateway MAC Address:
DAP-2320
45D-Link DAP-2320 User Manual
Section 3 - Configuration
DHCP Server
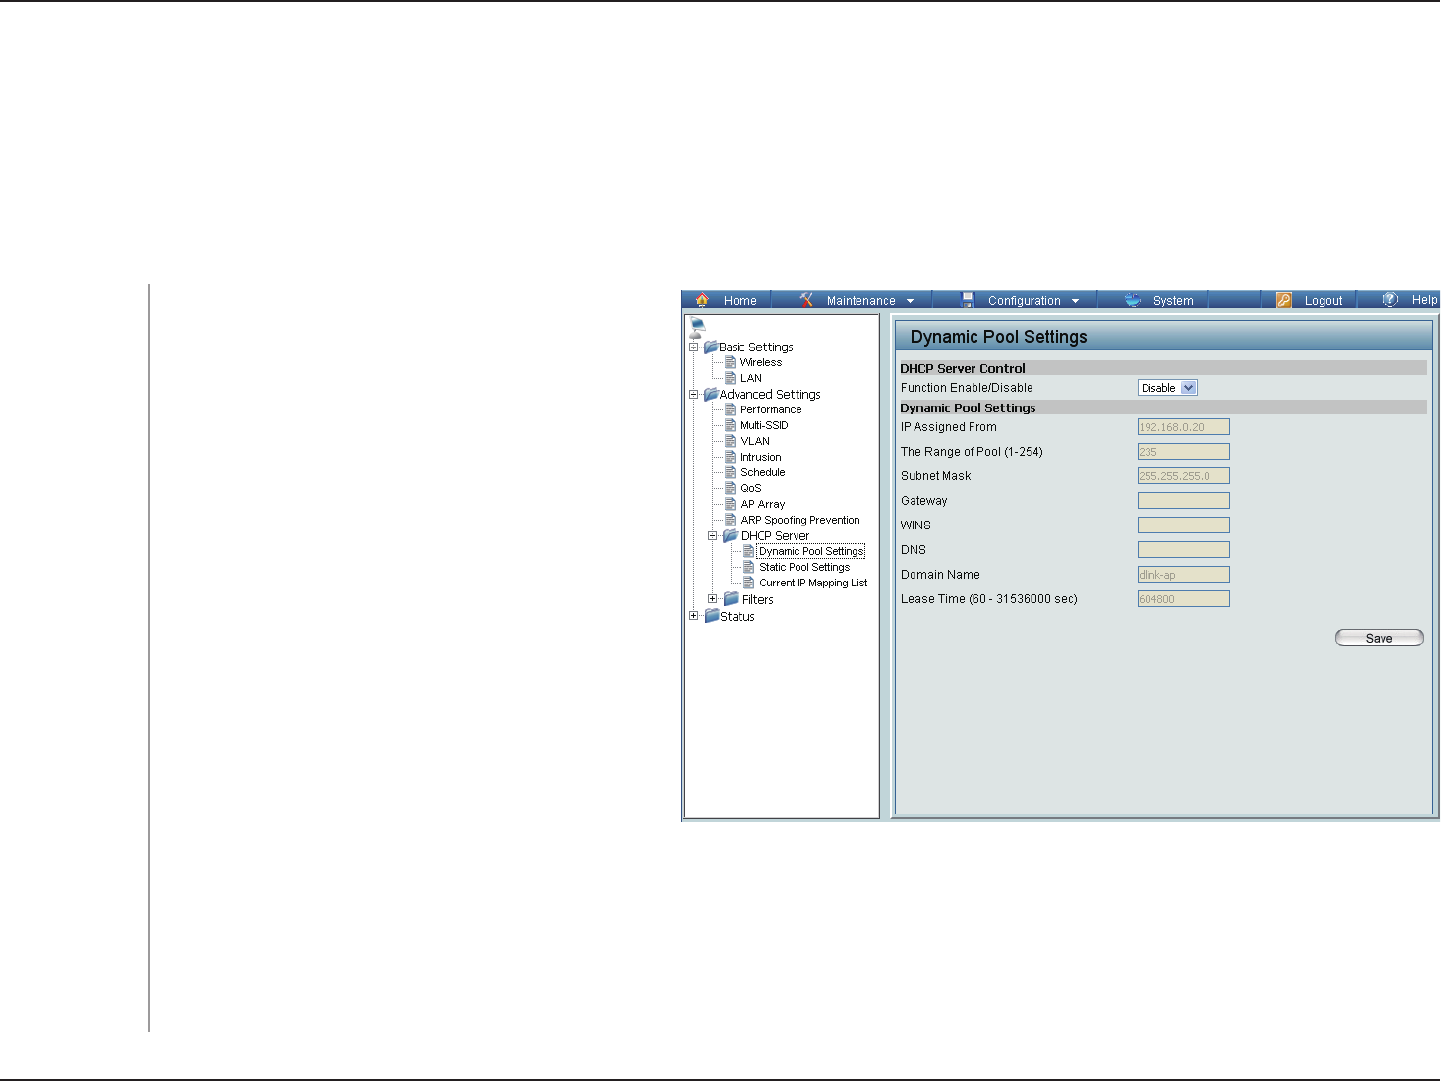
Dynamic Pool Settings
The DHCP address pool defines the range of the IP address that can be assigned to stations in the network. A Dynamic
Pool allows wireless stations to receive an available IP with lease time control. If needed or required in the network,
the DAP-2320 is capable of acting as a DHCP server.
Dynamic Host Configuration Protocol (DHCP)
assigns dynamic IP addresses to devices on
the network. This protocol simplifies network
management and allows new wireless devices
to receive IP addresses automatically without
the need to manually assign new IP addresses.
Select Enable to allow the DAP-2320 to function
as a DHCP server.
Input the first IP address available for assignment
on your network.
Enter the number of IP addresses available for
assignment. IP addresses are increments of
the IP address specified in the “IP Assigned
From” field.
All devices in the network must have the
same subnet mask to communicate. Enter the
submask for the network here.
Function Enable/
Disable:
IP Assigned
From:
The Range of
Pool (1-254):
Subnet Mask:
Gateway:
WINS:
DAP-2320
Enter the IP address of the gateway on the network.
Specify the Windows Internet Naming Service (WINS) server address for the wireless network. WINS is a system that
determines the IP address of a network computer that has a dynamically assigned IP address.

46D-Link DAP-2320 User Manual
Section 3 - Configuration
Enter the IP address of the Domain Name System (DNS) server. The DNS server translates domain names such as
www.dlink.com into IP addresses.
Enter the domain name of the network, if applicable. (An example of a domain name is: www.dlink.com.)
The lease time is the period of time before the DHCP server will assign new IP addresses.
DNS:
Domain Name:
Lease Time
(60-31536000 sec):
47D-Link DAP-2320 User Manual
Section 3 - Configuration
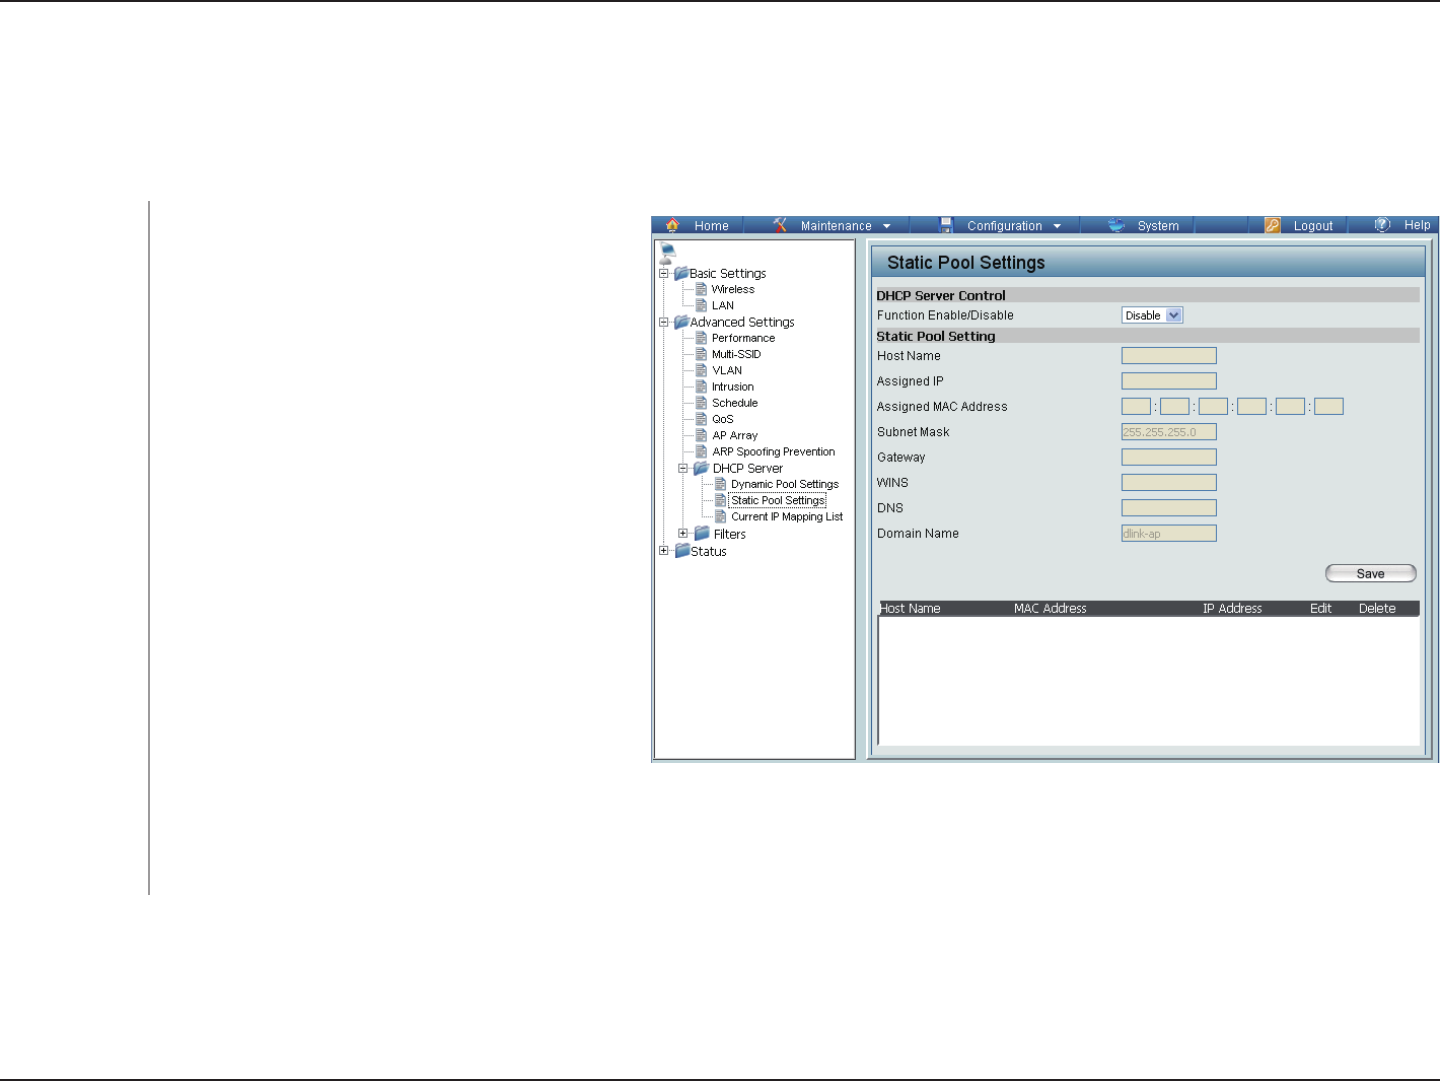
Static Pool Setting
The DHCP address pool defines the range of IP addresses that can be assigned to stations on the network. A static
pool allows specific wireless stations to receive a fixed IP without time control.
Dynamic Host Configuration Protocol
(DHCP) assigns IP addresses to wireless
devices on the network. This protocol
simplifies network management and allows
new wireless devices to receive IP addresses
automatically without the need to manually
assign IP addresses. Select Enable to allow
the DAP-2320 to function as a DHCP server.
Use the Static Pool Settings to assign the
same IP address to a device every time you
start up. The IP addresses assigned in the
Static Pool list must NOT be in the same IP
range as the Dynamic Pool. After you have
assigned a static IP address to a device via
its MAC address, click Save; the device will
appear in the Assigned Static Pool at the
bottom of the screen. You can edit or delete
the device in this list.
Function Enable/
Disable:
Assigned IP:
Assigned MAC
Address:
Subnet Mask:
DAP-2320
Enter the MAC address of the device requesting association here.
Define the submask of the IP address specified in the “IP Assigned From” field.

48D-Link DAP-2320 User Manual
Section 3 - Configuration
Specify the Gateway address for the wireless network.
Specify the Windows Internet Naming Service (WINS) server address for the wireless network. WINS is a system that
determines the IP address of a network computer with a dynamically assigned IP address, if applicable.
Enter the Domain Name System (DNS) server address for the wireless network. The DNS server translates domain names
such as www.dlink.com into IP addresses.
Specify the domain name for the network.
Gateway:
WINS:
DNS:
Domain Name:
49D-Link DAP-2320 User Manual
Section 3 - Configuration
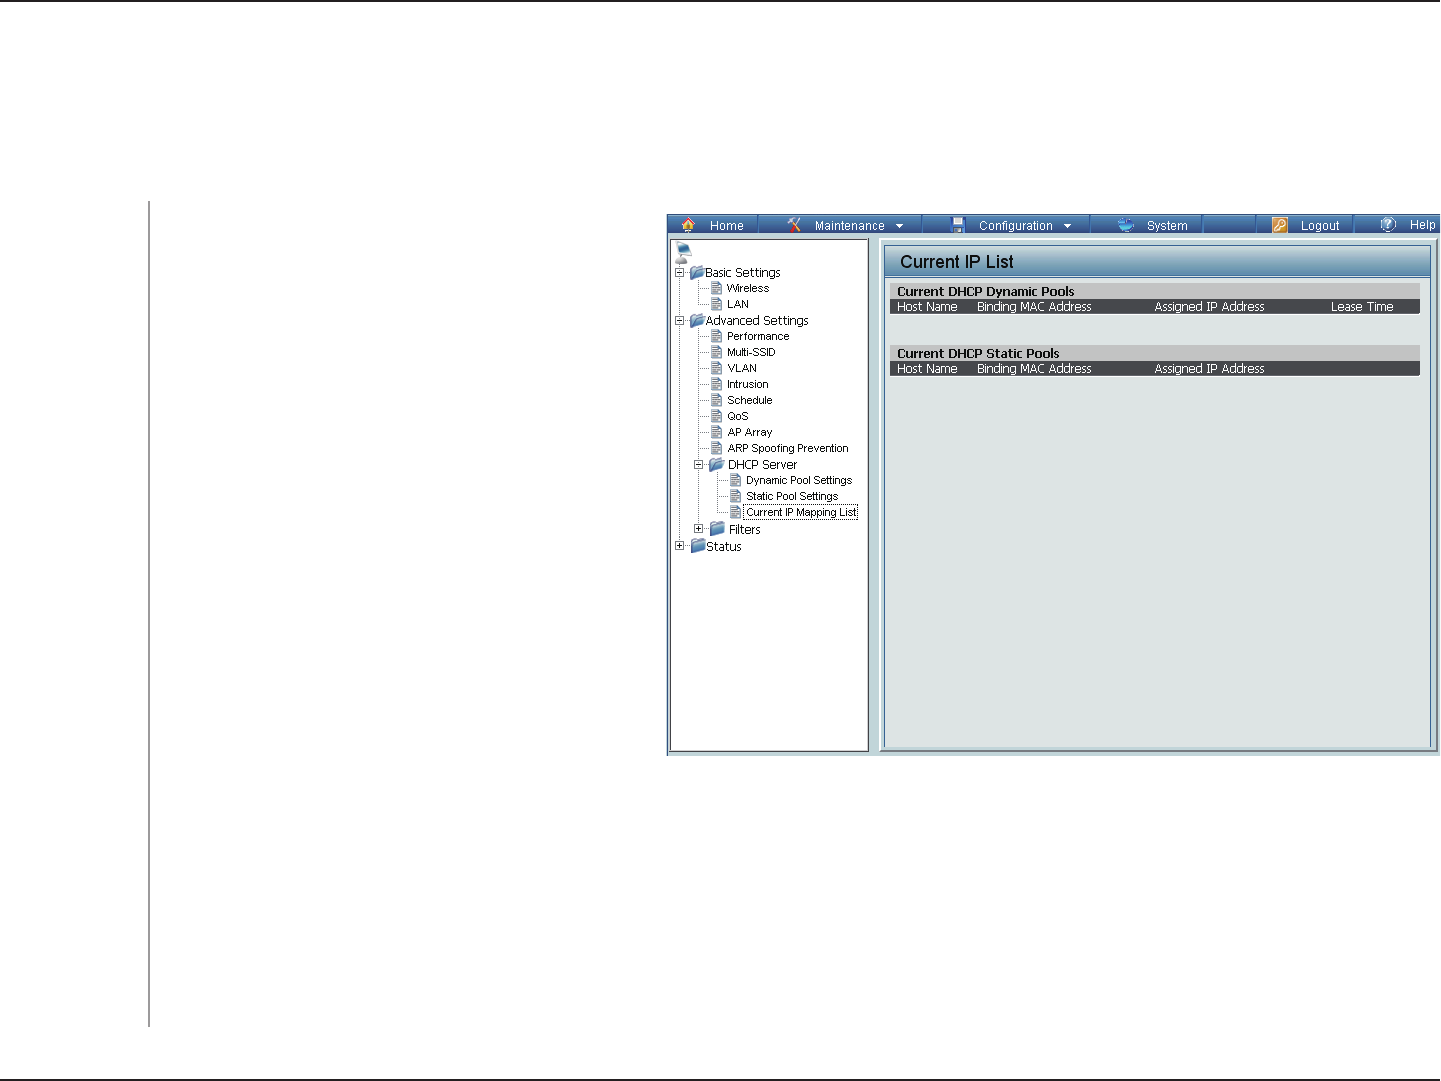
Current IP Mapping List
This window displays information about the current assigned DHCP dynamic and static IP address pools. This
information is available when you enable DHCP server on the AP and assign dynamic and static IP address pools.
These are IP address pools the DHCP server
has assigned using the dynamic pool setting.
The host name of a device on the network
that is assigned an IP address from the DHCP
dynamic pool.
The MAC address of a device on the network
that is assigned an IP address from the DHCP
dynamic pool.
The current corresponding DHCP-assigned
IP address of the device.
The length of time that the dynamic IP address
will be valid.
These are the IP address pools of the DHCP
server assigned through the static pool
settings.
Current DHCP
Dynamic Profile:
Host Name:
Binding MAC
Address:
Assigned IP
Address:
Lease Time:
Current DHCP
Static Pools:
Host Name:
Binding MAC
Address:
Assigned IP
Address:
The host name of a device on the network that is assigned an IP address from the DHCP dynamic pool.
The MAC address of a device on the network that is within the DHCP static IP address pool.
The current corresponding DHCP-assigned static IP address of the device.
DAP-2320
50D-Link DAP-2320 User Manual
Section 3 - Configuration
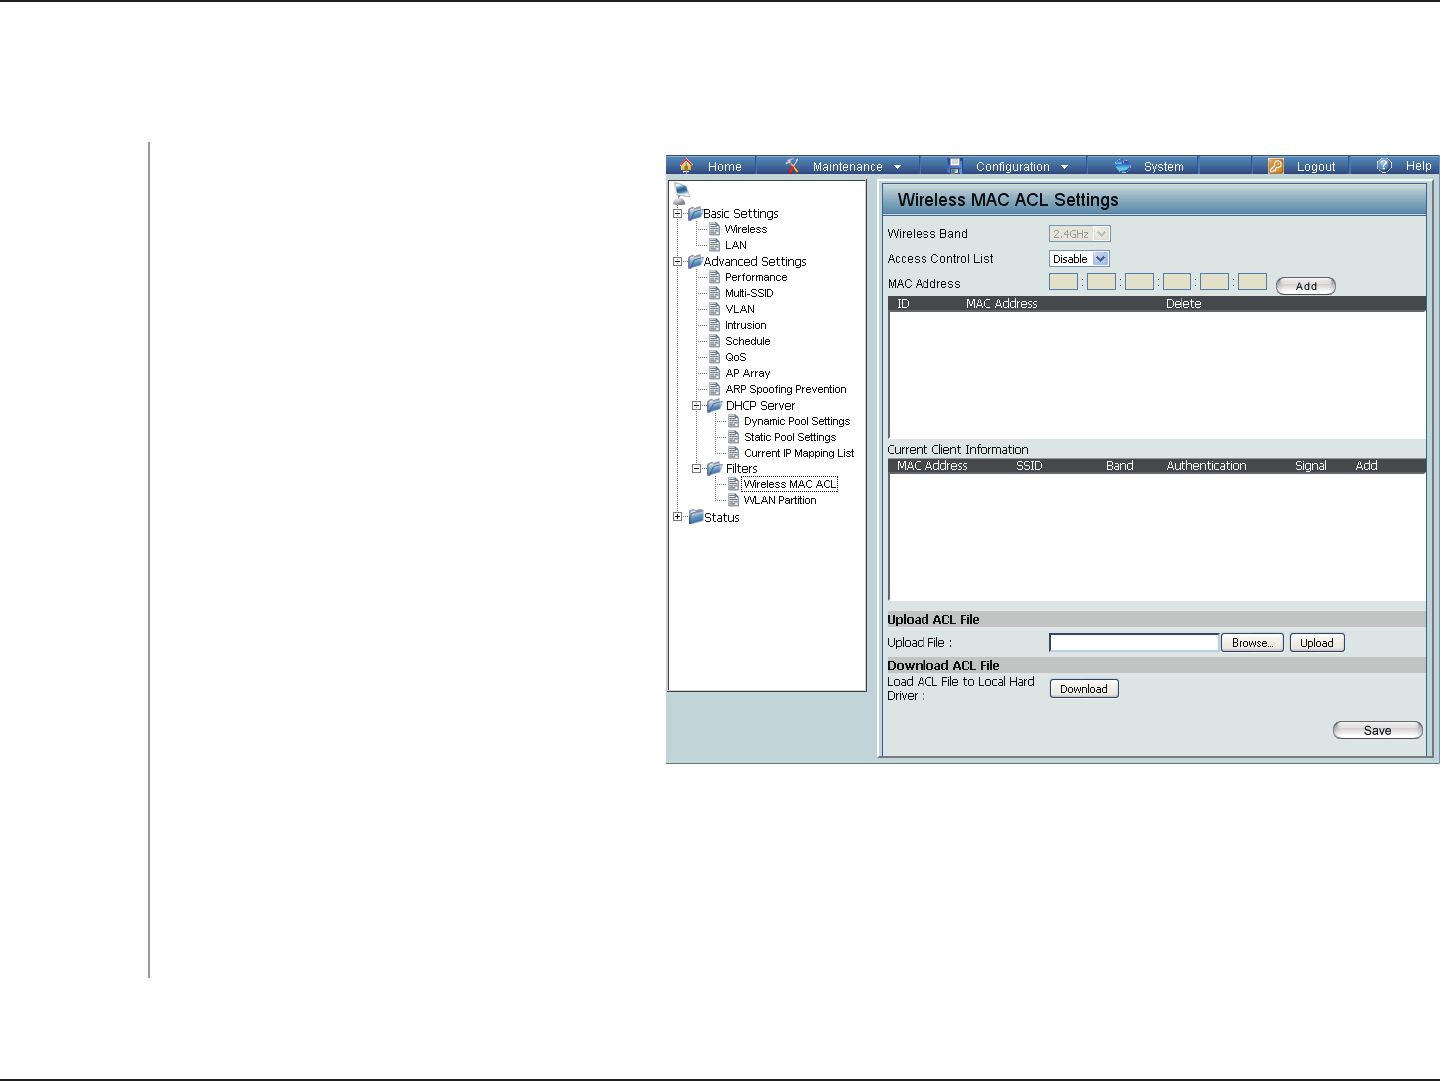
Filters
Wireless MAC ACL
Displays the current wireless band rate.
Select Disable to disable the filters function.
Select Accept to accept only those devices
with MAC addresses in the Access Control
List. All other devices not on the list will be
rejected.
Select Reject to reject the devices with MAC
addresses on the Access Control List. All
other devices not on the list will be accepted.
Enter each MAC address that you wish to
include in your filter list, and click Save.
When you enter a MAC address, it appears
in this list. Highlight a MAC address and click
Delete to remove it from this list.
You may create an ACL list and upload it to
the access point instead of manually entering
the information. Once created, click the
Browse button and locate your file. Select it
and then click Upload.
Click Download to export the ACL to a file
on your computer.
Wireless Band:
Access Control
List:
MAC Address:
MAC Address
List:
Upload ACL
File:
Download ACL
File:
DAP-2320
51D-Link DAP-2320 User Manual
Section 3 - Configuration
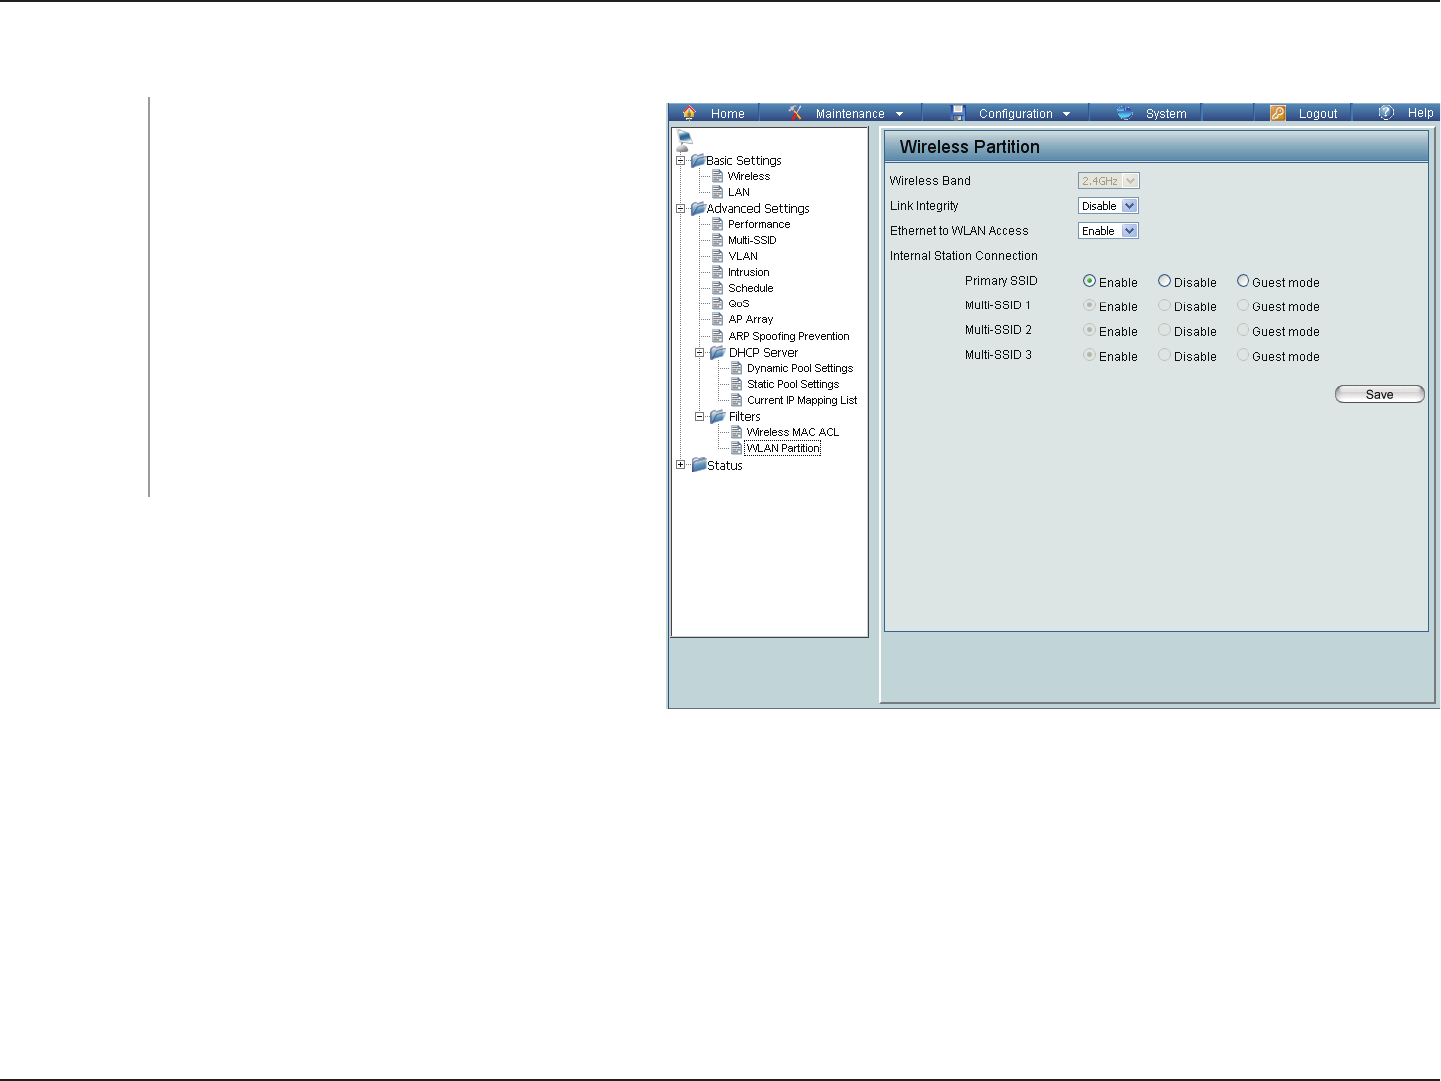
WLAN Partition
Displays the current wireless band rate.
Select Enable or Disable.
The default is Enable. When disabled, all
data from the Ethernet to associated wireless
devices will be blocked. Wireless devices
can still send data to the Ethernet.
The default value is Enable, which allows
stations to inter-communicate by connecting
to a target AP. When disabled, wireless
stations cannot exchange data through the
AP.
Wireless Band:
Link Integrity:
Ethernet to
WLAN Access:
Internal Station
Connection:
DAP-2320
52D-Link DAP-2320 User Manual
Section 3 - Configuration
Status
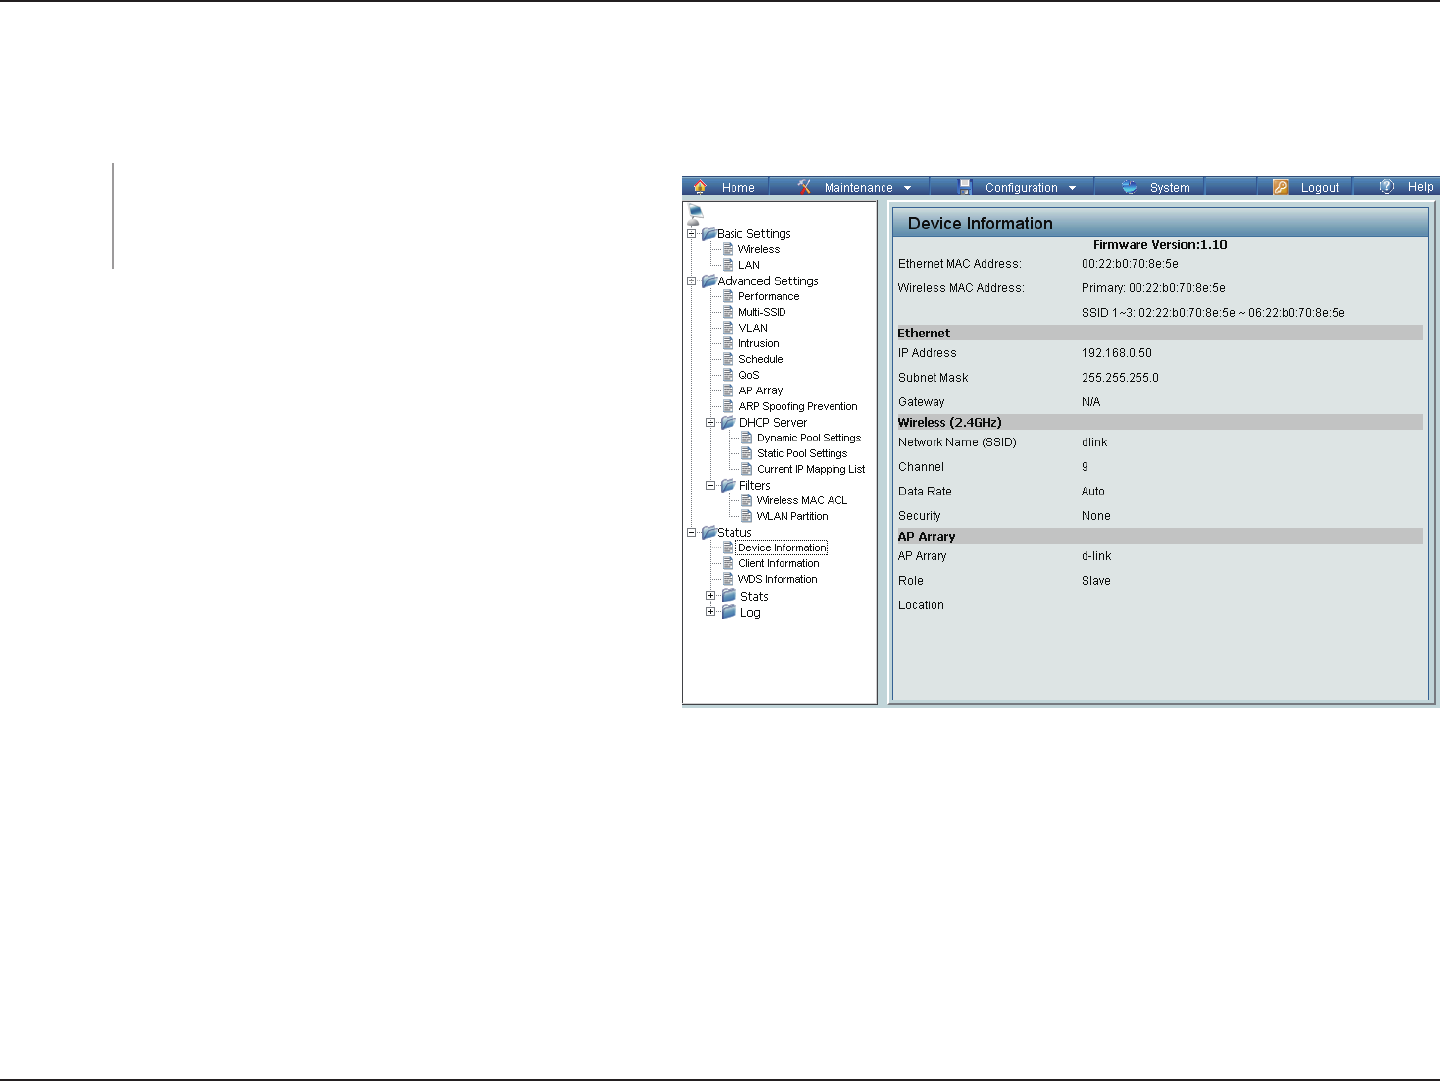
Device Information
This read-only window displays the configuration
settings of the DAP-2320, including the firmware
version and the device's MAC address.
Device
Information: DAP-2320
53D-Link DAP-2320 User Manual
Section 3 - Configuration
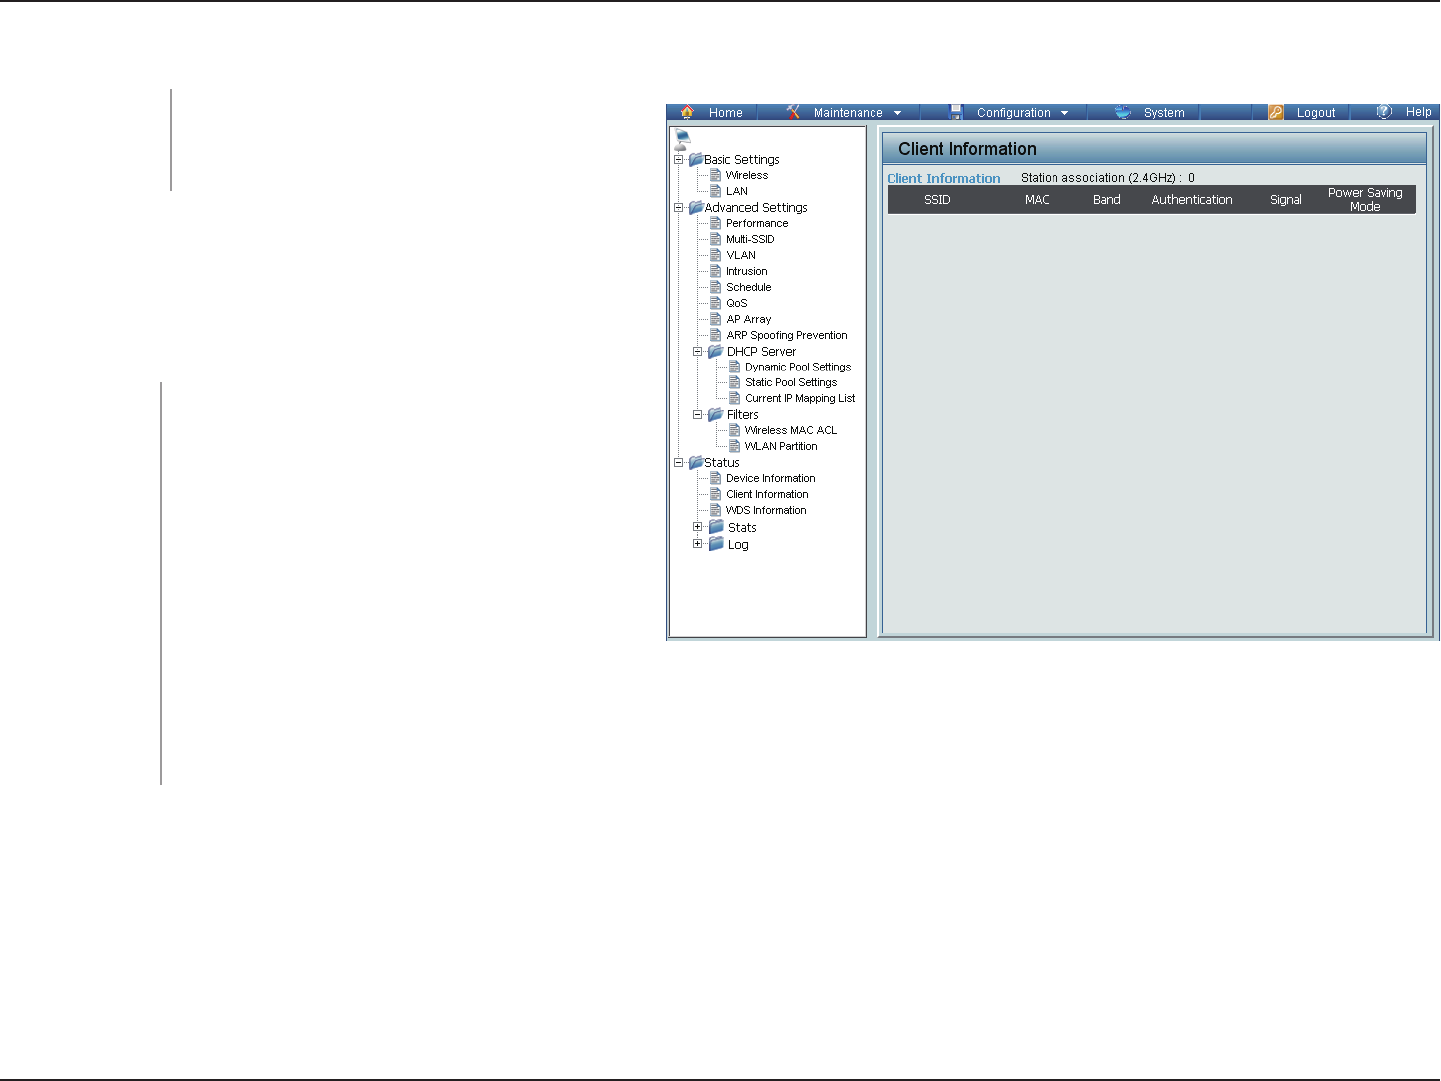
The following information is available for each
client communicating with the DAP-2320.
Client Information
This window displays the wireless client
information for clients currently connected
to the DAP-2320.
Client Information:
Displays the SSID of the client.
Displays the MAC address of the client.
Displays the wireless band that the client
is connected to.
Displays the type of authentication being
used.
Displays the client's signal strength.
Displays the status of the power saving
feature.
SSID:
MAC:
Band:
Authentication:
Signal:
Power Saving
Mode:
DAP-2320
54D-Link DAP-2320 User Manual
Section 3 - Configuration
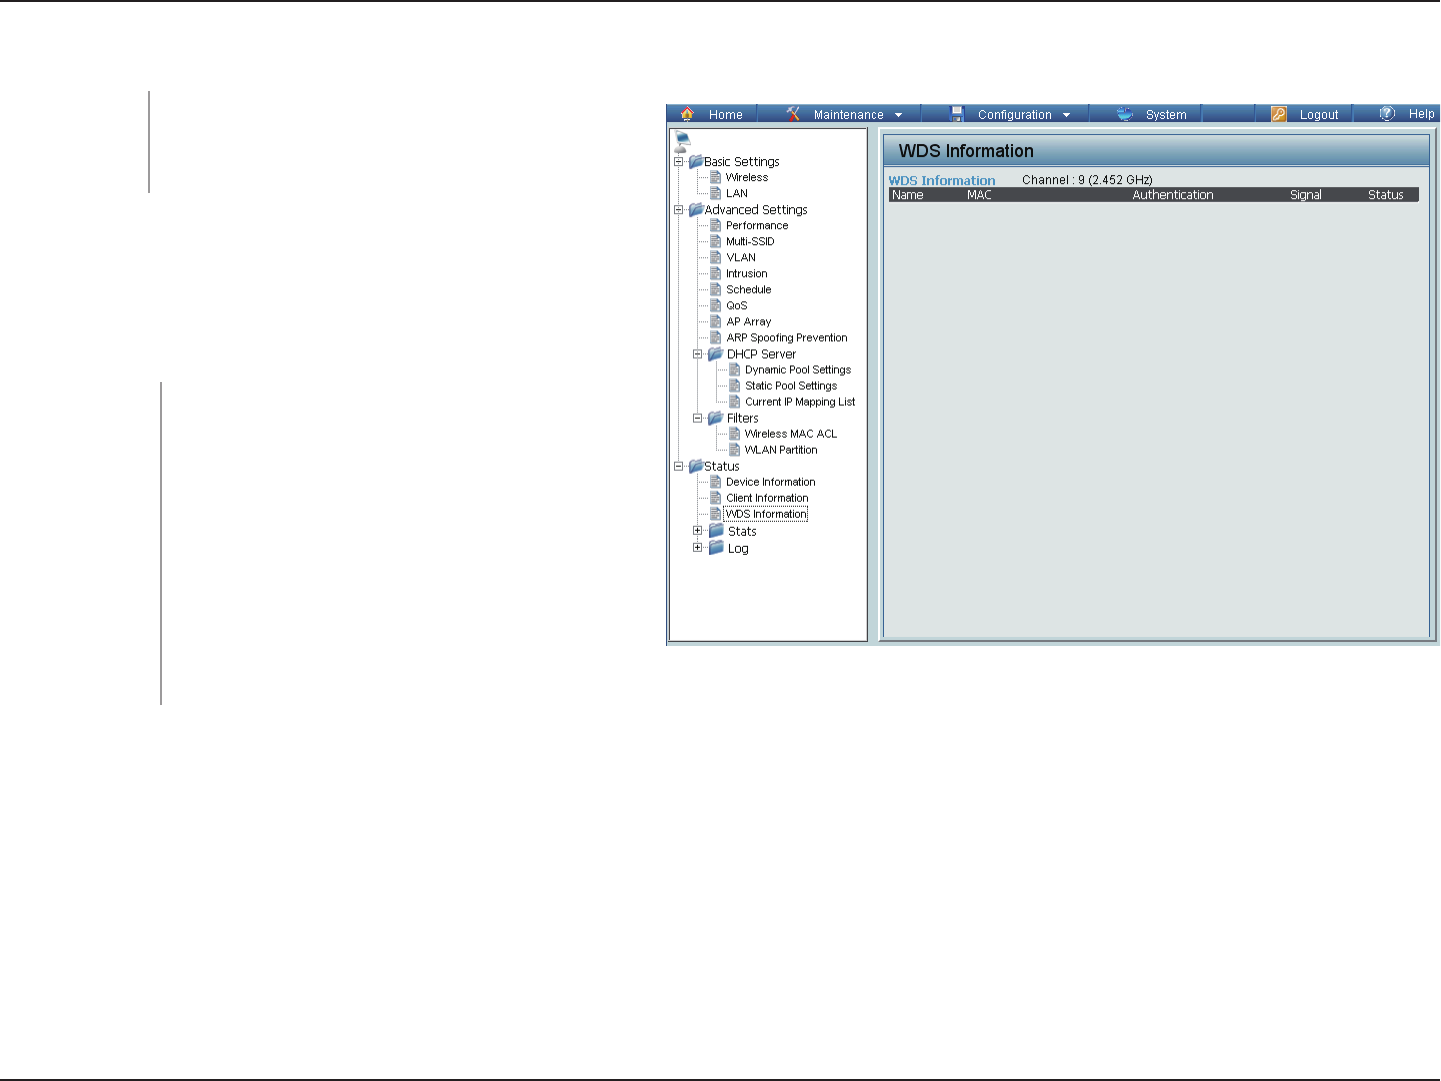
WDS Information
The following information is available for each
client communicating with the DAP-2320.
This window displays the Wireless
Distribution System information for clients
currently connected to the DAP-2320.
WDS
Information:
Displays the SSID of the client.
Displays the MAC address of the client.
Displays the type of authentication
being used.
Displays the client's signal strength.
Displays the status of the power saving
feature.
Name:
MAC:
Authentication:
Signal:
Status:
DAP-2320
55D-Link DAP-2320 User Manual
Section 3 - Configuration
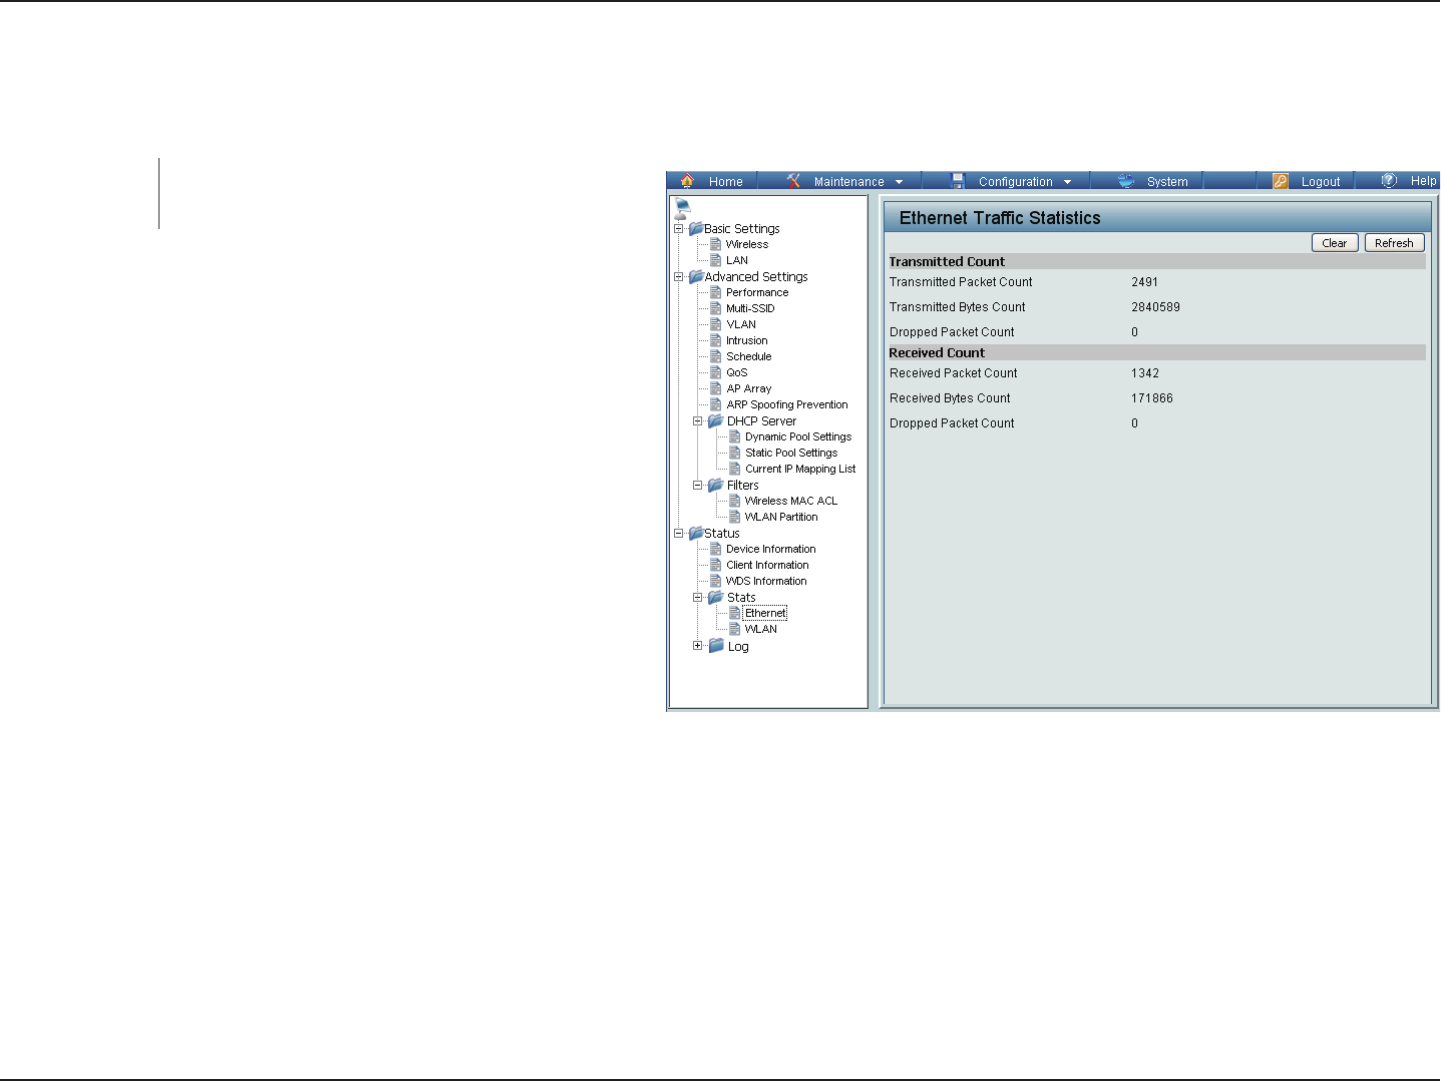
Stats
Ethernet
This page displays transmitted and received
count statistics for packets and bytes.
Ethernet Traffic
Statistics:
DAP-2320
56D-Link DAP-2320 User Manual
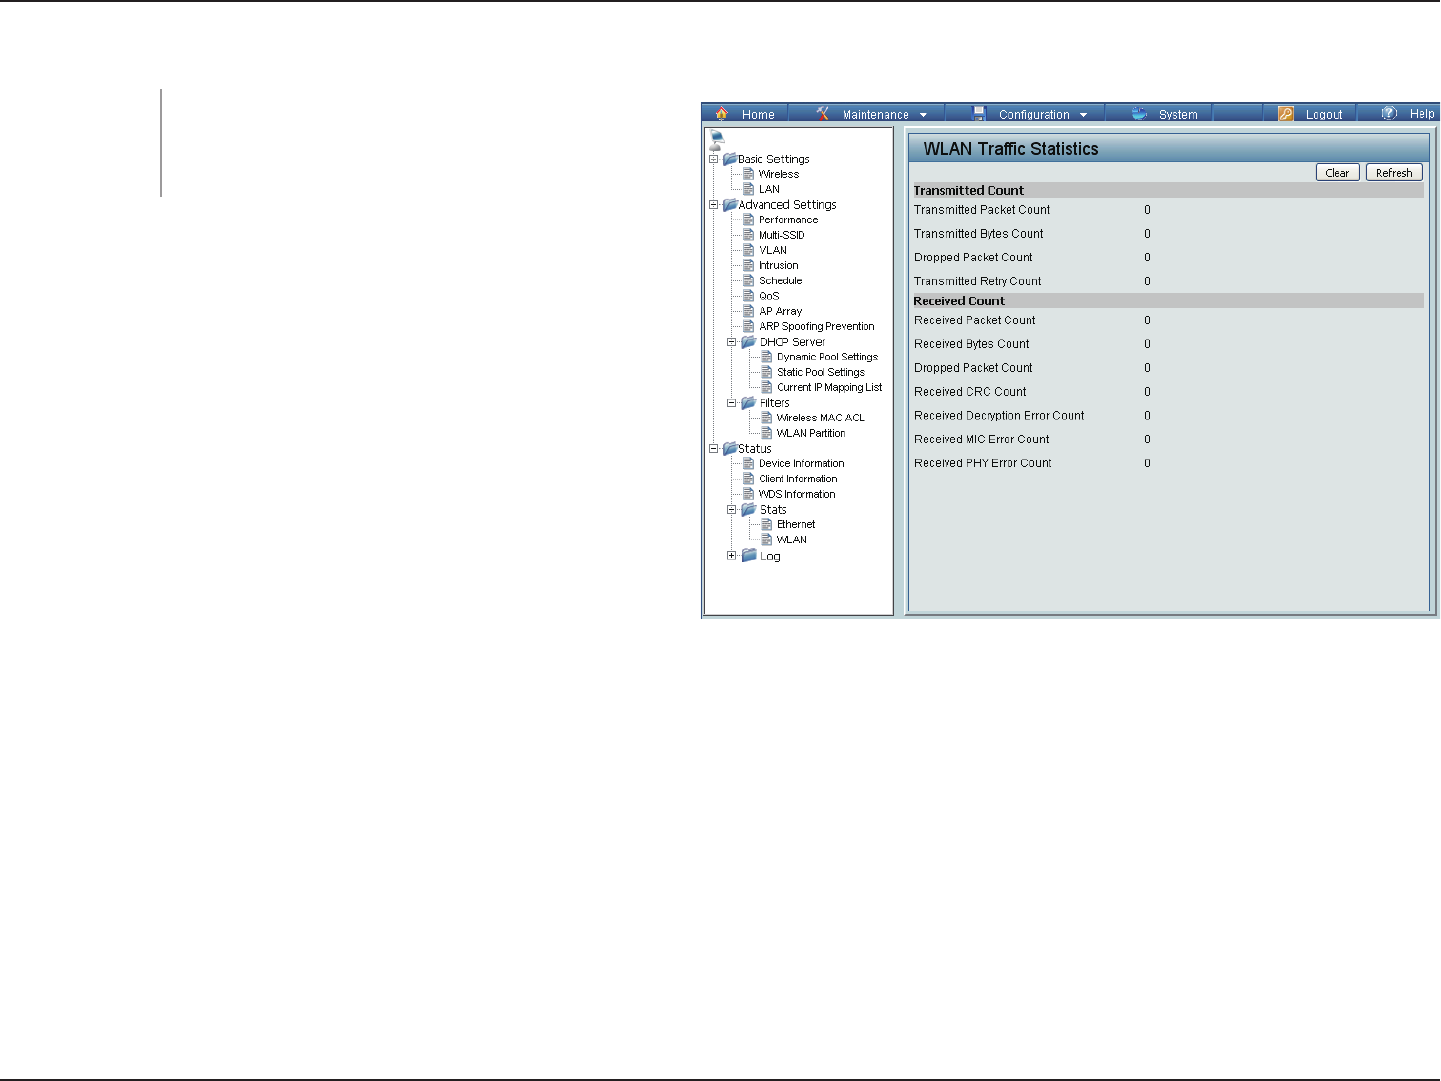
Section 3 - Configuration
WLAN Traffic
This page displays wireless network statistics
for data throughput, transmitted and received
frames, and frame errors.
WLAN Traffic
Statistics:
DAP-2320
57D-Link DAP-2320 User Manual
Section 3 - Configuration
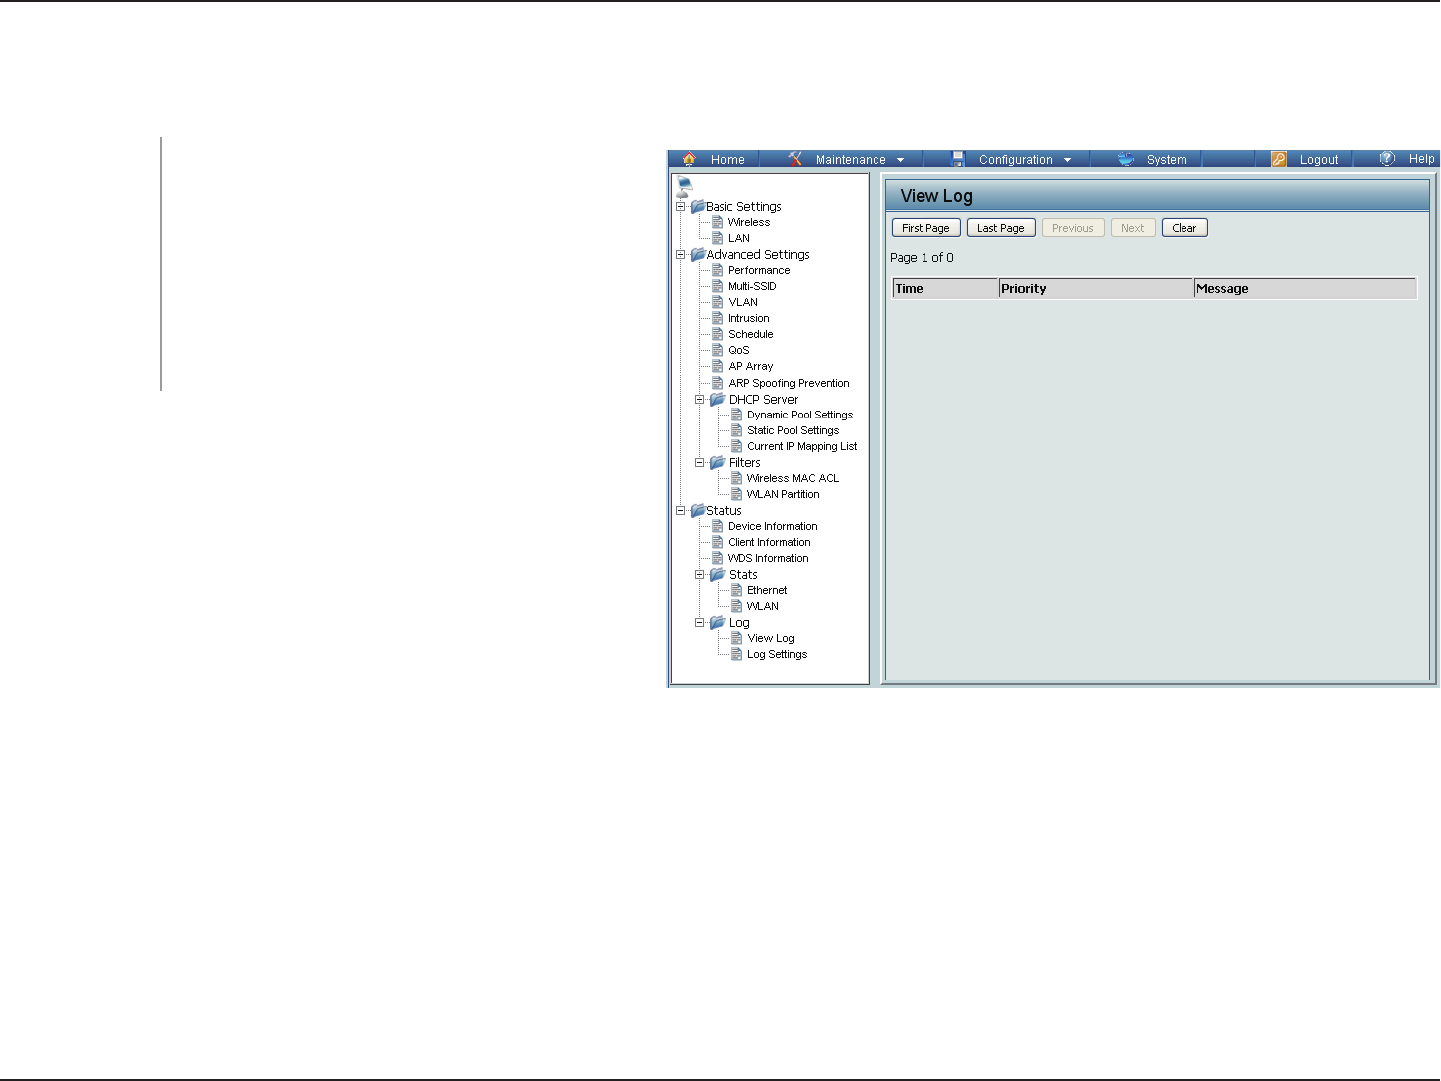
Log
View Log
The AP’s embedded memory displays
system and network messages including
a time stamp and message type. The log
information includes but is not limited to the
following items: cold start AP, upgrading
firmware, client associate and disassociate
with AP, and web login. The web page holds
up to 500 logs.
View Log:
DAP-2320
58D-Link DAP-2320 User Manual
Section 3 - Configuration
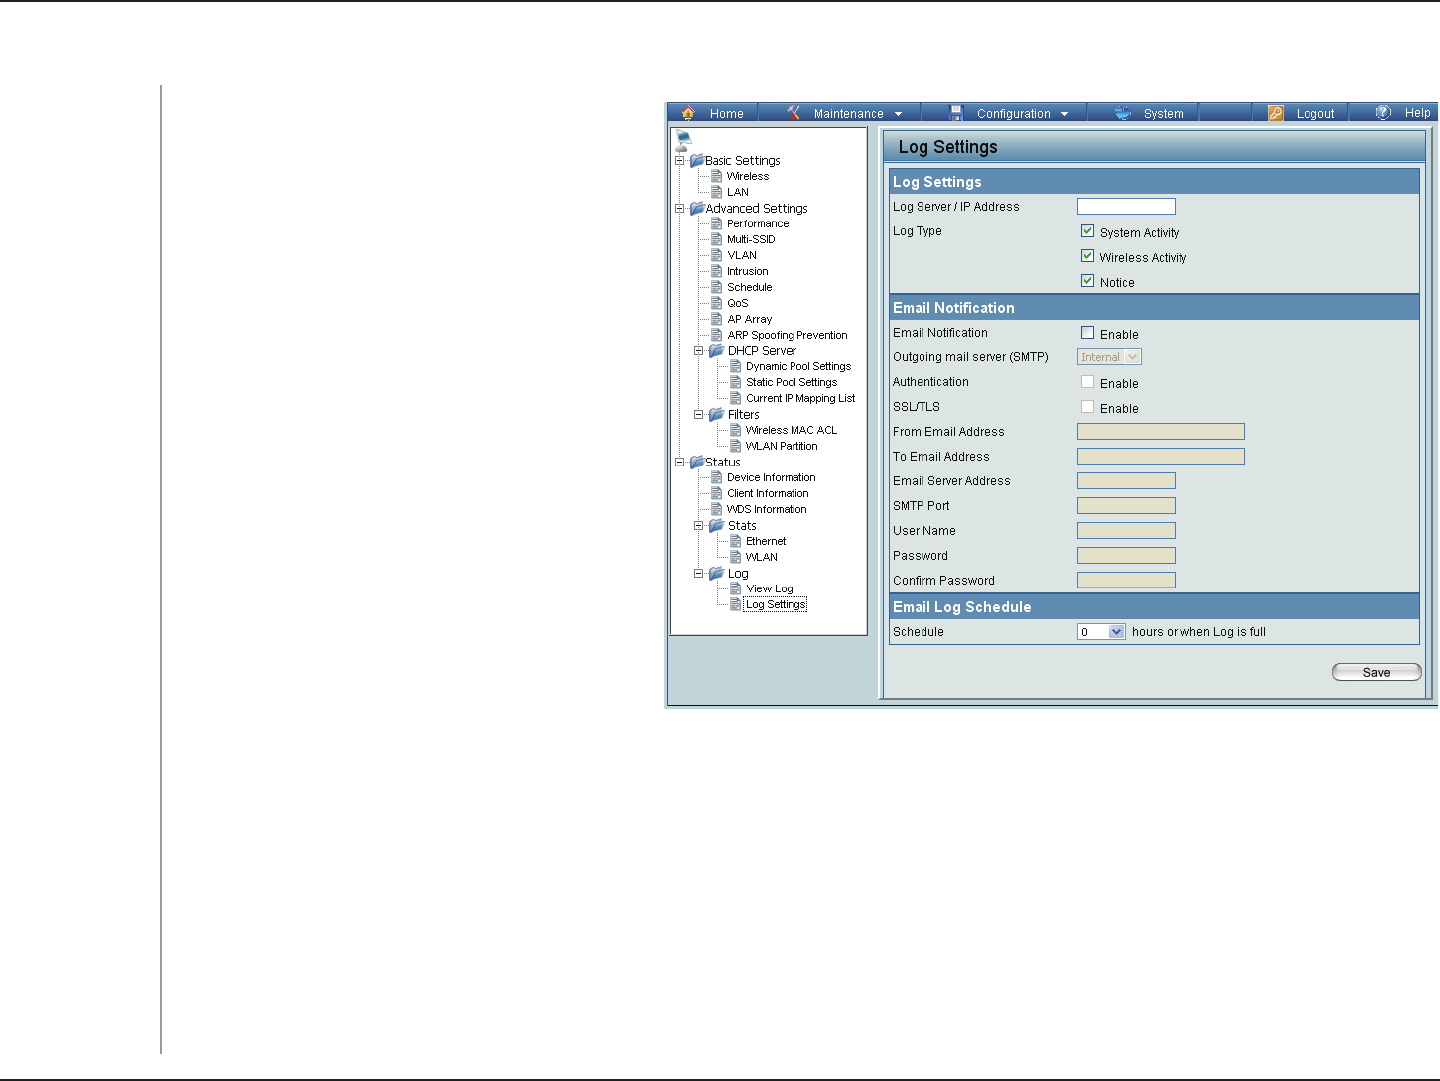
Log Settings
Enter the IP address of the server you would
like to send the DAP-2320 log to.
Check the box for the type of activity you
want to log. There are three types: System
Activity, Wireless Activity, and Notice.
Check to enable Email notification.
Select the SMTP server from the drop-down
menu.
Check to enable authentication.
Check to enable SSL/TLS authentication.
Enter the “From” email address.
Enter the destination email address.
Enter the Email Server Address.
Enter the SMTP port.
Enter your email username.
Enter your email password.
Enter your email password again.
Select when to send the log to your email
(in hours). You will receive an email when
the log is full too.
Log Server/IP
Address:
Log Type:
Email Notification:
Outgoing Mail
Server (SMTP):
Authentication:
SSL / TLS:
From Email
Address:
To Email Address:
Email Server
Address:
SMTP Port:
Username:
Password:
Confirm Password:
Schedule:
DAP-2320

59D-Link DAP-2320 User Manual
Section 3 - Configuration
Check one or more of the five main categories to display the various hidden administrator parameters and settings
displayed on the next five pages.
Maintenance
Administration Settings
DAP-2320
60D-Link DAP-2320 User Manual
Section 3 - Configuration
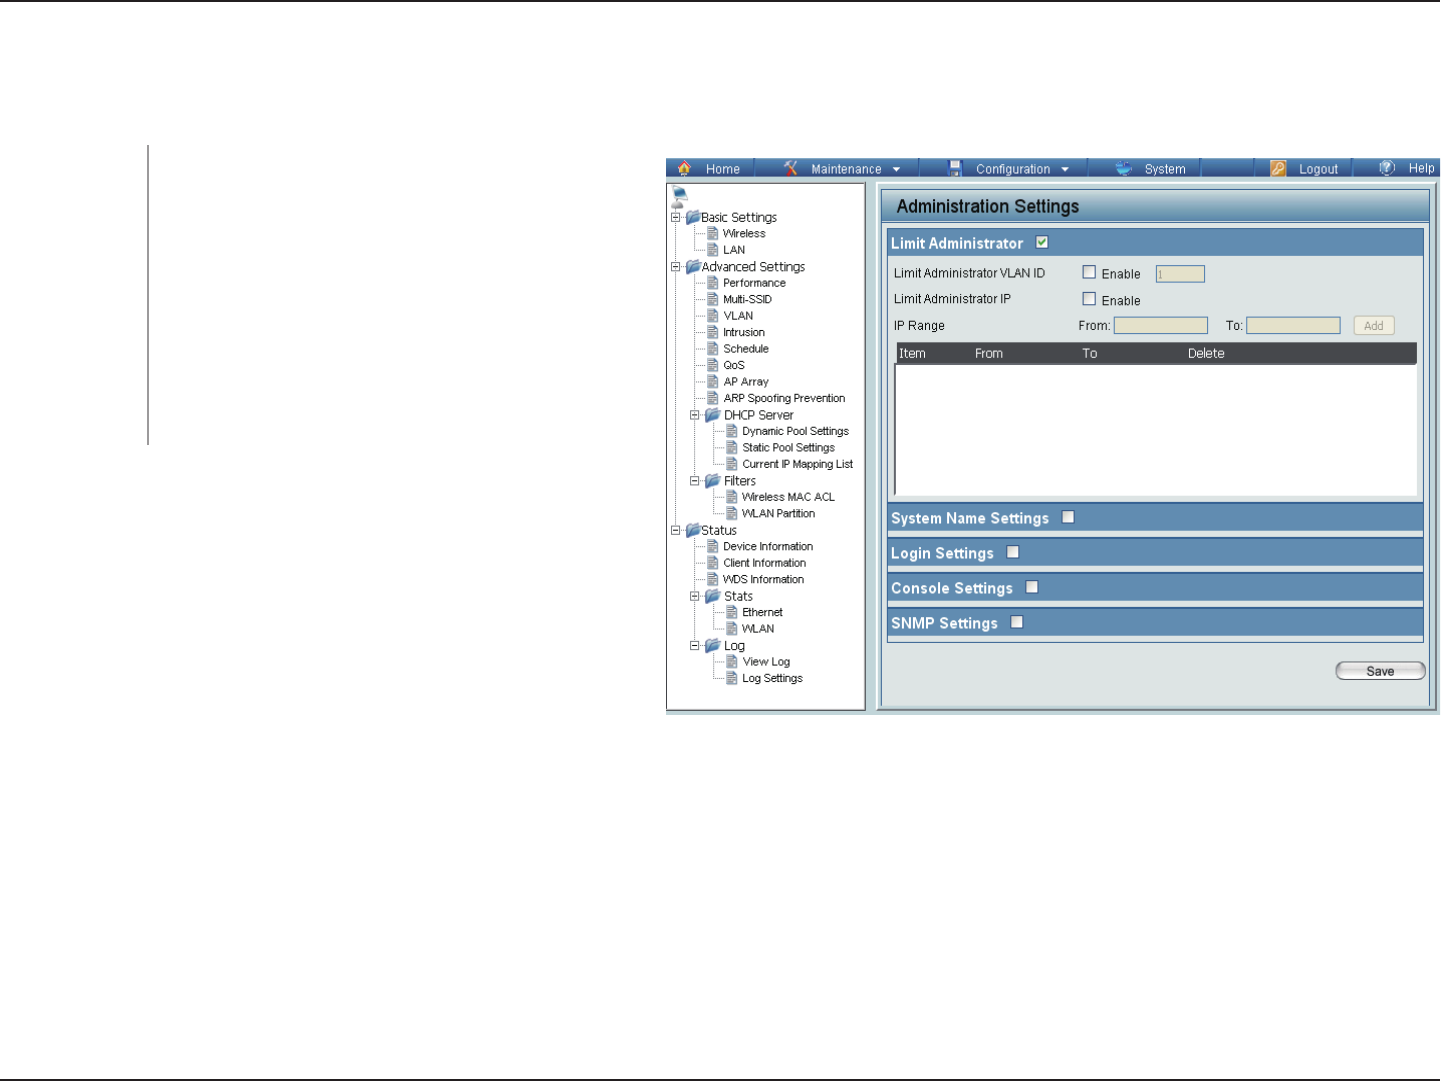
Limit Administrator
Each of the five main categories display various hidden administrator parameters and settings.
Check the box provided and the enter the
specific VLAN ID that the administrator will
be allowed to log in from.
Check to enable the Limit Administrator IP
address.
Enter the IP address range that the
administrator will be allowed to log in from
and then click the Add button.
Limit
Administrator
VLAN ID:
Limit
Administrator IP:
IP Range:
DAP-2320
61D-Link DAP-2320 User Manual
Section 3 - Configuration
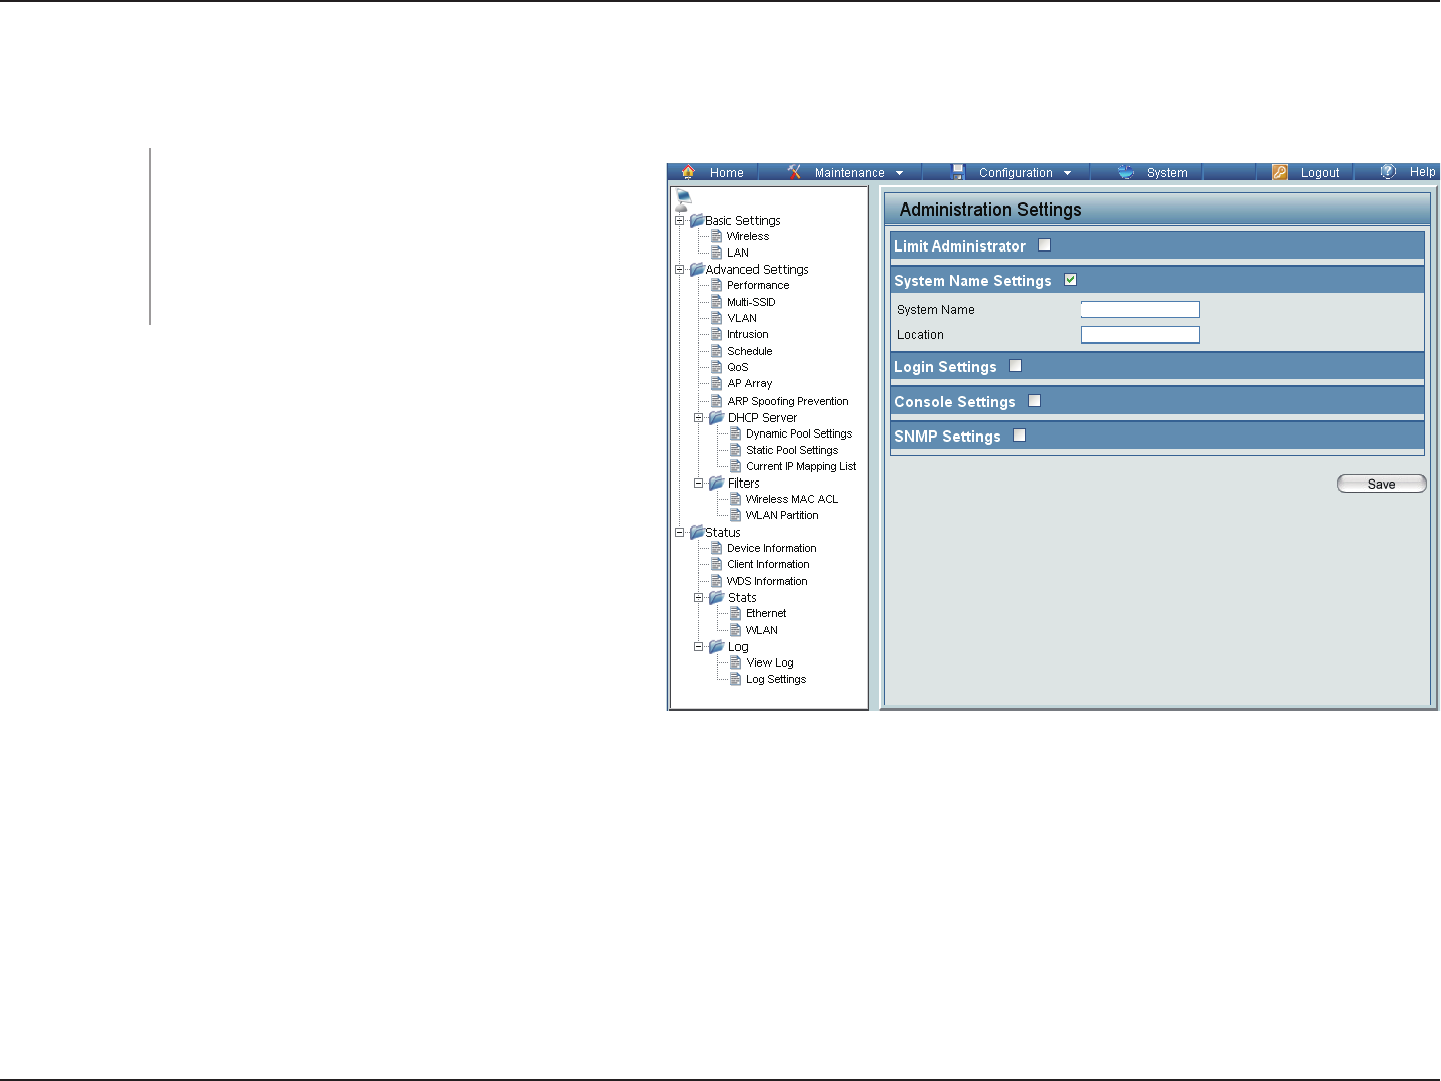
System Name Settings
Each of the five main categories display various hidden administrator parameters and settings.
The name of the device. The default name is
D-Link DAP-2320.
The physical location of the device, e.g. 72nd
Floor, D-Link HQ.
System Name:
Location:
DAP-2320
D-Link DAP-2320
62D-Link DAP-2320 User Manual
Section 3 - Configuration
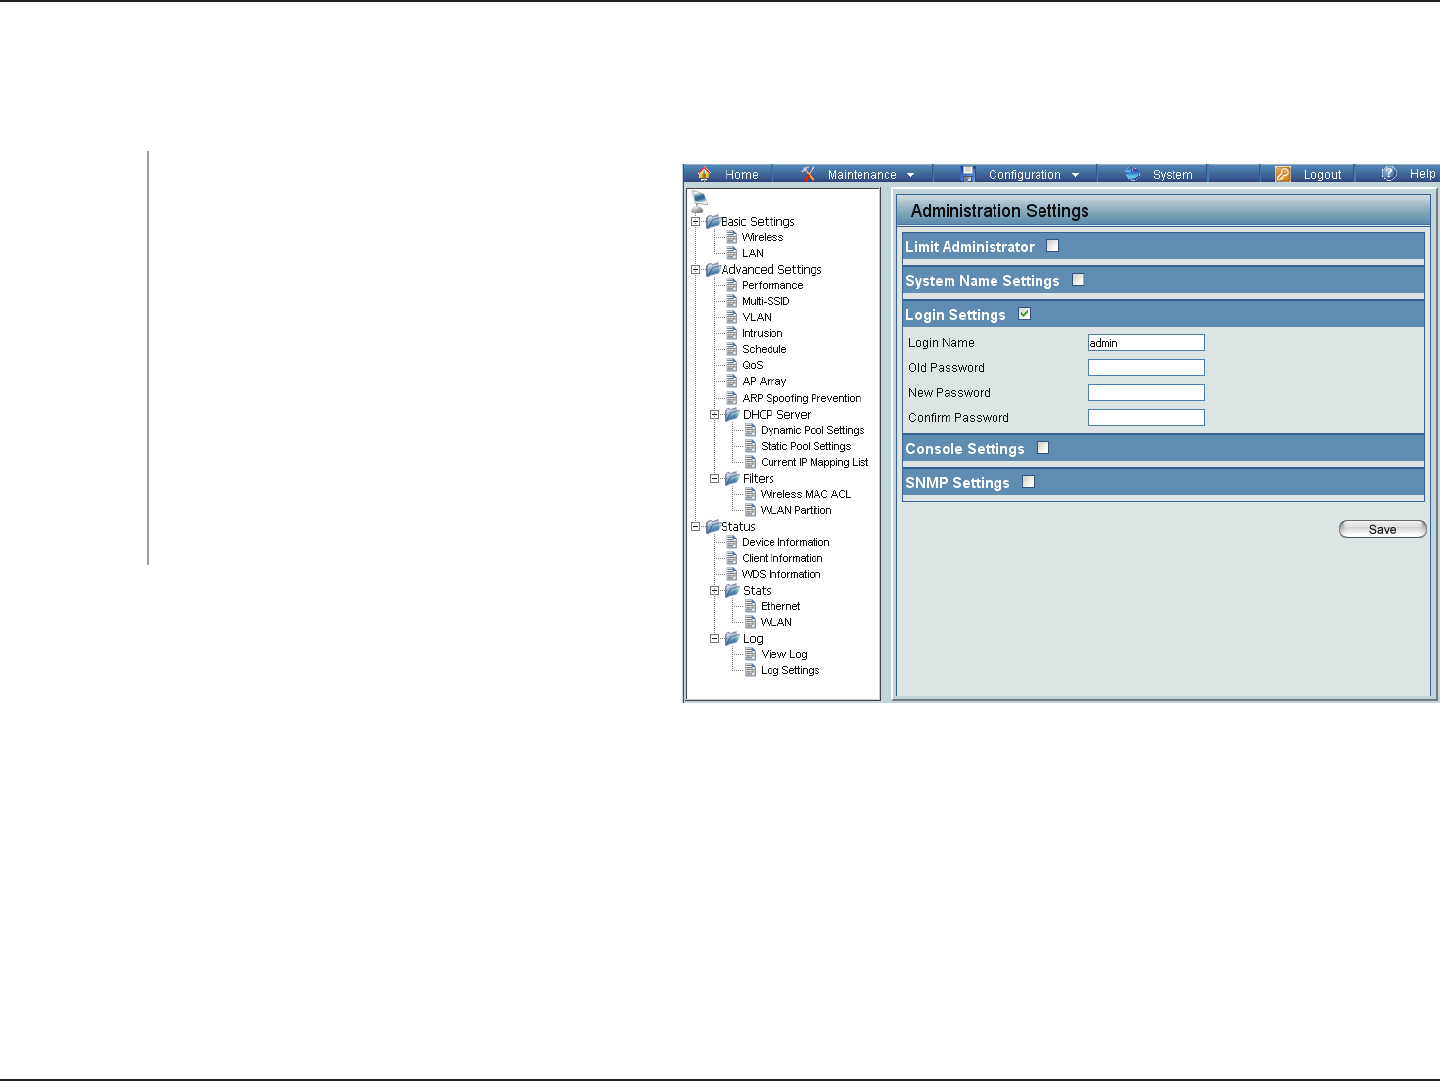
Login Settings
Each of the five main categories display various hidden administrator parameters and settings.
Enter a user name. The default is admin.
When changing your password, enter the old
password here.
When changing your password, enter the new
password here. The password is case-sensitive.
“A” is a different character than “a.” The length
should be between 0 and 12 characters.
Enter the new password a second time for
confirmation purposes.
User Name:
Old Password:
New Password:
Confirm
Password:
DAP-2320
63D-Link DAP-2320 User Manual
Section 3 - Configuration
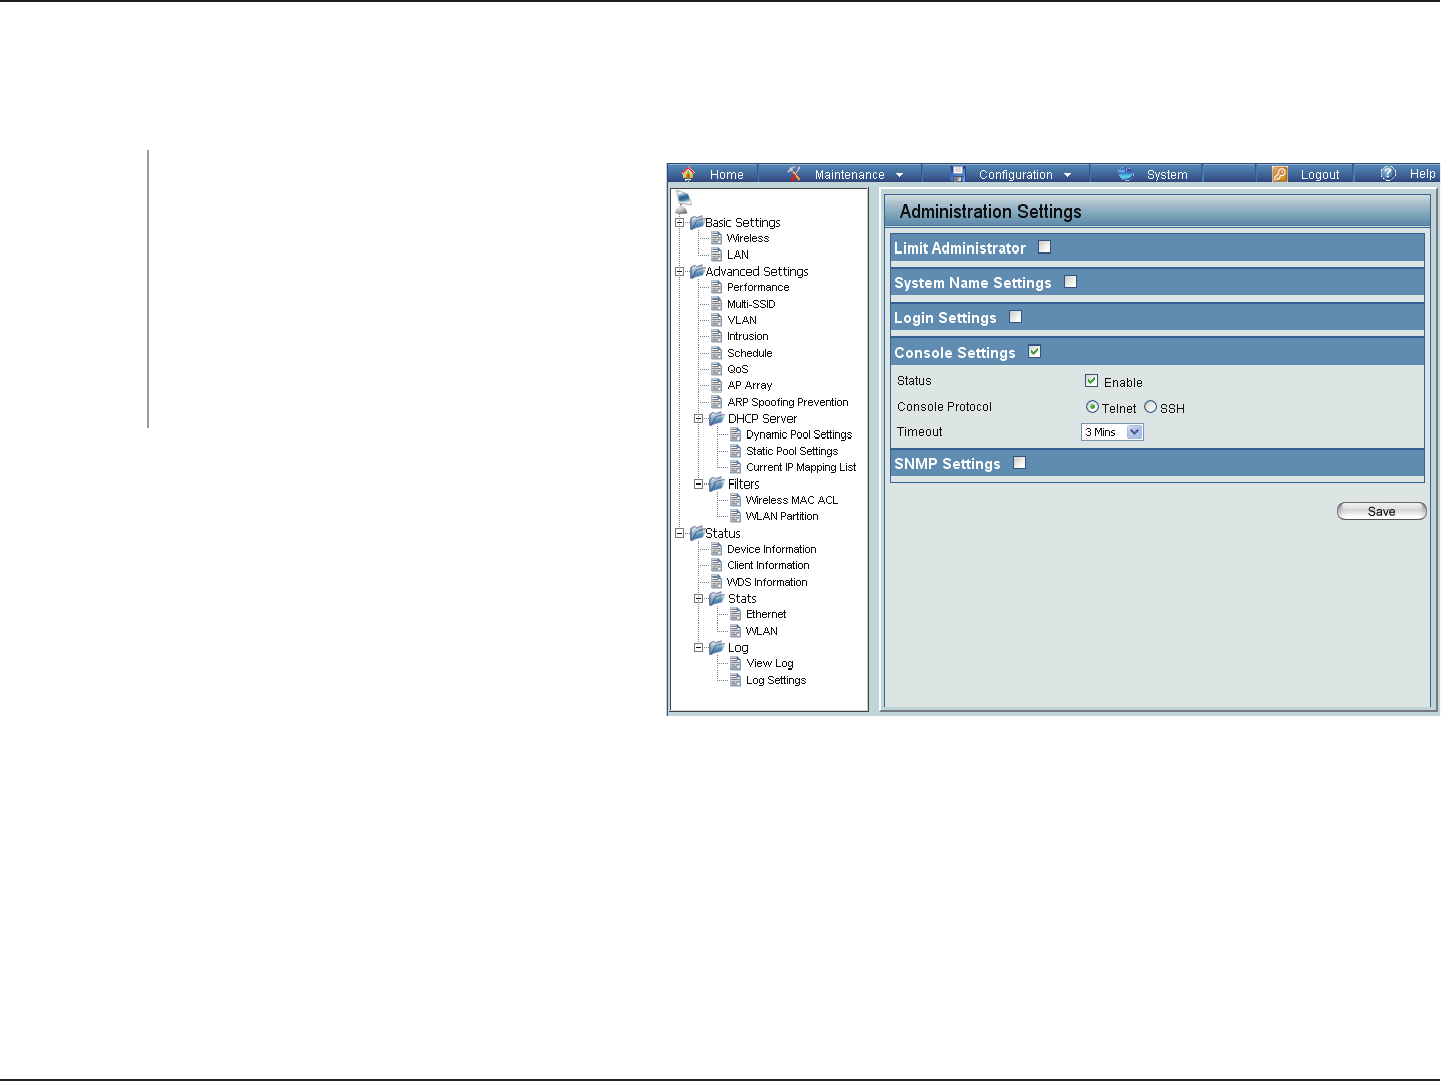
Console Settings
Each of the five main categories display various hidden administrator parameters and settings.
Status is enabled by default. Uncheck the
box to disable the console.
Select the type of protocol you would like to
use, Telnet or SSH.
Set to 1 Min, 3 Mins, 5 Mins, 10 Mins, 15
Mins or Never.
Status:
Console
Protocol:
Timeout:
DAP-2320
64D-Link DAP-2320 User Manual
Section 3 - Configuration
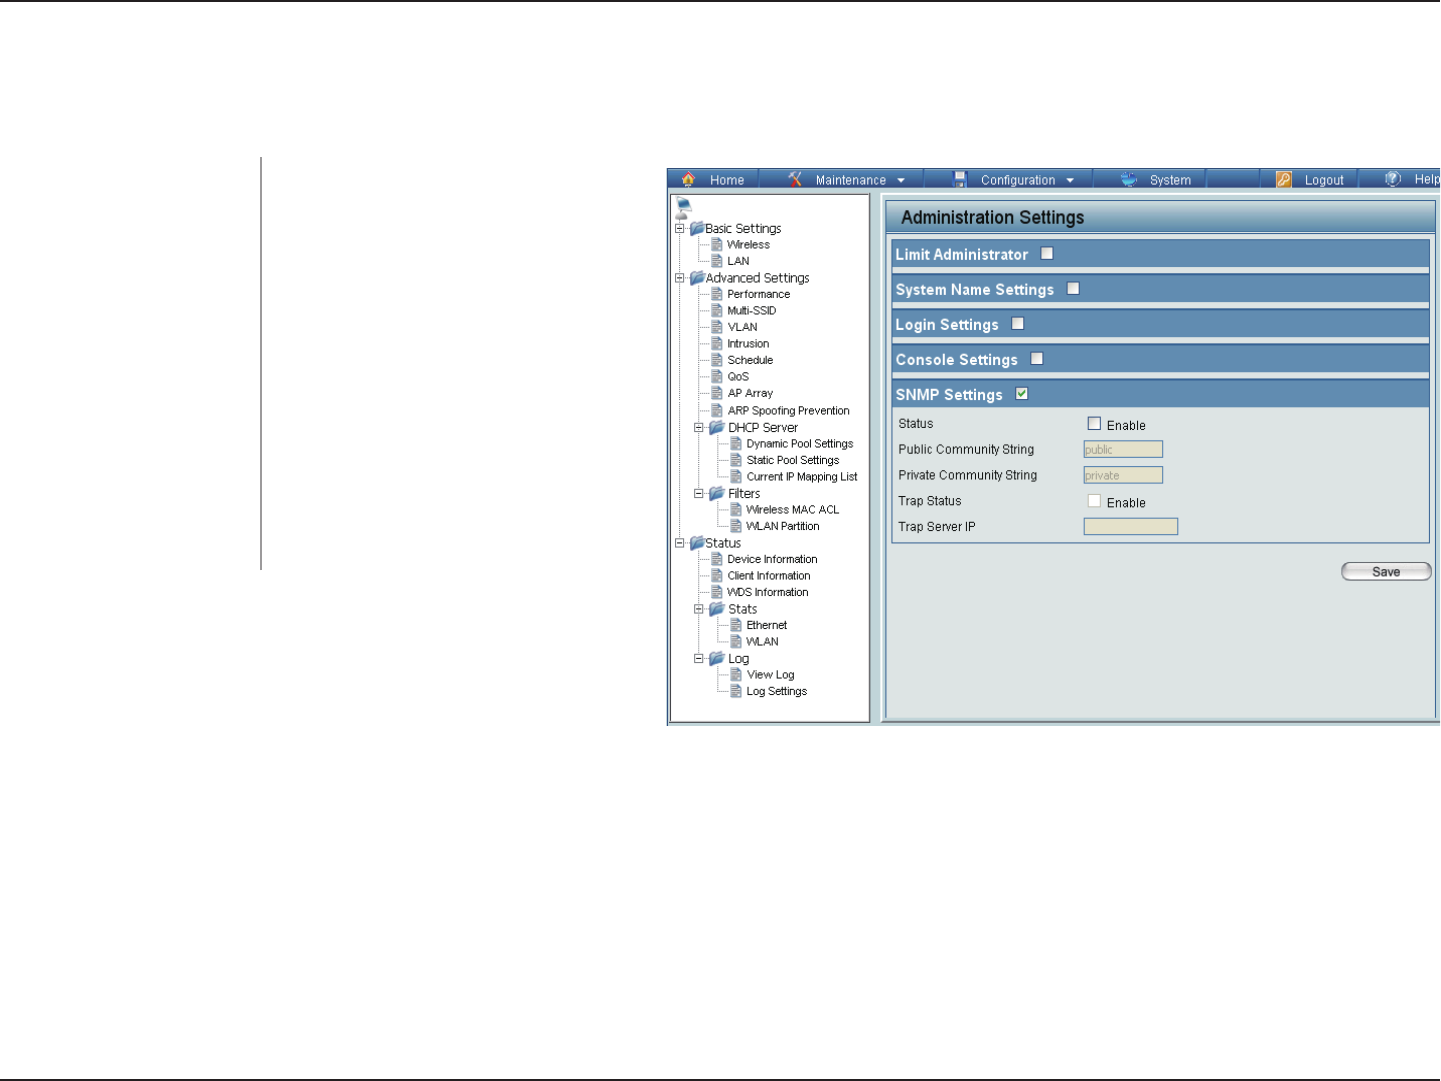
SNMP Settings
Each of the five main categories display various hidden administrator parameters and settings.
Check the box to enable the
SNMP functions. This option is
disabled by default.
Enter the public SNMP community
string.
Enter the private SNMP community
string.
Check the box to enable Trap
Status.
Enter the Trap Server IP address.
Status:
Public Community String:
Private Community String:
Trap Status:
Trap Server IP:
DAP-2320
65D-Link DAP-2320 User Manual
Section 3 - Configuration
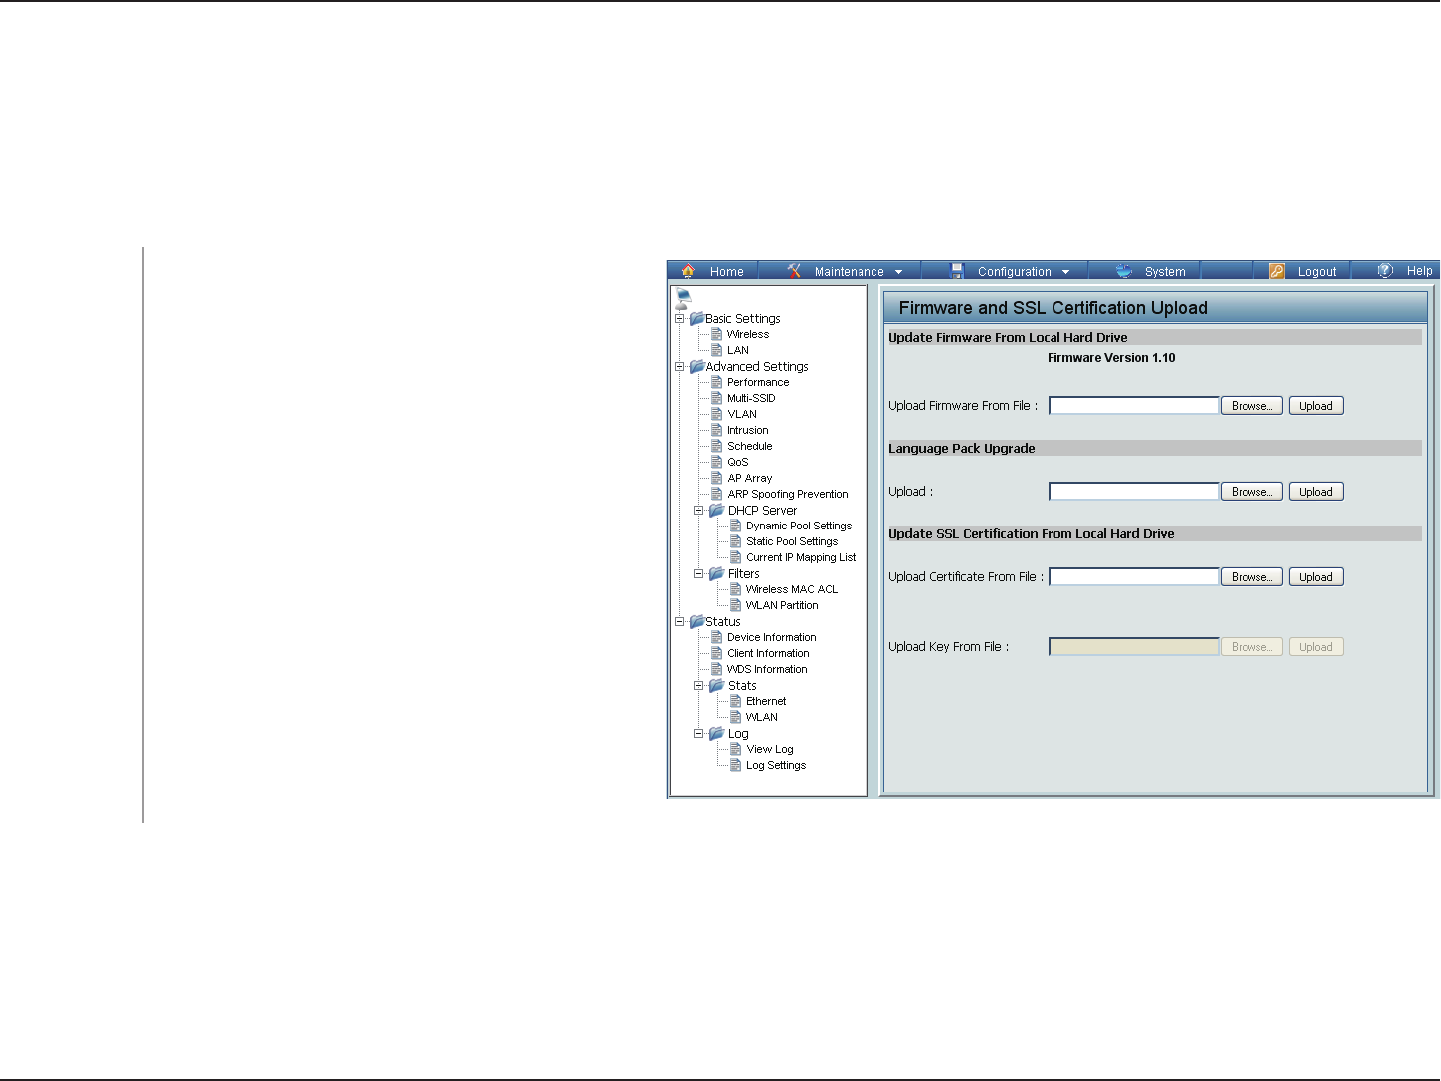
Firmware and SSL Certification Upload
The current firmware version is displayed
above the file location field. After downloading
the most recent version of firmware for the
DAP-2320 from http://support.dlink.com to
your local computer, use the Browse button to
locate the firmware file on your computer. Click
Upload to update the firmware version. Please
don’t turn the power off while upgrading.
You may load a language pack to display the
utility in another language. Click Browse to
locate the language pack file on your local
computer. After selecting and opening the
file, click Upload to upload the file to the
DAP-2320.
Click Browse to locate the SSL Certification
file on your local computer. After selecting and
opening the file, click Upload to upload the
file to the DAP-2320.
Upload Firmware
From Local Hard
Drive:
Language Pack
Upgrade:
Upload SSL
Certification
From Local Hard
Drive:
This page allows the user to perform a firmware upgrade. A Firmware upgrade is a function that upgrade the running
software used by the access point. This is a useful feature that prevents future bugs and allows for new features to
be added to this product. Please go to your local D-Link website to see if there is a newer version firmware available.
DAP-2320
66D-Link DAP-2320 User Manual
Section 3 - Configuration
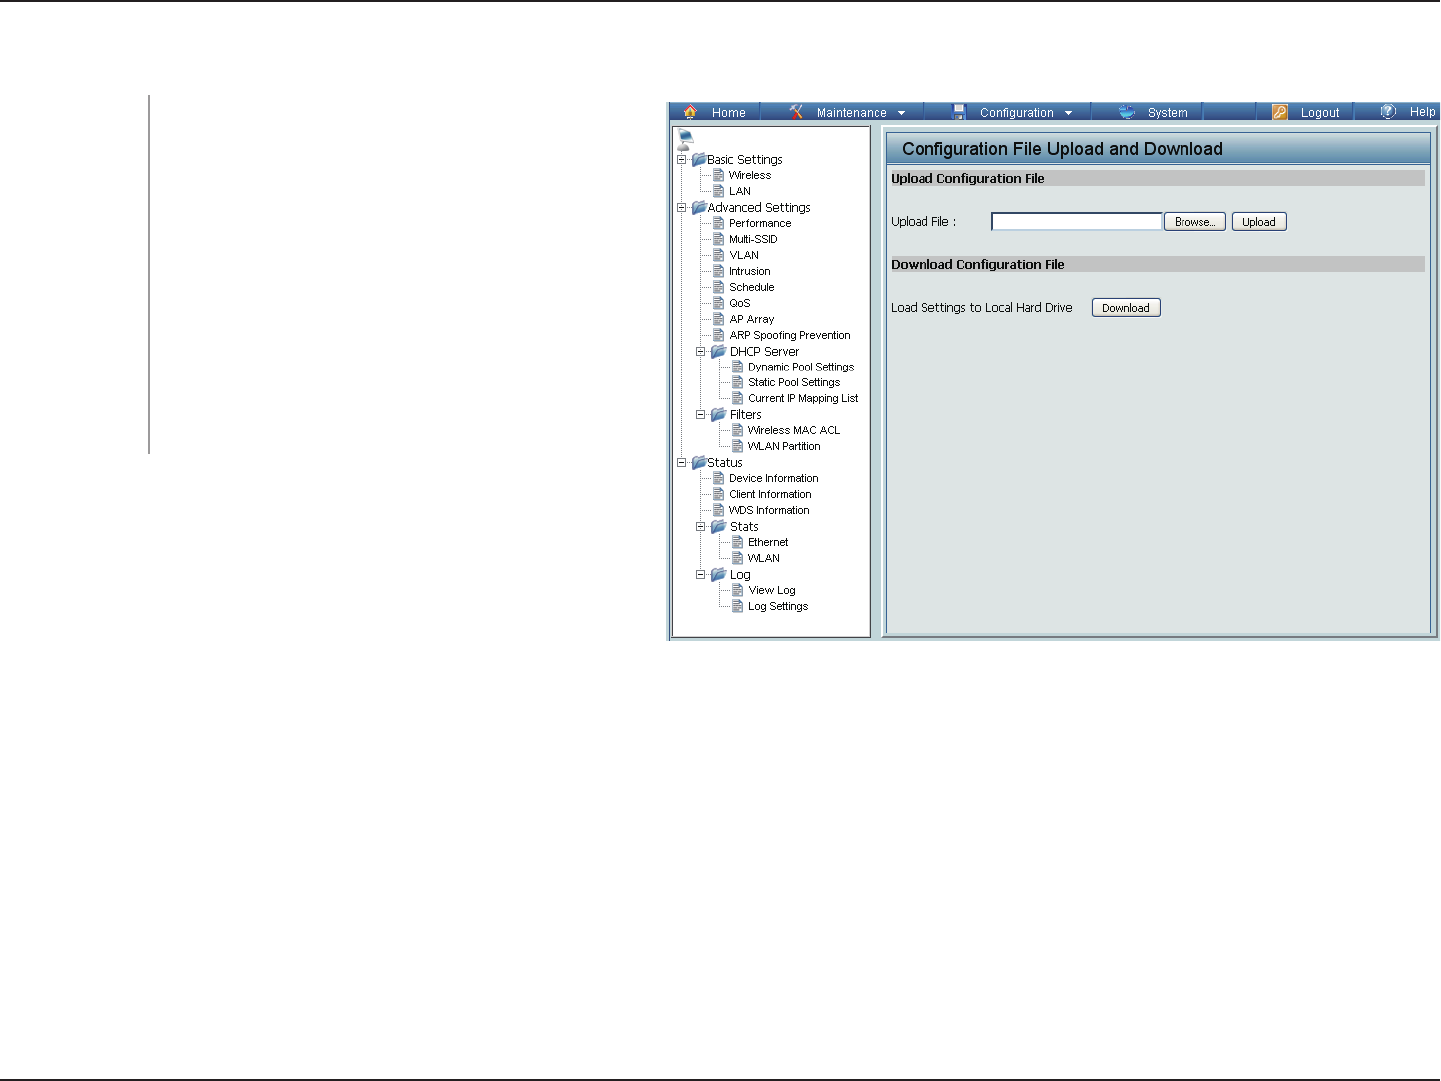
Configuration File Upload
Click the Browse button to locate a previously
saved configuration file on your local
computer. After selecting the file, click
Upload to apply the configuration settings
to the DAP-2320.
Click Download to save the current
DAP-2320 configuration to your local computer.
Note that if you save one configuration with
the administrator’s password now, after
resetting your DAP-2320, and then updating
to this saved configuration file, the password
will be gone.
Upload File:
Download
Configuration
File:
DAP-2320
67D-Link DAP-2320 User Manual
Section 3 - Configuration
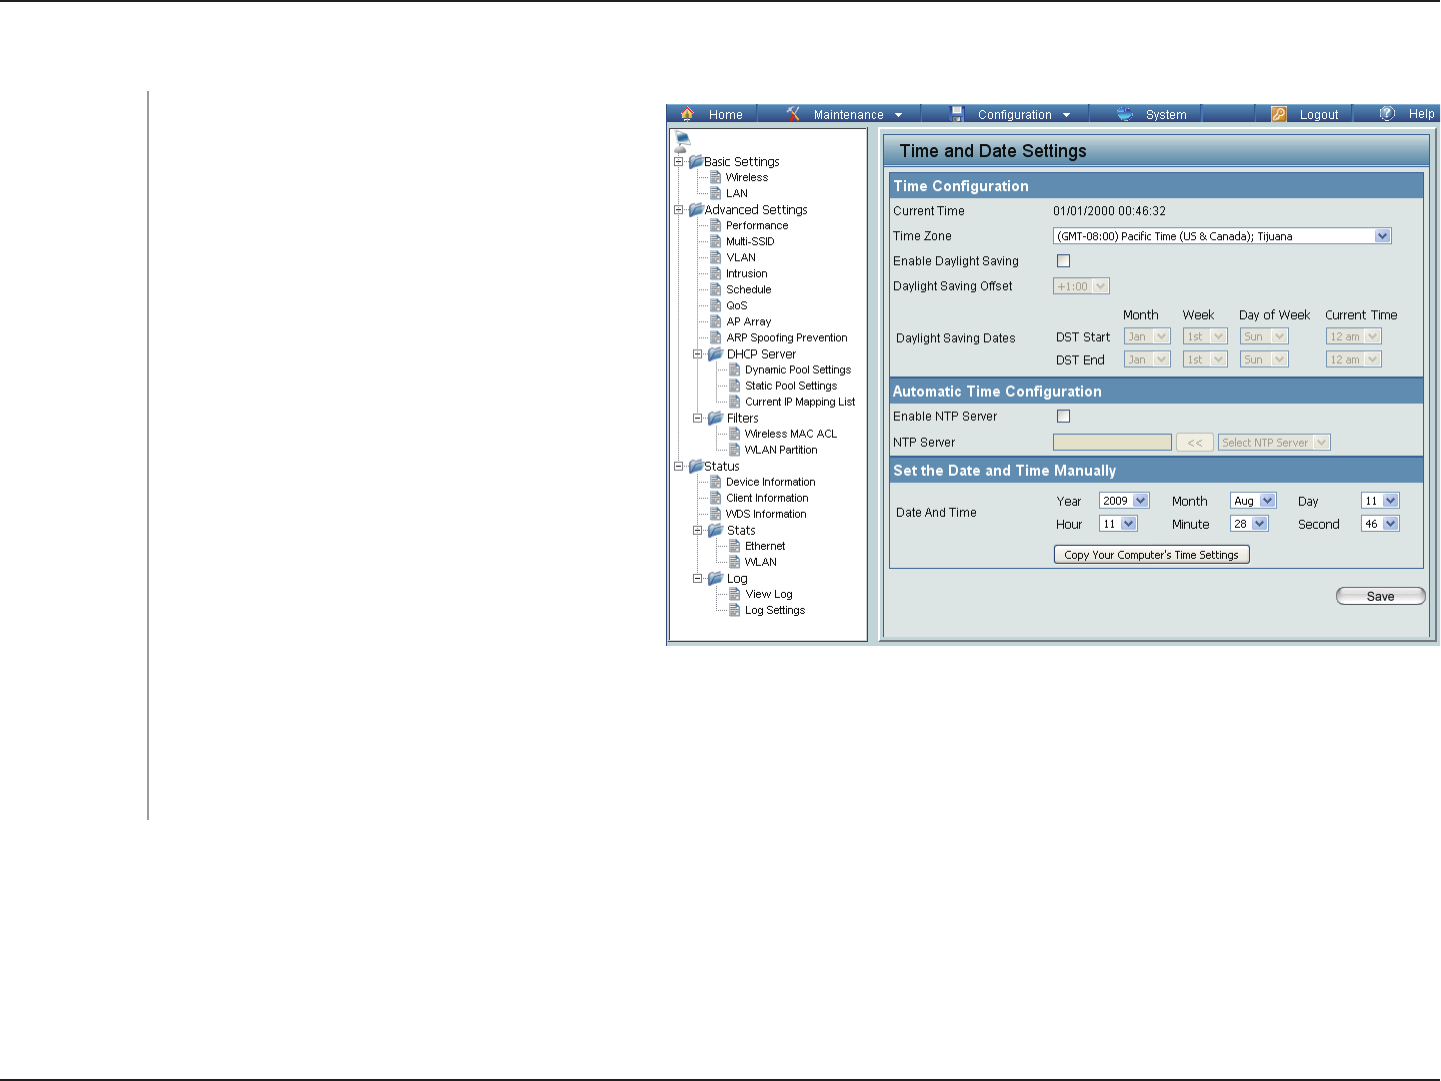
Time and Date
Displays the current time and date settings.
Use the drop-down menu to select your
correct Time Zone.
Check the box to Enable Daylight Saving
Time.
Use the drop-down menu to select the correct
Daylight Saving period.
Use the drop-down menu to select the correct
Daylight Saving offset.
Check to enable the AP to get system time
from an NTP server.
Enter the NTP server IP address.
You can either manually set the time for your
AP here, or you can click the Copy Your
Computer’s Time Settings button to copy
the time from the computer you are using
(Make sure that the computer’s time is set
correctly).
Current Time:
Time Zone:
Enable Daylight
Saving:
Daylight Saving
Offset:
Daylight Saving
Dates:
Enable NTP
Server:
NTP Server:
Set the Date and
Time Manually:
DAP-2320
68D-Link DAP-2320 User Manual
Section 3 - Configuration
System
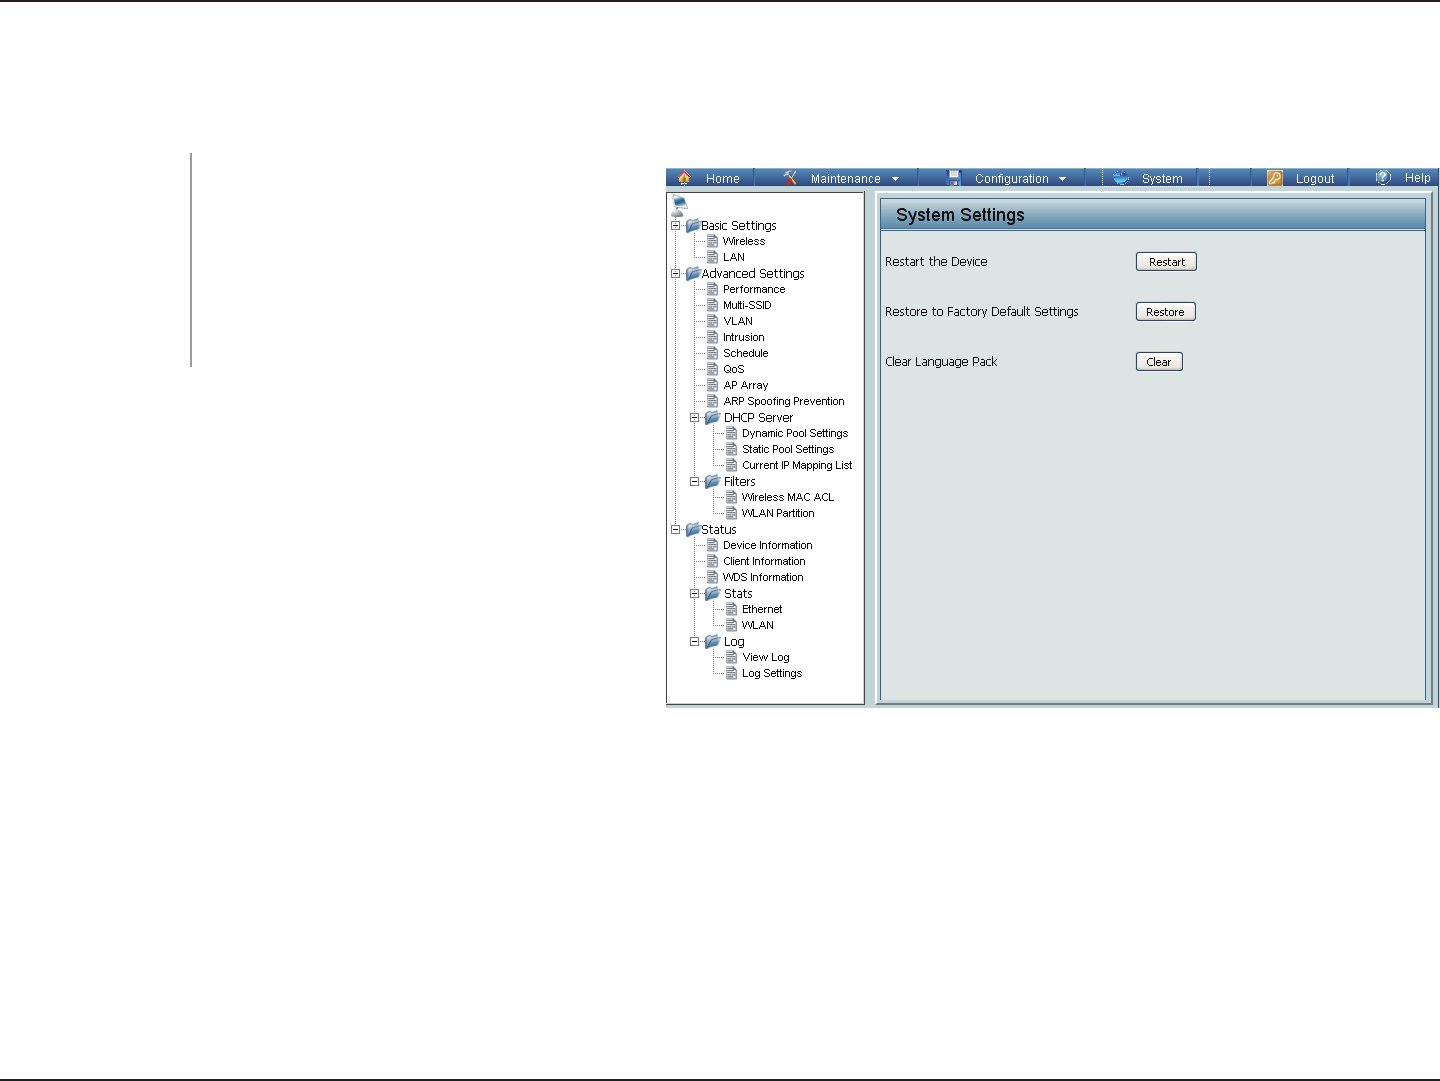
System Settings
Click Restart to restart the DAP-2320.
Click Restore to restore the DAP-2320
back to factory default settings.
Click Clear to remove any loaded
language packs.
Restart the Device:
Restore to Factory
Default Settings:
Clear Language Pack:
DAP-2320
69D-Link DAP-2320 User Manual
Section 3 - Configuration
Help
Scroll down the Help page for topics and
explanations.
Help:
DAP-2320

70D-Link DAP-2320 User Manual
Section 6 - Troubleshooting
Troubleshooting
This chapter provides solutions to problems that can occur during the installation and operation of the DAP-2320.
Read the following descriptions if you are having problems. (The examples below are illustrated in Windows® XP. If
you have a different operating system, the screenshots on your computer will look similar to the following examples.)
1. Why can’t I access the web-based conguration utility?
When entering the IP address of the D-Link access point (192.168.0.50 for example), you are not connecting to a
website on the Internet nor do you have to be connected to the Internet. The device has the utility built-in to a ROM
chip in the device itself. Your computer must be on the same IP subnet to connect to the web-based utility.
• Make sure you have an updated Java-enabled web browser. We recommend the following:
- Microsoft Internet Explorer® 6.0 and higher
- Mozilla Firefox 3.0 and higher
- Google™ Chrome 2.0 and higher
- Apple Safari 3.0 and higher
• Verify physical connectivity by checking for solid link lights on the device. If you do not get a solid link light, try
using a different cable or connect to a different port on the device if possible. If the computer is turned off, the link
light may not be on.
• Disable any internet security software running on the computer. Software firewalls such as Zone Alarm, Black Ice,
Sygate, Norton Personal Firewall, and Windows® XP firewall may block access to the configuration pages. Check
the help files included with your firewall software for more information on disabling or configuring it.

71D-Link DAP-2320 User Manual
Section 6 - Troubleshooting
• Configure your Internet settings:
• Go to Start > Settings > Control Panel. Double-click the Internet Options Icon. From the Security
tab, click the button to restore the settings to their defaults.
• Click the Connection tab and set the dial-up option to Never Dial a Connection. Click the LAN Settings
button. Make sure nothing is checked. Click OK.
• Go to the Advanced tab and click the button to restore these settings to their defaults. Click OK three
times.
• Close your web browser (if open) and open it.
• Access the web management. Open your web browser and enter the IP address of your D-Link access point in the
address bar. This should open the login page for your the web management.
• If you still cannot access the configuration, unplug the power to the access point for 10 seconds and plug back in.
Wait about 30 seconds and try accessing the configuration. If you have multiple computers, try connecting using
a different computer.
2. What can I do if I forgot my password?
If you forgot your password, you must reset your access point. Unfortunately, this process will change all your settings
back to the factory defaults.
To reset the access point, locate the reset button (hole) on the rear panel of the unit. With the access point powered
on, use a paperclip to hold the button down for 10 seconds. Release the button and the access point will go through
its reboot process. Wait about 30 seconds to access the access point. The default IP address is 192.168.0.50. When
logging in, the username is admin and leave the password box empty.
72D-Link DAP-2320 User Manual
Appendix B - Networking Basics
Networking Basics
Check your IP address
After you install your network adapter, by default, the TCP/IP settings should be set to obtain an IP address from a
DHCP server (i.e. wireless router) automatically. To verify your IP address, please follow the steps below.
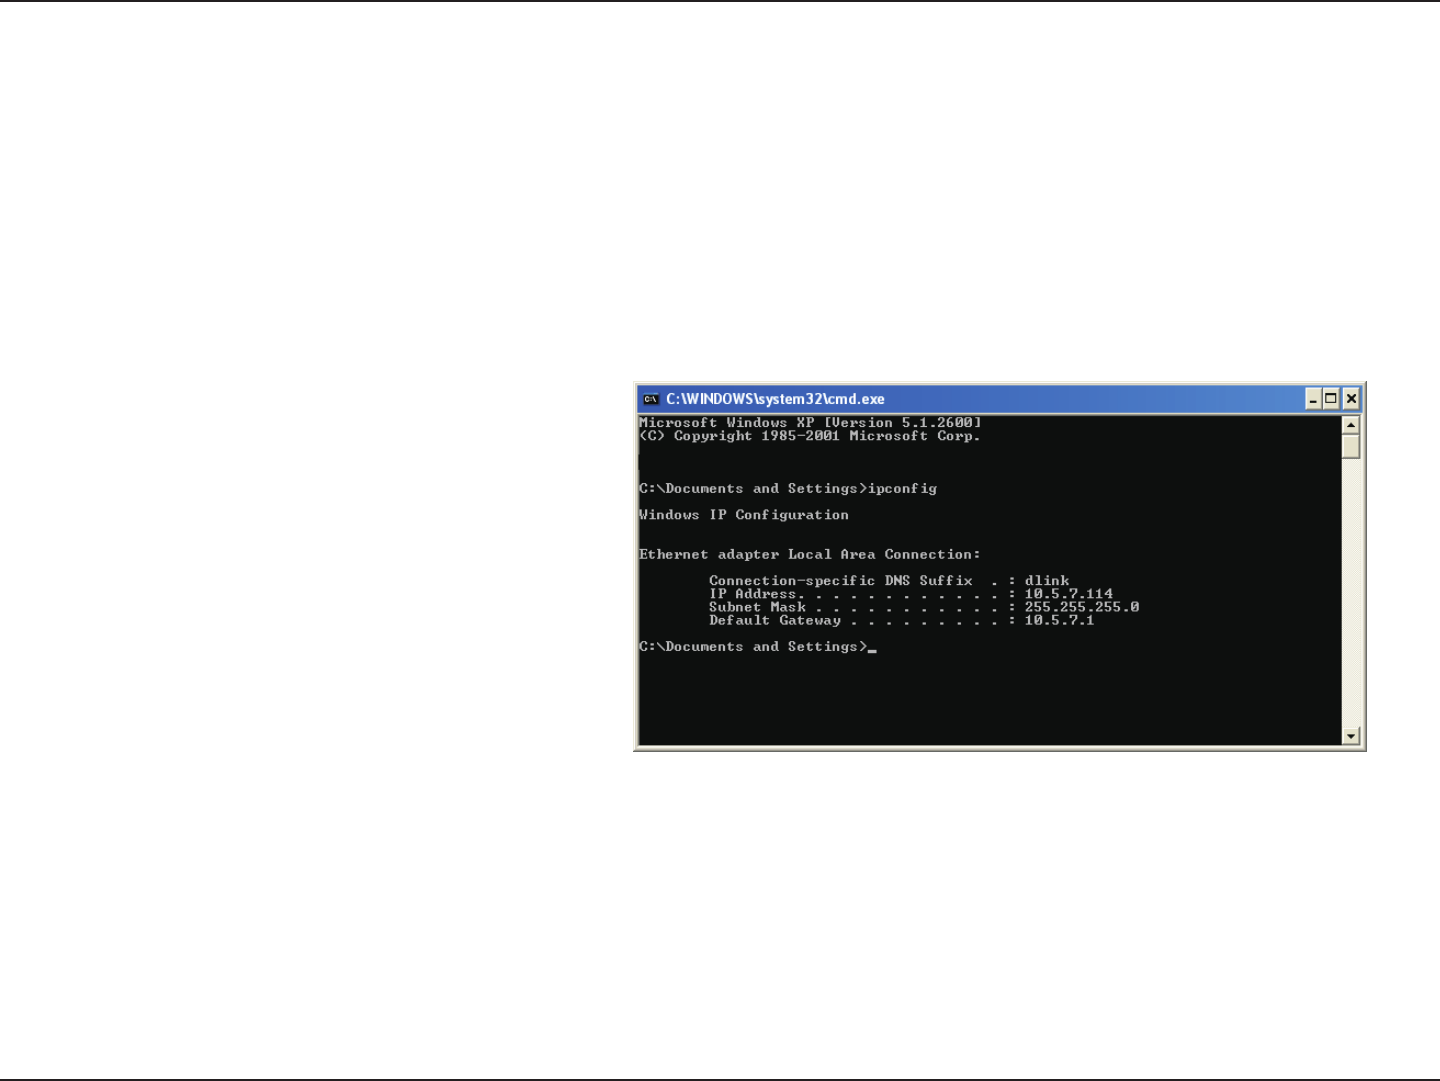
Click on Start > Run. In the run box type cmd and click OK.
At the prompt, type ipconfig and press Enter.
This will display the IP address, subnet mask, and
the default gateway of your adapter.
If the address is 0.0.0.0, check your adapter
installation, security settings, and the settings
on your router. Some firewall software programs
may block a DHCP request on newly installed
adapters.
If you are connecting to a wireless network at a
hotspot (e.g. hotel, coffee shop, airport), please
contact an employee or administrator to verify their
wireless network settings.

73D-Link DAP-2320 User Manual
Appendix B - Networking Basics
Statically Assign an IP address
If you are not using a DHCP capable gateway/router, or you need to assign a static IP address, please follow the
steps below:
Step 1
Windows® 2000: Click on Start > Settings > Control Panel > Network Connections
Windows® XP: Click on Start > Control Panel > Network Connections
Windows Vista®: Click on Start > Control Panel > Network and Internet > Network and Sharing Center >
Manage network connections
Step 2
Right-click on the Local Area Connection which represents your network adapter and select Properties.
Step 3
Highlight Internet Protocol (TCP/IP) and click Properties.
Step 4
Click Use the following IP address and enter an IP address that is on the same subnet as your network or the
LAN IP address on your router.
Example: If the router’s LAN IP address is 192.168.0.1, make your IP address 192.168.0.X where X is a number
between 2 and 99. Make sure that the number you choose is not in use on the network. Set Default Gateway the
same as the LAN IP address of your router (192.168.0.1).
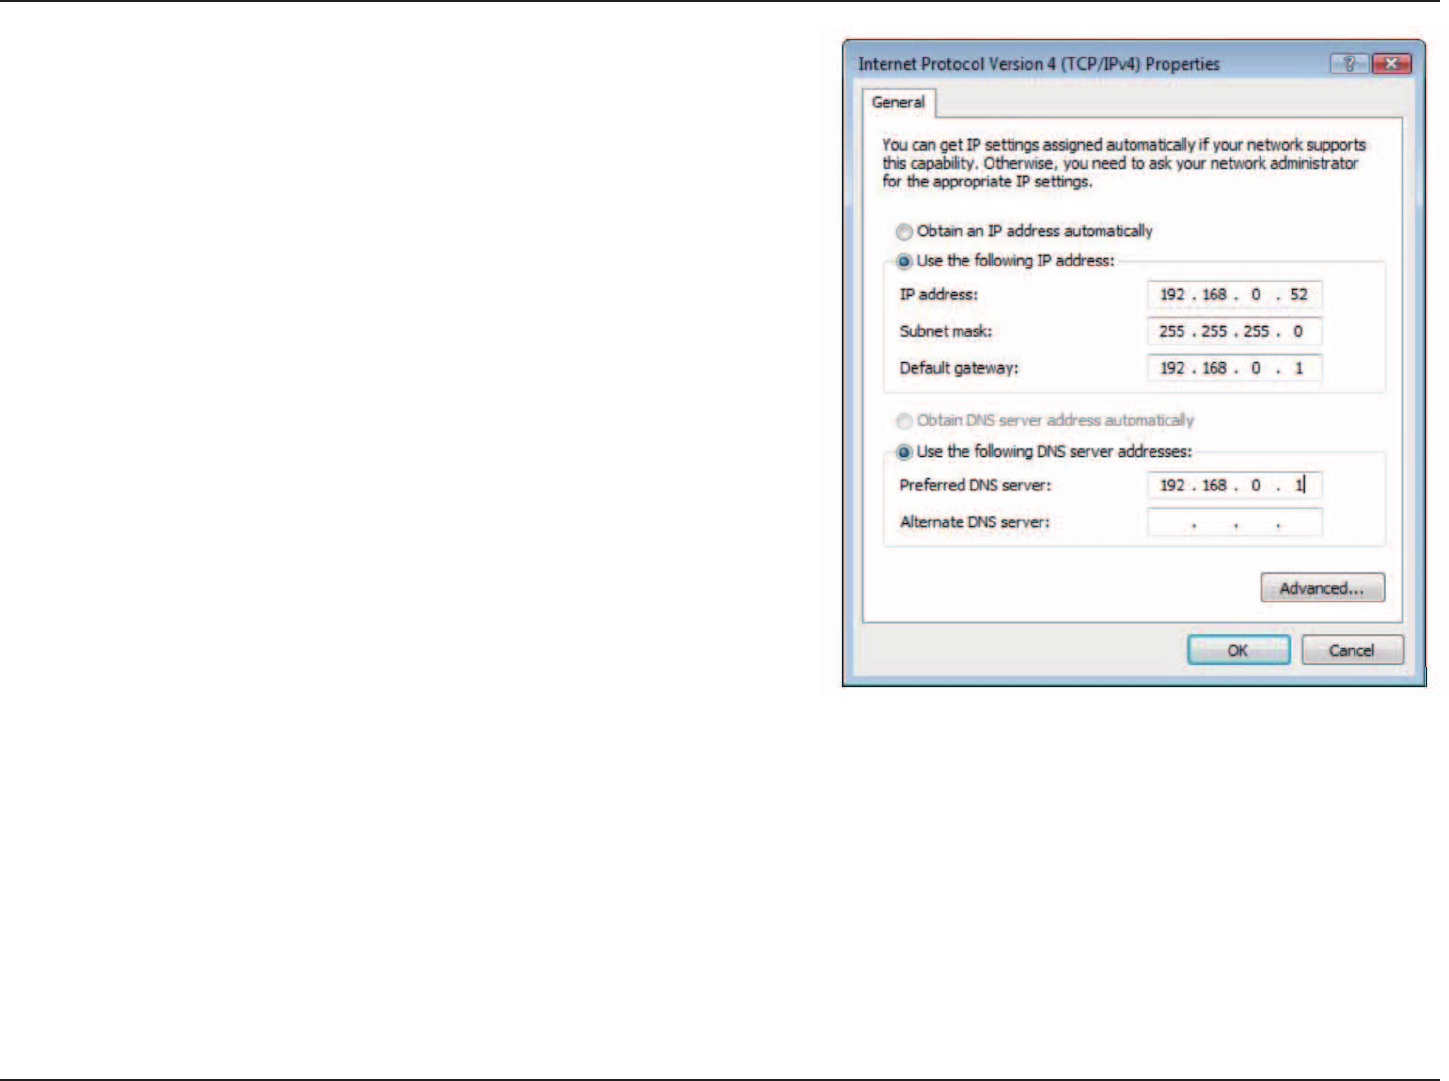
74D-Link DAP-2320 User Manual
Appendix B - Networking Basics
Set Primary DNS the same as the LAN IP address of your router
(192.168.0.1). The Secondary DNS is not needed or you may
enter a DNS server from your ISP.
Step 5
Click OK twice to save your settings.

75D-Link DAP-2320 User Manual
Appendix C - Technical Specifications
Technical Specifications
Standards
• IEEE 802.11b
• IEEE 802.11g
• IEEE 802.11n
• IEEE 802.3
• IEEE 802.3u
• IEEE 802.3ab
• IEEE 802.3af
Network Management
• Web Browser interface
HTTP
Secure HTTP (HTTPS)
• AP Manager II
• SNMP Support
D-View Module
Private MIB
• Command Line Interface
Telnet
Secure SSH Telnet
Data Rates*
For 802.11b:
• 11, 5.5, 2, and 1 Mbps
For 802.11g:
• 54, 48, 36, 24, 18, 12, 9, and 6 Mbps
For 802.11n:
HT20/HT40
• 144.4/300, 130/270, 117/243, 104/216, 78/162, 66/135,
58.5/121.5, 52/108, 39/81, 26/54, 19.5/40.5, 12/27, and
6.5/13.5 Mbps
Security
• WPA™ Personal/Enterprise
• WPA2™ Personal/Enterprise
• WEP™ 64-/128-bit
• SSID Broadcast Disable
• MAC Address Access Control
Operating Voltage
• 48V DC +/- 10% for PoE or 5V/2.5A
Radio and Modulation Type
For 802.11b:
DQPSK, DBPSK, DSSS, and CCK
Operating Frequency**
For 802.11b/g:
2.4 ~ 2.4835 GHz
For 802.11n:
2.4 GHz Band: 2.4 ~ 2.4835 GHz
* Maximum wireless signal rate derived from IEEE Standard 802.11g and Draft 802.11n specifications. Actual data throughput will vary. Network conditions and
environmental factors, including volume of network traffic, building materials and construction, and network overhead, lower actual data throughput rate. Environmental
factors will adversely affect wireless signal range.

76D-Link DAP-2320 User Manual
Appendix C - Technical Specifications
Antenna Type
• PIFA antenna with 2dBi gain
Transmit Output Power (at Antenna Connector)
• 29.25 dBm @ 2.4GHz
EIRP
• 19.24 dBm @ 2.4GHz
Max Power Consumption
• 10.5W
LEDs
• Power
• LAN
• 2.4 GHz
Temperature
• Operating: 0˚C to 40˚C
• Storing: -20˚C to 65˚C
Humidity
• Operating: 10%~90% (non-condensing)
• Storing: 5%~95% (non-condensing)
**Please note that operating frequency ranges vary depending on the regulations of individual countries and jurisdictions. The DAP-2320 isn’t supported in the 5.25~5.35 GHz and 5.47 ~ 5.725 GHz
frequency ranges in some regions.
Certications
• FCC Class B
• CE
• IC
• C-Tick
• CSA
• WiFi
Dimensions
• L = 198 mm
• W = 120 mm
• H = 32 mm
77D-Link DAP-2320 User Manual
Appendix D - Contacting Technical Support
Contacting Technical Support
U.S. and Canadian customers can contact D-Link technical support through our web site or by phone.
Before you contact technical support, please have the following ready:
• Model number of the product (e.g. DAP-2320)
• Hardware Revision (located on the label on the bottom of the access point (e.g. rev A1))
• Serial Number (s/n number located on the label on the bottom of the access point).
You can find software updates and user documentation on the D-Link website as well as frequently asked questions
and answers to technical issues.
For customers within the United States:
Phone Support:
(877) 354-6555
Internet Support:
http://support.dlink.com
For customers within Canada:
Phone Support:
(877) 354-6560
Internet Support:
http://support.dlink.ca

78D-Link DAP-2320 User Manual
Appendix E - Warranty
Warranty
Federal Communication Commission Interference Statement
This device complies with Part 15 of the FCC Rules. Operation is subject to the following two conditions: (1)
This device may not cause harmful interference, and (2) this device must accept any interference received, including
interference that may cause undesired operation.
This equipment has been tested and found to comply with the limits for a Class B digital device, pursuant to
Part 15 of the FCC Rules. These limits are designed to provide reasonable protection against harmful interference in
a residential installation. This equipment generates, uses and can radiate radio frequency energy and, if not installed
and used in accordance with the instructions, may cause harmful interference to radio communications. However,
there is no guarantee that interference will not occur in a particular installation. If this equipment does cause harmful
interference to radio or television reception, which can be determined by turning the equipment off and on, the user
is encouraged to try to correct the interference by one of the following measures:
- Reorient or relocate the receiving antenna.
- Increase the separation between the equipment and receiver.
- Connect the equipment into an outlet on a circuit different from that to which the receiver
is connected.
- Consult the dealer or an experienced radio/TV technician for help.
FCC Caution: Any changes or modifications not expressly approved by the party responsible for compliance
could void the user’s authority to operate this equipment.

79D-Link DAP-2320 User Manual
Appendix E - Warranty
This transmitter must not be co-located or operating in conjunction with any other antenna or transmitter.
Note: The country code selection is for non-US model only and is not available to all US model. Per FCC
regulation, all WiFi product marketed in US must fixed to US operation channels only.
Radiation Exposure Statement:
This equipment complies with FCC radiation exposure limits set forth for an uncontrolled environment. This
equipment should be installed and operated with minimum distance 20cm between the radiator & your body.
Industry Canada statement:
This device complies with RSS-210 of the Industry Canada Rules. Operation is subject to the following two conditions:
(1) This device may not cause harmful interference, and (2) this device must accept any interference received,
including interference that may cause undesired operation.
Ce dispositif est conforme à la norme CNR-210 d’Industrie Canada applicable aux appareils radio exempts de
licence. Son fonctionnement est sujet aux deux conditions suivantes: (1) le dispositif ne doit pas produire de brouillage
préjudiciable, et (2) ce dispositif doit accepter tout brouillage reçu, y compris un brouillage susceptible de provoquer
un fonctionnement indésirable.
Radiation Exposure Statement:
This equipment complies with IC radiation exposure limits set forth for an uncontrolled environment. This equipment
should be installed and operated with minimum distance 20cm between the radiator & your body.
Declaration d’exposition aux radiations:Cet equipement est conforme aux limites d’exposition aux rayonnements IC
etablies pour un environnement non controle. Cet equipement doit etre installe et utilise avec un minimum de 20 cm
de distance entre la source de rayonnement et votre corps.

80D-Link DAP-2320 User Manual
Appendix E - Warranty
Version 1.0
March 12, 2012
Product registration is entirely voluntary and failure to complete or return this form will not diminish your warranty rights.
Registration