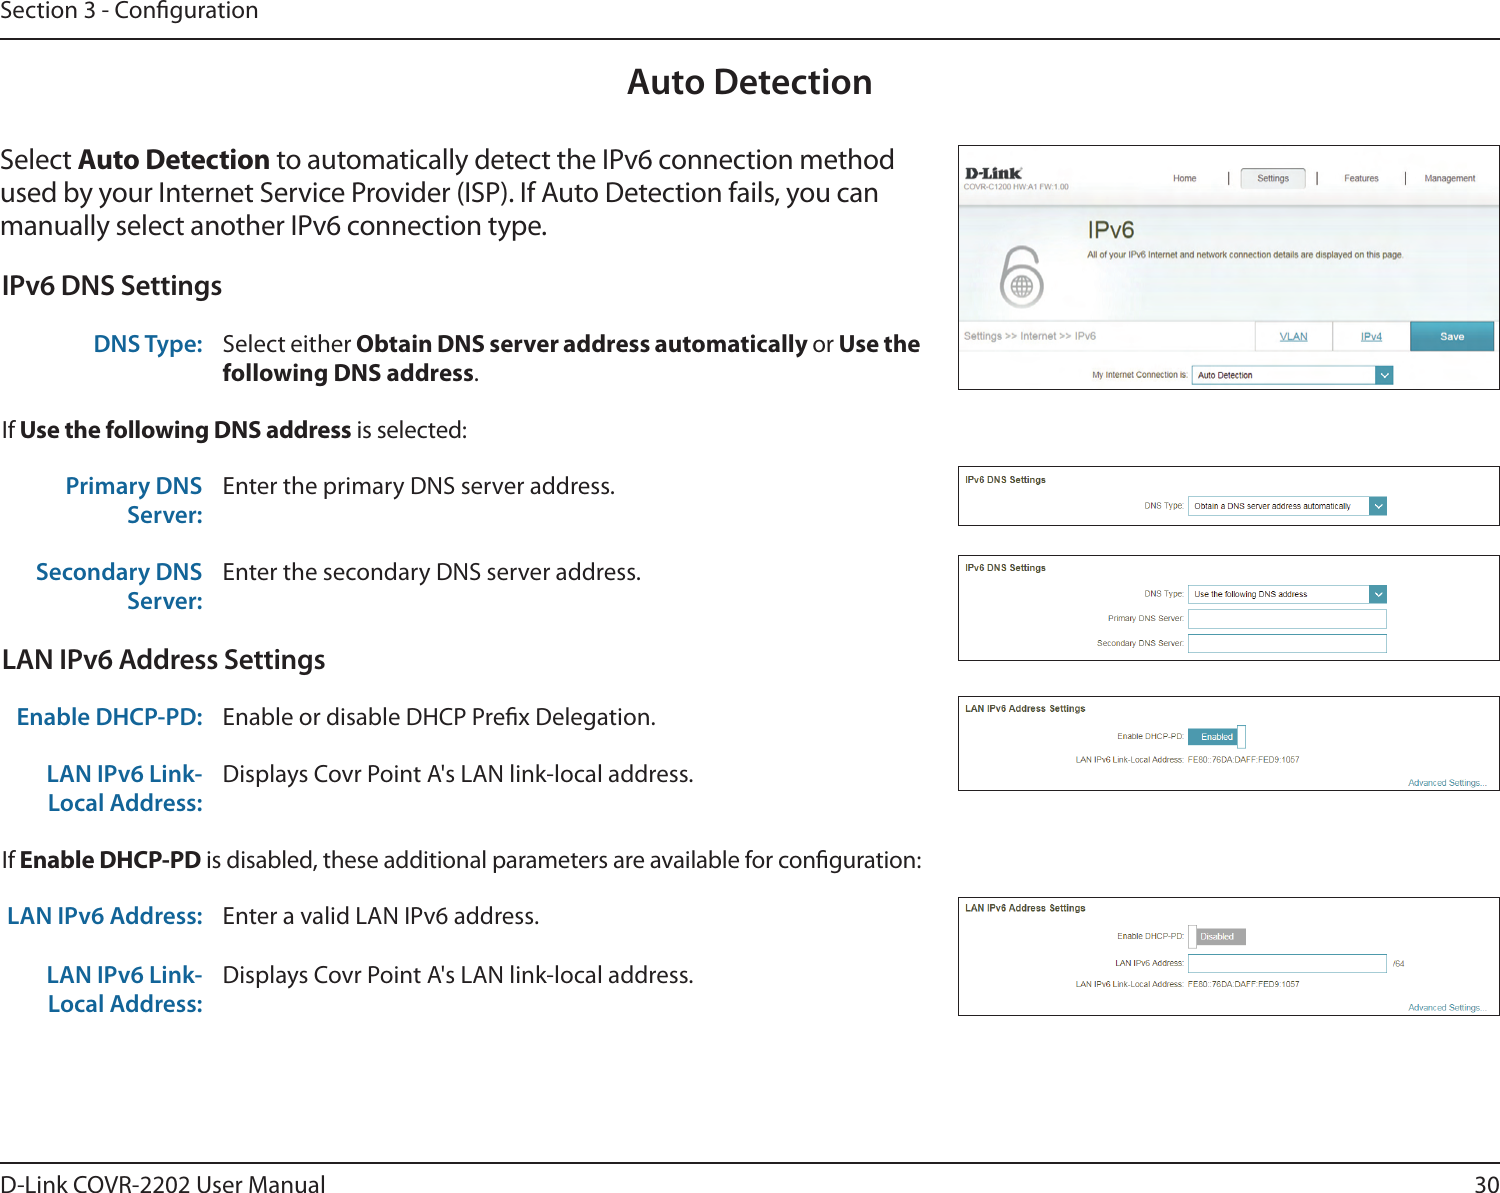
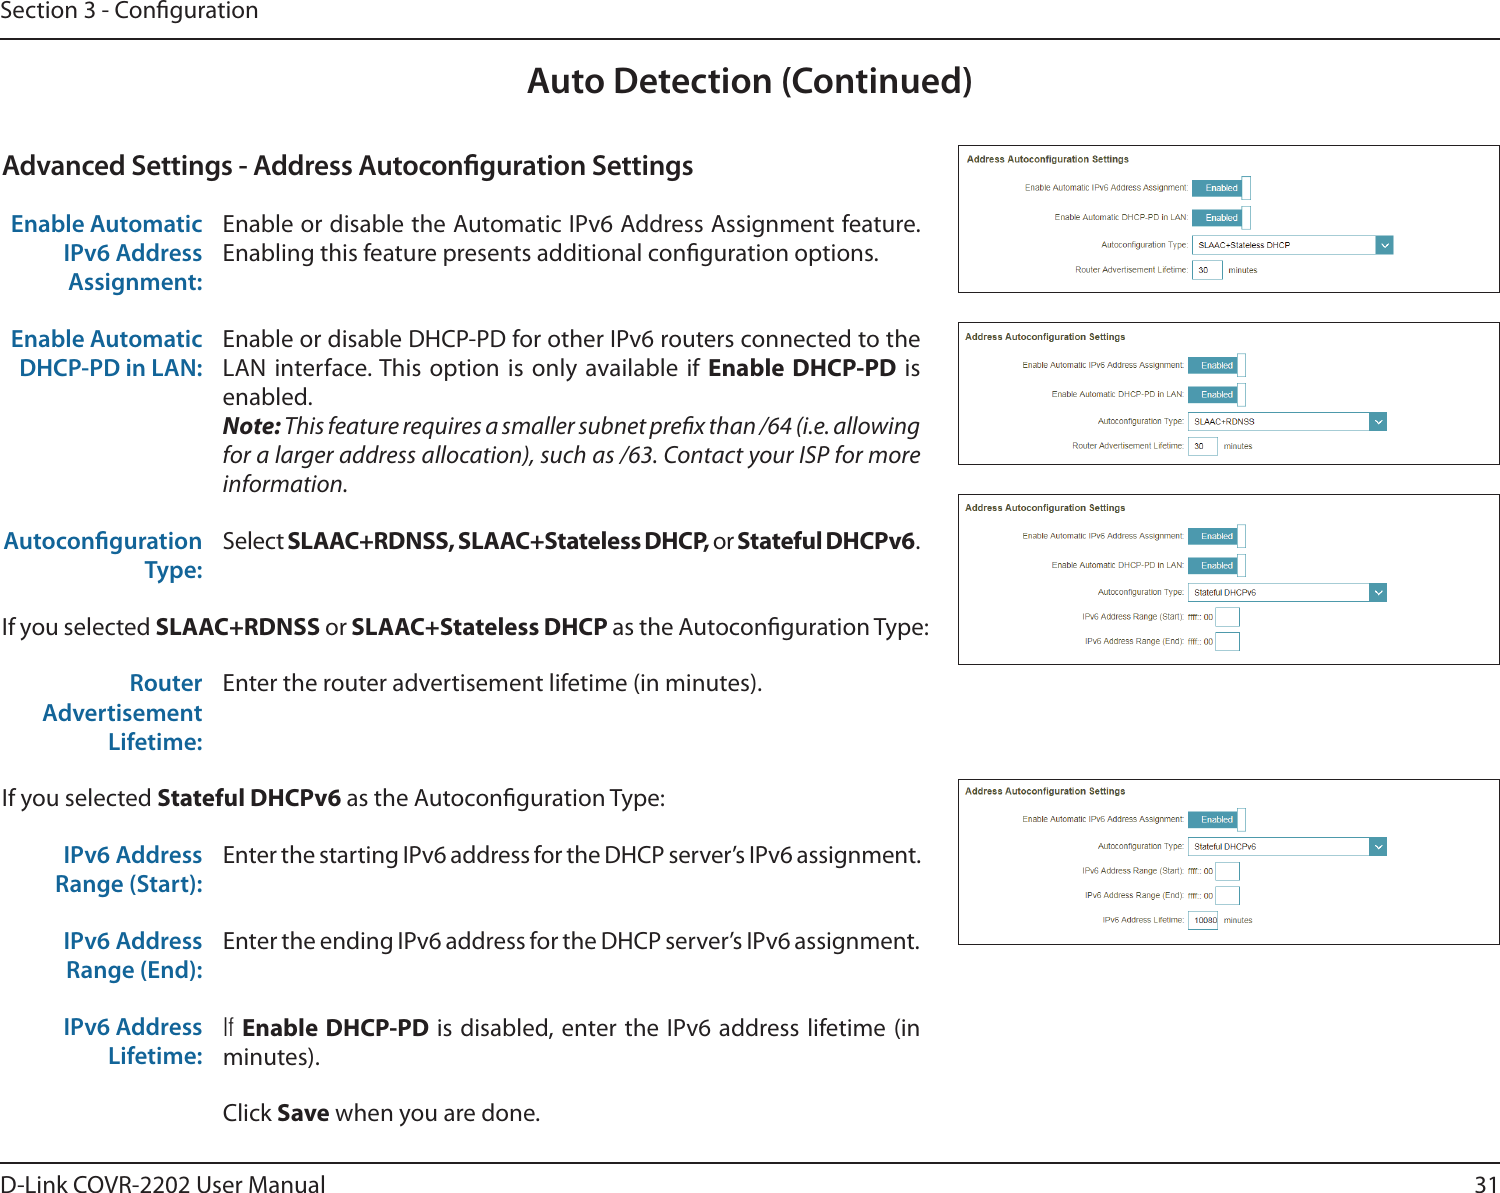
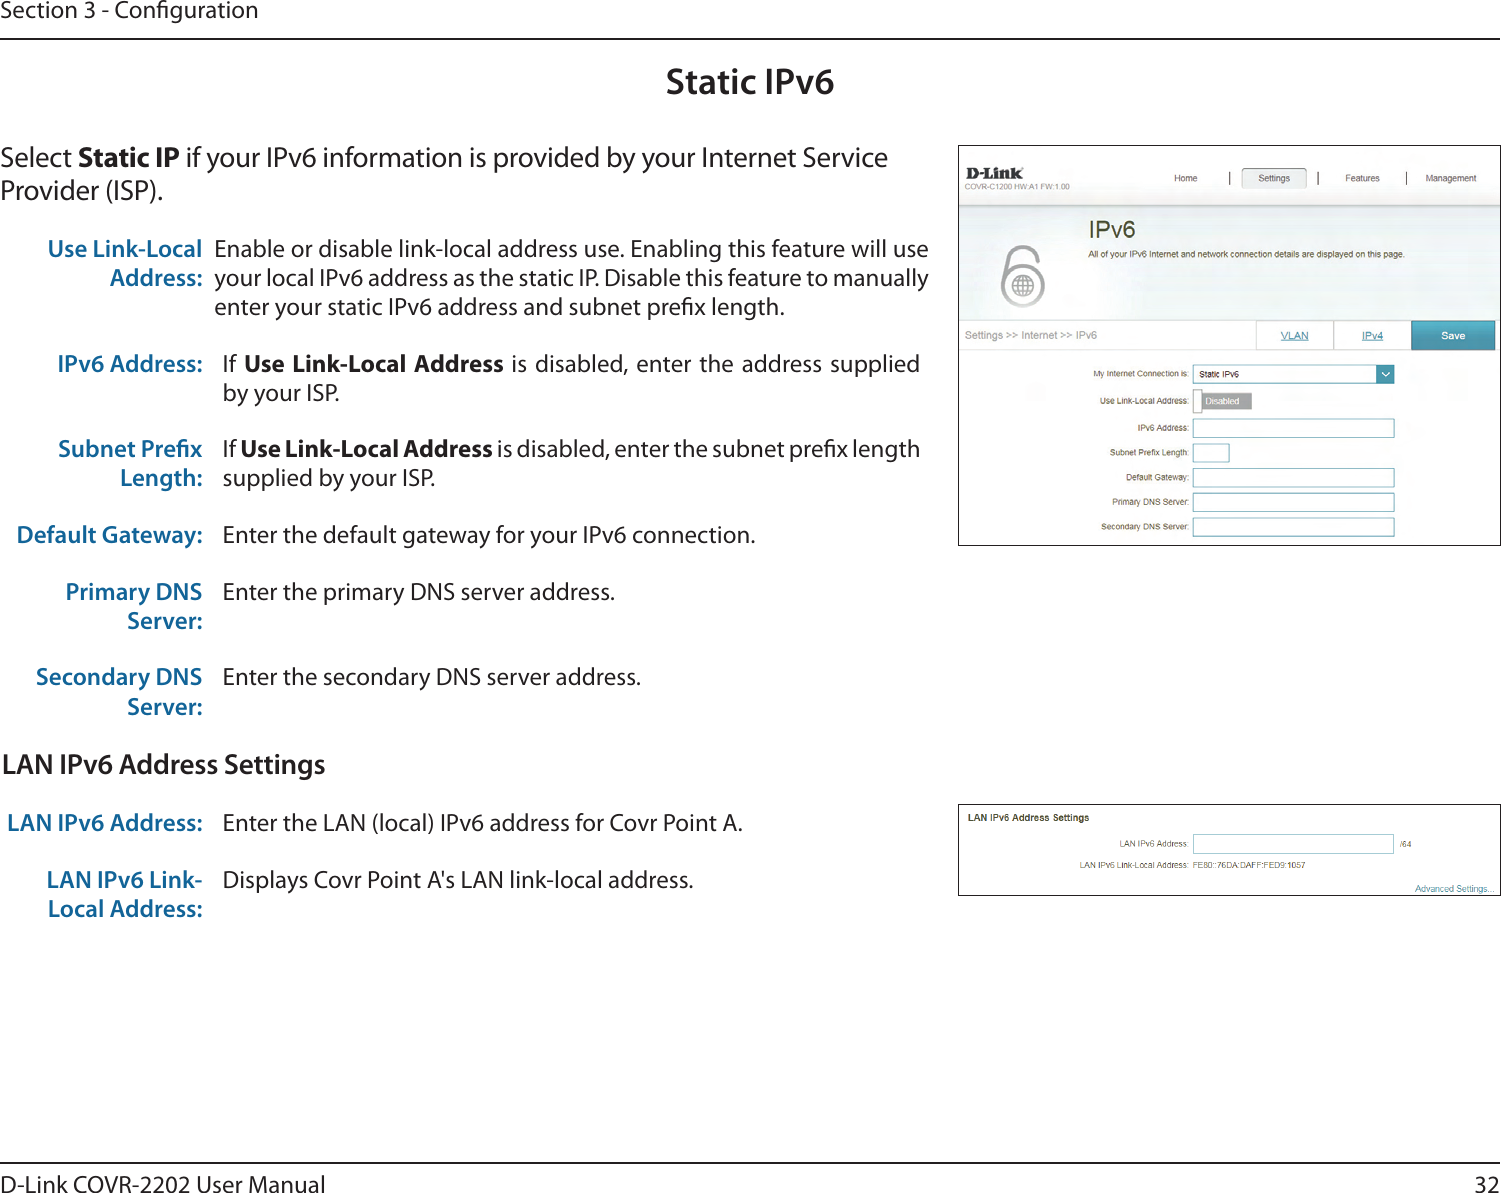
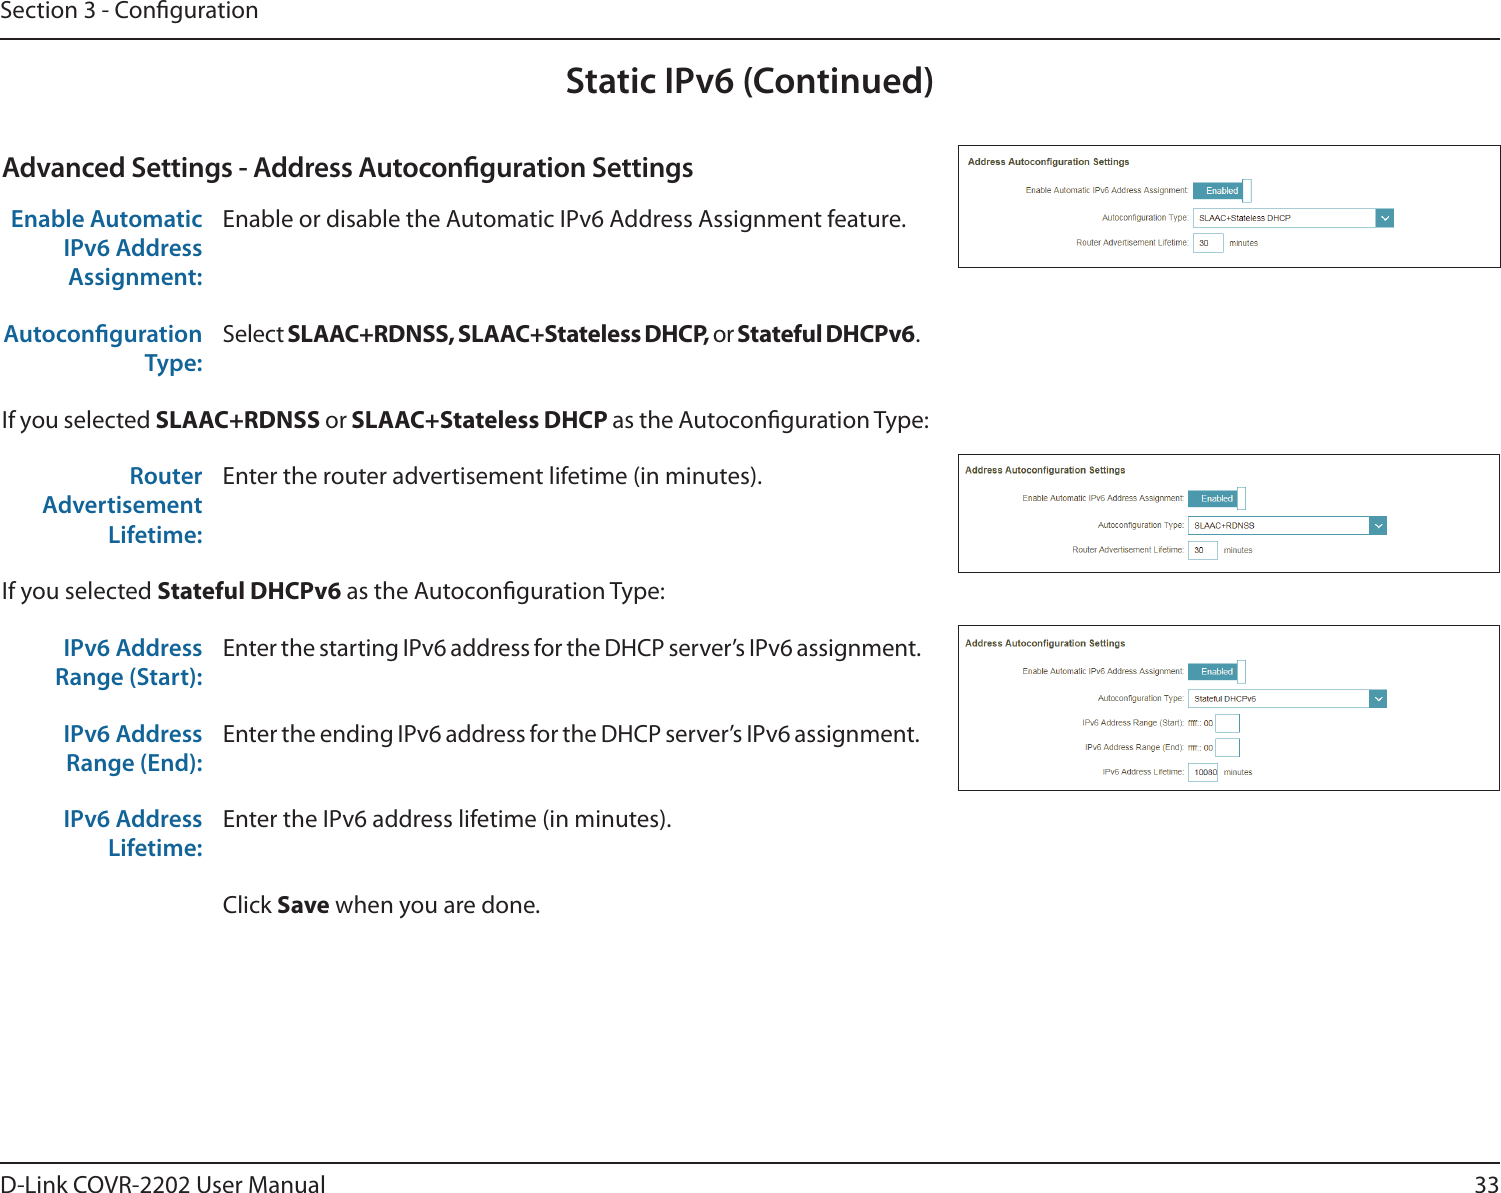
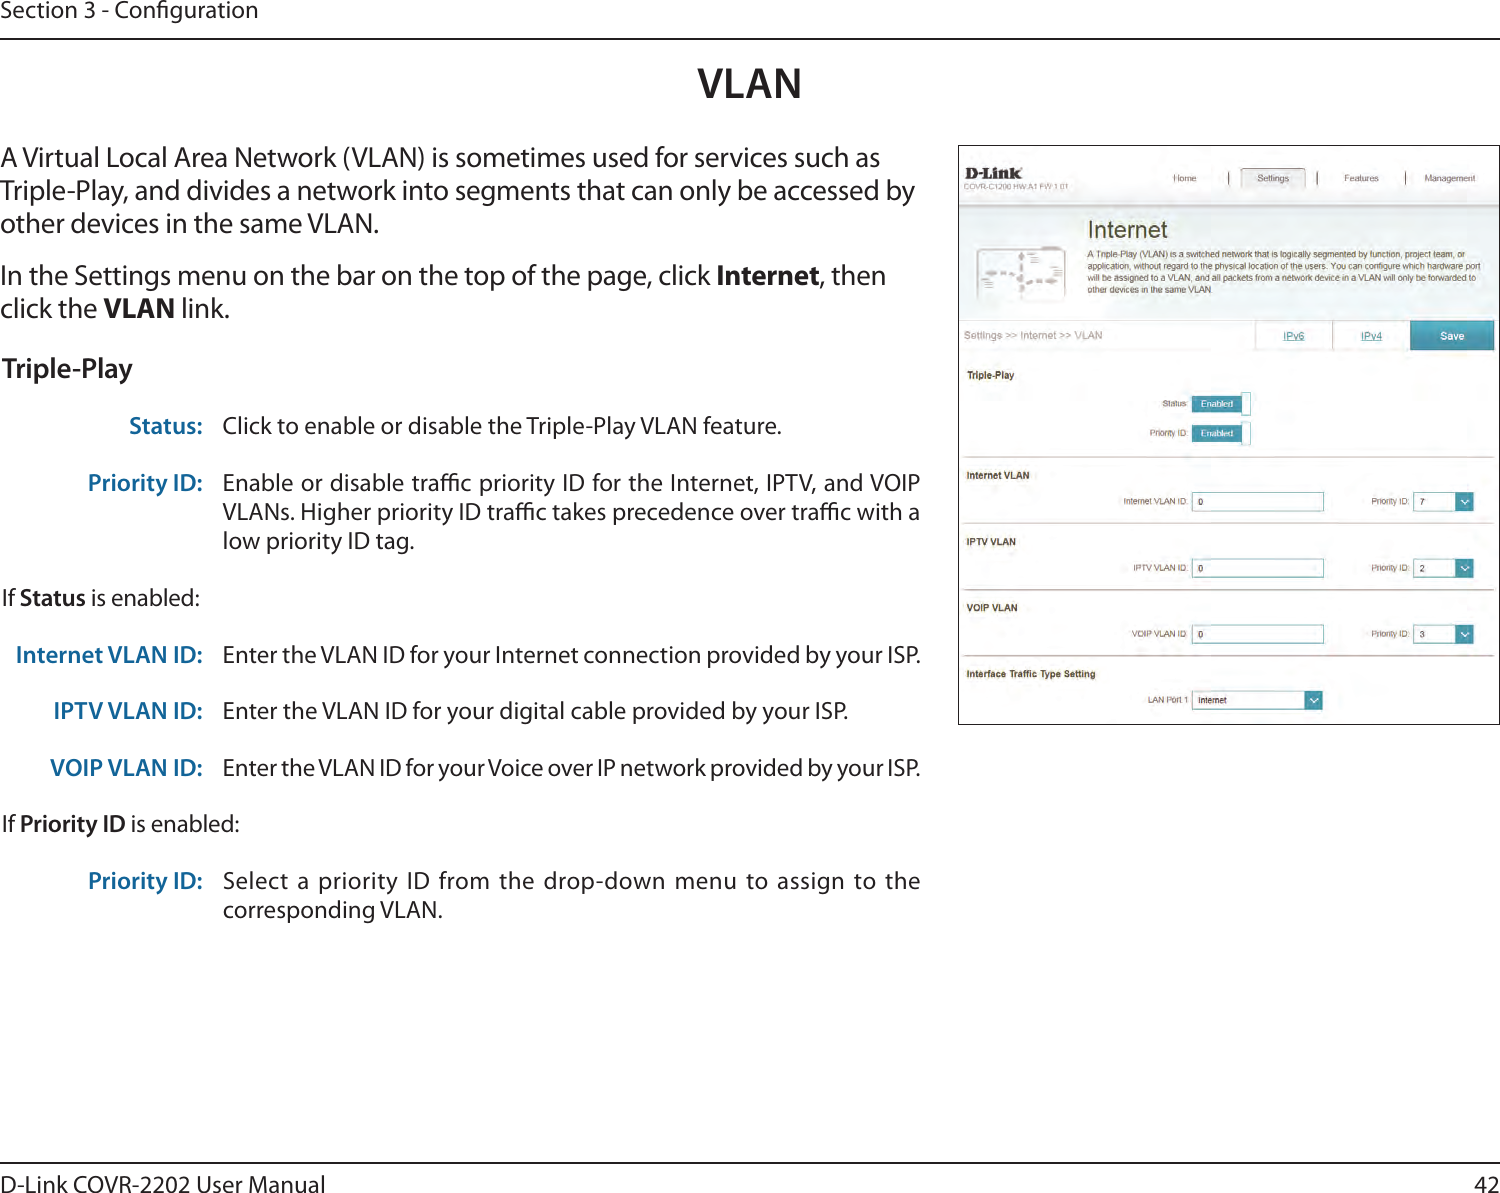
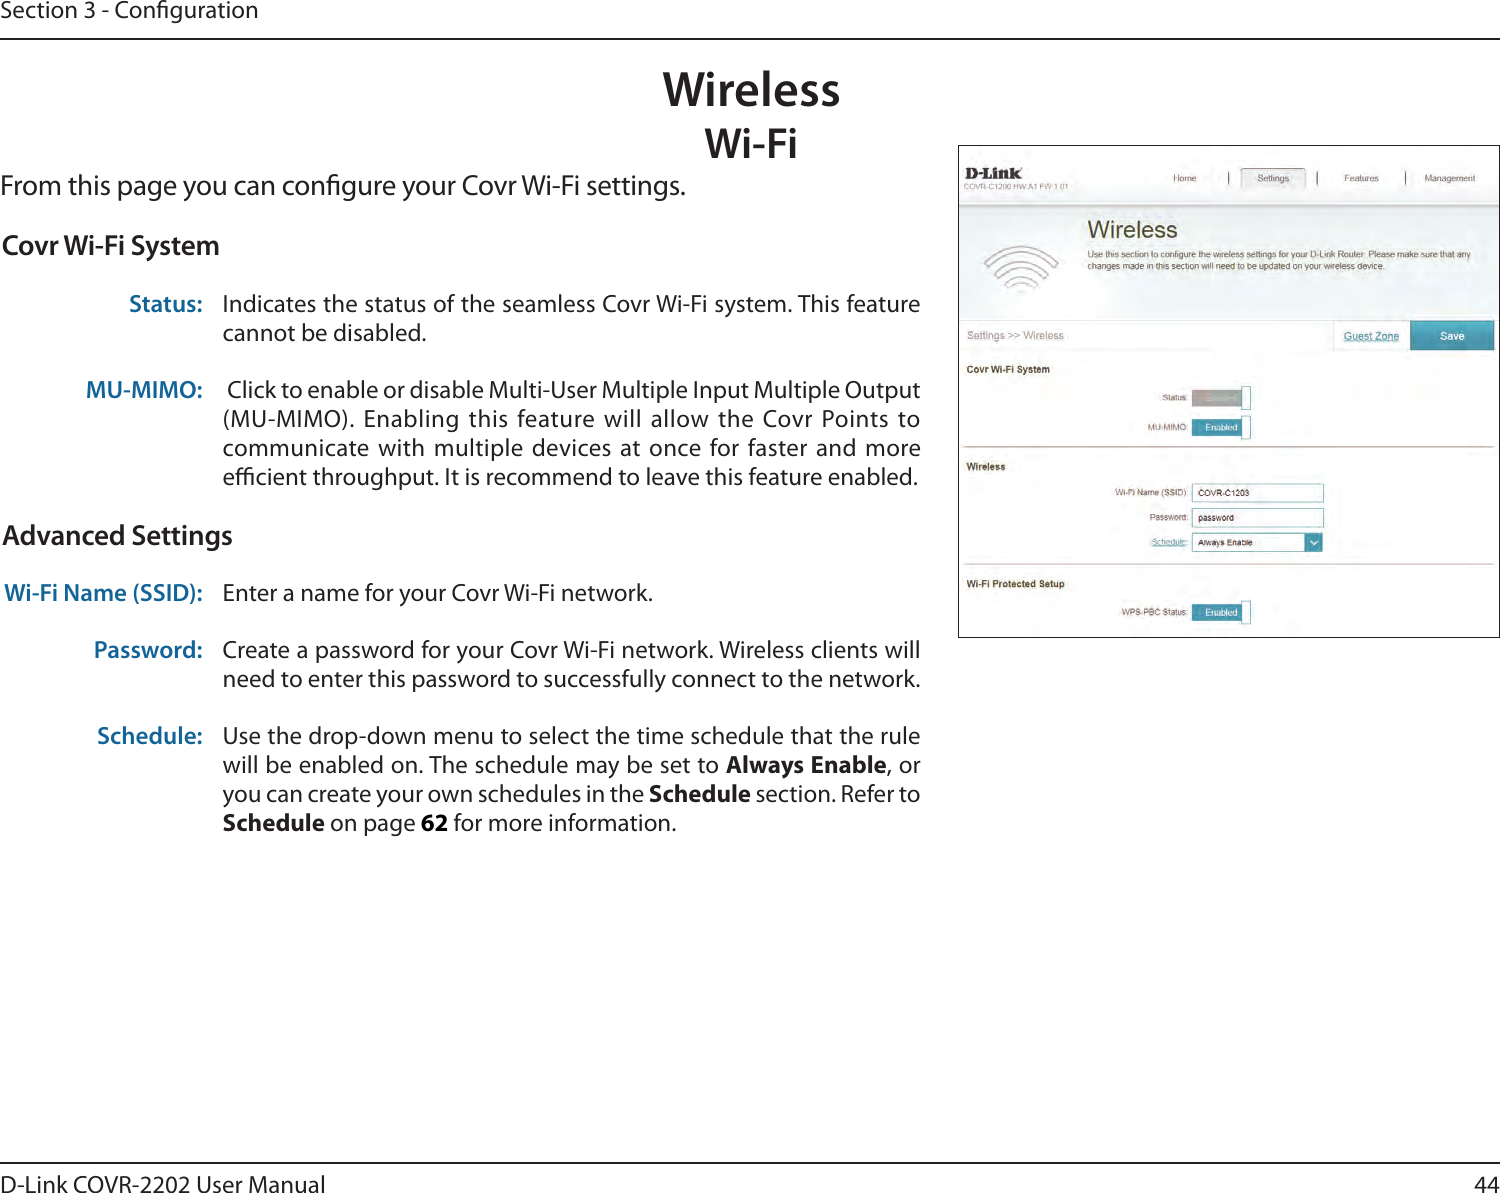
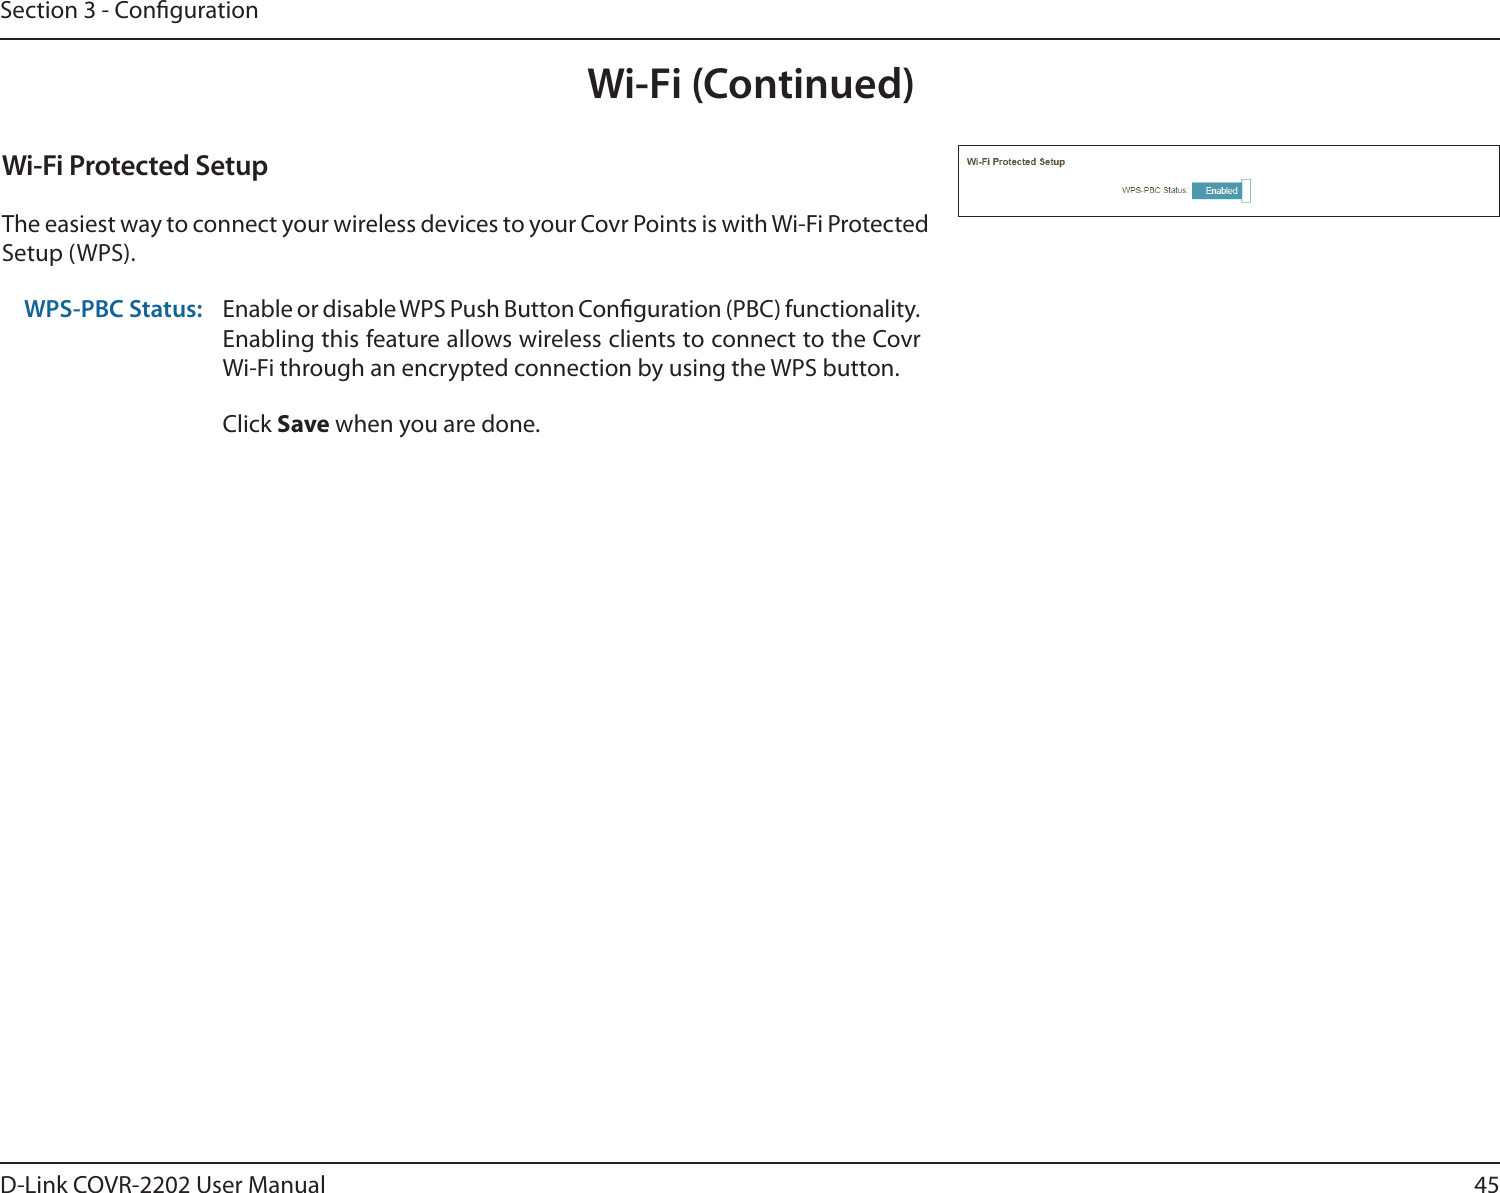
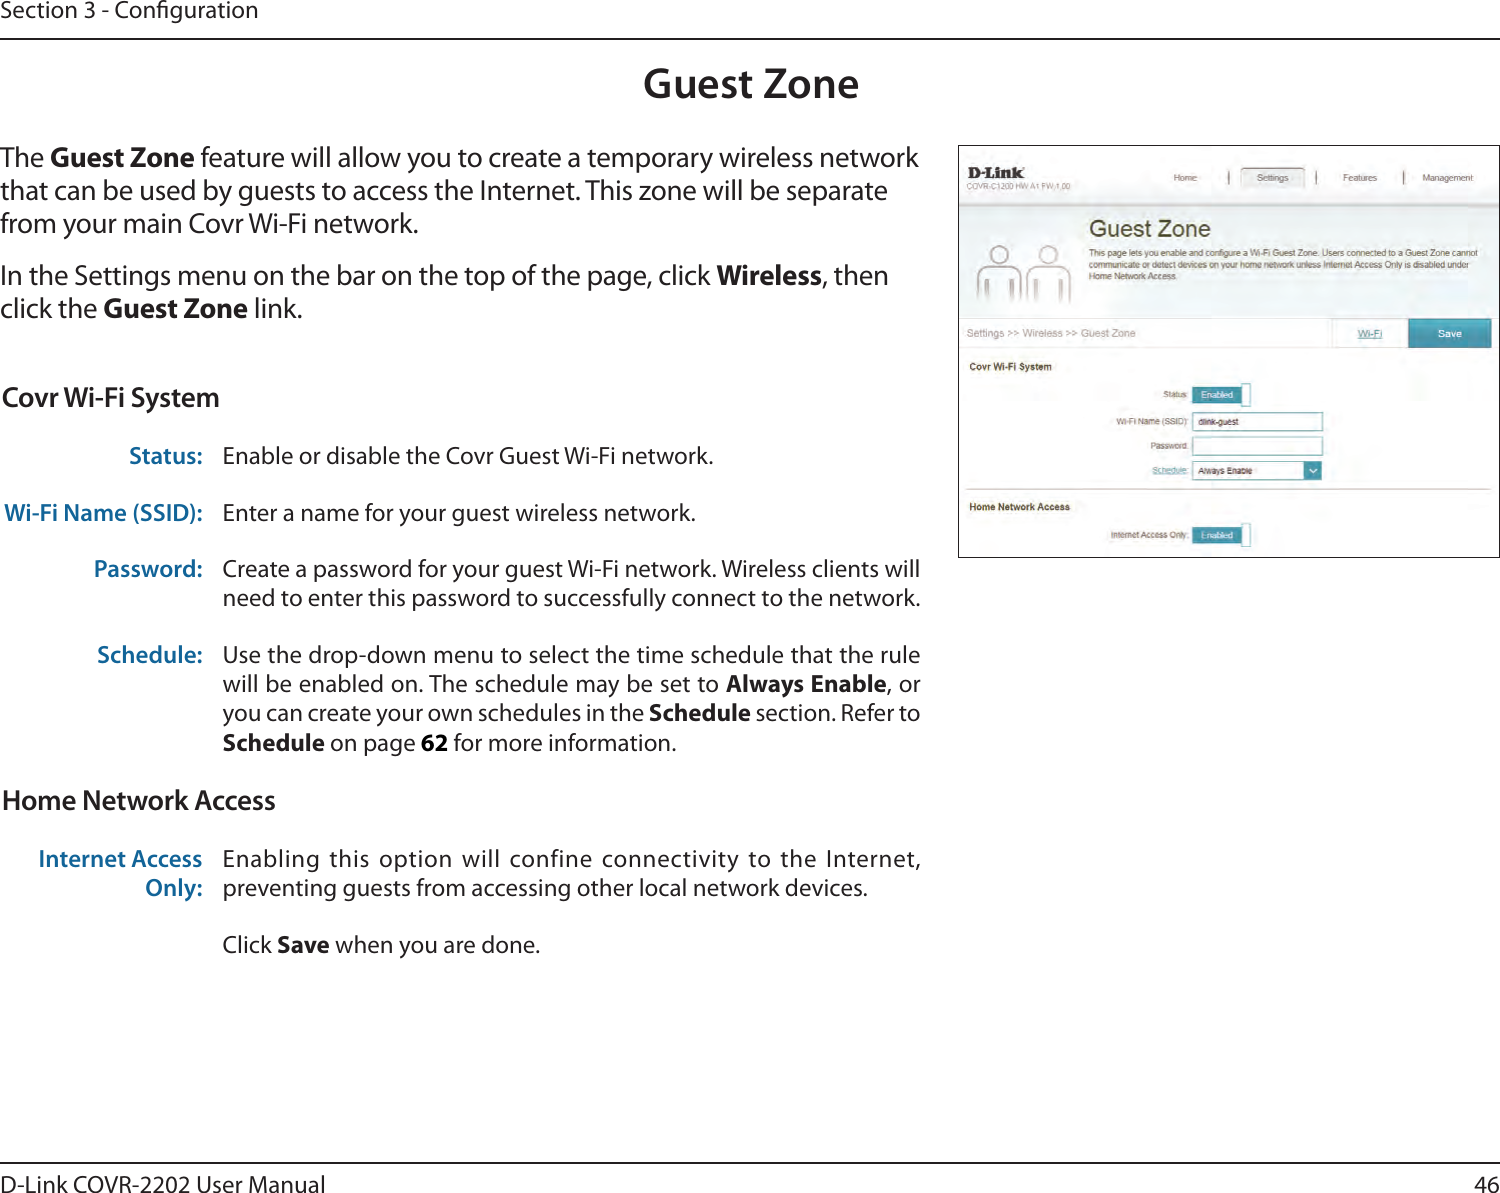
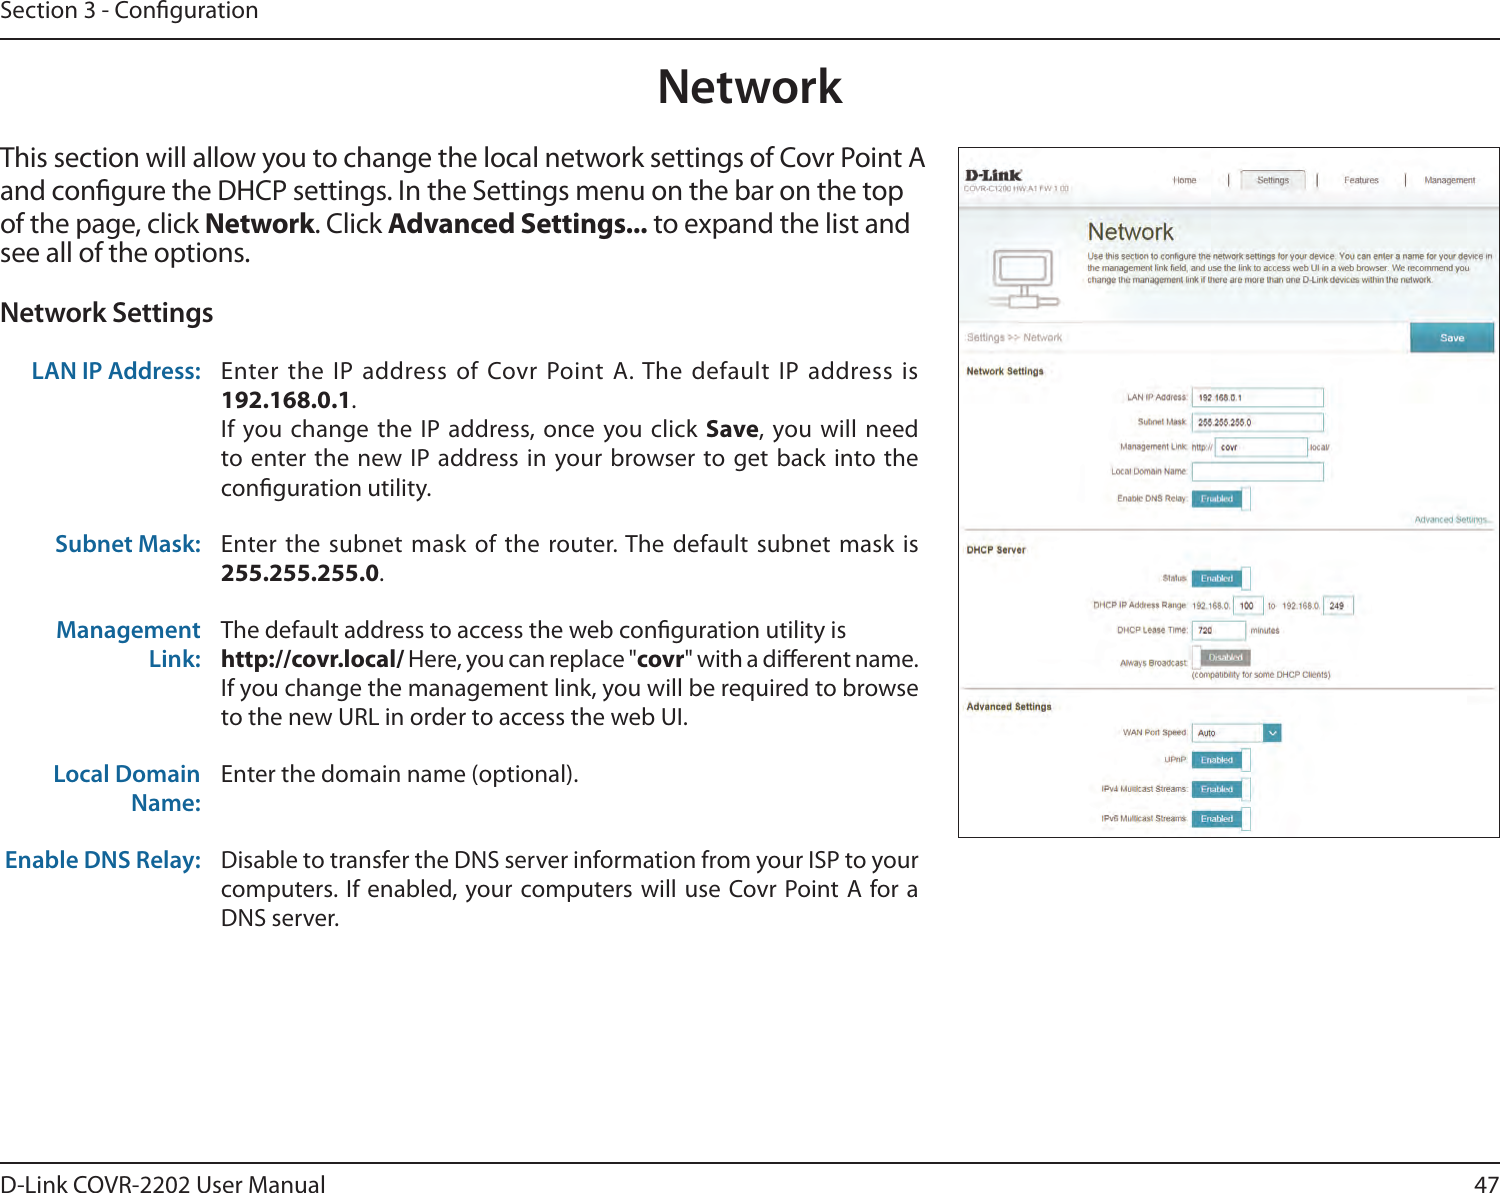
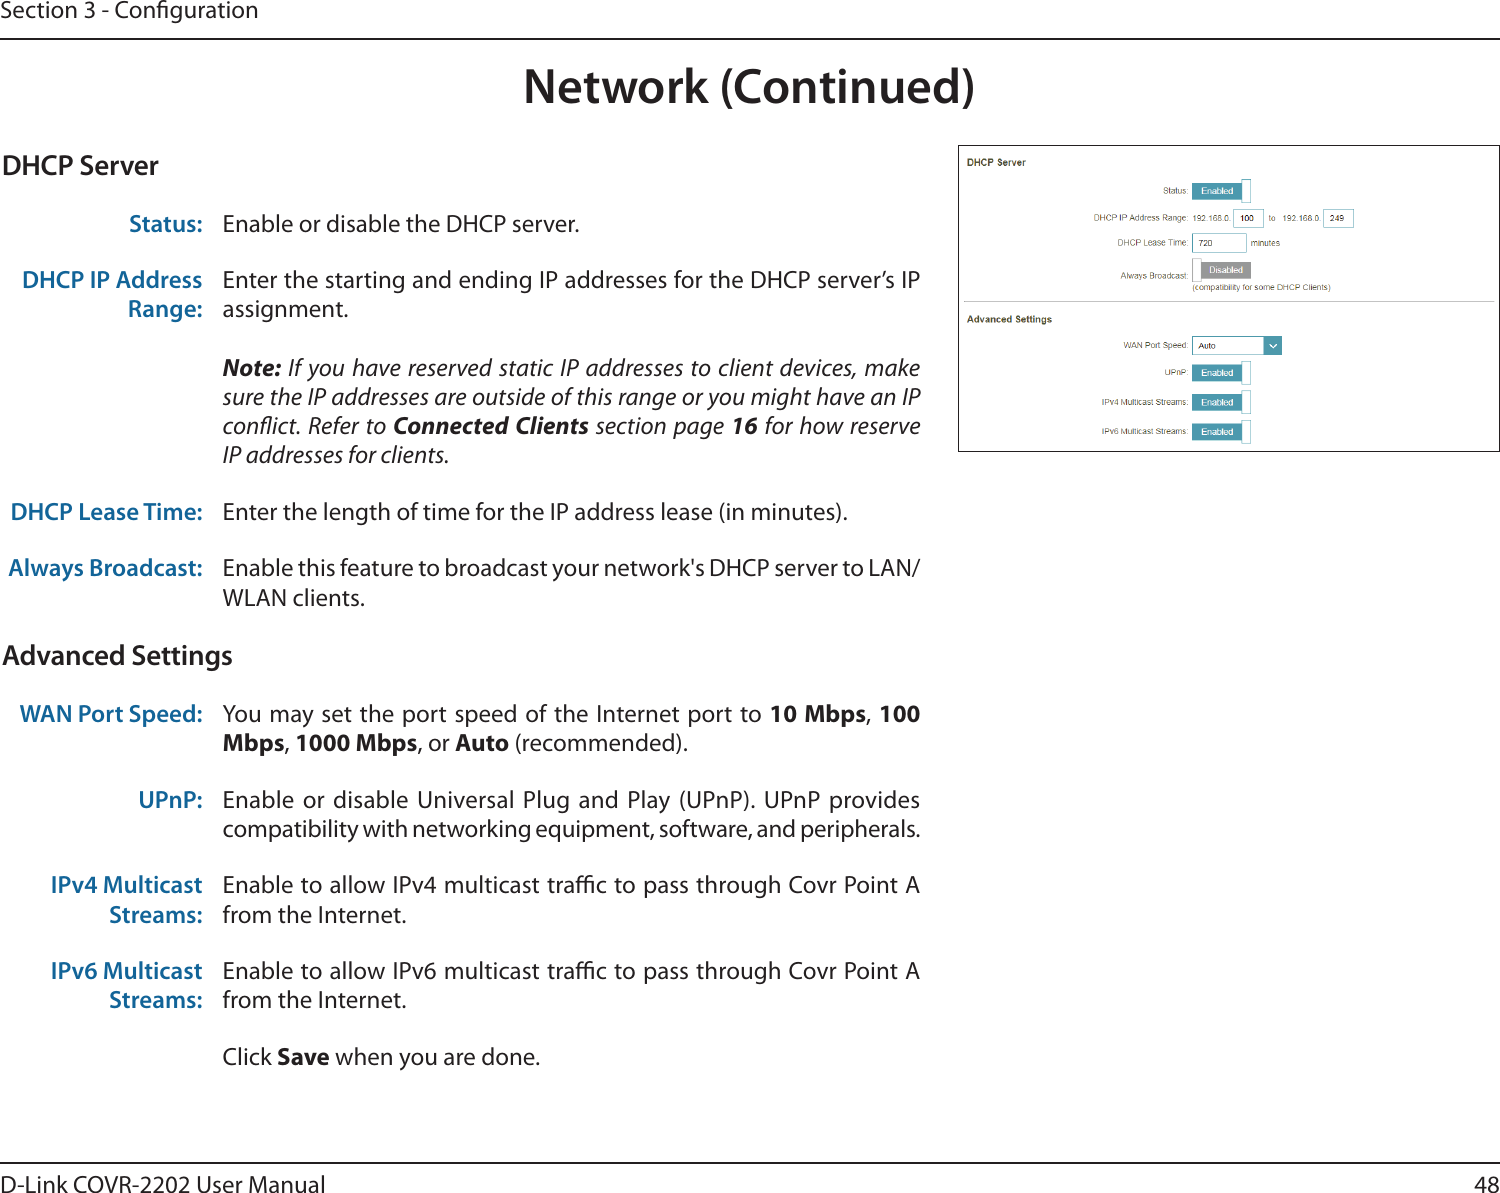
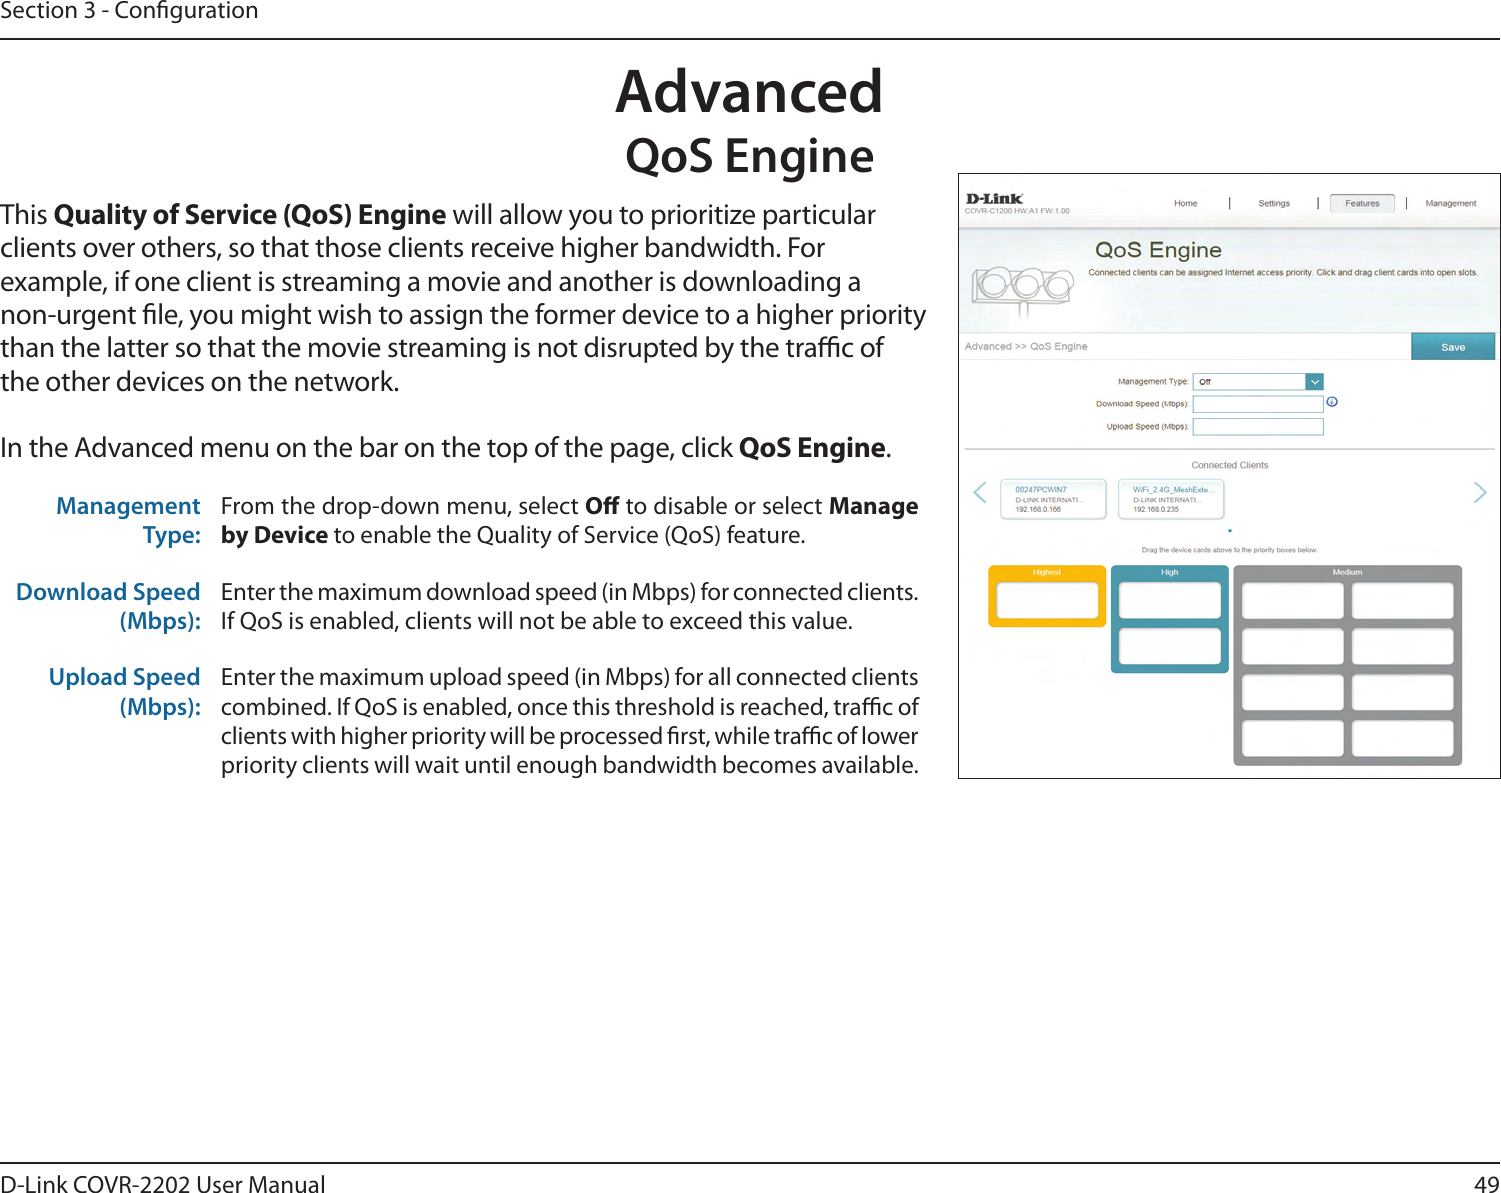
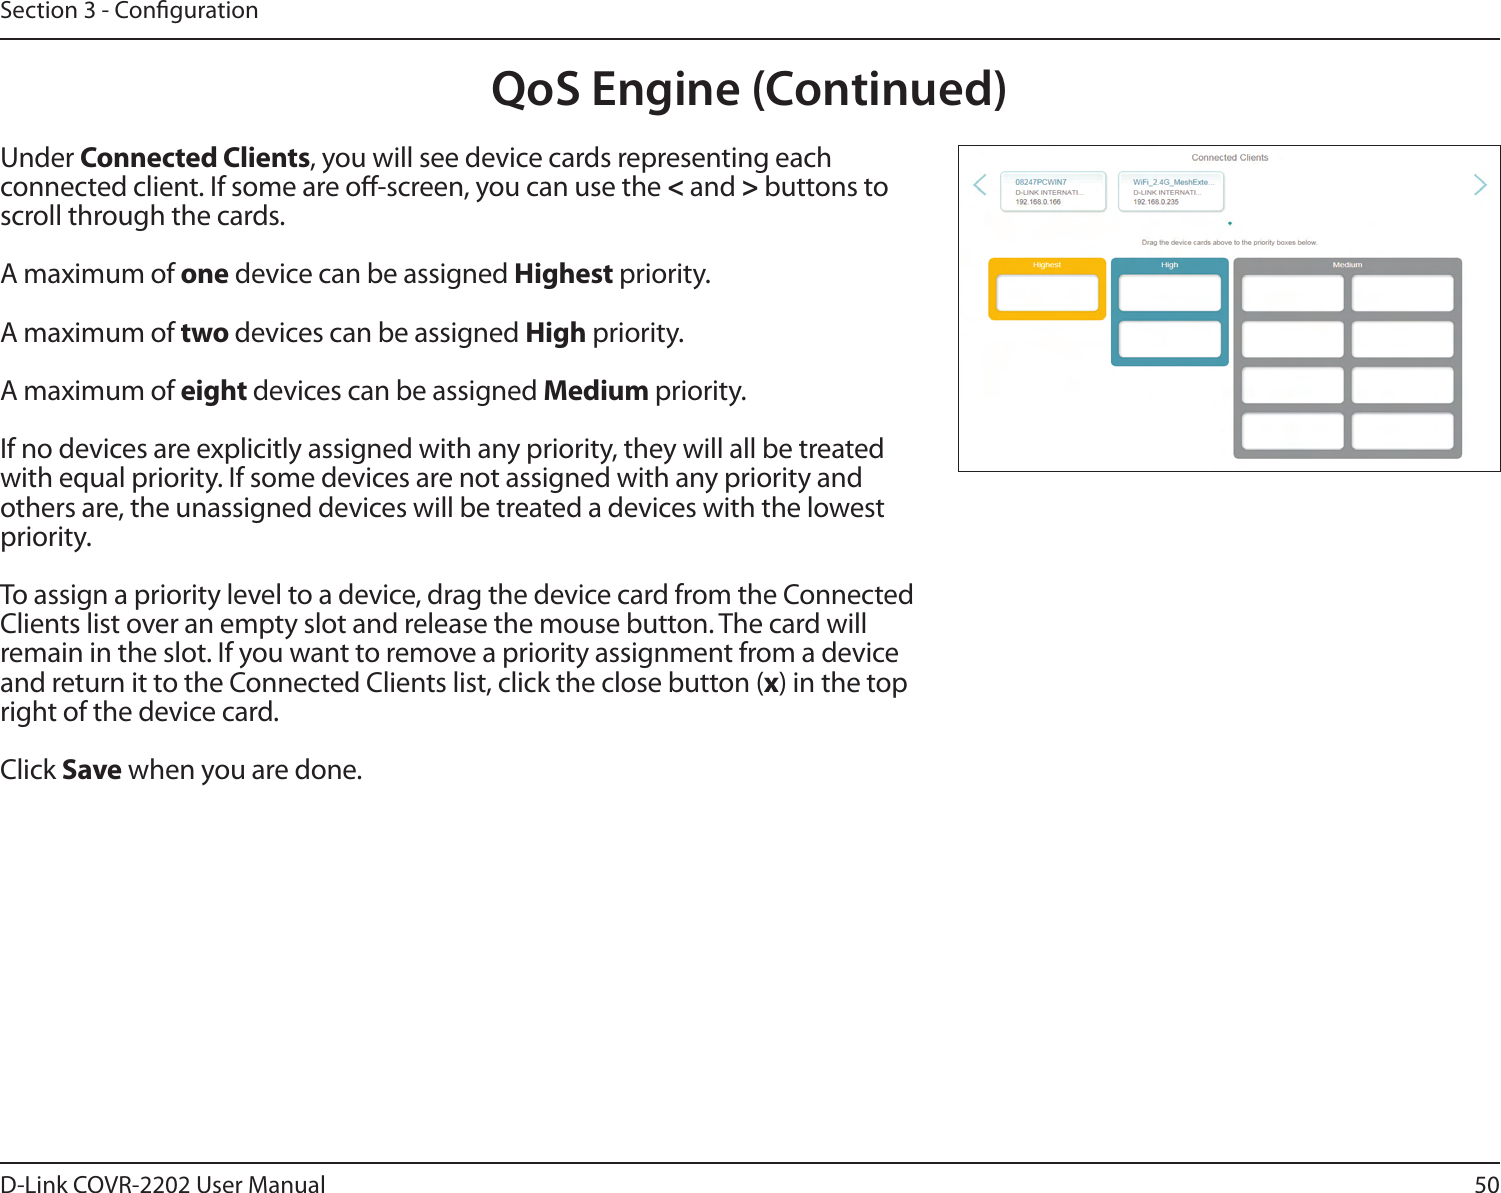
D Link COVR2200A1 Tri Band Whole Home Wi-Fi Extender User Manual
D-Link Corporation Tri Band Whole Home Wi-Fi Extender
UserManual.wiki
>
D Link
>
COVR2200A1 User Manual
User Manual
Navigation menu
Upload a User Manual
Namespaces
Wiki Guide
HTML
PDF
Info
Views
User Manual
Discussion / Help
Navigation

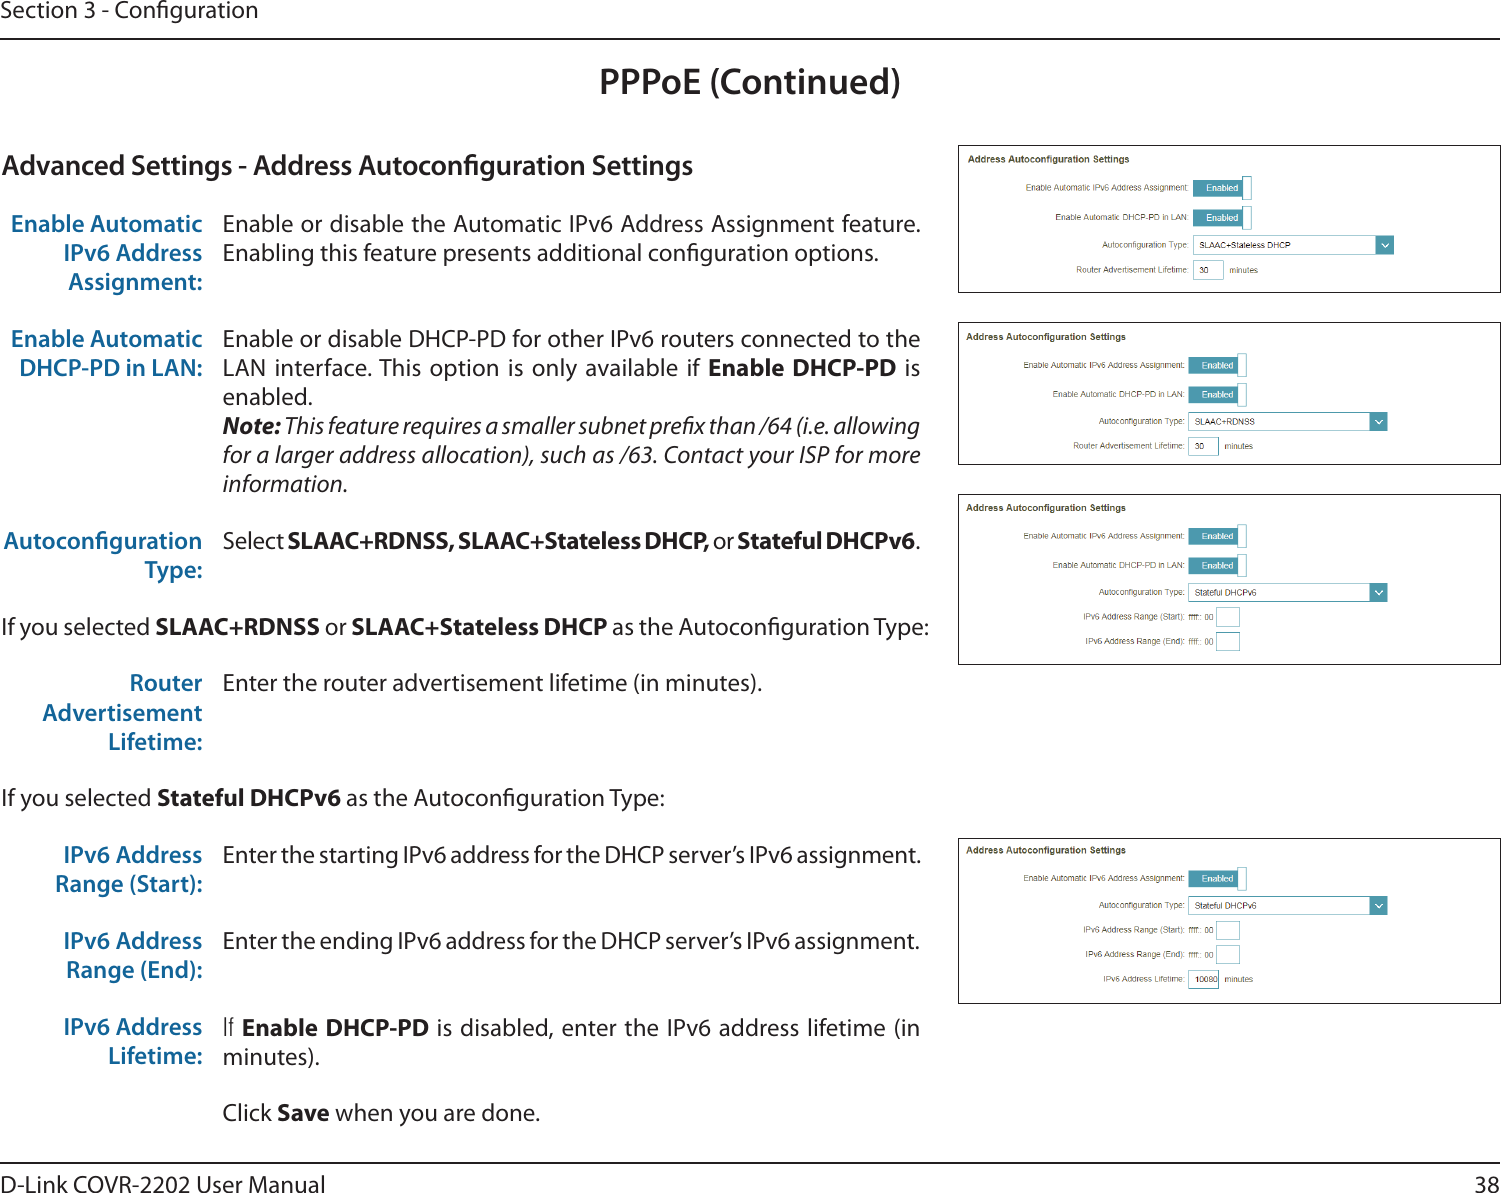

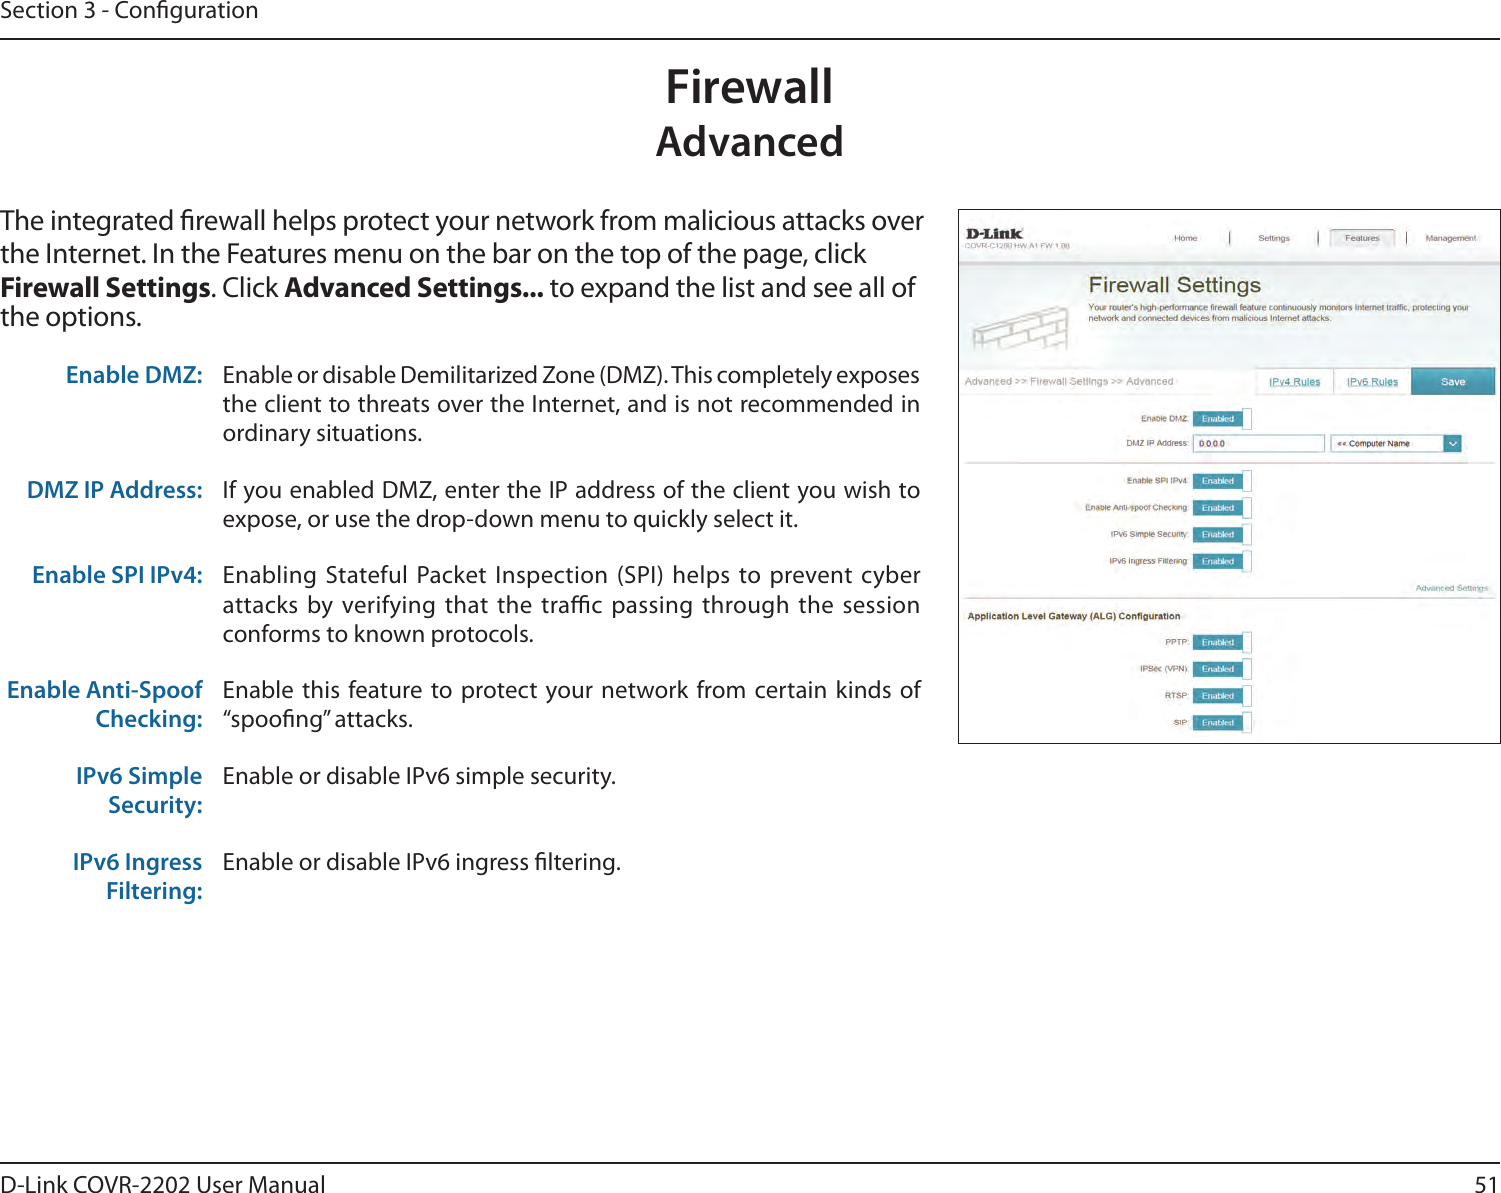


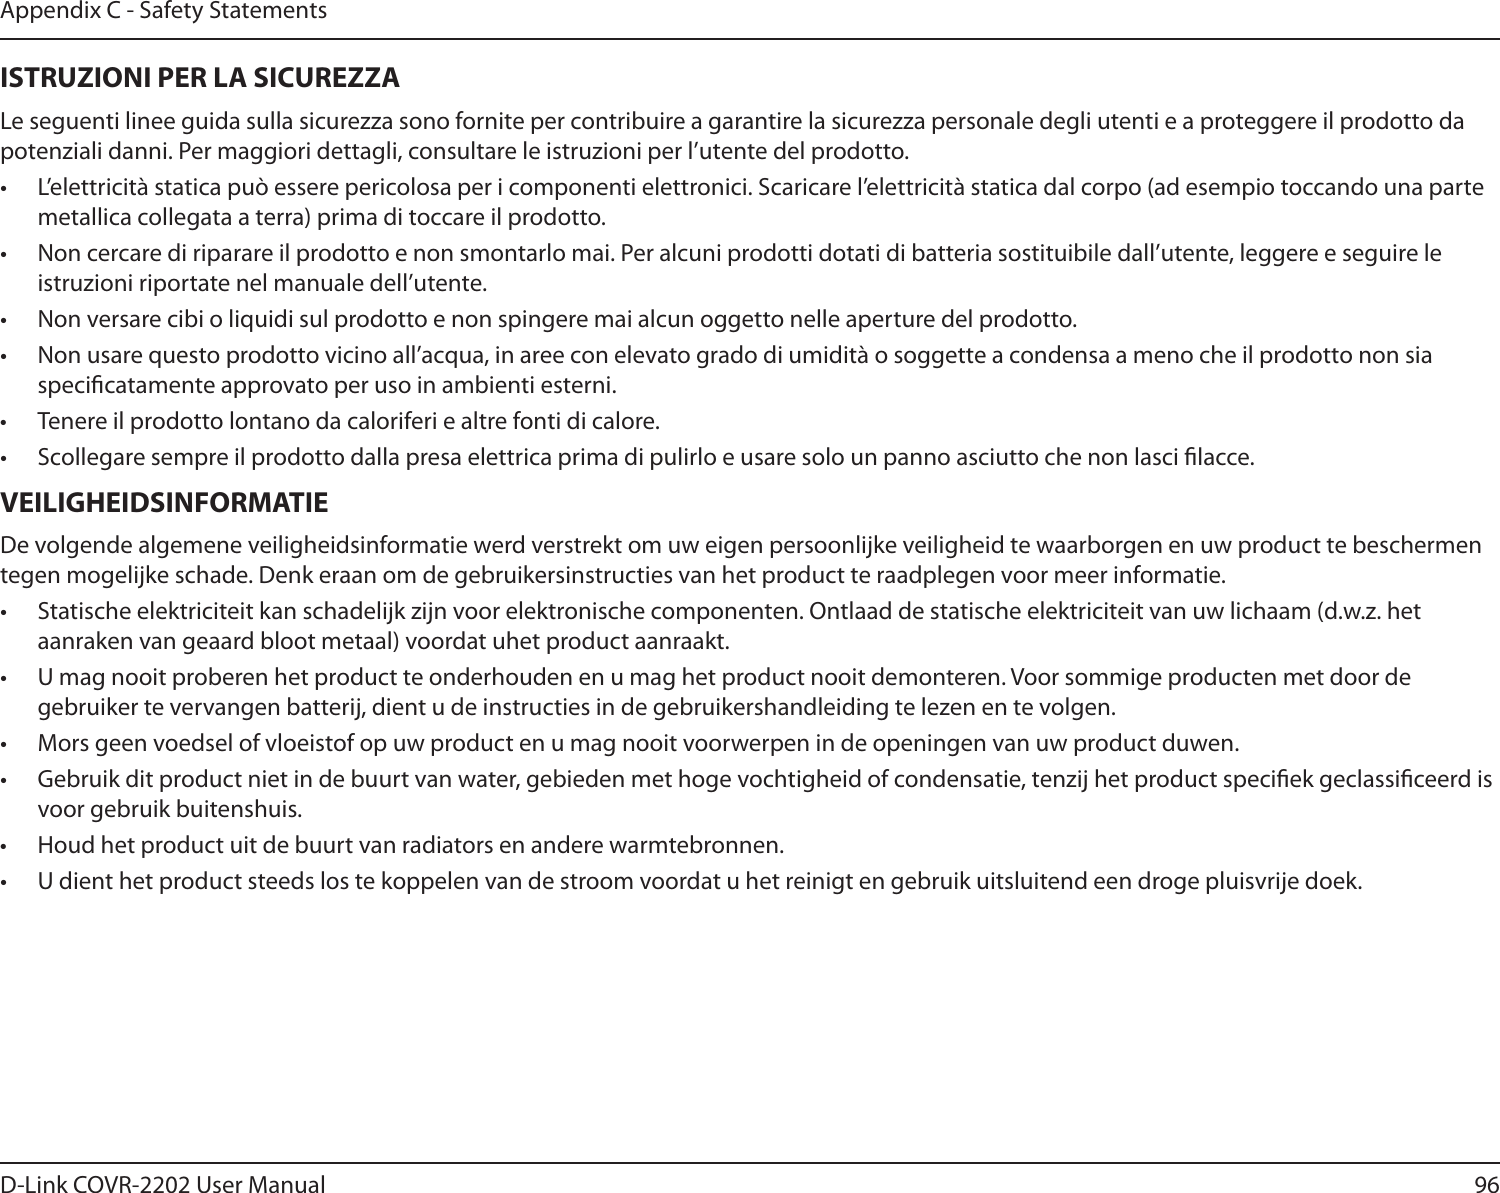
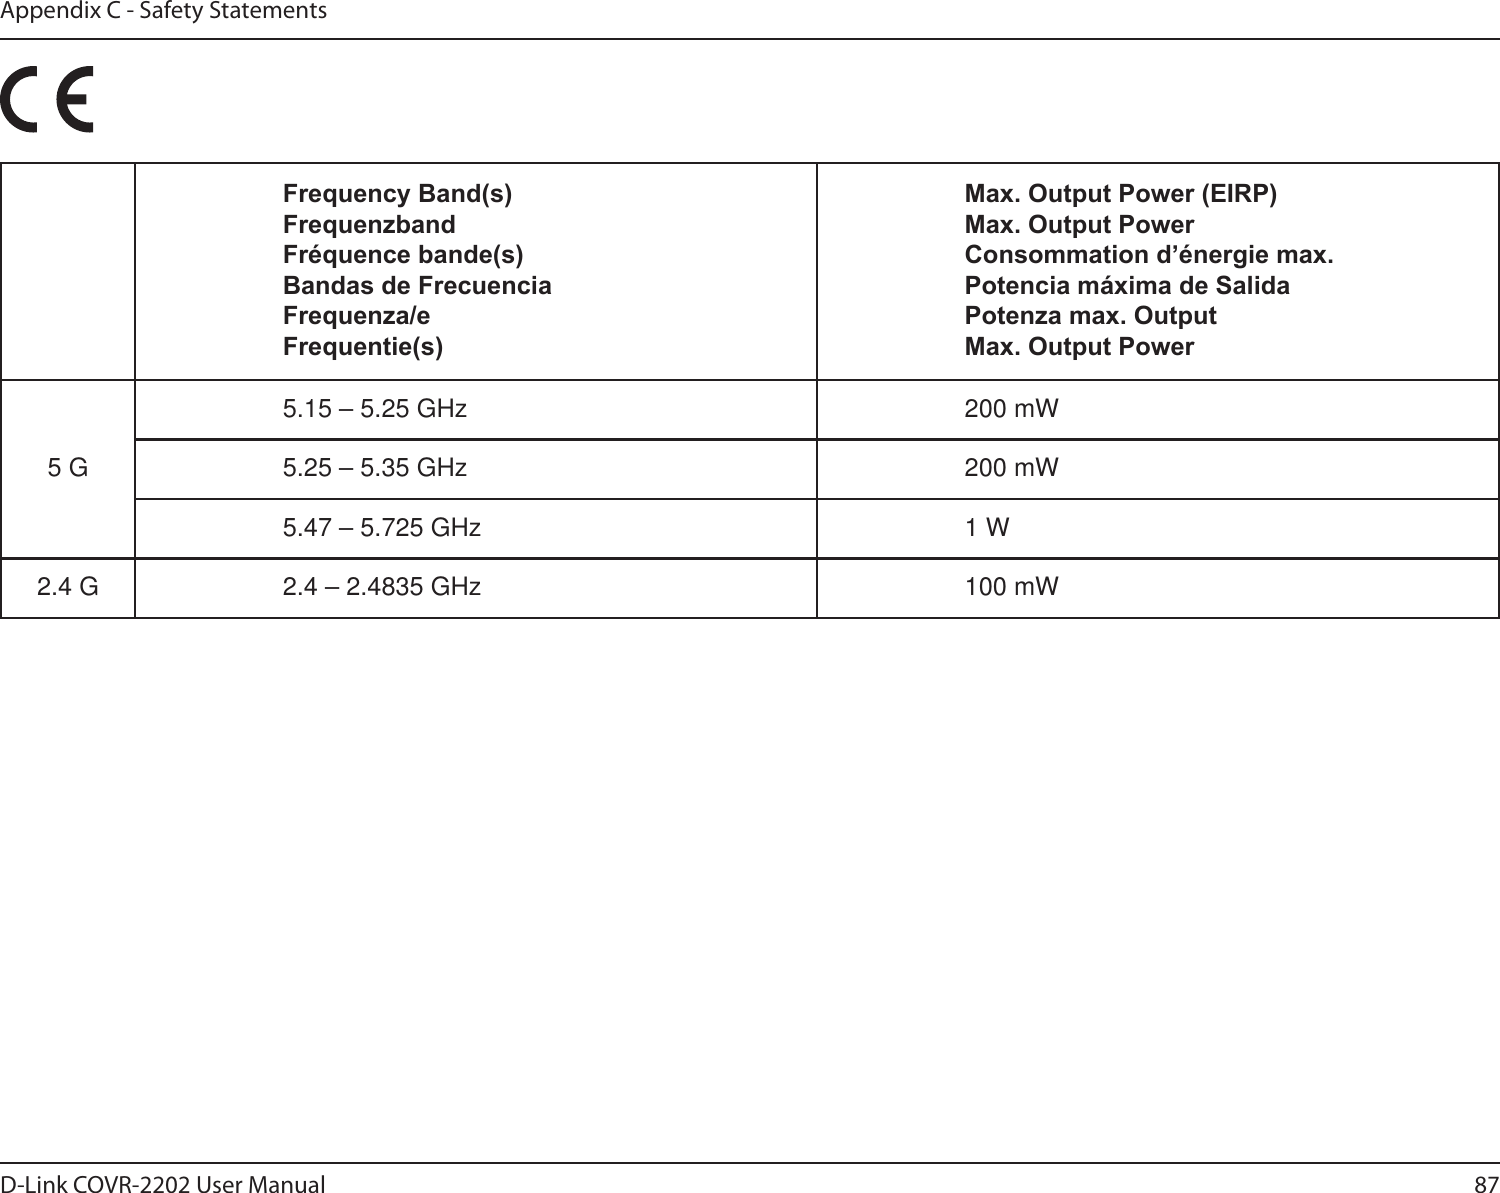
![81D-Link COVR-2202 User ManualAppendix B - Technical SpecicationsTechnical SpecicationsCOVR-2200 Technical Specications GeneralDevice Interfaces (per unit) • IEEE 802.11 ac/n/g/a wireless WAN• 2 x Gigabit LAN portsLEDs• COVRAntenna Type • 6 x internal antennasData Signal Rate• 2.4 GHz• Up to 300 Mbps1• 5 GHz• Up to 866 Mbps1• 5 GHz [backhaul]• Up to 866 Mbps1• Ethernet• 10/100/1000 Mbps (auto-negotiation)Standards • IEEE 802.3i• IEEE 802.3u• IEEE 802.3ab• Supports auto-negotiation• Supports auto-MDI/MDIX• IEEE 802.11ac Wave II• IEEE 802.11n• IEEE 802.11g• IEEE 802.11aFunctionalitySecurity • 128-bit AES data encryption • WPA/WPA2 wireless securityAdvanced Features • Covr Wi-Fi • Auto-configuration• Wireless roaming• Wireless band steering• Wireless Air Time Fairness (ATF)• Web-based setup wizard• Smart Backhaul• Quality of Service (QoS)• MU-MIMO (Wi-Fi)• Wi-Fi Protected Setup (WPS)PhysicalDimensions (L x W x H) • 90 x 100 x 200 mm (3.54 x 3.94 x 7.87 in) Weight (per unit) • TBD g (TBD lbs)Power Input • 100 V to 240 V/AC, 50/60 HzPower Consumption • 20 WTemperature • Operating: 0 to 40 °C (32 to 104 °F)• Storage: -20 to 70 °C (-4 to 158 °F)Humidity• Operating: 10% to 90% non-condensing• Storage: 5% to 90% non-condensing](https://usermanual.wiki/D-Link/COVR2200A1/User-Guide-3805426-Page-85.png)
![88D-Link COVR-2202 User ManualAppendix C - Safety StatementsEuropean Community Declaration of Conformity:Česky [Czech]Tímto D-Link Corporation prohlašuje, že tento produkt, jeho příslušenství a software jsou v souladu se směrnicí 2014/53/EU. Celý text ES prohlášení o shodě vydaného EU a o rmwaru produktu lze stáhnout na stránkách k produktu www.dlink.com.Dansk [Danish]D-Link Corporation erklærer herved, at dette produkt, tilbehør og software er i overensstemmelse med direktiv 2014/53/EU. Den fulde tekst i EU-overensstemmelseserklæringen og produktrmware kan wnloades fra produktsiden hos www.dlink.com.Deutsch [German]Hiermit erklärt die D-Link Corporation, dass dieses Produkt, das Zubehör und die Software der Richtlinie 2014/53/EU entsprechen. Der vollständige Text der Konformitätserklärung der Europäischen Gemeinschaft sowie die Firmware zum Produkt stehen Ihnen zum Herunterladen von der Produktseite im Internet auf www.dlink.com zur Verfügung.Eesti [Estonian]Käesolevaga kinnitab D-Link Corporation, et see toode, tarvikud ja tarkvara on kooskõlas direktiiviga 2014/53/EL. Euroopa Liidu vastavusdeklaratsiooni täistekst ja toote püsivara on allalaadimiseks saadaval tootelehel www.dlink.com.EnglishHereby, D-Link Corporation, declares that this product, accessories, and software are in compliance with directive 2014/53/EU. The full text of the EU Declaration of Conformity and product rmware are available for download from the product page at www.dlink.comEspañol [Spanish]Por la presente, D-Link Corporation declara que este producto, accesorios y software cumplen con las directivas 2014/53/UE. El texto completo de la declaración de conformidad de la UE y el rmware del producto están disponibles y se pueden descargar desde la página del producto en www.dlink.com.Ελληνική [Greek]Με την παρούσα, η D-Link Corporation δηλώνει ότι αυτό το προϊόν, τα αξεσουάρ και το λογισμικό συμμορφώνονται με την Οδηγία 2014/53/ΕΕ. Το πλήρες κείμενο της δήλωσης συμμόρφωσης της ΕΕ και το υλικολογισμικό του προϊόντος είναι διαθέσιμα για λήψη από τη σελίδα του προϊόντος στην τοποθεσία www.dlink.com.Français [French]Par les présentes, D-Link Corporation déclare que ce produit, ces accessoires et ce logiciel sont conformes aux directives 2014/53/UE.Le texte complet de la déclaration de conformité de l'UE et le icroprogramme du produit sont disponibles au téléchargement sur la page des produits à www.dlink.com.Italiano [Italian]Con la presente, D-Link Corporation dichiara che questo prodotto, i relativi accessori e il software sono conformi alla direttiva 2014/53/UE. Il testo completo della dichiarazione di conformità UE e il rmware del prodotto sono disponibili per il download dalla pagina del prodotto su www.dlink.com.](https://usermanual.wiki/D-Link/COVR2200A1/User-Guide-3805426-Page-92.png)
![89D-Link COVR-2202 User ManualAppendix C - Safety StatementsLatviski [Latvian]Ar šo uzņēmums D-Link Corporation apliecina, ka šis produkts, piederumi un programmatūra atbilst direktīvai 2014/53/ES. ES atbilstības deklarācijas pilno tekstu un produkta aparātprogrammatūru var lejupielādēt attiecīgā produkta lapā vietnē www.dlink.com.Lietuvių [Lithuanian] Šiuo dokumentu „D-Link Corporation“ pareiškia, kad šis gaminys, priedai ir programinė įranga atitinka direktyvą 2014/53/ES. Visą ES atitikties deklaracijos tekstą ir gaminio programinę aparatinę įrangą galima atsisiųsti iš gaminio puslapio adresu www.dlink.com.Nederlands [Dutch]Hierbij verklaart D-Link Corporation dat dit product, accessoires en software voldoen aan de richtlijnen 2014/53/EU. De volledige tekst van de EU conformiteitsverklaring en productrmware is beschikbaar voor download van de productpagina op www.dlink.com.Malti [Maltese]Bil-preżenti, D-Link Corporation tiddikjara li dan il-prodott, l-aċċessorji, u s-software huma konformi mad-Direttiva 2014/53/UE. Tista’ tniżżel it-test sħiħ tad-dikjarazzjoni ta’ konformità tal-UE u l-rmware tal-prodott mill-paġna tal-prodott fuq www.dlink.com.Magyar [Hungarian]Ezennel a D-Link Corporation kijelenti, hogy a jelen termék, annak tartozékai és szoftvere megfelelnek a 2014/53/EU sz. rendeletek rendelkezéseinek. Az EU Megfelelőségi nyilatkozat teljes szövege és a termék rmware a termék oldaláról tölthető le a www.dlink.com címen.Polski [Polish]D-Link Corporation niniejszym oświadcza, że ten produkt, akcesoria oraz oprogramowanie są zgodne z dyrektywami 2014/53/EU. Pełen tekst deklaracji zgodności UE oraz oprogramowanie sprzętowe do produktu można pobrać na stronie produktu w witrynie www.dlink.com.Português [Portuguese] Desta forma, a D-Link Corporation declara que este produto, os acessórios e o software estão em conformidade com a diretiva 2014/53/UE. O texto completo da declaração de conformidade da UE e do rmwareSlovensko[Slovenian]Podjetje D-Link Corporation s tem izjavlja, da so ta izdelek, dodatna oprema in programnska oprema skladni z direktivami 2014/53/EU. Celotno besedilo izjave o skladnosti EU in vdelana programska oprema sta na voljo za prenos na strani izdelka na www.dlink.com.Slovensky [Slovak]Spoločnosť D-Link týmto vyhlasuje, že tento produkt, príslušenstvo a softvér sú v súlade so smernicou 214/53/EÚ. Úplné znenie vyhlásenia EÚ o zhode a rmvéri produktu sú k dispozícii na prevzatie zo stránky produktu www.dlink.com.Suomi [Finnish]D-Link Corporation täten vakuuttaa, että tämä tuote, lisävarusteet ja ohjelmisto ovat direktiivin 2014/53/EU vaatimusten mukaisia. Täydellinen EU-vaatimustenmukaisuusvakuutus samoin kuin tuotteen laiteohjelmisto ovat ladattavissa osoitteesta www.dlink.com.Svenska[Swedish]D-Link Corporation försäkrar härmed att denna produkt, tillbehör och programvara överensstämmer med direktiv 2014/53/EU. Hela texten med EU-försäkran om överensstämmelse och produkt-rmware kan hämtas från produktsidan på www.dlink.com.](https://usermanual.wiki/D-Link/COVR2200A1/User-Guide-3805426-Page-93.png)
![90D-Link COVR-2202 User ManualAppendix C - Safety StatementsÍslenska [Icelandic]Hér með lýsir D-Link Corporation því yr að þessi vara, fylgihlutir og hugbúnaður eru í samræmi við tilskipun 2014/53/EB. Sækja má ESB-samræmisyrlýsinguna í heild sinni og fastbúnað vörunnar af vefsíðu vörunnar á www.dlink.com.Norsk [Norwegian]Herved erklærer D-Link Corporation at dette produktet, tilbehøret og programvaren er i samsvar med direktivet 2014/53/EU. Den fullstendige teksten i EU-erklæring om samsvar og produktets fastvare er tilgjengelig for nedlasting fra produktsiden på www.dlink.com.Warning Statement:The power outlet should be near the device and easily accessible.](https://usermanual.wiki/D-Link/COVR2200A1/User-Guide-3805426-Page-94.png)