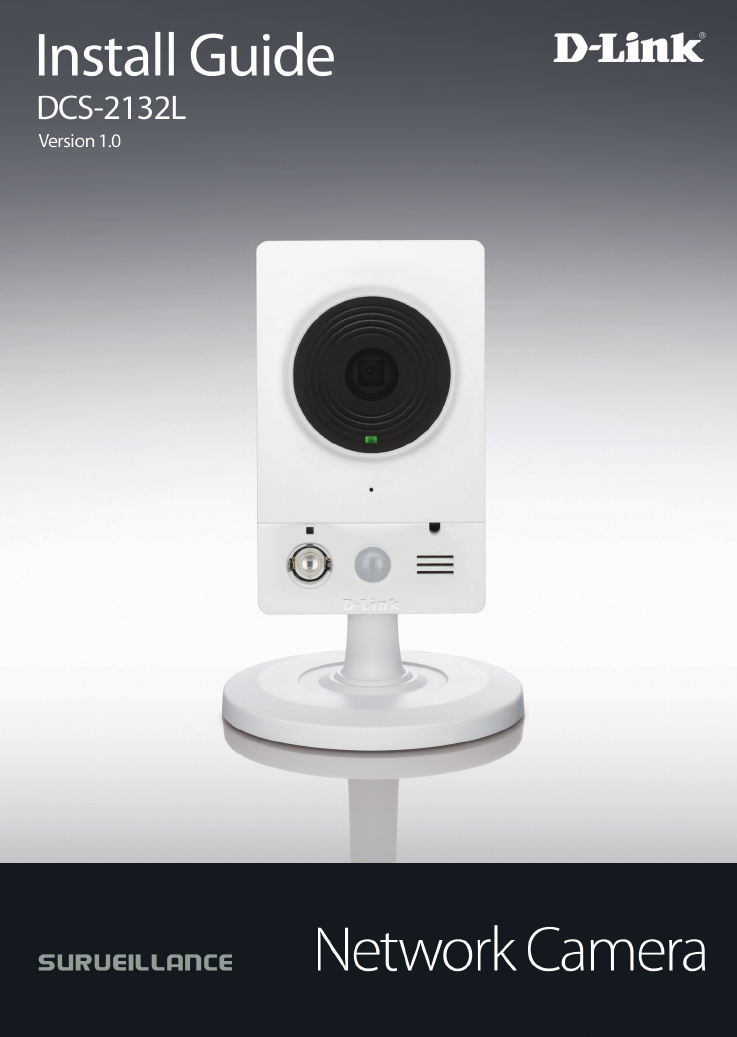
D Link CS2132LA1 HD Wirless N Cube Network Camera User Manual
D Link Corporation HD Wirless N Cube Network Camera
D Link >
User Manual
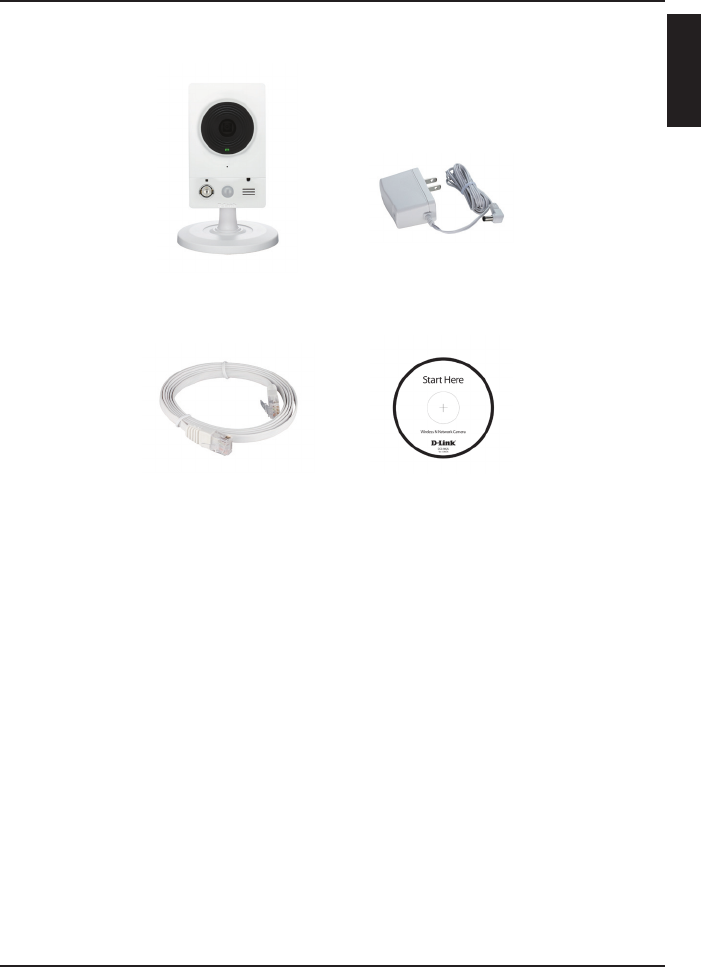
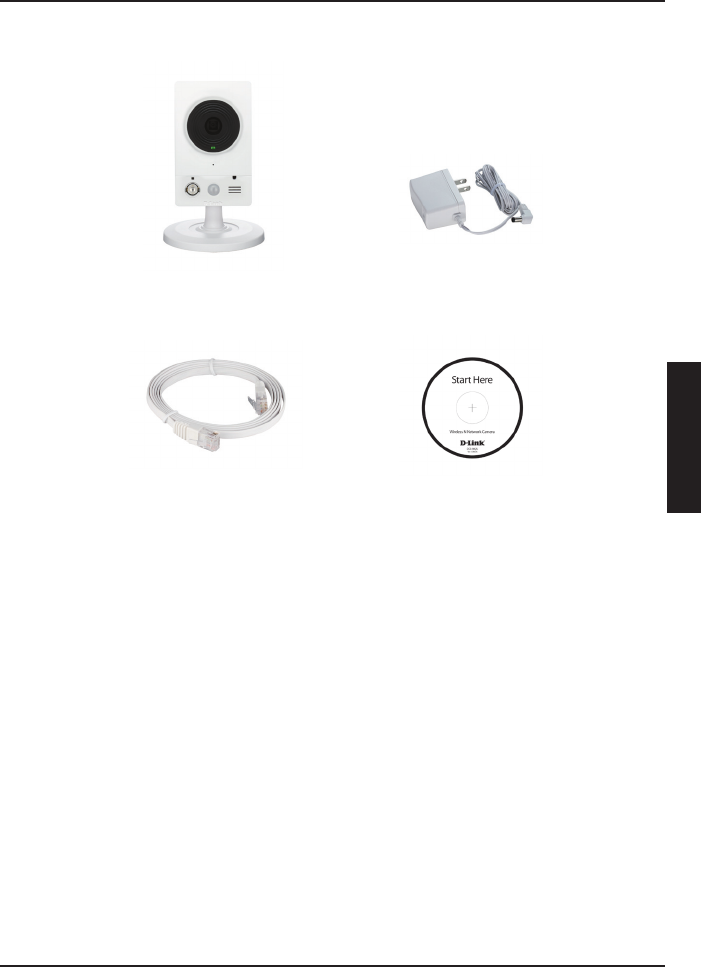
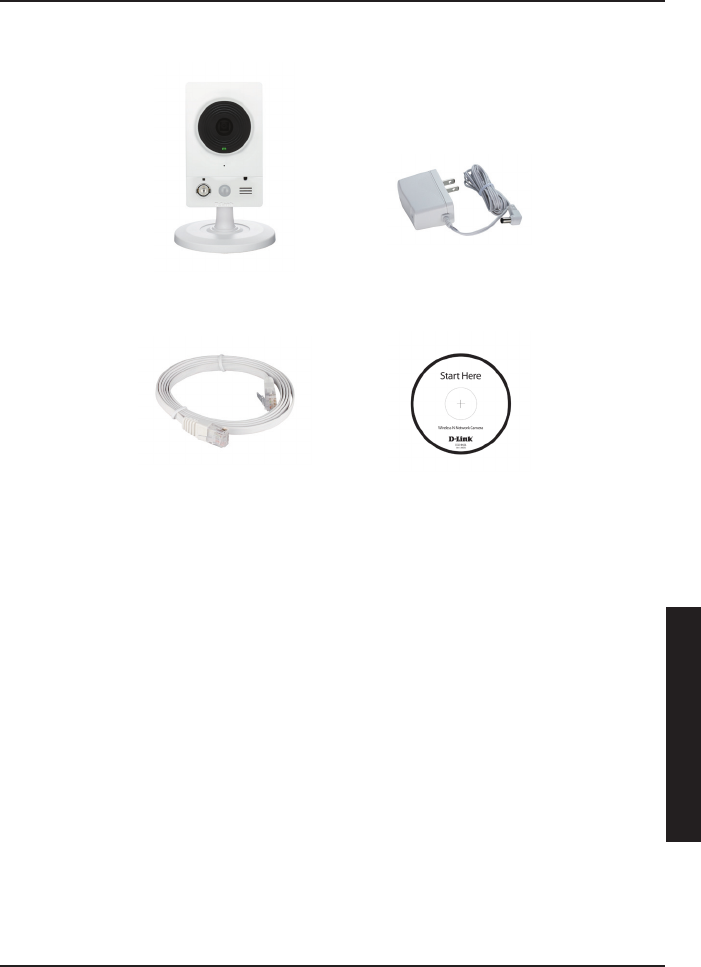
If any of the items are missing, please contact your reseller.
In order to successfully install your camera, make sure you have the following:
• An Internet connection
• A router connected to your broadband modem
• A PC running Windows® XP or Vista® (32/64-bit) with Internet Explorer®
7 or higher and ActiveX® controls enabled
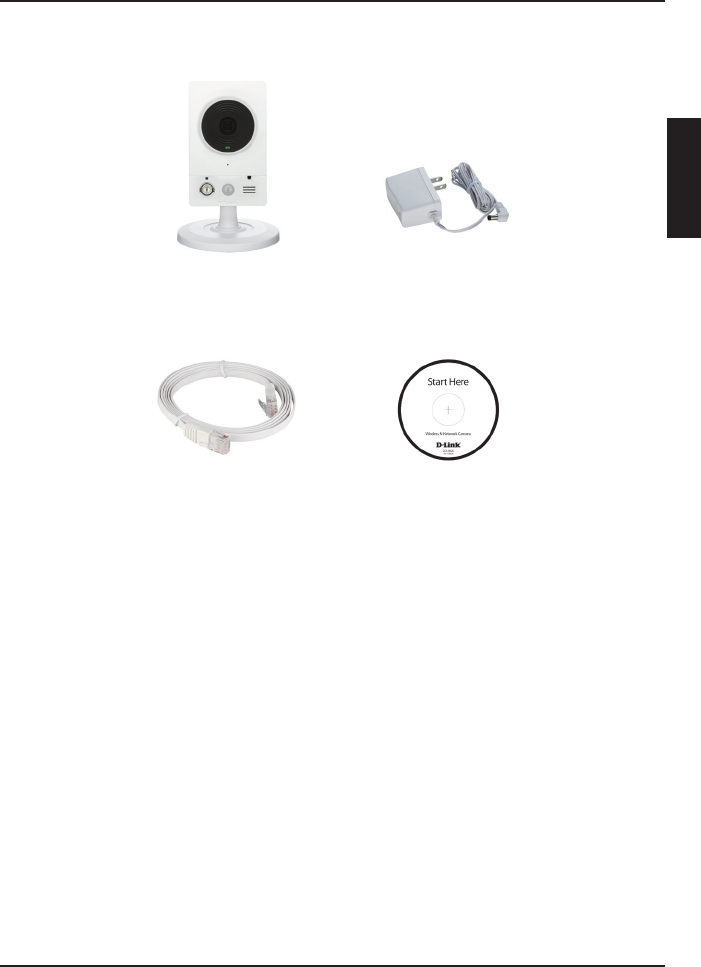
DCS-2132L Network
Camera Power Adapter
CAT5 UTP Ethernet Cable CD-ROM with Manual
and Software
3
ENGLISH
Do not mount or connect your camera yet!
Remove the installation CD from your package.
Put the CD into your PC’s CD-ROM drive, and make sure your
computer has an Internet connection. The Installation Wizard will start
automatically.
If the Installation Wizard does not start, open the CD from My Computer,
and double-click the
autorun.exe
file.
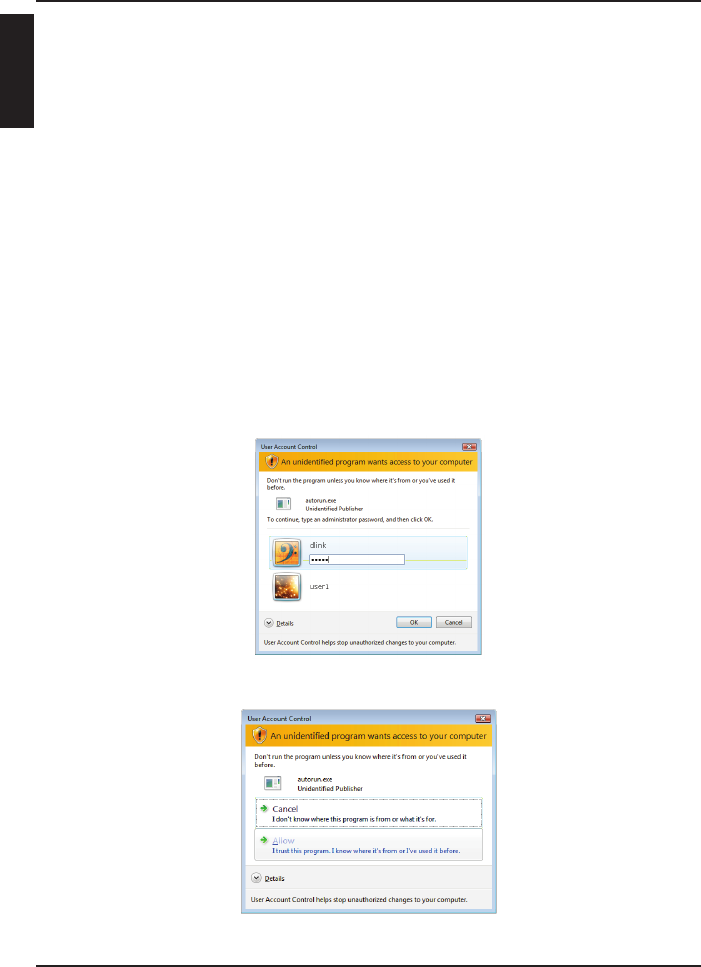
Vista® Users: You need to be logged in to an account with administrative
access to use the D-Link Installation Wizard.
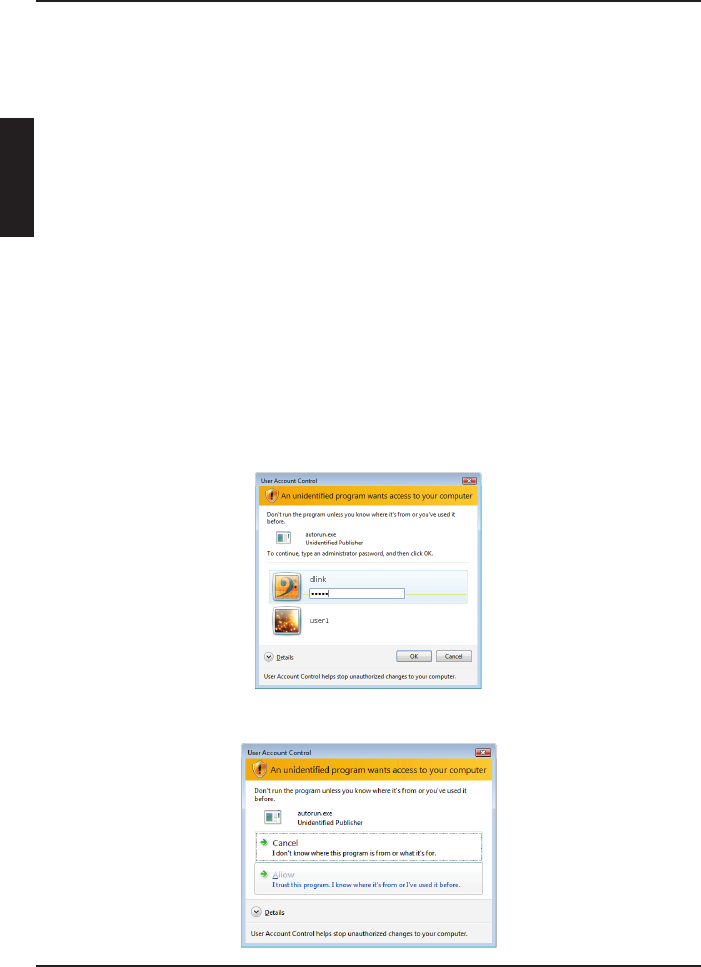
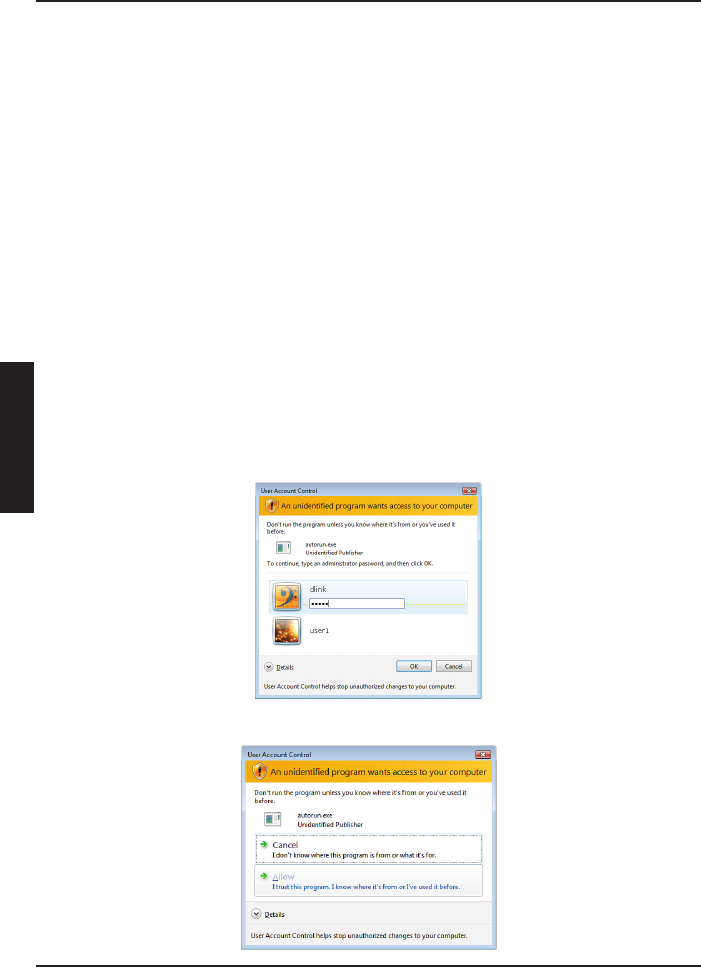
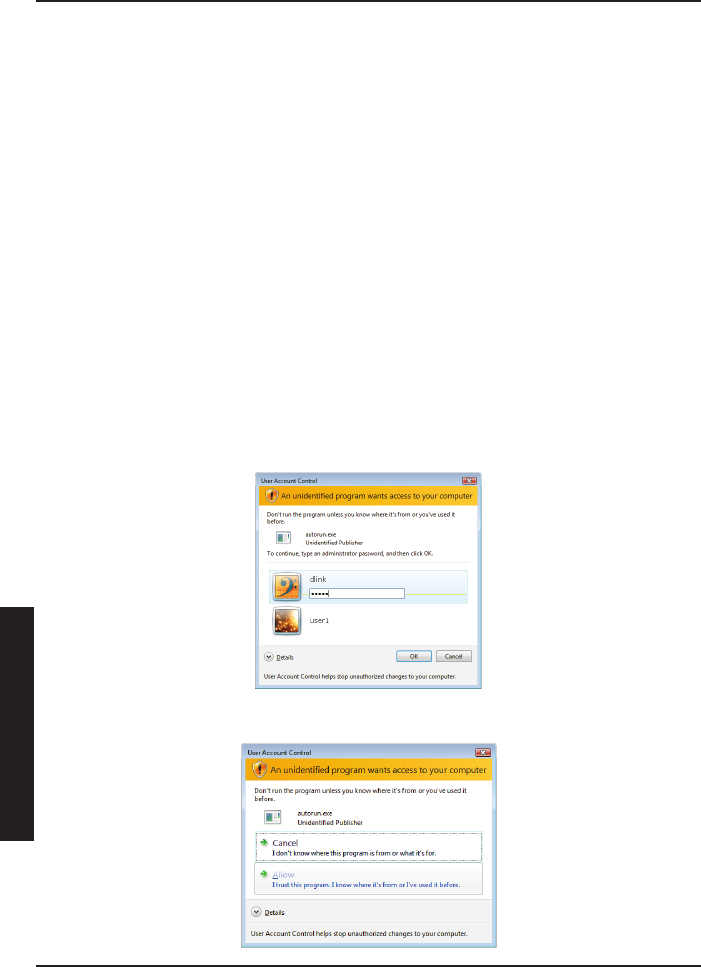
If you see the following screen appear, select a user account with
administrative access, enter the password if needed, then click .
If you see this screen appear, click to continue.
4
ENGLISH
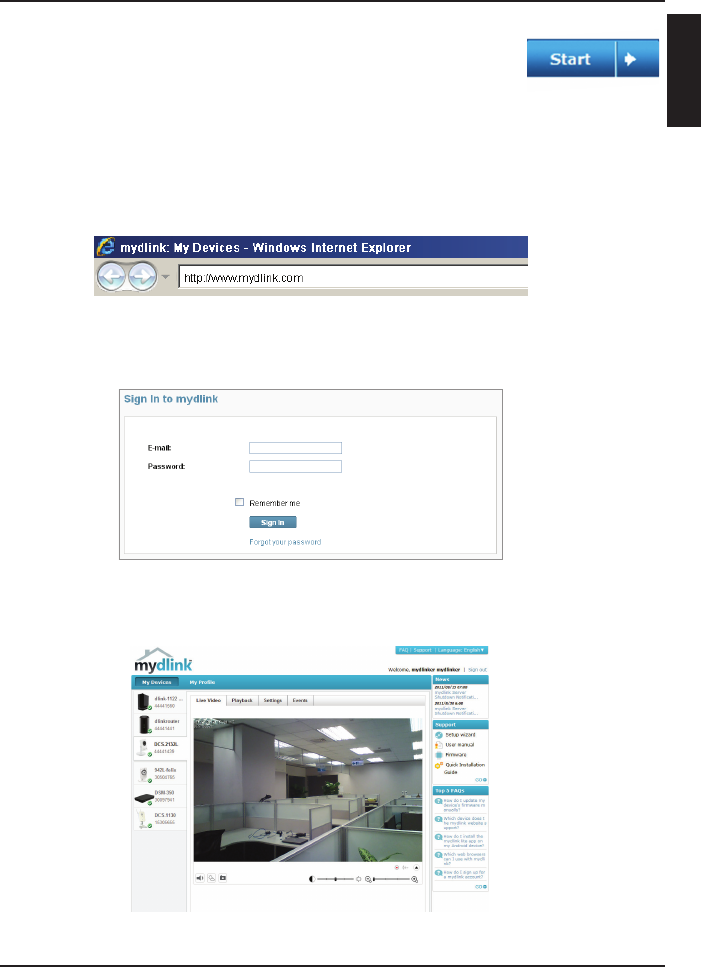
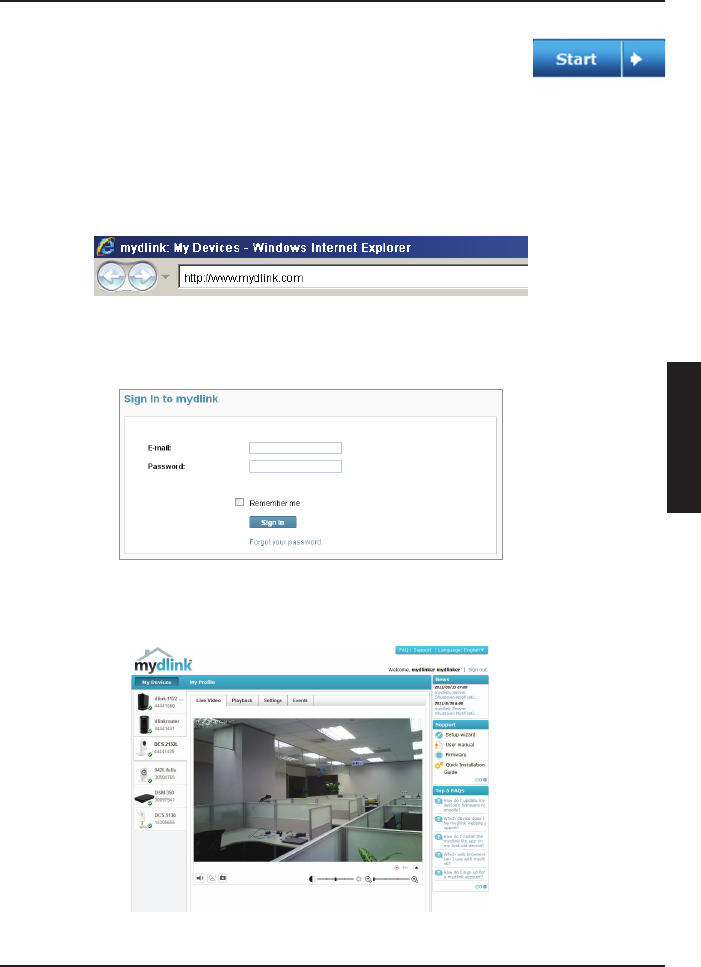
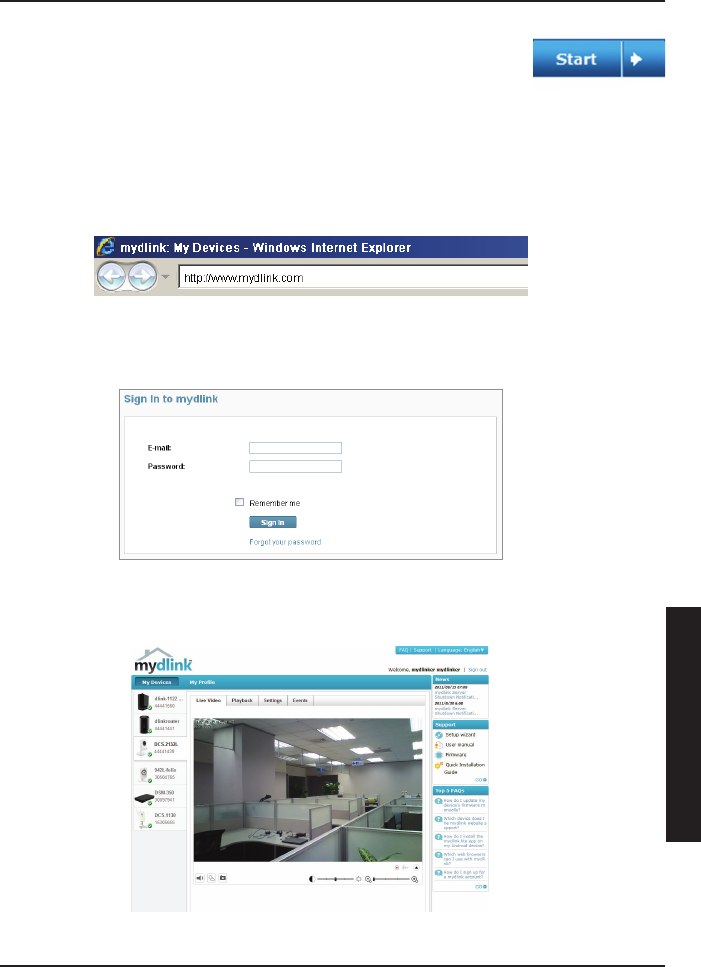
Getting started with mydlink:
A. Open Internet Explorer and go to http://www.mydlink.com
B. Click on the Sign In link at the top-right of the home page, then sign
in to your mydlink account.
C. Select your camera from the device list, and your camera’s Live View
will appear
Click on the button to start the wizard, and follow
the instructions from the Installation Wizard to nish
setting up your camera.
5
ENGLISH
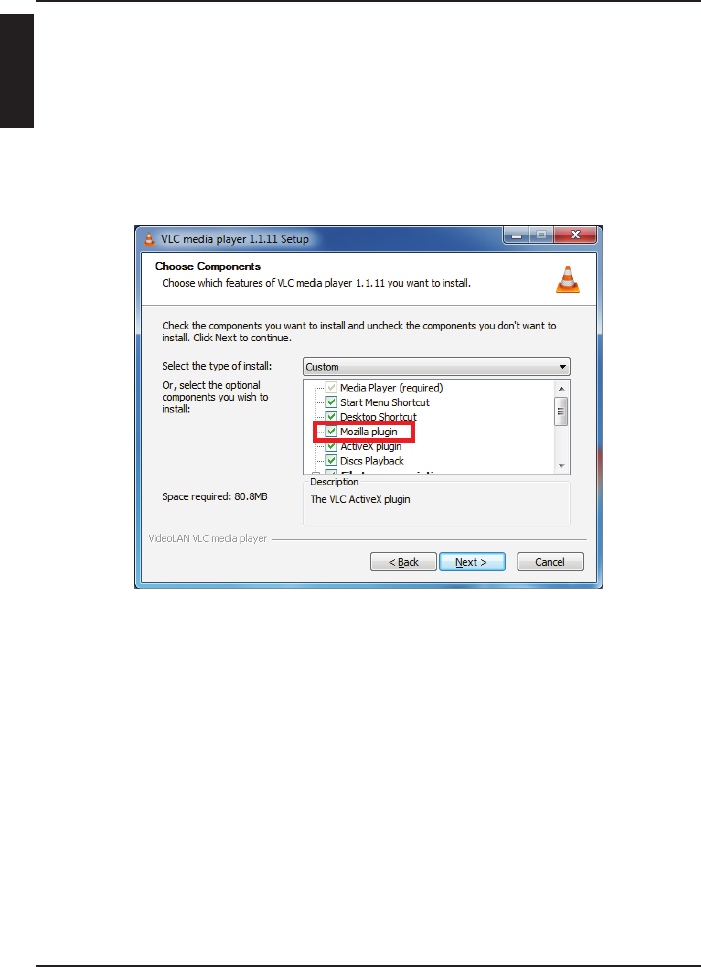
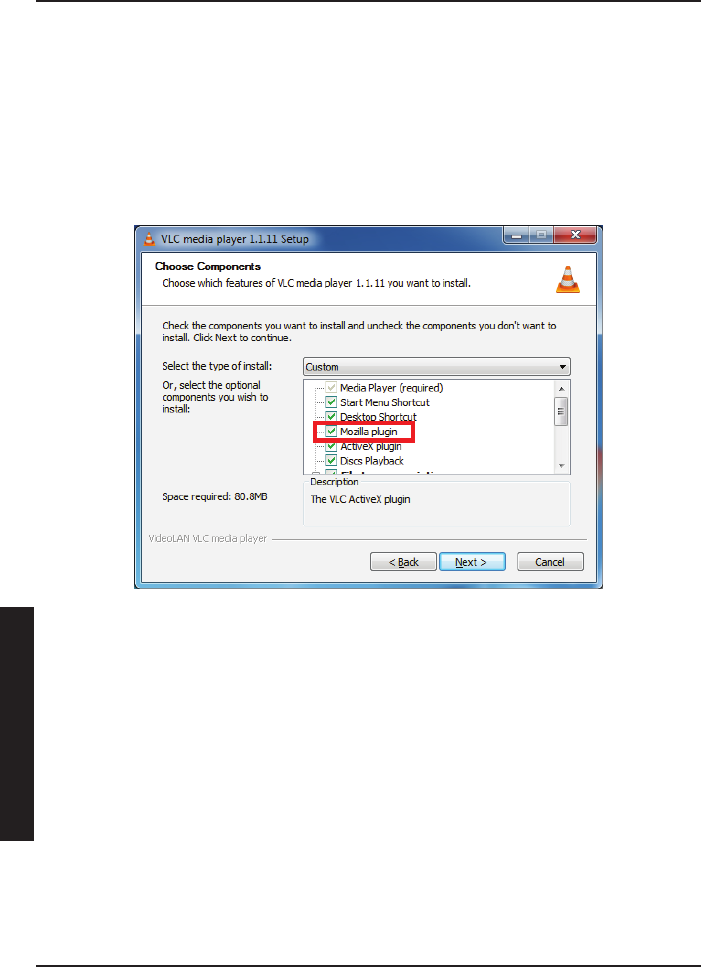
If using non-IE browsers to view the camera web manager, in order to
have all functions working properly, make sure VLC Mozilla plug-in and Java JRE
are both installed in your computer.
1. Download the VLC le from WEB site.
2. Execute the program and setup the congurations of the software.
3. Enable the “Mozilla plug-in” to install the components.
4. Finished the installation, then you can see the live video in the browser.
6
ENGLISH
mydlink.com provides users with a quick and easy way to view or manage multiple cameras
over the Internet. You can add your camera to your mydlink.com account after running the
Installation Wizard. Users can sign in to mydlink and access their devices under their account
from a PC connected to the Internet anytime, anywhere.
Each camera has a unique 8-digit mydlink No. which will be shown on the label on the back of
your camera. This 8-digit number identies your device, and is required to add your device to
your mydlink.com account.
•
Try using the wizard on the included CD.
•
To make sure your hardware is installed correctly, make sure that:
- the back LED is lit solid green
- your Internet connection is working
- your router’s LAN & WAN connections are ok
- your router supports UPnP®
- your camera is on the same network as your PC
- both your PC and camera have a working Internet connection
•
If your camera is still not working, check your router and make sure it is using the latest
rmware.
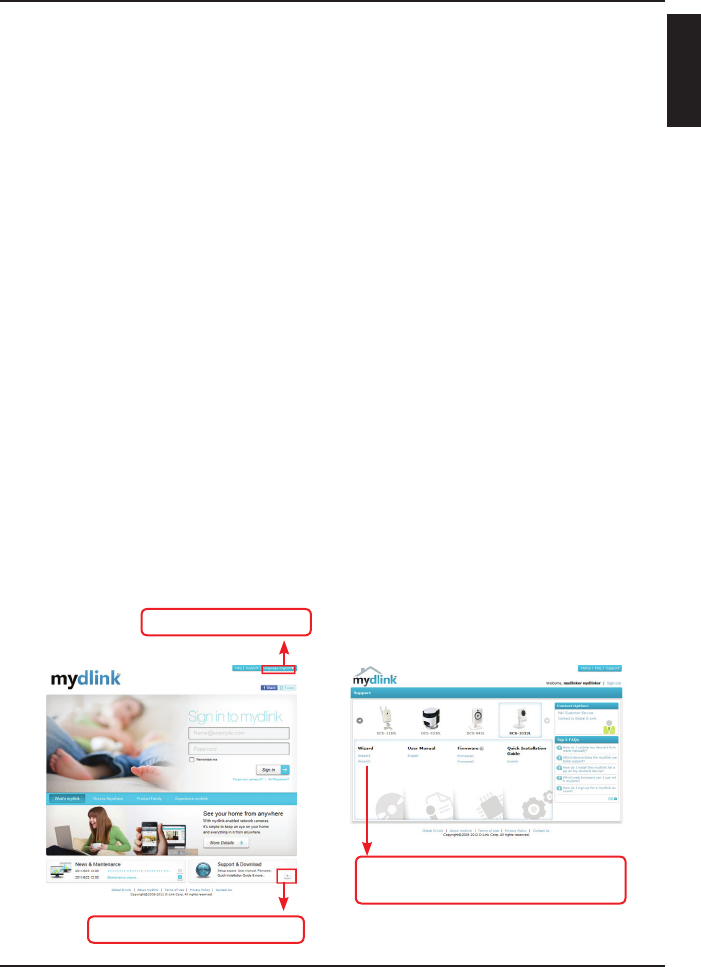
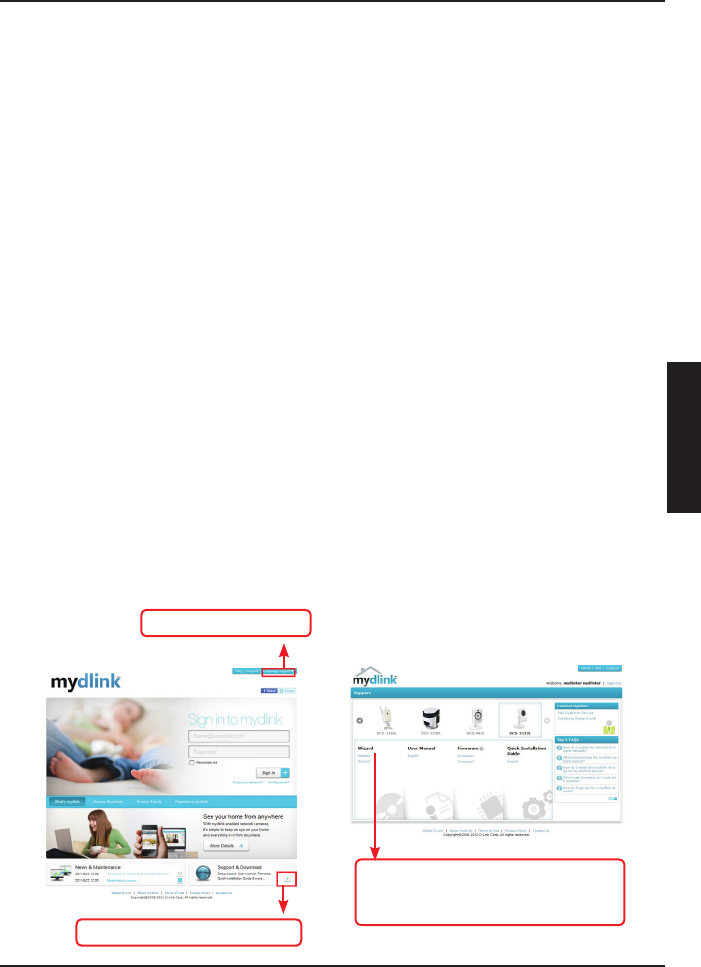
You can install your camera by using the online wizard:
• Go to mydlink portal
2. Click into the Support page
3. Support page for selecting camera
to download the online wizard
1. Select the language
7
ENGLISH

Australia:
Tel: 1300-766-868
24/7 Technical Support
Web: http://www.dlink.com.au
E-mail: support@dlink.com.au
India:
Tel: +91-22-27626600
Toll Free 1800-22-8998
Web: www.dlink.co.in
E-Mail: helpdesk@dlink.co.in
Singapore, Thailand, Indonesia,
Malaysia, Philippines, Vietnam:
Singapore - www.dlink.com.sg
Thailand - www.dlink.co.th
Indonesia - www.dlink.co.id
Malaysia - www.dlink.com.my
Philippines - www.dlink.com.ph
Vietnam - www.dlink.com.vn
Korea:
Tel : +82-2-2028-1810
Monday to Friday 9:00am to 6:00pm
Web : http://d-link.co.kr
E-mail : g2b@d-link.co.kr
New Zealand:
Tel: 0800-900-900
24/7 Technical Support
Web: http://www.dlink.co.nz
E-mail: support@dlink.co.nz
South Africa and Sub Sahara
Region:
Tel: +27 12 661 2025
08600 DLINK (for South Africa only)
Monday to Friday 8:30am to 9:00pm South
Africa Time
Web: http://www.d-link.co.za
E-mail: support@d-link.co.za
Saudi Arabia (KSA):
Tel: +966 01 217 0008
Fax: +966 01 217 0009
Saturday to Wednesday 9.30AM to 6.30PM
Thursdays 9.30AM to 2.00 PM
E-mail: Support.sa@dlink-me.com
D-Link Middle East - Dubai, U.A.E.
Plot No. S31102,
Jebel Ali Free Zone South,
P.O.Box 18224, Dubai, U.A.E.
Tel: +971-4-8809022
Fax: +971-4-8809066 / 8809069
Technical Support: +971-4-8809033
General Inquiries: info.me@dlink-me.com
Tech Support: support.me@dlink-me.com
Egypt
1, Makram Ebeid Street - City Lights Building
Nasrcity - Cairo, Egypt
Floor 6, ofce C2
Tel.: +2 02 26718375 - +2 02 26717280
Technical Support: +2 02 26738470
General Inquiries: info.eg@dlink-me.com
Tech Support: support.eg@dlink-me.com
Kingdom of Saudi Arabia
Ofce # 84 ,
Al Khaleej Building ( Mujamathu Al-Khaleej)
Opp. King Fahd Road, Olaya
Riyadh - Saudi Arabia
Tel: +966 1 217 0008
Technical Support:
+966 1 2170009 / +966 2 6522951
General Inquiries: info.sa@dlink-me.com
Tech Support: support.sa@dlink-me.com
Pakistan
Islamabad Ofce:
61-A, Jinnah Avenue, Blue Area,
Suite # 11, EBC, Saudi Pak Tower,
Islamabad - Pakistan
Tel.: +92-51-2800397, 2800398
Fax: +92-51-2800399
Karachi Ofce:
D-147/1, KDA Scheme # 1,
Opposite Mudassir Park, Karsaz Road,
Karachi – Pakistan
Phone: +92-21-34548158, 34326649
Fax: +92-21-4375727
Technical Support: +92-21-34548310, 34305069
General Inquiries: info.pk@dlink-me.com
Tech Support: support.pk@dlink-me.com
You can nd software updates and user documentation on the D-Link website.
Tech Support for customers in
8
ENGLISH

Iran
Unit 5, 5th Floor, No. 20, 17th Alley , Bokharest
St. , Argentine Sq. ,
Tehran IRAN
Postal Code : 1513833817
Tel: +98-21-88880918,19
+98-21-88706653,54
General Inquiries: info.ir@dlink-me.com
Tech Support: support.ir@dlink-me.com
Morocco
M.I.T.C
Route de Nouaceur angle RS et CT 1029
Bureau N° 312 ET 337
Casablanca , Maroc
Phone : +212 663 72 73 24
Email: support.na@dlink-me.com
Lebanon RMA center
Dbayeh/Lebanon
PO Box:901589
Tel: +961 4 54 49 71 Ext:14
Fax: +961 4 54 49 71 Ext:12
Email: taoun@dlink-me.com
Bahrain
Technical Support: +973 1 3332904
Kuwait:
Technical Support: + 965 22453939 / +965
22453949
Türkiye Merkez rtibat Ofisi
Ayazağa Maslak yolu
Erdebil Cevahir İş Merkezi No: 5/A Ayazağa /
Maslak İstanbul
Tel: +90 212 2895659
Ücretsiz Müşteri Destek Hattı: 0 800 211 00 65
Web:www.dlink.com.tr
Teknik Destek: support.tr@dlink.com.tr
073-796-2797
9
ENGLISH

Notes
10
Если что-либо из перечисленного отсутствует, пожалуйста, обратитесь
к поставщику.
Для успешной установки камеры убедитесь в наличии следующего:
• Интернет-соединение
• Маршрутизатор, подключенный к широкополосному модему
• Компьютер с ОС Windows® XP или Vista® (32/64-бит), браузером
Internet Explorer® 7 или выше и включенной опцией ActiveX®.
IP-камера DCS-2132L Адаптер питания
CAT5 UTP Ethernet
CableКабель Ethernet
категории 5 UTP
CD-диск с Руководством
пользователя и
программным
обеспечением.
11
Не подключайте пока камеру!
Извлеките установочный CD-диск из упаковки.
Вставьте установочный CD-диск в привод CD-ROM и убедитесь,
что компьютер подключен к Интернет. Мастер установки запустится
автоматически.
Если автоматический запуск Мастера установки не произошел,
откройте диск CD через My Computer (Мой компьютер) и нажмите
дважды по файлу autorun.exe.
Пользователям Vista®: необходимо зарегистрироваться с учетной
записью уровня администратора для использования Мастера
установки D-Link.
При появлении следующего экрана выберите учетную запись
администратора, введите пароль при необходимости, а затем
нажмите .
При появлении этого экрана нажмите , чтобы продолжить.
12
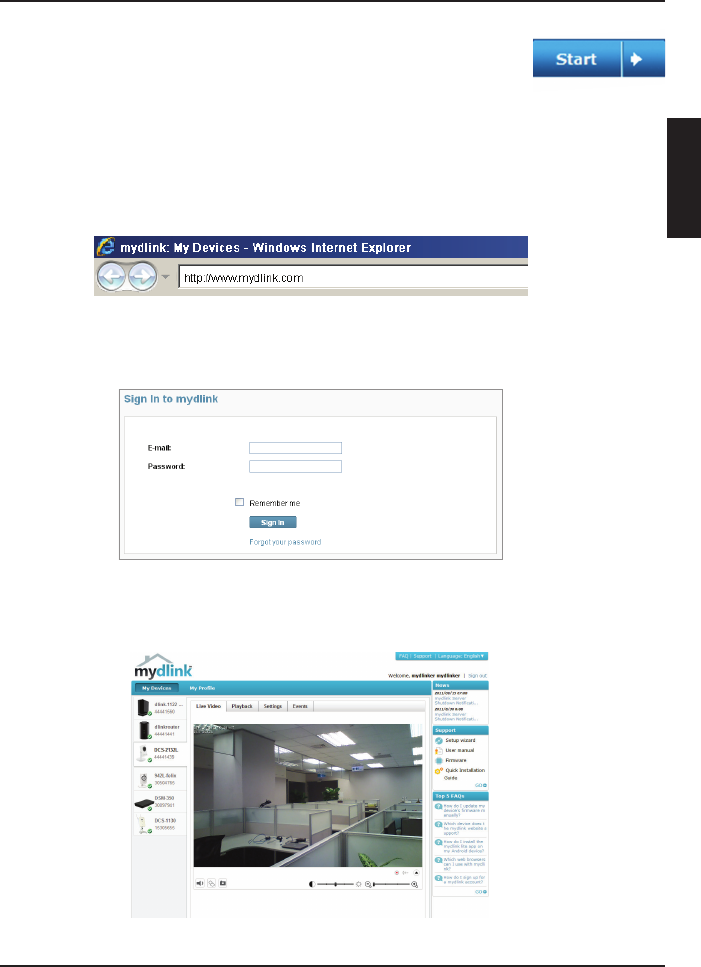
Запуск mydlink:
A. Откройте Internet Explorer и зайдите http://www.mydlink.com
B. Нажмите на ссылку Sign In в верхнем правом углу домашней
страницы, затем зарегистрируйте свою учетную запись mydlink.
C. Выберите камеру из списка устройств, и появится изображение
с этой камеры.
Нажмите кнопку для запуска Мастера установки и
следуйте инструкциям для завершения установки.
13
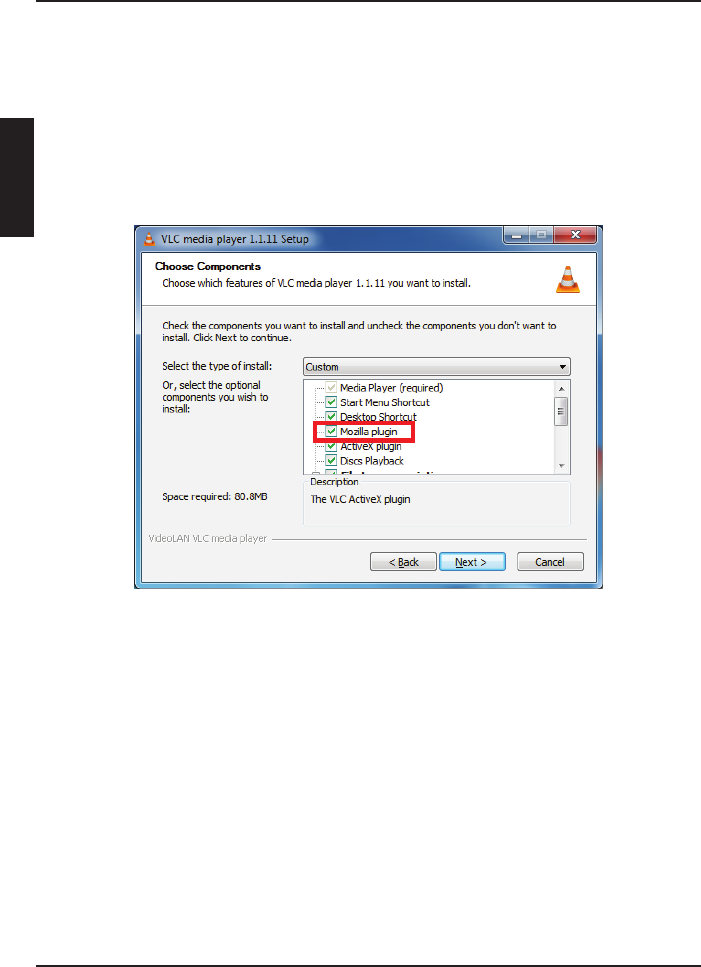
Если для просмотра Web-интерфейса Вы используете браузер,
отличный от IE, то для корректной работы всех функций убедитесь, что
плагин VLC Mozilla и Java JRE установлены на Вашем компьютере.
1. Загрузите файл VLC с WEB-сайта.
2. Установите программу и выполните настройки ПО.
3. Включите “Плагин Mozilla” для установки компонентов.
4. После завершения установки можно просматривать видео через
браузер в режиме реального времени.
14
Mydlink.com предоставляет пользователям быстрый и легкий способ управления и
просмотра изображений с нескольких камер по Интернет. Можно добавить учетную запись
на mydlink.com после запуска Мастера установки. Пользователи могут зарегистрироваться
на mydlink и на основе учетной записи получить доступ к устройствам с компьютера,
подключенного к Интернет, в любое время и в любой точке мира.
Каждая камера обладает уникальным 8-значным номером mydlink, который указан на
задней панели. Этот 8-значный номер идентифицирует оборудование и необходим для
того, чтобы добавить учетную запись на mydlink.com.
• Используйте Мастер установки на CD-диске.
• Убедитесь, что оборудование установлено правильно. Проверьте, что:
- индикатор на задней панели горит постоянным зеленым светом
- Интернет-соединение активно
- LAN и WAN-подключения исправны
- маршрутизатор поддерживает UPnP®
- камера находится в той же сети, что и компьютер
- камера и компьютер подключены к Интернет
• Если камера по-прежнему не работает, убедитесь, что на маршрутизаторе используется
последняя версия программного обеспечения.
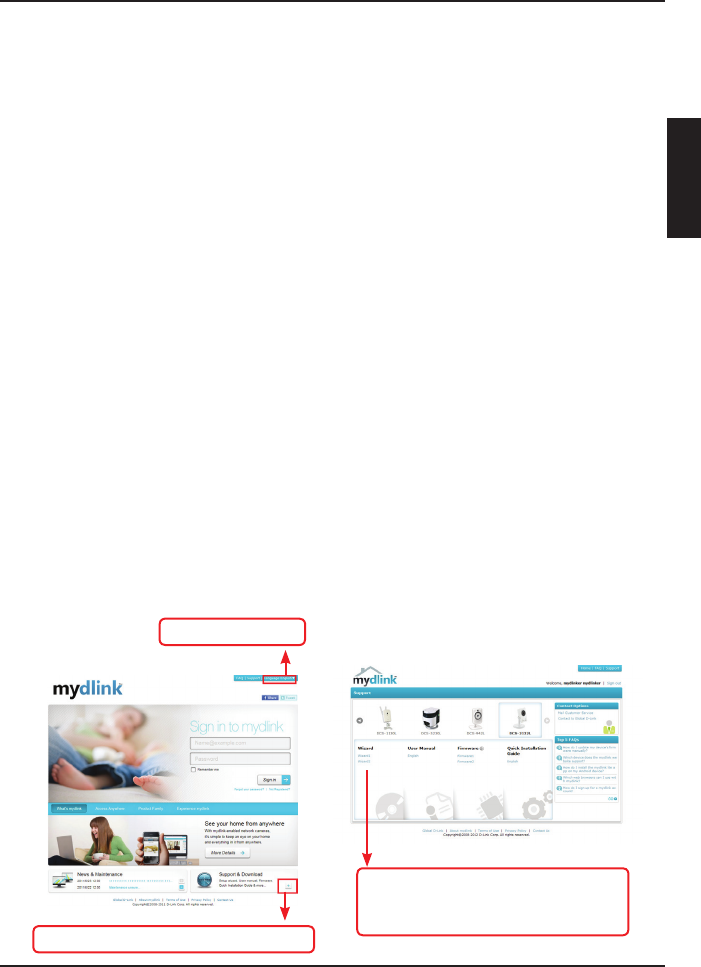
Инсталляция камеры возможна с помощью Мастера установки через Интернет:
• Перейдите на портал mydlink
2. Перейдите на страницу поддержки
3. Страница поддержки для выбора
камеры и загрузки мастера в
режиме онлайн
1. Выберите язык
15

Обновления программного обеспечения и документация доступны на Интернет-сайте D-Link.
D-Link предоставляет бесплатную поддержку для клиентов
в течение гарантийного срока.
Клиенты могут обратиться в группу технической поддержки D-Link по телефону или через
Интернет.
+7(495) 744-00-99
http://www.dlink.ru
e-mail: support@dlink.ru
04080 г. Киев , ул. Межигорская, 87-А, офис 18
Тел.: +38 (044) 545-64-40
E-mail: kiev@dlink.ru
220114, г. Минск, проспект Независимости,
169 , БЦ "XXI Век"
Тел.: +375(17) 218-13-65
E-mail: minsk@dlink.ru
050008, г. Алматы, ул. Курмангазы, дом 143
(уг. Муканова)
Тел./факс: +7 727 378-55-90
E-mail: almaty@dlink.ru
100015, г.Ташкент, ул. Нукусская, 89
Тел./Факс: +998 (71) 120-3770, 150-2646
E-mail: tashkent@dlink.ru
0038, г. Ереван, ул. Абеляна, 6/1, 4 этаж
Тел./Факс: + 374 (10) 398-667
E-mail: erevan@dlink.ru
0162, г. Тбилиси,
проспект Чавчавадзе 74, 10 этаж
Тел./Факс: + 995 (32) 244-563
09120, Vilnius, Žirmūnų 139-303
Tel./faks. +370 (5) 236-3629
E-mail: info@dlink.lt
Peterburi tee 46-205
11415, Tallinn, Eesti , Susi Bürookeskus
tel +372 613 9771
e-mail: info@dlink.ee
Mazā nometņu 45/53 (ieeja no Nāras ielas)
LV-1002, Rīga
tel.: +371 6 7618703 +371 6 7618703
e-pasts: info@dlink.lv
16
Si alguno de los artículos no se encuentra, por favor contáctese con su
vendedor
Para tener una instalación exitosa de su cámara, asegúrese de tener lo
siguiente:
• Conexión a Internet
• Un router conectado a su modem de banda ancha
• Un computador con Windows® XP o Vista (32/64-bit) con Internet Explorer
7 o superior y los controles ActiveX® habilitados.
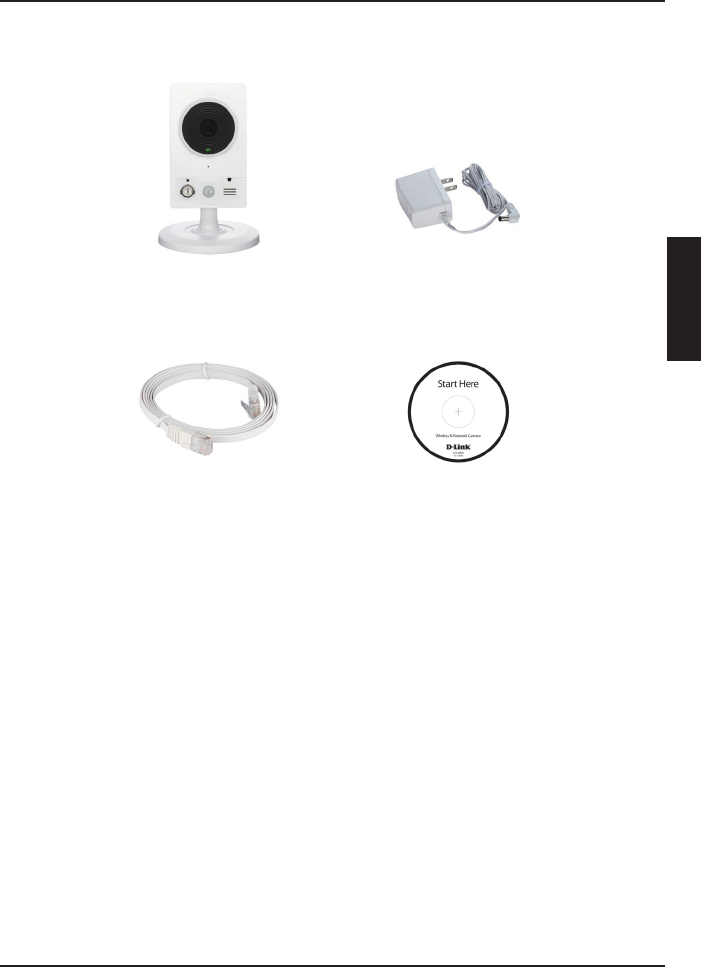
Cámara DCS-2132L Adaptador de energía
Cable Ethernet CAT5 CD-Rom con Manuales
y Software
17
No instale o conecte su cámara todavía!
Saque el CD de instalación desde su empaque
Inserte el CD dentro del Lector de CD de su PC, asegúrese que su
computador tenga conexión a Internet. El asistente de instalación
comenzará automáticamente.
Si el Asistente de configuración no comienza, abra el CD desde el
ícono Mi PC, y haga doble clic en el archivo autorun.exe
Usuarios Vista® : Debe ingresar con una cuenta con permisos
administrativos para utilizar el Asistente de Instalación D-Link.
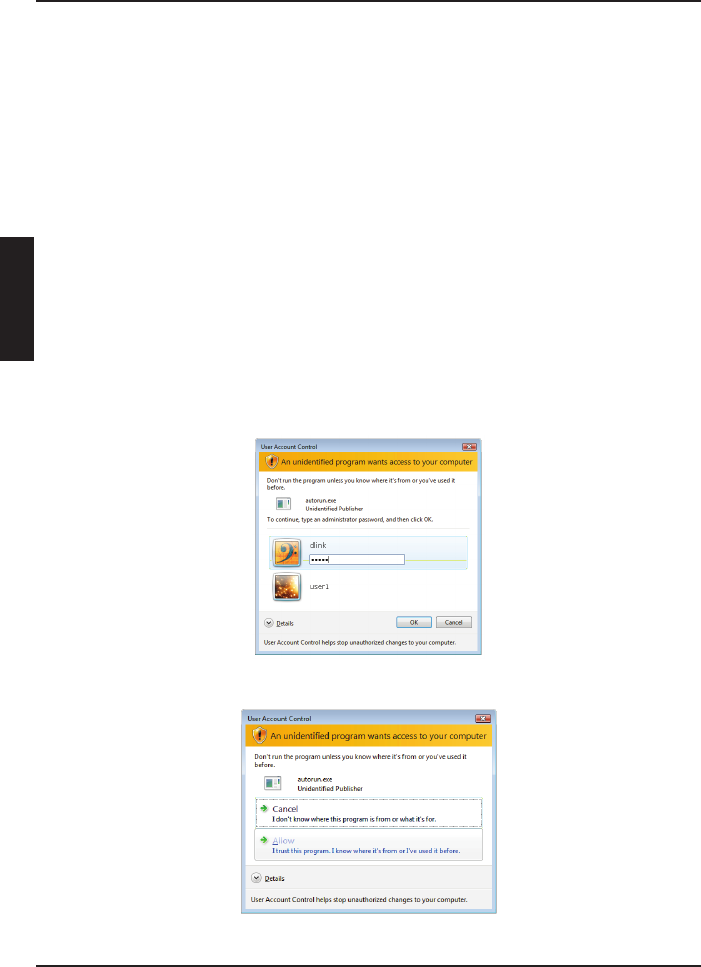
Si aparece la siguiente pantalla, seleccione una cuenta de usuario
con acceso administrativo, ingrese la contraseña si lo requiere, luego
presione .
Si aparece esta pantalla, presione para continuar
18
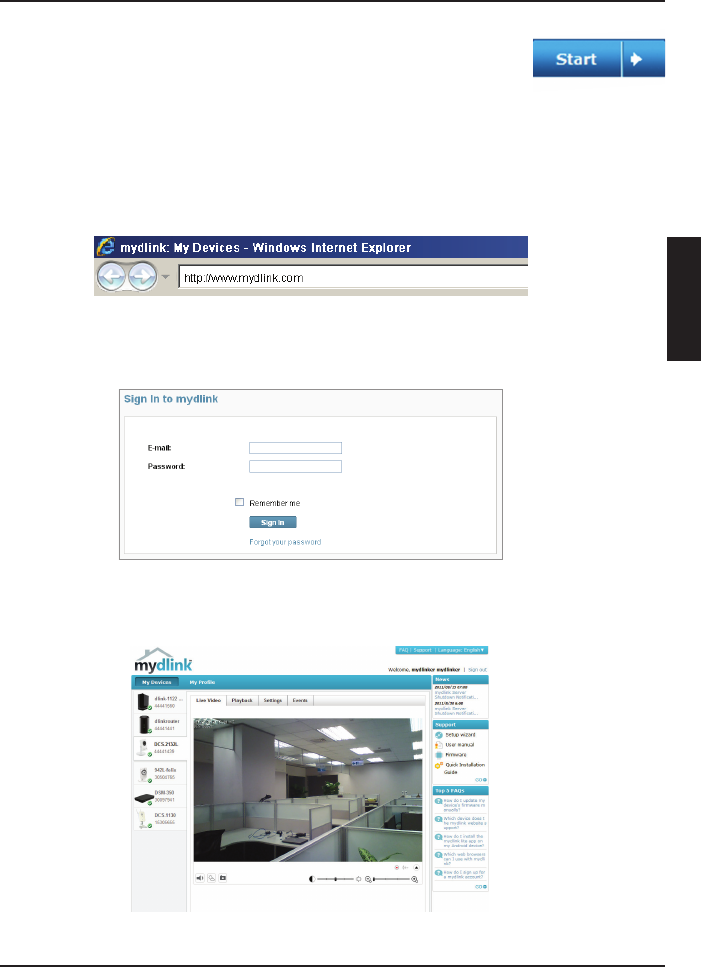
Comenzando con mydlink:
A. Abra Internet Explorer y diríjase a http://www.mydlink.com
B. Haga clic en el enlace de acceso en la parte superior derecha de la
página de inicio, a continuación, acceda a su cuenta mydlink.
C. Seleccione su cámara desde la lista de dispositivos, la visualización
en vivo de su cámara aparecerá
Presione el botón para iniciar el Asistente, y siga
las instrucciones desde el asistente de instalación para
nalizar la conguración de su cámara.
19
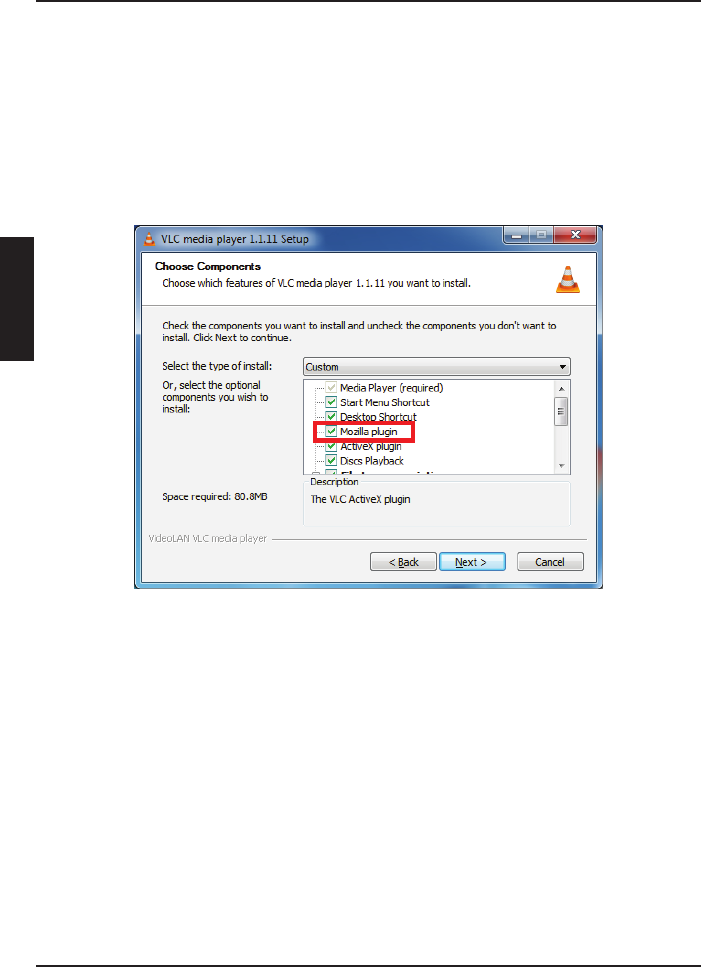
Si no está usando navegadores IE para administrar la cámara, con el n
de que todas las funciones operen correctamente, asegúrese de tener instalado
en su computador el plug-in VLC Mozilla y Java JRE.
1. Descargue el archivo VLC desde el sitio WEB.
2. Ejecute el programa y los ajustes de las conguraciones del software.
3. Habilite el “plug-in Mozilla” para instalar los componentes.
4. Terminada la instalación, usted puede ver el video en vivo en el
navegador.
20
Mydlink.com provee a los usuarios una rápida y fácil manera de ver o administrar múltiples
cámaras por Internet. Puede agregar la cámara a su cuenta mydlink.com después de ejecutar
el asistente de instalación. Los usuarios por medio de su cuenta mydlink, accederán a sus
dispositivos desde un PC conectado a Internet a cualquier hora y en cualquier lugar.
Cada cámara tiene un único número de 8 dígitos mydlink, el cual se encuentra en la etiqueta
detrás de su cámara. Este número identica su dispositivo, y se requiere para agregar sus
dispositivos a la cuenta mydlink.
• Intente utilizando el Asistente incluido en el CD
• Para asegurar que su Hardware está instalado correctamente, asegúrese que:
- El LED posterior se ilumina de color verde
- La conexión a Internet funcione correctamente
- Las conexión WAN y LAN de su Router estén correctas
- Su Router soporte UPnP
- La cámara está en la misma red que su PC
- La cámara y PC hayan trabajado en una conexión de Internet
• Si su cámara no está trabajando, revise su Router y asegúrese que tenga la última versión
de Firmware.
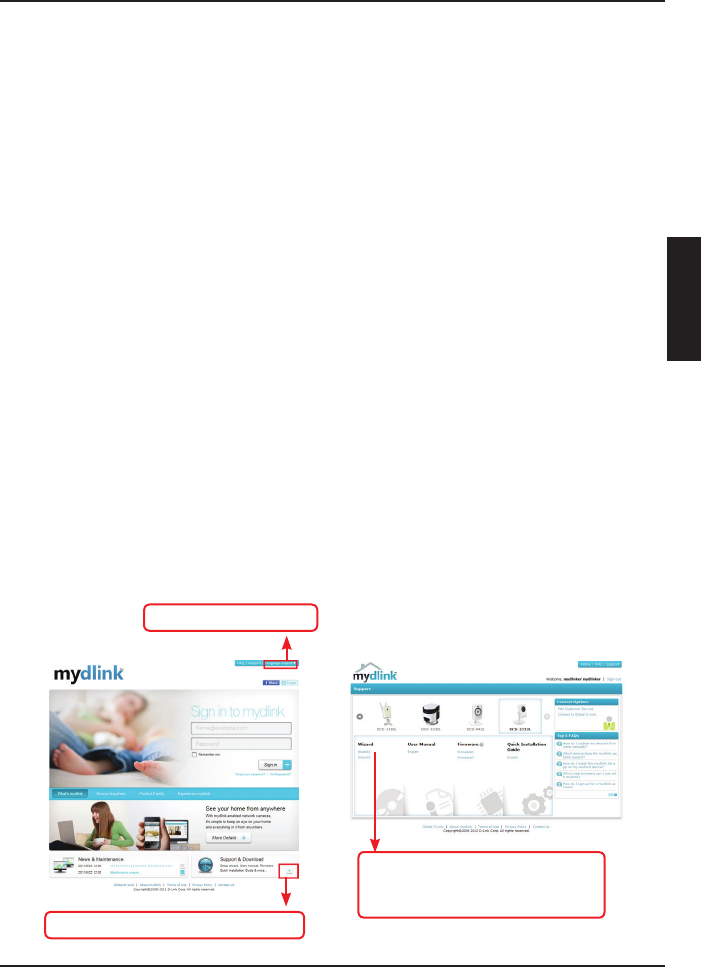
Puede instalar su cámara utilizando el asistente en línea:
• Ir al portal mydlink
2. Haga clic en la página de Soporte
3. Página de Soporte para la
selección de cámara para
descargar el asistente en línea
1. Seleccione el idioma
21
Usted puede encontrar actualizaciones de softwares o rmwares y documentación para usuarios a
través de nuestro sitio www.dlinkla.com
SOPORTE TÉCNICO PARA USUARIOS EN LATINO AMERICA
Soporte técnico a través de los siguientes teléfonos de D-Link
0800 - 12235465
800 260200
01800 - 9525465
0800 - 0521478
1800 - 035465
800 - 6335
1800 - 8350255
01800 - 1233201
011 008000525465
0800 - 00968
0800 - 1005767
Soporte Técnico de D-Link a través de Internet
Horario de atención Soporte Técnico en www.dlinkla.com
e-mail: soporte@dlinkla.com & consultas@dlinkla.com
22
Se qualquer dos itens acima estiver faltando, favor contatar o seu
revendedor.
Para instalar sua câmera com sucesso, certique-se de que você possui o
seguinte:
• Uma conexão de Internet
• Um roteador conectado ao seu modem de banda larga
• Um PC executando o Windows® XP ou Vista® (32/64 bits) com Internet
Explorer® 7 ou superior e controles ActiveX® habilitados
Câmera de Rede
DCS-2132L Adaptador de
Alimentação
Cabo Ethernet UTP CAT5 CD-ROM com Manual
e Software
23
Ainda não monte ou conecte sua câmera!
Remova o CD de instalação do seu pacote.
Insira o CD na unidade de CD-ROM do seu PC e certique-se de que o
seu computador possui uma conexão de Internet. O Installation Wizard
(Assistente de Instalação) será inicializado automaticamente.
Se o Assistente de Instalação não for iniciado, abra o CD a partir de Meu
computador e dê um duplo clique no arquivo autorun.exe.
Usuários do Vista®: Você precisa estar conectado a uma conta com acesso
administrativo para utilizar o Installation Wizard (Assistente de Instalação)
da D-Link.
Se a tela a seguir for exibida, selecione uma conta de usuário com acesso
administrativo, insira uma senha caso necessário, e então clique em .
Se você ver essa tela ser exibida, clique em para continuar.
24
Primeiros passos no mydlink:
A. Abra o Internet Explorer e vá http://www.mydlink.com
B. Clique no link Entrar, no canto superior direito da página inicial, em seguida,
acesse sua conta mydlink.
C. Selecione sua câmera na lista de dispositivos e o Live View de sua câmera
será exibido
Clique no botão para iniciar o assistente, e siga as
instruções do Installation Wizard para acabar de congurar
a sua câmera.
25
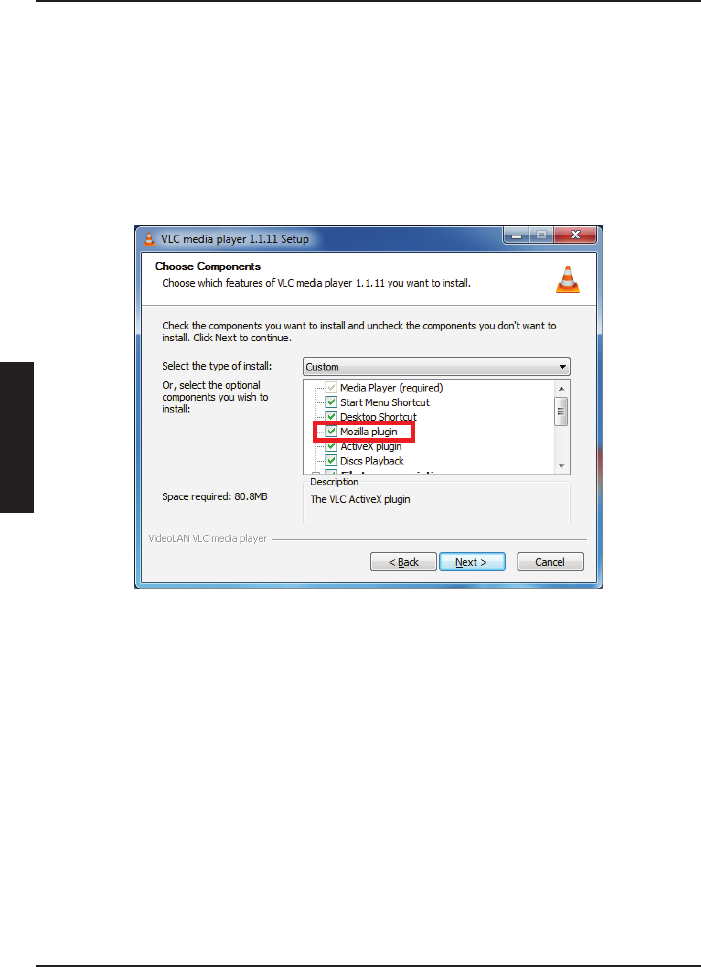
Caso não esteja usando o navegador IE para visualizar o gerente de
câmera web , certique-se que o plug-in VLC Mozilla e Java JRE estão instalados
em seu computador, a m de ter o funcionamento correto de todos os recursos.
1. Baixe o arquivo VLC no site da WEB.
2. Execute o programa e dena as congurações do software.
3. Ative o “Mozilla plug-in” para instalar os componentes.
4. Termine a instalação, agora você pode ver o vídeo ao vivo no navegador.
26
O mydlink.com oferece aos usuários uma maneira fácil e rápida de visualizar ou gerenciar
múltiplas câmeras via Internet. Você pode adicionar sua câmera à sua conta no mydlink após
executar o assistente de instalação (Installation Wizard). Você pode se registrar no mydlink e
acessar seus dispositivos sob sua conta de um PC conectado à Internet a qualquer hora, em
qualquer lugar.
Cada câmera possui um No. mydlink único de 8 dígitos que será exibido na etiqueta na parte
traseira da sua câmera. Este número de 8 dígitos identica seu dispositivo, e é necessário
adicionar o seu dispositivo à sua conta no mydlink.com.
• Tente utilizar o assistente (wizard) do CD incluso.
• Para certificar-se de que seu hardware está instalado corretamente, assegure que:
- LED traseiro está aceso de forma xa na cor verde
- sua conexão de internet está funcionando
- suas conexões LAN e WAN do roteador estão ok
- seu roteador suporta UPnP®
- sua câmera está na mesma rede que o seu PC
- tanto o seu PC como a sua câmera possuem uma conexão de Internet ativa
• Caso sua câmera ainda não esteja funcionando, verifique seu roteador e certifique-se de
que ele está usando o firmware mais atual.
Você pode instalar sua câmera utilizando o assistente on-line:
• Ir para o portal MyDlink
2. Clique na página de suporte
3. Página de suporte para a seleção
de câmera para fazer o download
do assistente on-line
1. Selecione o idioma
27

Caso tenha dúvidas na instalação do produto, entre em contato com o Suporte Técnico D-Link.
Acesse o site:
28
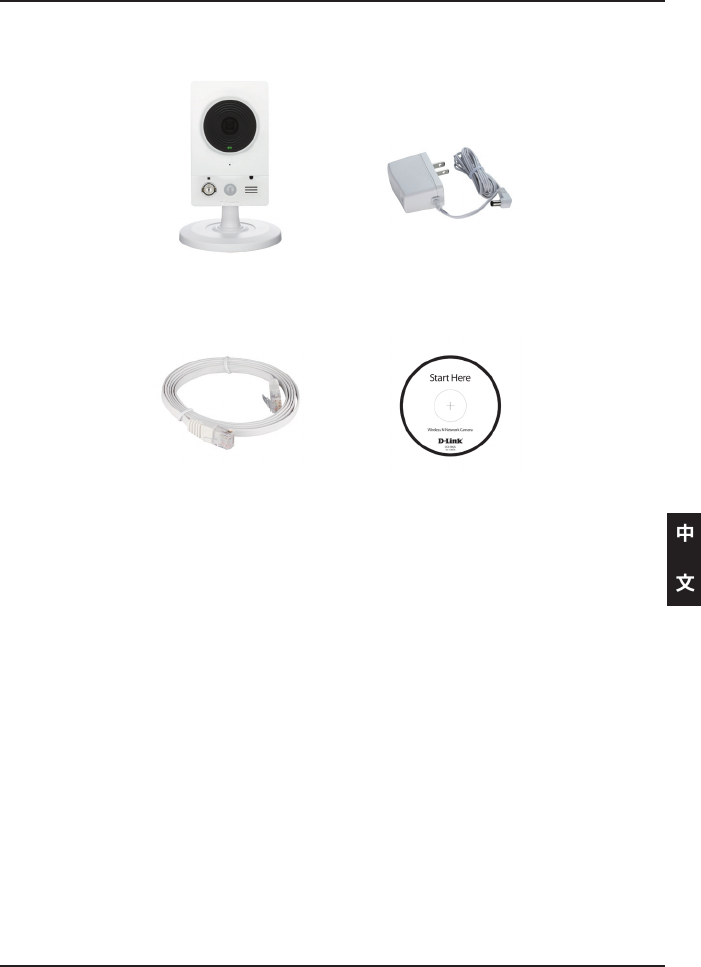
假如有缺少任何配件,敬請與您購買的經銷商聯繫。
在您開始安裝前
請先確認您具備下列說明事項才能夠成功的完成攝影機的安裝:
•具備網際網路連線具
•具備寬頻路由器並連結至寬頻數據機分享網路
•電腦具備Windows XP或Vista (32/64-bit)作業系統與Internet Explorer 7以
上的瀏覽器並且啟動ActiveX控制功能。
DCS-2132L 網路攝影機 電源供應器
CAT5 UTP 乙太網路線 光碟內含手冊與軟體
包裝清單
29
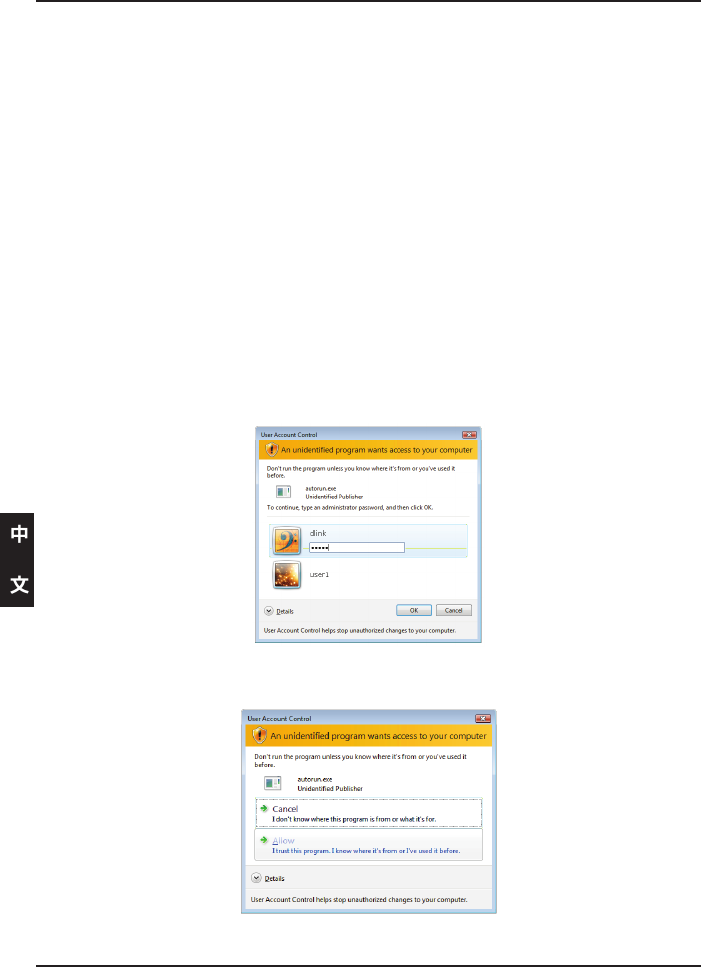
請先不要安裝您的網路攝影機!!
1. 從包裝中取出安裝光碟
2. 將光碟放入您電腦的光碟機中,並切確認您的電腦可以正常的連結網際網
路。安裝設定精靈程式將會自動進行安裝。
假如安裝設定精靈程式並沒有自動進行安裝,透過電腦桌面的”我的電腦”
圖示開啟光碟機檔案,然後點選autorun.exe檔案開始進行安裝。
Vista使用者:您必須先使用管理者權限的帳號登入您的作業系統才能夠進
行D-Link設定安裝精靈程式安裝。
假如您看到下面的視窗畫面,選擇具備管理權限的使用者帳號,假如需要
請輸入密碼,然後點選”確認”。
開始安裝設定精靈
假如您到此畫面,點選”允許”然後繼續安裝程序。
30
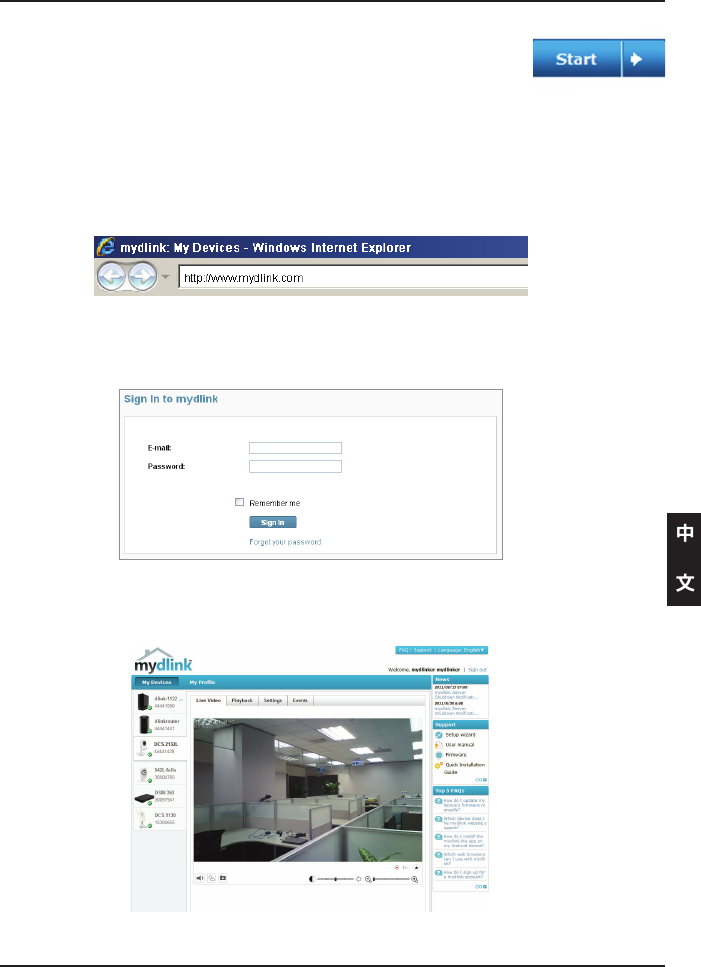
4. 啟用mydlink功能:
A. 開啟網頁輸入http://www.mydlink.com
B. 在網頁右上方以滑鼠按鍵按下『Sign In Link』,即可登入到您的mydlink
帳號。
C. 從清單中選擇您的網路攝影機,您的網路攝影機即時影像將會顯示。
3. 點選”開始”按鍵執行設定安裝精靈,經由畫面的導引
將協助您完成網路攝影機的安裝。
31
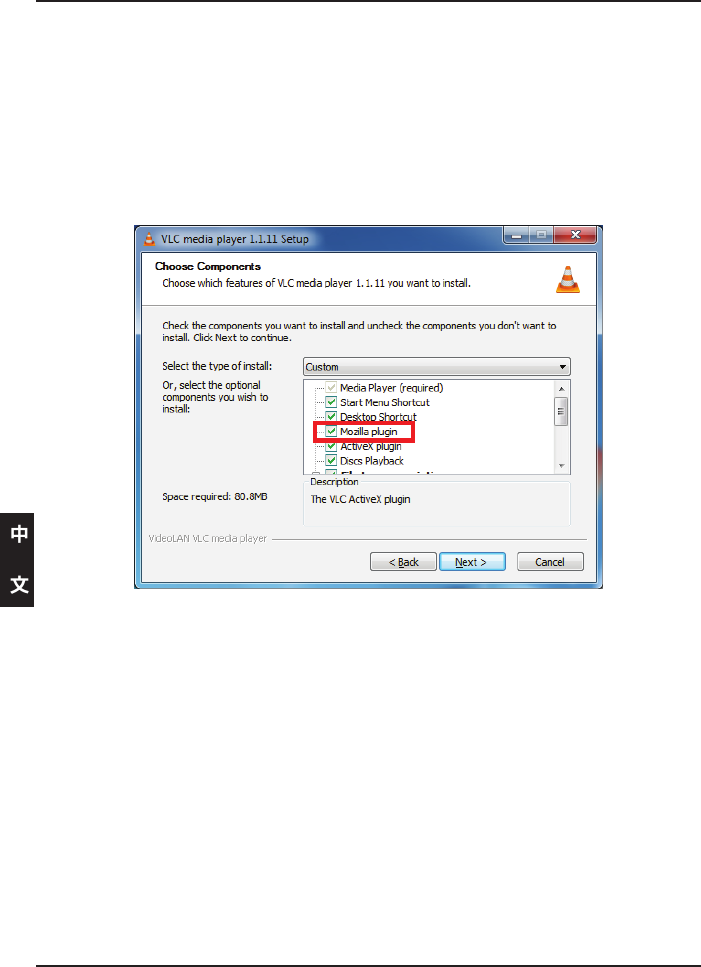
附註: 為了讓所有攝影機網頁相關所有功能均為正常,如果您要使用非IE瀏覽器觀
看攝影機網頁管理頁面,請確認您已於使用電腦中完成安裝VLC Mozilla Plug-in
及Java JRE。
1. 請至VLC官方網站下載VLC檔案。 http://www.videolan.org/vlc/
2. 將下載檔案解壓縮,並安裝設定此軟體。
3. 啟用“Mozilla plug-in”並安裝此組件。
4. 完成安裝後,您即可以透過瀏覽器看到即時影像。
32
故障排除
1. mydlink可以提供什麼服務?
Mydlink提供使用者透過網際網路快速且簡單的方式觀看或是管理網路攝影機。當您透過設定
精靈完成設定後,您可以將您的網路攝影機加入mydlink.com的帳號。使用者就可以透過登入
mydlink網站在任何時間與地點隨時觀看網路攝影機即時影像。
2. 什麼是mydlinkNo.?作用是什麼?
每一台網路攝影機都會具備一組8碼的mydlink No.,它會標示於您網路攝影機背面的貼紙上。
此8碼數字為您攝影機的識別碼,您可以透過此識別碼將網路攝影機加入mydlink.com網站。
3. 假如DCS-2132L沒有辦法正常運作該怎麼辦?
• 請嘗試透過設定精靈進行攝影機的安裝。
• 確認你的硬體安裝是正確的包含:
- 後方的綠色LED指示燈恆亮
- 您的網際網路連線是正常的
- 您的寬頻路由器LAN與WAN的連線是正常的
- 您的寬頻路由器支援UPnP的功能
- 您的網路攝影機與您的電腦是在相同的網路環境中
- 您的電腦與網路攝影機都已經可以連線網際網路
• 假如還是無法連線請確認您的寬頻路由器是使用最新的韌體版本。
4. 我無法執行光碟的設定精靈。我該如何安裝我的DCS-2132L?
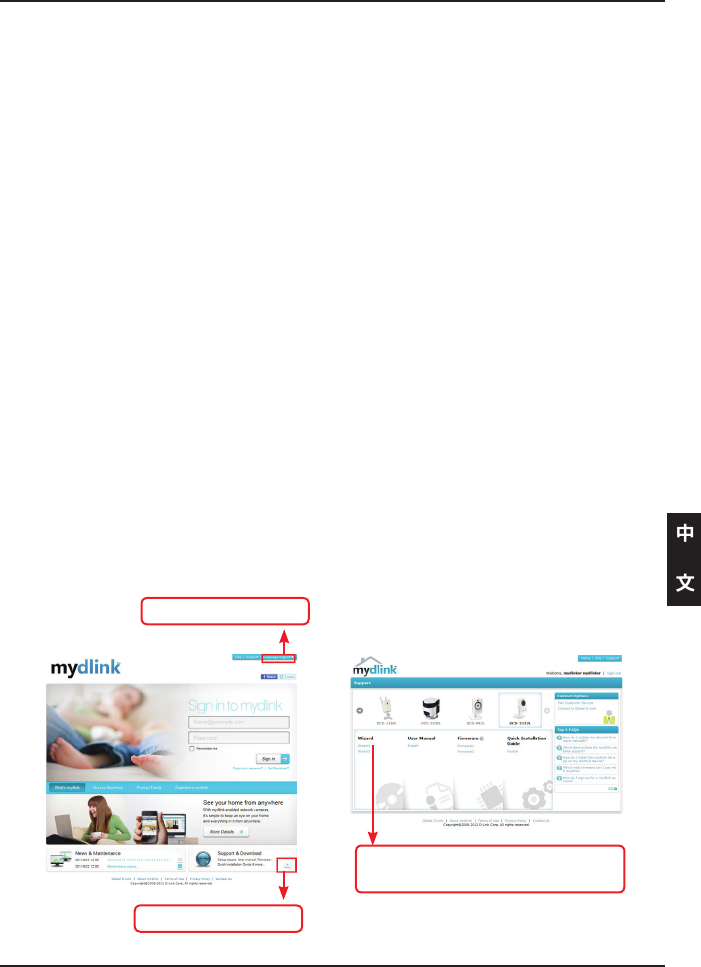
您可以透過線上的設定精靈安裝您的網路攝影機:
• 進入mydlink平台
2. 點選進入支援頁面
3. 進入支援頁面後請選擇網路攝影
機型號下載設定精靈
1. 選擇語言
33
D-Link友訊科技台灣分公司技術支援資訊
如果您還有任何本使用手冊無法協助您解決的產品相關問題,台灣地區用戶可以透過我
們的網站、電子郵件或電話等方式與D-Link台灣地區技術支援工程師聯絡。
免付費技術諮詢專線
0800-002-615
服務時間:週一至週五,早上9:00到晚上9:00
(不含周六、日及國定假日)
網 站:http://www.dlink.com.tw
電子郵件:dssqa_service@dlink.com.tw
如果您是台灣地區以外的用戶,請參考網站,全球各地分公司
的聯絡資訊以取得相關支援服務。
產品保固期限、台灣區維修據點查詢,請參考以下網頁說明:
http://www.dlink.com.tw
產品維修:
使用者可直接送至全省聯強直營維修站或請洽您的原購買經銷商。
34
Jika ada item-item yang hilang, silahkan hubungi penjual
Agar pemasangan kamera anda sukses, pastikan anda mempunyai
hal-hal berikut :
• Sebuah koneksi Internet
• Sebuah router yang terhubung ke modem jaringan pita lebar anda
• Sebuah komputer dengan sistem operasi Windows® XP atau Vista®
(32/64-bit) dengan Internet Explorer® 7 atau lebih tinggi dan kontrol
ActiveX® yang aktif
DCS-2132L Network
Camera Power Adapter
Kabel Ethernet CAT5 UTP CD-ROM yang berisi
Petunjuk Penggunaan dan
Perangkat Lunak
35
Jangan pasang atau hubungkan kamera anda dulu!
Keluarkan CD Pemasangan dari kotaknya.
Masukkan CD kedalam drive CD-ROM pada komputer anda, dan
pastikan komputer anda mempunyai koneksi internet. Bantuan
Pemasangan akan muncul secara otomatis.
Jika Bantuan Pemasangan tidak muncul, buka CD dari My Computer
dan klik dua kali pada file autorun.exe
Pengguna Vista® : Anda harus masuk dengan akun yang mempunyai
akses administrasi untuk dapat menggunakan Bantuan Pemasangan
D-Link.
Jika anda melihat layar berikut muncul, pilih sebuah akun pengguna
dengan akses administrasi, masukan kata kunci jika diperlukan
kemudian klik .
Jika anda melihat layar ini muncul, klik untuk melanjutkan.
36
Memulai dengan mydlink :
A. Buka Internet Explorer dan pergi ke http://www.mydlink.com
B. Klik bagian Sign In pada bagian kanan atas dari website, kemudian
masuk menggunakan akun mydlink anda.
C. Pilih kamera anda dari daftar perangkat, dan Live View kamera anda
akan muncul.
Klik tombol untuk memulai bantuan, dan ikuti
petunjuk-petunjuk yang ada pada Bantuan Pemasangan
untuk menyelesaikan pemasangan kamera anda.
37
Bila menggunakan browser selain IE untuk melihat kamera web
manager, dan untuk memastikan bahwa semua tur akan berjalan dengan baik,
pastikan plug-in VLC Mozilla dan Java JRE sudah diinstal pada komputer anda.
1. Unduh VLC dari internet.
2. Jalankan program dan kongurasi perangkat lunak.
3. Jalankan komponen “Mozilla plug-in” untuk menginstalnya.
4. Selesaikan instalasi, kemudian anda akan dapat melihat video pada
browser anda.
38
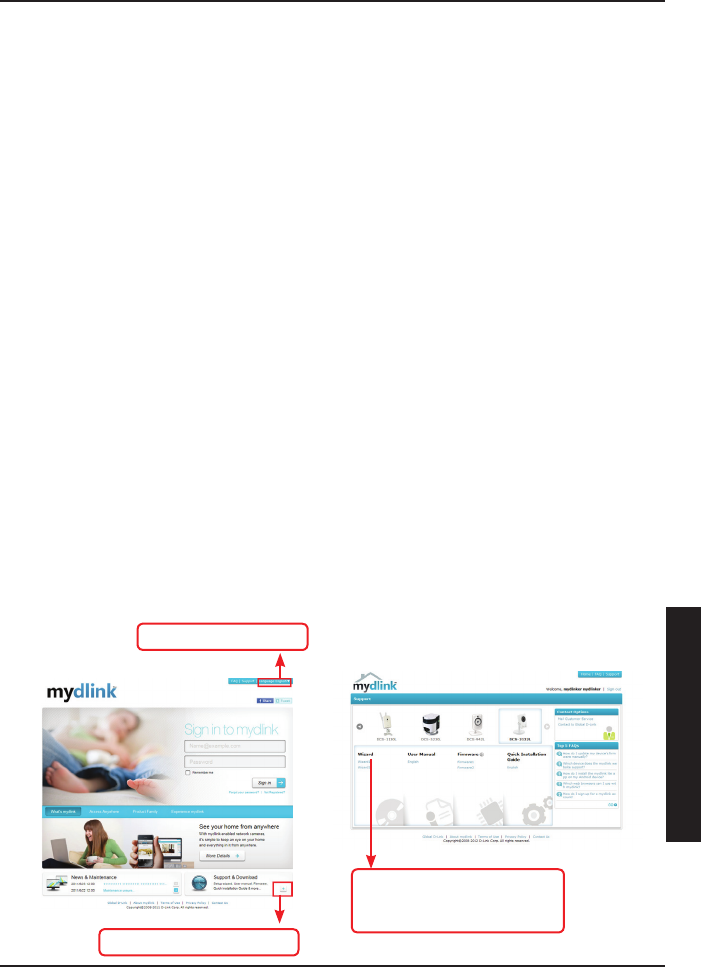
Mydlink.com memungkinkan pengguna untuk melihat atau mengatur beberapa kamera melalui
internet secara cepat dan mudah. Anda dapat menambah kamera anda ke akun mydlink.com
anda setelah menjalankan Installation Wizard. Pengguna dapat masuk ke mydlink.com dan akses
perangkat mereka menggunakan akun mereka dari sebuah komputer yang terhubung ke internet
kapan saja, dimana saja.
Setiap kamera mempunyai 8 digit unik No. mydlink.com yang dapat dilihat pada label yang ada
pada bagian belakang kamera anda. 8 digit angka ini bertindak sebagai identitas perangkat anda
dan dibutuhkan pada saat anda menambahkannya ke akun mydlink.com anda.
• Coba gunakan perangkat lunak Wizard yang ada didalam CD
• Untuk memastikan perangkat anda telah terpasang dengan benar, pastikan :
- Lampu LED belakang berwarna hijau menyala
- Koneksi internet anda berjalan normal
- Koneksi LAN & WAN router anda dalam kondisi Ok
- Router anda mendukung UPnP®
- Komputer dan kamera anda mempunyai koneksi internet yang bekerja dengan normal
• Jika kamera anda tetap tidak dapat bekerja, periksa router anda dan pastikan router tersebut
menggunakan firmware yang terbaru.
Anda dapat memasang kamera anda menggunakan wizard secara online :
• Kunjungi portal mydlink
2. Klik ke halaman Support
3. Halaman Support untuk
memilih tipe kamera dan
mengunduh wizard online
1. Pilih bahasa
39

Update perangkat lunak dan dokumentasi pengguna dapat diperoleh pada situs web D-Link.
Dukungan Teknis untuk pelanggan:
Dukungan Teknis D-Link melalui telepon:
Tel: +62-21-5731610
Dukungan Teknis D-Link melalui Internet:
Email : support@dlink.co.id
Website : http://support.dlink.co.id
40
FCC Notices
This device complies with Part 15 of the FCC Rules. Operation is subject to the following
two conditions: (1) this device may not cause harmful interference, and (2) this device
must accept any interference received, including interference that may cause undesired
operation.
CAUTION: Change or modification not expressly approved by the party responsible
for compliance could void the user’s authority to operate this equipment.
This equipment has been tested and found to comply with the limits for a Class B
digital device, pursuant to Part 15 of the FCC Rules. These limits are designed to provide
reasonable protection against harmful interference in a residential installation. This
equipment generates, uses and can radiate radio frequency energy and, if not installed
and used in accordance with the instructions, may cause harmful interference to radio
communications. However, there is no guarantee that interference will not occur in a
particular installation. If this equipment does cause harmful interference to radio or
television reception, which can be determined by turning the equipment off and on, the
user is encouraged to try to correct the interference by one or more of the following
measures:
--Reorient or relocate the receiving antenna.
--Increase the separation between the equipment and receiver.
--Connect the equipment into an outlet on a circuit different from that to which the receiver
is connected.
--Consult the dealer or an experienced radio/TV technician for help.
CAUTION:
Any changes or modifications not expressly approved by the grantee of this device could
void the user's authority to operate the equipment.
RF exposure warning
This equipment must be installed and operated in accordance with provided instructions
and the antenna(s) used for this transmitter must be installed to provide a separation
distance of at least 20 cm from all persons and must not be co-located or operating in
conjunction with any other antenna or transmitter. End-users and installers must be
provide with antenna installation instructions and transmitter operating conditions for
satisfying RF exposure compliance."
Canada Notices
Industry Canada regulatory information
Operation is subject to the following two conditions: (1) this device may not cause
interference, and (2) this device must accept any interference, including interference
that may cause undesired operation of the device.
The user is cautioned that this device should be used only as specified within this
manual to meet RF exposure requirements. Use of this device in a manner
inconsistent with this manual could lead to excessive RF exposure conditions.
Le présent appareil est conforme aux CNR d'Industrie Canada
applicables aux appareils radio exempts de licence. L'exploitation est
autorisée aux deux conditions suivantes : (1) l'appareil ne doit pas
produire de brouillage, et (2) l'utilisateur de l'appareil doit accepter tout
brouillage radioélectrique subi, même si le brouillage est susceptible
d'en compromettre le fonctionnement.
RF exposure warning
This equipment must be installed and operated in accordance with
provided instructions and the antenna(s) used for this transmitter must
be installed to provide a separation distance of at least 20 cm from all
persons and must not be co-located or operating in conjunction with any
other antenna or transmitter. End-users and installers must be provide
with antenna installation instructions and transmitter operating
conditions for satisfying RF exposure compliance."
Cet équipement doit être installé et utilisé conformément aux
instructions fournies et de l'antenne (s) utilisé pour cet émetteur doit être
installé pour fournir une distance de séparation d'au moins 20 cm de
toute personne et ne doit pas être co-localisés ou fonctionnant en
conjonction avec une autre antenne ou transmetteur. Les utilisateurs
finaux et installateurs doivent être fournir des instructions d'installation
de l'antenne et des conditions de fonctionnement du transmetteur de la
conformité sur l'exposition aux RF

Notes
41

Notes
42

Notes
43

Ver. 1.00 (DI)
2012/05/07
RMN0100761