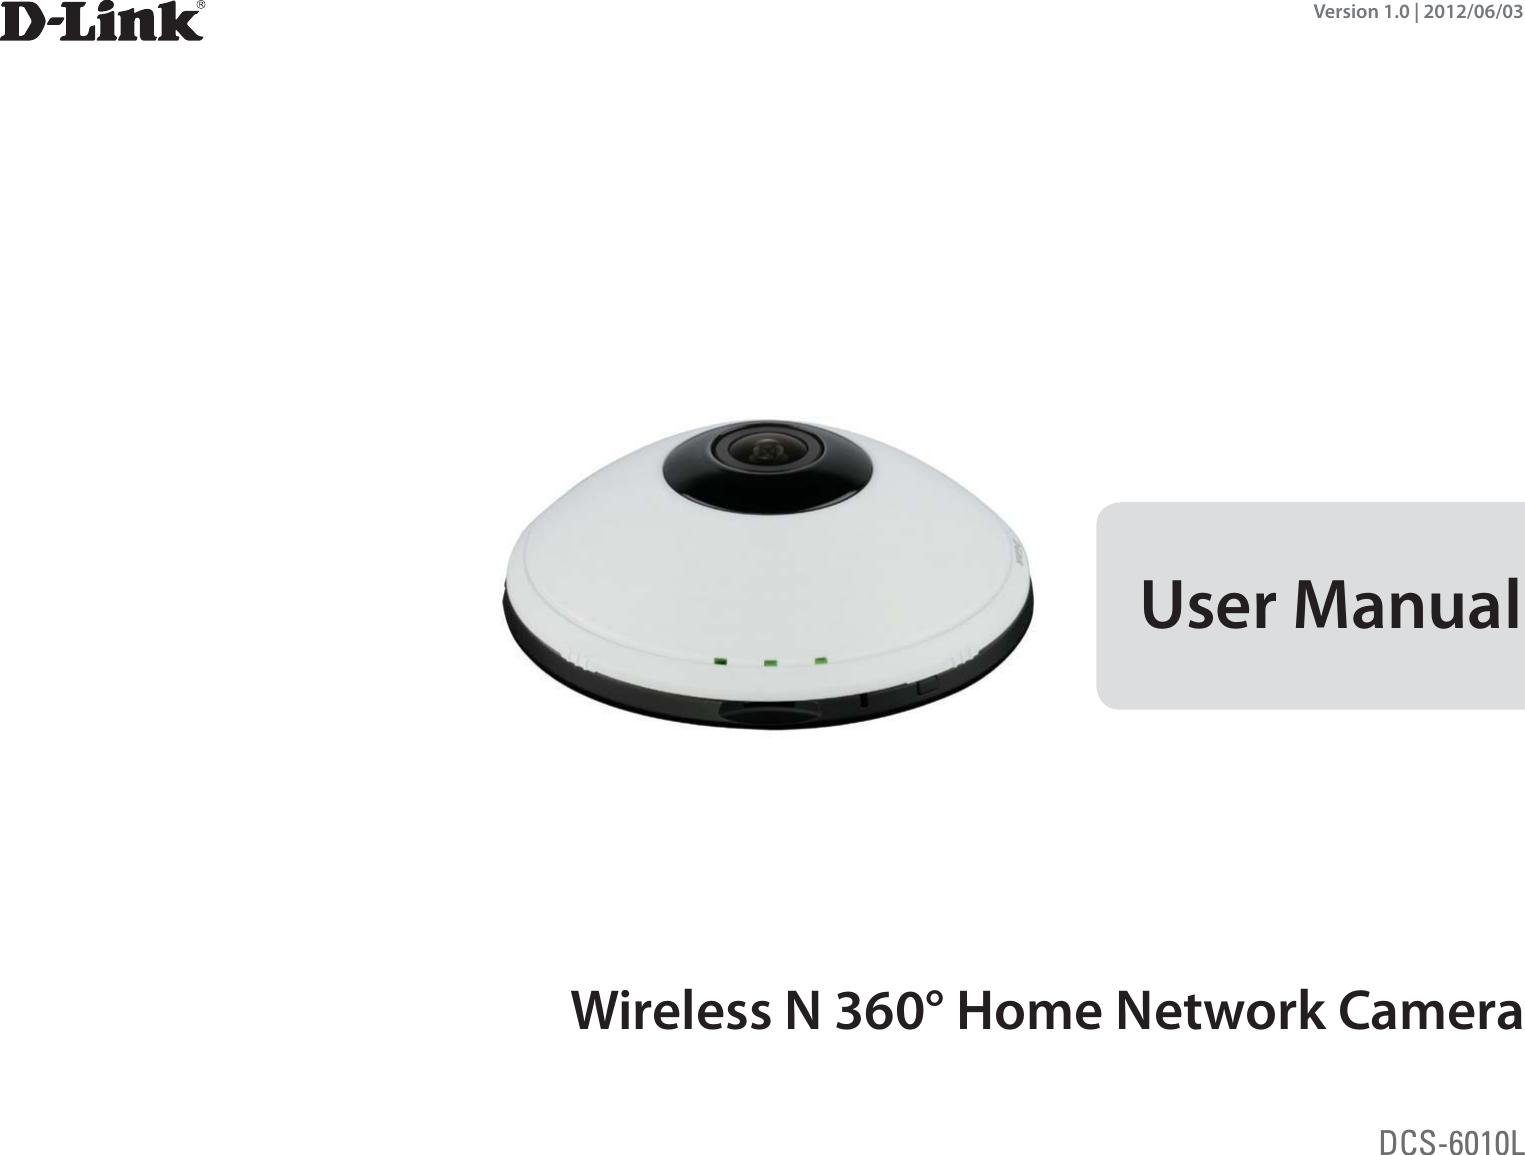
D Link CS6010LA1 HD Wirless N 360 degree Home Network Camera User Manual DCS 6010L A1 Manual v1 00 WW

D Link Corporation HD Wirless N 360 degree Home Network Camera DCS 6010L A1 Manual v1 00 WW

Contents

User Manual 01

User ManualWireless N 360° Home Network CameraDCS-6010LVersion 1.0 | 2012/06/03
2D-Link DCS-6010L User ManualD-Link reserves the right to revise this publication and to make changes in the content hereof without obligation to notify any person or organization of such revisions or changes. Information in this document may become obsolete as our services and websites develop and change. Please refer to the www.mydlink.com website for the most current information.Manual RevisionsRevision Date Description1.0 June 6, 2012 DCS-6010L Revision A1 with rmware version 1.00TrademarksD-Link and the D-Link logo are trademarks or registered trademarks of D-Link Corporation or its subsidiaries in the United States or other countries. All other company or product names mentioned herein are trademarks or registered trademarks of their respective companies.Copyright © 2012 D-Link Corporation.All rights reserved. This publication may not be reproduced, in whole or in part, without prior expressed written permission from D-Link Corporation.Preface
3D-Link DCS-6010L User ManualTable of ContentsProduct Overview ......................................................................... 4Package Contents ................................................................. 4Introduction ............................................................................ 5System Requirements ......................................................... 5Features ....................................................................................6Hardware Overview .............................................................7Outside ................................................................................. 7Internal Ports ...................................................................... 8Installation ...................................................................................... 9Wireless Installation Considerations .............................. 9Zero Conguration Setup ........................................................10Camera Installation Wizard .............................................14Manual Hardware Installation ........................................22Focussing the Camera .......................................................23Mounting the Camera .......................................................24WPS - Push Button Setup .................................................25mydlink ...........................................................................................26Camera Status ......................................................................27Live Video ..............................................................................28Playback .................................................................................29Settings ..................................................................................30Recording Settings .........................................................31Advanced Settings .........................................................33Events ......................................................................................34Conguration ...............................................................................35Using the Conguration Interface ................................35Live Video ..............................................................................36Setup .......................................................................................38Setup Wizard ....................................................................38Network Setup .................................................................44Wireless Setup ..................................................................47Dynamic DNS ...................................................................48Image Setup .....................................................................49Audio and Video ..............................................................51Preset ................................................................................... 53Motion Detection ...........................................................55Time and Date ..................................................................56Event Setup .......................................................................57SD Card ...............................................................................65Advanced ...............................................................................66HTTPS ..................................................................................66Access List ..........................................................................67Maintenance ......................................................................... 68Device Management .....................................................68Backup and Restore .......................................................69Firmware Upgrade ..........................................................70Status ......................................................................................71Device Info ........................................................................71Logs .....................................................................................72Help......................................................................................73Technical Specications ...........................................................74Safety Statements ......................................................................77
4D-Link DCS-6010L User ManualSection 1: Product OverviewProduct OverviewPackage ContentsIf any of the above items are missing, please contact your reseller.Note: Using a power supply with a dierent voltage than the one included with your product will cause damage and void the warranty for this product.DCS-6010L Wireless N 360° Home Network CameraCAT5 Ethernet cablePower adapterCD-ROM with User Manual and softwareQuick Installation GuideMounting Bracket
5D-Link DCS-6010L User ManualSection 1: Product OverviewIntroductionCongratulations on your purchase of the DCS-6010L Wireless N 360° Home Network Camera. The DCS-6010L is a versatile and unique solution for your small oce or home. Unlike a standard webcam, the DCS-6010L is a complete system with a built-in CPU and web server that transmits high quality video images for security and surveillance. The DCS-6010L can be accessed remotely, and controlled from any PC/Notebook over your local network or through the Internet via a web browser. The simple installation and intuitive web-based interface oers easy integration with your Ethernet/Fast Ethernet or 802.11n/g wireless network. The DCS-6010L also comes with remote monitoring and motion detection features for a complete and cost-eective home security solution.•  Computer with Microsoft Windows® 7, Vista®, or XP (for CD-ROM Setup Wizard), Mac OS or Linux•  PC with 1.3GHz or above; at least 128MB RAM•  Internet Explorer 7 or above , Firefox 3.5 or above, Safari 4 and Chrome 8.0 or above•  Existing 10/100 Ethernet-based network or 802.11n wireless network•  A MicroSD memory card (optional) is required for recording to onboard storage. SDHC Class 6 or above is recommended.•  Broadband Internet connectionSystem Requirements
6D-Link DCS-6010L User ManualSection 1: Product Overview360 Degree SurveillanceThe built-in sheye lens gives you a full 360 degrees of coverage, allowing it to monitor an entire room with ease. It can also be placed on a wall for 180 degree coverage of a hallway. Distortion correction gives you  a panoramic view or a normal corrected image that you can pan across easily.Simple to UseThe DCS-6010L is a stand-alone system with a built-in CPU, requiring no special hardware or software. The DCS-6010L supports both ActiveX mode for Internet Explorer and Java mode for other browsers such as Firefox® and Safari®.Supports a Variety of PlatformsSupporting TCP/IP networking, HTTP, and other Internet related protocols. The DCS-6010L can also be integrated easily into other Internet/Intranet applications  because of its standards-based features.802.11n Wireless or Ethernet/Fast Ethernet SupportThe DCS-6010L oers wireless 802.11n and Ethernet/Fast Ethernet connectivity, making the DCS-6010L easy to integrate into your existing network environment. The DCS-6010L works with a 10Mbps Ethernet based network or 100Mbps Fast Ethernet based network for traditional wired environments, and works with 802.11n routers or access points for added exibility. The Site Survey feature also allows you to view and connect to any available wireless networks.Web CongurationUsing a standard Web browser, administrators can congure and manage the Network Camera directly from its own Web page via Intranet or Internet. This means you can access your DCS-6010L anytime, anywhere in the world.Broad Range of ApplicationsWith today’s high-speed Internet services, the Network Camera can provide the ideal solution for delivering live video images over the Intranet and Internet for remote monitoring. The Network Camera allows remote access using a Web browser for live image viewing, and allows the administrator to manage and control the Network Camera anytime, anywhere in the world. Many applications exist, including industrial and public monitoring of homes, oces, banks, hospitals, child-care centers, and amusement parks.Remote Monitoring UtilityThe D-ViewCam application adds enhanced features and functionality for the Network Camera and allows administrators to congure and access the Network Camera from a remote site via Intranet or Internet. Other features include image monitoring, recording images to a hard drive, viewing up to 32 cameras on one screen, and taking snapshots.Features
7D-Link DCS-6010L User ManualSection 1: Product OverviewOutsideHardware Overview1 Camera Lens Records video of the surrounding area2 Camera CoverRotate the cover counter-clockwise to remove it and access the Ethernet port and power connecterCaution: When removing the cover, remove it slowly to avoid disconnecting the microphone.3 Microphone Records audio from the surrounding area4 MicroSD Card Slot Insert a MicroSD card for Local storage for storing recorded image and video5 WPS Status LED Indicates the WPS connection status of the camera Indicates the camera's current status6 Status LED Indicates the camera's current power and connectivity status.7 WPS Button Press this button, then press the WPS button for 5 seconds on your router to set up a wireless connection automatically8 Reset Button Press and hold this button for 10 seconds to reset the camera56431782
8D-Link DCS-6010L User ManualSection 1: Product OverviewInternal PortsYou can access the inside of the DCS-6010L by rotating the camera cover counter-clockwise, then lifting it o of the camera.Caution: When re-attaching the cover, ensure that the cables are seated in the cable channel.1 Power Receptor Power receptor for the provided power cable or PoE cable to connect to your network2 Ethernet Port Connects to an RJ45 Ethernet3 Cable Channel Channel for Ethernet and Power cables4 Cable Channel Guide Guide to assist correct casing alignment with the cable channel.2134
9D-Link DCS-6010L User ManualSection 2: InstallationThis D-Link device can connect to your wireless network from anywhere within the operating range of your wireless network. However, the number, thickness and location of walls, ceilings, or other objects that the wireless signals must pass through, may limit the range. Typical ranges vary depending on the types of materials and background RF (radio frequency) noise in your home or business. The key to maximizing wireless range is to follow these basic guidelines:1.  Minimize the number of walls and ceilings between your adapter and other network devices (such as your Network Camera) - each wall or ceiling can reduce your adapter’s range from 3-90 feet (1-30 meters).2.  Be aware of the direct line between network devices. A wall that is 1.5 feet thick (.5 meters), at a 45-degree angle appears to be almost 3 feet (1 meter) thick. At a 2-degree angle, it looks over 42 feet (14 meters) thick. Position your devices so that the signal will travel straight through a wall or ceiling (instead of at an angle) for better reception.3.  Building Materials make a dierence. A solid metal door or aluminum studs may weaken the wireless signal. Try to position your access points, wireless routers, and other networking devices where the signal passes through drywall or open doorways. Materials and objects such as glass, steel, metal, walls with insulation, water (sh tanks), mirrors, le cabinets, brick, and concrete will degrade your wireless signal.4.  Keep your product at least 3-6 feet or 1-2 meters away from electrical devices or appliances that generate RF noise.5.  If you are using 2.4GHz cordless phones or other radio frequency sources (such as microwave ovens), your wireless connection may degrade dramatically or drop completely. Make sure your 2.4GHz phone base is as far away from your wireless devices as possible. The base transmits a signal even if the phone in not in use.InstallationWireless Installation ConsiderationsNote: The DCS-6010L has a metal underside and mounting bracket.The metal underside and mounting bracket will aect directional WiFi signal strength adversely if not positioned correctly
10D-Link DCS-6010L User ManualSection 2: InstallationIf you have a mydlink-enabled Cloud Router, you can take advantage of Zero Conguration. Zero Conguration automatically congures your camera's settings for you, and adds it to your mydlink account automatically. This type of setup allows you to set up your camera by simply plugging it in and connecting it to your router.Connect your camera to your mydlink-enabled Cloud Router and Zero Conguration will automatically congure your DCS-6010L and automatically add the camera to your mydlink account. After the short time it takes to do this you can remotely access your camera from the www.mydlink.com website to manage and monitor your DCS-6010L.Connect the Ethernet CableUsing the provided Ethernet cable connect one end to your camera and the other-end to your network.To install the provided Ethernet cable see "Internal Ports" on page 8 for detailed instructions.Attach the External Power SupplyAttach the external power supply to the power receptor and to your wall outlet or power strip.To install the provided power supply see "Internal Ports" on page 8 for detailed instructions.Zero Conguration Setup11 Ethernet Cable Use an RJ45 Ethernet cable or PoE cable to connect to your network2 Power Cable Power cable for the provided power adapter2
11D-Link DCS-6010L User ManualSection 2: InstallationTo create a WPS connection:Step 1Press and hold the WPS button for approximately 5-6 seconds. The WPS LED will blink.Step 2Within 60 seconds press the WPS button on your router. On some routers, you may need to log in to the web interface and click on an on-screen button to activate the WPS feature. If you are not sure where the WPS button is on your router, please refer to your router’s User Manual.The DCS-6010L will automatically create a wireless connection to your router. While connecting, the status LED will ash. When the connection process is complete, the status LED will turn solid.You can now remove the Ethernet cable by removing the camera cover and disconnecting the Ethernet cable. See "Internal Ports" on page 8 for more details.Note: If your router does not support WPS, you can still use the wired connection method on the previous page. After Zero Conguration setup is complete, your router's wireless settings will be automatically transferred to the camera.Optional: WPS Wireless ConnectionAlternatively, if your router supports WPS, you can use the WPS button on the camera to easily create a secure wireless connection to your network.WPS ButtonWPS LED
12D-Link DCS-6010L User ManualSection 2: InstallationA summary and conrmation notication will appear with the automatically congured details. Make a note of the details and click OK to add the camera to your account.Check Your mydlink AccountFrom any computer, open a web browser, go to http://www.mydlink.com and loginto your account. Once mydlink detects your camera, a New Device Found! notice will appear in the bottom-left corner. Click on the device name to continue.
13D-Link DCS-6010L User ManualSection 2: InstallationZero Conguration is now complete and your camera has been added to your mydlink account. You can now view your camera on the mydlink Live View tab.If you wish to connect your camera to your router wirelessly, you can simply disconnect the Ethernet cable and move the camera to its intended location; your router's wireless settings have been automatically transferred to the camera, and no further conguration is required.Your camera is now set up, and you can skip to "mydlink" on page 26 to learn more about the mydlink features of this camera, or to "Conguration" on page 35 for advanced conguration of your camera.
14D-Link DCS-6010L User ManualSection 2: InstallationInsert the Installation CD-ROM into your computer’s optical drive to start the autorun program. The CD-ROM will open the Camera Installation Wizard. Simply click Setup Your Camera to go through the Installation Wizard, which will guide you through the installation process from connecting your hardware to conguring your camera.Camera Installation Wizard
15D-Link DCS-6010L User ManualSection 2: InstallationConnect the included Ethernet cable to the internal network cable connecter of the DCS-6010L and attach it to the network.Click Next to continue.Select your preferred language for the installation from the drop down menu and click on Start to continue.
16D-Link DCS-6010L User ManualSection 2: InstallationConnect the other end of the same Ethernet cable to a router.Click Next to continue.Attach the external power supply to the power connecter located inside the DCS-6010L and connect it to your wall outlet or power strip. Click Next to continue.
17D-Link DCS-6010L User ManualSection 2: InstallationThe LED on the front of the DCS-6010L will blink, then turn solid green once it successfully connects to your network. Click Next to proceed.If the LED continues to stay red, check your connections or click on the "What should I do if the LED stays red?" link for more information.Select your camera from the list, then click Next. If you have multiple cameras, you can identify them by the MAC ID printed on the label on the back of your camera.
18D-Link DCS-6010L User ManualSection 2: InstallationIf you wish to remove the camera from a previously registered mydlink account, press and hold the reset button on the rear panel for at least 10 seconds and click Restart to restart the wizard.After you have selected your camera from the list, you will be asked to create and conrm a password for it. The password is case sensitive and must contain at least 2 letters.Click Next to continue.
19D-Link DCS-6010L User ManualSection 2: InstallationTo move the camera to a wireless connection by using WPS or by selecting a wireless network, select the appropriate option then follow the steps displayed. Otherwise, click Next to continue.Complete the mydlink account registration form with your details making sure to select the I accept mydlink terms and conditions box, and click the Next button.
20D-Link DCS-6010L User ManualSection 2: InstallationIf you already have a mydlink account, enter your login details and click Next to proceed.Conrm your mydlink account details and give the camera a unique name and click Done.
21D-Link DCS-6010L User ManualSection 2: InstallationConrm your camera login details and IP address details and click Done.Your DCS-6010L camera is now set up. Log on to your mydlink account and explore the exciting benets available to you.Your camera is now set up, and you can skip to "mydlink" on page 26 to learn more about the mydlink features of this camera, or to "Conguration" on page 35 for advanced conguration of your camera.
22D-Link DCS-6010L User ManualSection 2: InstallationManual Hardware InstallationIf you wish to set up your camera without using the Camera Setup Wizard, please follow these steps. Note: In order to use the mydlink features of this product, you will need to go through the Camera Setup Wizard.Connect the Ethernet CableUsing the provided Ethernet cable connect one end to your camera and the other-end to your network.To install the provided Ethernet cable see "Internal Ports" on page 8 for detailed instructions.Attach the External Power SupplyAttach the external power supply to the power receptor and to your wall outlet or power strip.To install the provided power supply see "Internal Ports" on page 8 for detailed instructions.11 Ethernet Cable Use an RJ45 Ethernet cable or PoE cable to connect to your network2 Power Cable Power cable for the provided power adapter2
23D-Link DCS-6010L User ManualSection 2: InstallationFocusing the CameraThe DCS-6010L can be focused by adjusting the lens. Step 1Place the camera on a non-slip surface.Step 2Remove the cover by following the steps outlined in "Internal Ports" on page 8.Step 3Adjust the focus by rotating the lens in a clockwise or counter clockwise direction until satised.Step 4Ensure the cables are seated in the cable channel.Step 5Seat the cover and rotate to align the cable channel guide over the cable channel.435
24D-Link DCS-6010L User ManualSection 2: InstallationMounting the CameraThe DCS-6010L is suitable for mounting to a ceiling, wall or desktop using the bracket provided. Note: In order to use the mydlink features of this product, you will need to go through the Camera Setup Wizard.Step 1Unclip the wall bracket from the DCS-6010L by sliding the base down.Step 2Position the mounting bracket in the desired location and mark the surface behind it holes using the bracket as a stencil / in pencilStep 3 Use a 6mm drill bit to make required holes approximately 25mm deep.Step 4Insert wall anchors.Step 5Ax bracket using the screws provided.Step 6Clip the DCS-6010L to the bracket ensuring a tight tNote: if mounting on a wall ensure the camera is oriented with the cables positioned to the bottom of the device.1
25D-Link DCS-6010L User ManualSection 2: InstallationWPS - Push Button SetupIf your router supports WPS, you can use the WPS button on the camera to easily create a secure wireless connection to your network.To create a WPS connection:Step 1Press and hold the WPS button for approximately 5-6 seconds. The WPS LED will blink.Step 2Within 60 seconds press the WPS button on your router. On some routers, you may need to log in to the web interface and click on an on-screen button to activate the WPS feature. If you are not sure where the WPS button is on your router, please refer to your router’s User Manual.The DCS-6010L will automatically create a wireless connection to your router. While connecting, the status LED will ash. When the connection process is complete, the status LED will turn solid.Note: If your router does not support WPS, you can still use the wired connection method on the previous page.WPS ButtonWPS LED
26D-Link DCS-6010L User ManualSection 3: mydlinkmydlinkAfter registering your DCS-6010L camera with a mydlink account in the Camera Installation Wizard. You will be able to remotely access your camera from the www.mydlink.com website. After signing in to your mydlink account, you will see a screen similar to the following:Note: The above screenshot is representative only. The mydlink website is constantly improving and so may appear dierent.
27D-Link DCS-6010L User ManualSection 3: mydlinkCamera StatusIf your camera is oine, try the following:• Check to make sure that the Internet connection to your camera is working properly.• Try restarting your Internet router.• Check your camera’s Ethernet and power cable connections and make sure they are secure.• Check to make sure that the LED on your camera is lit solid green.If you still cannot access your camera, reset your camera and run the Camera Installation Wizard again from the CD-ROM included in your package.Here, you can see the online status of each of your cameras. Your online status may be one of the following:A red X indicates that your camera is oine and currently cannot be accessed remotely.A green checkmark indicates that your camera is online and ready to use.A yellow exclamation point indicates that your camera is online, but the camera password has changed. You will need to enter your new camera password to access your camera again.
28D-Link DCS-6010L User ManualSection 3: mydlinkLive VideoIn the main part of the screen, the Live Video tab will be selected by default. If the camera is available, a Live Video feed will be displayed. Video will be shown at VGA resolution (640x480) if viewing your camera from a PC on the same local network, or at QVGA resolution (320x240) if viewing your camera from a PC on a remote network.View Mode Here, you can select between the dierent view modes:  Fisheye Mode: shows the full camera view.  Normal Mode: shows a corrected view similar to a standard camera view that you can move using the control pad.  Panoramic Mode: This shows a corrected, full 180 view across 2 video panels.  Multi-View with Fisheye: This shows a multiple window view, with a full sheye view in the top-right panel.  Multi-View: This shows a multiple window view.Brightness Adjust the slider control to account for brightness.Zoom Adjust the slider control to zoom in or out.
29D-Link DCS-6010L User ManualSection 3: mydlinkPlaybackSelect the date of the footage you wish to preview from the drop down menu, then choose from the recordings available for playback.The Playback tab allows you to review pre-recorded footage captured to an inserted microSD card.
30D-Link DCS-6010L User ManualSection 3: mydlinkSettingsThe Settings tab contains several options for you to control how your DCS-6010L operates.Click on the Edit button to change how the camera name appears.This is the unique mydlink number for your device.This shows the model name of the camera.The shows the Media Access Control (MAC) address of the camera.The date the camera was registered to the mydlink service.E-mail notication of events can be switched on or o.Camera Name: mydlink No:Model name:MAC:Camera Activated on:Event Notication Settings:Each of the recording settings will open a further menu.Recording Settings:
31D-Link DCS-6010L User ManualSection 3: mydlinkSelect this option to enable the automatic recording when motion is detected.Add Detection Area: Click on this icon to draw areas that will trigger automatic recording when motion is detected.Remove Detection Area: Click on this icon to erase areas from regions that trigger automatic recording when motion is detected.Clear Detection Area: This will remove all detection areasRefresh Snapshot: This will refresh the current snapshot of the monitored area.Increase/Decrease Sensitivity Increase the motion detection sensitivityToggles notication by email on or o.In the event that the microSD card can not store further recordings, the user can choose to record over previous recordings or to be notied and cease recording.Record video clips when motion is detected:Email Notication:Video Clips Recording Mode:Recording Settings
32D-Link DCS-6010L User ManualSection 3: mydlinkToggles notication by email on or o.Email Notication:This option enables either continuous or recurring scheduled recording.Record Video Clips by Schedule:In the event that the microSD card can not store further recordings, the user can choose to record over previous recordings or to be notied and cease recording.Video Clips Recording Mode:
33D-Link DCS-6010L User ManualSection 3: mydlinkChecking this box will show the password.Show password:Advanced SettingsClicking on the Advanced Setting button will open a secondary window allowing full conguration of the DCS-6010LAdvanced Setting:
34D-Link DCS-6010L User ManualSection 3: mydlinkEventsSelect from the available options to manage your event log.Mark Page as Read: Clicking this button will mark the current page of event notications as read.Mark all as Read: Clicking this button will mark all event notications as read.The Events tab contains options for you to keep track of your DCS-6010L event notications.

Navigation menu