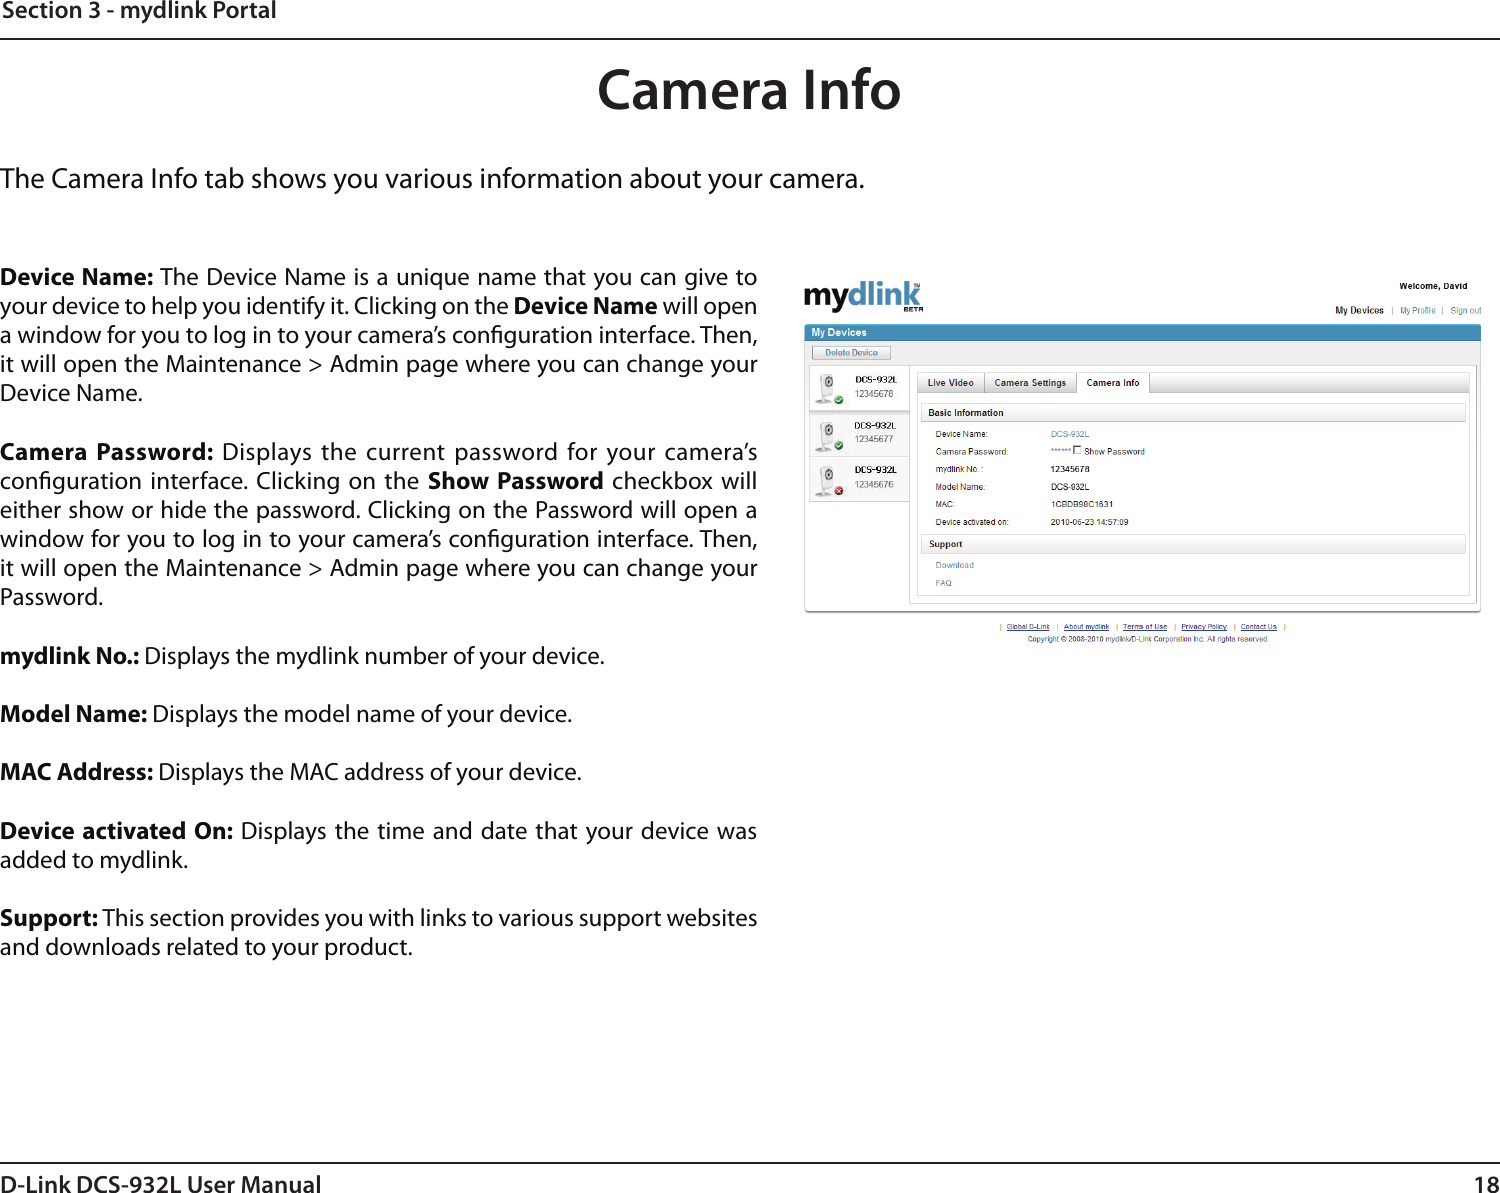
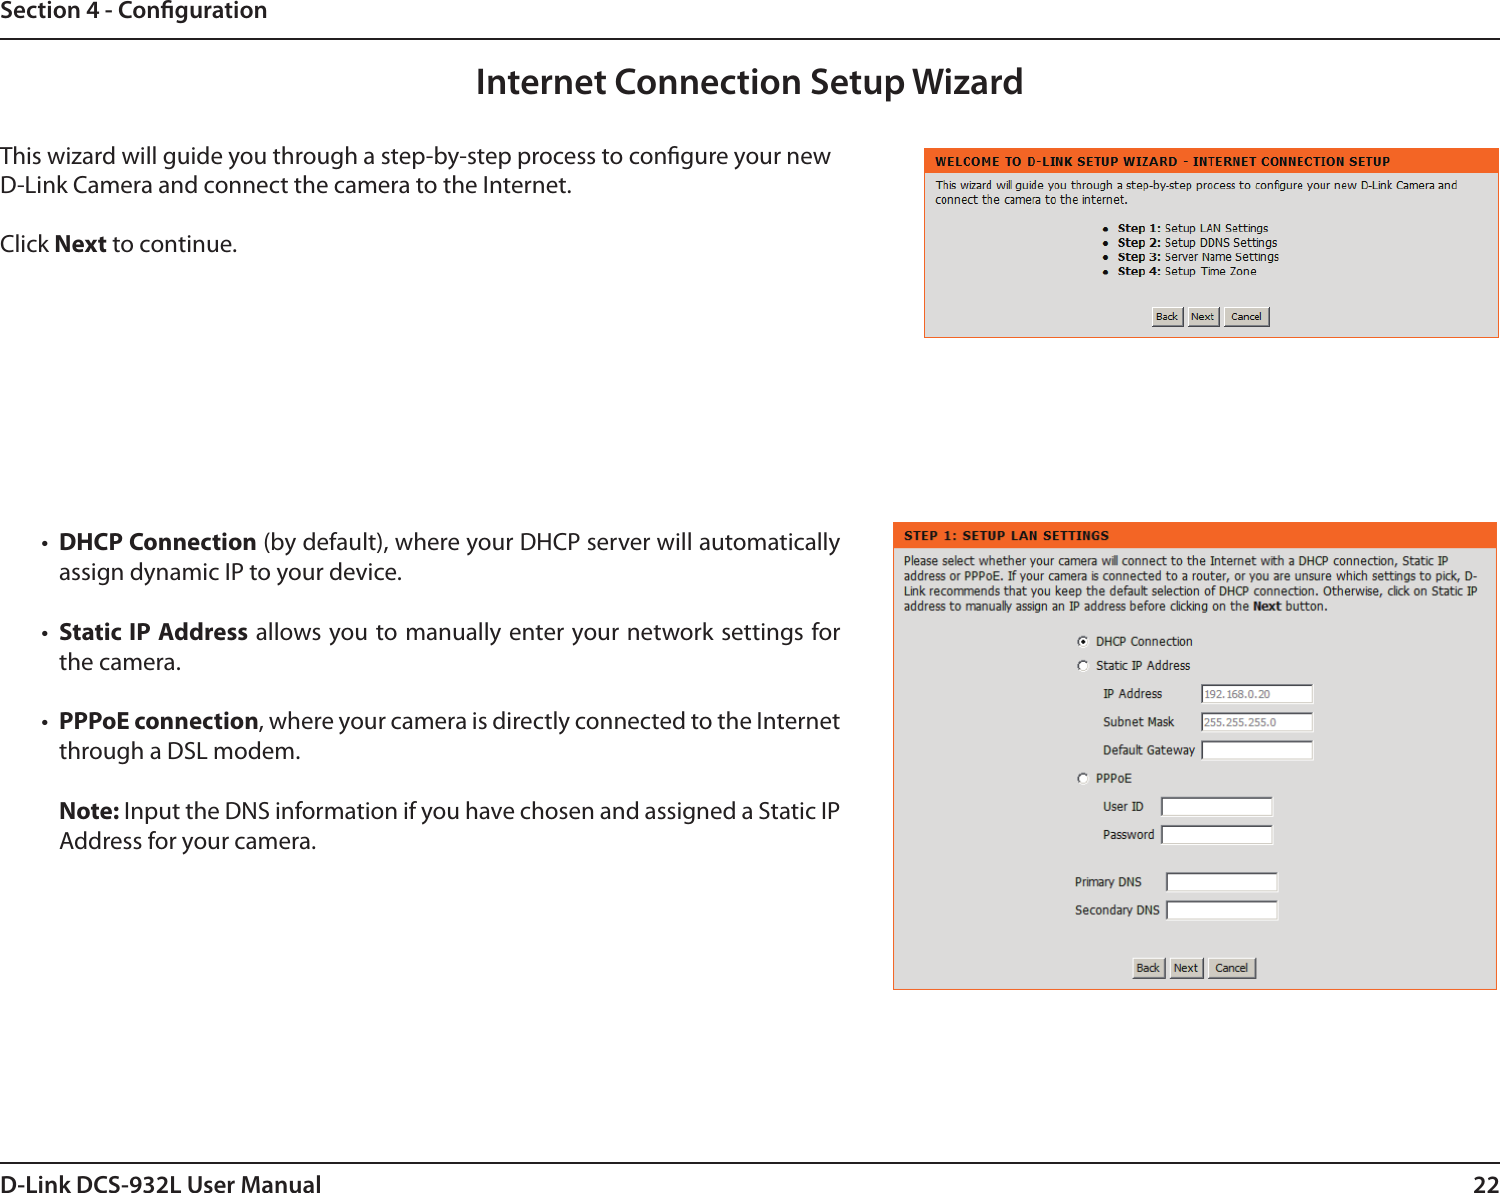
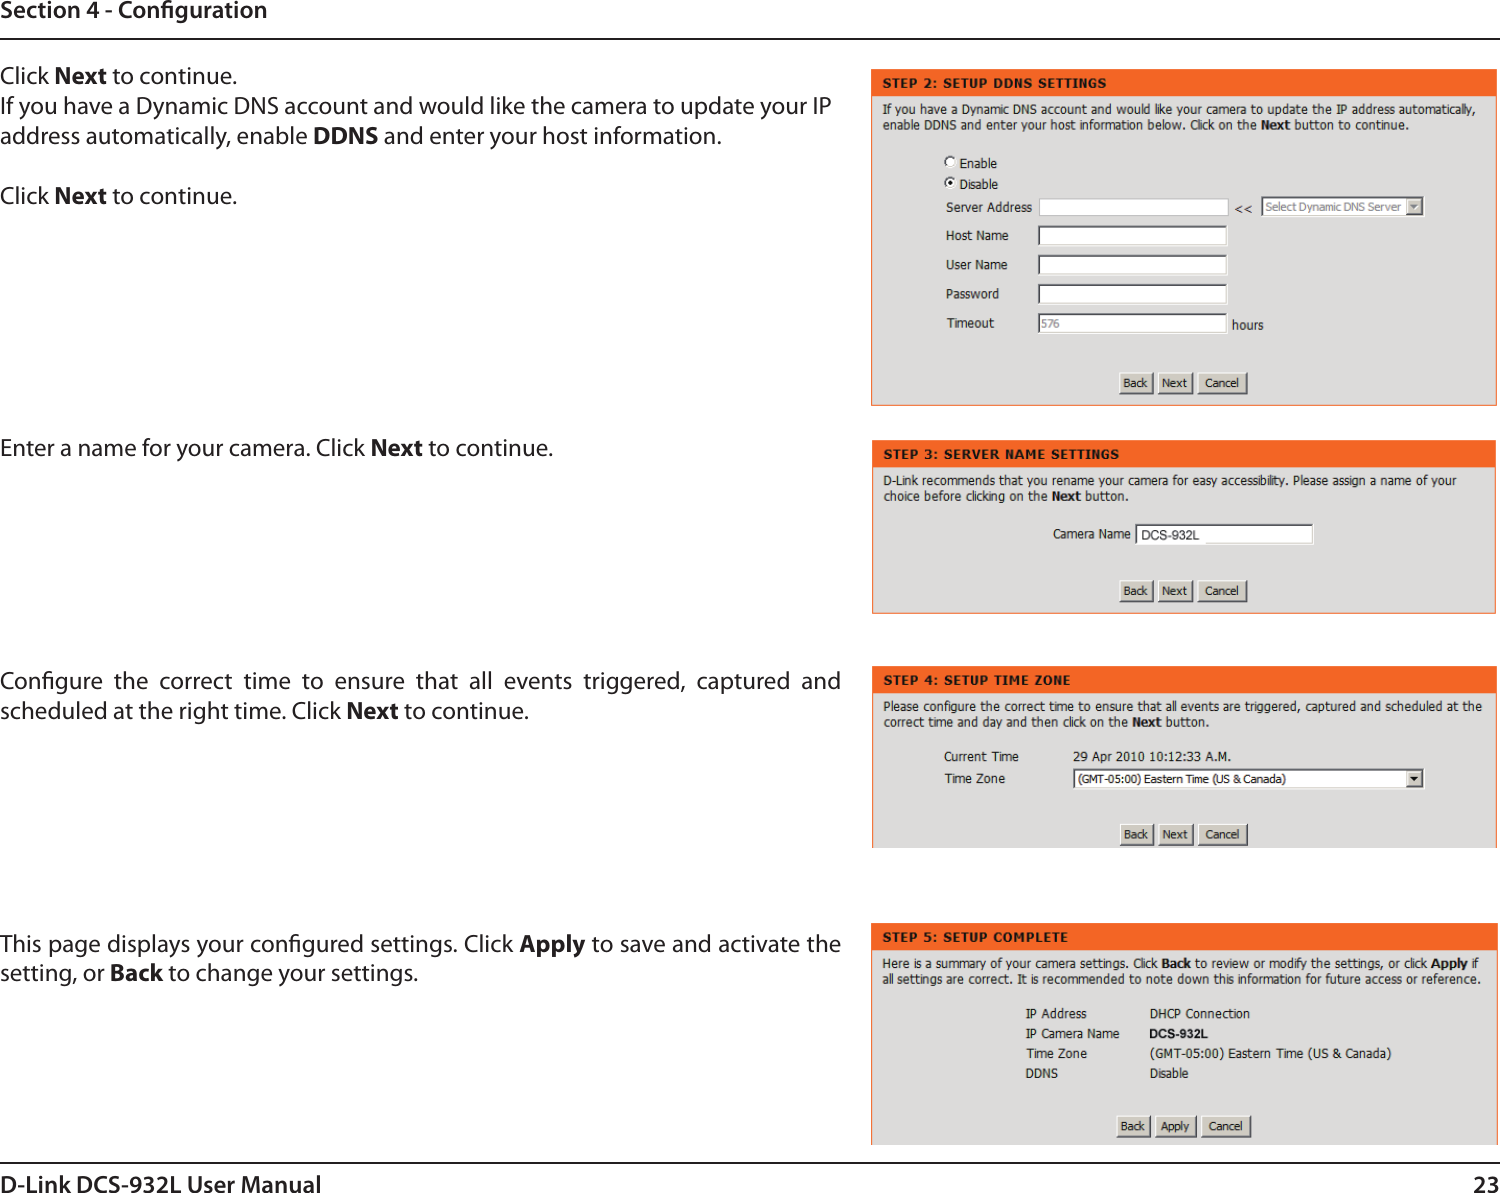
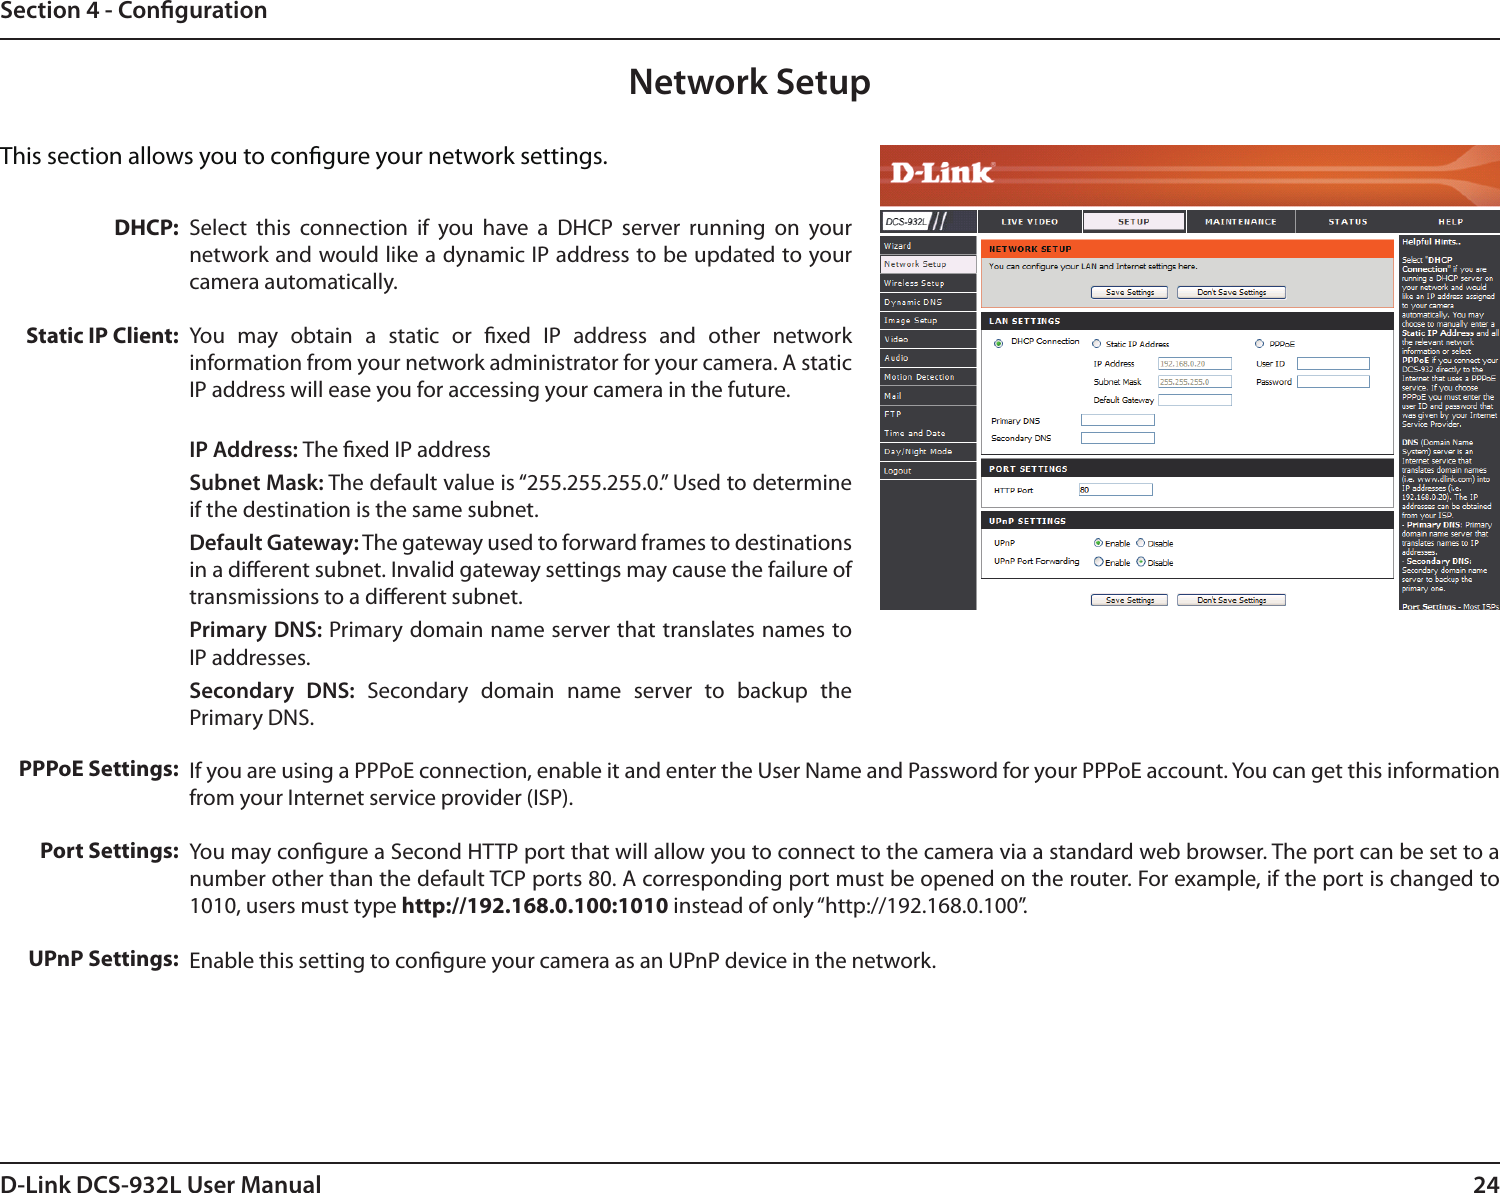
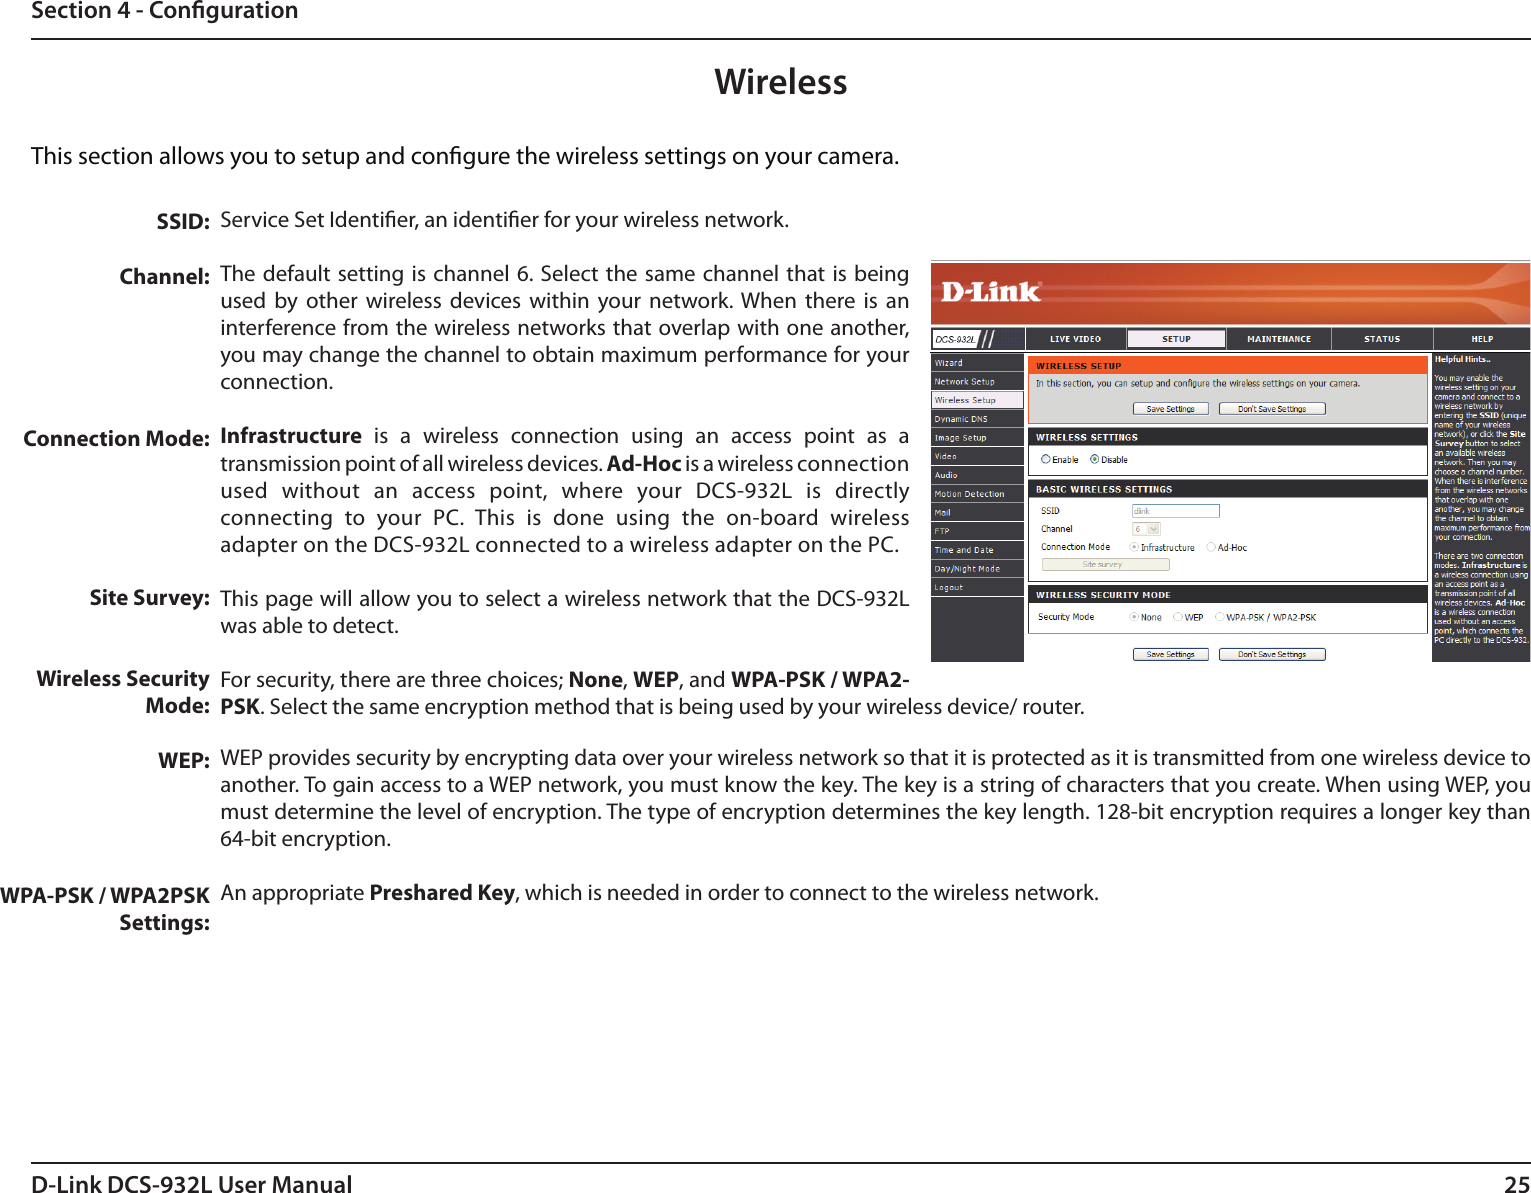
D Link CS932LA1 Wireless N Day/Night Home Network Camera User Manual DCS 932L UserMan 2 2011 01 27

D Link Corporation Wireless N Day/Night Home Network Camera DCS 932L UserMan 2 2011 01 27

(DCS-932L)UserMan-2-2011-01-27
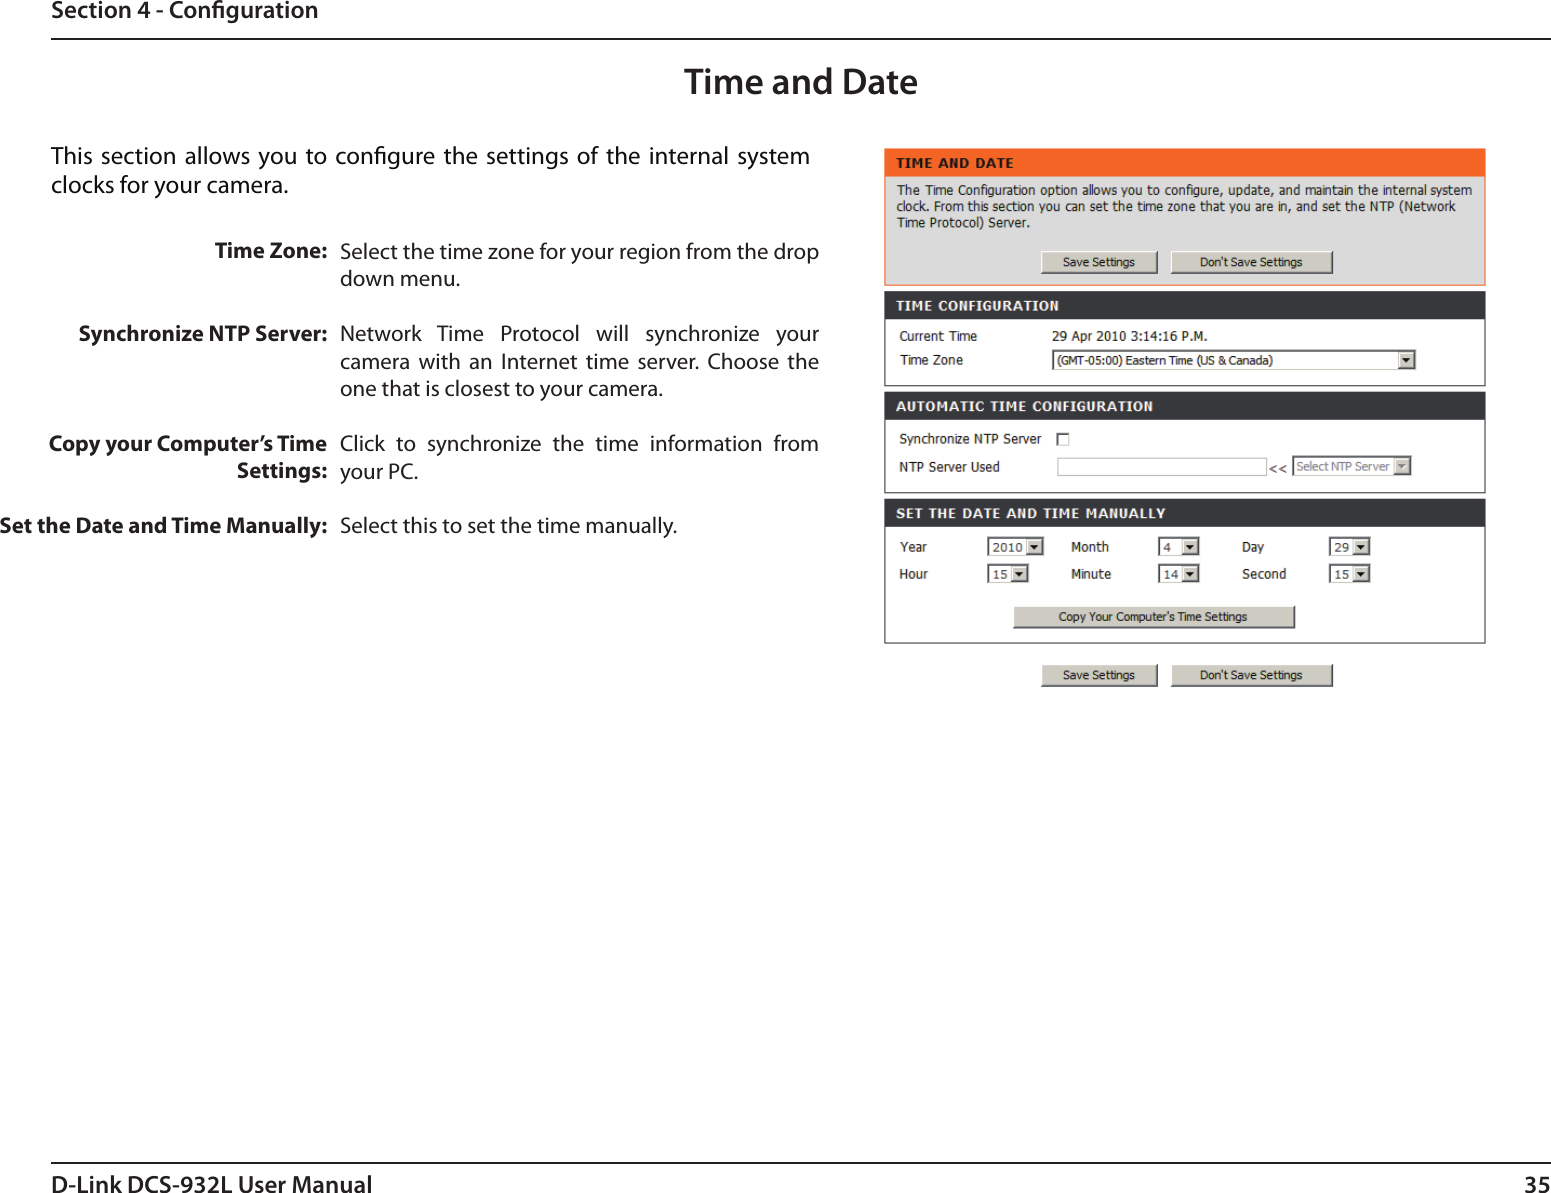
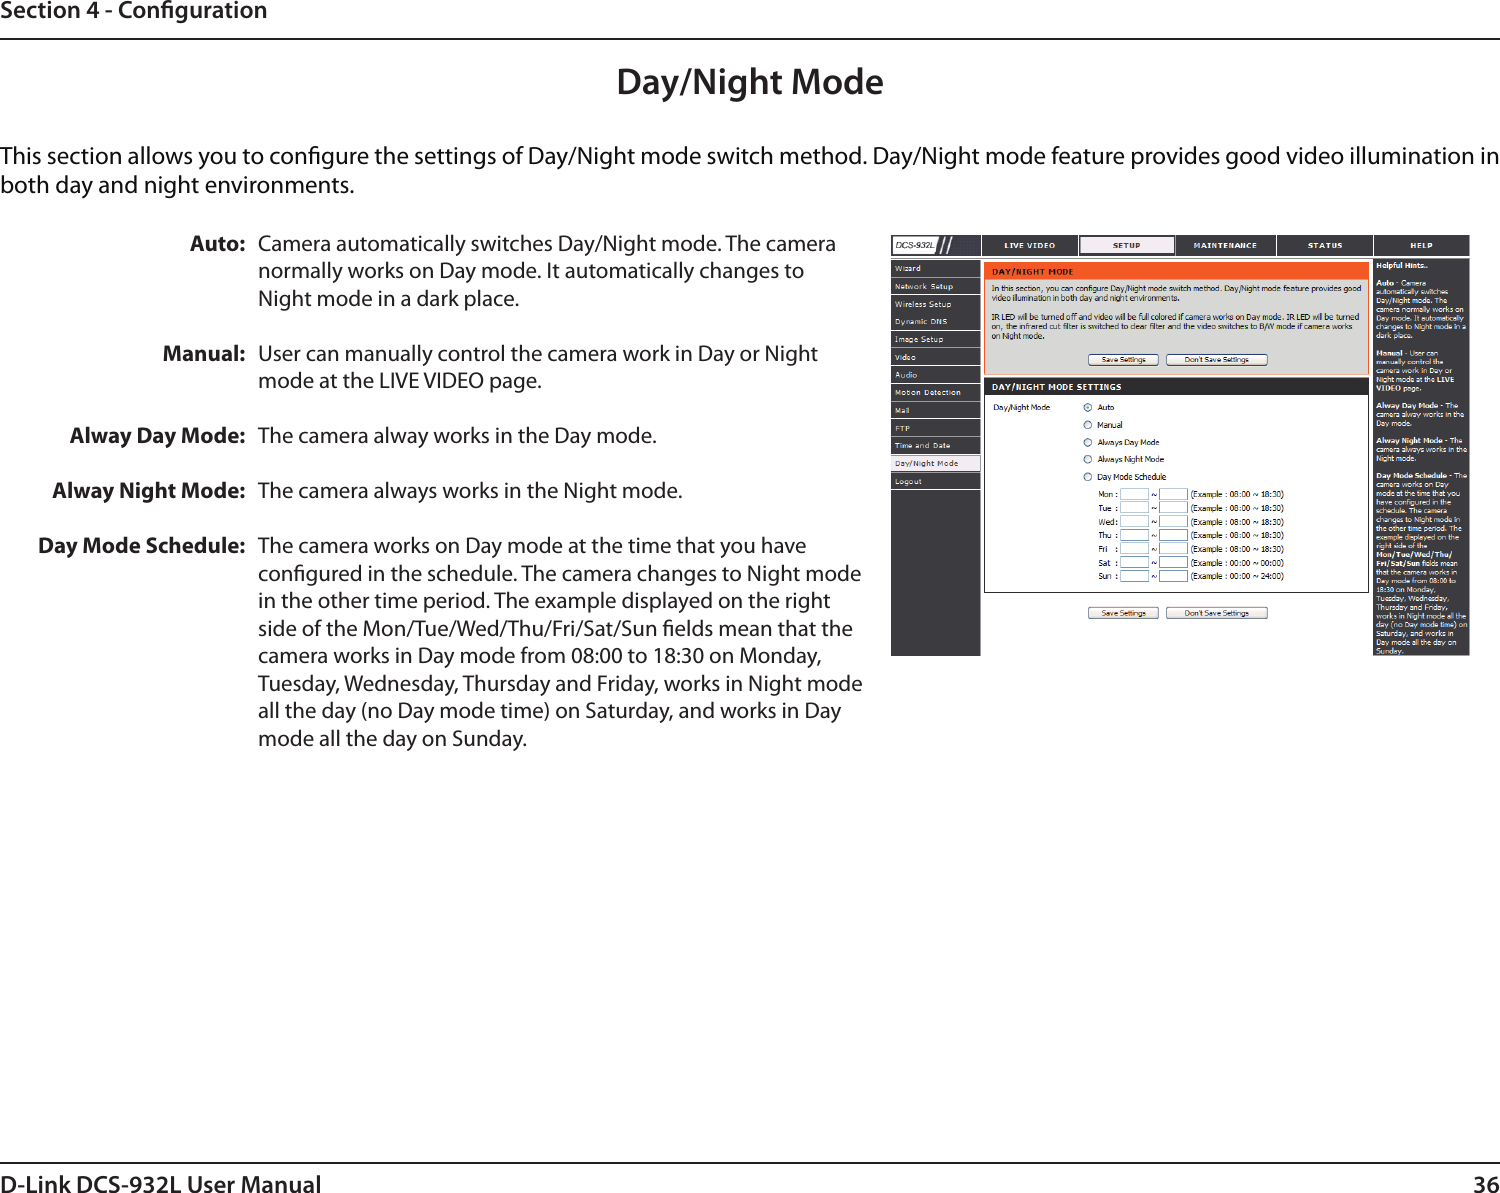
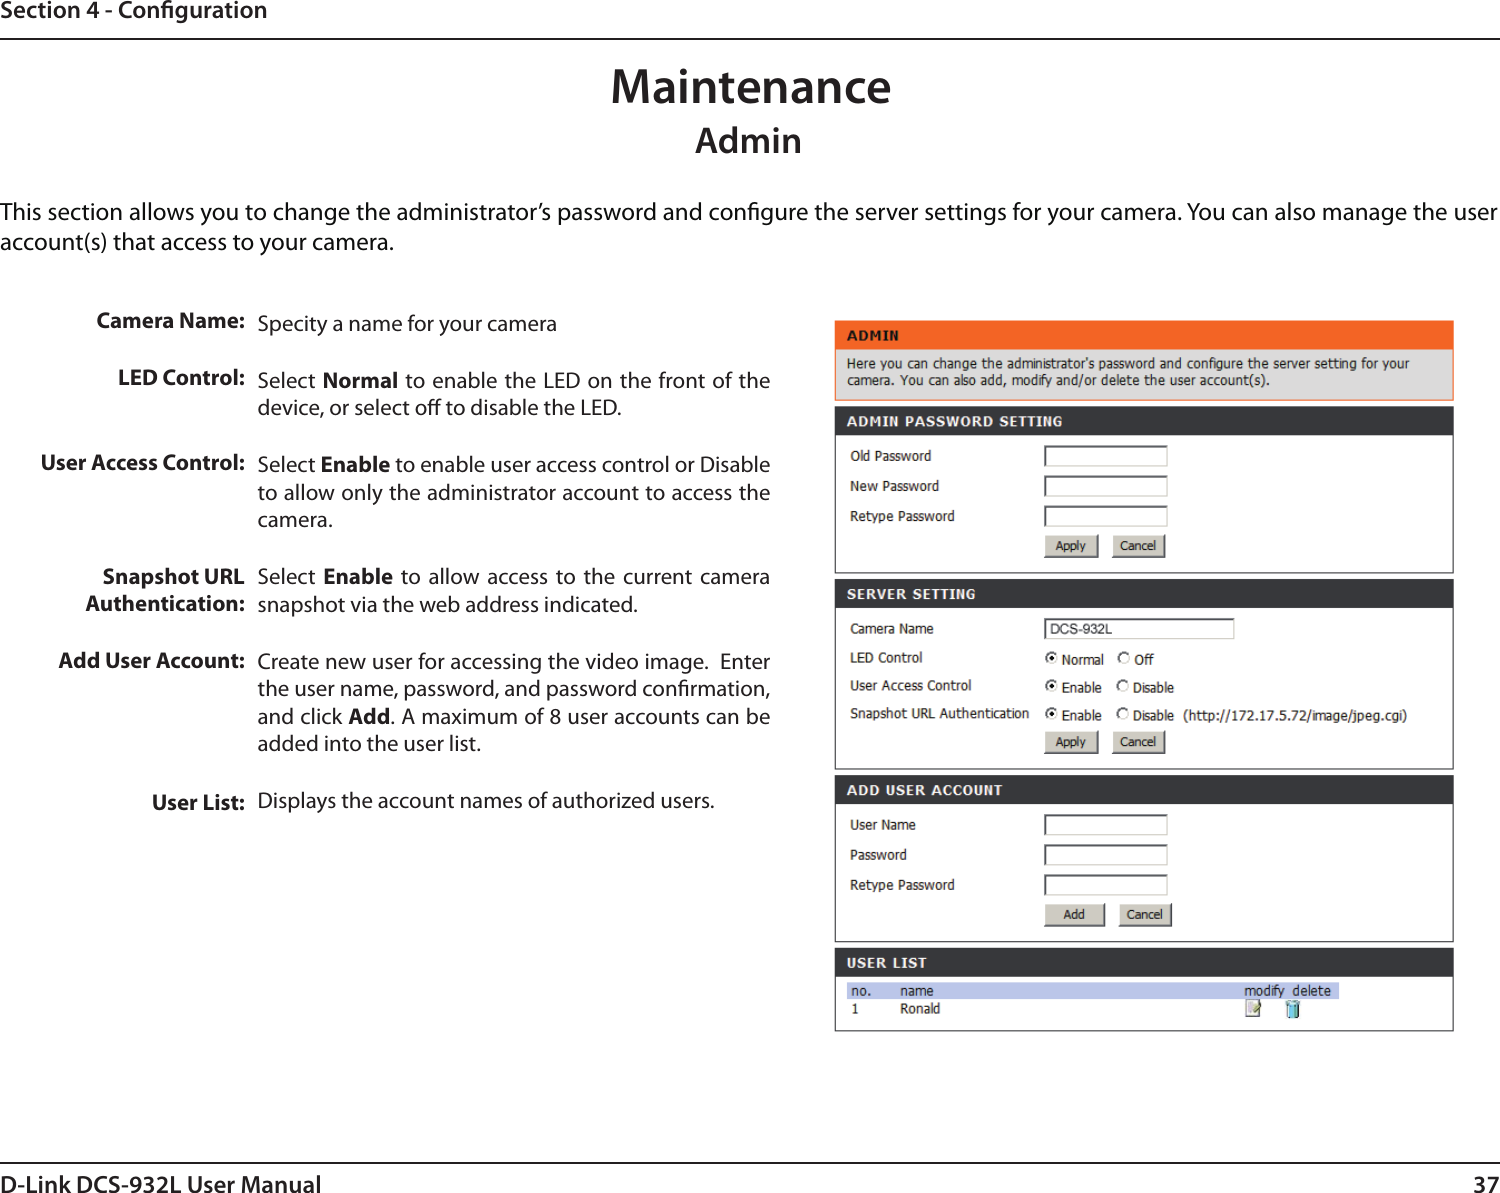
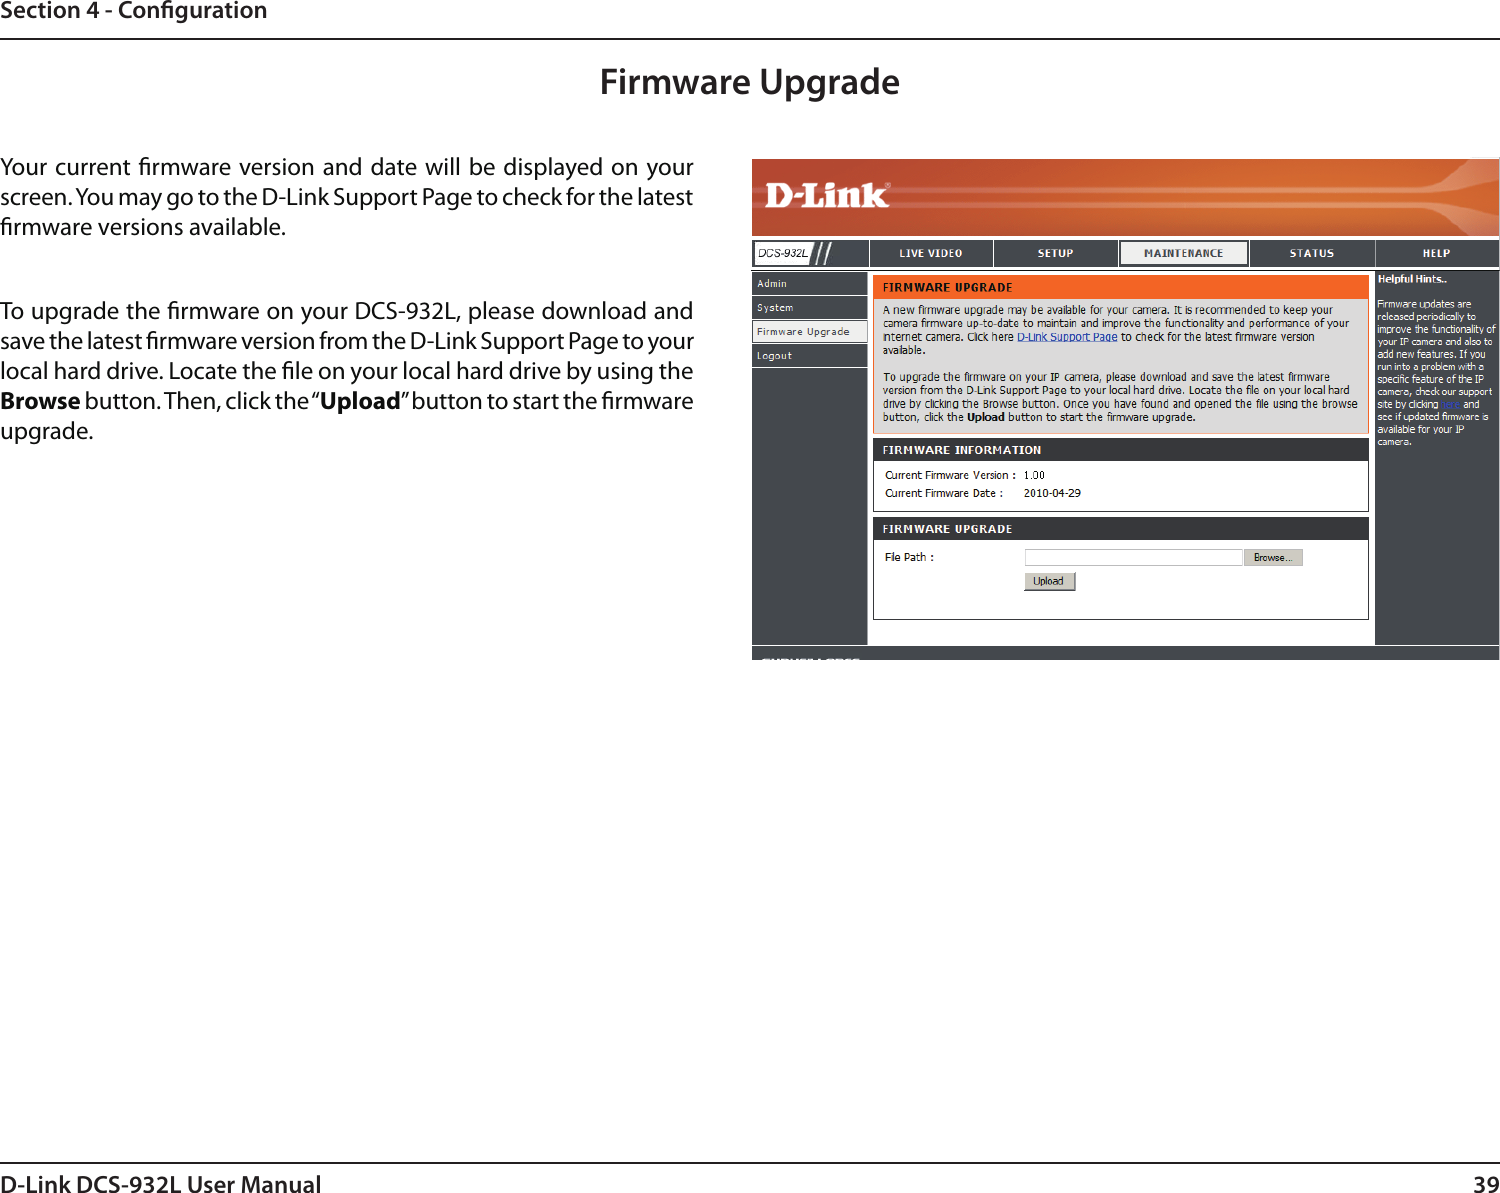
16D-Link DCS-932L User ManualSection 3 - mydlink PortalLive VideoIn the main part of the screen, the Live Video tab will be selected by default. If the camera is available, a Live Video feed will be displayed. Video will be shown at VGA resolution (640x480) if viewing your camera from a PC on the same local network, or at QVGA resolution (320x240) if viewing your camera from a PC on a remote network.
17D-Link DCS-932L User ManualSection 3 - mydlink PortalCamera SettingsThe Camera Settings tab allows you to access your camera’s conguration interface. To open your camera’s conguration interface, click Camera web page and enter the password exactly as listed on the Camera Settings page.
18D-Link DCS-932L User ManualSection 3 - mydlink PortalDevice Name: The Device Name is a unique name that you can give to your device to help you identify it. Clicking on the Device Name will open a window for you to log in to your camera’s conguration interface. Then, it will open the Maintenance > Admin page where you can change your Device Name.Camera Password: Displays the current password for your camera’s conguration interface. Clicking on the  Show Password checkbox will either show or hide the password. Clicking on the Password will open a window for you to log in to your camera’s conguration interface. Then, it will open the Maintenance > Admin page where you can change your Password.mydlink No.: Displays the mydlink number of your device.Model Name: Displays the model name of your device.MAC Address: Displays the MAC address of your device.Device activated On:  Displays the time and  date that your device was added to mydlink.Support: This section provides you with links to various support websites and downloads related to your product.Camera InfoThe Camera Info tab shows you various information about your camera.
19D-Link DCS-932L User ManualSection 4 - CongurationCongurationUsing the Conguration MenuAfter completing the Camera Installation Wizard, you are ready to use your camera. The camera’s built-in Web conguration utility is designed to allow you to easily access and congure your DCS-932L. At the end of the wizard, click Go To Camera, or enter the IP address of your camera into a web browser, such as Internet Explorer®. To log in, use the User name admin and the password you created in the Installation Wizard. If you did not create a password, the default password is blank. After entering your password, click OK.Note: If you are directly connecting your PC to the camera, or if you are using the camera on a closed network, the default IP is 192.168.0.20.
20D-Link DCS-932L User ManualSection 4 - CongurationFunction: Click the ActiveX or Java radio button to view live video.Please make sure that you have the latest version of Java application installed on your computer to ensure proper operation when viewing the video in Java mode. The Java application can be downloaded at no cost from Sun’s web site (http://www.java.com).When you connect to the home page of your camera, you will be prompted to download ActiveX. If you want to use ActiveX to view your video images instead of Java, then you must download ActiveX.
21D-Link DCS-932L User ManualSection 4 - CongurationLive VideoActiveX:  Java:For Windows® Users that do not have Java installed, please choose this option to view video streaming on the Live Video page.For Windows® users that have Java installed, you can also use this for viewing video. Mac users must choose this mode to view video. SetupYou may choose to congure your network by using the Internet Connection Setup Wizard that includes step-by-step instructions. Otherwise, you may manually congure your connection using the Manual Internet Connection Setup.Wizard
22D-Link DCS-932L User ManualSection 4 - CongurationInternet Connection Setup WizardThis wizard will guide you through a step-by-step process to congure your new D-Link Camera and connect the camera to the Internet. Click Next to continue.•  DHCP Connection (by default), where your DHCP server will automatically assign dynamic IP to your device.•  Static IP Address allows you to manually enter your network settings for the camera.•  PPPoE connection, where your camera is directly connected to the Internet through a DSL modem.  Note: Input the DNS information if you have chosen and assigned a Static IP Address for your camera.
23D-Link DCS-932L User ManualSection 4 - CongurationEnter a name for your camera. Click Next to continue.Congure  the  correct  time  to  ensure  that  all  events  triggered,  captured  and scheduled at the right time. Click Next to continue.This page displays your congured settings. Click Apply to save and activate the setting, or Back to change your settings.Click Next to continue.If you have a Dynamic DNS account and would like the camera to update your IP address automatically, enable DDNS and enter your host information. Click Next to continue.
24D-Link DCS-932L User ManualSection 4 - CongurationNetwork SetupSelect  this  connection  if  you  have  a  DHCP  server  running  on  your network and would like a dynamic IP address to be updated to your camera automatically. You  may  obtain  a  static  or  xed  IP  address  and  other  network information from your network administrator for your camera. A static IP address will ease you for accessing your camera in the future.IP Address: The xed IP addressSubnet Mask: The default value is “255.255.255.0.” Used to determine if the destination is the same subnet.Default Gateway: The gateway used to forward frames to destinations in a dierent subnet. Invalid gateway settings may cause the failure of transmissions to a dierent subnet.Primary DNS: Primary domain name server that translates names to IP addresses.Secondary  DNS:  Secondary  domain  name  server  to  backup  the Primary DNS.DHCP:Static IP Client: PPPoE Settings:Port Settings:UPnP Settings:This section allows you to congure your network settings.If you are using a PPPoE connection, enable it and enter the User Name and Password for your PPPoE account. You can get this information from your Internet service provider (ISP).You may congure a Second HTTP port that will allow you to connect to the camera via a standard web browser. The port can be set to a number other than the default TCP ports 80. A corresponding port must be opened on the router. For example, if the port is changed to 1010, users must type http://192.168.0.100:1010 instead of only “http://192.168.0.100”. Enable this setting to congure your camera as an UPnP device in the network.
25D-Link DCS-932L User ManualSection 4 - CongurationWirelessService Set Identier, an identier for your wireless network.The default setting  is channel 6. Select the  same channel that is being used  by  other  wireless  devices  within  your  network. When  there  is  an interference from the wireless networks that overlap with one another, you may change the channel to obtain maximum performance for your connection.Infrastructure  is  a  wireless  connection  using  an  access  point  as  a transmission point of all wireless devices. Ad-Hoc is a wireless connection used  without  an  access  point,  where  your  DCS-932L  is  directly connecting  to  your  PC.  This  is  done  using  the  on-board  wireless adapter on the DCS-932L connected to a wireless adapter on the PC.This page will allow you to select a wireless network that the DCS-932L was able to detect.For security, there are three choices; None, WEP, and WPA-PSK / WPA2-PSK. Select the same encryption method that is being used by your wireless device/ router. WEP provides security by encrypting data over your wireless network so that it is protected as it is transmitted from one wireless device to another. To gain access to a WEP network, you must know the key. The key is a string of characters that you create. When using WEP, you must determine the level of encryption. The type of encryption determines the key length. 128-bit encryption requires a longer key than 64-bit encryption.An appropriate Preshared Key, which is needed in order to connect to the wireless network.SSID:Channel:Connection Mode:Site Survey:Wireless Security Mode:WEP:WPA-PSK / WPA2PSK Settings:This section allows you to setup and congure the wireless settings on your camera.
26D-Link DCS-932L User ManualSection 4 - Conguration(Dynamic Domain Name Server) will hold a DNS host name and synchronize the public IP address of the modem when it has been modied. The username and password are required when using the DDNS service.Click to enable the DDNS function.Select your Dynamic DNS Server from the pull down menu.Enter the host name of the DDNS server.Enter your username or e-mail used to connect to the DDNS.Enter your password used to connect to the DDNS server.DDNS: Enable:Server Address: Host Name:User Name:Password:DDNS This section allows you to congure the DDNS setting for your camera. DDNS will allow all users to access your camera using a domain name instead of an IP address.
27D-Link DCS-932L User ManualSection 4 - CongurationImage SetupSelect this box to enable antiicker.Select this box to vertically ip the video. If the camera is installed upside down, Flip Image and Mirror should both be checked.Horizontally ip the video.  Allows you to adjust the brightness level.  Allows you to adjust the contrast level.  Allows you to adjust the saturation level.Enable Antiicker:Flip Image:  Mirror:Brightness Control:Contrast Control:Saturation Control:This section allows you to congure the image settings for your camera.
28D-Link DCS-932L User ManualSection 4 - CongurationVideoVideo Prole:Encode Type:Resolution: FPS: JPEG Quality:View Mode:Light Frequency:Video CongurationThis section allows you to congure the video settings for your camera.This section allows you to change the Encode Type, Resolution, FPS, and Quality.The compression format used when viewing your camera.Select  the  desired  video  resolution  from  three  formats:  640x480,  320x240,  and  160x120. The  higher  setting  can  obtain  better  quality. However, it will use more resource within your network. Select the optimal setting depending on your network status. Please note that the higher setting can obtain better quality. However, it will use more resources within your network.Select one of ve levels of image quality: Highest, High, Medium, Low, and Lowest.Select the mode for viewing the camera image. Select Image for a still images, ActiveX for Internet Explorer, or  Java for other web browsers. Select the proper frequency (50Hz or 60Hz) to reduce image icker.
29D-Link DCS-932L User ManualSection 4 - CongurationAudioEnabling audio setting will allow you to listen to audio from the camera through your PC’s audio output. Note: Please wait a few seconds for the camera to adjust the audio after the setting has been selected. Audio Settings:Volume Settings:You may Enable or Disable the camera audio feed. Select the desired volume percentage level.
30D-Link DCS-932L User ManualSection 4 - CongurationMotion DetectEnabling Video Motion will allow your camera to  use the motion detection feature. You may draw a nite motion area that will be used for monitoring.Motion Detection:Sensitivity:  Detection Areas:Select  this  box  to  enable  the  motion  detection  feature  of  your camera.Species  the  measurable  dierence  between  two  sequential images that would indicate motion. Please enter a value between 0 and 100.Use  your    mouse  to  click  on  the  blocks  that  you  would  like  to monitor for motion.
31D-Link DCS-932L User ManualSection 4 - CongurationMailSMTP Server Address: Sender e-mail Address:Receiver e-mail Address:User Name: Password:This is the domain name or IP address of your external e-mail server.This is the e-mail address of the person sending the camera snapshots. This is the e-mail address of the recipient. If  the  SMTP  server  uses  authentication,  you  must  enter  your  user name here.This is the password that corresponds to your user name to connect to the SMTP server.This section allows you to congure the email notication settings for your camera.For example, if you want to use Gmail by SSL-TLS for the e-mail notication, you can follow the setup procedure as below:Step 1 - Enter “smtp.gmail.com” in SMTP Server Address.Step 2 - Change the SMTP server port number from 25 to 465.Step 3 - Enter your gmail E-mail address in Sender E-mail Address.Step 4 - Enter the destination E-mail address in Receiver E-mail Address.Step 5 - Enter the user name required to access the SMTP server.Step 6 - Enter the password required to access the SMTP server.Step 7 - Select SSL-TLS and then click Save Settings.Step 8 - Click the Test button to send a test e-mail will be sent to the e-mail account listed above.   Note: You can also use STARTTLS which will use SMTP server port number 587.Note: If you want to use the Yahoo SMTP server, the SMTP server address will be dierent between each registered region. And it only supports the SMTP server port number 465 for the SSL-TLS.
32D-Link DCS-932L User ManualSection 4 - CongurationTime ScheduleEnable e-mail image to e-mail account:Interval:Test E-mail  Account:Choosing Always will start sending snapshots to the recipient’s e-mail account right away. Choosing Schedule will allow you to schedule when to start and stop the sending of snapshots to the recipient’s e-mail account. Select Motion Detection if you would like the camera to send images to the recipient’s e-mail account when the motions are detected.  The frequency of the snapshot interval can also be congured from 1 to 65535 seconds.This will send a snapshot to the e-mail account that you have congured in the E-mail section. If you have congured the SMTP account correctly, you will be able to send a test le to the e-mail account of the recipient.
33D-Link DCS-932L User ManualSection 4 - CongurationFTPHost Address:Port Number: User Name: Password:Directory Path:Passive Mode:This is the IP address of the FTP server that you will be connecting to.Default is port 21. If changed, external FTP client program must change the server connection port accordingly.Species  the  user  name  to  access  the  external  FTP  server.  If  you  are  to  upload snapshots to an FTP server you will need to ll in the Domain name or IP address of your external FTP server. The following user settings must be correctly congured for remote access.Species the password to access the external FTP server.Species the destination folder in the external FTP server.Enabling passive mode will allow access to an external FTP server if your camera is behind a router protected by a rewall.This section allows you to congure a FTP server to receive images from the camera.
34D-Link DCS-932L User ManualSection 4 - CongurationTime ScheduleEnable upload image to FTP server:Always:Schedule:Image Frequency: Base File Name: File: Test FTP Server:Checking this box will enable video uploads to the FTP server you have selected.Selecting this option allows snapshots to be uploaded to your FTP as soon as you click Apply.Selecting this option allows you to congure specic times when you want the snapshots to be uploaded to your FTP server.Users can select in frames per second (1, 2, 3 or auto, in auto this could go to 4). The user can also select a duration for each frame from 1 to 65535 seconds.This will be the  name that  precedes the time, for example DCS9302010072116425101.jpg. This means  that the camera took a snapshot in the year 2010, July 21 at 16th hour (4 o’clock), 42 minutes and 51 seconds and it is picture number one.Select Overwrite and there will be only one images that are constantly refreshed. Select Date/Time Sux and the pictures will be named with a date and time (may refer to Base File Name). Enable the Create subfolder function, the system will auto create the subfolder by 0.5 hour, 1 hour or 1 day. An example of this can be seen above under the Base le name category. Select Sequence Number Sux up to 1024 and all the pictures will be numbered from 1-1024. The total amount of pictures can be congured up to 1024 pictures.This will send a snapshot to the FTP server that you have congured in the Upload section. If you have congured the FTP correctly, you will be able to see a test le on your FTP server.
35D-Link DCS-932L User ManualSection 4 - CongurationTime and DateTime Zone: Synchronize NTP Server:Copy your Computer’s Time Settings:Set the Date and Time Manually:Select the time zone for your region from the drop down menu.Network  Time  Protocol  will  synchronize  your camera  with  an  Internet  time  server.  Choose  the one that is closest to your camera.Click  to  synchronize  the  time  information  from your PC.Select this to set the time manually.This section allows you to congure the settings  of  the  internal system clocks for your camera.
36D-Link DCS-932L User ManualSection 4 - CongurationDay/Night ModeThis section allows you to congure the settings of Day/Night mode switch method. Day/Night mode feature provides good video illumination in both day and night environments.Auto:Manual: Alway Day Mode:Alway Night Mode: Day Mode Schedule:Camera automatically switches Day/Night mode. The camera normally works on Day mode. It automatically changes to Night mode in a dark place. User can manually control the camera work in Day or Night mode at the LIVE VIDEO page.The camera alway works in the Day mode. The camera always works in the Night mode. The camera works on Day mode at the time that you have congured in the schedule. The camera changes to Night mode in the other time period. The example displayed on the right side of the Mon/Tue/Wed/Thu/Fri/Sat/Sun elds mean that the camera works in Day mode from 08:00 to 18:30 on Monday, Tuesday, Wednesday, Thursday and Friday, works in Night mode all the day (no Day mode time) on Saturday, and works in Day mode all the day on Sunday.
37D-Link DCS-932L User ManualSection 4 - CongurationMaintenanceThis section allows you to change the administrator’s password and congure the server settings for your camera. You can also manage the user account(s) that access to your camera.Camera Name:LED Control: User Access Control:Snapshot URL Authentication:Add User Account: User List:Specity a name for your cameraSelect Normal to enable the LED on the front of the device, or select o to disable the LED.Select Enable to enable user access control or Disable to allow only the administrator account to access the camera.Select  Enable  to allow  access to the  current camera snapshot via the web address indicated.Create new user for accessing the video image.  Enter the user name, password, and password conrmation, and click Add. A maximum of 8 user accounts can be added into the user list.Displays the account names of authorized users.Admin
38D-Link DCS-932L User ManualSection 4 - CongurationSystemThis section allows you to save and restore your conguration, restore the factory settings, and/or restart the camera.
39D-Link DCS-932L User ManualSection 4 - CongurationFirmware UpgradeYour current rmware version and date will be  displayed on your screen. You may go to the D-Link Support Page to check for the latest rmware versions available. To upgrade the rmware on your DCS-932L, please download and save the latest rmware version from the D-Link Support Page to your local hard drive. Locate the le on your local hard drive by using the Browse button. Then, click the “Upload” button to start the rmware upgrade.
40D-Link DCS-932L User ManualSection 4 - CongurationDevice InfoThis section displays all the details information about your device and network settings.
41D-Link DCS-932L User ManualSection 4 - CongurationActive UserThis page lists all the active user’s information including the User Name, IP address, and the time that camera access began.
42D-Link DCS-932L User ManualSection 5 - SecurityWireless SecurityThis section will show you the dierent levels of security you can use to protect your data from intruders.The DCS-932L oers the following types of security:• WPA-PSK (Pre-Shared Key)• WEP (Wired Equivalent Privacy)What is WEP?WEP stands for Wired Equivalent Privacy. It is based on the IEEE 802.11 standard and uses the RC4 encryption algorithm. WEP provides security by encrypting data over your wireless network so that it is protected as it is transmitted from one wireless device to another.To gain access to a WEP network, you must know the key. The key is a string of characters that you create. When using WEP, you must determine the level of encryption. The type of encryption determines the key length. 128-bit encryption requires a longer key than 64-bit encryption. Keys are dened by entering in a string in HEX (hexadecimal - using characters 0-9, A-F) or ASCII (American Standard Code for Information Interchange – alphanumeric characters) format. ASCII format is provided so you can enter a string that is easier to remember. The ASCII string is converted to HEX for use over the network. Four keys can be dened so that you can change keys easily.
43D-Link DCS-932L User ManualSection 5 - SecurityWhat is WPA?WPA, or Wi-Fi Protected Access, is a Wi-Fi standard that was designed to improve the security features of WEP (Wired Equivalent Privacy).  The 2 major improvements over WEP: Improved data encryption through the Temporal Key Integrity Protocol (TKIP). TKIP scrambles the keys using a hashing algorithm and, by adding an integrity-checking feature, ensures that the keys haven’t been tampered with. WPA2 is based on 802.11i and uses Advanced Encryption Standard instead of TKIP.User authentication, which is generally missing in WEP, through the extensible authentication protocol (EAP). WEP regulates access to a wireless network based on a computer’s hardware-specic MAC address, which is relatively simple to be snied out and stolen. EAP is built on a more secure public-key encryption system to ensure that only authorized network users can access the network.WPA-PSK/WPA2-PSK uses a passphrase or key to authenticate your wireless connection. The key is an alpha-numeric password between 8 and 63 characters long. The password can include symbols (!?*&_) and spaces. This key must be the exact same key entered on your wireless router or access point.
44D-Link DCS-932L User ManualSection 5 - SecurityD-Link’s DCS-932L is a versatile and cost eective Network Camera oering both video and audio monitoring. It can also serve as a powerful surveillance system in security applications. The DCS-932L can be used with any wired or 802.11n/g wireless router. This section explains how to view the camera from either the Internet or from inside your internal network.Components Needed: • 1 DCS-932L Network Camera• 1 Ethernet Cable • A Wired or Wireless router such as the D-Link DIR-655 Wireless Router• Ethernet based PC for system congurationSetting up the DCS-932L for Use Behind a RouterInstalling a DCS-932L Network Camera on your network is an easy 4–step procedure:1. Assign a local IP address to your network camera.2. View the network camera using your Internet Explorer web browser.3. Access the router with your web browser.4. Open virtual server ports to enable remote image viewing.Note: These are manual steps; however, if you decide to use the wizard, it will perform every step automatically.This section is designed to walk you through the setup process for installing your camera behind a router and enable remote video viewing. For the basic setup of the DCS-932L, follow the steps outlined in the Quick Installation Guide.After you have completed the setup of the DCS-932L outlined in the Quick Installation Guide you will have an operating camera that has an assigned IP Address. Because you are using a router to share the Internet with one or more PCs, the IP Address assigned to the Network Camera will be a local IP Address. This allows viewing within your Local Area Network (LAN) until the router is congured to allow remote viewing of the camera over the Internet.Conguring the DCS-932L with a Router
45D-Link DCS-932L User ManualSection 5 - Security1. Assign a Local IP Address to Your CameraRun the setup wizard from the CD included with the DCS-932L. Follow the steps in the Quick Installation Guide to congure the DCS-932L. The camera will be assigned a local IP Address that allows it to be recognized by the router. Write down this IP Address for future reference.Run your Internet Explorer Web browser. In the address bar, type in the IP Address that was assigned to the Network Camera by the DCC program. The DCS-932L Live Video Page appears with a window displaying live video from the camera. You are able to view this screen from any PC running Internet Explorer on your LAN.Click on the Setup button on the left side of the display. Scroll to the bottom of the Network Setup page to display the ports used by HTTP and Streaming audio and video.2. View the Network Camera Using Your Internet Explorer Web Browser
46D-Link DCS-932L User ManualSection 5 - SecurityThe Setup > Network Setup page displays the port settings for your camera. If necessary, these ports can be changed if they are already in use by other devices (e.g. in a multiple camera environment).Note: Both the HTTP port and RTSP port are required to be opened for the DCS-932L.
47D-Link DCS-932L User ManualSection 5 - SecurityThe following steps generally apply to any router that you have on your network. The D-Link DIR-655 is used as an example to clarify the conguration process. Congure the initial settings of the DIR-655 by following the steps outlined in the DIR-655 Quick Installation Guide.3. Access the Router with Your Web BrowserIf you have cable or DSL Internet service, you will most likely have a dynamically assigned WAN IP Address. ‘Dynamic’ means that your router’s WAN IP address can change from time to time depending on your ISP.  A dynamic WAN IP Address identies your router on the public  network and  allows it to access the Internet.  To nd out what your router’s WAN IP Address is, go to the Status menu on your router and locate the WAN information for your router (as shown on the next page). The WAN IP Address will be listed. This will be the address that you will need to type in your Web browser to view your camera over the Internet. Router Set-Up and InstallationYour WAN IP Address will be listed on the router’s Status > Device Info page.
48D-Link DCS-932L User ManualSection 5 - SecurityNote: Because a dynamic WAN IP can change from time to time depending on your ISP, you may want to obtain a Static IP address from your ISP. A Static IP address is a xed IP address that will not change over time and will be more convenient for you to use to access your camera from a remote location. The Static IP Address will also allow you to access your camera attached to your router over the Internet.4. Open Virtual Server Ports to Enable Remote Image ViewingThe rewall security features built into the DIR-655 router prevent users from accessing the video from the DCS-932L over the Internet. The router connects to the Internet over a series of numbered ports. The ports normally used by the DCS-932L are blocked from access over the Internet. Therefore, these ports need to be made accessible over the Internet. This is accomplished using the Virtual Server function on the DIR-655 router. The Virtual Server ports used by the camera must be opened through the router for remote access to your camera. Virtual Server is accessed by clicking on the Advanced tab of the router screen.1. Click Enabled.2. Enter a dierent name for each entry.3. Enter your camera’s local IP Address (e.g., 192.168.0.120) in the Private IP eld.4. Select TCP for HTTP port, both (TCP and UDP) for RTSP and both (TCP and UDP) for 5556 - 5559 ports.5. If you are using the default camera port settings, enter 80 into the Public and Private Port section, click Apply.6. Scheduling should be set to Always so that the camera images can be accessed at any time.Follow these steps to congure your router’s Virtual Server settings:
49D-Link DCS-932L User ManualSection 5 - SecurityRepeat the above steps adding the port 554 to both the Public and Private Port sections. A check mark appearing before the entry name will indicate that the ports are enabled.Important: Some ISPs block access to port 80 and other commonly used Internet ports to conserve bandwidth. Check with your ISP so that you can open the appropriate ports accordingly. If your ISP does not pass trac on port 80, you will need to change the port the camera uses from 80 to something else, such as 800. Not all routers are the same, so refer to your user manual for specic instructions on how to open ports.Enter valid ports in the Virtual Server section of your router. Please make sure to check the box next to the camera name on the Virtual Server List to enable your settings.
50D-Link DCS-932L User ManualSection 6 - TroubleshootingTroubleshootingThis chapter provides solutions to problems that can occur during the installation and operation of the DCS-932L.Read the following descriptions if you are having problems. (The examples below are illustrated in Windows Vista® and XP. If you have a dierent operating system, the screenshots on your computer will look similar to the following examples.)1. What is Remote Access? How do I enable it?Remote Access allows you to access your camera from any PC connected to the Internet through a web browser. This lets you view your camera feed and manage your camera’s settings when you’re away from home. To enable Remote Access, simply go through the Camera Installation Wizard included on the Installation CD that came in your package. You can also download the wizard from the following websites:DCS-932L: http://DCS-932L.mydlink.comAfter going through the wizard, you should see Remote Status: Enabled on the summary page.If you see Remote Status: Disabled, make sure that:...the front LED on your camera is lit solid green...your Internet connection is working...your router’s LAN & WAN connections are working properly...your router has UPnP enabled (if your router does not support UPnP, please refer to Appendix A)...your router can get a public IP...your router is upgraded to the latest rmware...you have tried rebooting your router by unplugging it, then plugging it back inAfter checking the above items, you can click the Retry button to refresh the summary screen to see if Remote Access has been enabled.2. What can I do if I forget my password?If you forget your password, you will need to perform a hard reset of your camera. This process will change all your settings back to the factory defaults.To reset your camera, please use an unfolded paperclip to press and hold the RESET button for at least 3 seconds while your camera is plugged in.3. In addition to using mydlink.com, is there another way to access my camera remotely over the Internet?
51D-Link DCS-932L User ManualSection 6 - TroubleshootingYes, you can access your camera over the Internet through the following URL after successfully installing your camera through the Camera Installation Wizard:http://[mydlink No.].mydlink.comFor example, if your camera’s mydlink No. was 12345678, you would be able to access your camera remotely by opening your web browser and going to http://12345678.mydlink.comThis URL will open a webpage where you will be asked to log in by entering your camera’s password. After entering your password, your camera’s Live View window will open, and you will be able to congure your camera as well.4. Why does the LED not light up?The power supply might be faulty. Conrm that you are using the provided DC 5V power supply for this network camera. Verify that the power supply is correctly connected. If the camera is functioning normally, the LED may have been disabled. See page 36 for information about how to enable the LED.5. Why is the camera’s network connection unreliable?There might be a problem with the network cable. To conrm that the cables are working, PING the address of a known device on the network. If the cabling is OK and your network is reachable, you should receive a reply similar to the following (…bytes = 32 time = 2 ms). Another possible problem may be that the network device such as a hub or switch utilized by the Network Camera is not functioning properly. Please conrm the power for the devices are well connected and functioning properly.6. Why does the Network Camera work locally but not remotely?This might be caused by the rewall protection. Check the Internet rewall with your system administrator. The rewall may need to have some settings changed in order for the Network Camera to be accessible outside your local LAN. For more information, please refer to the section about installing your camera behind a router. Make sure that the Network Camera isn’t conicting with any Web server you may have running on your network. The default router setting might be a possible reason. Check that the conguration of the router settings allow the Network Camera to be accessed outside your local LAN.
52D-Link DCS-932L User ManualSection 6 - Troubleshooting7. Why does a series of broad vertical white lines appear through out the image?It could be that the CMOS sensor (a square panel situated behind the lens that measures the light signals and changes it into a digital format so your computer can present it into an image that you are familiar with) has become overloaded when it has been exposed to bright lights such as direct exposure to sunlight or halogen lights. Reposition the Network Camera into a more shaded area immediately as prolonged exposure to bright lights will damage the CMOS sensor.8. The camera is producing noisy images. How can I solve the problem?The video images might be noisy if the Network Camera is used in a very low light environment.9. The images are poor quality, how can I improve the image quality?Make sure that your computer’s display properties are set to at least 6-bit color. Using 16 or 256 colors on your computer will produce dithering artifacts in the image, making the image look as if it is of poor quality. The conguration on the Network Camera image display is incorrect. The Web Conguration Video section of the Web management allows you to adjust the related-parameters for improved images such as: brightness, contrast, hue and light frequency. Please refer to the Web Conguration section for detailed information.10. Why are no images available through the Web browser?ActiveX might be disabled. If you are viewing the images from Internet Explorer make sure ActiveX has been enabled in the Internet Options menu. You may also need to change the security settings on your browser to allow the ActiveX plug-in to be installed. If you are using Internet Explorer with a version number lower than 6, then you will need to upgrade your Web browser software in order to view the streaming video transmitted by the Network Camera.
53D-Link DCS-932L User ManualAppendix A - Wireless BasicsD-Link wireless products are based on industry standards to provide easy-to-use and compatible high-speed wireless* connectivity within your home, business or public access wireless networks. Strictly adhering to the IEEE standard, the D-Link wireless family of products will allow you to securely access the data you want, when and where you want it. You will be able to enjoy the freedom that wireless networking delivers.A wireless local area network (WLAN) is a cellular computer network that transmits and receives data with radio signals instead of wires. Wireless LANs are used increasingly in both home and oce environments, and public areas such as airports, coee shops and universities. Innovative ways to utilize WLAN technology are helping people to work and communicate more eciently. Increased mobility and the absence of cabling and other xed infrastructure have proven to be benecial for many users. Under many circumstances, it may be desirable for mobile network devices to link to a conventional Ethernet LAN in order to use servers, printers or an Internet connection supplied through the wired LAN.  A Wireless Router is a device used to provide this link.Wireless Basics
54D-Link DCS-932L User ManualAppendix A - Wireless BasicsWhat is Wireless?Wireless or WiFi technology is another way of connecting your computer to the network without using wires. WiFi uses radio frequency to connect wirelessly, so you have the freedom to connect computers anywhere in your home or oce network.Why D-Link Wireless?   D-Link is the worldwide leader and award winning designer, developer, and manufacturer of networking products. D-Link delivers the performance you need at a price you can aord. D-Link has all the products you need to build your network.How does wireless work? Wireless works similar to how cordless phone work, through radio signals to transmit data from one point A to point B. But wireless technology has restrictions as to how you can access the network. You must be within the wireless network range area to be able to connect your computer. There are two dierent types of wireless networks Wireless Local Area Network (WLAN), and Wireless Personal Area Network (WPAN).Wireless Local Area Network (WLAN)In a wireless local area network, a device called an Access Point (AP) connects computers to the network. The access point has a small antenna attached to it, which allows it to transmit data back and forth over radio signals. With an indoor access point as seen in the picture, the signal can travel up to 300 feet. With an outdoor access point the signal can reach out up to 30 miles to serve places like manufacturing plants, industrial locations, college and high school campuses, airports, golf courses, and many other outdoor venues.
55D-Link DCS-932L User ManualAppendix A - Wireless BasicsWho uses wireless? Wireless technology as become so popular in recent years that almost everyone is using it, whether it’s for home, oce, business, D-Link has a wireless solution for it.Home• Gives everyone at home broadband access• Surf the Web, check email, instant message, and etc• Gets rid of the cables around the house• Simple and easy to useSmall Oce and Home Oce• Stay on top of everything at home as you would at oce• Remotely access your oce network from home• Share Internet connection and printer with multiple computers• No need to dedicate oce space
56D-Link DCS-932L User ManualAppendix A - Wireless BasicsWhere is wireless used? Wireless technology is expanding everywhere not just at home or oce. People like the freedom of mobility and it’s becoming so popular that more and more public facilities now provide wireless access to attract people. The wireless connection in public places is usually called “hotspots”.Using a D-Link Cardbus Adapter with your laptop, you can access the hotspot to connect to Internet from remote locations like: Airports, Hotels, Coee Shops, Libraries, Restaurants, and Convention Centers.Wireless network is easy to setup, but if you’re installing it for the rst time it could be quite a task not knowing where to start. That’s why we’ve put together a few setup steps and tips to help you through the process of setting up a wireless network.TipsHere are a few things to keep in mind, when you install a wireless network.Centralize your router or Access Point  Make sure you place the router/access point in a centralized location within your network for the best performance. Try to place the router/access point as high as possible in the room, so the signal gets dispersed throughout your home. If you have a two-story home, you may need a repeater to boost the signal to extend the range.Eliminate Interference   Place home appliances such as cordless telephones, microwaves, and televisions as away as possible from the router/access point. This would signicantly reduce any interfere that the appliances might cause since they operate on same frequency.Security Don’t let you next-door neighbors or intruders connect to your wireless network. Secure your wireless network by turning on the WPA or WEP security feature on the router. Refer to product manual for detail information on how to set it up.
57D-Link DCS-932L User ManualAppendix A - Wireless BasicsThere are basically two modes of networking: •  Infrastructure – All wireless clients will connect to an access point or wireless router.•  Ad-Hoc – Directly connecting to another computer, for peer-to-peer communication, using wireless network adapters on each computer, such as two or more DCS-932L wireless network Cardbus adapters.An Infrastructure network contains an Access Point or wireless router. All the wireless devices, or clients, will connect to the wireless router or access point. An Ad-Hoc network contains only clients, such as laptops with wireless cardbus adapters. All the adapters must be in Ad-Hoc mode to communicate.Wireless Modes
58D-Link DCS-932L User ManualAppendix B - Networking BasicsNetworking BasicsCheck your IP addressAfter you install your new D-Link adapter, by default, the TCP/IP settings should be set to obtain an IP address from a DHCP server (i.e. wireless router) automatically. To verify your IP address, please follow the steps below.Click on Start > Run. In the run box type cmd and click OK.At the prompt, type ipcong and press Enter.This will display the IP address, subnet mask, and the default gateway of your adapter.If the address is 0.0.0.0, check your adapter installation, security settings, and the settings on your router. Some rewall software programs may block a DHCP request on newly installed adapters. If you are connecting to a wireless network at a hotspot (e.g. hotel, coee shop, airport),  please contact an employee or administrator to verify their wireless network settings.
59D-Link DCS-932L User ManualAppendix B - Networking BasicsStatically Assign an IP AddressIf you are not using a DHCP capable gateway/router, or you need to assign a static IP address, please follow the steps below: Step 1Windows® Vista - Click on Start > Control Panel > Network and Internet > Network and Sharing Center > Manage Network Connections. Windows XP - Click on Start > Control Panel > Network Connections. Step 2Right-click on the Local Area Connection which represents your D-Link network adapter and select Properties. Step 3Highlight Internet Protocol (TCP/IP) and click Properties. Step 4Click Use the following IP address and enter an IP address that is on the same subnet as your network or the LAN IP address on your router. Example: If the router´s LAN IP address is 192.168.0.1, make your IP address 192.168.0.X where X is a number between 2 and 99. Make sure that the number you choose is not in use on the network. Set Default Gateway the same as the LAN IP address of your router (192.168.0.1). Set Primary DNS the same as the LAN IP address of your router (192.168.0.1). The Secondary DNS is not needed or you may enter a DNS server from your ISP. Step 5Click OK twice to save your settings.
60D-Link DCS-932L User ManualAppendix C - Technical SpecicationsTechnical SpecicationsSYSTEM REQUIREMENTS•  Operating System: Microsoft Windows XP, Vista, Windows 7•  Internet Explorer 6 or above , Firefox 3.5 or above, Safari 4NETWORKING PROTOCOL•  IPV4, ARP, TCP, UDP, ICMP•  DHCP Client•  NTP Client (D-Link)•  DNS Client•  DDNS Client (Dyndns and D-Link)•  SMTP Client•  FTP Client•  HTTP Server•  PPPoE•  UPnP Port ForwardingBUILTIN NETWORK INTERFACE•  10/100BASE-TX Fast Ethernet•  802.11b/g/n WLANWIRELESS CONNECTIVITY•  802.11b/g/n Wireless with WEP/WPA/WPA2 securityWIRELESS TRANSMIT OUTPUT POWER•  16 dbm for 11b, 12 dbm for 11g, 12 dbm for 11n (typical)SDRAM•  32 MBFLASH MEMORY•  4 MBRESET BUTTON•  Reset to factory defaultVIDEO CODECS•  MJPEG•  JPEG for still imagesVIDEO FEATURES•  Adjustable image size and quality•  Time stamp and text overlay•  Flip and MirrorRESOLUTION•  640 x 480 at up to 20 fps•  320 x 240 at up to 30 fps•  160 x 120 at up to 30 fpsLENS•  Focal length: 5.01 mm, F2.8SENSOR•  VGA 1/5 inch CMOS SensorMINIMUM ILLUMINATION•  1 lux @ F2.8VIEW ANGLE•  Horizontal: 45.3°•  Vertical: 34.5°•  Diagonal: 54.9°
61D-Link DCS-932L User ManualAppendix C - Technical SpecicationsDIGITAL ZOOM•  Up to 4x3A CONTROL•  AGC (Auto Gain Control)•  AWB (Auto White Balance)•  AES (Auto Electronic Shutter)POWER•  Input: 100-240 V AC, 50/60 Hz•  Output: 5 V DC, 1.2 A•  External AC-to-DC switching power adapterDIMENSIONS W X D X H•  Including the bracket and stand: 65.8 x 65 x 126 mm•  Camera only: 27.2 x 60 x 96 mmWEIGHT•  76.9 g (without bracket and stand)MAX POWER CONSUMPTION•  2 WOPERATION TEMPERATURE•  0 ˚C to 40 ˚C (32 ˚F to 104 ˚F)STORAGE TEMPERATURE•  -20 ˚C to 70 ˚C (-4 ˚F to 158 ˚F)HUMIDITY•  20-80% RH non-condensingEMISSION EMI, SAFETY & OTHER CERTIFICATIONS•  FCC Class B•  IC•  C-Tick•  CE
62D-Link DCS-932L User ManualAppendix C - Contacting Technical SupportContacting Technical SupportU.S. and Canadian customers can contact D-Link technical support through our web site or by phone.Before you contact technical support, please have the following ready:  • Model number of the product (e.g. DCS-932L)  • Hardware Revision (located on the label on the bottom of the Network Camera (e.g. rev A1))  • Serial Number (s/n number located on the label on the bottom of the Network Camera). You can nd software updates and user documentation on the D-Link website as well as frequently asked questions and answers to technical issues.For customers within the United States: Phone Support:(877) 453-5465Internet Support:http://support.dlink.com For customers within Canada: Phone Support:(800) 361-5265 Internet Support:http://support.dlink.ca
63D-Link DCS-932L User ManualAppendix E - WarrantyWarrantySubject to the terms and conditions set forth herein, D-Link Systems, Inc. (“D-Link”) provides this Limited Warranty:•  Only to the person or entity that originally purchased the product from D-Link or its authorized reseller or distributor, and•  Only for products purchased and delivered within the fty states of the United States, the District of Columbia, U.S. Possessions or Protectorates, U.S. Military Installations, or addresses with an APO or FPO.Limited Warranty:D-Link warrants that the hardware portion of the D-Link product described below (“Hardware”) will be free from material defects in workmanship and materials under normal use from the date of original retail purchase of the product, for the period set forth below (“Warranty Period”), except as otherwise stated herein.•  Hardware (excluding power supplies and fans): One (1) year•  Power supplies and fans: One (1) year•  Spare parts and spare kits: Ninety (90) daysThe customer’s sole  and  exclusive remedy and  the  entire liability of D-Link  and  its suppliers under this Limited Warranty  will be, at  D-Link’s option, to repair or replace the defective Hardware during the Warranty Period at no charge to the original owner or to refund the actual purchase price paid. Any repair or replacement will be  rendered by D-Link at an Authorized D-Link Service Oce. The replacement hardware need not be new or have an identical make, model or part. D-Link may, at its option, replace the defective Hardware or any part thereof with any reconditioned product that D-Link reasonably determines is substantially equivalent (or superior) in all material respects to the defective Hardware. Repaired or replacement hardware will be warranted for the remainder of the original Warranty Period or ninety (90) days, whichever is longer, and is subject to the same limitations and exclusions. If a material defect is incapable of correction, or if D-Link determines that it is not practical to repair or replace the defective Hardware, the actual price paid by the original purchaser for the defective Hardware will be refunded by D-Link upon return to D-Link of the defective Hardware. All Hardware or part thereof that is replaced by D-Link, or for which the purchase price is refunded, shall become the property of D-Link upon replacement or refund.
64D-Link DCS-932L User ManualAppendix E - WarrantyLimited Software Warranty:D-Link warrants that the software portion of the product (“Software”) will substantially conform to D-Link’s then current functional specications for the Software, as set forth in the applicable documentation, from the date of original retail purchase of the Software for a period of ninety (90) days (“Software Warranty Period”), provided that the Software is properly installed on approved hardware and operated as contemplated in its documentation. D-Link further warrants that, during the Software Warranty Period, the magnetic media on which D-Link delivers the Software will be free of physical defects. The customer’s sole and exclusive remedy and the entire liability of D-Link and its suppliers under this Limited Warranty will be, at D-Link’s option, to replace the non-conforming Software (or defective media) with software that substantially conforms to D-Link’s functional specications for the Software or to refund the portion of the actual purchase price paid that is attributable to the Software. Except as otherwise agreed by DLink in writing, the replacement Software is provided only to the original licensee, and is subject to the terms and conditions of the license granted by D-Link for the Software. Replacement Software will be warranted for the remainder of the original Warranty Period and is subject to the same limitations and exclusions. If a material non-conformance is incapable of correction, or if D-Link determines in its sole discretion that it is not practical to replace the non-conforming Software, the price paid by the original licensee for the non-conforming Software will be refunded by D-Link; provided that the non-conforming Software (and all copies thereof) is rst returned to D-Link. The license granted respecting any Software for which a refund is given automatically terminates.Non-Applicability of Warranty:The Limited Warranty provided hereunder for Hardware and Software portions of D-Link’s products will not be applied to and does not cover any refurbished product and any product purchased through the inventory clearance or liquidation sale or other sales in which D-Link, the sellers, or the liquidators expressly disclaim their warranty obligation pertaining to the product and in that case, the product is being sold “As-Is” without any warranty whatsoever including, without limitation, the Limited Warranty as described herein, notwithstanding anything stated herein to the contrary.Submitting A Claim (USA): The customer shall return the product to the original purchase point based on its return policy. In case the return policy period has expired and the product is within warranty, the customer shall submit a claim to D-Link as outlined below:•  The customer must submit  with  the  product  as  part of the claim a written description of the Hardware defect  or  Software nonconformance in sucient detail to allow DLink to conrm the same, along with proof of purchase of the product (such as a copy of the dated purchase invoice for the product) if the product is not registered.•  The customer must obtain a Case ID Number from D-Link Technical Support at 1-877-354-6555, who will attempt to assist the customer in resolving any suspected defects with the product. If the product is considered defective, the customer must obtain a Return Material Authorization (“RMA”) number by completing the RMA form and entering the assigned Case ID Number at https://rma.dlink.com/.
65D-Link DCS-932L User ManualAppendix B - Technical Specications•  After an RMA number is issued, the defective product must be packaged securely in the original or other suitable shipping package to ensure that it will not be damaged in transit, and the RMA number must be prominently marked on the outside of the package. Do not include any manuals or accessories in the shipping package. DLink will only replace the defective portion of the product and will not ship back any accessories.•  The customer is responsible for all in-bound shipping charges to D-Link. No Cash on Delivery (“COD”) is allowed. Products sent COD will either be rejected by D-Link or become the property of D-Link. Products shall be fully insured by the customer and shipped to D-Link Systems, Inc., 17595 Mt. Herrmann, Fountain Valley, CA 92708. D-Link will not be held responsible for any packages that are lost in transit to D-Link. The repaired or replaced packages will be shipped to the customer via UPS Ground or any common carrier selected by D-Link. Return shipping charges shall be prepaid by D-Link if you use an address in the United States, otherwise we will ship the product to you freight collect. Expedited shipping is available upon request and provided shipping charges are prepaid by the customer. D-Link may reject or return any product that is not packaged and shipped in strict compliance with the foregoing requirements, or for which an RMA number is not visible from the outside of the package. The product owner agrees to pay D-Link’s reasonable handling and return shipping charges for any product that is not packaged and shipped in accordance with the foregoing requirements, or that is determined by D-Link not to be defective or non-conforming.Submitting A Claim (Canada): The customer shall return the product to the original purchase point based on its return policy. In case the return policy period has expired and the product is within warranty, the customer shall submit a claim to D-Link as outlined below:•  Customers need to provide their receipt (proof of purchase) even if the product is registered. Without a receipt, no warranty service will be done. The registration is not considered a proof of purchase.•  The customer must submit with the product as part of the claim a written description of the Hardware defect or Software nonconformance in sucient detail to allow D-Link to conrm the same, along with proof of purchase of the product (such as a copy of the dated purchase invoice for the product) if the product is not registered.•  The customer must obtain a Case ID Number from D-Link Technical Support at 1-800-361-5265, who will attempt to assist the customer in resolving any suspected defects with the product. If the product is considered defective, the customer must obtain a Return Material Authorization (“RMA”) number by completing the RMA form and entering the assigned Case ID Number at https://rma.dlink.ca/.•  After an RMA number is issued, the defective product must be packaged securely in the original or other suitable shipping package to ensure that it will not be damaged in transit, and the RMA number must be prominently marked on the outside of the package. Do not include any manuals or accessories in the shipping package. D-Link will only replace the defective portion of the product and will not ship back any accessories.
66D-Link DCS-932L User ManualAppendix B - Technical Specications•  The customer is responsible for all in-bound shipping charges to D-Link. No Cash on Delivery (“COD”) is allowed. Products sent COD will be rejected by D-Link. Products shall be fully insured by the customer and shipped to D-Link Networks, Inc., 2525 Meadowvale Boulevard Mississauga, Ontario, L5N 5S2 Canada. D-Link will not be held responsible for any packages that are lost in transit to D-Link. The repaired or replaced packages will be shipped to the customer via Purolator Canada or any common carrier selected by D-Link. Return shipping charges shall be prepaid by D-Link if you use an address in Canada, otherwise we will ship the product to you freight collect. Expedited shipping is available upon request and provided shipping charges are prepaid by the customer. D-Link may reject or return any product that is not packaged and shipped in strict compliance with the foregoing requirements, or for which an RMA number is not visible from the outside of the package. The product owner agrees to pay D-Link’s reasonable handling and return shipping charges for any product that is not packaged and shipped in accordance with the foregoing requirements, or that is determined by D-Link not to be defective or non-conforming.•  RMA phone number: 1-800-361-5265 Hours of Operation: Monday-Friday, 9:00AM – 9:00PM ESTWhat Is Not Covered:The Limited Warranty provided herein by D-Link does not cover:Products that, in D-Link’s judgment, have been subjected to abuse, accident, alteration, modication, tampering, negligence, misuse, faulty installation, lack of reasonable care, repair or service in any way that is not contemplated in the documentation for the product, or if the model or serial number has been altered, tampered with, defaced or removed; Initial installation, installation and removal of the product for repair, and shipping costs; Operational adjustments covered in the operating manual for the product, and normal maintenance; Damage that occurs in shipment, due to act of God, failures due to power surge, and cosmetic damage; Any hardware, software, rmware or other products or services provided by anyone other than D-Link; and Products that have been purchased from inventory clearance or liquidation sales or other sales in which D-Link, the sellers, or the liquidators expressly disclaim their warranty obligation pertaining to the product.While necessary maintenance or repairs on your Product can be performed by any company, we recommend that you use only an Authorized D-Link Service Oce. Improper or incorrectly performed maintenance or repair voids this Limited Warranty.Disclaimer of Other Warranties:EXCEPT FOR THE LIMITED WARRANTY SPECIFIED HEREIN, THE PRODUCT IS PROVIDED “AS-IS” WITHOUT ANY WARRANTY OF ANY KIND WHATSOEVER INCLUDING, WITHOUT LIMITATION, ANY WARRANTY OF MERCHANTABILITY, FITNESS FOR A PARTICULAR PURPOSE AND NONINFRINGEMENT.
67D-Link DCS-932L User ManualAppendix B - Technical SpecicationsIF ANY IMPLIED WARRANTY CANNOT BE DISCLAIMED IN ANY TERRITORY WHERE A PRODUCT IS SOLD, THE DURATION OF SUCH IMPLIED WARRANTY SHALL BE LIMITED TO THE DURATION OF THE APPLICABLE WARRANTY PERIOD SET FORTH ABOVE. EXCEPT AS EXPRESSLY COVERED UNDER THE LIMITED WARRANTY PROVIDED HEREIN, THE ENTIRE RISK AS TO THE QUALITY, SELECTION AND PERFORMANCE OF THE PRODUCT IS WITH THE PURCHASER OF THE PRODUCT.Limitation of Liability:TO THE MAXIMUM EXTENT PERMITTED BY LAW, D-LINK IS NOT LIABLE UNDER ANY CONTRACT, NEGLIGENCE, STRICT LIABILITY OR OTHER LEGAL OR EQUITABLE THEORY FOR ANY LOSS OF USE OF THE PRODUCT, INCONVENIENCE OR DAMAGES OF ANY CHARACTER, WHETHER DIRECT, SPECIAL, INCIDENTAL OR CONSEQUENTIAL (INCLUDING, BUT NOT LIMITED TO, DAMAGES FOR LOSS OF GOODWILL, LOSS OF REVENUE OR PROFIT, WORK STOPPAGE, COMPUTER FAILURE OR MALFUNCTION, FAILURE OF OTHER EQUIPMENT OR COMPUTER PROGRAMS TO WHICH D-LINK’S PRODUCT IS CONNECTED WITH, LOSS OF INFORMATION OR DATA CONTAINED IN, STORED ON, OR INTEGRATED WITH ANY PRODUCT RETURNED TO D-LINK FOR WARRANTY SERVICE) RESULTING FROM THE USE OF THE PRODUCT, RELATING TO WARRANTY SERVICE, OR ARISING OUT OF ANY BREACH OF THIS LIMITED WARRANTY, EVEN IF D-LINK HAS BEEN ADVISED OF THE POSSIBILITY OF SUCH DAMAGES. THE SOLE REMEDY FOR A BREACH OF THE FOREGOING LIMITED WARRANTY IS REPAIR, REPLACEMENT OR REFUND OF THE DEFECTIVE OR NONCONFORMING PRODUCT. THE MAXIMUM LIABILITY OF D-LINK UNDER THIS WARRANTY IS LIMITED TO THE PURCHASE PRICE OF THE PRODUCT COVERED BY THE WARRANTY. THE FOREGOING EXPRESS WRITTEN WARRANTIES AND REMEDIES ARE EXCLUSIVE AND ARE IN LIEU OF ANY OTHER WARRANTIES OR REMEDIES, EXPRESS, IMPLIED OR STATUTORY.Governing Law:This Limited Warranty shall be governed by the laws of the State of California. Some states do not allow exclusion or limitation of incidental or consequential damages, or limitations on how long an implied warranty lasts, so the foregoing limitations and exclusions may not apply. This Limited Warranty provides specic legal rights and you may also have other rights which vary from state to state.Trademarks:D-Link is a registered trademark of D-Link Corporation/D-Link Systems, Inc. Other trademarks or registered trademarks are the property of their respective owners.Copyright Statement:No part of this publication or documentation accompanying this product may be reproduced in any form or by any means or used to make any derivative such as translation, transformation, or adaptation without permission from D-Link Corporation/D-Link Systems, Inc., as stipulated by the United States Copyright Act of 1976 and any amendments thereto. Contents are subject to change without prior notice.Copyright ©2010 by D-Link Corporation/D-Link Systems, Inc. All rights reserved.
68D-Link DCS-932L User ManualAppendix E - WarrantyCE Mark Warning:This is a Class B product. In a domestic environment, this product may cause radio interference, in which case the user may be required to take adequate measures.FCC Statement:This equipment has been tested and found to comply with the limits for a Class B digital device, pursuant to part 15 of the FCC Rules. These limits are designed to provide reasonable protection against harmful interference in a residential installation. This equipment generates, uses, and can radiate radio frequency energy and, if not installed and used in accordance with the instructions, may cause harmful interference to radio communication. However, there is no guarantee that interference will not occur in a particular installation. If this equipment does cause harmful interference to radio or television reception, which can be determined by turning the equipment o and on, the user is encouraged to try to correct the interference by one or more of the following measures:•  Reorient or relocate the receiving antenna.•  Increase the separation between the equipment and receiver.•  Connect the equipment into an outlet on a circuit dierent from that to which the receiver is connected.•  Consult the dealer or an experienced radio/TV technician for help.FCC Caution: Any changes or modications not expressly approved by the party responsible for compliance could void the user’s authority to operate this equipment.This device complies with Part 15 of the FCC Rules. Operation is subject to the following two conditions:(1) This device may not cause harmful interference, and(2) this device must accept any interference received, including interference that may cause undesired operation.If this device is going to be operated in 5.15 ~ 5.25GHz frequency range, then it is restricted in indoor environment only.IMPORTANT NOTICE:FCC Radiation Exposure Statement:This equipment complies with FCC radiation exposure limits set forth for an uncontrolled environment. This equipment should be installed and operated with minimum distance 20cm between the radiator & your body. This transmitter must not be co-located or operating in conjunction with any other antenna or transmitter.The availability of some specic channels and/or operational frequency bands are country dependent and are rmware programmed at the factory to match the intended destination. The rmware setting is not accessible by the end user..
69D-Link DCS-932L User ManualAppendix E - WarrantyFor detailed warranty information applicable to products purchased outside the United States, please contact the corresponding local D-Link oce.Industry Canada Statement:This device complies with RSS-210 of the Industry Canada Rules. Operation is subject to the following two conditions: (1) This device may not cause harmful interference, and(2) this device must accept any interference received, including interference that may cause undesired operation. IMPORTANT NOTE:Radiation Exposure Statement:This equipment complies with Canada radiation exposure limits set forth for an uncontrolled environment. This equipment should be installed and operated with minimum distance 20cm between the radiator and your body. This device has been designed to operate with an antenna having a maximum gain of 2 dB. Antenna having a higher gain is strictly prohibited per regulations of Industry Canada. The required antenna impedance is 50 ohms.
Appendix E - Registration70D-Link DCS-932L User ManualVersion 1.0November 04, 2010Product registration is entirely voluntary and failure to complete or return this form will not diminish your warranty rights.Registration
FCC Notices  This device complies with Part 15 of the FCC Rules. Operation is subject to the following two conditions: (1) this device may not cause harmful interference, and (2) this device must accept any interference received, including interference that may cause undesired operation.  CAUTION: Change or modification not expressly approved by the party responsible for compliance could void the user’s authority to operate this equipment.           This equipment has been tested and found to comply with the limits for a Class B digital device, pursuant to Part 15 of the FCC Rules. These limits are designed to provide reasonable protection against harmful interference in a residential installation. This equipment generates, uses and can radiate radio frequency energy and, if not installed and used in accordance with the instructions, may cause harmful interference to radio communications. However, there is no guarantee that interference will not occur in a particular installation. If this equipment does cause harmful interference to radio or television reception, which can be determined by turning the equipment off and on, the user is encouraged to try to correct the interference by one or more of the following measures: --Reorient or relocate the receiving antenna. --Increase the separation between the equipment and receiver. --Connect the equipment into an outlet on a circuit different from that to which the receiver is connected. --Consult the dealer or an experienced radio/TV technician for help.  CAUTION: Any changes or modifications not expressly approved by the grantee of this device could void the user's authority to operate the equipment.    RF exposure warning   This equipment must be installed and operated in accordance with provided instructions and the antenna(s) used for this transmitter must be installed to provide a separation distance of at least 20 cm from all persons and must not be co-located or operating in conjunction with any other antenna or transmitter. End-users and installers must be provide with antenna installation instructions and transmitter operating conditions for satisfying RF exposure compliance."
 Canada Notices Industry Canada regulatory information  Operation is subject to the following two conditions: (1) this device may not cause interference, and (2) this device must accept any interference, including interference that may cause undesired operation of the device.  The user is cautioned that this device should be used only as specified within this manual to meet RF exposure requirements.  Use of this device in a manner inconsistent with this manual could lead to excessive RF exposure conditions.

Navigation menu