User manual

QUICK
INSTALLATION
GUIDE
КРАТКОЕ РУКОВОДСТВО ПО УСТАНОВКЕ
GUÍA DE INSTALACIÓN RÁPIDA
GUIA DE INSTALAÇÃO RÁPIDA
快速安裝指南
PETUNJUK PEMASANGAN CEPAT
HD Wi-Fi Camera
DCS-936L
DCS-936L 1
ENGLISH
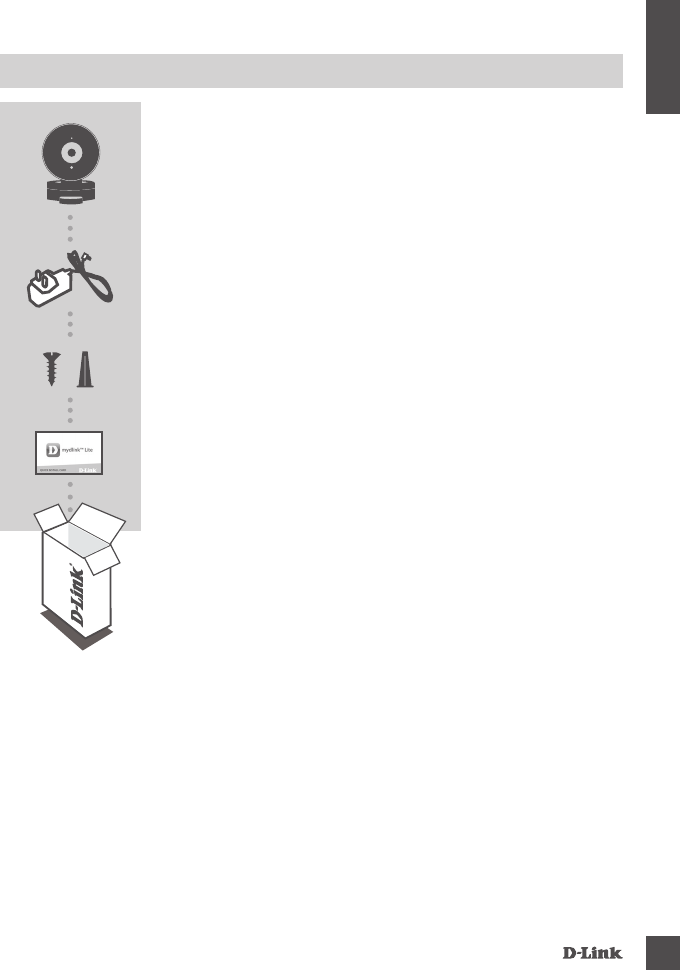
CONTENTS OF PACKAGING
HD WI-FI CAMERA
DCS-936L
MOUNTING KIT
POWER ADAPTER
If any of these items are missing from your
packaging, contact your reseller.
QUICK INSTALL CARD
DCS-936L
2
ENGLISH
SYSTEM REQUIREMENTS
• 802.11n/g router (a D-Link Cloud Router is recommended)
• A broadband Internet connection
• iPhone, iPad, Android, or Windows smartphone or tablet (please refer to the
mobile app's store page to check whether your device is compatible)
Please follow the instructions below to set up your mydlink camera.
Congratulations, your DCS-936L is now ready to use! Be sure to check the
mydlink.com website periodically for the latest rmware updates to keep your
product secure and up to date with the latest features.
Note: If you experience issues registering this camera with your mydlink
account, or if you purchased an open box or resold unit, perform a hard reset
by pressing and holding the reset button on the device for 10 seconds while
the device is powered on. If you are returning the device to the place of
purchase, please perform the hard reset procedure to clear the device of
any personal data.
Step 1: On your mobile device, download mydlink Lite by searching for
mydlink Lite in the iTunes App Store, Google Play, or the Windows
Store.
Step 2: Launch the mydlink Lite app and create a new account or sign in to
your existing account.
When you are asked to scan a QR code, use the code on the Quick
Install Card in your package, or on the label attached to your device.
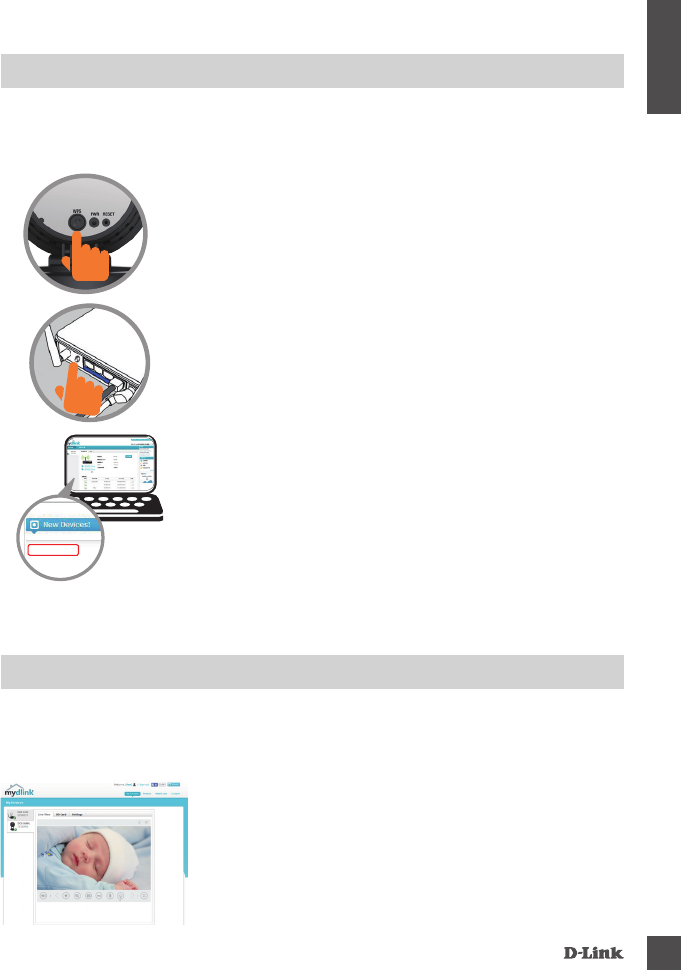
PRODUCT SETUP
SeTTiNG UP YOUr Camera WiTH mYDLiNK LiTe
DCS-936L 3
ENGLISH
Step 2:
Press the WPS button on your Cloud Router within
120 seconds. The DCS-936L will automatically
create a wireless connection to your router and
automatically reboot.
Step 3:
From any computer, open a web browser, go to
http://www.mydlink.com and log in to your account.
Click on the device name when the new device
notication appears to add the camera to your
account.
DCS-936L
If you have a D-Link Cloud Router, you can take advantage of Zero
Conguration Setup. This feature congures your camera’s settings for you
and adds it to your mydlink account automatically.
PRODUCT SETUP
ZerO CONFiGUraTiON SeTUP
Step 1:
Press the WPS button on the camera. The PWR LED
will start blinking.
Step 1:
Open Internet Explorer and go to www.mydlink.
com, then sign into mydlink.
Step 2:
Select your camera from the device list, and your
camera’s Live View will appear.
After registering your DCS-936L camera with a mydlink account in the mydlink
Lite mobile app, you will be able to remotely access your camera from the
mydlink website.
mydlink PORTAL
DCS-936L
4
ENGLISH
MOUNTING THE CAMERA
Please refer to the steps below to assist you with mounting the camera. It is
recommended that you congure the camera before mounting.
1Step 1:
Place your thumb behind the camera hinge as
shown, then press down on a base release nub and
pull to detach the camera from the camera base.
Step 6:
Attach the camera to the camera base and pull the
power cable to remove the extra cable. Adjust the
angle of the camera as desired.
6
Step 4:
Pull the power cable through the middle of the
camera base and through the cable channel as
shown.
4
Step 2:
Place the camera base where you want to position
the camera and use a pencil to mark the holes. Make
sure that the cable channel on the camera base is
facing in the direction you want.
2
Step 3:
Depending on the material of the wall or ceiling, use
proper tools to drill two holes 25mm deep with a 6mm
drill bit where you marked. If the wall is made out of
concrete, drill the holes rst, then insert the plastic
anchors to support the screws.
3
Step 5:
Place the camera base over the holes that are in
the wall. Make sure to align the camera base holes
with the holes in the wall. Use the supplied screws to
attach the camera base to the surface of the wall.
5

DCS-936L 5
ENGLISH
TROUBLESHOOTING
SeTUP aND CONFiGUraTiON PrOBLemS
1. WHY IS THE CAMERA VIEW HAZY OR BRIGHT WHEN USING NIGHT VISION
MODE?
The IR night vision lights on the camera may be reecting off of a nearby
surface or window. Try repositioning your camera to avoid reections or
glare.
2. WHAT CAN I DO IF I FORGET MY CAMERA PASSWORD?
If you forget your camera password, you will need to perform a hard reset
of your camera. This process will change all your settings back to the
factory defaults.
To reset your camera, please use an unfolded paperclip to press and hold
the RESET button for at least 10 seconds while your camera is plugged in.
FCC Statement:
Federal Communication Commission Interference Statement
This equipment has been tested and found to comply with the limits for a Class B digital device, pursuant
to Part 15 of the FCC Rules. These limits are designed to provide reasonable protection against harmful
interference in a residential installation. This equipment generates, uses and can radiate radio frequency
energy and, if not installed and used in accordance with the instructions, may cause harmful interference
to radio communications. However, there is no guarantee that interference will not occur in a particular
installation. If this equipment does cause harmful interference to radio or television reception, which can
be determined by turning the equipment off and on, the user is encouraged to try to correct the
interference by one of the following measures:
● Reorient or relocate the receiving antenna.
● Increase the separation between the equipment and receiver.
● Connect the equipment into an outlet on a circuit different from that to which the receiver is connected.
● Consult the dealer or an experienced radio/TV technician for help.
FCC Caution: Any changes or modifications not expressly approved by the party
responsible for compliance could void the user’s authority to operate this equipment.
This device complies with Part 15 of the FCC Rules. Operation is subject to the following two conditions:
(1) This device may not cause harmful interference, and (2) this device must accept any interference
received, including interference that may cause undesired operation.
For product available in the USA/Canada market, only channel 1~11 can be operated. Selection of other
channels is not possible.
This device and it's antennas(s) must not be co-located or operating in conjunction with any other
antenna or transmitter except in accordance with FCC multi-transmitter product procedures.
IMPORTANT NOTE:
FCC Radiation Exposure Statement:
This equipment complies with FCC radiation exposure limits set forth for an uncontrolled environment.
This equipment should be installed and operated with minimum distance 20 cm between the radiator &
your body.
(1) 「經型式認證合格之低功率射頻電機,非經許可,公司、商號或使用者均不得擅自變更頻率、加大功率
或變更原設計之特性及功能」。
(2) 「低功率射頻電機之使用不得影響飛航安全及干擾合法通信;經發現有干擾現象時,應立即停用,並改
善至無干擾時方得繼續使用。前項合法通信,指依電信法規定作業之無線電通信。低功率射頻電機
須忍受合法通信或工業、科學及醫療用電波輻射性電機設備之干擾」。