D Link DI524H1 Wireless Router User Manual Manual part 4
D Link Corporation Wireless Router Manual part 4
D Link >
Contents
- 1. Manual part 1
- 2. Manual part 2
- 3. Manual part 3
- 4. Manual part 4
- 5. Manual part 5
Manual part 4
47
Networking Basics
Naming your Computer
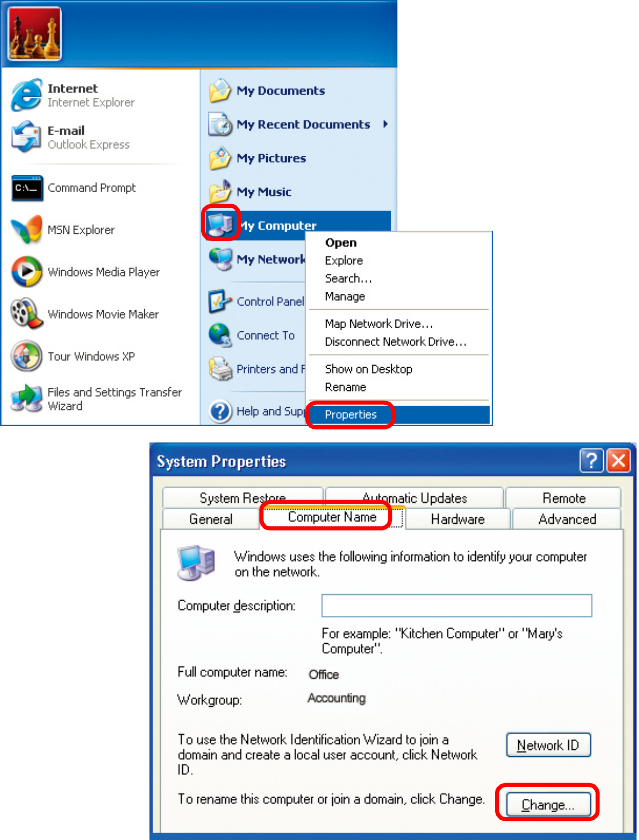
To name your computer, please follow these directions:In Windows XP:
Click Start (in the lower left corner of the screen)
Right-click on My Computer
Select Properties and click
Select the Computer
Name Tab in the System
Properties window.
You may enter a
Computer Description
if you wish; this eld is
optional.
To rename the computer
and join a domain, Click
Change.
48
Networking Basics
Naming your Computer
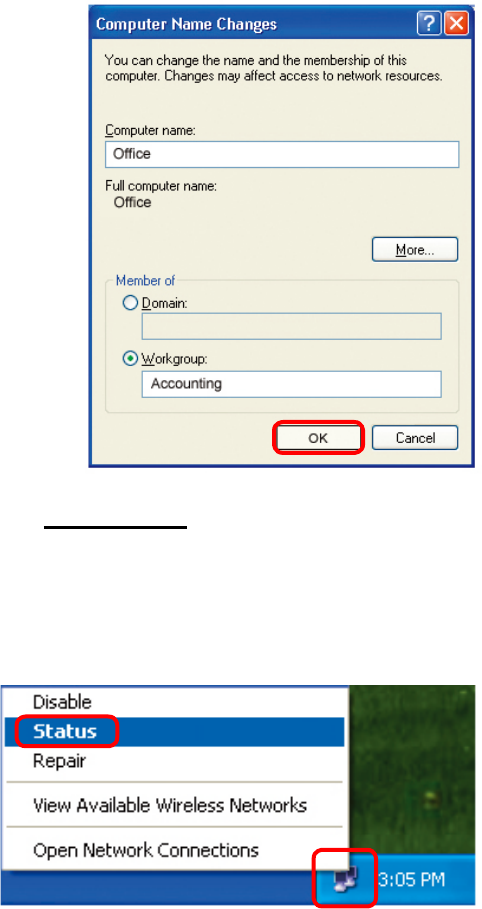
In this window, enter the
Computer name
Select Workgroup and enter
the name of the Workgroup
All computers on your
network must have the same
Workgroup name.
Click OK
Checking the IP Address in Windows XP
The wireless adapter-equipped computers in your network must be in the same IP Ad-
dress range (see Getting Started in this manual for a denition of IP Address Range.)
To check on the IP Address of the adapter, please do the following:
Right-click on
the Local Area
Connection icon
in the task bar
Click on Status
49
Networking Basics
Checking the IP Address in Windows XP
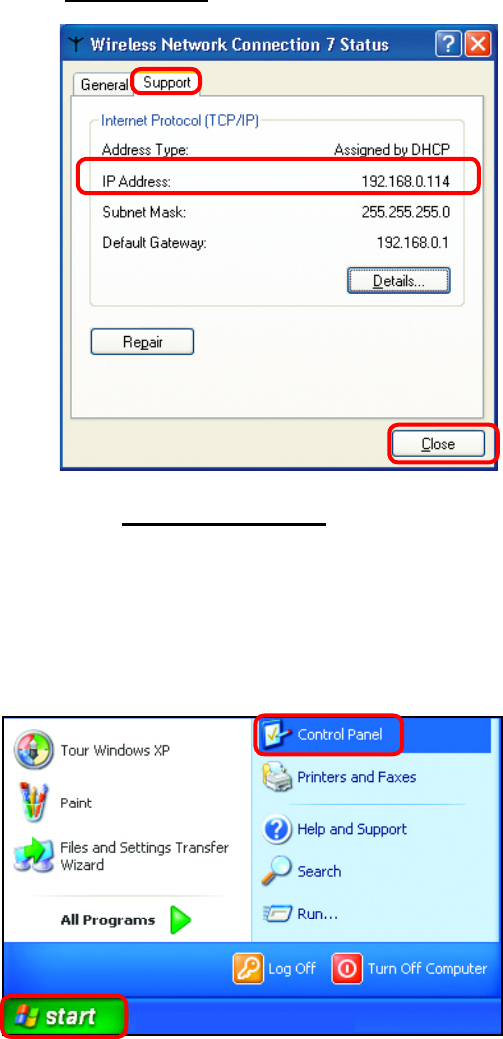
This window will appear.
Click the
Support tab
Click Close
Assigning a Static IP Address in Windows XP/2000
Note: Residential Gateways/Broadband Routers will automatically assign IP Addresses
to the computers on the network, using DHCP (Dynamic Host Conguration Protocol)
technology. If you are using a DHCP-capable Gateway/Router you will not need to
assign Static IP Addresses.
If you are not using a DHCP capable Gateway/Router, or you need to assign a Static
IP Address, please follow these instructions:
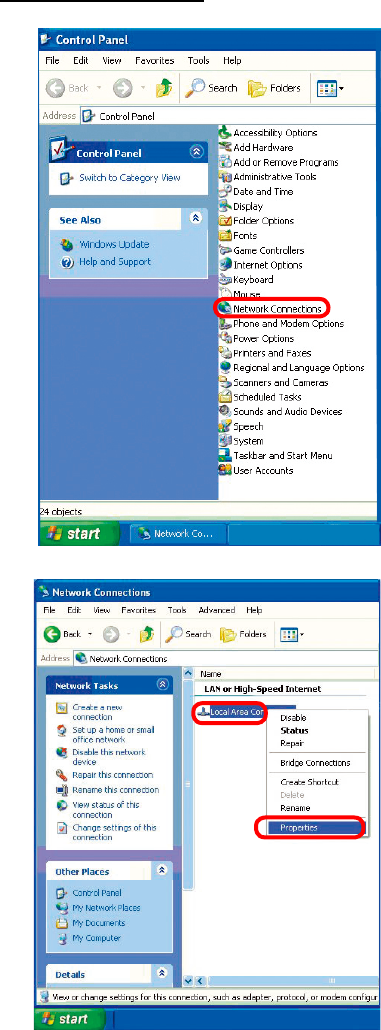
Go to Start
Double-click on
Control Panel
50
Networking Basics
Assigning a Static IP Address in Windows XP/2000
Double-click
on Network
Connections
Double-click on
Properties
Right-click on Local Area
Connections
51
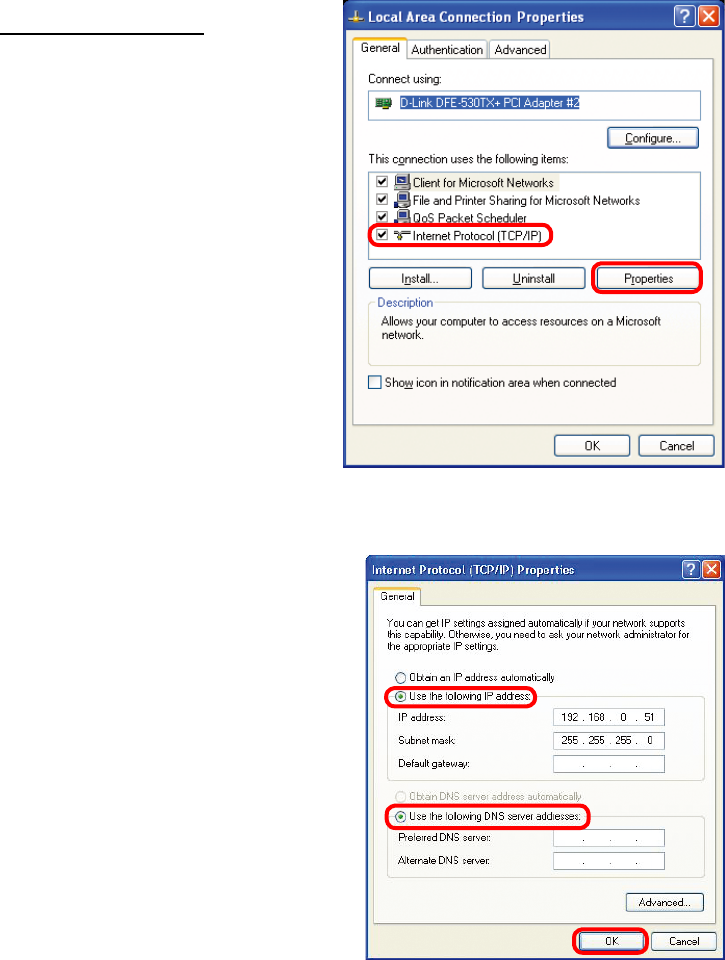
Input your IP address and
subnet mask. (The IP
Addresses on your network
must be within the same
range. For example, if
one computer has an IP
Address of 192.168.0.2,
the other computers should
have IP Addresses that are
sequential, like 192.168.0.3
and 192.168.0.4. The subnet
mask must be the same for
all the computers on the
network.)
Networking Basics
Assigning a Static IP Address
in Windows XP/2000
Input your DNS server
addresses. (Note: If you
are entering a DNS server,
you must enter the IP
Address of the Default
Gateway.)
The DNS server information will be supplied
by your ISP (Internet Service Provider.)
Click OK
Click on Internet Protocol
(TCP/IP)
Click Properties
52
Networking Basics
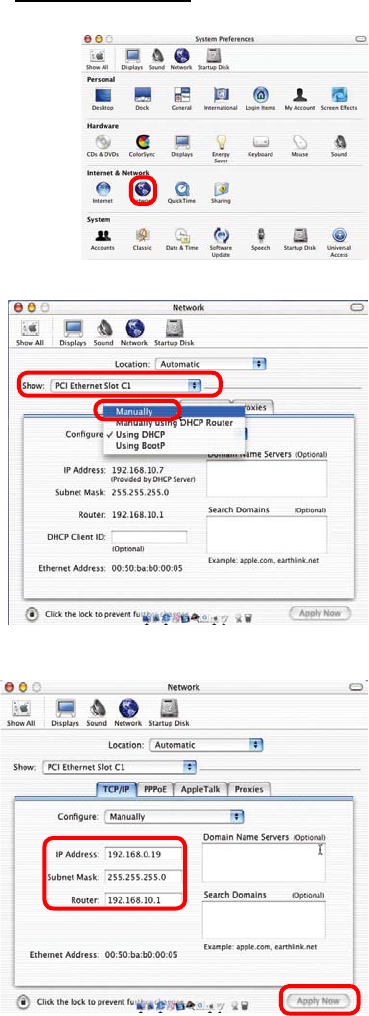
Assigning a Static IP Address with Macintosh OSX
Go to the Apple Menu and select
System Preferences
cClick on Network
Select Built-in Ethernet in the
Show pull-down menu
Select Manually in the
Congure pull-down menu
Input the Static IP Address,
the Subnet Mask and the
Router IP Address in the
appropriate elds
Click Apply Now
53
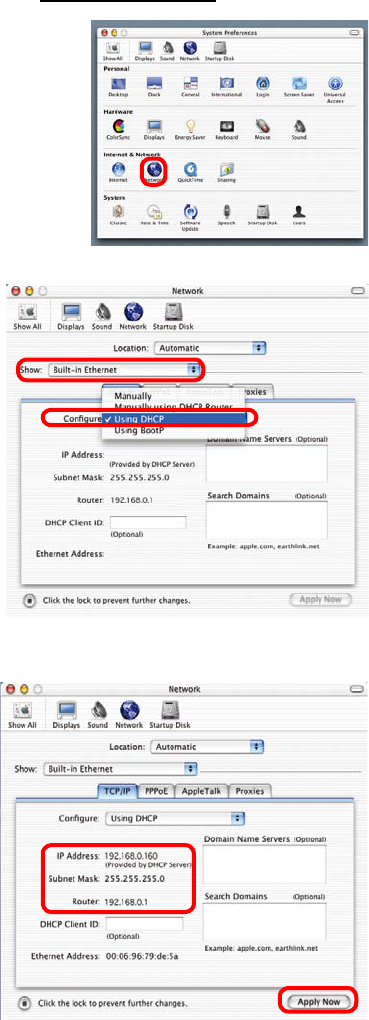
Networking Basics
Selecting a Dynamic IP Address with Macintosh OSX
Go to the Apple Menu and select
System Preferences
Click on Network
Select Built-in Ethernet in the
Show pull-down menu
Select Using DHCP in the
Congure pull-down menu
Click Apply Now
The IP Address, Subnet
mask, and the Router’s IP
Address will appear in a few
seconds
54
Networking Basics
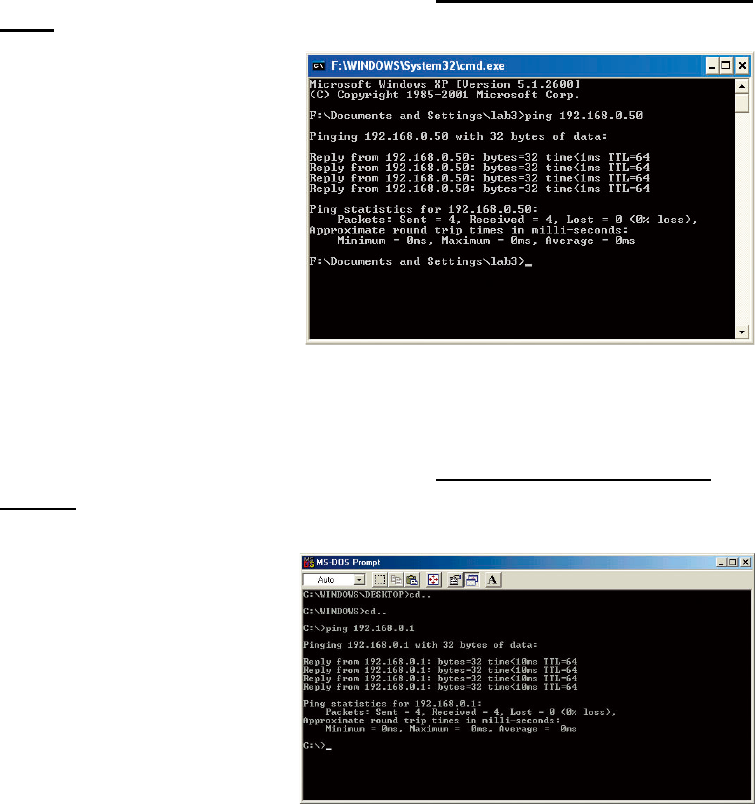
Checking the Wireless Connection by Pinging in Windows XP and
2000
Checking the Wireless Connection by Pinging in Windows Me
and 98
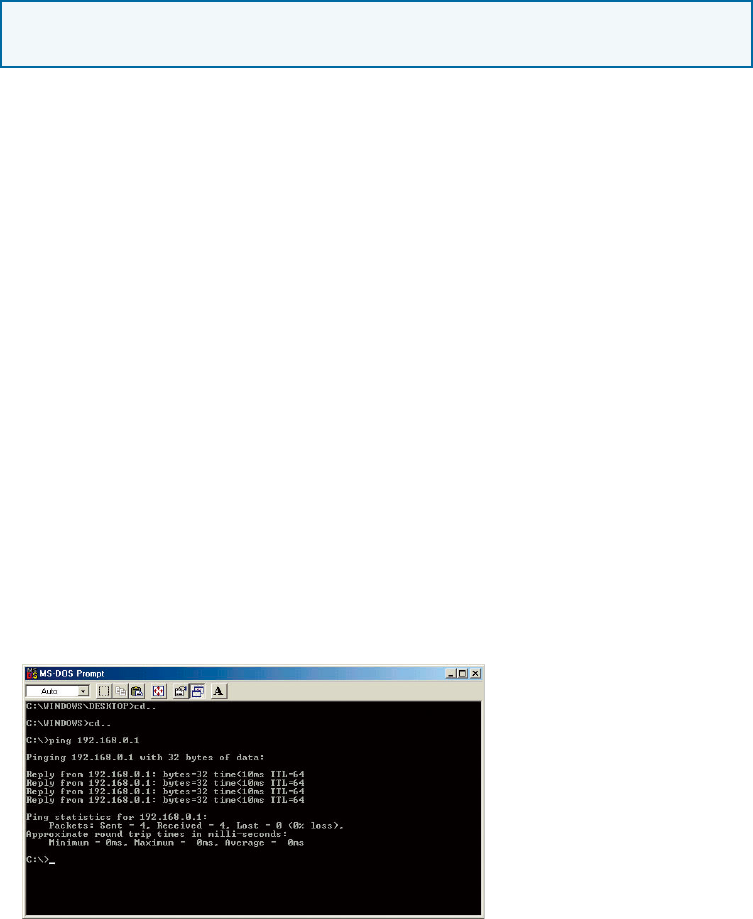
Go to Start > Run >
type cmd. A window
similar to this one
will appear. Type
ping xxx.xxx.xxx.
xxx, where xxx is
the IP Address of
the Wireless Router
or Access Point.
A good wireless
connection will show
four replies from
the Wireless Router
or Acess Point, as
shown.
Go to Start > Run
> type command.
A window similar
to this will appear.
Type ping xxx.xxx.
xxx.xxx where xxx
is the IP Address
of the Wireless
Router or Access
Point. A good
wireless connection
will show four
replies from the
wireless router or
access point, as
shown.
55
Troubleshooting
This Chapter provides solutions to problems that can occur during the installation and
operation of the DI-524 Wireless Broadband Router. We cover various aspects of the
network setup, including the network adapters. Please read the following if you are
having problems.
Note: If you have
changed the default IP
Address, make sure to
ping the correct IP Ad-
dress assigned to the
DI-524.
Note: It is recommended that you use an Ethernet connection to
congure the DI-524 Wireless Broadband Router.
1. The computer used to congure the DI-524 cannot access the
Conguration menu.
Check that the Ethernet LED on the DI-524 is ON. If the LED is not
ON, check that the cable for the Ethernet connection is securely
inserted.
Check that the Ethernet Adapter is working properly. Please see
item 3 (Check that the drivers for the network adapters are
installed properly) in this Troubleshooting section to check that
the drivers are loaded properly.
Check that the IP Address is in the same range and subnet as the
DI-524. Please see Checking the IP Address in Windows XP in
the Networking Basics section of this manual.
Note: The IP Address of the DI-524 is 192.168.0.1. All the computers on the
network must have a unique IP Address in the same range, e.g., 192.168.0.x.
Any computers that have identical IP Addresses will not be visible on the
network. They must all have the same subnet mask, e.g., 255.255.255.0
Do a Ping test to make sure that the DI-524 is responding. Go to
Start>Run>Type Command>Type ping 192.168.0.1. A successful
ping will show four replies.
56
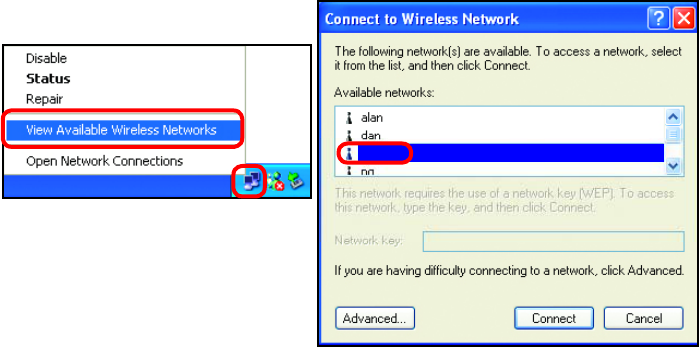
2. The wireless client cannot access the Internet in the
Infrastructure mode.
Make sure the wireless client is associated and joined with the correct Access
Point. To check this connection: Right-click on the Local Area Connection
icon in the taskbar> select View Available Wireless Networks. The Connect to
Wireless Network screen will appear. Please make sure you have selected the
correct available network, as shown in the illustrations below.
Troubleshooting
Check that the IP Address assigned to the wireless adapter is within
the same IP Address range as the access point and gateway. (Since
the DI-524 has an IP Address of 192.168.0.1, wireless adapters must
have an IP Address in the same range, e.g., 192.168.0.x. Each device
must have a unique IP Address; no two devices may have the same IP
Address. The subnet mask must be the same for all the computers on
the network.) To check the IP Address assigned to the wireless adapter,
double-click on the Local Area Connection icon in the taskbar >
select the Support tab and the IP Address will be displayed. (Please
refer to Checking the IP Address in the Networking Basics section of
this manual.)
If it is necessary to assign a Static IP Address to the wireless adapter,
please refer to the appropriate section in Networking Basics. If you
are entering a DNS Server address you must also enter the Default
Gateway Address. (Remember that if you have a DHCP-capable router,
you will not need to assign a Static IP Address. See Networking
Basics: Assigning a Static IP Address.)
57
Troubleshooting
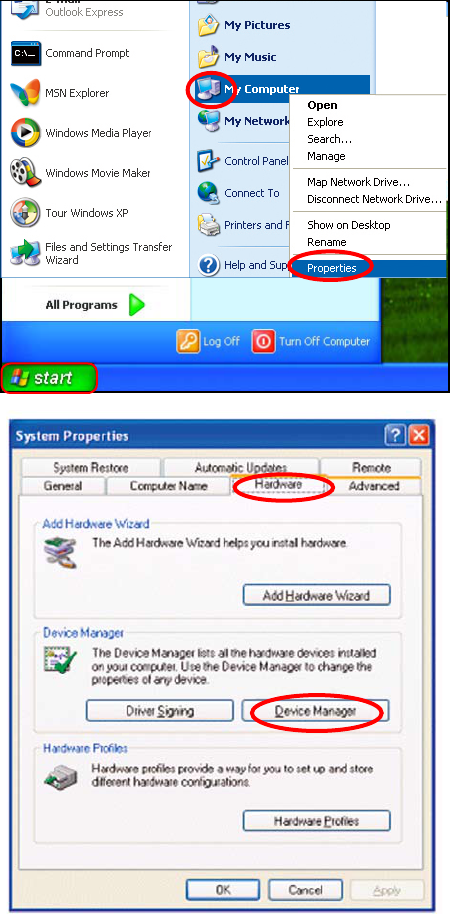
3. Check that the drivers for the network adapters are
installed properly.
You may be using different network adapters than those illustrated here, but this
procedure will remain the same, regardless of the type of network adapters you are
using.
Click Device
Manager
Select the
Hardware
Tab
Go to Start >
My Computer >
Properties
58
Troubleshooting
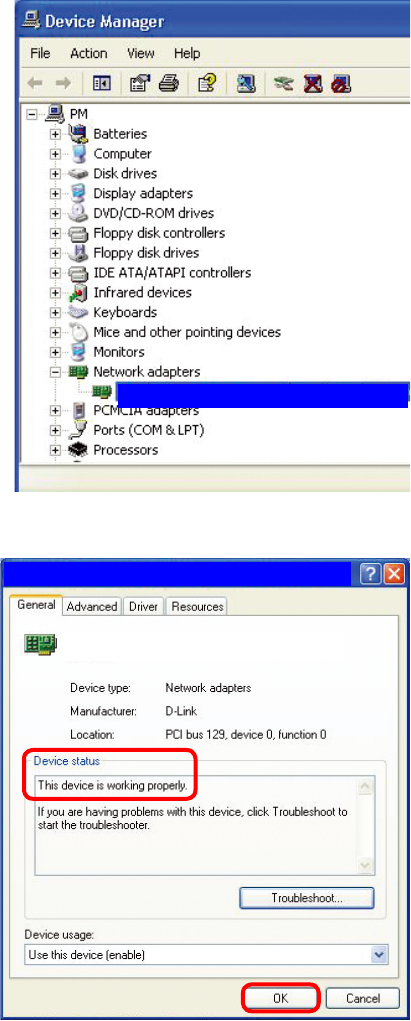
Double-click
on Network
Adapters
Right-click on D-Link
AirPlus DWL-G650
Wireless Cardbus
Adapter (In this example
we use the DWL-G650;
you may be using other
network adapters, but
the procedure will remain
the same.)
Select Properties
to check that
the drivers are
installed properly
Look under Device
Status to check that the
device is working
properly
Click OK
D-Link AirPlus DWL-G650 Wireless Cardbus Adapter
D-Link AirPlus DWL-G650 Wireless Cardbus Adapter
D-Link AirPlus DWL-G650
59
Troubleshooting
4. What variables may cause my wireless products
to lose reception?
D-Link products let you access your network from virtually anywhere you want. However,
the positioning of the products within your environment will affect the wireless range.
Please refer to Installation Considerations in the Wireless Basics section of this
manual for further information about the most advantageous placement of your D-Link
wireless products.
5. Why does my wireless connection keep dropping?
6. Why can’t I get a wireless connection?
If you have enabled Encryption on the DI-524, you must also enable encryption on all
wireless clients in order to establish a wireless connection.
Make sure that the SSID on the Router and the Wireless Client are exactly the
same. If they are not, wireless connection will not be established.
For 802.11b, the Encryption settings are: 64, 128, or 256 bit. Make sure that
the encryption bit level is the same on the Router and the Wireless Client.
Move the DI-524 and the wireless client into the same room and then test the
wireless connection.
Disable all security settings. (WEP, MAC Address Control)
Antenna Orientation- Try different antenna orientations for the DI-524. Try to
keep the antenna at least 6 inches away from the wall or other objects.
If you are using 2.4GHz cordless phones, X-10 equipment or other home
security systems, ceiling fans, and lights, your wireless connection will degrade
dramatically or drop altogether. Try changing the Channel on your Router, Access
Point and Wireless adapter to a different Channel to avoid interference.
Keep your product away (at least 3-6 feet) from electrical devices that generate
RF noise, like microwaves, Monitors, electric motors, etc.
60
Troubleshooting
6. Why can’t I get a wireless connection? (continued)
Turn off your DI-524 and the client. Turn the DI-524 back on again, and then
turn on the client.
Check that the LED indicators are indicating normal activity. If not, check that
the AC power and Ethernet cables are rmly connected.
Make sure that all devices are set to Infrastructure mode.
Check that the IP Address, subnet mask, gateway and DNS settings are cor-
rectly entered for the network.
If you are using 2.4GHz cordless phones, X-10 equipment or other home se-
curity systems, ceiling fans, and lights, your wireless connection will degrade
dramatically or drop altogether. Try changing the Channel on your DI-524, and
on all the devices in your network to avoid interference.
Keep your product away (at least 3-6 feet) from electrical devices that generate
RF noise, like microwaves, Monitors, electric motors, etc.
7. I forgot my encryption key.
Reset the DI-524 to its factory default settings and restore the other devices on
your network to their default settings. You may do this by pressing the Reset
button on the back of the unit. You will lose the current conguration settings.
61
8. Resetting the DI-524 to Factory Default Settings
After you have tried other methods for troubleshooting your network, you may
choose to Reset the DI-524 to the factory default settings. Remember that
D-Link AirPro products network together, out of the box, at the factory default
settings.
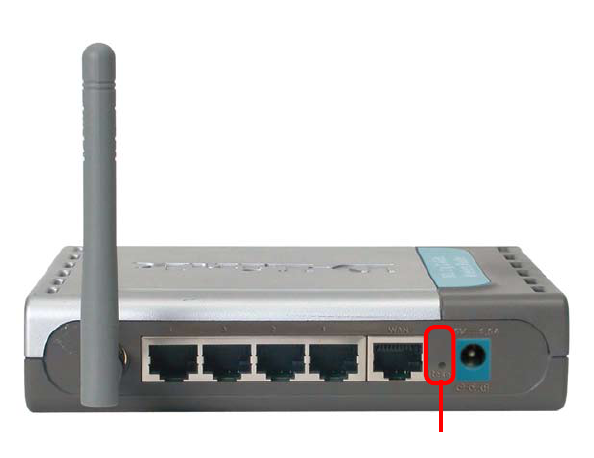
To hard-reset the DI-524 to Factory Default Settings, please do the following:
Troubleshooting
After the DI-524 reboots (this may take a few minutes)
it will be reset to the factory Default settings
Use a paper clip to press the Reset button
Hold for about 10 seconds and then release
Locate the Reset button on the back of the DI-524
Reset
62
IP Filtering
URL Filtering
Domain Blocking
Scheduling
IEEE 802.11b
IEEE 802.3
IEEE 802.3u
Technical Specications
L2TP
Standards
VPN Pass Through/ Multi-Sessions
PPTP
Device Management
Web-Based- Internet Explorer v6 or later; Netscape Navigator v7
or later; or other Java-enabled browsers
Advanced Firewall Features
NAT with VPN Passthrough (Network Address Translation)
95% maximum (non-condensing)
Wireless Operating Range
Operating Temperature
32ºF to 131ºF (0ºC to 55ºC)
Humidity:
Indoors – up to 328 feet (100 meters)
IPSec
DHCP Server and Client
MAC Filtering
Outdoors – up to 984 feet (300 meters)
Safety and Emissions:
FCC, CE
IEEE 802.11g
2.4GHz to 2.462GHz
Wireless Frequency Range: