D Link DIR825B1 Xtreme N DUAL BAND GIGABIT ROUTER User Manual Manual Part 2
D Link Corporation Xtreme N DUAL BAND GIGABIT ROUTER Manual Part 2
D Link >
Contents
Manual Part 2
21D-Link DIR-825 User Manual
Section 3 - Configuration
Select Static if your ISP assigned you the IP
address, subnet mask, gateway, and DNS server
addresses. In most cases, select Dynamic.
Enter the IP address (Static PPTP only).
Enter the Primary and Secondary DNS Server
Addresses (Static PPTP only).
Enter the Gateway IP Address provided by your
ISP.
Enter the Server IP provided by your ISP
(optional).
Enter your PPTP username.
Enter your PPTP password and then retype the
password in the next box.
Select either Always-on, On-Demand, or
Manual.
Enter a maximum idle time during which the Internet connection is maintained during inactivity. To disable this feature,
enable Auto-reconnect.
Address Mode:
PPTP IP Address:
PPTP Subnet Mask:
PPTP Gateway:
PPTP Server IP:
Internet Setup
PPTP
Choose PPTP (Point-to-Point-Tunneling Protocol ) if your ISP uses a PPTP connection. Your ISP will provide you with
a username and password. This option is typically used for DSL services.
Username:
Password:
Reconnect Mode:
Maximum Idle Time:

22D-Link DIR-825 User Manual
Section 3 - Configuration
The DNS server information will be supplied by your ISP (Internet Service Provider.)
Maximum Transmission Unit - you may need to change the MTU for optimal performance with your specific ISP. 1400 is the
default MTU.
The default MAC Address is set to the Internet port’s physical interface MAC address on the Broadband Router. It is not
recommended that you change the default MAC address unless required by your ISP. You can use the Clone Your PC’s
MAC Address button to replace the Internet port’s MAC address with the MAC address of your Ethernet card.
DNS Servers:
MTU:
MAC Address:
23D-Link DIR-825 User Manual
Section 3 - Configuration
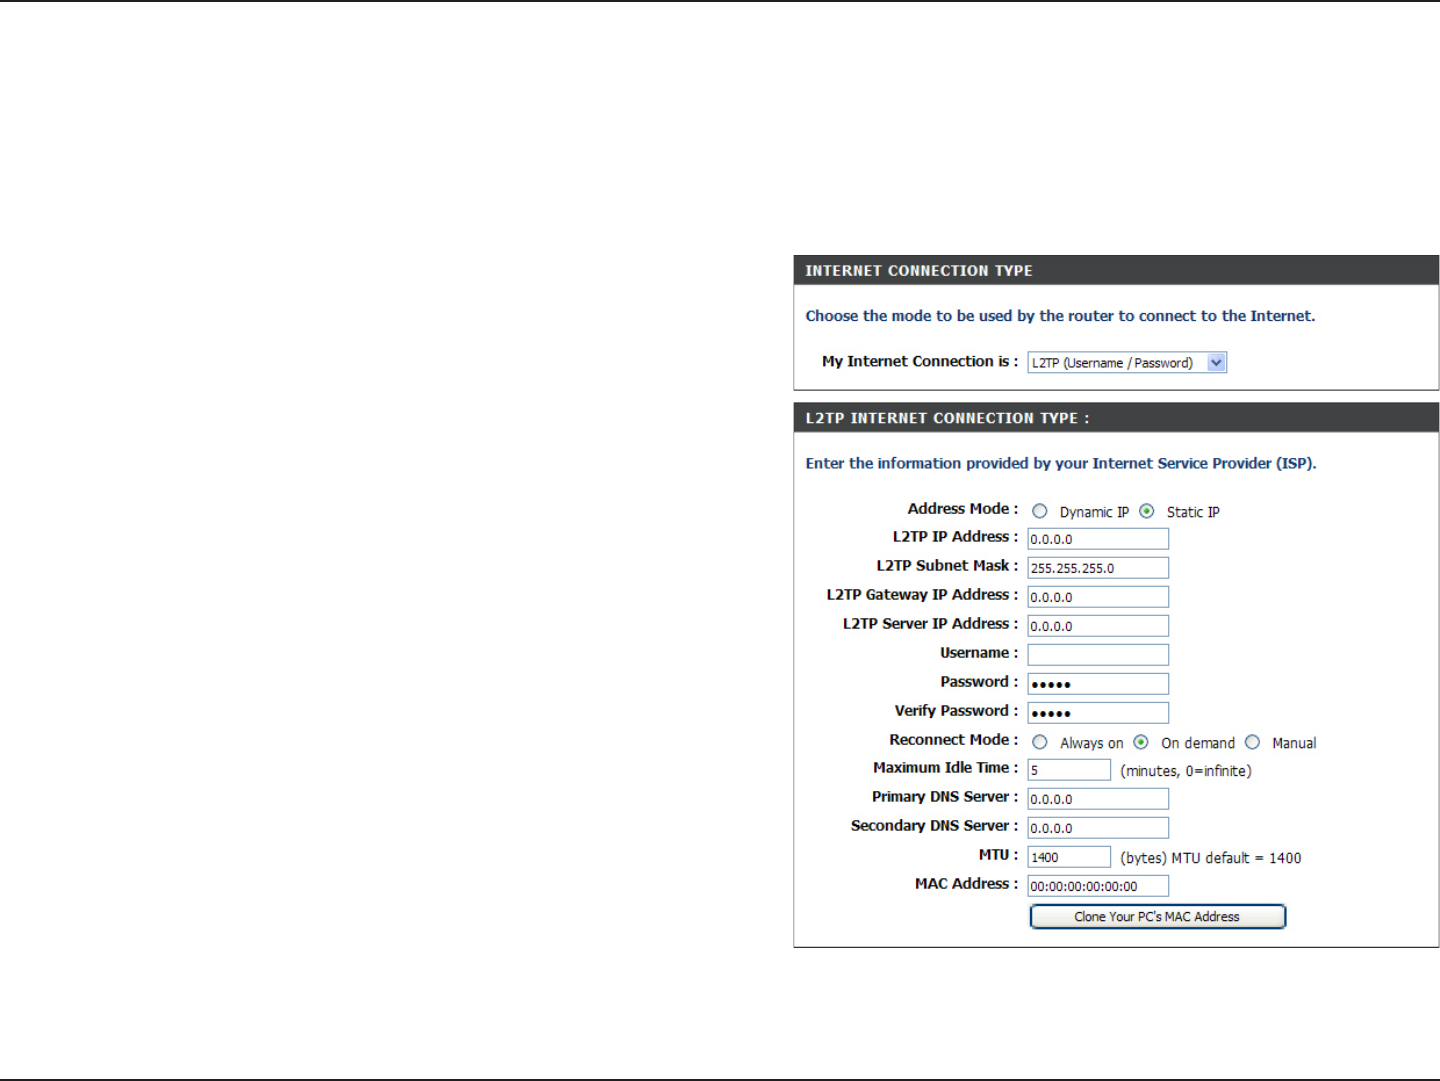
Select Static if your ISP assigned you the IP address,
subnet mask, gateway, and DNS server addresses. In most
cases, select Dynamic.
Enter the L2TP IP address supplied by your ISP (Static
only).
Enter the Subnet Mask supplied by your ISP (Static only).
Enter the Gateway IP Address provided by your ISP.
Enter the Server IP provided by your ISP (optional).
Enter your L2TP username.
Enter your L2TP password and then retype the password
in the next box.
Select either Always-on, On-Demand, or Manual.
Enter a maximum idle time during which the Internet
connection is maintained during inactivity. To disable this
feature, enable Auto-reconnect.
Enter the Primary and Secondary DNS Server Addresses
(Static L2TP only).
Address Mode:
L2TP IP Address:
L2TP Subnet Mask:
L2TP Gateway:
L2TP Server IP:
Username:
Password:
Reconnect Mode:
Maximum Idle Time:
DNS Servers:
Internet Setup
L2TP
Choose L2TP (Layer 2 Tunneling Protocol) if your ISP uses a L2TP connection. Your ISP will provide you with a username
and password. This option is typically used for DSL services.

24D-Link DIR-825 User Manual
Section 3 - Configuration
MTU:
Clone MAC
Address:
Maximum Transmission Unit - you may need to change the MTU for optimal performance with your specific ISP. 1400 is the
default MTU.
The default MAC Address is set to the Internet port’s physical interface MAC address on the Broadband Router. It is not
recommended that you change the default MAC address unless required by your ISP. You can use the Clone Your PC’s
MAC Address button to replace the Internet port’s MAC address with the MAC address of your Ethernet card.
25D-Link DIR-825 User Manual
Section 3 - Configuration
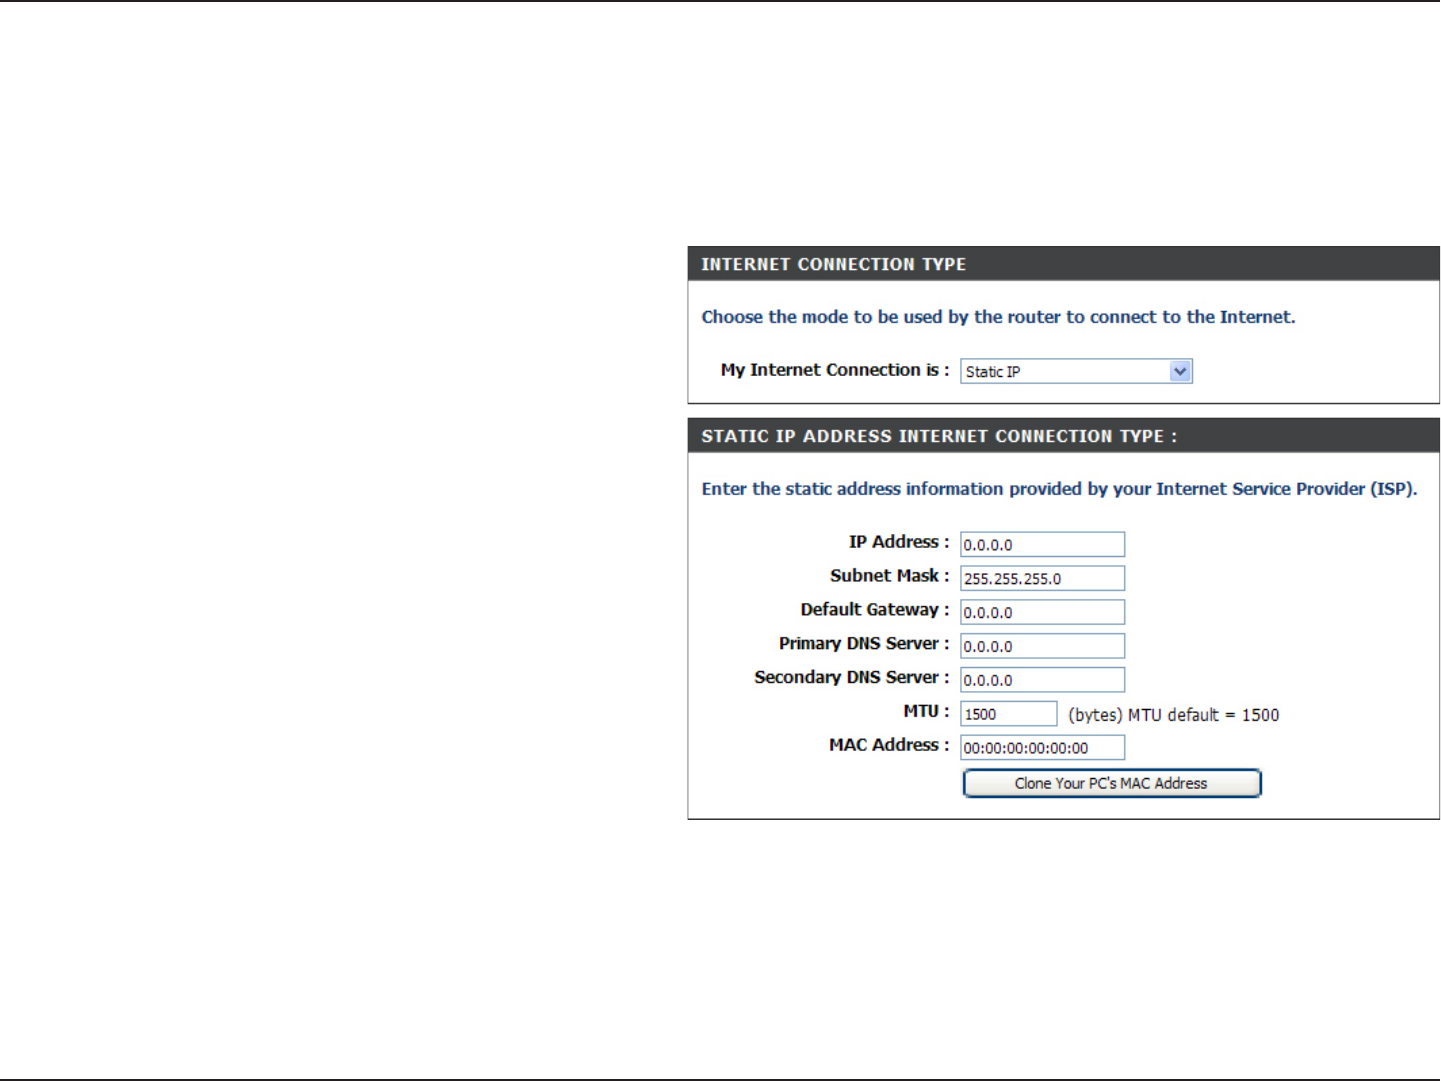
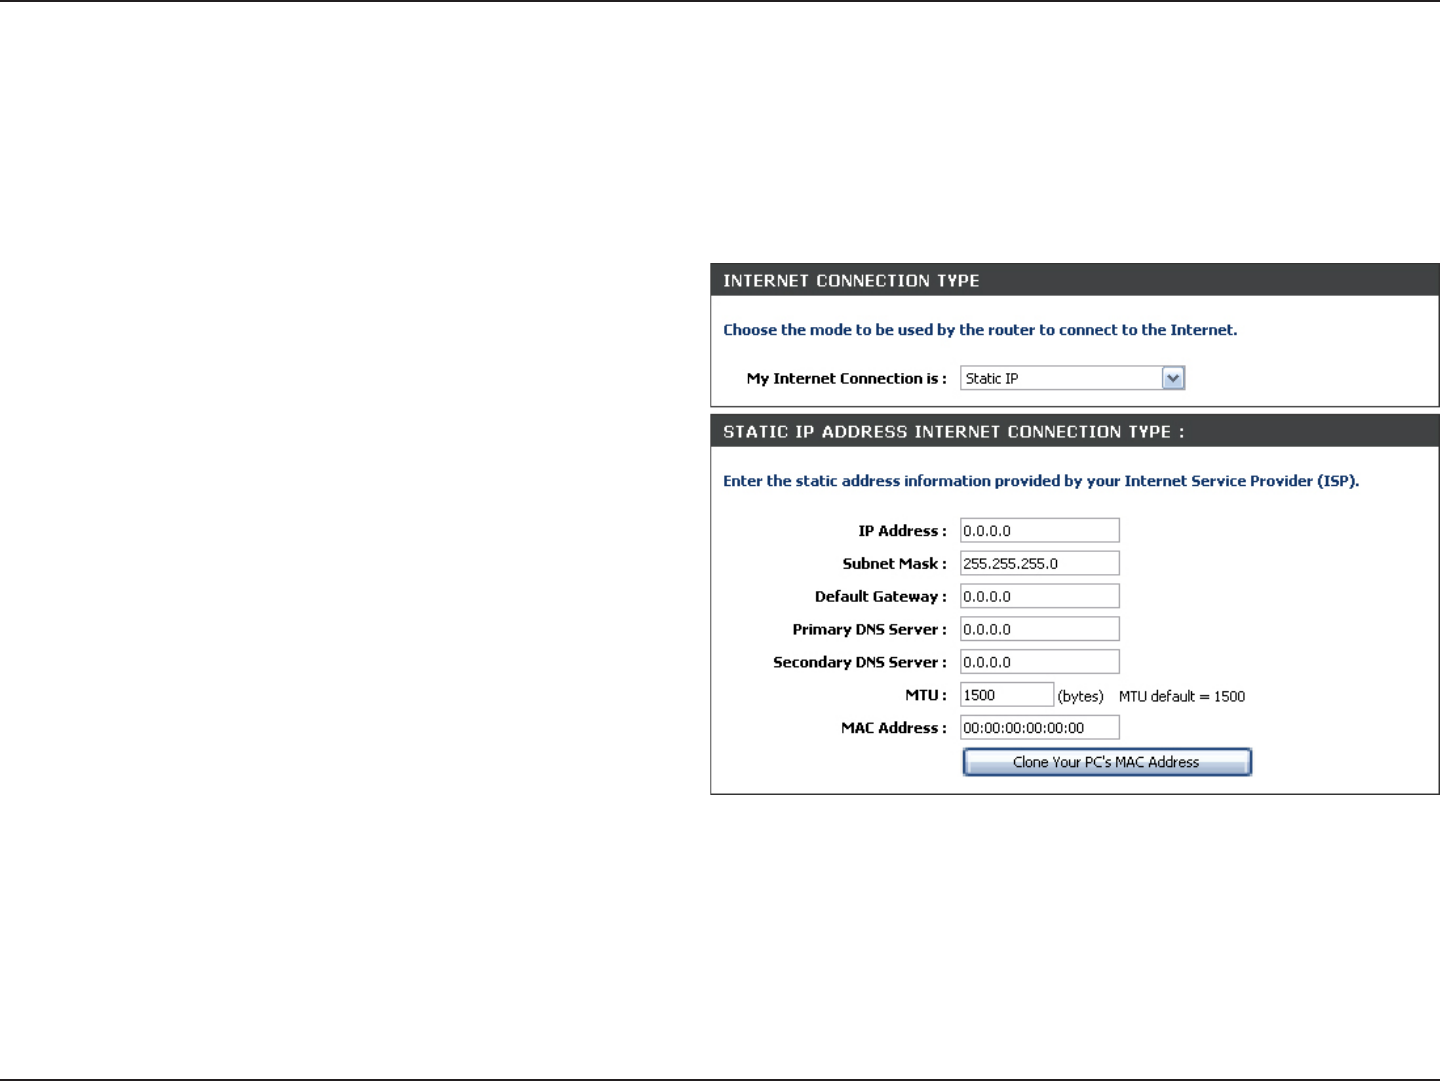
Enter the IP address assigned by your ISP.
Enter the Subnet Mask assigned by your ISP.
Enter the Gateway assigned by your ISP.
The DNS server information will be supplied by your
ISP (Internet Service Provider.)
Maximum Transmission Unit - you may need to
change the MTU for optimal performance with your
specific ISP. 1500 is the default MTU.
The default MAC Address is set to the Internet port’s
physical interface MAC address on the Broadband
Router. It is not recommended that you change the
default MAC address unless required by your ISP.
You can use the Clone Your PC’s MAC Address
button to replace the Internet port’s MAC address
with the MAC address of your Ethernet card.
IP Address:
Subnet Mask:
Default Gateway:
DNS Servers:
MTU:
MAC Address:
Internet Setup
Static (assigned by ISP)
Select Static IP Address if all the Internet port’s IP information is provided to you by your ISP. You will need to enter in the IP address,
subnet mask, gateway address, and DNS address(es) provided to you by your ISP. Each IP address entered in the fields must be in the
appropriate IP form, which are four octets separated by a dot (x.x.x.x). The Router will not accept the IP address if it is not in this format.
26D-Link DIR-825 User Manual
Section 3 - Configuration
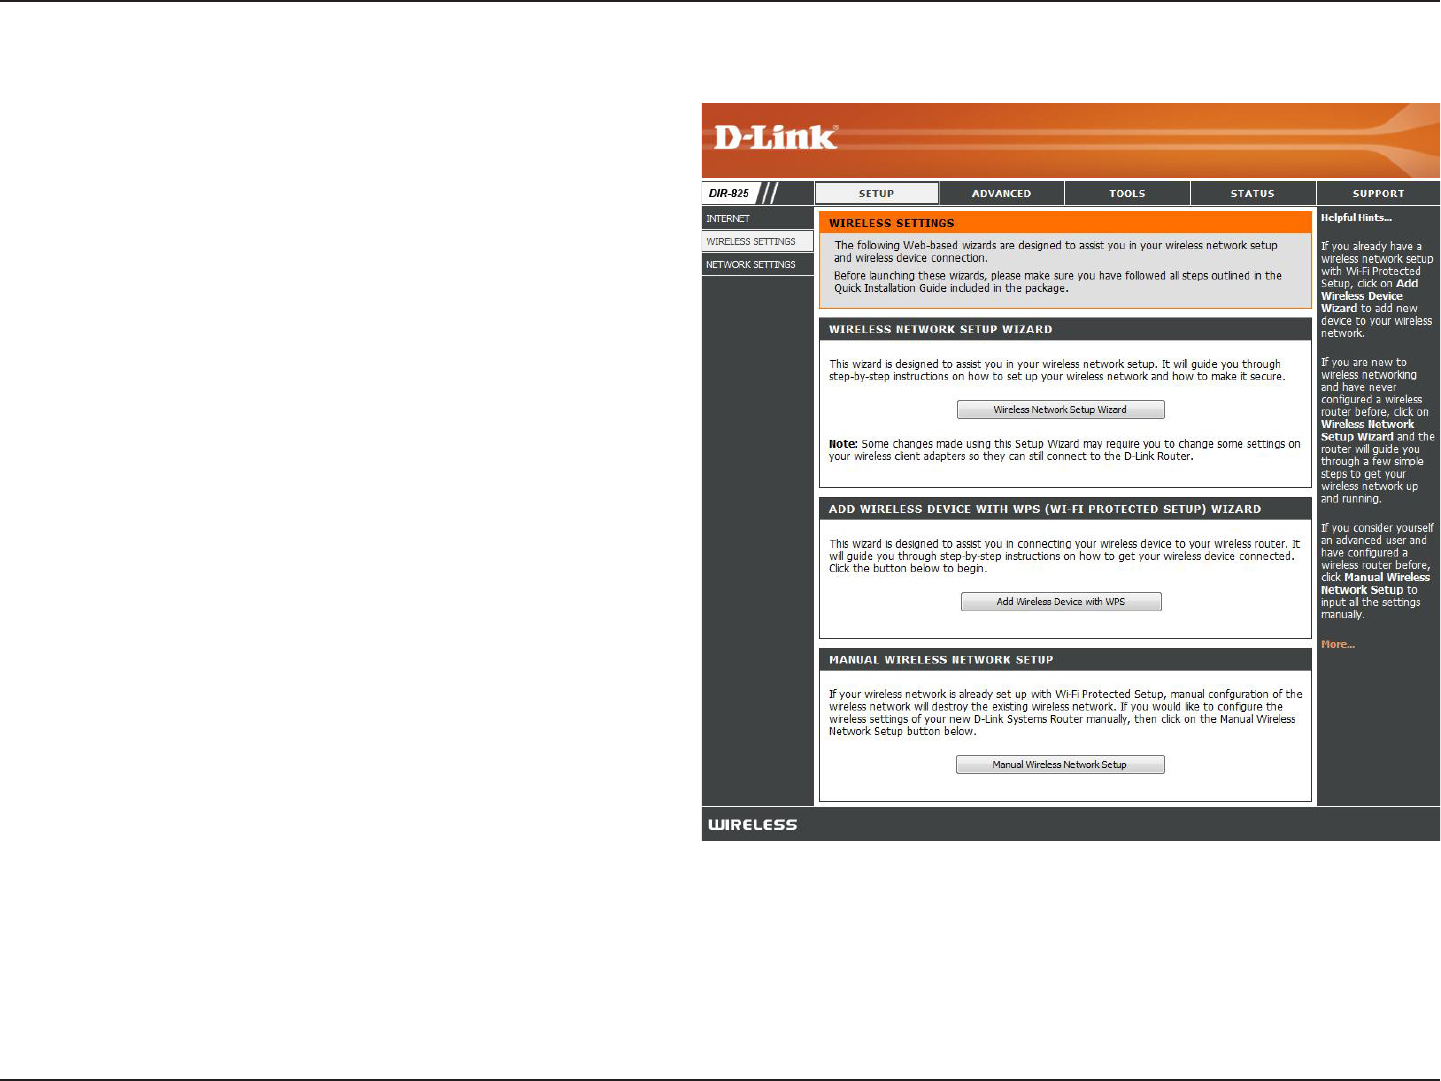
Wireless Settings
If you want to configure the wireless settings on your
router using the wizard, click Wireless Network Setup
Wizard and refer to page 71.
Click Add Wireless Device with WPS if you want to
add a wireless device using Wi-Fi Protected Setup
(WPS) and refer to page 73.
If you want to manually configure the wireless settings
on your router click Manual Wireless Network Setup
and refer to the next page.
27D-Link DIR-825 User Manual
Section 3 - Configuration
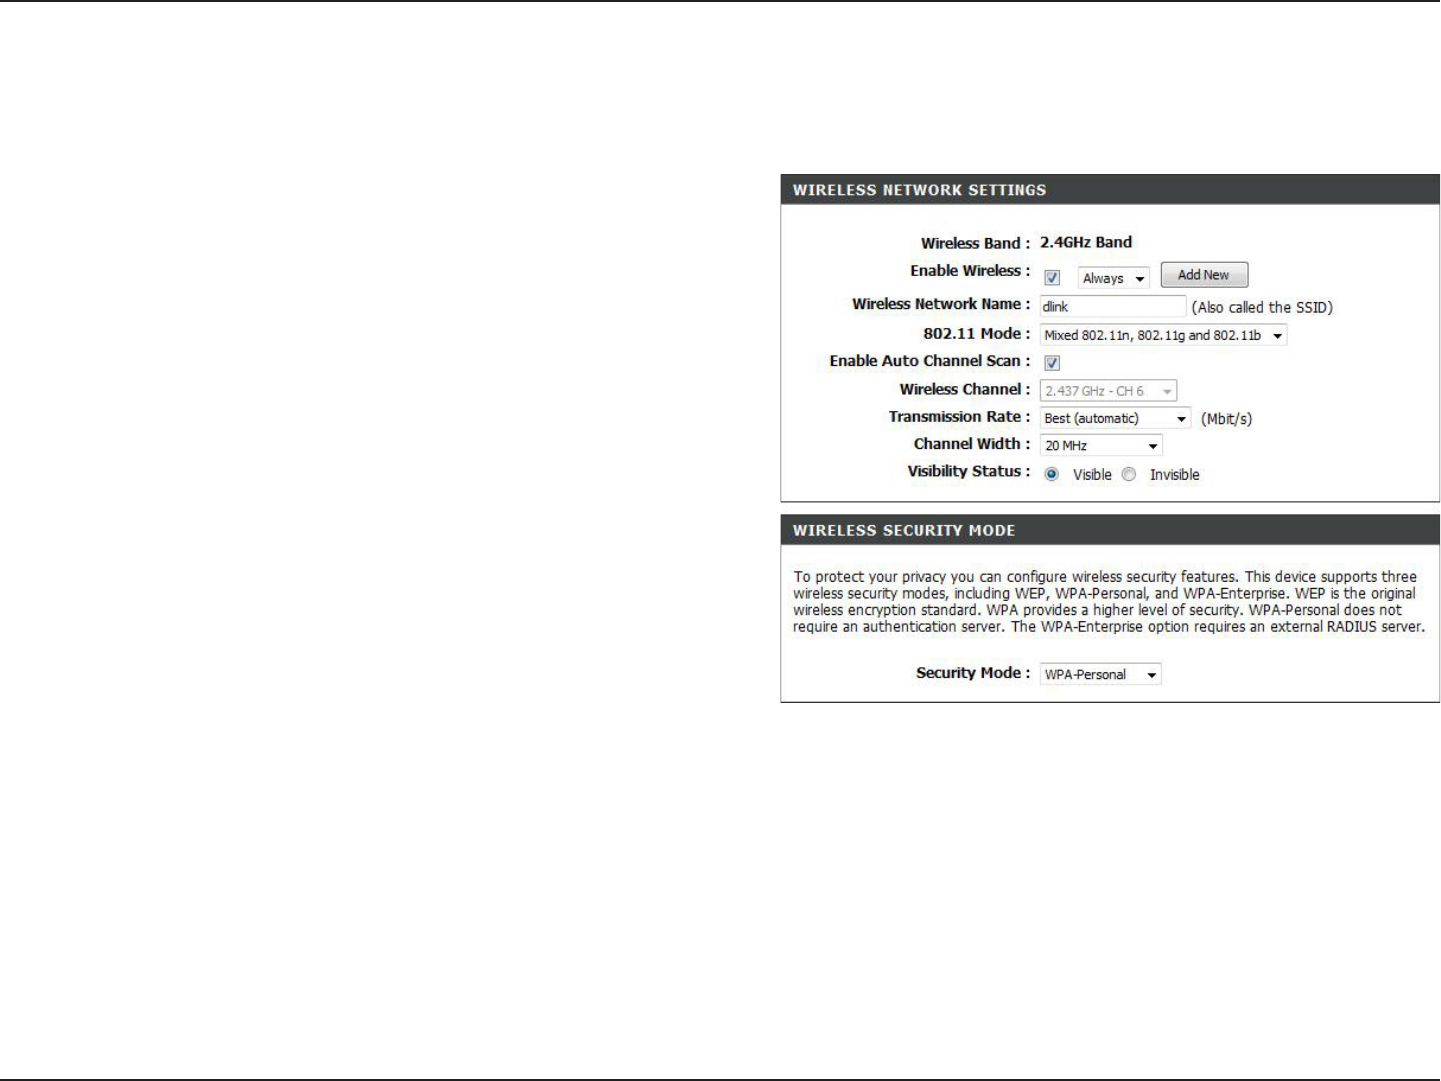
Check the box to enable the wireless function. If you do
not want to use wireless, uncheck the box to disable all
the wireless functions.
Select the time frame that you would like your wireless
network enabled. The schedule may be set to Always. Any
schedule you create will be available in the drop-down
menu. Click Add New to create a new schedule.
Service Set Identifier (SSID) is the name of your wireless
network. Create a name using up to 32 characters. The
SSID is case-sensitive.
Select one of the following:
802.11g Only - Select if all of your wireless clients are
802.11g.
Mixed 802.11n and 802.11g - Select if you are using both
802.11n and 802.11g wireless clients.
802.11n Only - Select only if all of your wireless clients
are 802.11n.
The Auto Channel Scan setting can be selected to allow the DIR-825 to choose the channel with the least amount of
interference.
Indicates the channel setting for the DIR-825. By default the channel is set to 6. The Channel can be changed to fit the
channel setting for an existing wireless network or to customize the wireless network. If you enable Auto Channel Scan,
this option will be greyed out.
Select the transmit rate. It is strongly suggested to select Best (Auto) for best performance.
Enable Wireless:
Schedule:
Wireless Network
Name:
802.11 Mode:
Enable Auto
Channel Scan:
Wireless Channel:
Transmission Rate:
Manual Wireless Settings
802.11n/g (2.4GHz)

28D-Link DIR-825 User Manual
Section 3 - Configuration
Select the Channel Width:
Auto 20/40 - This is the default setting. Select if you are using both 802.11n and non-802.11n wireless devices.
20MHz - Select if you are not using any 802.11n wireless clients.
Select Invisible if you do not want the SSID of your wireless network to be broadcasted by the DIR-825. If Invisible is
selected, the SSID of the DIR-825 will not be seen by Site Survey utilities so your wireless clients will have to know the
SSID of your DIR-825 in order to connect to it.
Refer to page 71 for more information regarding wireless security.
Channel Width:
Visibility Status:
Wireless Security:
29D-Link DIR-825 User Manual
Section 3 - Configuration
802.11n/a (5GHz)
Check the box to enable the wireless function. If you do
not want to use wireless, uncheck the box to disable all
the wireless functions.
Select the time frame that you would like your wireless
network enabled. The schedule may be set to Always. Any
schedule you create will be available in the drop-down
menu. Click Add New to create a new schedule.
Service Set Identifier (SSID) is the name of your wireless
network. Create a name using up to 32 characters. The
SSID is case-sensitive.
Select one of the following:
802.11a Only - Select if all of your wireless clients are
802.11a.
Mixed 802.11n and 802.11a - Select if you are using both
802.11n and 802.11a wireless clients.
802.11n Only - Select only if all of your wireless clients
are 802.11n.
The Auto Channel Scan setting can be selected to allow the DIR-825 to choose the channel with the least amount of
interference.
Indicates the channel setting for the DIR-825. By default the channel is set to 6. The Channel can be changed to fit the
channel setting for an existing wireless network or to customize the wireless network. If you enable Auto Channel Scan,
this option will be greyed out.
Select the transmit rate. It is strongly suggested to select Best (Auto) for best performance.
Enable Wireless:
Schedule:
Wireless Network
Name:
802.11 Mode:
Enable Auto
Channel Scan:
Wireless Channel:
Transmission Rate:

30D-Link DIR-825 User Manual
Section 3 - Configuration
Select the Channel Width:
Auto 20/40 - This is the default setting. Select if you are using both 802.11n and non-802.11n wireless devices.
20MHz - Select if you are not using any 802.11n wireless clients.
Select Invisible if you do not want the SSID of your wireless network to be broadcasted by the DIR-825. If Invisible is
selected, the SSID of the DIR-825 will not be seen by Site Survey utilities so your wireless clients will have to know the
SSID of your DIR-825 in order to connect to it.
Refer to page 71 for more information regarding wireless security.
Channel Width:
Visibility Status:
Wireless Security:
31D-Link DIR-825 User Manual
Section 3 - Configuration
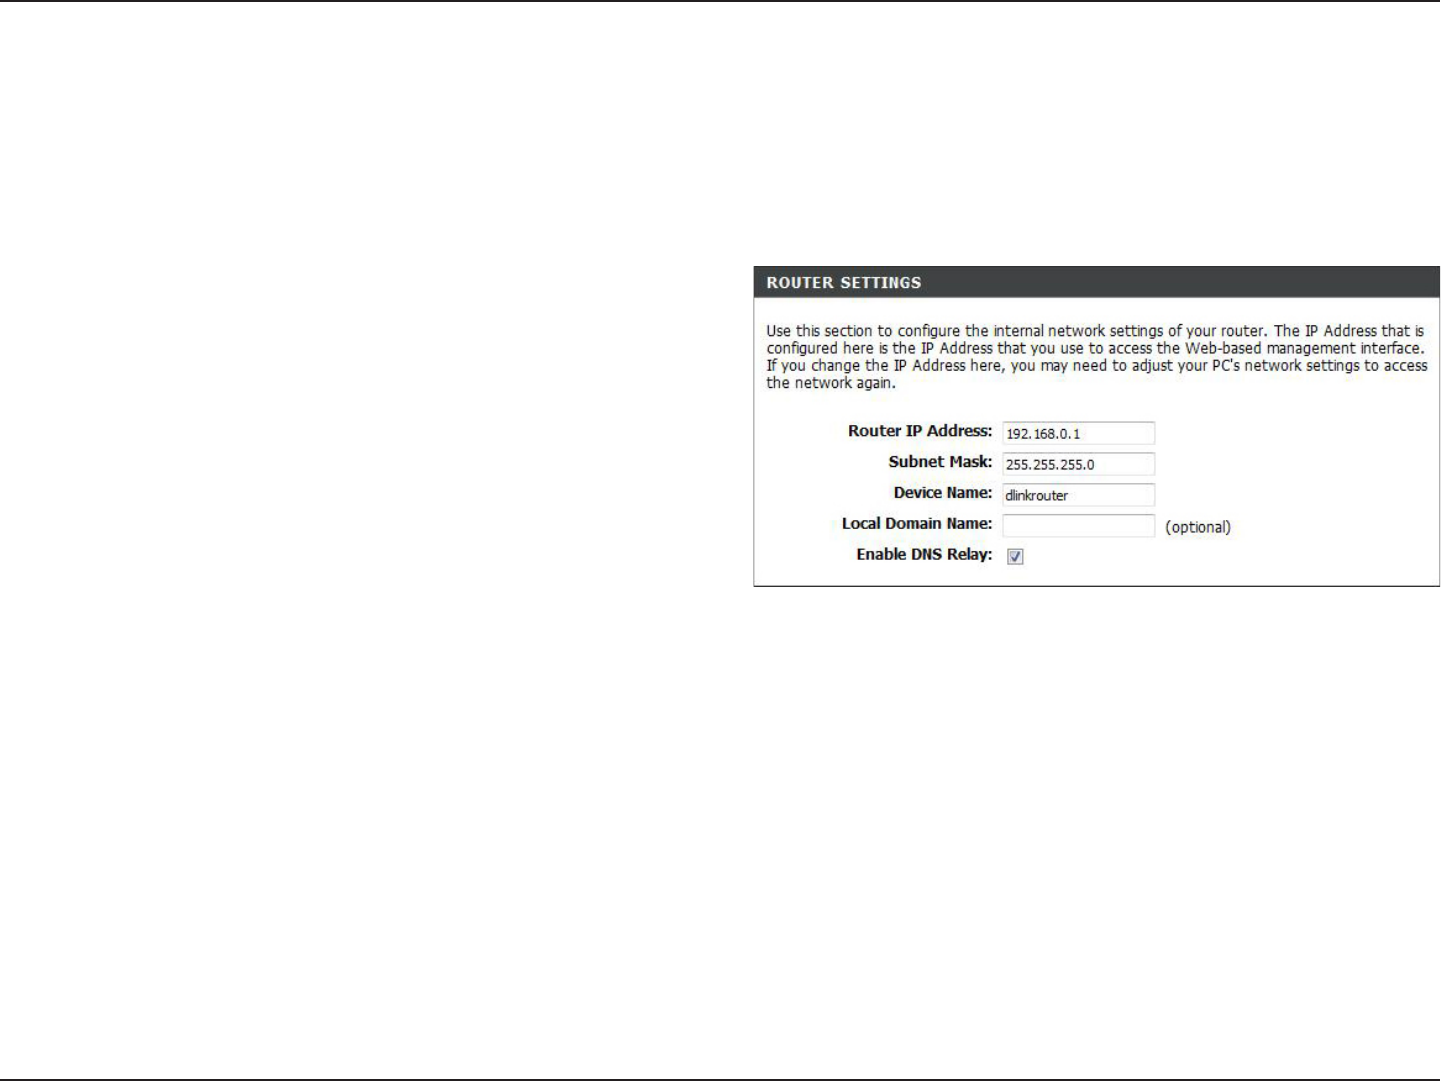
This section will allow you to change the local network settings of the router and to configure the DHCP settings.
Network Settings
Enter the IP address of the router. The default IP
address is 192.168.0.1.
If you change the IP address, once you click Apply,
you will need to enter the new IP address in your
browser to get back into the configuration utility.
Enter the Subnet Mask. The default subnet mask is
255.255.255.0.
Enter the Domain name (Optional).
Uncheck the box to transfer the DNS server information
from your ISP to your computers. If checked, your
computers will use the router for a DNS server.
Router IP Address:
Subnet Mask:
Local Domain:
Enable DNS Relay:
Router Settings
32D-Link DIR-825 User Manual
Section 3 - Configuration
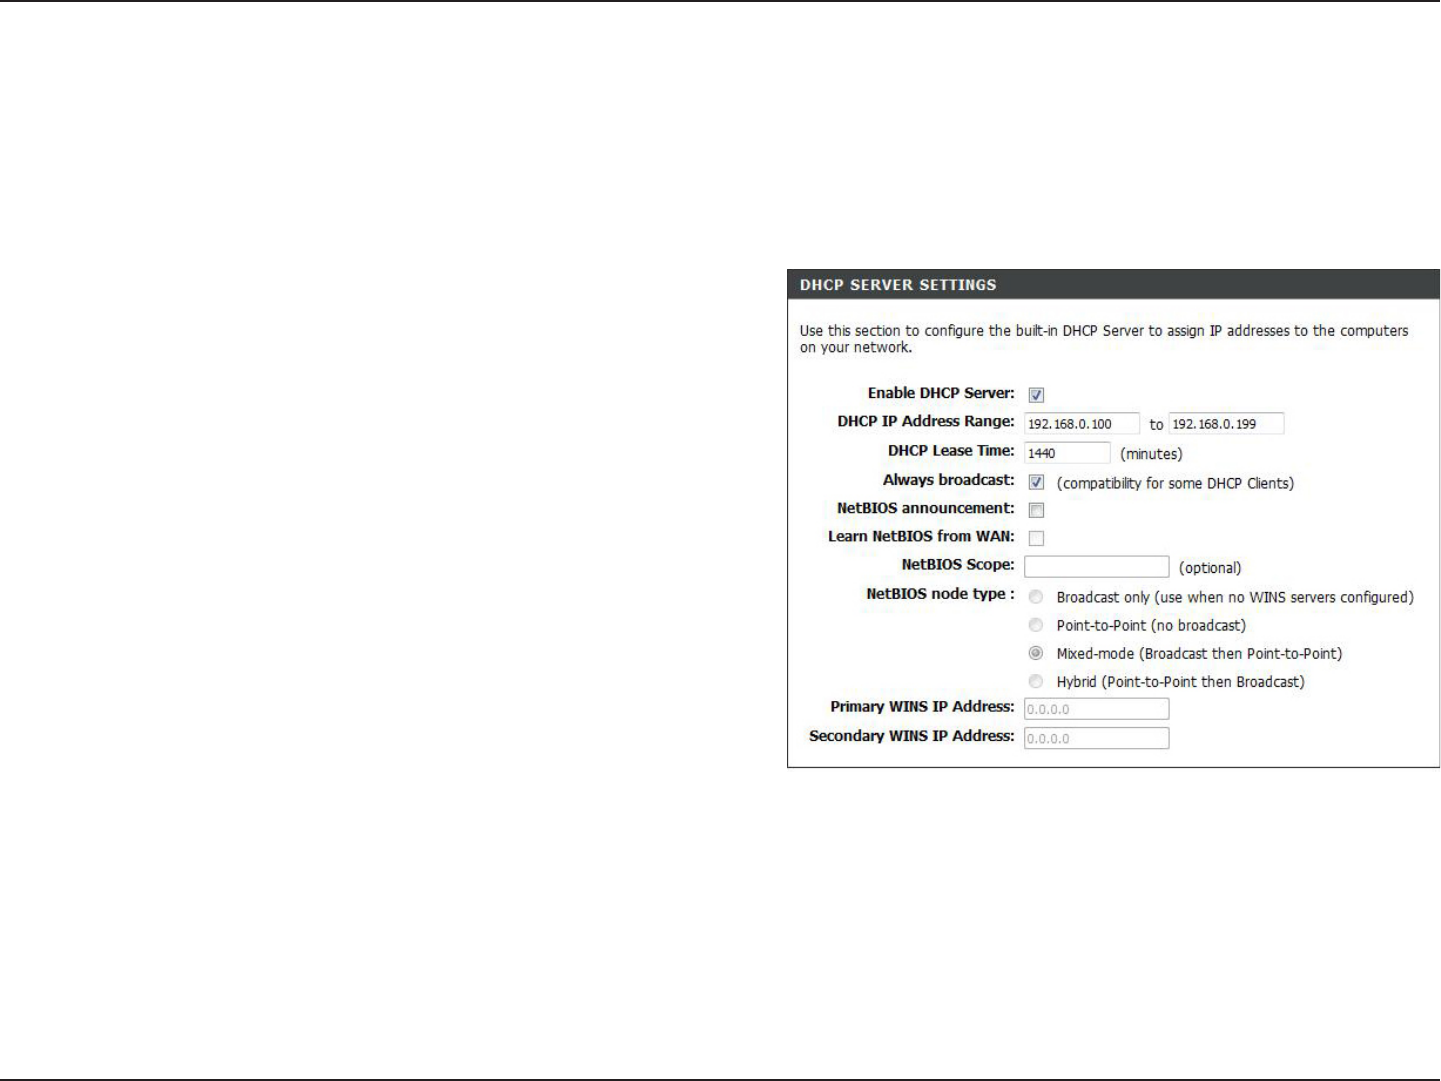
DHCP Server Settings
DHCP stands for Dynamic Host Control Protocol. The DIR-825 has a built-in DHCP server. The DHCP Server will automatically assign
an IP address to the computers on the LAN/private network. Be sure to set your computers to be DHCP clients by setting their TCP/IP
settings to “Obtain an IP Address Automatically.” When you turn your computers on, they will automatically load the proper TCP/IP settings
provided by the DIR-825. The DHCP Server will automatically allocate an unused IP address from the IP address pool to the requesting
computer. You must specify the starting and ending address of the IP address pool.
Check this box to enable the DHCP server on your router.
Uncheck to disable this function.
Enter the starting and ending IP addresses for the DHCP
server’s IP assignment.
Note: If you statically (manually) assign IP addresses to
your computers or devices, make sure the IP addresses are
outside of this range or you may have an IP conflict.
The length of time for the IP address lease. Enter the Lease
time in minutes.
Enable this feature to broadcast your networks DHCP server
to LAN/WLAN clients.
NetBIOS allows LAN hosts to discover all other computers
within the network, enable this feature to allow the DHCP
Server to offer NetBIOS configuration settings.
Enable this feature to allow WINS information to be learned from the WAN side, disable to allow manual configuration.
This feature allows the configuration of a NetBIOS ‘domain’ name under which network hosts operates. This setting has no
effect if the ‘Learn NetBIOS information from WAN’ is activated.
Select the different type of NetBIOS node; Broadcast only, Point-to-Point, Mixed-mode, and Hybrid.
Enter your WINS IP address
Enable DHCP
Server:
DHCP IP Address
Range:
DHCP Lease Time:
Always Broadcast:
NetBIOS
Announcement:
Learn NetBIOS
from WAN:
NetBIOS Scope:
NetBIOS Node:
WINS IP Address:
33D-Link DIR-825 User Manual
Section 3 - Configuration
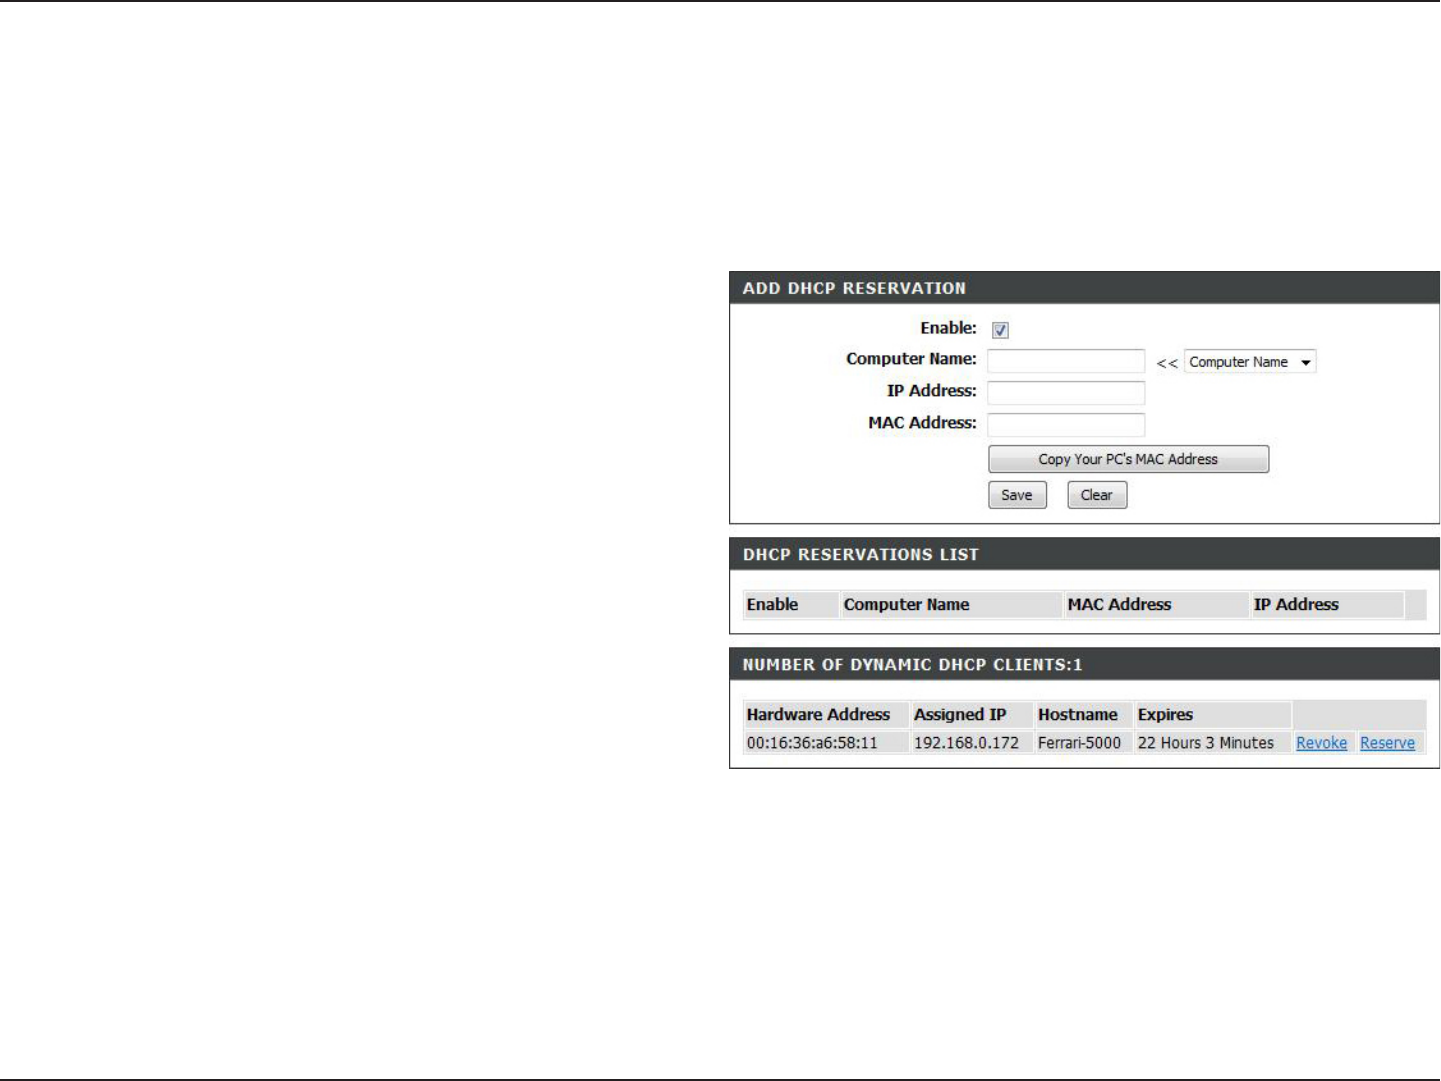
DHCP Reservation
If you want a computer or device to always have the same IP address assigned, you can create a DHCP reservation.
The router will assign the IP address only to that computer or device.
Note: This IP address must be within the DHCP IP Address Range.
Check this box to enable the reservation.
Enter the computer name or select from the drop
down menu and click <<.
Enter the IP address you want to assign to the
computer or device. This IP Address must be within
the DHCP IP Address Range.
Enter the MAC address of the computer or
device.
If you want to assign an IP address to the computer
you are currently on, click this button to populate
the fields.
Click Save to save your entry. You must click Save
Settings at the top to activate your reservations.
Enable:
Computer Name:
IP Address:
MAC Address:
Copy Your PC’s MAC
Address:
Save:

34D-Link DIR-825 User Manual
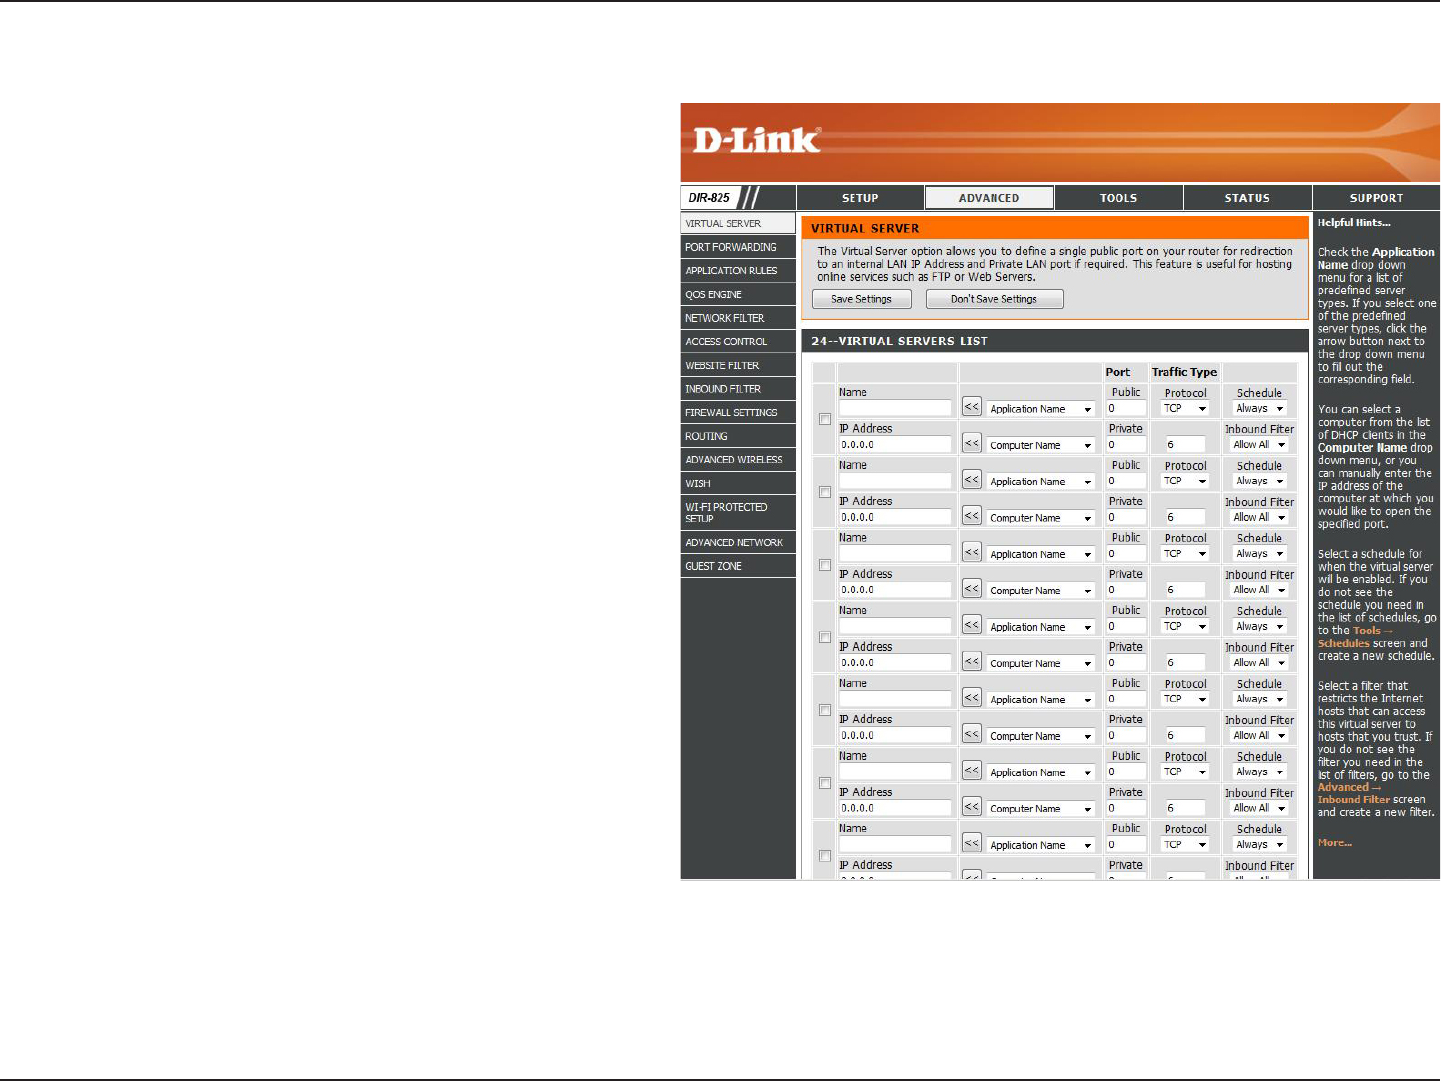
Section 3 - Configuration
The DIR-825 can be configured as a virtual server so that remote users accessing Web or FTP services via the public
IP address can be automatically redirected to local servers in the LAN (Local Area Network).
The DIR-825 firewall feature filters out unrecognized packets to protect your LAN network so all computers networked
with the DIR-825 are invisible to the outside world. If you wish, you can make some of the LAN computers accessible
from the Internet by enabling Virtual Server. Depending on the requested service, the DIR-825 redirects the external
service request to the appropriate server within the LAN network.
The DIR-825 is also capable of port-redirection meaning incoming traffic to a particular port may be redirected to a
different port on the server computer.
Each virtual service that is created will be listed at the bottom of the screen in the Virtual Servers List. There are
pre-defined virtual services already in the table. You may use them by enabling them and assigning the server IP to
use that particular virtual service.
For a list of ports for common applications, please visit http://support.dlink.com/faq/view.asp?prod_id=1191.
Virtual Server
35D-Link DIR-825 User Manual
Section 3 - Configuration
This will allow you to open a single port. If you would like to open a range of ports, refer to the next page.
Enter a name for the rule or select an application
from the drop-down menu. Select an application
and click << to populate the fields.
Enter the IP address of the computer on your
local network that you want to allow the incoming
service to. If your computer is receiving an IP
address automatically from the router (DHCP),
you computer will be listed in the “Computer
Name” drop-down menu. Select your computer
and click <<.
Enter the port that you want to open next to
Private Port and Public Port. The private and
public ports are usually the same. The public
port is the port seen from the Internet side, and
the private port is the port being used by the
application on the computer within your local
network.
Select TCP, UDP, or Both from the drop-down
menu.
The schedule of time when the Virtual Server
Rule will be enabled. The schedule may be set
to Always, which will allow the particular service
to always be enabled. You can create your own
times in the Tools > Schedules section.
Select Allow All (most common) or a created
Inbound filter. You may create your own inbound
filters in the Advanced > Inbound Filter page.
Name:
IP Address:
Private Port/
Public Port:
Protocol Type:
Schedule:
Inbound Filter: