D Link IR602LA1 Wireless N150 Cloud Router User Manual D Link DIR 645
D Link Corporation Wireless N150 Cloud Router D Link DIR 645
D Link >
users manual
DIR-602L

D-Link reserves the right to revise this publication and to make changes in the content hereof without obligation to notify any person or organization
of such revisions or changes.
Preface
Trademarks
D-Link and the D-Link logo are trademarks or registered trademarks of D-Link Corporation or its subsidiaries in the United States or other countries.
All other company or product names mentioned herein are trademarks or registered trademarks of their respective companies.
Copyright © 2012 by D-Link Systems, Inc.
All rights reserved. This publication may not be reproduced, in whole or in part, without prior expressed written permission from D-Link Systems, Inc.

Section 1 - Product Overview
Product Overview
Package Contents
DIR-602L Wireless N150 Cloud R outer
Power Adapter
Ethernet Cable
Quick Installation Guide
Check for the supplied accessories below:
Note: Using a power supply with a dierent voltage rating than the one included with the product, will cause damage and void the warranty for
this product.

Section 1 - Product Overview
System Requirements
Network Requirements
• An Ethernet-based Cable or DSL modem
• IEEE 802.11n or 802.11g wireless clients
• 10/100 Ethernet
Web-based Conguration
Utility Requirements
Computer with the following:
• Windows®, Macintosh, or Linux-based operating system
• An installed Ethernet adapter
Browser Requirements:
• Internet Explorer 6.0 or higher
• Chrome 2.0 or higher
• Firefox 3.0 or higher
• Safari 3.0 or higher (with Java 1.3.1 or higher)
Windows® Users: Make sure you have the latest version of Java
installed. Visit www.java.com to download the latest version.
CD Installation Wizard
Requirements
Computer with the following:
• Windows® 7, Vista®, or XP with Service Pack 2
• An installed Ethernet adapter

Section 1 - Product Overview
Features
• Internet Connectivity - In conjunction with a DSL or Cable Modem, this device provides high-speed Internet
connectivity to your local network for up to four wired devices.
• Wireless LAN functionality - This router supports features like WMM, RF Output Level Control, WPS, and much
more.
• Networking - This router comes with one WAN port and four LAN ports that enable up to four computers on your
local network to be connected.
• Wireless Distribution System (WDS) mode- The router supports WDS where it can extend the network coverage
from another router.
• Advanced Security - The router also supports a range of security features like Network Filtering, Access Control,
Website Filtering, Inbound Filtering, and SPI.
• IPv6 - This router supports local IPv6 support and IPv6 Internet Connection.
•User-friendly Setup Wizard -
your router qickly and conveniently.
The DIR-602L’s easy-to-use Web-based user interface lets you manage and congure

Section 2 - Hardware Installation
Wireless Installation Considerations
The router lets you access your network using a wireless connection from virtually anywhere within the operating range of your wireless network.
Keep in mind, however, that the number, thickness and location of walls, ceilings, or other objects that the wireless signals must pass through, may
limit the range. Ranges vary depending on the types of materials and background RF (radio frequency) noise in your home or oce. The key to
maximizing the wireless range is to follow these basic guidelines:
1. Keep the number of walls and ceilings between the D-Link router and other network devices to a minimum. Each wall or
ceiling can reduce your adapter’s range from 3 to 90 feet (1 to 30 meters.) Position your devices so that the number of walls
and/or ceilings is minimized.
2. Be aware of the direct line between network devices. A wall that is 1.5 feet thick (0.5 meters), at a 45-degree angle appears to
be almost 3 feet (1 meter) thick. At a 2-degree angle it looks over 42 feet (14 meters) thick. Position devices so that the signal
will travel straight through a wall or ceiling (instead of at an angle) for better reception.
3. Try to position access points, wireless routers, and computers so that the signal passes through open doorways and drywall.
Materials such as glass, metal, brick, insulation, concrete and water can aect wireless performance. Large objects such as sh
tanks, mirrors, le cabinets, metal doors and aluminum studs may also have a negative eect on range.
4. Keep your product at least 3 to 6 feet (1-2 meters) away from electrical devices or appliances that generate RF noise.
5. If you are using 2.4 GHz cordless phones, make sure that the 2.4 GHz phone base is as far away from your wireless device as
possible. The base transmits a signal even if the phone in not in use. In some cases, cordless phones, X-10 wireless devices, and
electronic equipment such as ceiling fans, uorescent lights, and home security systems may dramatically degrade wireless
connectivity.

Section 2 - Hardware Installation
Connect to Cable/DSL/Satellite Modem
If you are connecting the router to a Cable/DSL/Satellite Modem, please follow the steps below:
1. Place the router in an open and central location. Do not plug the power adapter into the router.
2. Turn the power o on your modem. If there is no on/o switch, unplug the modem’s power adapter. Shut down your computer.
3. Unplug the Ethernet cable (that connects your computer to your modem) from your computer and place it into the Internet
port on the router.
4. Plug an Ethernet cable into one of the LAN ports on the router. Plug the other end into the Ethernet port on your computer.
5. Turn on or plug in your modem. Wait for the modem to boot (about 30 seconds).
6. Plug the power adapter into the router and connect to an outlet or power strip. Wait about 30 seconds for the router to boot
up.
7. Turn on your computer.
8. Verify that the Power LED on the router is lit. If the Power LED does not light up, make sure your computer, modem, and router
are powered, on and verify that the cables connected correctly.
9. In a later section in this manual we’ll discuss the Web GUI conguration of the router in more detail..
Section 3 - Software Conguration
Conguration
This section will show you how to congure your new D-Link wireless router using the web-based conguration utility.
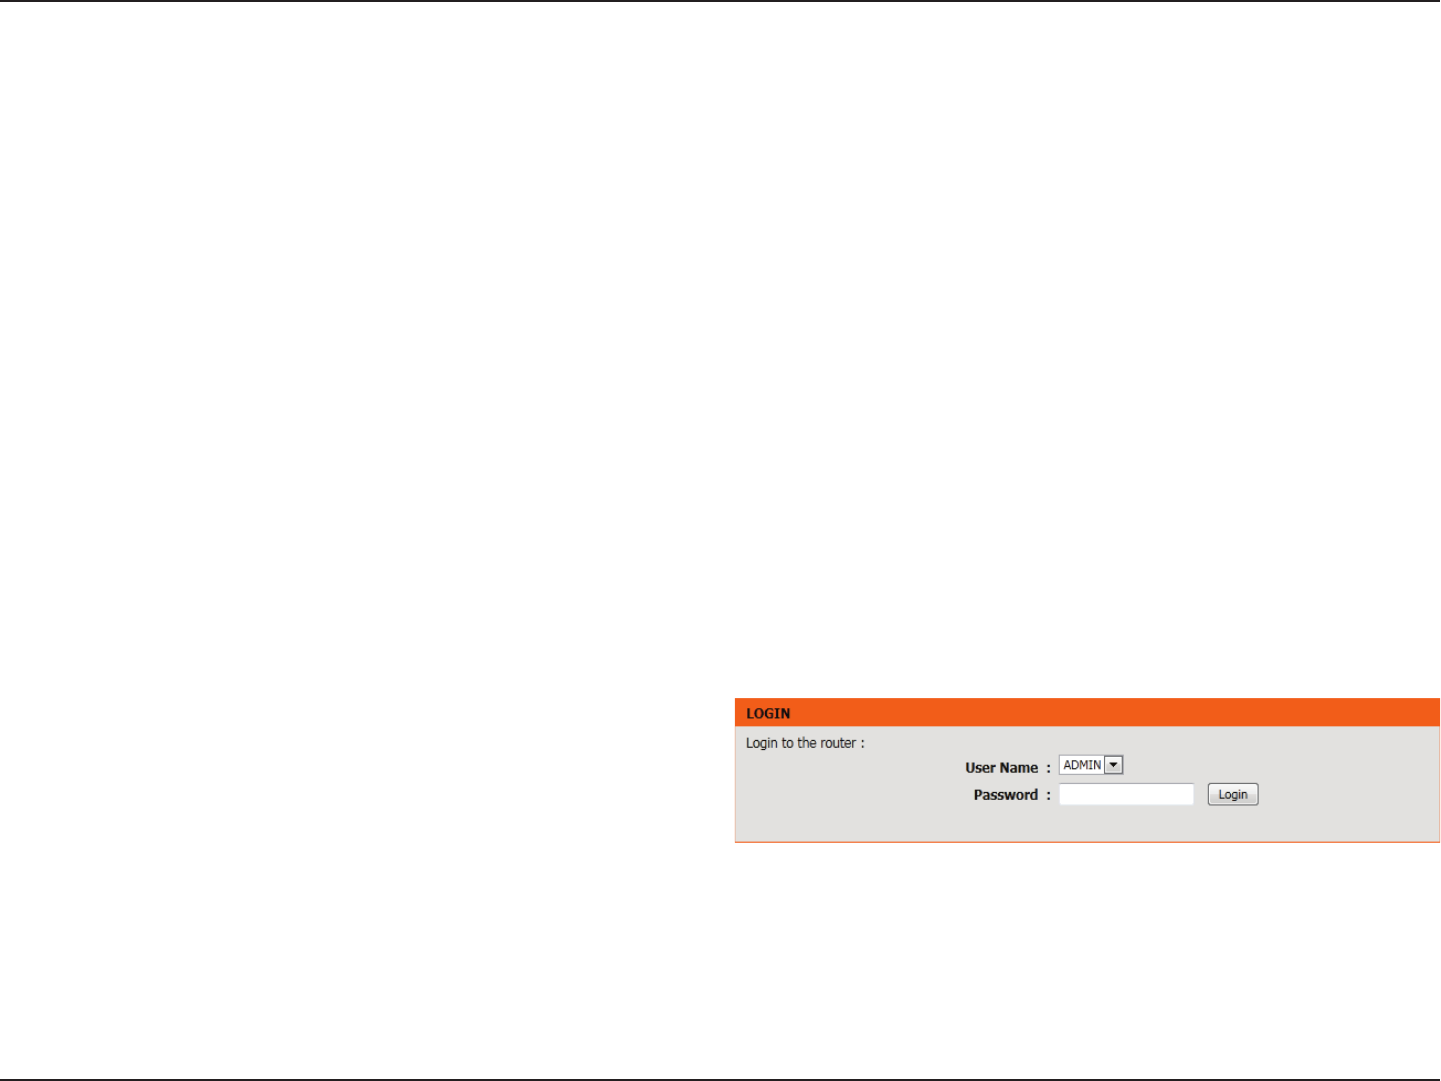
Web-based Conguration Utility
To access the conguration utility, open a web browser such as Internet
Explorer and enter the IP address of the router (192.168.0.1).
You may also connect using the NetBIOS name in the address bar
(http://dlinkrouter).
Enter your password. Admin is the default username and cannot be
changed. The password is left blank by default.
If you get a Page Cannot be Displayed error message, please refer to the
Troubleshooting section for assistance.
Click Login to log into the Router.

Section 3 - Software Conguration
Setup Wizard
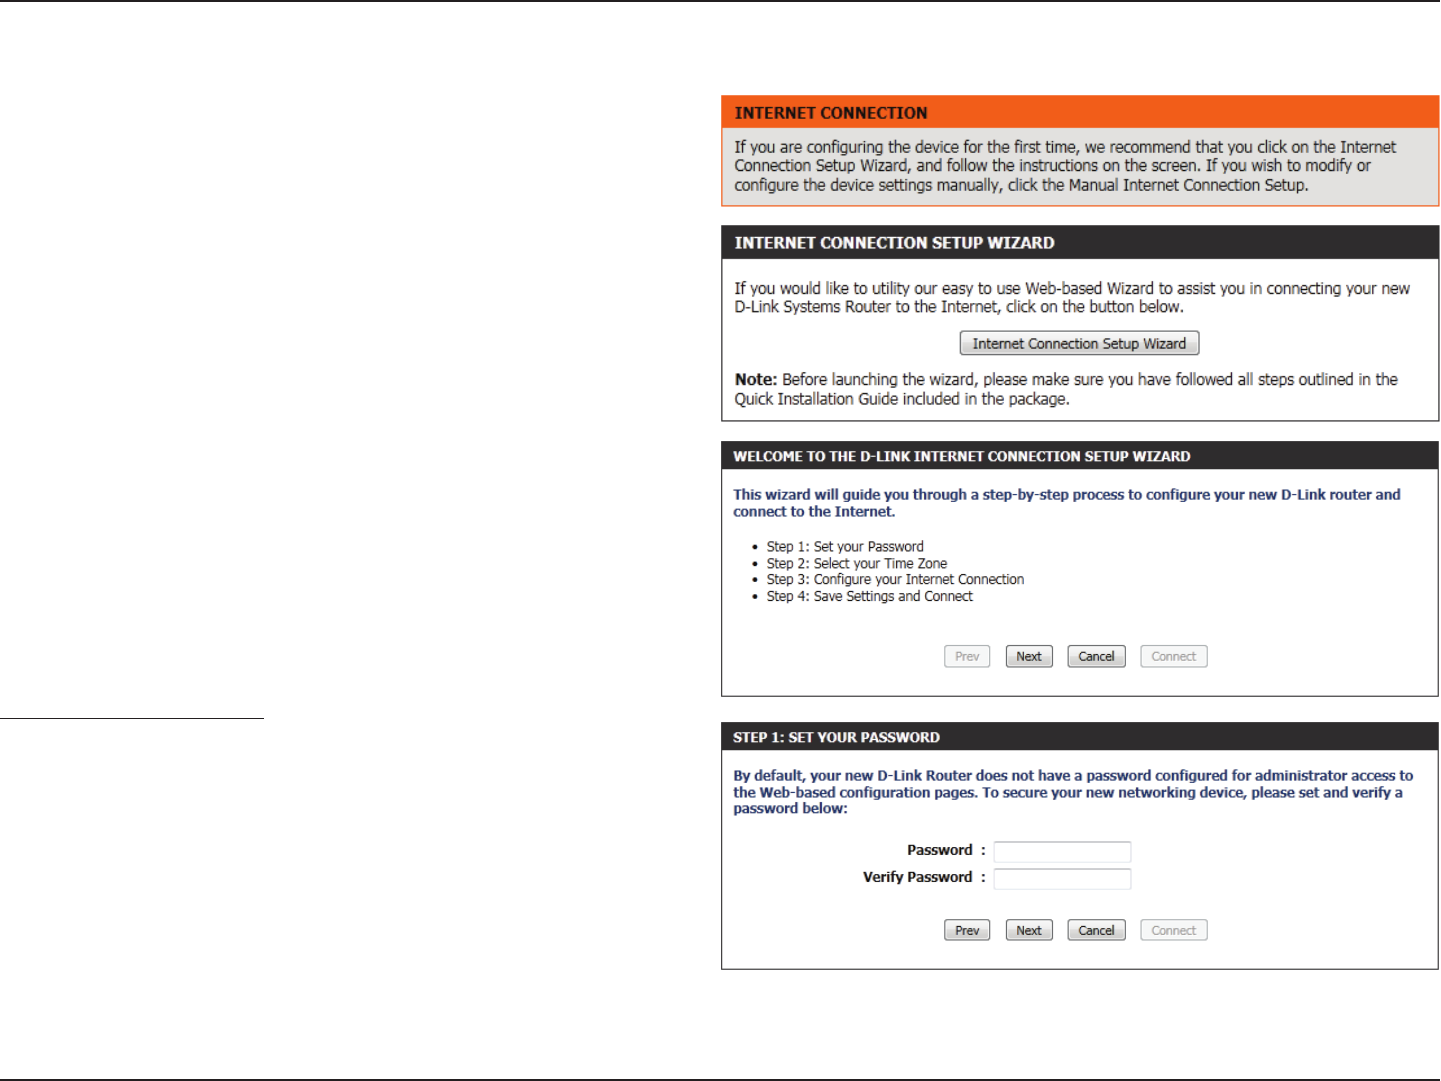
Click Internet Connection Setup Wizard to quickly congure your
router. Skip to the next page.
If you want to enter your settings without running the wizard, click
Manual Conguration and skip to page 20.
Internet Connection
Section 3 - Software Conguration
Internet Connection(Setup Wizard)
When conguring the router for the rst time, we recommend that you
click Internet Connection Setup Wizard, and follow the instructions
on the screen. This wizard is designed to assist user with a quick and
easy method to congure the Internet connection of this router.
Anytime during the Internet Connection Setup Wizard, you can click on
Cancel to discard any changes made and return to the main Internet
page. Also you can click on Prev to return to the previous window for
re-conguration.
This wizard will guide you through a step-by-step process to congure
your new D-Link router and connect to the Internet.
Click Next to continue.
Step 1: Set Your Password
By default, the D-Link Router does not have a password congured for
administrator access to the Web-based conguration pages. To secure
your new networking device, please enter and verify a password in the
spaces provided. The two passwords must match.
Click Next to continue.
Section 3 - Software Conguration
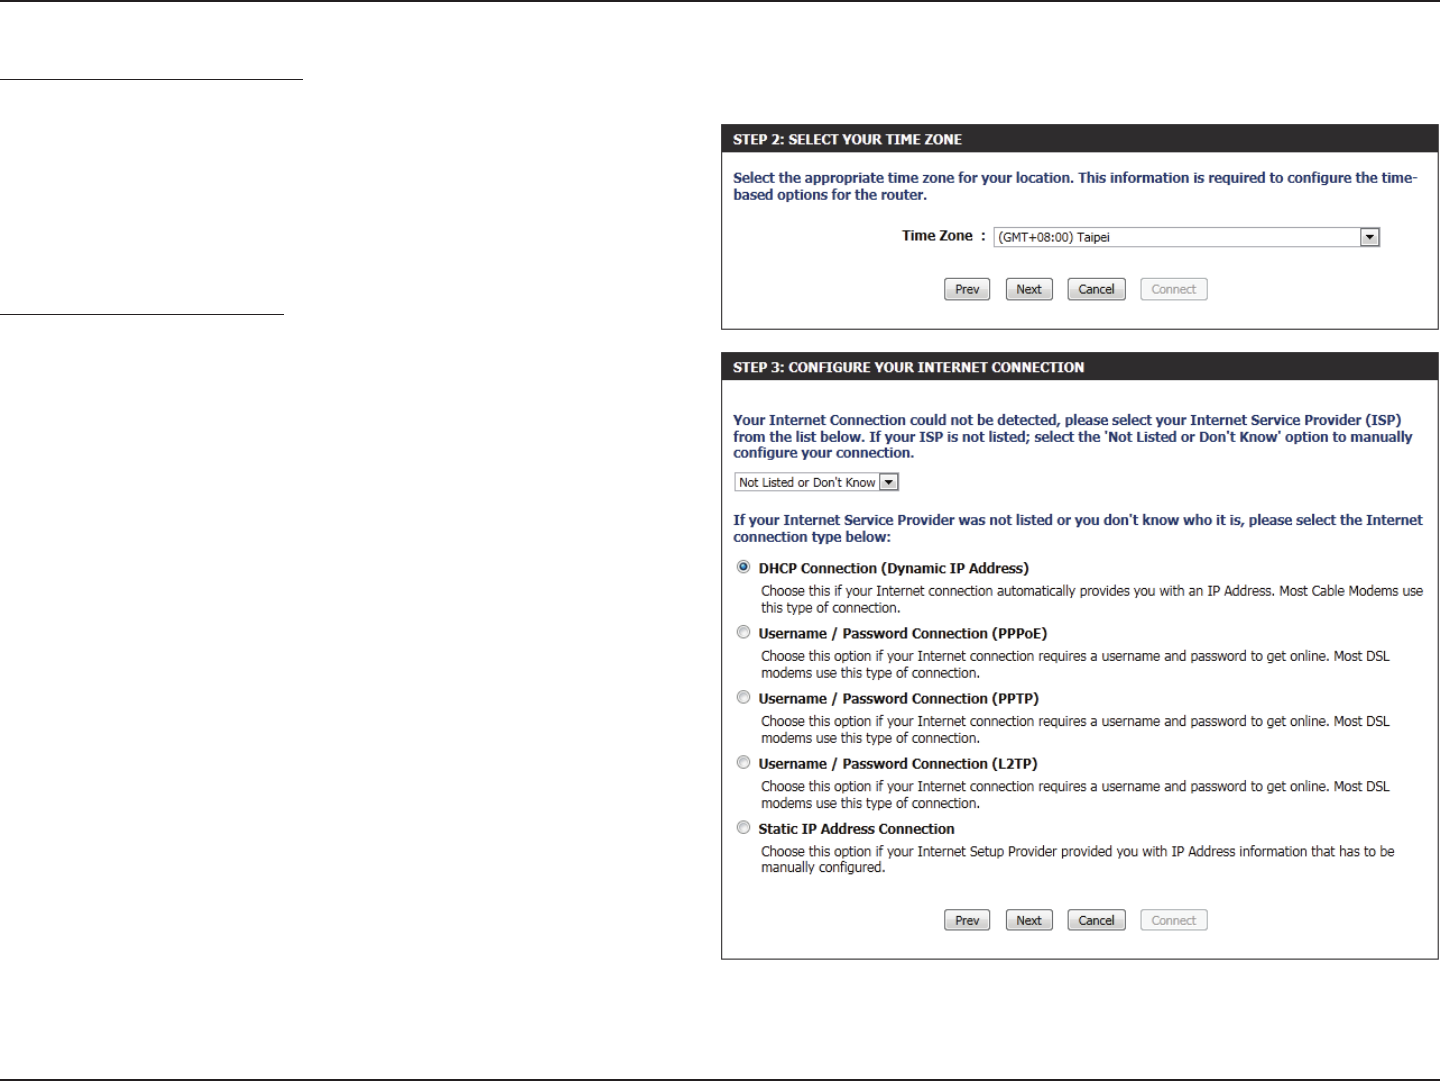
Step 2: Select Your Time Zone
Select the appropriate time zone for your location. This information is
required to congure the time-based options for the router.
Click Next to continue.
Step 3: Internet Connection
Here the user will be able to congure the Internet Connectivity used
by this device. If your ISP connection is listed in the drop-down menu
select it and click Next. If your ISP connection is not listed then you
can proceed to select any of the other manual Internet Connection
methods listed below.
Dynamic IP
Address:
Choose this if your Internet connection
automatically provides you with an IP Address.
Most Cable Modems use this type of connection.
PPPoE: Choose this option if your Internet connection
requires a PPPoE username and password to
get online. Most DSL modems use this type of
connection.
PPTP: Choose this option if your Internet connection
requires a PPTP username and password to get
online.
L2TP: Choose this option if your Internet connection
requires an L2TP username and password to get
online.
Static IP Address: Choose this option if your Internet Setup Provider
provided you with IP Address information that has
to be manually congured.
Section 3 - Software Conguration
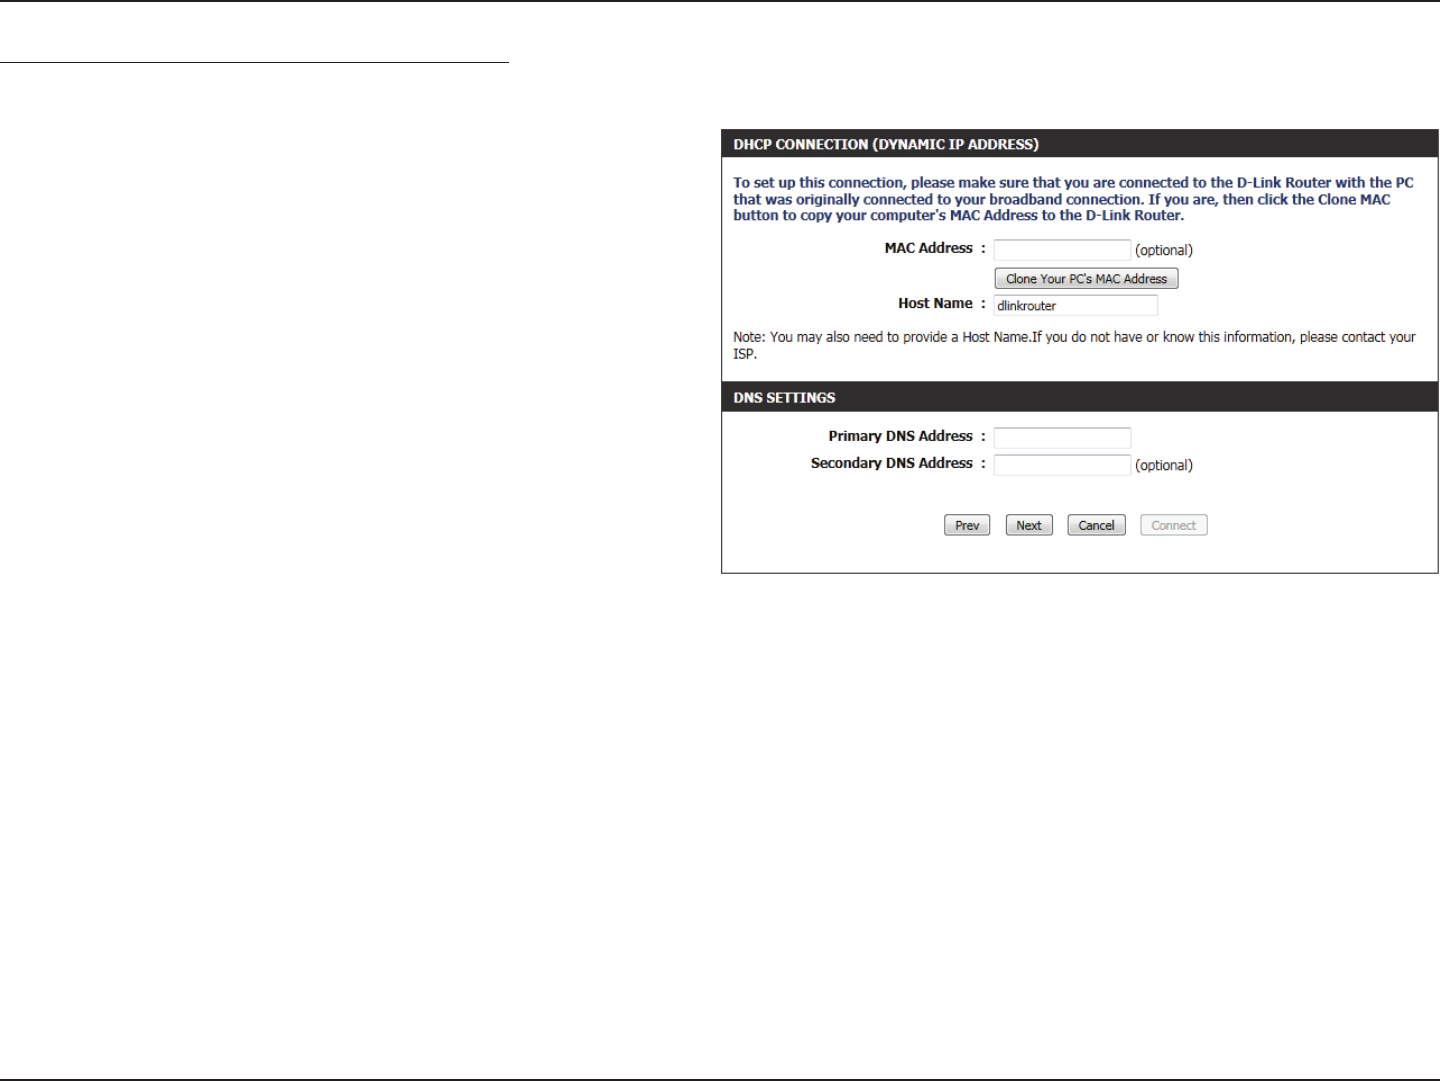
Step 3: Internet Connection (Dynamic IP Address)
After selecting the Dynamic IP Address Internet connection method,
the following page will appear.
MAC Address: Enter the MAC address of the Internet gateway
(plugged into the Internet port of this device).
Clone Button: If the conguration PC also acts as the Internet
gateway, then click on the Clone Your PC’s MAC
Address button to copy the PC’s MAC address into
the space provided. If you’re not sure, leave the
MAC Address eld blank.
Host Name: Enter the host name used. You may also need to
provide a Host Name. If you do not have or know
this information, please contact your ISP.
Primary DNS
Address:
Enter the Primary DNS IP address used.
Secondary DNS
Address:
Enter the Secondary DNS IP address used. This eld is normally optional. Only one DNS address is required for a functional
Internet connection, but using a second DNS address provides more stability.
Click Next to continue.