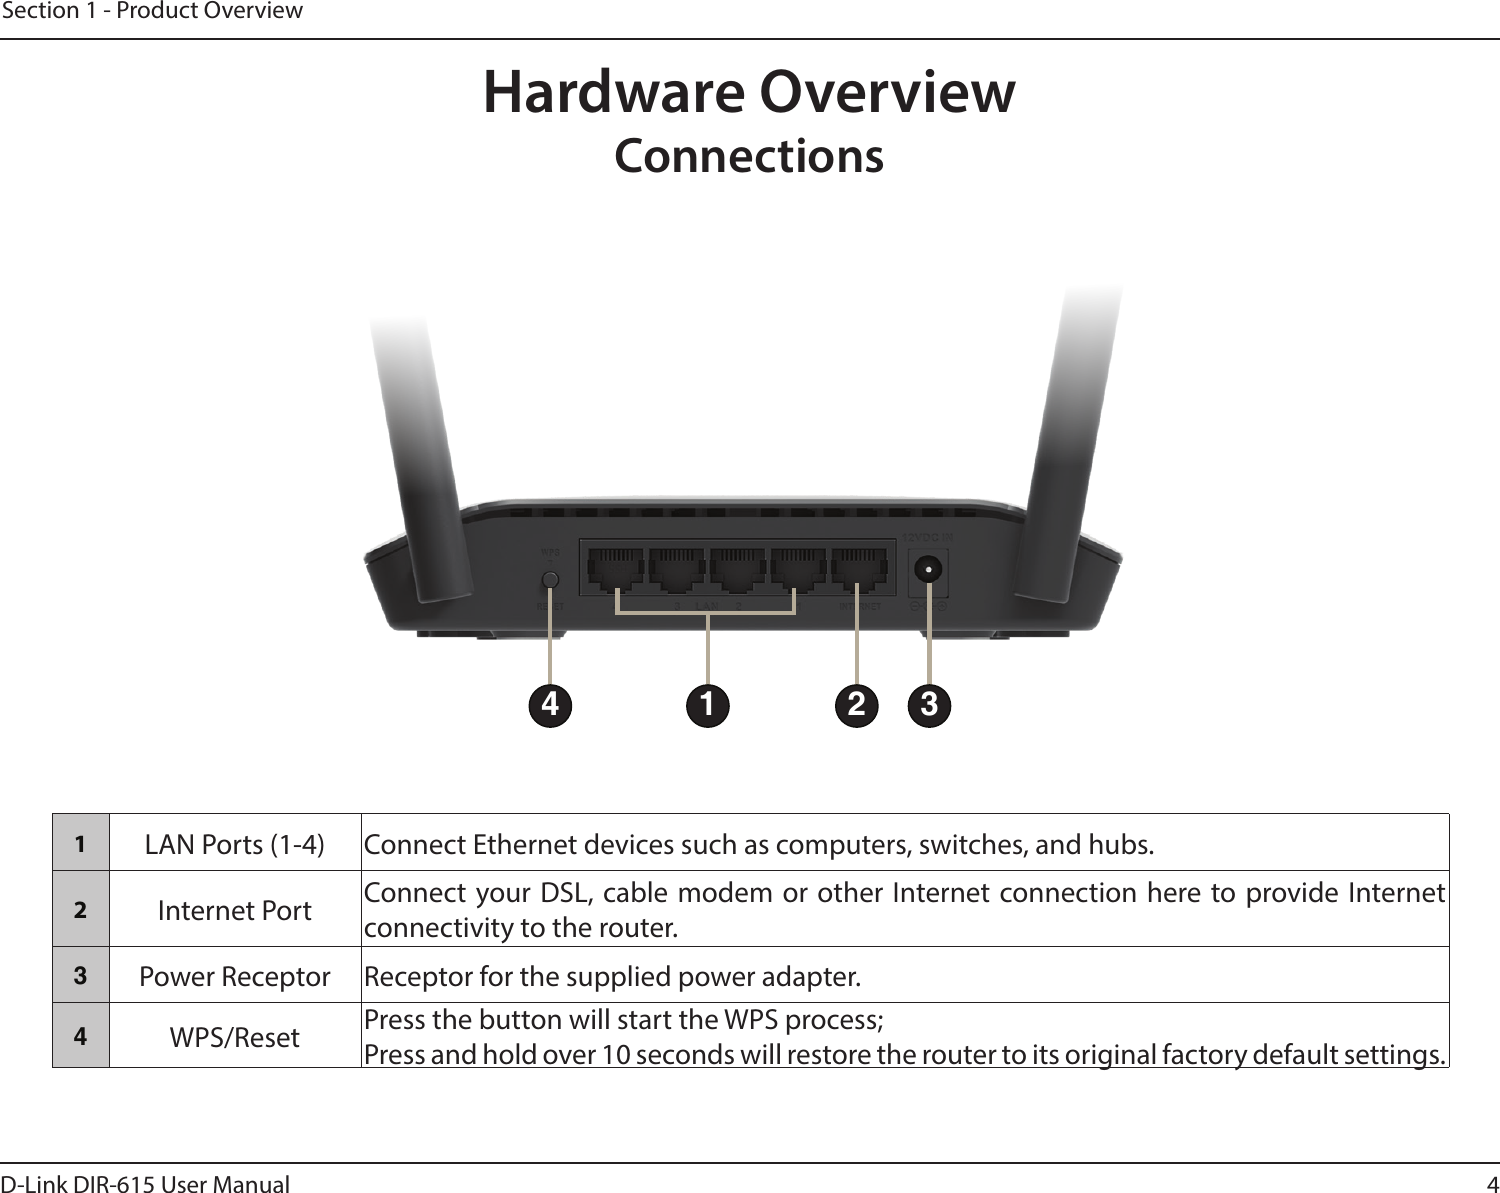
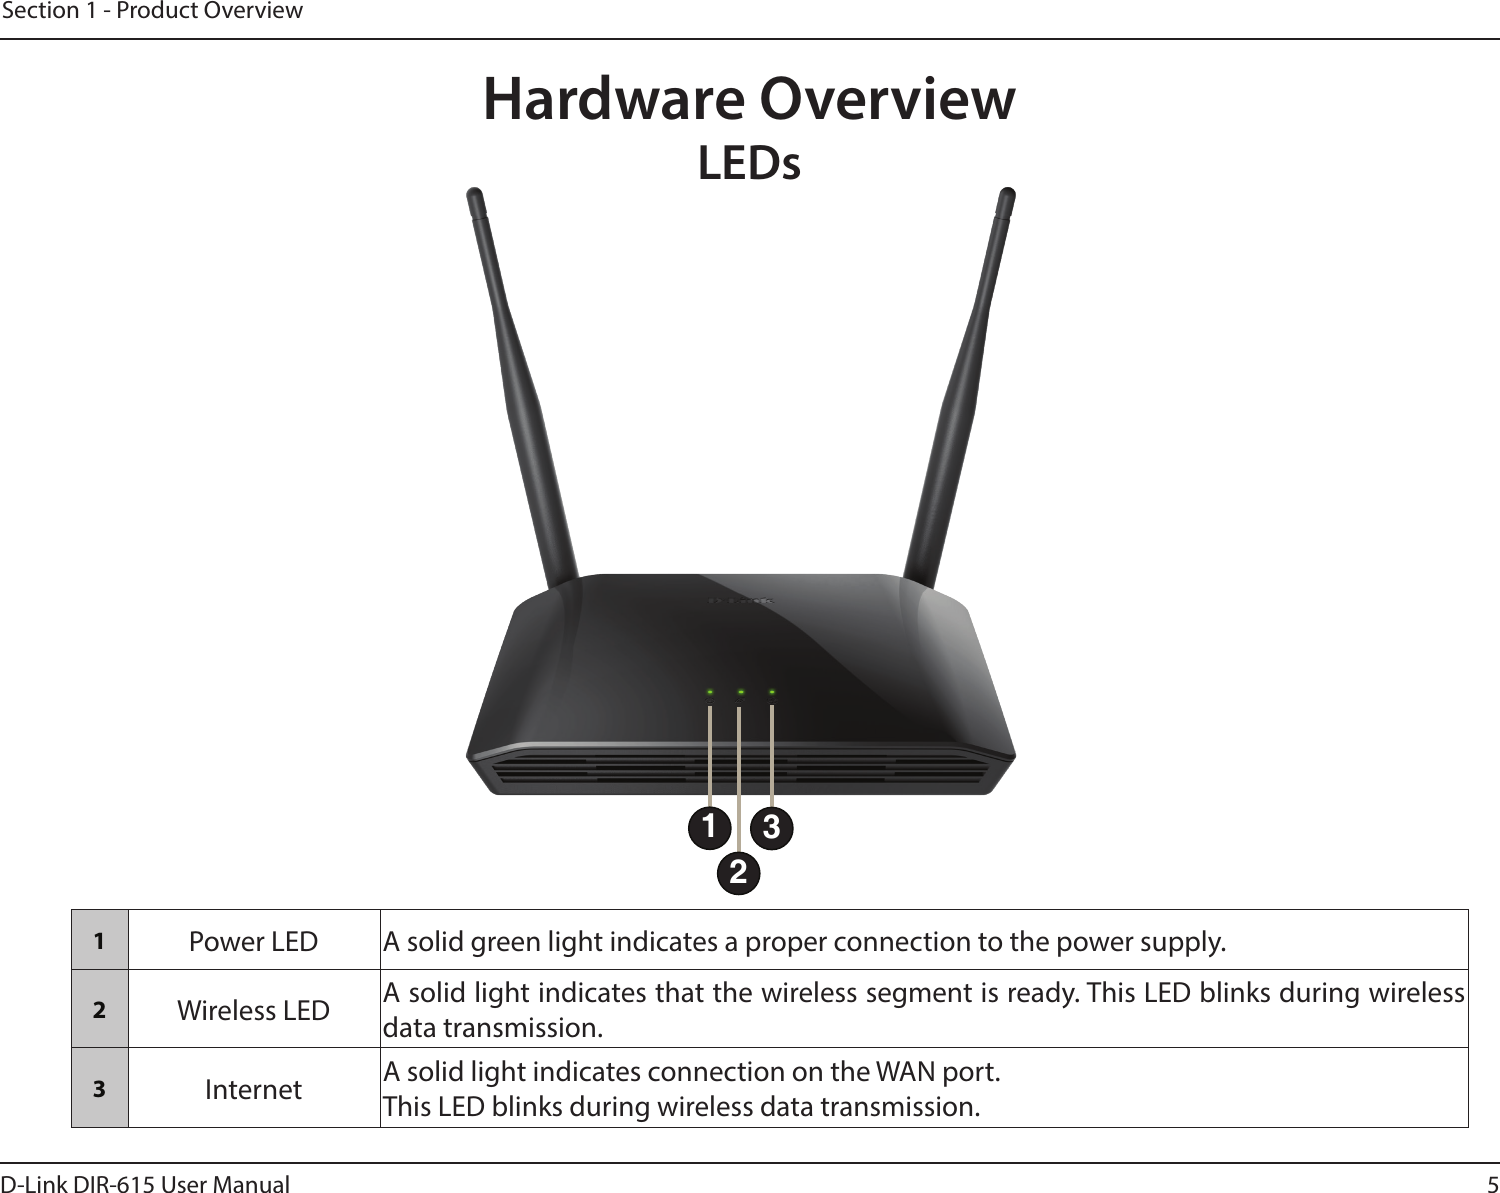
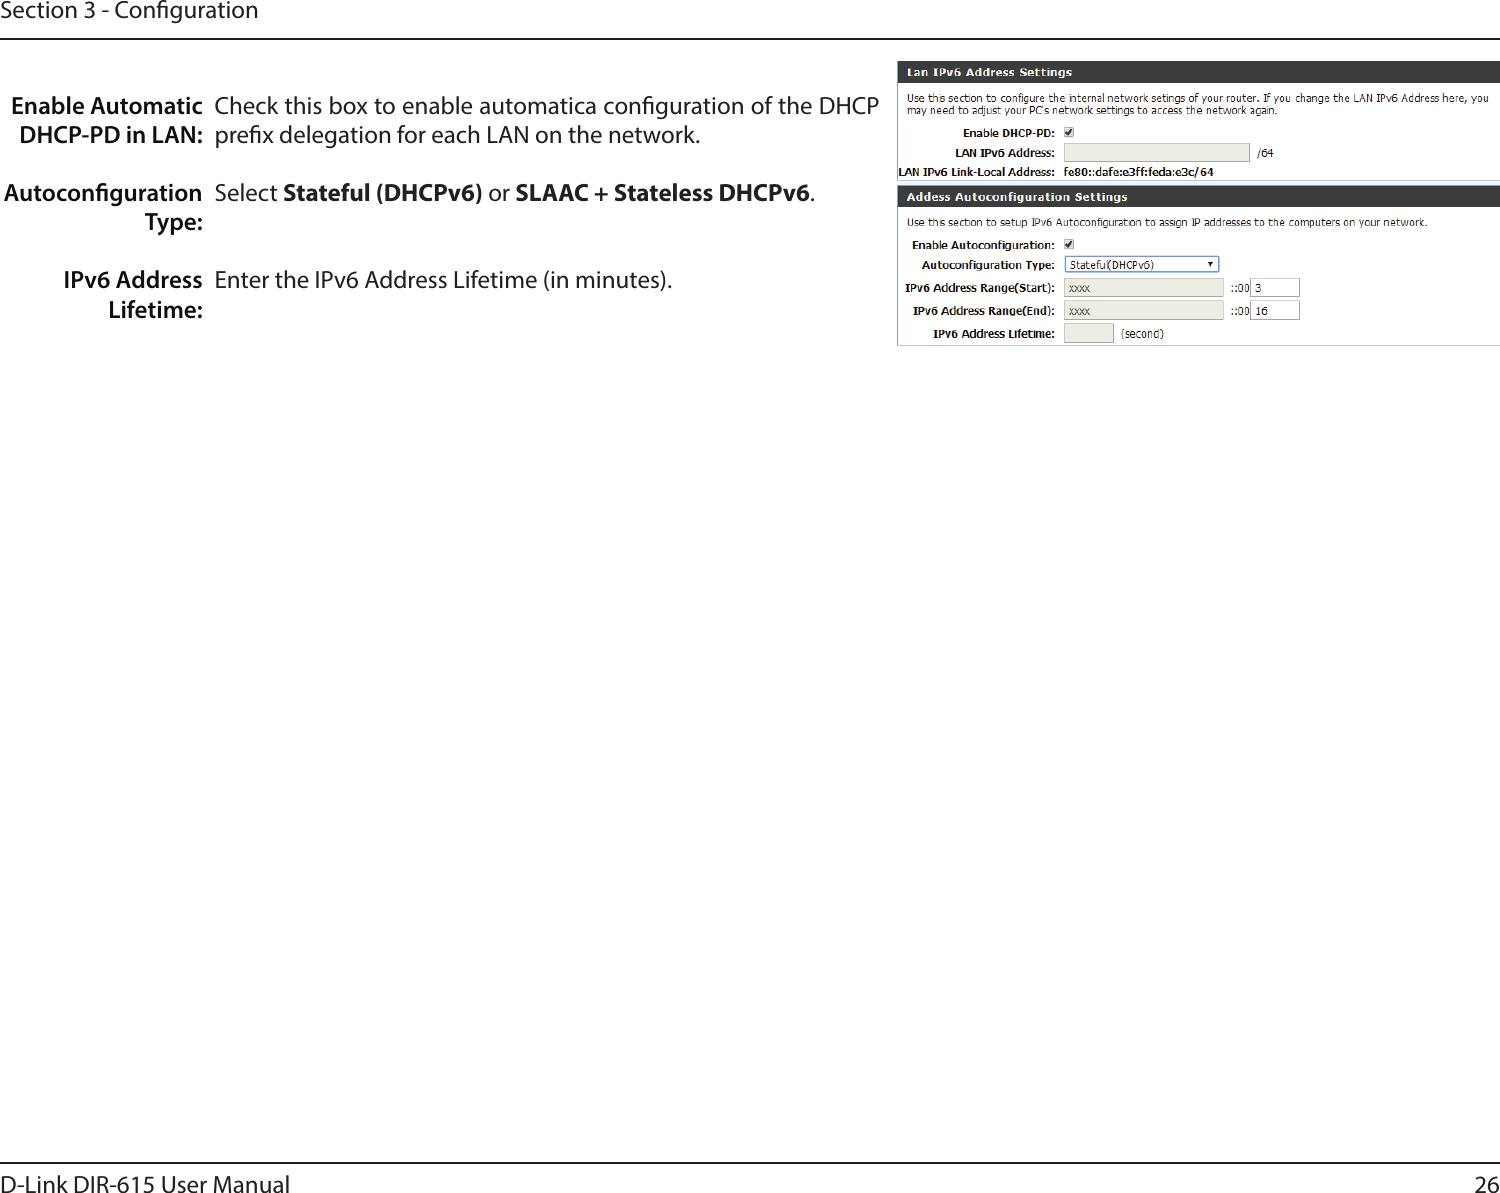
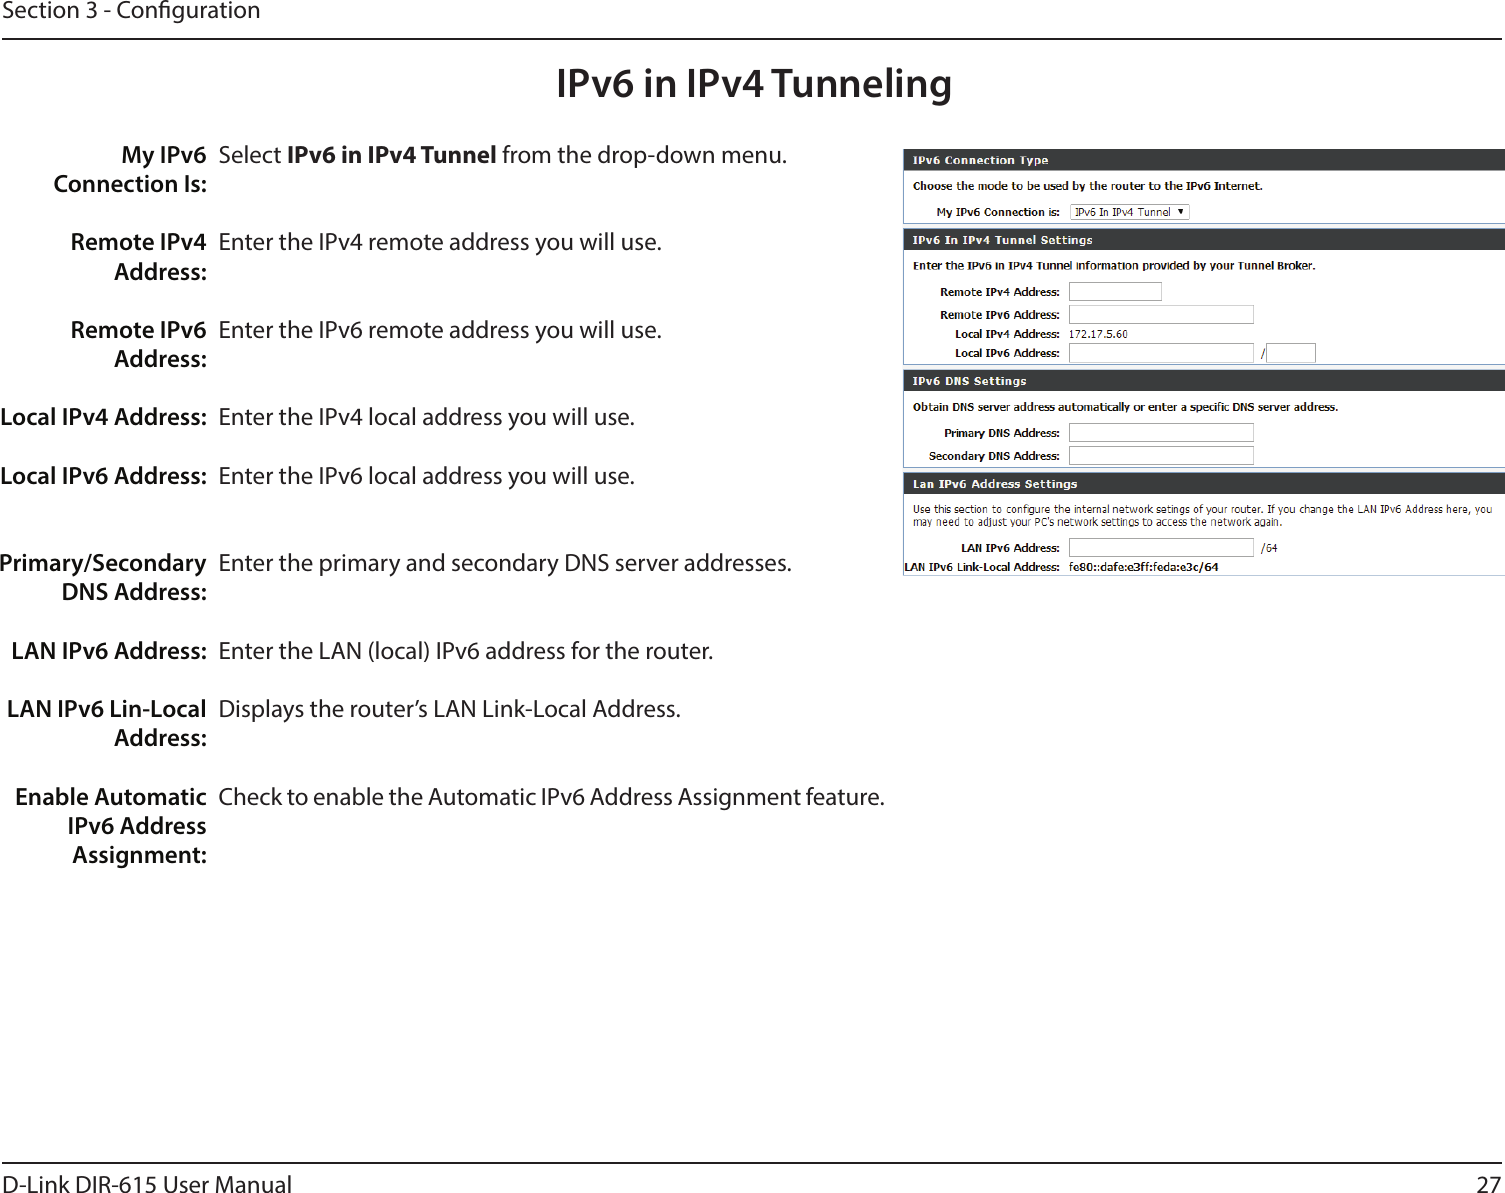
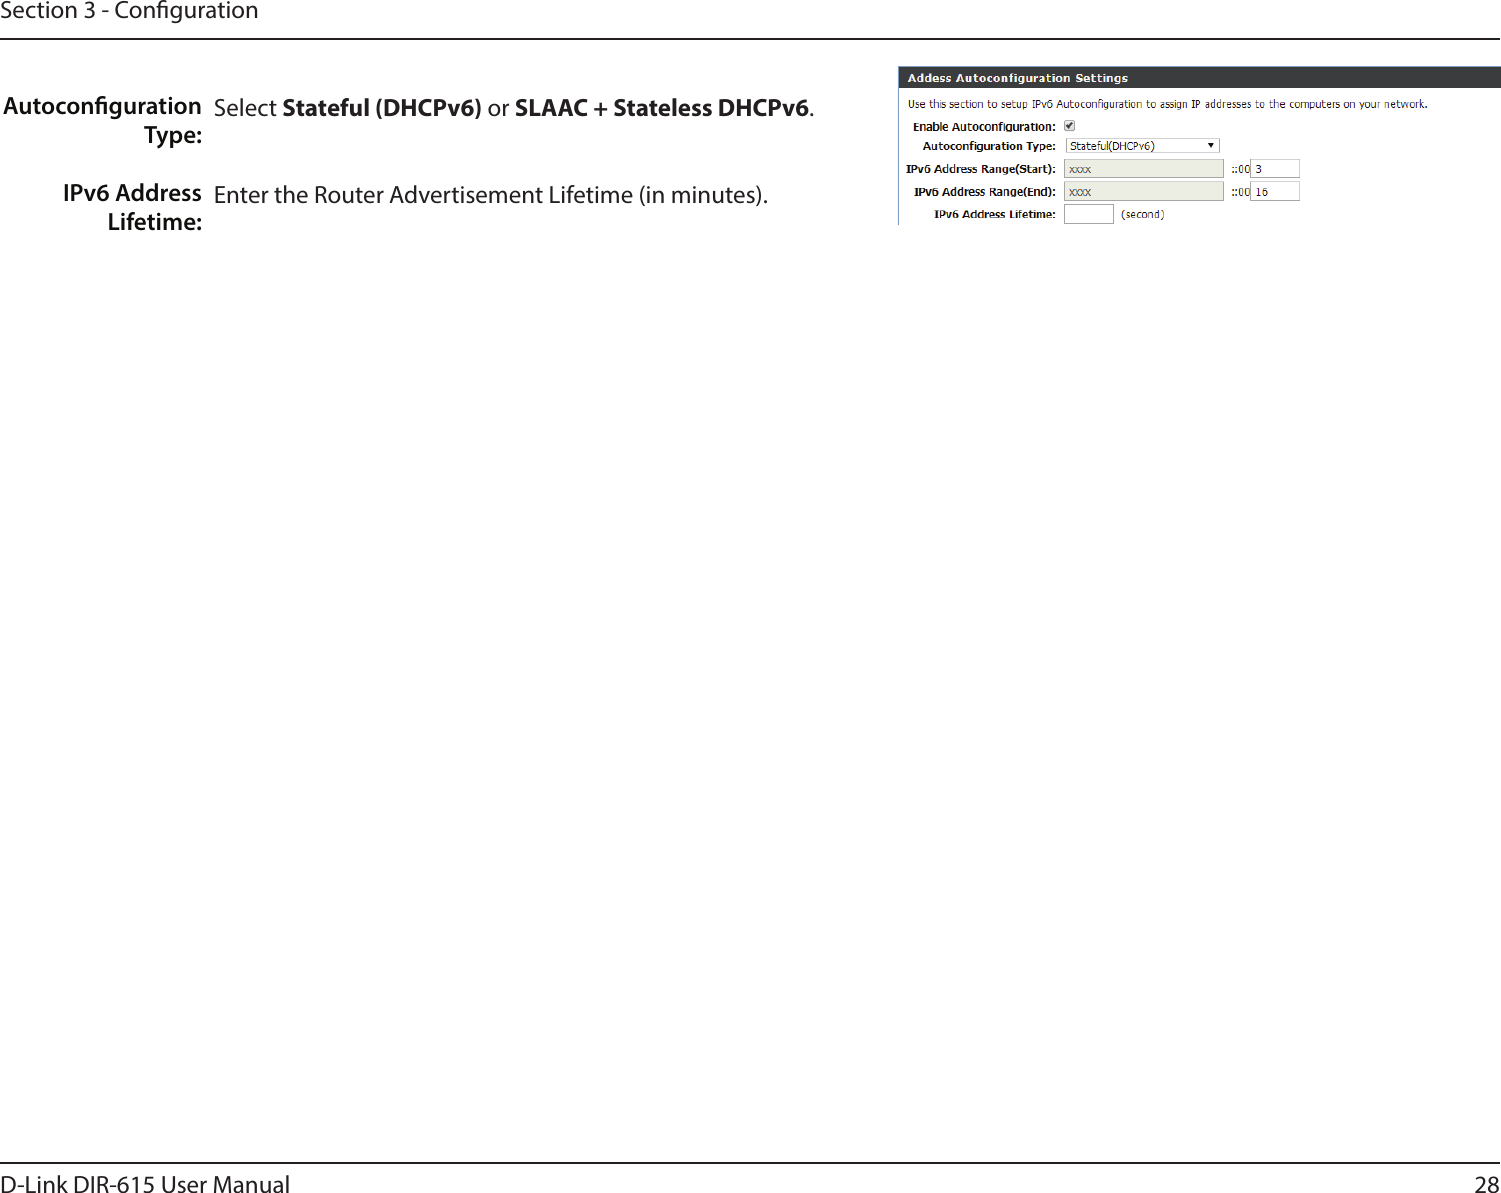
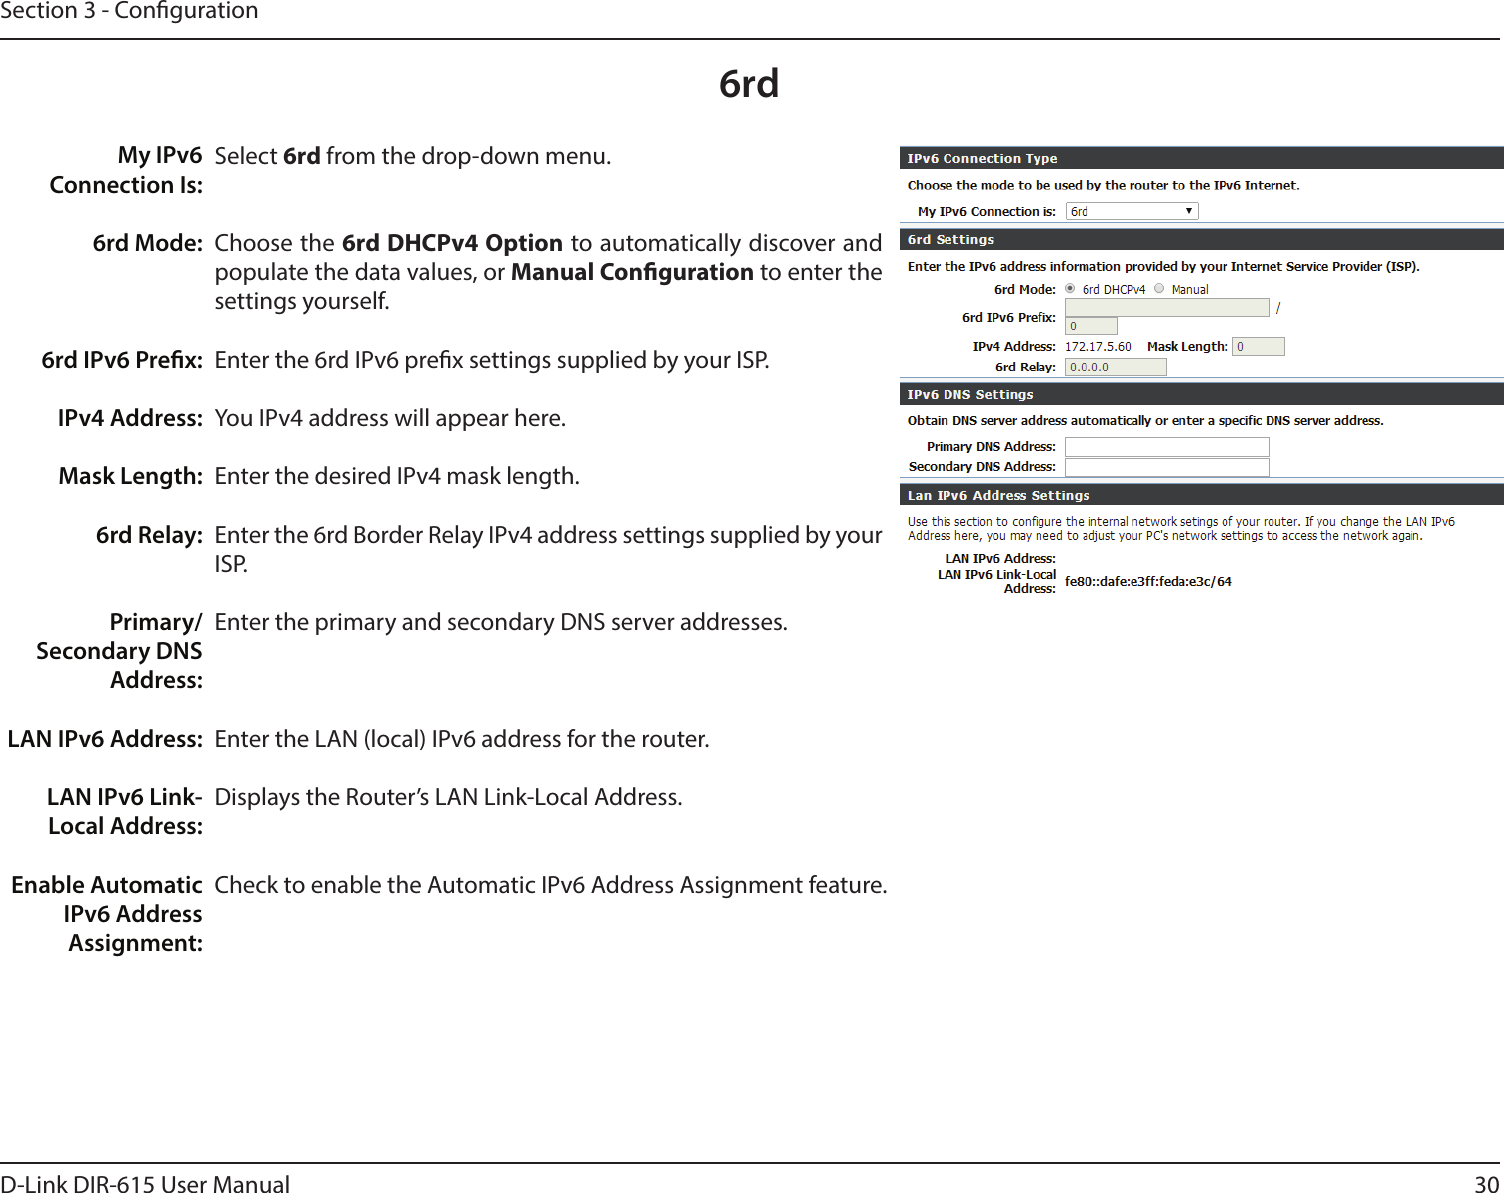
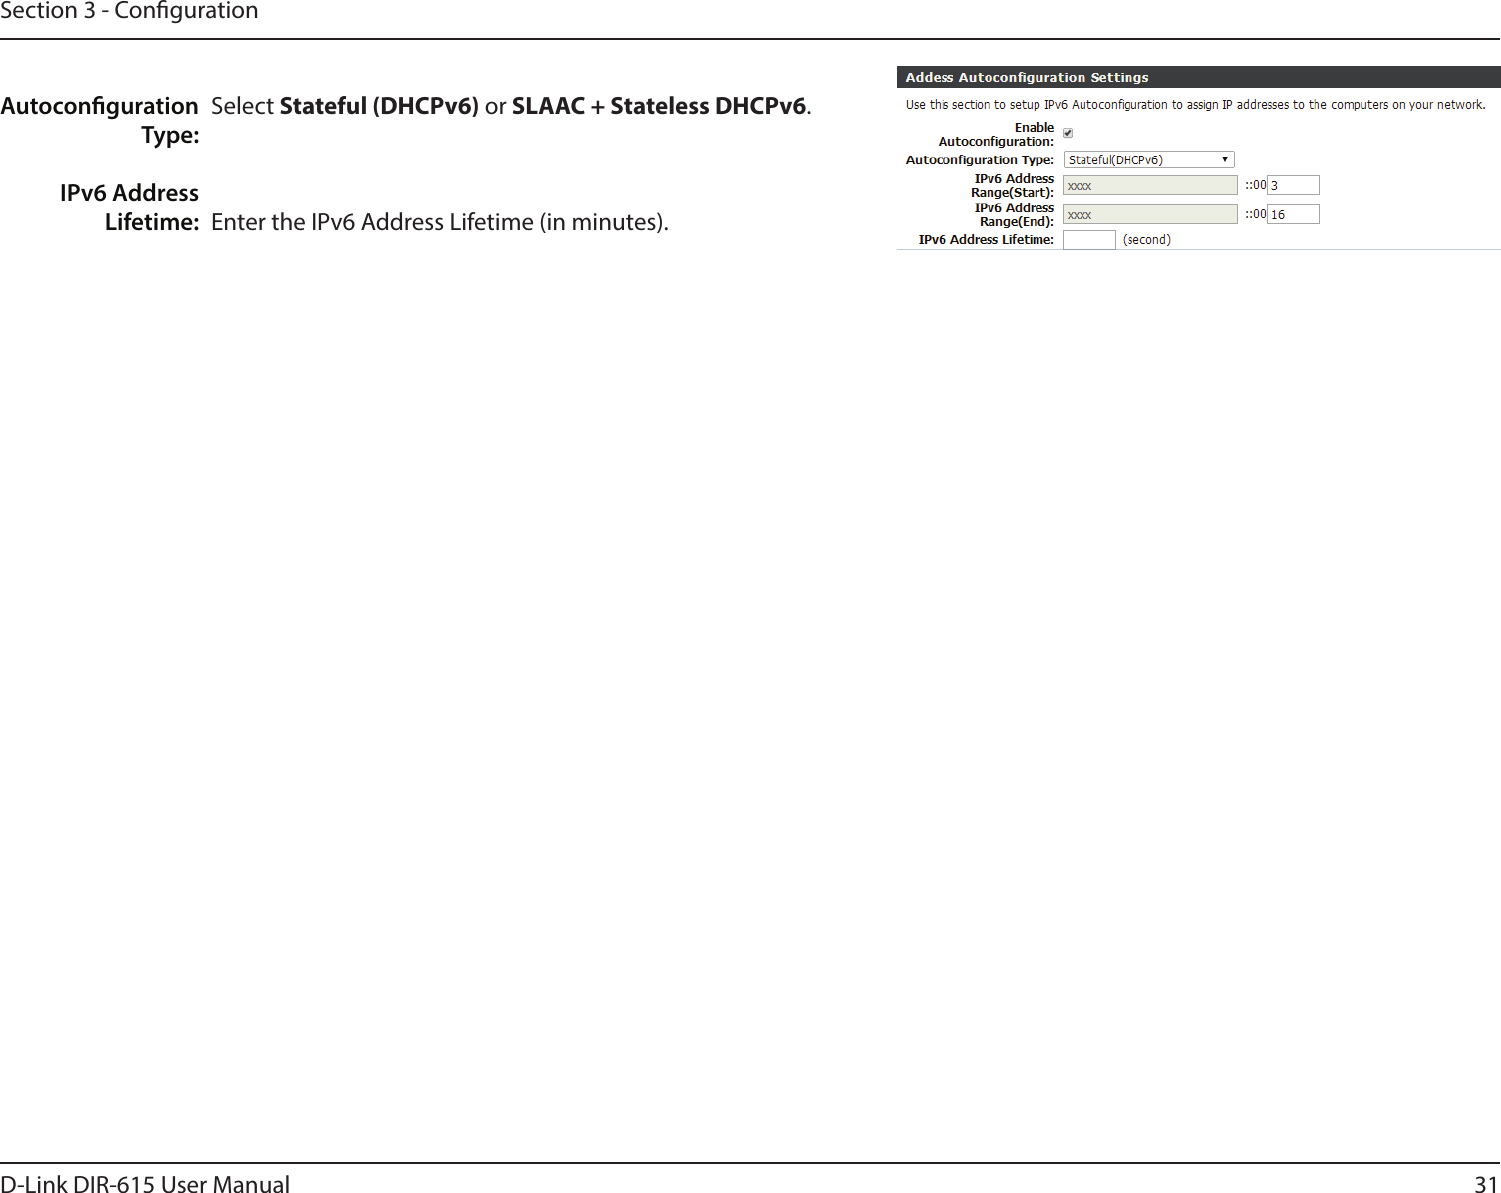
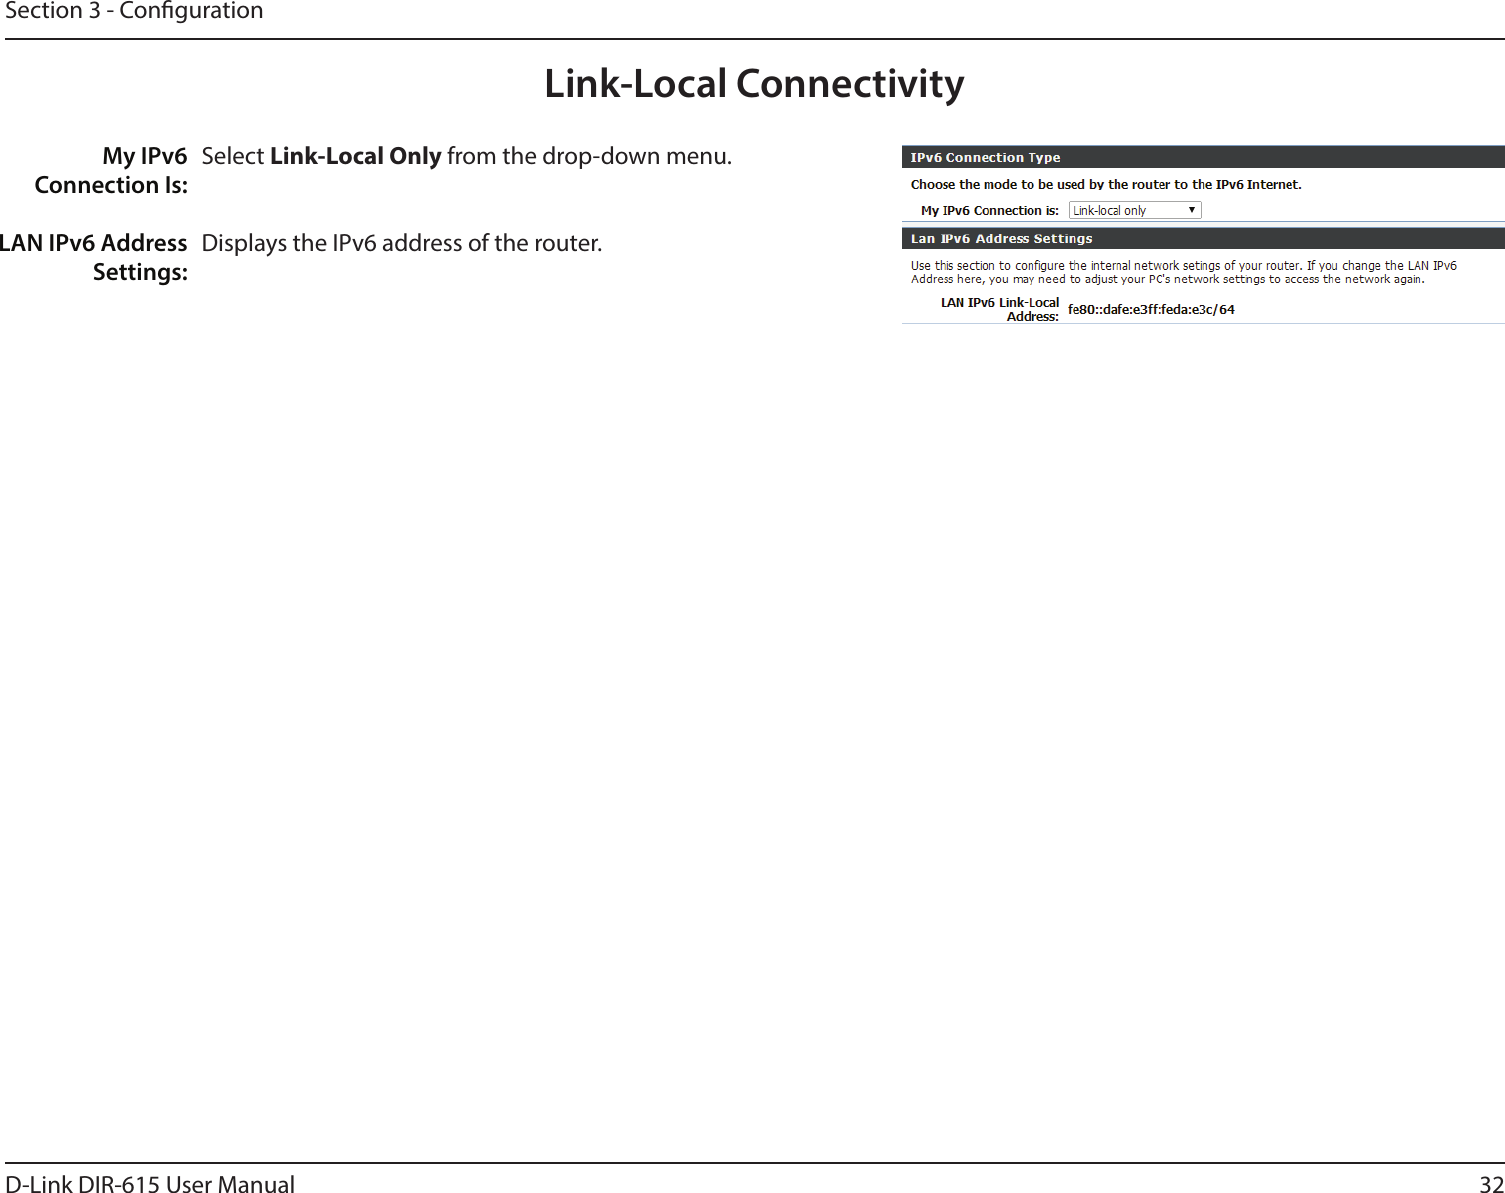
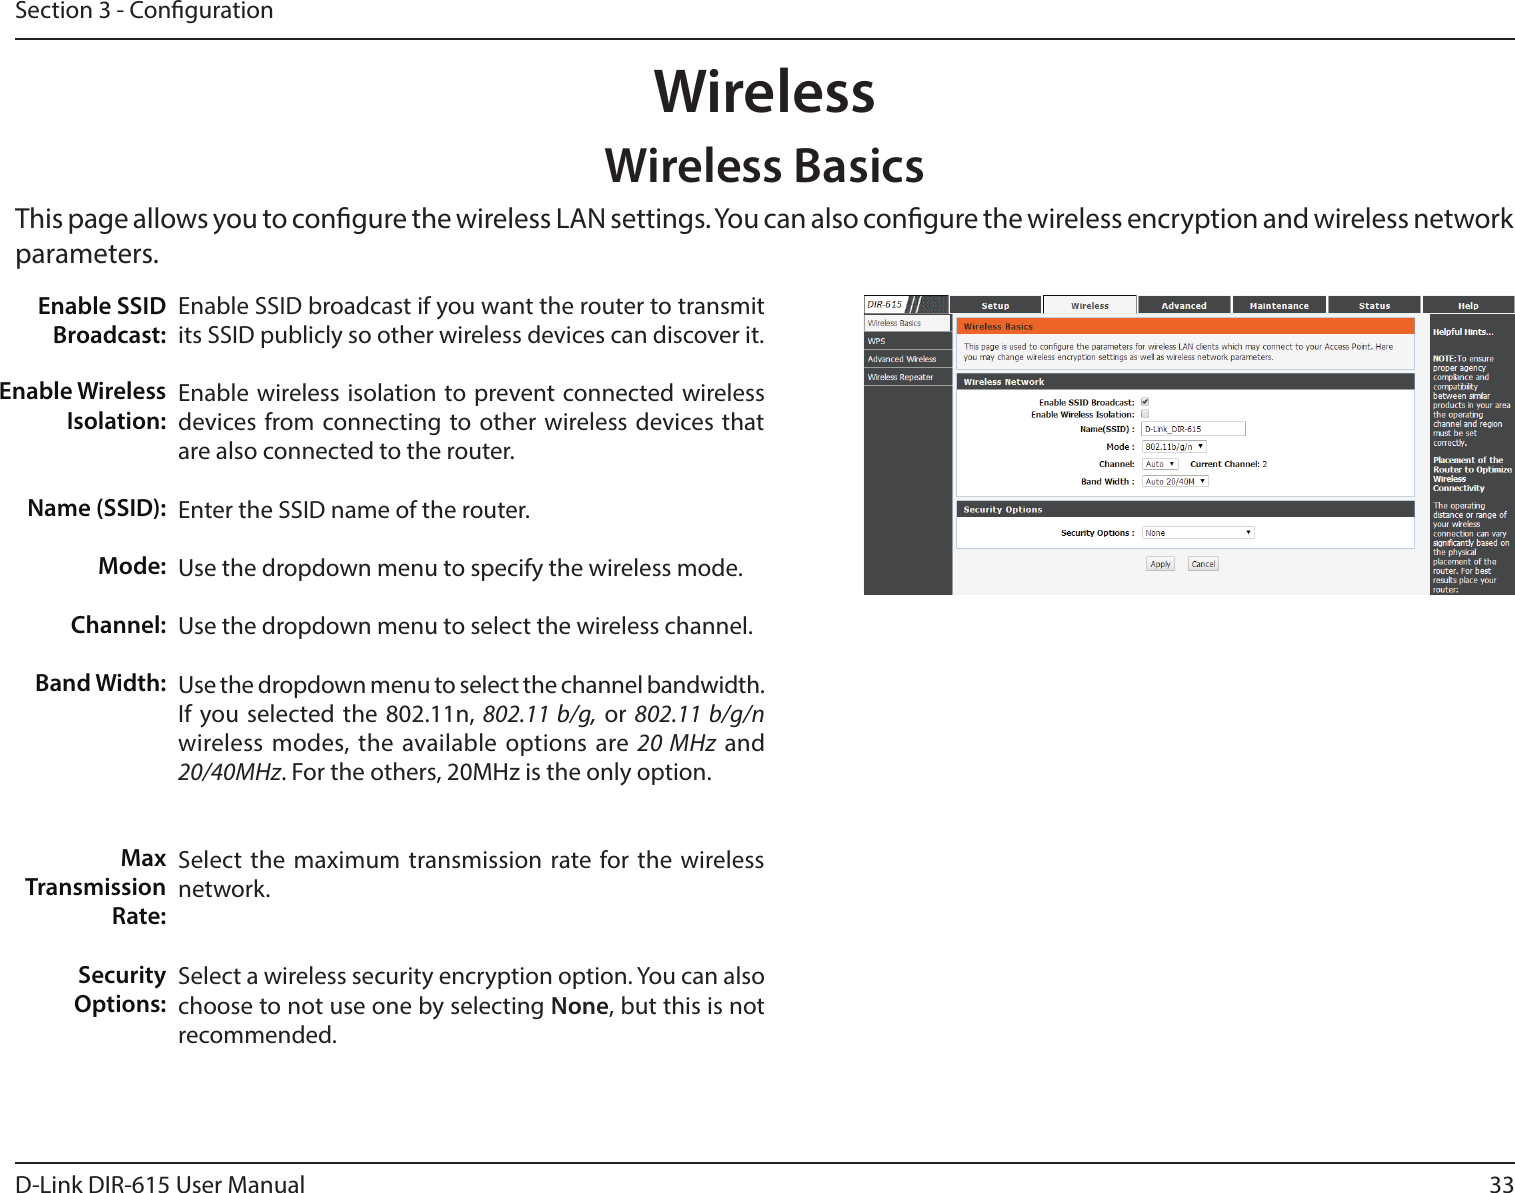
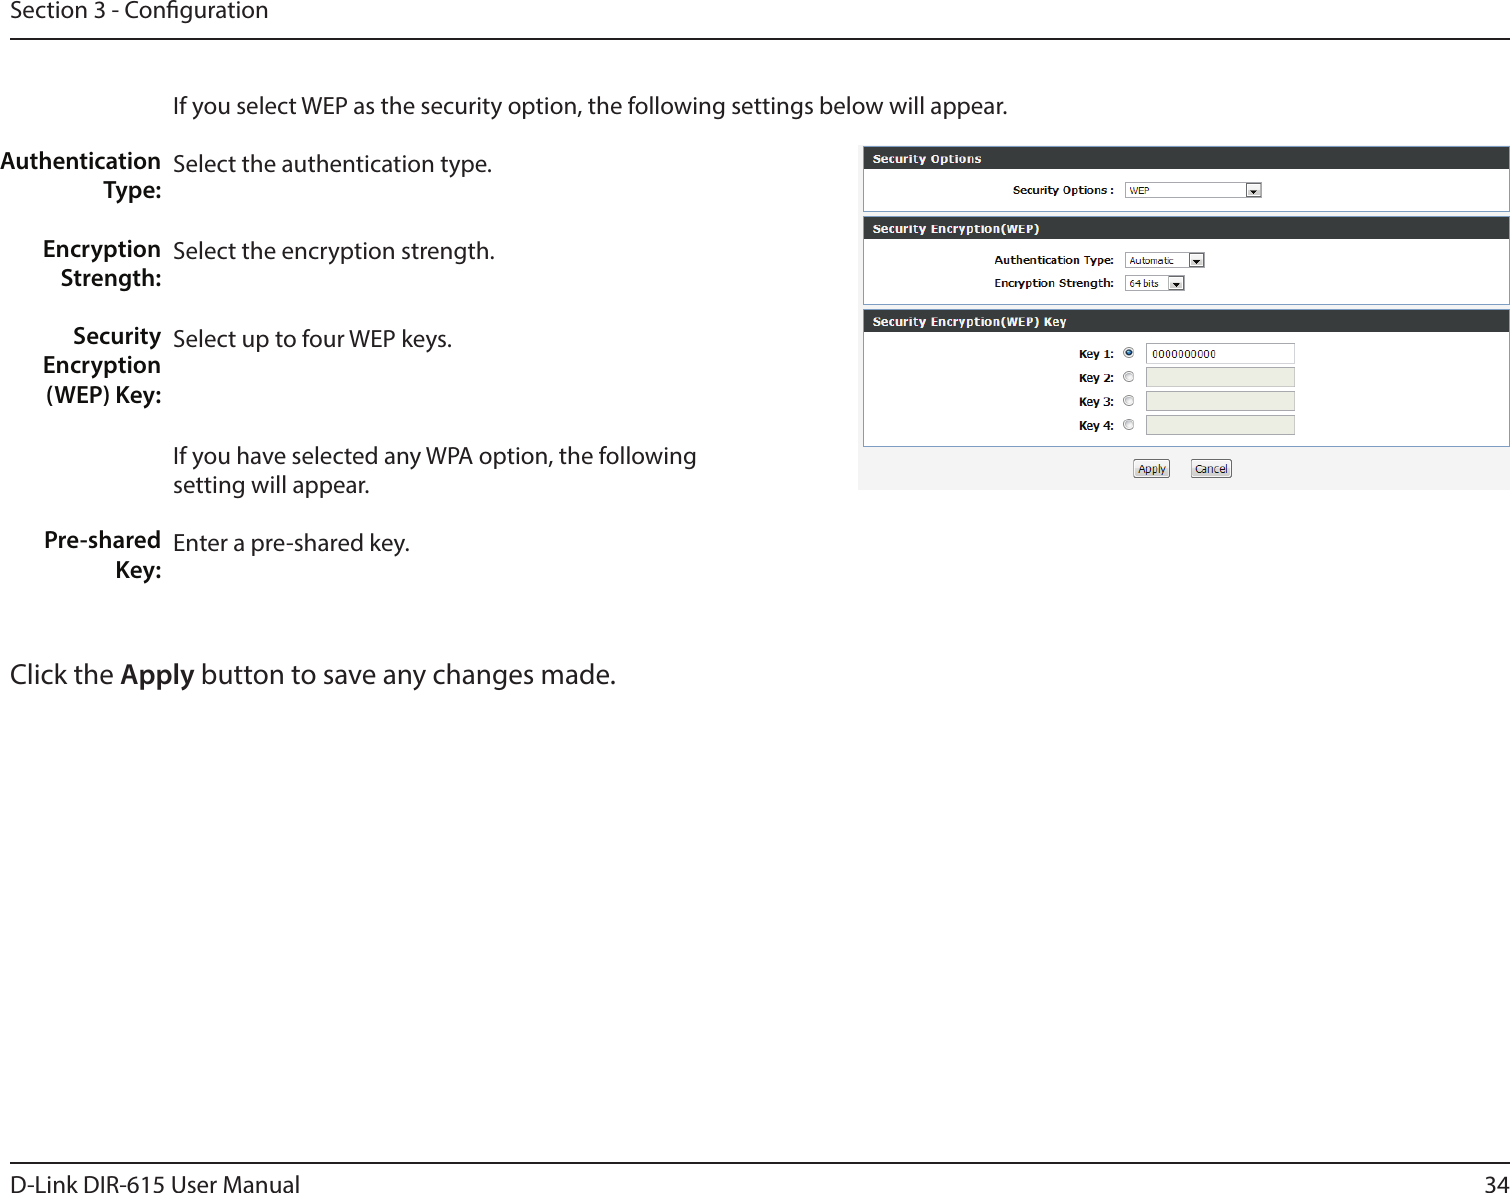
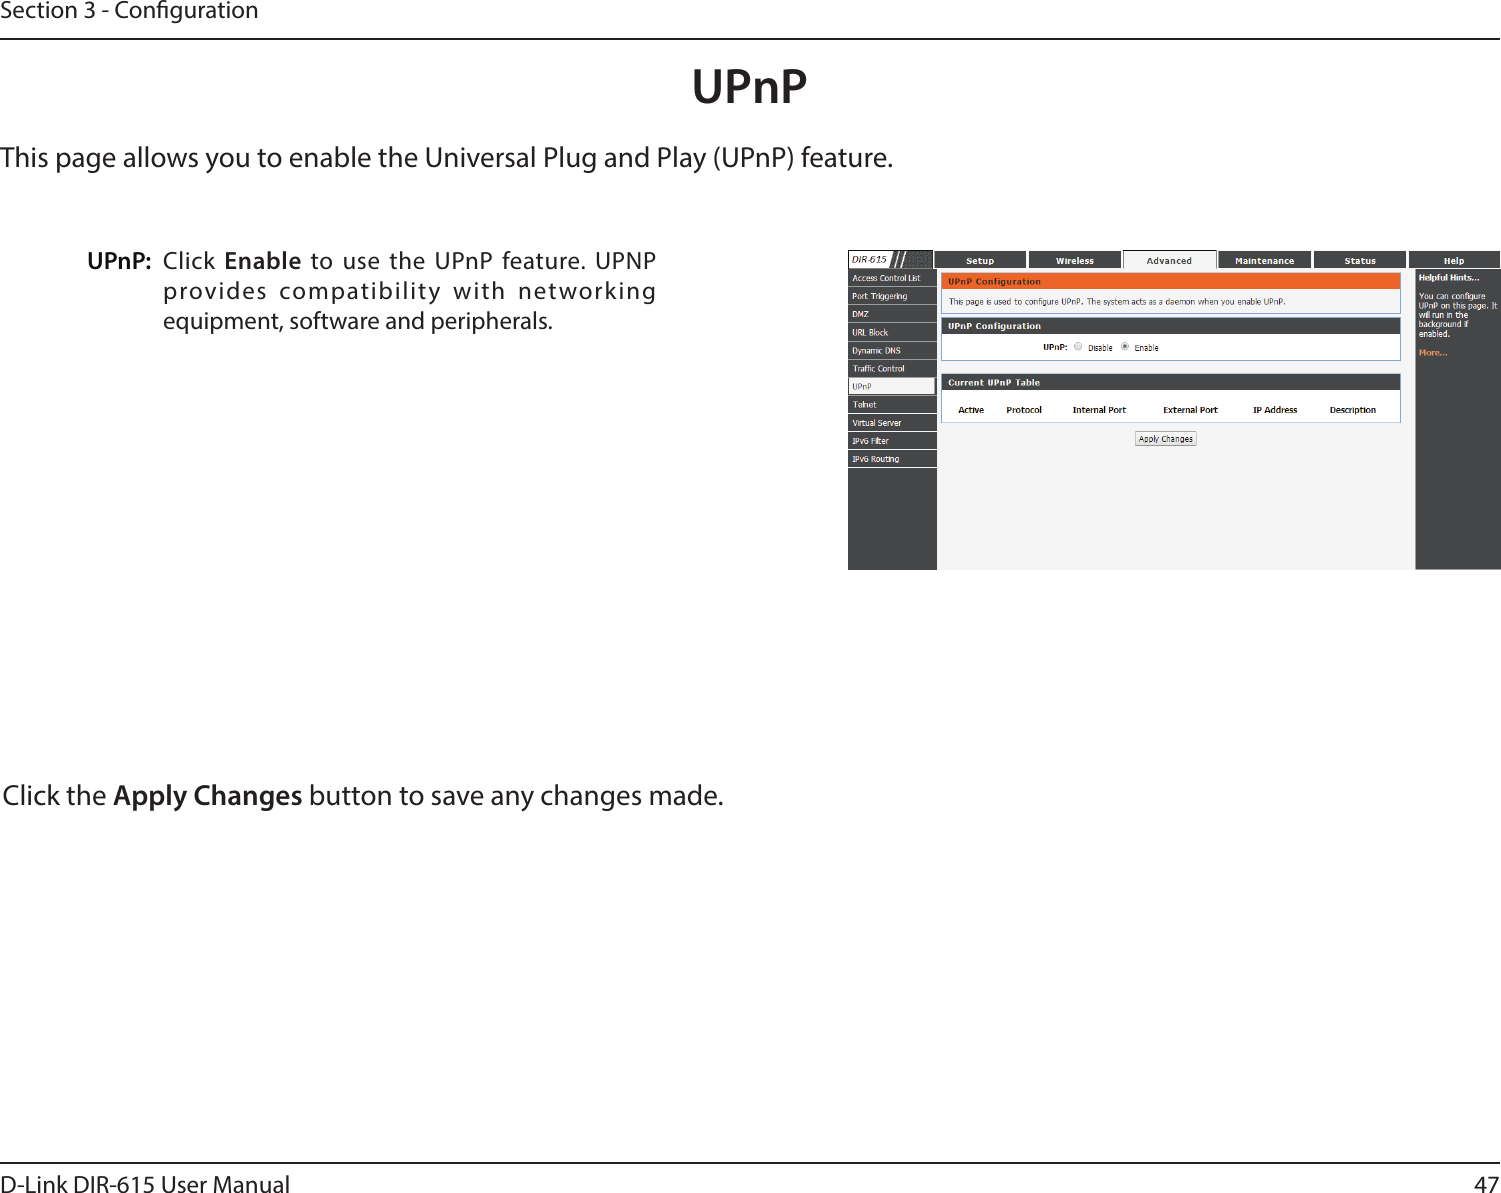
D Link IR615T3 Wireless N300 Router User Manual 15 DIR 615 UserMan r1
D Link Corporation Wireless N300 Router 15 DIR 615 UserMan r1
UserManual.wiki
>
D Link
>
IR615T3 User Manual
15_DIR-615 UserMan r1
Navigation menu
Upload a User Manual
Namespaces
Wiki Guide
HTML
PDF
Info
Views
User Manual
Discussion / Help
Navigation


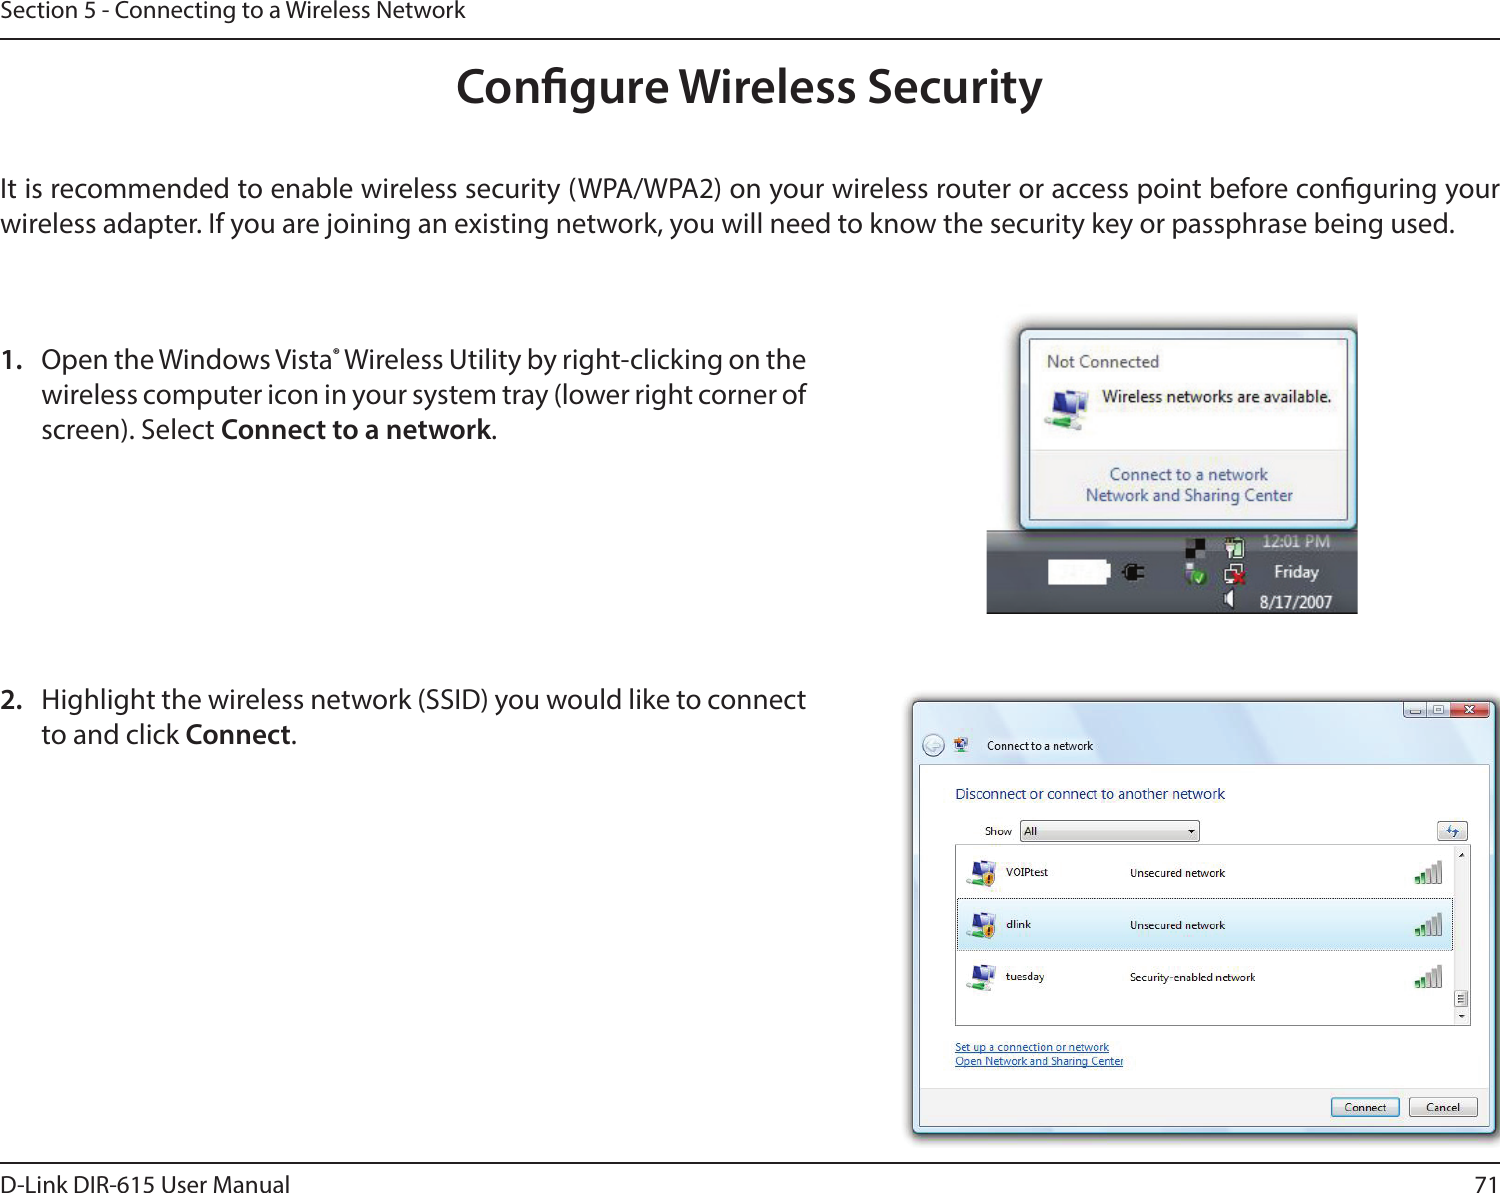
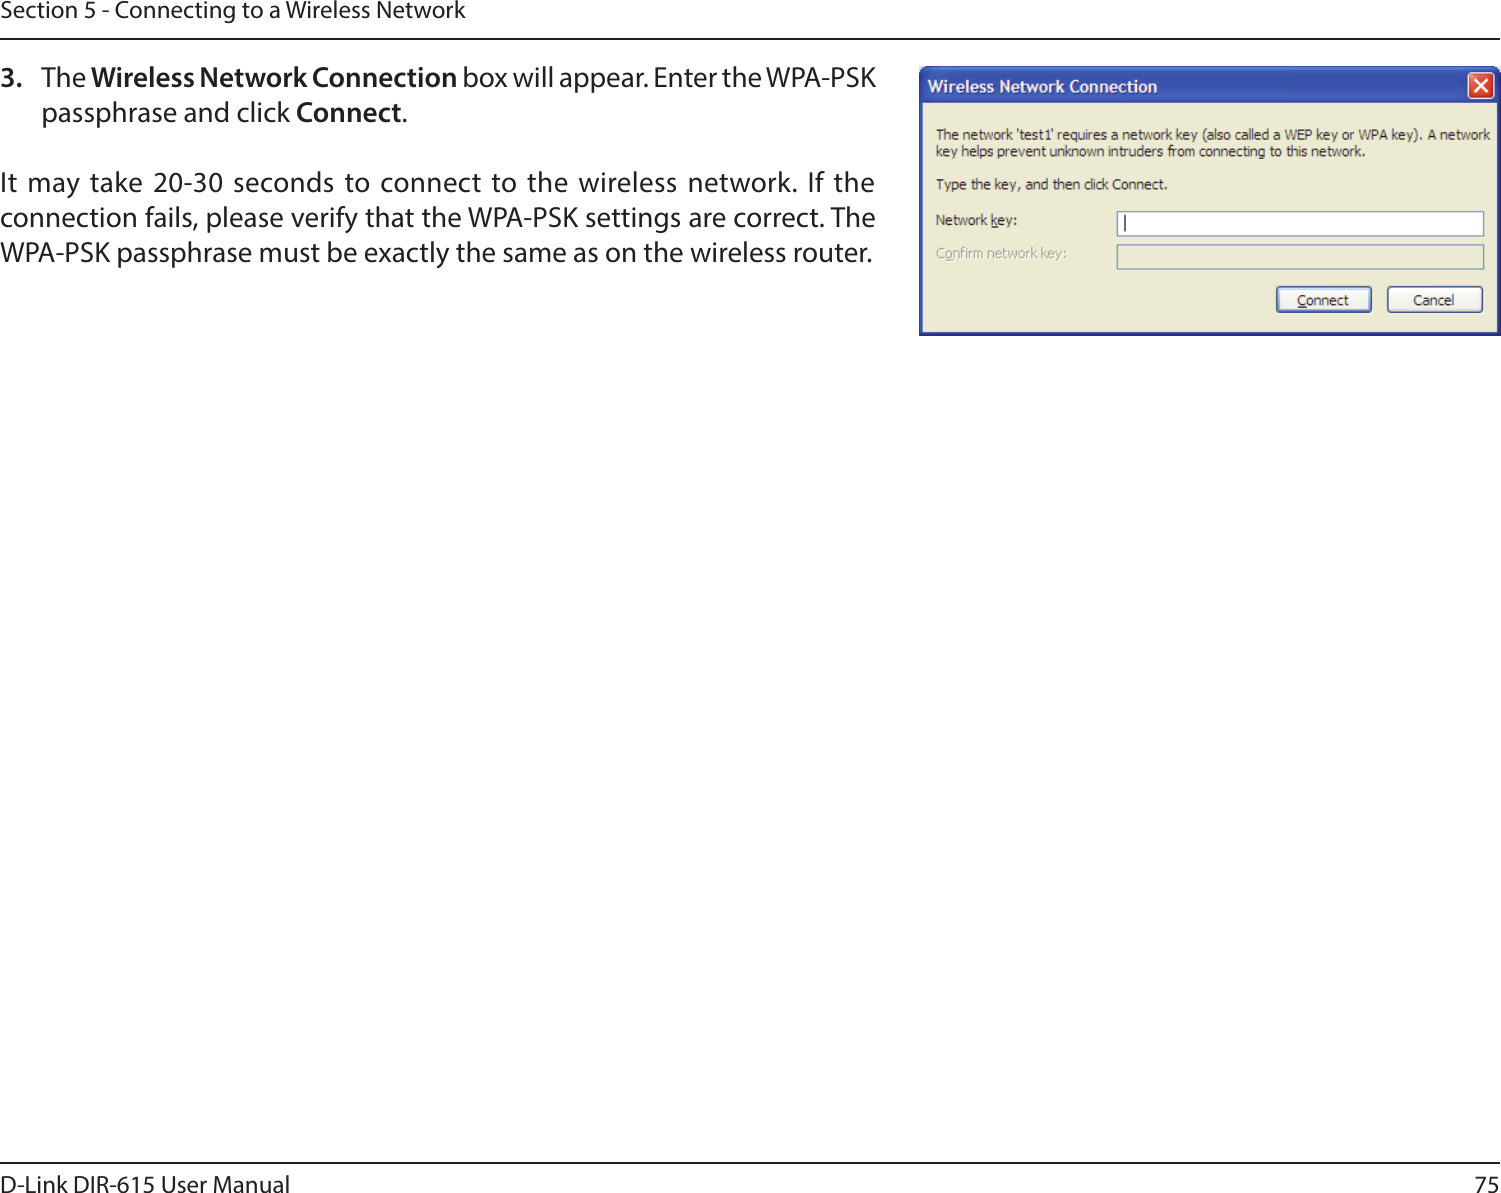
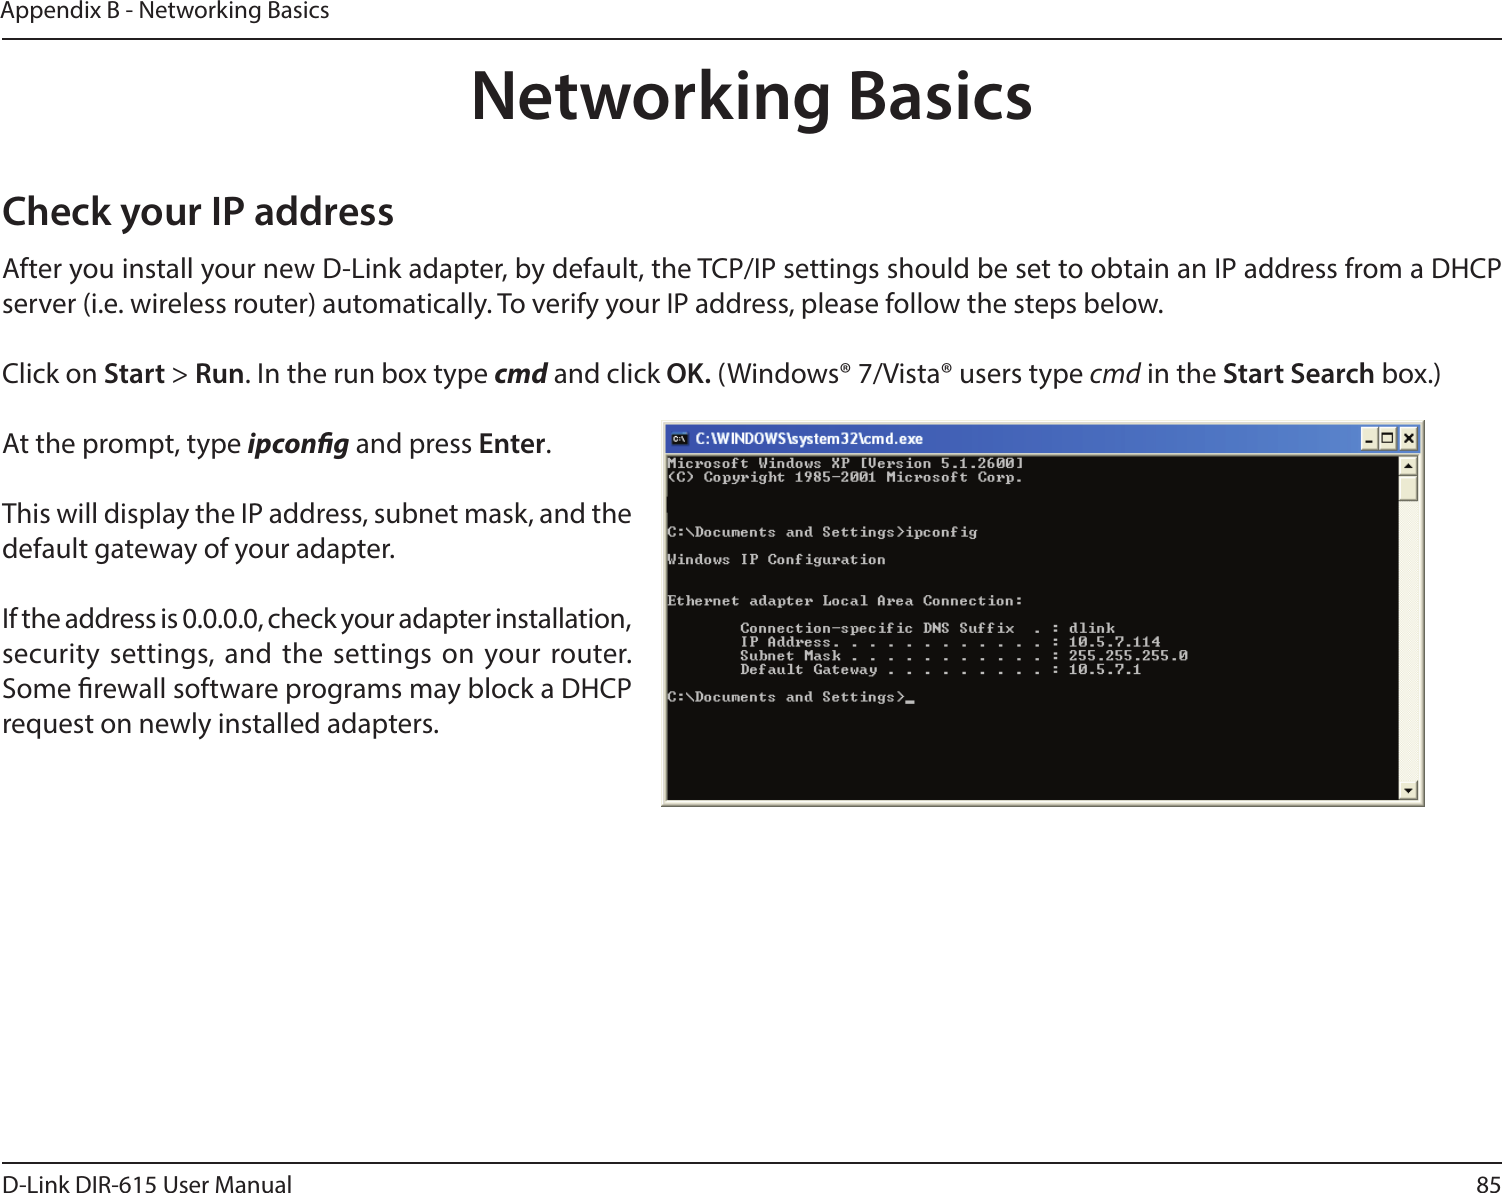
![78D-Link DIR-615 User ManualSection 6 - Troubleshooting3. Why can’t I connect to certain sites or send and receive emails when connecting through my router? If you are having a problem sending or receiving email, or connecting to secure sites such as eBay, banking sites, and Hotmail, we suggest lowering the MTU in increments of ten (Ex. 1492, 1482, 1472, etc). Note: AOL DSL+ users must use MTU of 1400. To nd the proper MTU Size, you’ll have to do a special ping of the destination you’re trying to go to. A destination could be another computer, or a URL. • Click on Start and then click Run. • Windows® 95, 98, and Me users type in command (Windows® NT, 2000, and XP users type in cmd) and press Enter (or click OK). • Once the window opens, you’ll need to do a special ping. Use the following syntax: ping [url] [-f] [-l] [MTU value] Example: ping yahoo.com -f -l 1472](https://usermanual.wiki/D-Link/IR615T3/User-Guide-3525199-Page-82.png)

![92D-Link DIR-615 User ManualAppendix D - Regulatory InformationEuropean Community Declaration of Conformity:Česky [Czech]Tímto D-Link Corporation prohlašuje, že tento produkt, jeho příslušenství a software jsou v souladu se směrnicí 2014/53/EU. Celý text ES prohlášení o shodě vydaného EU a o rmwaru produktu lze stáhnout na stránkách k produktu www.dlink.com.Dansk [Danish]D-Link Corporation erklærer herved, at dette produkt, tilbehør og software er i overensstemmelse med direktiv 2014/53/EU. Den fulde tekst i EU-overensstemmelseserklæringen og produktrmware kan wnloades fra produktsiden hos www.dlink.com.Deutsch [German]Hiermit erklärt die D-Link Corporation, dass dieses Produkt, das Zubehör und die Software der Richtlinie 2014/53/EU entsprechen. Der vollständige Text der Konformitätserklärung der Europäischen Gemeinschaft sowie die Firmware zum Produkt stehen Ihnen zum Herunterladen von der Produktseite im Internet auf www.dlink.com zur Verfügung.Eesti [Estonian]Käesolevaga kinnitab D-Link Corporation, et see toode, tarvikud ja tarkvara on kooskõlas direktiiviga 2014/53/EL. Euroopa Liidu vastavusdeklaratsiooni täistekst ja toote püsivara on allalaadimiseks saadaval tootelehel www.dlink.com.EnglishHereby, D-Link Corporation, declares that this product, accessories, and software are in compliance with directive 2014/53/EU. The full text of the EU Declaration of Conformity and product rmware are available for download from the product page at www.dlink.comEspañol [Spanish]Por la presente, D-Link Corporation declara que este producto, accesorios y software cumplen con las directivas 2014/53/UE. El texto completo de la declaración de conformidad de la UE y el rmware del producto están disponibles y se pueden descargar desde la página del producto en www.dlink.com.Ελληνική [Greek]Με την παρούσα, η D-Link Corporation δηλώνει ότι αυτό το προϊόν, τα αξεσουάρ και το λογισμικό συμμορφώνονται με την Οδηγία 2014/53/ΕΕ. Το πλήρες κείμενο της δήλωσης συμμόρφωσης της ΕΕ και το υλικολογισμικό του προϊόντος είναι διαθέσιμα για λήψη από τη σελίδα του προϊόντος στην τοποθεσία www.dlink.com.Français [French]Par les présentes, D-Link Corporation déclare que ce produit, ces accessoires et ce logiciel sont conformes aux directives 2014/53/UE.Le texte complet de la déclaration de conformité de l'UE et le icroprogramme du produit sont disponibles au téléchargement sur la page des produits à www.dlink.com.Italiano [Italian]Con la presente, D-Link Corporation dichiara che questo prodotto, i relativi accessori e il software sono conformi alla direttiva 2014/53/UE. Il testo completo della dichiarazione di conformità UE e il rmware del prodotto sono disponibili per il download dalla pagina del prodotto su www.dlink.com.](https://usermanual.wiki/D-Link/IR615T3/User-Guide-3525199-Page-96.png)
![93D-Link DIR-615 User ManualAppendix D - Regulatory InformationLatviski [Latvian]Ar šo uzņēmums D-Link Corporation apliecina, ka šis produkts, piederumi un programmatūra atbilst direktīvai 2014/53/ES. ES atbilstības deklarācijas pilno tekstu un produkta aparātprogrammatūru var lejupielādēt attiecīgā produkta lapā vietnē www.dlink.com.Lietuvių [Lithuanian] Šiuo dokumentu „D-Link Corporation“ pareiškia, kad šis gaminys, priedai ir programinė įranga atitinka direktyvą 2014/53/ES. Visą ES atitikties deklaracijos tekstą ir gaminio programinę aparatinę įrangą galima atsisiųsti iš gaminio puslapio adresu www.dlink.com.Nederlands [Dutch]Hierbij verklaart D-Link Corporation dat dit product, accessoires en software voldoen aan de richtlijnen 2014/53/EU. De volledige tekst van de EU conformiteitsverklaring en productrmware is beschikbaar voor download van de productpagina op www.dlink.com.Malti [Maltese]Bil-preżenti, D-Link Corporation tiddikjara li dan il-prodott, l-aċċessorji, u s-software huma konformi mad-Direttiva 2014/53/UE. Tista’ tniżżel it-test sħiħ tad-dikjarazzjoni ta’ konformità tal-UE u l-rmware tal-prodott mill-paġna tal-prodott fuq www.dlink.com.Magyar [Hungarian]Ezennel a D-Link Corporation kijelenti, hogy a jelen termék, annak tartozékai és szoftvere megfelelnek a 2014/53/EU sz. rendeletek rendelkezéseinek. Az EU Megfelelőségi nyilatkozat teljes szövege és a termék rmware a termék oldaláról tölthető le a www.dlink.com címen.Polski [Polish]D-Link Corporation niniejszym oświadcza, że ten produkt, akcesoria oraz oprogramowanie są zgodne z dyrektywami 2014/53/EU. Pełen tekst deklaracji zgodności UE oraz oprogramowanie sprzętowe do produktu można pobrać na stronie produktu w witrynie www.dlink.com.Português [Portuguese] Desta forma, a D-Link Corporation declara que este produto, os acessórios e o software estão em conformidade com a diretiva 2014/53/UE. O texto completo da declaração de conformidade da UE e do rmwareSlovensko[Slovenian]Podjetje D-Link Corporation s tem izjavlja, da so ta izdelek, dodatna oprema in programnska oprema skladni z direktivami 2014/53/EU. Celotno besedilo izjave o skladnosti EU in vdelana programska oprema sta na voljo za prenos na strani izdelka na www.dlink.com.Slovensky [Slovak]Spoločnosť D-Link týmto vyhlasuje, že tento produkt, príslušenstvo a softvér sú v súlade so smernicou 214/53/EÚ. Úplné znenie vyhlásenia EÚ o zhode a rmvéri produktu sú k dispozícii na prevzatie zo stránky produktu www.dlink.com.Suomi [Finnish]D-Link Corporation täten vakuuttaa, että tämä tuote, lisävarusteet ja ohjelmisto ovat direktiivin 2014/53/EU vaatimusten mukaisia. Täydellinen EU-vaatimustenmukaisuusvakuutus samoin kuin tuotteen laiteohjelmisto ovat ladattavissa osoitteesta www.dlink.com.](https://usermanual.wiki/D-Link/IR615T3/User-Guide-3525199-Page-97.png)
![94D-Link DIR-615 User ManualAppendix D - Regulatory InformationSvenska[Swedish]D-Link Corporation försäkrar härmed att denna produkt, tillbehör och programvara överensstämmer med direktiv 2014/53/EU. Hela texten med EU-försäkran om överensstämmelse och produkt-rmware kan hämtas från produktsidan på www.dlink.com.Íslenska [Icelandic]Hér með lýsir D-Link Corporation því yr að þessi vara, fylgihlutir og hugbúnaður eru í samræmi við tilskipun 2014/53/EB. Sækja má ESB-samræmisyrlýsinguna í heild sinni og fastbúnað vörunnar af vefsíðu vörunnar á www.dlink.com.Norsk [Norwegian]Herved erklærer D-Link Corporation at dette produktet, tilbehøret og programvaren er i samsvar med direktivet 2014/53/EU. Den fullstendige teksten i EU-erklæring om samsvar og produktets fastvare er tilgjengelig for nedlasting fra produktsiden på www.dlink.com.Warning Statement:The power outlet should be near the device and easily accessible.](https://usermanual.wiki/D-Link/IR615T3/User-Guide-3525199-Page-98.png)