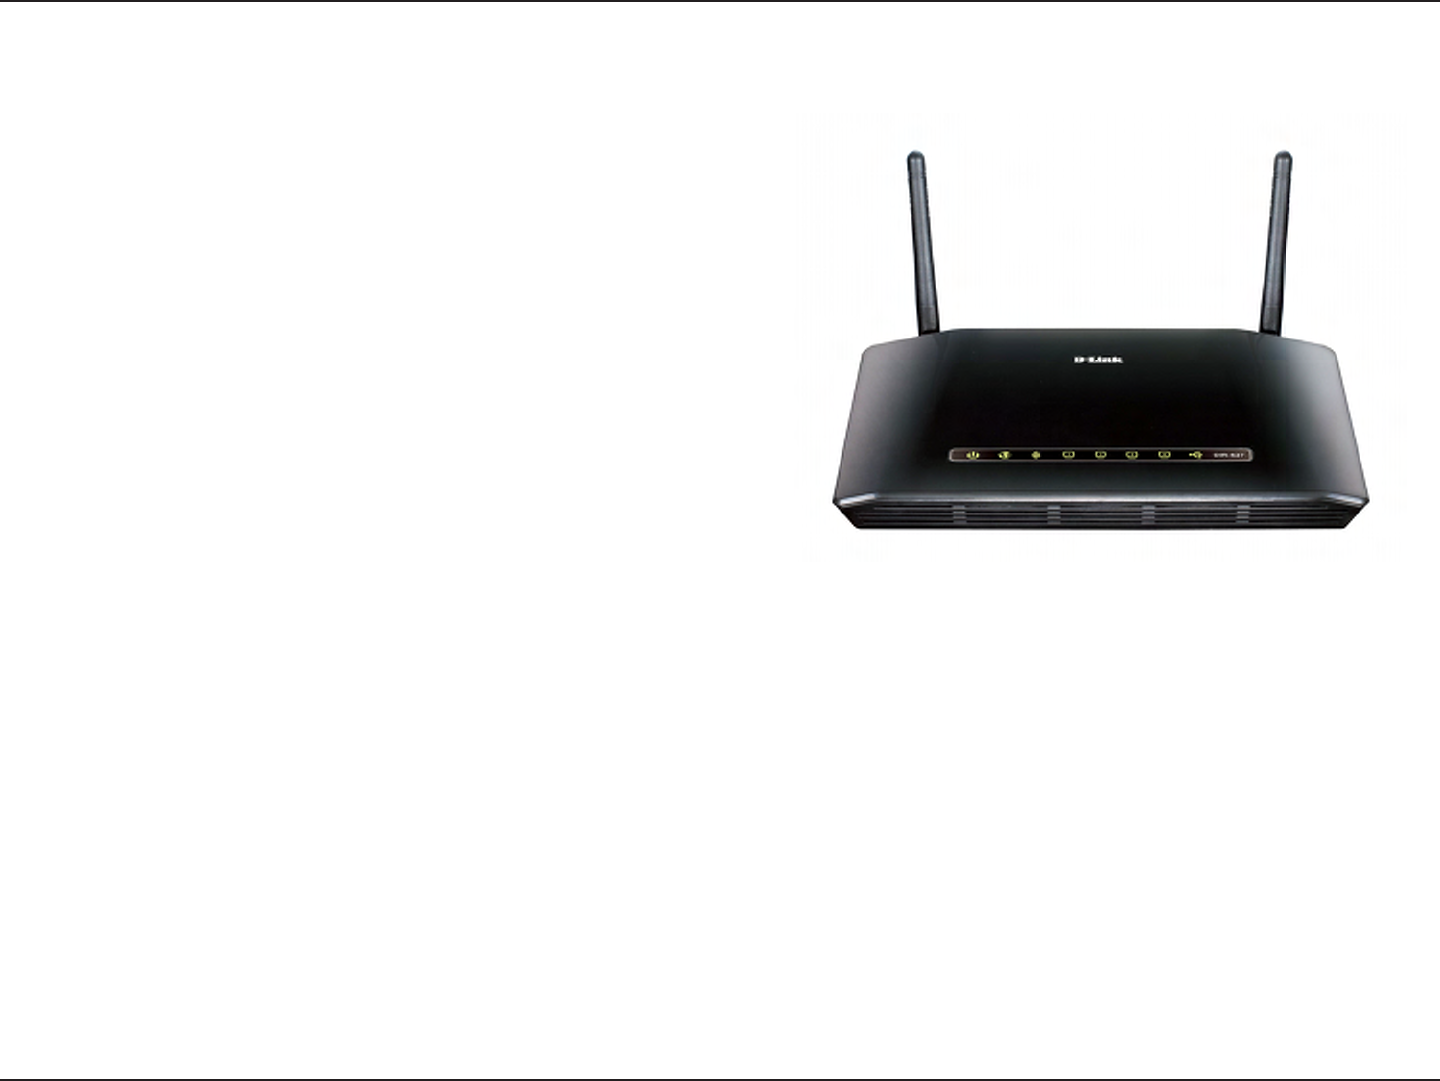
D Link IR627A1 Wireless N 300 Open Source Router User Manual
D Link Corporation Wireless N 300 Open Source Router
D Link >
User Manual

Wireless N 300 Open Source Router
Wireless N 300 OPEN SOURCE 無線寬頻路由器

iD-Link DIR-627 User Manual
Table of Contents
Package Contents ......................................................................1
System Requirements ...........................................................1
Features.................................................................................2
Hardware Overview ...............................................................3
Rear Panel Connections ................................................. 3
Front Panel LEDs............................................................4
Right Side Panel LED .....................................................5
Installation ...................................................................................6
Before you Begin ...................................................................6
Wireless Installation Considerations ......................................7
Wall Mounting Your Device ...................................................8
Connect to Cable/DSL/Satellite Modem ..............................10
Connect to Another Router .................................................. 11
Conguration ............................................................................13
Web-based Conguration Utility ..........................................13
Basic .............................................................................14
LAN ............................................................................... 15
WAN .............................................................................16
Status ...........................................................................18
Filters ...........................................................................19
Routing .........................................................................20
Radio ............................................................................21
SSID .............................................................................23
Security ........................................................................ 24
Firmware ...................................................................... 27
Wireless Security......................................................................28
What is WEP?......................................................................28
Congure WEP .................................................................... 29
What is WPA?......................................................................30
Congure WPA-PSK............................................................31
Congure WPA2-PSK..........................................................32
Congure WPA .................................................................... 33
Congure WPA2 .................................................................. 34
Congure WPA (RADIUS) ................................................... 35
Congure and WPA2 (RADIUS) .......................................... 36
Connect to a Wireless Network ...............................................37
Using Windows® XP .............................................................37
Congure WEP .................................................................... 38
Congure WPA-PSK............................................................40
Setting Up Wi-Fi Protection
(WCN 2.0 in Windows Vista) .................................................... 42
Initial Router Conguration for Wi-Fi Protection ..................42
Setting Up a Congured Router...........................................43
Changing the Computer Name and Joining a Workgroup ...44
Conguring the IP Address in Vista .......................................46
Setting Up a Connection or Network Wirelessly ...................49
Connecting to a Secured Wireless Network (WEP, WPA-PSK
& WPA2-PSK) ............................................................................54
Connecting to an Unsecured Wireless Network....................58
Conguring the Network in MAC OS X Snow Leopard (10.6) ..
62
Conguring the Wireless Network in MAC OS X Snow
Table of Contents

iiD-Link DIR-627 User Manual
Table of Contents
Leopard (10.6) ........................................................................... 64
Troubleshooting .......................................................................68
Wireless Basics ........................................................................72
Tips ......................................................................................75
Wireless Modes ...................................................................76
Networking Basics ...................................................................77
Check your IP address ........................................................77
Statically assign an IP address ............................................78
Technical Specications..........................................................79
1D-Link DIR-627 User Manual
Section 1 - Product Overview
• D-Link DIR-627 Wireless Router
• Power Adapter
• Ethernet Cable
• Wall Mount Kit
• User Manual on CD
• Open Source Manual on CD
• Warranty Card
System Requirements
• Ethernet-based Cable or DSL Modem
• Computers with Windows®, Macintosh®, or Linux-based operating systems with an installed Ethernet
adapter
• Internet Explorer 6 or later or Mozilla Firefox 2.0 or later (for conguration)
Package Contents
Note: Using a power supply with a different voltage than the one included with
the DIR-627 will cause damage and void the warranty for this product.
Note: Always attach the power cord plug to the power supply, before inserting
the power cord and connected power supply to the wall outlet.

2D-Link DIR-627 User Manual
Section 1 - Product Overview
•FasterWirelessNetworking - The DIR-627 provides up to 300Mbps* wireless connection with other
802.11n wireless clients. This capability allows users to participate in real-time activities online, such as
video streaming, online gaming, and real-time audio.
•Compatiblewith802.11band802.11gDevices - The DIR-627 is still fully compatible with the IEEE
802.11b and IEEE 802.11g standard, so it can connect with existing 802.11b and IEEE 802.11g PCI,
USB and Cardbus adapters.
•Supportsfour10/100MEthernet ports - The DIR-627 has four LAN ports.
•AdvancedFirewallFeature - The Web-based user interface displays a number of advanced network
management features including:
• FilterScheduling - These lters can be scheduled to be active on certain days or for a
duration of hours or minutes.
* Maximum wireless signal rate derived from IEEE Standard 802.11g and Draft 802.11n specications. Actual data throughput will vary. Network conditions and
environmental factors, including volume of network trafc, building materials and construction, and network overhead, lower actual data throughput rate. Environmental
conditions will adversely affect wireless signal range.
Features
3D-Link DIR-627 User Manual
Section 1 - Product Overview
LANPorts
Connect Ethernet devices such as
computers, switches, and hubs.
HardwareOverview
Rear Panel Connections
Reset Button
Pressing the Reset Button restores
the Router to its original factory
default settings.
AlarmConnector
The connector for the alarm.
This is used to set up alarms.
USB Port
This USB port supports the D-Link
SharePort function. Connect a multi-
function printer, scanner, or USB
storage device to the port and share
the device through the network.
PowerReceptor
The receptor for the supplied
Power Adapter.
Internet Port
The Auto MDI/MDIX WAN port is
the connection for the Ethernet
cable to the Cable or DSL modem.
4D-Link DIR-627 User Manual
Section 1 - Product Overview
WLANLED
A solid light indicates that the
wireless segment is ready. This
LED blinks during wireless data
transmission.
PowerLED
A solid green light indicates a proper connection
to the power supply. A blinking amber light
indicates the device is booting up.
EthernetLEDs
A solid light indicates a connection to an
Ethernet-enabled device on ports 1 to 4. This
LED blinks during data transmission.
USBLED
A solid green light
indicates a device is
connected to the USB
port via a USB cable.
InternetLED
A solid green light indicates
the connection on the
WAN port. An amber light
indicates that the Internet
connection has failed.
This LED blinks during
data transmission.
HardwareOverview
FrontPanelLEDs
5D-Link DIR-627 User Manual
Section 1 - Product Overview
HardwareOverview
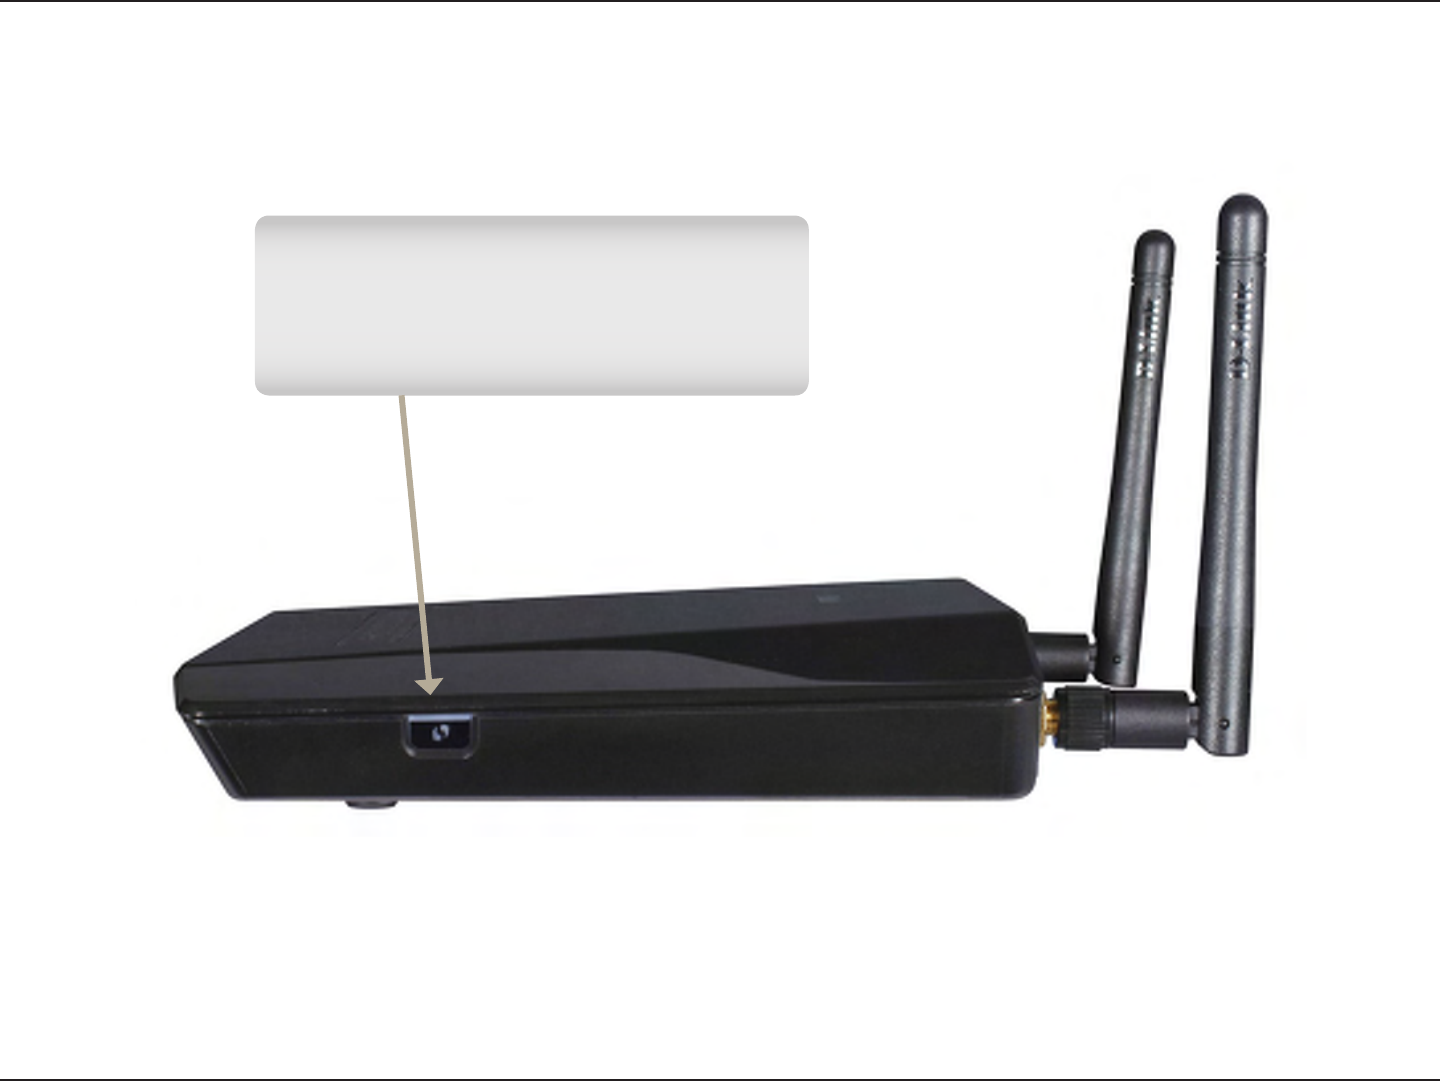
RightSidePanelLED
WPSButtonLED
Use the WPS button on the right side
panel of the Router to establish a secure
connection to wireless clients that support
WPS (Wi-Fi Protected Setup).

6D-Link DIR-627 User Manual
Section 2 - Installation
Before you Begin
Installation
This section will walk you through the installation process. Placement of the Router is very important. Do not place the
Router in an enclosed area such as a closet, cabinet, or in the attic or garage.
Please congure the Router with the computer that was last connected directly to your modem. Also, you can only use
the Ethernet port on your modem. If you were using the USB connection before using the Router, then you must turn
off your modem, disconnect the USB cable and connect an Ethernet cable to the WAN port on the Router, and then
turn the modem back on. In some cases, you may need to call your ISP to change connection types (USB to Ethernet).
If you have DSL and are connecting via PPPoE, make sure you disable or uninstall any PPPoE software such as
WinPoet, Broadjump, or Ethernet 300 from your computer or you will not be able to connect to the Internet.

7D-Link DIR-627 User Manual
Section 2 - Installation
WirelessInstallationConsiderations
The D-Link wireless Router lets you access your network using a wireless connection from virtually anywhere within
the operating range of your wireless network. Keep in mind, however, that the number, thickness and location of
walls, ceilings, or other objects that the wireless signals must pass through, may limit the range. Typical ranges vary
depending on the types of materials and background RF (radio frequency) noise in your home or business. The key
to maximizing wireless range is to follow these basic guidelines:
1. Keep the number of walls and ceilings between the D-Link Router and other network devices to a
minimum - each wall or ceiling can reduce your adapter’s range from 3-90 feet (1-30 meters.) Position
your devices so that the number of walls or ceilings is minimized.
2.Be aware of the direct line between network devices. A wall that is 1.5 feet thick (.5 meters), at a 45-degree
angle appears to be almost 3 feet (1 meter) thick. At a 2-degree angle it looks over 42 feet (14 meters)
thick! Position devices so that the signal will travel straight through a wall or ceiling (instead of at an
angle) for better reception.
3.Building Materials make a difference. A solid metal door or aluminum studs may have a negative effect on
range. Try to position access points, wireless routers, and computers so that the signal passes through
drywall or open doorways. Materials and objects such as glass, steel, metal, walls with insulation, water
(sh tanks), mirrors, le cabinets, brick, and concrete will degrade your wireless signal.
4. Keep your Router away (at least 3-6 feet or 1-2 meters) from electrical devices or appliances that
generate RF noise.
5. If you are using 2.4GHz cordless phones or X-10 (wireless products such as ceiling fans, lights, and
home security systems), your wireless connection may degrade dramatically or drop completely. Make
sure your 2.4GHz phone base is as far away from your wireless devices as possible. The base transmits
a signal even if the phone in not in use.
8D-Link DIR-627 User Manual
Section 2 - Installation
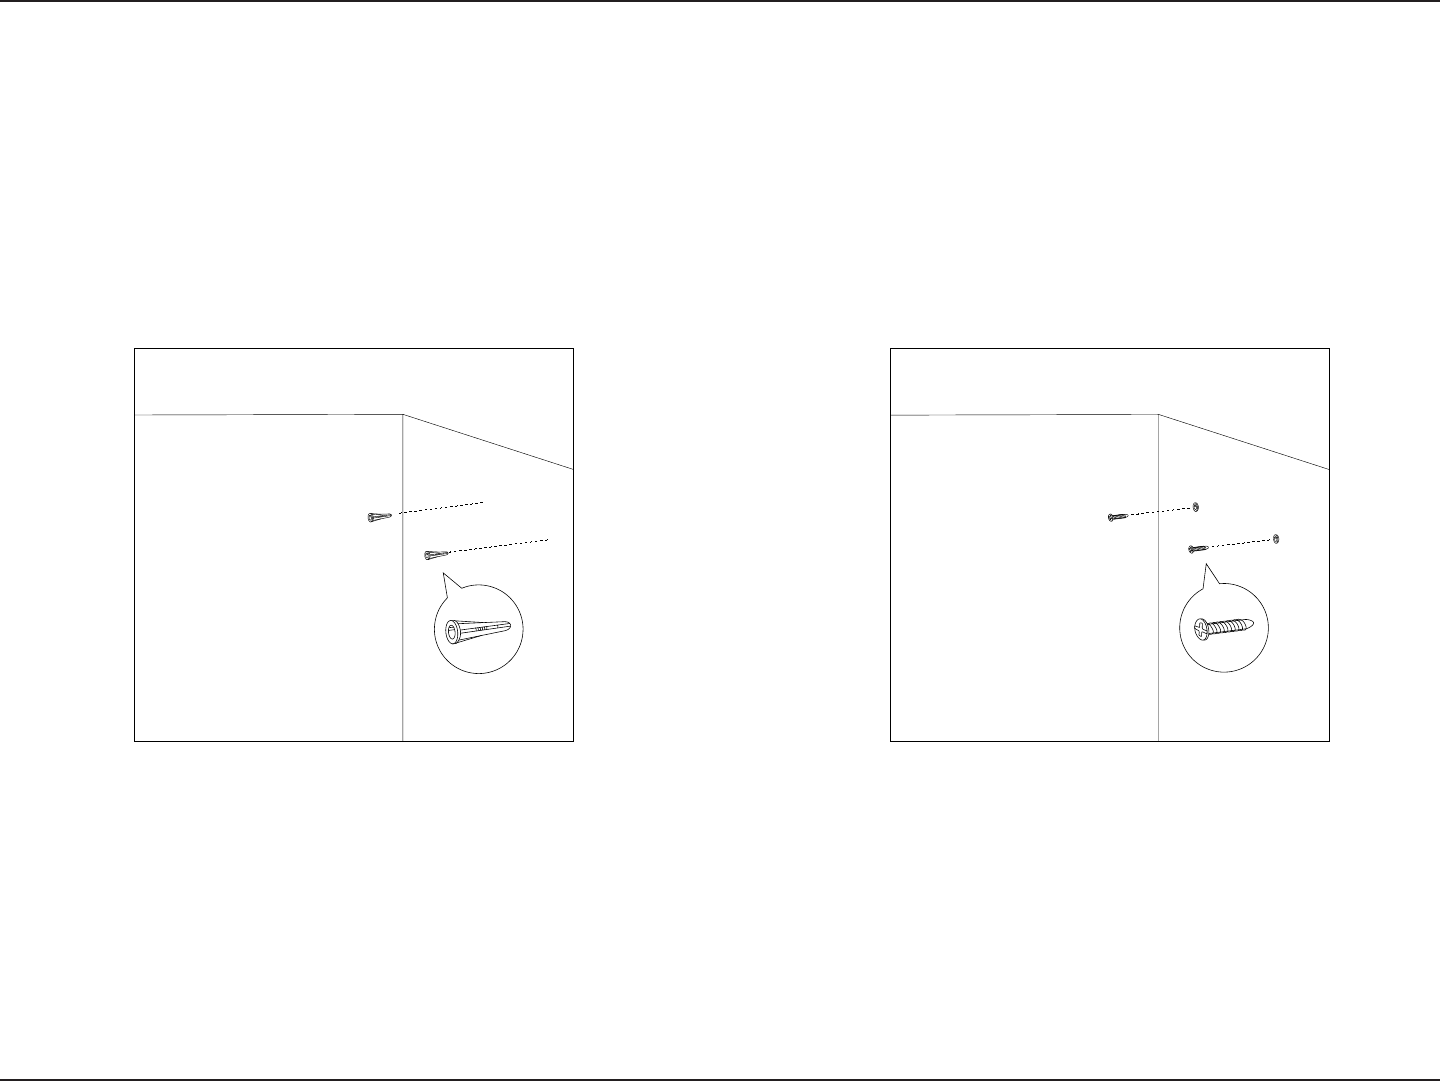
WallMountingYourDevice
You can mount the Router to a wall or a partition for easy and convenient placement of your device.
To wall mount your device,
A. Place the two provided screw anchors about 15
centimeters (~6 inches) apart in the wall or partition
where the device is to be placed.
B. Drive the two provided screws into the screw anchors
in the wall or partition where the device is to be
placed.
9D-Link DIR-627 User Manual
Section 2 - Installation
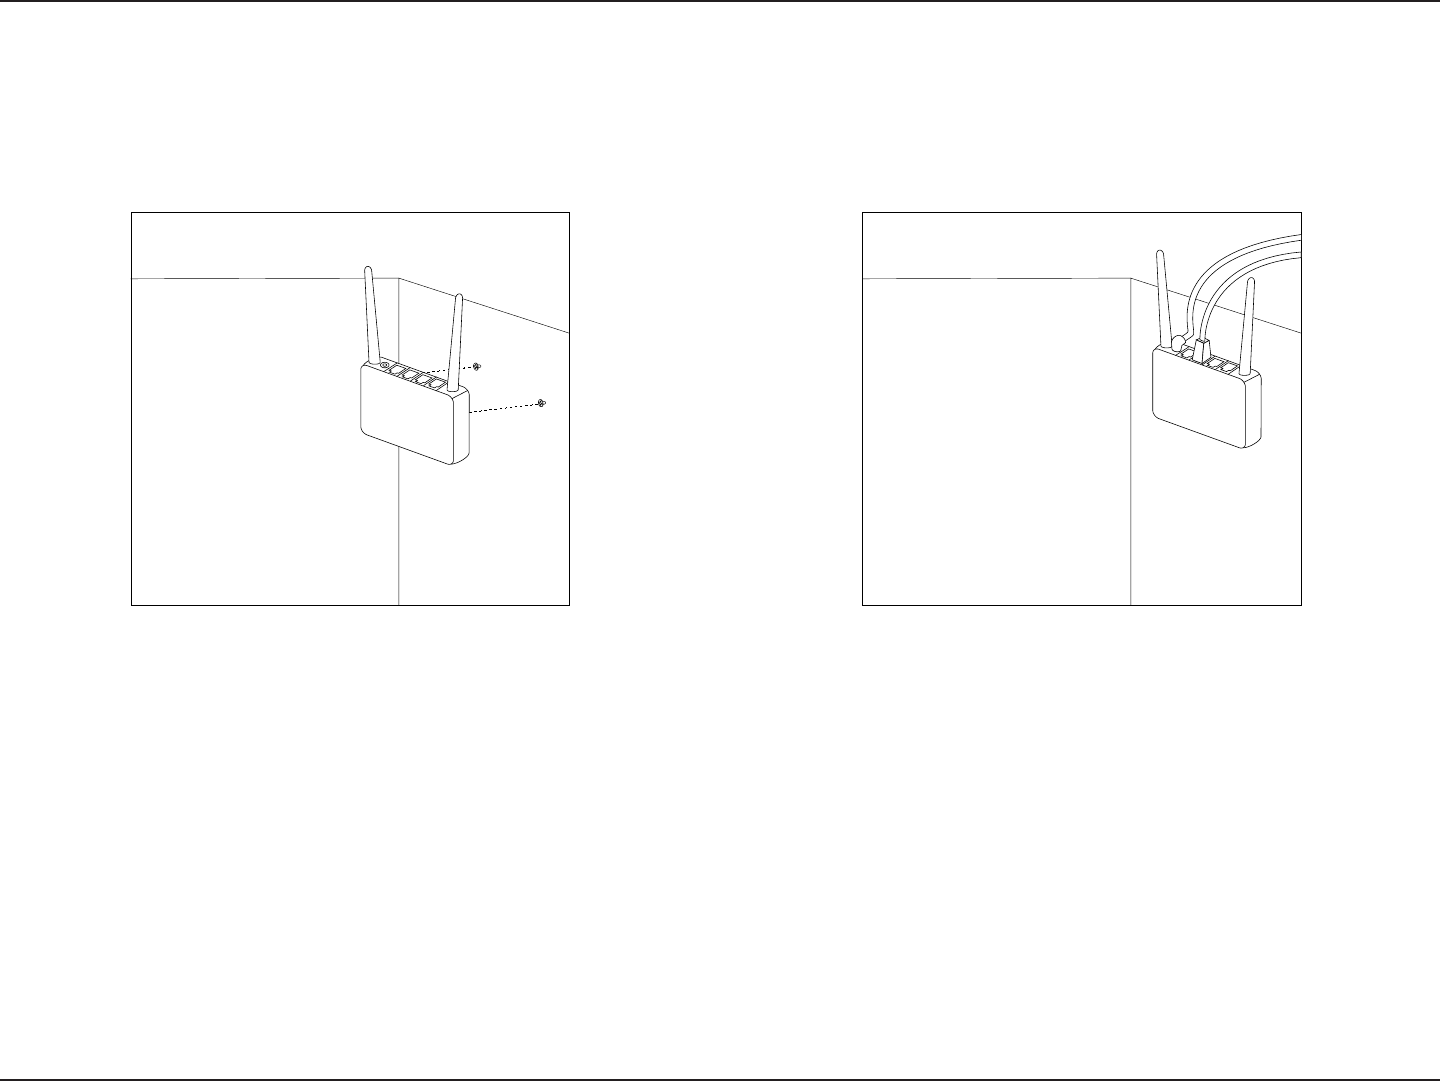
C. Place the mounting holes on the bottom of the device
over the screws to mount it to the wall or partition.
D. Connect your cables to the device.

10D-Link DIR-627 User Manual
Section 2 - Installation
If you are connecting the Router to a cable/DSL/satellite modem, please follow the steps below:
1. Place the Router in an open and central location. Do not plug the power adapter into the Router.
2. Turn the power off on your modem. If there is no on/off switch, then unplug the modem’s power adapter. Shut down
your computer.
3. Unplug the Ethernet cable (that connects your computer to your modem) from your computer and place it into the
WAN port on the Router.
4. Plug an Ethernet cable into one of the four LAN ports on the Router. Plug the other end into the Ethernet port on
your computer.
5. Turn on or plug in your modem. Wait for the modem to boot (about 30 seconds).
6. Plug the power adapter to the Router and connect to an outlet or power strip. Wait about 30 seconds for the Router
to boot.
7. Turn on your computer.
8. Verify the link lights on the Router. The power light, WAN light, and the LAN light (the port that your computer is
plugged into) should be lit. If not, make sure your computer, modem, and Router are powered on and verify the
cable connections are correct.
9. Skip to page page 13 to congure your Router.
ConnecttoCable/DSL/SatelliteModem

11D-Link DIR-627 User Manual
Section 2 - Installation
If you are connecting the Router to another router to use as a wireless access point and/or switch, you will have to do
the following before connecting the router to your network:
• Disable UPnP™
• Disable DHCP
• Change the LAN IP address to an available address on your network. The LAN ports on the Router
cannot accept a DHCP address from your other router.
To connect to another router, please follow the steps below:
1. Plug the power into the router. Connect one of your computers to the router (LAN port) using an Ethernet cable.
Make sure your IP address on the computer is 192.168.0.xxx (where xxx is between 2 and 254). Please see the
NetworkingBasics section for more information. If you need to change the settings, write down your existing settings
before making any changes. In most cases, your computer should be set to receive an IP address automatically in
which case you will not have to do anything to your computer.
2. Open a Web browser and enter http://192.168.0.1 and press Enter. When the login window appears, set the user
name to admin and leave the password box empty. Click OK to continue.
3. Click on Advanced and then click AdvancedNetwork. Uncheck the Enable UPnP check box. Click SaveSettings
to continue.
4. Click Setup and then click NetworkSettings. Untick the Enable DHCP Server server check box. Click SaveSettings
to continue.
5. Under Router Settings, enter an available IP address and the subnet mask of your network. Click SaveSettings to
save your settings. Use this new IP address to access the conguration utility of the router in the future. Close the
browser and change your computer’s IP settings back to the original values as in Step 1.
ConnecttoAnotherRouter

12D-Link DIR-627 User Manual
Section 2 - Installation
6. Disconnect the Ethernet cable from the router and reconnect your computer to your network.
7.Connect an Ethernet cable in one of the LAN ports of the Router and connect it to your other router. Do not plug
anything into the WAN port of the Router.
8. You may now use the other three LAN ports to connect other Ethernet devices and computers. To congure your
wireless network, open a Web browser and enter the IP address you assigned to the router. Refer to the Conguration
and WirelessSecurity sections for more information on setting up your wireless network.
13D-Link DIR-627 User Manual
Section 3 - Conguration
Conguration
This section will show you how to congure your new D-Link wireless Router using the Web-based conguration utility.
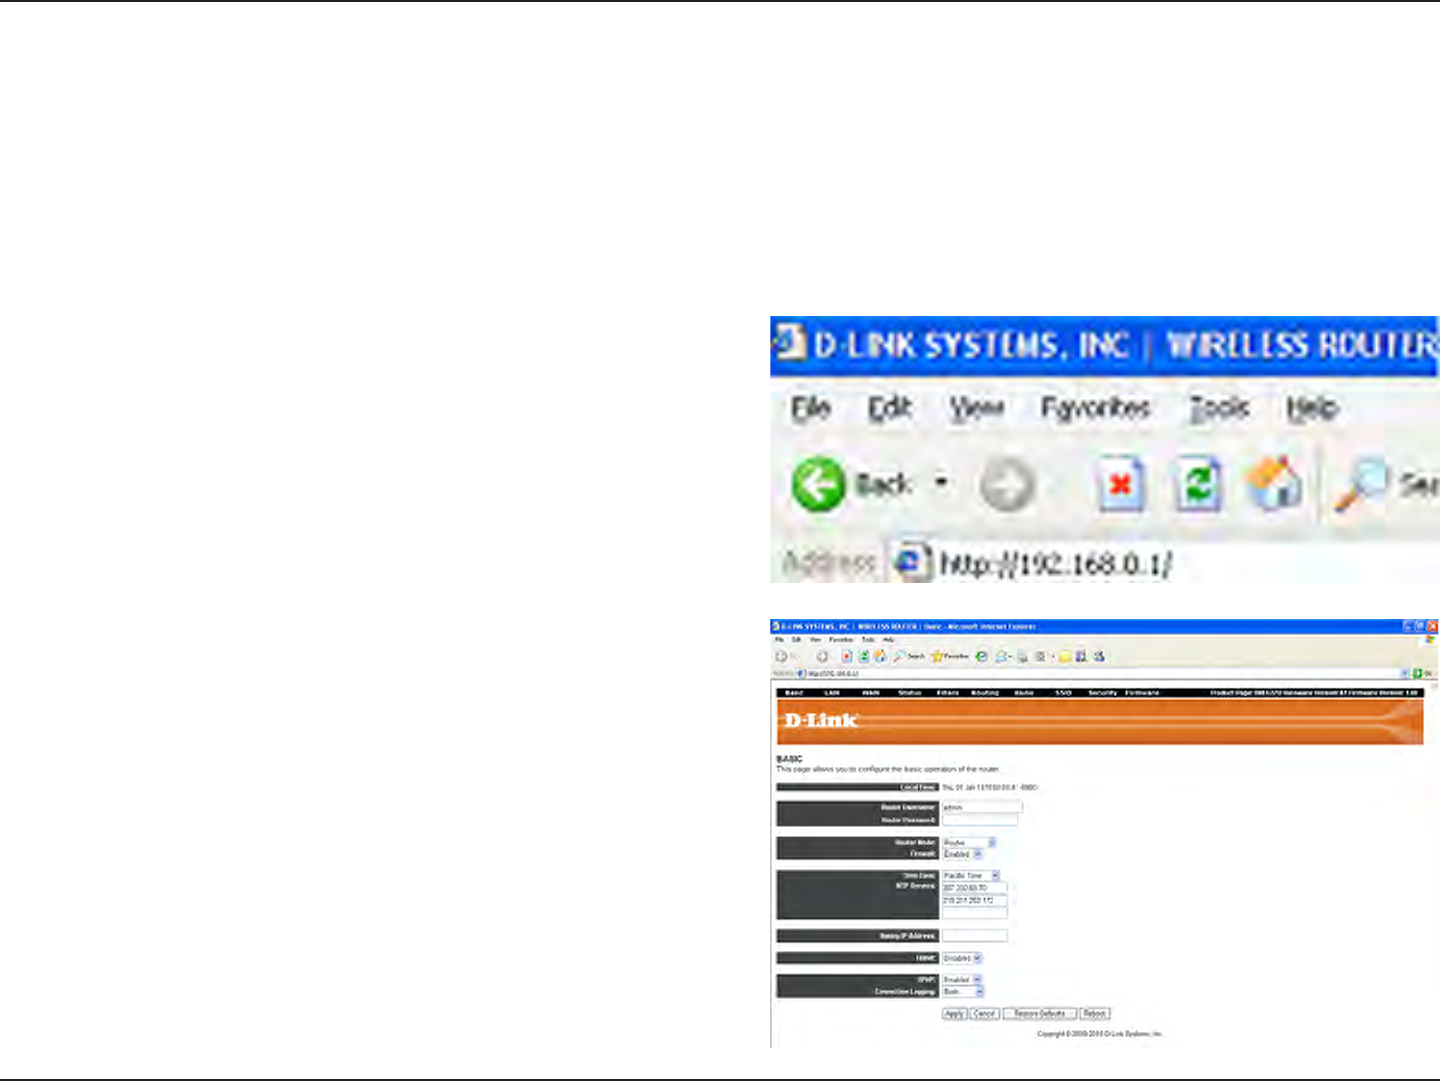
Web-basedCongurationUtility
To access the conguration utility, open a Web-browser
such as Mozilla Firefox or Internet Explorer and enter
the IP address of the Router (192.168.0.1).
The opening Router page appears.
14D-Link DIR-627 User Manual
Section 3 - Conguration
Basic
Displays the Local TIme maintained by the Router.
Set the router user name for access to the Router’s
Web interface. The initial router user name is
admin. Once this is set up, users can leave this
eld and the router password eld blank to disable
the authentication login process.
Set the router password for access to the Router’s
Web interface. Once this is set up, users can leave
this eld and the router user name eld blank to
disable the authentication login process.
Choose either Router or Access Point. When the
mode is Access Point, the LAN DHCP server, LAN
Spanning Tree Protocol, and WAN protocol are
disabled.
Choose either Enabled or Disabled. The rewall
default state is Enabled. Connections from the
WAN are still allowed when the rewall is Disabled.
Select the correct time zone for the Router’s
location: Pacic Time, Mountain Time, Central
Time, or Eastern Time.
Enter the NTP server IP addresses to use for time
synchronization.
Enter the system log IP address where
system log messages will be sent.
.
Local Time:
Router
User Name:
Router
Password:
Router
Mode:
Firewall:
Time Zone:
NTP
Servers:
Syslog IP
Address:
The Basic page allows users to congure the basic operations of the Router.
Choose either Enabled or Disabled. Telnet is
Disabled by default.
Choose either Enabled or Disabled. Universal Plug
and Play is Enabled by default.
Choose Disabled, Denied, Accepted, or Both to set
which connections the Router should log. Denied
enables logging of denied connections, Accepted
enables logging of accepted connections, and
Both enables logging of both denied and accepted
connections. The default setting is Both.
Telnet:
UPnP:
Connection
Logging:
15D-Link DIR-627 User Manual
Section 3 - Conguration
Displays the MAC address of the LAN interface.
This is also referred to as the Ethernet address.
Set the IP address of the LAN interface.
Set the IP netmask of the LAN interface.
Choose either Enabled or Disabled. This controls
DHCP server functionality on the LAN.
Set the start of the IP address range that the DHCP
server will use.
Set the end of the IP address range that the DHCP
server will use.
Set the number of seconds a DHCP lease should
be valid for.
This displays active DHCP leases since the last
reboot.
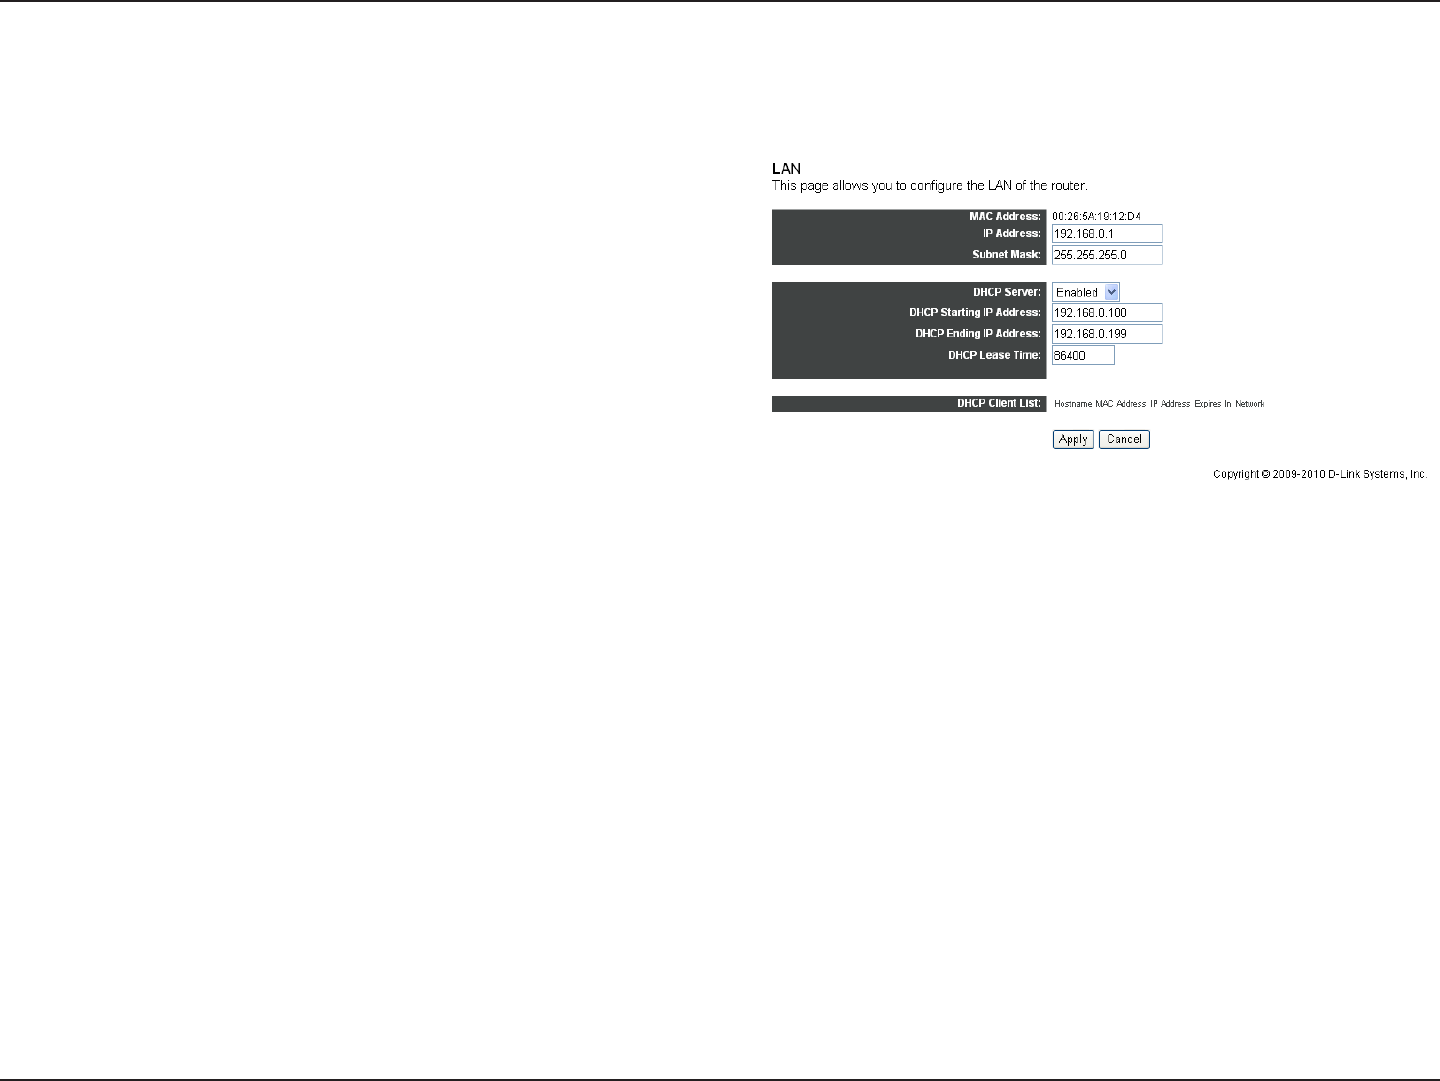
LAN
The LAN page allows users to congure the LAN of the Router.
MAC
Address:
IPAddress:
SubnetMask:
DHCP
Server:
DHCPStarting
IPAddress:
DHCPEnding
IPAddress:
DHCPLease
Time:
DHCPClient
List:
16D-Link DIR-627 User Manual
Section 3 - Conguration
Set the method to obtain an IP address for the
connection: DHCP, Static, or PPPoE.
Set a host name. Some ISPs require a host name
be provided when requesting an IP address using
DHCP. The default host name is DIR-627.
Set the domain name provided to LAN clients who
request an IP address through DHCP.
Some ISPs require users to enter a specic MAC
address. This MAC cloning feature allows users
to set the MAC address of the WAN interface. The
MAC address format is: XX:XX:XX:XX:XX:XX.
Set the IP address of the connection.
Set the IP netmask of the connection.
Set the IP address of the default gateway of the
connection.
Set the primary and secondary IP addresses of the
DNS servers used for resolving host names.
Set the user name for authentication with a PPPoE
server.
Set the password for authentication with a PPPoE
server.
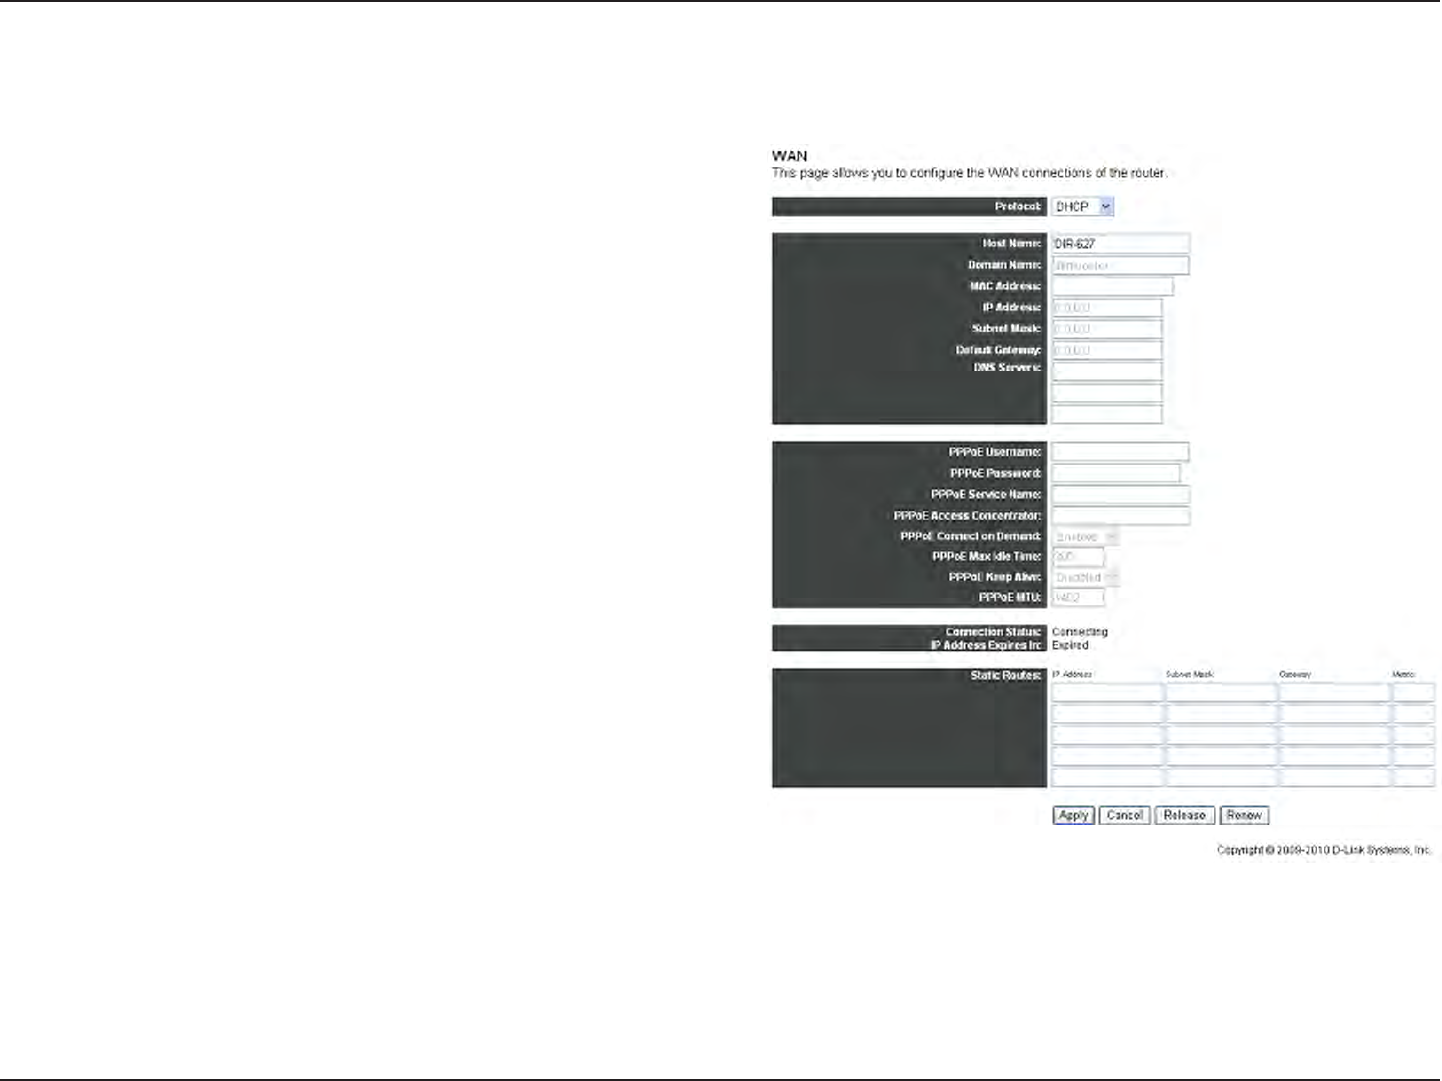
Protocol:
Host Name:
Domain
Name:
MAC
Address:
IPAddress:
SubnetMask:
Default
Gateway:
DNS
Servers:
PPPoEUser
Name:
PPPoE
Password:
WAN
The WAN page allows users to congure the WAN connections of the Router.

17D-Link DIR-627 User Manual
Section 3 - Conguration
PPPoE
Service
Name:
PPPoE
Access
Concentrator:
PPPoE
ConnectOn
Demand:
PPPoEMax
IdleTime:
PPPoEKeep
Alive:
PPPoEMTU:
Connection
Status:
IPAddress
ExpiresIn:
Static
Routes:
Set the PPPoE service name. This is required by some ISPs.
Set the PPPoE access concentrator. This is required by some ISPs.
Choose either Enabled or Disabled. This determines whether the PPPoE link should be automatically disconnected if no
trafc has been observed for the period species by the PPPoE Max Idle Time.
Set the number of seconds to wait before disconnecting the PPPoE link if PPPoE Connect on Demand is Enabled. The
default is 300 seconds.
Choose either Enabled or Disabled. This determines whether the PPPoE link should be automatically restored if it is lost.
This setting has no effect if PPPoE Connect on Demand is Enabled.
Set the maximum number of bytes that the PPPoE interface will transmit in a single Ethernet frame.
This displays the connection state.
This displays IP address lease information.
Set up static routes in this section.
18D-Link DIR-627 User Manual
Section 3 - Conguration
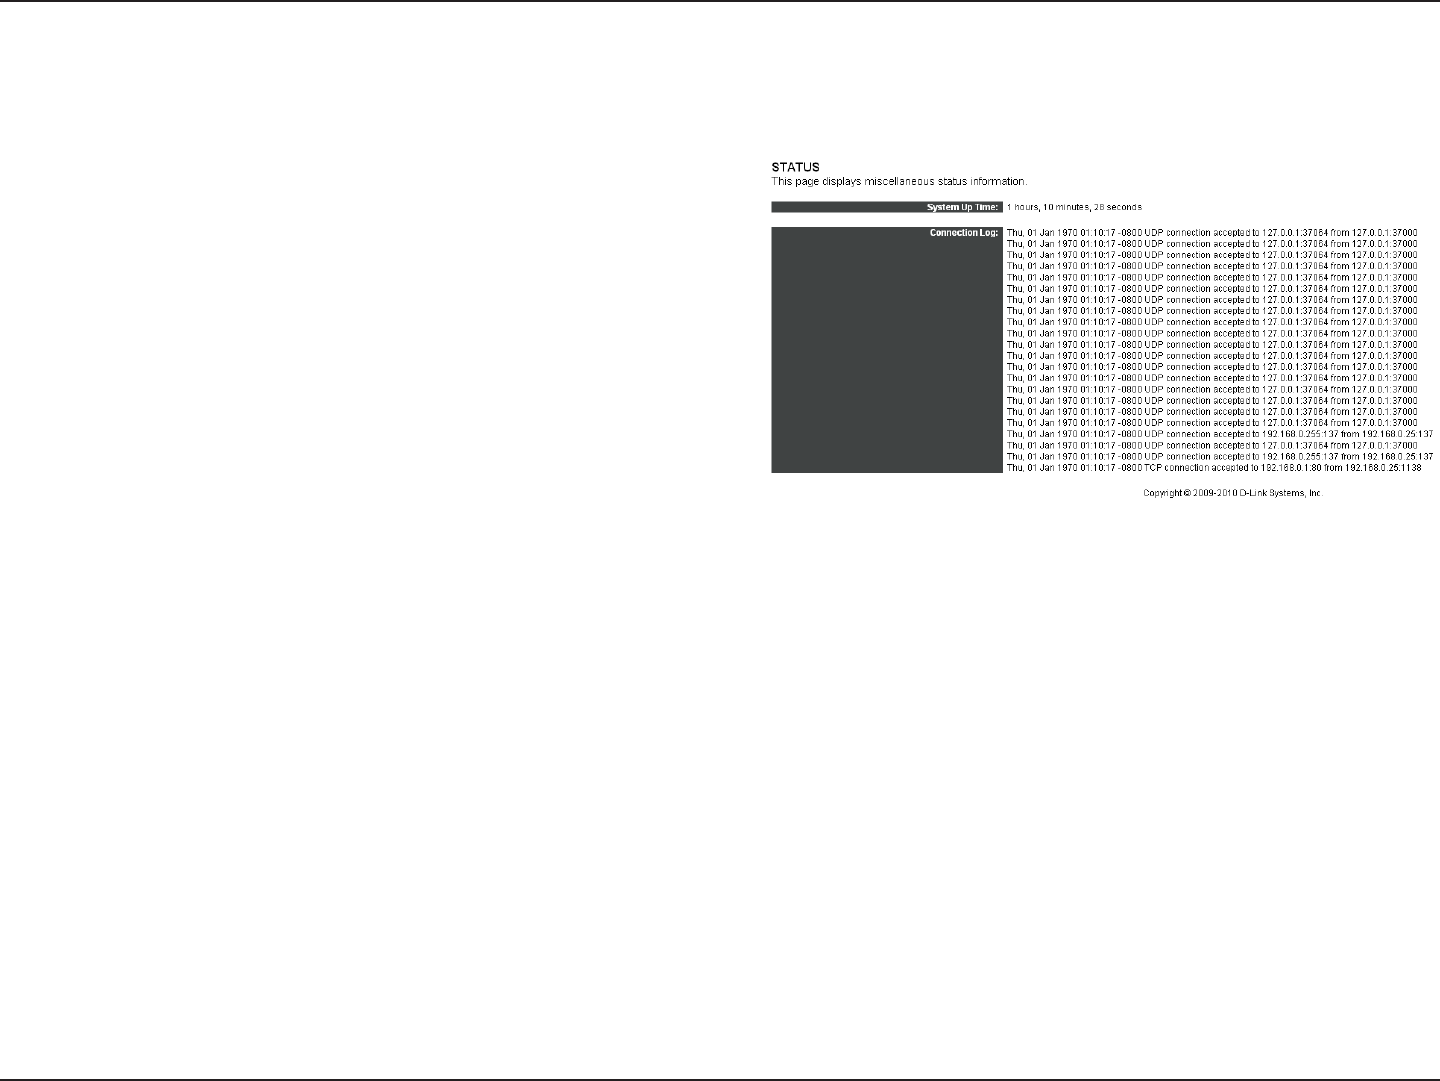
Status
The Status page displays miscellaneous status information.
Displays the system up time since the Router was
last booted up.
Displays a log of recent connection attempts.
SystemUp
Time:
Connection
Log:

19D-Link DIR-627 User Manual
Section 3 - Conguration
Filters
The Filters page allows users to congure LAN lters for the Router. The LAN machines affected by the lters will not
be able to communicate through the WAN but will be able to communicate with each other and with the Router itself.
Set whether clients with the specied MAC address
are denied or allowed access to the Router and the
WAN. The options are: Disabled, Allow, or Deny.
The Router lters packets from LAN machines
with specied MAC addresses. The MAC address
format is: XX:XX:XX:XX:XX:XX.
The Router filters packets from IP addresses
destined to certain port ranges during the specied
times.
LANMAC
Filter
Mode:
LANMAC
Filters:
LANClient
Filters
20D-Link DIR-627 User Manual
Section 3 - Conguration
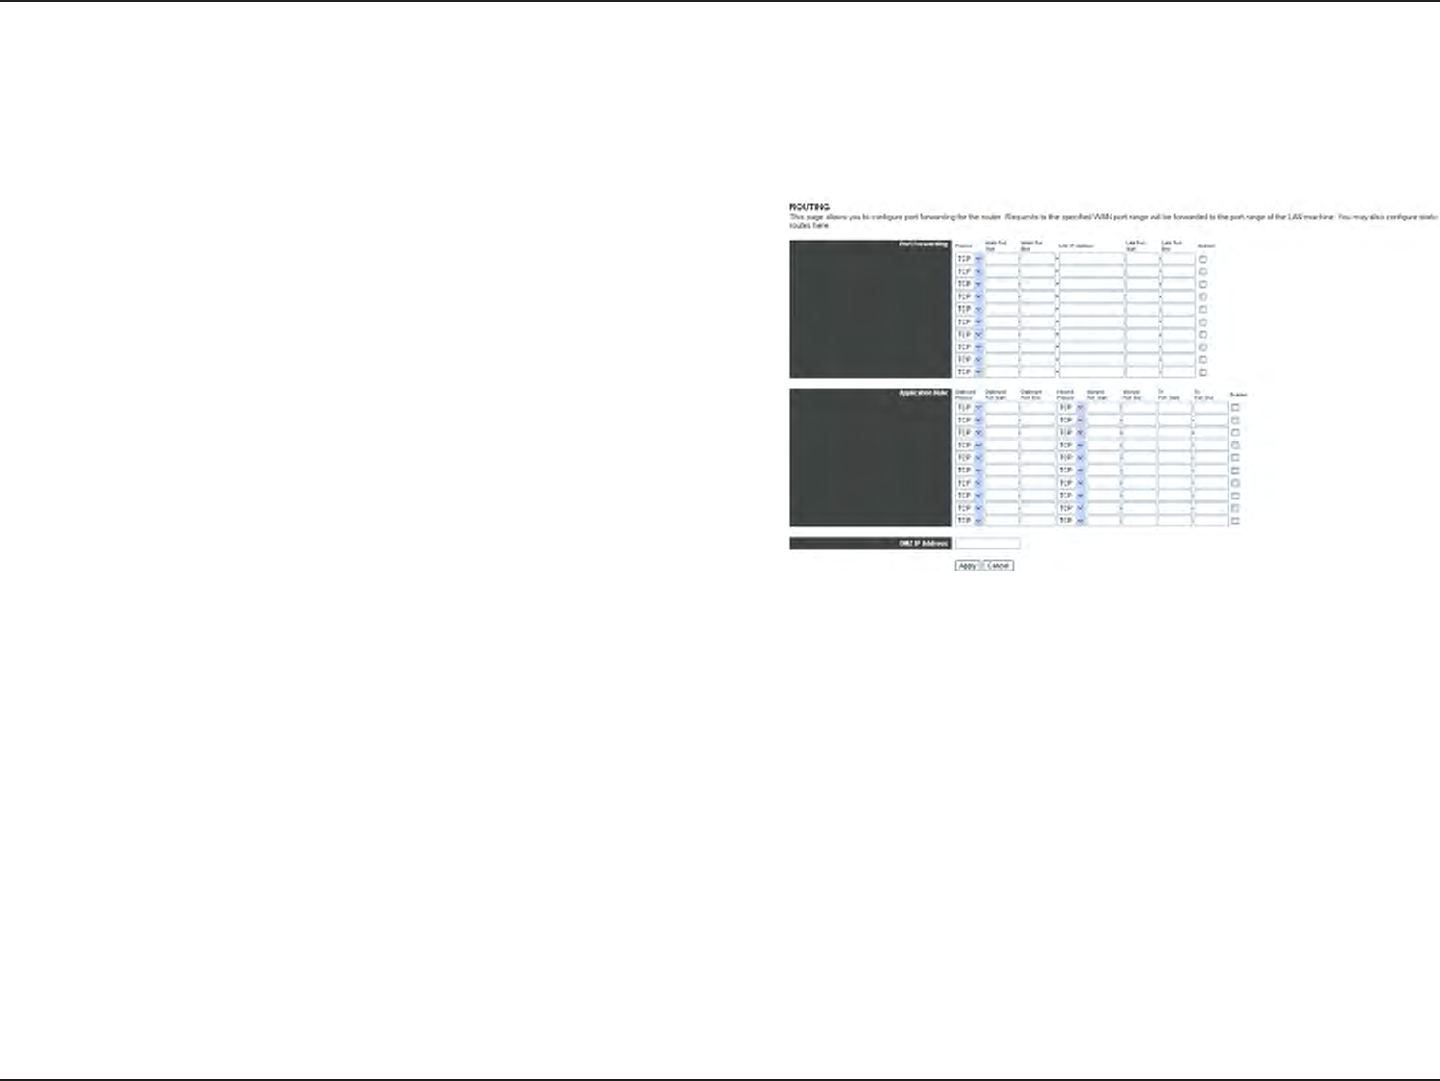
Routing
The Routing page allows users to congure port forwarding for the Router. Requests to the specied WAN port range
will be forwarded to the port range of the LAN machine. Users may also congure static routes here.
The Router allows users to forward packets
destined in the rst range to the LAN machine with
the specied IP address. In addition, users may
specify a second range (please note that the ranges
must not overlap and they must be the same size).
Enter the appropriate information to automatically
forward connections.
This allows users to forward all other incoming WAN
packets to the LAN machine with the specied IP
address.
Port
Forwarding:
Application
Rule:
DMZ
IPAddress
21D-Link DIR-627 User Manual
Section 3 - Conguration
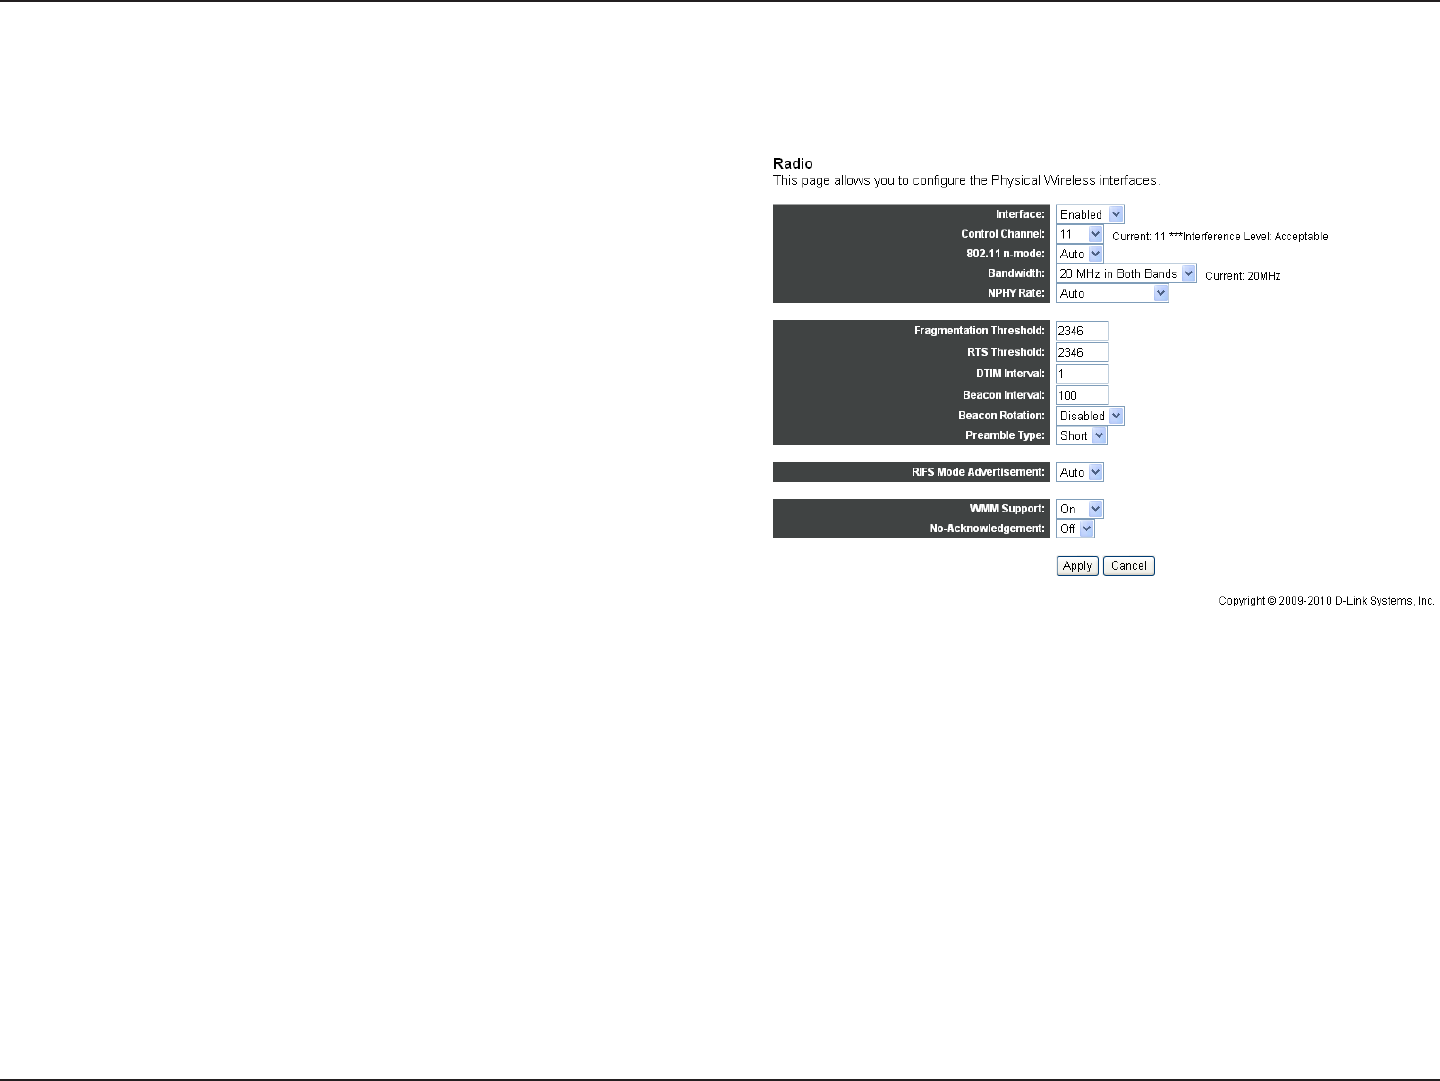
Radio
The Radio page allows users to congure the physical wireless interfaces.
Choose either Enabled or Disabled. This enables
or disables the wireless interface.
Set the channel on which to operate on: Auto, 1,
2, 3, 4, 5, 6, 7, 8, 9, 10, or 11.
Choose either Auto or Off to enable or disable
802.11n support.
Choose the channel bandwith, either 20 MHz in
Both Bands or 40 MHz in Both Bands.
Set the NPHY Rate (MCS Index): Auto, Use Legacy
Rate, 0: 6.5 Mbps, 1: 13 Mbps, 2: 19.5 Mbps, 3:
26 Mbps, 4: 39 Mbps, 5: 52 Mbps, 6: 58.5 Mbps,
7: 65 Mbps, 8: 13 Mbps, 9: 26 Mbps, 10: 39 Mbps,
11: 52 Mbps, 12: 78 Mbps, 13: 104 Mbps, 14: 117
Mbps, or 15: 130 Mbps.
Set the fragmentation threshold. The default is
2346.
Set the Request to Send (RTS) threshold. The
default is 2346.
Set the Delivery Trafc Indication Message (DTIM)
value. This is the wakeup interval for clients in
power save mode. The default is 1.
Set the beacon interval for the access point. The
default is 100.
Interface:
Control
Channel:
802.11n
Mode:
Bandwidth:
NPHYRate:
Fragmentation
Threshold:
RTS
Threshold:
DTIM
Interval:
Beacon
Interval:

22D-Link DIR-627 User Manual
Section 3 - Conguration
Beacon
Rotation:
Preamble
Type:
RIFSMode
Advertise-
ment:
WMM
Support:
No
Acknowledge-
ment:
Choose either Enabled or Disabled. This enables or disables the rotation of the beacon order when running in
Multi BSS mode.
Choose either Short or Long. This sets whether short or long preambles are used. Short preambles improve
throughput but all clients in the wireless network must support this capability if selected.
Choose either Auto or Off. Reduced Interframe Spacing (RIFS) mode is used to advertise in beacons and probe responses.
Choose Auto, Off, or On to set Wi-Fi Multimedia (WMM) support.
Choose either Off or On to enable or disable Wi-Fi Multimedia (WMM) non-acknowledgement.
23D-Link DIR-627 User Manual
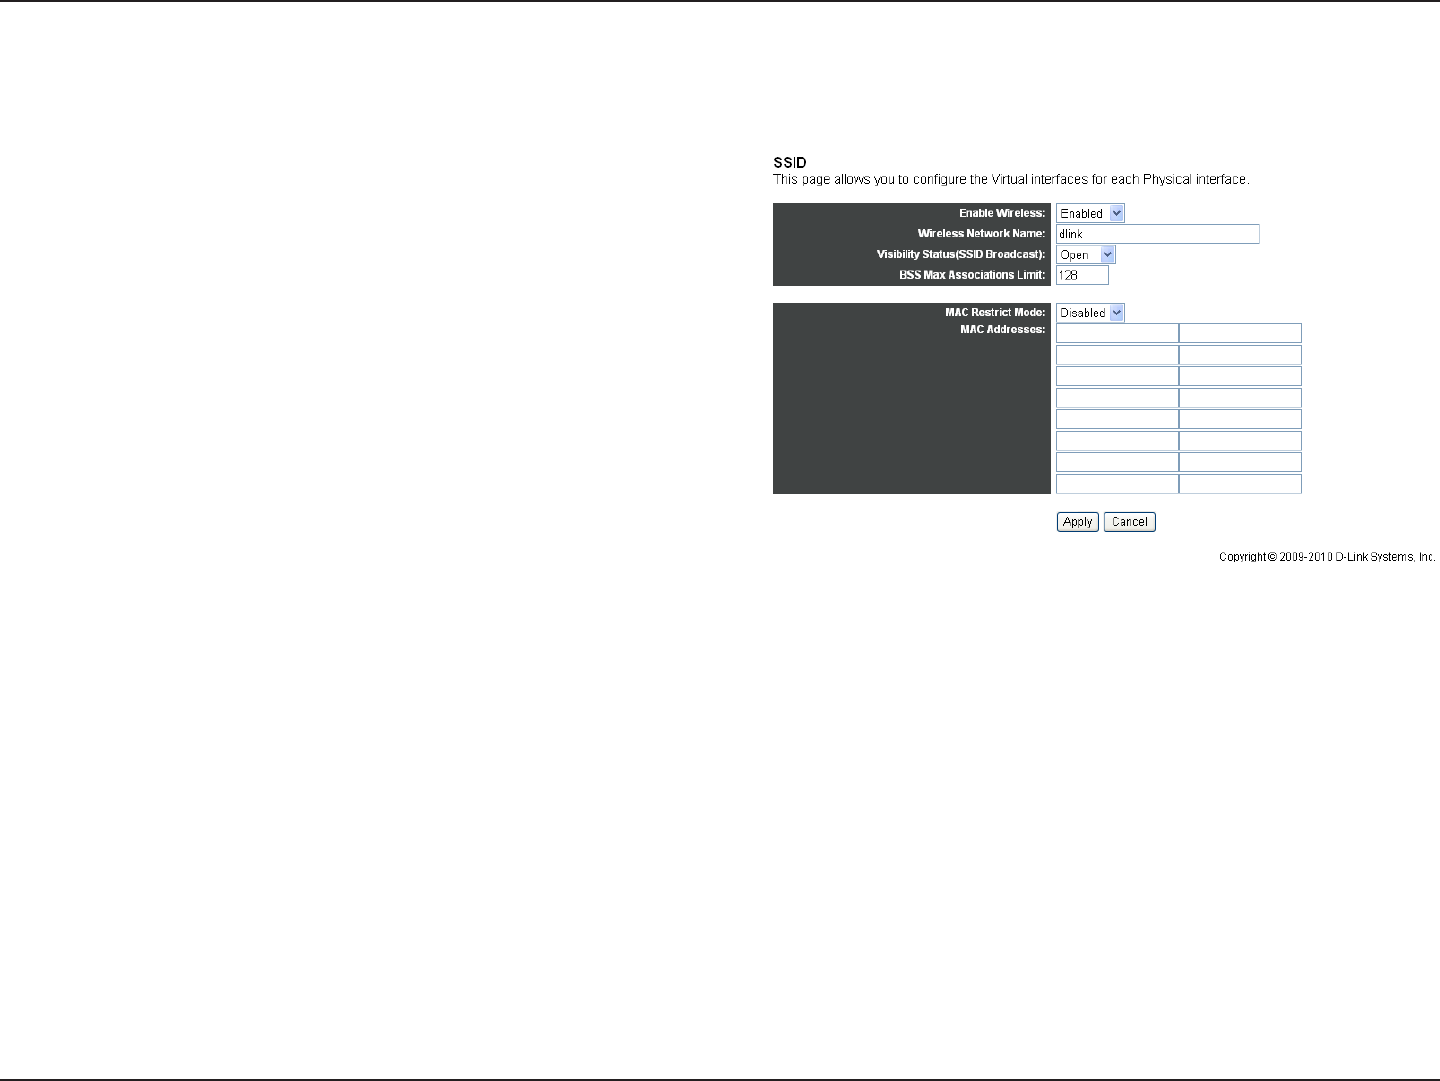
Section 3 - Conguration
SSID
The SSID page allows users to congure virtual interfaces for each physical interface.
Choose either Enabled or Disabled. This enables
or disables the wireless interface.
Set the service set identier (SSID), otherwise
known as the network name, of this network.
Choose either Open or Closed. Open reveals the
network to active scans while Closed hides the
network from active scans.
Set the maximum associations for this basic service
set (BSS). The default is 128.
Choose Enabled, Allow, or Deny to determine
whether clients with the specied MAC address
are allowed or denied wireless access:
Enter the MAC address(es) of clients that are
either allowed or denied wireless acess. The MAC
address format is XX:XX:XX:XX:XX:XX.
Enable
Wireless:
Wireless
Network
Name:
Visibility
Status
(SSID
Broadcast):
BSSMax
Associations
Limit:
MAC
Restrict
Mode:
MAC
Addresses:
24D-Link DIR-627 User Manual
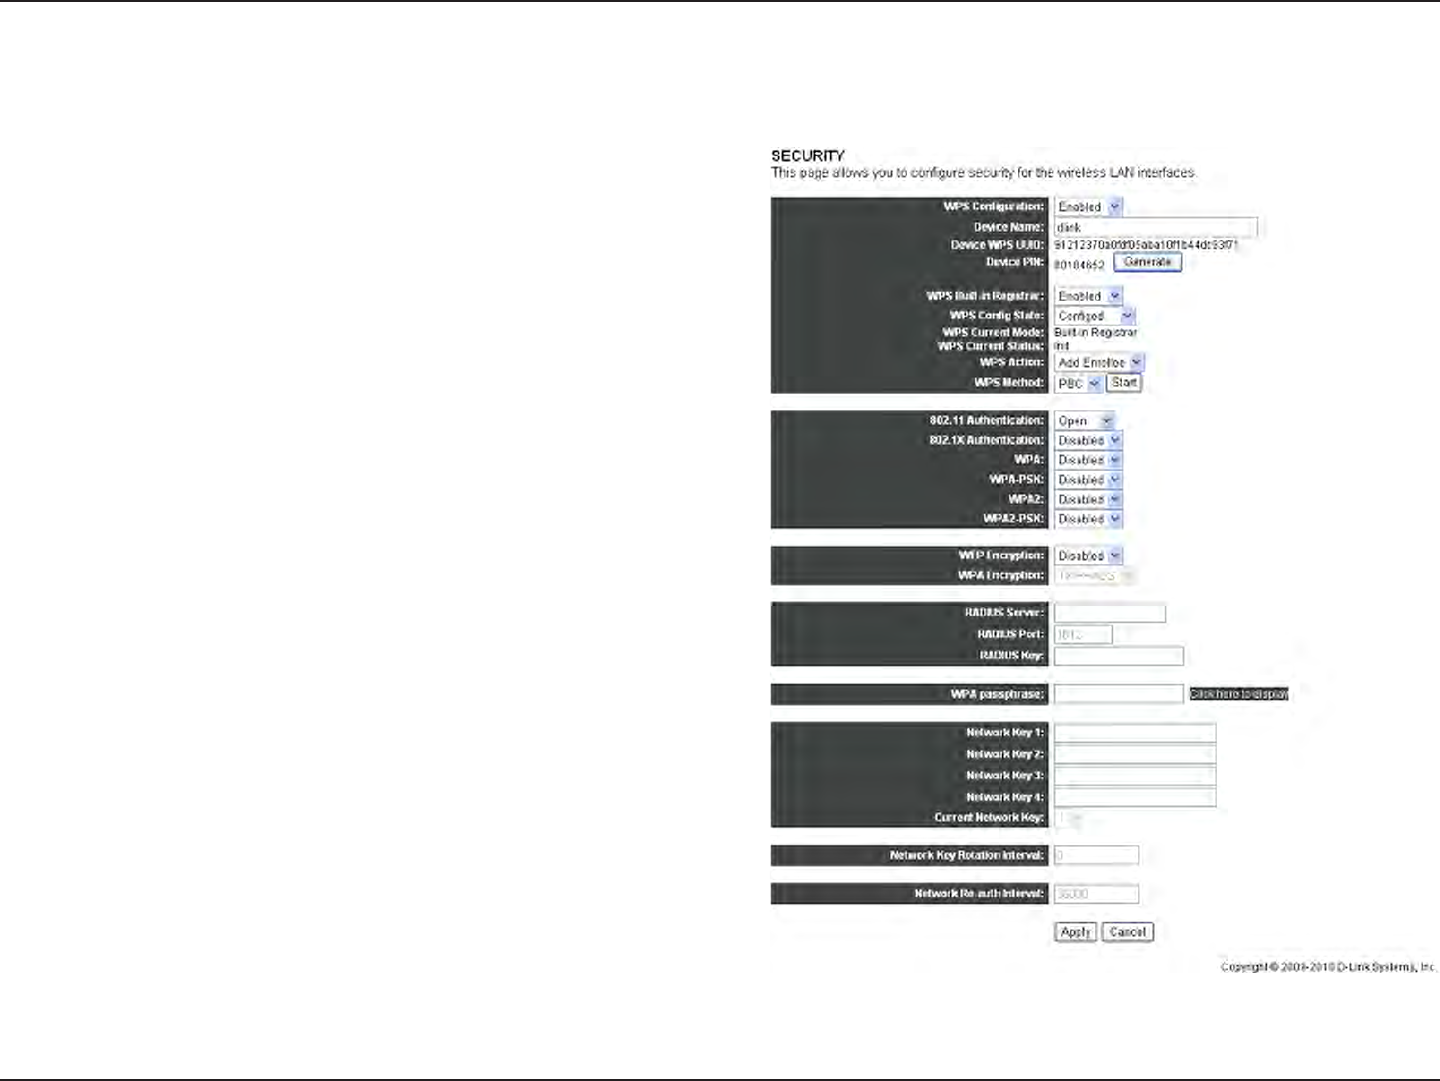
Section 3 - Conguration
Security
The Security page allows users to congure security for the wireless interfaces.
Choose either Enabled or Disabled to enable
or disable Wi-Fi Protected Setup (WPS) simple
conguration mode.
Enter a mnemonic name that can be used to identify
the Router.
This displays the Wi-Fi Protected Setup (WPS)
UUID number of the Router.
Click the Generate button to create a PIN number
for the Router.
Choose either Enabled or Disabled to enable or
disable the Router’s built-in registrar feature.
Set the Wi-Fi Protected Setup (WPS) conguration
state to Cong(ur)ed or Uncong(ur)ed.
Displays the current Wi-Fi Protected Setup (WPS)
mode.
Displays the Wi-Fi Protected Setup (WPS)
processing status.
Choose the desired Wi-Fi Protected Setup (WPS)
action, Add Enrollee or Cong AP.
WPS
Congur-
ation:
Device
Name:
DeviceWPS
UUID:
DevicePIN:
WPSBuilt-in
Registrar:
WPS
Cong
State:
WPS
Current
Mode:
WPS
Current
Status:
WPS
Action:

25D-Link DIR-627 User Manual
Section 3 - Conguration
WPS
Method:
802.11
Authen-
tication:
802.1X
Authen-
tication:
WPA:
WPA-PSK:
WPA2:
WPA2-PSK:
WEP
Encryption:
WPA
Encryption:
RADIUS
Server:
RADIUS
Port:
RADIUS
Key:
WPA
Passphrase:
Click the Start button to use the Push Button Conguration (PBC) Wi-Fi Protected Setup (WPS) method.
Choose the 802.11 authentication method, either Open or Shared.
Once the user has decided on the network authentication type, choose either Enabled or Disabled to enable or disable
network authentication.
Choose either Enabled or Disabled to enable or disable Wi-Fi Protected Access (WPA).
Choose either Enabled or Disabled to enable or disable Wi-Fi Protected Access Pre-Shared Key (WPA-PSK).
Choose either Enabled or Disabled to enable or disable Wi-Fi Protected Access 2 (WPA2).
Choose either Enabled or Disabled to enable or disable Wi-Fi Protected Access 2 Pre-Shared Key (WPA2-PSK).
Choose either Enabled or Disabled to enable or disable Wired Equivalent Privacy (WEP) encryption.
First enable WPA above and then choose the WPA data encryption algorithm, AES or TKIP+AES.
Set the IP address of the RADIUS server used for authentication and dynamic key derivation.
Set the UDP port number of the RADIUS server. The port number is usually 1812 or 1645, depending on the server. The
default RADIUS port number is 1812.
Set the shared secret for the RADIUS connection.
Set the WPA passphrase. Use the Clickheretodisplay button to display the WPA passphrase.

26D-Link DIR-627 User Manual
Section 3 - Conguration
Network
Key1-4:
Current
Network
Key:
Network
Key
Rotation
Interval:
Network
Re-auth
Interval:
Enter ve ASCII characters or ten hexadecimal digits for a 64-bit key. Enter 13 ASCII characters or 26 hexadecimal digits
for a 128-bit key.
Select which network key is used for encrypting outbound data and/or authenticating clients.
Set the network key rotation interval, in seconds. Leave blank or set to zero to disable the rotation.
Set the network re-authentication interval, in seconds. Leave blank or set to zero to disable periodic network authentication.
27D-Link DIR-627 User Manual
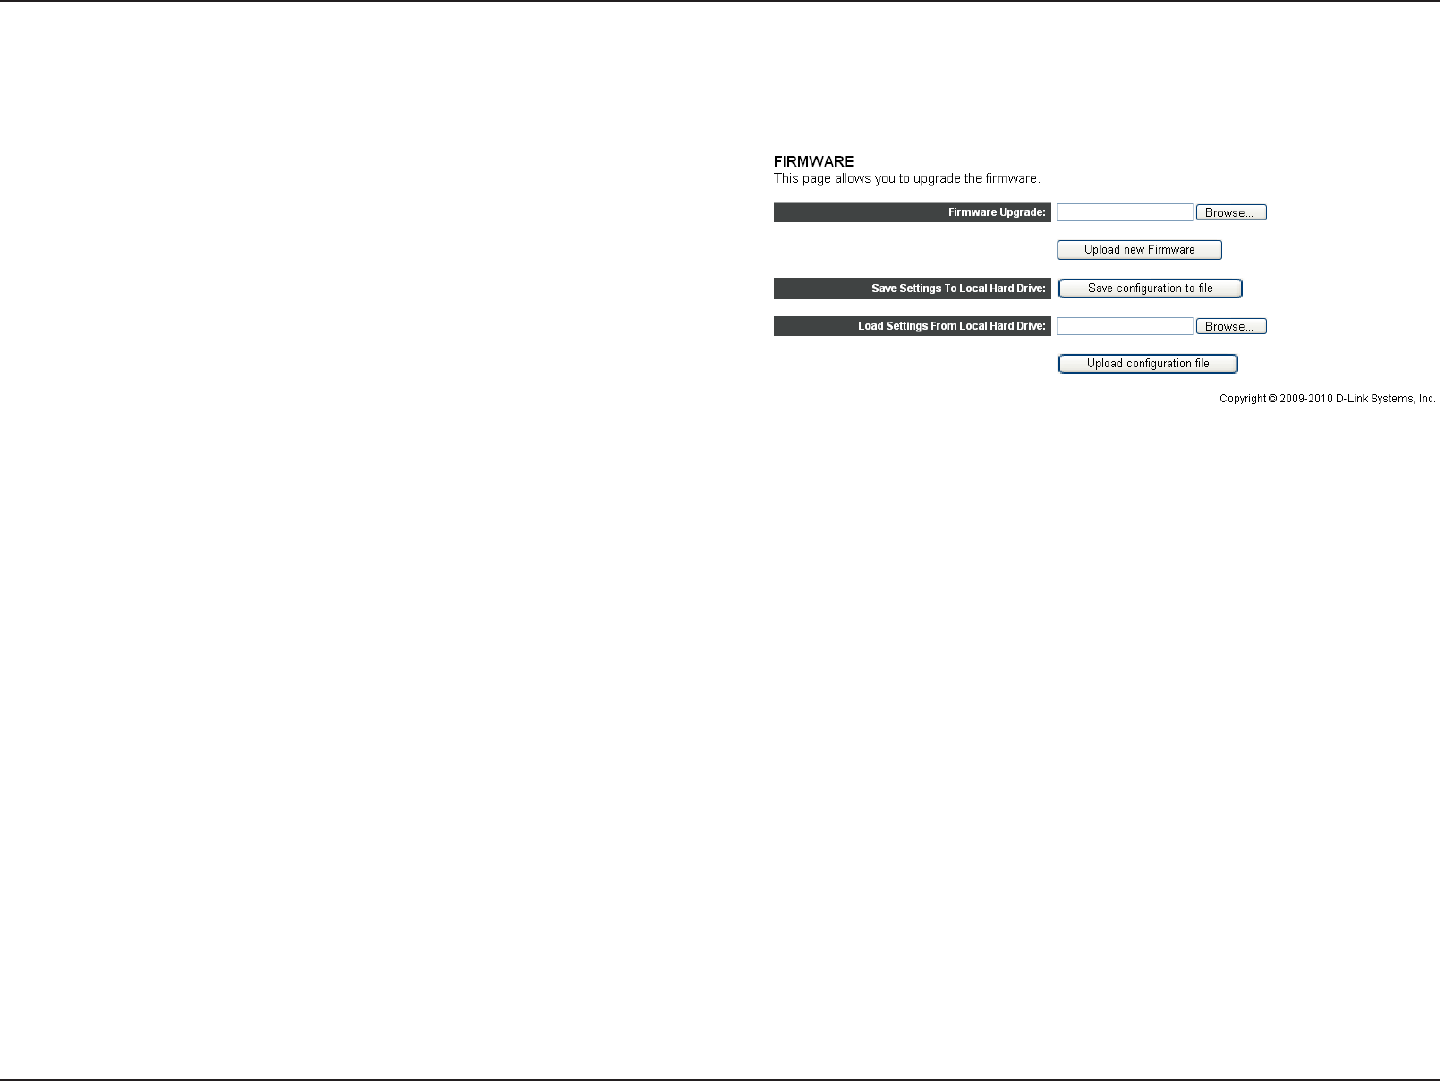
Section 3 - Conguration
Firmware
The Firmware page allows users to upgrade the Router rmware.
Enter the new rmware to upload to the Router or
click Browse to locate the rmware on the user’s
computer. Click UploadnewFirmware to initiate
the rmware upgrade.
Click Savecongurationtole to save NV-RAM
variables to le.
Enter the lename of the saved NV-RAM le here
or click Browse to locate the le on the user’s
computer. Click Upload configuration file to
initiate the conguration le upload.
Firmware
Upgrade:
Save
Settings To
LocalHard
Drive:
Load
SettingsFrom
LocalHard
Drive:

28D-Link DIR-627 User Manual
Section 4 - Security
WirelessSecurity
This section will show you the different levels of security you can use to protect your data from intruders. The
DIR-627 offers the following types of security:
• WPA2 (Wi-Fi Protected Access 2) • WPA2-PSK (Pre-Shared Key)
• WPA (Wi-Fi Protected Access) • WPA-PSK (Pre-Shared Key)
• WEP (Wired Equivalent Privacy)
WhatisWEP?
WEP stands for Wired Equivalent Privacy. It is based on the IEEE 802.11 standard and uses the RC4 encryption
algorithm. WEP provides security by encrypting data over your wireless network so that it is protected as it is transmitted
from one wireless device to another.
To gain access to a WEP network, you must know the key. The key is a string of characters that you create. When
using WEP, you must determine the level of encryption. The type of encryption determines the key length. 128-bit
encryption requires a longer key than 64-bit encryption. Keys are dened by entering in a string in HEX (hexadecimal -
using characters 0-9, A-F) or ASCII (American Standard Code for Information Interchange – alphanumeric characters)
format. ASCII format is provided so you can enter a string that is easier to remember. The ASCII string is converted to
HEX for use over the network. Four keys can be dened so that you can change keys easily.

29D-Link DIR-627 User Manual
Section 4 - Security
CongureWEP
It is recommended to enable encryption on your wireless router before your wireless network adapters. Please establish
wireless connectivity before enabling encryption. Your wireless signal may degrade when enabling encryption due to
the added overhead.
1. Log into the Web-based conguration by opening a Web browser and entering the IP address of the Router
(192.168.0.1). Click Security at the top of the window.
2. Go to WEPEncryption and toggle Disabled to Enabled.
3. Go to 802.11Authentication and select either Shared or Open. Shared is recommended as it provides greater
security when WEP is enabled.
4. Go to NetworkKey1 and enter a WEP key (passphrase) that you create. The key is an alpha-numeric password
between 8 and 63 characters long. The password can include symbols (!?*&_) and spaces. Make sure you enter
this key exactly on all your wireless devices. You may enter up to four different keys either using hexadecimal or
ASCII. Hexadecimal is recommended (letters A-F and numbers 0-9 are valid). In ASCII all numbers and letters are
valid.
5. Go to CurrentNetworkKey and select which network key to use for encrypting outbound data and/or authenticating
clients.
6. Click Apply to save your settings. If you are conguring the Router with a wireless adapter, you will lose connectivity
until you enable WEP on your adapter and enter the same WEP key as you did on the Router.

30D-Link DIR-627 User Manual
Section 4 - Security
WhatisWPA?
WPA, or Wi-Fi Protected Access, is a Wi-Fi standard that was designed to improve the security features of WEP (Wired
Equivalent Privacy).
The two major improvements over WEP:
• Improved data encryption through the Temporal Key Integrity Protocol (TKIP). TKIP scrambles the keys
using a hashing algorithm and, by adding an integrity-checking feature, ensures that the keys haven’t
been tampered with. WPA2 is based on 802.11i and uses Advanced Encryption Standard (AES) instead
of TKIP.
• User authentication, which is generally missing in WEP, through the extensible authentication protocol
(EAP). WEP regulates access to a wireless network based on a computer’s hardware-specic MAC
address, which is relatively simple to be sniffed out and stolen. EAP is built on a more secure public-key
encryption system to ensure that only authorized network users can access the network.
WPA-PSK/WPA2-PSK uses a passphrase or key to authenticate your wireless connection. The key is an alpha-numeric
password between 8 and 63 characters long. The password can include symbols (!?*&_) and spaces. This key must
be the exact same key entered on your wireless router or access point.
WPA/WPA2 incorporates user authentication through the Extensible Authentication Protocol (EAP). EAP is built on a
more secure public key encryption system to ensure that only authorized network users can access the network.

31D-Link DIR-627 User Manual
Section 4 - Security
CongureWPA-PSK
It is recommended to enable encryption on your wireless Router before your wireless network adapters. Please establish
wireless connectivity before enabling encryption. Your wireless signal may degrade when enabling encryption due to
the added overhead.
1. Log into the Web-based conguration by opening a Web browser and entering the IP address of the router
(192.168.0.1). Click Security at the top of the window.
2. Go to 802.11Authentication and select Open.
3. Go to WPA-PSK and toggle Disabled to Enabled.
4. Go to WPAEncryption and select AES or TKIP+AES.
5. Go to WPAPassphrase and enter the WPA Passphrase that is being used on your wireless network.
6. Click Apply to save your settings. If you are conguring the Router with a wireless adapter, you will lose connectivity
until you enable WPA-PSK on your adapter and enter the same passphrase as you did on the Router.

32D-Link DIR-627 User Manual
Section 4 - Security
CongureWPA2-PSK
It is recommended to enable encryption on your wireless Router before your wireless network adapters. Please establish
wireless connectivity before enabling encryption. Your wireless signal may degrade when enabling encryption due to
the added overhead.
1. Log into the Web-based conguration by opening a Web browser and entering the IP address of the router
(192.168.0.1). Click Security at the top of the window.
2. Go to 802.11Authentication and select Open.
3. Go to WPA2-PSK and toggle Disabled to Enabled.
4. Go to WPAEncryption and select AES or TKIP+AES.
5. Go to WPAPassphrase and enter the WPA Passphrase that is being used on your wireless network.
6. Click Apply to save your settings. If you are conguring the Router with a wireless adapter, you will lose connectivity
until you enable WPA-PSK on your adapter and enter the same passphrase as you did on the Router.

33D-Link DIR-627 User Manual
Section 4 - Security
CongureWPA
It is recommended to enable encryption on your wireless Router before your wireless network adapters. Please establish
wireless connectivity before enabling encryption. Your wireless signal may degrade when enabling encryption due to
the added overhead.
If you are using a RADIUS server for wireless authentication that is using WPA encryption, carry out the following:
1. Log into the Web-based conguration by opening a Web browser and entering the IP address of the Router
(192.168.0.1). Click Security at the top of the window.
2. Go to 802.11Authentication and select Open.
3. Go to WPA and toggle Disabled to Enabled.
4. Go to WPAEncryption and select AES or TKIP+AE.
5. Go to RADIUSServerand enter the IP address of your RADIUS server.
6. Go to RADIUSPort and enter the port number that is being used by your RADIUS server. 1812 is the default port.
7. Go to RADIUSKey and enter the security key that is being used by your RADIUS server.
8. Go to NetworkKeyRotationInterval and enter a value, in seconds, for the interval for cycling through the network
keys entered above. If this eld is left blank, this feature is disabled.
9. Go to NetworkRe-authInterval and enter a value, in seconds, for the interval for periodic network re-authentication.
If this eld is left blank, this feature is disabled.
10. Click Apply to save your settings. If you are conguring the Router with a wireless adapter, you will lose connectivity
until you enable WPA on your adapter and enter the same passphrase as you did on the Router.

34D-Link DIR-627 User Manual
Section 4 - Security
CongureWPA2
It is recommended to enable encryption on your wireless Router before your wireless network adapters. Please establish
wireless connectivity before enabling encryption. Your wireless signal may degrade when enabling encryption due to
the added overhead.
If you are using a RADIUS server for wireless authentication that is using WPA2 encryption, carry out the following:
1. Log into the Web-based conguration by opening a Web browser and entering the IP address of the Router
(192.168.0.1). Click Security at the top of the window.
2. Go to 802.11Authentication and select Open.
3. Go to WPA2 and toggle Disabled to Enabled.
4. Go to RADIUSServerand enter the IP address of your RADIUS server.
5. Go to RADIUSPort and enter the port number that is being used by your RADIUS server. 1812 is the default port.
6. Go to RADIUSKey and enter the security key that is being used by your RADIUS server.
7. Go to WPAEncryption and select AES or TKIP+AE.
8. Go to NetworkKeyRotationInterval and enter a value, in seconds, for the interval for cycling through the network
keys entered above. If this eld is left blank, this feature is disabled.
9. Go to NetworkRe-authInterval and enter a value, in seconds, for the interval for periodic network re-authentication.
If this eld is left blank, this feature is disabled.
10. Click Apply to save your settings. If you are conguring the Router with a wireless adapter, you will lose connectivity
until you enable WPA2 on your adapter and enter the same passphrase as you did on the Router.

35D-Link DIR-627 User Manual
Section 4 - Security
CongureWPA(RADIUS)
It is recommended to enable encryption on your wireless Router before your wireless network adapters. Please establish
wireless connectivity before enabling encryption. Your wireless signal may degrade when enabling encryption due to
the added overhead.
1. Log into the Web-based conguration by opening a Web browser and entering the IP address of the Router
(192.168.0.1). Click Security at the top of the window.
2. Go to 802.11Authentication and select Open.
3. Go to WPA and toggle Disabled to Enabled.
4. Go to WPAEncryption and select AES or TKIP+AE.
5. Go to RADIUSServer and enter the IP Address of your RADIUS server.
6. Go to RADIUSPort and enter the port you are using with your RADIUS server. 1812 is the default port.
7. Go to RADIUSKeyand enter the security key.
8. Click Apply to save your settings.

36D-Link DIR-627 User Manual
Section 4 - Security
CongureandWPA2(RADIUS)
It is recommended to enable encryption on your wireless Router before your wireless network adapters. Please establish
wireless connectivity before enabling encryption. Your wireless signal may degrade when enabling encryption due to
the added overhead.
1. Log into the Web-based conguration by opening a Web browser and entering the IP address of the Router
(192.168.0.1). Click Security at the top of the window.
2. Go to 802.11Authentication and select Open.
3. Go to WPA2 and toggle Disabled to Enabled.
4. Go to WPAEncryption and select AES or TKIP+AE.
5. Go to RADIUSServer and enter the IP Address of your RADIUS server.
6. Go to RADIUSPort and enter the port you are using with your RADIUS server. 1812 is the default port.
7. Go to RADIUSKeyand enter the security key.
8. Click Apply to save your settings.
37D-Link DIR-627 User Manual
Section 5 - Connecting to a Wireless Network
ConnecttoaWirelessNetwork
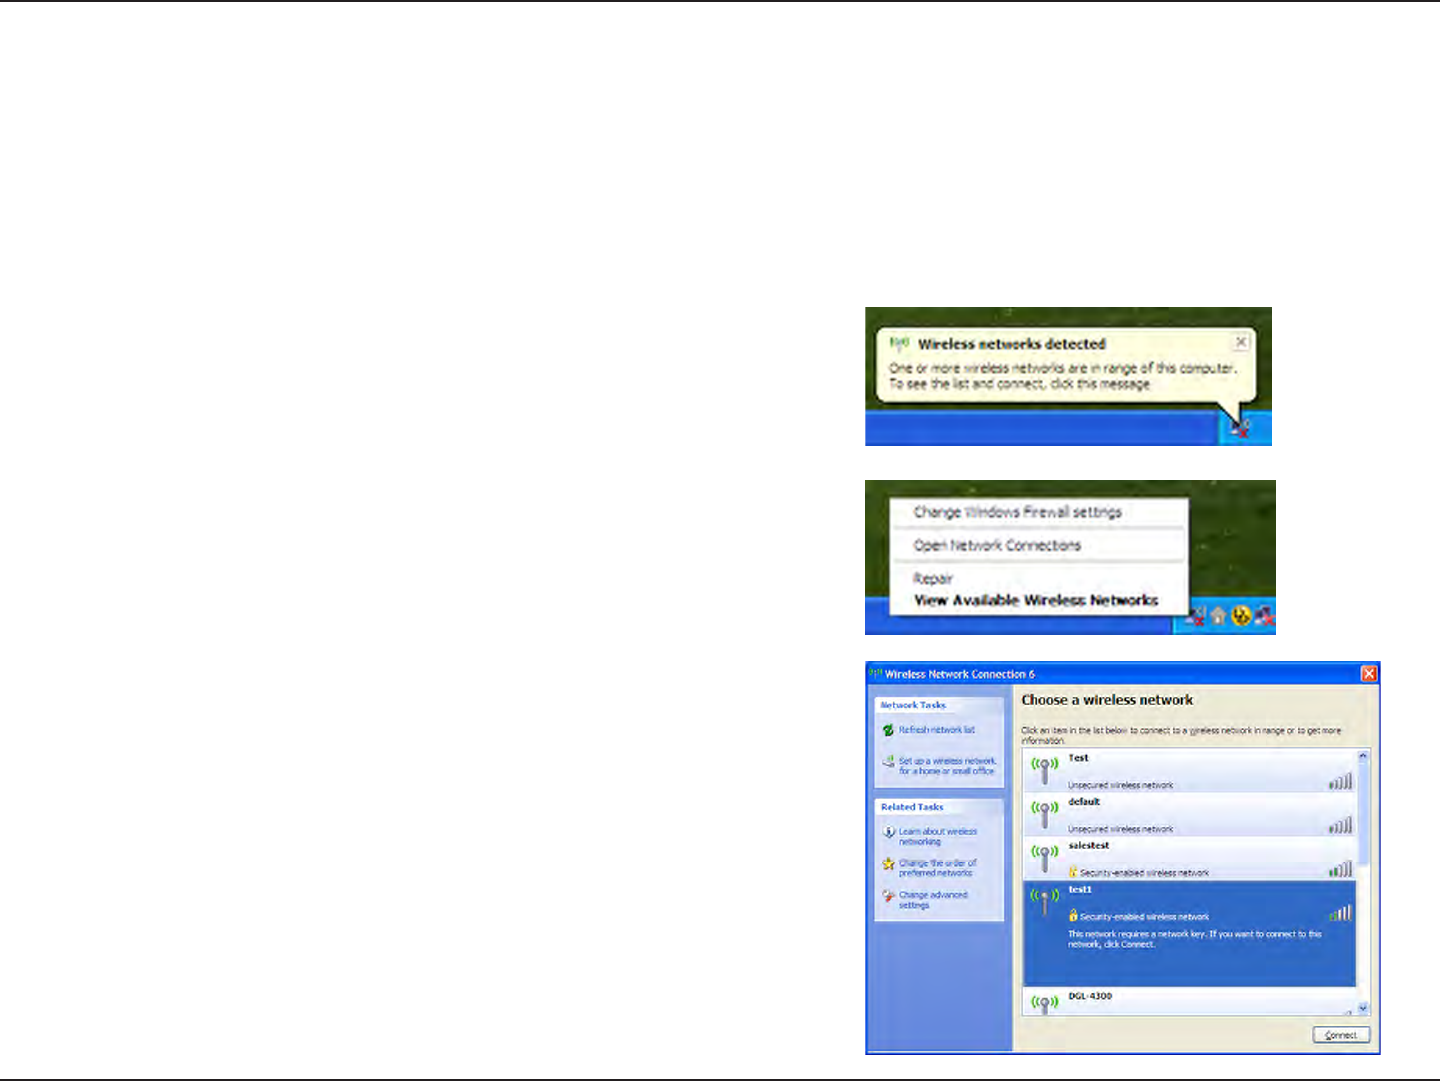
UsingWindows®XP
Windows® XP users may use the built-in wireless utility (Zero Conguration Utility). The following instructions are for
Service Pack 2 users. If you are using another company’s utility or Windows® 2000, please refer to the user manual
of your wireless adapter for help with connecting to a wireless network. Most utilities will have a “site survey” option
similar to the Windows® XP utility as seen below.
Right-click on the wireless computer icon in your system tray
(lower-right corner next to the time). Select ViewAvailable
WirelessNetworks.
If you receive the WirelessNetworksDetected bubble, click
on the center of the bubble to access the utility.
or
The utility will display any available wireless networks in your
area. Click on a network (displayed using the SSID) and click
the Connect button.
If you get a good signal but cannot access the Internet, check
you TCP/IP settings for your wireless adapter. Refer to the
NetworkingBasics section in this manual for more information.
38D-Link DIR-627 User Manual
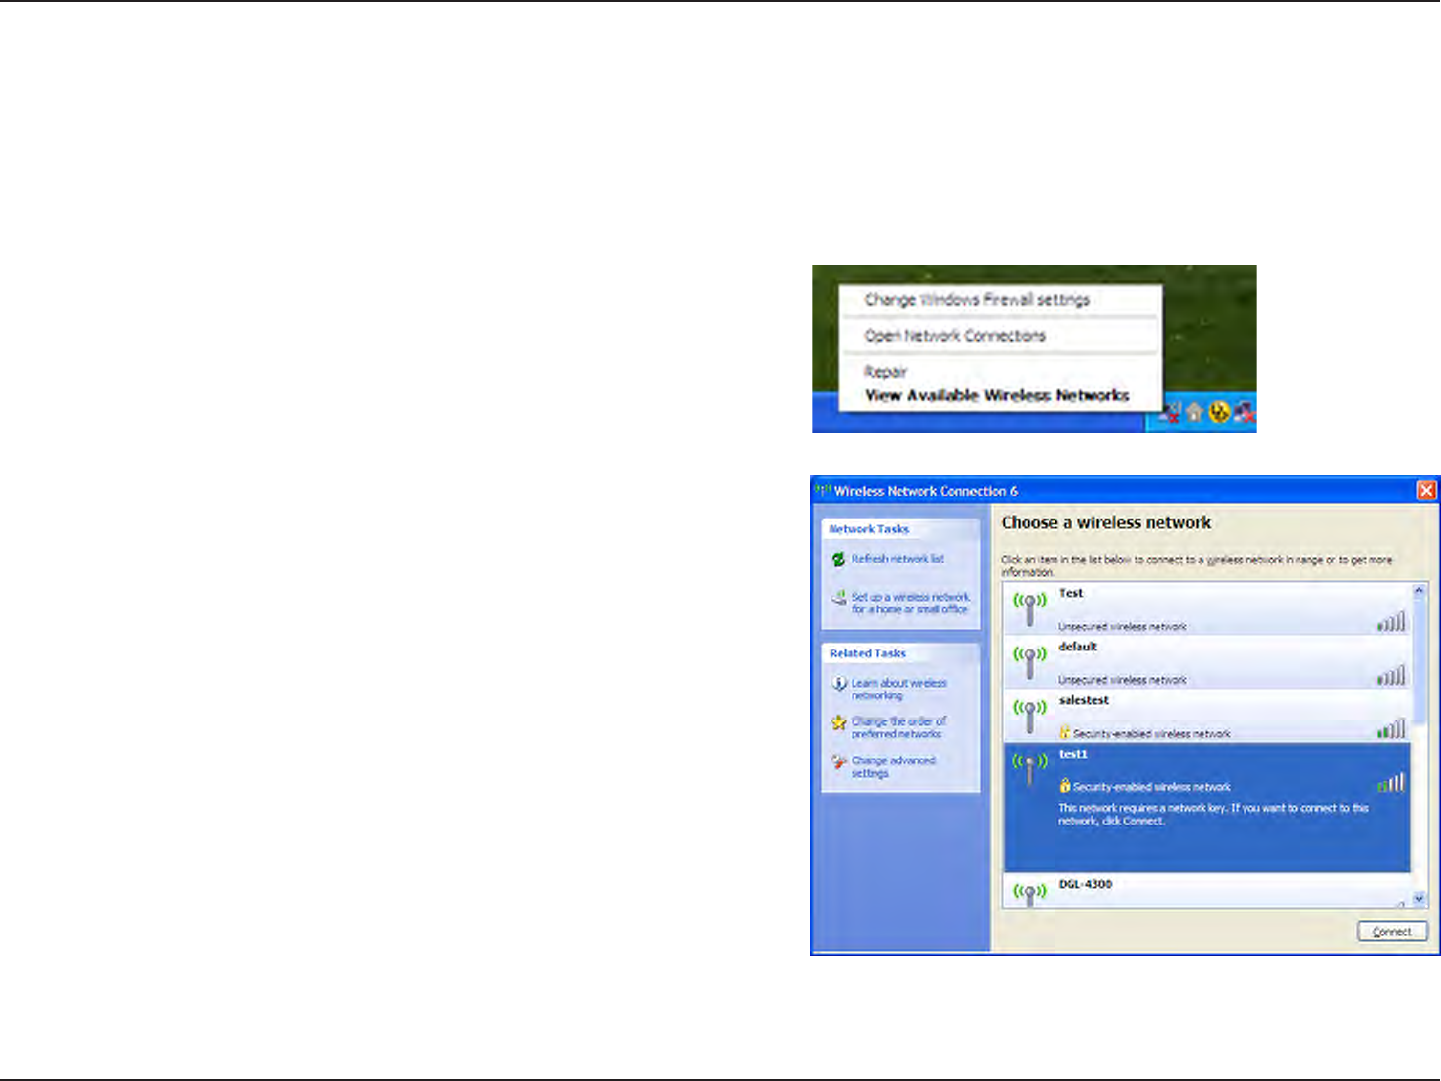
Section 5 - Connecting to a Wireless Network
CongureWEP
It is recommended to enable WEP on your wireless Router or access point before conguring your wireless adapter.
If you are joining an existing network, you will need to know the WEP key being used.
2. Highlight the wireless network (SSID) you would like to
connect to and click Connect.
1. Open the Windows® XP Wireless Utility by right-clicking
on the wireless computer icon in your system tray
(lower-right corner of screen). Select ViewAvailable
WirelessNetworks.
39D-Link DIR-627 User Manual
Section 5 - Connecting to a Wireless Network
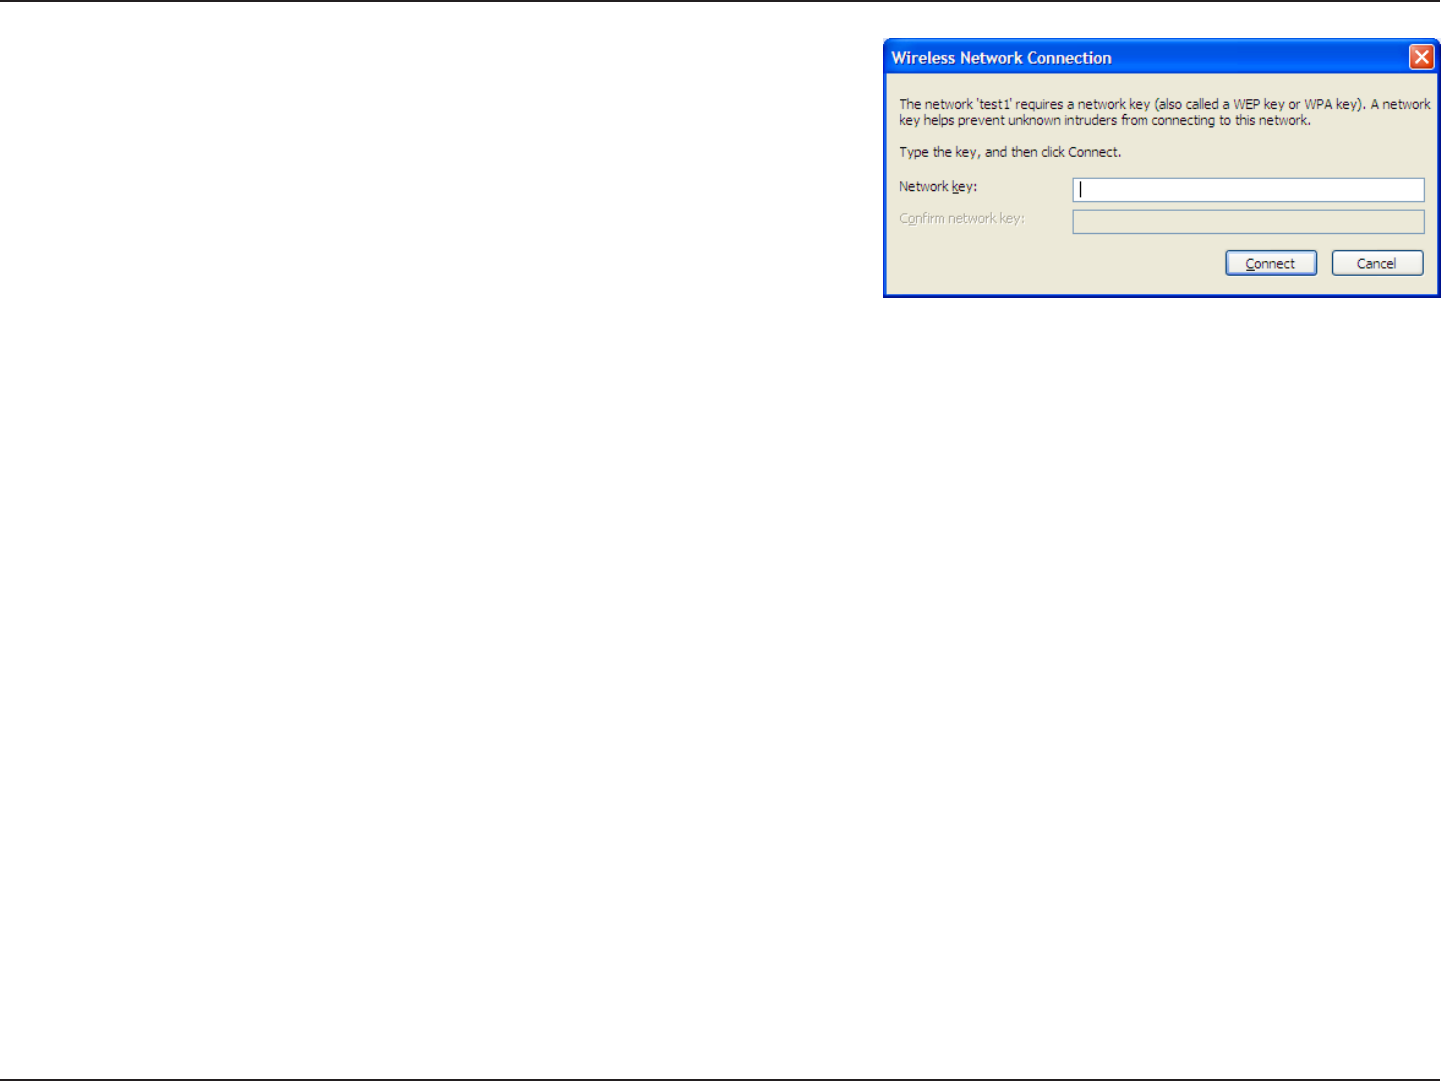
3. The WirelessNetworkConnection box will appear. Enter the same
WEP key that is on your Router and click Connect.
It may take 20-30 seconds to connect to the wireless network. If the
connection fails, please verify that the WEP settings are correct. The
WEP key must be exactly the same as on the wireless router.
40D-Link DIR-627 User Manual
Section 5 - Connecting to a Wireless Network
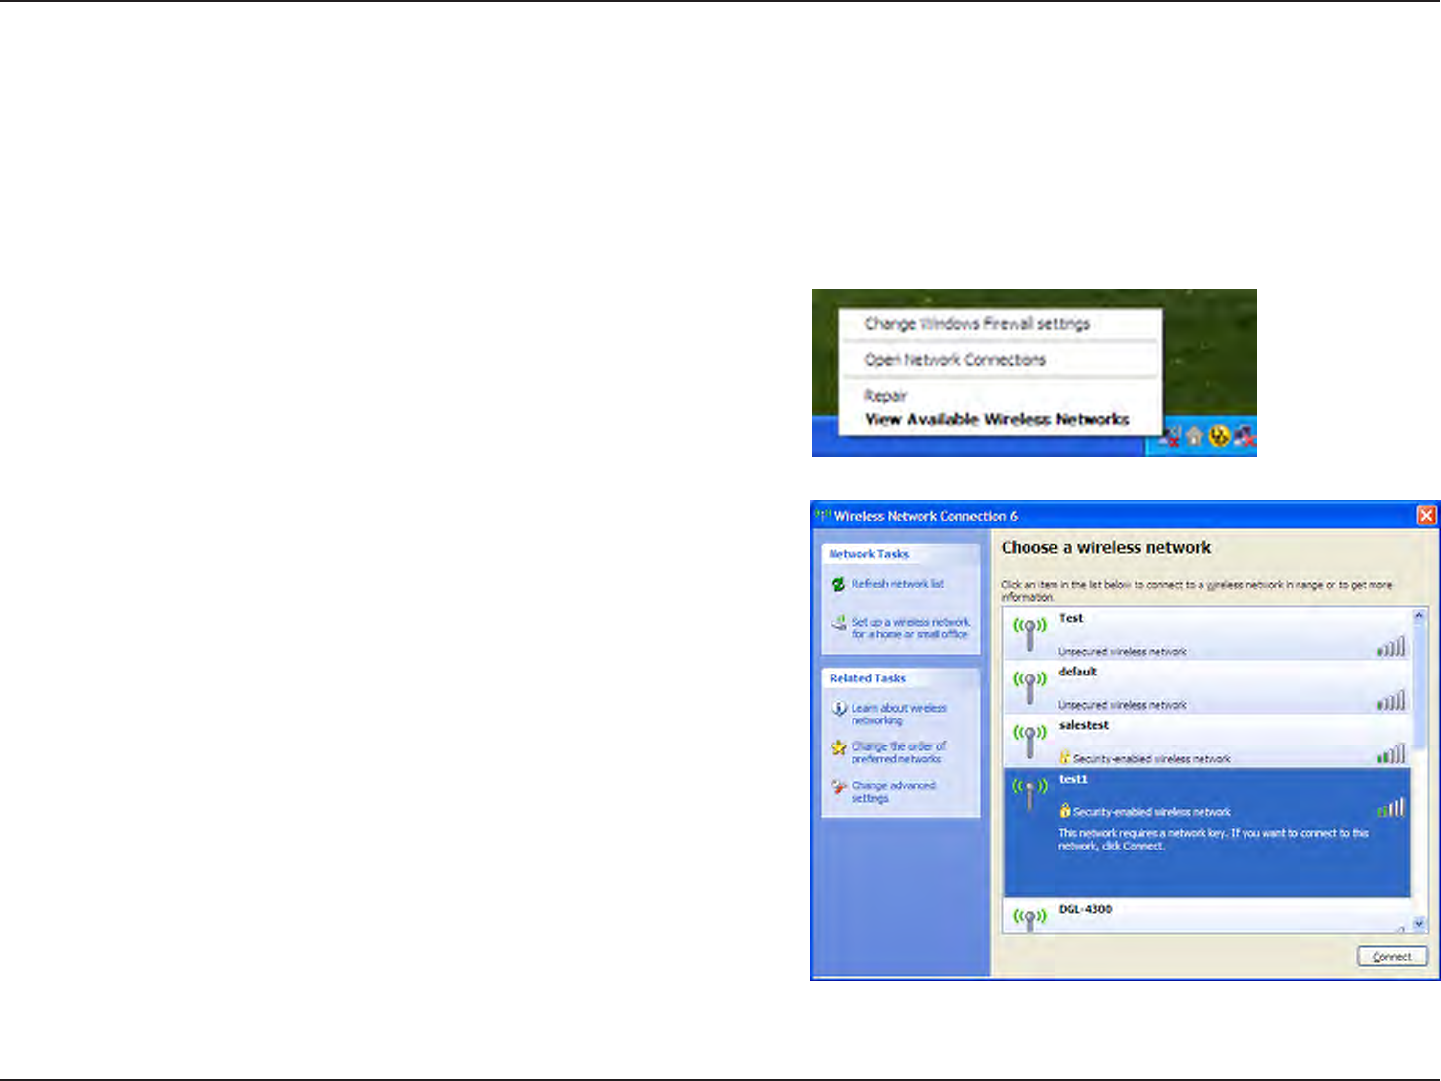
CongureWPA-PSK
It is recommended to enable WEP on your wireless Router or access point before conguring your wireless adapter.
If you are joining an existing network, you will need to know the WEP key being used.
2. Highlight the wireless network (SSID) you would like to
connect to and click Connect.
1. Open the Windows® XP Wireless Utility by right-clicking
on the wireless computer icon in your system tray
(lower-right corner of screen). Select ViewAvailable
WirelessNetworks.
41D-Link DIR-627 User Manual
Section 5 - Connecting to a Wireless Network
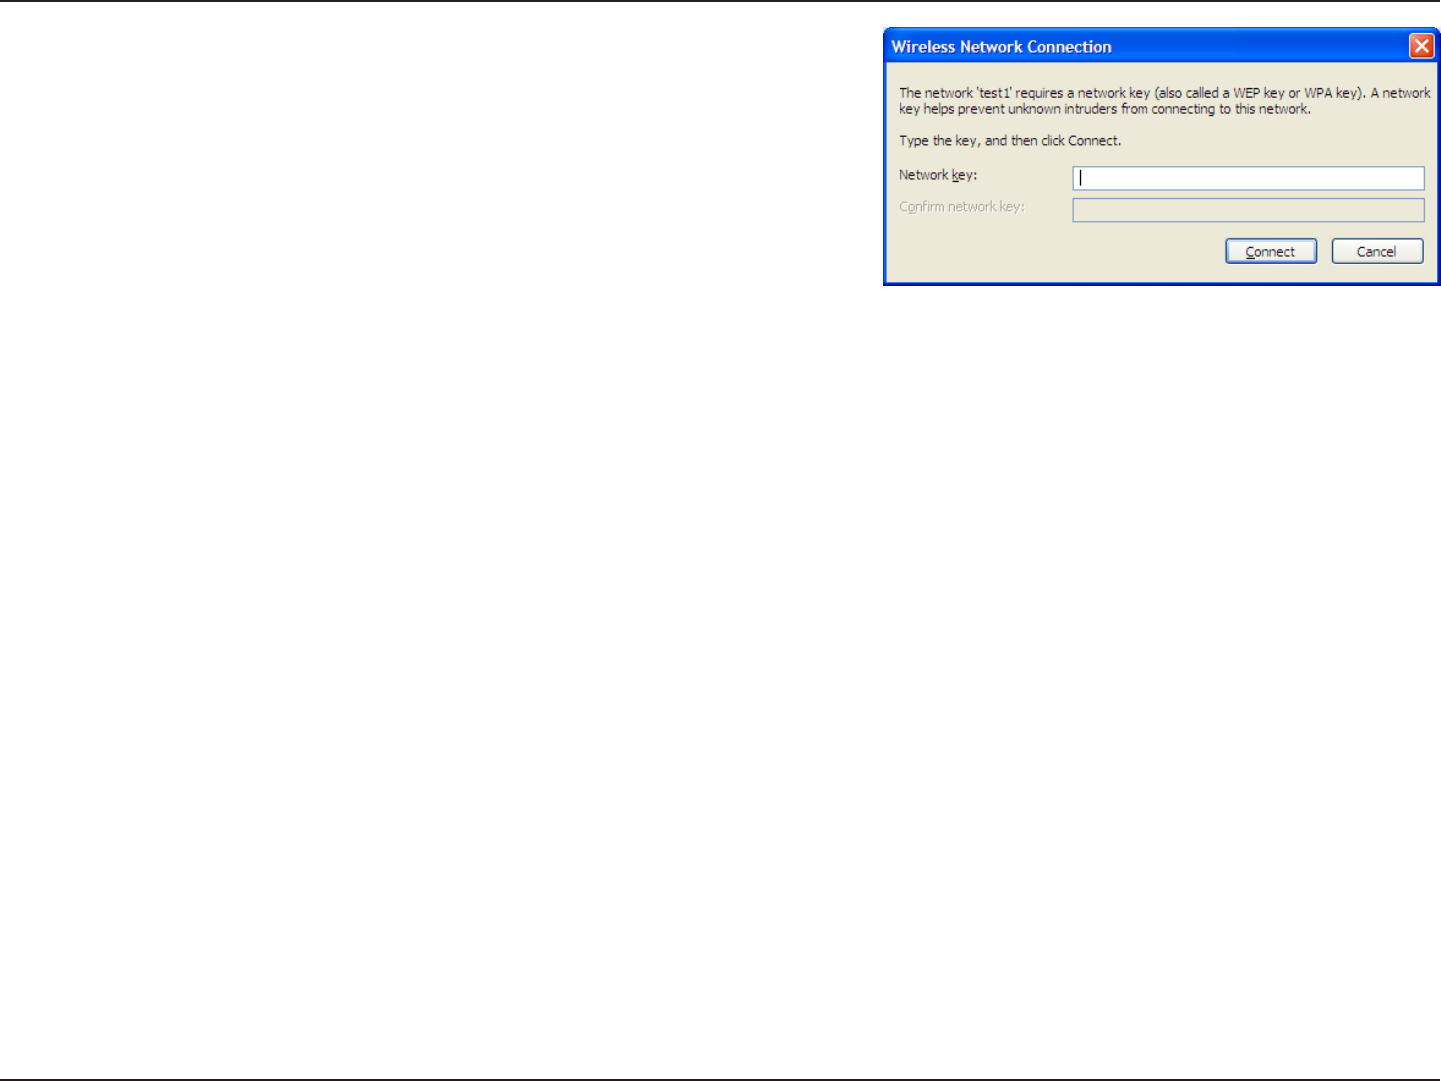
3. The Wireless Network Connection box will appear. Enter the
WPA-PSK passphrase and click Connect.
It may take 20-30 seconds to connect to the wireless network. If the
connection fails, please verify that the WPA-PSK settings are correct.
The WPA-PSK passphrase must be exactly the same as on the
wireless router.

42D-Link DIR-627 User Manual
Section 6 - Setting Up Wi-Fi Protection (WCN 2.0 in Windows Vista)
SettingUpWi-FiProtection
(WCN2.0inWindowsVista)
The Router supports Wi-Fi protection, referred to as WCN 2.0 in Windows Vista. The instructions for setting this up
depend on whether you are using Windows Vista to congure the Router or third party software.
InitialRouterCongurationforWi-FiProtection
When you rst set up the Router, Wi-Fi protection is disabled and uncongured. To enjoy the benets of Wi-Fi protection,
the Router must be both enabled and congured. There are three basic methods to accomplish this: use Windows
Vista’s built-in support for WCN 2.0, use software provided by a third party, or use the traditional Ethernet approach.
If you are running Windows Vista, use the WPS Conguration drop-down menu on the Security window to select
Enabled. Use the Current PIN that is displayed on the Security window or choose to click the Device PIN Generate
button.
If you are using third party software to set up Wi-Fi Protection, carefully follow the directions. When you are nished,
proceed to the next section to set up the newly-congured Router.

43D-Link DIR-627 User Manual
Section 6 - Setting Up Wi-Fi Protection (WCN 2.0 in Windows Vista)
SettingUpaConguredRouter
Once the Router has been congured, you can use the push button on the Router or third party software to invite a
newcomer to join your Wi-Fi protected network. For maximum security, the software method is recommended. However,
the push button method is ideal if there is no access to a GUI.
If you are using the Router’s Wi-Fi Security push button option, simultaneously depress the push button located on
the side of the Router and the button on the client (or virtual button on the client’s GUI). Next click Finish. The Client’s
software will then allow a newcomer to join your secure, Wi-Fi protected network.
If you are using third party software, run the appropriate Wi-Fi Protected System utility. You will be asked to either use
the push button method or to manually enter the PIN. Follow the on-screen instructions.
44D-Link DIR-627 User Manual
Section 7 - Changing the Computer Name and Joining a Workgroup
ChangingtheComputerNameandJoininga
Workgroup
The following are step-by-step directions to change the computer name and join a workgroup.
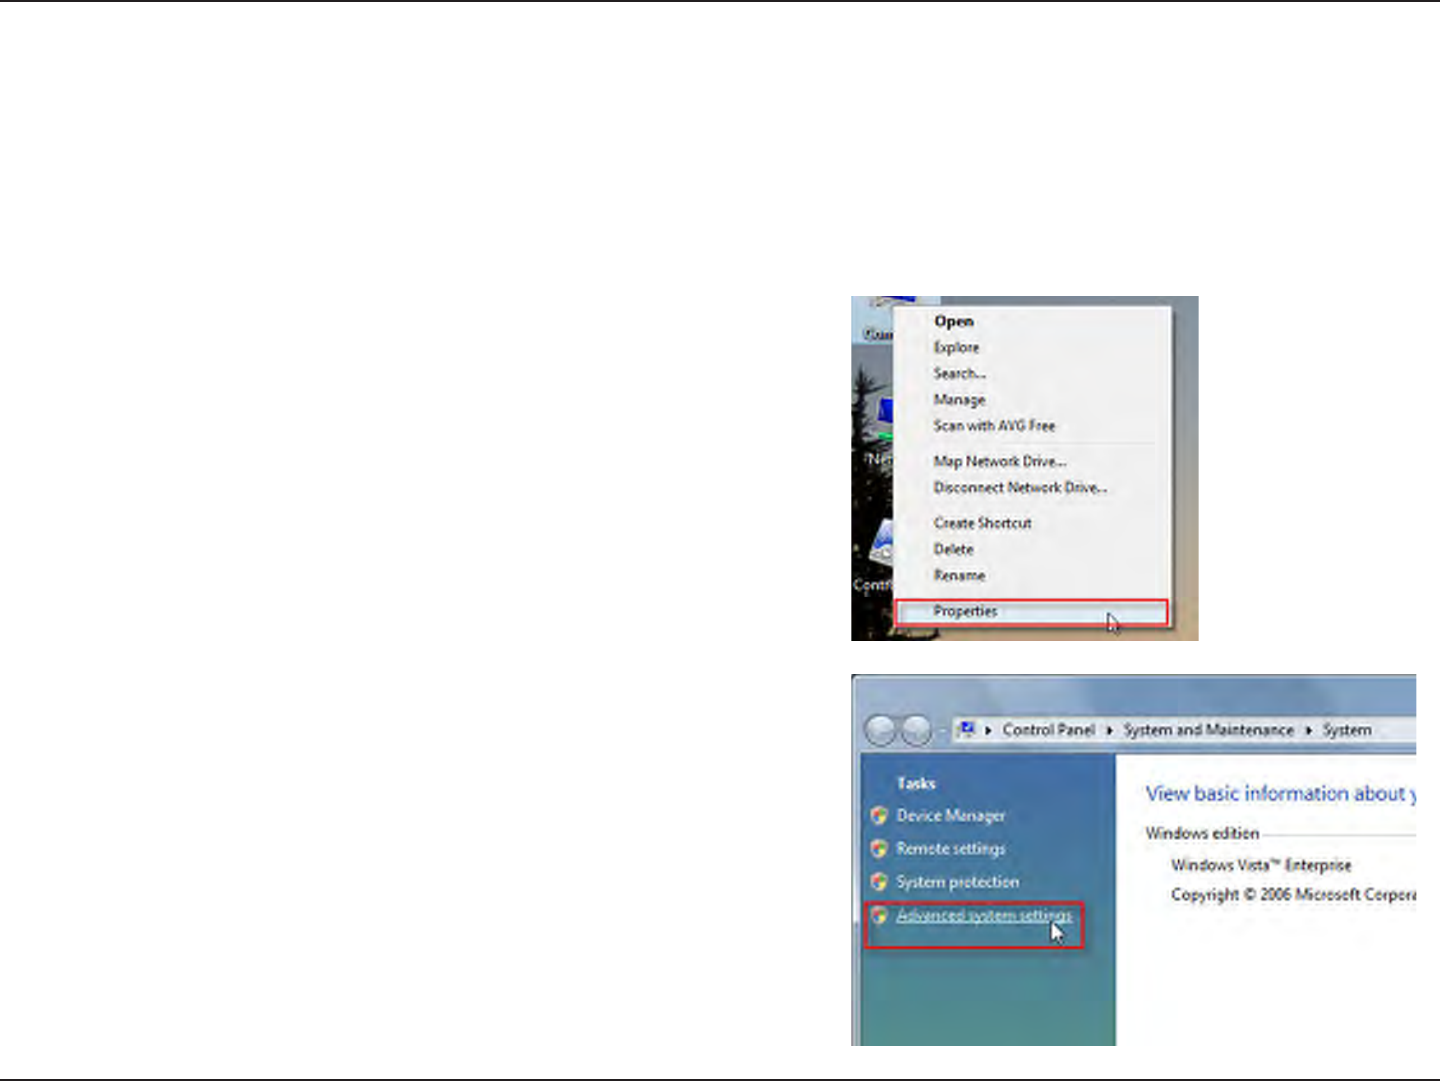
2. Click on the Advancedsystemsettings link.
1. Click on Properties.
45D-Link DIR-627 User Manual
Section 7 - Changing the Computer Name and Joining a Workgroup
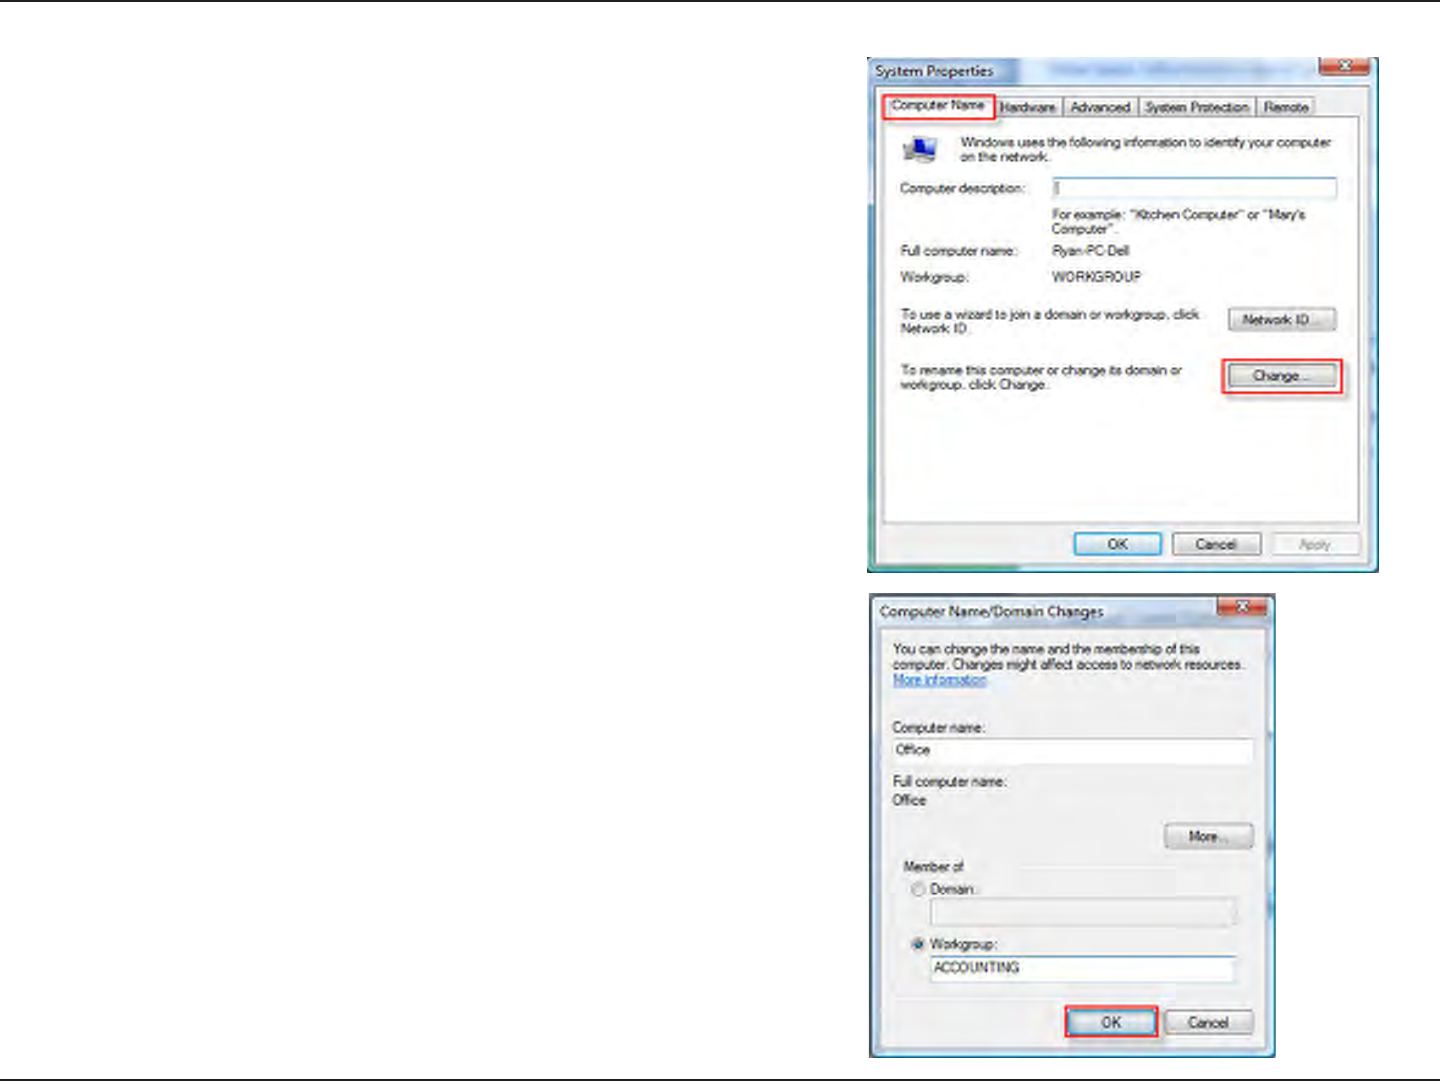
3. Click the ComputerName tab in the SystemPropertieswindow
and enter a description of your computer in the textbox. When you
are nished, click the Change button.
4. Go to the ComputerName/DomainChangeswindow and
click the radio button next to the Workgroup you want to
join. When you are nished, click the OKbutton.
46D-Link DIR-627 User Manual
Section 8 - Conguring the IP Address in Vista
ConguringtheIPAddressinVista
The following are step-by-step directions to congure the IP address in Windows Vista.
2. Go to the Network and Internet window and click the
appropriate LocalAreaConnection icon.
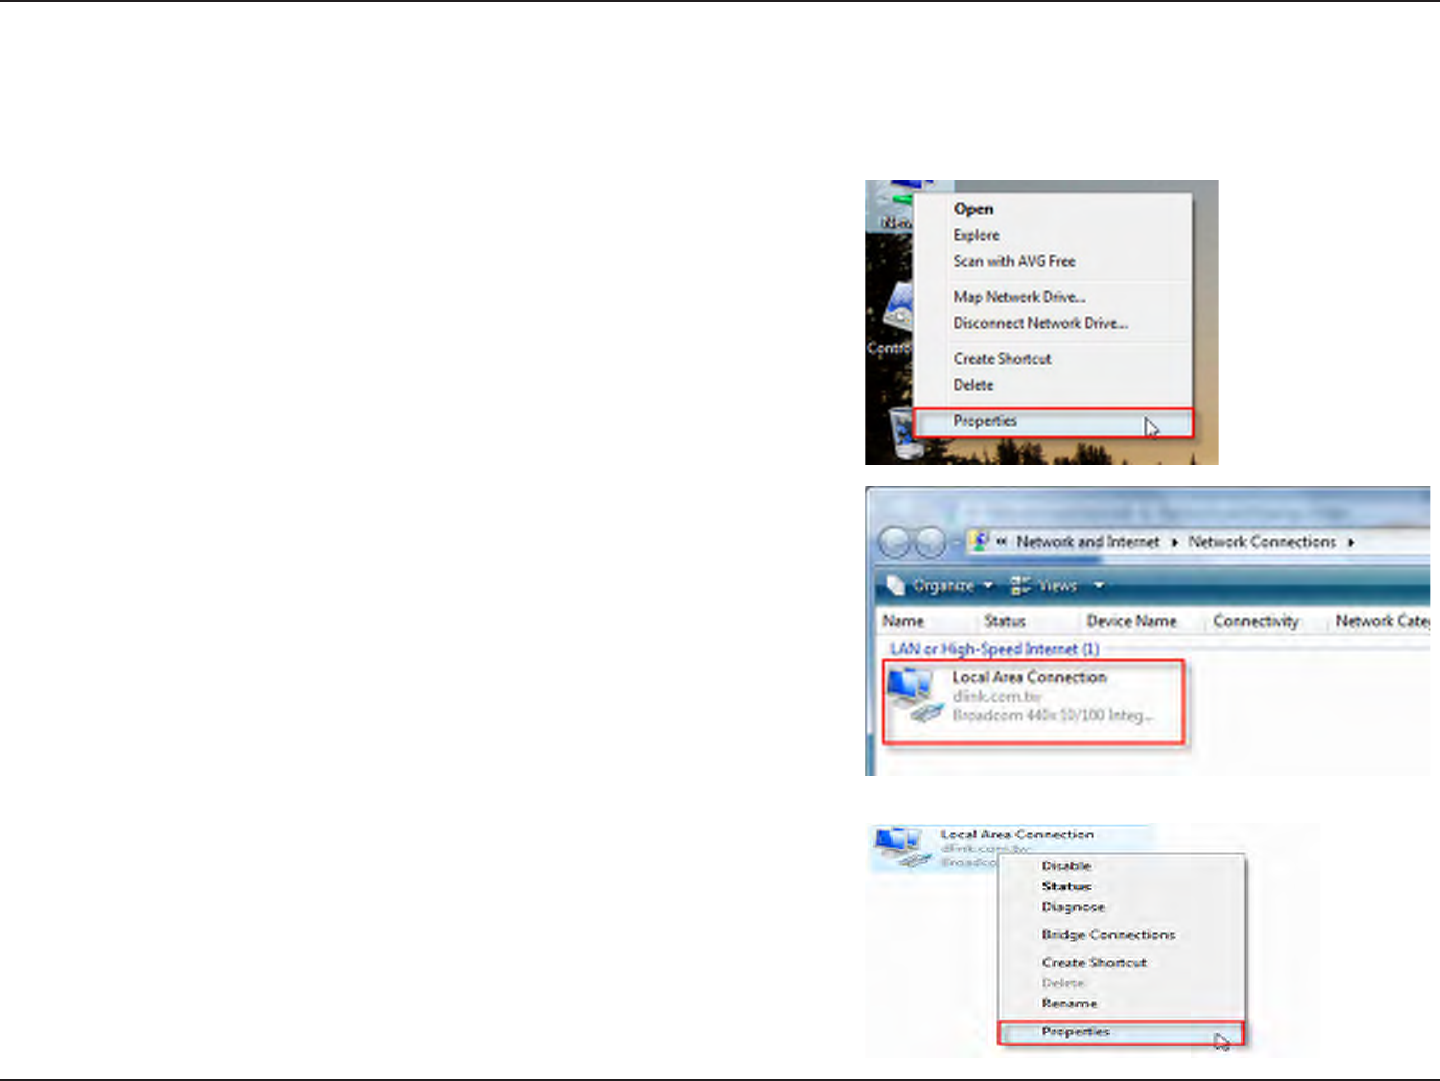
1. Click on Properties.
3. Right-click the LocalAreaConnection icon and then select
Properties from the drop-down menu.
47D-Link DIR-627 User Manual
Section 8 - Conguring the IP Address in Vista
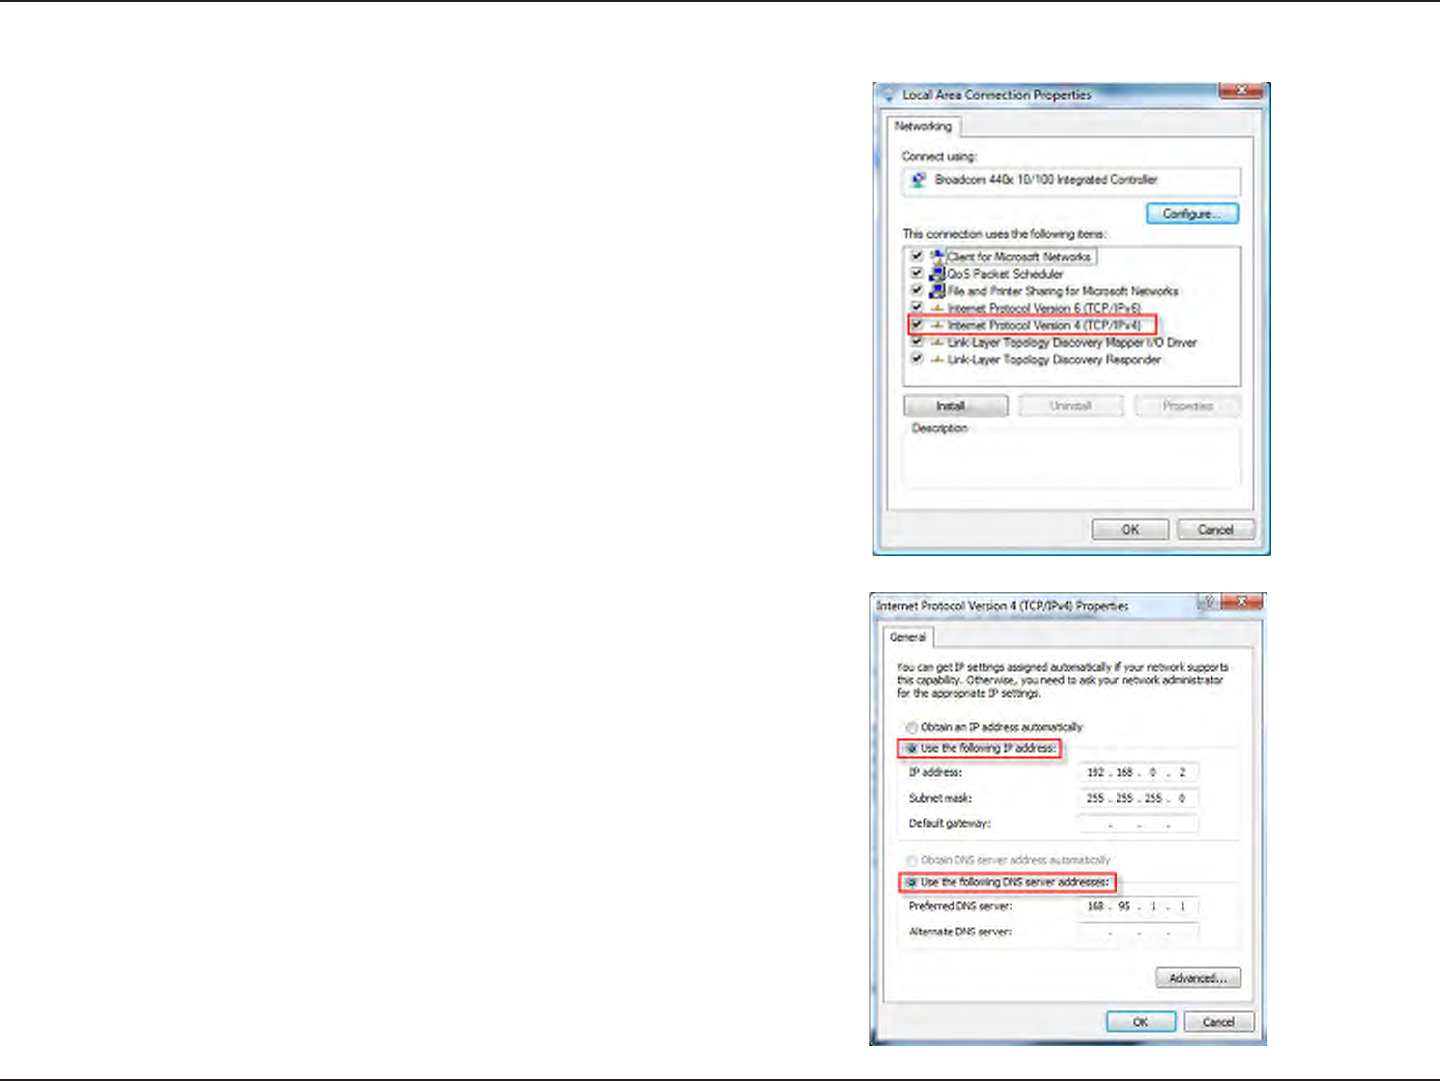
4. Tick the InternetProtocolVersion4(TCP/IPv4) check box in the
Networkingtab in the LocalAreaConnectionProperties window.
5. Click the “Use the following IP address” option in the General
tab in the LocalAreaConnectionsProperties window and
enter the desired IP address in the space offered. Then click
the “Use the following DNS server adresses” option on the
same tab and enter the desired DNS server information.
48D-Link DIR-627 User Manual
Section 8 - Conguring the IP Address in Vista
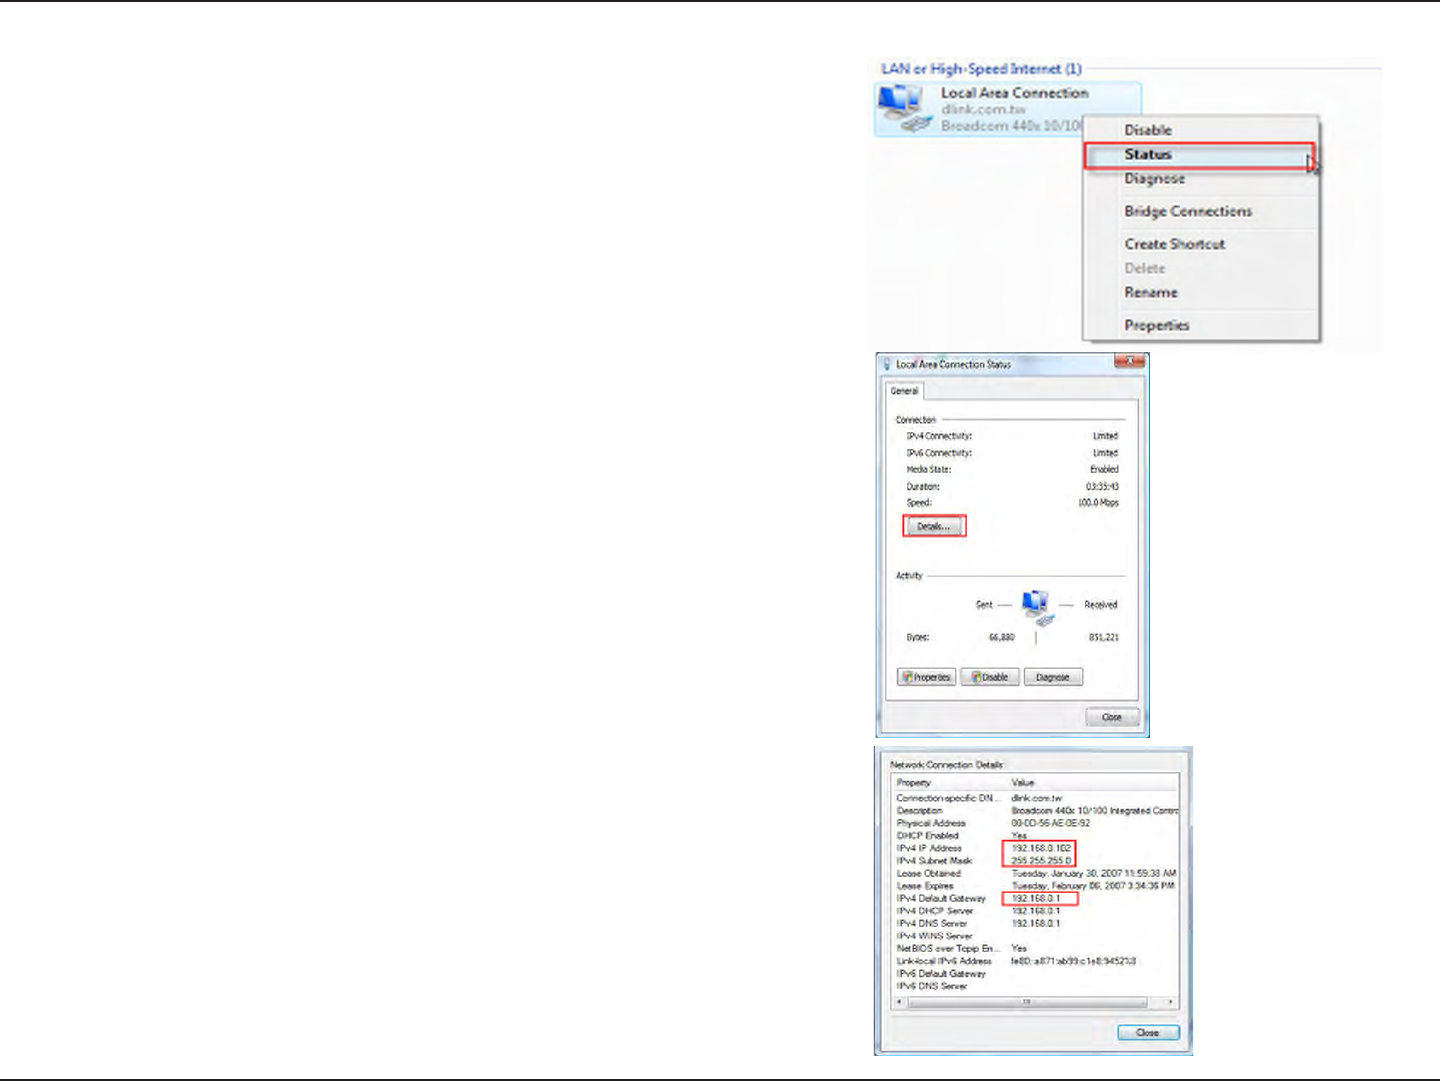
6. Right-click the LocalAreaConnection icon and then select Status
from the drop-down menu.
7. Go to the LocalAreaConnectionStatuswindow and click
the Details button.
8. Conrm your new settings on the Network Connection Status
window. When you are nished, click the Done button.
49D-Link DIR-627 User Manual
Section 9 - Setting Up a Connection Wirelessly
SettingUpaConnectionorNetwork
Wirelessly
The following are step-by-step directions to set up a wireless connection.
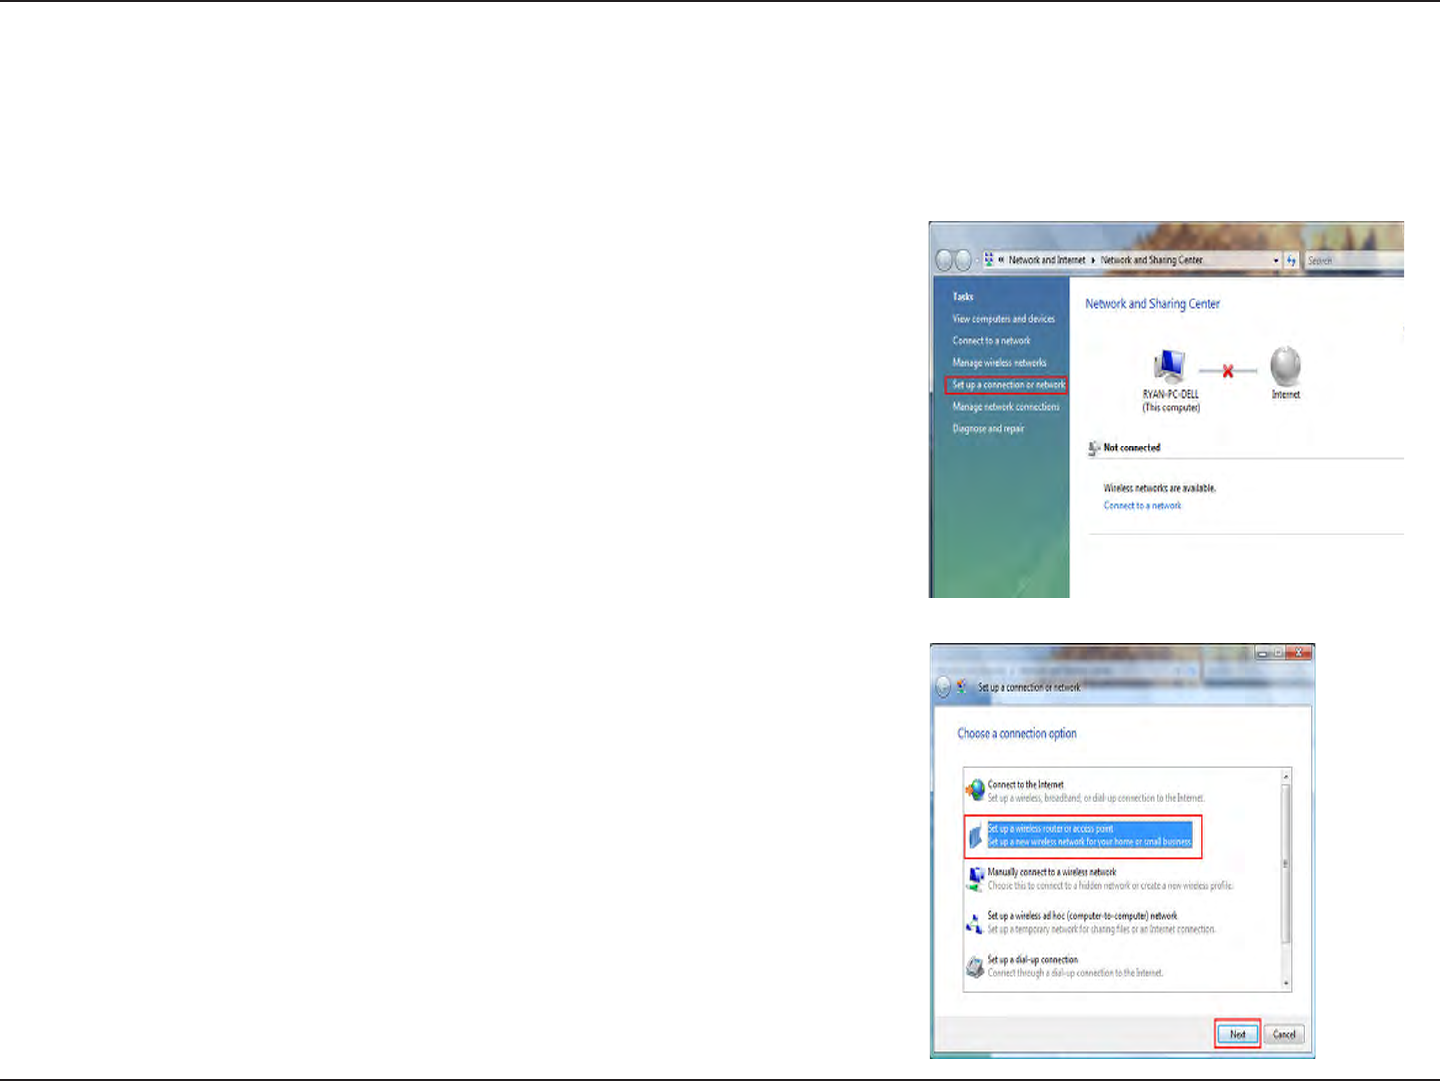
2. Go to the Setupaconnectionornetworkwindow and choose the Set
upawirelessrouteroraccesspointSetupanewwirelessnetwork
foryourhomeorbusiness option. Click the Next button.
1. Click on SetupaconnectionornetworkintheNetworkand
SharingCentersection.

50D-Link DIR-627 User Manual
Section 9 - Setting Up a Connection Wirelessly
3. Click the Next button on the Setupawirelessrouteroraccess
pointwindow.
4. The following window displays the system progress.
5. This window conrms that you want to create wireless network
settings that are savable to a USB ash drive.
51D-Link DIR-627 User Manual
Section 9 - Setting Up a Connection Wirelessly
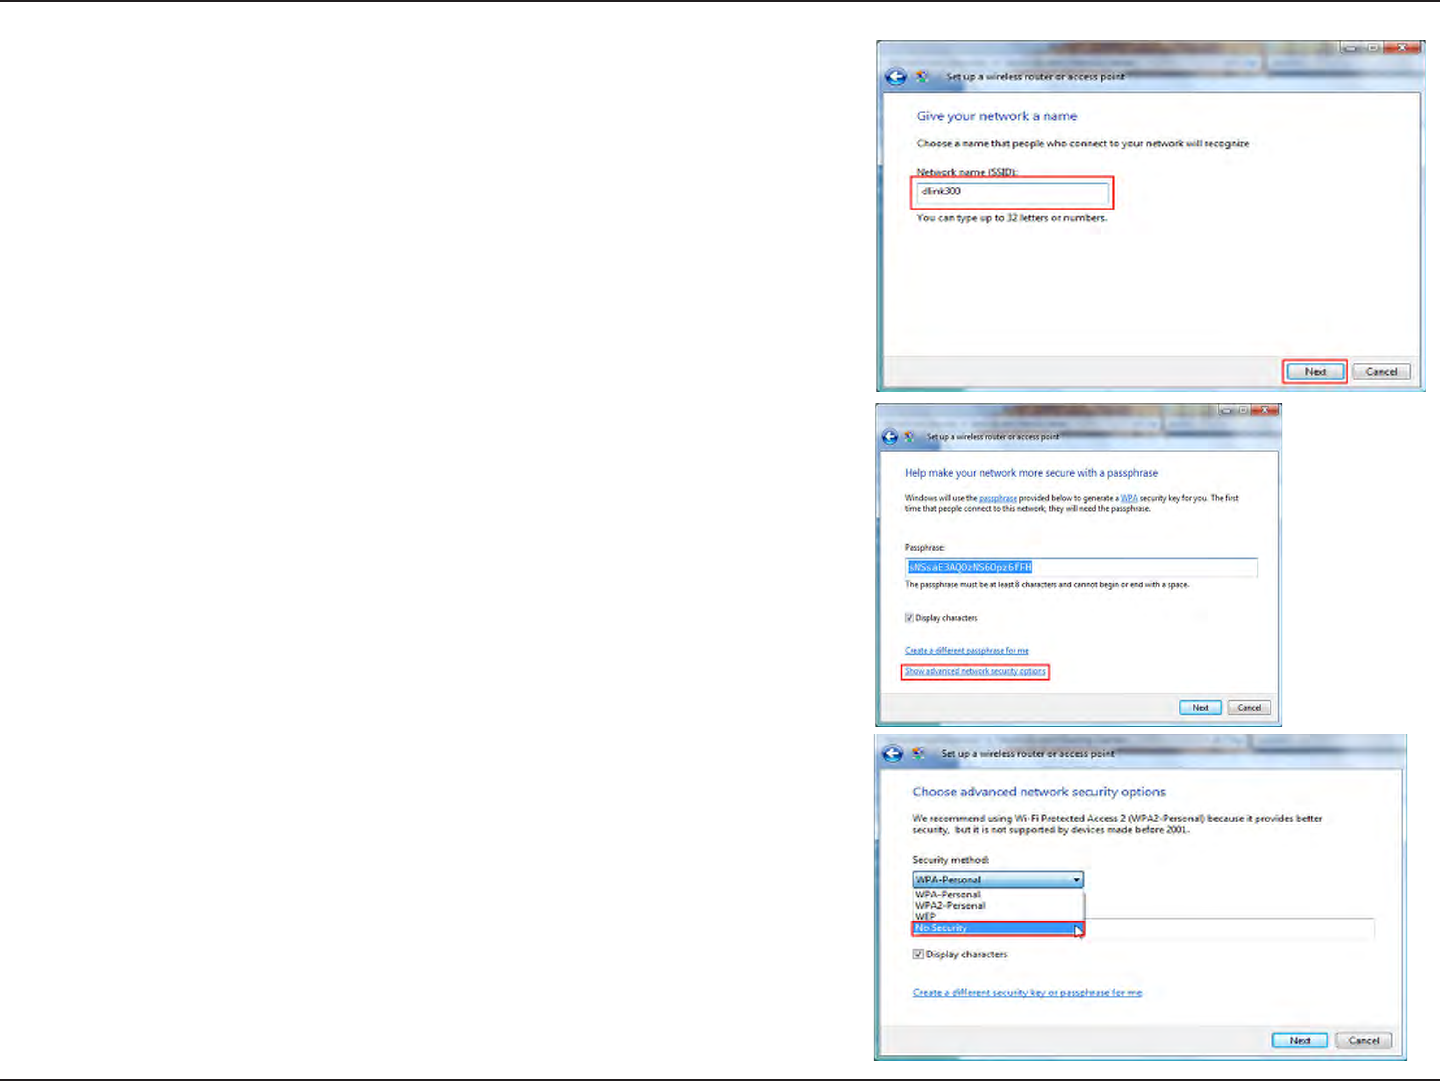
6. Enter a network name on the Giveyournetworkaname window
in the Setupawirelessrouteroraccesspoint wizard. Click the
Next button.
7. Enter a passphrase on the Helpmakeyournetworkmoresecure
withapassphrasewindow in the Setupawirelessrouteror
accesspoint wizard. Click the Showadvancednetworksecurity
options link.
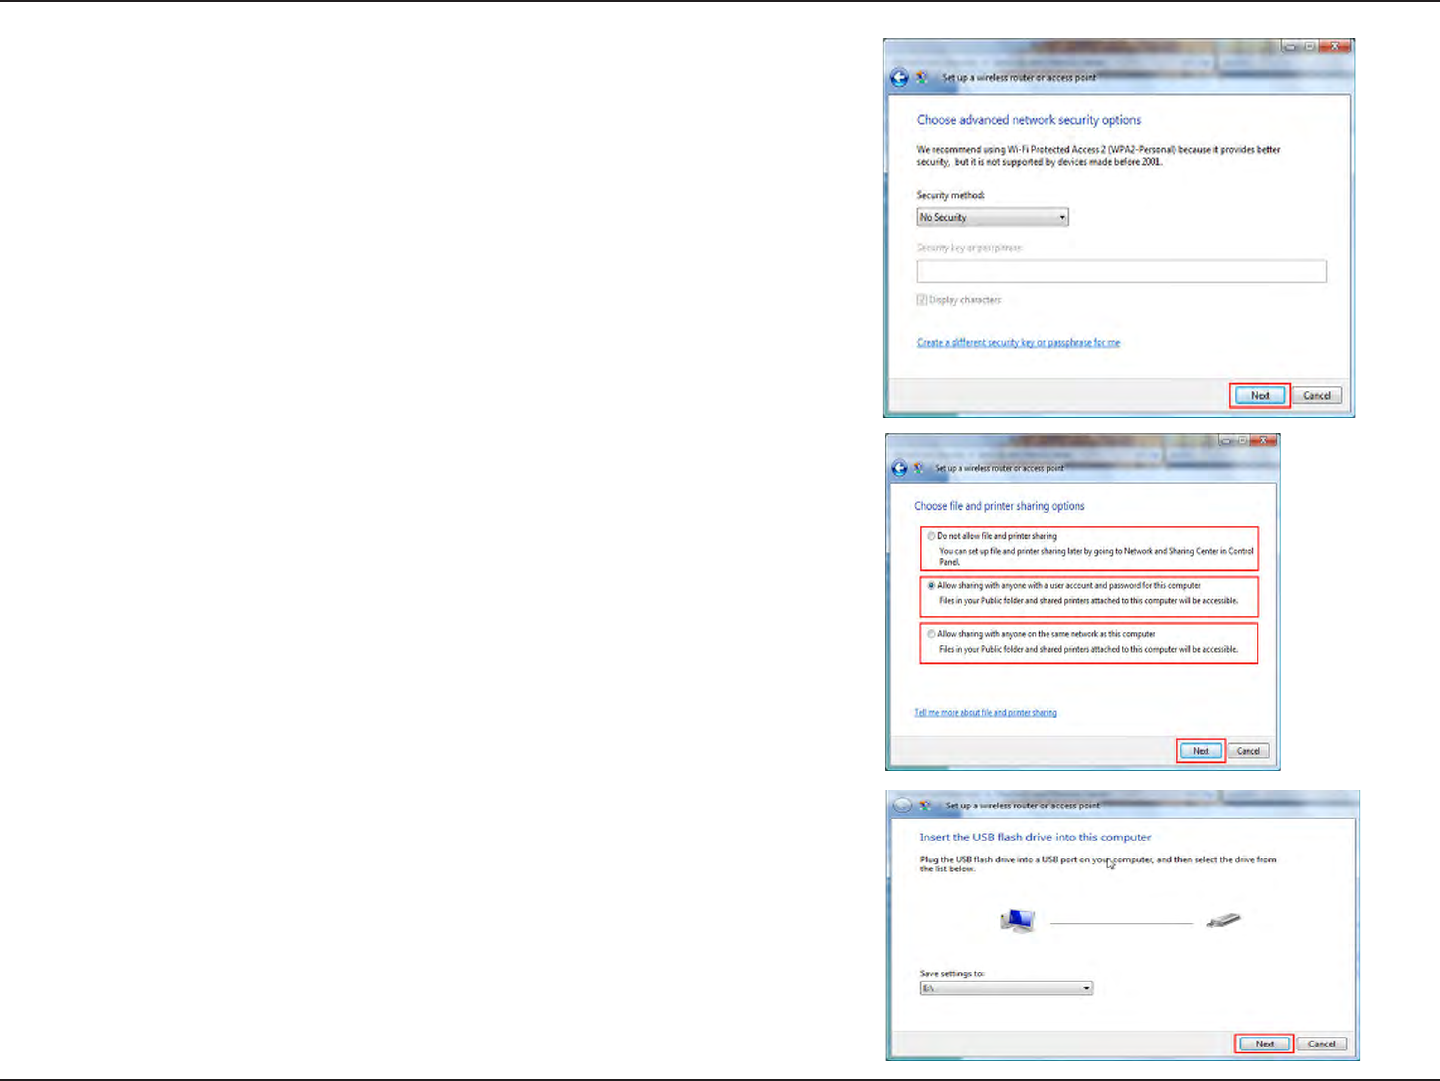
8. Select security method on the Chooseadvancednetworksecurity
optionswindow in the Setupawirelessrouteroraccesspoint
wizard. Click the Nextbutton.
52D-Link DIR-627 User Manual
Section 9 - Setting Up a Connection Wirelessly
9. Once you have selected the desired security method on the Choose
advanced network security options window in the Set up a
wirelessrouteroraccesspoint wizard, click the Nextbutton.
10.Select the desired le and printer sharing option on the Choose
leandprintersharingoptionswindow in the Setupawireless
routeroraccesspoint wizard. Click the Nextbutton.
11.Once you have saved your network settings to USB, use the pull-
down menu on the InserttheUSBashdriveintothiscomputer
window in the Setupawirelessrouteroraccesspoint wizard to
select a destination for your network settings. Click the Nextbutton.
53D-Link DIR-627 User Manual
Section 9 - Setting Up a Connection Wirelessly
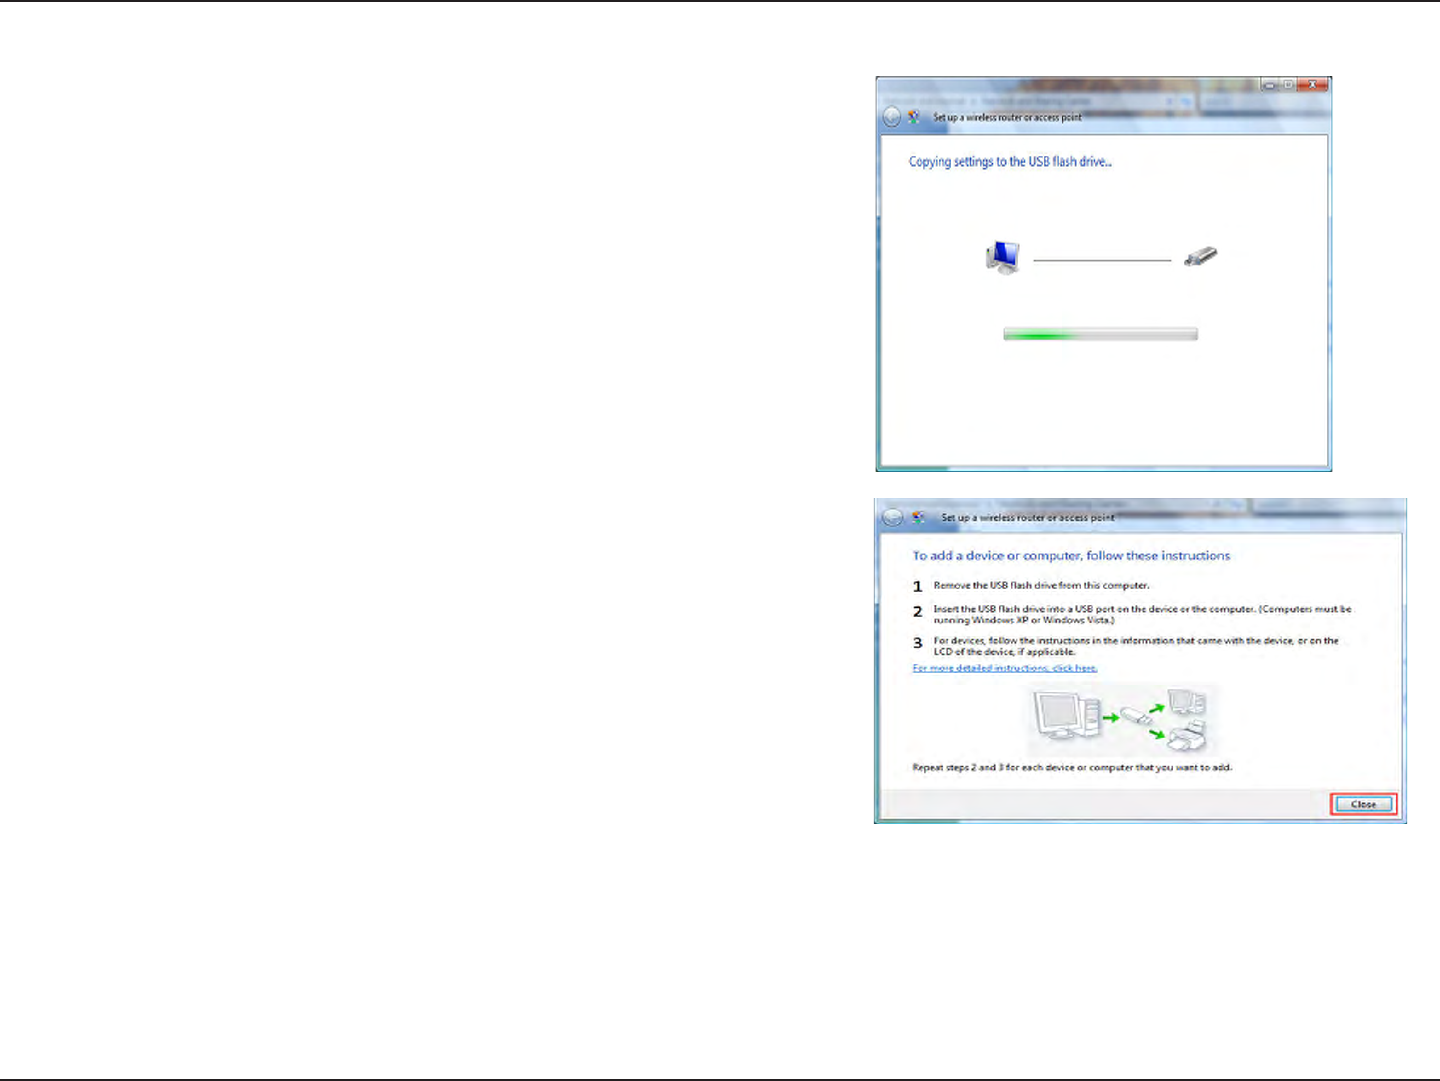
12.Once you have saved your network settings to USB, the
CopyingsettingstotheUSBdrivewindow in the Setup
awirelessrouteroraccesspoint wizard opens to indicate
the system progress.
13.Once you are nished, the Toaddadeviceorcomputer,follow
these instructions window in the Set up a wireless router or
accesspoint wizard opens. When you are nished, click the Close
button.
54D-Link DIR-627 User Manual
Section 10 - Connecting to a Secured Wireless Network (WEP, WPA-PSK & WPA2-PSK)
ConnectingtoaSecuredWirelessNetwork
(WEP,WPA-PSK&WPA2-PSK)
The following are step-by-step directions to set up a wireless connection.
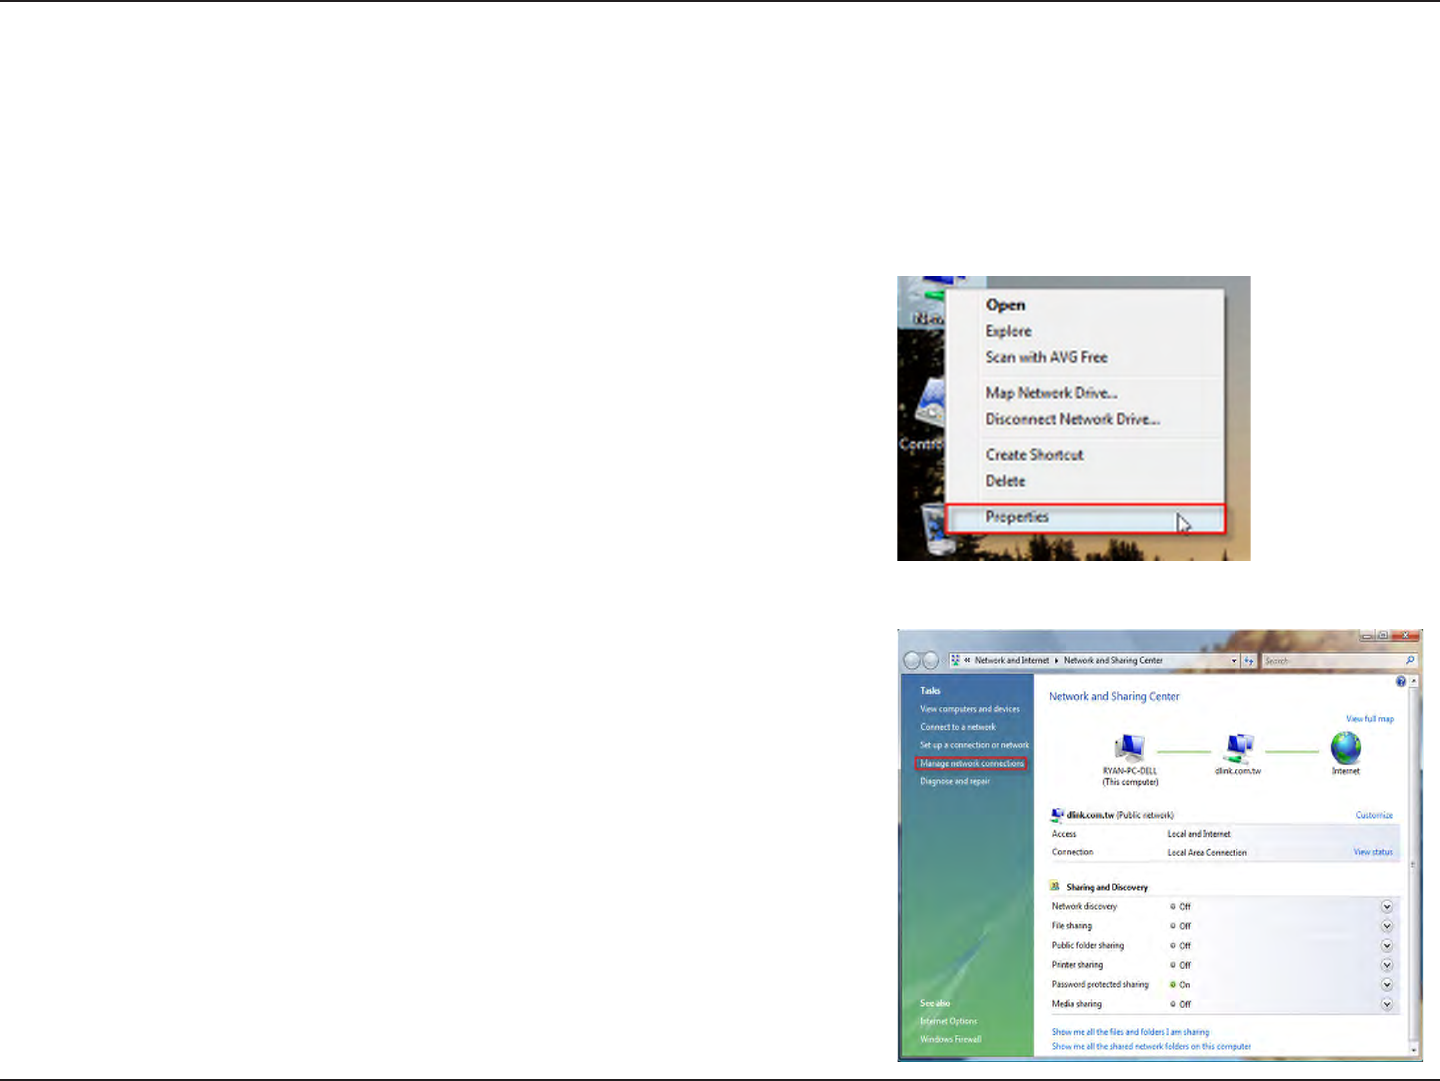
2. Click the Managenetworkconnections link in theNetwork
andSharingCenter window.
1. Click on Properties.
55D-Link DIR-627 User Manual
Section 10 - Connecting to a Secured Wireless Network (WEP, WPA-PSK & WPA2-PSK)
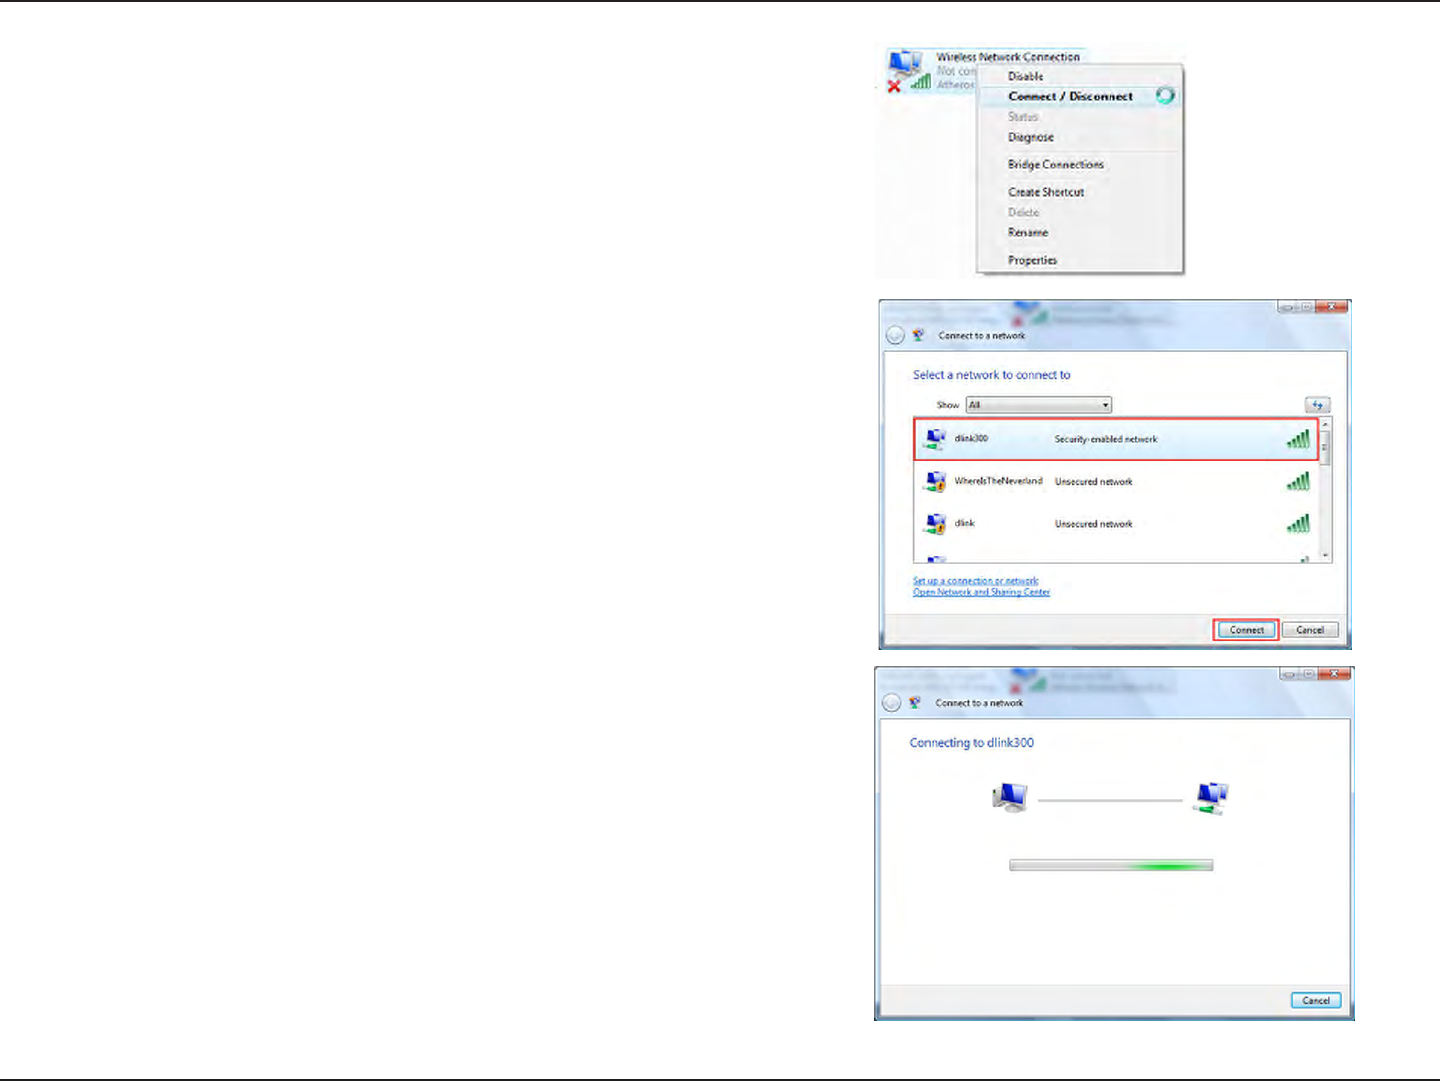
4. Select a network to connect to in the Selectanetworktoconnect
to window in the Connecttoanetwork wizard and then click the
Connect button.
5. The following Connecttoanetworkwizard window displays the
system progress.
3. Right-click the WirelessNetworkConnection entry and then select
Connect/Disconnect from the drop-down menu.
56D-Link DIR-627 User Manual
Section 10 - Connecting to a Secured Wireless Network (WEP, WPA-PSK & WPA2-PSK)
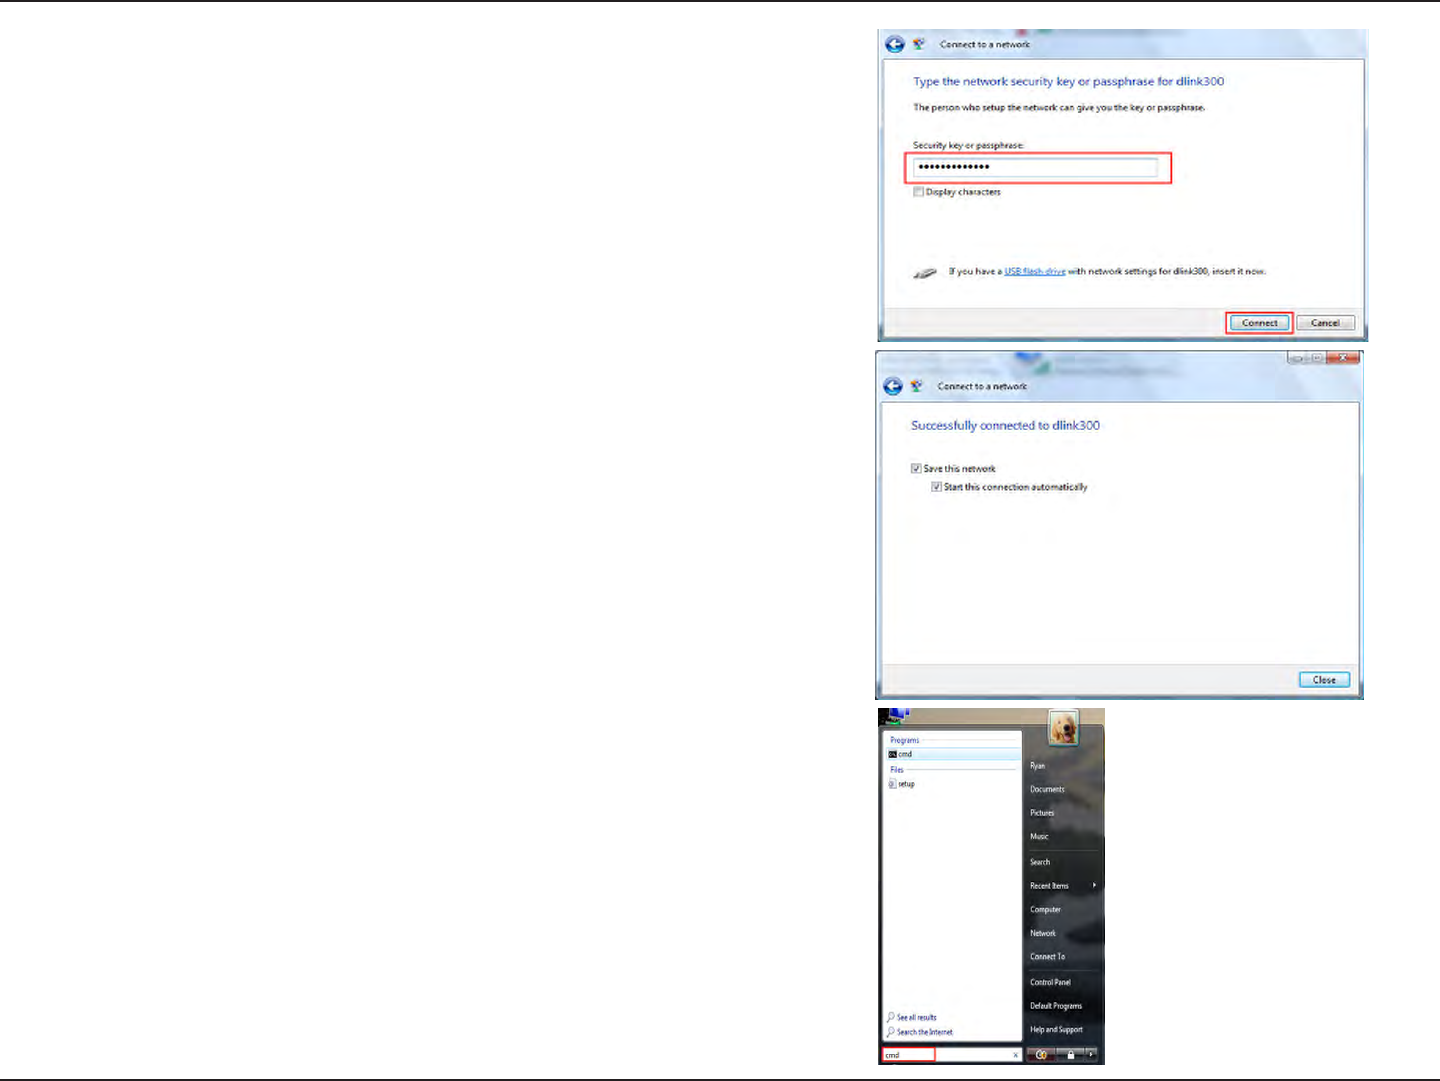
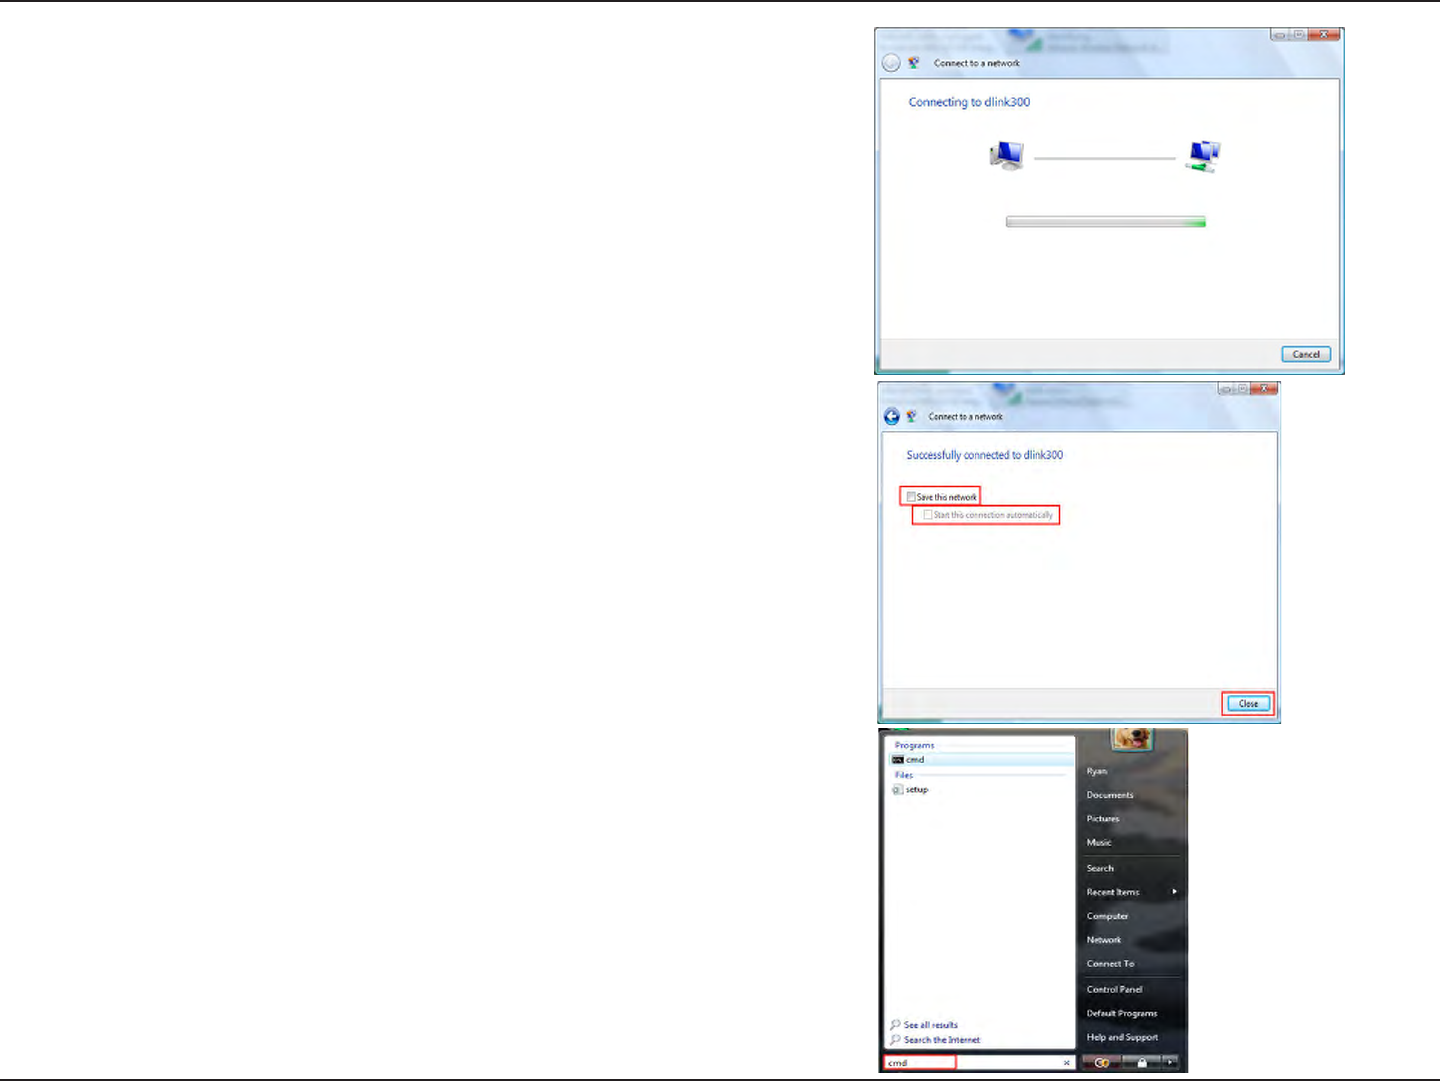
7. The following Successfullyconnectedtodlink300 window in the
Connecttoanetwork wizard is displayed. Choose to save to the
network and/or start the new connection automatically. When you
are nished, click the Close button.
8. The successful connection is displayed at the bottom of the
Windows start up menu.
6. Enter the network security key or passphrase for the Router in
the textbox provided in the Type the network security key or
passphrasefordlink300 window in the Connectanetworkwizard.
When you are nished, click the Connect button.
57D-Link DIR-627 User Manual
Section 10 - Connecting to a Secured Wireless Network (WEP, WPA-PSK & WPA2-PSK)
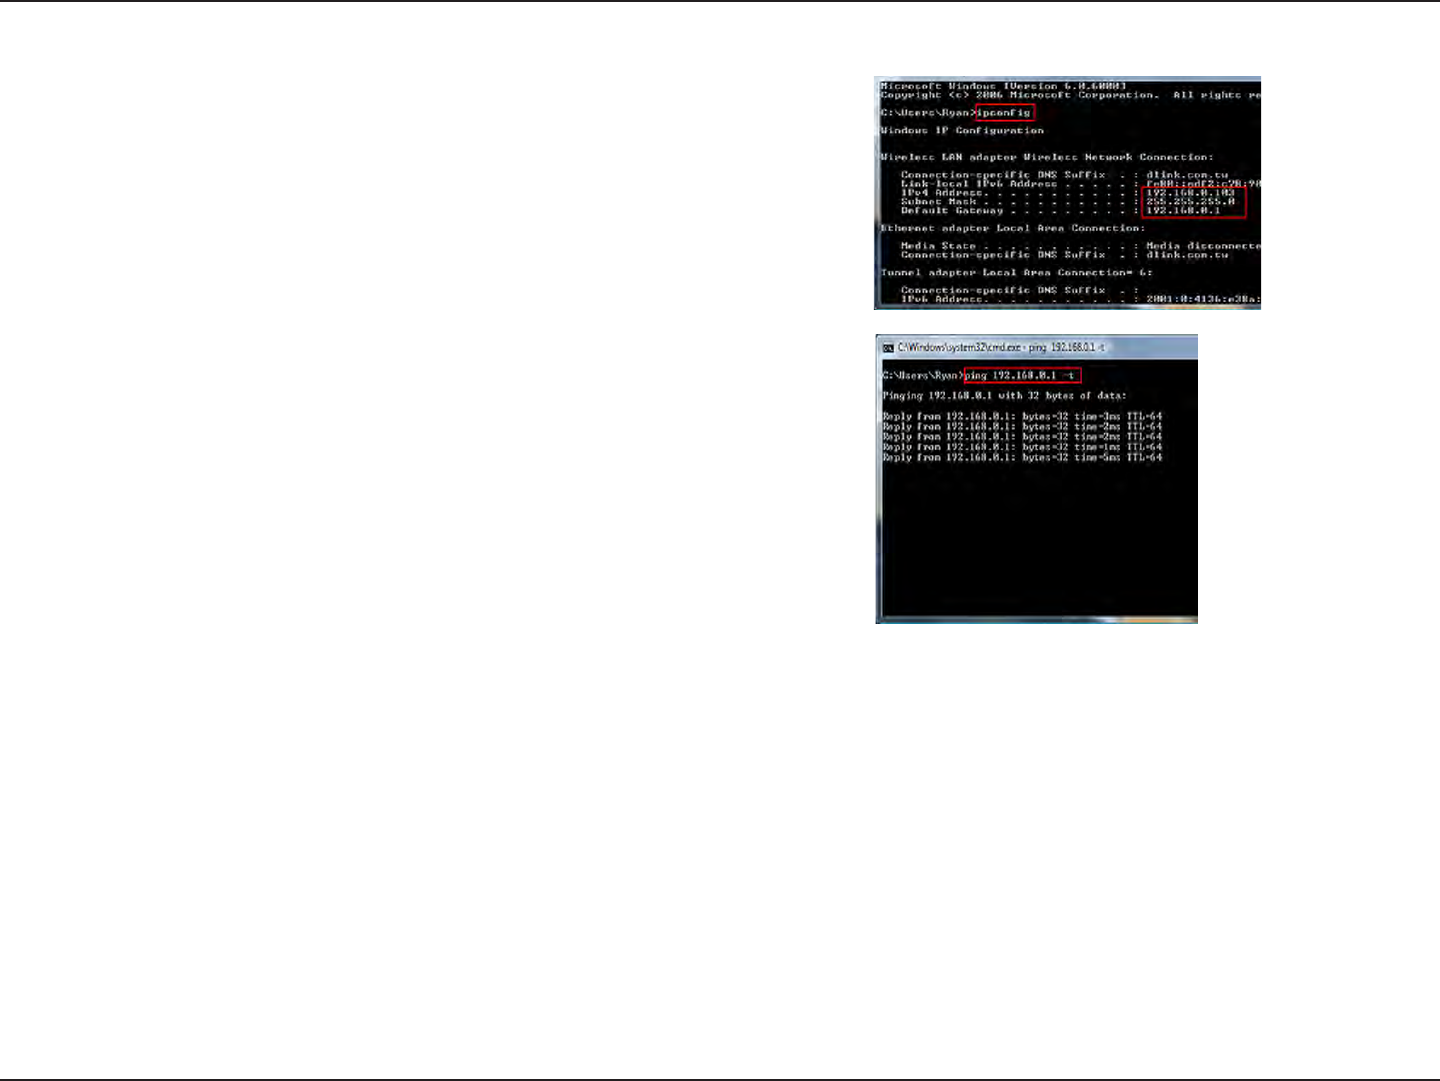
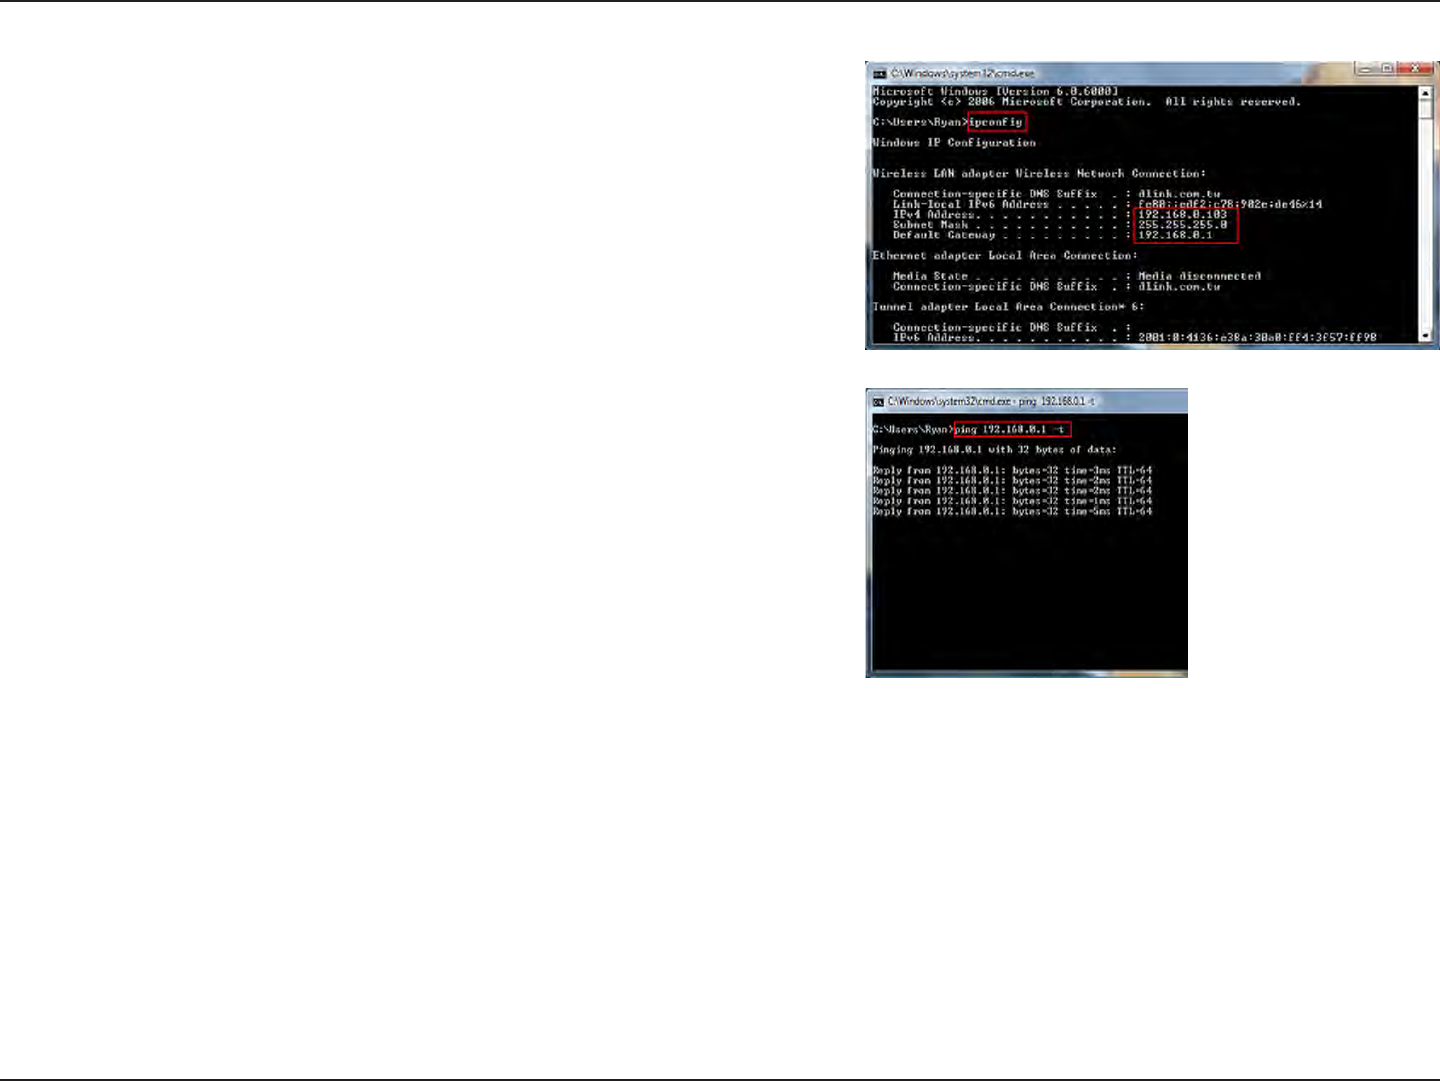
10.To test the new IP address, use the Ping feature of the command
prompt.
9. Conrm your new settings by calling up the command prompt and
then entering the ipcong command.
58D-Link DIR-627 User Manual
Section 11 - Connecting to an Unsecured Wireless Network
ConnectingtoanUnsecuredWireless
Network
The following are step-by-step directions to set up an unsecured wireless connection.
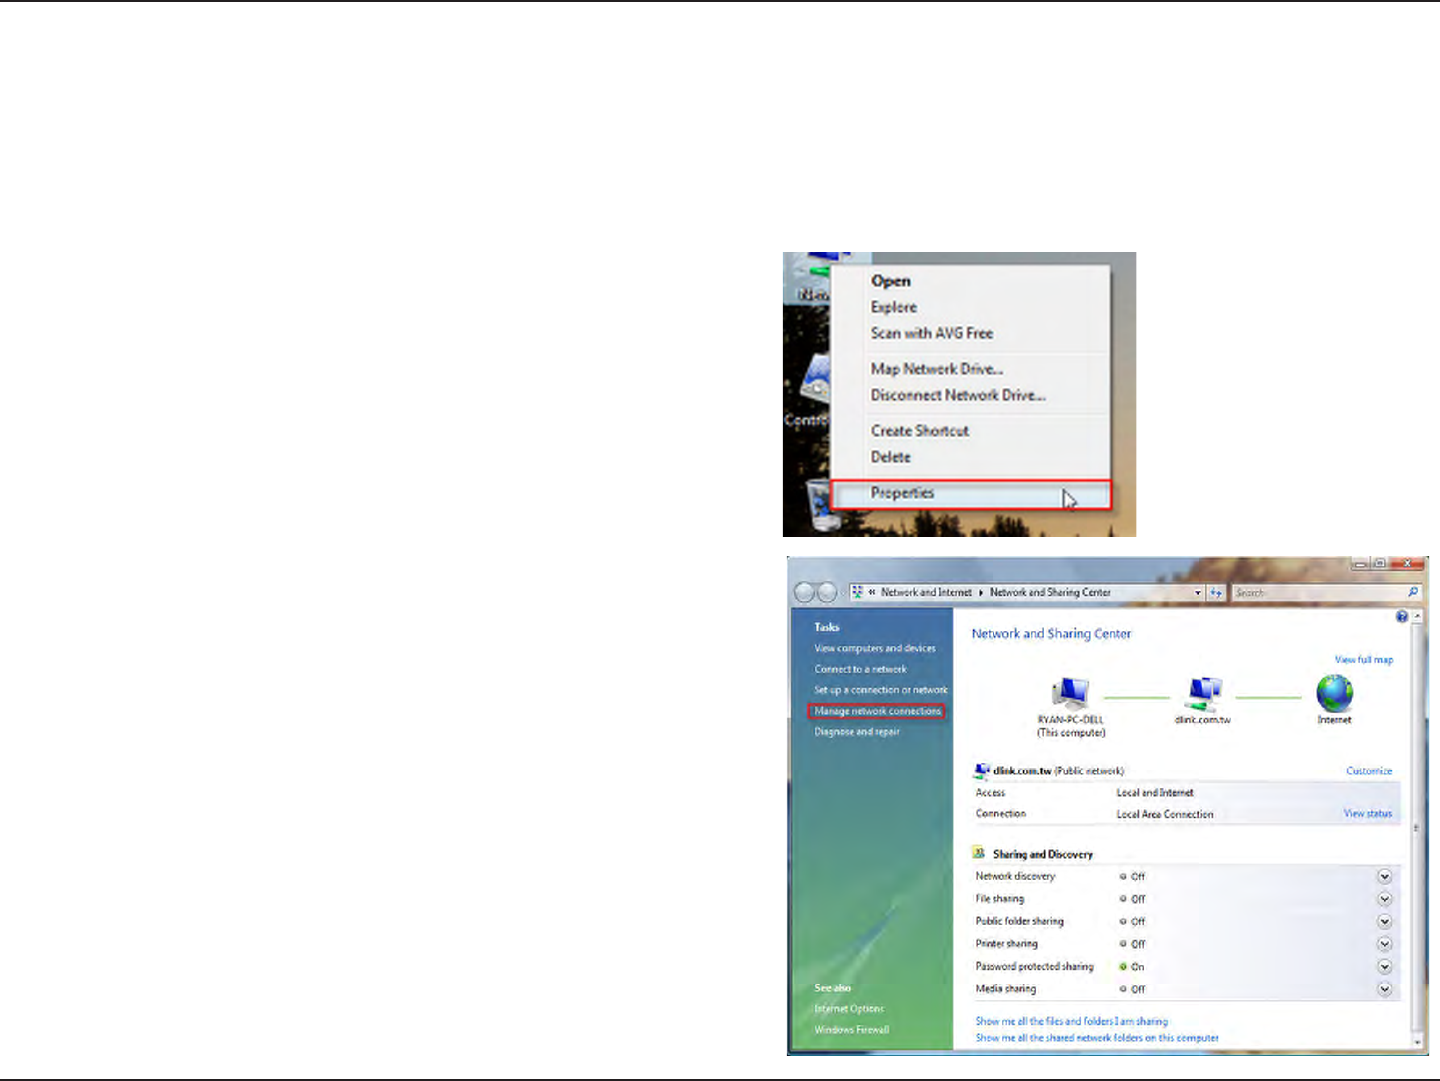
2. Go to the NetworkandSharingCenter window and click
the ManageNetworkConnections link.
1. Click on Properties.
59D-Link DIR-627 User Manual
Section 11 - Connecting to an Unsecured Wireless Network
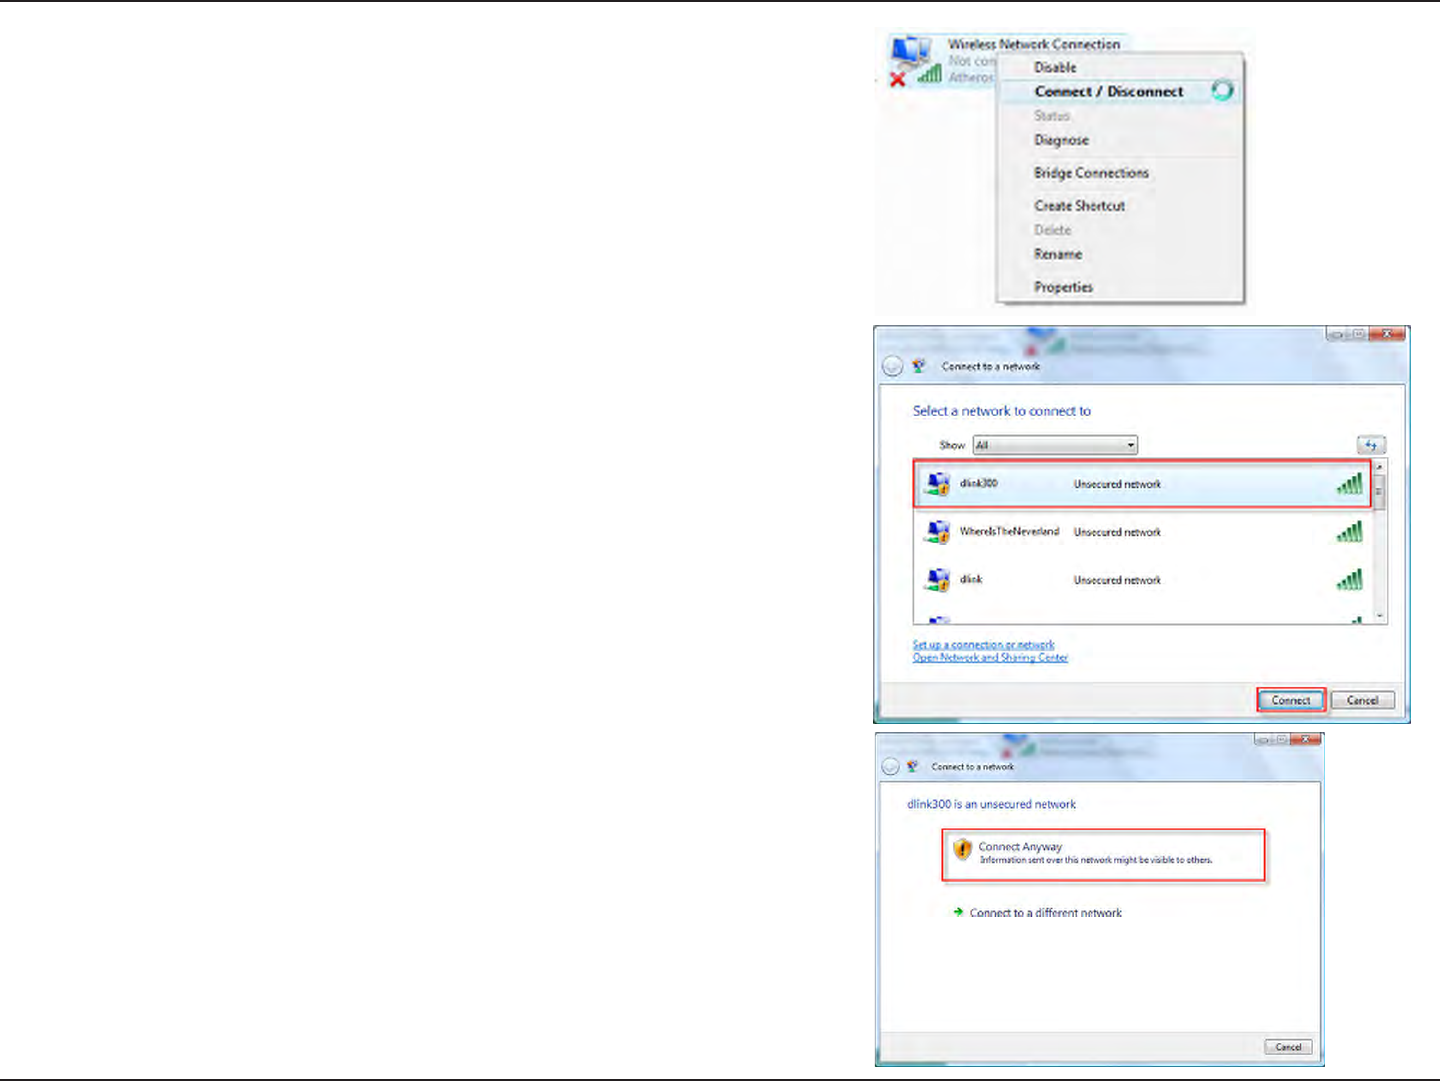
3. Right-click the WirelessNetworkConnection entry and then select
Connect/Disconnect from the drop-down menu.
4. Select a network to connect to in the Selectanetworktoconnect
to window in the Connecttoanetwork wizard and then click the
Connect button.
5. Conrm your desire to connect anyway on the following Network
Connection Status window.
60D-Link DIR-627 User Manual
Section 11 - Connecting to an Unsecured Wireless Network
6. The following Connecttoanetworkwizard window displays the
system progress.
7. The following Successfullyconnectedtodlink300 window in the
Connecttoanetwork wizard is displayed. Choose to save to the
network and/or start the new connection automatically. When you
are nished, click the Close button.
8. The successful connection is displayed at the bottom of the Windows
start up menu.
61D-Link DIR-627 User Manual
Section 11 - Connecting to an Unsecured Wireless Network
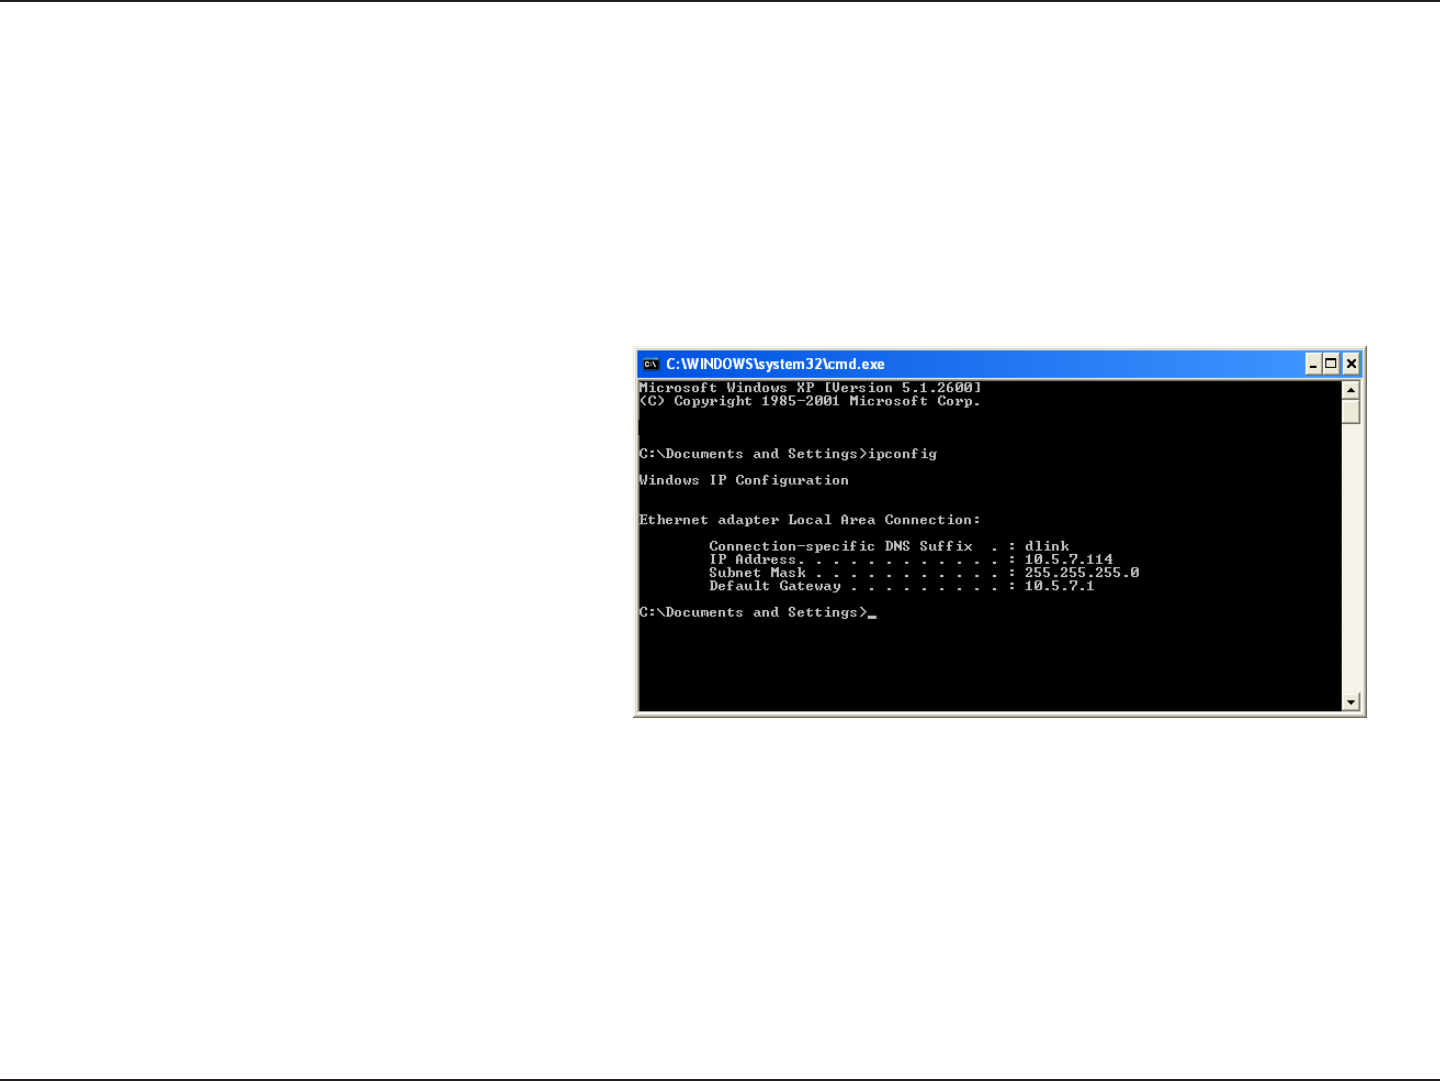
9. Conrm your new settings by calling up the command prompt
and then entering the ipcong command.
10.To test the new IP address, use the Ping feature of the command
prompt.

62D-Link DIR-627 User Manual
Section 11 - Connecting to an Unsecured Wireless Network
ConguringtheNetworkinMACOSXSnow
Leopard(10.6)
The following are step-by-step directions to congure the network in MAC OS X Snow Leopard (10.6).
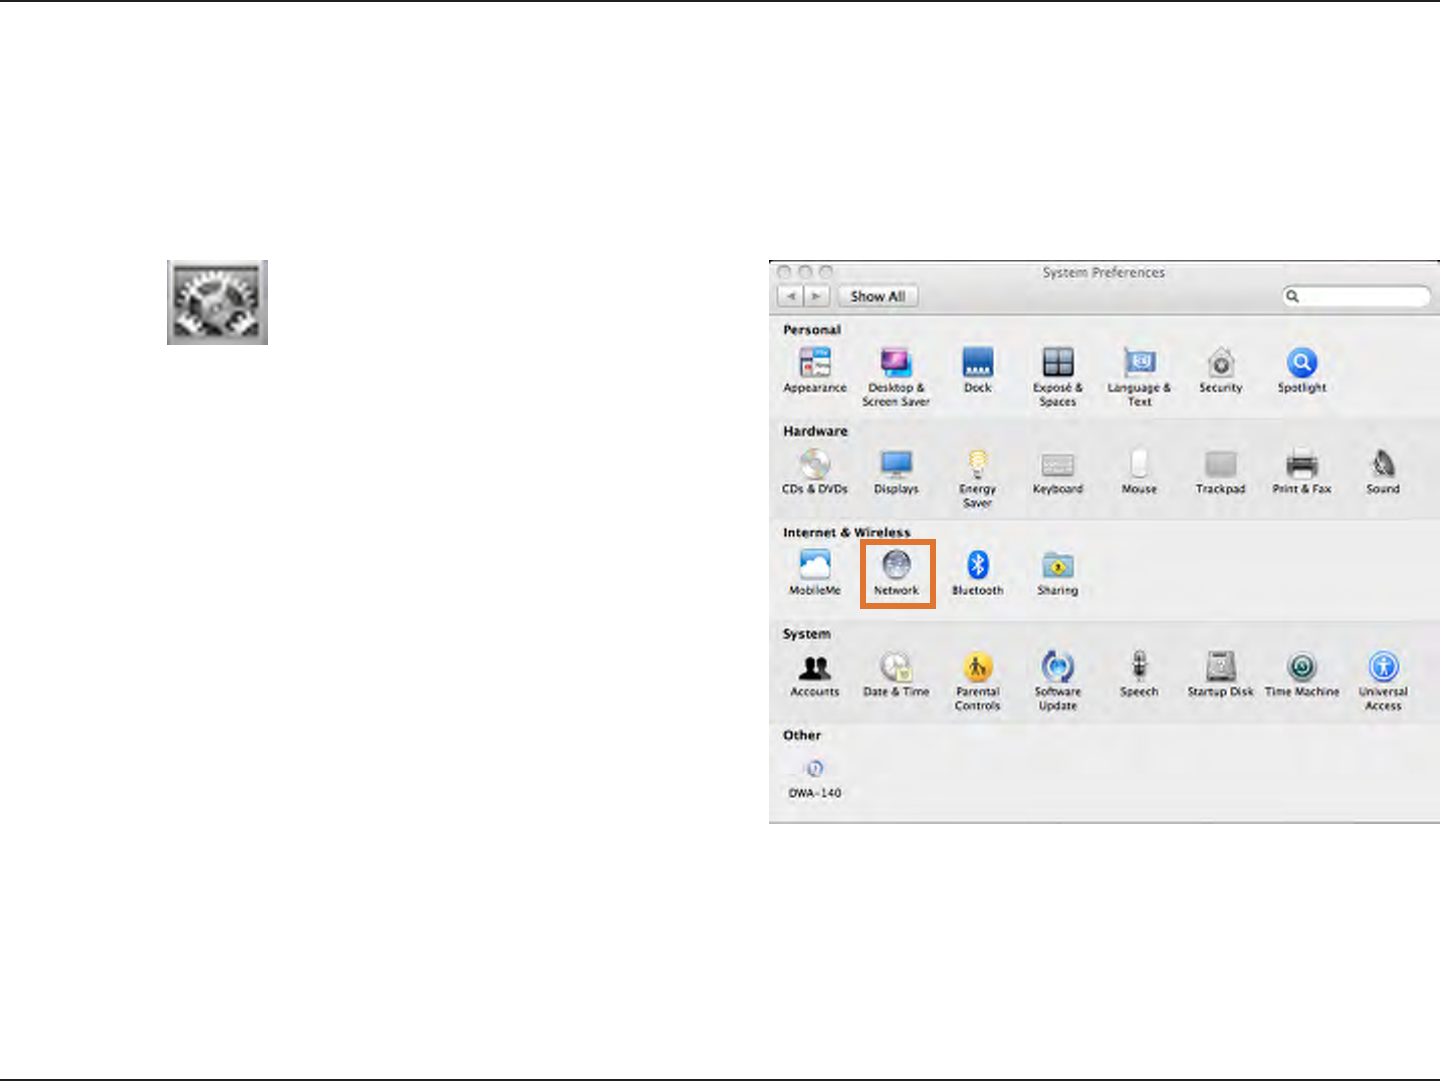
1. Click the icon in your Dock to open your System
Preferences window.
2. Click the Network icon in System Preferences menu to view
the Network menu.
63D-Link DIR-627 User Manual
Section 11 - Connecting to an Unsecured Wireless Network
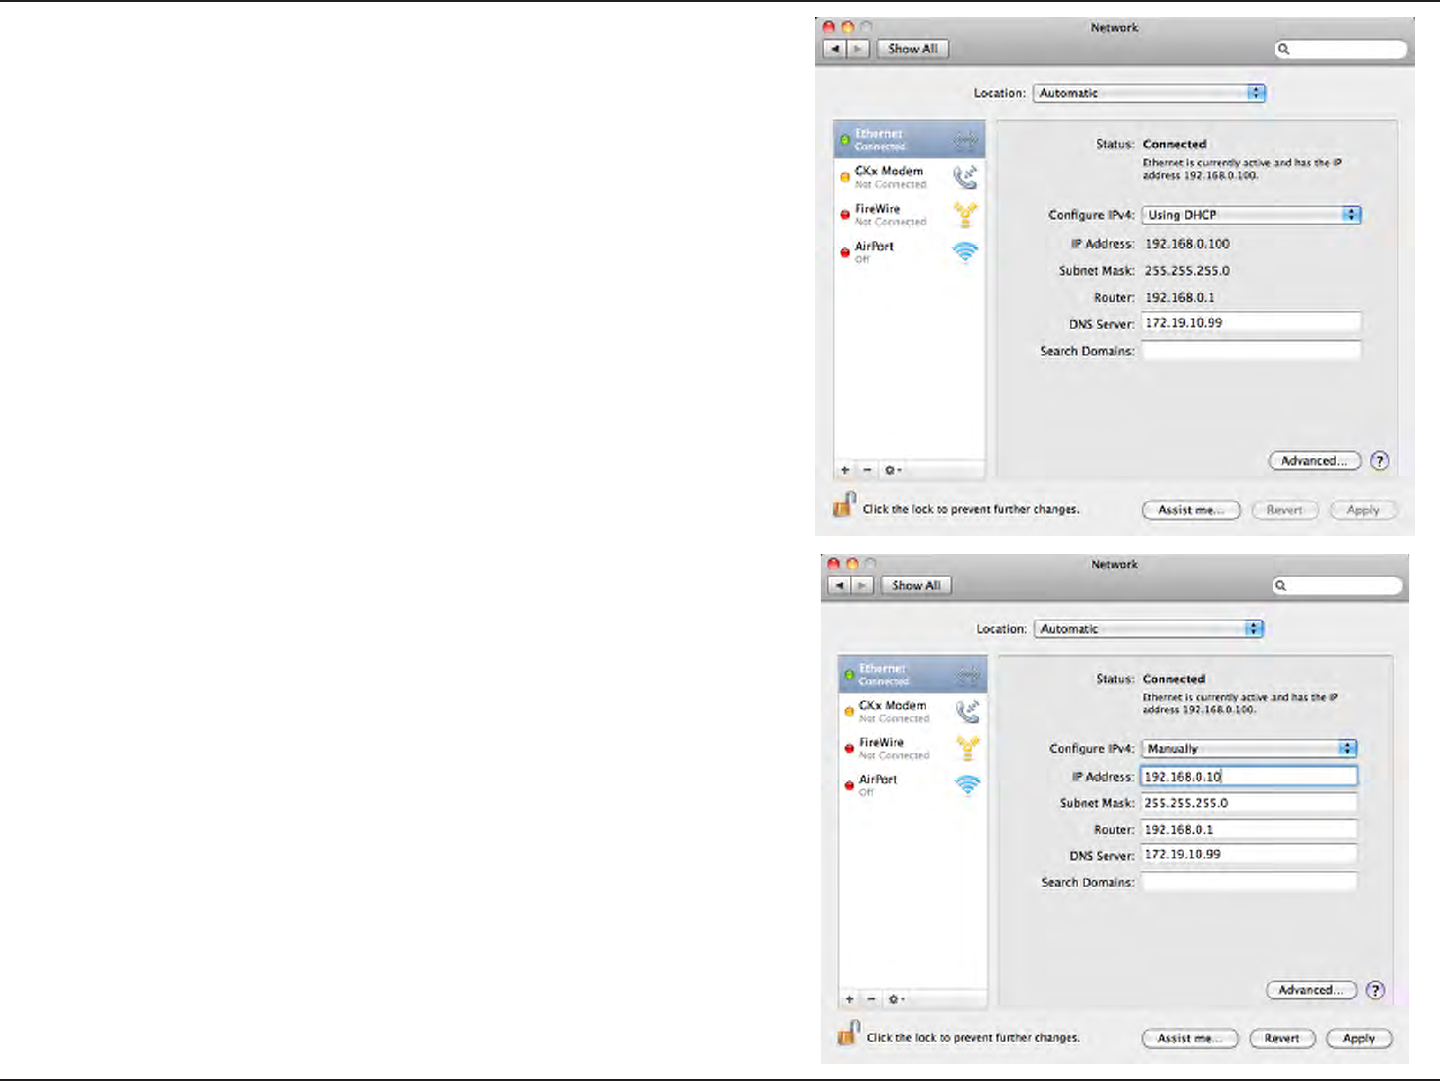
3. Click Ethernet on the left to see the local network settings.
TCP/IP settings should be set to obtain an IP address from
a DHCP server (i.e. wireless router) automatically. The
IP address, its subnet mask and the router’s IP address
displays when selecting UsingDHCP from the Congure
IPv4 drop-down menu.
If you are not using a DHCP capable gateway/router, or you
need to assign a static IP address, select Manually from the
CongureIPv4 drop-down menu to manually enter the IP
address and it’s subnet mask.
4. Click the Apply button to save the settings.
64D-Link DIR-627 User Manual
Section 11 - Connecting to an Unsecured Wireless Network
ConguringtheWirelessNetworkinMAC
OSXSnowLeopard(10.6)
The following are step-by-step directions to congure the Wireless in MAC OS X Snow Leopard (10.6).
1. Click the icon in your Dock to open your System
Preferences window.
2. Click the Network icon in System Preferences menu to view
the Network menu.
65D-Link DIR-627 User Manual
Section 11 - Connecting to an Unsecured Wireless Network
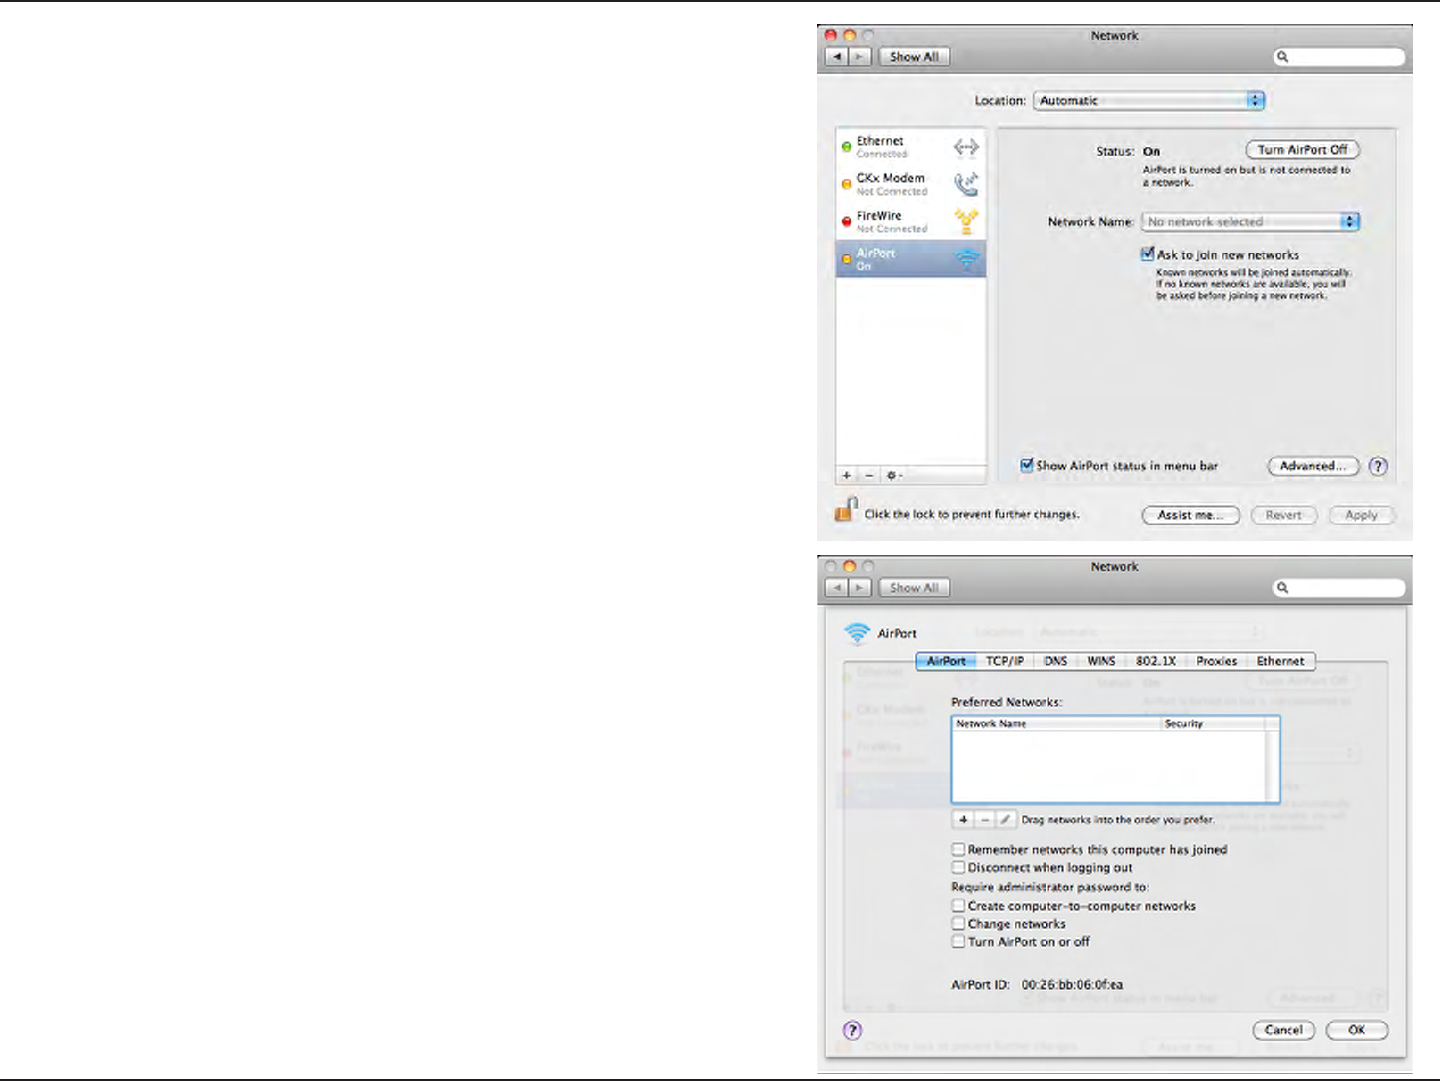
3. Click AirPort on the left to congure the wireless network.
4. Make sure the Status is On. If the Status is Off, click the Turn
AirPortOn button to enable AirPort.
5. Click the Advanced button to see the window.
6. Click the + button to see the window in the next page.
66D-Link DIR-627 User Manual
Section 11 - Connecting to an Unsecured Wireless Network
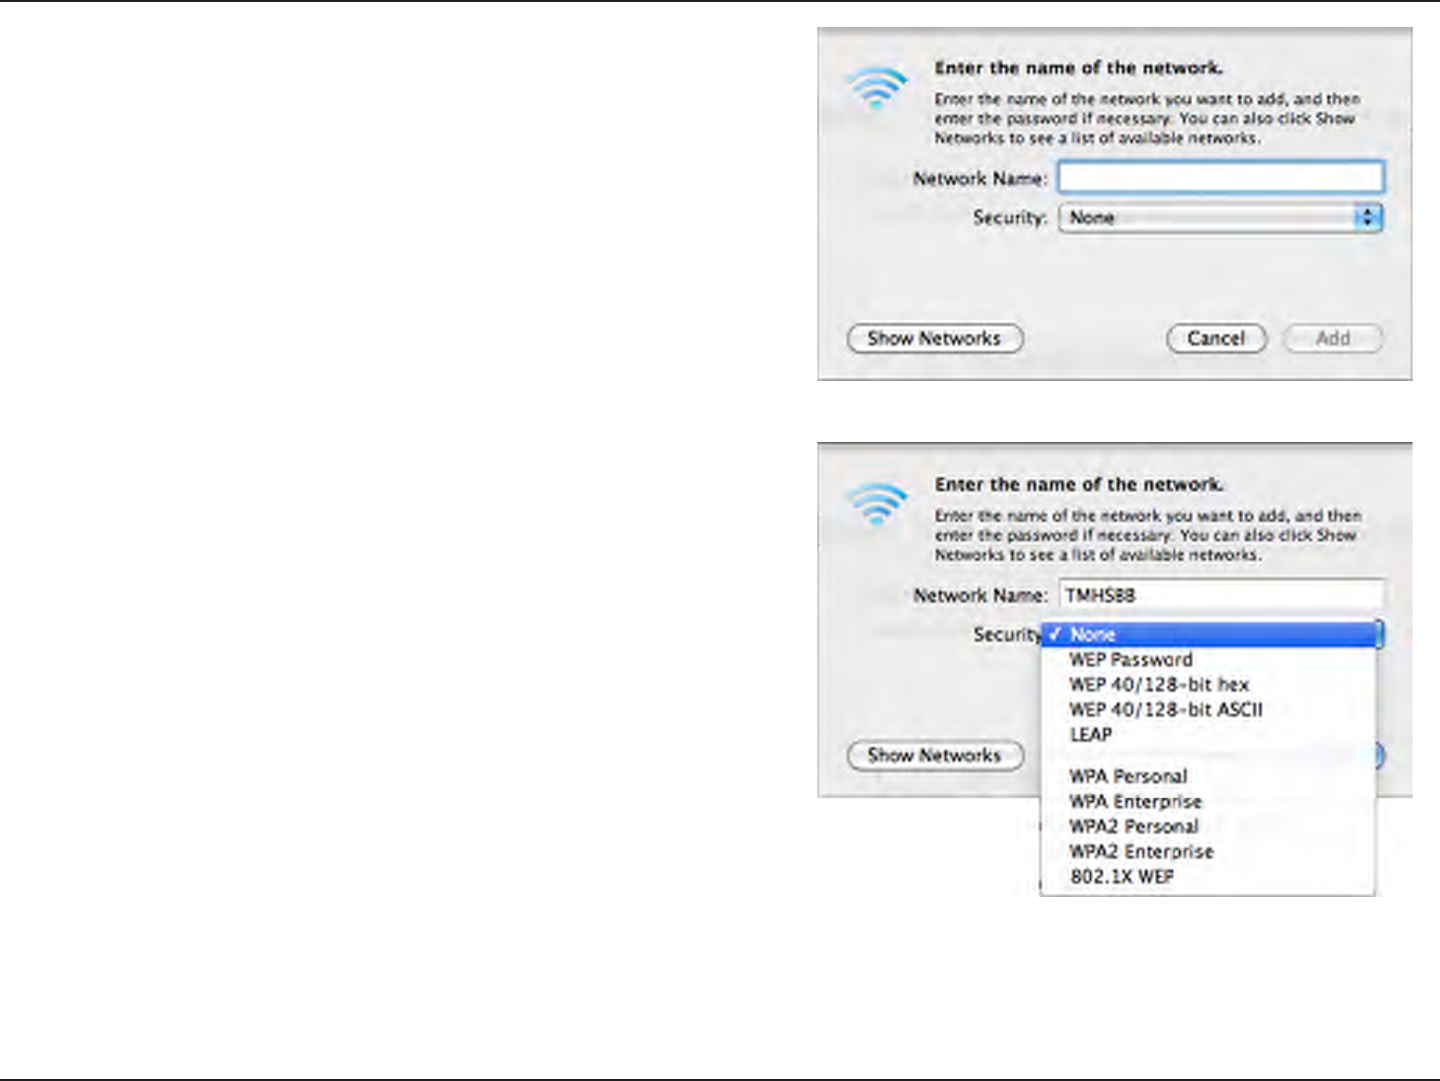
7. Enter the Network Name (SSID) of the Router.
8. Select the Security type of the network from the drop-down
list, and security related information below.
Click the Add button to add the wireless network in the
Preferred Network list.
67D-Link DIR-627 User Manual
Section 11 - Connecting to an Unsecured Wireless Network
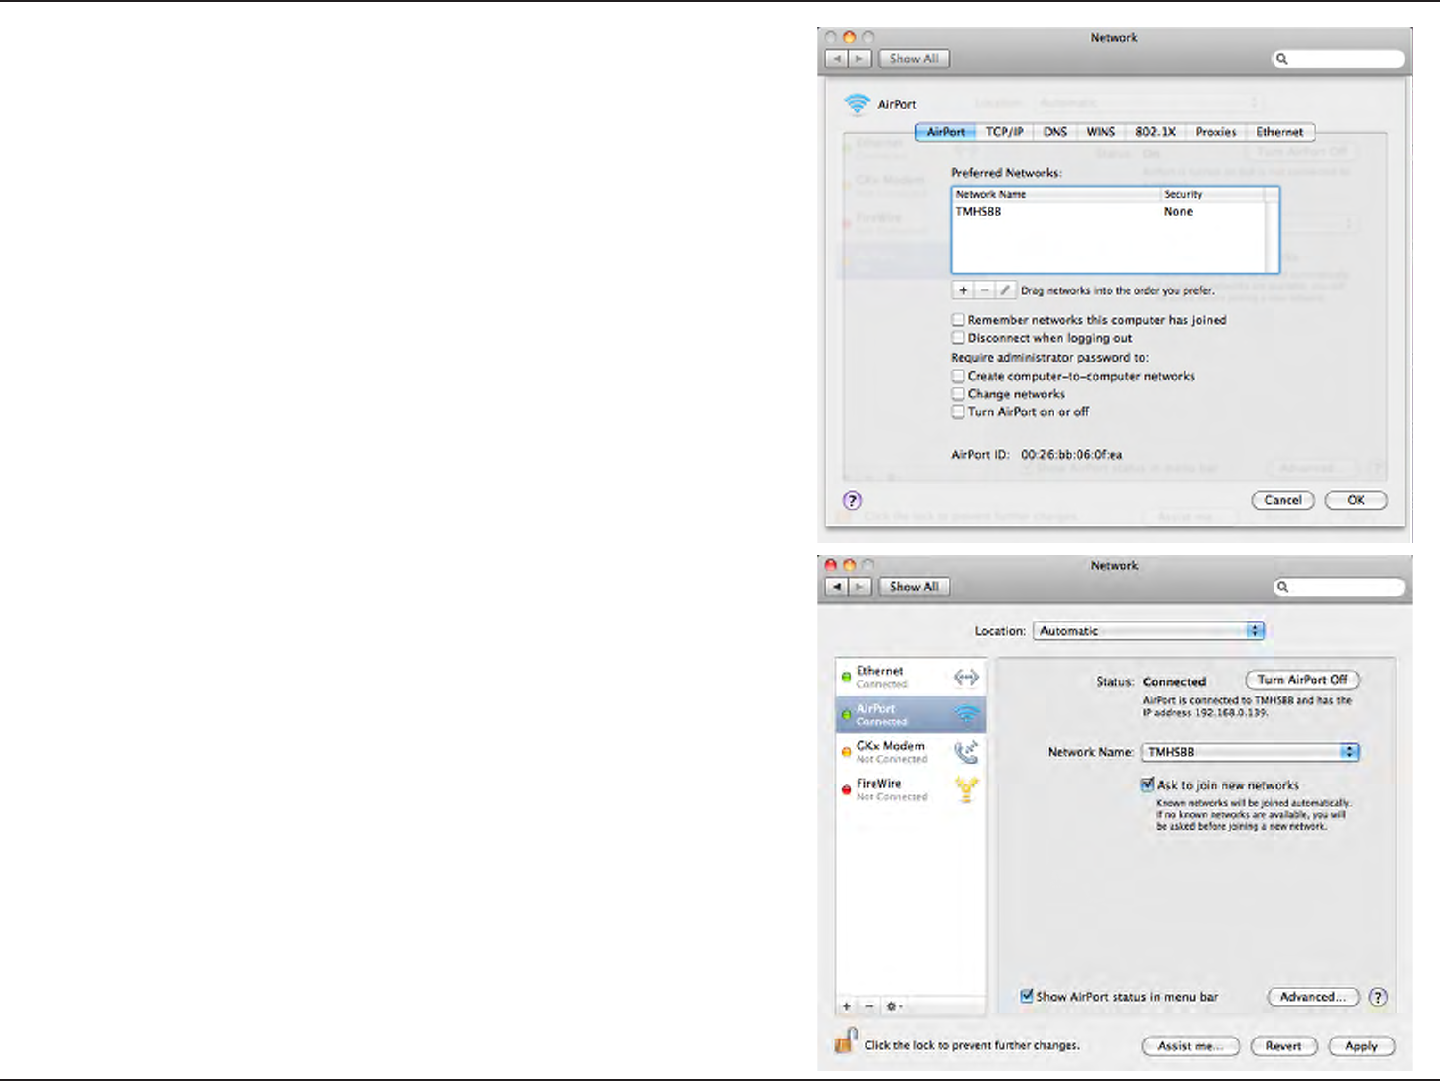
9. Click OK to proceed.
10. Select the NetworkName from the drop-down menu.
11. Click the Apply button to save the settings.

68D-Link DIR-627 User Manual
Section 12 - Troubleshooting
Troubleshooting
This chapter provides solutions to problems that can occur during the installation and operation of the DIR-627. Read
the following descriptions if you are having problems. (The examples below are illustrated in Windows® XP. If you
have a different operating system, the screenshots on your computer will look similar to the following examples.)
1.Whycan’tIaccesstheweb-basedcongurationutility?
When entering the IP address of the D-Link router (192.168.0.1 for example), you are not connecting to a Website on
the Internet or have to be connected to the Internet. The device has the utility built-in to a ROM chip in the device itself.
Your computer must be on the same IP subnet to connect to the Web-based utility.
• Make sure you have an updated Java-enabled Web browser. We recommend the following:
• Internet Explorer 6.0 or higher
• Netscape 8 or higher
• Mozilla 1.7.12 (5.0) or higher
• Opera 8.5 or higher
• Safari 1.2 or higher (with Java 1.3.1 or higher)
• Camino 0.8.4 or higher
• Firefox 1.5 or higher
• Verify physical connectivity by checking for solid link lights on the device. If you do not get a solid link light, try using
a different cable or connect to a different port on the device if possible. If the computer is turned off, the link light may
not be on.
• Disable any internet security software running on the computer. Software rewalls such as Zone Alarm, Black Ice,
Sygate, Norton Personal Firewall, and Windows® XP rewall may block access to the conguration pages. Check the
help les included with your rewall software for more information on disabling or conguring it.

69D-Link DIR-627 User Manual
Section 12 - Troubleshooting
• Congure your Internet settings:
• Go to Start > Settings > Control Panel. Double-click the InternetOptions icon. From the Security tab,
click the button to restore the settings to their defaults.
• Click the Connection tab and set the dial-up option to Never Dial a Connection. Click the LANSettings
button. Make sure nothing is checked. Click OK.
• Go to the Advanced tab and click the button to restore these settings to their defaults. Click OK three
times.
• Close your Web browser (if open) and open it.
• Access the Web management. Open your Web browser and enter the IP address of your D-Link router in the address
bar. This should open the login page for your the Web management.
• If you still cannot access the conguration, unplug the power to the router for 10 seconds and plug back in. Wait
about 30 seconds and try accessing the conguration. If you have multiple computers, try connecting using a different
computer.
2.WhatcanIdoifIforgotmypassword?
If you forgot your password, you must reset your router. Unfortunately this process will change all your settings back
to the factory defaults.
To reset the router, locate the reset button (hole) on the rear panel of the unit. With the router powered on, use a
paperclip to hold the button down for 10 seconds. Release the button and the router will go through its reboot process.
Wait about 30 seconds to access the router. The default IP address is 192.168.0.1. When logging in, the username is
admin and leave the password box empty.
70D-Link DIR-627 User Manual
Section 12 - Troubleshooting
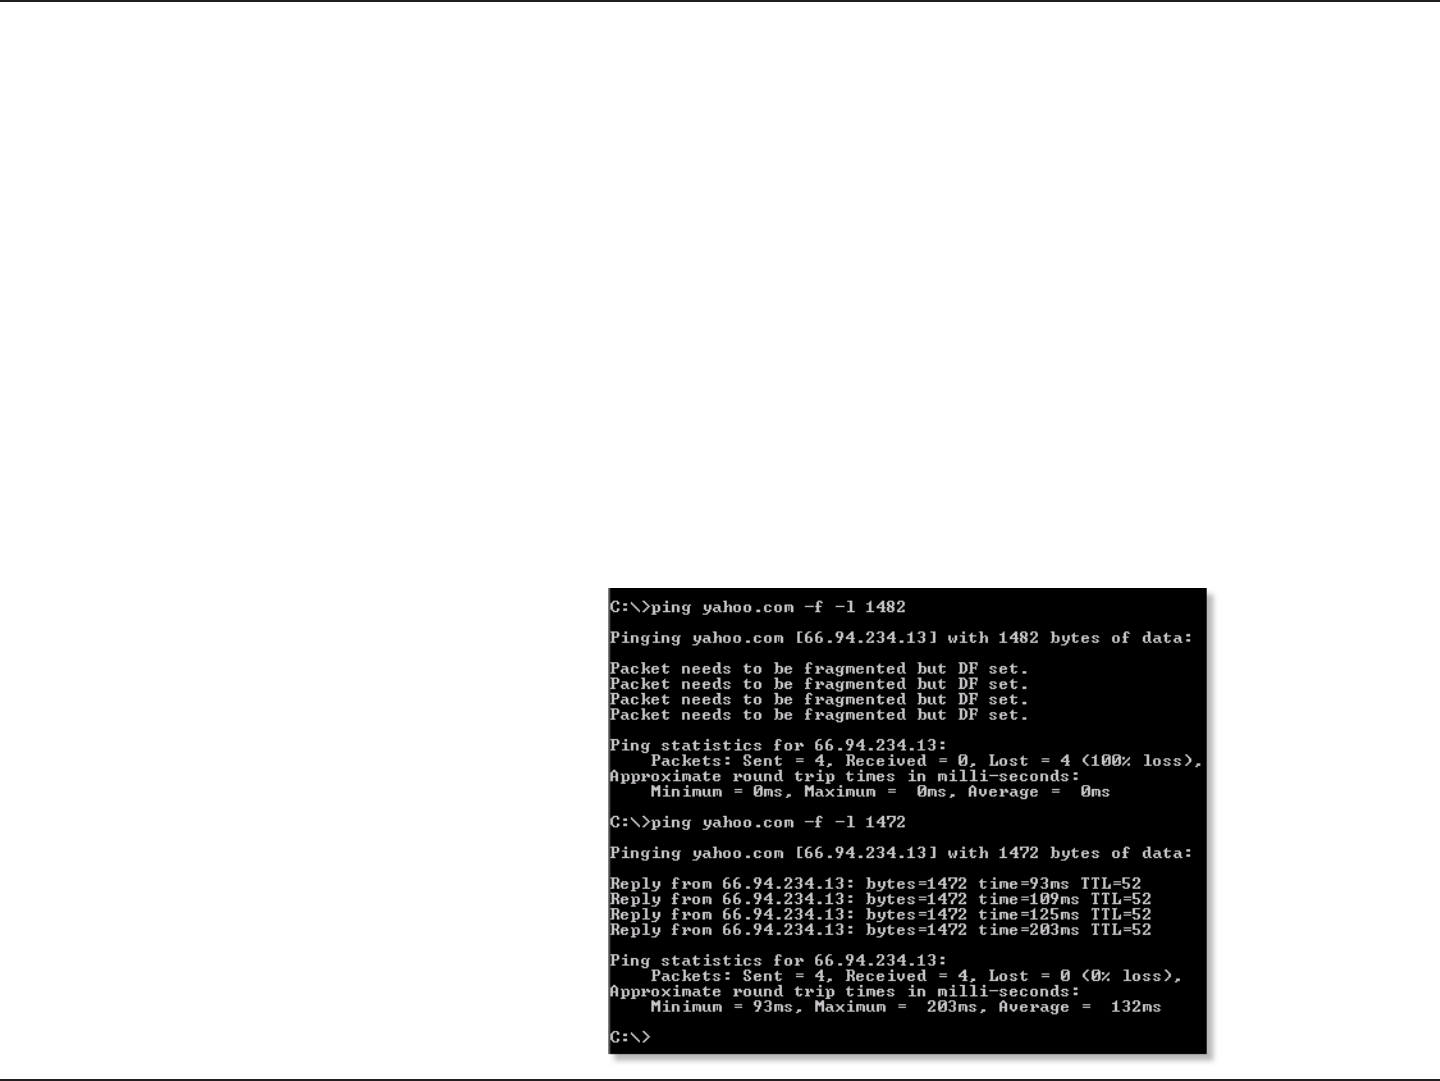
3.Whycan’tIconnecttocertainsitesorsendandreceiveemailswhenconnectingthroughmyrouter?
If you are having a problem sending or receiving email, or connecting to secure sites such as eBay, banking sites, and
Hotmail, we suggest lowering the MTU in increments of ten (Ex. 1492, 1482, 1472, etc).
Note:AOLDSL+usersmustuseMTUof1400.
To nd the proper MTU Size, you’ll have to do a special ping of the destination you’re trying to go to. A destination could
be another computer, or a URL.
• Click on Start and then click Run.
• Windows® 95, 98, and Me users type in command (Windows® NT, 2000, and XP users type in cmd) and
press Enter(or click OK).
• Once the window opens, you’ll need to do a special ping. Use the following syntax:
ping[url][-f][-l][MTUvalue]
Example: pingyahoo.com-f-l1472

71D-Link DIR-627 User Manual
Section 12 - Troubleshooting
You should start at 1472 and work your way down by 10 each time. Once you get a reply, go up by 2 until you get a
fragmented packet. Take that value and add 28 to the value to account for the various TCP/IP headers. For example,
lets say that 1452 was the proper value, the actual MTU size would be 1480, which is the optimum for the network
we’re working with (1452+28=1480).
Once you nd your MTU, you can now congure your router with the proper MTU size.
To change the MTU rate on your router follow the steps below:
• Open your browser, enter the IP address of your router (192.168.0.1) and click OK.
• Enter your username (admin) and password (blank by default). Click OK to enter the web conguration
page for the device.
• Click on Setup and then click ManualCongure.
• To change the MTU enter the number in the MTU eld and click the SaveSettings button to save your
settings.
• Test your email. If changing the MTU does not resolve the problem, continue changing the MTU in
increments of ten.

72D-Link DIR-627 User Manual
Appendix A - Wireless Basics
D-Link wireless products are based on industry standards to provide easy-to-use and compatible high-speed wireless
connectivity within your home, business or public access wireless networks. Strictly adhering to the IEEE standard,
the D-Link wireless family of products will allow you to securely access the data you want, when and where you want
it. You will be able to enjoy the freedom that wireless networking delivers.
A wireless local area network (WLAN) is a cellular computer network that transmits and receives data with radio signals
instead of wires. Wireless LANs are used increasingly in both home and ofce environments, and public areas such
as airports, coffee shops and universities. Innovative ways to utilize WLAN technology are helping people to work and
communicate more efciently. Increased mobility and the absence of cabling and other xed infrastructure have proven
to be benecial for many users.
Wireless users can use the same applications they use on a wired network. Wireless adapter cards used on laptop
and desktop systems support the same protocols as Ethernet adapter cards.
Under many circumstances, it may be desirable for mobile network devices to link to a conventional Ethernet LAN in
order to use servers, printers or an Internet connection supplied through the wired LAN. A Wireless Router is a device
used to provide this link.
WirelessBasics

73D-Link DIR-627 User Manual
Appendix A - Wireless Basics
WhatisWireless?
Wireless or Wi-Fi technology is another way of connecting your computer to the network without using wires. Wi-Fi
uses radio frequency to connect wirelessly, so you have the freedom to connect computers anywhere in your home
or ofce network.
WhyD-LinkWireless?
D-Link is the worldwide leader and award winning designer, developer, and manufacturer of networking products. D-Link
delivers the performance you need at a price you can afford. D-Link has all the products you need to build your network.
Howdoeswirelesswork?
Wireless works similar to how cordless phone work, through radio signals to transmit data from one point A to point
B. But wireless technology has restrictions as to how you can access the network. You must be within the wireless
network range area to be able to connect your computer. There are two different types of wireless networks Wireless
Local Area Network (WLAN), and Wireless Personal Area Network (WPAN).
WhyisthespeedofmyWirelessNdevicelimitedto54mbps?
This is likely to be the result of the wireless settings. Go to Advanced -> AdvancedWireless to see if the Wireless
Mode is congured as 802.11n only. As the Wi-Fi Alliance restricts the maximum speed to 54Mbps when WPA or WPA2
wireless security is congured with TKIP Cipher Type, go to Setup -> WirelessSetup to make sure the Cipher Type
is congured as AES.
WirelessLocalAreaNetwork(WLAN)
In a wireless local area network, a device called an Access Point (AP) connects computers to the network. The access
point has a small antenna attached to it, which allows it to transmit data back and forth over radio signals. With an
indoor access point as seen in the picture, the signal can travel up to 300 feet. With an outdoor access point the signal
can reach out up to 30 miles to serve places like manufacturing plants, industrial locations, college and high school
campuses, airports, golf courses, and many other outdoor venues.
WirelessPersonalAreaNetwork(WPAN)

74D-Link DIR-627 User Manual
Appendix A - Wireless Basics
Bluetooth is the industry standard wireless technology used for WPAN. Bluetooth devices in WPAN operate in a range
up to 30 feet away.
Compared to WLAN the speed and wireless operation range are both less than WLAN, but in return it doesn’t use
nearly as much power which makes it ideal for personal devices, such as mobile phones, PDAs, headphones, laptops,
speakers, and other devices that operate on batteries.
Whouseswireless?
Wireless technology as become so popular in recent years that almost everyone is using it, whether it’s for home,
ofce, business, D-Link has a wireless solution for it.
Home
• Gives everyone at home broadband access
• Surf the Web, check e-mail, instant message, etc.
• Gets rid of the cables around the house
• Simple and easy to use
SmallOfceandHomeOfce
• Stay on top of everything at home as you would at ofce
• Remotely access your ofce network from home
• Share Internet connection and printer with multiple computers
• No need to dedicate ofce space

75D-Link DIR-627 User Manual
Appendix A - Wireless Basics
Whereiswirelessused?
Wireless technology is expanding everywhere not just at home or ofce. People like the freedom of mobility and it’s
becoming so popular that more and more public facilities now provide wireless access to attract people. The wireless
connection in public places is usually called “hotspots”.
Using a D-Link Cardbus Adapter with your laptop, you can access the hotspot to connect to Internet from remote
locations like airports, hotels, coffee shops, libraries, restaurants, and convention centers.
Wireless network is easy to setup, but if you’re installing it for the rst time it could be quite a task not knowing where to
start. That’s why we’ve put together a few setup steps and tips to help you through the process of setting up a wireless
network.
Tips
Here are a few things to keep in mind, when you install a wireless network.
Centralizeyourrouteroraccesspoint
Make sure you place the router/access point in a centralized location within your network for the best performance. Try
to place the router/access point as high as possible in the room, so the signal gets dispersed throughout your home.
If you have a two-story home, you may need a repeater to boost the signal to extend the range.
For the wireless repeater, there are two types of repeater in D-Link for user to select:
• Universal repeater: It acts as an AP and a wireless STA at the same time. It can support all AP and wireless STA if
they work in the same wireless channel.
• AP-repeater (AP with WDS): only repeat same model or limited models which base on the same proprietary protocol.
Please choose a universal repeater to boost the signal to extend the range.

76D-Link DIR-627 User Manual
Appendix A - Wireless Basics
EliminateInterference
Place home appliances such as cordless telephones, microwaves, and televisions as far away as possible from the
router/access point. This would signicantly reduce any interference that the appliances might cause since they operate
on same frequency.
Security
Don’t let you next-door neighbors or intruders connect to your wireless network. Secure your wireless network by turning
on the WPA or WEP security feature on the router. Refer to product manual for detail information on how to set it up.
There are basically two modes of networking:
• Infrastructure – All wireless clients will connect to an access point or wireless router.
• Ad-Hoc – Directly connecting to another computer, for peer-to-peer communication, using wireless network
adapters on each computer, such as two or more WNA-2330 wireless network Cardbus adapters.
An Infrastructure network contains an access point or wireless router. All the wireless devices, or clients, will connect
to the wireless router or access point.
An Ad-Hoc network contains only clients, such as laptops with wireless cardbus adapters. All the adapters must be in
Ad-Hoc mode to communicate.
WirelessModes
77D-Link DIR-627 User Manual
Appendix B - Networking Basics
NetworkingBasics
CheckyourIPaddress
After you install your new D-Link adapter, by default, the TCP/IP settings should be set to obtain an IP address from a
DHCP server (i.e. wireless router) automatically. To verify your IP address, please follow the steps below.
Click on Start > Run. In the run box type cmd and click OK.
At the prompt, type ipcong and press Enter.
This will display the IP address, subnet mask, and
the default gateway of your adapter.
If the address is 0.0.0.0, check your adapter
installation, security settings, and the settings on
your router. Some rewall software programs may
block a DHCP request on newly installed adapters.
If you are connecting to a wireless network at a
hotspot (e.g. hotel, coffee shop, airport), please
contact an employee or administrator to verify their wireless network settings.
78D-Link DIR-627 User Manual
Appendix B - Networking Basics
StaticallyassignanIPaddress
If you are not using a DHCP capable gateway/router, or you need to assign a static IP address, please follow the steps
below:
Step1
Windows® XP - Click on Start > Control Panel > NetworkConnections.
Windows® 2000 - From the desktop, right-click MyNetworkPlaces > Properties.
Step2
Right-click on the LocalAreaConnection which represents your D-Link network adapter and select Properties.
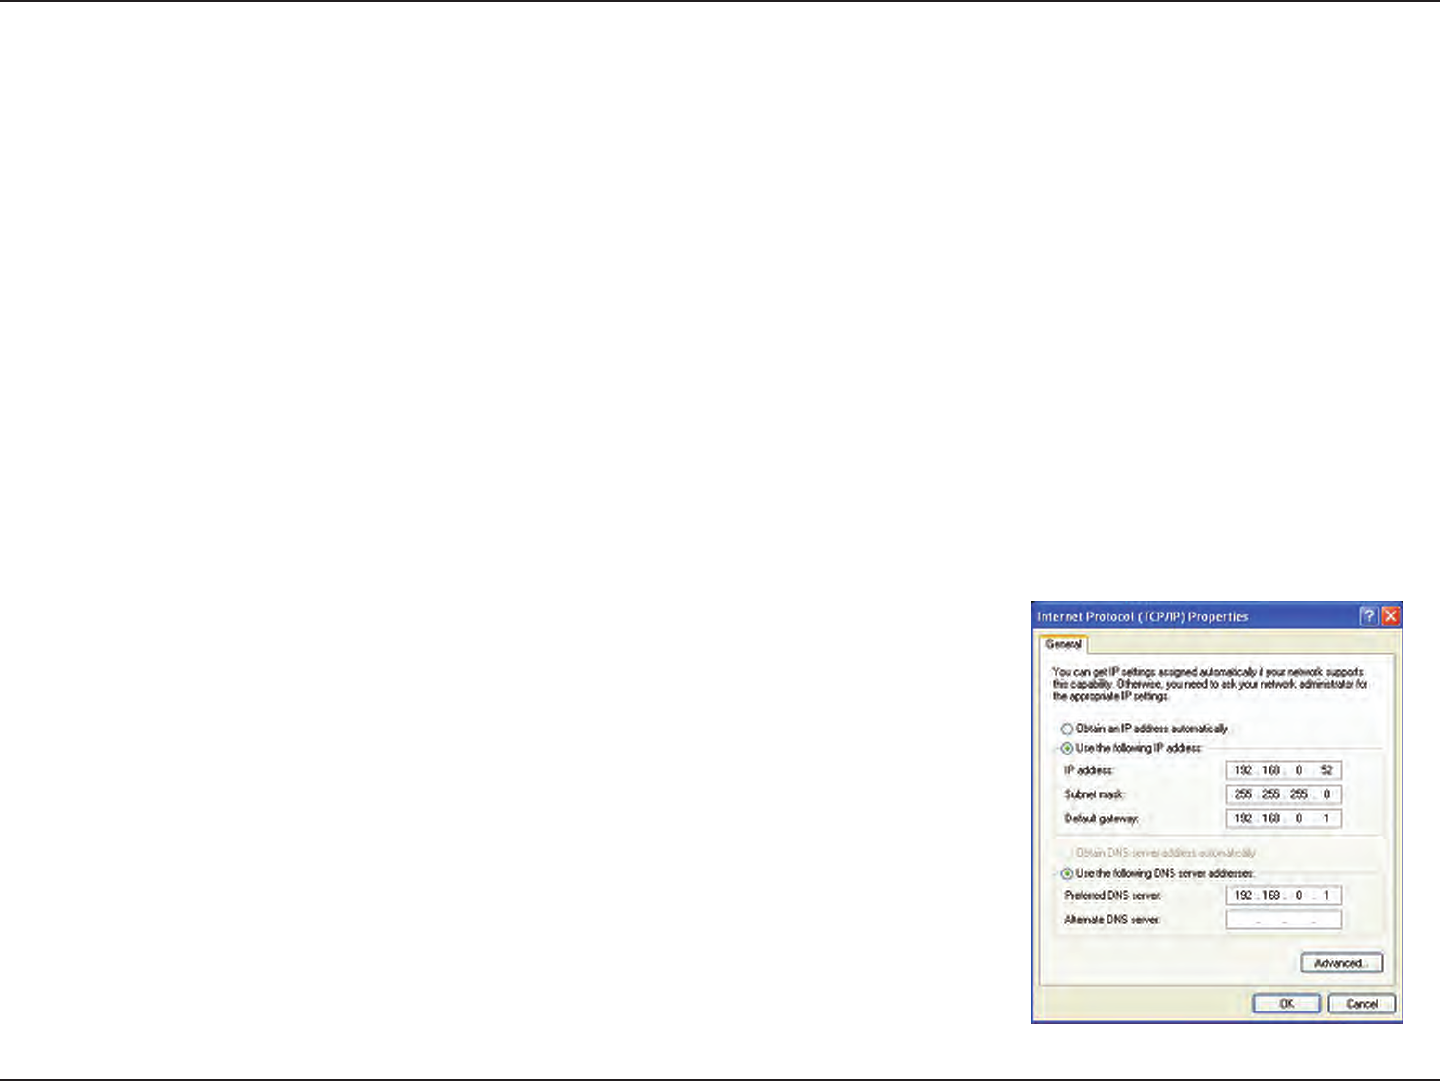
Step3
Highlight InternetProtocol(TCP/IP) and click Properties.
Step4
Click UsethefollowingIPaddress and enter an IP address that is on the same subnet as your network or the LAN
IP address on your router.
Example: If the router´s LAN IP address is 192.168.0.1, make your IP address
192.168.0.X where X is a number between 2 and 99. Make sure that the number
you choose is not in use on the network. Set Default Gateway the same as the LAN
IP address of your router (192.168.0.1).
Set Primary DNS the same as the LAN IP address of your router (192.168.0.1).
The Secondary DNS is not needed or you may enter a DNS server from your ISP.
Step5
Click OK twice to save your settings.

D-Link DIR-627 User Manual
!
"
#$
%
%&
%'" ()'"
)'" %*'"
)'" '"
'" '"
'" *'"
(('" '"
'"
Security
+,+.,#/0,1'1
31#04&5
*)8"+,
,98,:+,
";<8<:,08<=,080
!;*='8*)='8:,08=,0>?.<'
;*='8*)='8:,08=,0>?.<'
@
%'"?.<'1A,B1C*:E
@)
%'"?.<'1A,B1C*):E
"!
()'"?.<'1A,B1:E
)'"?.<'1A,B1:E
%*'"?.<'1A,B1*:E
)'"?.<'1A,B1:E
'"?.<'1A,B1:E
'"?.<'1A,B1%:E
'"01A,B1(:E
'"?.<'1A,B1(:E
*'"?.<'1A,B1:E
(('"01A,B1:E
'"<=,01A,B1:E
'"<:,01A,B1:E
+""###F*##G99F!#
F*##G##HF""#>#
<@,#F#
)J@K)J@K/"5
)J@K)%(J@N/!5
3/5HI{!up!3/5946HI{!

80D-Link DIR-627 User Manual
Appendix C - Technical Specications
WirelessOperatingRange2
• Indoors - up to 328 ft. (100 meters)
• Outdoors- up to 1312 ft. (400 meters)
WirelessTransmitPower(AVGPower)
11b:17dBm(Max) 11g:16dBm(Max) 11n:13dBm(Max)
ExternalAntennaType
Two xed reverse SMA external antennas
OperatingTemperature
32°F to 129 °F (0°C to 40°C)
Humidity
95% maximum (non-condensing)
SafetyandEmissions
FCC Part 15B/ 15C/ MPE
IC RSS-210
NCC LP0002
* Maximum wireless signal rate derived from IEEE Standard 802.11b, 802.11g and 802.11n specications. Actual data throughput will vary. Network
conditions and environmental factors, including volume of network trafc, building materials and construction, and network overhead, lower actual
data throughput rate. Environmental factors will adversely affect wireless signal range.
LEDs
• Power
• Internet
• WLAN (Wireless Connection)
• Ethernet
• USB
• WPS
Dimensions
• L = 197.82mm
• W = 133.18mm
• H = 28.91mm
Weight
0.273kg
Federal Communication Commission Interference Statement
This equipment has been tested and found to comply with the limits for a Class B digital device, pursuant to
Part 15 of the FCC Rules. These limits are designed to provide reasonable protection against harmful
interference in a residential installation. This equipment generates, uses and can radiate radio frequency
energy and, if not installed and used in accordance with the instructions, may cause harmful interference to
radio communications. However, there is no guarantee that interference will not occur in a particular
installation. If this equipment does cause harmful interference to radio or television reception, which can be
determined by turning the equipment off and on, the user is encouraged to try to correct the interference by
one of the following measures:
- Reorient or relocate the receiving antenna.
- Increase the separation between the equipment and receiver.
- Connect the equipment into an outlet on a circuit different from that
to which the receiver is connected.
- Consult the dealer or an experienced radio/TV technician for help.
This device complies with Part 15 of the FCC Rules. Operation is subject to the following two conditions: (1)
This device may not cause harmful interference, and (2) this device must accept any interference received,
including interference that may cause undesired operation.
FCC Caution: Any changes or modifications not expressly approved by the party responsible for compliance
could void the user's authority to operate this equipment.
IEEE 802.11b or 802.11g operation of this product in the U.S.A. is firmware-limited to channels 1 through 11.
IMPORTANT NOTE:
FCC Radiation Exposure Statement:
This equipment complies with FCC radiation exposure limits set forth for an uncontrolled environment. This
equipment should be installed and operated with minimum distance 20cm between the radiator & your body.
This transmitter must not be co-located or operating in conjunction with any other antenna or transmitter.
The availability of some specific channels and/or operational frequency bands are country dependent and are
firmware programmed at the factory to match the intended destination. The firmware setting is not accessible
by the end user.
以下警語適用台灣地區
經型式認證合格之低功率射頻電機,非經許可,公司、商號或使用者均不得擅自變更頻率、加大功率或變更原
設計之特性及功能。
低功率射頻電機之使用不得影響飛航安全及干擾合法通信;經發現有干擾現象時,應立即停用,並改善至無干
擾時方得繼續使用。前項合法通信,指依電信法規定作業之無線電通信。低功率射頻電機須忍受合法通信或工
業、科學及醫療用電波輻射性電機設備之干擾。